Leaderboard


Popular Content
Showing content with the highest reputation on 07/13/20 in all areas
-
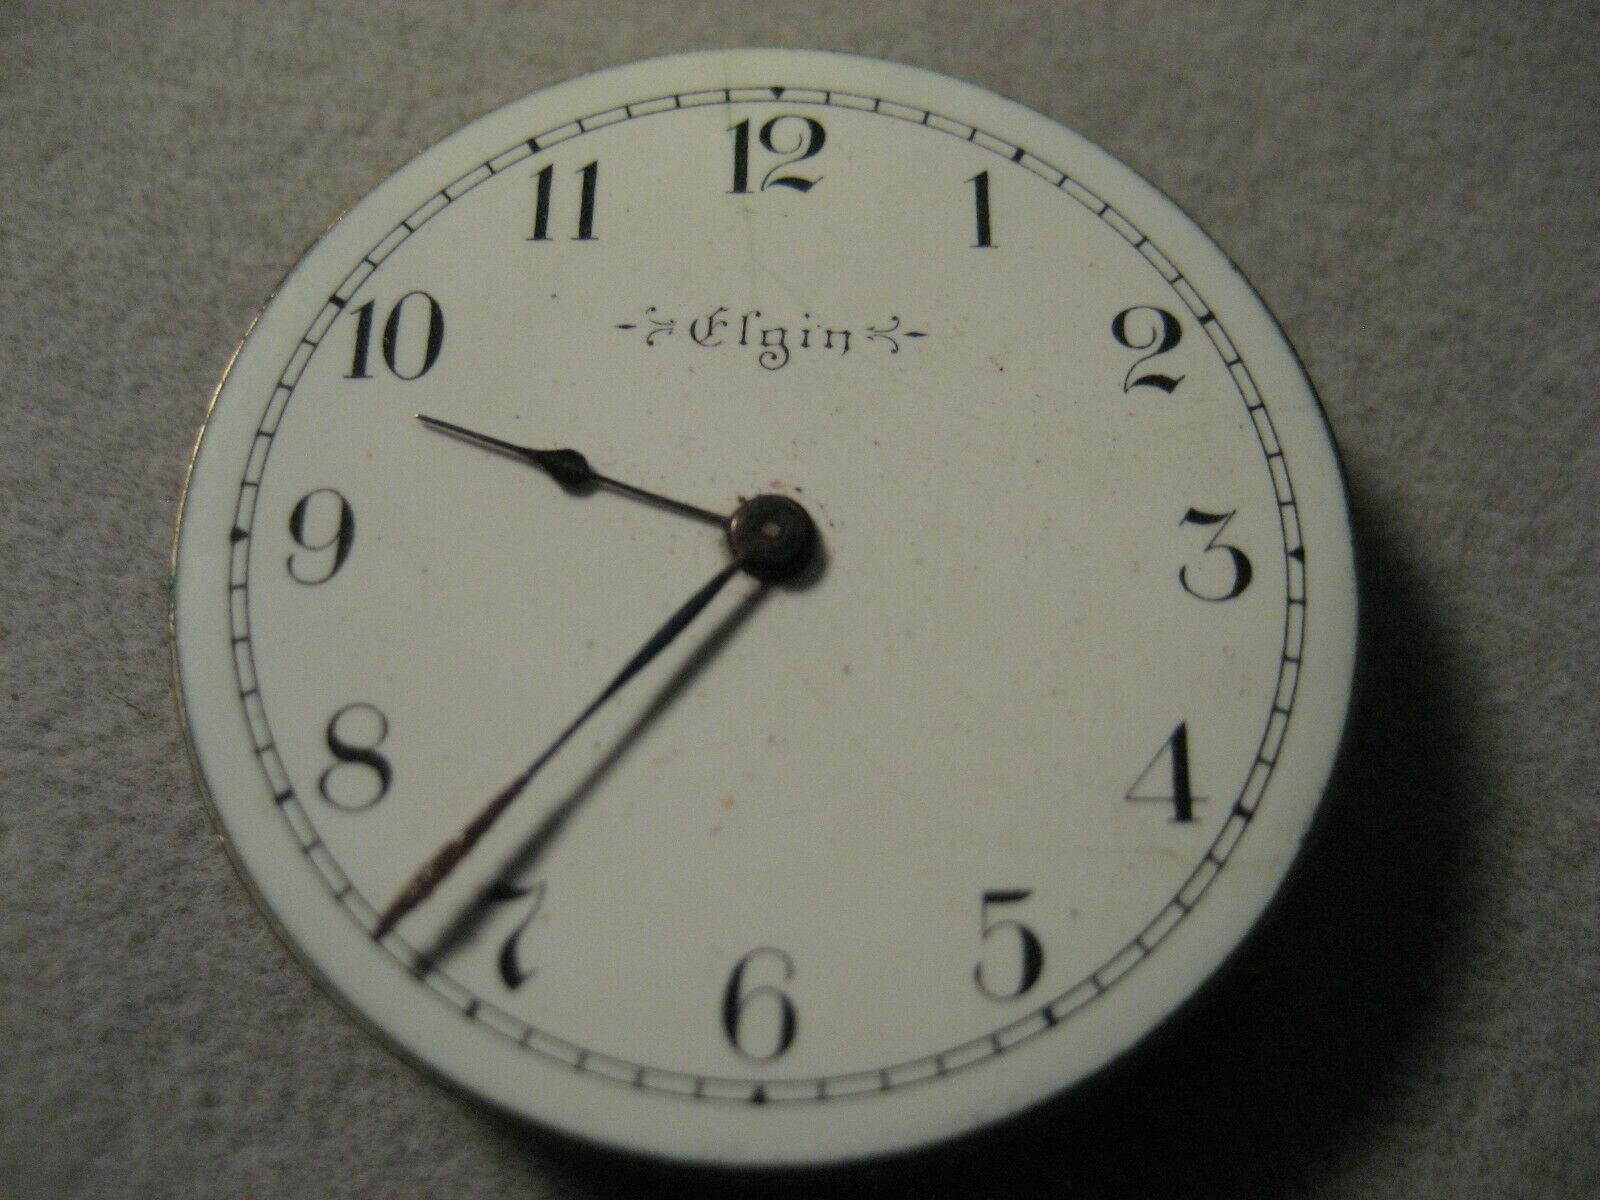
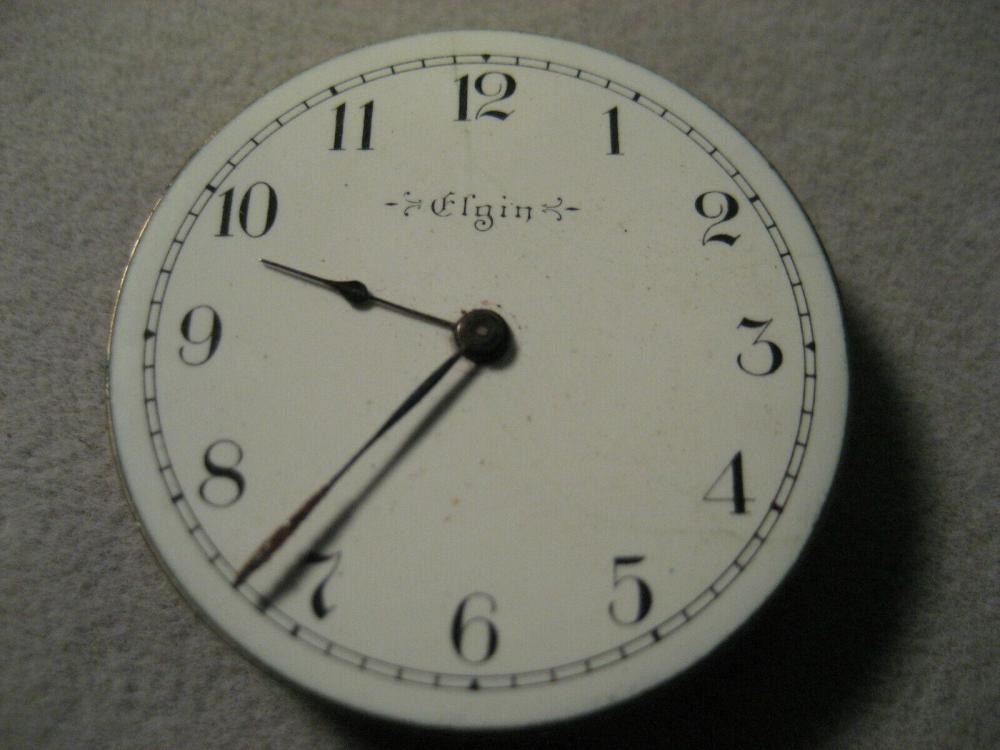
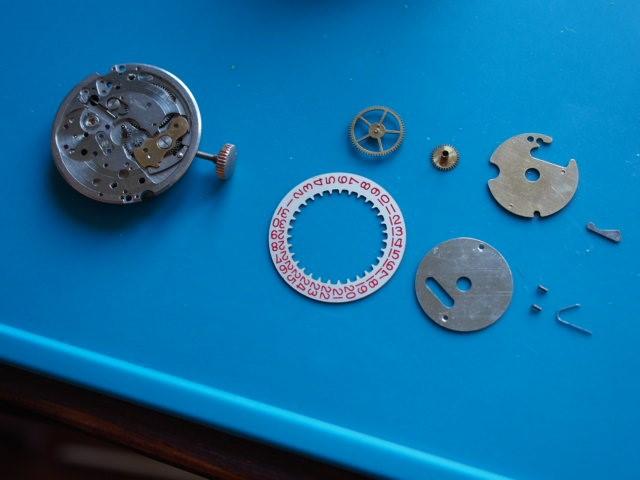
I will be attempting to build a fully functional, cased Elgin size 6s Grade 206 pocket watch. This all began a short while ago, when I watched a video about getting in to watchmaking as a hobbyist in which the watchmaker being interviewed suggested starting with a scrap pocket watch movement, which can be found on the cheap on eBay. I found the ubiquity and low cost of American movements to be counter-intuitive, as I would think 100+ year old watches would be quite valuable. This led me down the rabbit hole of the history of pocket watches, and America's former status as the worldwide leader in production volume of watches. The Watch Flipping through eBay listings for non-running movements I ended up buying an Elgin one for about $20 shipped. Here is a photo of the movement-side, and here is a link to more info on Pocket Watch Database. An interesting thing about this particular piece is the lack of a seconds sub-dial. None of the examples I see online on Pocket Watch Database share that, which is a bit weird to me. Phase 1: Irresponsibly Hacking Away When the movement first arrived, I decided to just take a stab at taking it apart. I figured, hey, it's a scrap movement that didn't cost me too much money, what's the worst that can happen? Well, I have to say I'm glad I learned the lesson of why NOT to do that, I just wish I'd been maybe a little more careful. As some fine folks here let me know, with a pocket watch or very old vintage movements, unless you're sure what you're dealing with isn't rare or valuable, don't treat it like trash. I went at the movement with the smallest screw drivers I had available and started to take it apart. Here are the mistakes I made: Not releasing the power from the mainspring: parts flew all over the place and I lost the center wheel for a couple weeks until recently I was looking for a fallen screw and came across it on the floor Not taking pictures - there are a couple missing parts from the setting mechanism, so I am a bit unsure about exactly what was originally going on since I didn't do step by step photos (it's also hard to photograph step by step when the whole thing blows up ) Unscrewing the banking pins not knowing what banking pins are During re-assembly, after trying to set the banking pins so the watch might run, I gave the balance wheel a spin with a toothpick with what I KNEW was too much force, and broke off the impulse jewel - this also is a lesson I knew in theory but learned in practice all too clearly, not to force ANYTHING, and also not to treat any part as if it's scrap or garbage So with all that in mind, and with some insight from the community here which got me reading about the different Elgin models and parts, I've decided to source another identical movement, and a 6s-sized case + movement. Hopefully between the 3 I'll have enough good parts to have a fine working watch. I'd also love to hear anyones thoughts about "switching," I intend to attempt to use all parts from the same grade and model movement. The case I'd be using would probably not have originally contained this movement, as I see lots of 6s pieces w/ case and movement for sale but not with this particular movement. Note: since the horrific events described above, I've amassed a bunch of tools (most of them cheap versions from eBay) for watchmaking, including a screwdriver set, tweezers, movement holders, parts trays, cleaner with baskets and jars, hand levers, lubricants, Rodico, and probably some more stuff I'm not mentioning. Will be in a bit of a better position to attack this next challenge. Anyway, stay tuned for Phase 2, when I will make what will hopefully a more measured and informed attempt at the build.
.thumb.jpg.9a471f9f88b6ca5d7c0fa31e8d18b329.jpg)
 3 points
 -
I use plug gages, which are in 0.01mm increments, but they are expensive. If you need to measure the hole in the hand and can't measure the pivot (and a micrometer will easily differentiate between 0.25 and 0.27mm, you can easily see a difference of 0.005mm), you can use a small broach. Slide the hand on until it stops, and measure there. There's a little interpolation to do, but you will be very close.3 points
-
Hi you might find the attached useful for reference. 3400_ETA 2390,2391.pdf2 points
-
Since you can see the balance is in a good nick the back is open. The check points you could look at is the wear and tear off the winding stem, the inside of the sliding pinion. Check if the crown wheel is still in place. Is all of the teeth left on the barrell. If you checked yes on all the above the chanses for a broken mainspring is big. "Should have said "defektive" since it can have got lose from the barrell arbor too."2 points
-
There's a big difference in making a functional part and making one that's right and looks the part too. I think a good minute jumper, that's indistinguishable from factory would take a skilled watchmaker more than an hour or two. If it is steady pinned and unadjustable, and especially if it's beveled, definitely more. Here's one I did this year for a Longines 30CH. This poor thing had had a jumper from a stopwatch cobbled in, they used one of the steady pin holes for the new screw, so it had been threaded and thus was off location (and the new pins are two different sizes). For this one I used a toolmaker's microscope to locate the steady pin holes and screw hole in relation to where the beak needed to be (hammer down so minute wheel was positioned correctly). Imported an image of an original in cad, scaled it and traced the outline. Cut out the part with cnc, the spring portion oversized, hardened and tempered, thinned the spring down (much easier when heat treated) made and fitted steady pins, fine tuned the beak, polished beak, beveled the foot. That was about a 3 hour job but I'm a prototyper so it's normal work for me, and I have cnc. I left the steady pins visible (with polished ends) as the locations had been changed and this part likely won't fit another 30CH- a little heads-up to a future watchmaker I hope.2 points
-
Very true, I usually set it in beat by sighting the roller jewel with only the balance installed in the mainplate. Unless you're aiming for chronometer grade standards thats usually enough. If you want to to get the beat perfect you also need to get the balance poised and make sure the pivots are prefect, otherwise you'll be running in circles as the beat will change depending on position. Anilv2 points
-
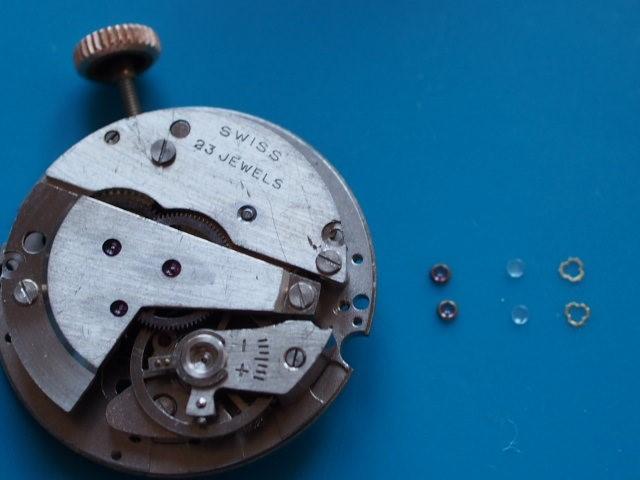
Last part of this walk-through. Pallet, pallet bridge, and screw make 3 parts. This is a replacement pallet, and it has a large end-shake. I did not investigated further at the moment, as I wanted to see if it runs reliably in first place. I touched two of escape teeth with 9010. Cap jewels plate and its screw, 2 more. Balance, cock and screw consist actually of at least 10 parts, even if I haven't take them all apart. Balance jewels, end stones and springs make 6 more parts. For the occasion I bough the KIF Trior tool (largest size) which made installation significantly easier and safer. Lubrication is just 9010 under the end stone. Time to check that is running strong in all positions before moving on. For the record I got about 180° amplitude with the default lift angle. Beat error was 2.5 ms, pattern barely acceptable, and large positional error. Last are the date wheel, hour wheel, inner plate, date jumper, date ring, outer plate and its two screws. The date finger spring can be inserted conveniently and safely from outside. 9 more parts. I used HP-1300 on all arbors and contact parts. There are actually 2 last parts to fit, that's the dial screws (not pictured). It's probably a bit easier to fit them them as the very first thing. I have been counting parts to get to a total is 67 or thereabout, or 90 if we count the jewels separately. Not a small number for an economical, unsophisticated mov't. I hope that this no-pretense document can be useful somehow, thank you for reading so far.
 2 points
 -
Yes they are easy to work on, however, if you happen to break a part, you pretty well need to buy a second movement and end up with just movement, whereas with two pocket watches both in need of repair, you can end up with a good running pocket watch a plenty of parts.1 point
-
Welcome to the forum. On subject of appropriate movement to start with, the consensus here is on pocket watches for their large size, not to mention their parts won't break as easy. It is always a good idea to get two non runner of the same caliber to assemble a good one out of the two. Regards1 point
-
After moving the spring between the guides, it has slowed down considerably. I imagine there are multiple issues with this movement. Thanks again for all your great comments and help!1 point
-
Thanks Nucejoe! I do hear and see the ratchet and crown wheel turning, just not the clicking sound of a broken spring that I have heard before.1 point
-
Fault is at barrel arbour , since you hear no sound nor have effective power. HSL knows that real well, but funny how he messed up. lol.1 point
-
If the spring is low down it's a sign of the HS isn't flat either. If you move the regulator arm and it has no effect the hairspring for sure couldn't be right between the regulatur pins.1 point
-
I move the regulator arm all the way back to or as near as you can to the stud holder (you will be letting all available length of the hairsrping to oscillate, almost " free sprung" ) a healty hairspring should run slow then( in full length) and regulate somewhere in between. In case it still ran fast, we should look for the reason. Good luck.1 point
-
You didn't mention if the watch is running but I'm pretty sure it doesn't. In any case when trying to understand what goes on with a watch that you have in hand, open the back and observe as much as possible.1 point
-
Silver solder does work with steel, but the colour differs slightly.1 point
-
I recently got some Seiko S-2 mainspring grease. In the box was an instruction sheet. Basically says to use a brush to apply a very thin coat on the barrel wall, bottom and lid. Using a brush is different than the procedure I commonly see. The S-2 grease sure looks a lot like the Kluber grease. I'm not a trained watchmaker and I don't know if a Seiko procedure doesn't translate well from Japanese. S-2 is specified for the 6309 and the Orient is closer to a 7 series Seiko. Maybe try this?1 point
-
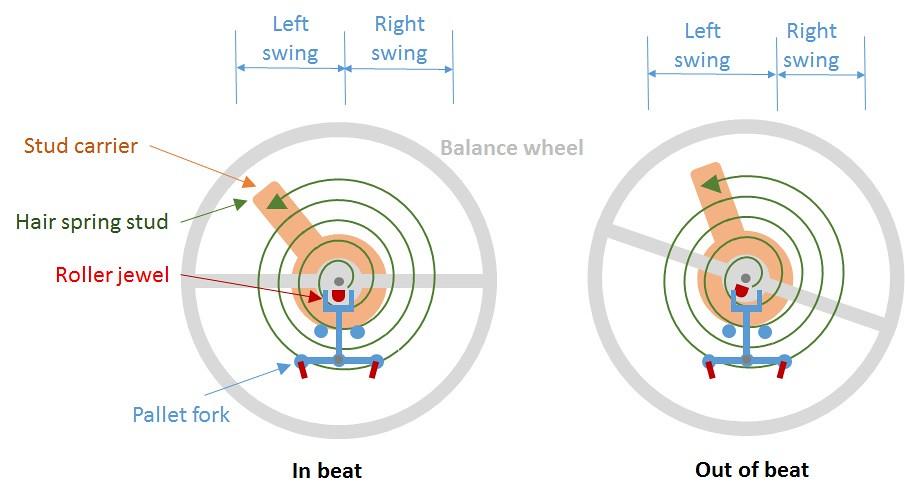
From what I've picked up I believe that it is a good thing in general to strive for a low beat error and I think the reasons for this are pretty much covered in @rodabod's somewhat, shall we say "defiant" questions: When working with watches the question of what is acceptable tolerances can always be debated. From what I've learnt and personally find to be reasonable tolerances we'd generally want to strive for a beat error less than or equal to about 0.3 ms for a watch with a beat corrector arm and less than or equal to about 0.8 ms for a watch without a beat corrector arm (I guess because it's more difficult and time consuming to exactly adjust a hairspring collect). I think of these boundaries as a rule of thumb and something to strive for, but if it can't be achieved it doesn't mean the watch isn't working well enough or that it is an actual "error". BTW, here are the watch repair channel videos discussing how to adjust the beat error on watches both with a without a beat corrector.1 point
-
Silver solder works well on brass cases. I used it many times to remove dents and damages. Laser welding is optimal for steel cases. Frank1 point
-
I have that tool and have used it many times. If you have a hand that is smaller than the gauge can not measure then you measure the pinion it fits onto.1 point
-
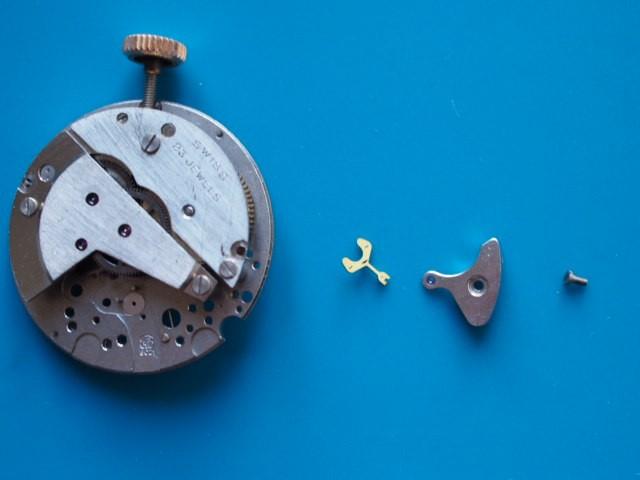
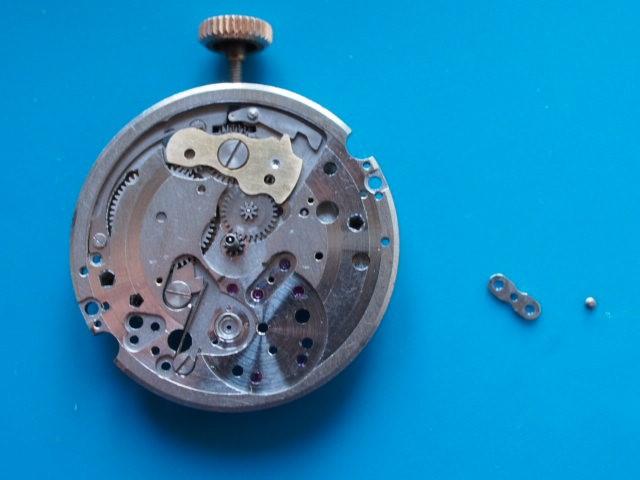
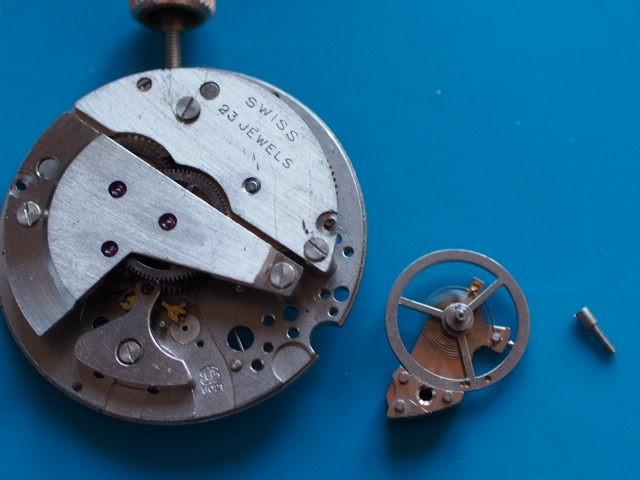
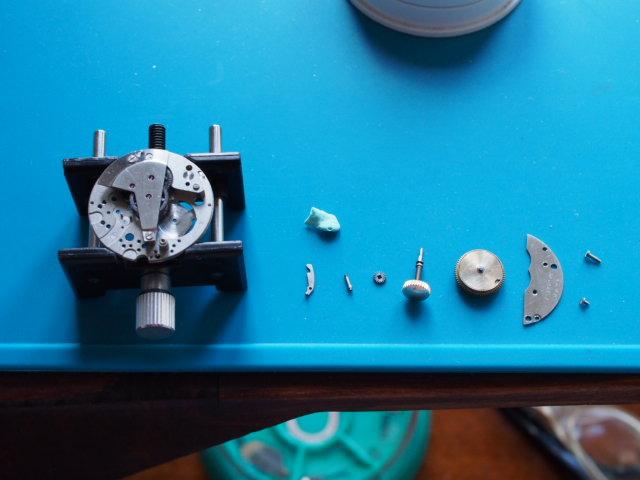
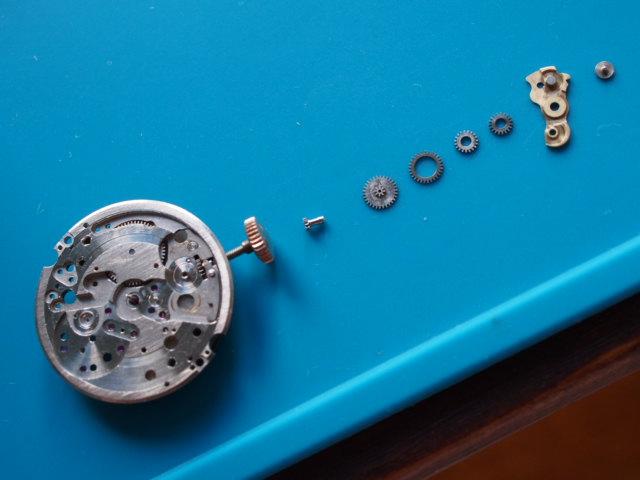
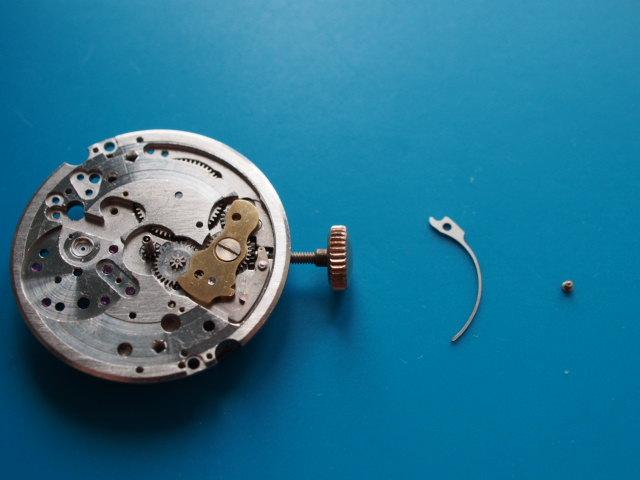
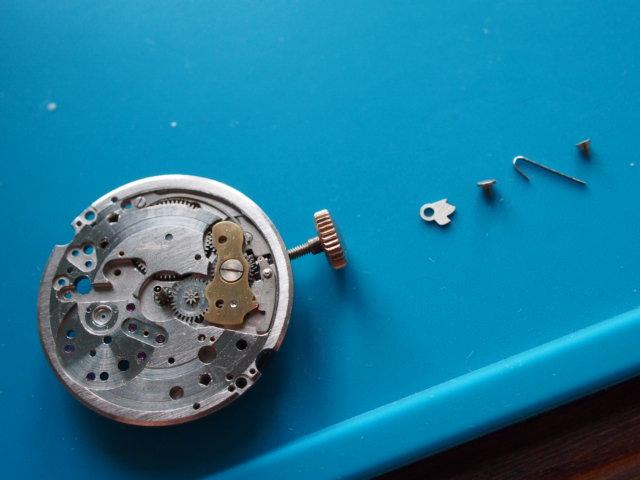
Here's the 1st part of a service walk-throughout of this 10.5''' pin pallet mov't which was barely running. It's built with some unusual characteristics for this class, like the ratchet wheel on dial side, the abundance of parts, and the use of four tally upping jewels beside the shock protection, perhaps an attempt to compete with Swiss lever mov'ts by boasting 23 jewels. I apologize for the mediocre quality of the pictures or any inaccuracy. I didn't find a service sheet, but that is not big deal really. Starting from the dial side we remove two tiny screws and the top calendar plate. Here we need to be cautious with the finger spring. You can place some rodico on it and lift where it's curved. Then remove the finger and the brass plate. Lots of more parts are now revealed, off it goes the date ring, date wheel, hour wheel, and the rocking bar Not less than three pinions on the bar, and that is without a quick-setting mechanism. Sorry I did not picture the setting spring, which is not difficult to remove safely. Having full access to the click we can now let the mainspring down. The next "dangerous" item is the click spring, again use caution. After the click we remove the setting wheel, cannon pinion, and the small plate holding two cap jewels, the lower anti-shock, according to the part list they are different from up and down sides don't mix them up. By noting the four no-function jewels around the date wheel machining we're done with this side. After pulling the stem out and storing the sliding wheel we can then flip the main plate, remove the upper anti-shock device and the balance. The massive cock it's a bit fiddly to lift. Also be aware that the dial screw can be completely removed, it's a good a idea to do that to avoid these falling at some point. Removing the pallet bridge and pallet I didn't noticed immediately but a pin had snapped. Maybe that happened in the washing jar, but the pin was nowhere to be found ?!? Fortunately a spare pallet fork was available to order. It should be also possible to make a a new, I hope to be able to cover that in a future posting. Remove the train bridge. It's possible that the barrel bridge is to be done first, but I had no problem anyway. Remove seconds, third and the escape wheels. In the best Swiss style there is no screw like another. After removing the barrel bridge we start seeing oil having left around. The thick center wheel bridge is removed with the wheel, lastly is setting lever screw and lever. I don't know why I pictured the sliding wheel with them. Opening the barrel we see that the last repairer, decades ago. liked to use a lot of grease in there. I don't guess on a mainspring's condition by its uncoiled shape, but just get a new one when possible. Washable parts go into my special machine, which is a small jam jar. First bath is horological ammonia solution, rinsed with petroleum ether, followed by distilled water rinse that is repeated until no floating particles can be seen against the light. Last rinse is with IPA. To be continued.
.JPG.07dfa6056be1fd70ea18e78ef547758f.JPG)
.JPG.d1839476ae3b5edd7a0bc4dac041ba1a.JPG)
.JPG.6089732206527a0185c737adbac8b066.JPG)
.JPG.382f5a02b833010ae845b4767cdf2cd8.JPG)
.JPG.9aaad65532d22dfbbf3ef31db2b14a48.JPG)
.JPG.ac85267e36c59c0f7610d33715797230.JPG)
.JPG.5c81b3ad593e5394135c04a6e18a3ac5.JPG)
.JPG.ec18cb20db1ae0b20d209031f8b7f738.JPG)
.JPG.e32d09d66a82bc15e877bebb618300c6.JPG)
.JPG.d67200f00c0e48b731be75a455c89f53.JPG)
.JPG.0d3241f5ffd746caa26b36c5a248579f.JPG)
.JPG.071c66645e8655de0b02eadffa24482b.JPG)
.JPG.640946714f18df4bf6d1f9d2b4c80f56.JPG)
.JPG.26528040aa108fd31941ff9700cfd722.JPG)
.JPG.e76c72d8f6c2cff31ca7091950e57d3f.JPG) 1 point
1 point -
I used lead solder and the watch platers had all sorts of issues afterwards. It also scratches easily and flakes off afterwards. It's definately good for practicing technique, but you wouldnt do it on a keeper.1 point
-
I usually look at what would be the escape wheel bridge to see if it's below the plane of the other bridges, and under the balance. When it is, it says "cylinder" to me. LeCoultre made them. I believe even Patek and Vacheron made them, so the escapement wasn't terrible, especially on the three mentioned. Virtually any watch repair manual from "the day" will have information on cylinders. Lots of info around the WWW. Cheers back at'cha.1 point
-
I'm pretty sure it's a legitimate LeCoultre. That was a common bridge design they used on their cylinder movements. Be advised that cylinder escapement are rarely highly sought after, and not every watchmaker works on them. Their escapement isn't complicated, but it's different to work on. And it is not considered as accurate as lever escapements. I don't think I'd chase that one, especially if it's not running. Good luck.1 point
-
When I had a similar problem sourcing a replacement balance assembly for this Camy Silver Cloud with the FHF ST 96 movement...... I bought a complete running watch from an eBay seller in India and 'stole' the balance assembly out of it for the Camy..... Bottom line is that I have the rest of the movement spare (original Camy balance with FUBAR'ed hair spring currently in place)...... John...1 point
-
Well, you have to consider the reasons why you want to aim for a beat error of less than a particular value. Is it the ease of ability to “self-start”? Or is it the potential to increase overall balance amplitude. Or do you believe it will significantly improve timekeeping? In my opinion, the reason why people are so interested in it these days is because it is now so simple to measure via timegraphers. Also the fact that the term has the word “error” in the title. And the fact that on modern watches it is so easy to adjust. You don’t hear people talk about it in the same way as positional-error which is usually far more difficult to adjust.1 point
-
That kind of irrelevant. First, the Chinese set is sized for individual types, so you would rely on the chance of a same size spring that winds backward, and that's uncommon. And then, any winder can do both directions. Just transfer the wound spring first to a properly bored roundel, then insert as needed.1 point
-
Cheap hands are often plated base-metal. That base metal could be brass, or something similar.1 point
-
Stainless steel won't blue; I don't know of any watch hands being made of it either. If the supplier doesn't state or know the material check them with a magnet. Hands can be almost any material from gold to plastic but brass and steel are the most common.1 point
-
Steel is what you want. Preferably stainless. Get a magnet- good quality 304, 306, 316 stainless alloy will be non magnetic. Try ofrei and kas-ker. otherwise vintage NOS is always good but like we talked about-can get spendy. Otherwise some can be cheap tin or aluminium. Even plastic.1 point
-
I suggest steel if you wan't to blue them.1 point
-
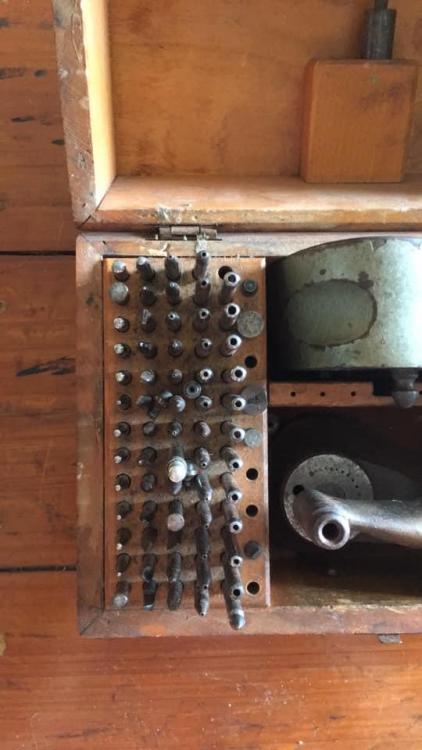
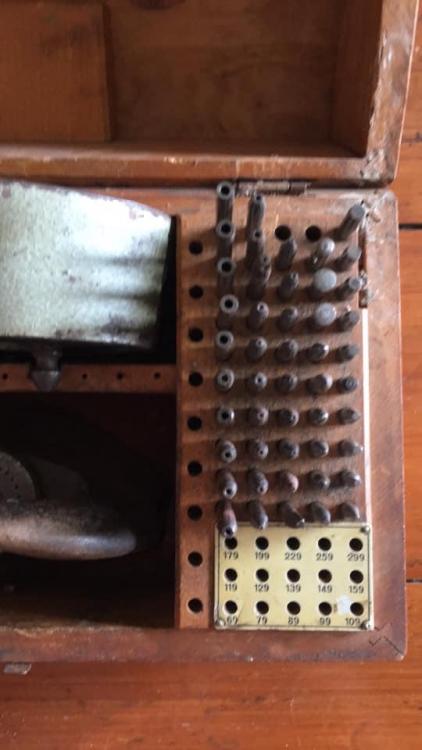
There looks to be many missing stakes and plugs. New stakes/plugs can be bought from good suppliers. Have a good look at what you might buy, Do the stakes line up with the holes in the bass, make sure there not blocked, the same goes for the stakes. Looks like it all needs a good clean, this can be done and it should then look fine. You can also find second hand stakes on ebay. The price is fair. Just make sure it all works and moves free.1 point
-
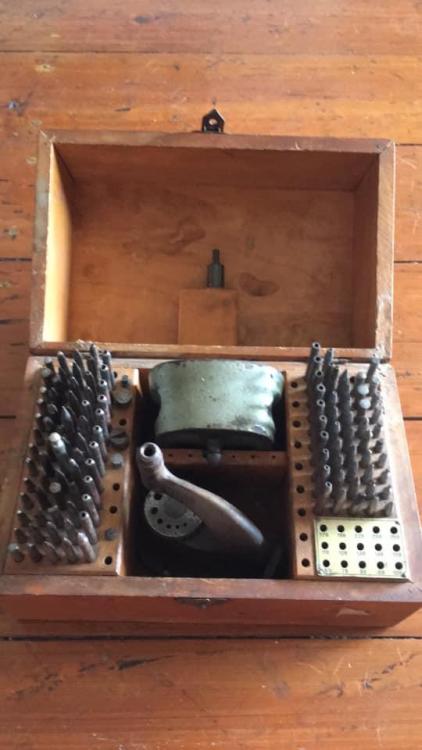
Hi All, Newbie here and I posted this question on someone else's thread in this forum and am not sure if I could do that so I've started a new discussion. Admins please delete if I did something wrong here. My local thrift shop has this vintage used Boley staking set. Photos below. Do you think it's worth £95 / USD$120? Any advice is appreciated. Cheers. Mo

 1 point
 -
Silver solder would probably work OK but definitely not soft lead solder....1 point
-
I have read of people using solder to fill damage in case backs before plating.. I'd actually planned to eventually ask someone what sort of solder they use but now will look forward to seeing what others write about this topic1 point
-
Brilliant - thanks very much @watchweasol1 point
-
usually on American pocket watches were the click is not visible there will be a hole on the side near the mainspring barrel. With your bench key in and a little pressure the click will release. then with something inserted into the hole I usually use a screwdriver. You can hold the click out then the bench key slowly rotating your fingers and let the power off.1 point
-
There also could be a tiny foreign body interfering on the hairspring.1 point
-
Can you post picture of HS from top of the cock view. Oscilator runs fast if the active length of HS is shorter than should be, which happens if the last circle of the coil get stuck behind stud or boot of the regulator arm, another possibility is if two outer circles get inside the regualtor slot. I gather you mean hairspring look Ok by " hairspring checked" . It can look alright but run fast if too short or stiff.1 point
-
It may be a simple fix. If the H/spring is not inside the regulator adjusting pins it will run just very fast and moving the regular arm will make no difference whatsoever. Well worth a check. 9 out of 10 times running fast is an escape issue. If confident it is not the escape a loose cannon pinion will be the issue.1 point
-
I've got quite a lot as well.. I'll start off with this Timex quartz diver, which cost £1.99..... Before.... And after.....1 point
-
Swatch v Cousins in the Bern Court only slightly delayed due to Covid-19 Our fight with Swatch over the supply of parts has only been slightly delayed by the Covid-19 outbreak. Because the Swiss judicial system mainly relies on written submissions rather than Court appearances, the impact on our case has been less than might have been expected. The deadlines for submission of documents were extended for an extra four weeks by the Swiss Federal authorities, and an extra two weeks extension was granted by the Judge in Bern. All the formal submissions by both sides have now been completed. The remainder of the process consists of informal comments by both sides (Swatch are due to submit theirs in the next two weeks and we will reply after that), and then a hearing in the Bern Court. We would expect the written verdict from the Judge around two to four months after that. The date for the hearing has not yet been set. The summer recess for the Courts runs from mid-July to mid-August and we expect it will be some time after that. A lot will depend on travel restrictions and quarantine issues, but hopefully by the Autumn this will not be a factor. As we said in our last News update, we were happy that our first submission was a very robust defence. As before, we can’t go into detail, but we can say that we think our second submission is even stronger than the first, and are very confident that the judge will reach the right verdict. We will keep updating you as matters unfold by email and on our website news page.1 point
-
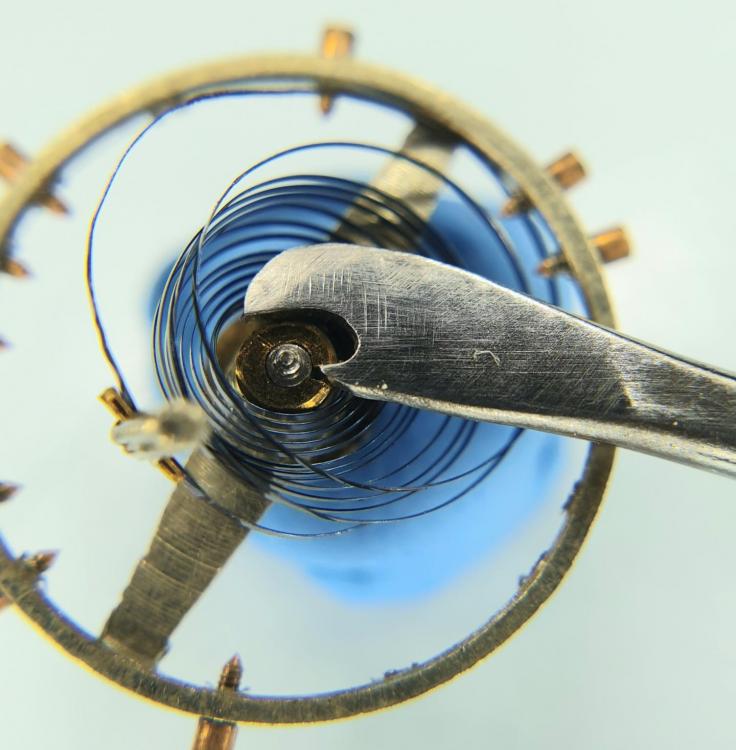
I made this tool last week. Got the idea from an item on ebay. I haven't tested it on an actual watch yet, but on a scrap balance, it works very well. With this, in theory, the collet can be adjusted in situ. The possibility of getting a zero beat error is very high.
 1 point
 -
If you find turning the hairspring collet in situ, as watchweasol said, you may find it easier to remove the balance from the cock.
 1 point
 -
Hi Once you get the balance out of the watch check on the underside of the rim there is often a mark at the point where the stud is as a reference. This adjustment can be done with the balance on a balance tack and working through the coils but needs great care. If its somthing you have not undertaken before remove the balance from the cock. but again check for the stud point if none put a mark on the rim yourself markerpen. You might find the attached useful.
 1 point
 -
This, what seems a simple job can go horribly wrong. On close inspection see if there is any reference point in relation to the collet split. Before any adjustment make sure the screwdriver shaft is clean with no grease deposits. If you have a ref point move the collet a tiny amount towards that ref point. re-install the balance and see if the direction is correct. Then move in tiny increments until you are satisfied. Getting this style to a zero beat error is difficult, personally providing I get it within 0.9 or below I leave well alone.1 point
-
Motorcycle references tickles me too, as one needs to make them right . The Ducati Monster is just (like a watch model) name for their popular naked bike style. They come as small as 400c with power adequate for a beginner and the related license. Monster was ever meant to deliver big power, not even in it's 1200cc declination, or track use. 20 years ago the overused reference for a top performance bike was perhaps an Hayabusa, more modernly maybe Ducati V4, or a Ninja H2R.1 point
-
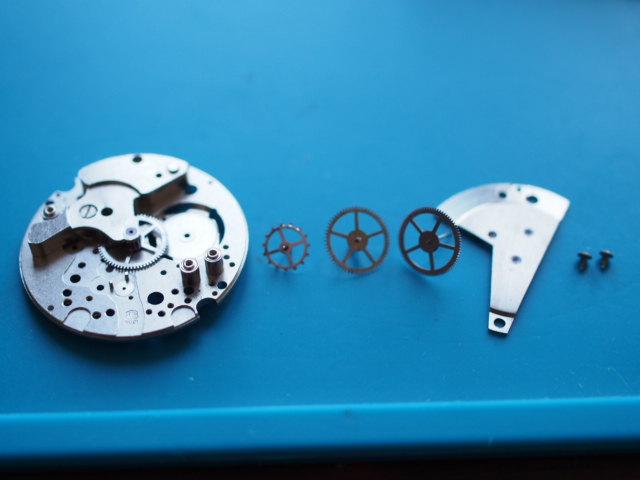
As the usual things are taking longer than expected so her's a 2nd part before concluding. First of all I need to correct two inaccuracies, the inactive jewels are in fact six, as there are also two under the setting wheel, that make the actual jewel count to be a very common 17. And I mentioned something like a "sliding wheel", when the correct name is setting pinion, because it does not slides in this mov't. Main plate ready to work on I found worth of note the interesting construction of the three large posts fitted into pentagonal broached holed holes of the main plate. With everything cleaned and inspected the first that we assemble is the center wheel on the main plate, with its bridge and screw. That is 4 parts to begin with. Lubrication is only HP-1300 on the pivots. Next is the train with the escape, third, seconds wheels, bridge and two same screws, 6 more parts. As the usual a bit of patience and attention is needed to line up the picots. Lubrication is 9501 on the pivots that can't be reached. otherwise it's placed on the concave jewels from the outside. Test that all spins free, I've got it running 4 seconds with a puff of air. We then reassemble the barrel (not pictured). To insert the barrel arbor I had to adapt a bit the hook and that was a bit difficult because I had transferred the mainspring already, so perhaps is better to do that with the mainspring still outside. For this section we need to install first the setting lever and its screw, stem pinion (which has no orientation), and stem. You can use a bit of rodico to hold the setting lever. Then the barrel, bridge, and the two screws pictured, that is 11 more parts. HP-1300 on where parts rotate or move. We continue with the cannon pinion, setting wheel, rocking bar complete with three pinions, and the screw, 7 more parts. The two smaller pinions are the same and there is no orientation to take care of. Once a bit of HP-1300 is place on contact area, the pinions should stay in place when you set the assembly. The setting spring and screw (2 parts) are not difficult, set the screw lose and leave the tip of the spring over the raised section, then position it and tighten the screw. Check that motion is transferred alternatively to barrel or setting wheel depending on the crown position. Follow with the click, its screw, spring, and screw, 4 more parts. I used keep the long leg of the spring secure with rodico before pushing in the short leg and fitting the screw. To be continued.


.JPG.2f3a105af7aa6dba05bec5645c2db3e9.JPG)
.JPG.d8d17dde58330b3e813a9c2723c6d3b1.JPG)
 1 point
 -
Retail sellers, including Chinese ones, are exactly that. You can see they often stock all kind of items, including lingerie, in order to make an honest buck. Is not like they have to know the in and outs of the product that they did not design, did not produce, and was never explained to them.1 point
-
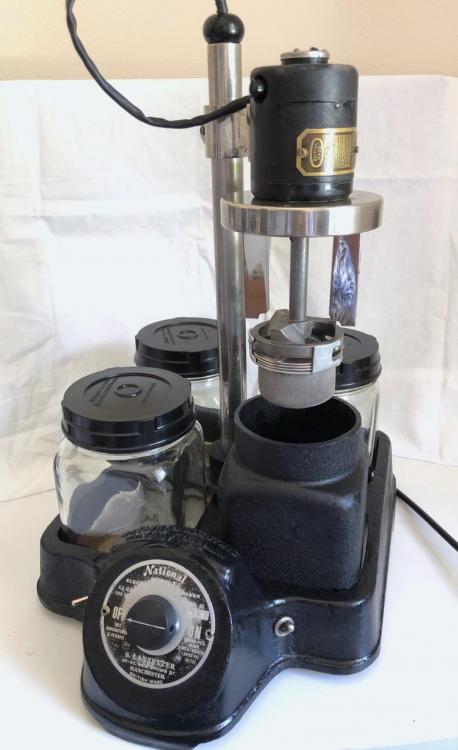
The "After" Shot. So - here it is after the work was done. I think it is a sympathetic restoration and I have tried to maintain the original look and function of the machine and have kept all of the real replacements out of sight. It looks well to my mind whilst still managing to wear it's age well. TESTING Speed control - easily controllable, steady speed when set. The new controller does have a different operating range than the old one. The new controller (when the power switch is ON) provides a minimum of 30 volts to the motor. This is not enough to move it in any visible way. Advancing the controller till the motor begins to move and I measured around 130 volts at the controller output. A slow and steady rotation happens when the control is further advanced and the output at this point is around 150 volts. Around 160 to 175 volts is needed to obtain a steady rotation at around the operational "washing" speed. This seems about right as the motor will rarely (if ever) be operated flat out. Over all speeds, the motor exhibits no detectable RF interference, according to my RF Test gear, so I'm guessing the new controller is well suppressed as standard, and the motor itself is not noisy. The heater was also measured for surface heat temperature and self-regulation. Essentially I just turned it on and measured it over a period of around 15 minutes. The surface temperature quickly reaches around 170C to 180C (after about 5 minutes), and seems to maintain that temperature fairly steadily, not really varying by more than about 10 degrees. Hot enough to burn yourself if you touch it, but well out of the way with the "tunnel" installed. Heat at the top of the tunnel was estimated to be no more than around 45 degrees (rising air temperature) with the tunnel itself remaining cool to touch over a test period of 20 minutes. My recommendation would be to turn the heater on when you start the first wash and it will be ready for you when needed at the end of the second rinse.
 1 point

.jpg.4763cc6714dd78e7e1e306df22e15b89.jpg)