Leaderboard


Popular Content
Showing content with the highest reputation since 04/09/25 in all areas
-
Hi all, I did ad the Google Adsense program to this site quite some time ago in order to attempt to reduce some of the costs of this site - which it did. I never did enjoy the look of the site clustered with ads and all sorts of tricks Google plays in order to garner clicks. In fact I hated it. Yesterday I decided to ditch Google Adsense and remove all ads from the site with immediate effect. I hope this will help to make the site more enjoyable and, hopefully, even faster loading.20 points
-
I received this, forwarded by @Klassiker, from OH have torn muscles in my right shoulder. I have not been able to use my pc because of the pane I'm on very strong painkillers and spent a little time in hospital. Could you let the other mods know. Thanks.13 points
-
Hi guys. @VWatchie Those images are self hosted (not hosted on this server). Do a look at the page source and you will see this. I’m afraid, I can’t have control or backup images not hosted on this server. ( They seem to be served from here: https://qehvsw.bn.files.1drv.com/) This server is backed up fully every night and the database is backed up and versioned every hour, all stored off site on Amazon S1 platform. It’s hard for us to lose data. Ive got a huge overhead of space on this particular server the site is served from so no worries there Sorry all for lack of response so far, I have been extremely busy and am embarrassed to say that priorities had to be set in place for a while. Be assured that i’ve got constant monitoring and alerts should the site be in an extended problematic state (down etc) and work on these issues if they arise.
 12 points
 -
That’s a nice idea, But i’m committed to providing this site as a gift to the watch repair community as my thank you for my incredible life i’ve had in this business. Ive done well and unless my financial circumstances change then i’m more than happy to foot the bill. If circumstances do change then be assured that I will make an appeal. For now, I’m comfortable with the way things are and I am extremely delighted to remove Google Ads from this site and to stop Patreon, it feels like a major step forward Sorry, I missed your reply, I got blinded by another poster in this thread. Yes - I can confirm that I have always seen WRT as a not-for-profit website, and therefore - not a business as such. I’m lucky and have done well in my life due to a decision made in my teens to start a watch repairing apprenticeship which has sustained myself and my family for many years now. Consider this my small way of paying it forward. Ive been committed to keeping the site alive on a technical and financial level for over 10 years now and I have zero plans to change that. Thank you for your kind words by the way. And as for your wish - nobody can control what happens in life, if something happens to me I have things in place with my family but I’m just not comfortable talking about my personal business - I wish a certain person would respect that, but i’ve calmed down now - i’m only human11 points
-
In tandem with my last post regarding the removal of Google Adsense on this website - I have also decided to fully self fund this site as a gift to the watch repair community of which I’ve been a member of, and have benefited from since being extremely lucky to gain an apprenticeship back in the late 80s. Well, that means that I have also closed down my Patreon account - or, to be clear, stopped all future transactions on my Patreon account and this is with immediate and permanent effect. not to mention, but I will, I really really do appreciate the contribution all my patreon and PayPal supporters have provided over the years, you guys have been absolutely awesome and helped to keep this forum alive and available for those who might not be able to afford the payments. again, from the bottom of my heart thank you.10 points
-
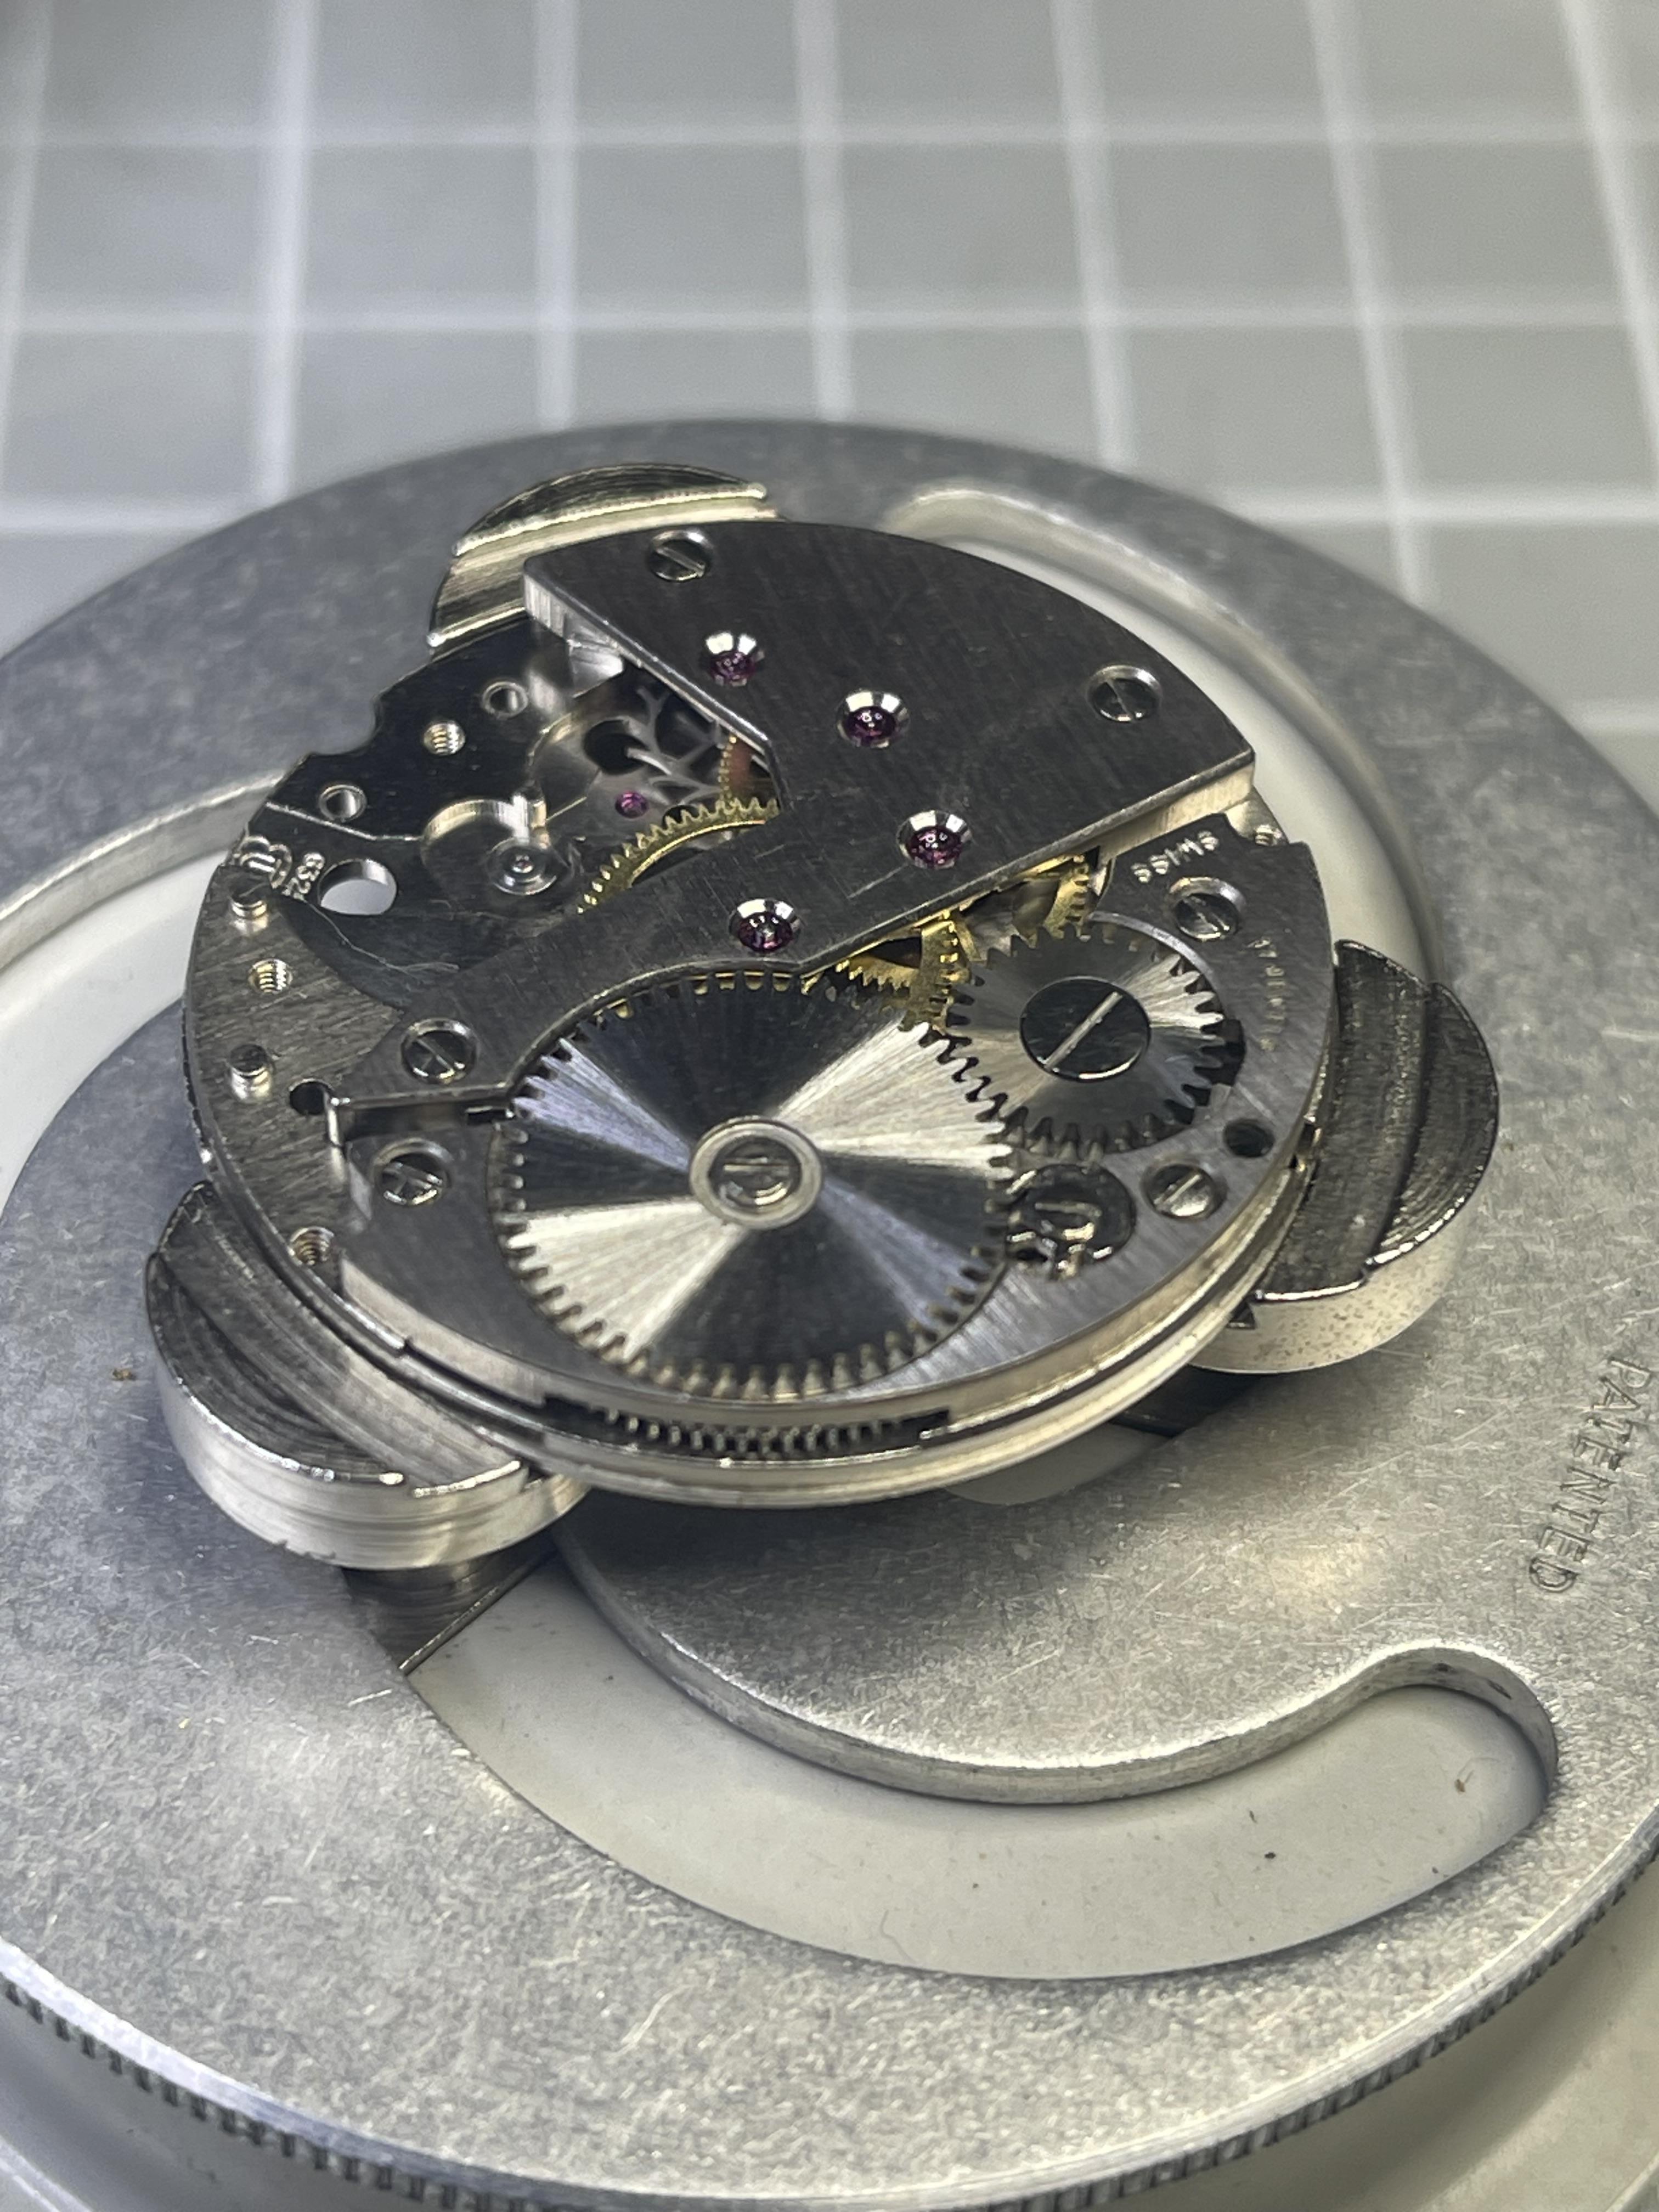
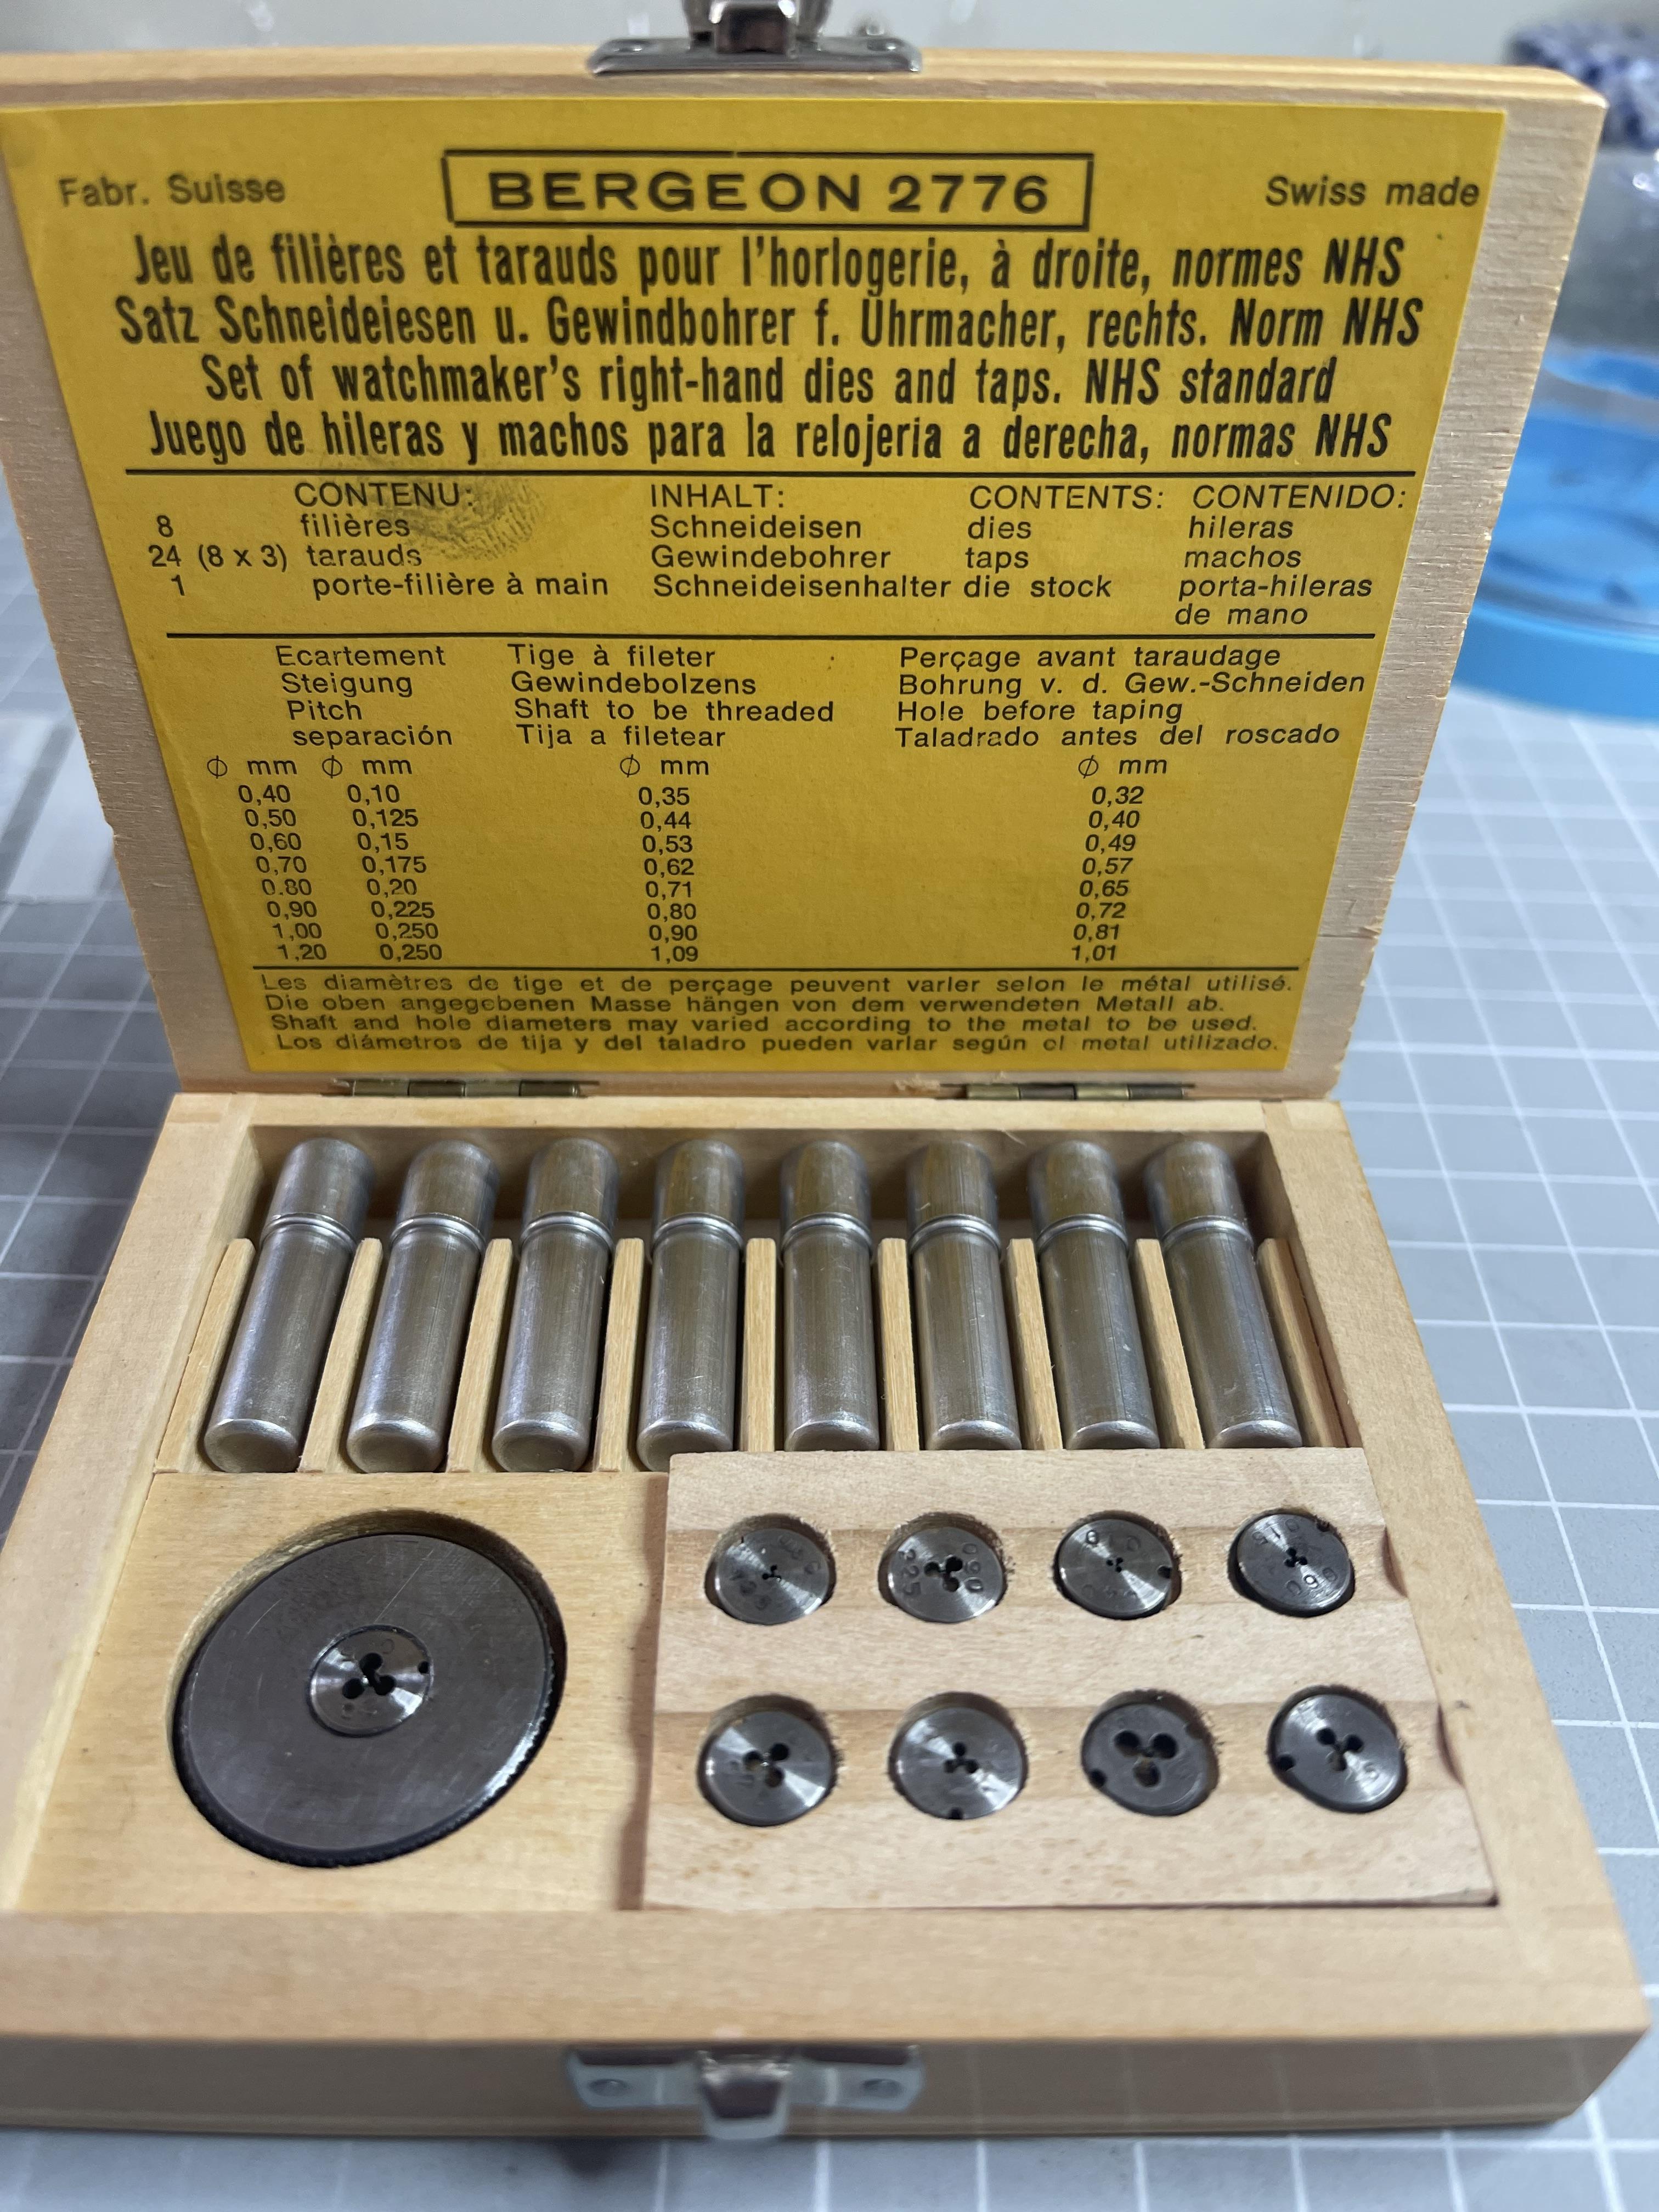
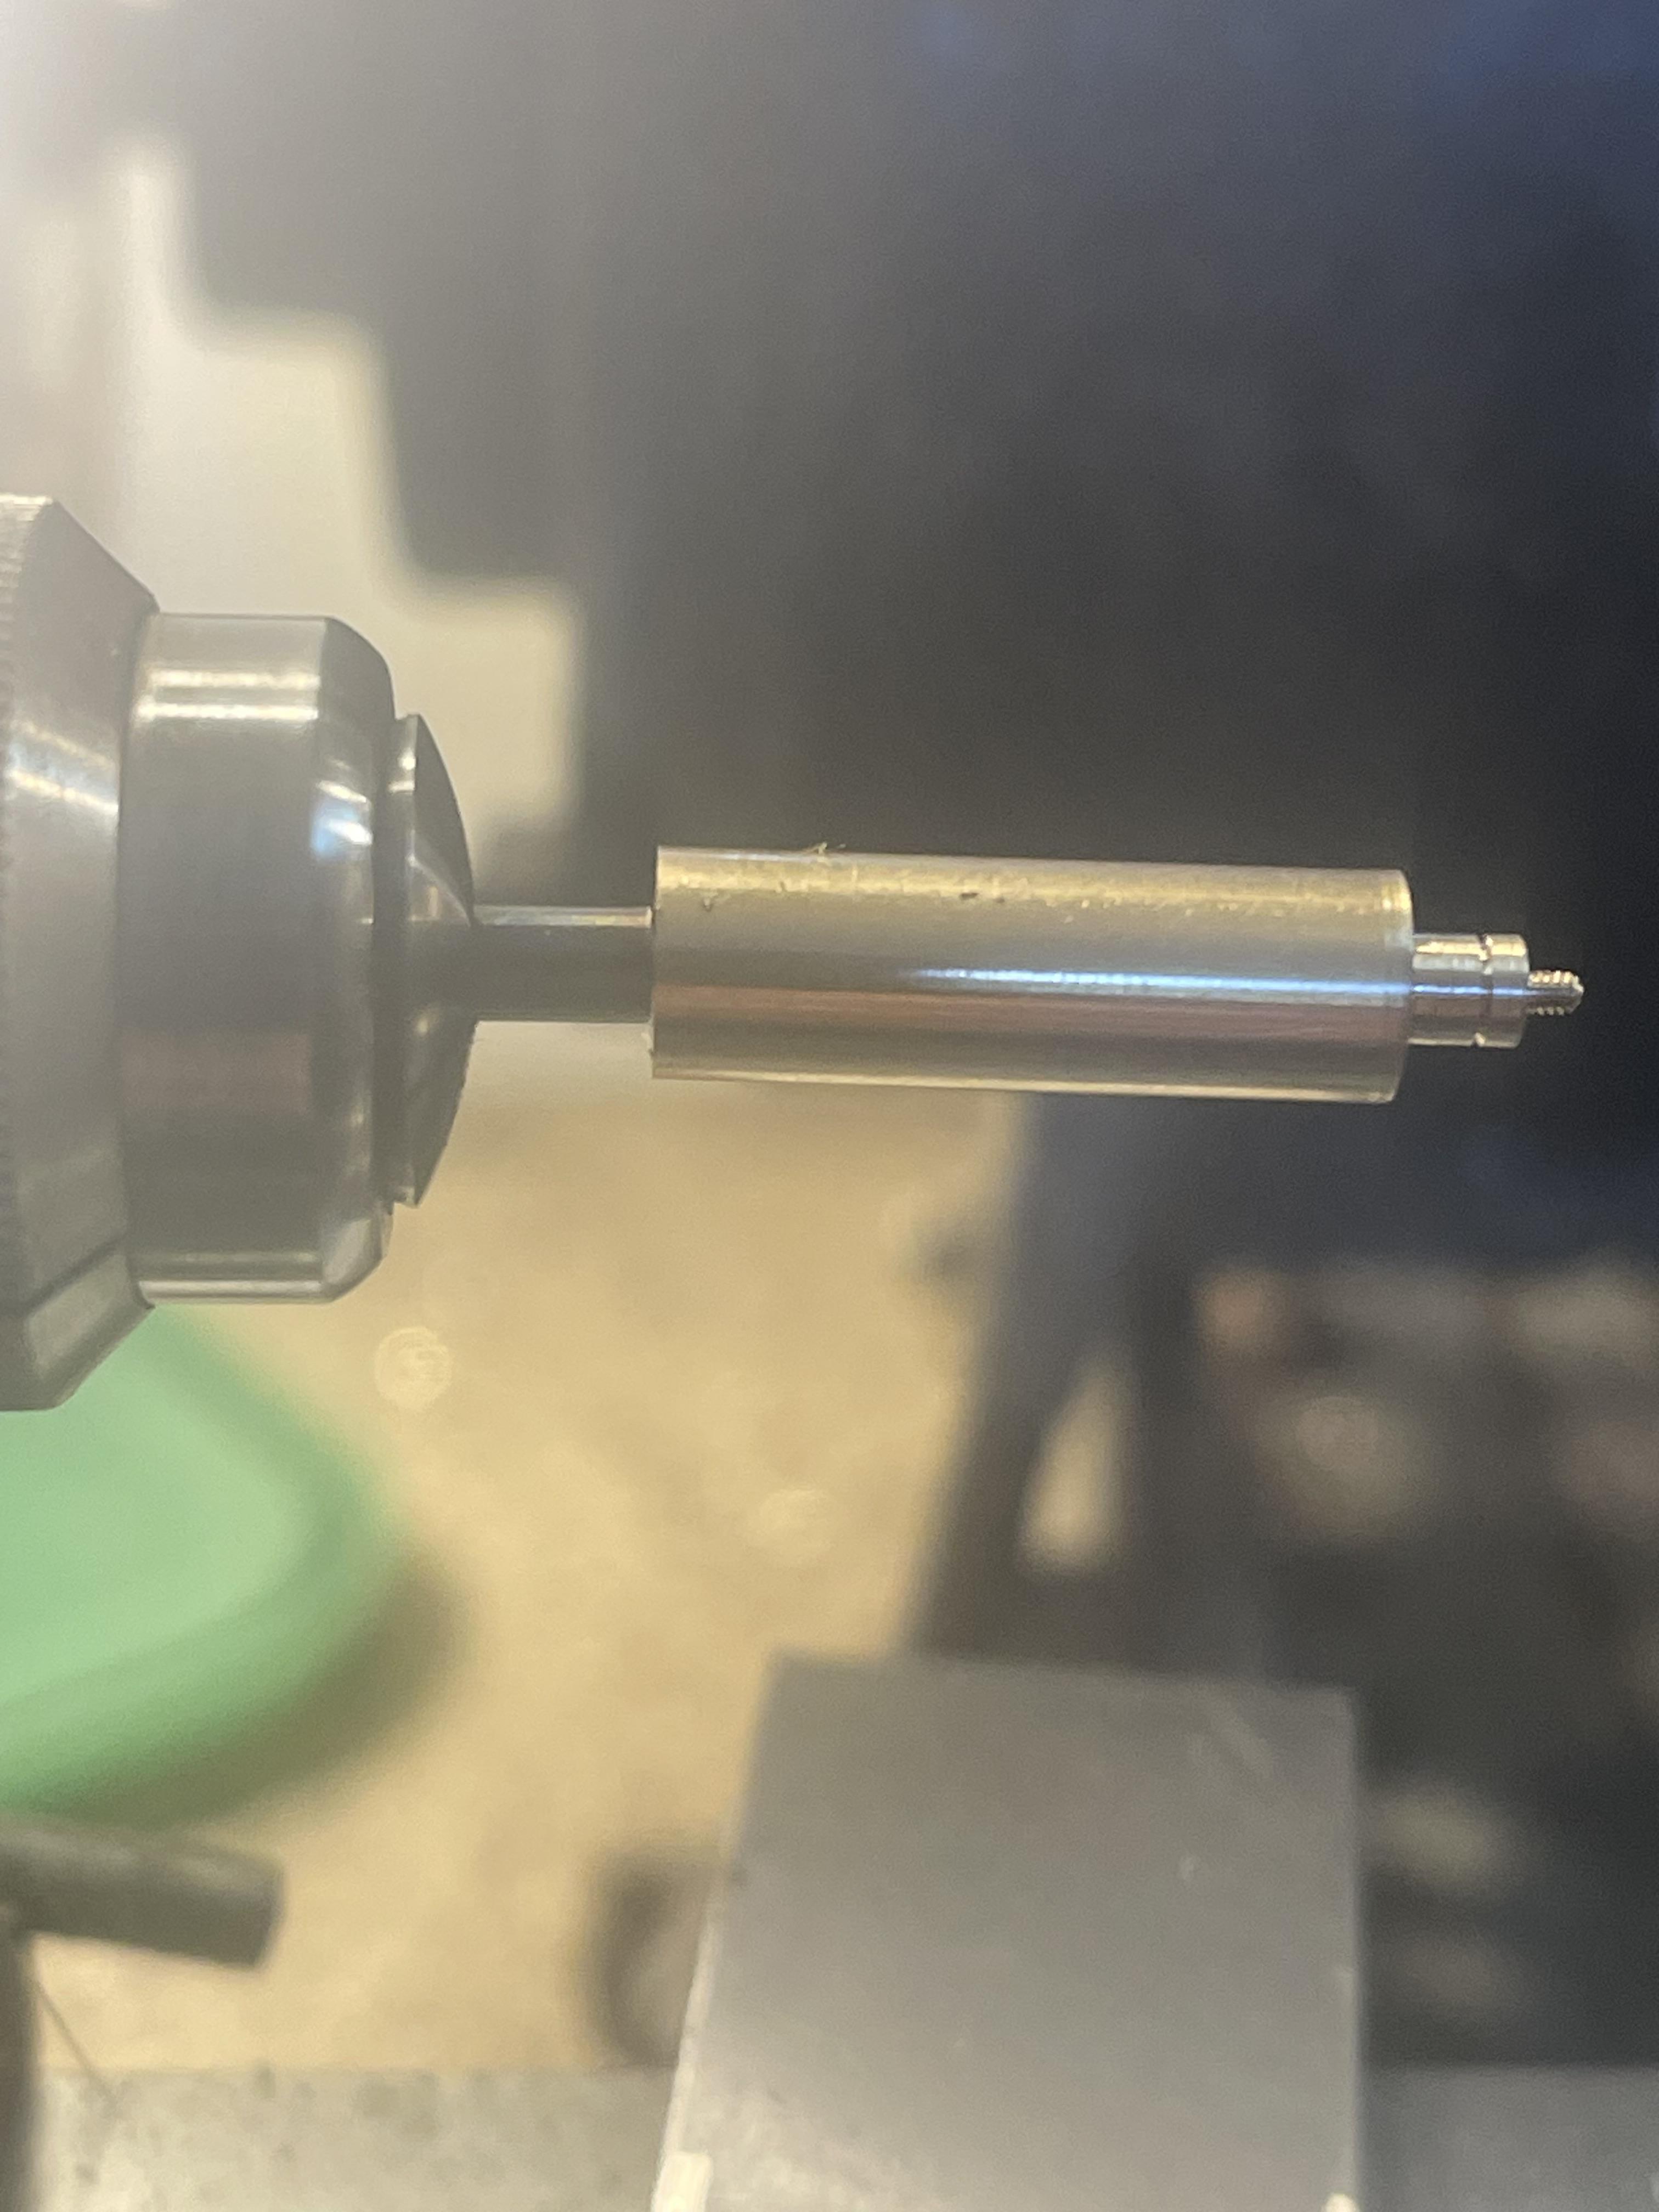
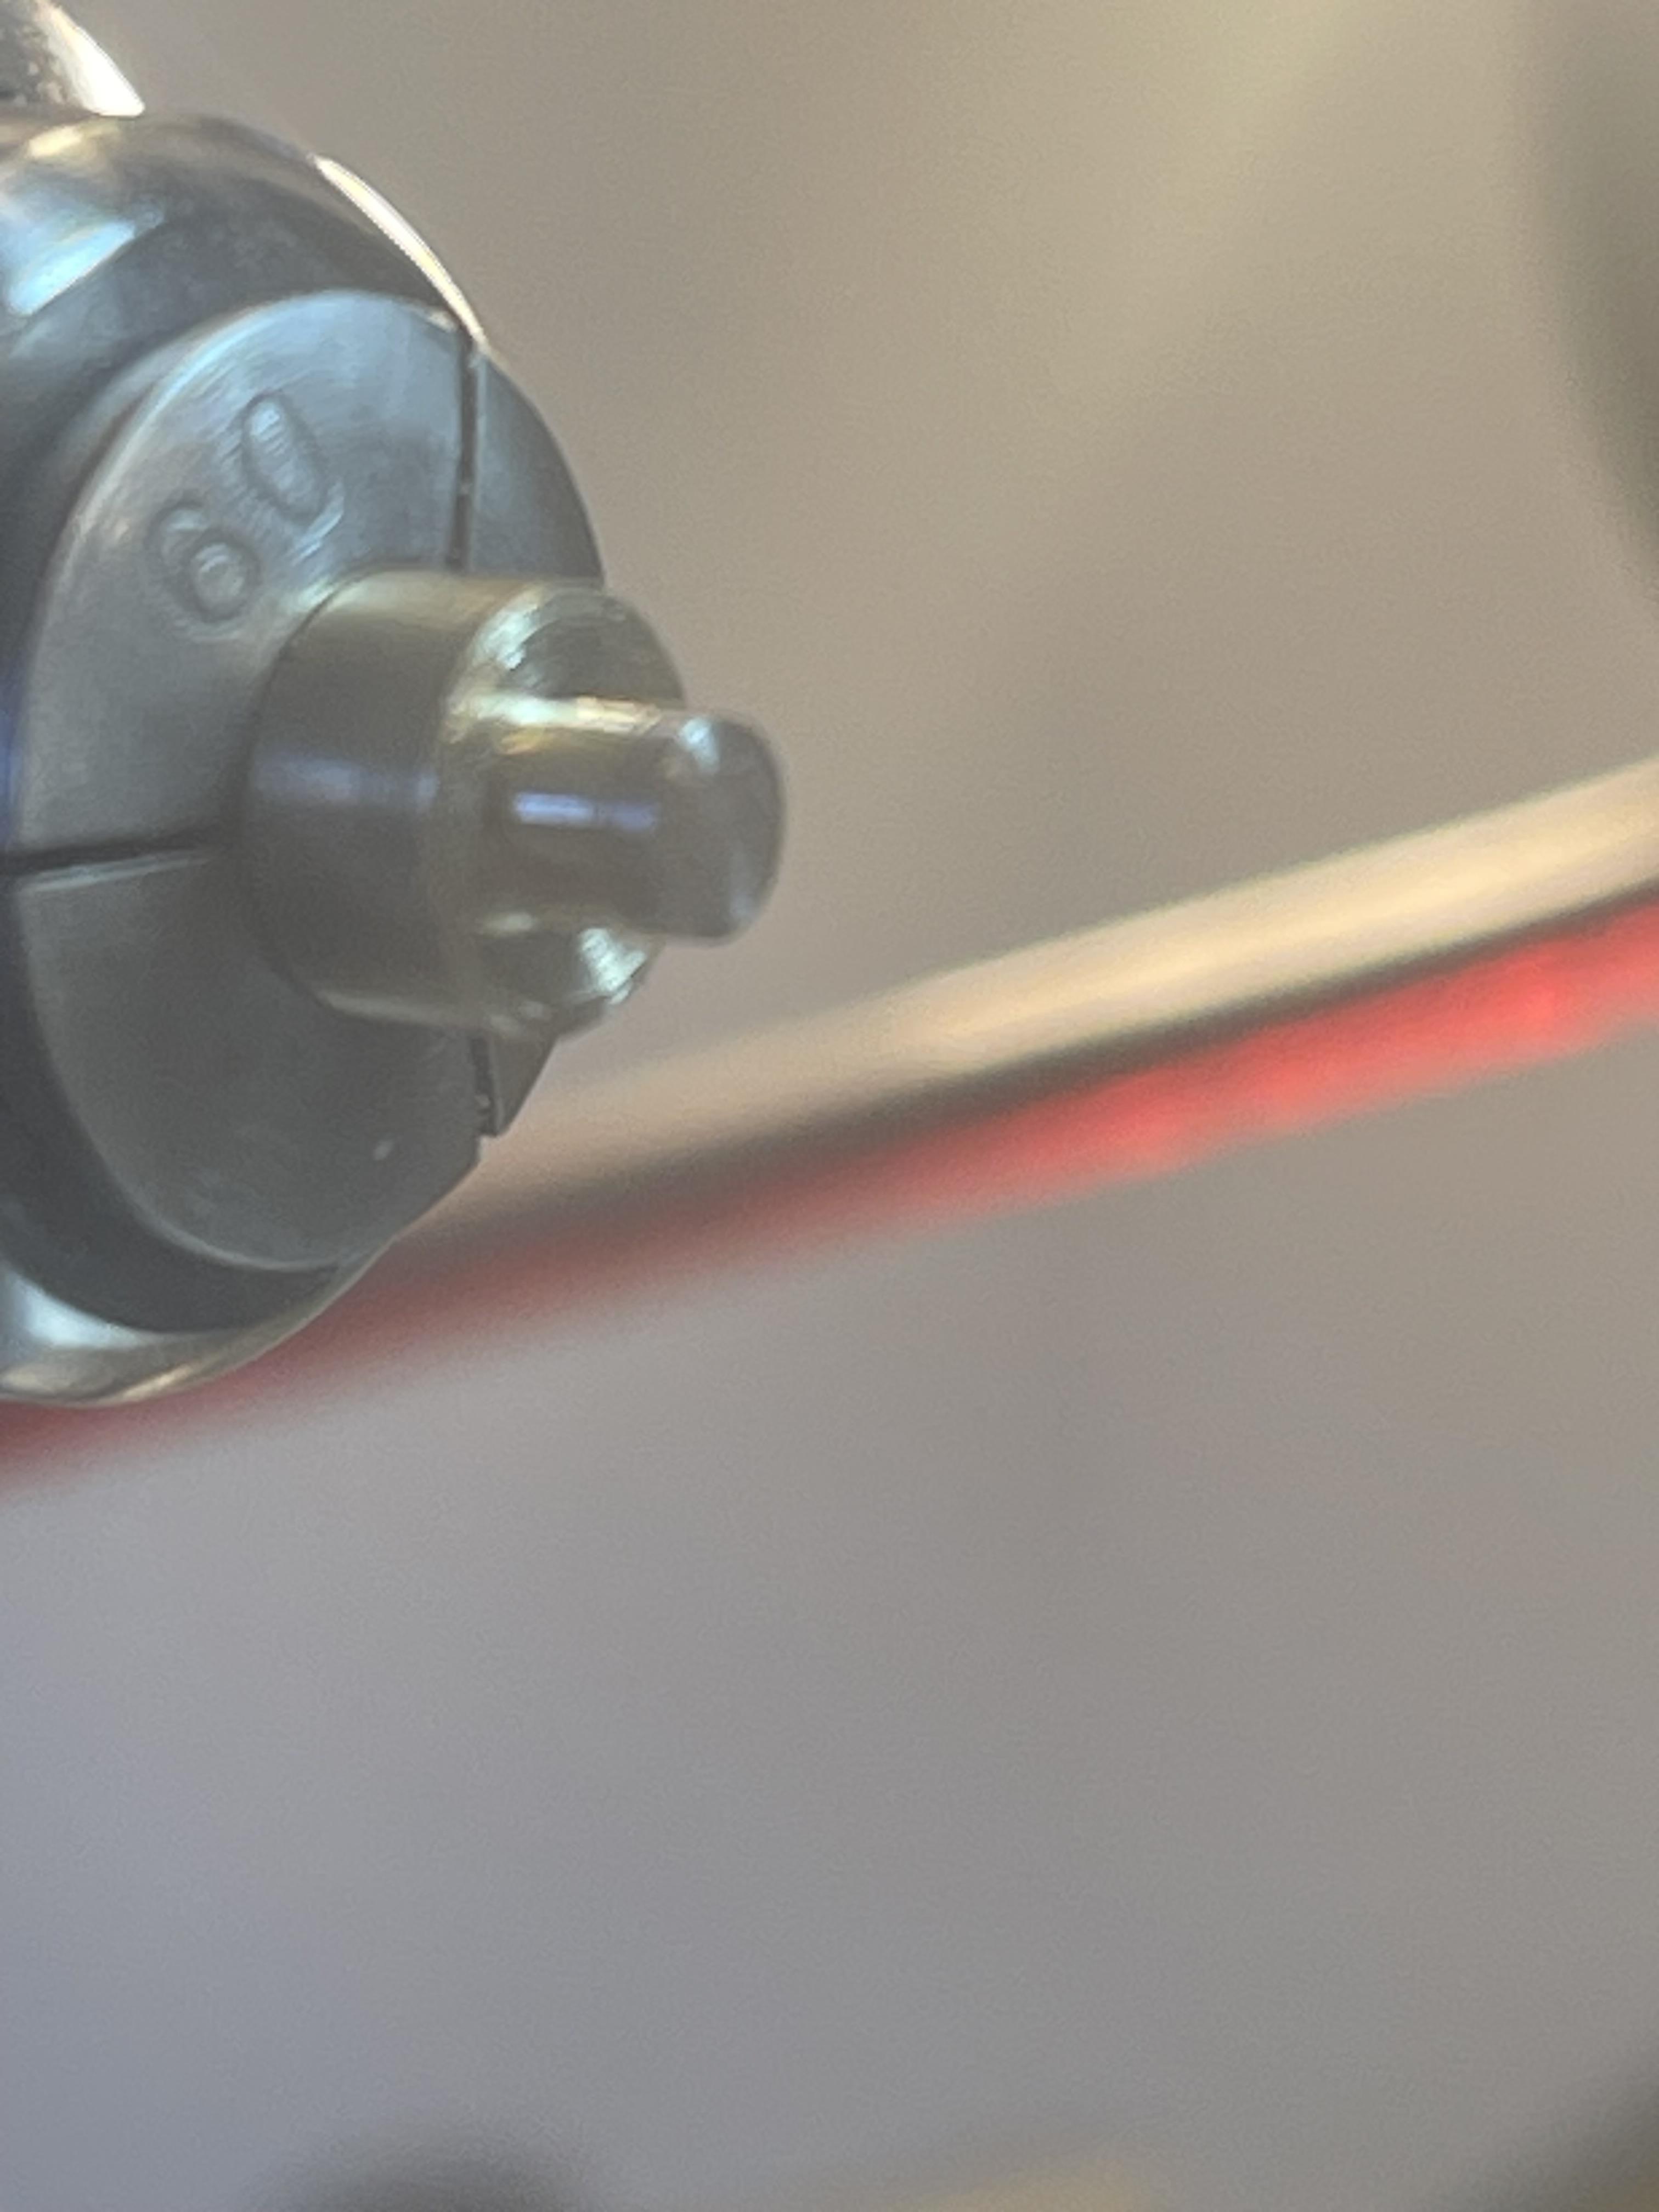
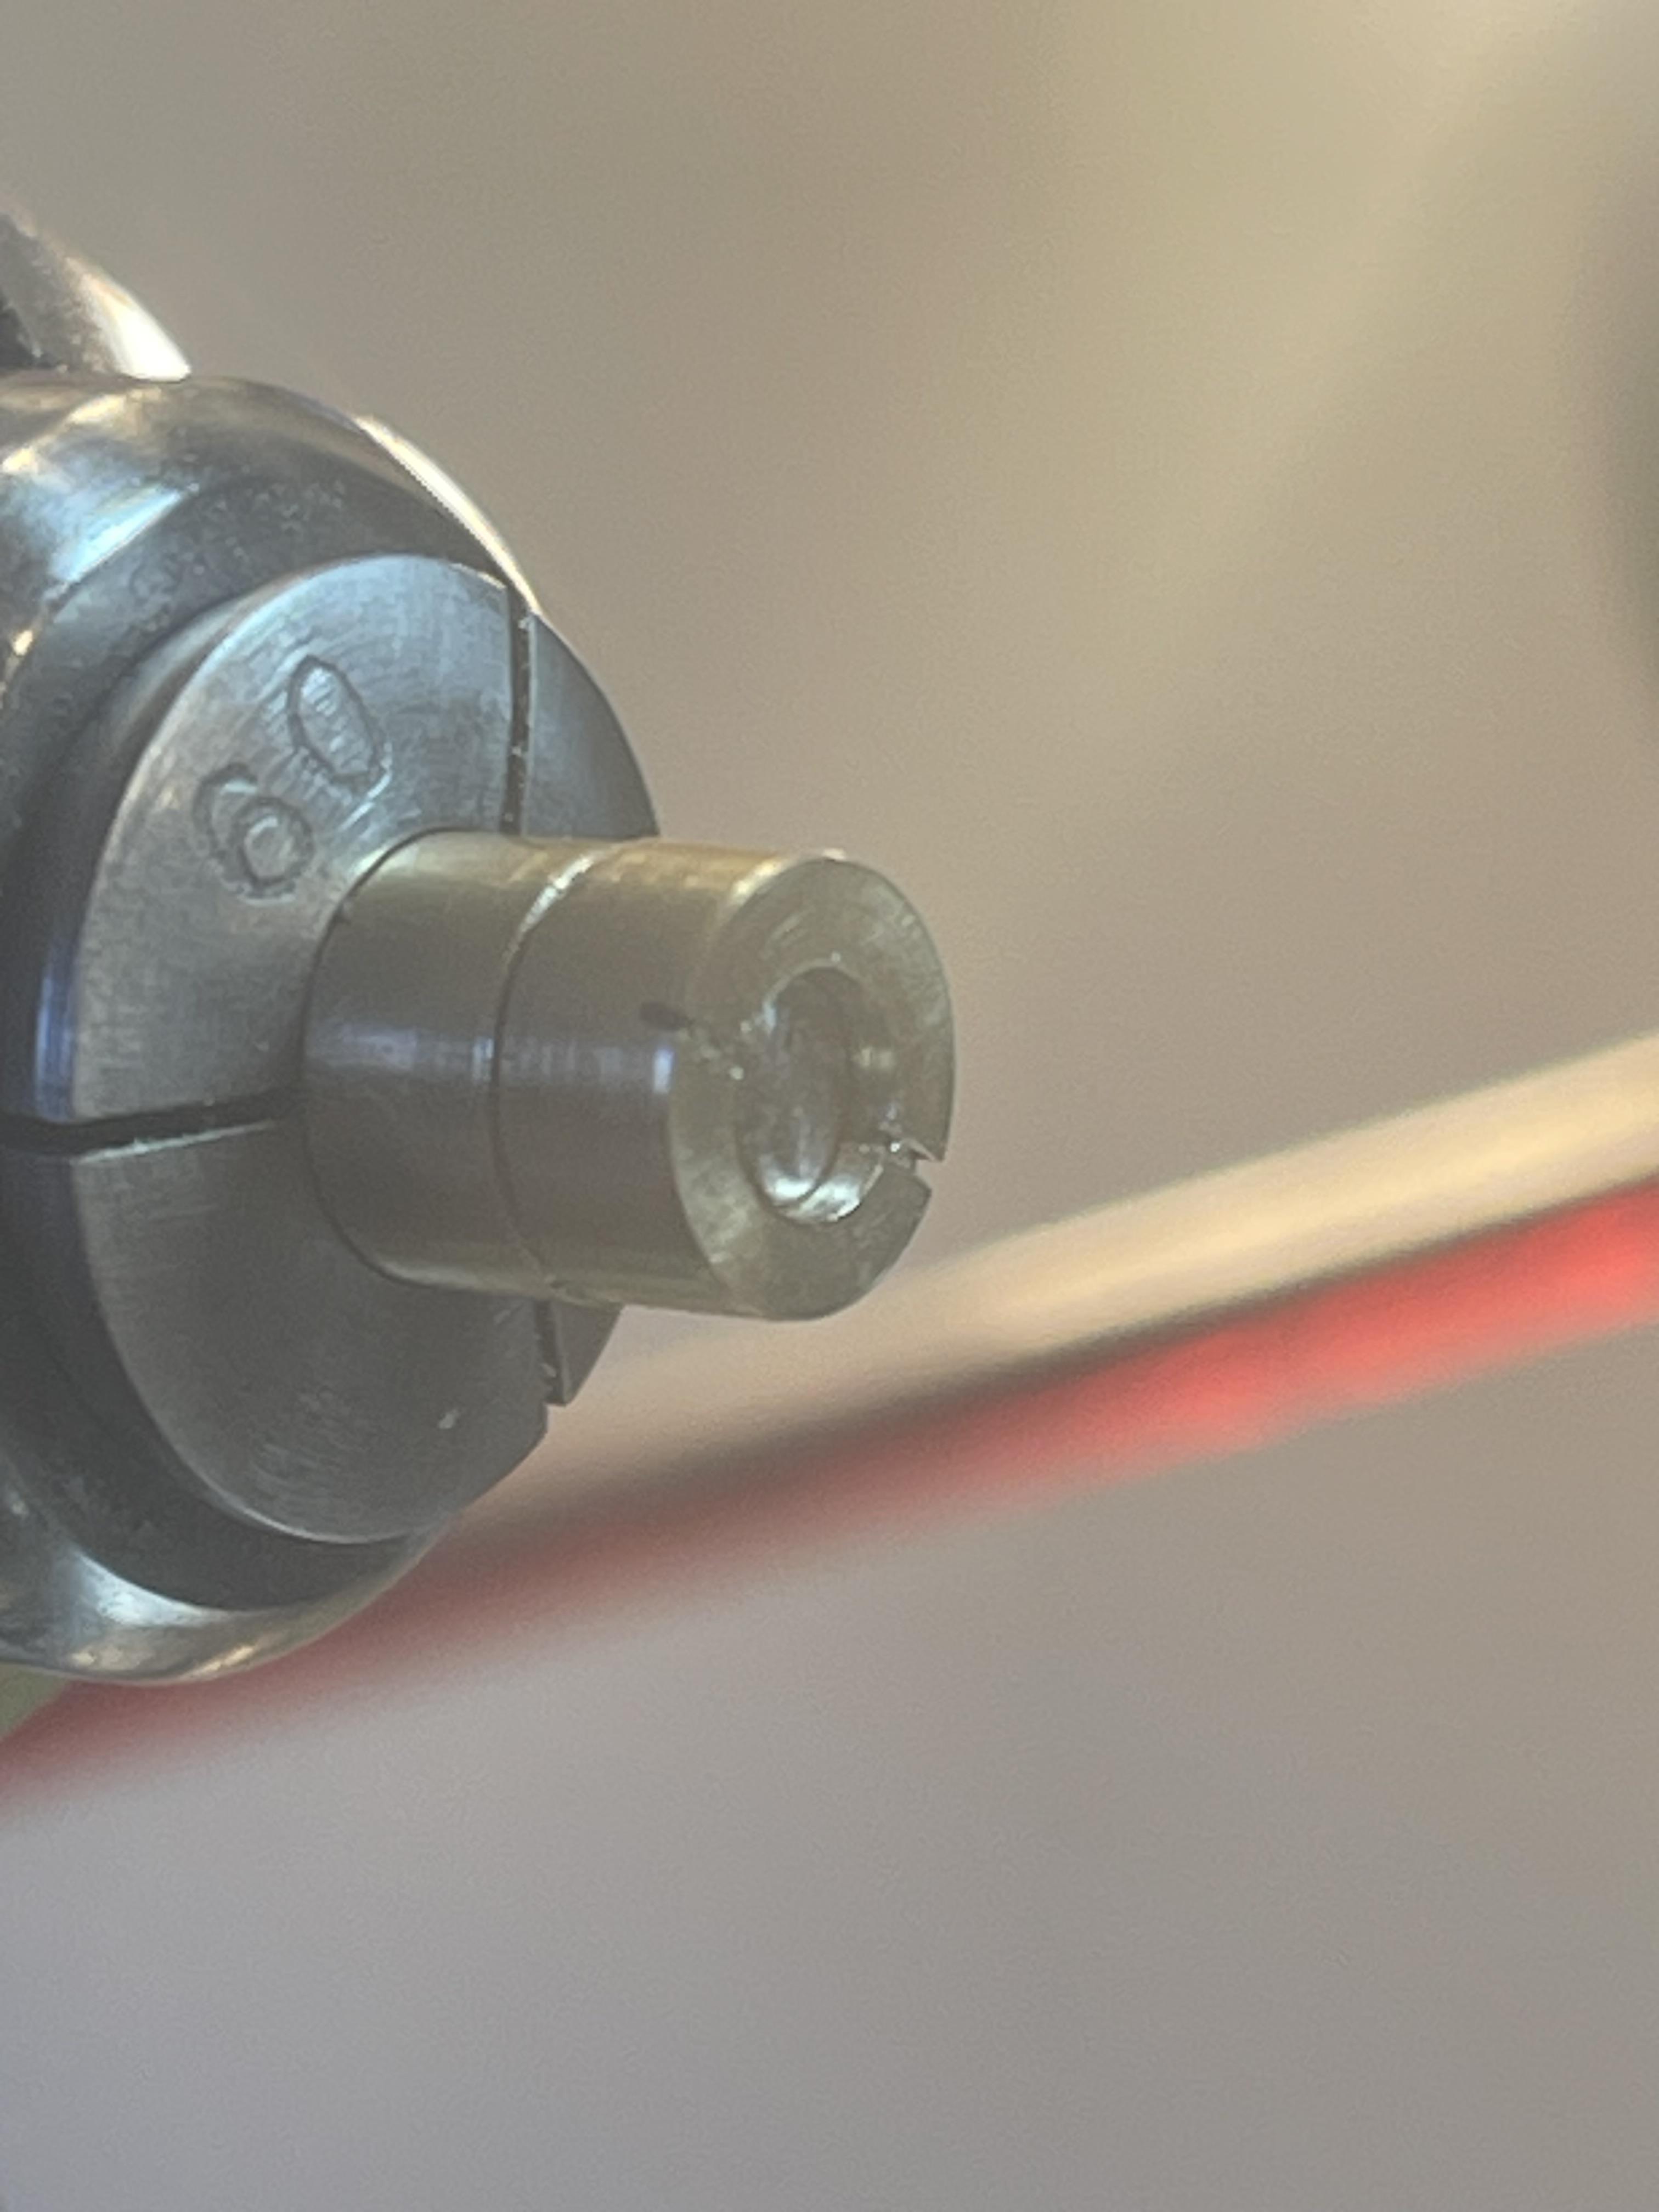
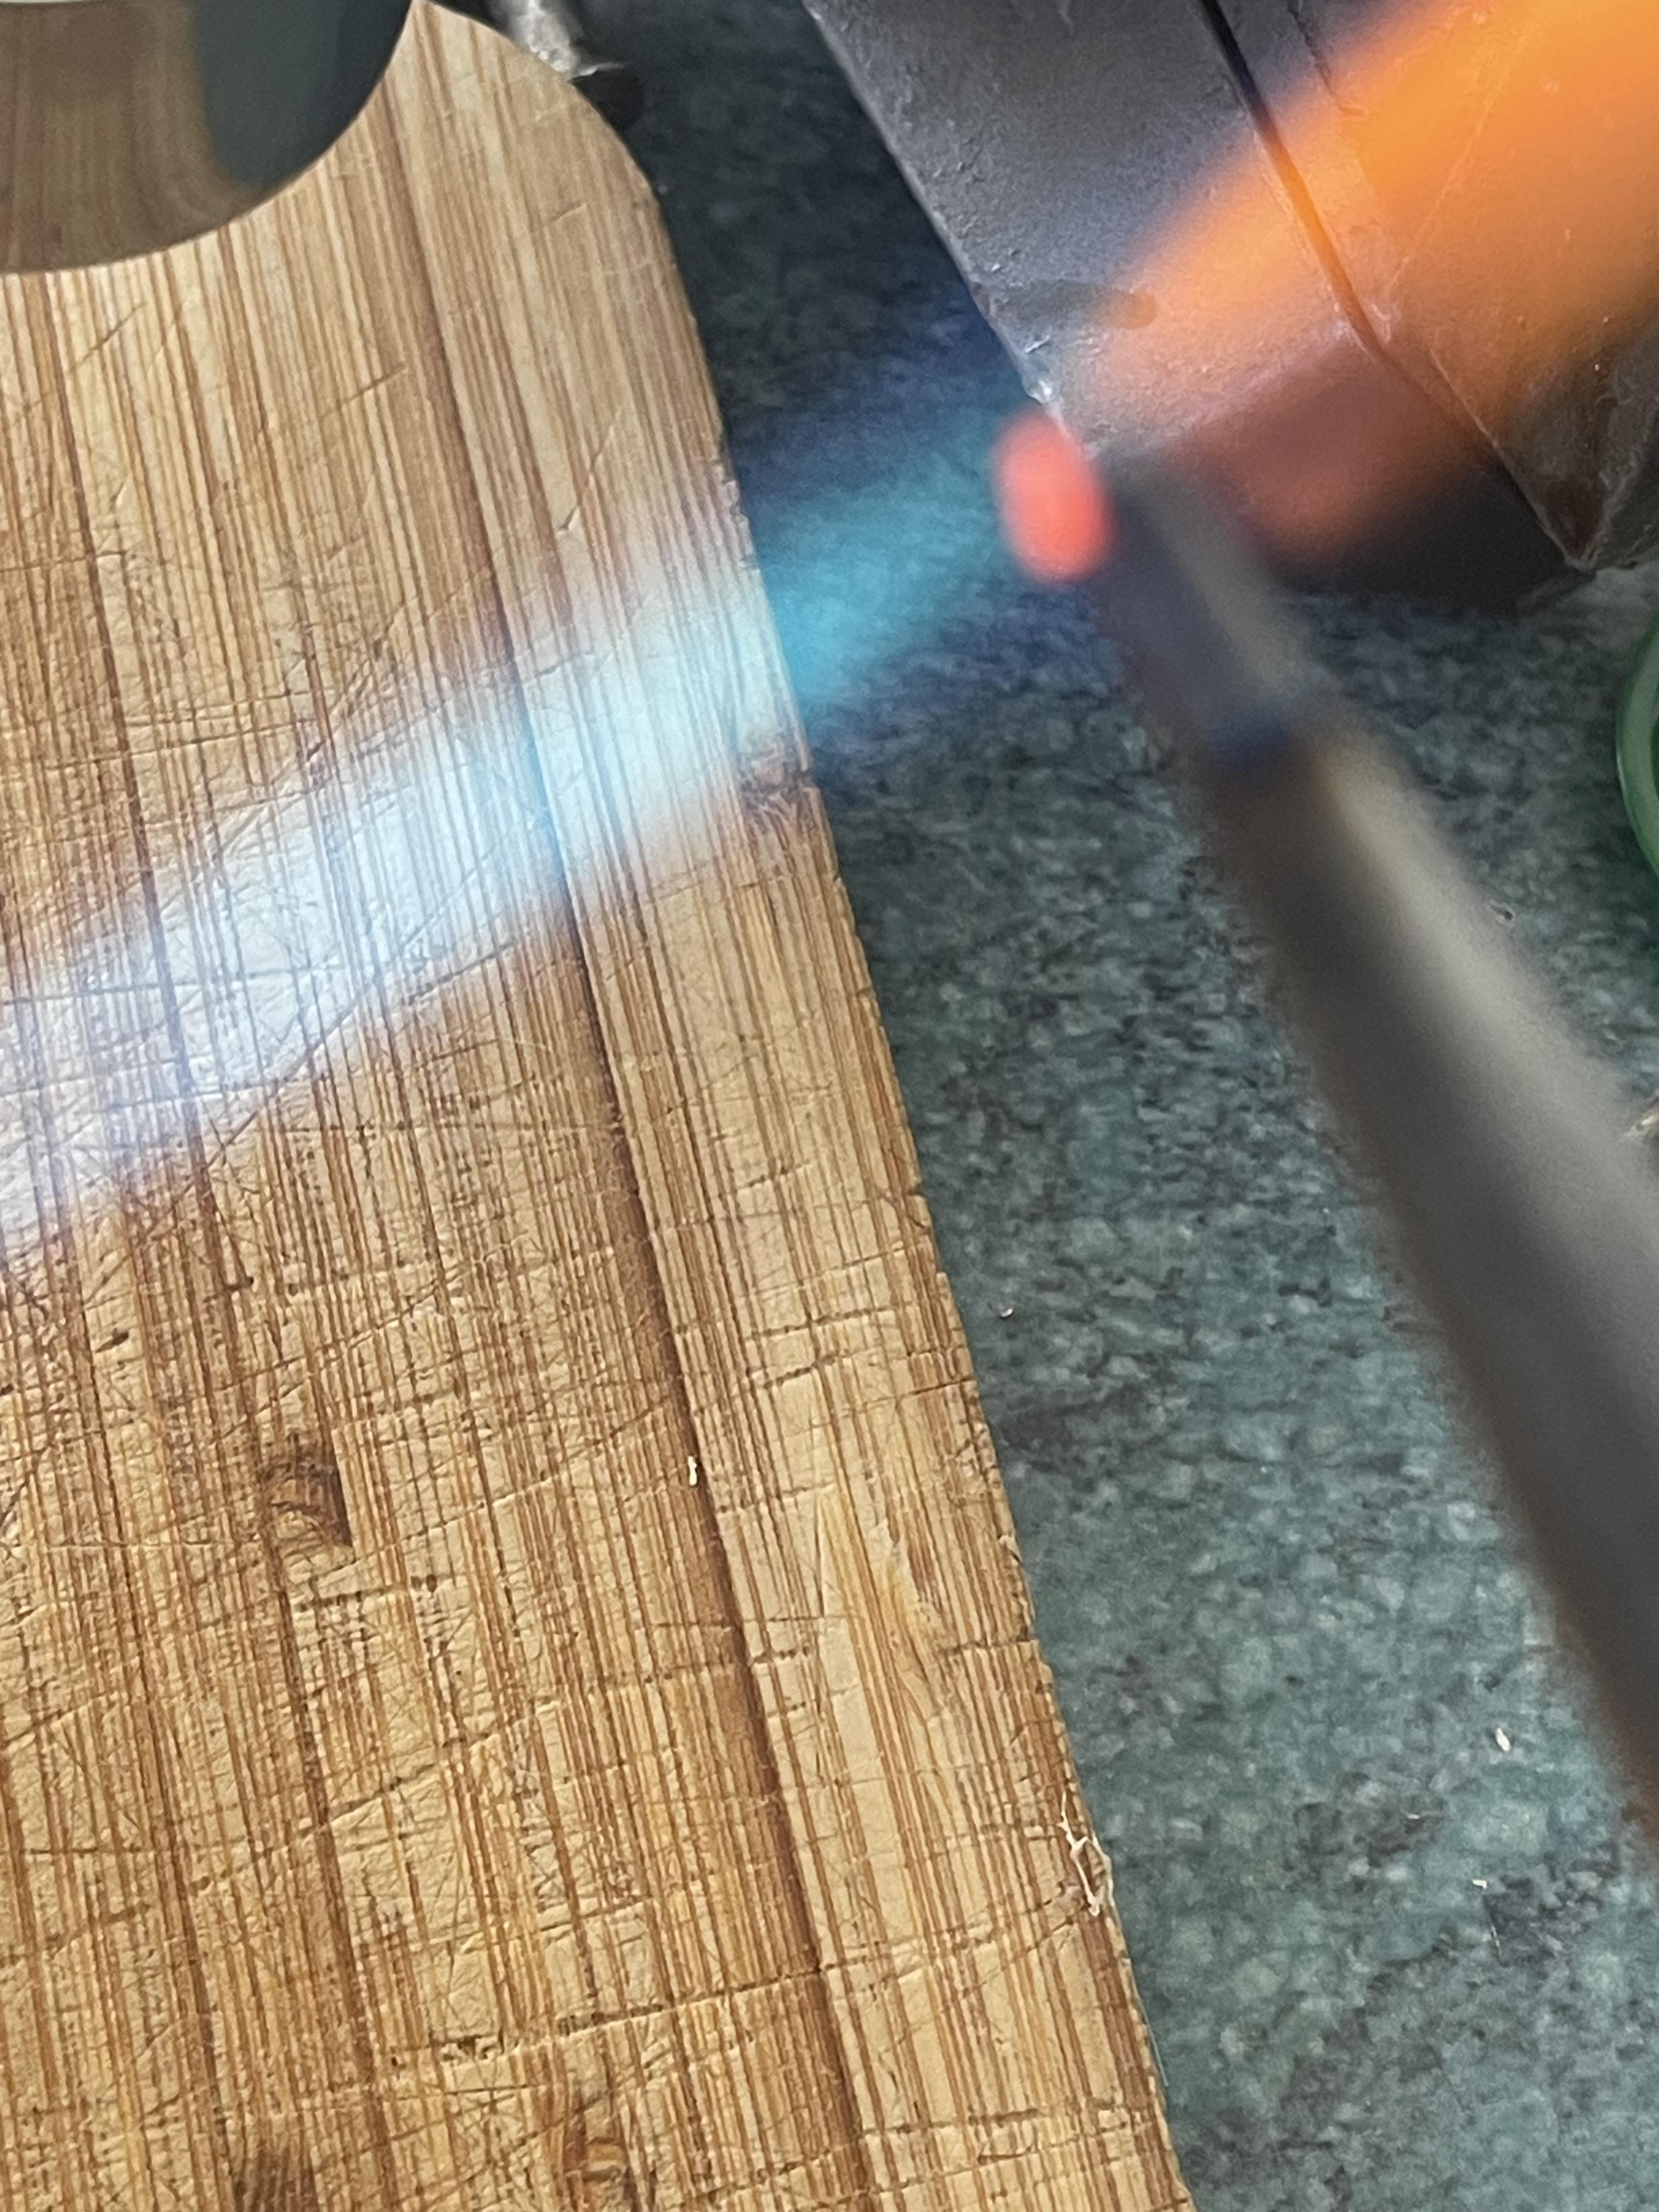
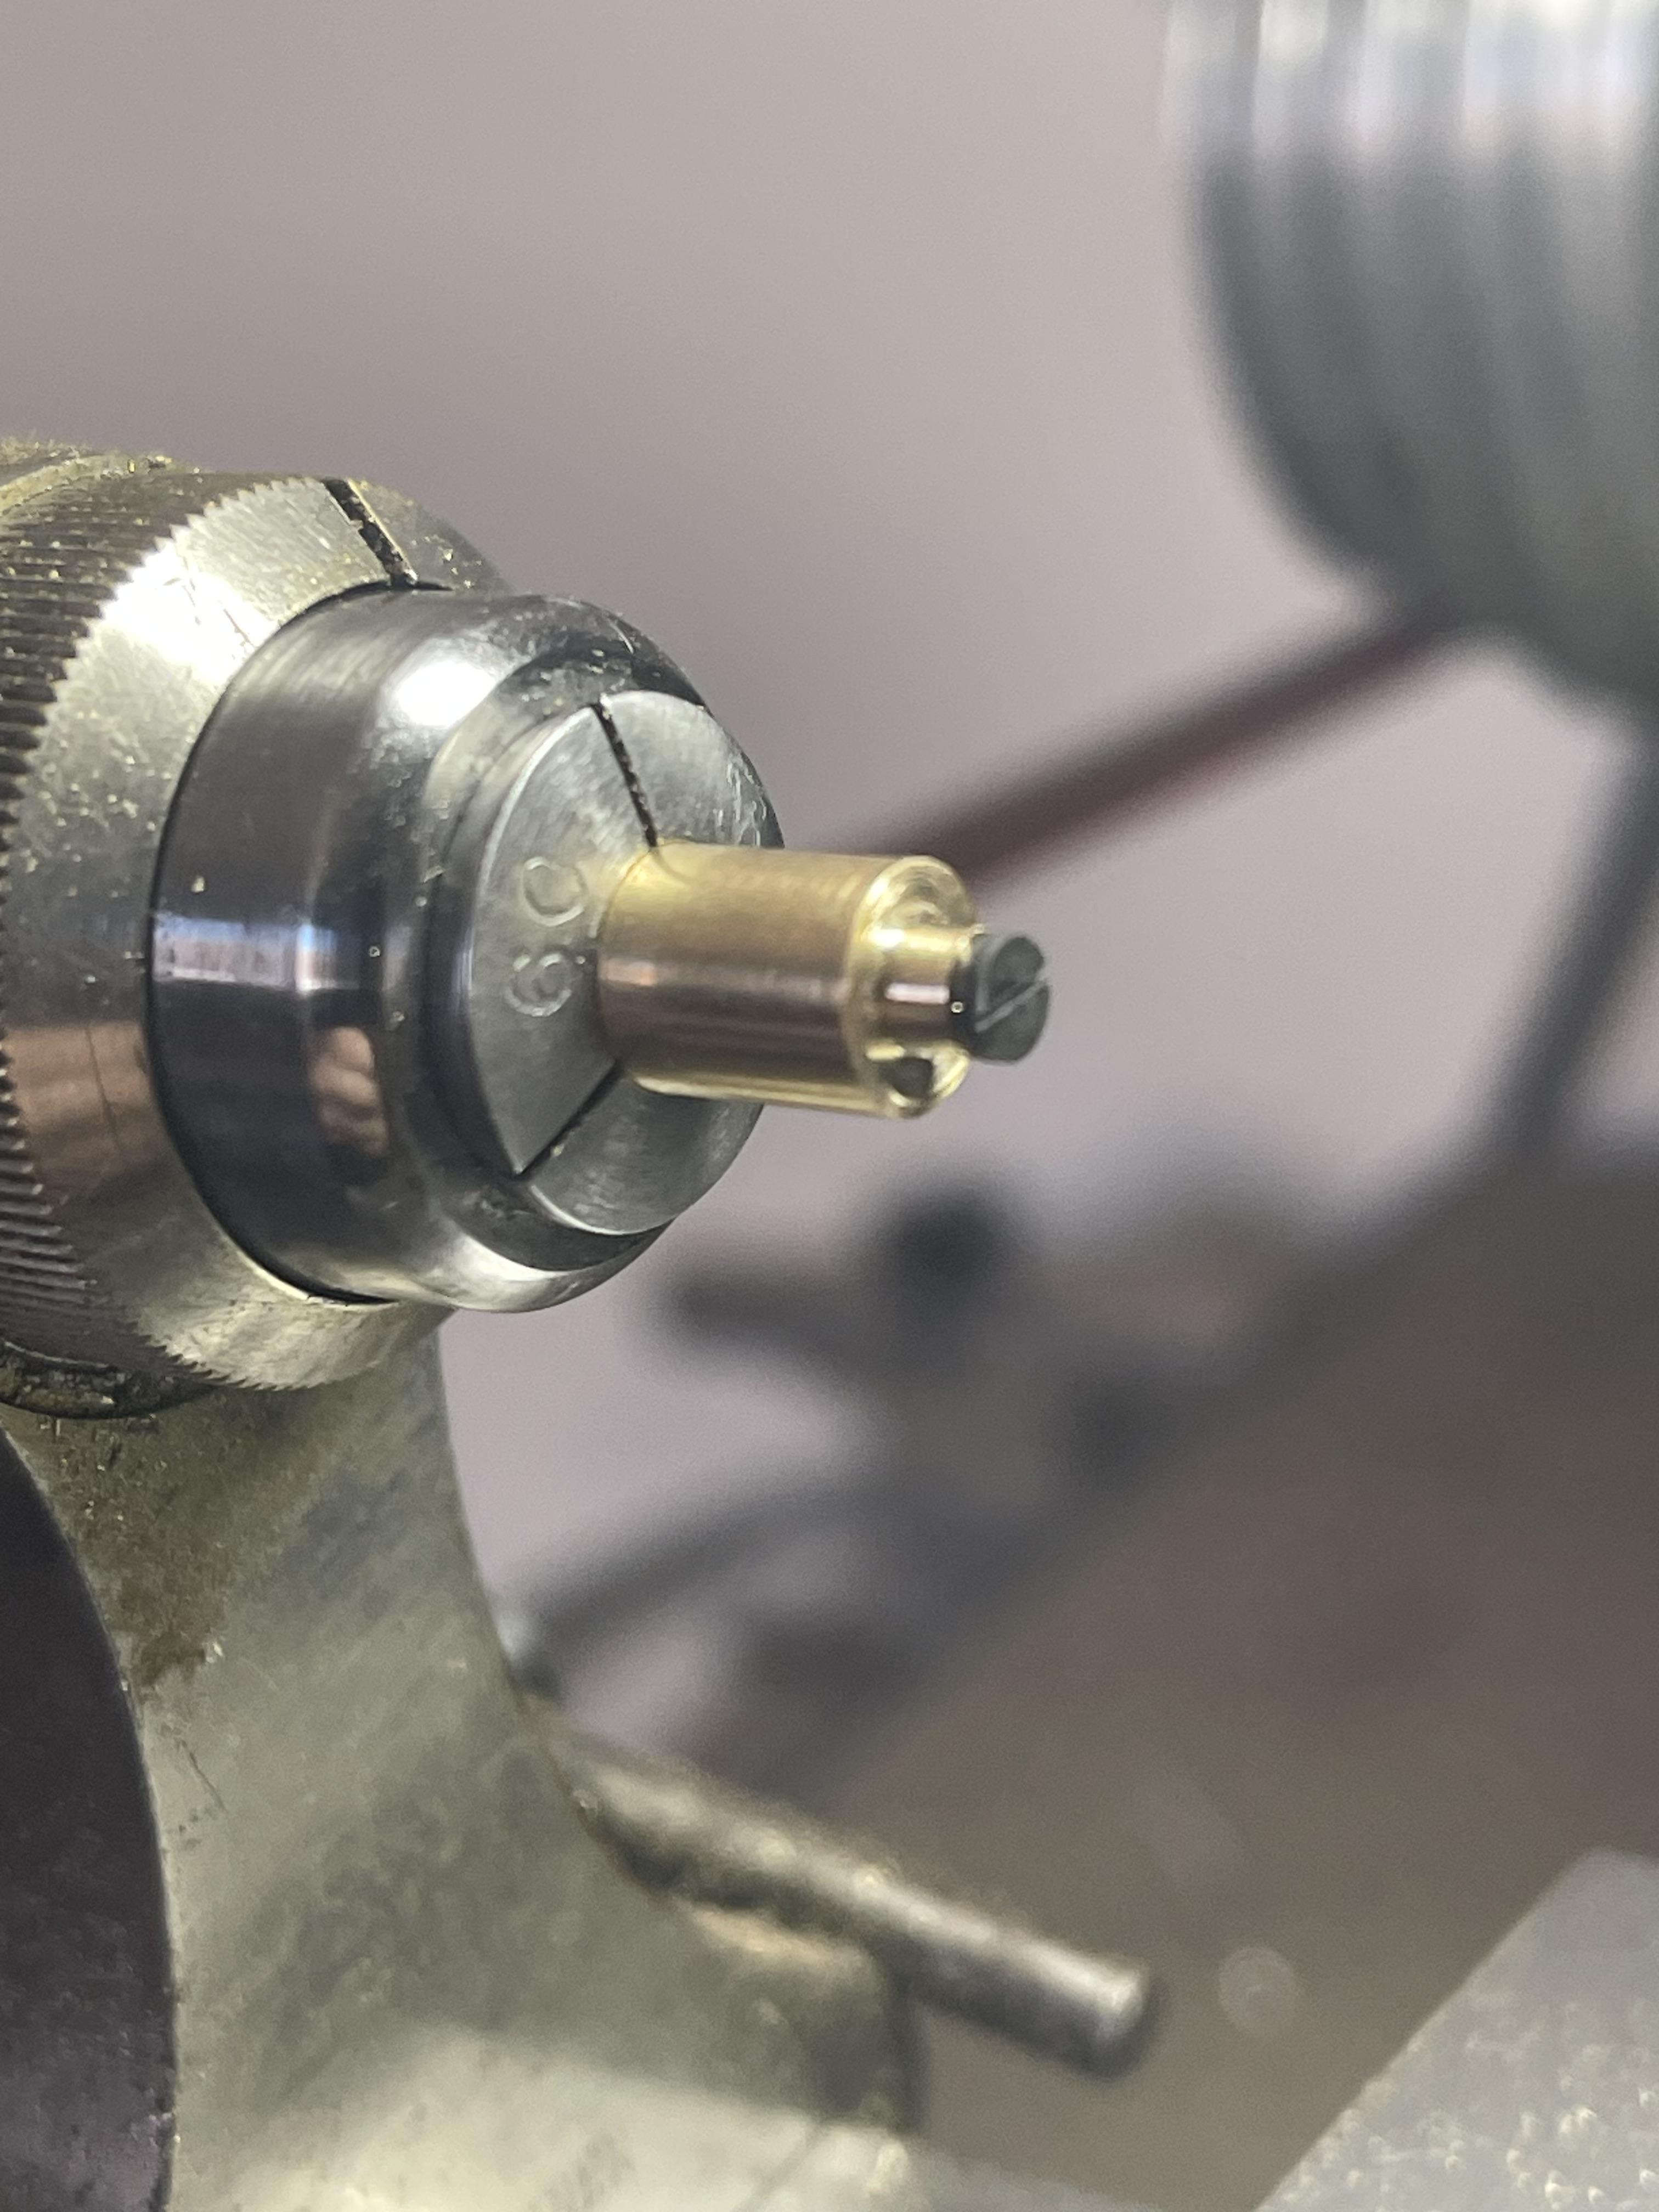
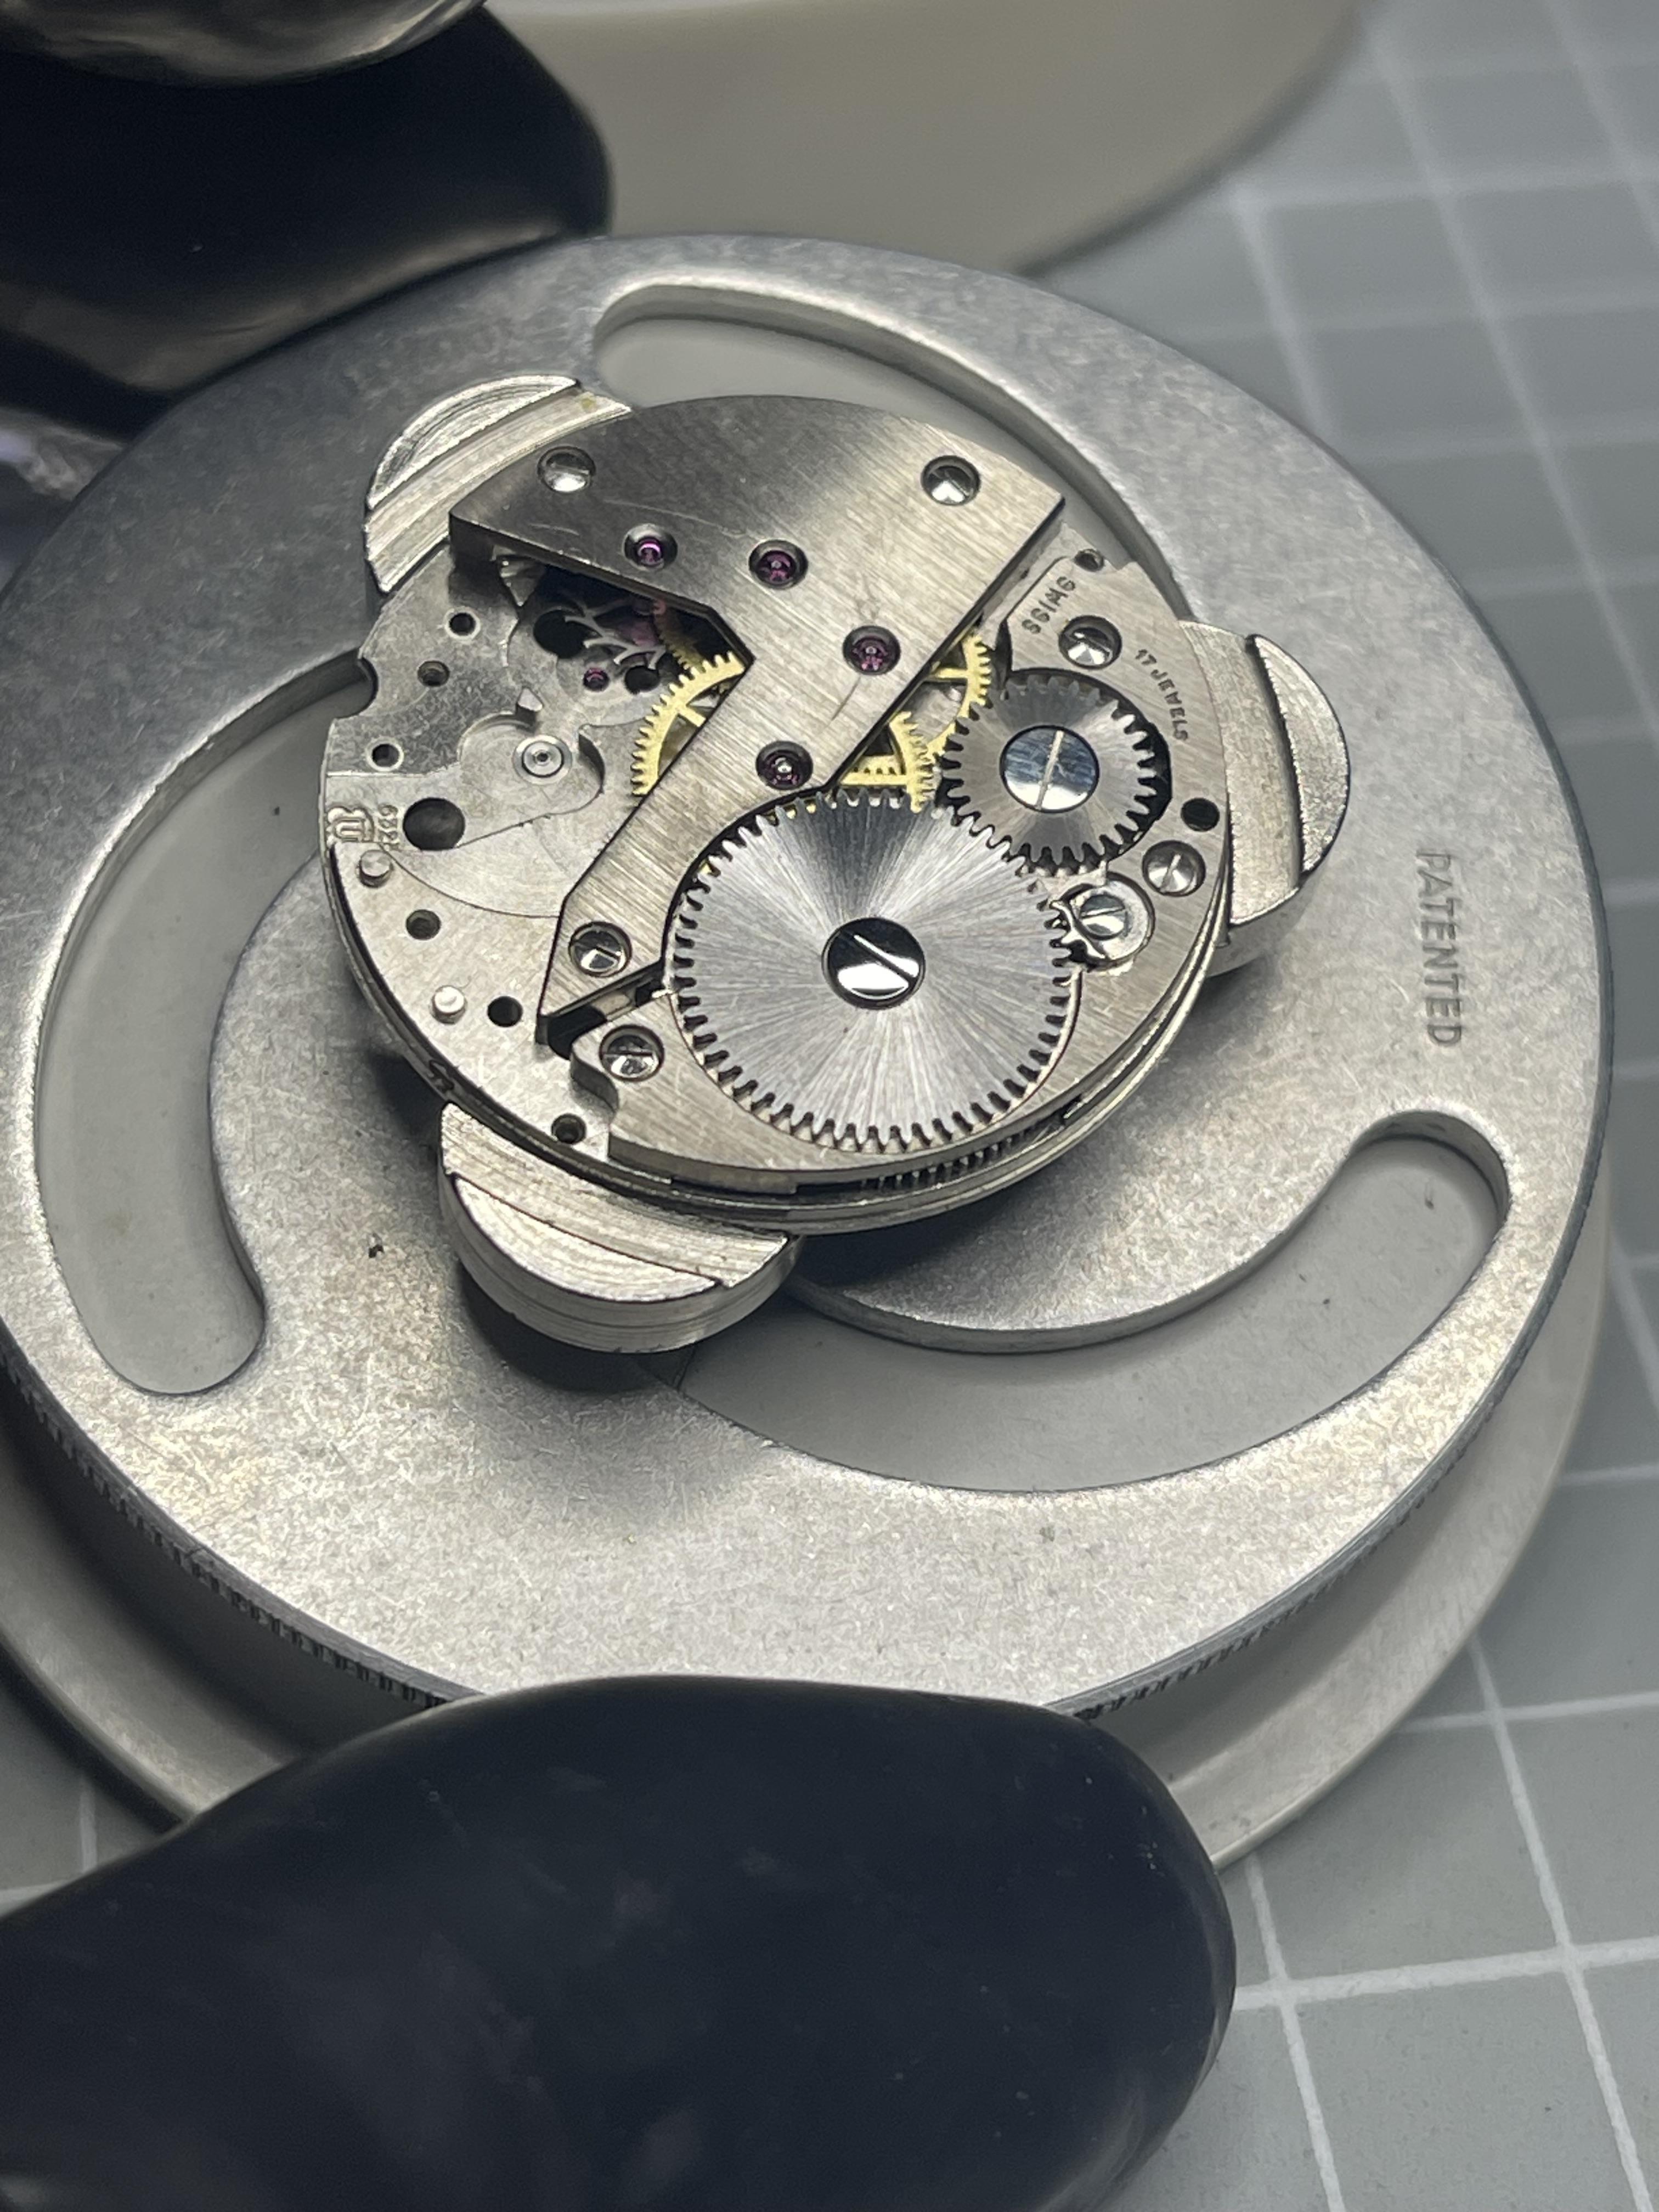
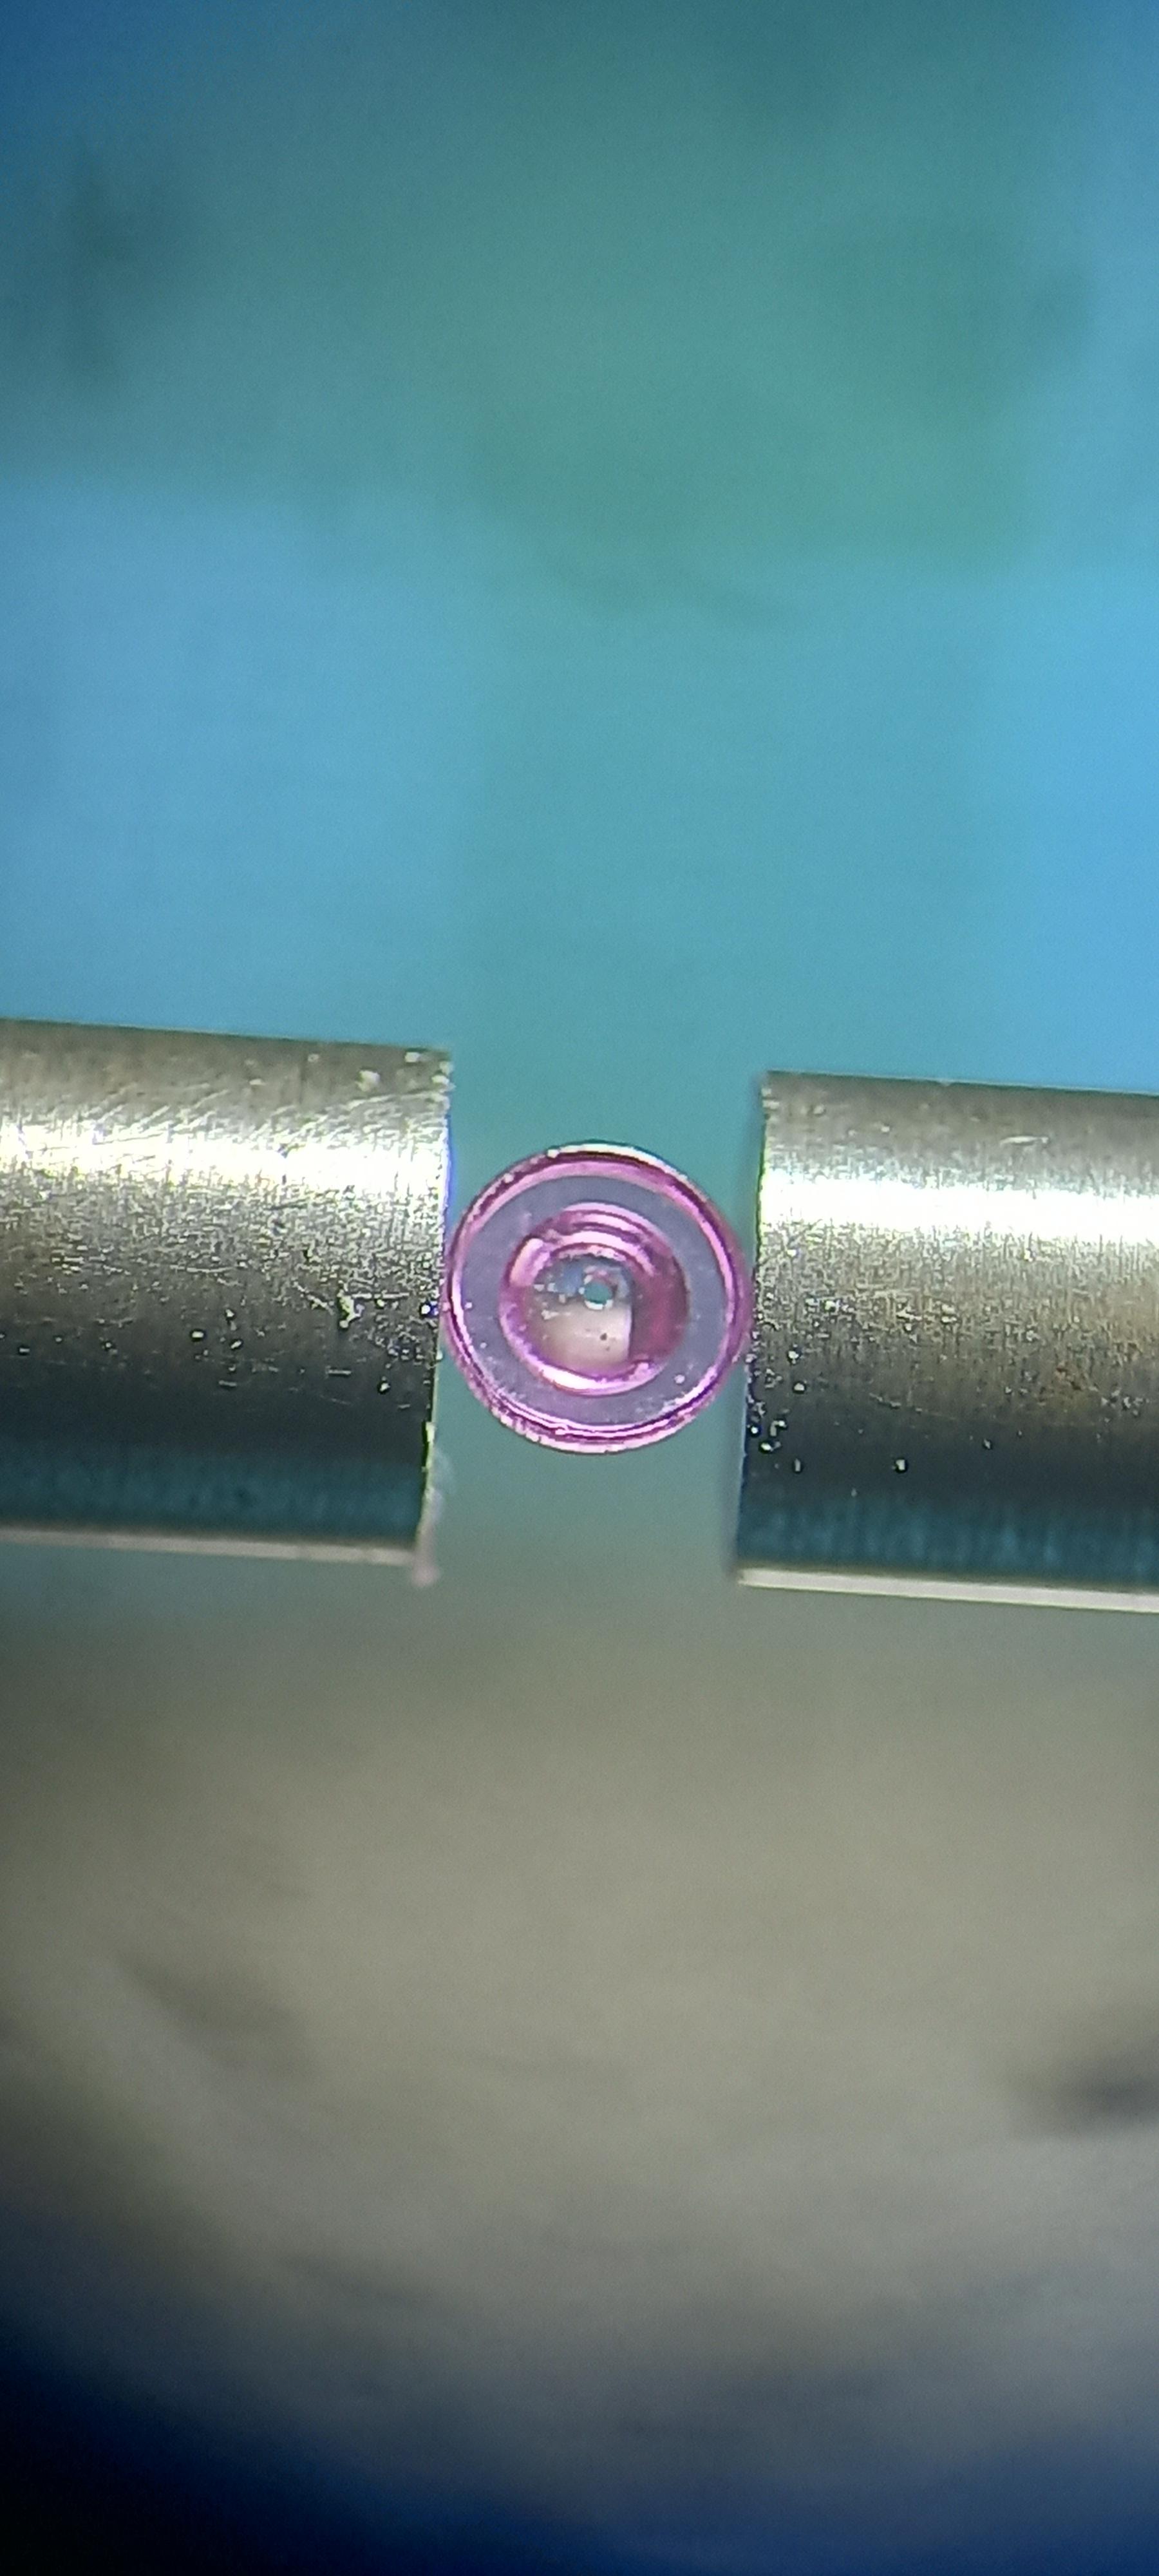
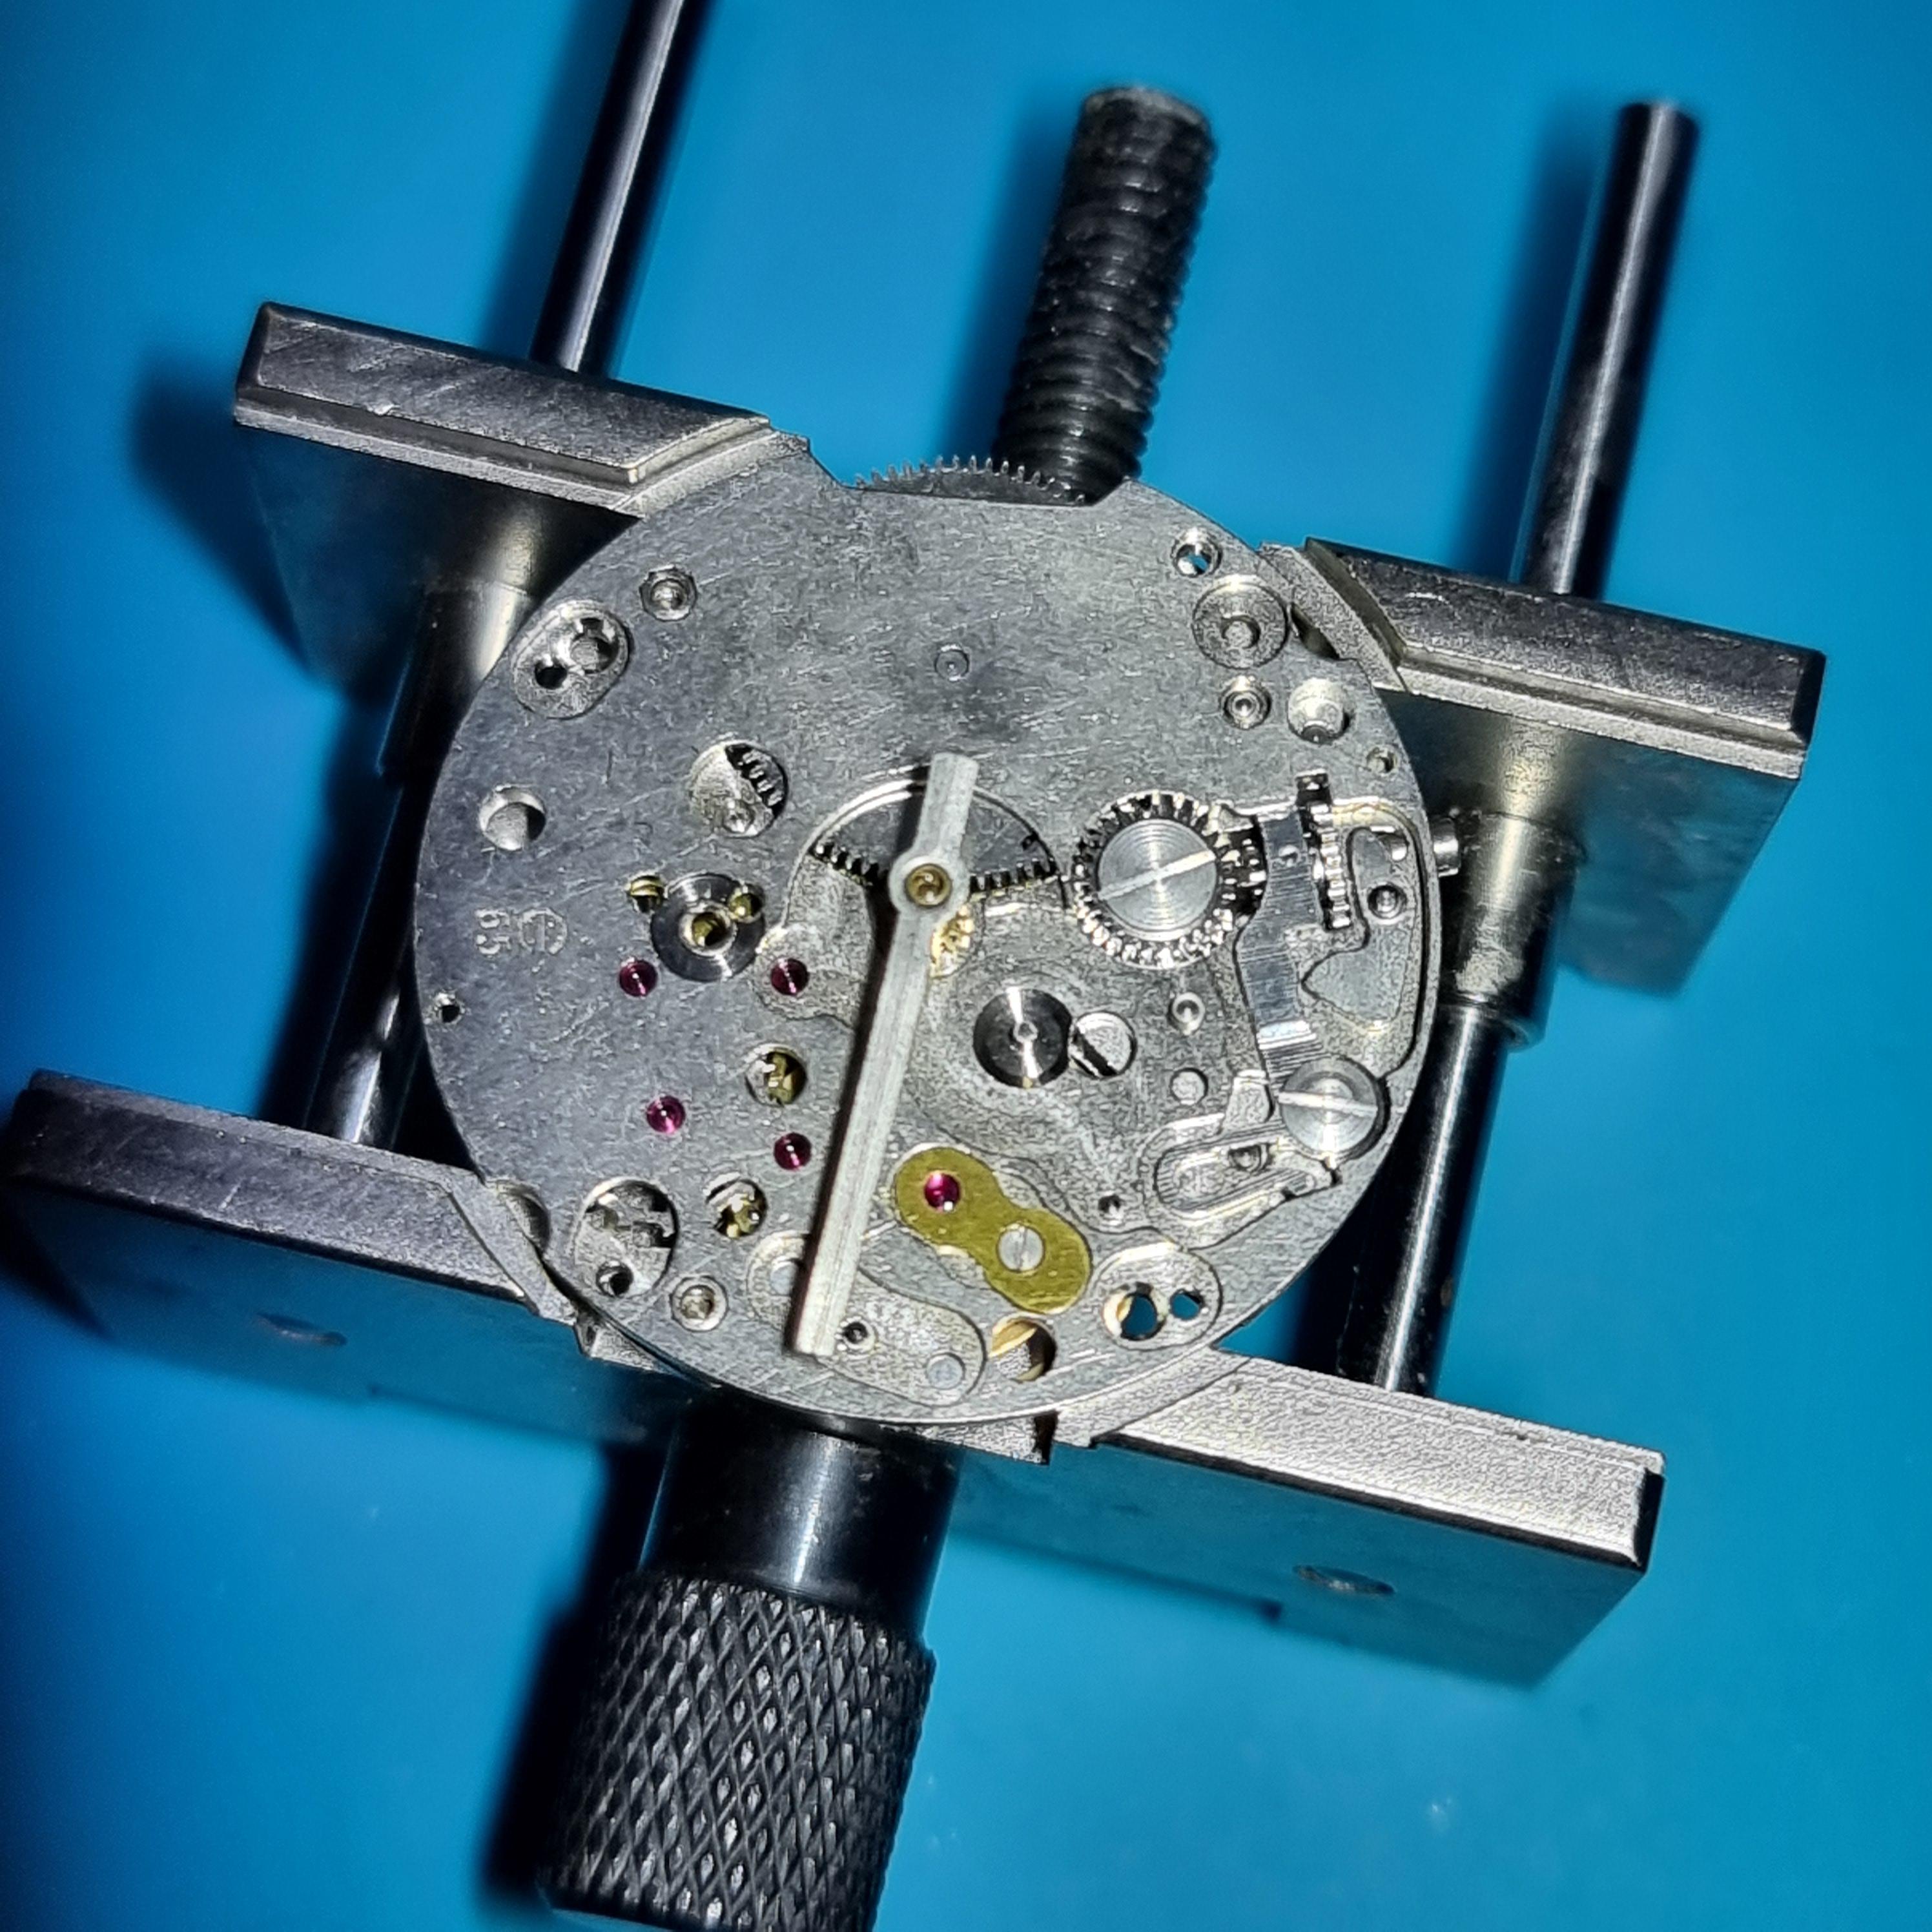
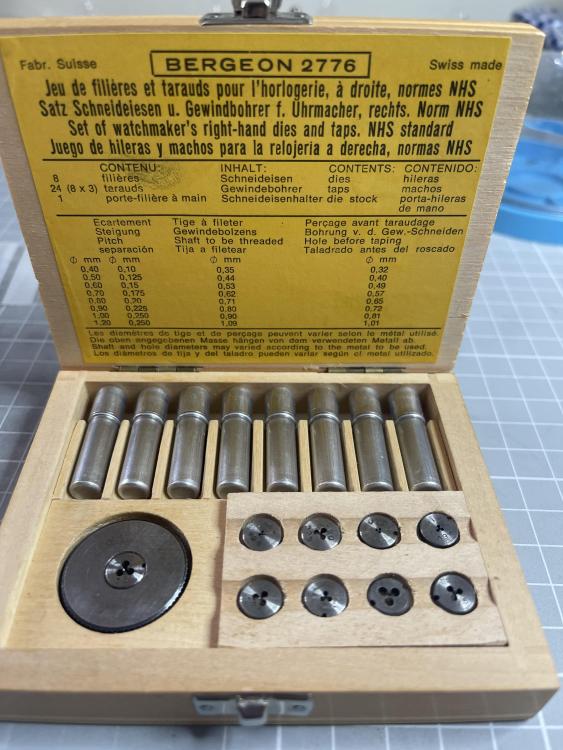
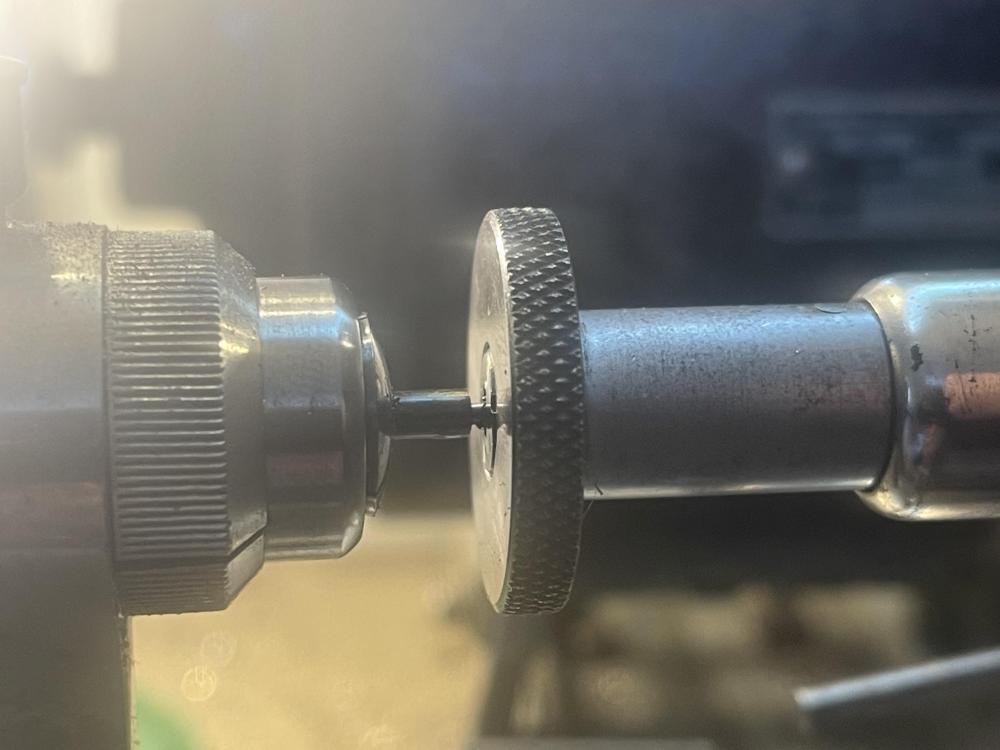
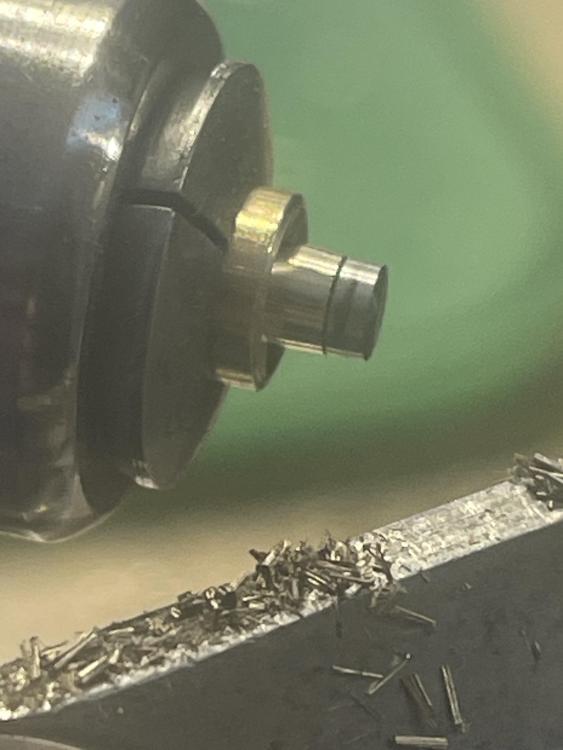
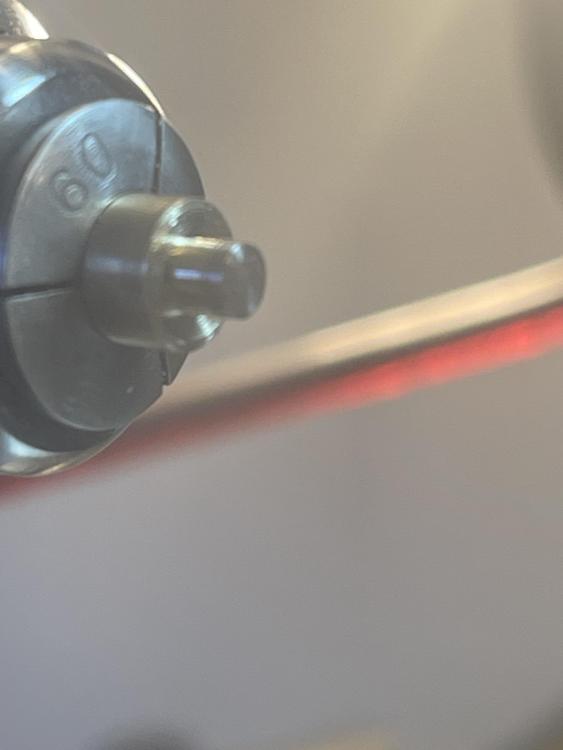
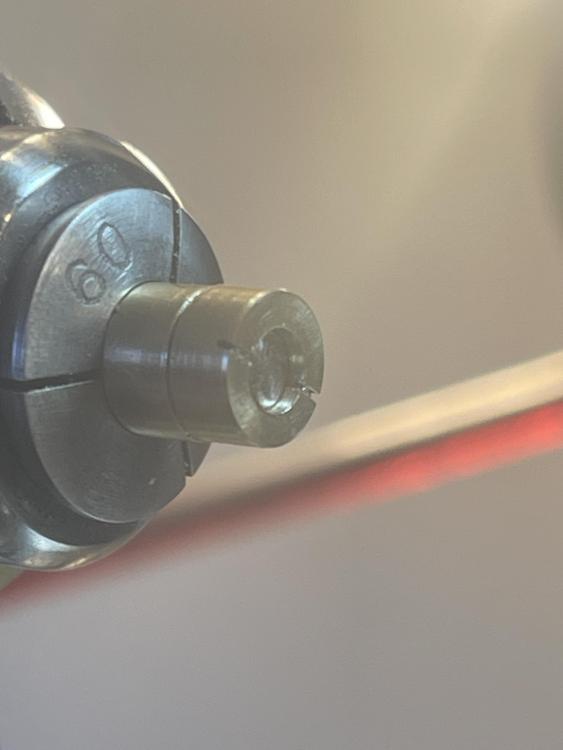
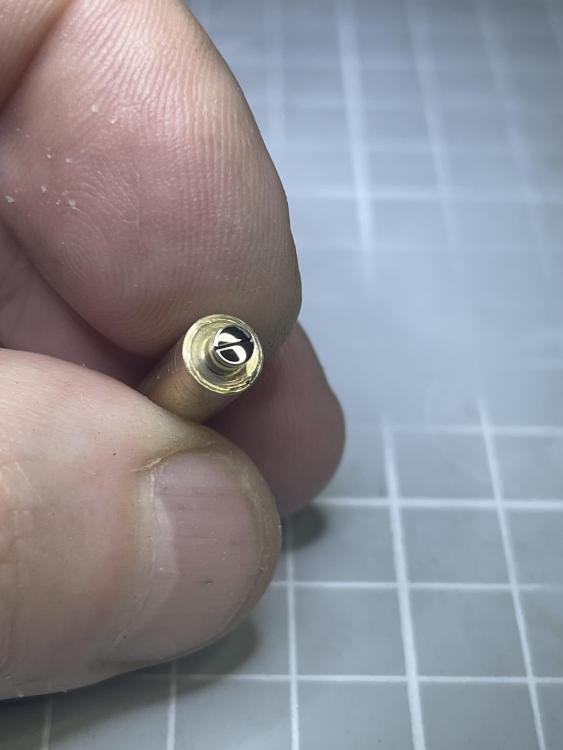
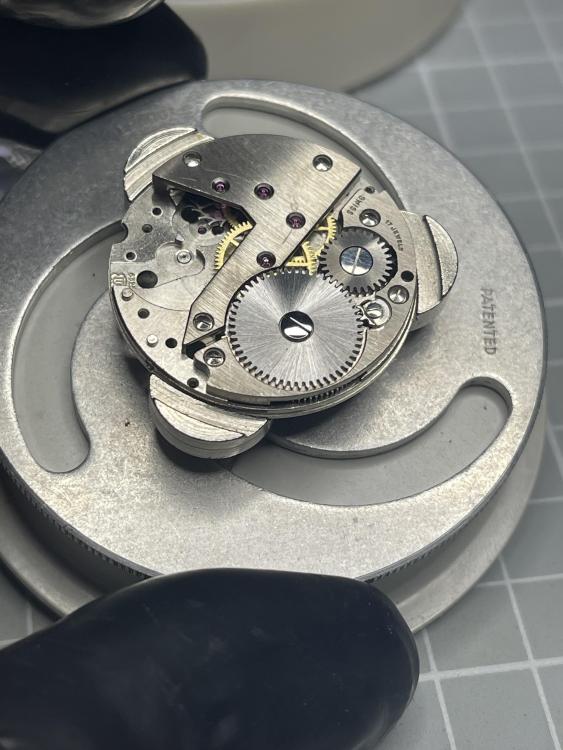
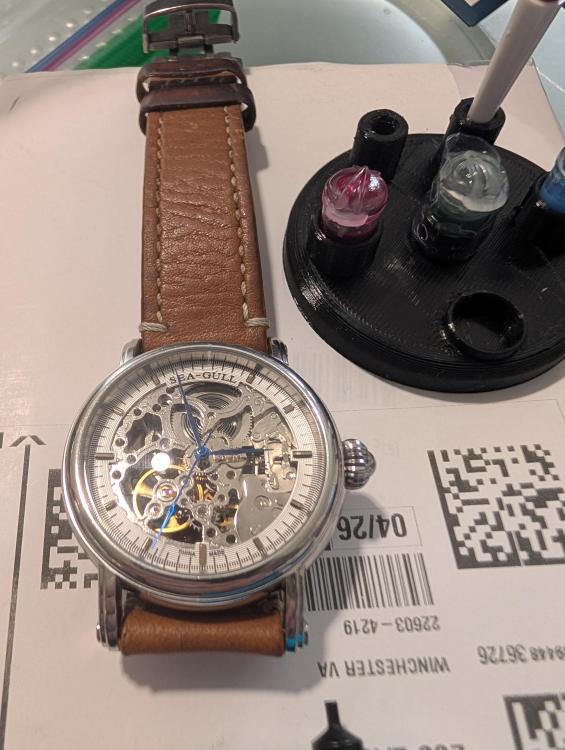
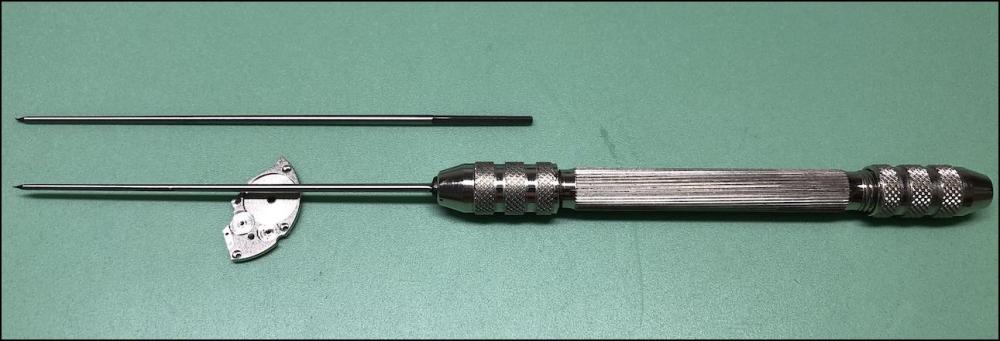
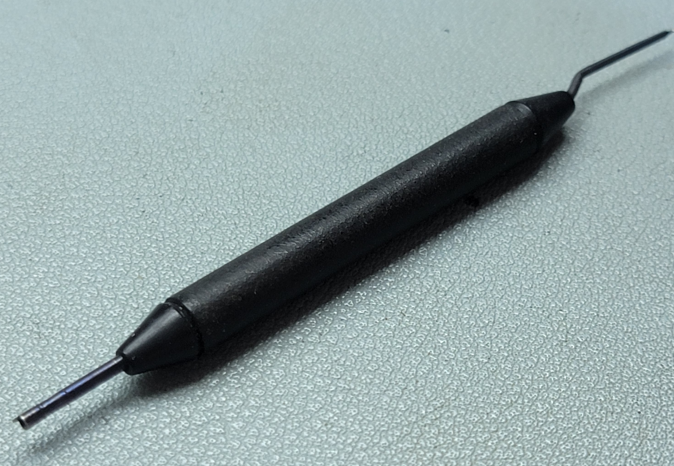
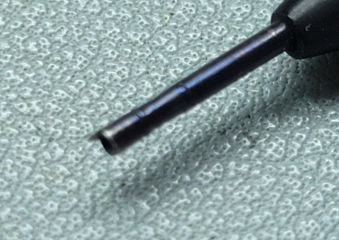
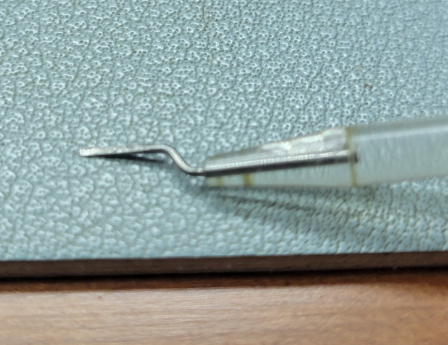
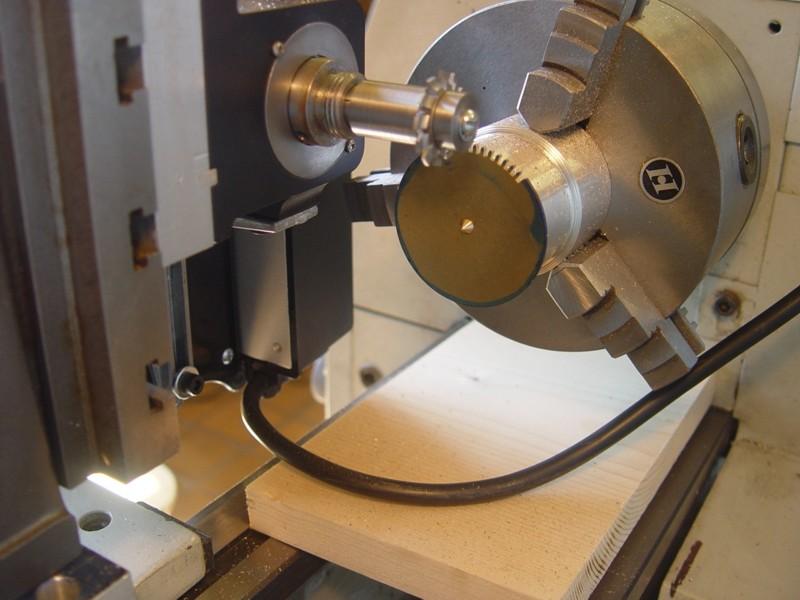
I recently repaired this movement but the screw for the ratchet wheel was the wrong size and it was bugging me (pic 1). I tried to find a replacement but I couldn't match the head width and tap size, so I decided to make one. I wasn't sure of the tap size for the screw, but it looked to be either 1.0 or 1.2 so I made a test screw out of a brass bar, with a matching threaded hole on the other end. I didn't photograph this but you can see the bar in picture 4. I settled on a size and proceeded to cut a steel bar down to length. I softened the bar first to make it easier to work with and the cut it to size, using the chart on my tap and die set for reference Once cut I set up the die in its holder and used my tailstock to hold it straight while I created the thread. Once the thread was cut, I tested it using the brass bar Happy with the diameter and thread I cut the screw off the bar and then twisted it into the bras bar to use it as a holder, for securing it in the lathe to protect the thread I made a face cut to clean the head up Next step was to make the slot. I currently do not have a table saw for the lathe so I was going to have to use a saw. To keep the cut straight and centred, I made a jig out of a piece of brass bar by drilling a hole big enough to slot over the stew, with a slot in it to guide the saw while cutting the slot on the screw head I then cut the slot with a fine saw (I forget what they're called, pin saw?). Once that was done, it was ready for hardening and tempering and then a first polish from 800 grits to 2000 on the lathe. The picture below is just before the first polish. Once I got it to polished with 2000 grit, I removed it from the lathe and then polished it with diamond paste and a Dremel, using the brass bar to hold it. (this turned out to be a really useful tool) Finally, it was ready to go into the movement. I am pleased with the result. I should have made it flatter to match the crown wheel screw better but, overall, it is a vast improvement on the screw that was in there. The main thing I took away from this was how useful the brass bar was, not just for testing the thread but as a holder in the lathe, for cutting the slot and for handling when polishing. No trying to hold it with tweezers or a vice. It was a really simple tool to make and really worth the 10 minuets or so to make it and cut the threads. The slot guide was a huge bonus because it worked much better than expected.


 10 points
 -
Haha, tell him you're supposed to fill the pool with water before diving.9 points
-
Firstly i think you need calm down, and secondly you need to understand that Andy is trying to help you. A picture tells a thousand words, supplying us with a photo explains more than you can tell and is standard practice. I can't ever remember anyone arguing over it.8 points
-
WRT feels like a second home to me, and I’m sure I’m not the only one. That’s why we care so much about making sure it’s seen as something bigger than just Mark and us users. Companies don’t rely on one person, no matter how great they are, because life happens. You know — don’t put all your eggs in one basket. When I started my own business, I lost a lot of gigs because clients worried what would happen if I got sick. Teaming up with a competitor to cover for each other made a huge difference. Right now, WRT is the company, and Mark is our brilliant, irreplaceable consultant. It would feel a lot safer if there was someone who could step in if needed. That’s my only little wish. Otherwise? Nothing but love for WRT and everyone here.7 points
-
Nice ! Maybe less elaborate than a Luthy but surely equal useful. Cause you lack my Electronic Box? Frank
 7 points
 -
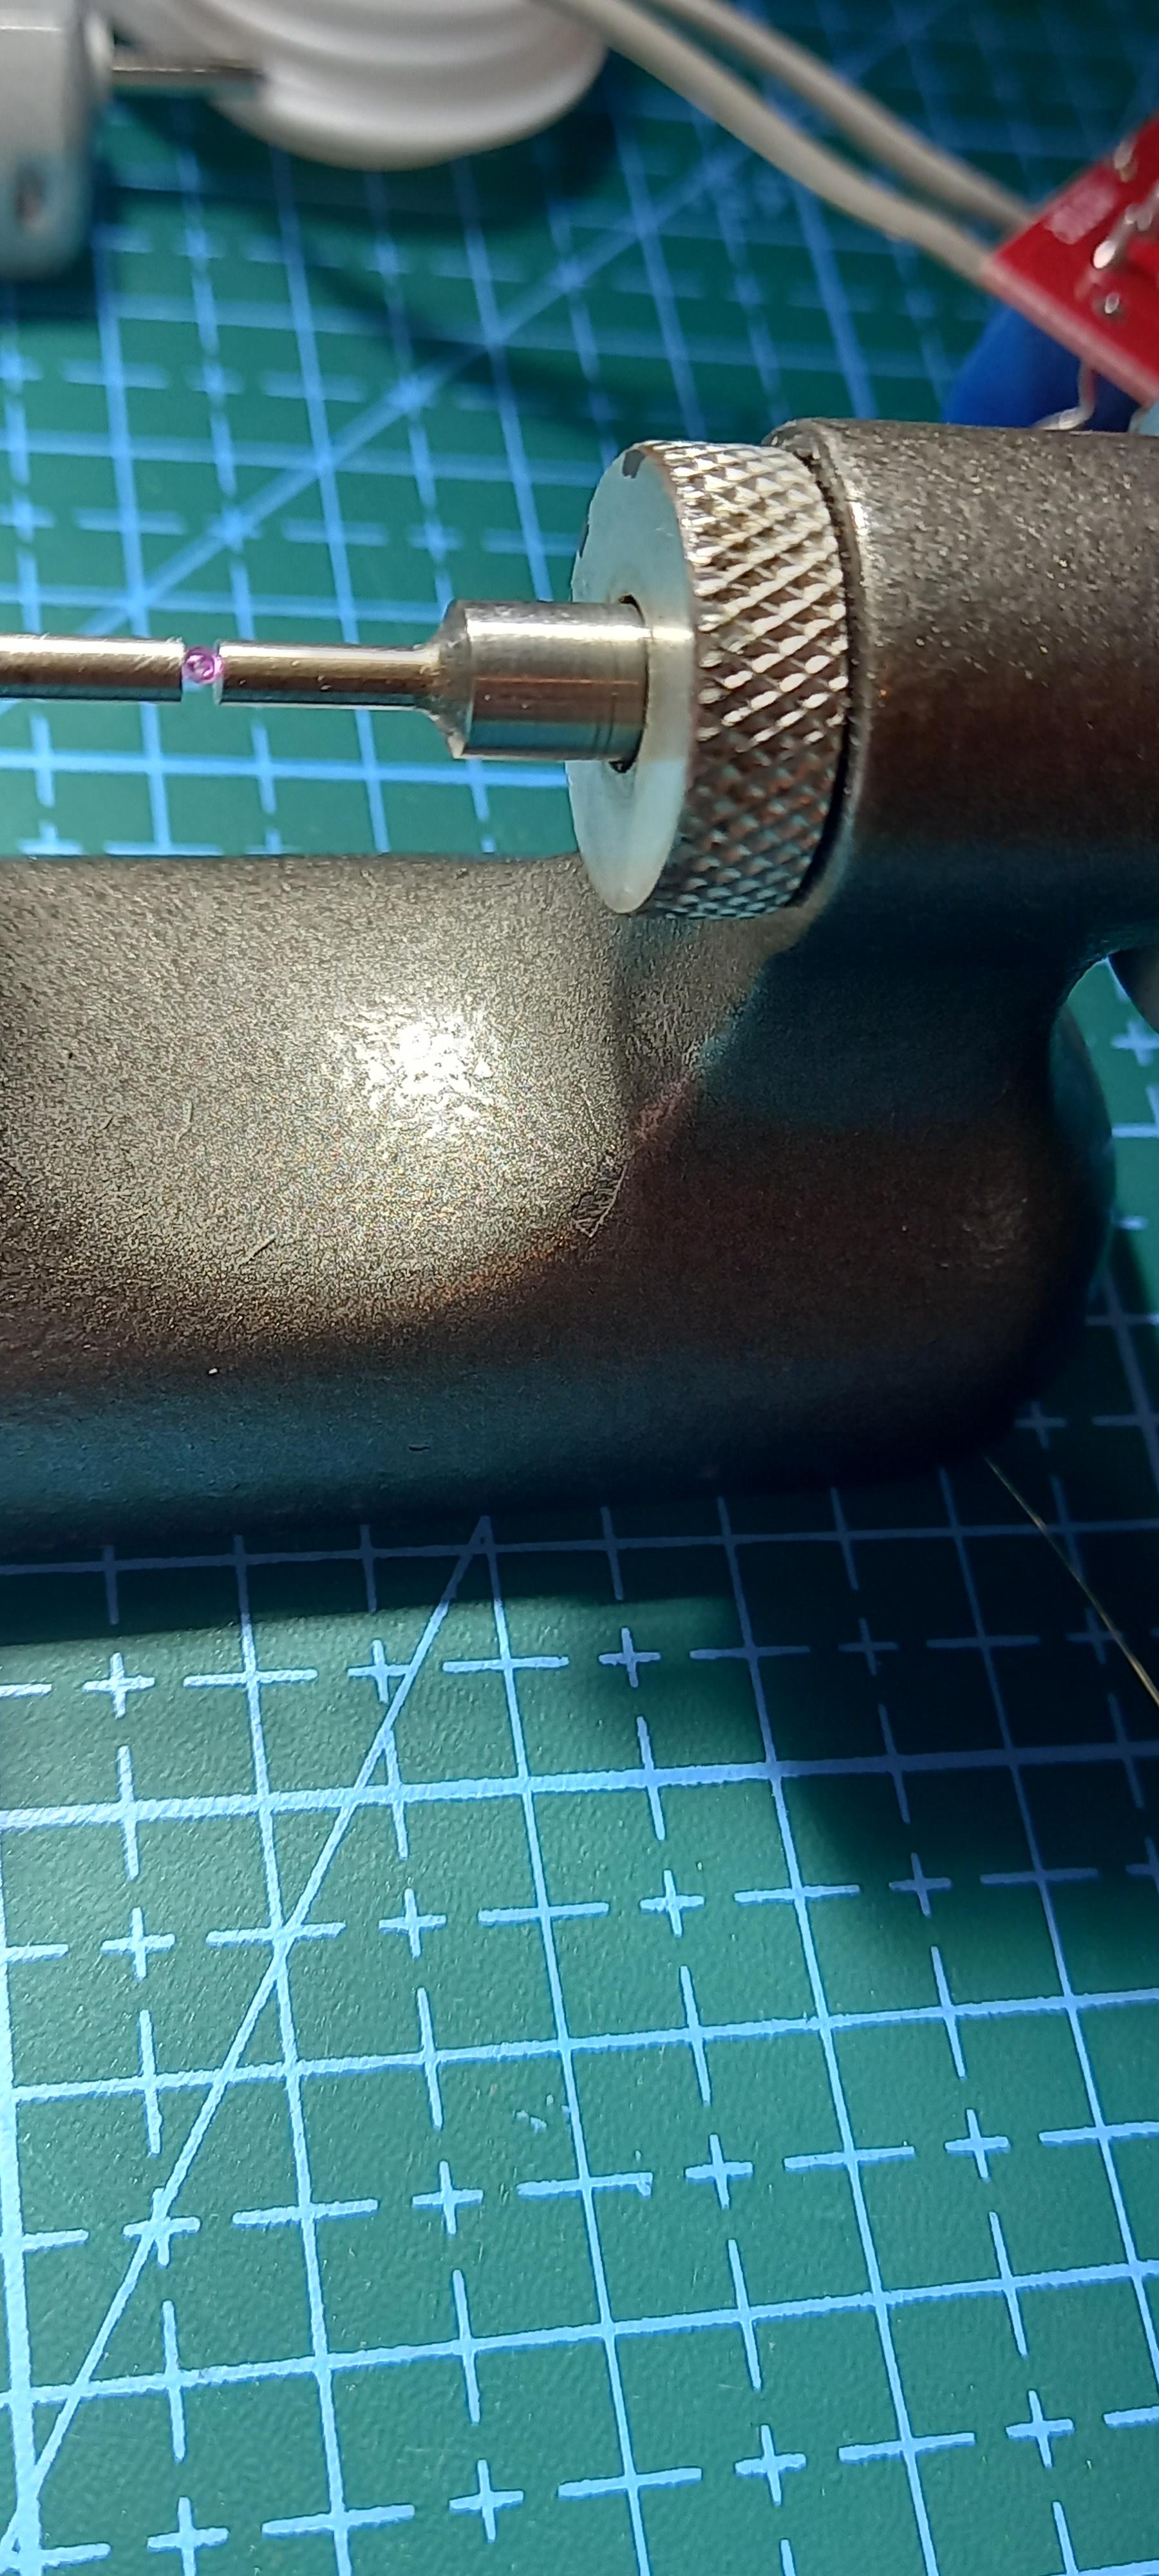
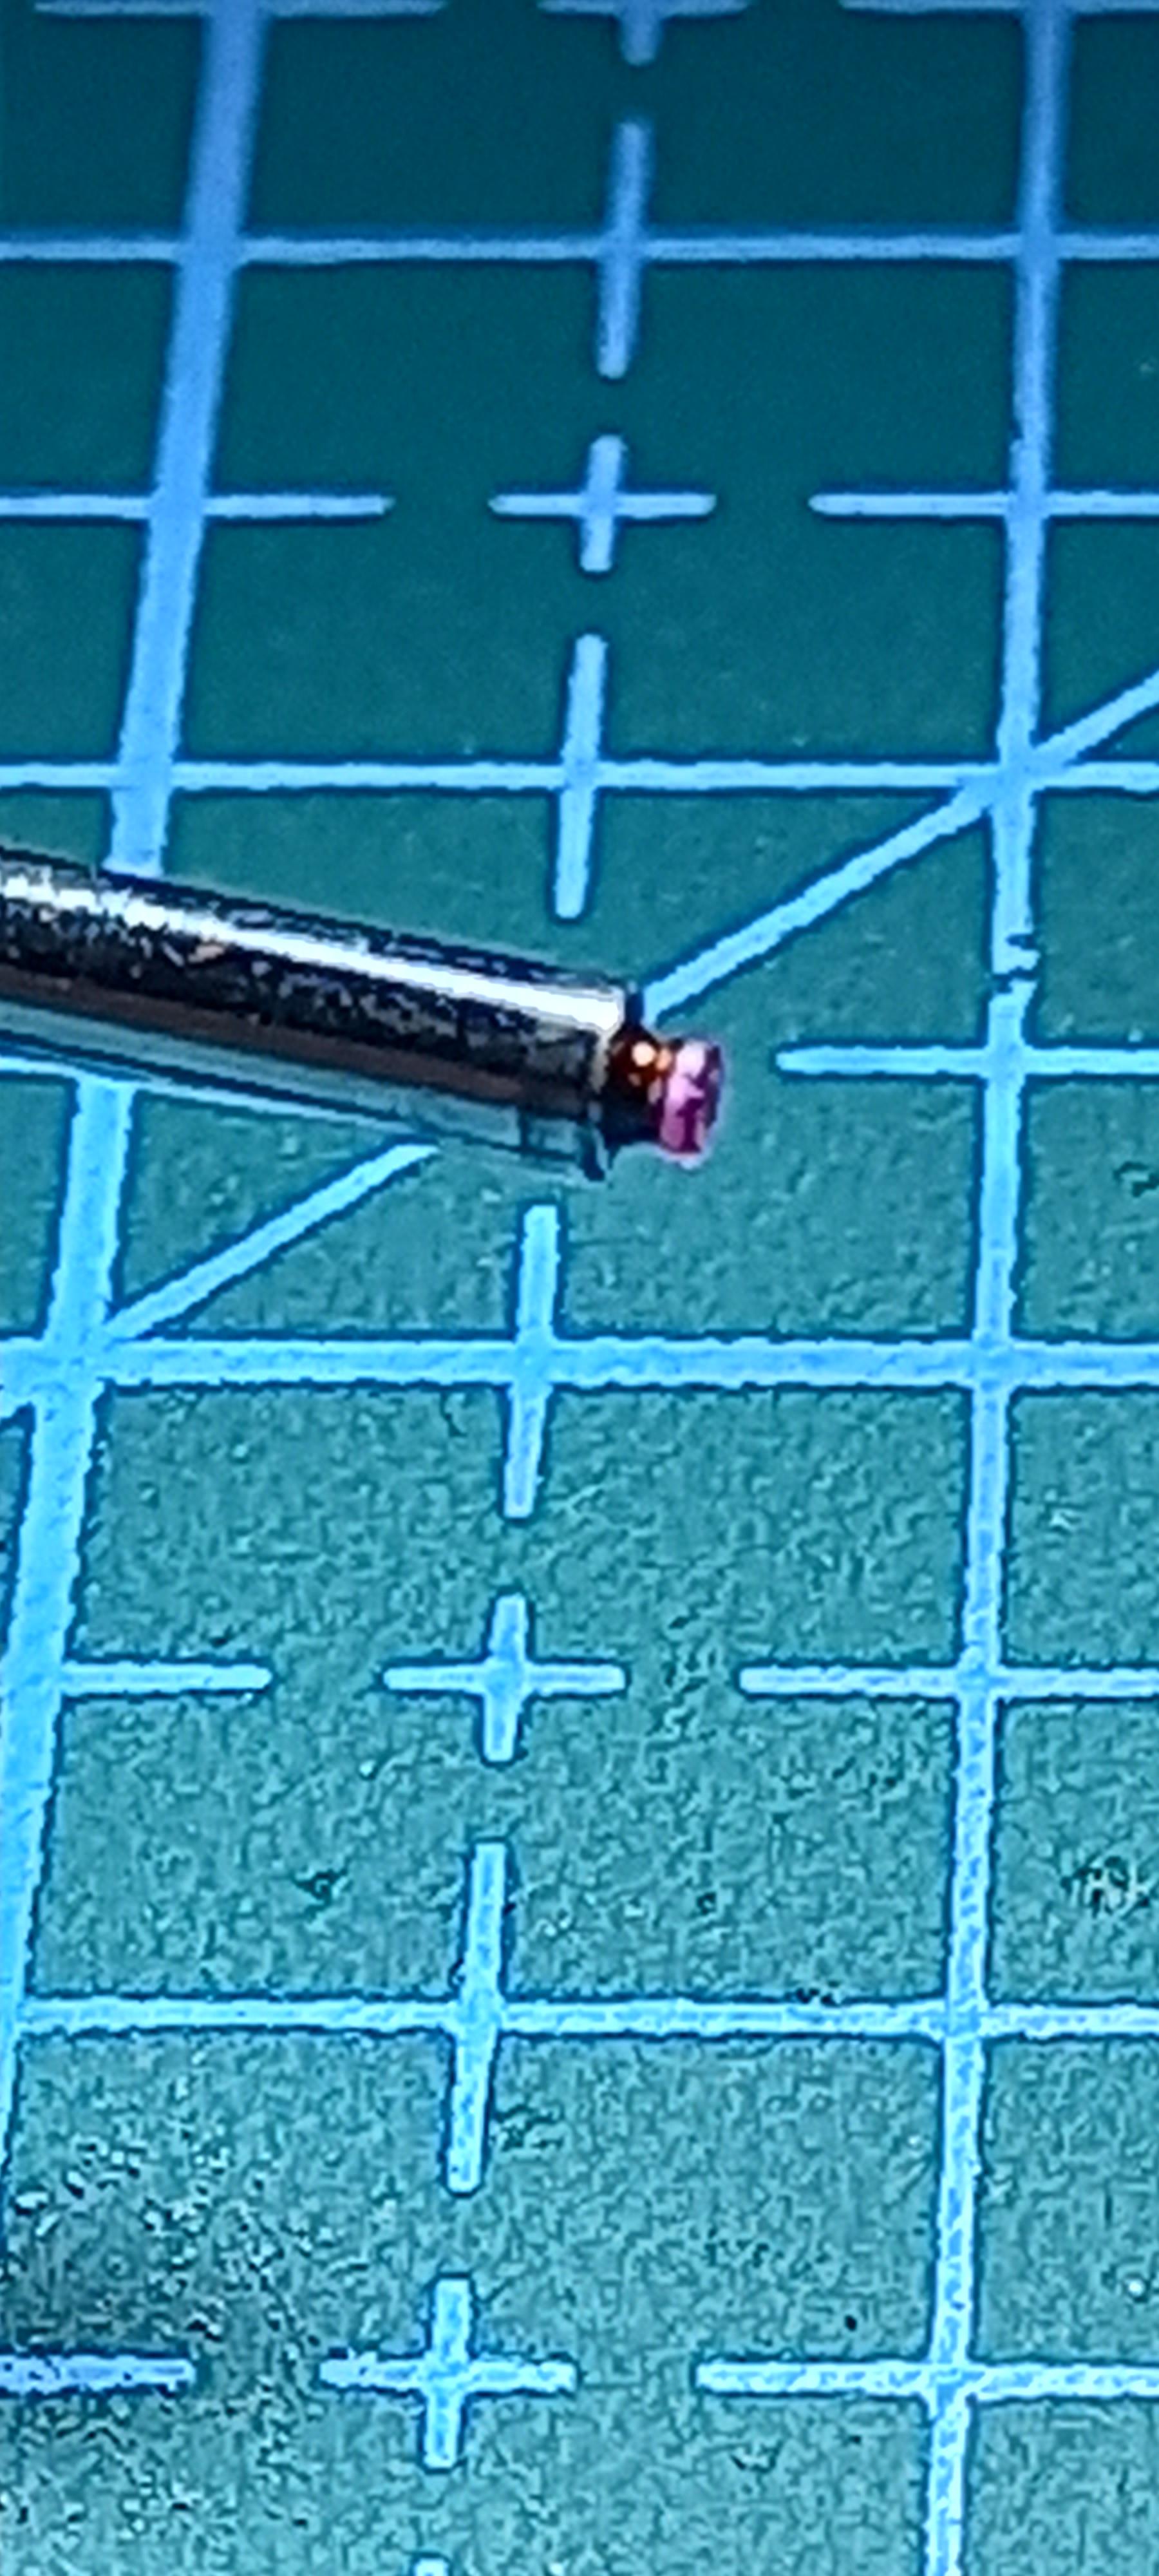
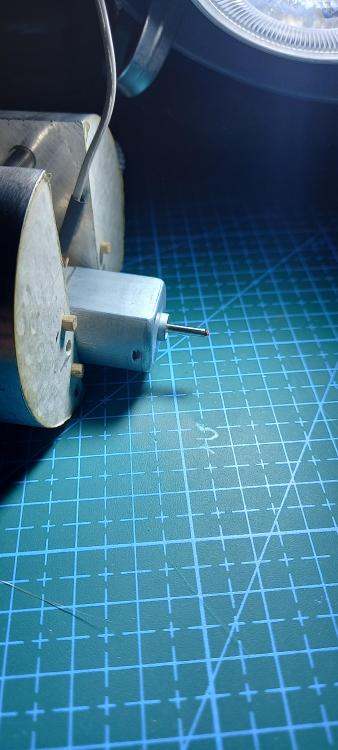
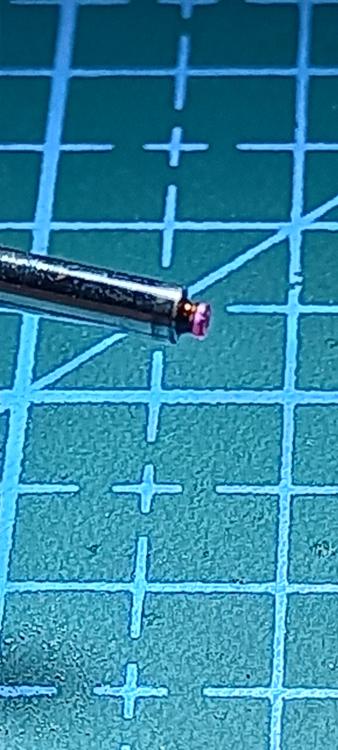
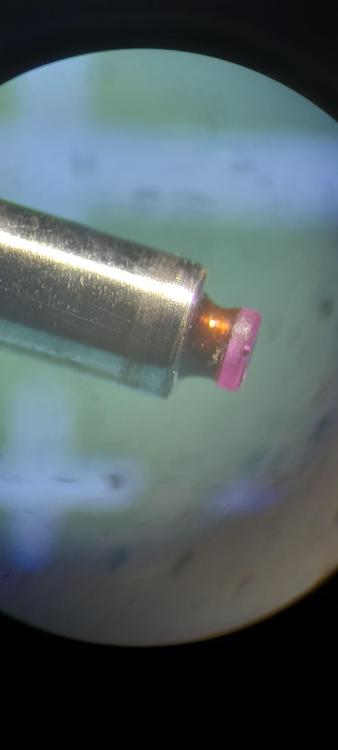
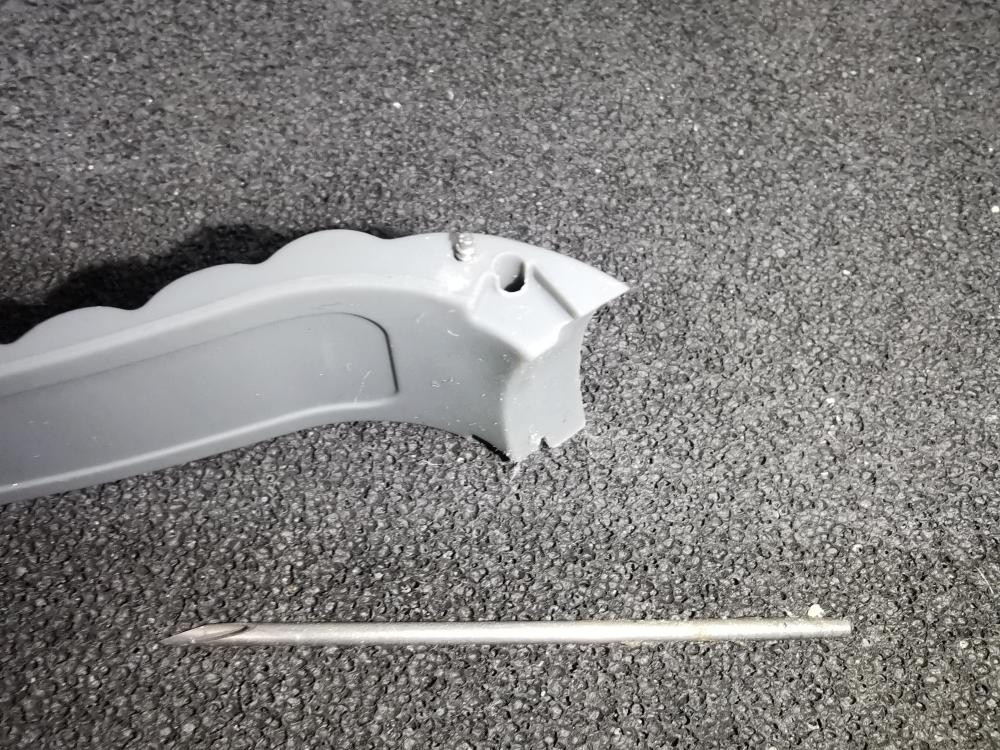
If you dont mind me tagging something onto this thread of modifying jewels Cole. I had a little play at changing the outside diameter of one, no lathe required. I used a very small dc motor, the type that were used in Scalextric cars. I turned the very end of the 2mm spindle down to 0.8mm, then shellaced a 1.2 mm jewel and centred it while heating and running. Using the spindle directly minimises any run-out, that can also be futher improved by shortening the spindle, but for the 8mm sticking out, I couldn't see any at x40. Once mounted I used a 2000 diamond file on the side of the jewel , which quickly ground down the size. In the pictures you can see the outside edge is a little rough and chipped from the file. The jewel did polish up much better with some diamond dental strips. But as I was finishing up, I got a bit heavy handed.... the shellac gave way and the jewel flew . You'll have to take my word for the finish, though it did need some diamond paste ( on its way from AliExpress) to complete the job. The initial diameter reduction was rapid, at the last measure before it disappeared the OD was 1.13mm, which took less than 2 minutes. Now I just need to check in a mirror, I seem to have something in my eye


 7 points
 -
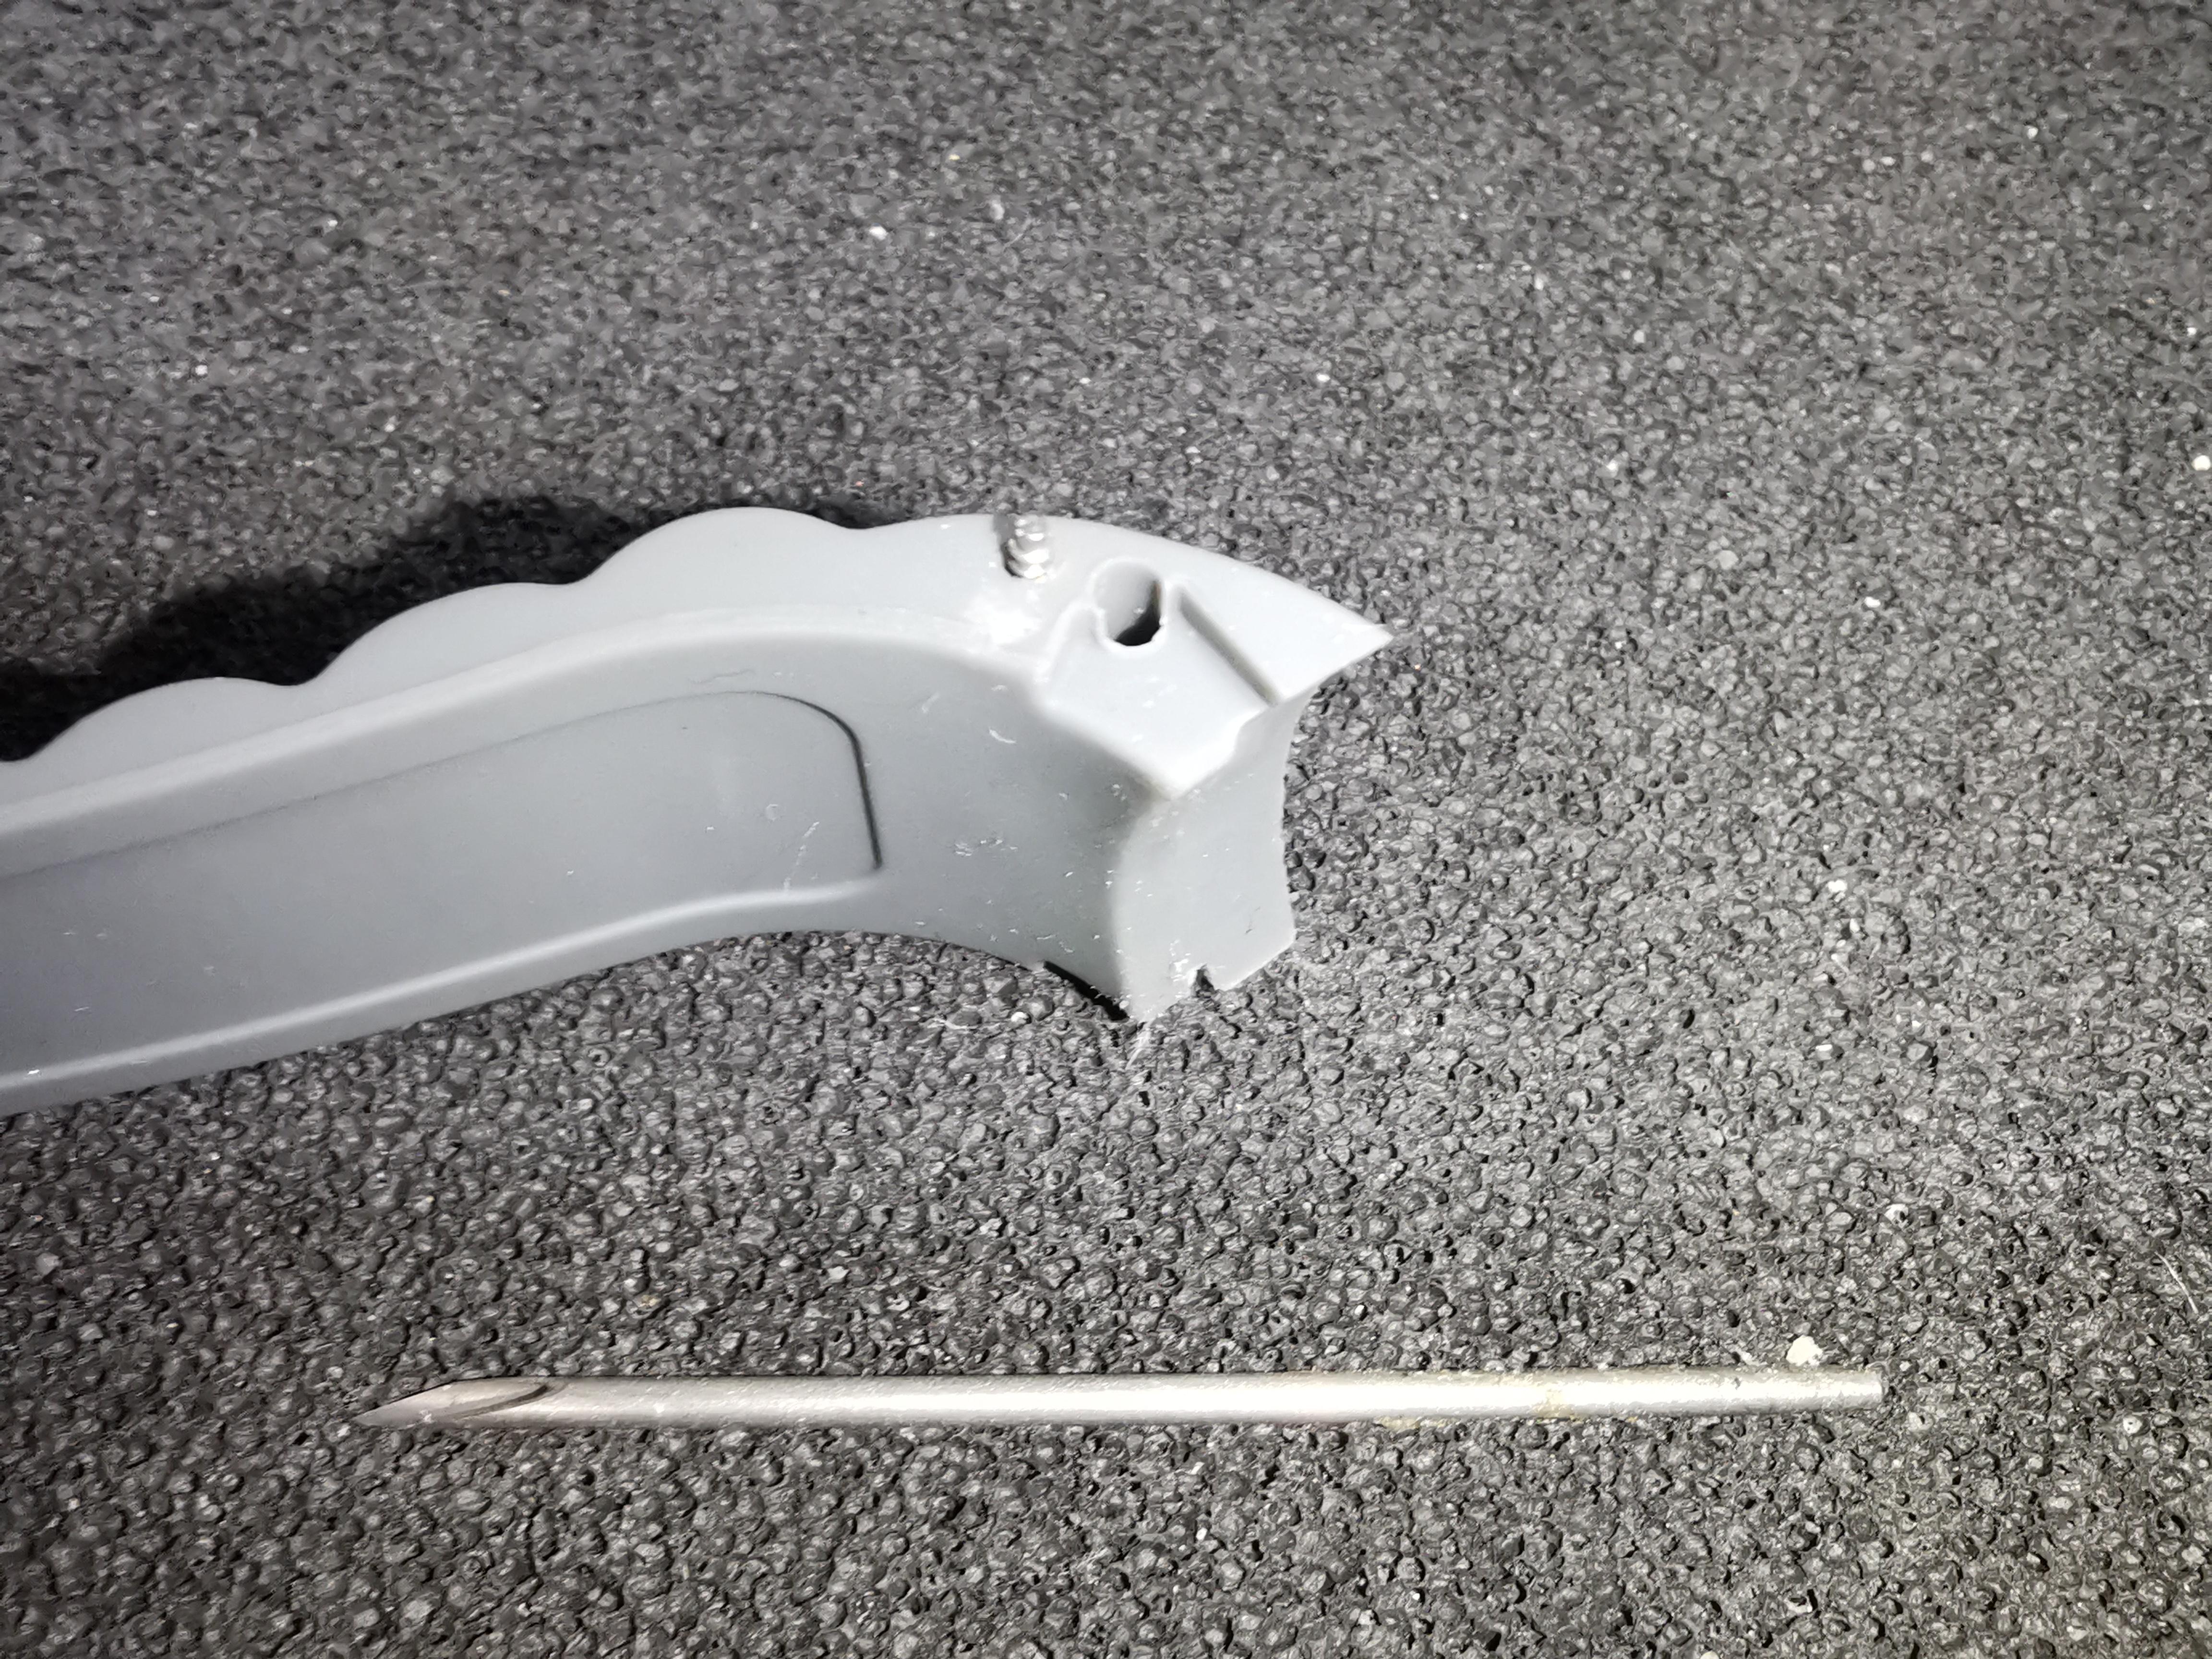
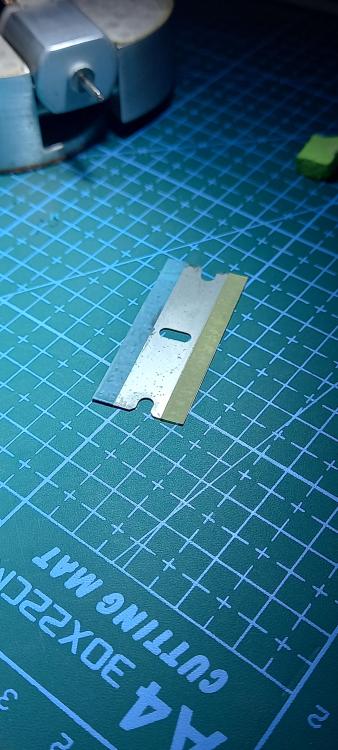
So despite not have the correct drill and setup here at home the piercing needle did the job without any heat.
 7 points
 -
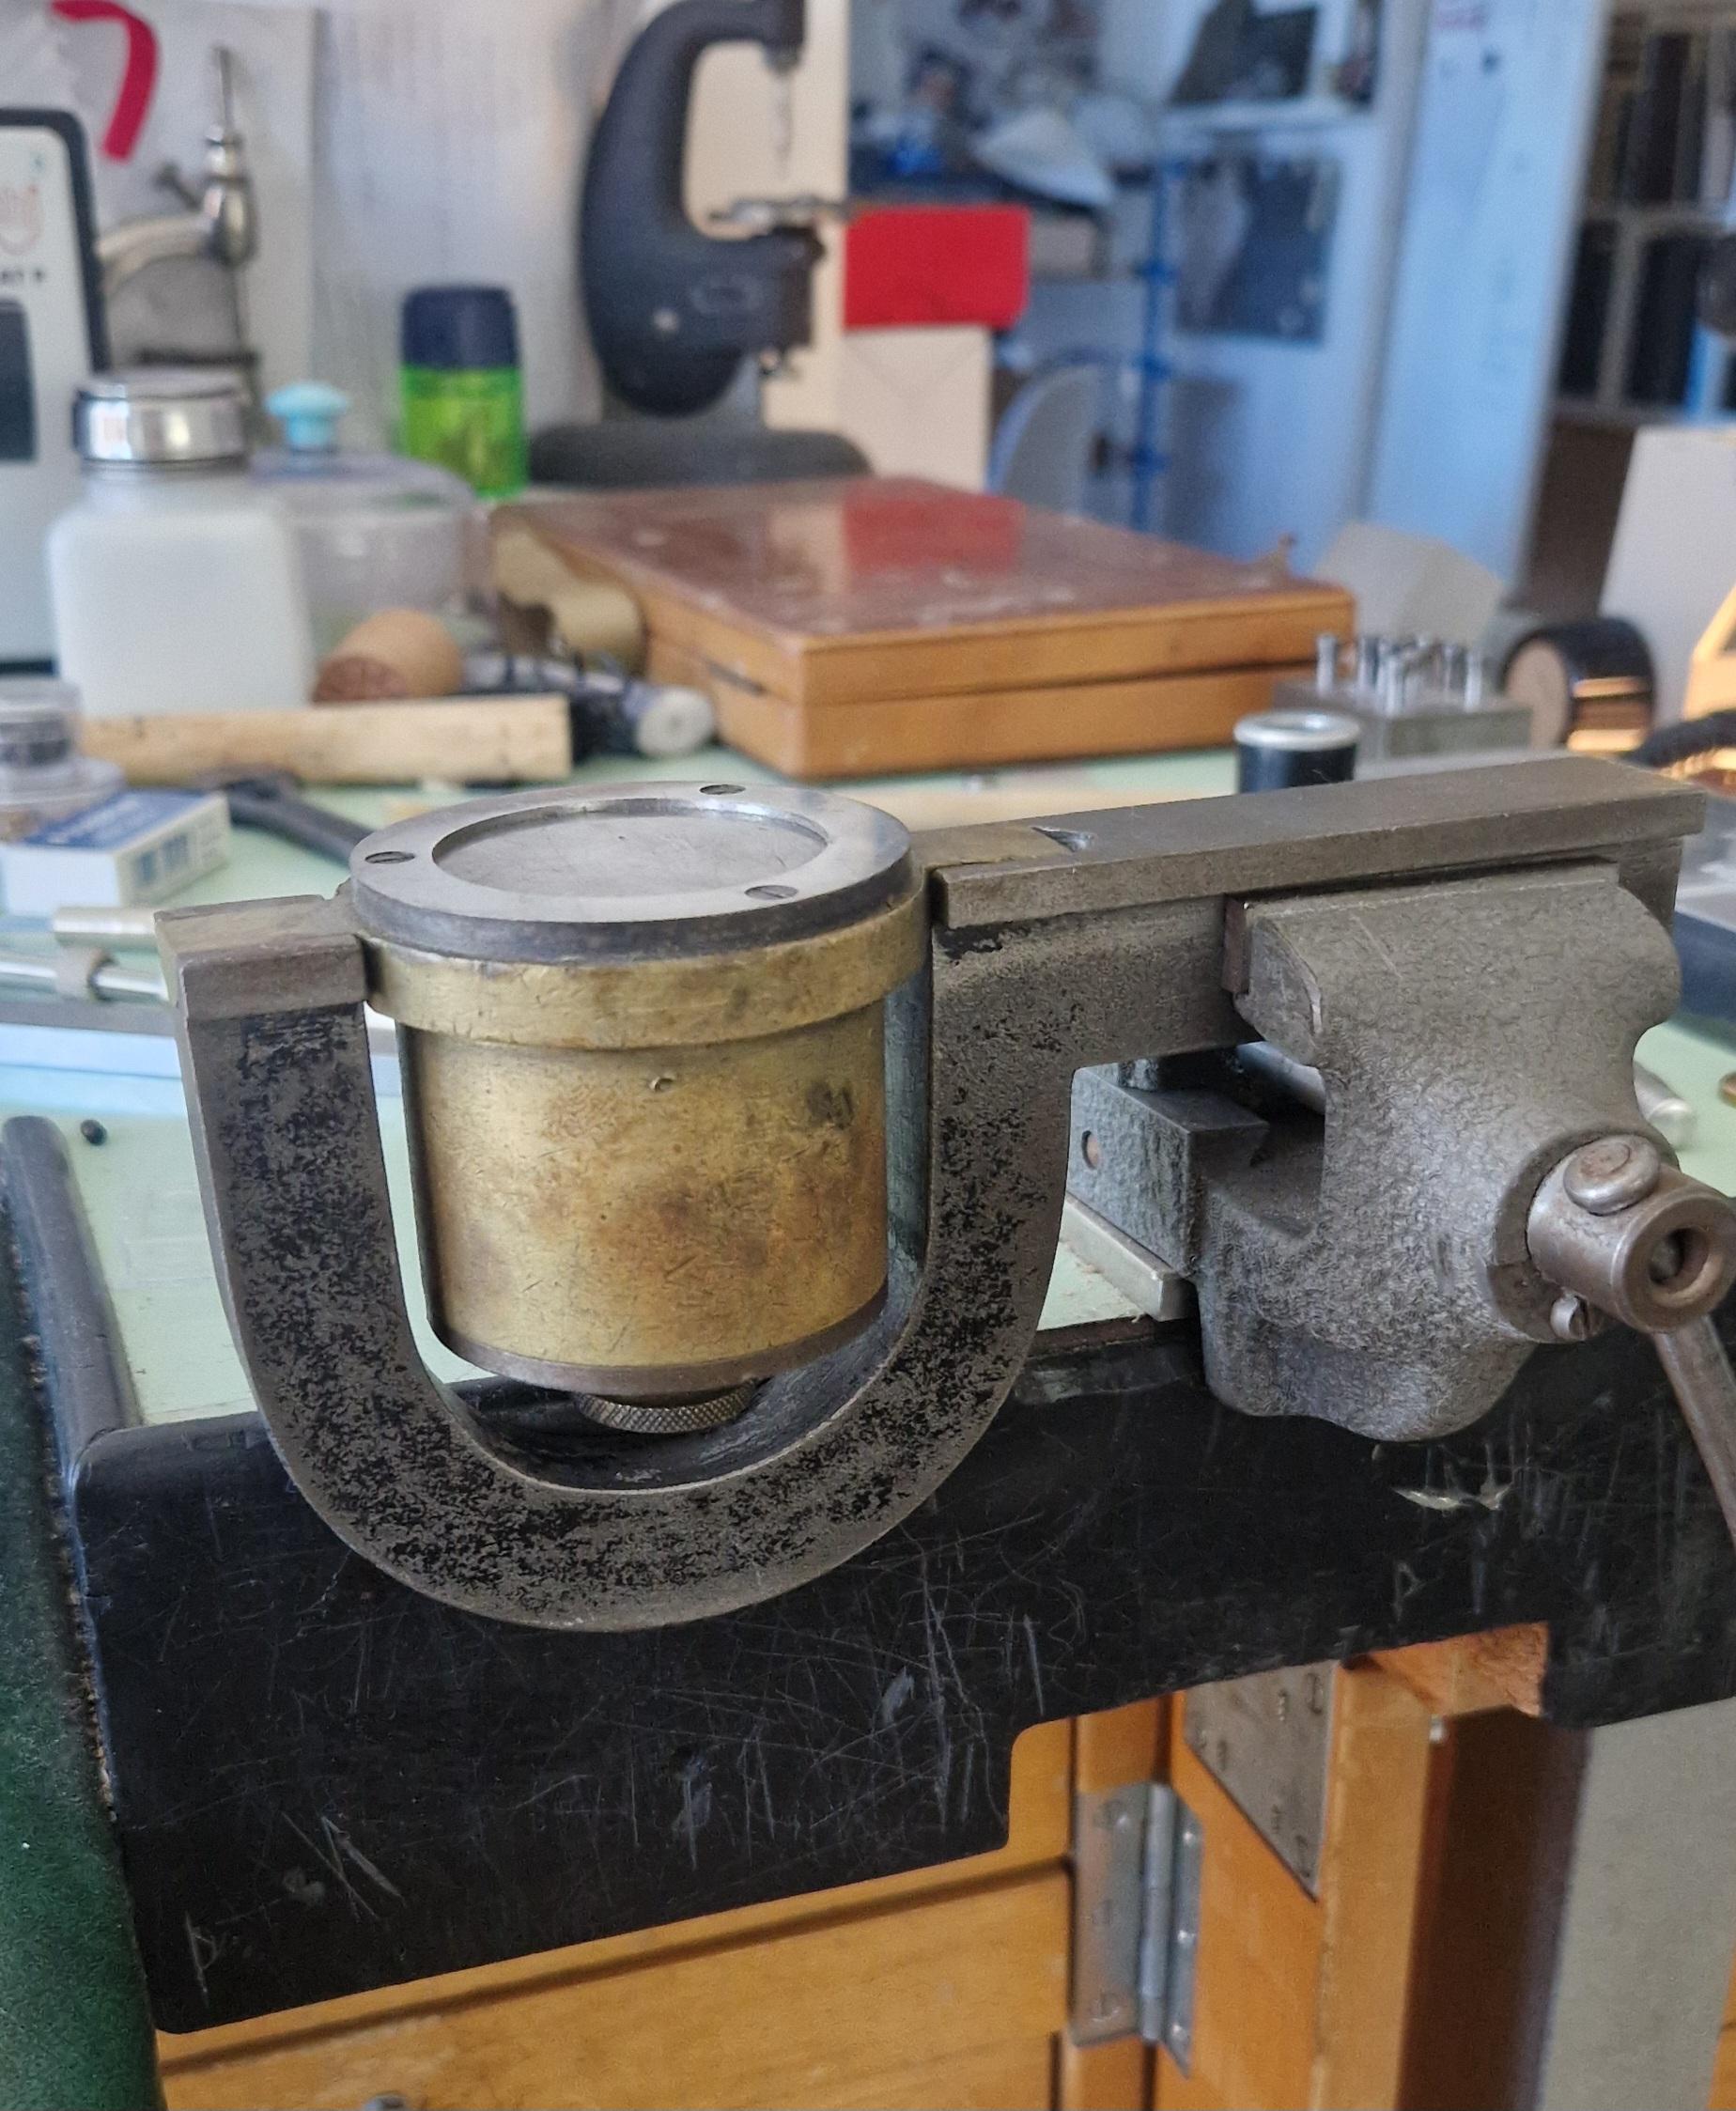
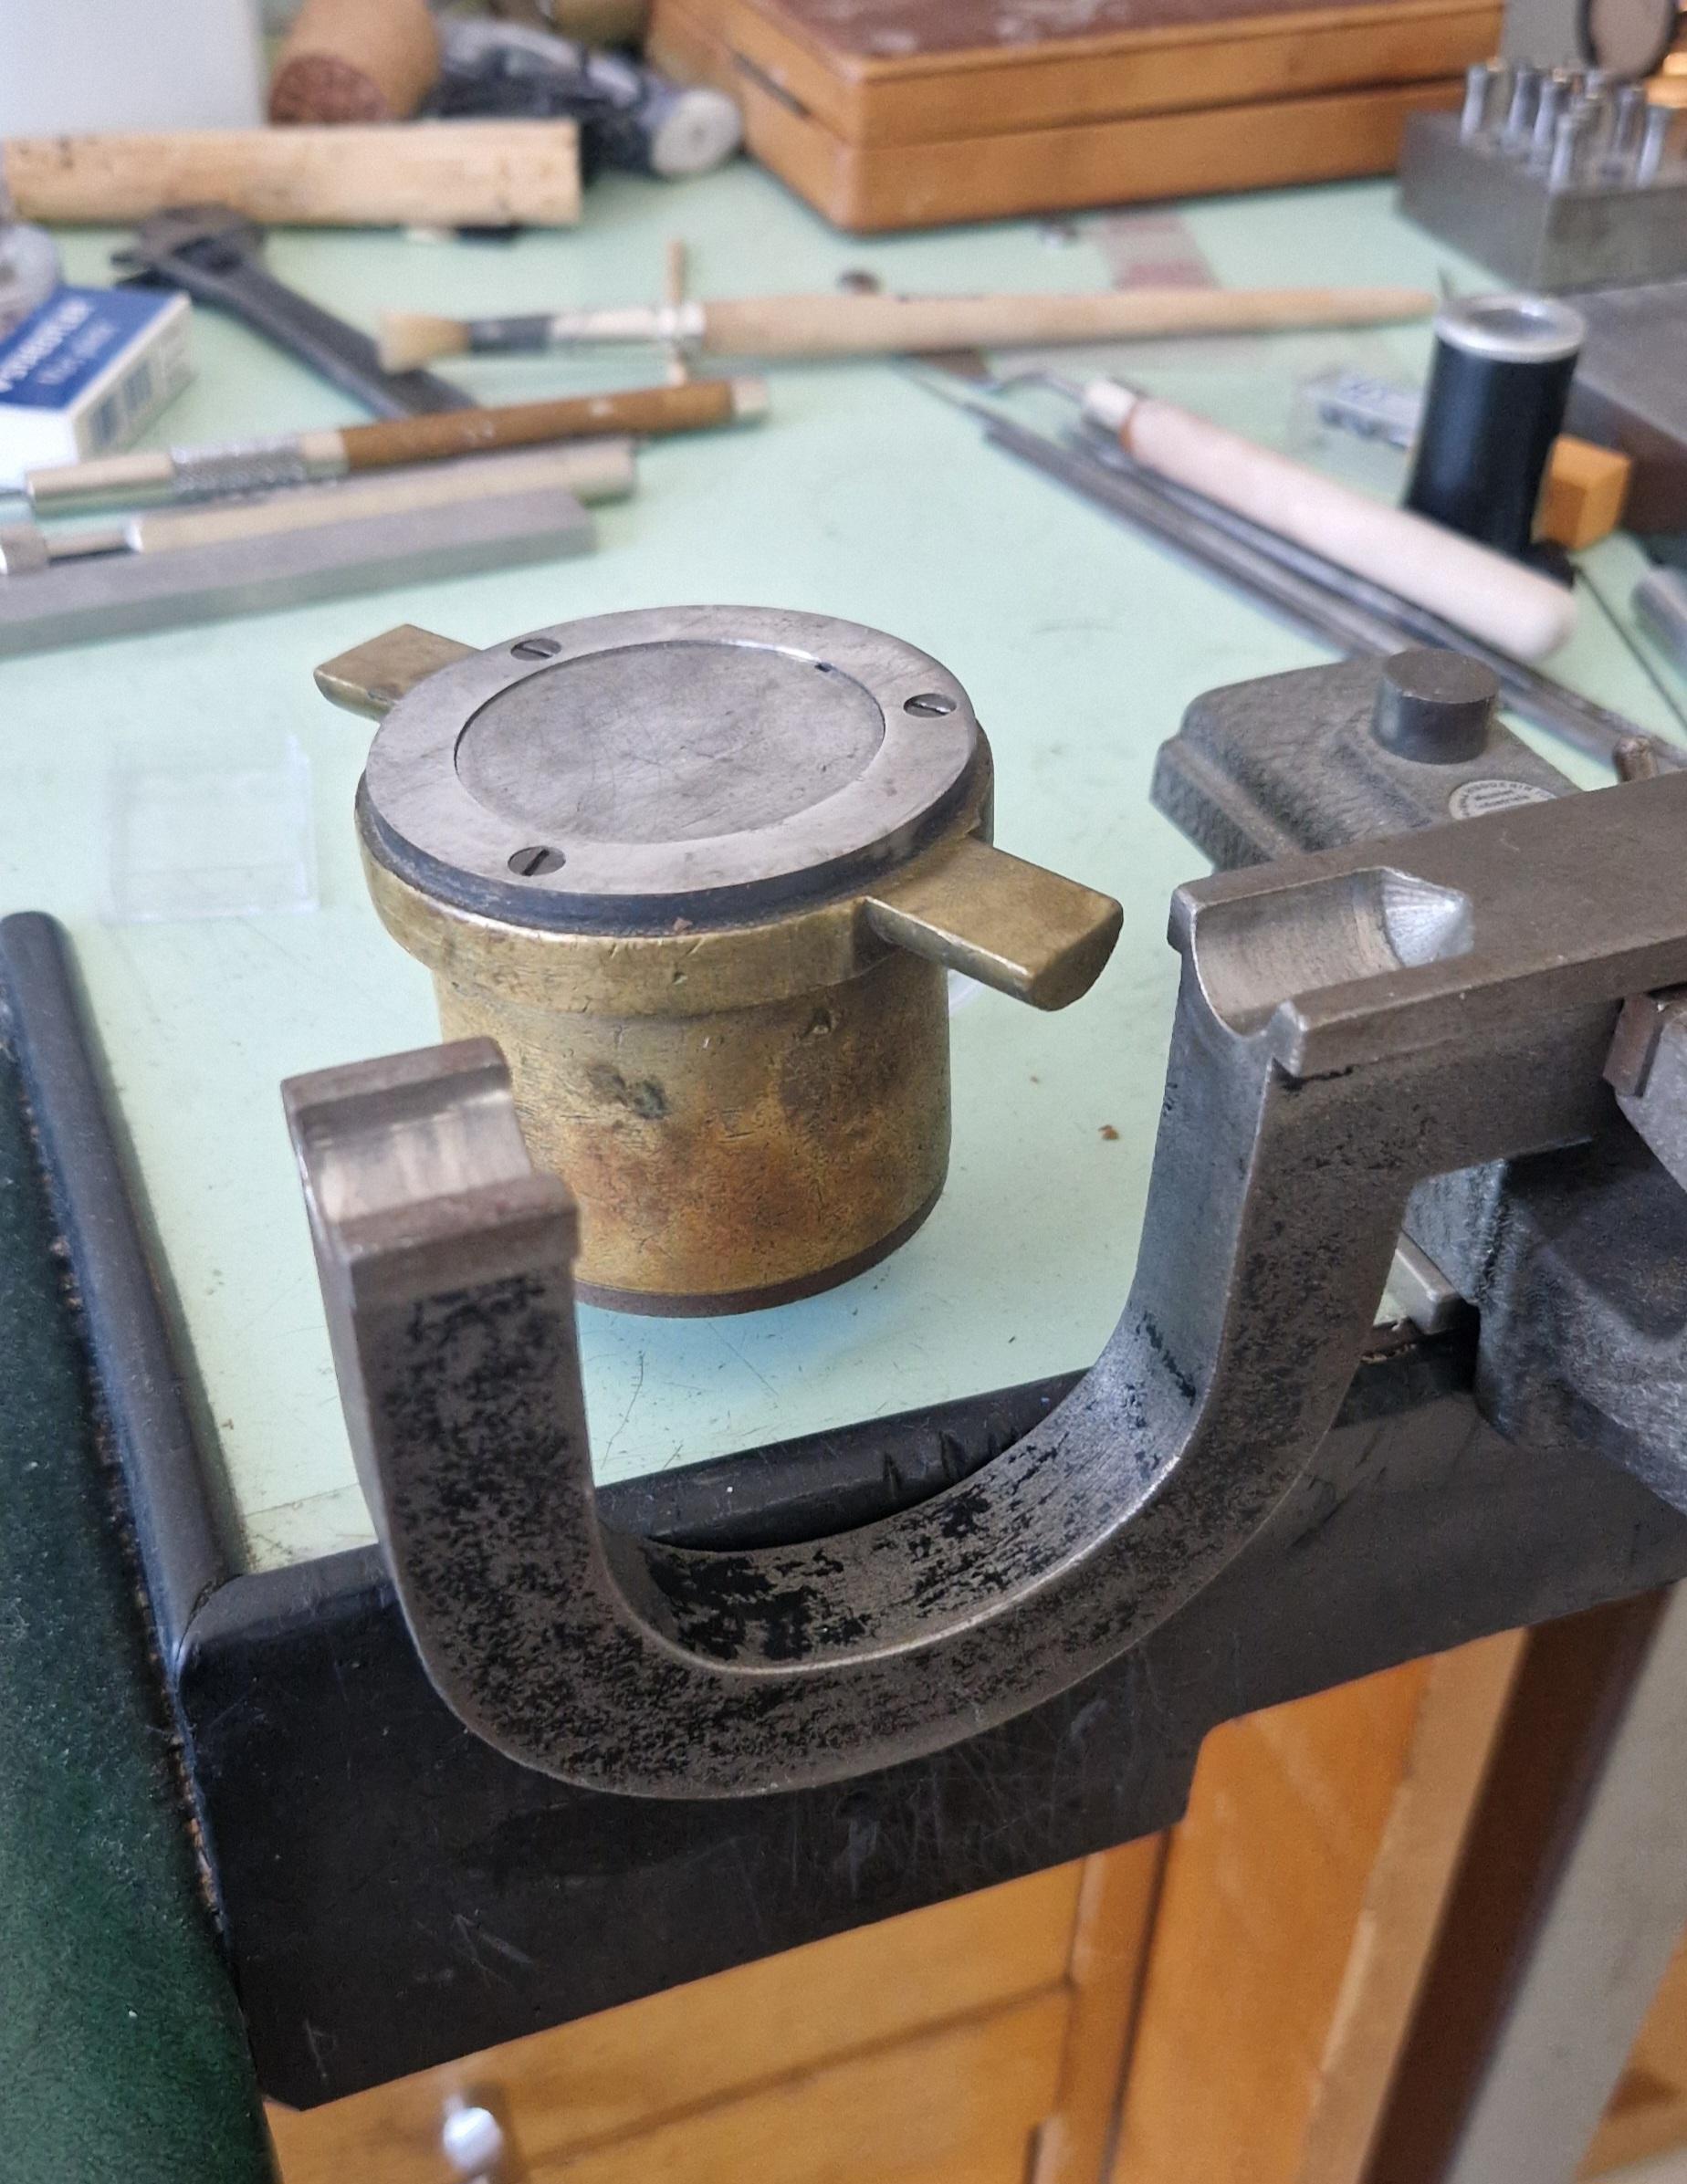
I really like this old tool. They are still made (Horia makes one), but this one has seen some serious use and still works great. It's a filing block; the center portion can be adjusted in height with the knob at the bottom, and the rim is glass hard. It lets you file small parts very flat and parallel quickly. The frame goes in a vise and allows it to pivot to further help keep the file flat. I don't use it often, and when I do I never use the frame, I just hold it in my hand.

 7 points
 -
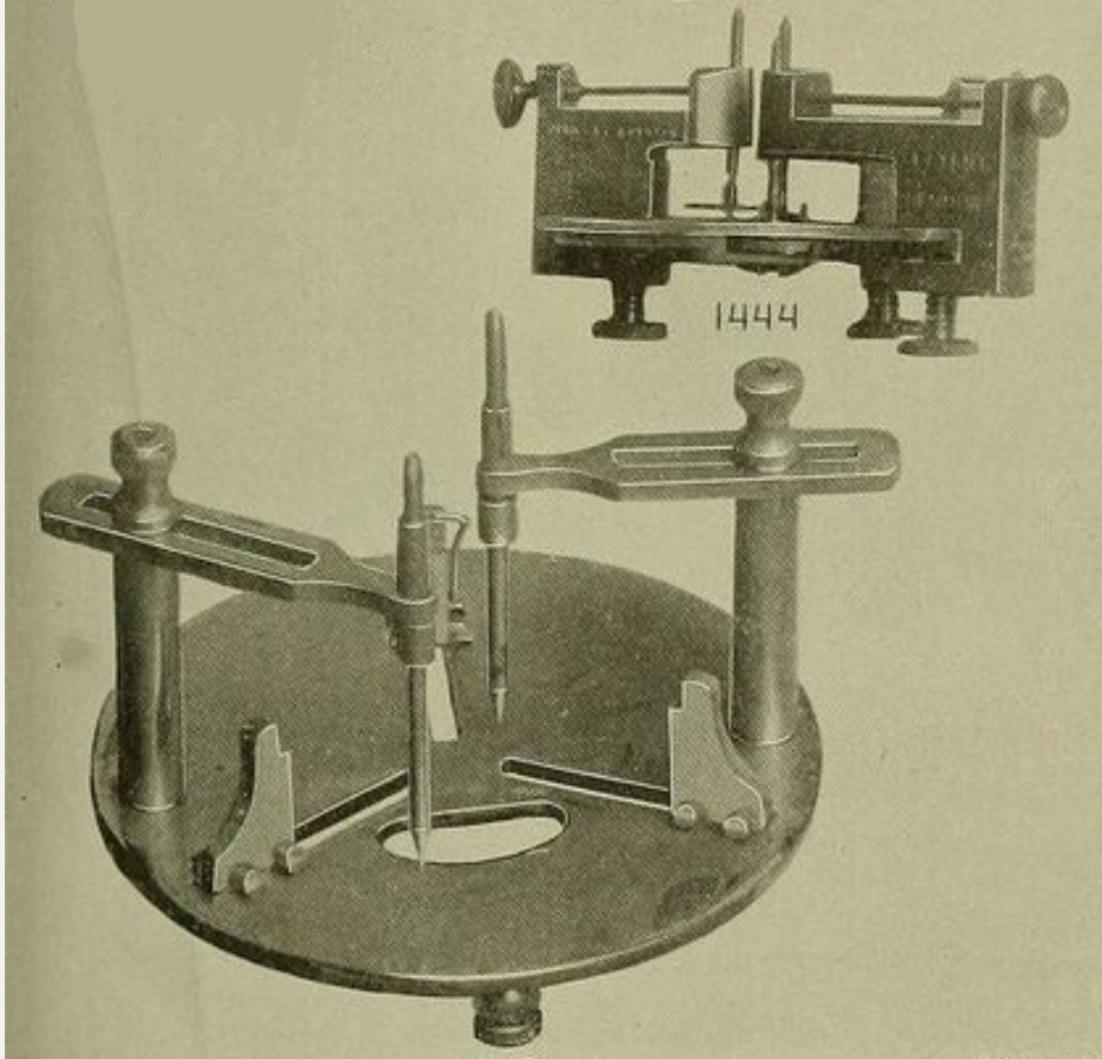
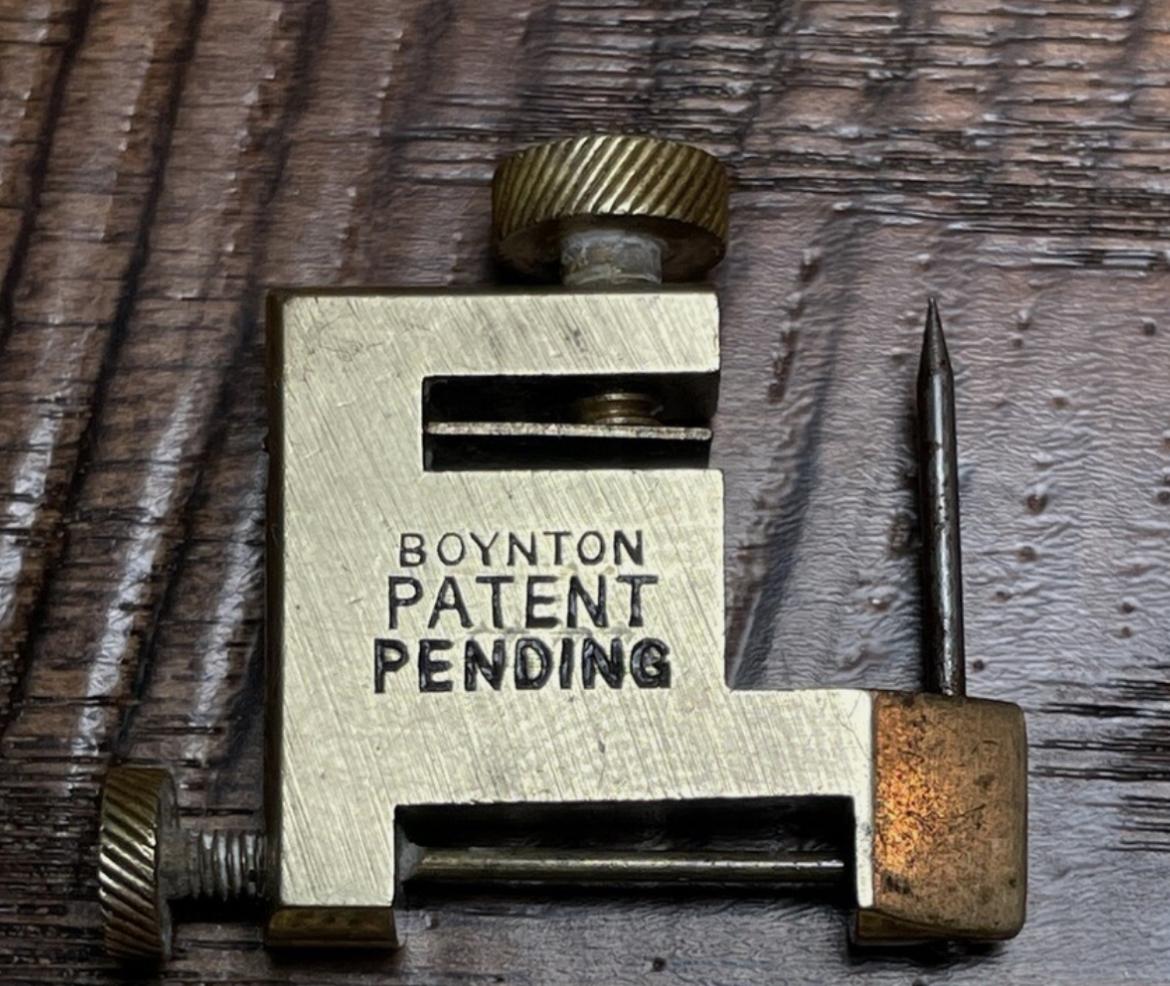
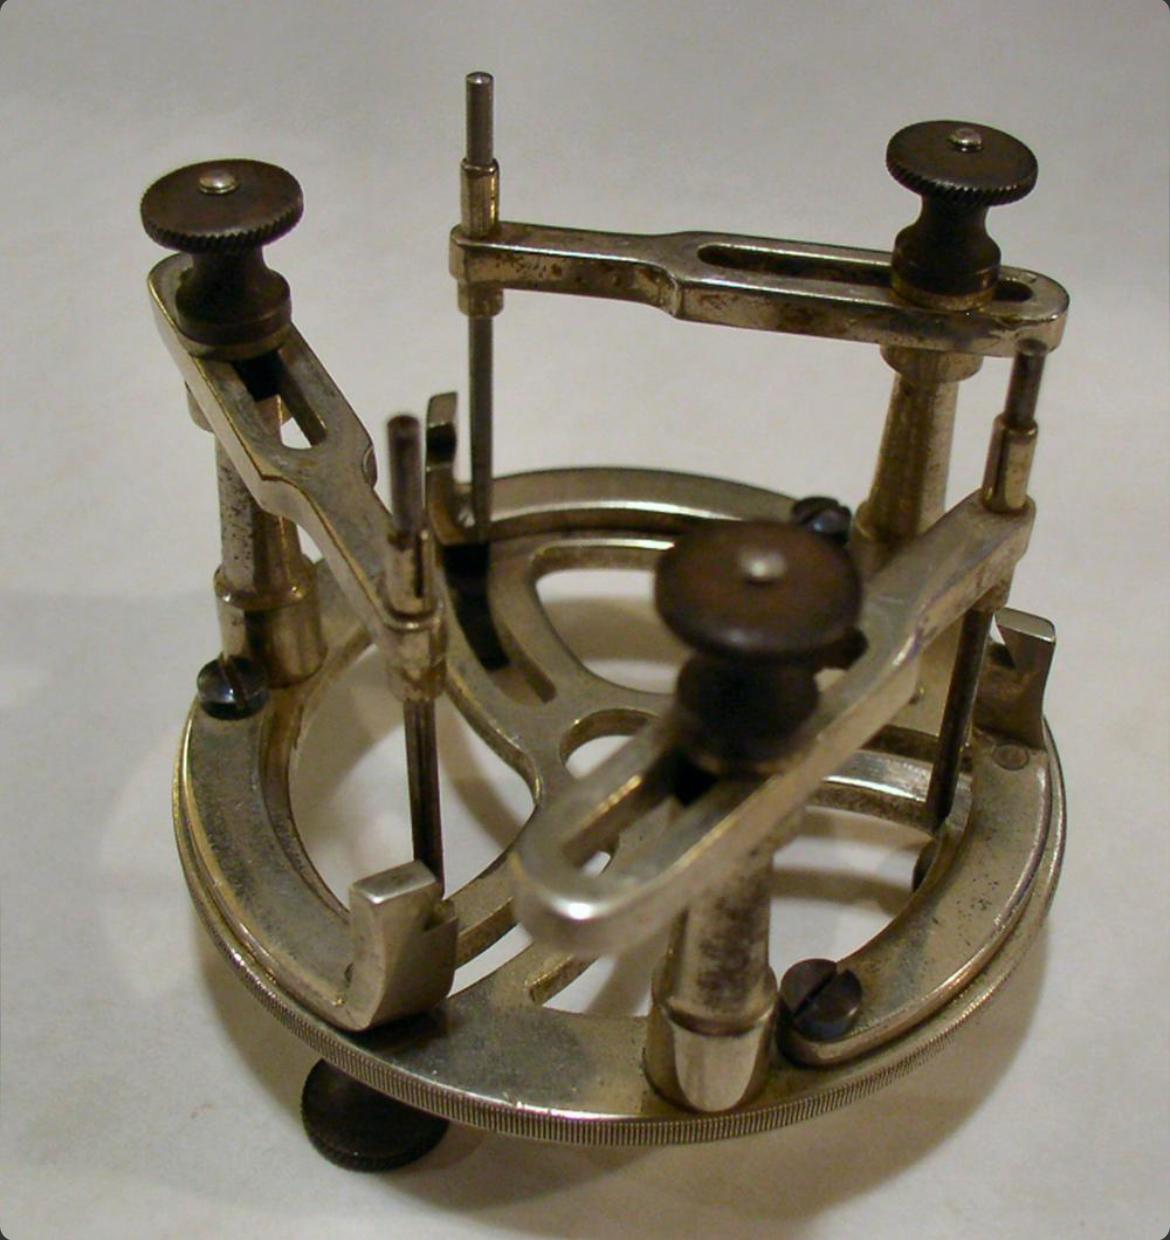
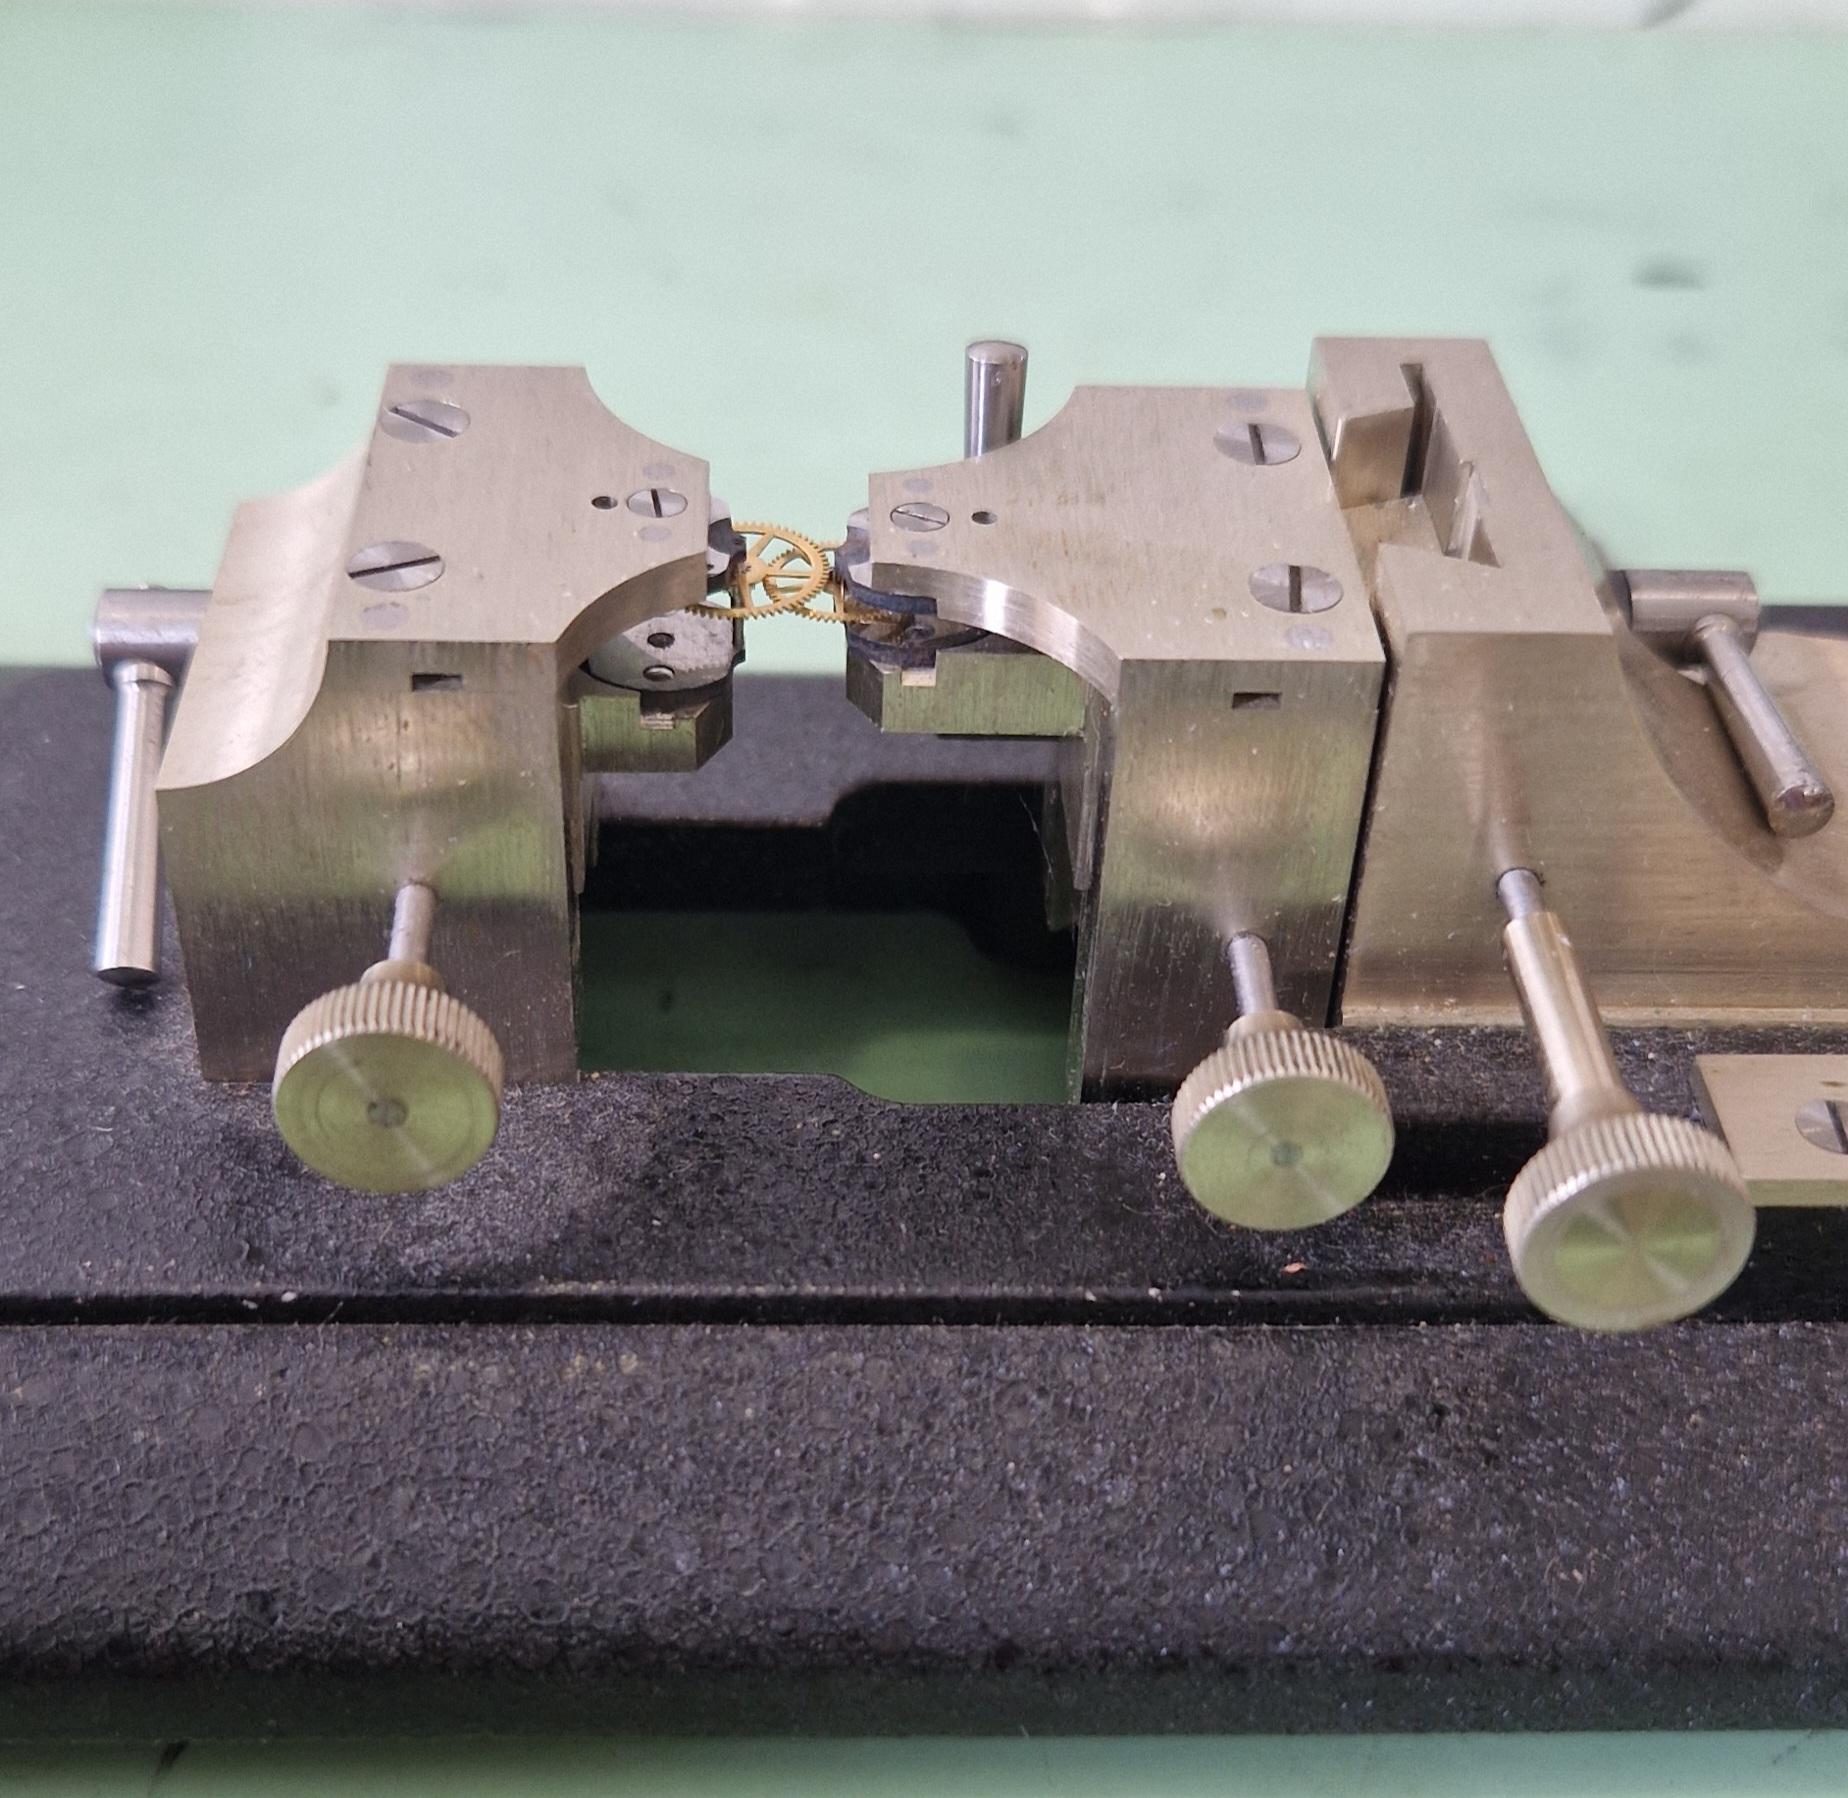
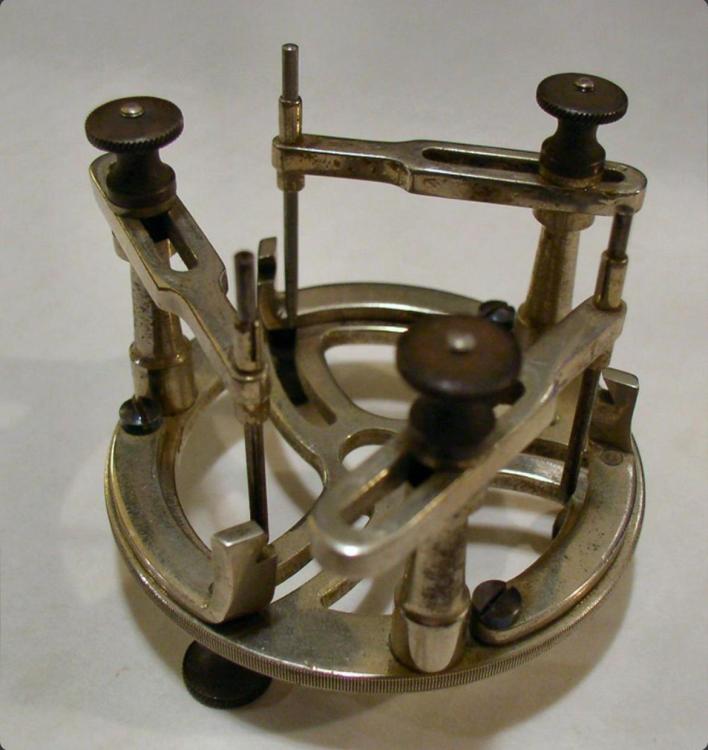
There is a tool that was made for setting up and adjusting escapements of full plate watches. There were two styles, the picture below shows both of them. The lower tool held a movement plate and the vertical pointed rods were adjusted to hold the unsupported pivots of the lever and escape wheel. There was also a version of this tool that had 3 adjustable safety centres so that the balance pivot could be supported by the tool : The other version I’m aware of is the Boynton’s Escapement Matching and Examining Tool came as a set of two or three clamps that gripped the watch plate and held the safety centres for the pivots : These do turn up on eBay from time to time. For some escapement work, you can set up the parts in a regular depthing tool, with the centres set according to the distance between the corresponding pivot holes on the movement. I hope this helps, Mark


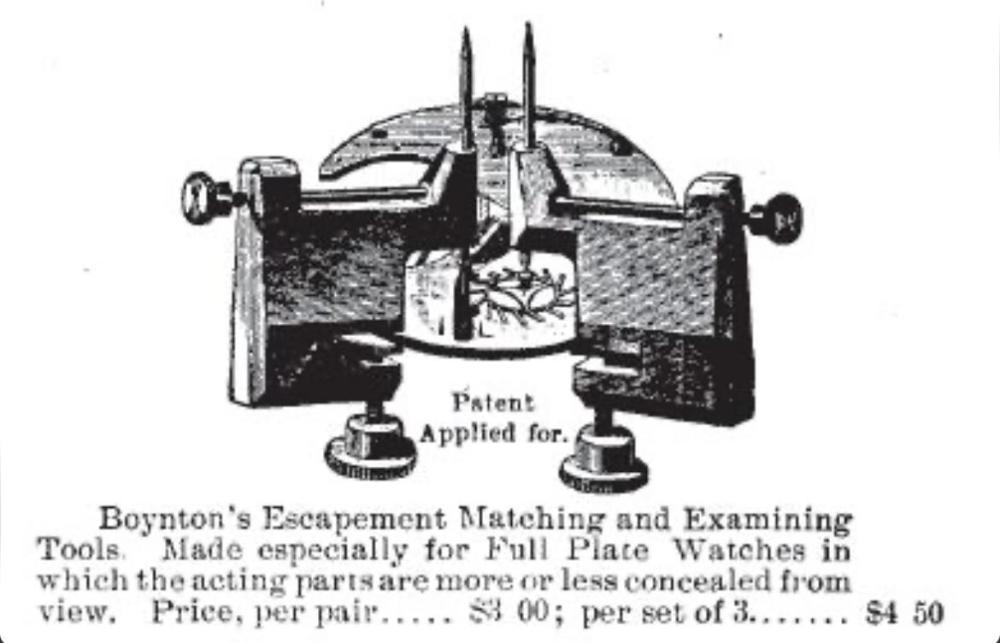
 6 points
 -
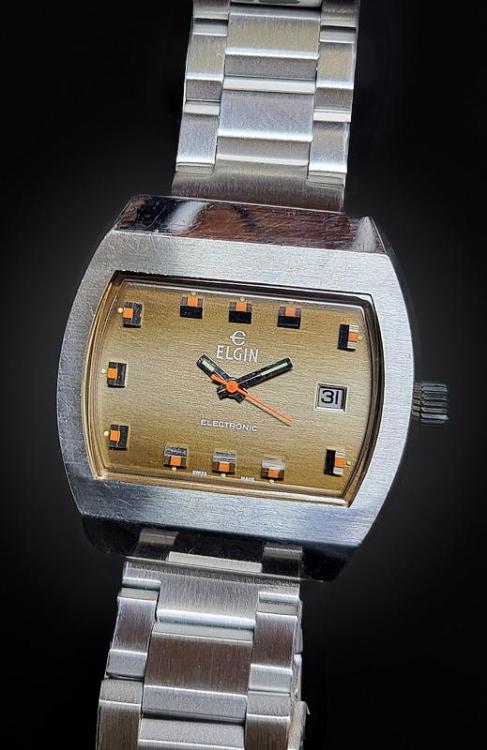
I've been on a ESA 9154 kick lately with this being the latest. A funkalicious 1970's Elgin Electronic with a brown and orange earth toned dial in a big old hunk of steel. Just like the last one this one runs from about -2 to +2 in 5 positions as it seems to be easy to dial these 9154's in.
 6 points
 -
Note the 8992 is 850 pounds for a liter. I think this is really for industrial settings like they say, where it would be used as a final bath in a 20,000 buck cleaning machine. I use the 8981. That is excellent- I don't often get to see a serviced watch 5 years later, but when I do I expect to see pretty much the same oiling on the balance jewels as when it went out. I think at that area, being essentially sealed, it really should remain fairly pristine for likely 10 years. It's why some makers go to the trouble to use cap jewels on the escape wheel as well- not so much for friction reduction, but to keep the oil longer where it really counts.6 points
-
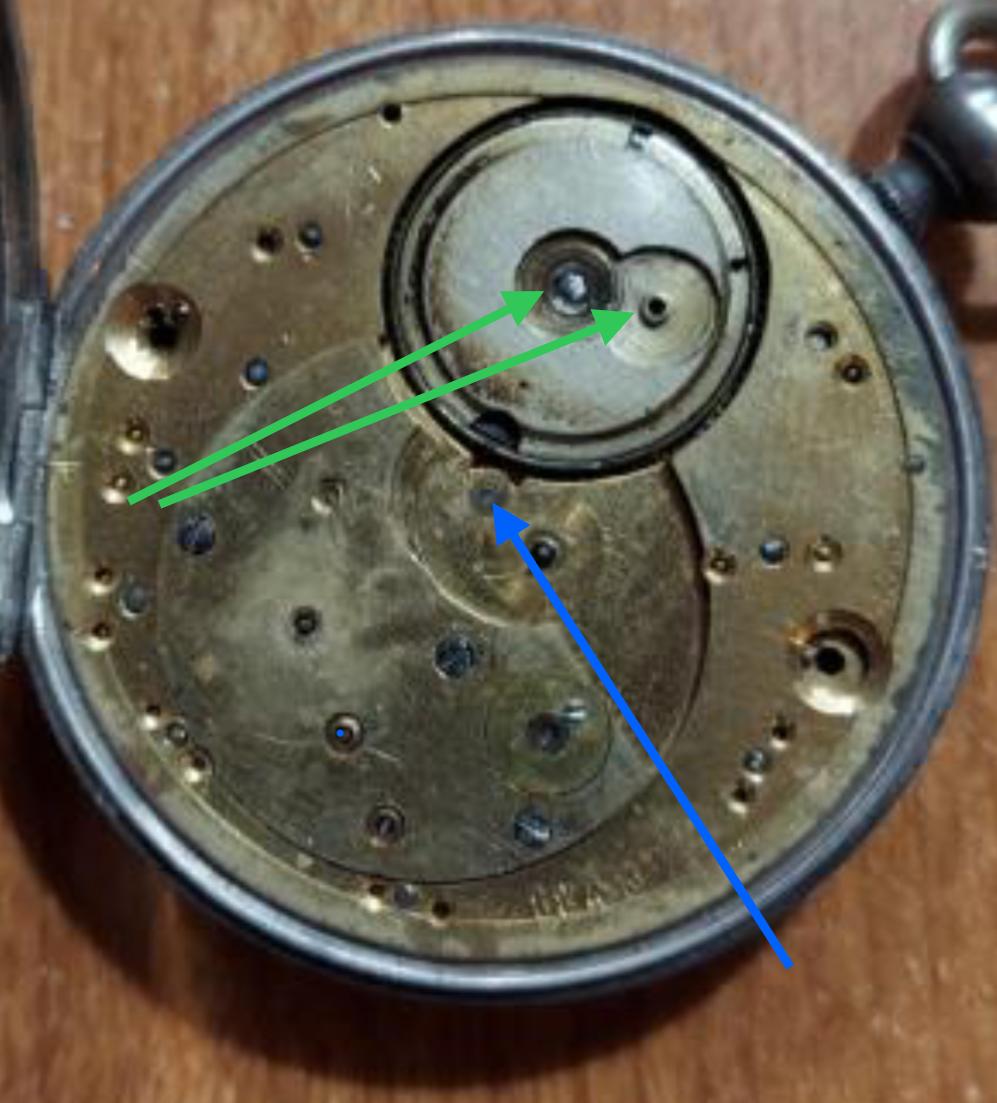
The movement looks like a lepine movement in the Locle style, with a tangential lever escapement, with decorative engraving. Without engraving, the movement would have looked something like this : The blue arrow points to the click, which appears to be missing from your movement. Without a click, it will be impossible for the mainspring to retain any power when wound. The “Echappment A Ancre” means the watch has a lever escapement. There is some damage and missing parts on the dial side. The blue arrow below indicates where the cannon pinion, centre wheel arbour and the pin that runs through them has snapped off. The green arrows indicate where the Maltese cross style stop works should be. Best Regards, Mark

 6 points
 -
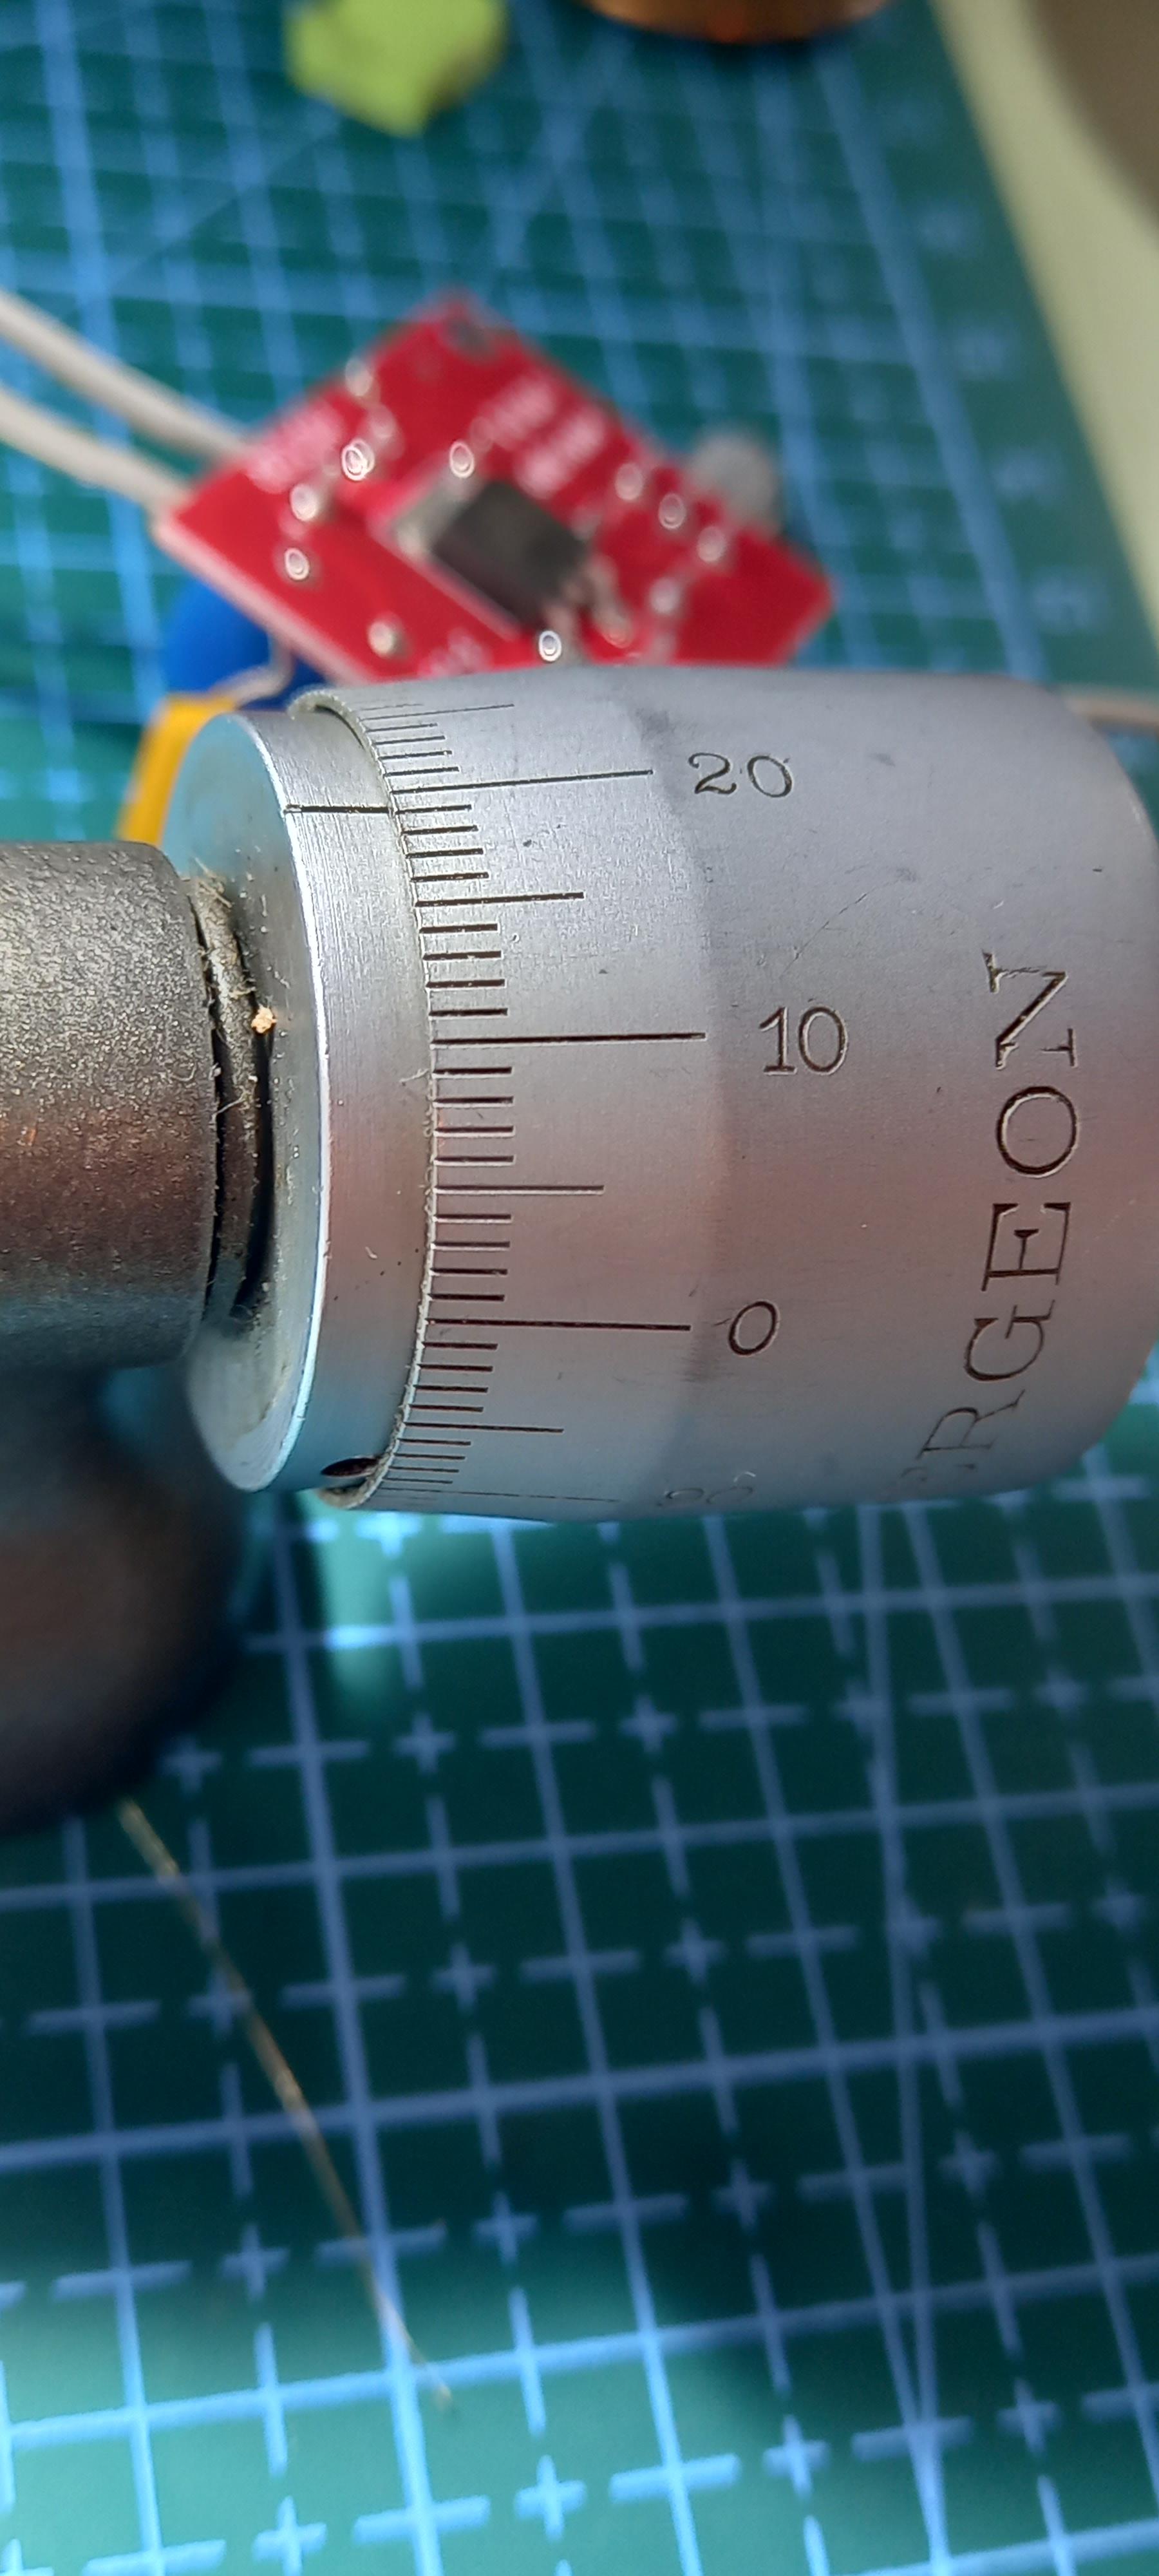
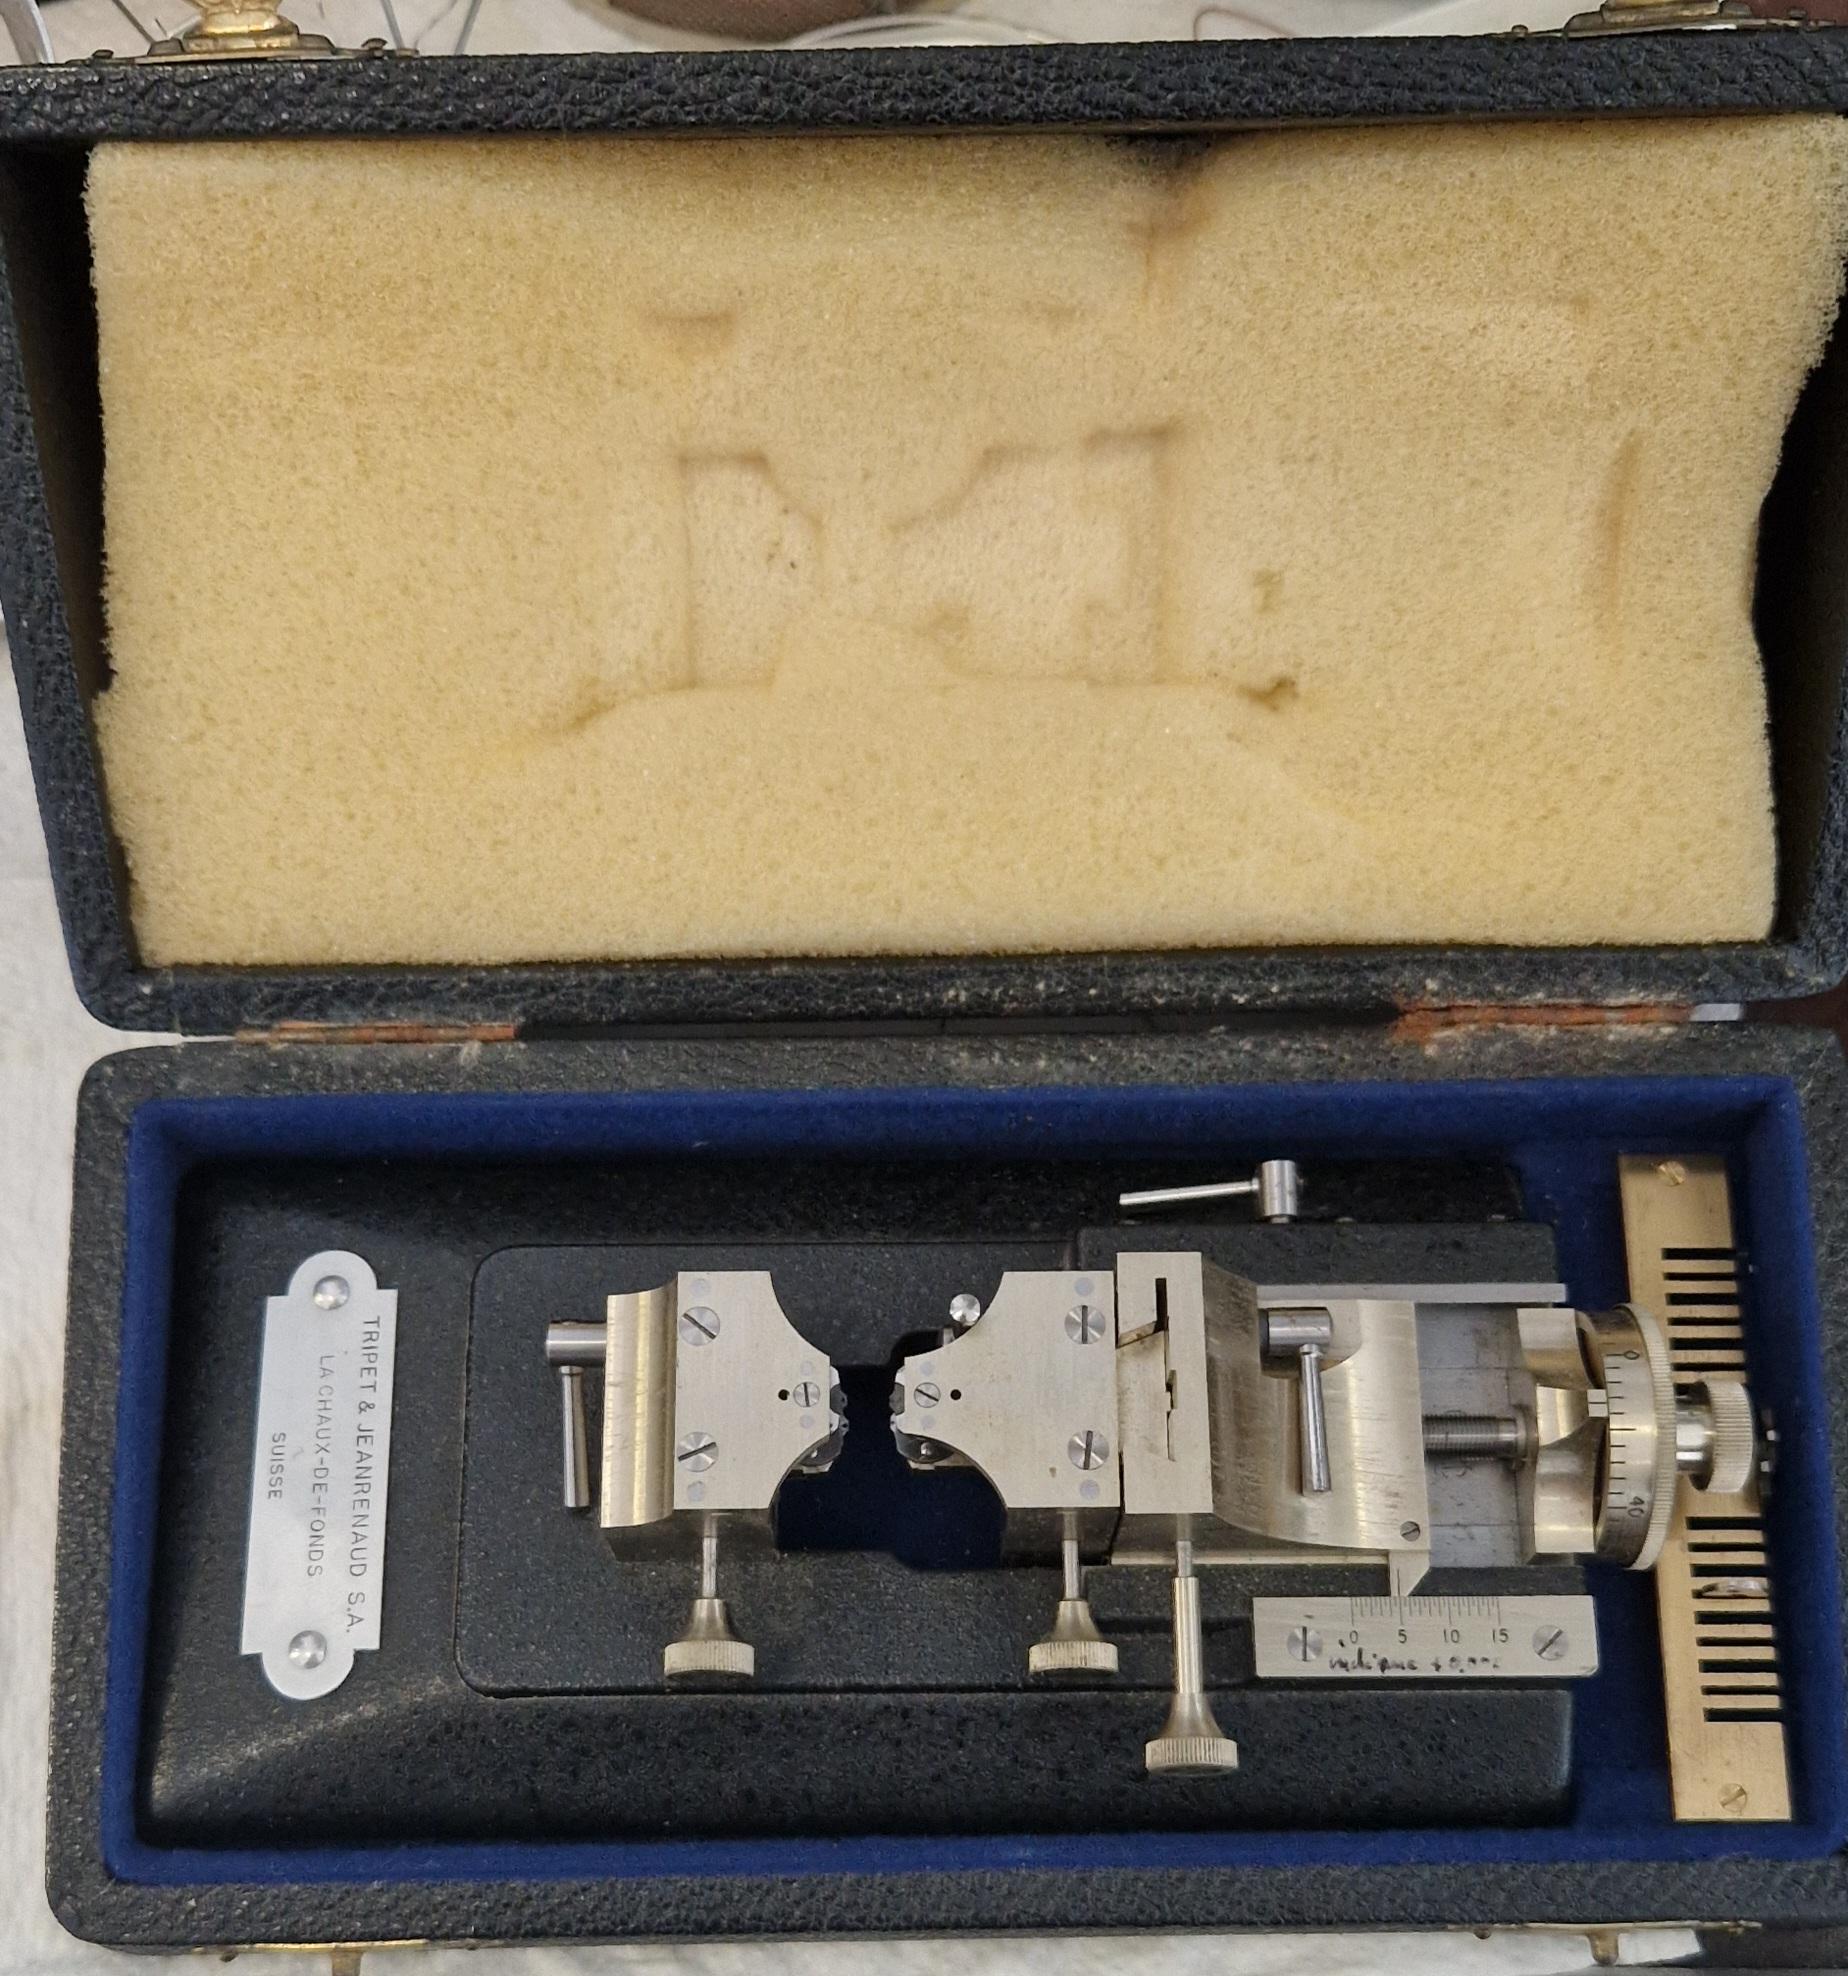
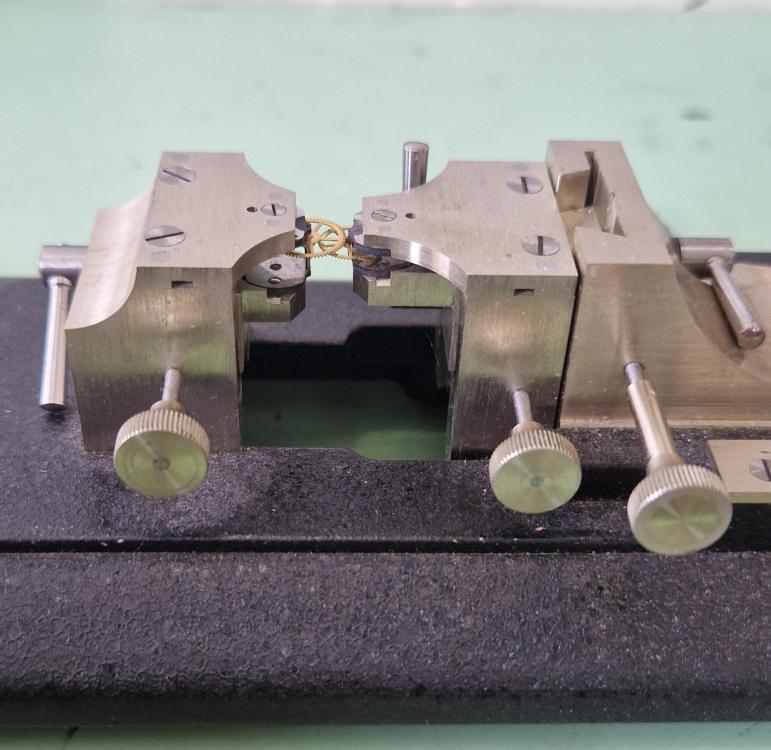
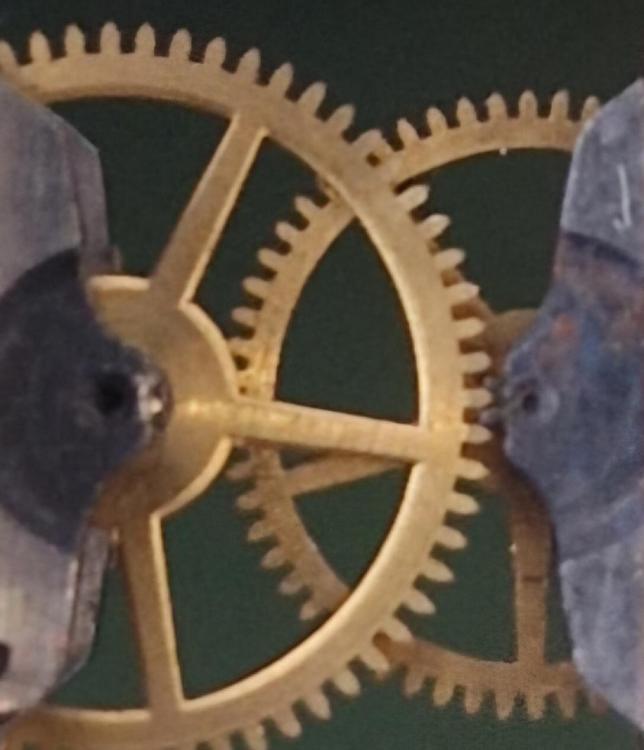
Here's another old tool that doesn't get used much, but has saved me many hours and headaches when it has been. This is a depthing tool, but quite special. The depth can be set (or measured) very precisely with the micrometer to the right, with a direct reading of the actual center distance between the wheel and pinion. It originally came with a set of the little plates in the slots to the right that take the pivots (first pic), most of mine are missing but they can be made when needed. The section that takes the right hand wheel can be adjusted in height. And it can be set on a profile projector if needed to check things. This one is marked Tripet, but most I have seen are marked Hauser. All of them were made by a small company in La Chaux de Fonds (can't think of the name now).

 6 points
 -
As a retired dentist, I've drilled into a lot of stuff, including elastomeric substances. I had drills that turn as fast as 400,000 rpm and as slow as 1 rpm. Rubbers don't drill very well. They tend to distort under pressure and the hole will end up... not very nice. Watch this video first. Rubber is better cut with a blade than drilled with a twist drill or abrasive like a diamond drill. In the above video, a brass rod was used but your case, I think a large bore stainless steel hypodermic needle would work better. Maybe a 1.5mm needle. Cut off the sharp tip and file the inside surface of the tube until a sharp, cutting edge is obtained. Then mount the needle in pin vise and bore the rubber by hand, constantly checking that the bore hasn't drifted. You might need several straps as guinea pigs before succeeding. Hope this helps. And please treat everyone with respect and dignity. Shalom.6 points
-
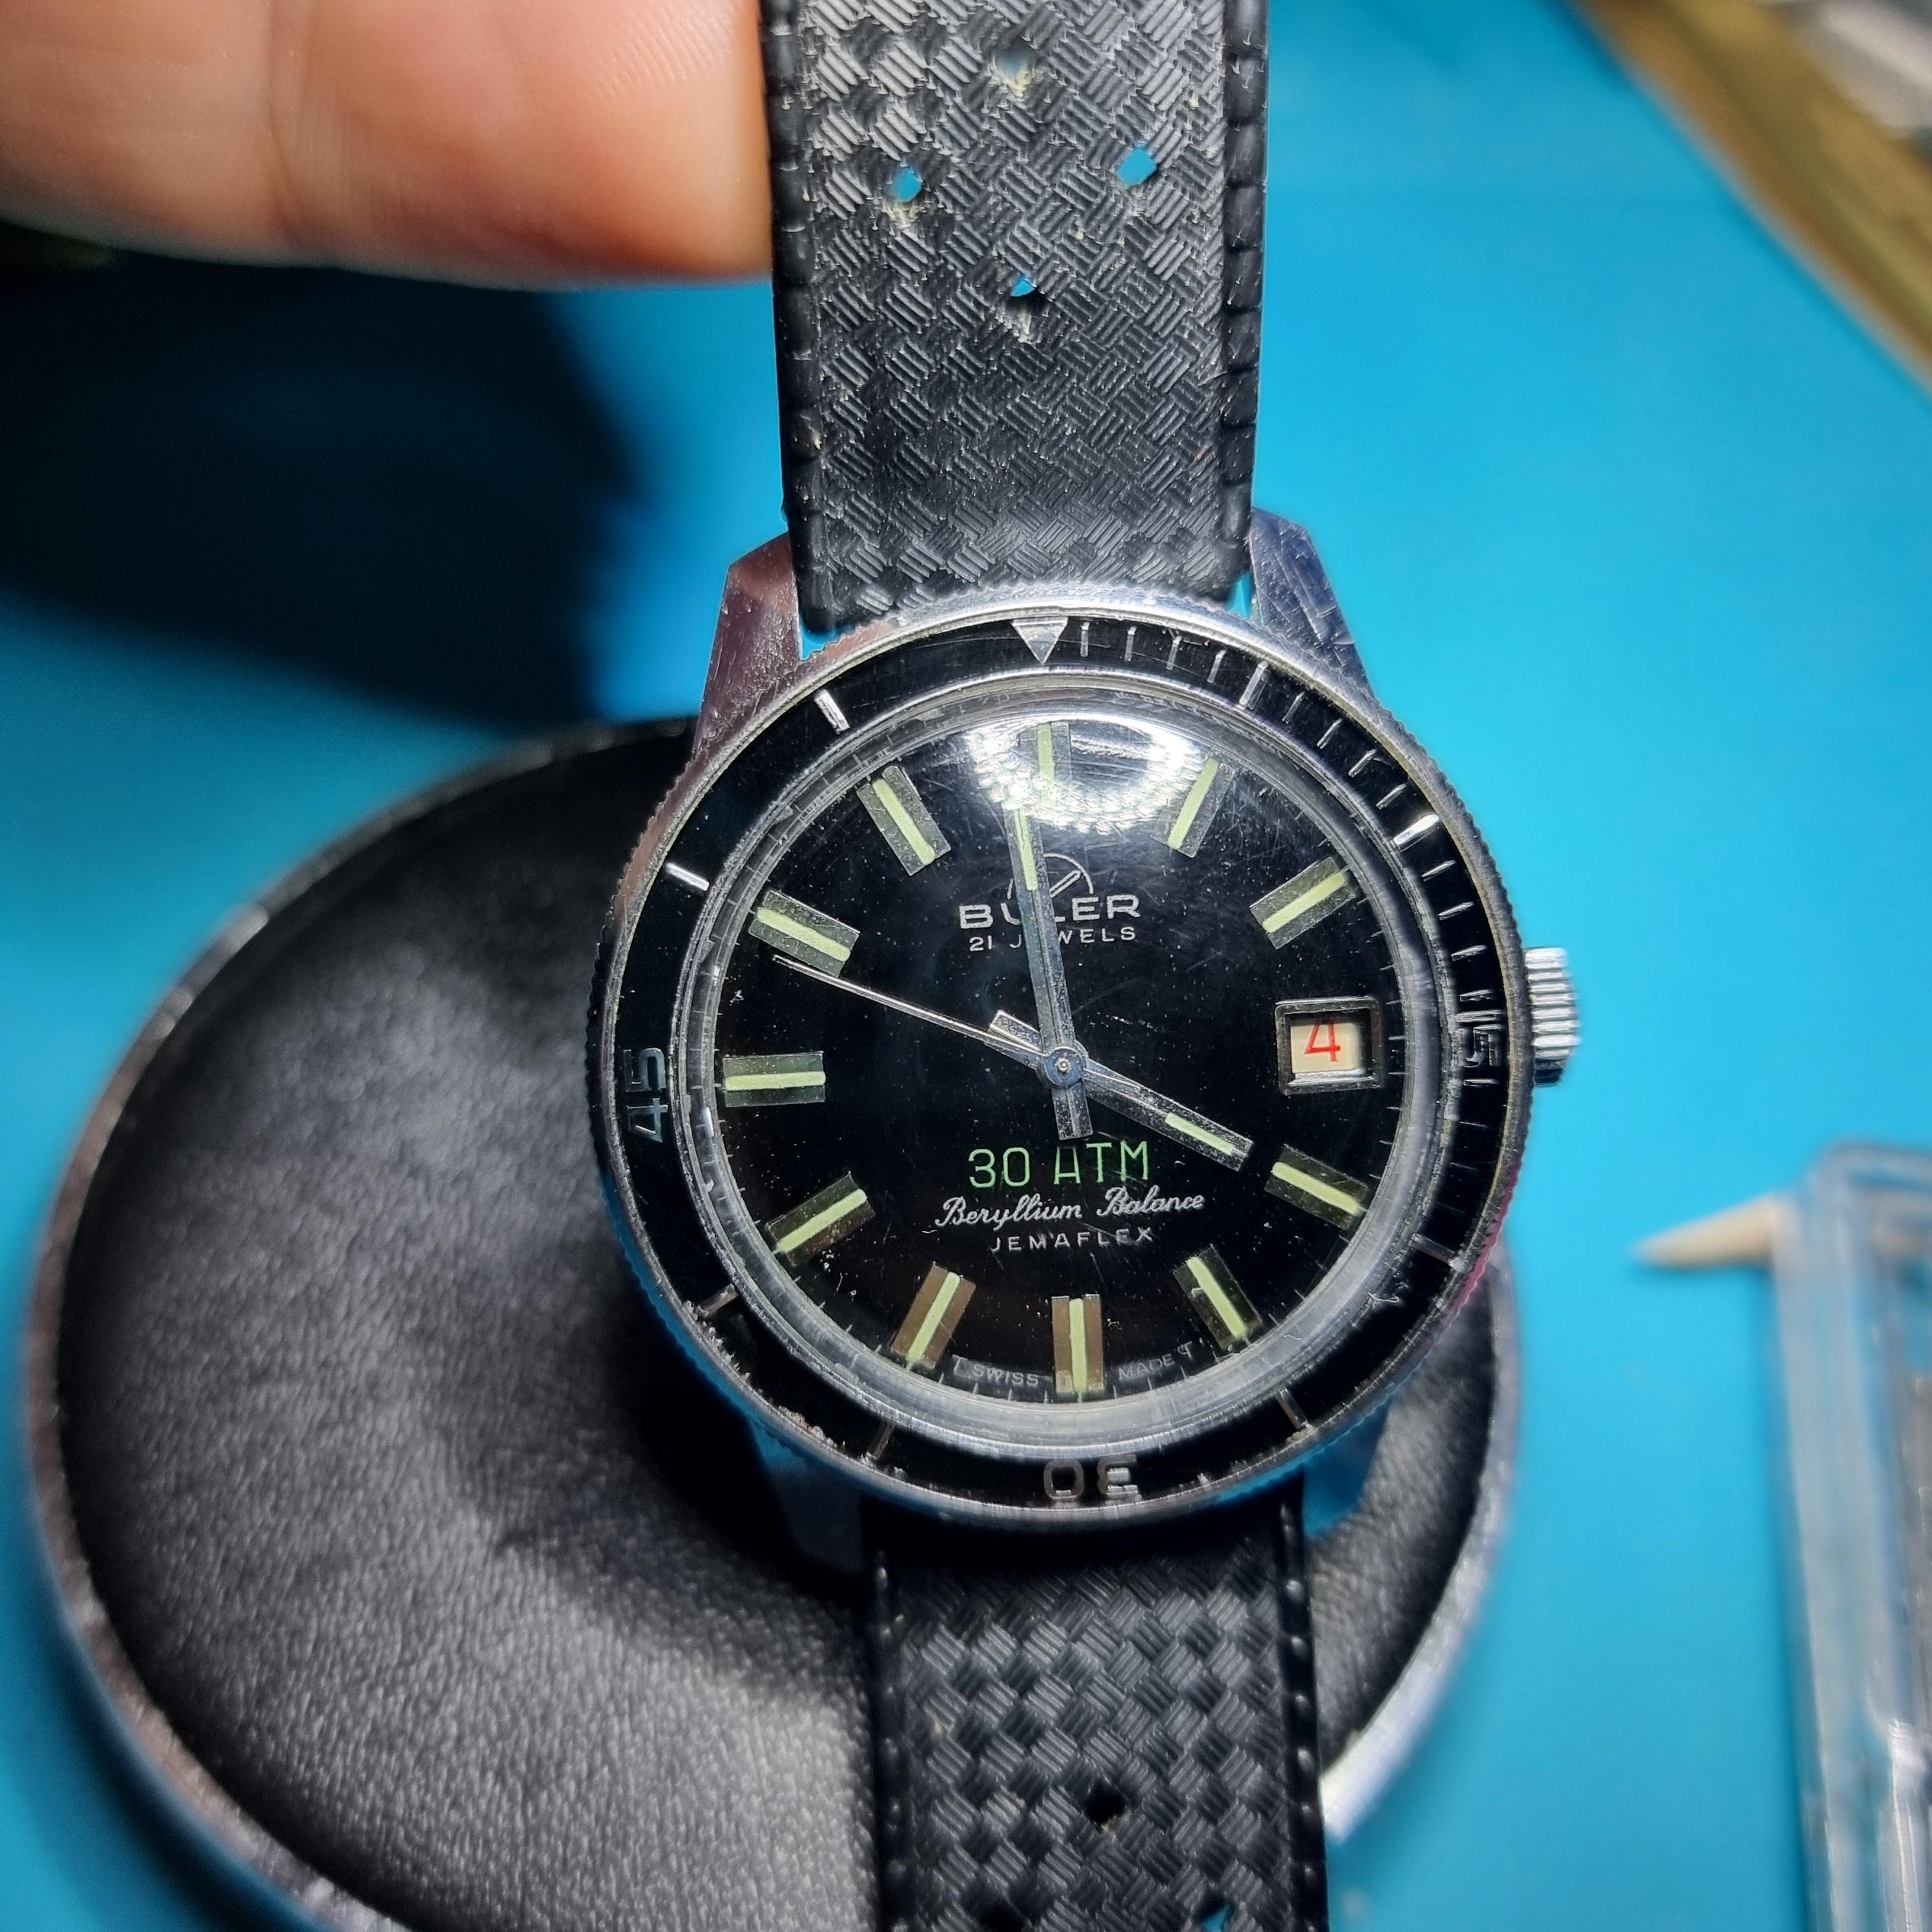
I'm late to the party. ?Merlin? The watch shown is from the "Sprite" series of mock skin divers. Smaller sized at 31MM across case. These were marketed to boys, thus the smaller size. The issue is very common and is due to the crown being press fit to the stem. You can try to use a super glue to get it to hold. But if there is metal loss to either the crown or stem it is best to just find an NOS replacement. Given that reply I'm sure you are thinking where do I find a NOS stem crown? Well I know a guy who just may has the part. ok, I have to retract my comment on calling it a "Sprite" and I'll blame it on the jet lag of just having come back from the west coast. it is a "Marlin" Sport Diver 34mm across cushion case. missing the bezel ring. that is common since they were made of plastic.5 points
-
The clickspring is not the problem. When the power is released, the barrel turns. That should not happen. The pallet fork should be blocking the train of wheels while you're putting some wind in. Try again and focus on how the pallet fork and the escape wheel interact.5 points
-
Got the correct crystal in today from Esslinger, 31.5mm x 1.5mm. It actually measured 31.5mm on the dot, and surprise surprise, it actually properly fit! After fitting the crystal, I inspected and lightly oiled the movement and crown before reassembling and my very first mechanical watch is back in rotation! Thanks to everyone for your help and guidance.
 5 points
 -
Thank you everyone for the advise! Now I have a working watch :). I started with the cannon pinion and made sure the minute hand moved (shown in pics). I continued adding every component one by one to make sure the hand moved. I think that was the problem originally: the cannon pinion disengaging somehow from the barrel wheel.


 5 points
 -
I asked ChatGPT's deep research mode about blue screws in Rolex without pointing to any particular source. After thinking for 10 minutes (deep research mode), it quoted your earlier conversation with ChatGPT: We are slowly breaking the Internet, post by post. Forums, populated with real people, are crucial!5 points
-
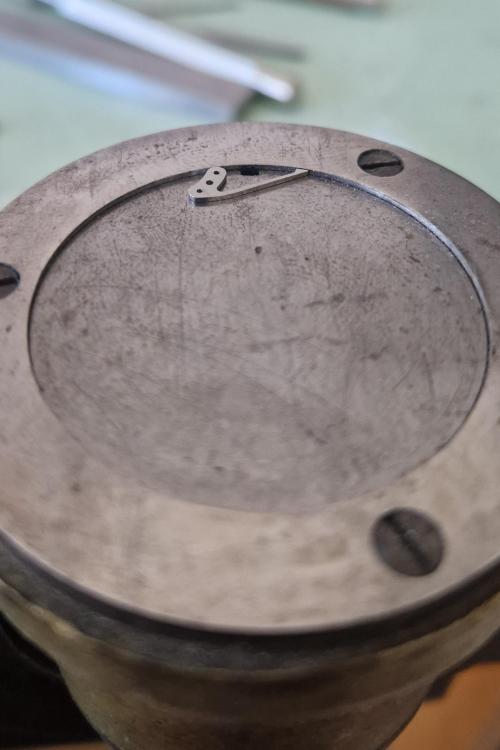
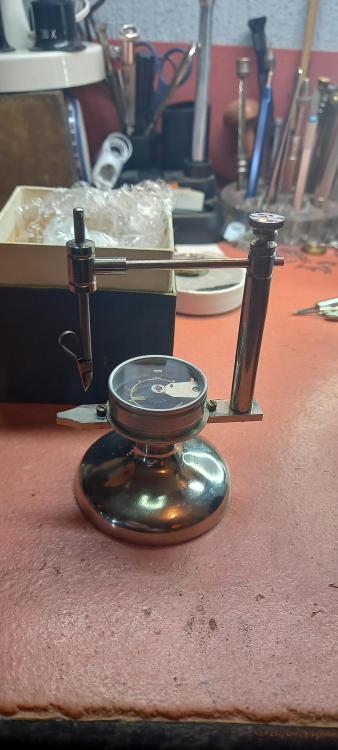
Provided the tool is in good condition, and hasn’t been subject to dodgy repairs (some I’ve seen on eBay are in terrible condition or were incompetently repaired) the balance arms are clamped very securely when performing adjustments and the relevant surfaces are true. This is an excellent tool in my experience. Here’s a picture of a balance clamped securely, ready for an adjustment to be made : Best Regards, Mark
 5 points
 -
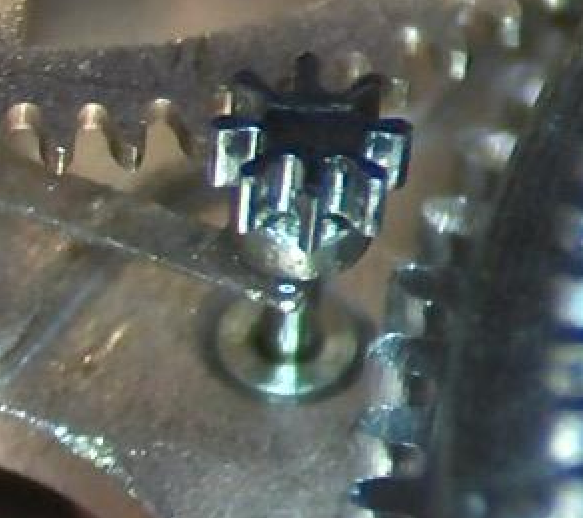
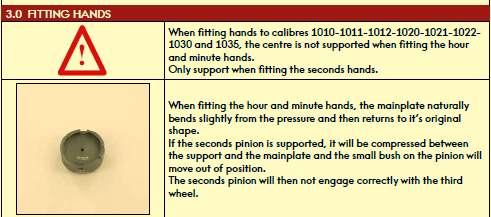
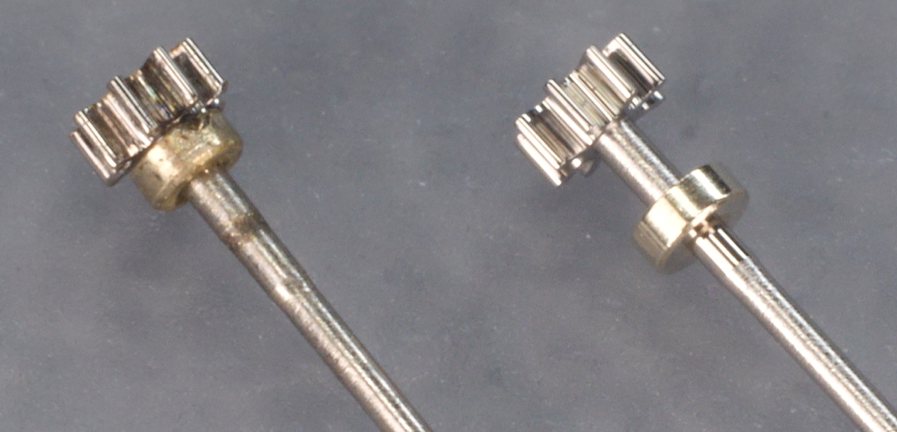
There were things bothering me about this discussion that took me a while to figure out the problem. In the image below it appears to be the spring may be pushing up? Normally when Omega has a spring pushing up the pinion has a pivot with a bridge to hold it in place so in other words the spring can push on something that stationary as opposed to this which appears to be floating? To understand the problem with the above image we need another image of side view which I have below. In my image down below on the left-hand side it agrees with the image up above. But the only problem is the left-hand side is defective and the right-hand side image is the way it's supposed to look. Then Omega if you can access the right documents does explain how and why this problem occurs. With the pinion floating around it might be assumed that you support it when putting on all the hands but you do not because as noted below if you do this small bush on the pinion will relocate out of position exactly what we see in the image up above. Then Omega does not mention this but there is a possibility of also damaging the pinion and causing the bush to move to where it's not supposed to be when removing the hands.
 5 points
 -
Yes, the specific old tools do exist, but may be having one is not needed as they are not cheap, and also You will be able to do without it well enough. My advice will be to use regular depthing tool and adjust it for the exact distance between pallet fork and escape wheel bearings from the watch. Then remove the shellac from the pallet that now doesn't pass the ew teeth and move this pallet in. Then put the pallet fork and ew on the depthing tool and check how they lock. They should not lock when the pallet is in, but You will little by little move the pallet out and locking will appear. Then move just an idea out for reliable work and apply shellac, then check if things are still the same. You have to observe where the teeth fall on the pallets - it must be just a little below the edge between impulse and rest planes. Then You must check how everything behaves in the movement This Potence tool is so ingenious, but actually, the traditional way to do the things is much more simple. Arrange the parts not on the pillar plate, but on the cover plate. Only the central wheel will remain on the pillar plate, secured by the cannon pinion.5 points
-
I know he had indicated that he would like to retire. But it's always sad when people just disappear off the message board and we don't know why. then I was looking at his profile I wonder if that really is his birth date? In this day and age is always concerning if your birth date is out there along with any other personal information. Then I went to his profile for this Devon England. It seems like the moderators and other people in the UK could get together from time to time. or perhaps the moderators should have communications beyond this message board like maybe a phone number or a physical address jesting case things break down you could reach out the somebody. that would mean that if the moderator is concerned about another moderator you can at least investigate as to they just disappeared or never seen again.5 points
-
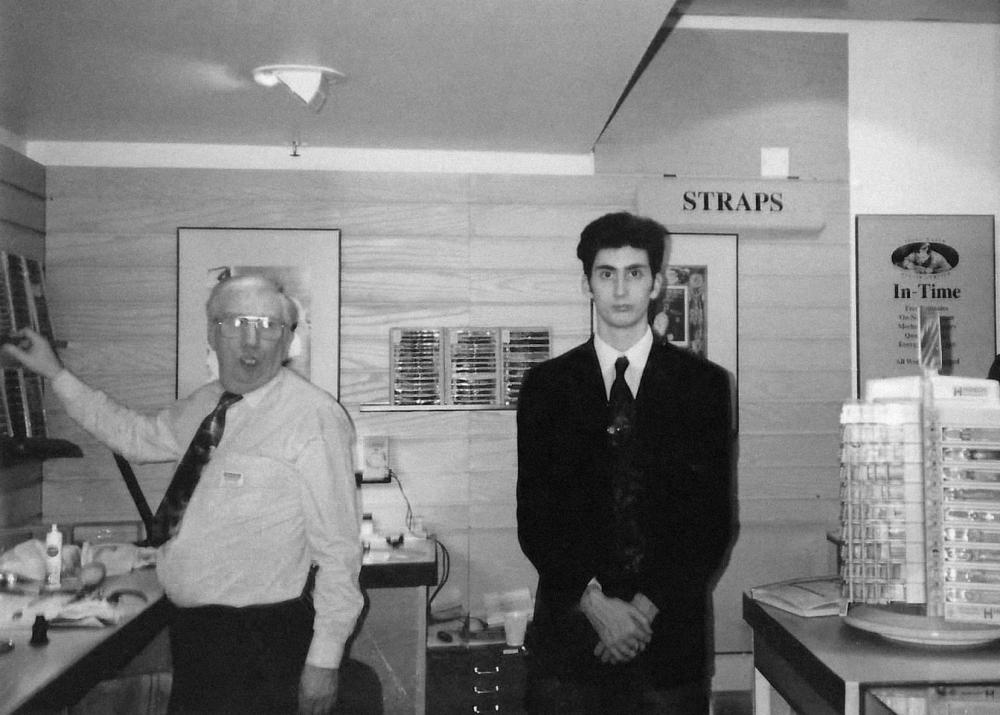
Early ‘90s Debenhams in Oxford Street at InTime Watch Repairs. The older guy was one of my mentors Mr John Campfield, fantastic ex-Omega watchmaker. Good times - black hair gone now!
 5 points
 -
I have only been a member for six years & I have found this a very friendly forum although I don’t have anything to do with watches not because I don’t like watches but because I have gout in both hands so my dexterity isn’t very good, I restore torsion clocks & occasionally other antique clocks also at 72 my eyes are not what they used to be, that is why I only post on the clock forum & the lathe forum mostly . As others have said Mark it is much appreciated that you are willing & able to do this. very many Thanks Dell5 points
-
This is indeed a unique site and members including myself genuinely care about it. All we want is the site to continue.5 points
-
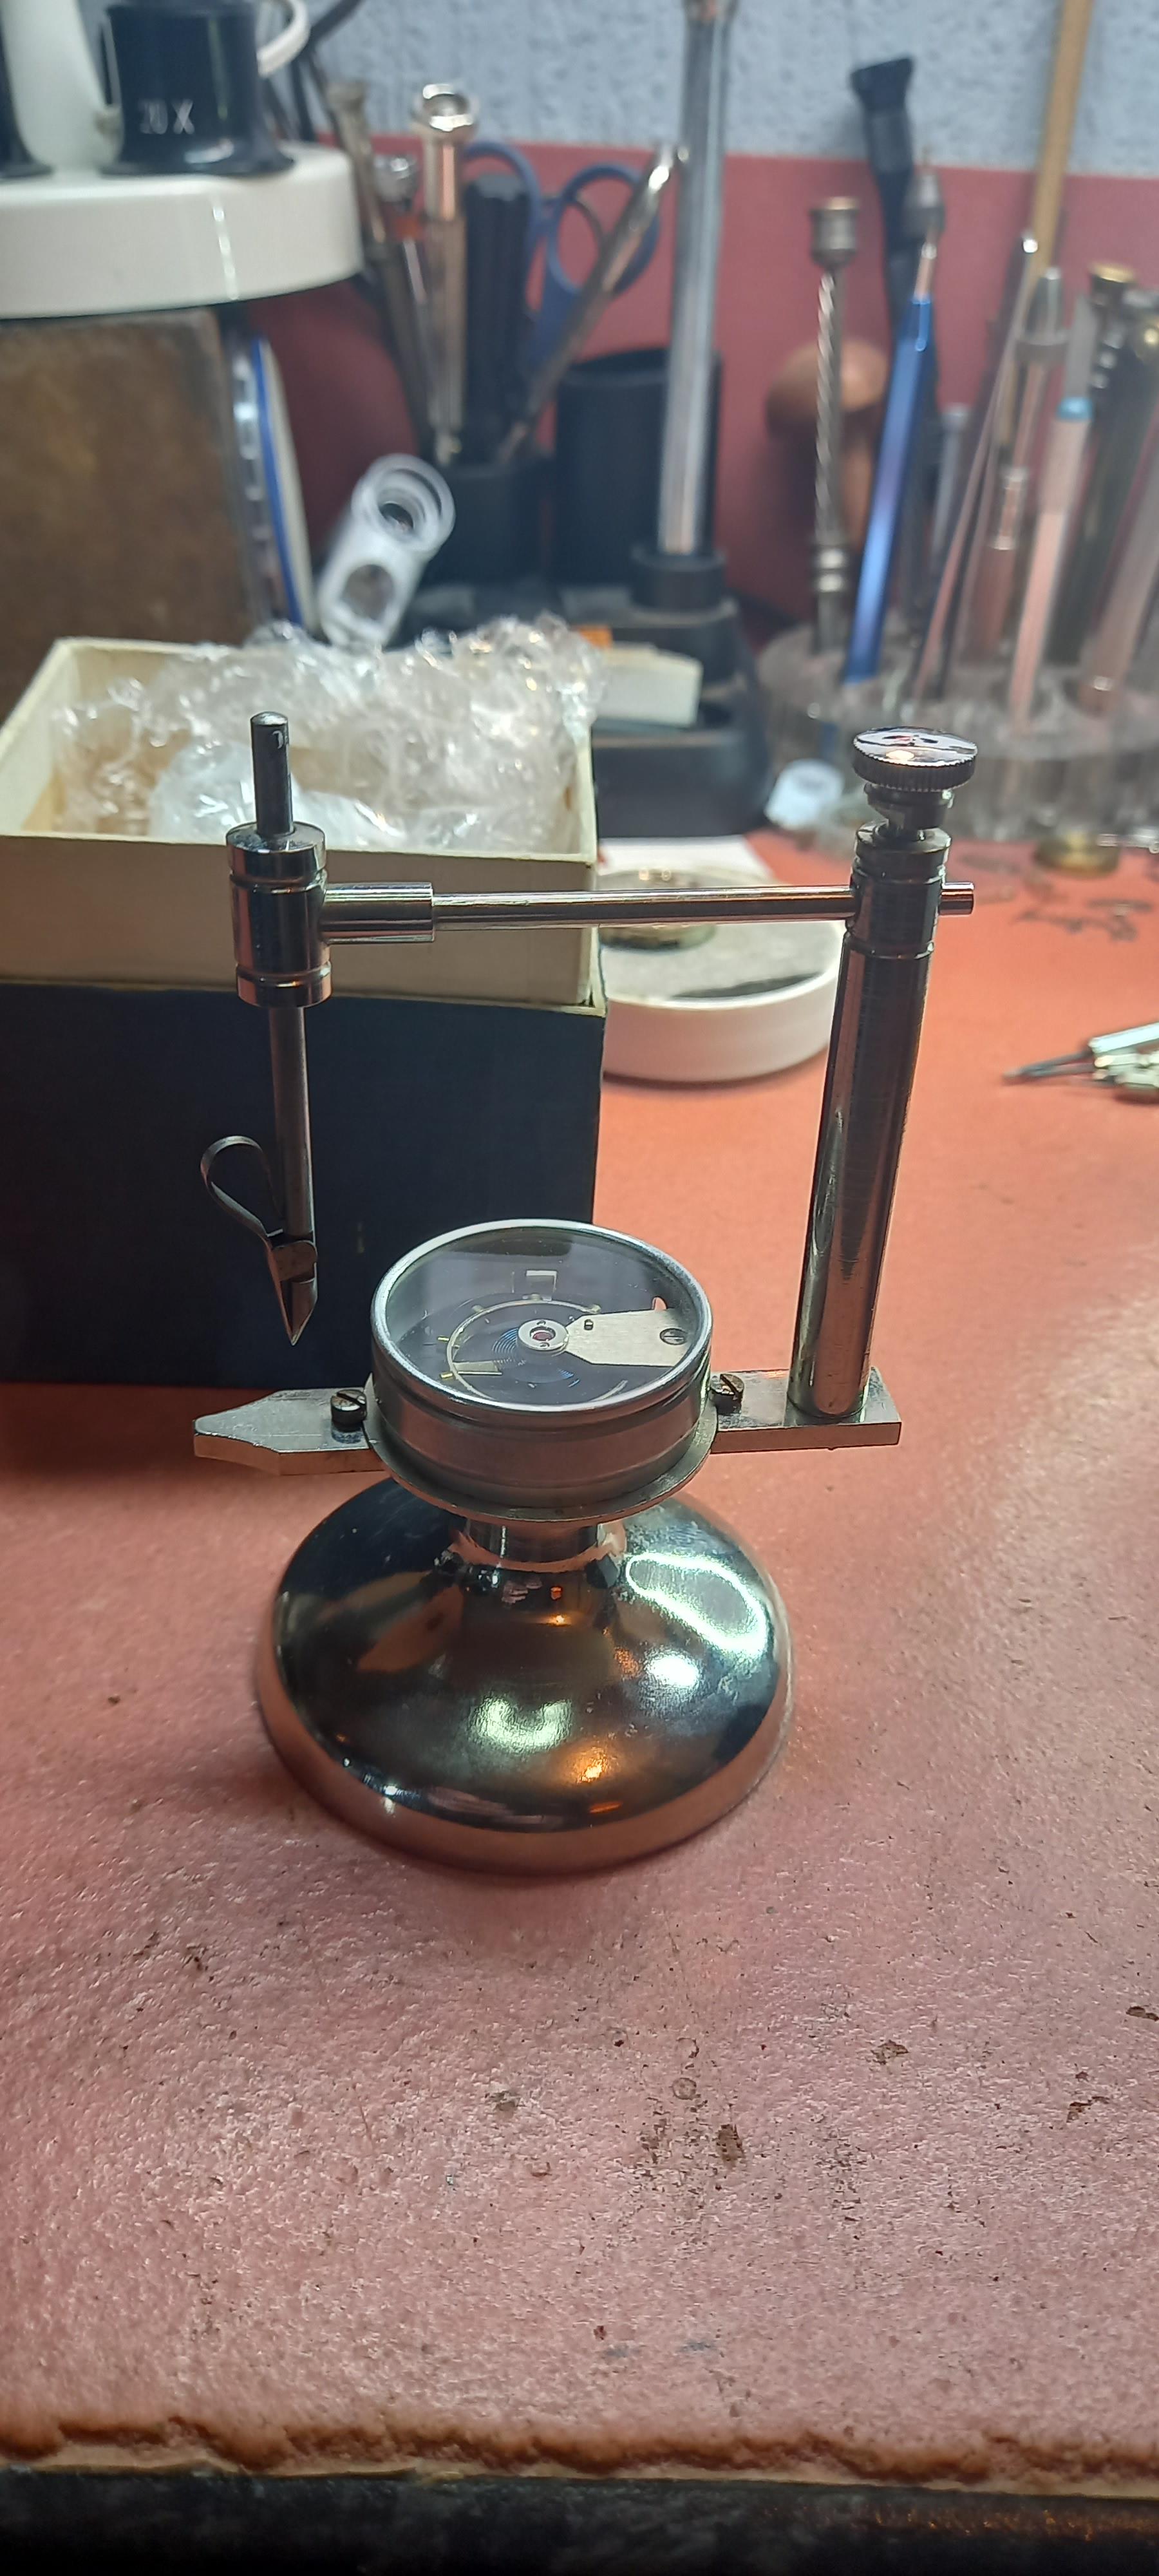
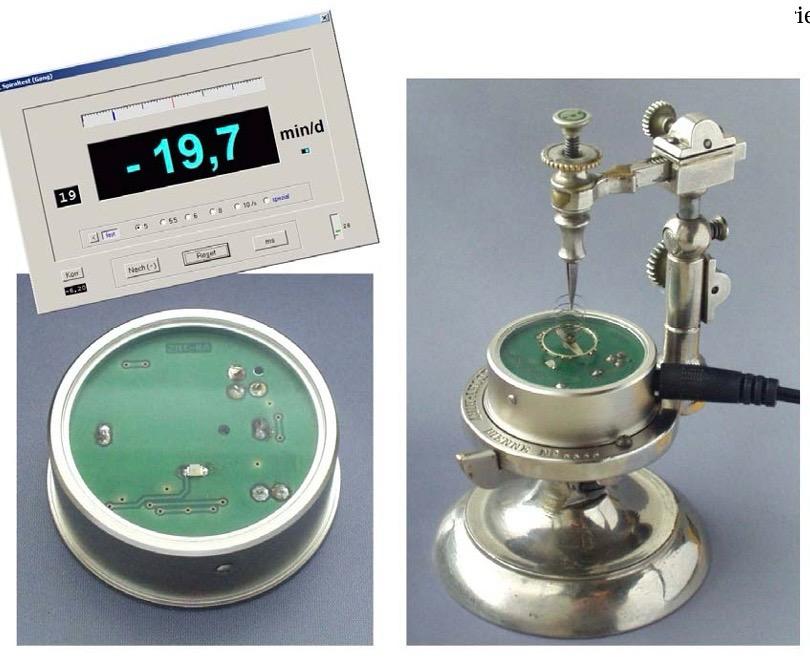
So this was something I bought a few years ago. I've always been interested in how hairsprings work, and pretty good at the manipulation of them from day one, mostly because I have rock steady hands and very good dexterity. Watching guys hands on the UTube flutter around when working on hairsprings.... makes me wonder whats going on ? I may be just very lucky in that respect. This isn't the better, more expensive Luthy, but it works lovely. I have only used it once to check a hairspring's frequency, something unnecessary, as a timing machine can do just that, but it was accurate compared against. I guess these things were a timesaver, after pinning a new hairspring to a collet, something I might never do, but probably will
 5 points
 -
I suggest if you don't like a simple response from someone trying to offer help then you go elsewhere.5 points
-
Here’s a tip for those of you who occasionally use a smoothing broach—for example, to smooth out the bearing for the barrel arbor in the barrel bridge. Mount the smoothing broach in a pin vise. It greatly increases efficiency, ease of use, and control. I was genuinely surprised by how much of a difference it made. So much so that I felt I had to share it.
 5 points
 -
Not sacrilegious at all. Repurposing redundant objects I always consider a good thing , somthing that may well have been put in the tip has another useful life. May I suggest maintaining the horological theme use it for displaying your watch collection . Somewhat fitting for the old clock case.5 points
-
Just got some of these and the knife ones are brilliant for getting into places like in the photo.
 5 points
 -
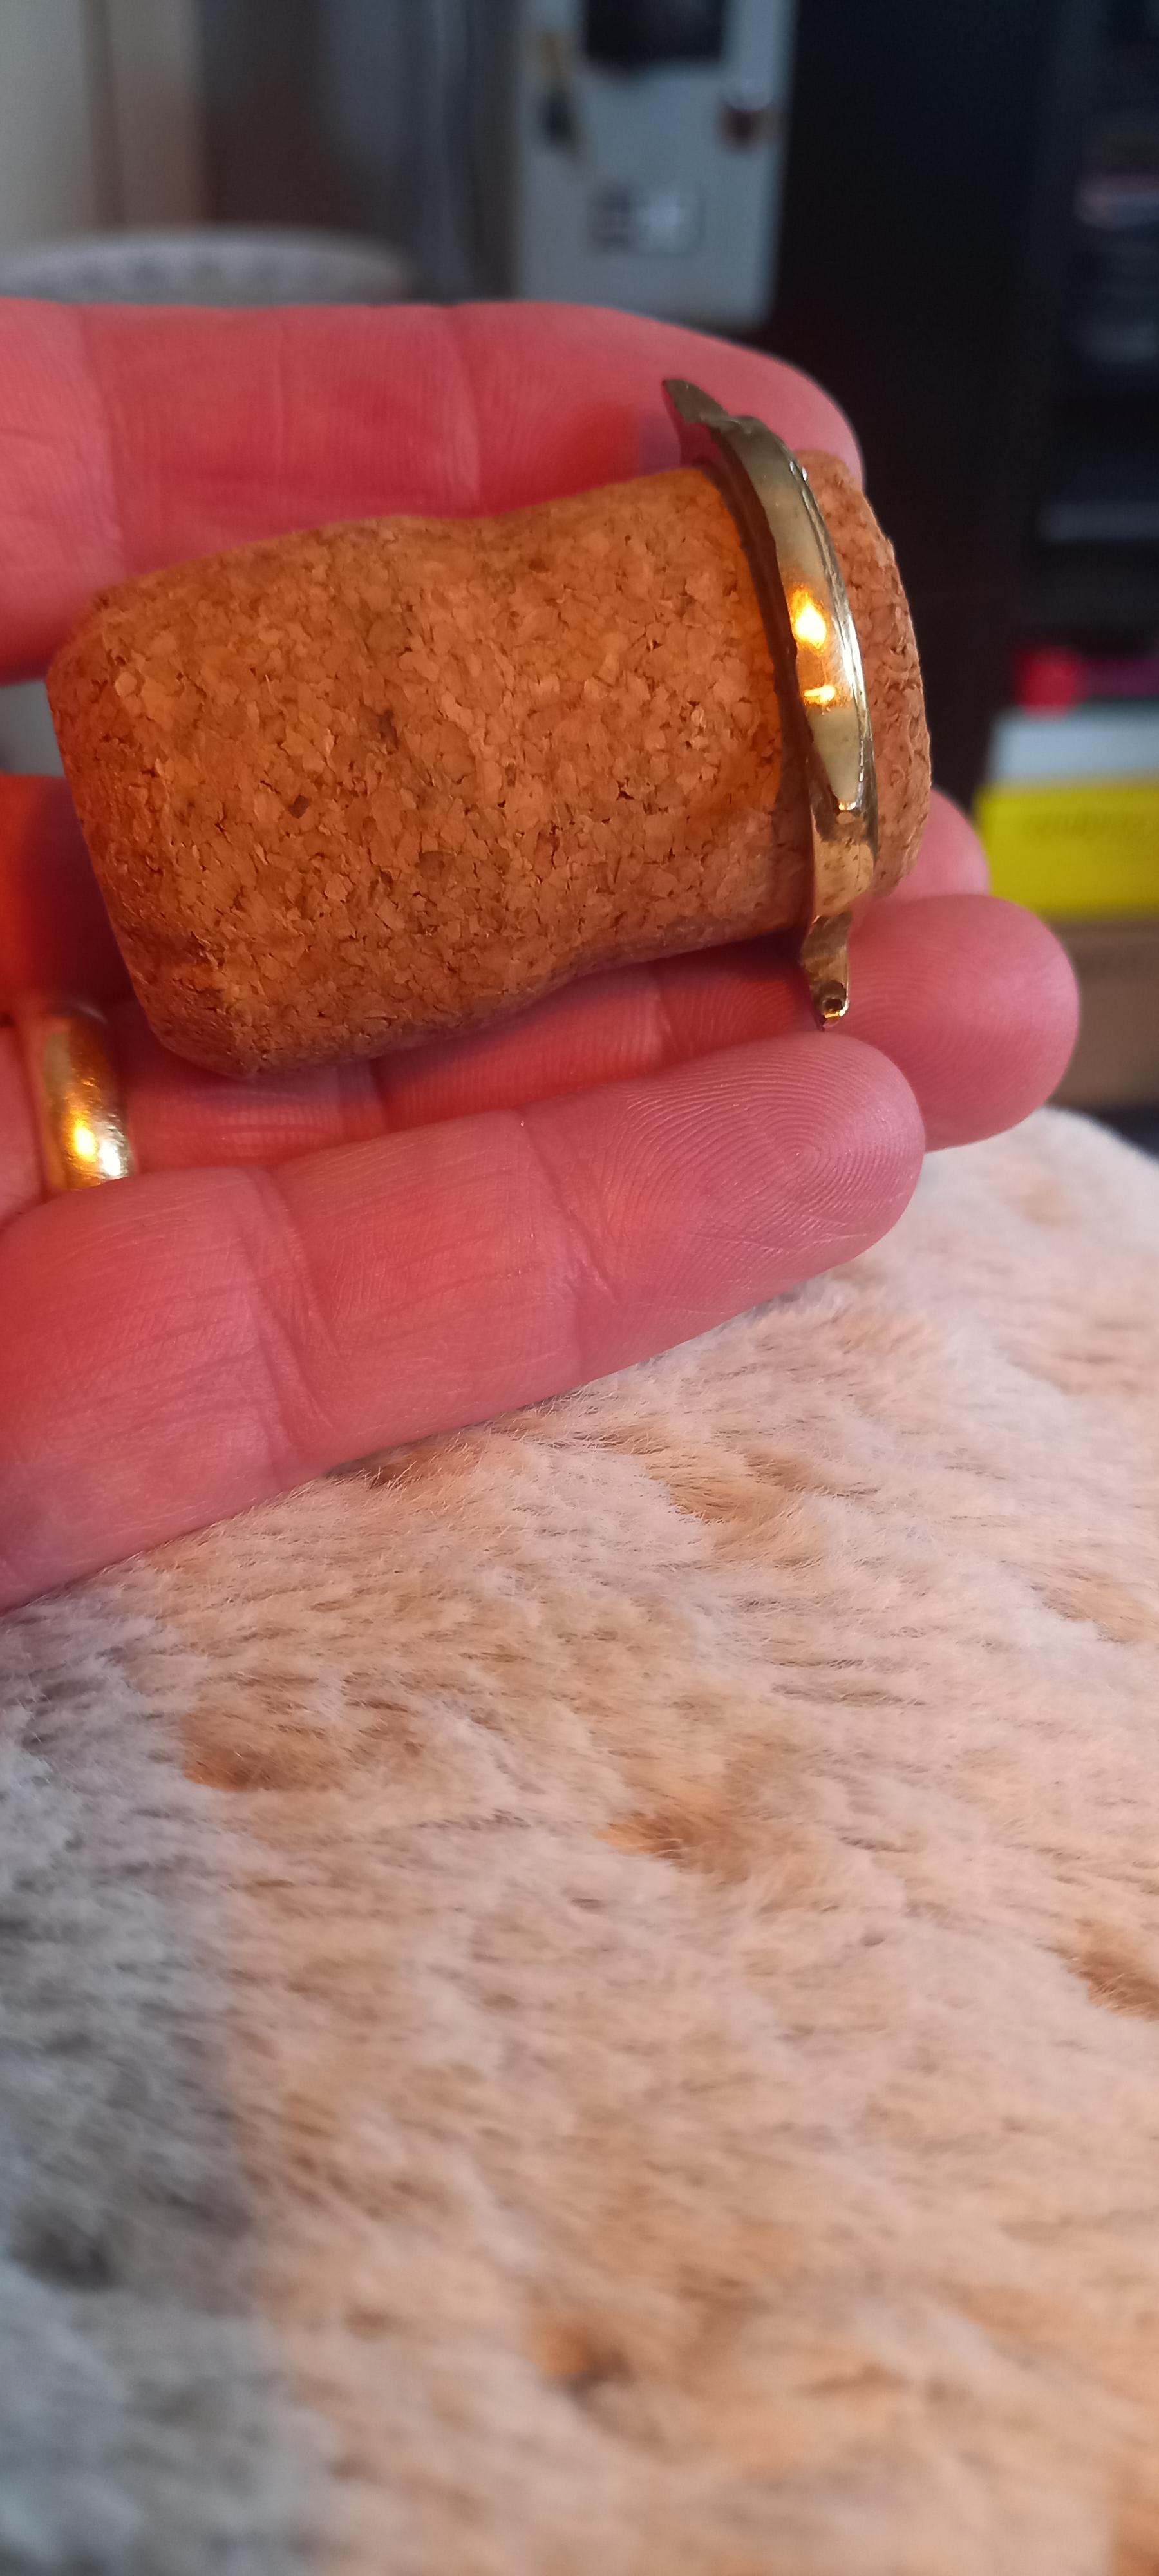
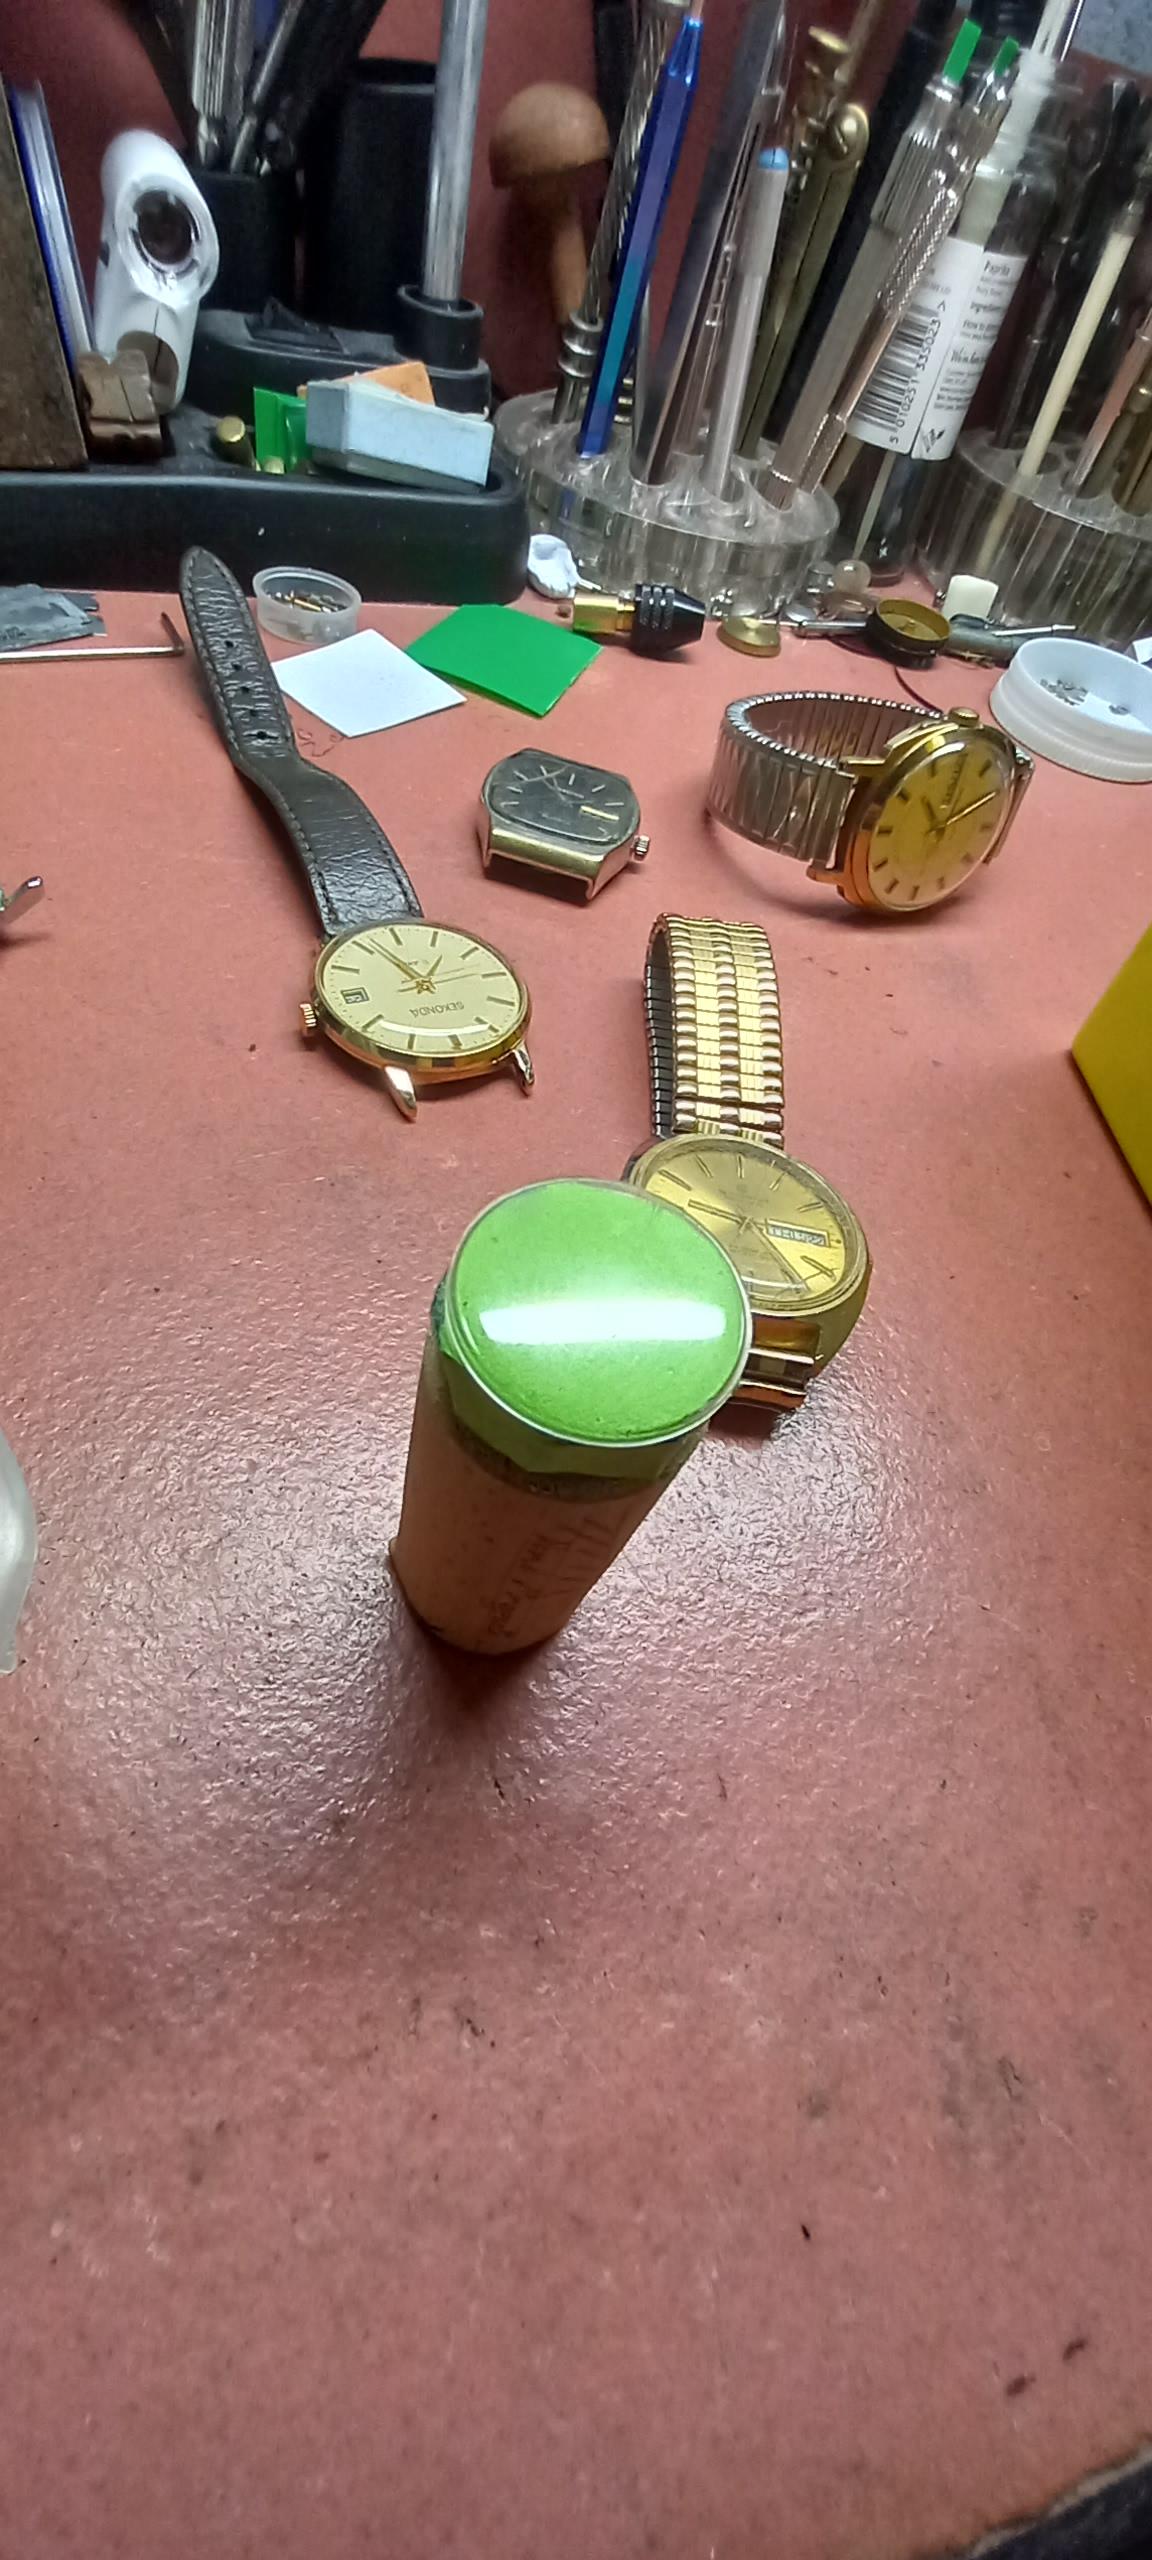
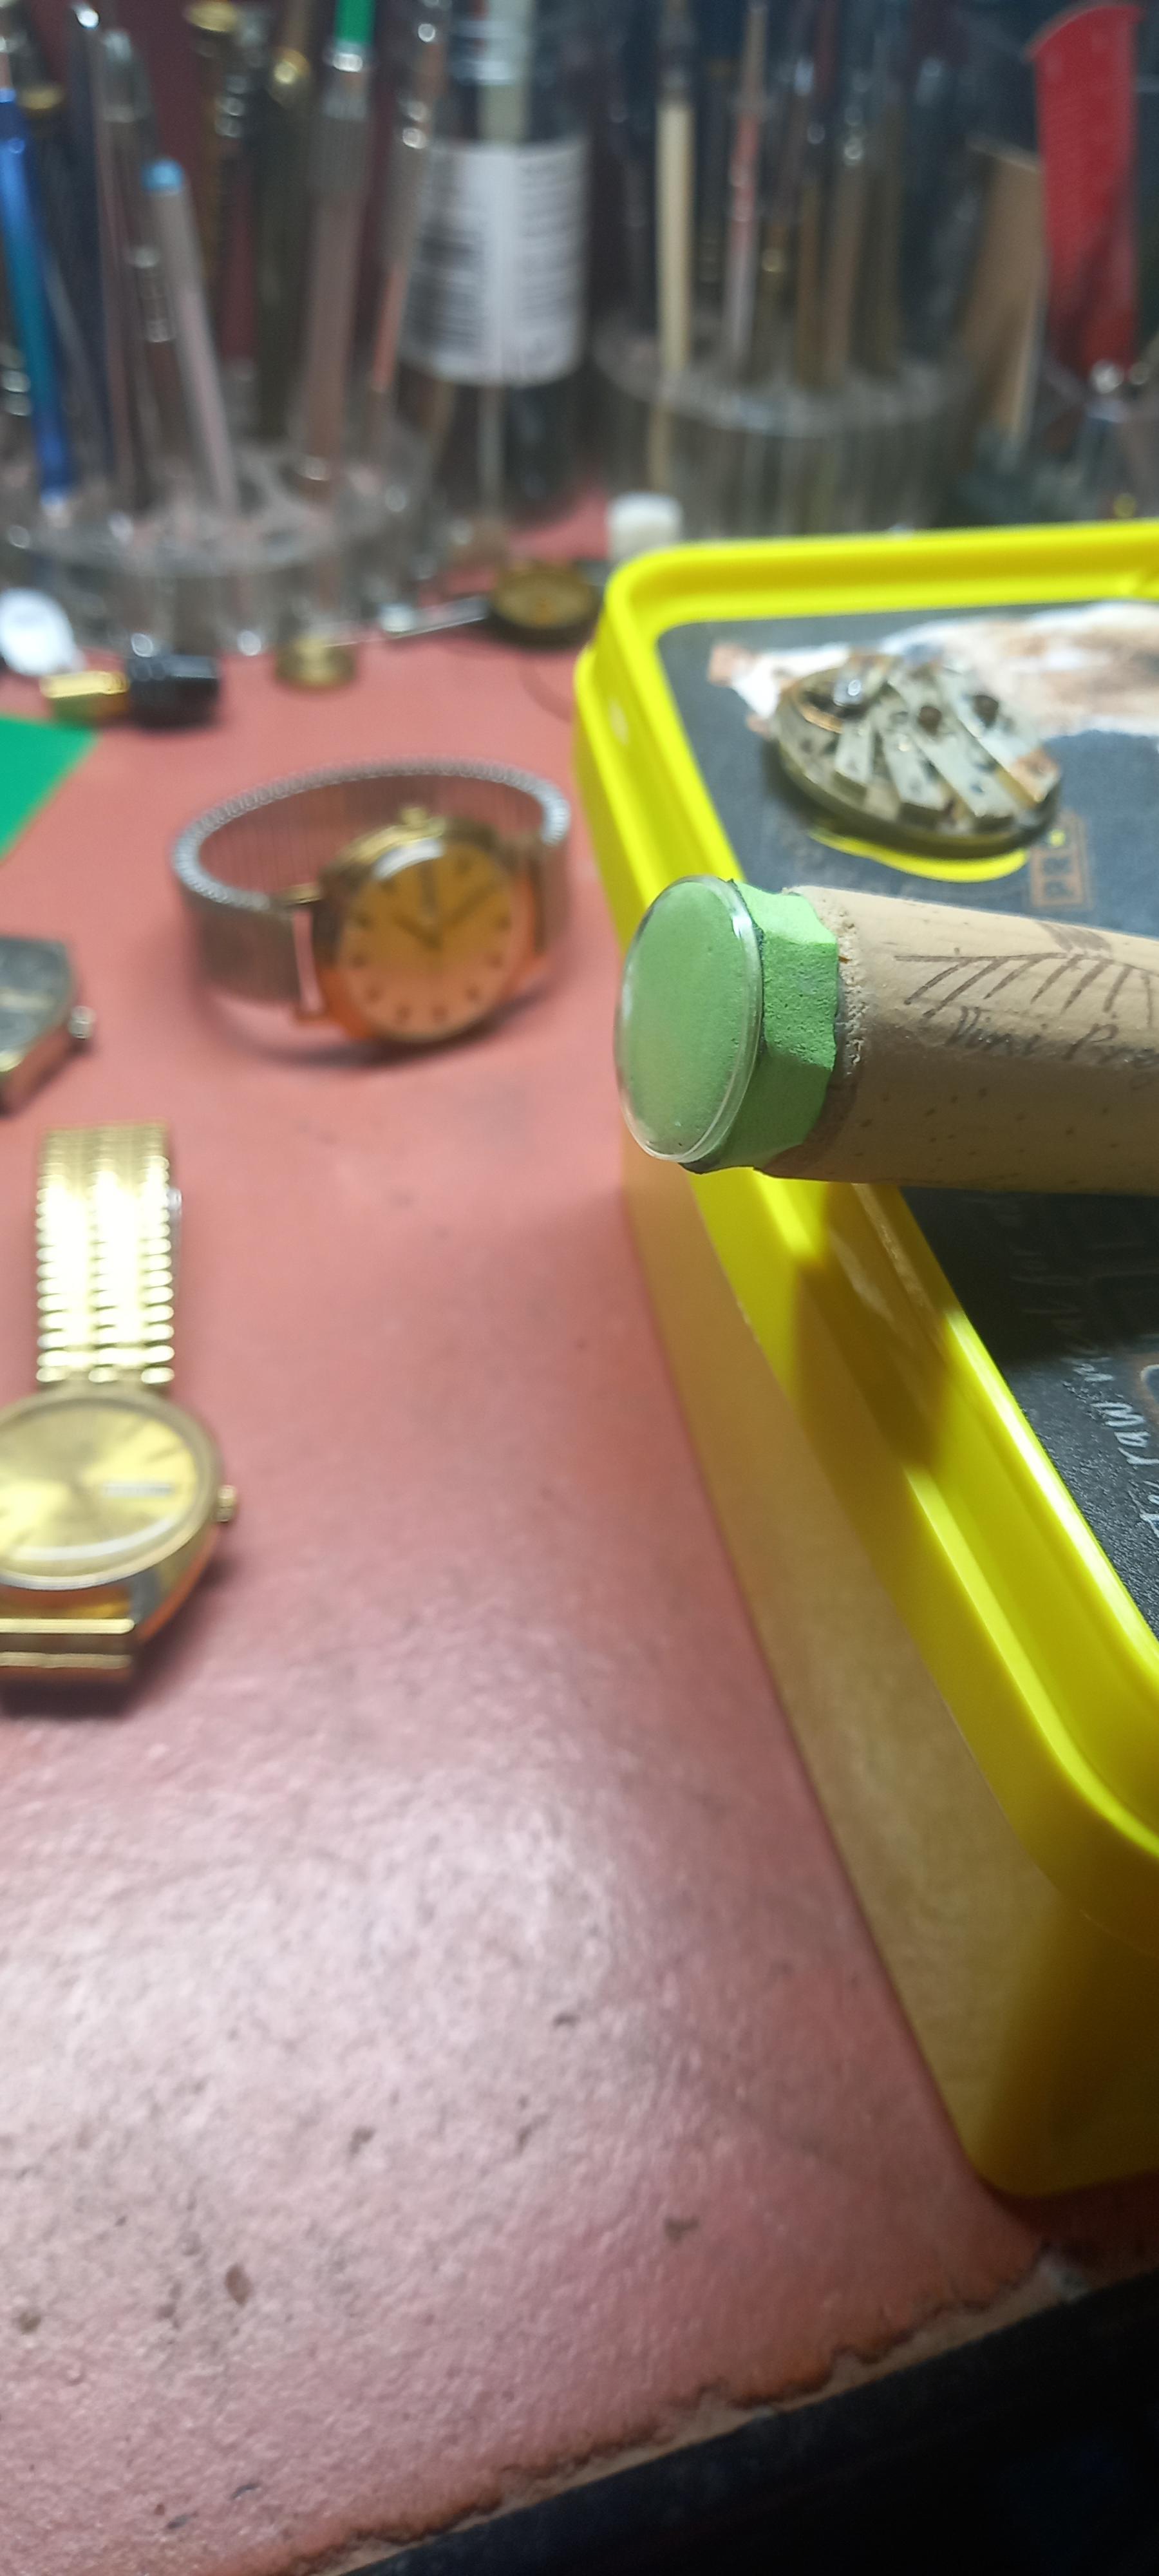
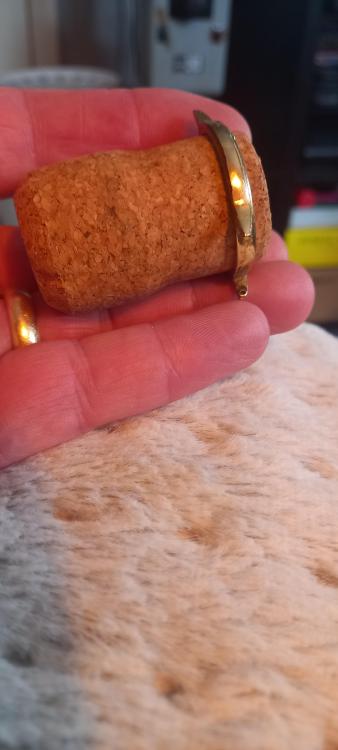
Some might find this idea useful. My son owns a bar, which is handy. If you have lots of different cork sizes like me ( I don't drink ) you can usually find one thats a good tight fit inside the case. If not , find one that's close undersize and bang a wedge down the middle of the cork to expand it, like wedging a handle for something. I also use corks for sittings domed acrylics on when polishing them. Stick a sponge on the cork end and squeeze the crystal over it. Like so.

 5 points
 -
It's quite a lot of work to get it back to brass and replate with nickel. The finish you get on the nickel will be the brass finish you achieve - nickel does not fill any defects. So you need a polished finish with no defects. I plate with copper before nickel as it can be plated thick enough to fill pits and defects. But then I have to polish again before the nickel. You can do home plating quite cheaply, there are plenty of Youtube videos showing DIY nickel plating.5 points
-
I have a few of these. The post is hollow on the black tool, so that it fits over the staff and the tiny pin fits in the collet slot making it easy to turn. Frankly, I rarely use it. But, it is there just in case. show us a picture
 4 points
 -
If the hole of the roller is that bigger, then just putting something in the hole for tightening can easy make the roller rotate out of true. It is important, especially for the safety roller, to be true. Closing the hole with triangle punch also will not guaranty the safety roller true rotation. The roller is to be placed as the impulse jewel to be right at 90 degr. against the balance arms.4 points
-
I agree. I do the same, gloves + mask and cover the work surface with cling film. I have replaced the radium on a few dials and hands. You may want to keep the dial original, but If you want to remove the radium it easily dissolves in water. For the hour dots, using a cotton bud or pegwood, put a drop of water (just on the radium) and let it soak for a minute. Then with some pegwood sharpened to a chisel point, the dot should just slide off. For hands, soak in water for a minute or two, and push the radium out with pegwood. I replace with modern green lume. Original radium was similar in colour to modern green lume. I sometimes put a touch of orange in to make it look aged on older watches. When finished, I wipe all surfaces and tools. Gloves, cling film, wipes, cleaning fluids, pegwood, buds etc get sealed in a ziploc bag and put in the household waste.4 points
-
60! Wow, that's a lot. Can't say I understand the problem because disassembly is usually quite uneventful, except for springs launching into space. Most people break pivots during assembly. I use a homemade brass pry tool to loosen parts. It's just a short length of hard brass wire sharpened to a chisel point. Don't pry at just one point and crowbar it out. Pry at the notch and when a crack opens up, slip the pry tool in and loosen it at a few more points until the bridge is free.4 points
-
That good to know in one way.4 points
-
A helpful way in aid of assembly is to place all the wheels in their respective places, place to plate on the top and fit a couple of the nuts onto the pillars. This stops all the wheels wobbling about as they are lightly held by the plate, you can manoeuvre the pivots into their holes, using a tool , usually home made or can be bought on eBay. I made my own. As the pivots align and fall into place screw the nuts down a bit to keep up the tension on the plate untill all wheels are in place then tighten down sufficiently to keep the plate in place whilst checking the end shake on ALL wheels and their location when all is good only then tighten down the plate.4 points
-
Why do you think this is Fontainemelon ? The balance staff you will need to source separately. But first it's important to accurately identify what you have there. Research Ebauches Sa, see who was in group, to find the brand that made this movement.4 points
-
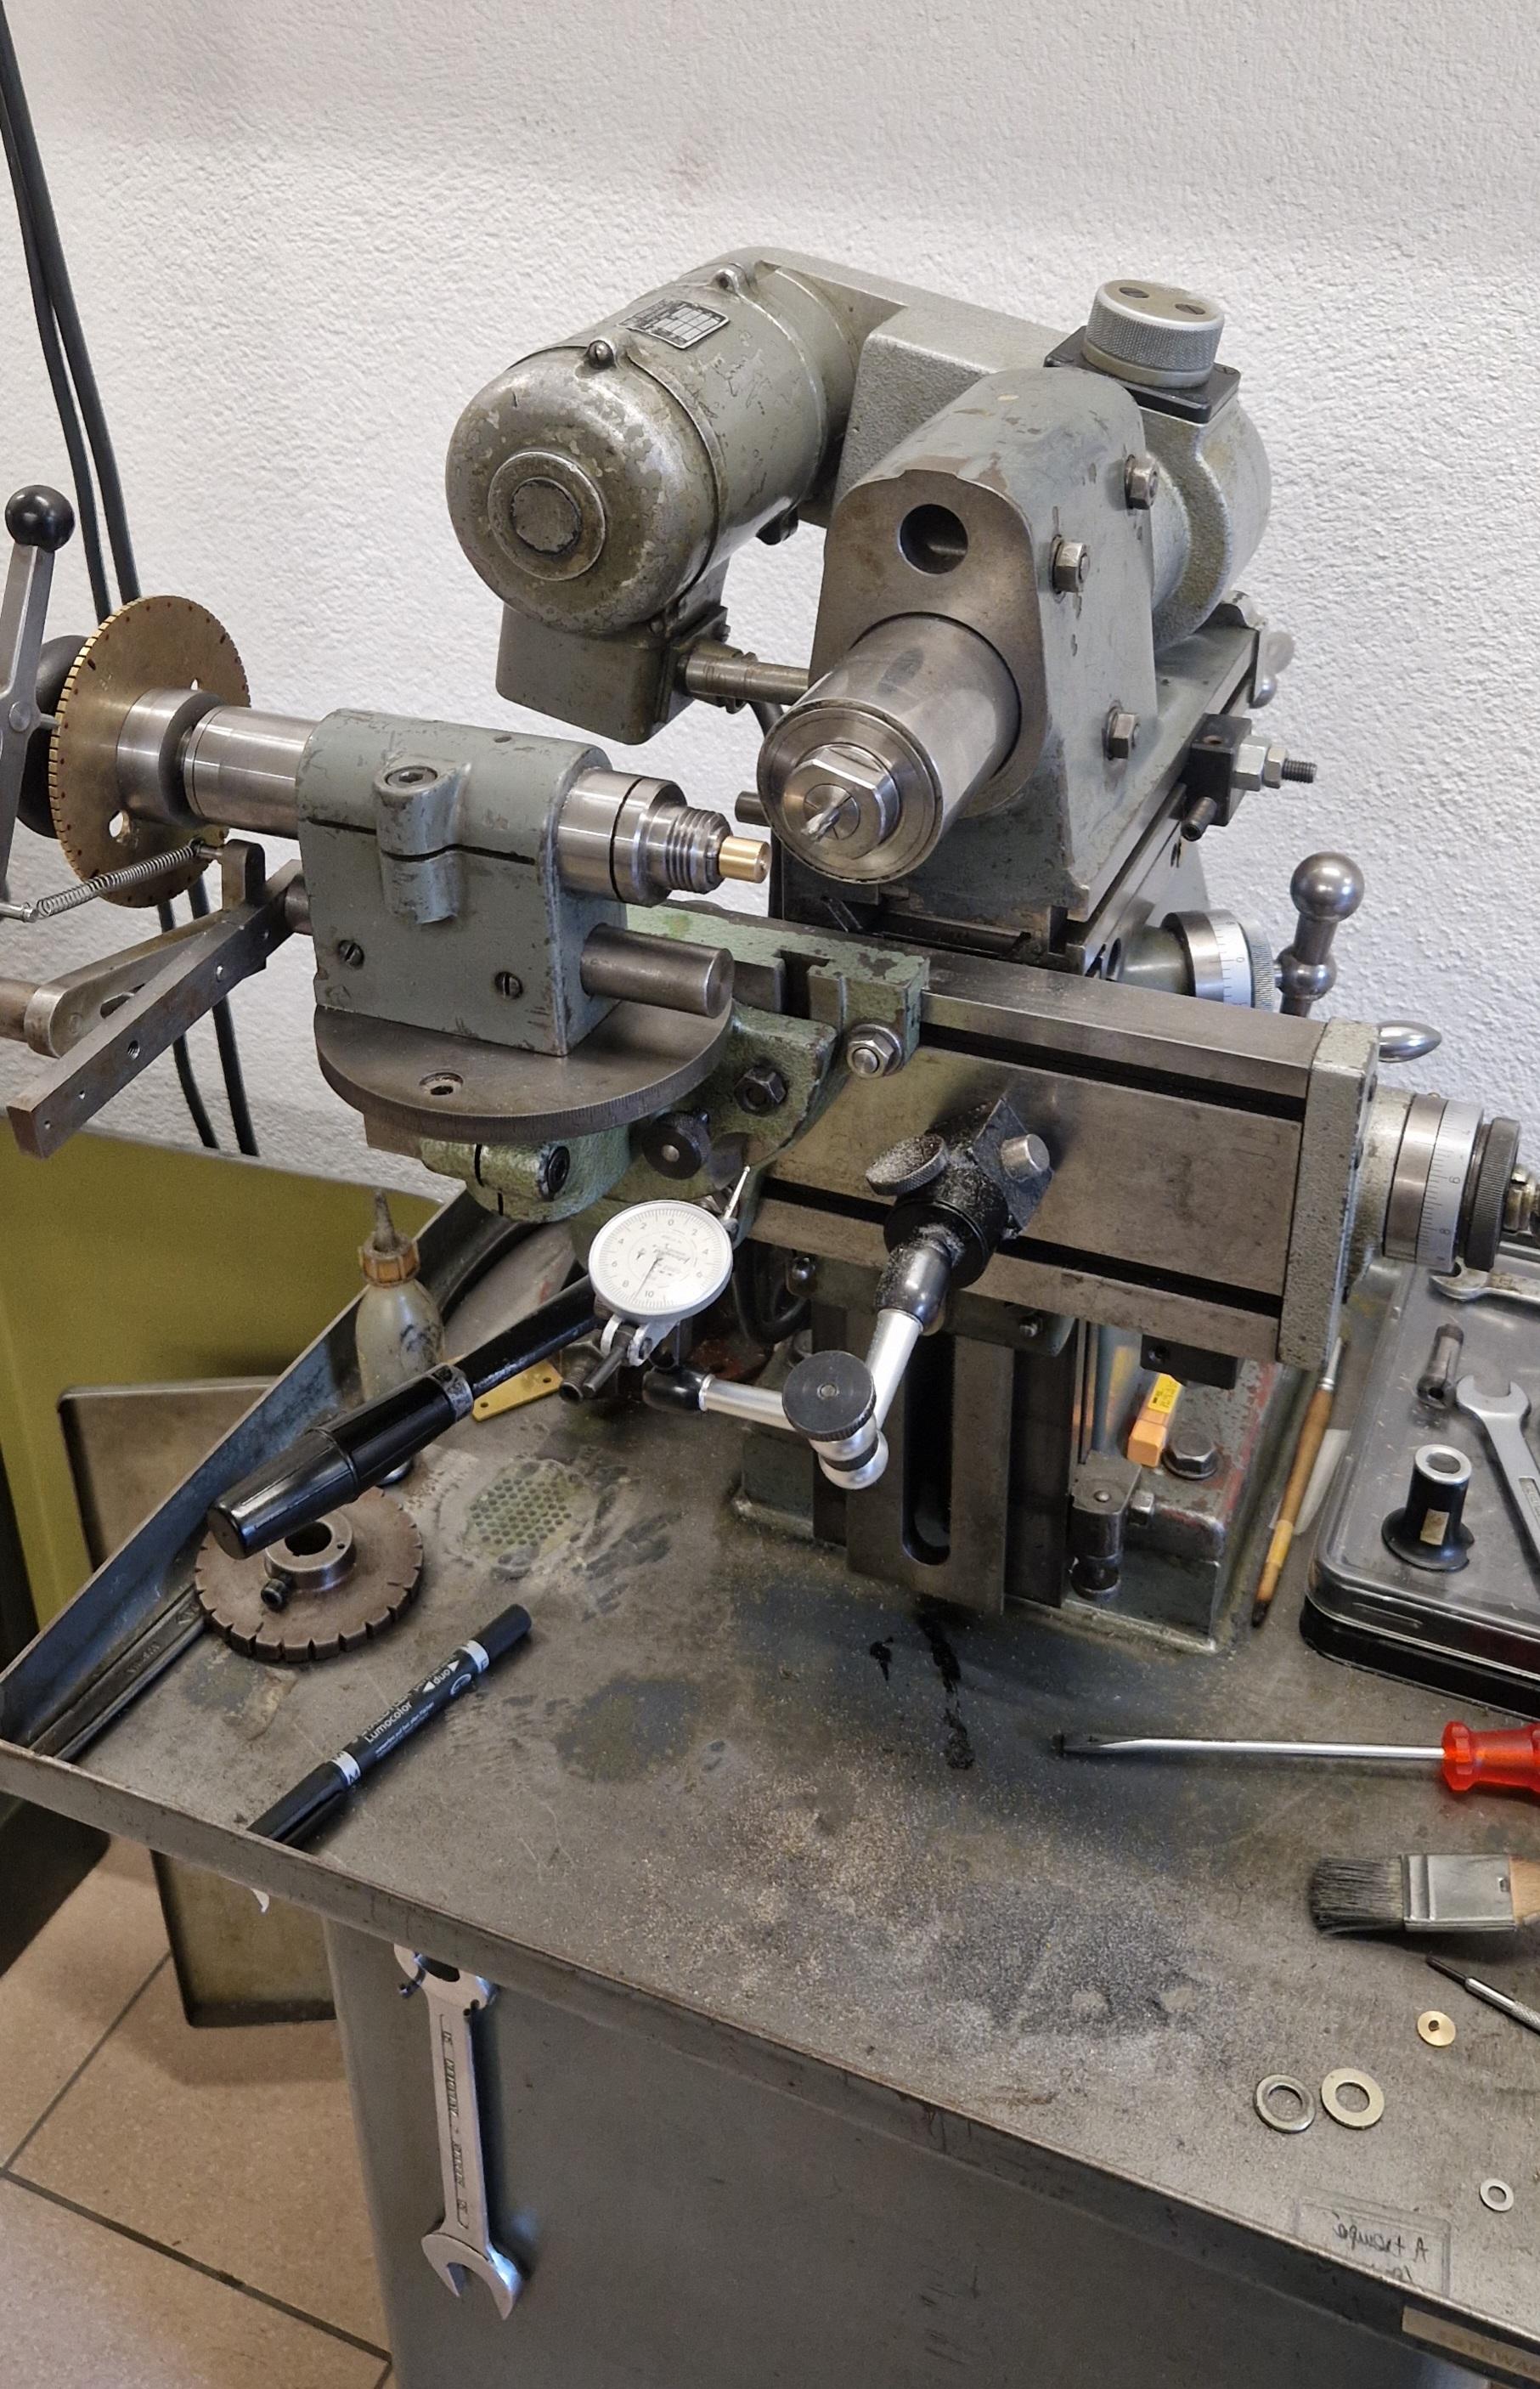
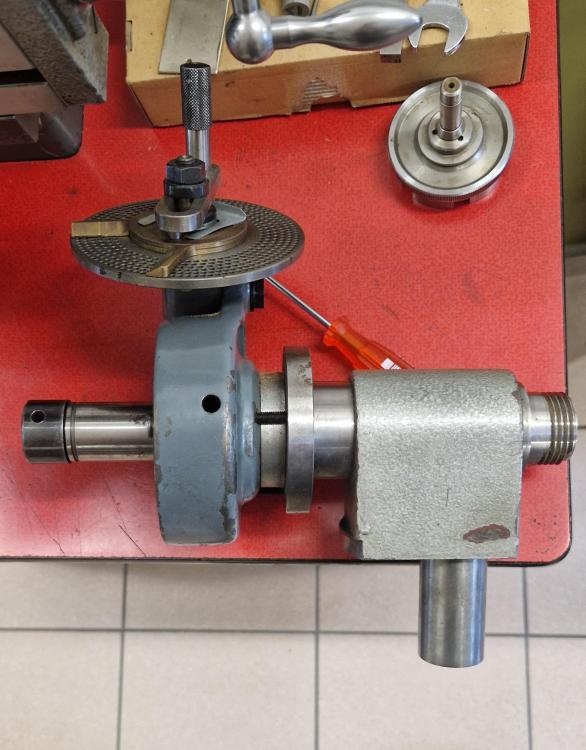
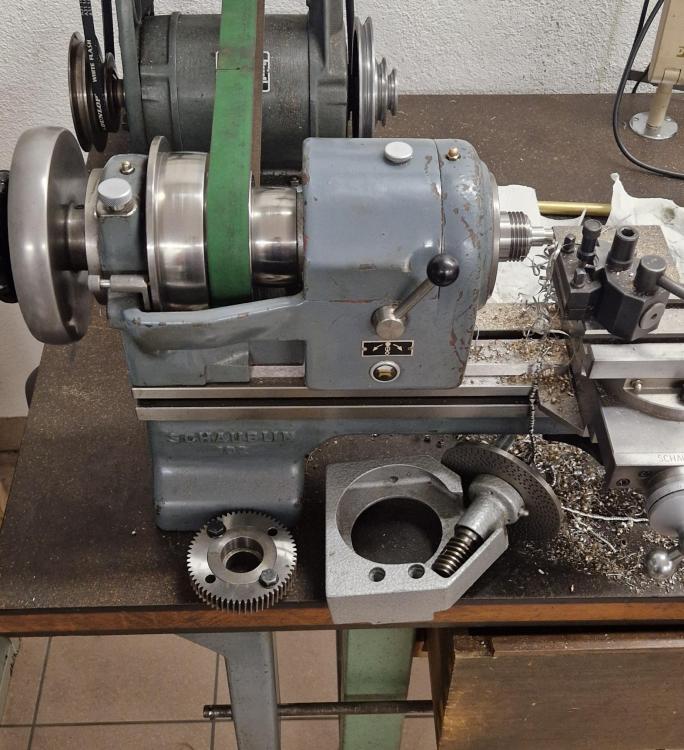
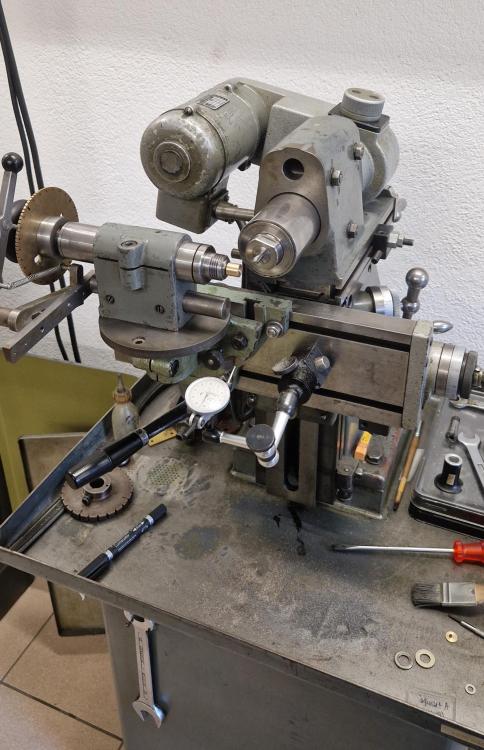
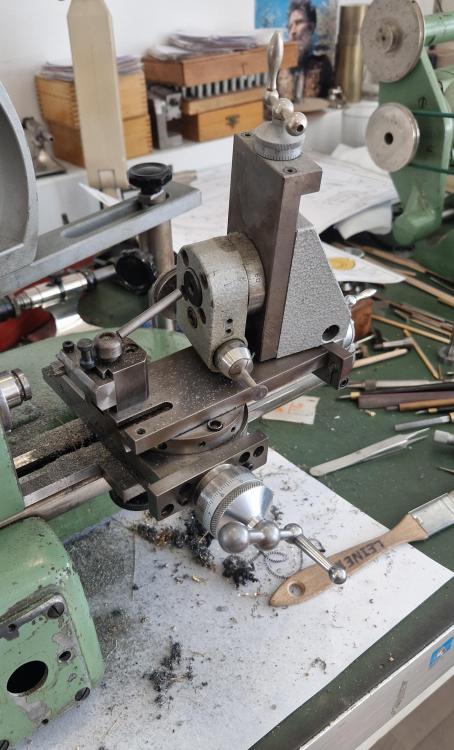
I have a little milling attachment for my WW lathe, but very rarely use it and not for wheel and pinion cutting. For that I use a small Sixis 101 milling machine. I normally do direct dividing, but sometimes have to do an odd count and use the universal index which also fits on the Sixis. Back in the day when I didn't have a mill, I would cut gearing on my Schaublin 102. It has a universal dividing attachment which fits the back of the spindle. Both it and the one for the Sixis are 60:1 ratio, and with the set of 4 index plates I can do almost any division. When I've had to do a strange high count prime number, I print a disc with the needed division and just place the plunger on the dot. Any position error is reduced by a factor of 60 so still plenty accurate. The machines are a mess in the pics as I'm in the process of making a batch of barrels for a wristwatch . This is the Sixis. The head can also be placed vertically, as can the dividing spindle. Dividing plates. The smaller ones fit another dividing spindle. Universal divider for the Sixis. I put it together with parts from an odd Sixis spindle that takes w20 collets, like the Schaublin 102, and a dividing attachment from a Schaublin mill. The dividing attachment for the 102. The gear fits in place of the handwheel at the back of the headstock. And the little milling attachment for the WW lathe. I just set it on the slide rest to illustrate the size, you can see from the dust on it it really doesn't get used much. I think only when I change bearing in the head, to kiss the collet head seat (grinding wheel still in the milling attachment).

 4 points
 -
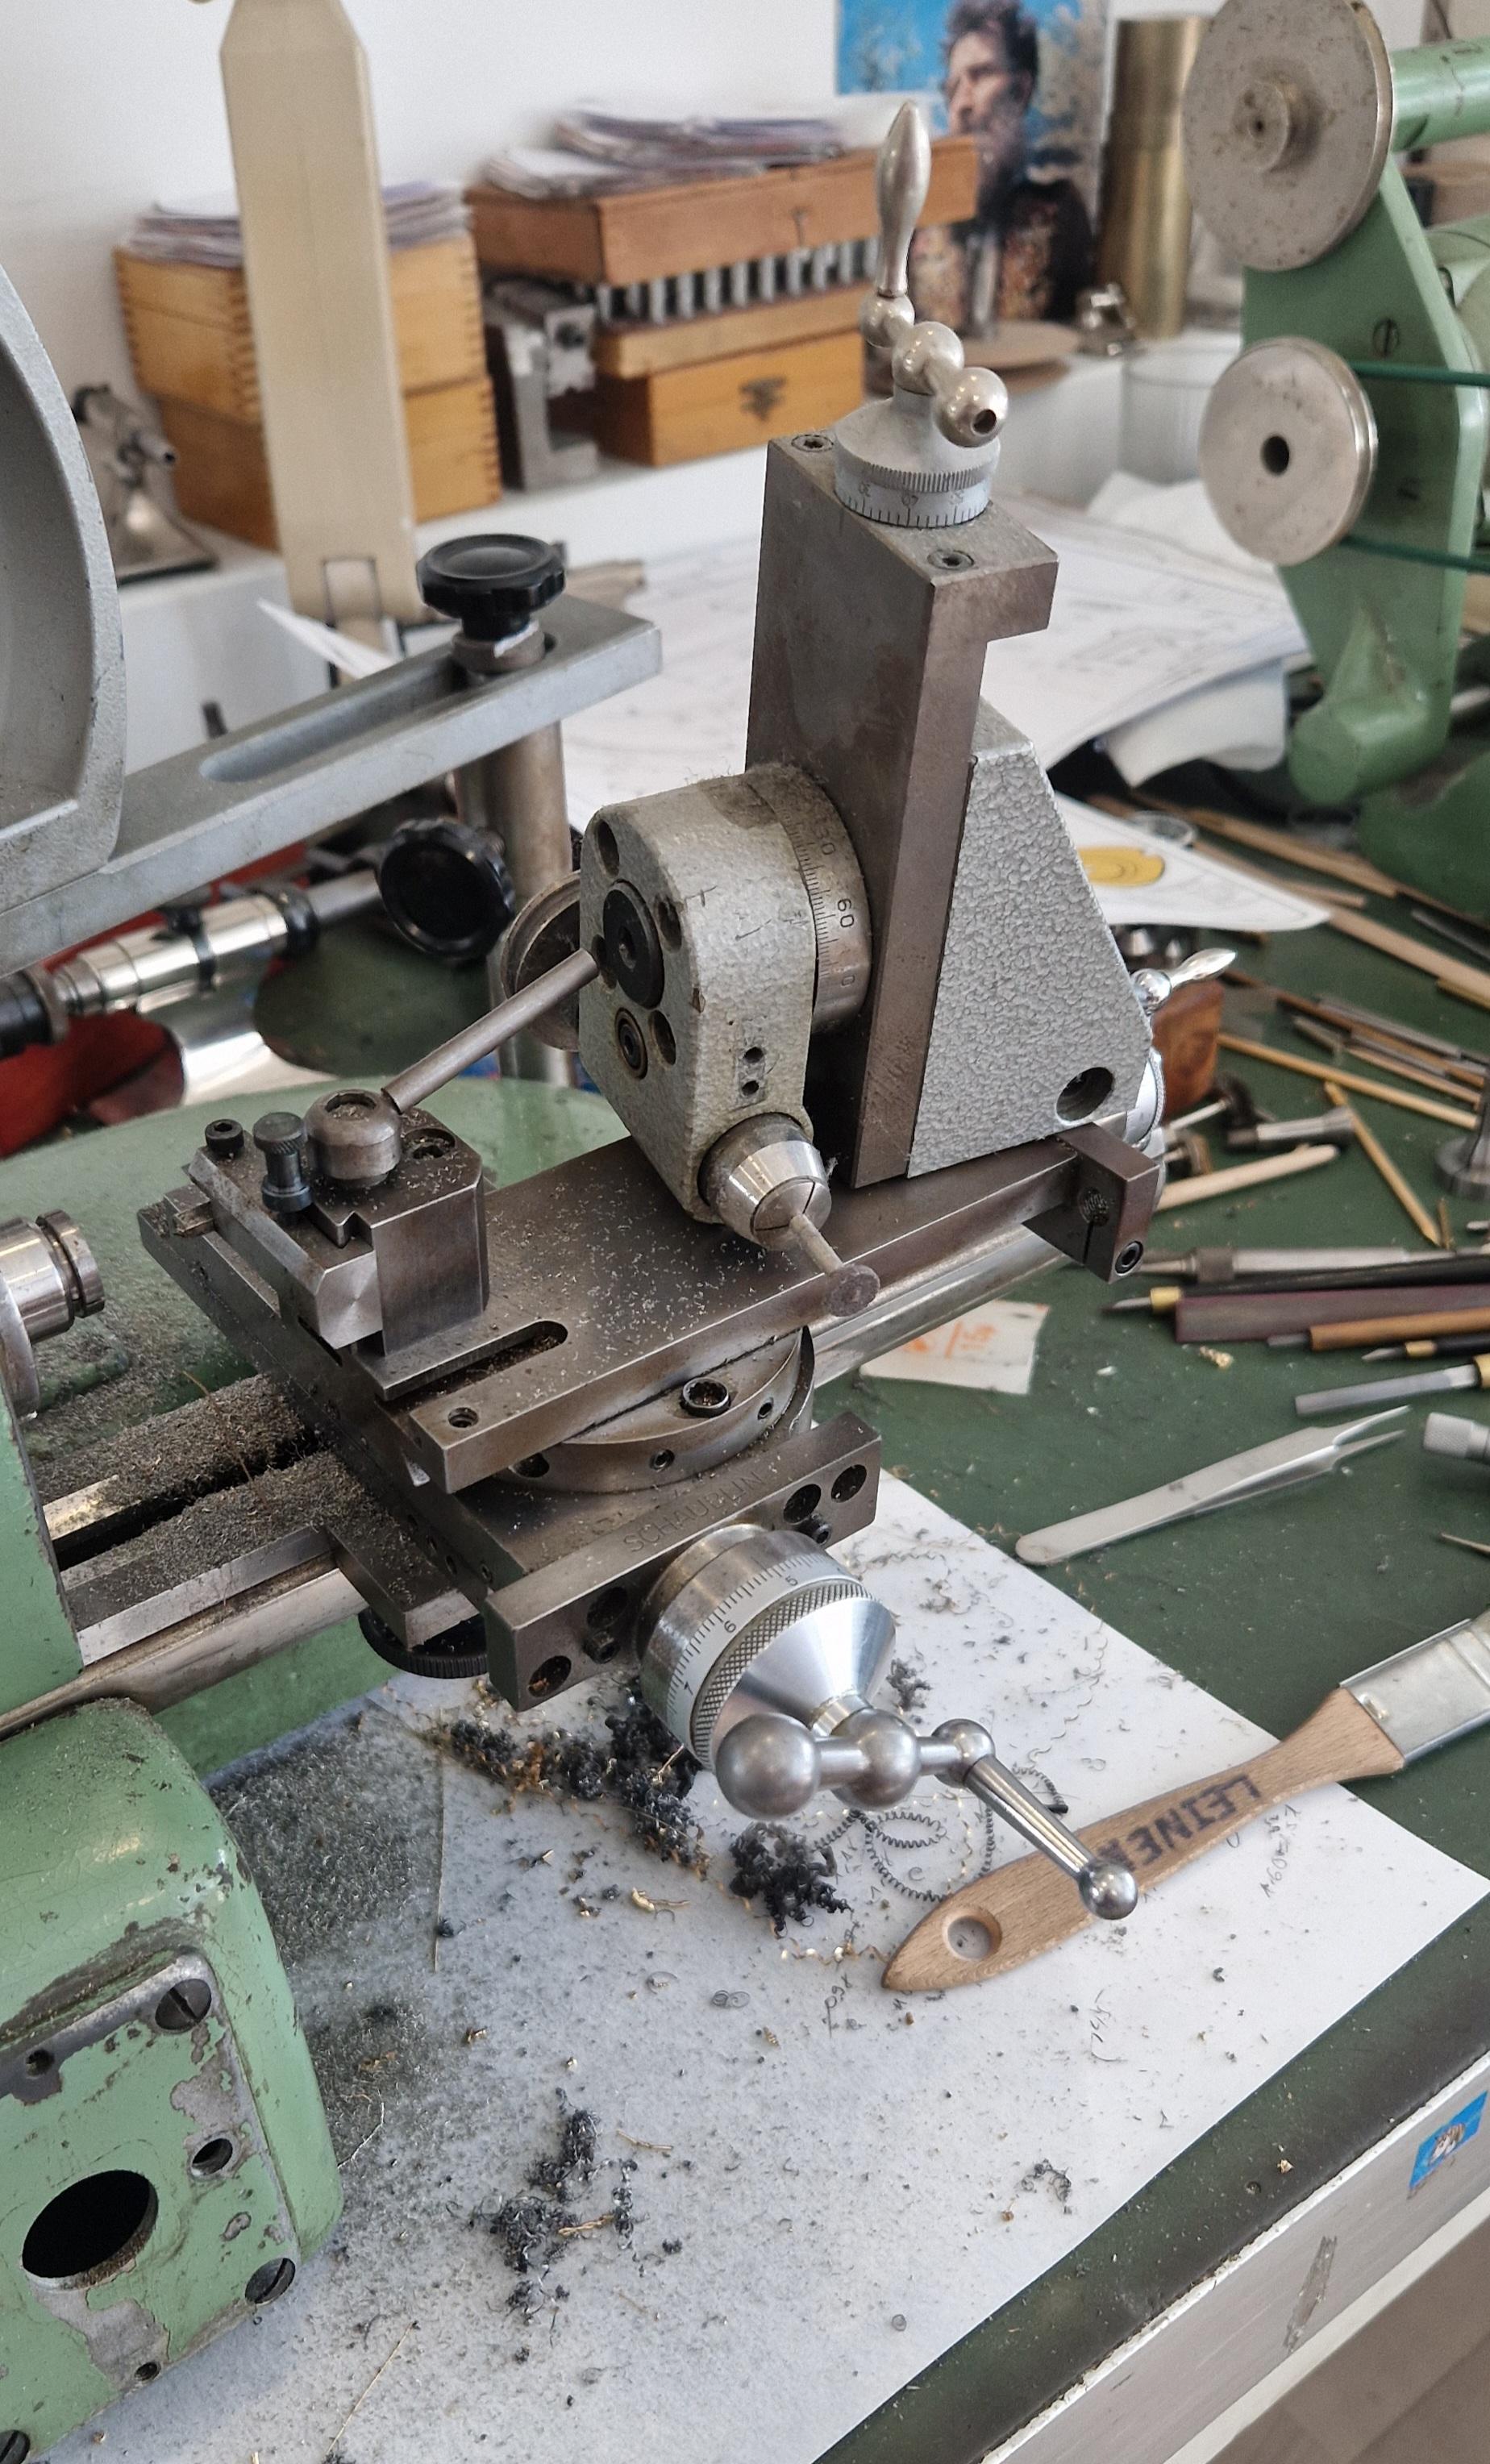
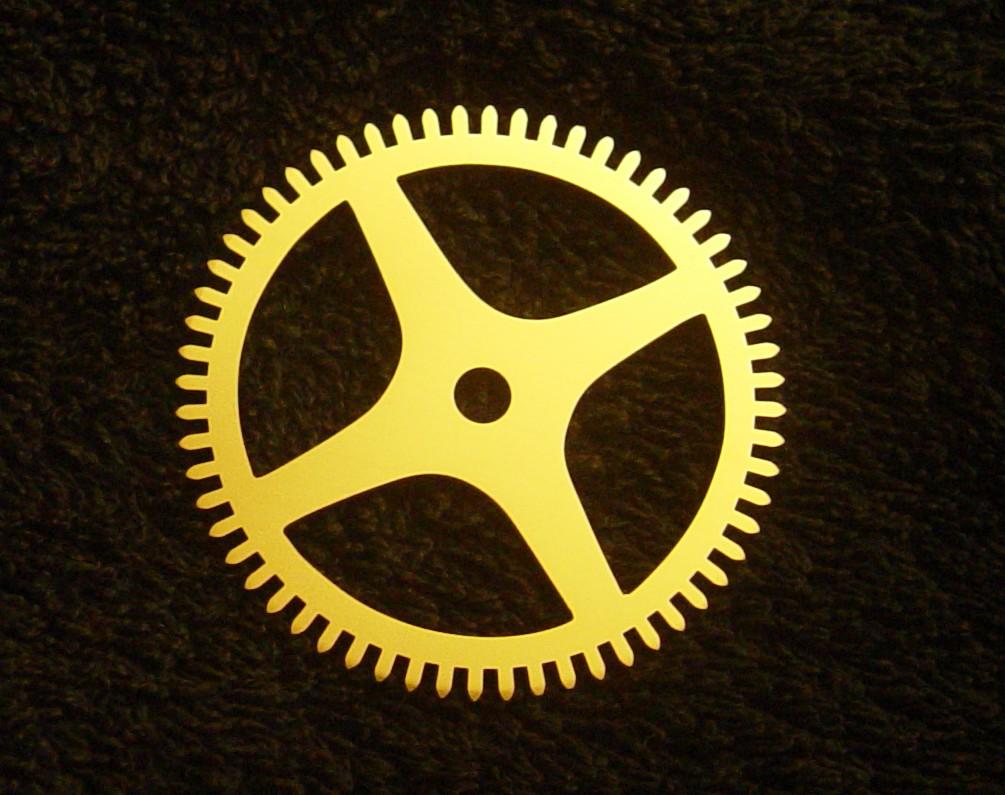
You might like to see the contraption that I made for indexing on my Chinese lathe. This is a 4 inch rotary table with dividing plates that I attached to my lathe mandrel using a drawbar. It is completely manually operated. No electronics or computer needed. I have used it to make a 60 tooth clock wheel. I use a Sherline headstock on a vertical slide to drive the gear cutter. The wheel blank is mounted on an aluminium "superglue arbor." This is the modern equivalent of a shellac chuck, and allows the wheel to be centre bored, trued and the teeth cut in a single setup, ensuring that concentricity is maintained. The finished wheel after crossing. I have not tried to make small watch parts on this lathe. The runout on the mandrel bearings may be too high for that. I won't know unless I try.
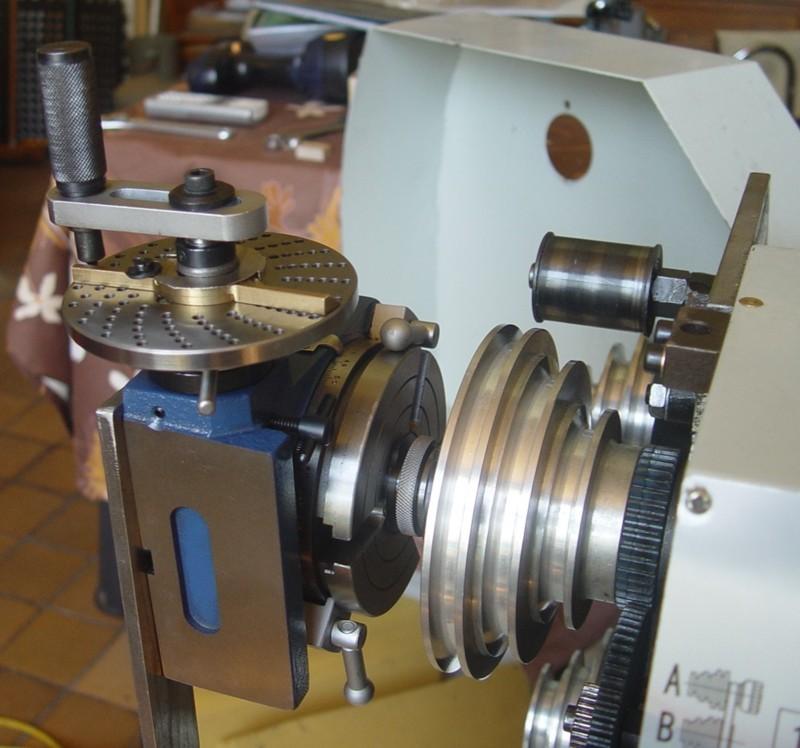

 4 points
 -
Success. I just received the clock from across the pond where it was expertly repaired by forum member known as MikeEll. After I so disastrously mangled the gears by failing to release the mainspring tension, this one was a goner. With forum help I attempted to straighten out several gear teeth only completely to break off a tooth. Mike came to my aid and we have been working together for about two months. The clock is absolutely beautiful and will be passed down to my grandson as coming finally from his great, great, great uncle. But now I intend to keep it a lot longer than originally planned. Thank you so much Mike for your expert work and willingness to help me out. Pic attached. (I love this forum.)
 4 points
 -
I had another paragraph but I took it out. Basically my interpretation of the above quote would be conceivably someday in the future will come to the group they will go through this discussion and they will reach the? The problem wasn't solved as we don't get an answer to how was solved at all. So somebody's going to be unhappy someday in the future because they don't know what the problem was. Watch repair is a continuous lifelong learning process. Were unfortunately along the way we all make mistakes and with time we make less mistakes. Unfortunately we still from time to time make mistakes. But with time they become fewer and far between its part of learning and for those of us helping on the group we would like to know what the problem was it will help us to help somebody else in the future.4 points
-
If I were you I'd be very pleased with the result so far, and quit while I'm ahead.4 points