Leaderboard


Popular Content
Showing content with the highest reputation since 04/25/24 in all areas
-
Hi all, I did ad the Google Adsense program to this site quite some time ago in order to attempt to reduce some of the costs of this site - which it did. I never did enjoy the look of the site clustered with ads and all sorts of tricks Google plays in order to garner clicks. In fact I hated it. Yesterday I decided to ditch Google Adsense and remove all ads from the site with immediate effect. I hope this will help to make the site more enjoyable and, hopefully, even faster loading.20 points
-
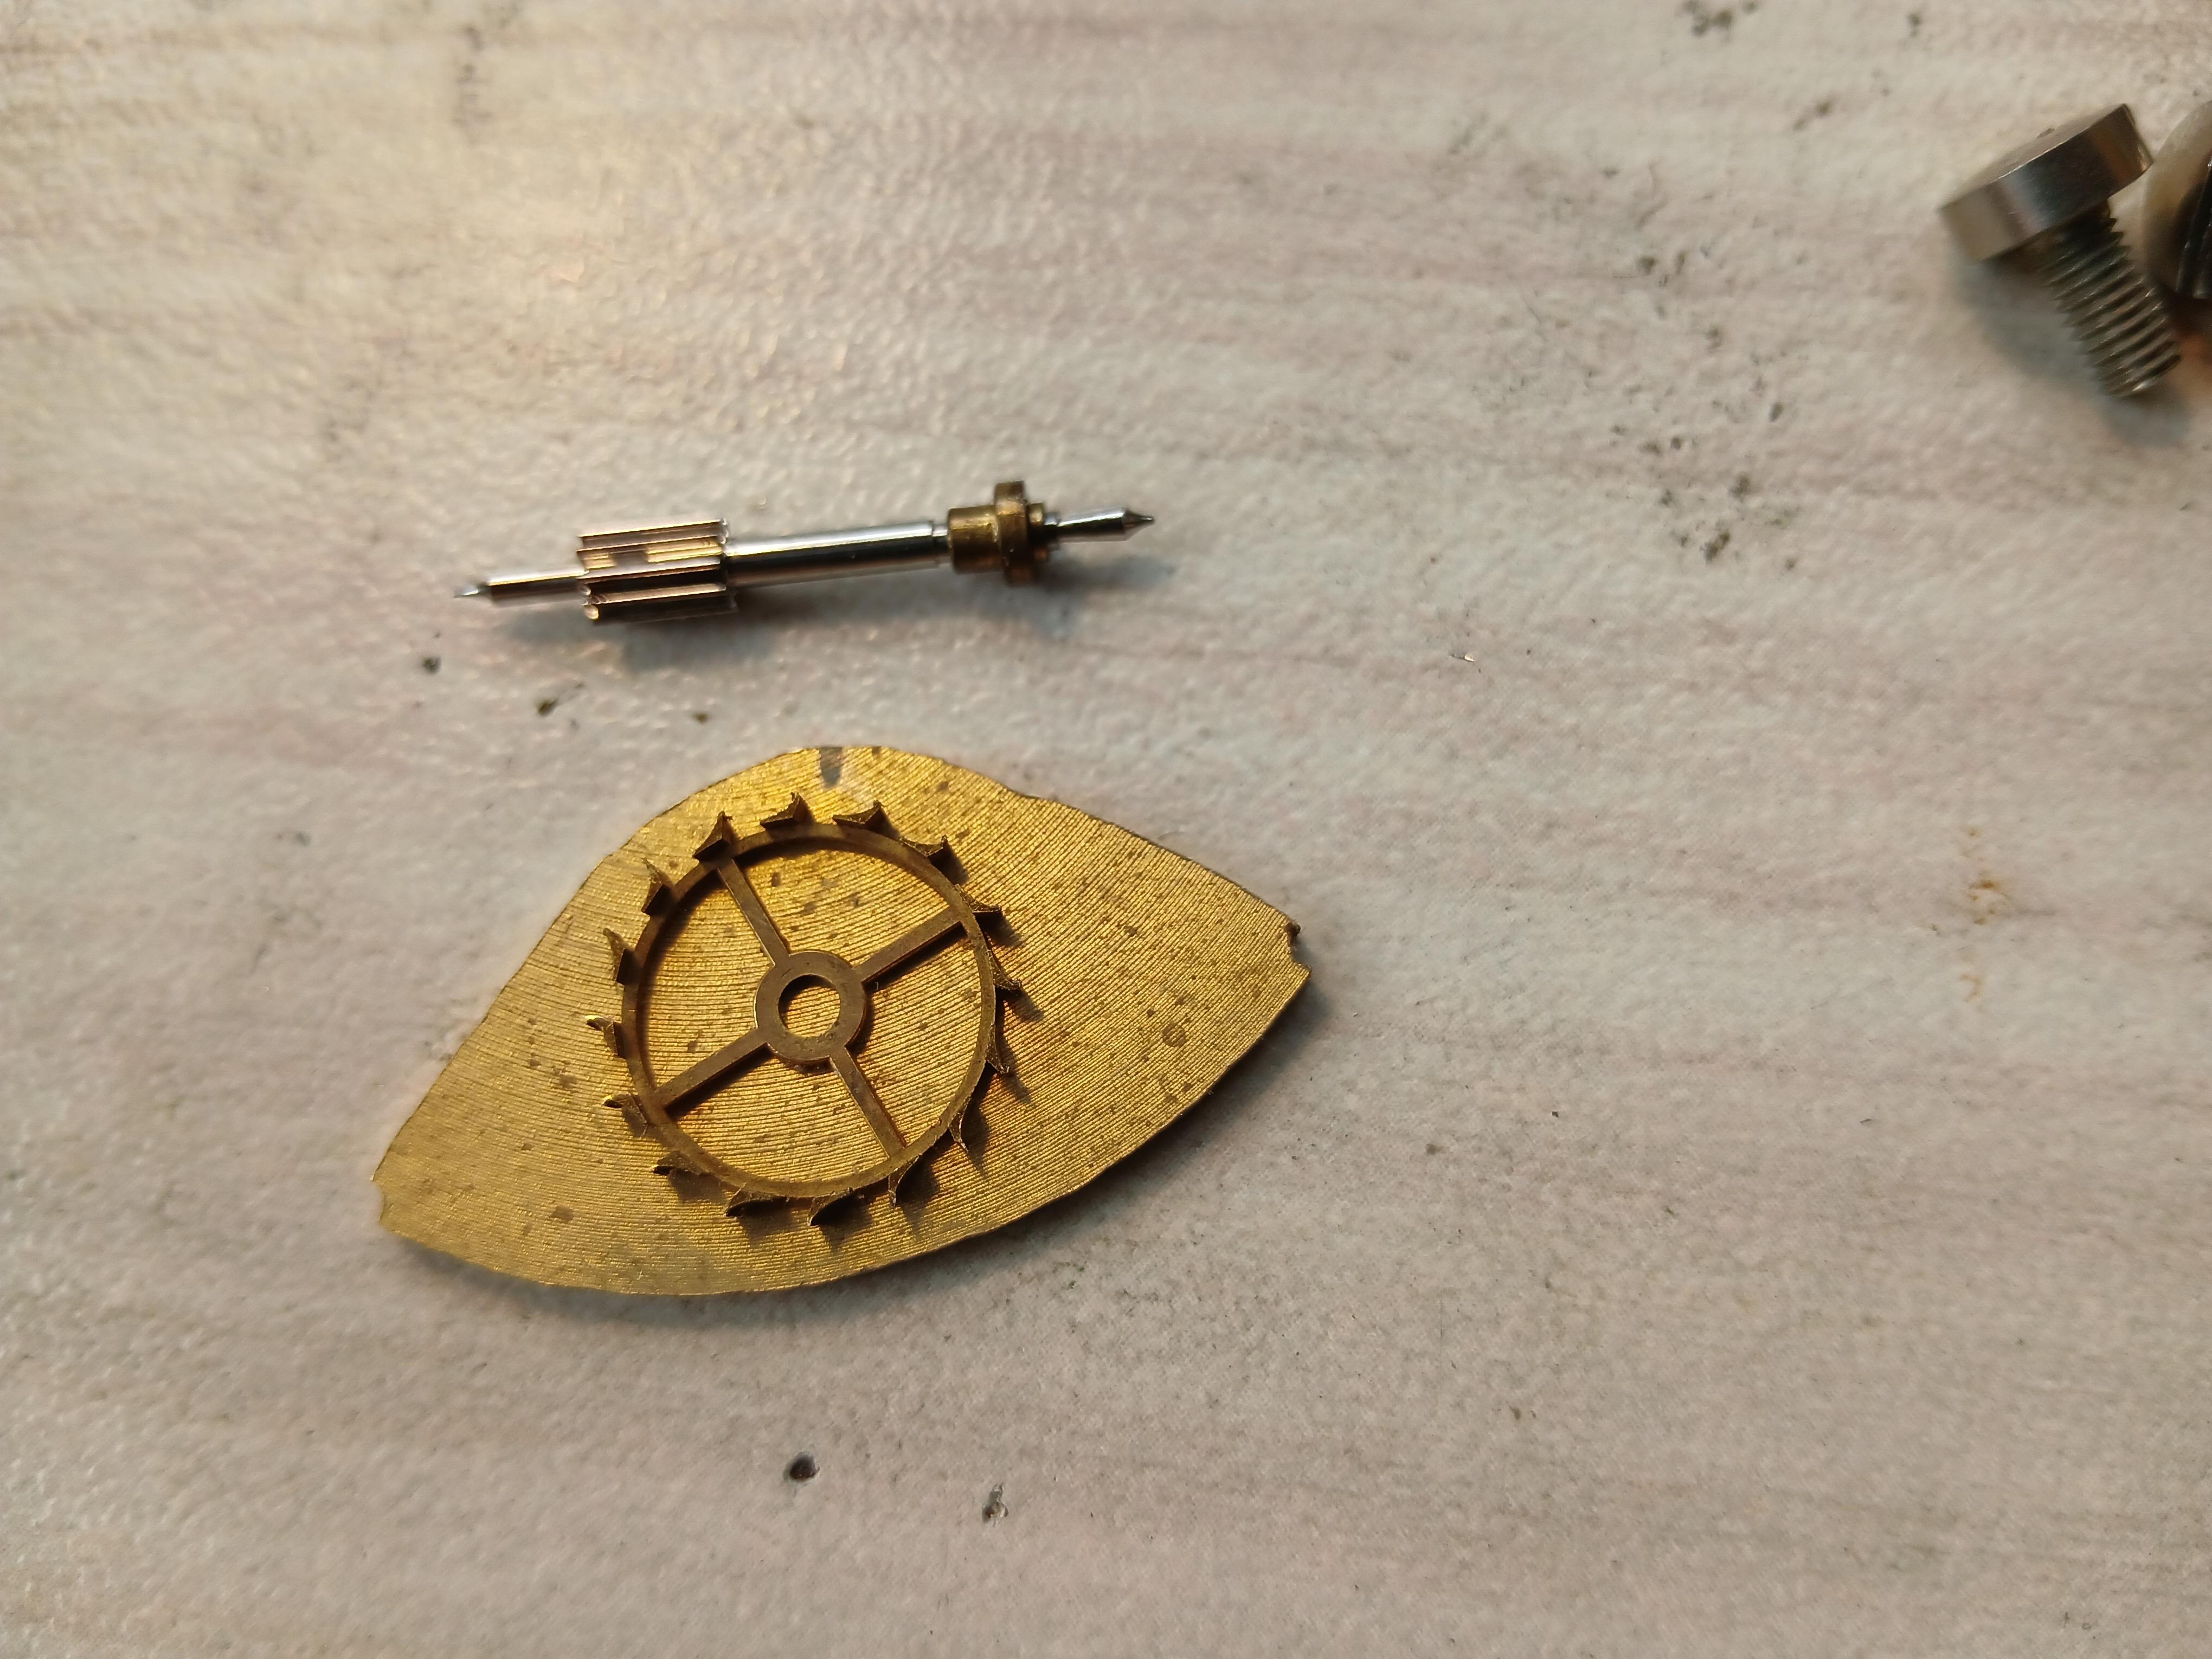
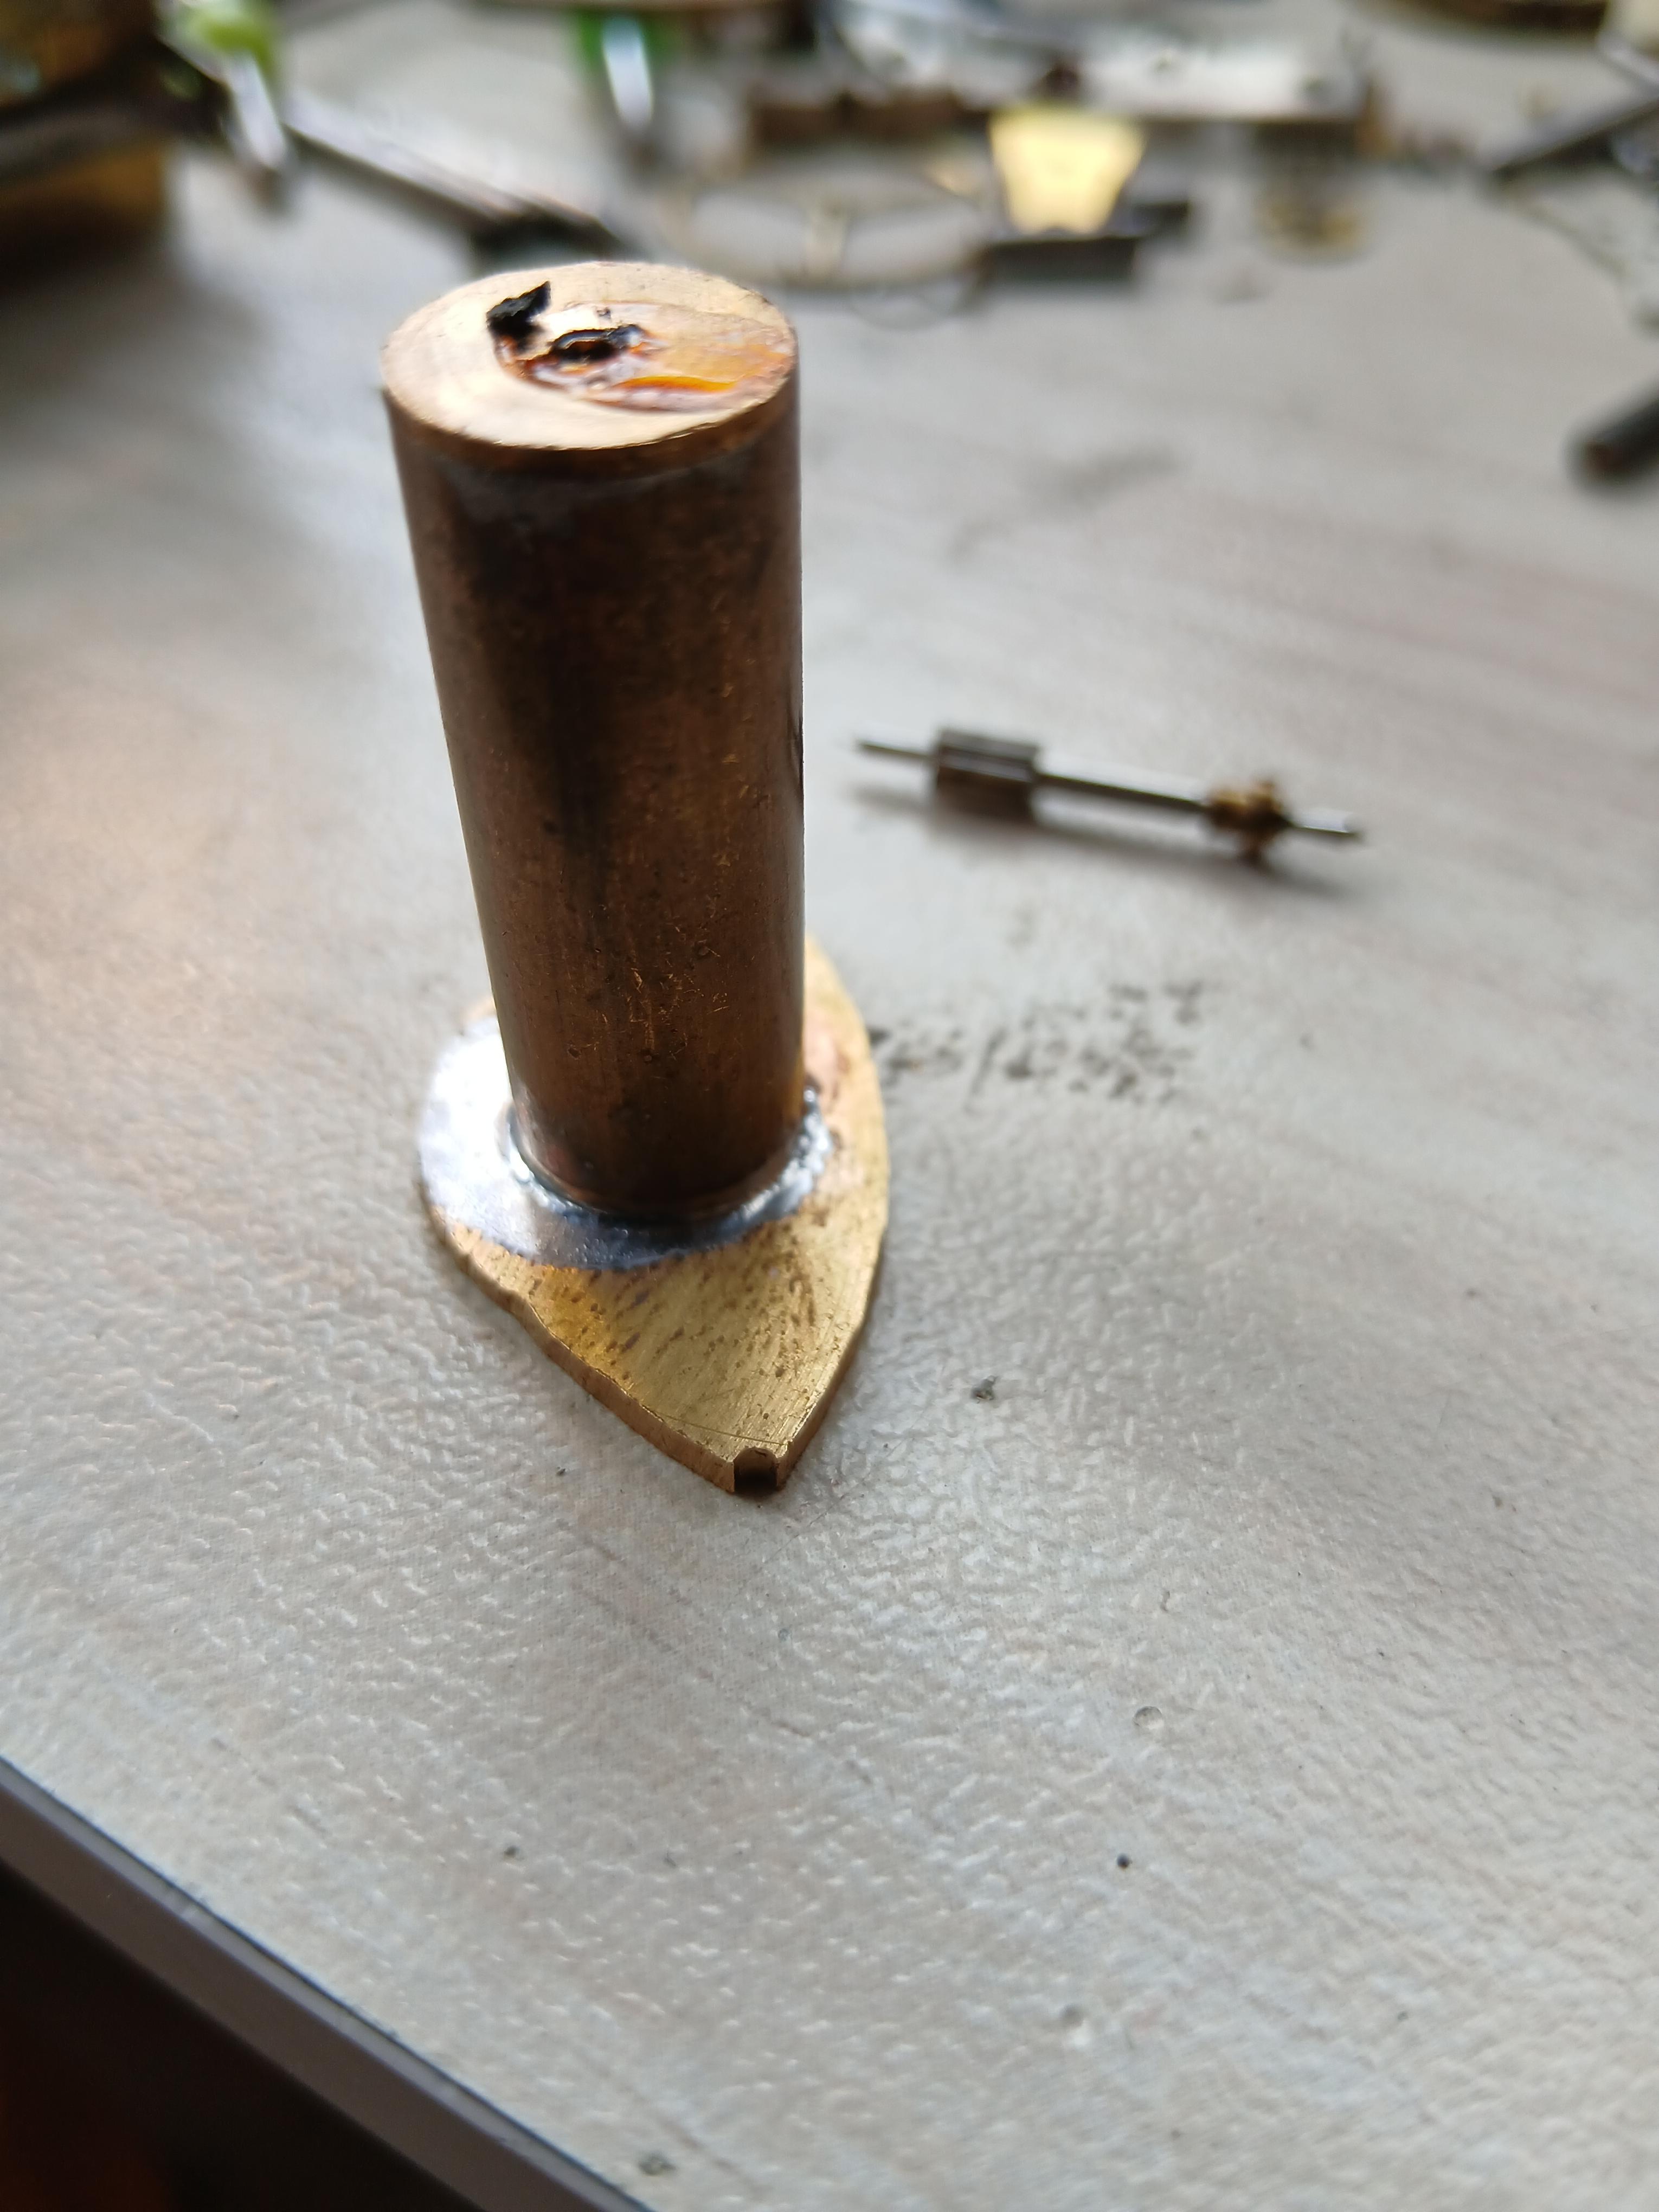
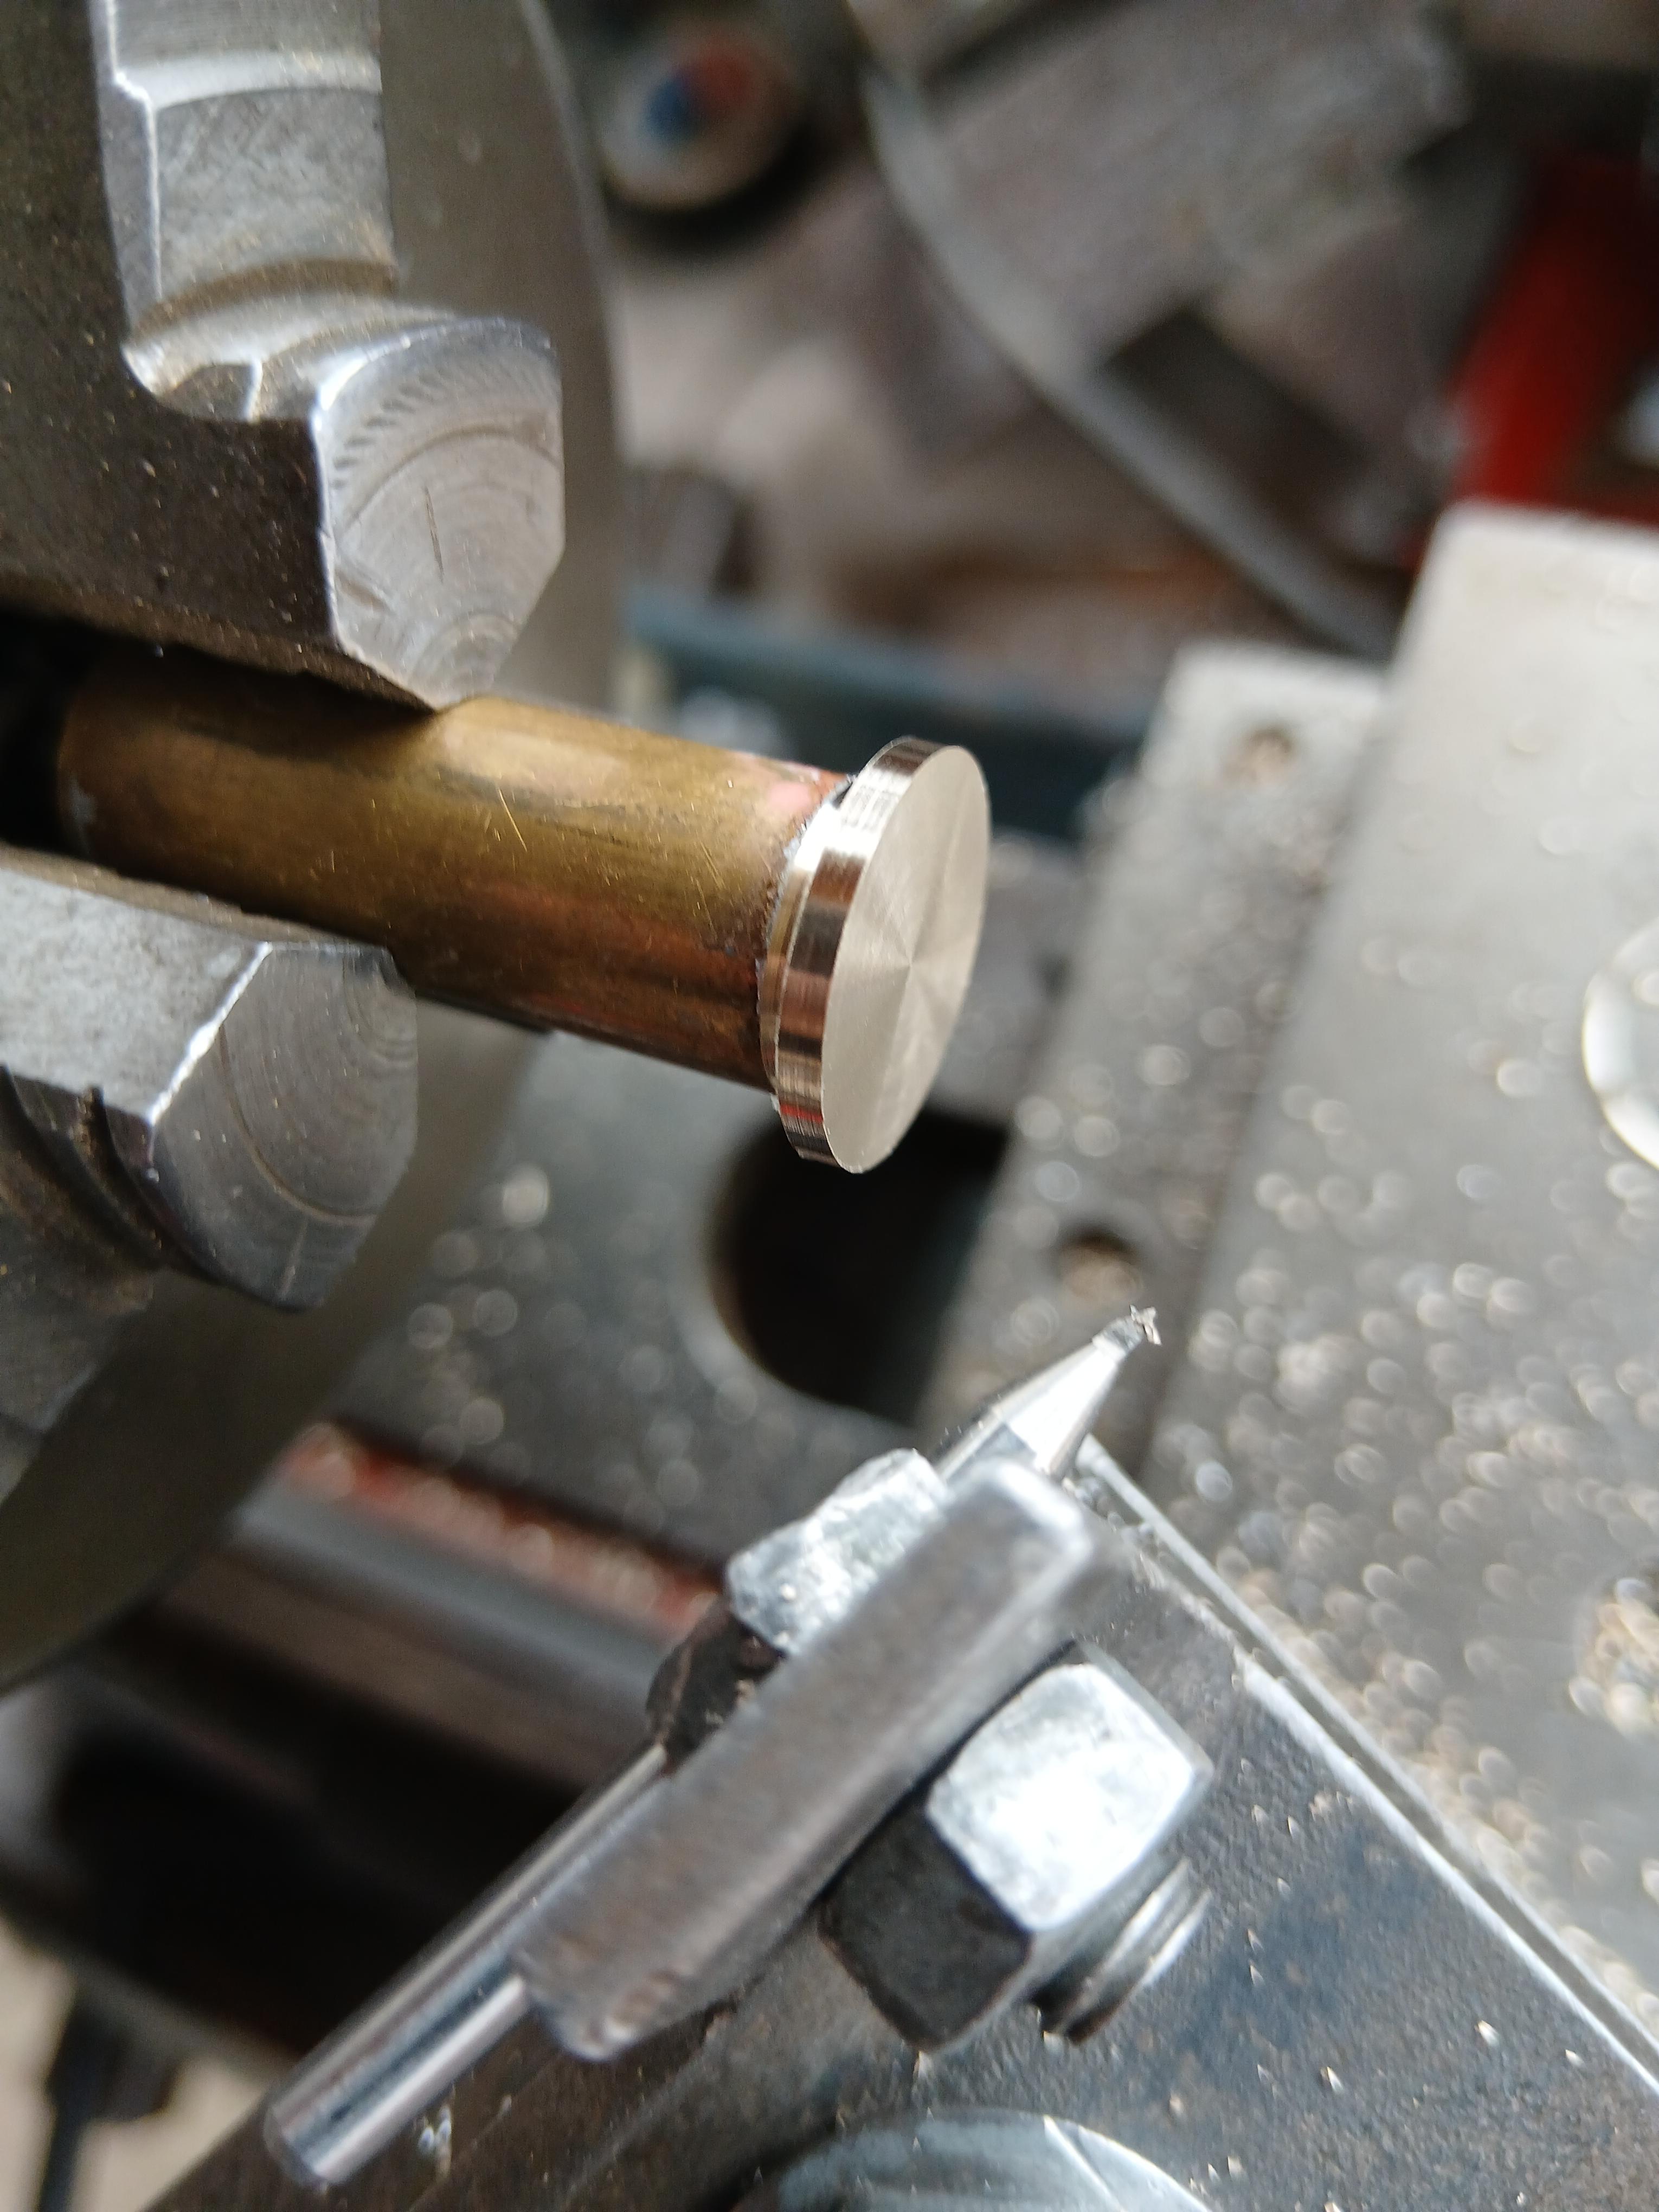
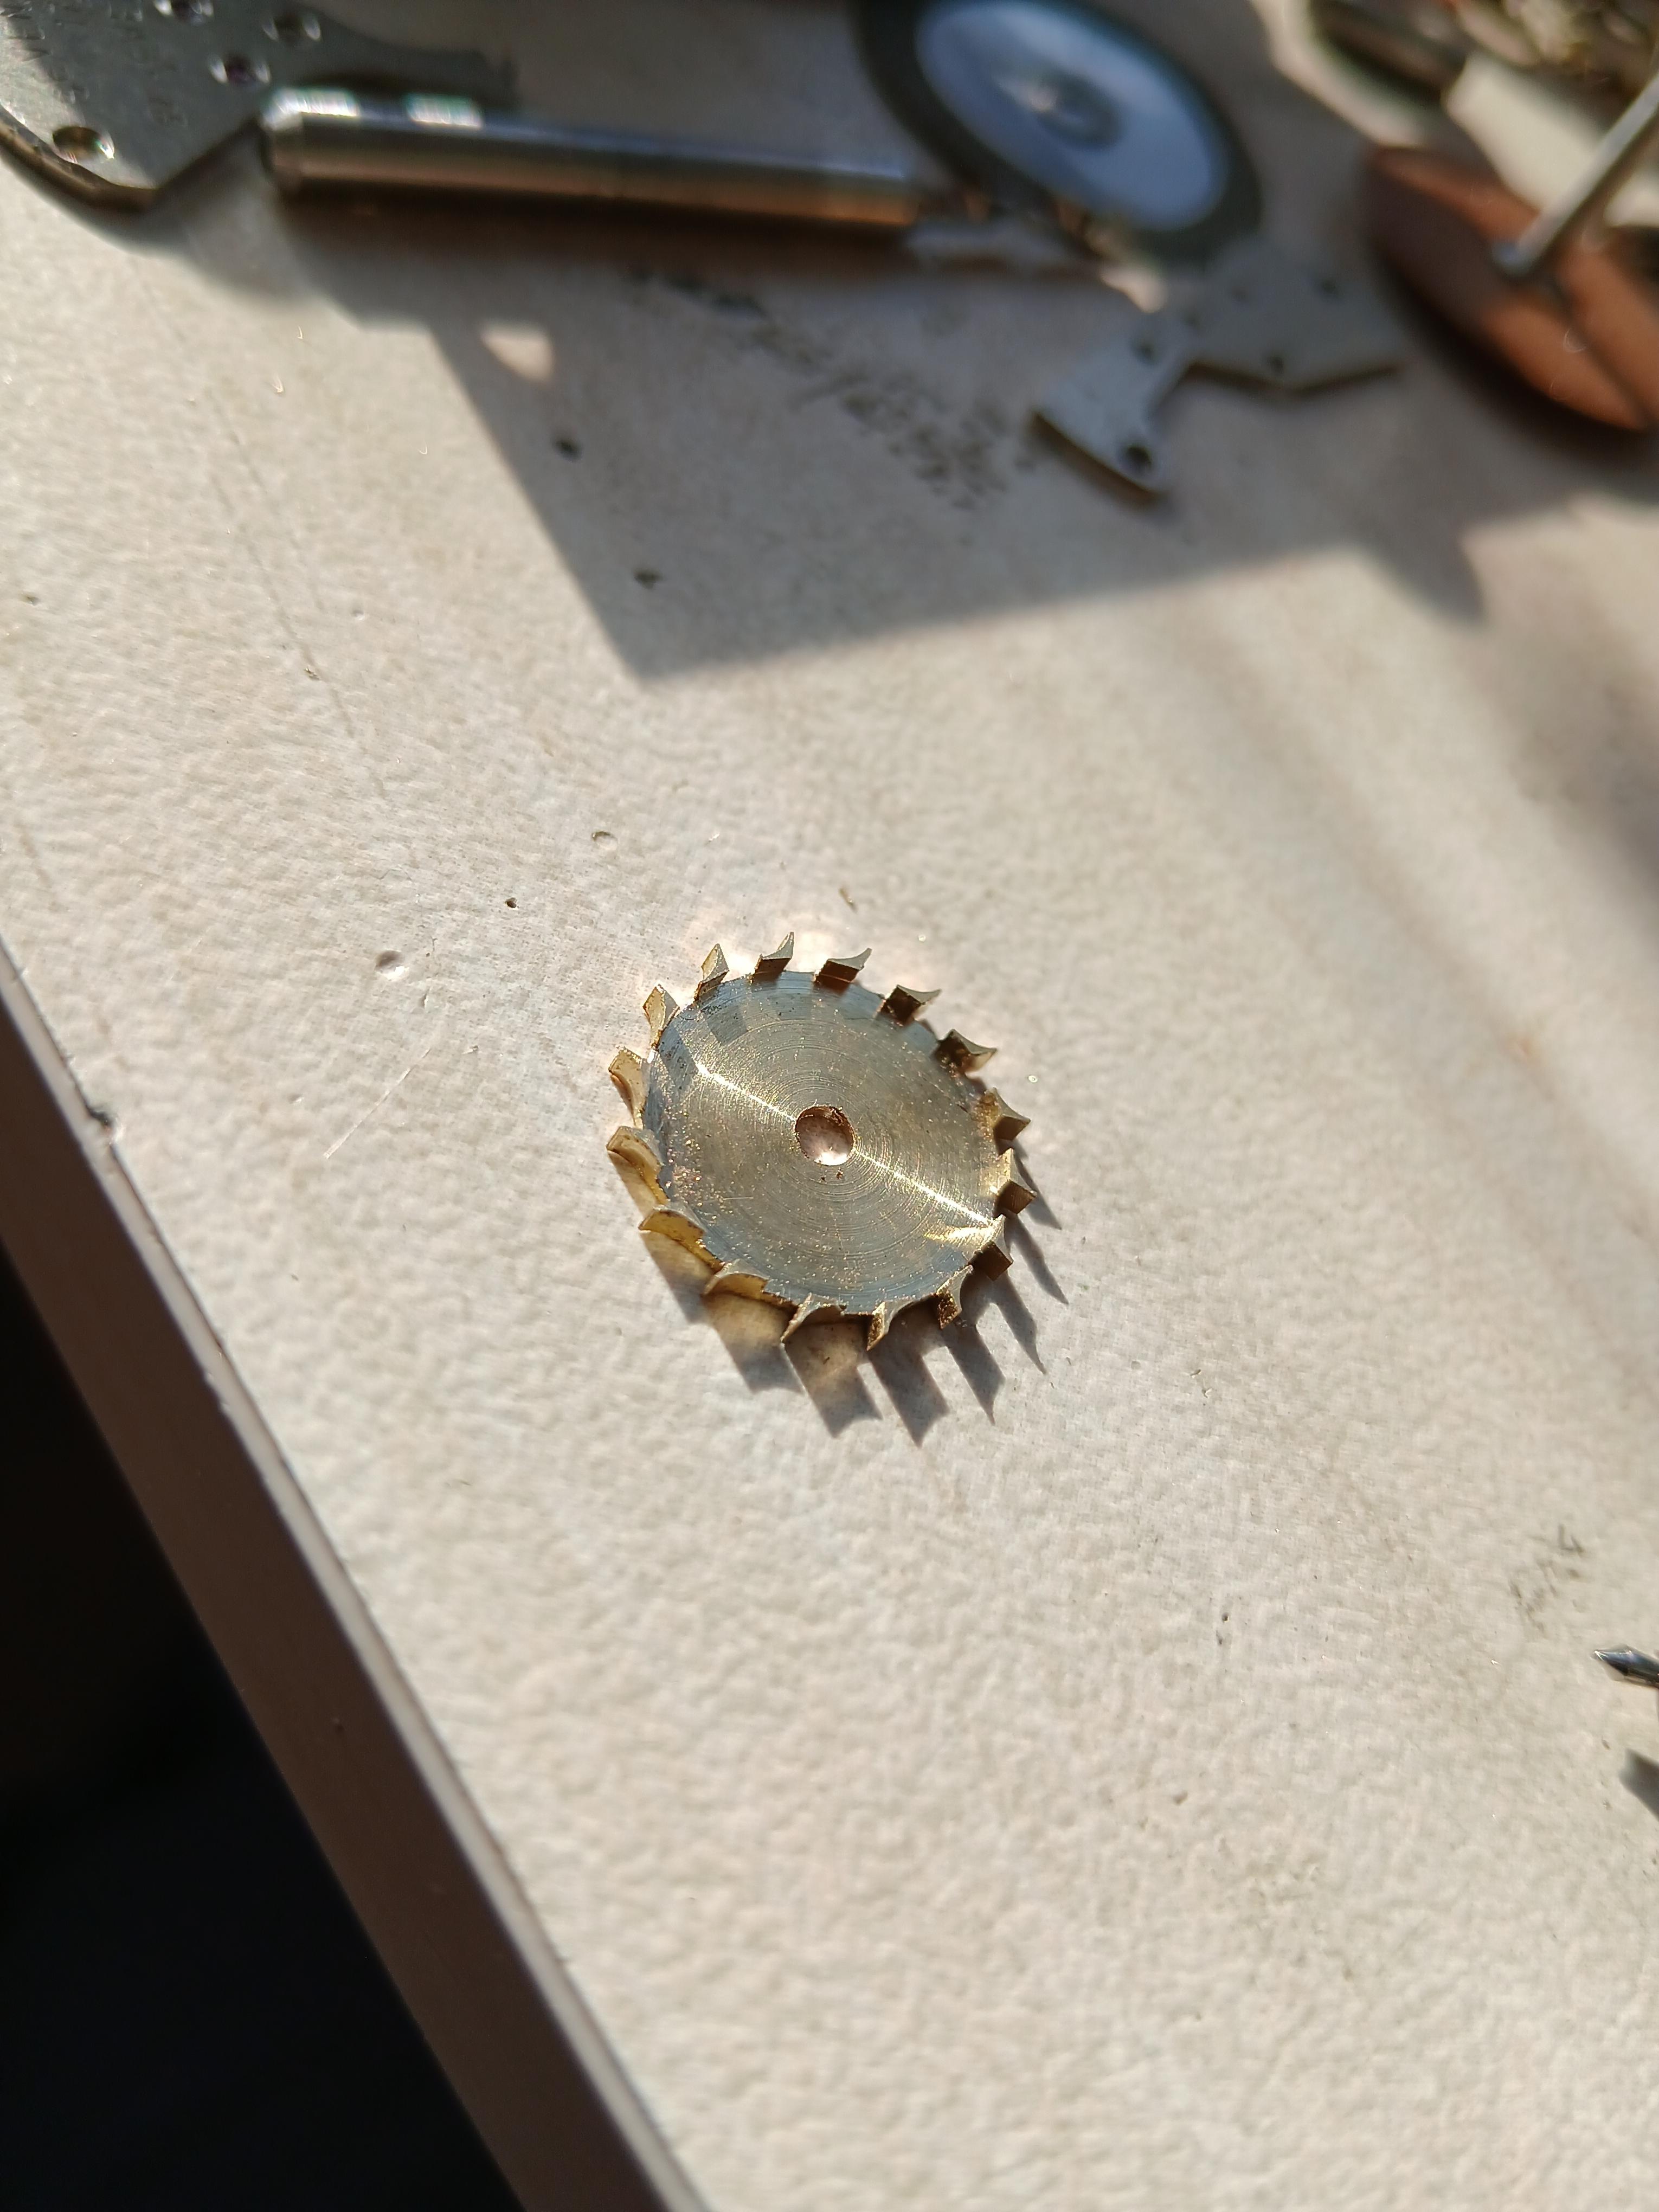
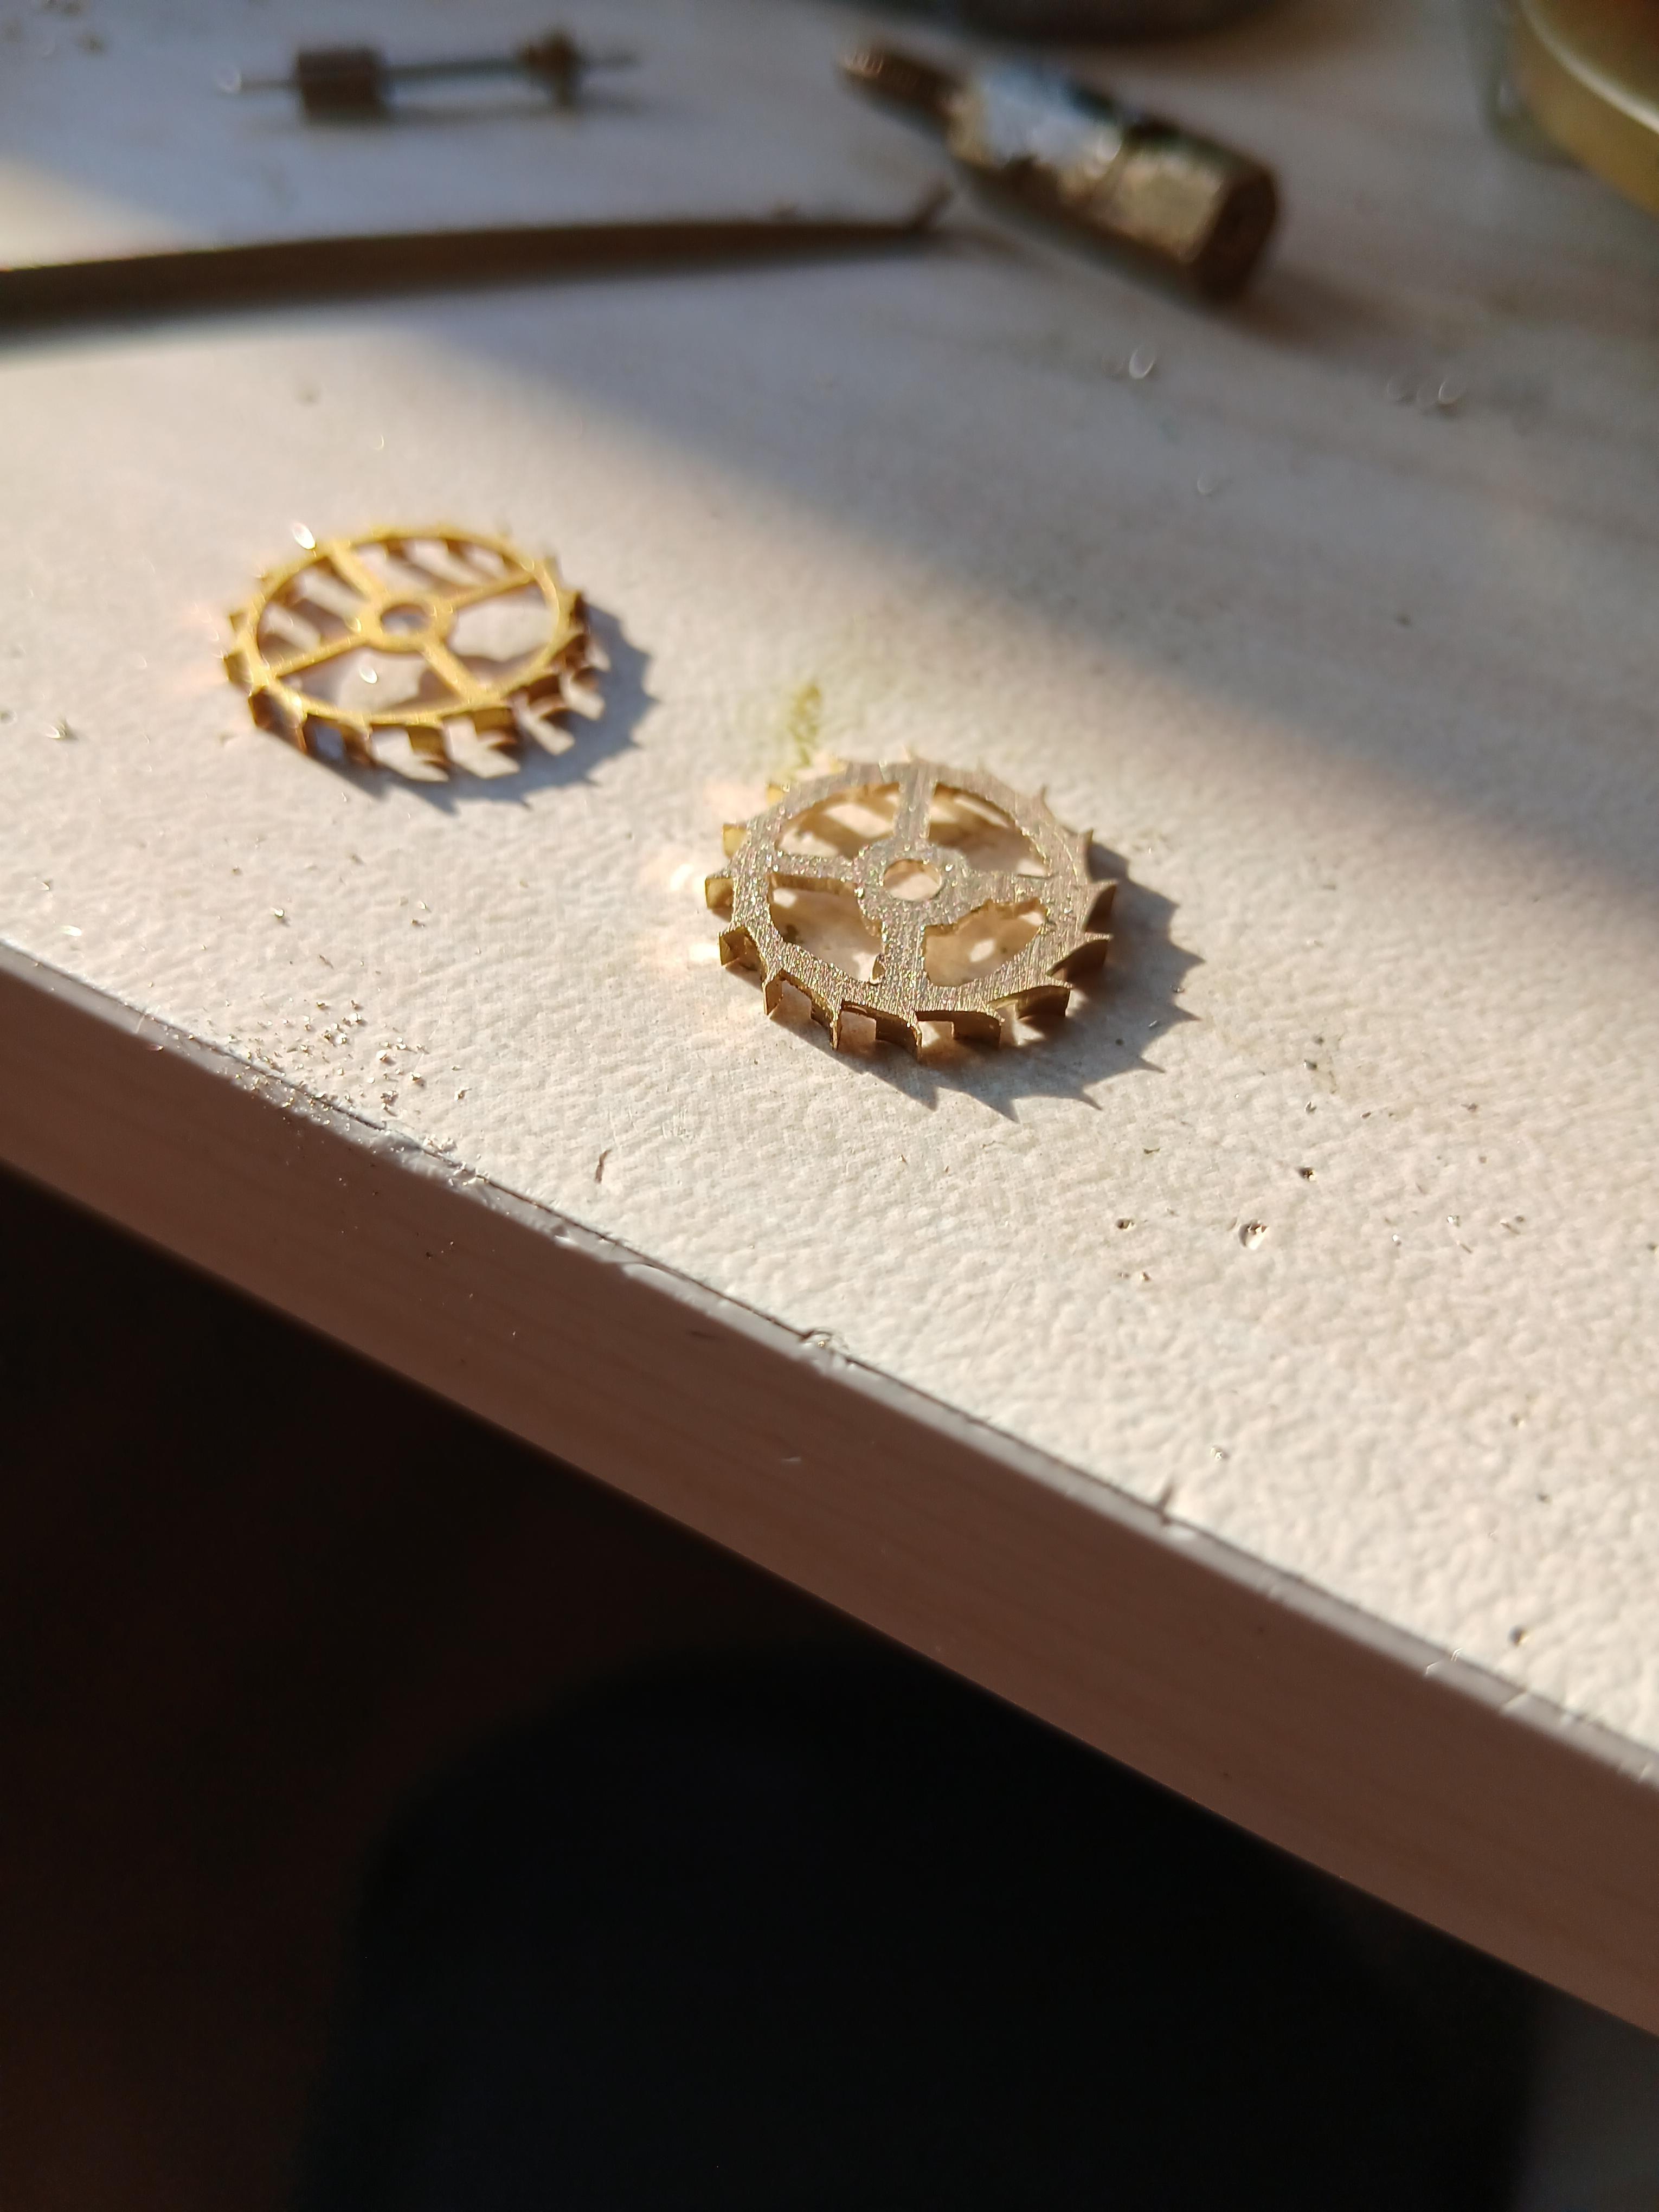
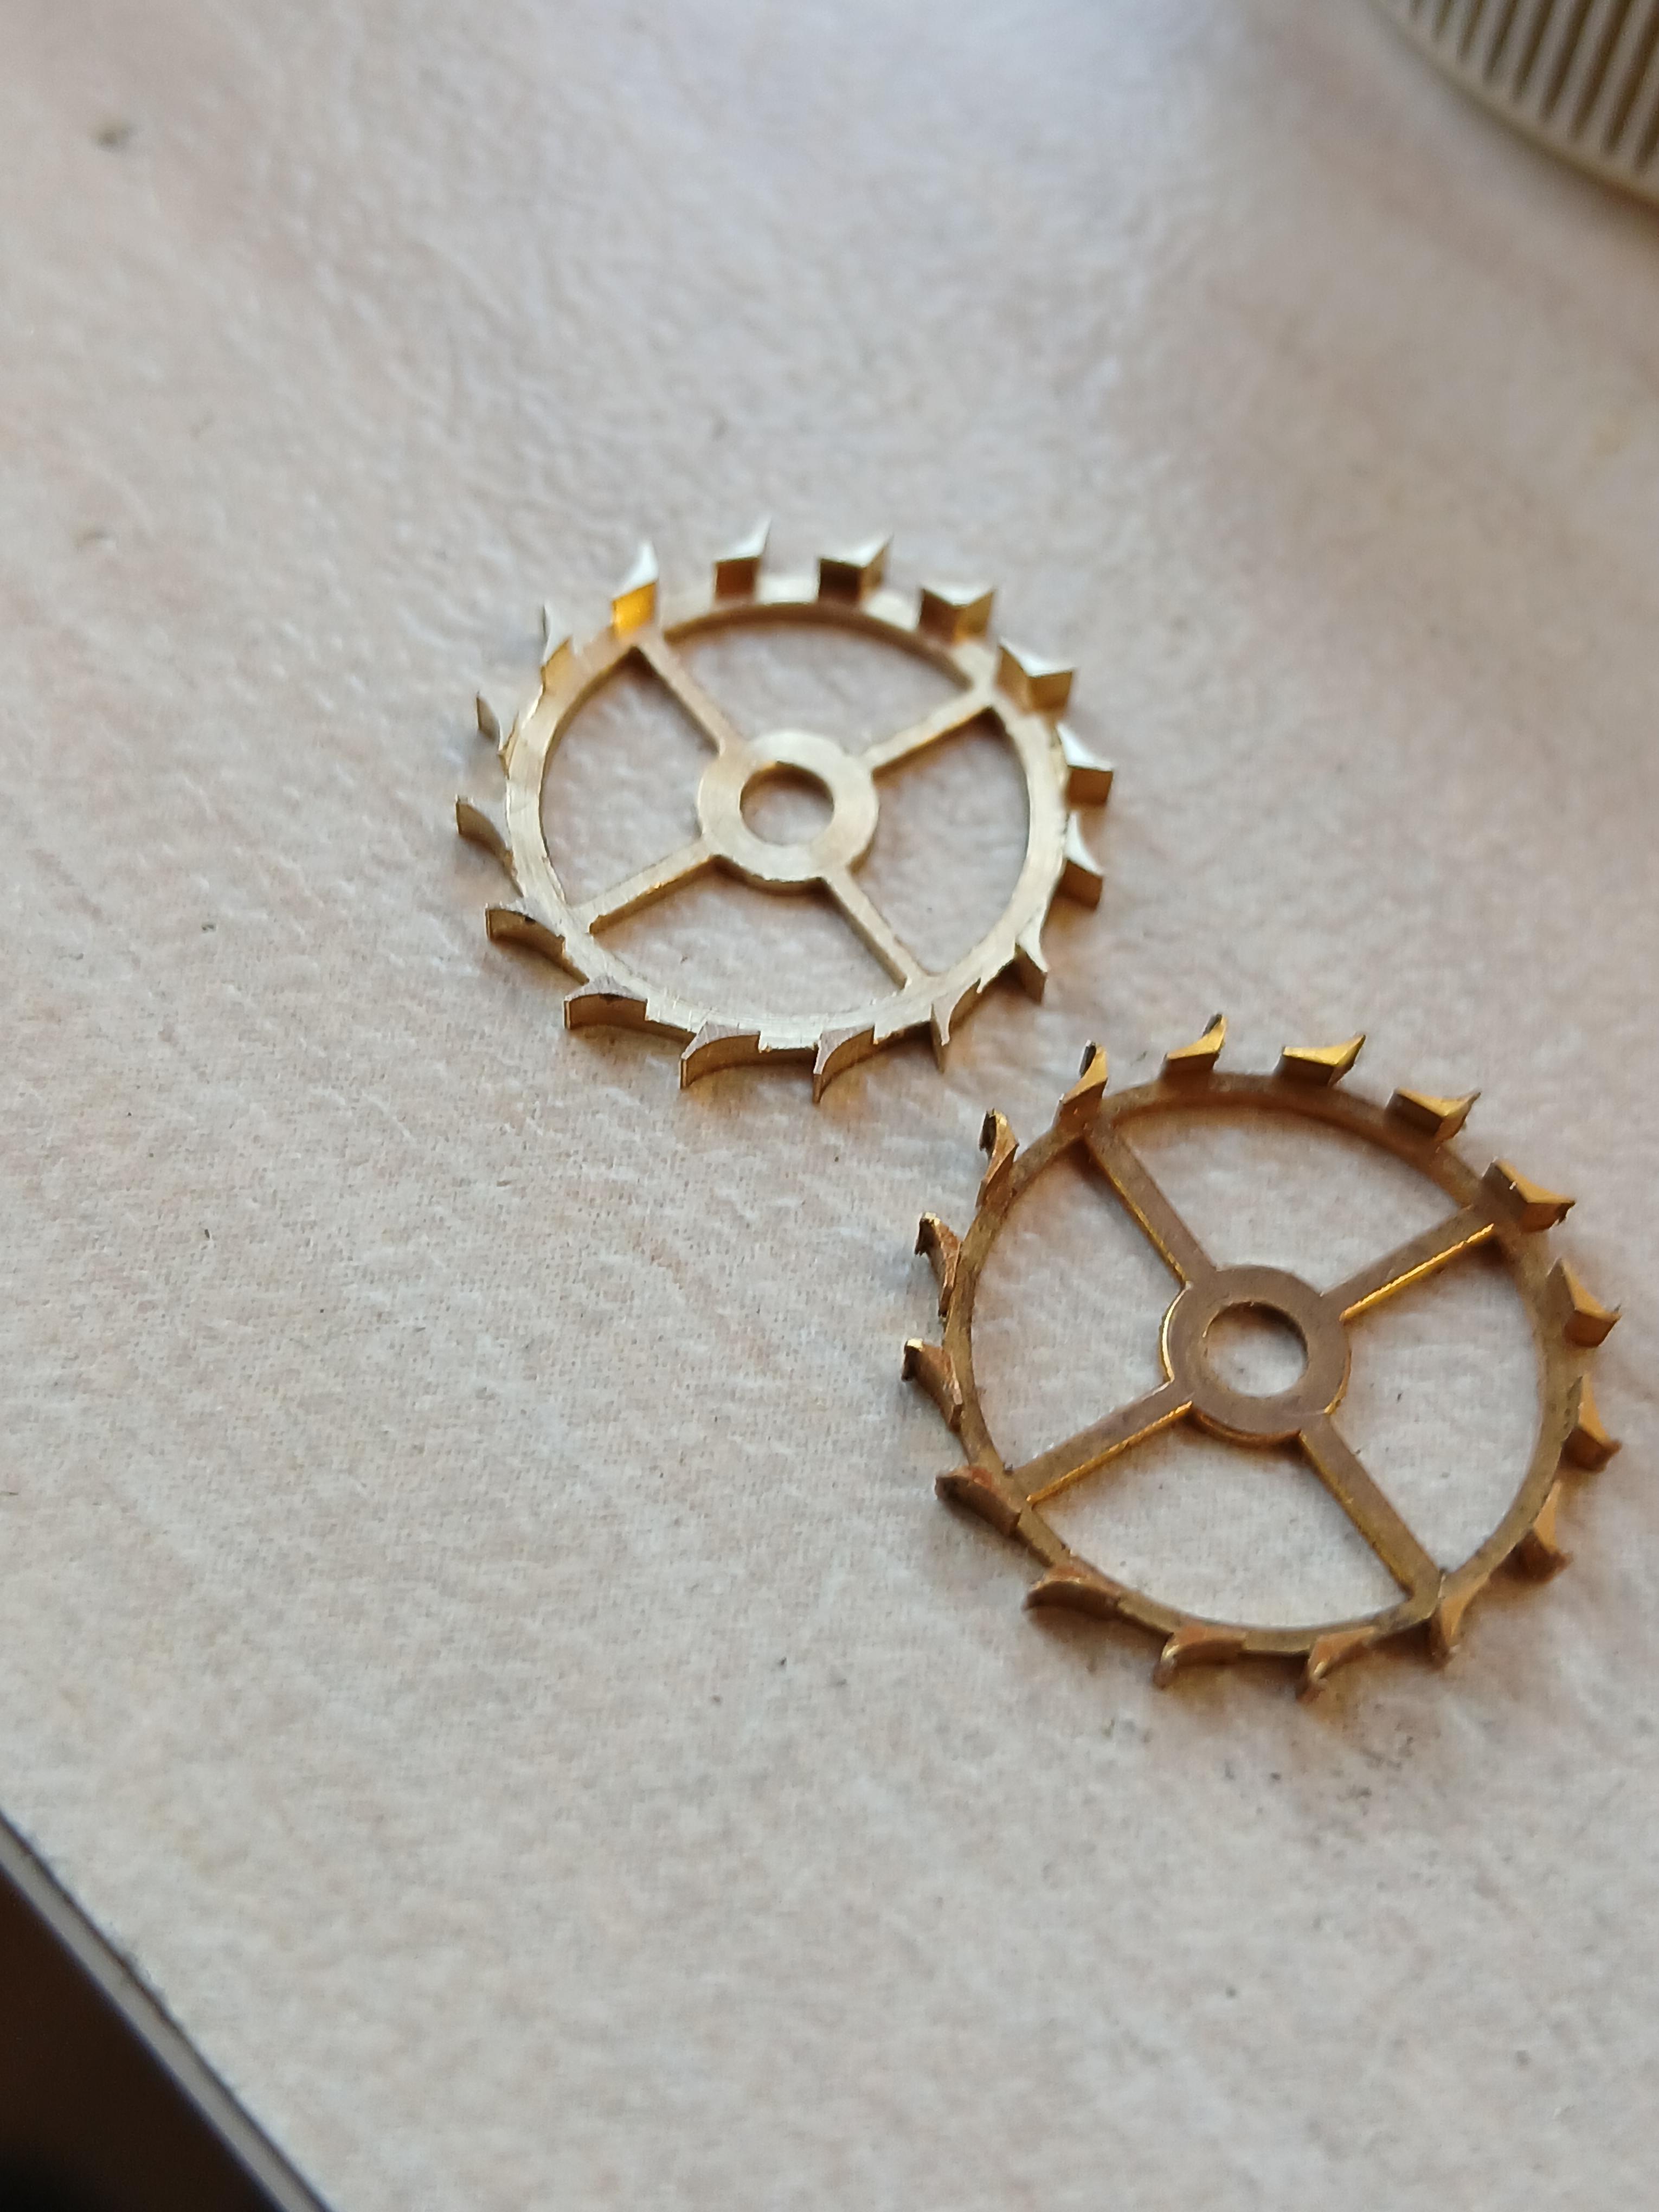
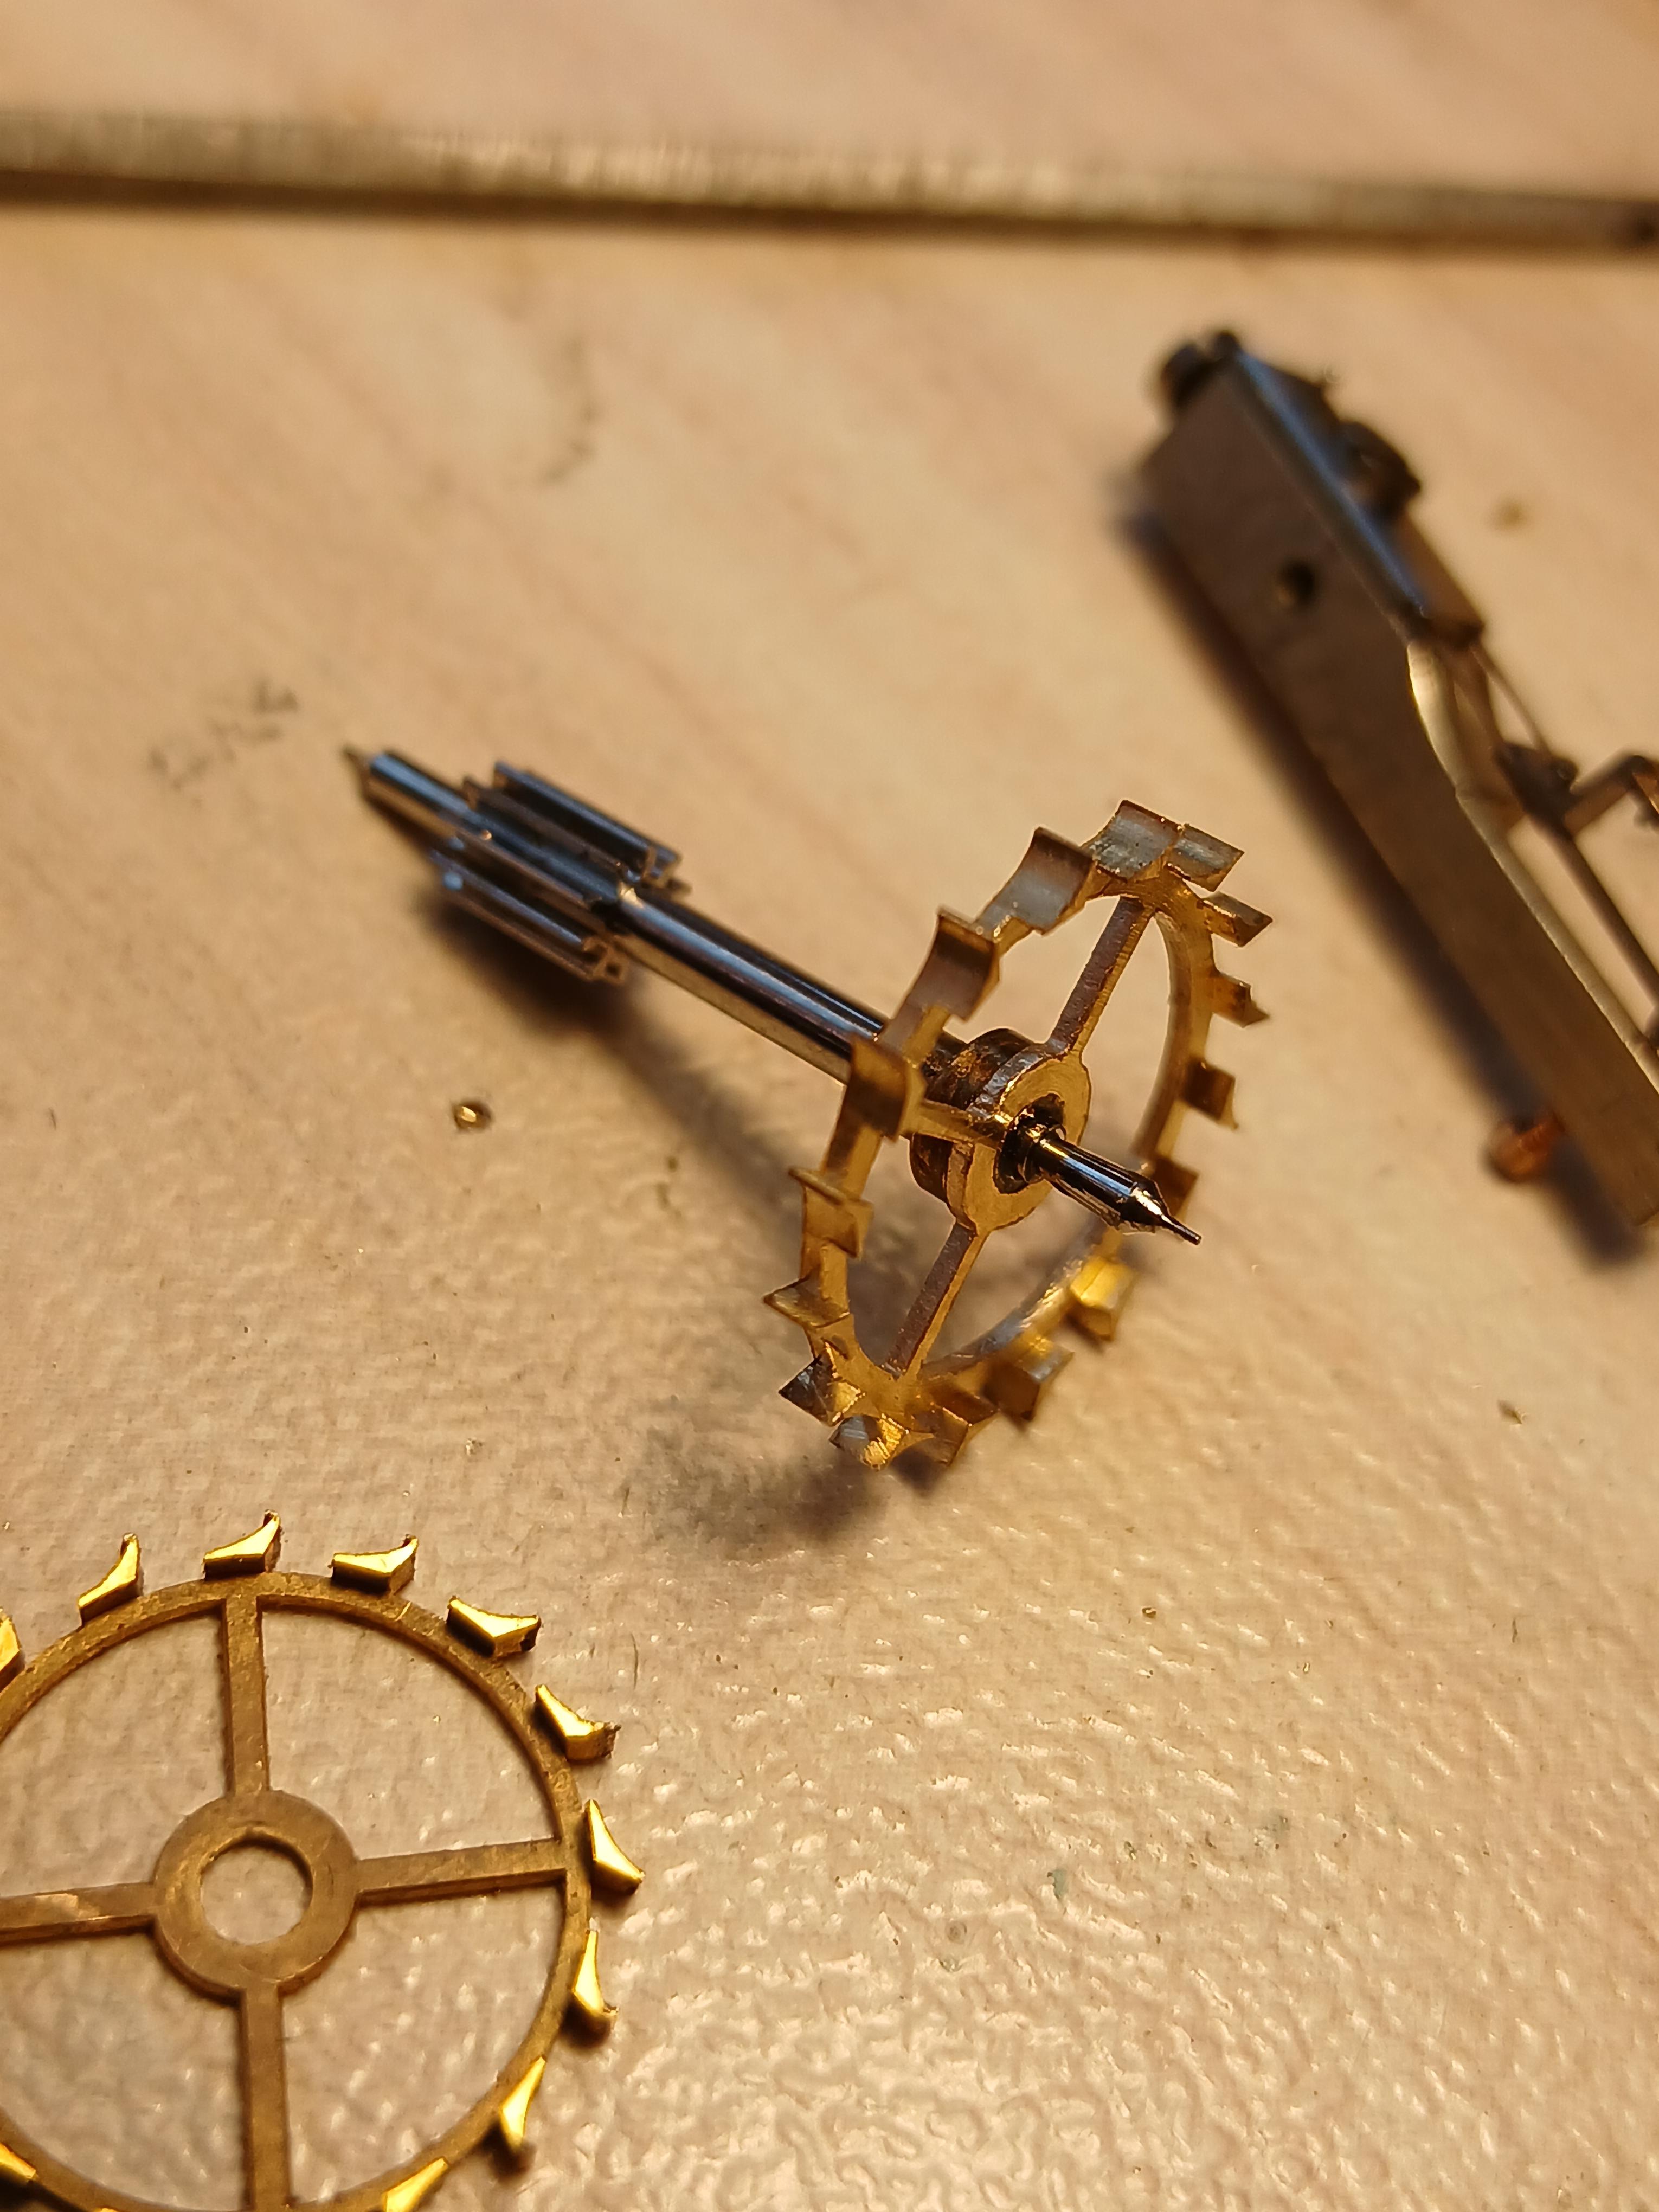
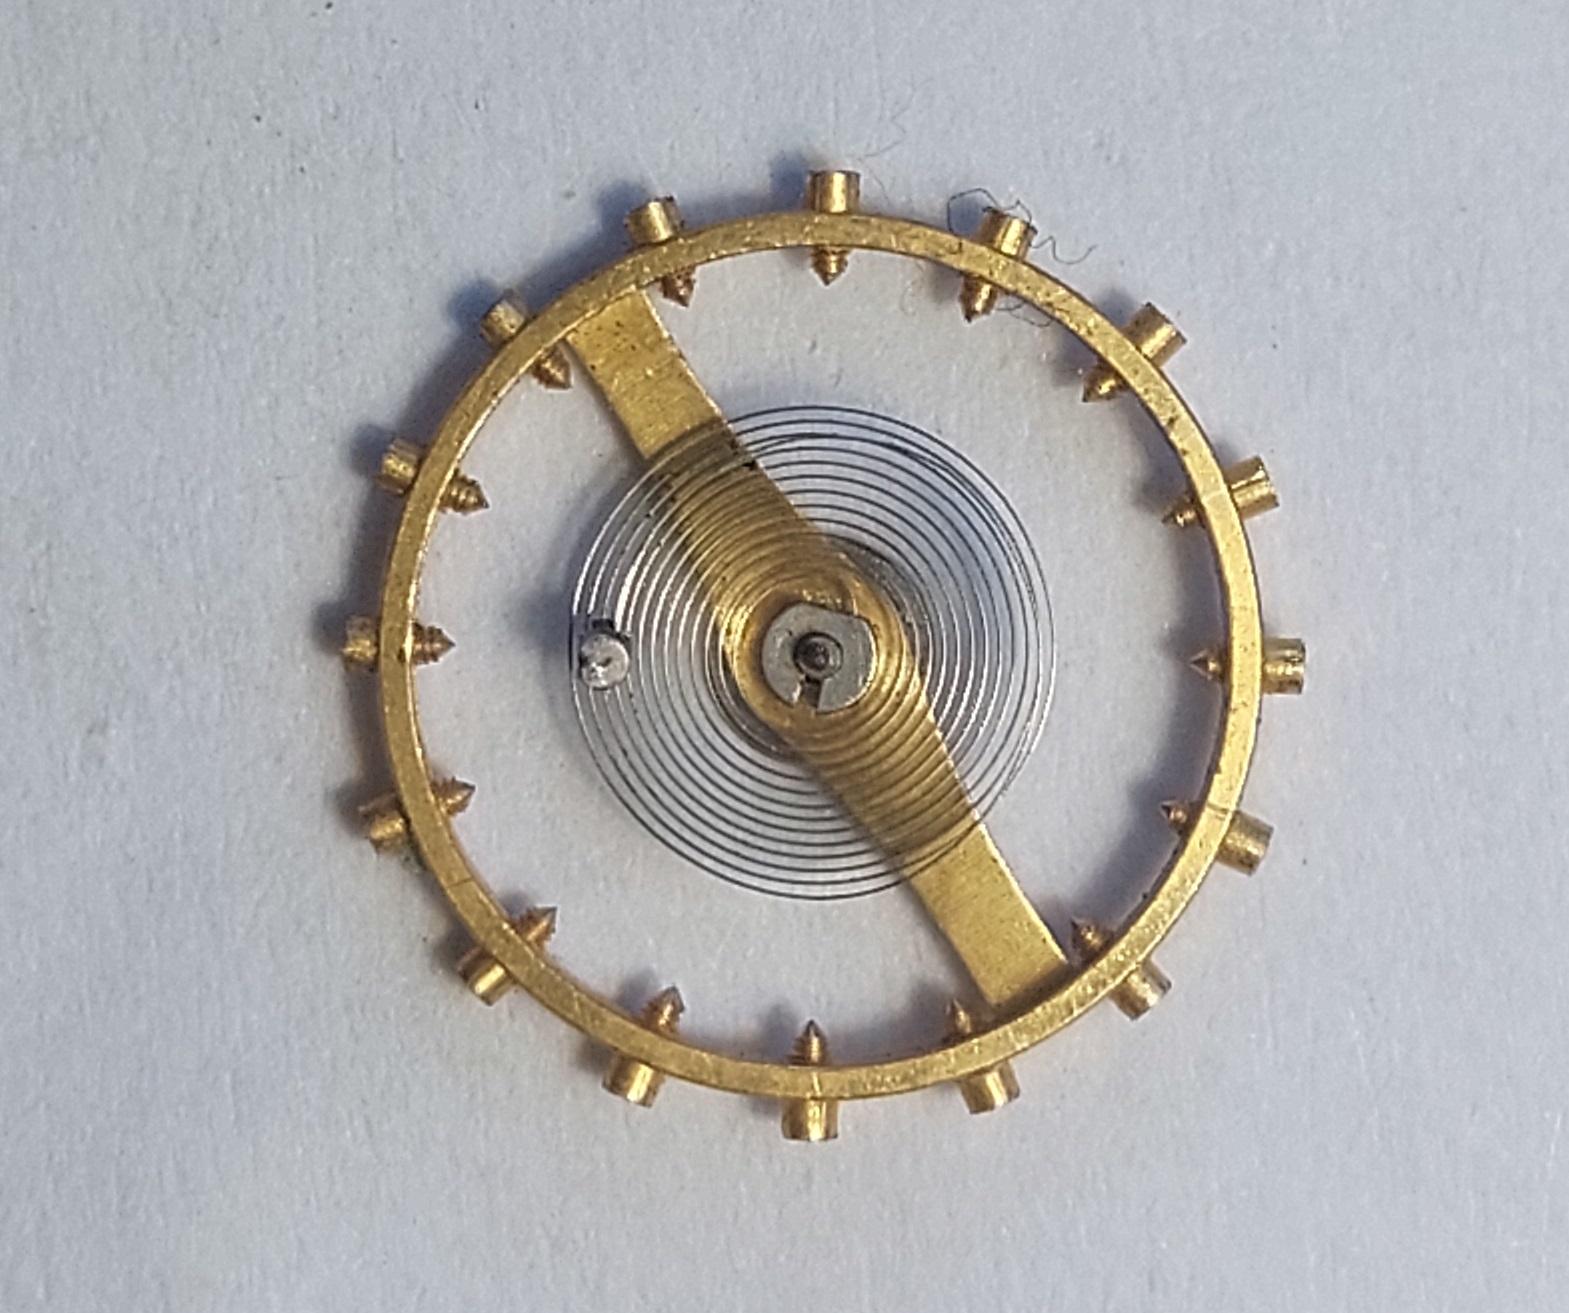
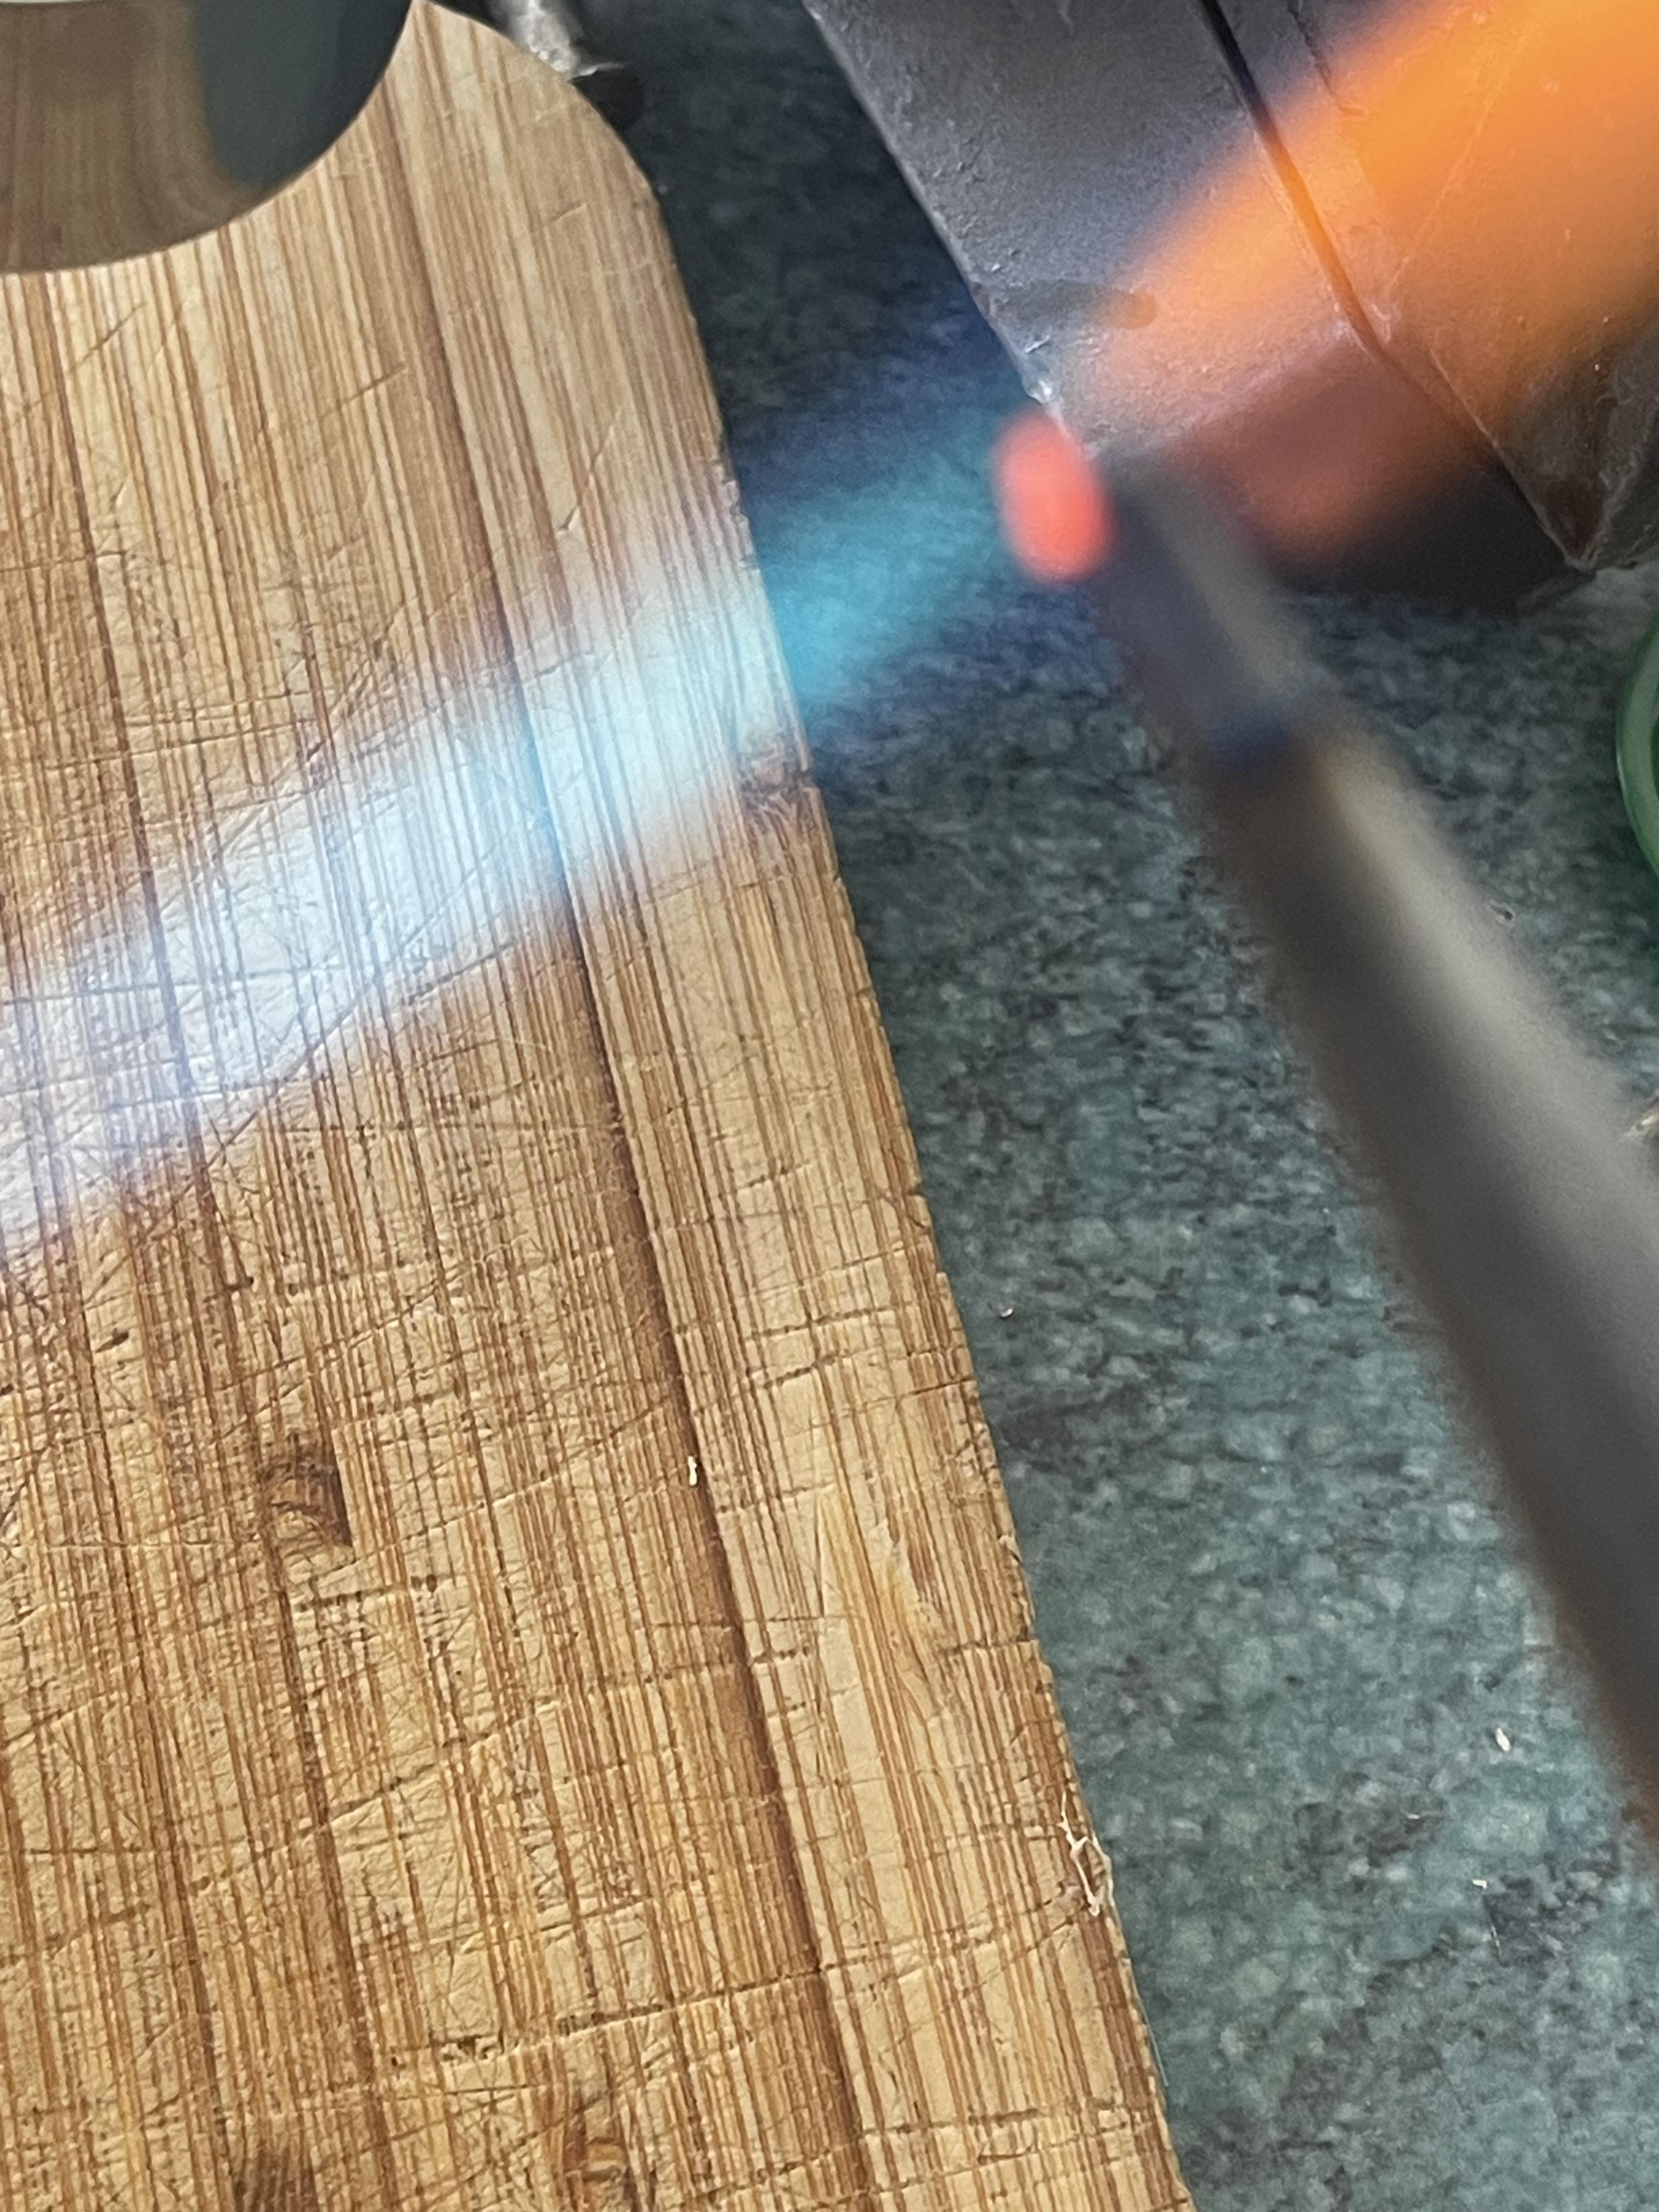
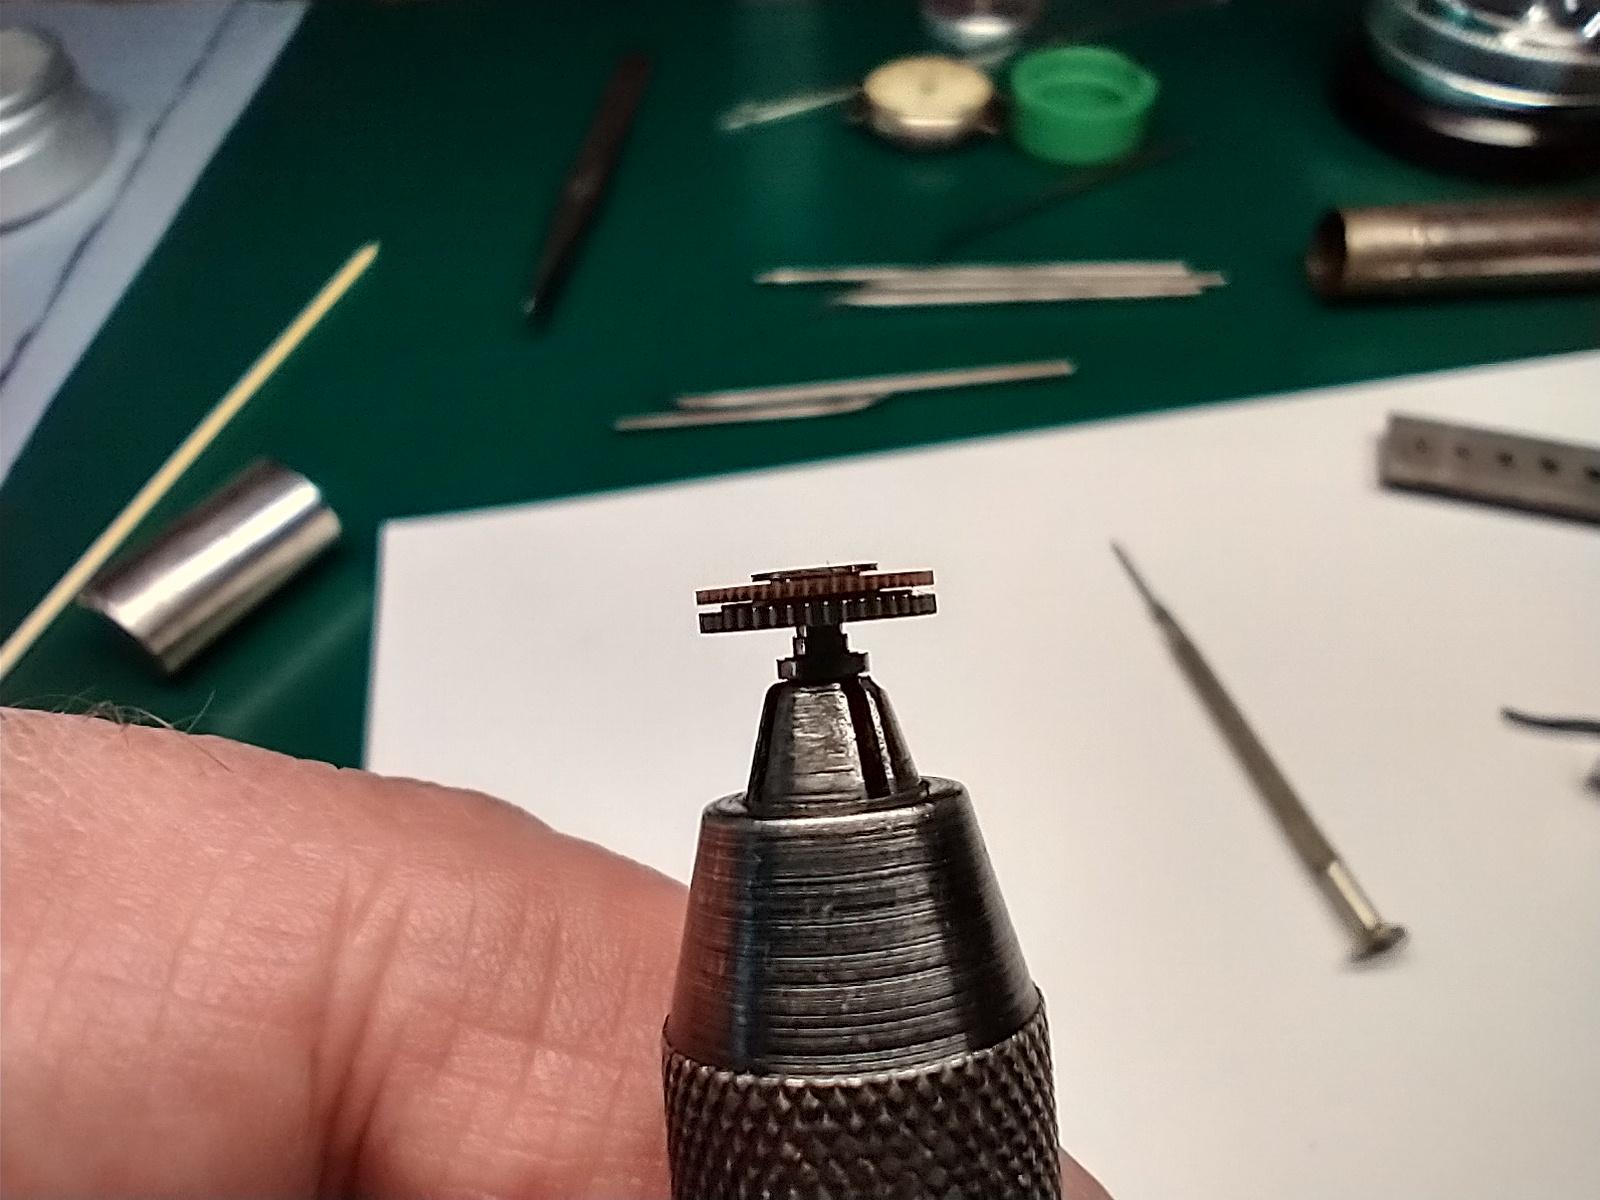
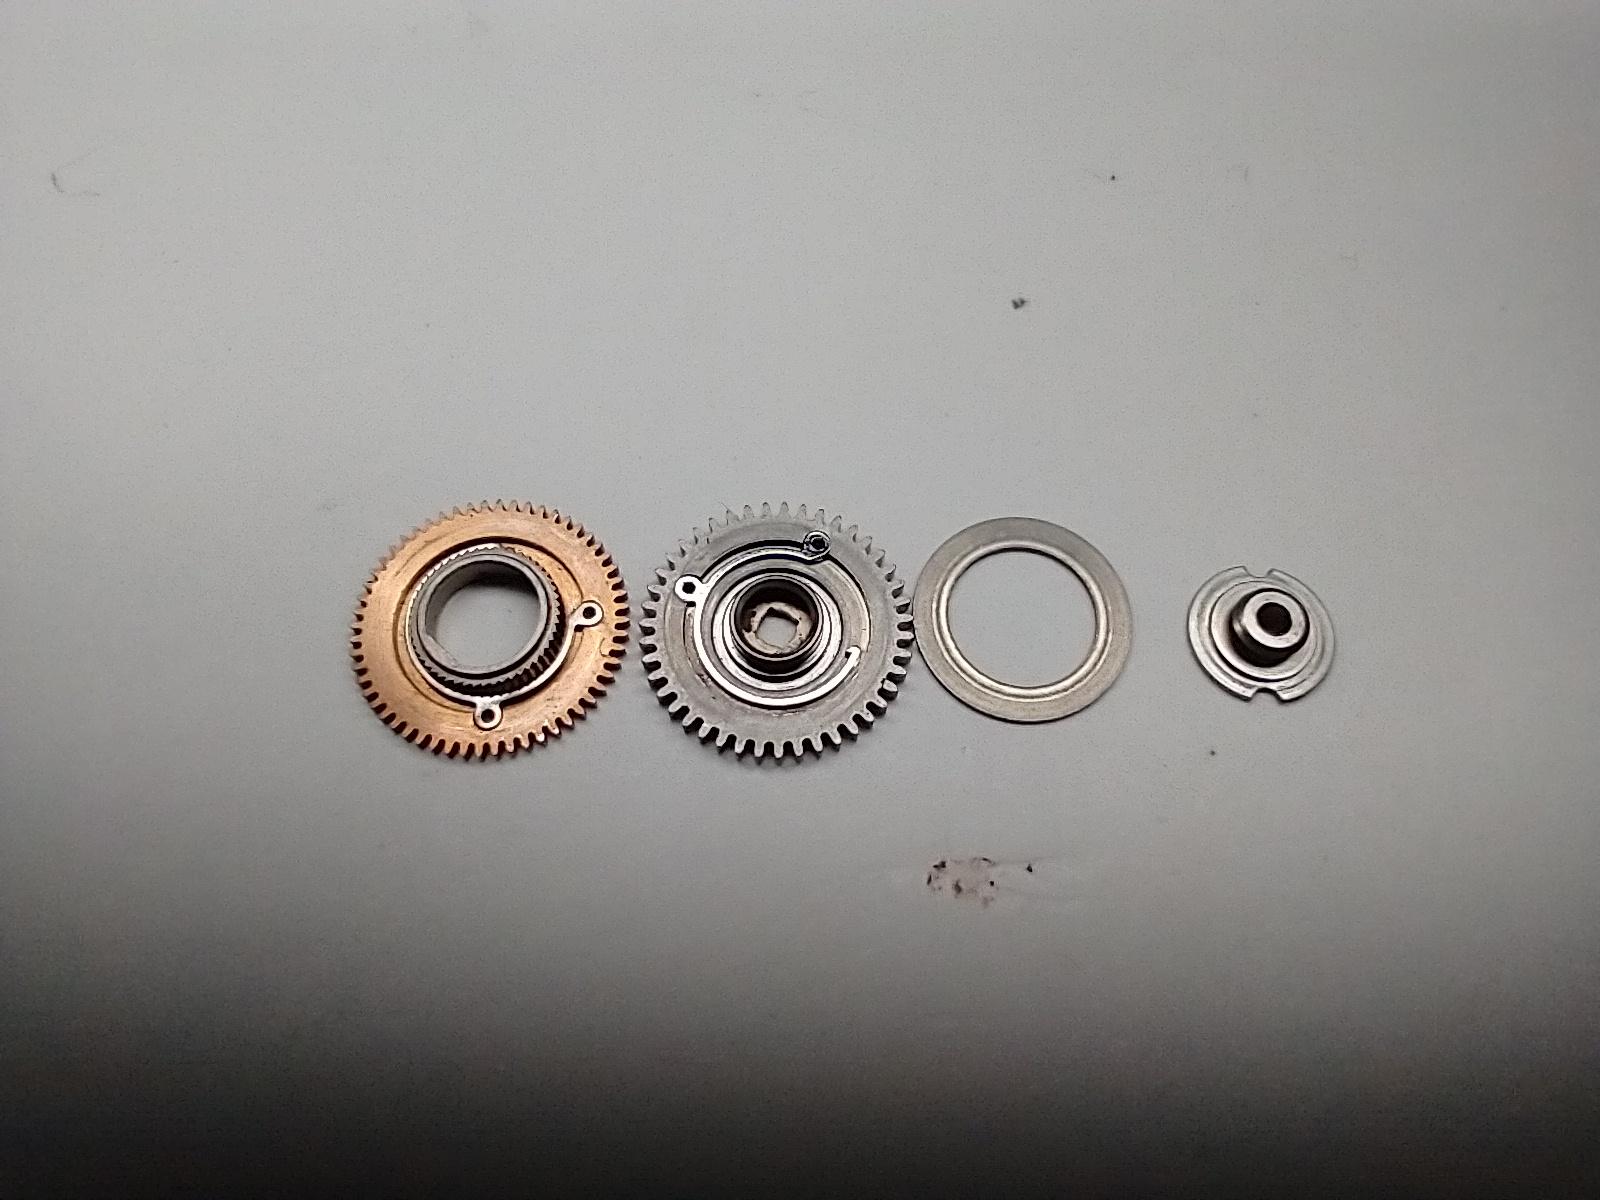
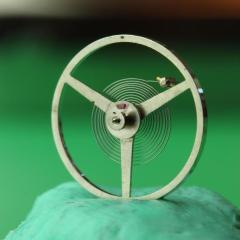
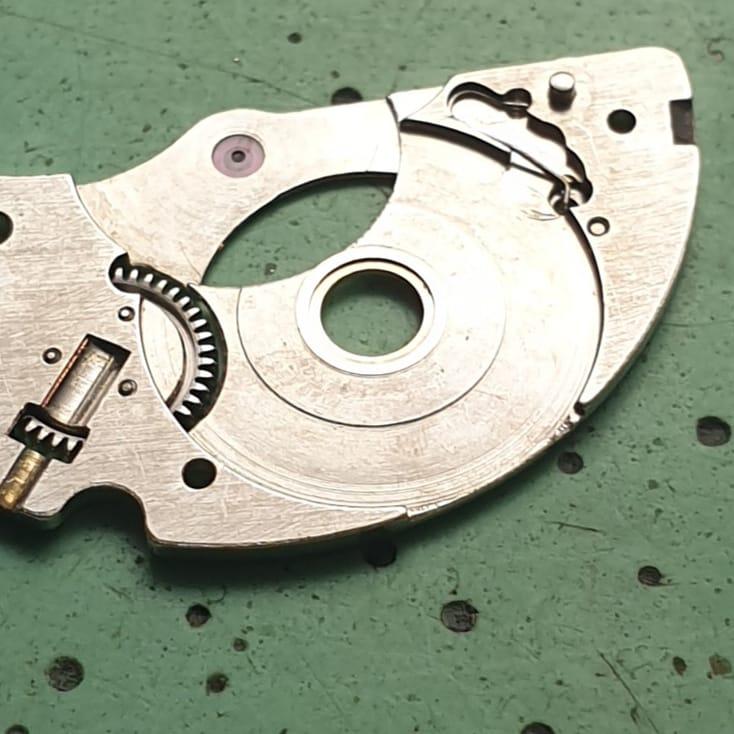
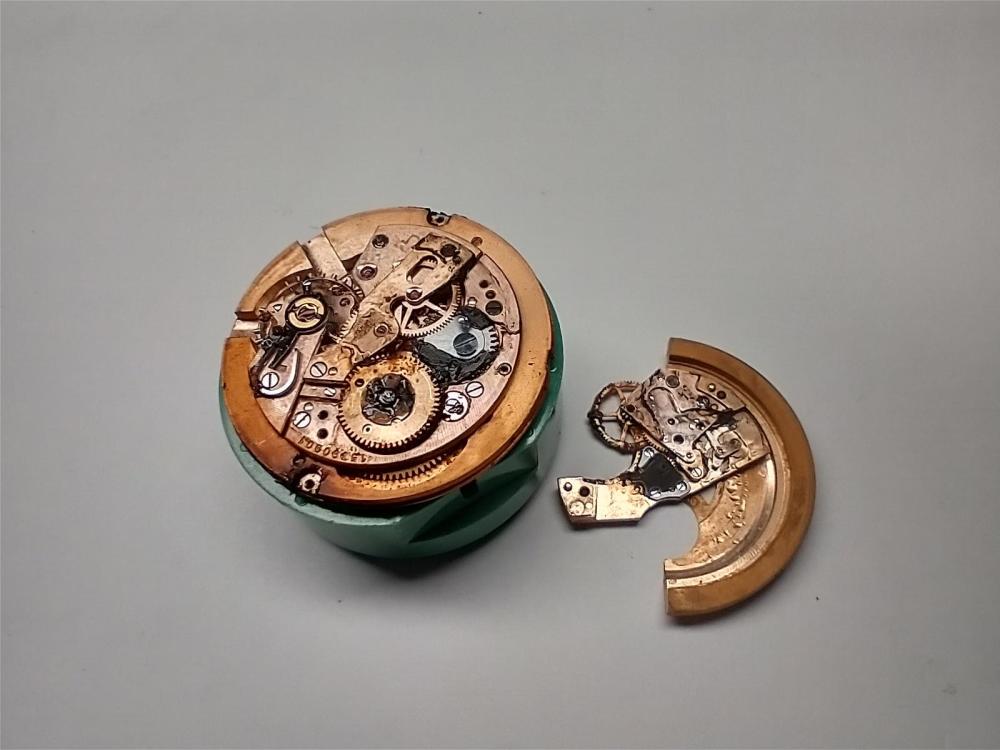
Today I had to make new table for the badly damaged escape wheel. Here are some photos


 16 points
 -
Hi All, I started this forum over 10 years ago and never intended for it to me a 'for profit' concern. Since then, I launched an online course and I draw funds from that business in order to fund this website. There is also a little bit of funding from Google ads but I don't rely on it because they keep changing the goalposts. The forum costs a few hundred pounds per month to run and Im comfortably managing it. Why a few hundred pounds? I am OCD about backups and not relying on a single company to host those backups, I use amazon S3 to backup hourly and daily, I also use Digital Ocean. I use a separate mail service to handle the serious amounts of emails sent from the site, I am on here most days admin'ing and updating the site or servers/applying security patches and the like - its not a big deal, I enjoy it. In short - you might not see me a lot posting (for my sanity as it's addictive (same on all my social media)) but I certainly do a lot behind the scenes. I can't control my mortality and so there's always that - but other than that, I'm damn committed to this site as I am committed to my commercial site watchfix.com which supports this site. I have no interest in shutting down, selling or otherwise changing this sites format. Having said that, if anyone wants to consider taking on moderation tasks to help (in particular, making sure people post in the correct place and moderating new members posts) that would be very helpful. (Only members who have been active for more than a year please). Finally, thanks very much for your support and kind words - I truly appreciate that. This forum has to be one of the friendliest I am part of - a massive refreshment after reading some of the Facebook groups I'm part of - except mine FB group - that's also great with great people14 points
-
Hi guys. @VWatchie Those images are self hosted (not hosted on this server). Do a look at the page source and you will see this. I’m afraid, I can’t have control or backup images not hosted on this server. ( They seem to be served from here: https://qehvsw.bn.files.1drv.com/) This server is backed up fully every night and the database is backed up and versioned every hour, all stored off site on Amazon S1 platform. It’s hard for us to lose data. Ive got a huge overhead of space on this particular server the site is served from so no worries there Sorry all for lack of response so far, I have been extremely busy and am embarrassed to say that priorities had to be set in place for a while. Be assured that i’ve got constant monitoring and alerts should the site be in an extended problematic state (down etc) and work on these issues if they arise.
 12 points
 -
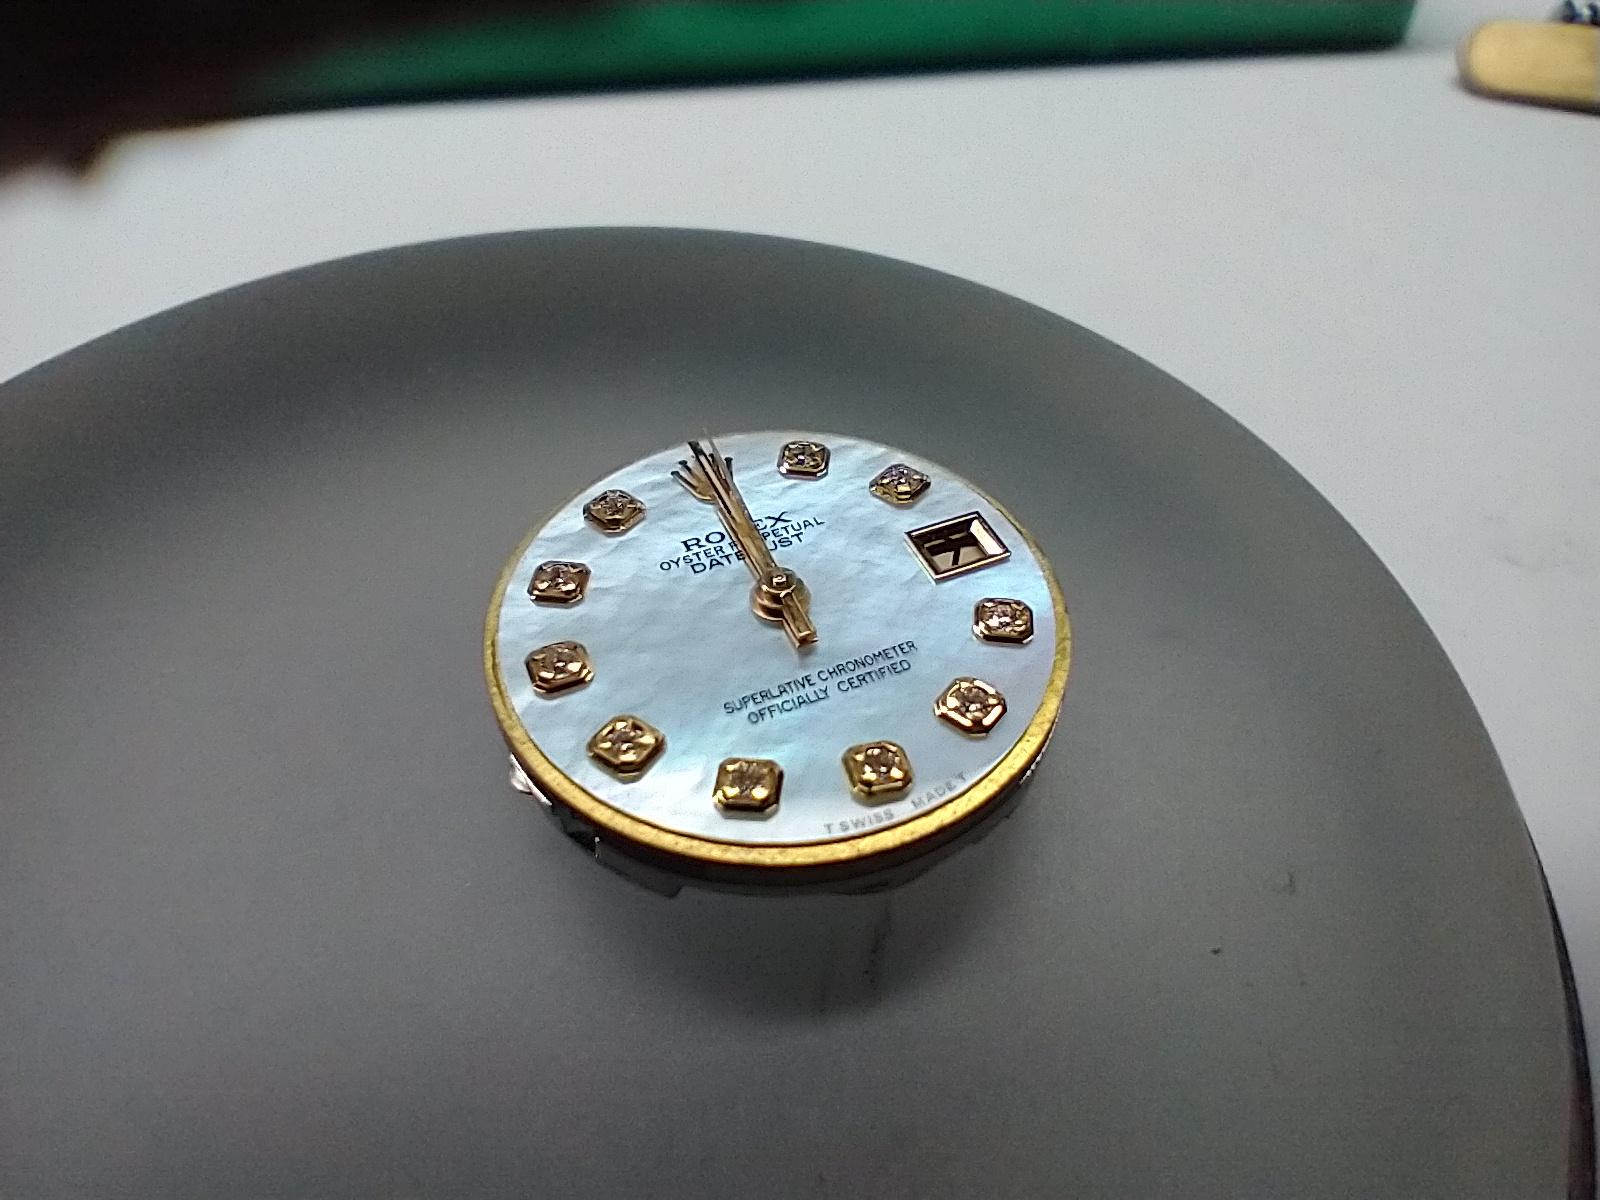
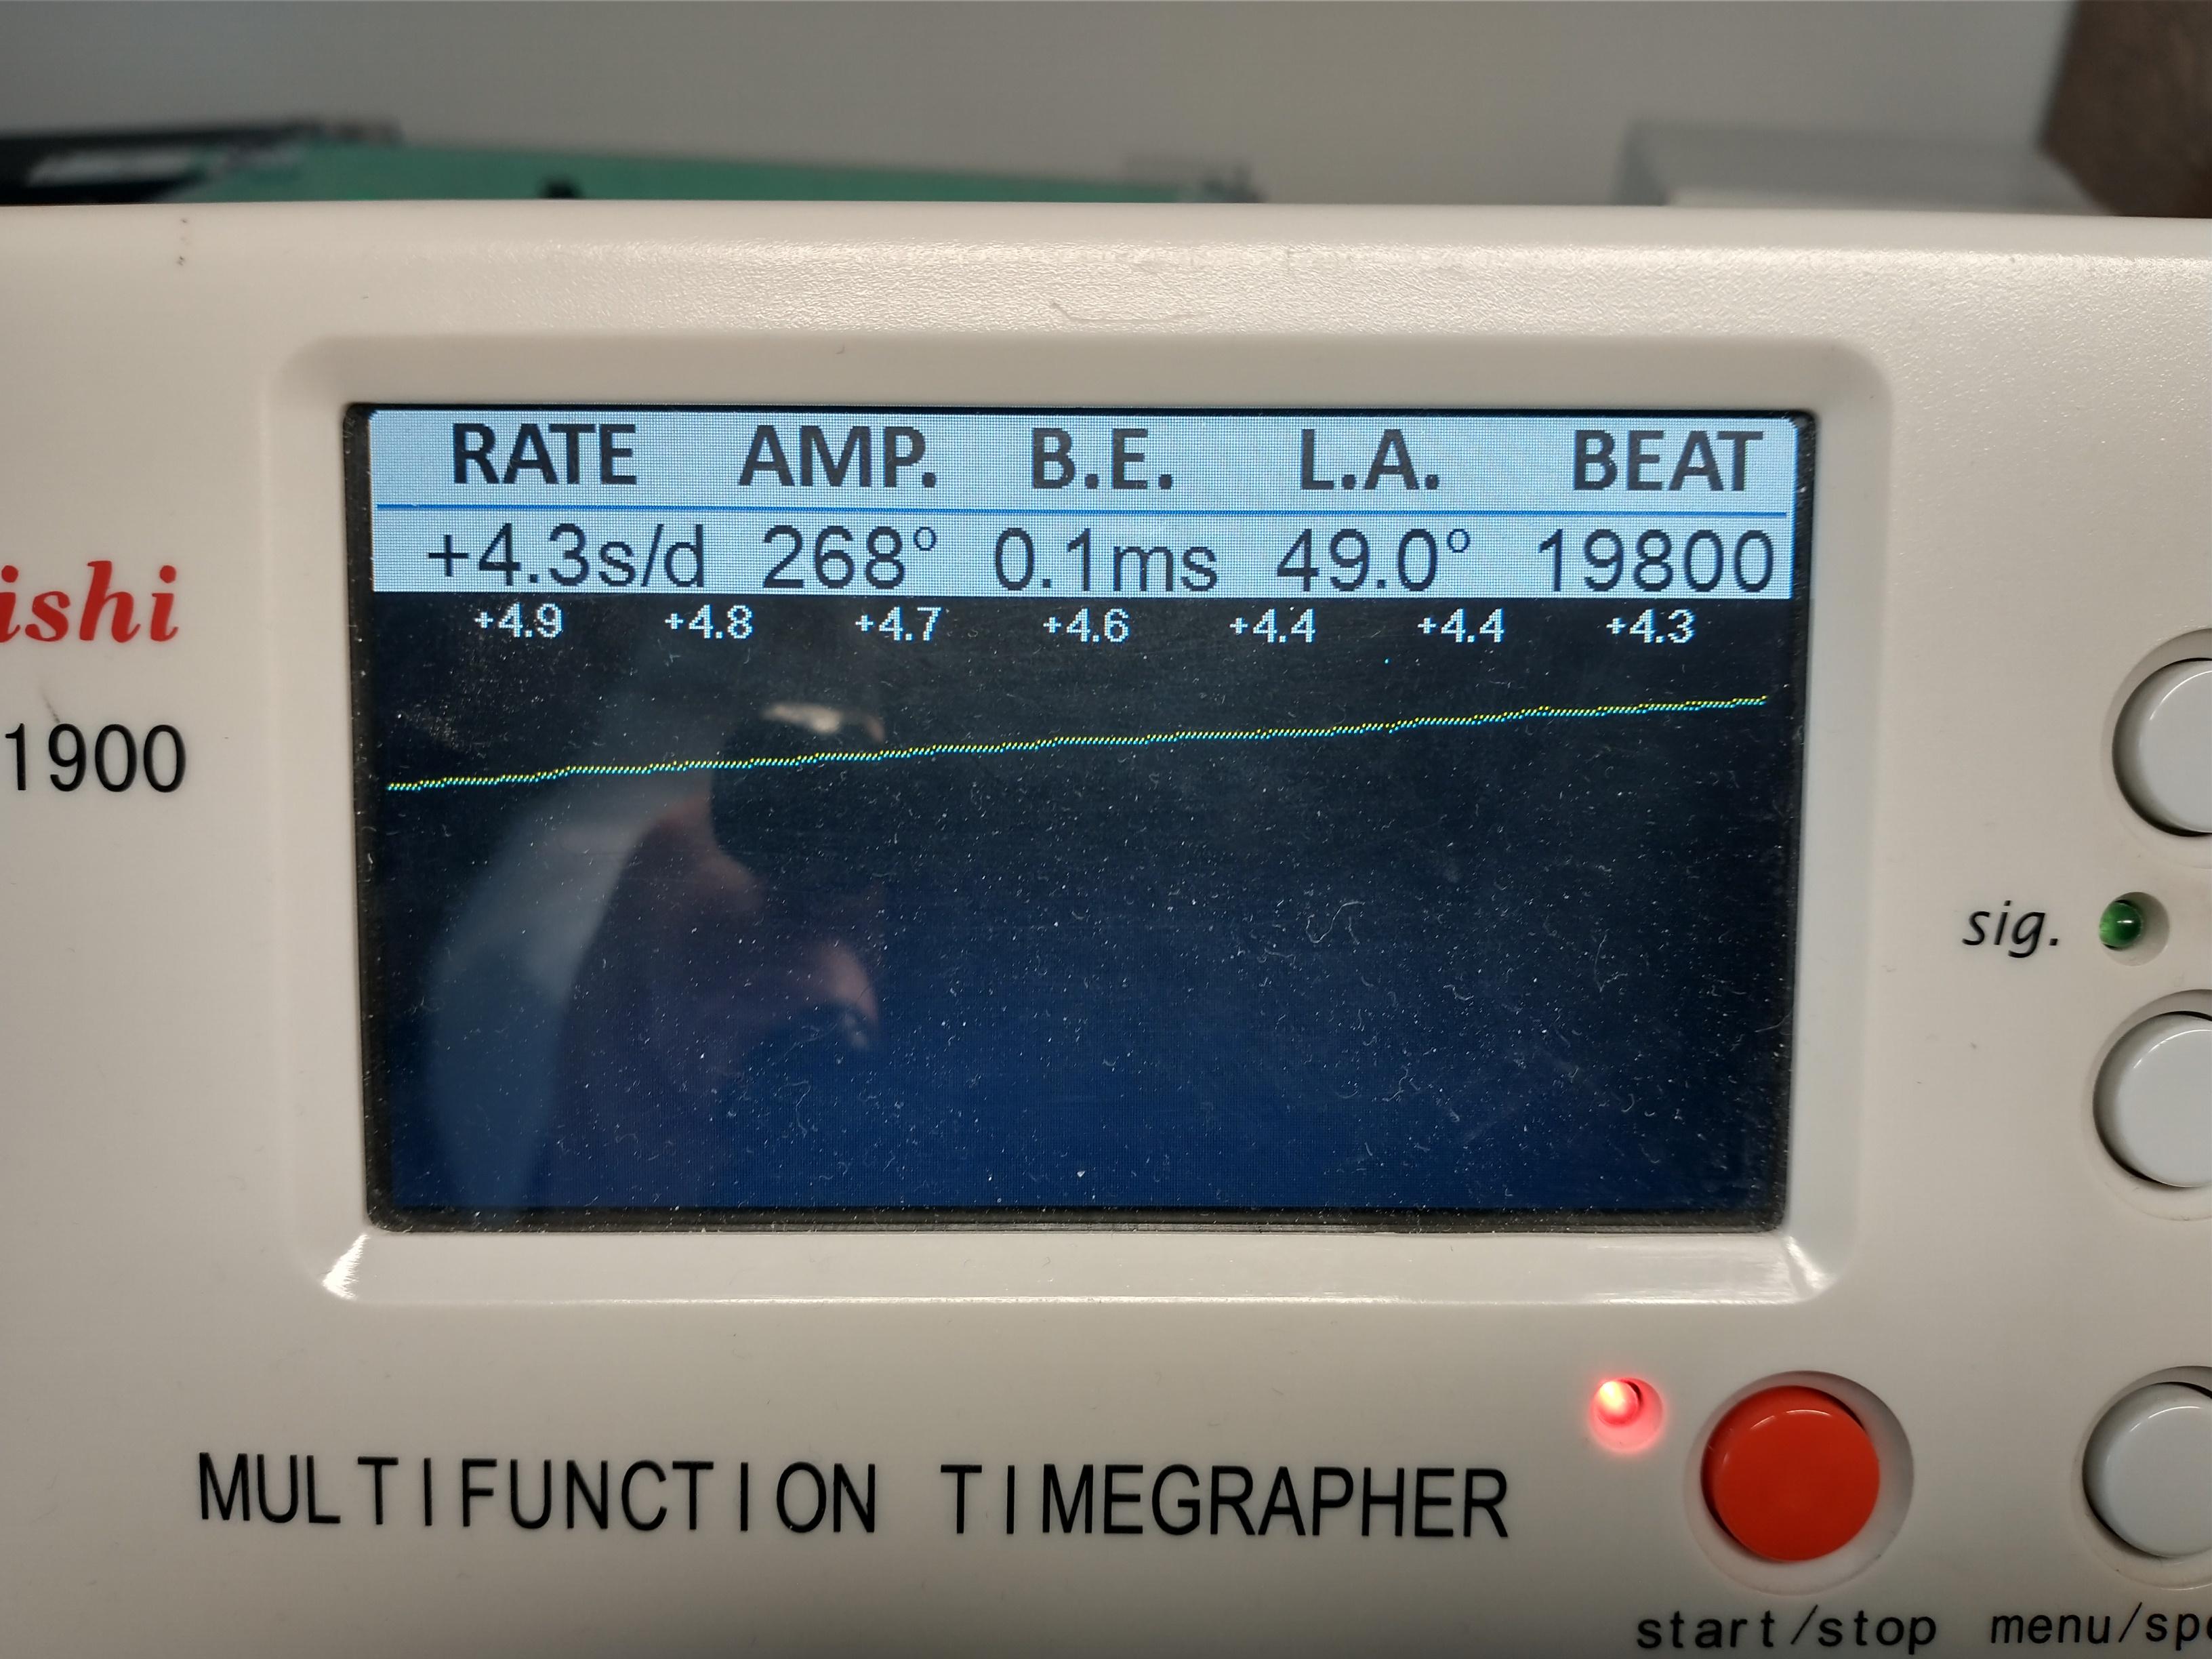
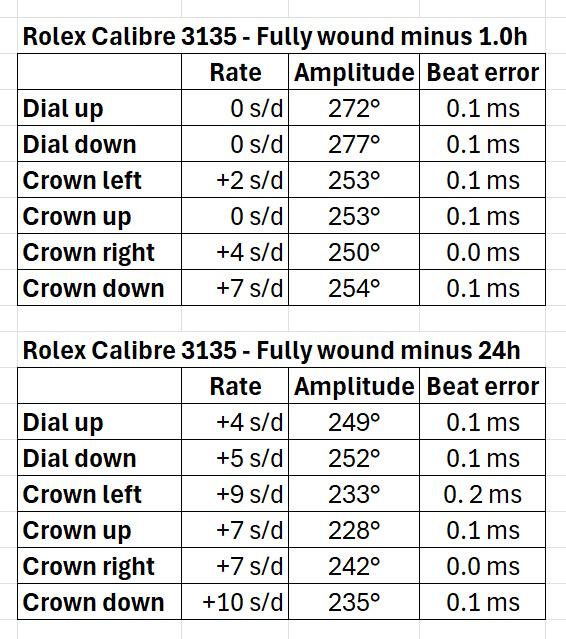
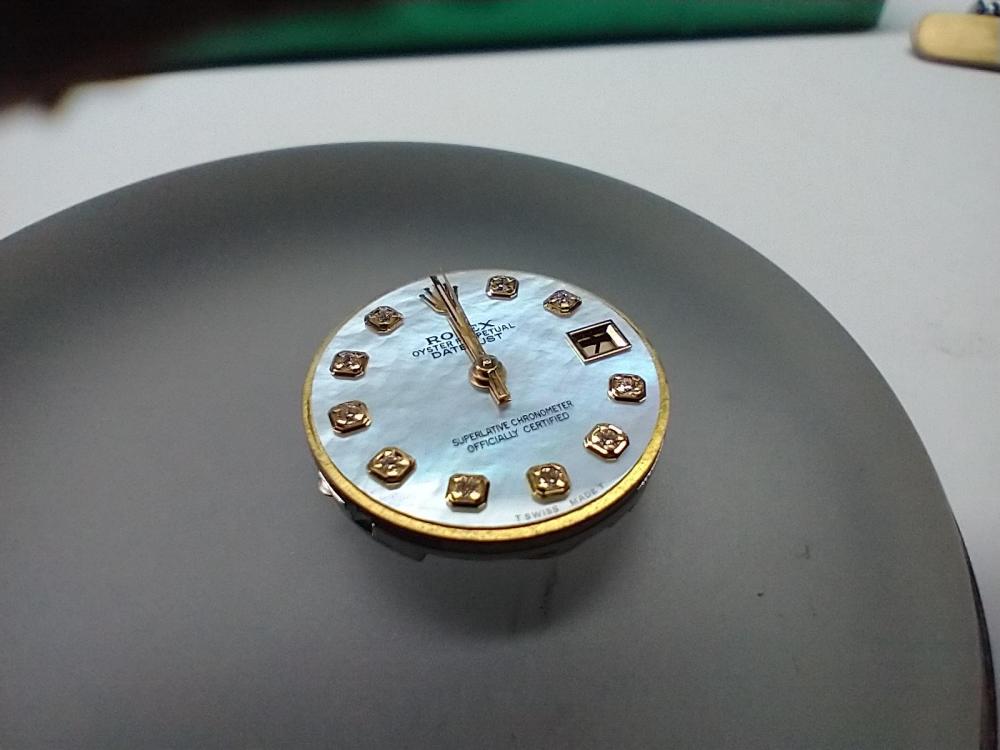
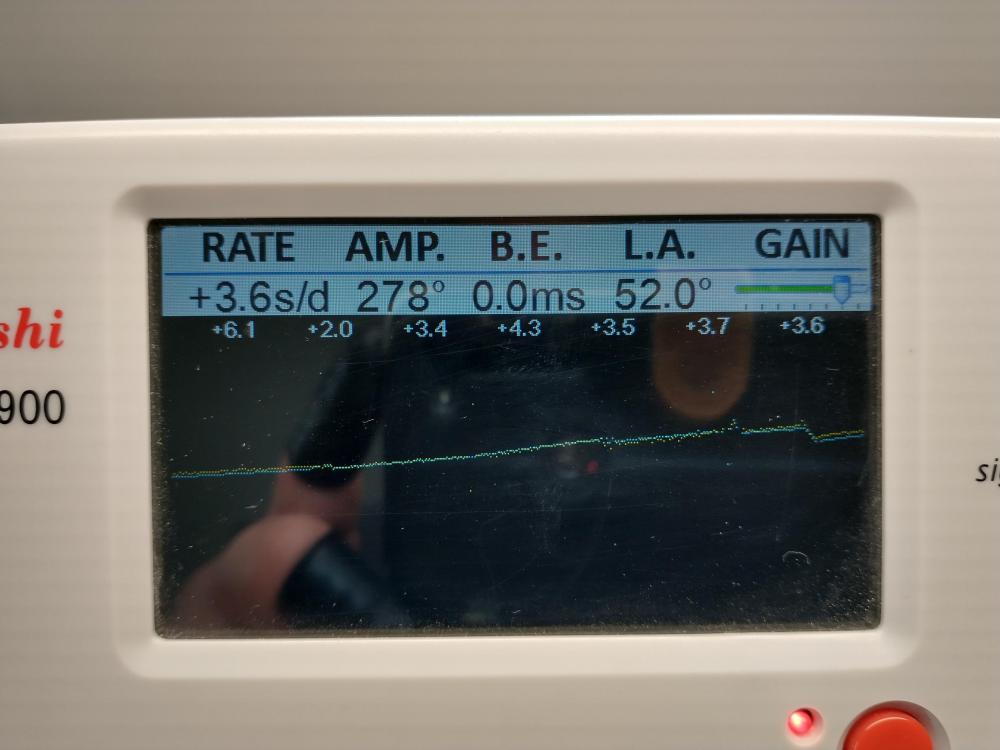
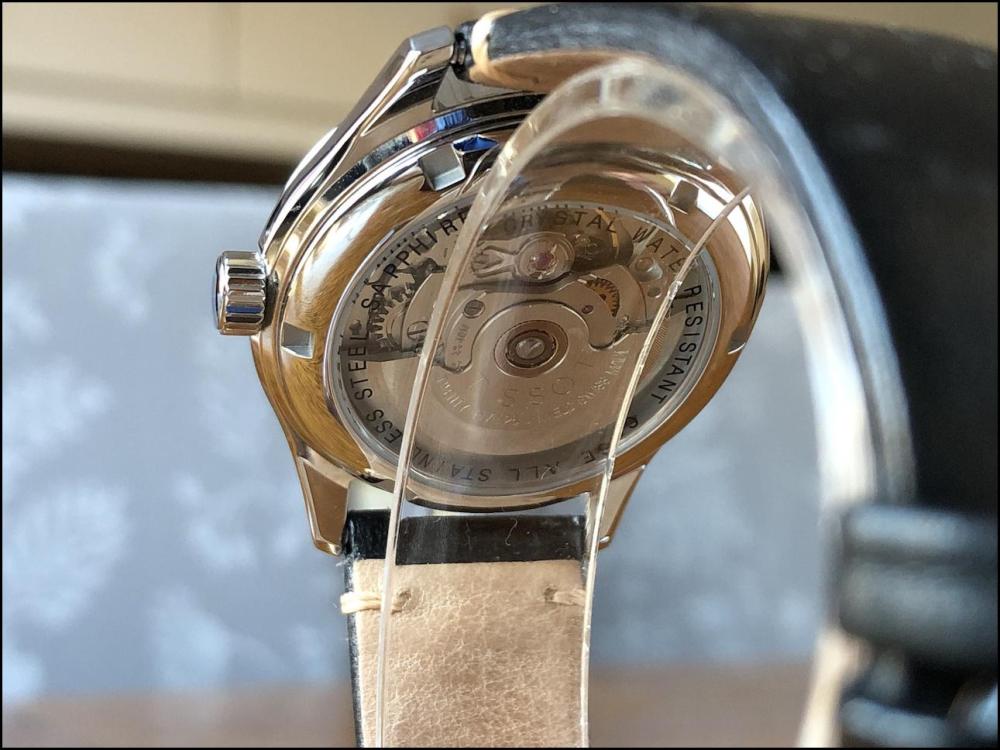
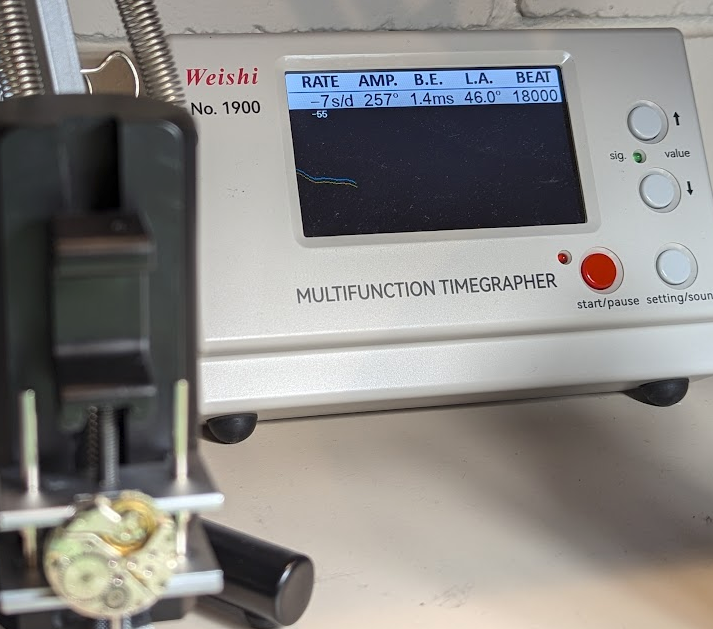
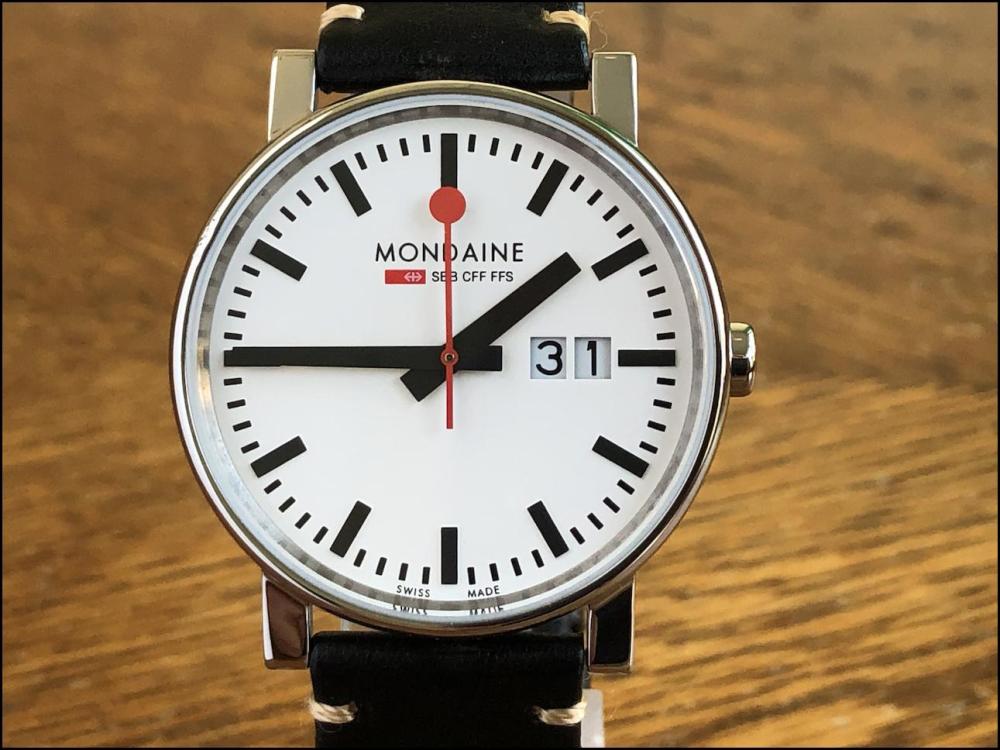
Tomorrow it is finally time to hand over the watch to the owner so this may be my last post in the thread. It feels a bit solemn. It has been an educational and fun time to have had the privilege of servicing and repairing this beautiful Rolex Oyster Perpetual Date with its fantastic movement calibre 3135. All the help and information you have so generously shared has been crucial, so again a big, big thank you. Special thanks to @Jon for sharing his professional and in-depth experience and to @Knebo for the encouragement (and facts) between us enthusiasts. I am sure many others will appreciate and benefit from this thread in the future. The final challenge was to regulate the rate with the Microstella tool as described in my previous post, which I did in two rounds, most recently yesterday. Here are the final results measured with PCTM. Each measurement is averaged over three minutes. It is very satisfying to see that all values and performance tests, including the rate, are now well within Rolex's specified limits.
 12 points
 -
This is a really cool forum with a lot of very interesting, like minded people from all over the world, and yet it's microscopic. Sounds like @Nucejoe (Iran) spent some time very near where I used to live here in Colorado decades ago. @JohnC's (Canada) brother worked/s in the same lab as my best friend up in Boulder. @AndyHull (Scotland) shares my enthusiasm for cheap thrills and technology. @SparkyLB (Florida) shares my enthusiasm for woodworking, and we've exchanged many texts on the subject. @LittleWatchShop (Texas) gave me some good advice on patent matters for the tech I'm trying to turn into a business. And finally, a huge, massive thanks to @gpraceman (Colorado). He lives down the hill from me about 20 minutes away. We met for burgers and beers a while back since it's somewhat rare to find people on here that are actually close by. I started a car club (theme is social wrenching), and he came out with his awesome BMW Z4M to help me and a group of car enthusiasts modify my Jeep. Lately, he's been coming up to my house pretty much daily to help me with some major home repairs in preparation for the baby we're having in the next week (hopefully Sunday, and no sooner!). I've made real life friends on the internet before, but while the variety of people here is probably the most broad in many aspects, the quality is simply outstanding. Kudos to @Mark and the moderators for setting up this thriving community! Thank you all!12 points
-
This is just to say a heartfelt thank you to everyone who hangs out on this forum. I was browsing one of the bigger watchmaking Reddit subs today and was struck (as usual) by just how comically bad the advice tends to be over there, and how poorly researched or formulated so many of the questions are. What a difference here on this old fashioned web forum. I've been around here about two years now and every time I arrive with a question, I get a bunch of thoughtful responses from experienced hobbyists and working professionals, without any snark or condescension. For years, I was a major contributor (still on some global leader boards!) on the computer programming site Stack Overflow; the techies here know what I mean. That place is famously unkind to new members and non-professional programmers, with required adherence to a bunch of strict community customs and no tolerance for questions from people who just don't know yet what they need to ask. In fact, a lot of others in my specific areas of specialty over there really disliked me for wanting to take time to tutor novices. It's such a different world here. Any little watchmaking hurdle, no matter how commonplace, begets a stream of really helpful advice that solves the immediate issue and then anticipates the next one. It's been great for skill building. And without the peanut gallery of redditors who mostly don't have a clue what they're talking about. Thanks so much to all of you.12 points
-
Hi guys, I had a videographer in my workshop last week whilst I was teaching the ladies from Mr Jones Watches, here in London https://www.instagram.com/p/C8mWgjnohG8/?img_index=1 He made a short film of what I do and thought I would share it with you12 points
-
12 points
-
That’s a nice idea, But i’m committed to providing this site as a gift to the watch repair community as my thank you for my incredible life i’ve had in this business. Ive done well and unless my financial circumstances change then i’m more than happy to foot the bill. If circumstances do change then be assured that I will make an appeal. For now, I’m comfortable with the way things are and I am extremely delighted to remove Google Ads from this site and to stop Patreon, it feels like a major step forward Sorry, I missed your reply, I got blinded by another poster in this thread. Yes - I can confirm that I have always seen WRT as a not-for-profit website, and therefore - not a business as such. I’m lucky and have done well in my life due to a decision made in my teens to start a watch repairing apprenticeship which has sustained myself and my family for many years now. Consider this my small way of paying it forward. Ive been committed to keeping the site alive on a technical and financial level for over 10 years now and I have zero plans to change that. Thank you for your kind words by the way. And as for your wish - nobody can control what happens in life, if something happens to me I have things in place with my family but I’m just not comfortable talking about my personal business - I wish a certain person would respect that, but i’ve calmed down now - i’m only human11 points
-
11 points
-
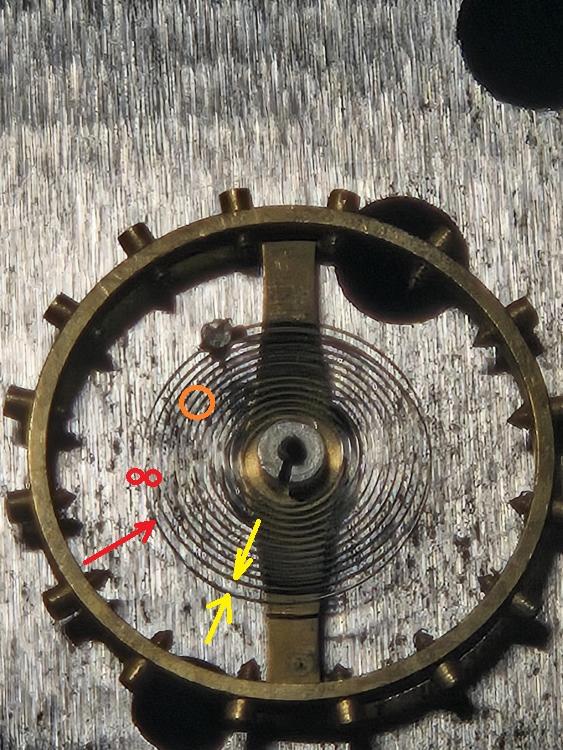
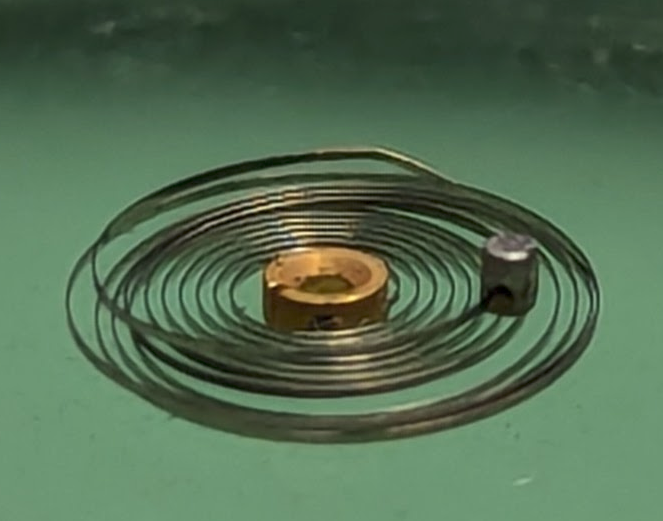
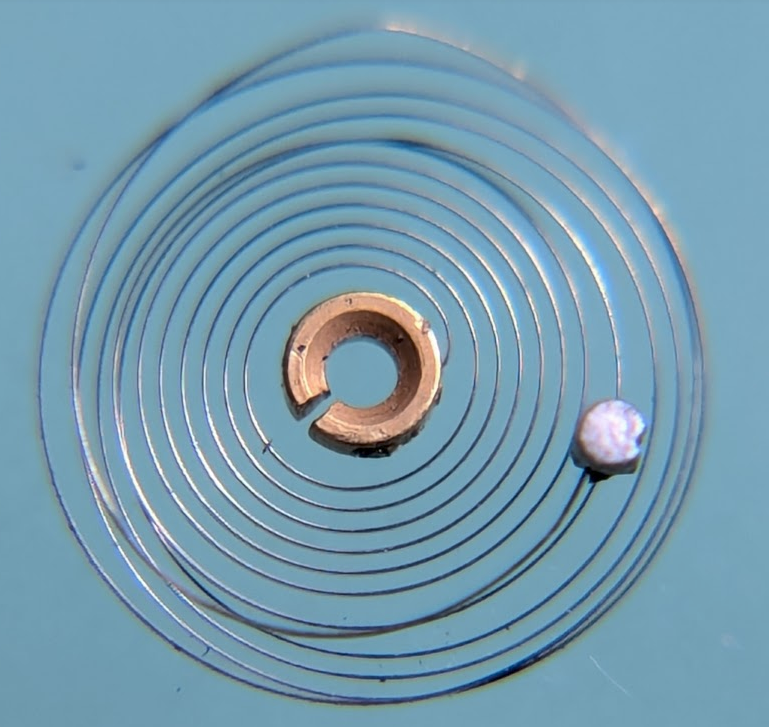
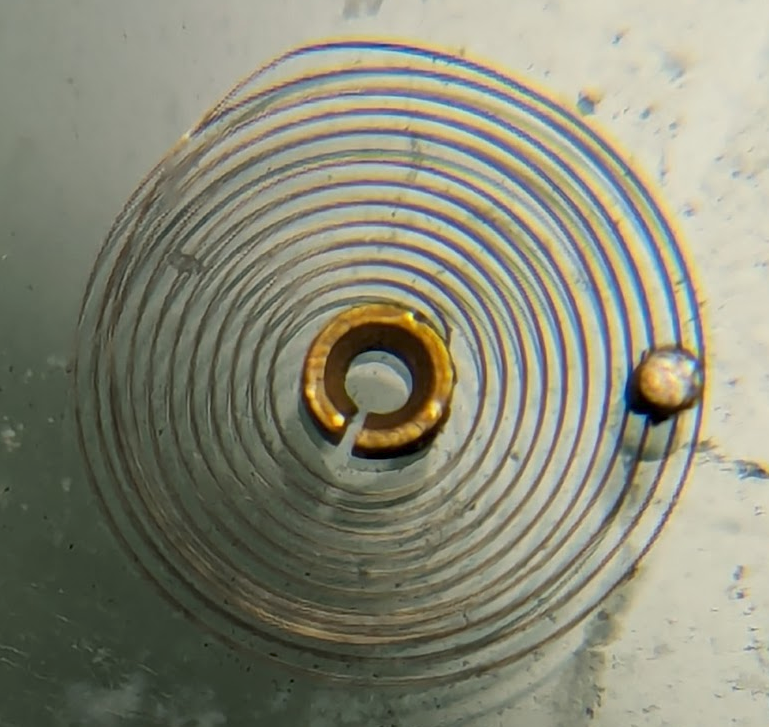
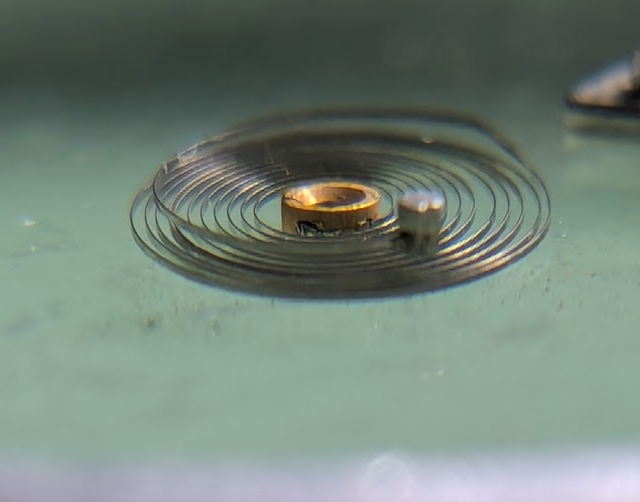
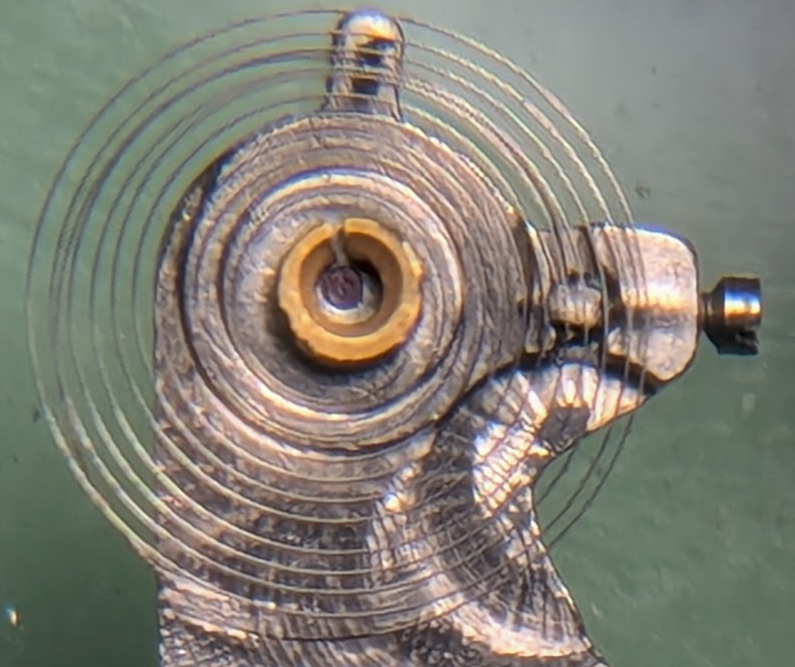
OK, I will start with some pictures of the spring as it should be. As You see, most of the picture are from aside and the aim is to show that the overcoil must be in a plain that is parallel to the spring body. The distance from every point of the overcoil to the spring body is equal. This distance is determined by the 'Z'-curve, which is actually the place where the overcoil lifts above the spring body. Then I have shown a picture from above - this is to show how the overcoil must look and where is the place of the stud relative to spring body - this is above the 4th coil from the periphery to center. Now here is You spring: It is obvious that the overcoil is twisted up. This is the main problem, as the spring with such overcoil will be pressed towards the balance arm. What to do? You need to untwist it. You see points from 1 to 5. The idea is to untwist portion by portion. You must use 2 tweezers. One will grasp the spring in point 1, the other in point 2 and You will twist by rotating tweezers 2 relatively to 1 in untwisting direction. Actually, tweezers at 1 will stay still, the tips of tweezers 2 will be guided in place and the tweezers tilted a little in a manner that grasping the spring will cause twisting. You look at the height of point 3 and when it gets equal to the height of point 2 (looking from aside), then this is done and You move one point ahead - grasp in points 2 and 3 and observe at 4, and so on to the end. This will need some practice, but what is needed is patience and good sharp tweezers. The good thing is that the overcoil is above the spring body and grasping with tweezers is easy. In the end, the overcoil must be in plain and parallel to the spring body. The distance between the stud bottom and the spring should be about the 1.5 height of the spring (width of the band of which the spring is made). Next is the overcoil shape. You must bend the overcoil inwards in several places, beginning where I have shown. Use one tweezers and needle (or the other tweezers, but hold them closed and use as a needle). The tweezers must grasp where shown with two small red circles, the needle will press in place and with direction shown with red arrow, the aim is to bring the distance which is shown with yellow arrows the same as the spacing of the coils in the untouched places. Then continue shaping the overcoil moving ahead and to the end, when the stud will come where shown with orange circle. and the overcoil will start looking as needed. Then, check again the height of the overcoil and if needed, make small corrections. The lat thing is the portion where the spring is fixed to the stud. The interest thing is that the hole in the cock not always holds the stud upright and fixing the stud when replacing the balance assembly is always connected with spring adjustment near the stud. If the spring is OK, then it can be done without removing the spring from the balance, but for a newbie it will be easier to see what He does if the spring is removed. The last pictures show how the spring must look when fixed on the cock. To achieve this, the spring can be twisted and bent up/down near the stud in order to bring it parallel and bent left/right in order to make it stay without pressure between regulator pins. The collet should stay right above the stones, thus guarantee the spring is centered. I realize that it all sounds simple, but it is not so easy to do if one has not practice. And it is easier to start with alarm clocks first, then big pocket watches and then wrist ones. The idea is to understand what needs the result to be in the end and what is the way to do it step by step. In the end the spring should not touch anything, which means there should be safe distance between it and all the other things, no matter what the position of the movement and the position of the balance in the movement is.


 11 points
 -
A little over a week ago I tried making something resembling a balance staff for the first time. It wasn't for any specific watch, just trying to get a feel for how the gravers and steel "worked". I got encouraging feedback , so today I decided to try again. Now for an actual project, a Junghans J47 with both balance staff pivots broken. I do actually have some new balance staffs for this specific movement, so that made it easier to get good measurements. I won't ask you to spot the differences between the DCN staff and mine (my wife sometimes says I'm snotty enough already), but any feedback is greatly appreciated.. Tonight I'll fit the wheel, finish the pivots on the jacot tool and see if it will actually work..
 11 points
 -
In tandem with my last post regarding the removal of Google Adsense on this website - I have also decided to fully self fund this site as a gift to the watch repair community of which I’ve been a member of, and have benefited from since being extremely lucky to gain an apprenticeship back in the late 80s. Well, that means that I have also closed down my Patreon account - or, to be clear, stopped all future transactions on my Patreon account and this is with immediate and permanent effect. not to mention, but I will, I really really do appreciate the contribution all my patreon and PayPal supporters have provided over the years, you guys have been absolutely awesome and helped to keep this forum alive and available for those who might not be able to afford the payments. again, from the bottom of my heart thank you.10 points
-
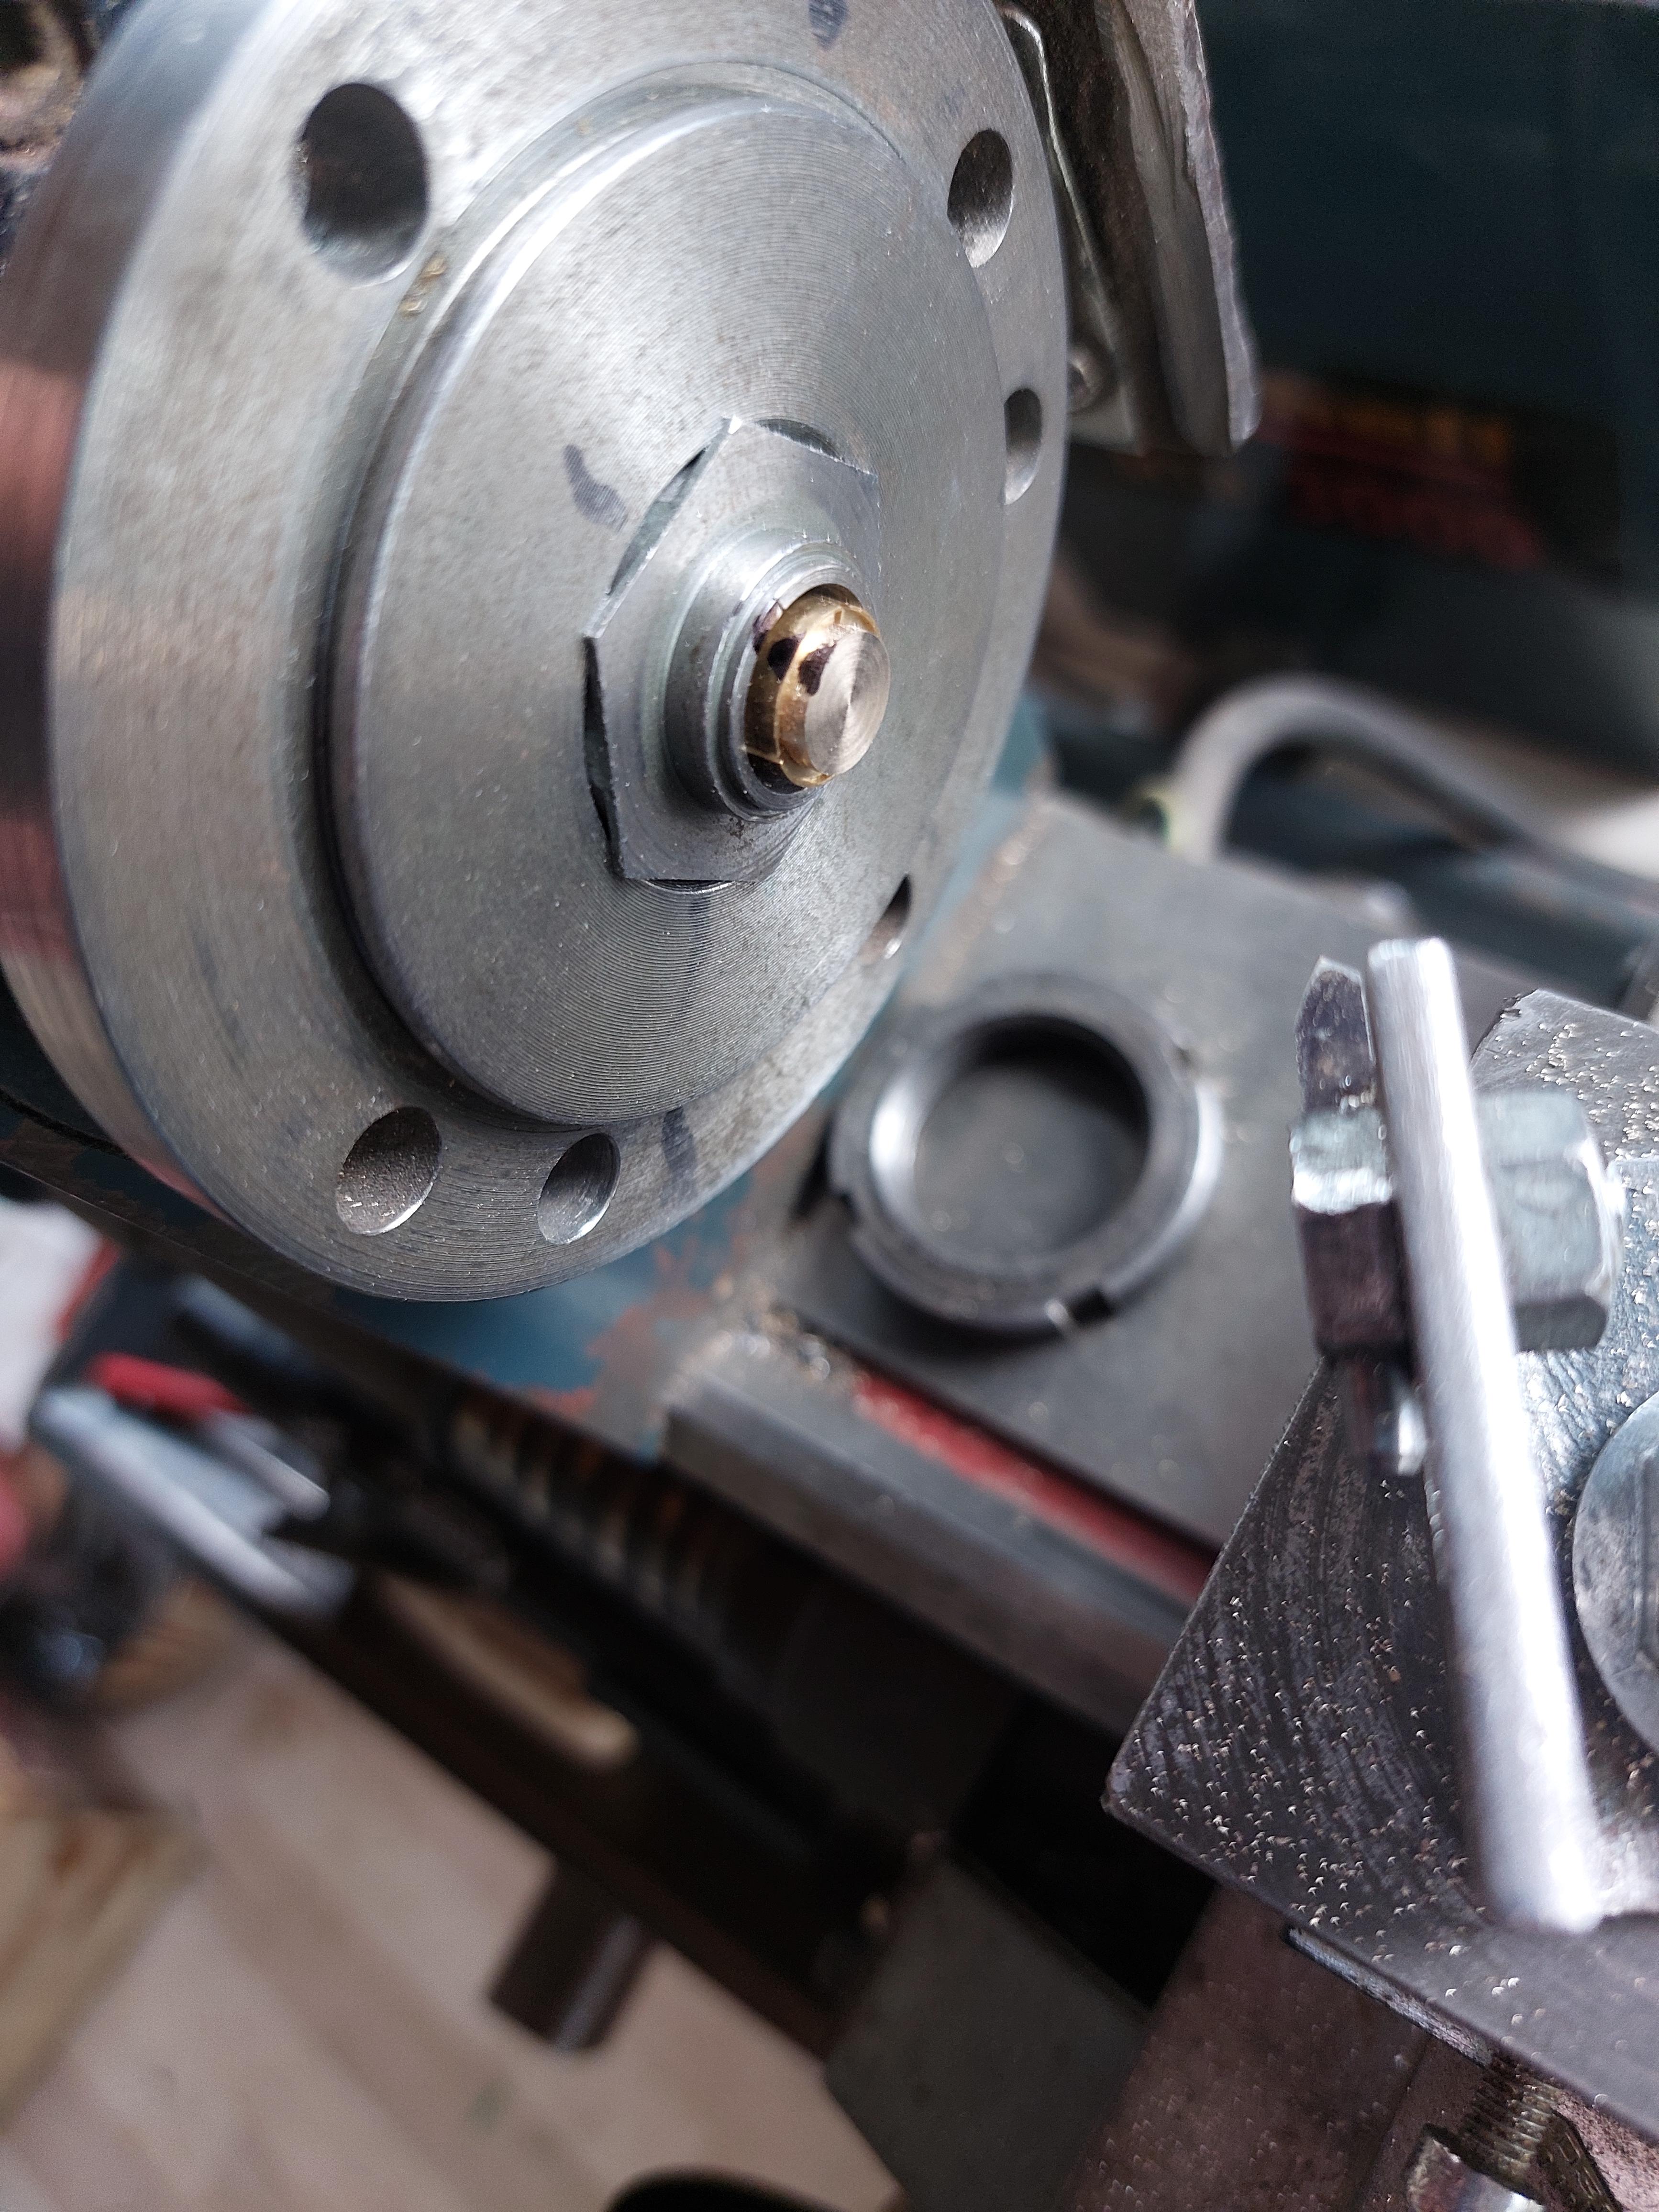
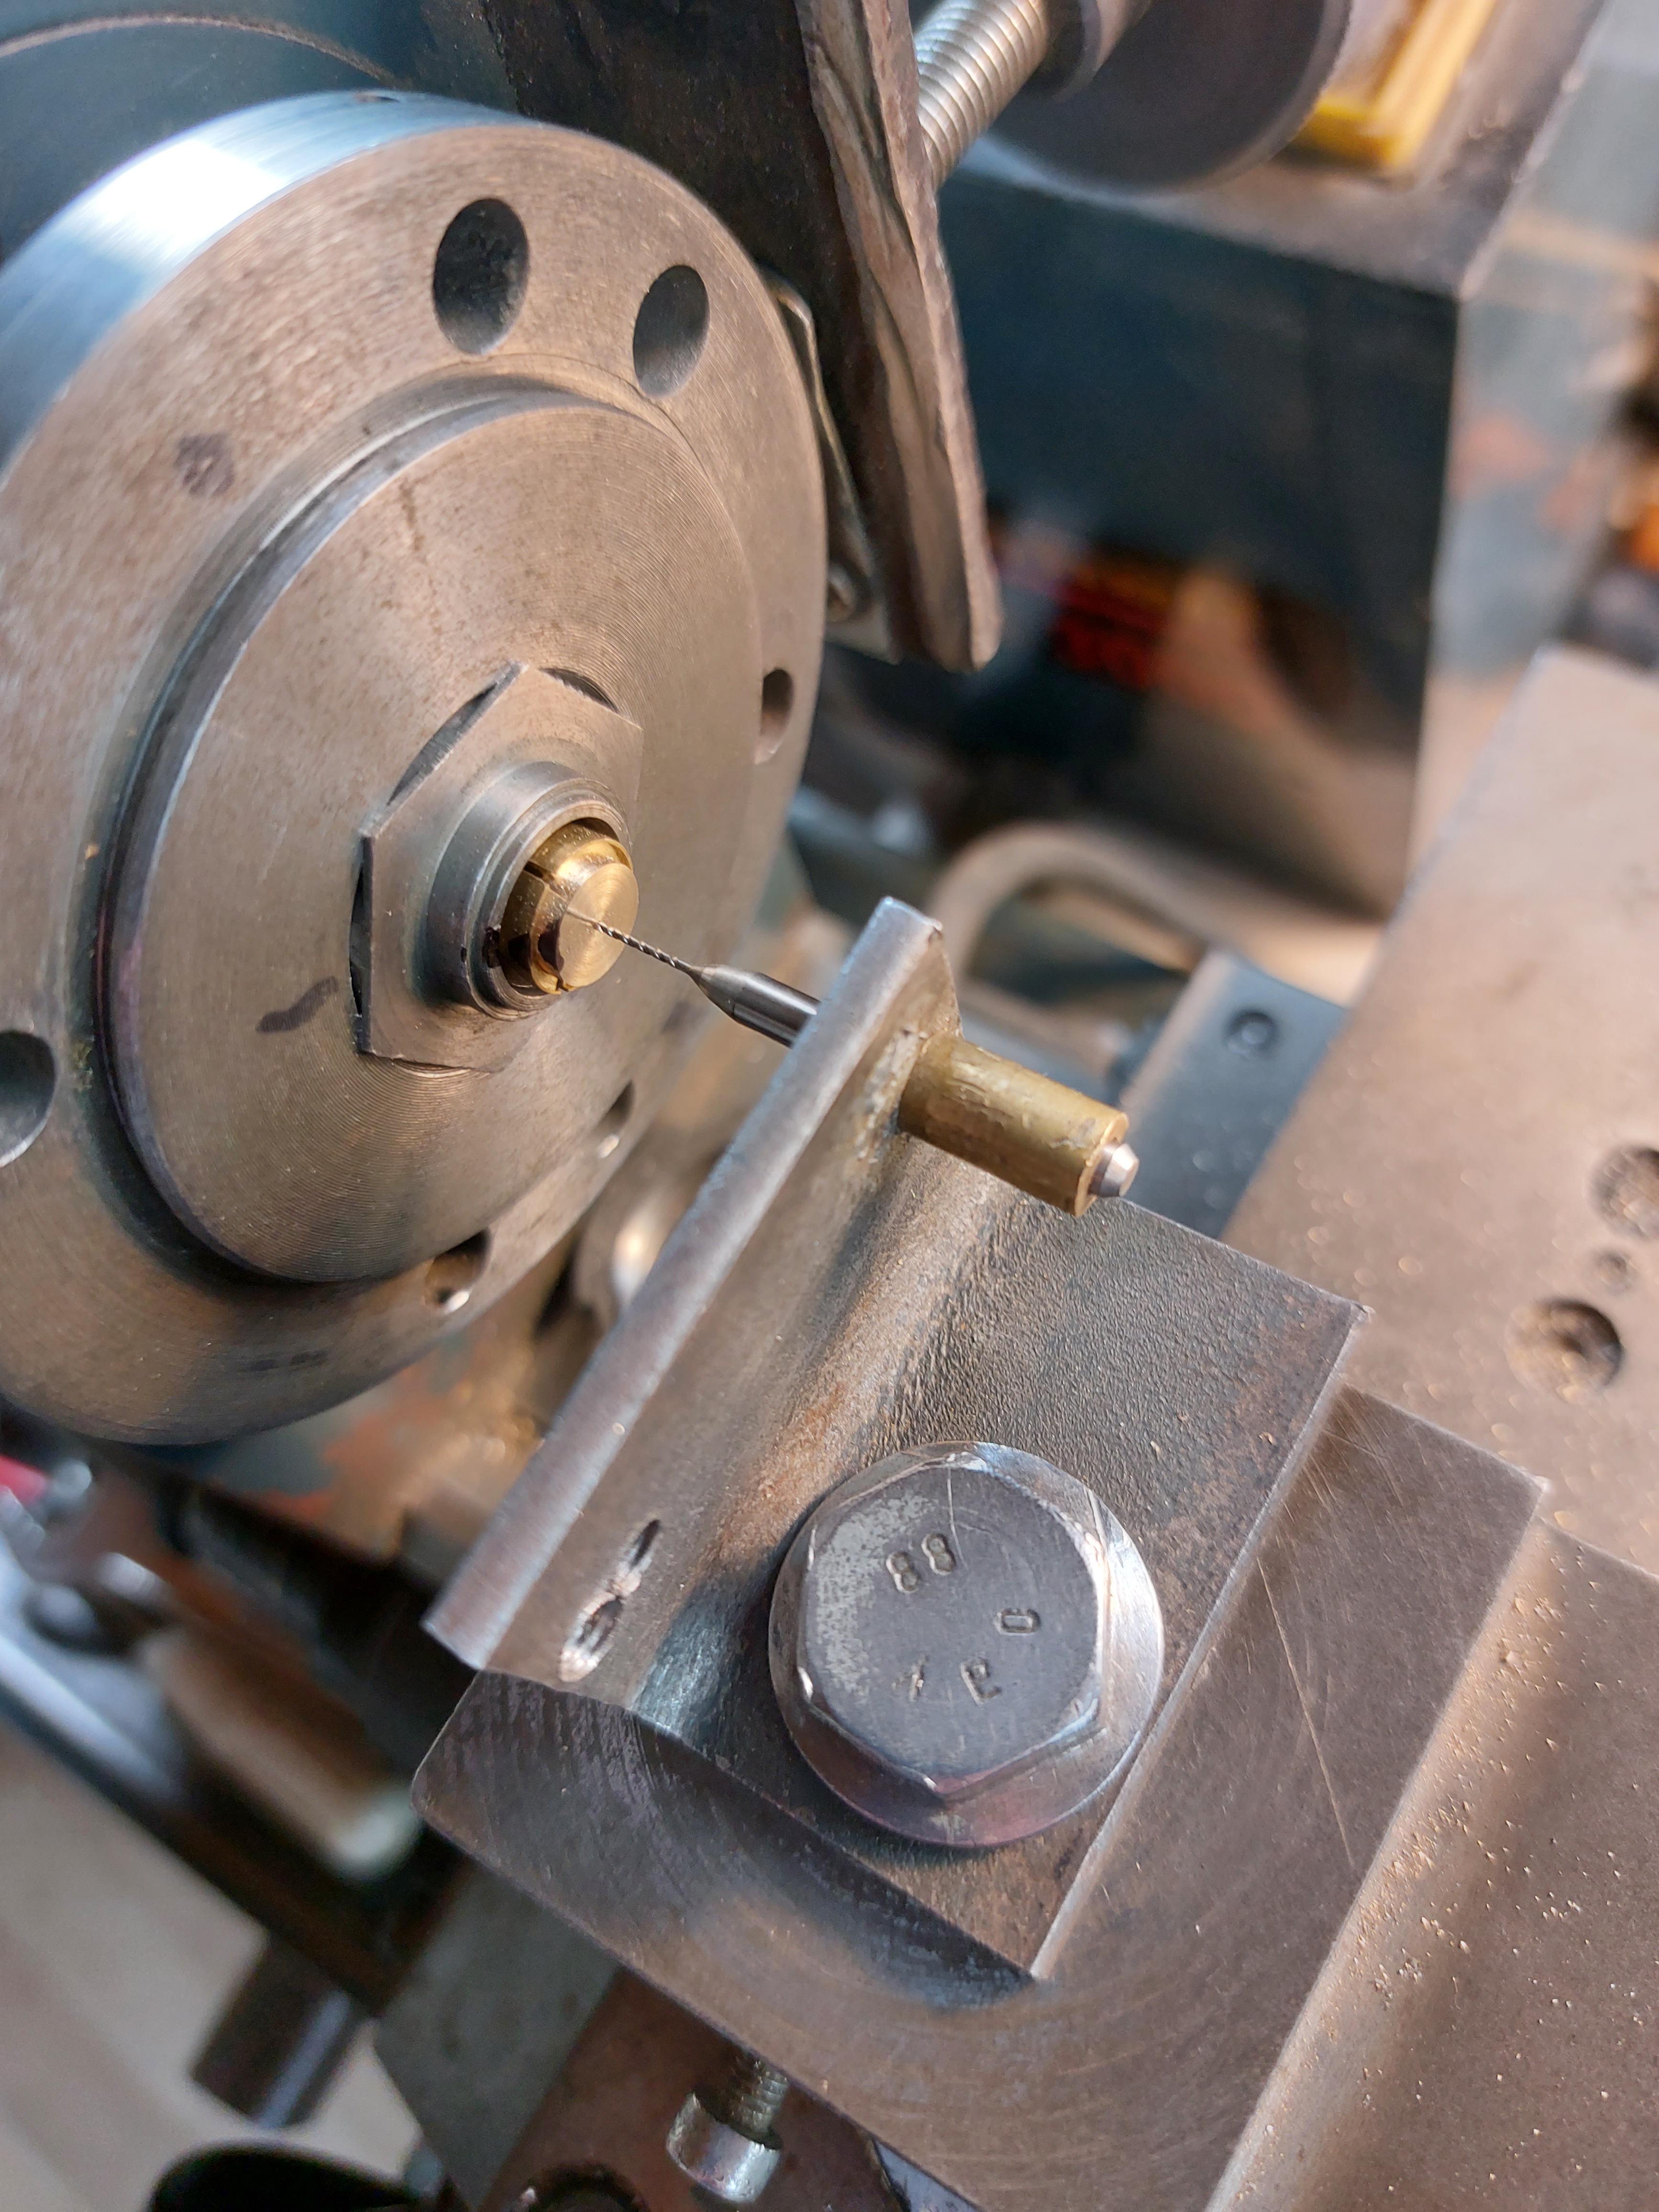
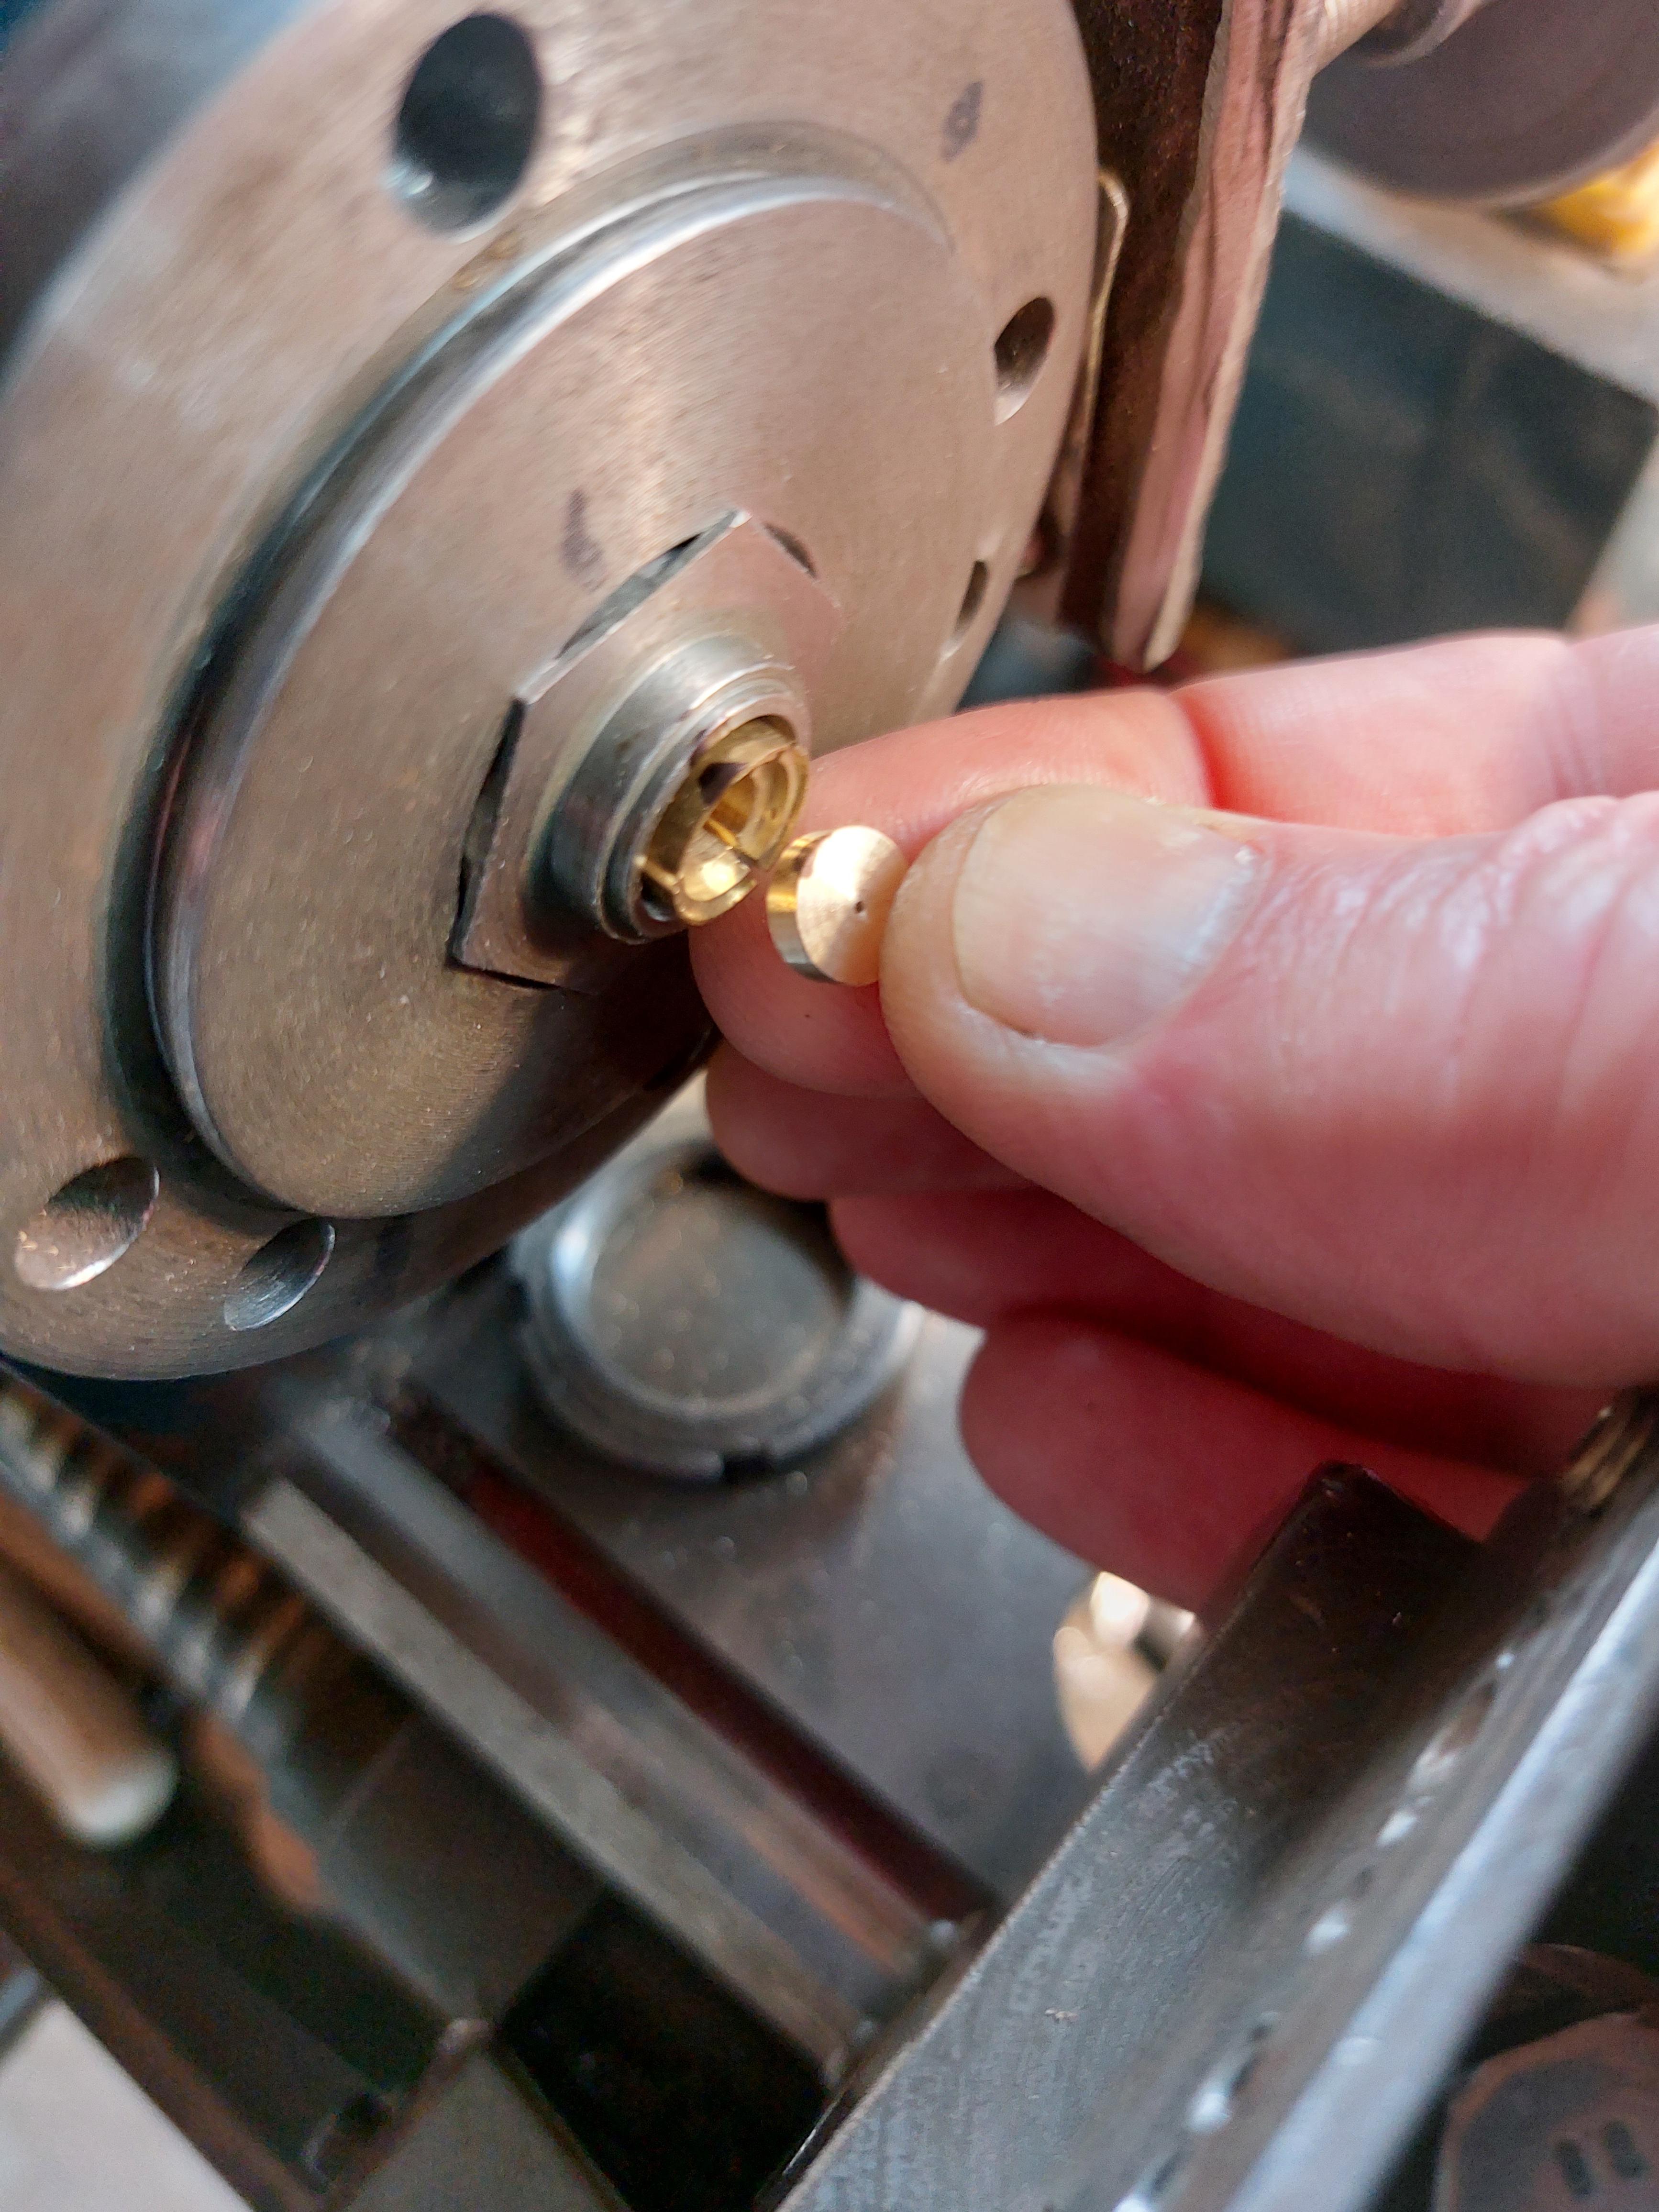
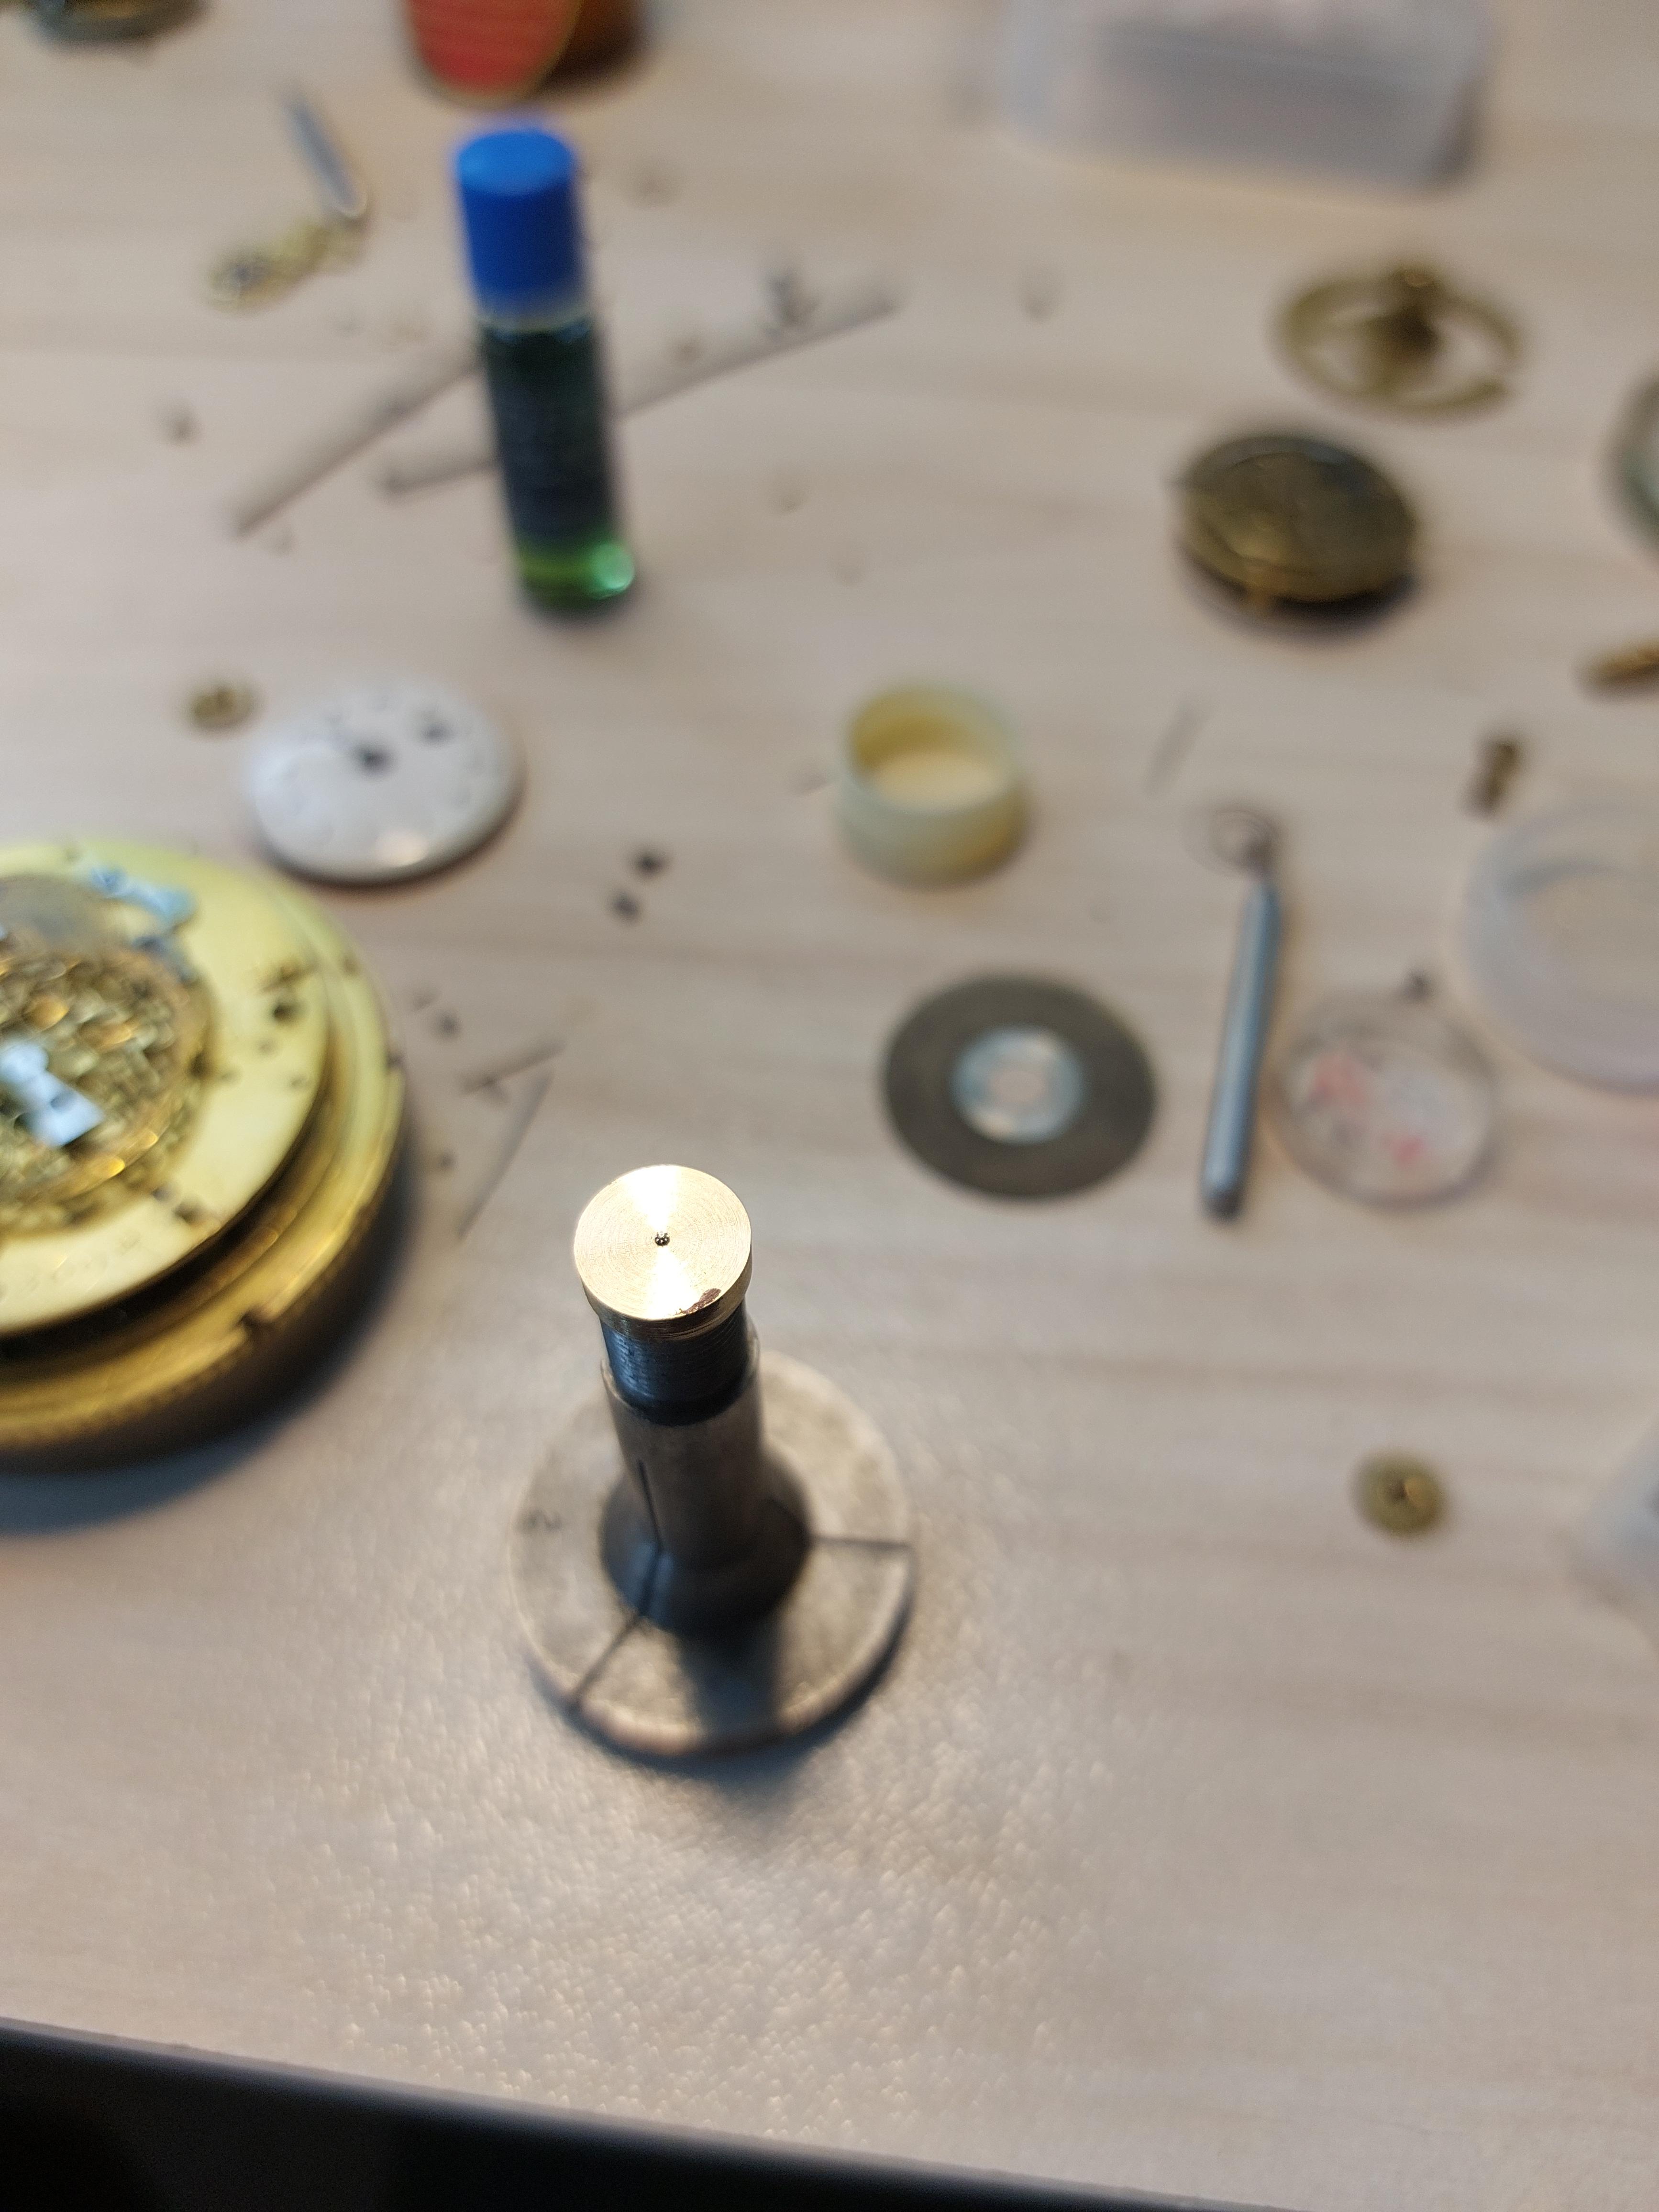
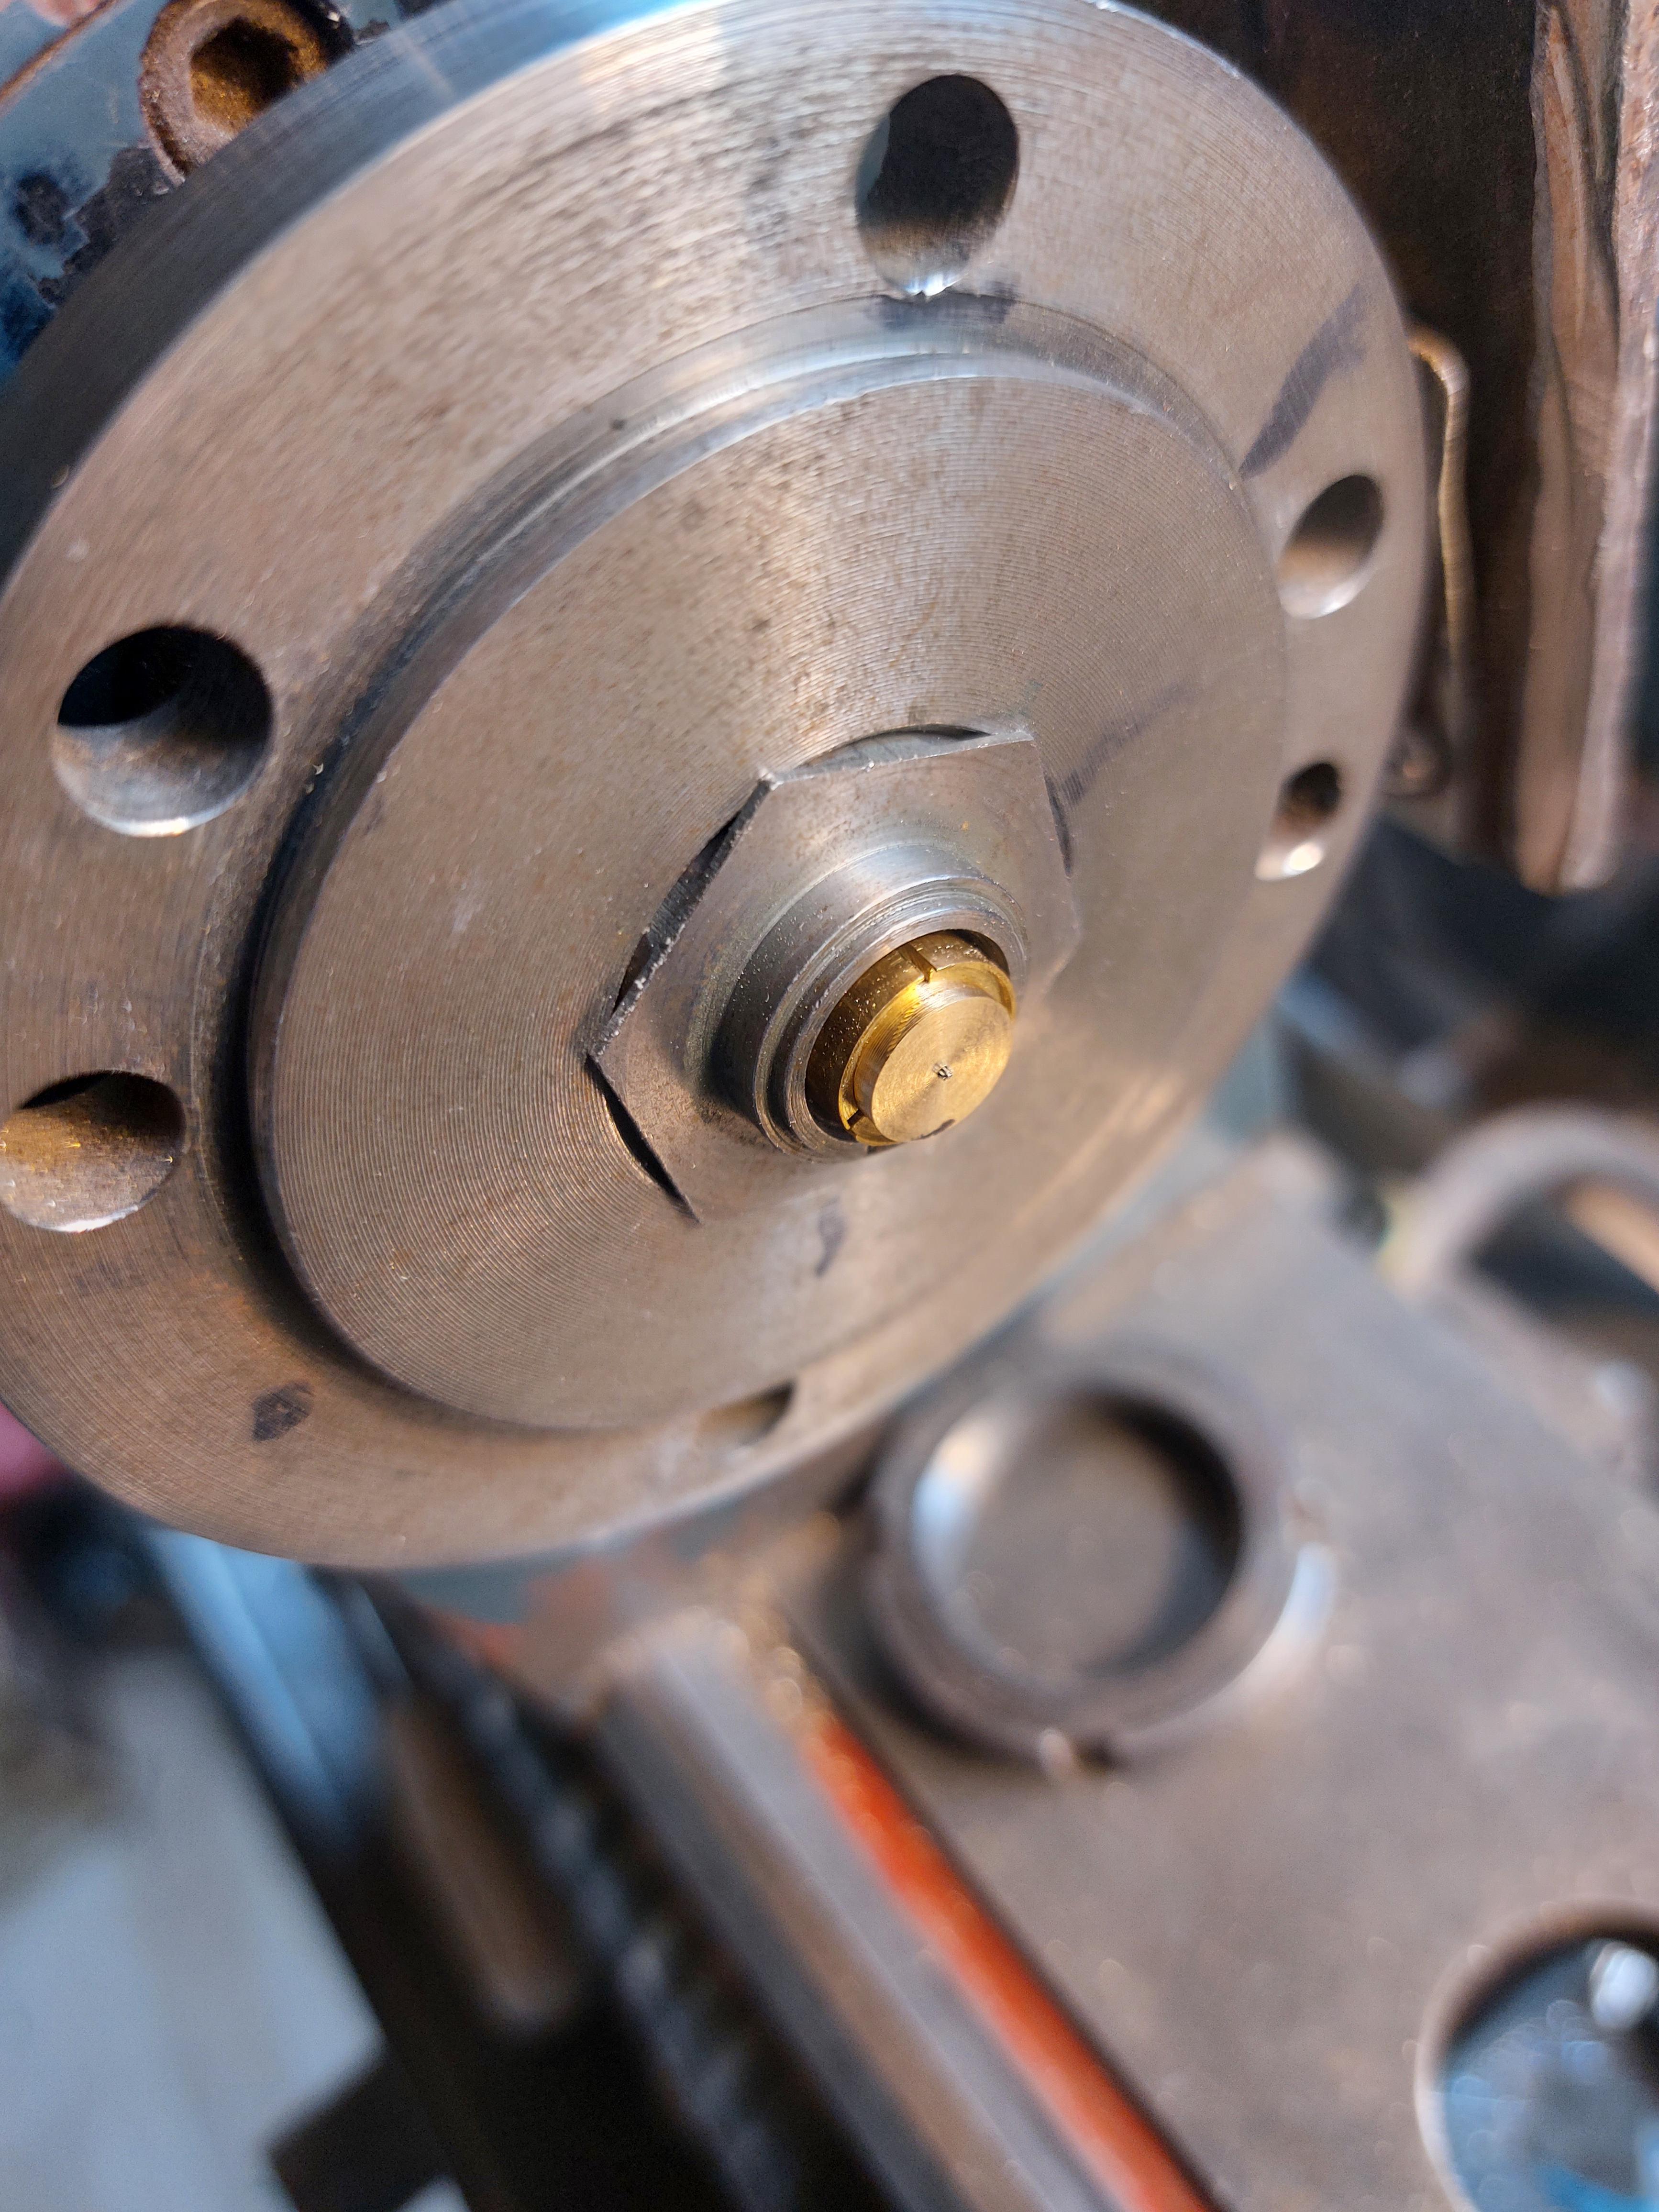
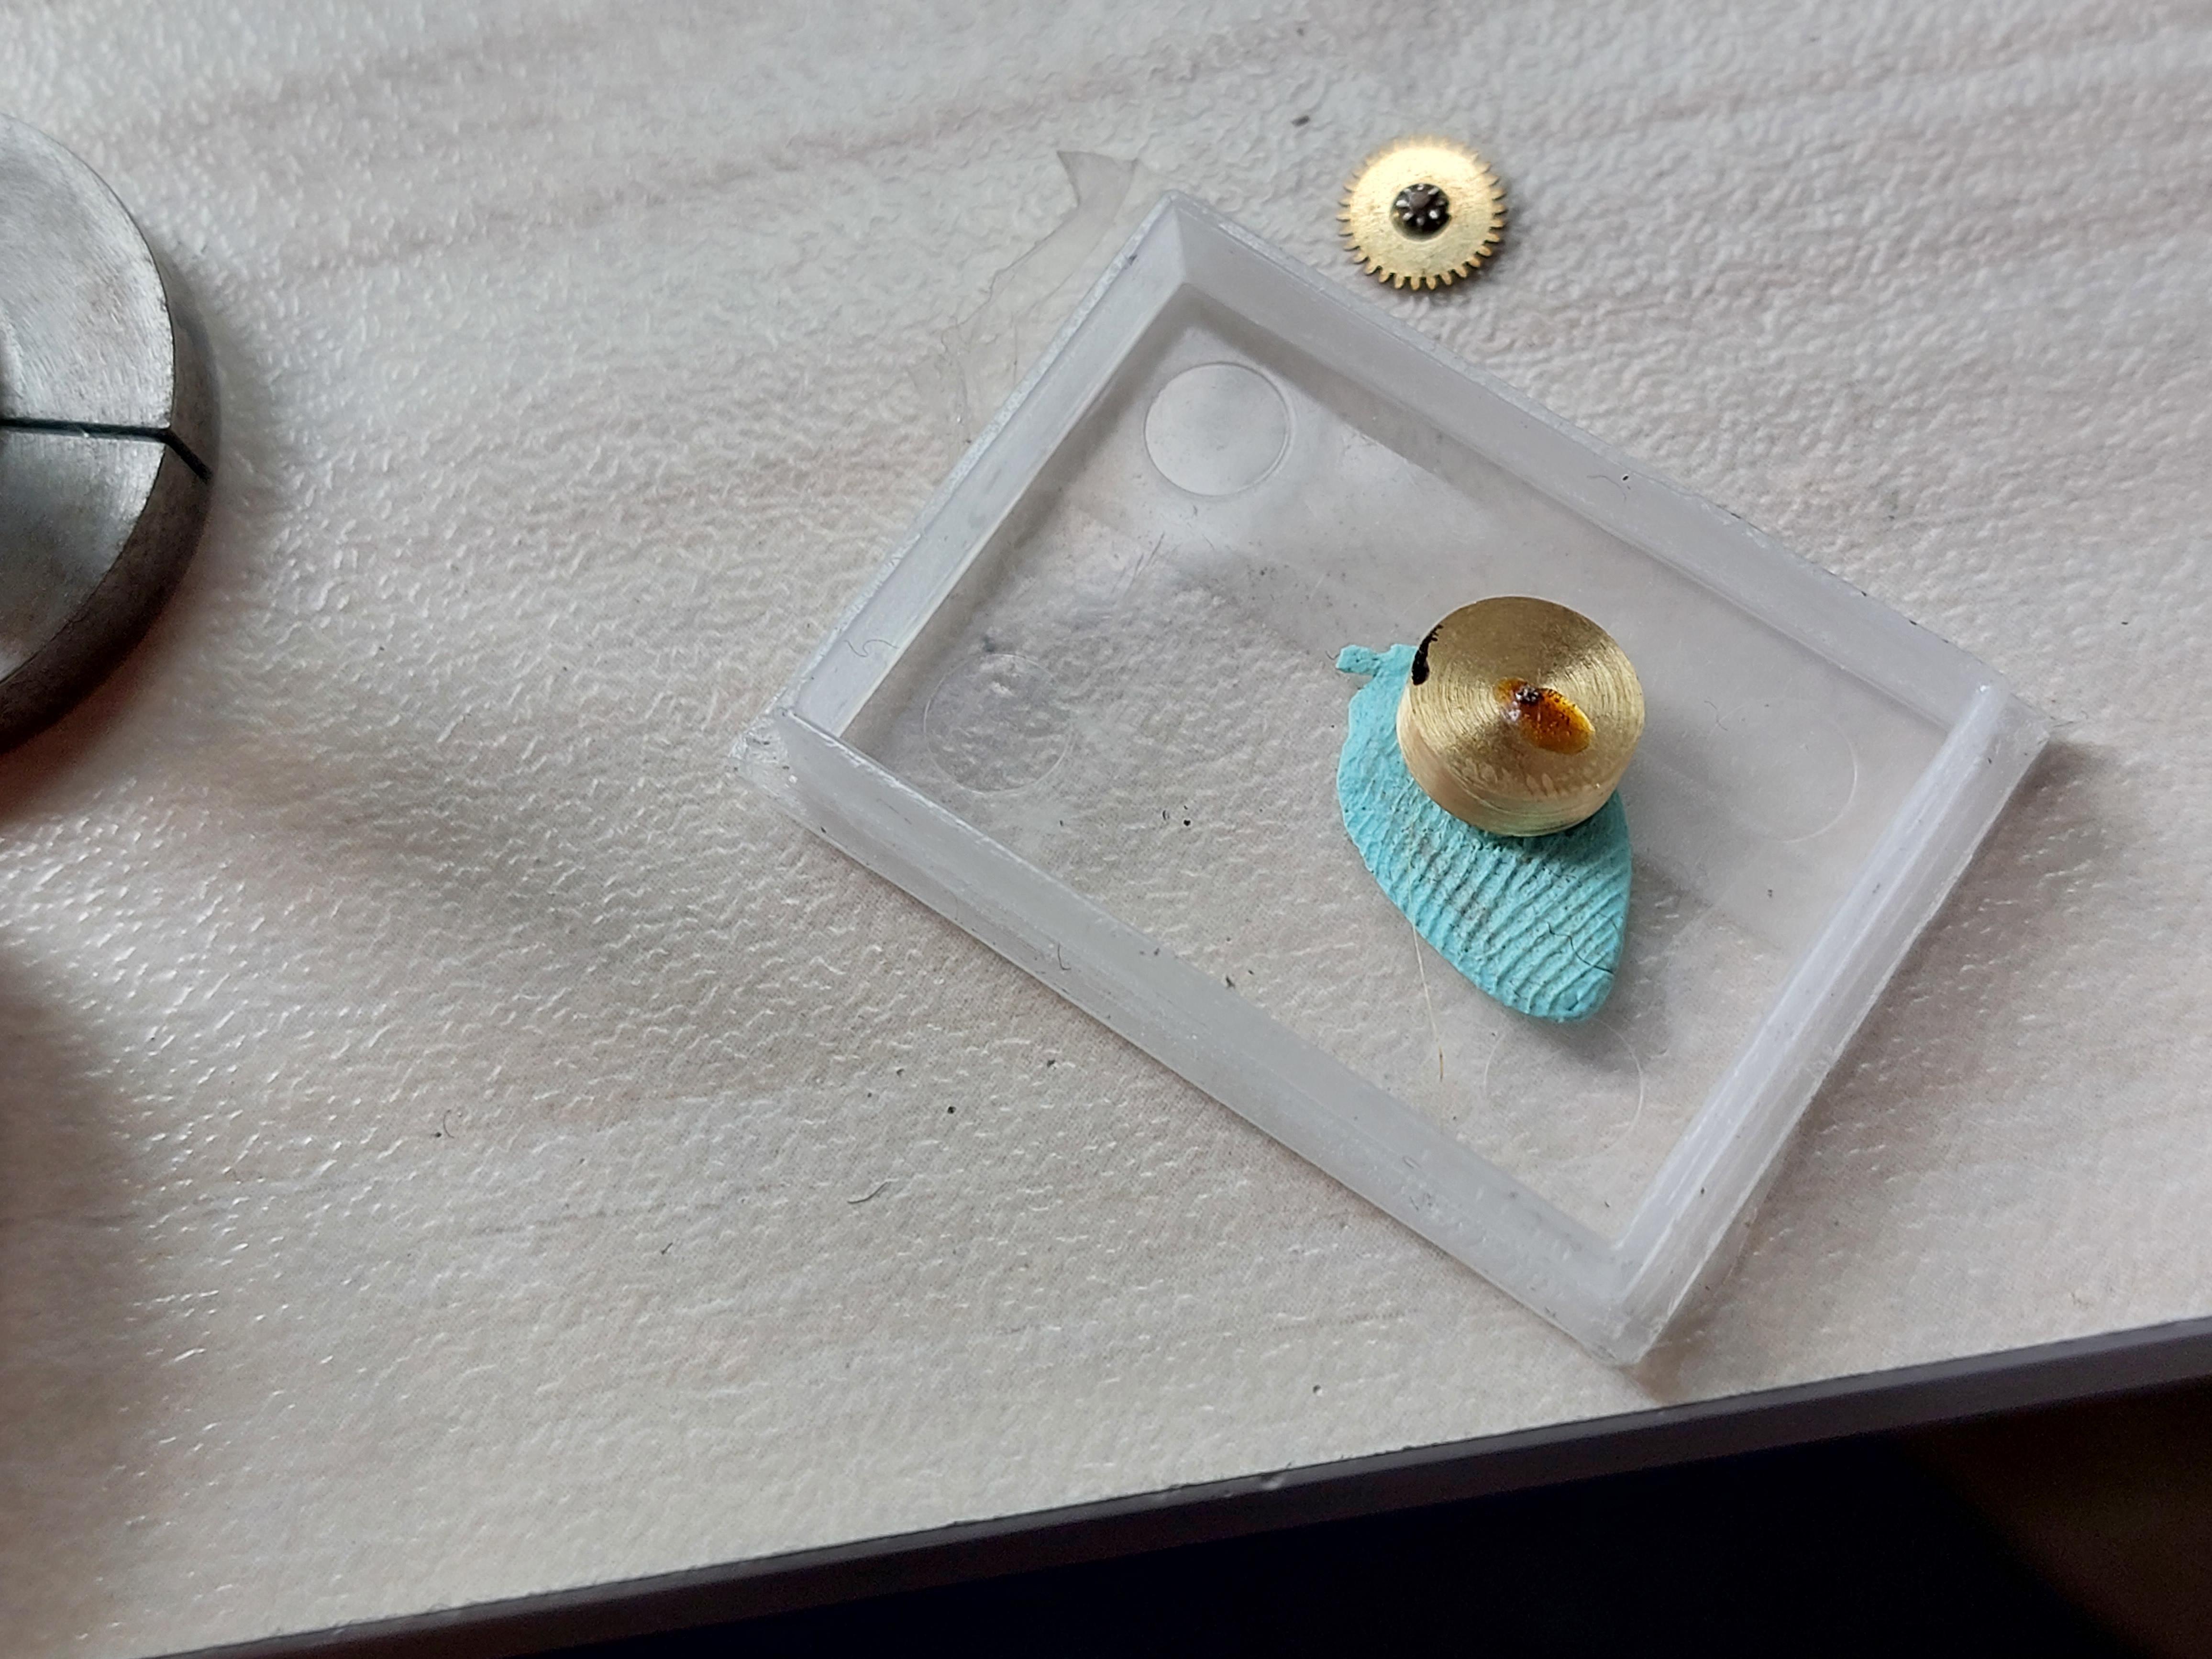
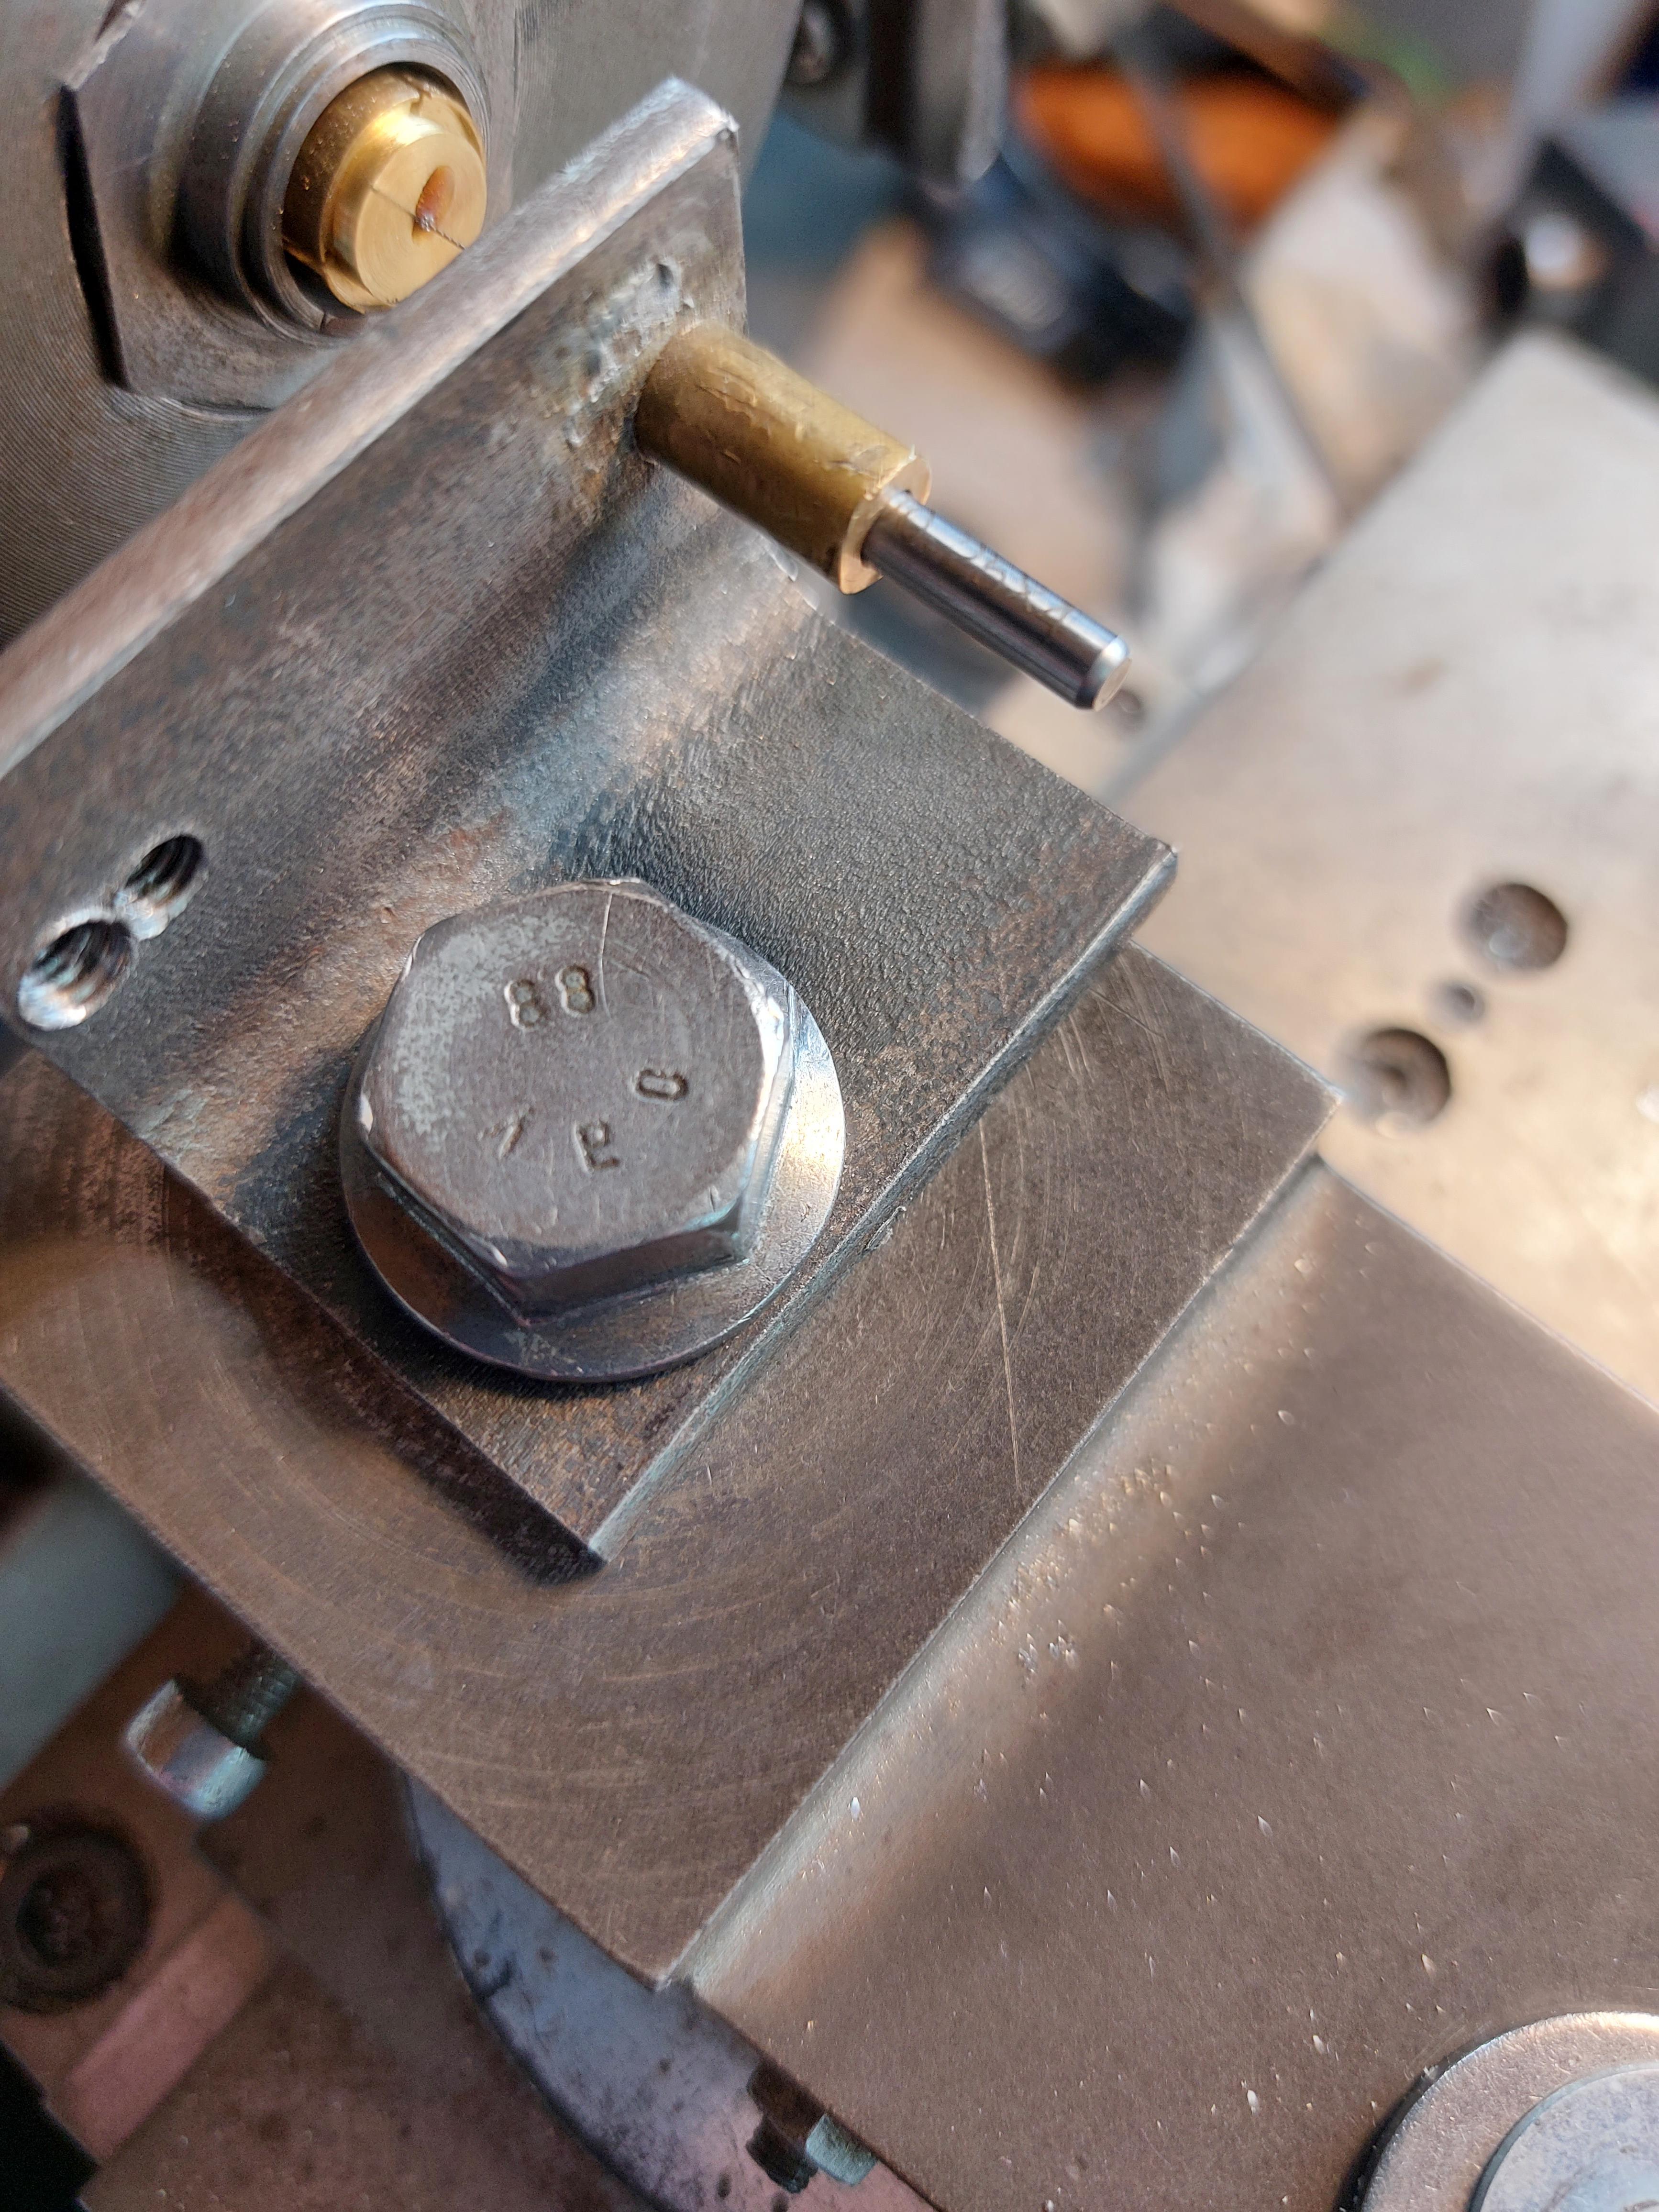
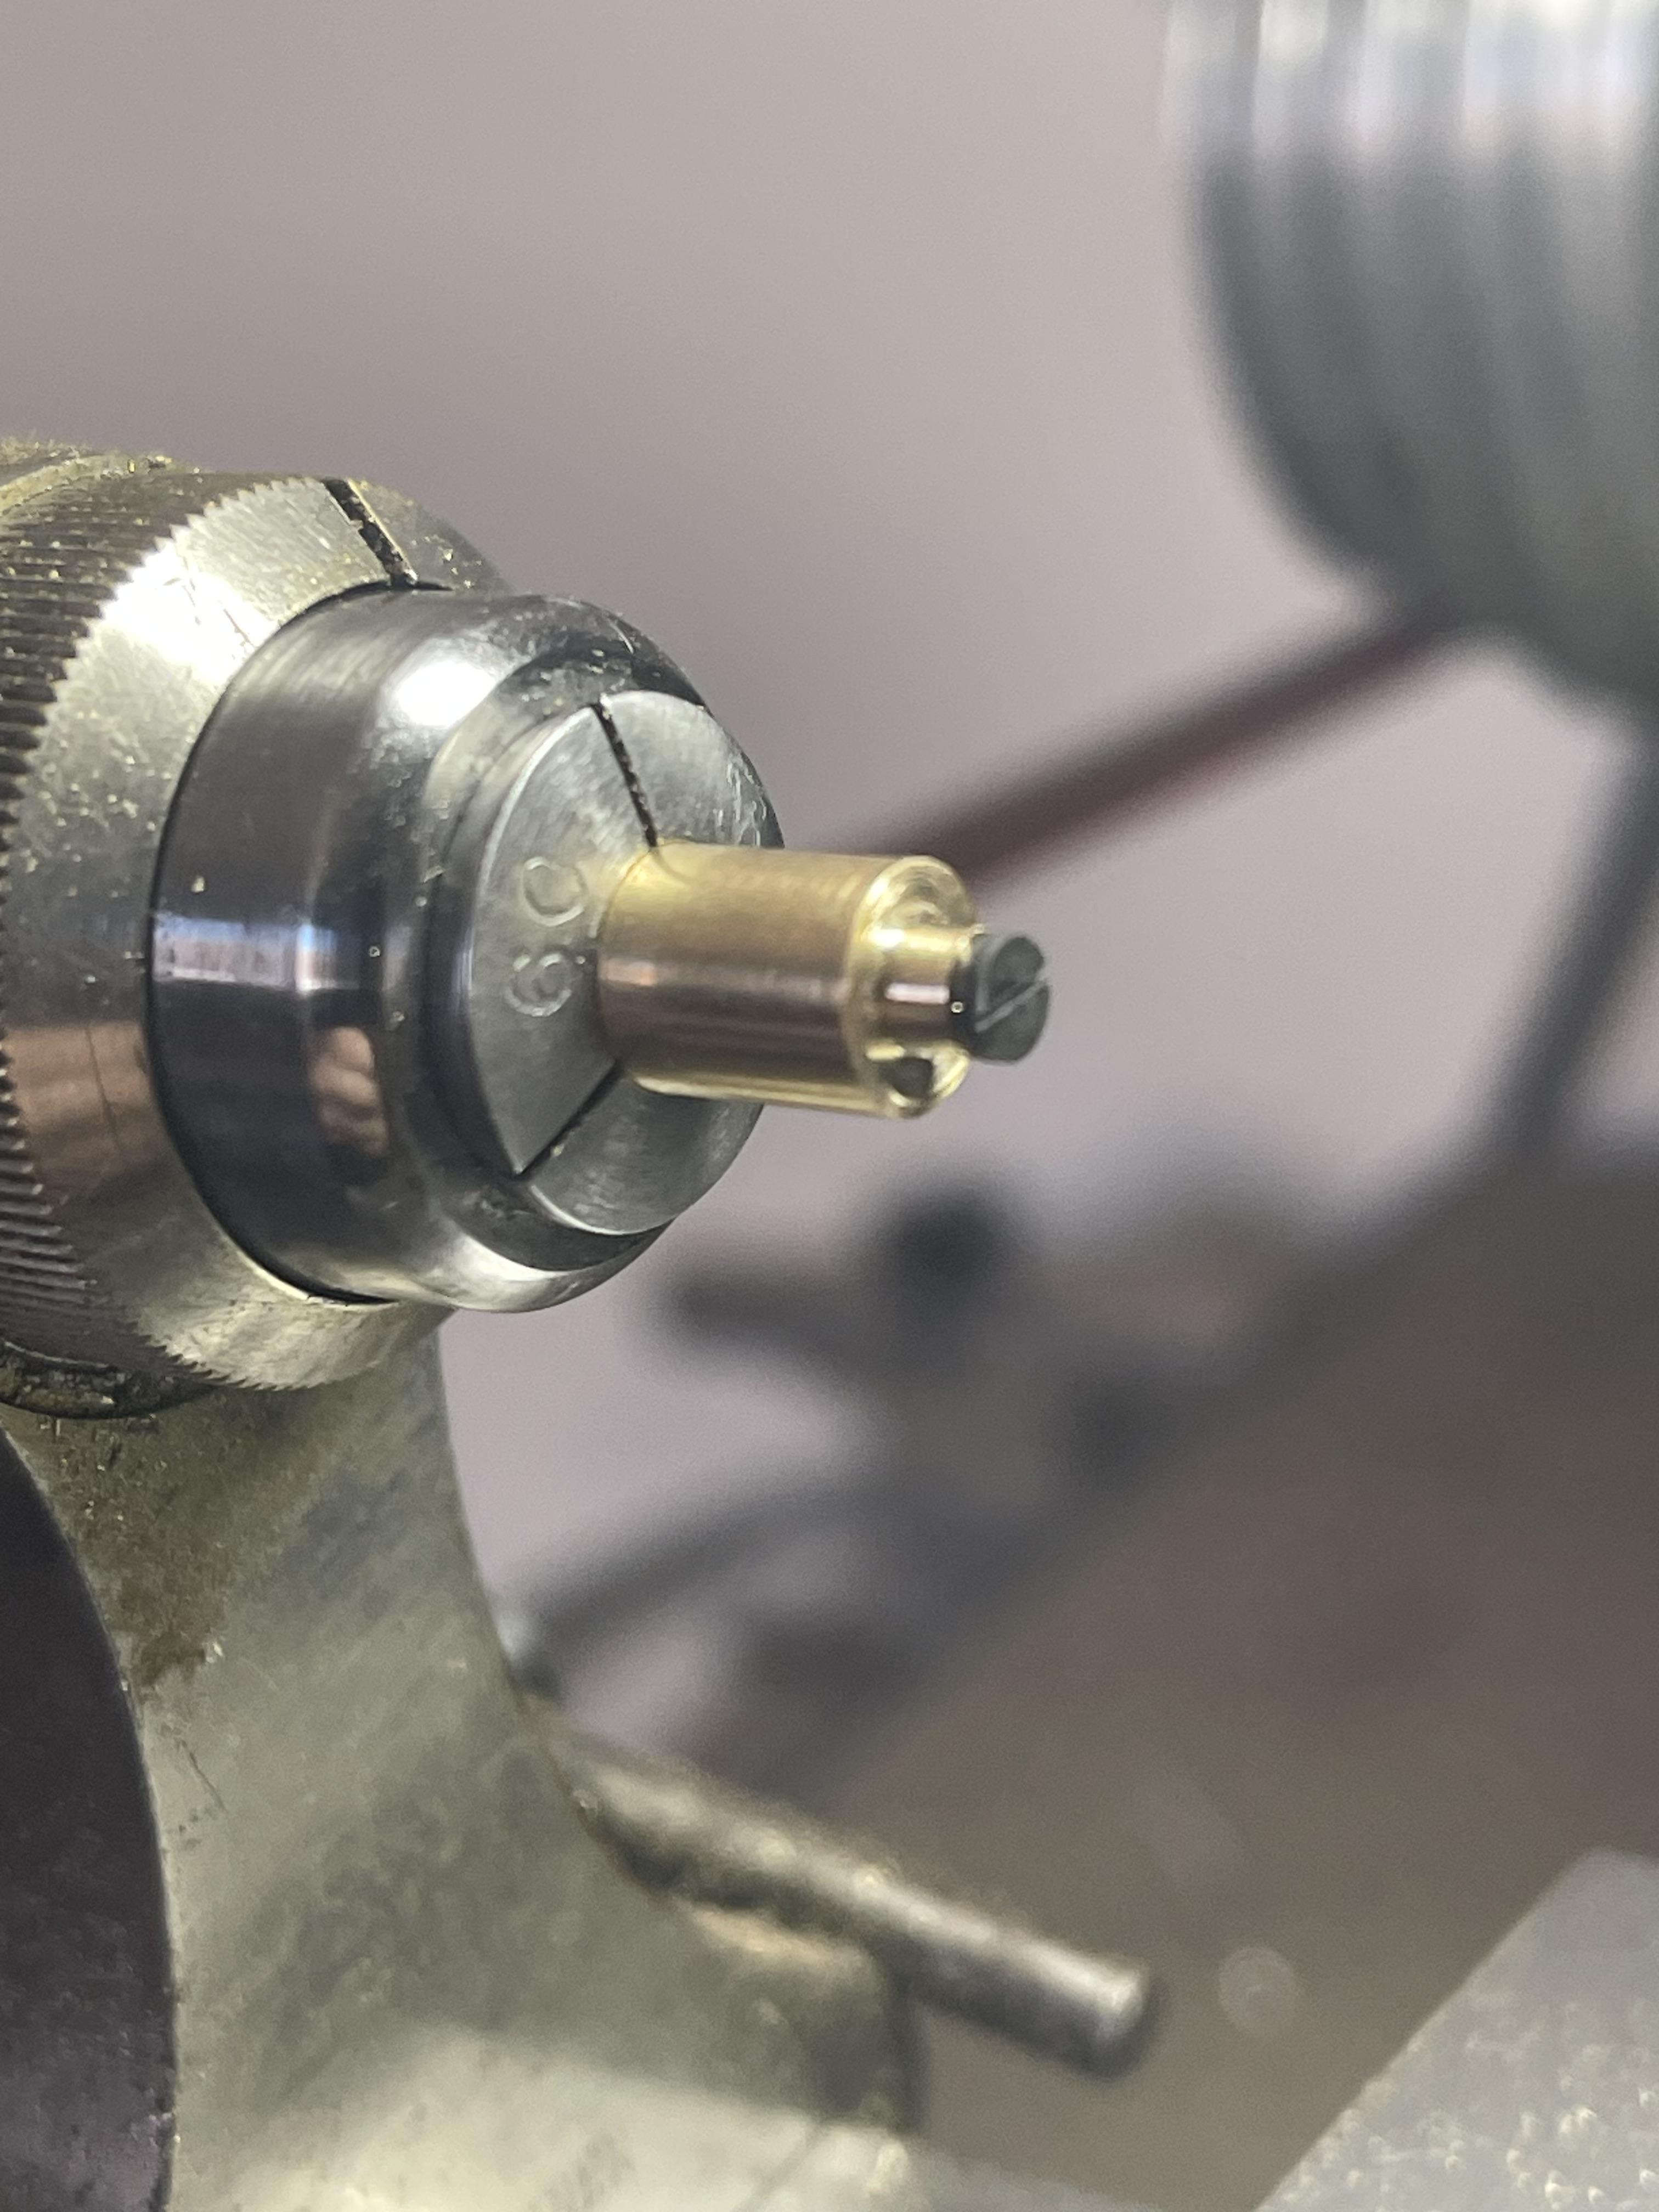
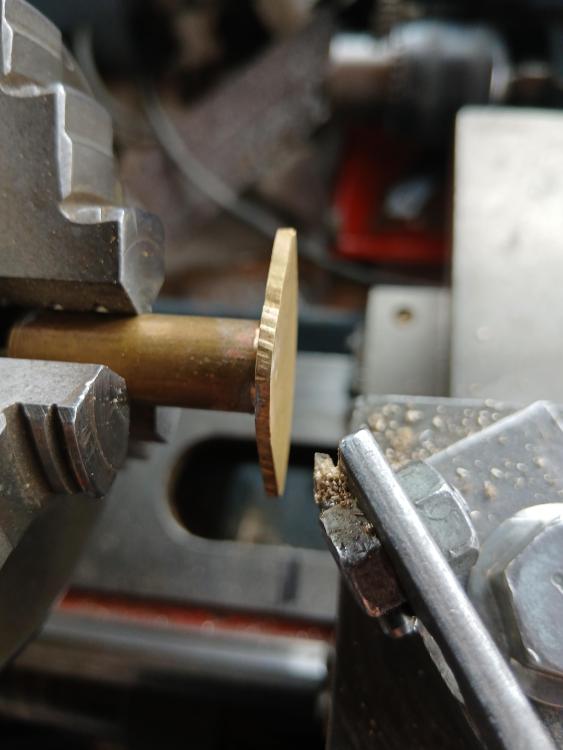
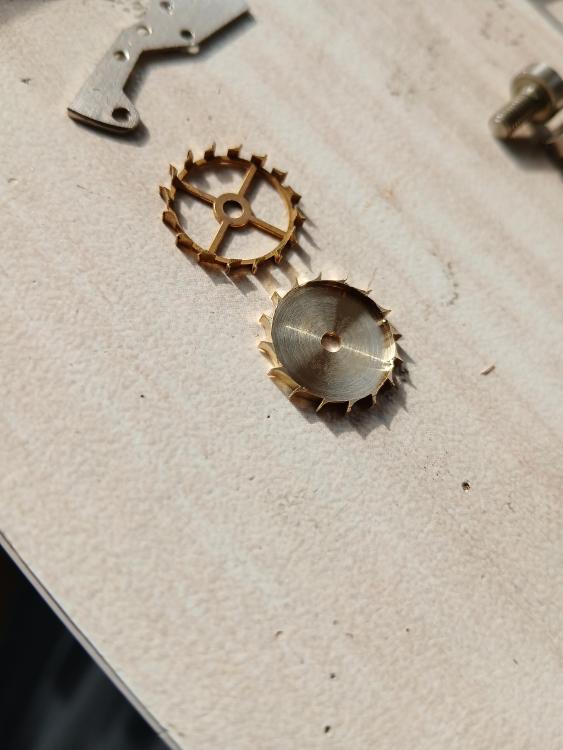
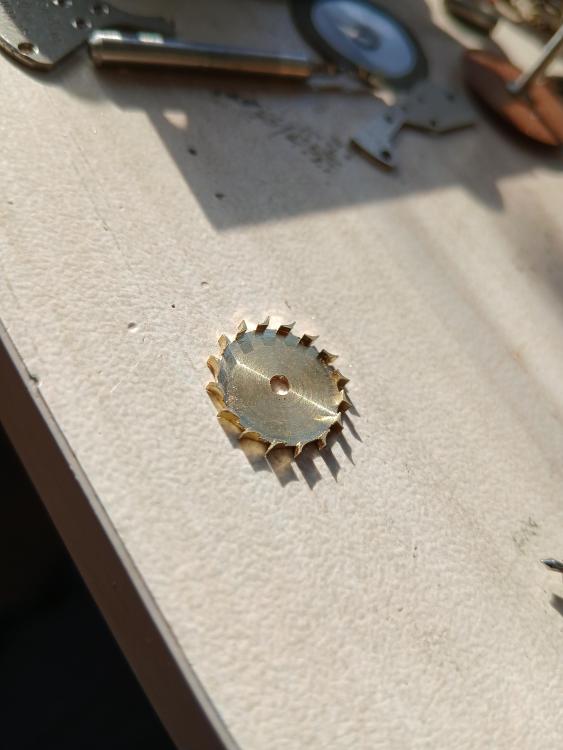
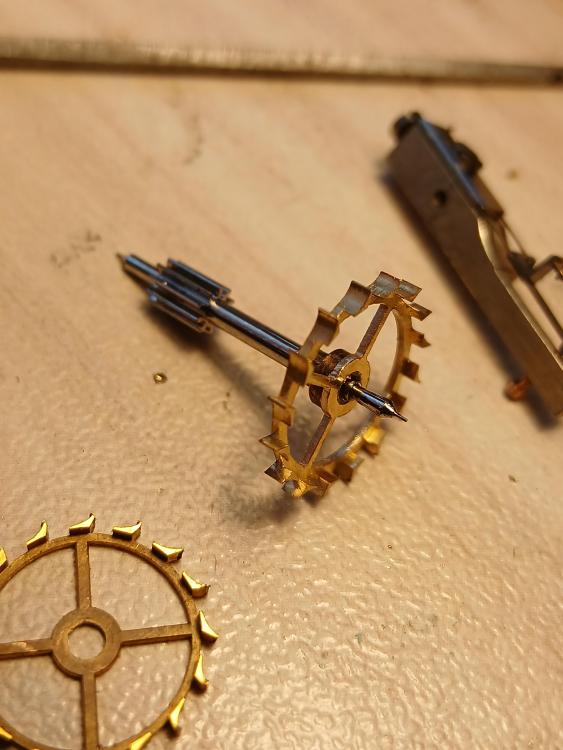
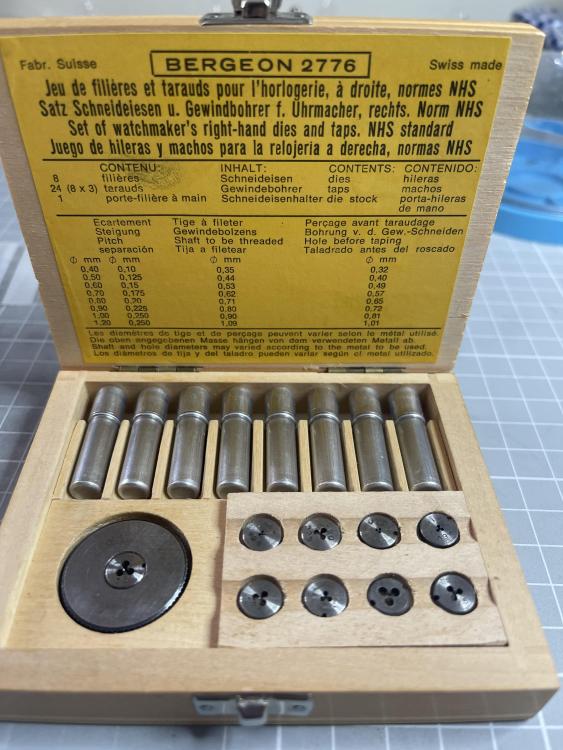
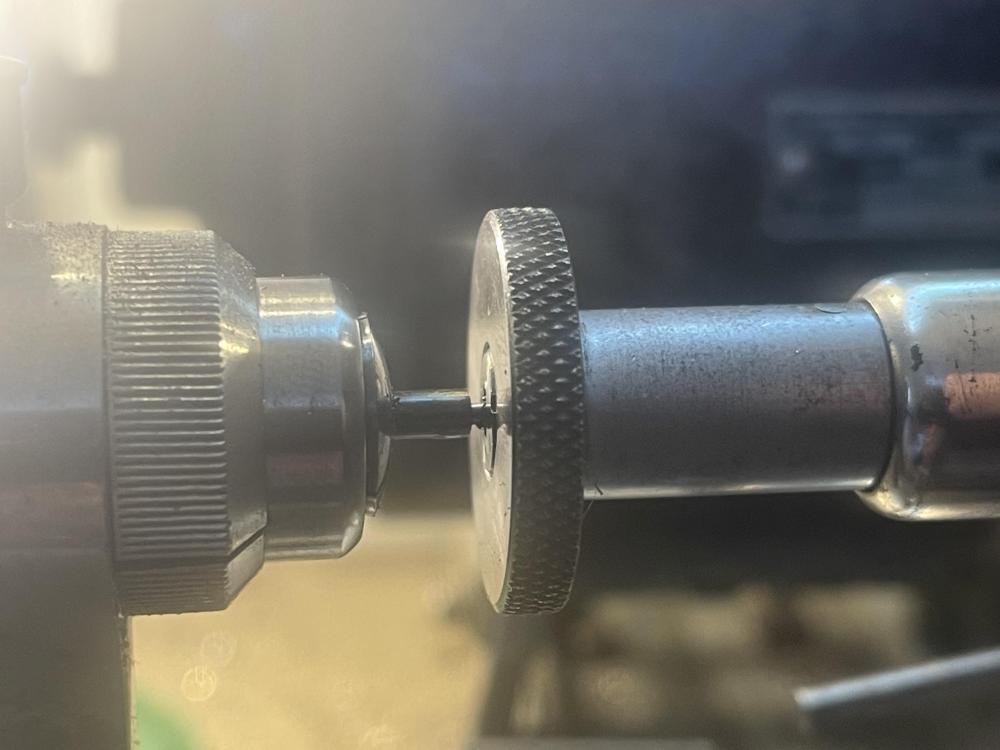
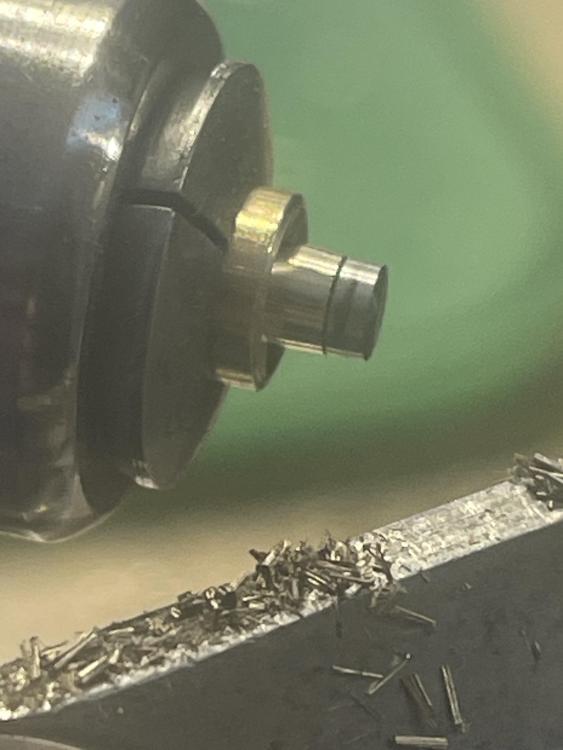
I recently repaired this movement but the screw for the ratchet wheel was the wrong size and it was bugging me (pic 1). I tried to find a replacement but I couldn't match the head width and tap size, so I decided to make one. I wasn't sure of the tap size for the screw, but it looked to be either 1.0 or 1.2 so I made a test screw out of a brass bar, with a matching threaded hole on the other end. I didn't photograph this but you can see the bar in picture 4. I settled on a size and proceeded to cut a steel bar down to length. I softened the bar first to make it easier to work with and the cut it to size, using the chart on my tap and die set for reference Once cut I set up the die in its holder and used my tailstock to hold it straight while I created the thread. Once the thread was cut, I tested it using the brass bar Happy with the diameter and thread I cut the screw off the bar and then twisted it into the bras bar to use it as a holder, for securing it in the lathe to protect the thread I made a face cut to clean the head up Next step was to make the slot. I currently do not have a table saw for the lathe so I was going to have to use a saw. To keep the cut straight and centred, I made a jig out of a piece of brass bar by drilling a hole big enough to slot over the stew, with a slot in it to guide the saw while cutting the slot on the screw head I then cut the slot with a fine saw (I forget what they're called, pin saw?). Once that was done, it was ready for hardening and tempering and then a first polish from 800 grits to 2000 on the lathe. The picture below is just before the first polish. Once I got it to polished with 2000 grit, I removed it from the lathe and then polished it with diamond paste and a Dremel, using the brass bar to hold it. (this turned out to be a really useful tool) Finally, it was ready to go into the movement. I am pleased with the result. I should have made it flatter to match the crown wheel screw better but, overall, it is a vast improvement on the screw that was in there. The main thing I took away from this was how useful the brass bar was, not just for testing the thread but as a holder in the lathe, for cutting the slot and for handling when polishing. No trying to hold it with tweezers or a vice. It was a really simple tool to make and really worth the 10 minuets or so to make it and cut the threads. The slot guide was a huge bonus because it worked much better than expected.


 10 points
 -
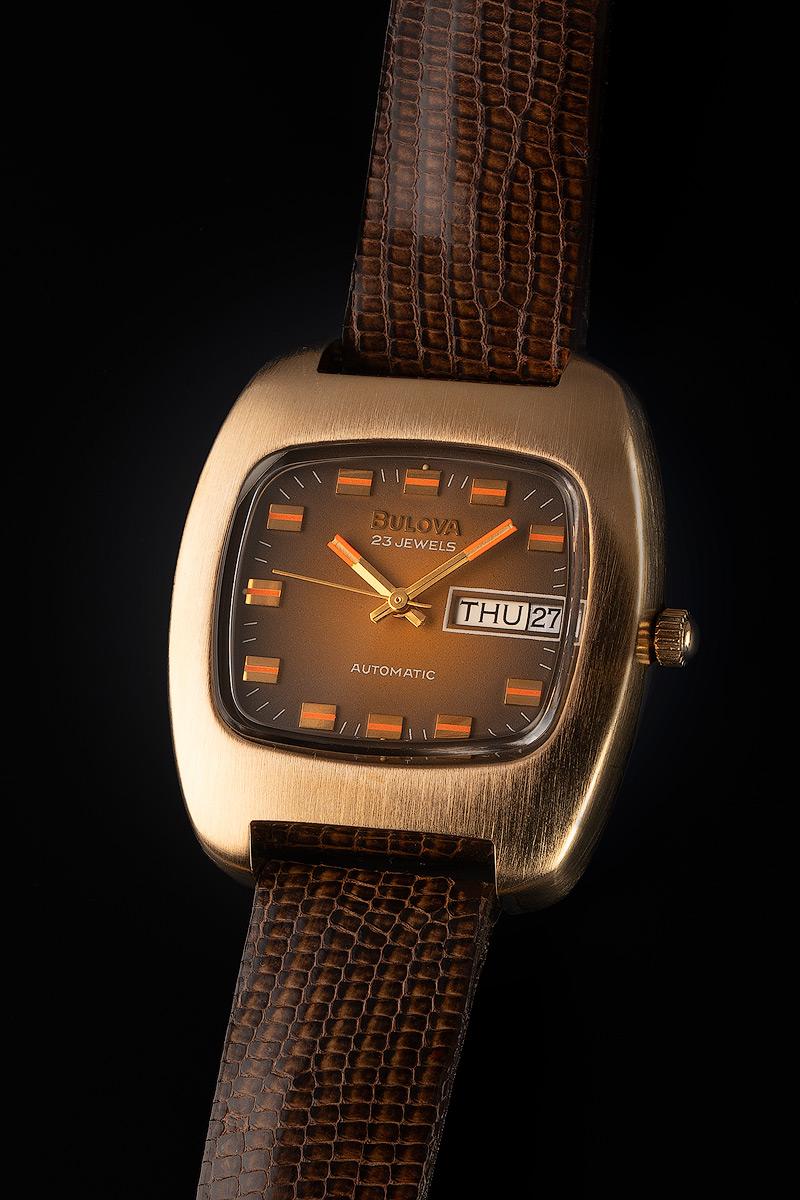
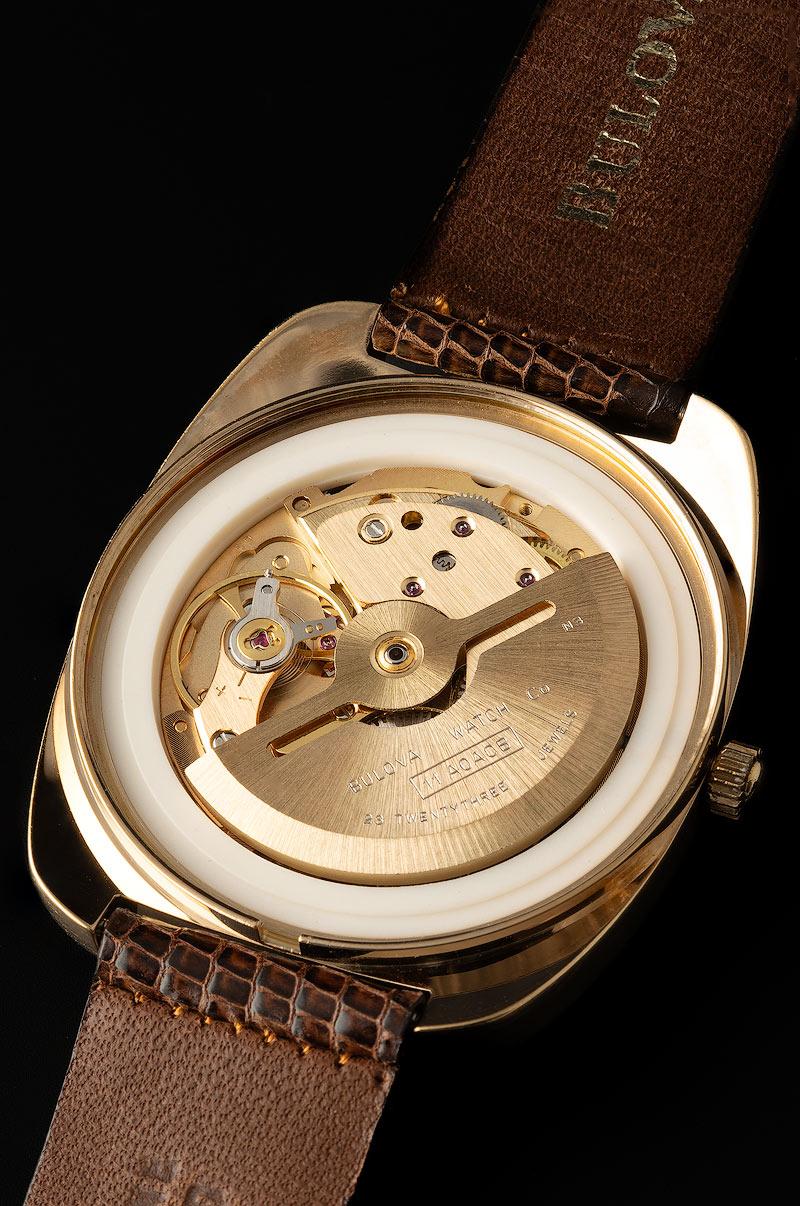
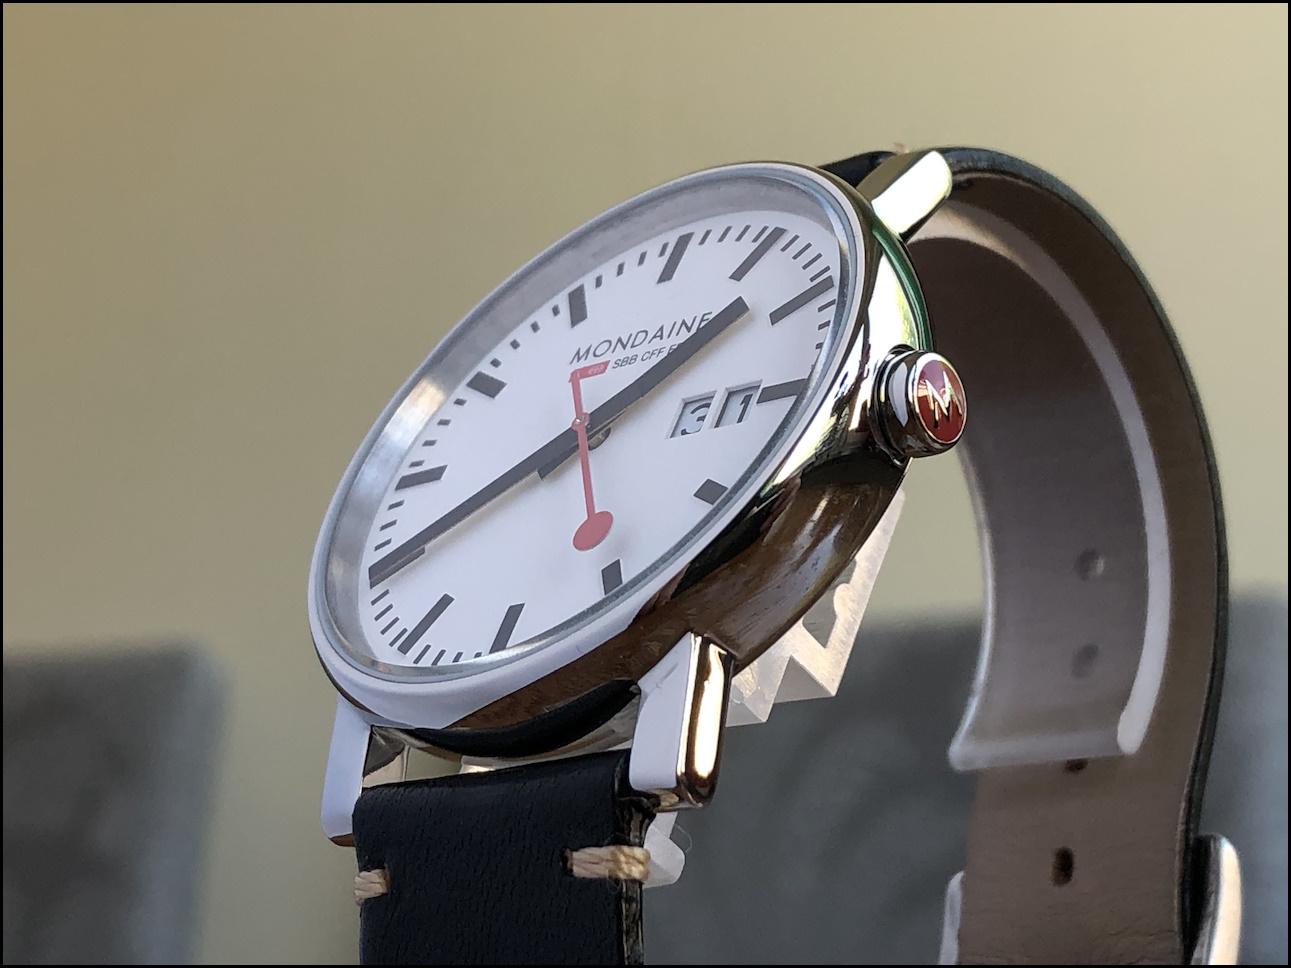
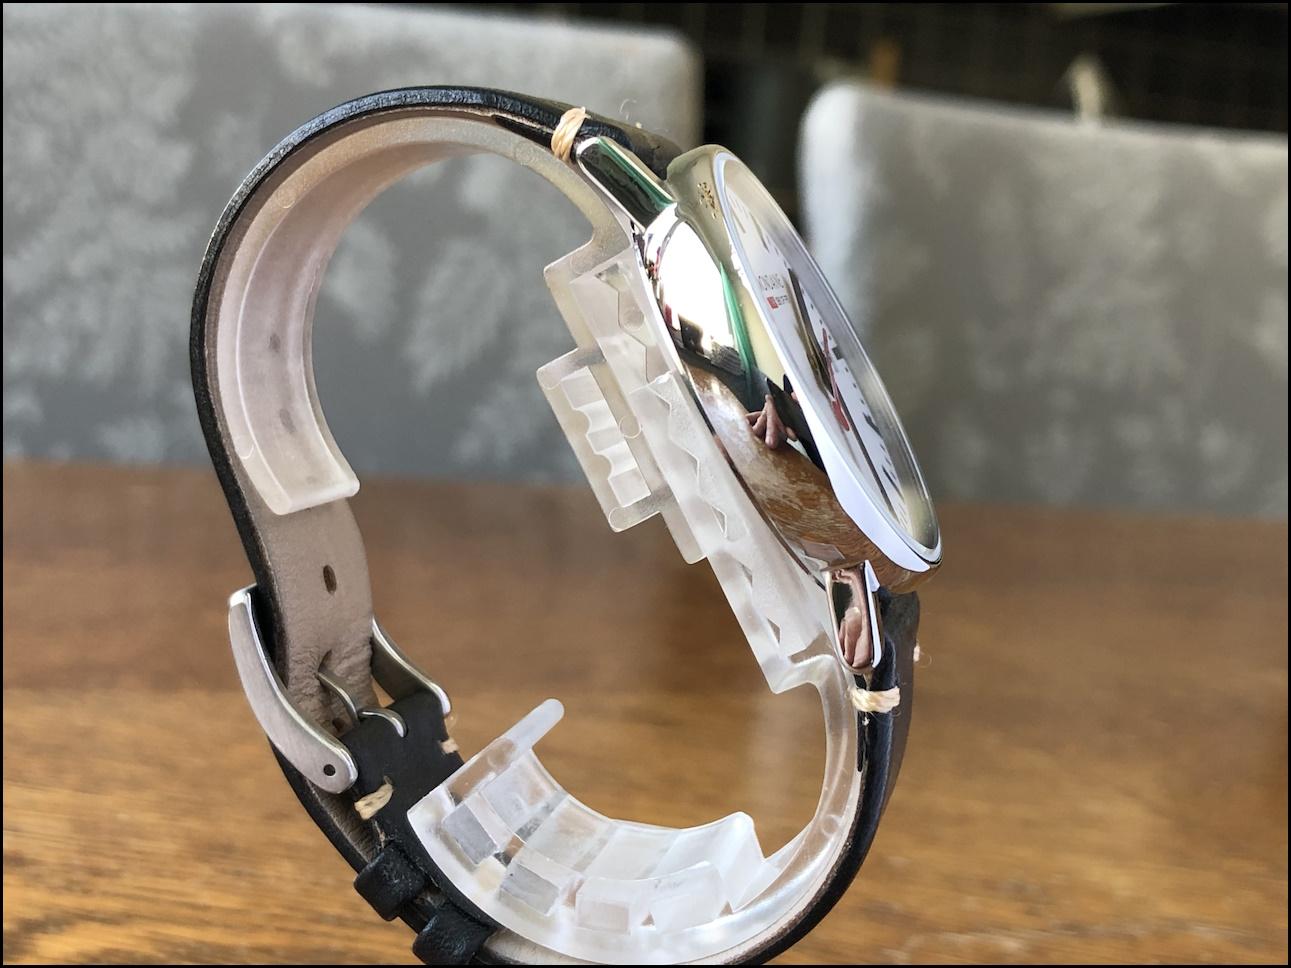
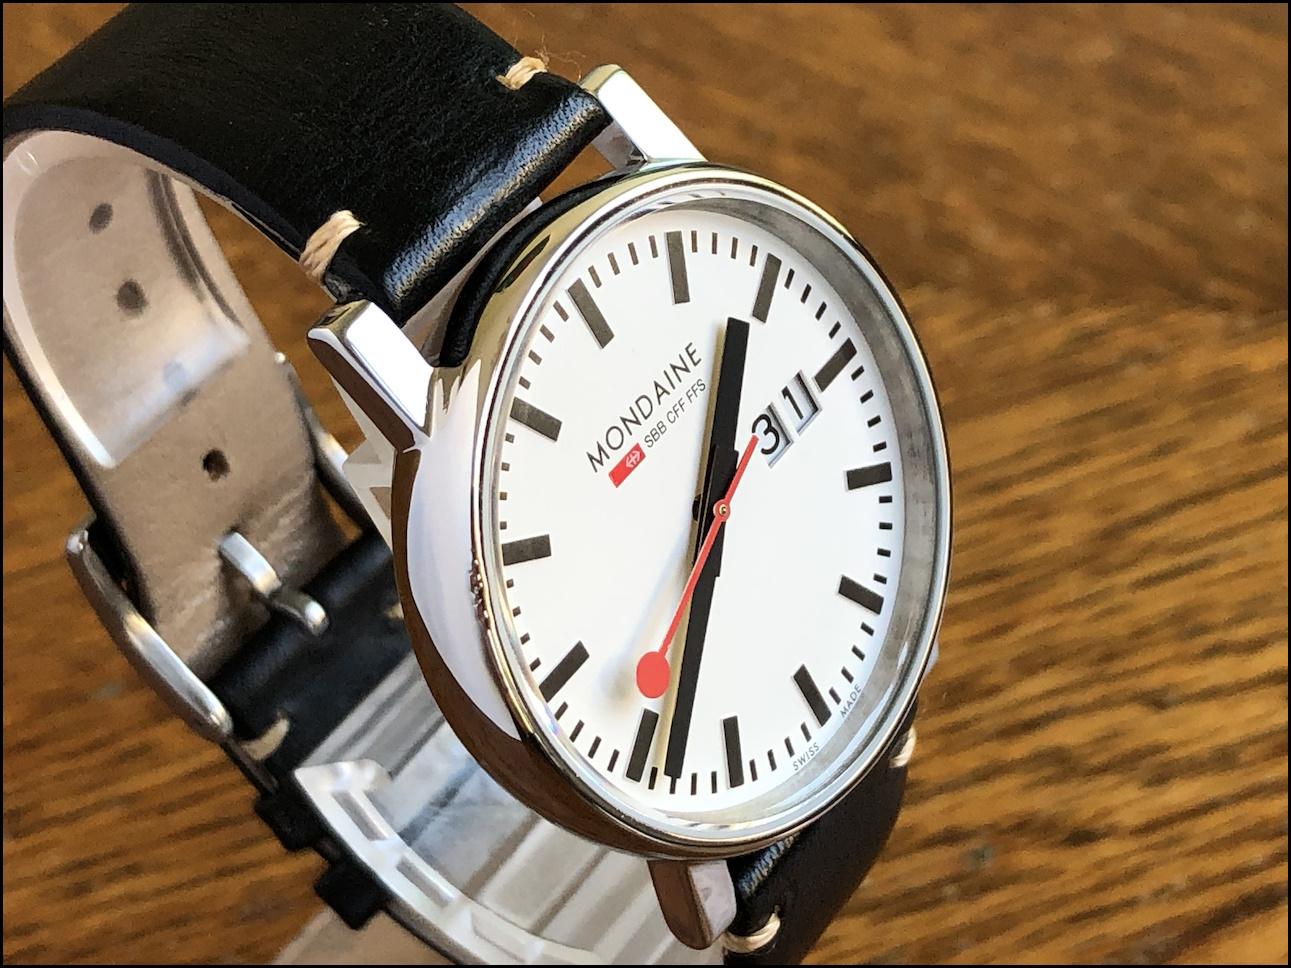
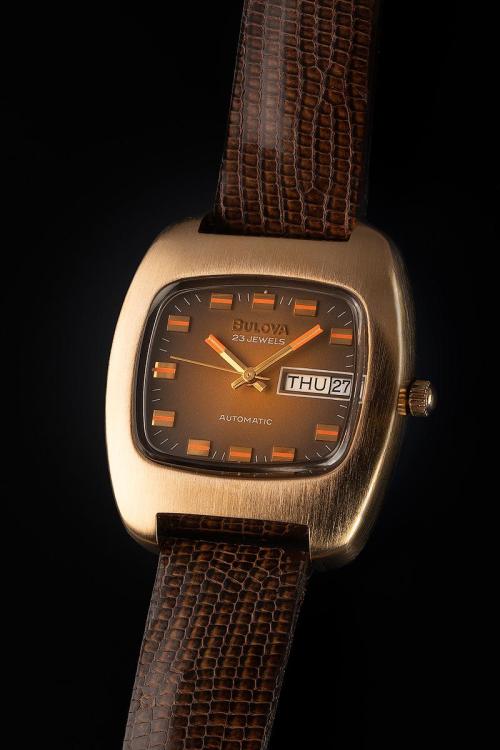
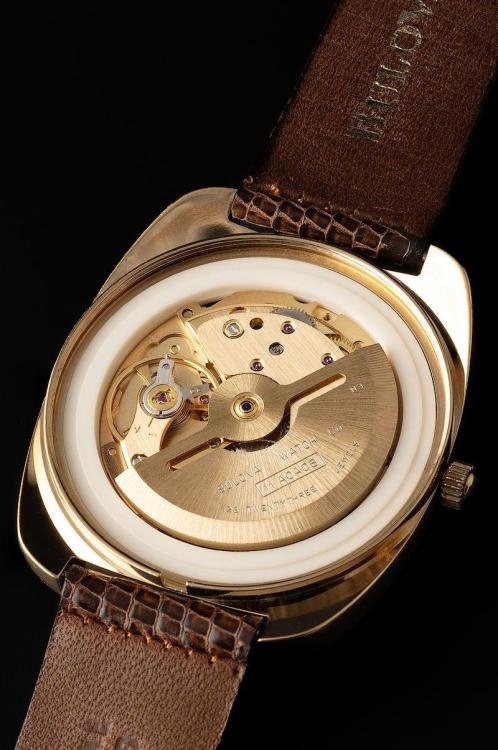
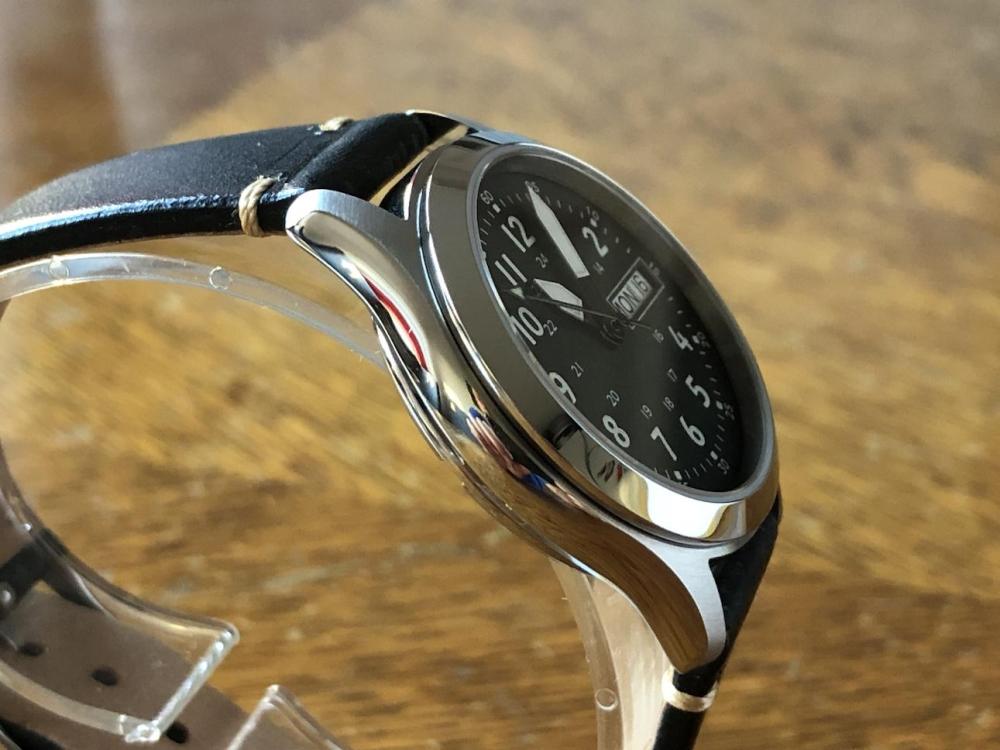
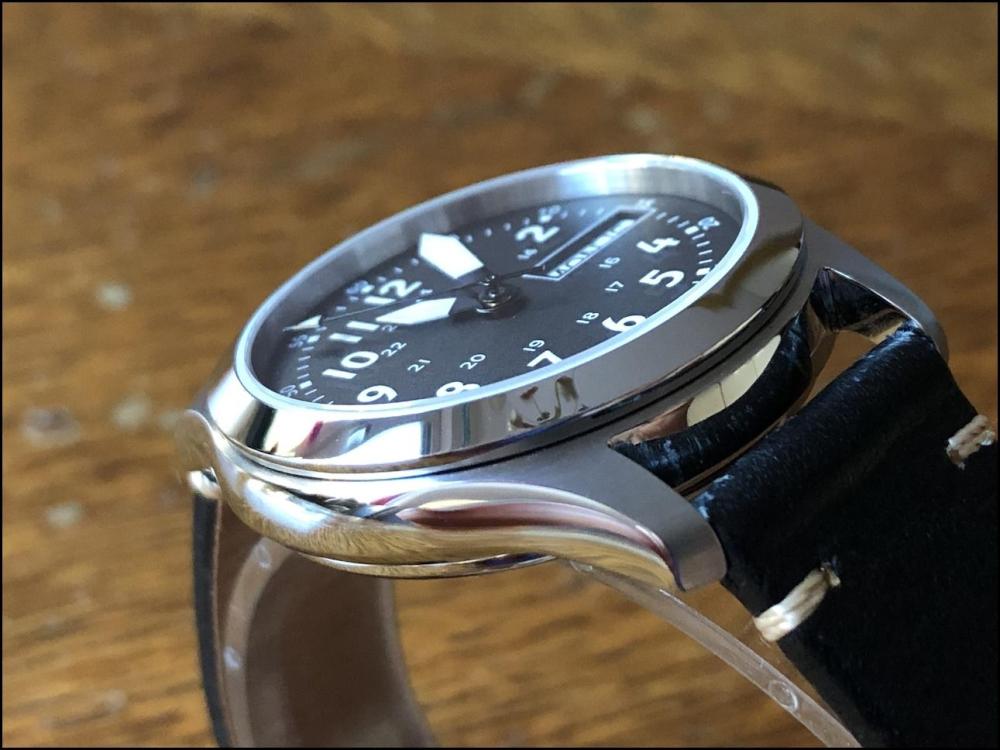
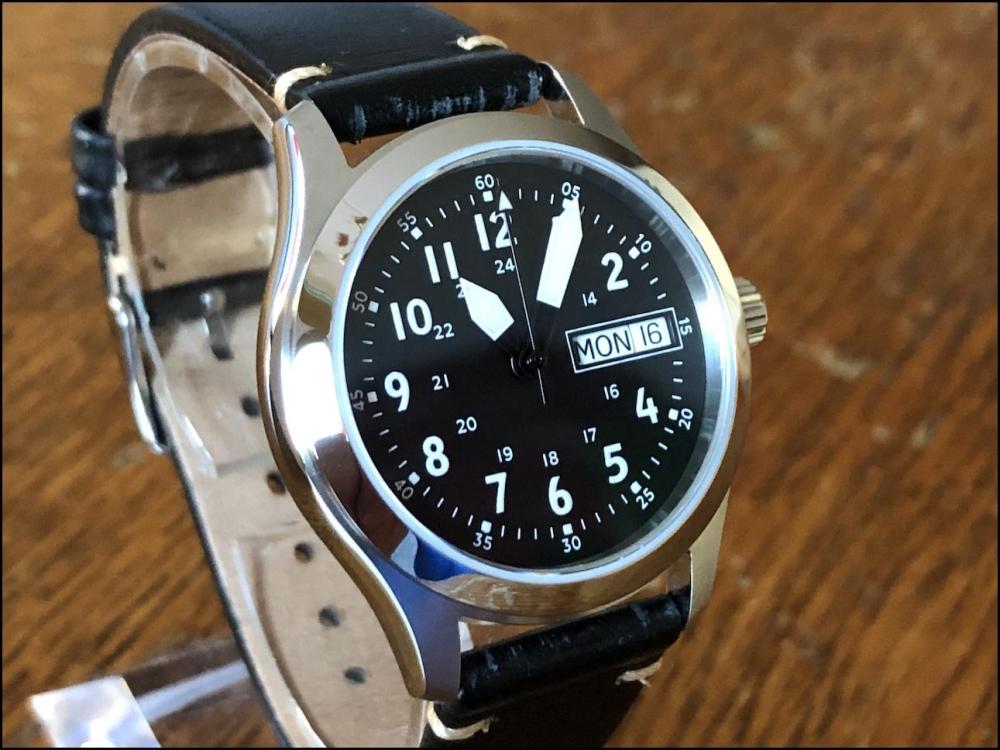
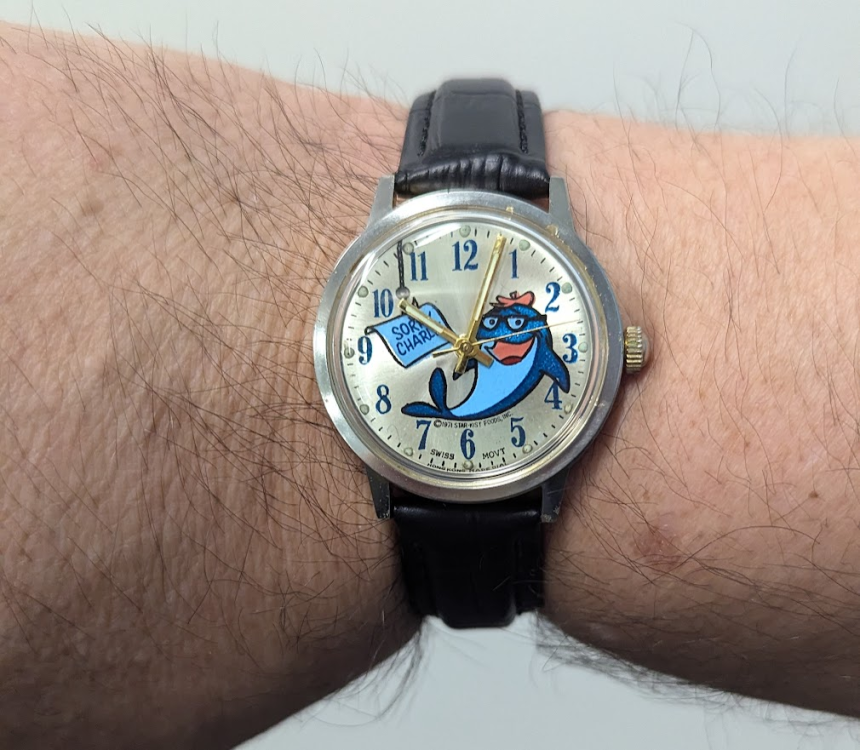
Here is my 1973 NOS Bulova 'Minute Man' on the original lizard skin strap. The '70s vibe is strong in this one.
 10 points
 -
If you can make a stepped hole in the bridge you can avoid the need for solder. Here's a fix I did on a JLC 838, this has a suspended barrel, so 100% of wear is on the bridge and there's next to no material to work with. The worn portion protrudes down toward the barrel a bit and up toward the ratchet wheel. I did the bridge work in a faceplate, the stepped bushing was all lathe work. In the last pic the the barrel arbor looks low but it pulls up when screwed to the ratchet wheel.

 10 points
 -
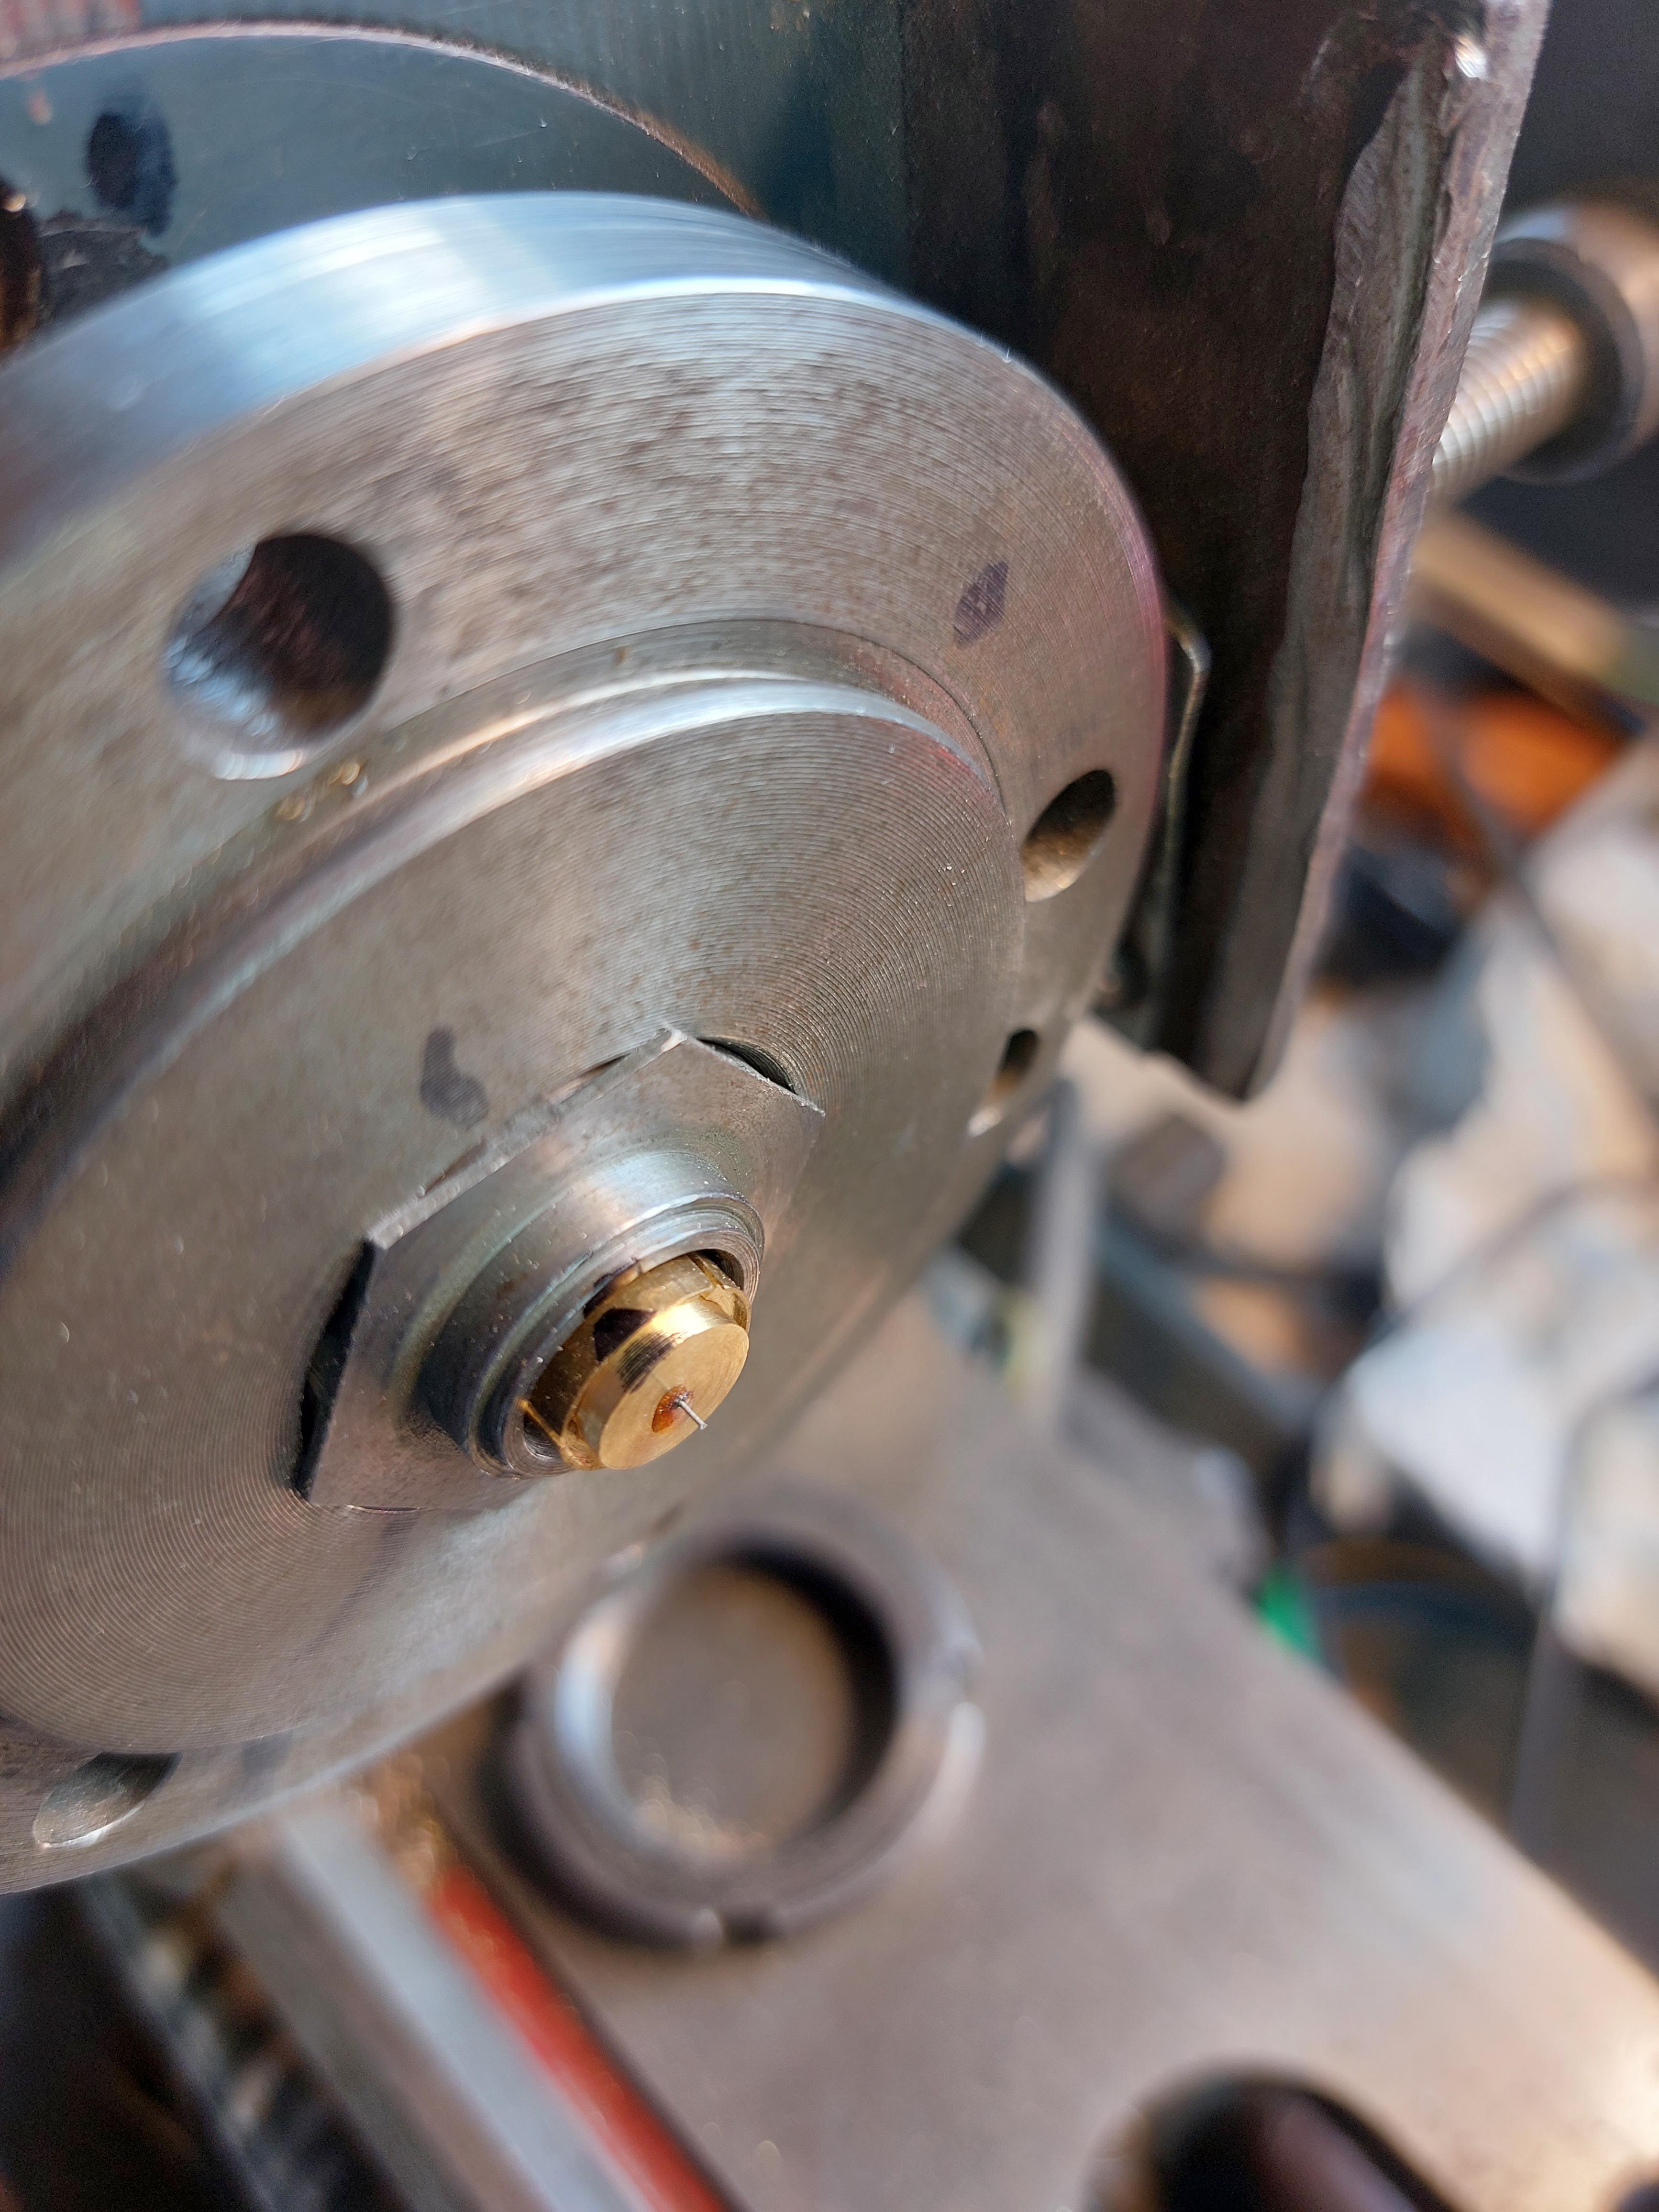
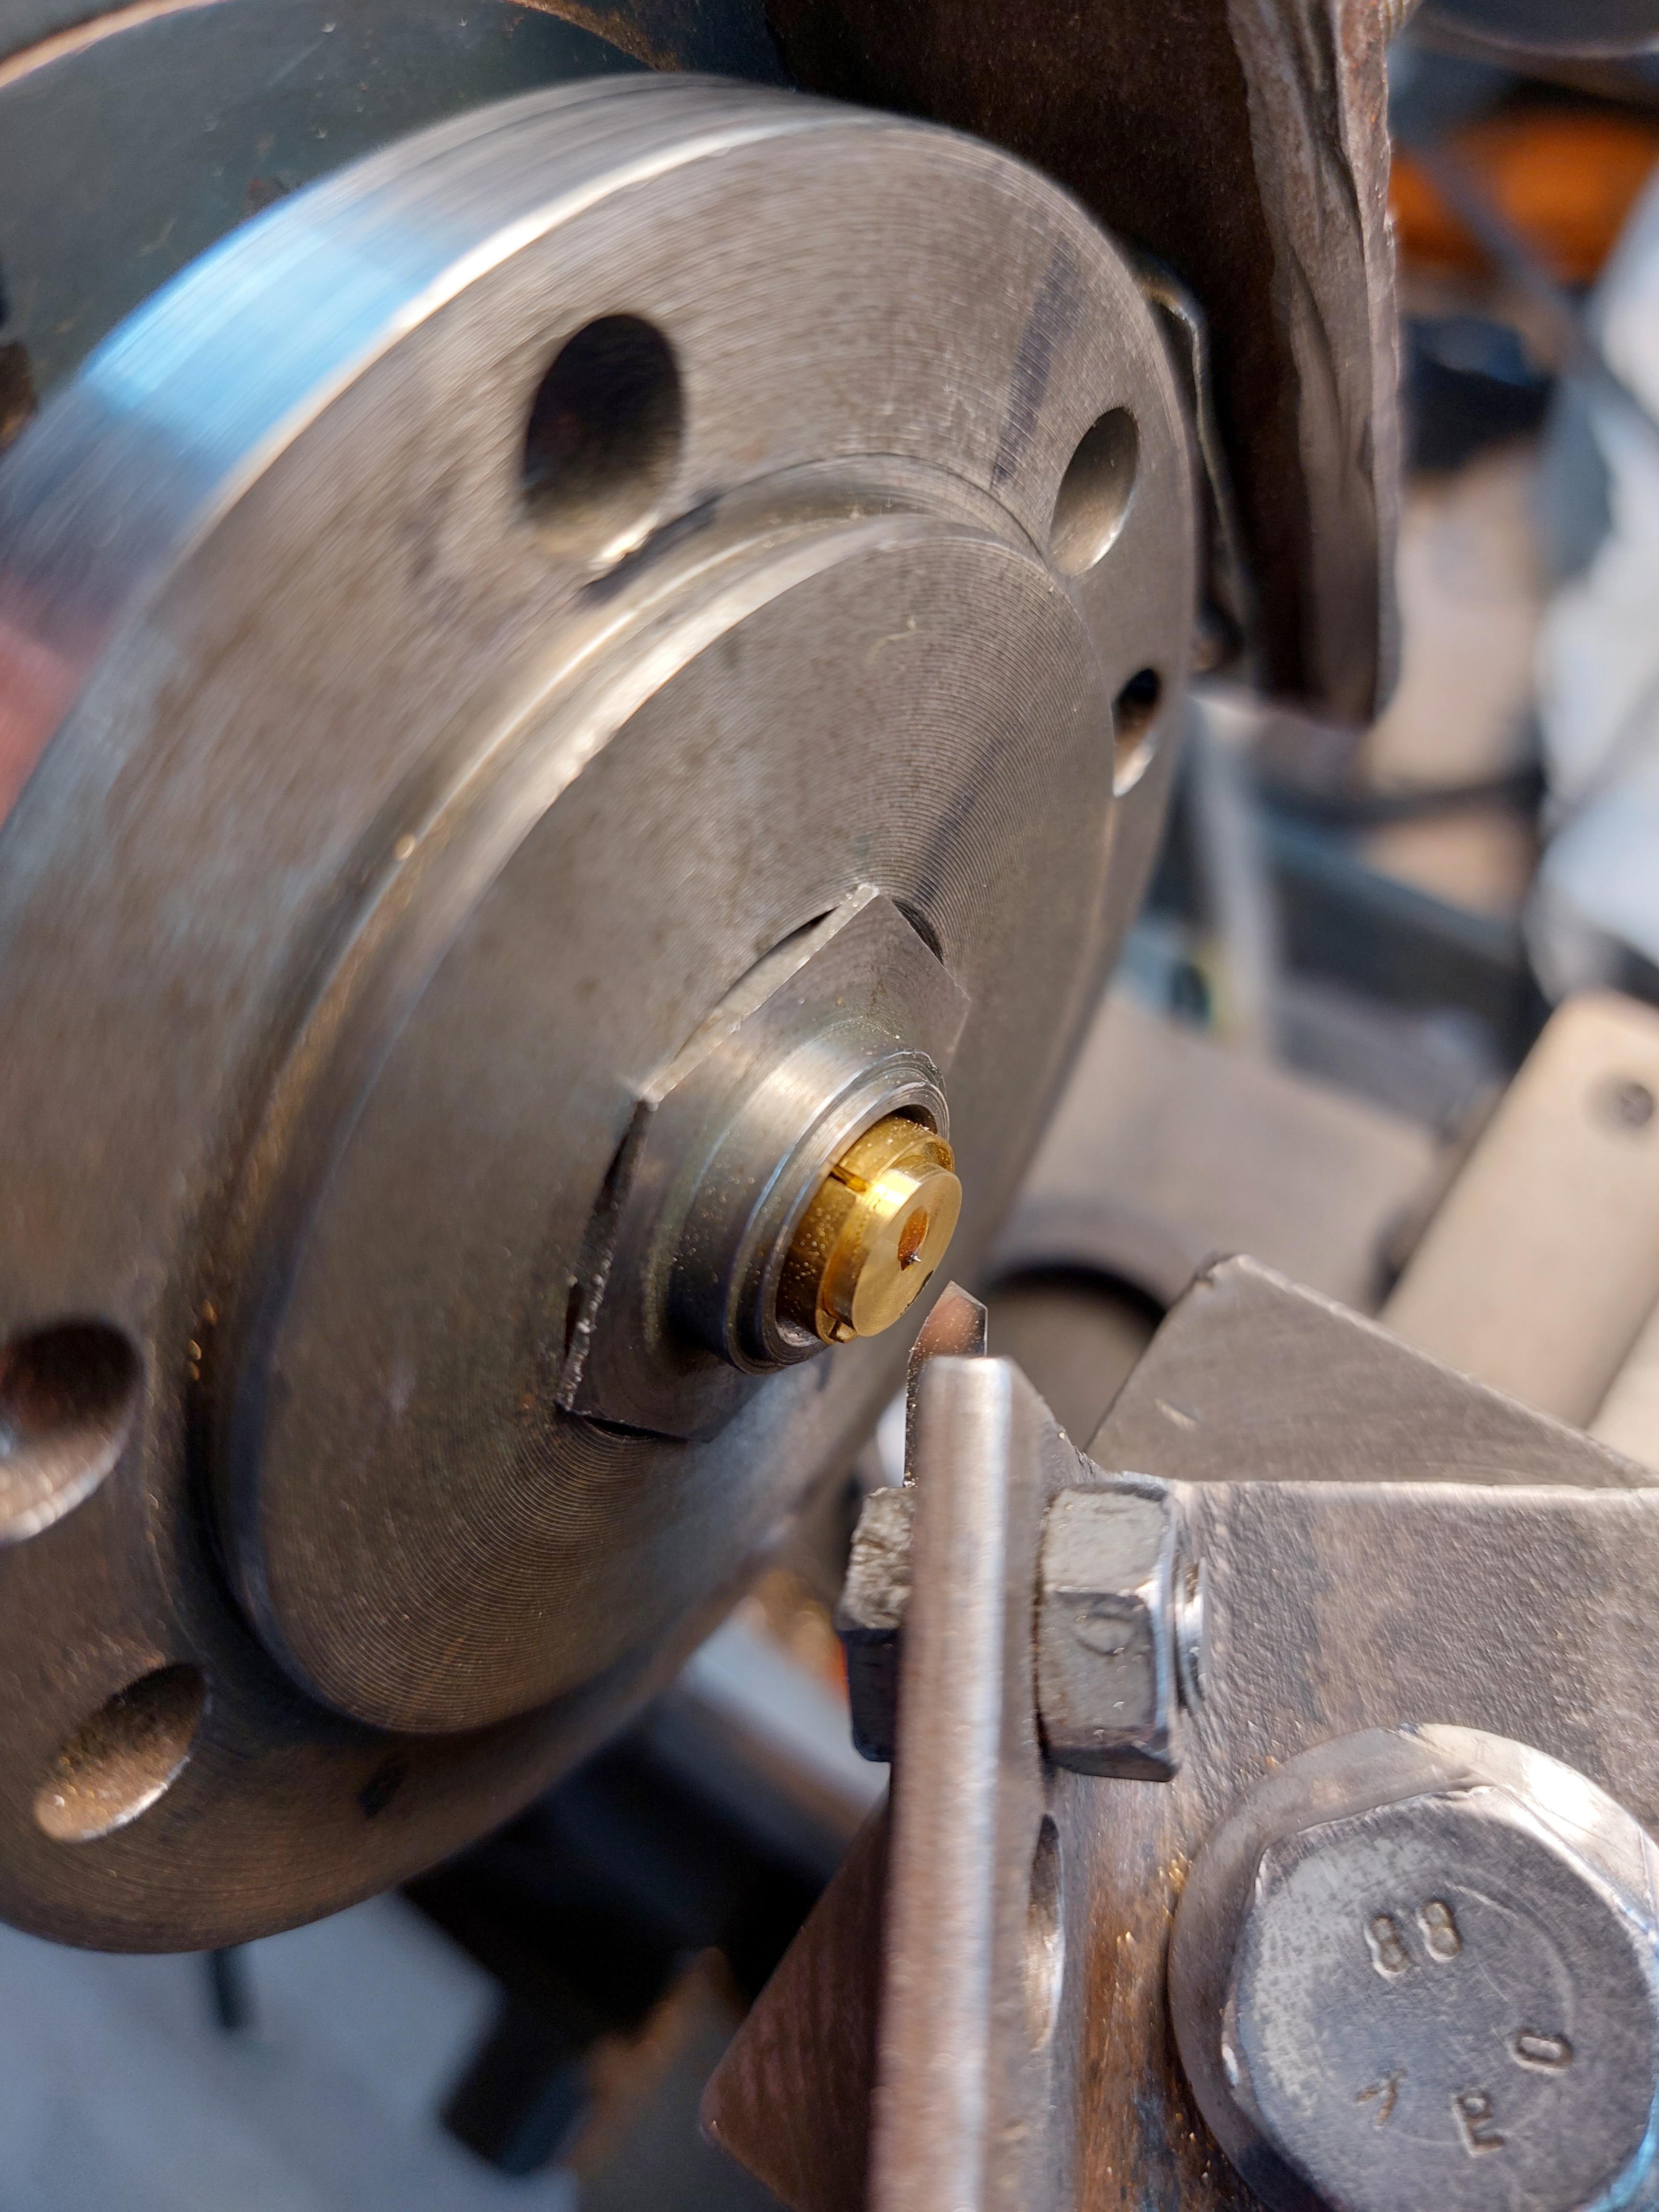
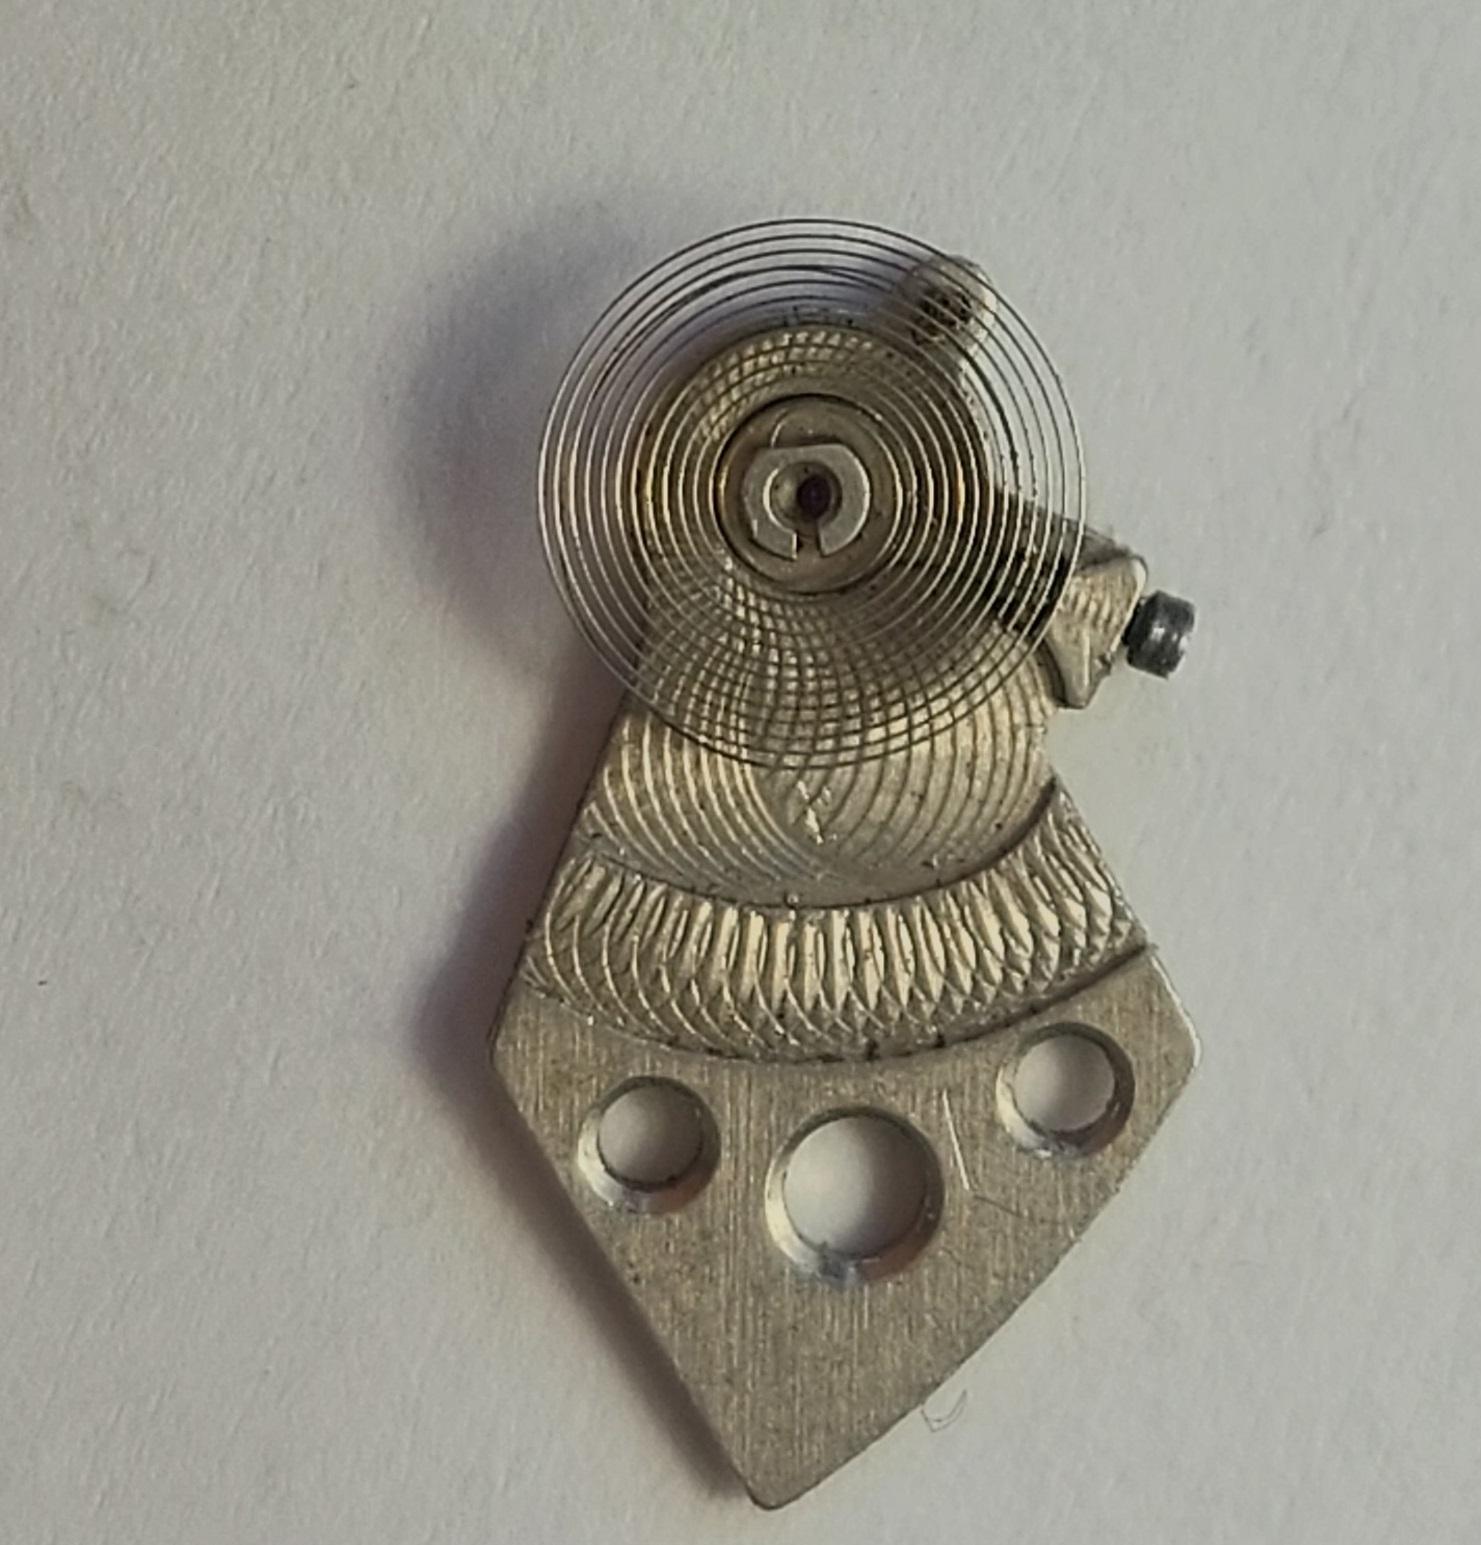
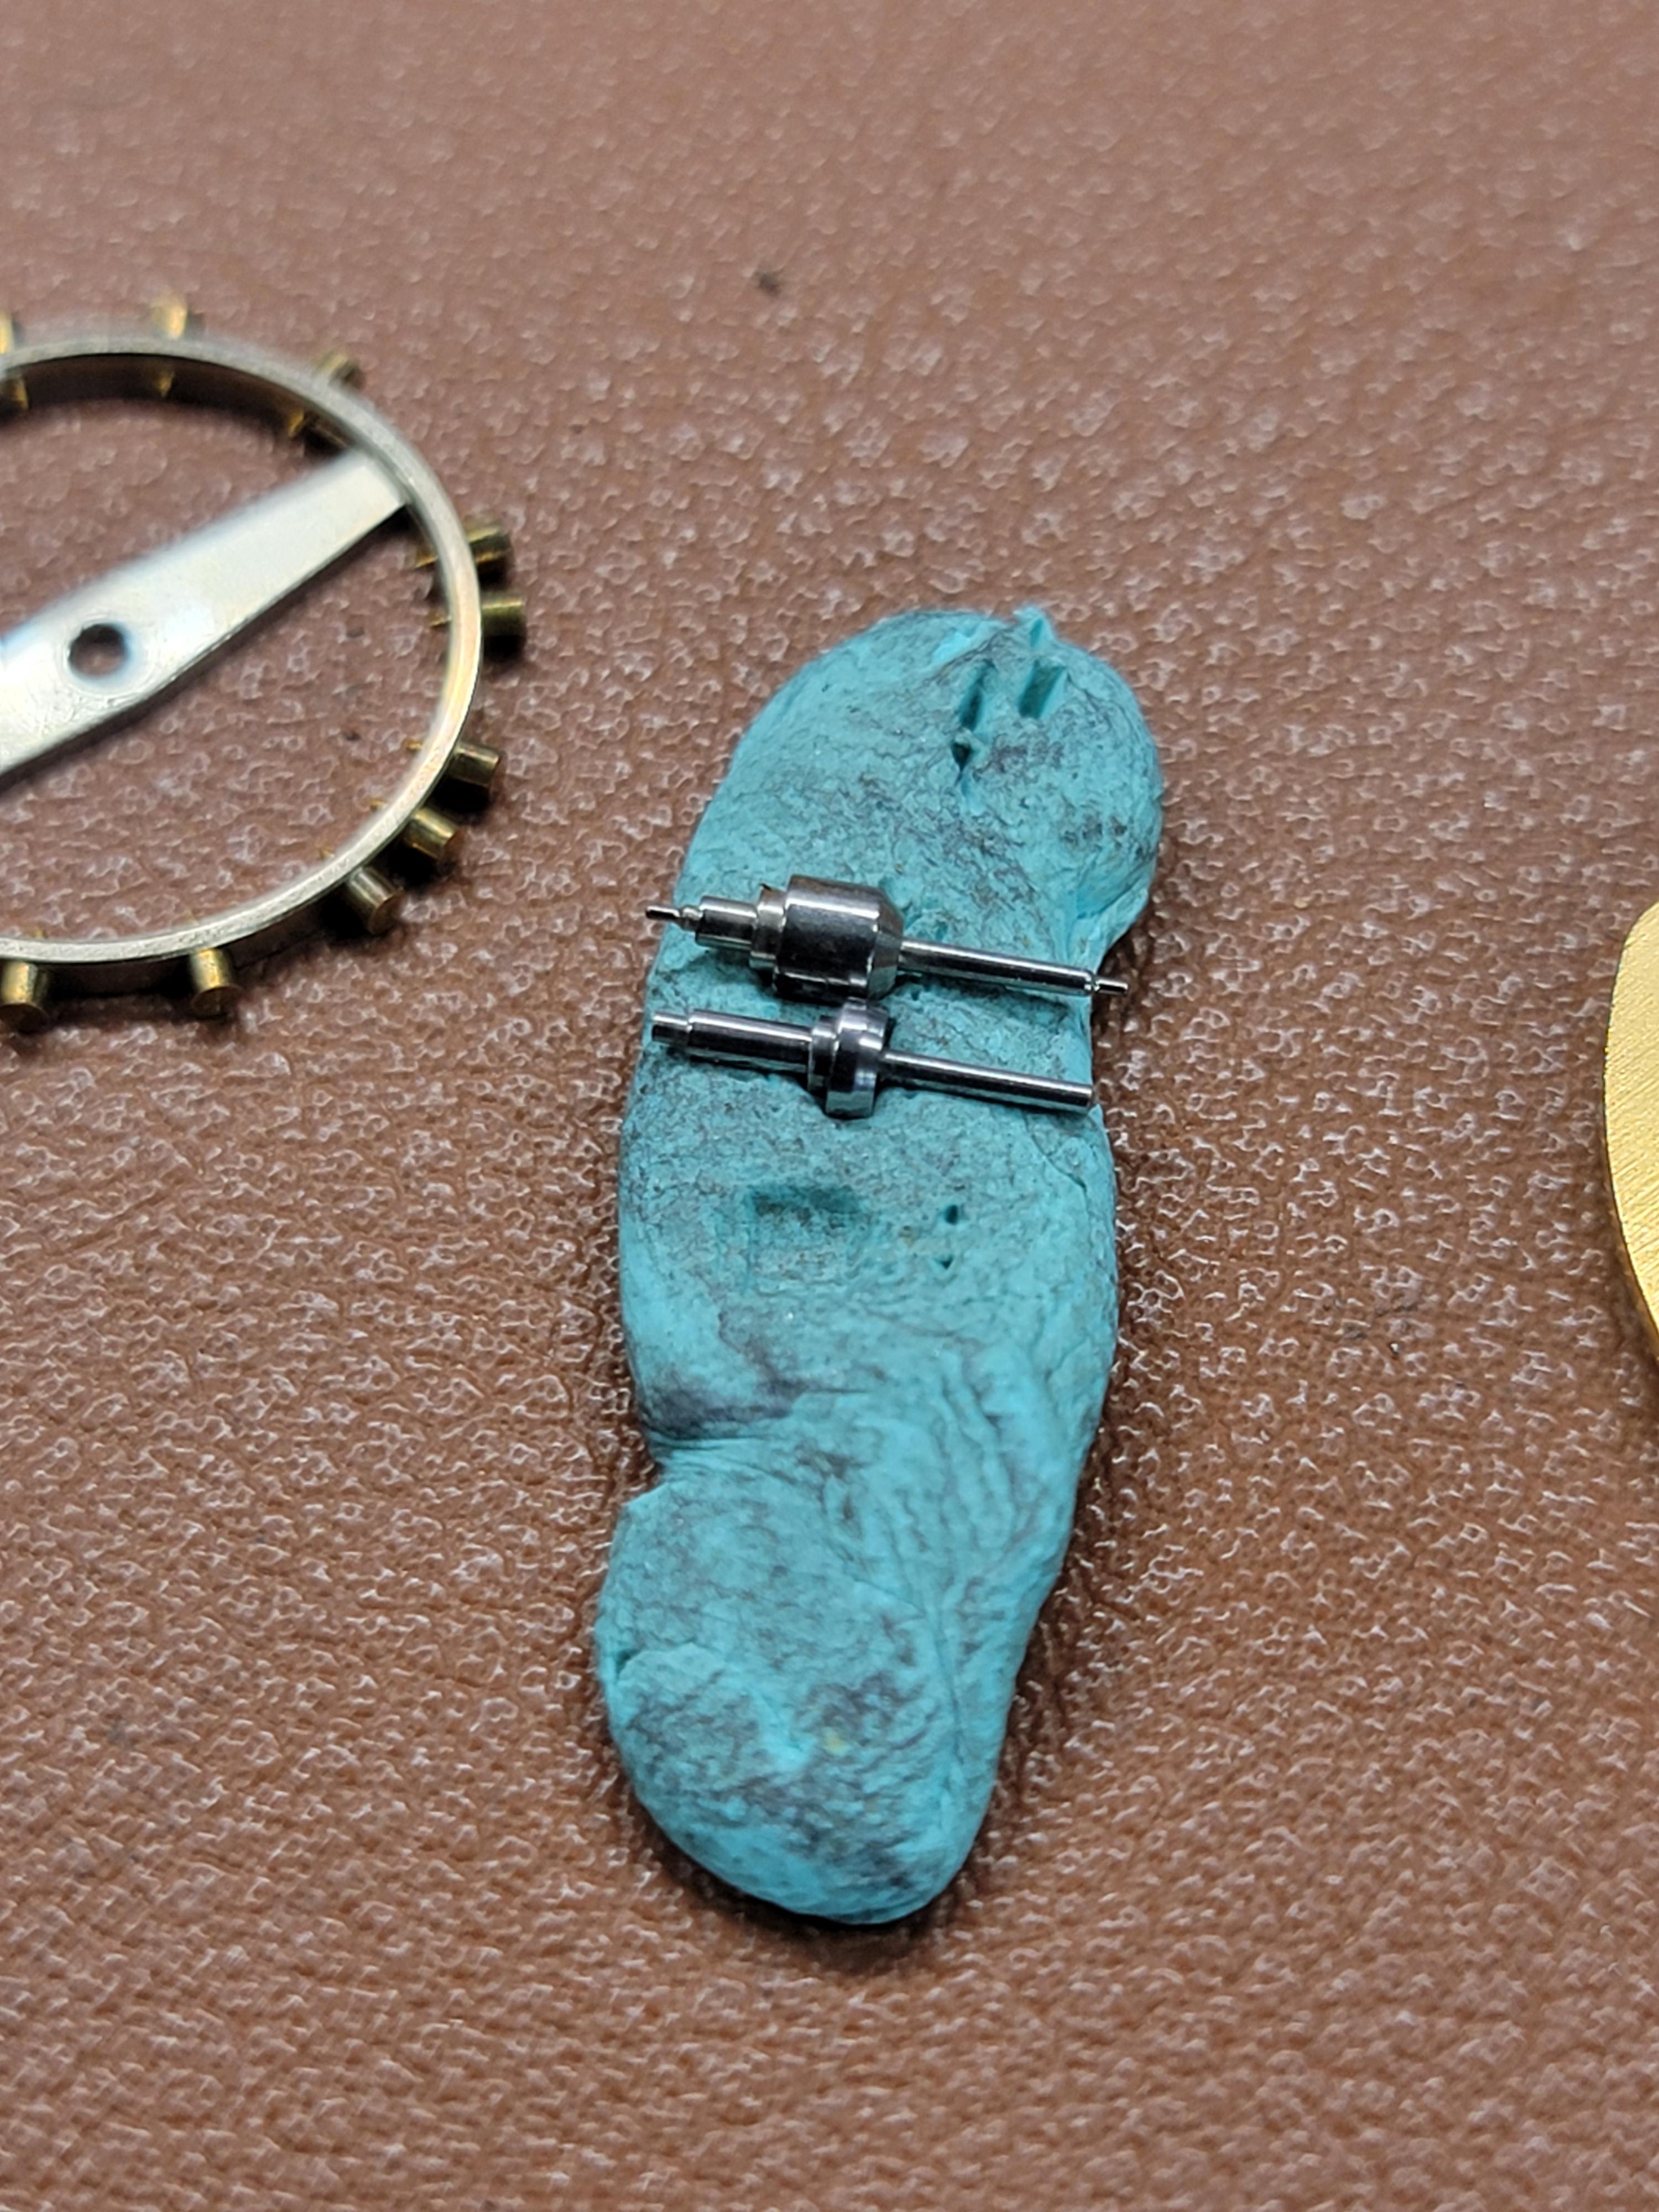
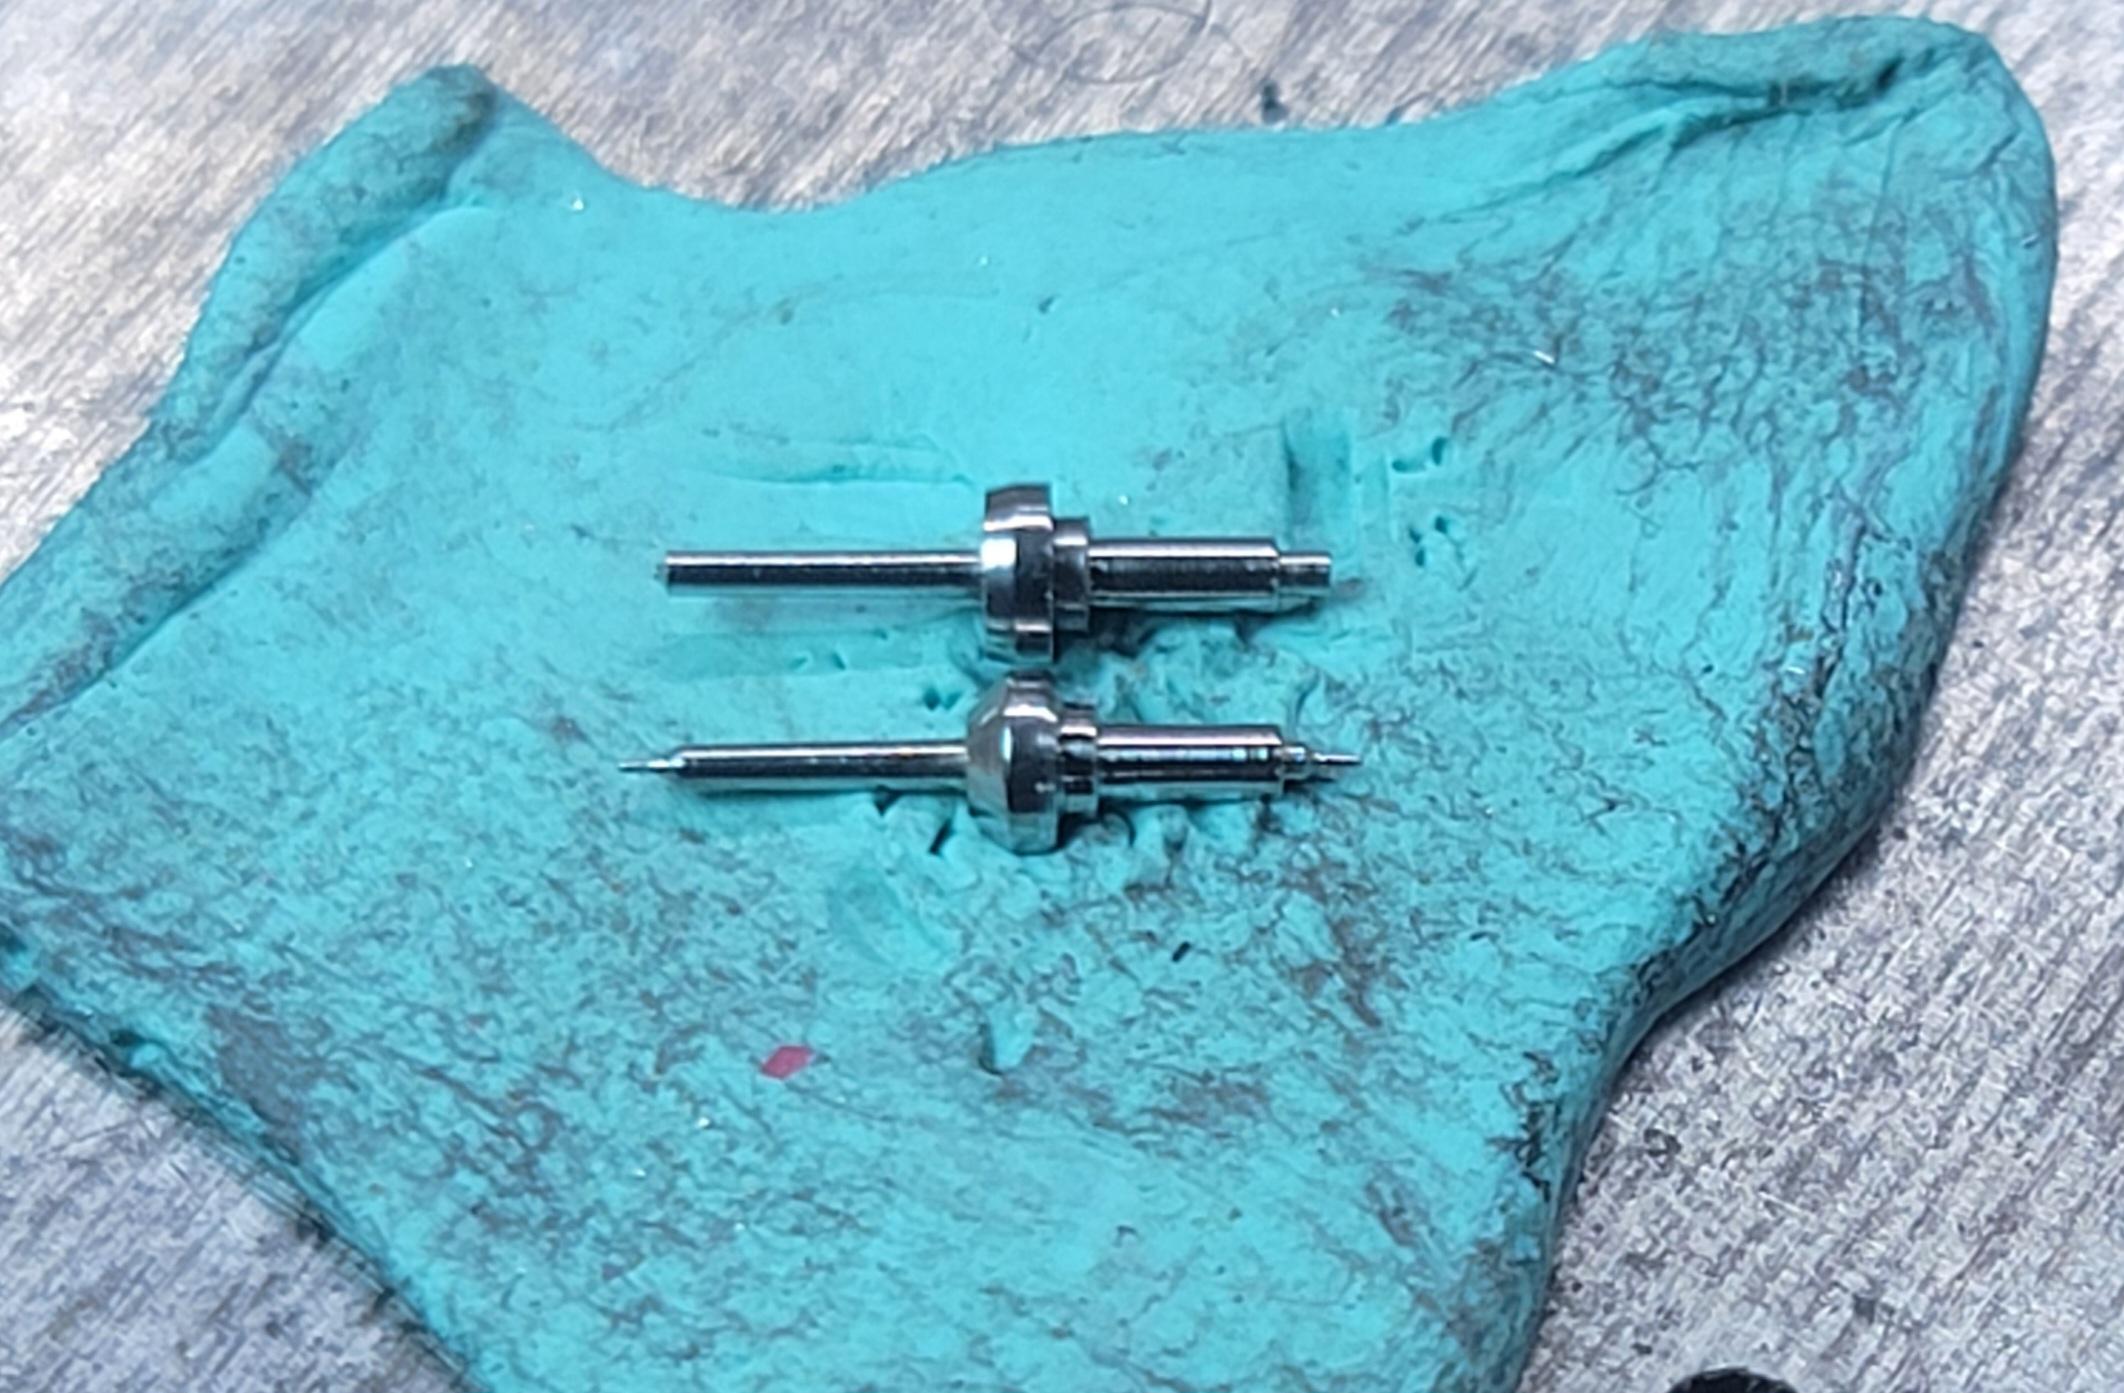
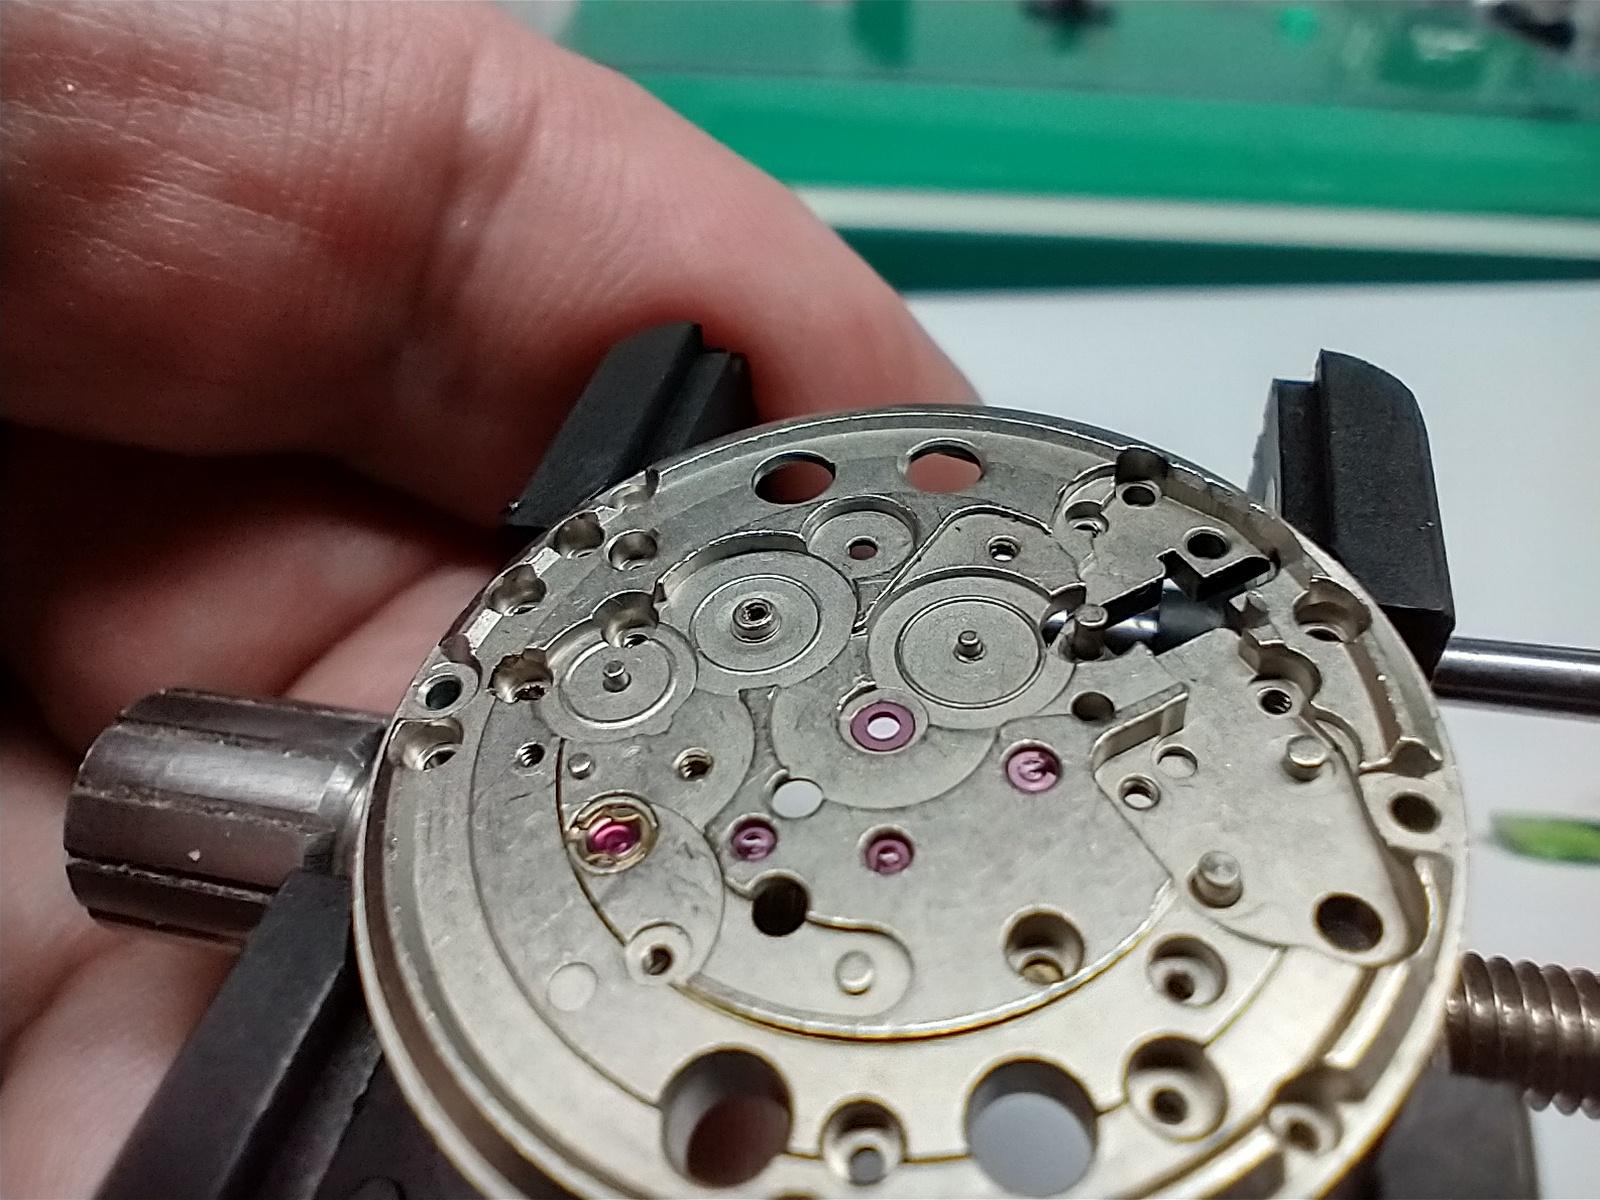
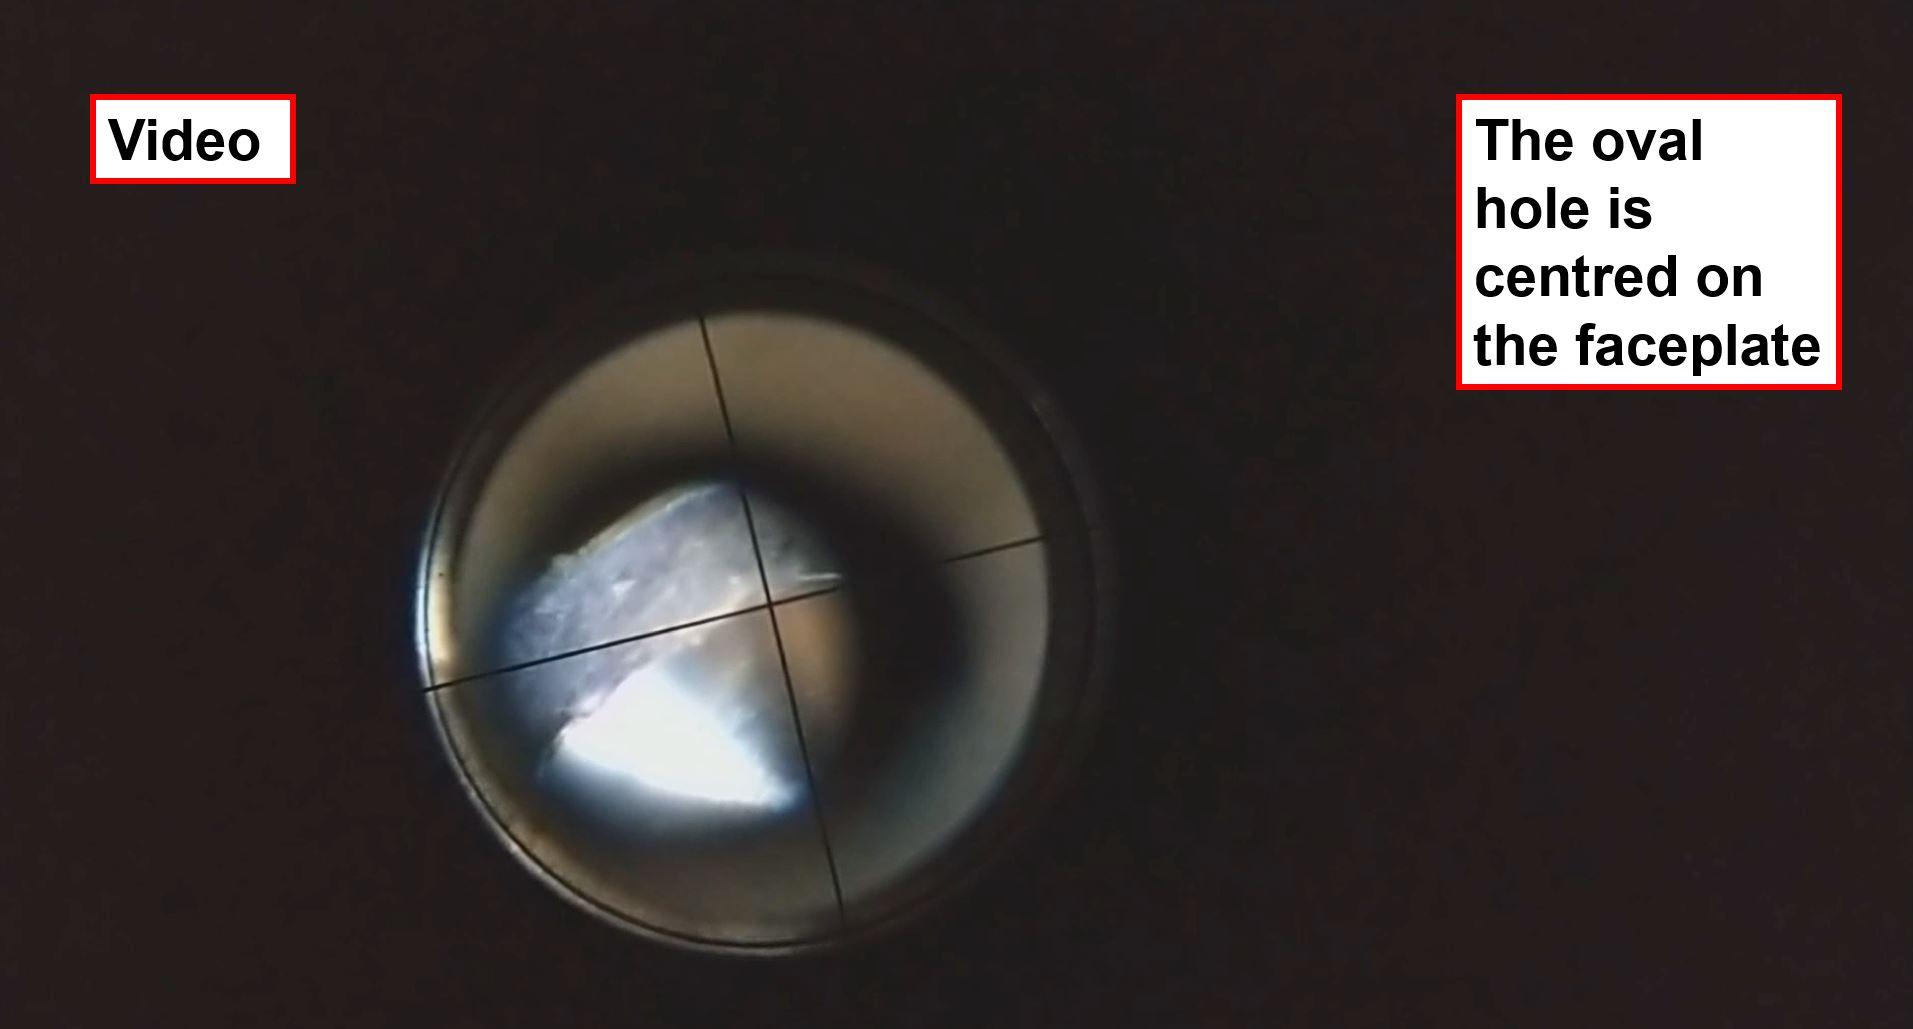
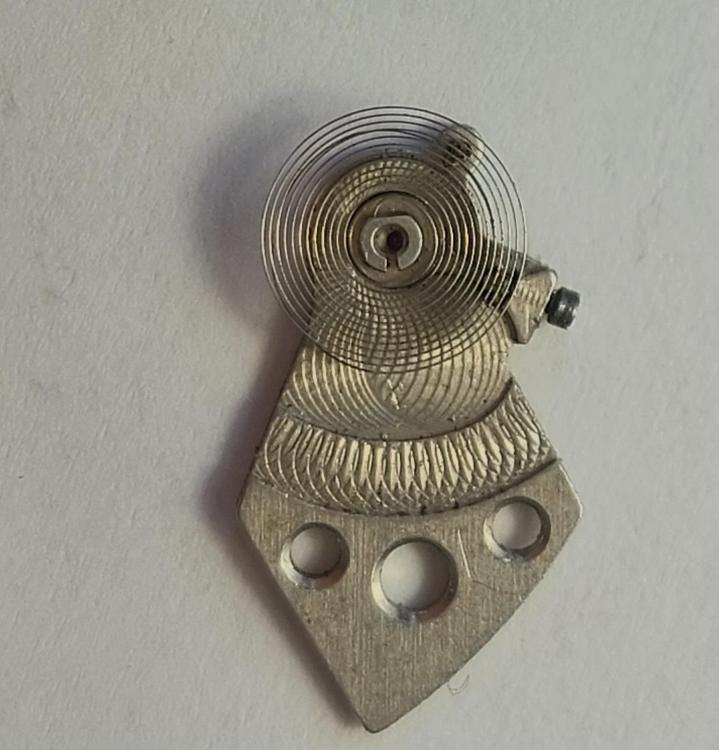
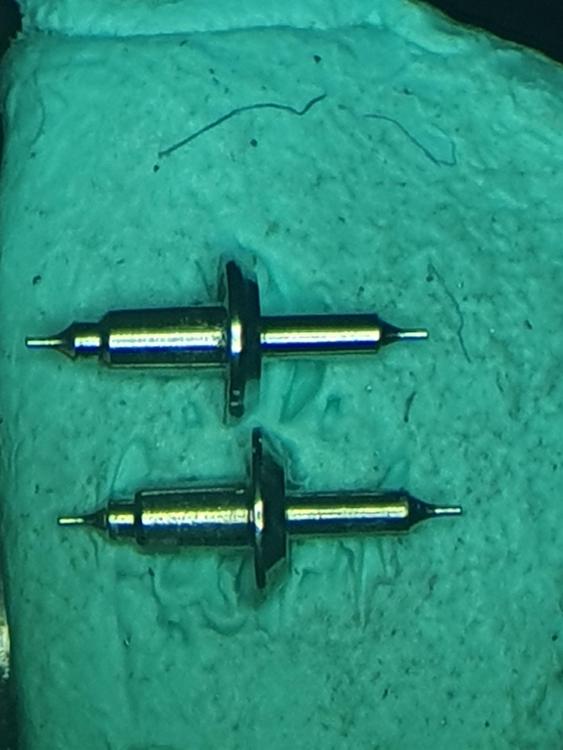
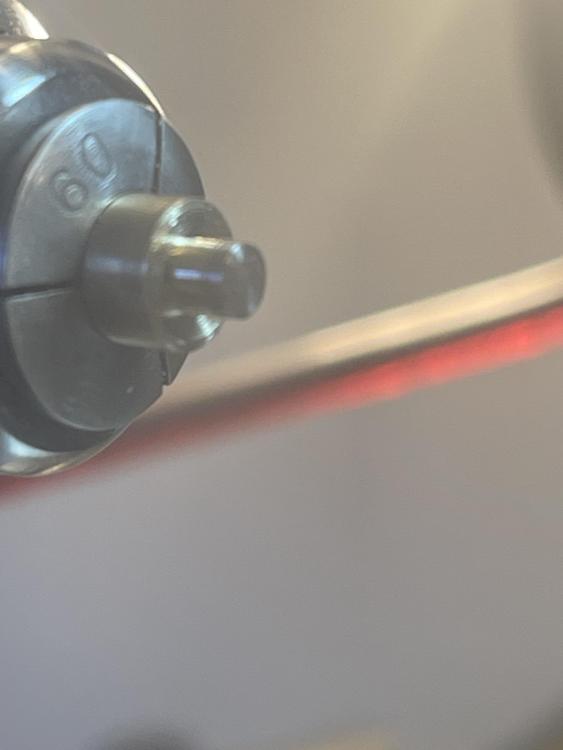
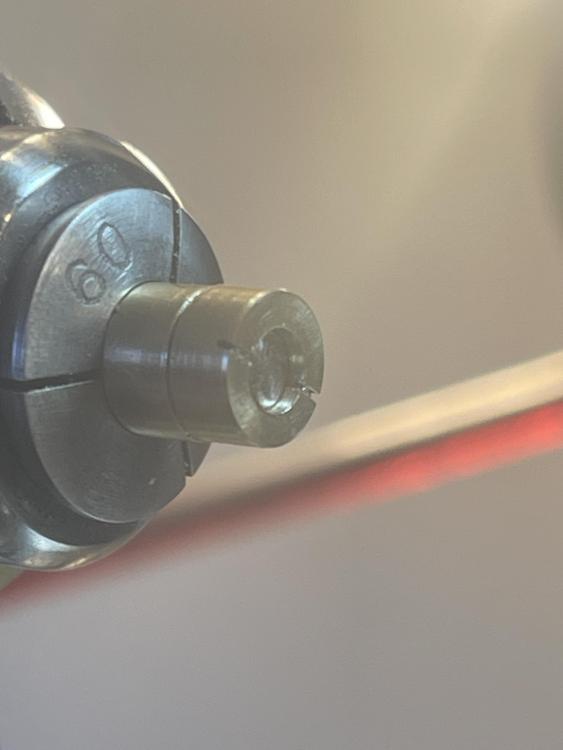
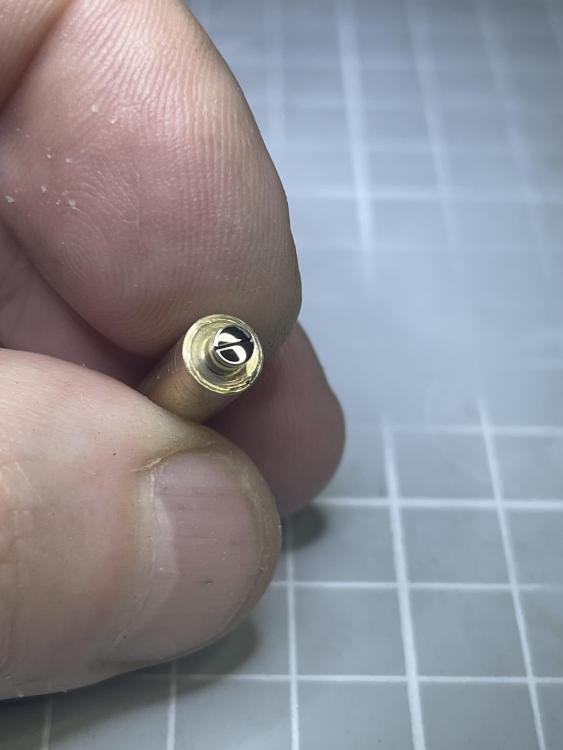
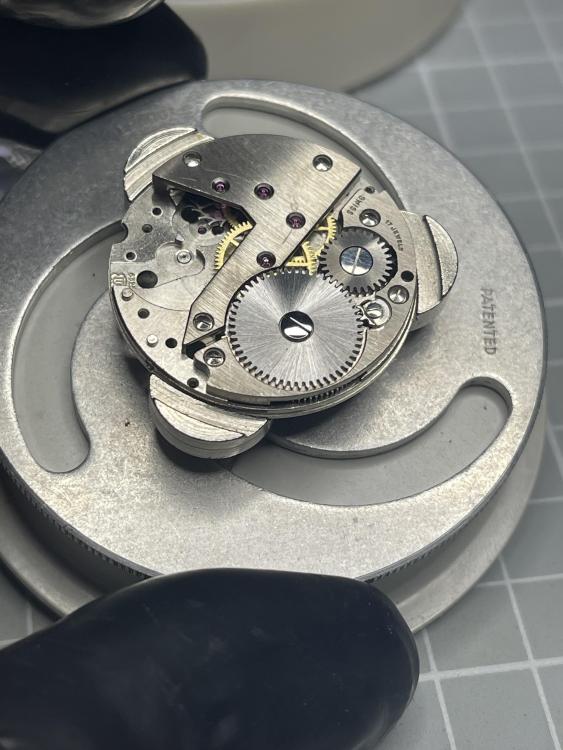
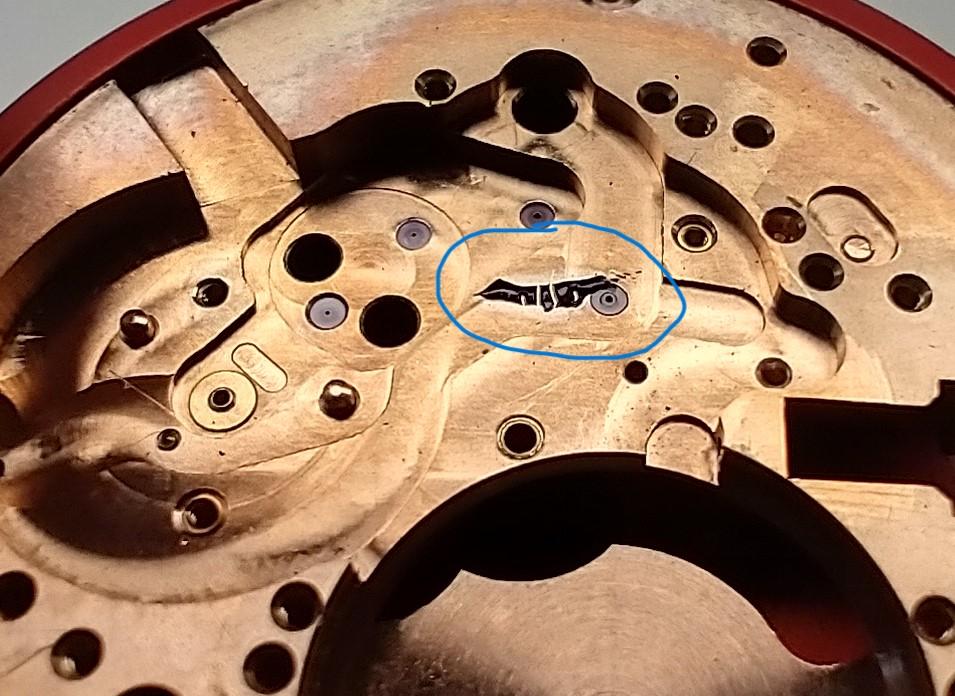
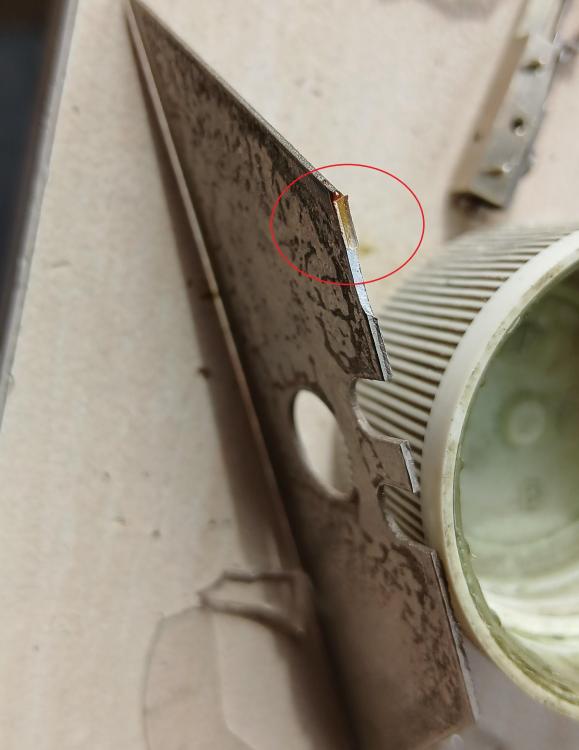
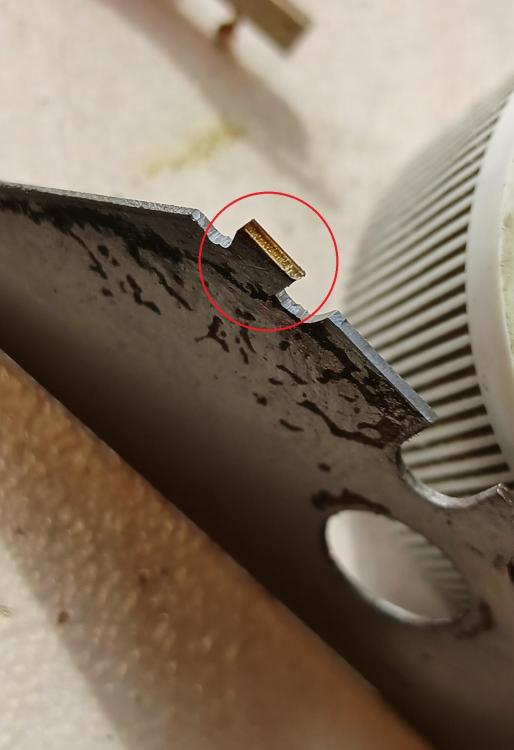
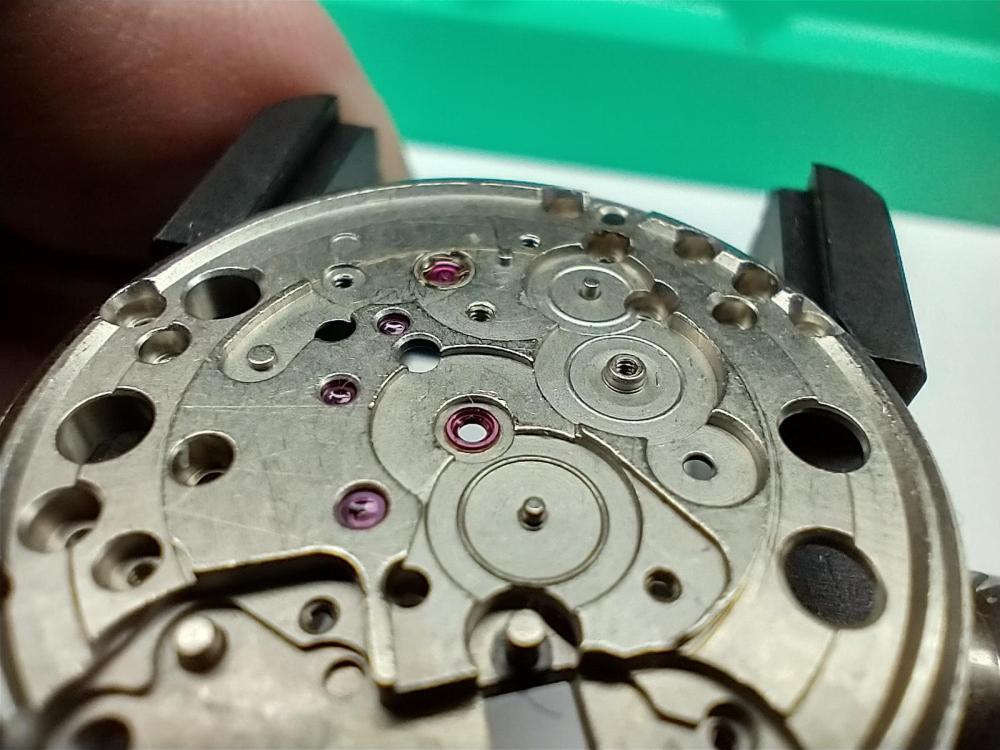
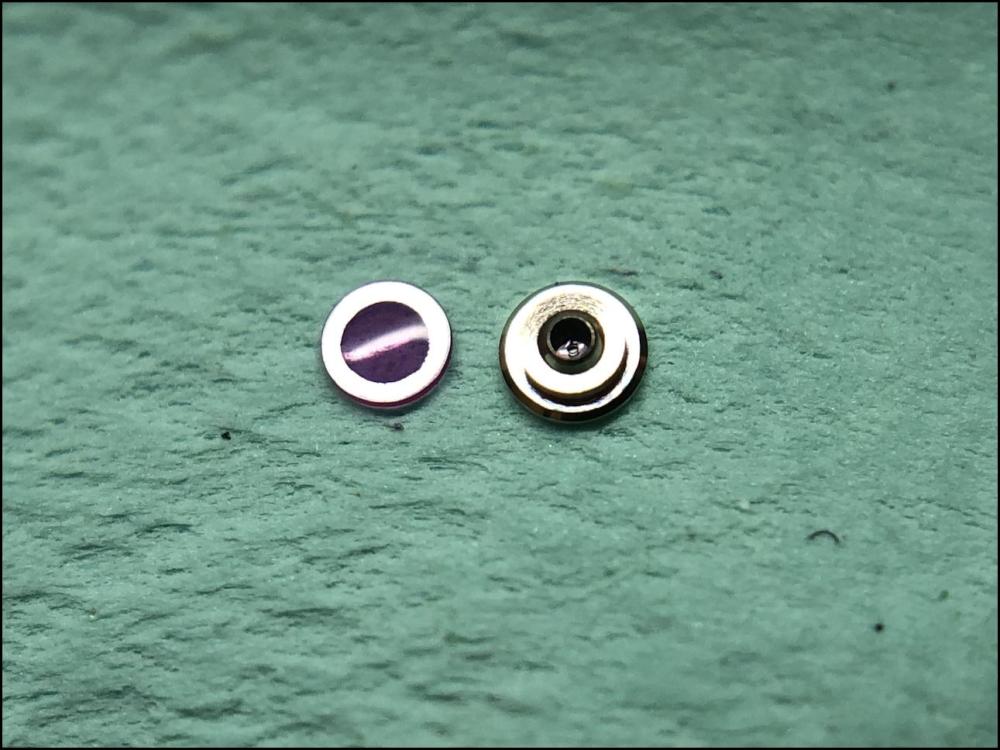
Sorry for the question, but, do You know how to replace such jewel? It is rolled one and not pressed like modern jewels. You must not screw up the way the movement looks by deforming the stone seat or leaving any kind of marks there. This is not a movement to learn on.10 points
-
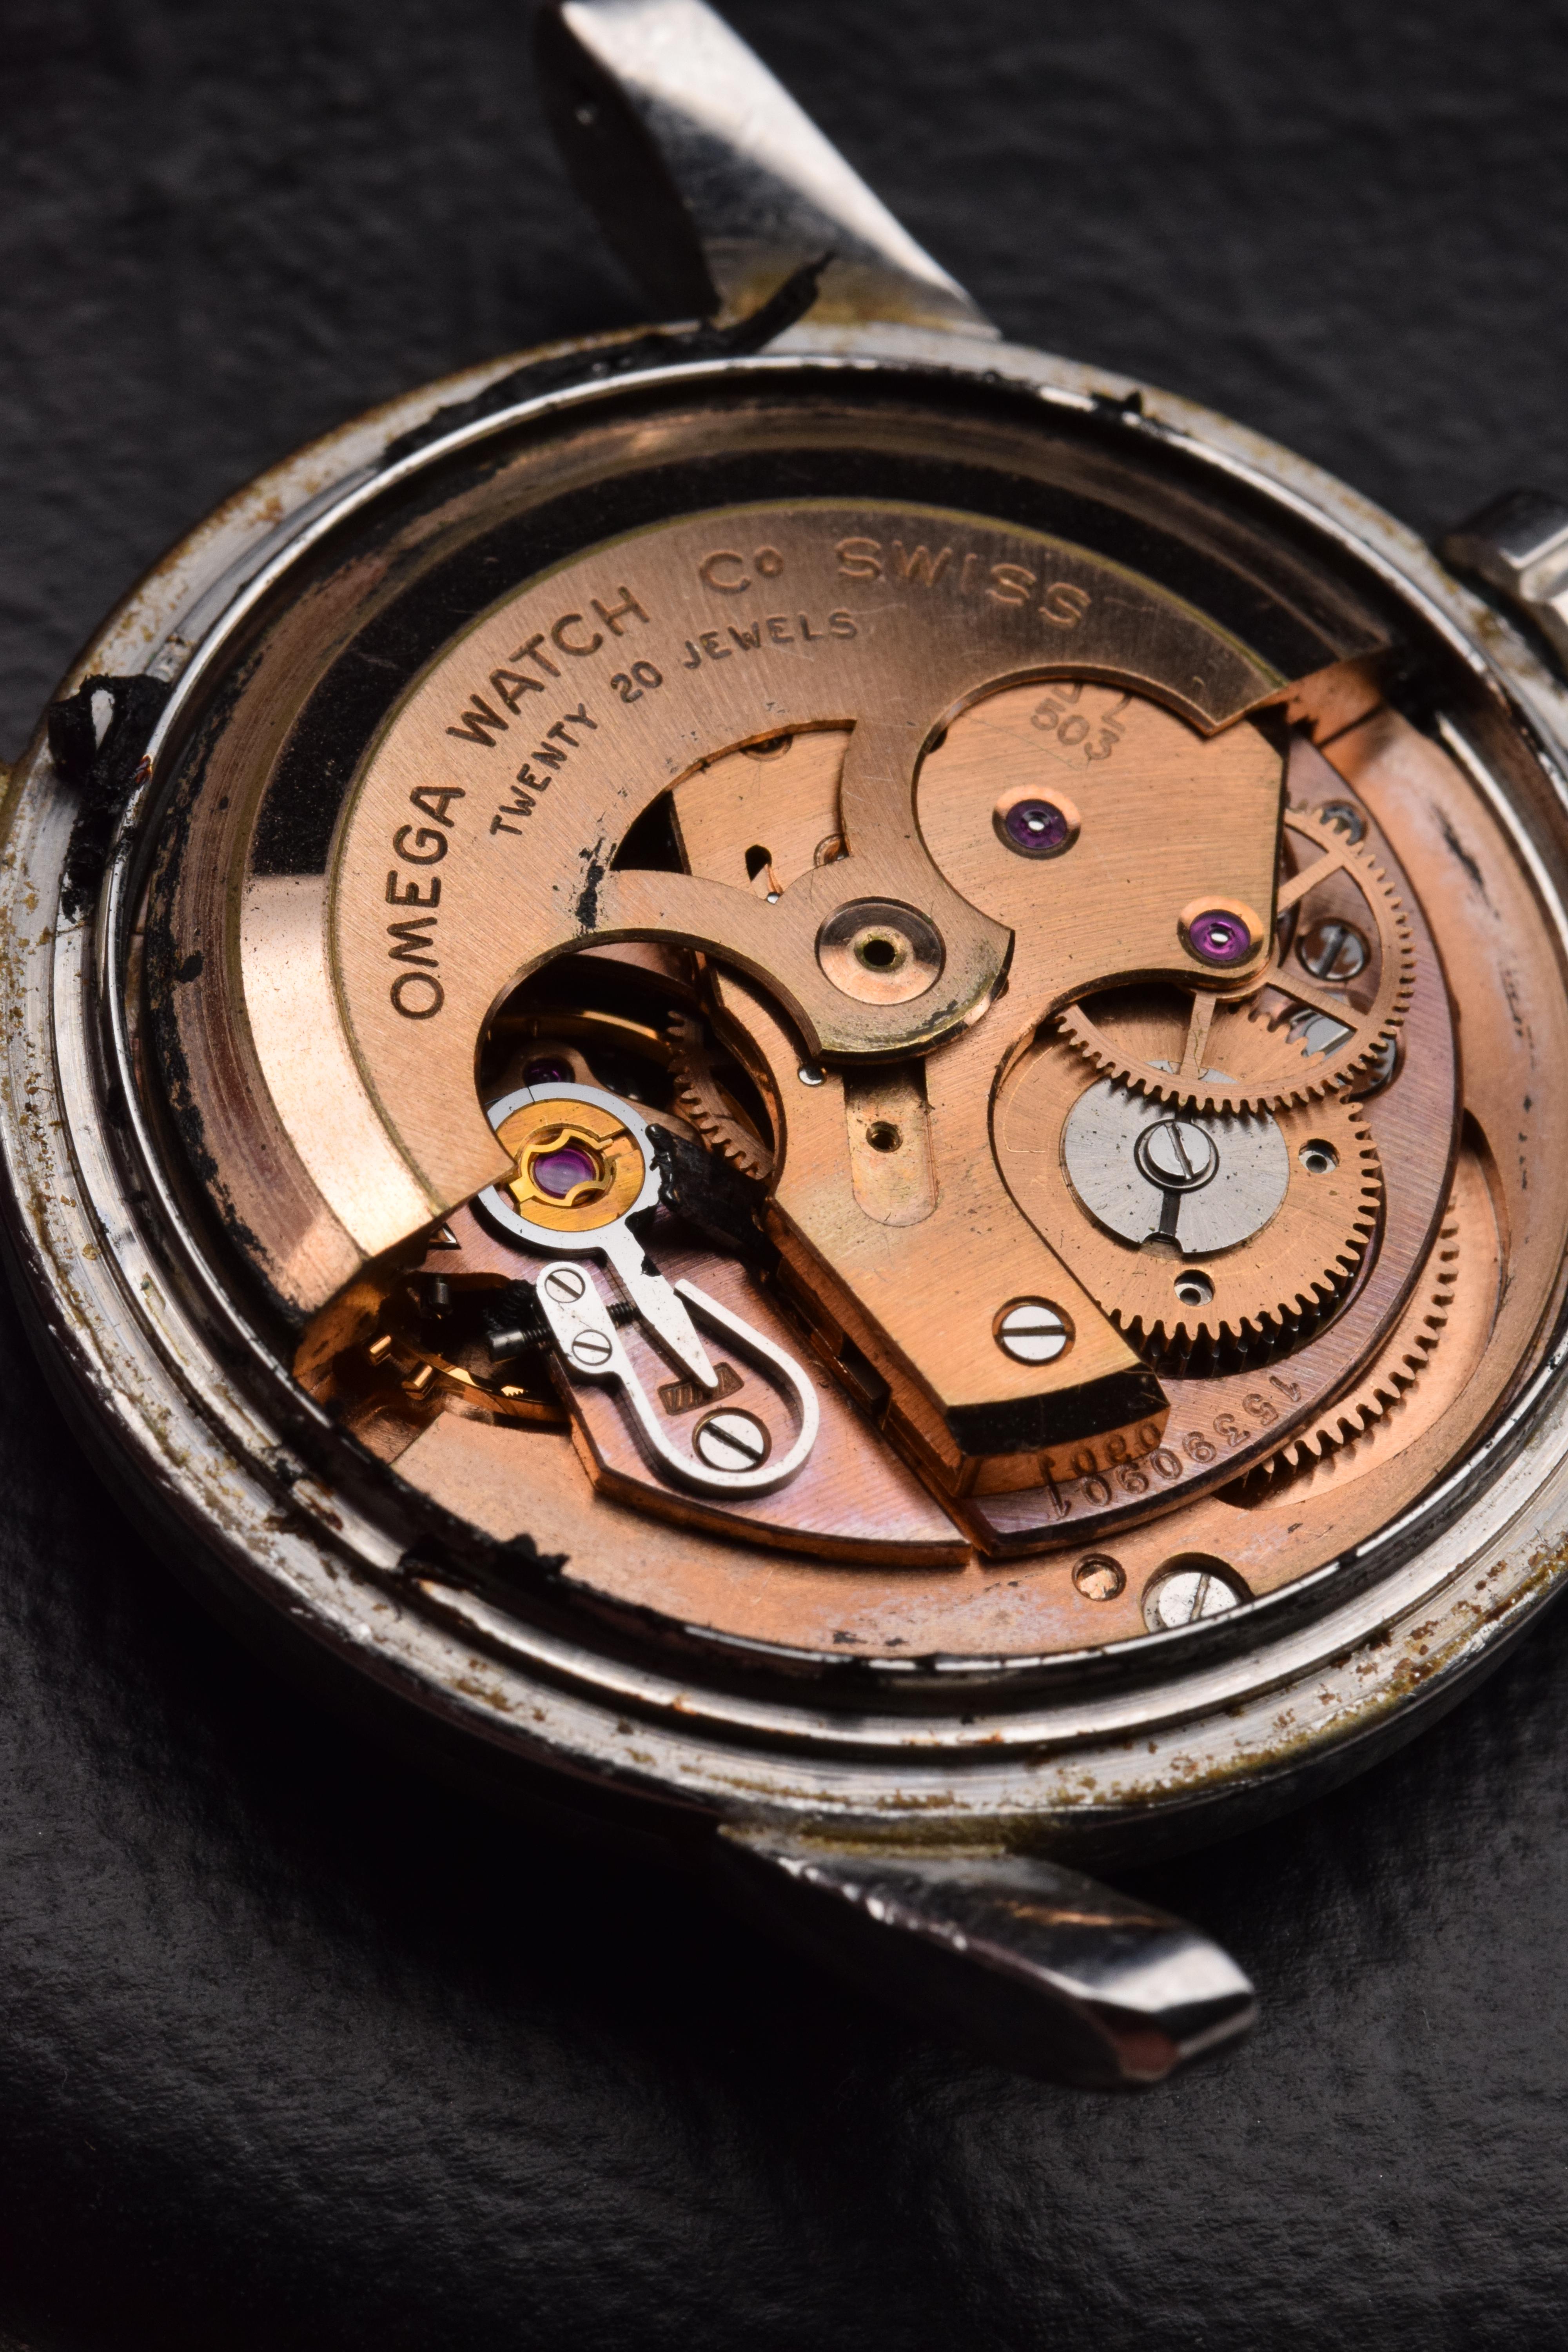
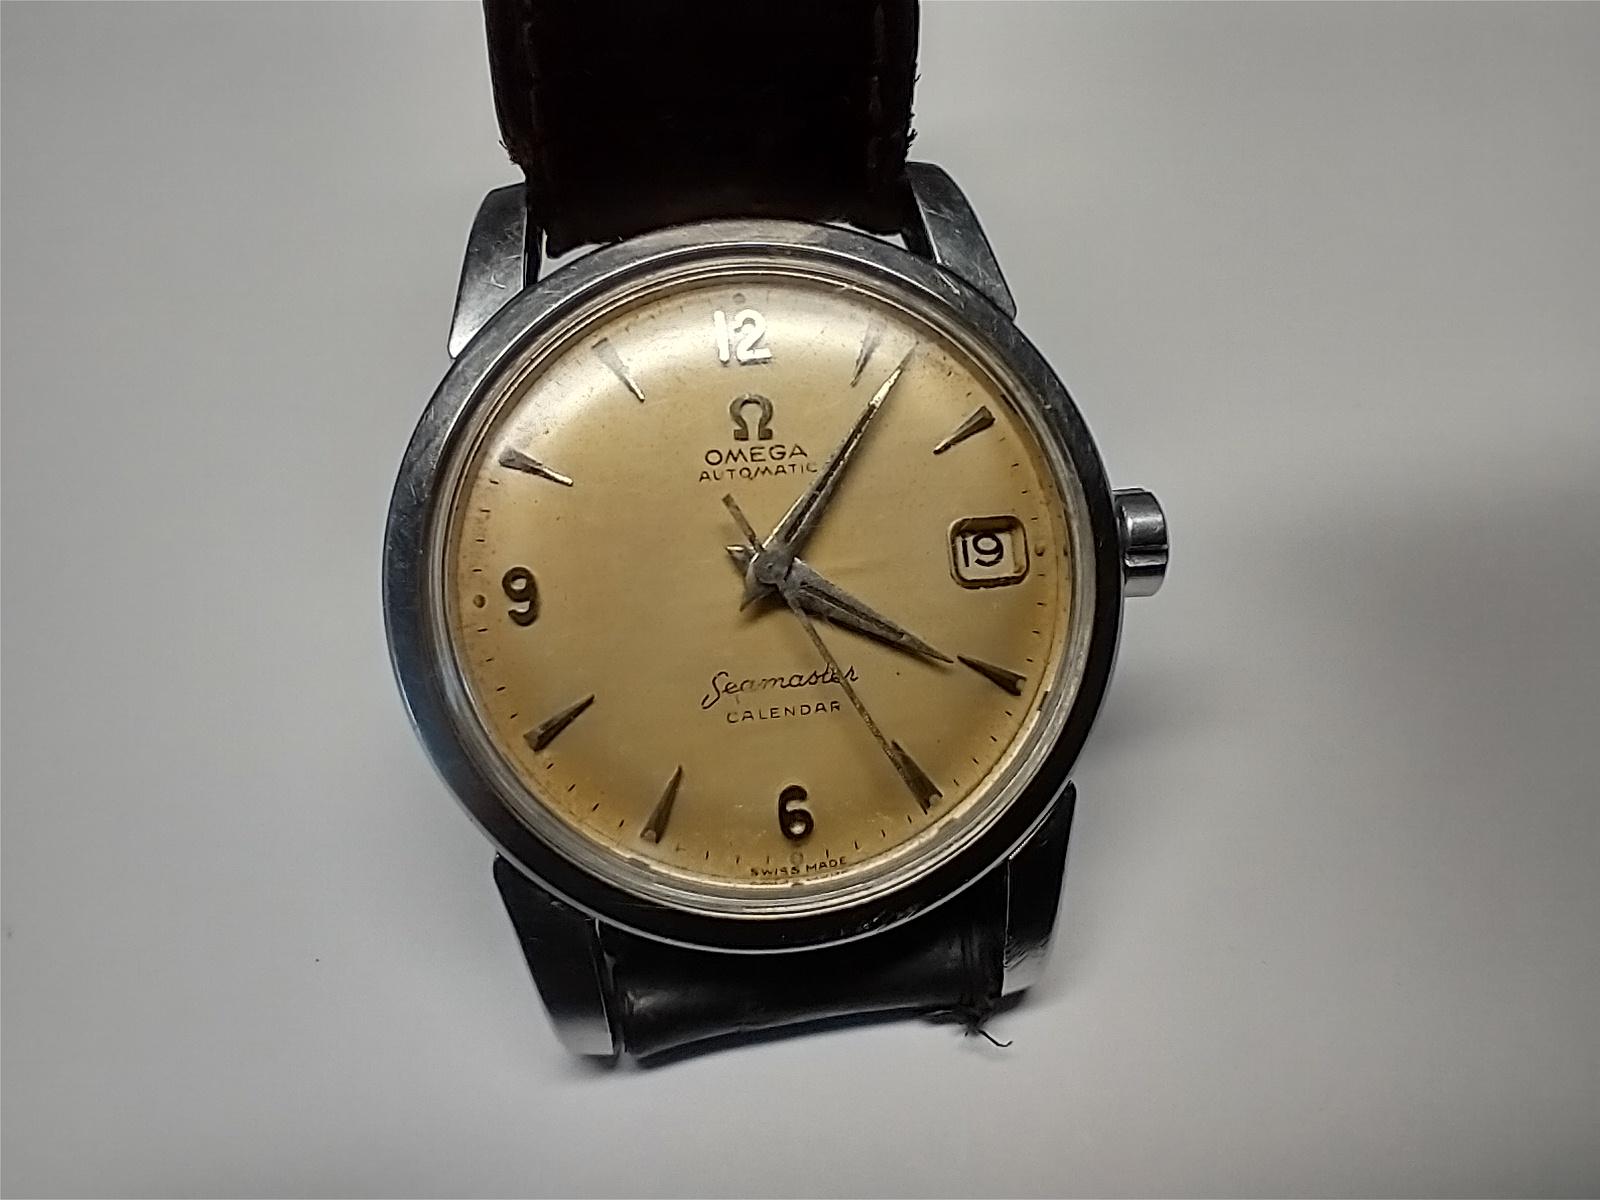
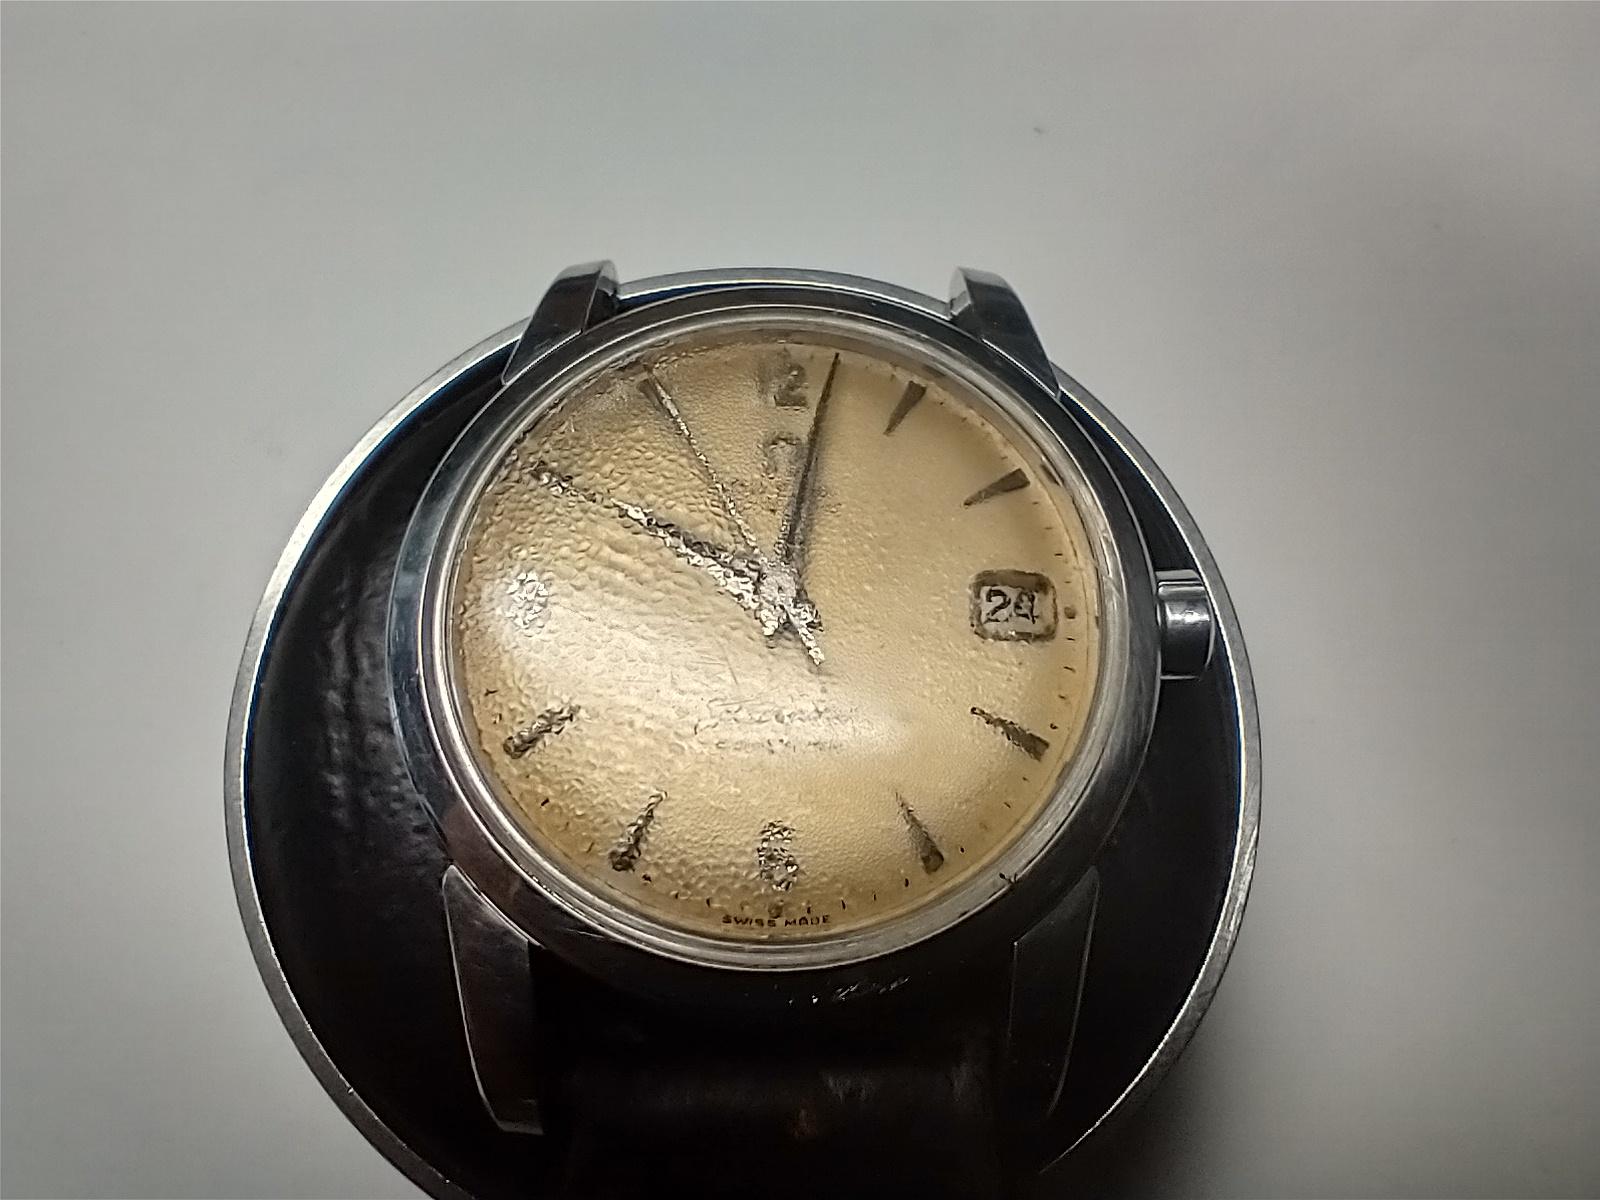
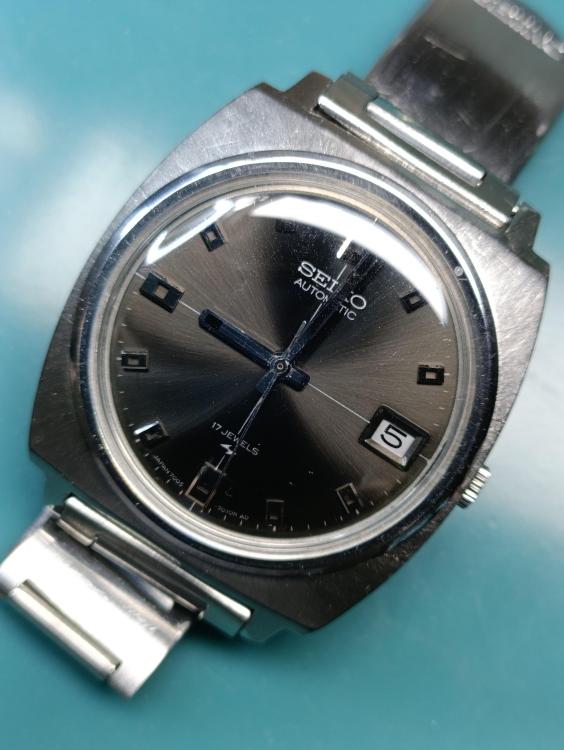
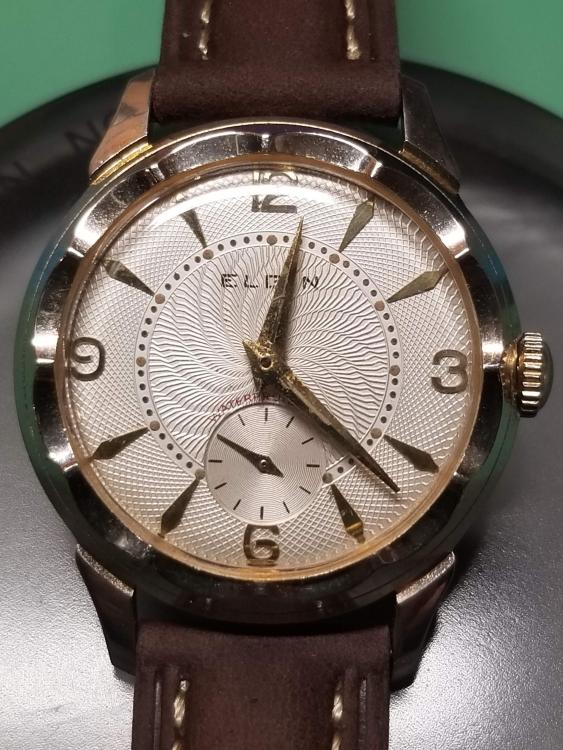
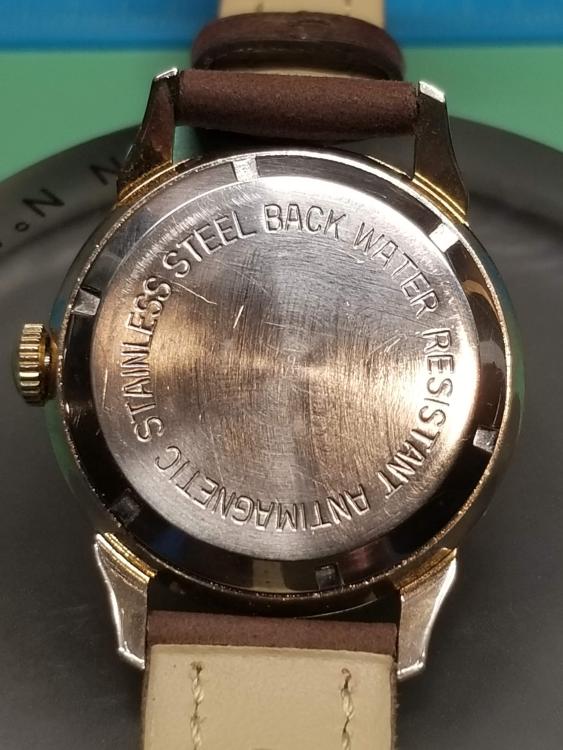
One of the things I love about my job as a watchmaker is the variation in what I'm servicing or/and repairing. One day will be a modern Omega Seamaster with a coaxial escapement, the next a Baumgartner pin pallet and the next a Goliath pocket watch. So the vast array of quality to the not so quality of movements. In fact that has been several of the watches across my bench this month, as well as the usual bread and butter work of vintage Rolex and Omegas, which personally I like working on, as you can get such great results from a 50 year old watch and even get them to chronometer standards again, which is very satisfying. This ladies Rolex watch with a 2135 under the hood came to me with a story, as all watches tend to. Now, the story that the client tells you is sometimes a lot different to what the watch movement is telling you. The watch never lies, but clients have a habit of missing bits out and massaging the truth, so to speak. Here's an example of what the watch is telling you and what the client is.... You decide. This watch had been sitting in a draw for almost ten years, said the customer and prior to that it had been working fine. Now, looking at some of the damage from water ingress and rust and the blob of metal that used to be called a rotor and I would say that unless that draw was in the swimming pool, I doubt very much what I'm being told is even marginally close to the truth The Gif shows dissolving a rusted in screw using Bergeon Vissin. The reason the movement is held upright in the Vissin, is because I didn't want to remove everything that was steel like the IncaBloc setting and minute wheel post, etc. Remember that this watch was in working order to prior to safely putting it in the swimming pool.... I mean the draw in their bedroom. What I usually ask is, 'Are there any children in the house?' because that throws a different light on everything. What one of their little treasures could have done with that watch is anyone's guess and the 'story' the client is giving you is now seeming a little more truthful with throwing in the 'X' child factor, but alas they didn't have children, not even a random niece or nephew we could possibly pin this on. It was looking more that the version of events or non-events that was being fed to me, didn't add up. The underside of the rotor actually still had moisture on it! When I showed the photos of the damage and the estimated repair bill, they didn't seem phased by it and a passing 'Oh, I wonder how water could have gotten inside?' In the end she cleaned up really nicely. I wish I had taken a shot inside the case. The last shot of the timegrapher shows the timing in all six positions For some reason, some Rolex movements you will only get 286 amplitude out of them in horizontal positions. For some reason 286 is the magic number. I've seen this many times. with a new spring and getting 286 amplitude, I'm happy. Another watchmaker friend of mine who works for an accredited Rolex watchmaker told me the same. This isn't all Rolex movements. On a side note, I serviced a beautiful Omega Seamaster a few years ago. The rubber gasket had turned into a sticky paste just like Marmite, which had gotten everywhere The movement had an intricate slipping pawl ratchet wheel to stop the keyless work from turning as the rotor turned this to put power in the mainspring and vice-versa if I can recall. Great to discover this over engineered piece of kit and see the similarity of this to a reversing wheel! It was serviced and returned to it's owner and unfortunately because it has 'Seamaster' written on the dial he thought it would be alright to get into the shower with it! This only had one outcome, which water logged the case and movement within seconds. The watch wasn't returned to me for two weeks, so I had to get to work quickly, but the damage was already done and set in and I wasn't sure if the old girl wasn't going to pull through this one. The client didn't try to dress this story up! There was no cosy warm dry bedroom draw to talk about. No niece, nephew or child to hang this one on! The thing with a movement with power in the mainspring and a jammed gear train is, it's like playing Jenga. You know at some point it's coming crashing down, just like the movement, you know as you remove parts at some point the power is going to hammer through a train you are taking the bridge off, so it's minimising the least expensive replacement part to break, so holding back the train to remove the escape wheel as a priority because this is the most delicate part to break and then if you can the fourth wheel. The third and second wheel might come off lightly. In fact, I was able to remove all the train by holding back the second wheel which wasn't that hard because of the rust was doing a great job at that. The only parts that was permanently damaged beyond repair was the whiplash regulator on the top of the balance and a few bits and pieces from the auto works, which had fused together. The timegrapher results were pleasing once it had been cleaned and serviced again. Even with all that water and the work needed, a perfectly working vintage Omega 503 brought to within Chronometer standards. It's so pleasing to bring that look of joy to a clients face when they tell you they've been to several watch service places and they've said it can't be repaired and you tell them that you will get her working again. Priceless! Two services and a complete de-rusting in less than three weeks was a costly mistake


 10 points
 -
I should have done this a long time ago. I would like to say a big thank you to all my followers new and old. If I can help in any way just message me and I will do my very best for you.10 points
-
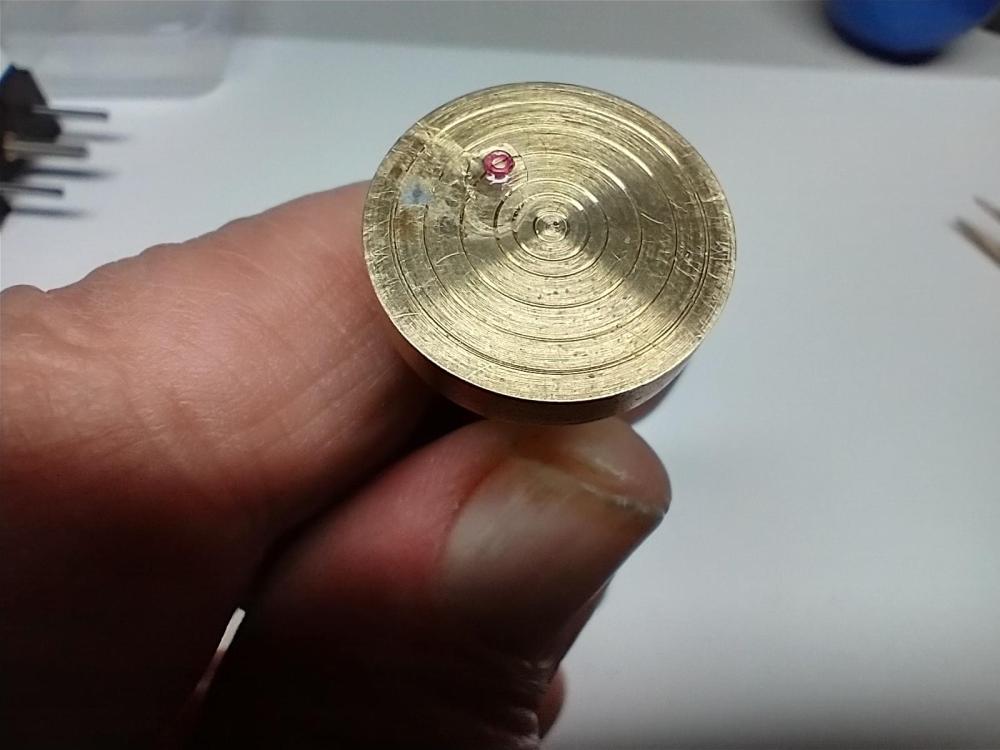
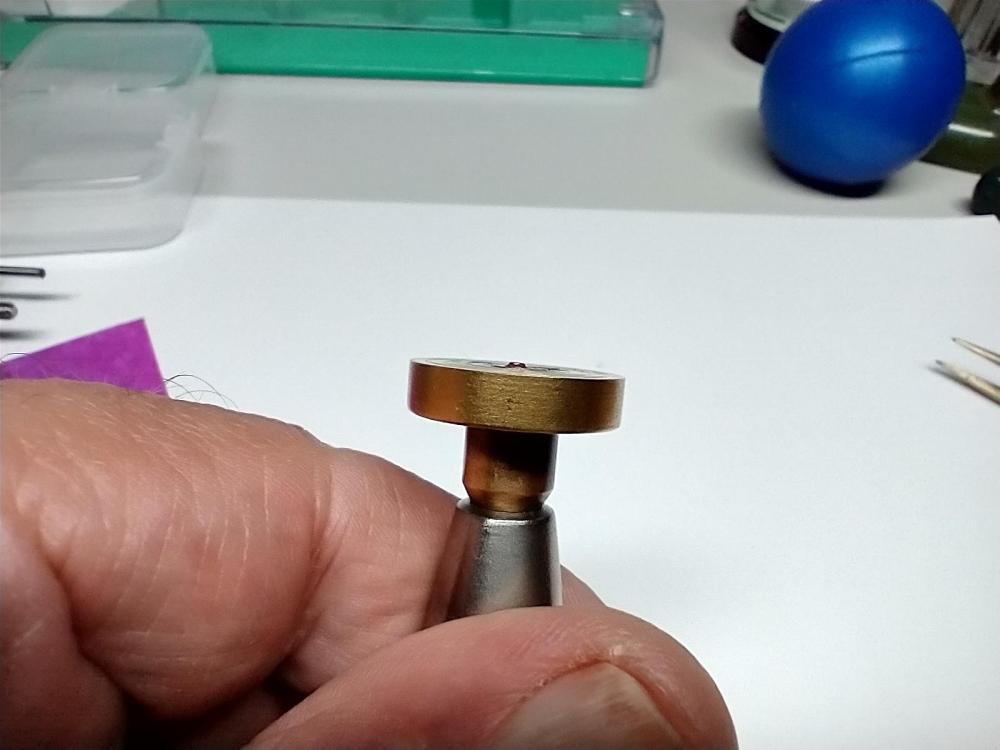
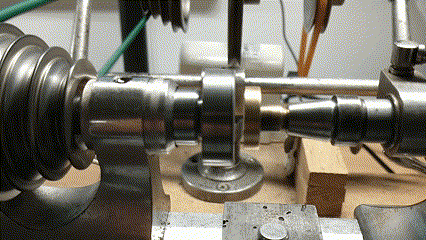
OK, today I visited a friend who is watchmaker and asked him if he has useless old sapphire crystal. He took out one from an old Seiko Kinetic for parts and gave it to me. I came home and started work. The first I did was to break the crystal with the hope some small piece will have suitable shape to work on. For my surprise, appears there is thin (0.35mm) sapphire layer on top of a thick glass piece. I first was disappointed, as the stone I need is with diam 0.65mm (and then ground to half to obtain D cross-section) but then figured that it may be actually better for me. Realized that I can use one of the flat and polished faces as locking face of the jewel and thus there is still enough meat in thickness of the sapphire. So, I ground small rectangle piece and glued it with shellac on the side of a 0.6mm steel plate, then filed it round and lapped it to form the 'back' of the stone. I think the stone is good enough and will do the job it is meant for. I cleaned all the parts of the movement as there was gummed oil everywhere. The spring is very strong and it was challenge to get it wound while holding the barrel and collect it in the winder barrel to extract it. It left for tomorrow to test everything
 9 points
 -
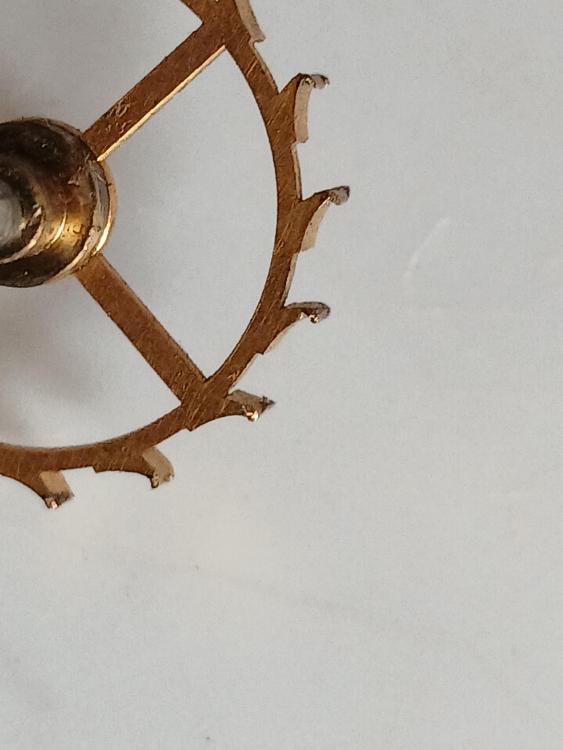
Picked this up for $80 at a little antique shop. Said it was running--not! Broken balance staff and bodged mainspring. I looked around for a staff and could only find staffs that were about 6mm long. This one is about 8mm. Both pivots were broken yet there is no indication the clock was dropped. We'll, I could see deep pot marks around the edge of the balance jewels on the plate. Some numb nutz was just forcing the balance until it broke. With little hope of finding a staff, I made one. I started with a larger PW staff. The escapement platform is assembled and my free spin test was excellent. I am repairing the MS arbor, so until that is done, I cannot test operation.


 9 points
 -
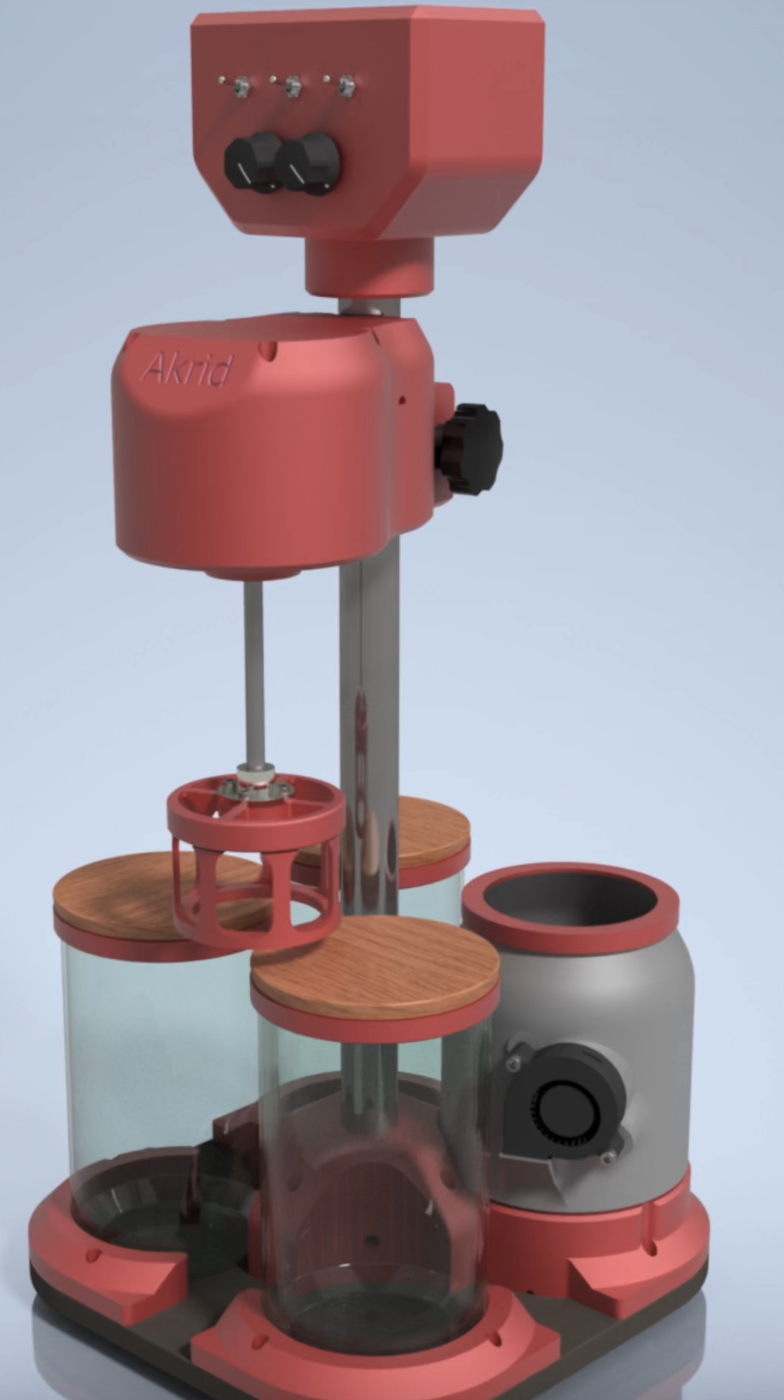
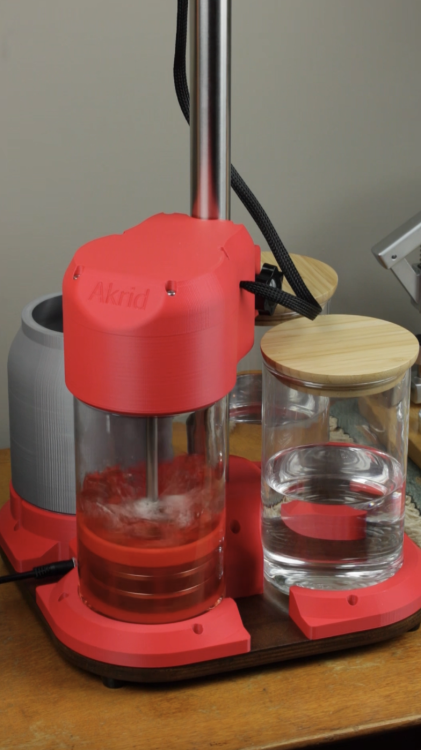
Hello everyone! This is my first post here on WatchRepairTalk, and I wanted to share a project I've been working on—a DIY Watch Cleaning Machine that I designed and built myself. Since it's difficult to find a good-quality machine at a reasonable price, I decided to use my engineering skills and create one. Why not, right? Look at a demonstration video on my instagram page. You can follow this page if you are interested in my watchmaking journey! Demonstration video of Akrid the Watch Cleaning Machine I named this machine after my alias from the Dutch watch forum, Akrid (which is also my alias here). It features three stations: one for cleaning and two for rinsing. The final cycle is for drying the watch parts, allowing the movement to be reassembled immediately after the cleaning process. I've been using it for two months now, and it's been working flawlessly! The cleaning results are far superior to what I used to get with my ultrasonic cleaner. See the cleaning results here: Cleaning results of Akrid I'd love to hear your thoughts on the design!

 9 points
 -
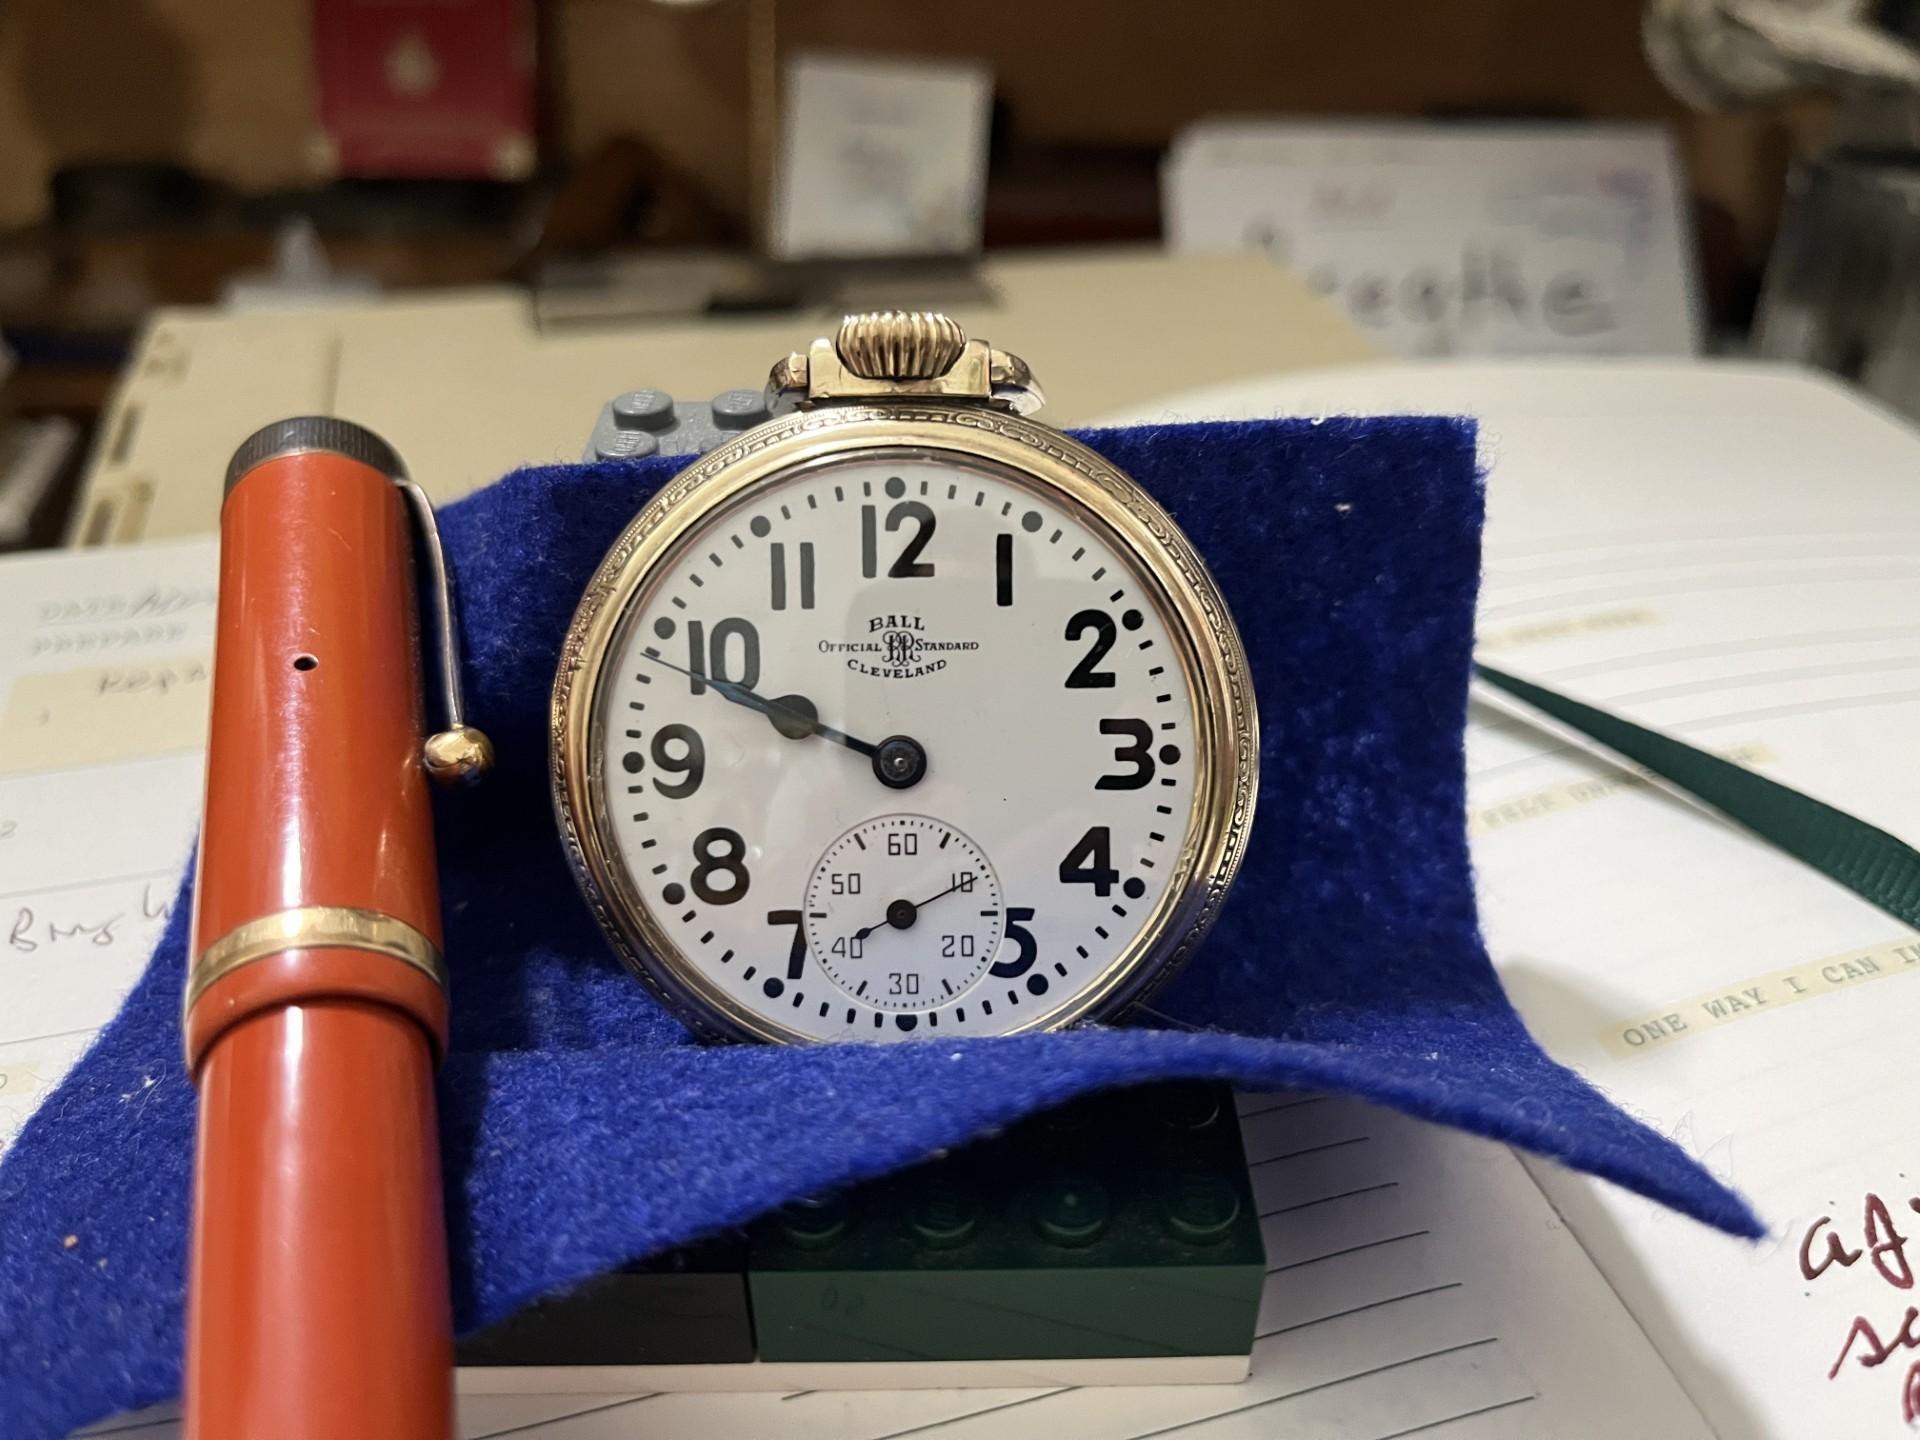
Hi Guys, Today I have a huge sense of accomplishment and relief after finally finishing restoration of this Ball 999B 16s 21 j railroad grade pocket watch. I started it in April, so it only took me five months to complete; as life got in the way. It also had a lot wrong with it. Broken jewels, broken staff, bent wheel, broken hands, well, you get the picture. It's running great in my estimation. The fact that it's running at all is proof, not of my workmanship because heaven knows it's lacking, but of the high quality of workmanship that went into the watch's manufacture. I feel very lucky to have gotten it back into shape. My only regret is that you can see some of the glue used to adhere the crystal. I thought it was supposed to dry clear. I might retry with some UV glue to see if that's better. Thanks to all the people who gave me input along the way. I couldn't have finished without all their help. Arron.
 9 points
 -
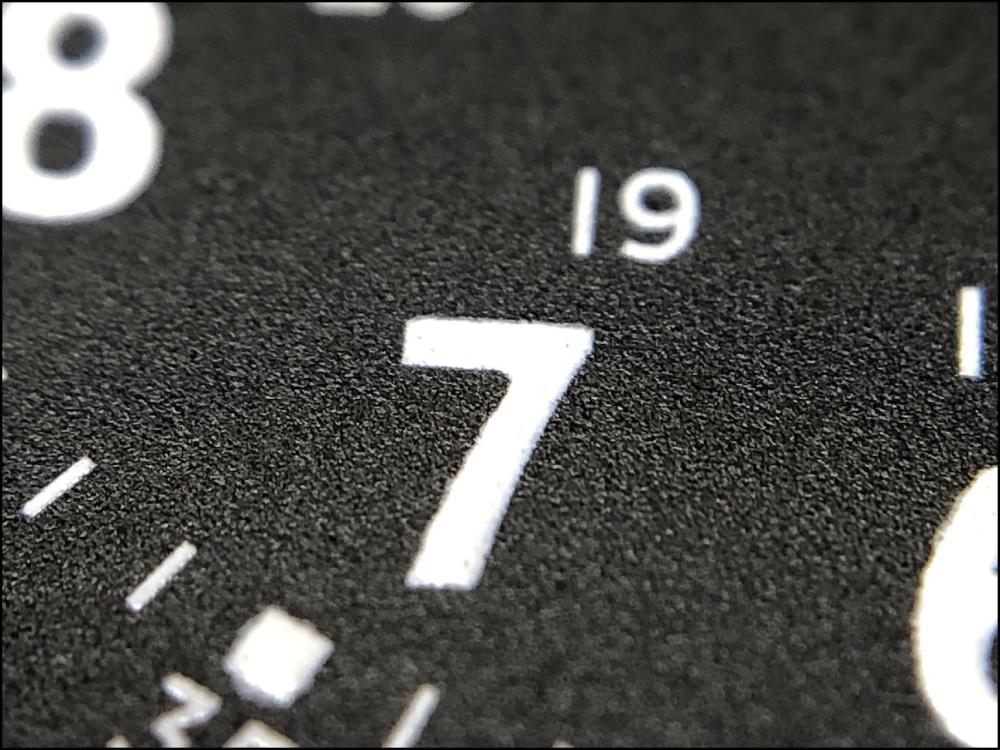
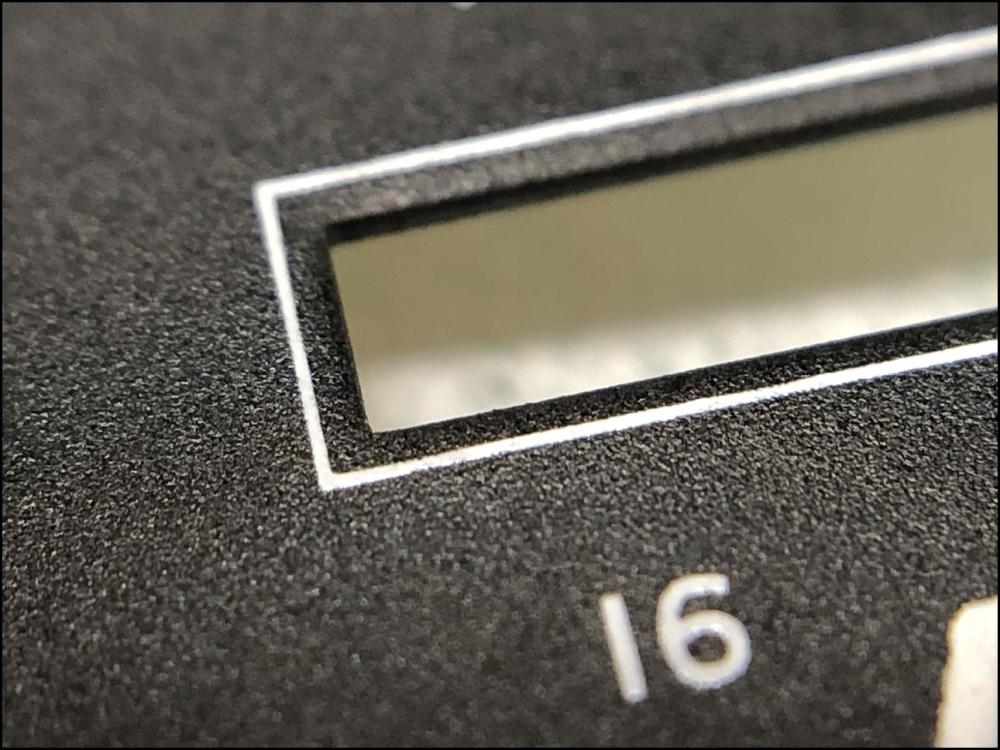
I would like to share a check list made up by a master watchmaker. I take no credit for it, only think it would be helpful for us hobbyists. Here it is! CHECK LIST I decided to write up what is called a 16 point check that is meant to be a guide to steps required to service a watch this is slightly bias towards a wrist watch but very relevant to pocket watches also: This is a guide and not the definitive answer after going through it a few times add you own additional tests and observations. This is of course for a basic time only non-automatic or any with additional features, I also leave out things like demagnetizing, actual cleaning procedures, a good chunk of common sense needs to be applied also as I say its meant as a good starting point to a correct disciplined procedure, This is version 1 may add or edit/delete later. Check number 1 a Check the winding to see if the mainspring is broken. b Check to see if the setting bridge or sleeve is broken by pulling the stem out and testing the proper snap of stem. A broken setting bridge/sleeve is easily detected c. The balance wheel should be oscillated to see that it is true and the balance pivots should be checked by looking through the upper jewel to see that there is not a flash on the pivot. d. The hairspring should be checked to see that it is not damaged. e Check setting of hands f. The watch should be looked over in every respect, paying particular attention to any rust spots that may appear on any part of the movement. When rust is evident around the stem or setting mechanism, it is most important to remove the dial and hands in order to check this mechanism to see if the rust is very extensive. Check Number 2 a. Examine each part as it is being removed from the movement. b. Check for rust on every part. c. Check every pivot to see that it is not damaged or bent. d. Check the jewels in the watch, to see that there are no cracked jewels. e. Check pallet stones to see that they are not chipped or damaged. f. When removing barrel cap, make sure that it snaps off only after sufficient pressure has been applied to it. g. In the examination of each part, a close check is not made at this time as many of the parts will not be clean enough for that purpose. a much closer check will be made on the parts as each part is handled in the assembly of the watch Check Number 3 a. Upon completion of cleaning and parts removed from the basket into the assembly tray, each part should be checked over with the use of a watchmaker’s loupe special attention should be paid to the jewels, because if there is gum oil still remaining on the jewels, the cleaning job was not done satisfactory . It is also worthwhile at this time to examine the pivots. If the jewels are clean, and the pinion leaves are clean, it is almost certain that the cleaning operation was performed effectively. Check Number 4 a. Examine the condition of the mainspring. b. Check the width, strength and length of the mainspring. c.. If correct, replace mainspring using correct mainspring winding tool, not by hand d. Check the lubrication of the mainspring if required e. Check the fit of the mainspring around barrel arbor. f. check the mainspring end for proper shape to catch in barrel. g. Check the snap of the cap on barrel and replace in correct position h. Check the end shake and side shake of barrel arbor is it also sometime recommended to do this without mainspring fitted to test for free run and end shake i. Check the cleanliness of the barrel and barrel teeth. j. Check the oiling of the barrel arbor after the cap is on. k. Check the condition of the barrel teeth to see if they are bent or worn. Check Number 5 a. Jewel holes must be cleaned with peg wood if necessary. b. Jewels must be checked for chips or cracks. c. Check the train wheel pivots for rust, polish, cuts and straightness. d. Check the pinions for rust’, pits and polish. e. Check the pivots for pitting check that clean pith wood is being used. f. Check plates for tarnish, fingerprints, and polish jewel settings. g. Assemble time train and check end shake and side shake. h. Check wheels for trueness arid upright. i. Lift each wheel with tweezers to check for end shake and to see if each wheel is free enough to fall back to its original position. j. Spin train to see that is spins freely, in dial up, dial down and a vertical position. Check Number 6 a. Replace barrel and barrel bridge and check the oiling of the barrel arbor upper and lower bearing. b. Check oiling of crown wheel. c. Replace ratchet wheel. d. Note: do not oil remainder of movement until after kick-back is checked or cap jewels are present oil those now e. Wind watch slightly to check kick-back and recoil. This check should be made in dial up and dial down positions. If the watch does not have kick¬back, this indicates that the train is not as free as it should be. First, however, before checking into the train itself to determine if there is some frictional error, it would be worthwhile to examine the mainspring around the barrel arbor. Many times the loose fit of the mainspring around the arbor will prevent kick-back from occurring within the train. In such instances, the arbor is simply slipped in the mainspring instead of the train receiving the reversal torque, that normally occurs. If the barrel is found to be satisfactory, then the train. should be checked to see if the trouble can be located. first, the train should be examined carefully to see if each wheel is free, and if no trouble can be found, then it is advisable to remove the train wheels from the watch and replace each wheel in the watch individually and to check the spin of each wheel. If each wheel spins freely, this indicates that the pivots and the jewels are in good condition and that one need not look further for defects or faults in those areas. Next, place two wheels at a time in the watch and check the spin of the wheels. Thus, any error of improper depthing or a badly formed tooth on a wheel or pinion will be detected. It is simply a process of elimination in order to locate the particular trouble, and of course, proper corrective measures must be taken to correct an error when one is found. Check Number 7 a. Oil all the train jewels in the watch, and at this point it is advisable to oil also the balance jewels. b. Check to see that there is a ring of oil around each train pivot and that the jewels are not over-oiled or under-oiled. c. Check the jewels that have caps to see that the globule of oil has been formed properly between the flat cap and curved hole jewel and no keyhole shape if so remove re clean jewels and check seating the re oil and repeat check for perfect ring. Check Number 8 a. Oil stem properly. b. Oil friction parts of setting. c. Oil wolf teeth of clutch wheel and winding pinion. d. Oil clutch wheel groove. e. Oil points on setting lever that contact the setting bridge or the clutch lever. f. Never oil dial train. Note: ‘dial train means all wheels following center wheel staff. g. Seek expert advice on some types of intermediate wheels connecting clutch at setting positions that require oil. Check Number 9 a. Check condition of pallet arbor pivots. b. Check for chipped or loose stones, shellac or gummed oil on pallet stones. c. Check guard pin for straightness and proper shape. d. Check polish of pallet arbor, pivots and fork slot. e. Check end shake of pallet fork. f. Check height of pallet stones in conjunction with escape wheel teeth. g. Check matching stones. h Check drop lock i. Inside and outside drop. j. Draw. k. Hang-up of stones on escape wheel teeth. Check Number 10 a. Check tightness of roller jewel in roller table - uprightness of roller jewel. b. Check the height of the balance wheel in conjunction with the fork bridge and the center wheel. c. Check the clearances. d. Check the height of the guard pin in relation to safety roller. e. Check the proper length of roller jewel and fit of roller jewel to fork slot. f. Check the guard clearance. g. Check the corner clearance. h. Check the jewel pin shake. i. Check the guard test, j. Check the corner test. Check Number 11. a. Check the hairspring in-the-flat. b. Check the hairspring in-the-round. c. Check the quadrant of the hairspring to see that it is formed properly between the regulator pins and stud d. Check for beat of the watch by equalizing the force to receiving and discharge pallets. e. Check for the collet wobble. f. Check for trueness of the balance wheel, and for the flash of the balance pivots g. Check for trueness of roller table. Check Number 12 a. Place the watch on the timing machine and take a rate in the dial down position, then turn the movement over to dial up position and take a rate. There are three things that should be observed from the rate that was taken: 1. Dial up should indicate the same time as dial down. 2. Observe the closeness of the lines to determine if the watch is in perfect beat. 3. Observe how the watch is running in reference to the time error over a 24-hour period. b. Adjust the mean time rate of the watch so that the dial up and dial down positions will record on time. Do not move the regulator more than one degree in adjusting the mean time rate. Any other alteration must be made by adjusting mean time screws or by adding or removing weight from the balance wheel in such a manner as not to affect poise, static or dynamic,. c. If the rates in dial up arid dial down are found to be different from one another, then this indicates a mechanical error in the watch which must be traced out before proceeding. d. If the watch is found to be out-of-beat, then of course, it should be put r in proper beat at this time. We might emphasize that if the watch was put in proper beat in accordance with the proper procedure at the bench, then an out-of-beat condition or minimal amount would not be indicated on the timing machine. e. When the above conditions have been satisfied, the next step would be to take a rate in positions and errors corrected. If everything has proved to be satisfactory, the watch should be tested for isochronal test be made on the timing machine, which consists of re-testing at different winding levels and rate in the dial up position. Check Number 13 a. Check for proper lubrication of cannon pinion on center post. b. When replacing the cannon pinion, be sure that the leaves of the cannon pinion do not come down on top of the minute wheel teeth so as to bend the teeth of the minute wheel. c. Check tightness of. cannon pinion d. Check to see that cannon pinion does not ride up when watch is being set. and smooth consistent operation. Check Number 14 a Make sure that the hands are fitted securely to the parts to which they are attached b. Make sure that the hands are adjusted so that there is equal space between the hands and the hands are set as close to the dial as possible. c. Check to be sure that the hands are shaped to the contour of the dial. d. Check to see that\ the hands are positioned so that they are synchronized with one another. Check Number 15 a. If there is no case for the movement, simply disregard this check and proceed with the next check, number 16. b. Check for proper snap/screw back of the case. c. Check for the clearance of the hands under the crystal. d. Check the crystal to see that it is securely fitted into the case. e. Check to see that the crown is next to the stem and reasonably close to the case. f. Check for tightness of movement in case. g. Check the spring bars to see that proper spring bars are used for the particular type of case so that the band is held securely to the case. h. Check the lug holes to see that they have not been worn badly by the spring bars to a point where the hole may break through and allow the spring bar to come out of place. Check Number 16 a. Set the watch on time with a master clock. b. Let the watch run for a period of 24 hours and check the error in the time repeat in several positions. c. Allow the watch to run until it completely runs down and check the length of run. The watch should run a minimum of 30 hours, preferably 40 hours, if it is in “A. I have no answers to any of the steps since I didn't make this up. Maybe Mark might.9 points
-
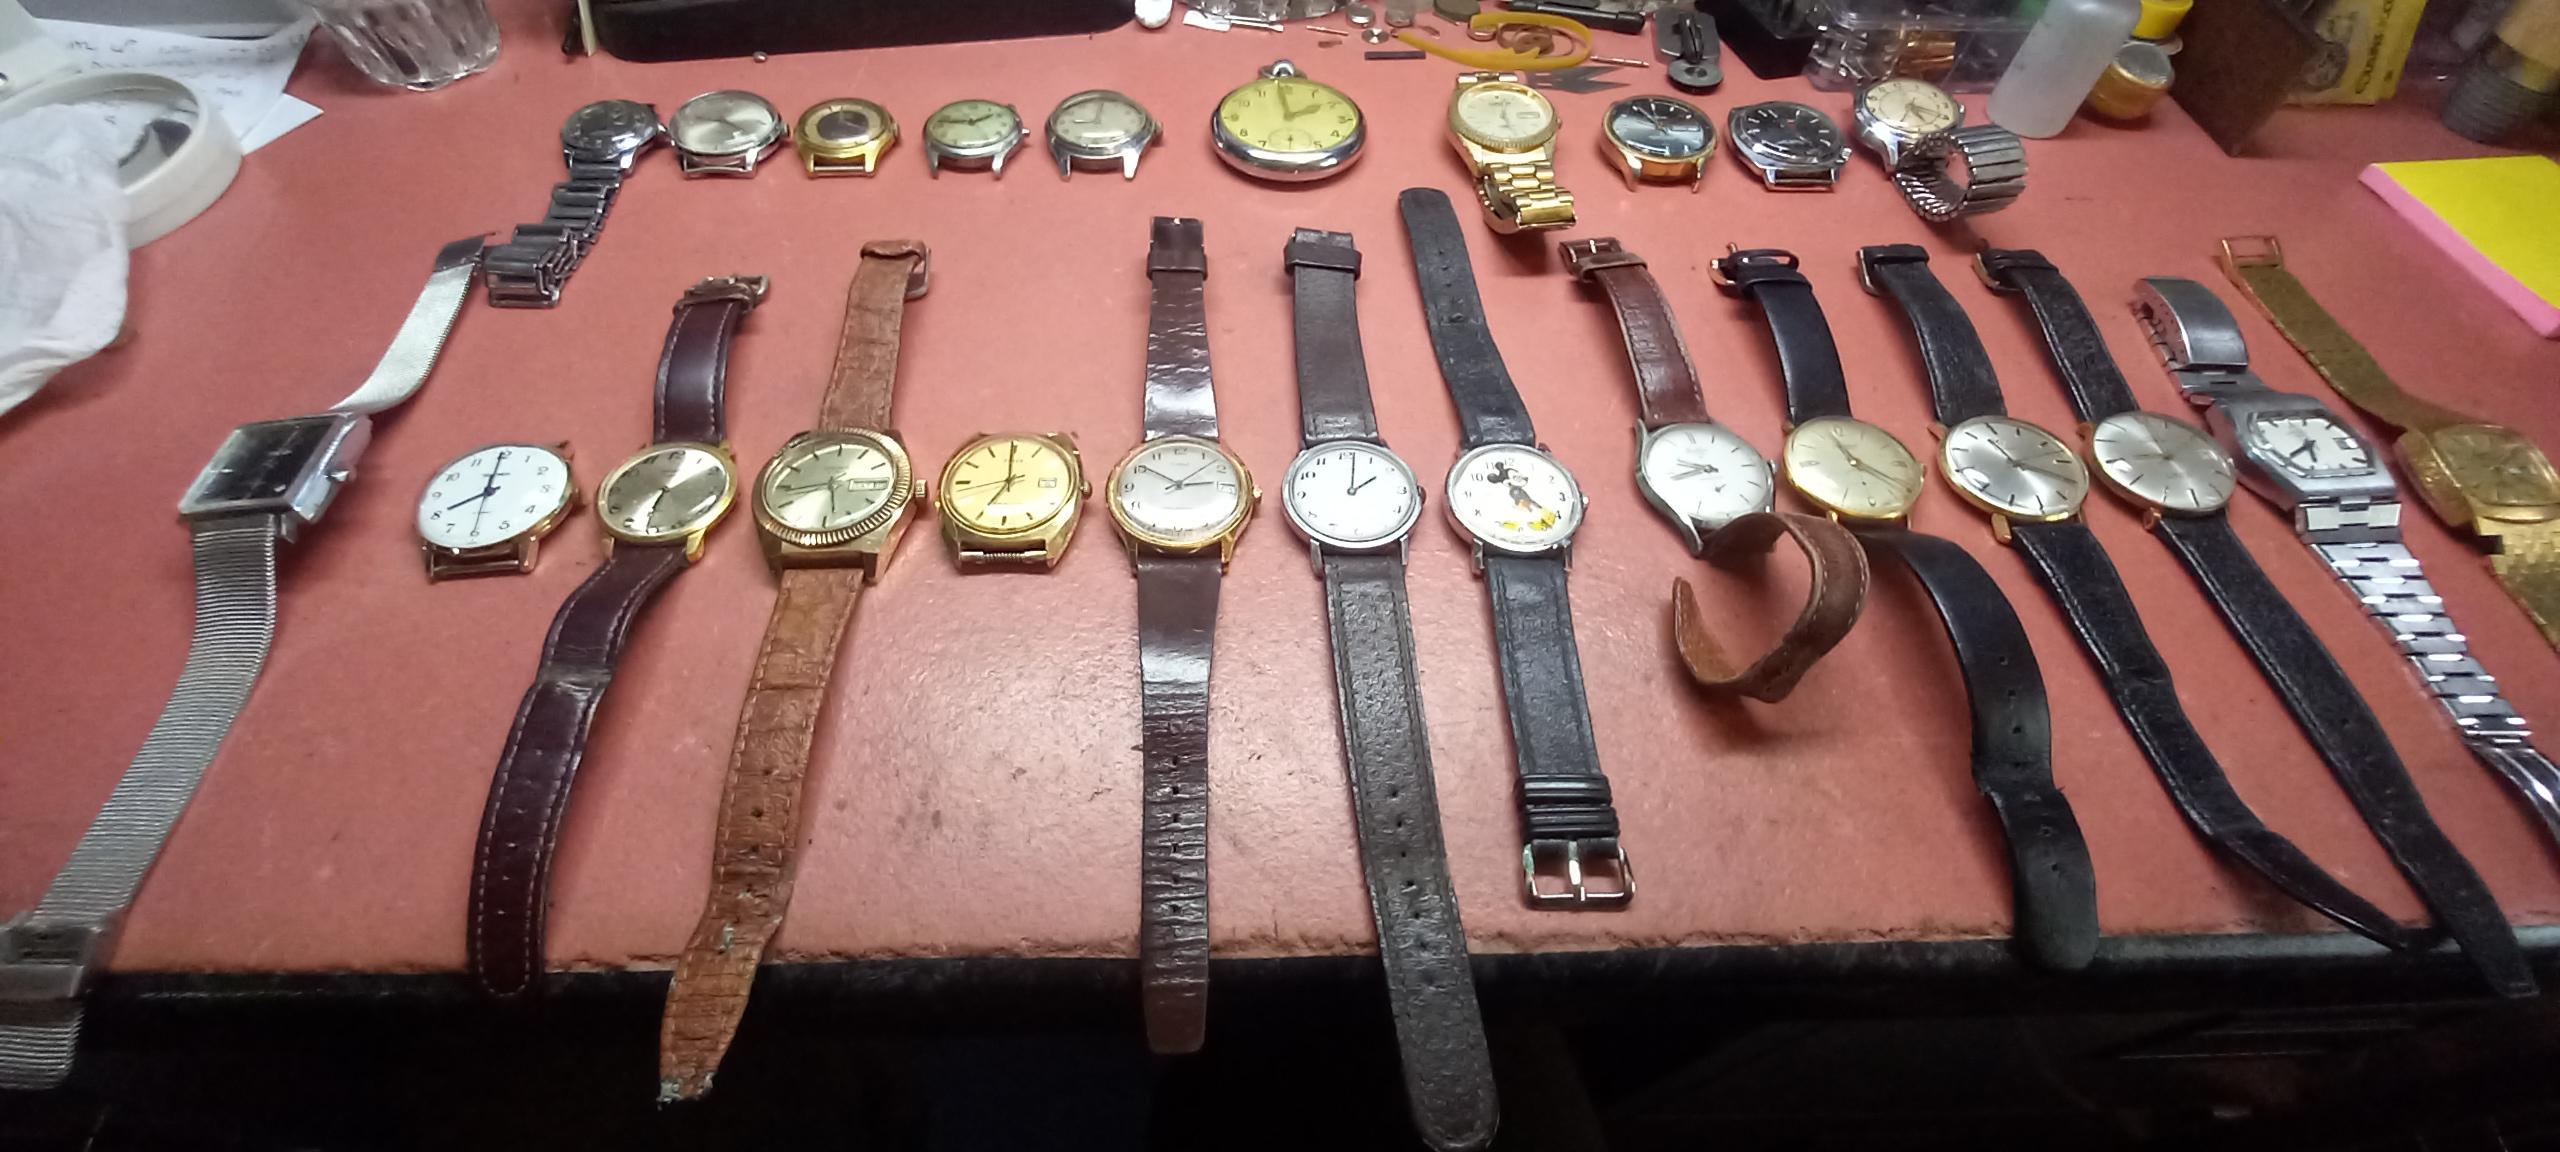
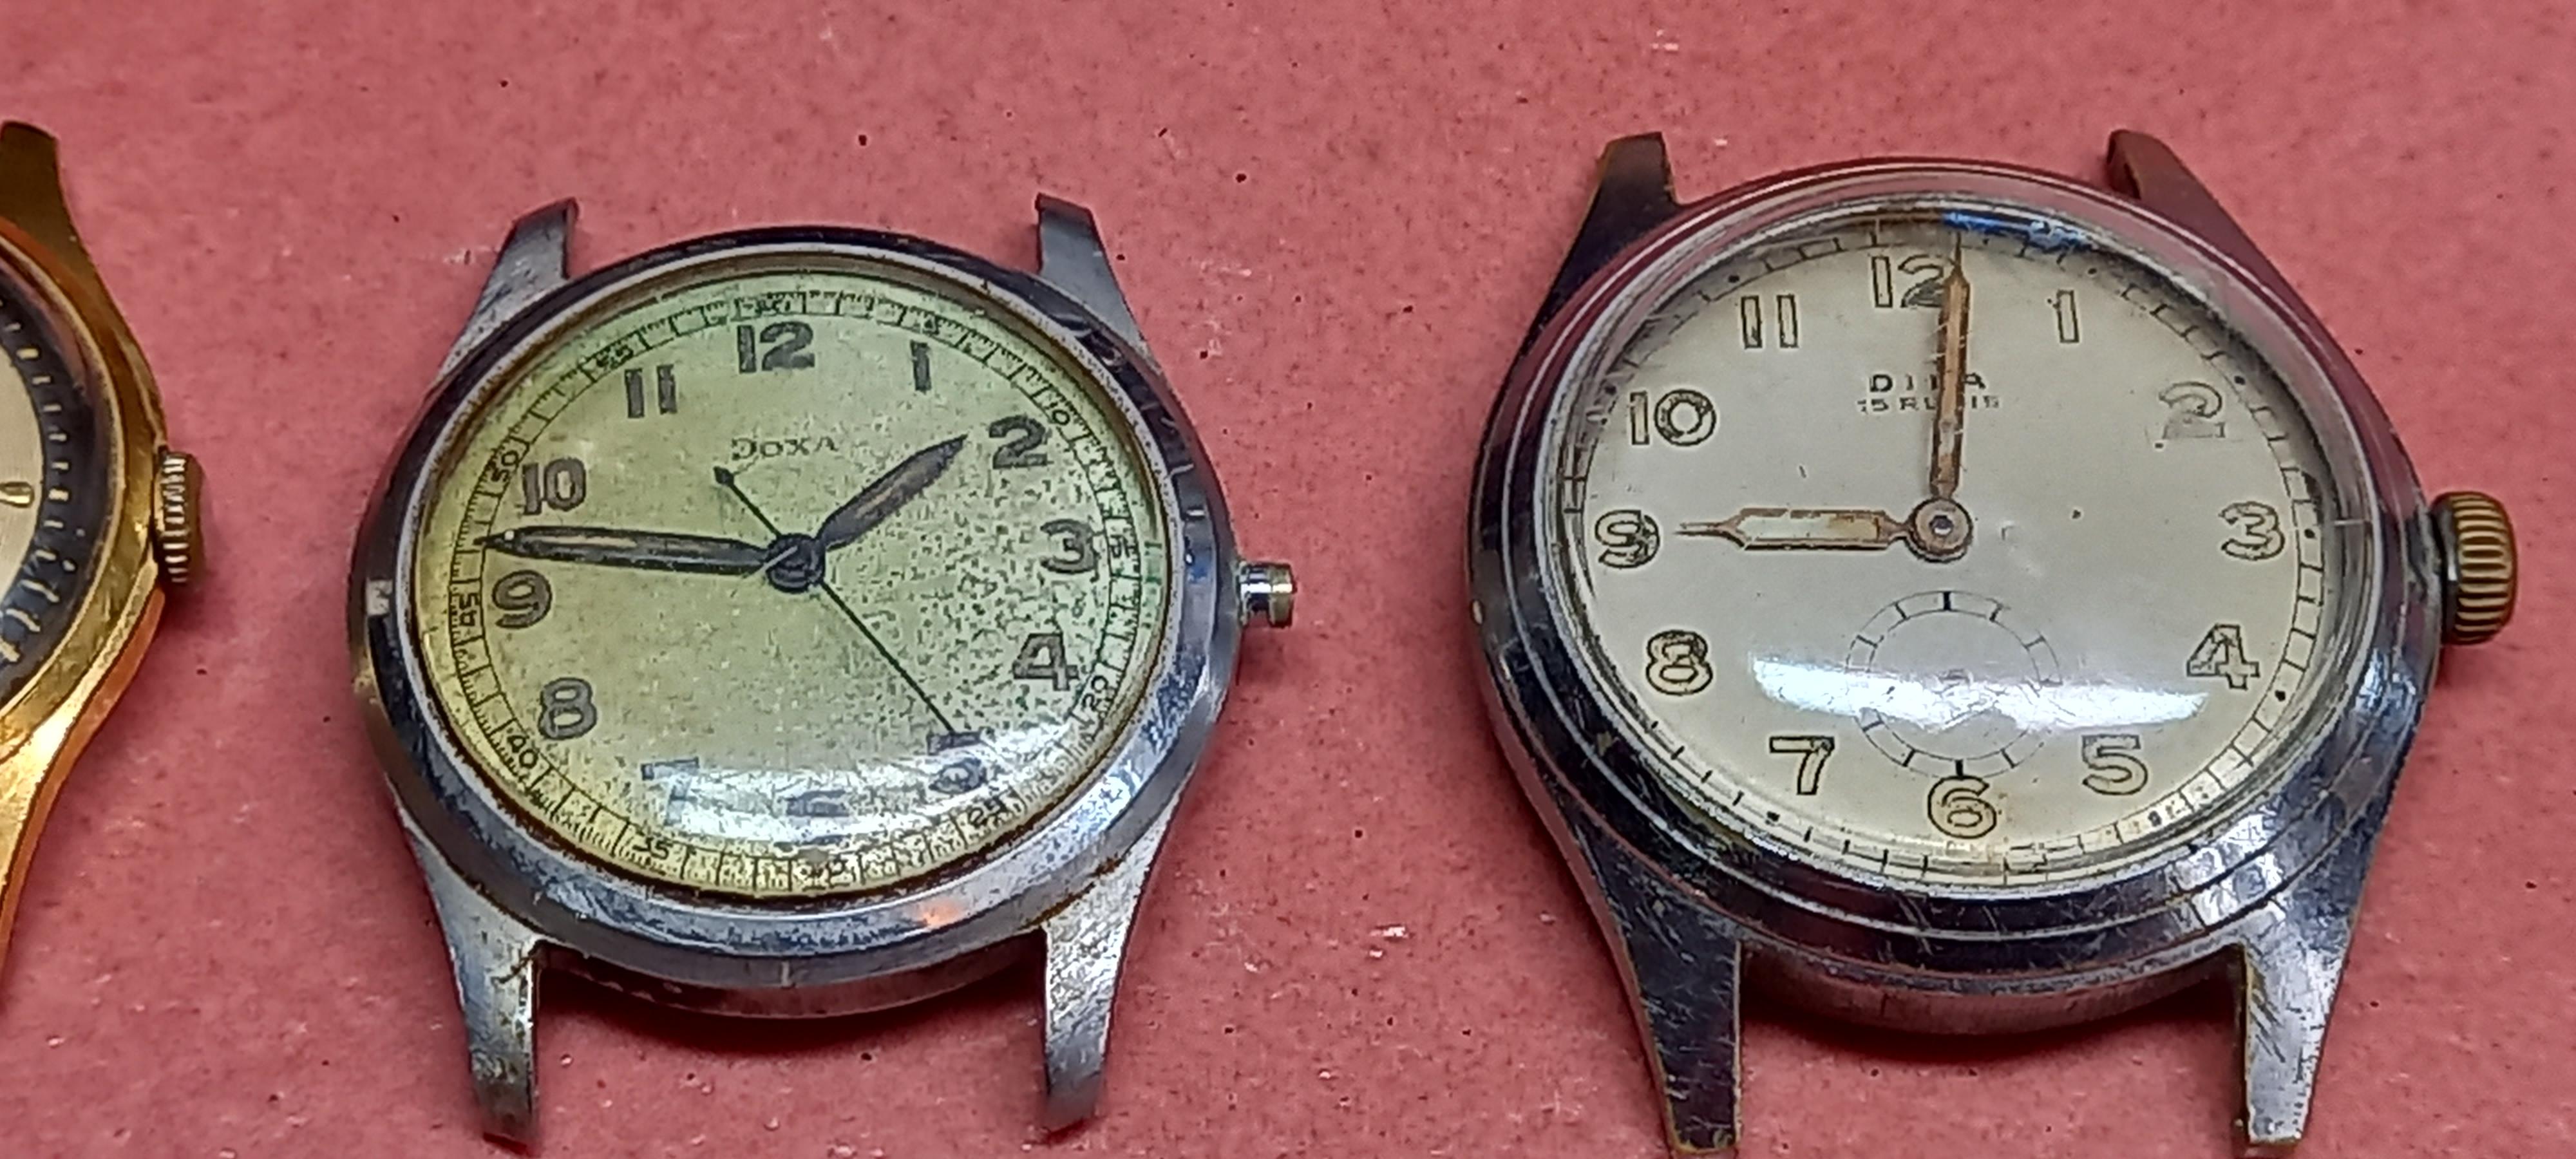
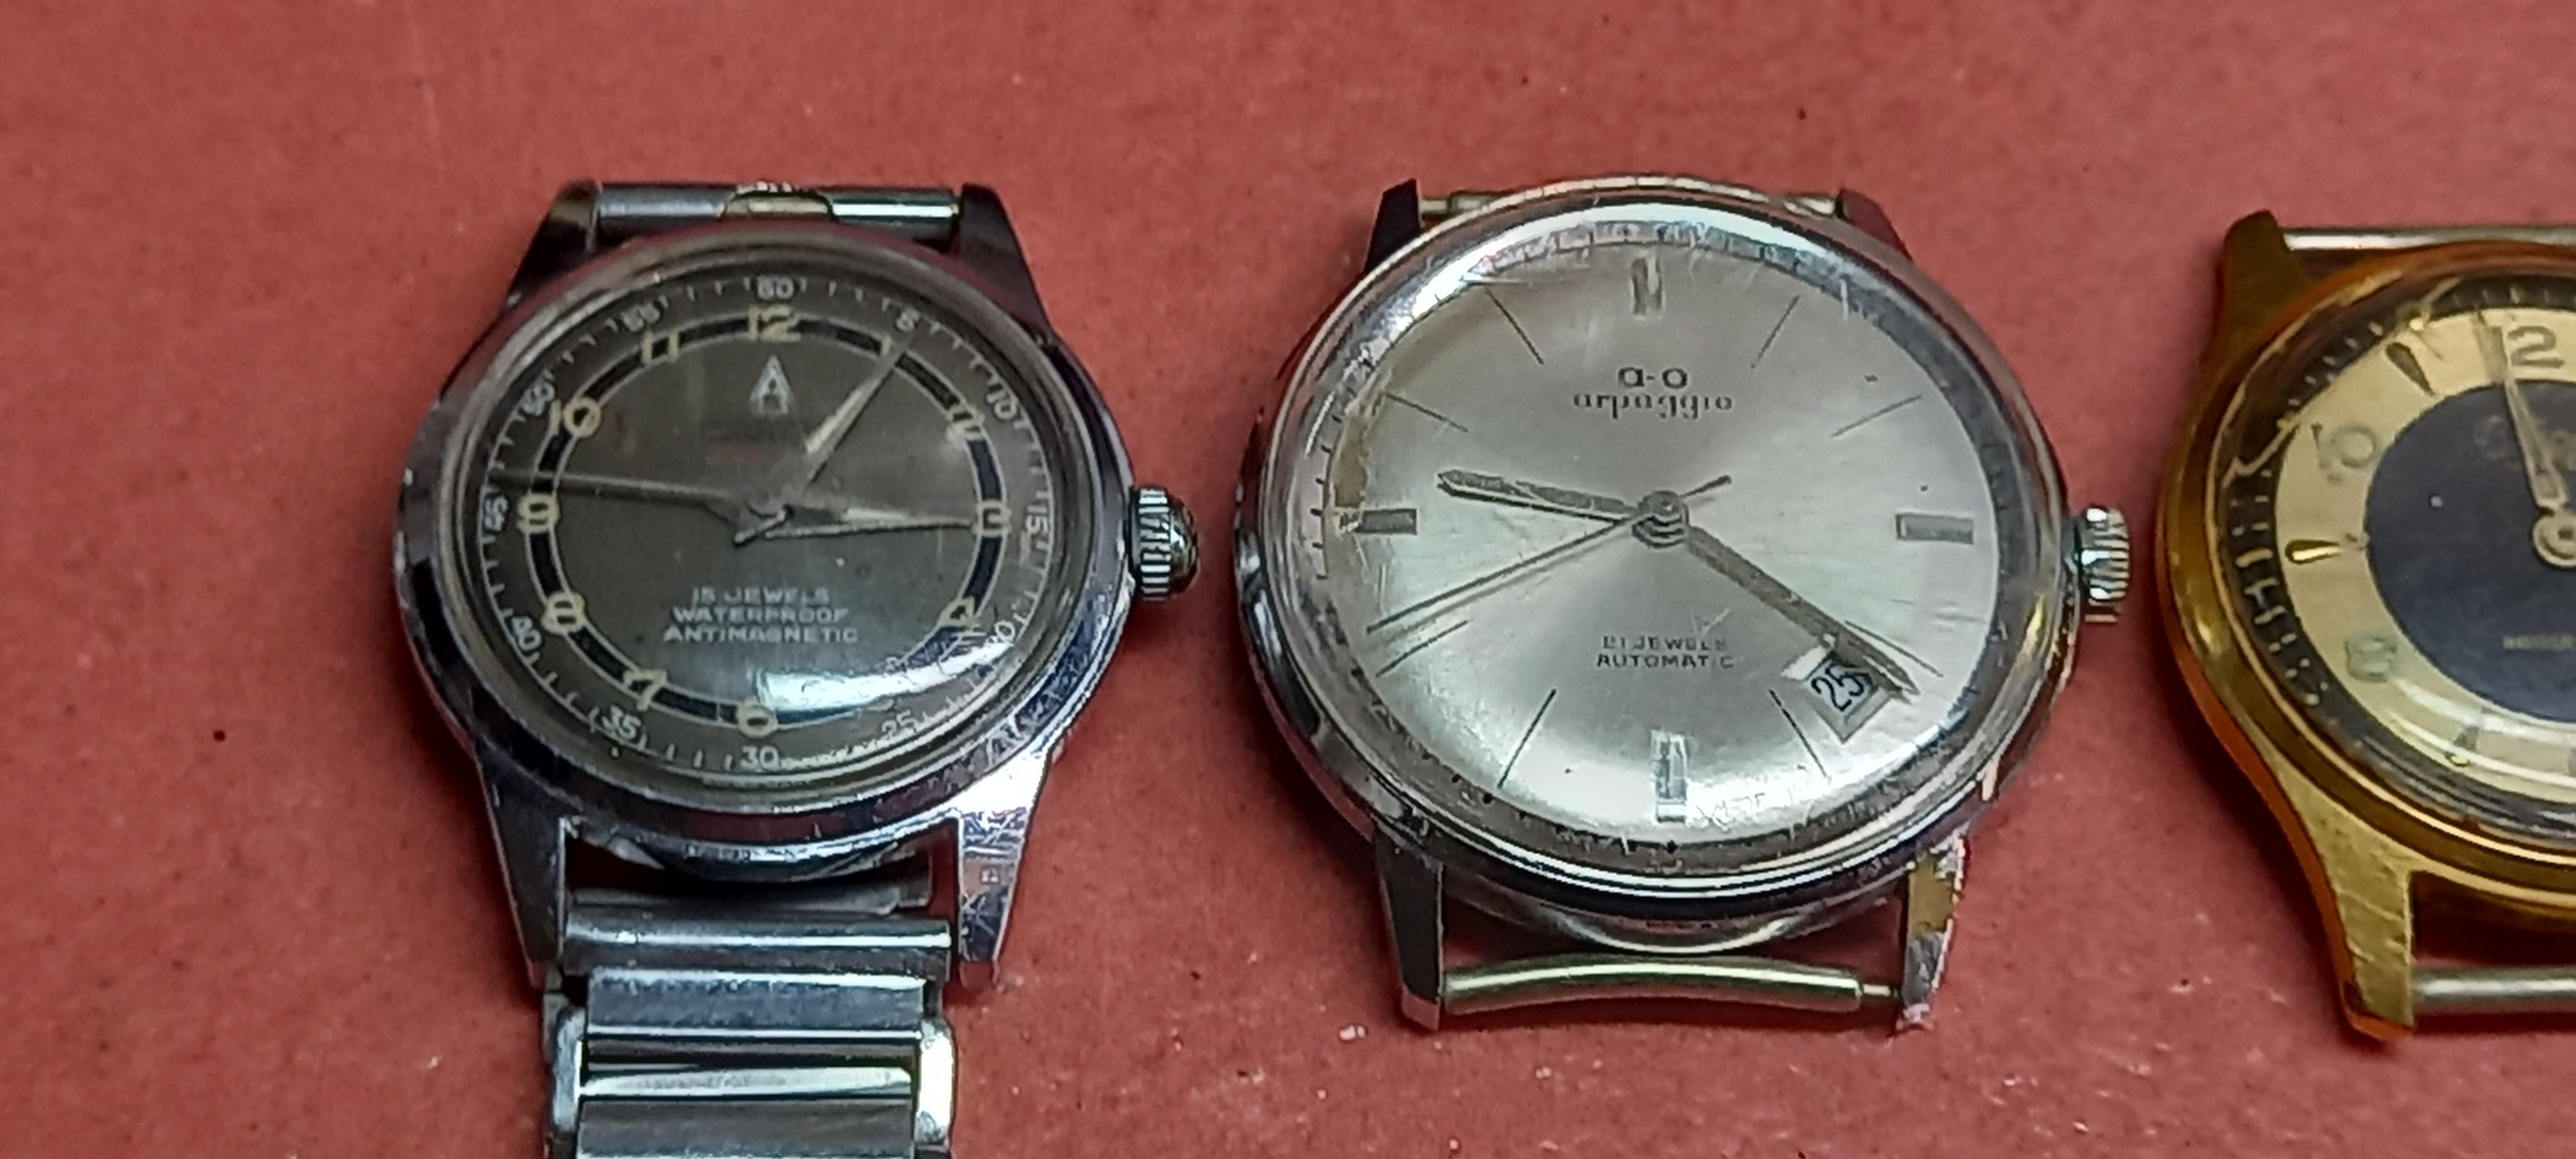
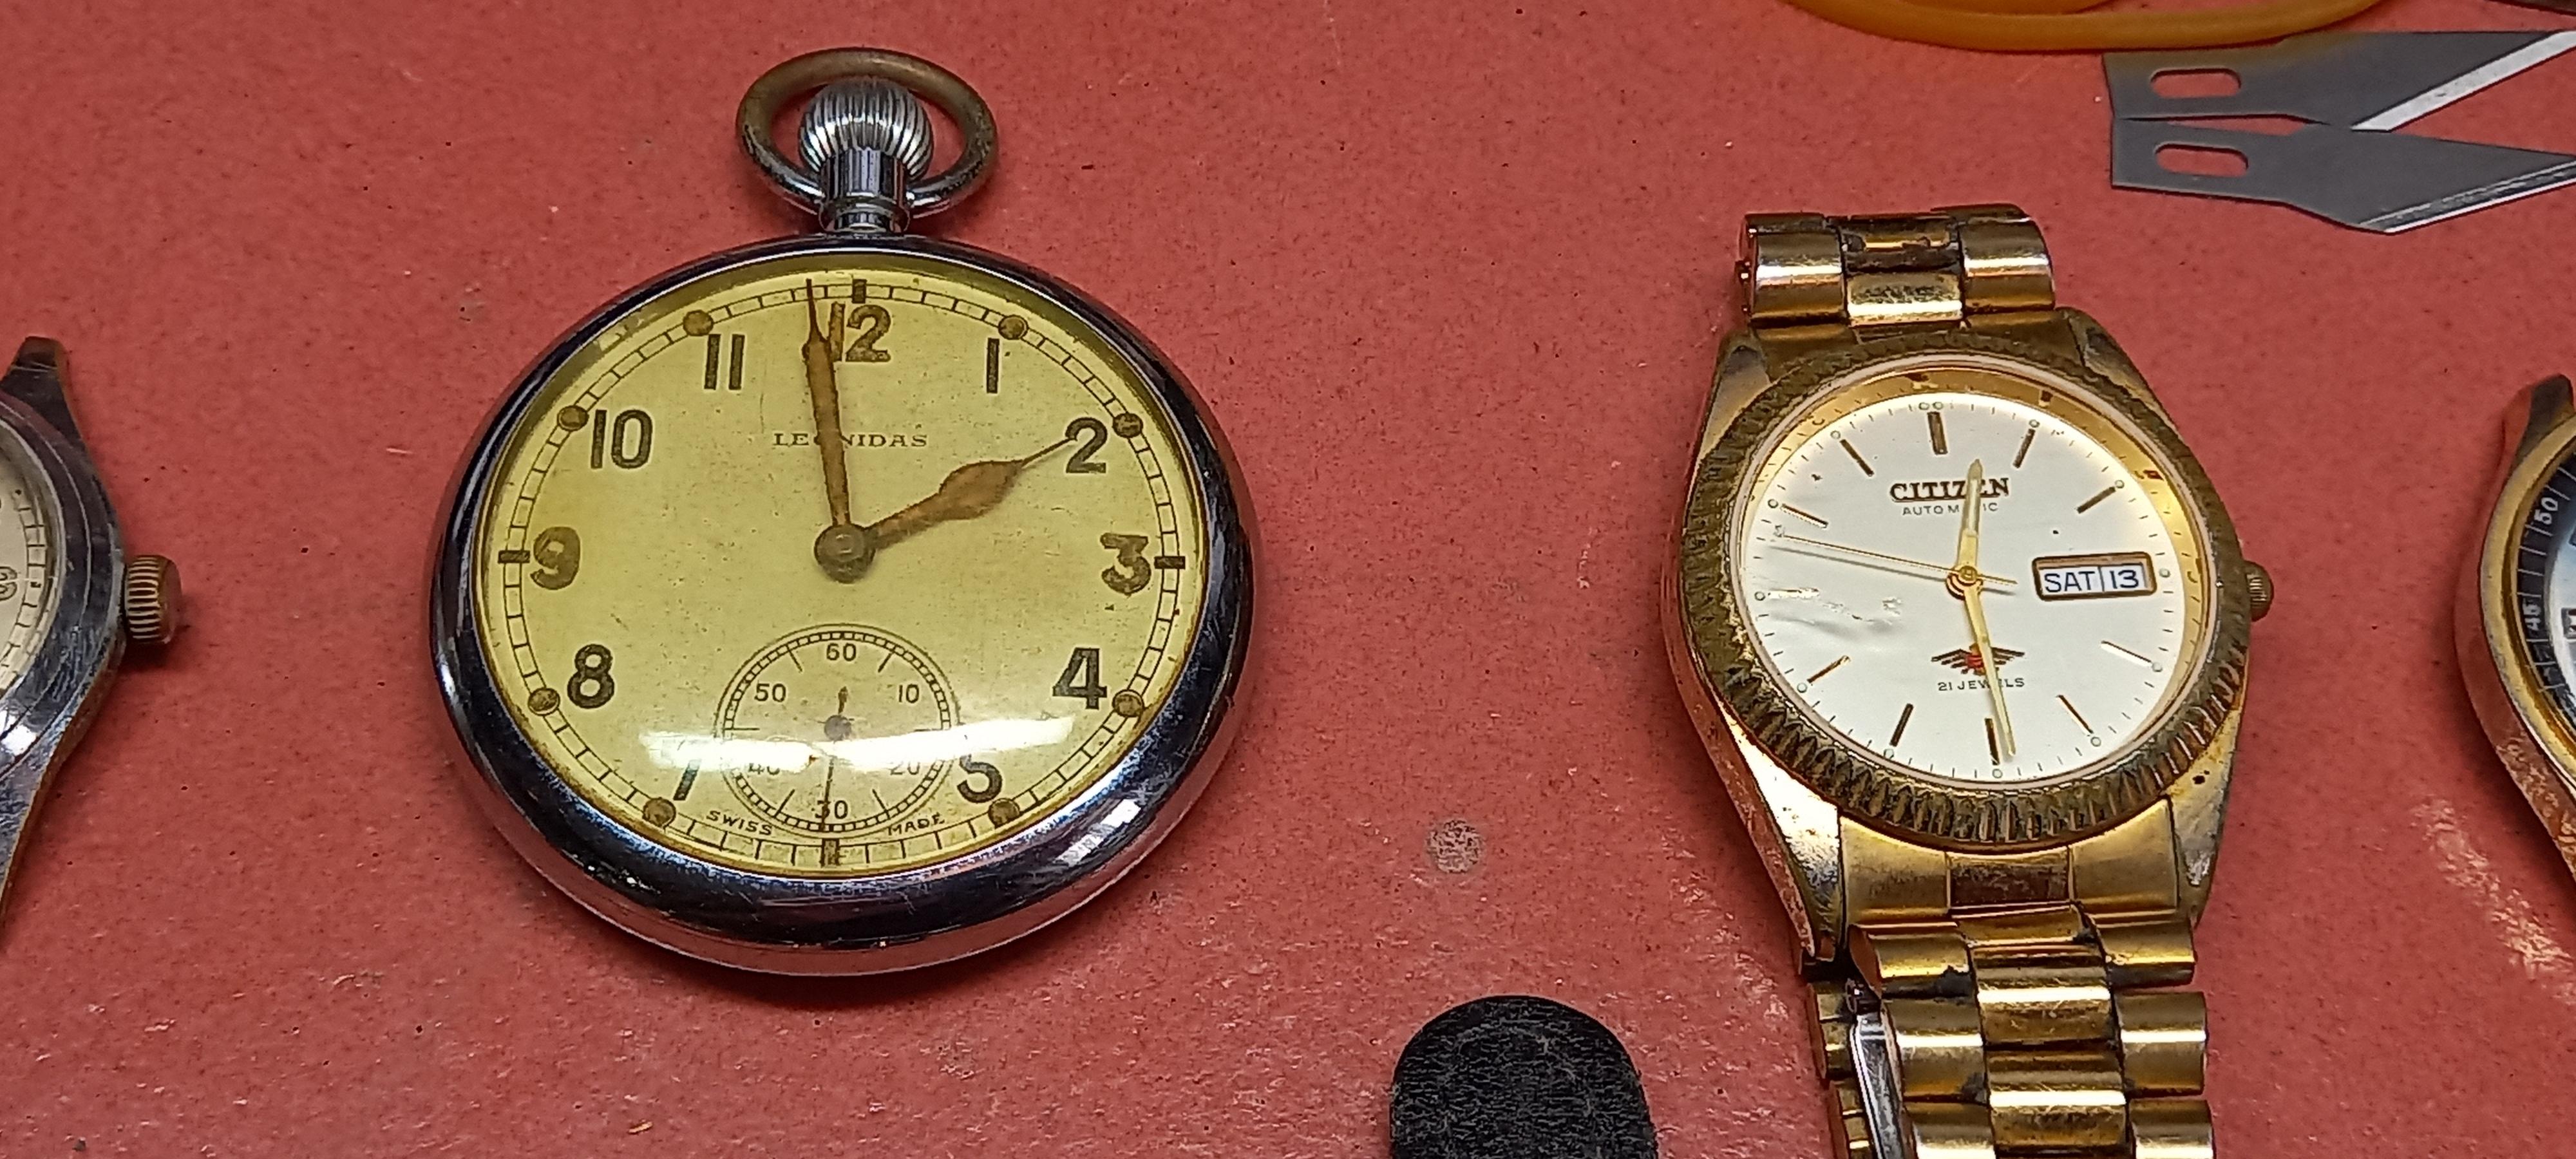
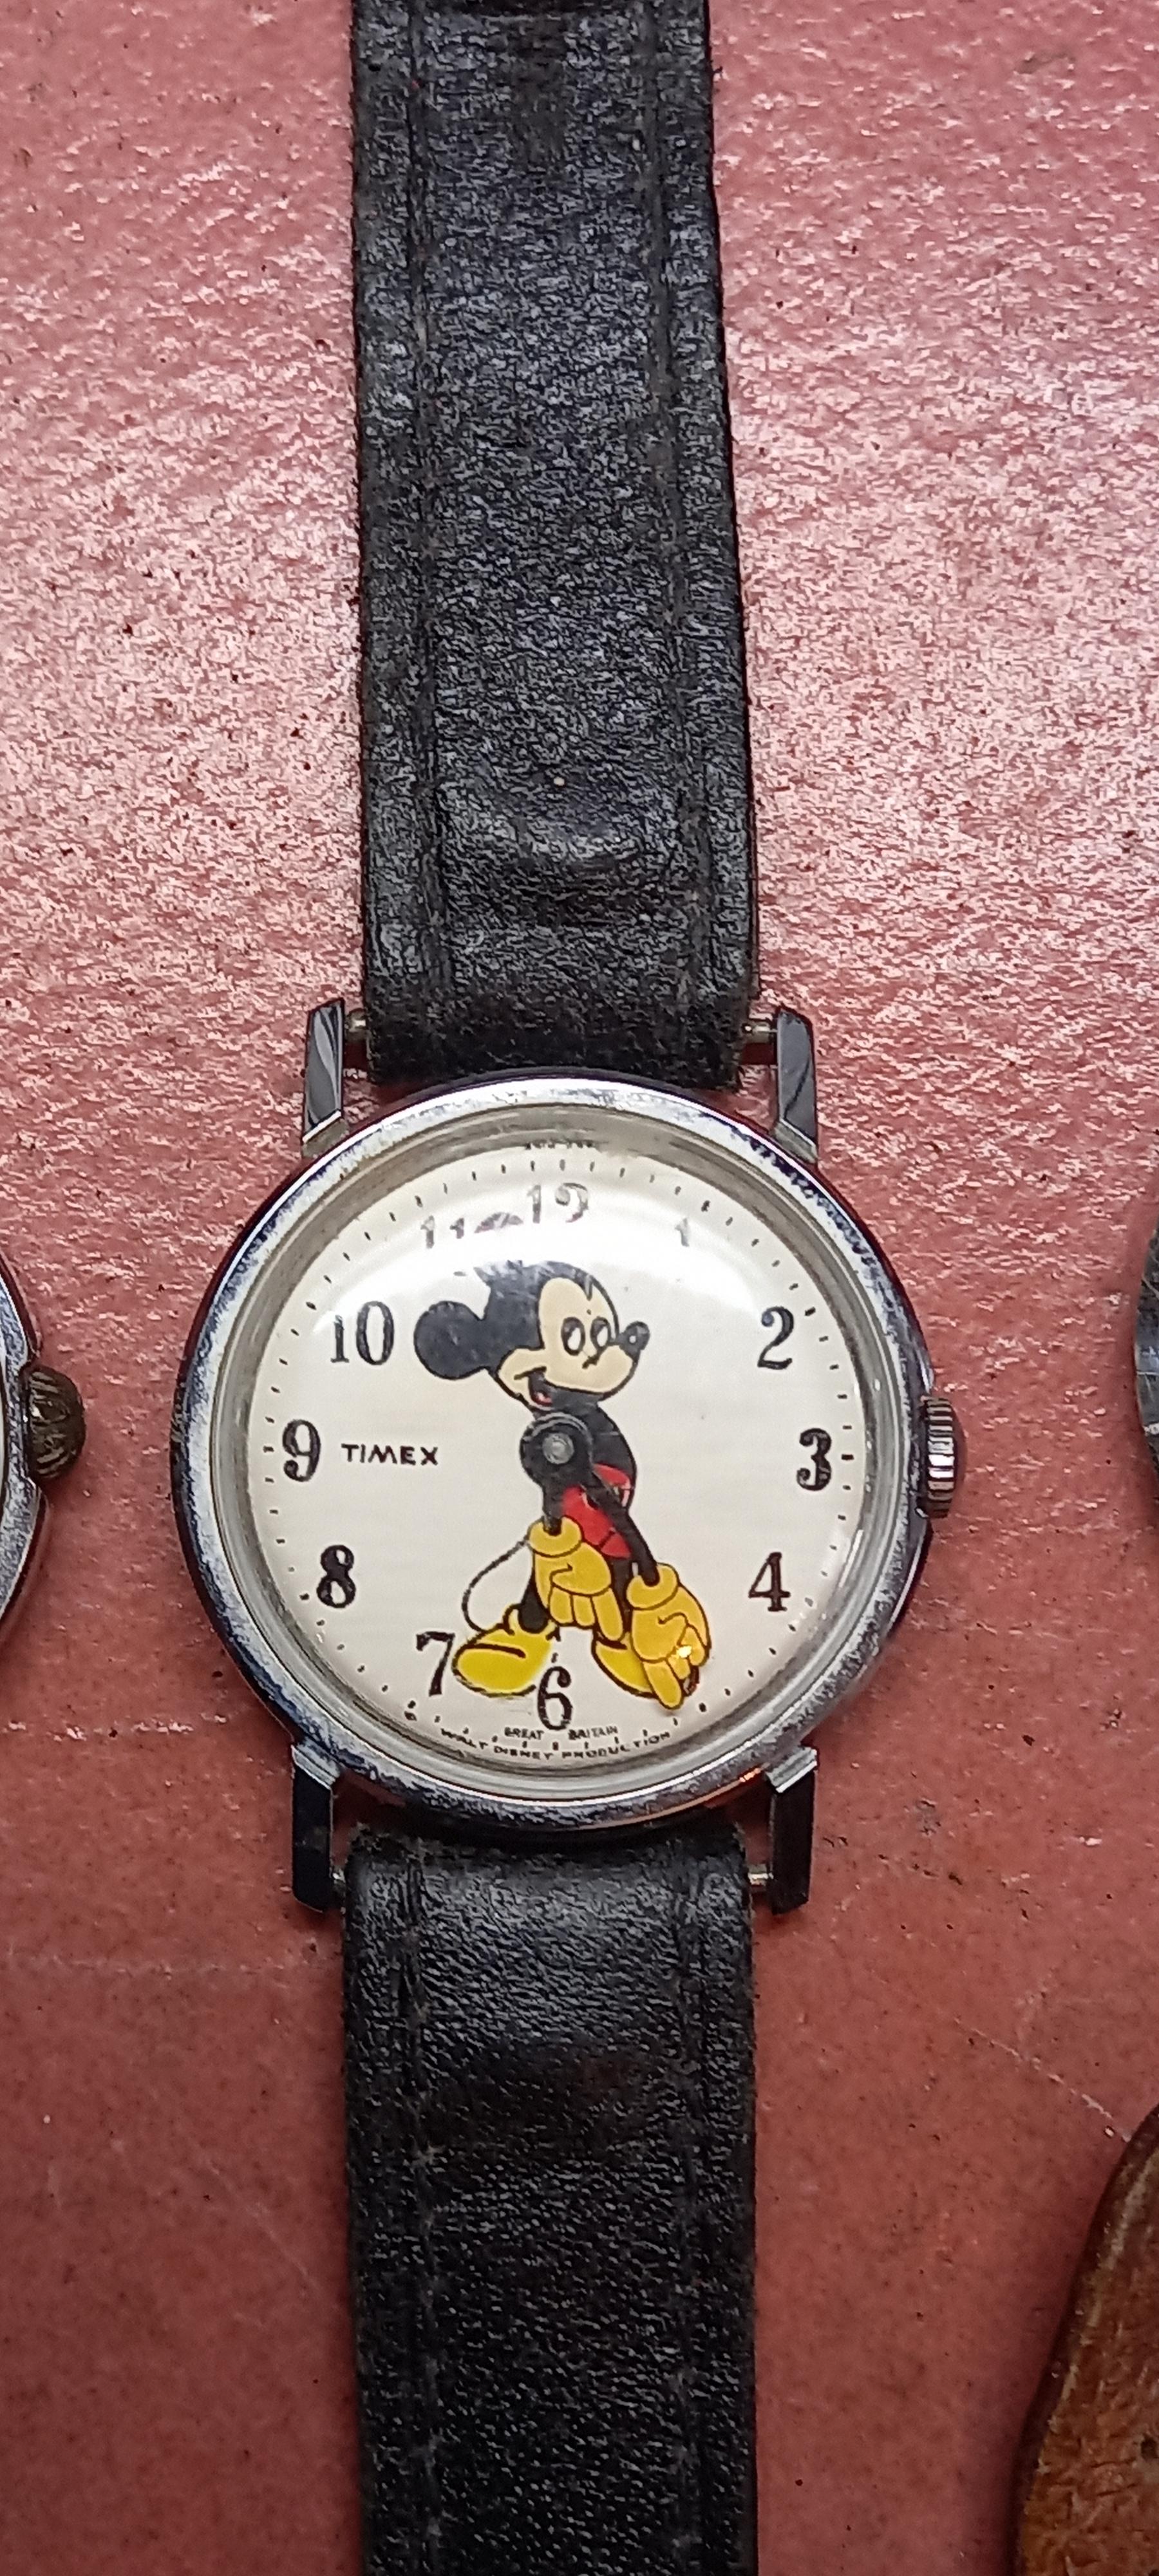
Been a few weeks since anyone posted. Heres 25 candidates for the 10:10 club. 25 watches £203.00. I have a few favourites. The Nivada on my wrist, bit small at 30mm but its a lovely little bumper automatic. The Doxa, cant wait to get to this, the Cyma is a nice size, Citizen Eagle 7, Leonidas GSTP. Mickey Mouse Timex.


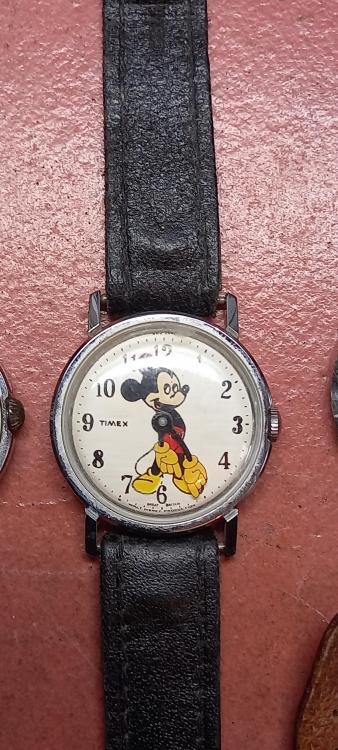
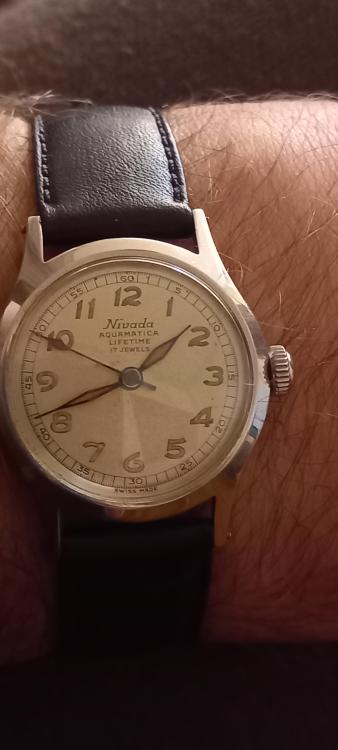 9 points
 -
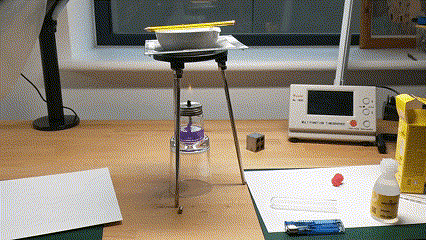
Hi guys, Some of you who have been stuck down the rabbit hole of watchmaking know that a fair part of it is finding a solution to a particular problem, especially when it come to vintage watches and all their idiosyncrasies. And, to find the solution, some unorthodox approaches and methods are employed. I find a good watchmaker will find a way to overcome. So, I'm servicing this Tissot 784.2 and find the centre wheel jewel is toast. The flat side of the jewel which the centre wheel sits on is intact, but the oil sink/dial side is crumbling and half of it is gone. It might last this way for some time, but maybe not and I'm guessing more on the latter. When I pressed it out, it fell apart. I teach my students there are two golden rules of watchmaking. Rule one: You are like the S.A.S. with servicing. You are in and out with no one knowing you were ever there. Not leaving gnarled screw heads and scratched bridges, etc. Rule two: Always think and consider the next watchmaker who is going to work on the watch. Don't leave obvious problems, or bodge something together, knowing it will create problems for the next watchmaker who works on the movement. If rule one is adhered to, rule two covers itself. The point I'm making here is, I could have left the centre wheel jewel and it might have lasted, but that's leaving the problem for the next guy and not very SAS. For some reason Seitz have discontinued the jewel size I needed (Sods law!), so I found one in a scrap movement that was the correct inside diameter. 0.8 mm to take a 0.79 centre wheel arbor. The outside diameter of the replacement jewel was 1.5 mm, so I had to ream the centre hole a little bigger from 1.19 mm to 1.49 mm. The problem was the jewel was 0.4 mm deep, so sat proud on the dial side and stopped the cannon pinion from seating properly, as you can see from this photo. I needed the jewel to be 0.27 mm deep like the cracked old one. Now, synthetic jewels are made from aluminium oxide with some colouring thrown in. Aluminium oxide is what is coated on wet and dry paper and as I don't have a diamond honing wheel, I decided to glue a piece of 400 grit onto a blank 8 mm collet and glue the jewel to a faced off wax chuck. Make sure the jewel is off-centre. Then I used my 8 mm lathe to hone the jewel from 0.4 to 0.27 mm. I can only use a GIF, so here it is... Then I lay another jewel that is 0.4 mm deep next to the one I'm honing and compare how much has been honed. I use a feeler gauge between the wax chuck and the wet and dry to gauge how deep the jewel is, so when I remove the jewel from the chuck using acetone, I know it is pretty close to what I want and found on my bench micrometre that I had honed it to 0.275 mm, so 0.005 mm bigger, which I'll force myself to live with. I was pretty impressed by the accuracy of doing this by eye with no CNC or even micrometre gauges whilst honing, just a rudimentary feeler gauge I made. Then I pressed in the jewel with a jewelling tool and set the correct end-shake for the centre wheel and ensured the cannon pinion sat correctly without touching the centre wheel jewel. There was no real need to polish the face of the jewel, as it isn't an acting surface, but could have done using the same method with different diamond micron pastes to get a mirror finish. The whole process probably took me close to an hour to figure out and work. Obviously the next time, it would be half as long. The diamond wheels would have made the job a lot quicker, as the wet and dry was wearing out making honing more difficult. I think with a diamond wheel, this could be done in a matter of minutes. A lot of the time was taken soaking the wax chuck in acetone and gently teasing the jewel away from the chuck. Because the jewel is so slim it is also very brittle and will easily break if this stage is rushed, so it's a matter of being patient and letting the acetone do its work and wipe away the melted superglue and gently prying it off with your fingers, not tweezers. You can't gauge how much pressure you are putting on the side of the jewel if you use tweezers. I could have saved myself time and effort by making a brass bush to fit, but I didn't like that idea I had robbed a jewel and broken one of my cardinal rules, which was more 'Dad's Army' rather than S.A.S.! It's a very similar way I hone down brass bushes, as parting them off on a lathe can't get total accuracy on the depth, so I finish them off like this. Now I've been successful using this method, I'm going to invest in some different grade diamond wheels for my lathe. These kind of skills and problem solving, I teach here in South London in evening first and second year courses. I hope this gives you ideas of overcoming obstacles and another reason to buy a lathe!


 9 points
 -
It’s not perfect but it works, plus learned loads from turning it. So I’m a bit chuffed
 9 points
 -
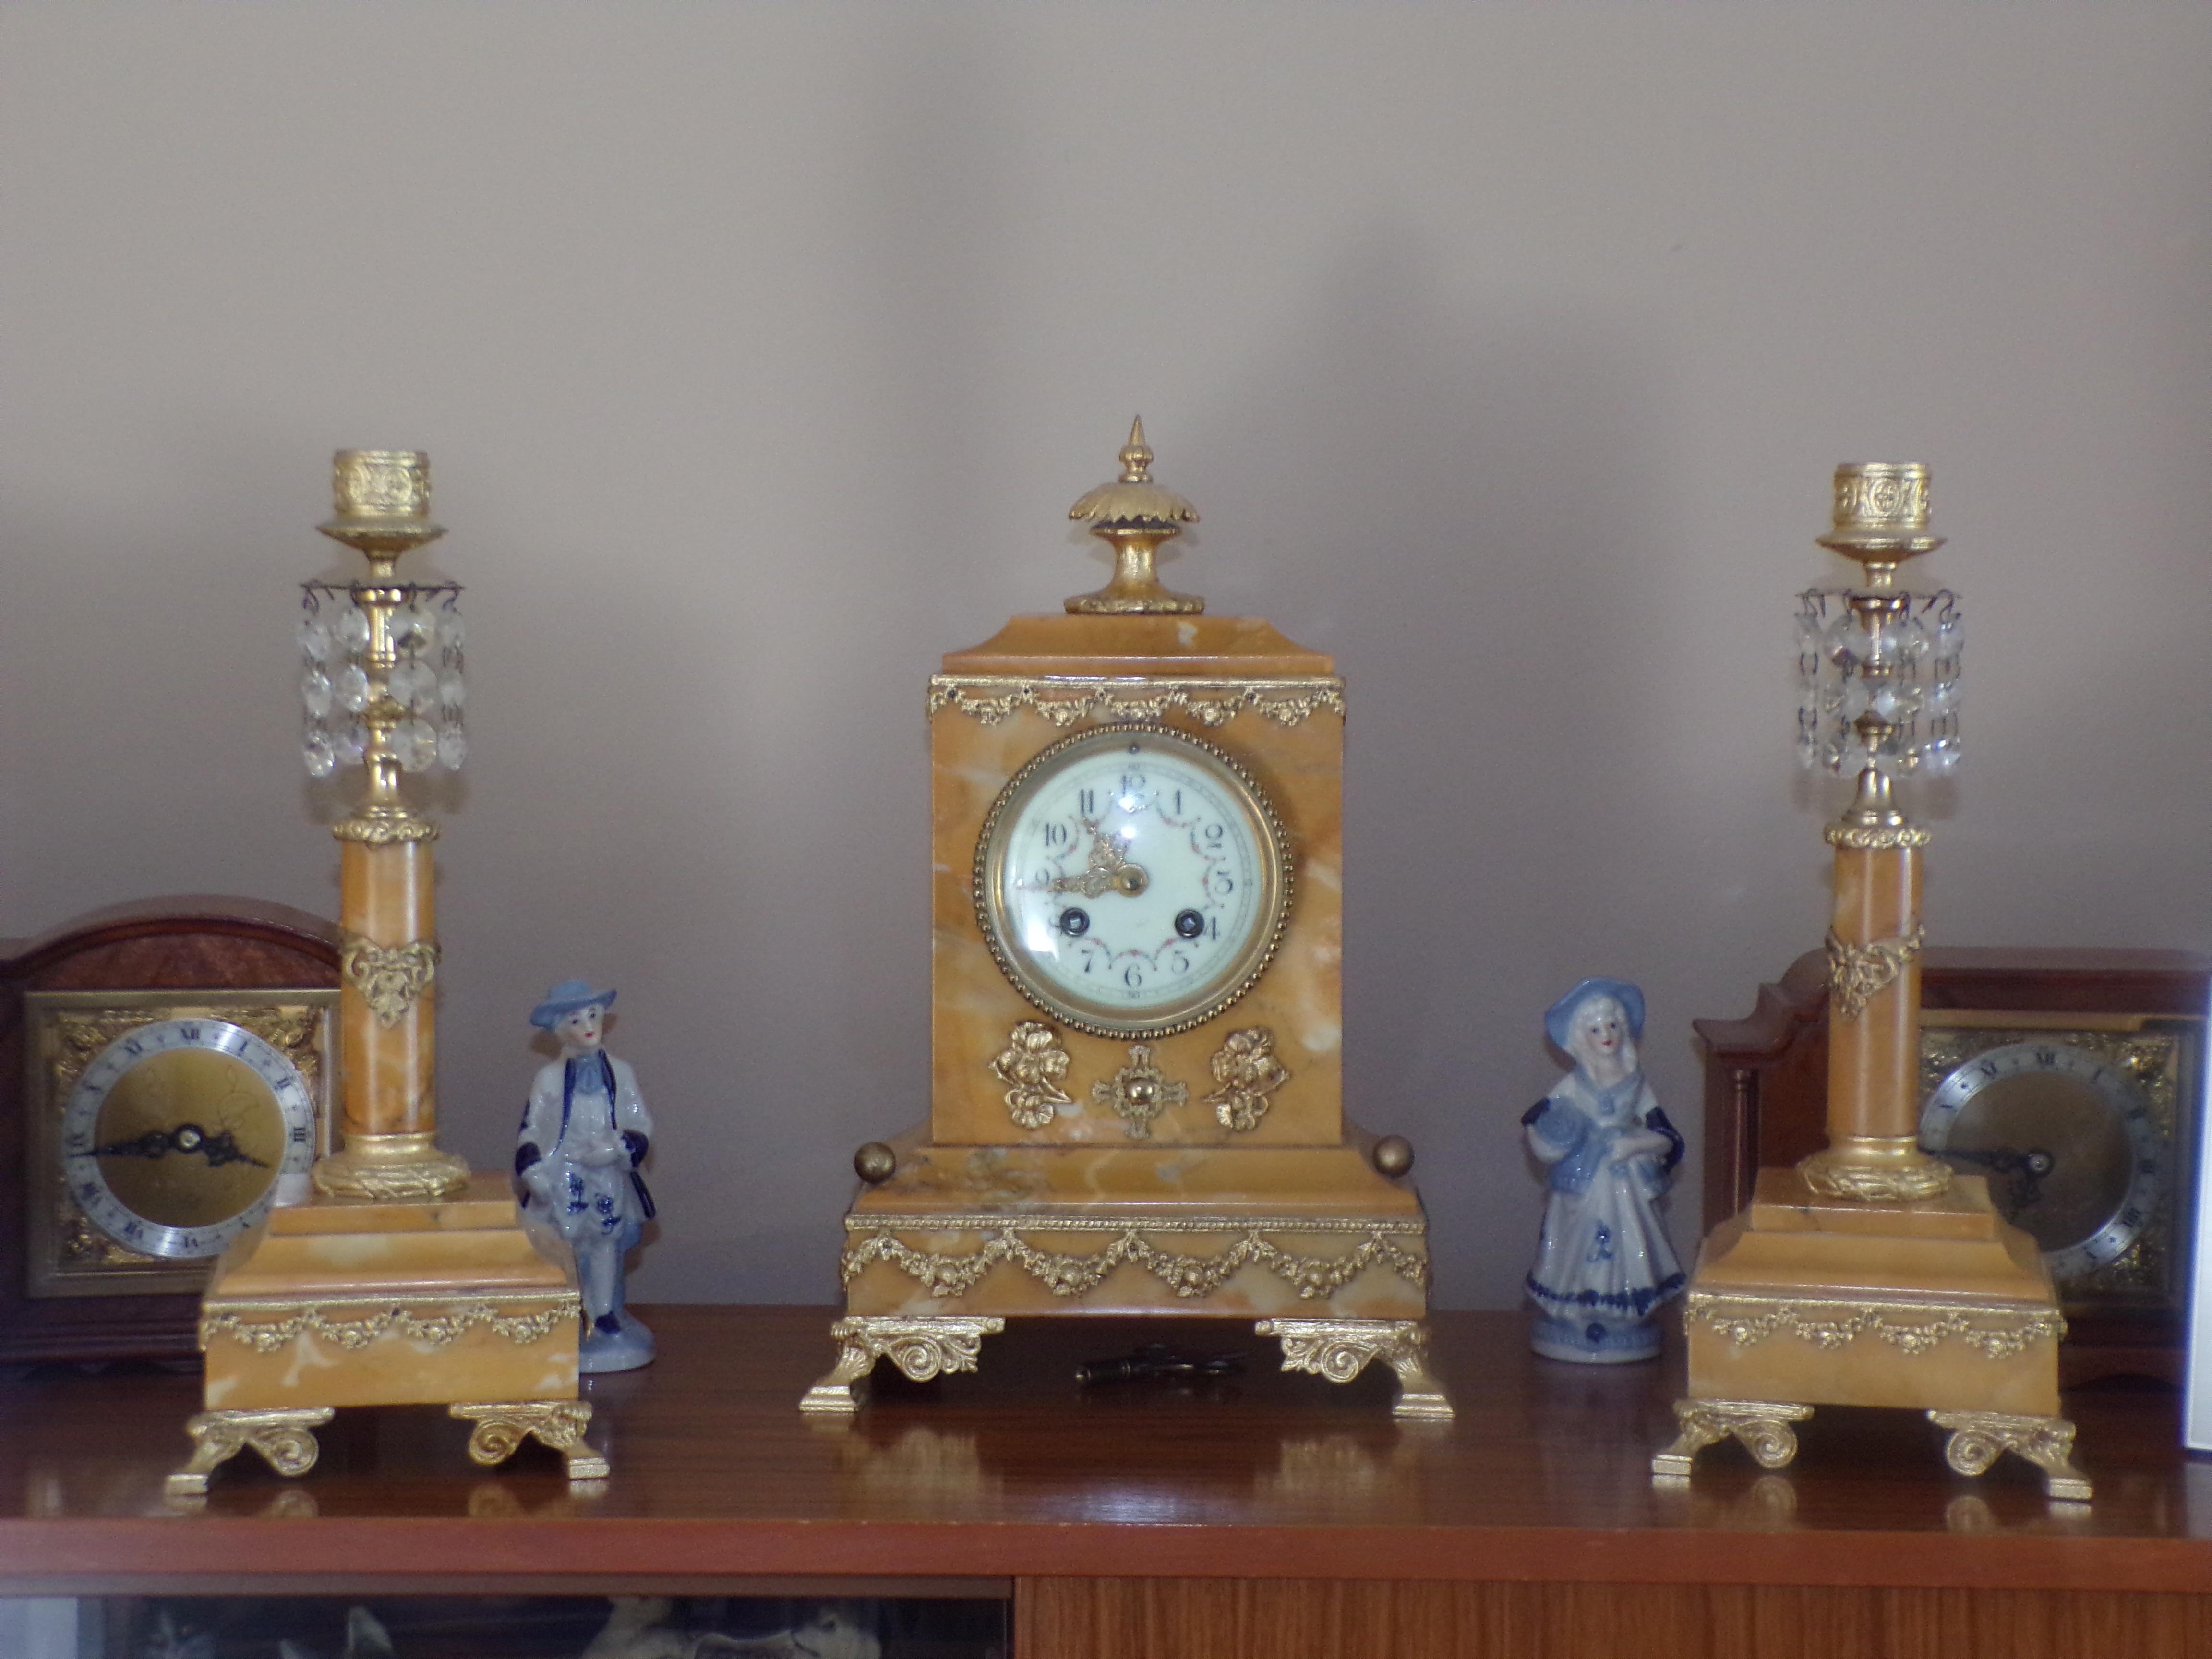
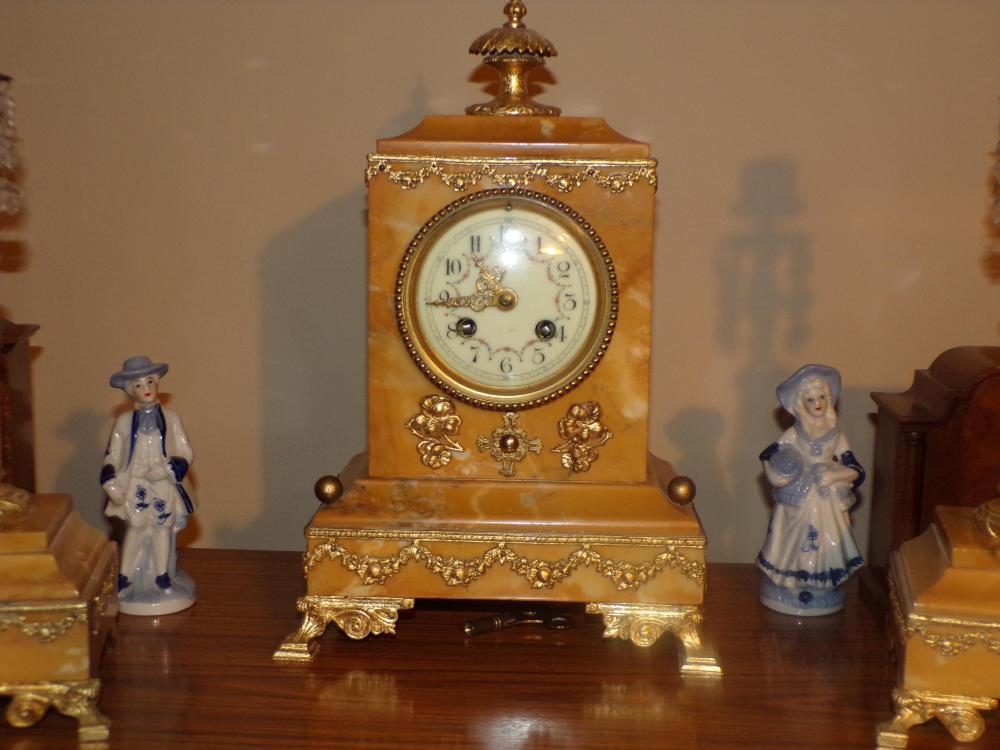
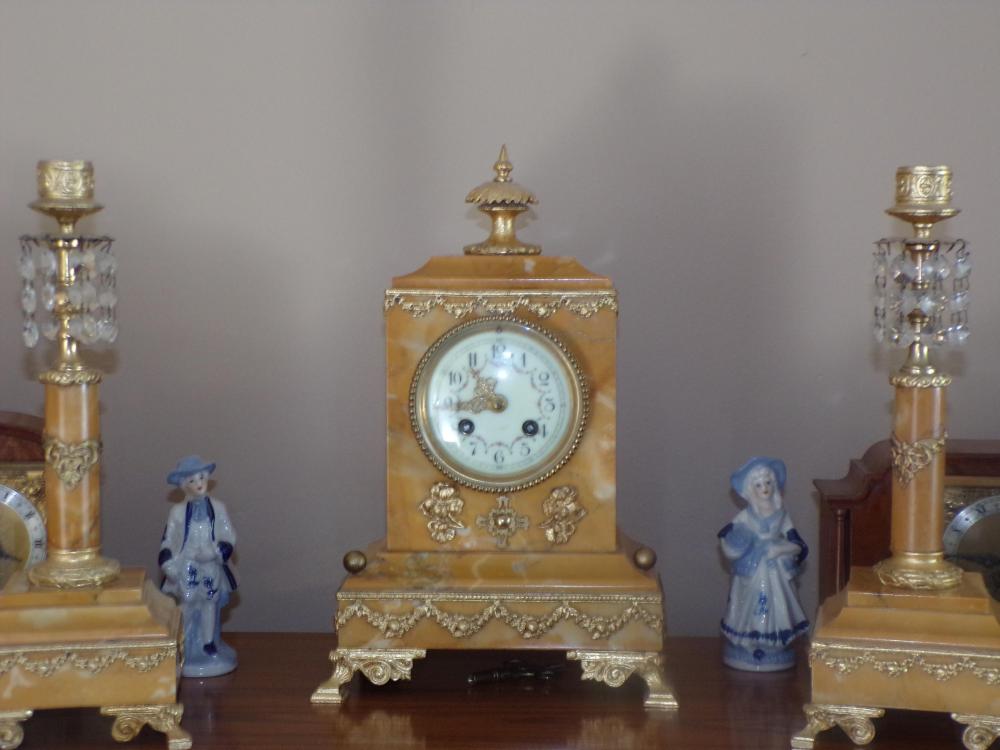
This is the clock I was talking about.

 9 points
 -
Firstly i think you need calm down, and secondly you need to understand that Andy is trying to help you. A picture tells a thousand words, supplying us with a photo explains more than you can tell and is standard practice. I can't ever remember anyone arguing over it.8 points
-
OK guys, This is a bold statement, but I think you all need to throw away your Polywatch! I've just scratched up an acrylic crystal with a blade, then gave it a good going over with 1200 grit wet and dry and finished it off with the Autosol acrylic polish by hand with a microfibre cloth. @RichardHarris123and @Neverenoughwatcheswere spot on suggesting using this stuff. The results are damn good as you can see from the before and after photos. Just in case some might think I put it on a watch cushion to make it look better


 8 points
 -
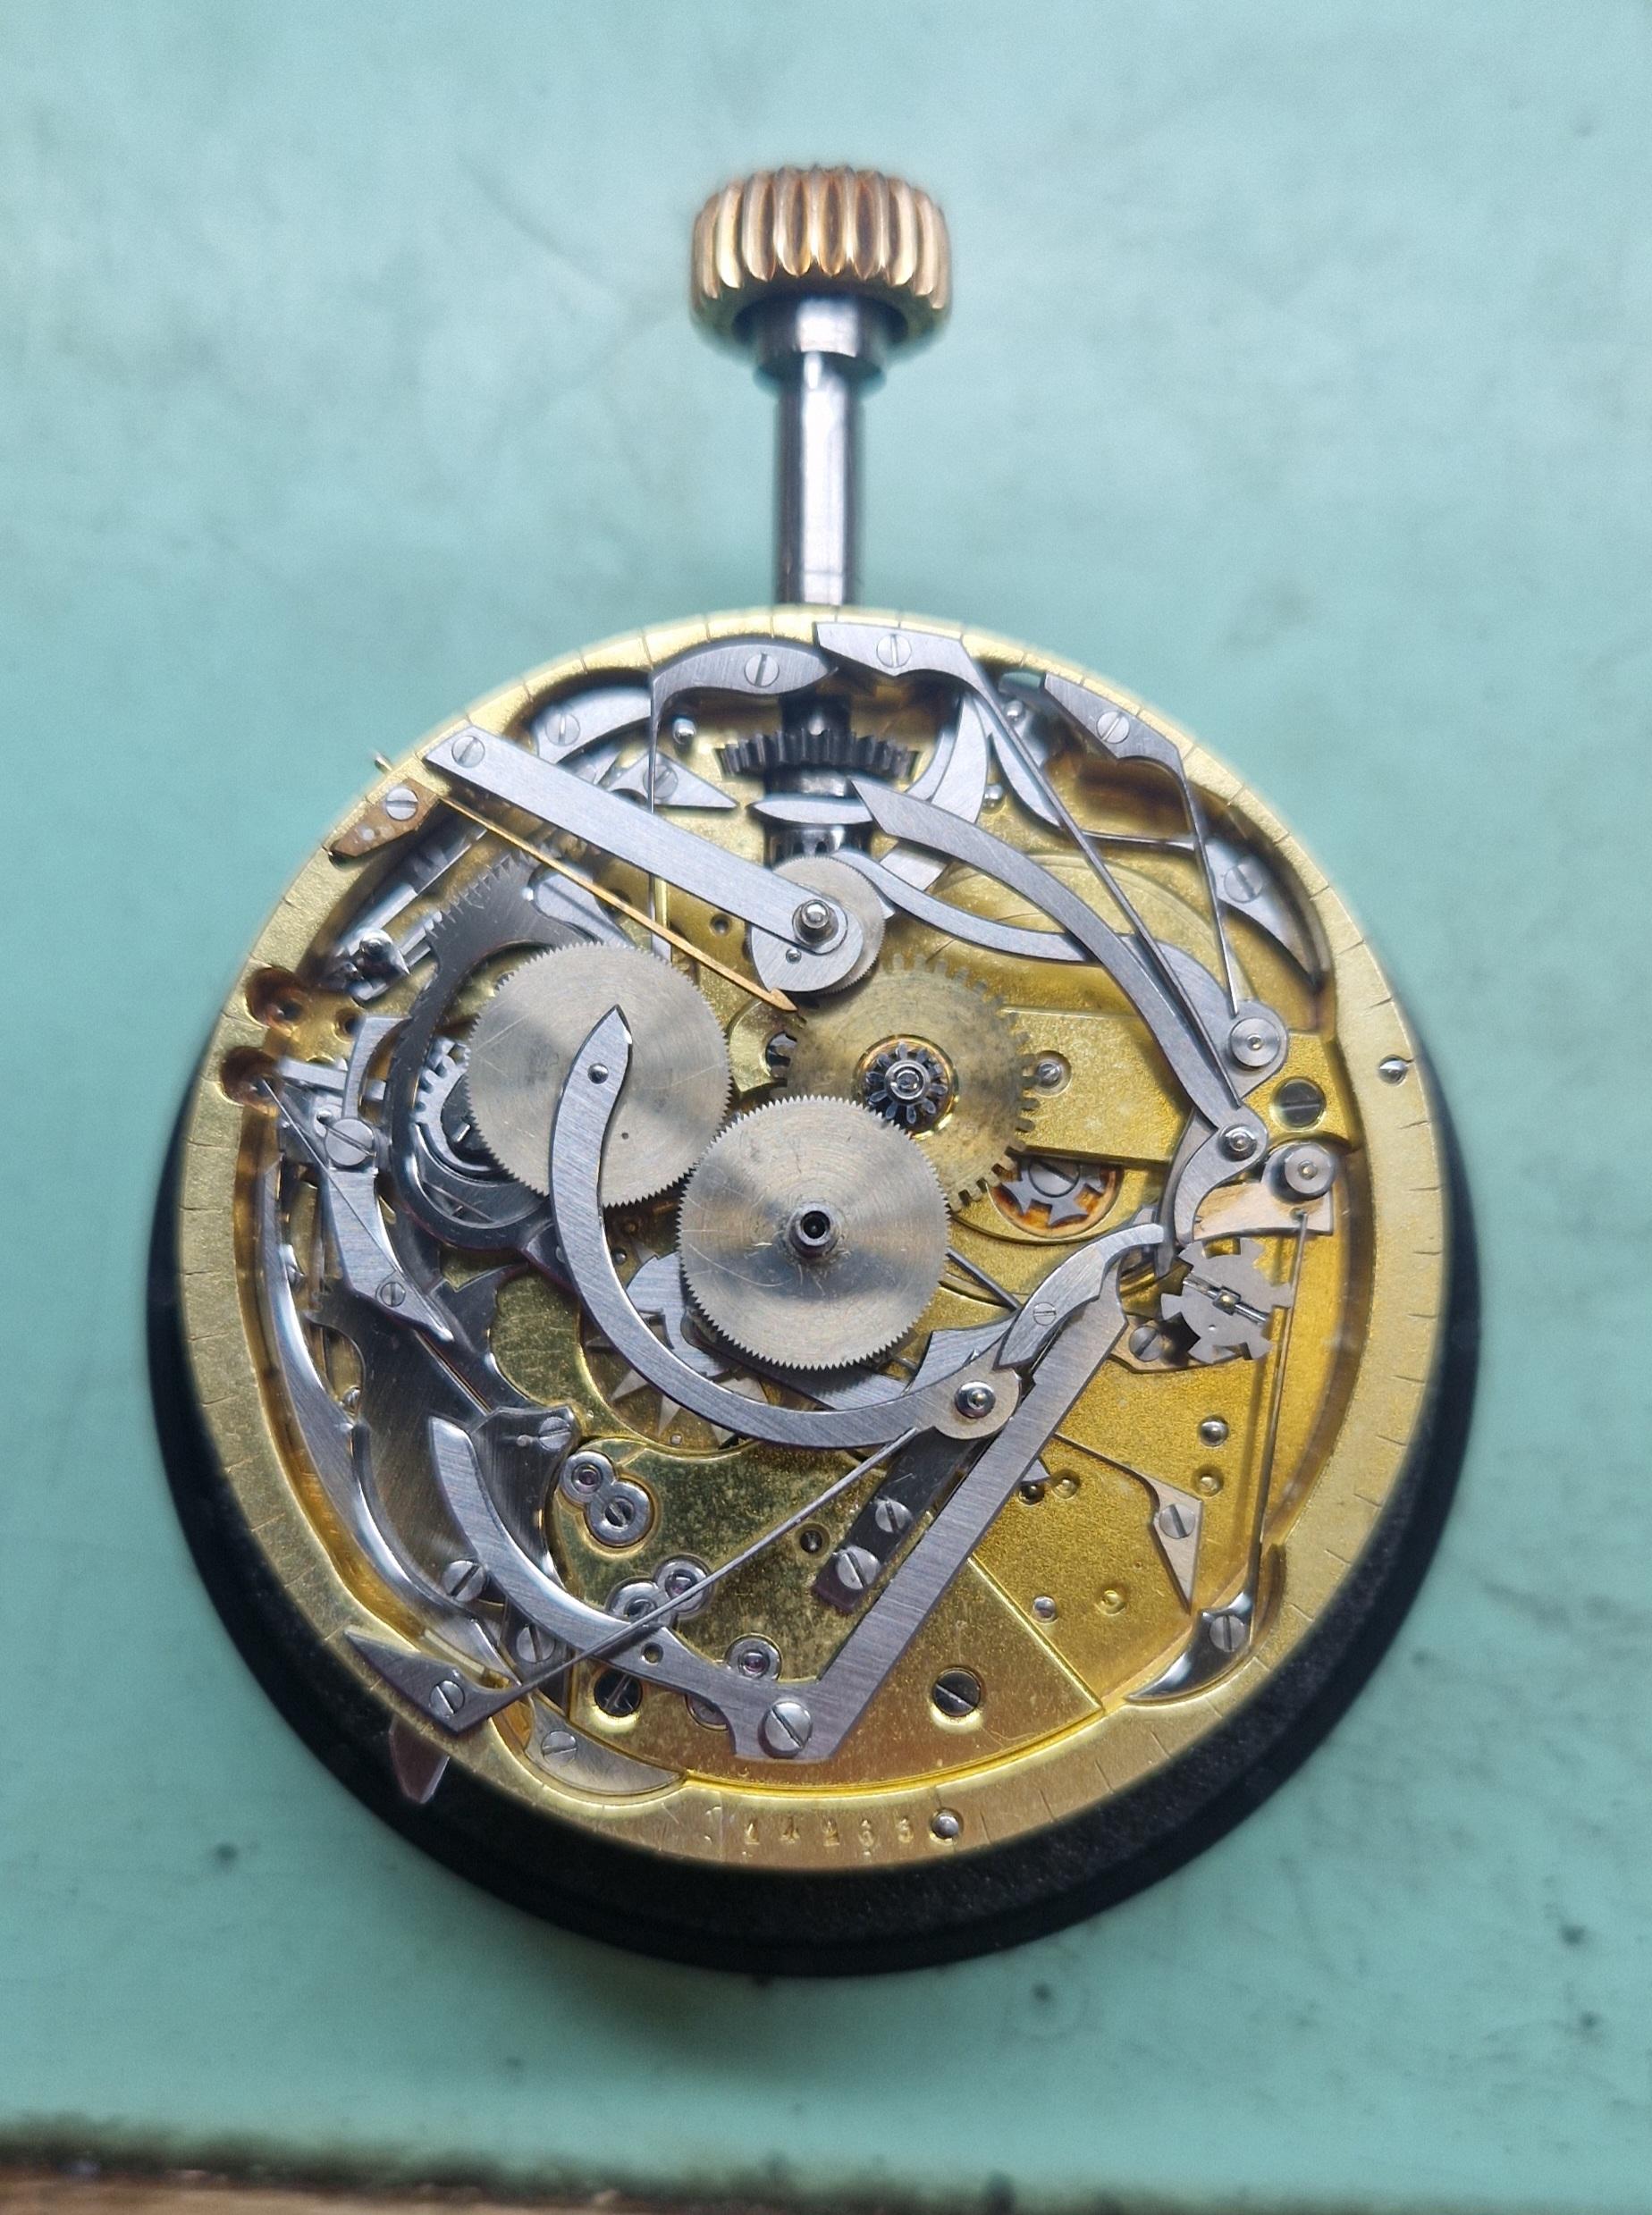
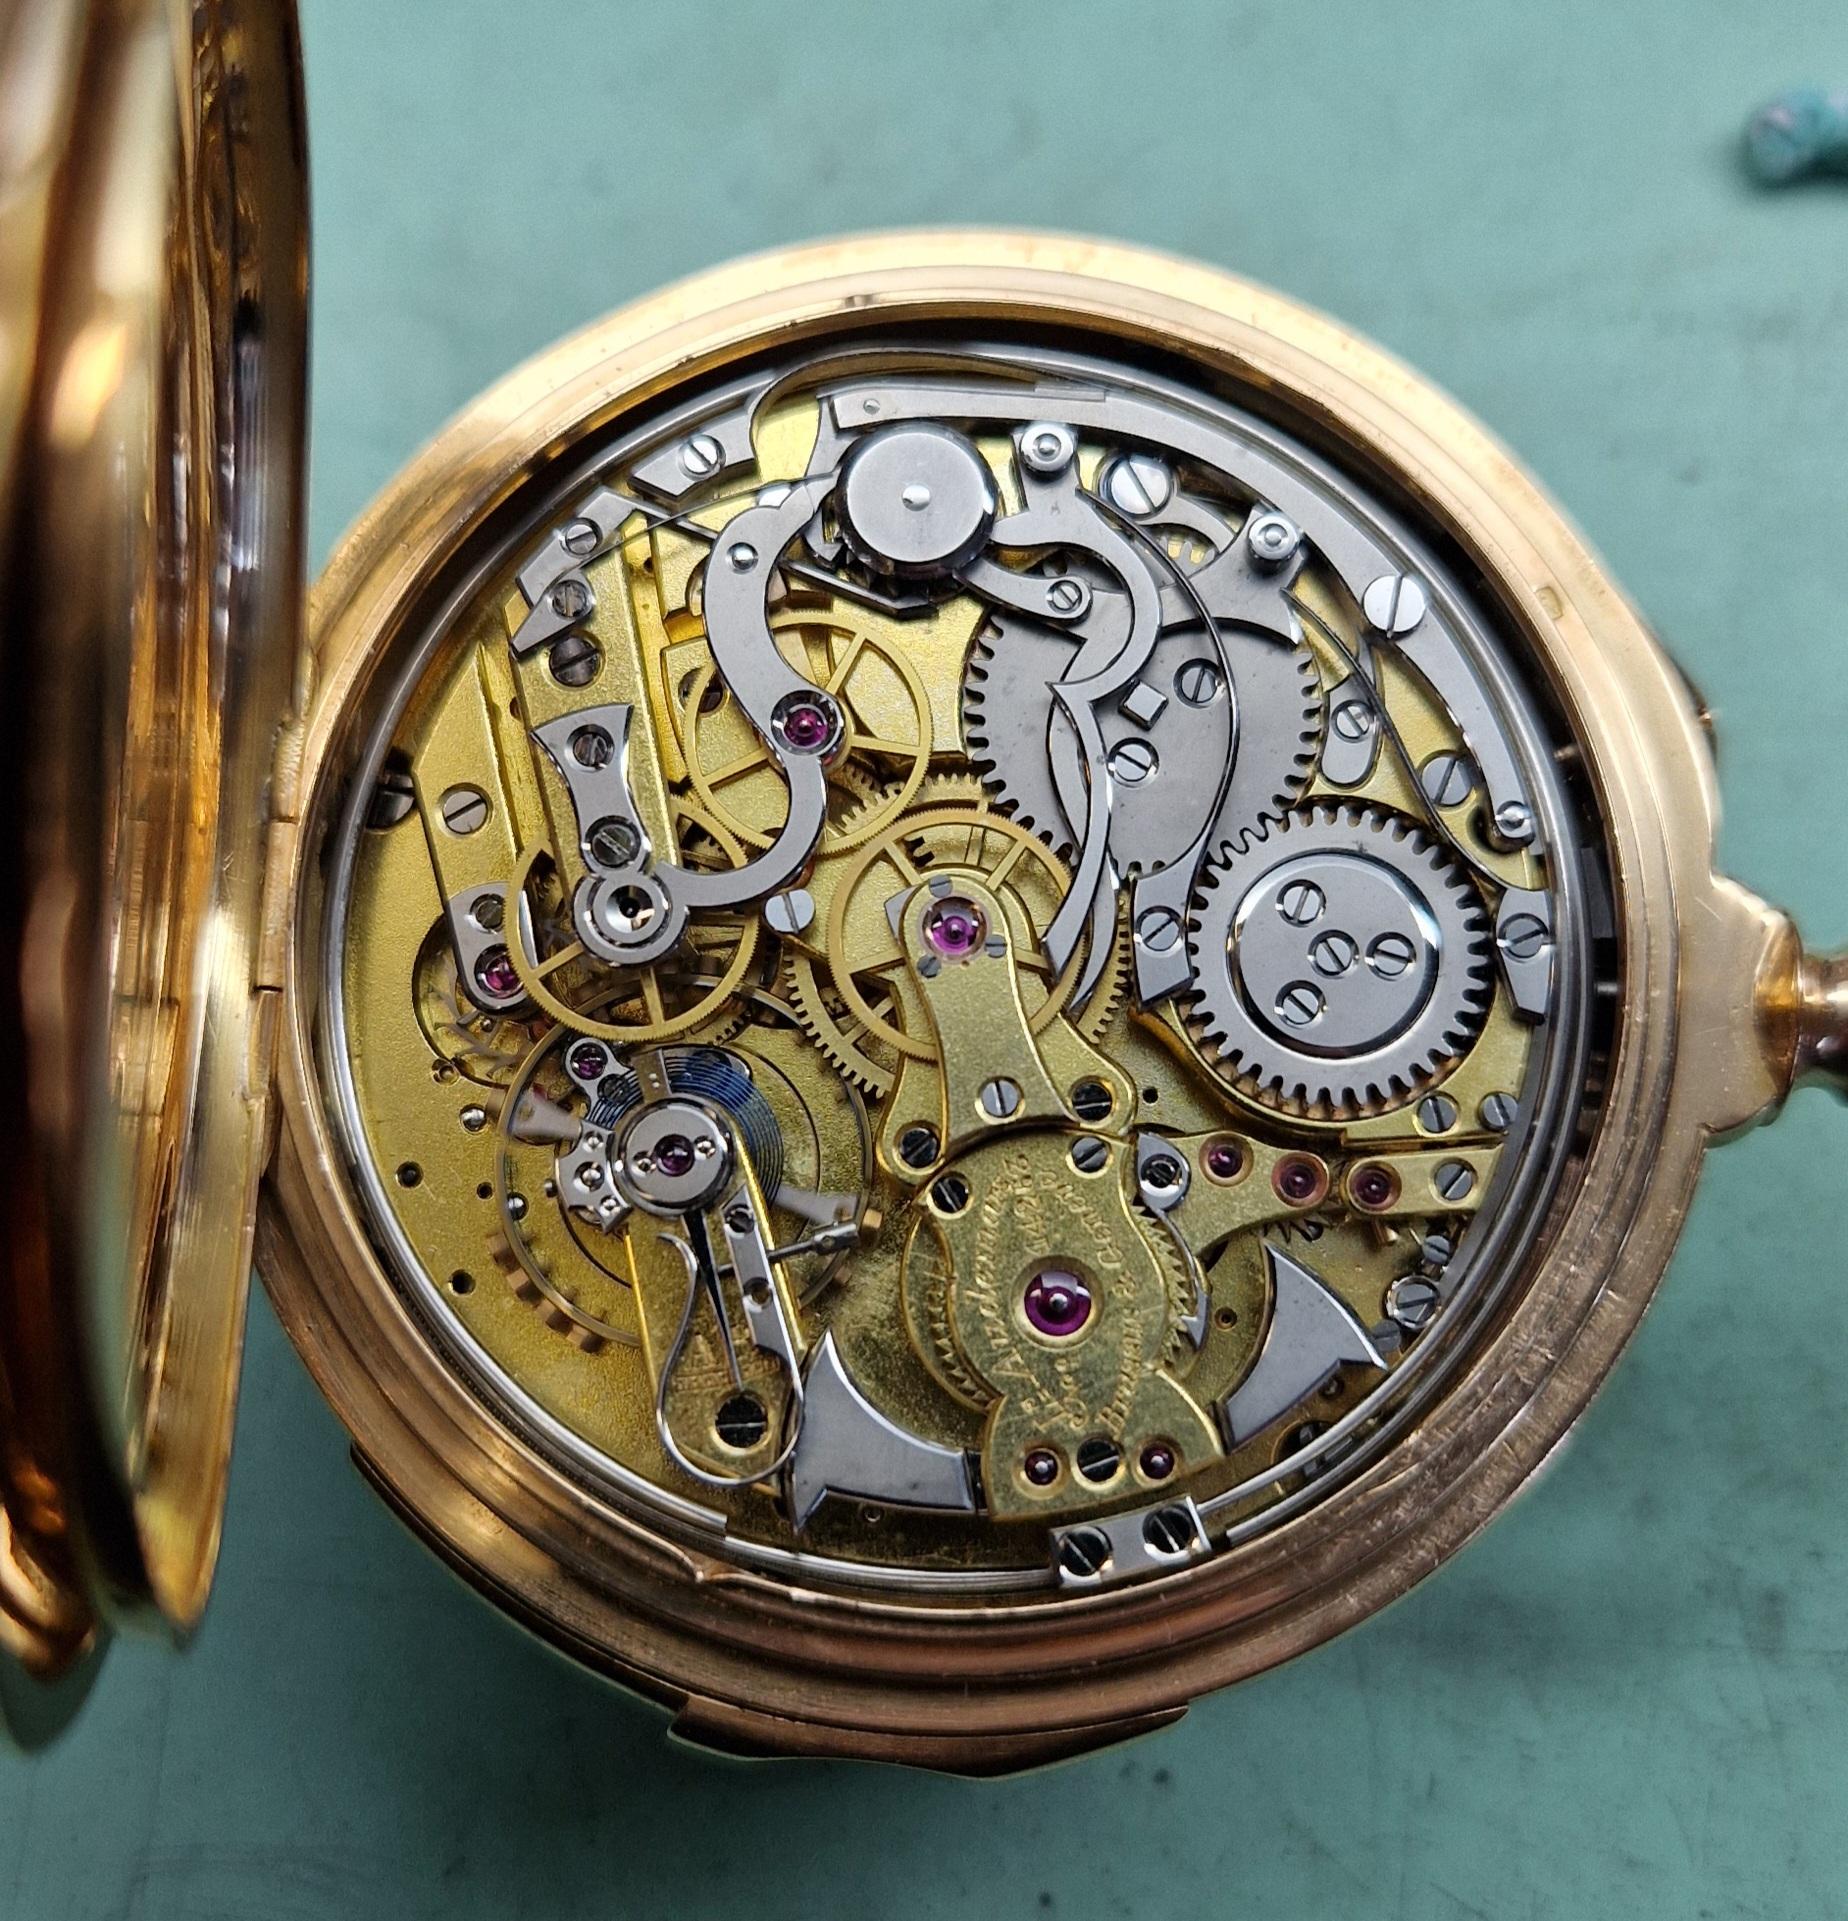
One I just finished today, L. Audemars pocket minute repeater with chronograph. The case is in great shape, so I'm laying the destruction at the hands of the last watchmaker. I think they clamped it tightly in a movement holder and squeezed the hammers, but still kind of a mystery. Maybe the bare movement hit the floor? The damage: New arbors both hammers (both pivots gone on both- the plate pivots are like 0.60mm) New lift pin one hammer New bridge jewels both hammers New weight repeater escapement fork New banking pin for repeater escapement eccentric Repivot 4th wheel (3.70mm long) New staff I managed to get jewels in the original rub-in settings, so overall I doubt anyone down the line (except you guys) will ever know. Beautifully made watch.

 8 points
 -
Just had in a very nice thin Patek pocketwatch. Came in for a staff; found out it had a random staff installed along with a random roller table- it didn't even engage with the fork. And best of all, a tooth was broken off the escape wheel. It was extremely lucky that I had an escape wheel in my stock that was the correct diameter, also found a roller table that was able to be modifed and work very well with the fork, and made a new staff. Darn thing runs great now- around 270 flat, 30 degree drop in verts. At least the former watchmaker did no permanent modifications.8 points
-
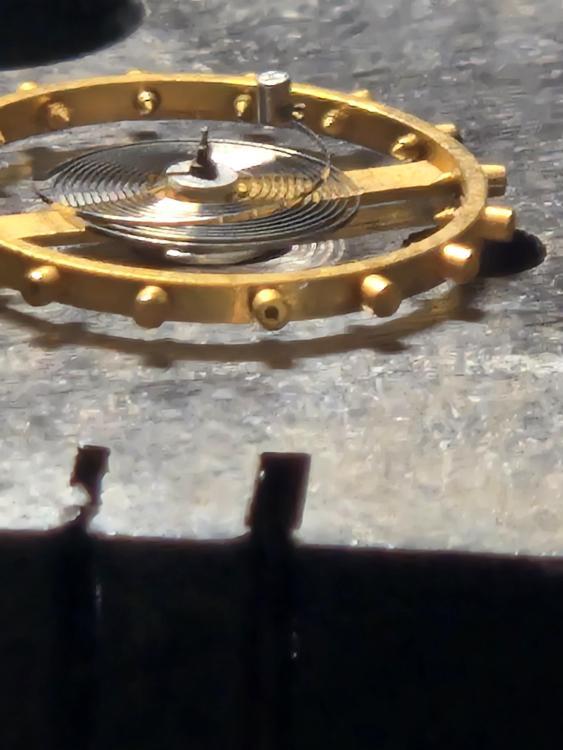
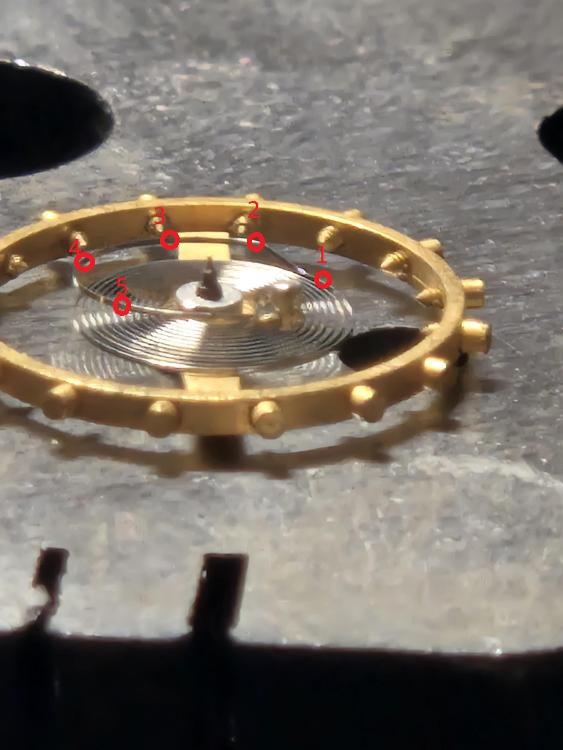
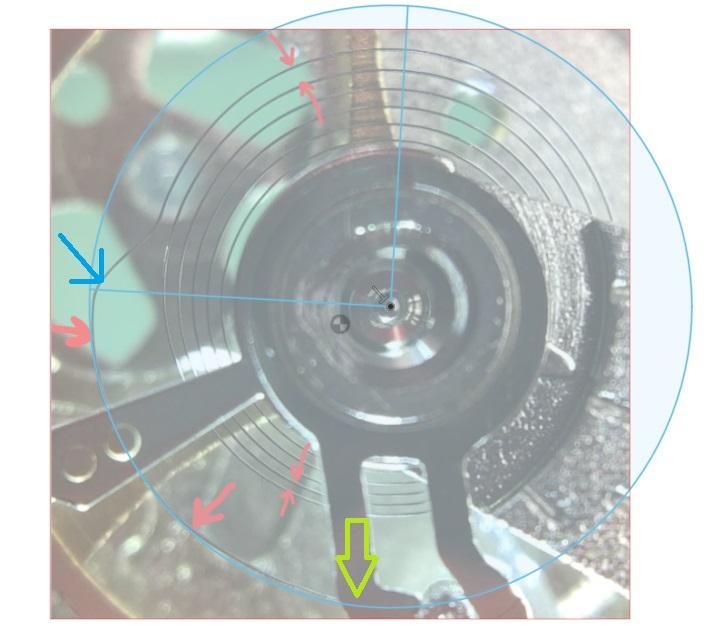
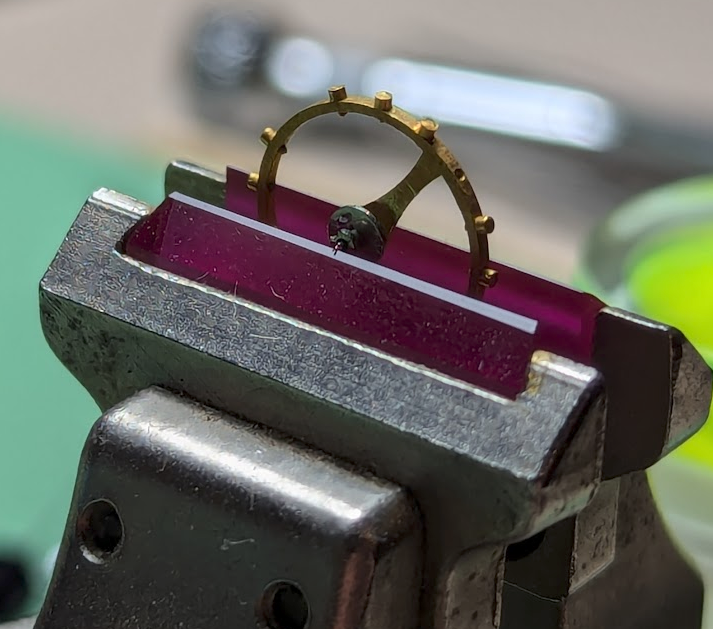
MIke's on the right track. For errors in the round, you make the correction at 90 degrees to the maximum error. You can see the regulator curve is pretty "on", but I would still push a little at the stud where the green arrow is. This will bring the hairspring a bit closer to center, but will also worsen the fact that the regulator curve is already favoring the inside of its perfect radius on the other side of the regulator pins. You could reform it, but you would reintroduce the out of round condition. For me the quickest and best fix would be to twist at the blue arrow, which happens to be at one of the bends that transition from regulator curve to hairspring body, and happens to be at 90 degrees to the max error.
 8 points
 -
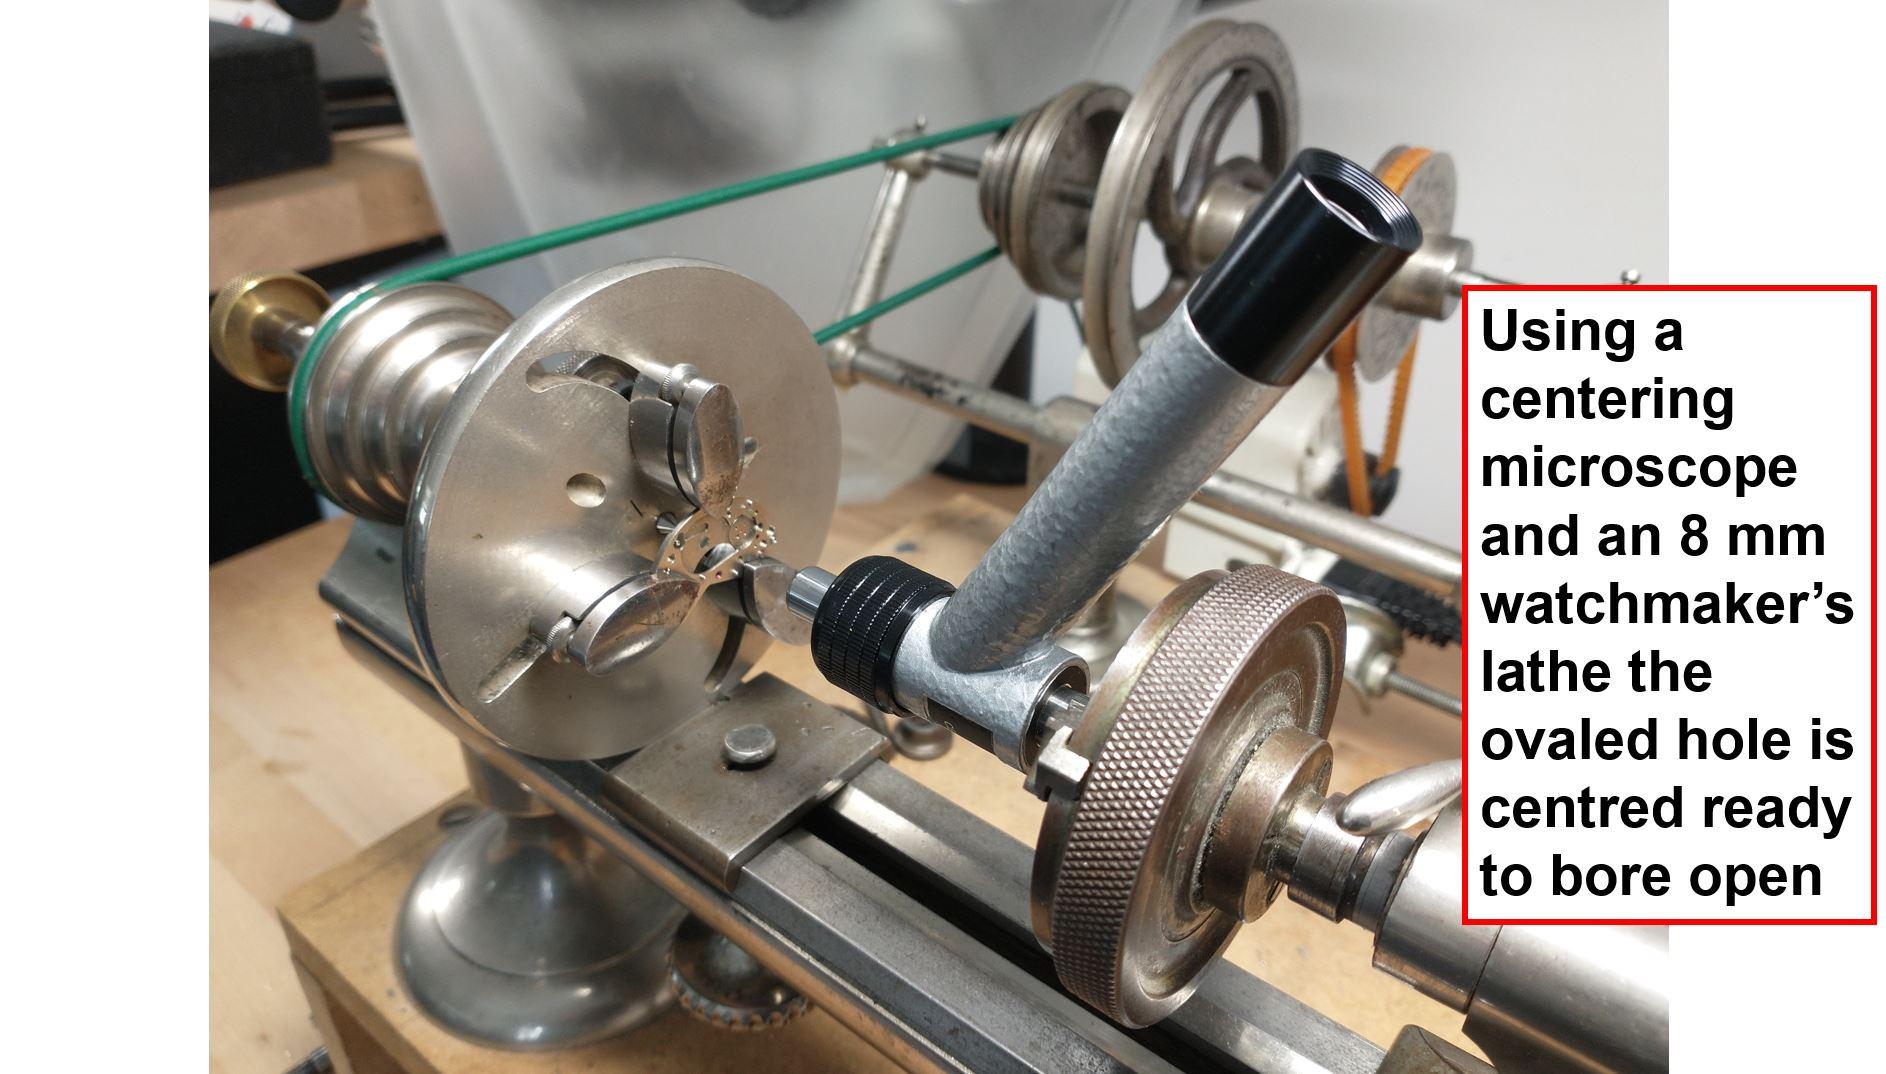
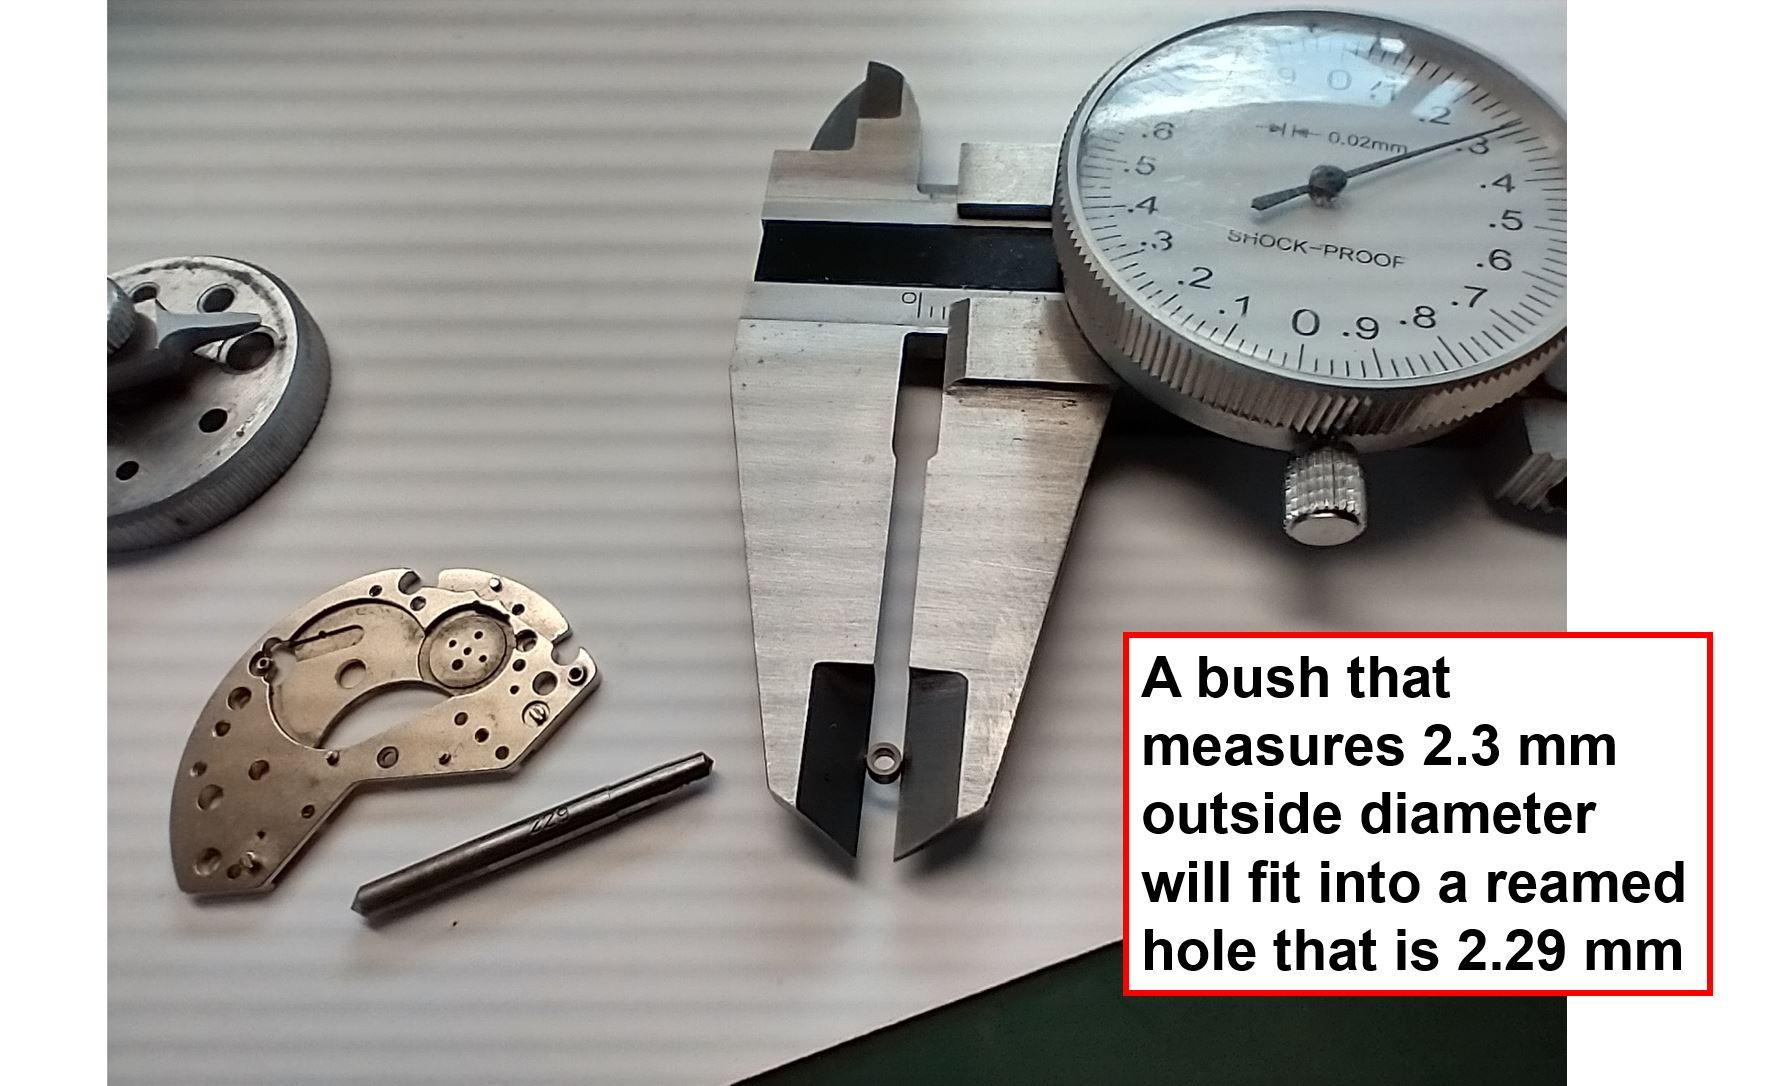
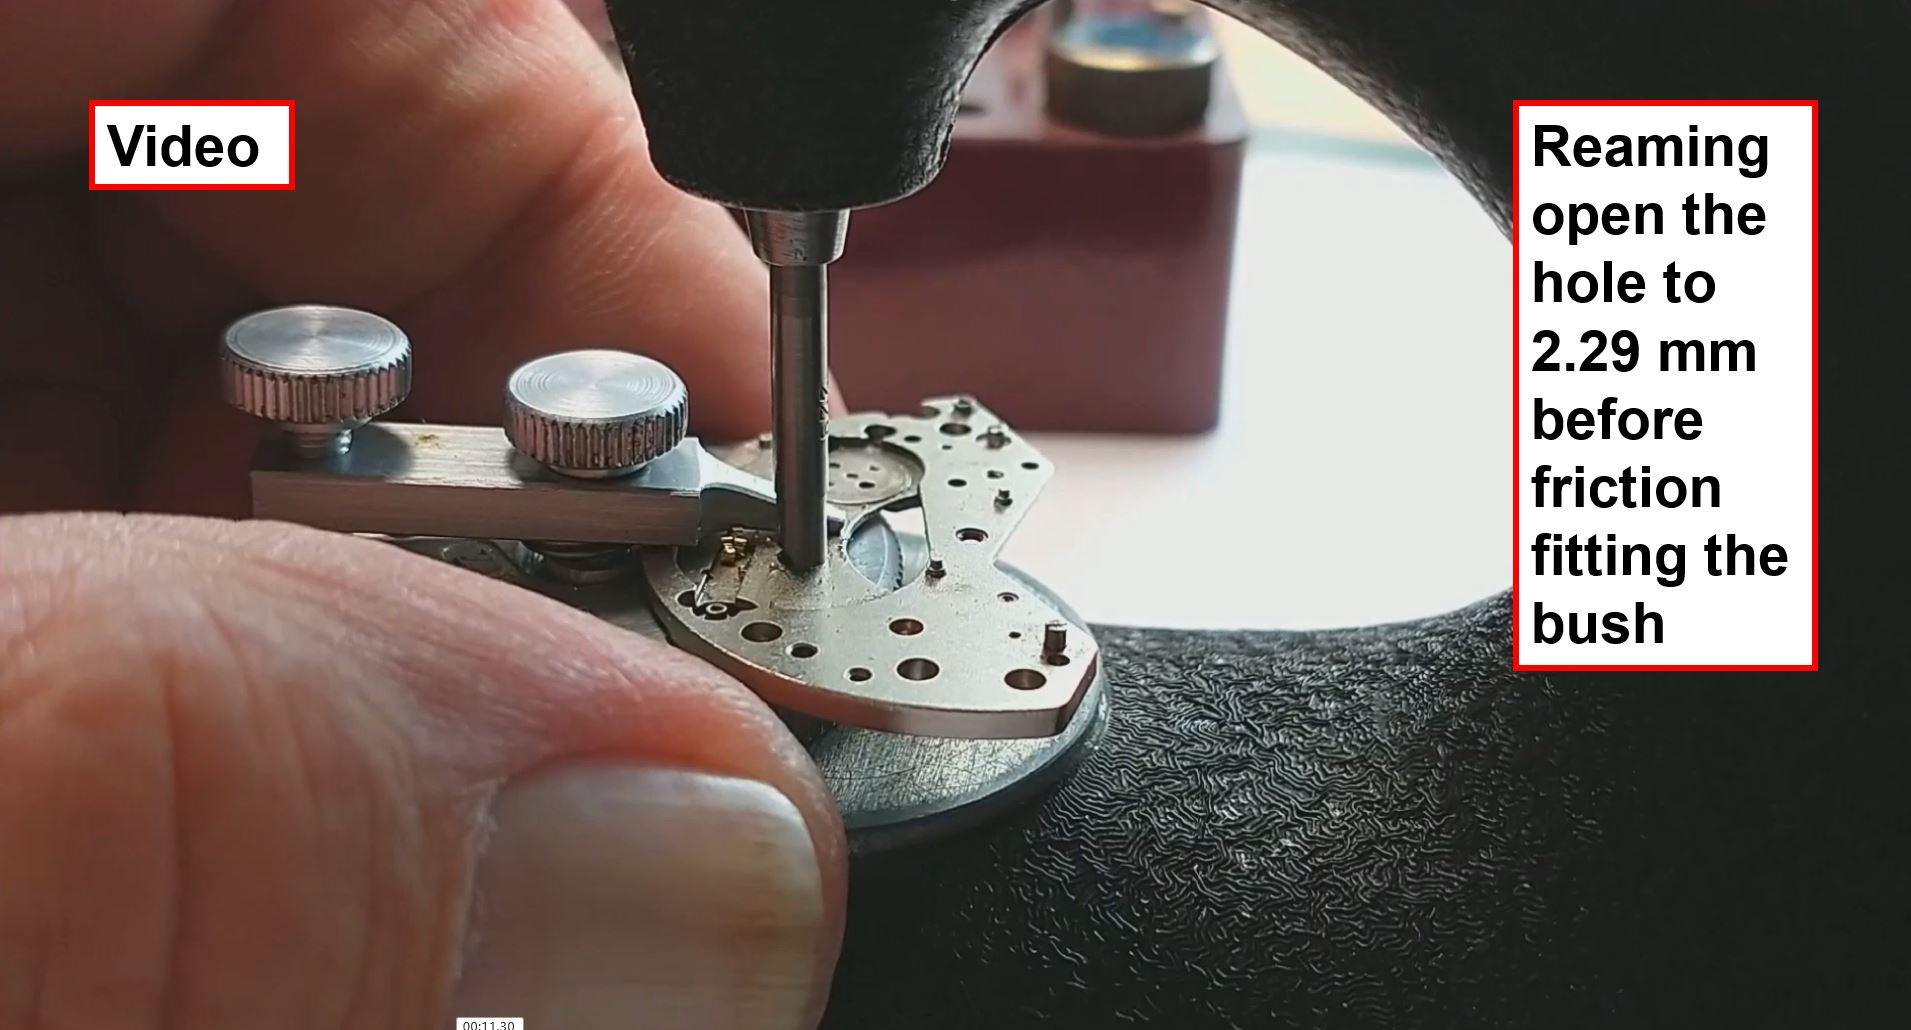
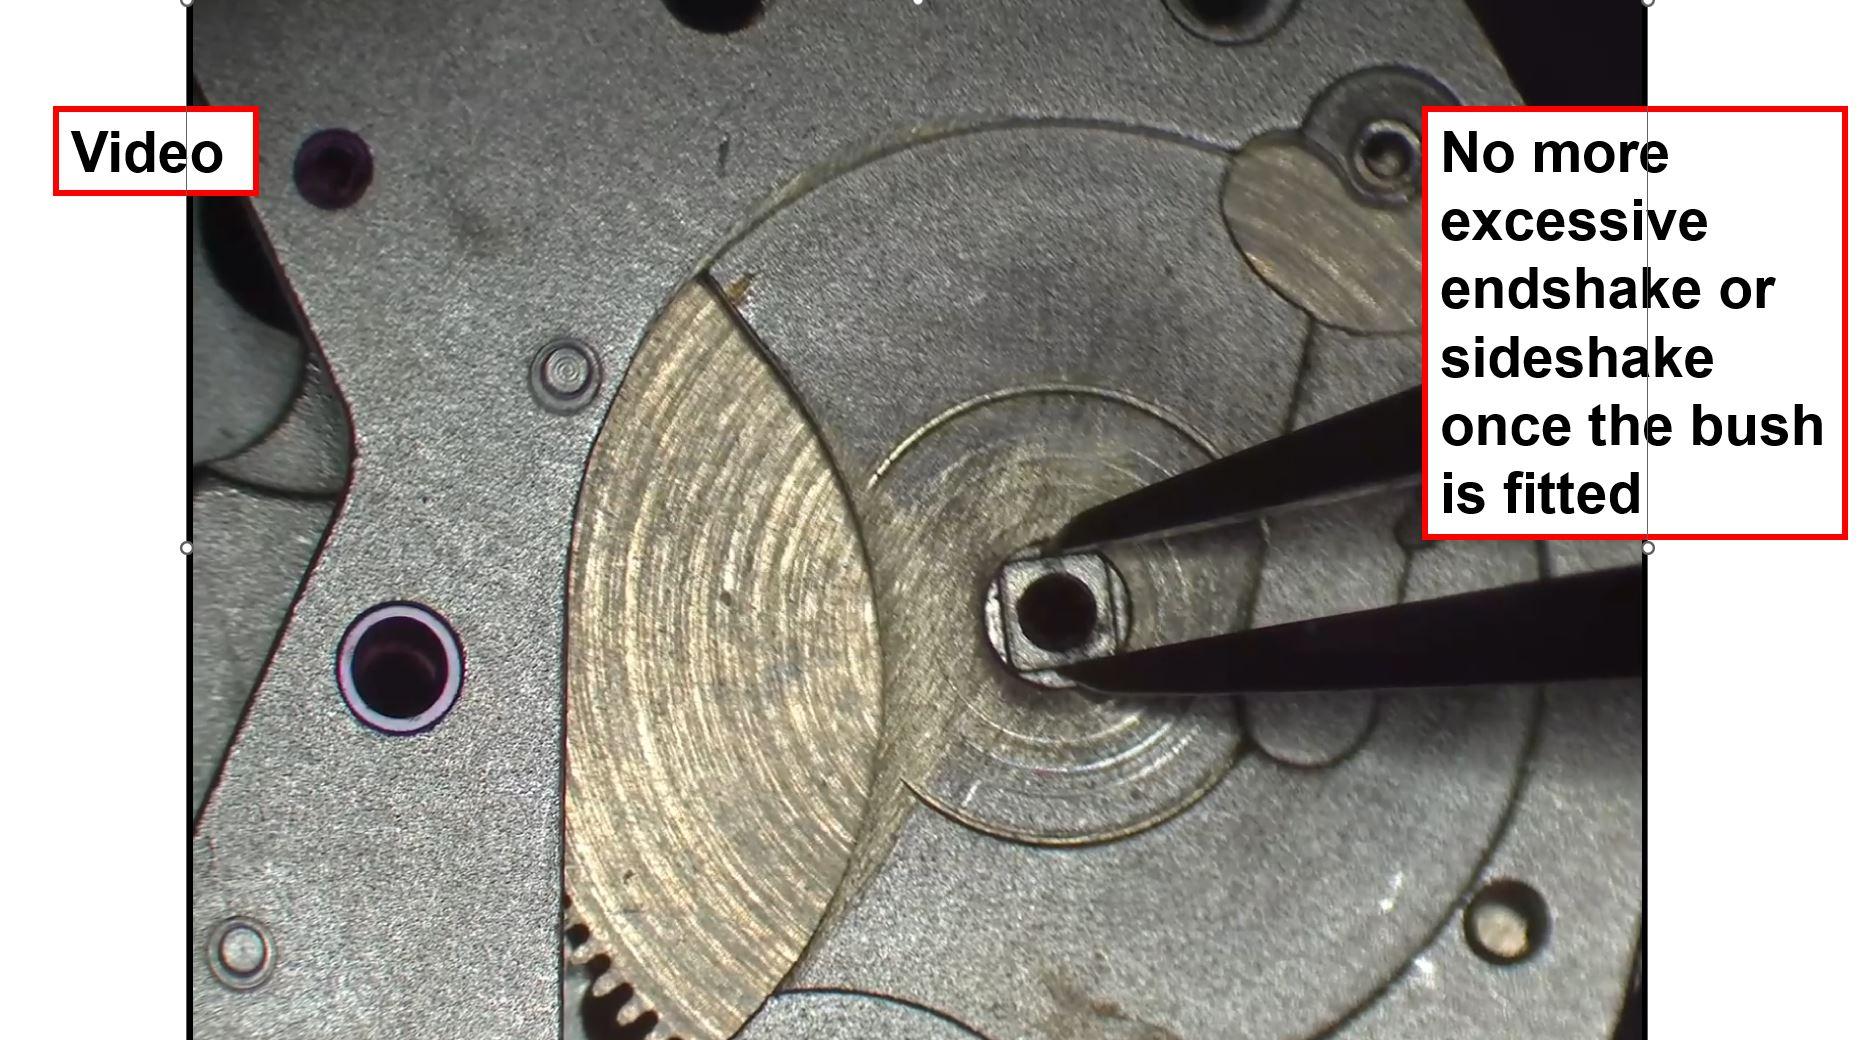
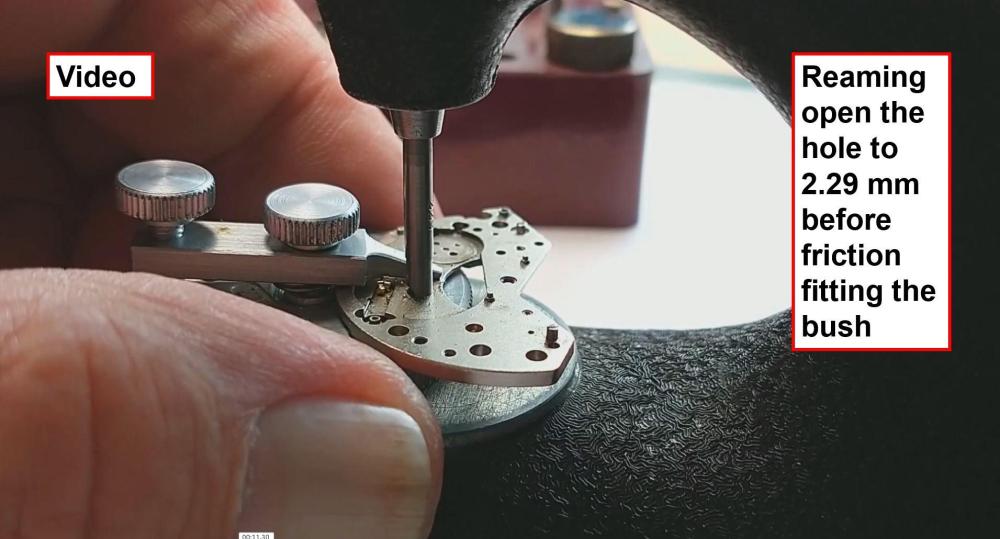
Funnily enough, I made a lesson on this subject for my third year students. As @nickelsilverhas already pointed out, that there is no magical fix just using a reamer in a jewelling tool, especially if you have to use several to open up the hole to the correct diameter for the bush. The hole will wander on a badly ovaled hole, no matter how good you think you are! Btw, what a lovely set-up you've made for your faceplate @nickelsilver. It's a pity you can't post videos on here, as a couple of slides have them. The slide with the crosshair on the centering microscope picks up the outside of the hole as it is turned whilst centering the work with light taps on the side of the bridge or mainplate. That's the hardest part of the job, really. Once the hole is centred, or what is left of it, the hole is bored open just a tad smaller than the reamer which is 0.01 smaller than the bush you make. You can bore it to 0.01 undersize by measuring the hole with a plug gauge then fit the bush that is 0.01 mm bigger than the bored/reamed hole. I do like this kind of work, as it's so satisfying when it all comes together


 8 points
 -
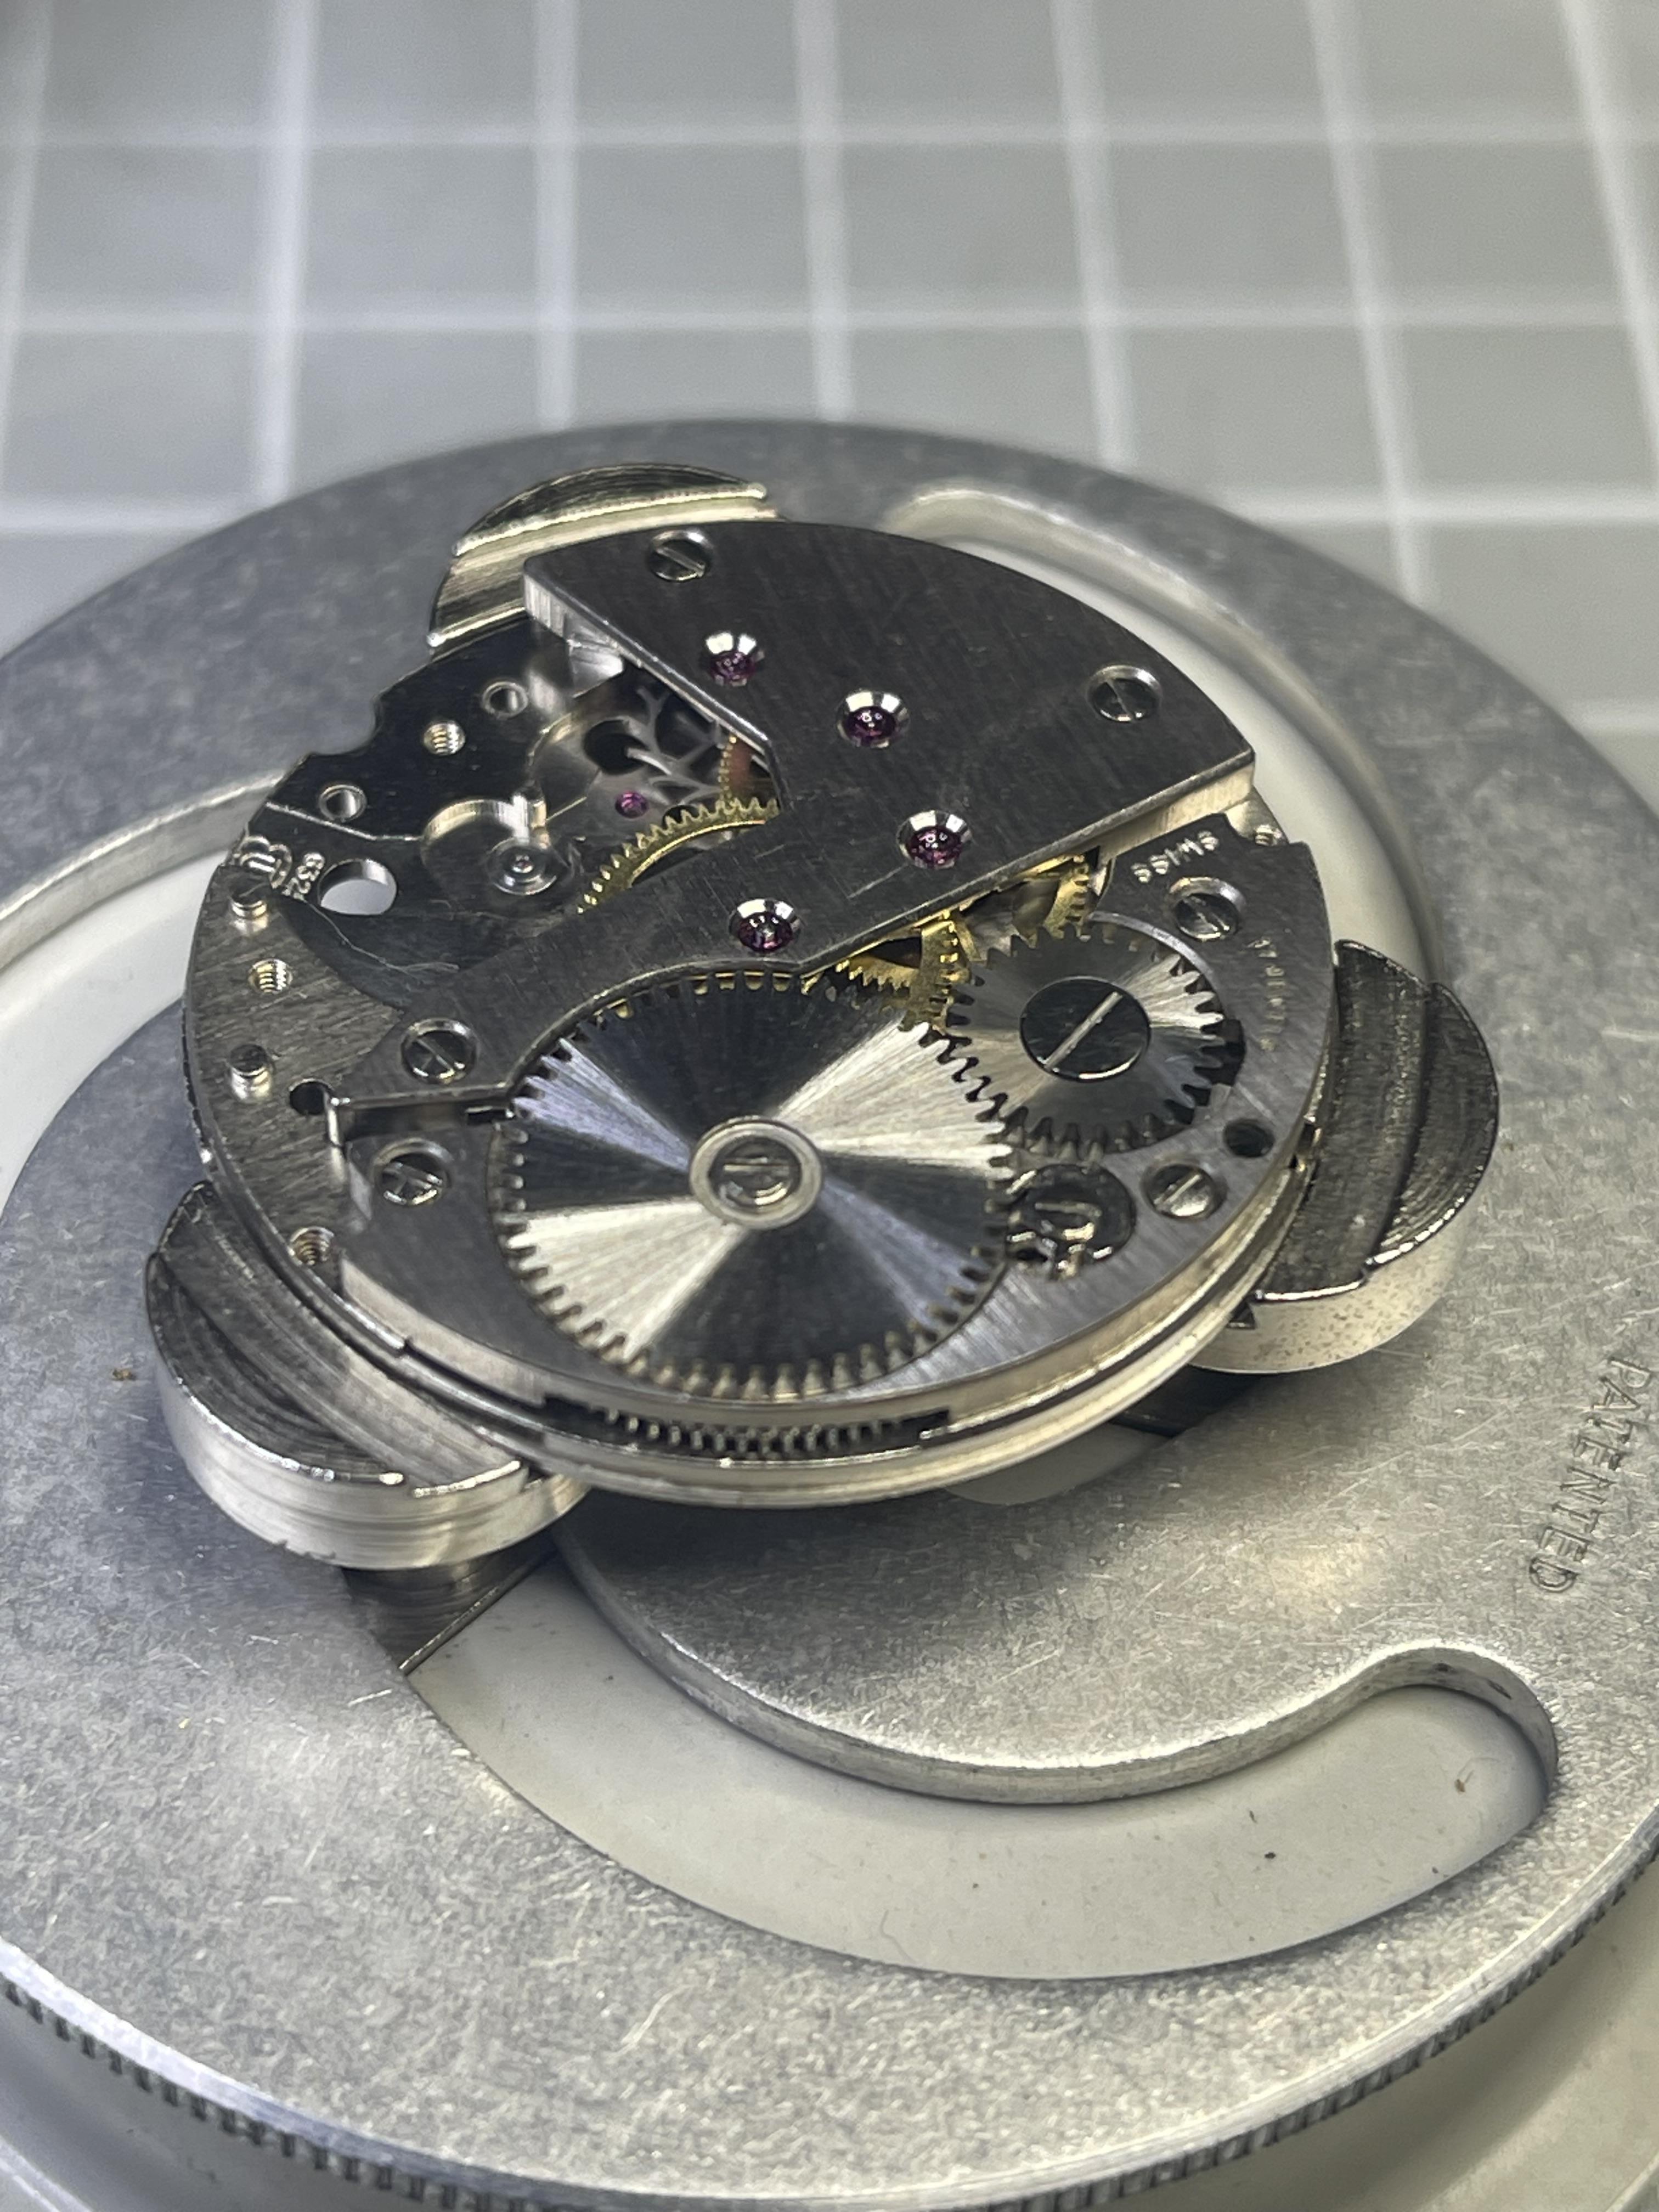
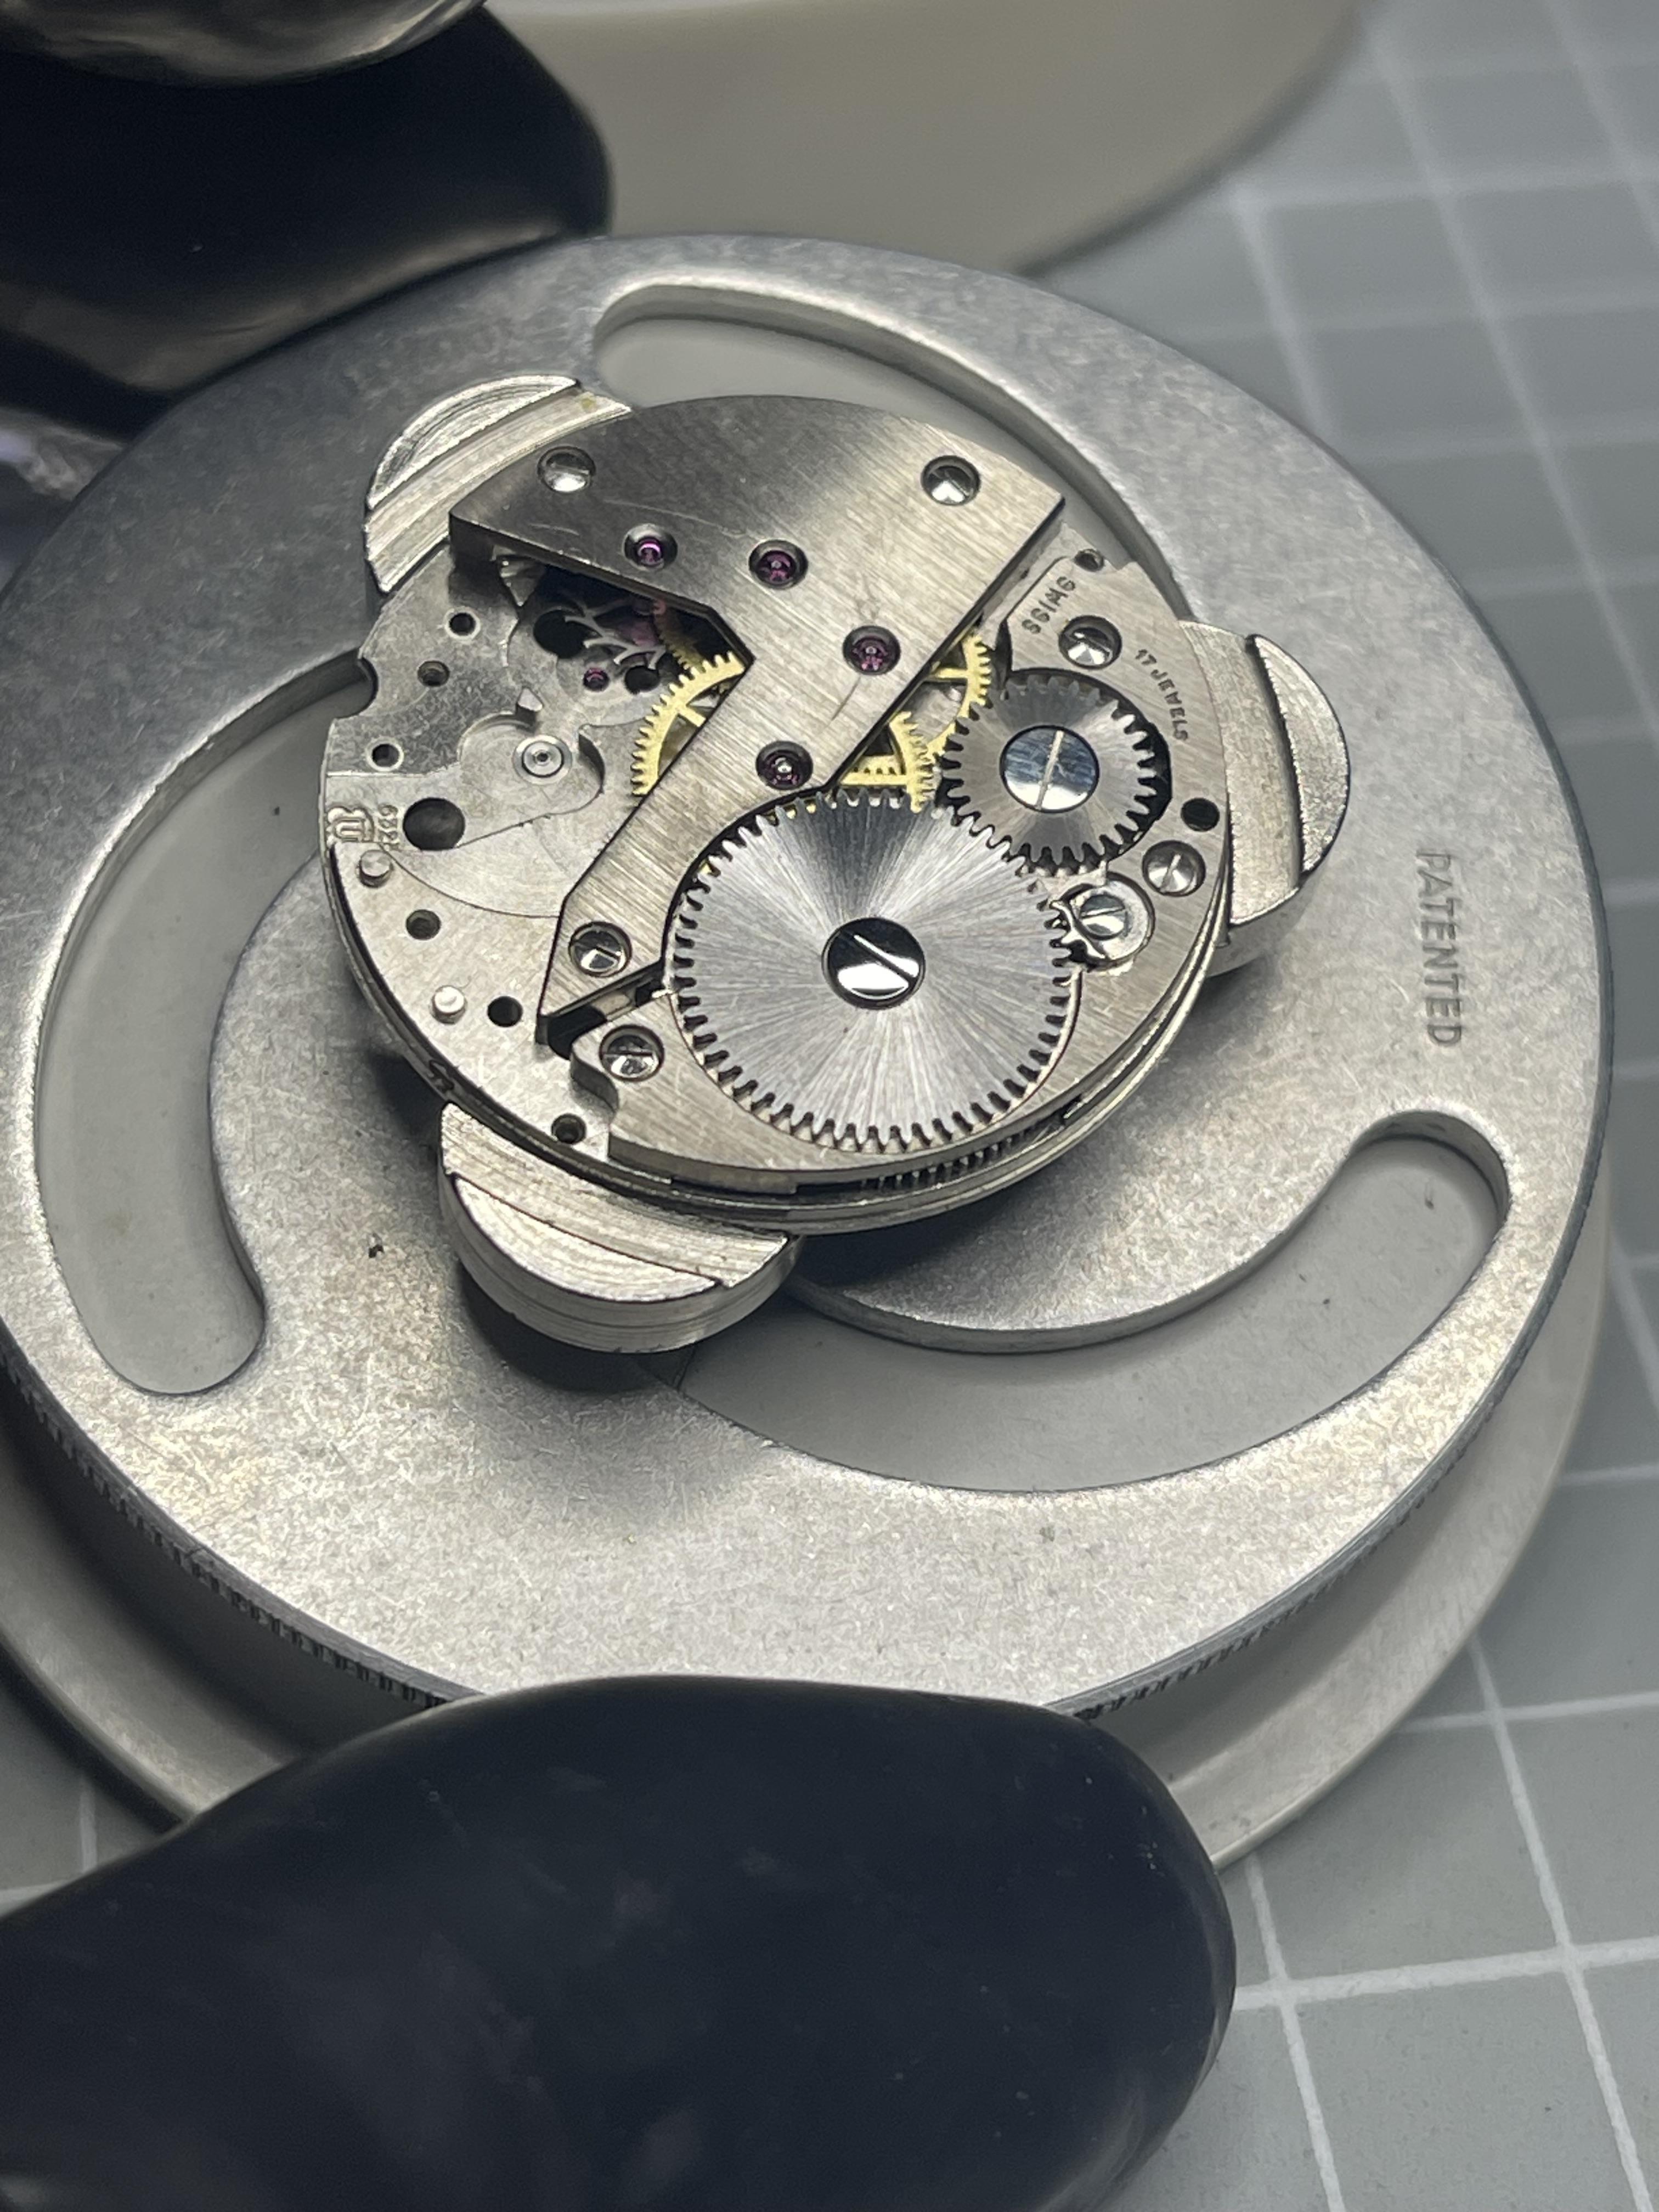
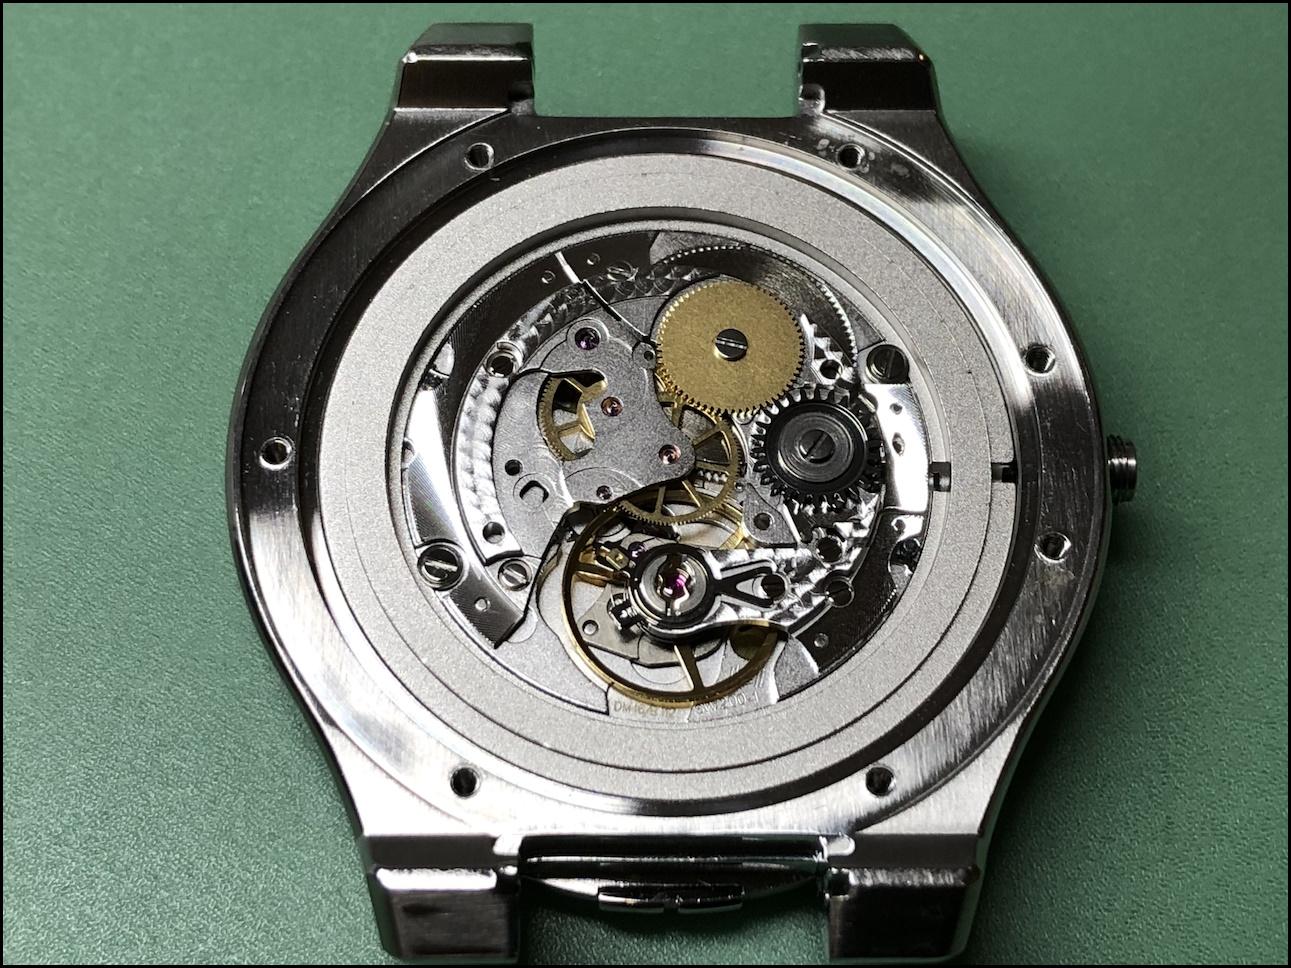
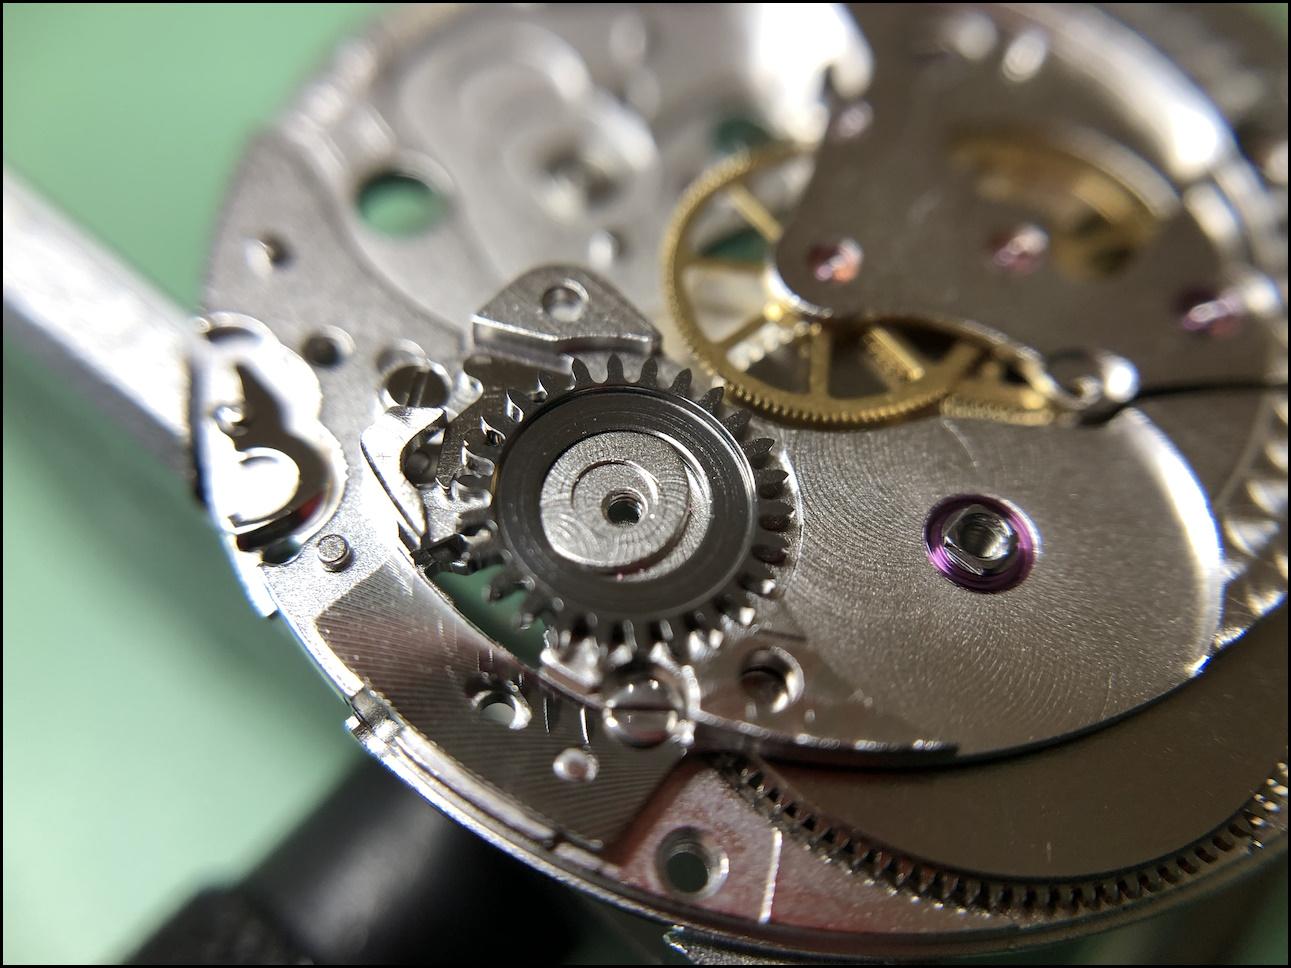
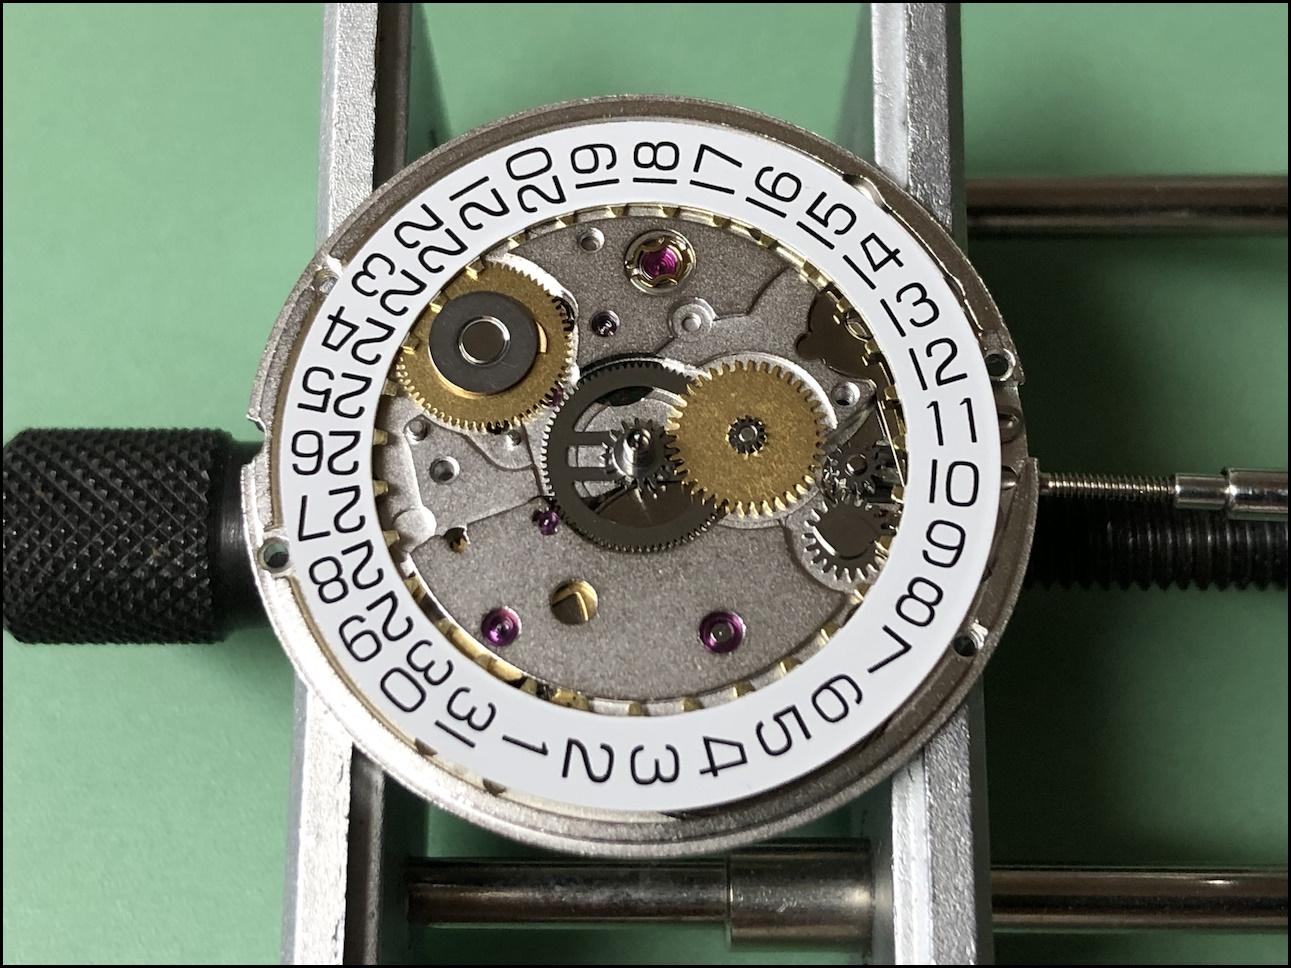
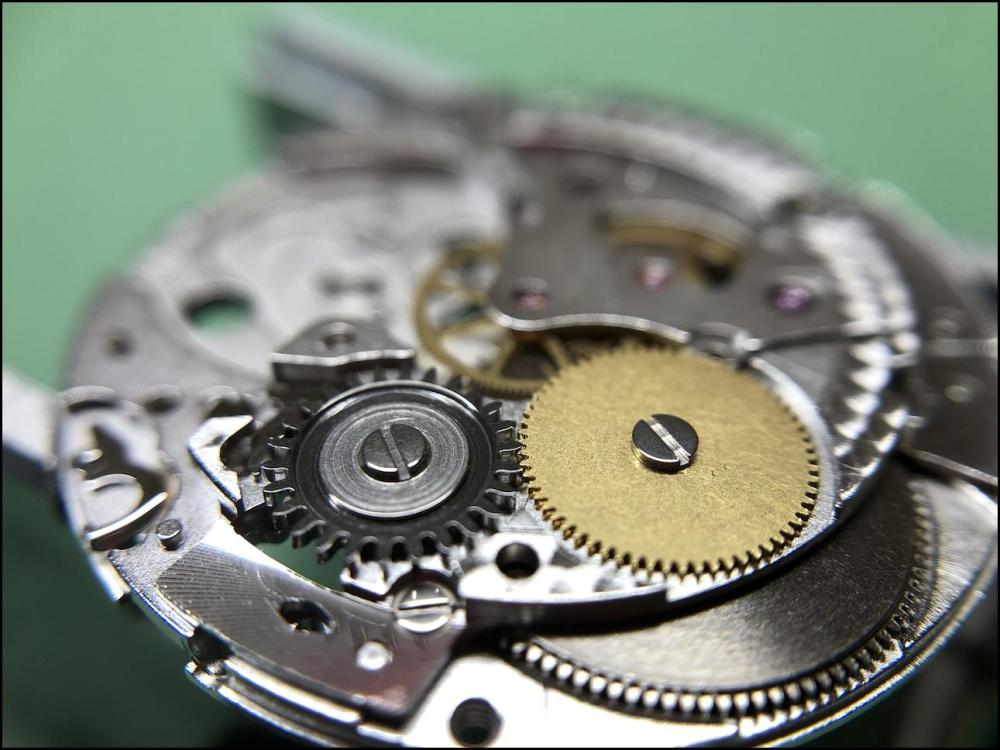
I recently serviced my first Sellita movement, the SW 200-1 calibre. It was my very first Sellita movement, so it was a bit more exciting, especially since I could compare it with my experience of servicing and repairing several ETA movements, including the famous 2824-2. The first time I heard about this movement, it was described—and still is—as an ETA clone. The impression I got back then was that the SW 200-1 was a fairly decent and relatively inexpensive copy, though it didn’t quite reach the same level of quality as the original. After servicing it, however, I’m pleased to say that my overall impression is that Sellita's movement is at least as good and, in some aspects, even better than ETA’s. When I disassembled the movement, the only unexpected thing was that the cap jewels and pallet stones were somewhat overoiled. Whether Sellita or someone else was responsible for this, I don’t know. Regardless, the movement performed well, but after seven years of 24/7 use by the previous owner, it was time for a service. One thing I really appreciate about the Sellita SW 200-1 is how easy it is to pull the crown to its second position to set the date. There’s absolutely no risk of accidentally pulling the crown too far out. This, I believe, is an improvement introduced by Sellita. My memory of the corresponding function in ETA's movements is that it’s far too easy to overshoot, inadvertently stopping the watch when you only intend to set the date. In fact, it works about as well as on the Rolex calibre 3135, which is perfect in this regard. ETA’s 2824-2 has 25 jewels, while Sellita’s SW 200-1 has 26 jewels. I’ve long been curious whether this difference was simply a way for Sellita to outdo ETA in the jewel-counting competition. To my delight, this turned out not to be the case. The extra jewel is placed exactly where, in my opinion, it does the best: as a bearing for the barrel arbor on the barrel bridge. Very nice! It’s also my impression that the click spring is stronger in Sellita’s movements, to the point where it became a bit fiddly to fit the click itself. I think there’s a good reason for this. When the cogs of the winding pinion and sliding pinion begin to wear (which only happens when you manually wind the watch), the pressure from the click on the crown wheel (which can move sideways away from the ratchet wheel) needs to be high enough to prevent the teeth of the crown wheel from slipping over those of the ratchet wheel. This could result in the ratchet wheel losing grip on the mainspring (not good!). This issue only manifests when you wind the watch manually. I’ve written about this issue in this thread/post. In short, I believe Sellita has solved this problem by making the click spring stiffer. Another sign of good manufacturing precision is the wonderful feeling when setting the time. The play you almost always feel in the crown of ETA movements is almost completely eliminated. It’s not at all stiff, just very precise. What unfortunately doesn’t impress me is Sellita’s assembly instructions. However, the documentation, unlike ETA’s, includes several exploded diagrams with part measurements. Personally, I don’t find this particularly useful, although it’s a nice touch. As for the assembly instructions themselves, there’s certainly room for improvement. The documentation is not particularly easy to understand and contain a few outright mistakes, such as showing that the escape wheel bearing on the main plate should first be oiled with 9010 and then with HP-1300. ETA isn’t entirely free from this issue, but their documentation is significantly more useful. And, of course, there’s nothing stopping you from using ETA’s documentation, as both movements are built in exactly the same way. This is something I actually recommend if you’re not experienced enough to not need the documentation. All in all, I would recommend the Sellita SW 200-1 over the ETA 2824-2. Not least because spare parts are readily available for independent watchmakers, meaning owners of watches with Sellita movements can generally expect faster and cheaper service and repairs. This also means they’re not dependent on the Swatch Group, which owns ETA, as well as brands like Hamilton, Tissot, Omega, Longines, Rado, Certina, Mido, and others, and doesn’t sell parts to independent watchmakers. In this respect, it’s better to choose a watch that houses a Sellita movement from brands like Oris, Baume & Mercier, Maurice Lacroix, Christopher Ward, or Stowa, to name a few. Additionally, ETA has started using plastic in some of its movements, which, for me at least, is a red flag and something I struggle to associate with high-quality Swiss movements. Thankfully, as far as I know, Sellita's movements are entirely free of plastic. Thanks for reading!


 8 points
 -
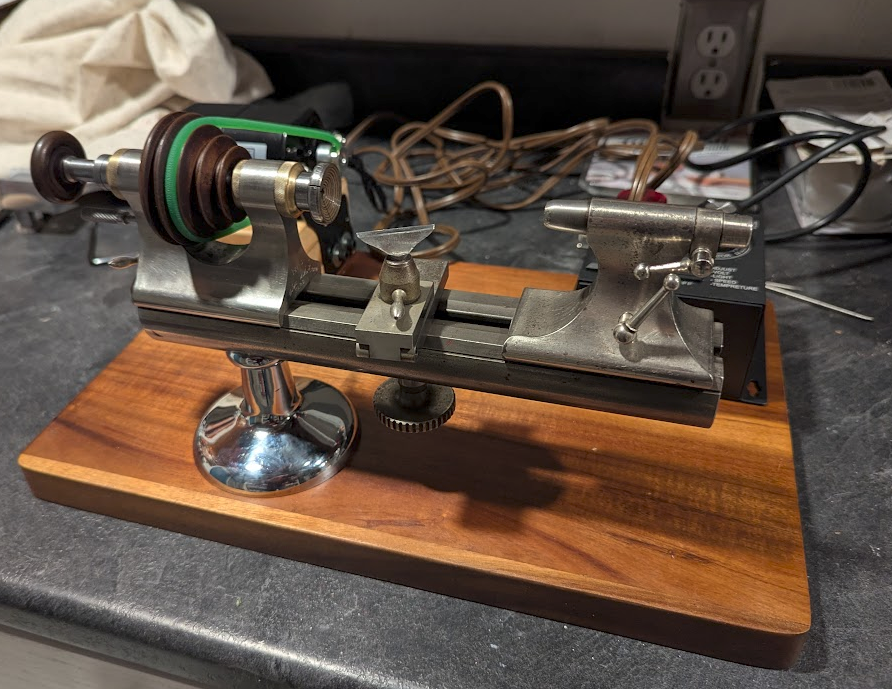
I have finished setting up my lathe! It took a lot more effort than I hand planned to get it running. It turned out that the rear bearing was seized together, and the bearing part that was supposed to be attached to the headstock frame was spinning freely (and surprisingly smoothly). Once everything was cleaned up, I refit the bearing to the headstock with Loctite sleeve retainer (nickelsilver's suggestion) and then found that the rear bearing was still capable of locking up completely on rotation, needing to be tapped on the outside with a brass hammer to jolt it free (caseback's suggestion). To make the bearings run smoothly, I lapped them with green Timesaver Lapping Compound, hand turning until both bearings were nicely refinished and turn without obstruction (again, nickelsilver's suggestion). This was all a lot more information about machining than I expected to be confronted with so soon. I didn't like the aluminum Borel base it arrived with since it was a poor fit to the short 10in bed, and so I mounted everything to a hardwood cutting board. For that, I had to wait a few weeks until a pedestal base turned up in a random lot of clockmaker tools on ebay. It is harder than it should be to procure a long M8x1.0 bolt in the USA where we still like our inches but that just arrived today so I could finally finish assembly. The cheap sewing machine motor is fixed to wood blocks and damped with a soft rubber pad. It came with a foot pedal that was janky as hell and I didn't want to use, so I am instead running it with a voltage regulator. I know at some point I will probably need a solution for more torque but this is a start. I just got the belt in place and spun it up for the first time tonight. It works great and I am very happy with the results. Much gratitude for the patient help I received from @nickelsilver, @caseback, and @Dell over in my other headstock setup thread. They all worked through explaining to me how things should work and discovering what was out of sorts as I got the headstock to turn. So thanks again everyone - now I'll have to start turning some stock and you can look forward to more silly novice questions as I do. I'm beginning to collect collets. And I am bothered by how shiny the pedestal is compared to the underside of the bed, so I may eventually give in and take a buff to that. The circle of space where the bed has always been in contact with a base is still shiny so I can assume the whole thing had a polish in the past. Finished job photos:
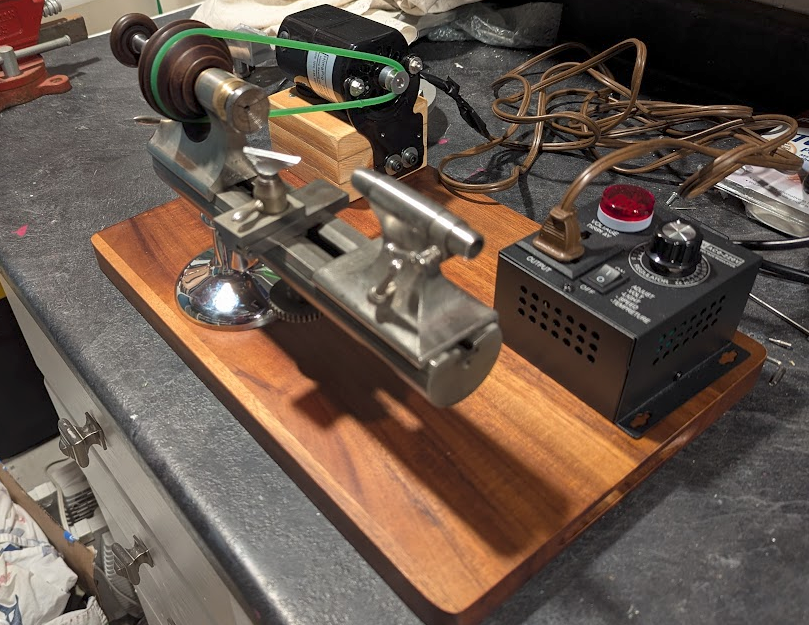
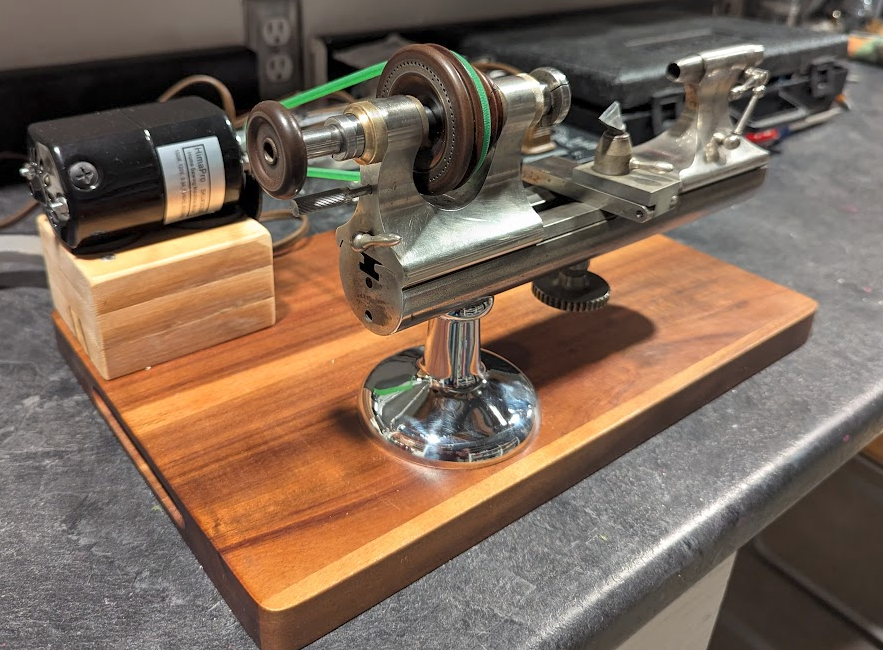 8 points
 -
As here the conversation is about matching hairsprings/balances in russian watches, I have some information that will help to understand what is happening. The supplier of material for hairsprings is only one for USSR/Russia watch factories and they are not able to reproduce it with small enough tolerances. The batches of coils with the profiled wire (may be it is called ribbon or tape?) every time have slightly different thickness and other parameters. The hairsprings always are produced from the wire with same shape - length, diameter, number of coils and angle between beginning/end. Thus, when the wire parameters change with the next batch, the 'strength' of the new hairsprings changes too. To solve this problem, the balance wheels are turned with different moment of inertia to meat the different hairsprings strength for every new batch. Further, within every batch, the hairspring manufactured are tested and separated to 20 groups of strength, the balances again separated in 20 groups of moment of inertia and every group of hairsprings is matched to related group of balances. As the balance wheels are easier to manufacture with desired and predictable parameters, and the hairsprings is harder to make with desired strength, they first make the hairsprings with whatever strength will be and then make balance wheels to match the hairsprings.8 points
-
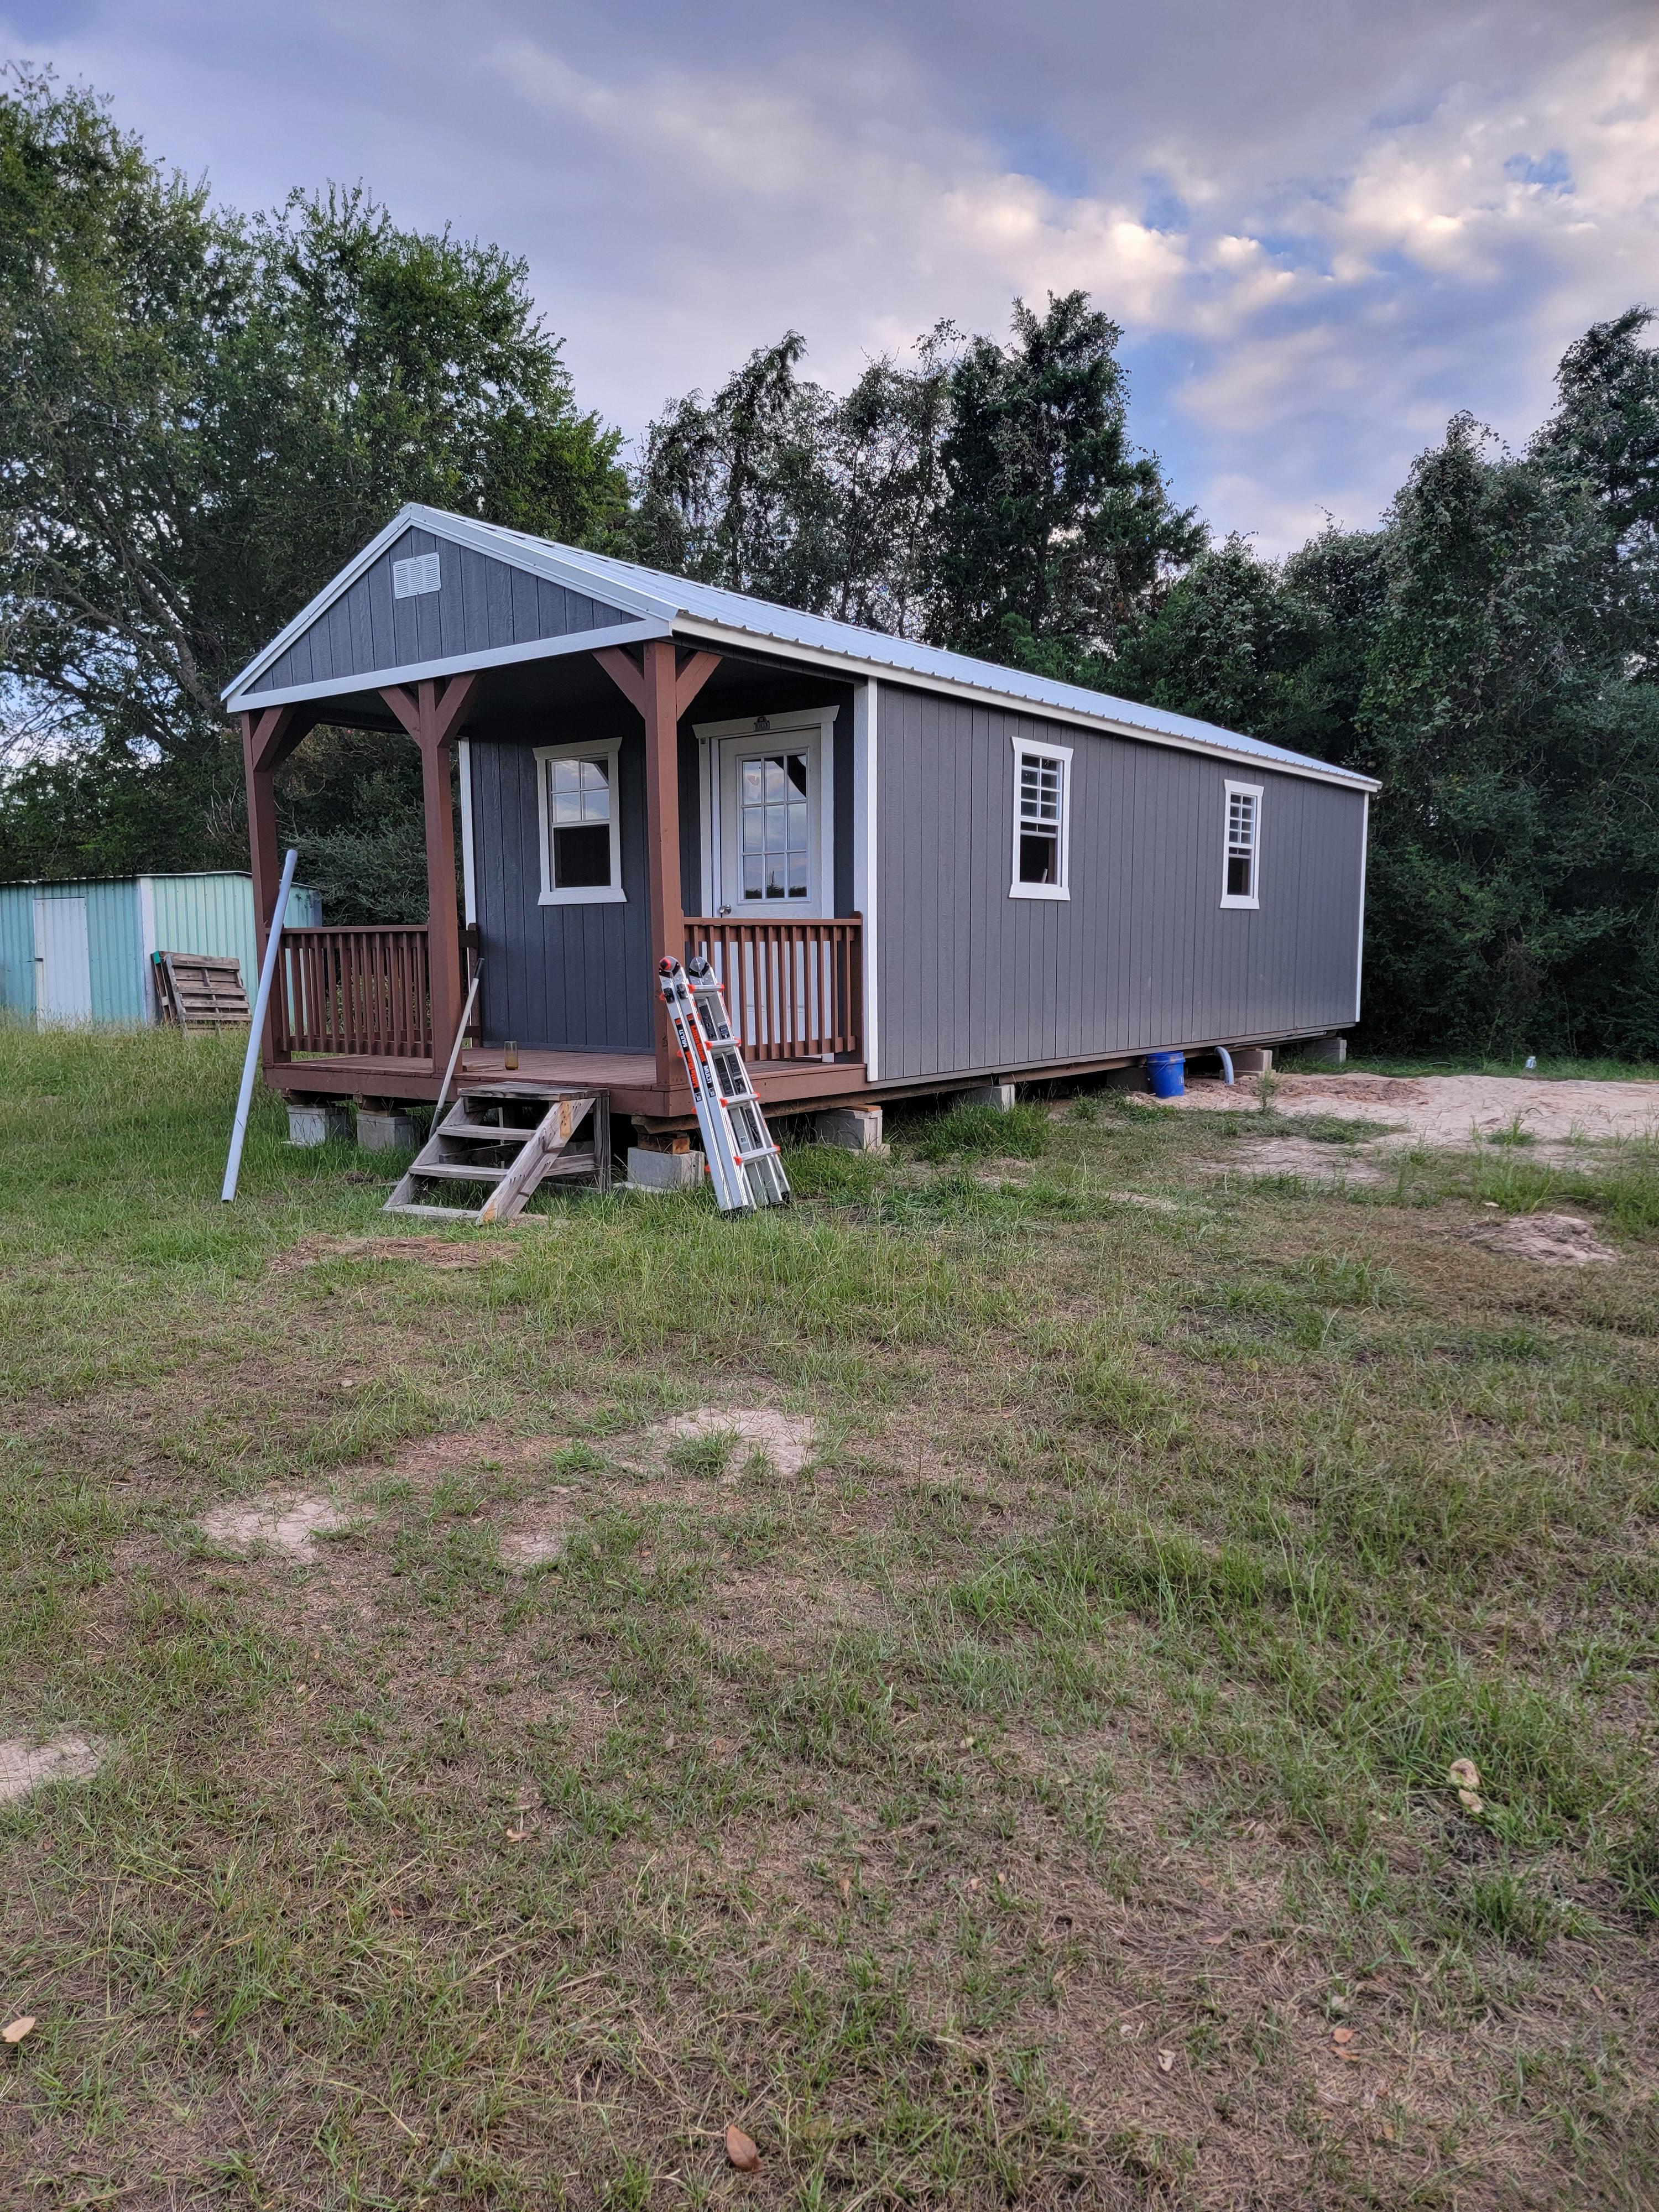
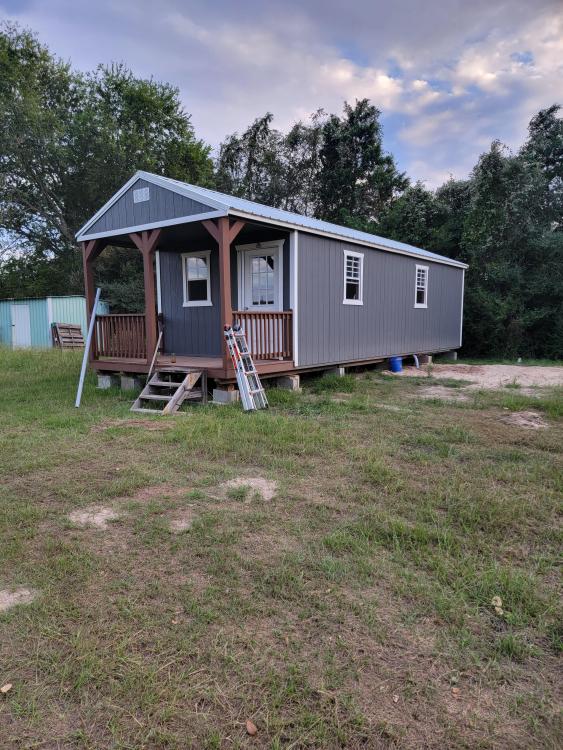
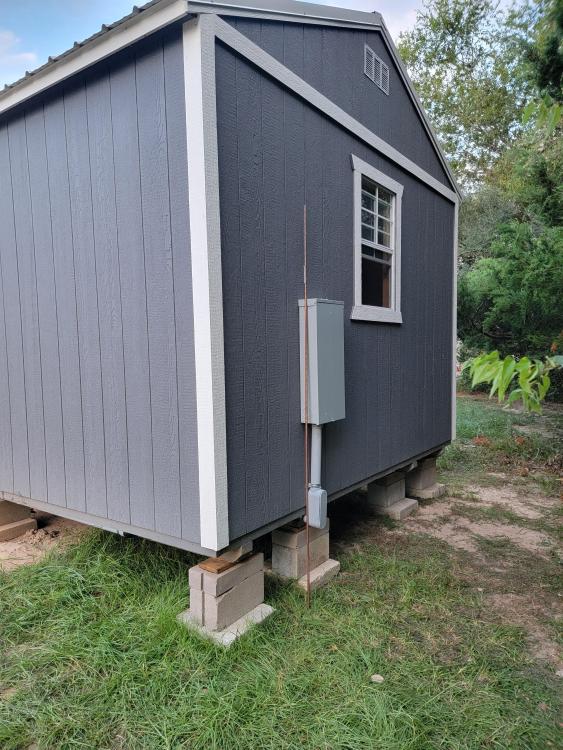
Spent the day doing electrical. Service panel installed. Ground rod TBD. Electrical boxes 90% done. Miles to go before I sleep.
 8 points
 -
A few years ago, when I was still relatively new to the service and repair field, I found an intact but non-functioning ETA 2836-2 calibre movement in a bag of watch parts I had purchased at an auction for about 30 US dollars. That movement has now found its home in the Ofrei watch shown in the pictures. Apart from the movement and the strap, I bought all the parts (case, hands, and dial) from the American website Ofrei.com. It cost me about 200 US dollars, nearly half of which was spent on shipping, import fees, and European taxes. As a non-American, I still feel it was worth the money. If I had been American, I would have found it exceptionally affordable. The first time I disassembled the movement, the obvious and seemingly only issue was a black, sticky "gunk" on the pallet fork's impulse surfaces. At the time, I had no idea what caused this black and sticky "gunk." Now I believe, though I’m not entirely sure, that it was epilame that had somehow degraded or gone bad. Despite great efforts, I couldn’t clean the pallets, and I ended up buying a new one. Even so, the watch didn’t run very well. A couple of years later, with more knowledge and experience, I disassembled the movement again but found no obvious issues. I serviced the movement again and adjusted the side shake and end shake of all the wheels as precisely as I could in the hope that it would help, but it didn’t. Then, a few months ago, I decided to take the movement apart a third time, and this time I finally found the reason for the irregular and poor timekeeping: micro-oxidation and micro-rust on almost all the wheel pivots. Barely visible even at 40x magnification. I brought out my Jacot tool, and the problem was finally solved! This wasn’t the first time the Jacot tool had brought one of my movements from either poorly functioning or somewhat acceptable performance to function as if it were brand new. The Jacot tool requires a significant investment, not least in acquiring the knowledge and training to use it, but it has once and for all proven to be worth the money and effort. The decisive moment for me was when @nickelsilver showed me how to hold the burnisher properly. For those of you who want to know more, you can click on this link: "How to hold a Jacot tool burnisher" So, why buy a case, hands, and dial from Ofrei.com instead of from eBay, where a "stainless steel" case from China usually costs less than 50 US dollars? If you ask me, the answer is that Chinese cases on eBay are junk and a scam. The three I’ve purchased in total all had numerous issues, the most serious being that they rust (stainless steel, really?) and cause skin problems since I’m allergic to nickel!!! Less serious but still annoying is that the movement fits poorly in the case and that the threads are generally poorly made. There are several issues with these cases, but what I’ve described here should suffice. No more Chinese cases from eBay for me! Are Ofrei’s cases manufactured in the USA, Germany, or Switzerland? I don’t know. They’re probably made in China as well, but at least there’s a contractor (Ofrei) who knows their stuff and has quality-controlled their deliveries. It may not be Rolex quality, but the case is symmetrical and carefully polished, and the case back fits the case like a glove (buttery smooth!). The dial is perfectly symmetrical, and the hands are straight and well-made. Best of all, all the parts fit together perfectly with the movement. I’m so satisfied that I felt it was my duty to share my experiences. I hope someone finds it useful!


 8 points
 -
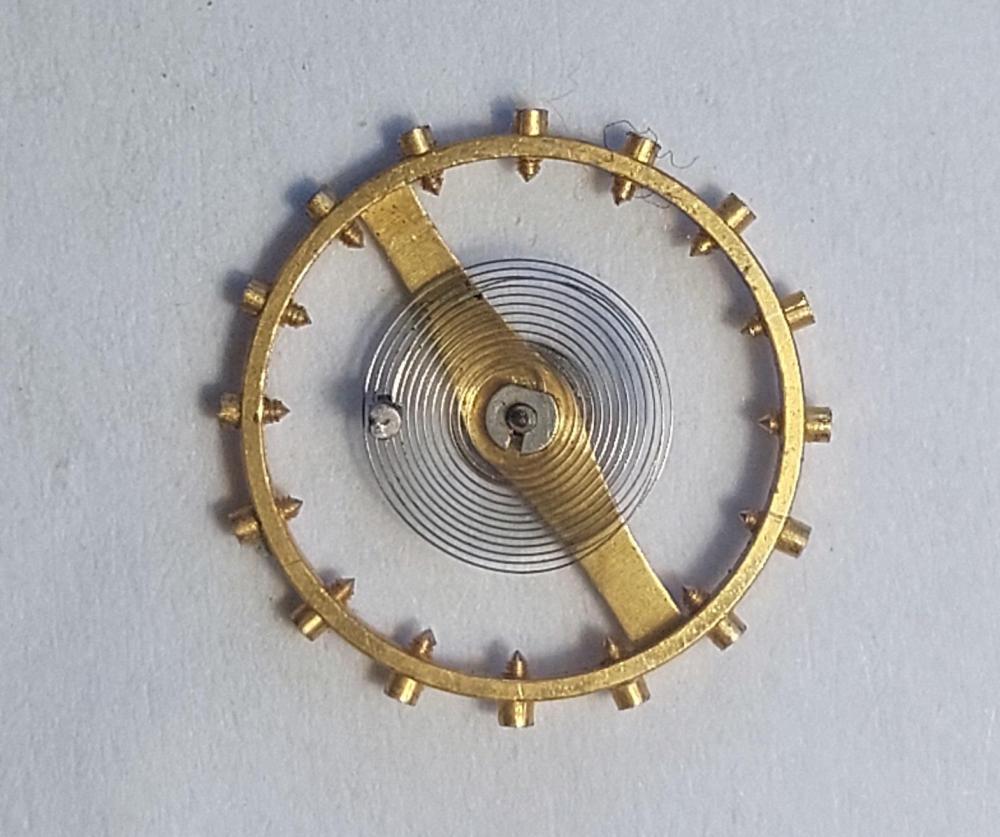
Well my friends, it is a Friday-Before-Black-Friday miracle. I have got this watch running again. This is my first significant hairspring repair and I feel like I just leveled up. When I removed the balance complete from the cock, I found it had 2 coils swung underneath and looped around the roller table. I might have made things harder for myself by lifting them over in the wrong sequence. But when the hairspring was removed, it didn't look that bad. The overcoil had several issues but no kinks. Concentricity looked very decent and flatness was a little out, but I discovered while fixing the flats that what looked like concentricity defects were actually tangles. There were two tangles which I could not see well under a loupe (have no microscope) without a 3D view. The first two photos are what I started with: I did not know the strategy for removing a tangle I first did one in the outer 2 coils by manipulating the stud through them - which worked but was very challenging and probably dangerous. The second tangle was much farther in and I didn't see any feasible way to pass the stud through there and have it pop out untangled. I figured I could maybe get some oilers in between and just push tangle around and around until it made its way out to the stud where I could lift it through. This worked. With the tangles out, I was left with not too bad a state, 2 or 3 minor concentricity issues and the overcoil pointing down a little. Also the collet was twisted at a slight angle. Because I don't know any theory on forming overcoils, I decided I would just try to wing it. I mounted it back to the balance cock and pushed here and there until it was pretty well centered. Any additional adjustments to the overcoil I have to make while the whole balance is in the watch, because I can't work out the 3D relationship. Someday I will learn to do this the right way but for now, it's just YOLO and poke at the running balance until it looks right. I took the opportunity to check its poise, which was fine on this tool. I probably won't go to the trouble of dynamically posing this watch. And now it's running in! I have it at 1.4ms BE and honestly, I think I may leave it here. After my first service attempt from a year ago, it was at >3.0ms BE but running flat in all positions. How I got myself into this mess in the first place was by going back in to dial down the BE and reclean the balance jewels, then my ocillations test and my tangled up hairspring. Right now, the verticals are very good (>250°!). I'm okay with the BE since there's no mobile stud carrier (and this is a vostok not a patek which has already caused me a lot of trouble). The horizontal traces are noisy a bit irregularly wavy. I will go back in to clean those jewels once again, because at one point before messing up the hairspring I swapped the lower from a spare movement while end shake seemed too high. I can swap that back and I expect to see some improvement. Thanks for all the encouragement. I didn't expect I would actually fix this one rather than toss it in my "USSR box"
 8 points
 -
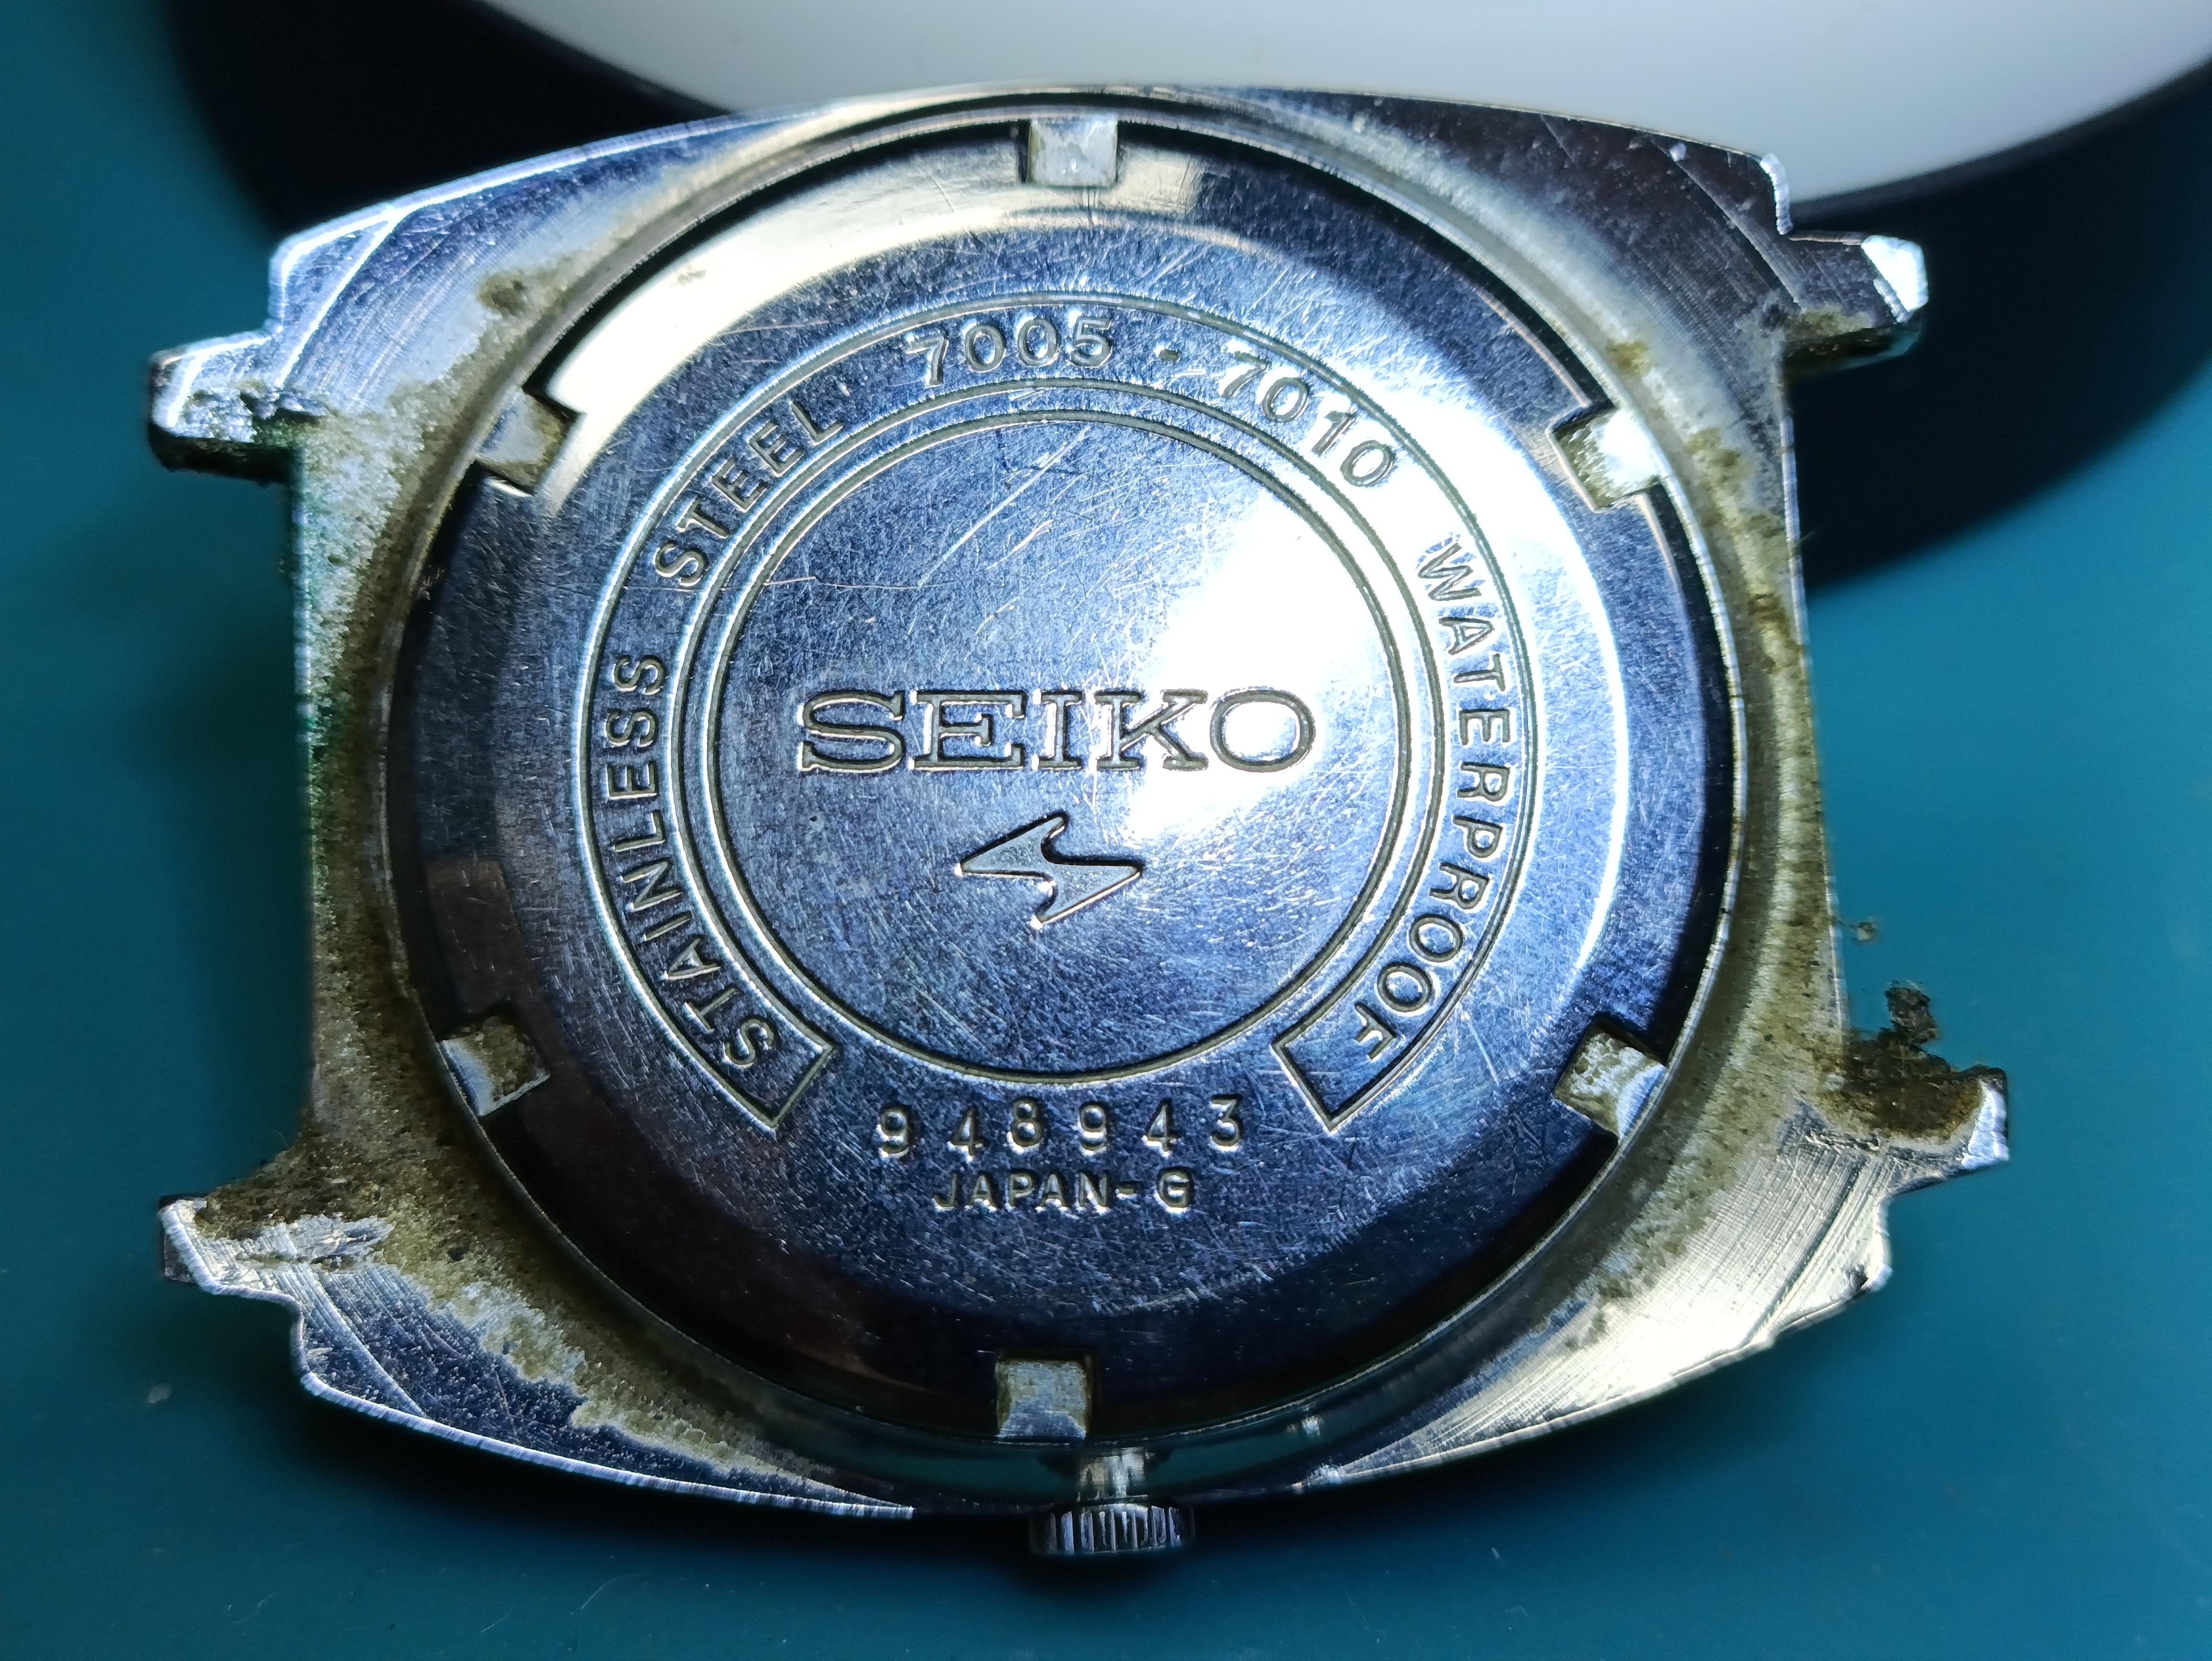
Hi everyone, been a while since I posted, but just moved house and then getting ready to move back to the UK to start a whole new career, so my watch shenanigans have had to take a back seat. Anyhow, I recently managed to sneak in a Seiko 7005, I think it was made in April 1969. Here are the before and after shots. Here is the front, I had to replace the cracked crystal, but it was hiding a nice dial, not 100% convinced it's original, but suits the watch: Here is the back of the watch, with a generous helping of arm cheese: And here is the finished watch, I managed to save the bracelet and everything else is original, apart from the crystal and mainspring , and bearing on the rotor.


 8 points
 -
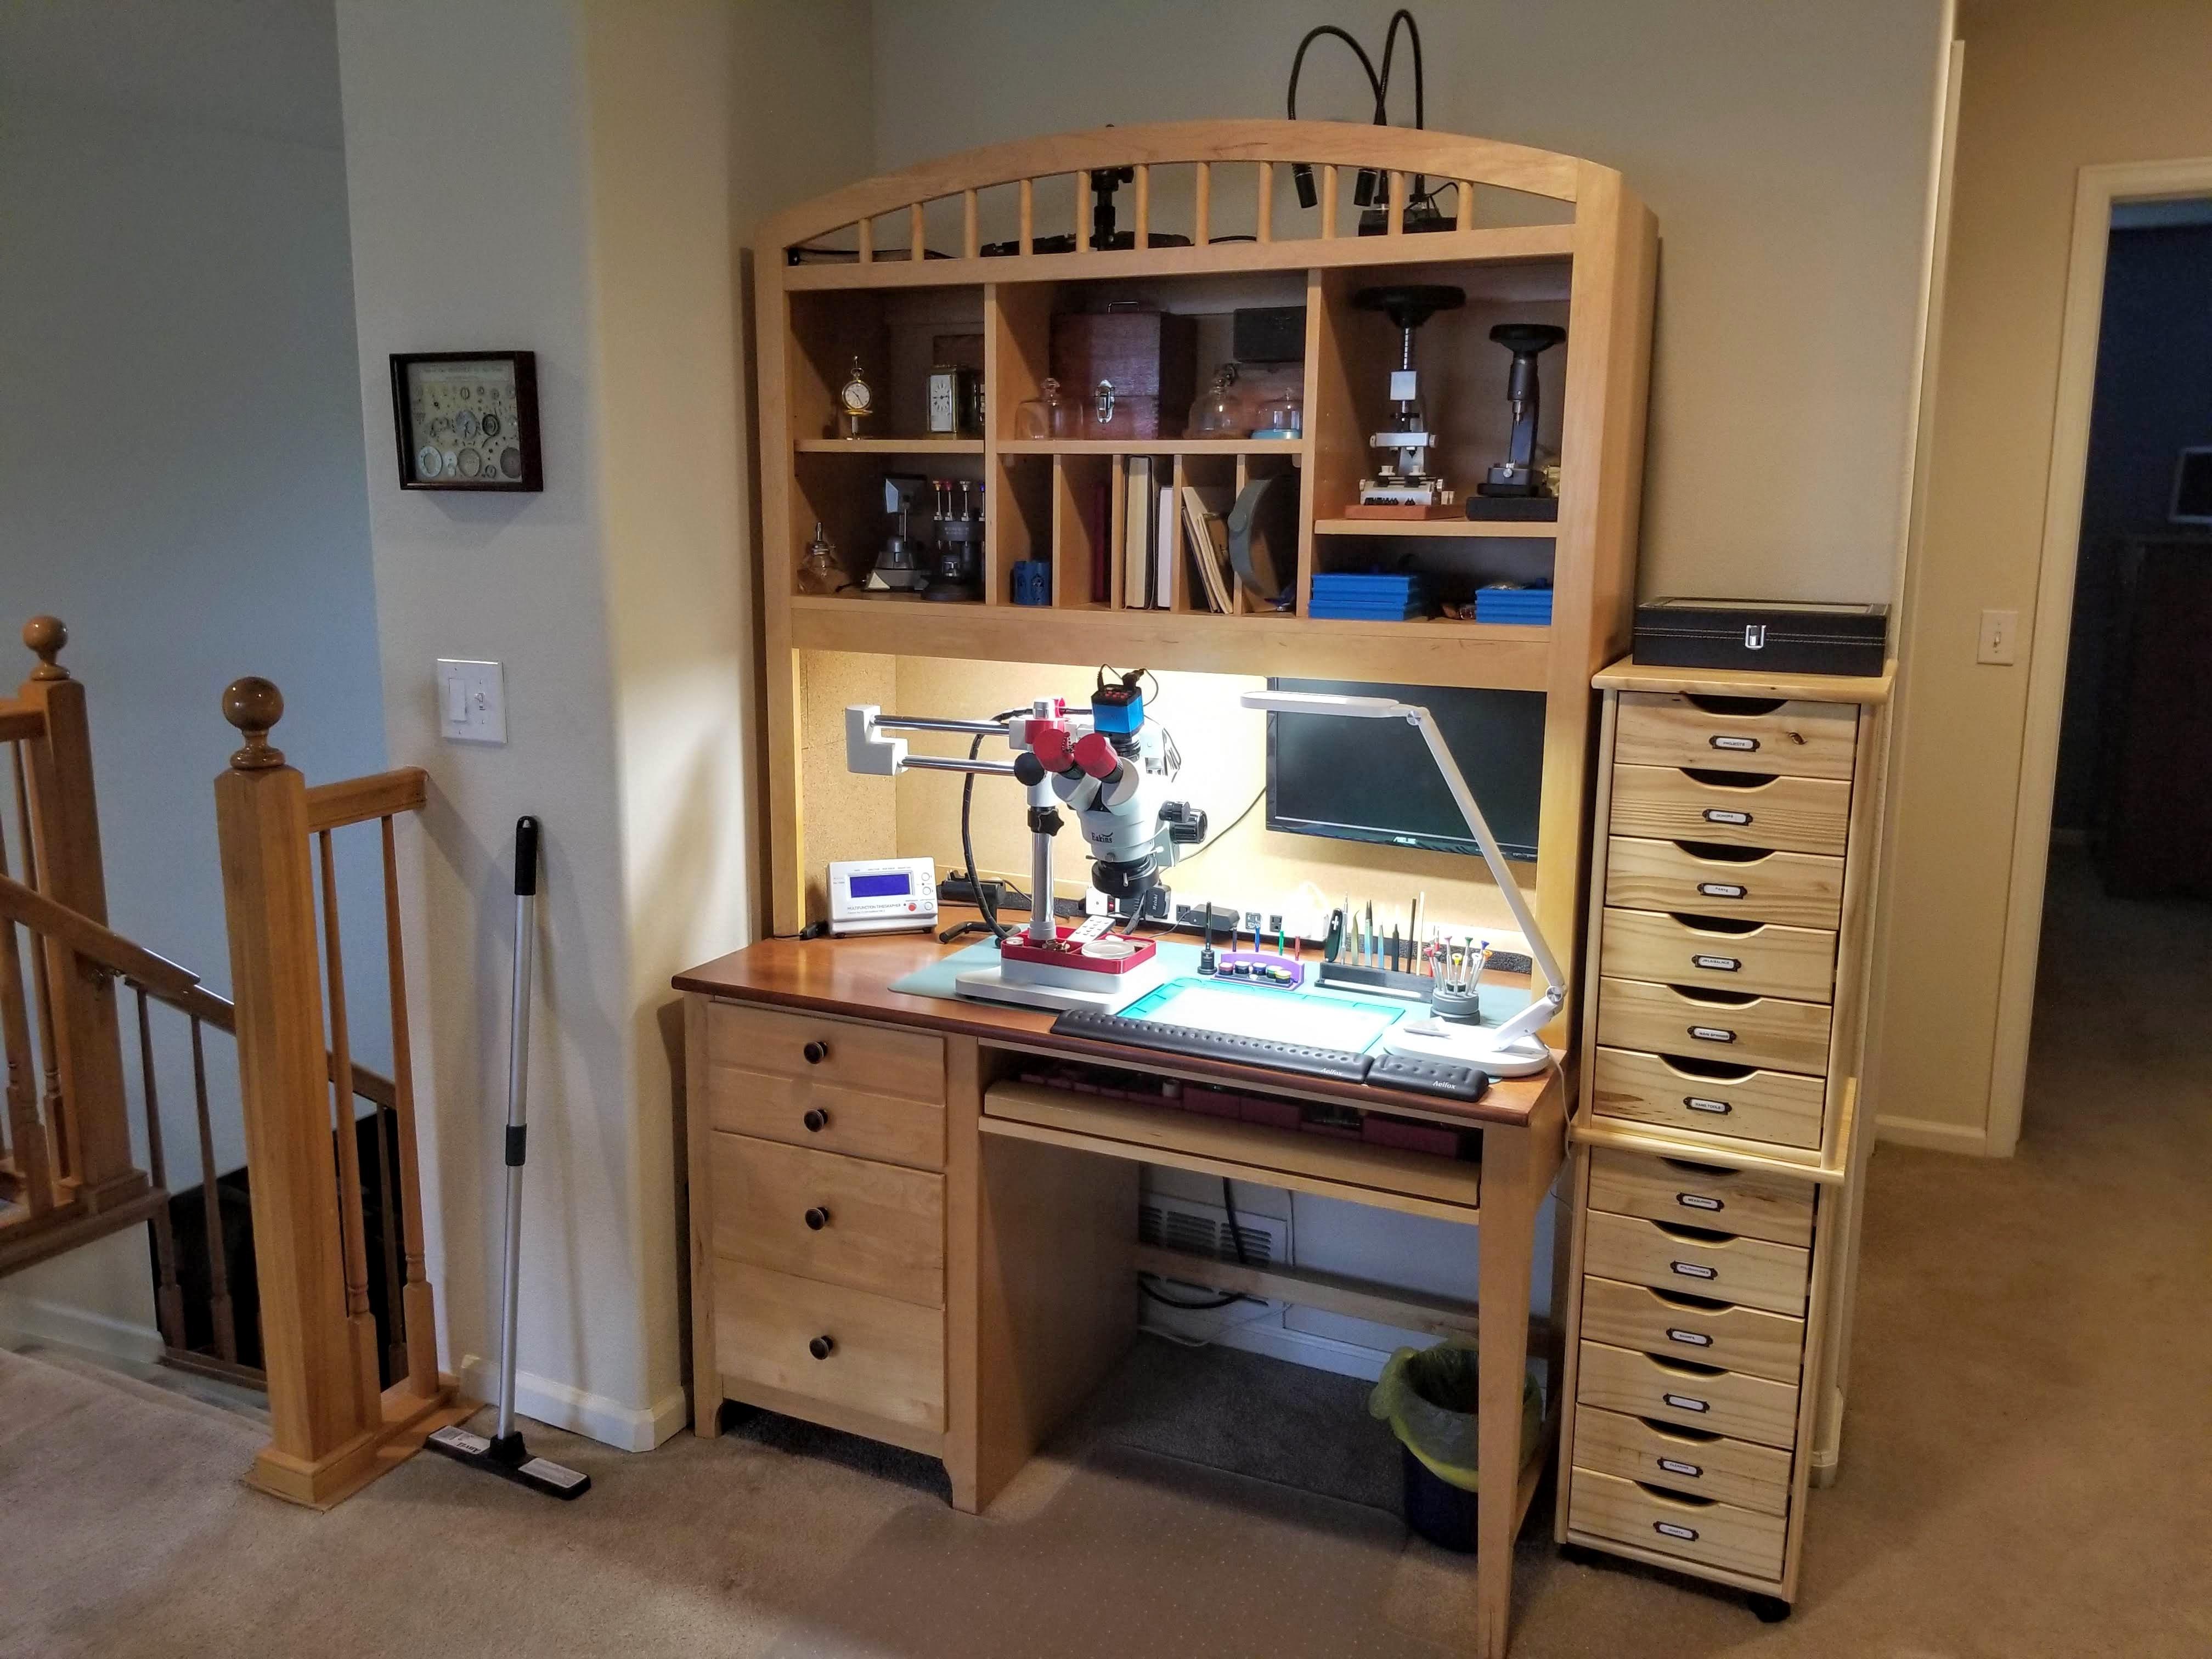
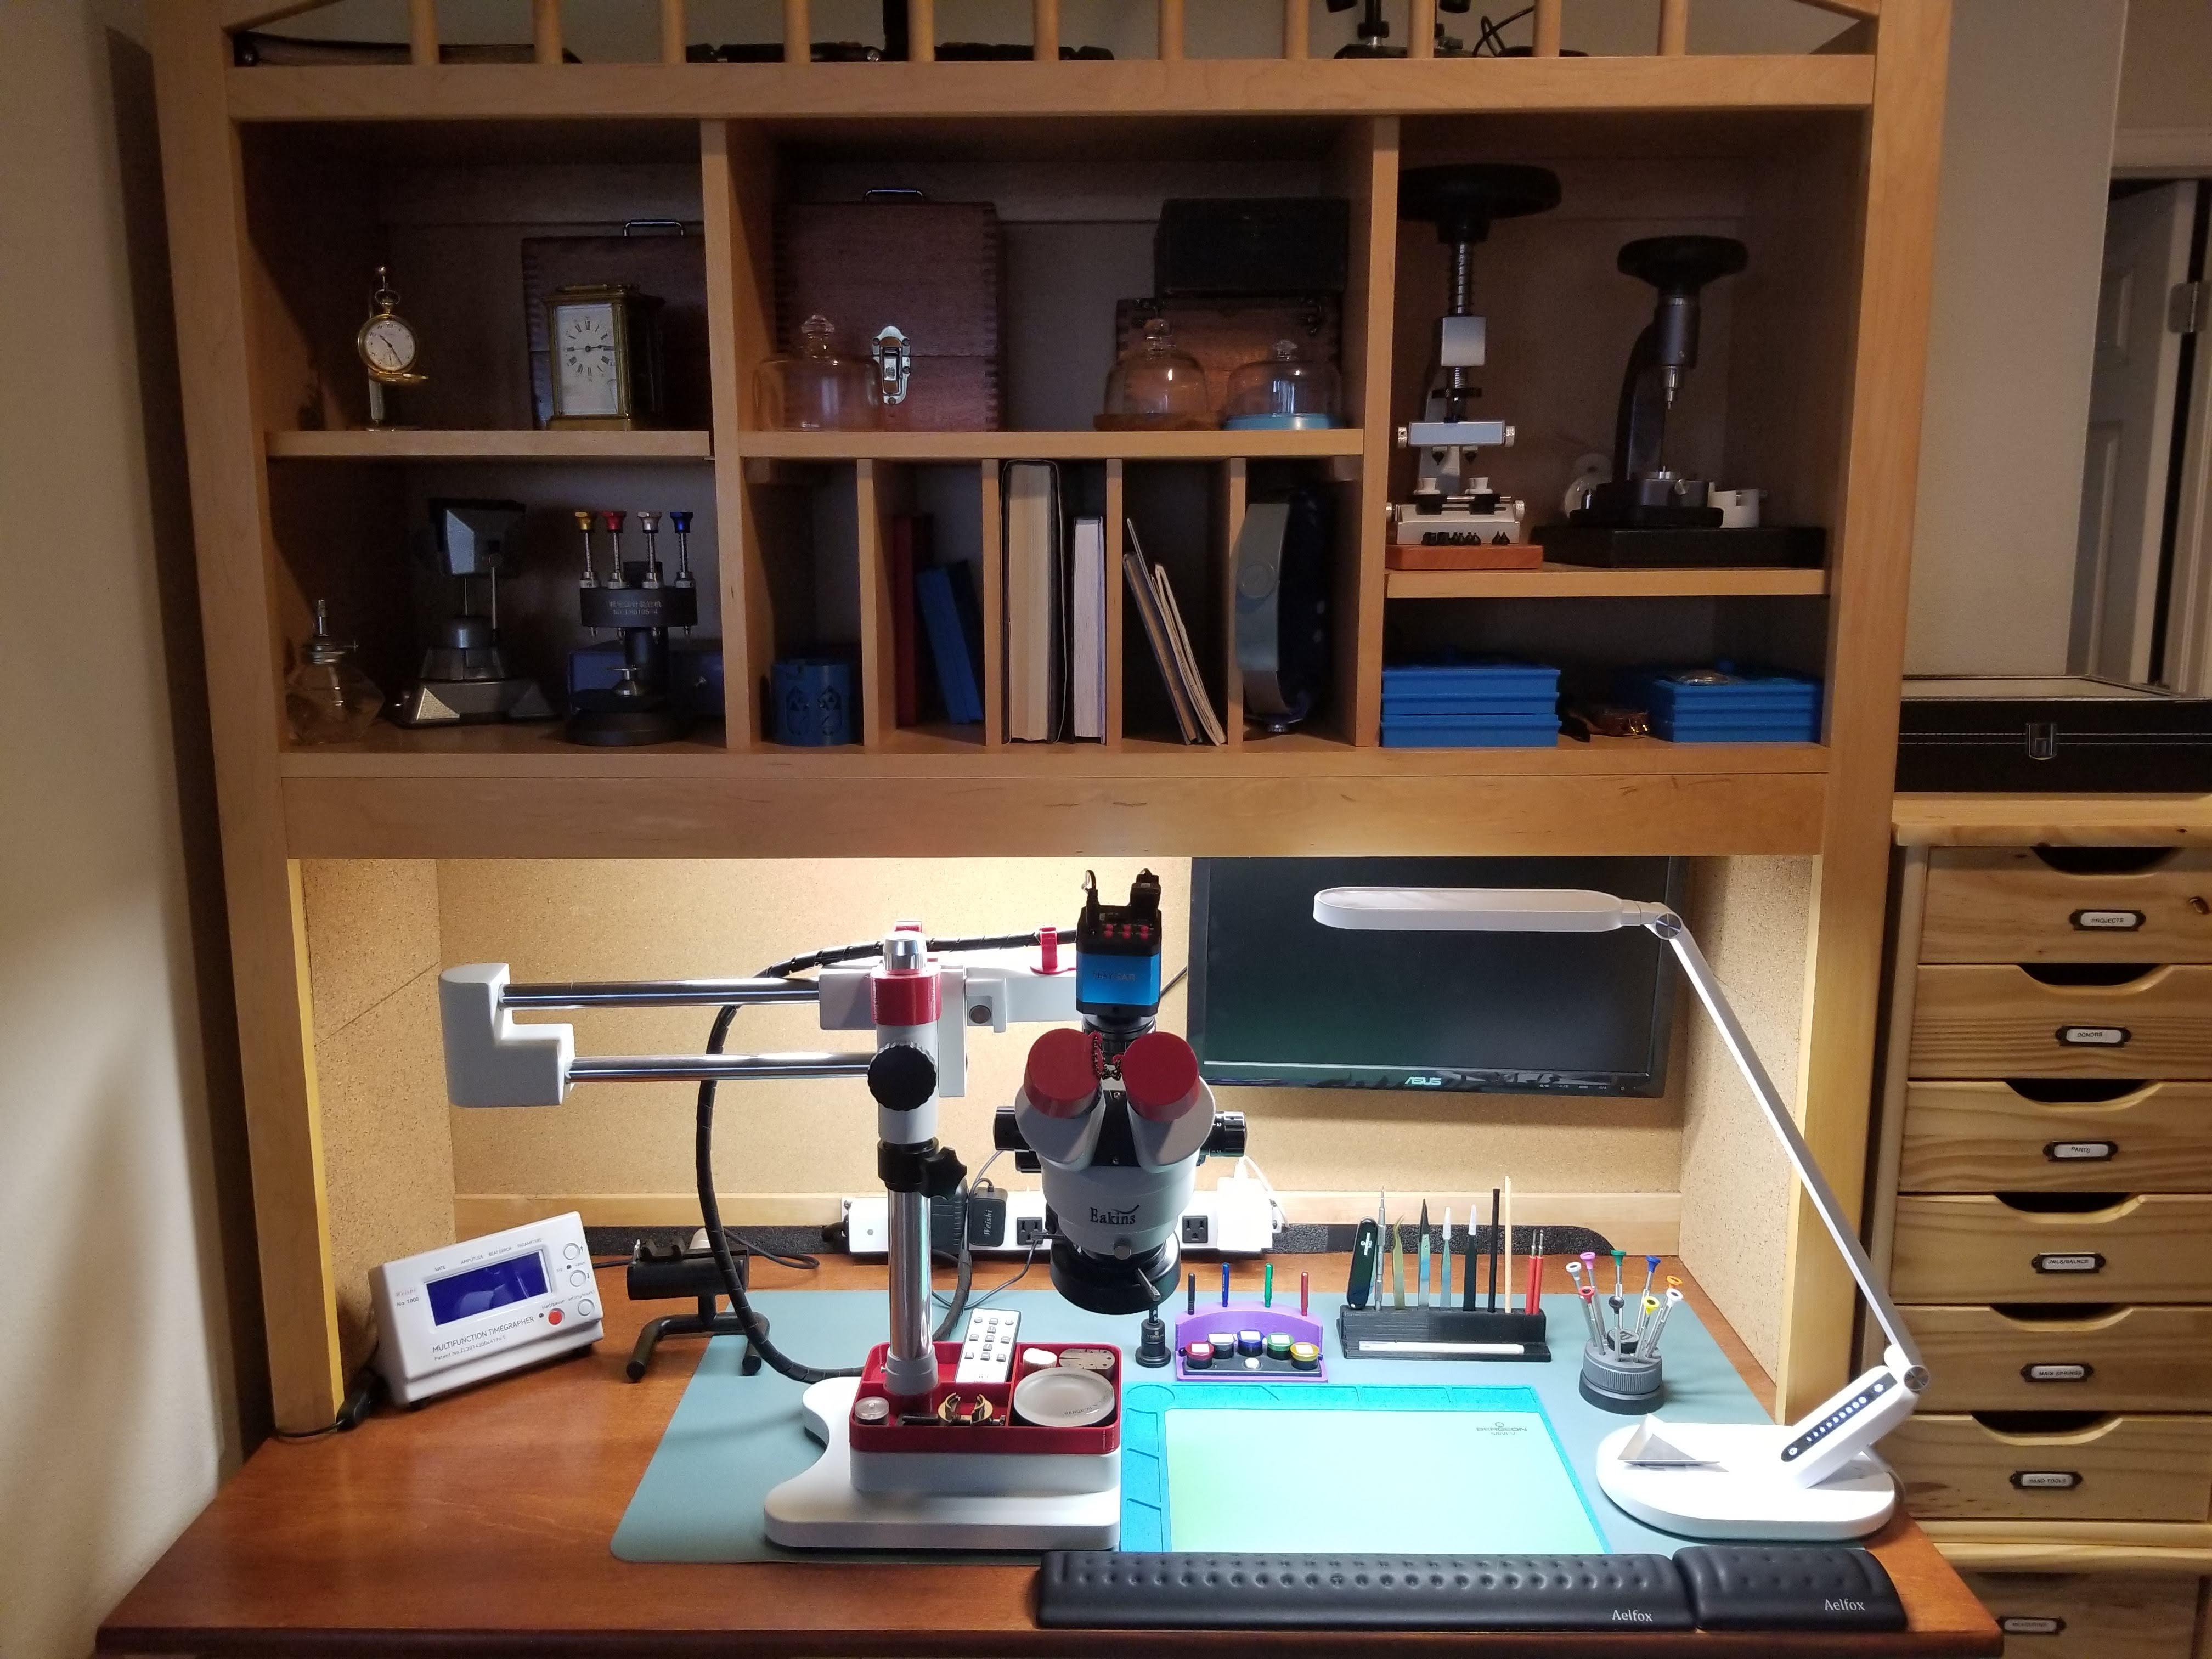
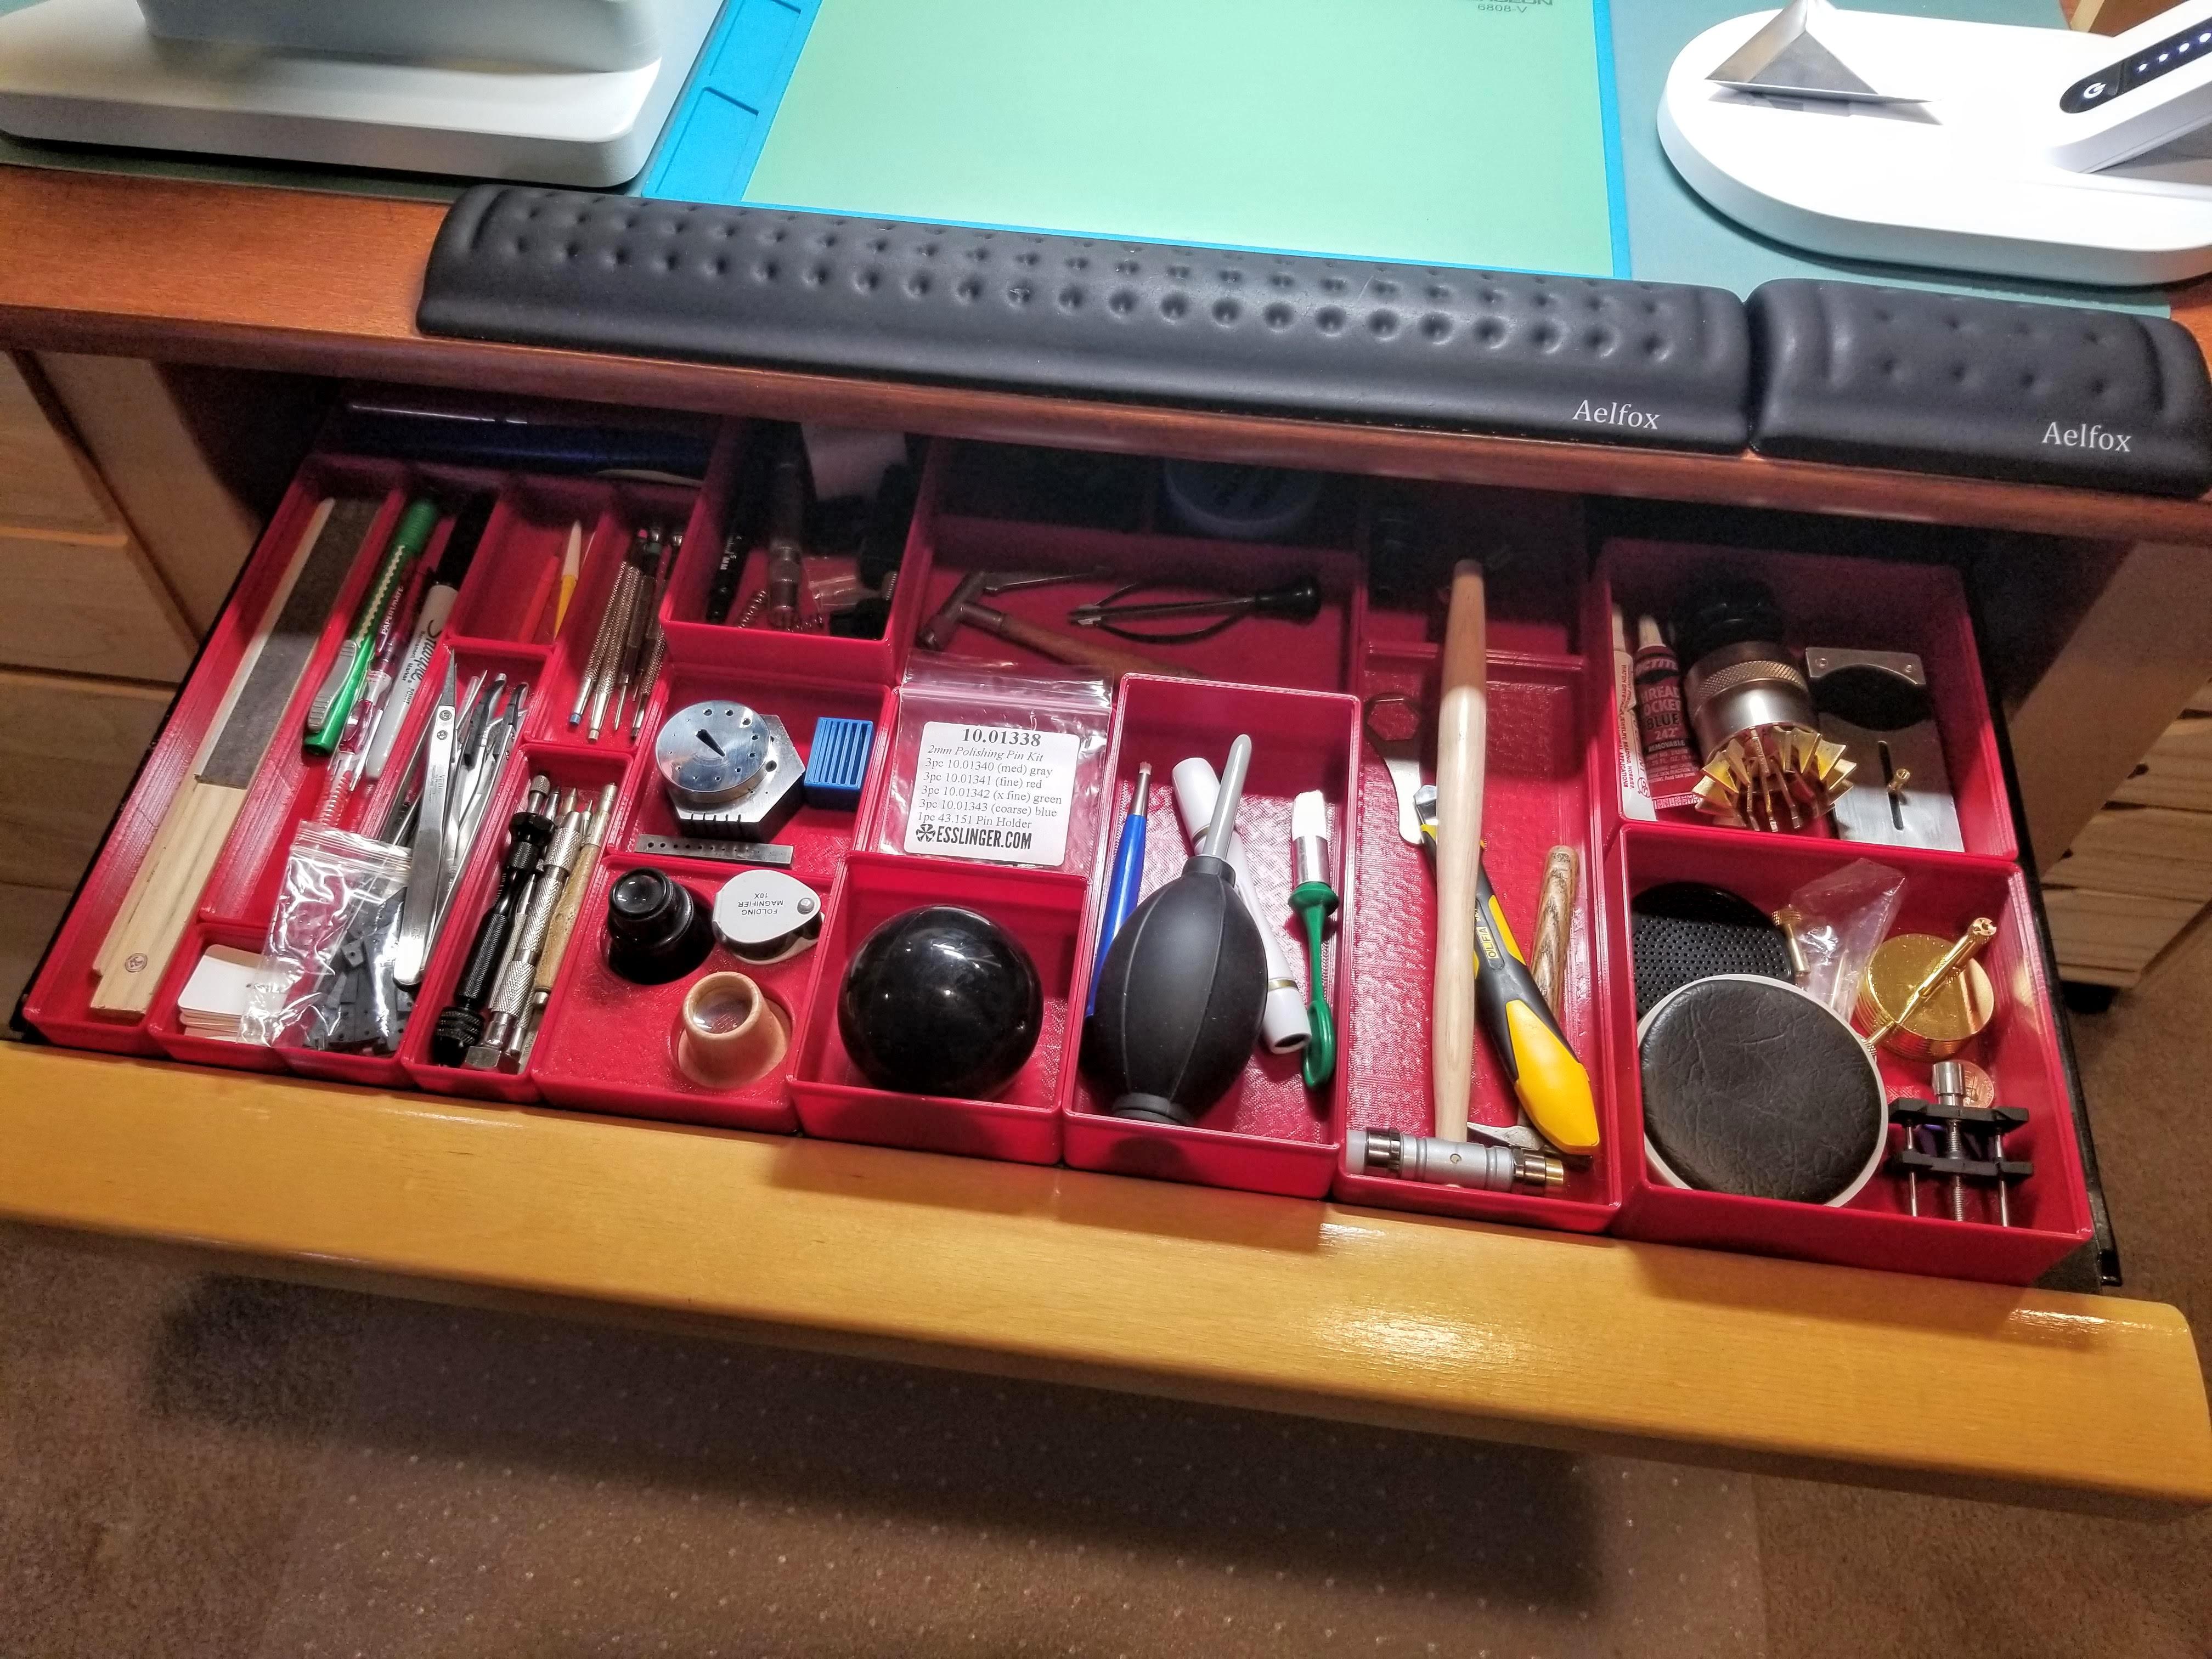
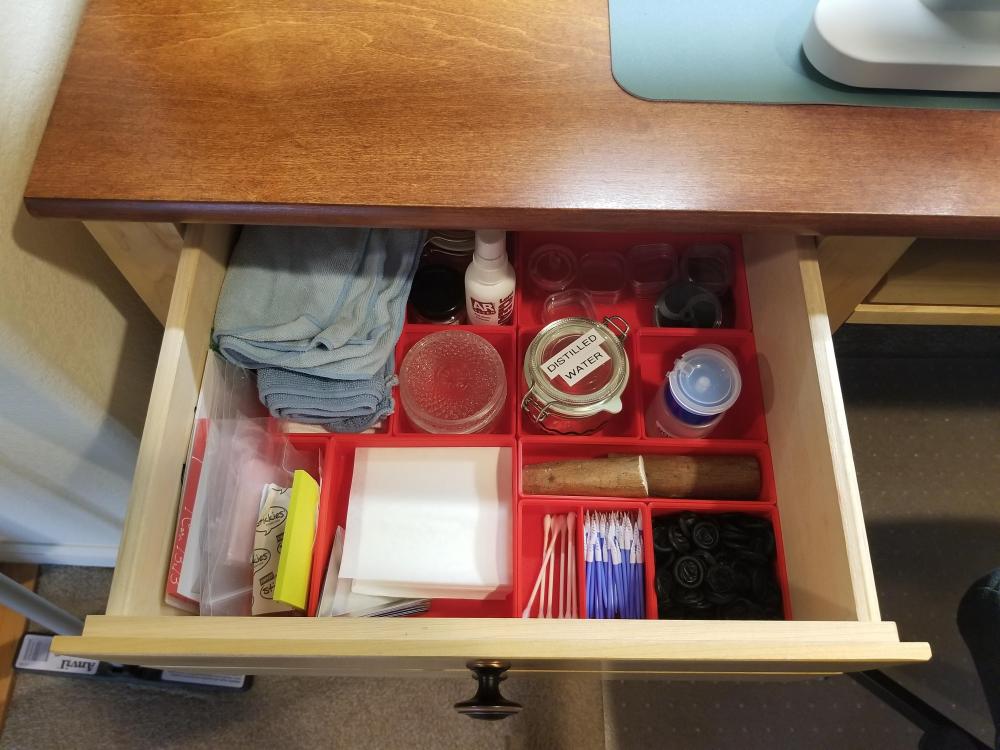
My setup has continued to evolve. Not ideal, I know, but it works well for the tight real estate that I have. Added an optical microscope. Takes up a lot of space, but so much nicer than using a loupe or magnifying visor. Better on my back, for sure. Added two sets of drawers for projects, parts and tools. Keeps me better organized. I now use the desk drawers for tools and supplies that I more commonly need. The hutch and drawer units are handy to store all of the tools that I have been acquiring. The computer wrist rests help corral parts. I plugged up the gap between the hutch and desk with some foam, where some parts liked flying to. I also added some cork board to the sides of the hutch for a bit of parts ping abatement. There's only one part (a screw) that pinged away that I haven't been able to find, even with the big magnet wand that I keep off to the left of the desk. Lighting is still something that I want a better solution for. The microscope gets in the way of a portable desk light. I did buy a unit with two adjustable lights for the times that the microscope ring light provides too much glare for photography, but it's awkward to use and isn't as bright as I'd like. I keep my ultrasonic cleaner and watch cleaning machine down in my basement.


 8 points
 -
Following your suggestions, I've made something vaguely resembling a cutter. I'll set this up on my milling machine and will try using it on brass first to see what it does..
 8 points
 -
I don't really see many Seikos (like 1 every 3 or 4 years?) but they seem to be known for running lower than 270 amplitude. Likewise, I might have worked on one Russian movement years ago. But for other stuff, regardless of age, I do go for a healthy 270 horizontal. I am doing this for paying customers though. If I am under, I will figure out a way to get it up (and 99 times out of 100 a new mainspring isn't the answer). That often entails adjusting the escapement, which I do very frequently. There are exceptions; for example I had a nice little Piaget 9P in last week, which hit 255 or so horizontal. However, it only dropped to 240 in vertical, and had a 15 second delta over 6 positions, going to 20s at 24h and amplitude staying above 200. So I let it go at that.8 points
-
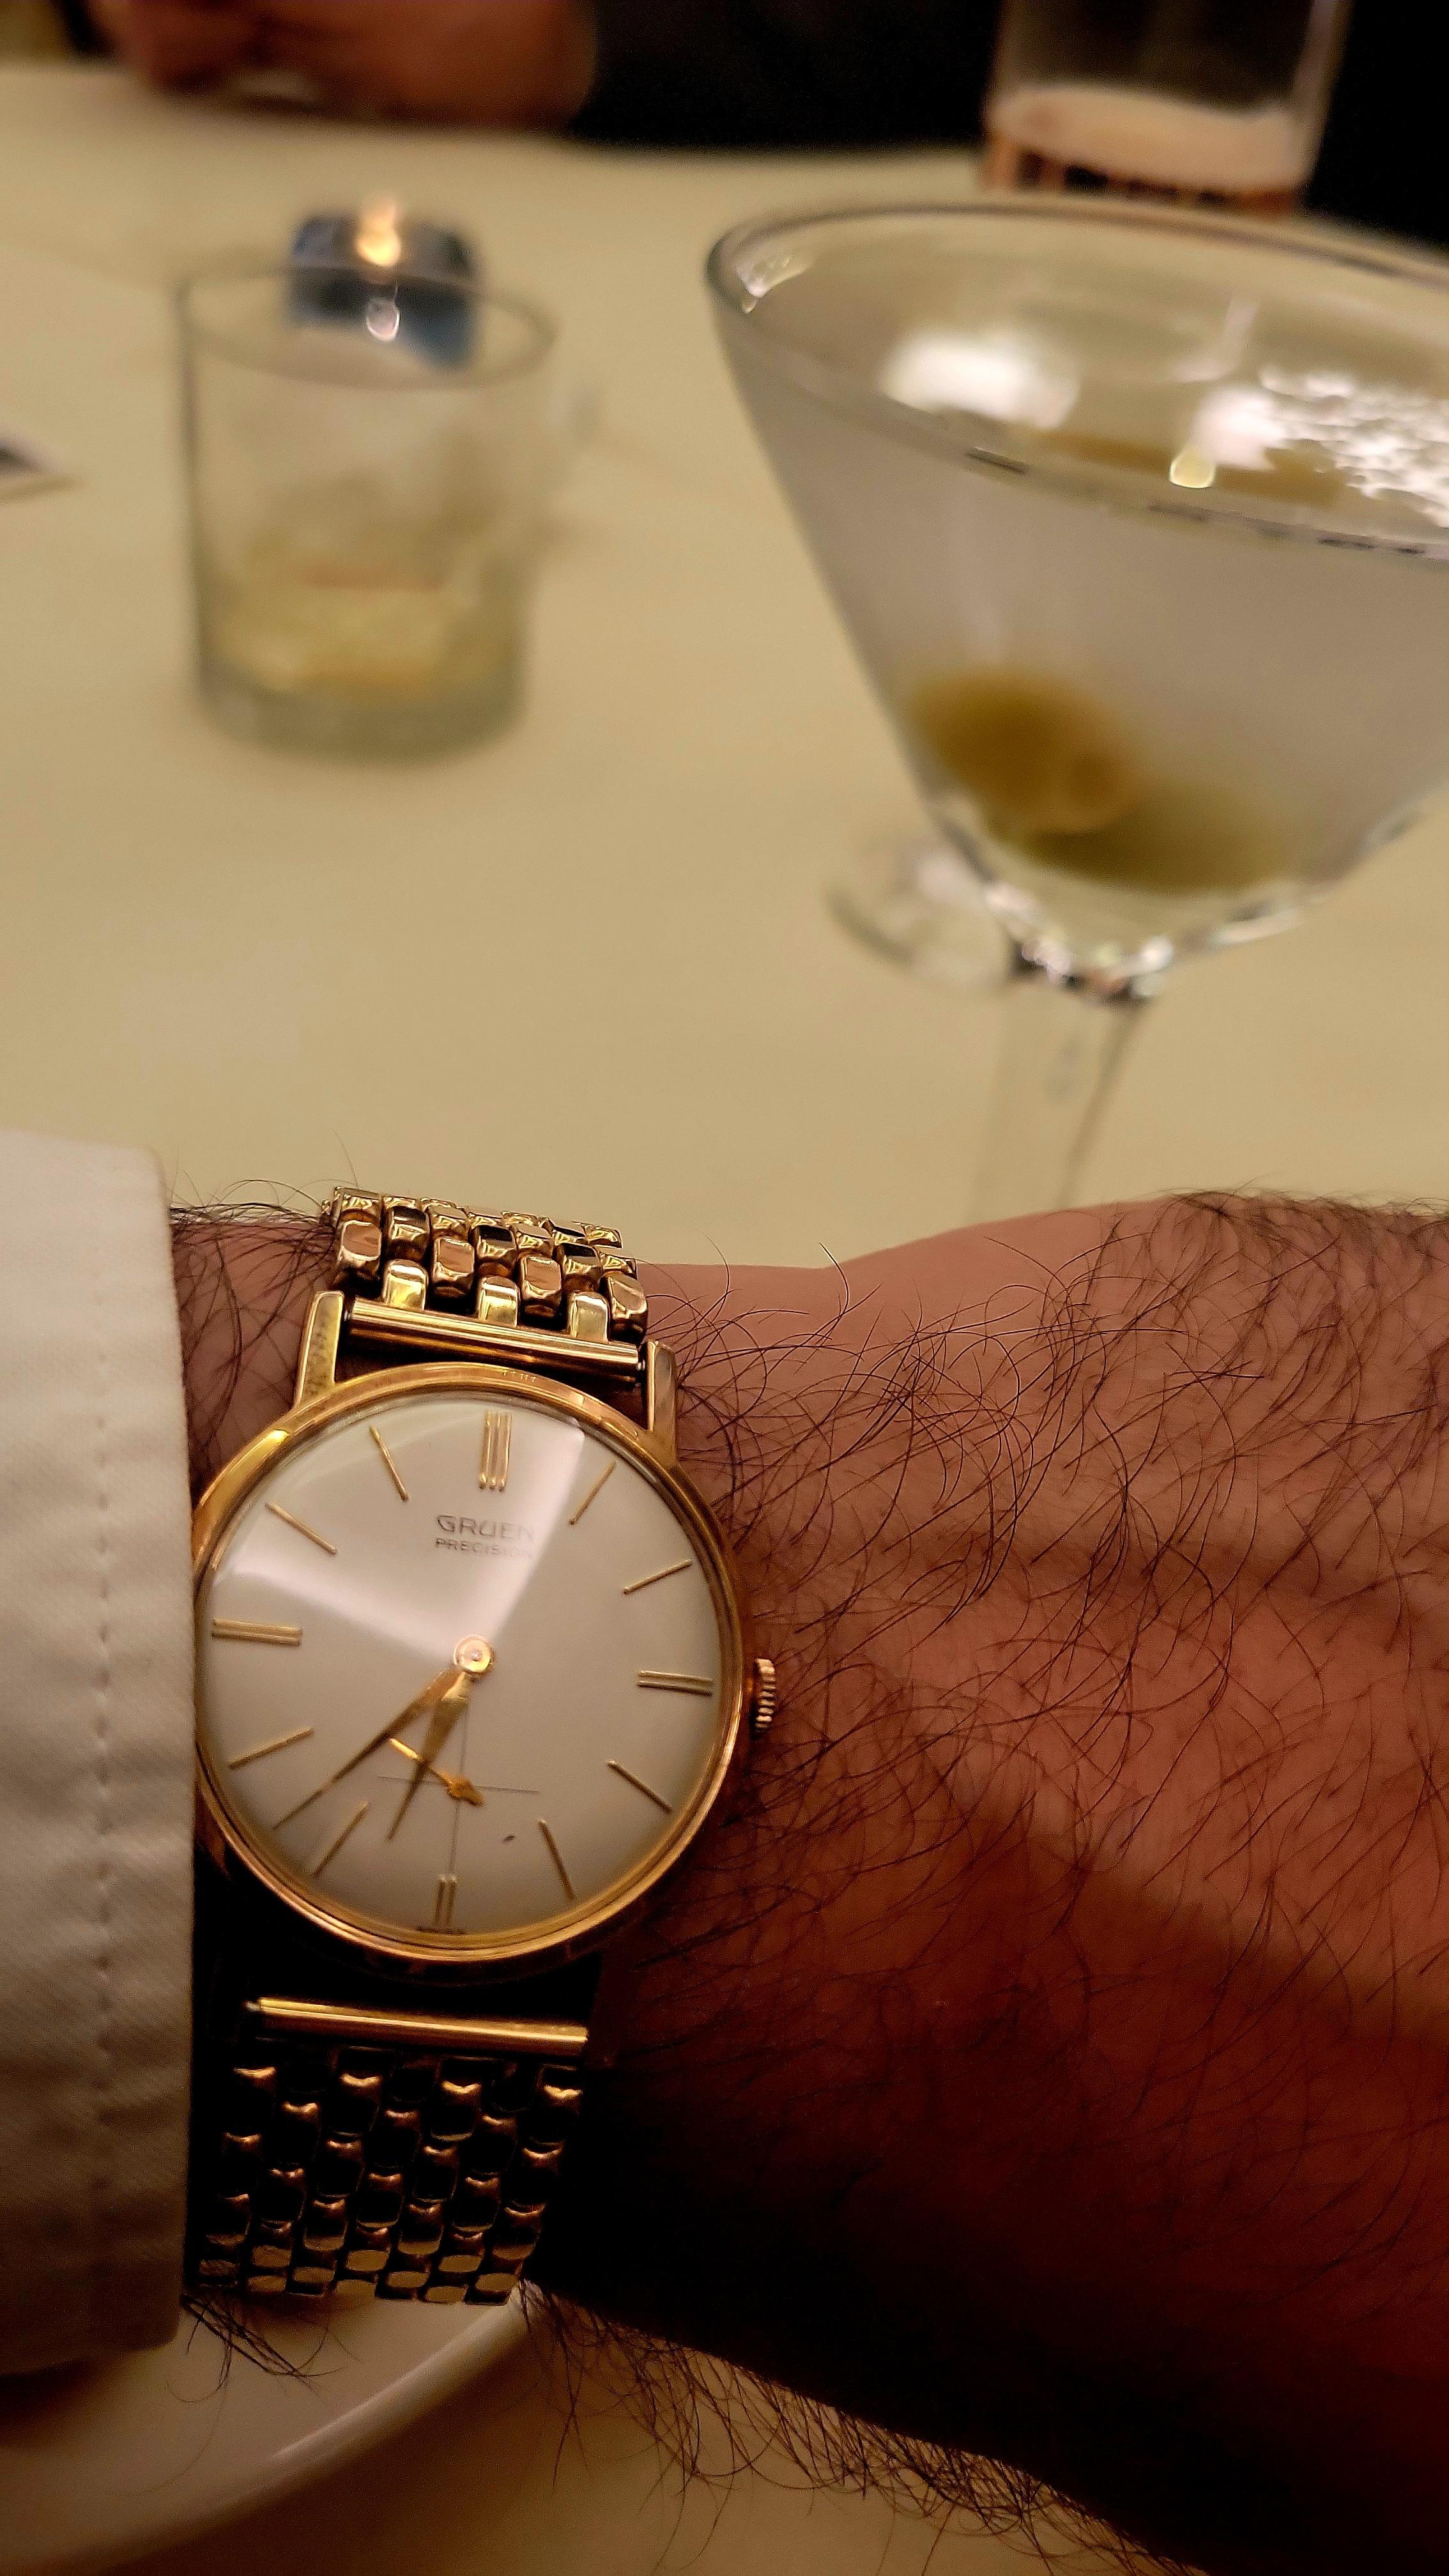
Went full Bond last night with my Gruen 510 and a dry gin martini. I know, I know, Bond's martini is vodka, but I just enjoy flavor too much.
 8 points
 -
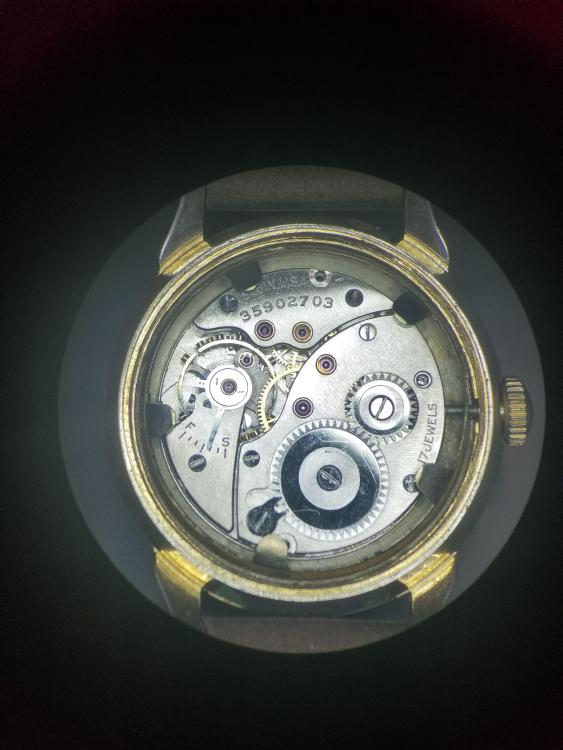
Several months back, I was perusing eBay looking for a cheap watch to work on. Saw this lot of 8 watches and got them all for pretty cheap. What attracted me to the lot was the scalloped case of the Elgin. The movement turned out to be an Elgin Grade 524, manufactured in 1937. I finally got around to servicing it. The balance wheel had lots of issues (bent hairspring, wheel out of true, roller table not fully set on balance staff, and a loose roller jewel). I ended up finding a 1936 donor movement to steal the balance out of. Well, that doesn't seem to work well with these older timepieces. So, I serviced the donor and got it to run pretty decent. I ended up doing a movement swap with the watch. Now I have a movement that I can use as my guinea pig for a variety of balance work. The watch turned out quite nice i think. Case just needed a clean and light polish. Crystal was in good shape. Added a leather strap to finish it off. Love the look of that case and dial.

 8 points
 -
Got this wonderful 1971 $8 eBay find running. Other than a broken mainspring and a crack in the crystal, it just needed a good clean up. It did have a beat error problem, but I got it adjusted to a 0.6ms BE, a 260° and positional error of +/-30s. Not bad for essentially a novelty watch probably not expected to make it much past the '70s. I think the hardest part was fitting the pallet fork without jewels. Those holes are TINY! That brass plating was 10 kinds of awful so I just polished it off for now. I might nickel plate it. Or 24k rose gold, for such an elegant timepiece.
 8 points
 -
Another update Time has passed. What can I do as an amateur. Open a watch without damage. Assess problems. Disassemble without damage. Assess what needs to be done. Clean and repair damage parts. Specialist working Use of Staking set. Use of Gem setting tool. Replace mainsprings manually, or with tool. Repair hairsprings. Regret that I am not capable of hairspring pin insert. Not capable of pin replacement. Time setting, I can do. As an amateur, I do feel confident that I am fulfilling my aim to serve my self imposed apprenticeship, which I hope will never end. A good look at myself. 76 years of age. Working on a computer table. Well I mean. Ah well. Not running a business. Armature only. Working on own watches, ebay etc. I do want to get better, Only practice will achieve that. I am now contemplating working on my own high end watches. I do feel confident enough now. Aims? I did think of the qualification route. BHI route. Not for qualification, but for knowledge and increase capabilities. When I did contact BHI, they were very good to me. Answering my questions without influence. The emphasis on toolmaking and use of lathe put me off. Yes, the cost was also a factor. Total cost in excess of £3,000 was my calculation. BHI membership, course, tutor, tools, travel and accommodation. Better for me is a hands on training. Would love to do Jon the watch's course. But, too far. Mark Lovick's distance learning course still stands solid. Done, and still doing Mark's course. Level 3 I can now absorb. Chronographs? Another few years. I am now levelling out as I realise my standard of capabilities. Onward and practice. Ross Entered in wrong forum. Can moderator please move the post to Current Achievements?8 points
-
Five months ago I decided it was time to learn basic polishing and received much-appreciated help in the "Please help me buy a polishing machine" thread. Usually, I prefer to keep the patina especially if I or the owner of the watch has had it in their possession for a long time and shares a history with it. That the watch and of course the movement should always be clinically clean after a service I consider a matter of course. I also think that really expensive watches should avoid polishing, at least if you can't do it correctly and preserve the original shape of the case. I have learnt during this period that accidents can happen very quickly if you don't really know what you are doing, so training is a necessity. Having said that, although the result is not perfect, I feel very proud of my achievements so far, and I hope you like the before and after pictures because there are quite a few. Before the refurbishment: After the refurbishment:


 8 points