Leaderboard


Popular Content
Showing content with the highest reputation on 02/05/21 in all areas
-
My career has spanned several startups and nearly as many industries and areas of expertise. Previous business ventures have had varying degrees of success and failure, and more often than not failure boils down to one or more partners dropping a ball in a big way. Similarly, I've had to answer to investors and big money types, and while it's nice to have the funds, I'd prefer to not have to answer to them either if I can avoid it (also, I get to keep all the money I make, so that's better too). For the past two and a half years, I've been working on a new technology that is lightyears ahead of everything else on the market. At the most simplified level, it beats the best competition by a factor of 20, and that ignores the vast majority what makes my tech superior. On top of that, the prototype cost is on par with or less than the off the shelf cost of the status quo, AND it's tiny in comparison in an application where size matters (less than 1% by volume, rough guess). When I initially had the idea, I was talking to the CFO of a major equipment supplier in the industry, and he told me on the spot that if I could solve the problem they were interested; I've done that, and so much more. I've still got a long way to go, but I just pushed the last commit before I'm ready to move to beta. I'm sure I'll find all manner of shortcomings between my simulations and real life, but that's to be expected. Next is installation and beta. Then do the patent dance. Then extended beta (find some willing testers). Then I call up that CFO, and we have a chat. If he falls through, there are many more that would happily take his place. It's not a huge market, but with a shop of one, it doesn't take much to make a meaningful dent. For now, I just scored a major win. At least in this project, and possibly in life if it goes in the right direction longer term. Normally, today would be a day that the team would call it early, crack some beers, order pizza, and have a big celebration of some sort. There's a pandemic, and I'm a shop of one, and the baby is asleep, and my wife is in a Zoom meeting, so... I cracked a beer and I'm sharing my success with you all. Cheers!3 points
-
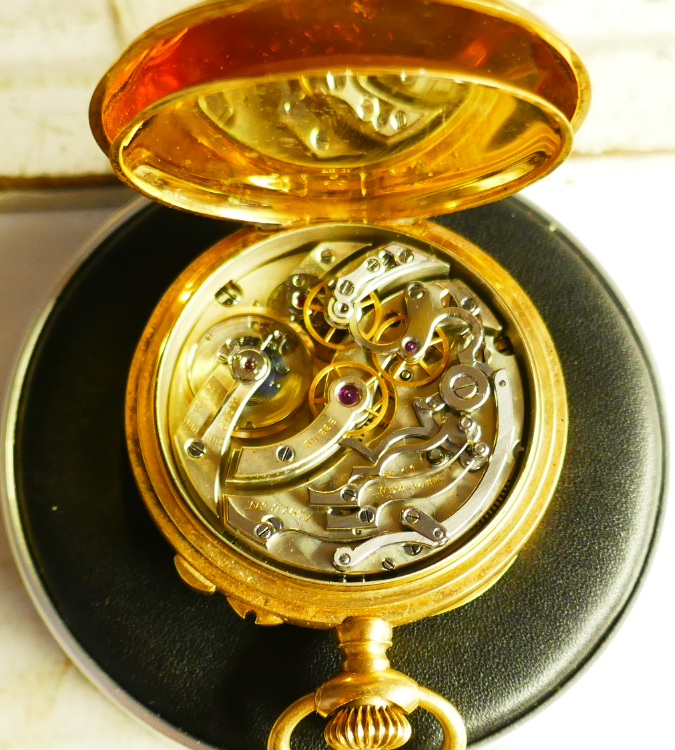
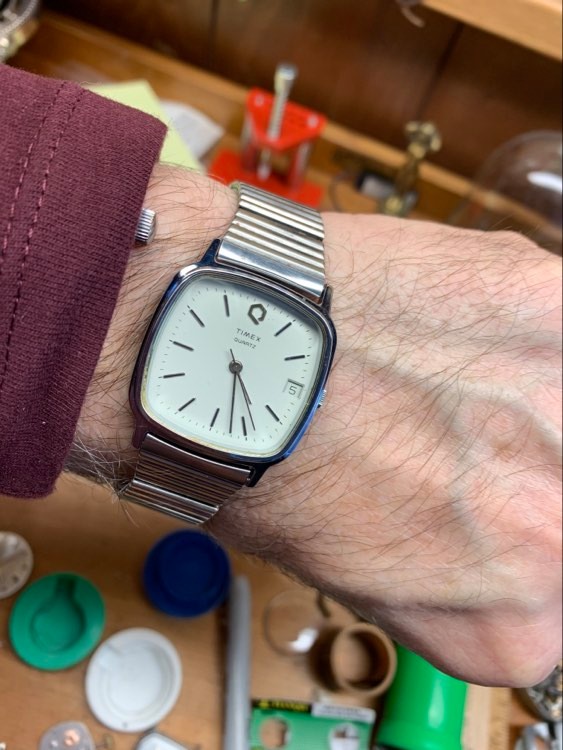
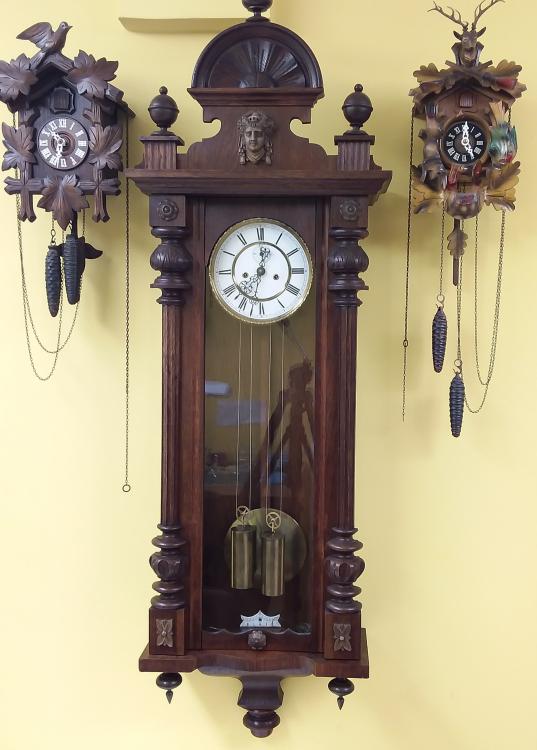
LOL, last night my neighbor was over for happy hour and I am telling her about my watchmaking renaissance. She says she has this watch that belonged to her grandmother...wondering about it. So she runs it over today and hands it to me to check out. Oh my!

 3 points
 -
Personally I would check how the hairspring is attached to the end stud. If pinned then remove the pin to release the hairspring. Removing the stud is not easy without causing other issues. Looking at the hairspring it is highly unlikely that this will have a successful outcome but always worth trying.2 points
-
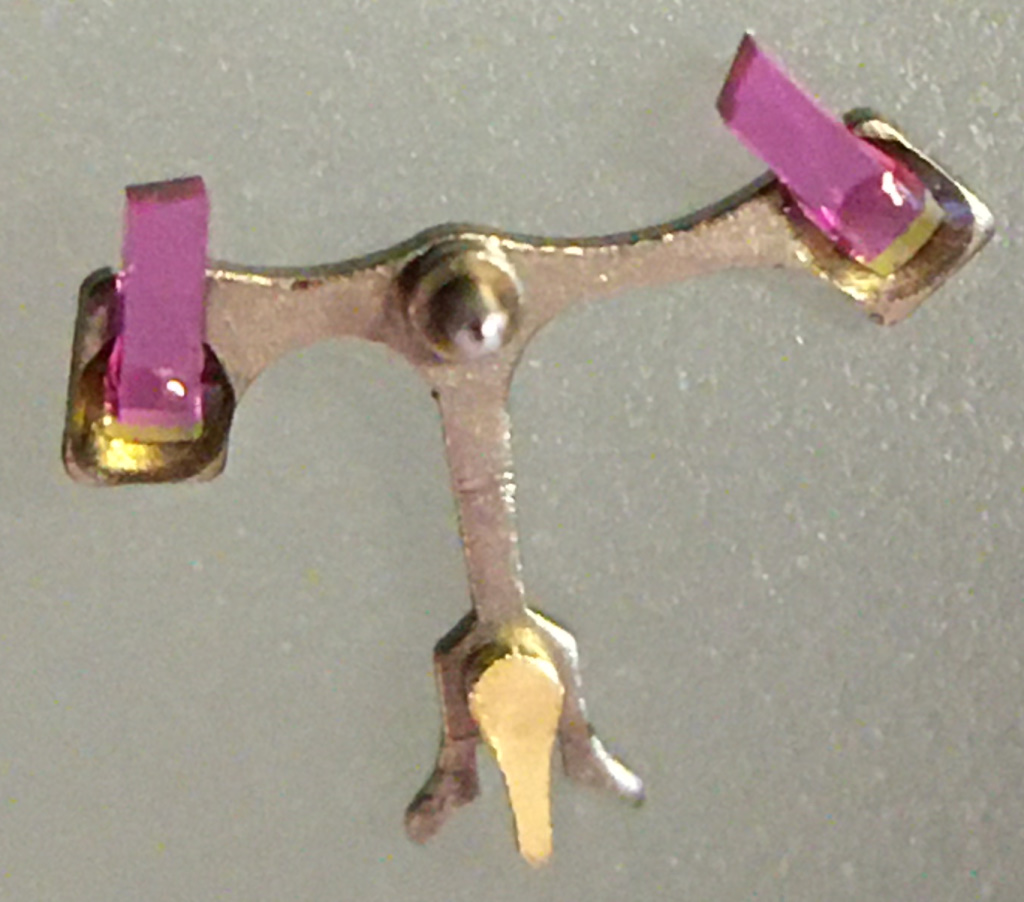
Brass wants zero rake angle. If you are turning it on a lathe that means that your tool will have flat top (or close to it) rather than say a 15ish degree angle for steel. With a drill, the rake is built into the twist. So, you do what's called "dubbing", which is to put a flat on the cutting edge that's in line with the body of the drill. You are making a zero rake cutting edge, and even if very small, makes a big difference in brass. If you don't do it, it wants to sort of screw itself into the work, grabbing and sometimes breaking, or with sheet brass grabbing and spinning it around to smash and slice your fingers. Just did a quick check to cheat and find some pics illustrating it and there's a vid by Clickspring! I haven't watched it but all his videos are fantastic so here it is.2 points
-
It was used in spray cans a lot in the electronics biz back in the day. I have an old industrial watch cleaning machine with a Dymo label on one jar marked Freon, and spoke to folks in electronics who would get 20 liter drums of it. It's apparently a lot less dangerous to your health than some other solvents- unless you are smoking around its vapors.2 points
-
Give it a manual wind every month. Put the back plare on.2 points
-
This thread is guiding me with regards to all these watches my dad left behind...but this comes at a time when I am involved in another restoration. It is not about watches...but it is about time. I will give the "brief" version of this story. My uncle bought a 1964 Chevy C10 and drove it until he passed. My dad got it after that and then around 1980 or so, my dad gave it to me. I drove until 1989 and then I decided to sell it. I wanted new shiny things! Well 20 years later I began to regret having sold it. So...my brother...who restores vehicles started looking for it. He was not looking for a similar vehicle...he was looking for MY vehicle. After years of looking we found it and bought it. Yup, I had the proof--VIN number. But in reality...I did not need the VIN. They guy who bought it never removed the wooden console that set in the floor where my dad put his coffee mug. Well...there were many other things...like my gun rack (yup...I am a native Texan...we have guns). Anyway, the guy I sold it to is the guy from whom I bought it back! He is a musician. The name of the band: "Stop the Truck." My truck was featured on his album covers. Fast forward. The truck is almost fully restored. I was able to keep all of the interior (even the steering wheel that has a big chip that I CAUSED). I refused to replace the old steering wheel with a nice restored one. Had to replace both doors. I bought a junker and we took the doors off the junker and put them on my C10. The bumper was broken in two places. We welded it back perfectly and tweaked the marking on the bumper so as to look original (back then, the dealership installed the bumpers with their names stamped on them). It is beautiful...absolutely stunning (and it has cost me far more than it is worth). I think I did the right thing.2 points
-
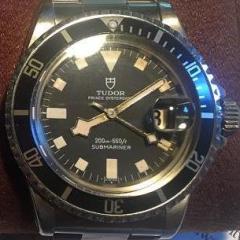
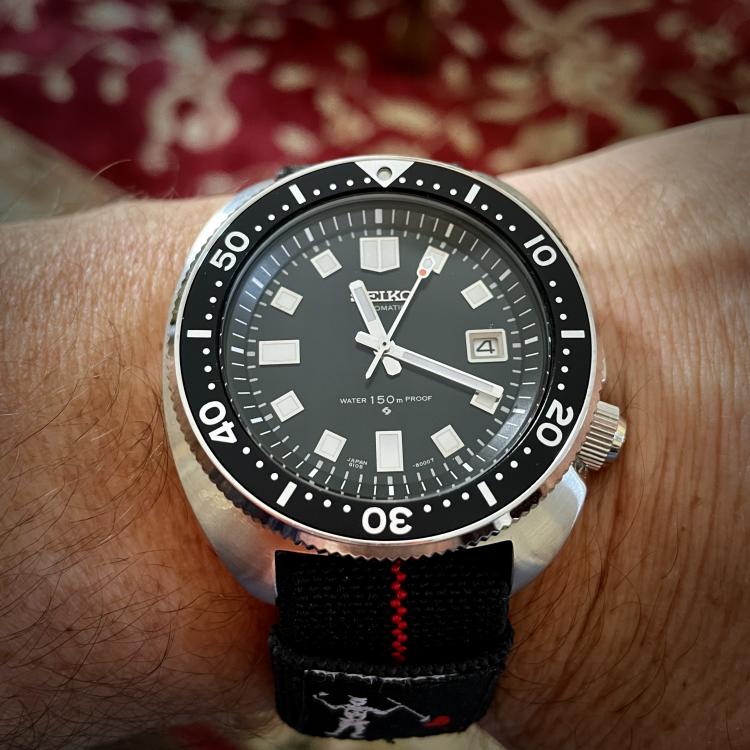
Today is my Seiko SRP777 model as a 6105 "Captain Willard" homage. Dial, hands, and coin-edge bezel. I don't wear this one during the winter because of the size and it doesn't fit under gloves very well. But I'm working form home today so is gets some wrist time.
 2 points
 -
Thinking further about Petek Philippe...and their Calibre 89 watch It was the most complex watch until Vacheron upped the ante with their 57260. The complexity and genius must be admired, but there is a part of my brain that is conflicted. For $30 bucks I can put a Raspberry Pi in service to do all those functions and more. In addition, the Pi has more than a billion transistors squeezed into 10's of square millimeters of silicon. Zoom in to those silicon chips and you will observe a different kind of beauty...and consider the brilliant technology that enabled printing of billions of transistors, each of which is about 20 nanometers square. My entire career was spent as an integrated circuit designer, so I have seen this beauty first hand. Even so, when I peer into a beautiful watch and see it's fine workings, another part of my brain lights up. Circuit and watch...both very beautiful.2 points
-
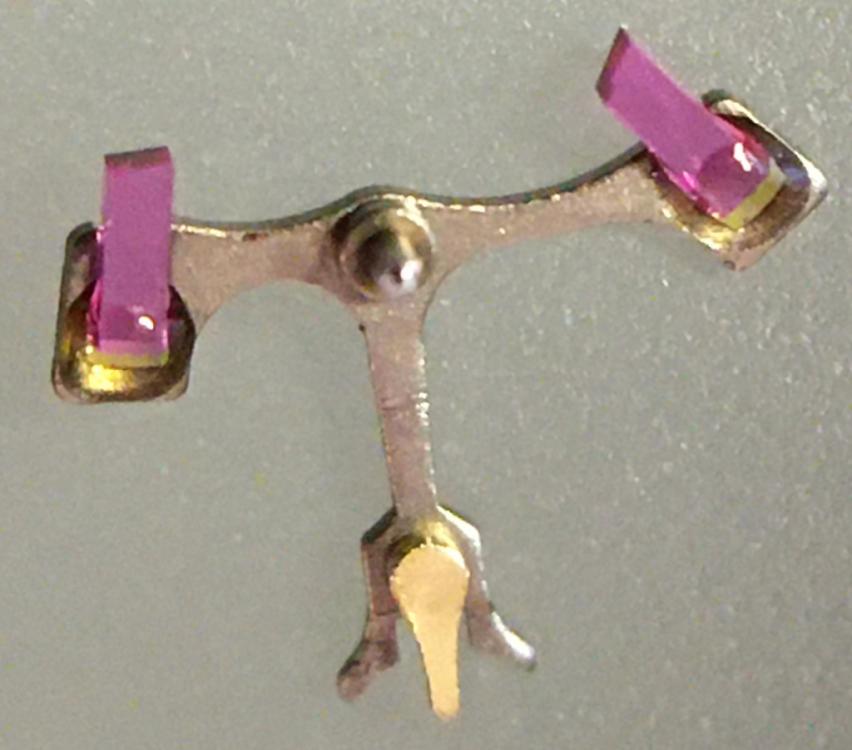
Intro A while back I successfully made my first attempt refitting and adjusting pallet stones using shellac. It was something I had dreaded doing (it seemed difficult) but in the end it wasn’t that difficult at all. Having gathered experience from a few years of handling tiny watch parts using tweezers and having developed some left-hand dexterity as well (I’m right handed) probably helped. Anyway, I thought I’d share the experience with anyone who would be interested and hopefully there’ll be some other WR-talker, now or in the future, who’ll find it useful. If you’re new to this topic you might find this page and this video on the watch repair channel a good start. As I didn't want to risk ruining my Gaston tool I melted and prepared the small pieces of shellac on a chisel tool (my improvisation) that I happened to have in my tool box. However, the chisel tool had a very tough plastic y surface but I was able to burn it away to expose the bare metal with my alcohol lamp before melting and forming small pieces of shellac on it. However, the pieces of shellac needed were much smaller than what they looked like to me in the video. My way of making even smaller pieces was simply to poke the small pieces that I had made with tweezers once they had cooled and were hard. Setting and adjusting the pallet stones was easier than I thought it would be. I didn't realize the fork slots for the stones pinch the pallet stones (Vostok calibre 2414) and actually keep them in place before the shellac is applied. So, I could replace the pallet stones and then check and adjust the locking depth to the escape wheel teeth before applying the shellac. A bit fiddly yes, and you do need to develop some dexterity with tweezers before you try this but not to the point that you break a sweat. Anyway, thank god for my stereo microscope! Anyway, it was my first attempt, and as is common when you try something for the first time, I made a mistake. Despite very consciously applying what I felt was a little too little shellac it still flooded the stones and a large portion of the fork when it melted. Also, I applied too much heat so that the shellac started boiling creating bubbles. So, I decided to start all over. Fortunately, the “industrial isopropanol” (so called on eBay) that I have is very efficient so no problem removing the shellac from the stones and the fork. The second time around I only used a minuscule amount of shellac. Also, I heated the Gaston tool holding the fork in short turns, just so that the shellac would fully melt without staring to boil. Much better! The following is what I would suggest based on my first experience: Basically, follow the video I linked to above. In the video, Mark pokes and scrapes the fork and the stones with tweezers to get rid of old shellac. I tried that, but it wasn’t very efficient. Instead I would let the pallets soak in industrial isopropanol for about 10 minutes and then use a paintbrush to brush them clean. The shellac dissolves completely in the isopropanol and the stones can then be easily removed and further brushed if required. To insert or slide a stone back into the fork slot I found holding the fork by the end of the slot (opposite side of where the pallet stone is inserted) with tweezers (left hand) was giving me the most control. I placed the pivot of the fork (guard pin up, of course) in a small hole in my staking block while inserting/sliding the stones with another pair of tweezers (right hand) into the slots. After having applied the shellac Mark suggests re-heating the shellac to adjust the stones. I was worried that it might result in a mess if I tried it, so I decided to do the adjusting before applying the shellac as shown in this video. The slots for the stones pinch the stones pretty well so if you're careful while you're testing the lock to the escape wheel teeth this method works well and won't dislocate the stones. However, to make sure, double check the positions (depth and angle) of the stones before applying the shellac. Now, the tiny piece of shellac should be placed on the rear section were the stone meets the fork. Mark is clear about this in his video but for some reason it completely passed me by when I made my first attempt. In my second attempt I followed Mark's instruction, but the piece of shellac, being very asymmetrical in shape, was difficult to place in the right spot. However, after warming the pallets to the point that it had only softened the shellac a bit, I discovered, to my surprise, that I could manipulate the shellac into the perfect spot with the tip of my tweezers, without the shellac sticking to the tweezers. Of course, as I've come to realize, every repairer must find his or her own way, but hopefully you'll find my "discoveries" useful. Above is a picture of the result. It's not perfect but still worked very well. The amount of shellac on the entry stone is a bit too little, and there is a < 1 degree tilt on the exit stone (which, of course, can’t be seen in the picture).
 1 point
 -
Has anyone in the US ordered from CousinsUK in the last month? How long did the shipment take (also which service option you used would be appreciated)? I need a mainspring size only they currently have, but I'm thinking of doing a large order if the shipment doesn't take a month to get here. My last experience was before the pandemic and a mainspring and screwdriver in a Royal Mail bubble mailer took a week. I'm on the east coast of the US.1 point
-
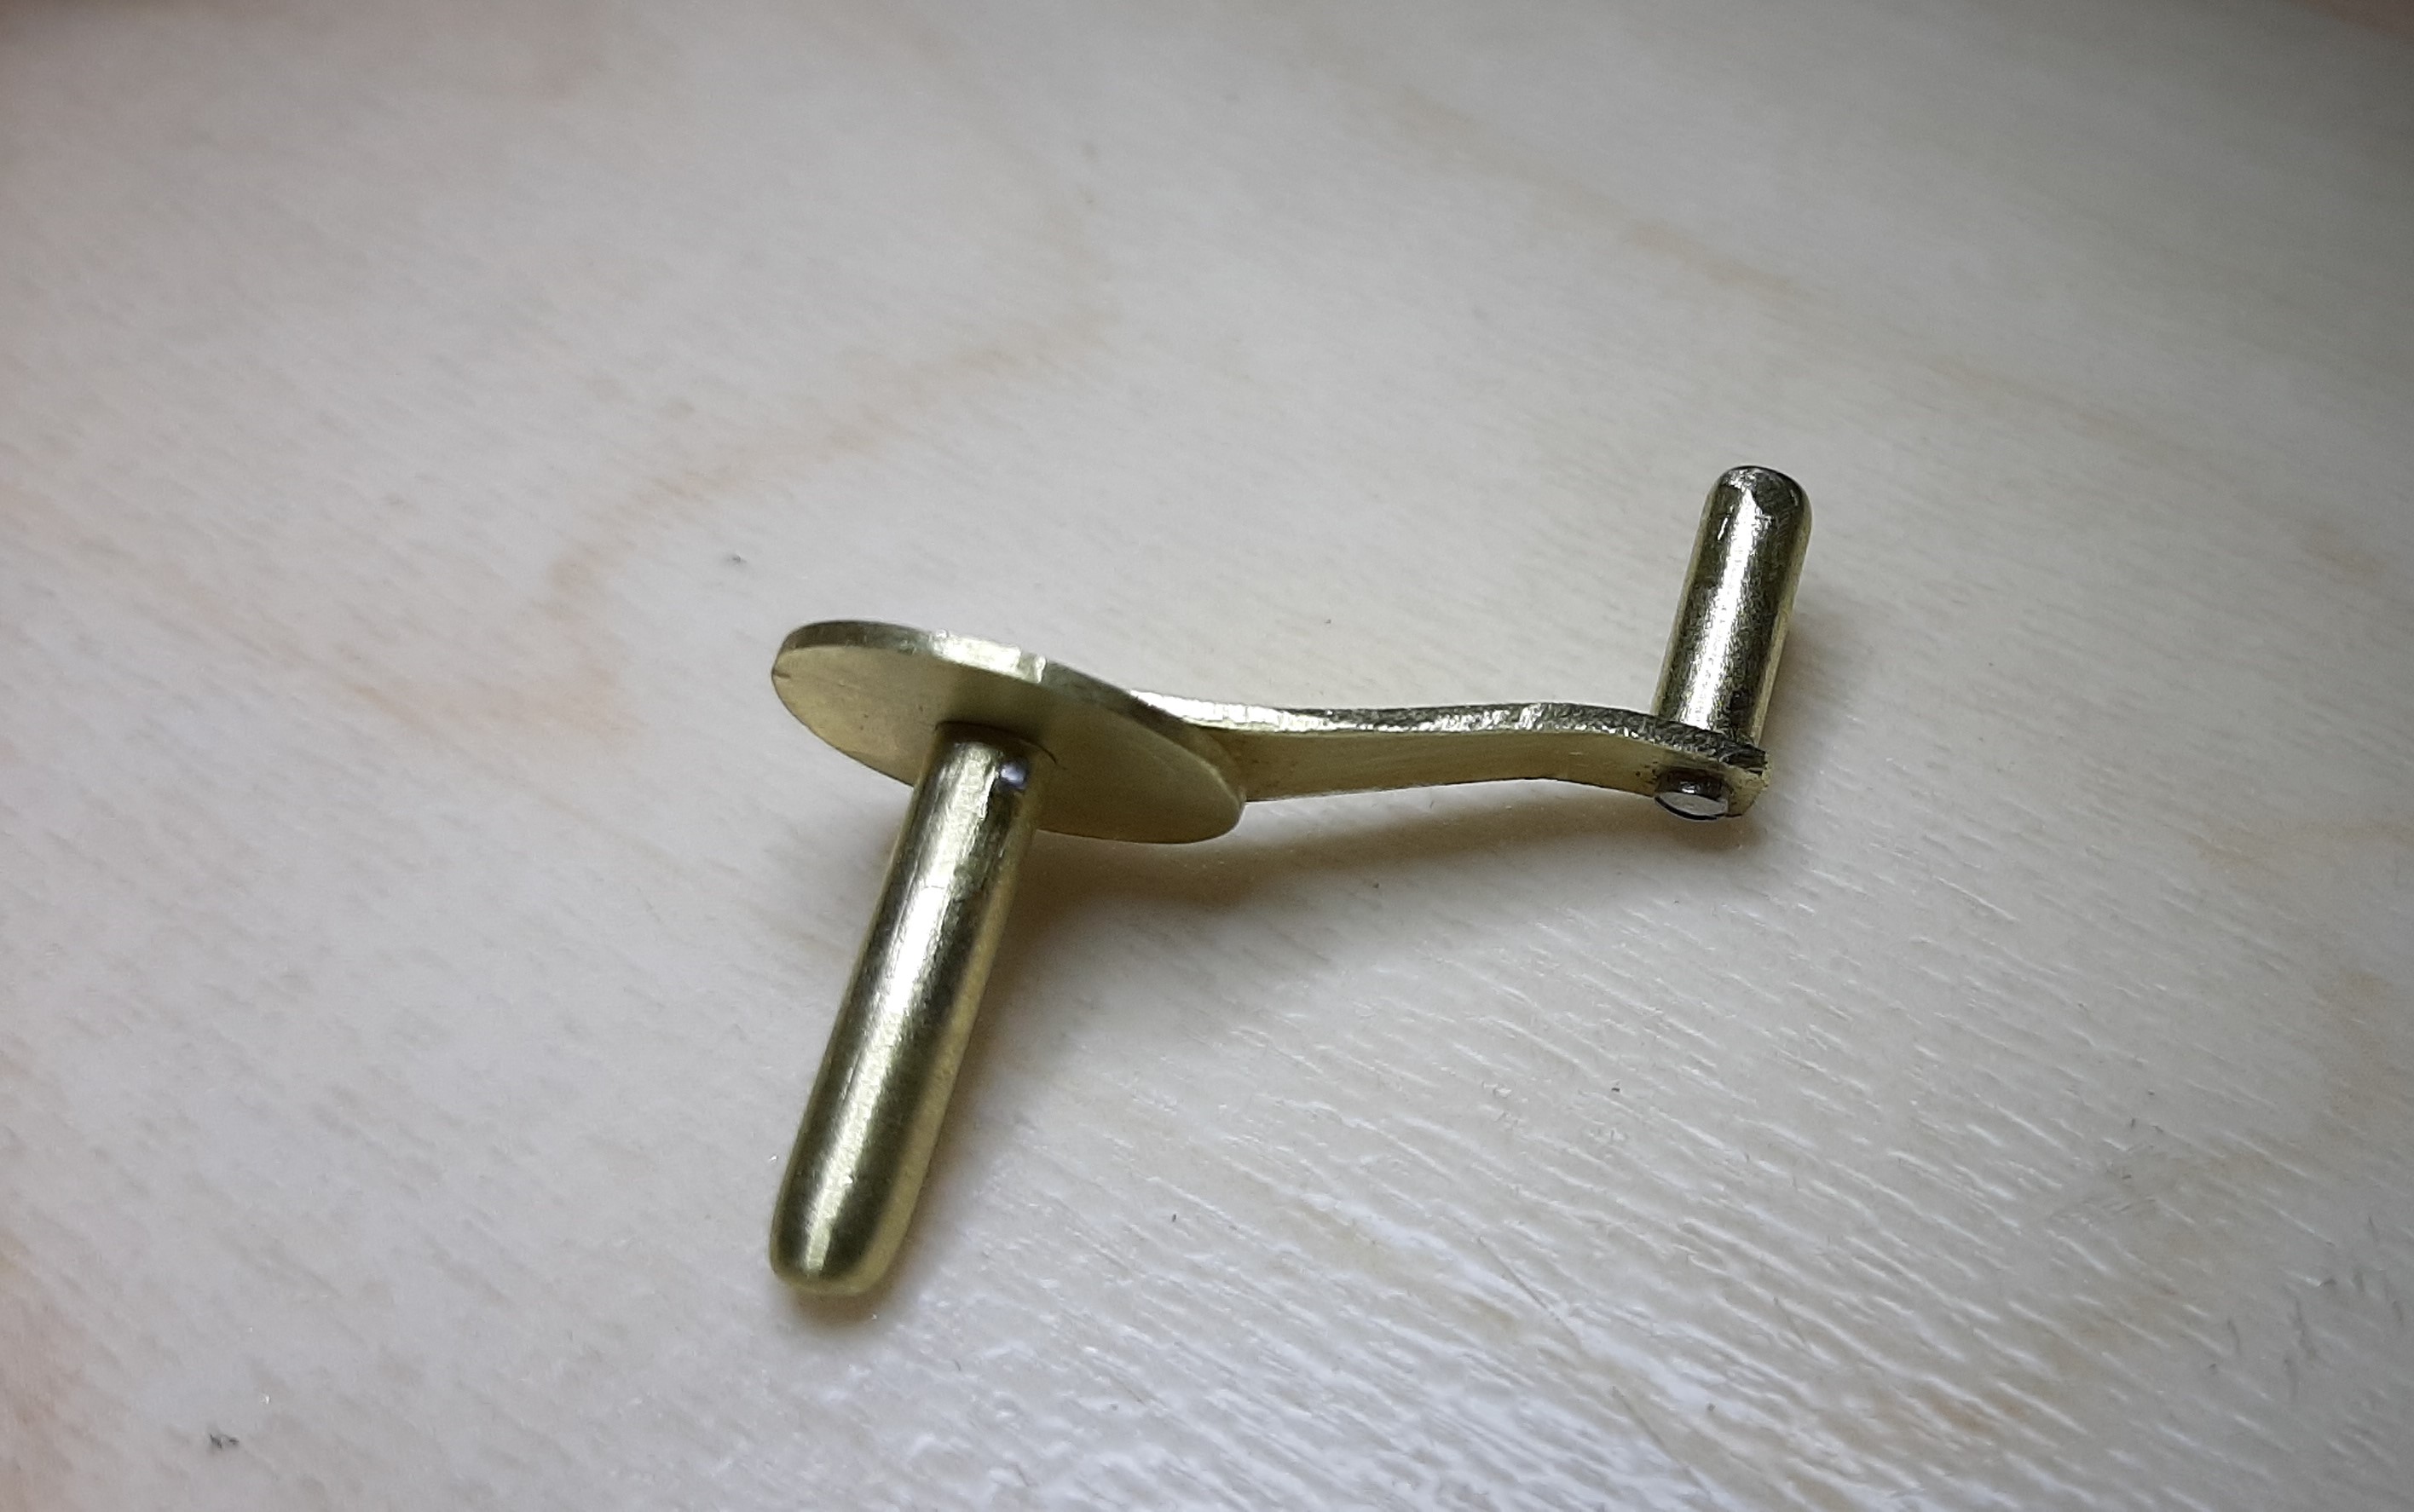
I knocked up this left handed winder this afternoon - I got fed up with Seiko springs pinging out of washers as I tried to reverse them ! I bought the brass from a model shop, and as it's easy to cut and file, I assumed drilling it would be easy. Not ? I broke 2 drills and got nowhere, before finding that lots of oil and a very low speed seemed to (slowly) work. (I don't have a lathe, or mounted drill, so all was done free-hand with a cordless drill. My dremel type drill seemed much too fast to cut). So my question is, what is the best way to drill brass ? The handle is currently screwed to the arbor - but as it's winding left hand, it tends to undo. So I plan to either use epoxy, or solder the bits together.
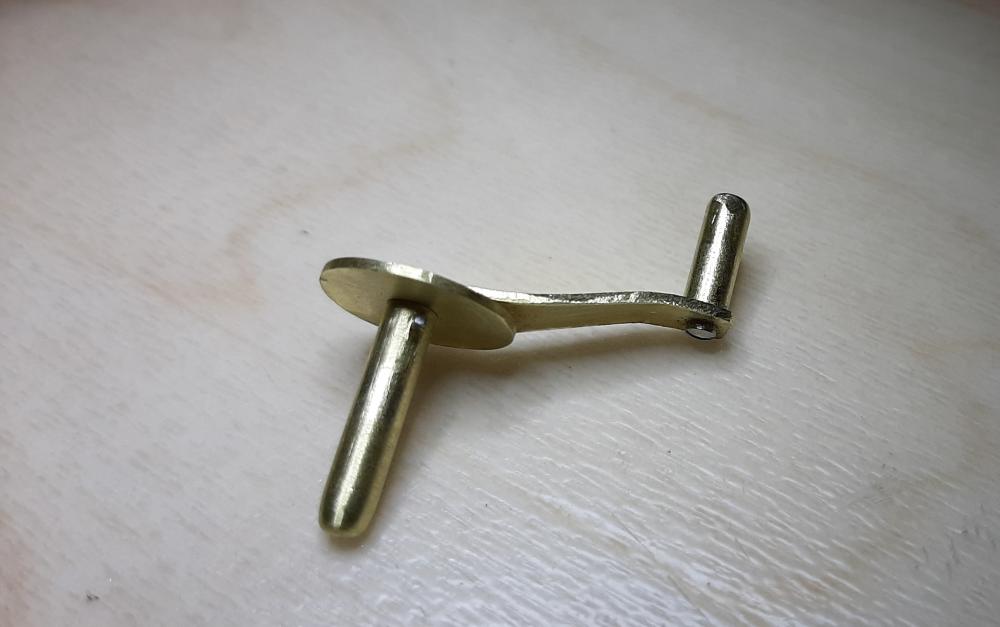 1 point
 -
When wearing an automatic watch, my wrist's natural warmth transfers to my watch. But I live in a snowy clime and my "workshop" is unheated when not occupied. Any sense of the effect of low temps on watch function? If it gets down to, say, 3 F/-16 C at night, do I need to warm things up before I can trust my Timegrapher?1 point
-
I like the battery clip too. Timex did make these for many of the early battery ops. I have to dig a few up to show. But in the meantime, I did work on an early big "Q" today myself. The checked my NOS stock and found a replacement bezel and stem\crown. Looks great with the original stretch strap too.
 1 point
 -
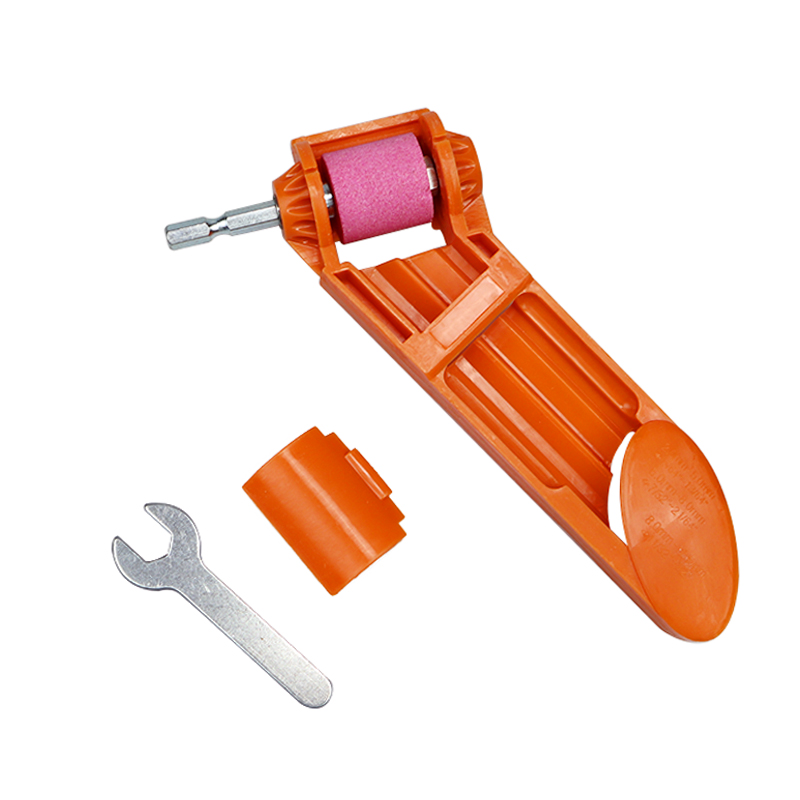
I bought one of these recently for a fraction of that. Reputable seller, Co5 / coating and most probably made in China. The index are metal and having them on the shelf builds confidence and sends away the need to ever use them. If and when they will need regrind I'll just watch some Stefan Gotteswinter videos, and then get busy with my new €3.50 tool ?
 1 point
 -
They are pinned, just remove the pin. You will increase your chances of success if you remove the whole coil and collet off of the balance, lay on a white flat sheet of paper, see what you got. The spring doesn't look original. I believe EB1197 balance complete is interchangable with this.1 point
-
Yes.1 point
-
Yes you can push it out as it is pressure fitted. I tried to find you a post I read earlier, someone made a tool for it as far as I remember -it looked like a little vice, but I failed to find it now. How to correctly push it out? Maybe somebody could give you some hint with more experience. My method is: get it out somehow ? I would place the edge of that HS stud on a block and would try to push it out with something, probably with something from a staking set or anything really, a used pair of tweezers, or a filed screwdriver, toothpick etc.1 point
-
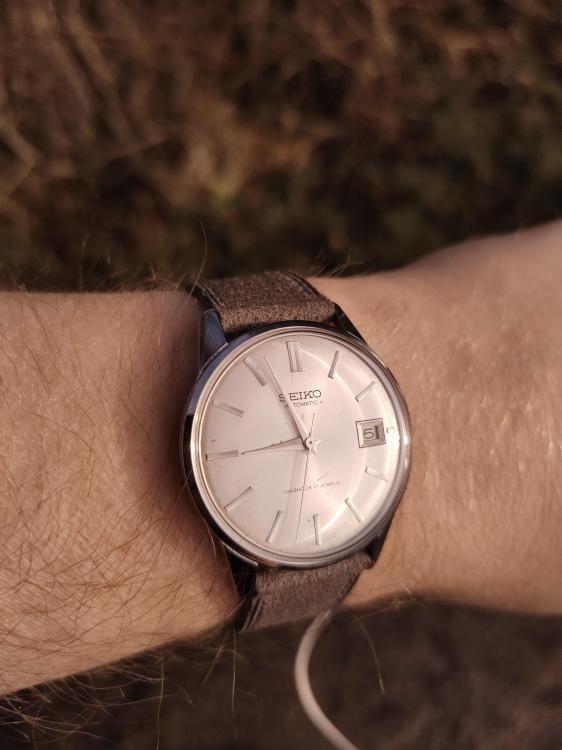
That's an absolutely gorgeous watch and a great story. If I had a diver it would look like that.1 point
-
You may want to consider a Webster mainspring winder. There is one on ebay now that comes complete with containment rings.1 point
-
The latest WMO /UN Environment Programme Scientific Assessment of Ozone Depletion, issued in 2018, concluded that the ozone layer on the path of recovery and to potential return of the ozone values over Antarctica to pre-1980 levels by 2060. This is because of the long lifetime of the chemicals in the atmosphere. https://public.wmo.int/en/media/news/record-breaking-2020-ozone-hole-closes But for one aspect that gets better, too many others are already unrepairable.1 point
-
Can't see any issues with using that..... who needs an ozone layer anyway??? ??1 point
-
Not used freon TF for over 25 years I think it was a banned substance. ours was in spray cans and in bottled form not seen it around buy then never looked.1 point
-
This just makes me itchy. I'd have to order them by colour or size. OCD kicking in.1 point
-
Working on a Hamilton 992 with a dirty dial. A fine cleaning with Rodico followed by targeted removal of spots and blotches with a toothpick; and then a cleanup with Rodico and Ta Da. And the movement was cleaned with Rodico as well. Being very careful not to touch the jewel holes. This PW has a swing of 540 Degrees. Sent from my iPhone using Tapatalk Pro1 point
-
Morning all. I've been an avid watch collector for the last ten years and have ended up with a few pieces I rotate regularly. They include an IWC Big Pilot, Panerai 351, Cartier Santos 100 and a 1910's Omega trench watch.1 point
-
Thanks John. I think it would be wise for me to put down the screwdriver and send it away. Appreciate the reply.1 point
-
We've had people start off with Rolex watches so if you want to learn on this watch no problem. The expense is it really not a concern unless you have an accident. If you're a beginner your chance of an accident is extremely high. It looks like you broke off the axle at least that's what it looks like in the picture. I don't suppose you dropped it? First step we need a model or movement number. The movement number is located under the balance wheel it's a little bit fuzzy in the picture I am attaching an image so you can see where it would be just to verify that I have the number which looks like Looks like it is model number 51110 although the zeros a bit fuzzy so it be nice if you'd verify. Once we verify the model number we can see if we get you a technical guide. Because with the technical guide to make it easy to figure out if you really did break the axle off like I think. How many components are going to have to take off to get the axle and? Then yes I did check there are IWC parts out there so it's not an impossible task unless? What a ripoff you should do it yourself Cameron screwdriver we can get this fixed in no time. The reality of the situation is unless you're skilled in watch repair you're going to have to take off quite a few components to get the broken component off. It's extremely likely we cannot get a technical bulletin for this. Also equally as likely even though I've looked at there are IWC parts out there without a proper parts book or service guide identifying those parts is going to be a challenge. But this is really your choice in your watch long ago I've given up trying to discourage people from doing something they shouldn't. Although if you're paying attention I am trying to discourage you from doing this. https://watchbase.com/iwc/caliber/51110
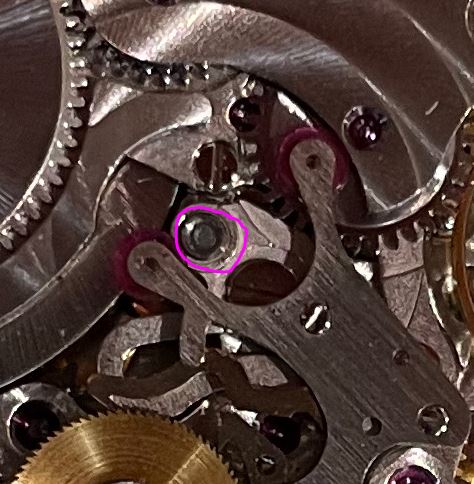 1 point
 -
Another Seiko, 7625-1990 from 1965. 7625A version with fixed balance stud. VID-20210205-WA0009.mp4
 1 point
 -
Did you try pulling out on the stem really really really hard? If so you probably found it doesn't work. I snipped out something from one of your pictures notice the opening next to the stem? Normally when it's cased up there should be a pin of some kind found here. If you push in the here it will allow the watch to go in the setting mode.
 1 point
 -
There are definitely a handful of car guys on here. I used to have a K10 and a K5 (2wd isn't so hot up here). Currently DD a ZR2 Bison. My old Karmann Ghia is the 5th result in google images if you search "57 karmann ghia". Black and white, Texas plates, ironic coniferous background because the photo was taken at a Cars 'n Coffee at a BMW dealership in Dallas, and ultimately ended up actually in the mountains with more or less that exact background. Lots of others in my portfolio.1 point
-
Sounds like a reasonable equation.1 point
-
Yup...well it is draining my wallet and filling my heart!1 point
-
“I think I did the right thing” That’s the bottom line, literally and philosophically. I’m sure you’re uncle would be very pleased.1 point
-
This is a topic of discussion with old motorbikes as well, and the opinions vary as widely and in the same ways. Personally, I like things to show their age. I prefer the function to be as good a s it can possibly be and would not object to internal parts being replaced if they are worn, but taking as much opportunity to preserve their integrity and originality as is practical. Externally I am a bit more or a purist. I don't like tinted lume to make a watch look older. I like the idea stated above of stabilizing old lume to preserve it. I can tolerate a lot of scratches in a crystal as long as it is not cracked and maiatianis its integrity. I would prefer a lightly polished older crystal that is solid to a replacement. I have seen a lot of really nice work cleaning dials but am less a fan of replacing or re-creating something to look like the original dial. Im a big fan of the British TV series "The Repair Shop" They seem to wrestle with these same questions on a variety of different sorts of items, including clocks. It is amazing to see their skill and technique brought to bear and the way that they deal with old things the have significant sentimental value to their owners.1 point
-
Dear all, I think it's all a question of if you are a "restorer" or a "repairer". I met a bloke once here in Germany who had an astonishingly looking "brand new" collapsible bike. He told me it was a RAF paratroopers bike made in 1943. He had restored every part, every screw. Spray painted it British Racing Green. This witness of a bygone time had no doubt been restored to death. The English language has a most appropriate expression when it says that something "is in good repair". I always prefer a well repaired watch, Land Rover or German vineyard tractor to a restored one. Cheers from Hamburg, Alex1 point
-
For me it depends how messed up it is. If it looks like it lived its last seconds under the tire of an 18 wheeler I will replace the grindy parts. If its more like a natural patina I like using the original parts if they are usable.1 point
-
She is now complete and running perfectly
 1 point
 -
Hi all, Not sure how successful this will be but I thought it would be a good idea to get lots of peoples methods of movement cleaning all in one easy to read place. I've created this spreadsheet... https://docs.google.com/spreadsheets/d/1ZsVCR5nO7VHckhFO8pi1O9BFFqpSr6f3lyqsf2TkOXg/edit?usp=sharing Split into 3 sections, Hand, Ultrasonic and Machine. I invite you to PM me with your methods so that I can add the information. When PMing please use the templates I've created below. If your technique doesn't fit into a column or you'd like to suggest new columns please reply on this thread. Many thanks! Hand Cleaning Cleaning fluid : Include balance(Y/N) / fork(Y/N) : Time / Minutes : Rinse 1 fluid : Include balance(Y/N) / fork(Y/N) : Time / Minutes : Rinse 2 fluid : Include balance(Y/N) / fork(Y/N) : Time / Minutes : Drying method : Notes : Ultrasonic Cleaning Machine : Heater Temp / °C : Cleaning fluid : Include balance(Y/N) / fork(Y/N) : Time / Minutes : Rinse fluid : Notes : Machine Cleaning Machine : Include balance(Y/N) / fork(Y/N) : Jar 1 : Time / Minutes : Jar 2 : Time / Minutes : Jar 3 : Time / Minutes : Jar 4 : Time / Minutes : Heater time / minutes : Notes :1 point
-
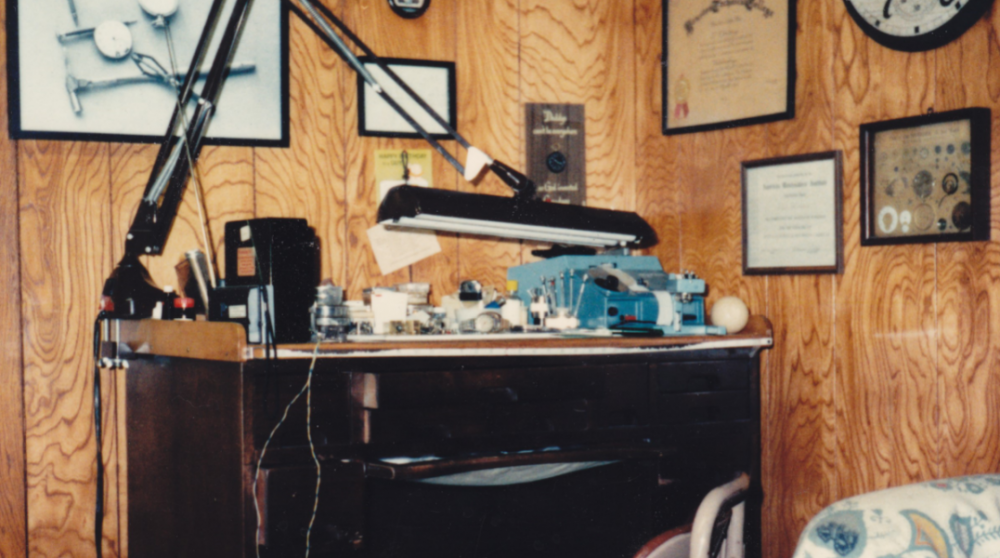
Update on my earlier comments about Accutron test gear. I found this picture of my Dad's watch bench (after he sold his business and was working from home). I believe that black unit is the Accutron test meter. I forgot about him having it and I do not know what happened to it--he probably sold it. Incidentally, that is the watch bench and equipment I inherited (sans the meter).
 1 point
 -
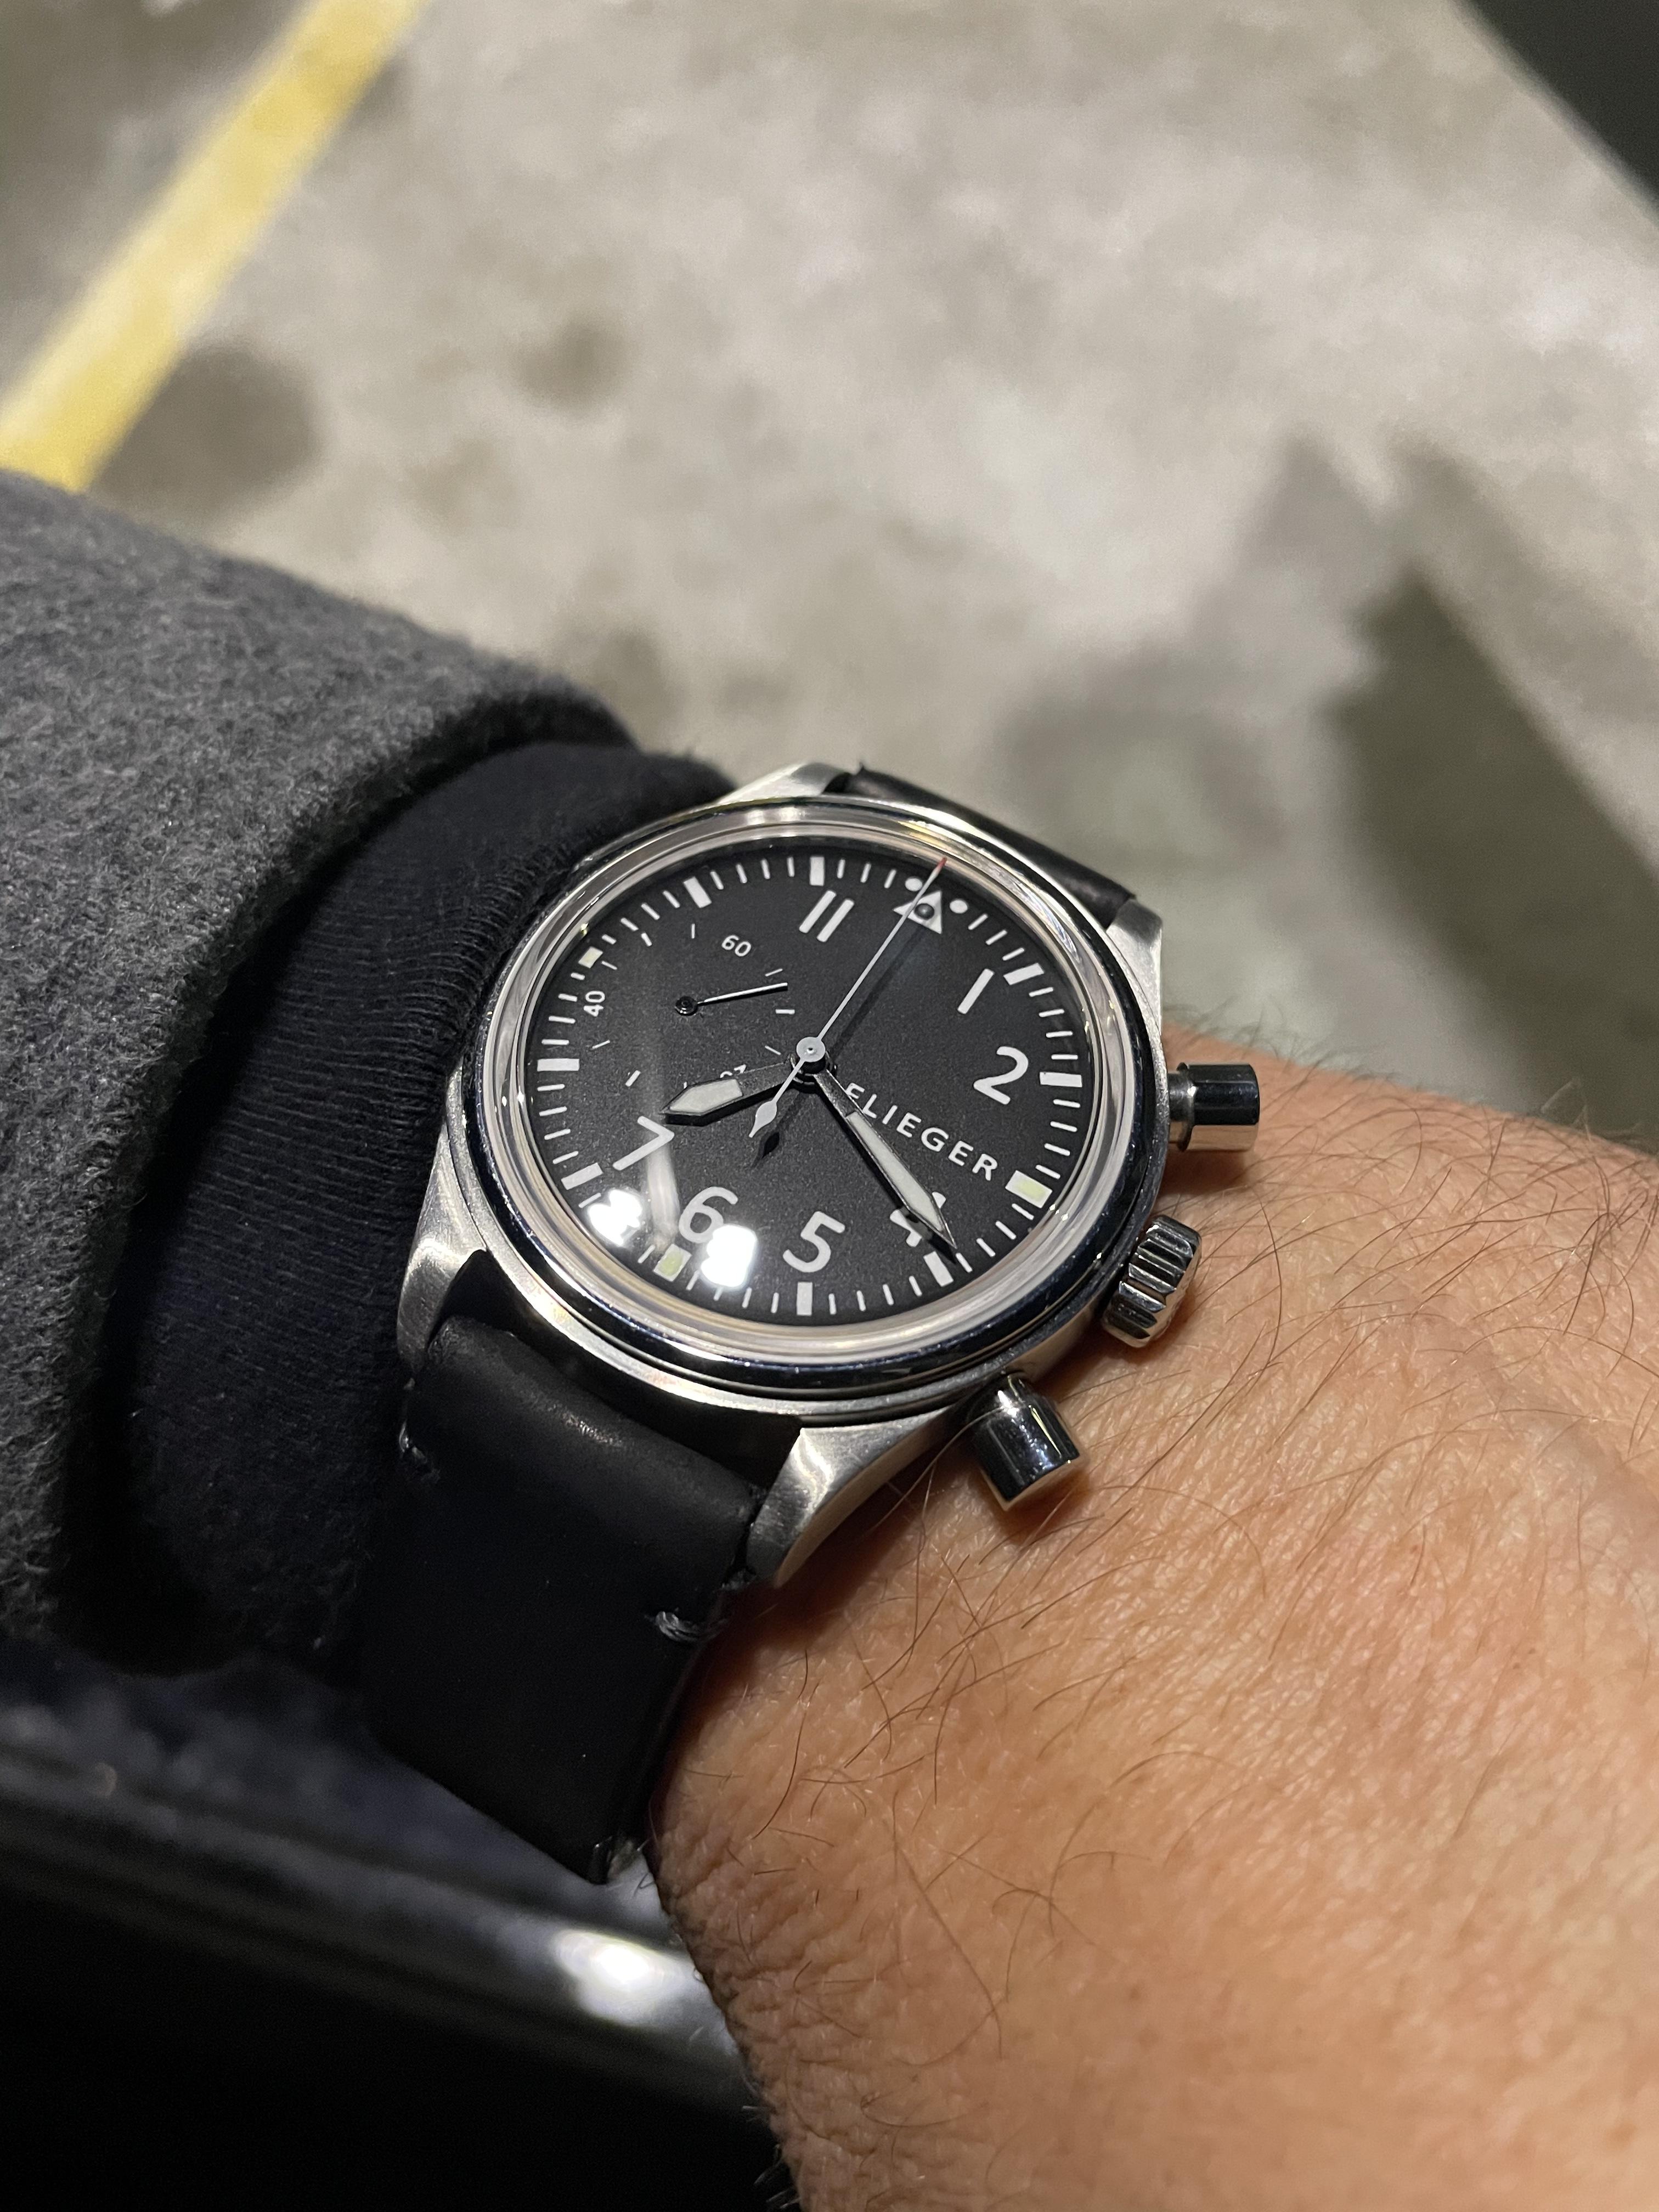
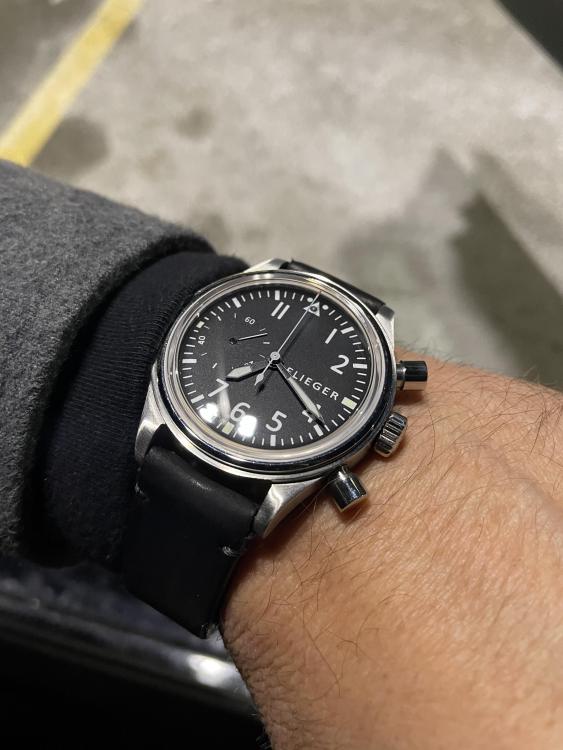
Wearing my Flieger with my all new handmade dial.
 1 point
 -
A few tests to produce more data helps diag. How long does it run when it does? Checking the balance for broken pivot tops the check list, that is, observe if balance pivot stays in the jewel hole as you gently lift one side of the balance wheel. Check power at various points in the train, gently turn( by spoke) any gear you have access to. Does the barrel stop winding if wound fully or just keeps on turning as you wind. Does it stop in all positions namely face up FU , face down FD, pendent up PU. Welcome to the forum. Regs Joe1 point
-
My philosophy...every door closed brings another door opened! You now have a clean slate to do what you want. Sometimes, having a job that pays crushes inspiration...to do something you always wanted but were addicted to the job (the paycheck) you have. Good luck!1 point
-
Please guys, don't worry about the alcohol bit. It was just a tongue in cheek comment. Tomorrow will see me get up in the morning and keep on preparing an old aluminium table & two chairs for repainting. I am looking forward to getting that done as I am then starting on my Hettich table clock. I will be sure to post up photos as I work on that. I also have to get my synthesisers all connected up again as I have been chasing an electrical hum. I think I have found it now. Onward & upward.1 point
-
It is different and also being close to Europe I presume. It is very different here, but there should still be the ability to survive out of watches or clocks. I wish I understood the parts issue more than what I do. The second hand prices of the clocks over here that I showed you all as well does not fill me with much confidence. And don't worry about the self-medication bit. I only have two drinks at most. ?1 point
-
If it's any consolation I made a good living in horology but England is so different to Oz. Don't get me wrong but booze is not the answer. Here you are amongst friends and as they say it's good to talk.1 point
-
Thanks @oldhippy I will not work as a planner again. I have had that much doubt put on me about every decision that I simply do not trust my decisions anymore. I have been second guessing everything. As you may have read on other topics, I would love to make a go of watches and clocks. I just don't know if it is viable down here in Oz. I will ask some questions of the watchmaker that I am sending my Seiko back to. See what he says and go from there. Just a bit angry and upset at the moment. Self medicating with Jack Daniels and Dry Ginger Ale. ?1 point
-
Servicing my 2nd Omega cal. 268 (service walk-through for my 1st here) I wasn't too happy with the state of the shellac holding the pallet stones in place. The shellac had crackled quite badly and some pieces had fallen off. So, I decided to remove and refit the pallet stones, and in the process I made a few more observations and experiences I'd like to share. 1. Removing the old shellac was not as easy as just soaking the pallets in isopropanol and brush it off. The shellac just wouldn't dissolve. The shellac only softened somewhat in the isopropanol despite leaving it in for over 30 minutes. So, I had to scrape the shellac out using pegwood dipped in isopropanol, and I even had to poke some sections of the fork slot with my most pointed tweezers (being very careful not to scratch the fork). My newly bought fresh shellac dissolves completely in isopropanol in about 10 minutes. I estimate that the old shellac was almost 60 years old and perhaps it is the case that the chemical composition of old shellac changes over time so that it becomes harder and less susceptible to isopropanol!? In that case, it explains why it is sometimes possible to rinse the pallets in isopropanol without the shellac softening, while at other times it leads to the shellac becoming very soft and soggy dislocating the pallet stones. 2. I wasn't sure it was the case that the fork slots always, or most of the time, pinch the pallet stones, but I have since then learned that the stones should always fit snugly in the slots. The exception I believe might be some very old pocket watches. Well, the point being that we can adjust the locking depth of the stones to the escape wheel teeth (as shown in the video I linked to in my previous post) before fixing the stones with shellac as long as we're being gentle. 3. I found a more efficient way to create small pieces of shellac of a more convenient size by heating the end of my shellac stick until it starts to glisten and then stick the end of a small piece of pegwood (2 mm in diameter) into it and pull out a tapered string of shellac. As long as the shellac is warm you can basically pull out a string as thin as air. Anyway, when the string is tapering from about 0.5 to 0.1 mm I stop pulling, let the shellac cool and break off the string. After this I use the tip of a sharp scalpel to cut the string into small conveniently sized pieces. 4. The Gaston tool mentioned in my previous post proved to be more useful than I first thought. As it firmly holds the fork in place it makes it easy to refit the stones by sliding them into the slots. So, no need to hold the fork steady in a staking block using tweezers held by the left hand (which feels a bit scary really). Also, the arms of the Gaston tool really makes it easy to push the stones into the slots in a very exact manner. I think that sums up most of what I learned doing this operation the second time around. So, hopefully it will be useful to present and future WR-talkers who are in the process of learning this technique.1 point
-
My penguin postie delivered a nice postcard from a fellow member That was nice of you! And regarding your note... Don't worry about a thing! Cheers!
 1 point
 -
That red coil is actually a small hydrogen bomb. “it has a very loud alarm.”1 point