Leaderboard


Popular Content
Showing content with the highest reputation on 02/25/22 in all areas
-
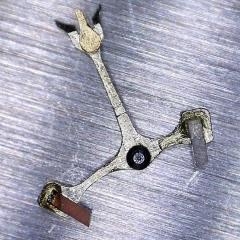
That first tool is better suited to removing bezels or backs. And not by much. The crystal itself would still need to be taken out. That second tool is a (lower priced) crystal lift. It is used for domed plastic crystals that need to be compressed all around their edge to be fitted into their case. Yours is not that kind. As jdrichard said, these tools won't do what you need. But once the movement is out, you can push out the crystal from the inside. I wear nitrile gloves when I do that; I've had them crack sometimes. Then, the tool that jdrichard describes, the crystal press, uses plastic dies to press the crystal into the case. Measure the old crystal carefully (if it comes out whole) with a digital caliper and get that exact diameter, and thickness.2 points
-
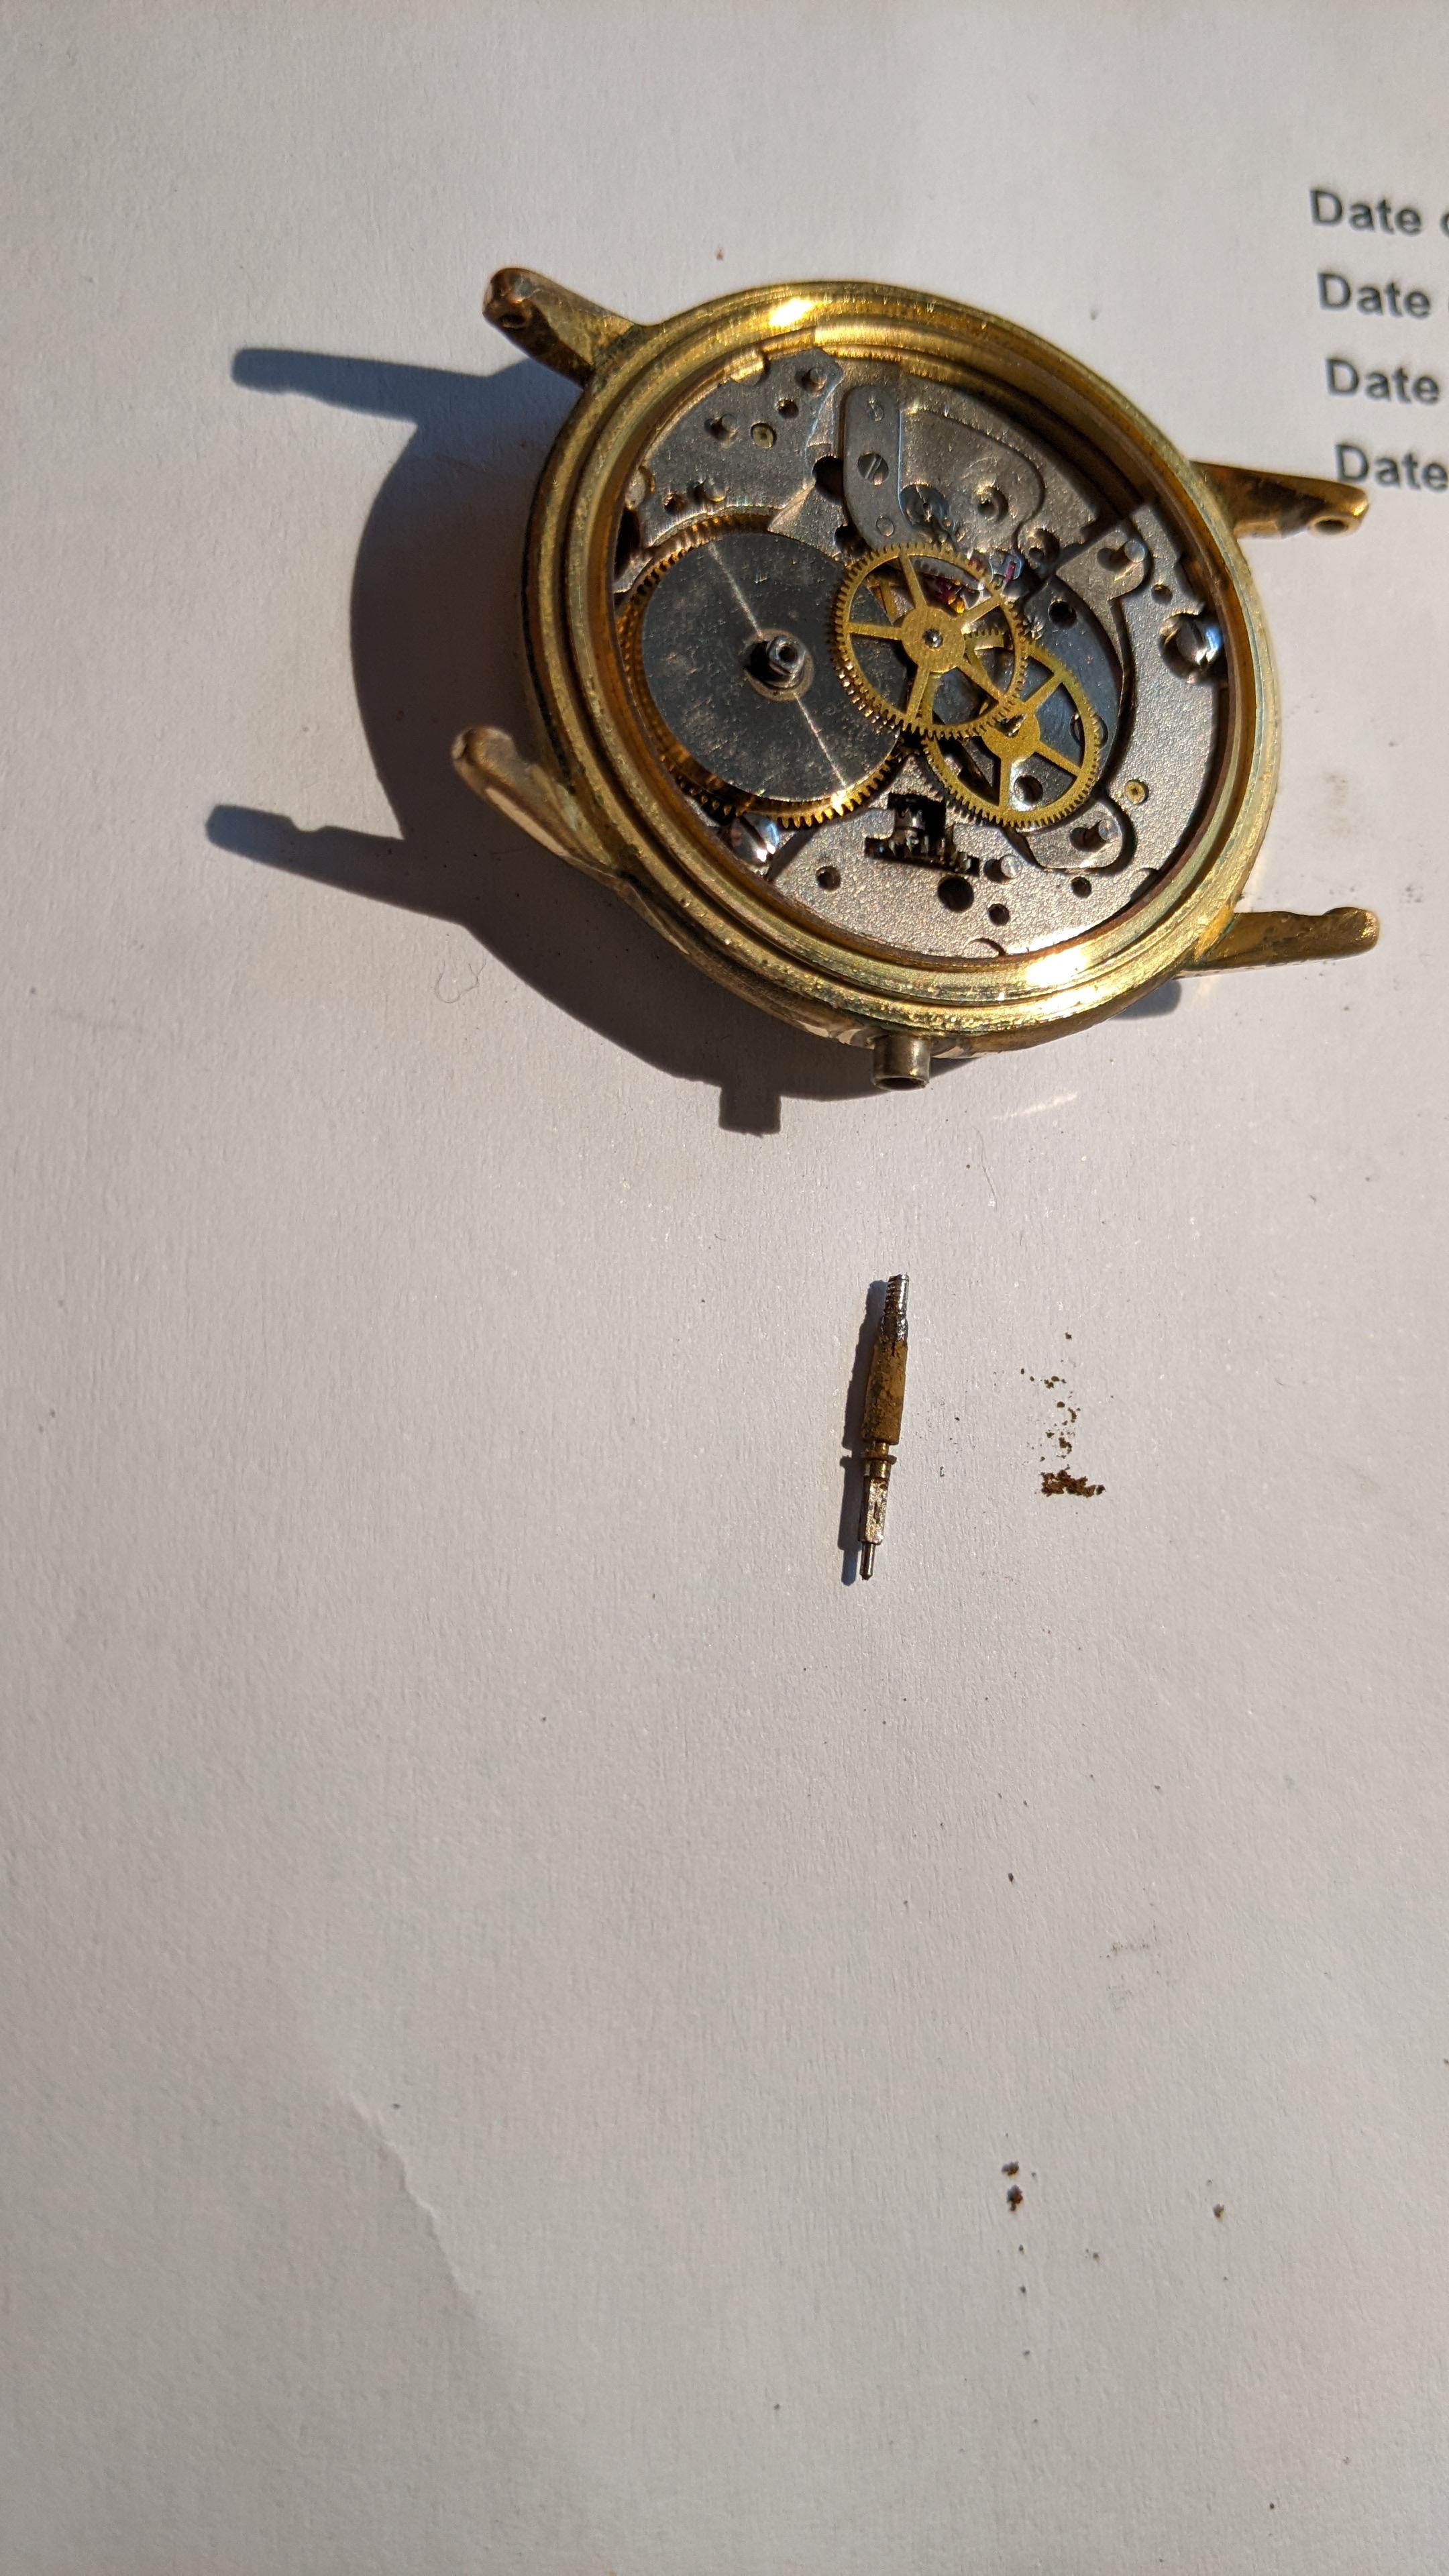
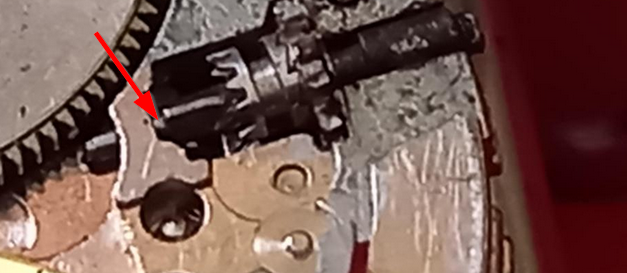
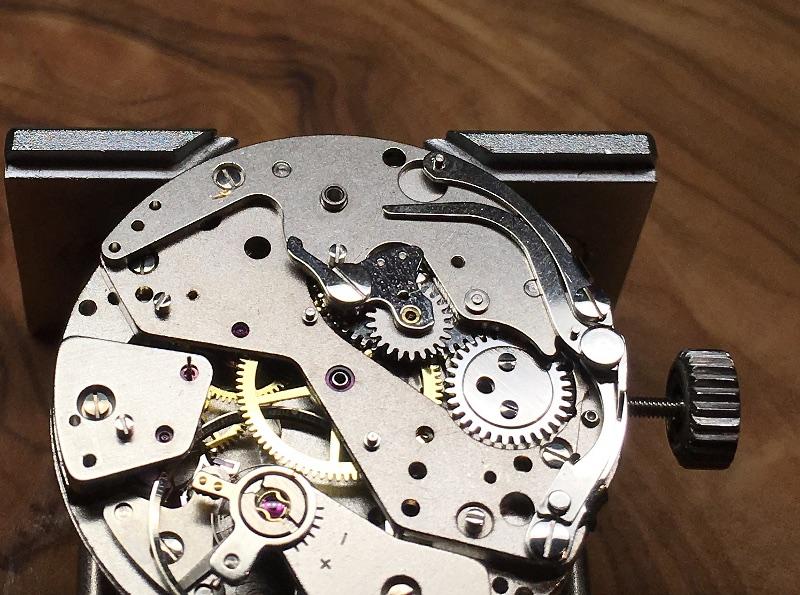
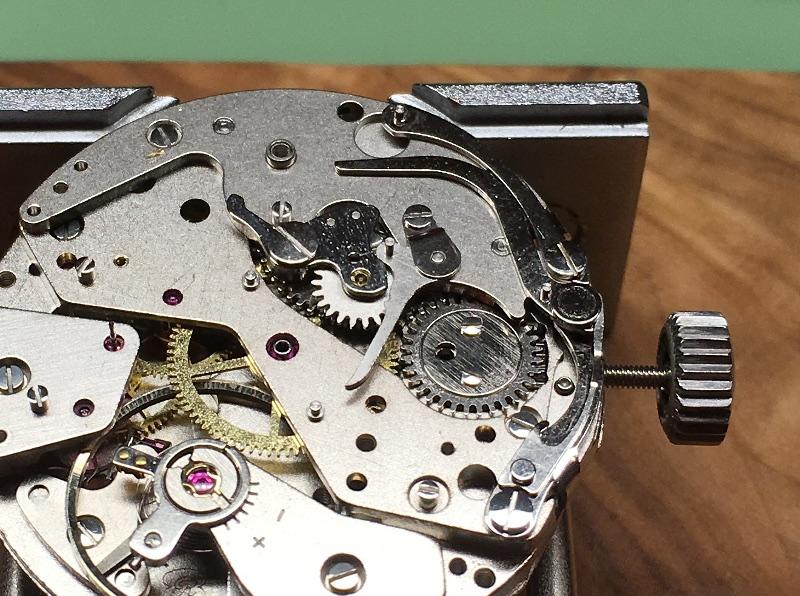
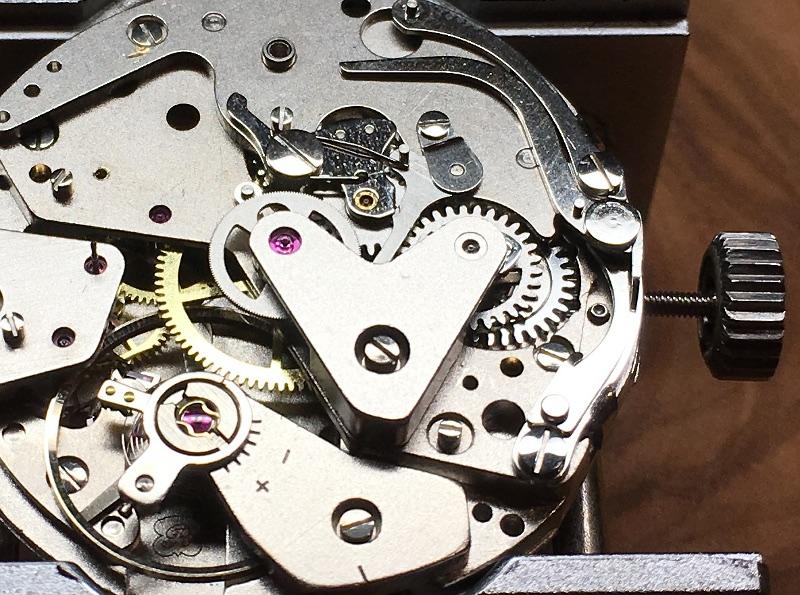
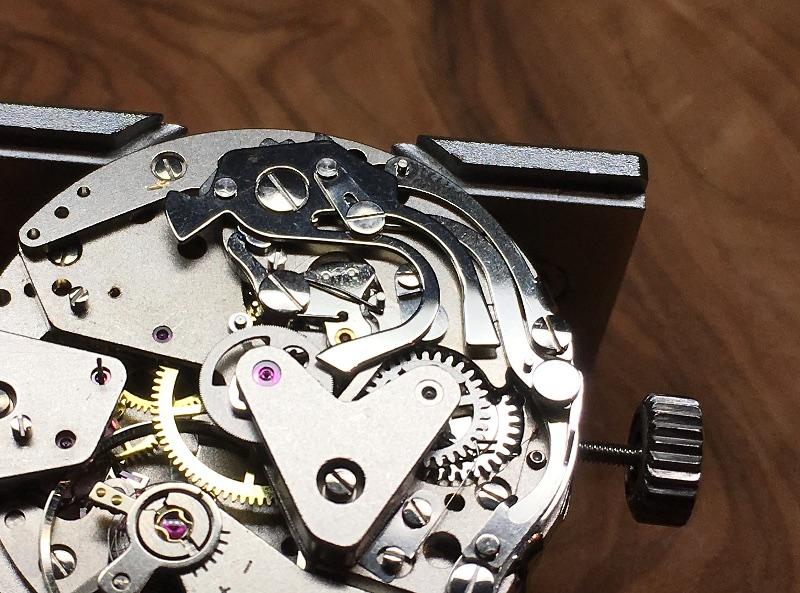
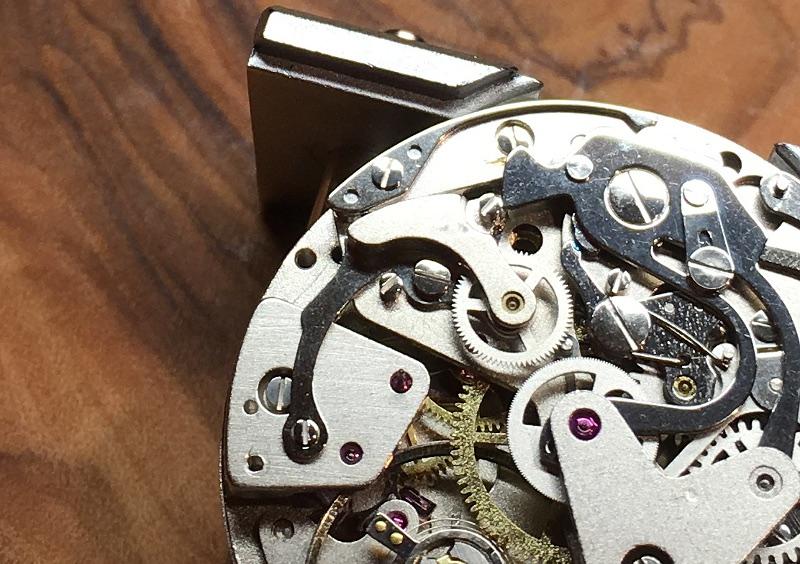
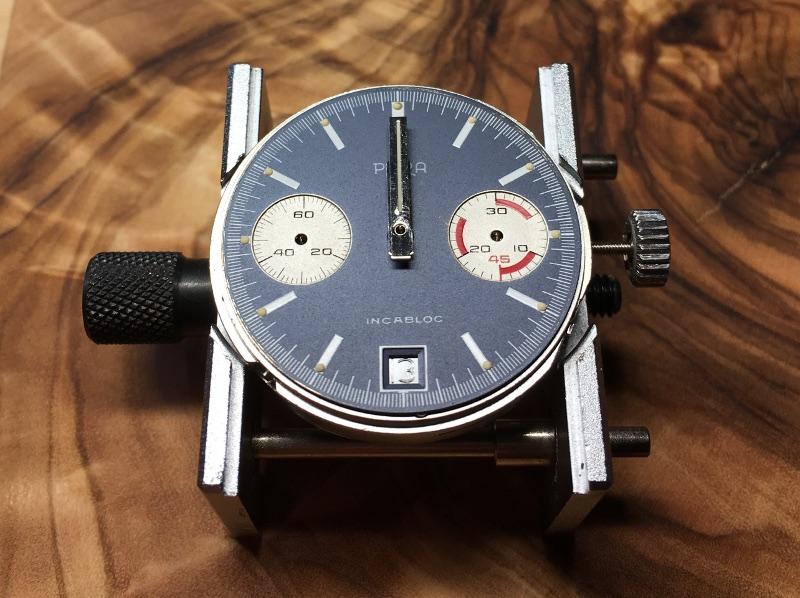
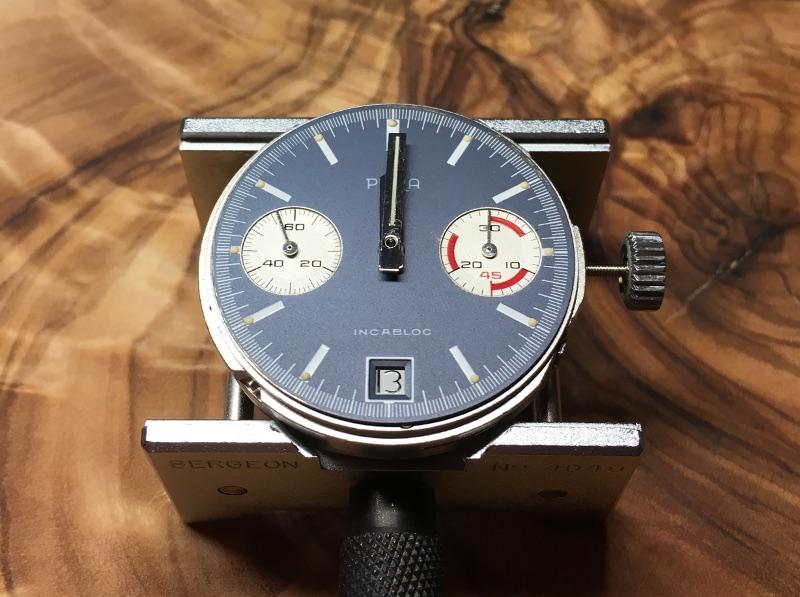
Tricky. I have been in similar situations before...some far worse than this. I think there is some rust and/or corrosion that has occurred. At this stage, I would drop some penetrating oil on the keyless works and let it set for awhile...maybe a day. Then, using a small screwdriver, wedge where I have shown and twist, applying outward radial force on the stem. You will probably have to re-dress your screwdriver after this. Alternatively, I would remove EVERYTHING else from the main plate and immerse it in penetrating oil...again...for a day or so. The try again. A possible, yet more dangerous next step would be to construct a jig so that the plate can be mounted orthogonal on a staking tool and tape down (an inward radial force) because there appears to be some room for it to move in that direction. This is a last resort solution IMHO.
 2 points
 -
No worries. It isn't as though the rest of us haven't also asked a few really dumb questions in our time. As I see it, asking a stupid question is often better than doing a stupid thing. And recognizing the absurdity in it yourself makes you wiser.2 points
-
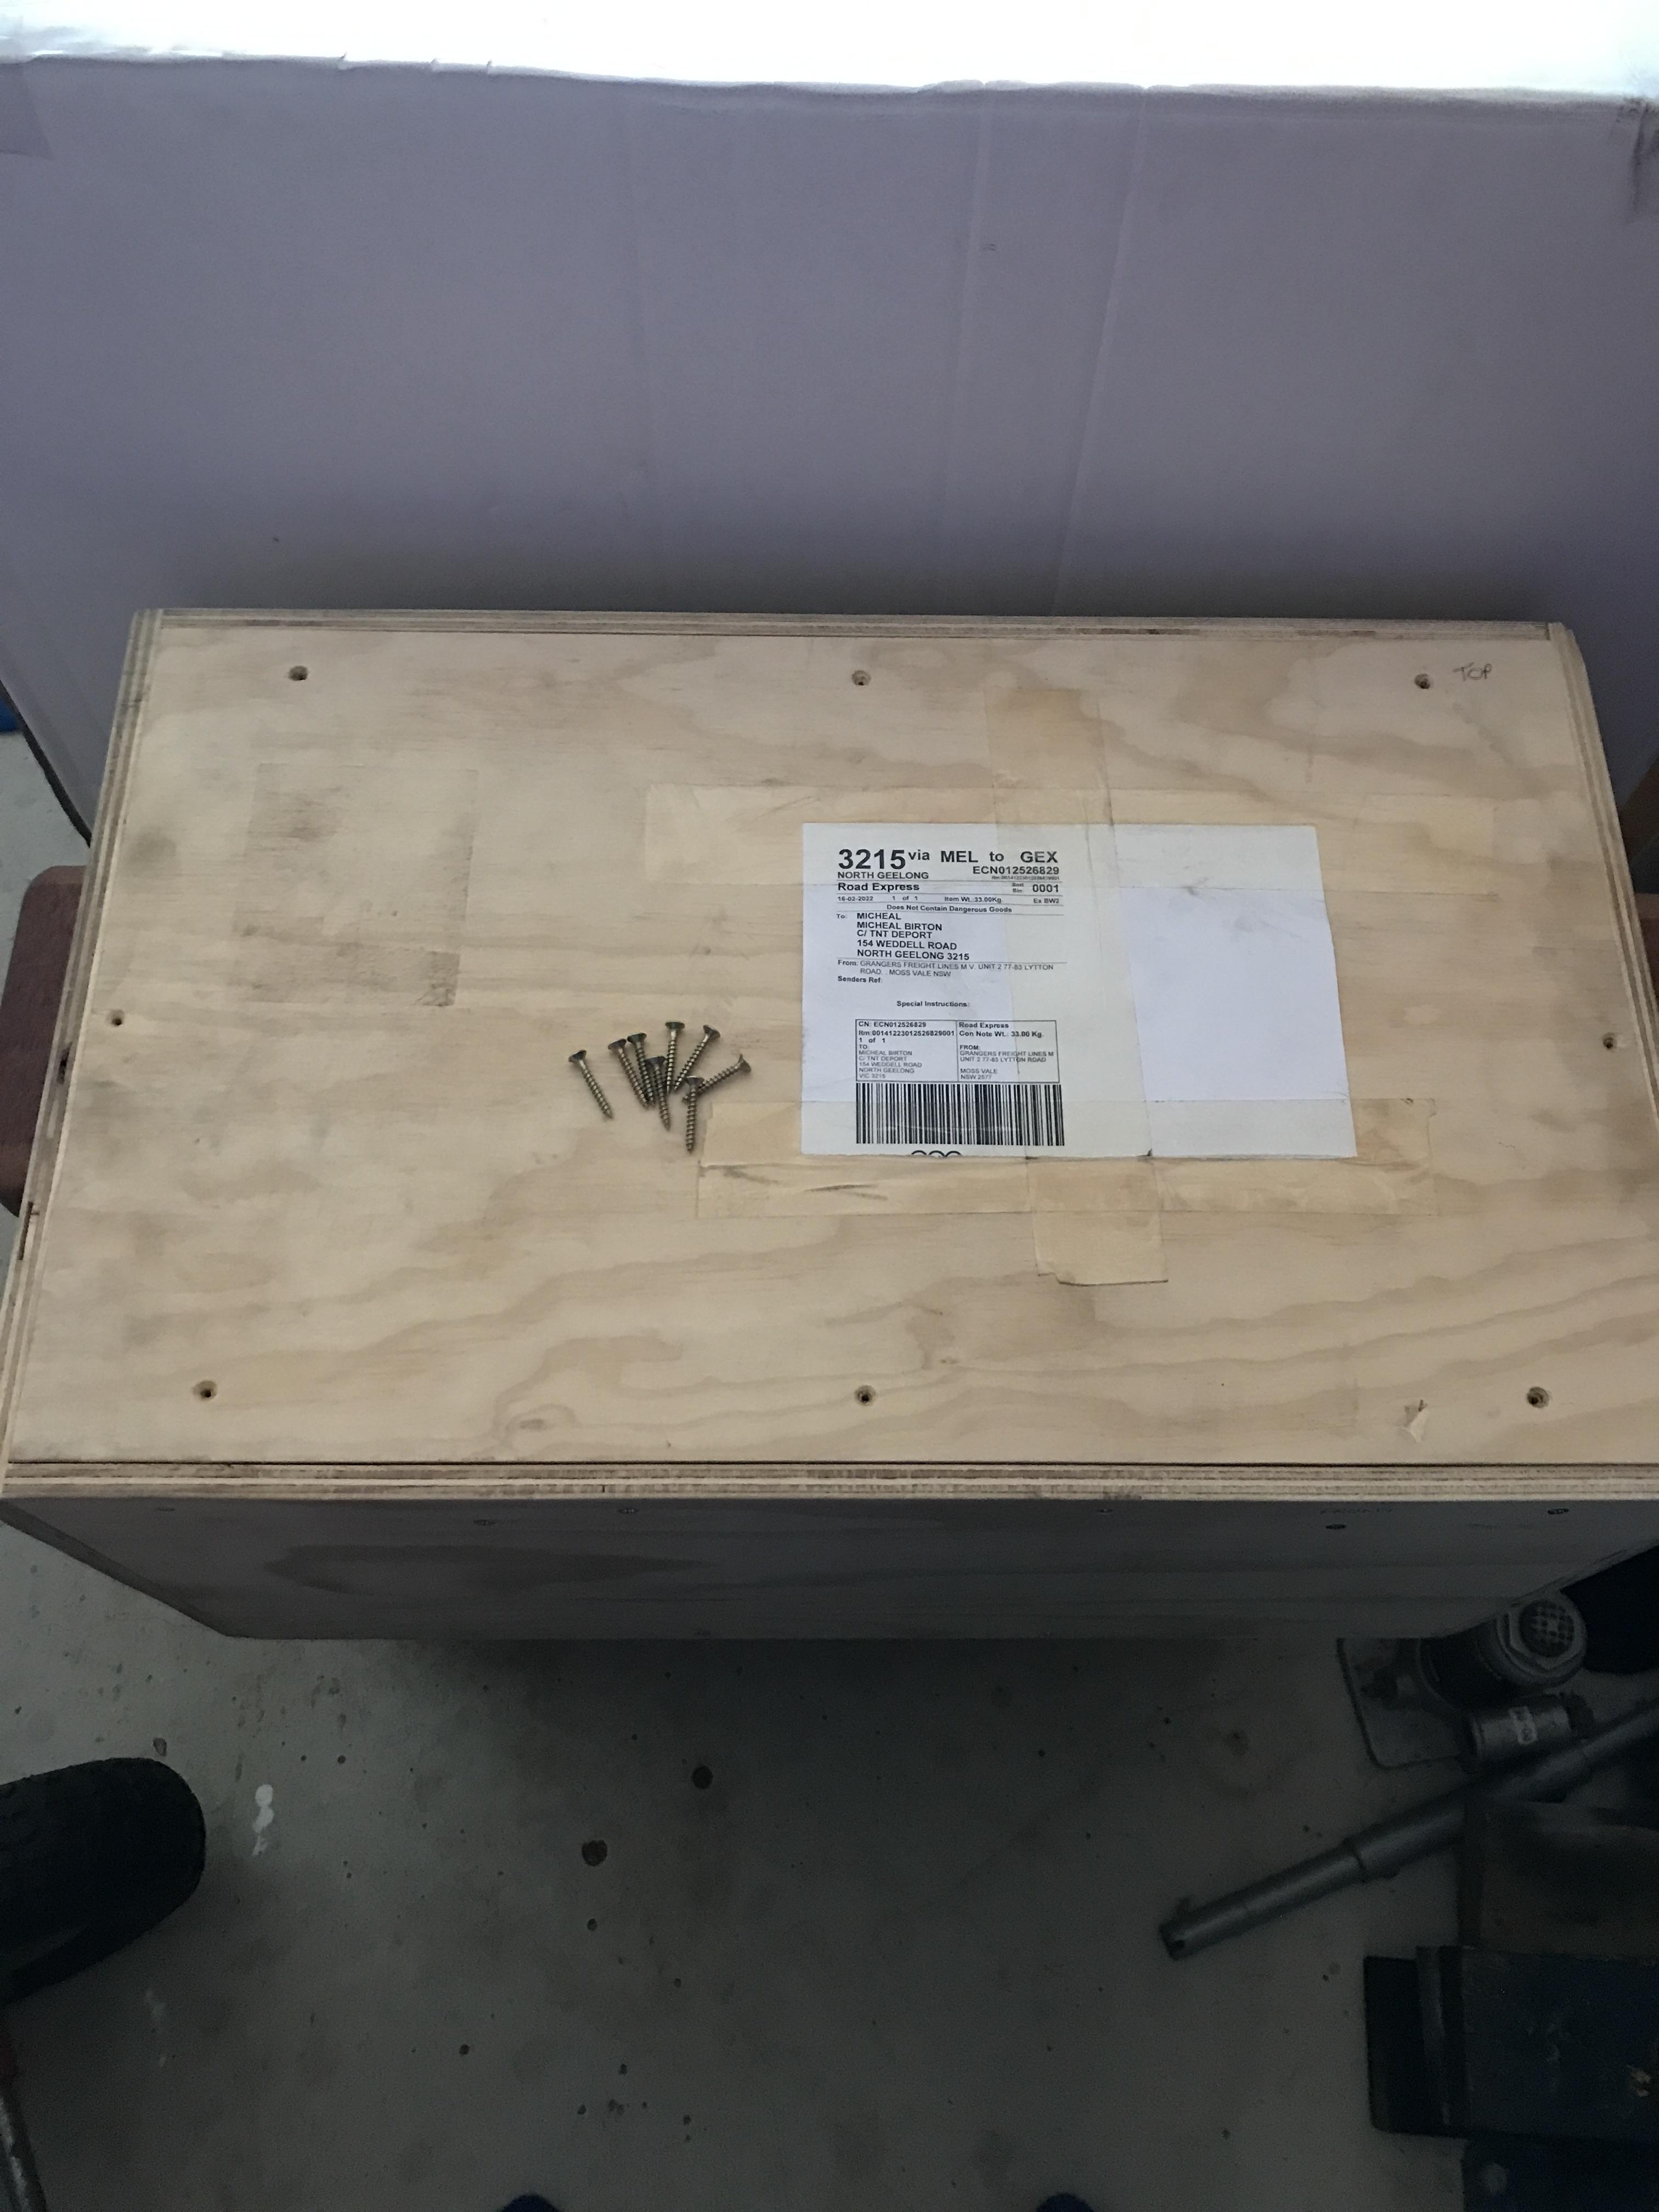
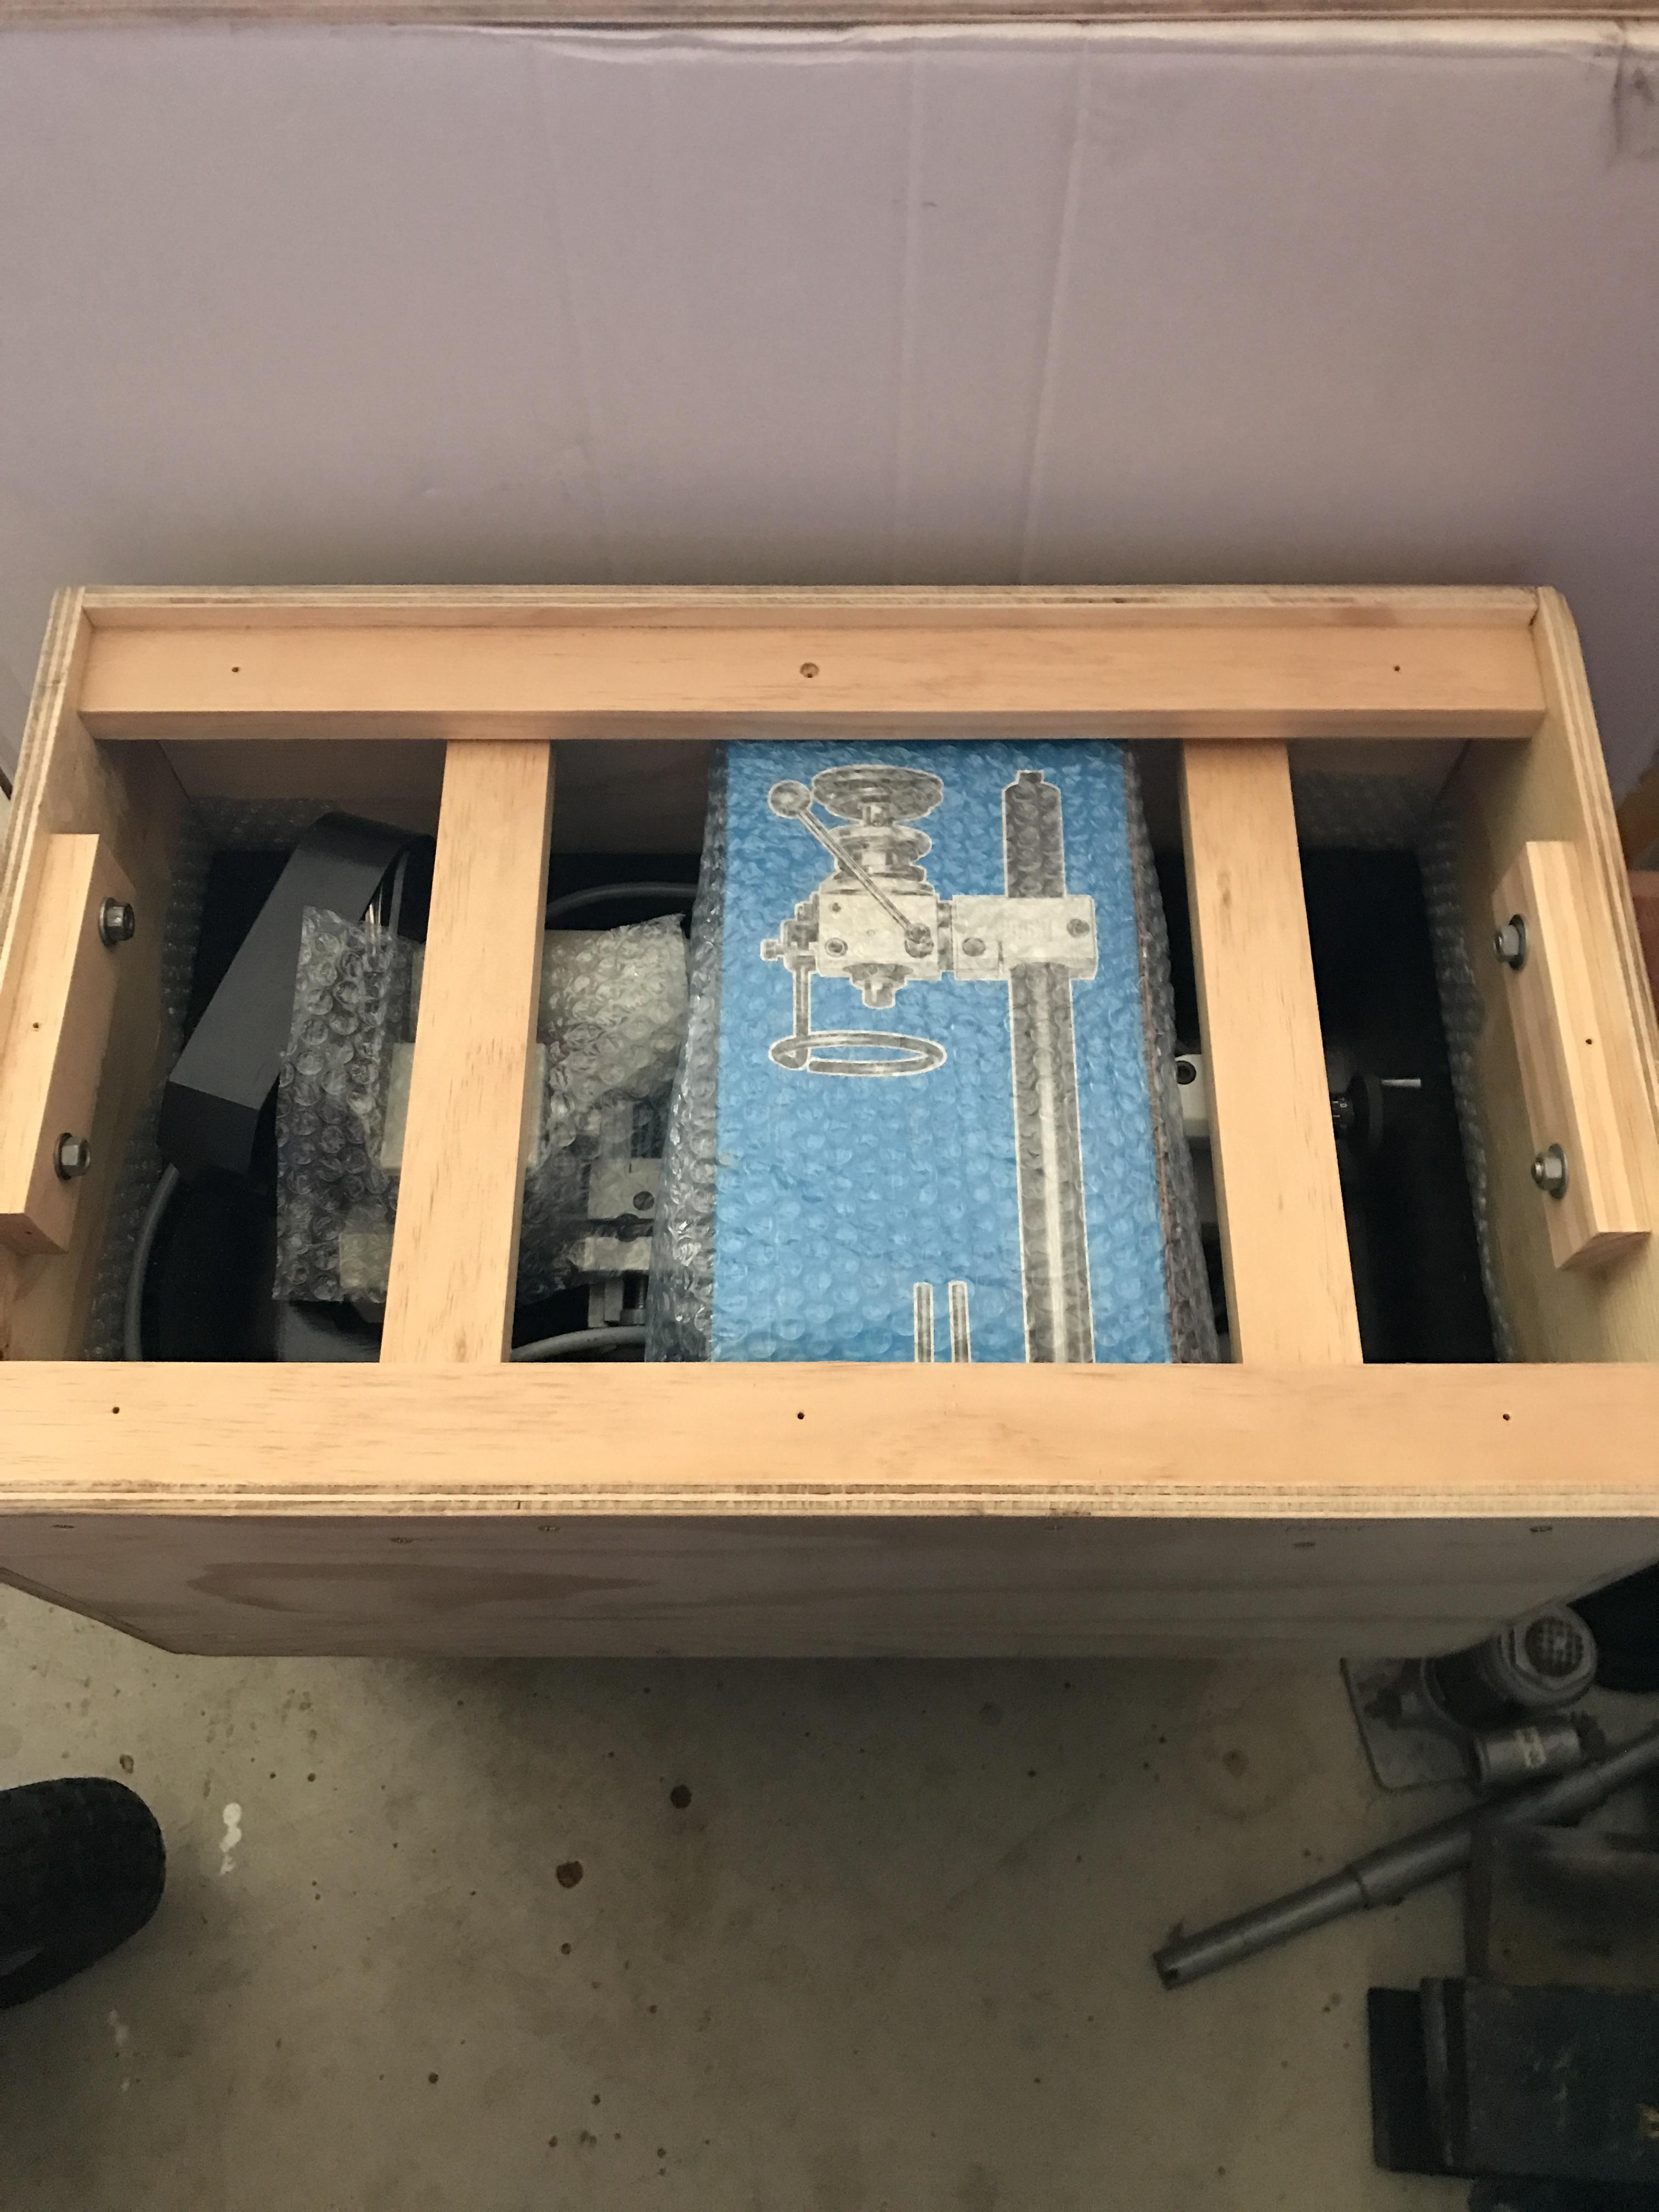
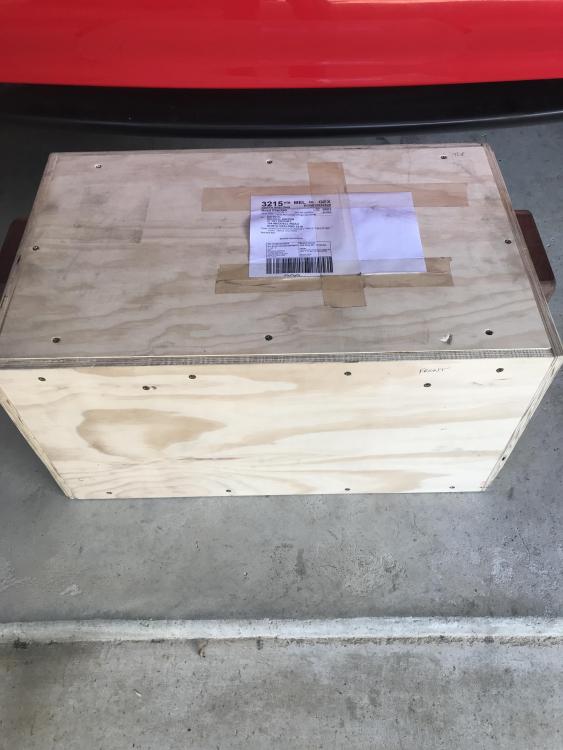
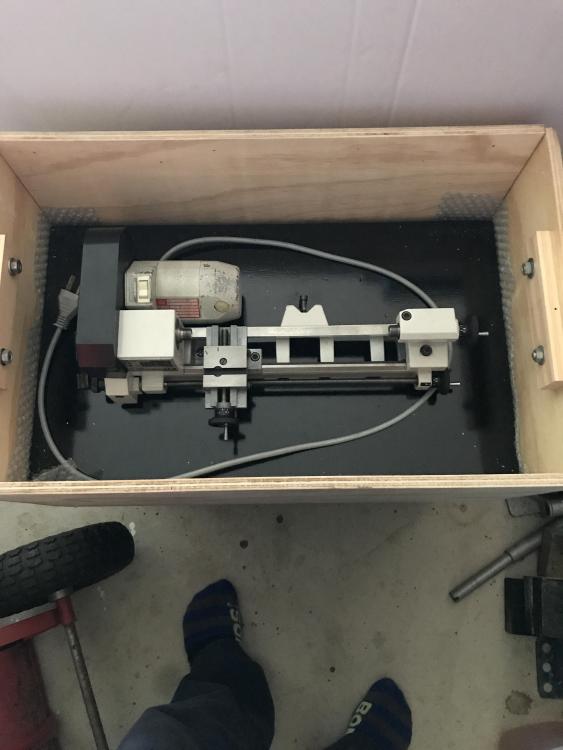
So I had the tracking number for my crate and when I put it in the app 3 days ago , it said "Delivering". I took that to mean that it had reached the depot and that they were logging it in etc. After 3 days of "Delivering", I rang. "You're crate has been waiting for you to collect for 3 days sir." Hmmm. Went and got it today. Apparently "Delivered" which was the next step on the tracker is not when the receiving depot has processed it for collection. "Delivered" is for when I have collected it. Anyway, when a crate becomes art. I mean he even made handles! And the crowd fell into a hushed silence as the lid was unscrewed. And the crowd went, "Ooooooo....." And then after removing at least half of the package weight in screws as well as all of the associated timber and bubble plastic, Is it politically incorrect to call a metalworking machine cute? It is bolted to the drawer that you see it sitting on in the bottom of the crate. All of the bits and pieces are in there. I knew it was going to be small. It is quite possibly smaller than what I thought it might be. The chucks on the lathes I did my apprenticeship on weighed a lot more than all of this. Condition? Immaculate. It really is. I will have to be careful as I have 'rusty' hands. I think I will either have to have oil handy to clean everything down after use or wear rubber gloves when using the lathe and mill. I could not be happier. Oh, okay. If I won millions in Lotto, I would probably be happier. Chuffed? Absolutely.


 2 points
 -
Credit goes to @HectorLooi for that one. I followed his lead from many pages ago. That's the majority of the rationale behind the '4' in the SM-4TP in the watchmaking 'scope recommendation. The '4' indicates the double arm boom stand, which has an adjustment for the angle of the head where the single arm stand doesn't. You could conceivable get the price down a little with the lesser stand, but I'd drop the simufocal/trifocal feature before I dropped the upgraded stand.2 points
-
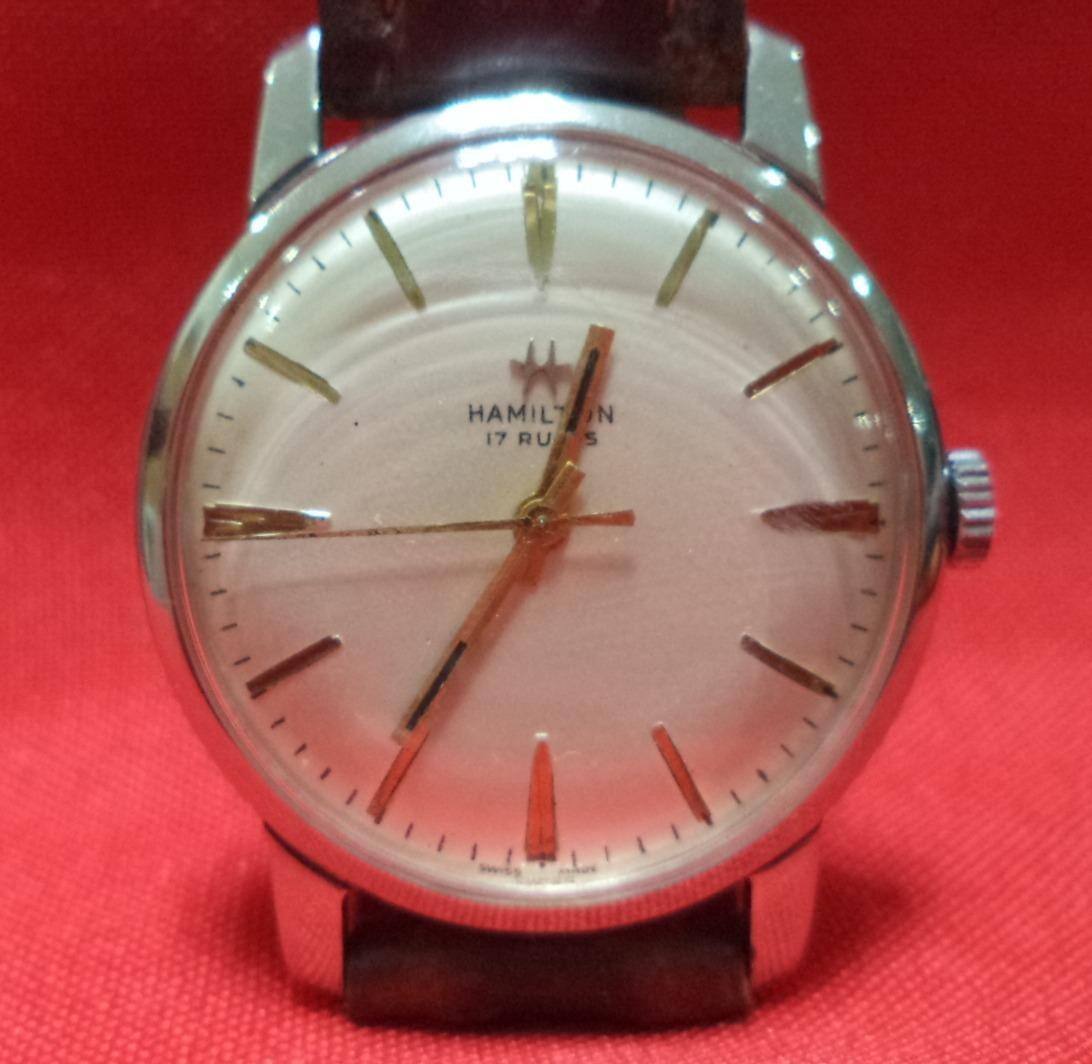
Hello all. I recently bought this Hamilton watch because I like its soberness. I believe it is from the late sixties. However, I have some doubt about the originality of the dial, as it has no model identification. The movement is manual. Any info on this watch will be highly appreciated! Thanks in advance.
 1 point
 -
I let all discoloured pieces soak in Coca-Cola for 48hrs, then rinse under tap, use powder laundry detergent as abrasive and a used tooth brush to scrub the parts with, you be surprised with the result, its then ready for a bath in ultrasonic.1 point
-
Hi plato, I guess for some task making a tent to work under might work just as well.1 point
-
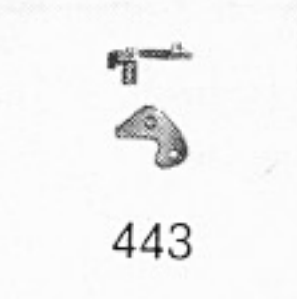
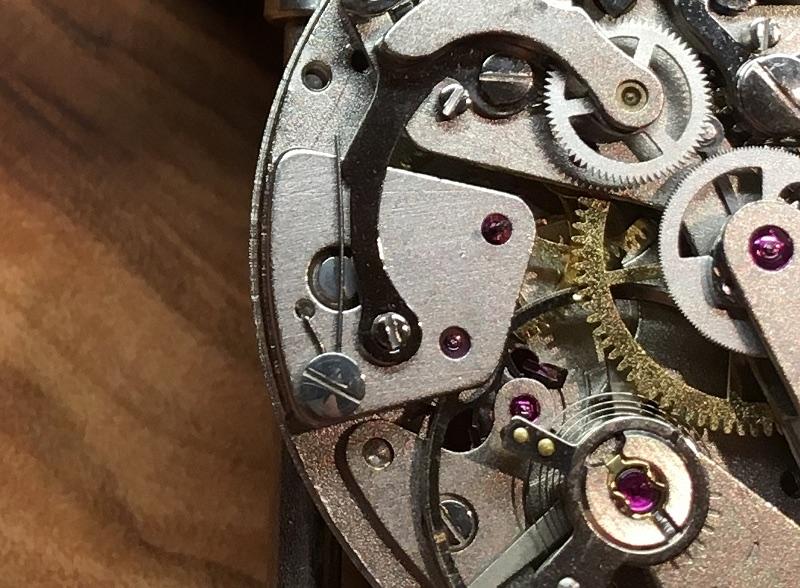
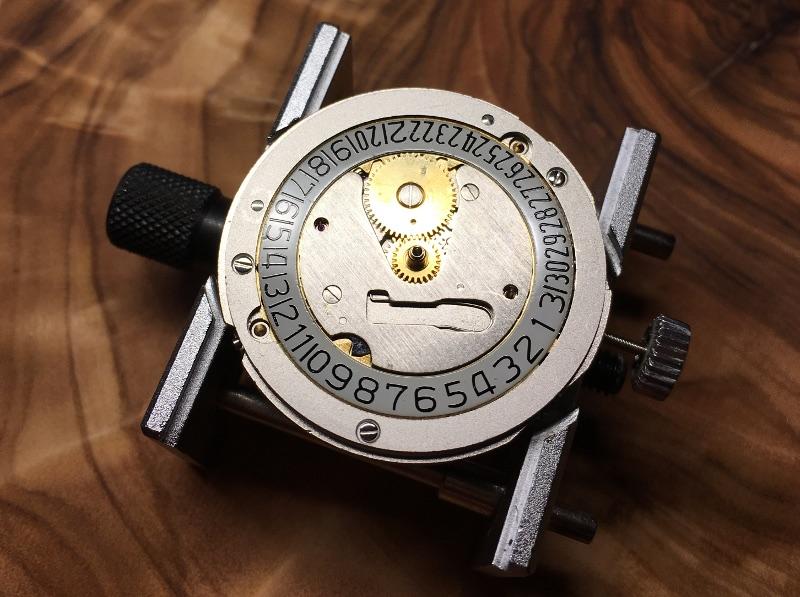
Setting lever

 1 point
 -
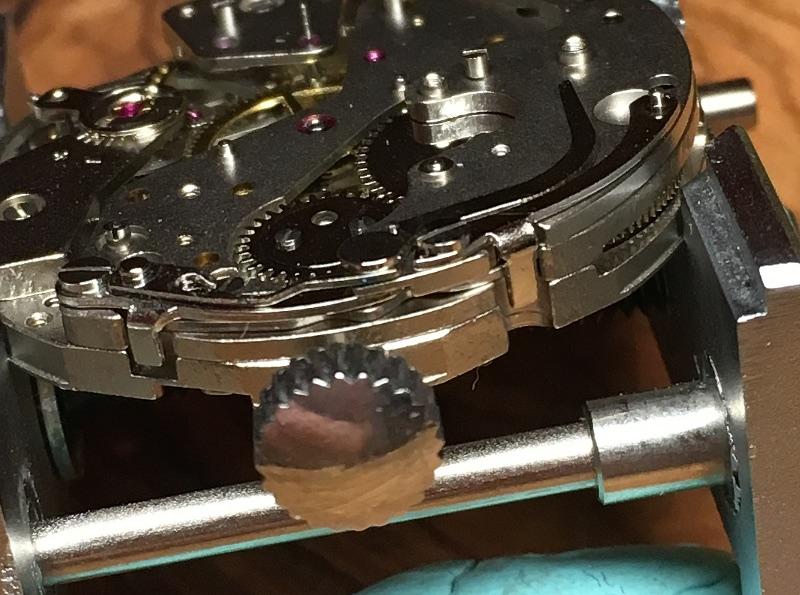
Aha! I was thinking something different, as in you were disassembling the movement in a big see-through bag. 'A picture paints a thousand words'! More like when Mr. Lovick uses a plastic sheet to protect hands when being levered off.1 point
-
To remove the balance you will have to split the plares again , first removing the power from the mainspring then turn the plate containing the balance on its back with the balance uppermost and un pin the spring from the post. Then its a case of re forming the sprin correctly. and re fitting in reverse order.1 point
-
If the kink is caught between the index pins then it might distort the rest of the hairspring but not after 5 hours of free running.1 point
-
Here I am unlocking a shock spring inside a bag, no chance of loosing the endstone or jewel, same with tiny springs. A small ziploc will do and finding the endstone in small bag is easier. Notice I am not wearing gloves, the bag works as glove in this case. https://cdn.watchrepairtalk.com/monthly_2019_01/IMG-20190103-WA0005.jpg.7f5f509d2e25dce1359d4ab130ec8ea3.jpg1 point
-
Running for 5 hours then stopping is probably unrelated to the hairspring kink.1 point
-
I would advice that you stop using the watch immediately. If the dial feet have sheared off there's a chance they may damage sensitive parts in the watch, especially the hairspring. You need to locate and remove the sheared off dial feet first. Then you can deal with the problem of reattaching the dial.1 point
-
It needs two pair of tweezers to gently reform the spring and a great deal od patience and practise Utube links such as below will give you a decent tutorial. https://r.search.yahoo.com/_ylt=AwrIQZJBQRliU5gAlwh3Bwx.;_ylu=Y29sbwMEcG9zAzEEdnRpZAMEc2VjA3Ny/RV=2/RE=1645851074/RO=10/RU=https%3a%2f%2fwww.youtube.com%2fwatch%3fv%3didO5elKgFMA/RK=2/RS=wDaVKHtZopM_3xKRlYUNNnrLNog-1 point
-
There are definitely outliers. A lot of JLC stuff is 56-60 range, but their pocketwatches can be as low as 38 degrees. Check the arms and figure it out- it can be all over the map. There's a Russian IG guy I follow (steamlainere282), amazing restoration work, but he regularly posts watches showing 335 degrees amplitude with video and I can see it has 270ish. Tried to explain it to him but he doesn't get it. Weishi whatever always at 52 degrees haha. I'm guessing he's older and used to paper tape machines that don't give amplitude (though we had them in school and our teacher expected us to write amplitude [visual] and rate on the appropriate sections of tape).1 point
-
If it works, it works!1 point
-
Hi The kink will have to be teased out so the spring is free from end to end in order for it to run smoothly1 point
-
RGM make their own watches too so they must be pretty good, they're on YouTube.1 point
-
I also spread a large white plastic sheet on carpet at home, the type of sheet used for big table mats and sit in the middle of it to dismantle movements, parts that fly will often land on it and can be easily spotted. One obviously wouldn't do so in a watch shop and become a laughing stock to others.1 point
-
If its running with the regulator hard over to fast check the position of the balance spring through out the travel of the regulator. I should move from end to end without moving the balance spring out of position.1 point
-
Bringing the original discussion to a close, I had the watch serviced at RGM Watch Co. located in Mount Joy, PA. They quoted (and held to) a price of $900.00. They did service the watch and actually had to make/replace at least one part. It took a little longer than planned but I was very happy with the result. I have been wearing the watch almost daily since and it keeps great time. Thanks all.1 point
-
Can you post a picture of the balance and top plate, usually the balance is pinned to a post although I havs seen some glued.1 point
-
A spring ( keyless bridge) pushes on the stem release, which keeps it in place. You are close to a full tear down, a clean and lube is seems inevitable. When you get to tearing the date complication, do so inside a ziplpc bag, no part can flies out of the bag. I don't see howelse you can clean the keyless.1 point
-
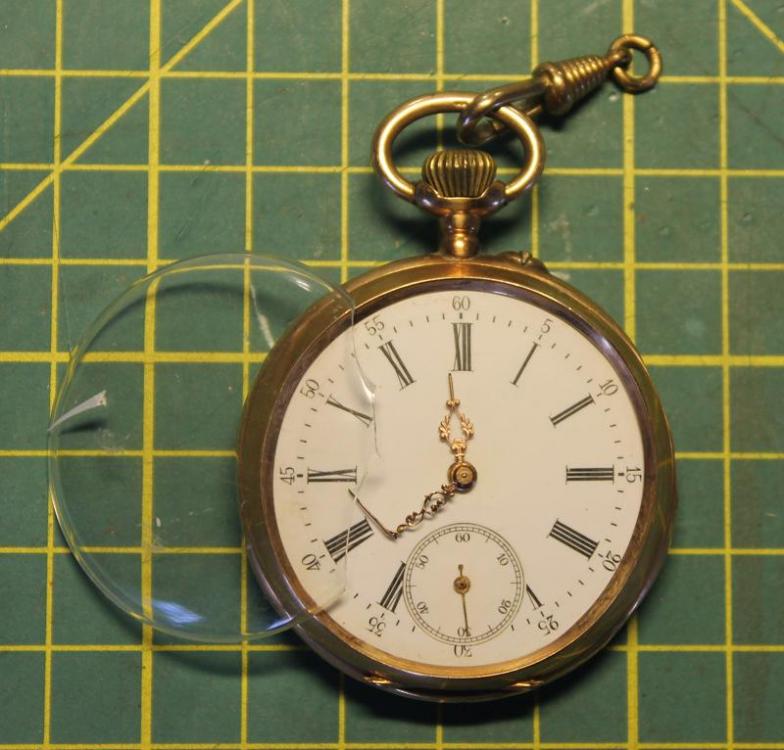
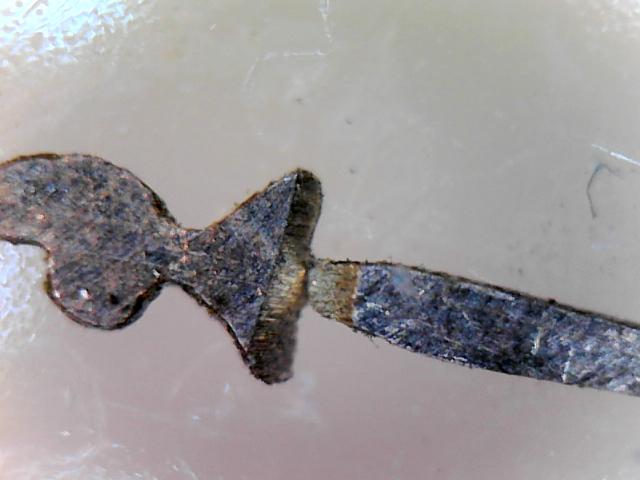
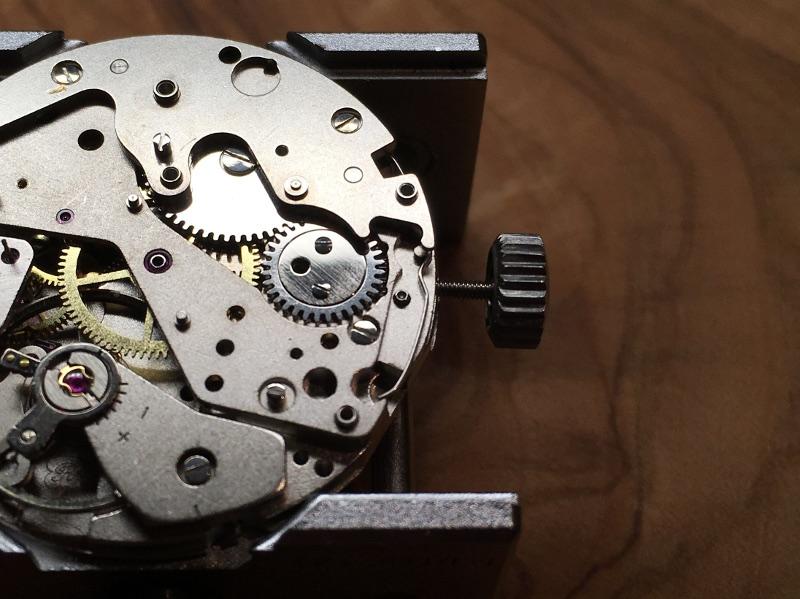
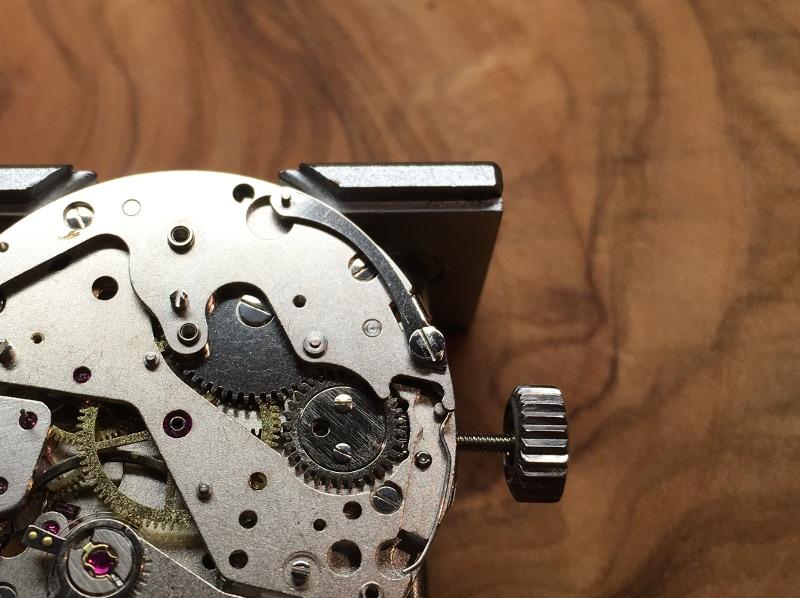
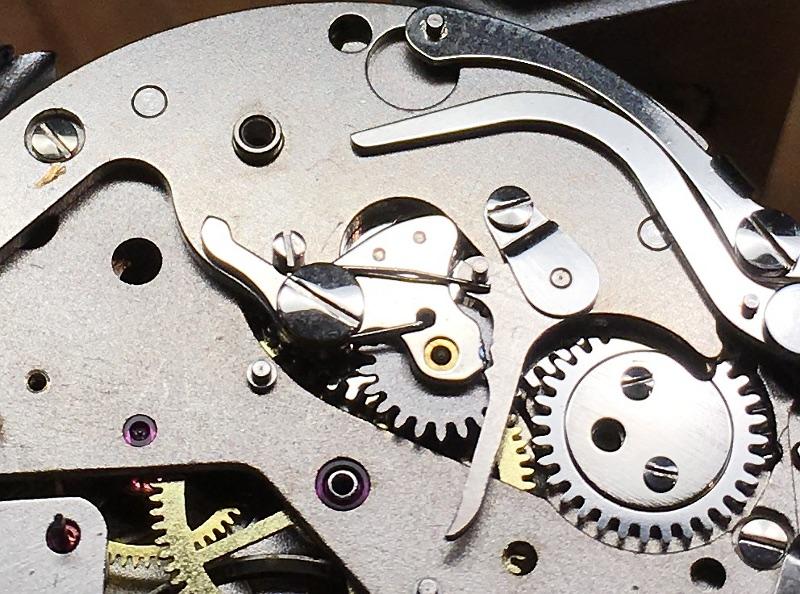
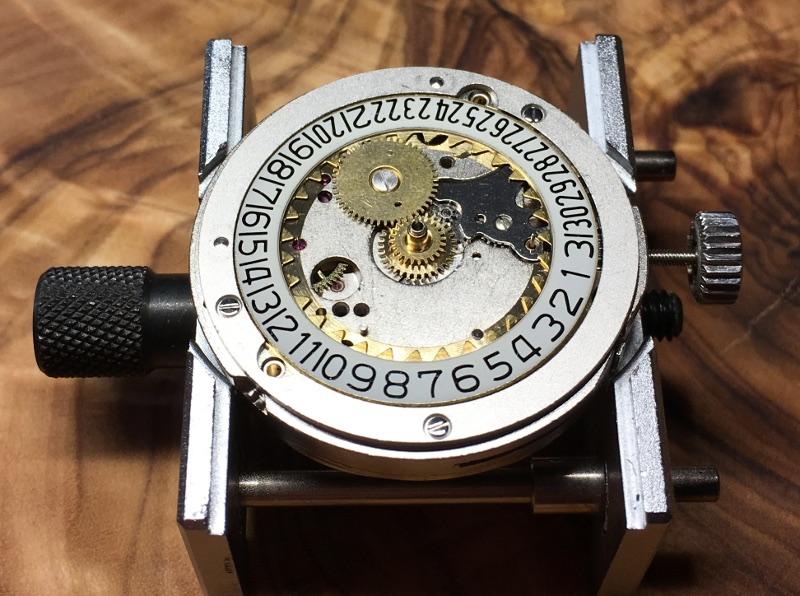
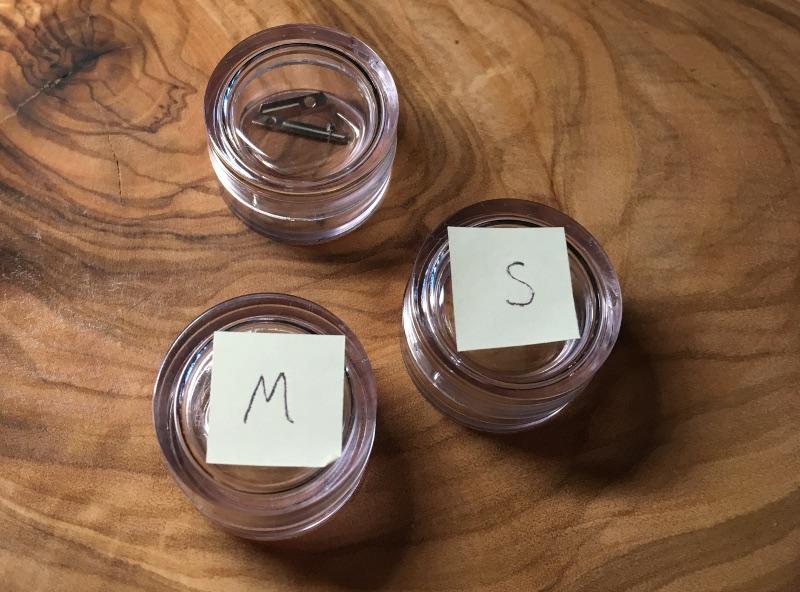
Is the stem release button stuck? Appears ( refer to image) pressed all the way in. Usually a part rusted or stuck due to rust means a clean and lube is long overdue.1 point
-
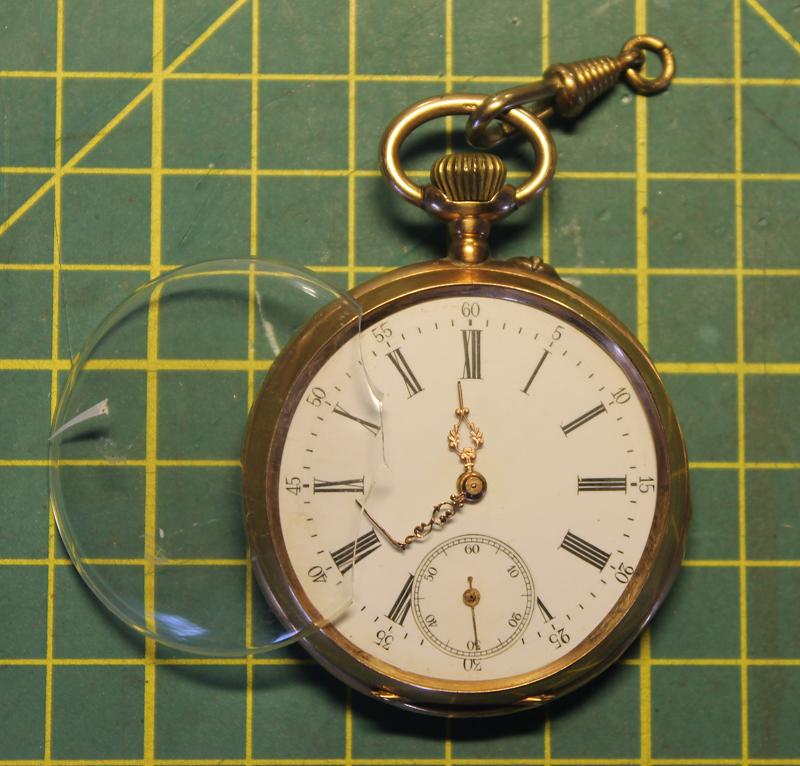
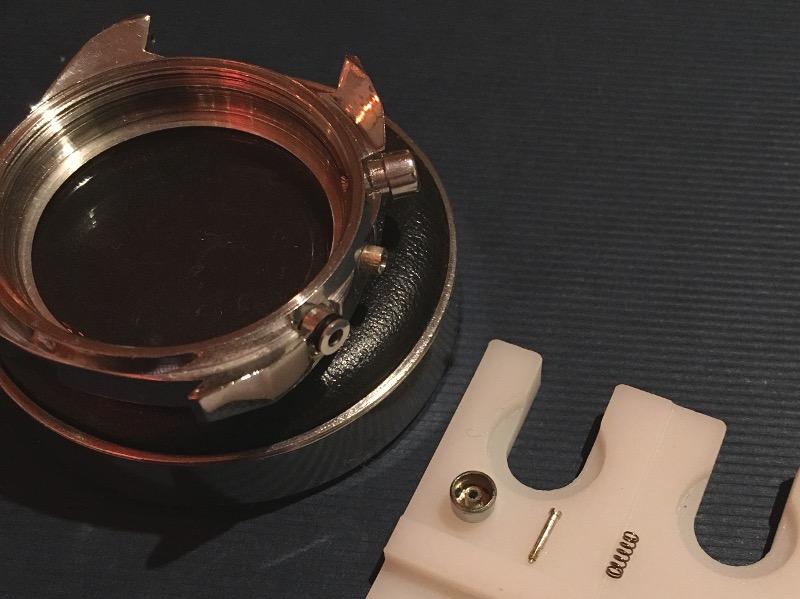
Save the dial plate. Uncase the movement with dial and hands attached, the glass then can be pushed out (by your thumb) from inside of the case. Make as many mistakes as you like when installing the glass without damage to the dial and movement. Epoxy five will do.1 point
-
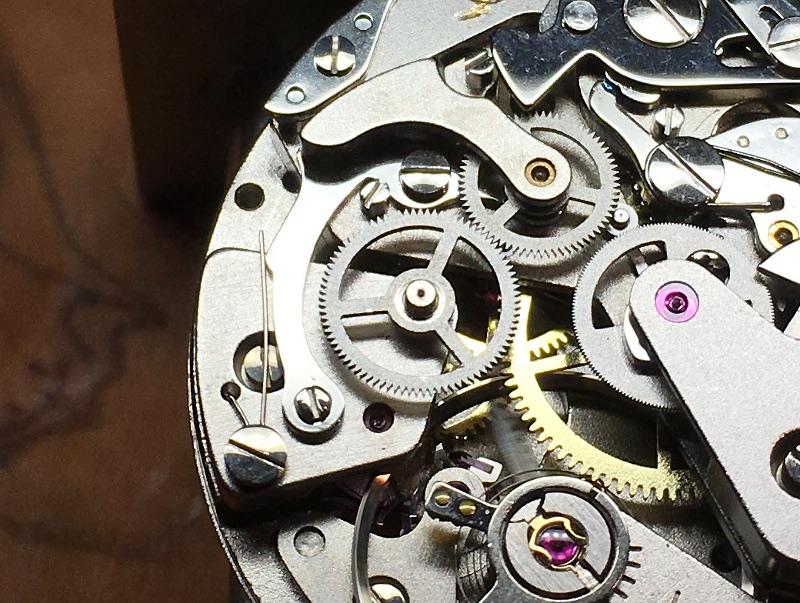
So the stem could be stuck either to the crown pinion or sliding pinion or both, as said penetrating oil helps. Stem release button looks pushed down enough to release the stem, in addition to what littlewatchshop shows you got access to more point to grab the stem, for instance the big groove on the winding crown side. If no joy, I often loosen bridge screws on the gear bridge, half a turn the screw close to the balance , one and half turn the other screw, this will let you raise the gear bridge a little and slide the barrel out, there will then be enough space to press the stem out by pressing on the stem end with a pair of thin long nose pliers as pliers press on the stem end strong enough to break it loose of anywhere its stuck. So far you have had no spring to jump out and get lost. if no tool slips you have done just fine.1 point
-
Please don’t buy either tool. They are useless. You need to remove the movement and then simply push the crystal out. You will or may however need a crystal press to put in the new crystal.1 point
-
took a while but finally arrived, unpacked but not yet used.1 point
-
For what its worth, if you look up Omega and/or Brandt on bidfun, you will see quite a number of different calibers, but none seem an exact match for the one above. http://www.ranfft.de/cgi-bin/bidfun-db.cgi?10&ranfft&&2uswk Enter the keyword omega (or brandt). The serial numbers generally appear on both the dial side, and/or on at least one of the bridges on the balance side. There are also Omega trade marks on most of the examples and in some cases an Ω on the balance cock.1 point
-
It gets even more interesting is it has variable specifications? Originally anything I saw was that it hardened up really really fast and would bring your watch to stop. Definition fastest couple weeks at the most. Finding this mysterious lubrication interesting with this incredible fast gluing properties and because it was $10 a bottle I spent the money and purchased a bottle. But I was extremely disappointed? Oil was the most fluid oil I've ever seen it is super thin. Then because it is so thin it didn't seem to want to stay wherever I put it. As a consequence the test watch I did it seemed all disappear really fast. I was really hoping for fast gluing but that's not what I found not that it didn't get hard eventually. But definitely an interesting substance not suitable for watch repair though.1 point
-
I found some time today and serviced this one again. Two interesting observations. The fresh oil was very difficult to wash away. There was still some oil oil the jewels after dipping and scrubbing with a small brush. I thought fresh Moebius 9010 would dissolve easily. It doesn't. When I removed the escape wheel, it looked like there was a blob of congealed oil on the pivot. I dug out my stereo microscope for a closer look. It looked like a gooey blob just above the pivot. After a good scrub, most of it is gone but some remained. I changed to 30x magnification and it turns out it is rusted. The pivot is fine but the gear above it is rusted. This rust and maybe a speck of debris basically sucked all the oil out of the jewel and it ran up the gear. Enlightening. And, I should have inspected the parts with the stereo microscope before. Using a loupe, everything look just fine. Waiting for it to run in and see what I have for amplitude and timing.1 point
-
Yes measuring mainsprings calipers can be or have issues with the thickness. It's hard to hold the thing absolutely parallel to the jaws you end up getting wrong measurements. The length you don't have to measure exactly just need the grasp what it corresponds to. The web use it helps if you measure the center part of the spring we have several coils. Then unfortunately with pocket watch data it seems to be the best place to find it is on eBay. Which is largely where the stuff I have came from. One of the reasons it may not be available out in the wild is that some of the files are really really big greater than tens of megabytes. So while you can download all kinds of stuff including some pocket watch material if you know where to look usually eBay is the best place to buy a disk with a whole bunch a technical stuff.1 point
-
Yes that's been the experience with the apps They can be so very problematic. Where the timing machines whether it's a Chinese Or Swiss they can sometimes be fooled r they sometimes are having issues with something but you do work around the issues but that is just a really tiny percentage versus problematic it works at all. So yes timing machine purchase is well worth that anyone watch repair now really should have one.1 point
-
The movement is a Hamburg American Clock Company or HAC. Clean it in Horolene clock cleaner, don't forget to remove the two springs from the barrels first.1 point
-
My crystal lift band snapped not long after I got it. I just replaced it with a 200 series o-ring. I got mine from work, but they can be had at any home improvement center. You just need to know your size. If you still have the original, take it with you and get one as close as you can to the ID.1 point
-
Hi Petrol is ok to clean them down I some times use white spirit, Having got rid of all the gunk then clean in the normal way should be ok. Springs will have to be clamped or tie wrwpped down for removal.1 point
-
Anyone out there who has neck and back problems, get one of these for your upright scope. SG$ 45.91 13%OFF | Stereo Microscope Universal Bracket Arm 360 Degree Rotating Xtended For Eakins Binocular Trinocular Microscope https://a.aliexpress.com/_mL0Adnw Even if you don't have any problems now, your neck and back will thank you in 10 years time.1 point
-
Hi Ross. ETA 2789-1 has a date ring so you will encounter fiddly springs if you attack from dial side, but not much can go wrong when you approach from the rotor side. So take pix as you go. Remove the two screws( gun metal colour) to the auto device, the module with rotor attached will come off. Release barrel power by pushing the crown wheel ring aside. Remove ratchet wheel screw Remove barrel bridge. You have access to the stem. Good luck1 point
-
Another "makes it look so easy" video by one of our members @Repivot, this time about hairspring manipulation. https://youtu.be/IoBd-oxpEZ41 point
-
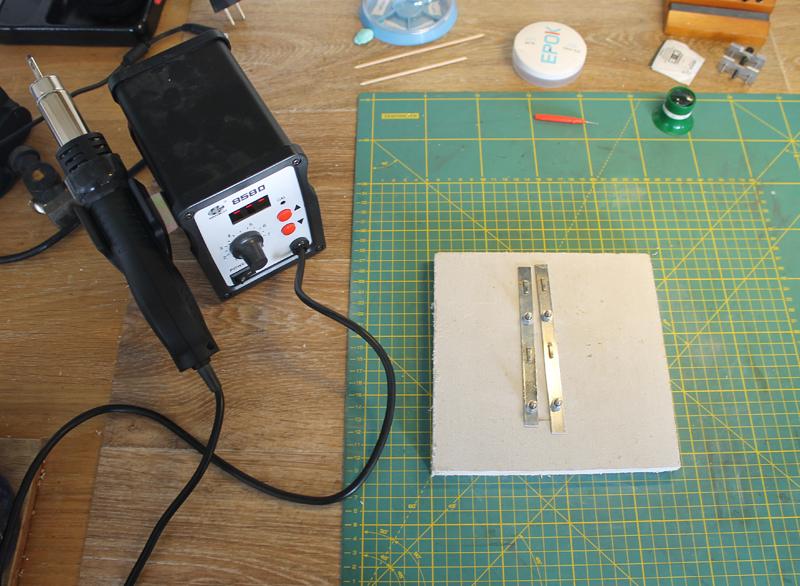
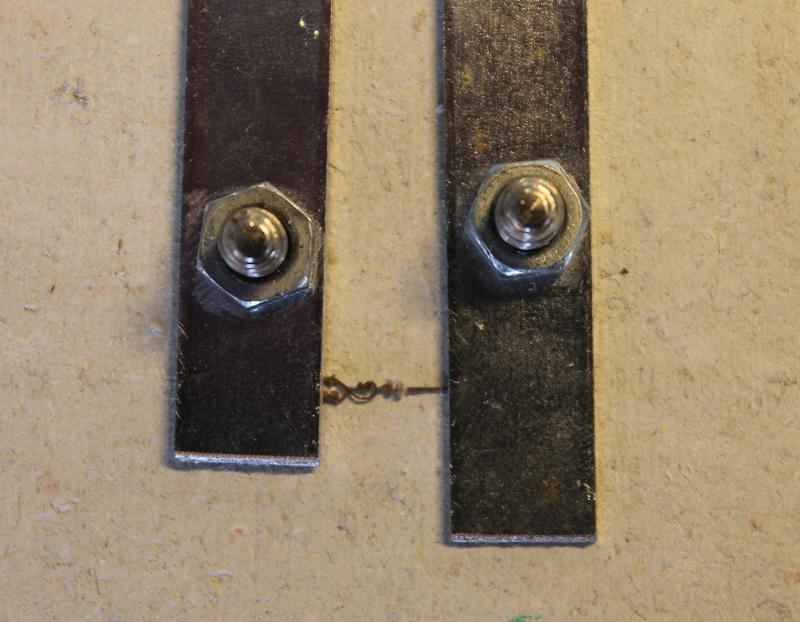
Thought it may be worth to share; I received a pretty beaten up, none-running 1890-1900 cylinder-escapement pocket-watch. It had all sorts of problems, a list too long to go into details. Among those problems was a bend/broken minute hand. It inevitably broke off when trying to straighten it. The center-hole diameter of the minute-hand was 0.5mm and the length was 15mm. The hour-hand had a hole diameter of 2.0mm and the length was 10mm. Searching the internet to find an identical set proofed futile. The watch is a heirloom so originality was a priority. The hands turned out the be made of bronze, a copper-tin alloy. Therefor it made sense to attempt soldering but the part that had to be soldered had a thickness of only 0.3mm. Both parts had to be fixed in place with a sort of clamp capable to fixing both parts, being heat resistant and "none-sticking". A soldering iron, even with the smallest tip, would be far too big for the job and to avoid touching the parts, I choose to use a hot-air gun used in electronics for soldering SMD-components to a circuit-board. A few test were made which tin to use and at which temperatures. 300 degrees C with tin used in electronics seemed to work fast and made the tin to flow nicely. I used a soldering flux-paste. The clamp consisted of two metal rails, slightly diverting from each other to give many clamping options, bolted on a plate of gypsum. Pulling over a #1000 grid sand paper, I made two 45 degrees chamfered edges on either end of both parts; The two parts were clamped in; Applied some soldering flux, heated it all up to 300 deg.C and applied a tiny bit of tin. Once cooled down, I removed some excess tin with a small diamond file. Here a picture of the back side of the minute-hand; And here the front; the tin didn't flow further away from the soldered joint or around the edges Most likely not the strongest repair in the world, but when not touched it should be strong enough to do the job. On the picture the hand color looks black, but that's due to the lighting. In reality the hand hasn't lost any of its shiny patina at the front ...... Anyway, I thought to share this repair as one of the many different possibilities
 1 point
 -
This post is I am afraid a common issue on this forum. Many including myself watch vids and it looks so, so easy BUT most of the vids have been edited with the flyers up- cocks etc edited out. Successful watch repair requires skill, experience and knowledge which can not be gained by watching the pros vids. Anyone considering watch repair start on a easy low cost movements such as a pocket watch and treat it as part of the learning curve. Handling a screwdriver and small parts requires skill and patience, assembling is yet another skill that can destroy a watch if not carful. In this case a stuck stem would not be a huge issue for a watch repairer with experience. However it can also be extremely satisfying when the final result is a dead movement has been transformed into a up and running movement.1 point
-
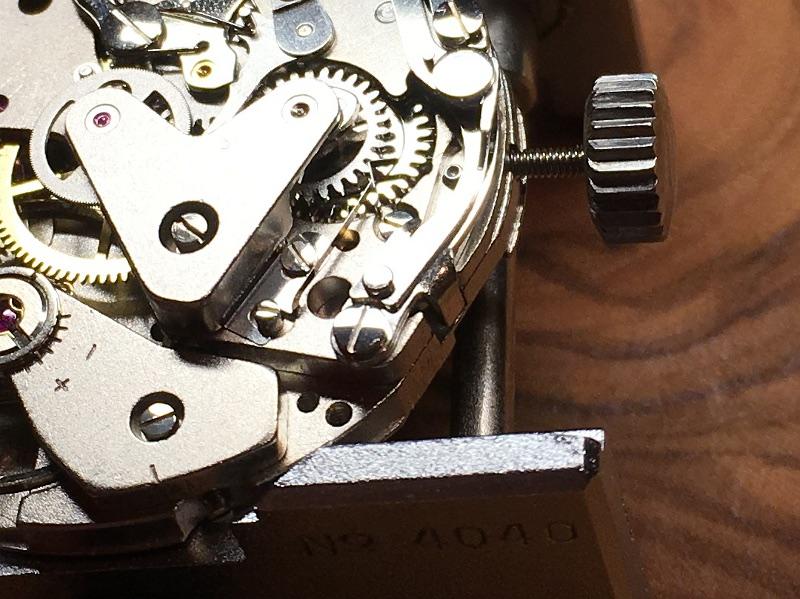
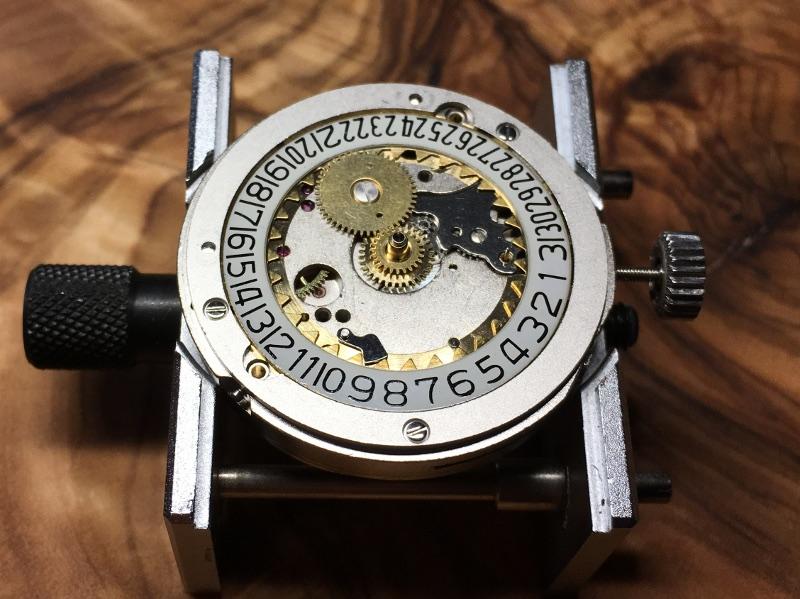
alright an update. finally got the stem out and yes, it was corrosion. seems to be a very snug fitting stem so a little corrosion was enough to swell the stem. winding and setting knocked it off where it rubbed on the case tube but there was probably a shoulder of rust that prevented it from coming out even after it was disengaged. it took quite a bit of force to remove it using pliers. the crown broke off but needed replacing anyway. probably need to replace the stem as well since i think i marred up the threads. The next problem is that the movement is in there really tight in the case and won't budge.
 1 point
 -
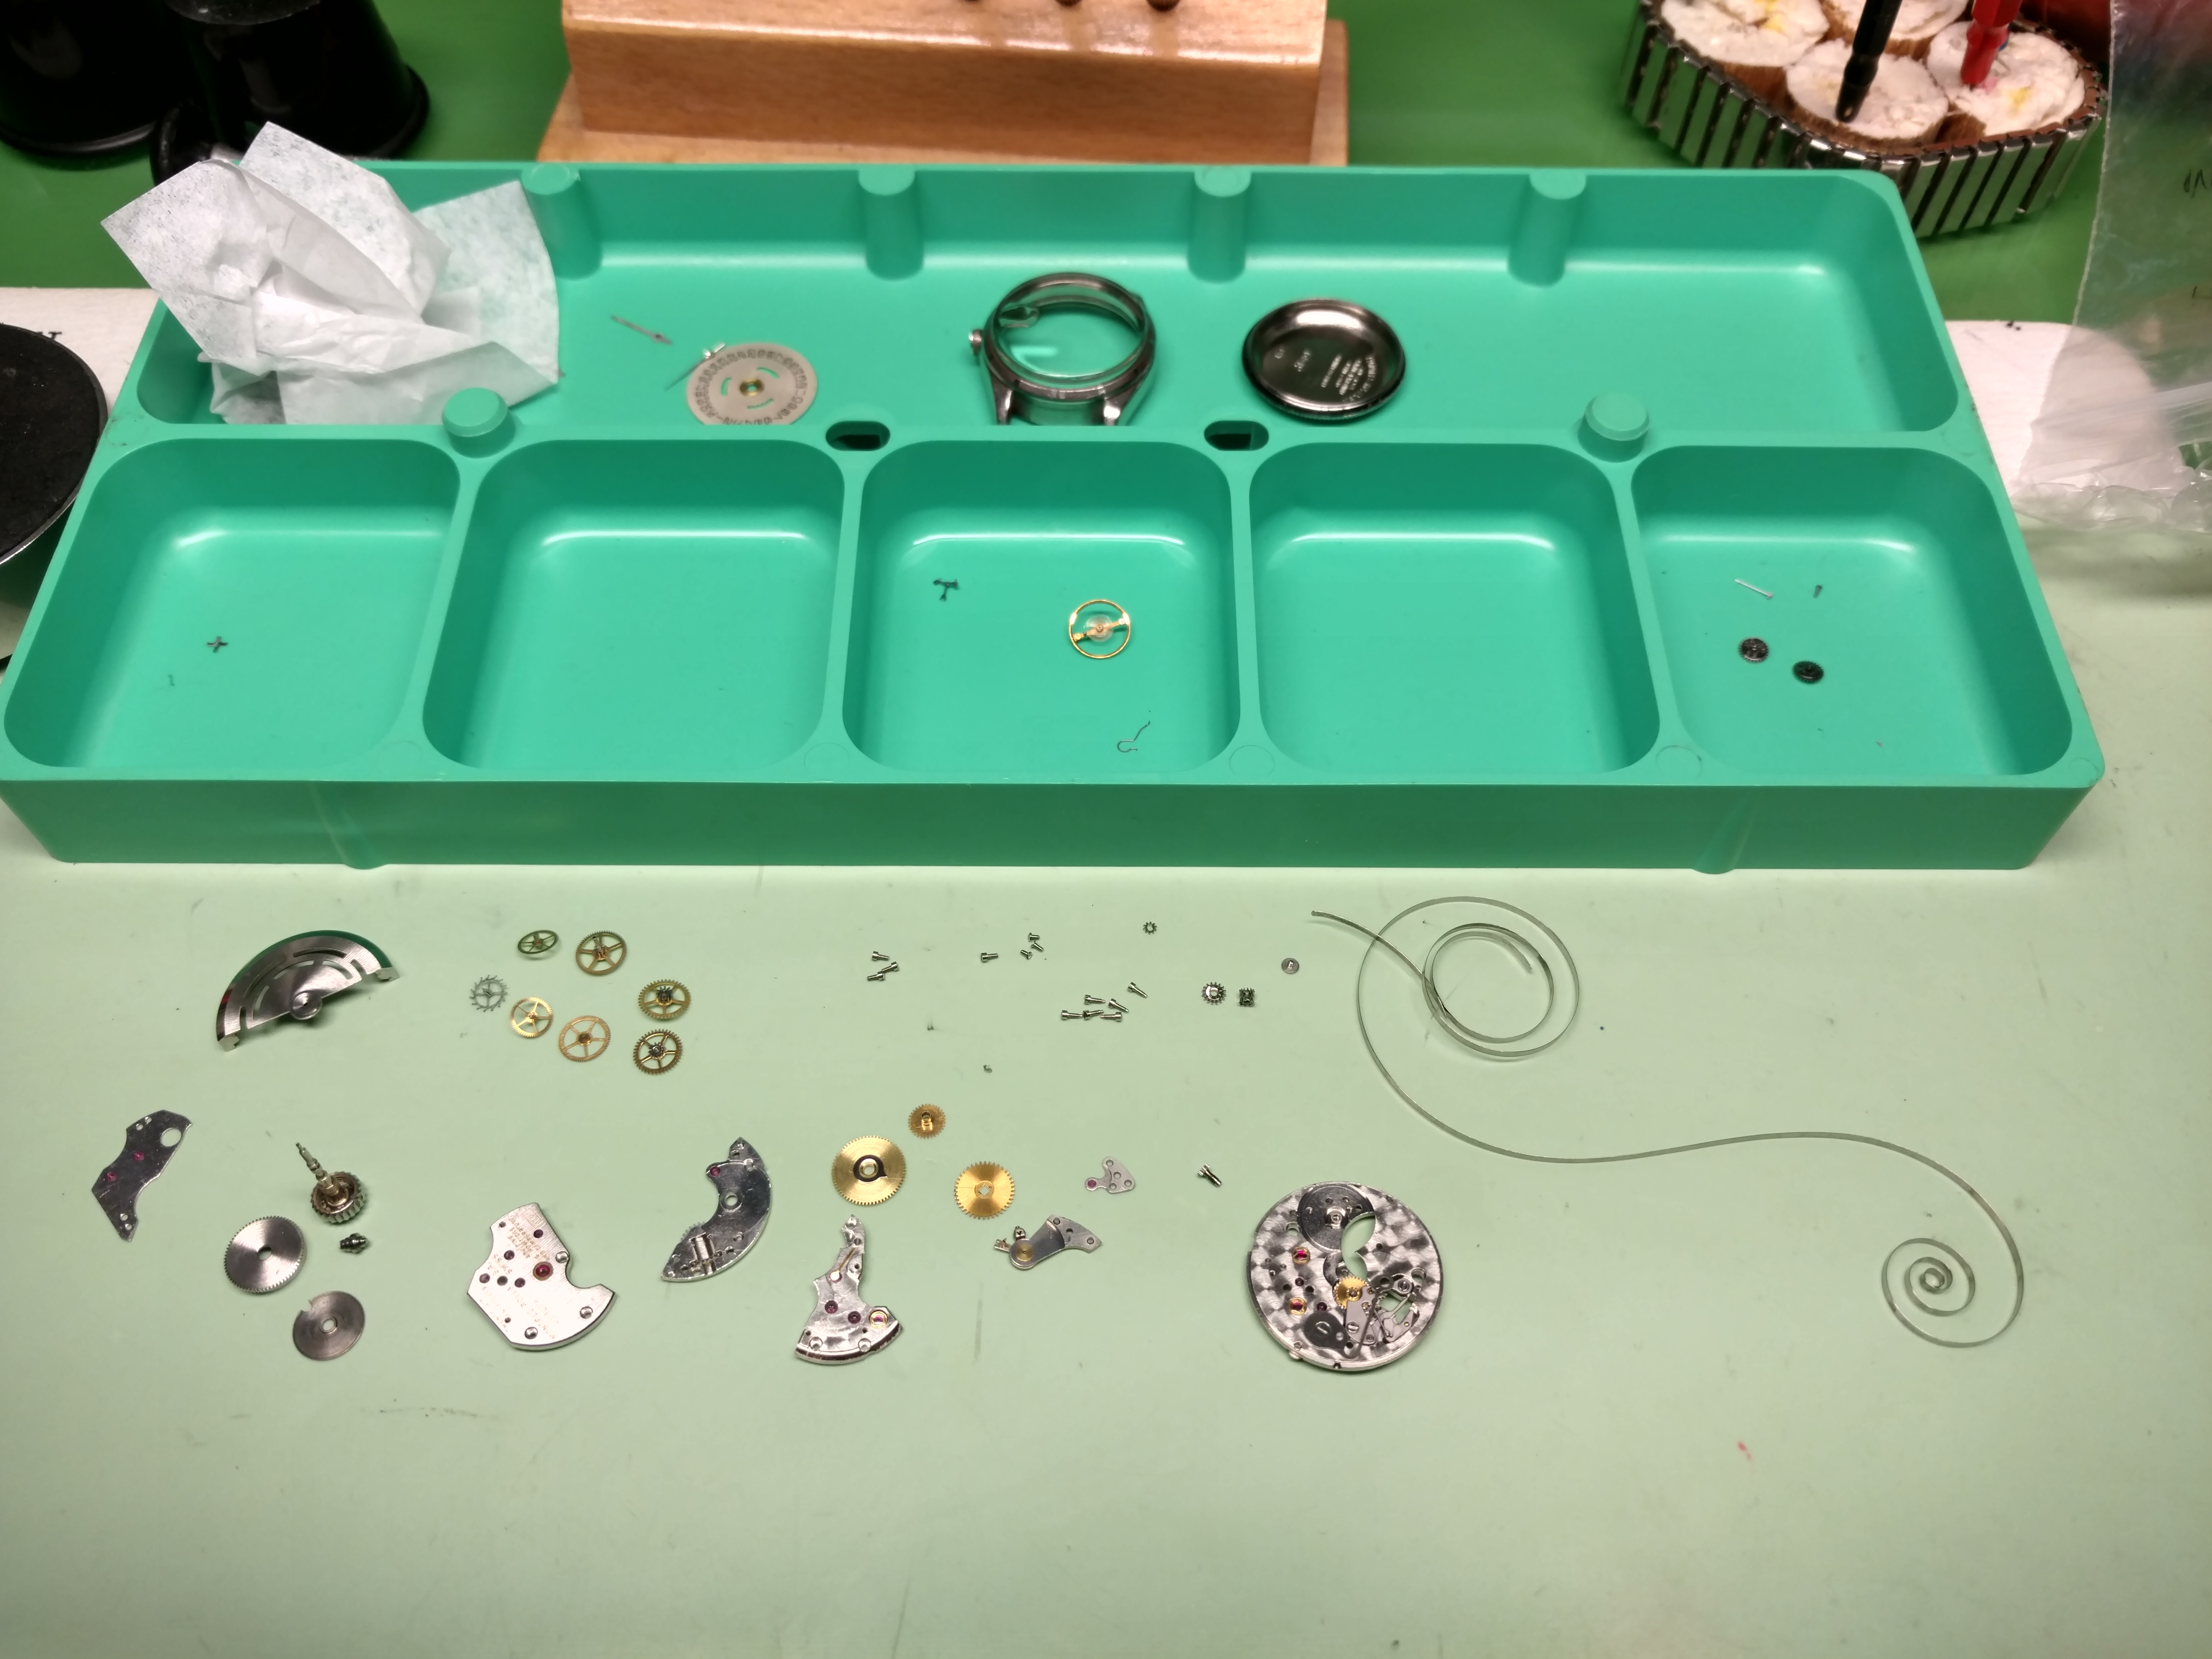
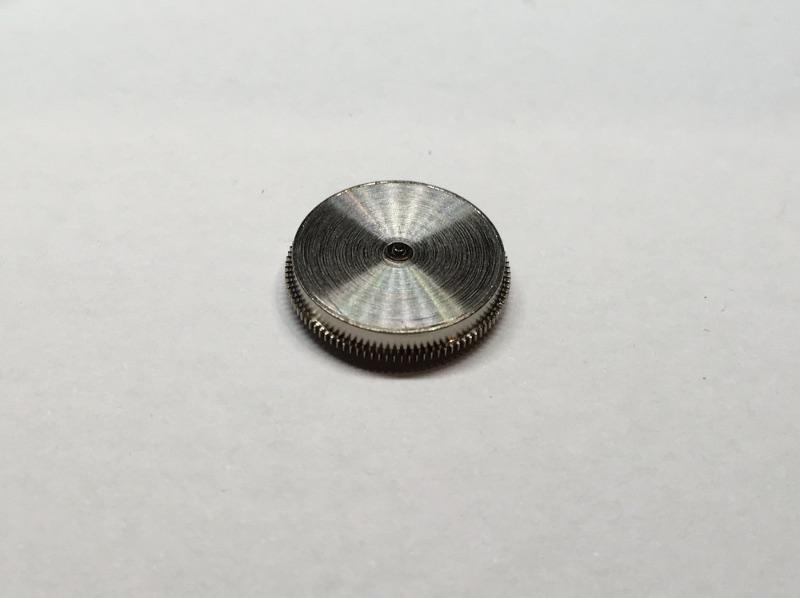
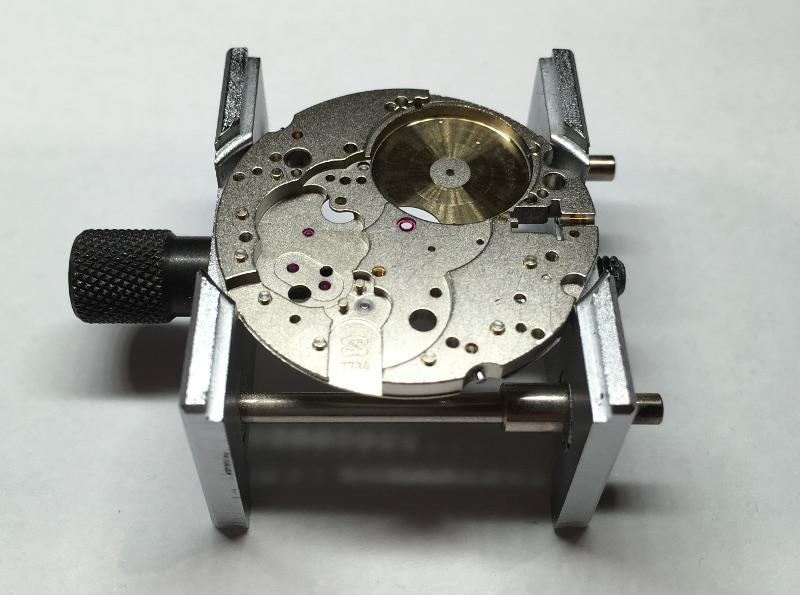
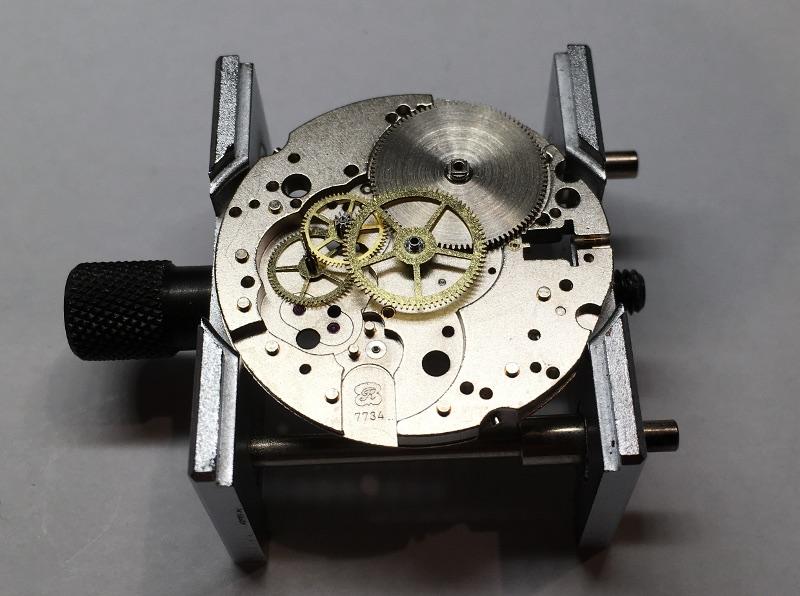
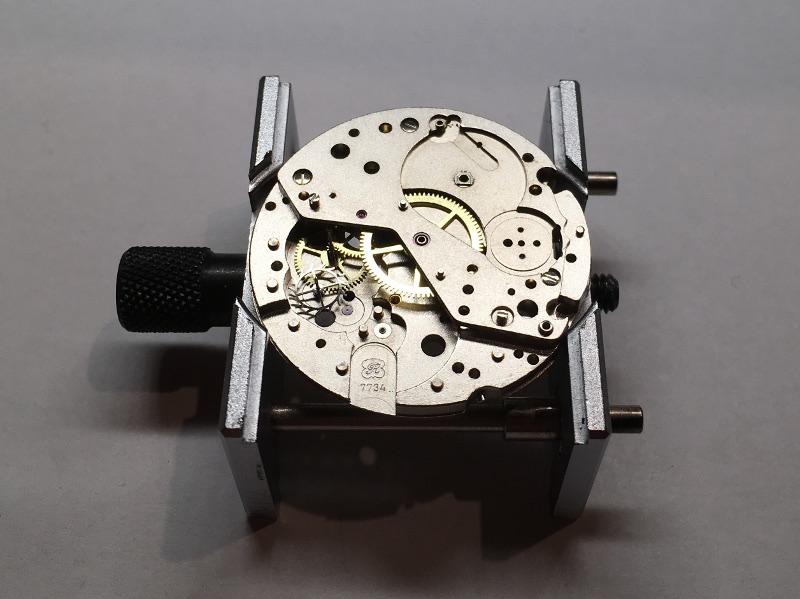
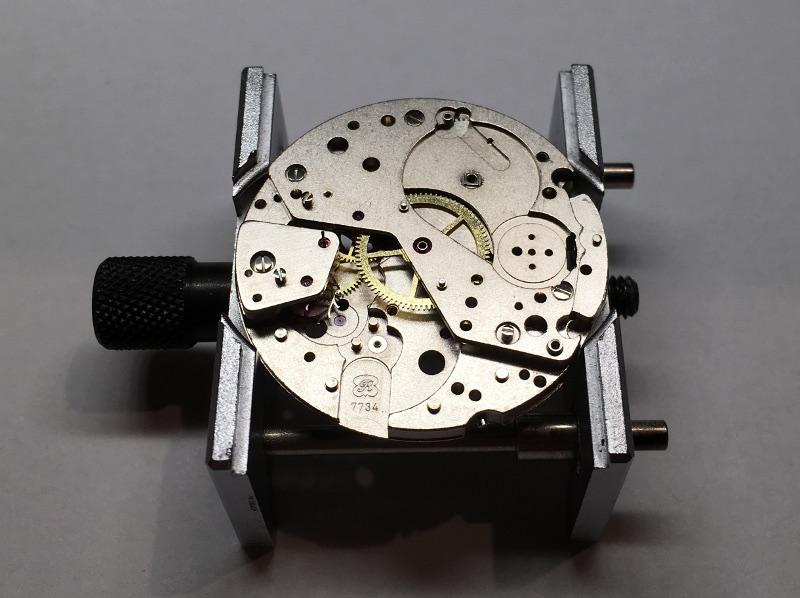
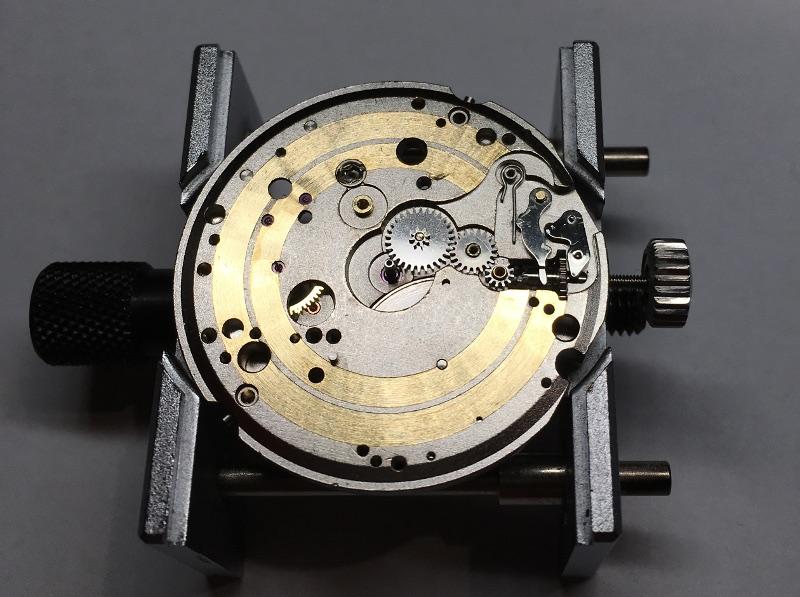
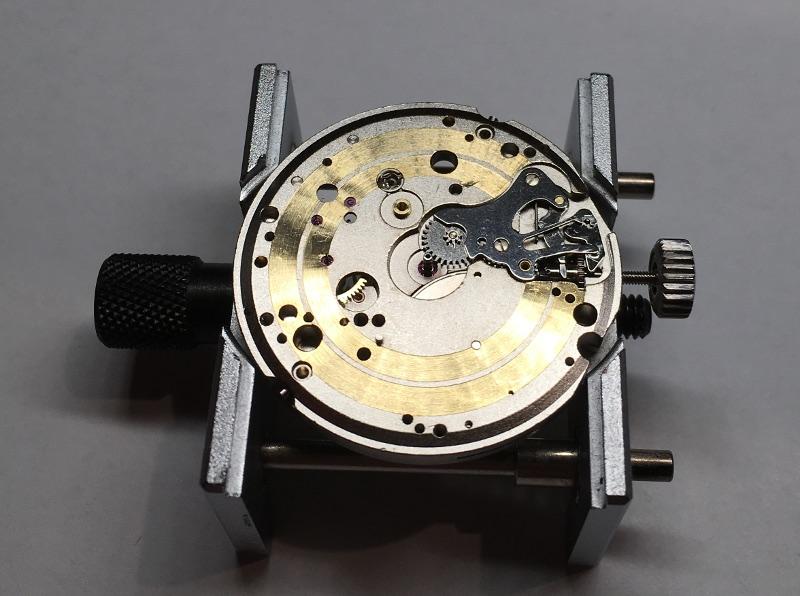
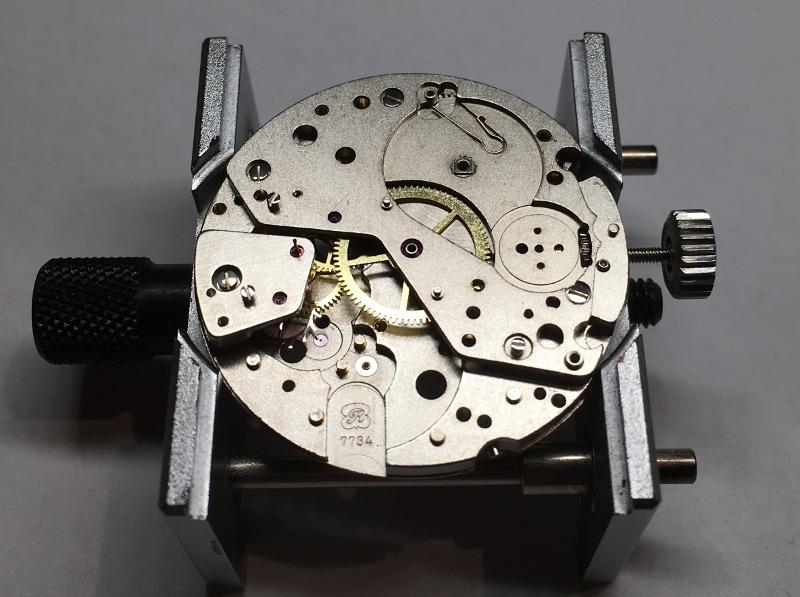
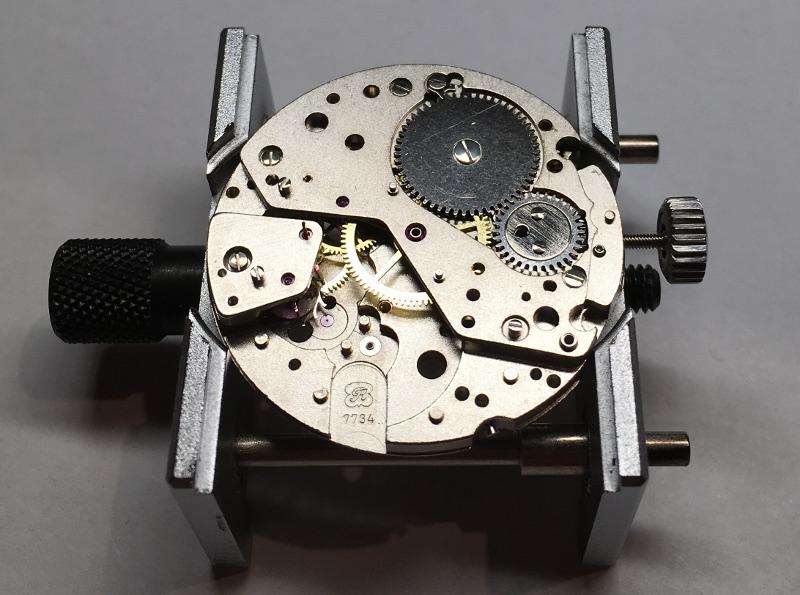
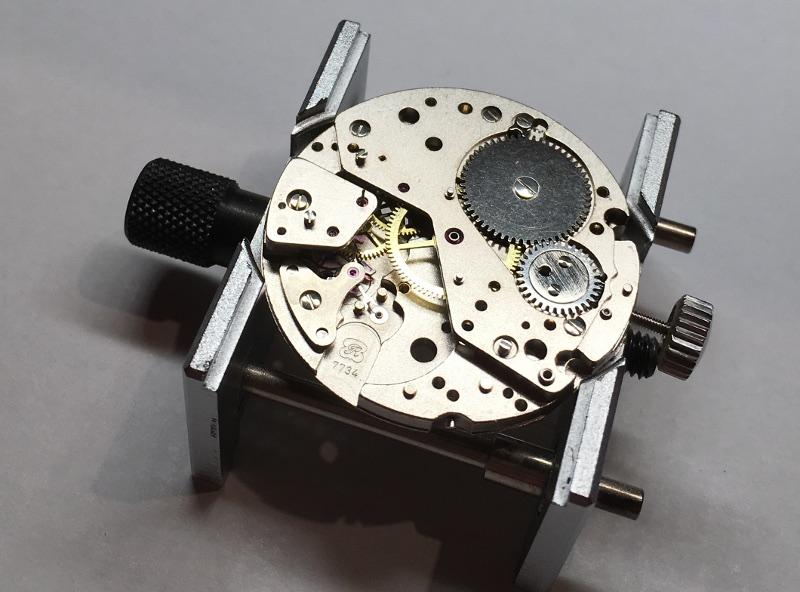
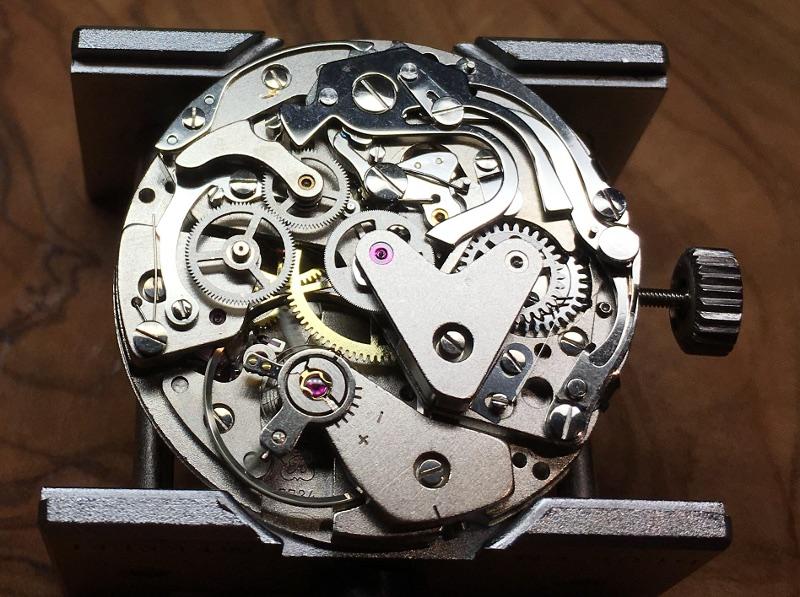
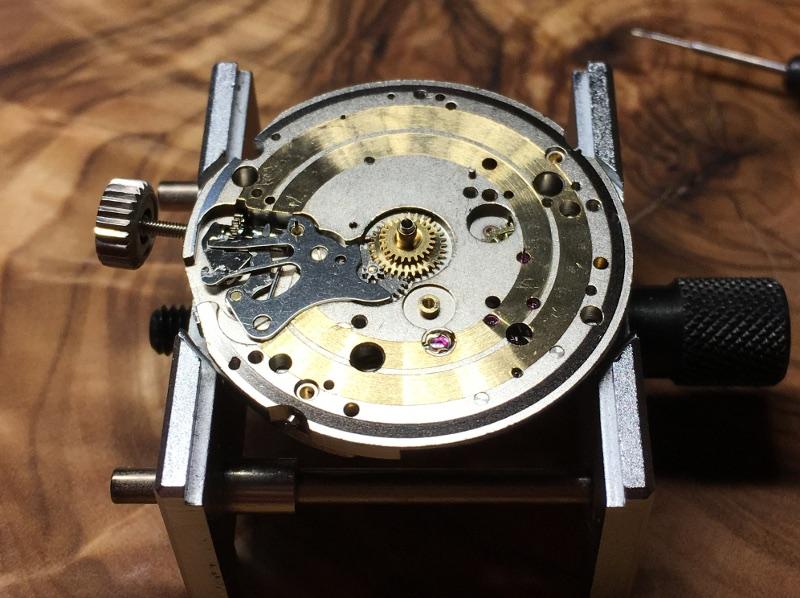
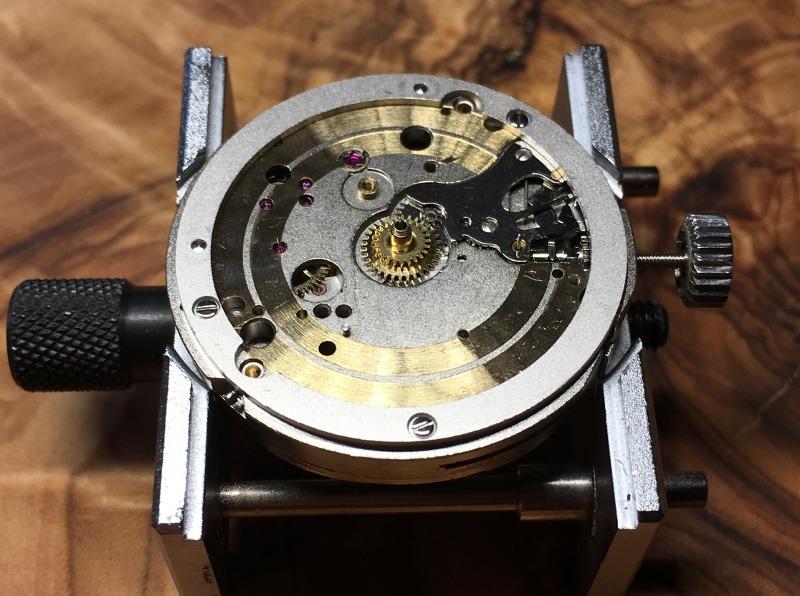
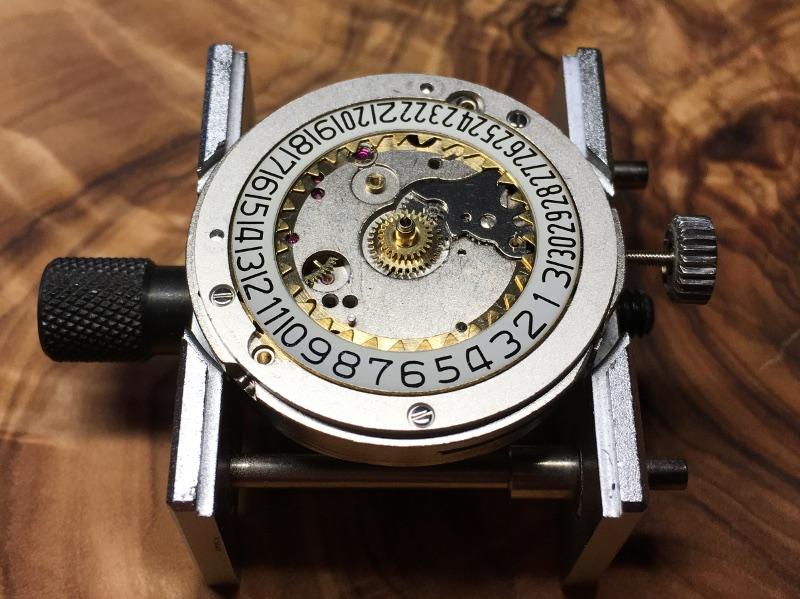
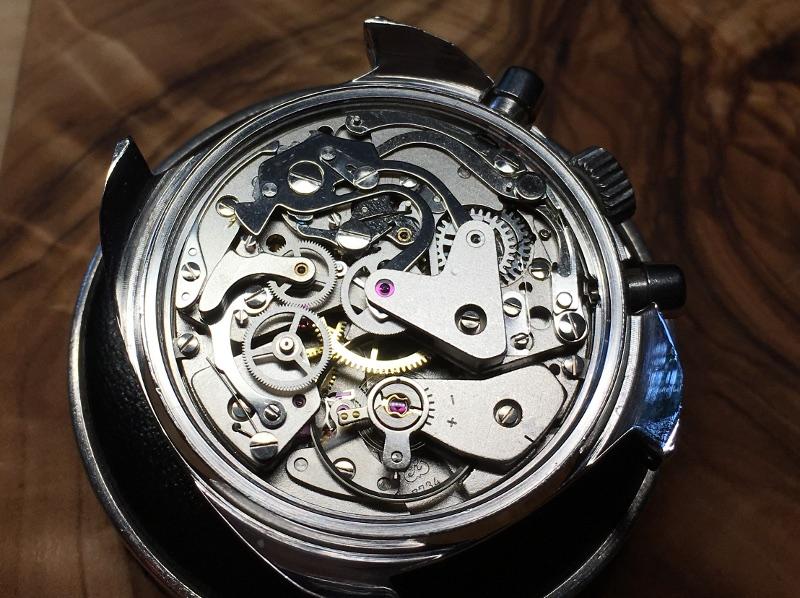
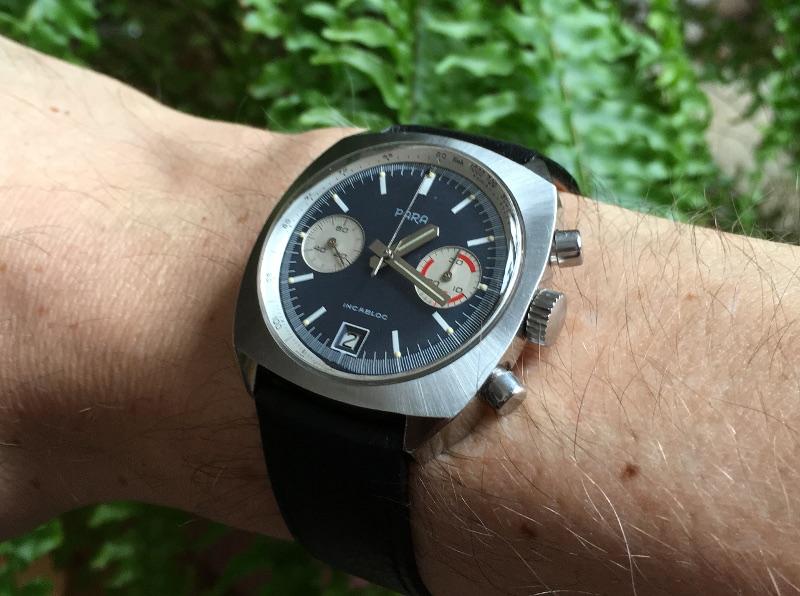
First of all my apologies for not having documented the disassembling, but the watch arrived in a terrible condition and I stripped it down right away to get rid of all that dirt. If you have worked on some watches yet and think about entering the chronograph world with a 7734 let me give you 3 advices: Do it! The 7734 is a solid construction and not too complicated. Take your time and watch all the 6 parts of Mark's Venus 175-service on youtube. Of course the Venus is a column wheel system, but the basic movement is very similar and also on the chrono layer you can learn a lot especially about lubrication: https://www.youtube.com/watch?v=EI3T-IR3AgM Download the 7734 service manual. A lot of information here: https://strela-watch.de/valjoux-7734-7733-7736-technical-documentation/ Here we go. Some 8200 for the barrel and the new mainspring goes in (got it from cousins - what I'm gonna do after Brexit? ). The complete barrel. Some D5 for the arbor. Putting in the wheels and the bridges. Lubrication: 9010 for the escape wheel and the second wheel, D5 for all others. The keyless works. 9501 for the stem and the gears. D5 for the wheels and the lever axis, 9501 for the contact points of levers and springs. The click spring. D5 for the click and the crown wheel, 9501 for the contact point of click and its spring. Finally the ratchet wheel goes in. The pallets go back in, no lubrication for the pivots. Lubricating the balance jewels with 9010. The balance back in. The escape wheel and the pallets got epilame so I let run the movement with dry pallets for some minutes. After that 941 for the pallets (work from the dial side through the window). Now I start with the chronograph. First the bridge and the spring for the levers go in. Fly back lever goes in with some D5. Operating lever, again D5 for the axis. A little bit tricky, you must upline the integrated spring with the upper lever first (9501 for the contact area). The second pictures shows the final layering. The sliding gear goes in, D5 for the lever axis, no lubrication for the wheel! At this point I forgot to put in the minute recorder runner (no lubrication). You should install it here, later its going to be more difficult. The blocking lever (D5) returns. Some 9501 for the contact area to the sliding gear. The blocking lever spring. Be very careful, this one isn't just a flyer, its a damned Lockheed SR-71 Blackbird. The friction spring (gets a drop of 9010). The chronograph runner and its bridge (9010 for the long pivot and the jewel in the bridge). The minute recorder jumper, no lubrication. The hammer. D5 for the axis, 9010 for the lever ends that hit the hearts, 9501 for the contact areas to the sliding gear, fly back lever, operating lever, jumper. The hammer cam jumper. Before installing the clutch give 9010 to the pivots of the coupling wheel. D5 to the lever axis. The spring. 9501 for the contact point. Finally line up the driving wheel with the coupling wheel and the chrono layer is complete again! The dial side. Some 9501 and the cannon pinion goes in. Hour wheel with D5. The dial rest with its 3 screws. The date indicator. The date indicator driving wheel with some D5. The jumper with D5 to its axis. As there was no lubrication described in the manual between disc/jumper or disc/wheel and the parts looked well polished I didn’t lubricate. It works - let’s see how long. The guard with 2 screws. Finally the spring. The dial comes back and is secured with its 2 screws from the side. While disassembling I put the little hands into seperate trays to prevent mixing them up. Now I turned the crown in the setting position exactly to the point when the date switches and put on the hour hand to 12. Positioning the chrono-hand exactly on zero was that tricky that I forgot to take a pic. New springs and gaskets for the pushers. Unfortunatly I’m not good in restoring cases. So just refreshing the brushing a bit and some cape cod work. The movement back in the case and secured with 2 screws. A new gasket for the caseback and here we are. Thank you for watching.


 1 point
 -
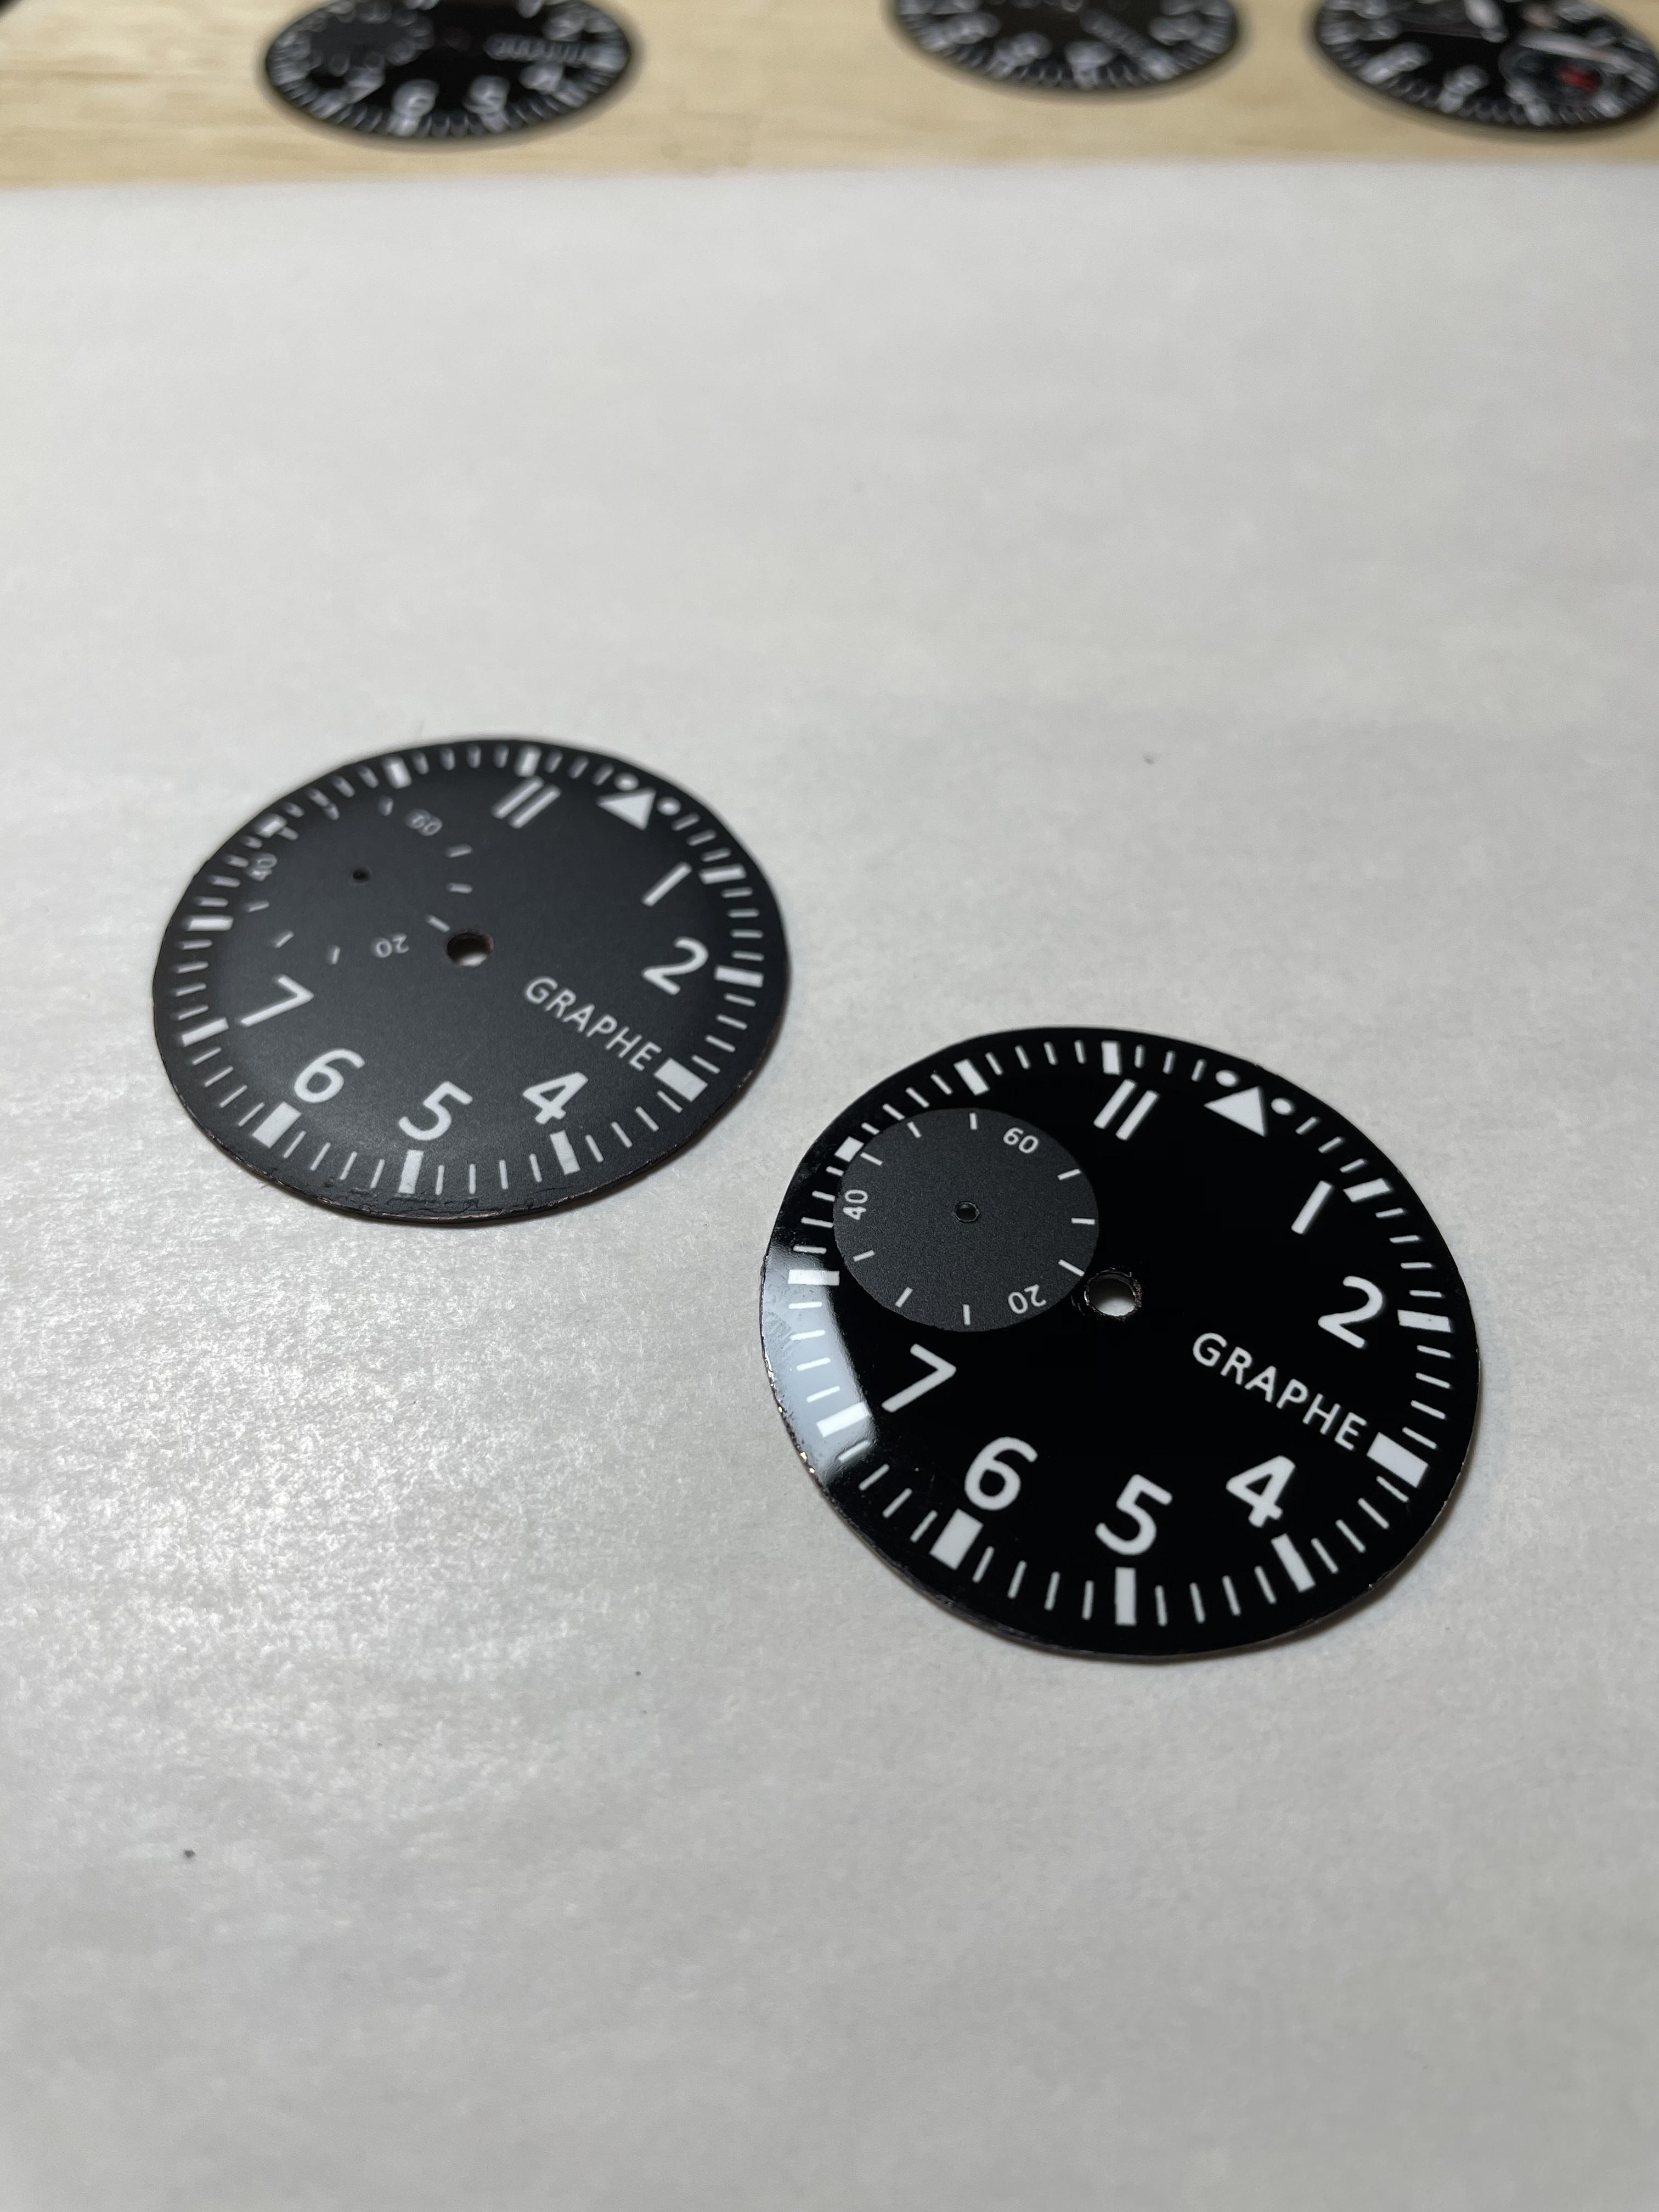
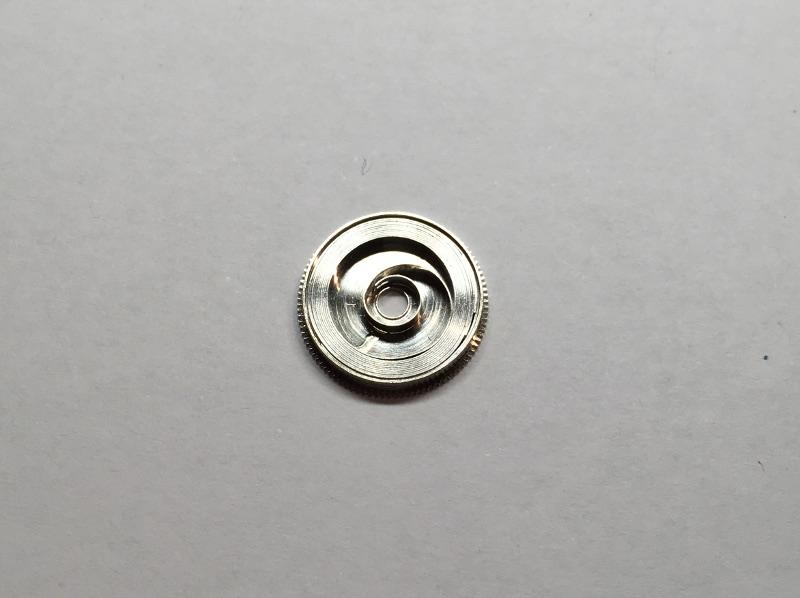
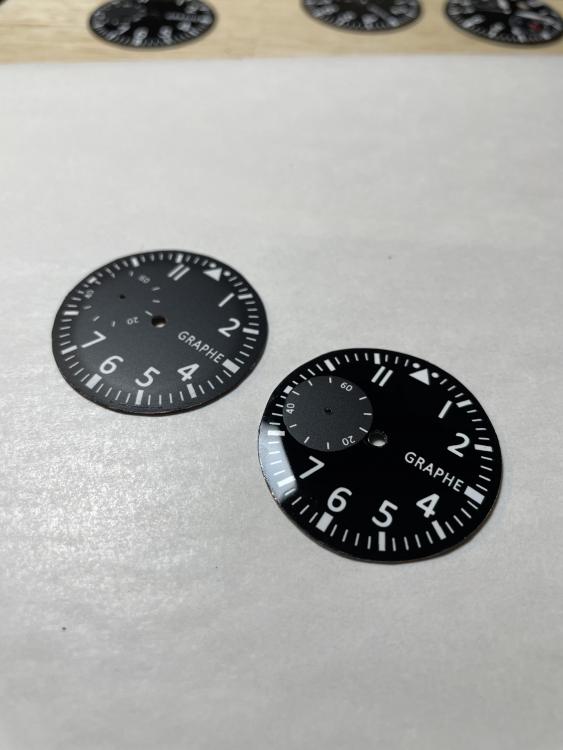
This is a project I have been working on for 2 days and now I think I have it down. Turned out fantastic. What do you think?
 1 point
 -
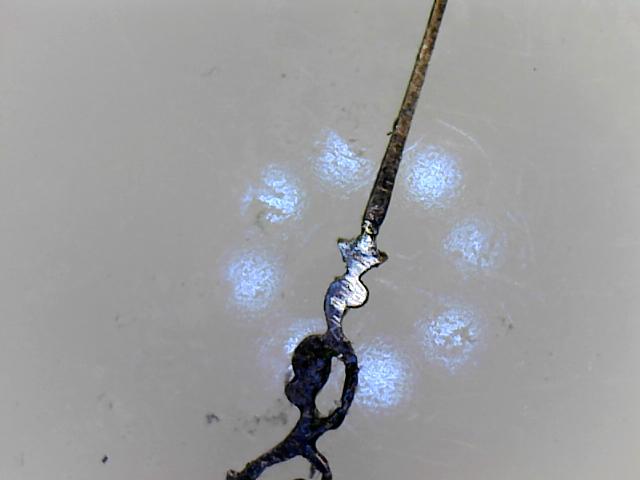
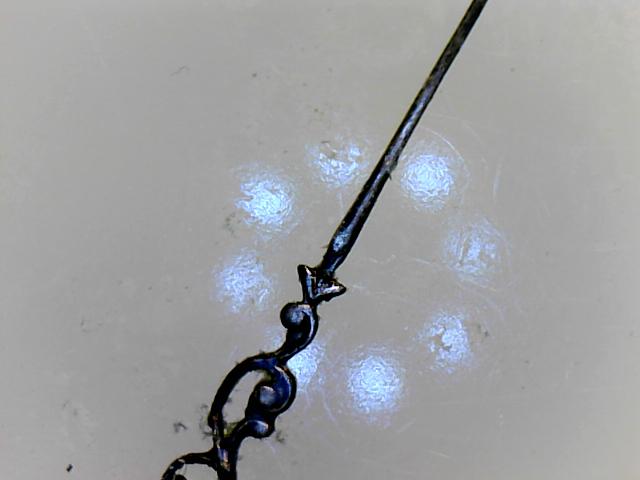
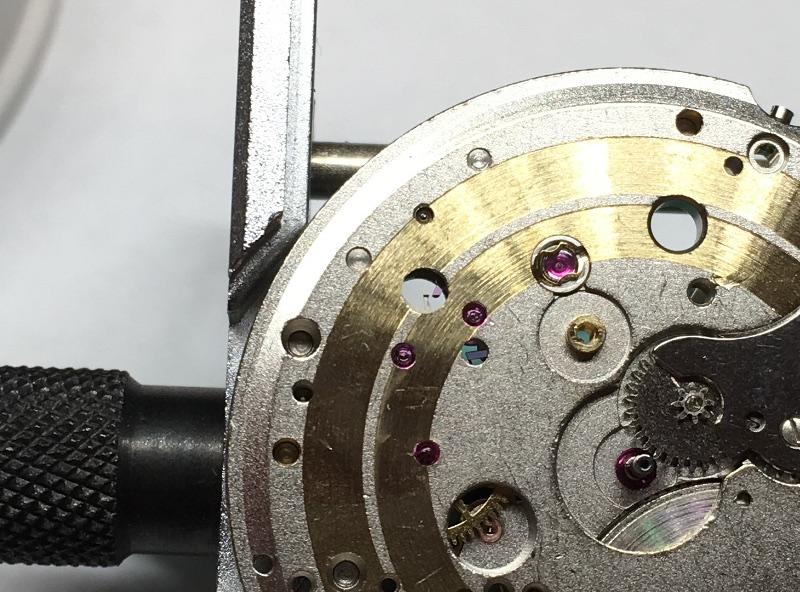
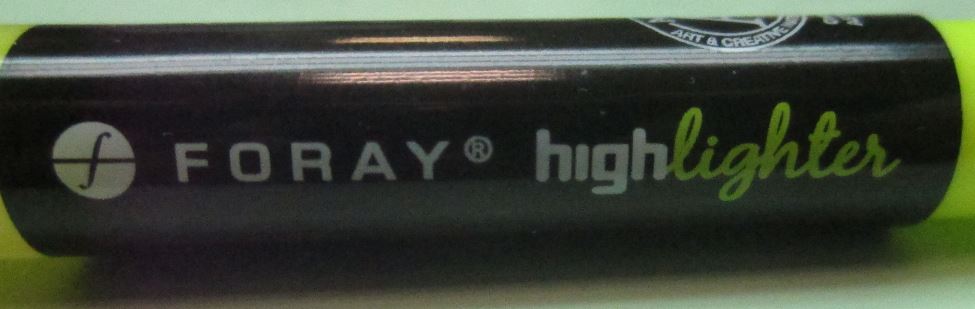
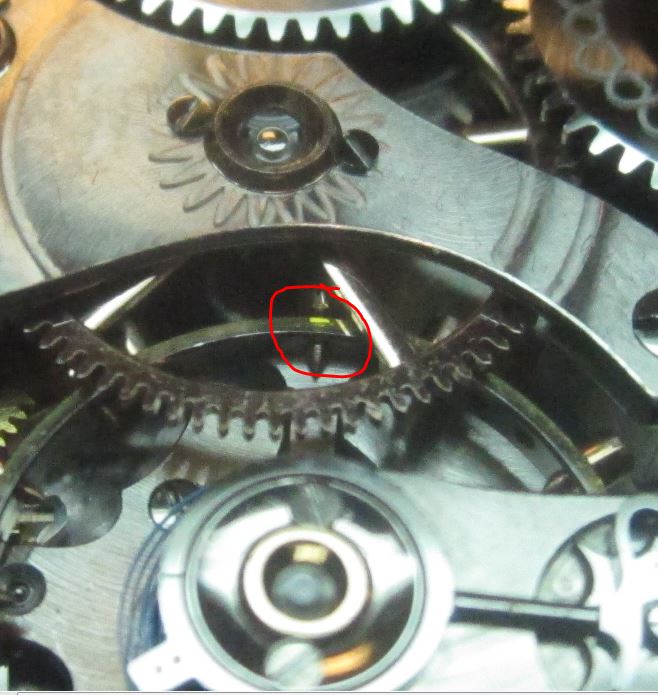
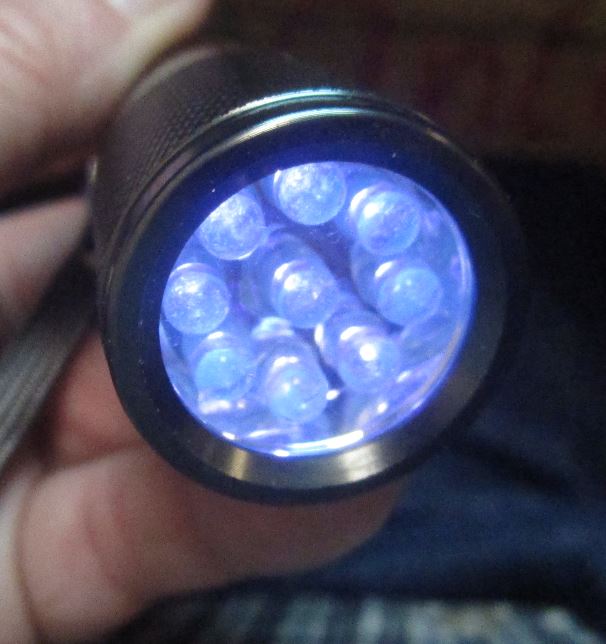
Knowing your lift angle is not a life or death situation for using the timing machine. If you don't like the numbers on the machine either because are too high or too low versus what you think you're seeing in the watch just change the lift angle to give your machine happier numbers. I know it doesn't sound like a very scientific method but it really doesn't matter that much. Because even if it's not exactly right you could still look at dial-up dial down and the crown positions and see how much it varies.. Then as this is a new timing machine additional information like PDFs. Probably not the same company who produced your machine but still good information. Also a link that lists lift angles just not American pocket watch lift angles. Then your question has interesting timing for me in that two things related to this question of come up this week.. First on Monday my boss asked the same question.. So I got to explain what American pocket watches came into existence timing machines did not exist at all. It's not until vacuum tubes become readily available do machines that can show rate come into existence.. Then amplitude measuring machines don't really come into existence at least in any quantity until we get to the digital machines.. Then the Swiss get obsessed with amplitudes and we have always nifty charts but they don't care about pocket watches. It's really only when the hobbyists get their cheap Chinese machine does it become a bigger problem.. The other reason why the question is interesting is at work we found a better way of observing the 180° for finding the lift angle. There is a link to a YouTube video no notice that the dot he has is easy to see.. We found that using a Yellow FORAY® Liquid Ink Highlighter With a UV flashlight works really really well. To understand that I have pictures attached.. Nice bonus that while it's a highlighting pen on metal standard lighting it's basically invisible.. That comes off in the cleaning machine it's not a problem.. The second reason the timing is interesting for your question is that the UV flashlight at work went missing and I ordered one off of eBay yesterday. There really cheap one eBay it's probably way brighter than what I had before and I'll let you know how it works when it comes. The reason we had a UV light it was given to us by some watch company it makes the dials look much prettier or anything on the dial that would florescent really fluoresces under UV.. But I'm guessing somebody in the front room thought the flashlight was broken and didn't grasp what it was and tossed it in the trash. Then I suppose something good with an obsessed boss lift angles below came from that. The only thing where I made a mistake I should I had the serial numbers that we would know exactly which model watch these are because you'll notice that it's not set like all 16 size or 18 size are not the same it varies. Ball Illinois 12 size 45° Elgin 12 size 55° Elgin 18 size 49° Elgin 590 16 size 21 J 48° Elgin GM Wheeler 16 size 52° Elgin 6 size 62° Hamilton 12 size 48° Hamilton 912 12 size 38° Hamilton 940 16 size 60° Hamilton 992 16 size 48° Hamilton 992B 51.5° Hamilton 992E 42°Louis Audemar 44° Hampton 3/0 52° Illinois 12 size 45° Illinois 305 16 size 48° Illinois 6 size 62° Lange and Sohne 40° Longines pocket watch 35° Waltham 18 size 38.5° Waltham 1888 16 size 60° Waltham 21 jewel 645 16 size 42° Waltham Crescent Street 45° Waltham Riverside 16 size 44° https://watchguy.co.uk/cgi-bin/lift_angles https://youtu.be/-Xgcck692js witschi Witschi Training Course.pdf witschi X-D-DVH-Di-Im-N_EN.pdf

 1 point
 -
@nucejoe: Some additional information. When the watch arrived everything worked but amplitude was poor (220 deg dial up). While disassembly I took a close look at every part for damages (bent pivots, broken teeth, etc). After a rough cleaning with cleaning sticks and pegwood (especially for the fine pivots and the jewels to wipe off the old dirty lube) I cleaned all parts in an ultrasonic with elma 1:9 (except balance, balance jewels and pallets which were cleaned in bergeon one dip). After that I washed off the water and soap in benzinum. While assembly I checked every part for dust/little hairs before it went in. I did a rough endshake check with a pair of tweezers. After oiling the pallets and the watch running for 24 hours it showed good results on the timegrapher (290 dial up/down, 245 hanging, no waves). At this point I normally stop analyzing and start drinking beer. I never came across adjusting springs for endstones. I just opened the springs, cleaned and oiled the jewels, put them back, closed the springs and everything worked.1 point
-
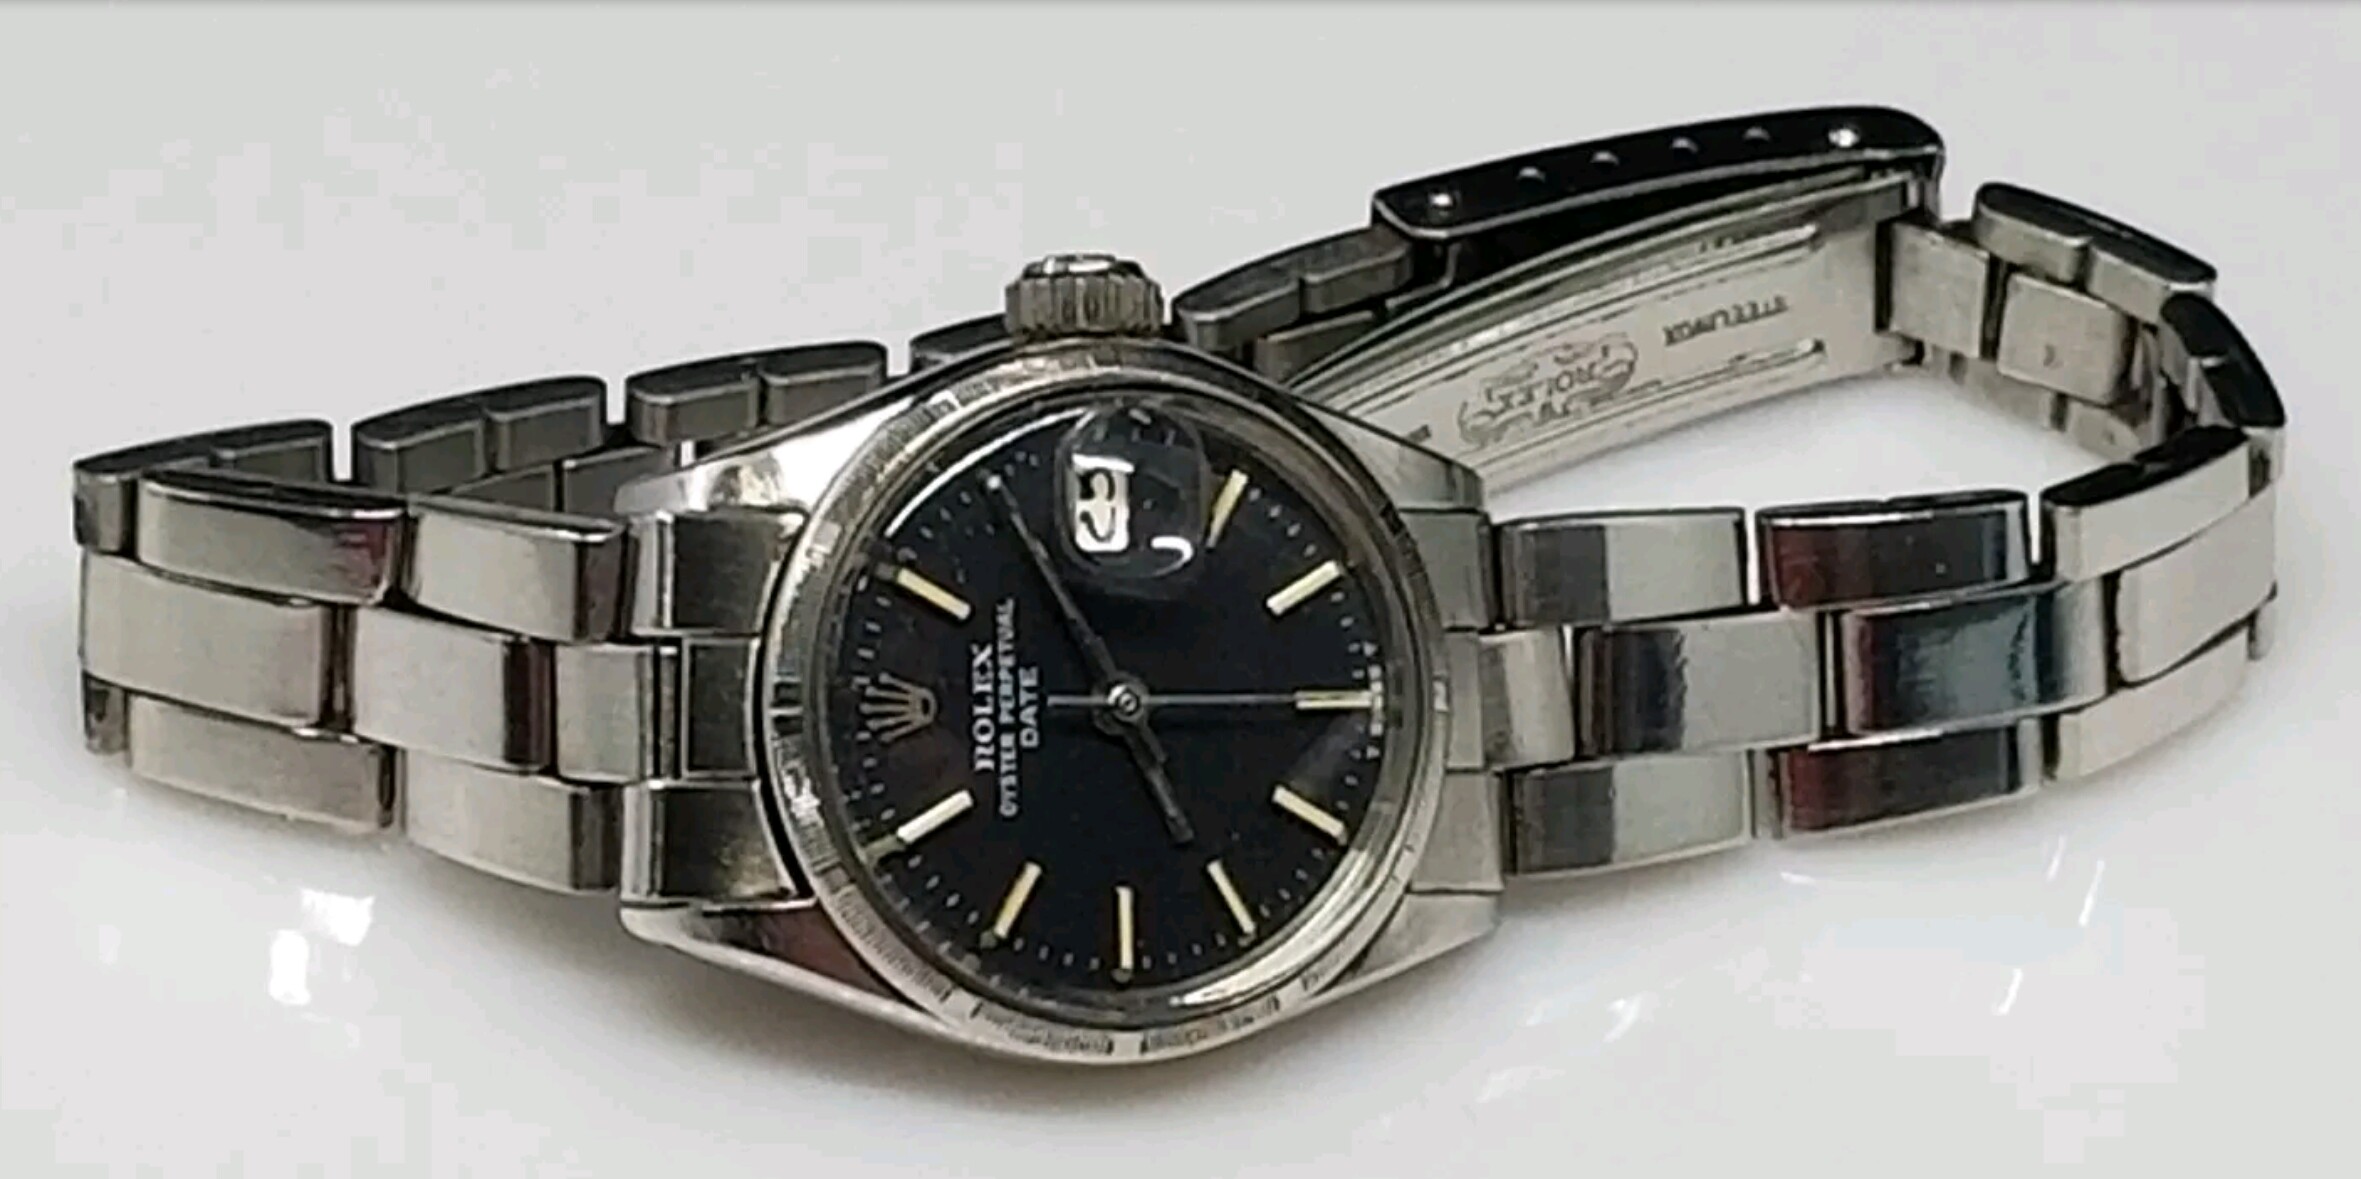
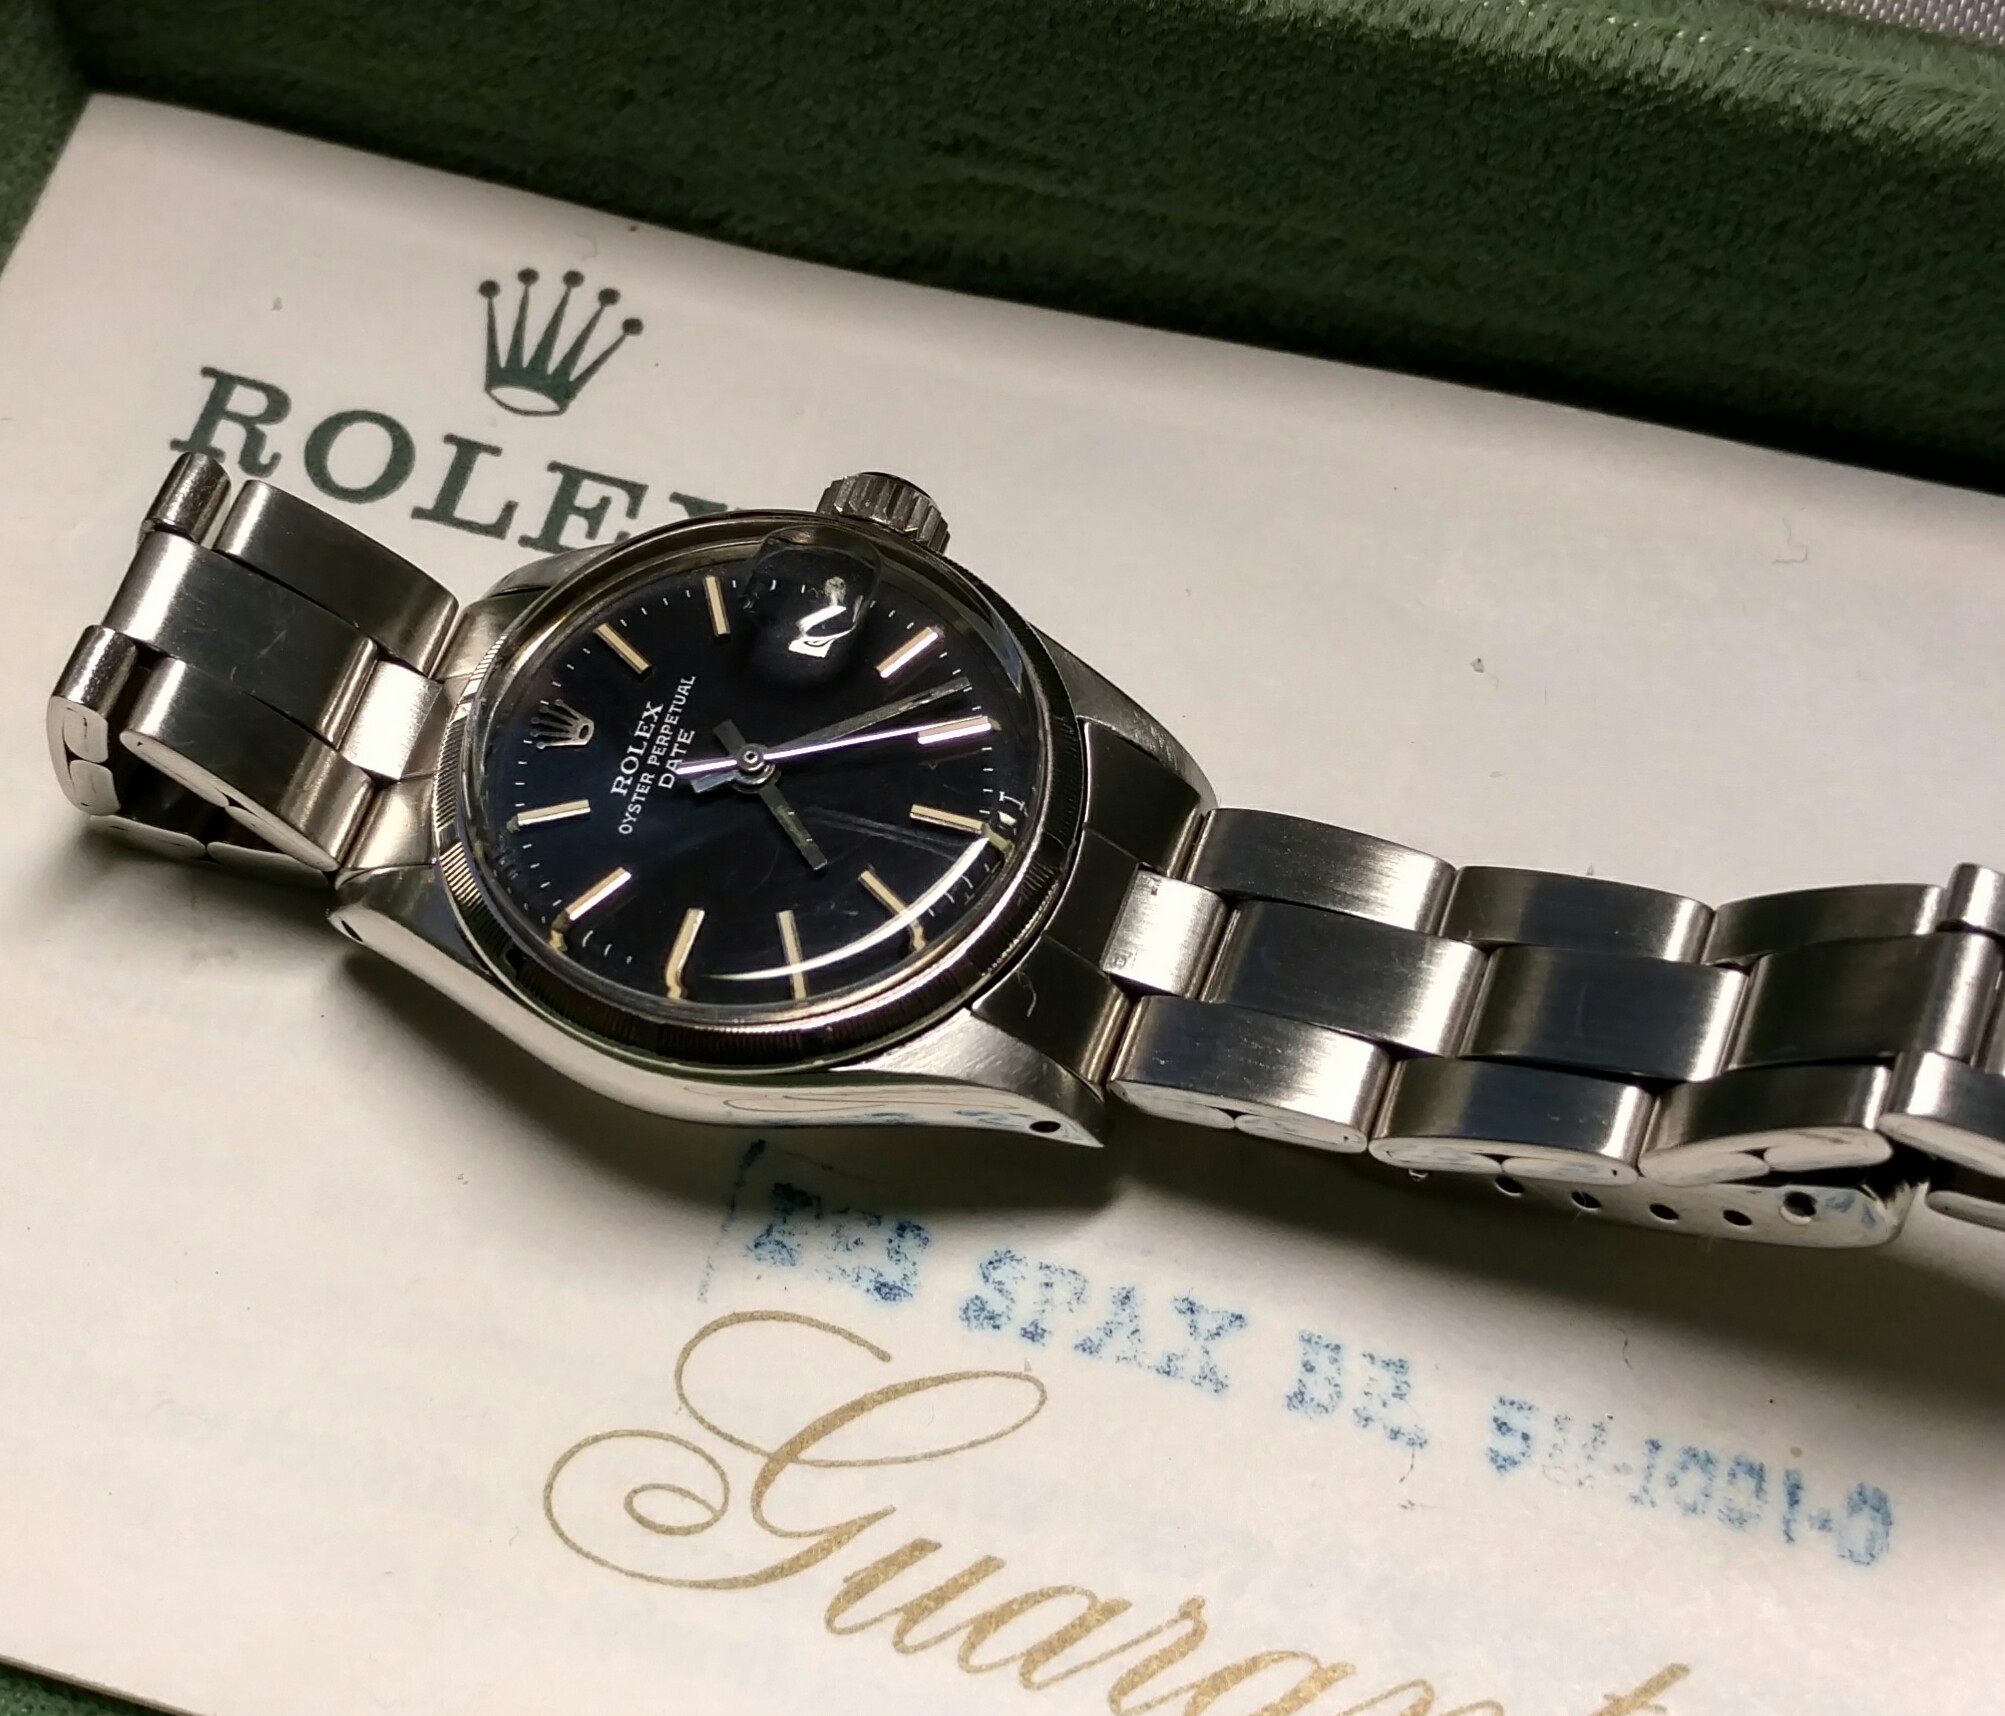
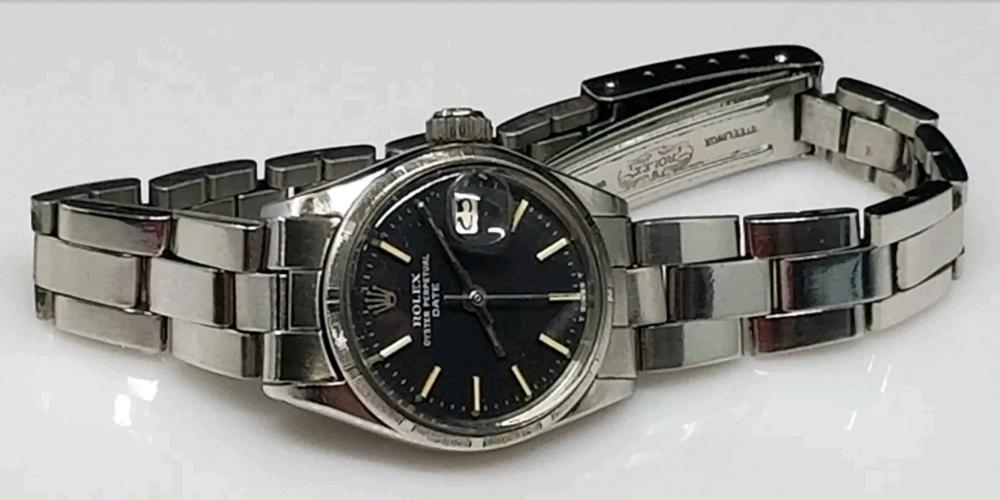
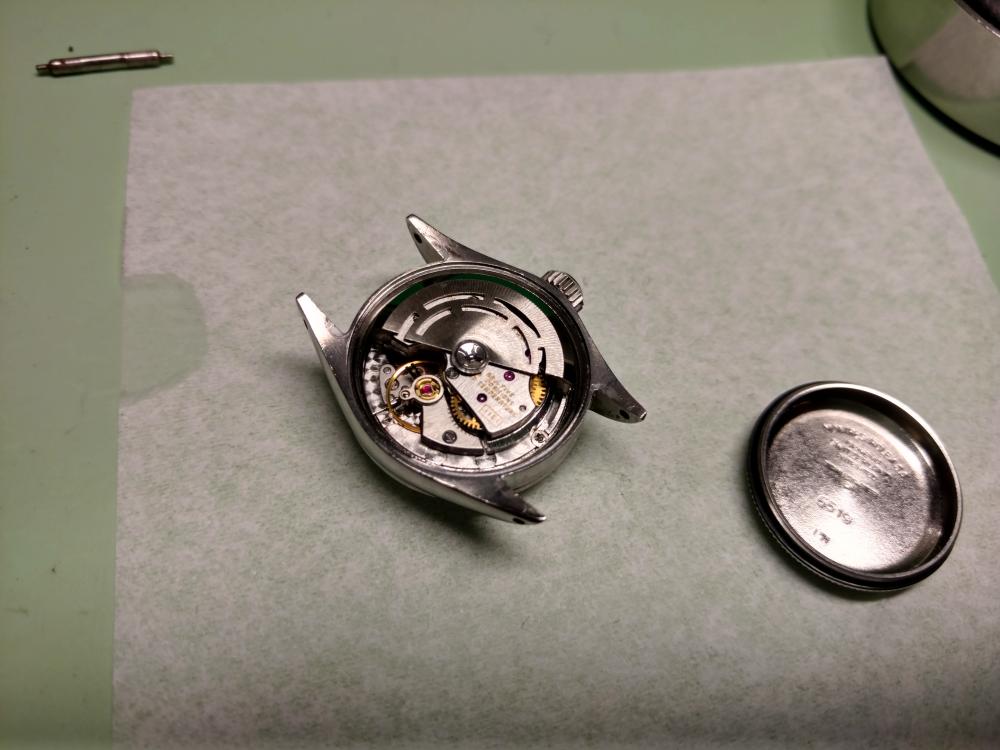
I got a great deal on this woman's Rolex model 6519. Nobody bid on the very low starting price of $599. That made me kind of nervous when I won it with the only bid...I'm thinking what do I see in auction pictures that everyone else sees and prevented them from bidding on it... Luckily, when it arrived it was was in better condition than the auction pics..I posted a pic of it from the auction... It was polished by someone who didn't know that it should have a brushed finish. (First picture) all other pics are during disassembly, reassembly and after refinishing the case.. Also came with original box and warranty paperwork...from 1971!


 1 point
 -
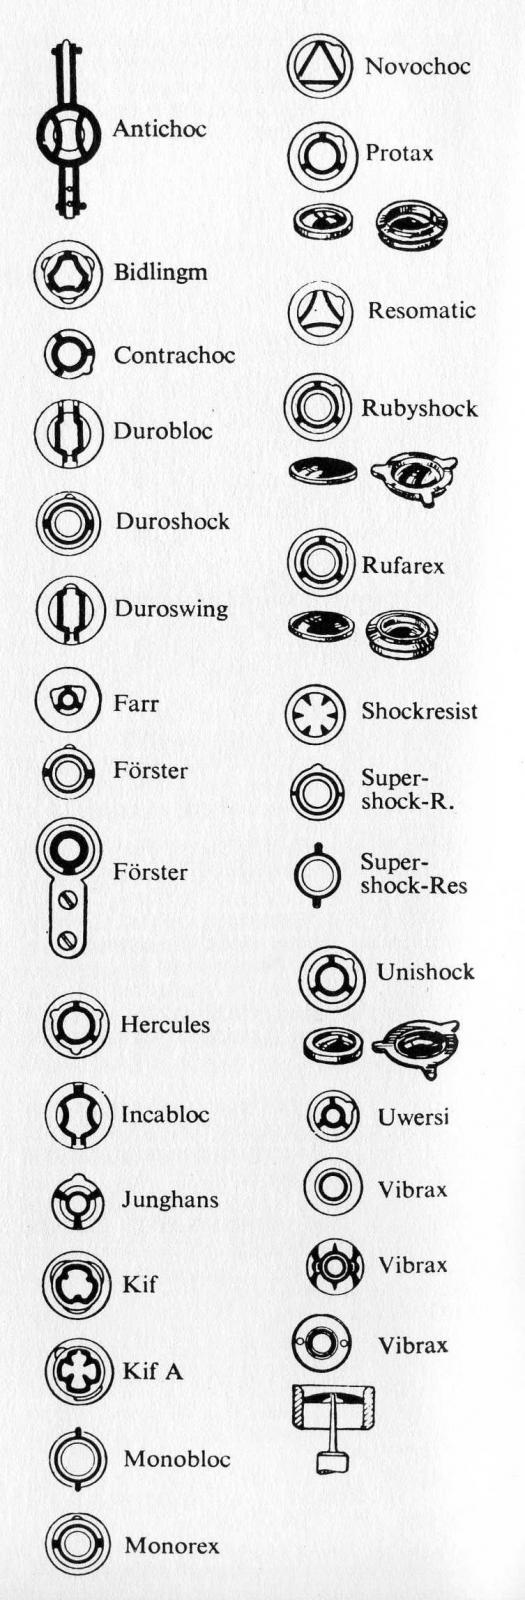
I am trying to find as may different kinds of springs system as i can .Please list some if you find any new or old system .
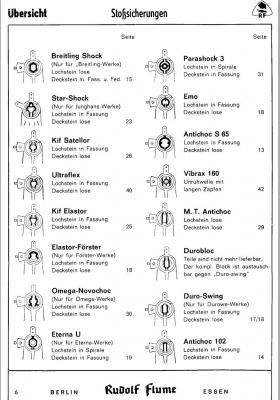
 1 point