Leaderboard


Popular Content
Showing content with the highest reputation on 03/13/21 in all areas
-
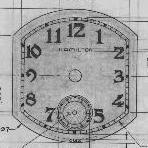
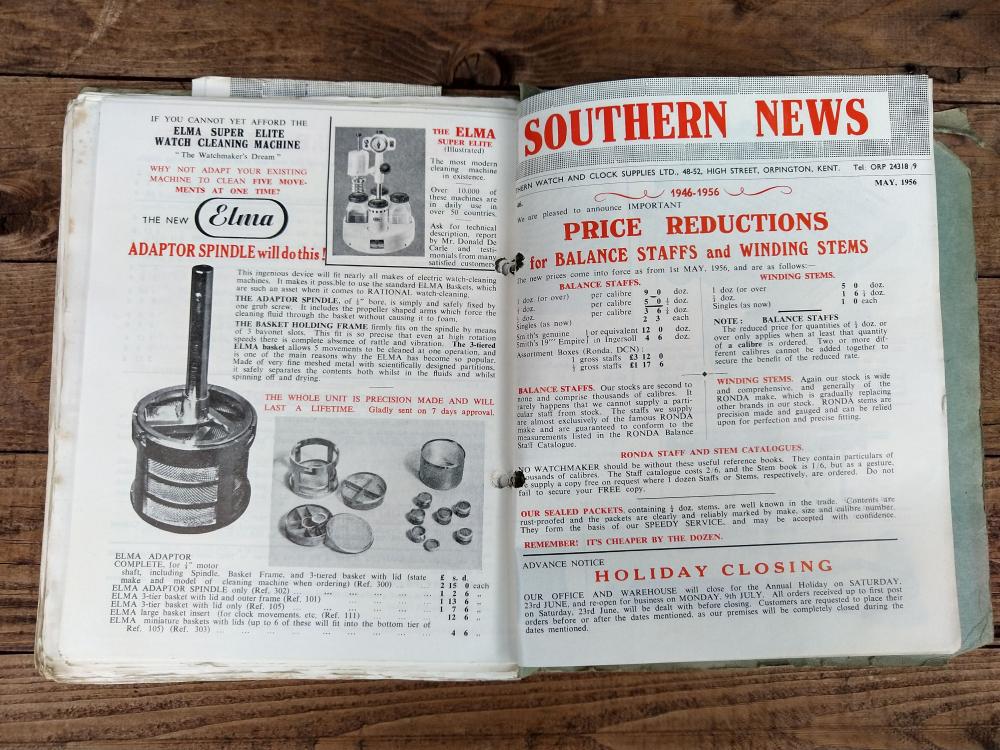
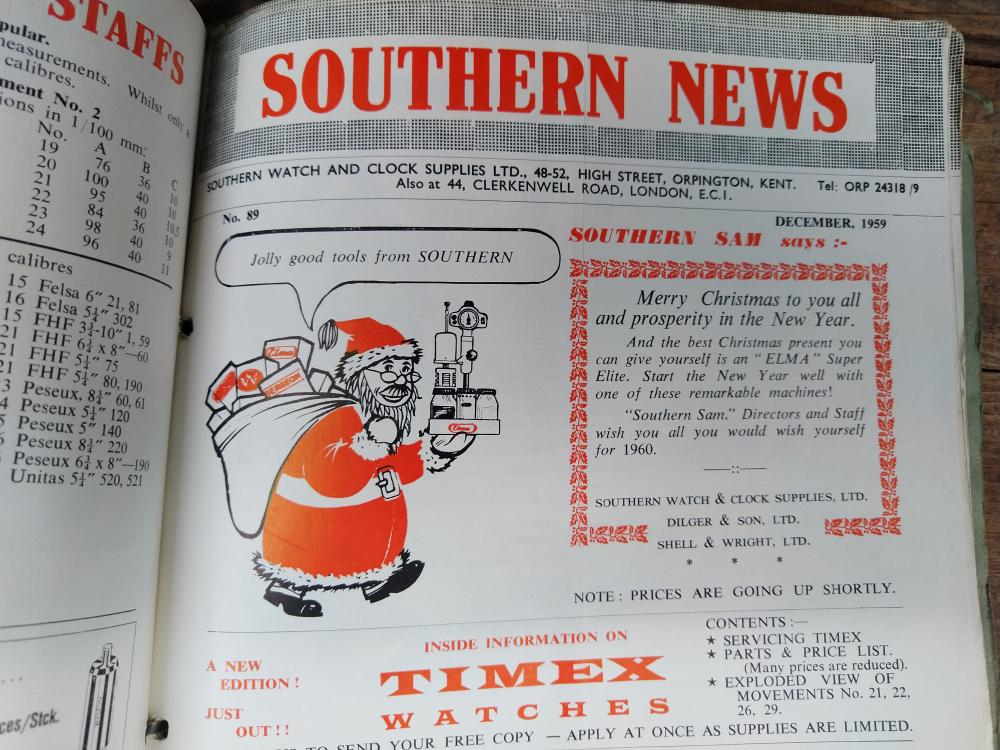
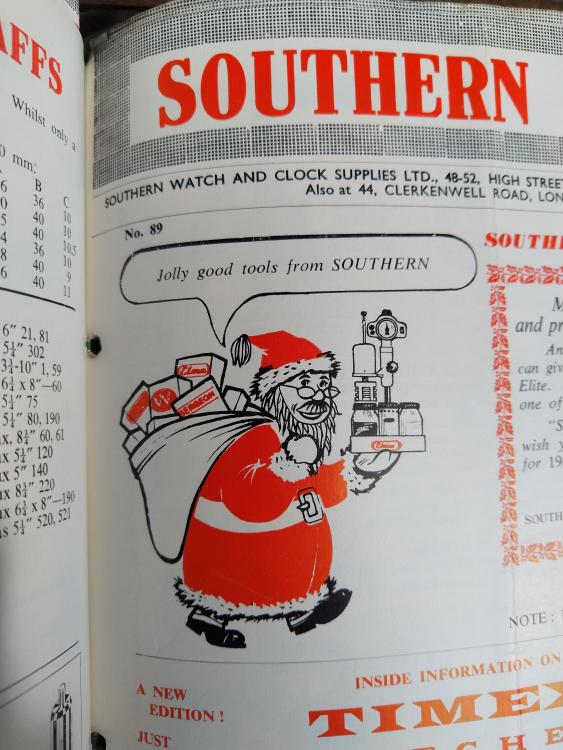
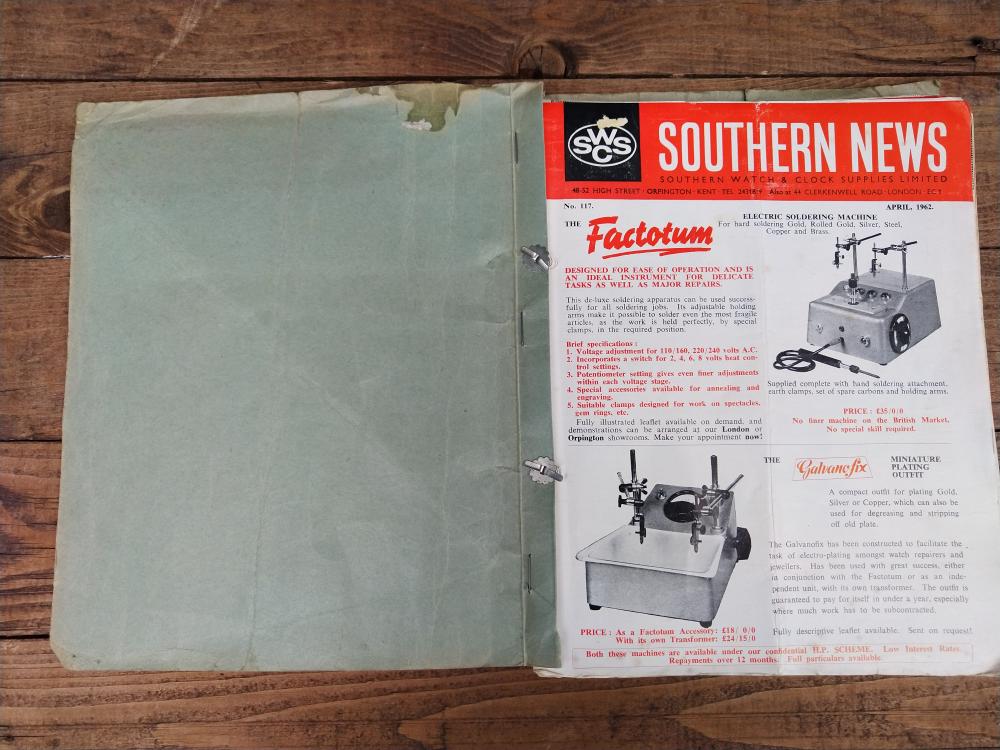
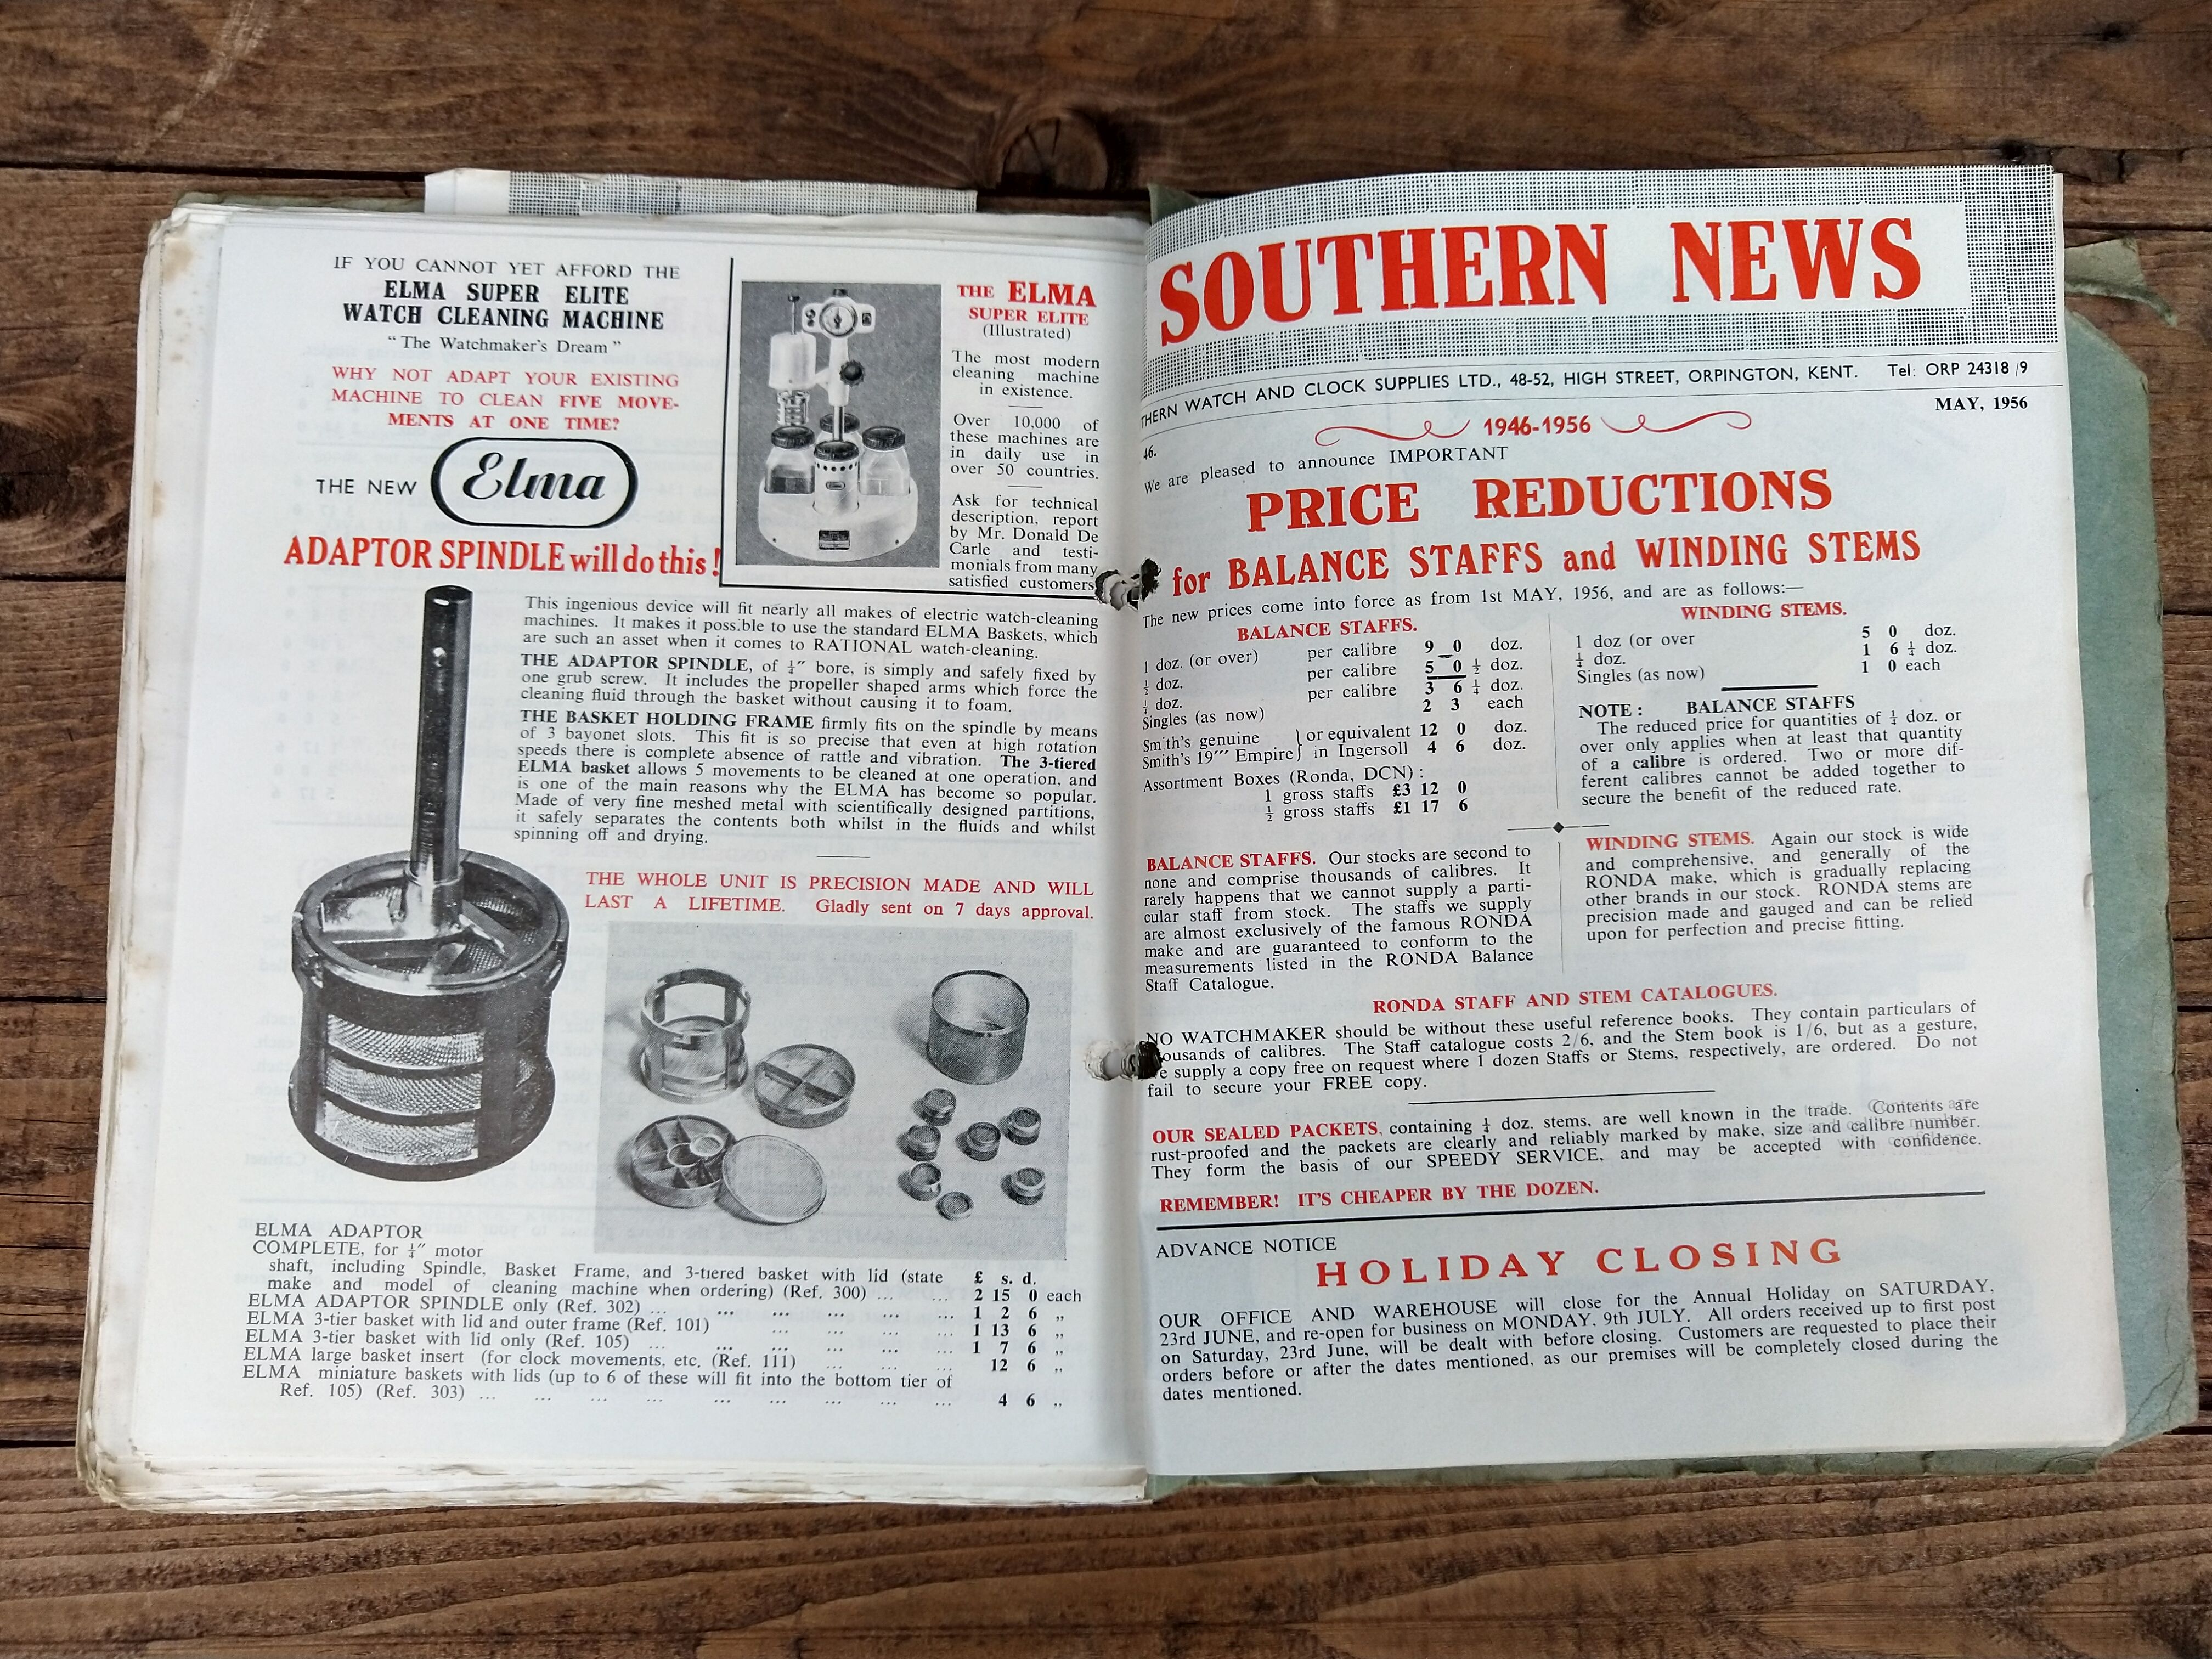
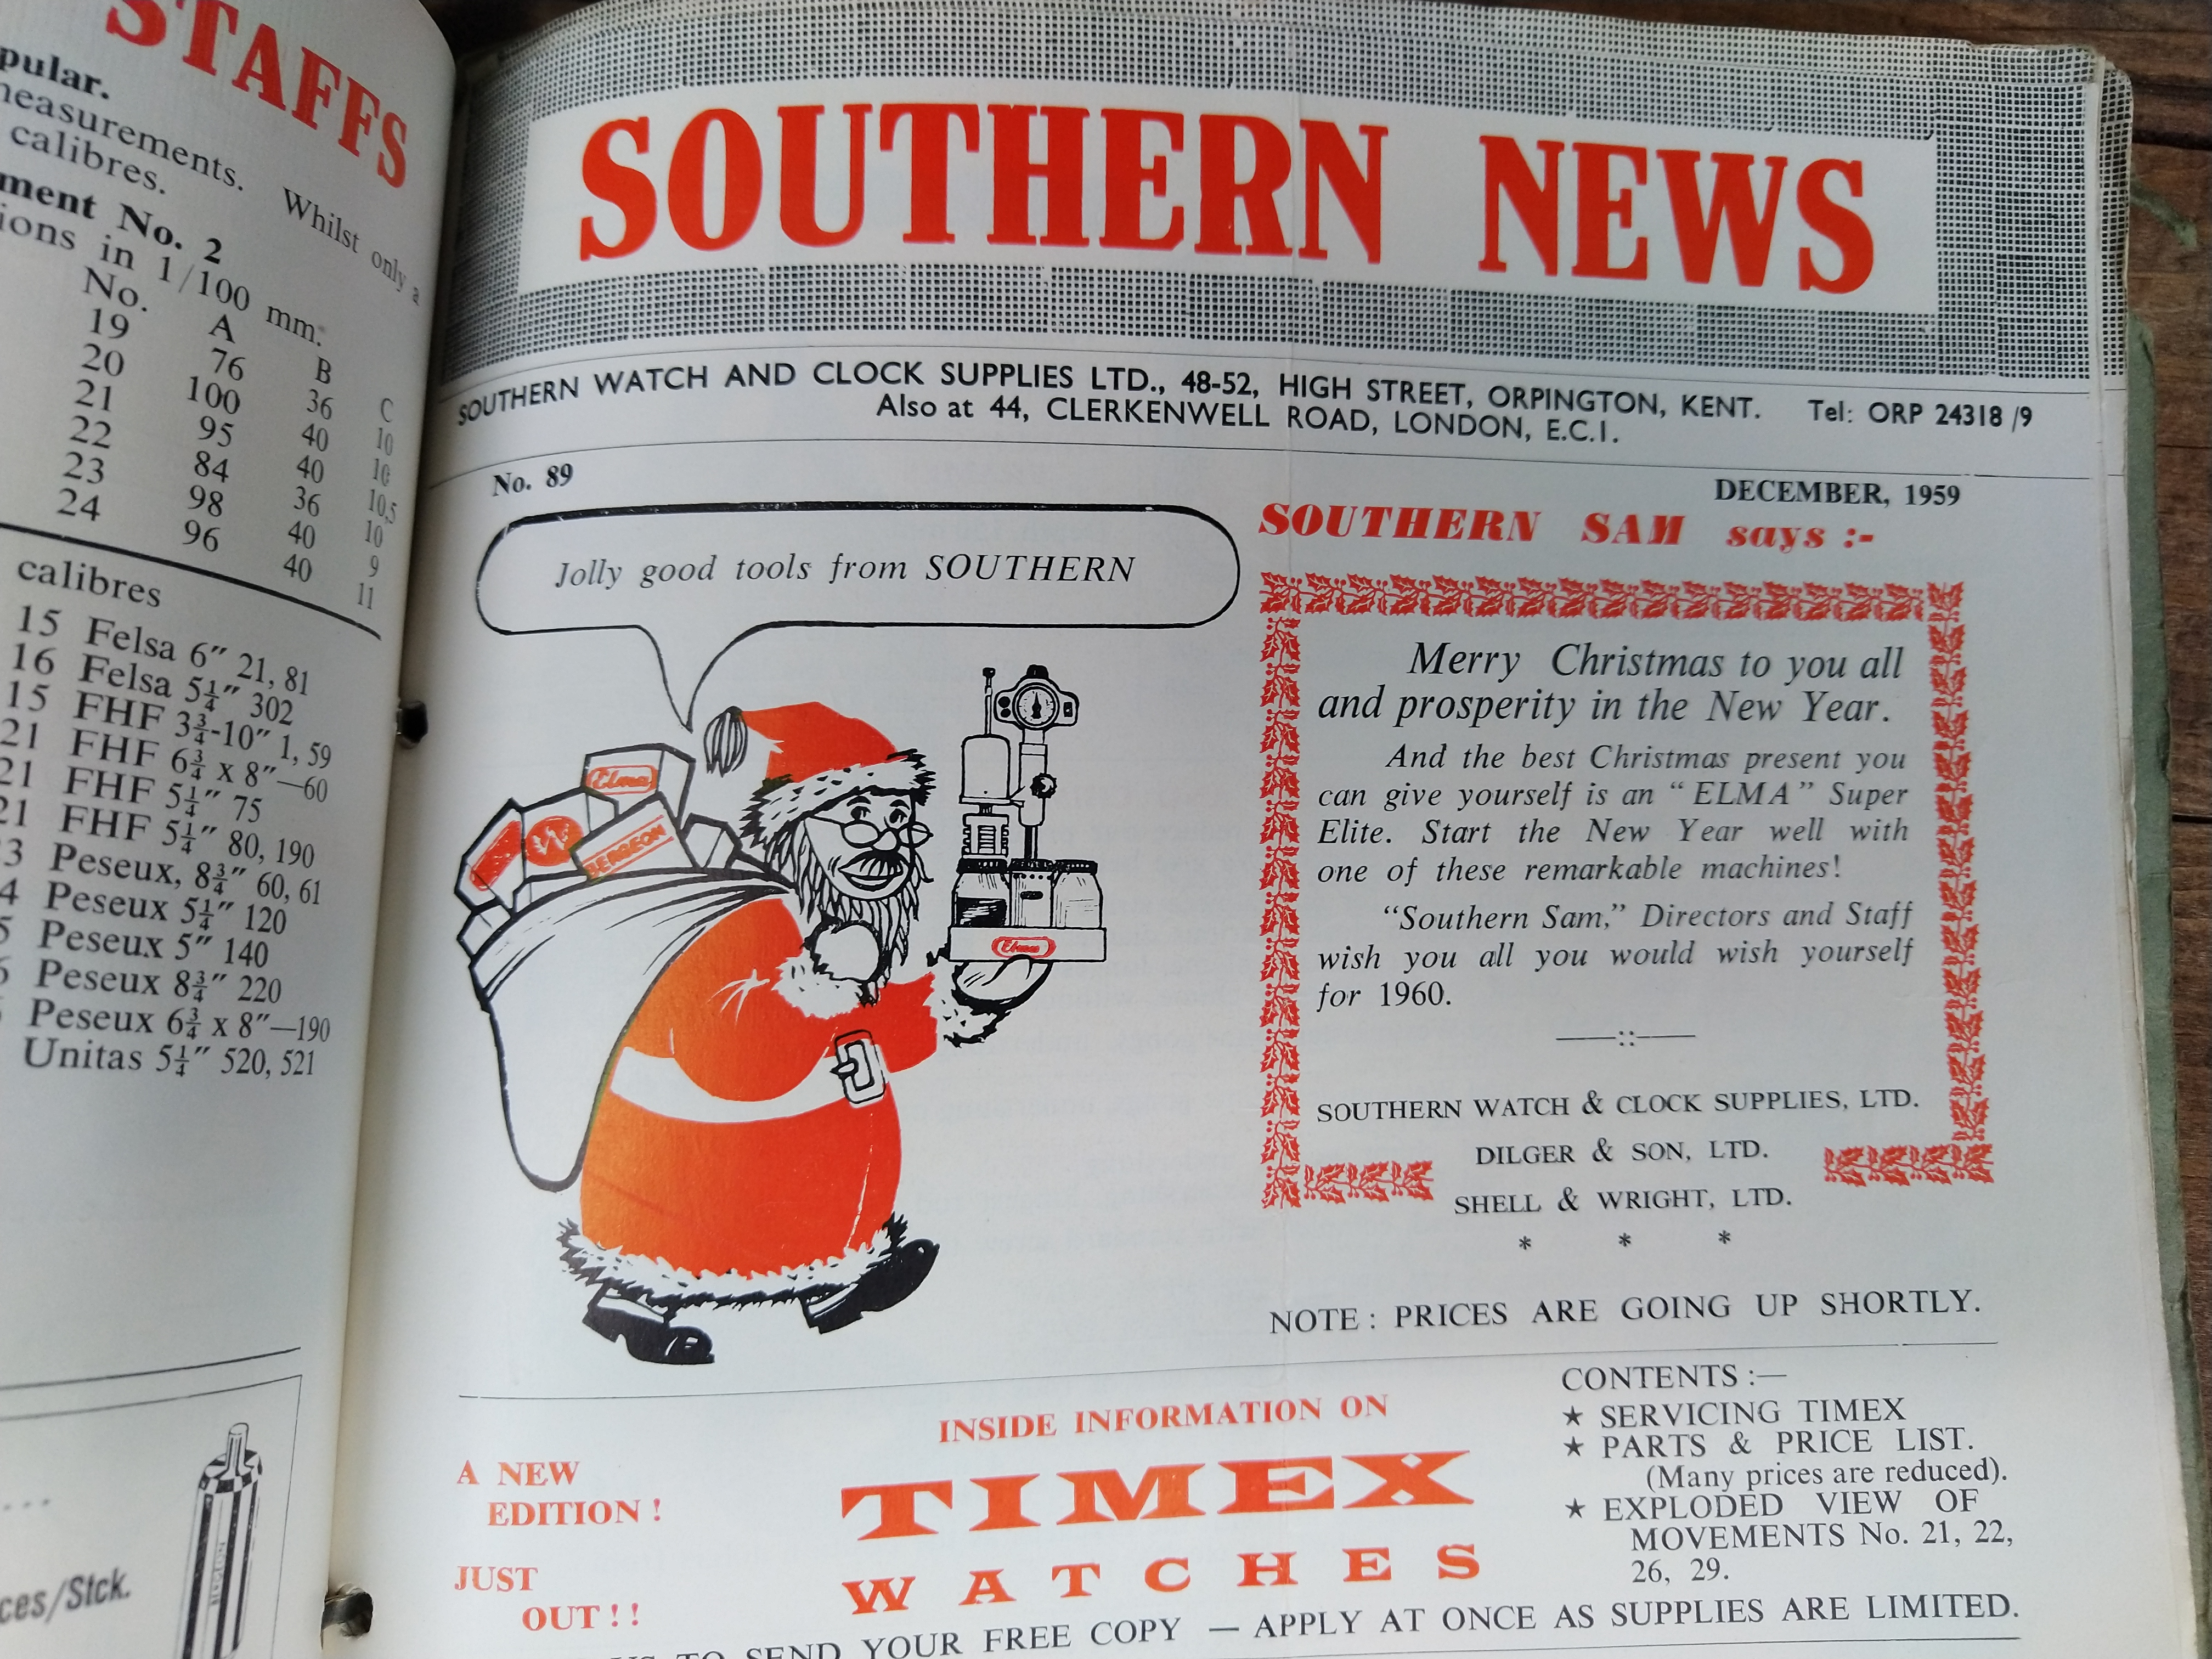
This is from eBay covers May 1956 - April 1962 SWCS leaflets. December 1959 is featuring @oldhippy as Santa. ?
 3 points
 -
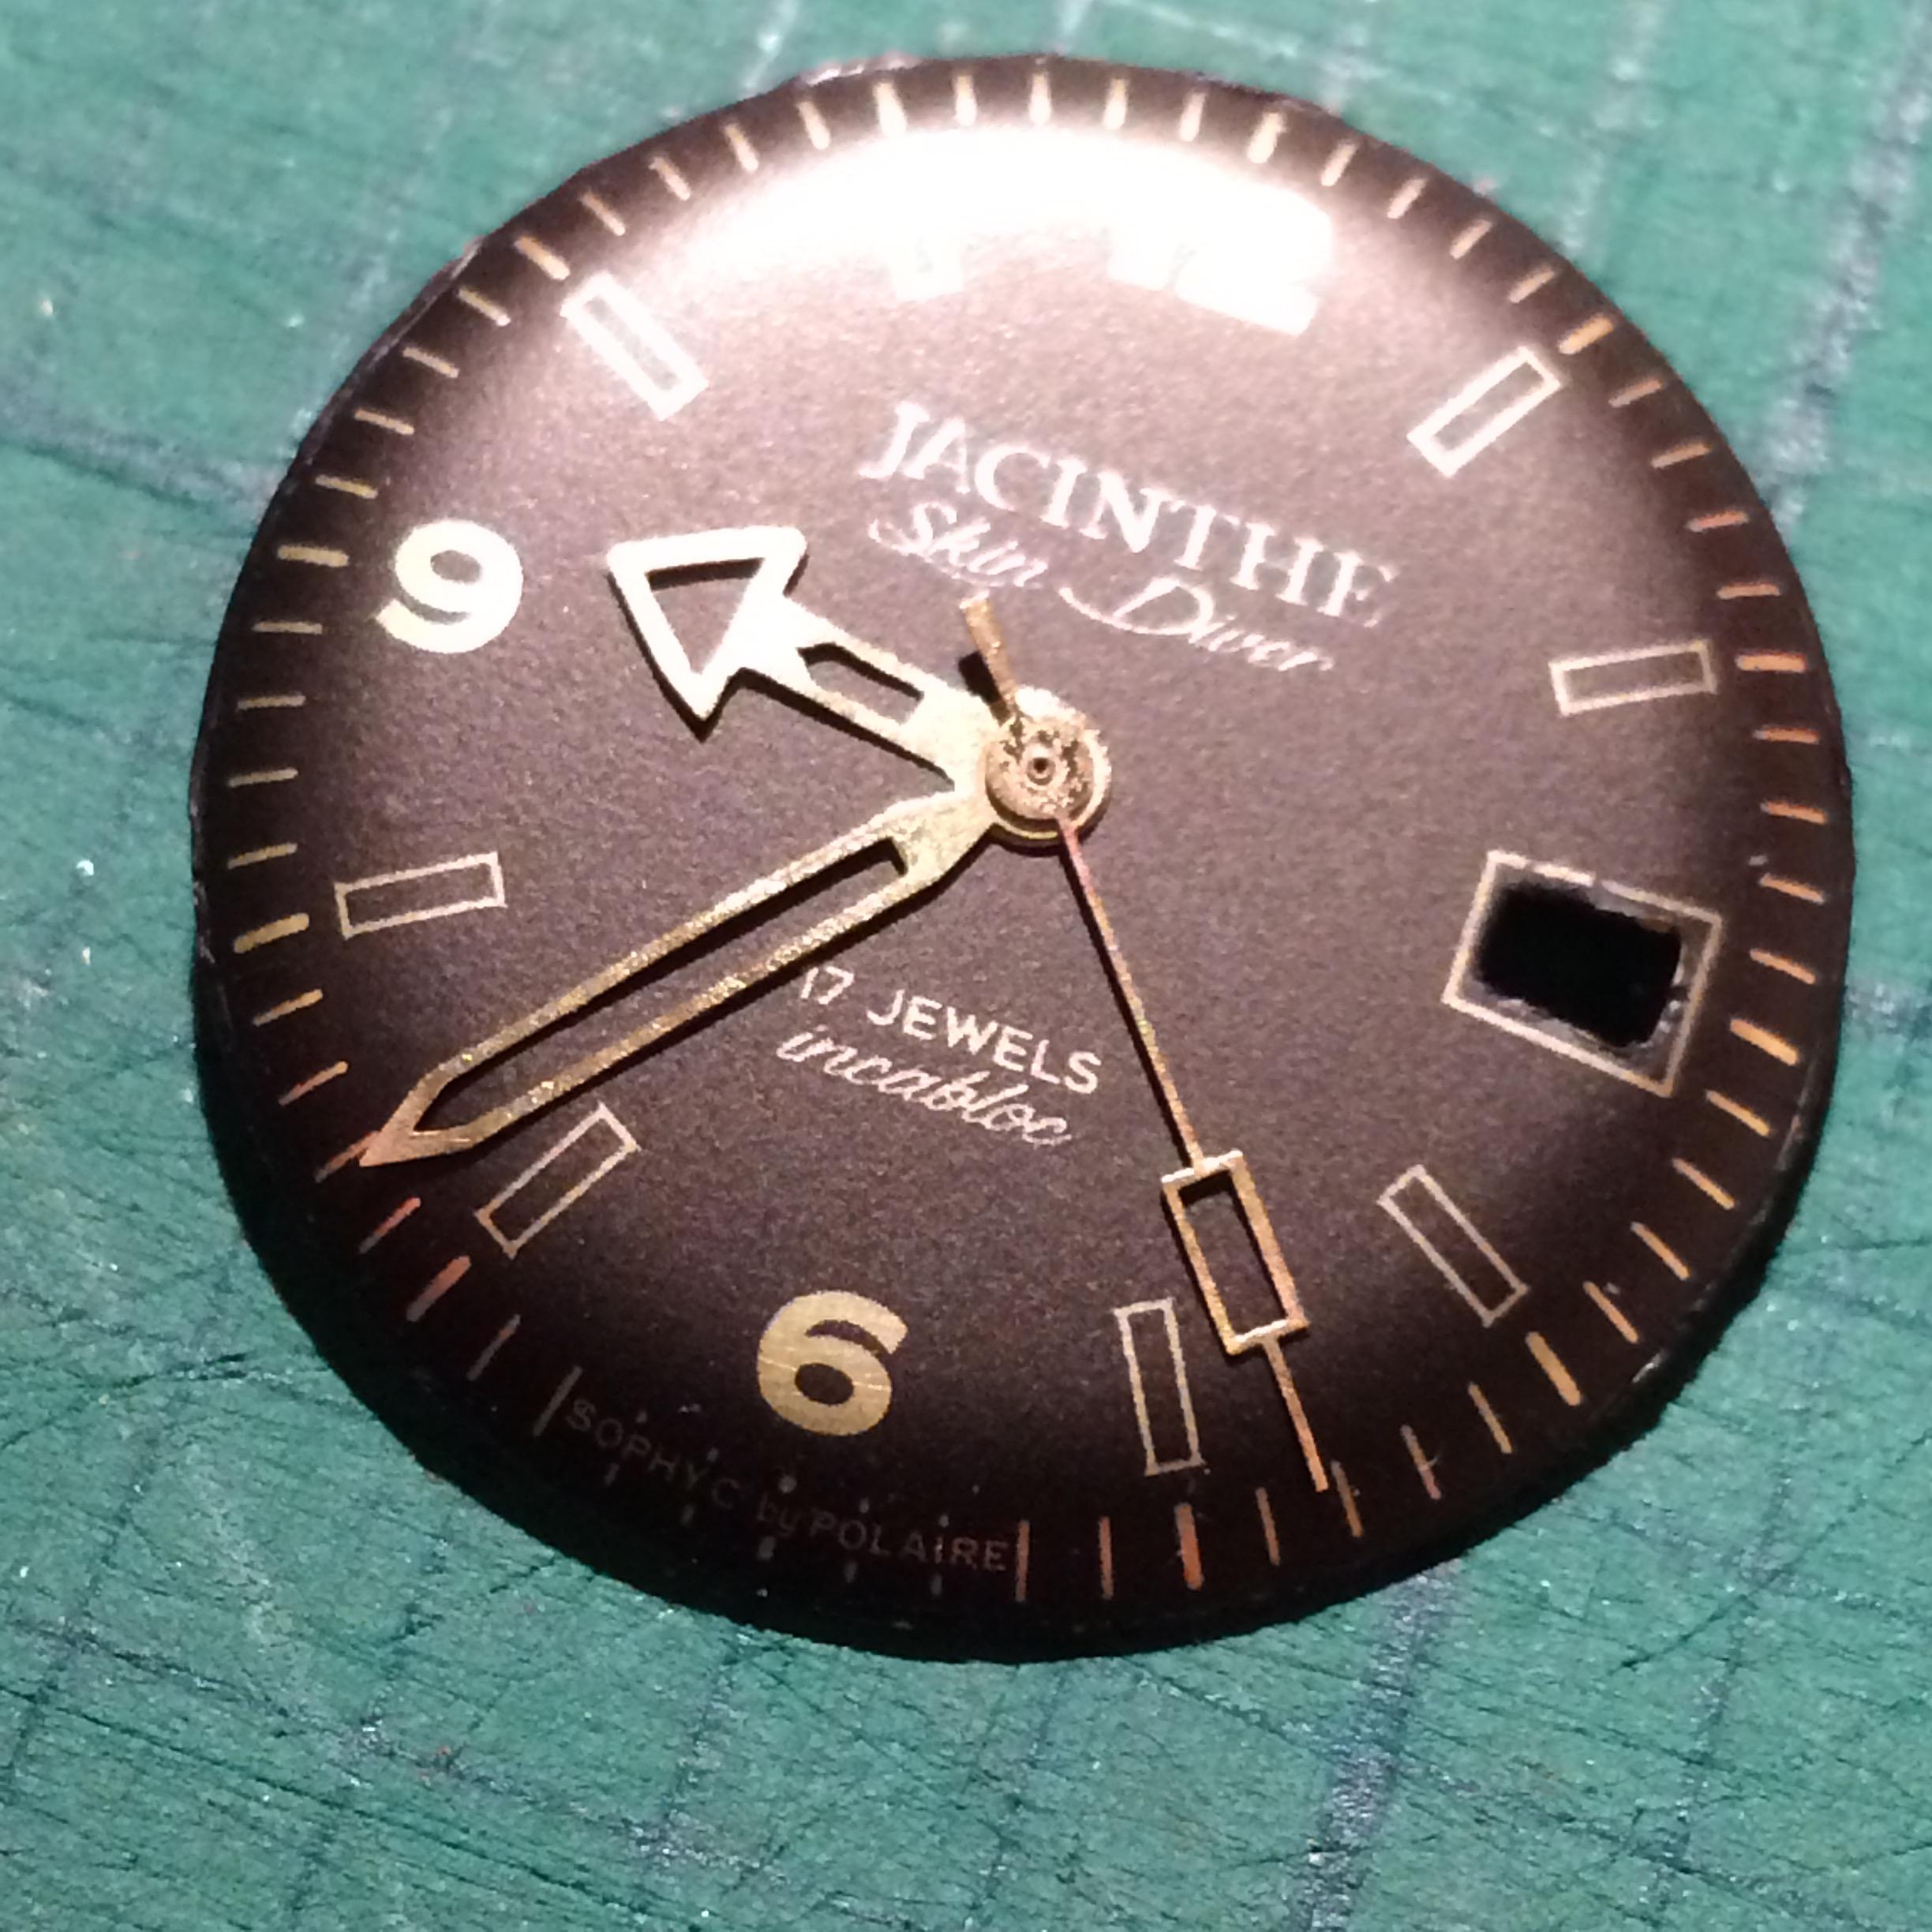
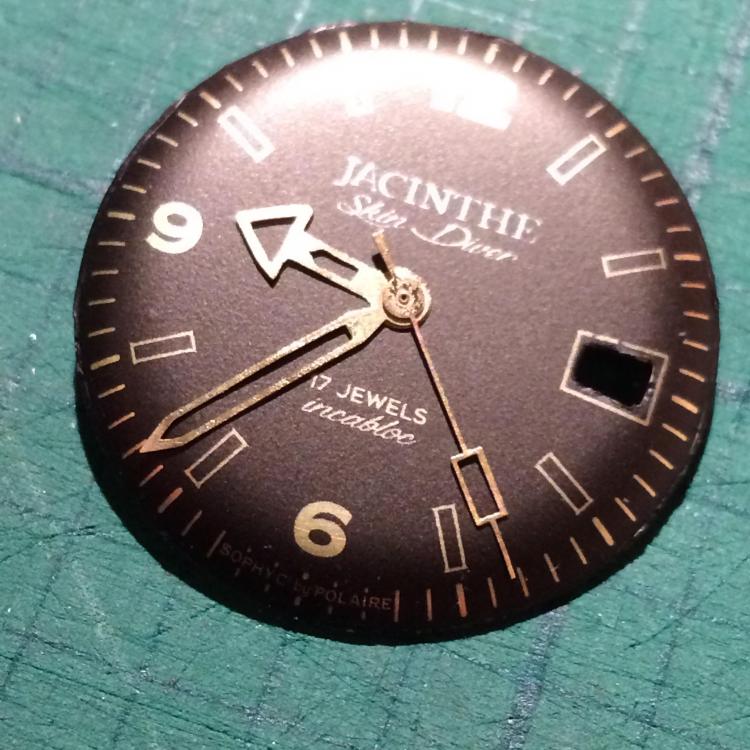
Well, I have given up on the original hands for the moment. Mostly because the replacements hands arrived and they look pretty darned good and of course fit properly. The tip of the minute hand required a bit of gentle bending around some peg wood to get the same curvature of the original, and the hour hand required a little reaming of the mounting hole with a broach, but success! They are a little wider than the originals, and at the moment the lume is bright white. I bought a second set of the same hands to experiment with aging the lume. I know many have used coffee or tea to accomplish the effect, but I am also a budding fountain pen user and have a collection of a few different inks that might do the trick very well, especially when watered down. Here it is in its current state. It is keeping good time at about +15 seconds per day. I am still regulating it using the Watch Tracker app. It is effective but takes a few days of readings between adjustments. Im very happy with the transformation and the fact that it is all nice and tight in the right places. Thanks for all of the helpful suggestions and I will report back if I am able to restore the original hands to a useable condition. Another project!
 3 points
 -
This what they say about it, Ideal for removing tarnish from exterior brass door furniturem and restoring it to its original colour. Apply Rustins Brass Restorer with a brush or dipping small items. Also may be used for cleaning copper and bronze.2 points
-
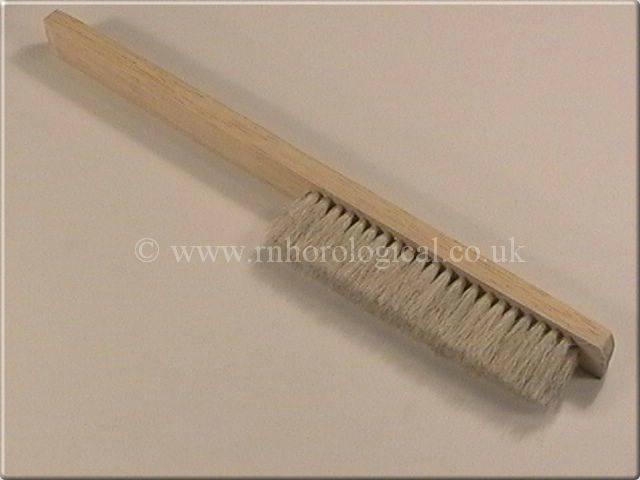
I use a long handled Glasgow brush with very soft natural bristles, the chalk comes in a block draw the brush across the block to load it with particles of chalk then with no pressure dust it very fast over the plate, I don't quite know why it works so well but I think the chalk must pick up microscopic particles of contaminates on the surface of the plates, but plates I have done a few years ago rather than go a dirty brown from oxidisation and exposure to air take on a sort of golden colour rather than a full on tarnish. https://www.cousinsuk.com/product/natural-bristle-brushes-handheld I have used very soft A.F brushes they are absolute rubbish they shed bristles like a malting dog sheds hair. The plates you brush must be absolutely bone dry after cleaning so that the chalk cant stick in the pivot holes use a blower after dusting to clear any excess chalk from the plates and pivot holes, I have a air compressor for applying Lacquer I use that to blow them clear.2 points
-
Before popping the movement out remember to Either remove or rotate the case screws out of the way. Then it's very likely it hasn't been serviced in a very very long time probably service last time with organic oils which have hardened up more than likely a new mainspring and cleaning will possibly fix the problem. Notice how I use the phrasing possibly fix the problem? Your watch is missing a few things who knows what else has been done to it. American pocket watches have suffered in the hands of people who didn't always grasp what they were doing and it makes for challenging repairs at times. So simple cleaning is may not fix the problem. If you're lucky maybe no one's actually touched the movement since it was manufactured then cleaning should fix the problem and new mainspring. What's interesting the pocket watch database that was mentioned above found that the link below doesn't have the parts list for your watch? The parts listings are out there it just means that they haven't got them listed yet hopefully. https://pocketwatchdatabase.com/search/result/waltham/61763672 points
-
Yep, no bezel. And I would bet money it's a split stem. Even though it's a lever set case, I don't see a lever protruding from the movement, so I'm guessing you have a crown-set cased in a lever-set case. In which case (pardon the pun) you'll want to remember to pull out the crown to the set position before lifting out the movement. Pocket Watch Database will give you a picture and tell you more. Nice old Waltham you have!2 points
-
I have always recommended taking pictures at each stage of disassembly, I don't believe anyone has ever listened.? There also diagrams for some calibers. Back thirty five years ago, taking many pictures wasn't a cheap option, so I usually got at least two of the same calibers, one was an actual diagram for the other and supplied full house of spare parts. Regs Joe2 points
-
Hi guys … I had promised that I would make a « custom decal dial tutorial » on another thread there So here we are … There are many variations of decal dials, the best IMHO being the « negative gilt » dials which gives the best results. The process I’m showing today is aabout how to make a dial with black printings on a one color background. I had a cheap quartz diver waiting in my drawers so I’ll make a Heuer diver hommage based on the 980.016 model (quartz one too). DAY 01 : It’s 4:30 AM (I’m an early bird) and I have 2 hours to kill before a business trip to Paris (I’m French) so I decide I have time enough to begin. The first part of the process is to prepare the dial plate : - stripped it, removing all the lumes bars and dots - soaked the dial for some minutes in acetone to remove the paint - filled the tiny holes where the bars and dots go with cyanolite glue - sand everything flat I sand with 800 and don’t try to get a smooth surface as I want the paint to adhere perfectly to thedial plate. Here is the result … Then I want to spray paint. I make a tube with some painter’s tape, from a « curve » with it and place it on a plastic bottle cap. I want it curved so that I can stick the dial on it without any risk of bstructing the center hole or the date window of the dial plate. So I stick the sanded dial plate on the tape tube. As you can guess from the pic below … that’s not the first time a make an orange dial. Then I place the bottle cap and dial plate on a paper sheet and spray paint in orange. I use street art spray paint as it is « water resistant ». As you can see on the next pic, I don’t try to get a smooth surface, or even to perfectly cover the dial plate at first. I will let this coat dry, sand it with 2000 grade, then spray 1 or 2 coats until I get a perfectly smooth orange dial plate, ready for receiving a decal. So I place the bottle cap and dial under a shooter glass and will let it dry for about 24 hours before sanding and spraying the second paint coat. The 24 hours drying time is really important (though it could depend on the paint you use). The paint I use looks perfectly dry after about 5 hours but if you spray the second coat without waiting enough, that coat won’t perfectly adhere to the first and you could get a granular surface like an orange peel. And here is the dial waiting under the shooter glass. On the right is a « negative gilt » dial (third and last matte varnish coat) On the background there are two Raketa 2609 movements from the 70ies, quietly (really loudly to be honest) ticking for test after I‘ve recently serviced them. Now it’s 5:45 AM so I will have a and go to the train station. I’ll sand the dial plate this evening and spray the second paint coat tomorrow morning. Then sand it in the evening and spray the third coat (if needed) the day after. DAY 02 - DAY 03 : So here's what you get after the first paint coat … doesn't look really good but no matter as there's still some work to do to get a better result. And here's what you get after 3 coats of paint, each one sanded with 2000 grade, to get a perfect finish, flat and smooth. Now the dial plate is eady to receive the decal. DAY 03 : I won’t explain anything about Photoshop and Illustrator here … I’ll only explain how I print my decals. One thing really important, from my own experience, is the definition of the design. I’ve tried several, from 1200ppp to 6000pp and the best results I’ve got on printing decal sheets were with a 4000ppp definition. So all my dial designs are done in 4000ppp. The result is really BIG files … for example an A6 template with 12 dial desings ready to print is about 800Mo. As that dial is black printing only I open it with Photoshop and let the softwre (so ont the printer) deal with the printing quality. My printer is an old Epson Picturemate with a 1200 maximum definition. As the good quality decal sheets are not cheap and as I’m a « skinflint» I often print on A7 sheets … 6 dial designs on one sheet. When printed you should let it dry for about 4 hours then spray 2 really thin coats of matte varnish, letting each coat dry for at least 12 hours (24 hours is better). DAY 04 - DAY 05 : 2 days of speed-hiking with my wife so I didn’t worked on that tuto. You can check on the net what speed-hiking is, but to summarize it’s hiking as fast as you can with really light backpacks, trying not to run (or only short runs). On a good day you can walk 5 to 6 miles/hour … when trained you can walk up to 6,5 miles/hour … and while I trained for my first 62 miles ultra I achieved to walk (no running) up to 6,85 miles/hour (11 km/heure). DAY 06 : Today is Monday 6:00 AM. It’s been 5 days since I begun that tutorial and … my legs ache and all my body is painful (see Day 04 - Day 05) The dial plate is ready and the decal sheet too. You can see that the decal sheet looks matte now. That is because I have sprayed 2 coats of matte varnish on it, to protect the inkjet ink while I’ll soak the decal in water. Of course if you print with a laser you won’t have to spray varnish as the laser inks are (almost) water resistant. First thing to do is to chose the best item on the decal sheet and cut it round. Then you are ready to go. On the next pic you can see all you need now : - dial plate … fixed on a foam board using the dial feets - decal dial … nicely cut round - tweezers - thin and smooth brush (mine’s a watercolor brush) - some « micro set » … or just vhite wine vinegar (it helps the decal to set on the dial plate) - cold water Now you put the decal in cold water and while it soaks you brush some micro-set (or white vinegar) on the dial plate. Then you put the decal on the dial plate. Here you can see why I prefer using clear decal sheets on coloured dial plates … because it’s much easier to « perfectly » positionate the decal, using the central hole and the date-window. When you’re happy with the position of your decal you use a paper tissue to absorb the excess of water. Do that carefully as you don’t want to move the decal on the plate. And here we are … everything worked fine while absorbing the water and the decal position is OK. I’ll let it dry for about 12 hours before I cut the central hole and the date window, before I proceed to the varnish finish. Still Day 06 but 7:00 PM The decal has dried for about 13 hours so now I can proceed on cutting the decal sheet That's what I do then I : - fix it back on the foam board - apply some « micro set » around the center hole, the date-window and the outer diameter - gently press with a paper tissue so that the decal is perfectly applied (no more «air bubbles) And I let dry for 3 hours more Evening … 10:00 PM Now the decal is « perfectly » applied and dried and ready for the finish Last pic for today is after spraying the first coat of glossy varnish I will let it dry for 12 hours, sand it with 2000 grade paper and apply the 2nd coat. DAY 07 : 20:00 AM … only 1 pic today just after finely sanding with 2000 grade the 2nd varnish coat I applied yesterday DAY 08 : Yesterday evening I applied the 3rd and final varnish coat after finelt sanding and cleaning And today I can show you the final result … and say I'm pretty happy That dial is so glossy it’not easy to get a good pic, even on close-up. May I say that me hpone is nit the best at shooting pics (just like me) and the actual dial is much much better that it looks on the pictures below. I hope that you liked that tutorial and that it could be helpfull to members who want to try to build their own watch dials. I’ll try to make better pics with a real camera and a better lens … next week of the week after, after luming the dial together with the hands. Then I will still have to get a case and rework it so that it could be a 980,016 lookalike. Some of you may wonder how much time did I spend to make that dial. It took 8 days to achieve the all process but I spent only 1 hour the first day then only from 15mnm to 5mn the days after. So, apart from the design work on Illustrator and Photoshop (which took me hours), I would say that the whole process is about 2 to 3 hours. I must say that it's not my first try at dial making and I've trained for 2 years now. So if you want to try you should consider spending a few more hours but it's really worth the time spent as at the end you get your unique DIY dial.1 point
-
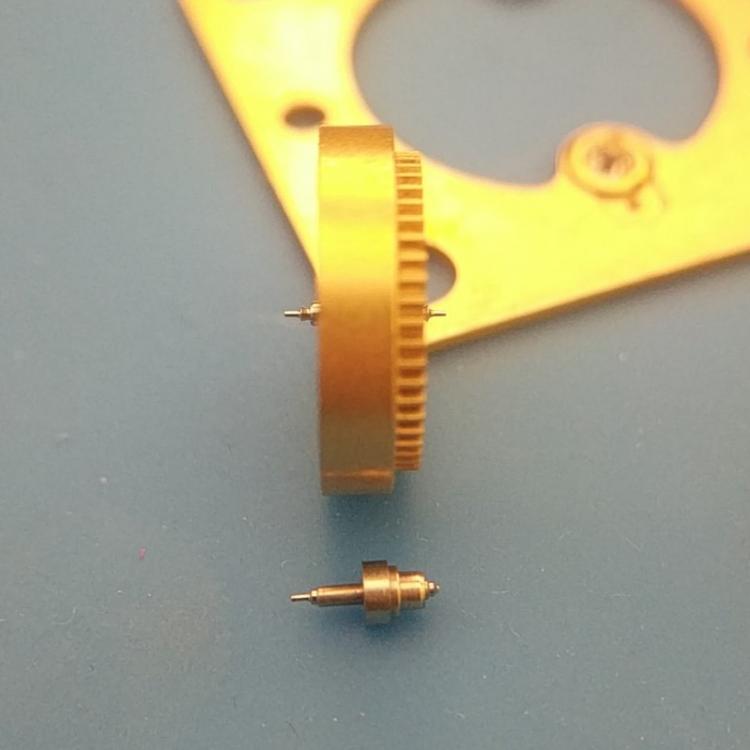
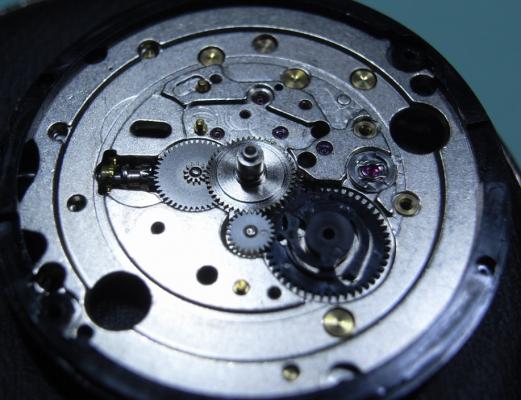
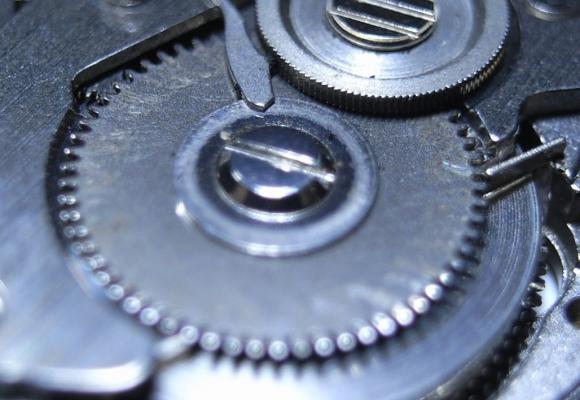
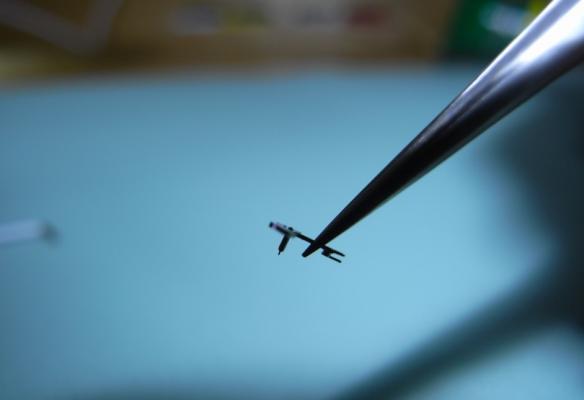
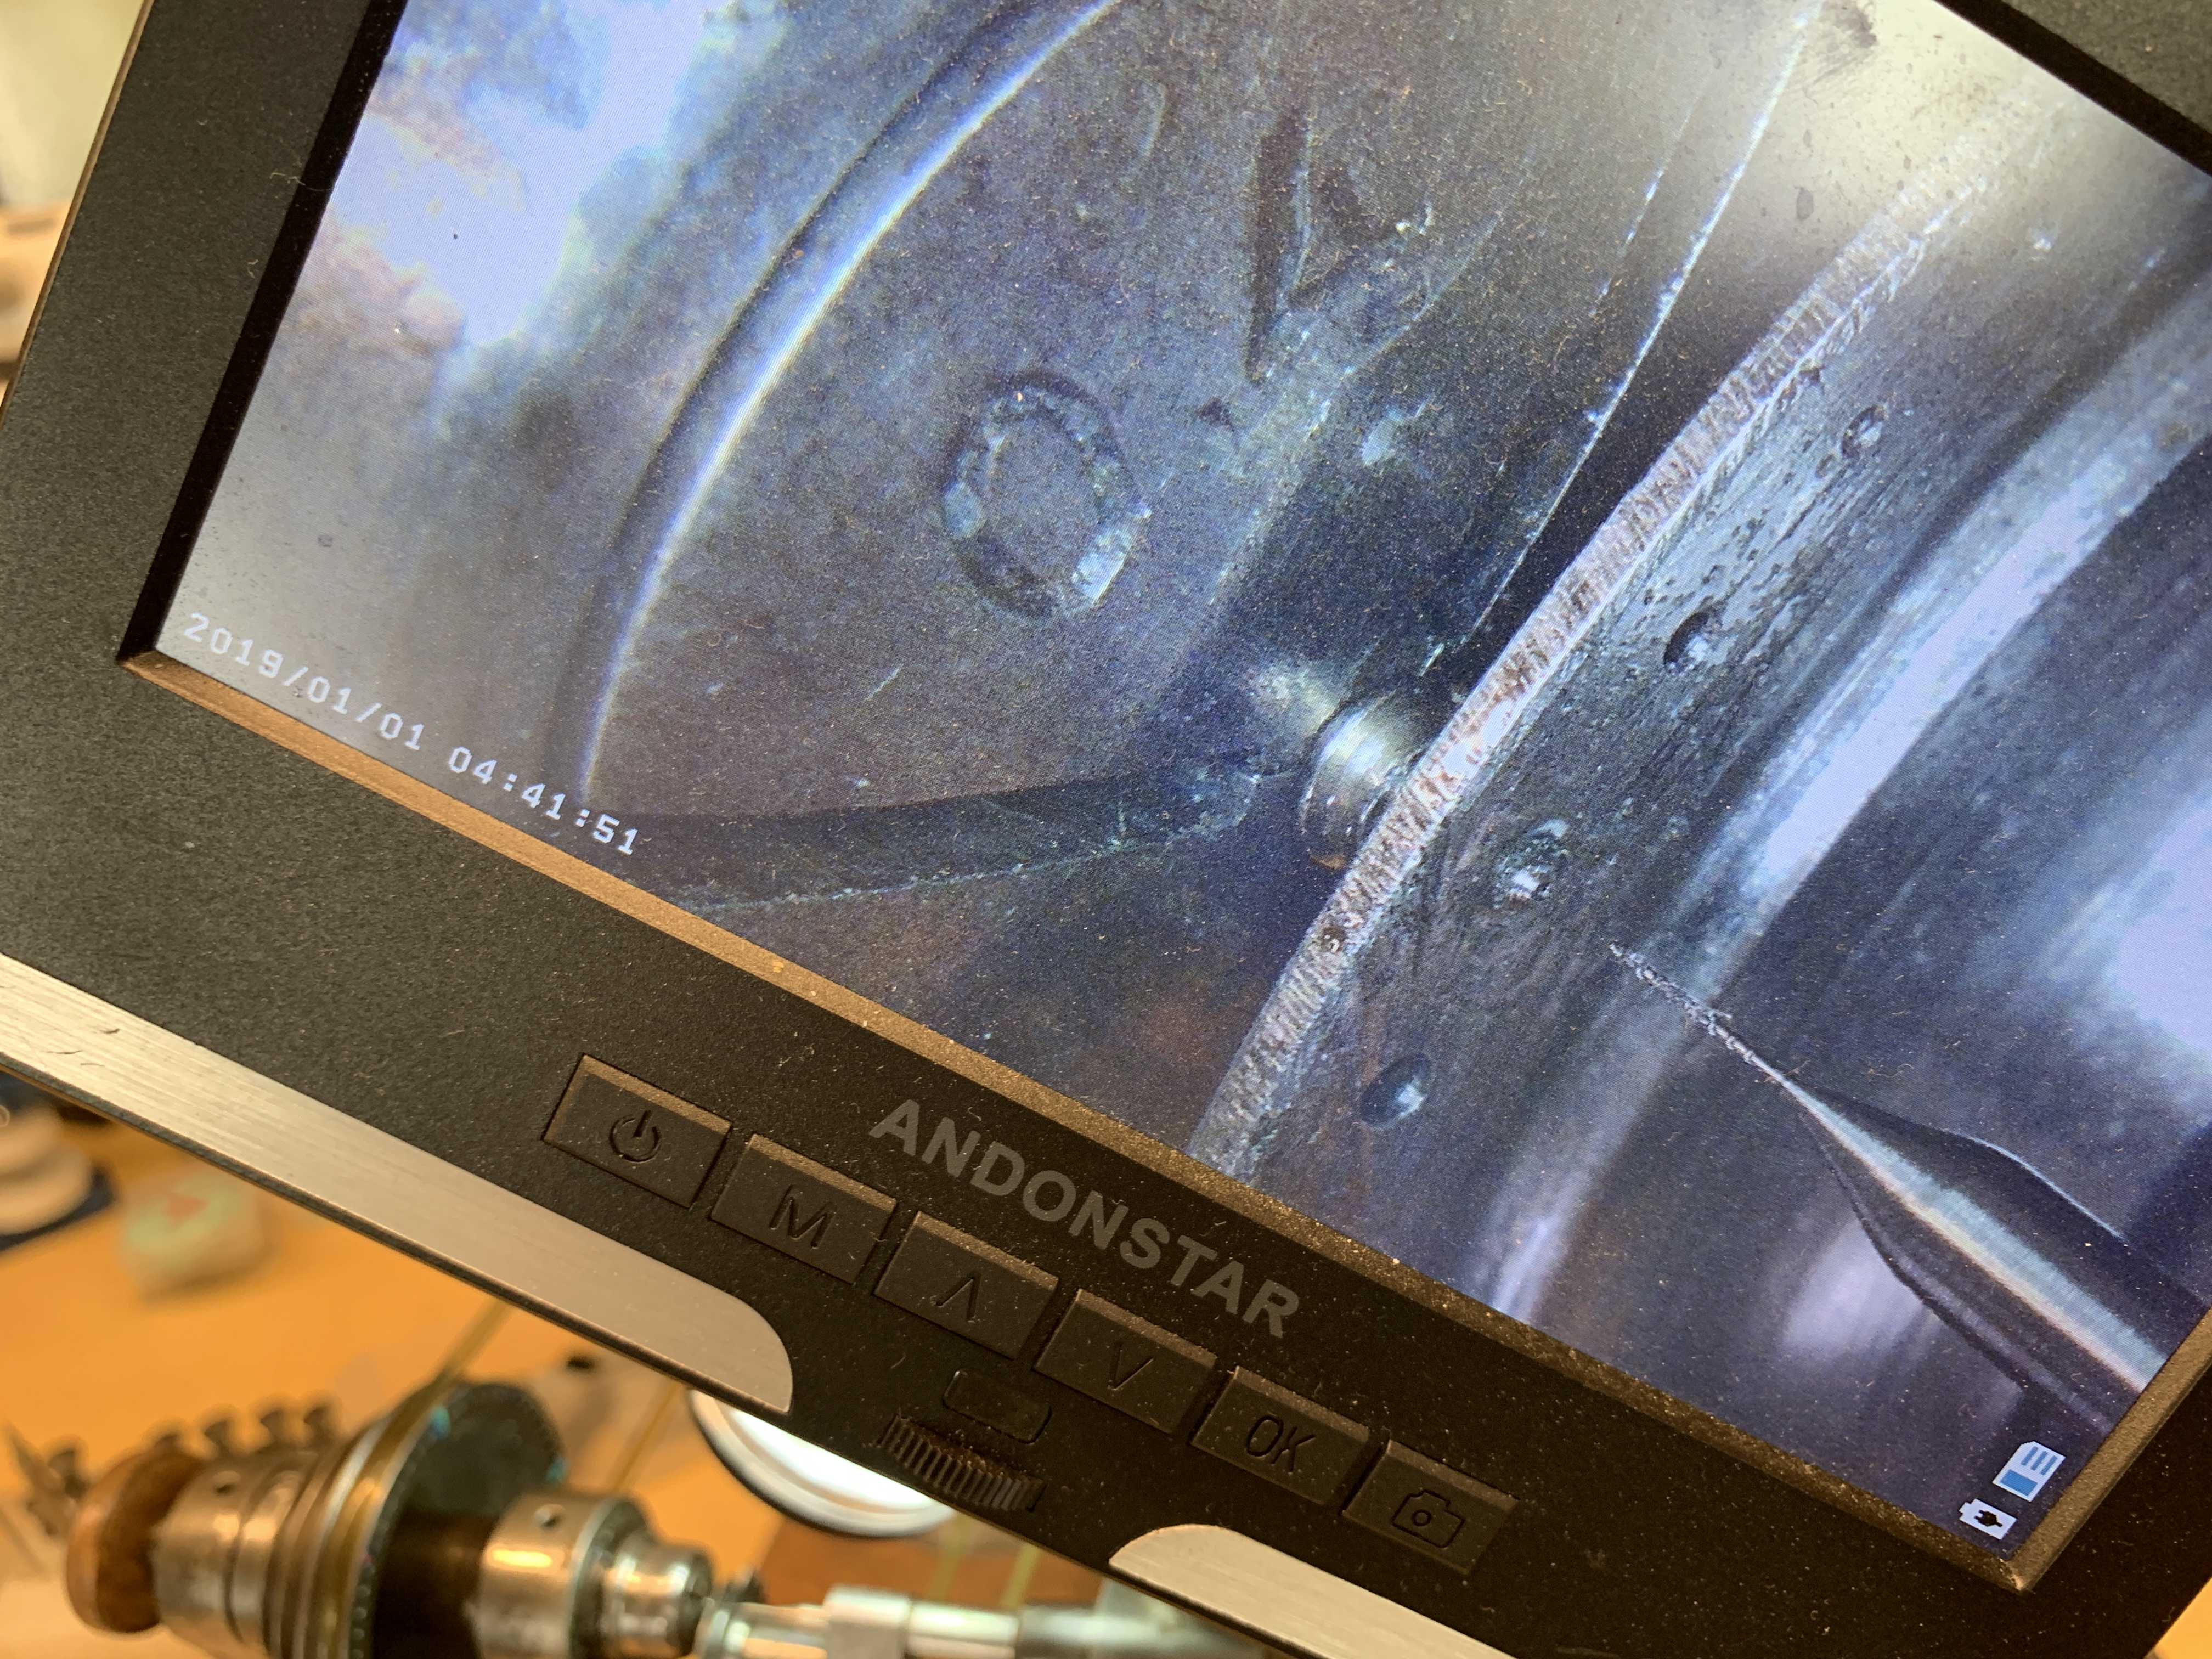
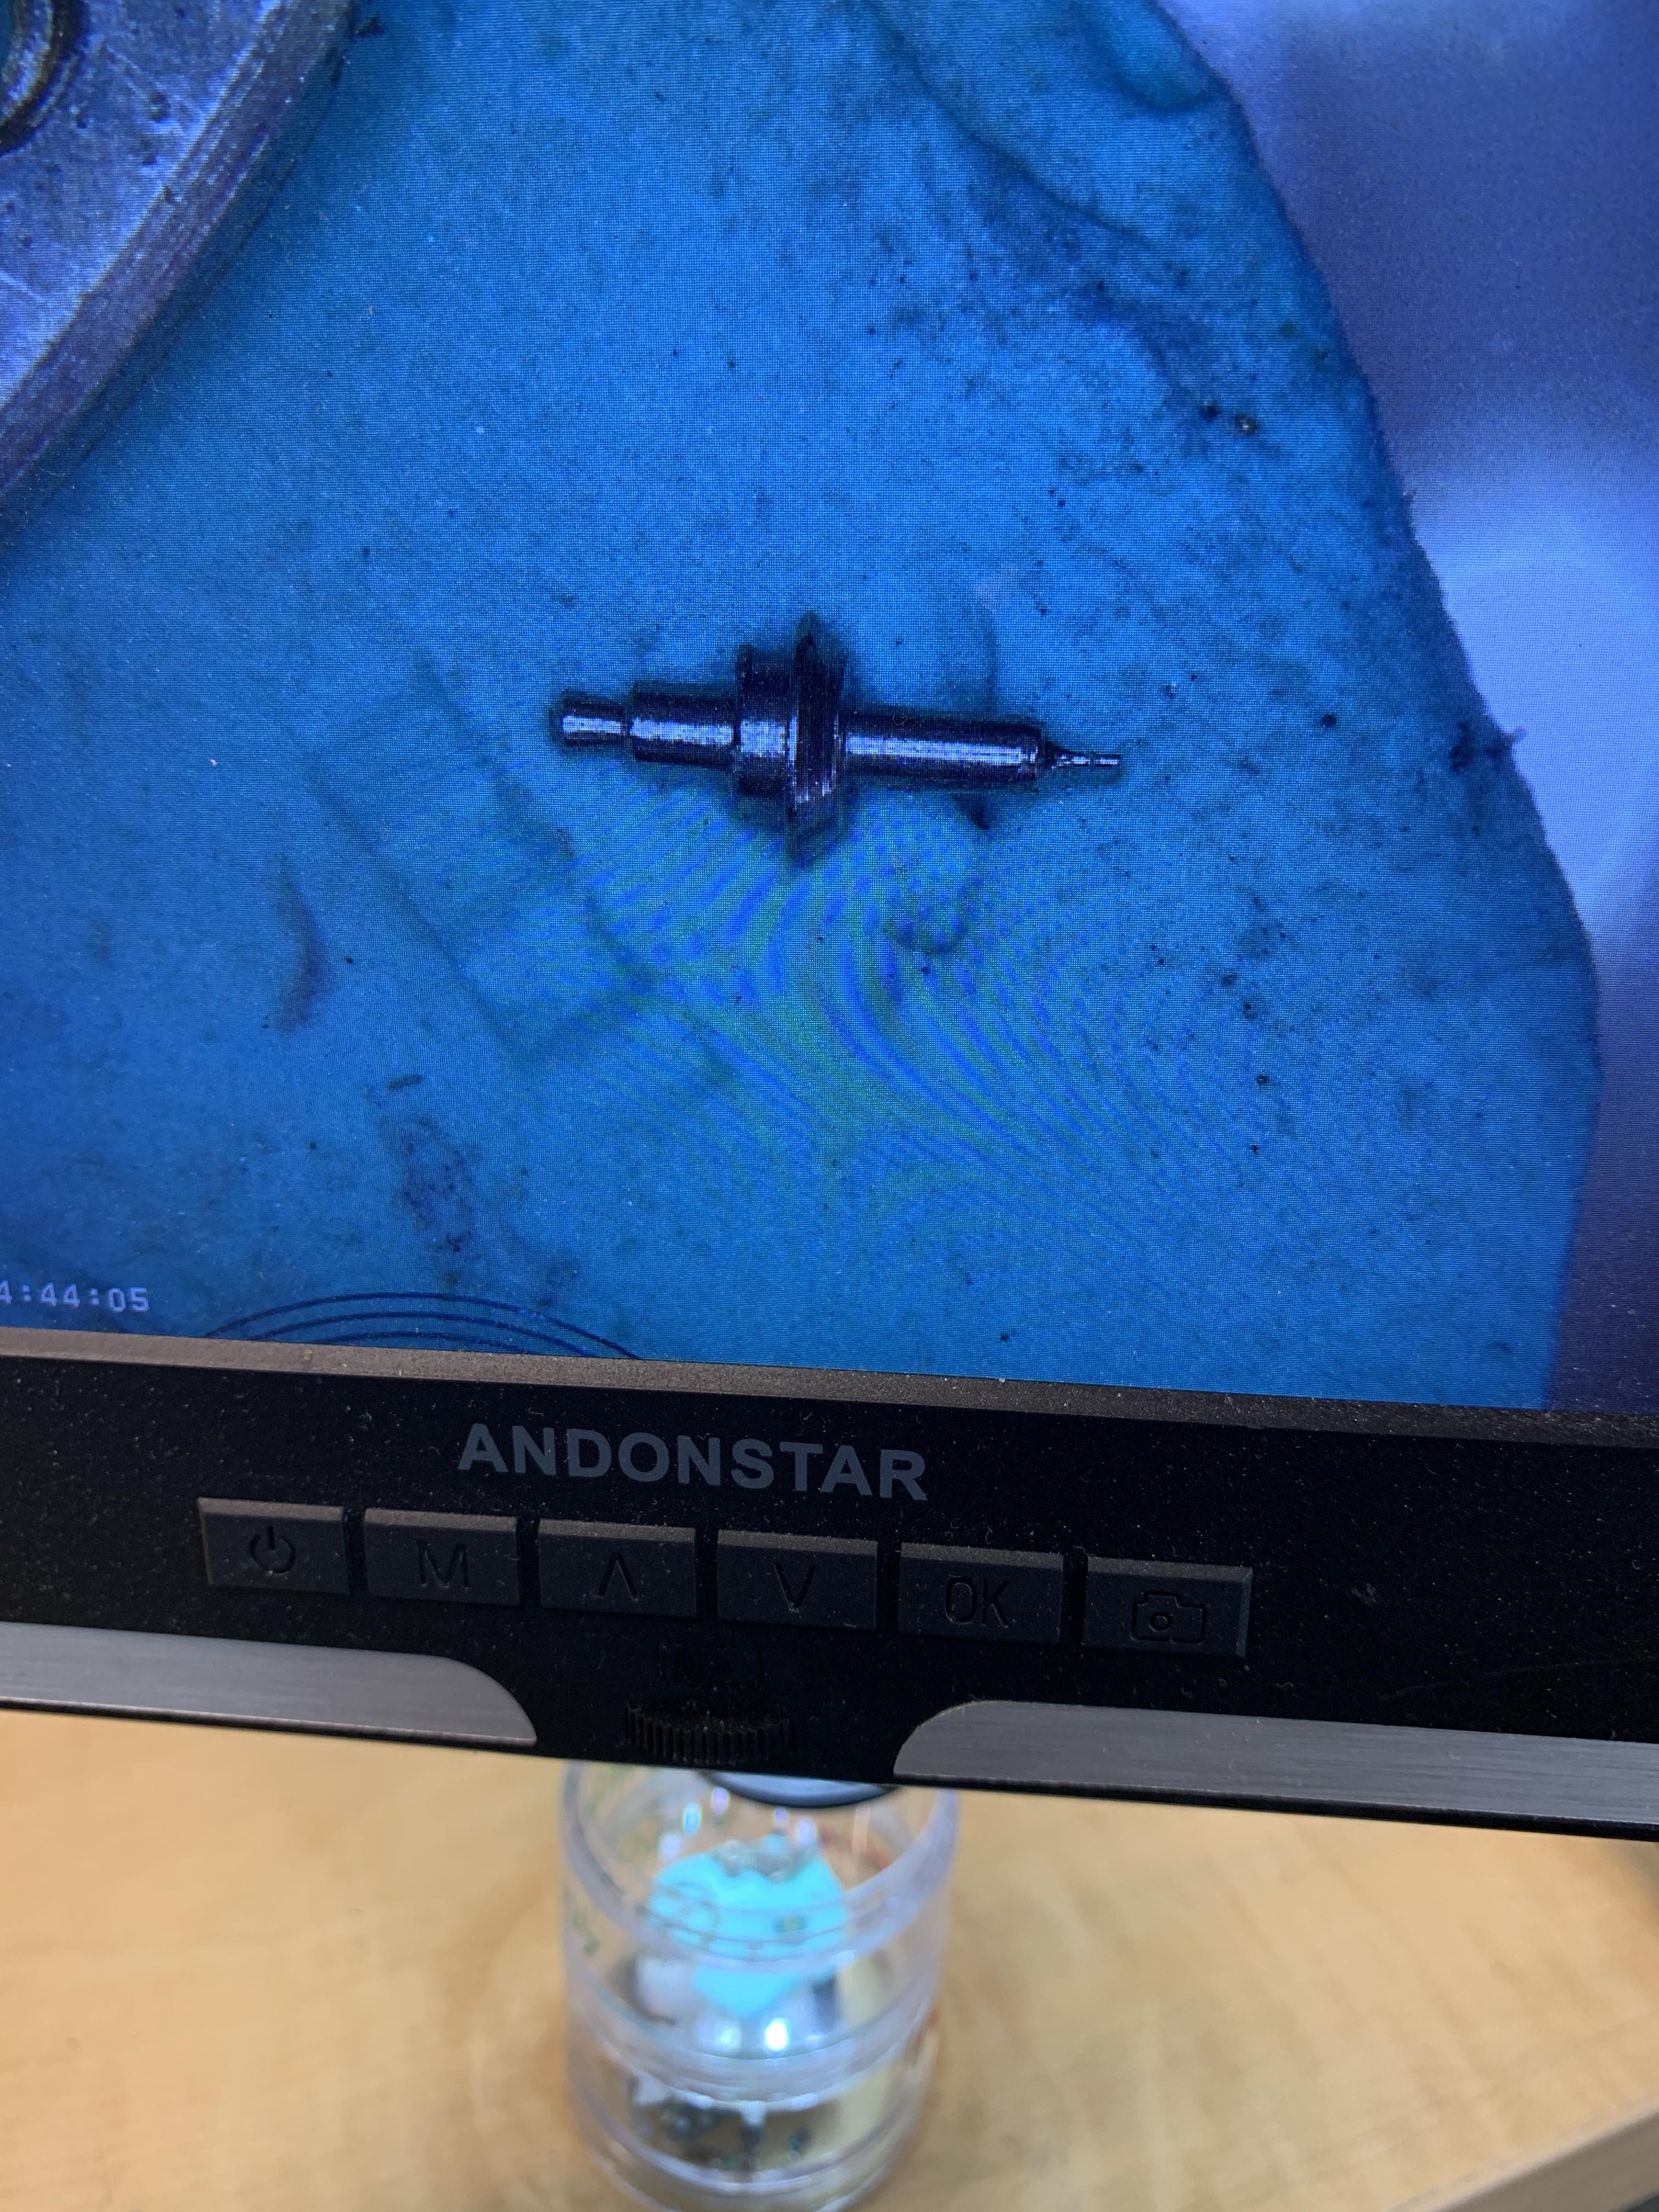
Finally managed to successfully drill a 0.1mm hole to fix my omegas staff lower pivot! Now got to make the little pivot and lock it in. I am wondering if I should have actually made the hole 0.2
 1 point
 -
I forget just how I decided to start learning about watchmaking, but here I am. Other than my Garmin watch that I use to track my backpacking activities, I only own one "real" watch, a 1928 Bulova Surrey that I bought on Ebay 15 years ago. I think it was probably that watch that sparked an interest as it stopped running many years ago and has just sat in drawer ever since. I remember looking at ways to service it over the years and I think I just figured I'd try and see if I couldn't do it myself and here I am ? I've gone through the first two of Mark's courses and have been practicing on some scrap watches I got off of ebay. I'm a retired dentist and some of the hand/eye skills do seem to carry over but as I watch some of the videos I have filmed of myself as I've stripped and then rebuilt movements I do see that I'm a bit heavy handed. I need to add another fine motor gear or two into my repertoire ? It looks like there is a great community here and I'm looking forward to climbing that road to where I can at least service that beautiful Bulova in my drawer. OK, I'm off to post my first of what I'm sure will be one of many questions ?1 point
-
Hi all, I signed up because I wanted to answer a question, but it looks like I'm not allowed to do that until I introduce myself, so ... hello! I'm Chris, I'm a watchmaker. I'm not sure what else to say so I'll share cool photos. My most interesting project this week was a staff for the flywheel/inertial damper in a Seiko "crystal chronometer" QC951-II which is a very early quartz ship's chronometer from 1967. It had been dropped, breaking a pivot on the flywheel and it had a few other problems. This was just like making a custom balance staff. Sometimes it's easier when I know there's no hope of finding a part, and I need to go ahead and make it. That can save time! Cheers, Chris

 1 point
 -
If anyone knows the current location of the Elgin 900 mainspring arbor that shot silently from my tweezers and into an adjacent wormhole, there maybe a sizeable reward for it's safe return. I spent over three hours last night looking for it in a small but crowded work space. ? If seen, it answers to "LITTLE $#!+". ? Shane1 point
-
Take comfort in knowing that repetition will allow you to develop a pattern. I've done enough mechanical watches by now that, unless it's something unusual, I just know where all the parts go. I haven't needed to photograph anything recently (knocking on wood). I always let down the mainspring first. I put the balance complete on my nifty little brass tack/table I made, and that, and the fork, get a special and separate cleaning. I put most of the screws back in their holes - and clean them individually later. I will sometimes still photograph the keyless works if the clicks and springs are arranged strangely. But generally, I have my rails and I run on them. It helps me not forget something.1 point
-
I use my wife whenever I've lost a part and I'm devastated. She has the eyes of a hawk and has an eerie ability to find any part no matter how small in minutes. She definitely gets a kick out of it. The record is a cap jewel anti-shock spring for the escape wheel pivot of a Seiko cal. 7S36B. It is smaller than a spec of dust. I think she was sent to me for this very reason. Bless her and I try to treat her really well so that she won't get any second thoughts about me. Couldn't do watches without her! She has a sister who's single if anyone is interested ?1 point
-
When parts were plentiful. If only !!!!1 point
-
Thanks very much for the advice. I will definitely use my iPhone.1 point
-
I did!1 point
-
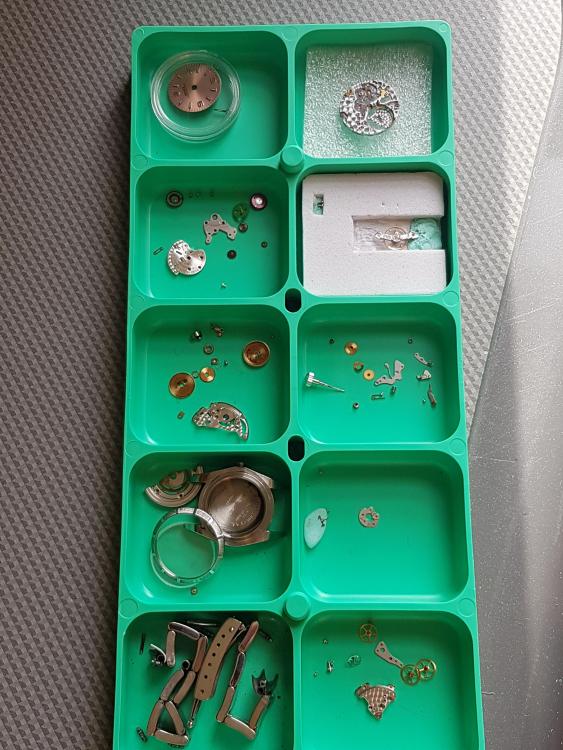
Without reference to your particular movement, so speaking in general terms, what most of us do is to group related parts together as we disassemble, keep those related parts together for cleaning, and then stage them together in groups for reassembly. mikepilk shows the type of storage box most folks acquire after a while, but for starters you might use a free (and carefully cleaned!) styrofoam egg carton for the purpose. So for example, you remove the train bridge and place its retaining screws and the wheels it secures (likely the escape, 4th, 3rd and center wheels) together. Remove and group together the crown wheel (and any parts that come off with it), the ratchet wheel, the click, click spring and retaining screw. Remove the barrel bridge (group it with the other bridges) and add securing screws, the spring barrel, barrel, lid, arbor to the other power unit parts. Likewise with the keyless works, motion works, pallets, balance, etc. Suggest you keep heavy parts like bridges separate from small parts like wheels to avoid damage. Eventually all the parts of a watch will become very familiar to you and it will be easy to sort them into groups quickly and accurately even if they become mixed up. Until then, notes and cell phone photos are very helpful, as are tech sheets for your particular movement (if available). Now that I have a few years of experience, I can usually proceed quickly and with no confusion. The exception might be with keyless works -- these are of many different (sometimes subtly different) designs and I still frequently take photos of keyless works as cheap insurance. Agree with JohnR725 you will often assemble in somewhat different order than you disassemble. For this reason, best to place parts into functional groups rather than try to spread them out one at time in order of disassembly. Be comforted (or not) that in most cases a watch will resist being put together wrong. If you get things mixed up, careful trial and error will eventually solve the puzzle and in about 95% of cases you won't be able to put the watch together wrong (at least without employing force and violence, which you must always avoid!) Best of luck Nicholas G, and enjoy the learning curve!1 point
-
This is a job which I repeat fairly regularly. Best option (for me)is a Seitz jewelling set with hand hole-closing punches. It’s a precise job.1 point
-
Bugger. I've got my jealous head on again.1 point
-
The short answer is the smallest others may disagree but too much oil in the escapement can effectivly reduce the balance amplitude.1 point
-
Another thing I find useful to do is remove the metal posts especially on striking clocks the ones that the rack and rack hook fit to etc, to stop them getting mixed up place them with the corresponding part, there is nothing worse than rapping you knuckles against them when dusting at speed or snagging the brush.1 point
-
Correct. All you need is a very soft bench brush make sure it is really soft so it doesn't leave scratch marks on the brass Natural is best avoided nylon. This type of thing.
 1 point
 -
You need what is called a chalking brush, you must always keep the brush clean and never use it for other things, you load the brush by chalking the brush and then brush the plates. It is a very old way of stopping brass from tarnishing. I dear say the chalk of today is nothing like the old stuff and how things change I bet it isn't even the same now as what I bought back in the 70's & 80's.1 point
-
Welcome to the forum Wasim.1 point
-
I was thinking of some type of sheet plastic/nylon as well. Cutting a rectangle and removing the centre would be easy. I am not sure how you would go about working out the thickness required? Might just be some thickness and depth measurements. And then how to sort of make the ring 'clip' onto the movement. Look at some other movement rings to get an idea of what you would want your to be fashioned like.1 point
-
Still haven't found the current prodigal part yet but I am running out of places to look. One morning, some time ago, I had spent what proved to be a fruitless effort looking for a pallet fork that got away from me just before work. About lunch time I found it velcroed to the cuff of my shirt sleeve more than fifty miles away and six hours later. I didn't have tweezers to safely pick it off so I pulled it off with a piece of masking tape and stuck it inside the lid of my lunchbox. The crazy part is that I had put on and had taken off my jacket twice before that. Thanks for the sympathy. Shane1 point
-
I use a magnetic sweeper too, but I wrap mine in masking tape. They have a habit of picking up random stuff on the one hand, and the chrome housing would like to mar the bottoms of furniture legs. Additionally, masking tape comes in colors other than metal which makes finding other metal colored parts easier to see. My best into-the-ether part story so far is a missing shock spring. Sproinged off, as is their wont, and I spent an entire evening looking for it. My wife got involved. Many swearings. I eventually worked up a bit of a sweat moving furniture or whatever, and took my glasses off to rub my eyes or something. There it was, statically clinging to the lower inside of my left lens the entire time. Talk about being right in front of you the whole time!1 point
-
I have been known to get my 1 meter steel ruler from my outside workshop and put rare earth magnets on it every 10cm and then wave it over everything. I've found more than 1 click spring with that method, once I even found 2 click springs and I was only looking for 1 at the time. ?1 point
-
French chalking will give a lasting shine to any clock movement that has been polished. Yes you need to plug all the holes I used cocktail sticks. Some things do take a time to achieve but what is the rush. Just think how nice it will all look when you see the final results.1 point
-
Yeah. I caught that a few minutes ago, and edited it to reflect that while you were posting. I blame (a lack of) caffeine.1 point
-
That would possibly allow the hour hand to move, but the minute hand is fixed to the canon pinion which (should be) is fixed to the center wheel.1 point
-
Don't worry you will find it on your bench in either 6 months time, or just after you receive a replacement arbor. I remember finding a cap jewel on my work table about 3 months after I lost it and had bought another junker watch to get a replacement jewel. We have all done it too.1 point
-
Hello and welcome Wasim to the forum professional knowledge is always welcome.1 point
-
Greetings!1 point
-
Welcome! Glad you found us!1 point
-
Thank you for your introduction and welcome to this friendly forum.1 point
-
Welcome to the forum.1 point
-
welcome, always good to see a new pro joining and sharing experiences.1 point
-
"Dark" Netflix Originally German, dubbed well enough in English. A watchmaker and watchworks-like device play a central role (though almost ruinously implausible in my opinion, even for the genre). You MUST pay close attention, because there are lots of twists and turns, multiple chronological settings with different actors cast (with more or less success) as the same characters at different ages. I'm about 2/3rds of the way through what's currently available (not sure if it stops at 3 seasons, or is ongoing), but the plot is a bit of a gordian knot. My wife is super into it. It's difficult for me to get really into TV shows, but I'm committed enough to keep going (this is high praise if you know me at all). "The Expanse" Prime Fantastic SciFi opera. They pay attention to the physics they must, and ignore what the genre insists they must include but don't yet have an answer for (this is something that can sour me a bit if not at least somewhat believable). The first season or two does a little genre blending a la Firefly, and it's well done. There are three main thematic sections across five seasons, the second of which may represent some shark jumping if they don't bring it back (the theme is absent in the third section, currently in production); I suspect they will. George R.R. Martin is a fan, and said it's how the SciFi genre was meant to be. I have yet to watch Game of Thrones, but I'm given to understand that is high praise.1 point
-
Ideally if you actually understand how the watch works you wll be able to recognize each of the components. Then it's just like putting a puzzle back together. Also helpful to take pictures because we don't always like puzzles. If you start getting anything that's different and for newbe everything unfortunately is different. But for the rest of us anything that's different it's nice to have a picture because trying to figure out a puzzle gets to be tiring. Then you do not necessarily put the watch back together in the exact opposite order that you took it apart. For instance a lot of times I will see people put the pallet fork in first when reassembling and the reality is that will go in almost at the end. Not helpful if you're expecting a tech sheet. It looks like they made more than one watch. So this means I get the pick and choose and I choose this one. http://www.emka-watches.ch/Site/EN/Mechanical/EN_Detail_Mechanic.php?recordID=1500 No notice that the model number is ETA 6498-2. What makes this particular movement of interest is it and 6497 they're basically identical with the exception where the secondhand goes. What makes them interesting is there a good basic movement to learn on. Which is why I'm attaching a technical sheet. Or basically most watches will resemble this. _c_t_ct_6498-1_fde_482382_10 31.01.2020.pdf1 point
-
What's the movement - there may be a technical service sheet for it ? There is a general sort of order - just watch any of Mark's videos. When disassembling (take photos at each stage) I use containers with compartments - each compartment for a different set of components : gear train, auto mechanism, keyless work etc. Then, as I only have a small ultrasonic, I clean each compartment set at a time.
 1 point
 -
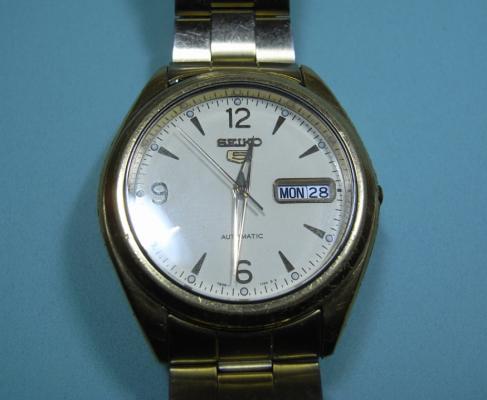
I figured I'd post the watch that started me on this journey. It really is quite gorgeous. I saved the photos from the original ebay listing. The listing said, "ART DECO 1930s BULOVA ENGRAVED CASE WATCH NEAR MINT" I've since learned that the watch is not from the 1930's but is a 1928 Surrey. Also, not mentioned in the listing is that it was recased in an Illinois Watch Co. case. I actually like this case much more than the original Surrey case so I can't really complain about that. The only real issue is that the movement just kind floats in the case since the movement isn't actually attached to the case in any way.
 1 point
 -
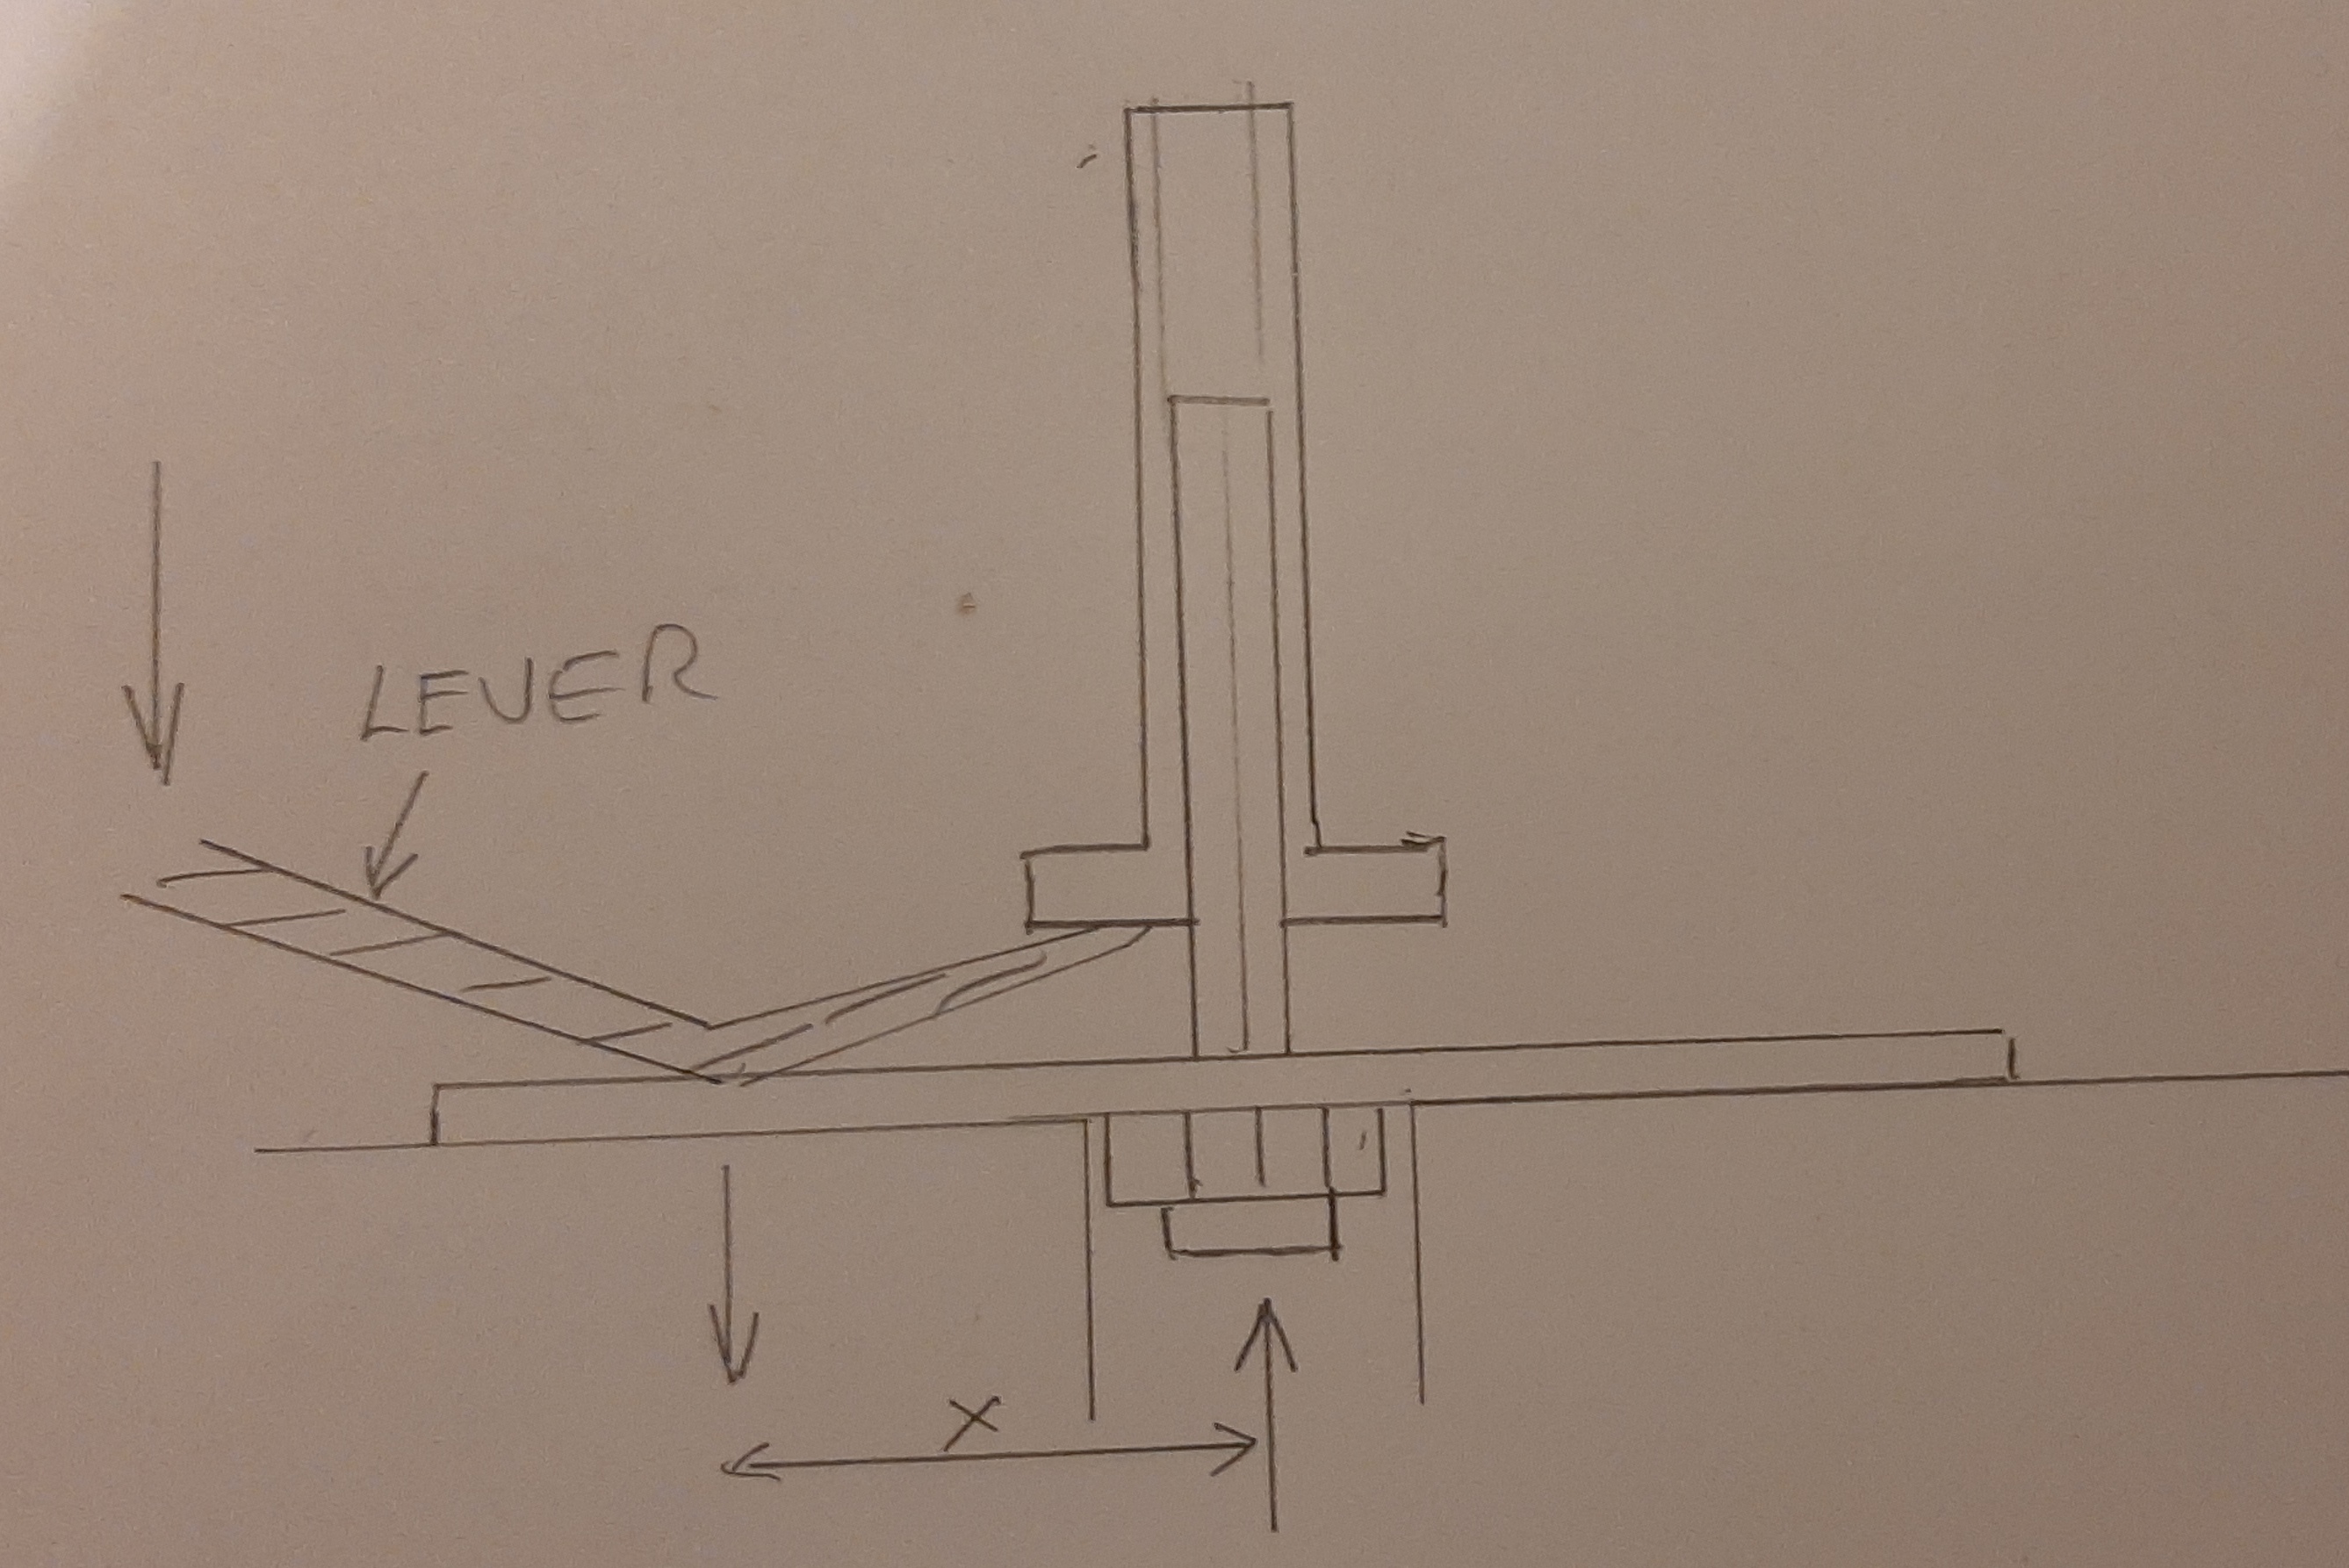
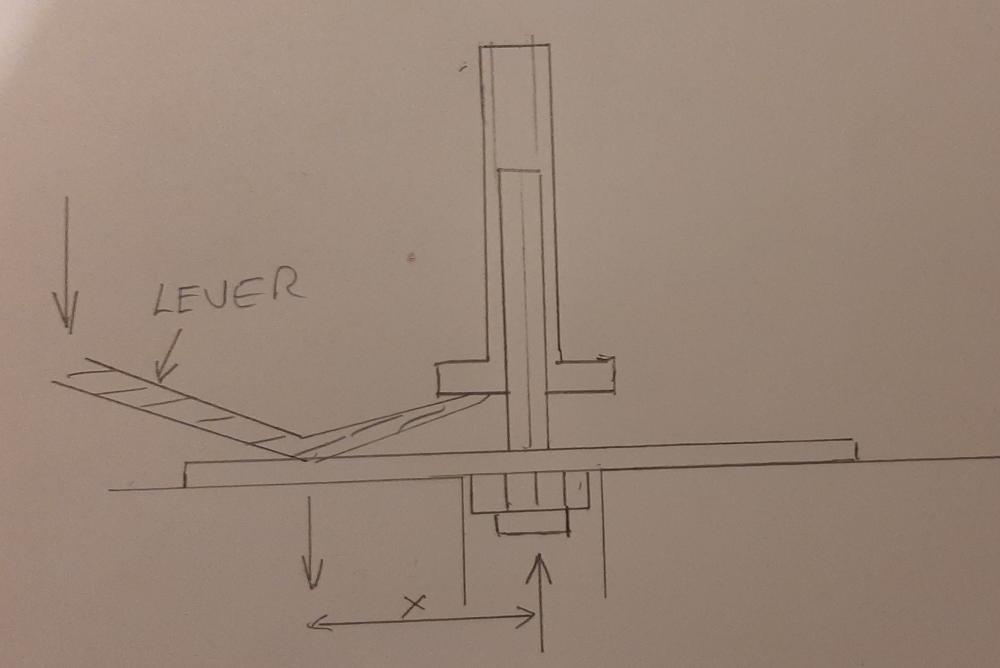
That's exactly what I did, and this is why it can damage the wheel : The force you apply by either levers, or hand pullers, at distance 'x' from the centre, has to be reacted by the wheel spokes. I believe there's a good chance they will bend before the pinion releases. I tried under a microscope, and could see the centre of the wheel start to distort, so I stopped.
 1 point
 -
Here are the mainspring winder sizes. Caliber Barrel Arbor 2000 7.34 1.63 2671 7.35 1.65 2235 8.04 1.80 8500-1 9.30 1.90 8500-2 9.30 2.28 8200 9.91 2.65 C07111 10.90 1.50 3135/2824 10.91 2.44 2892/2836 10.90 2.44 7750 12.00 2.73 Notes: Accurate to +/- 0.02 2000 and 2671 differ by winding direction 3135 and 2892 differ by arbor shape, 3135 has a cut out section and 2892 does not, I have no ideas why.1 point
-
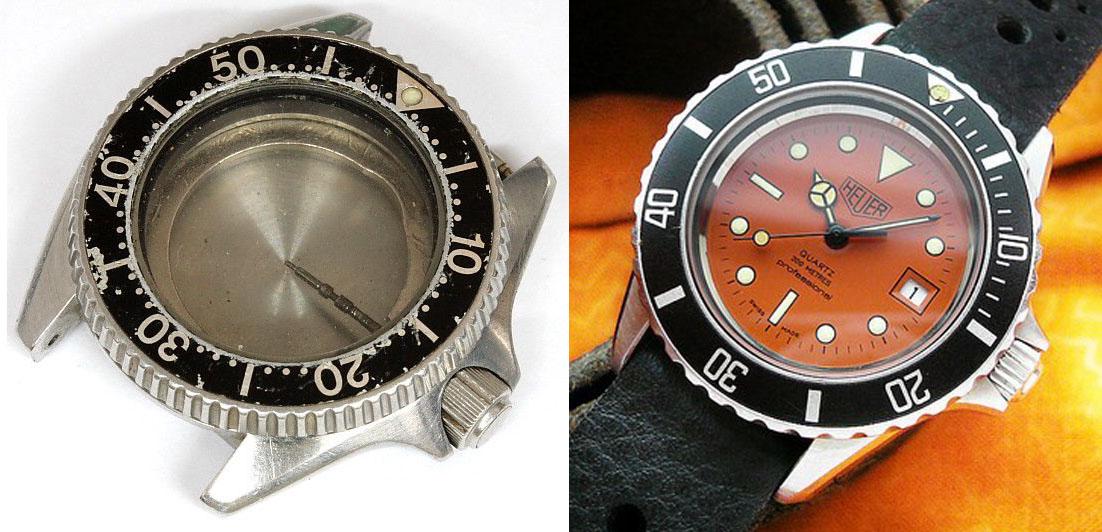
Some news about the casing of that dial I've had the opportunity to get a 2625-001 Seiko case, which is not in really good condition. But just have a look at that comparison pic below ... it seems to be a good start case for a 980.016 hommage. I'll probably (certainly) have to redo all the dial making process as the rehaut opening is really short on the 2625, and the date window will be a little too close to the rehaut but if it's not under the rehaut I will live with that. Plus I'll probably build a custom "bakelite" bezel (in fact plexiglass with a printed underside). As I will redo the dial I have decided to change the color. I will make it pistacchio green and spray some really thin gold powder on the decal prior to varnishing. So if I succeed the dial should look matte in certain lighting conditions but sometimes there will be shiny gold spots
 1 point
 -
More tutorials to come Next one could be about "making a custom negative gilt dial" and "gold plating a handset" to make it match ... If I ever have the opportunity to redo something like what you can see on the pic below FYI it all started with this
 1 point
 -
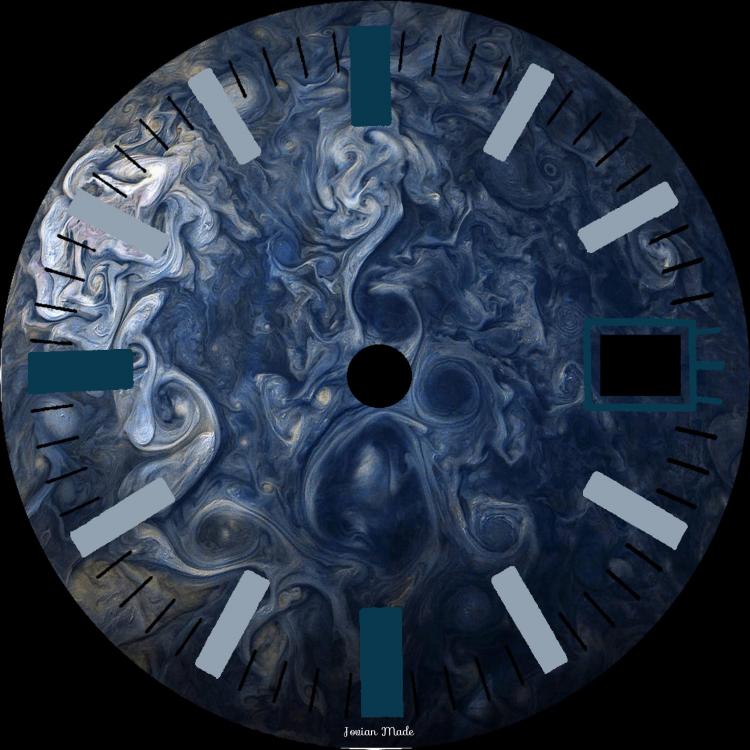
Just to show how simple it is to work with layers to quickly alter the image, here is the same set of dial markings on a vivid blue image in the same sequence. I only needed to alter one layer and pick a new colour to replace the sandy tone of markings of the original example.
 1 point
 -
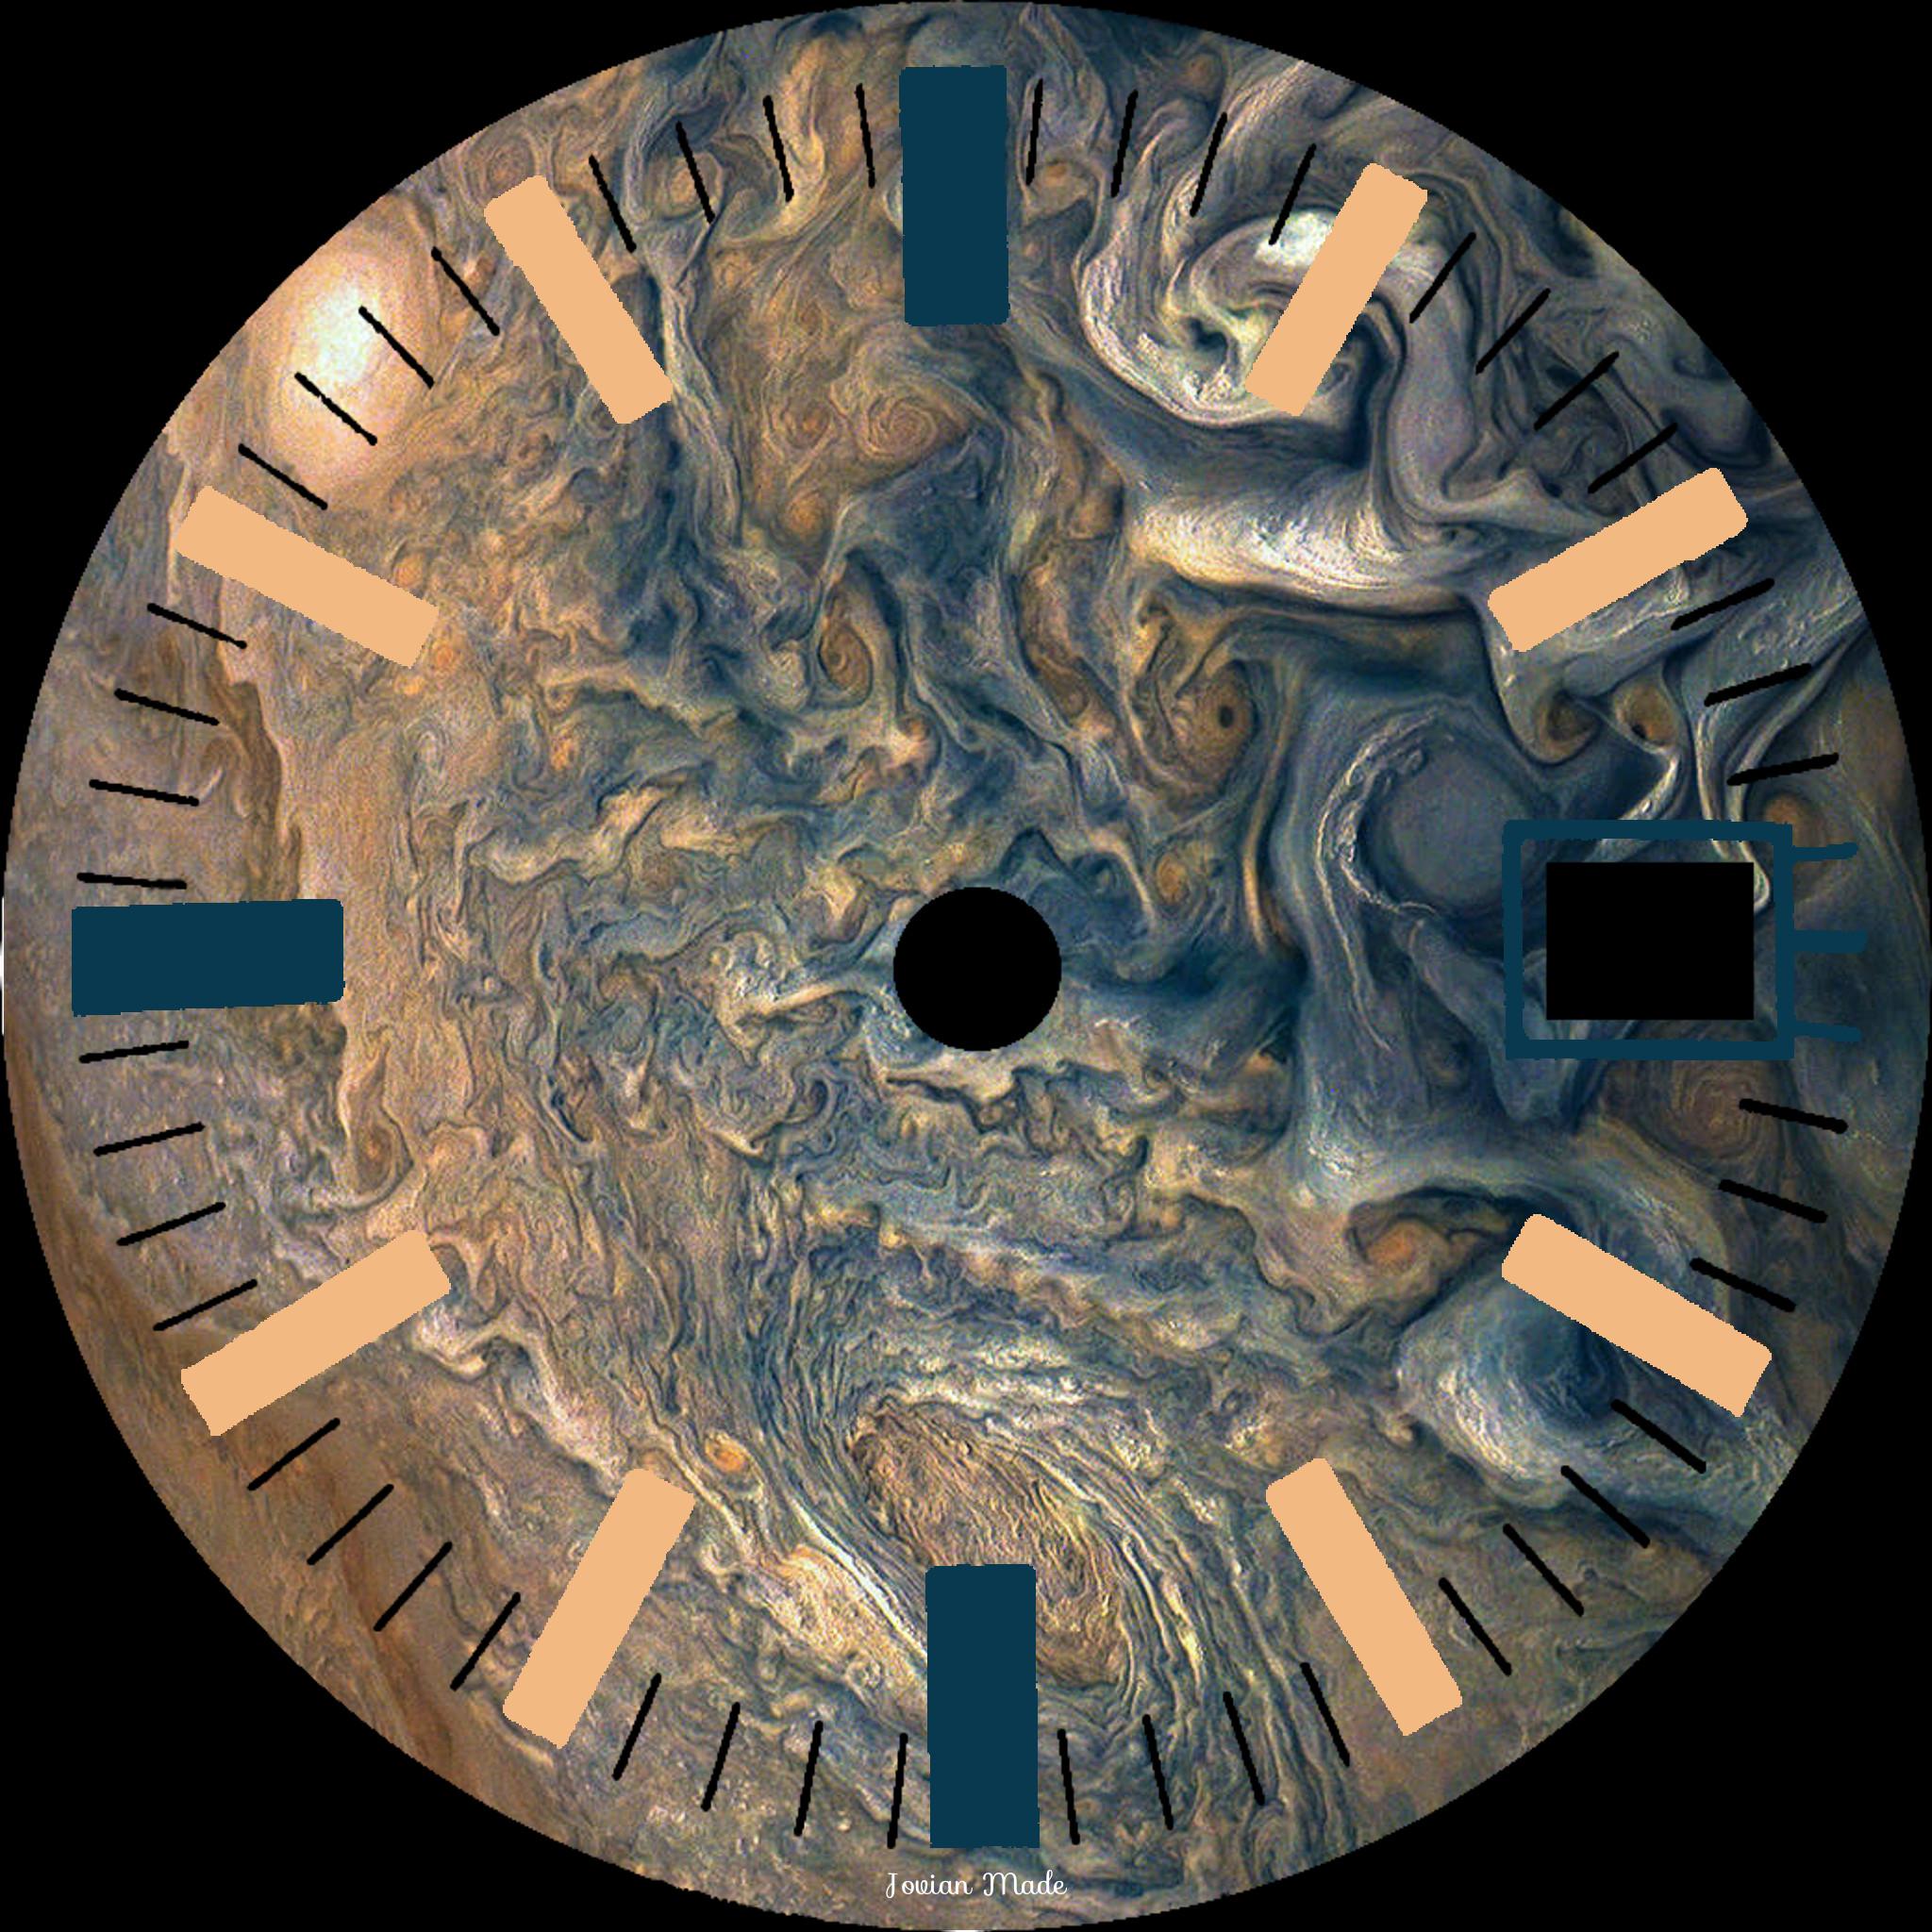
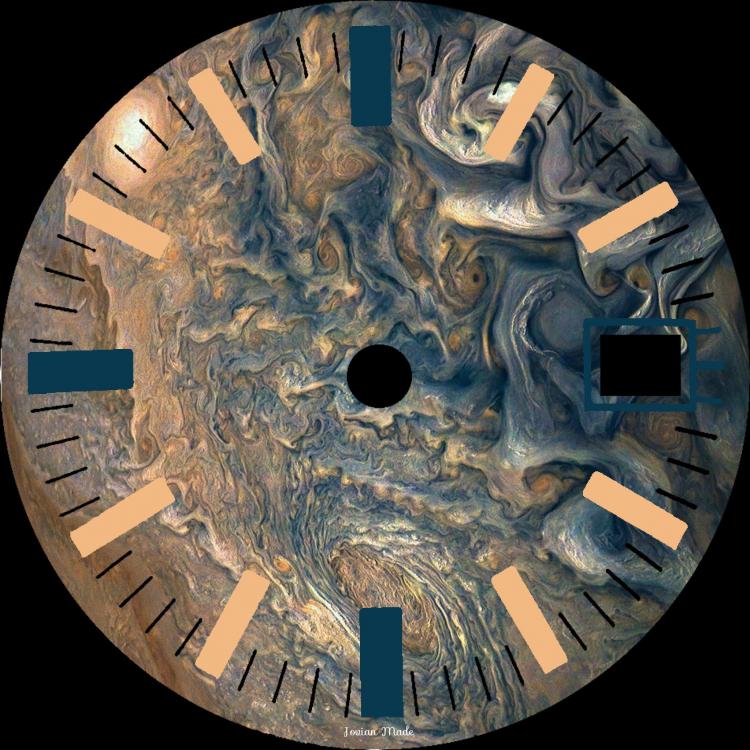
Inspired by a documentary I saw about the NASA Voyager missions (launched 42 years ago, in 1977), which I was watching on the flight home, I decided to see what I could come up with in a Jovian theme. The base image is actually from the Juno mission, but it is such a spectacularly colourful image I had so see what I could make from it. The dial marker positions are borrowed from a Certina 2000 dial, which had a suitably 1970s vibe to it. I can see I could have a lot of fun with this if I can get the technique mastered. The sky and your imagination is the limit. It needs a little more work, and I'm not sure I'm 100% happy with those hour markers, but the great thing about image editors is, if you don't like it you can change it.
 1 point
 -
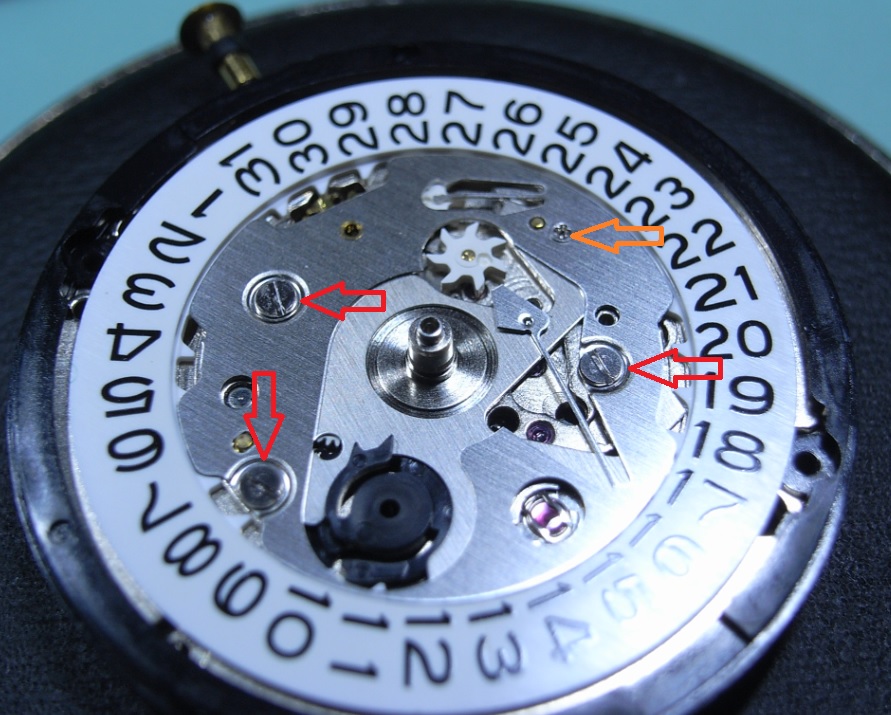
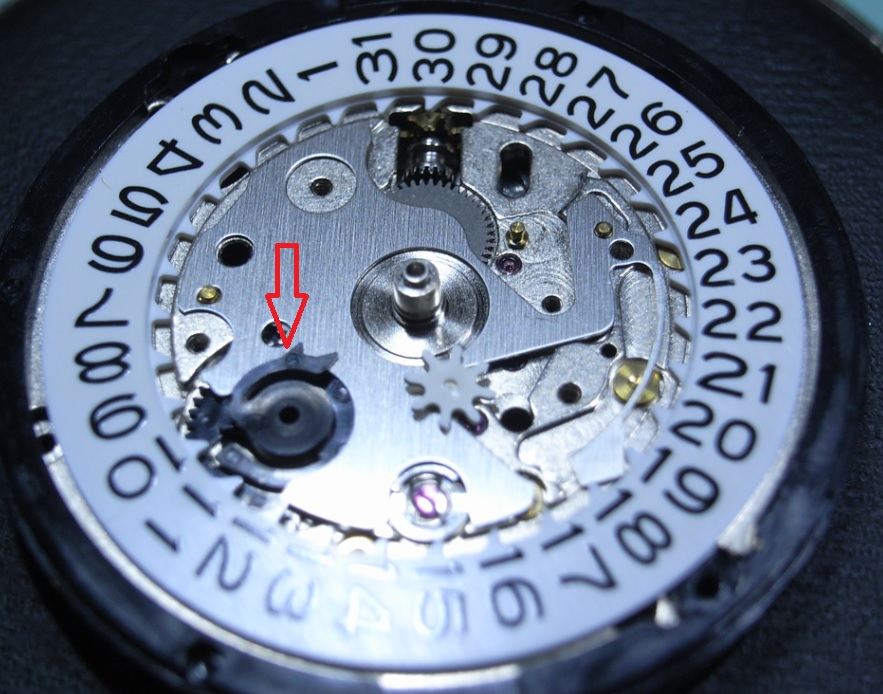
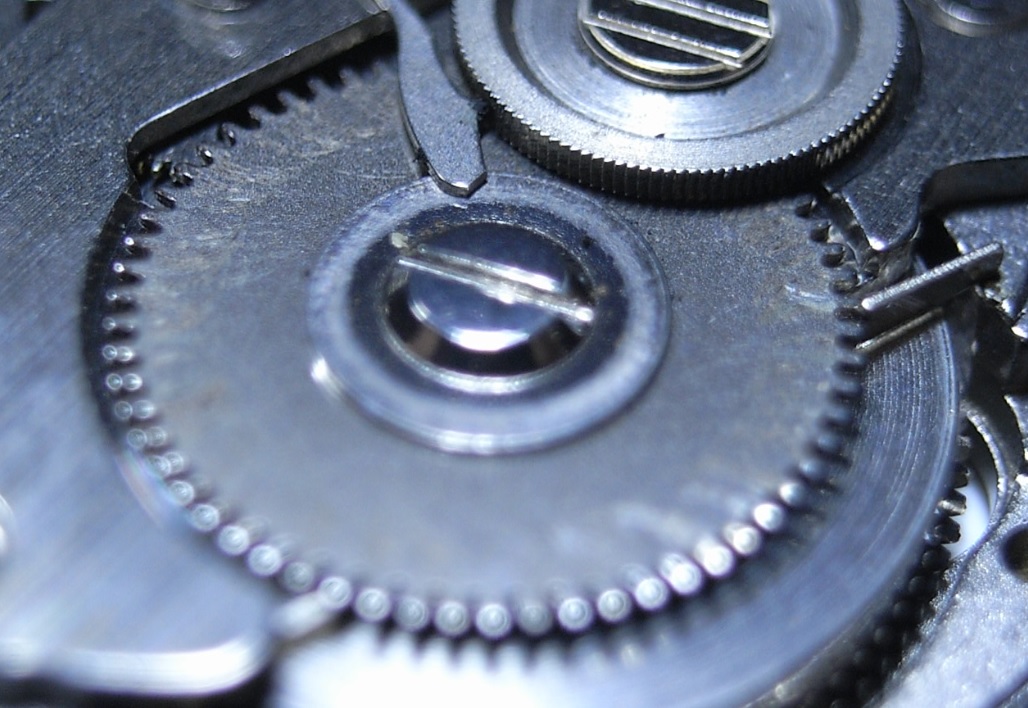
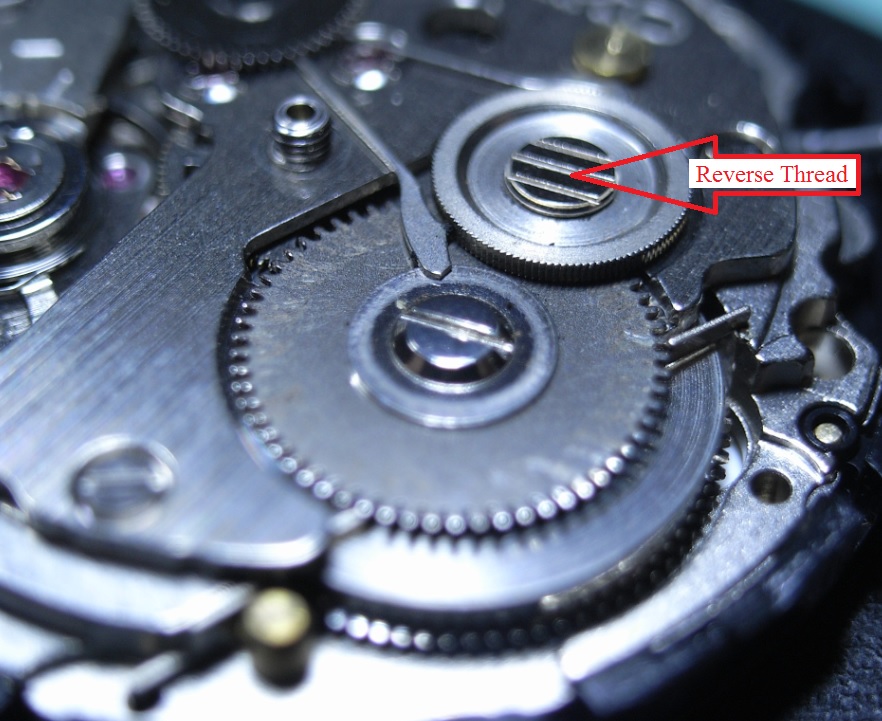
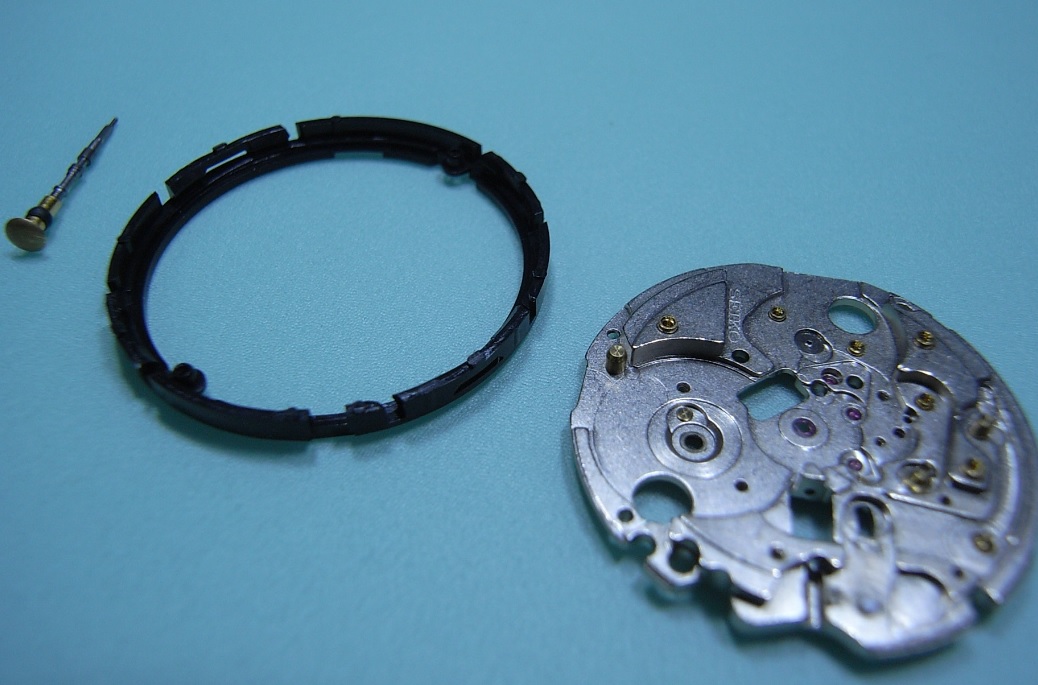
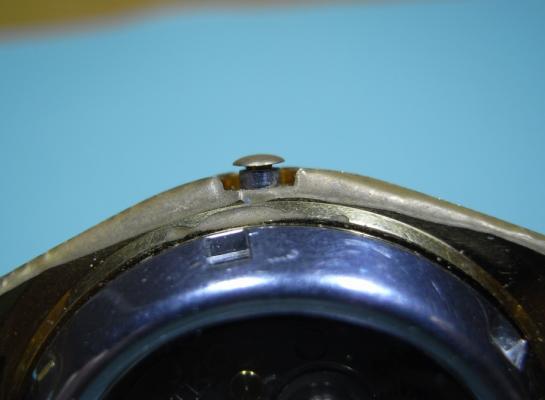
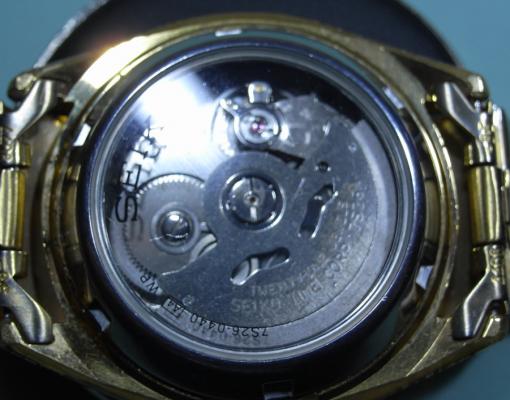
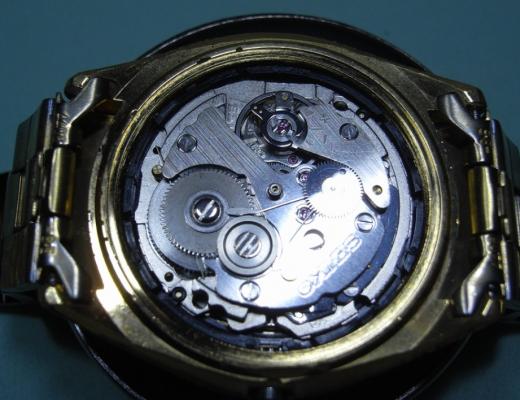
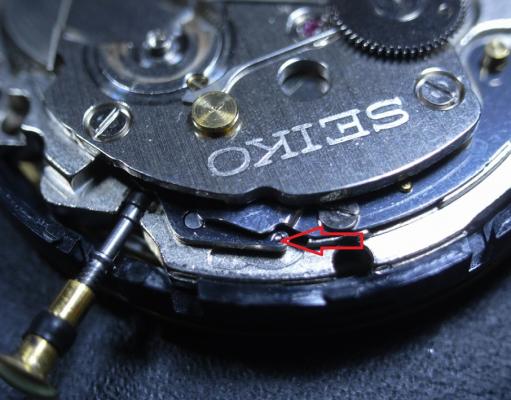
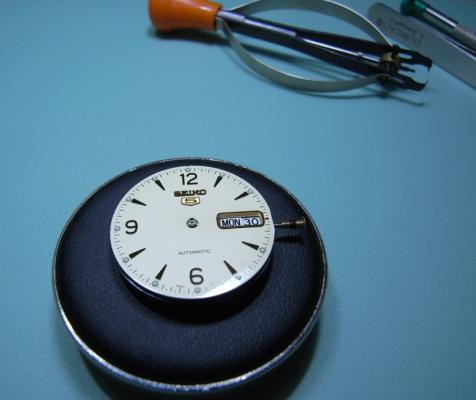
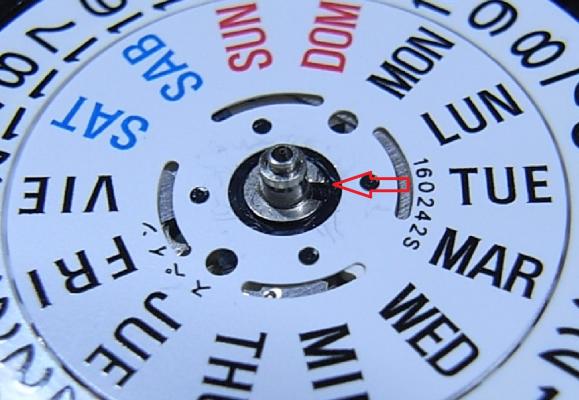
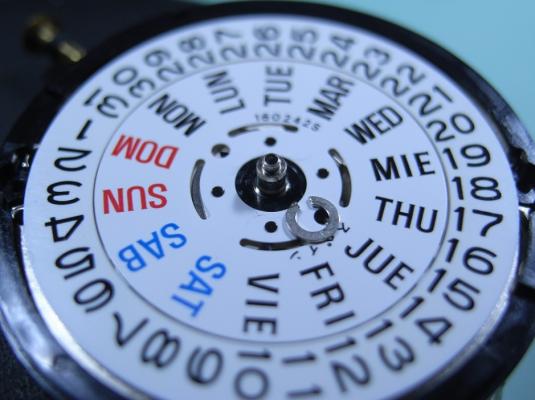
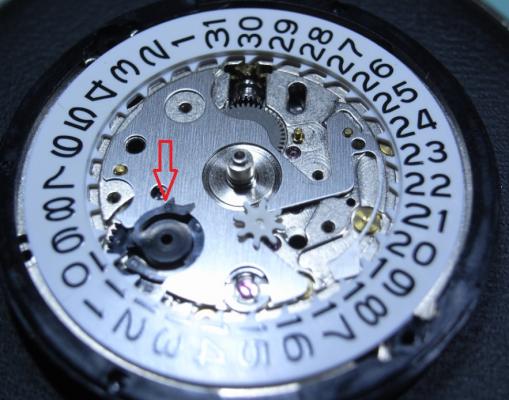
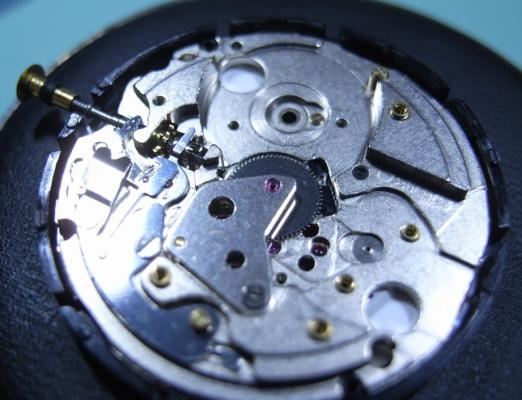
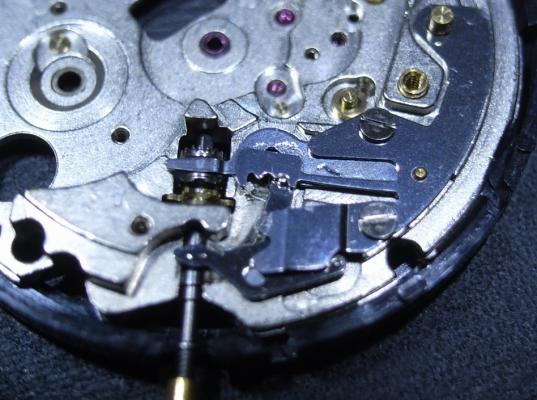
Seiko 7S26A Complete Service Background I have a good friend, a brother in Christ Jesus, who I've known for many years. He knows I've embarked on retraining myself for a new career in Watchmaking, and seen my first two restored watches. He told me that his old faithful Seiko 5, which he's worn everyday for 12 years, has recently had issues. Occasionally it will advance rapidly in time (up to an hour in a few seconds) and then just keep ticking away normally. I told him I'd be happy to take a look at it, and put it on my ACEtimer Timegrapher. The pattern on the screen looked like a B-52 drop in Nam (stupid me forgot to take a photo), and I told him that his watch definitely needed an inspection and service. So started my research on what the problem might be. After reading a "Practical Watchmaking", and the many forums that I've read, I was pretty sure it was the Pallet Fork ... either very dirty or damaged stones, or a broken/damaged fork pivot. So onward to the service... Disassembly One unusual aspect of this watch is the crown ... or lack there of, more to the point. I suppose since this is an automatic watch, they thought it didn't need to be wound. This watch also has a display back, so extra special care not to mark any of the plates, or damage screw heads! The first issue you'll face when working on a 7S26A Movement, is how to get the stem out! It isn't obvious at all, and there is a little trick. The crown needs to be pushed all the way in to expose the push plate (it is hidden in the other crown positions). I took this photo once the movement was out to best illustrate where to push. Remove the Hands, Dial and Oscillating Weight (2.0mm Screwdriver). Gently lever up one end of the circlip and carefully work your way around. You then should be able to raise the circlip up the length of the shaft without it pinging off. Remove the Day Wheel and the four screws holding the Date Dial Guard. (Use a 1.40mm Screwdriver, and this driver is good of all the screws from now on; bar one.) NOTE ORANGE ARROW: Seiko Special Tool needed for the 0.98mm Philipshead Screw (Part Number: S-921) I had to journey down to my nearest Seiko Distributor and grab one ... cost was AU$24.00 Here's a closer look at the troublesome screw. Remove Date Jumper, and note that the Date Drivewheel lips over the top of the plate. Remove all the motion work, and pull the Cannon Pinion Remove the tension from the Mainspring. Remove the Ratchet Wheel and the Second Reduction Wheel and Pinion. (remember the Reduction Wheel has a reverse thread) Unscrew the Balance Cock and remove the Balance. Also unscrew the Pellet Cock and remove the Pellet Fork. BINGO! Found the problem with my friends watch. The top pivot on the fork is broken. Easy fix with a replacement fork :) Remove the Barrel/Train Wheel Bridge Remove the Click, then the Barrel. Remove the Fourth Wheel, Third Wheel and Escapement. Unscrew the Centre Wheel Bridge and remove the Centre Wheel Now to the Keyless Work. Remove the Setting Lever Spring Remove the Yoke and the Setting Lever Pull the Stem out, and the Clutch and Intermediate Wheel will fall away. Lastly, pull the black plastic location ring off. ... and now it's bath time!!! I hope this has been of help to you guys. I'll post the Assembly steps in this thread tomorrow morning.


 1 point


.thumb.jpg.e1737221d1bb91b37331a627546ff250.jpg)