Leaderboard


Popular Content
Showing content with the highest reputation on 06/09/20 in all areas
-
There is always a better way to do a simple job. You may take the steps that better apply to your situation Remove the band and clean it separately. If leather apply a specific product. Clean the case carefully before opening it Use a good and proper opener so to have zero chances of the tool slipping Clean the gasket groove and any other trace of dirt around Check voltage on the new battery, you want a bit more that 1.55V Check well if any screw need to be losened to ease the battery out Handle the battery with plastic tweezers or finger coats only Some modules have an AC pad to be shortened to battery to get restarted Some modules require a lot of button pressing and perhaps reading the manual to reset sundials correctly Set date one day earlier, then set time so to be sure that it changes at midnight Check the gasket, if any wear of deformation replace it with a new one which fits perfectly even if you have to order it Mark the date on the caseback Apply a little silicone grease before reinstalling the gasket Remove stem, clean it all carefully, apply hp-1300 to all contact areas and silicone grease to its gasket Blow air to module before closing it Do a pressure testing Brighten the case by hand with cloth and a touch of Dialux bar more suited to the case material Present to owner with a proud smile Now you know how to turn a 2 minute task into a one hour one.3 points
-
You need proper watchmaker screwdrivers and have the properly dressed. These can cost a little as 2.5 gbp a piece for top Swiss quality. Cost of good tweezers is not much higher, to gently correct the bent hand. Beside that repairing the calendar and and doing the service needed after 20 years is above the level of a beginner, so you will have to give it to a professional or patiently learn on little value watches before attacking your nice one.2 points
-
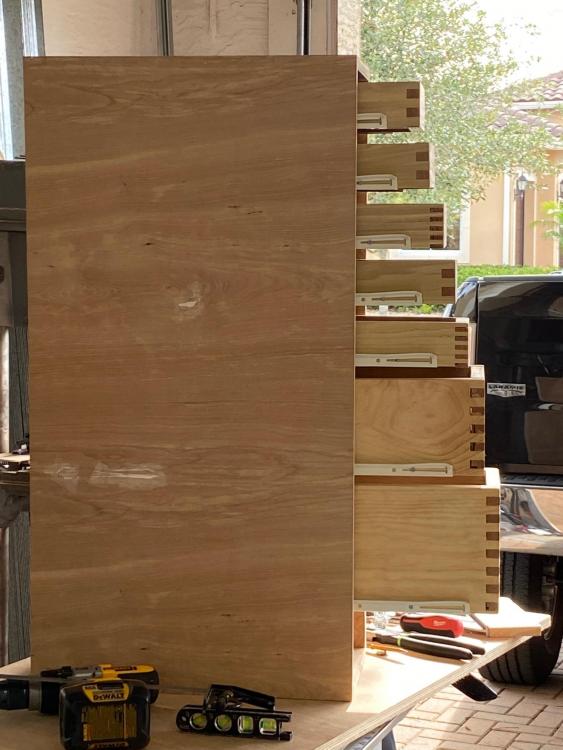
Here is the right side drawer encasement with drawers. Making the bench satisfactorily is consuming a lot of time, but I have no regrets. I enjoy the work. I think after the drawer-fronts are done and pull-handles installed I will make the back, and left/right sides of the bench. Then I can take it inside and have a surface on which to work; while I complete the left-side encasement and drawers. It might take some months; but I know when it's finished I will have known I did my best on everything.
 2 points
 -
"This video is no longer available because the YouTube account associated with this video has been terminated" I really hate it when YouTube prevents their users to publish certain content, but of course there are limits to what is still acceptable, such as filling a watch with oil. So, good YouTube noticed it and prevented it!2 points
-
Hi Andy spot on, A nice part of the country although the local accent at speed is a foreign language. I look out over Inverallochy golf course and the sea, Windy but nice Been watching the sparrows feeding the young, Goldfinches are busy at the sunflowerhearts, they are all very entertaining. If ever up this way you will always get a cuppa here.1 point
-
131_O1086-D5 MSDS englisch.pdf1 point
-
How lovely. This is what I have been watching over the past few weeks. Click on the black screen. A pair of Osprey's and two chicks. One poor little one died. I felt so sad. https://www.cumbriawildlifetrust.org.uk/wildlife/cams/osprey-cam?utm_source=email&utm_medium=email&utm_campaign=2020-04-08-Places_We_Love___Lake_District&utm_content=title_Cumbria_Osprey_Webcam&eid=O9128150809737222184882463425221 point
-
99% sure I saw that on eBay a week or two ago. Not sure if I tossed a 404 at it or not though... Better you than me. If that had shown up on my door step, it'd go straight into a drawer for when I'm better capable of taking on such a hot mess!1 point
-
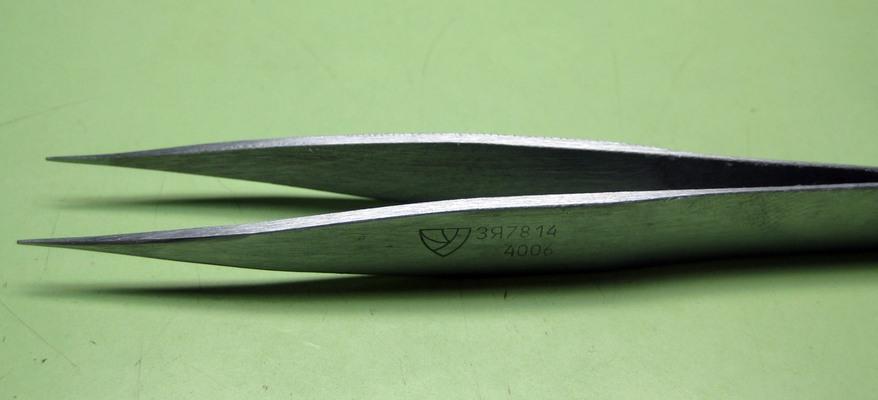
You need to measure the groove with vernier calipers. Watch silicone grease is used there, good practice but not mandatory1 point
-
Neatsfoot - that's D5.1 point
-
Will continue sifting through these, I may find more or sexier lookin ones.1 point
-
Dose this seem right to you or about right. The good news is I found out there are more than two thousand staff in these containers. Bad new is, I seem to have lost my vernier.
 1 point
 -
With your bench in place you gently attempt to wind the watch which would take the load off the click then you can push in and then it will release you can let the bench key slowly spin in your fingers.1 point
-
And so it as to be, in older times the ellipse (that's its other name too) shape was thought to be more efficient due to its larger contact and sliding area to the fork.1 point
-
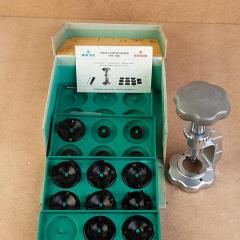
Just my suggestion, buy from Cousins UK, lowest prices and shipping fees, largest inventory ever, great ease and businesses practices. USA buyers will have to wait a little longer but they buy tax free.1 point
-
Excellent work, really enjoyed that read. I'm actually got a LM sat on my bench that was bought as a spare/repair. I'm not petrified of opening it! Haha Congratulations tho, unbelievable how robust yet sometimes fragile these watches can be.1 point
-
any watchsmith worth his salt will be able to sort that out for you mate1 point
-
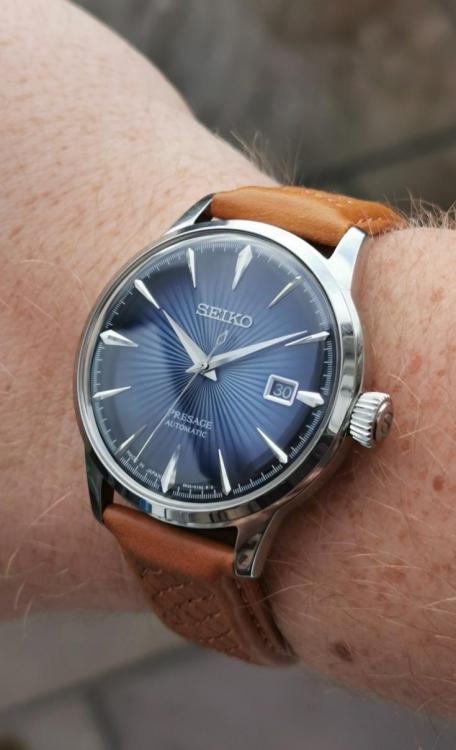
It really is an Incredible watch, the detail is unbelievable for the price point... Looks killer on a tan strap too!
 1 point
 -
I get the serial number. First purchase when I turned 21. Very cool.1 point
-
I think you might find their website Moebius below helpful.They even have a nice PDF lubrication chart To download. Then it would be impossible for any horological company not to have 9010 because everyone in the universe except me uses that for the balance pivots. It's just about the universal one that 99.9% of the world recommends is 9010. You could use the 8000 except it's a natural or mineral oil it's not synthetic. Although it's much cheaper you really want to get the 9010 so you can be with the cool kids of the world. Then you're right I've done a really thorough search because it's impossible but they really don't have any 9010? You really want to look at their website Moebius look at the tech sheets 9010 and 9020 are not the same thing. 9020 by Psalm is now considered obsolete. When I was in school it was the universal pivot oil of course yet 9010 up for the balance of light stuff. So it's basically just heavier 9010 and it seems to stay in place longer. As typically I'm doing pocket watches it's my oil a choice as the light oil. Then when purchasing a horological stuff it's very important to shop around prices can vary considerably. So I have a link to eBay below they have a variety of oils and the seller is in the US. There was another seller in France it might've been cheaper but I don't know what shipping's going to be or whether you even get anything from France right now. Then the D5 is a mineral oil The suggestion is to replace it with HP 1300 9104 I have a link below for that. Slightly cheaper than your D5 Then the last link is another seller and if their prices are up to date they look pretty good you'll just have to scroll down the page for the various lubricants. http://www.moebius-lubricants.ch/en https://www.ebay.com/itm/Moebius-Oils-Lubricants-Greases-for-Watches-Clocks-Repair/172671249074?hash=item2834022ab2:m:mXVxMGZkUfPs7aD9W88bz1A https://www.esslinger.com/moebius-9104-synt-hp-1300-synthetic-watch-oil-2ml/ http://www.ofrei.com/page246.html1 point
-
A lot of videos show how people cleverly walk a mainspring out this is fine for a wristwatch it's not suitable for pocket watch. The springs at least two or three times as wide it has way more force it has to be pulled out but certain precautions are needed unless you're used to doing it. The arbor has to be removed because you don't want that flying around the room. Typically I hold it in my hand and pull it out but I've done enough of them and even though I'm holding in my hand I have my hand under the bench out of my sight just in case it decides to fly away. A better procedure is to remember to put a towel over the whole thing or have your hand buried in a towel just to contain everything. The definition of flying away? Typically we have a mystery here in that it depends upon the condition of the mainspring. Typically blued steel Springs are set they will open up to a relatively small diameter. But if the spring is in good condition it can have a heck of a lot of force and when you pull the mainspring out all the energy releases. So all The energy released means that a lot of bad things can occur if you're not careful. The definition of flying away is literally that it depends upon how big your room is as to whether room will contain the barrel where it's going to hide after it flies away And is never seen again or if they can escape out an open door. I'll skip over the open door Part although it did make a nice sound that was the barrel bouncing off the door disappearing down the hallway. On the other hand it wasn't a typical pocketwatch mainspring it was slightly bigger. So while you can wear safety glasses as recommended above. I still prefer that the process take place out of your visual site so do it under the bench. If you're concerned about your hands you can get a glove or hold the barrel with the towel so the towel is between you and the barrel but the whole thing still has to be wrapped up to contain everything doesn't have to wrapped up Tight it just has to be a will contain when all The energies released.1 point
-
Hi some more information for your interest attached.. Moebius Oil_Chart.pdf moebius-specsbook.pdf1 point
-
Isopropanol will soften and wash away the shellac. Take care with the balance and pallet fork. Just a quick dip of a few seconds, then straight onto watch paper to take off the excess, then use a puffer to dry the critical areas where the shellac bonds on the jewels. After 4 years using lighter fluid and thinking I was getting parts clean, I now use Elma watch cleaning product. Amazing how I fooled myself about how clean was clean. Also, try an ultrasonic which are very cheap nowadays. In general, IPA (isopropyl alcohol)is not a good cleaner, but is good for the final fine rinse if done quickly. Sent from my iPhone using Tapatalk1 point
-
I 'might' be able to find a few more Andy ...........
 1 point
 -
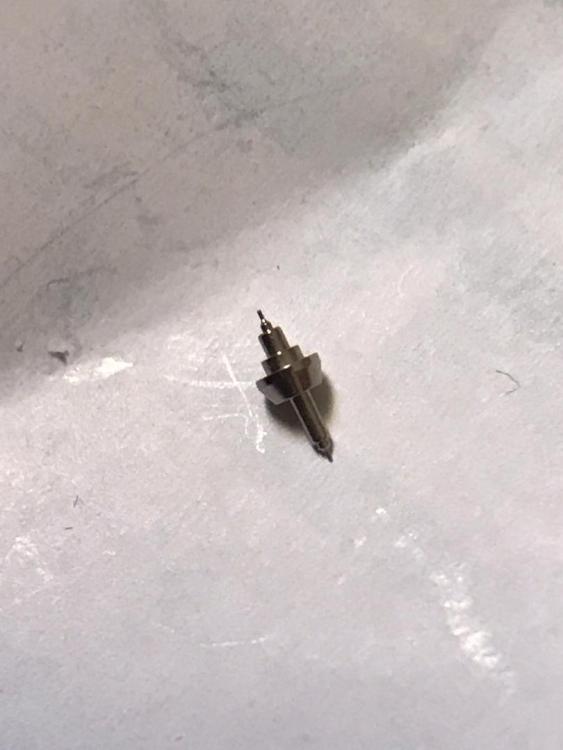
@jdm Nice walk through. Unfortunate about your pallet pin snapping somewhere in the process! Wow...I didn't think they were that delicate. Saying that, I don't put jewelled pallets through a cleaning machine, just as a precaution, so I'll now also be hand cleaning pin pallets. You were sure right about liking to grease the mainspring to the max whenever it was last done. No wonder it was pooling on the top of the barrel as well. Looking forward to the next instalment, once you've got the replacement pallet1 point
-
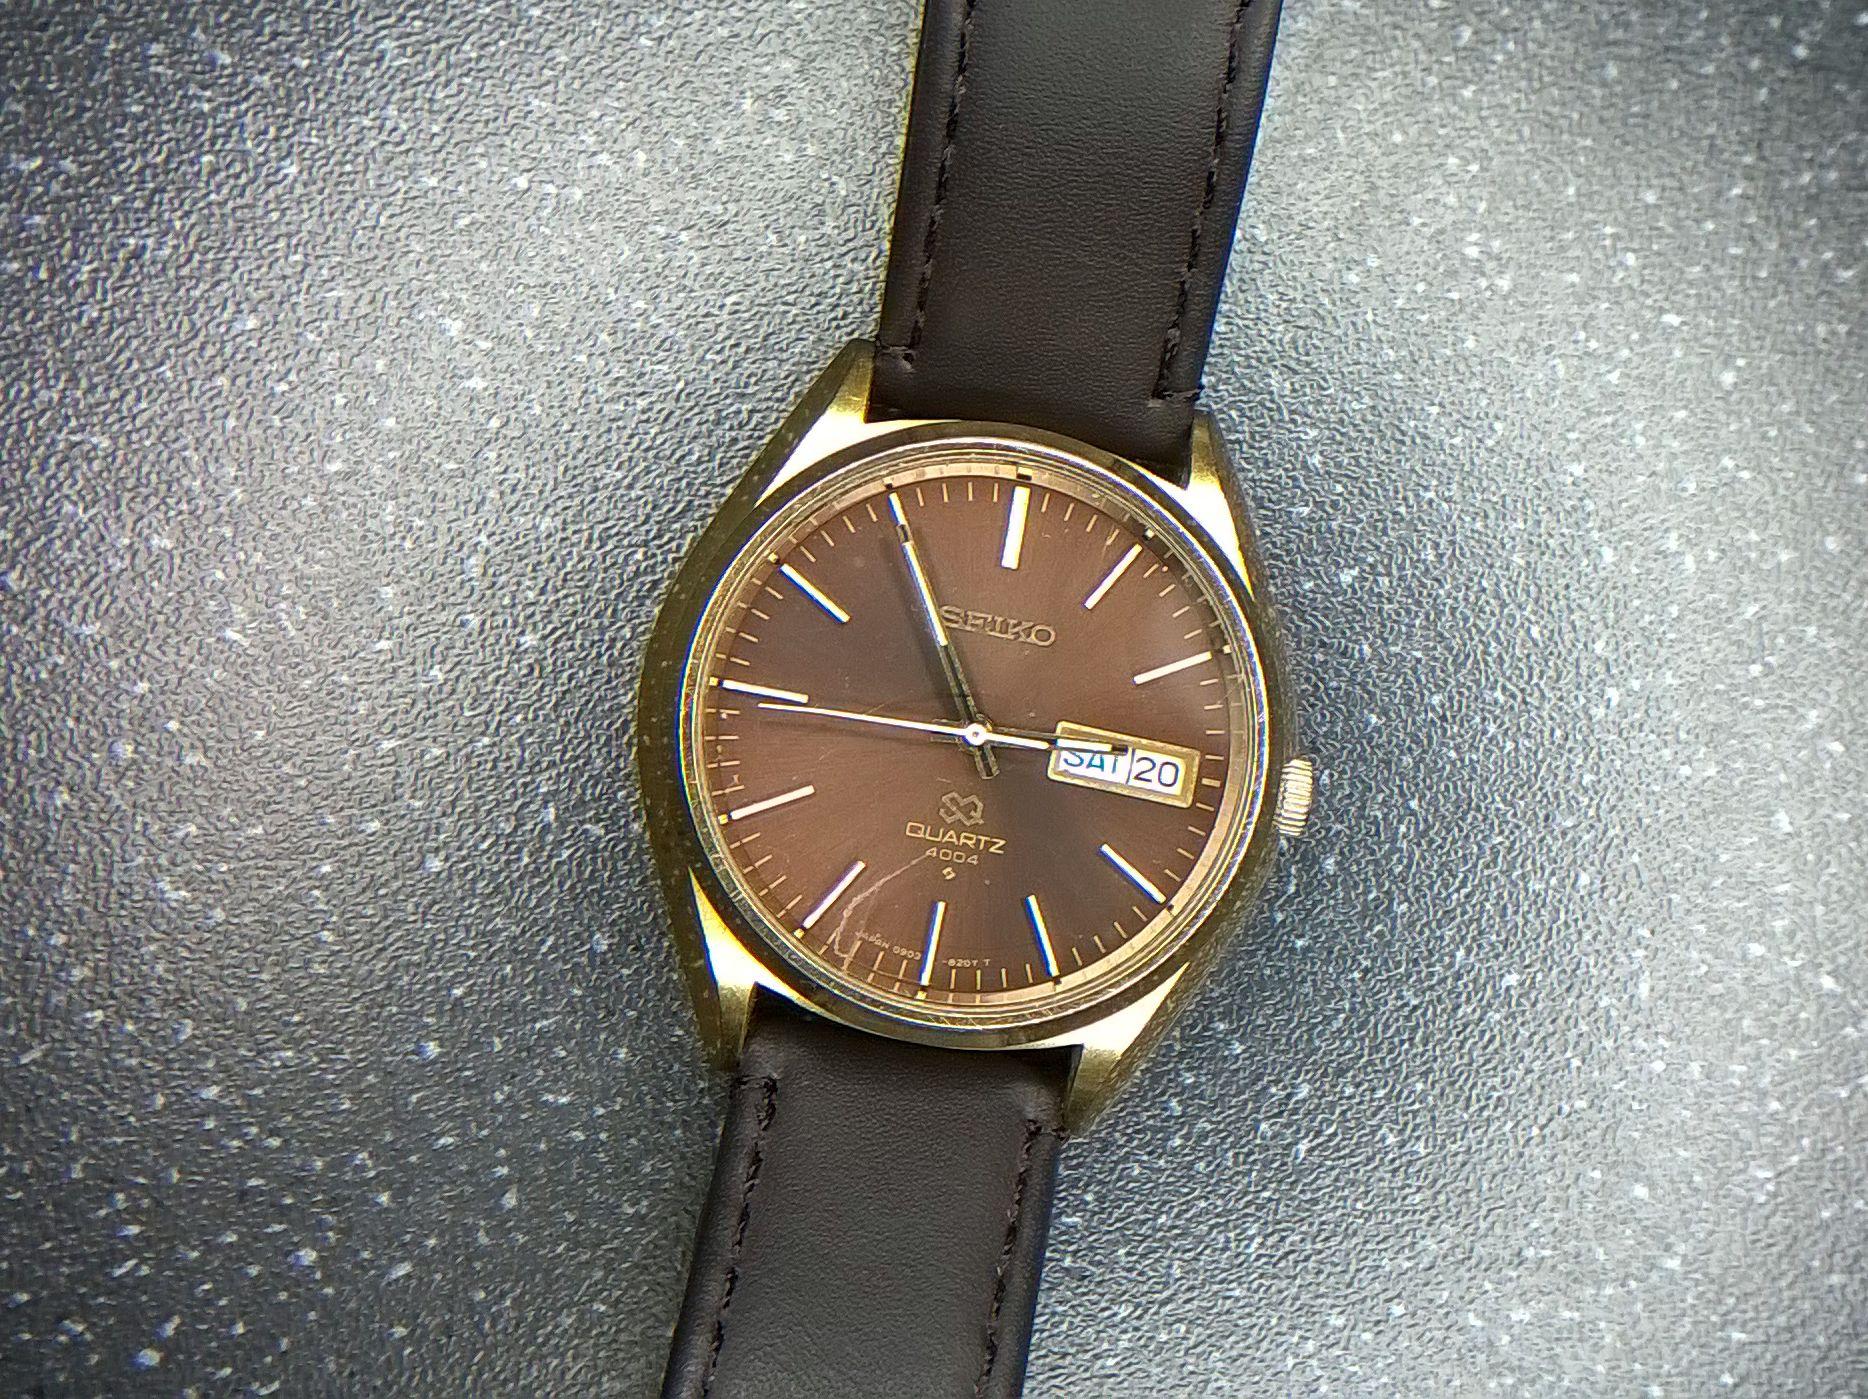
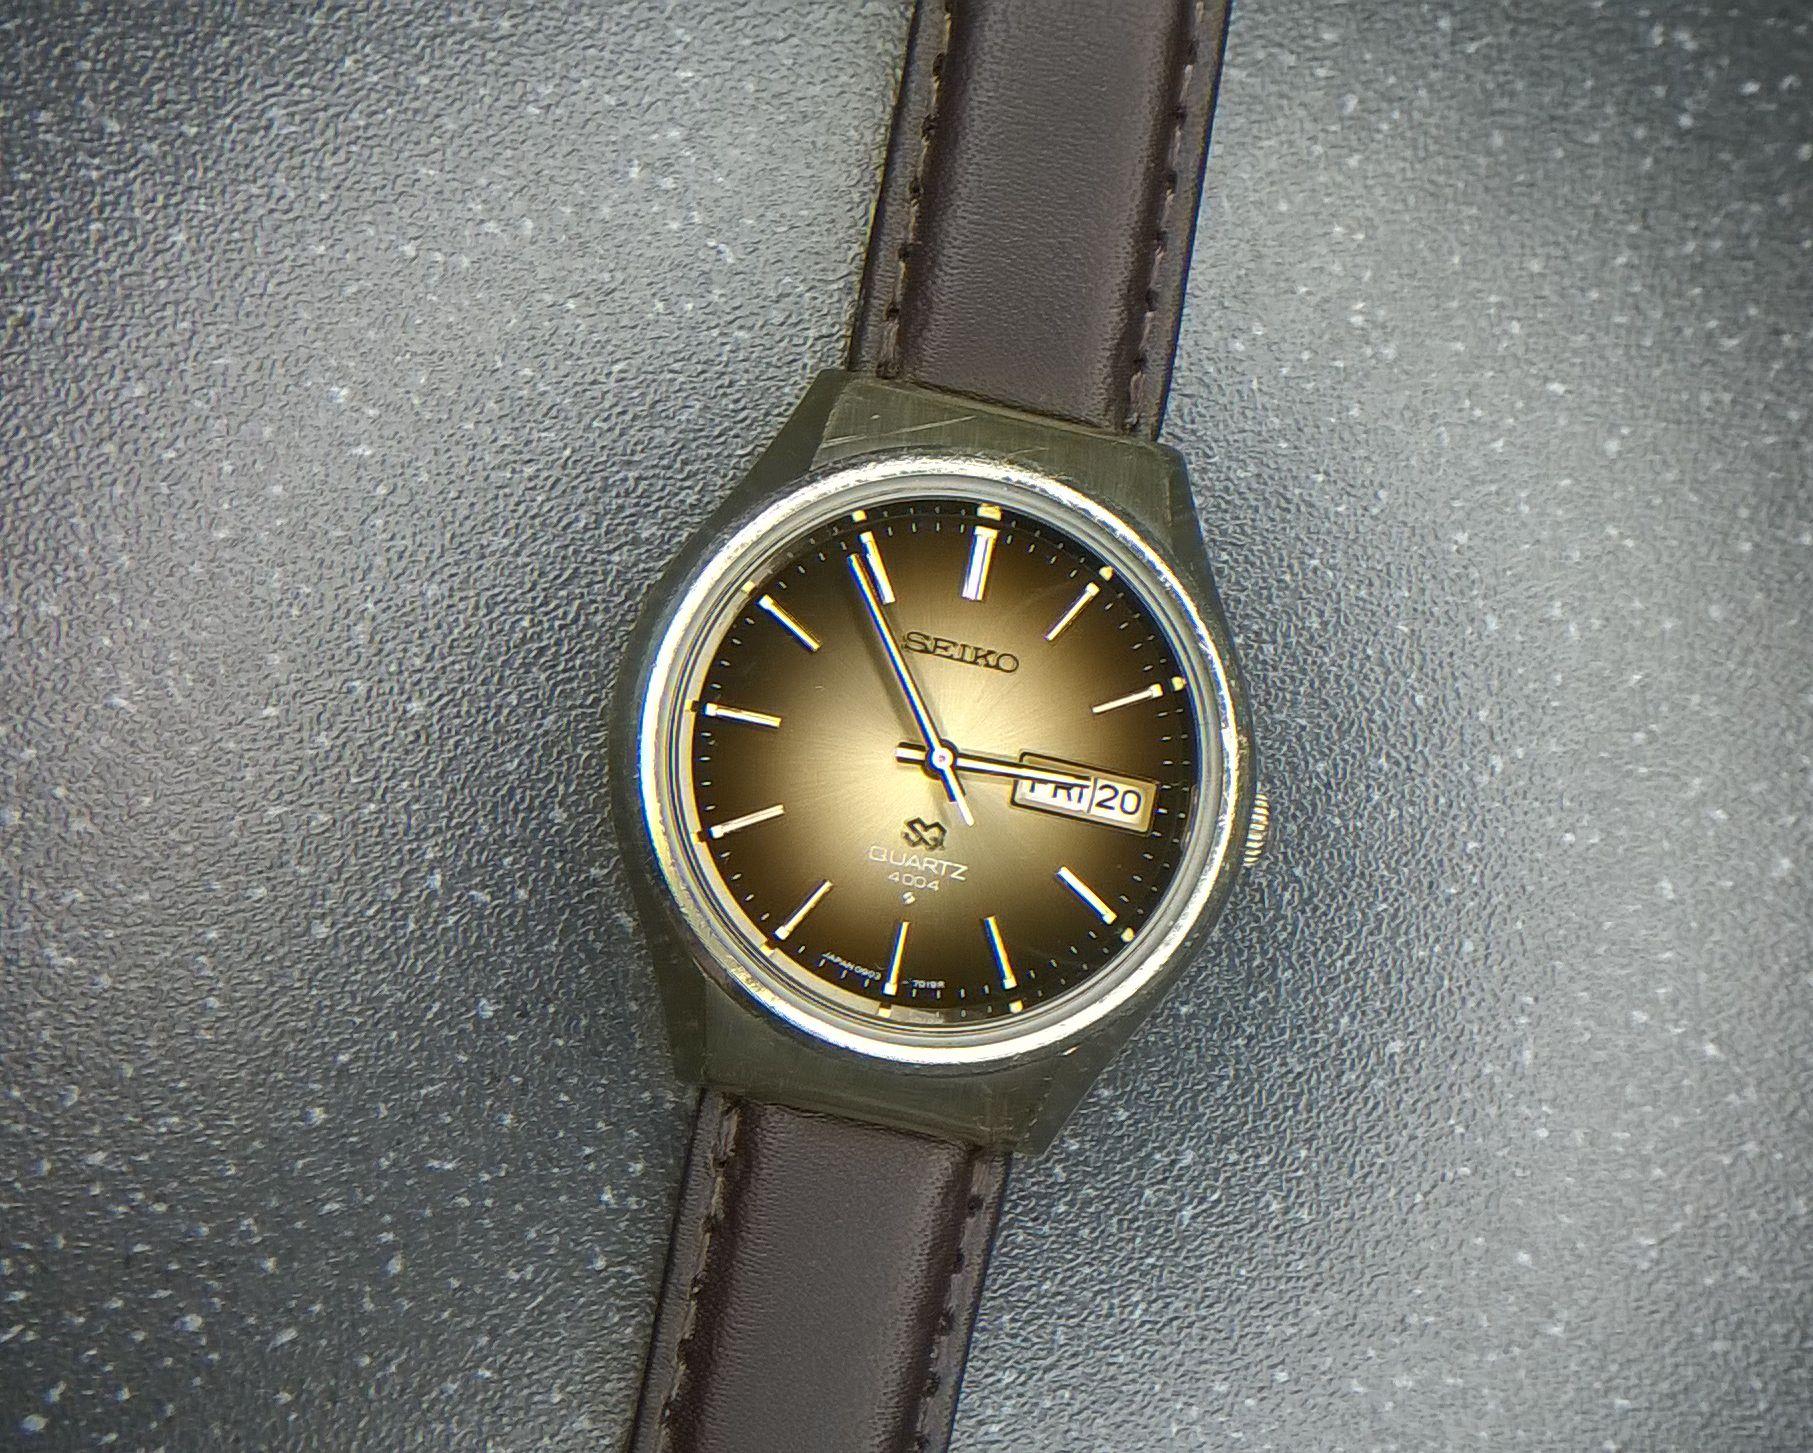
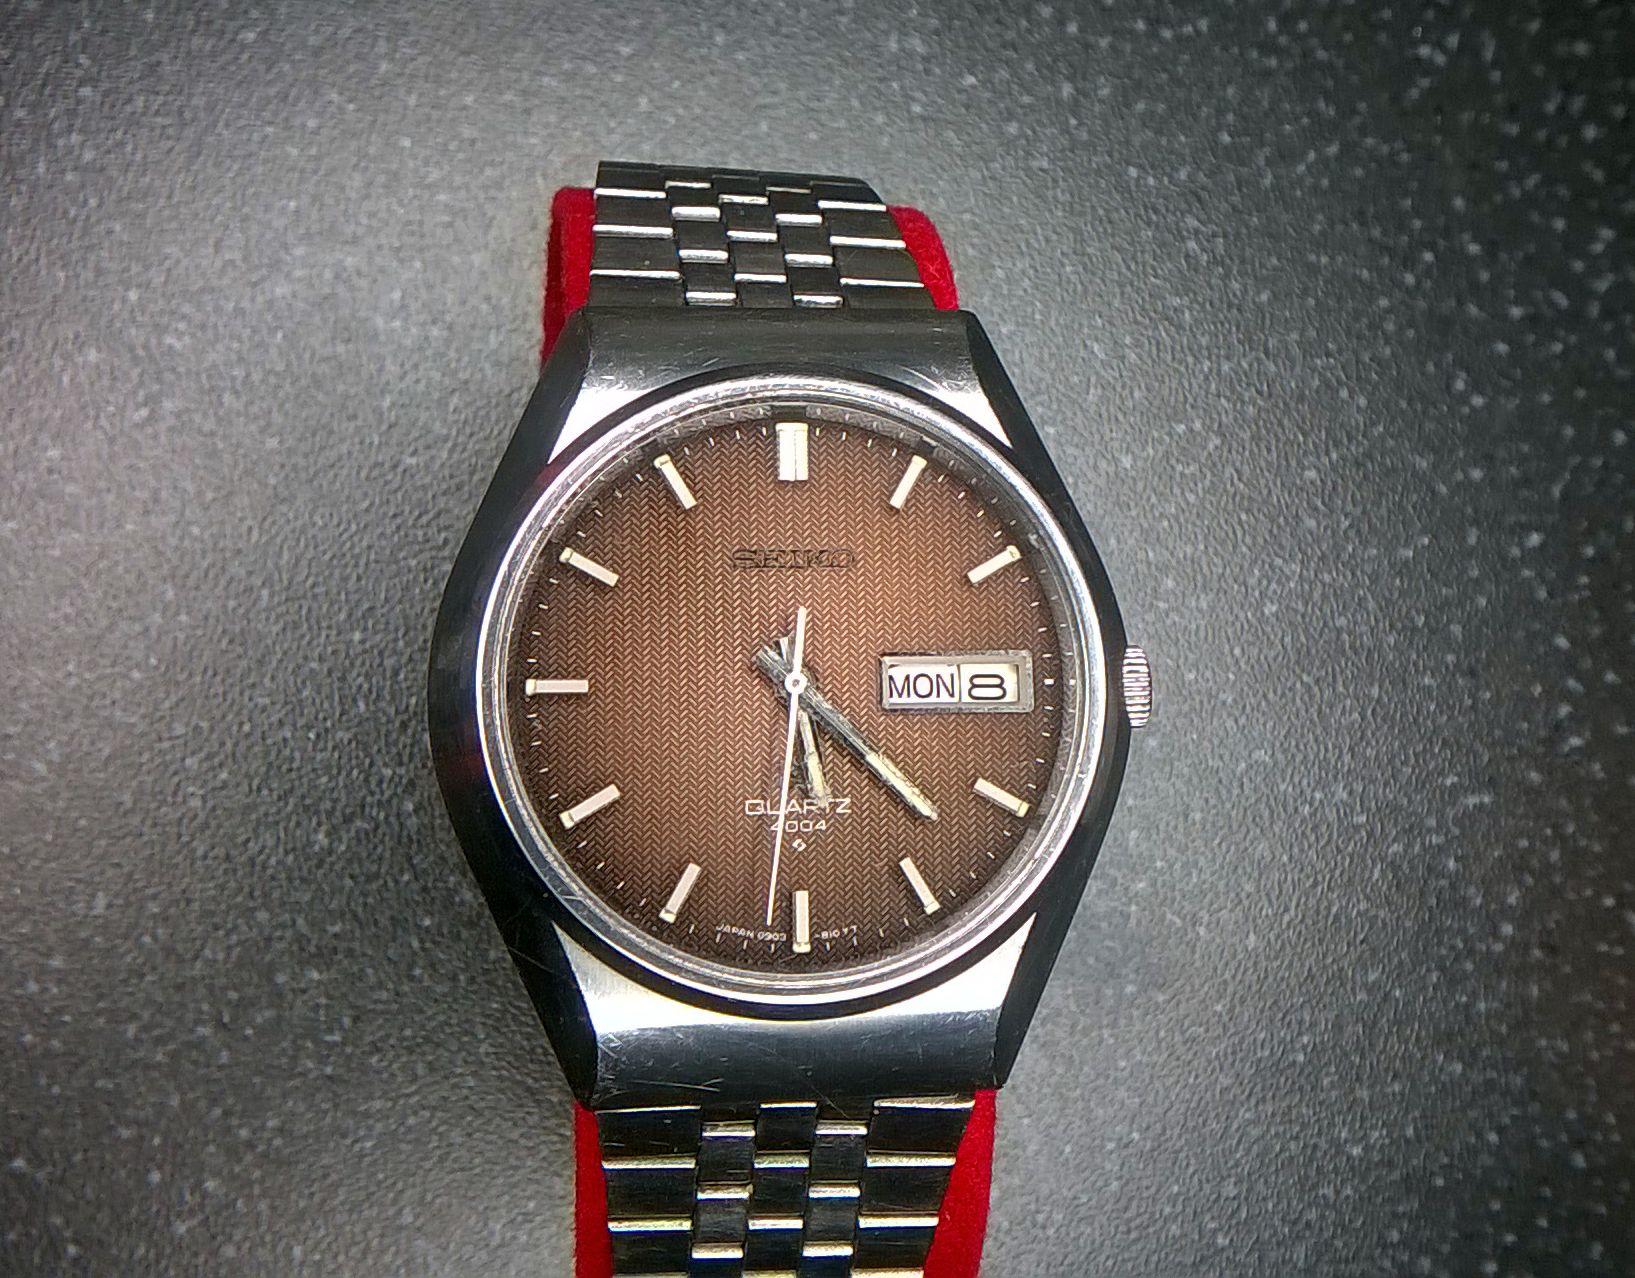
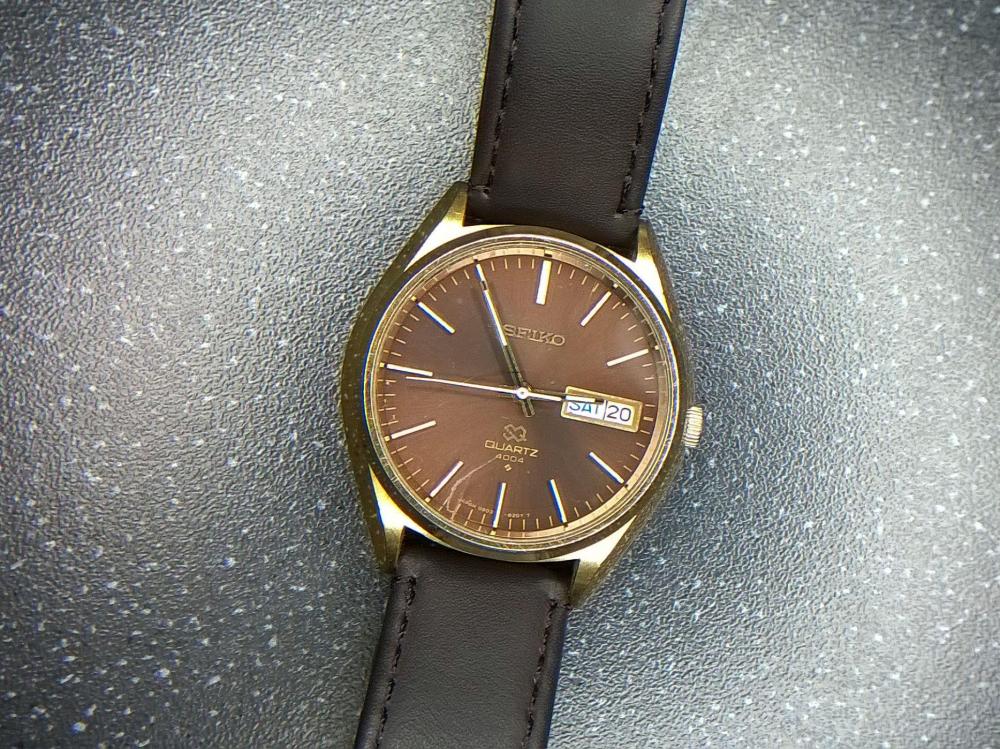
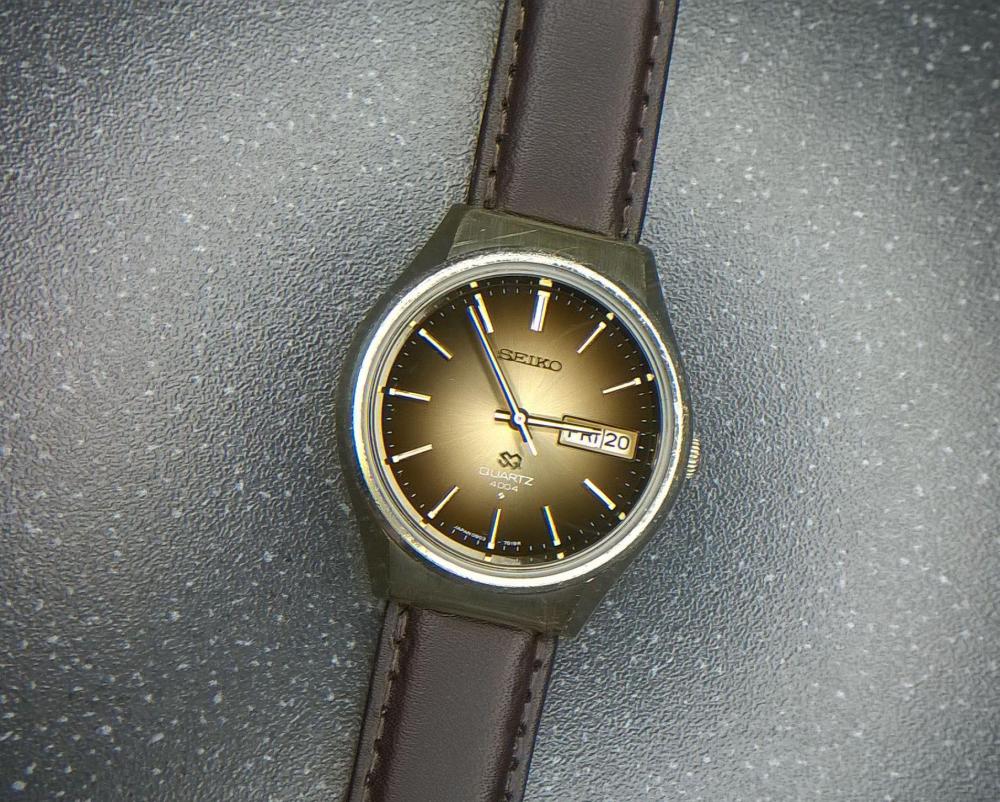
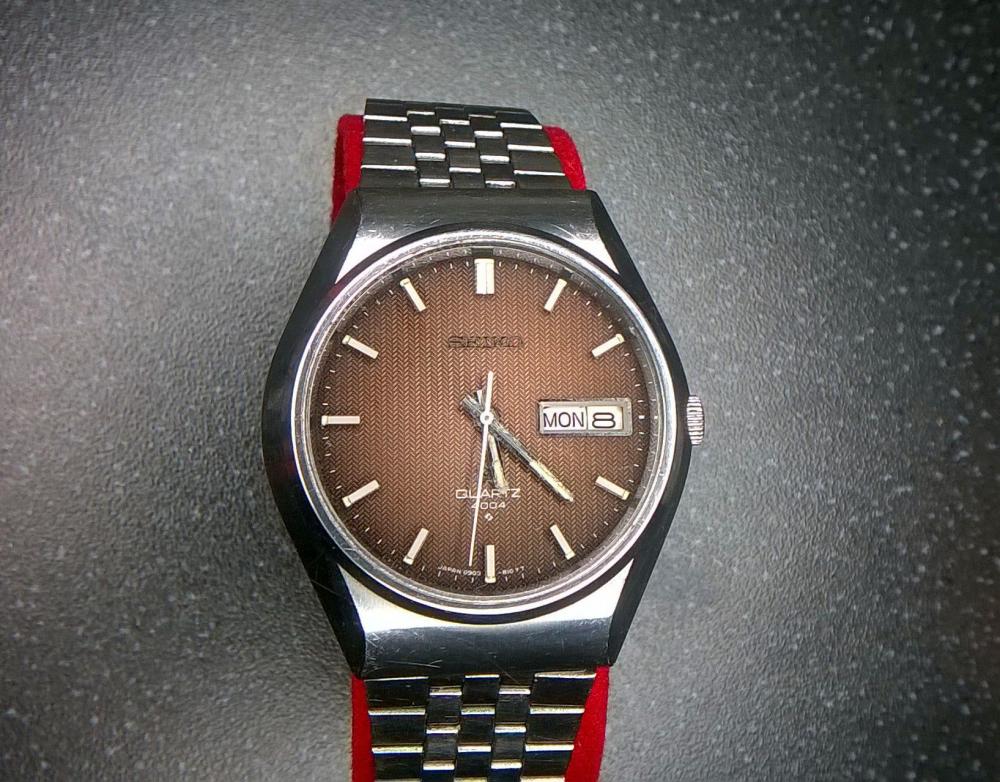
It is possible to produce an iconic brown dial, but it is a tricky task. In my opinion the troicalized Omega Speedmaster hits the spot a bit better than the Rolex.1 point
-
One website I use regularly to find suitable mainsprings for the vintage watches I service is https://www.vintagewatchstraps.com/mainsprings.php. Very useful explanations and calculators that I use so either when you can’t identify a movement to look up a mainspring or when one isn’t available from the materials house. I can work out a suitable size by measuring the internal diameter of the barrel and external diameter of the arbor. Ideally you’ll have the old spring to measure the thickness (strength) but even without one, one of the calculators can estimate the correct thickness. It also helps as a way to verify if the old spring was in fact the appropriate one as past servicers have been known to fit a “near match”. The Ranfft website also has mainspring data for most vintage watches. Hope that helps for future reference. Sent from my iPad using Tapatalk1 point
-
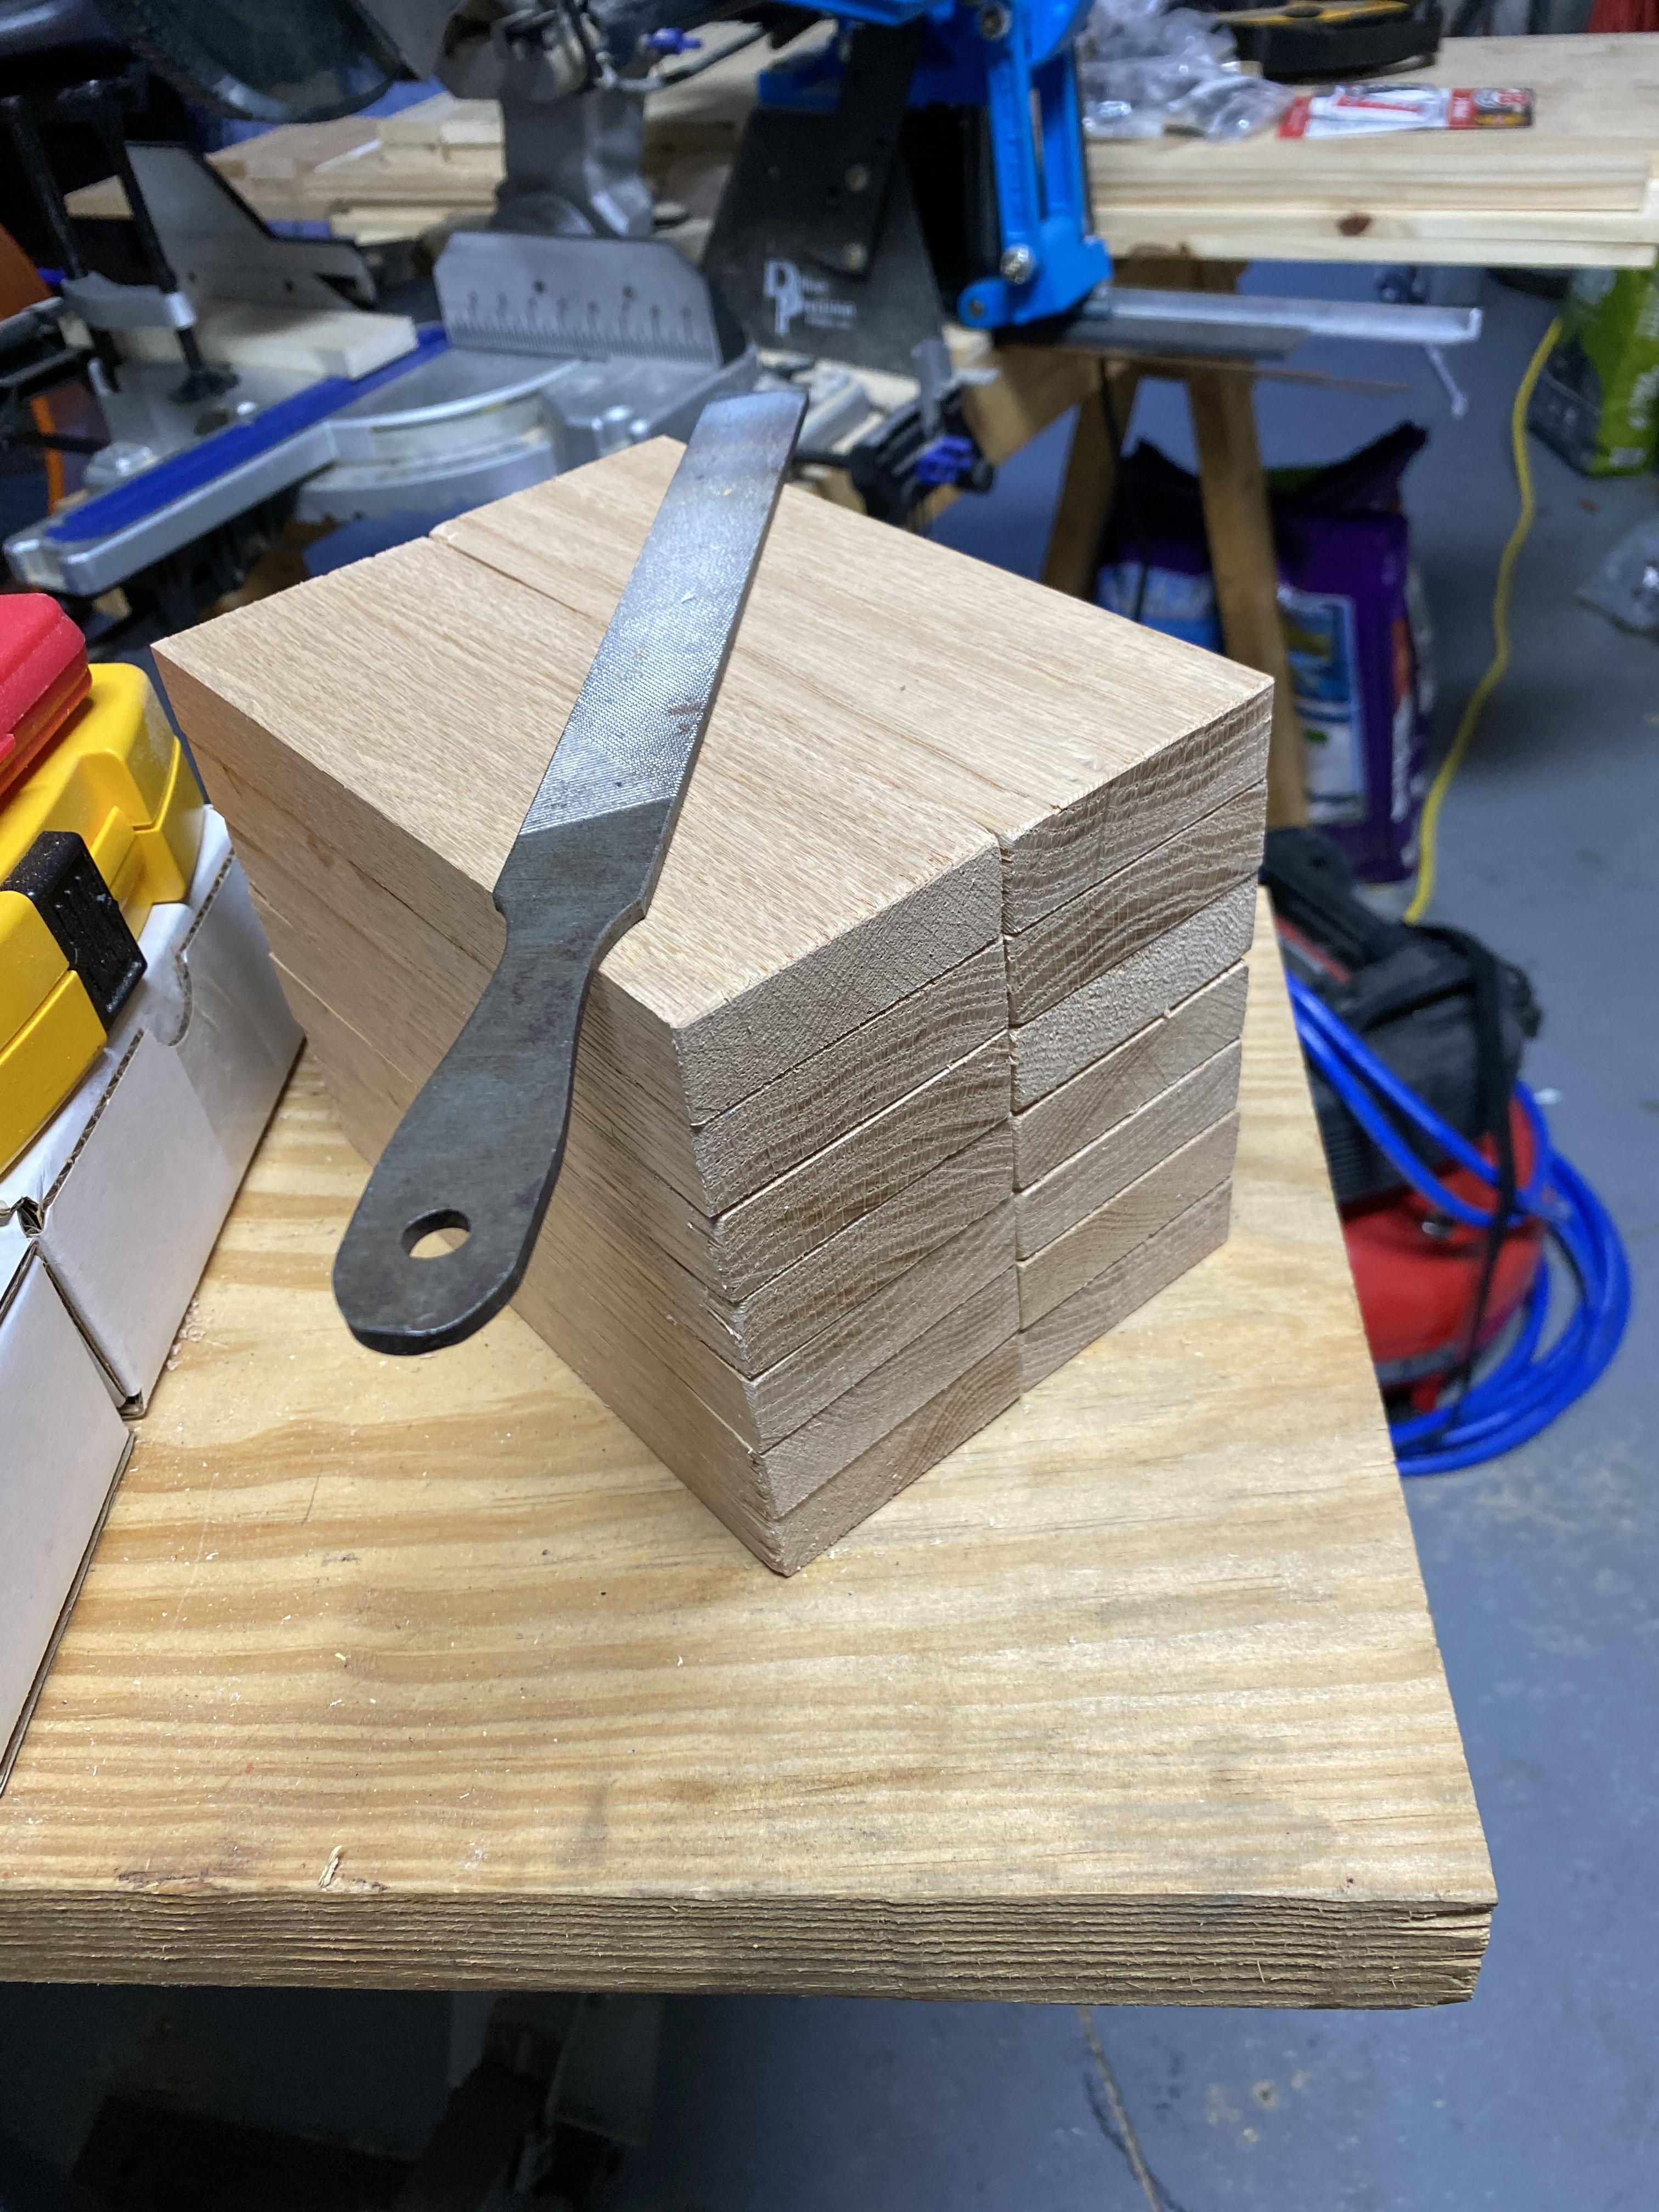
Cut, filed and staged for tomorrow. For 7 drawers. The oak The Poplar

 1 point
 -
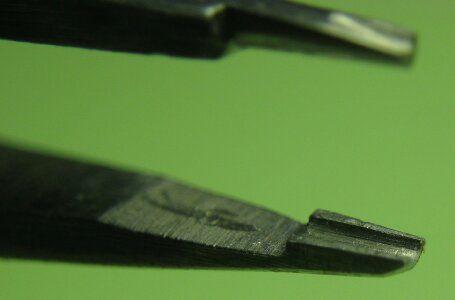
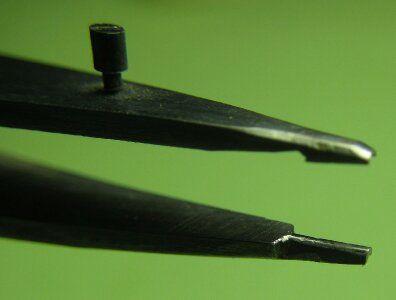
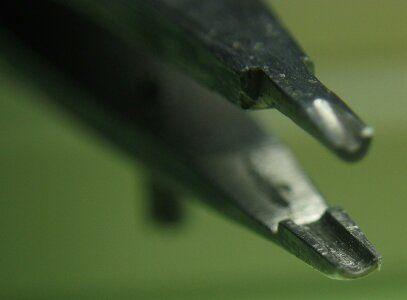
Hi, it was mainly filing and a bit grinding. Origin was a steel tweezers of this type, which I had a lot of: Some pictures of the curve tweezers: Frank
 1 point
 -
Tinkered with it today. Did as JohnR725 said and run only the rotor . Worked . And when i put the wheels back it started to run. No idea why or how . But as is now it's working . I am going to let it run . Need to adjust the hour hand a little but at least it's working. YAAAAAAAAA.
 1 point
 -
The arm is used as a guide. Take a look at this short video. The calipers are not the same as yours but it shows you what I mean.1 point
-
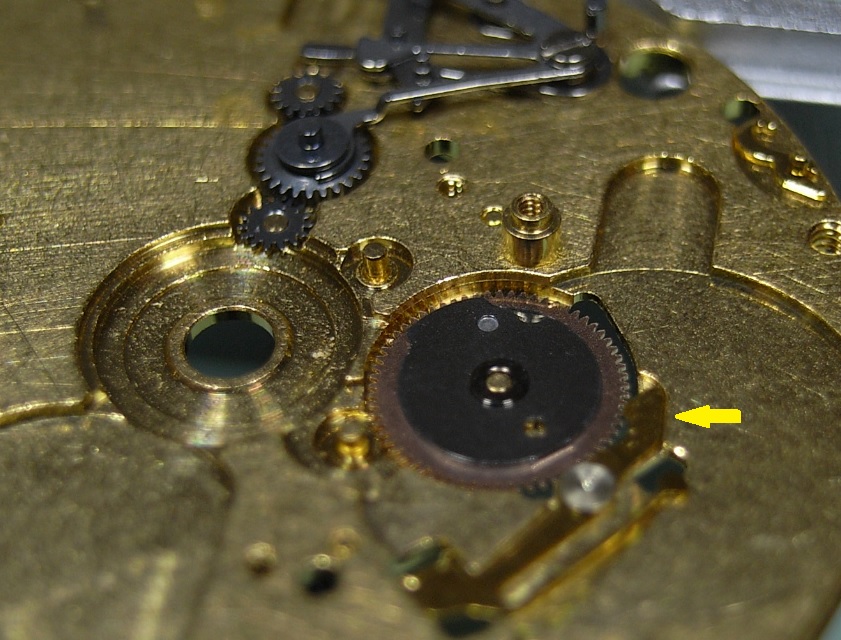
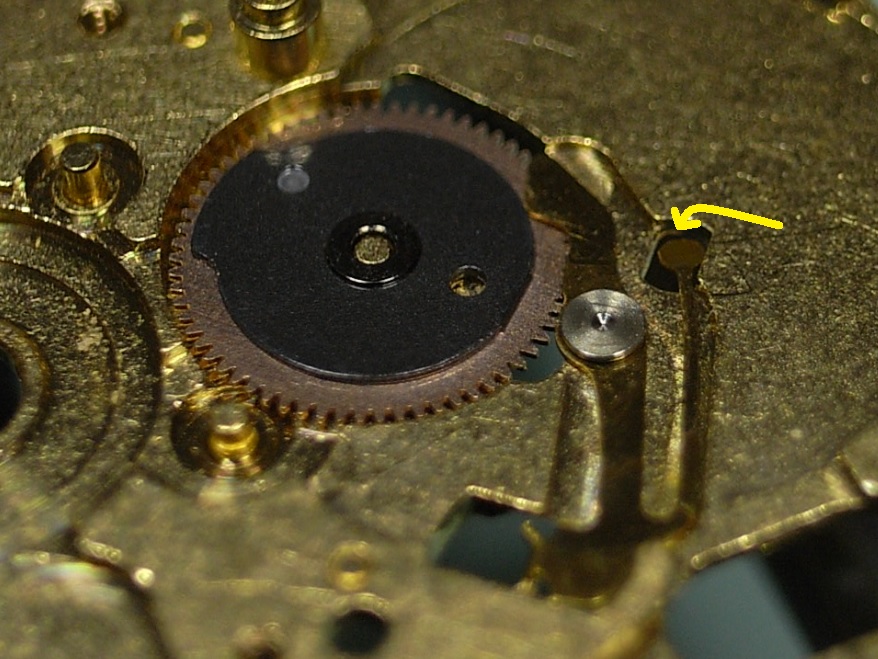
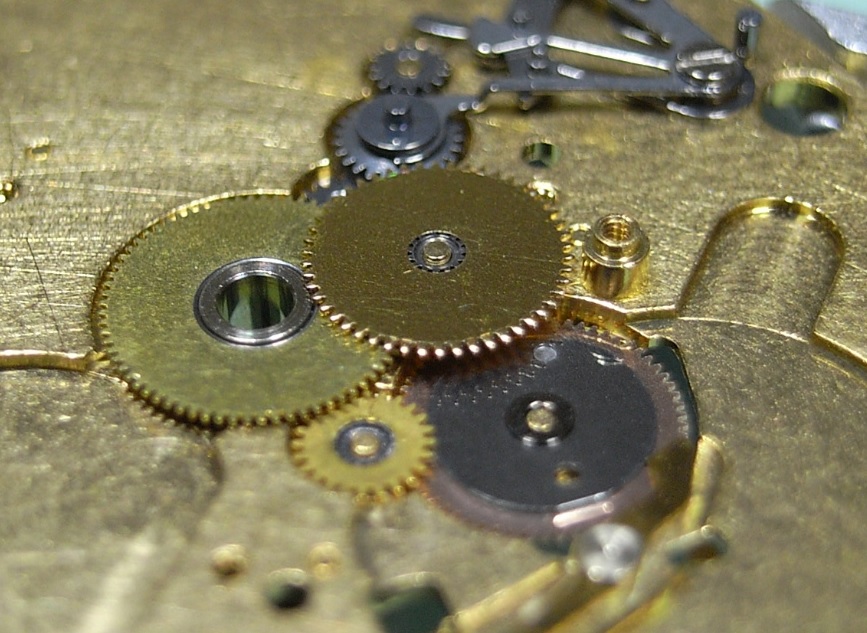
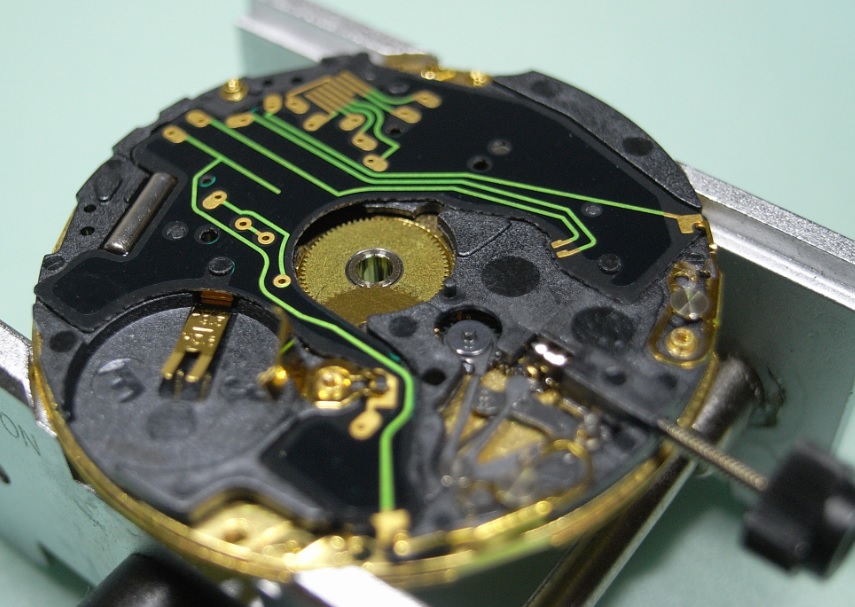
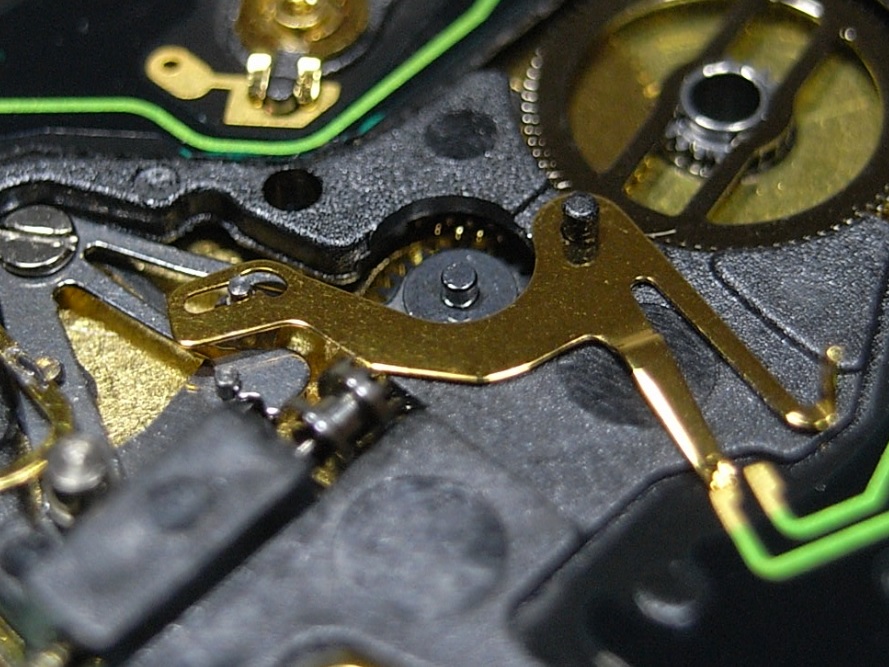
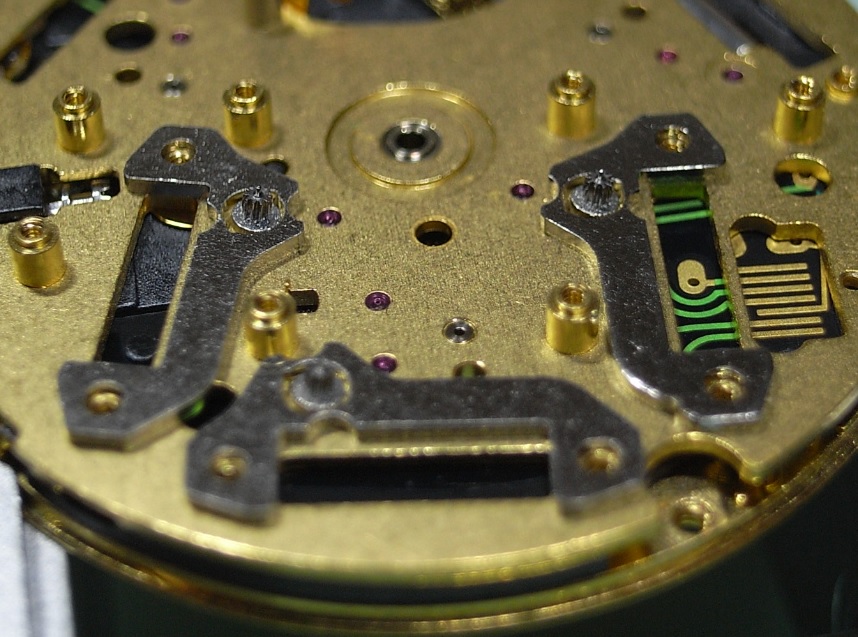
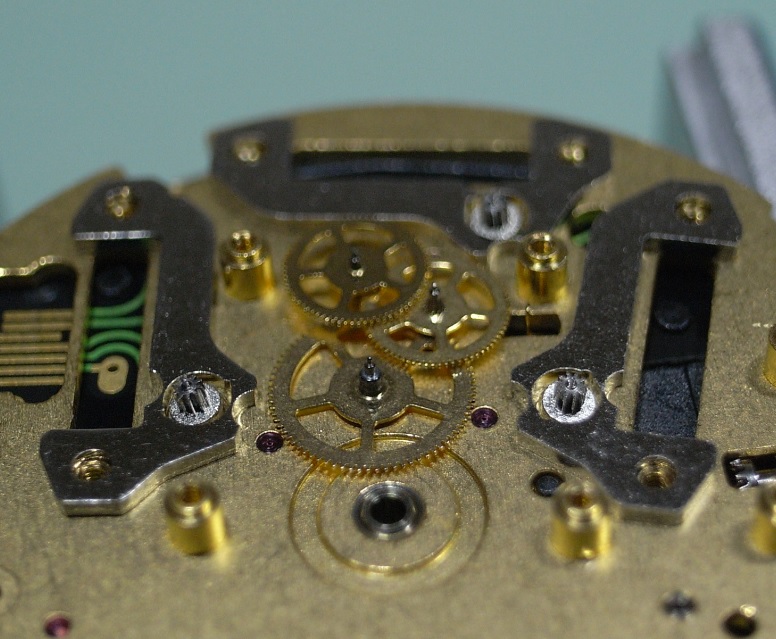
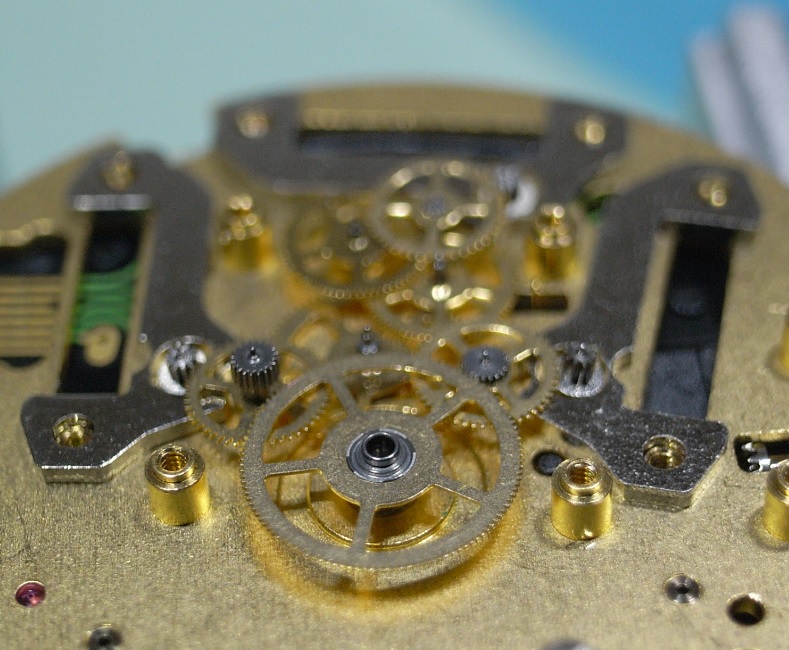
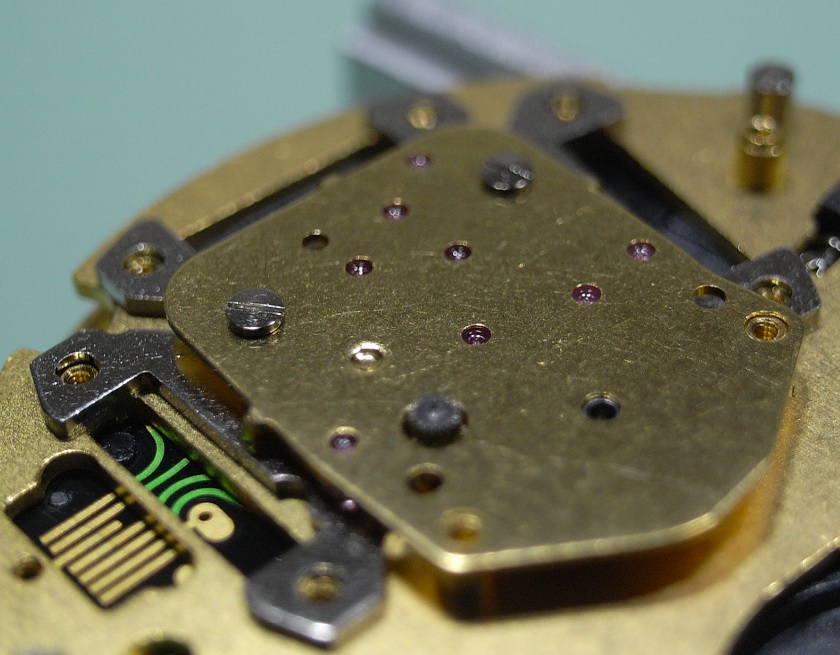
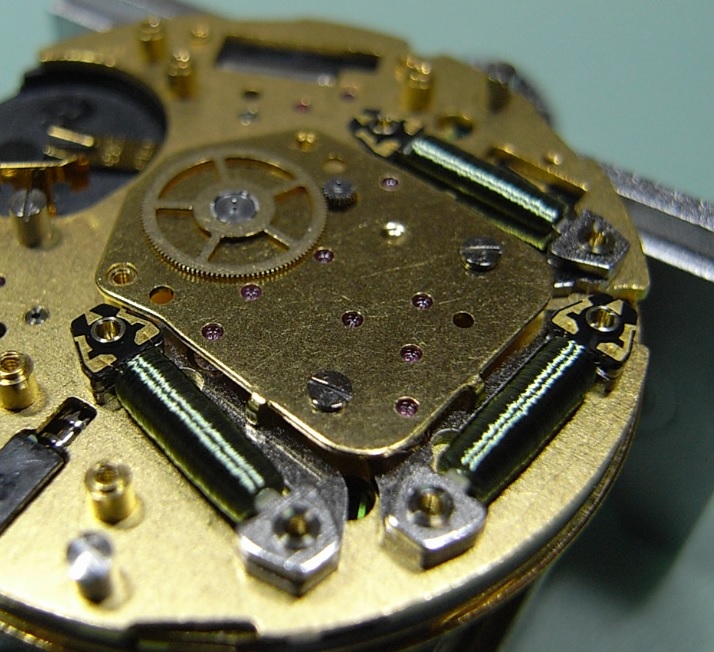
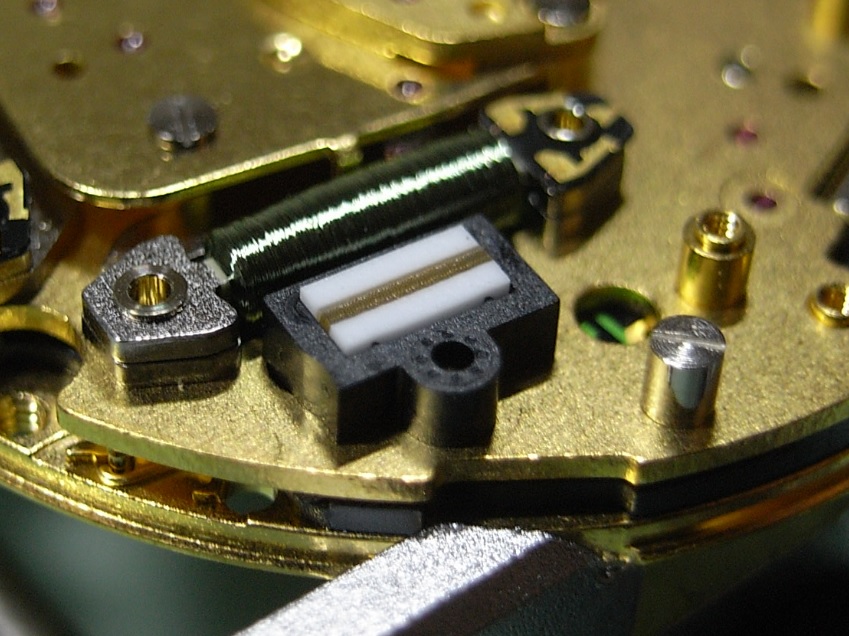
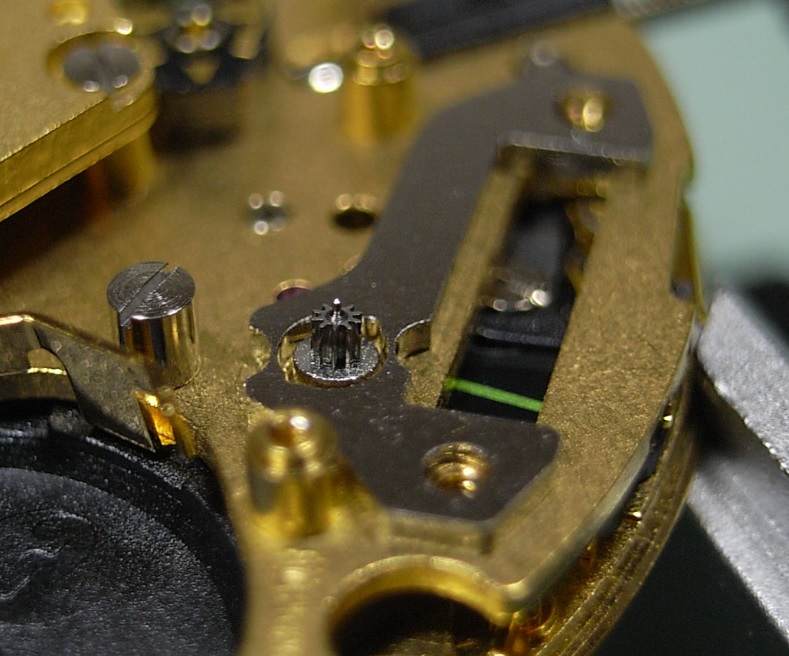
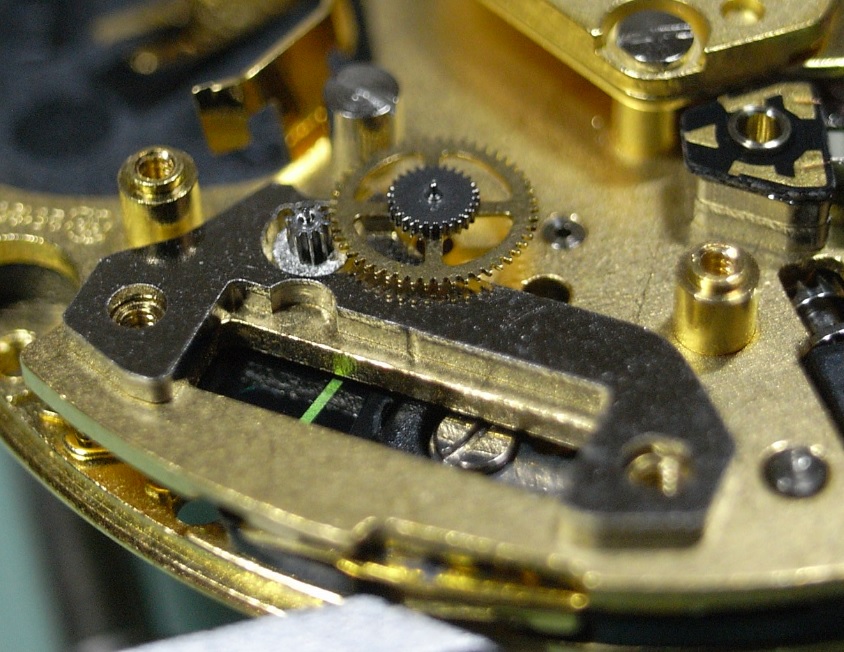
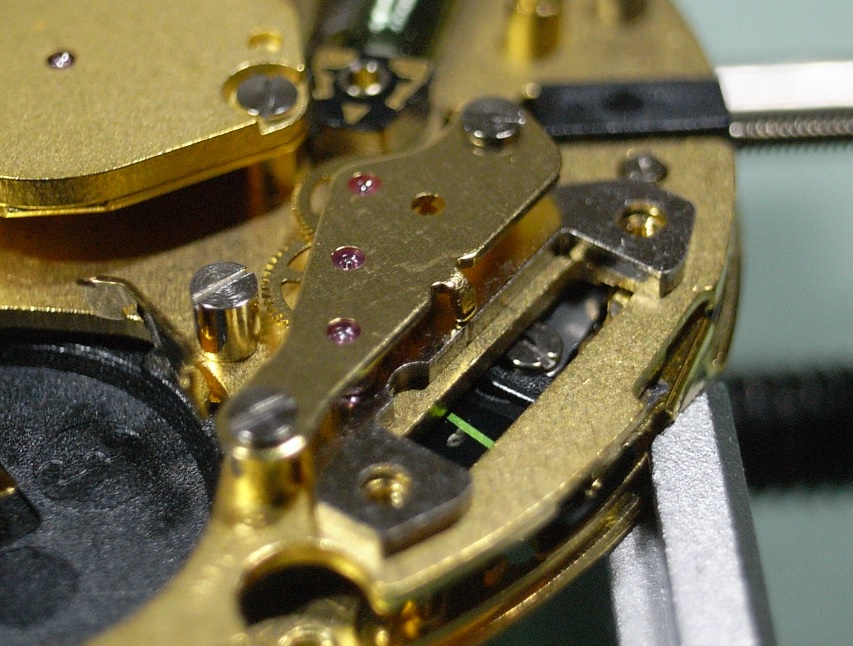
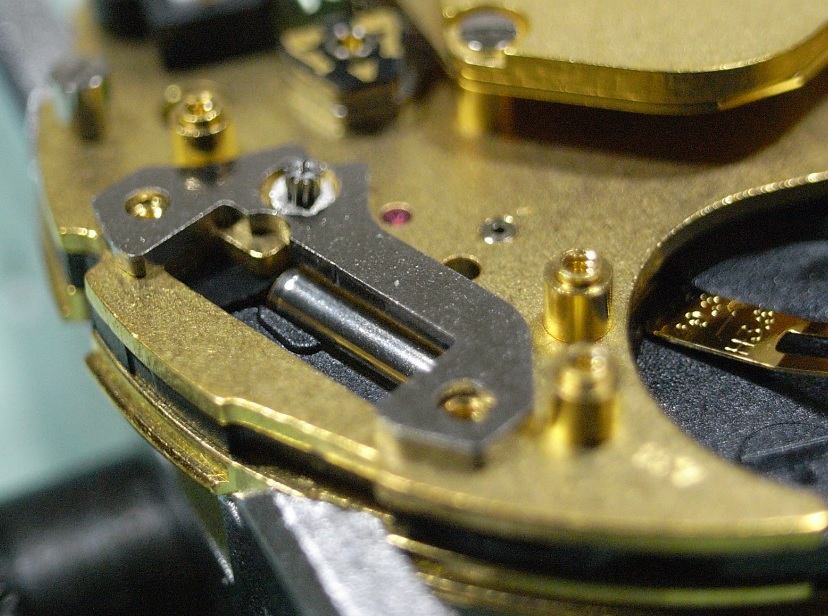
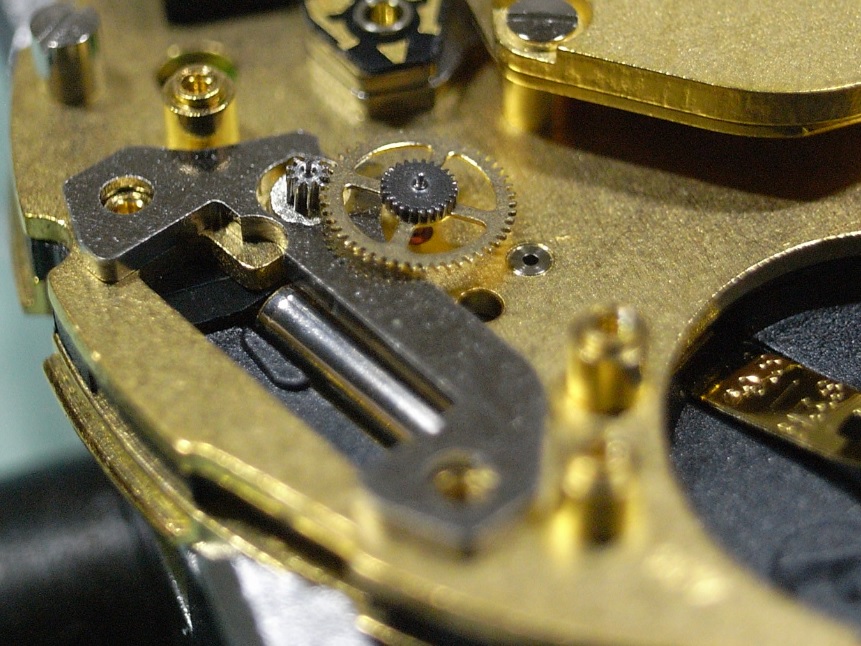
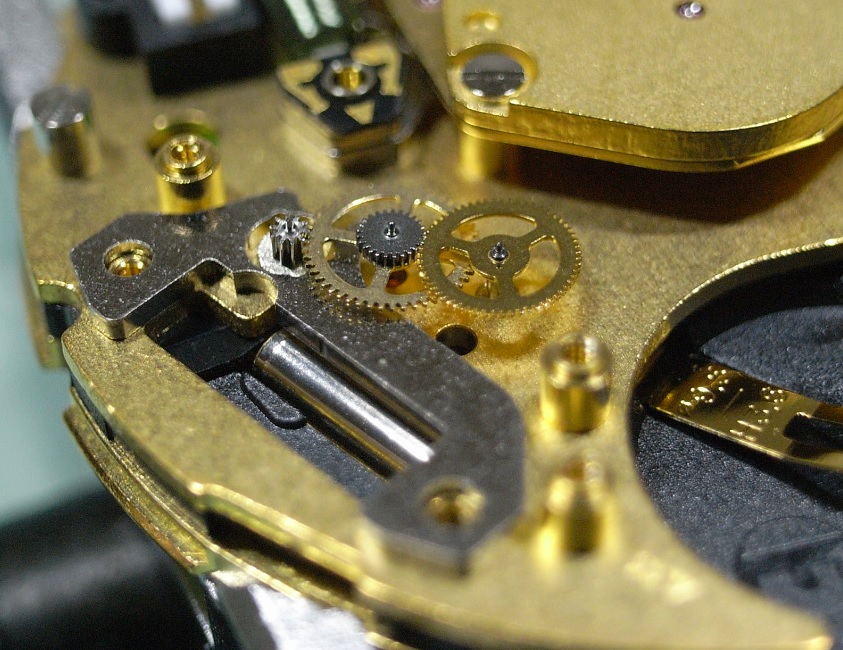
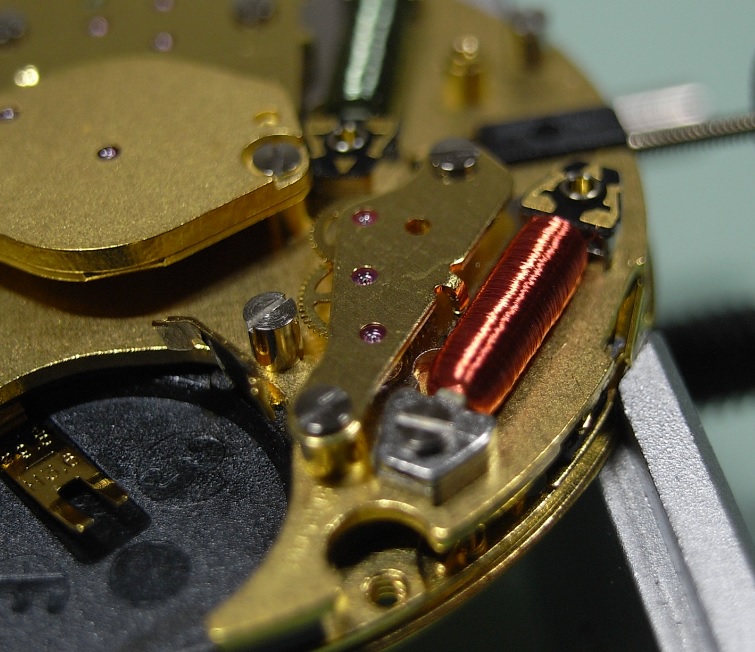
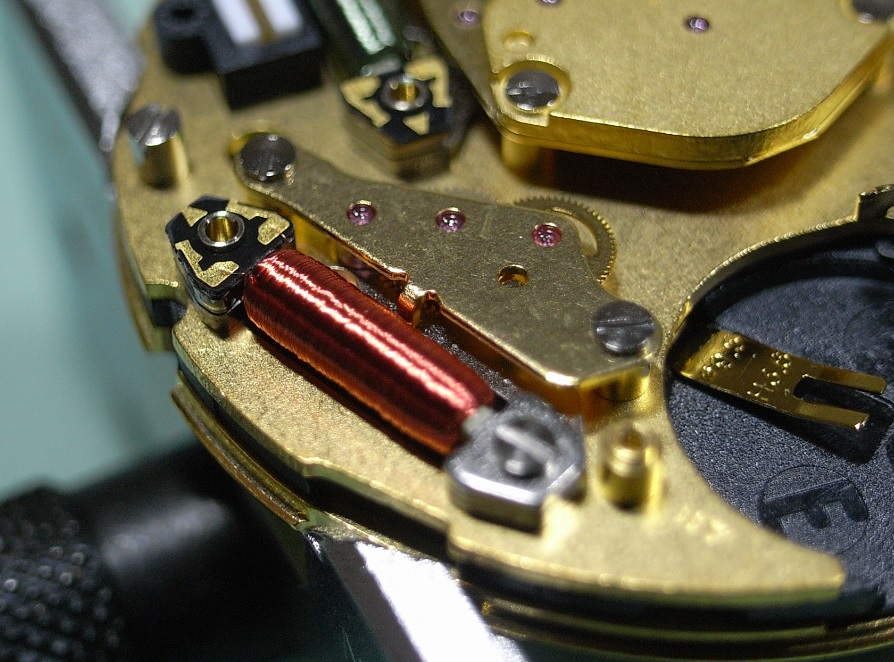
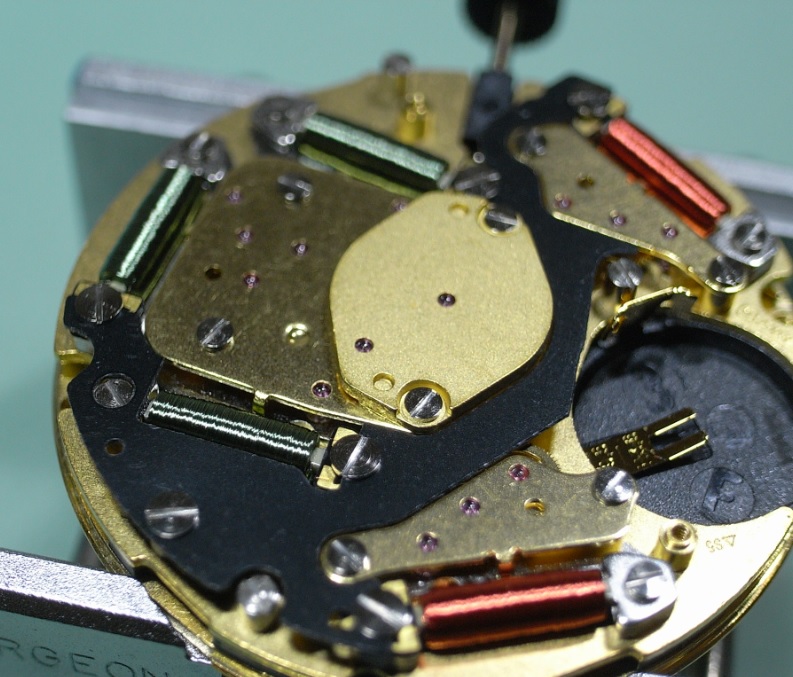
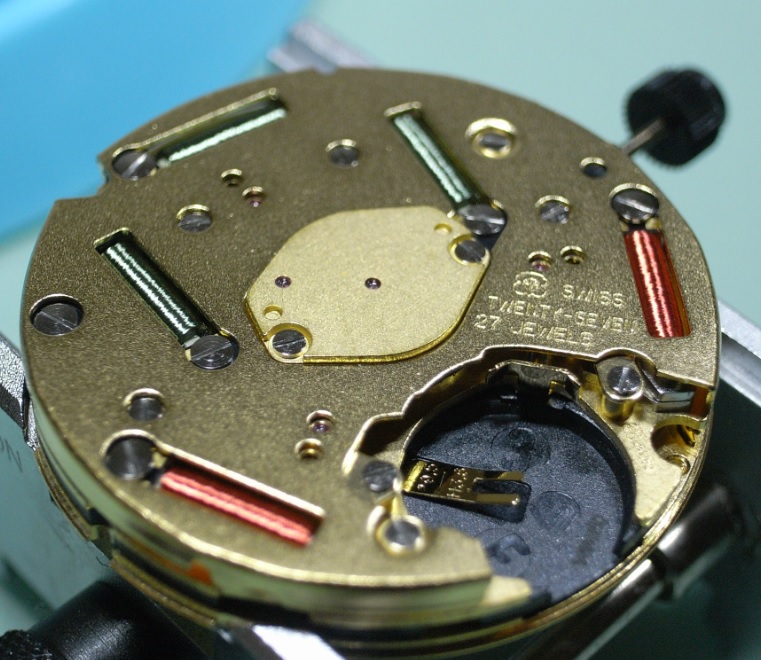
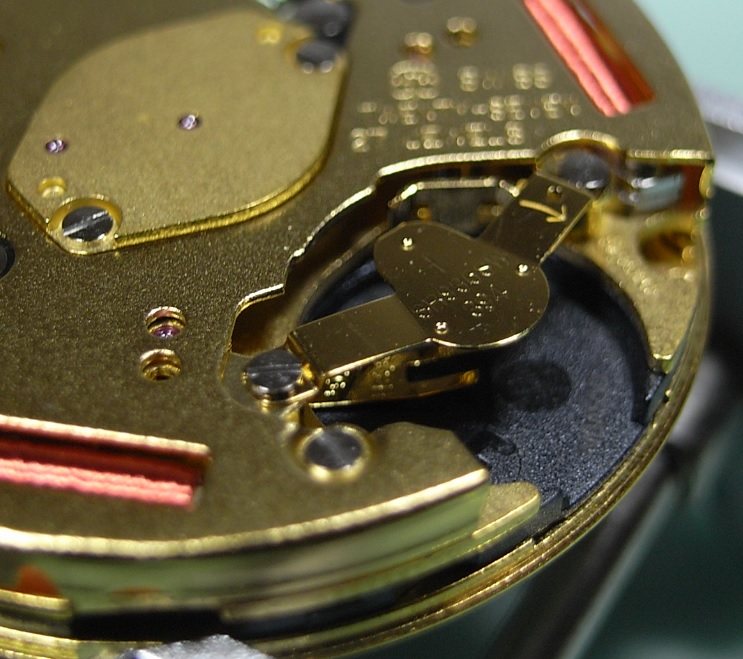
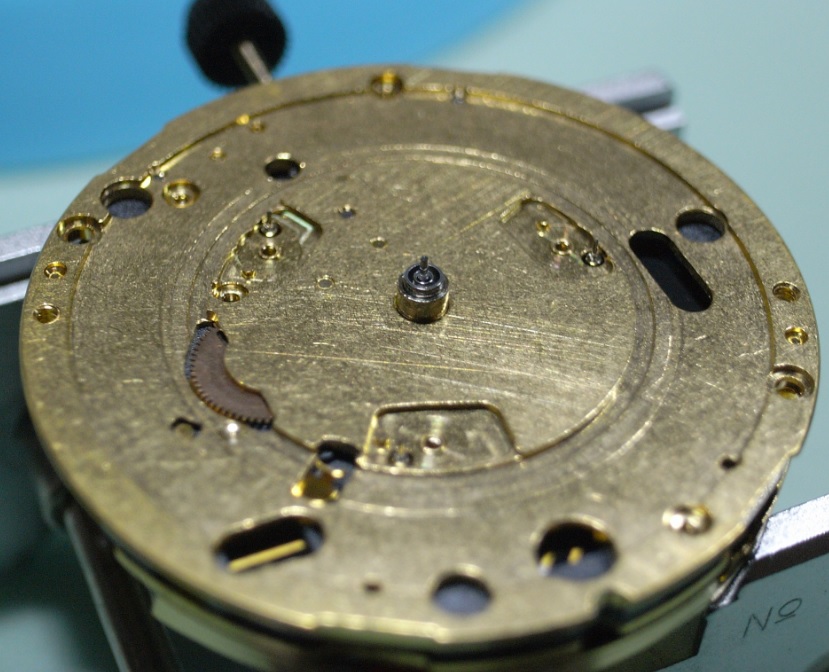
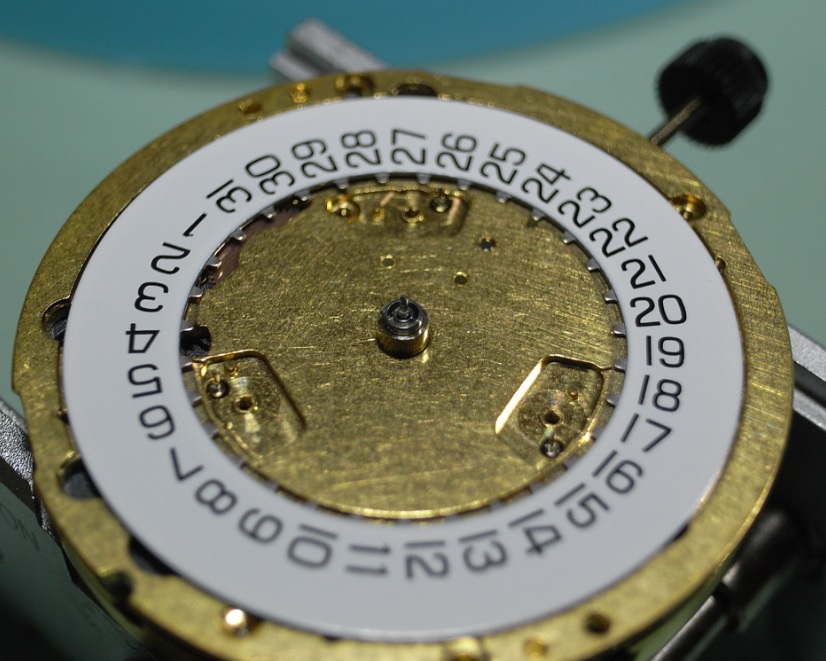
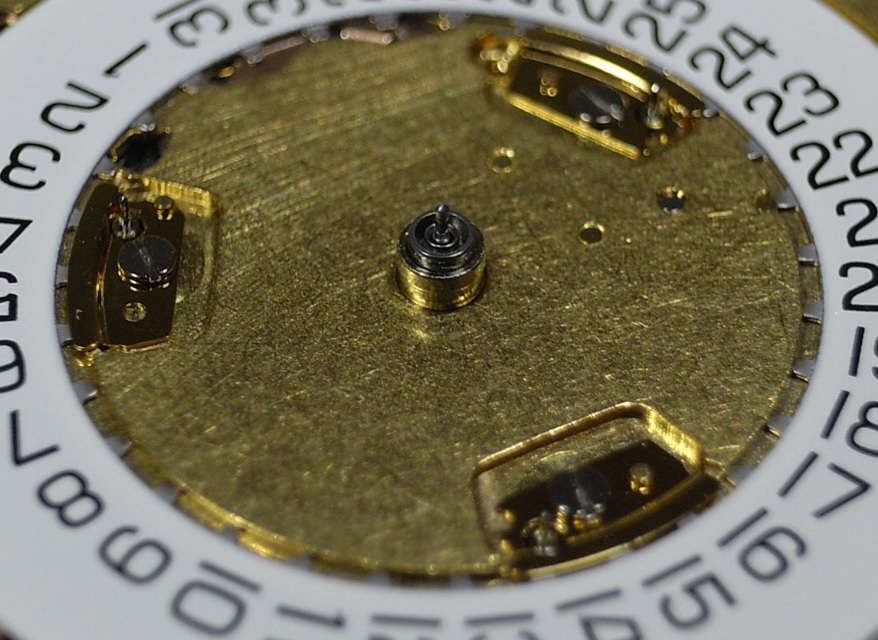
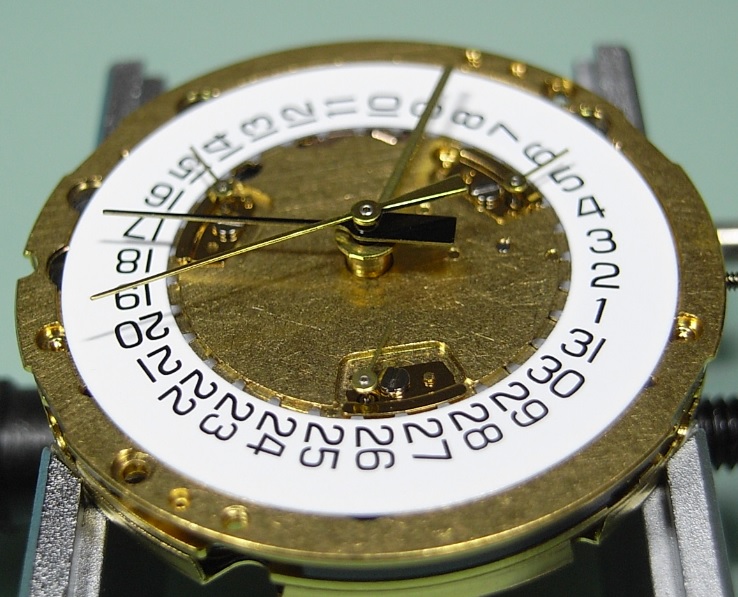
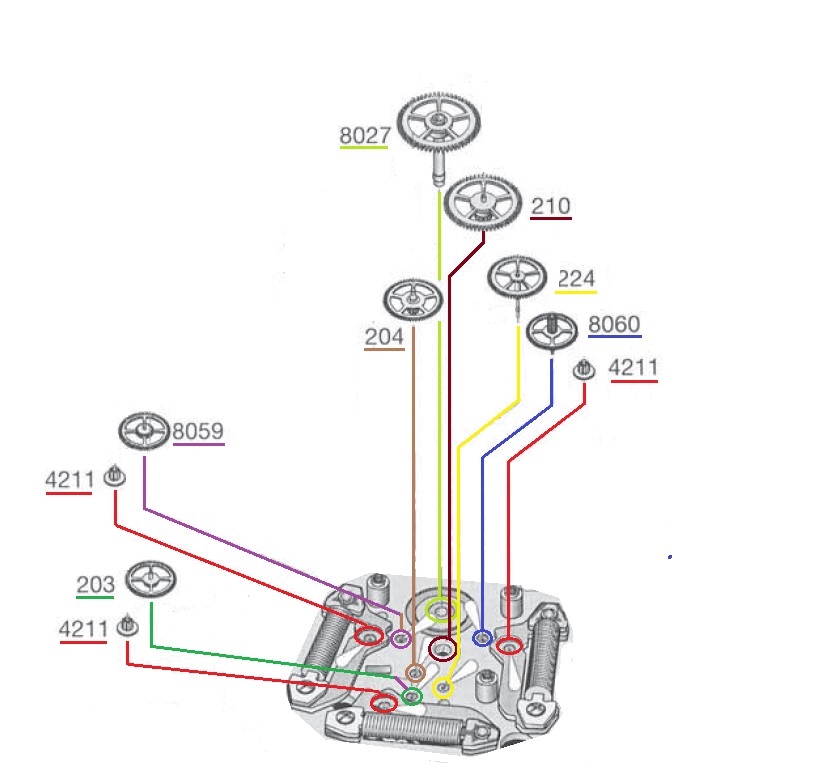
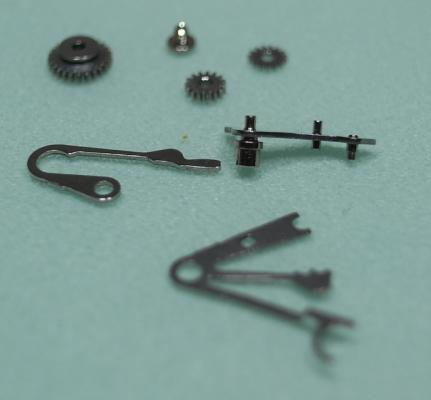
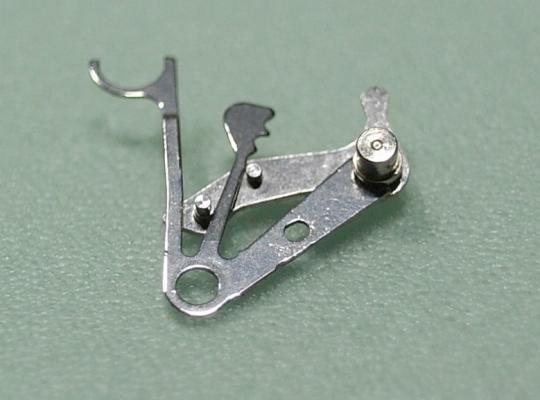
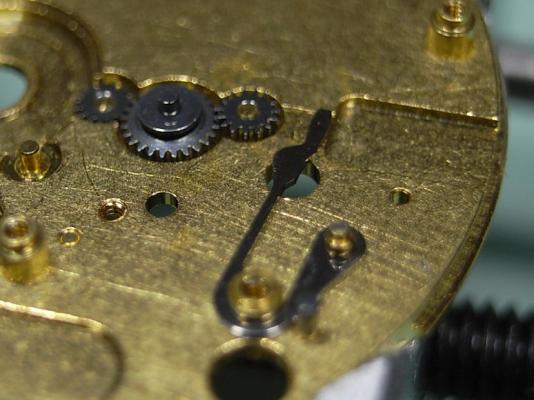
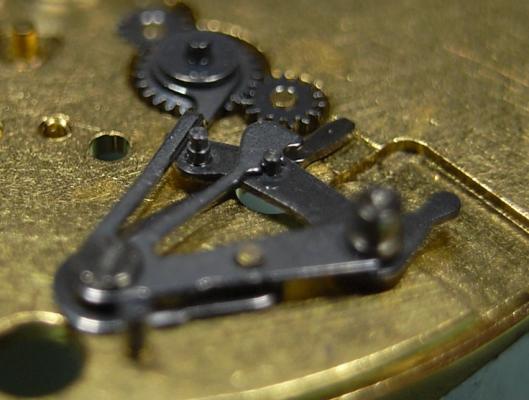
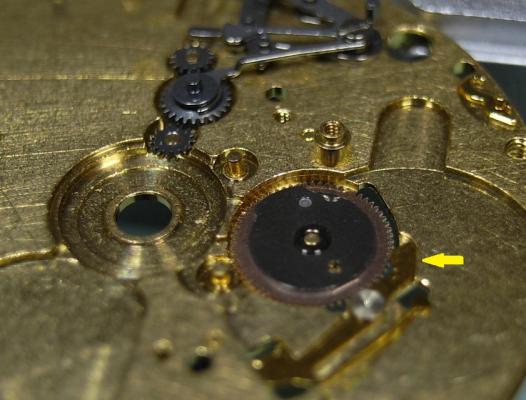
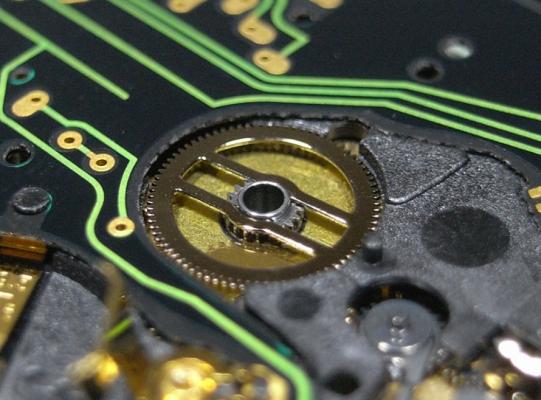
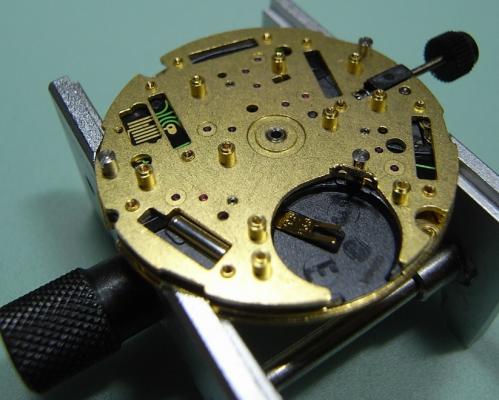
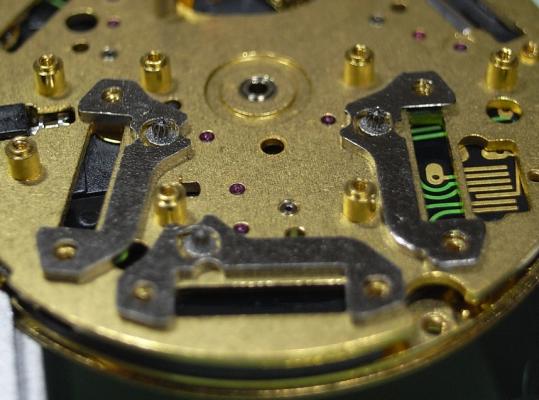
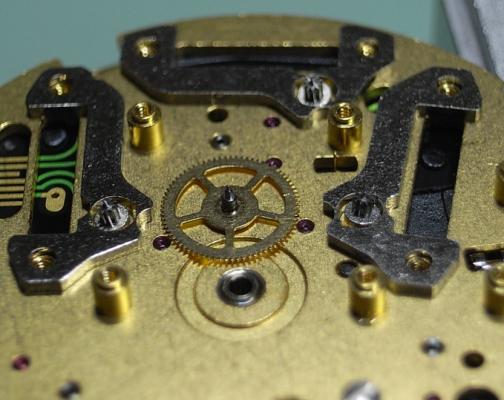
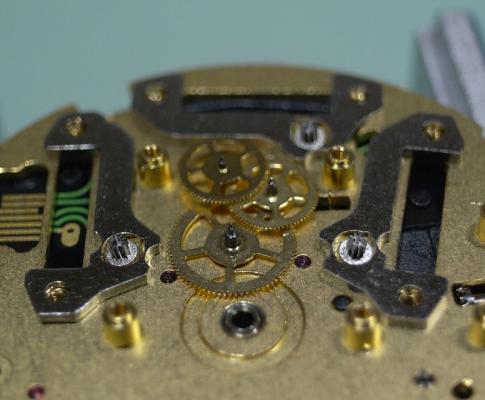
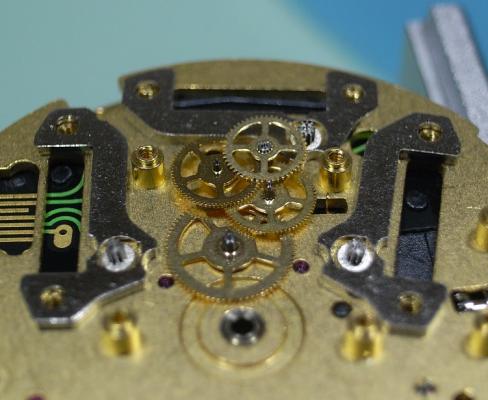
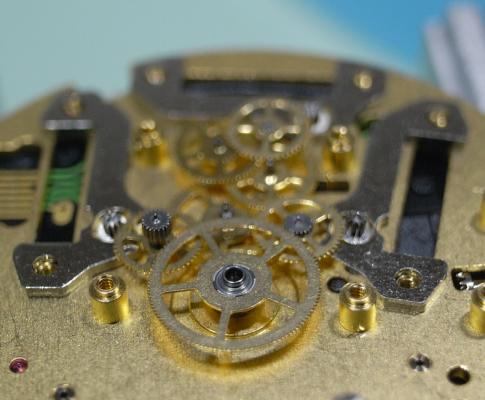
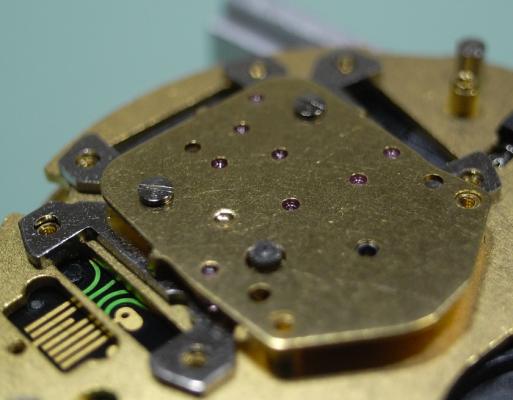
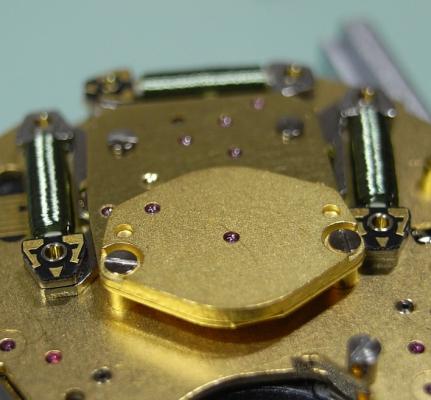
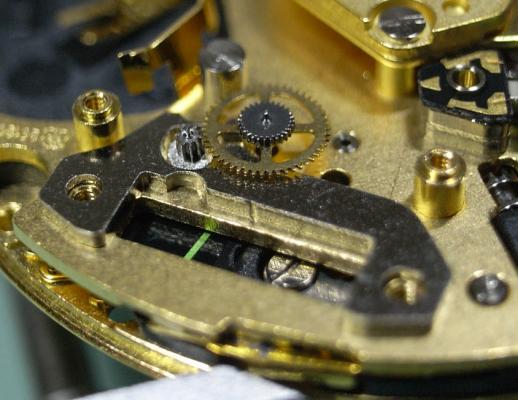
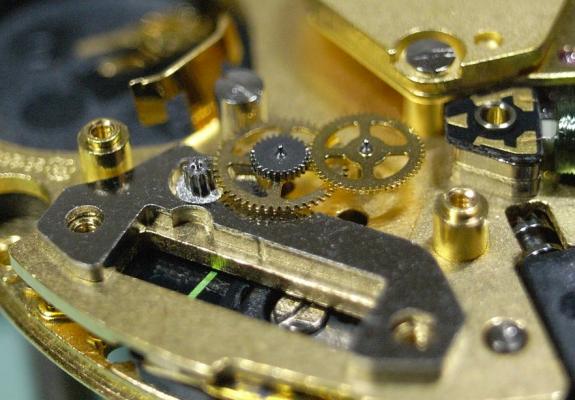
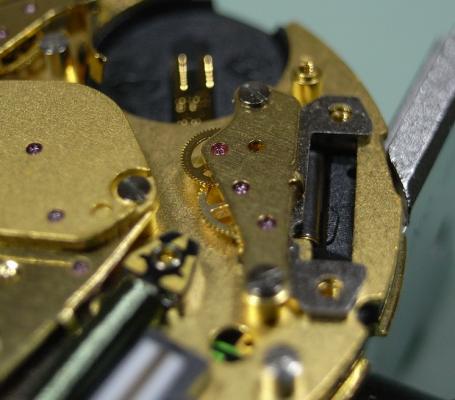
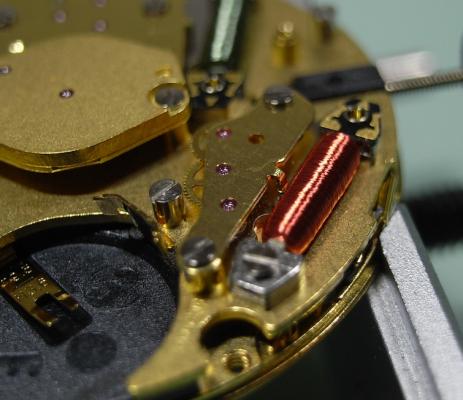
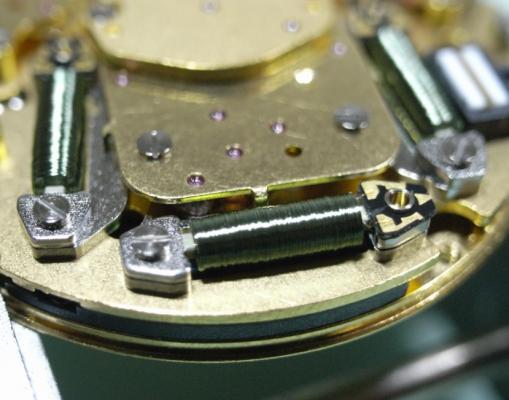
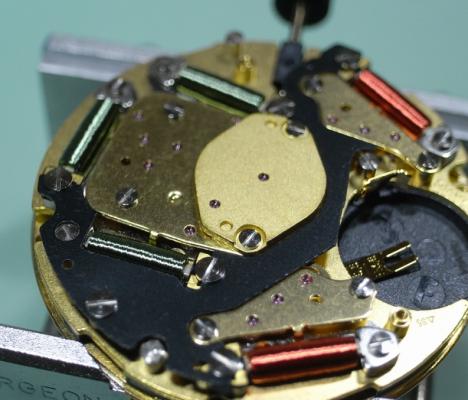
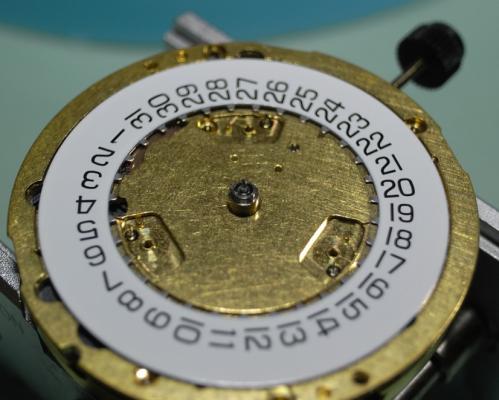
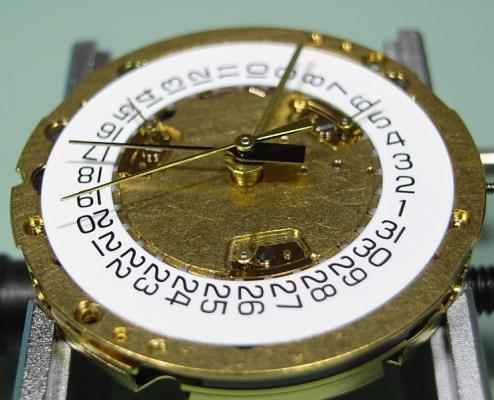
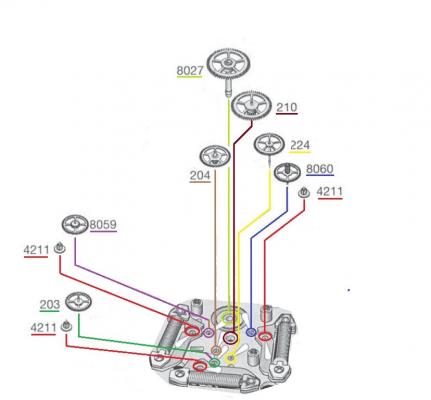
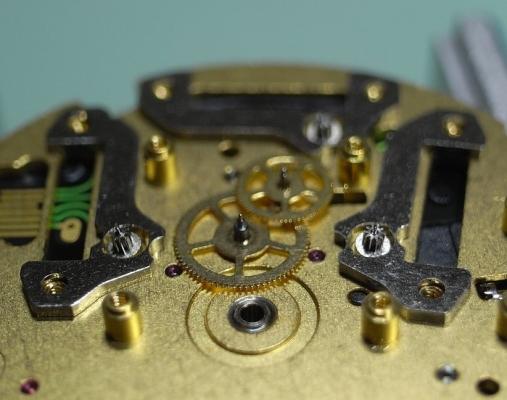
ETA 251.626 Service Walkthrough Part 2 Assembly We begin the assembly with the keyless work. Fit together the Setting Lever and Setting Lever Jumper. Then install the Driving Wheel, Intermediate Setting Wheel No.1, and the Setting Wheel Install the Yoke Then slide the saddle at the end of the Setting Lever Jumper Arm into the groove in the Intermediate Setting Wheel No.1. You will have to then lift the Intermediate Setting Wheel No.1 slightly to position the Setting Lever Assembly as shown below. Then locate the Setting Lever and Jumper onto their respective posts and slots. Once screwed down engage the position arm of the jumper onto it's post on the Setting Lever. Next install the Date Indicator Driving Wheel. Remember that you need to slide back the Date Jumper Once the Date Jumper is back in position check that the spring arm is once again down in it's correct position. Install the Contact Intermediate Wheel, the Hour Wheel and then the Minute Wheel. Replace the Electronic Module, then fit the Sliding Pinion and the Stem. Install the Cannon Pinion with Driver. Replace the Stop Lever/Switch. Then gently place the Upper Plate back on the movement, making sure the Yoke and Setting Lever are positioned correctly, and that you do not disturb any of the other components underneath. Refit the bank of Stators and Rotors which have the Green Coils. Now we come to the trickiest part of this service: installing the Main Gear Train. To assist in the order in which to install the wheels I will give the part numbers, and colour code the text, to match that of the diagram above. Start with the Third Wheel [210]. Then the Additional Intermediate Wheel [204] Then the Second Wheel [224] Then the Intermediate Wheel [203] Then the Driving Wheel for Second Counter [8059] Then the Driving Wheel for Chronograph Wheel 60s [8060] And lastly replace the Counting Wheel for Seconds or Minutes [8027] Once the train is in place, take some time to tweak the wheels so that are standing up as straight as possible. Remember that you have 10 pivots to align with their respective jewels, so taking some time to position the wheels and rotors now can save you a LOT of frustration fitting the Train Wheel Bridge. I would go so far as to take a little break, have a drink, relax your muscles and mind before proceeding to the next step. Fit the Train Wheel Bridge and align all the pivots to their jewels, and check the free running of all wheels before tightening down only the 2 rear screws. Install the Chronograph Wheel. Next fit the Chronograph Bridge and align the 2 pivot points to their jewels. This has to be done without the ability to manipulate the wheels directly, so make sure you inspect the jewels with high magnification to be sure the pivots are in their holes. And again, check the free running of the train. Replace the Connector Next we will install the small trains for the Counting Wheel, 1/10s and Hour Counters. These are the ones with the Red Coils driving them. Remember that the wheels are specific for each train and should have always been separated ... DO NOT MIX THEM UP. We shall begin with the right side. Install the right side Stator and Rotor for the 1/10s Counter. Next replace the Driving Wheel for Counting 1/10s [8059/1] Then replace the Counting Wheel, 1/10s [8027/1] Note this has 4 spokes to the wheel. Fit the Counting Wheel Bridge, making sure to align the pivots and test the free running before tightening. We repeat the process for the left side Hour/Minute Counting Train. Install the right side Stator and Rotor for the Hour/Minute Counter. Replace the Hour/Minute Counter Driving Wheel [8630/1] Then replace the Hour/Minute Counting Wheel [8600/1] Note this has 3 spokes to the wheel. Fit the Hour/Minute Wheel Bridge, making sure to align the pivots and test the free running before tightening. Fit the Red Coil to the right side Counting Wheel Assembly and screw down. Fit the Red Coil to the left side Counting Wheel Assembly and screw down. At this stage also screw down the 3 Green Coils. Refit the Additional Printed Circuit. Replace the Magnetic Screen. Secure the Battery Clamp. Then turn over the movement to the dial side. Fit the Date Indicator. And secure the Date Indicator with the 3 Indicator Maintaining Small Plates. Then fit the dial and hands and test all the functions of the movement. ETA 251.262 operating instructions.pdf The service is complete. As always, I hope this walkthrough was informative and instructive, and gives you the confidence to complete this service on your ETA 251.626


 1 point
 -
you can try to squeeze the pen out and then break off a bit of an equally thick drill bit and squeeze it in0 points
-
amazing work, well done. The heavy drawers are a bit overkill imo but it really looks good. Like Vwatchie I was looking for the Ikea Bekant table which was around 450 euro but I was able to buy a watchmakers heritage with a few professional workingbenches and a ton of parts. Sadly the family, who were not in contact with their father, only had eyes for the gold and gemstones and had already thrown away at least 20 movingboxs full with parts, books, tools ect....0 points
-
I saw the video, which inspired me to maybe try it as well. I was just wondering if someone had any experience with hydro-modding a timex Mk1 Aluminum. And whether it might have a bad effect on the acrylic crystal?0 points