Leaderboard


Popular Content
Showing content with the highest reputation on 04/21/21 in all areas
-
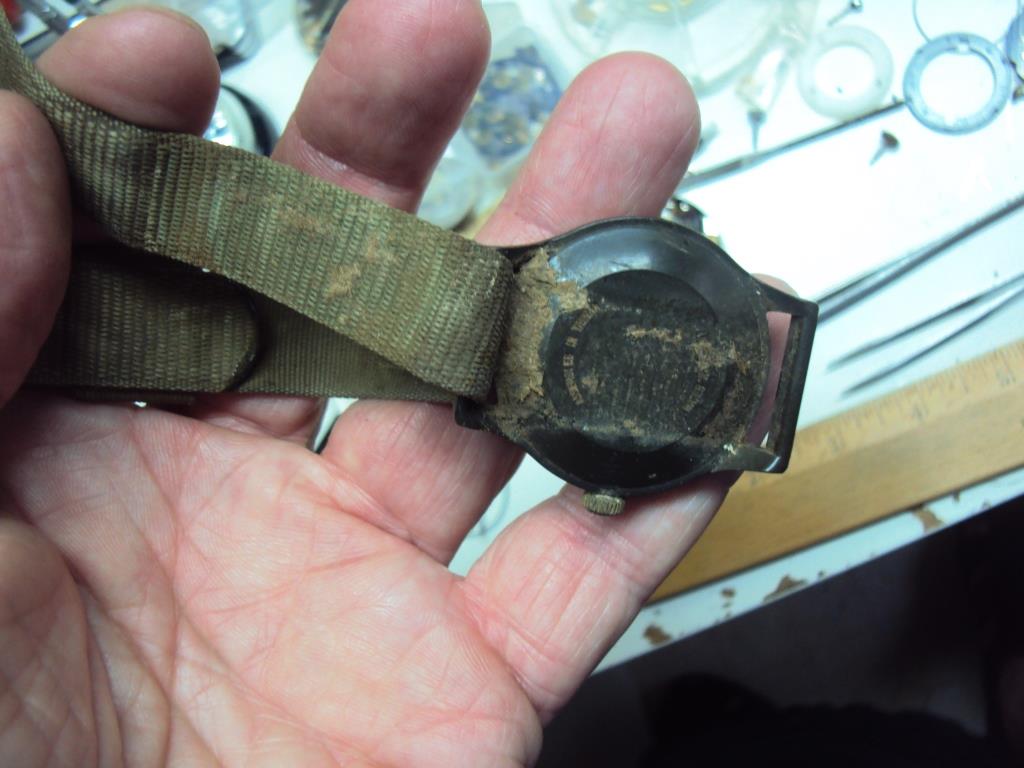
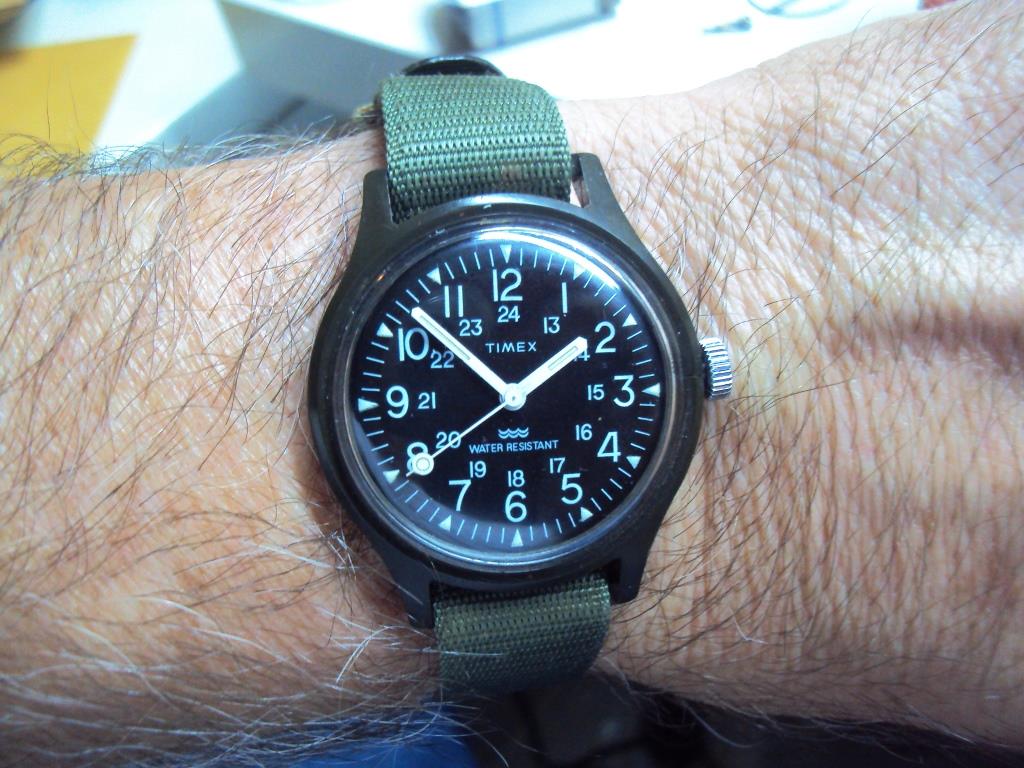
I have been focusing on the Timex Campers the last few weeks and came across that looked like it spent time under ground. Here is the high level tasks performed: Soak strap in Oxy-Clean Clean case Clean and buff crystal Service movement replace crown grease stem tube Before and after -


 3 points
 -
Testing my new demagnetizer, I placed an, according to the Lepsi-App "megnetism-detected" iron watch-hand on it. Fired the demagnetizer and the watch hand flew about 10cm next to the demagnetizer. Tested the hand and it was still detected as "magnetized". Placed the hand again, but this time held it down with some copper tweezers. "Zapped" it and this time the hand was by the Lepsi-App delared as being "healthy".2 points
-
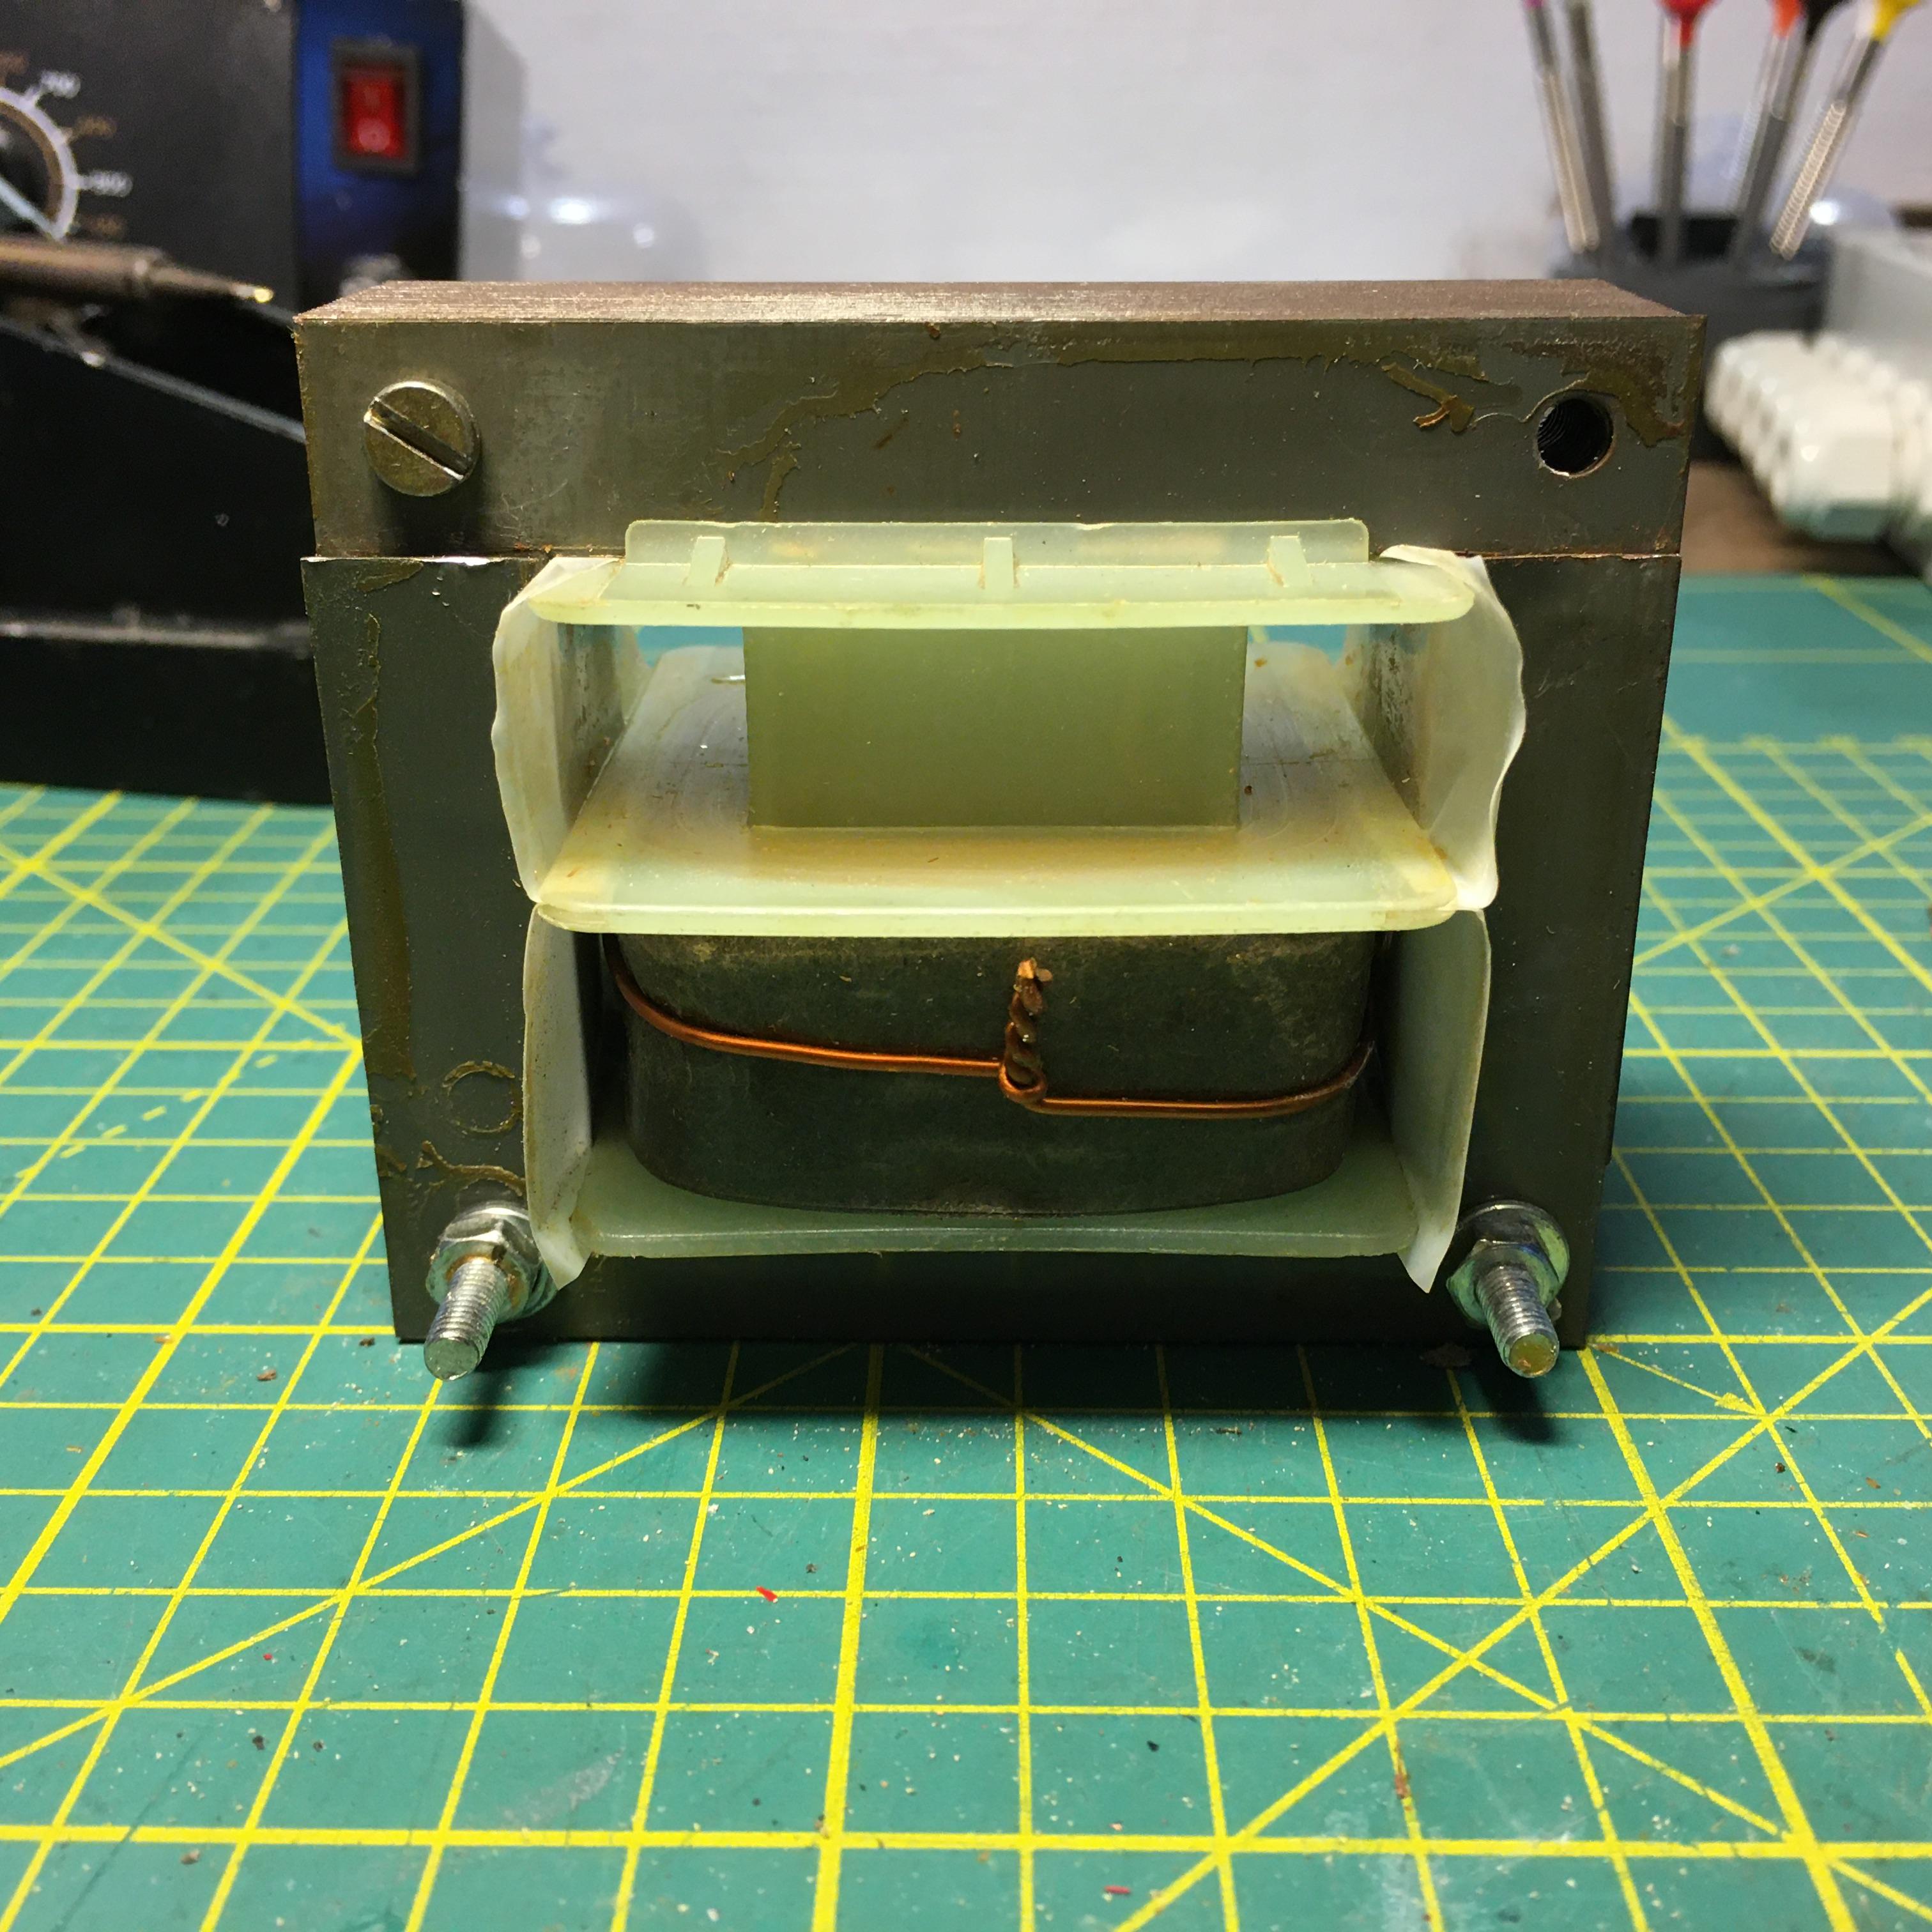
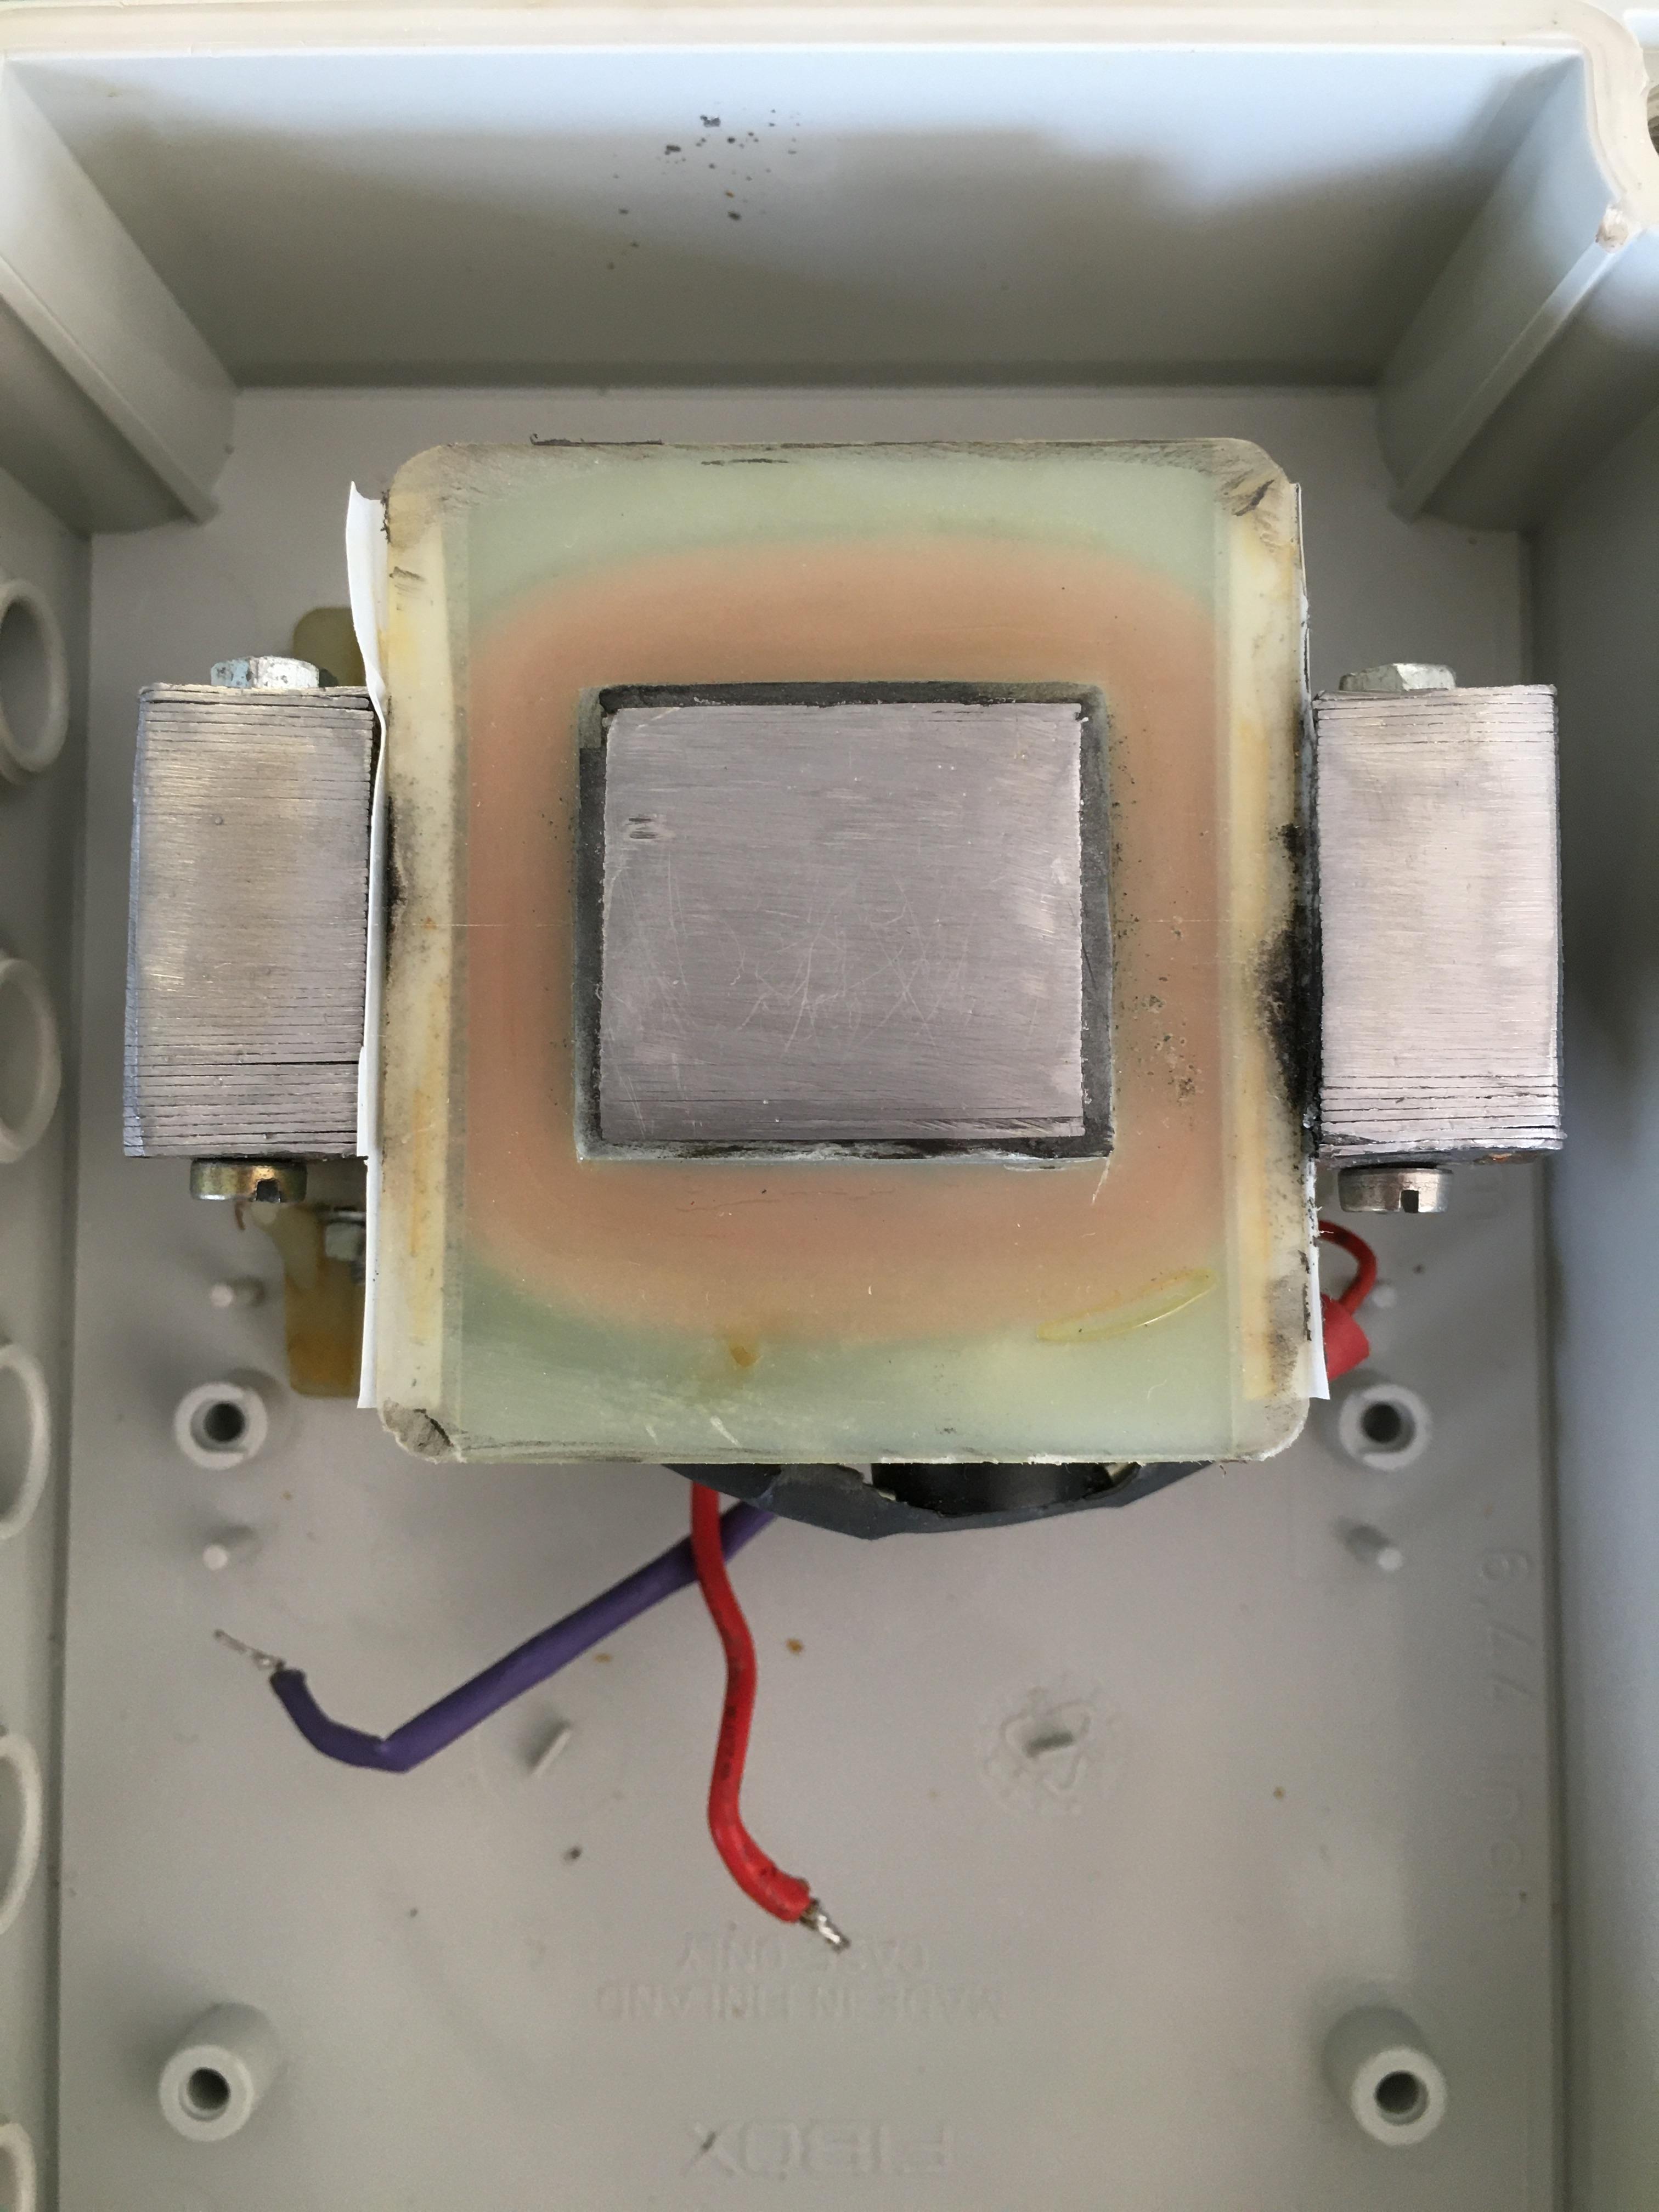
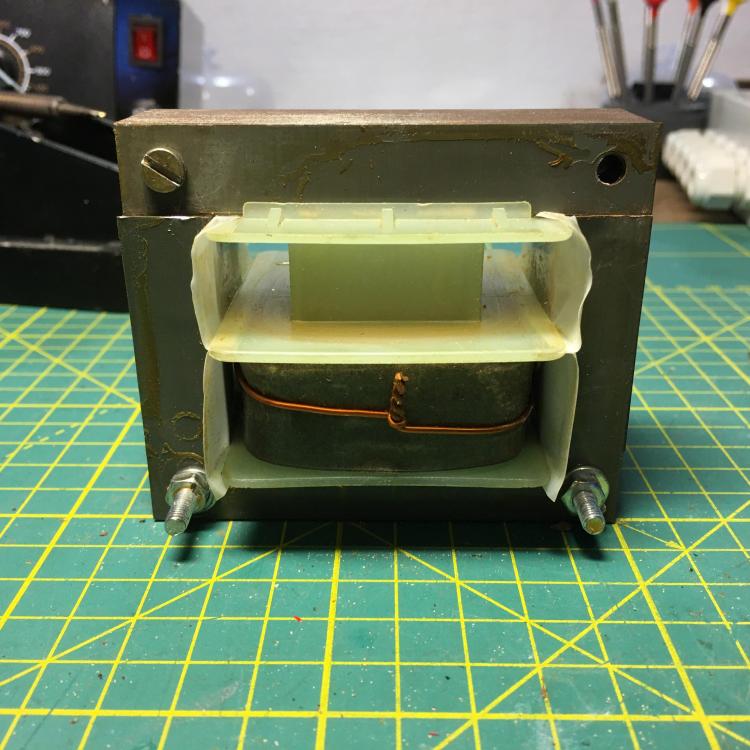
My transformer is taken out of an old 240VAC / 12V (≈150W) battery dump charger. The secondary coil removed; and the top carefully flush above the primary-coil chopped off; Of course it's not all as slick as an official factory made Ristra / Elma-coil and it has no Ristra-sticker across it, but it works the same ..... ?
 2 points
 -
2 points
-
It gets better with practice. ? The secret is in tweezering technique. Firstly, dress your tweezers. It doesn't need to be expensive Swiss tweezers. But make sure the tips are straight, gripping properly. When you apply pressure, make sure the very tips of the tweezers don't open up. Tweezers slso have different closing strength. I prefer tweezers with a light touch. You can make a tweezer lighter by thinning the body of the tweezers near where the two blades come together. Next, learn to control your squeezing pressure. Don't use anymore force than is necessary. Squeezing harder only ensures a further flight path. Some people prefer brass tweezers as brass is a little softer than stainless steel and grips better. Use pegwood to hold down parts that are under tension, like springs, setting levers, etc. Or you can stick a blob of Rodico to the spring to trap it when it tries to get away. Some of our members have advised working inside a plastic bag or a photographic tent to catch the parts when they fly. Practice your tweezering techniques on scrap parts first. Then if you are a masochist, practice on ladies watches. Some of the screws are so tiny that an ant can carry it away. Good luck and get a torch, a long bar magnet and knee pads.2 points
-
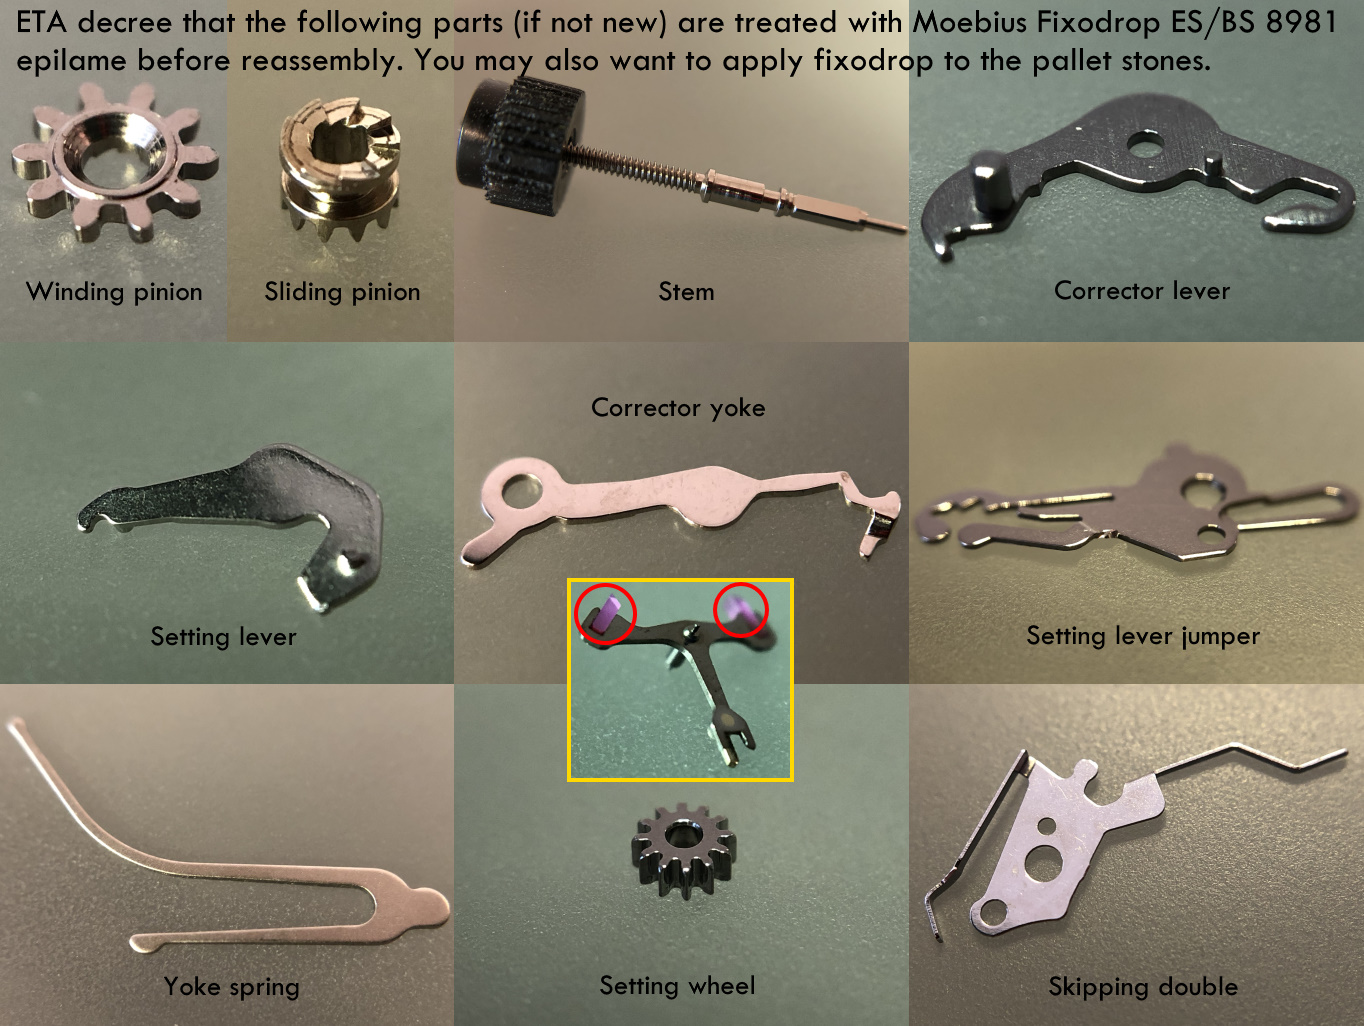
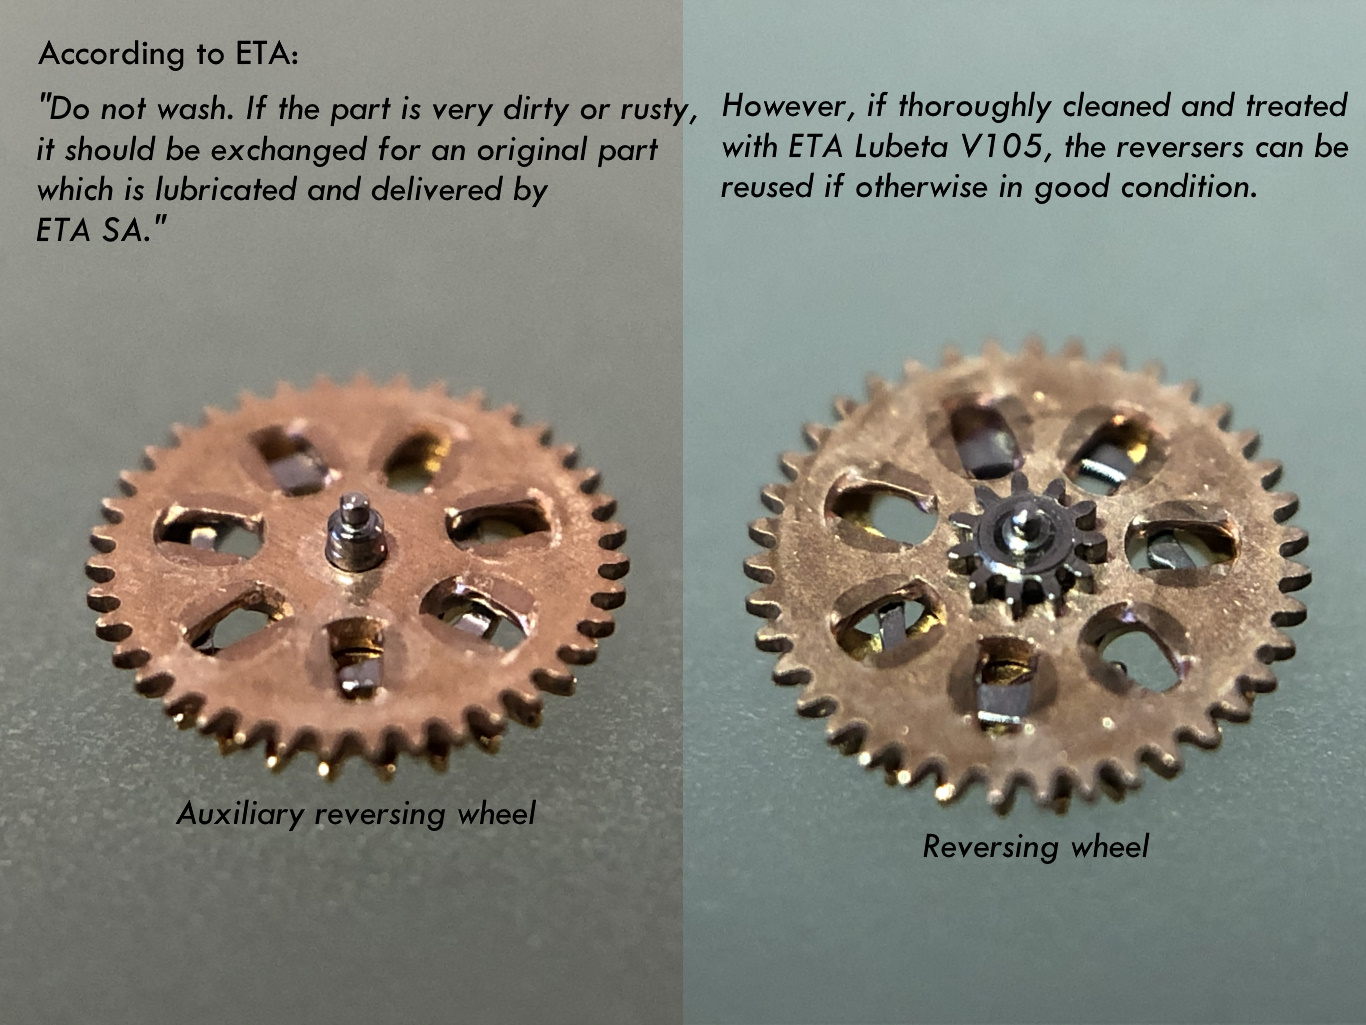
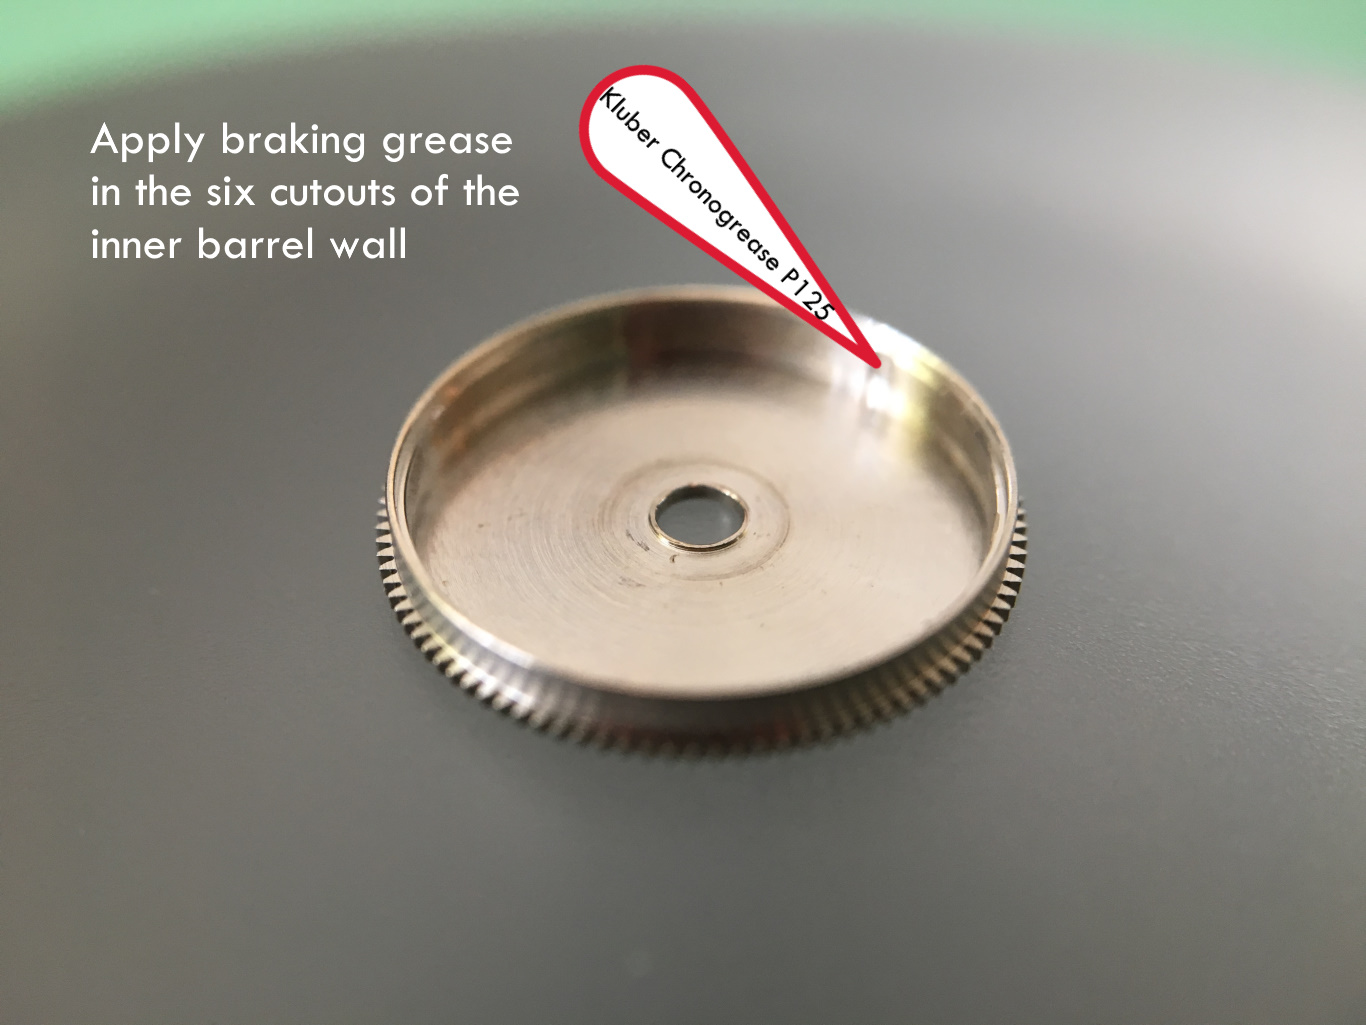
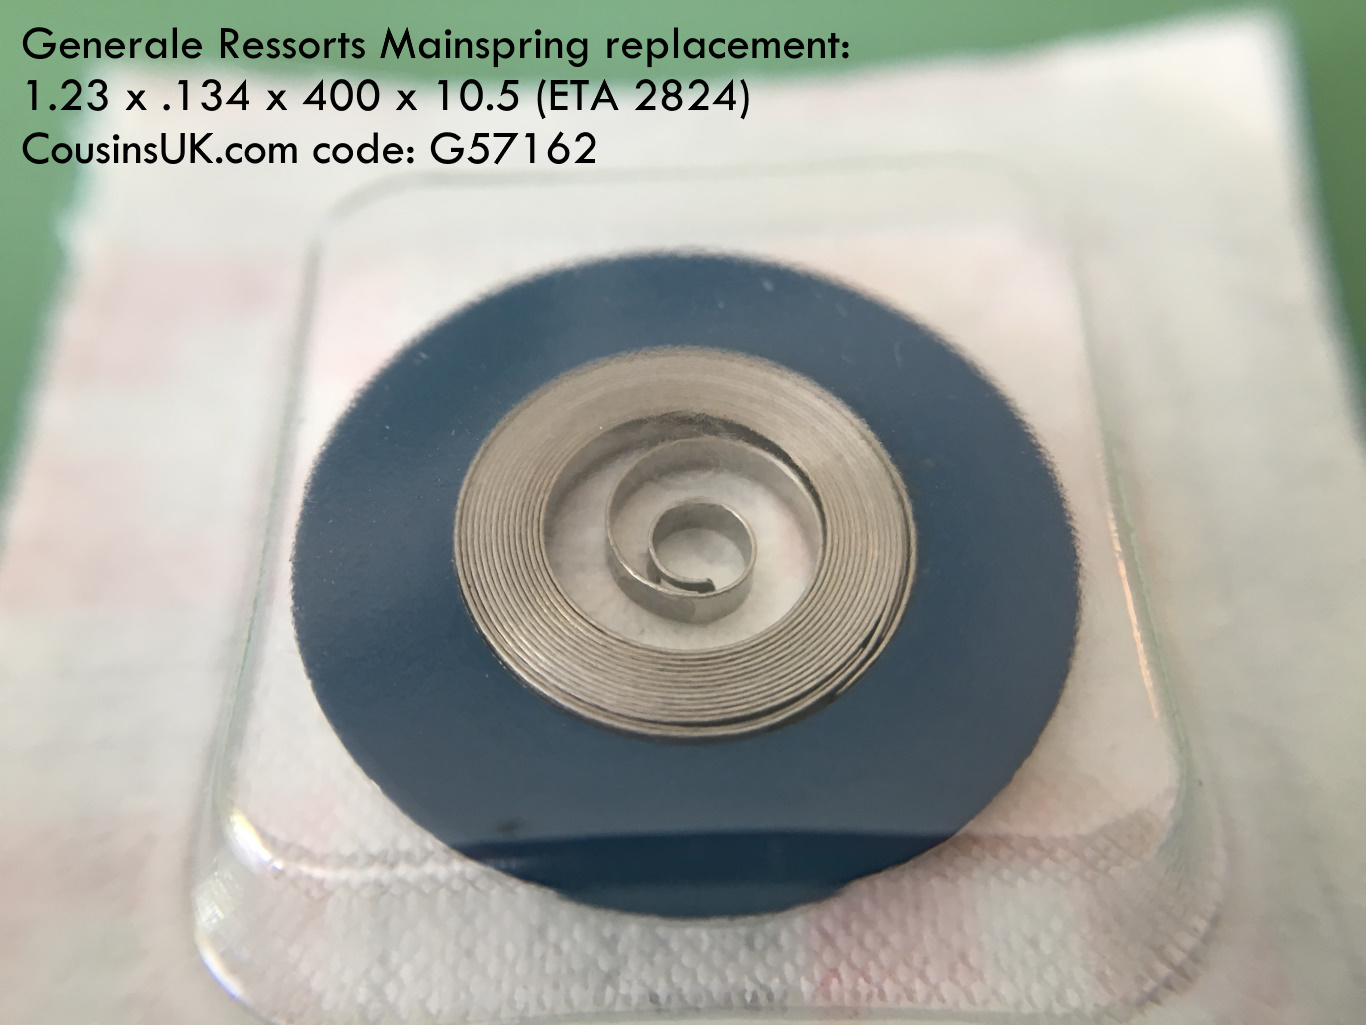
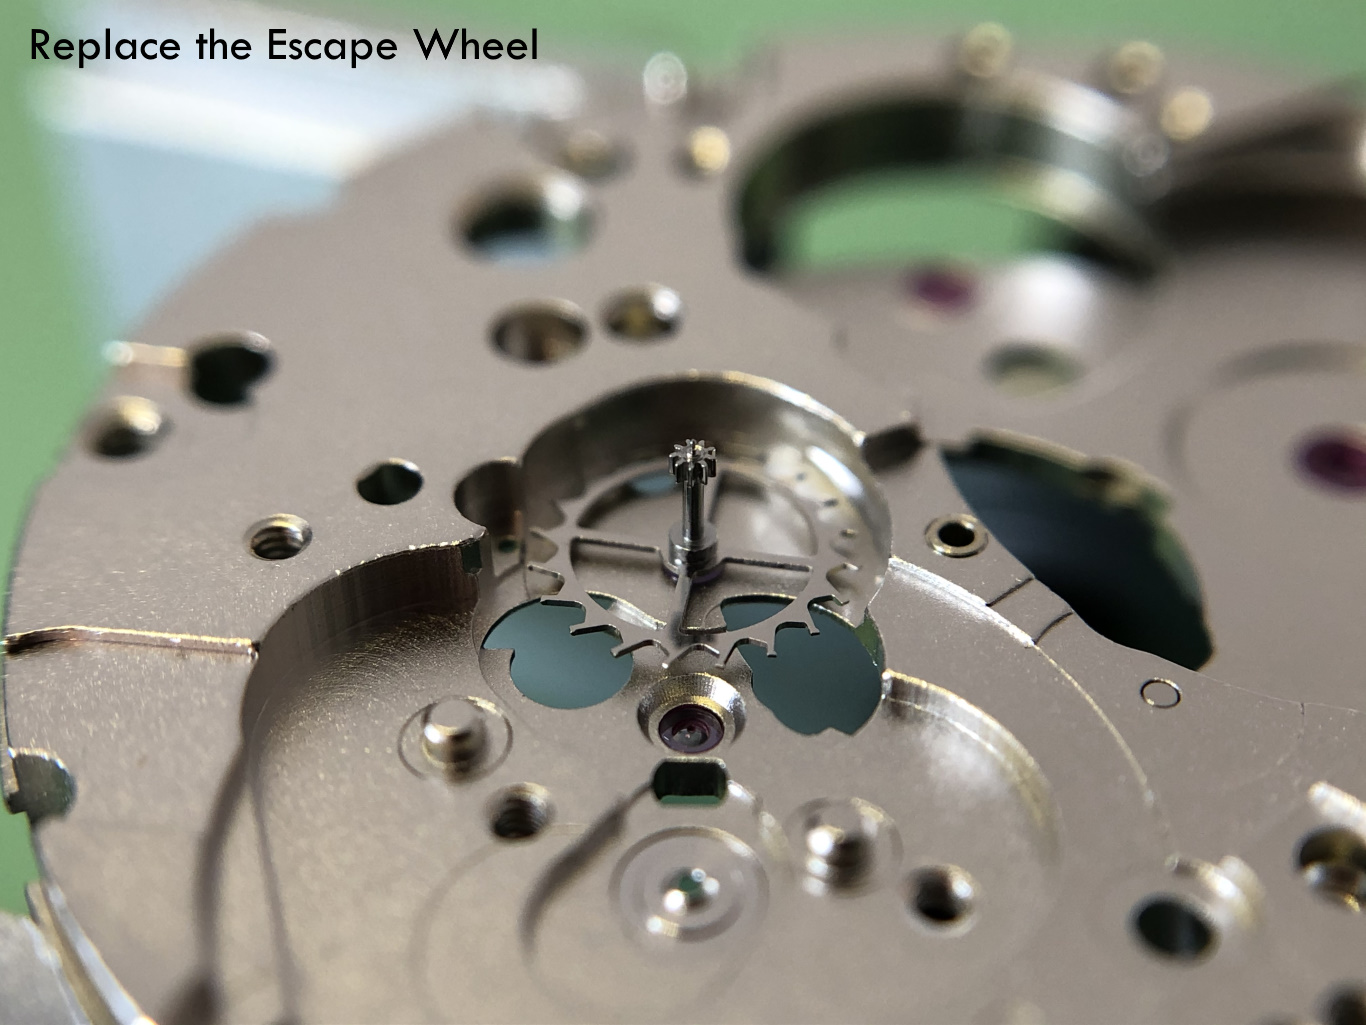
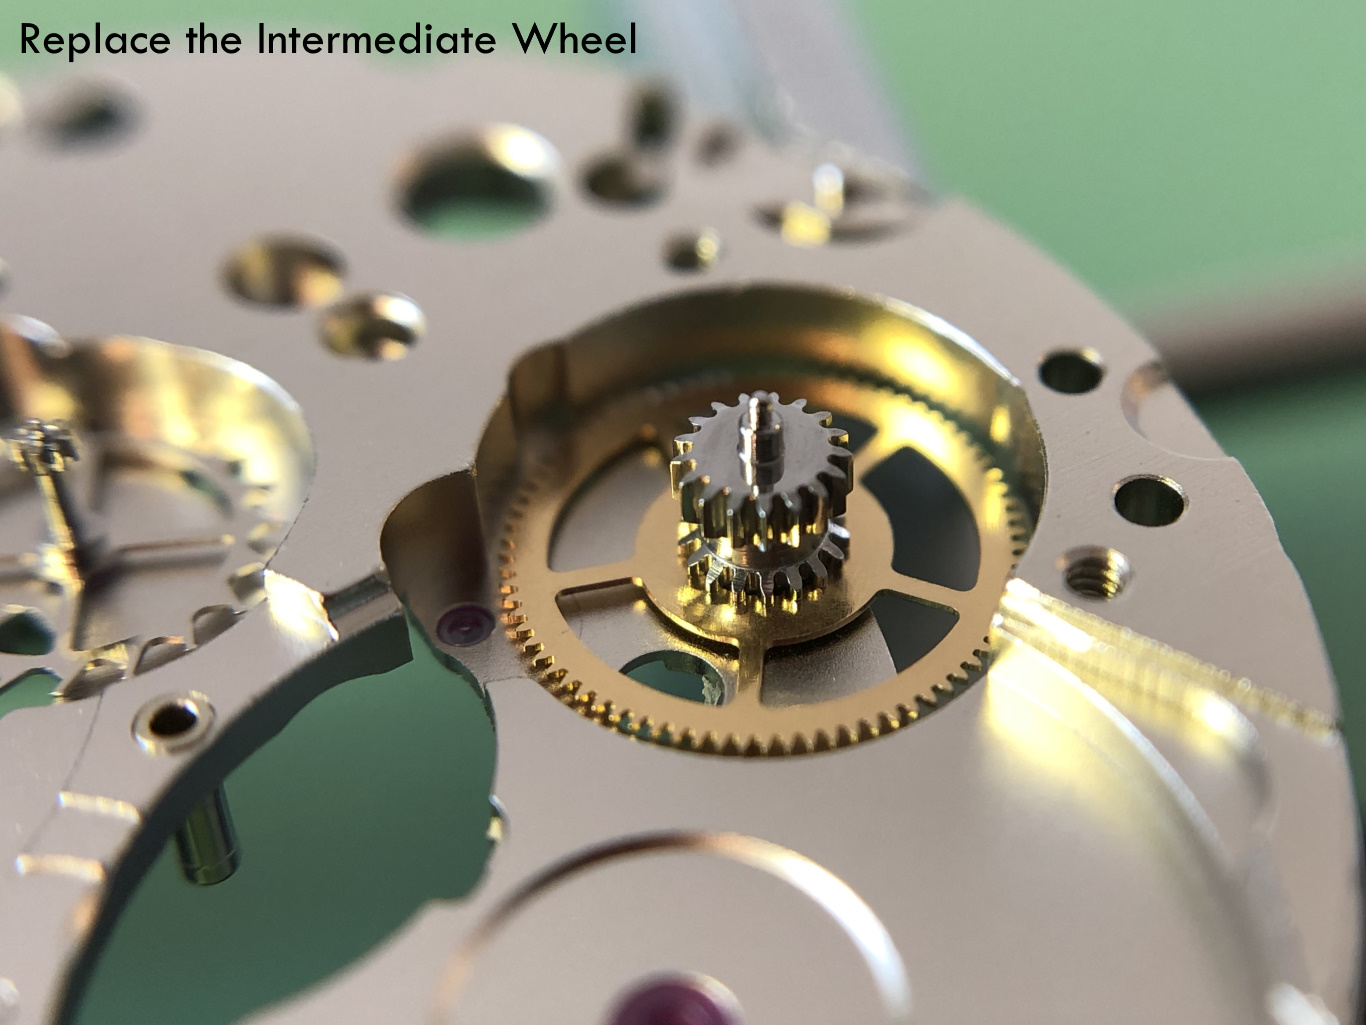
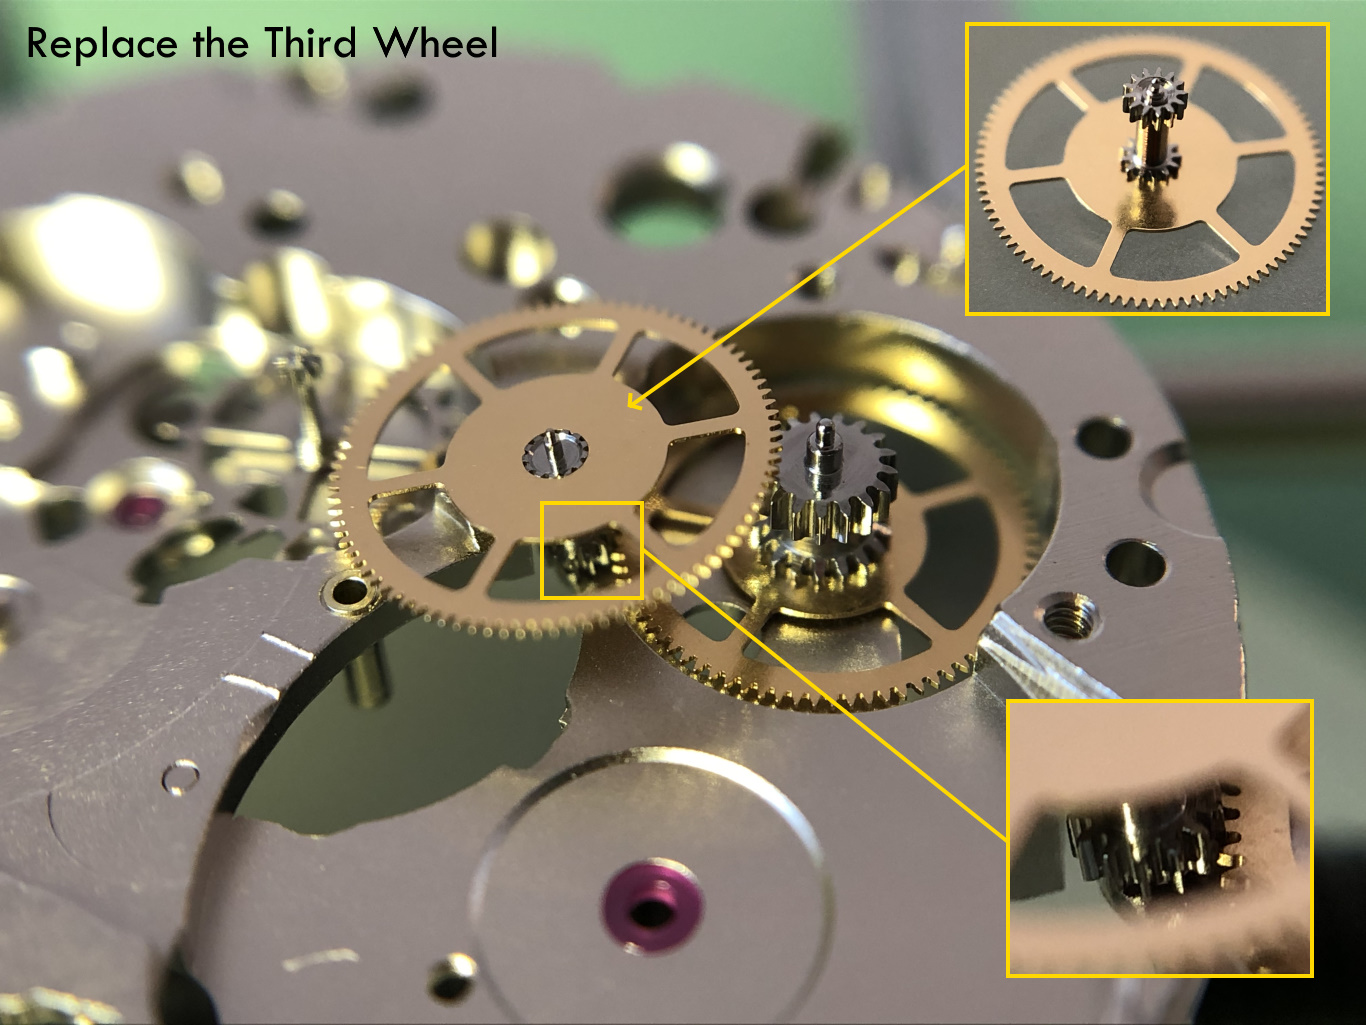
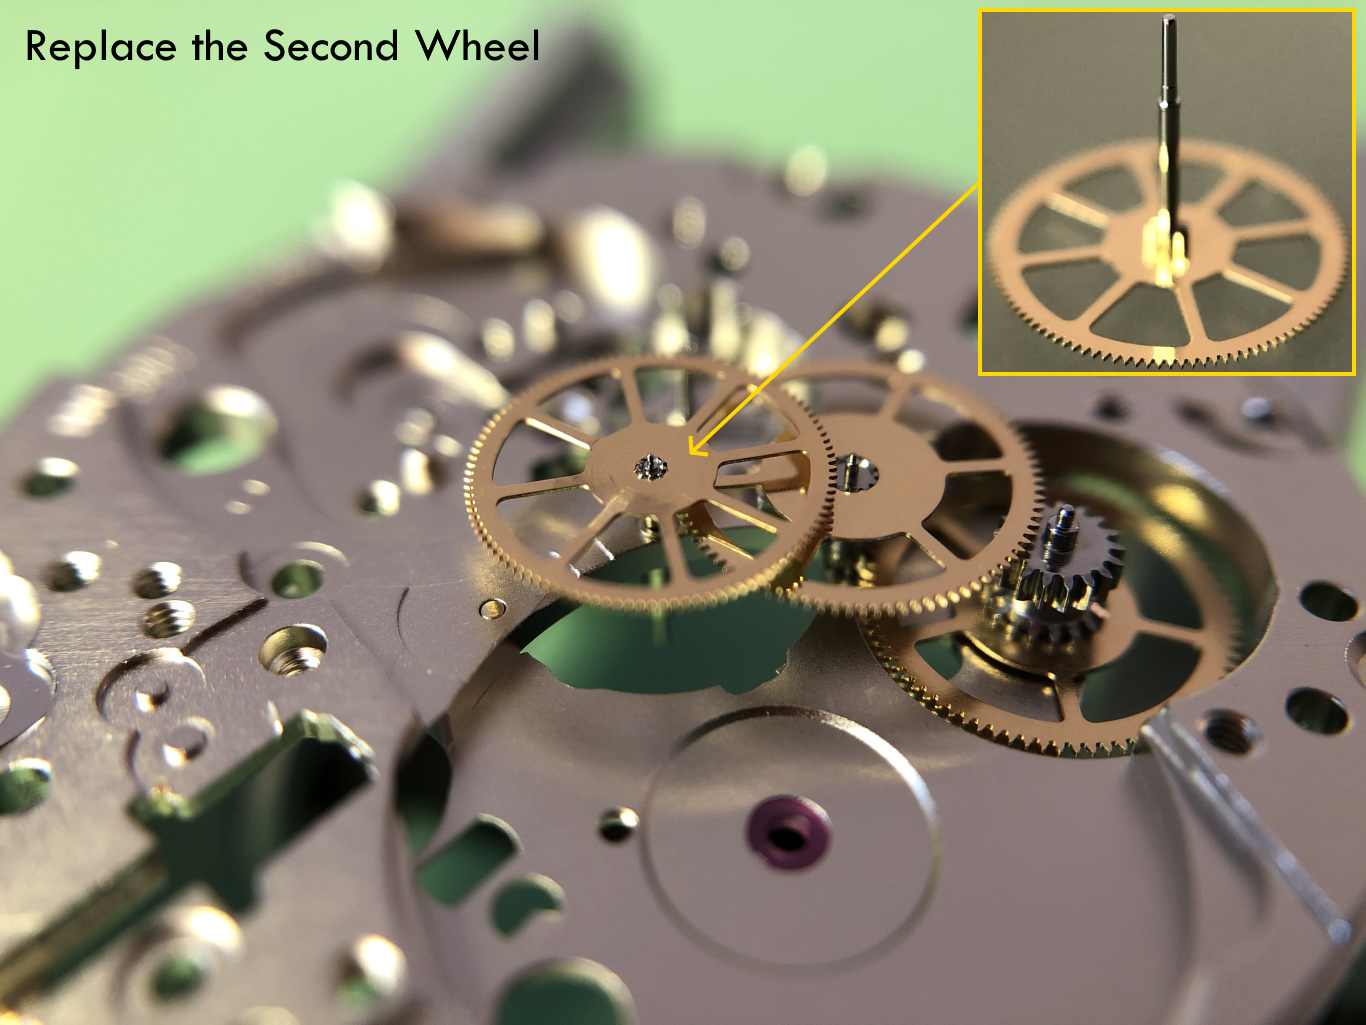
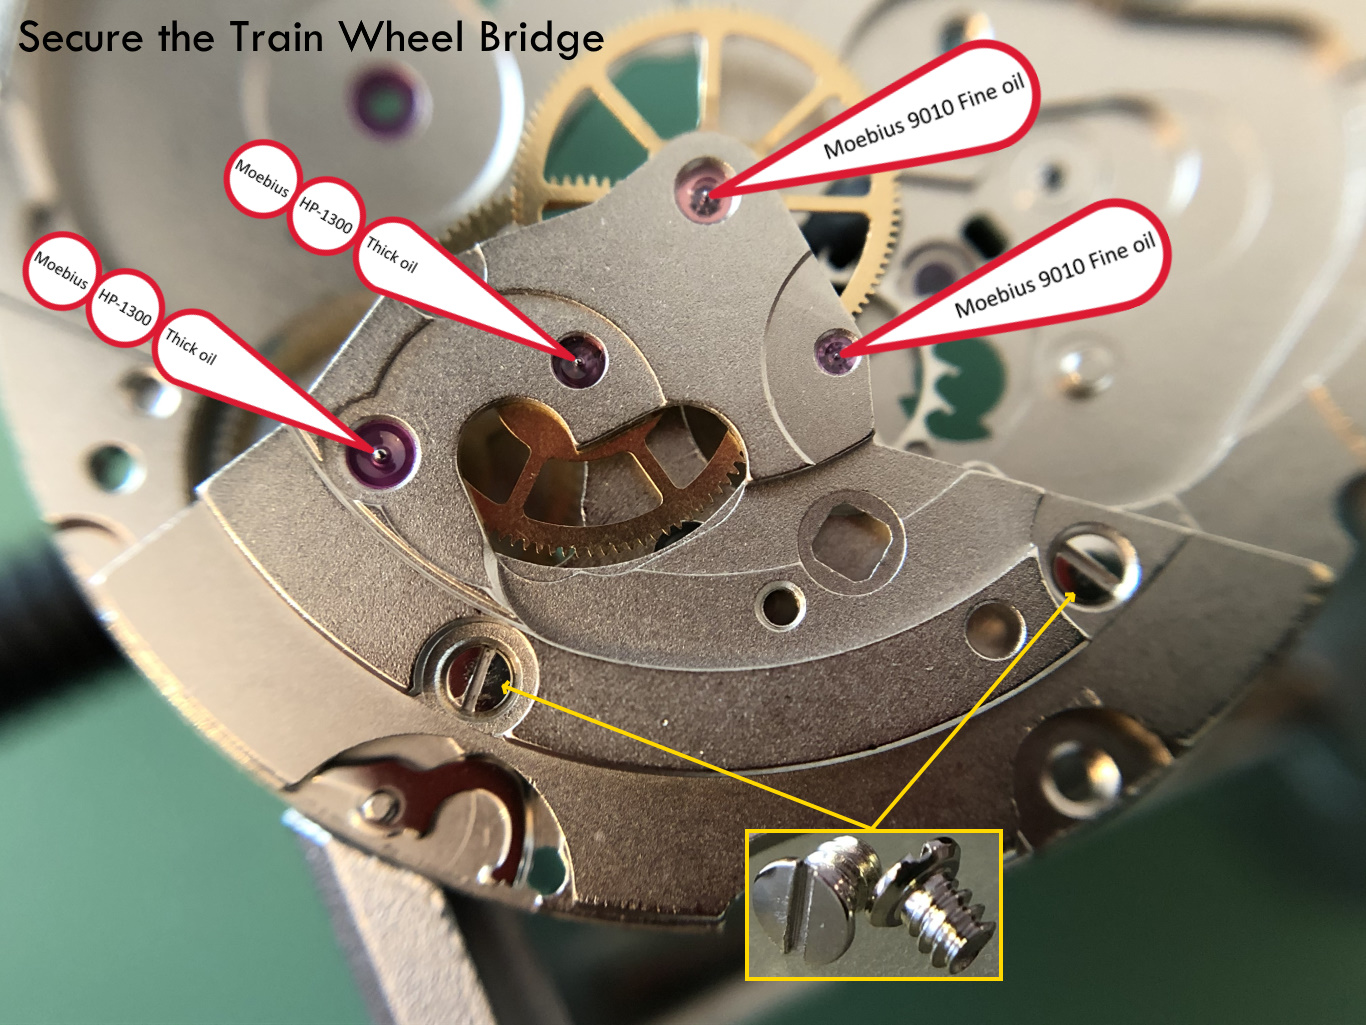
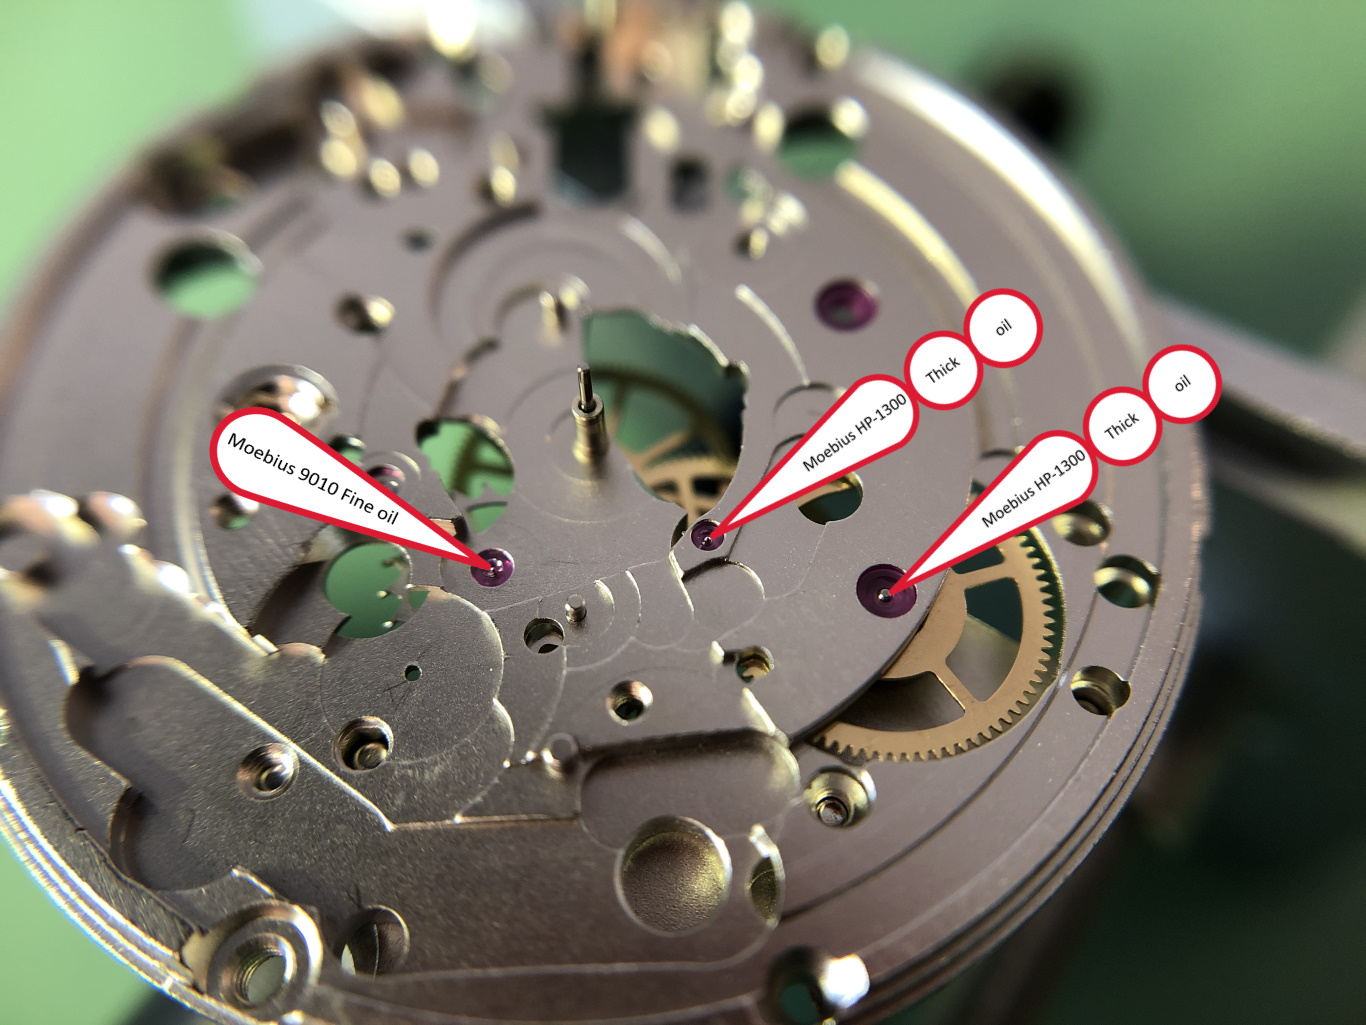
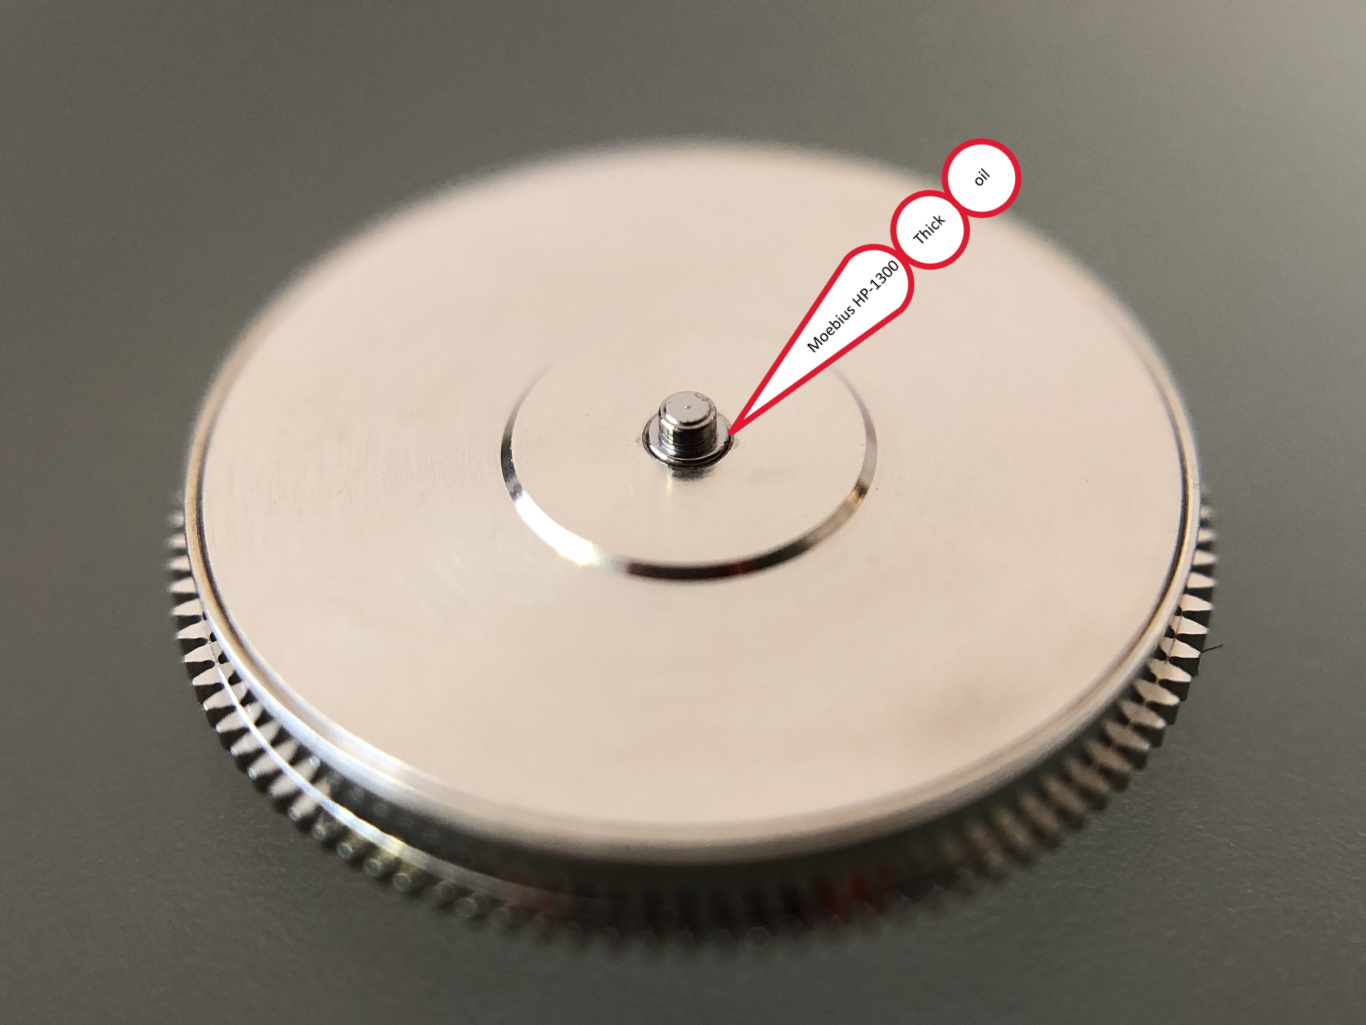
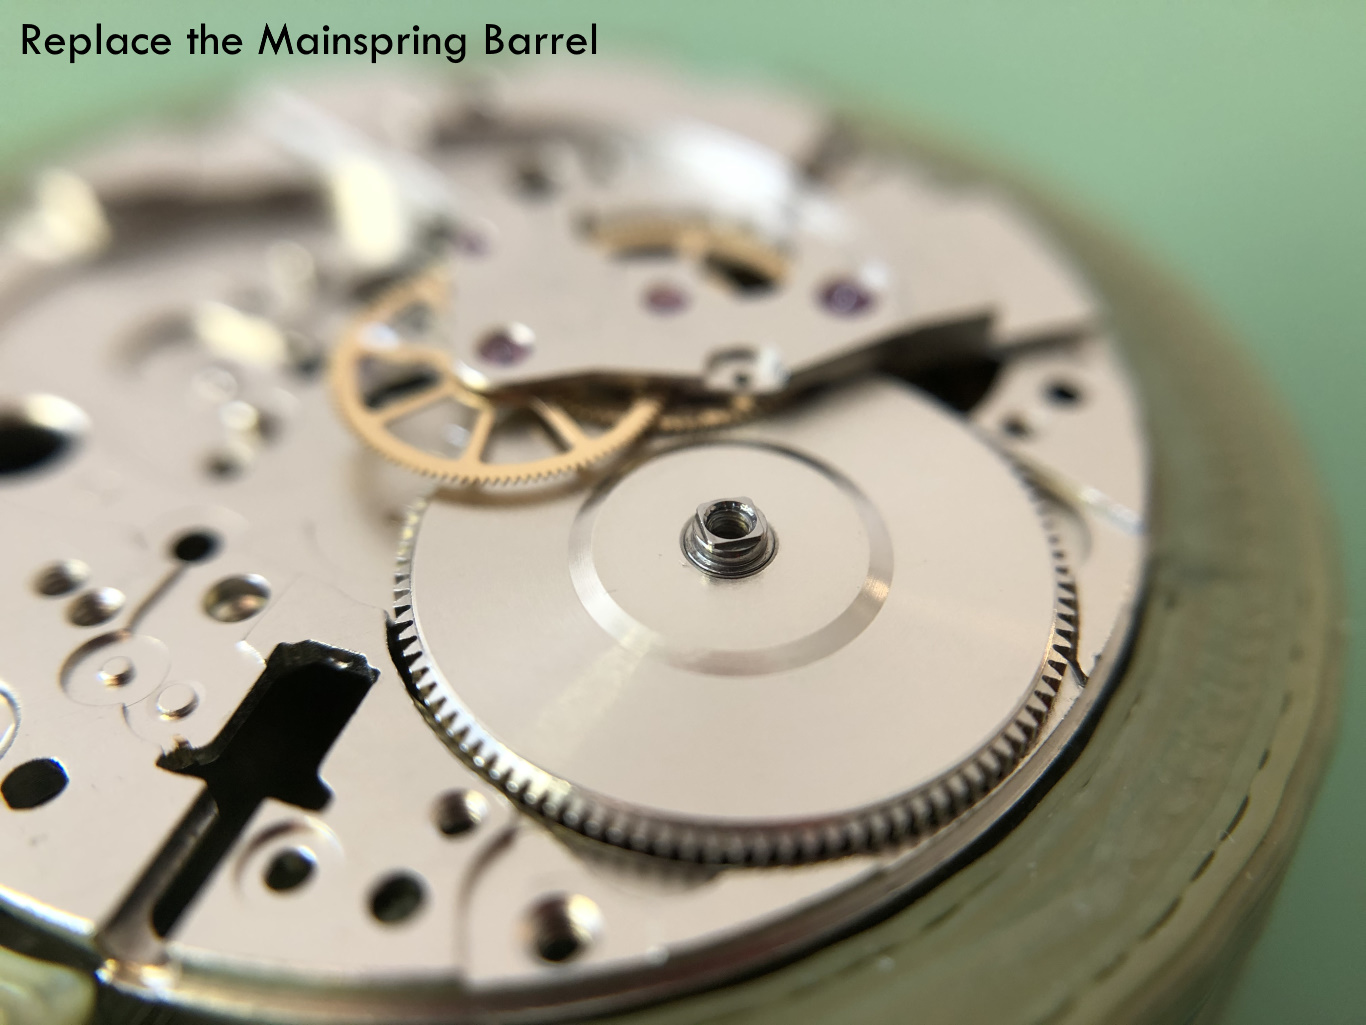
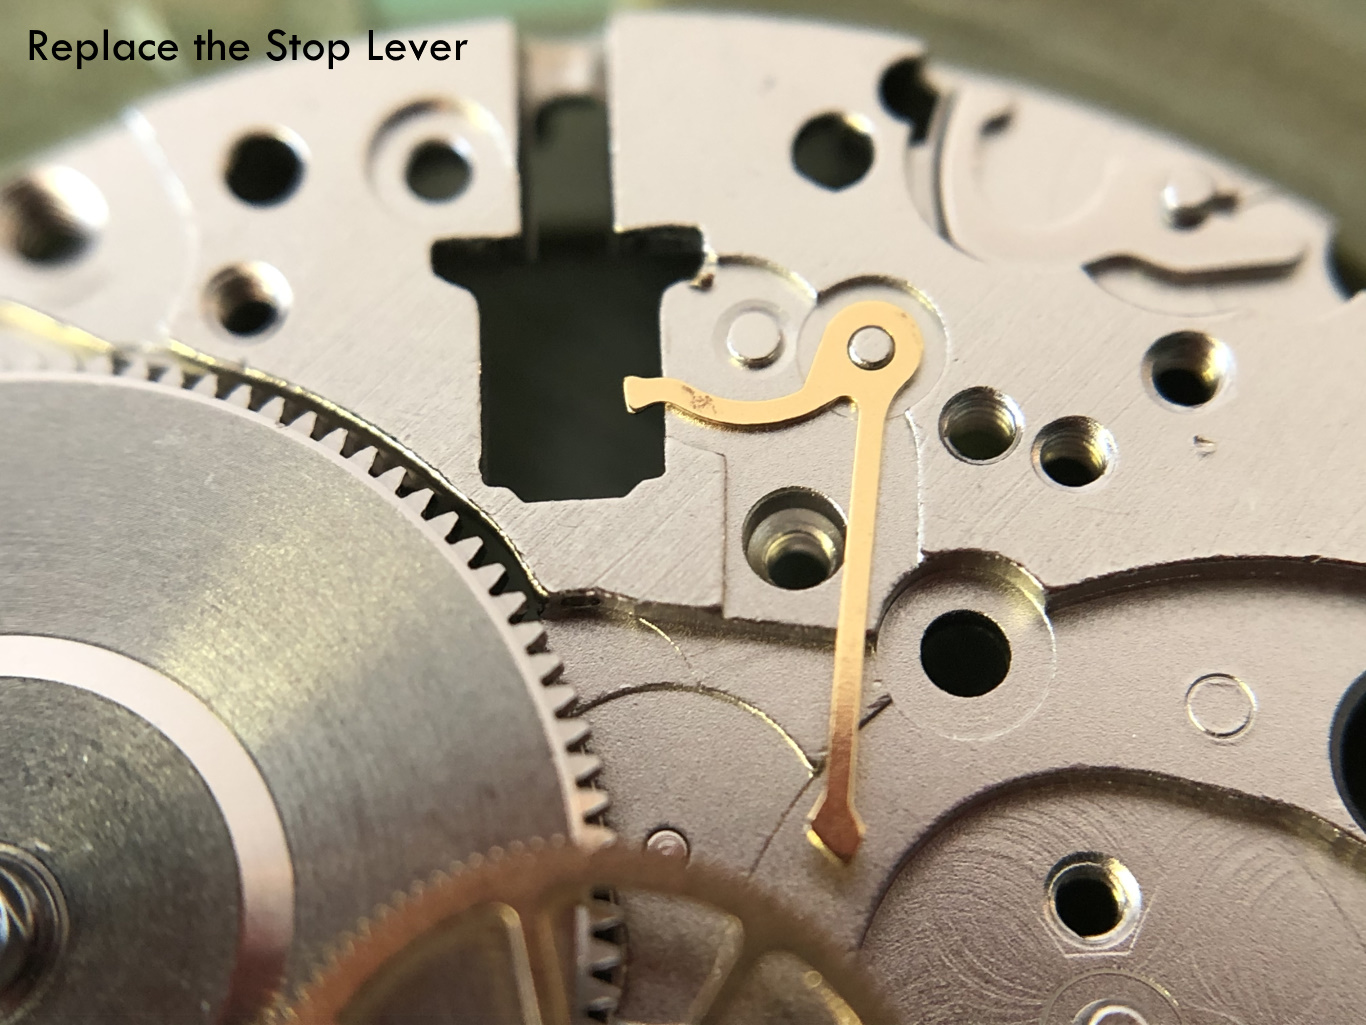
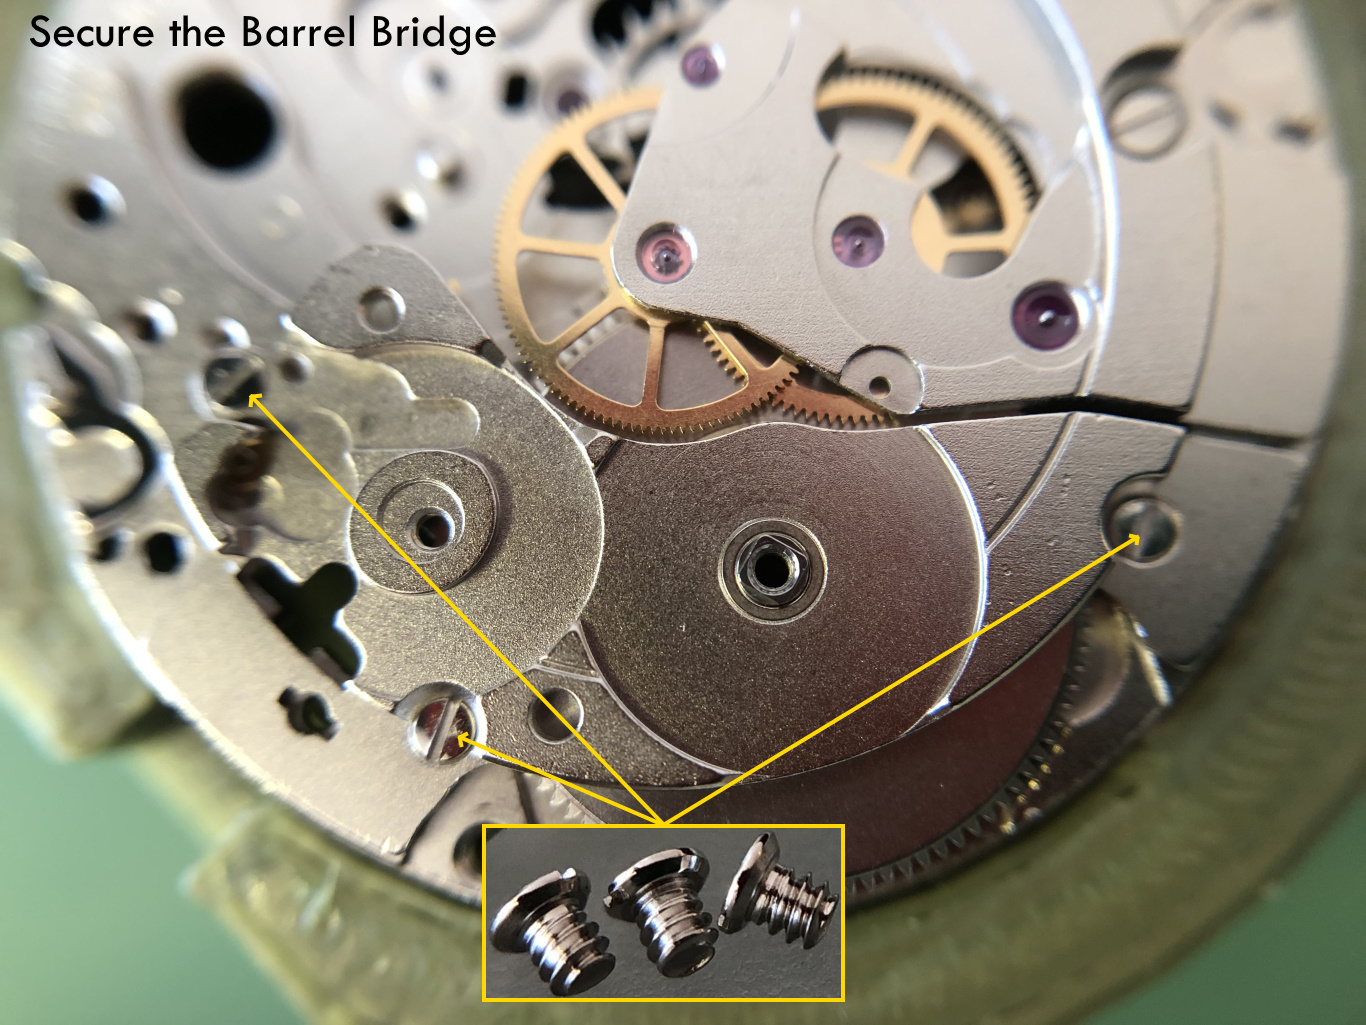
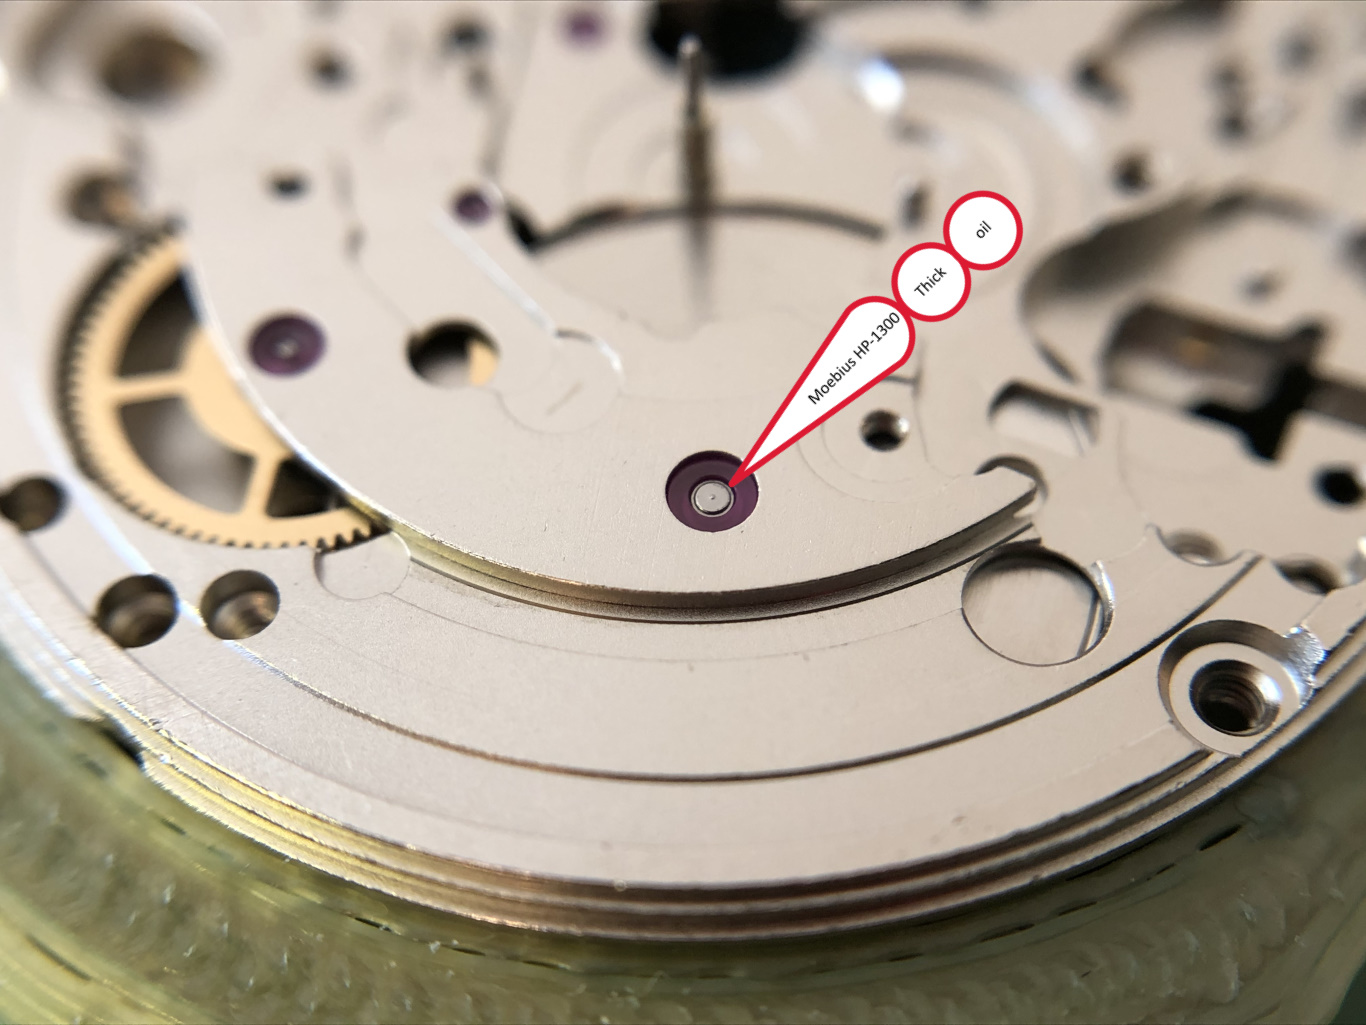
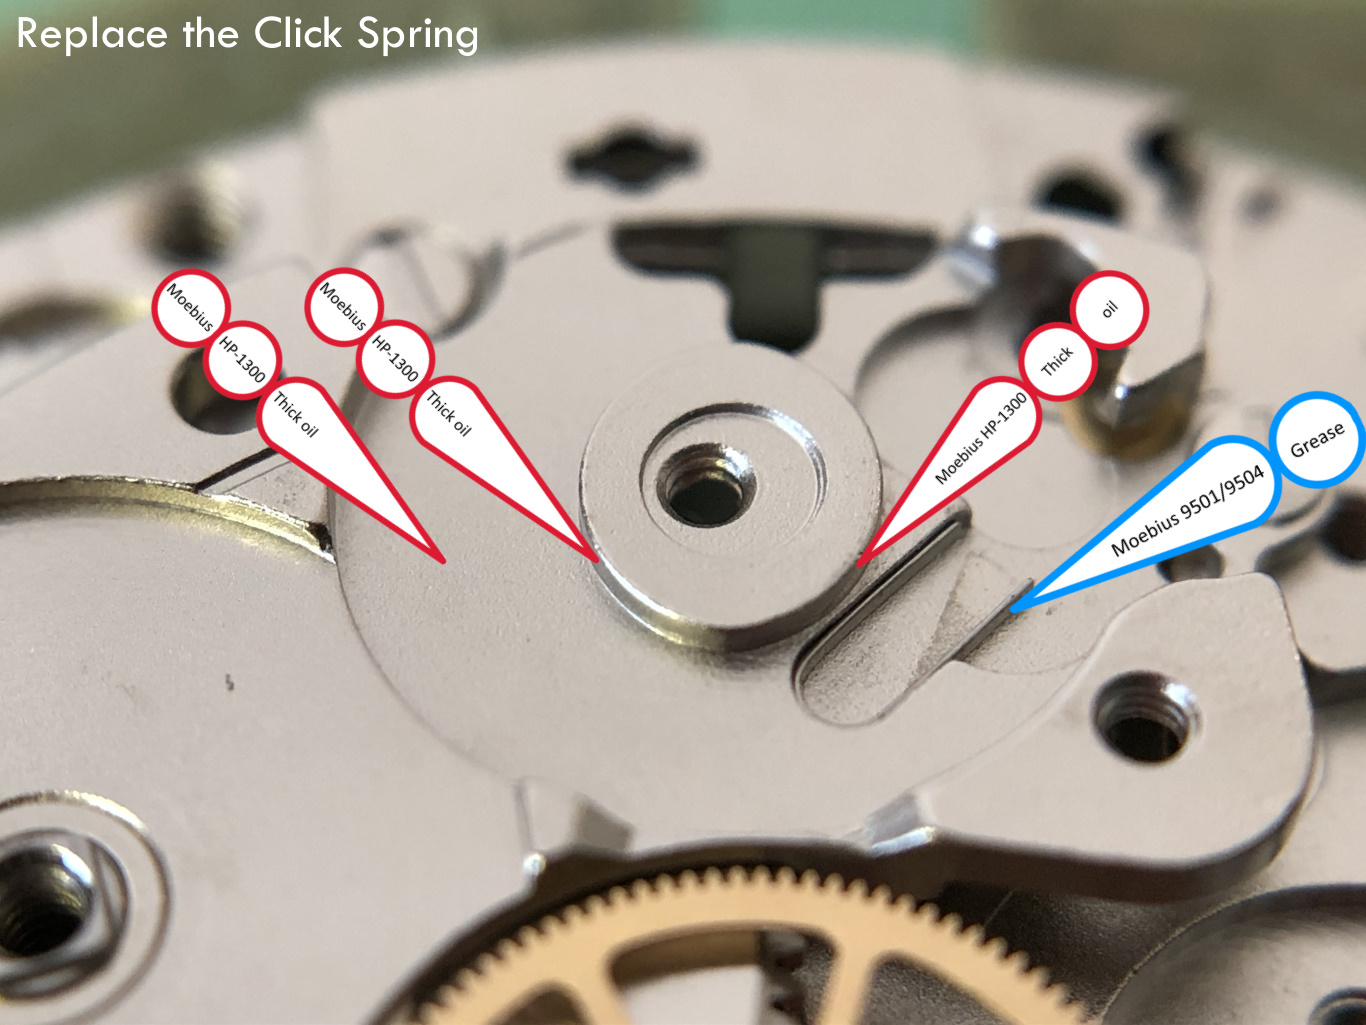
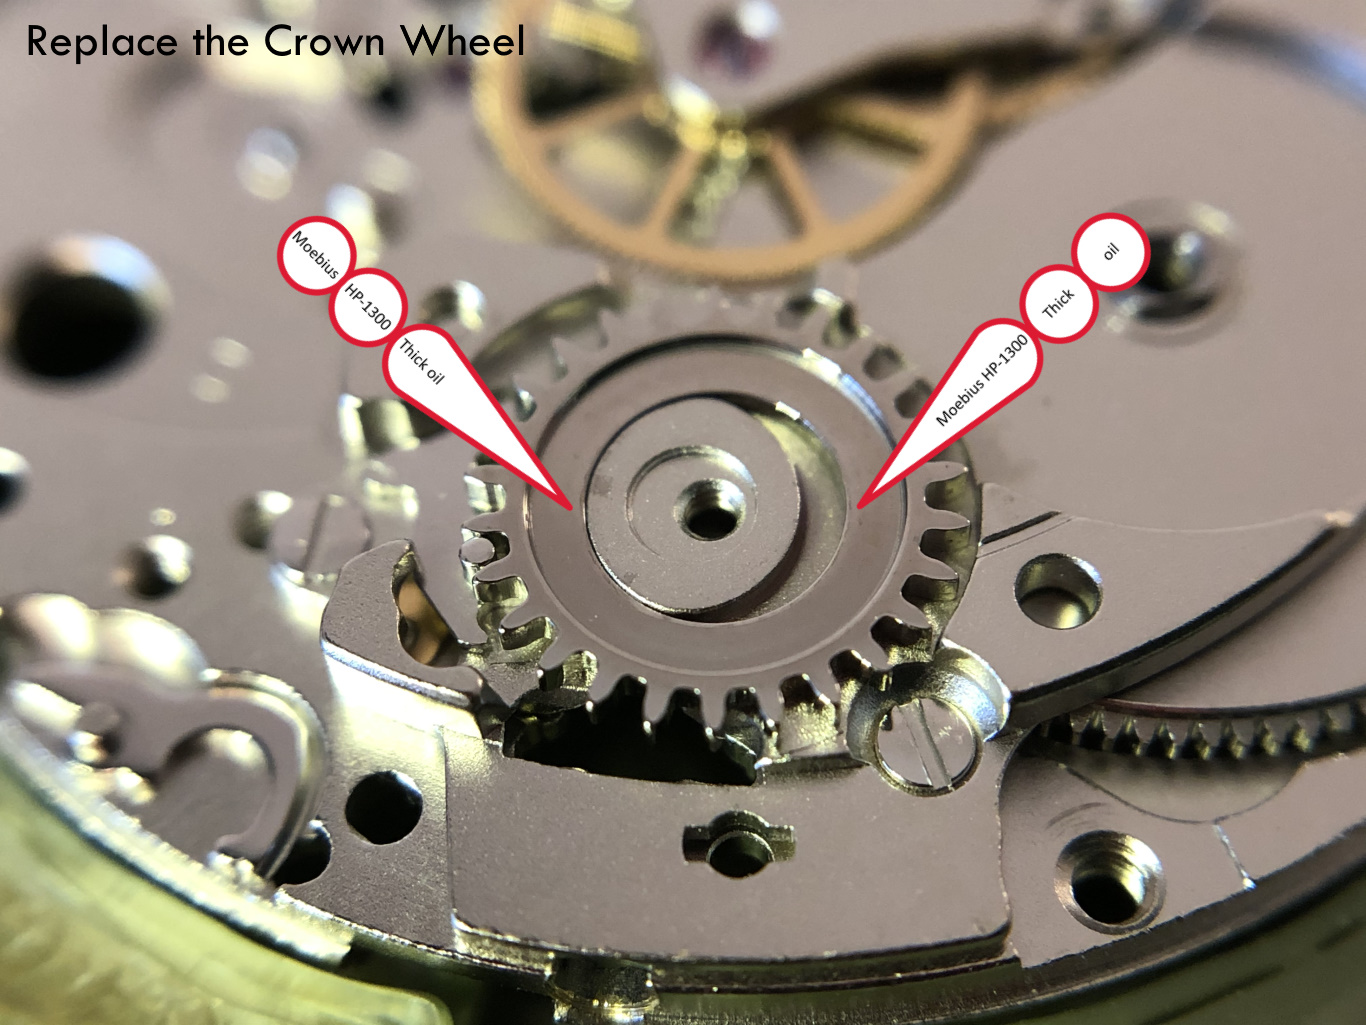
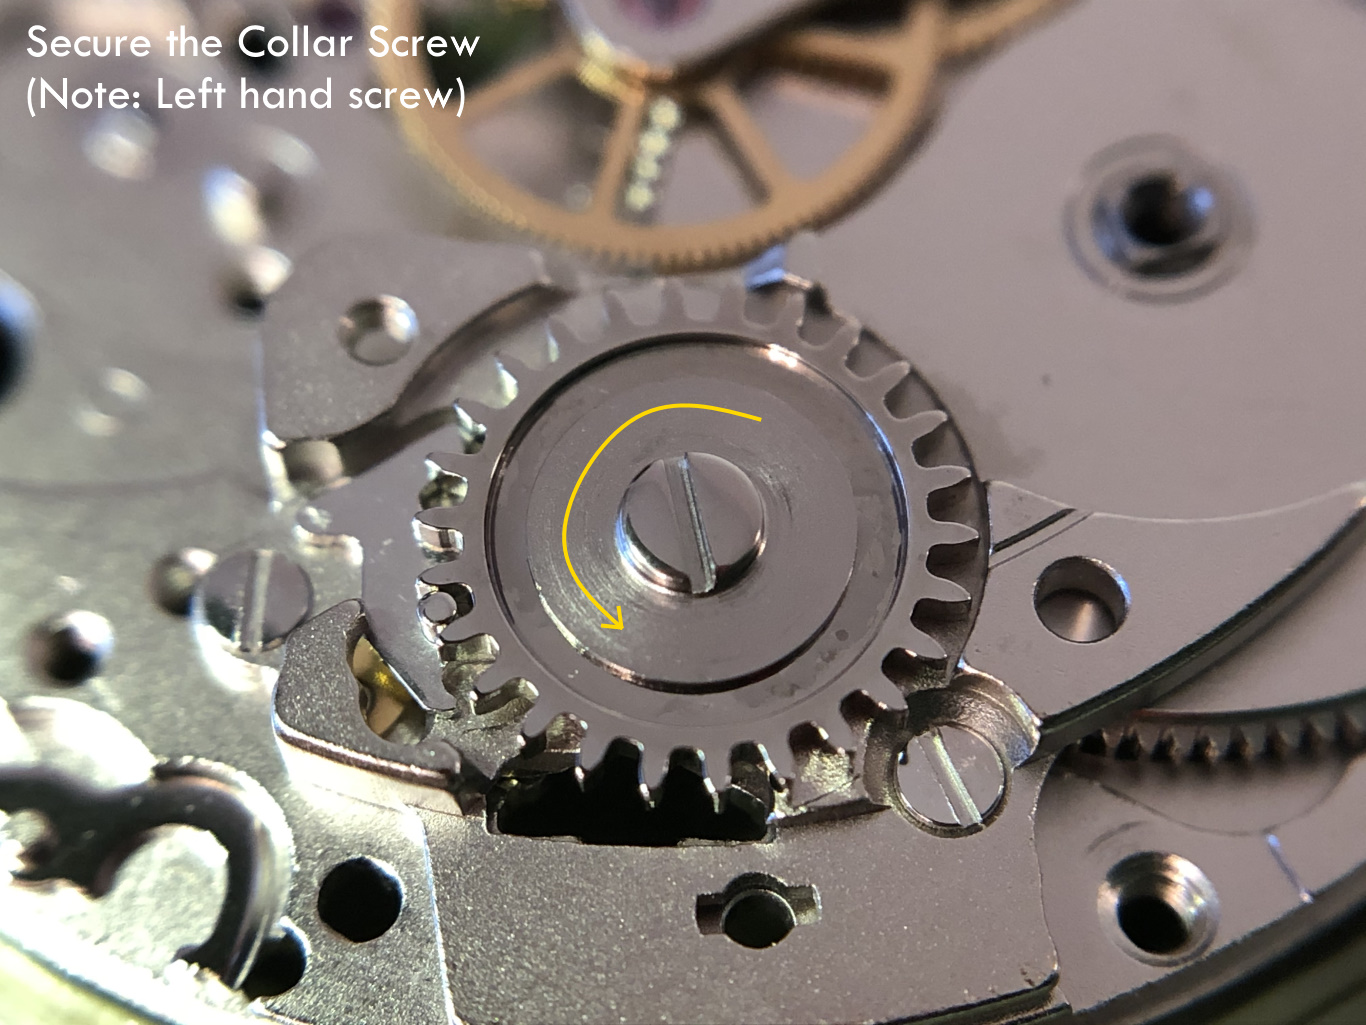
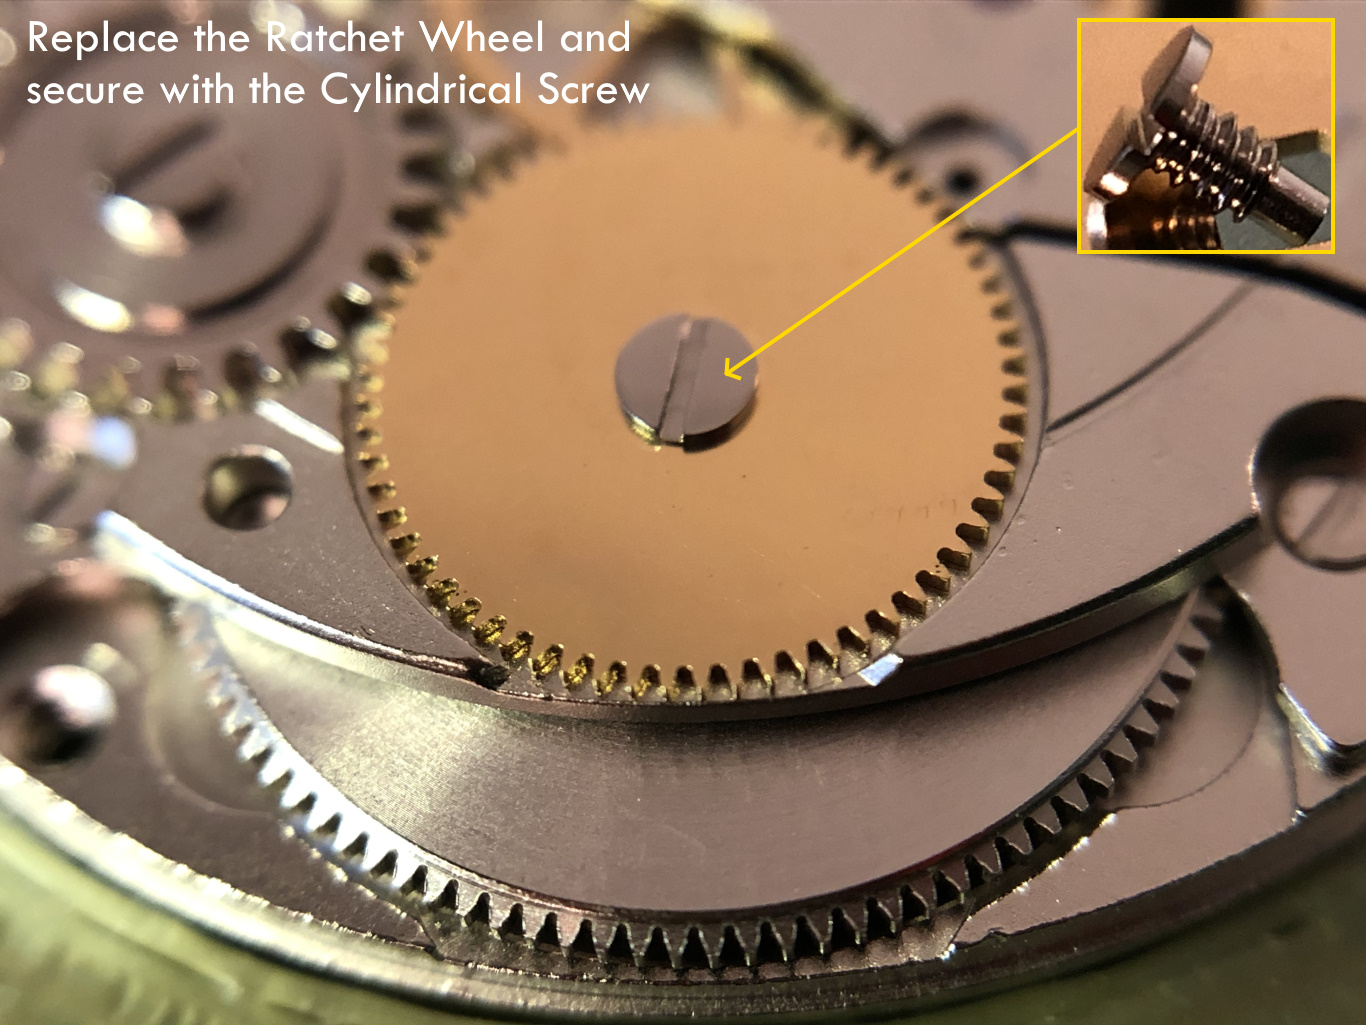
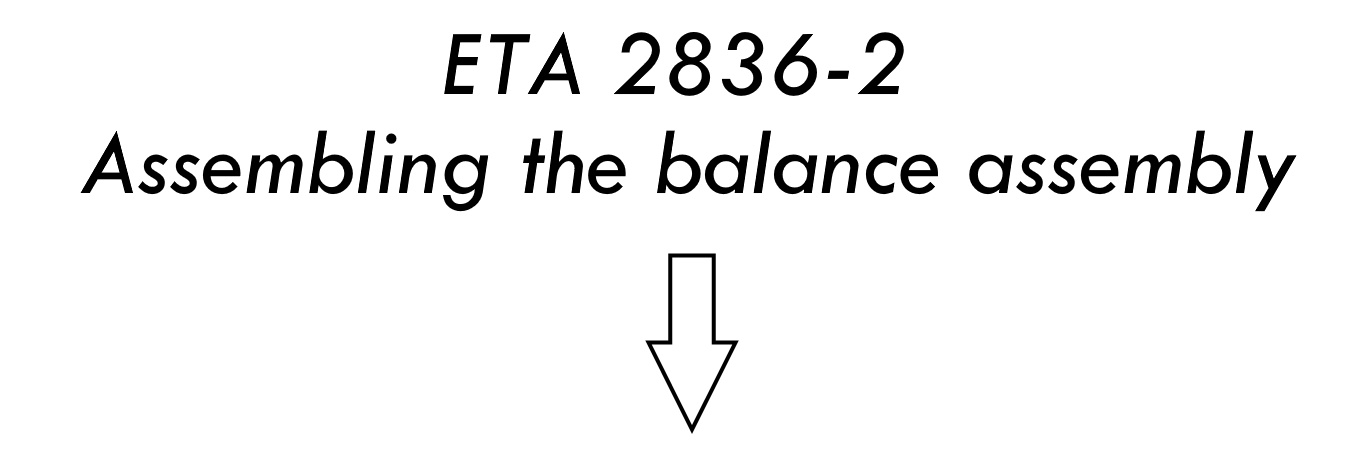
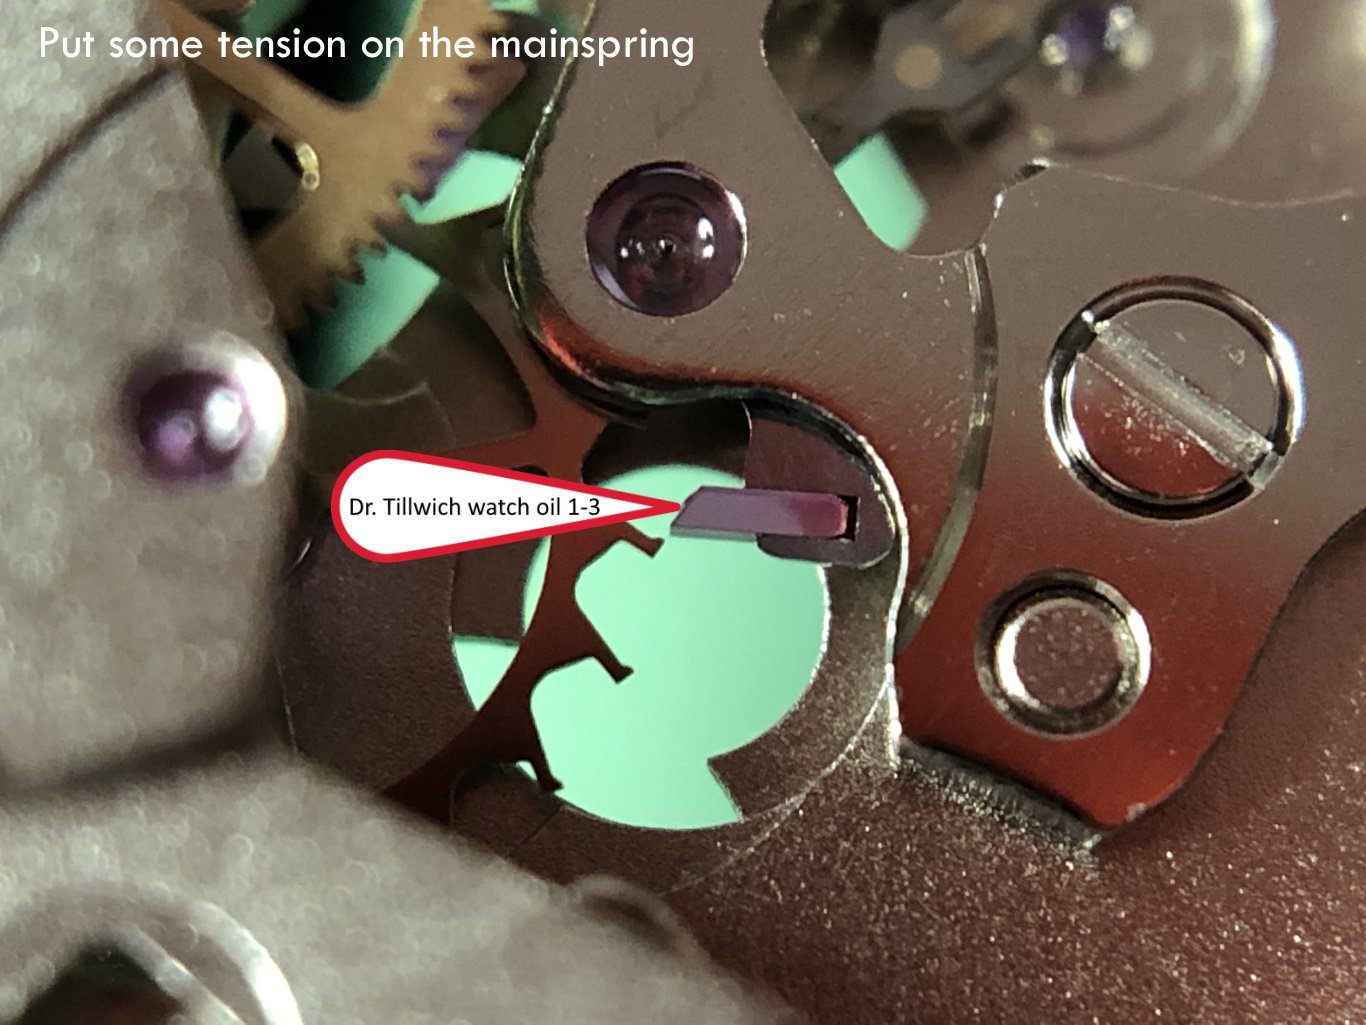
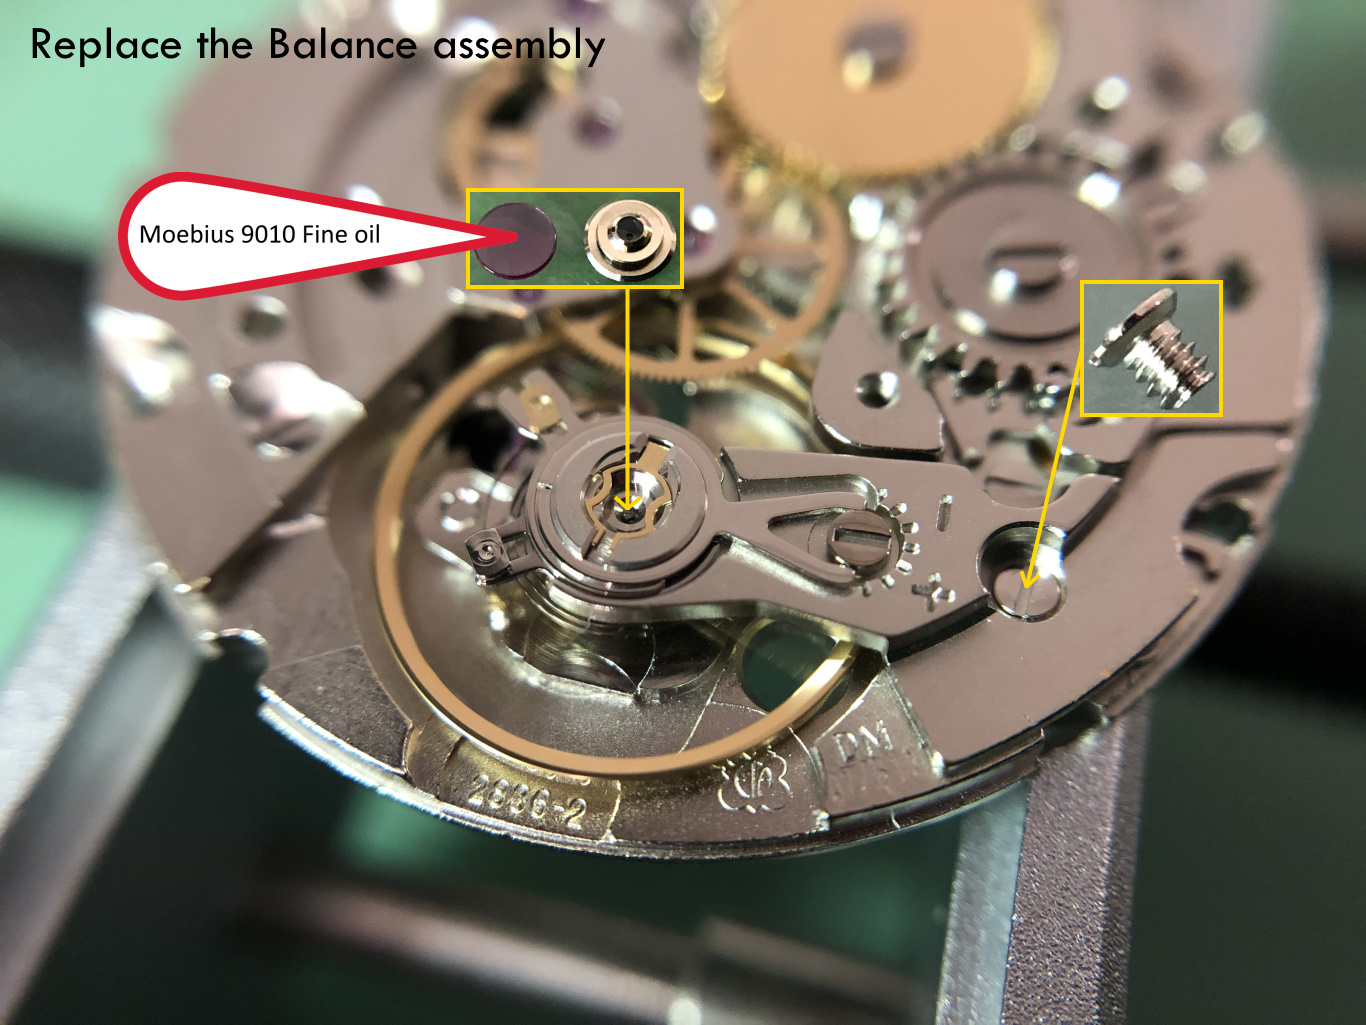
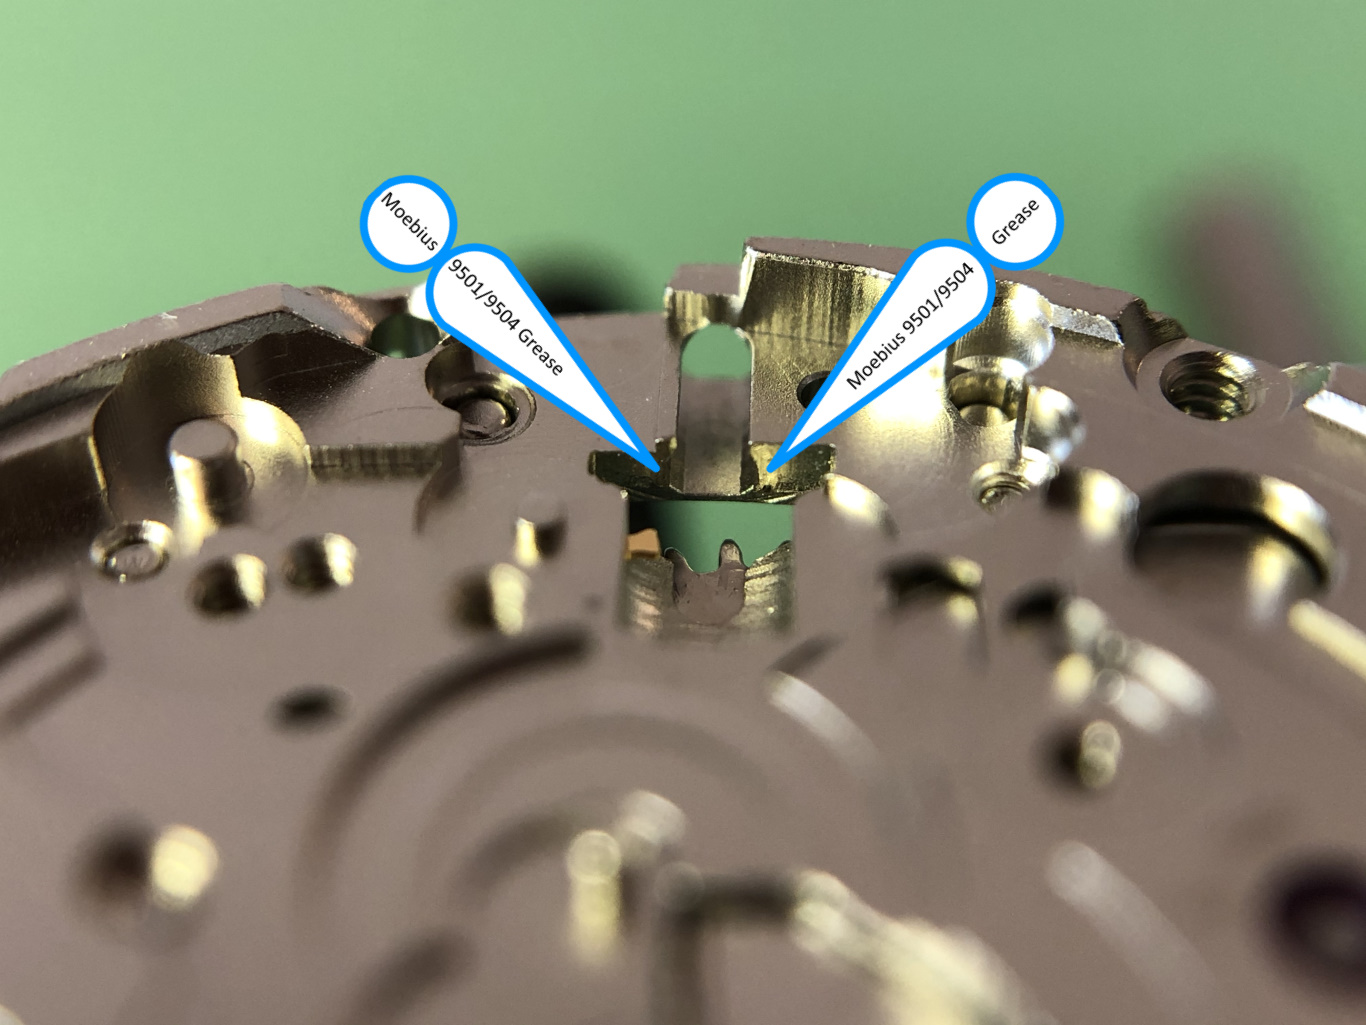
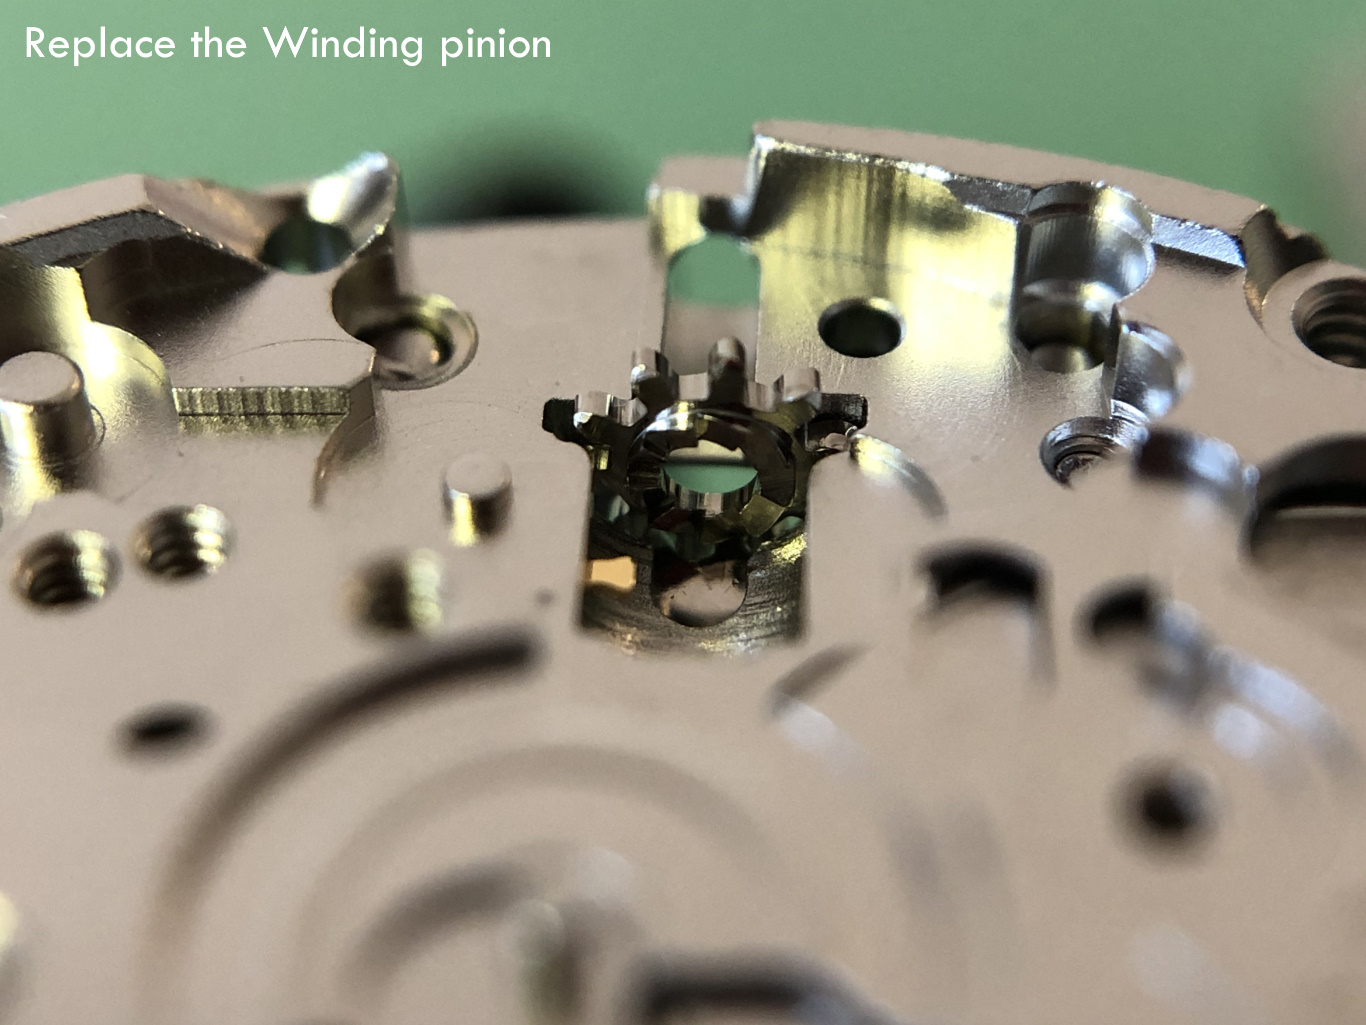
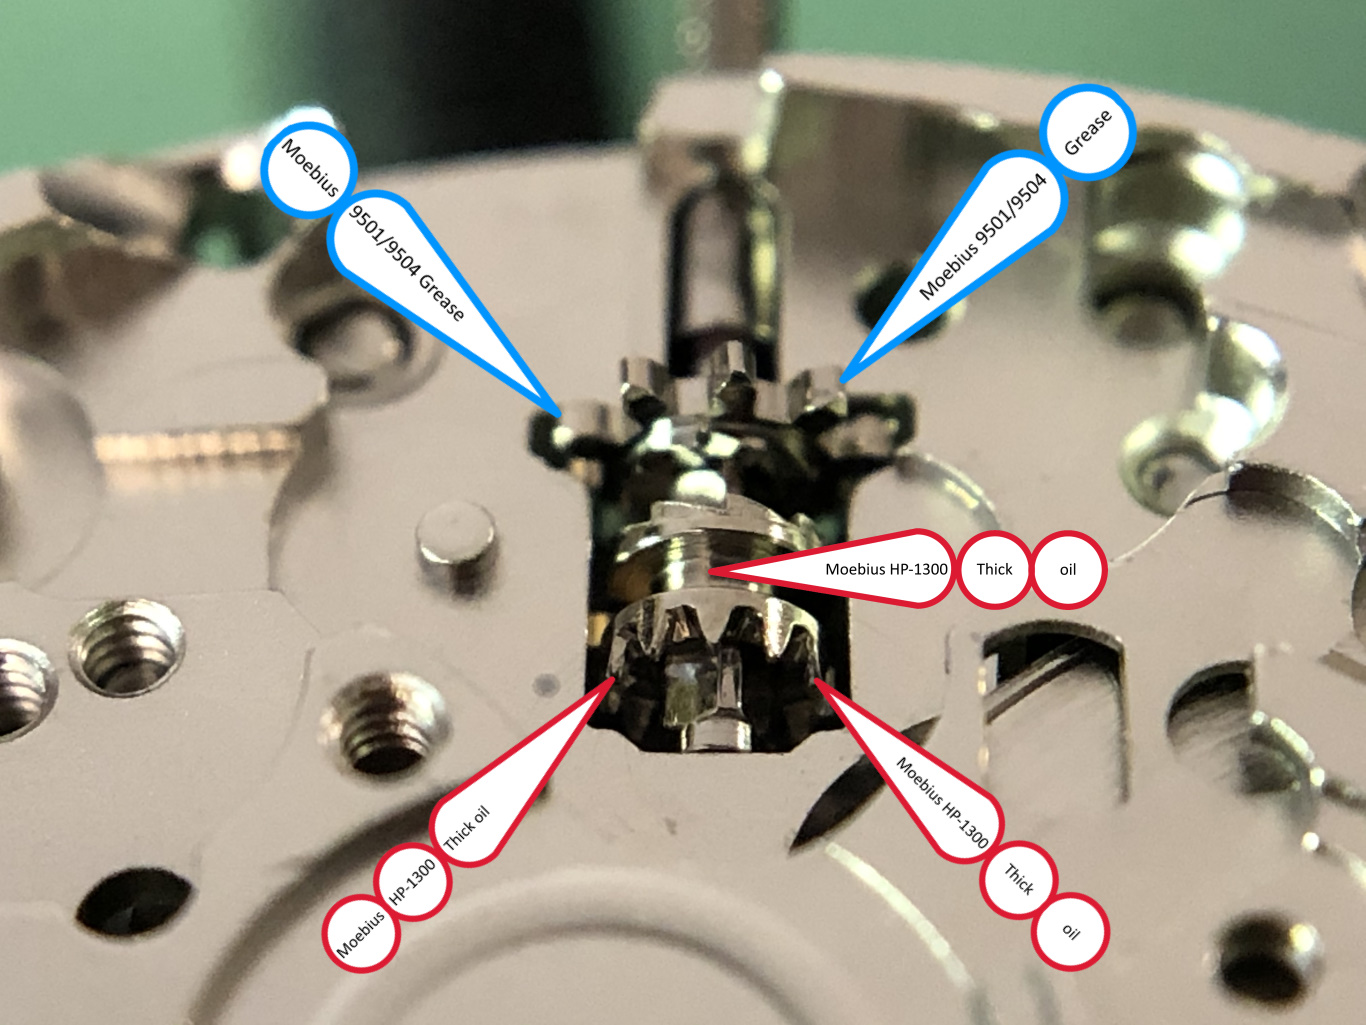
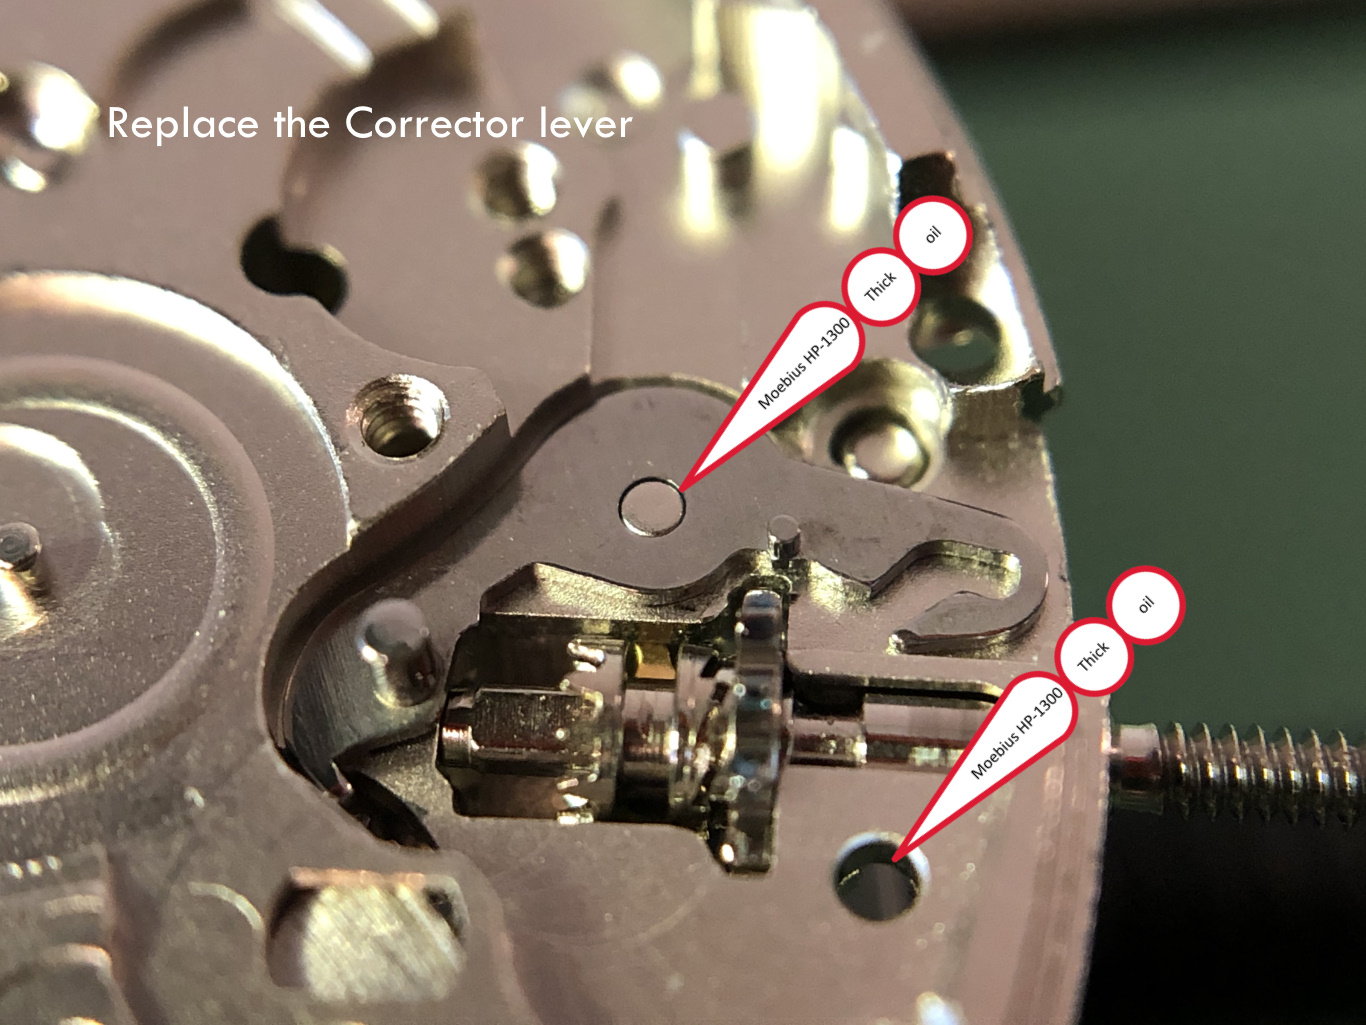
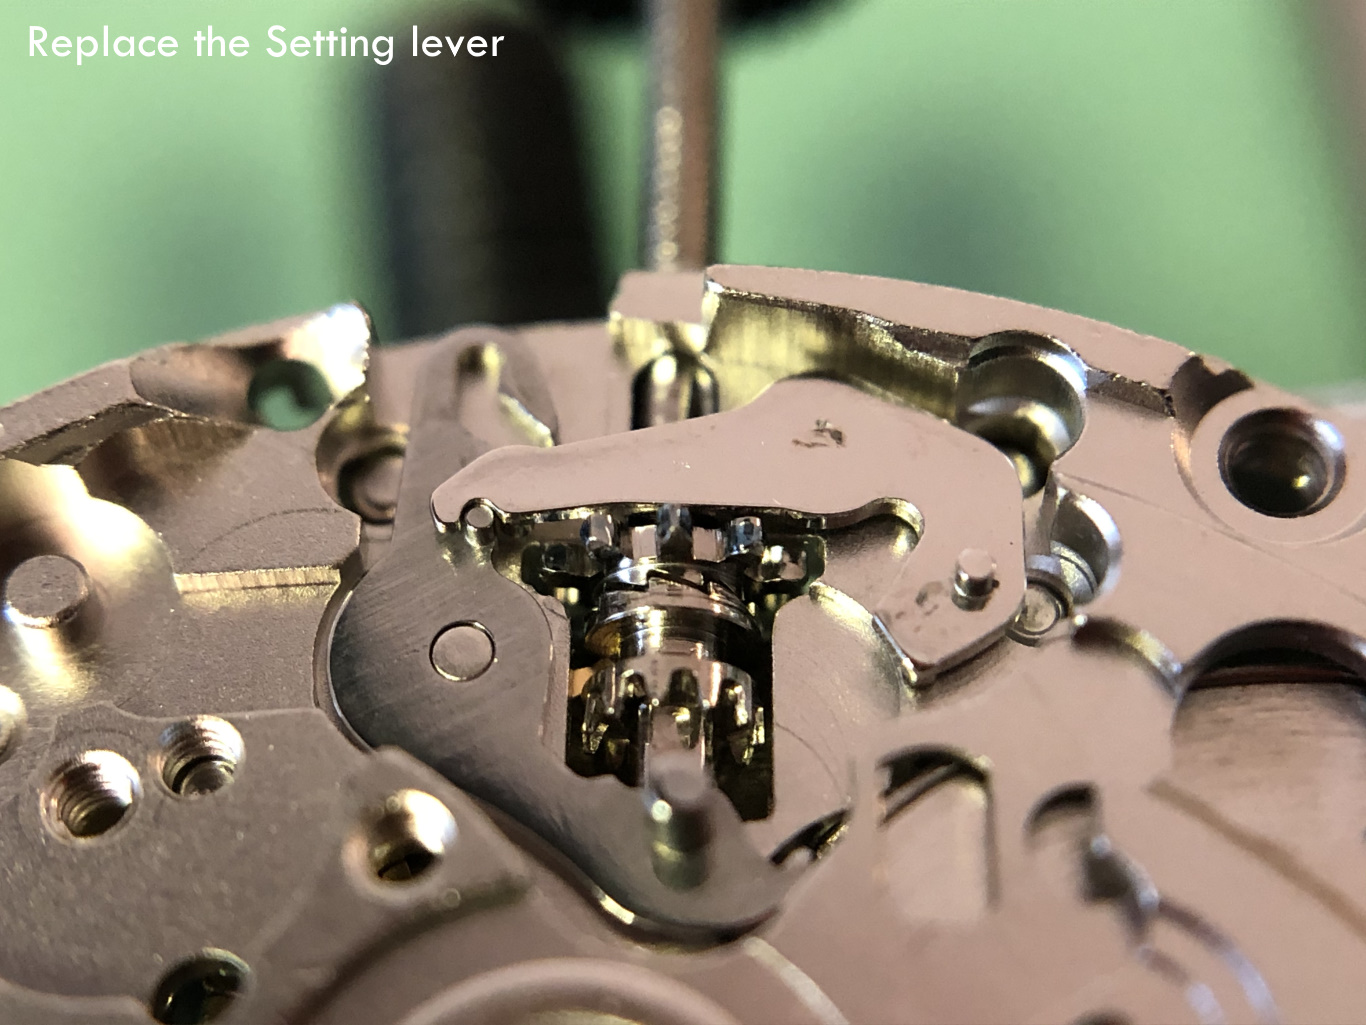
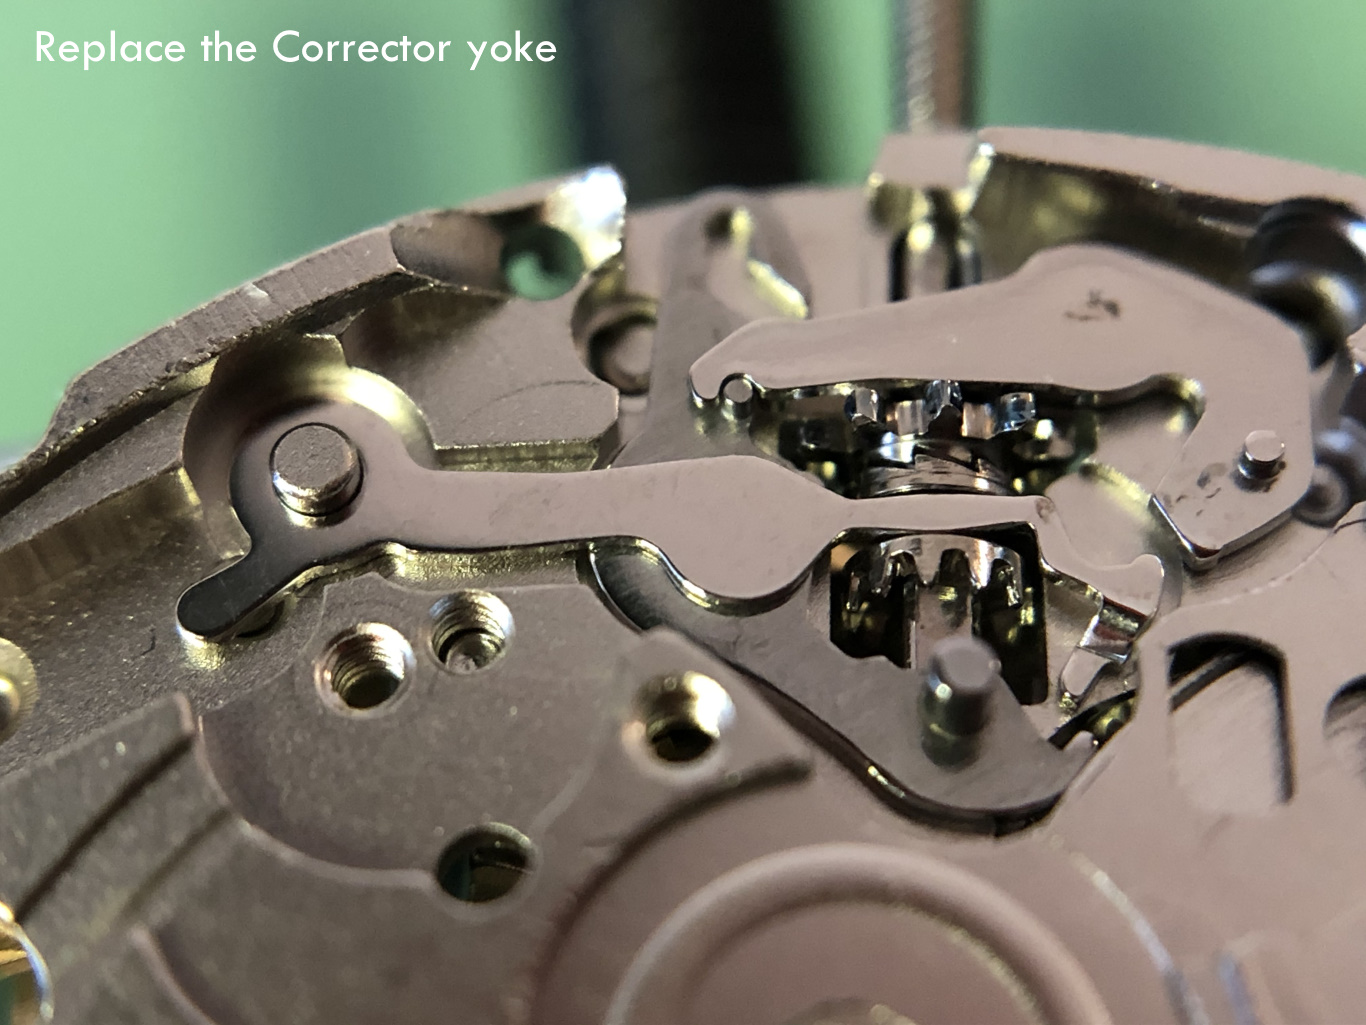
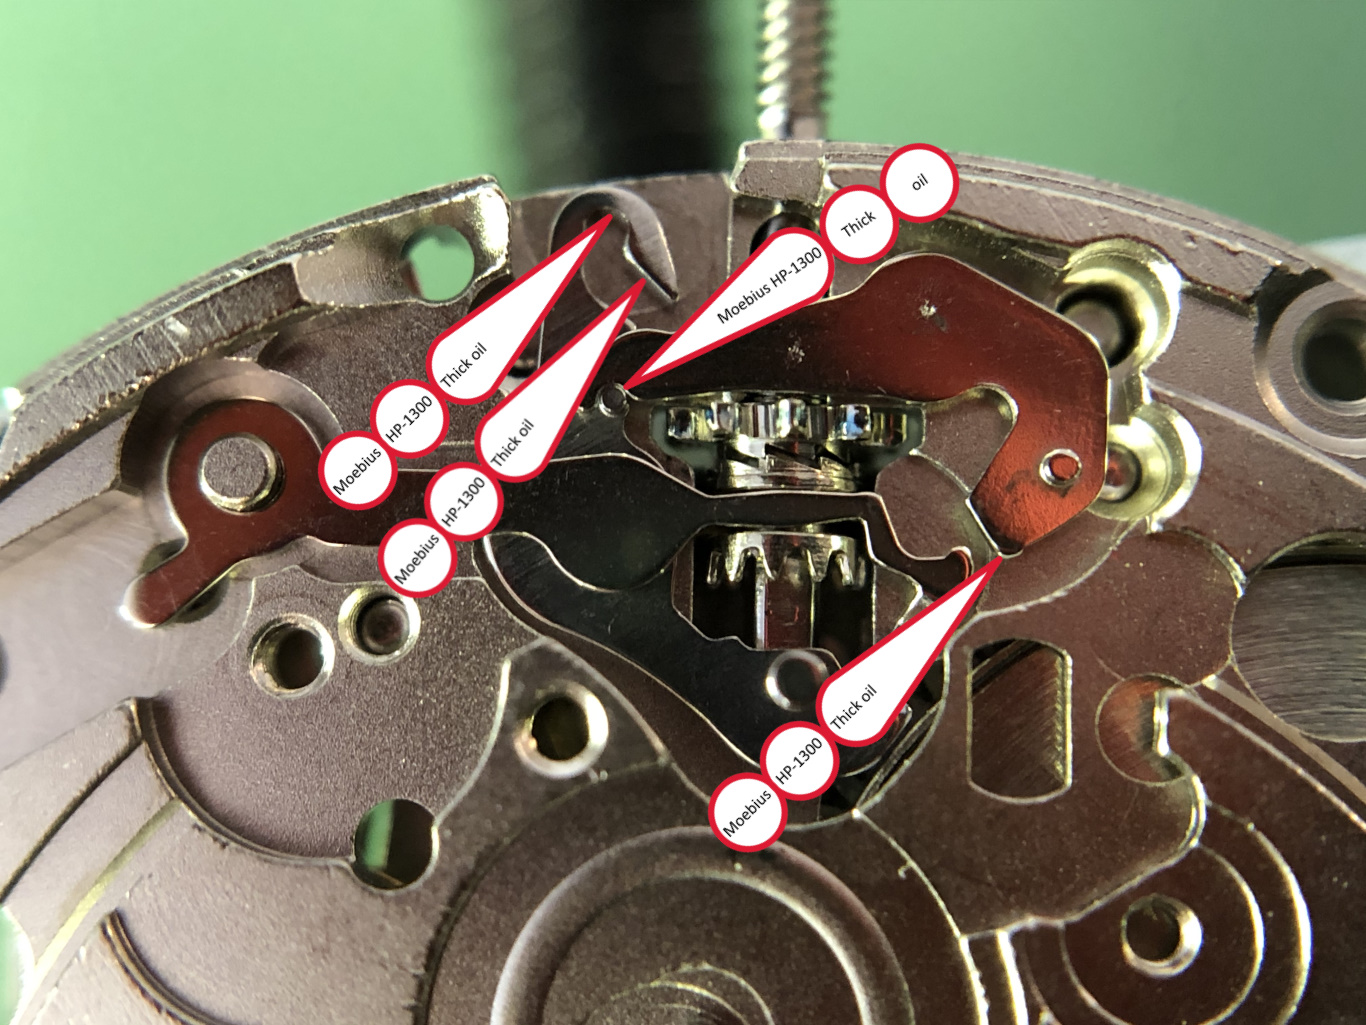
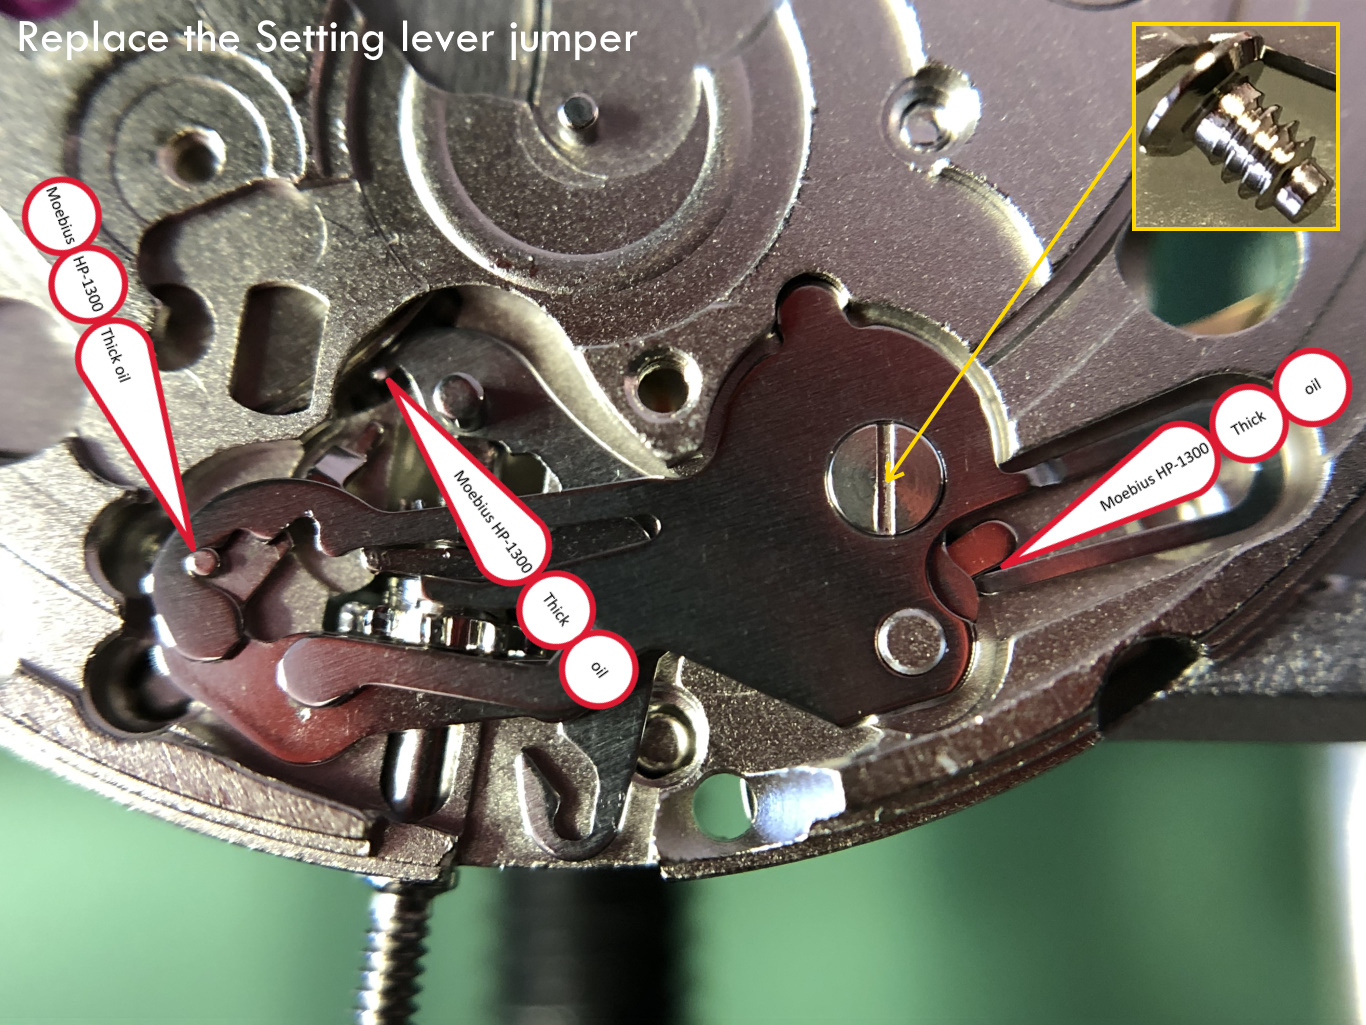
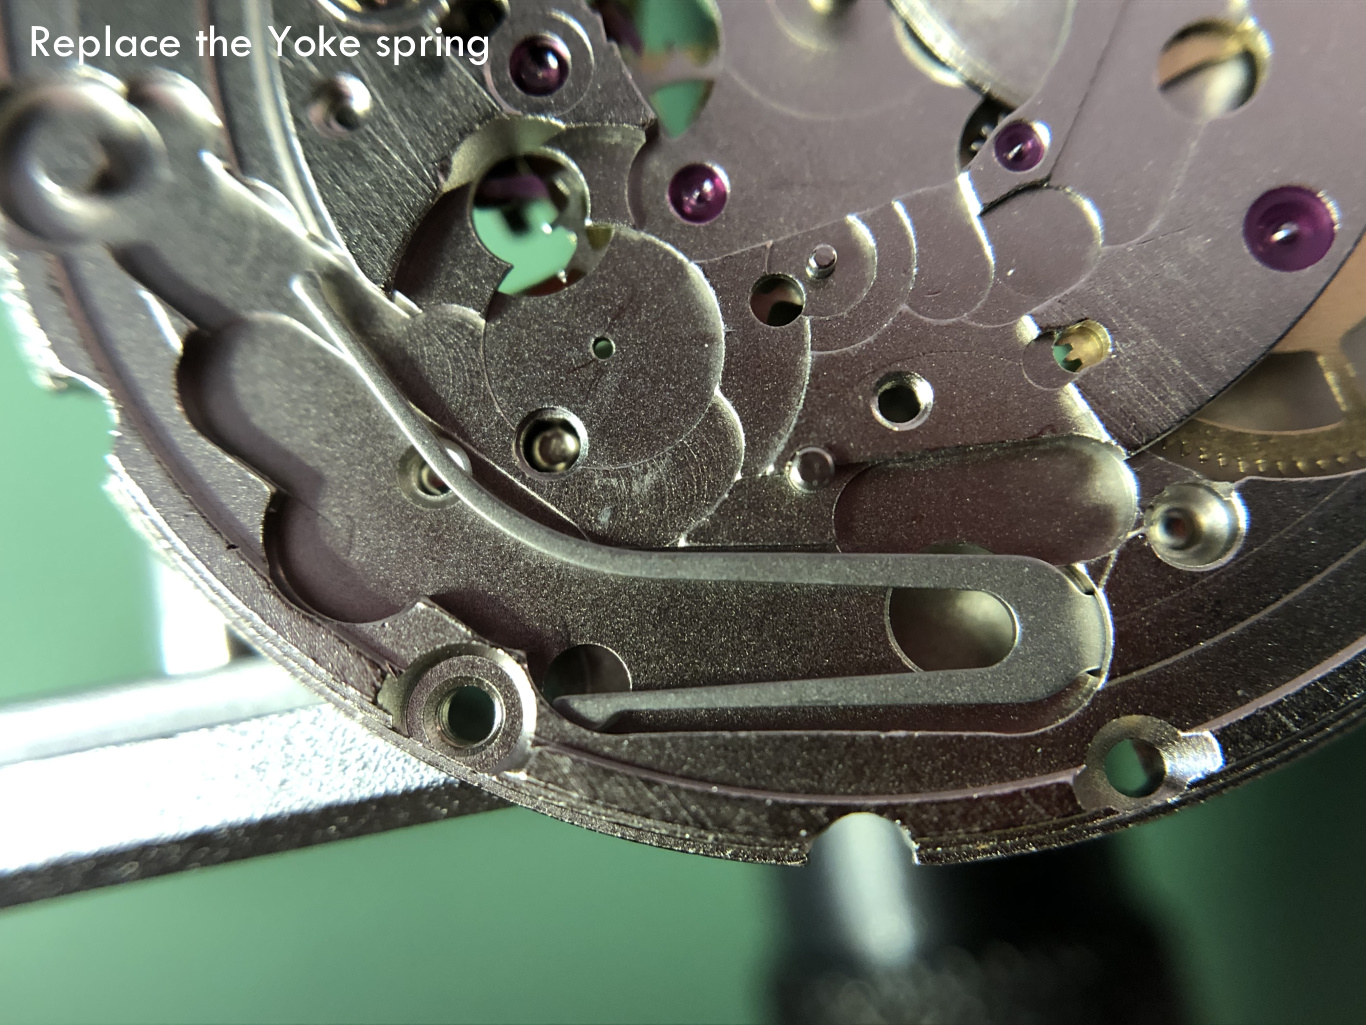
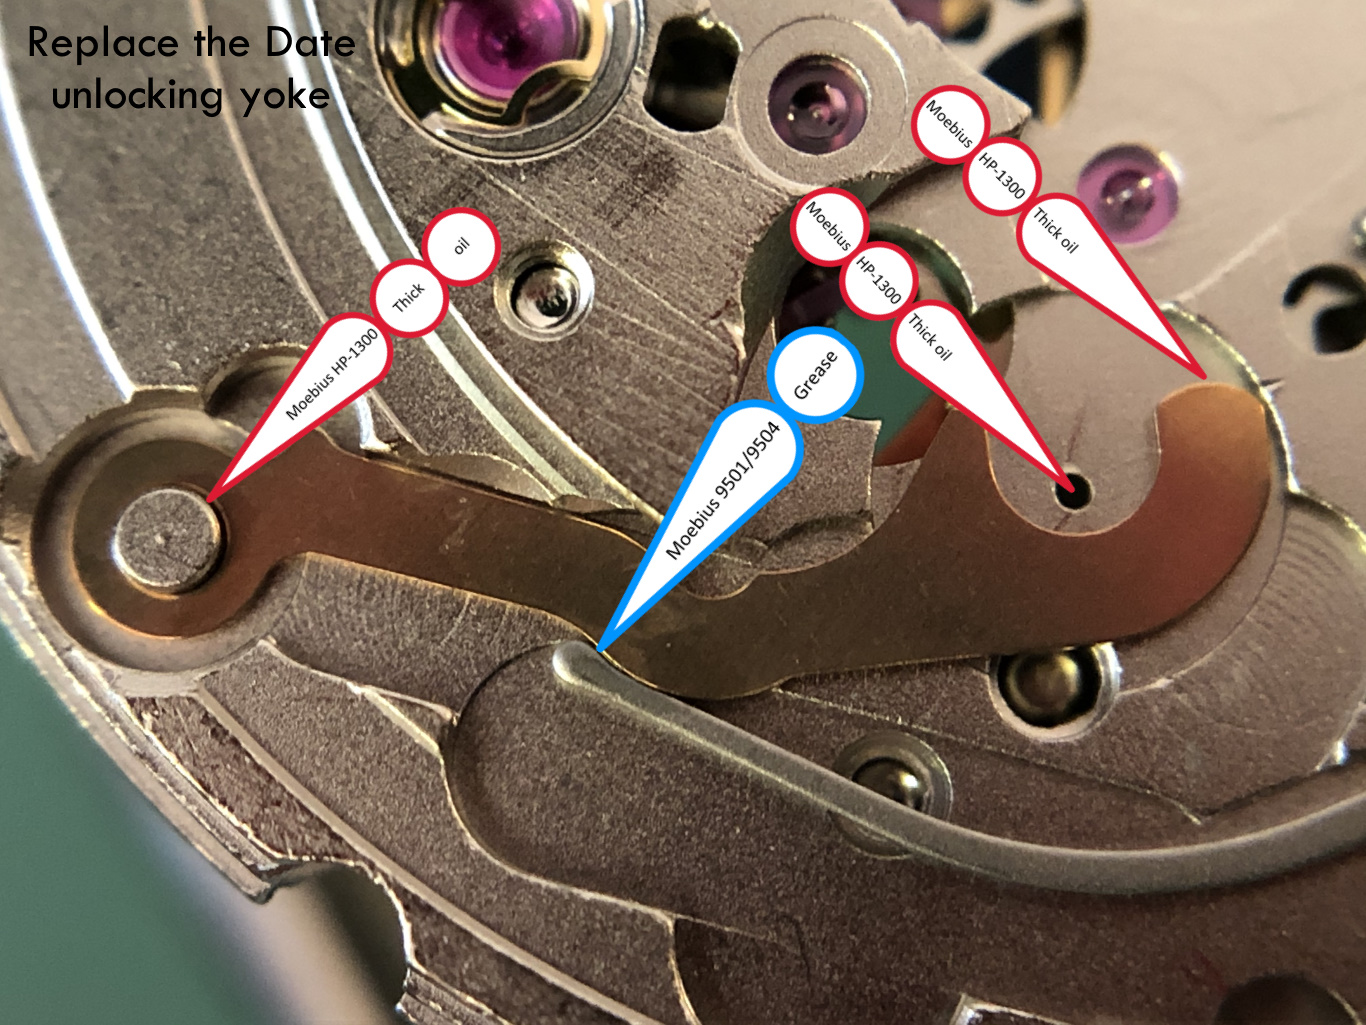
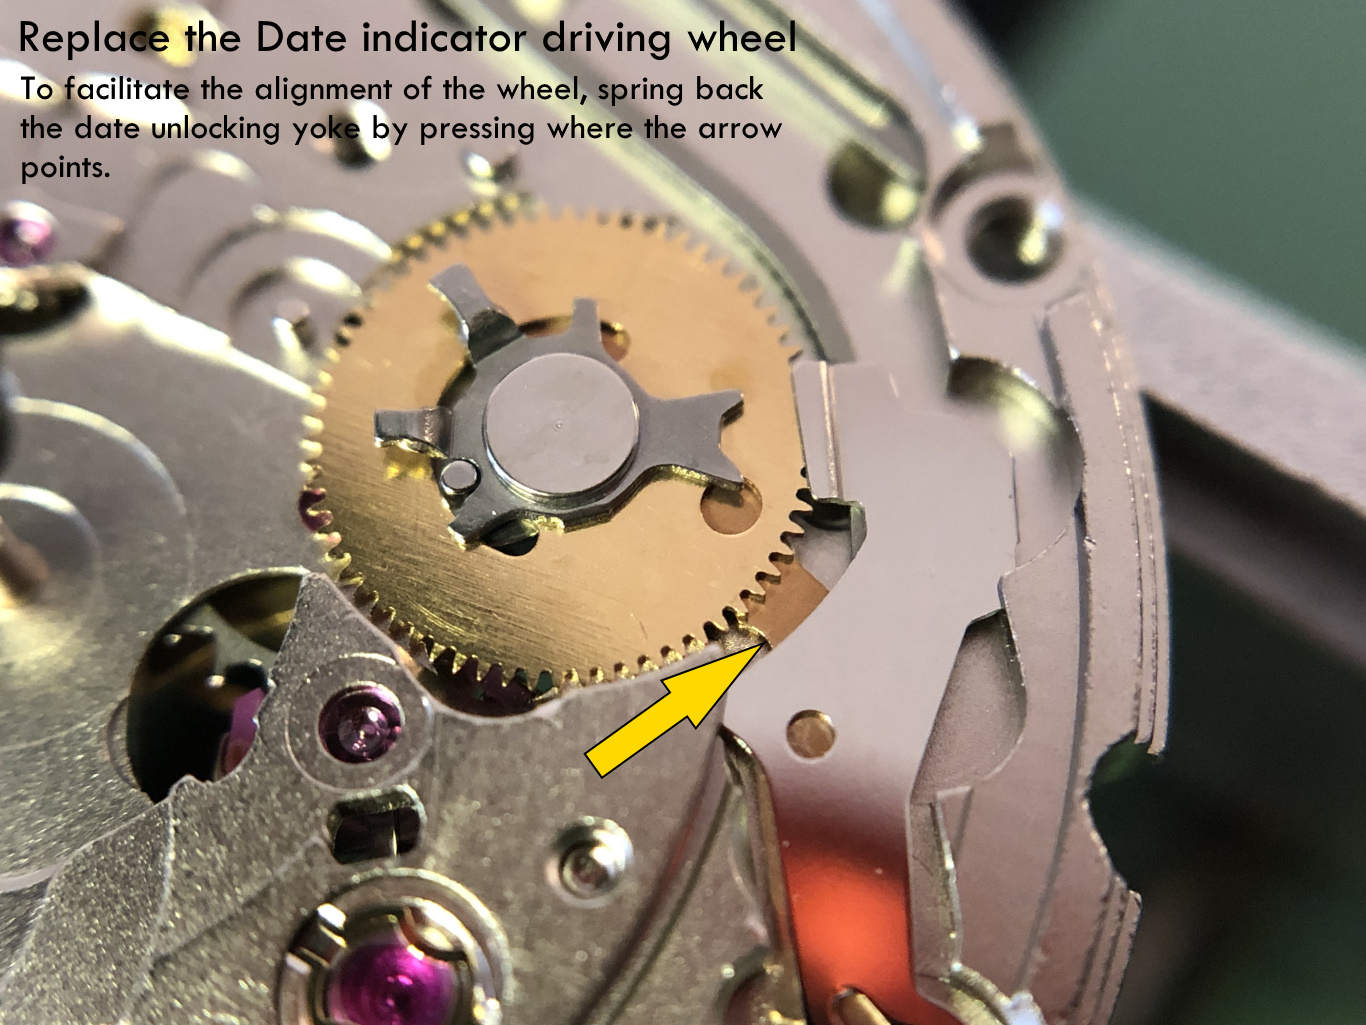
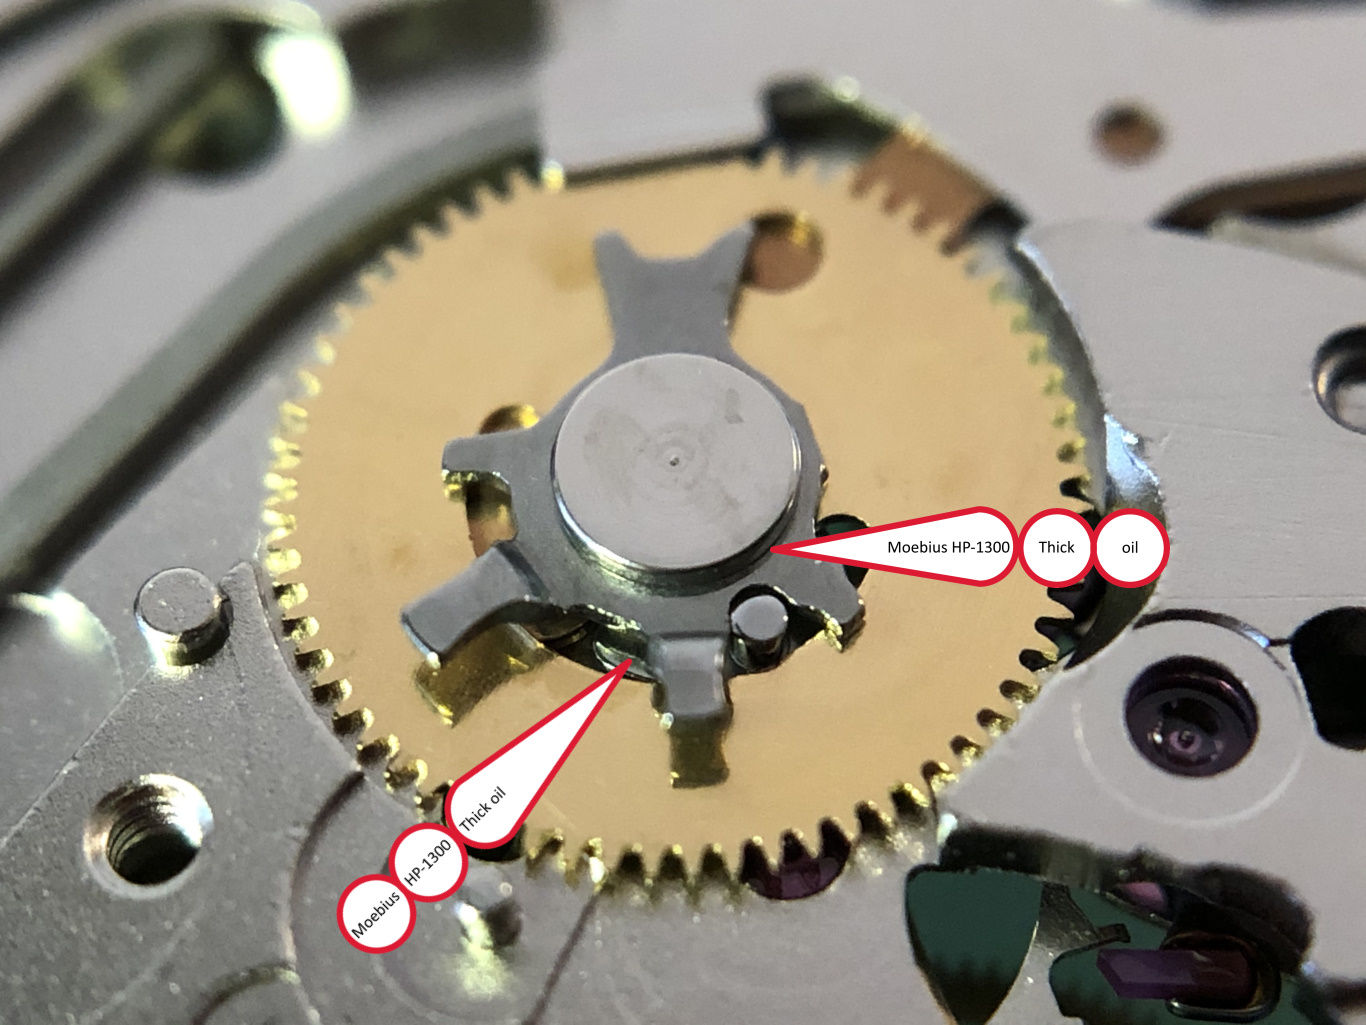
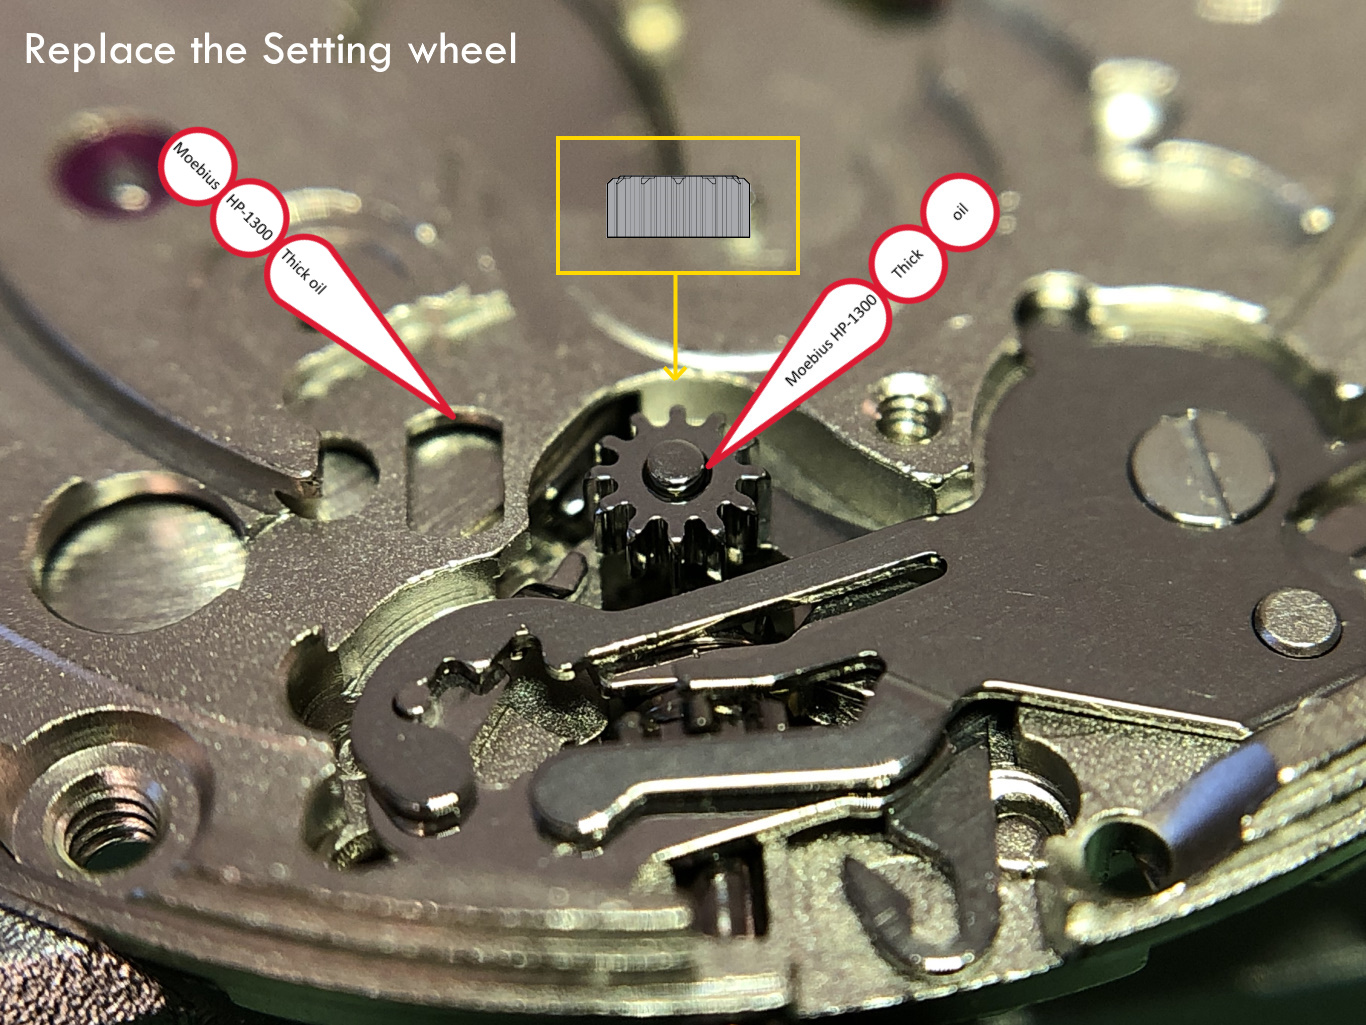
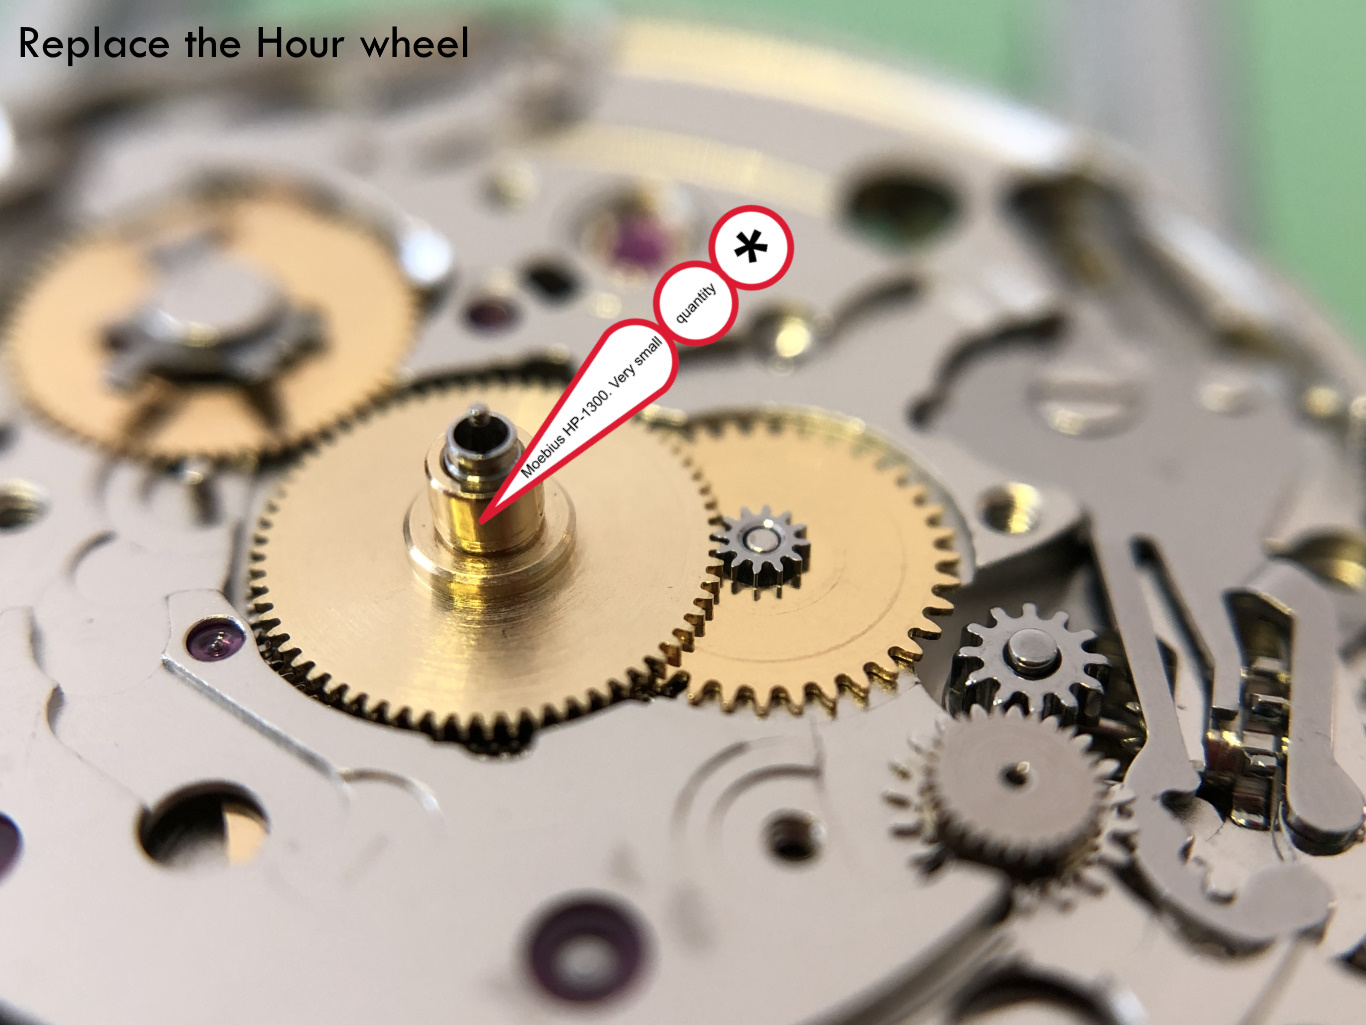
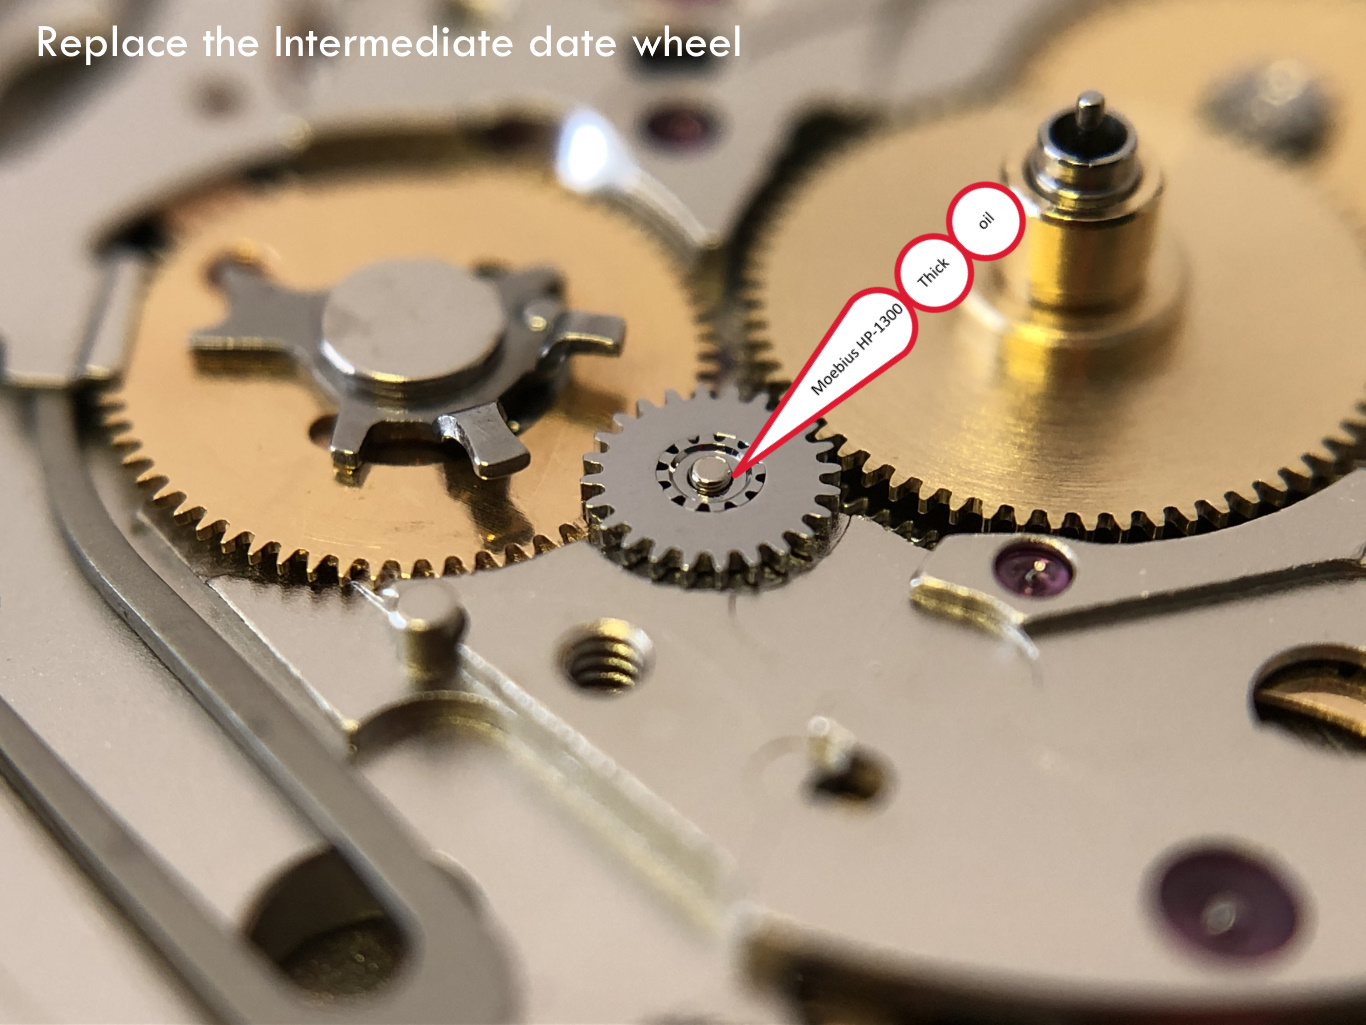
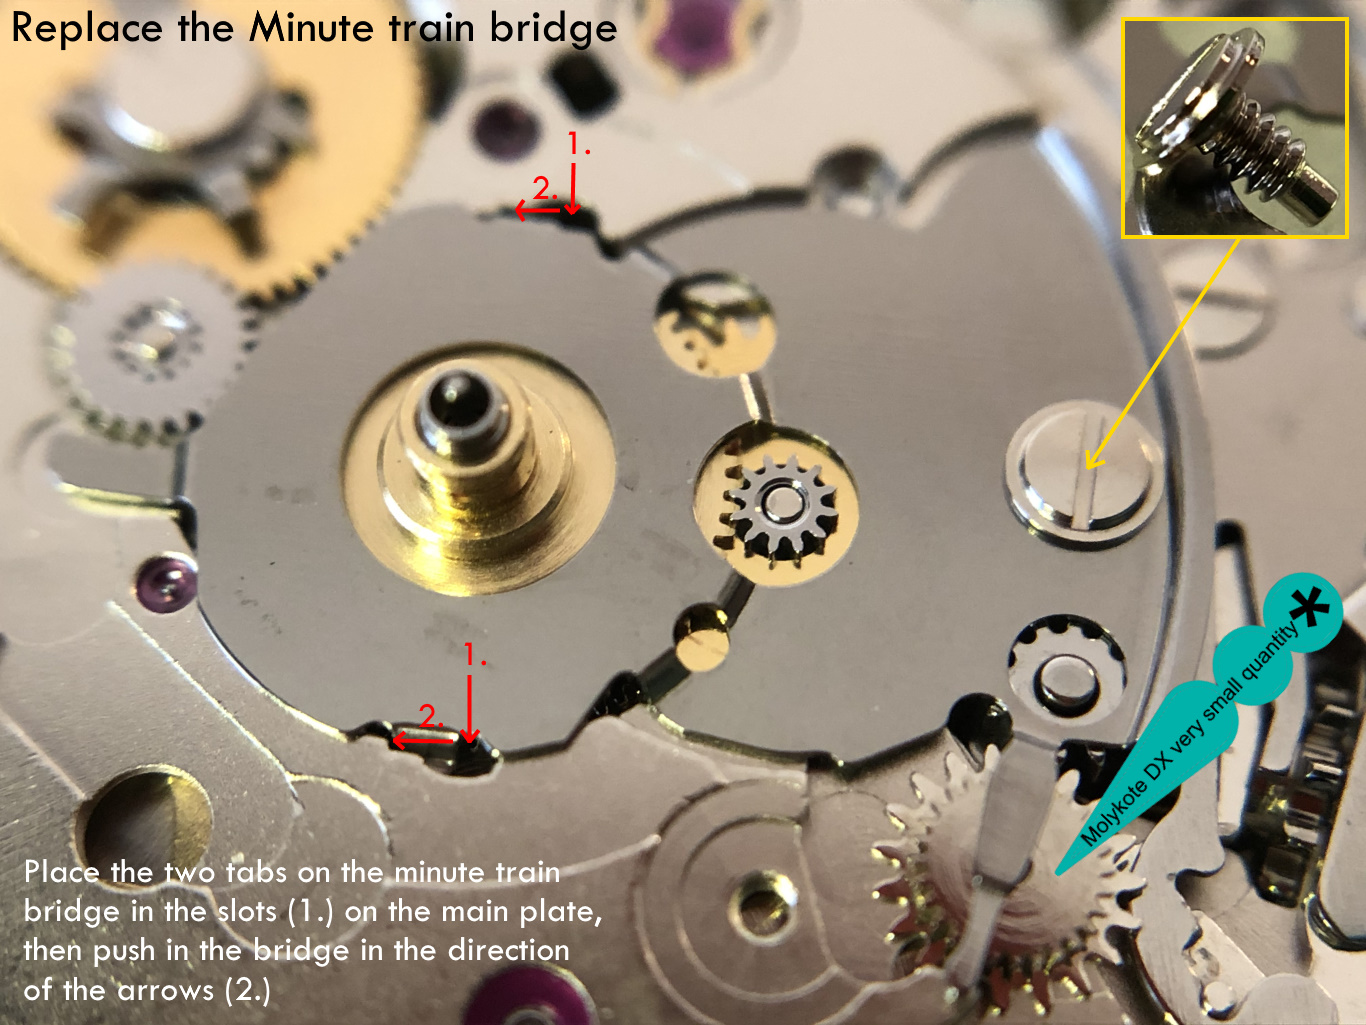
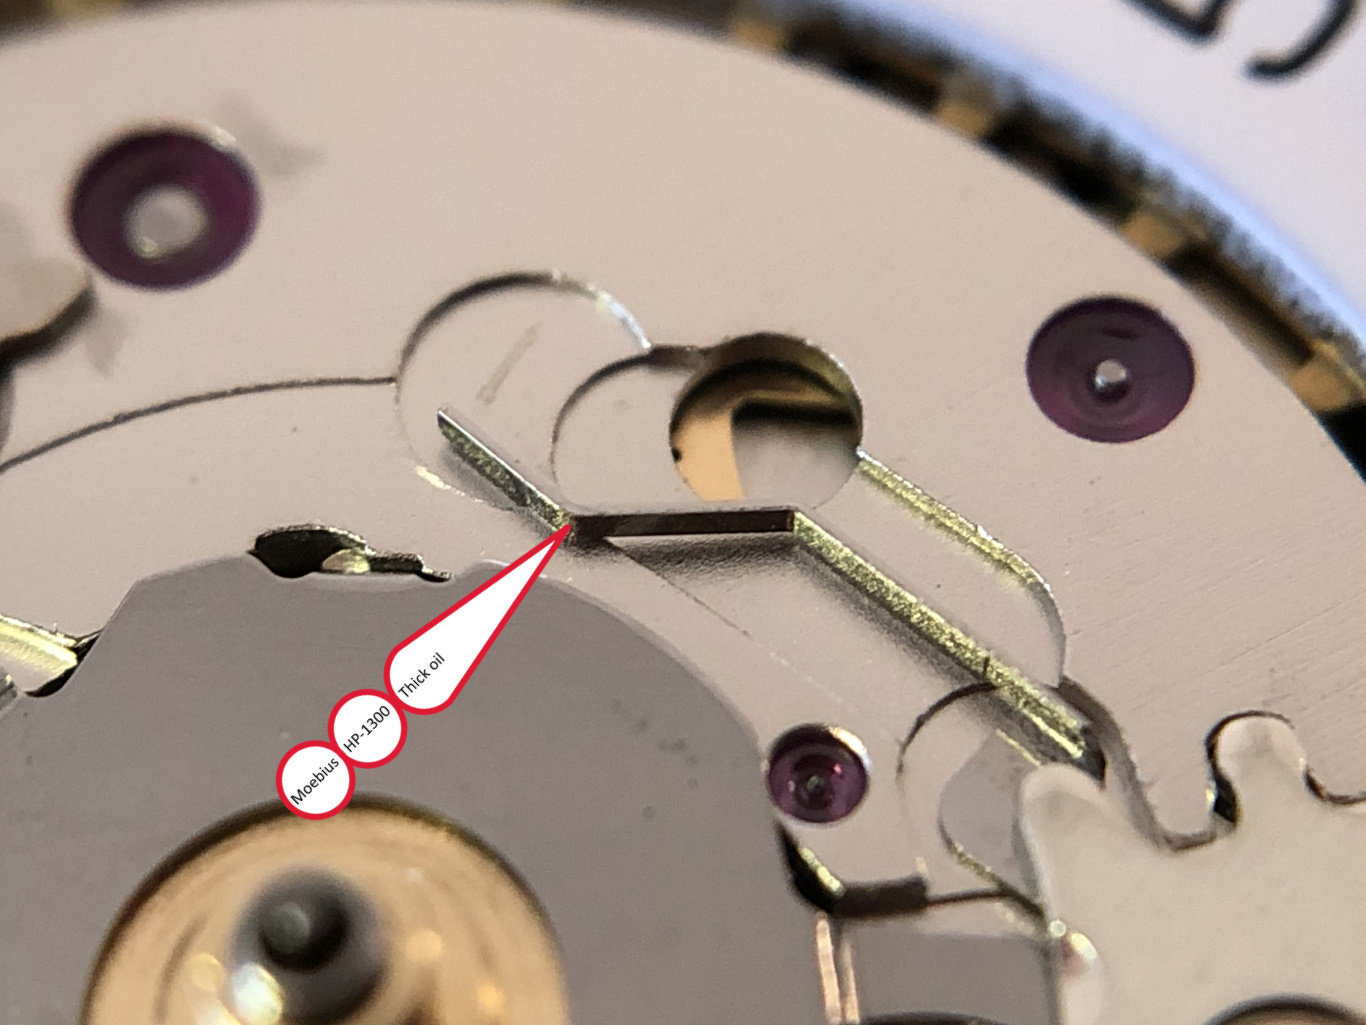
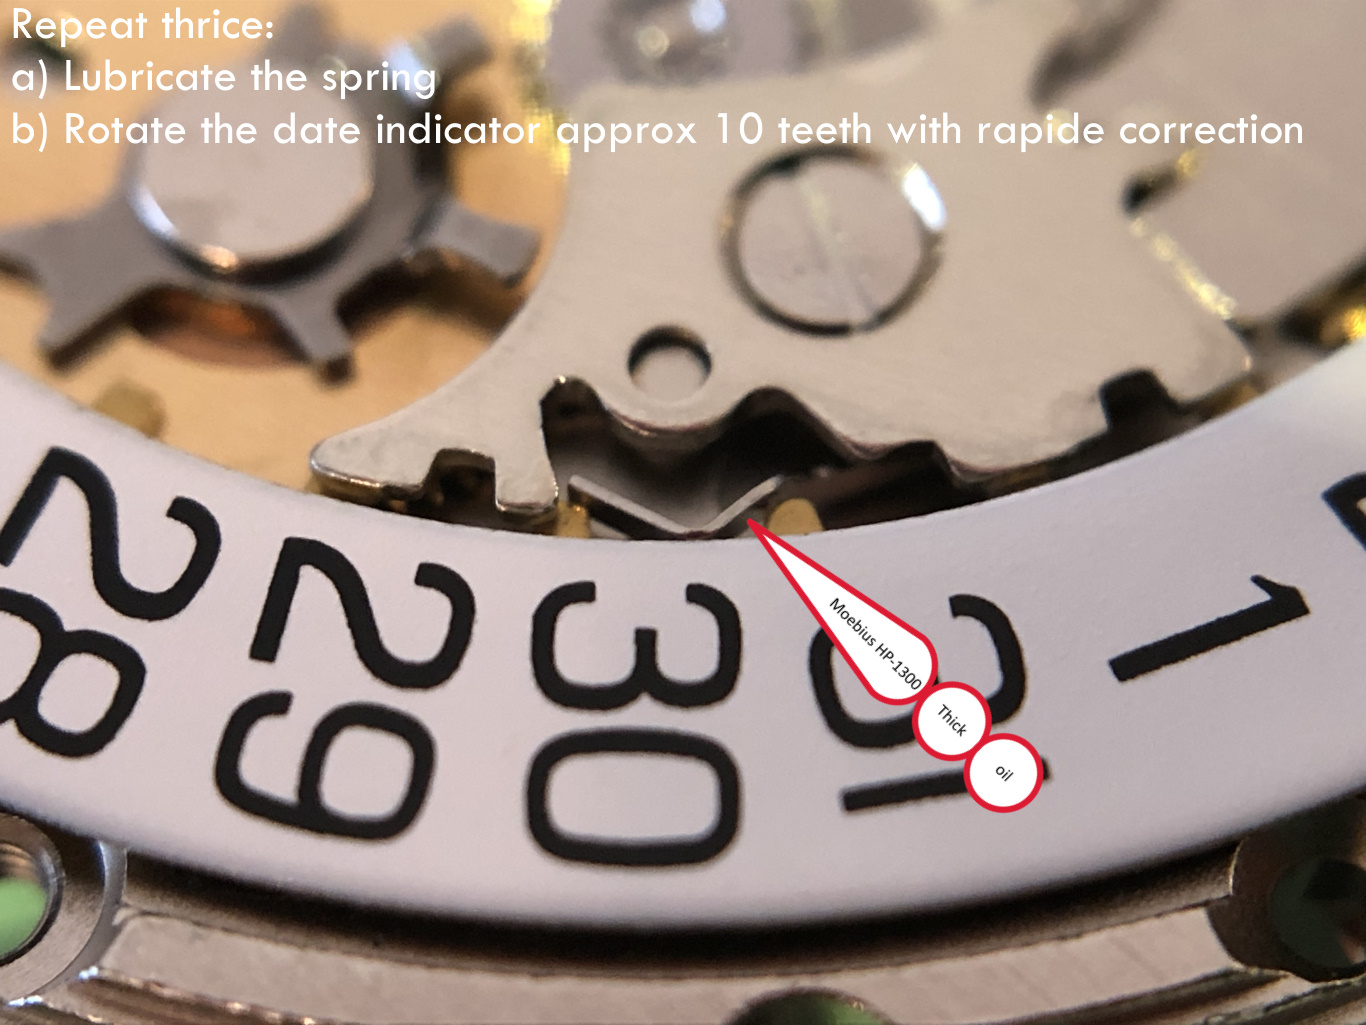
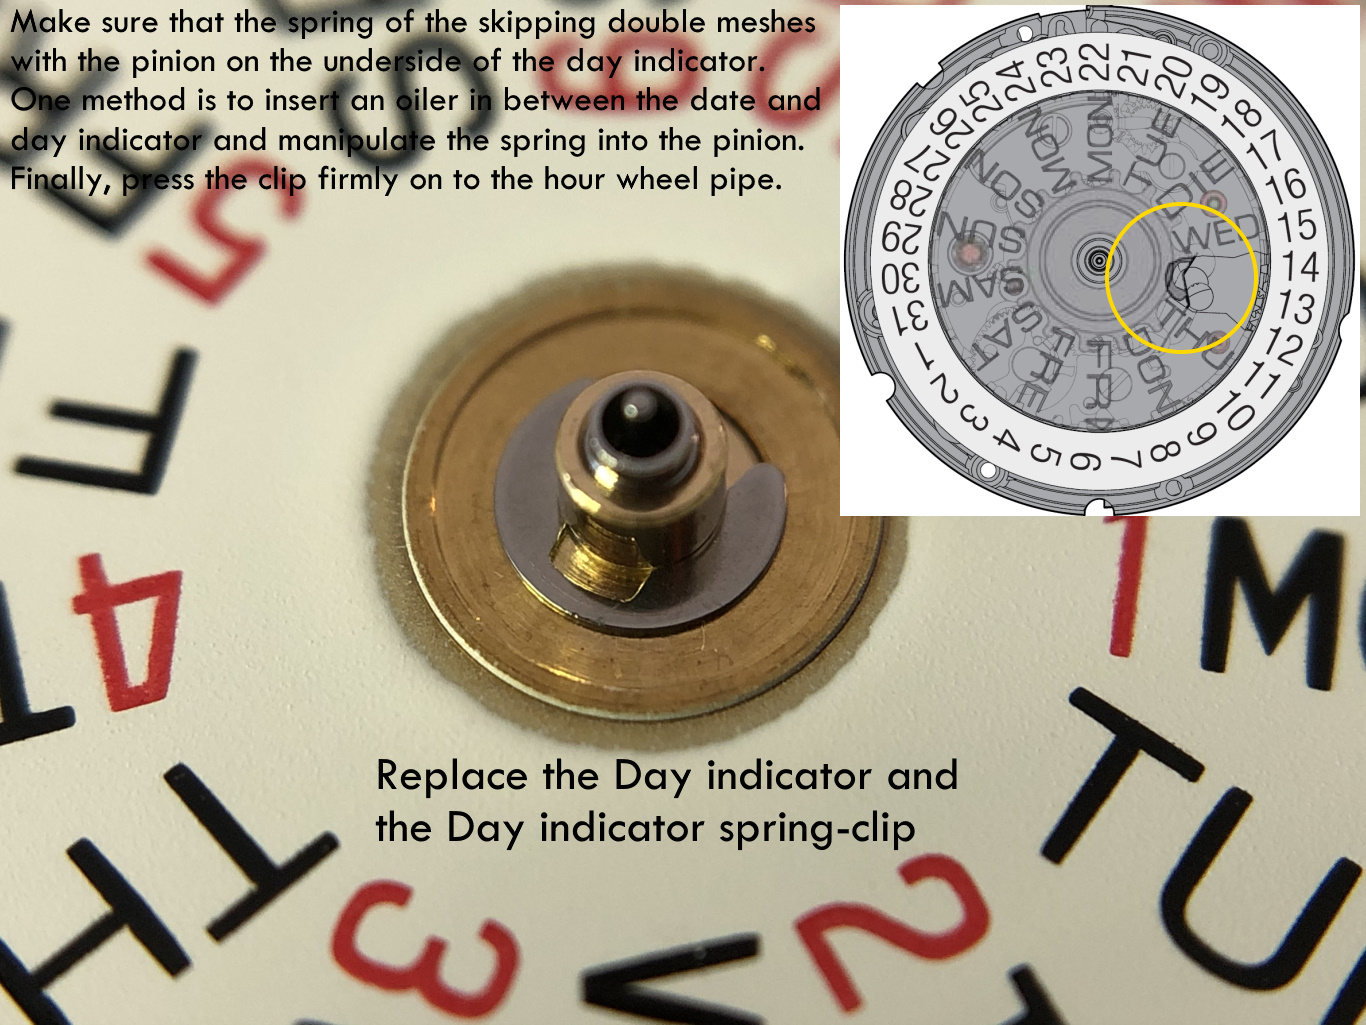
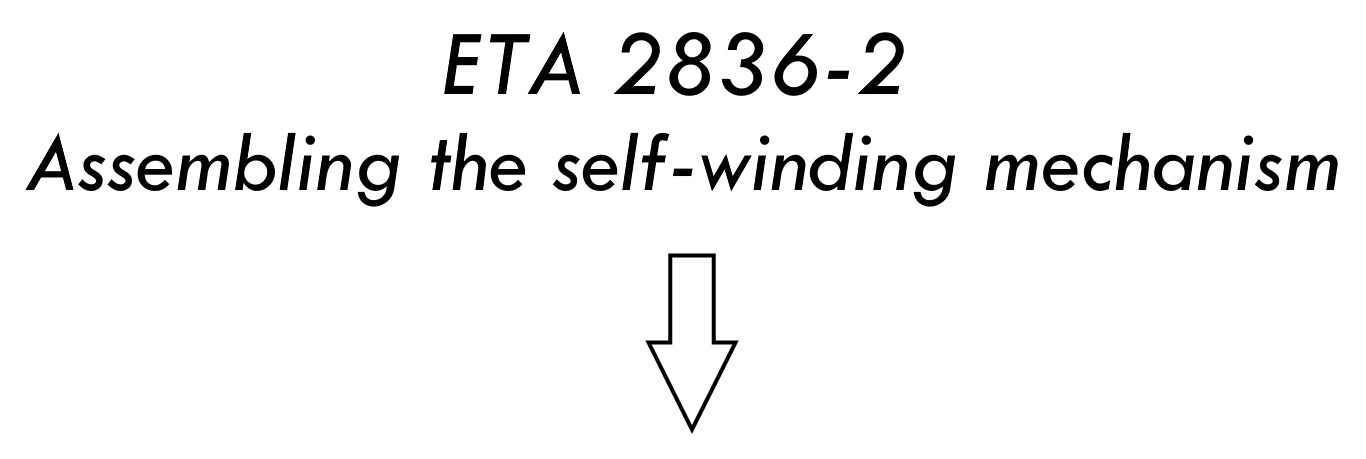
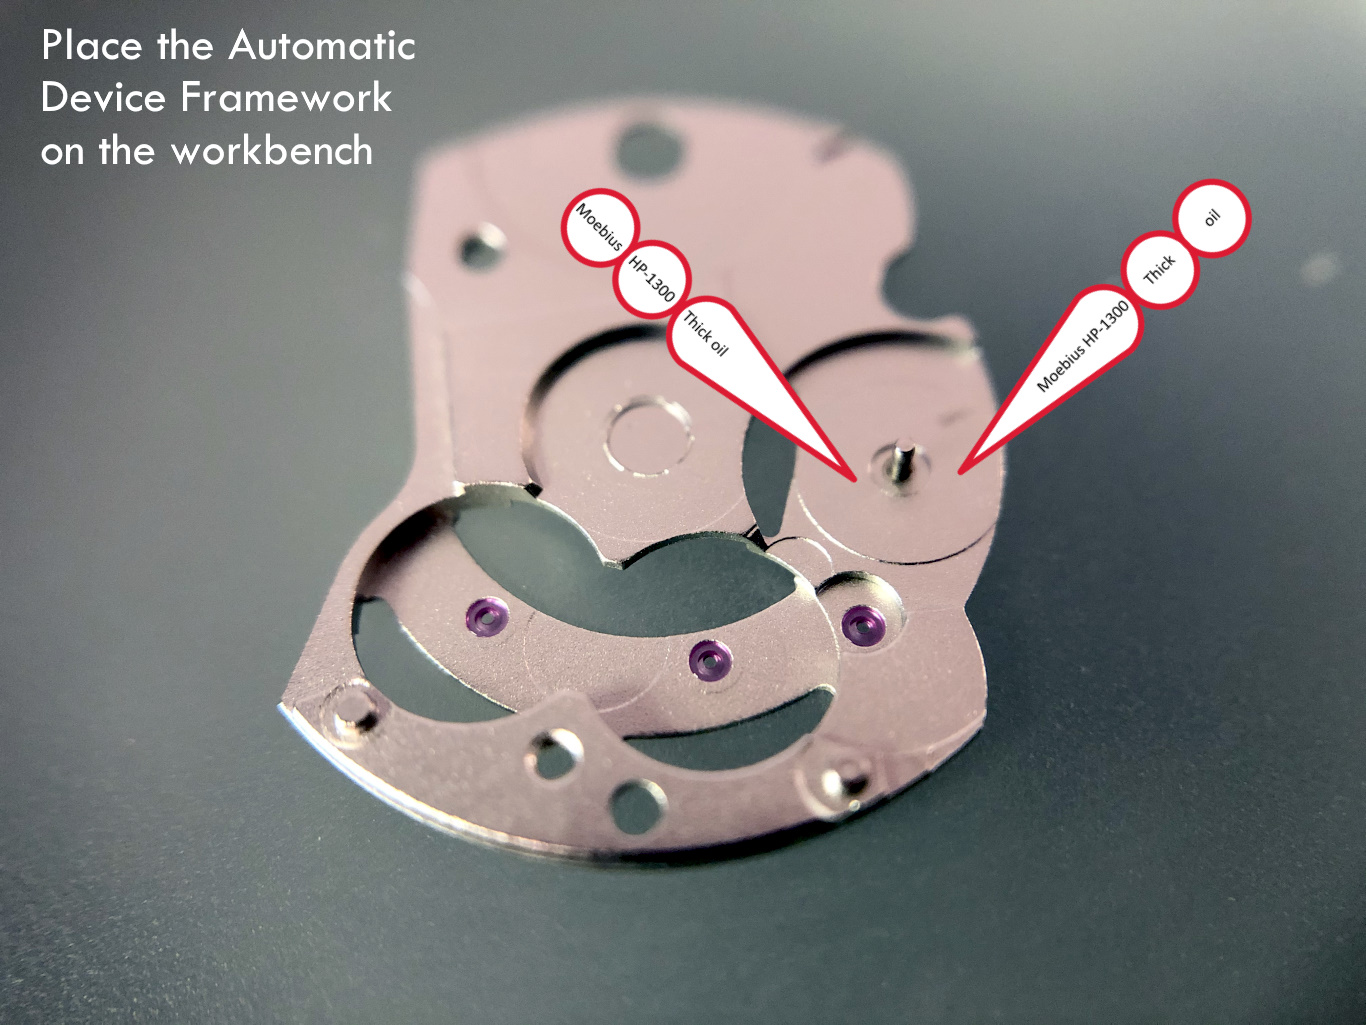
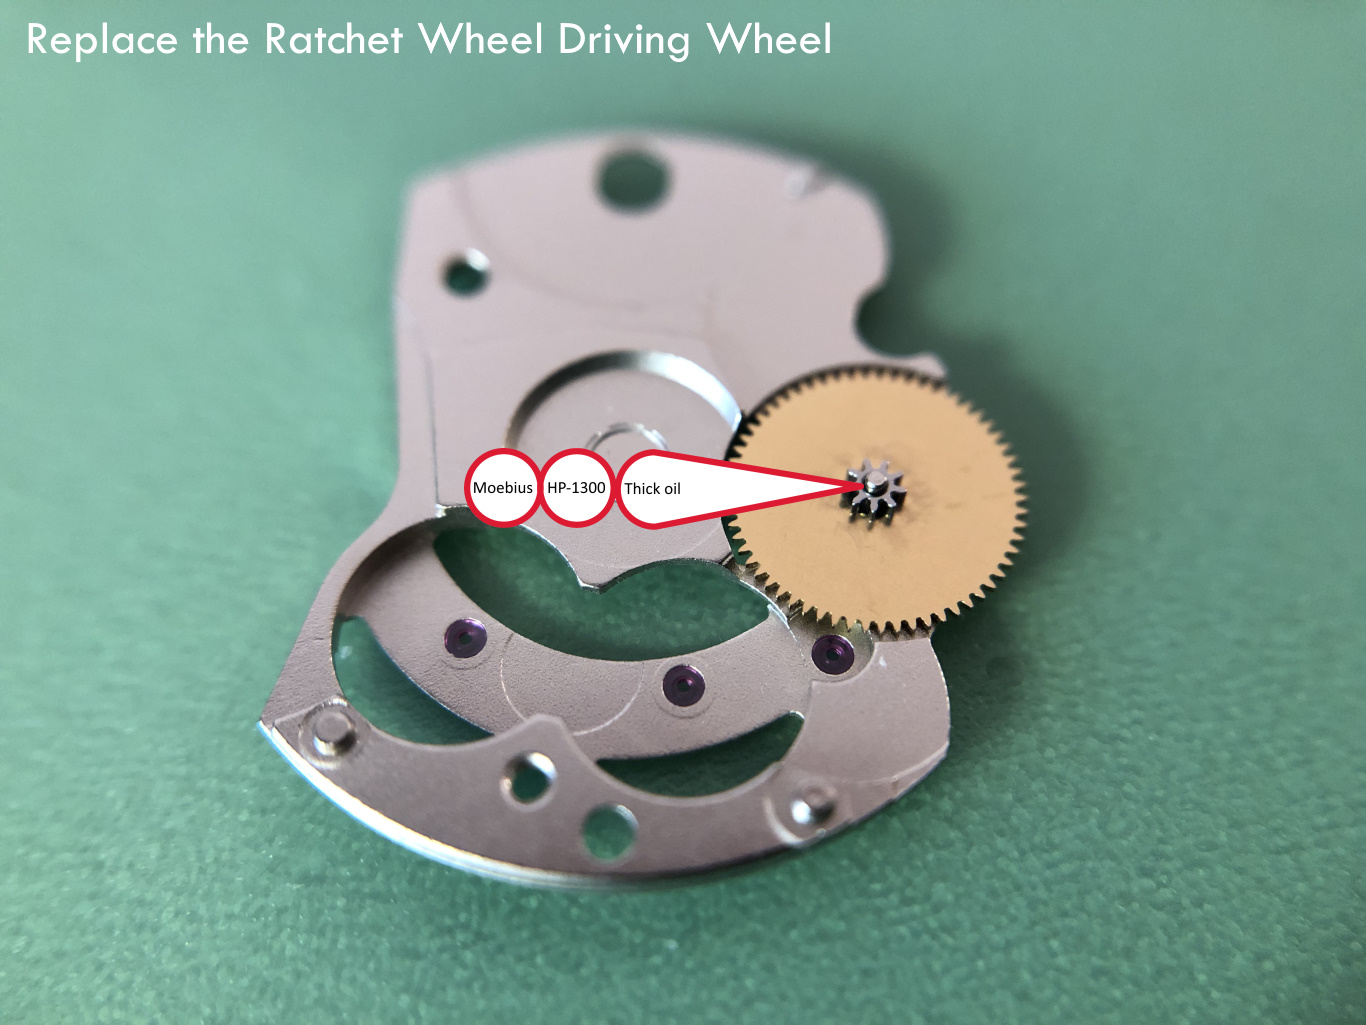
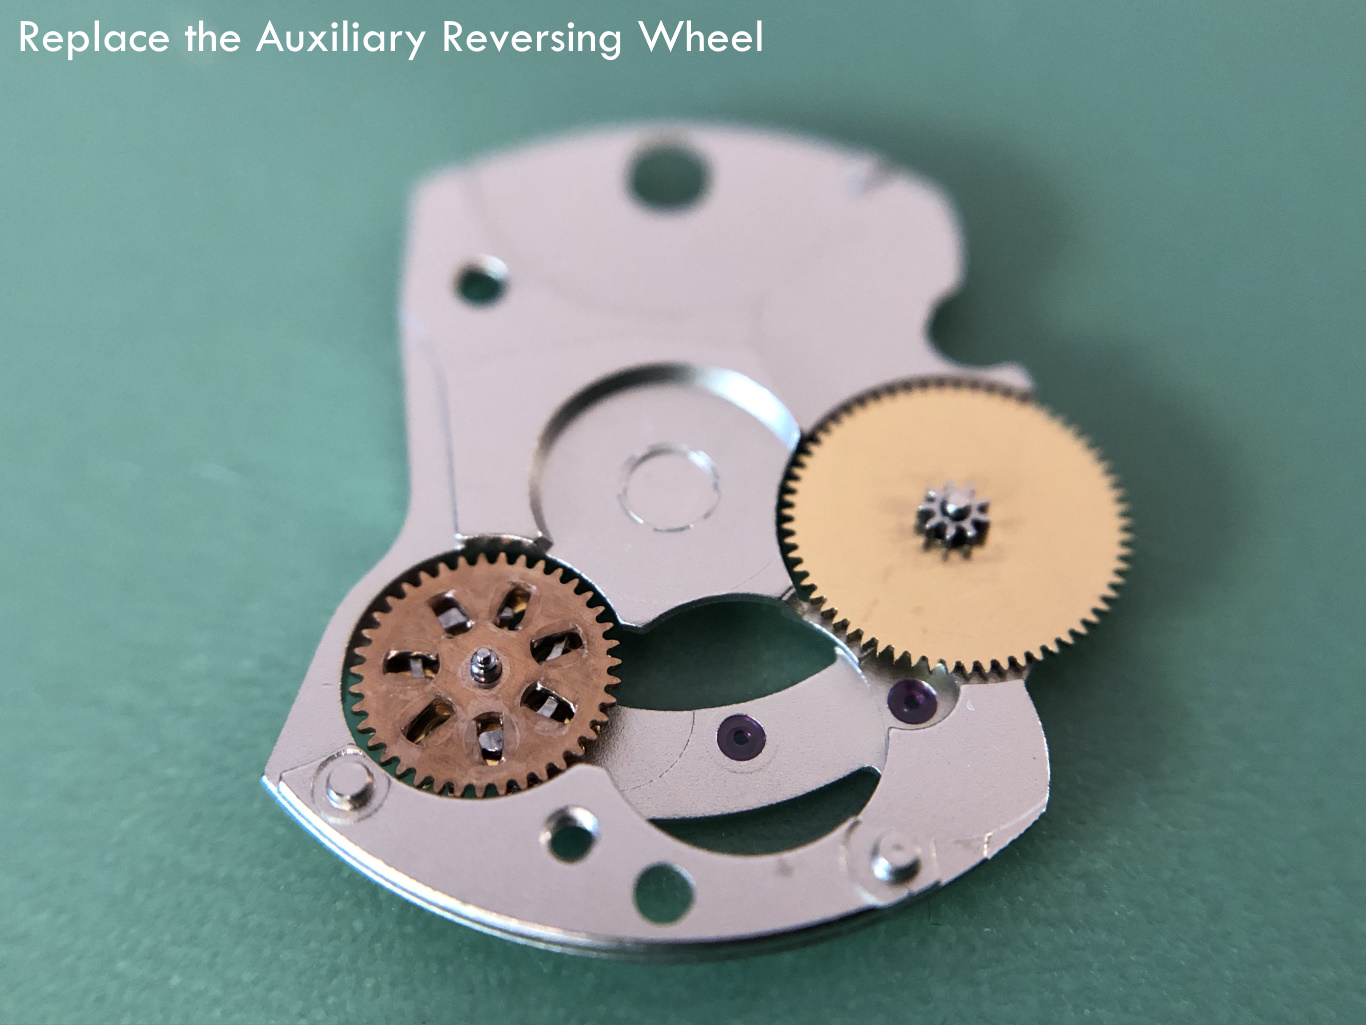
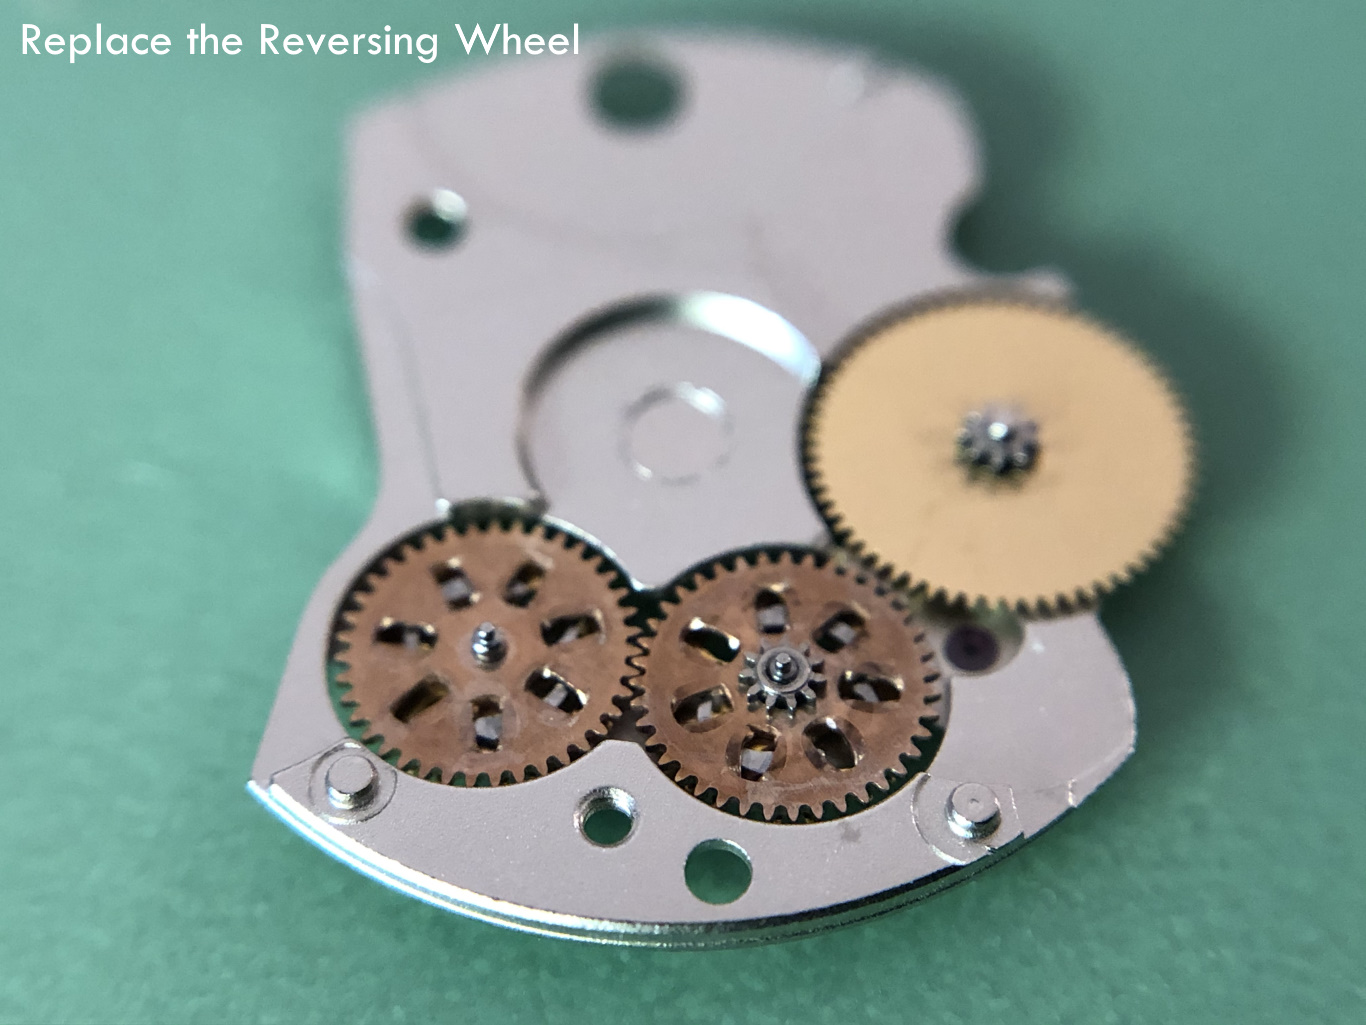
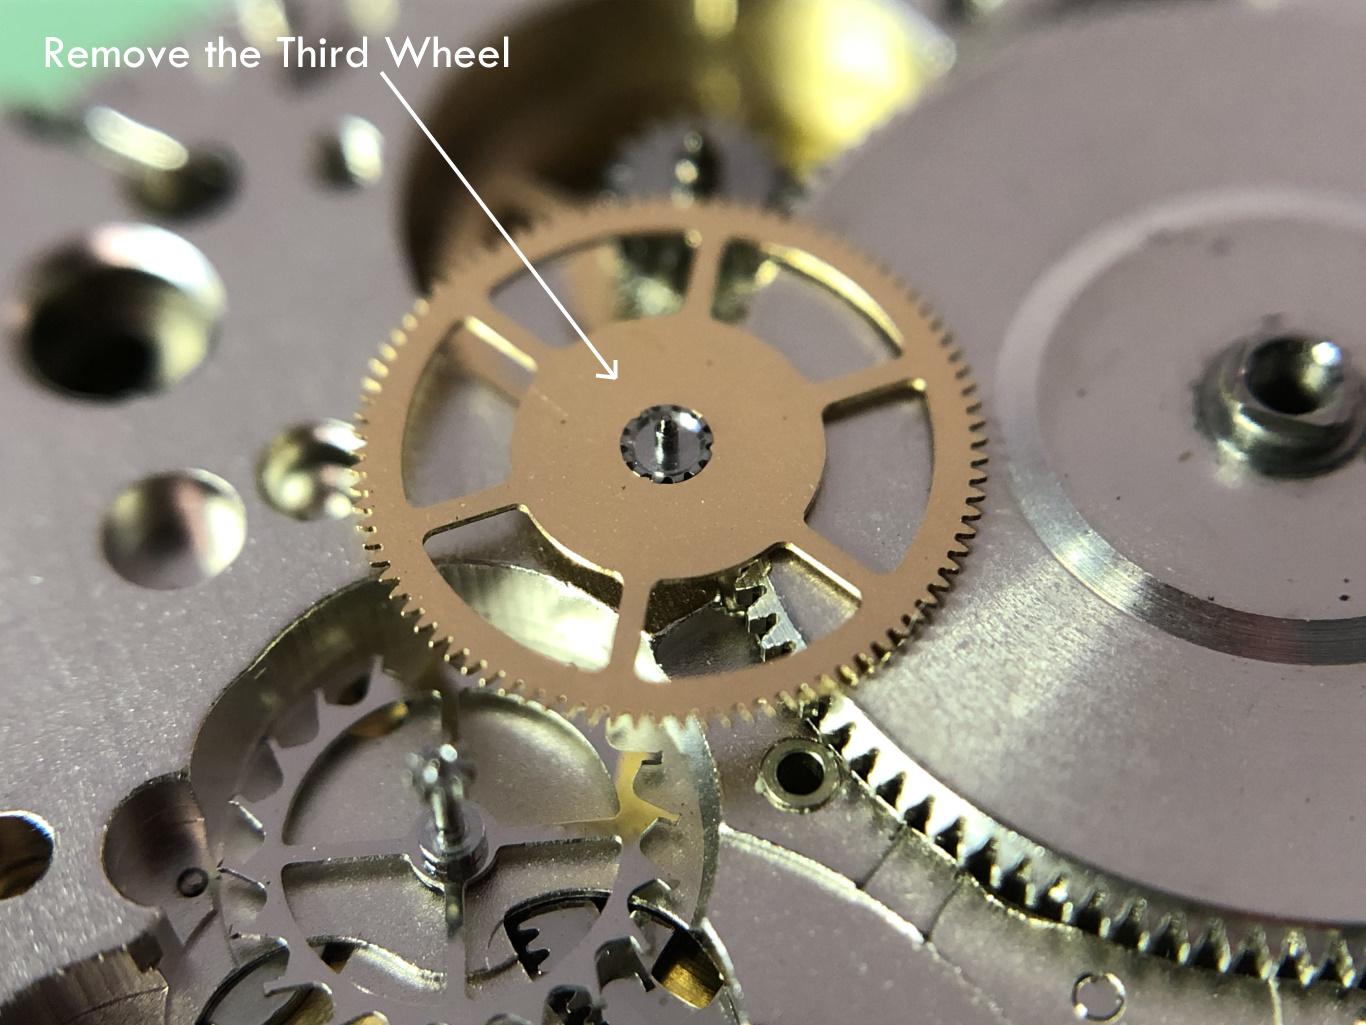
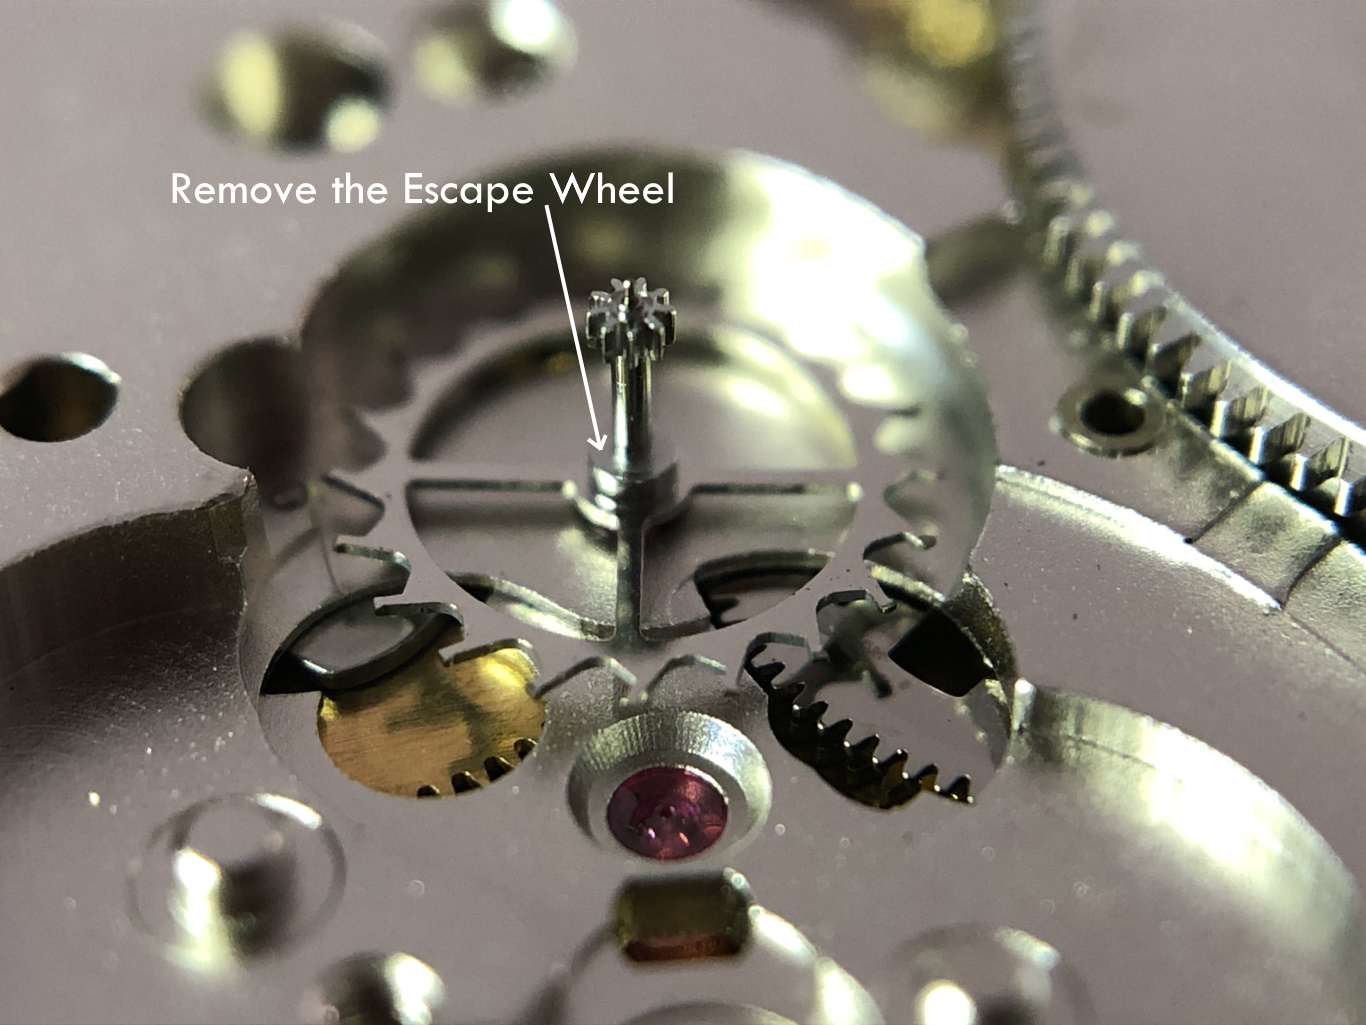
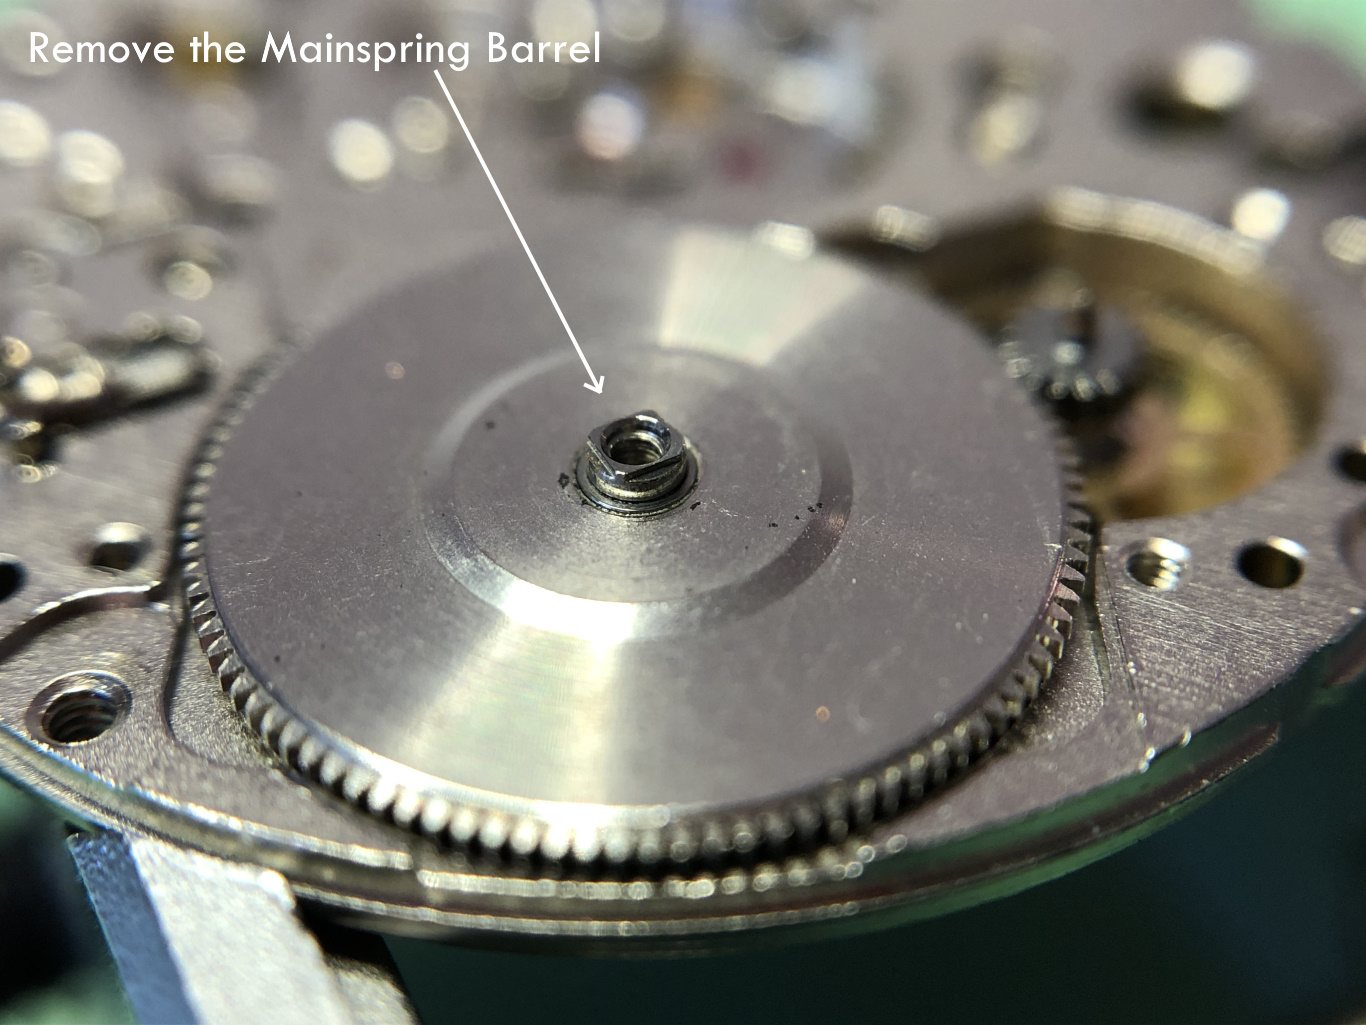
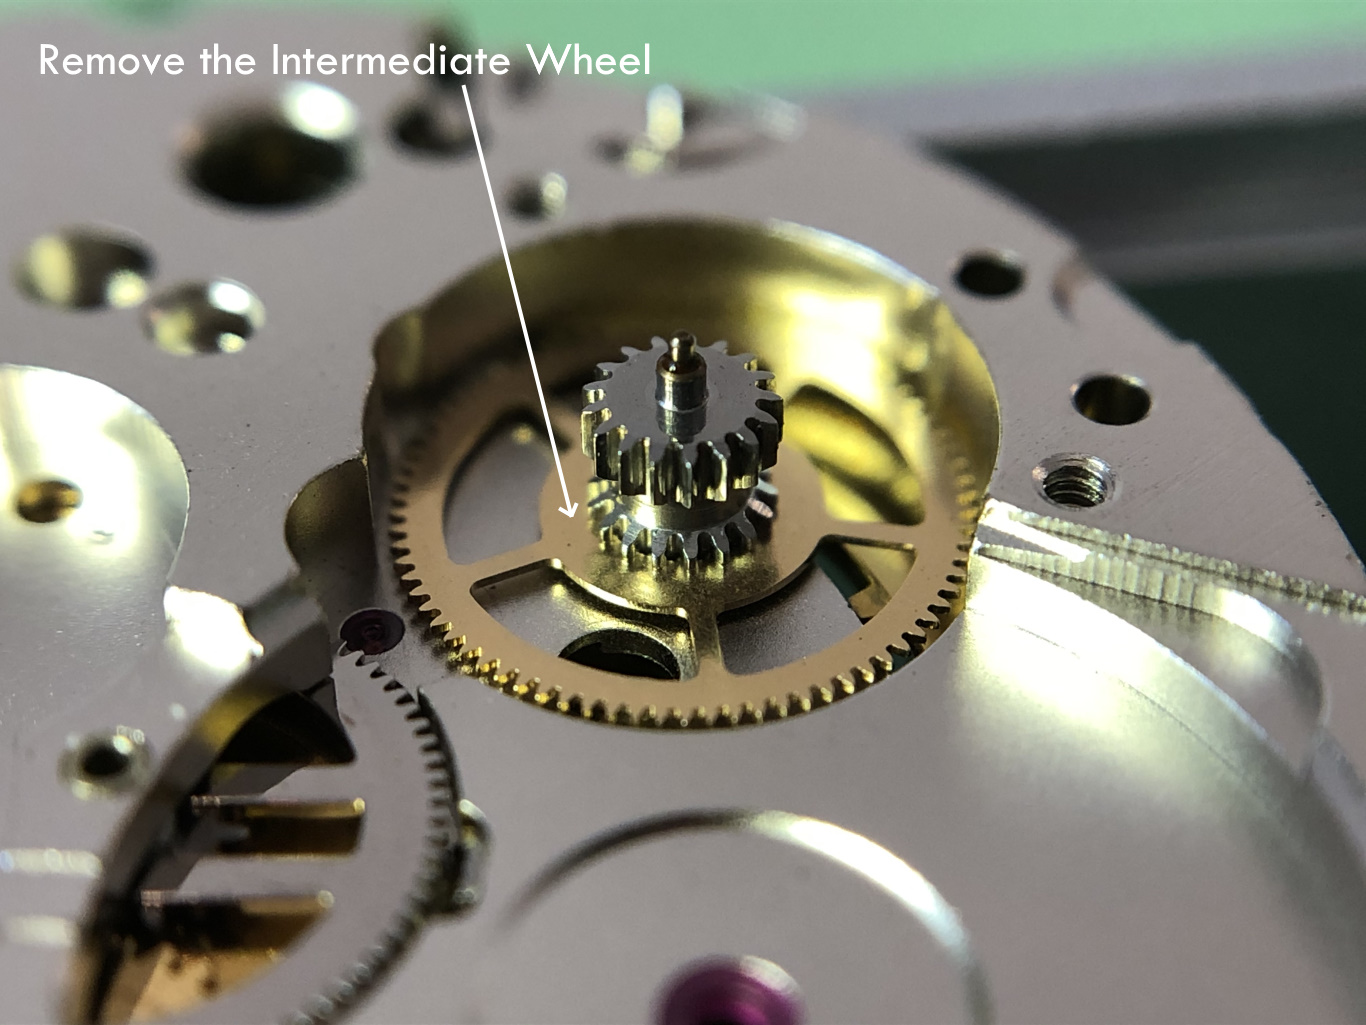
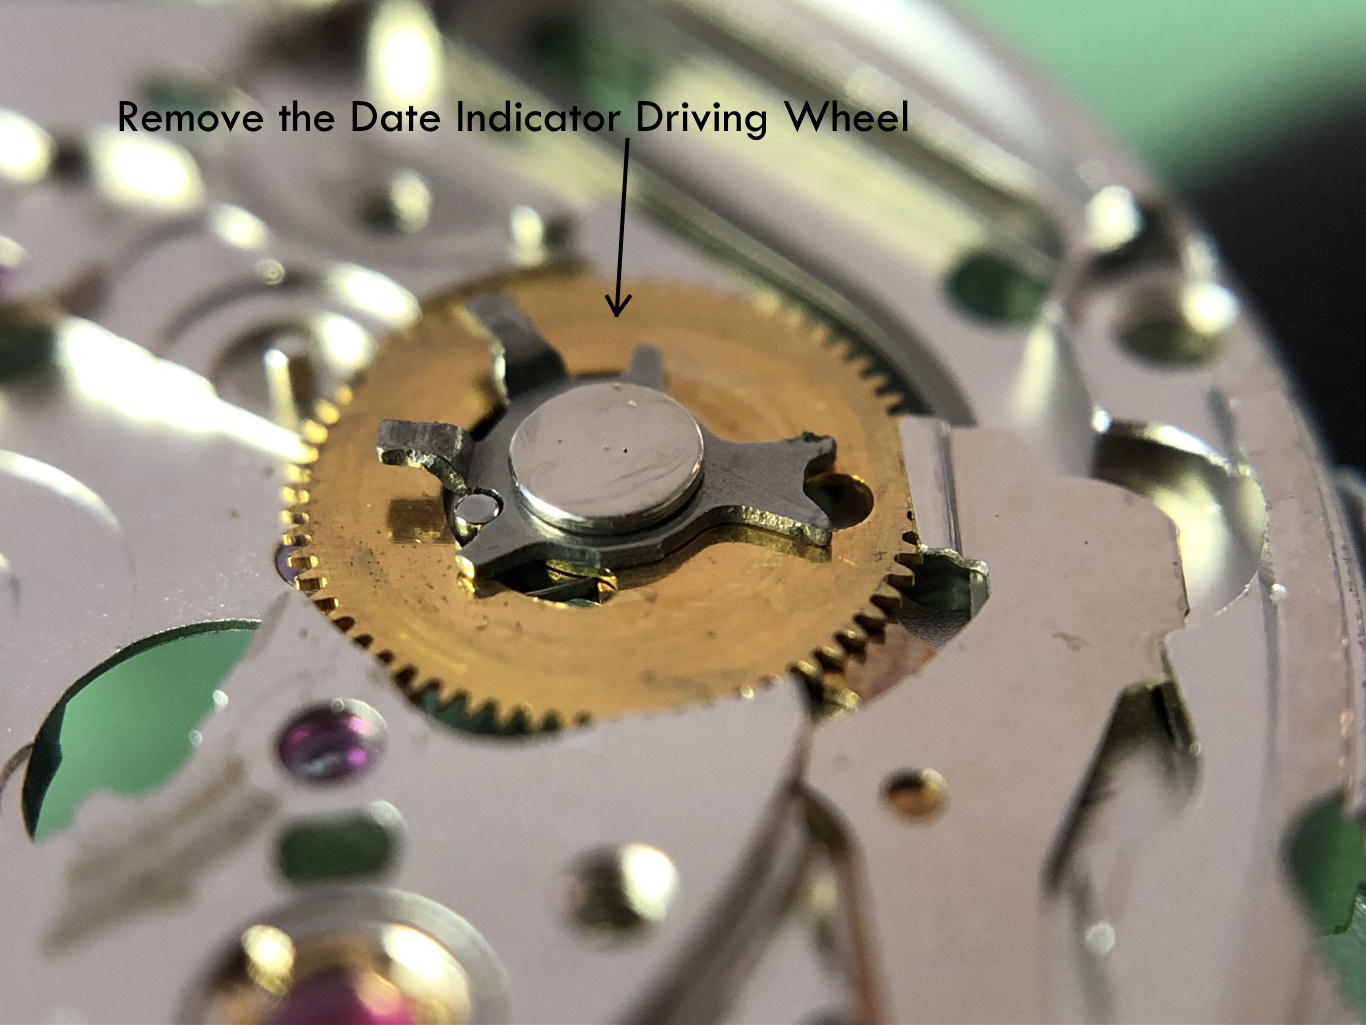
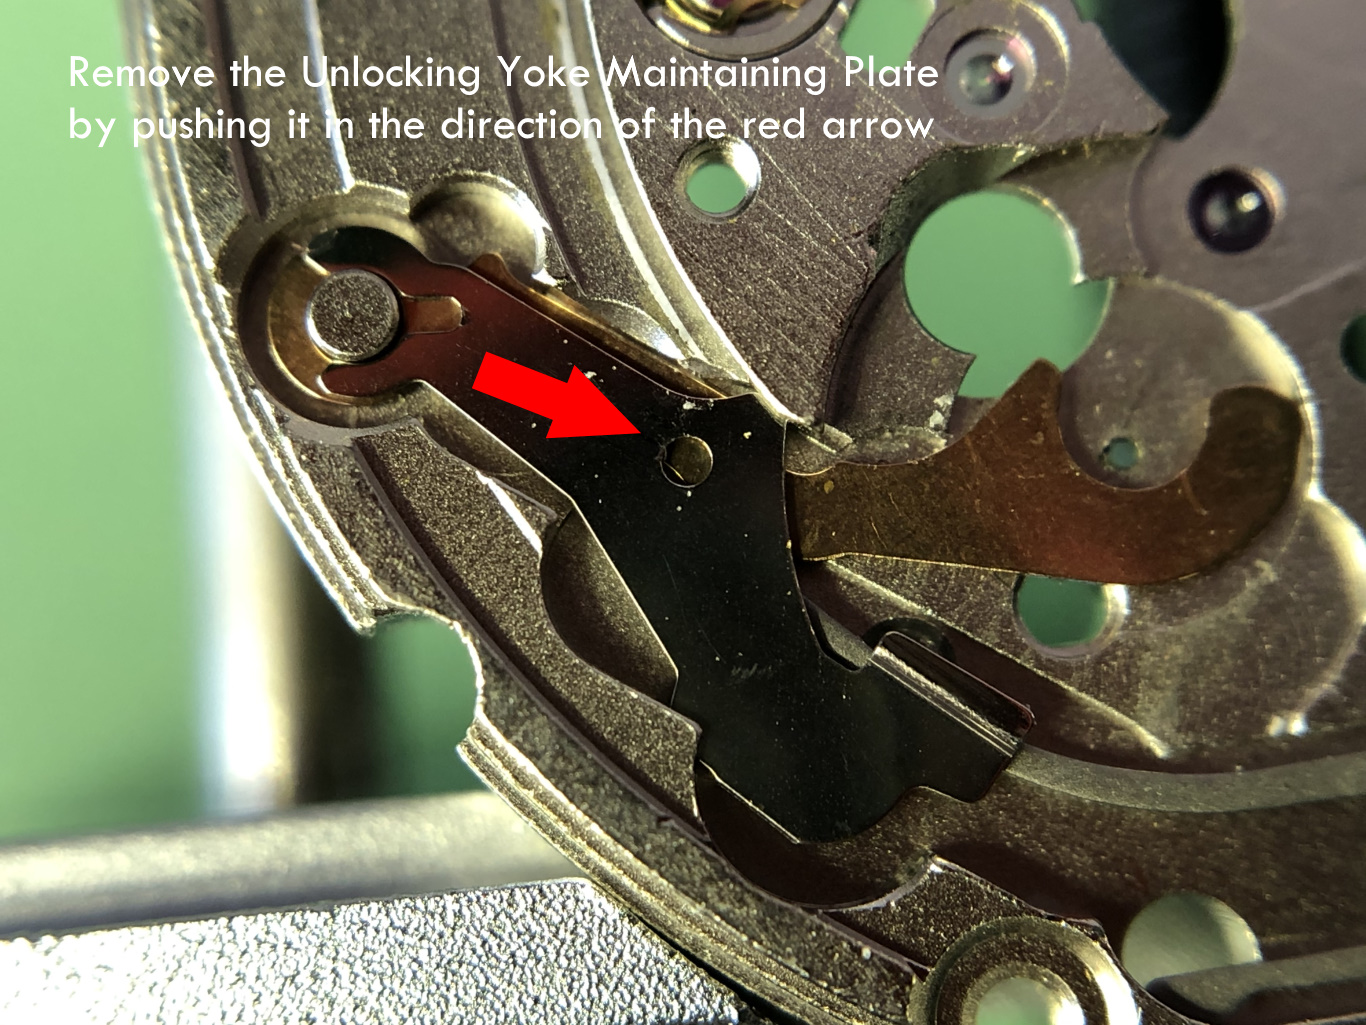
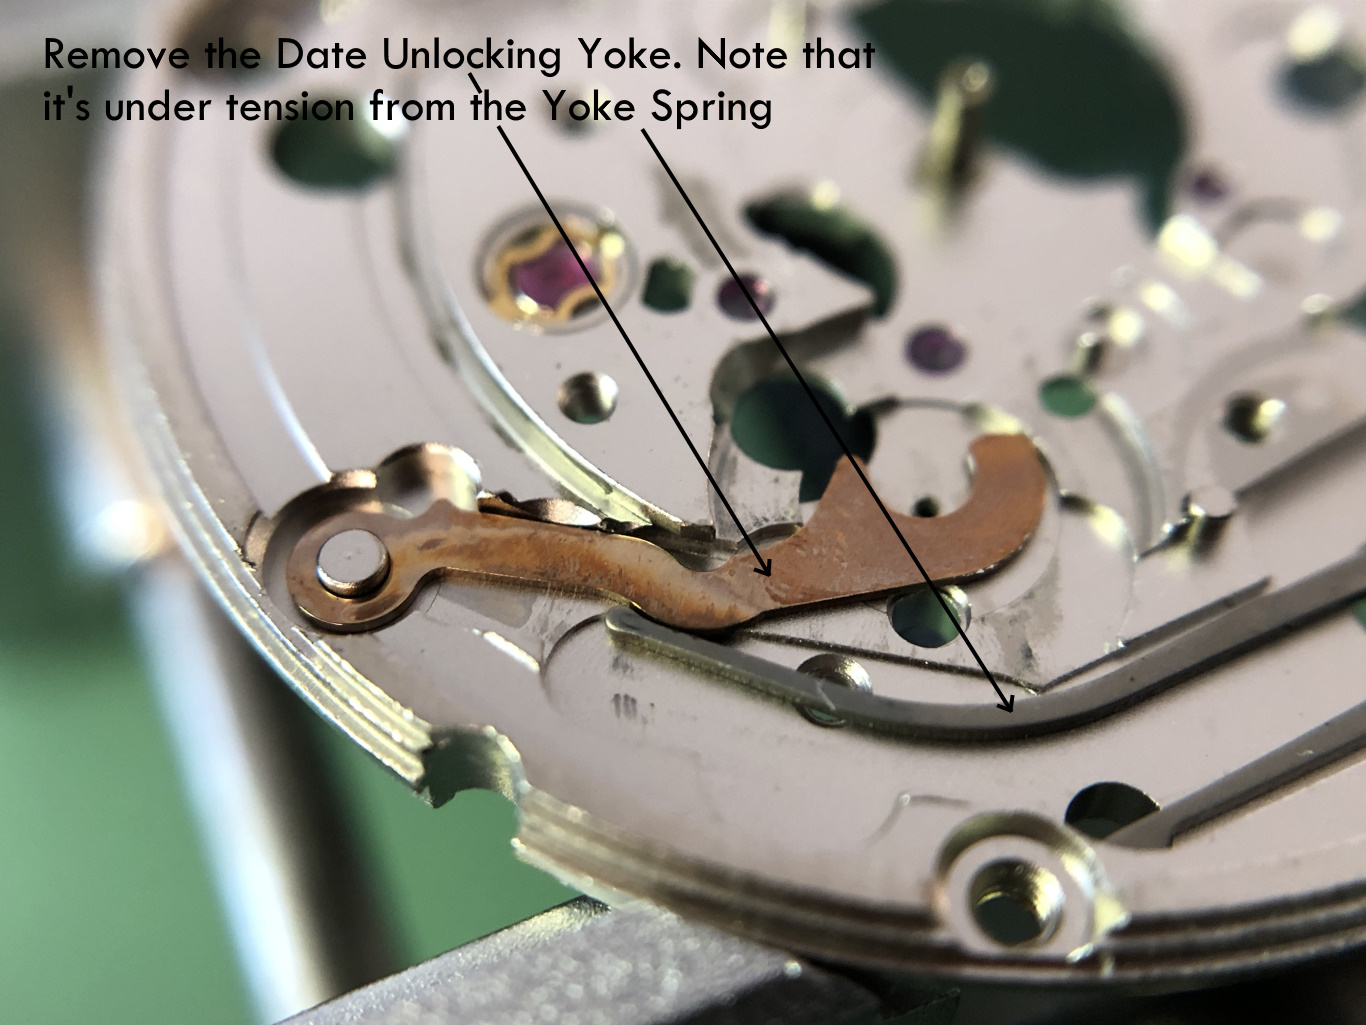
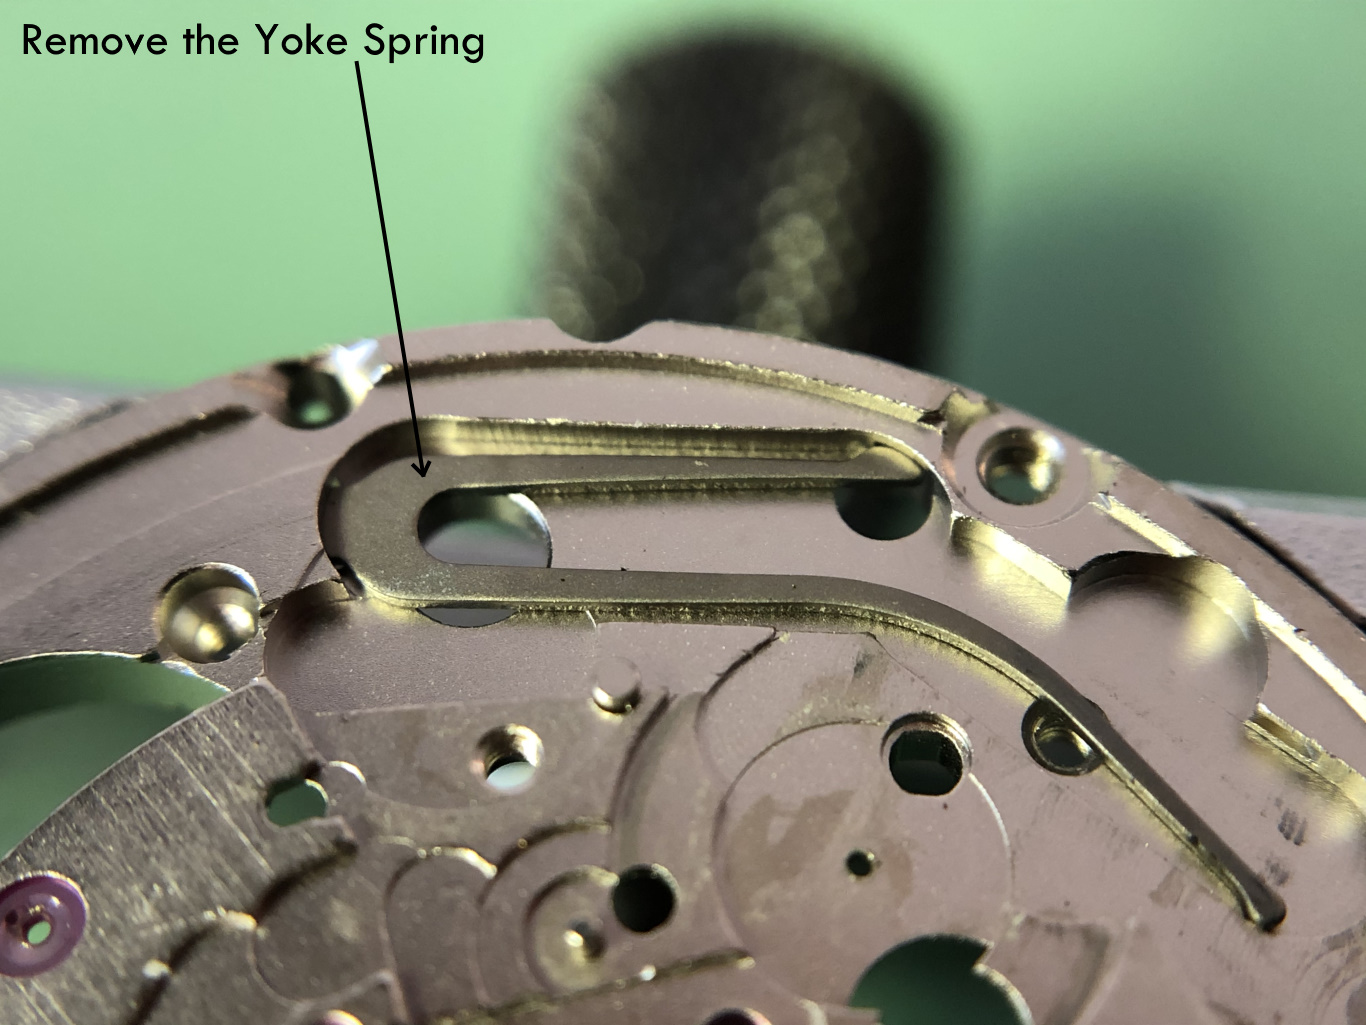
ETA 2836-2 Disassembly walkthrough here ETA 2836-2 Assembly walkthrough here When I started out servicing watches (Vostok cal. 2414) I was desperately looking for easy to follow walkthroughs and tutorials. That was several years ago. I did find a walkthrough on WUS, and I did find the YT-videos of former car mechanic Dan, the “Ratfaced Git”, and although his approach was much that of a car mechanic, rather than that of a skilled watch repairer (he hardly knew the names of parts, didn’t care much, and was proud of it), it inspired me endlessly and gave me - at that time a complete mechanical idiot - the courage to try it myself. Without those videos I’m not sure my interest would have taken off. I know Dan struggled with many difficulties in his life including cancer, and it has been close to three years since he published anything on his YT-channel. Anyway, I hope you’re still with us “Ratfaced git” and I say thank you for the inspiration and dedicate this walkthrough to you. In ETA’s technical communication for calibre 2836-2 the assembly is made in seven steps in the following order: 1. Keyless works 2. Train of wheels 3. Mainspring barrel and bridge 4. Balance assembly 5. Self-winding mechanism 6. Dial train (/motion works) and the calendar works part 1 7. Dial train (/motion works) and the calendar works part 2 However, if you follow my assembly procedure, I put it together in a different order as I find it more convenient and wish to test the running of the watch as soon possible, that is, as soon as the train of wheels, barrel, and balance have been replaced. If at that point it’s not running well, I can more easily deal with it before continuing on with the assembly. Also, should problems arise at a later stage I’ll know it’s (very likely) not related to the train, barrel or balance. The downside, of course, is that the balance is exposed to potential damage for a longer period, although it can of course be removed. So, here are the steps of my assembly procedure: 1. Train of wheels 2. Mainspring barrel and bridge 3. Balance assembly 4. Keyless works 5. Dial train (/motion works) and the calendar works part 1 6. Dial train (/motion works) and the calendar works part 2 7. Self-winding mechanism Apart from the click spring and the pallet stones, the oiling suggestions follow ETA’s technical communication. Finally, I make walkthroughs for my personal use and enjoyment. They are not meant to be tutorials (for that I wholeheartedly recommend watchrepairlessons.com), but I like to share them in case there’s someone who would find them useful. So, without further ado…1 point
-
Greetings to all. I'm Chad, recently retired and thought I'd give watch restoration a go. Why? Watches are very cool; I've always been fascinated by them. I think watchmakers and folks who can work on them successfully are cool as well, and well, I'm cool too, I just haven't worked on a watch yet! I have a couple of vintage Omega's, one a pocket watch and one a wristwatch. The wristwatch was my Dad's. It will go to my son one day. I thought I'd never be able to work on a watch due to the size and complexity but after watching about everything on Youtube on watch repair I think I might find some success as a hobbyist. Likely some failures too. I have a bunch of non-working movements coming my way and I'm going to experiment on them as much as I can prior to working on anything I don't want to destroy. I just did buy a (I think), nice, almost 100 year old Illinois pocket watch which will be the first real watch I'll work on, but after I'm more familiar with using the tools, etc. Like the title says, good to be here, and you'll certainly hear from me again. Cheers, chadman1 point
-
Hi all, isn't it cool to see some of the inventions that have made our lives so comfortable over the years.1 point
-
Is the problem with American balance staffs. People used to Swiss watches sometimes typically one staff. Unless there were variations because of the balance protection system perhaps. But with American staff specially Elgin there can be variations with the same part number as you've noted the pivots size almost always varies with almost all the staffs there's a few that are only one pivots size but almost all of them different pivots sizes. Then if it's a modern replacement staff like typically bestfit its typically over size so you can reduce it to fit. This means the minimum you have to do is measure the old measure the new and verify their the same? Except it also need to verify that the original fits within the specifications of whatever staff you think is supposed to be there. Hopefully there were no other modifications made to your watch.1 point
-
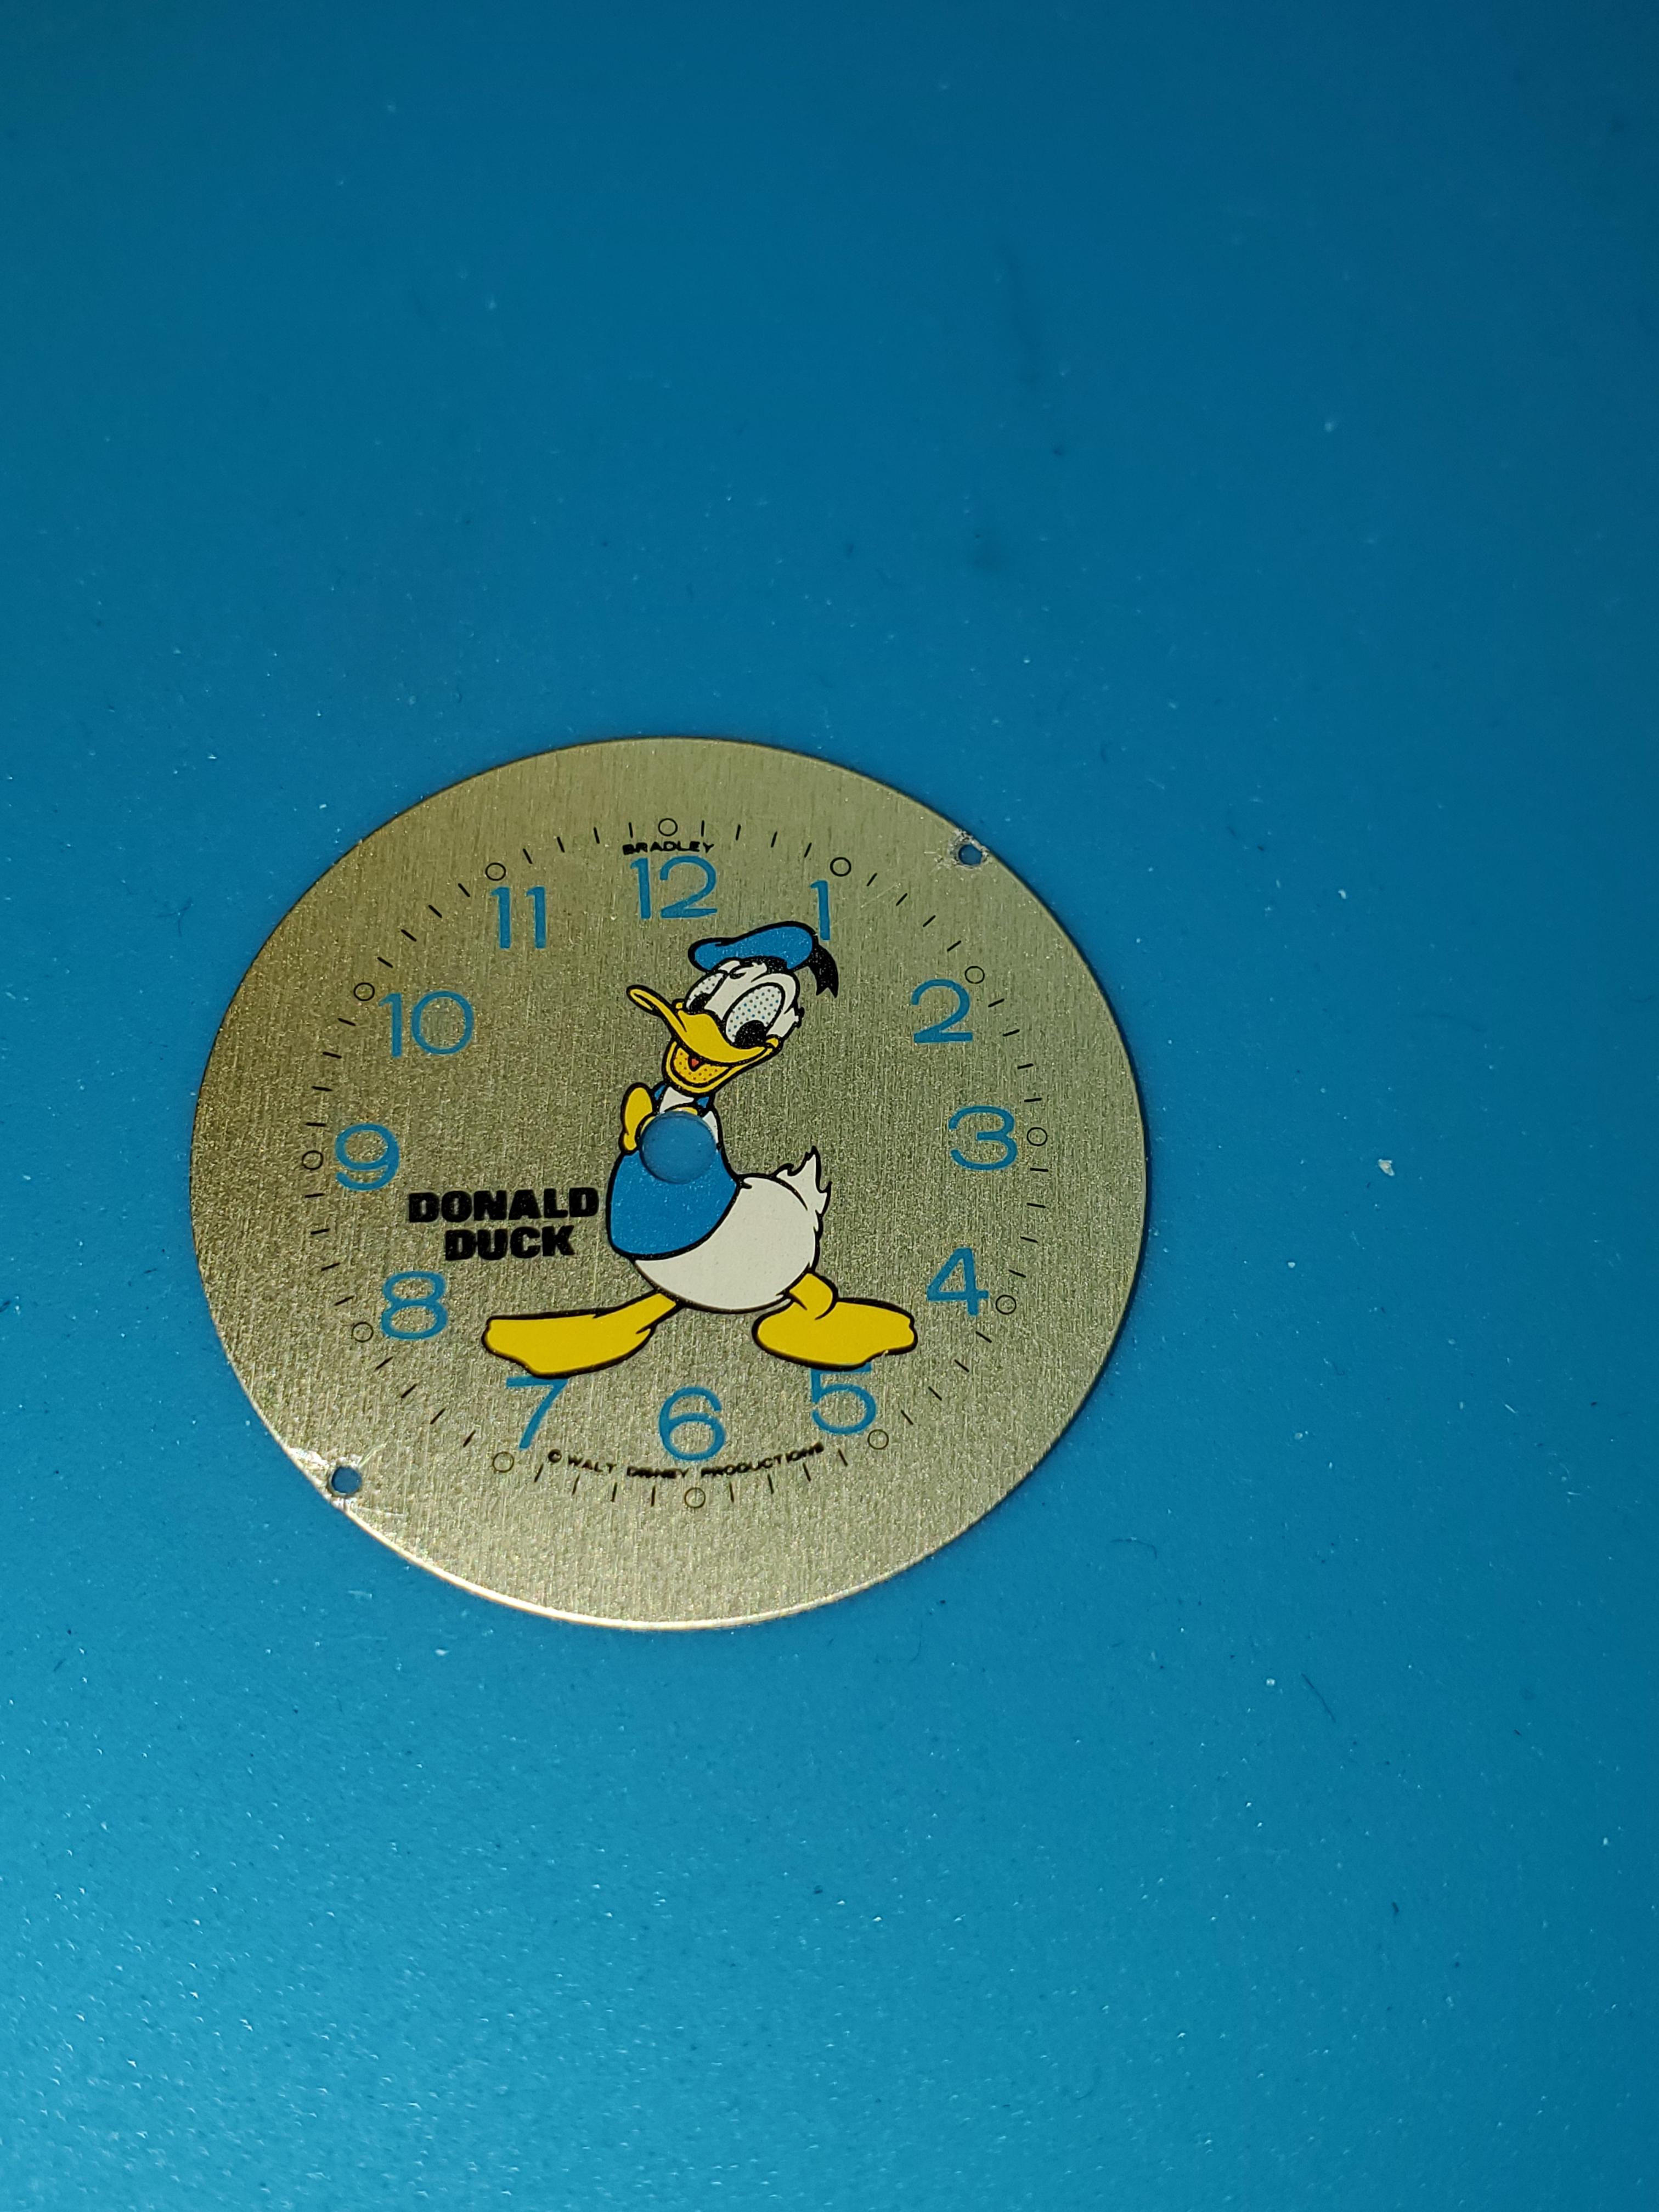
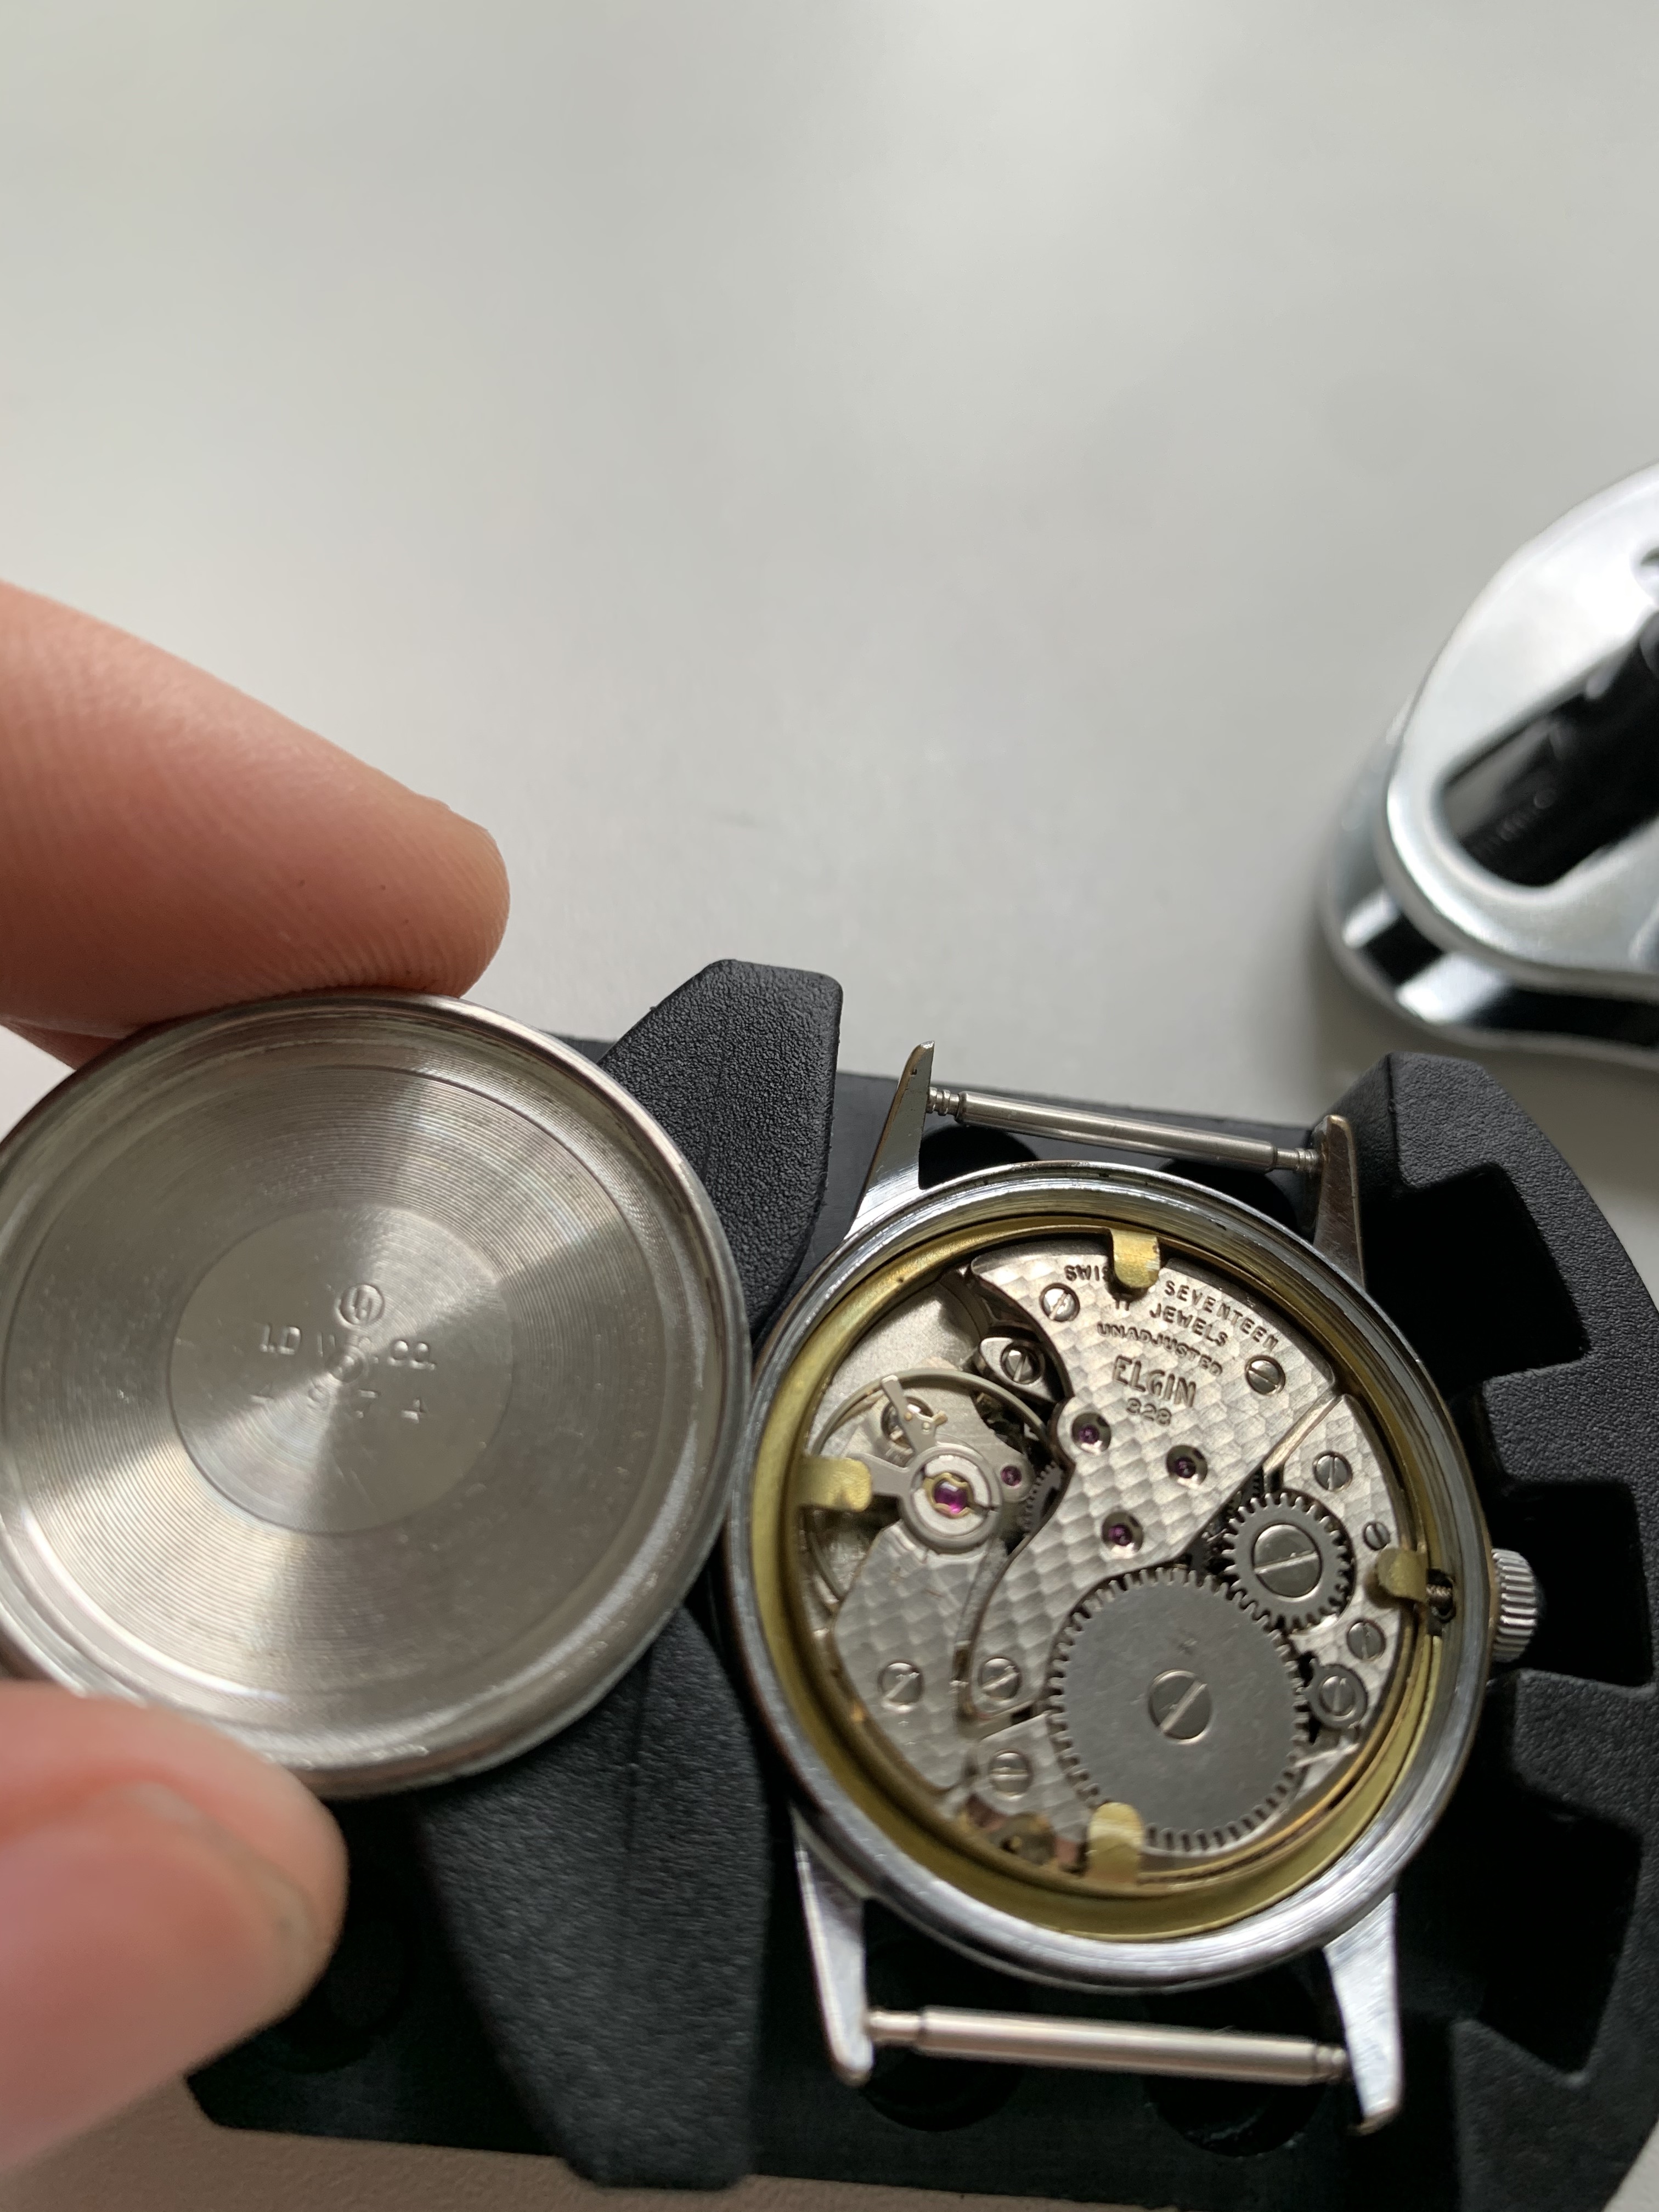
Sorry for the delay. There are some scratches where the disk screws are, but those were hidden by the case.
 1 point
 -
Out of the box thinking by someone who could not get a proper staff.1 point
-
It is reasons like this as a guess as to why the Swiss don't want to sell American watchmakers parts. That's because we are so creative with problem solving. We would need the dimensions of the staff but I suspect it's not a roller problem but a staff problem.1 point
-
"I bought new in 1984" "It lasted more like 9 years." would suggest the battery died in 1993? These are not capacitors, they are rechargable lithium batteries. The main problem with these batteries is that if they are discharged and left in that state, they will no longer take a charge. If you leave it in a drawer for a year or so, it's done. I can imagine the vintage lithium-titanate ones from 40 years ago were worse in this regard, and faster to die if uncharged? The manual for this movement says it can only go for 50 days without a charge, compare to current eco-drive claims of operating for 6 months with no charge.1 point
-
Thank you for your comments ? The schematic was the template for my 240VAC design. It was taken of the internet; https://www.instructables.com/Demagnetizer-From-a-Microwave-Transformer/ . In fact the neon-bulb didn't work; it was either too slow to react or perhaps I blew it up? Therefor I indeed planned on to connect a neon light across the capacitor. Besides, since I get the STDP momentary push button, S2 will only be "active" when depressed. With the push-button in the rest position it will be connected ("S1") such that the capacitor sits parallel with the coil. This way the capacitor will be discharged and when connected to the mains, there won't be any current flowing. Talking about the push-button I've ordered; it is to me a bit unclear whether it has a build-in neon-light. There seems to be some additional contacts but I've to see when it arrives ...... ; https://www.ebay.co.uk/itm/Arcade-Game-AC-250V-15A-24mm-Dia-Circular-Push-Button-Red-Micro-Switch/351810829315?ssPageName=STRK%3AMEBIDX%3AIT&_trksid=p2060353.m2749.l2649 If it has a neon light build in than it will be used as indication lamp. As for the 20Ω 2Watt resistor; I was planning on to install a NTC 5D-15 thermistor right after the on/off switch. This should hopefully prevent any overloads. If a 2KΩ resistor is better, I need to get some with the correct Wattage as most I have in stock are 1/8 - 1/4 Watt. Once I have my demagnetizer up & running, I was planning on to post pictures of the build together with the final schematic. Today I received my 45µF capacitor and I have to admit, size-wise it's a "tad" overdone ! But I'm sure it will bring the message across ?1 point
-
Thank you for your introduction and welcome to this friendly forum.1 point
-
Who knew, today is National Tea Day in the UK. https://en.wikipedia.org/wiki/National_Tea_Day I'd like to say us Brits celebrate this every year with a day off work and street parties but I've actually never hear of it.1 point
-
Hello Chad and welcome to the forum. I have attached a little reading for you 1612608791_ToolsfortheHobbyist.pdf TZIllustratedGlossary.pdf1 point
-
Not for me.1 point
-
It would be interesting to see the schematic ! Looking at the number of diodes (the 1N4007 is rated for 1Amp, 1000V) and the 630V auxiliary capacitors, one would think that there is some voltage multiplication happening (?). The main cap is rated to 450 - 500VAC ..... Since this is read world-wide, it would be very wise, for future reference and for DIY enthusiast, to mention the main-voltage the design is meant for ! We surely deviated from the threads topic, but since it is so interesting, still within magnetism and the remedies, I would suggest we let it run. It won't be the first- and the last-thread were we are ending up talking about cars ? Here the schematic of the simple demagnetizer I build (240VAC mains). It is currently working well but still in it's "proto-type" state (awaiting the final parts); Since my modified transformer is quite big it will get a no less than 45µF 450VAC capacitor ??? The switch I've ordered is a STDP 15Amp momentary push-button; press to charge, release to discharge via the coil. So when out of use or stored, the cap will always be discharged. Currently it works on a smaller 7µF 450VAC cap.
 1 point
 -
Welcome Chad and thanks for the introduction! Cool like the watchmaking Fonz.1 point
-
Welcome to the forum and good luck with your foray into horology.1 point
-
Very, very nice production. Really outstanding walkthrough!1 point
-
I have some lapsang souchong, but I haven't tried it yet. When I opened the bag and took a sniff, it smelled like I had stuck my head in the fireplace (no, I've only done that when the fireplace is cold). So we'll see ?1 point
-
In the past I have researched on the subject and found that even a leading manufacturer like Seiko does not claim amagnetic properties for their hairsprings. That confirms my experience, these can and do get magnetized.1 point
-
1 point
-
Good quality tweezers are the key, cheap oness require more force to compress and the resulting force will shoot parts away. Good tweezers require little pressure. One trick to reduce the amount or pressure required was to grind down the thickness at the part where the tweezers bend away... but ulimately cheap steel will have less 'spring' and the best solution is to buy some good quality stuff. Anilv1 point
-
Hey MechanicMike! I seem to have stumbled upon this same watch on ebay in very good condition. I bought it as a practice watch to learn repairs/service on as the movement is fairly simple. This one seems to be in very good working order and after regulating it, it is only losing about 5 seconds a day. Its a pretty good little time keeper as far as I'm concerned. After searching the internet for more information about the watch, the only good information I could find was this thread! Just thought you might appreciate seeing another one of these! Thanks,


 1 point
 -
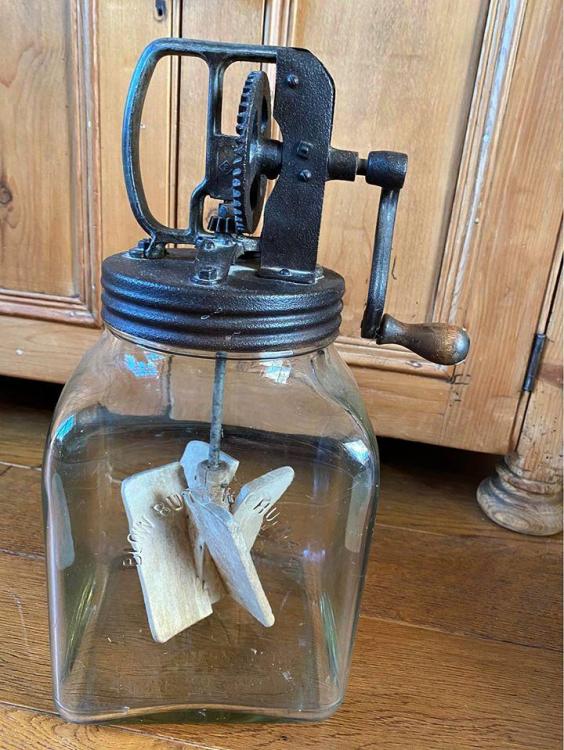
Found another way, vintage butter churn.
 1 point
 -
Just testing my contraption with some random stuff in my clinic. Using plain water only. Notice the huge vortex. Some anti-vortex baffles will definitely be necessary. Everything comes out magnetized but the good news is that the magnetic stirrer itself can be used to demagnetize the items. 20200722_100602.mp41 point
-
That might actually have the effect of de-magnetising the components. If you have ever encountered the workings of an old fashioned CRT based colour TV, they often had a degausing coil circuit. This worked by applying an alternating magnetic field around the tube with the coil (at line voltage frequency) that slowly collapsed, so not entirely dissimilar to the rotating magnet of the stirrer. Degausing coils work exactly the same way as watch demagnetisers. Generally they consist of a coil of wire (the electromagnet) and a PTC thermistor or some similar arrangement that allows an initial inrush of current, but then rapidly quenches that inrush, and thus a strong, but rapidly changing magnetic field, the quenching circuit then acts by decreasing the intensity of the field to zero. When you switchedon an old colour TV, then off and back on rapidly, you could sometimes see the effect, as the picture would shimmer for a second or so at power on. Some even had a button on the back of the TV to demagnetise the tube. Pressing the button produced the same effect. You stir bar should cause the rotating magnetic field (at 100 to 3000 hz). The trick might be to slowly withdraw the baskets while the stirrer is still running, hence causing the field to decrease to zero without setting it up in any particular orientation for any significant time.1 point
-
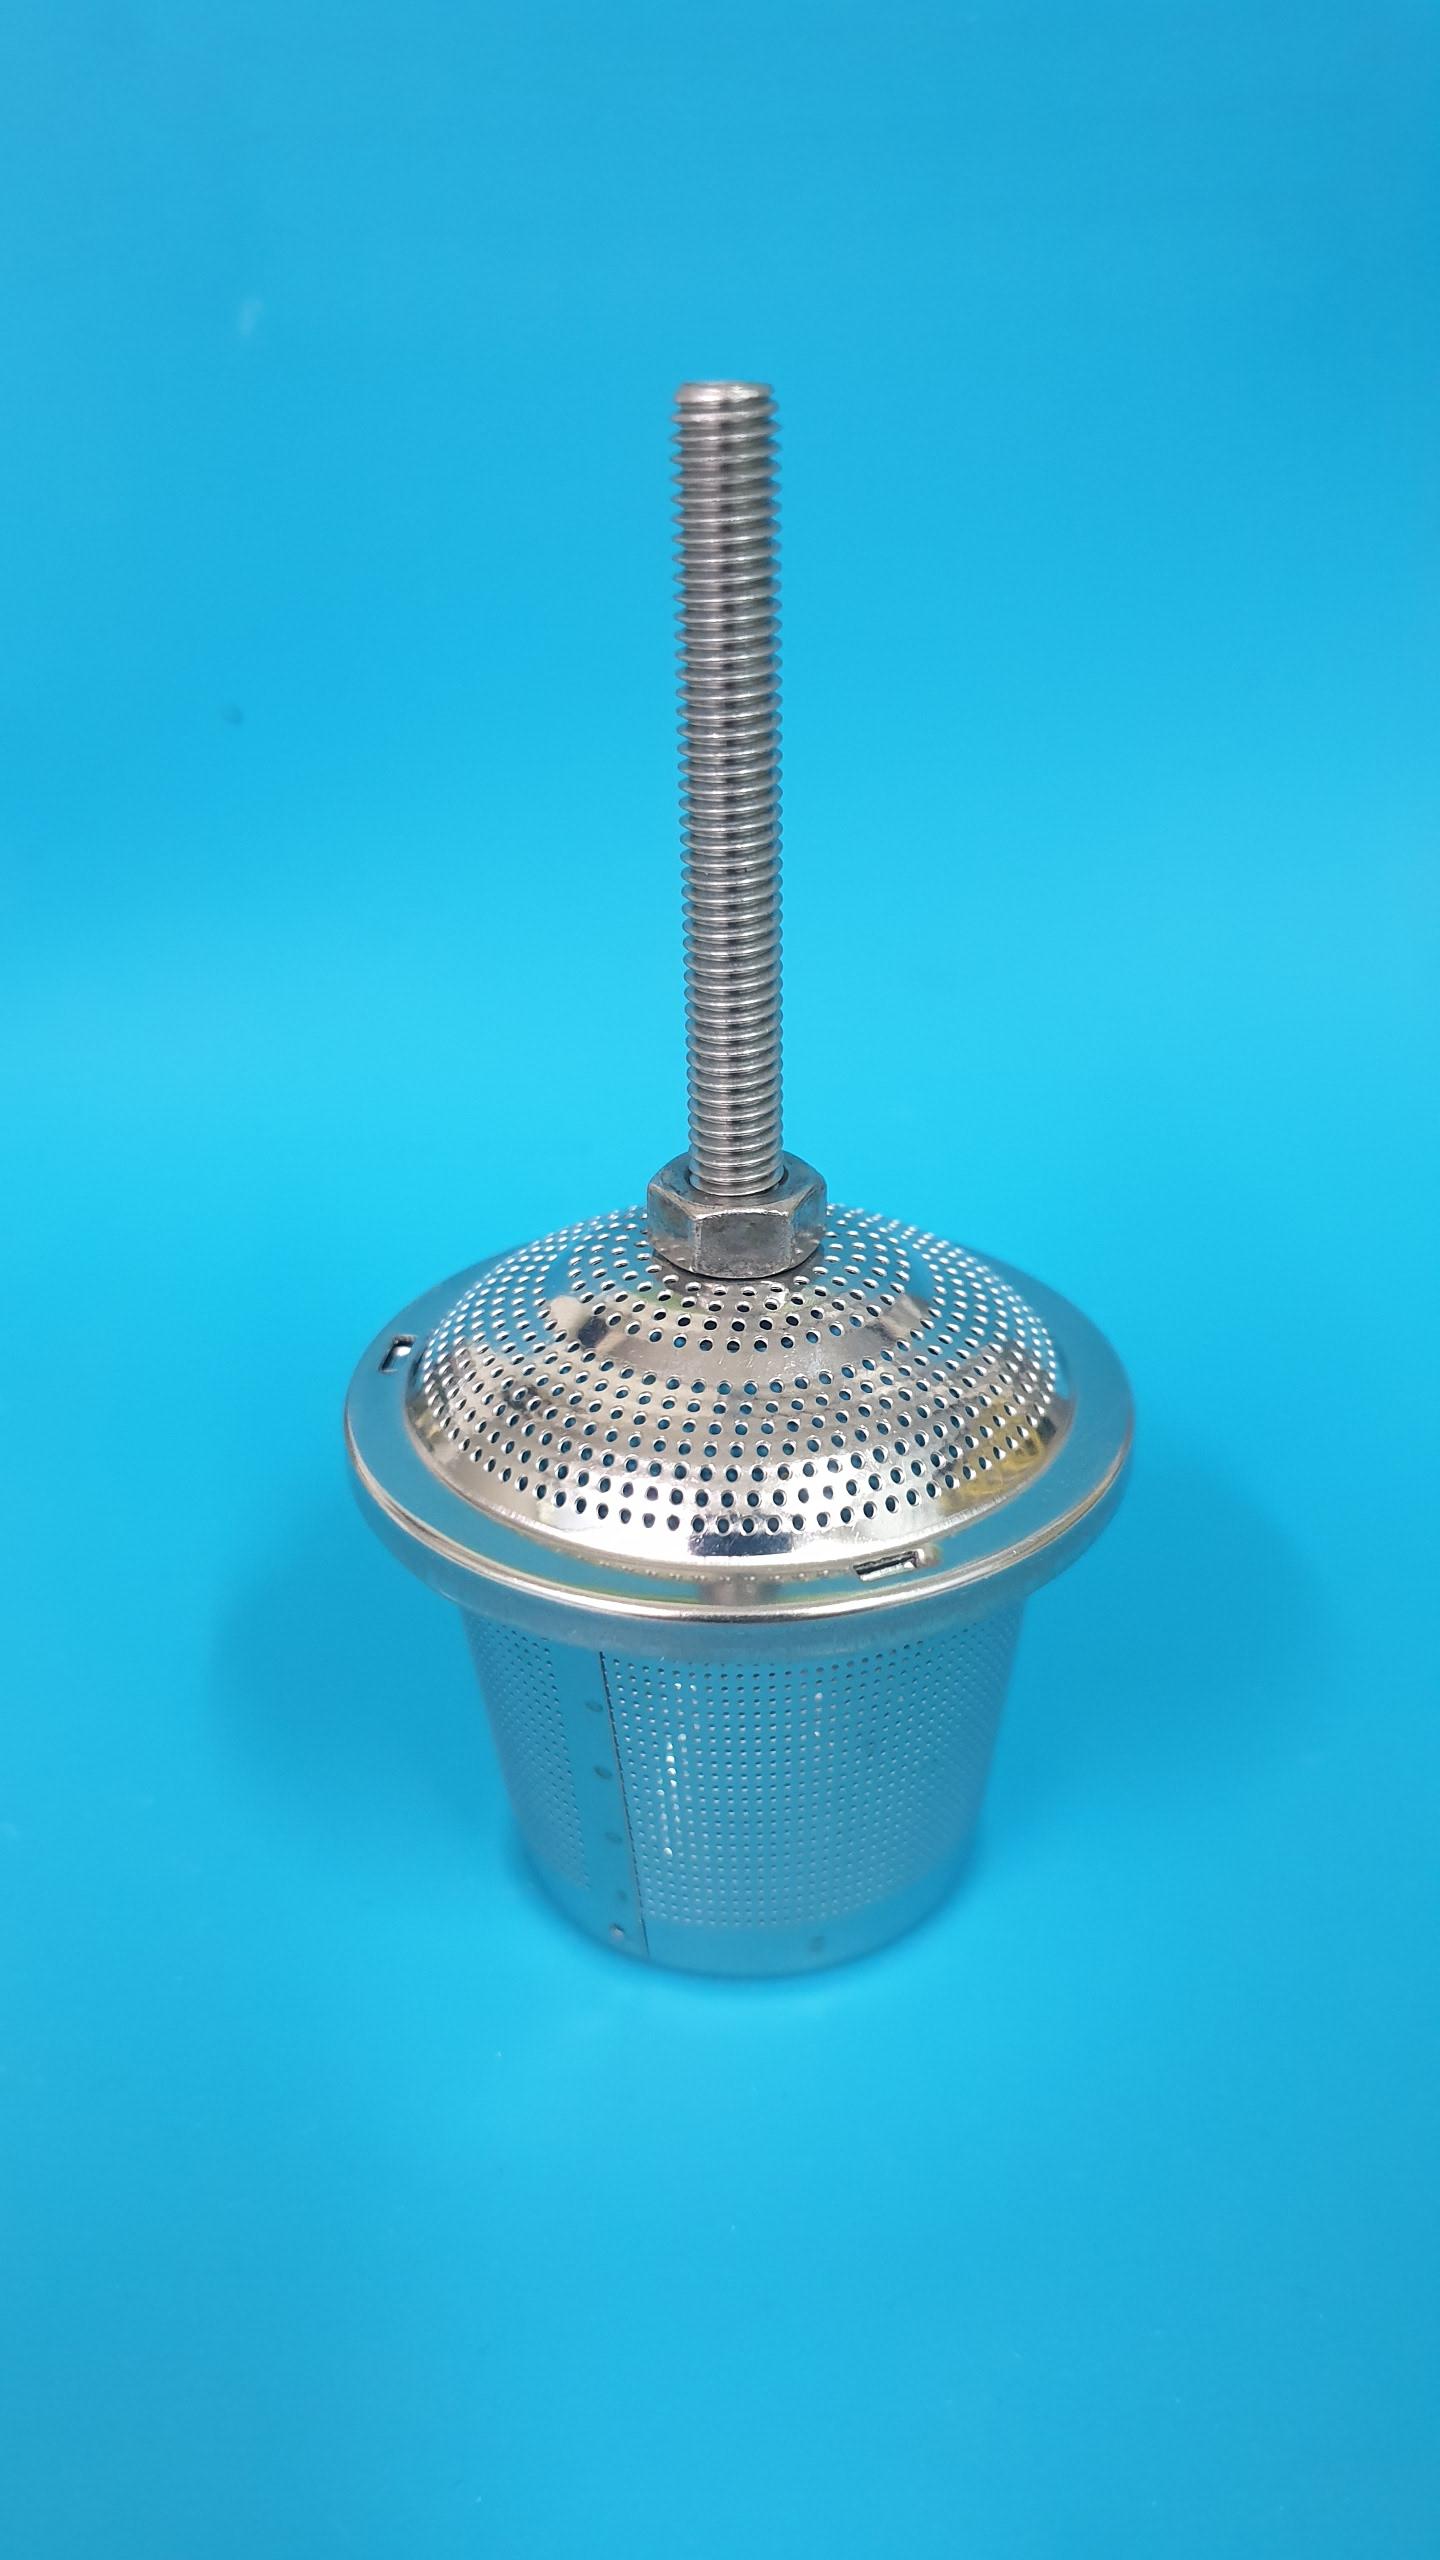
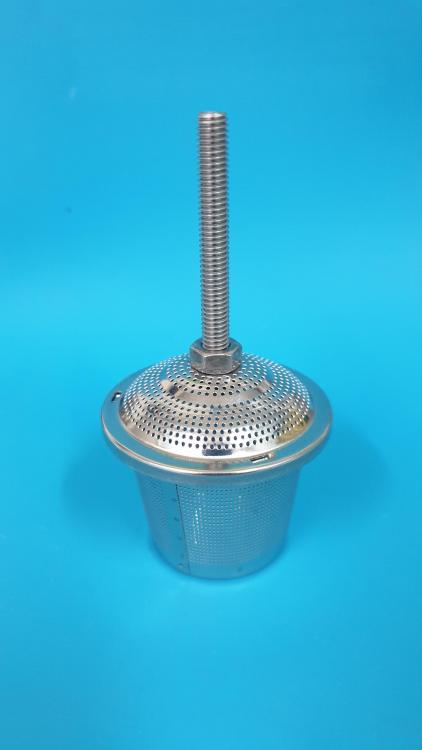
Just sidetracking a little. Here is a cleaning basket which I made from a tea strainer. I fix it to my drill press and spin it in a jar of cleaning fluid. Works pretty well.

 1 point
 -
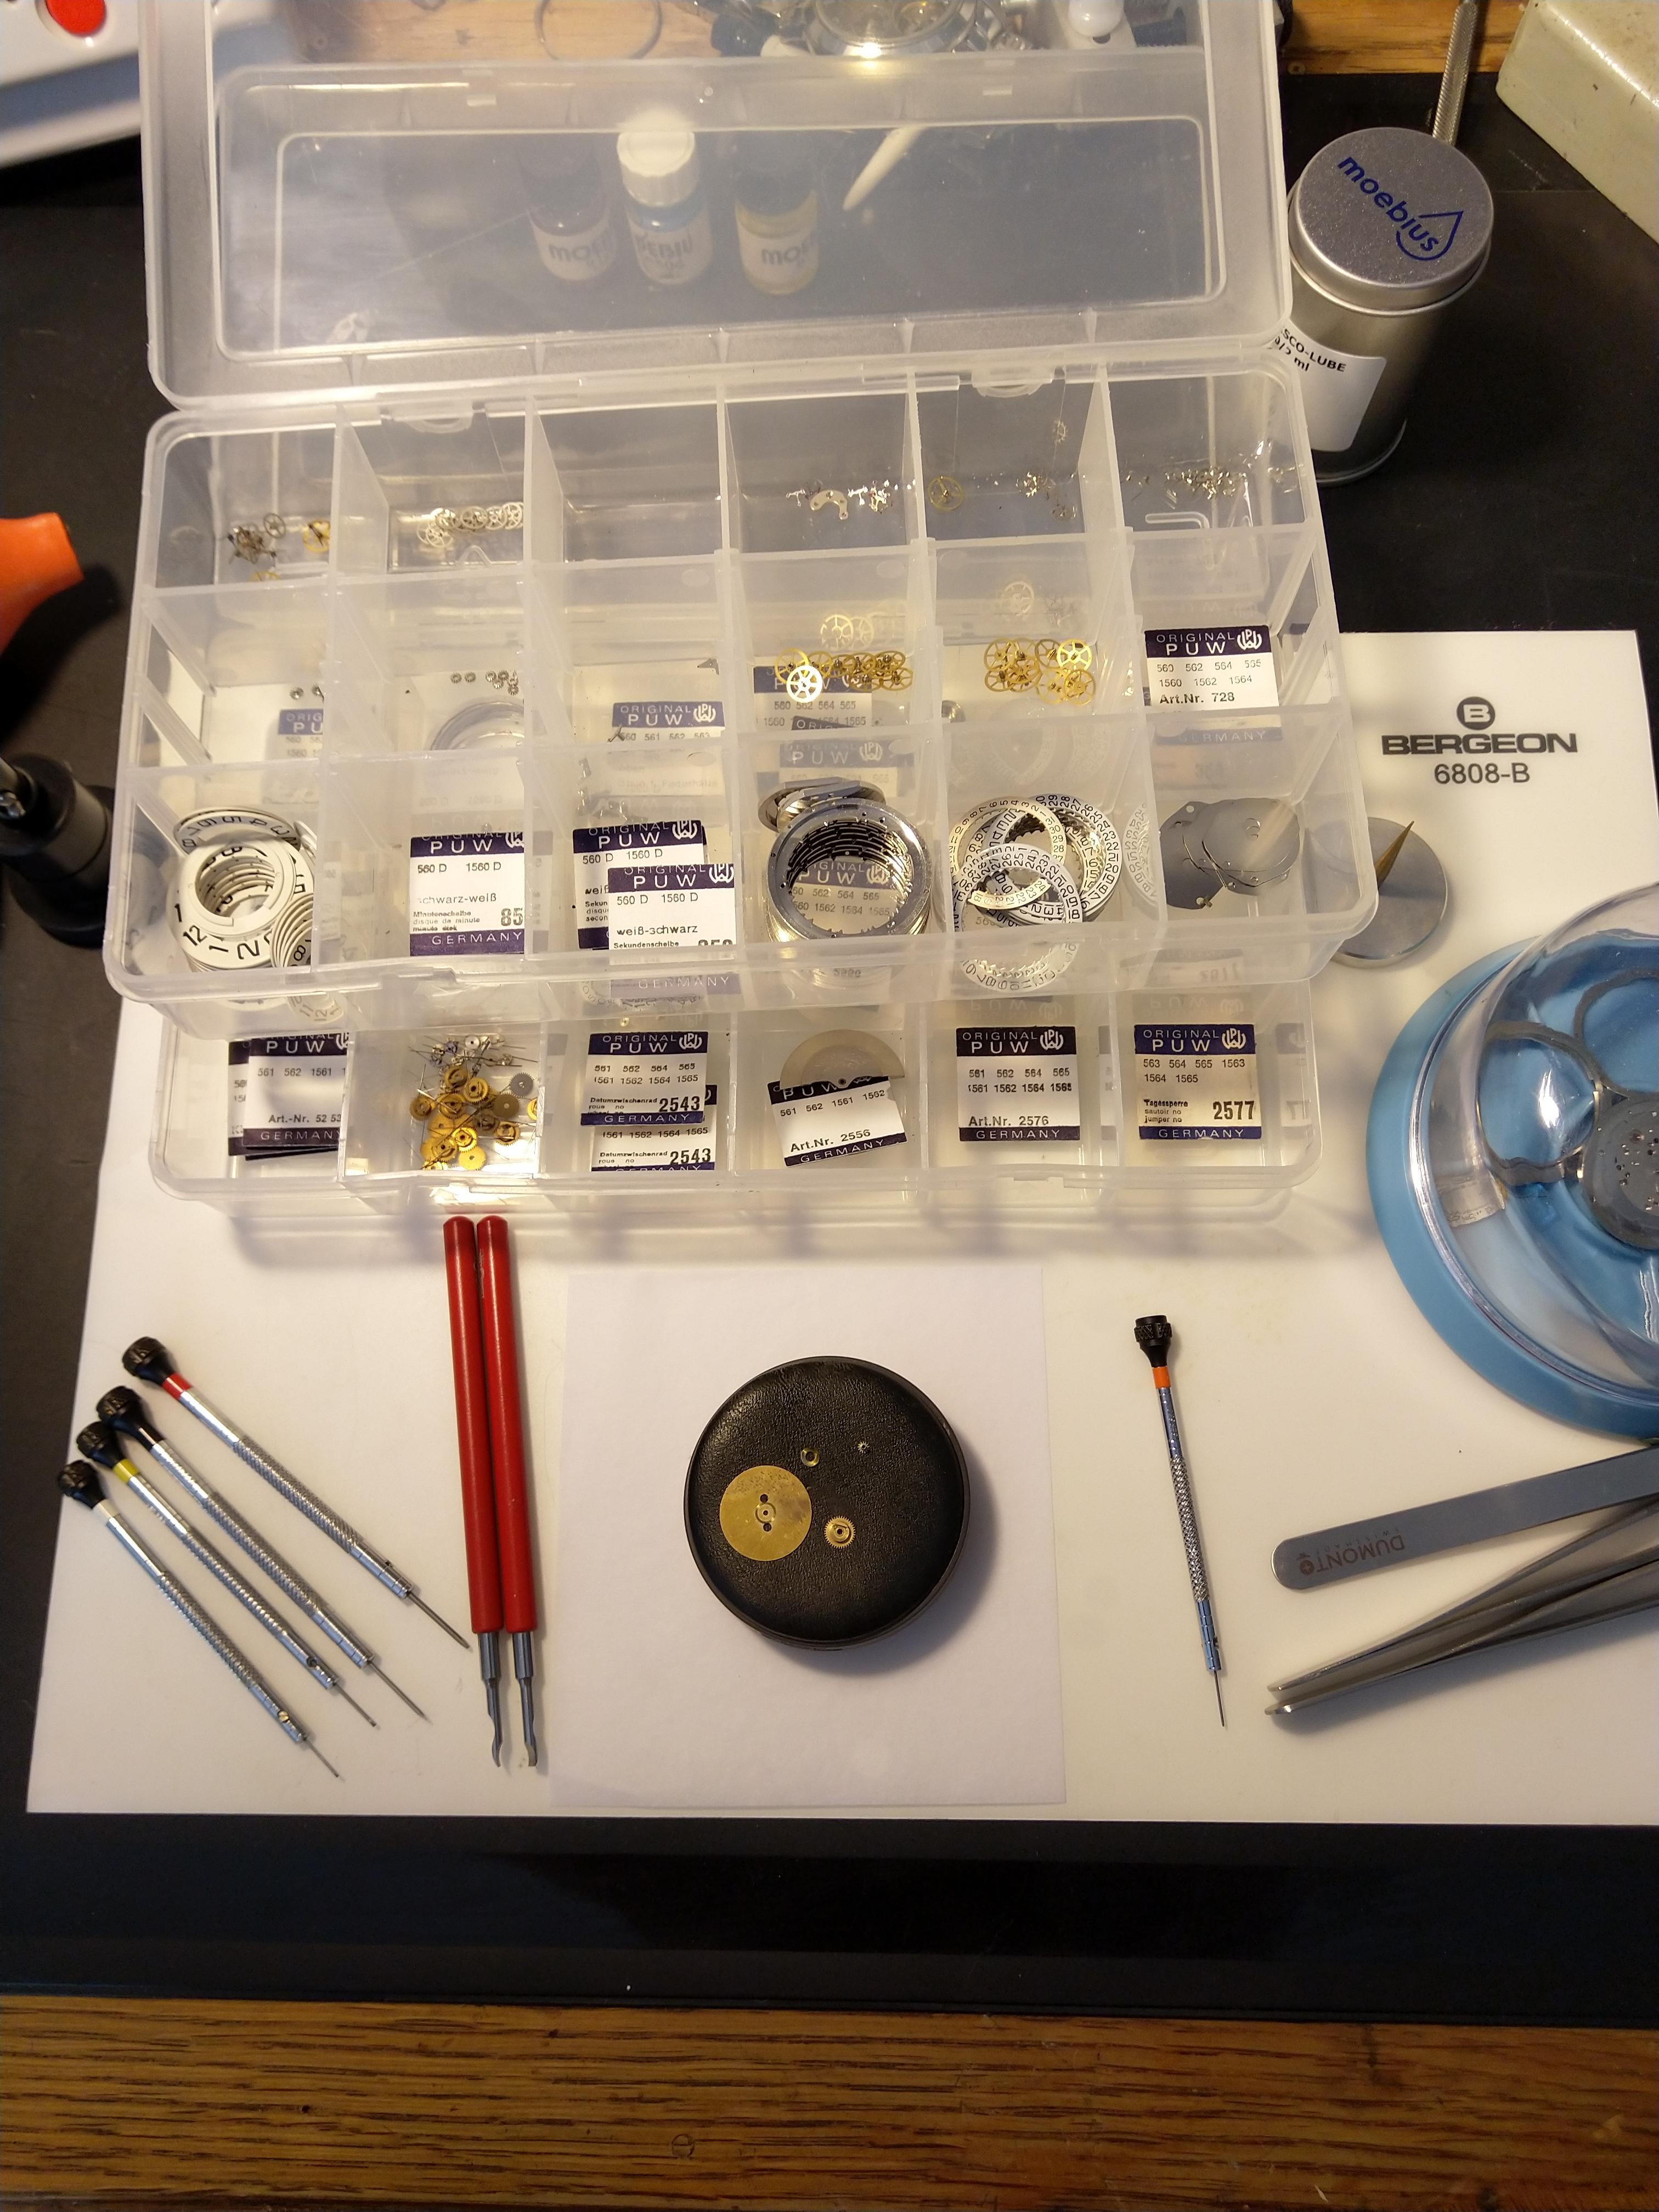
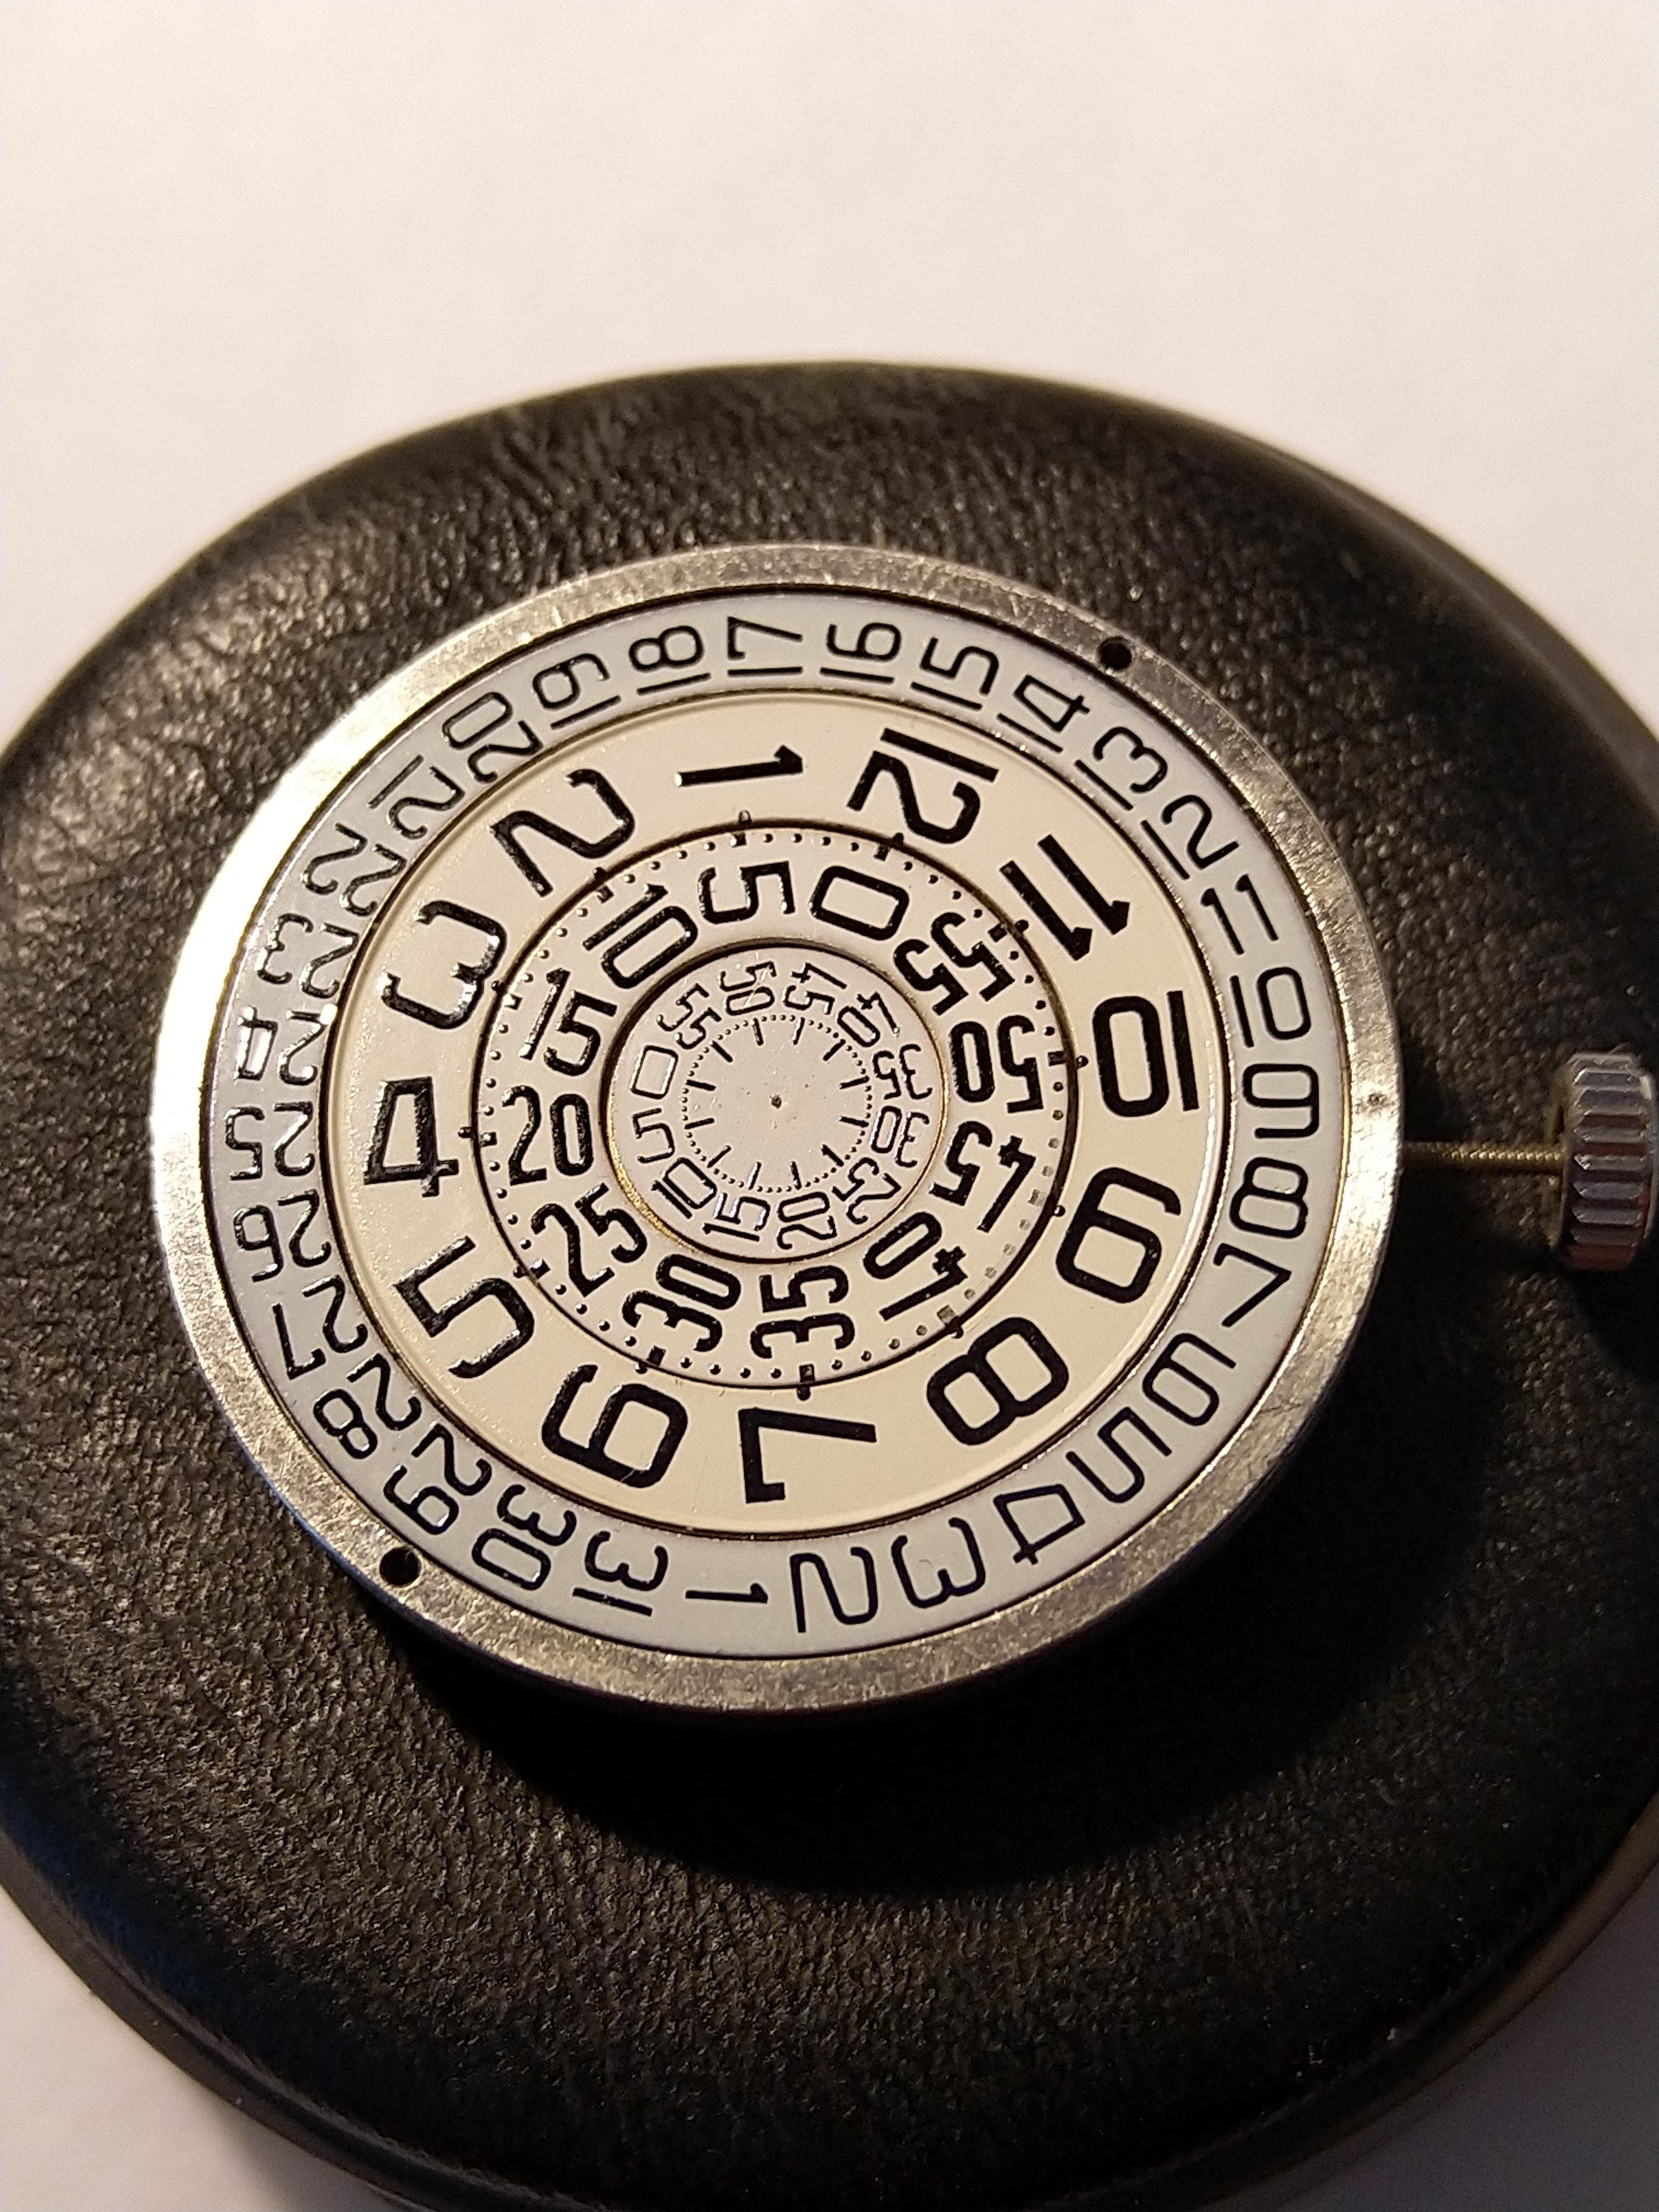
Back in business after some hectic weeks before my summer hollidays. Now I think the most parts I probably need has arrived and it is time to finish up this service. Well I probaly have parts for a dozen or two but better to be prepared one never know! So to save space on the server the whole procedure is attatched to the following PDF, just as anticipated the build wasn´t completly straight forward. Here is the PDF: PUW1560D_Assemble.pdf Now it is off to a new adventure, a pure discorama..The PUW 1561D.
 1 point