Leaderboard


Popular Content
Showing content with the highest reputation on 10/30/19 in all areas
-
What is to add, is that the water should be hot, at least initially. That accelerates the action of the solution.2 points
-
An easy and cheap way to remove broken screws is to use alum powder. You have to remove all steel parts from the plate with the broken screw and you let it sit in alum powder mixed with water. You have to check it regulary but in about 24h, the steel from the screw will become soft and you will be able to poke it off with a toothpick and clean it very easily. I used this method once for a 1966 Omega watch and got perfect results. Of course, you shouldn't use it on a movement with steel parts still on it as it will dissolve them but plates made of brass will not be affected by this product. Here is the one I used and purchased at a local grocery store: https://www.helloflavour.ca/en-ca/our-brands/club-house/products/herbs-and-spices/spices/alum-powdered2 points
-
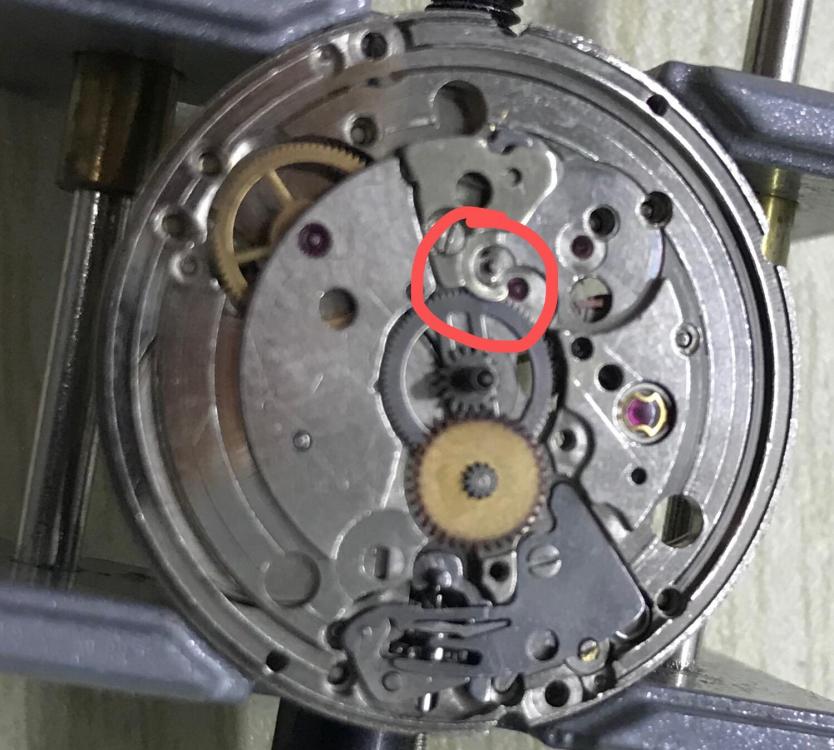
Yes, I have been using this great topic below to service a 7750 and there is no washer included either:2 points
-
I have 3 different tech guides for the 7750 and not 1 has it included. I have added the day function to many 7750s and have never had an issue. The movements with the day function that ive worked on did not have it either. Sent from my SM-G950U using Tapatalk2 points
-
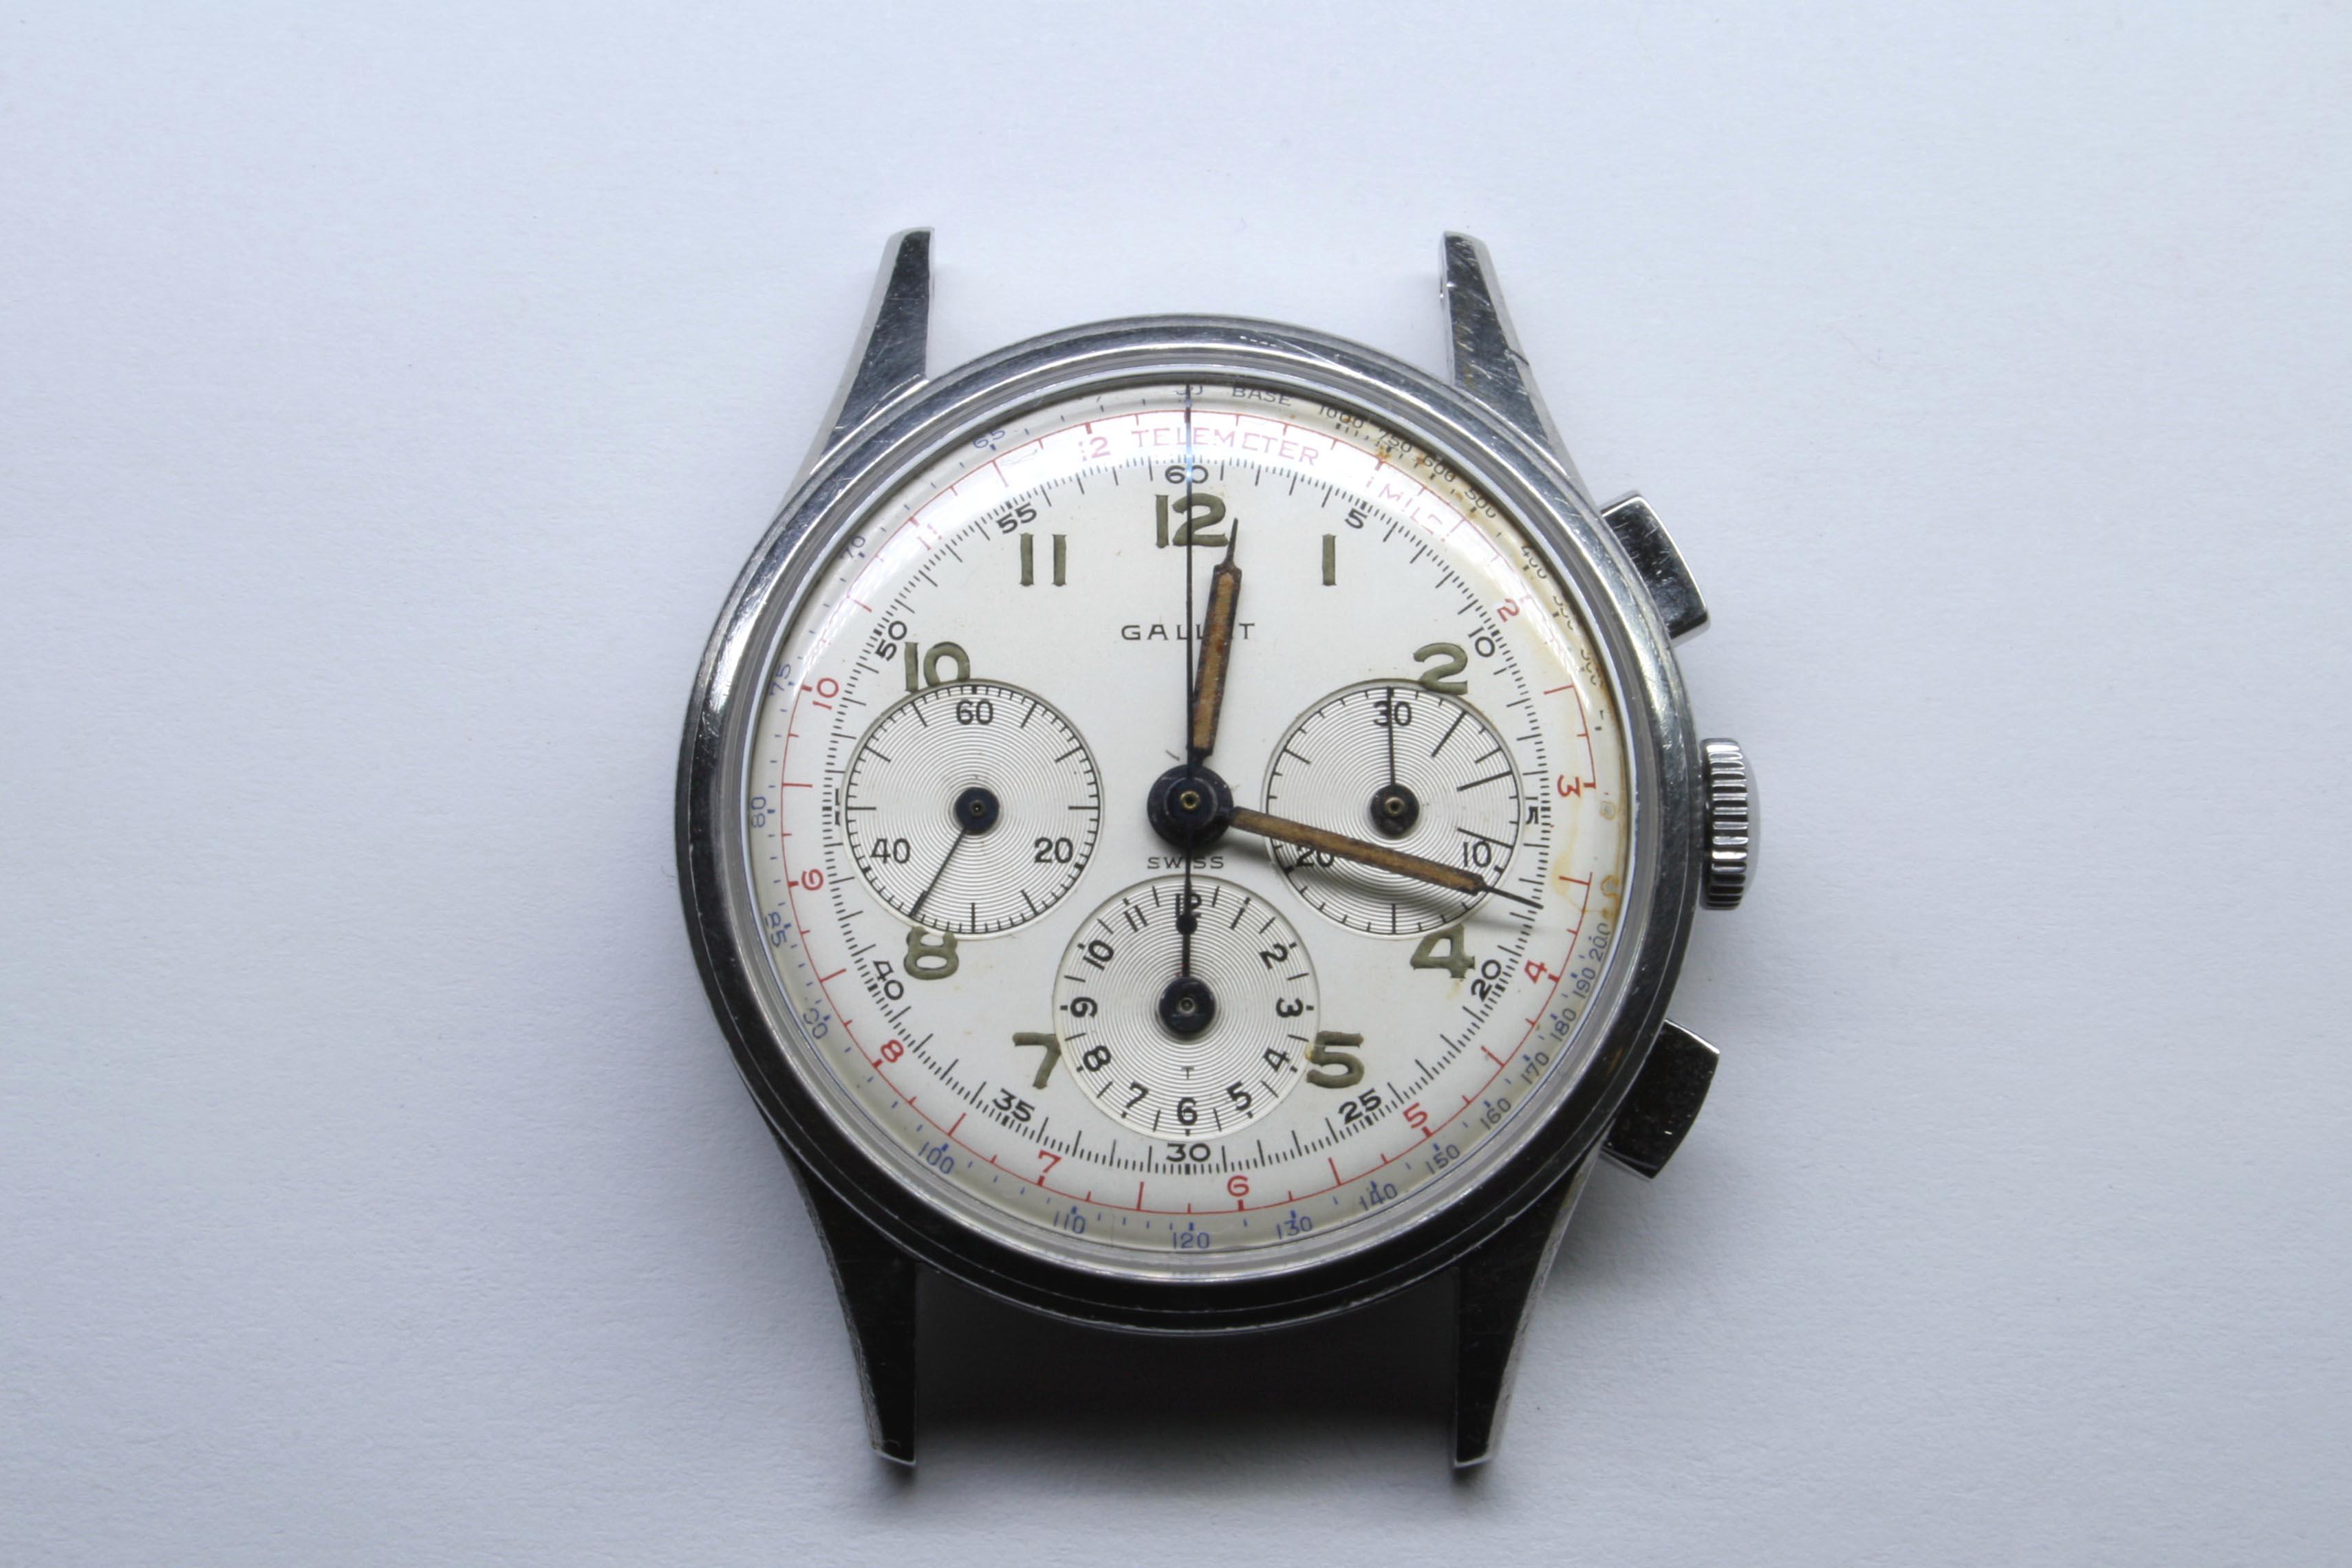
My Yema chronograph with a Venus 150 column wheel caliber.
 2 points
 -
I apologize, but an error has slipped into the assembly sequence of pictures. For detailed info please see the following post: https://www.watchrepairtalk.com/topic/12634-eta-calibre-2472-service-walkthrough/?tab=comments#comment-115897 When I first started out trying to service and repair watches I took a picture of every step, and I really needed those pictures as I didn’t have the knowledge to deduct where the parts should go, how they worked, and how they interacted. Now that I’ve gained some experience, I no longer need all those pictures, but I still need some pictures. For example, it’s very convenient to have pictures of the train of wheels or certain parts of a date complication, and so on. Anyway, I really enjoy taking these pictures as I go and I organize them and keep them on my OneDrive for future use. For this project, servicing my brother’s Atira Plana housing an ETA 2472, I felt it would be fun, interesting and perhaps even useful not only to take the pictures but to edit the pictures adding visual and textual instructions. These pictures are made for my personal use and are not intended as a tutorial or to tell other people how to service an ETA 2472. The pictures simply document how I went about it. Nevertheless, I guess others may find my work useful so I’m happy to share it. There are many ways to service a watch and I’m still learning. That said, I do follow the practices taught on watchrepairlessons.com and they work very well for me! Here are links to my other service walkthroughs here on WRT: Unitas Calibre 6325 Service Walkthrough ETA cal. 2824-2 (17 jewels) disassembly/assembly Vostok 2409 Service Walkthrough ETA Calibre 2472 Disassembly (132 pictures) ETA Calibre 2472 Assembly (131 pictures)1 point
-
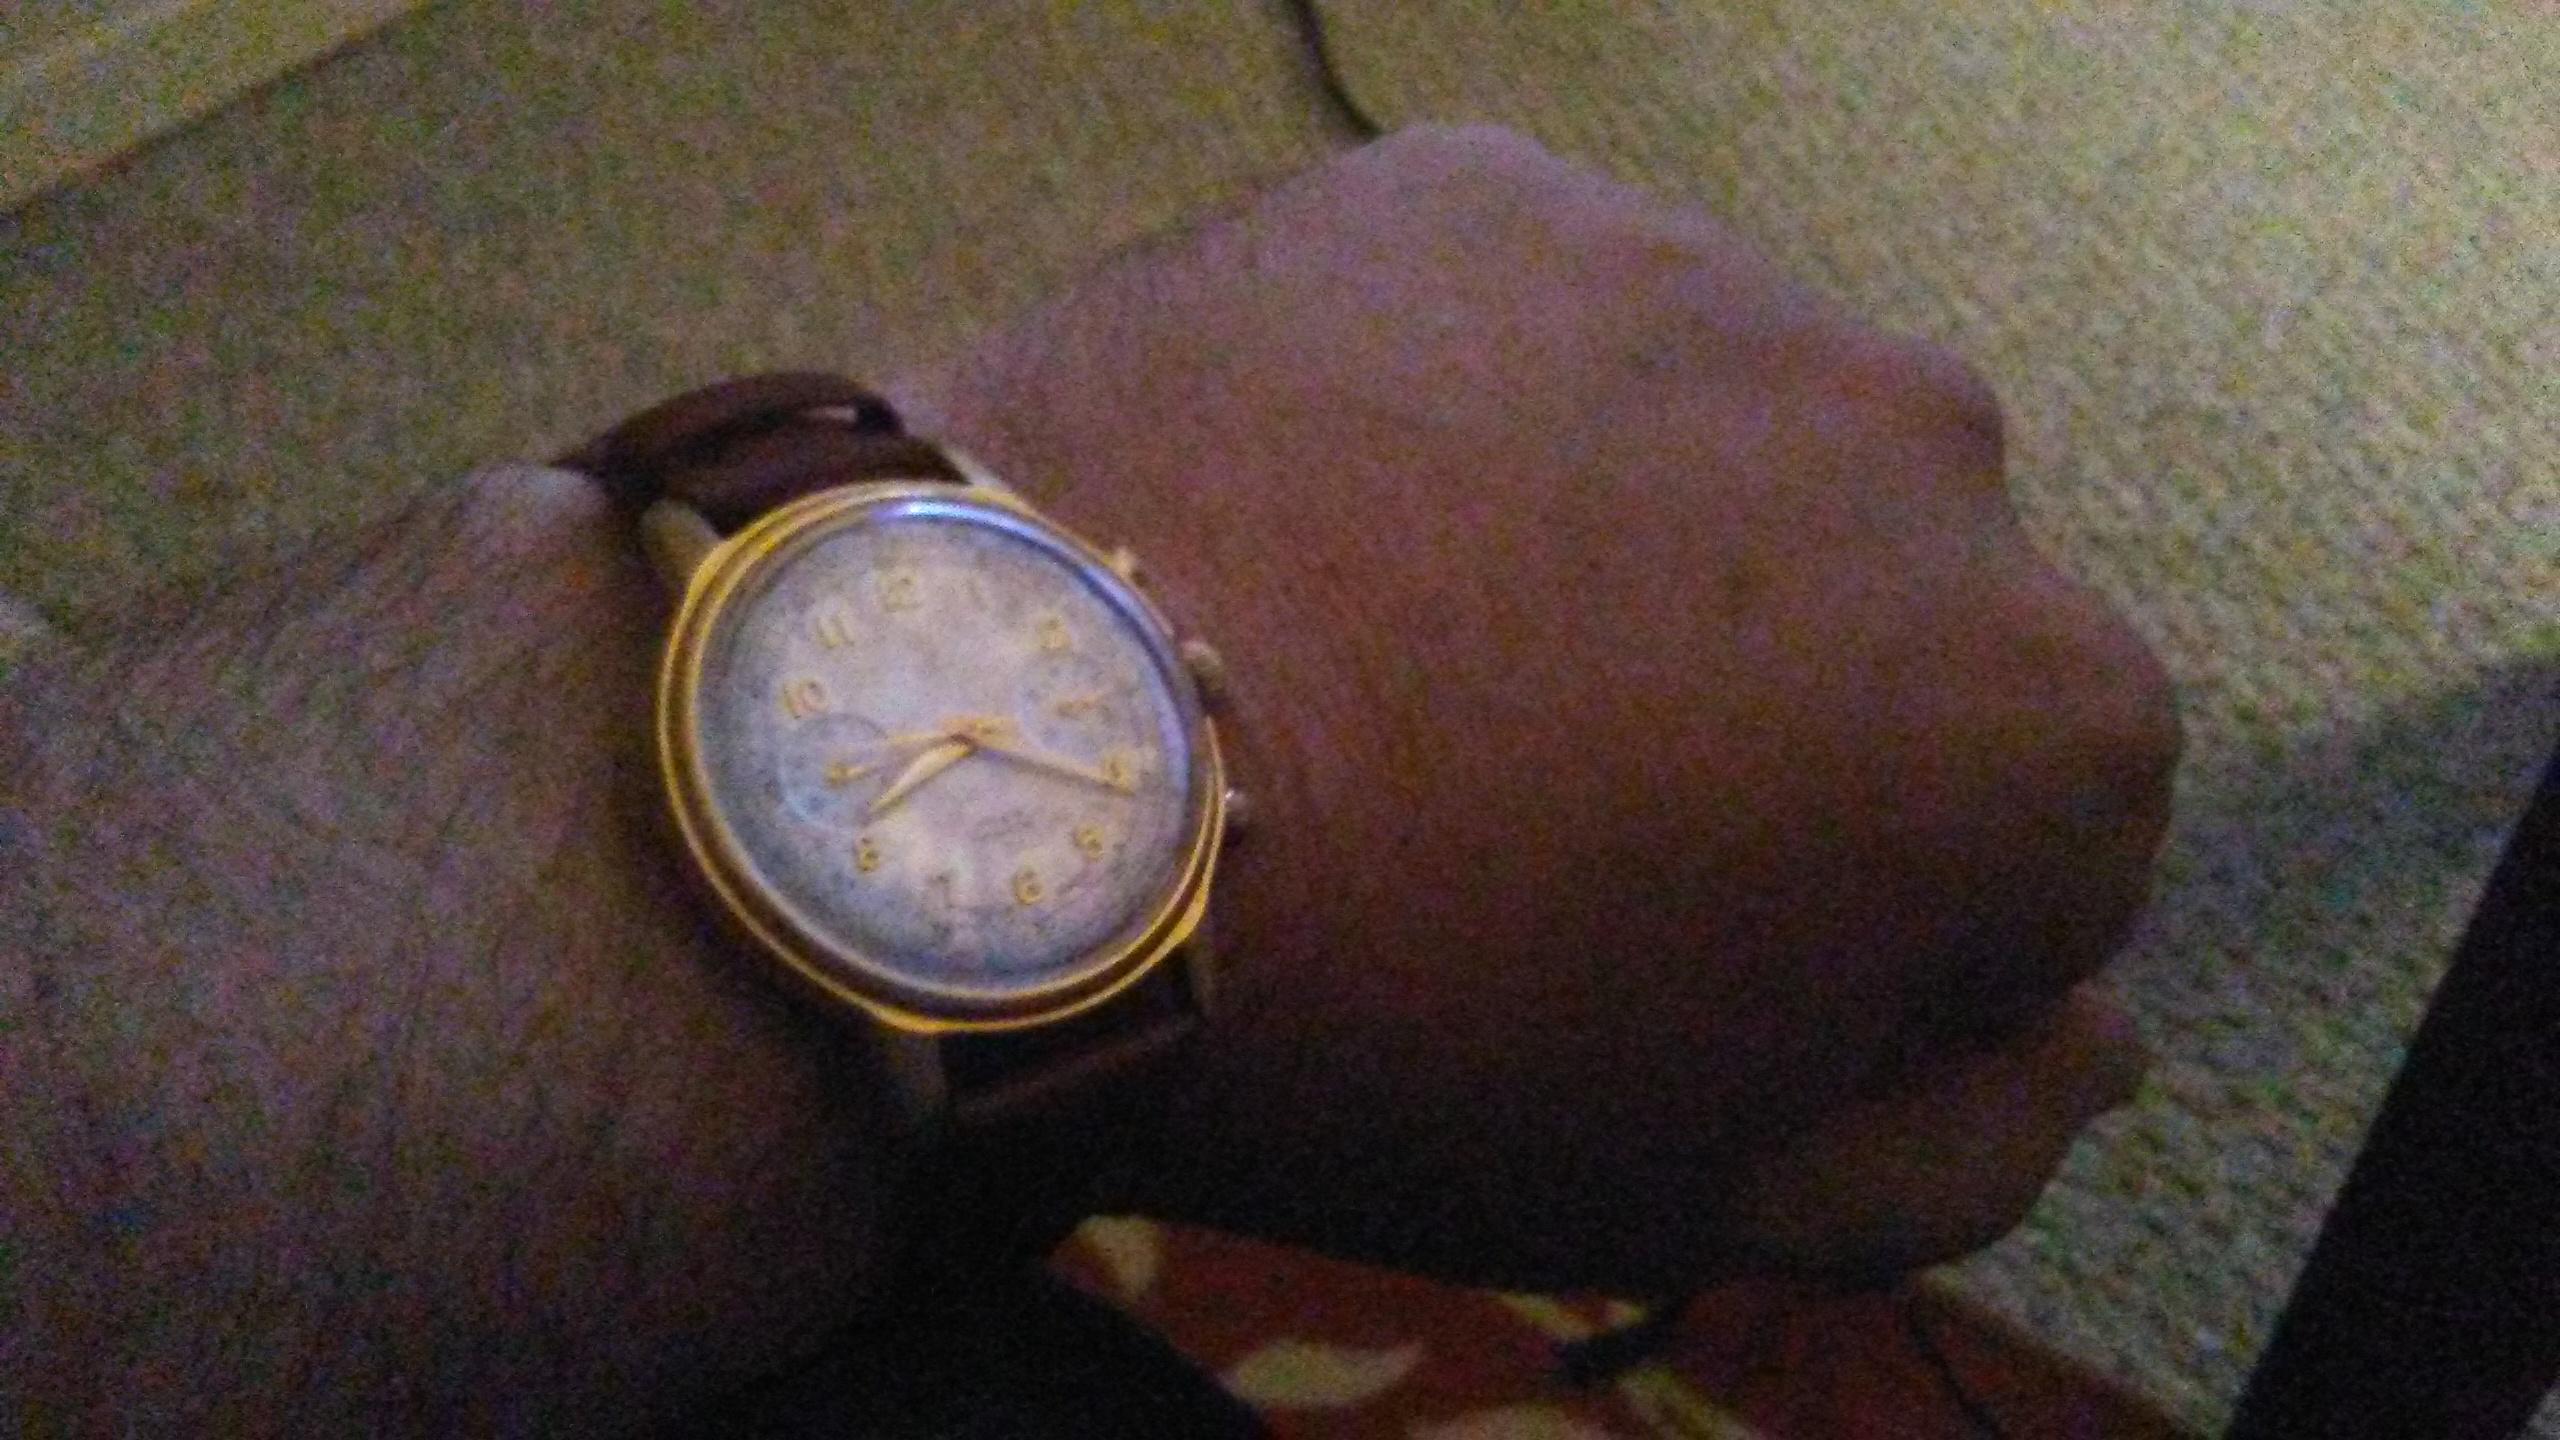
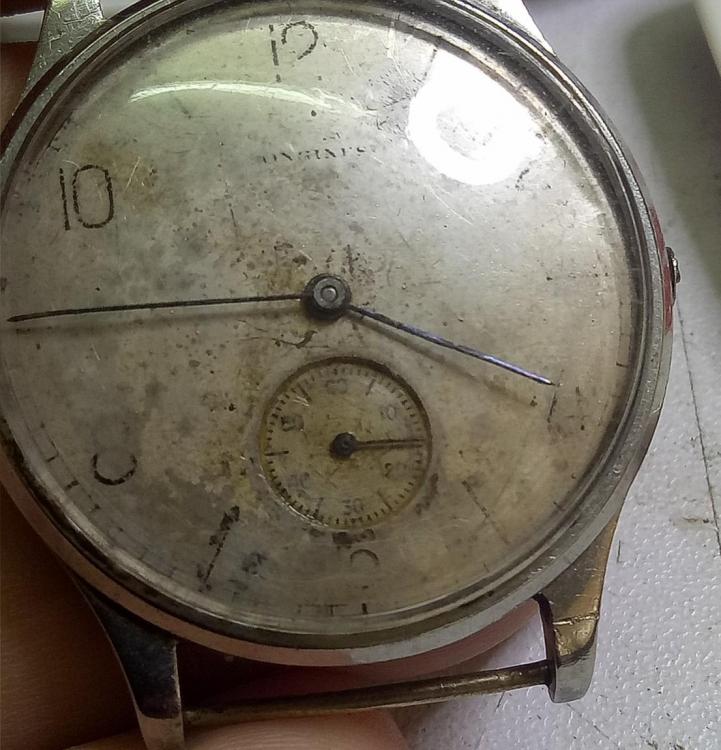
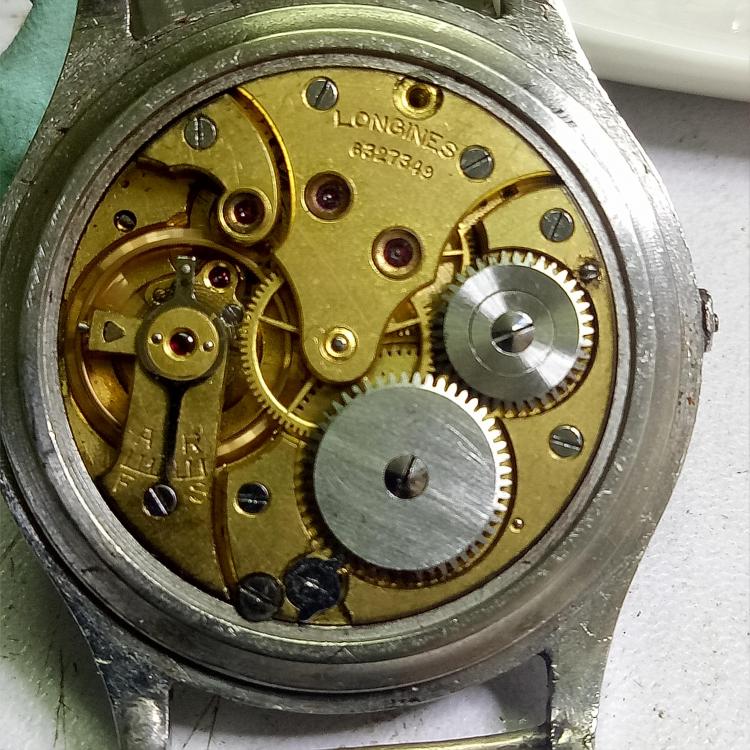
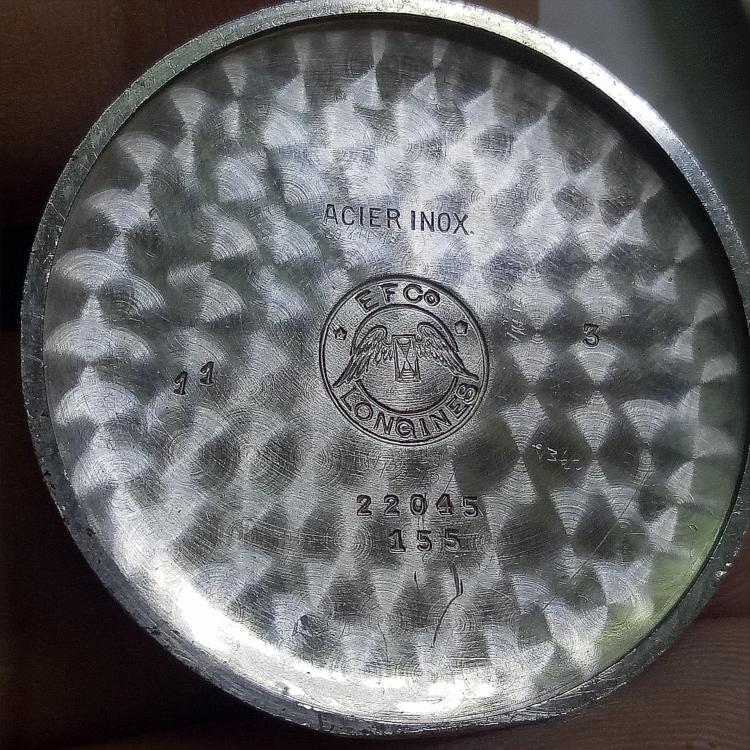
Got this beat up Longings at a flea market about two weeks ago. Dial is thrashed but hands can be saved. Its a Cal.12 which is a nice movement and the balance swung smoothly. When I got it back home I wound the mainspring with the screw on the ratchet wheel and it started ticking.. Sluggish but it bodes well for this project! Apart from a missing case screw everything looks good so far! Mainspring was wound down (no power) when I got it and the regulator is in the middle so I bet is was a nice runner until a missing crown led to it being put away. Crown tube is pretty mashed up but at least the stem is there (a plus point!) , and the case has a lot of scars. It has solid springbars but it looks like they were added on later, it a pretty untidy job and one lug in particular looks a bit weak As it's only the solder holding it in. It's normal to see damaged lugs on base metal cases but this is a Stainless Steel case. Nice engraving on the inner case back. I'll probably clean and oil it and fit a new crown and crystal. I should be able to 'massage' the hands back to shape but the dial will probably stay as it is. Will post up pics as I get along but this is not an urgent job as I have a few others waiting in line. Anilv
 1 point
 -
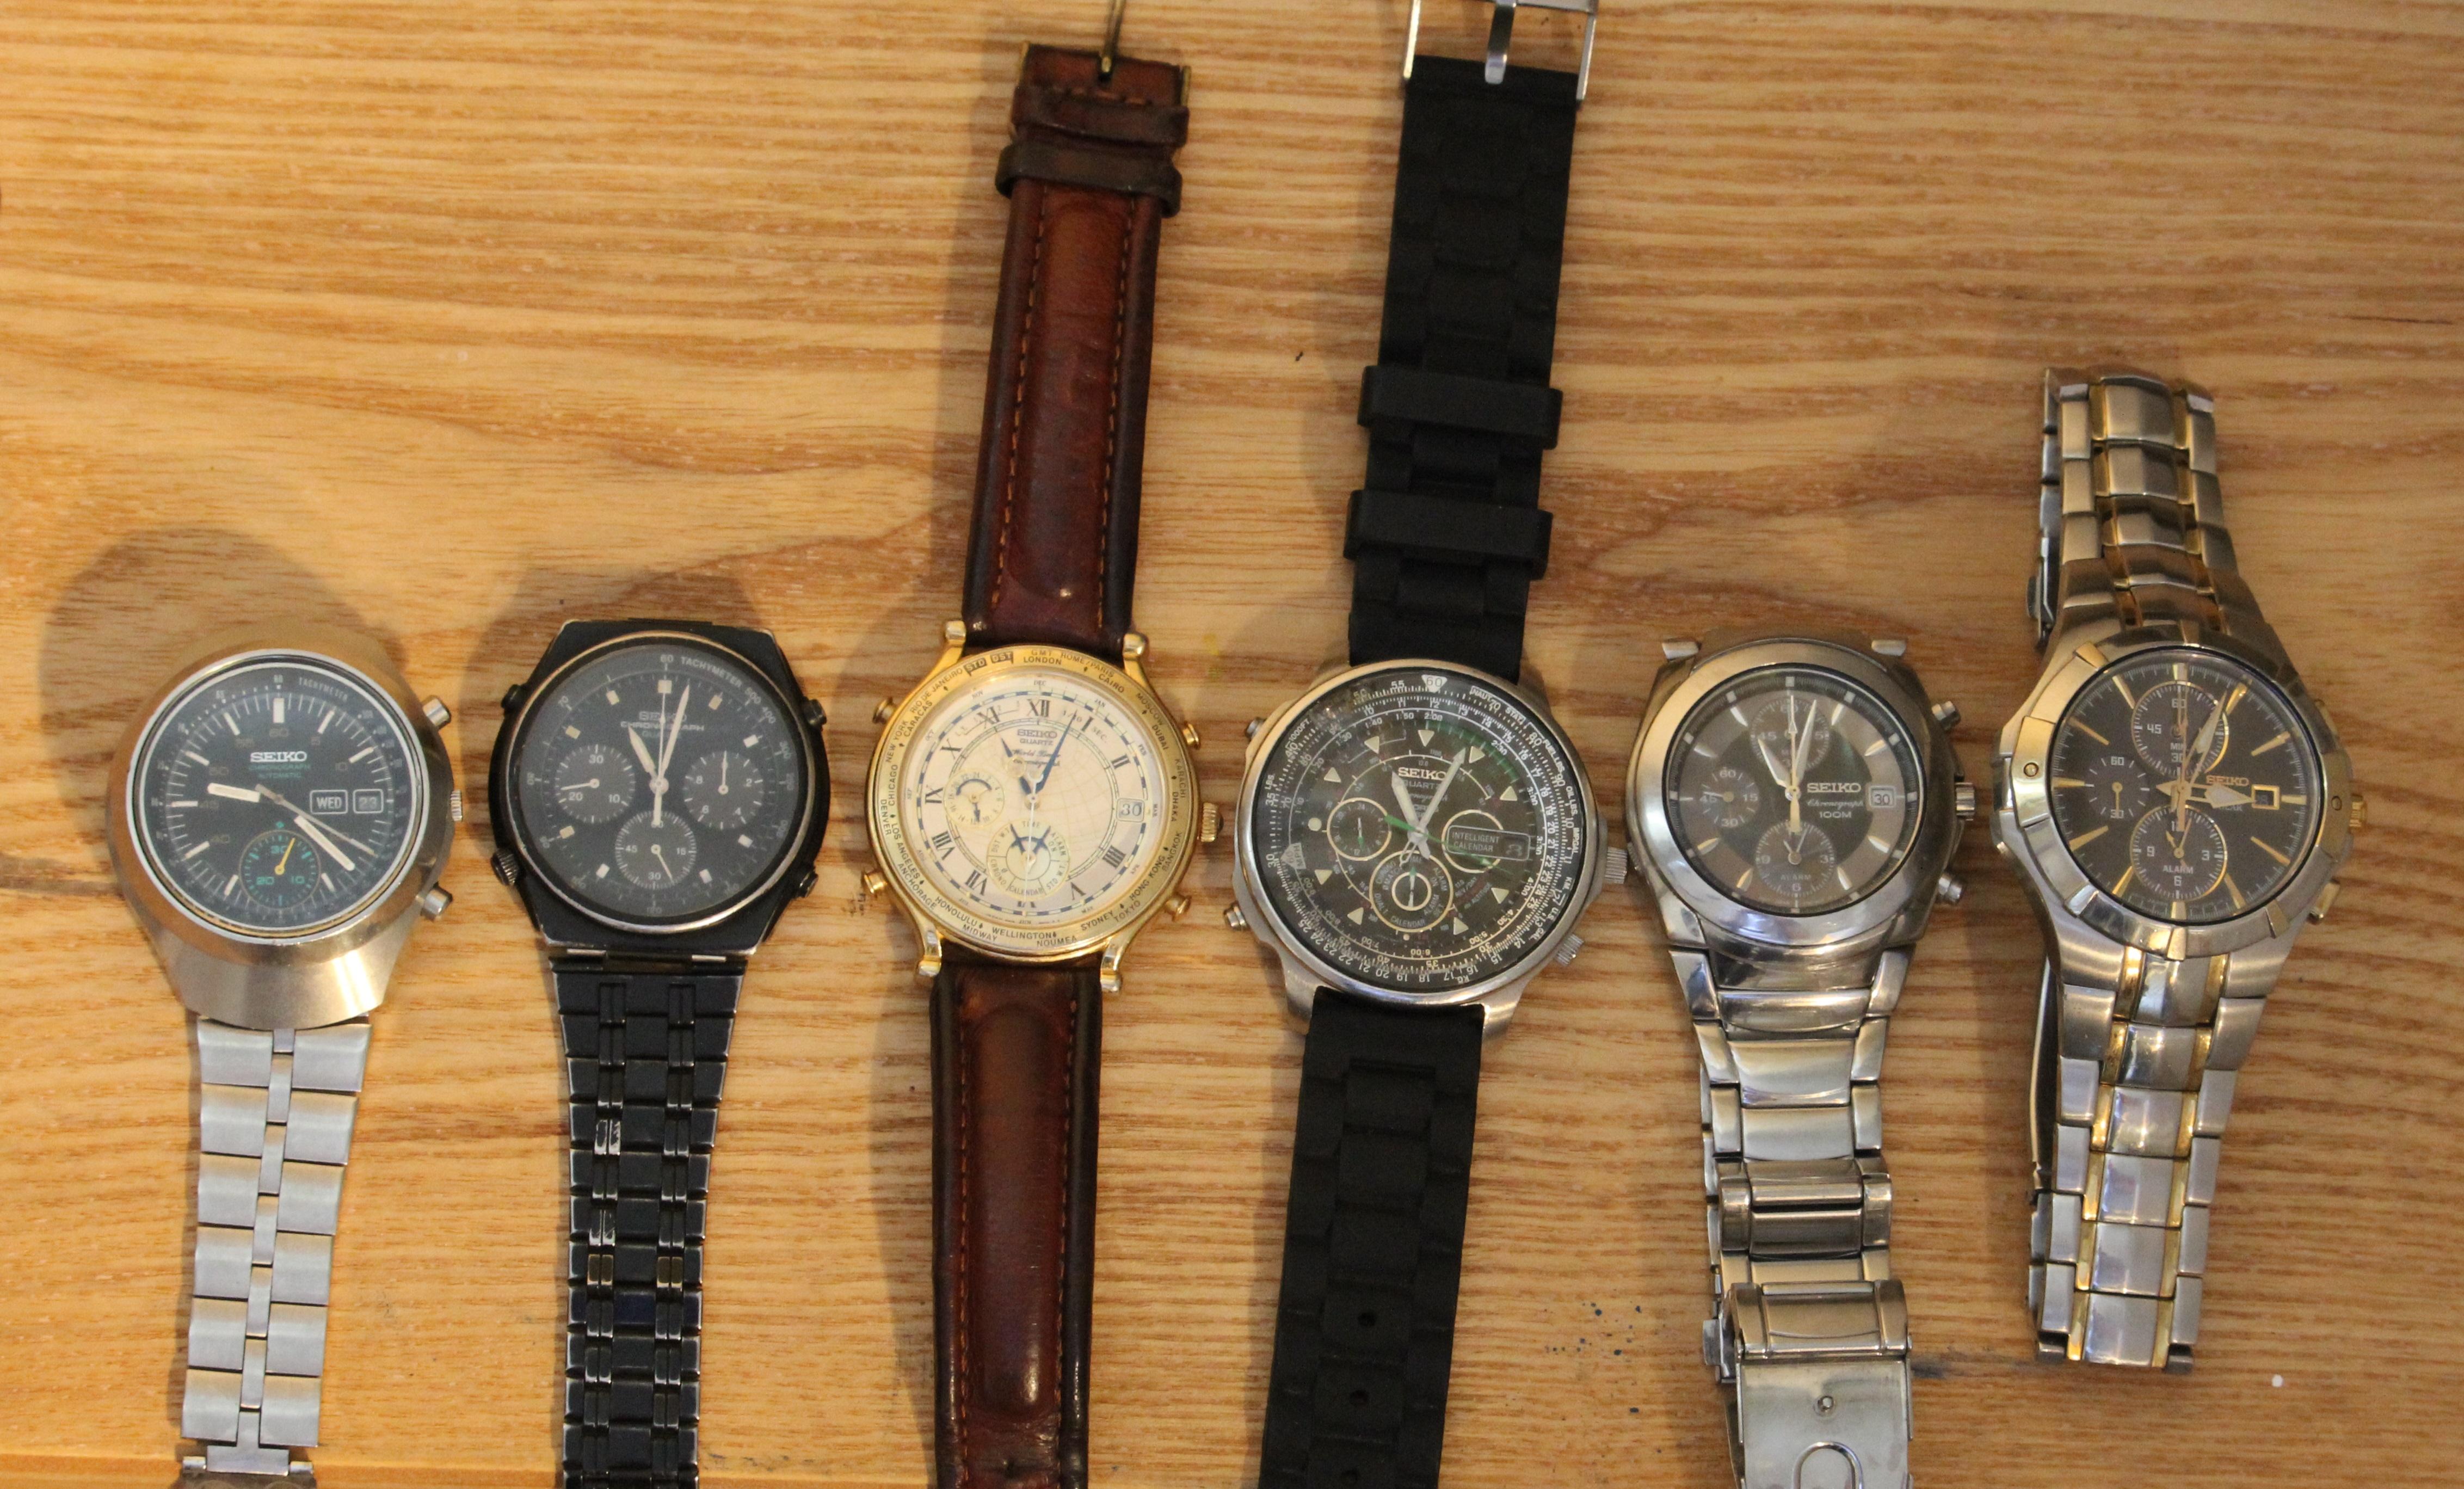
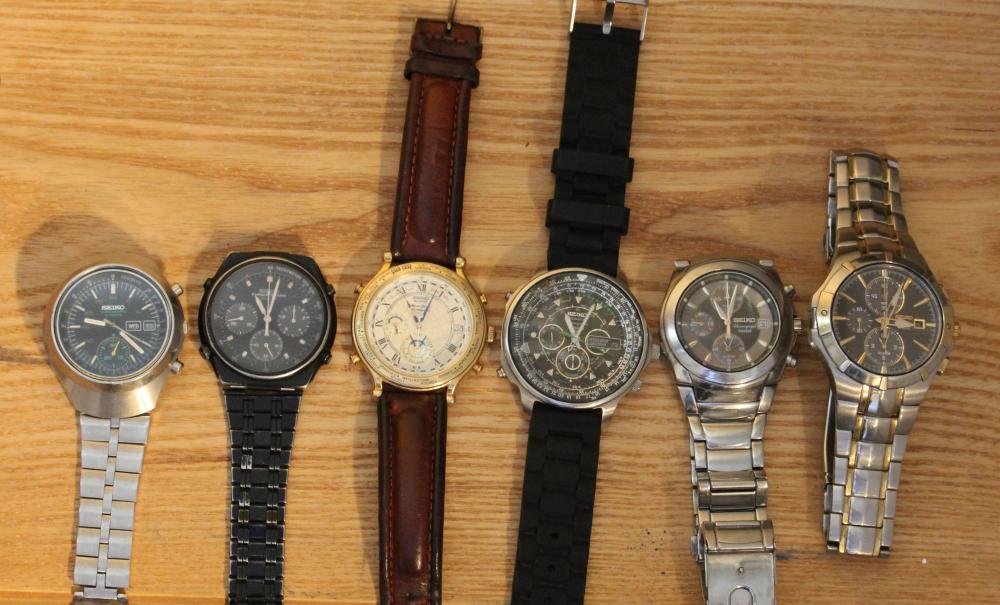
Here is part of my Seiko chronograph collection. From left to right: 1. 1975 with the 6139 caliber: The first automatic chronograph in the world in 1969 and also the first automatic chronograph known to be worn in space by the general Pogue in 1973. 2. 1983 with the 7A28 caliber: The first quartz chronograph with analog display in the world. 3. 1993 with the 6M15 caliber: Not sure if it's the first of anything but it has very interesting features like the chronograph with dancing hands. It was also created to celebrate the 500th anniversary of the discovery of the Americas. 4. 1992 with the 6M23 caliber: Another Seiko used in space, a "Space Navigator" worn by a Japanese astronaut during an US shuttle mission. 5. 2007 with the 7T62 caliber: Not much to say about this Seiko but it's the watch I wear when I am at home or sleeping. 6. 2013 with the V172 caliber: My most recent watch and also the only one that never gives the right time. Not sure what is wrong but the hour hand turns slower than the other ones. I have to use the buttom sub dial to check the right time.
 1 point
 -
does Cousins have a store in the U S ?1 point
-
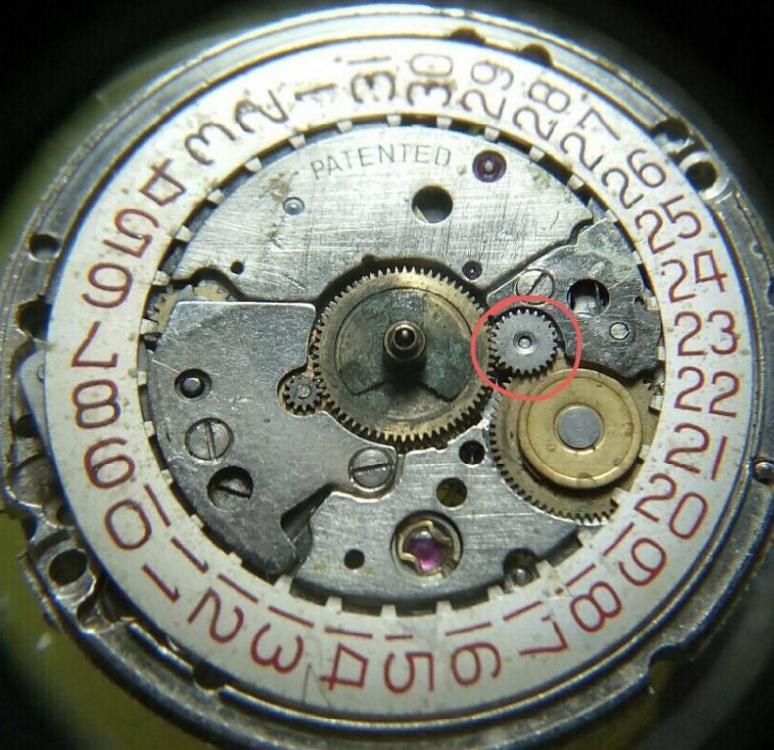
That's odd, all the ones with day function I have come across, 3 from Bulova, 2 from Victorinox, and 3 from Mido all have the dial washer.1 point
-
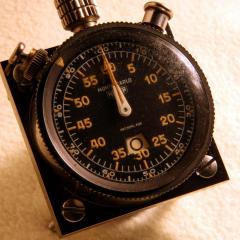
This catalogue may help to I.D the clock: http://www.hells-confetti.com/Technical data/Jaeger Instruments/British Jaeger Dashboard Instruments.pdf1 point
-
I had a major screw issue and had to put the movement in my Lathe and drill out the screw. If you need to know the technique to do this I shall provide it. I used the screw removal tool and it did not work for my situation. Screw was locked in way too tight and it was the screw for the mainspring arbor. Sent from my iPhone using Tapatalk Pro1 point
-
Hi I have attached some technical sheets for the ecodrive . If the stem pulls out altogether from the movement it suggests that the retaining lever in the mech is faulty or broken, if the stem is bent it will require replacement. The only way to find out is by removing the mech from the case and removing the dial and hands so as to be able to inspect the keyless work 1029_Citizen E001, E011, E031, E101, E111.pdf 2018_Citizen Eco-Drive.pdf1 point
-
I have tried the Alum method with some success but it is slow. I must say the Chinese tool Paul shows looks impressive and a nice price. One method I did use was to use a series of micro drills into the broken screw then un-screwed with a small screwdriver.1 point
-
Thanks very much for the feedback, So that is two no's and one yes. If it doesn't cause any issues I may add the foil just in case. Thanks @Lawson for the link to the servicing guide, I look forward to reading it. Stuart1 point
-
There is no supplier. You could try and email their sales/service. You may find generic hands that fit from a supplier or look for a donor watch on eBay.1 point
-
Will do. And good idea on the nail clippers.1 point
-
Here is a 1972 Seiko coming from Greece
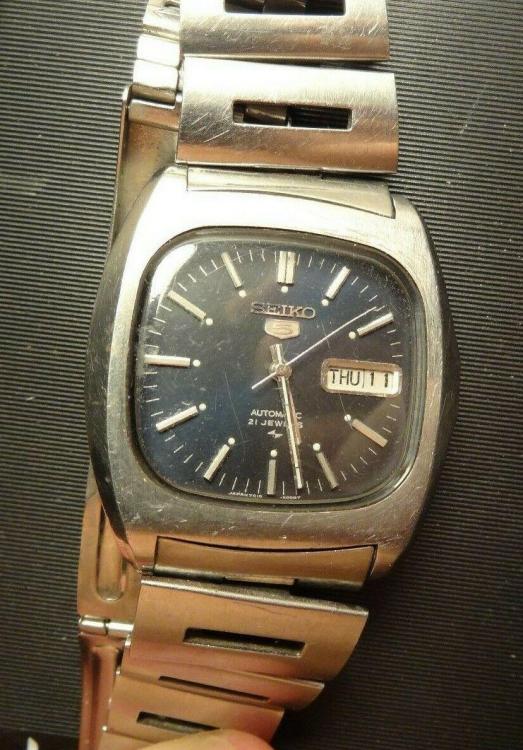 1 point
 -
From my experience yes you need it. I have neglected to put it in in the past thinking it was omit-able because it was so thin and flat. Apparently that extra bit of clearance is all that's needed for my day wheel to become dislodged and jam up in short order. I can't find any place where you would get one and the service manual don't even include it. But I guess you can use any generic washer that fits over the hour wheel arbor but not wide enough to peek out the day window and thickness of about a piece of A3 paper.1 point
-
Great that it worked out! Anilv1 point
-
@Sberry I've done a lot of Vostoks and I hope you'll find this post useful where you'll find a picture (among the assembly pictures) and a video (link) demonstrating how to get the anti-shock spring in place.1 point
-
In that version, the mechanism comes out from the crystal side. First back of the screw adjacent to the crown by 1 1/2 to 2 1/2 turns, and wiggle the crown out. Next either remove the crystal with a crystal lifter if you have one . This is the safer, preferred method. Otherwise, press firmly into those half moon shaped cut-outs in the case, in order to press the mechanism against the crystal and force it out that way. This is much riskier, not least because the whole thing can fly apart, and send things bouncing round the room. Never a good idea with any watch. Once you have the mechanism out, you can give it a clean and oil as per the service manual. Rebuilding is the reverse of taking apart. Refit the mechanism to the case, then fit the crown and stem (a one piece affair on these Timexes) and screw the screw back down. Next, fit your new crystal, preferably with a suitable crystal press, although you may be able to press it in to place by hand. This takes care, and not a little skill, as you don't want to damage the new crystal in the process, or get dirt or grubby fingerprints on it or the dial or hands, nor bend the hands in the process of fitting the crystal.1 point
-
If you’re like me, taking apart you first ETA calibre 2472 and feeling somewhat intimidated after having removed the case back lid looking down on the automatic works, then you will likely appreciate this post. By the way, except for the oscillating weight itself, the automatic winding device is identical for the following calibres: ETA 2450, ETA 2451, ETA 2452, ETA 2453, ETA 2454, ETA 2472, and ETA 2474. My only other experience of ETA’s automatic winding devices comes from calibre 2824-2. So, looking down on the oscillating weight of the ETA 2472 and not seeing a screw holding it attached to the automatic device framework, made me think the parts had somehow been riveted together and probably were inseparable. Having removed and looked at the back of the automatic device framework I could see that the oscillating weight was indeed attached with a screw or at least something that reminded me of a screw. Its slot was very thin, and it sat in a large jewel! No way I was going to try to remove it without knowing for sure it could be done and how it should be done, especially as this watch wasn’t mine but my brother’s who’d trusted it to me for an overhaul. My first thought then was to try to remove all wheels without touching the oscillating weight. After having looked at the device for a good long while, I realized I wouldn’t be able to remove a single wheel before separating the oscillating weight from the framework. So, I decided to be patient (hardest part of watch repairing), put the parts away for now and research the Internet. I Googled “eta 2472 how to remove oscillating weight”. The first hit was “Untitled - OM-Mechanics”, a PDF document. Well, I wasn’t feeling very optimistic but lo and behold, there it was, in full detail! Anyway, the PDF is pretty poorly scanned, and it isn’t all that easy to read the part numbers, so I decided to make my own picture guide for disassembling the automatic device of this ETA calibre 2472, and that’s what follows next: (Eventually, I’ll publish a complete ETA calibre 2472 service picture walkthrough. If interested, you’ll find a link to it in a future post in this thread.)1 point
-
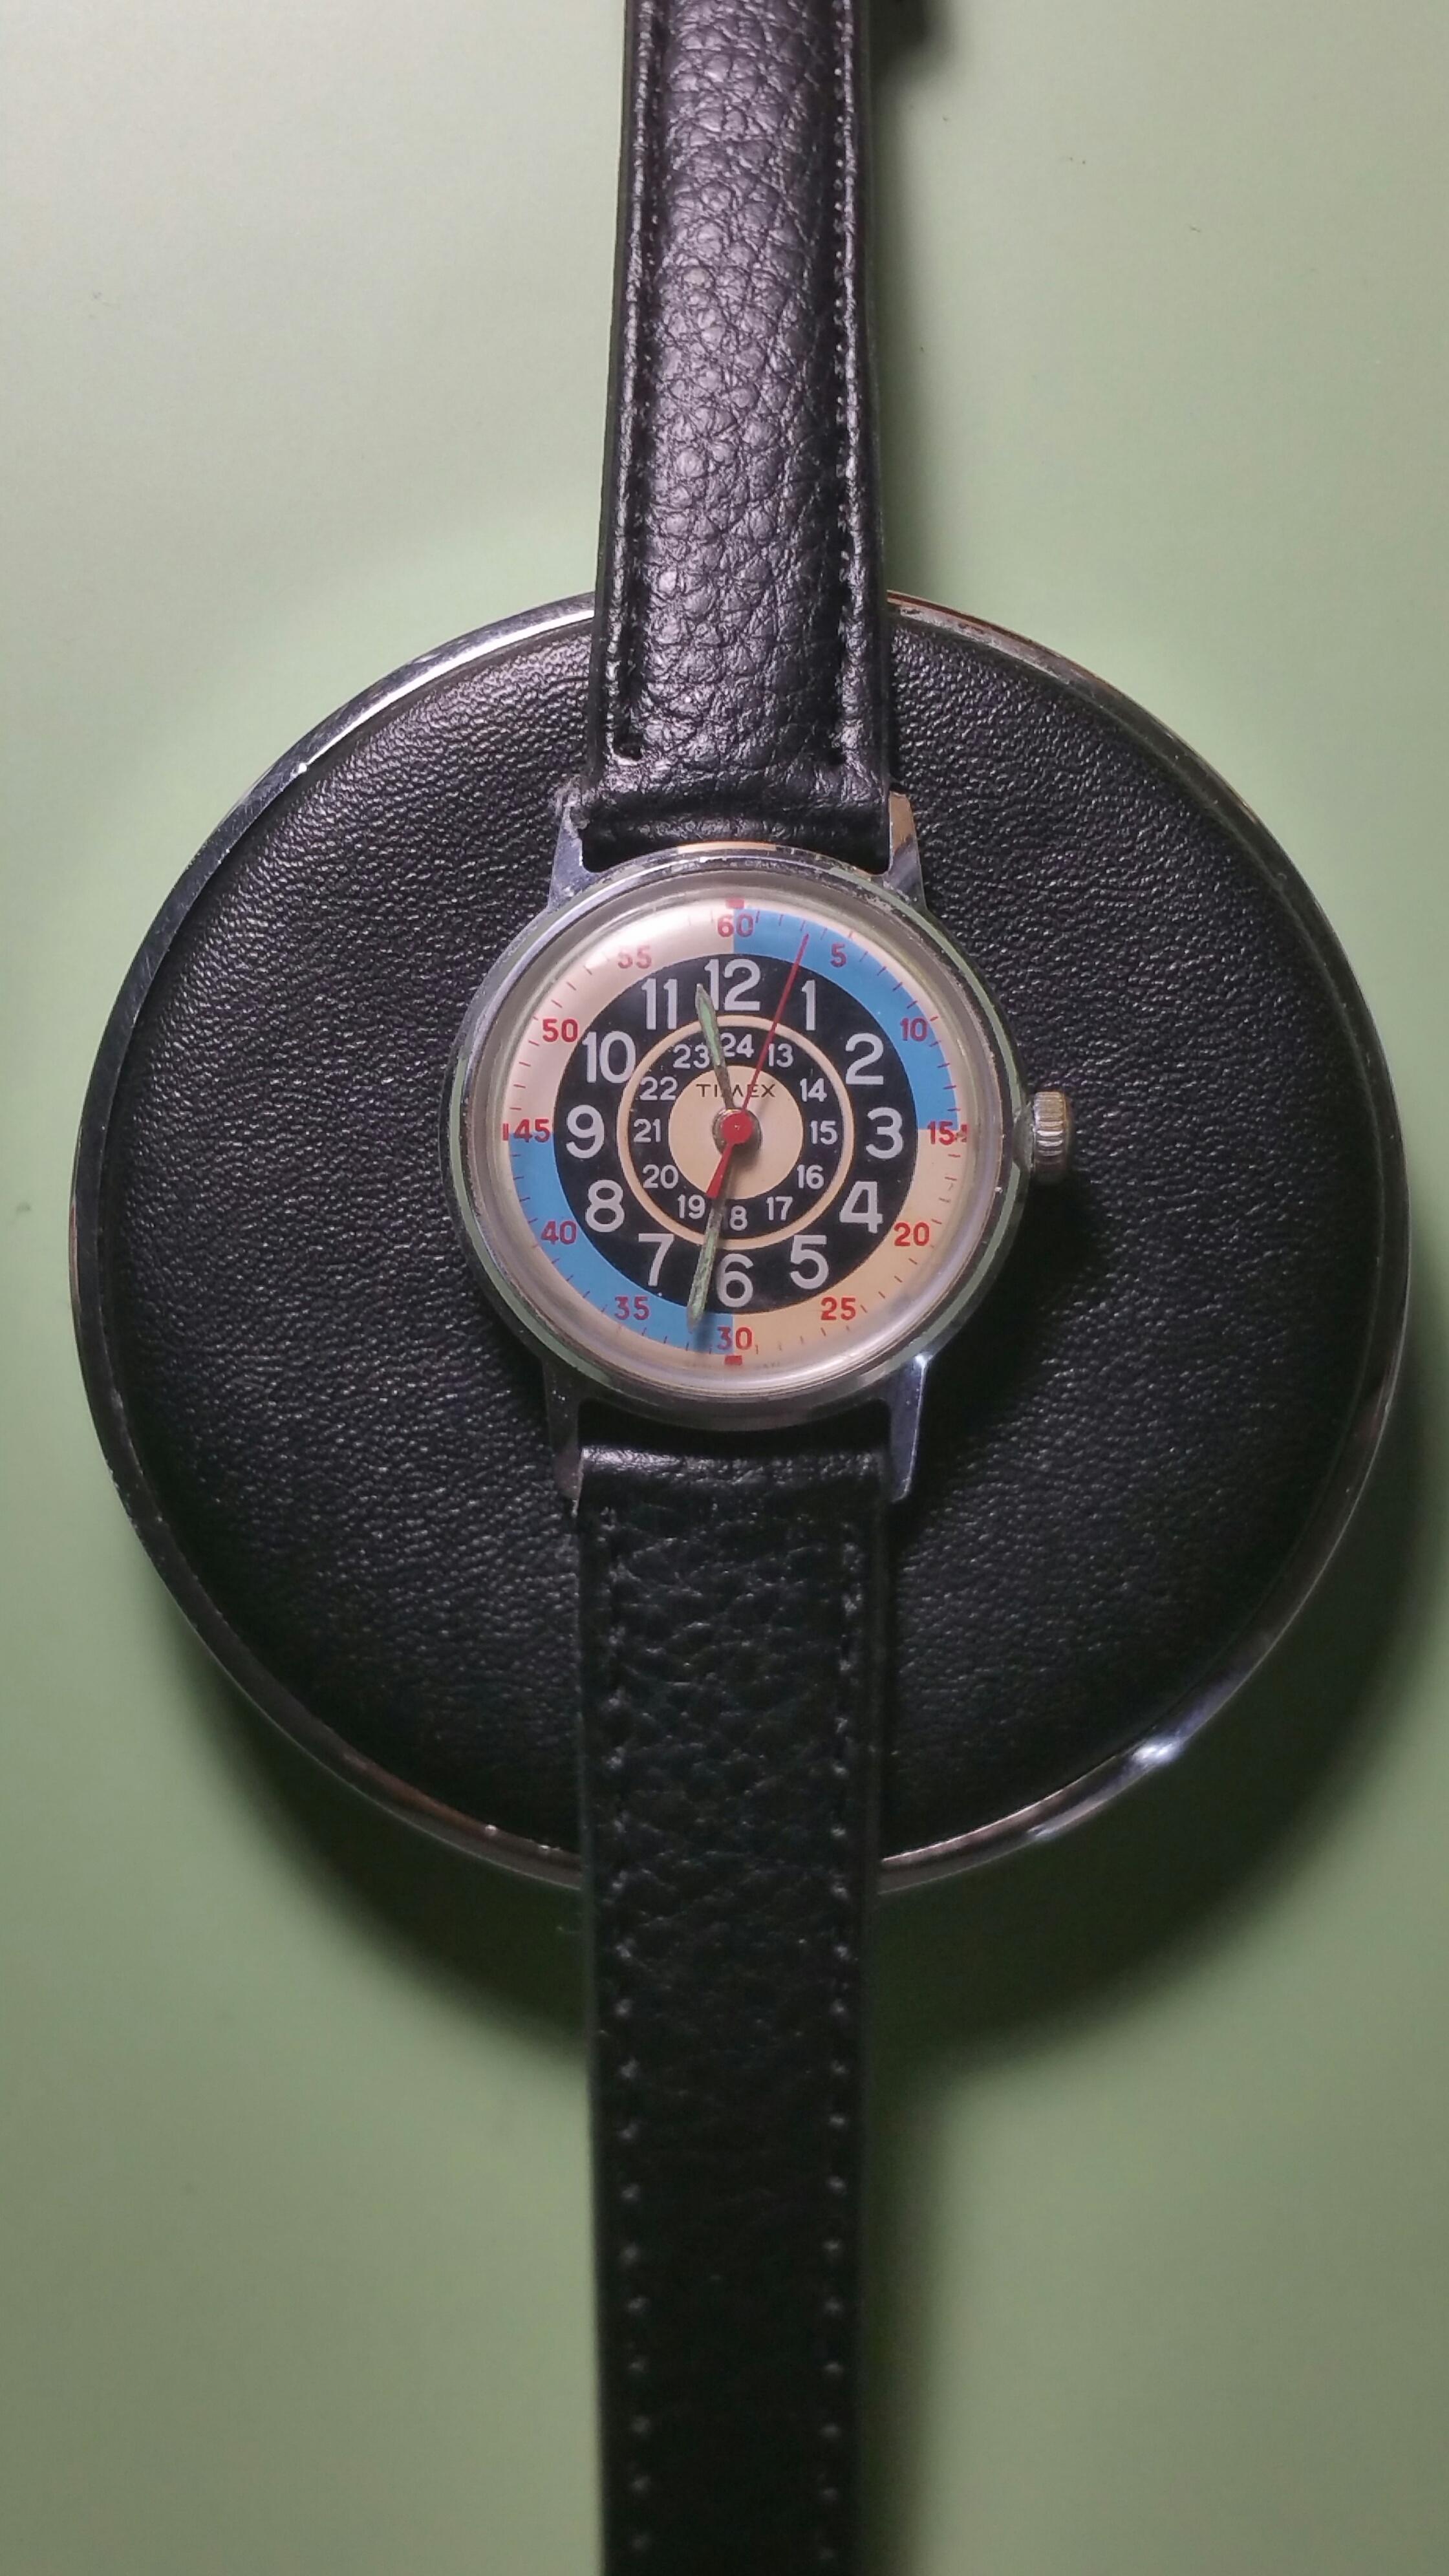
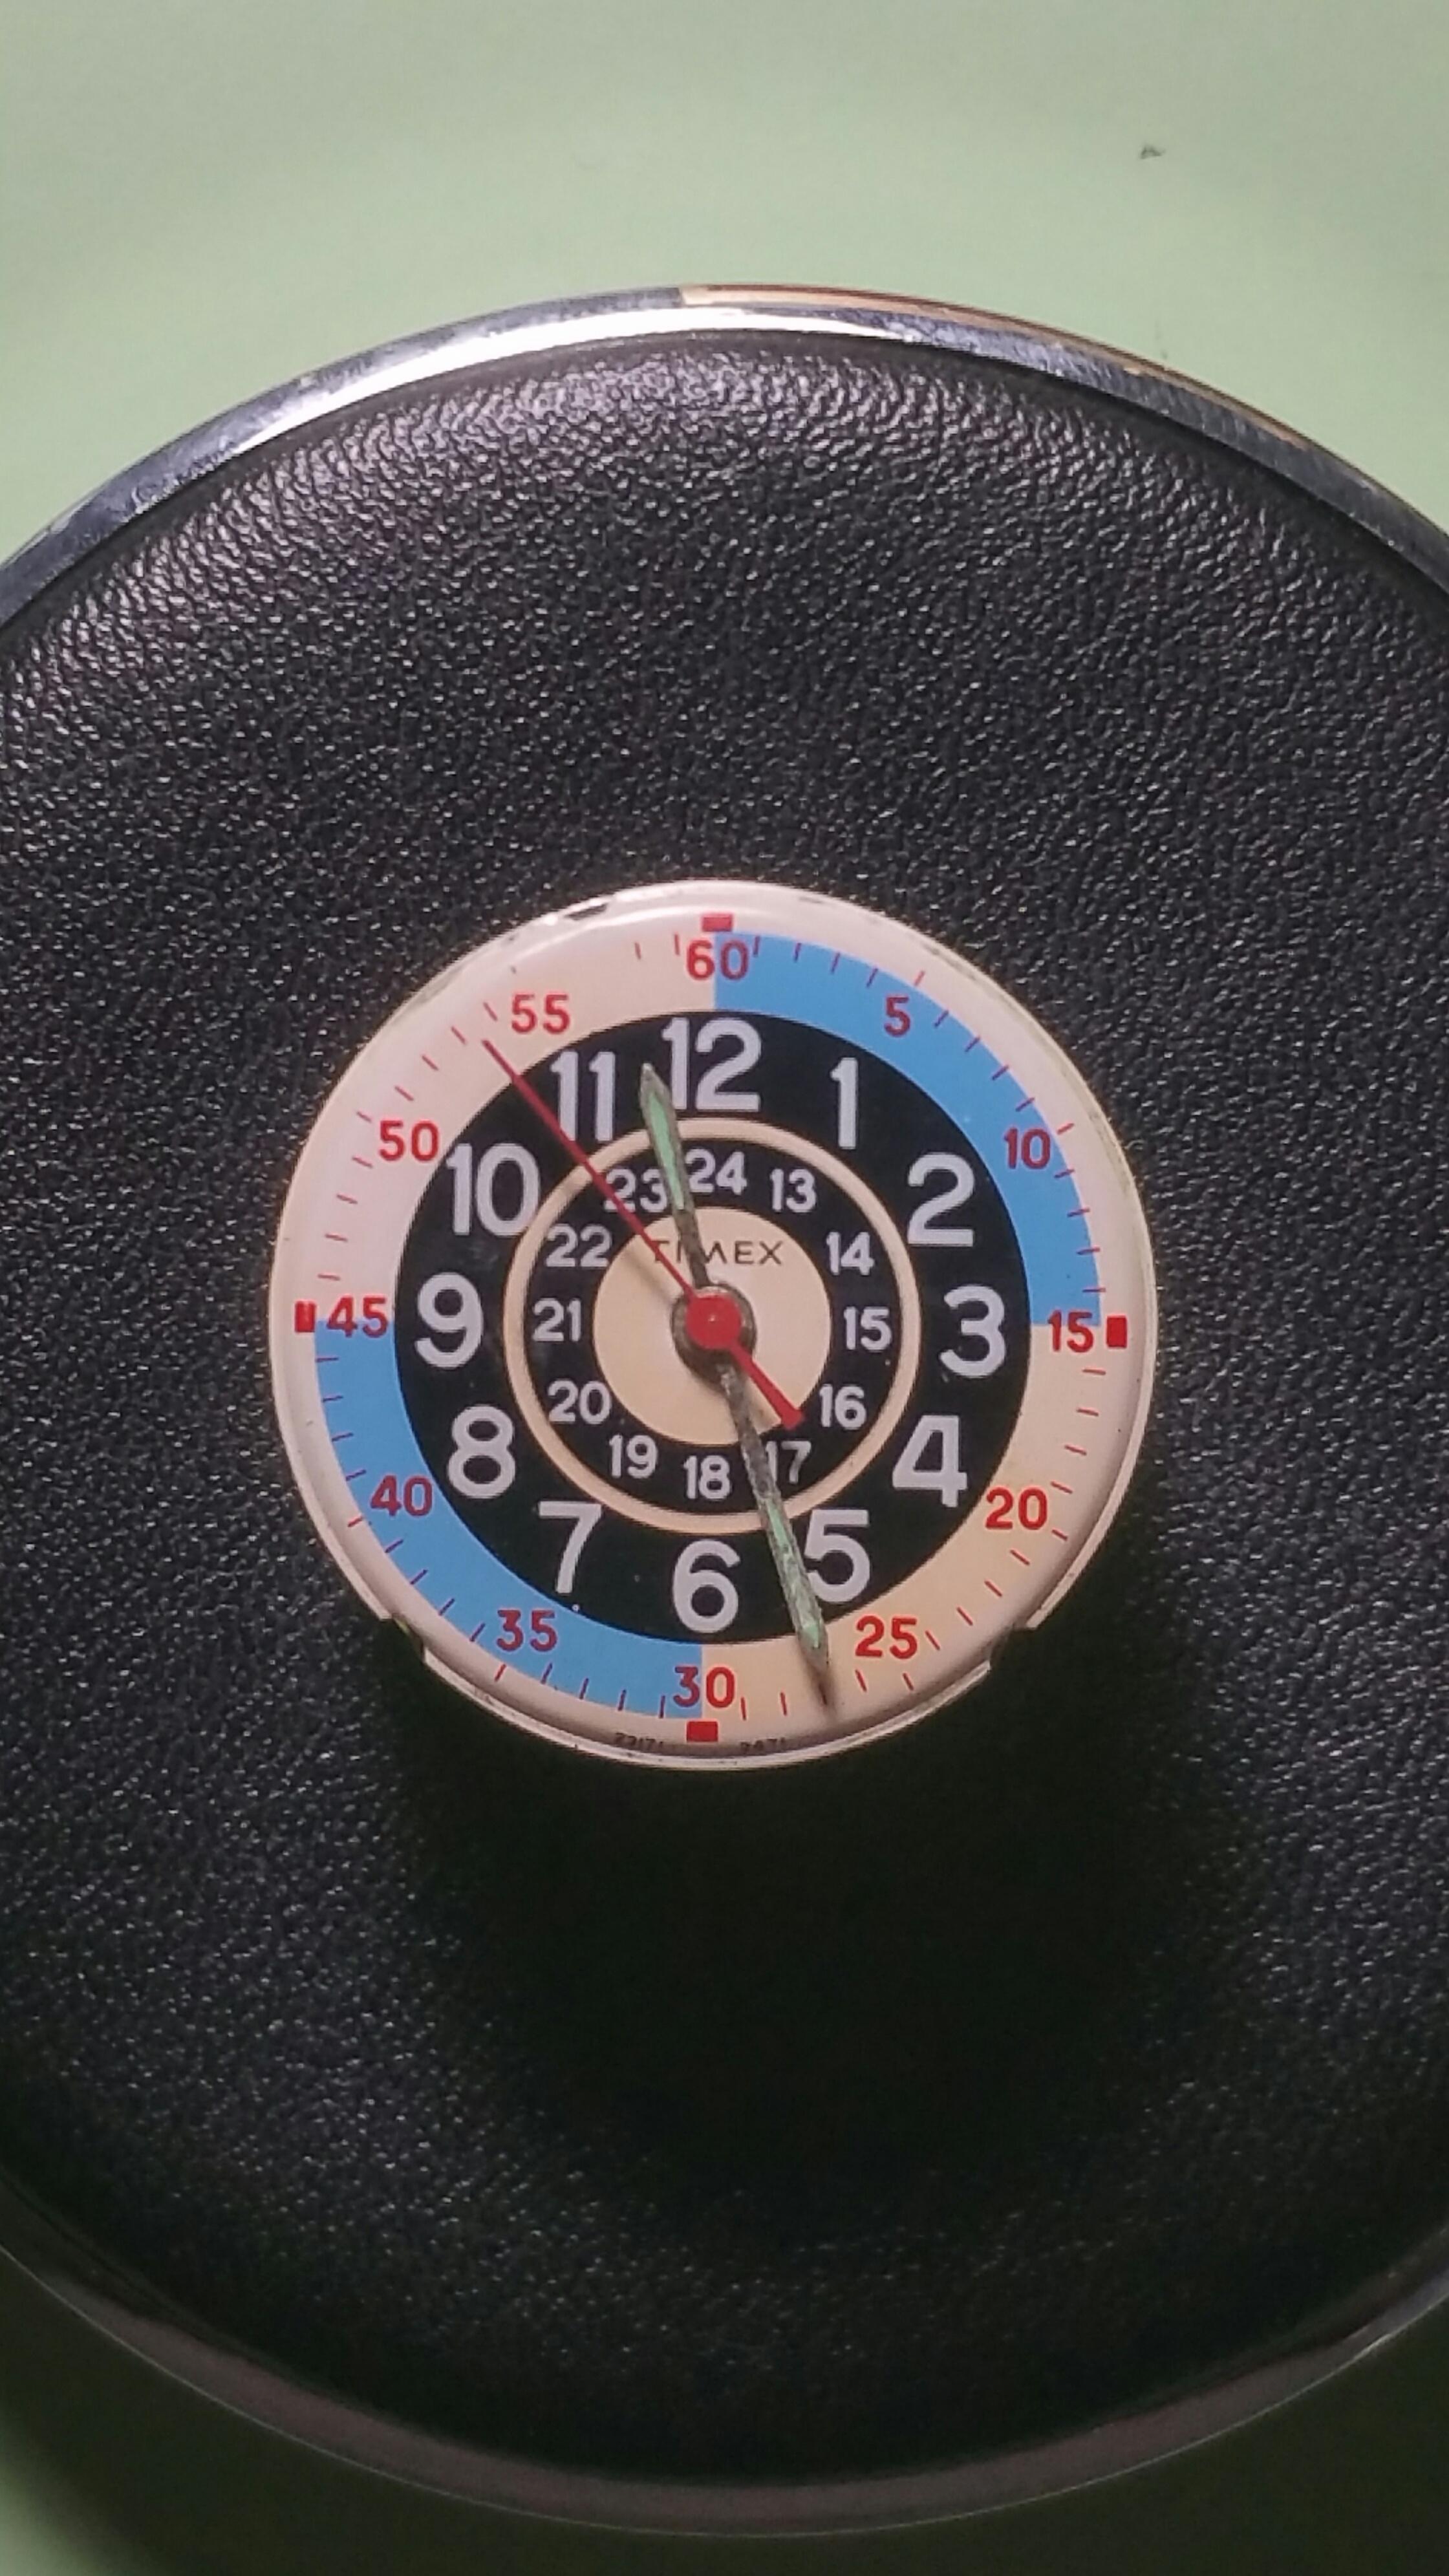
A couple of years ago I found the bug for Timex. I don't know what it is, but I love fixing these watches. This is what started me down the path on just wanting to fix old time pieces. I have expanded into more complex movements and repairs. This was one however will be of my favorite restores. It was a none running one I picked up from a flea market, I restored kept it for a while and then sold it. I am really regretting the selling part.

 1 point
 -
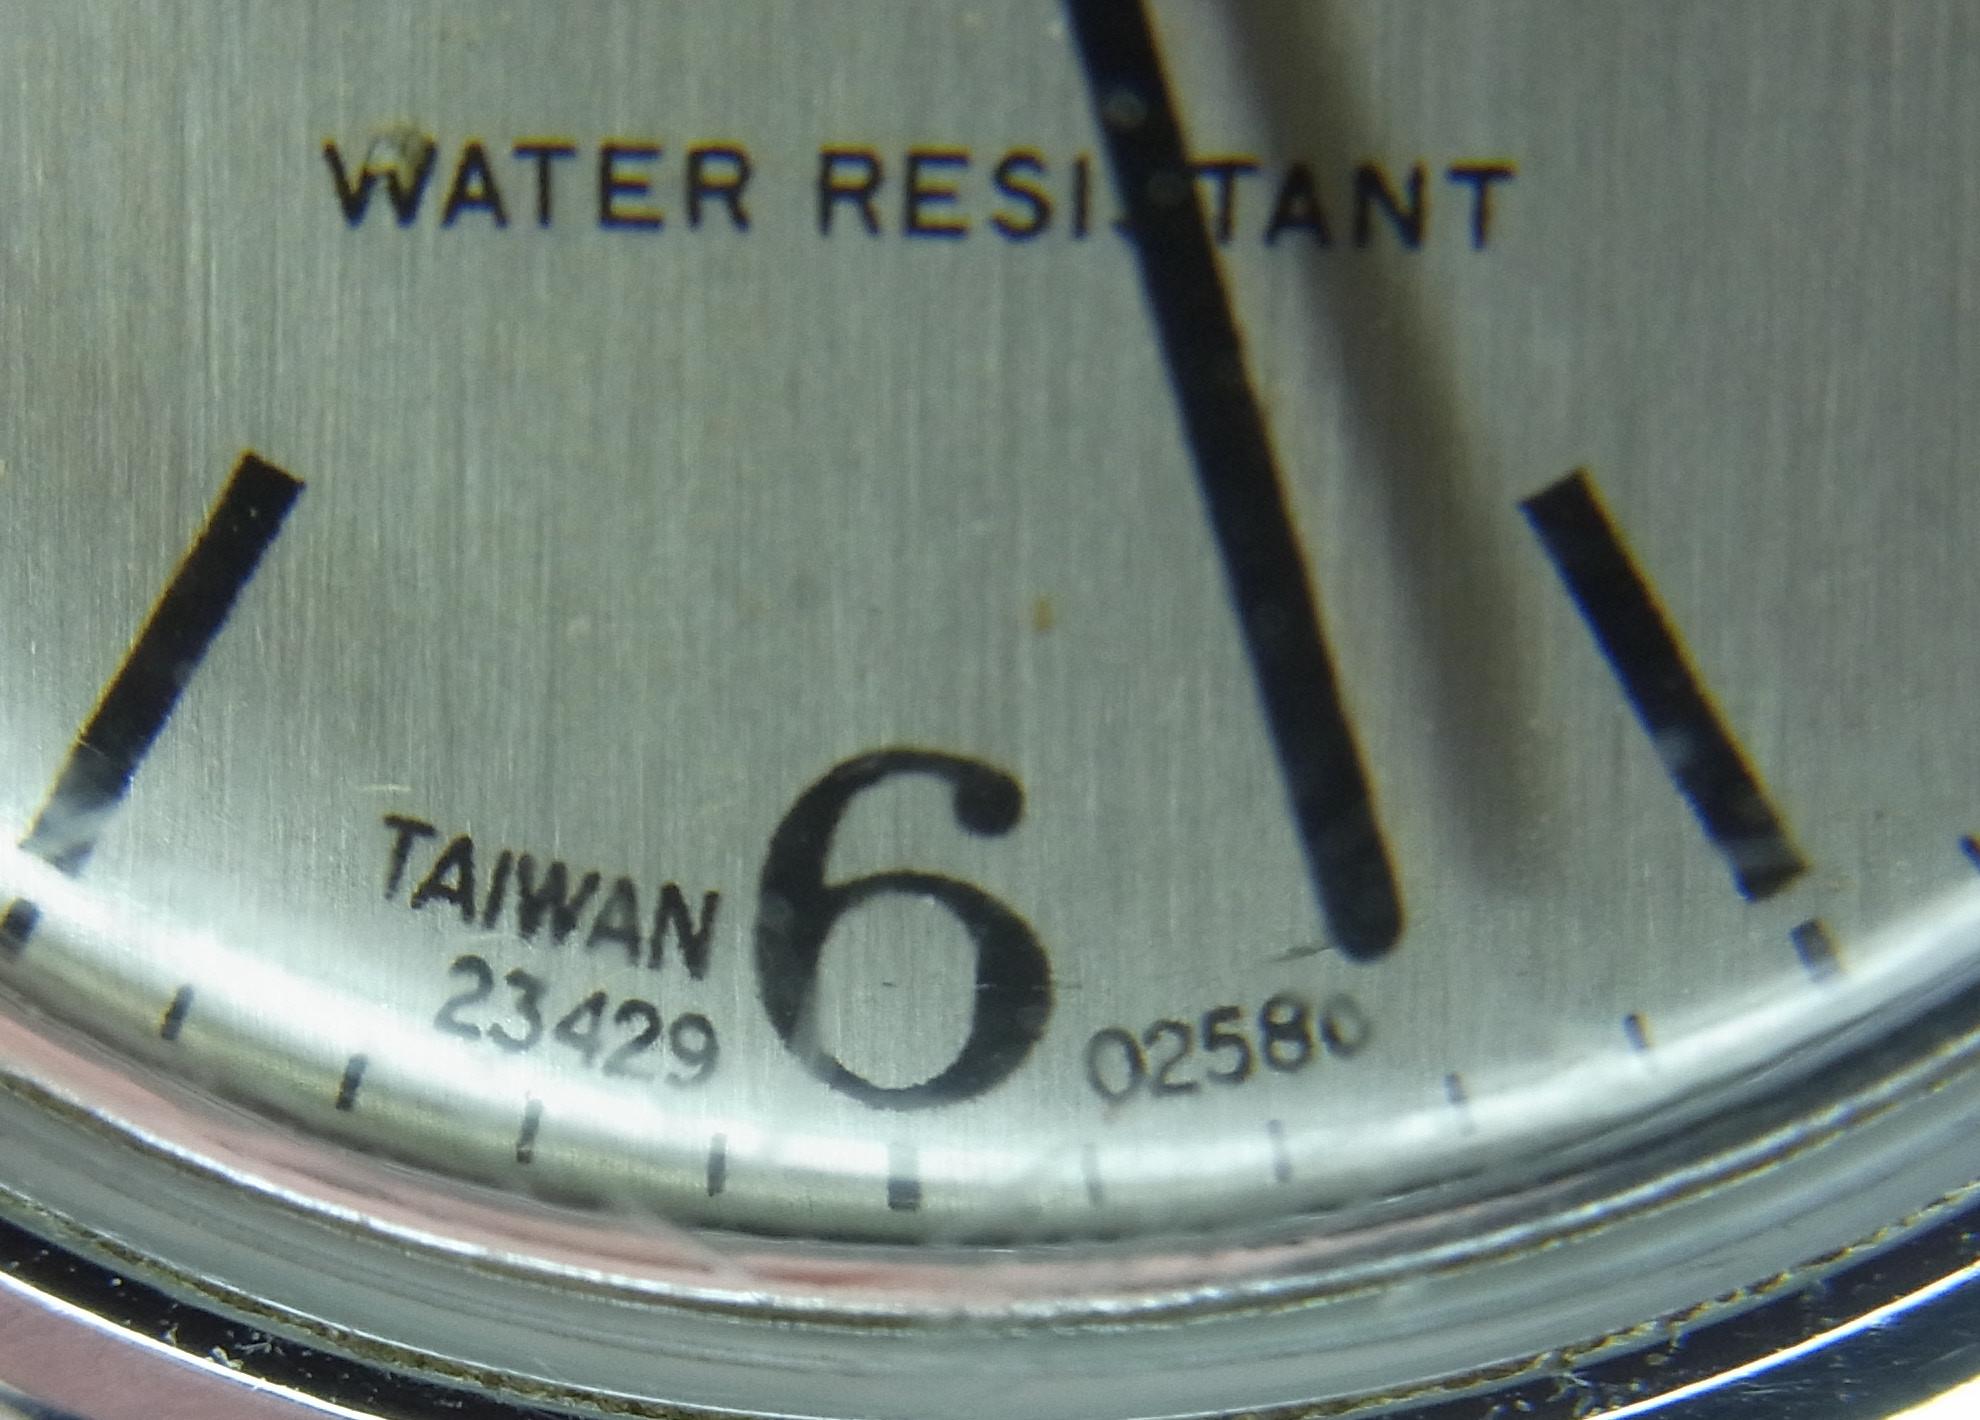
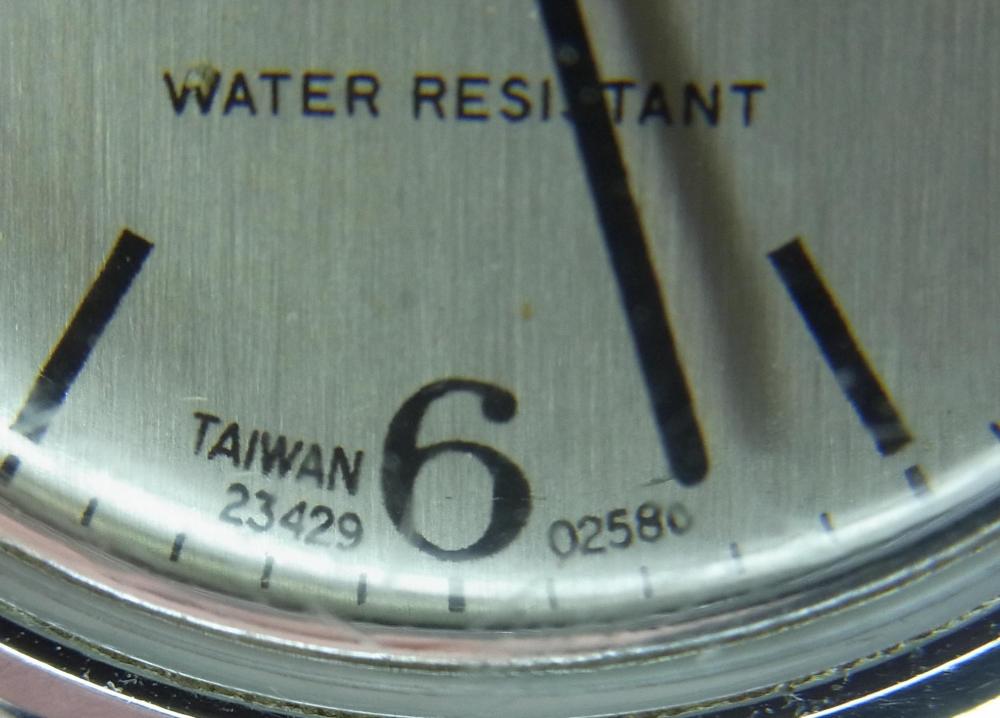
Here is a rather scruffy example of a Taiwan Timex from 1980 that is sitting awaiting my attention. The numbers at the bottom are 23429 02580 which you can decode from this site -> https://en.wikibooks.org/wiki/Budget_Watch_Collecting/Timex_date_codes The last two digits being the year (1980 in this case). The watch you linked to above is a much nicer example, but the numbers on that one may be hidden behind the case edge. Price is not something that tends to be discussed on this forum, but based purely on historic prices for similar aged Timex automatics watches sold on ebay, you could expect to pay anything from under £5 in a non working condition to somewhere between £20 and £100 (perhaps more if in perfect unused condition), depending on whether it has been professionally serviced, and is running well, and how clean and damage free it is. It does appear to be an attractive and fairly uncommon example. If the price is right, then I would go for it. What is the right price however is something only you can decide.
 1 point
 -
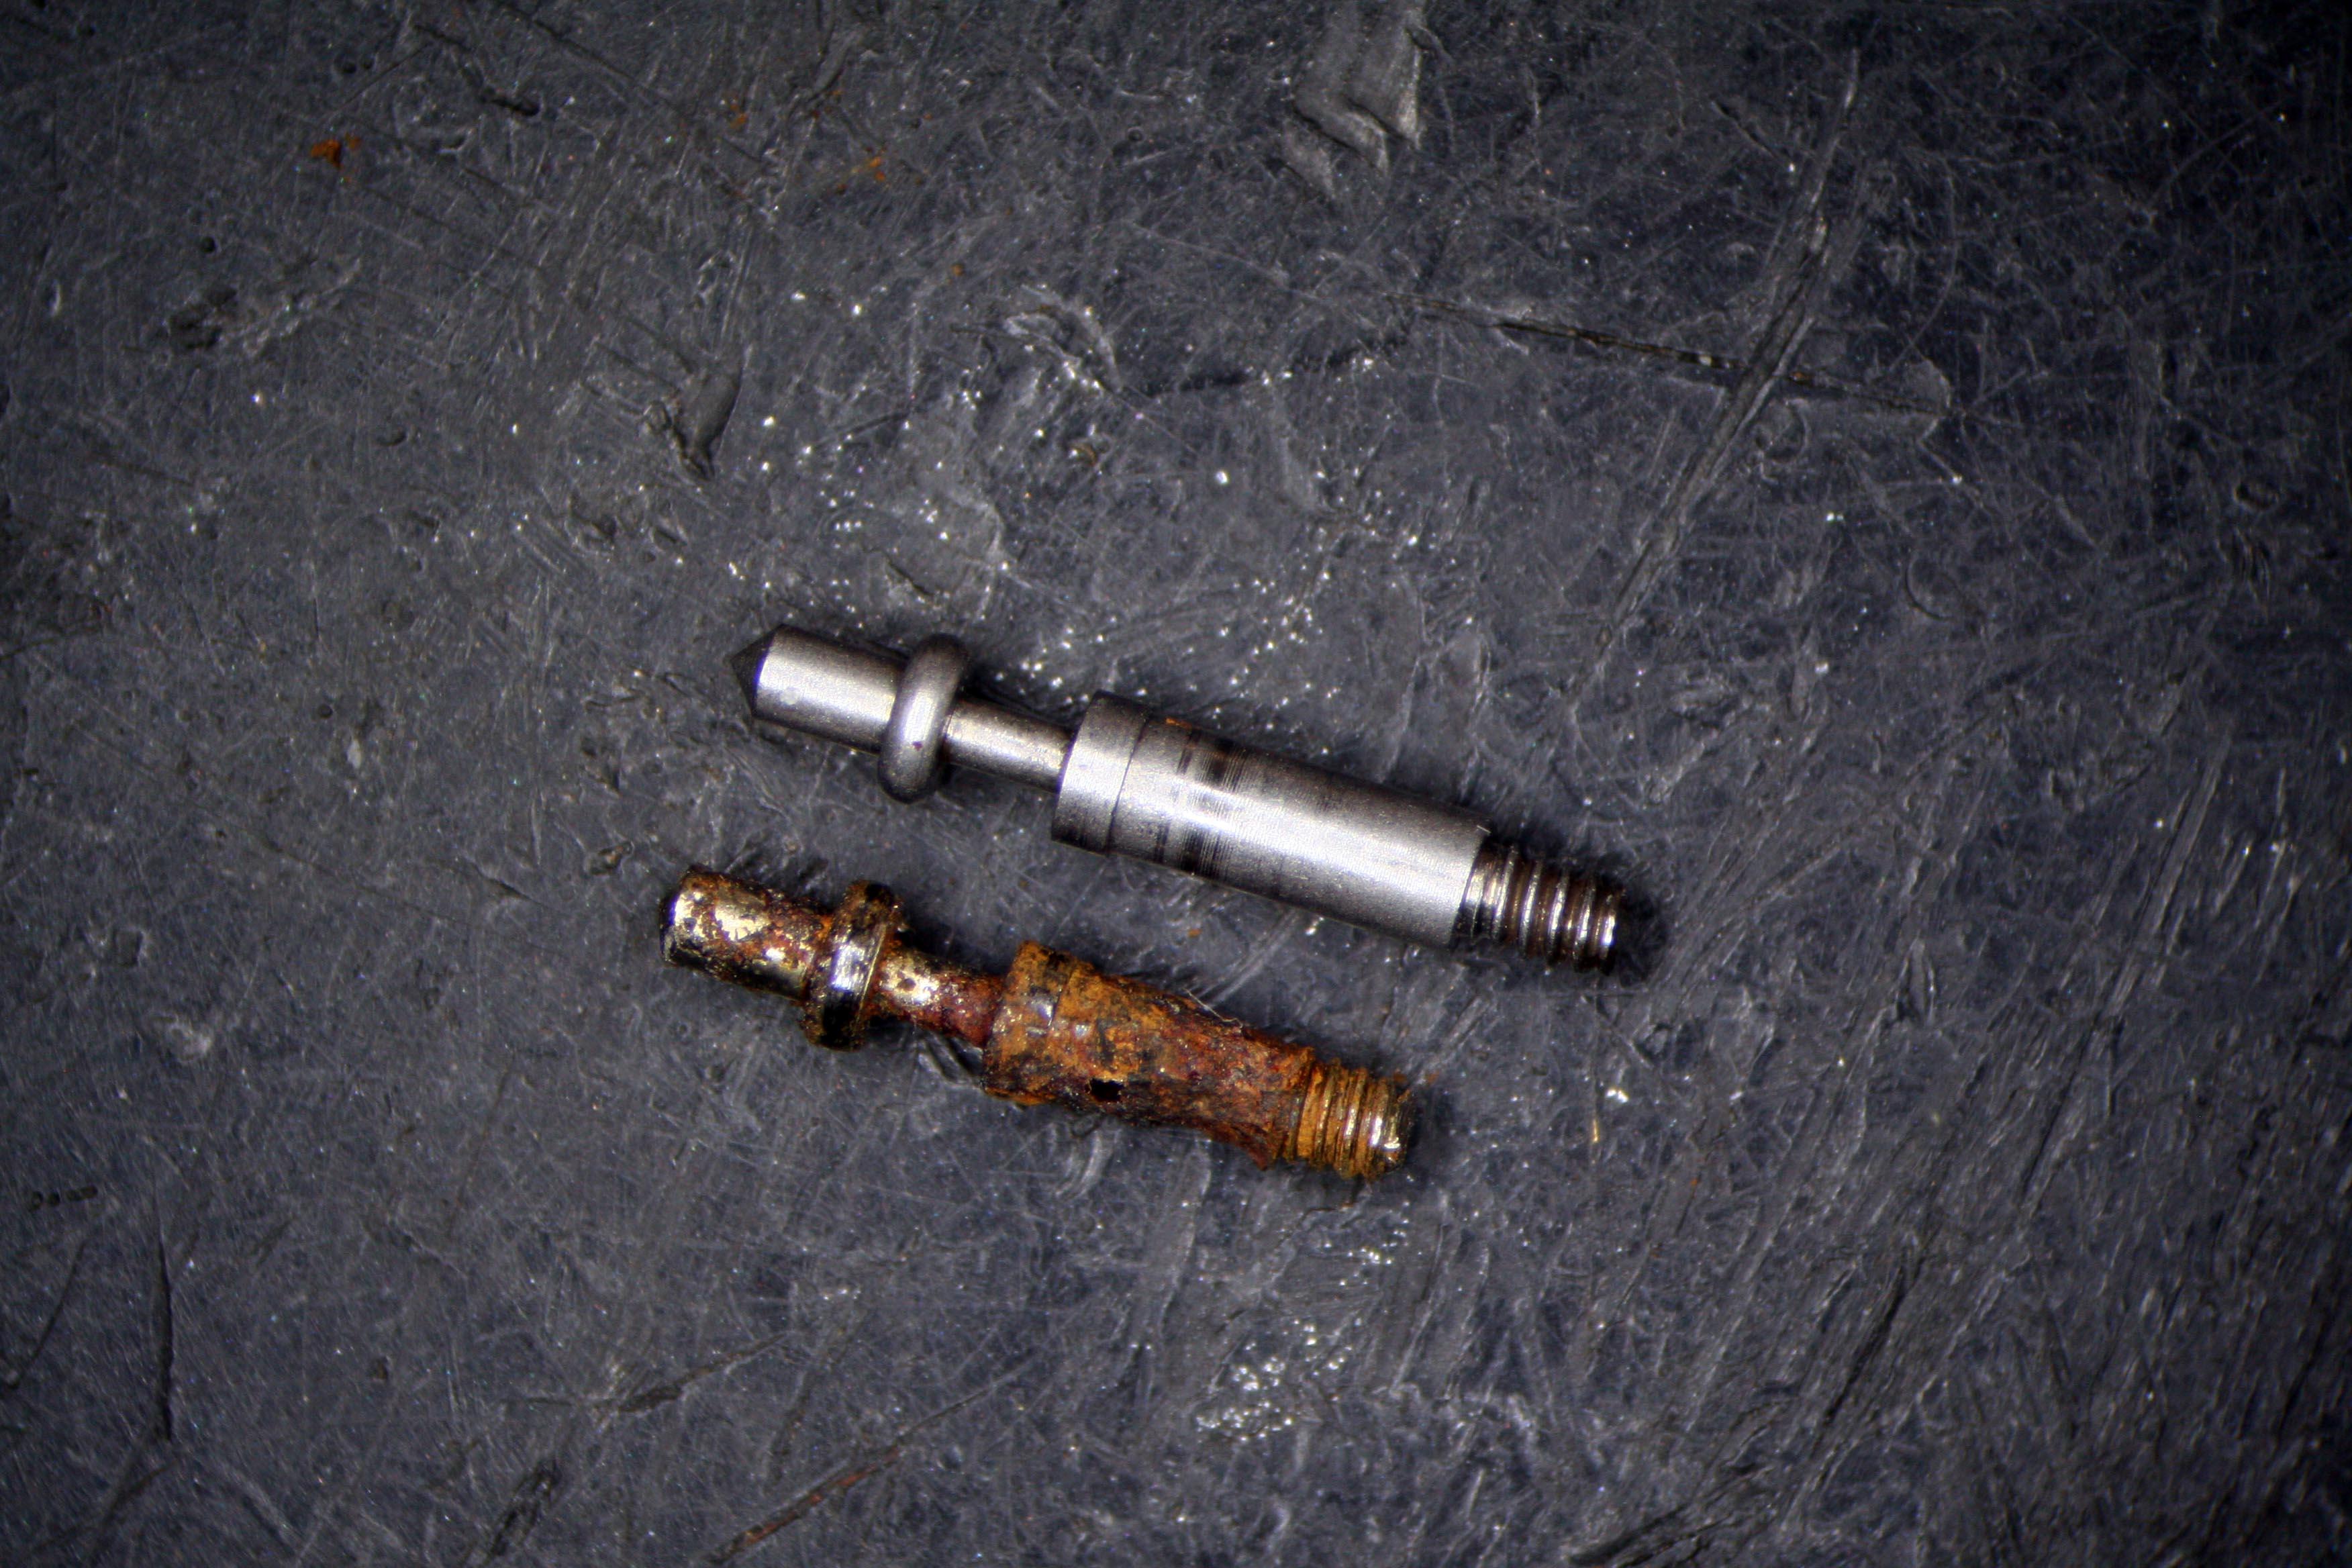
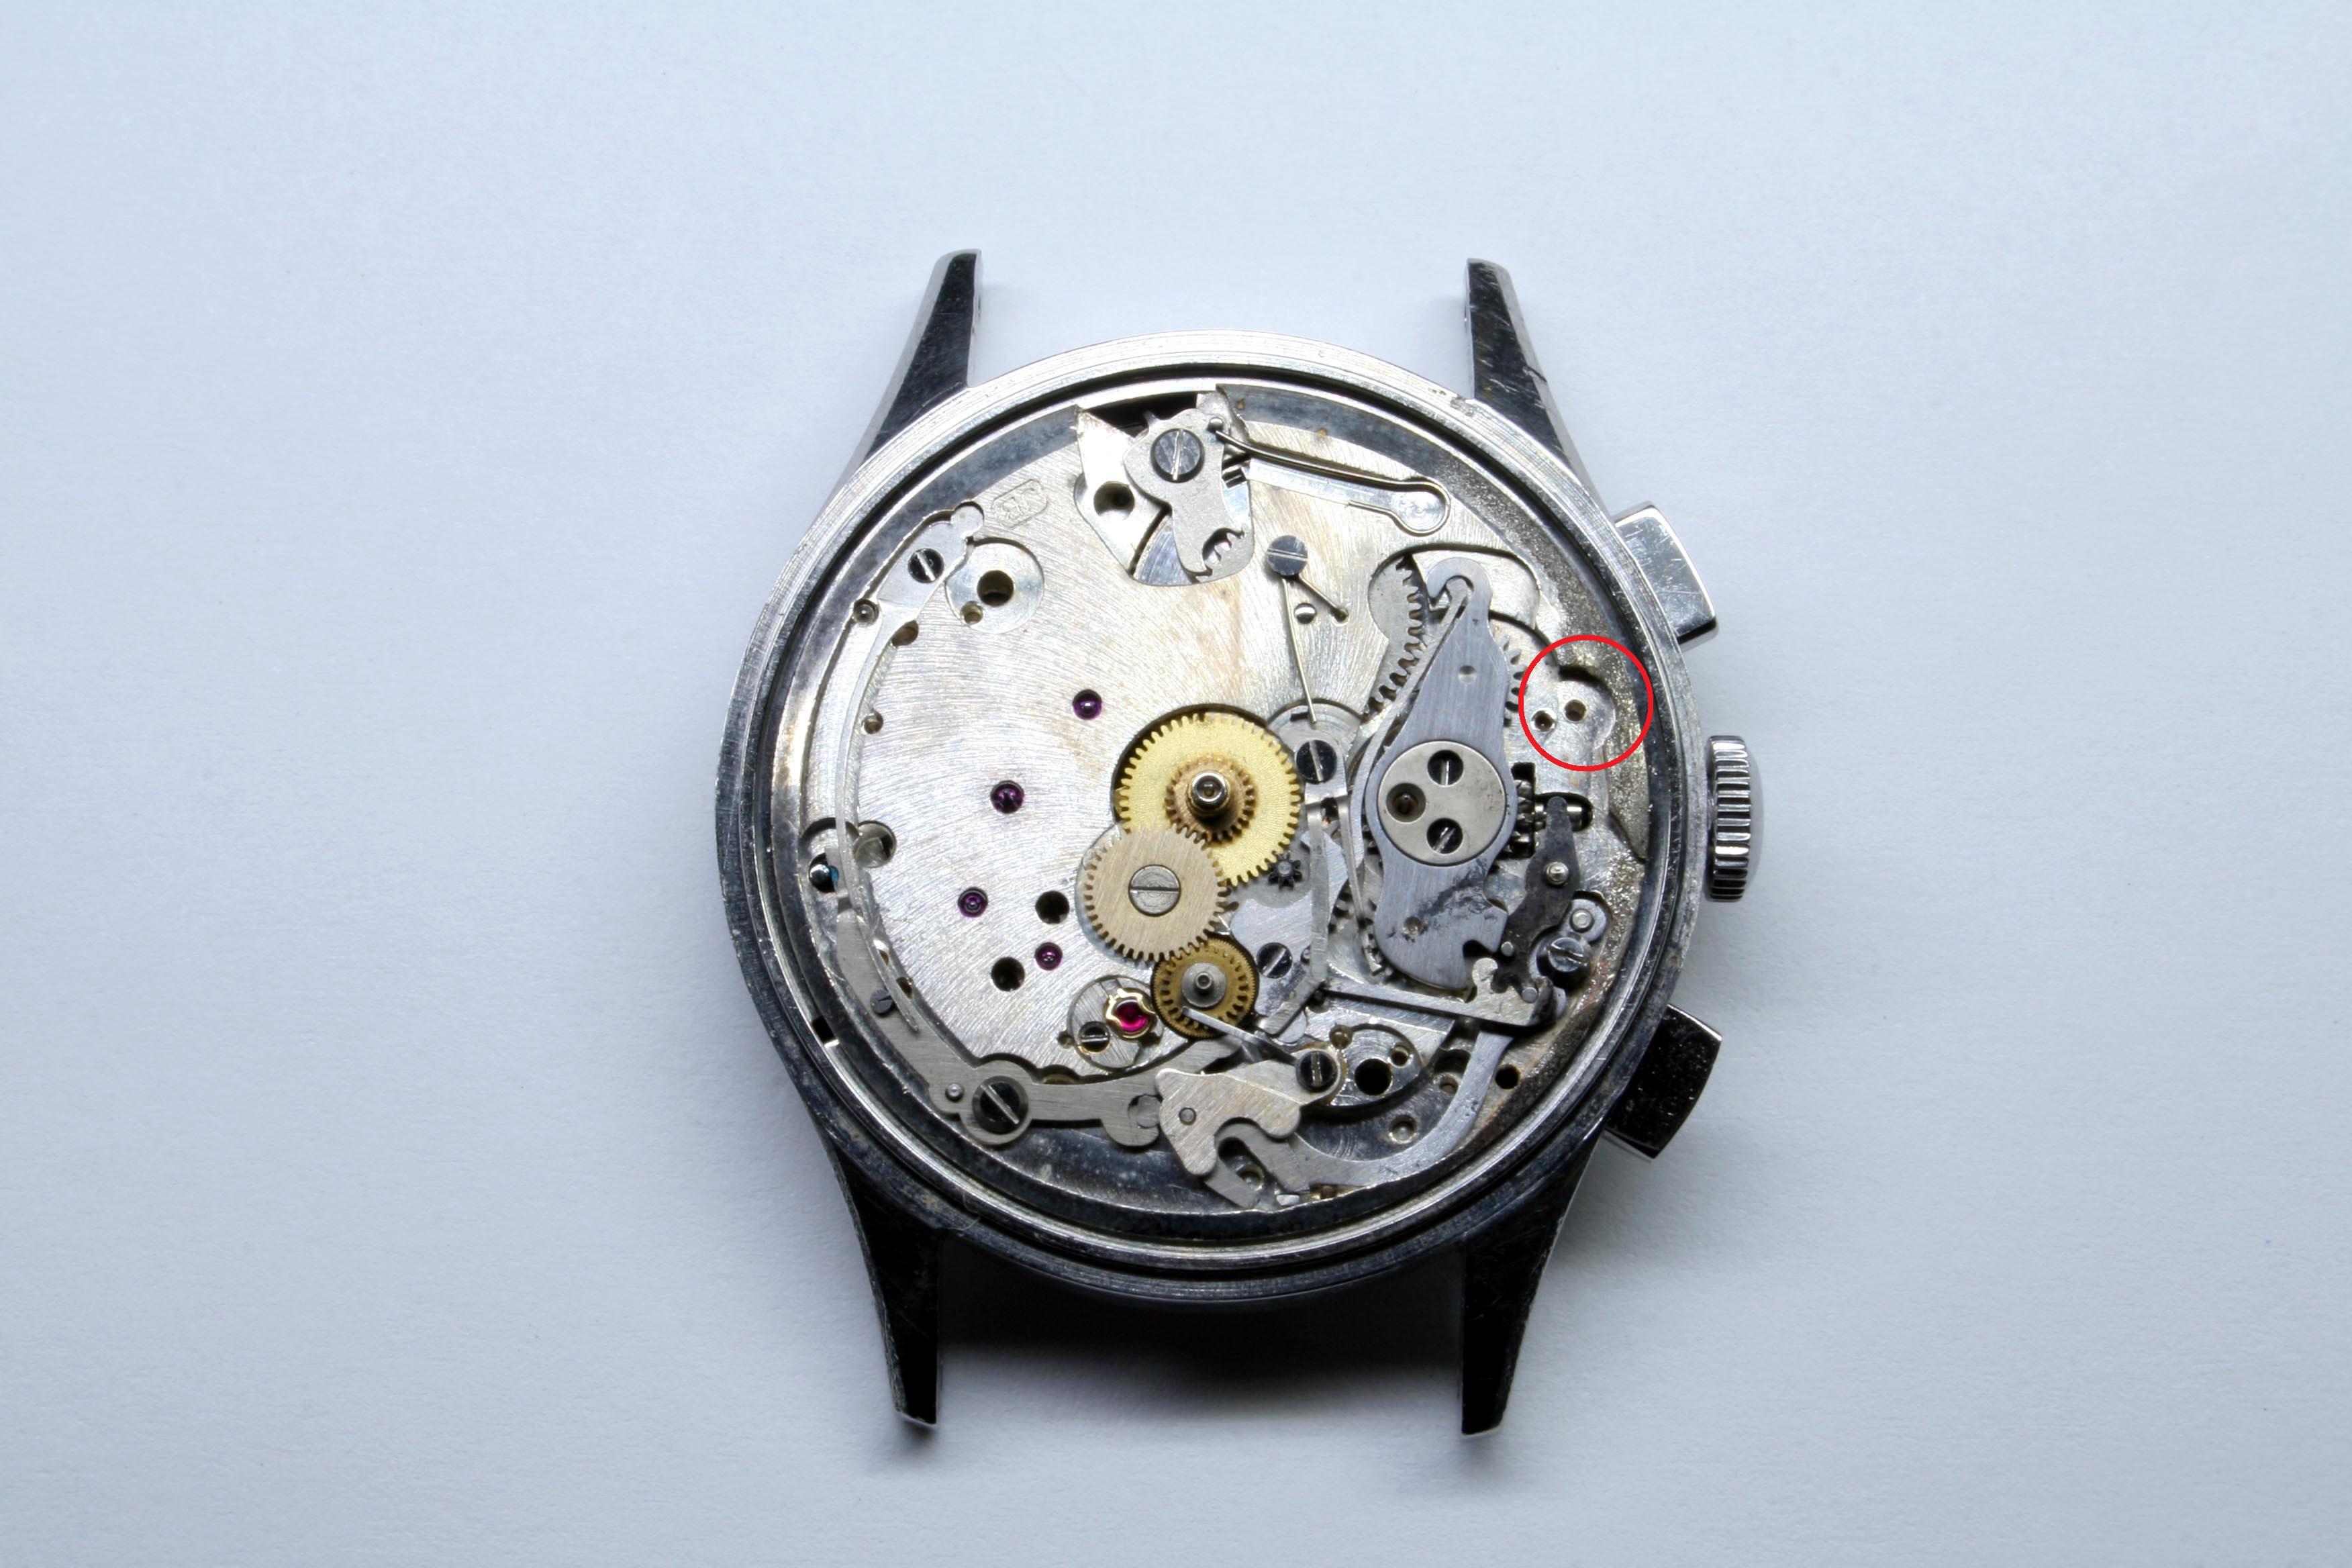
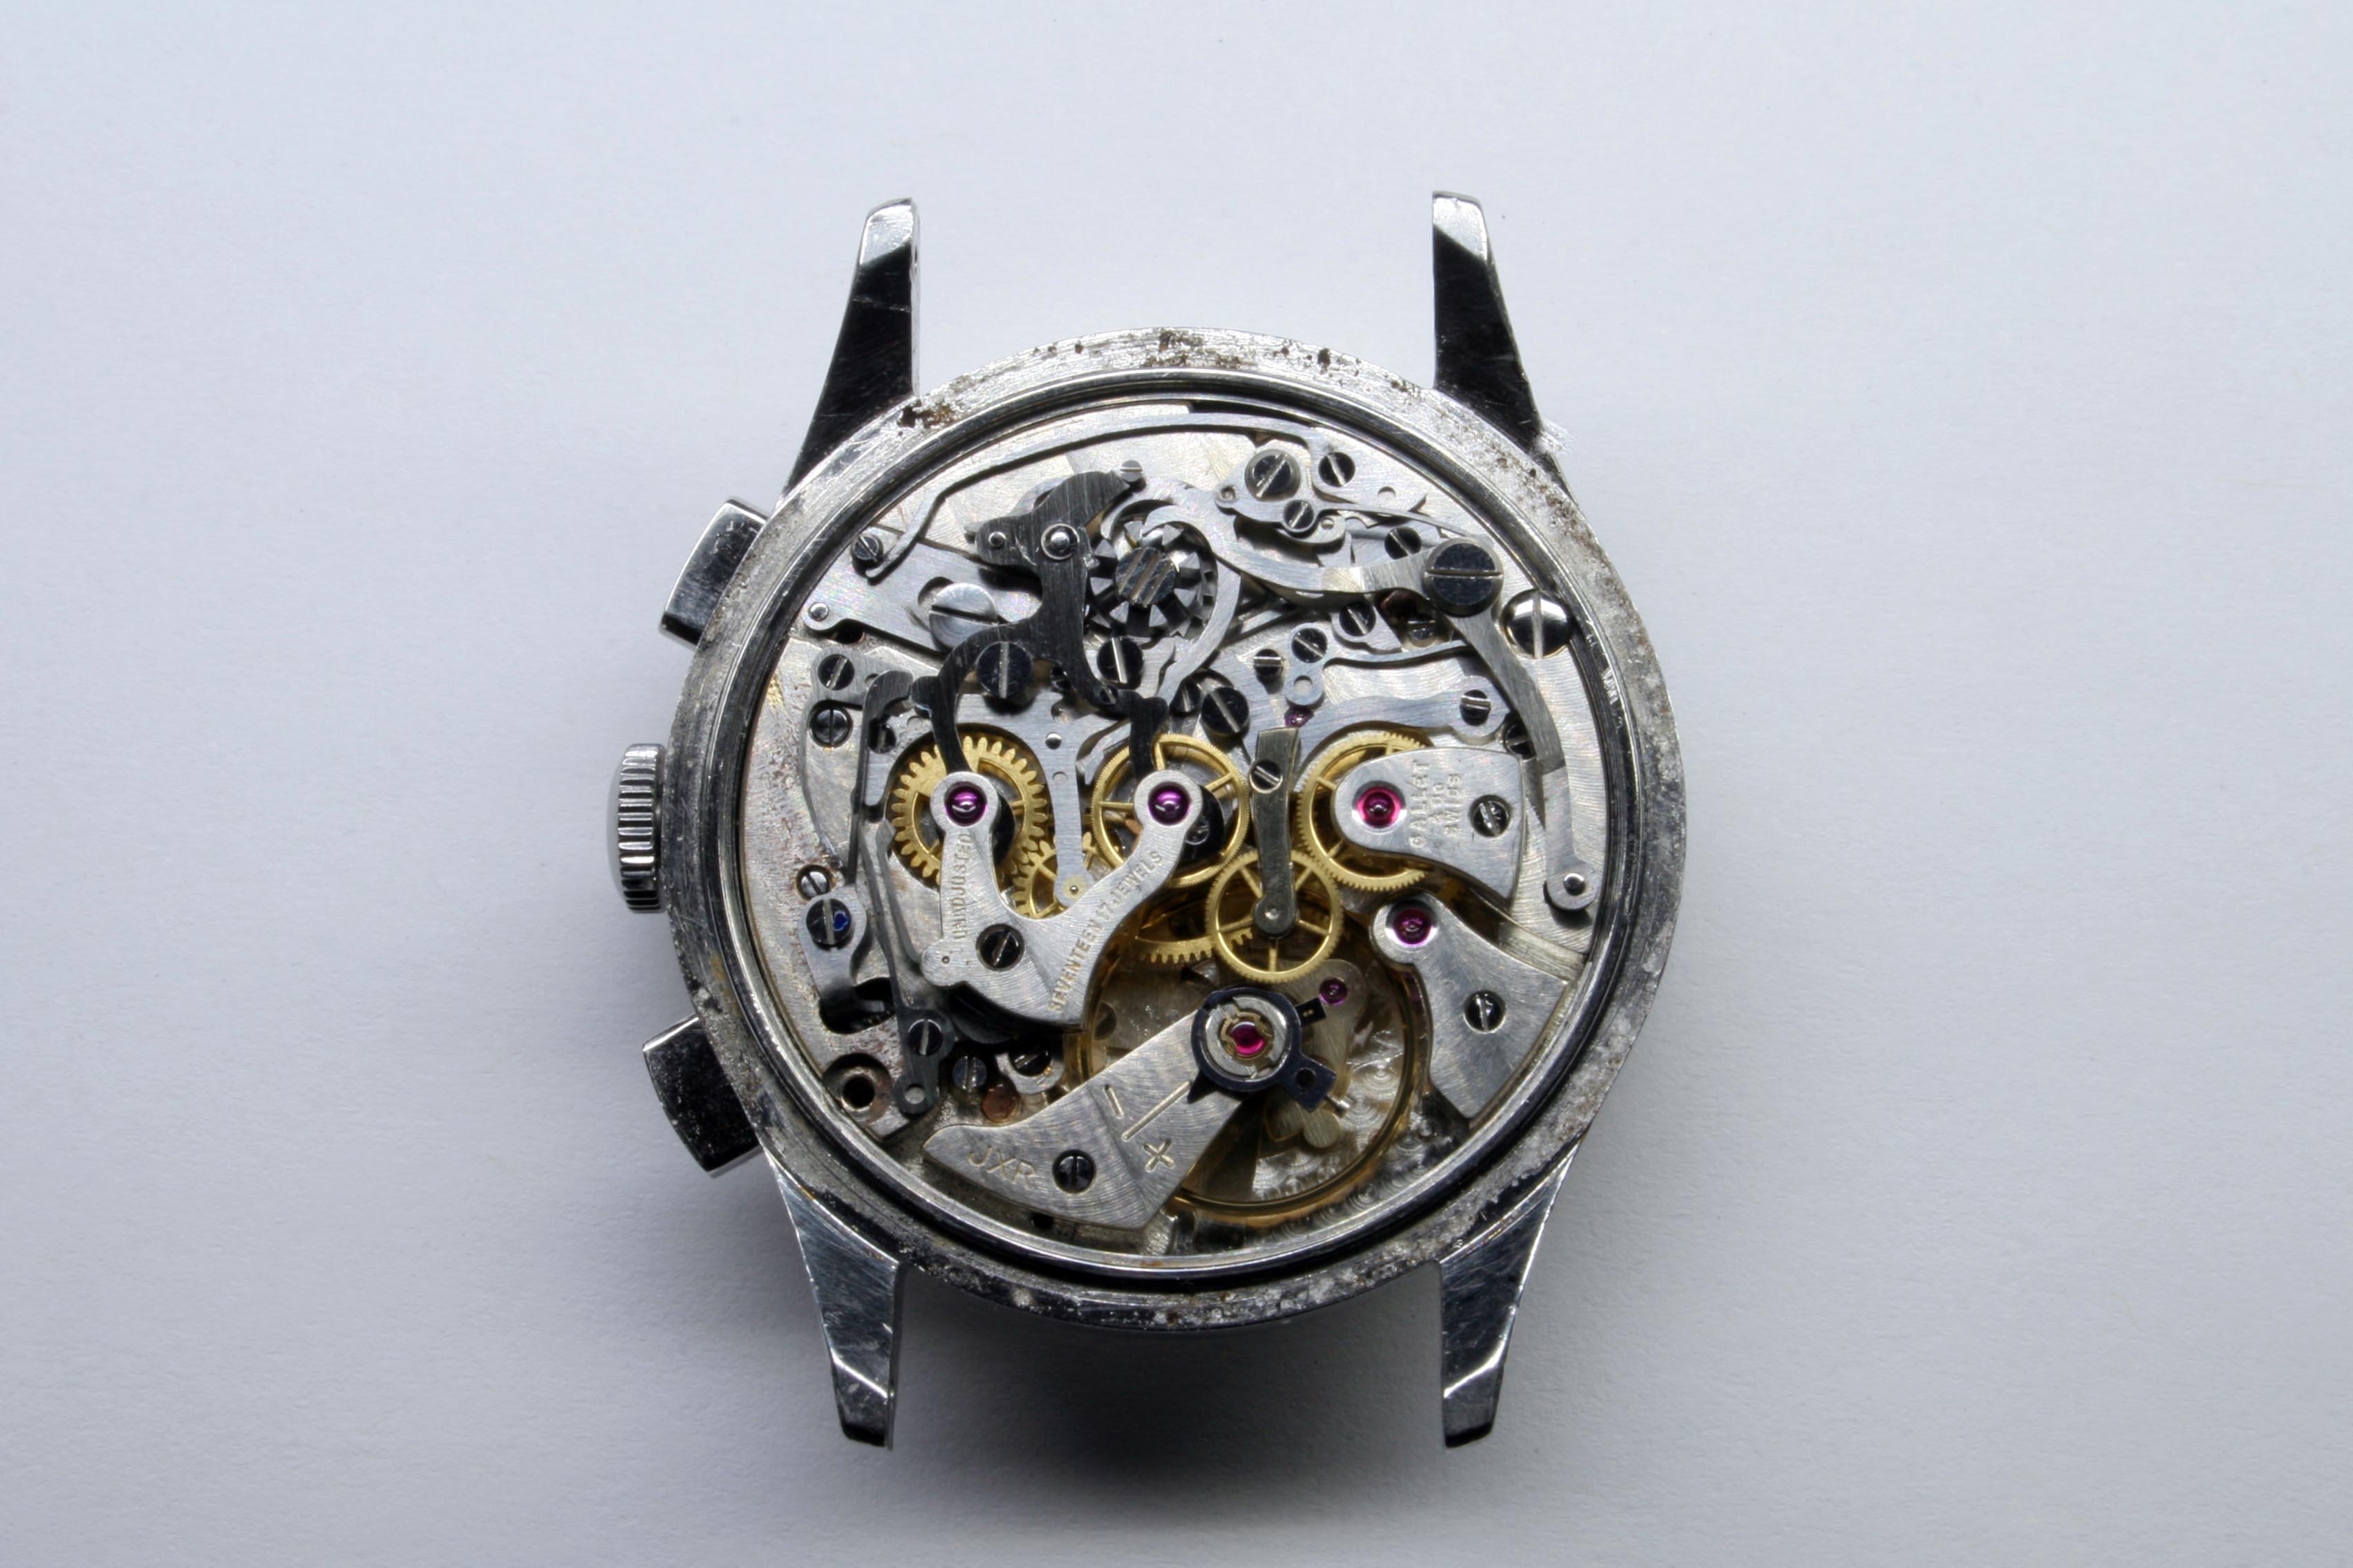
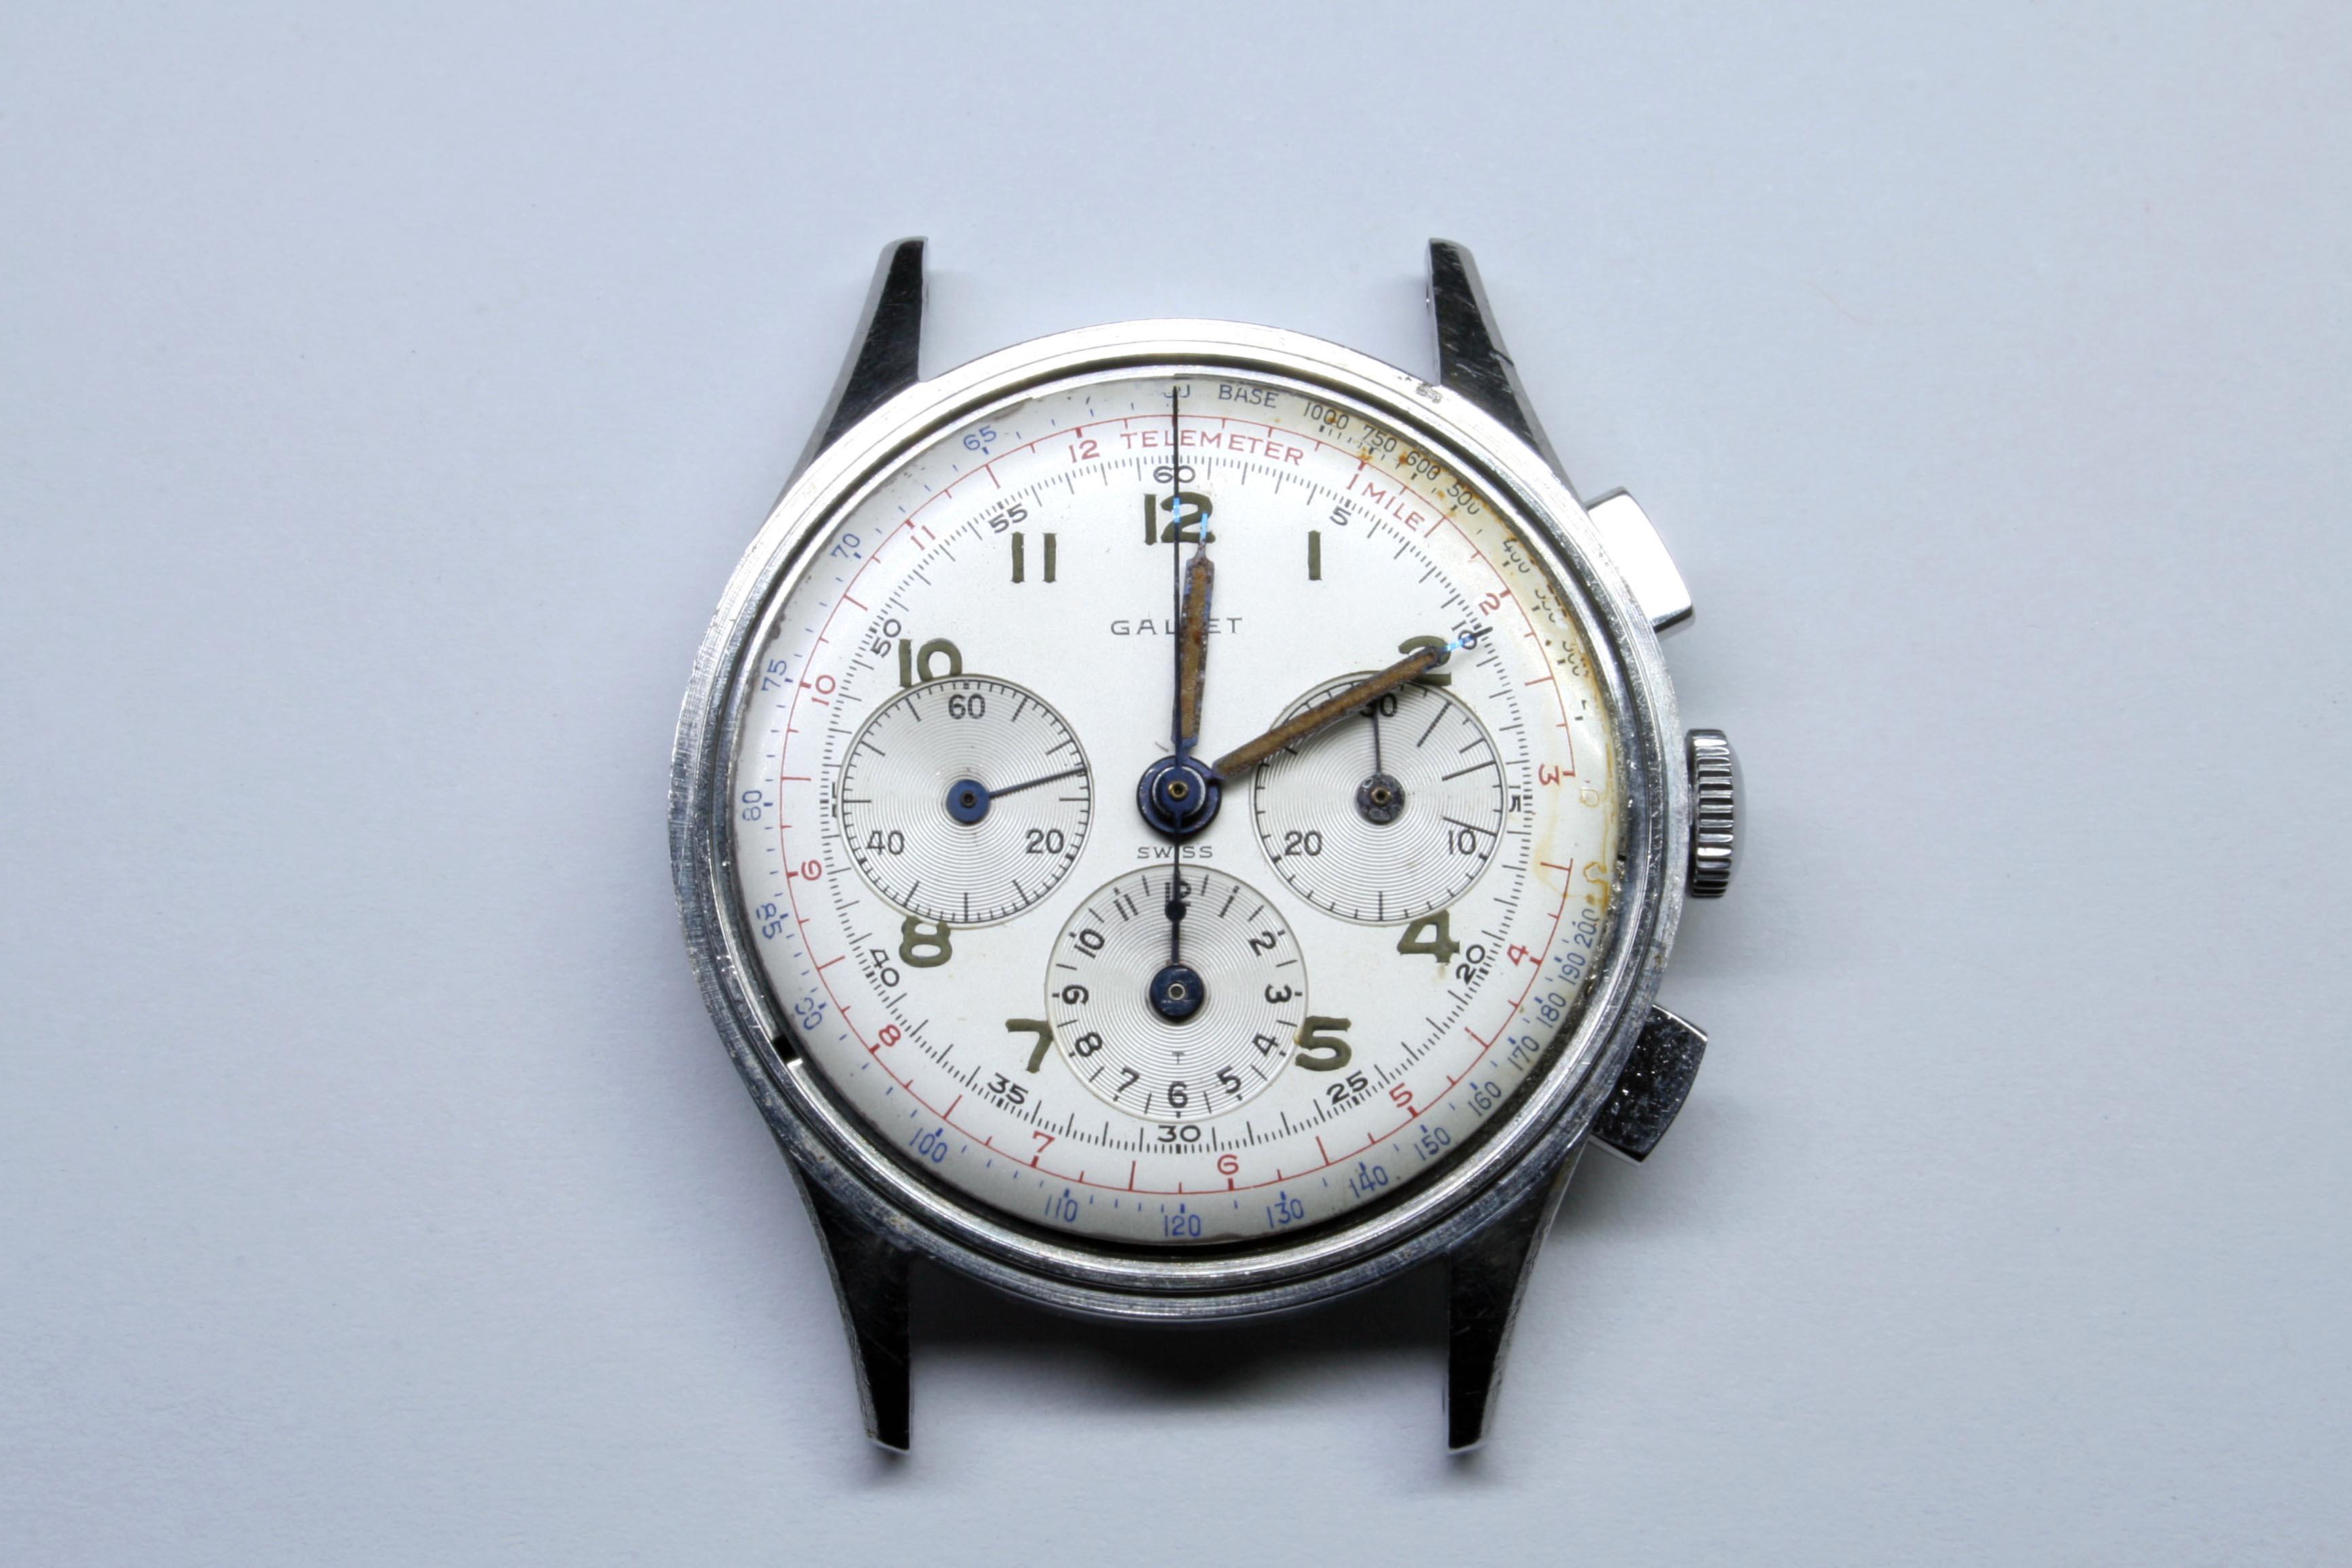
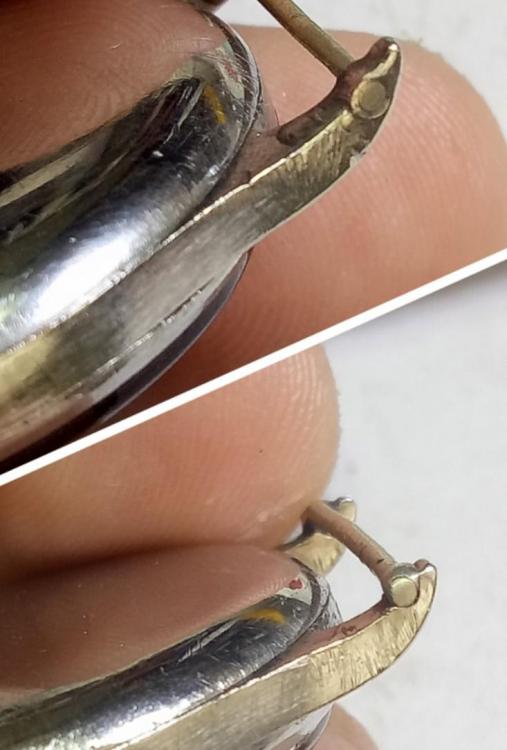
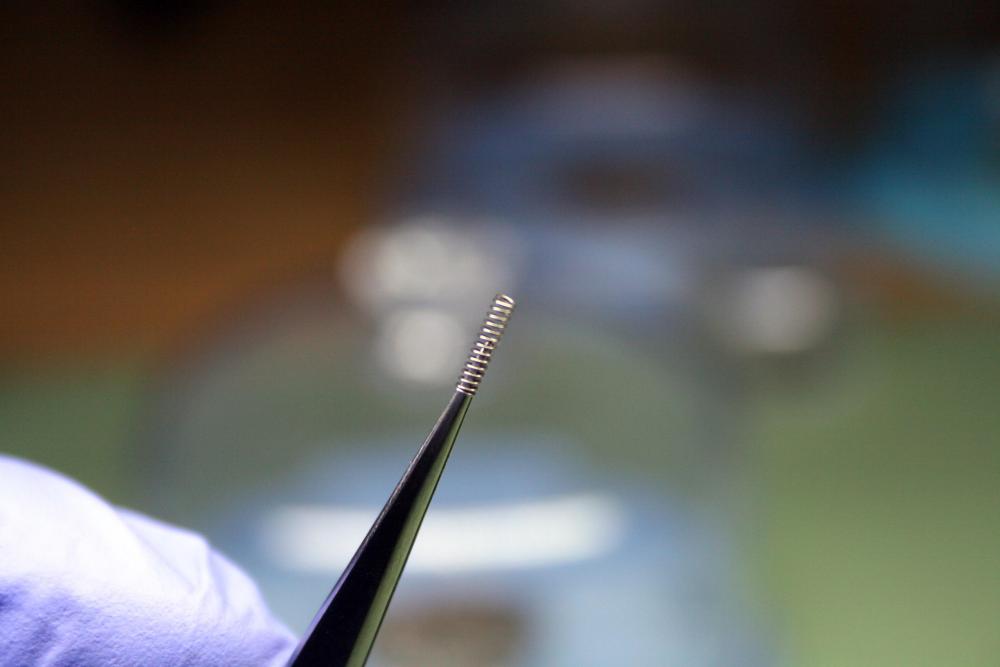
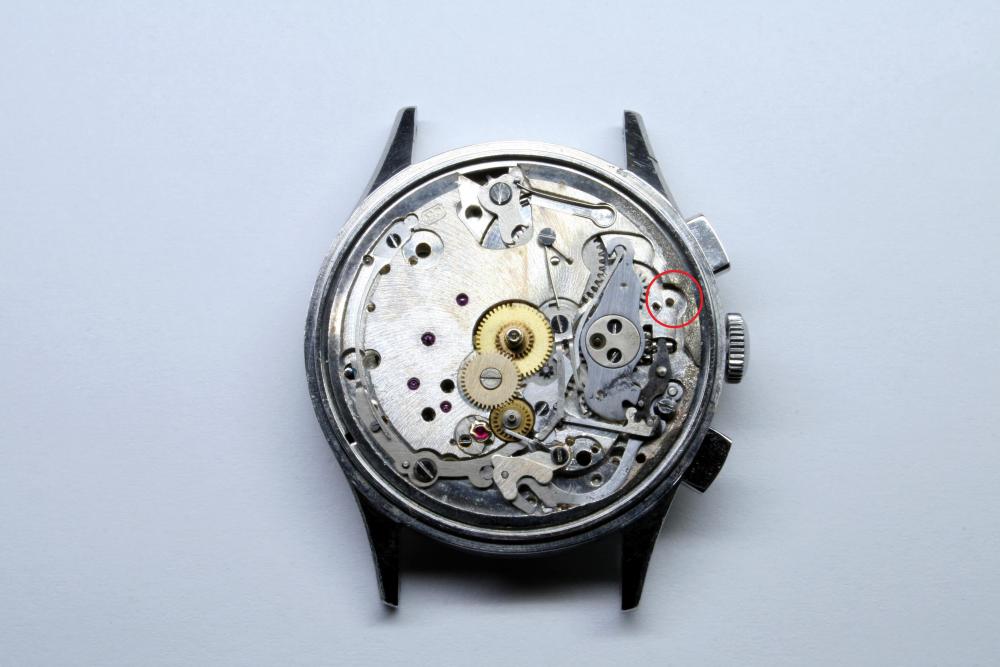
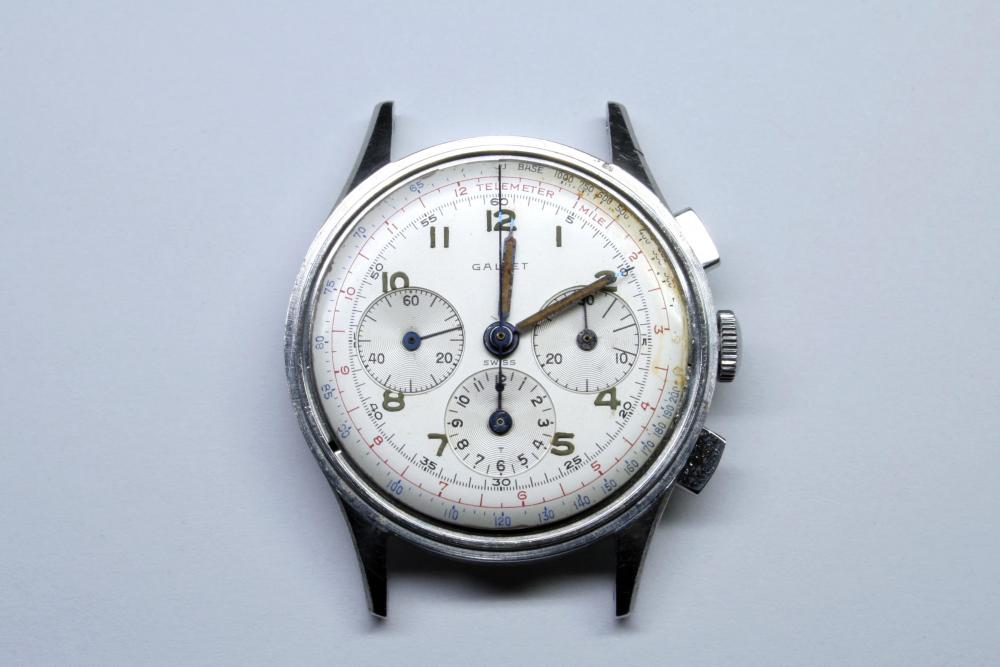
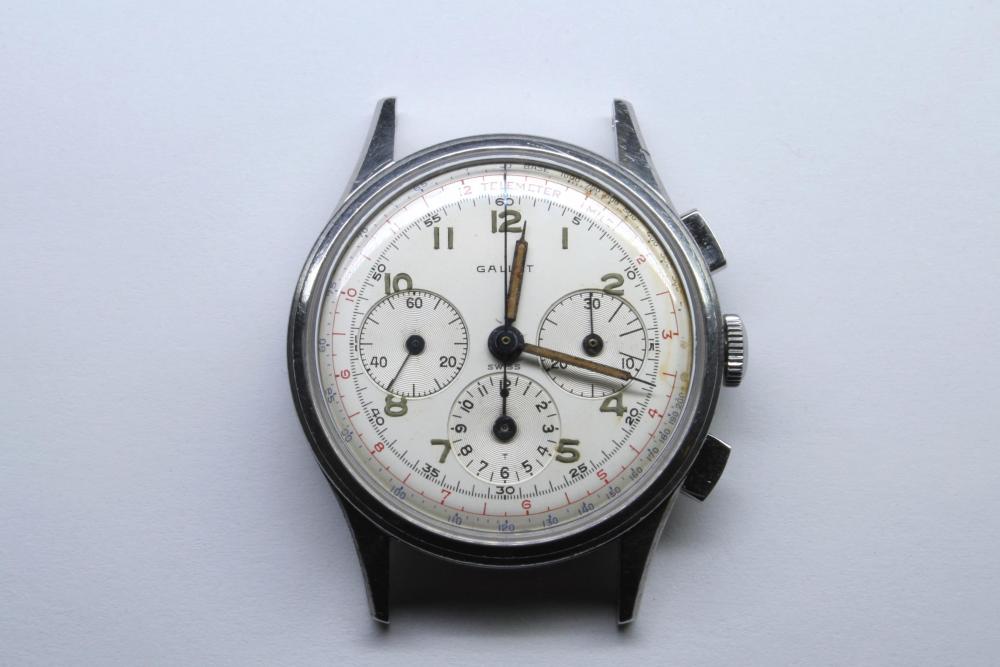
Well, I've pretty much wrapped up this project. The replacement chronograph pushers (buttons) arrived last week and needed a bit of adjustment before they could be installed. As you can see from the picture below, the shaft of the pusher which acts on the Flyback Lever was a bit long and needed to be turned down on the lathe then re-threaded. The lot of Excelsior Park parts which I purchased earlier included replacement coil springs for the pushers which was just perfect as the spring for the Flyback Lever was quite rusty. The replacement is pictured below. I found it was easiest to case the movement first, then install the pushers. While doing this I noticed there was a part missing from the keyless works. Worried that I had lost something irreplaceable, I went back over my images taken during disassembly and discovered the missing bit wasn't there when I started. The missing piece belongs to the setting lever assembly- although what exactly it's purpose is I'm not sure. Perhaps it provides stability when applying the clutch. I noted the keyless works seems to function properly without the part so maybe it's just the appendix of an EP40 movement. I've circled the area with the missing bit below and added a linked image from the Watchguy's image archive which shows exactly what is missing. If I ever do find the missing part, I'll probably have to give my right arm to purchase it. I replaced the Flyback Lever and Operating Lever, both of which secured the pushers to the movement. The Flyback Lever is secured with a left-hand thread shouldered screw. The original screw was destroyed by rust but I found a suitable replacement; it doesn't have the three slots cut into the head so I added a dab of blue paint to distinguish the screw. I still need to find a large case screw to replace the original which was also destroyed. I needed to adjust some of the eccentrics in order to get the chronograph working just right. It's a pity too because those eccentrics had perfect heads on them until they were galled by my screwdriver. That will serve as a reminder to review the section in George Daniel's book on screwdriver sharpening. I cleaned up the dial with a bit of water and a Q-Tip but as you can see I lost some of the tachymetre around 3 o'clock from my efforts. The text came away without effort so I stopped any further efforts to improve the dial. The Hour, Minute, and Minute Recording hands all had oxidation damage. I scrapped the rust away with an oiler and Rodico and applied a coat of varnish to the luminous paint to keep it from crumbling. I think I could have polished and re-blued the hands (which would have been the "correct" solution) but opted to keep the scarred look; it's a reminder of what this watch has been through. By the way- blued steel hands on a white dial is just a fantastic look. They look black against the dial when viewed straight on, but when the light hits them just right they shimmer with the deepest blue. I tried to catch an image of the effect with my camera but just couldn't do it justice. A high dome acrylic crystal completed the job. So far, so good. The movement has kept time for the past twenty-four hours without issue. Once I've found a strap for it, I'll take it out on the town and then make final adjustments if need be. I think I got lucky on this one as the water damage wasn't as great as it could have been and I was able to find all of the replacement parts at a reasonable cost. Only the pushers broke my budget but I'm happy with the new buttons. I still have some NOS parts left over which I can hold onto or flip later to offset the cost of repair.


 1 point
 -
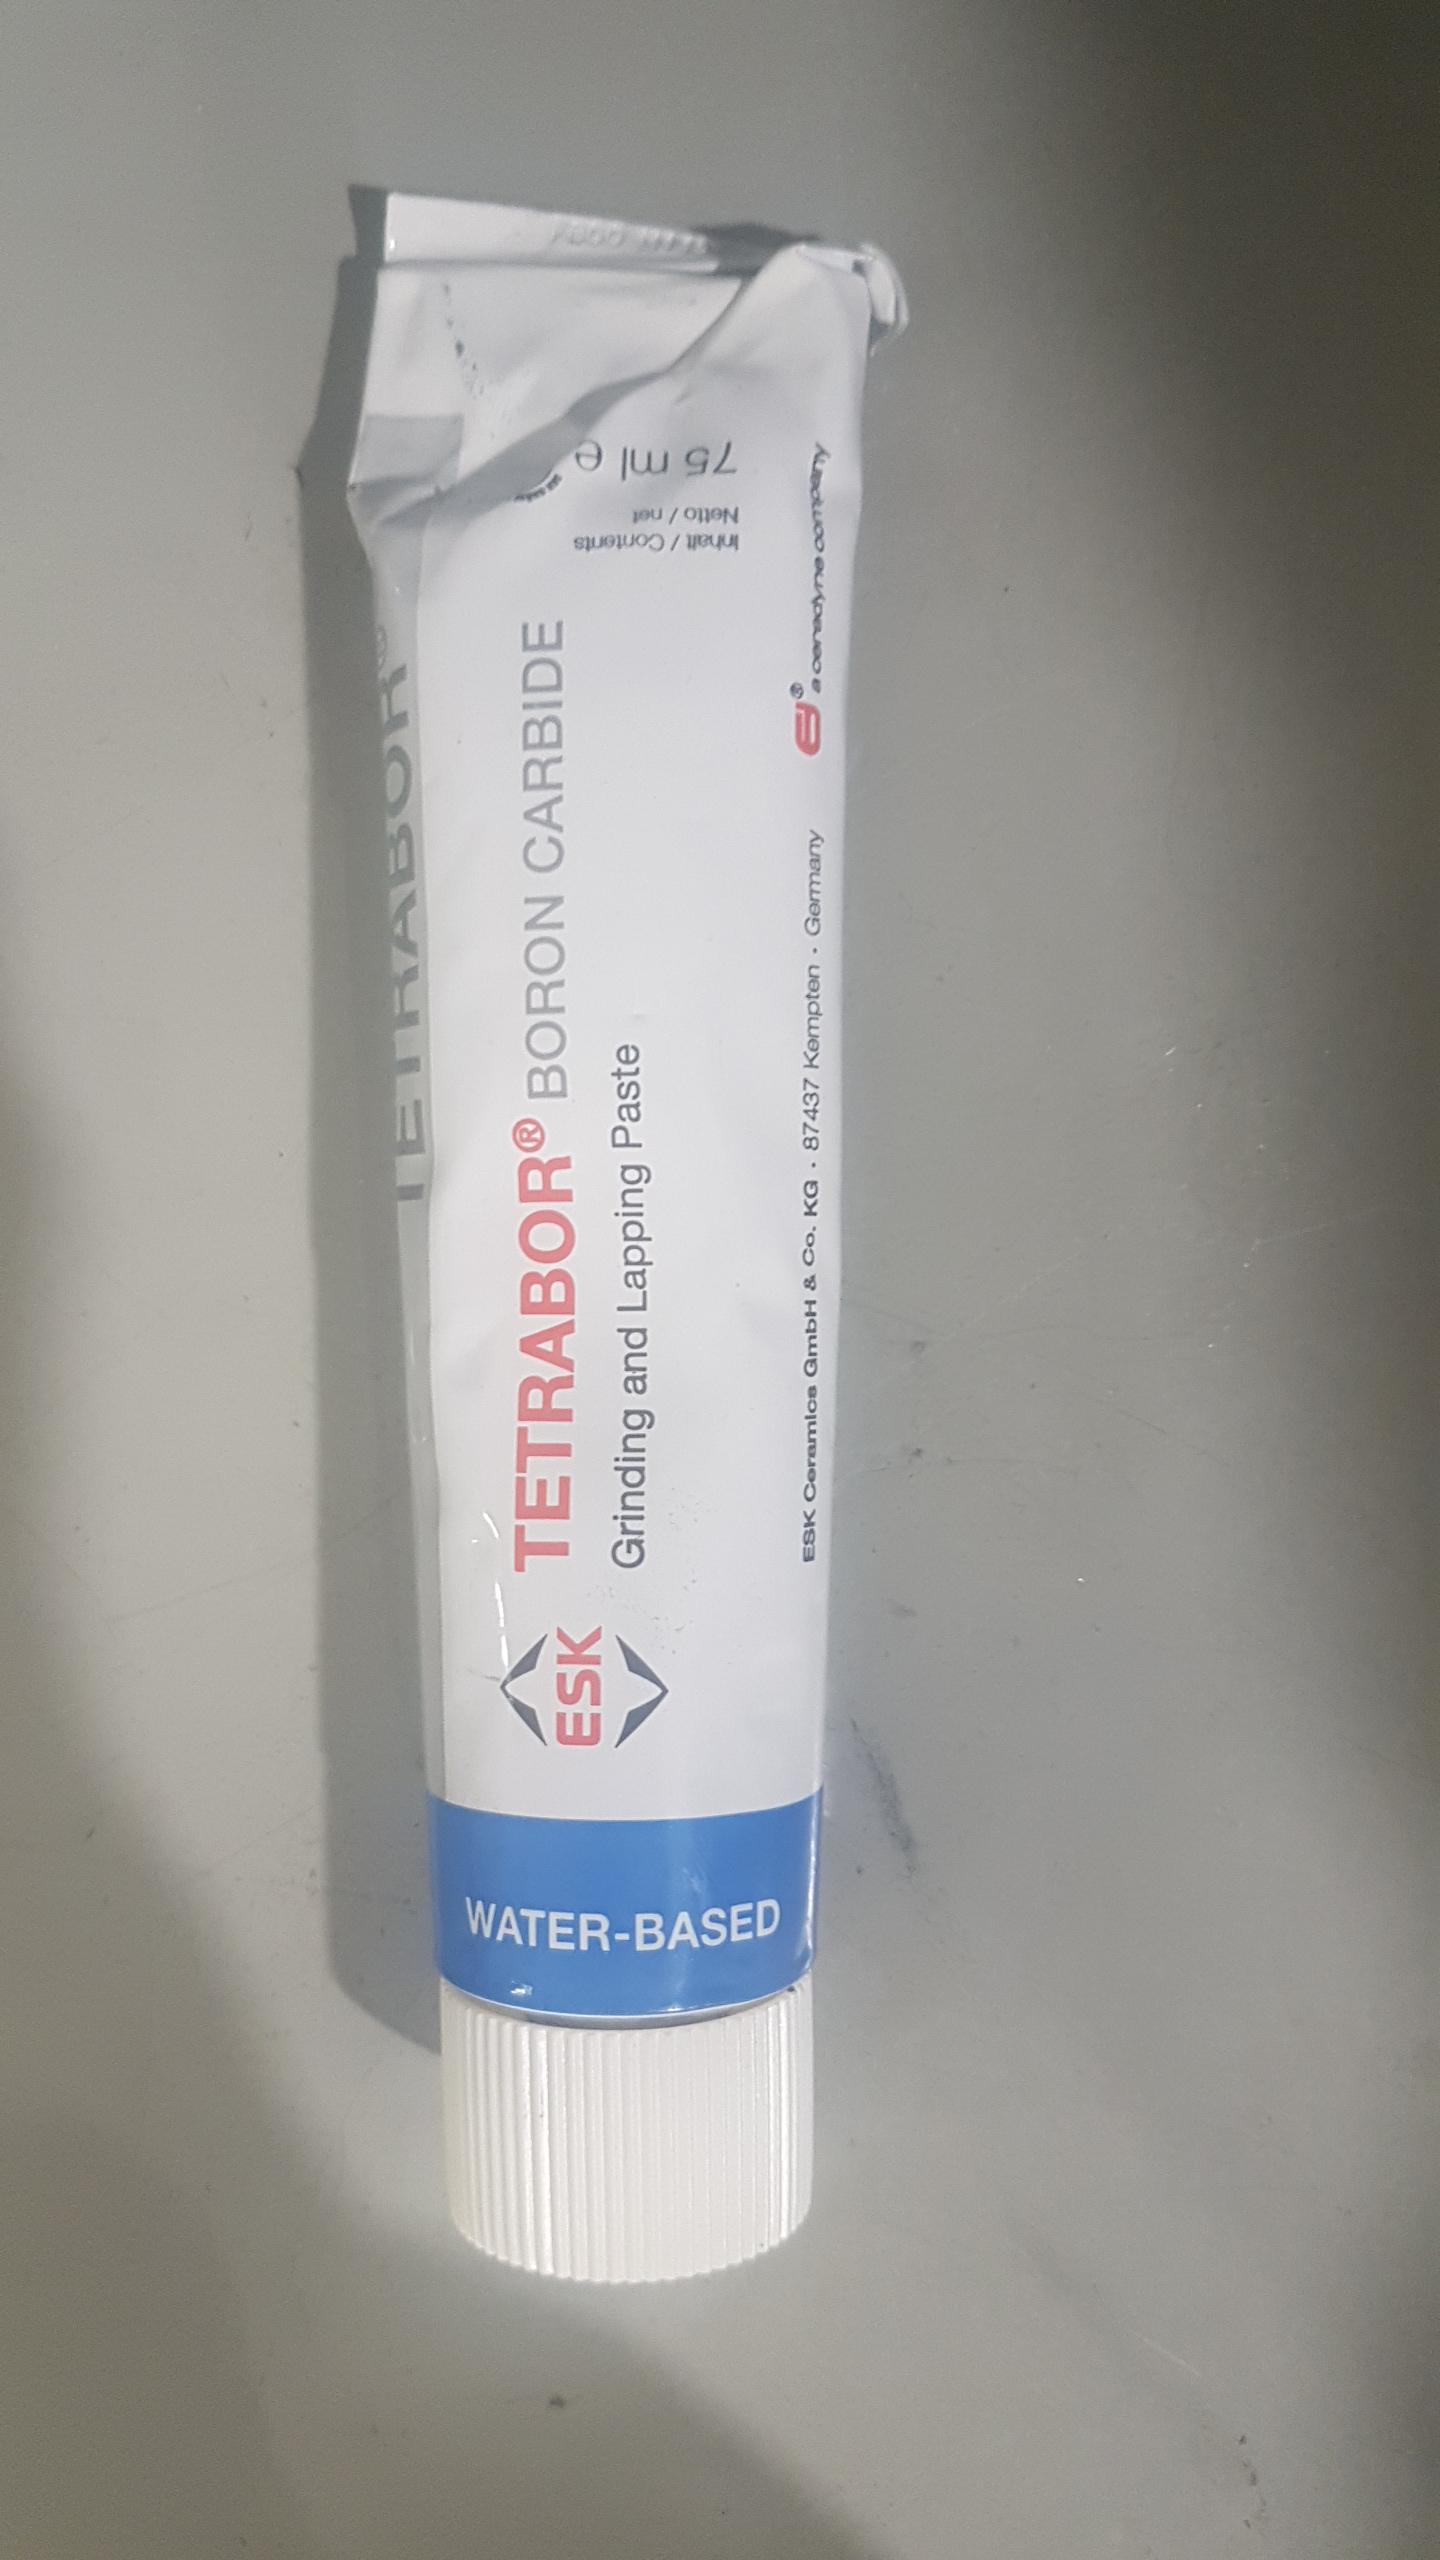
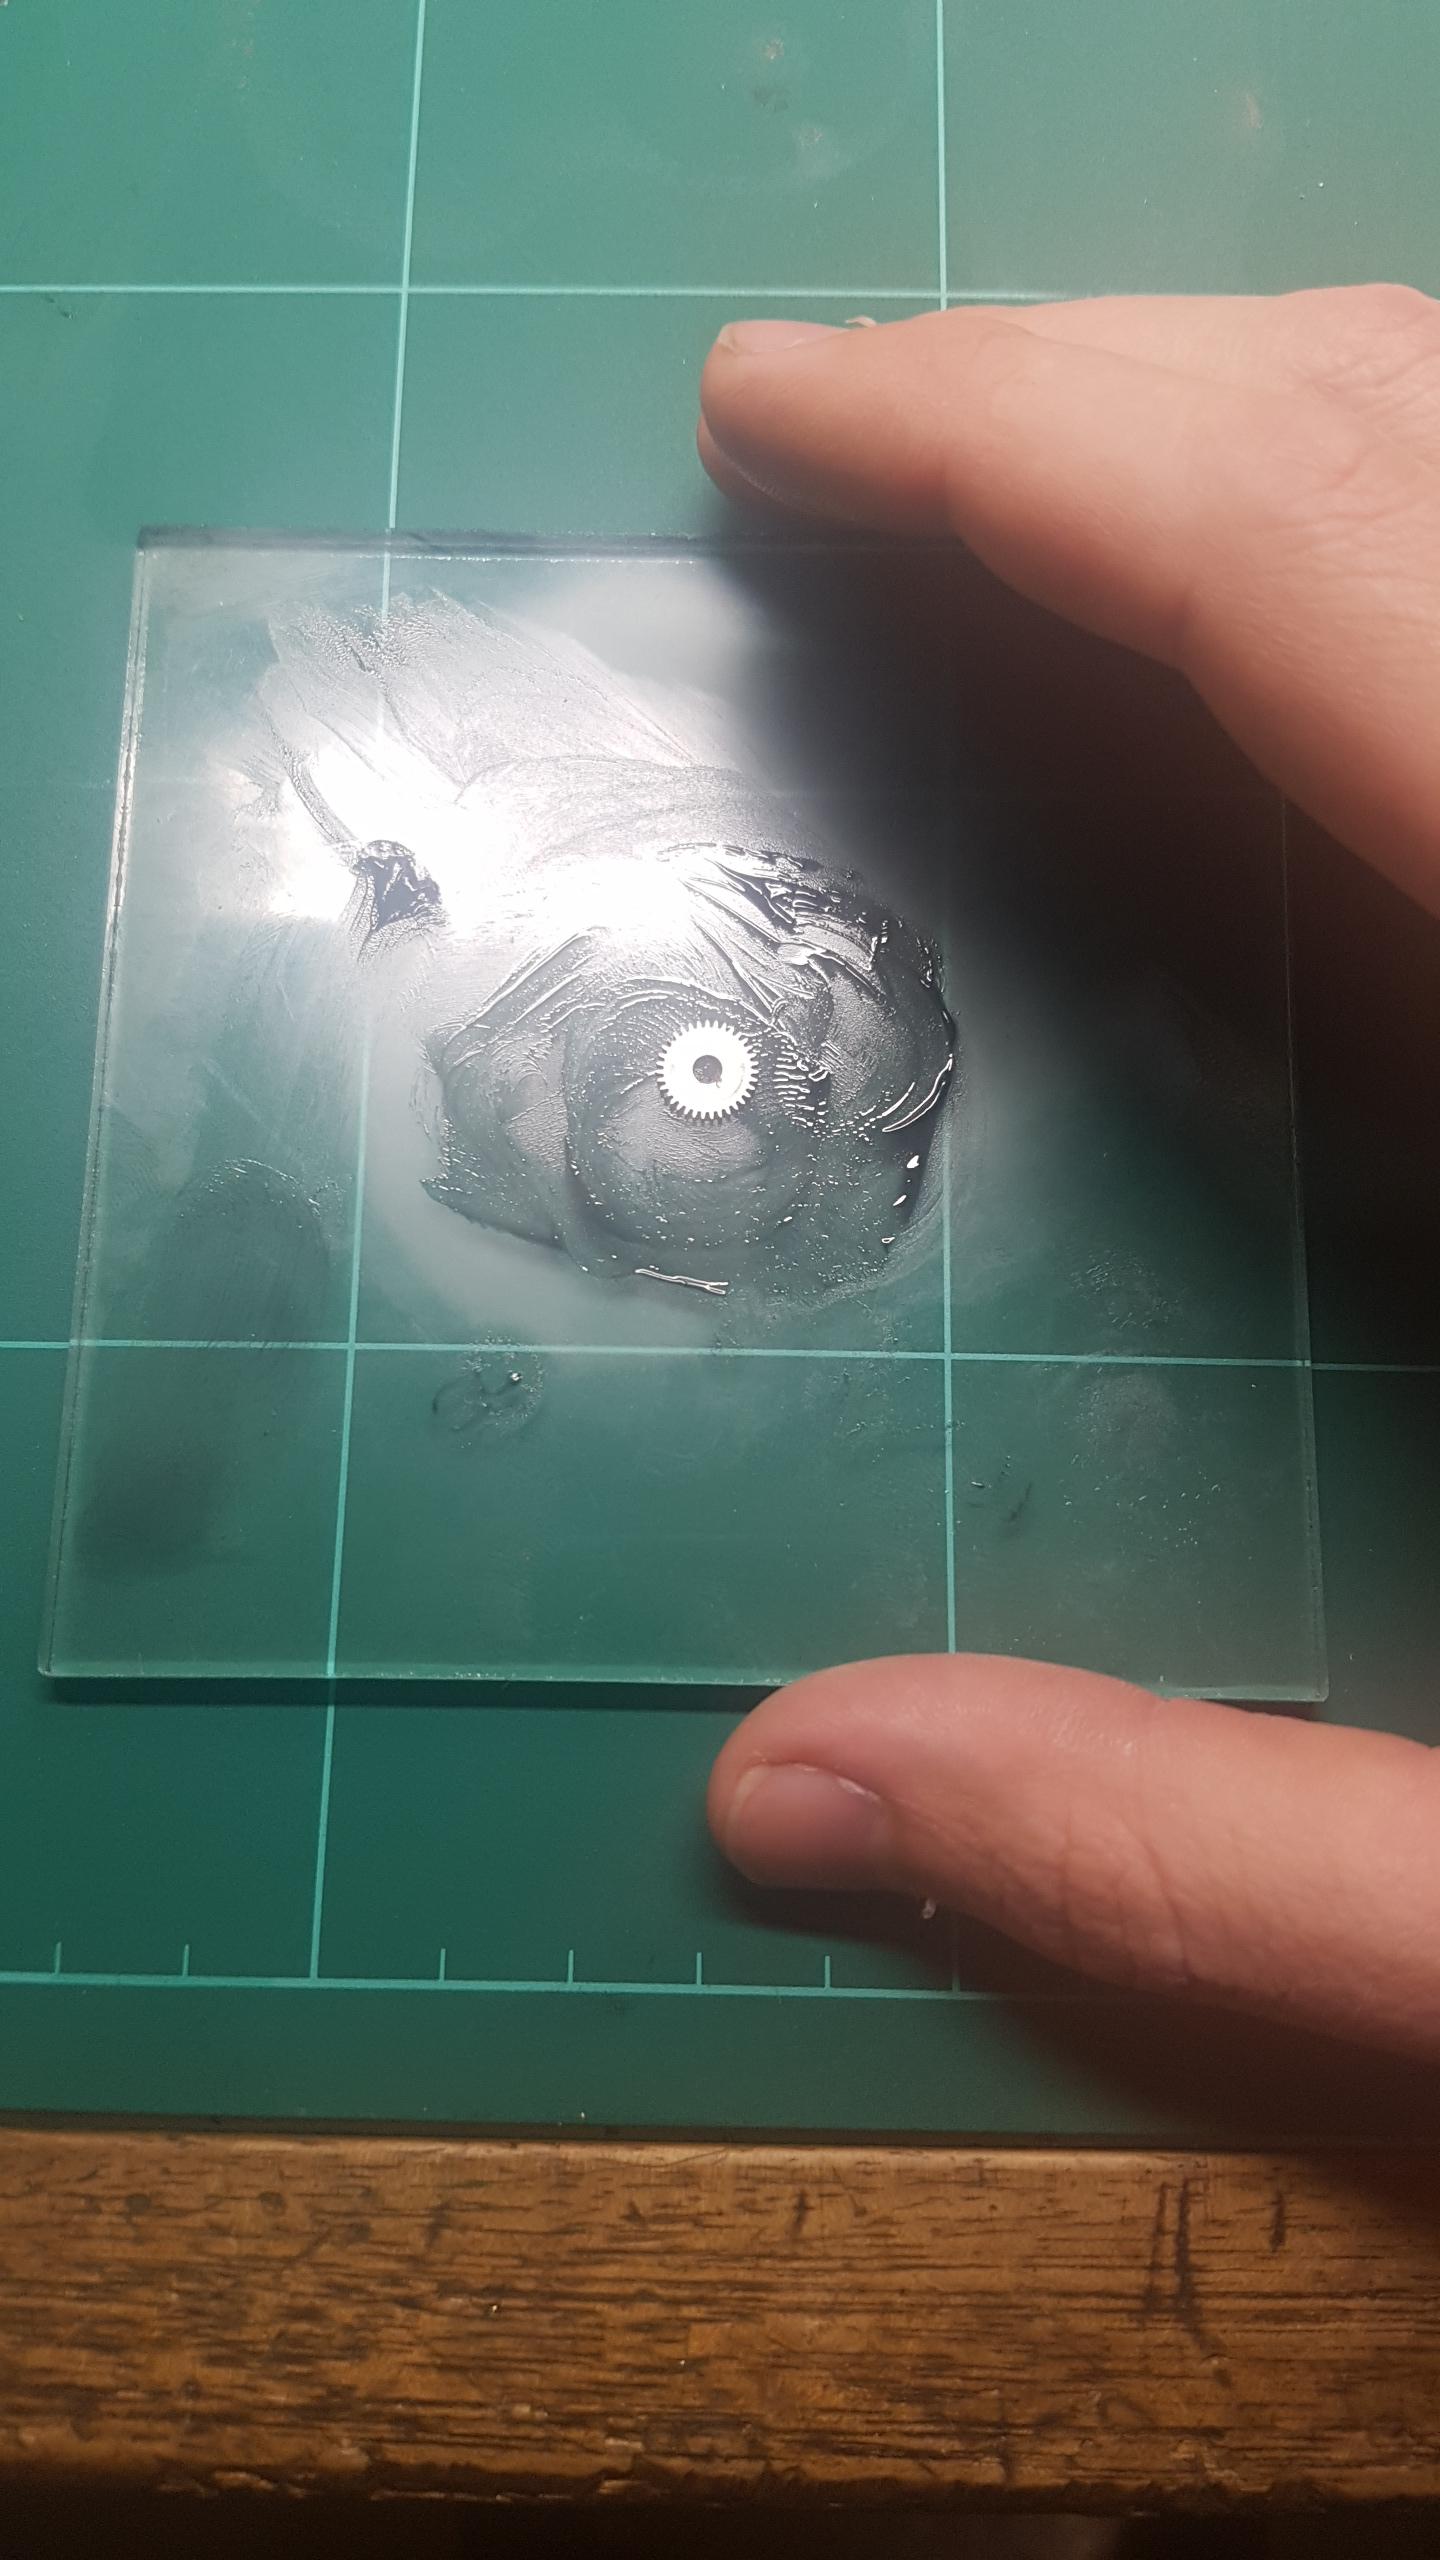
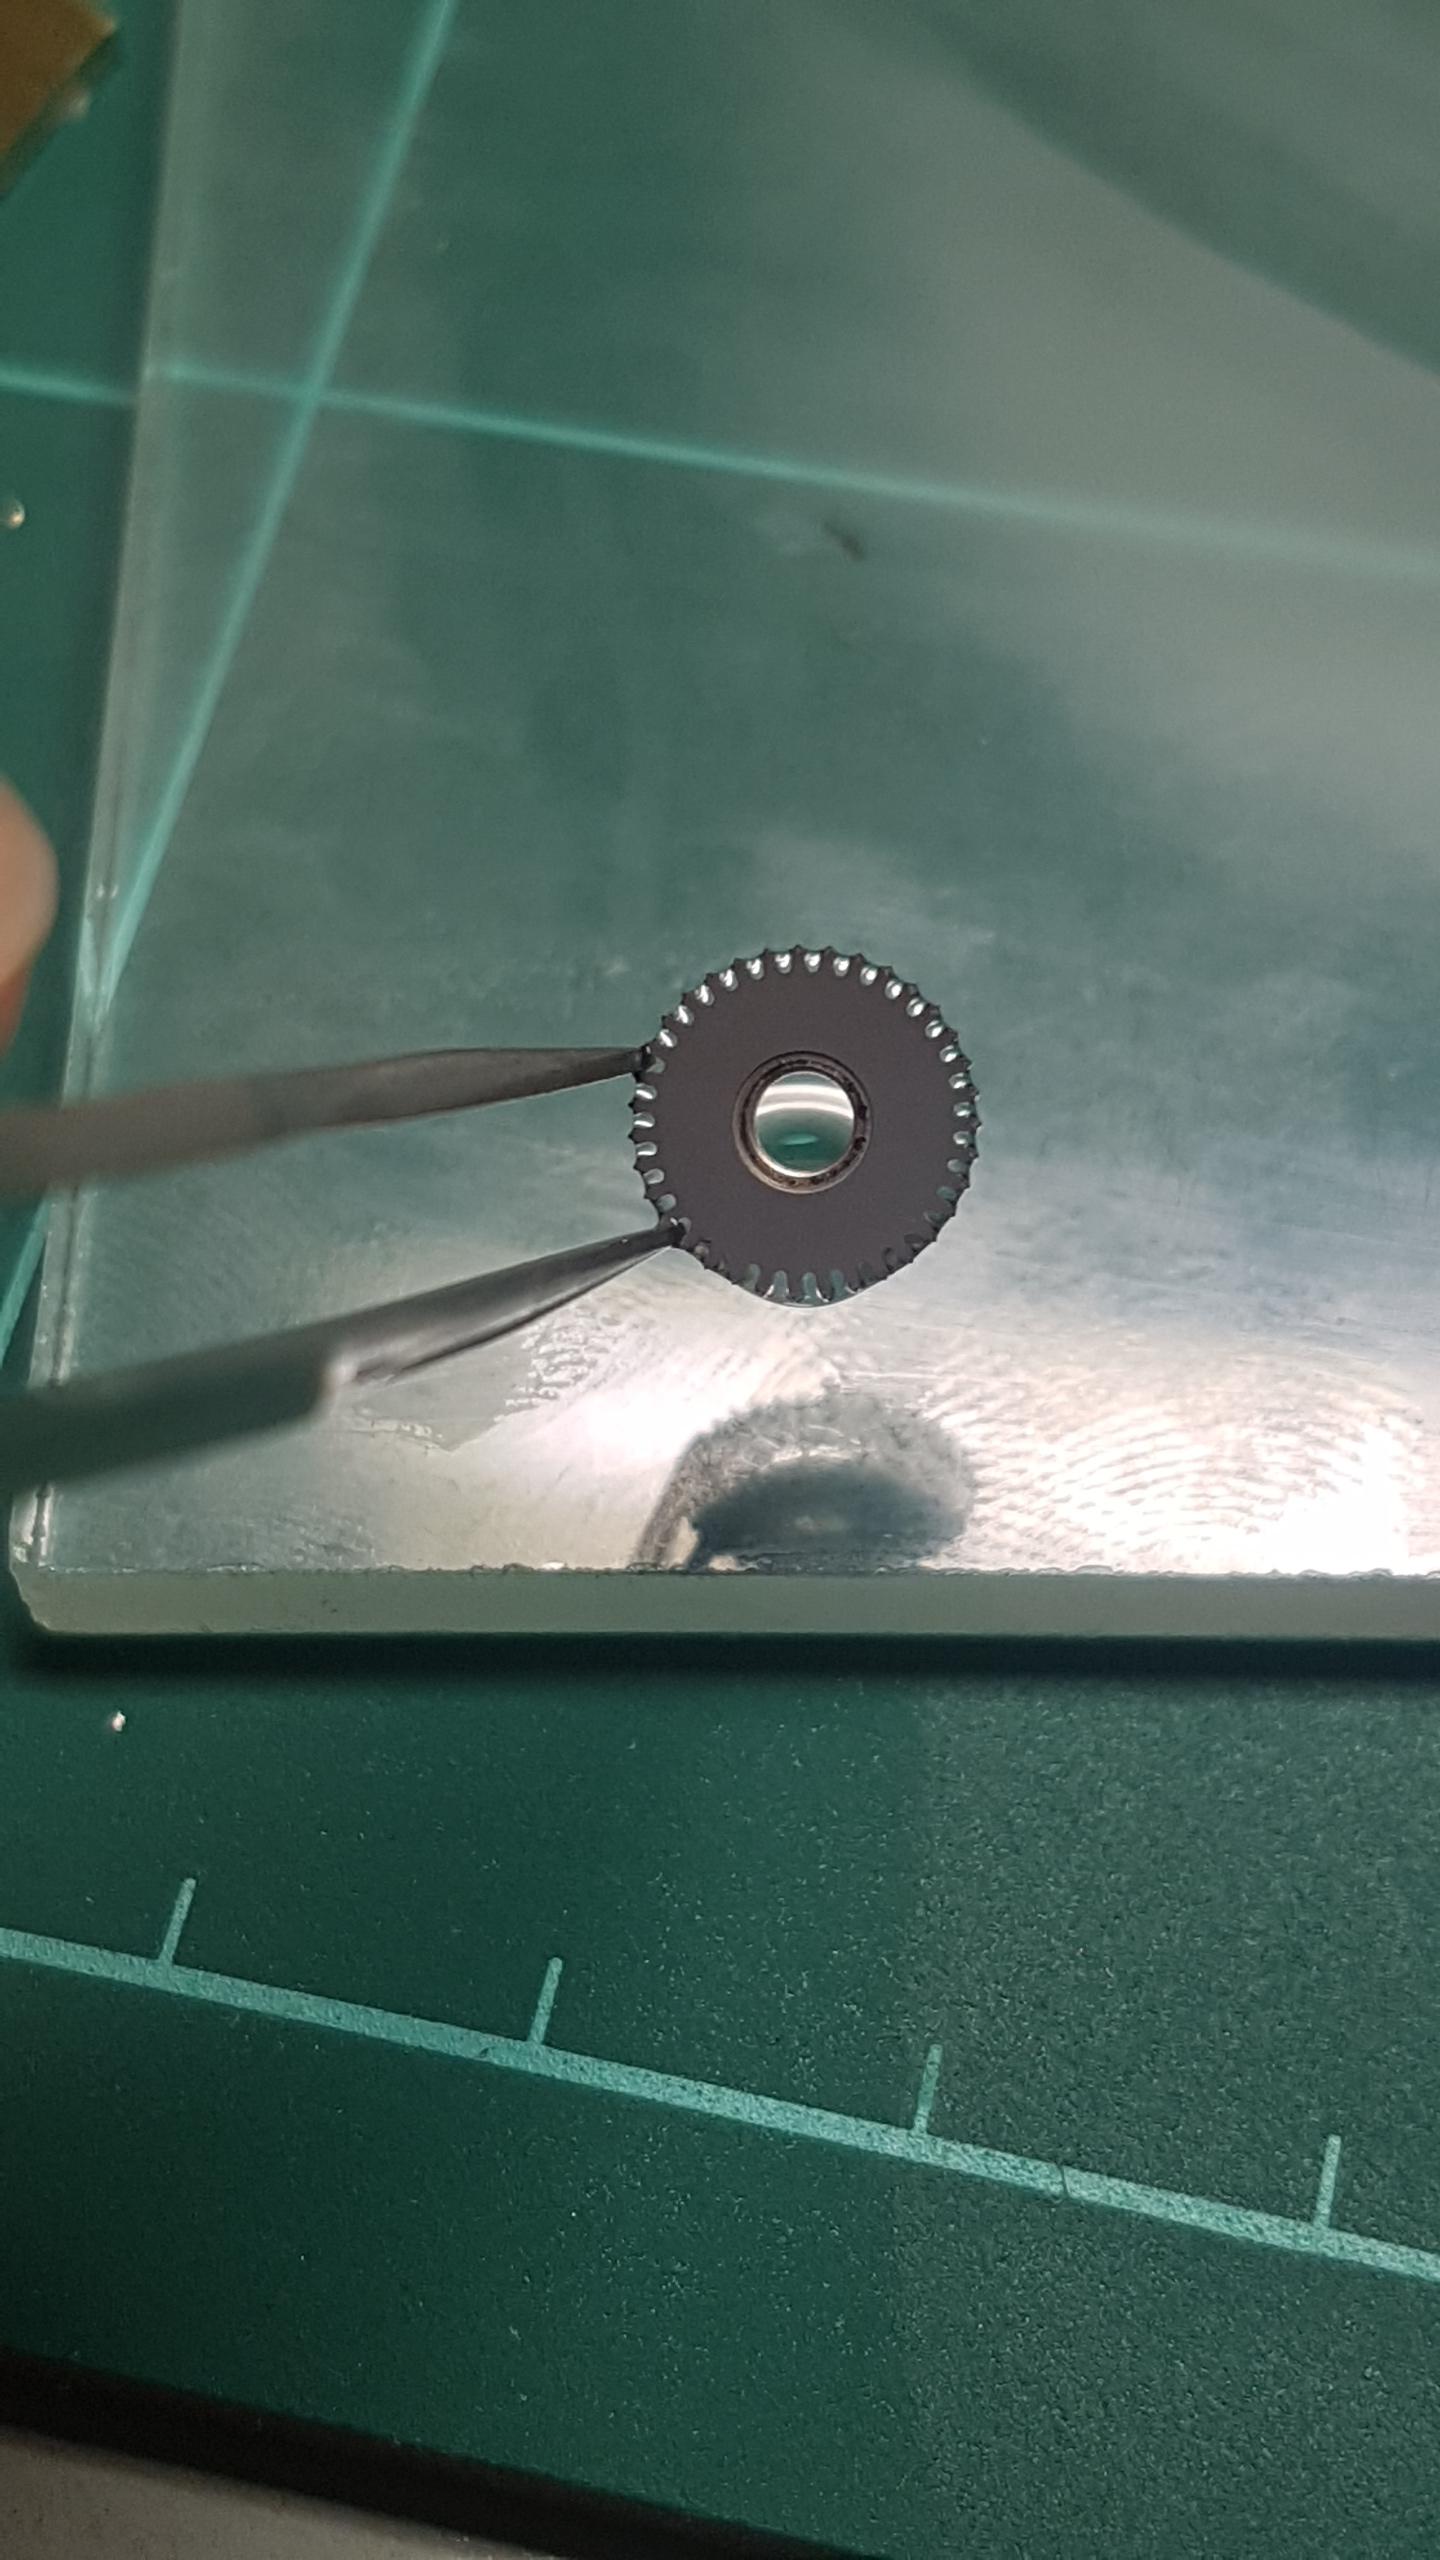
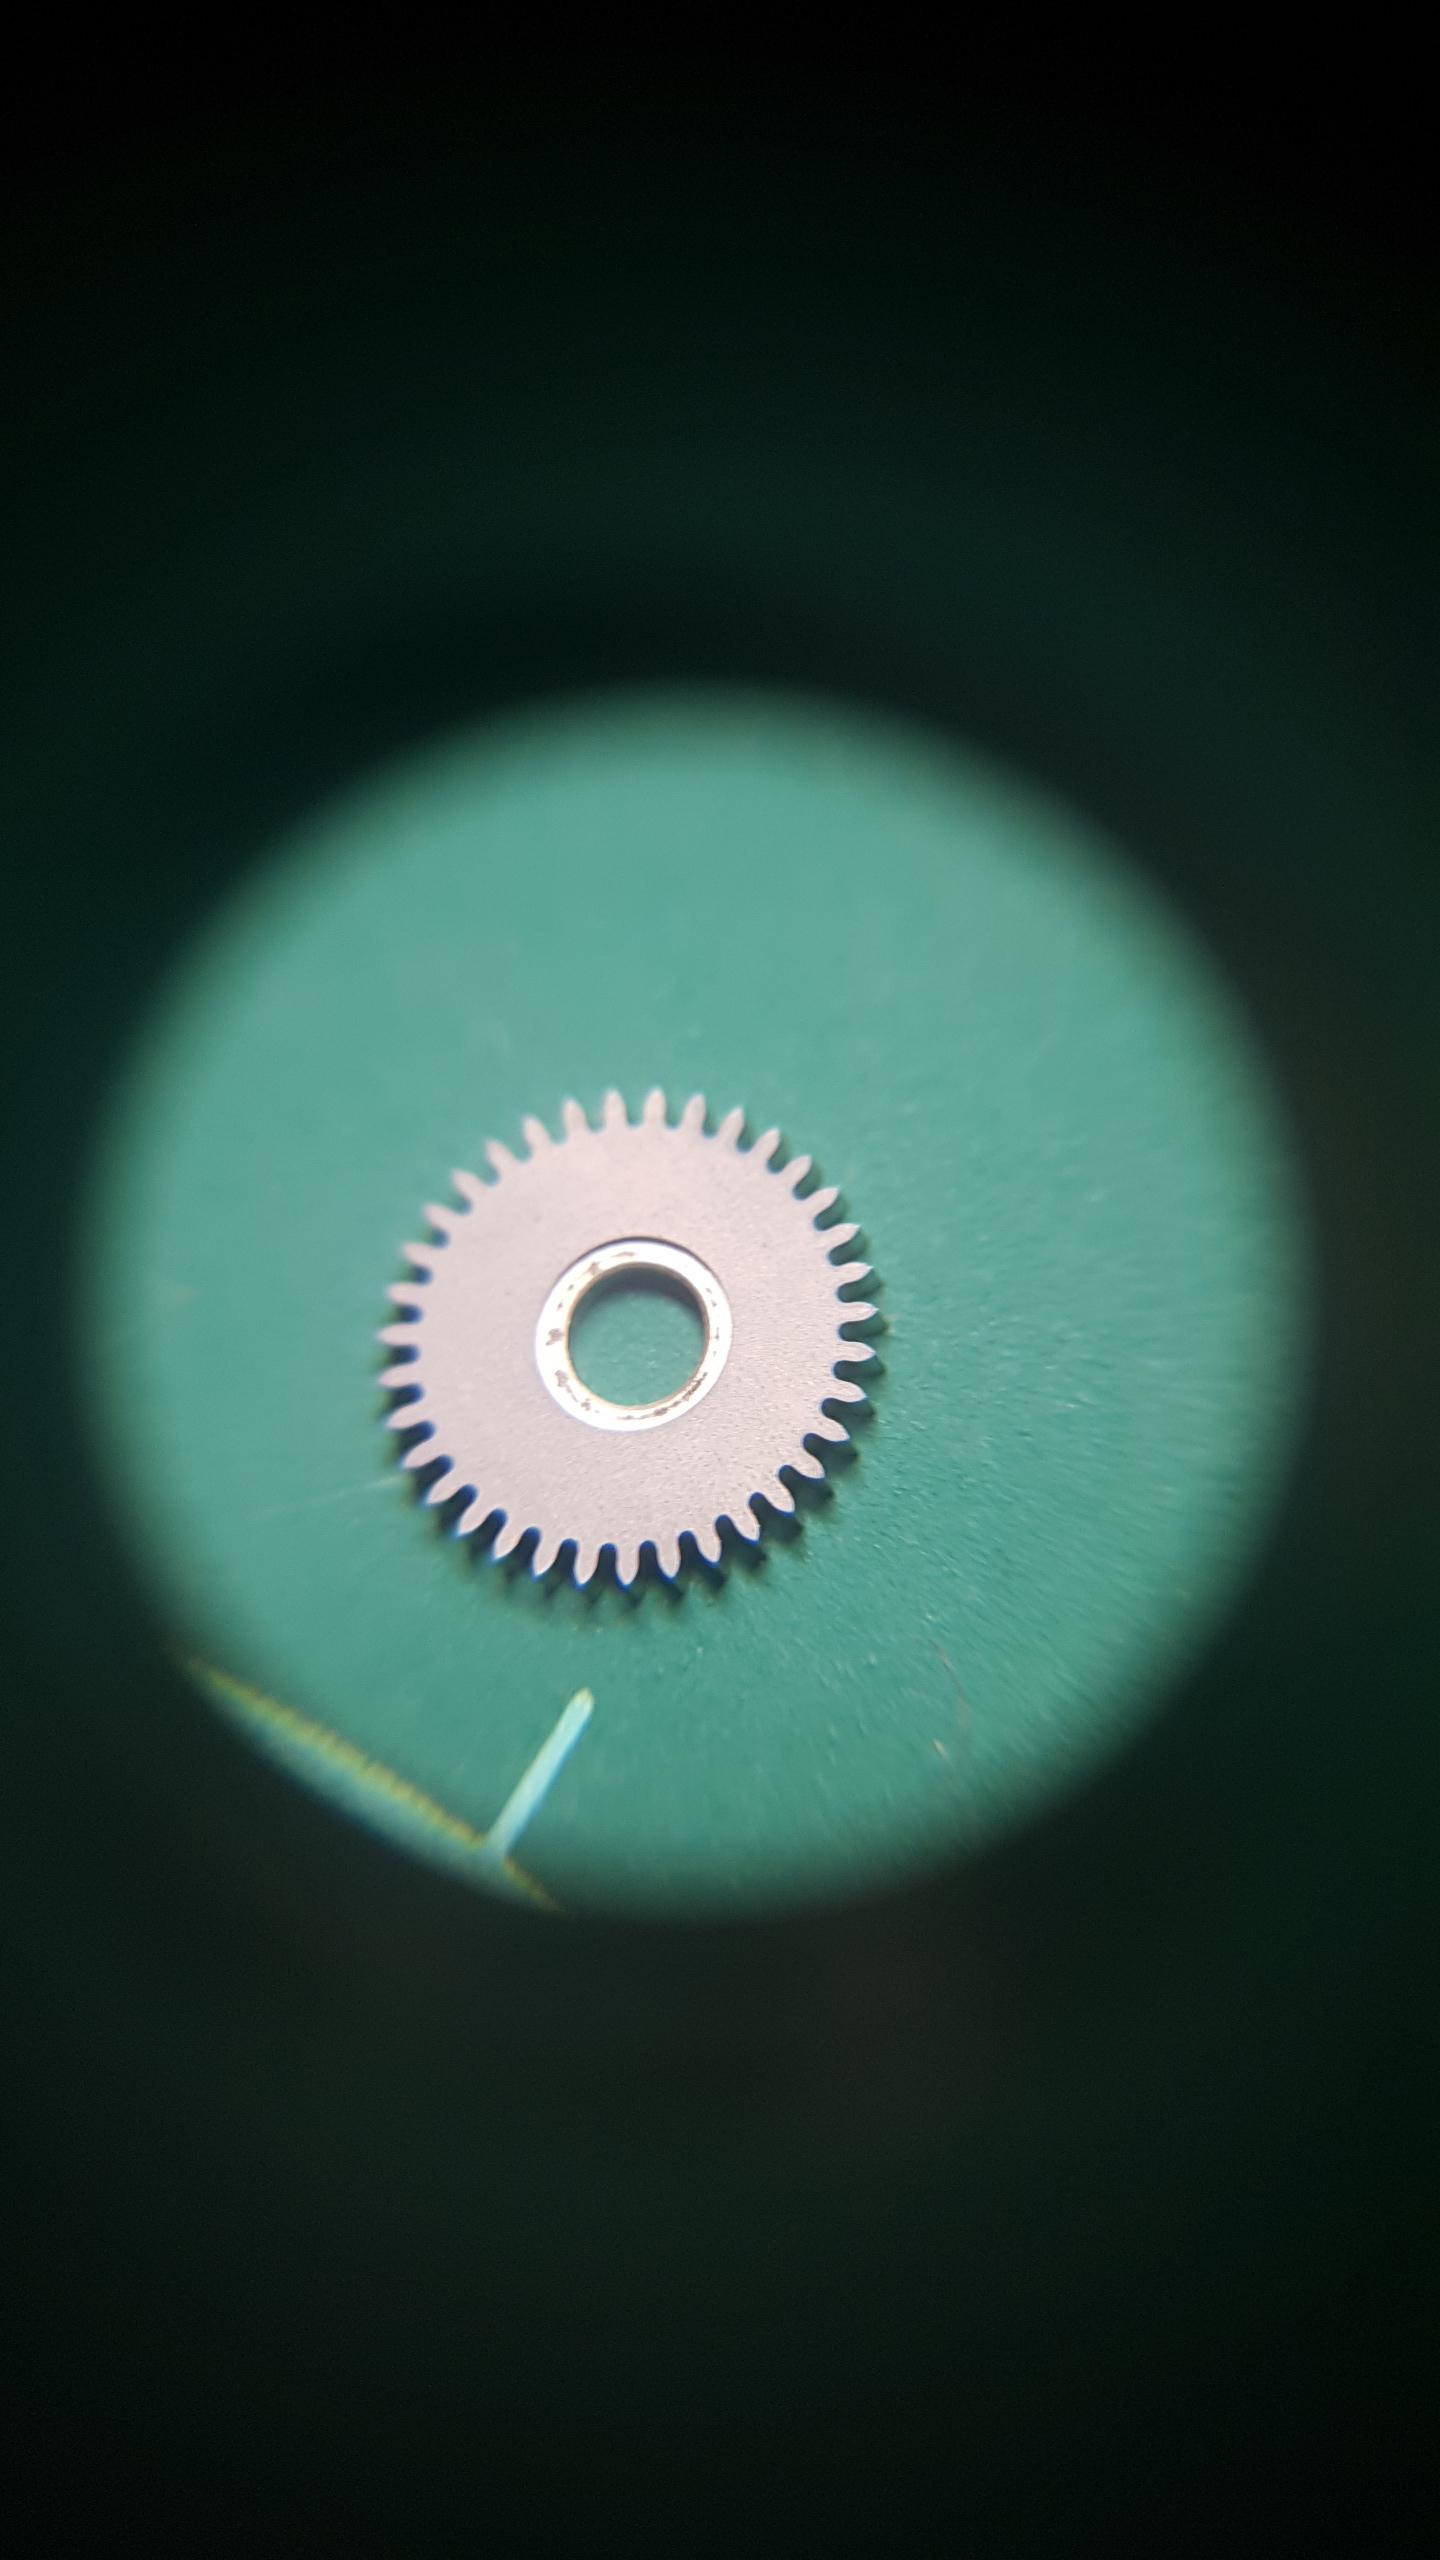
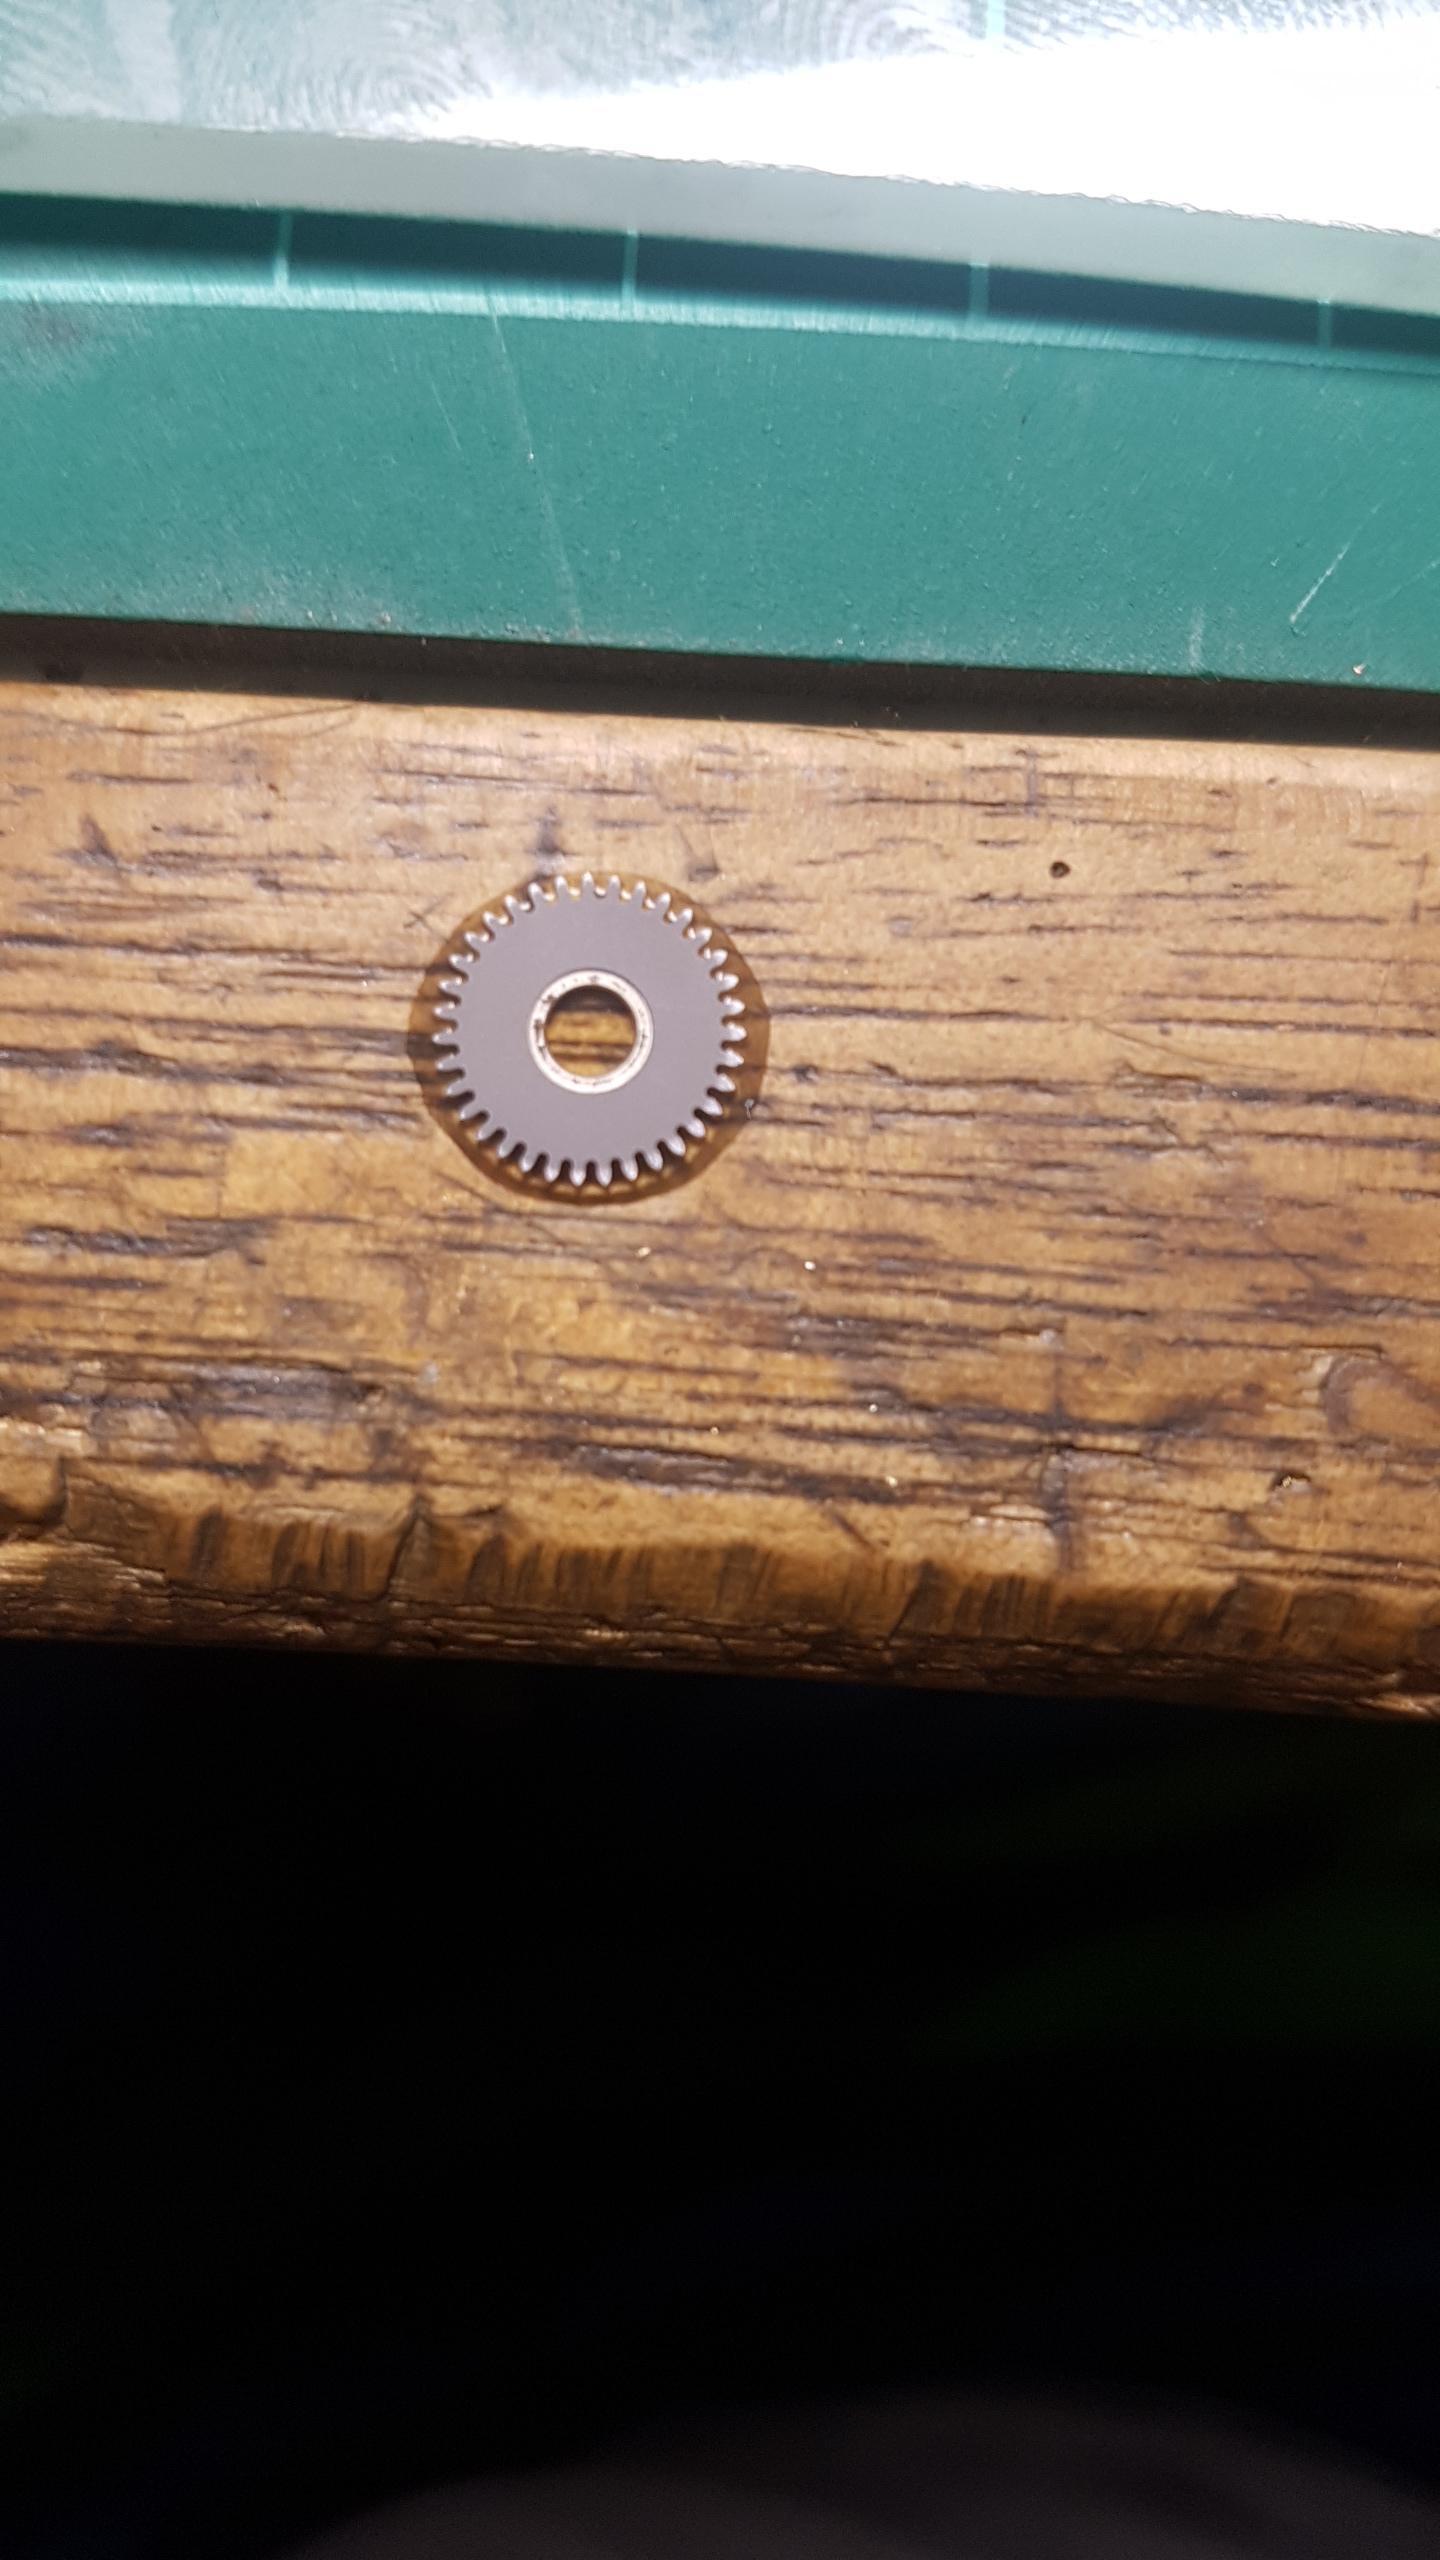
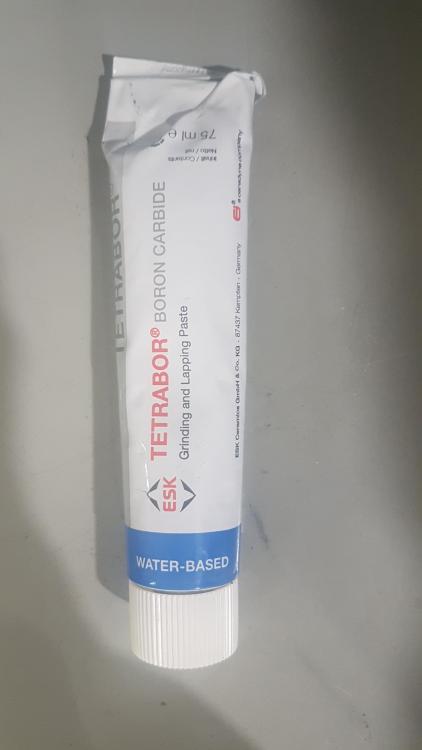
Hello All, This is my first post so I thought I would show a little finishing technique I learnt a while back. It basically turns the ratchet or crown wheel into a matte/ frosted finish. It was popular back in the day with some high end companies and still looks good in my opinion. I'll run through how it's done and try answer your questions as best as possible. What you need: 1. glass plate 2. Micron paper in various grits. 20 and 12 will do. 3. Tetrabor 800 grit/ mesh 4. Ultrasonic or cleaning machine 5. rodico First thing first, you have to flatten your ratchet wheel. To do this I use some lapping paper on glass. I start on a 20 micron and rub the ratchet wheel with my finger in a figure 8 pattern or circular or however I feel. (we arent trying to achieve black polishing flatness) If you are worried you can set up a jig to hold the ratchet wheel. but I often find using your finger will suffice. Once happy, move onto a 12 or 9 micron and do the same. At this point it is imperative to clean the wheel so that you remove all the grit from the paper that may be stuck between the teeth. So chuck it in an ultrasonic or your cleaning machine. Next place some tetrabor onto your plate, no need to add oil or water. place wheel onto plate and start rubbing it in. Generally it doesn't take to long no longer than a min or so. Doesn't hurt to check the piece to see how the finish is developing. if you want to check you can dab it with rodico, very carefully to remove the tetrabor. Do NOT wipe with a tissue or anything, this finish scratches so easy its crazy!! you can always chuck it through the ultrasonic (carefully) to see how the pattern is going. Its the checking and chasing that one last scratch which takes up the most time. The slightest bit of dust or dirt on the glass plate will scratch the wheel. You can always blue the wheel after, it comes out with an interesting tone when blued with this finish. This technique is fairly hard and does take some time to get good at, because it's just so easy to scratch and because of this scratches stand out against the matte surface. I'll try answer questions as best as possible. I try and post interesting stuff on Instagram regularly at least 3 to 4 times a week. obr_horology is my account on insta. its just time consuming to post (slow at typing) I plan on doing a youtube video in the coming weeks to better explain it. I learnt this from Henrick Korpela. Check him out if you haven't heard of him. He also writes in the AWCI and gives away a lot of info. Thanks O

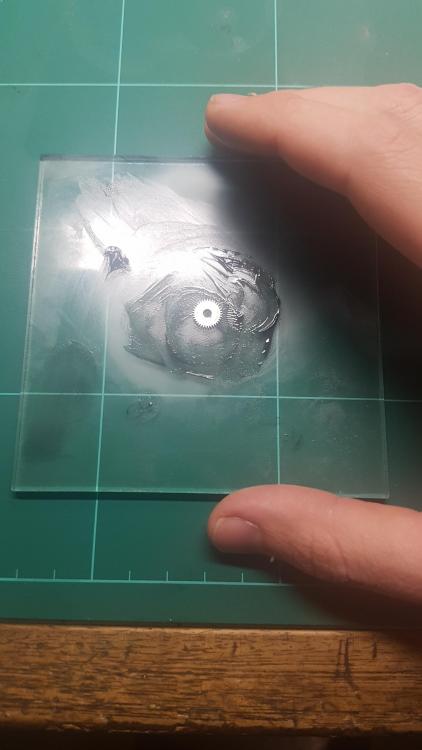
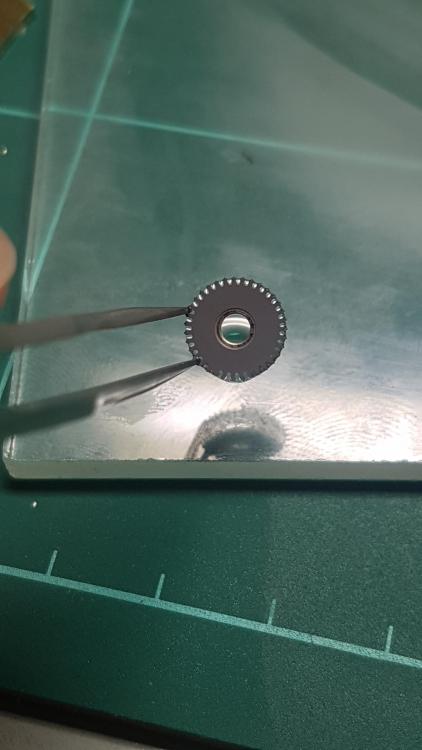
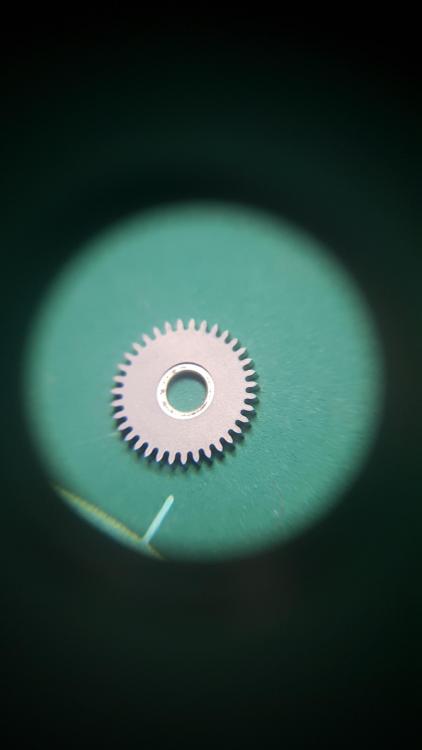
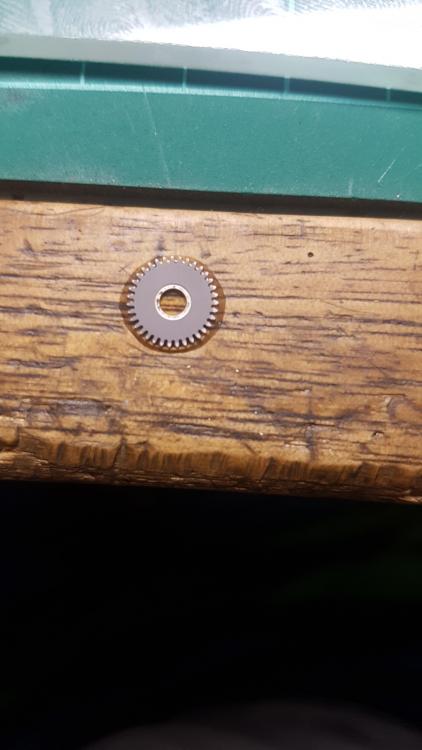 1 point
 -
Just noticed your response here, sorry for the delay. You going to send it back to Seiko? I just noticed when browsing Esslinger the other day they have Seiko movements, including a few solar: https://www.esslinger.com/seiko-watch-movements-original/ I wonder how involved a swap would be? Seems like it could be hairy.1 point
-
I know it is a very common thought that Timex produced watches for a short duration of service. But after having handle thousands of them over some 8 years now, I an more apt to think they were more focused on cost savings. After all they designed their movements to be what would latter be called upwardly compatible in computer jargon. For example they take the #24 movement modify it some and now it is the #25 with date ring. take that same base 24 add a rotor and you have an automatic. Plus the metal used was a benefit of having manufactured for the US military. Light weight and durable plus an over sized balance staff that can stand up for who knows how long. And even though the watch cases were base metal they stood up for years even as an everyday working man's watch.1 point
-
There have been several Timex forums over the years, the current incarnation is here - The New Timex Forum This is a general forum, not specific to repair. The owner (Mel) is battling ill health at the moment. Since the forum is set for moderator approval of new posts, it can take some time for them to appear. I am sharing some Timex documents, including repair manuals, here - Timex Documents As far as sharing repair/restoration info,tips,and tricks, right here might be the best place that I know of, just ask!1 point
-
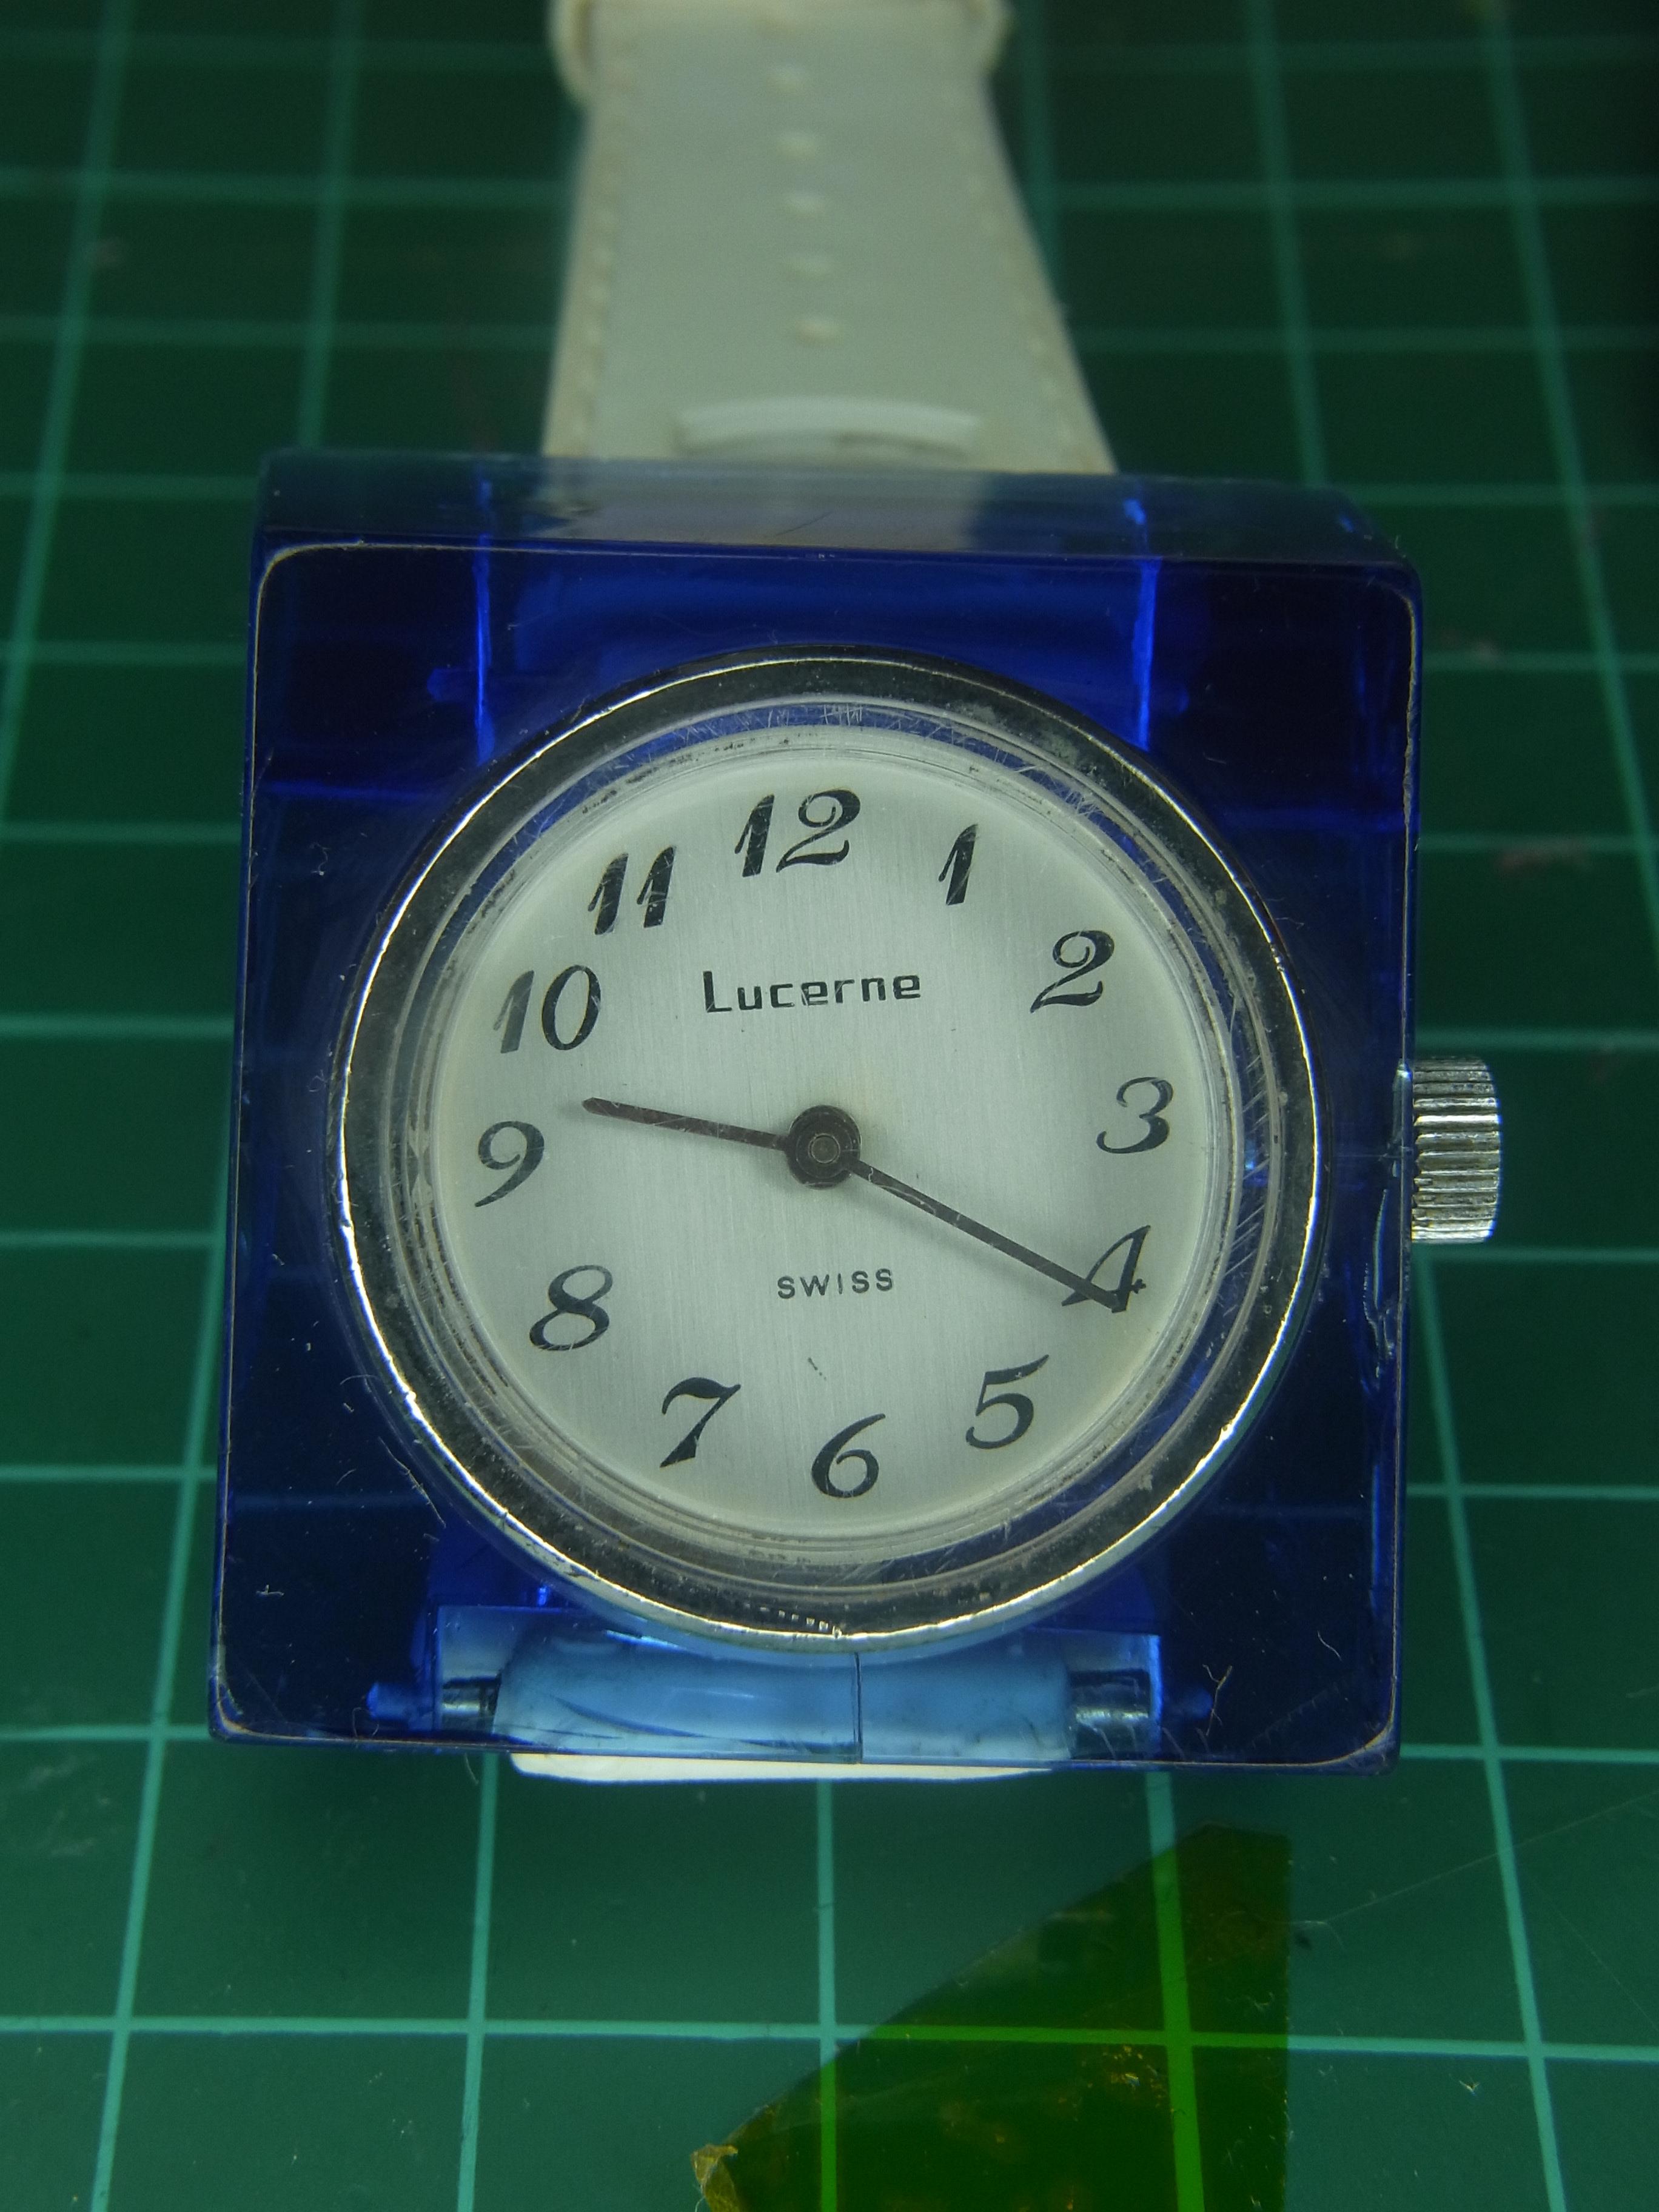
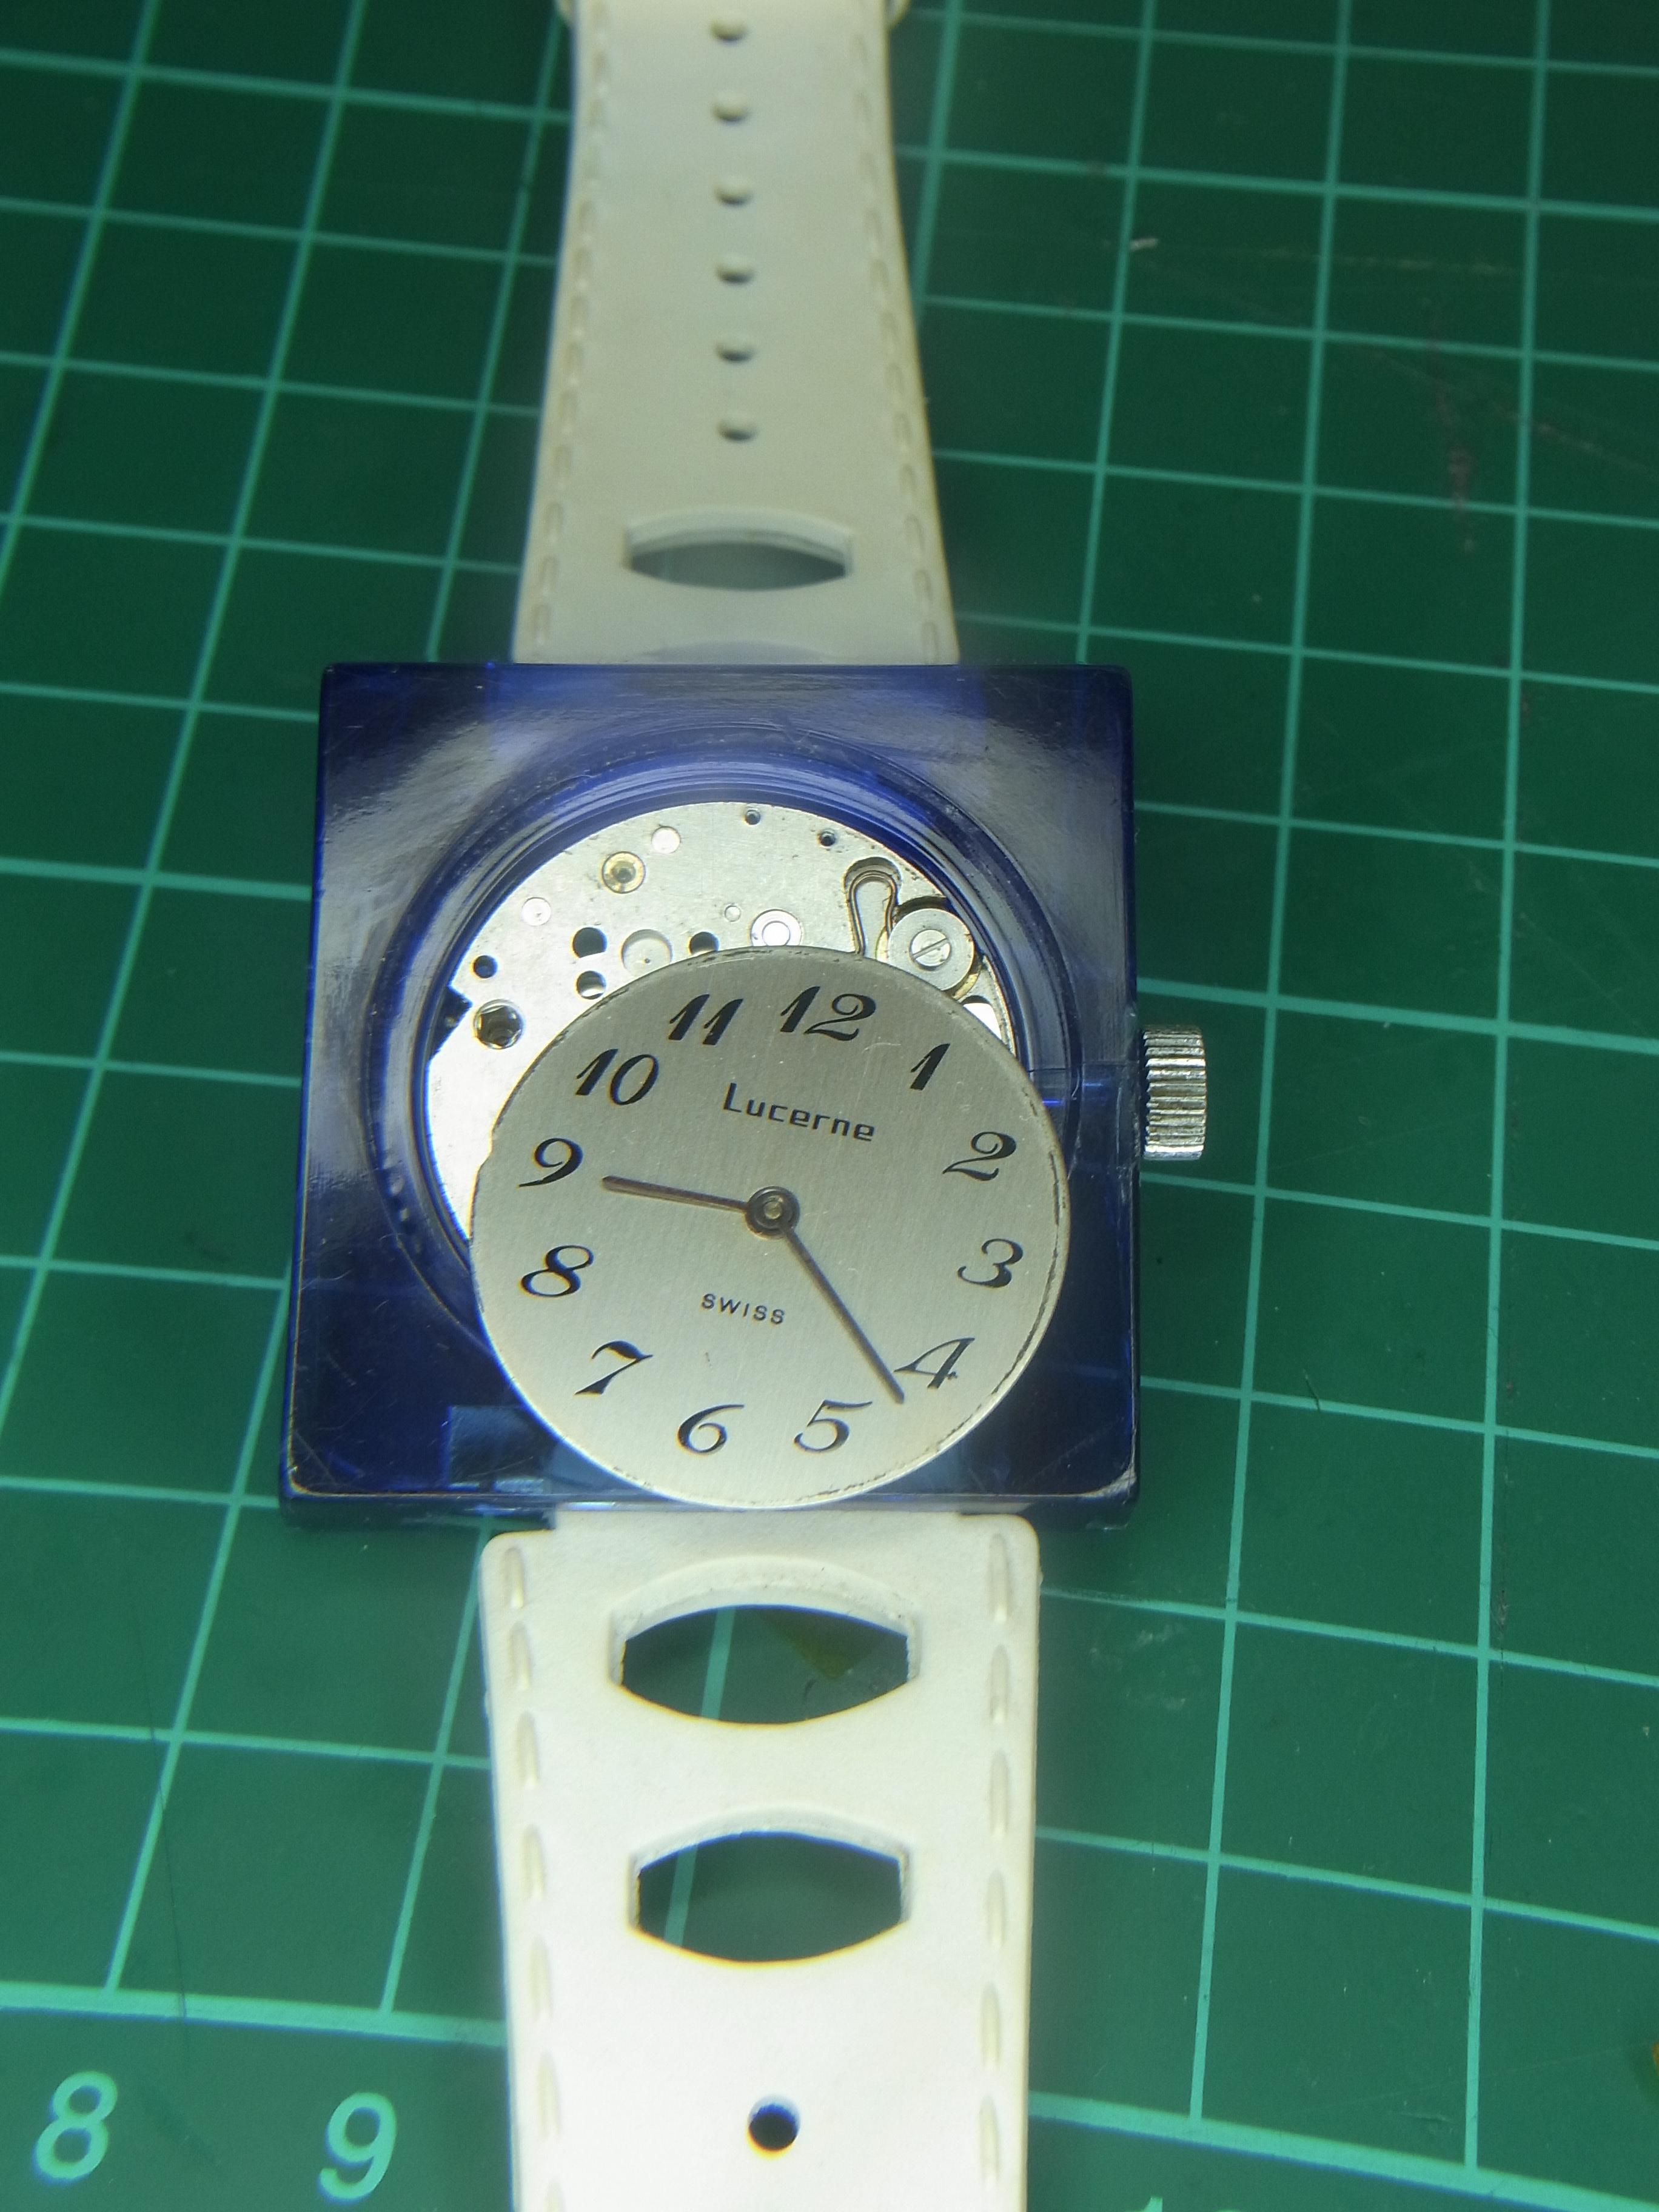
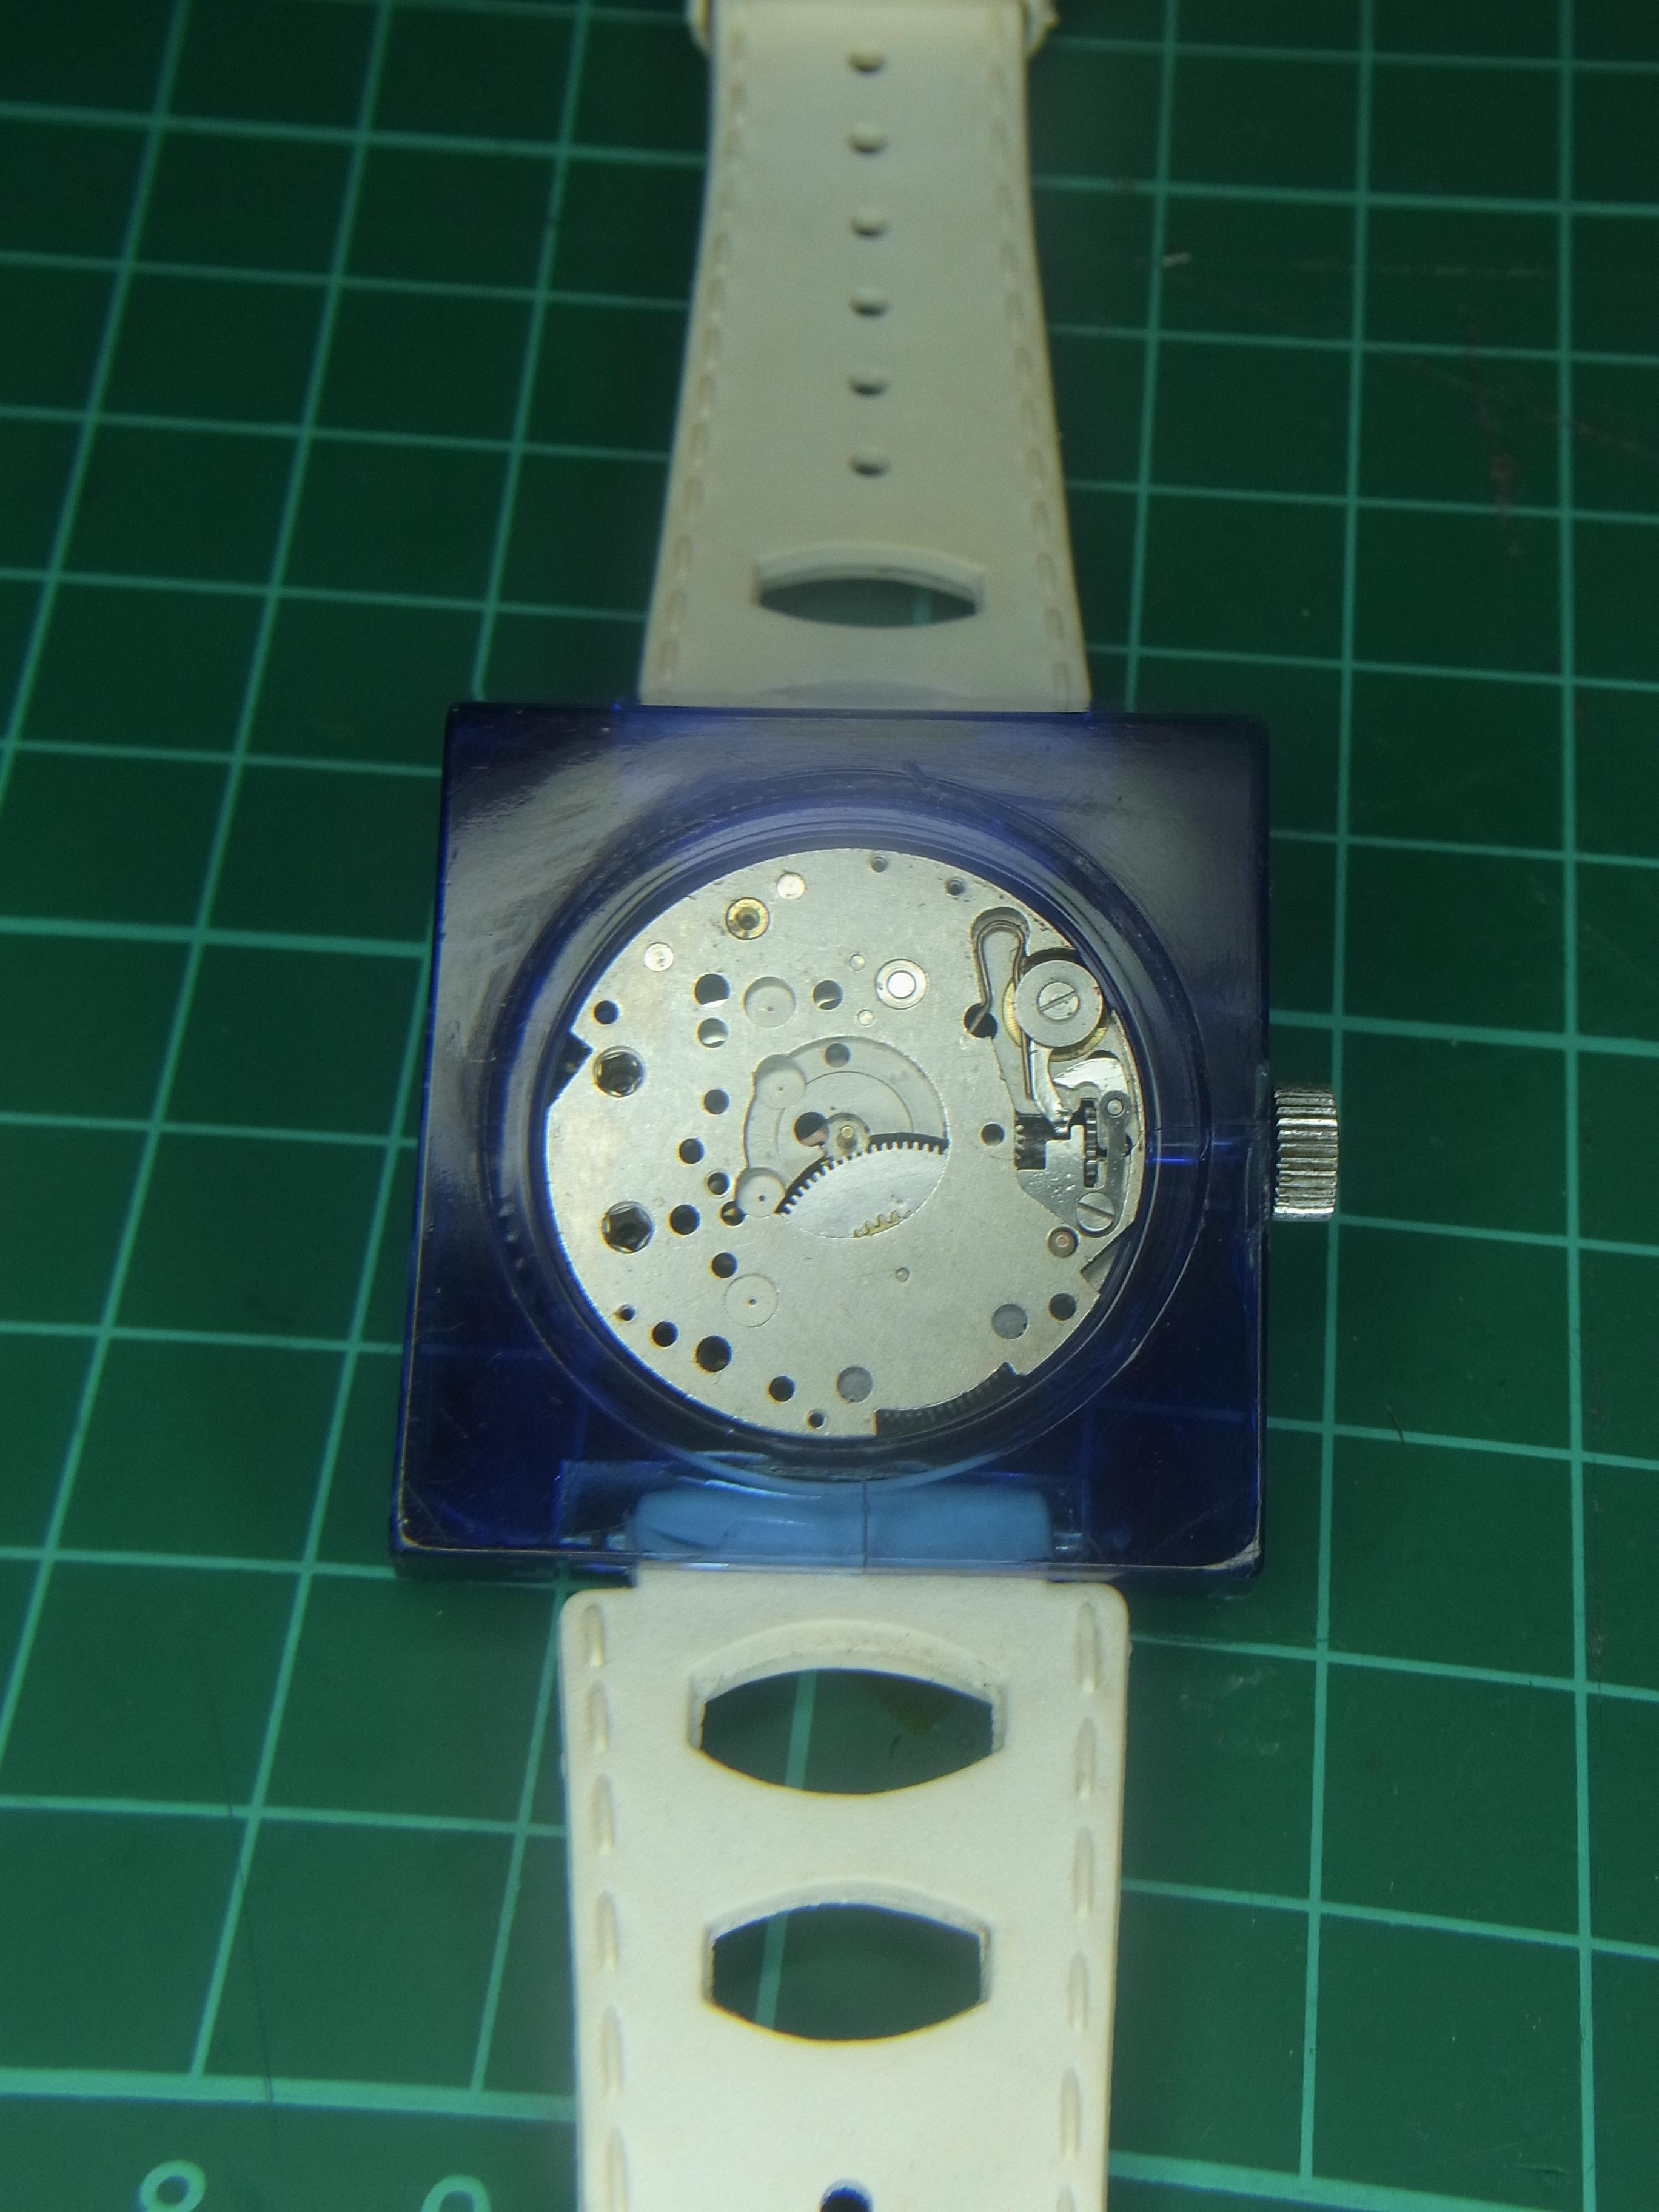
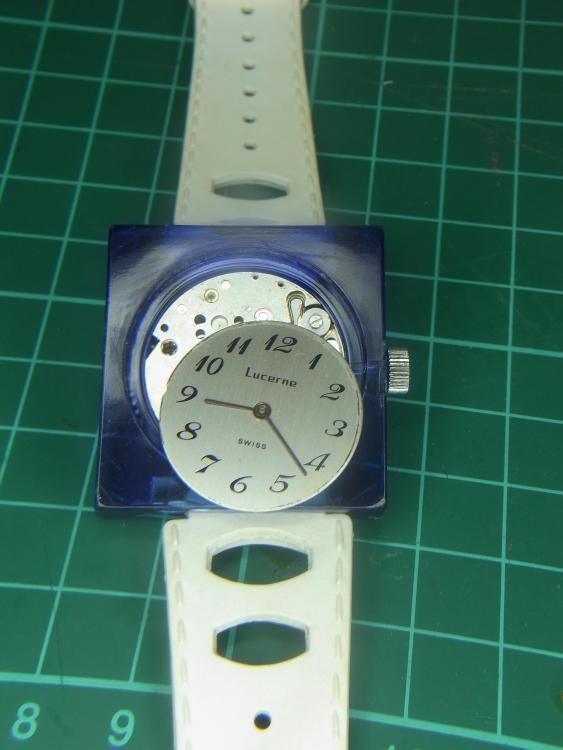
This time, its a "real" watch for Watch of today, sort of. You may have noticed that I have a fascination for the more quirky stuff. Strange types of movements, Communist dictators with bad tobacco habits, sausages, tennis playing beagles.. that sort of thing. Well today's , quirk is plastic. Lots of plastic. Blue acrylic and off white PVC to be precise. This is a Basis "Lucerne" watch. Pprobably, judging by the bizarre design,this is from round about the same time as the first of the Jelly Fish Swatch watches, so around 1983 give or take a few years. It is a One Jewel Wonder, with the dial held in place by the crystal which in turn is held in place by a metal retaining ring. No dial feet here, so the positioning of the dial is a little hit or miss. There is no obvious way in to the watch, and the stem release, while visible through the rear acrylic is not accessible, therefore you have to attack it from the front, so I grabbed a large lump of blue-tak, jammed it on the crystal and pulled, with dramatic effect. The crystal, crystal ring, dial and hands all parted company from the watch, reveling the gummed up mechanism beneath. The crown and stem was extracted by backing off the screw holding the keyless work down, and gently lifting the retaining tab with a sewing needle. This then permitted extraction of the mechanism, which I then tore apart and cleaned. The only remaining issue is that if I want to do any further adjusting or regulating, I need to repeat the above rigmarole, however since the thing has presumably never been looked at from the moment it left the factory, it may well be another thirty years or more before anyone else has to figure this out. Having said that, I will strip it back down again tomorrow assuming it runs for the next 24hrs without any major issues. I have the beat error, and the rate sorted out, but the amplitude is still a little low but I'm hopeful it will pick up a bit as the lubrication gets to work on all of those long neglected pinions


 0 points