Leaderboard


Popular Content
Showing content with the highest reputation on 02/14/21 in all areas
-
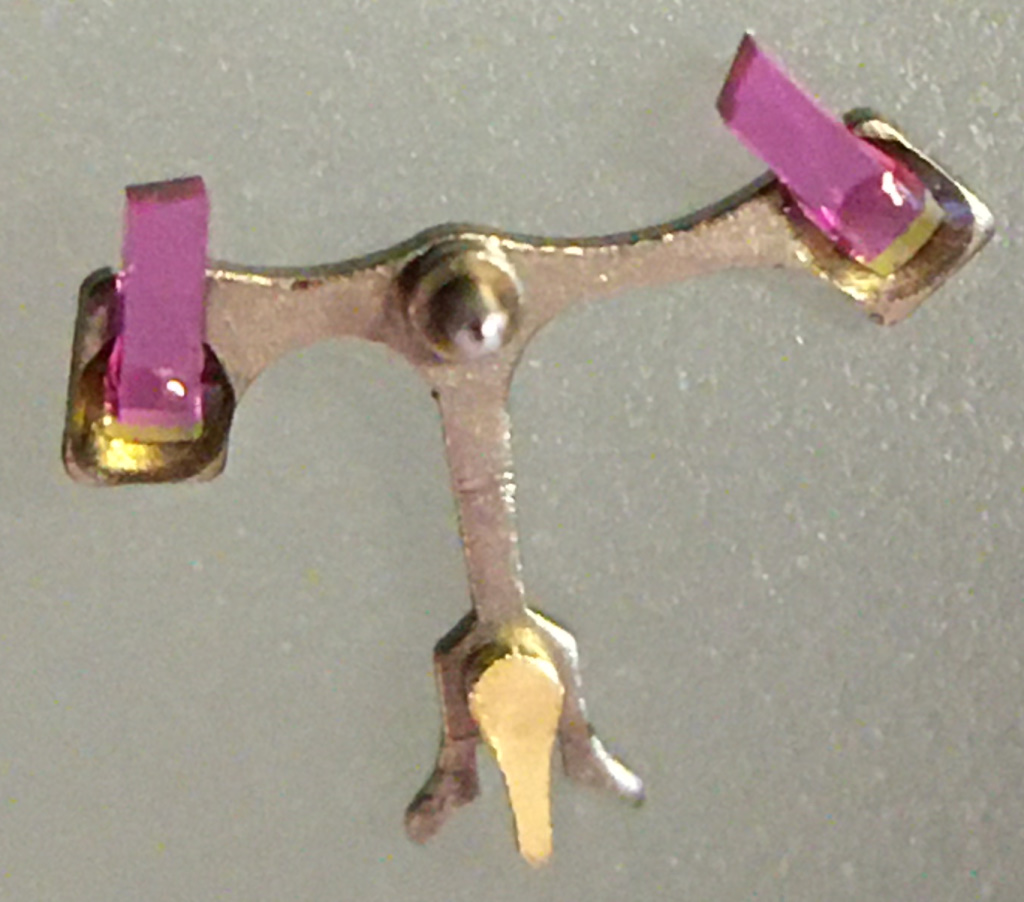
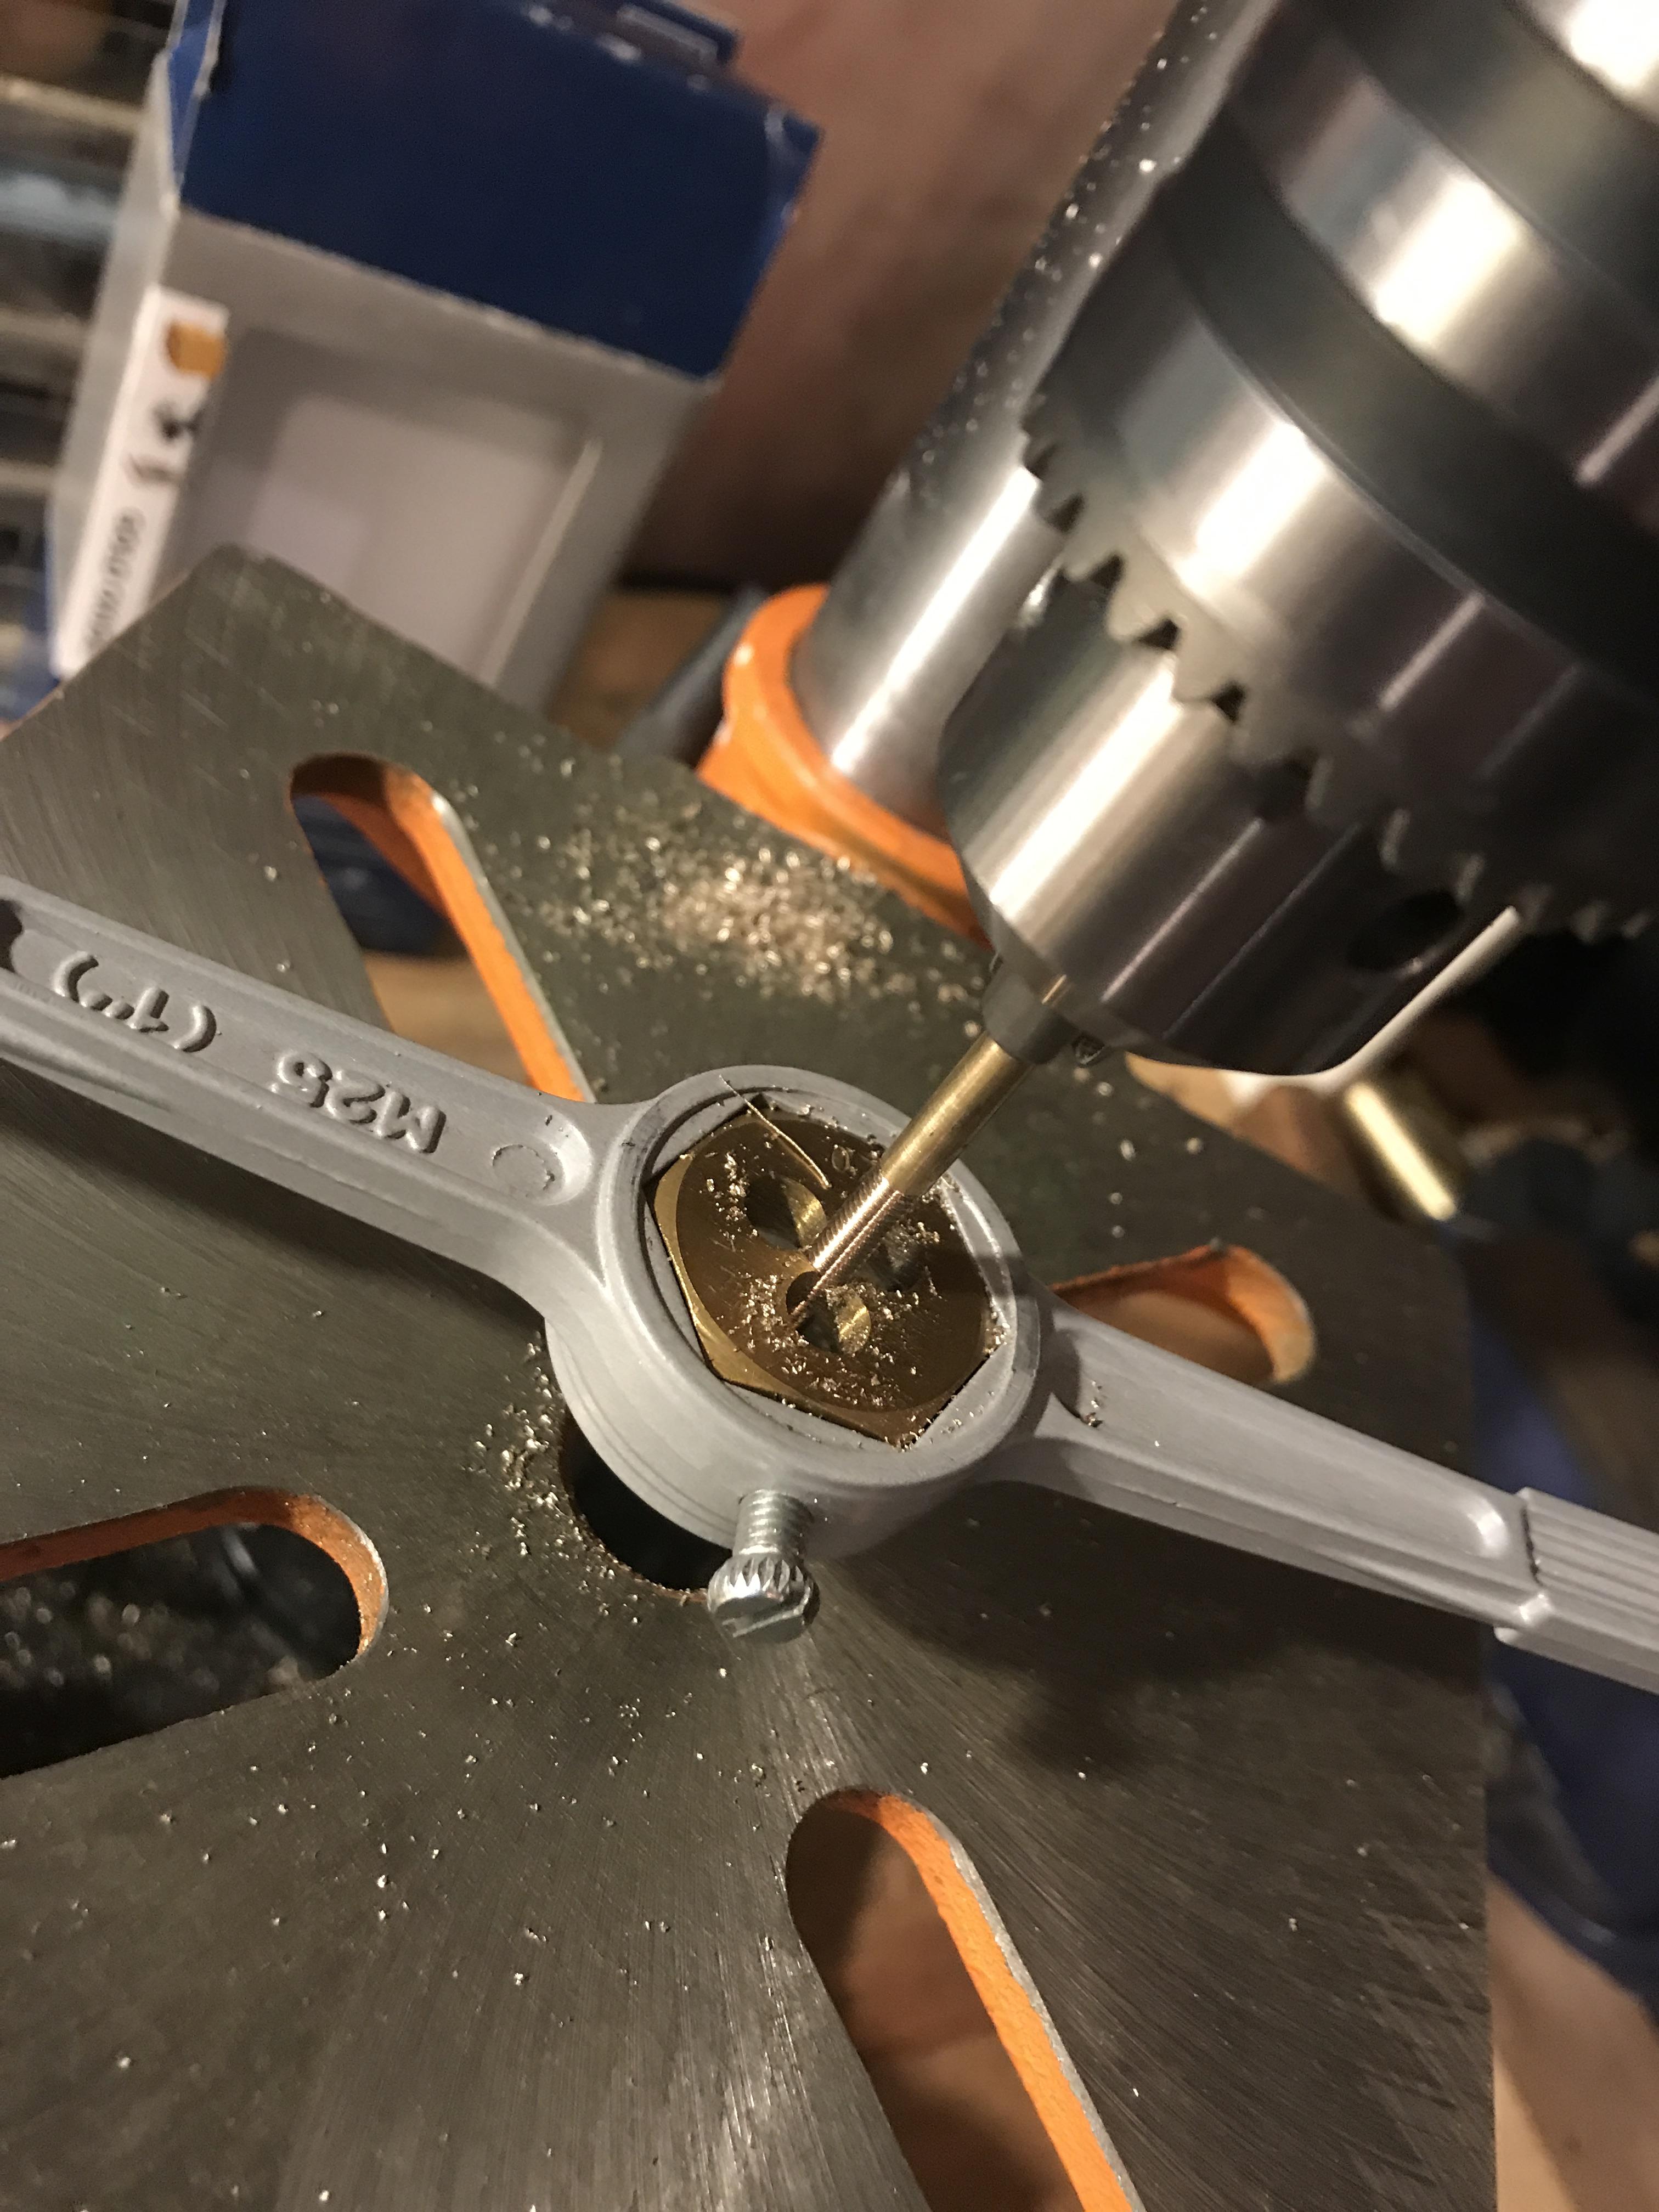
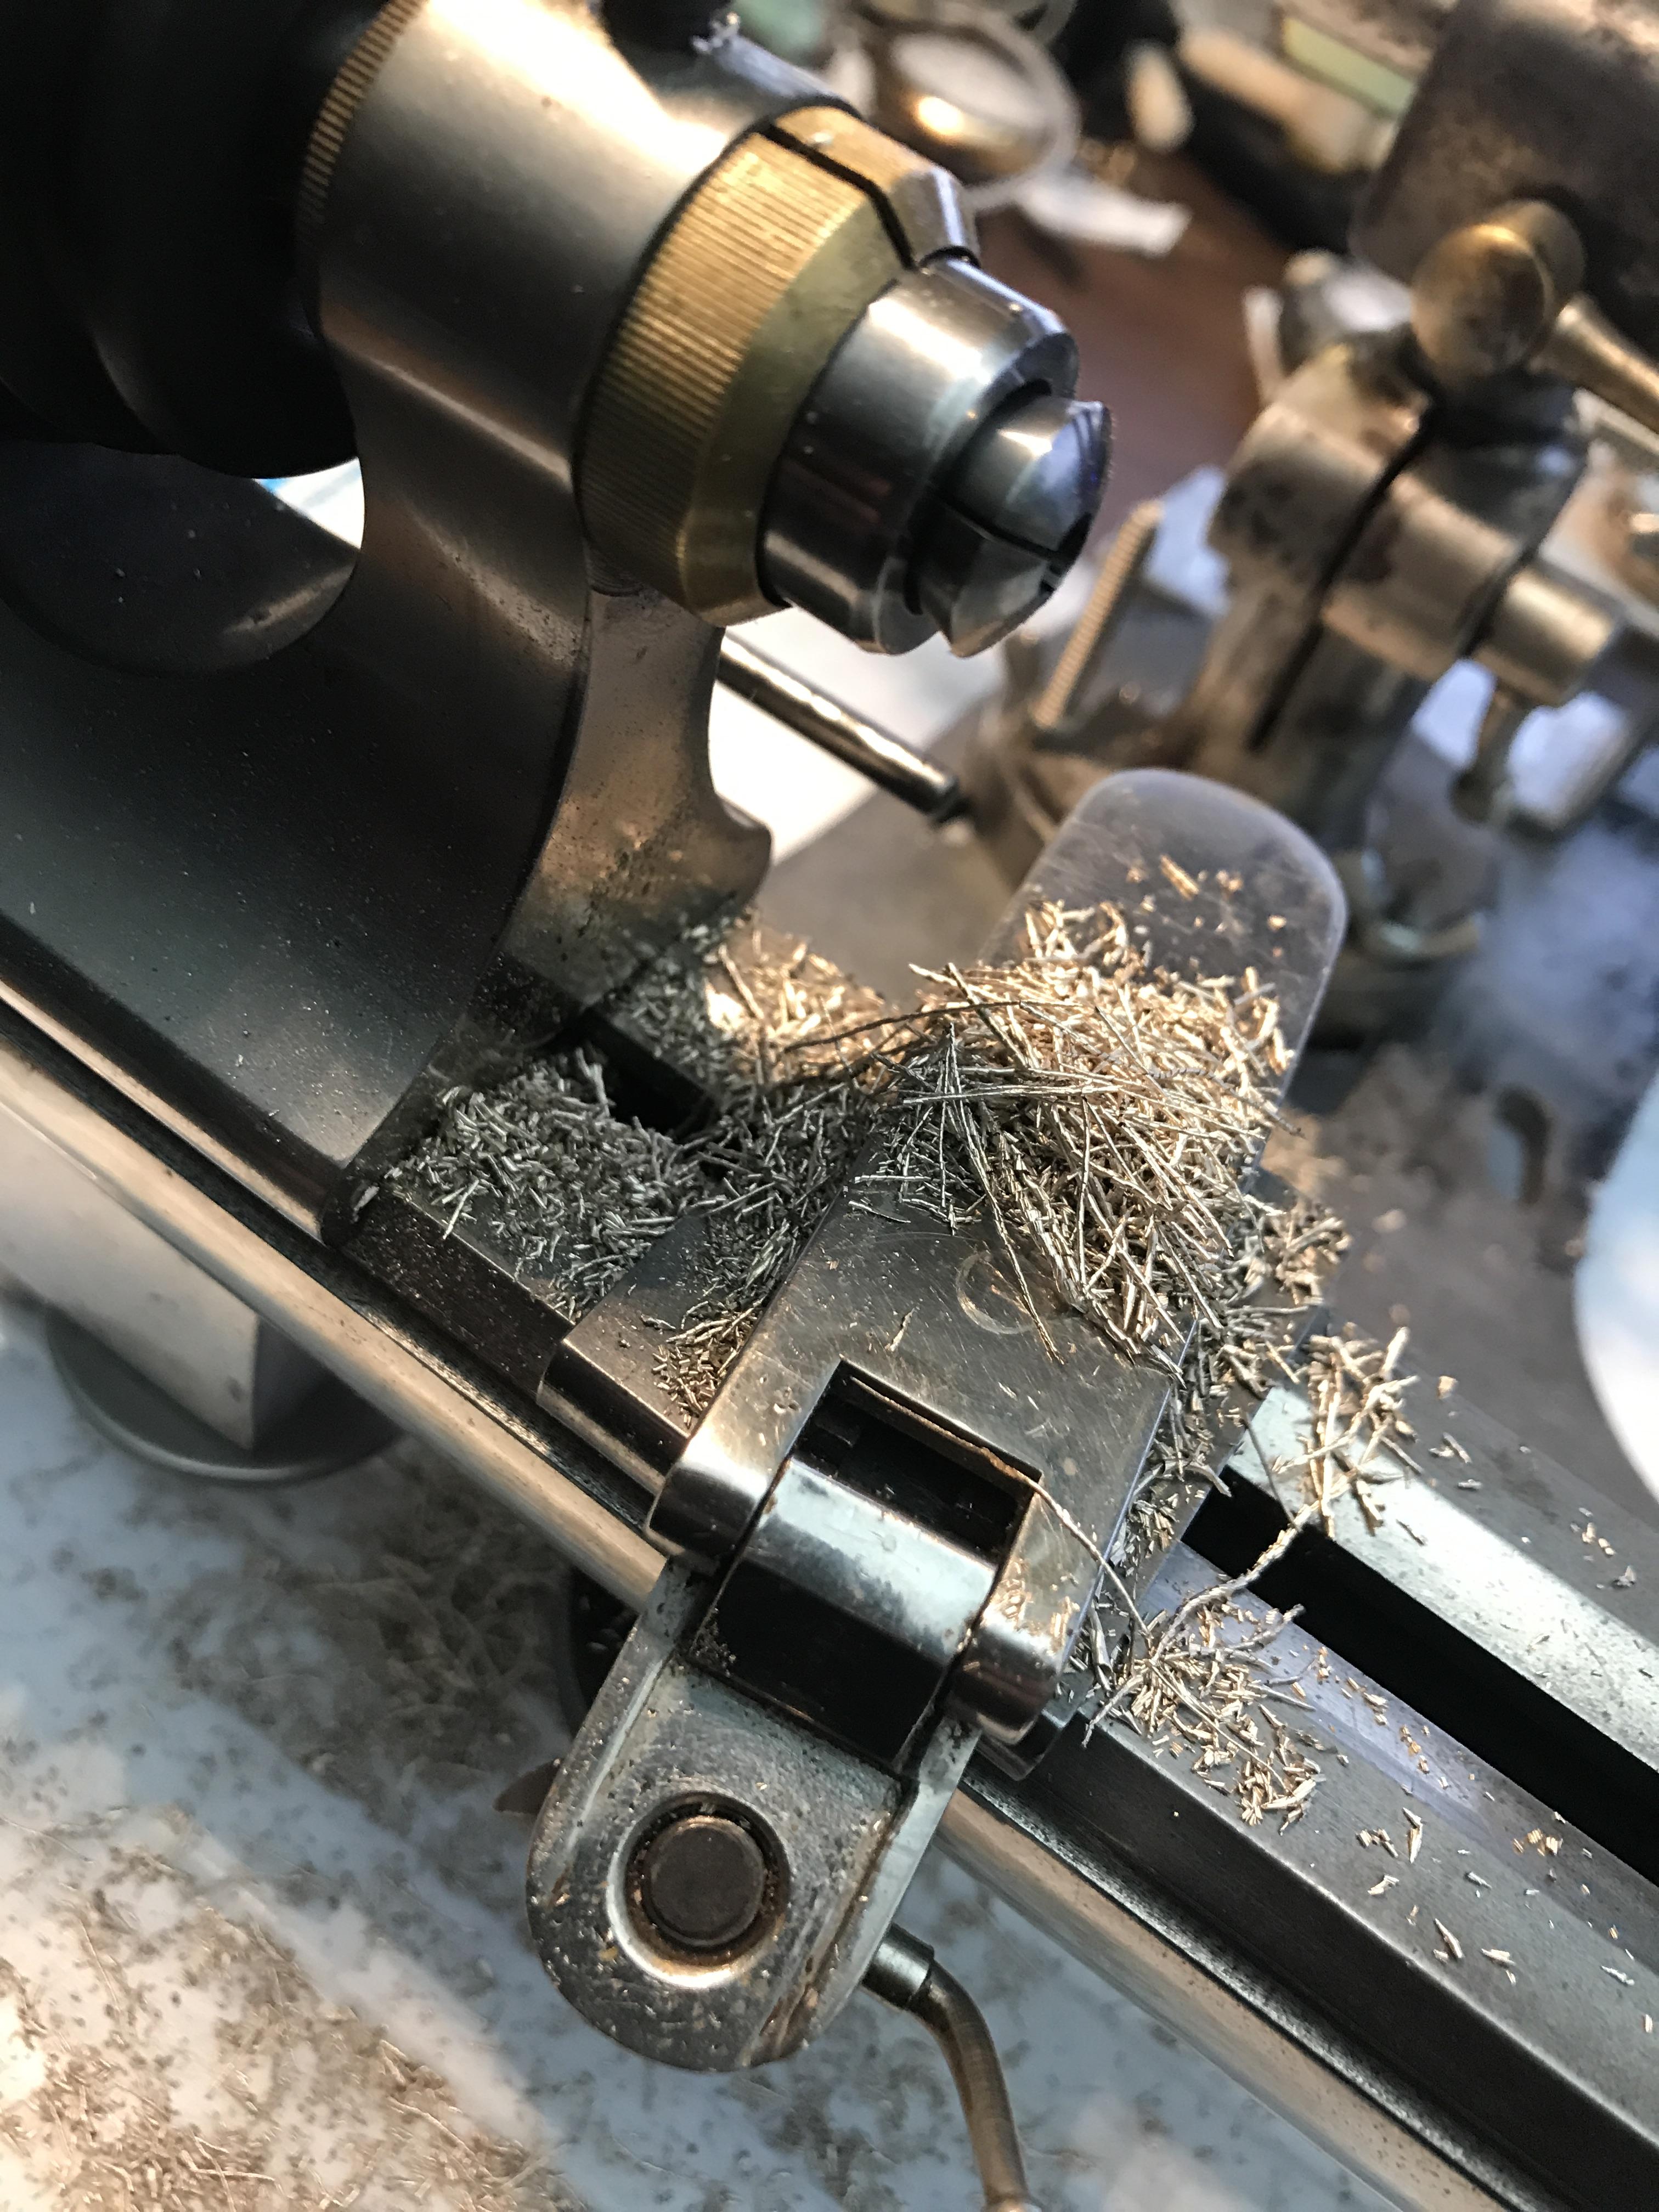
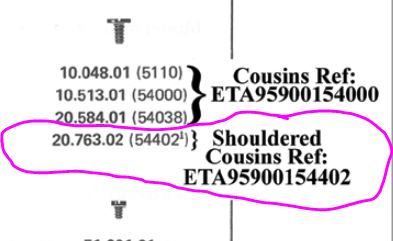
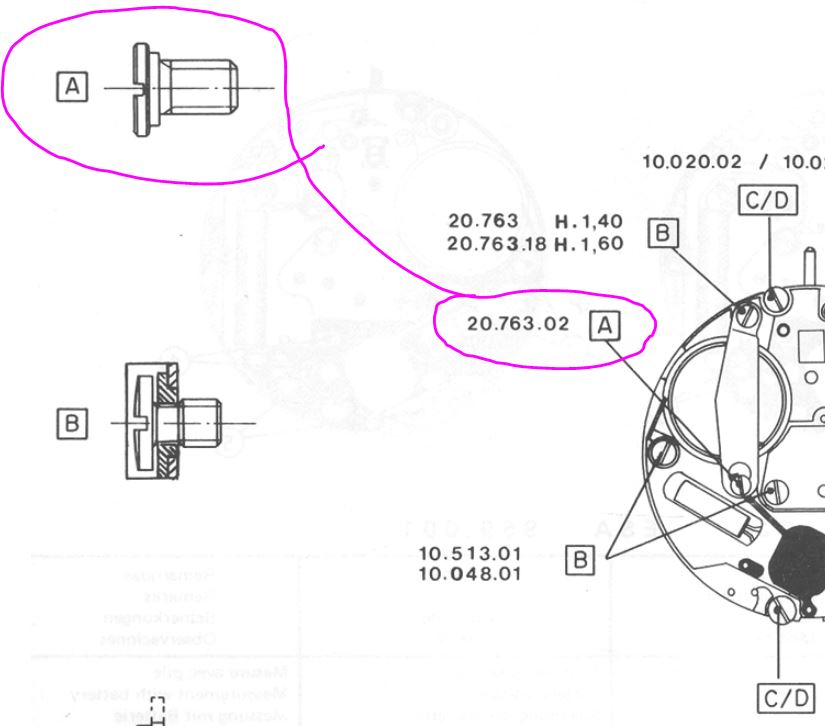
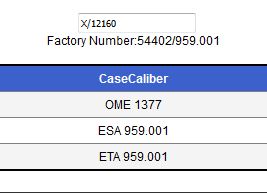
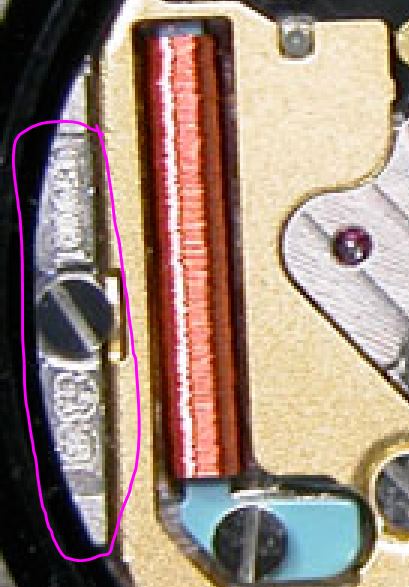
One of the sad realities of quartz watches are people changing batteries who are not skilled at doing this. On the other hand it brings index to work for people who are you get the fix their mistakes sometimes. What typically happens is somebody takes the wrong screw out and it flies away. Then we really need a better picture so I found one at the link below which also had the other thing I needed off a better picture which is what is this equivalent to if it's equivalent to something else Usually the equivalent number in other words whoever they purchased it from would be lurking somewhere else on the movement which is why we need a good picture. But it does appear to be they are the same I'm attaching both technical bulletins. Plus and stepping out a image so everyone can see the problem of what happens when you take out the screw. The battery strap is under a lot of tension one screw is meant to come off because it's attached to the strap the other screw which I assume is the missing one is meant to stay on the watch. Usually they take the wrong one off its catapulted into the stratosphere and their confused. Because the technical drawing is a nice picture I'm snipping out a image for all to avoid this stupidity. Notice the helpful arrow it tells you which screw you're supposed to take out. Is nipped out a lot of images is a reference to cousin screw. I have text below that came from best fit their telling us they are a number which has the X. Then there telling us the factory number and of course it's been discontinued. Then what I was hoping for was more cross references that it cross reference to lots of watches which it does not. Unfortunately bestfit does not even have Longines Which is why it's not even in the cross reference list interestingly enough it does cross-referenced tour Omega watch. But you do have a cousin's number so you can order it from cousins. Or if you are in the US you could use the best fit number in order from the material houses. https://www.worthpoint.com/worthopedia/longines-l761-eta-959001-dial-hands-1774788213 5334_Longines L761.2.pdf 673_ETA 959.001.pdf


 3 points
 -
It looks to be one of A. Schilds 340 series of ebauche movements. Sometimes there's no markings on these movements, go through Ranfit A. Schilds and ye should find2 points
-
Sada watch co Brienne in switzerland. with a watch of that vintage you are best looking at the bestfit books and identify it from the setting lever spring.2 points
-
Not always. On many contemporary "front-loaders" the flat crystal cannot be grabbed in any way, and there is no bezel either. So one has to uses a syringe type tool, or the like, to pop it out. However on these normally have a caseback and a regular stem removal method.2 points
-
Agree. It seems a regular snap back to me, using a small module by the distance from date window to dial edge. OP said he pulled out the crown, what that means we can't know since he didn't post pictures of that. I'm afraid that force pulling a regular stem may have damaged the keyless works. Then sometime opening a watch without the proper tools may be relatively easy (disregarding any scratch added), then the issue is closing it not having a press, more improvisation, more risk and adventure.2 points
-
I think this is down to untrained staff and not knowing how to use the tools. Down to some basic training and understanding that the watch no matter what cost is the customers and should be treated with respect and returned in good order.2 points
-
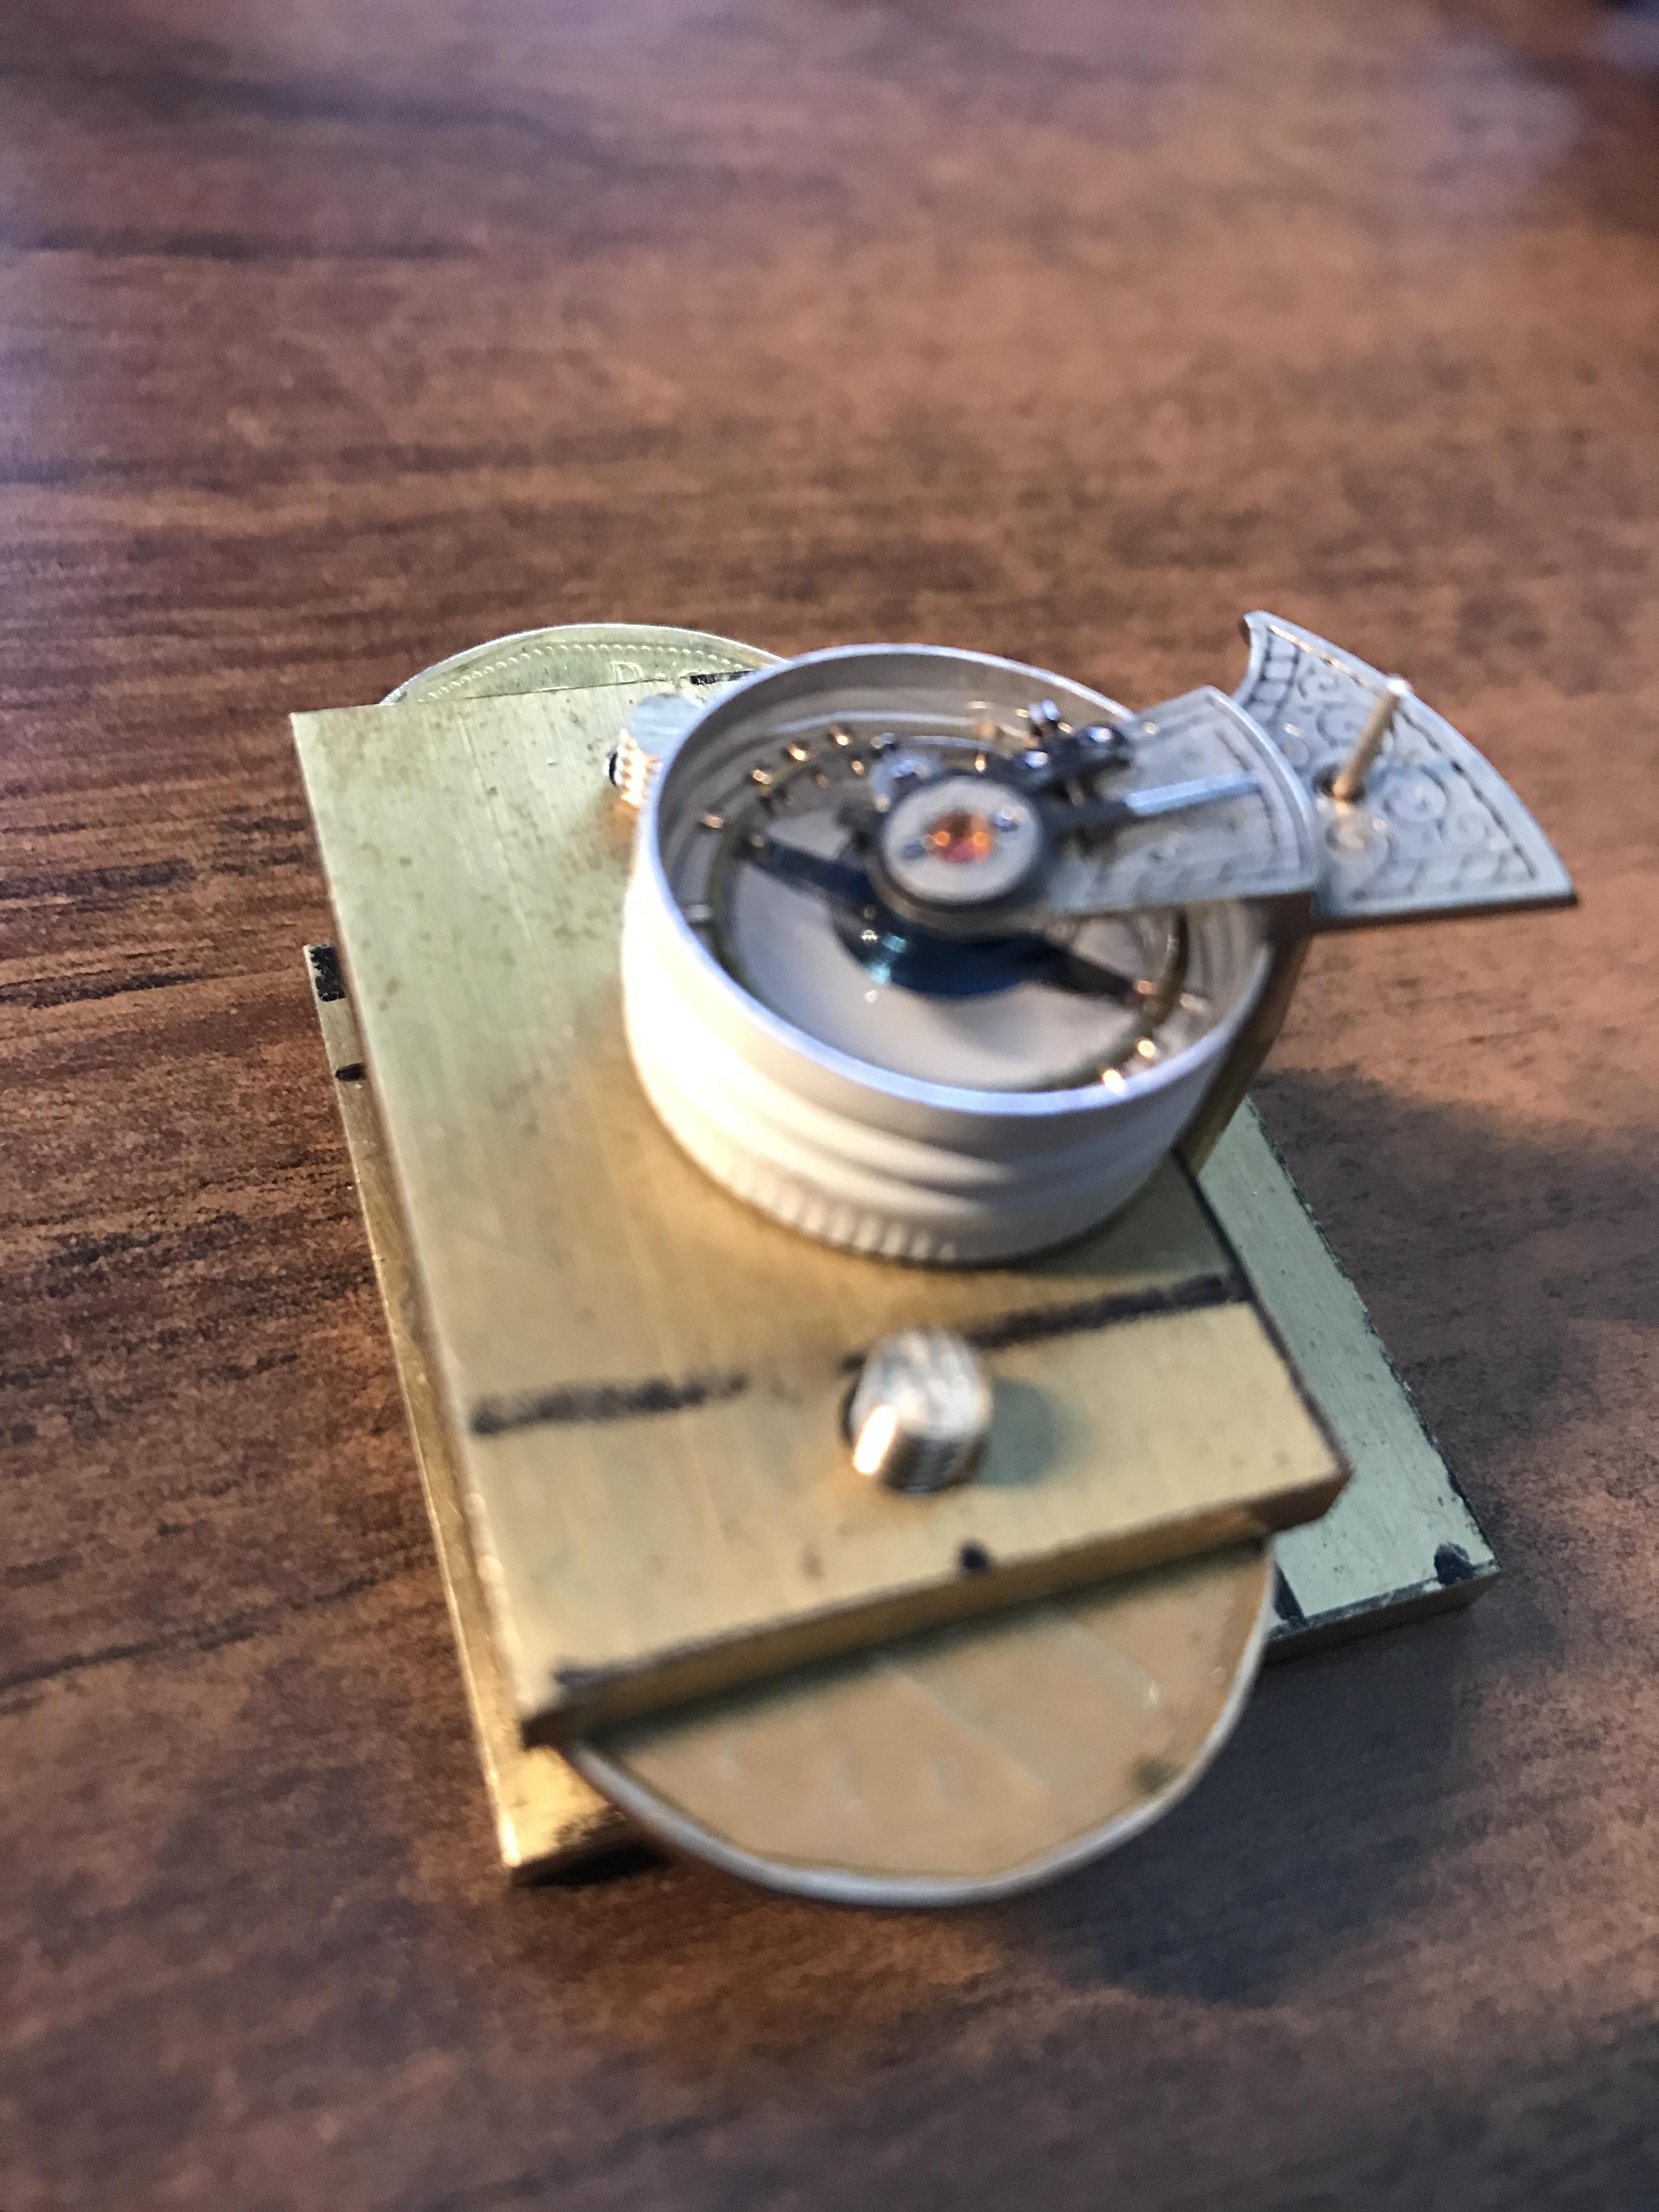
Intro A while back I successfully made my first attempt refitting and adjusting pallet stones using shellac. It was something I had dreaded doing (it seemed difficult) but in the end it wasn’t that difficult at all. Having gathered experience from a few years of handling tiny watch parts using tweezers and having developed some left-hand dexterity as well (I’m right handed) probably helped. Anyway, I thought I’d share the experience with anyone who would be interested and hopefully there’ll be some other WR-talker, now or in the future, who’ll find it useful. If you’re new to this topic you might find this page and this video on the watch repair channel a good start. As I didn't want to risk ruining my Gaston tool I melted and prepared the small pieces of shellac on a chisel tool (my improvisation) that I happened to have in my tool box. However, the chisel tool had a very tough plastic y surface but I was able to burn it away to expose the bare metal with my alcohol lamp before melting and forming small pieces of shellac on it. However, the pieces of shellac needed were much smaller than what they looked like to me in the video. My way of making even smaller pieces was simply to poke the small pieces that I had made with tweezers once they had cooled and were hard. Setting and adjusting the pallet stones was easier than I thought it would be. I didn't realize the fork slots for the stones pinch the pallet stones (Vostok calibre 2414) and actually keep them in place before the shellac is applied. So, I could replace the pallet stones and then check and adjust the locking depth to the escape wheel teeth before applying the shellac. A bit fiddly yes, and you do need to develop some dexterity with tweezers before you try this but not to the point that you break a sweat. Anyway, thank god for my stereo microscope! Anyway, it was my first attempt, and as is common when you try something for the first time, I made a mistake. Despite very consciously applying what I felt was a little too little shellac it still flooded the stones and a large portion of the fork when it melted. Also, I applied too much heat so that the shellac started boiling creating bubbles. So, I decided to start all over. Fortunately, the “industrial isopropanol” (so called on eBay) that I have is very efficient so no problem removing the shellac from the stones and the fork. The second time around I only used a minuscule amount of shellac. Also, I heated the Gaston tool holding the fork in short turns, just so that the shellac would fully melt without staring to boil. Much better! The following is what I would suggest based on my first experience: Basically, follow the video I linked to above. In the video, Mark pokes and scrapes the fork and the stones with tweezers to get rid of old shellac. I tried that, but it wasn’t very efficient. Instead I would let the pallets soak in industrial isopropanol for about 10 minutes and then use a paintbrush to brush them clean. The shellac dissolves completely in the isopropanol and the stones can then be easily removed and further brushed if required. To insert or slide a stone back into the fork slot I found holding the fork by the end of the slot (opposite side of where the pallet stone is inserted) with tweezers (left hand) was giving me the most control. I placed the pivot of the fork (guard pin up, of course) in a small hole in my staking block while inserting/sliding the stones with another pair of tweezers (right hand) into the slots. After having applied the shellac Mark suggests re-heating the shellac to adjust the stones. I was worried that it might result in a mess if I tried it, so I decided to do the adjusting before applying the shellac as shown in this video. The slots for the stones pinch the stones pretty well so if you're careful while you're testing the lock to the escape wheel teeth this method works well and won't dislocate the stones. However, to make sure, double check the positions (depth and angle) of the stones before applying the shellac. Now, the tiny piece of shellac should be placed on the rear section were the stone meets the fork. Mark is clear about this in his video but for some reason it completely passed me by when I made my first attempt. In my second attempt I followed Mark's instruction, but the piece of shellac, being very asymmetrical in shape, was difficult to place in the right spot. However, after warming the pallets to the point that it had only softened the shellac a bit, I discovered, to my surprise, that I could manipulate the shellac into the perfect spot with the tip of my tweezers, without the shellac sticking to the tweezers. Of course, as I've come to realize, every repairer must find his or her own way, but hopefully you'll find my "discoveries" useful. Above is a picture of the result. It's not perfect but still worked very well. The amount of shellac on the entry stone is a bit too little, and there is a < 1 degree tilt on the exit stone (which, of course, can’t be seen in the picture).
 1 point
 -
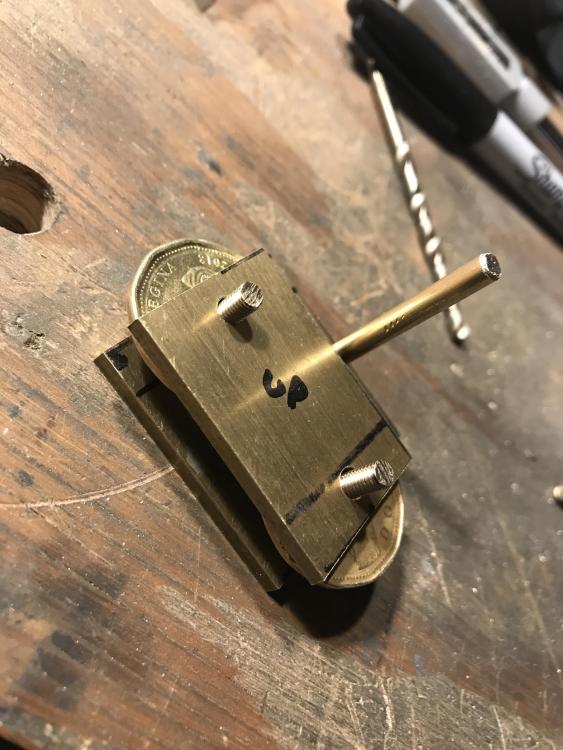
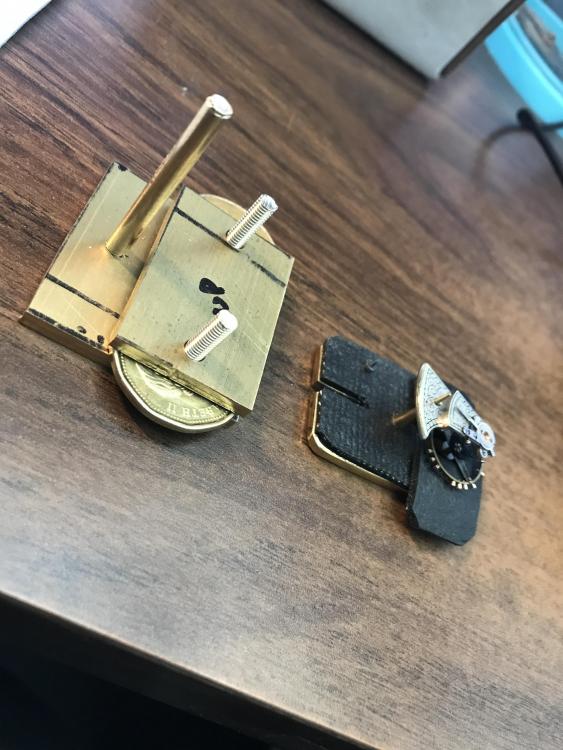
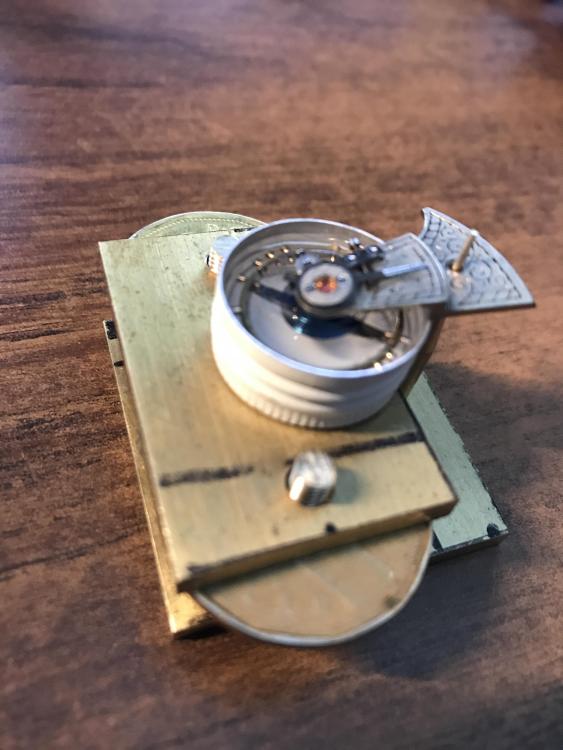
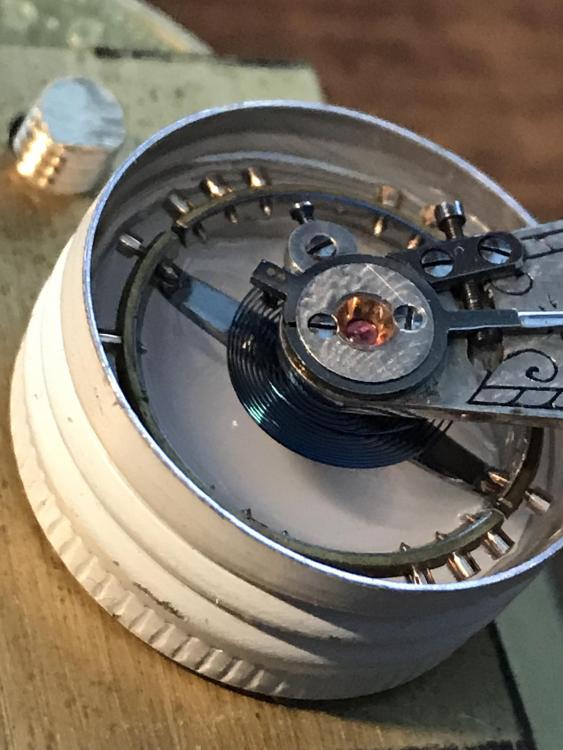
So have you ever dipped a balance with hairspring into lighter fluid to clean it...old school. Well I do this occasionally and most often remove the spring for cleaning. However, sometimes it is nice to just clean the balance and hairspring will still on the balance cock. Soooooo, I invented and made this little elevator that has a small cap filled with lighter fluid, and the Balance is hanging on a tack. You simply lift the fluid up to the balance. This is so so safe with no chance of snagging the hairspring or dropping the balance cock and leaving the hairspring elongated. It has not been completely finished yet and is still in rough form. Plus, I need to make a brass bowl vs using the cap of a cigar tube (it actually worked) with a spot of lock tight on the bottom. Really fun little adventure. And “IT WORKS”.


 1 point
 -
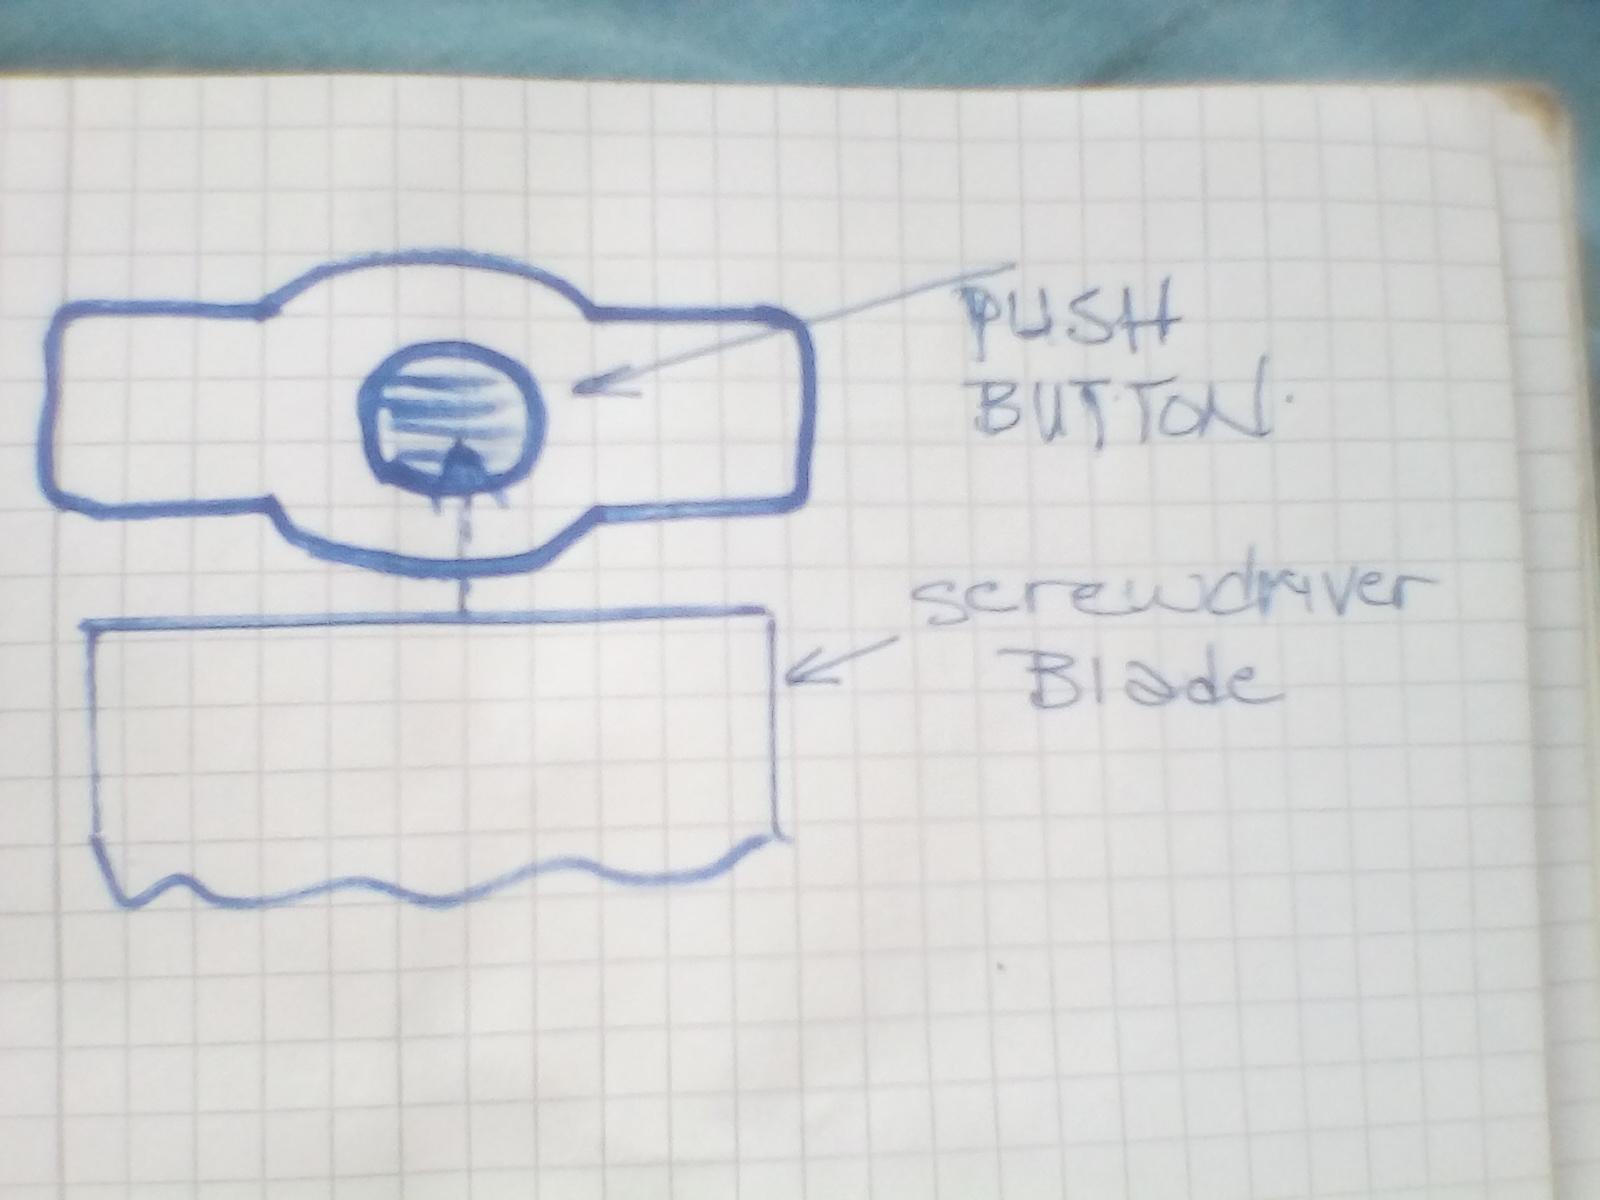
This movement is infamous for its fiddly keyless works. You're not the first person to find stem removal and insertion vexing with it. As noted earlier, try using a screwdriver that fits through the rectangular "window" over the button. You're less likely to press it too far that way compared to tweezer tips and pointy objects.1 point
-
Sometimes unfortunately hard to find because sometimes the wording is incorrect. But always worth a look may be somebody else has asked your question before. Here's a link with a nice picture which explains what I was trying to say . https://www.watchrepairtalk.com/topic/9981-stem-removal-on-sellita-sw200-1/1 point
-
Oh dear did we forget to give you the link? The link to the Doctor who can graphically attach it thirdhand we all have three hands we never have these problems. Then the best of us get more than three just think with six hands you can do Are than one watch at a time it really increases productivity quite a bit. Ideally the movement should be in something either in the case or movement holder. One of your 16 hands can hold that in place. Did you notice how the opening to get the release is not round? This is where we really need a picture and I'm having a hard time finding a decent picture online. You want to use something big enough so that yes it pushes the button down but it catches on the edge or basically is protruding up and you don't want to push below the protrusion. That's there to keep you from doing what you're doing now. At least that's the theory. Ideally the watch either should be in the case or in a movement holder you do not want to be holding the watch in your hand. Then with suitable tool you can push down the release. Providing you have more than one finger per hand you can usually have one finger under the edge of the crown like the fingernail and yes you really have enough fingers and hands to do it without using your mouth. He's having a problem with pointy objects. I would avoid the pointy aspect because you risk pushing too far.1 point
-
Not sure I understand, but when the movement is out I place it in a movement holder (Bergeon 4040) dial down while protecting the dial with a piece of plastic film (the kind to wrap around food). I then gently press the setting lever button with a pointed piece of peg wood (right hand, I'm right handed) while pulling the stem out or pushing it in using my left hand. Hope that helps!1 point
-
I had never had a watch hit 0 sec/day in all 6 positions before. It was sort of a spooky experience and involved a healthy dose of luck!1 point
-
I wonder how many high street repairers know that you should not handle a battery with your fingers and you must use plastic tweezers when fitting the new one.1 point
-
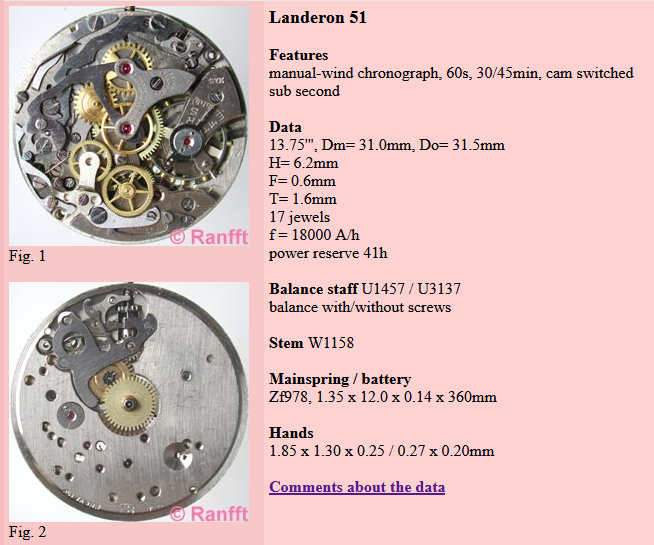
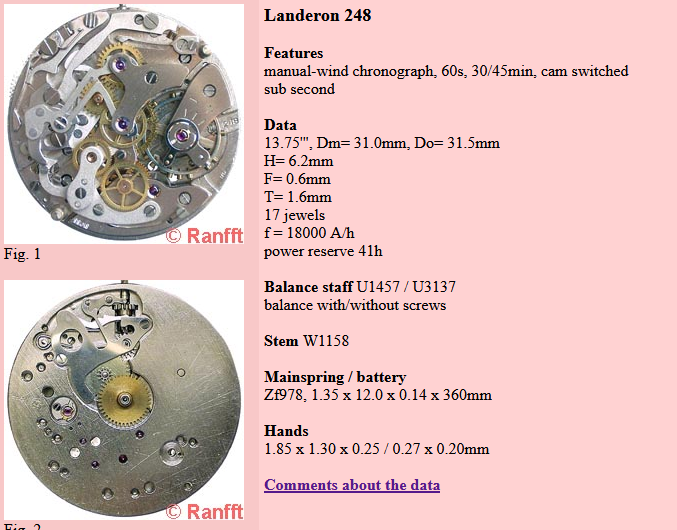
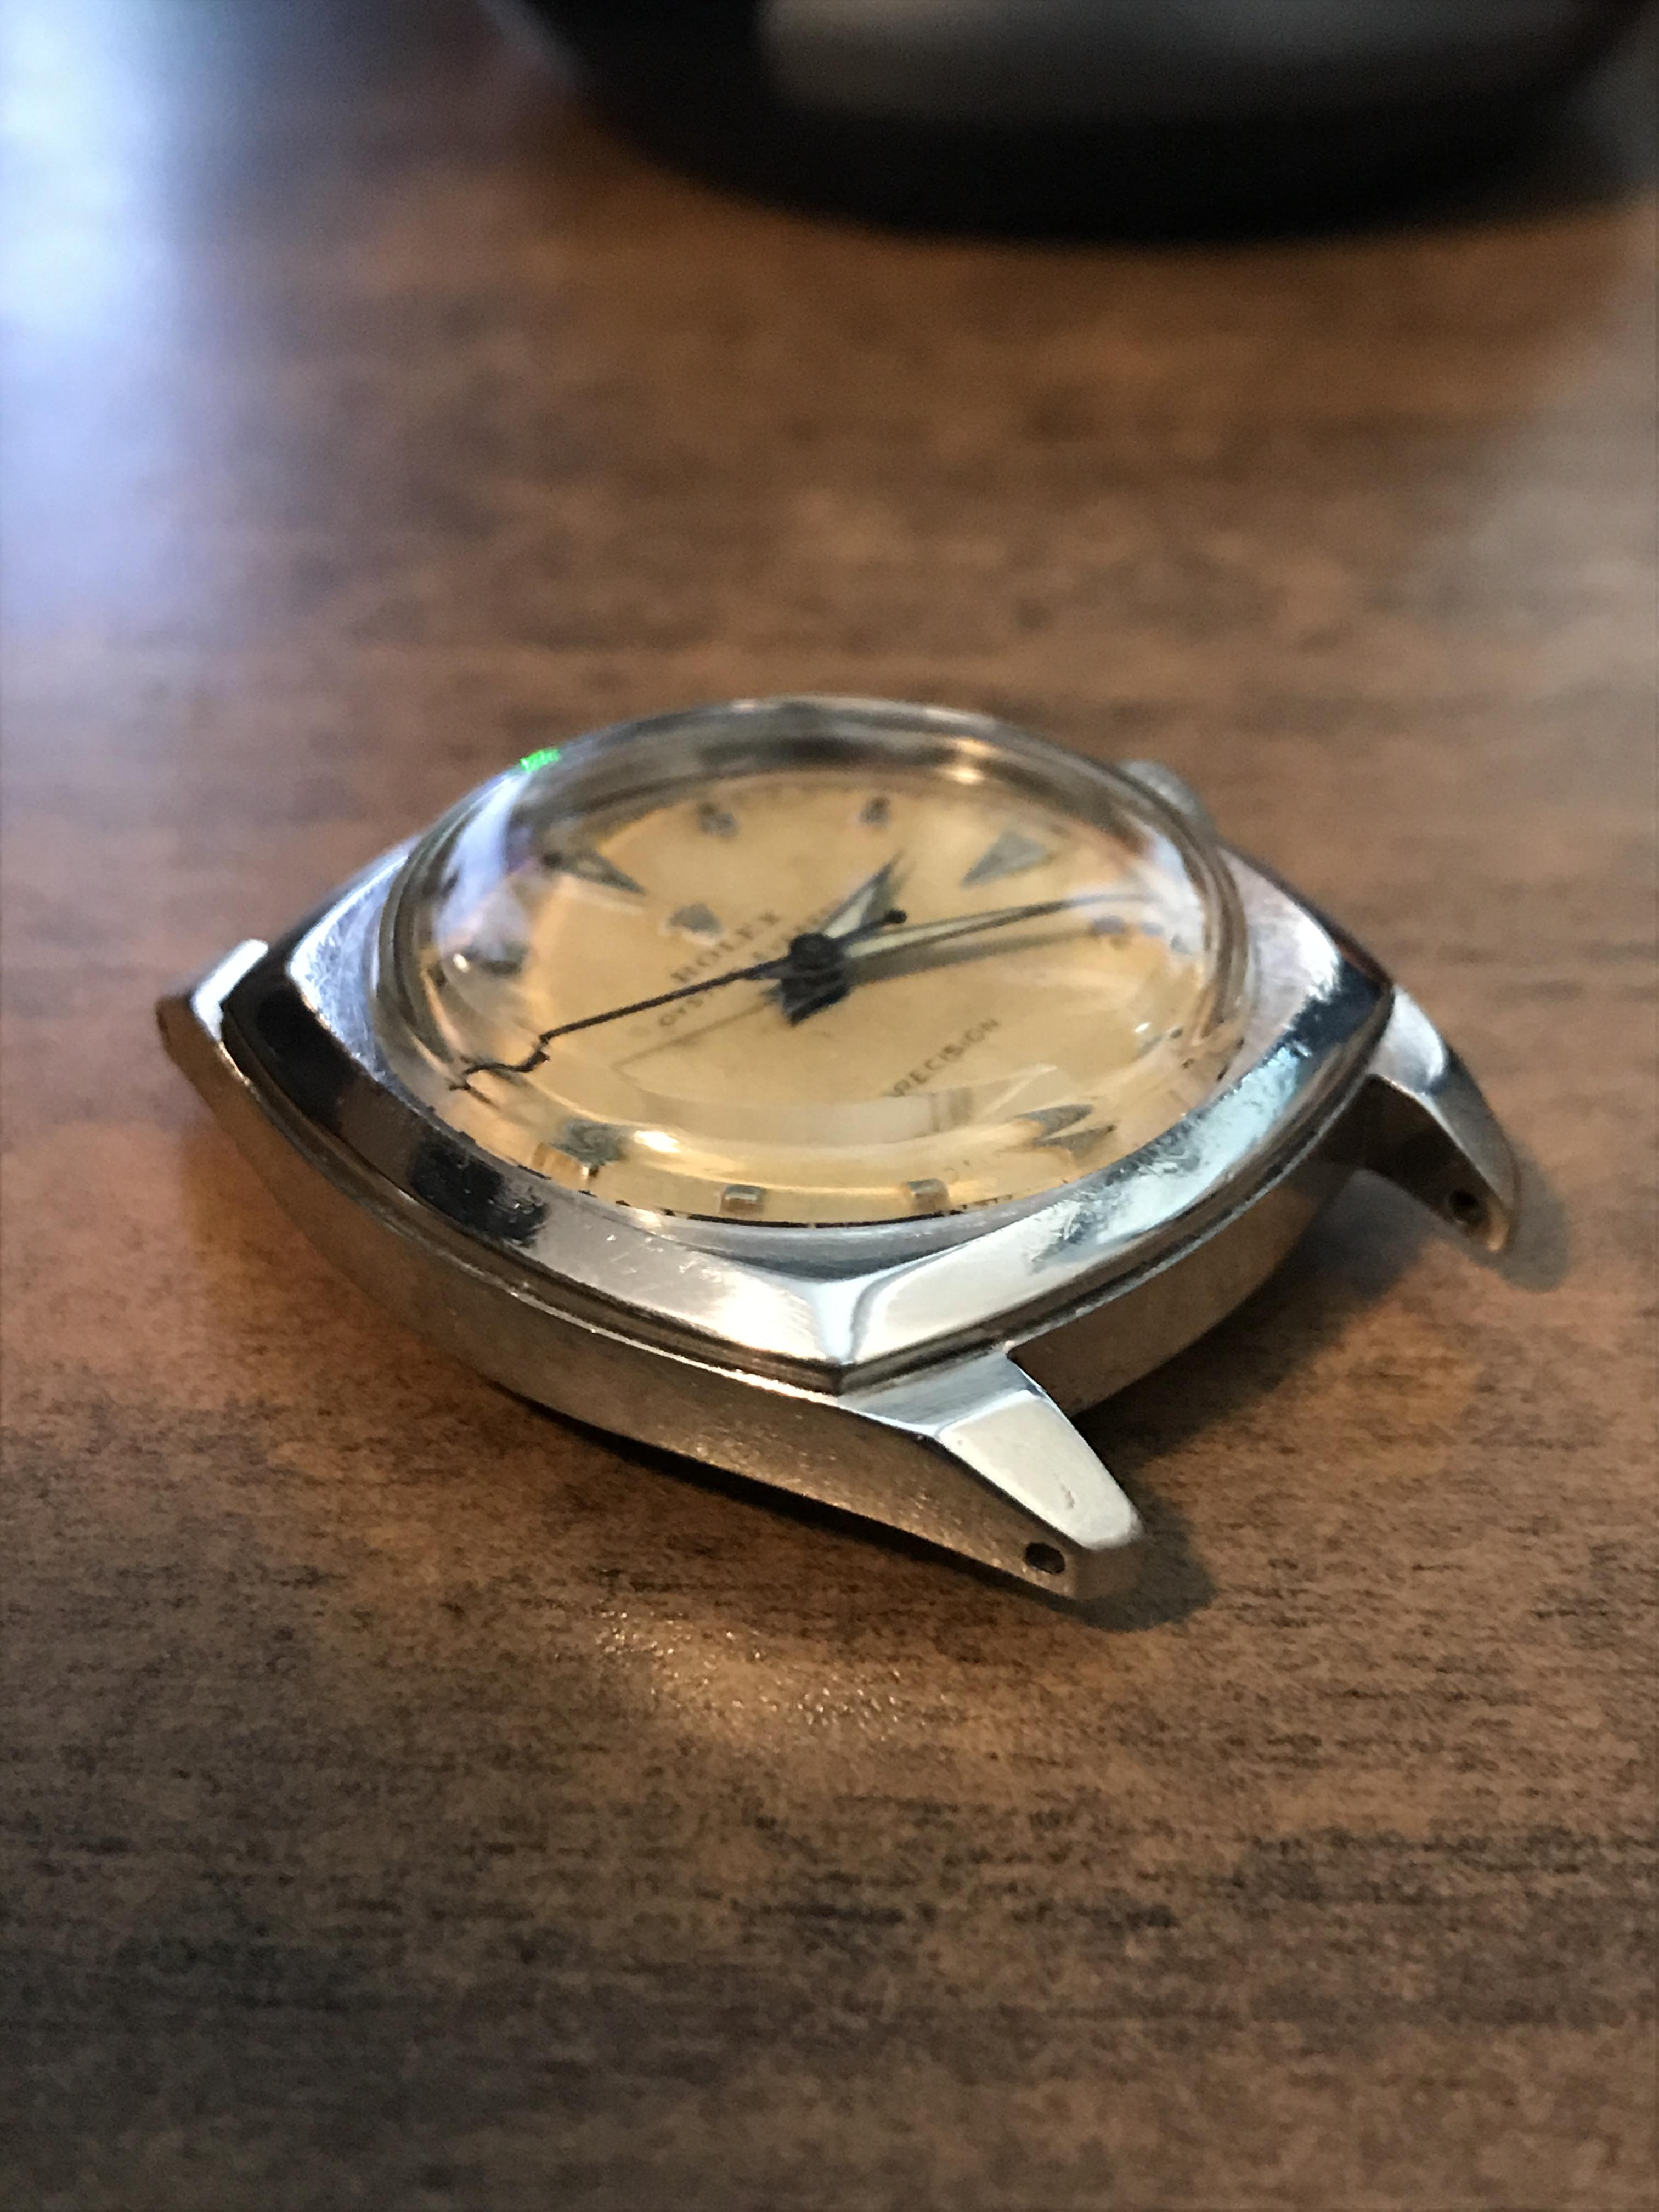
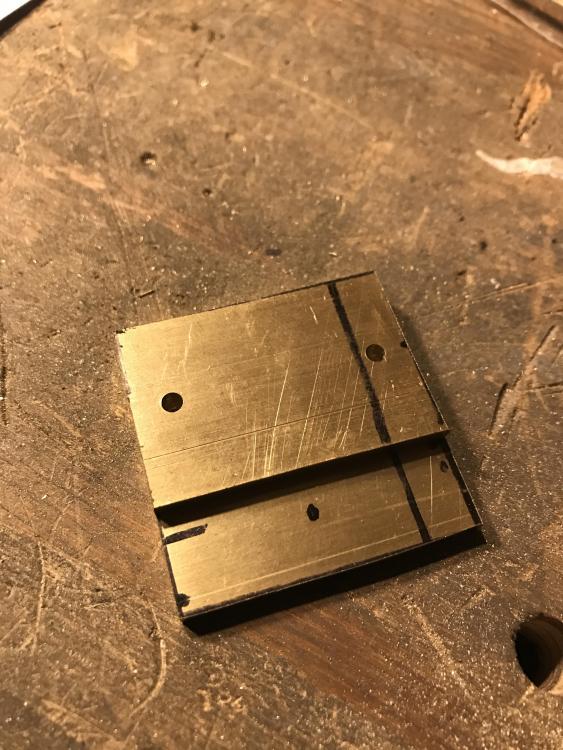
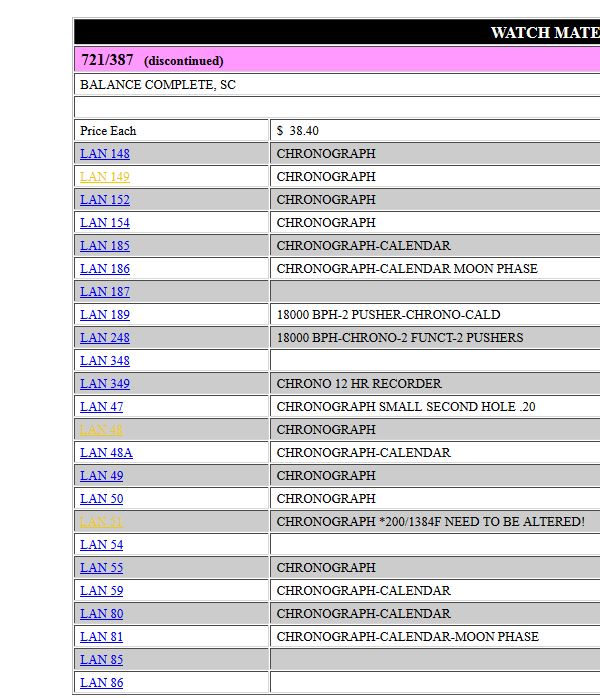
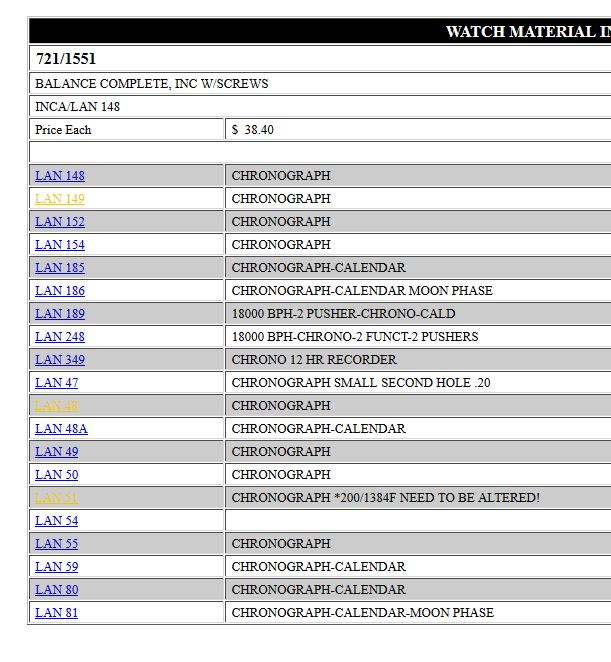
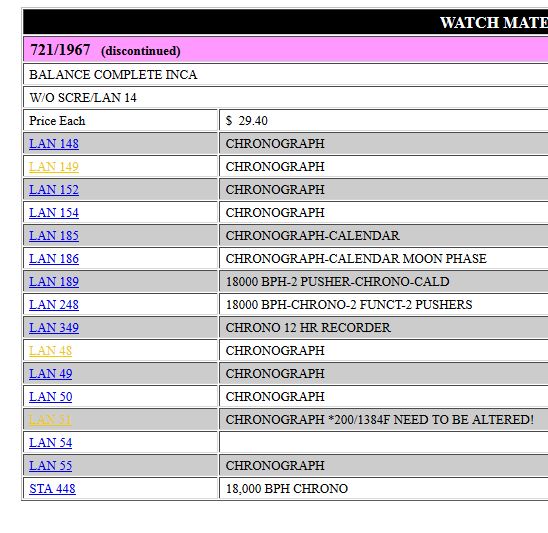
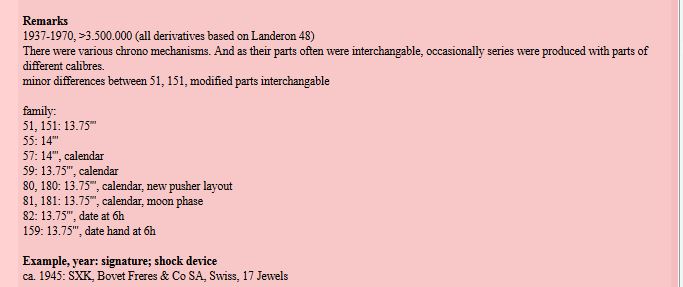
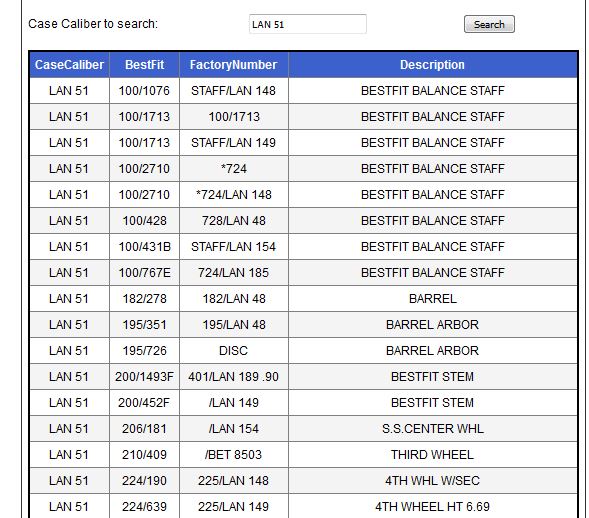
I like your pictures and you're right the 51 and the 248 interchange exactly except? It appears to be that there were variations and because there are variations there are minimum of three different balance wheels that all interchange but not necessarily amongst themselves? The loss of forgot to include something so I'm attaching another image notice something under remarks this watch was made for how many years? Between 1937 in 1970 that means that it was upgraded. Notice how in the technical description it says of all the parts interchange but notice in the spare parts list that there are three different balance wheels. So that means that a real life there probably is an interchangeability issue where conceivably everything does not interchange 100%. Oh and the other problem with interchangeability is if somebody is played with a watch before you perhaps they modified or change something so then you have to fix whatever they modified unchanged perhaps always interesting when cross-referencing parts to check multiple of sources. Like bestfit online I snipped out images for you. so it appears to be there are limited number of balance completes but how many separate numbers do we have for balance staffs?. If I was really enthusiastic I go in the bestfit book which everybody should have any way if you doing modern watches and you can look up the staff numbers and see why there is differences between all of them. But it is troubling that there appear to be more staff numbers and balance complete numbers? http://cgi.julesborel.com/cgi-bin/matcgi2?ref=LAN_51

 1 point
 -
You'll notice that most people don't have a location on their profile. The problem with not having a location or even a country is that generic answers have to be given because don't know where you're located. Although a lot of times the answer is not going to change even if I did know where you're located. I'm attaching another technical sheet because it's apparently the same movement. Sometimes it's hard to tell with interchangeability whether everything would interchange 100%. But the weird aspect is that the eta and Omega at least for this screw do appear to interchange. But conveniently for the Longines It just isn't showing up on the cross reference. Probably because everyone looks at the alternative number knows what it is perhaps? It's why I was hoping for a much better sharper photograph because usually the other number is Usually visible somewhere. Like for instance in the really crappy image that I've attached you can see where the number is located. unfortunately the crappy photo I found online does not give us enough resolution. Always a good idea for sentimental watches if you could acquire spare parts or replacement movement. Especially for electric watches where components can go out with possibility of no replacement. Or somebody's careless changing your battery and they nixed the coil and you need a new one of those it sometimes challenging to find that stuff. Usually it ends up easier to find a replacement movement if you can. Omega 453_1377_complet_2335.pdf
 1 point
 -
Here is one fish for you - 30.4 mm 30.6 mm 30.8 mm.... Get a new pair of calipers and start measuring.1 point
-
Hi Stephen! Nice to meet you again. I actually am wrapping up that series of posts on balance staffing this month.1 point
-
Another alternative would be to find a watchmaker or even eBay which you can get a whole spare movement. Seeing this is a sentimental watch and this particular model is no longer produced, it's good insurance to have your own parts movement or two for future repairs. I believe the ETA model is correct or nearly so. You can look on the plate by the coil and see if it's stamped like in the technical drawing. I'm pretty sure while it's marked Longines, the plate will still be stamped with the ETA model number.1 point
-
1 point
-
Thanks for the ideas. I will keep cleaning with the ultrasonic, and fussing over the parts. I'm just working on my watches, so I can only complain to myself.1 point
-
Don't like to disappoint you but that is a fake Cartier. Best advice would be buy another watch bracelet.1 point
-
Hi paul, There is always some dirt residue round the backplate of used watches, so cleaning round the back prior to removal is always a good idea, a used tooth brush will do, a spec of that dirt falling inside the case as you are removing the backplate can find its way into the movement causing issues. Best wishes Joe1 point
-
Hmmm I find it strange that to fit a new battery you have to dismantle and remove the movement from the case. Was the stem a spit stem, if so that is a clue that it may well be a front loader, If so Hectors advise will get you in.1 point
-
Cousins is a good source they have a really good selection1 point
-
I just don't get it how customers are willing to accept all this battery changing sloppiness. A colleague of mine had her battery replaced at a shop selling mostly watches (Ur&Penn) and when she got her watch back the case back was horribly scratched up. She complained about it but the staff simply said that it didn't matter as no one would notice. My colleague decided not to make a fuss about it, accepted their argument and paid for the service. I just gasped when she told me this story, and it was a pretty nice $500 or so watch as I remember it. I would have held the shop 100 % responsible.1 point
-
Agree with John regarding un- skilled changing batteries. I was asked to look at a rotary (chronograph style) after the customer had had its battery changed at a well known high street shoe repairers who also offer to service watches. The problem was that the repairer was obviously unaware that it had a screw down crown and had just ripped it out stripping the thread of the crown. I replaced the crown and re fitted the battery which was also upside down.1 point
-
Thank you for your introduction and welcome to this friendly forum.1 point
-
Thanks so much! This is really helpful information!1 point
-
Yikes, those look like the plating has lifted up off the numerals in some areas. I think one technique is to "charge" up the tip of some pegwood with a polishing compound like cerium oxide or jeweler's rouge, and use that to polish the numerals. You can shape the tip of the pegwood as needed, and just rub it in the powder with a little water before you use it on the numbered area. Haven't actually tried it myself though ? If you can clean up the numerals and relume the dial and hands, I think it will look quite nice.1 point
-
I added this to the blog specifically to show how I remove cap jewels in gold settings to clean the jewel and oil. Very very high end pocket watch as a 24 Jewel Illinois Bunn Special, full plate. Enjoy:) JEWEL Cleaning a 24 Jewel Bunn Special Pocket Watch https://youtu.be/KUE-nLG7KcI1 point
-
A balance complete is balance with hairspring and roller table. That's a balance complete.1 point
-
Good thoughts. I have more money than I will ever be able to spend before I die, but even when it makes no economic sense, I make things that I can buy. I am an engineer...can't help it. An Engineer1 point
-
Not another Metamec, but it is a synchronous mains clock. This time a Westclox for the bargain bin price of £2.99. From the styling I would guess perhaps the late 1950s, but I can't be certain. It doesn't have a "starter" mechanism, so it won't be earlier than late 1940s I would think. The woodwork needs a little TLC and someone has snipped off the mains cable, so it probably needs some internal work too. It will certainly need a service, so lets see if I can bring it back from the scrap heap without resorting to fitting a quartz mechanism. I did see a similar one here, most likely from 1962 -> https://lespook.wordpress.com/synchronous-clocks/westclox/ so I think my estimate of age is probably pretty close. There is also a pretty good chance that it was produced not far from here in Dumbarton near Glasgow (Scotland).
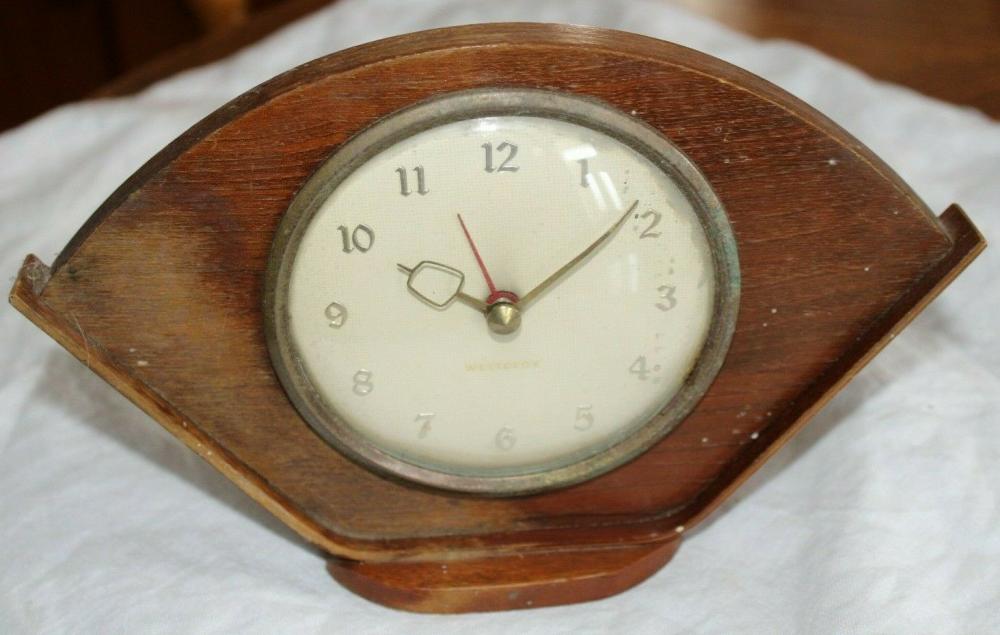 1 point
 -
Welcome fellow EE! There are a couple of us on the forum...and a few more that have a pretty good understanding of electronics. My dad wanted me to follow in his footsteps, but while working on an electric clock for him, as a youngster, I got interested in electronics and set my foot on the road to a wonderful career. I have returned to watchmaking recently and am enjoying the hell out of it!1 point
-
Welcome to the forum.1 point
-
I'm posting this here as I think it will be of interest to anyone working with radium dials and watches. I would suggest that there is actually very little measurable risk from handling a few radium watch hands, so long as you wash your own hands afterwards, and make sure that you don't grind up significant amounts of the material and release it in to the air. The point here being that you would need significant amounts. Grams of dust, not a few microgrammes. You have to bear in mind that the materials involved are indeed radioactive, and that they present a hazard, but that hazard is a cumulative one. In other words the radiation they produce would need to be present for a considerable period of time and in significant amounts to produce a measurable statistical risk. In the environment around us at all times, there are similar levels of radioactive materials to the amount you would be encountering in a watch hand. Even the humble banana is very very very slightly radioactive, due to the fact that it is a good source of potassium (which we need for our biological health), some of which is naturally radioactive. We are perfectly capable of dealing with the tiny amount of damage this radiation does. We probably receive far more DNA damage walking around on a nice sunny day in the snow, from ultraviolet light. Our biology is designed to deal with this in the same way that we deal with a cut finger or any other damage. Radiation damage from alpha and beta emitters (like radium) is generally very low level. The harm would come if you treated the stuff the same way the Radium Girls, who painted radium dials for a living did. They absorbed many millions of times more radium than you would ever be exposed to from a few minutes directly handling the radium in a few watch hands. I've posted the chart below a few times, but it is relevant. I would estimate your dose from staying in the room where a few watch hands have been exposed to the elements for a few hours, would not even be measurable. It certainly wouldn't increase background levels by any significant amount. If, for a dare, you were crazy enough to eat the watch hands, you would mainly ingest some steel, some zinc sulphide and a tiny amount of radium. You would excrete the majority of the radium, but a tiny tiny amount of an already tiny amount *might* be absorbed, but you would probably absorb more radioactivity from eating a few bananas. The most dangerous thing about eating them might be from the obvious risk of eating sharp bits of metal. I am obviously not advocating eating watch hands, radioactive or otherwise. If you have already cleaned up the surfaces that might have had a few micrograms of radium on them, then you will be unlikely to be able to measure any increase in background radiation levels. If you were still concerned, then take some measurements with a Geiger counter of the general background radiation elsewhere. In the kitchen for an hour, in the garden for an hour, in your workplace perhaps for an hour, and get a good feeling for what is normal, then re-measure in the area that you are worried about. I would doubt if you can detect anything above background. Even if the area seems to have slightly higher levels than normal, this may still be normal, and may have existed prior to your watch hand work. Take a look at the above chart and you will see that you need significantly higher levels to warrant concern. If you live in Aberdeen for example, or Devon, or anywhere that there is granite in the local geology, then you will naturally be exposed to slightly higher levels of radiation from uranium, radon and other naturally occurring radioactive materials than you would in say Dover which is geologically mainly chalk and limestone. This does not lead to any significant risk. Aberdonians do not grow two heads or glow in the dark as a result.
 1 point
 -
Hello and welcome to the forum, a couple of bits of reading to whet your appetite enjoy 1612608791_ToolsfortheHobbyist.pdf TZIllustratedGlossary.pdf1 point
-
I tell you, I felt like I was fluent in Swiss...or German with a Swiss accent!! Then...all of a sudden...shite hits the fan. While putting the hands on and adjusting them to get a perfect calendar roll over, something hit the one o'clock lume and it popped off. No biggie...I will glue it on. I did this once before on another watch. Well, no bueno. The glue caused the lume to fracture and it was a mess. Who needs one o'clock anyways! Nothing happens then. It is not a happy hour. Here is the final result (sans case). That's my story!
 1 point
 -
Hi there, Ranfit website is a good resource for movement date of manufacture and other information such as mainspring, stem etc sizing, check it out http://www.ranfft.de/cgi-bin/bidfun-db.cgi?10&ranfft&2&2uswk And to determine what decade the case style comes from, this is an interesting read https://vintagedancer.com/vintage/history-mens-watches/ This is a good book as well expensive but a lifetime of knowledge in a book.... https://www.boffinsbooks.com.au/books/9783791385068/watch-a-twentieth-century-style-history1 point
-
Indeed I am sir - parts one and two now completed three next on the list !! enjoying it very much - hope to get poart three done in February stay safe regards1 point
-
That is fascinating! Thanks for an excellent write up.1 point
-
Cheers Yasser hello ex londoner here now near Edinburgh new to this and have amassed a few tools and engineers box and have a collection of mechanical watches and ready to start the courses next week.1 point
-
Done and cased and runs really well. IMG_0833.MOV
 1 point
 -
Welcome!1 point
-
Hi service manual attached for the 87 full of good stuff timex 87.pdf1 point
-
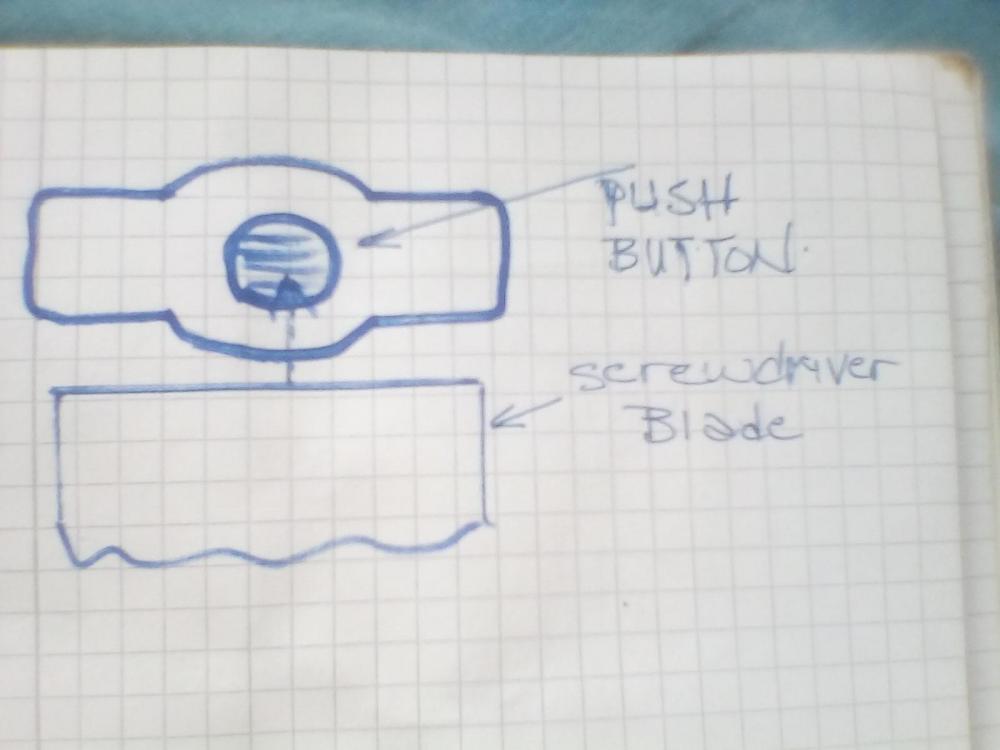
Yes, thanks to OH , the picture shows the push button. The hole as viewed from top is not circulare but parabollic. The screwdriver blade should be wider than diameter of the button, so not to enter the button hole, rather enter the parobollic hole only and go down as far as the parrabolla hole provides depth, the shoulder inside keeps the screwdriver from entering button hole only if the screwdriver blade is wider than button hole.
 1 point
 -
Use the largest tip screw driver which gets in the oval hole. The tip is be wider than diametet of release button and enters cross to the STEM AXIS, a shoulder is provided inside the hole to stop the screwdriver tip from insertion deeper in. Pushed in down to the shoulder which is enough to leave the stem free to be taken out. If not clear let m know to hand draw you a sketch showing what I say. Regqrds joe1 point
-
Very loud ticking! Yes these are not meant to last that long, and yet here they are 50 years later! JC1 point