Jump to content

Watch of Today


mk3

Recommended Posts

7 hours ago, ro63rto said:

That's a good looking mod emoji106.png

Are the markers and hands luminous?

Where did you get the parts from?

Thanks. 

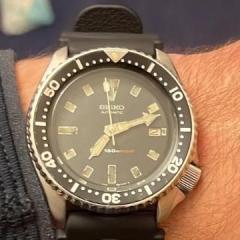
The dial is the 'Fuller 6 O'clock Special' from Jake (Dagazwatch.com) . It's awesome quality with polished lume filled markers. all round. 

Hands are from Dagaz also except the electric blue seconds from harold (yobokies)

And AR sapphire crystal from yobokies also

Edited by Tunokies
Link to comment
Share on other sites

Desk diving today with Seiko 6309-7040 from Dec 1984. Has been reworked with new hands, dial, bezel insert and case base been lightly polished. This is one of the easiest wearing divers watch I've had the pleasure to slap on my wrist and fits ok under the sleeve of a dress shirt. This case style originally came with a black bezel but the guy I bought it from fitted a 'Pepsi' bezel. Looks good and it'll probably stay this way.

I have to say the quality of aftermarket parts is really goods these days..the only problem with the ones here is the poor lume.

P_20160810_082817_1_p.jpg

Close up of the dial..alignment of the '150m' could be better!P_20160810_083311_1_p.jpg

Anil 

  • Like 4
Link to comment
Share on other sites

I was looking at Jeffc83 posting showing the Helbros, in my travels I picked up a Gruen for spares/ repair that bears a remarkable similarity, I was attracted by the date at 6 and it does tick for a while so I live in hope.

c002df09b7d9100234169920a3a94a76.png

Makes me wonder if there was a relationship between Helbros and Gruen but apart from the American connection there does not seem to be one

Cheers,

Vic

  • Like 2
Link to comment
Share on other sites

Breaking away from Seiko's for a change, i saw this and had to give it a work over :) 

Swiss Made but assembled in England, the case design is awesome, smooth curved lines contrasted with straight and angular hands/indices, and that seconds hand just tipped me over the edge :D

ETA 2783 - Summit 25 Jewel Automatic

DSC06093.JPG

  • Like 6
Link to comment
Share on other sites

Ok so it's seikotime.  This is another "bitser"  that I've made up.  I went through a phase of these things.  It's an early 1960's seiko 8306 Sealion that I made up from my parts bin.  The movement is a low /hi beat (pending on how you look at it at 18000) 30 jewel unit.  Probably it's most interesting feature is the winding mechanism.  You can hand wind it or it self winds using a fairly complex, but very smooth and compact inversion roller type mechanism.  A nice change from the "magic arm"  so common in seikos. I just couldn't find any more original dials so it got a Seiko 5 pilot type one and  grafted it onto it.  It doesn't really reflect what's under the hood  (but I know and that's what counts),  but it's produced a nice daily wearer. 

1471382103307496964993.jpg

  • Like 2
Link to comment
Share on other sites

Join the conversation

You can post now and register later. If you have an account, sign in now to post with your account.
Note: Your post will require moderator approval before it will be visible.

Guest
Reply to this topic...

×   Pasted as rich text.   Restore formatting

  Only 75 emoji are allowed.

×   Your link has been automatically embedded.   Display as a link instead

×   Your previous content has been restored.   Clear editor

×   You cannot paste images directly. Upload or insert images from URL.


  • Recently Browsing

    • No registered users viewing this page.
  • Topics

  • Posts

    • Could you print the image either enlarged or reduce the the same size as the actual part and then glue it to the steel. 
    • Next is to drill the screwhole this then provides an anchor point so the bridge doesnt slip around while scribing the shape. A cork lid, a pin and a piece of gaffer tape ( 😅 ) keeps it all in place. The hole is measured from the broken part using a hand measuring gauge. Mark the hole, punch it and drill it off to size. The awkward bit is working out where the jumper should be and the detent positions.  I remember watching a youtuber a while back do this with dividers, so i dug out my old school compasses and improvised a little. This bridge only has one hole and to find the detent positions you need two points of reference, so i just worked the second point from one of the corners, hopefully its near enough. Then scribe in the jumper using the two detent positions ( wind and time set ) that were marked and a big picture of the complete spring to look at that helps to give you a feel of where the jumper should be.   
    • Right now I'm making do with a similar micrometer (the one below is $45 shipped but you can find better deals) and a $20 stand. You do have to be excruciatingly careful measuring jewels, since there's no table, but if you don't have the $500 to throw around, it's a nice option.
    • As  I kid, I'd watch Godzilla stomping over buildings and cars and I'd think to myself: Tokyo is a really dangerous place to live... . Cool watch!!
    • Next one up an AS 554, looks like a bit more to this one. First job is to check thickness, most springs are somewhere between .3 and .4, this one measures .35, that matches in with the .4 spring steel i ordered. So for marking up a permanent marker comes in handy to colour up the steel to be marked later with a scriber once its dry. Bestfit provide the extra bit of info for the jumper spring that is missing.
×
×
  • Create New...