Leaderboard


Popular Content
Showing content with the highest reputation on 03/09/20 in all areas
-
I wish that people would read before doing and don't skim on tools and practice watches. But judging from various recent postings is not like that.3 points
-
Hi there ,just a little reminder for enthusiasts and diy maybe not the pros ,anyway I got 2 watches today for a service ,firstly a seventies mortima dive watch and a 1920s elgin grade 292 hunter pocket watch . Well it looked like the dust cover on the pocket watch had been opened by everything from a crowbar to an axe what a mess .The mortima had the bezel bent and huge scratches where someone had tried to take it off . Please use the right tools to open casebacks ,remove bezels ( no caseback knife ) use bezel remover ,and sharp blade for dust covers . Have an assortment of snapback tools as these are the easiest to damage . Remember to achieve perfection one must leave the timepiece if one can in better condition than when one received it2 points
-
As often mentioned, you need to apply some heat to loosen the locking agent. Tube is always a separate part from the case but pushing it in or out is not an easy affair and not the correct solution for your problem.2 points
-
Be reassured all of these are the same and it won't make a difference. Rather if you want an easy task and uniform film get a sponged applicator. Also note that especially on the case back gasket is the O-ring that makes it waterproof, not the grease, which is there mainly to keep it in place and peace of mind. It is not even used by the factory.2 points
-
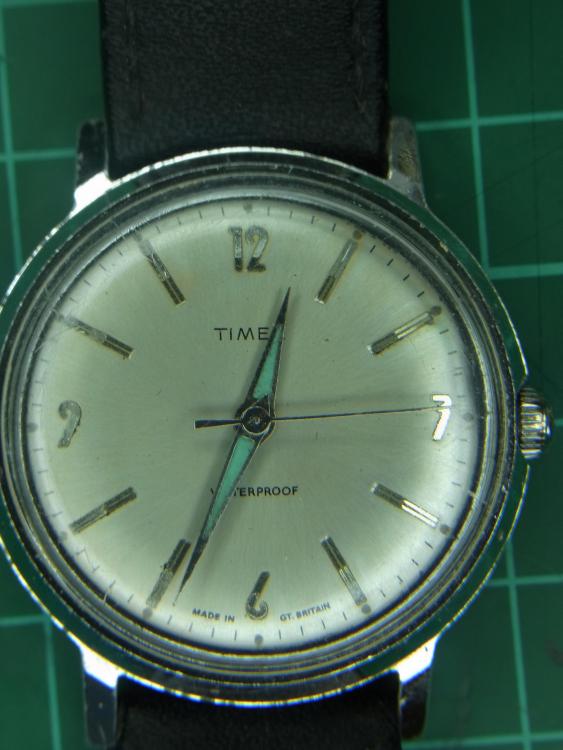
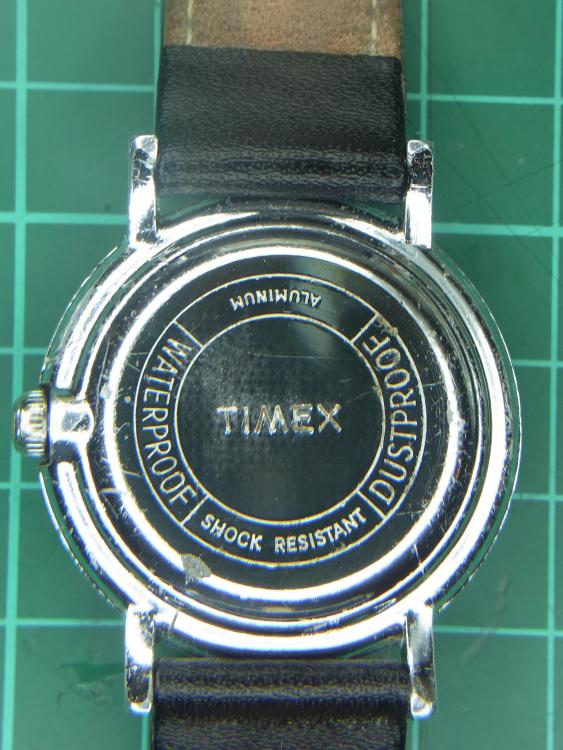
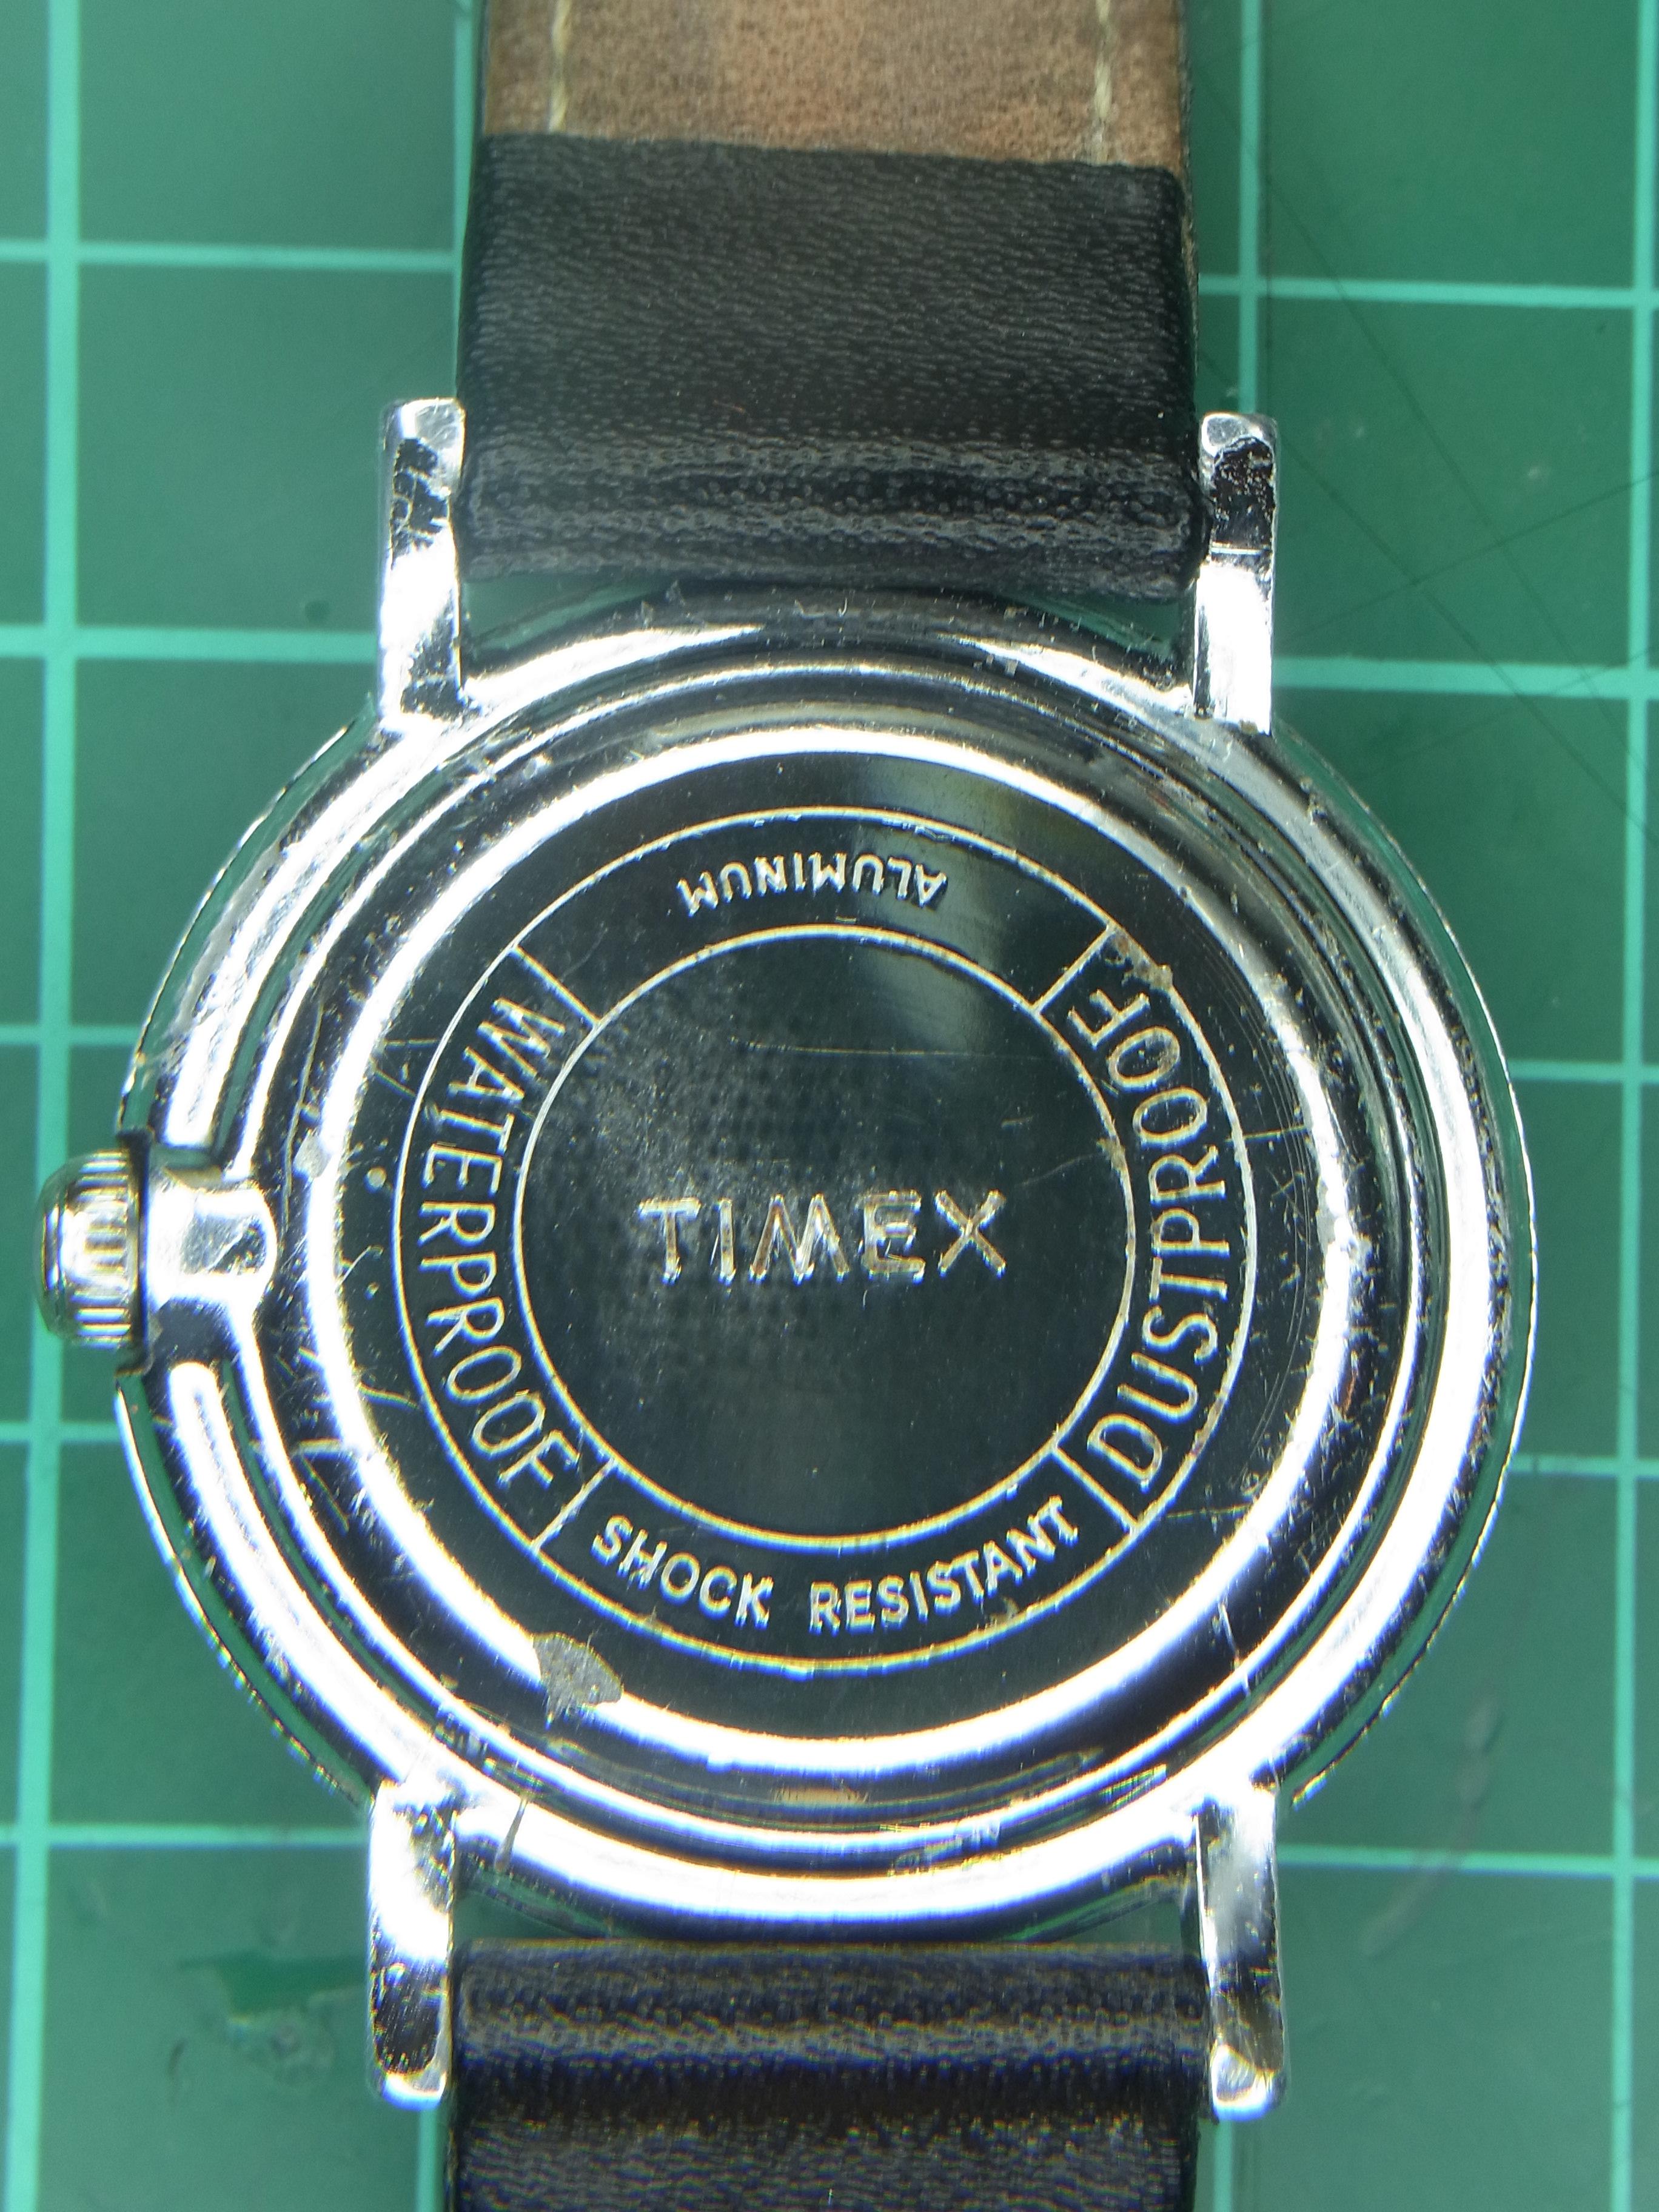
Time for something a little older, and slightly more refined. An early (my guess is sometime between 1956 and 1962) Timex model 22 based Marlin ? Aluminium front loader. No doubt someone can give me a more precise date for this. This one is another "Scotland" mechanism from Dundee. This is what it looks like after a service, and crystal polish, but with a few grubby marks still to attend to, despite manually scrubbing the case under the hot tap. The grime and paint splatters on this poor thing were set like glue. .. and finally a picture from the listing, showing it in its previous state. What I will say, is whoever thought up the arrangement of the second hand on this mechanism really should have handed in their "I'm an engineer" badge, and gone back to playing tiddlywinks. It must have taken me at least a dozen attempts to remedy the "flapping about in the breeze" second hand that it arrived with. Fiddly and hit or miss, to say the least.
 1 point
 -
Hi Most of the watches about these days are quartz movements so this Seiko manual may come in handy some time. 1980.07 Seiko Technical Guide General Instruction Analog Quartz.pdf1 point
-
Me too. By far the safest way I've found to handle jewels. Never get it near your cleaning solvents though.1 point
-
Yes, I agree with watchweasol, that post is steel and will be destroyed with the screw. I've encountered a number of broken screws of that type on Omega chronos, in my experience with a little patience they can be worked out- they aren't actually tight in the threads if they aren't rusted. If you don't have a screw extractor you can simulate it with a staking tool, you need a stake and punch that get to the screw, you catch it from both ends and then turn the whole movement around to unscrew. If you have an Inverto type set two punches may work better. I believe it's a 0.8mm screw, so you need pretty small stake/punch, like 0.6mm. The post itself can be pressed out too, but you would need a source for a spare one or be able to make one. Getting the screw out is the best route.1 point
-
Some month ago I had a similar situation with a diashock cap jewel (I finally fount if though). Our fellow member Marc told about a tool mentioned in the thread I'm linking below. I bought it, it's very cheap, and I haven't had a problem since then. I even pick the cap jewel with the tool and oil it while it is stick there, then put it in the chaton that I have previously put on the balance cock or the main plate, and everything goes perfect, no nerves trying not to press the twizers too much or too little, no spreading the oil when putting the chaton over the jewel, etc. I really recommend it.1 point
-
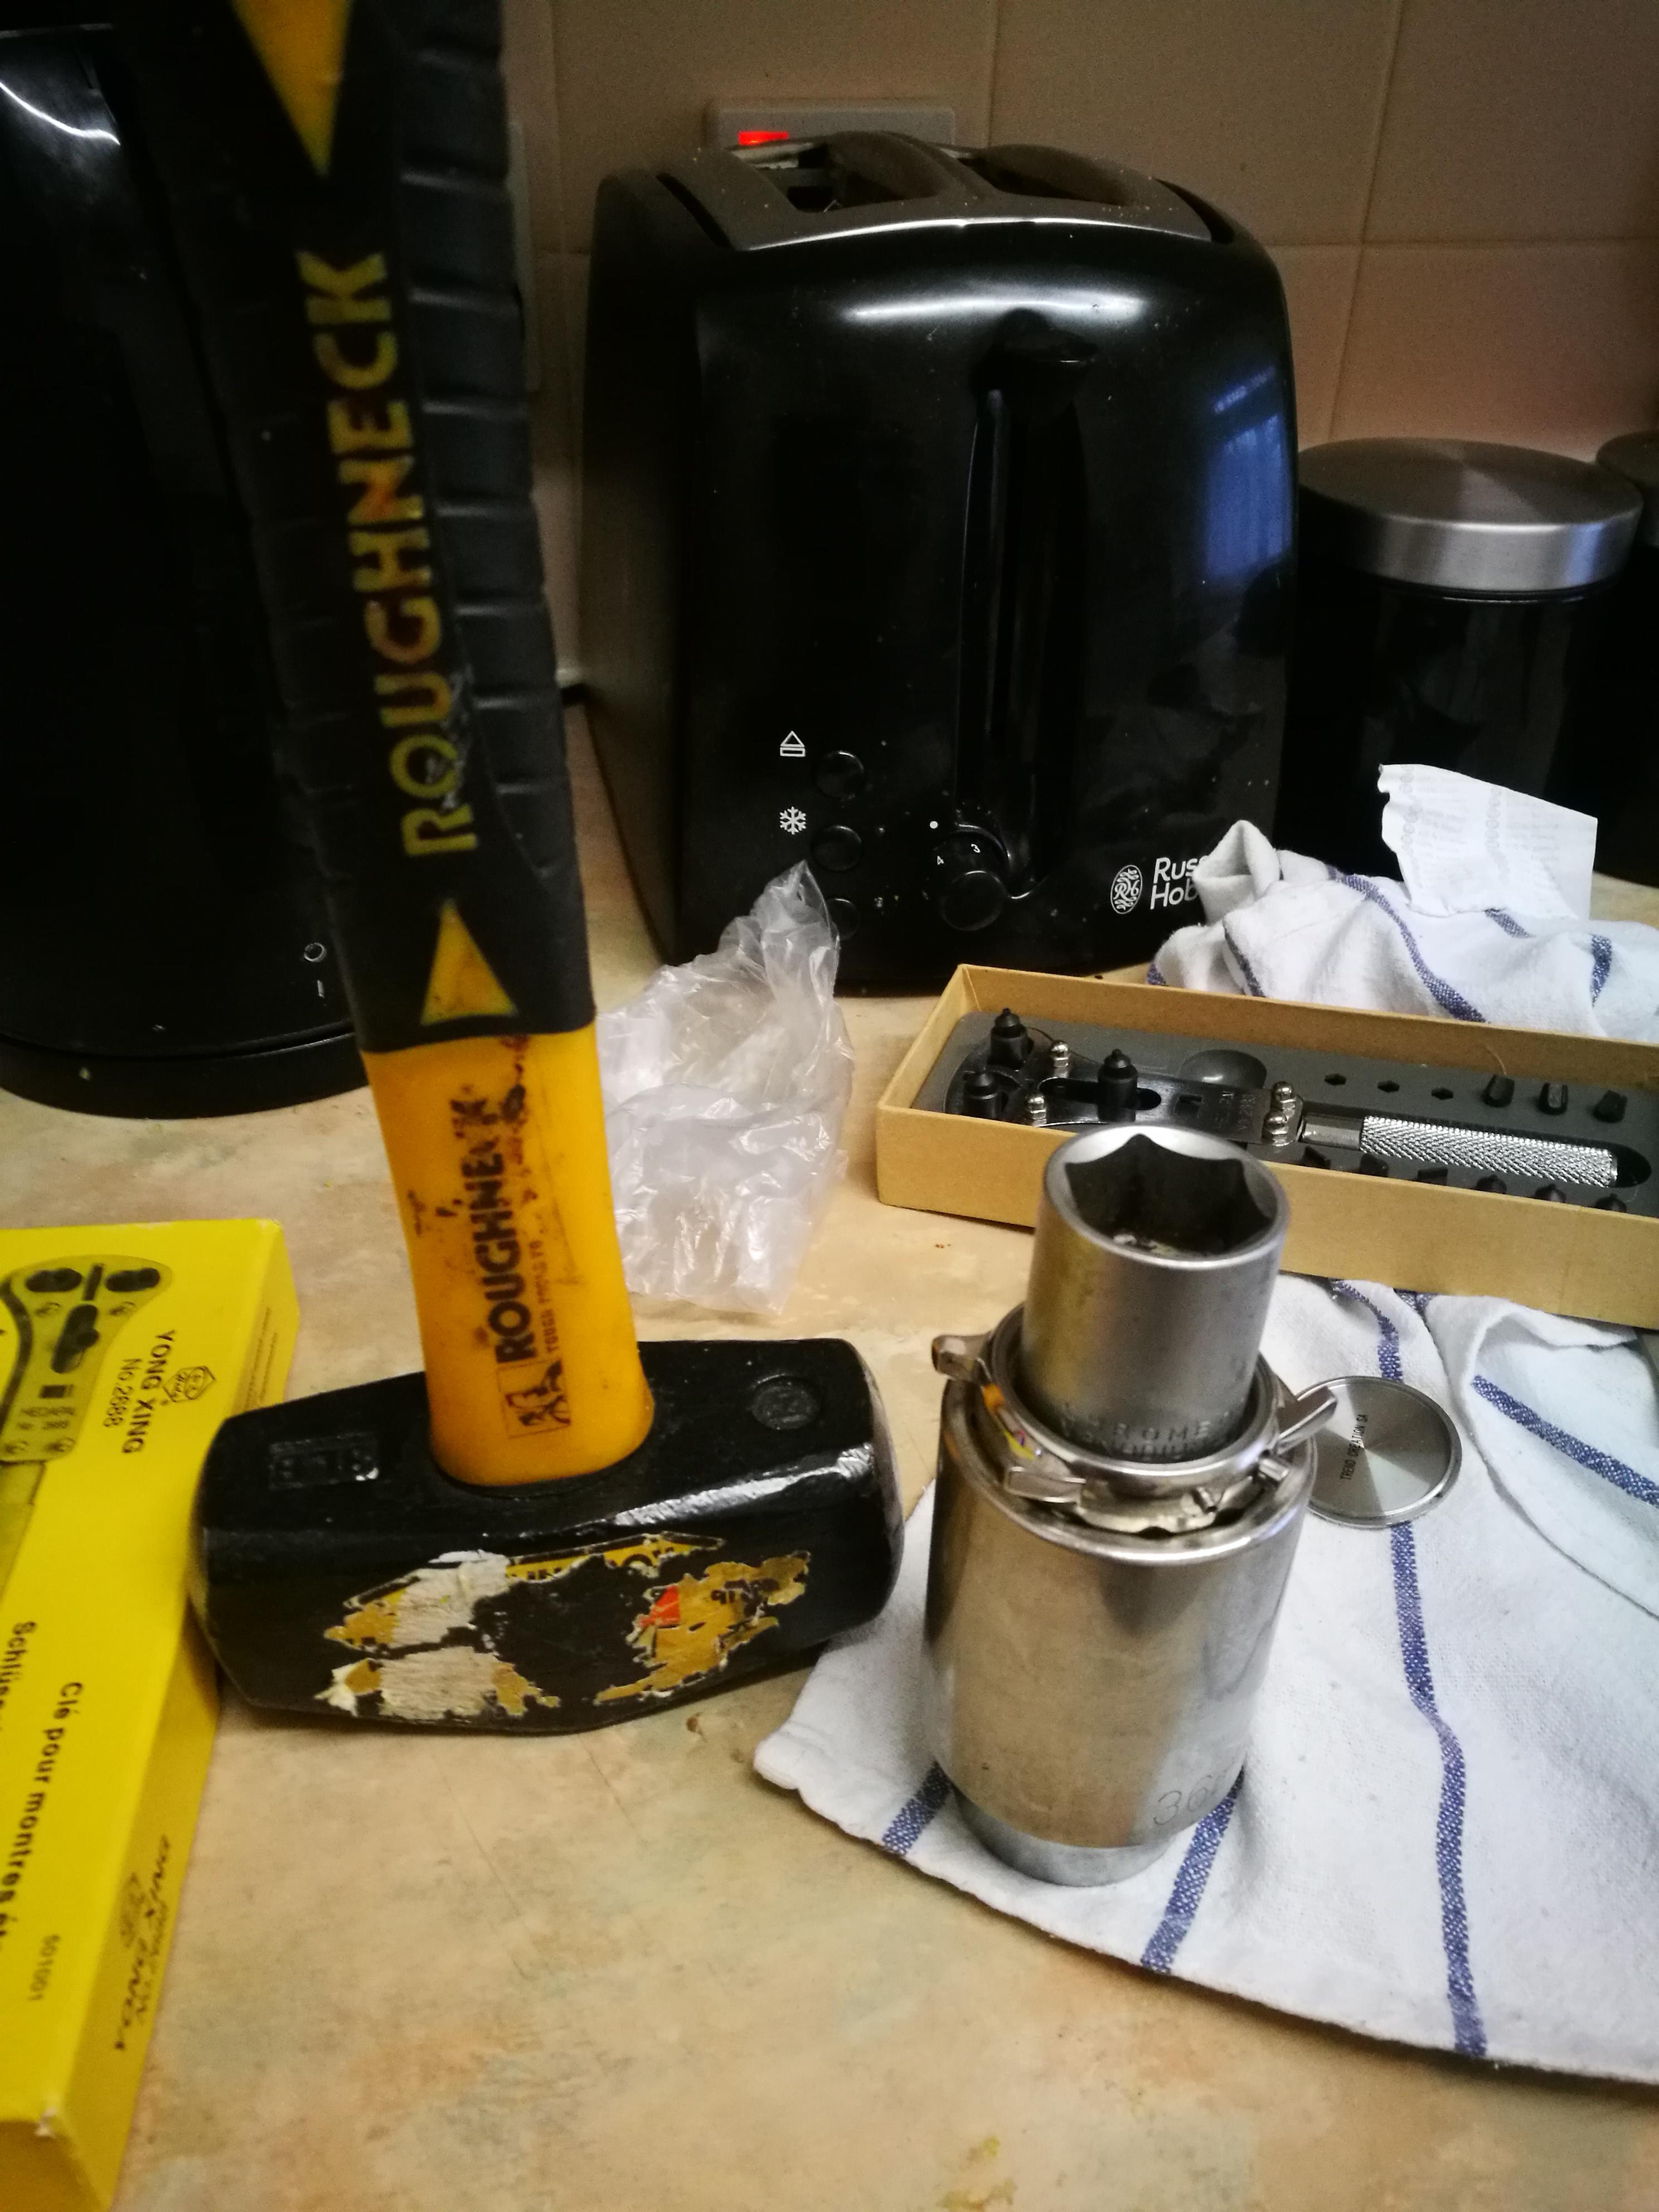
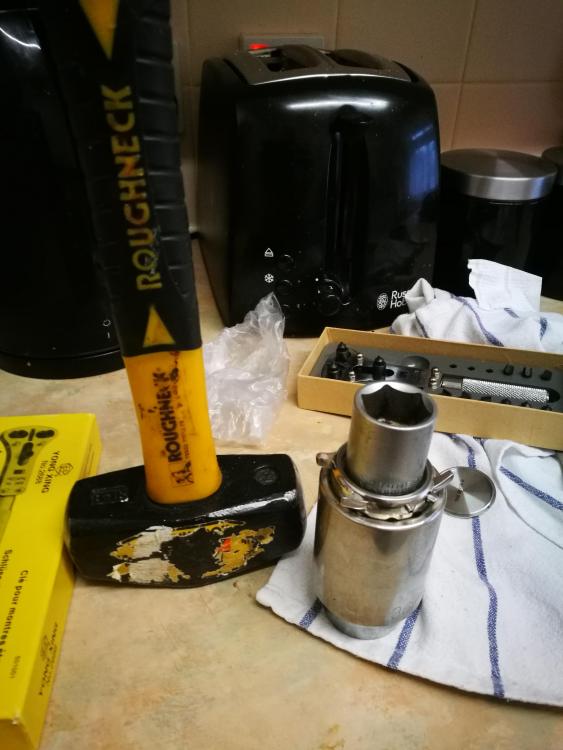
Hmmm, the hammer... yes, the caseback opener... OK, the cloth.. fine.. the socket...well I might have been tempted.... but the toaster, what kind of a barbarian are you sir?!1 point
-
Hi for the sake of your knees and the flashlight industry I would be inclined to try it whats to loose, and everything to gain. go for it.1 point
-
If you can get the spring in place, it is probably the right thickness too. Colours can differ.1 point
-
Hi as like as not Alum would destroy the post and screw Therefore stick with the penetrating oil and if that wont work get hold of a screw extractor.1 point
-
I see the crystal fitting tools are on show1 point
-
in 1920 s', a pocket watch was a just a tool - not a hobby. BUT IF - you wore a " double brested" watch and chain, most often will have a small pocket knife at the end of the chain.. with the key wind, you had to open the back to wind every day. cheers vin1 point
-
good post ! a better way is to losed it with penitrating oil. vin1 point
-
It's cheaper from Cousins. https://www.cousinsuk.com/product/gasket-grease-applicator?code=G369641 point
-
Yes, there was also a more common deck watch by V.C that did not have a up down indicator they turn very regular in auctions and go for around £1,500, there are also centre seconds deck watches by V.C.1 point
-
Hi If you are working on a 7009 you may find this useful cheers 277_Seiko7009A (2).pdf1 point
-
No this screw polisher does not have the wood, brass and steel polishing wheel, that is a more complex polisher. Yours is made for using a file to clean the screw-heads, so not for getting a perfect mirror finish, but it can still acheive pretty good results. As you rotate back and forwards the part holding the screw with one hand you run a file on the roller with the other hand to clean up the screw heads. All that it is missing is a few more sized collets for clamping the screws. The items in the red square are lantern chucks for screws. The head goes inside the 'lantern' part with the threaded end poking outthrough the hole in the end. This lets you clean up the threaded end of the screw, very useful if you need to shorten a screw. It is also useful to regrind / sharpen the balance wheel pivots on the cheap alarm clocks that just have conical pivots that sit in cupped screws. You can do this on a watch makers lathe too, but the benefit of using this tool to do it is you can turn it backwards and forwards like a jacot tool to allow you to burnish / harden the pivots which you cant do on a lathe.1 point
-
There are currently 2 available on eBay. One has a solid case back and the plastic casing is missing, the other has the clear back but is tough to search for on eBay, google found it for me.1 point
-
The big difference between a pro & a hobbyist is often the pro returns the watch with no visible signs of any work but as we all know this is often not the case. Scraches on case backs, bruised screws are the most common. Before any work on any piece I always photograph and date the photo of any damage.1 point
-
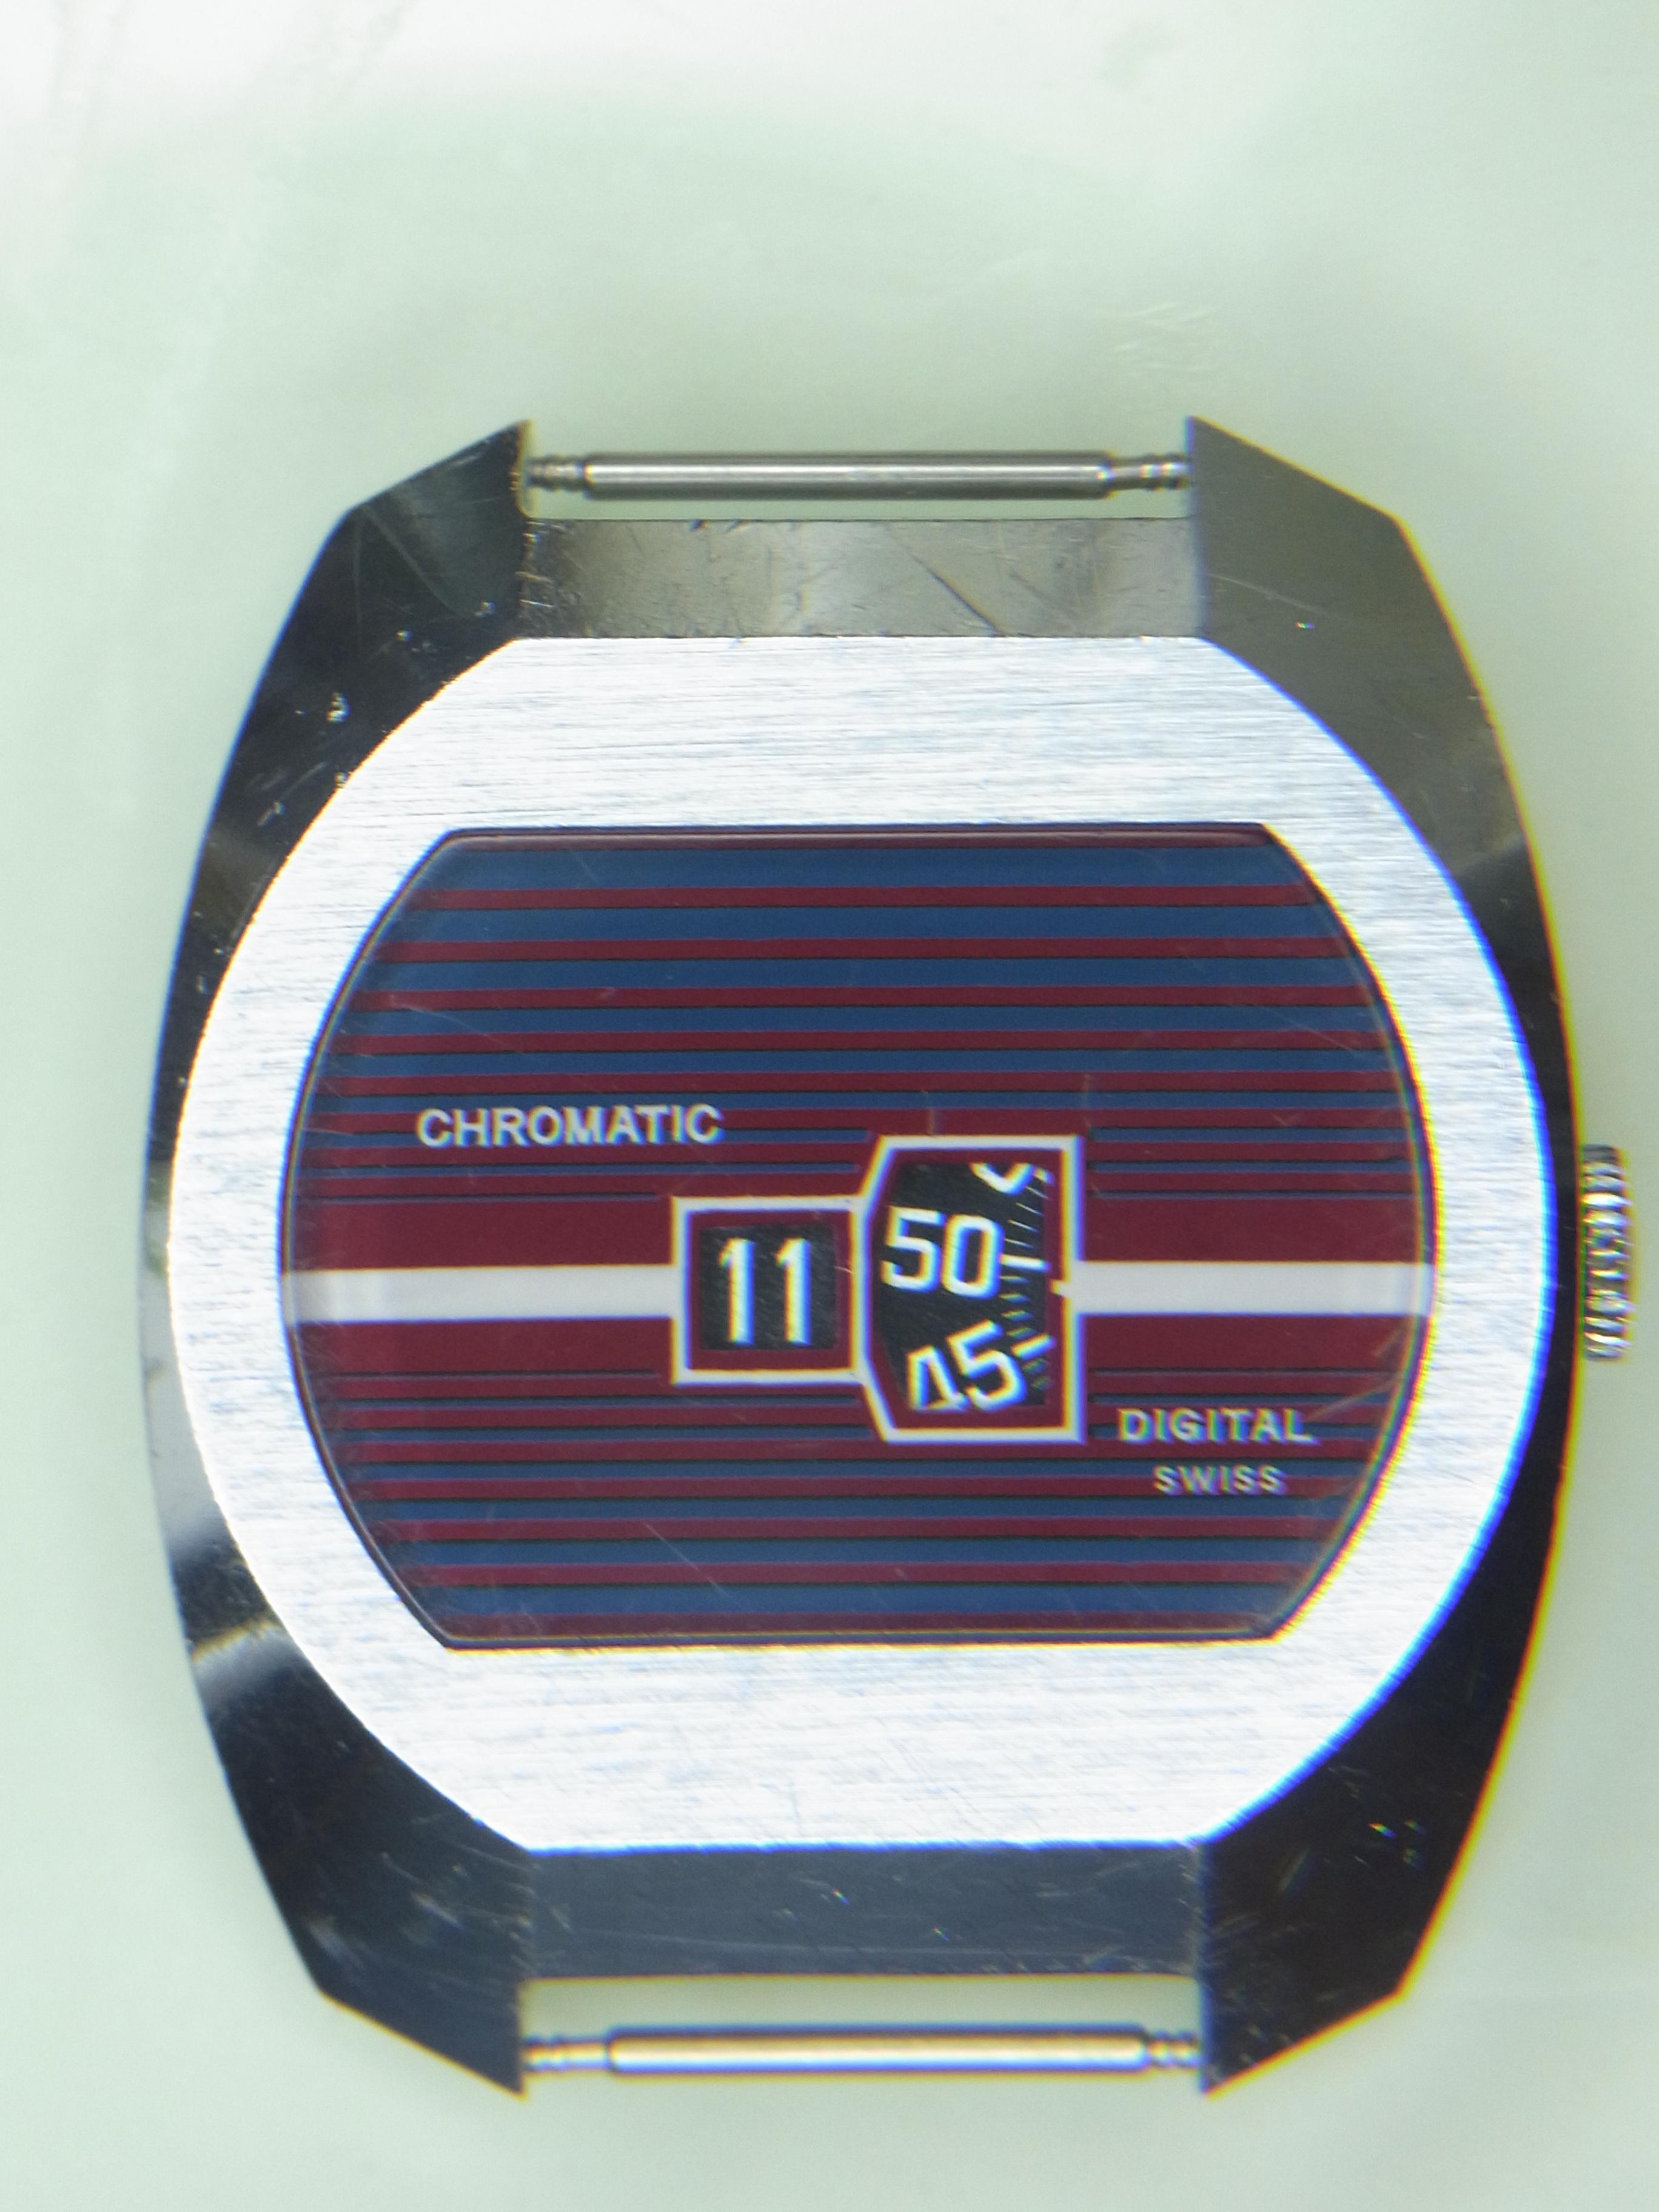
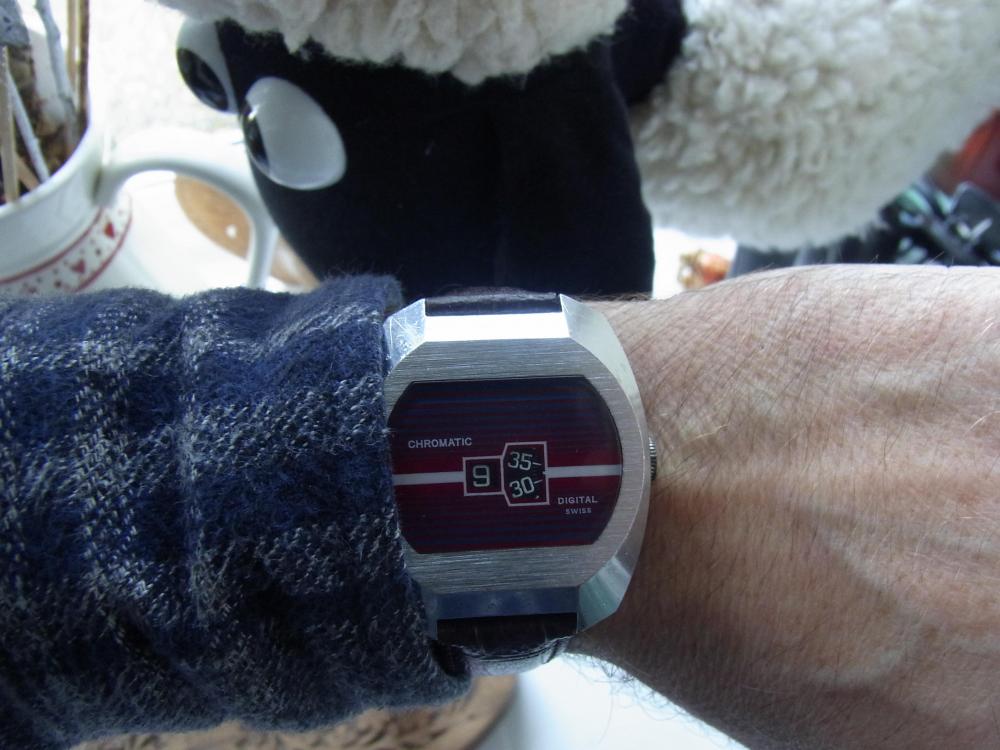
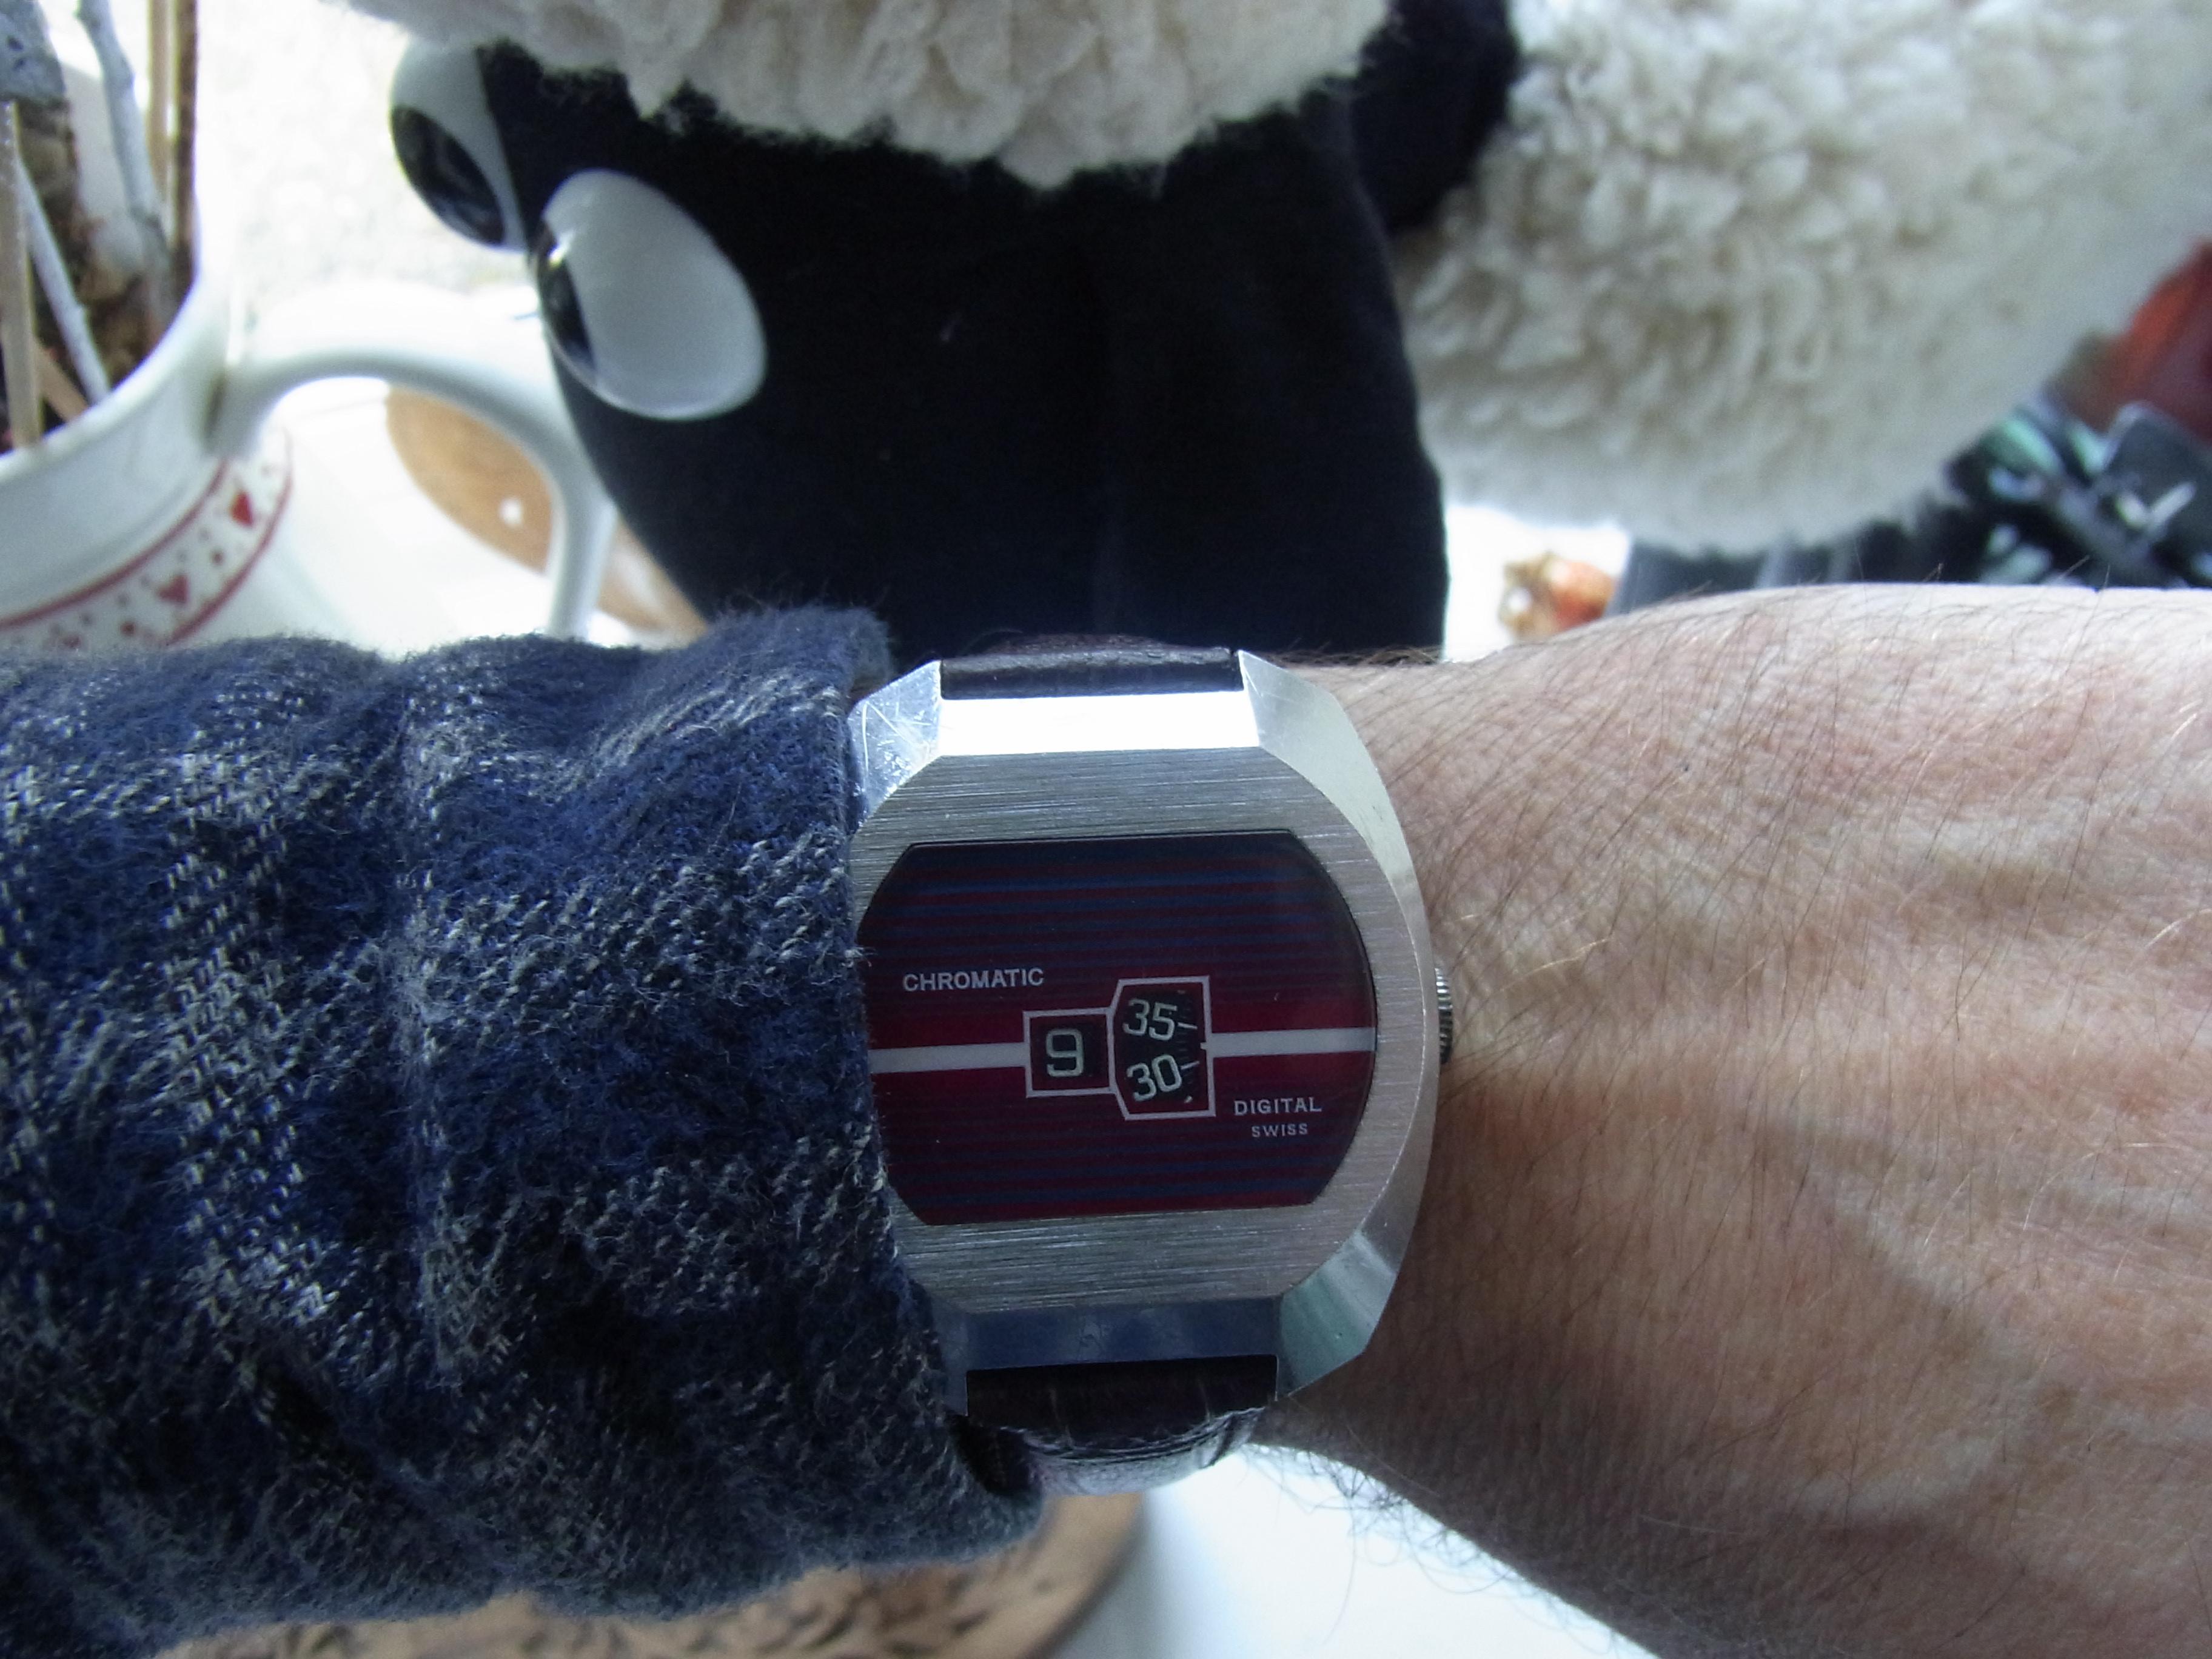
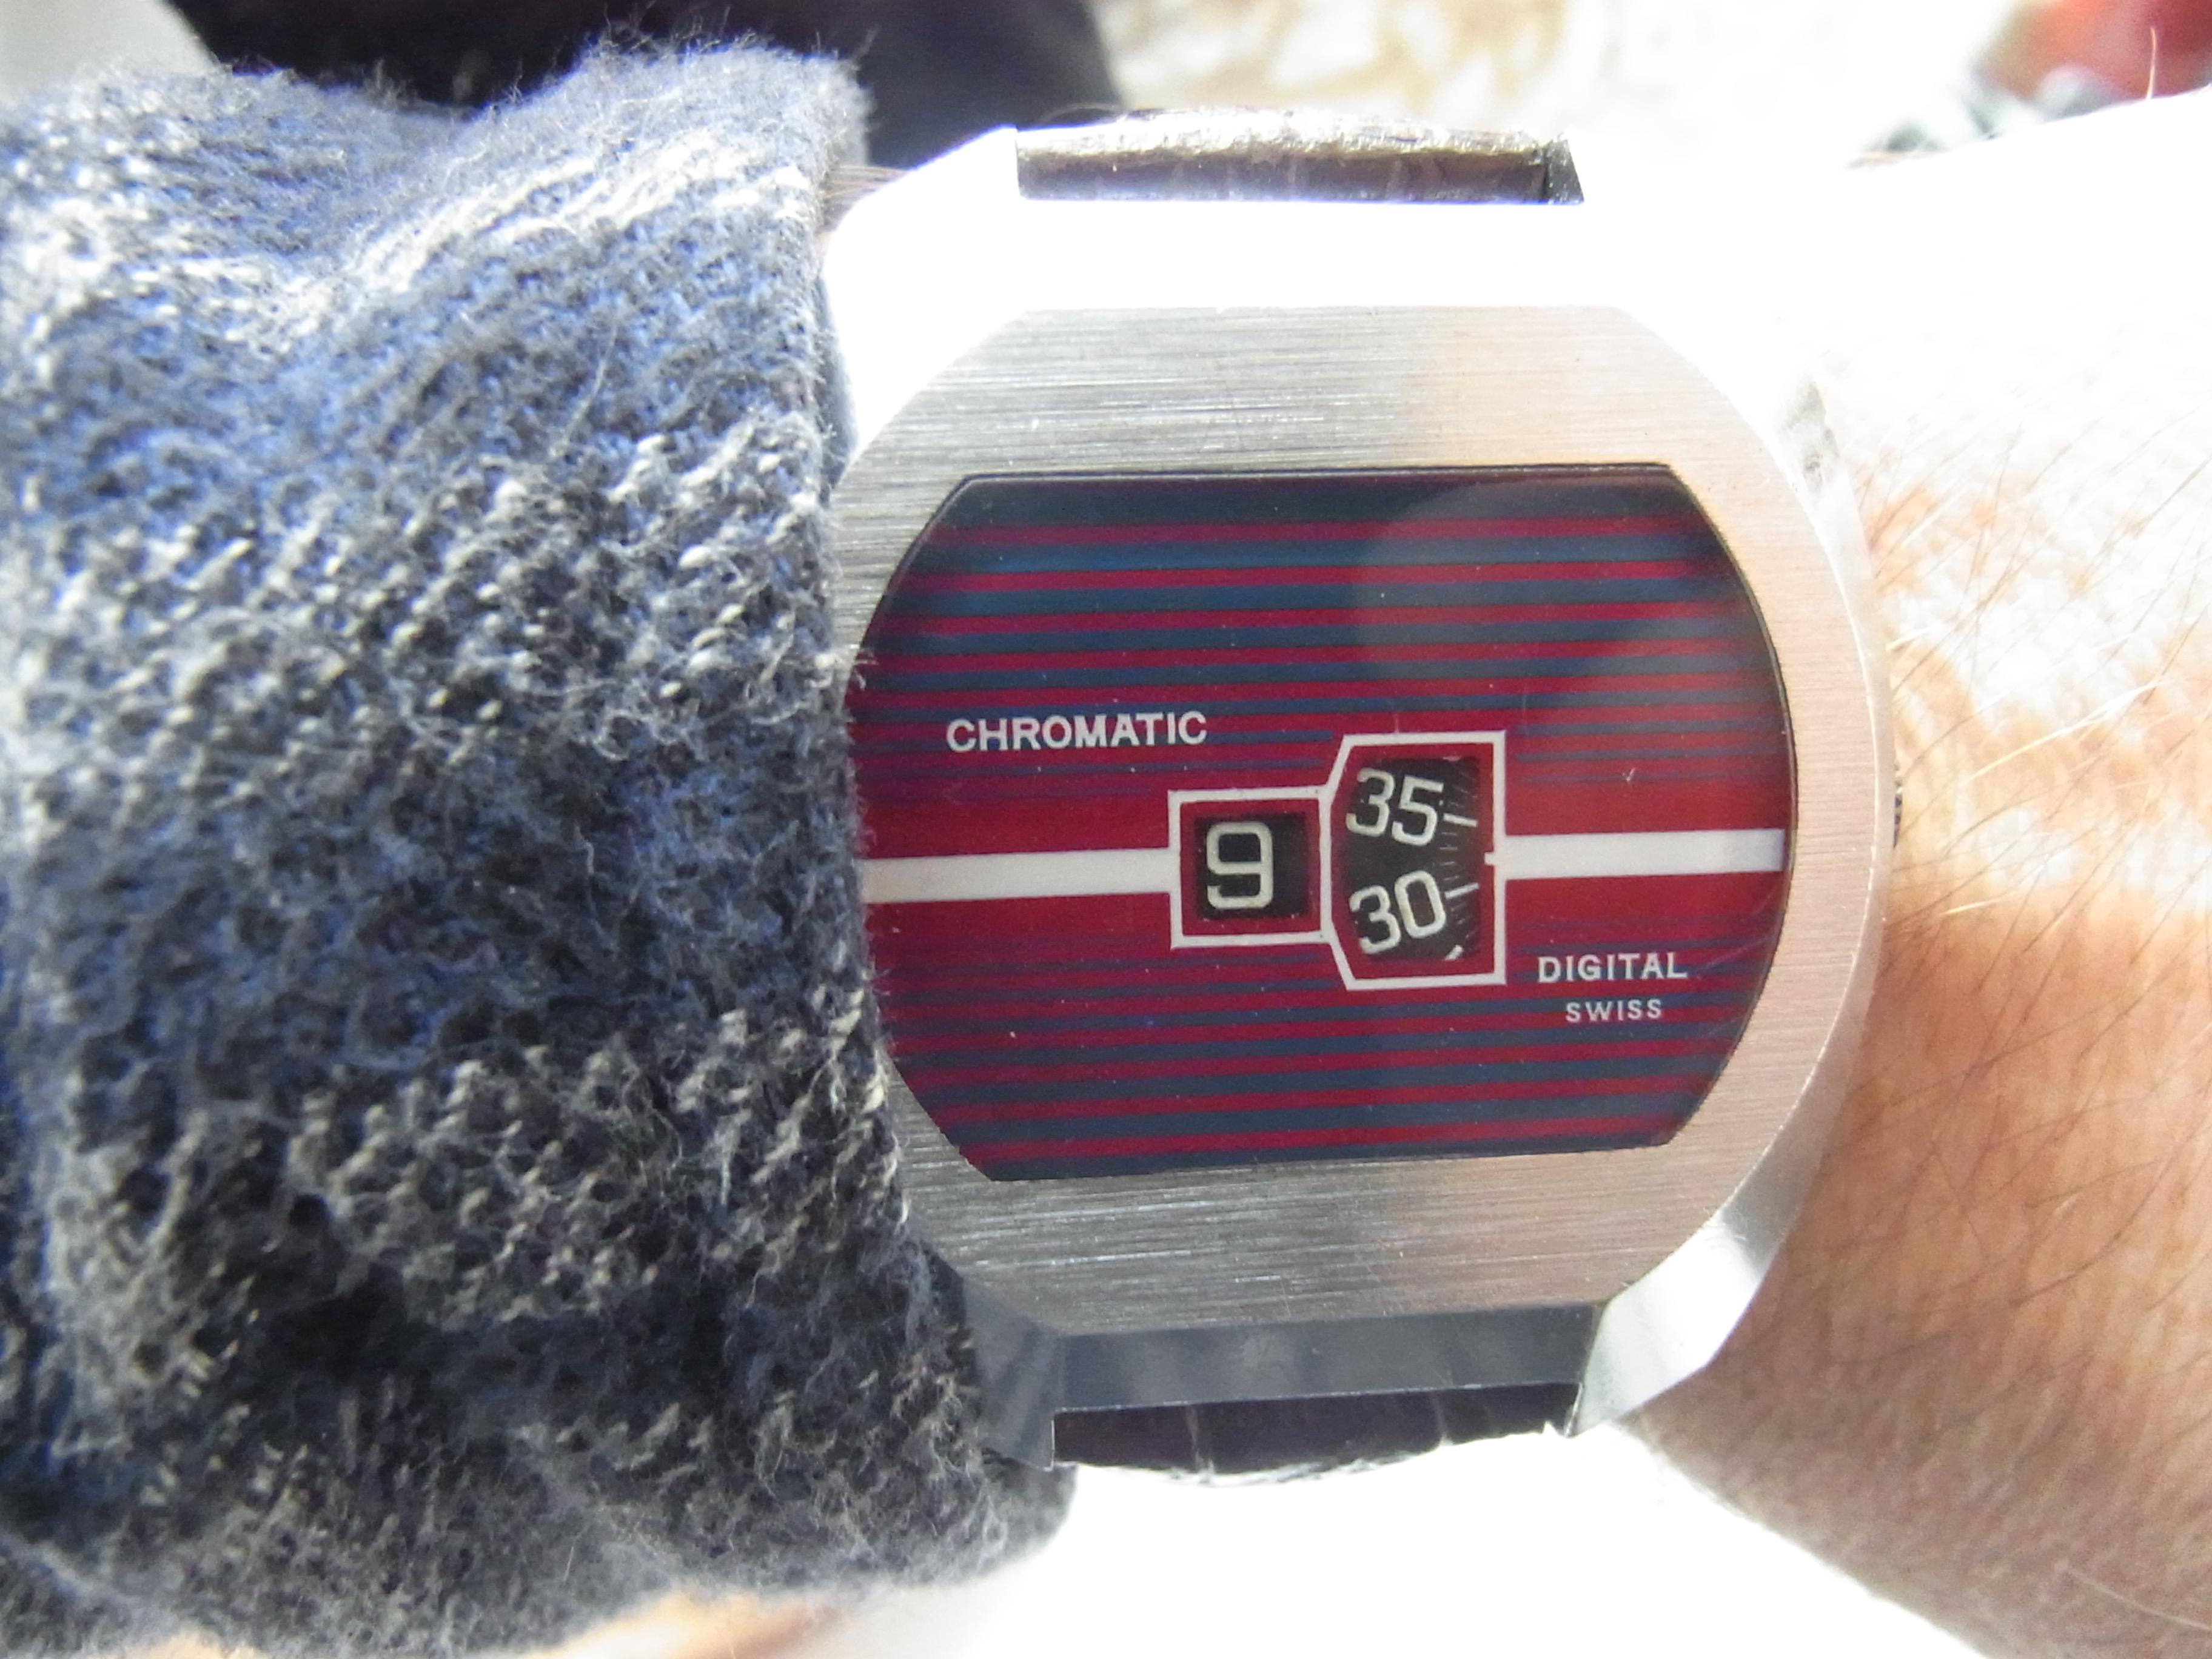
Today we have a Chromatic EB8807 "Digital" probably from around the same period as the previous Keinzle stopwatch/chrono. Hamilton produced their first LED "Pulsar" in 1971 (for a whopping $2,100.00 - the price of a small car at the time). These "digitals" were designed to have the look and feel of an LED watch, but without the eye watering price tag. This Chromatic actually changes its appearance slightly depending on the light, which I guess was an attempt to further emulate some of the novel appeal of the LED display. The effect is quite subtle, and I doubt it would fool anyone, since it is entirely passive, and down to the choice of colours used on the dial. This watch arrived in a pretty tatty condition "overwound", in other words in need of a clean, but once cleaned and serviced it has scrubbed up to look almost new. It feels pretty huge on the wrist, although most of the case is empty space, as the EB8807 mechanism sits in a large, offset plastic holder. As you can see from this Rannft picture of the mechanism there is a lot of empty space to fill to make up for those large numeral disks. The 18mm case lugs and narrow strap have the effect of making the case look even larger, so it would appeal to the modern "dinner gong full of fresh air on the wrist" design aficionados. All in all, strangely, I actually like it. It exudes 1970s charm by the bucket load.
 1 point
 -
Hi Amar, I think it's a lovely little movement to work on. Cheap as chips for donor watches if you need parts. Mine does have the movement marking under the balance, as you can see in one of the pics1 point
-
here ya go
.thumb.jpg.05e60085d778006807037a5efde30a60.jpg) 1 point
1 point -
https://www.ebay.co.uk/itm/Watch-Silicone-Grease-and-Pad-Lubricator-Box-For-Re-Sealing-Watch-Gaskets-Seals/391691958404?hash=item5b32a8f884:g:F3YAAOxypNtSnfZM This is what most people I know use. The pot holds two sponges, top and bottom that are impregnated with silicone grease. Put the gasket between the two and hey presto!1 point
-
You can also take the movement out of the cas and check if the stem/crown can run into the case tube. This is to verify that the crown is the correct one for the case. I've seen wrong crowns with a too fat gaskets with the effects you describe.1 point
-
I agree with Gpsluvr. If crown doesn't want to unscrew though, Sometimes the case tube can be pushed further into the case which let's the crown pressed in deeper. How did you deal with dial plate, perhaps the broken feet let's movement free to get pushed back as you press on the crown.1 point
-
If it is a replacement stem, they may have cut it a little short and there is no room to press the stem inward via the crown. Try unscrewing the crown from the stem one turn if you can, and see what happens. Then you can decide what to do to permanently fix it. Sent from my iPad using Tapatalk Pro1 point
-
An EB8800 based "Digital Swiss Chromatic" took its turn in the queue today. Picked up as a non runner, it was completely gummed up, but responded well to some TLC. I'm not a huge fan of jump hour watches, but this one is actually quite attractive. It has 18mm lugs, but looks quite large on the wrist. The crystal still needs a little more finishing, but otherwise I'm pretty pleased with this latest member of the 404 club.
 1 point
 -
I'm assuming you have tried the movement with the balance in place, as you haven't said and the pivots don't unlock? Try putting a wind on the mainspring without the balance in the movement and check the 'run to banking'... That's where you push the pallet fork away from the banking pin and see how far the pallet gets away from the banking pin before it clicks over to the other banking pin. It should be a smidgen in distance. If you have to pull the fork far away from the banking pin before it clicks to the other side or that action doesn't happen at all, then the 'lock' of the pallet fork jewel into the escape wheel tooth is indeed too deep. Check every tooth on the escape wheel in this way. Your top pic doesn't show a 'lock' as the escape wheel spins clockwise and the entrance jewel has the escape wheel tooth on the wrong side of it in your pic and your bottom pic shows a lock, but can't quite see how deep that is. Which pic is the problem are they the same problem movement?1 point
-
A example Issue number M10822 exactly the same model sold at Mellors and Kirk auction house in Nottingham for £3,200 in 2018 it carried a pre sale estimate of £4,000-5,000 so would expect your example to be in a similar price range.1 point
-
Seems Legit ;}
 1 point
 -
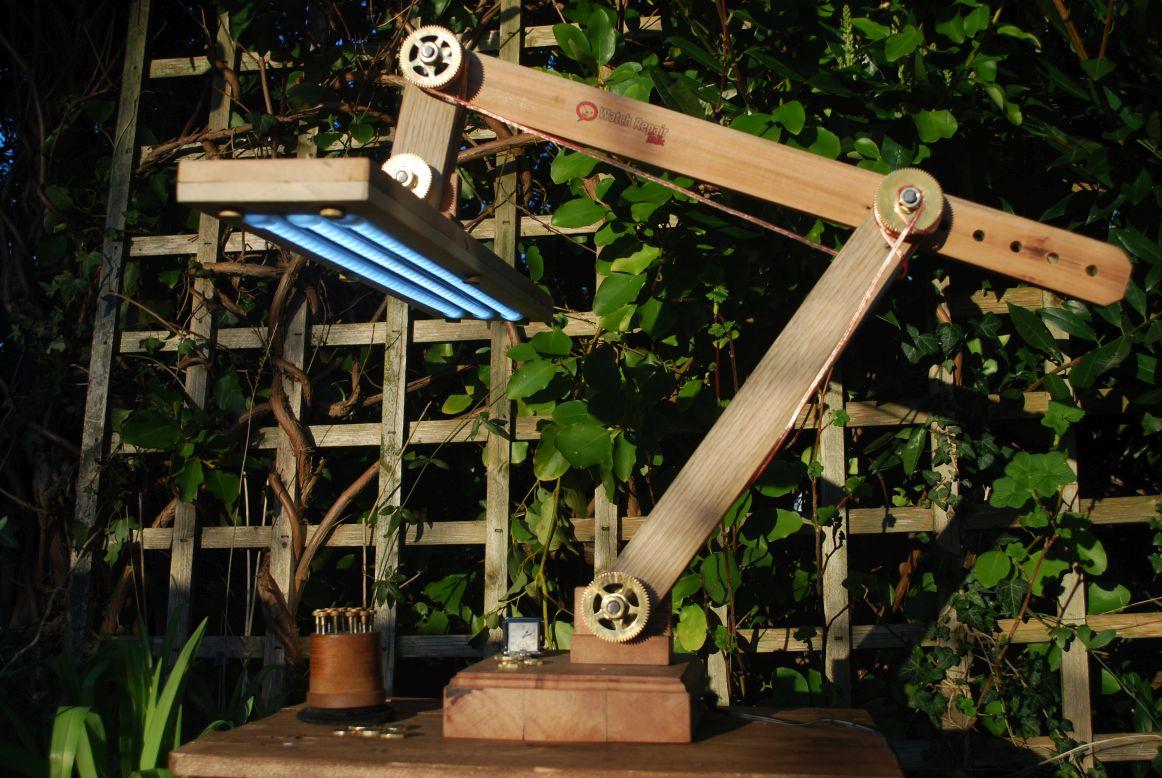
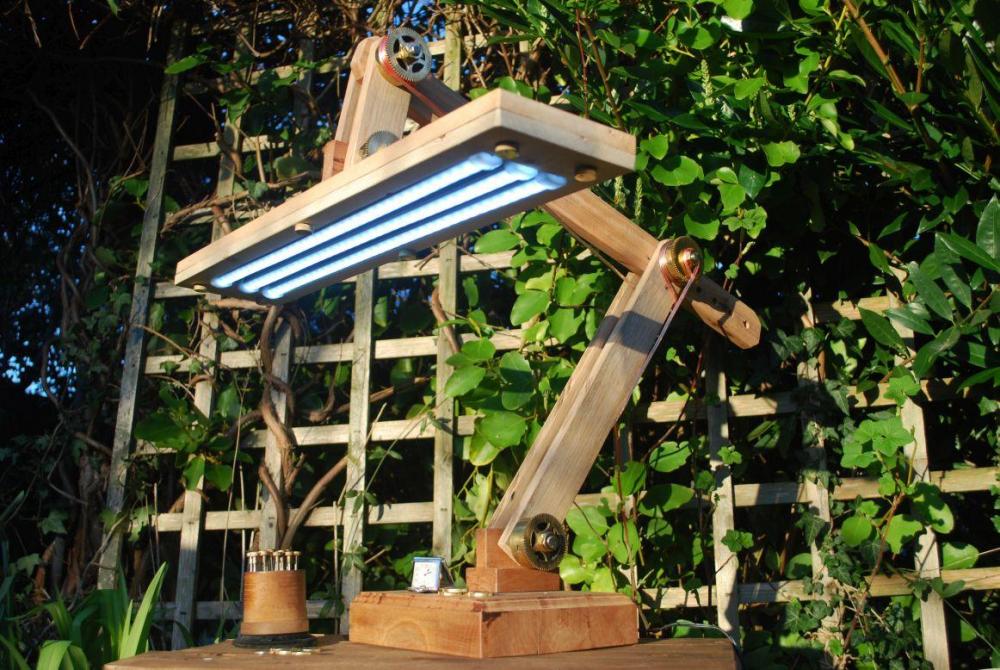
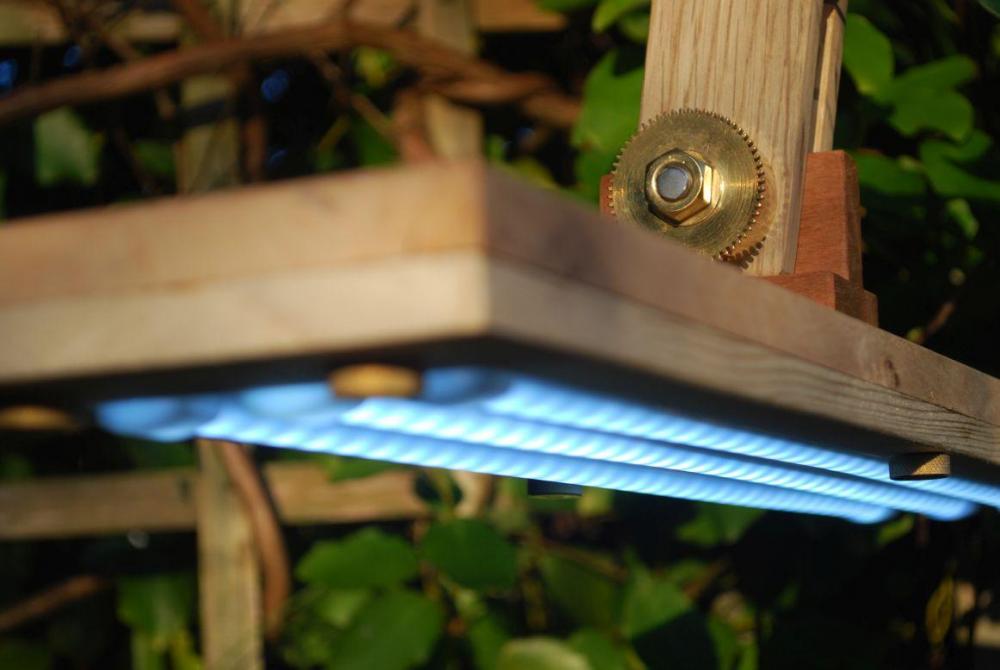
I really like that, I don't know if it was your intention or not, but I love the 'steampunk' look about it, if you could just fit a large analogue dial mounted in a brass plate to adjust the brightness it will be complete.1 point
-
This is what as known a 5 bar p/w movement about 1880. With the barrel cap removed the arbor should unscrew from its center part. Some can be very tight so be careful when under taking this, some refuse to move and you might have to clean it in your machine partly dismantled.1 point
-
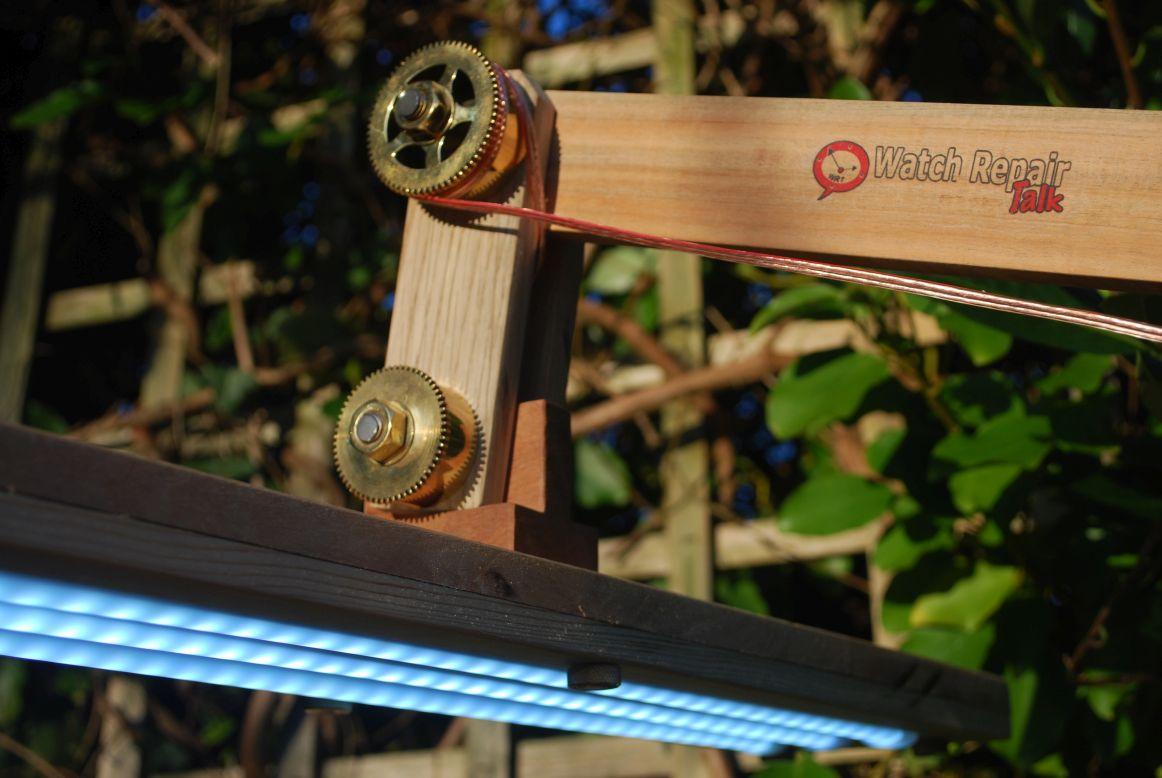
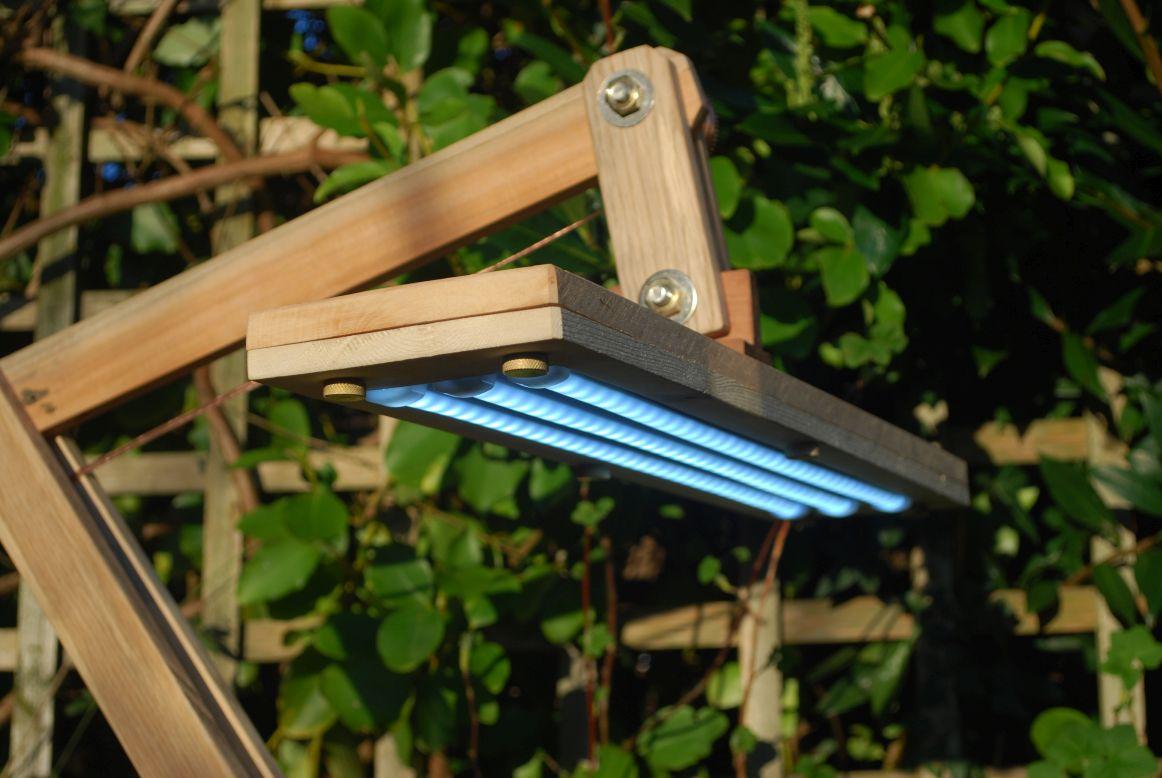
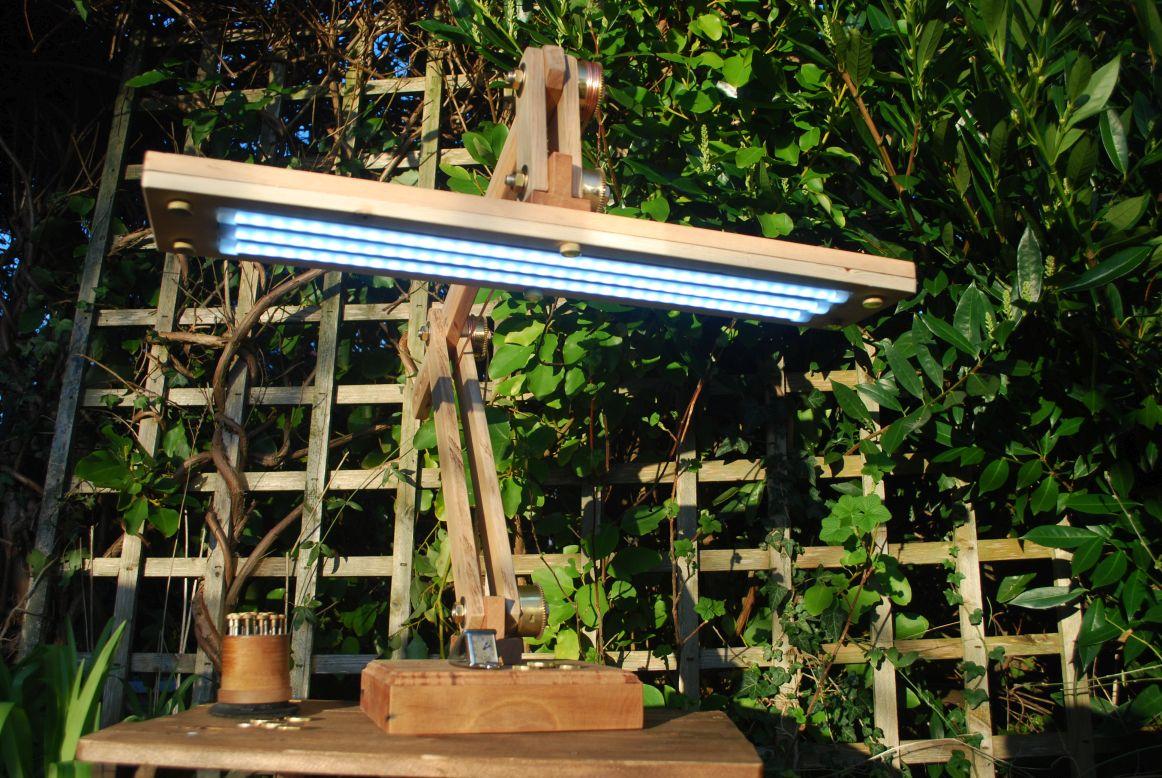
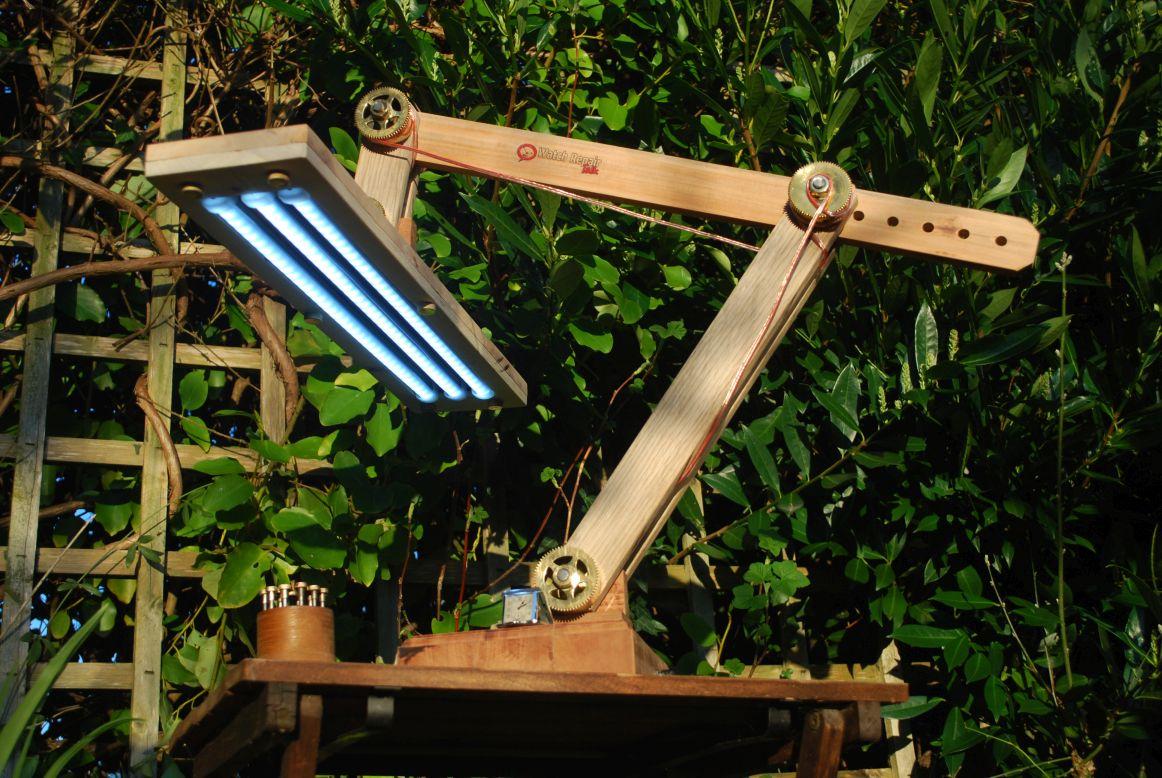
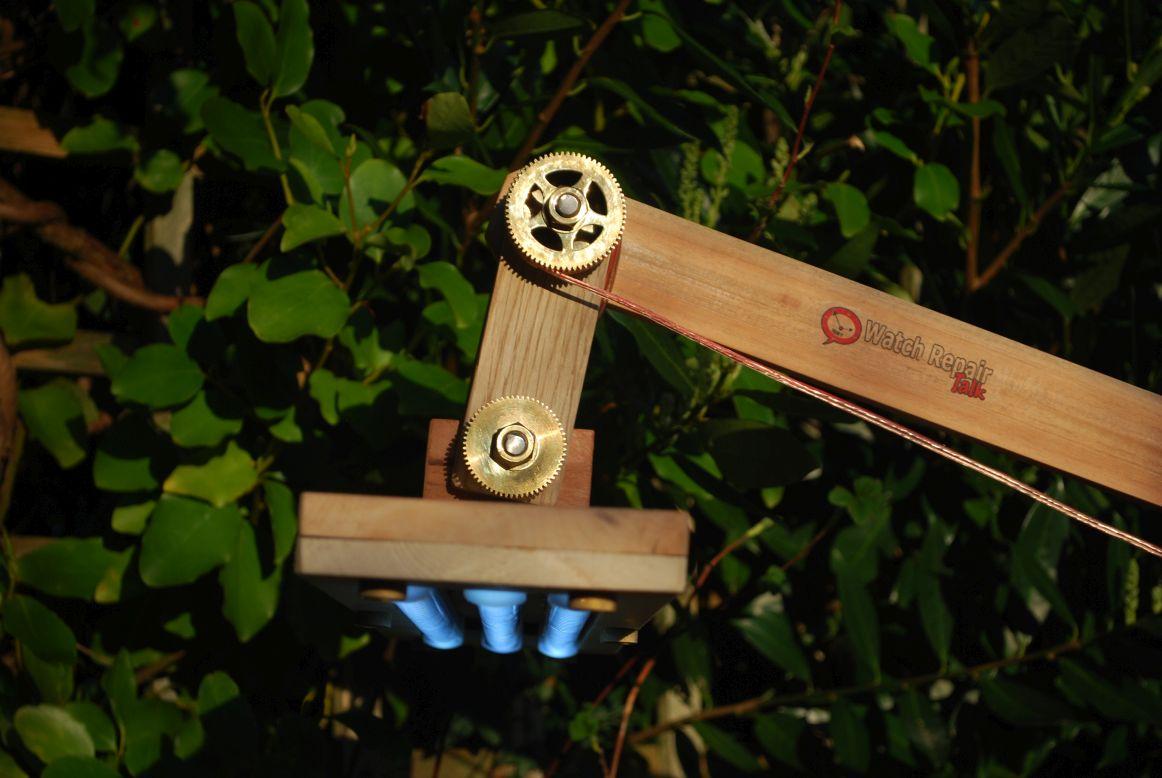
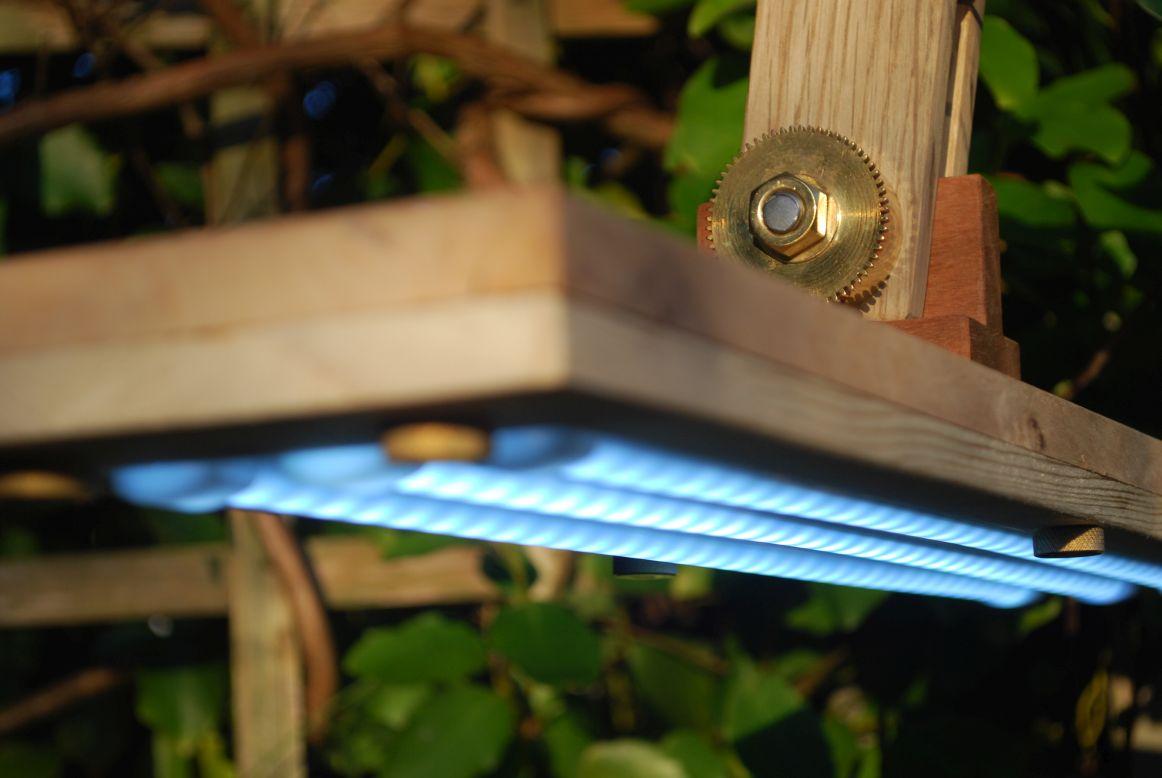
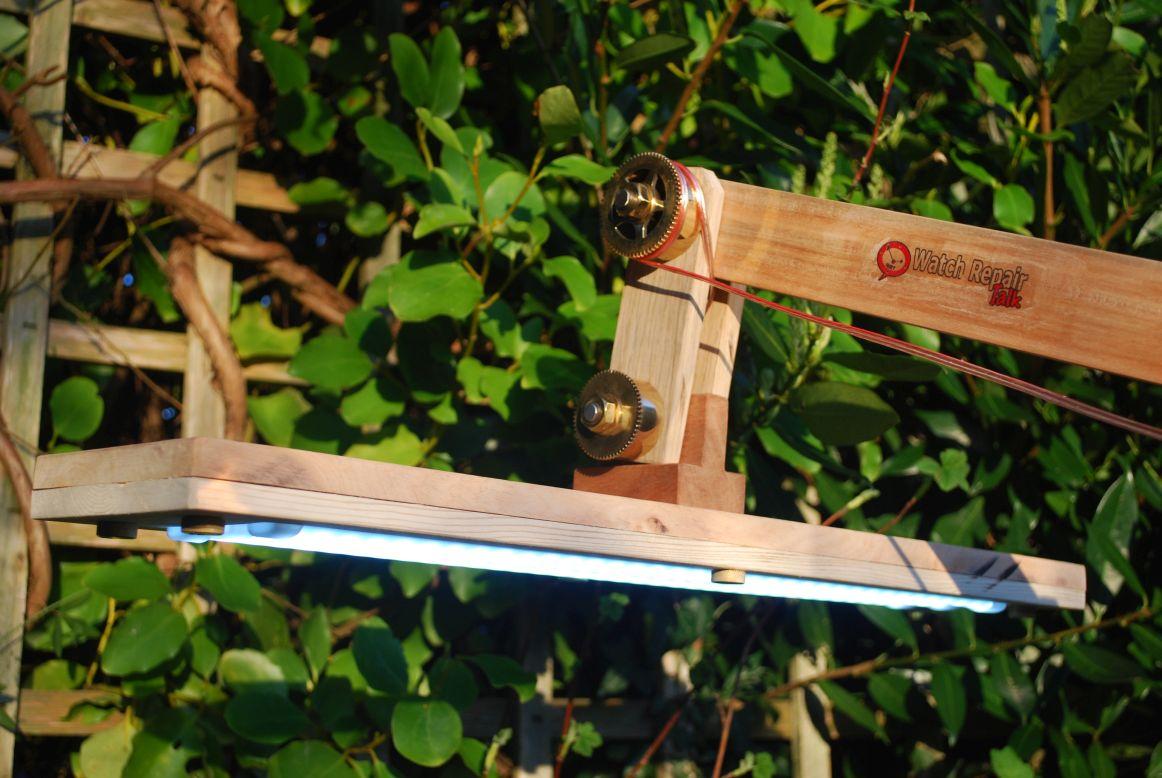
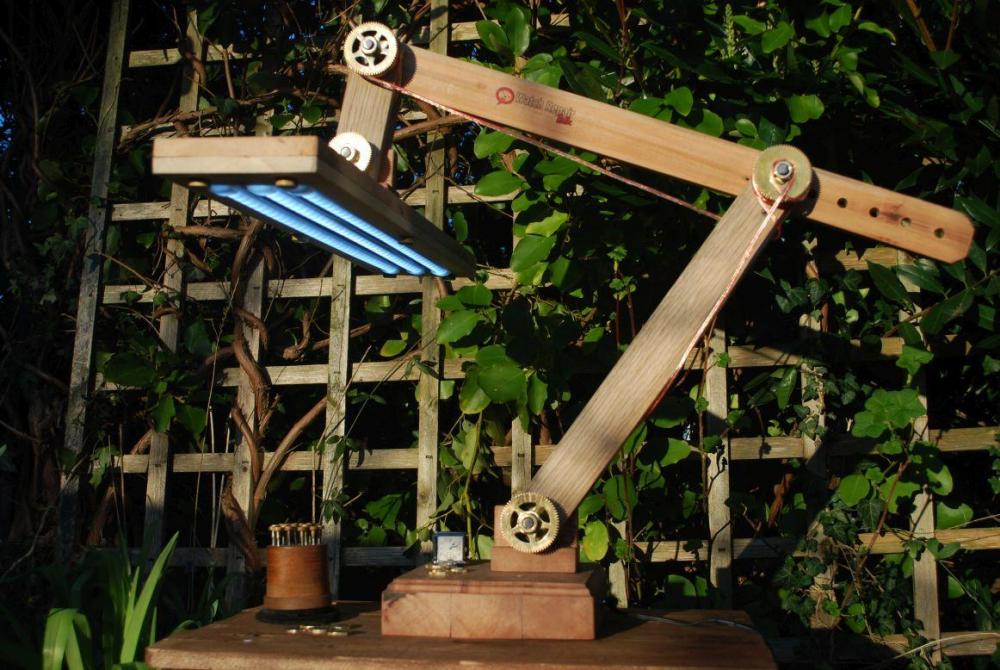
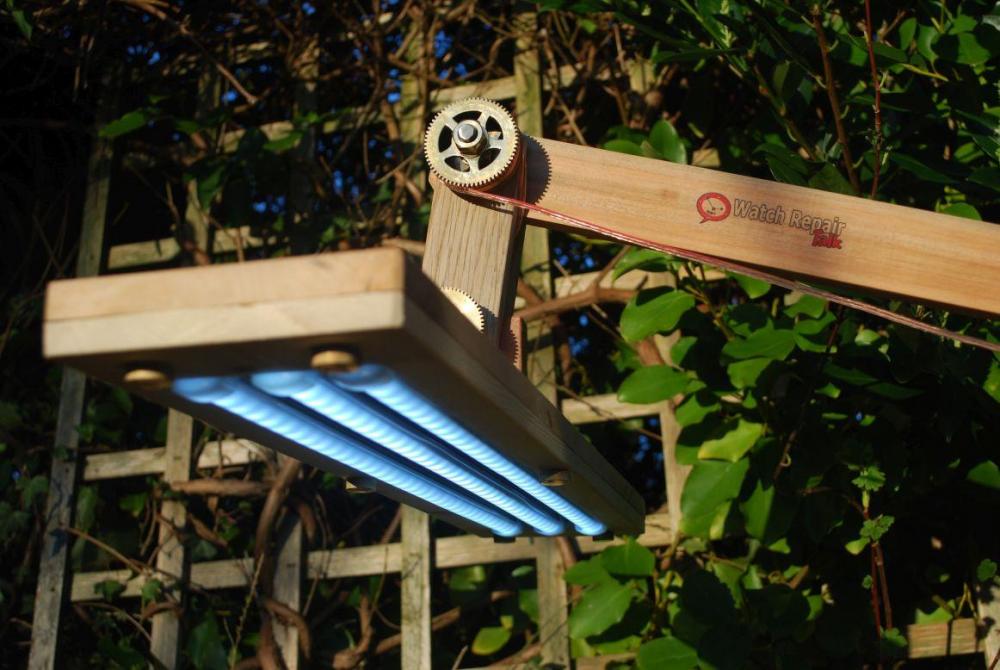
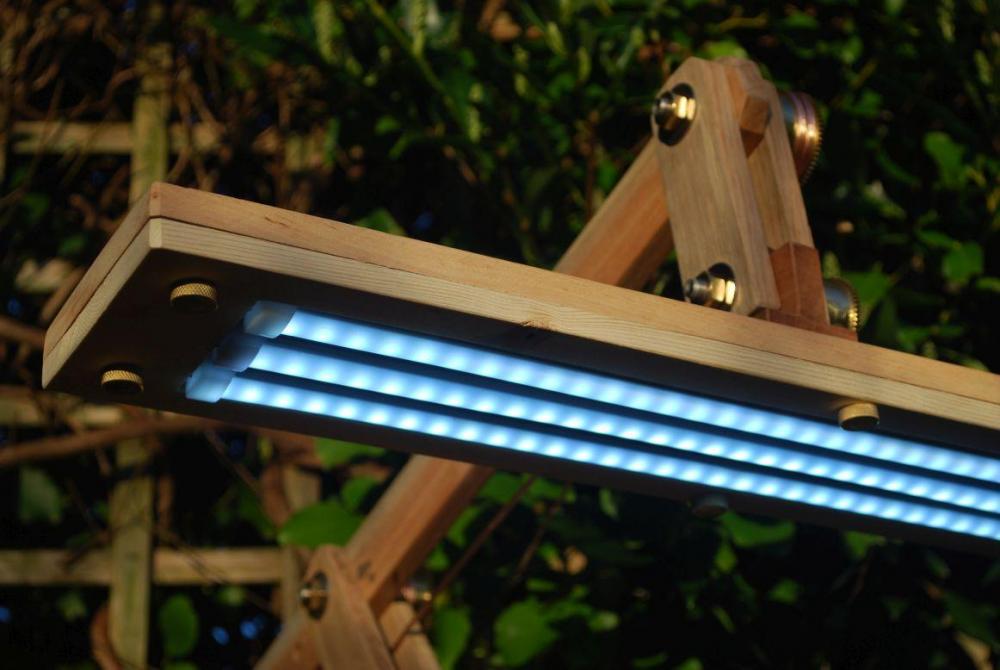
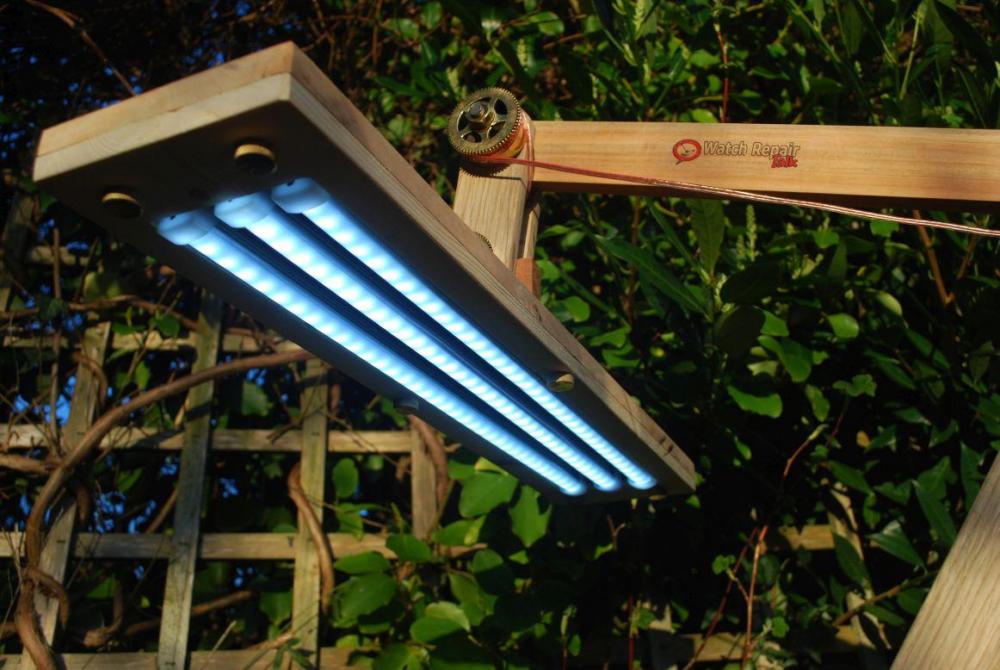
I have been busy with this bench lamp, I think I spent at least about 30 hours with it and even if it is not perfect I am pleased with the end result. Would I do it again? My immediate answer would sound like: Not a chance! Second thought: Maybe I would be happy to set up the tools and processes for a kind of a mass production. It was worth it economically as I have not spent much money on it, and it was worth it because I enjoyed bulding it and learnt? some new skills like knurling. Question mark is there because I am not sure if I learnt it, the result is again acceptable, but I dont really know how should the end result for knurling look like, when it is kind of perfect. I made, as always many mistakes during the process, blood was also shed when I tried to use my hand as a machine vice, and that spring barell tried to slice me up when I failed to hold it, instead it only could get some of my skins of one finger. Luckily my company sends me to regular first aid trainings so I could quickly apply an oily rug lying in the dust around my bench to the wound and carry on with the drilling. It also gave me the opportunity to suck some blood when I was hungry/thirsty. They say money is time so if you dont want to spend about 30 hours with sawing/planing/drilling/polishing/gluing/sanding/swearing and soldering you just could go to cousins and buy that led lamp which is a lightweight bench lamp with dimmer and you can even position it better over your work piece compared it to mine. I think this lamp will be a usefull addition to my bench from now on anyway. I used pallet and crate wood and you can see nail holes here and there and i left them there on purpose. I am going to add a switch to the base and I am in the process to decide how to lead that cable in a nice looking way still to be able to move the upper arm in and out if needed with the cable in place. Skills what were used: - some woodworking - some soldering - skip diving - time finding Tools what were used: - different kind of woodworking tools (planer and thicknesser/ chisels / sanding paper/ router / table saw / mitre saw) - angle grinder - pillar drill (used it for drilling and polishing) - laser printer - unimat 3 - cordless drill - and other tools like screwdivers / pencil / ruler / caliper / etc.. Materials what were used: - threaded stainless steel rods from the skip - copper bolts and nuts and washers from the skip - 2 core speaker cable (i had from previous project) - spring barells (i had a box of them / bought them from eBay earlier without knowing what to do with them) - a BT hub from the skip for the 12V power supply and the connector - I bought 5 led strips ($10.78) but only used 3 of them as the power supply was rated to 1.5A and one strip is using about 400 mAmps. - used pallet (collected earlier for other projects and firewood) - used building materials crate (collected earlier for other projects and firewood) - wood glue (had it, its like bread and butter you need it every day ;-) - gel medium for the photo transfer (had it from earlier project) - polishing material (had it) - some wood screws (had them) - bought a switch for £3.64 If you ever thought about what skip diving is, I can teach that to you, but be prepared that you have to give up some of your dignity. I am a professional skip diver and I can stay there longer than 10 minutes! Years of practice!


 1 point
 -
I can happily announce the crystal is out! I shouldn't think I'll be the last to adopt this unorthodox approach, the crystal was damaged prior to this violation of horological etiquette. Yes I did cut myself & no, on reflection, I concede it wasn't a very good idea.
 0 points


.jpg.cc05abe62b7776473e10ffb05dd421bc.jpg)