Leaderboard


Popular Content
Showing content with the highest reputation on 04/20/21 in all areas
-
4 points
-
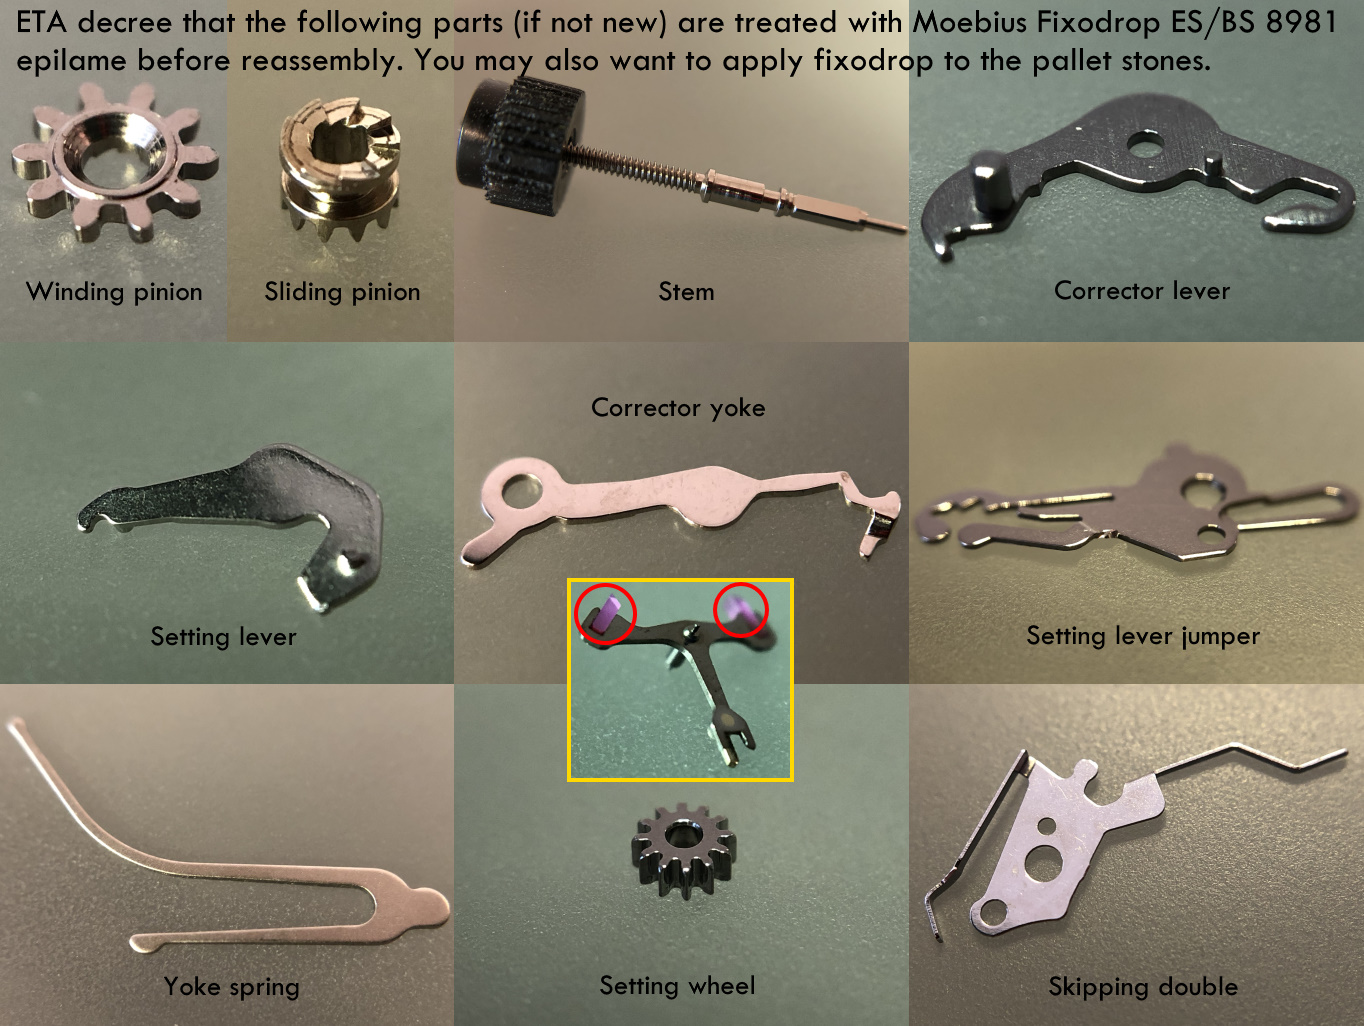
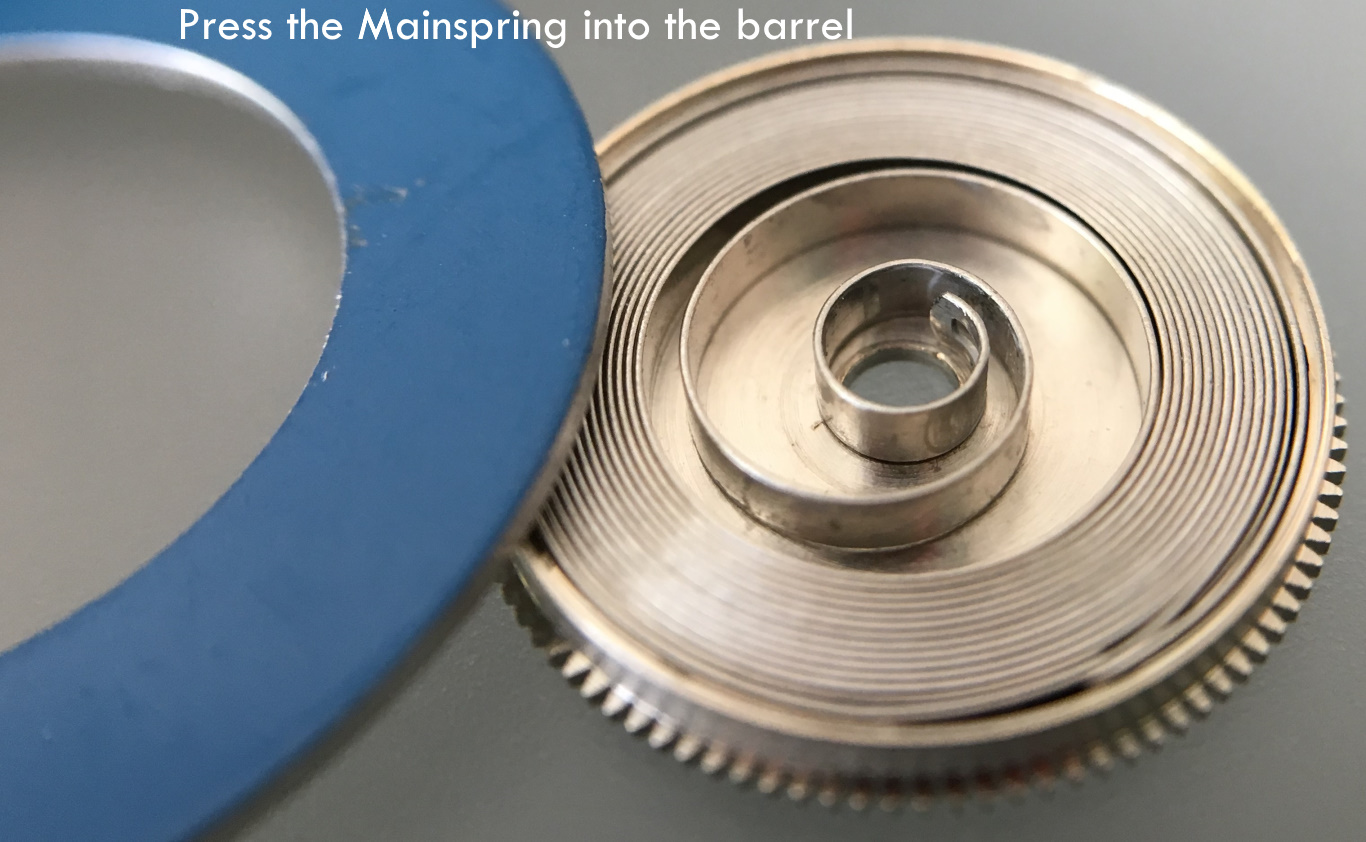
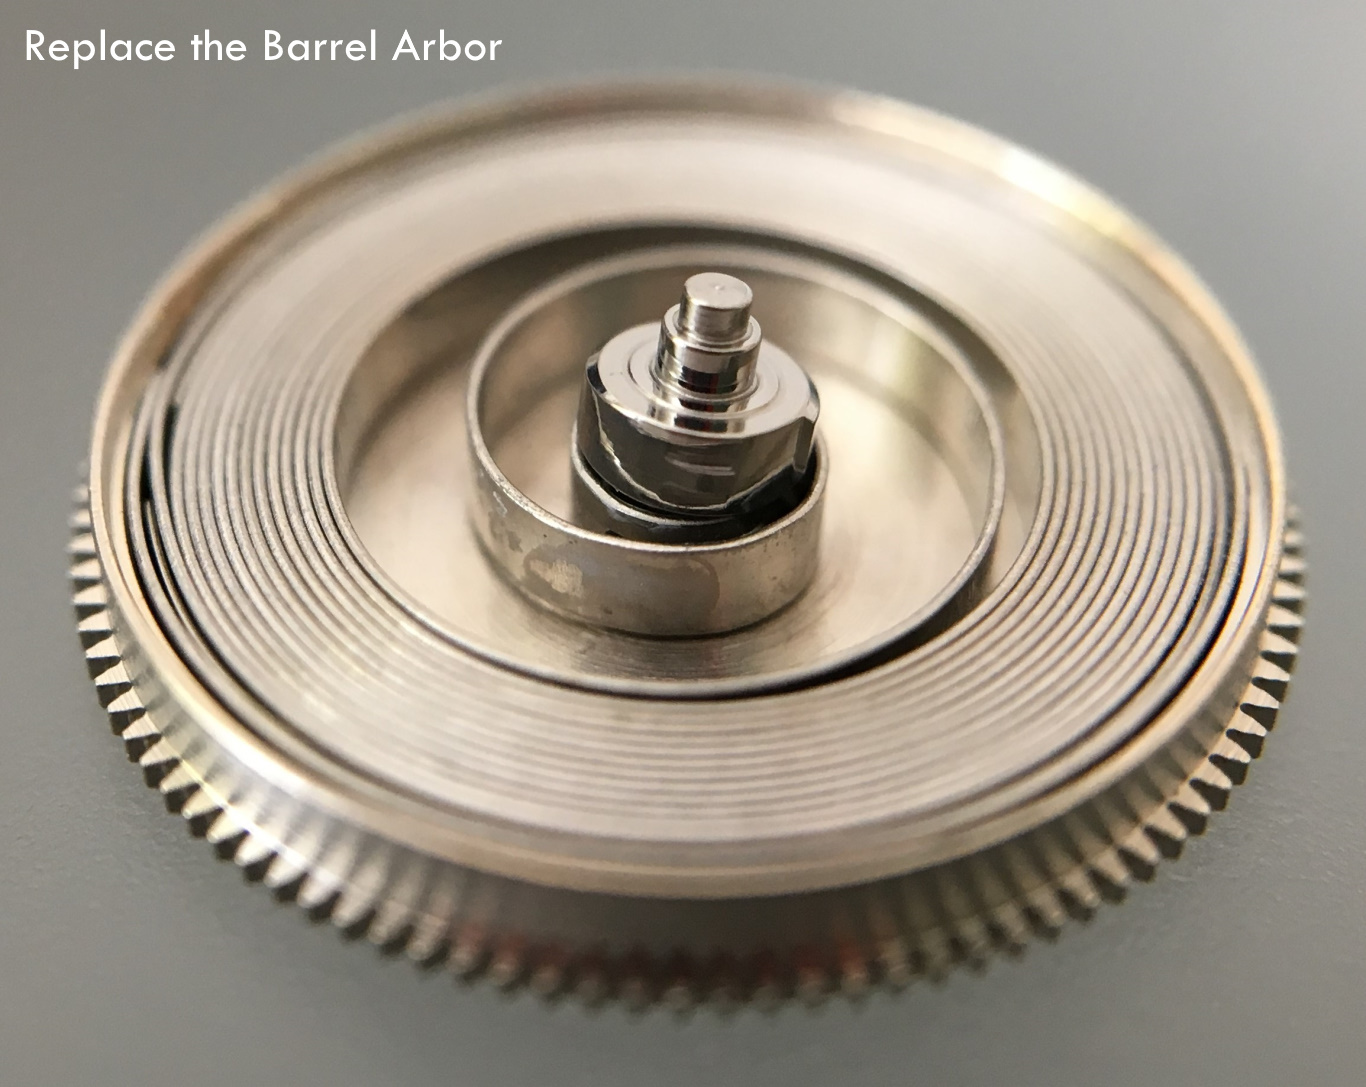
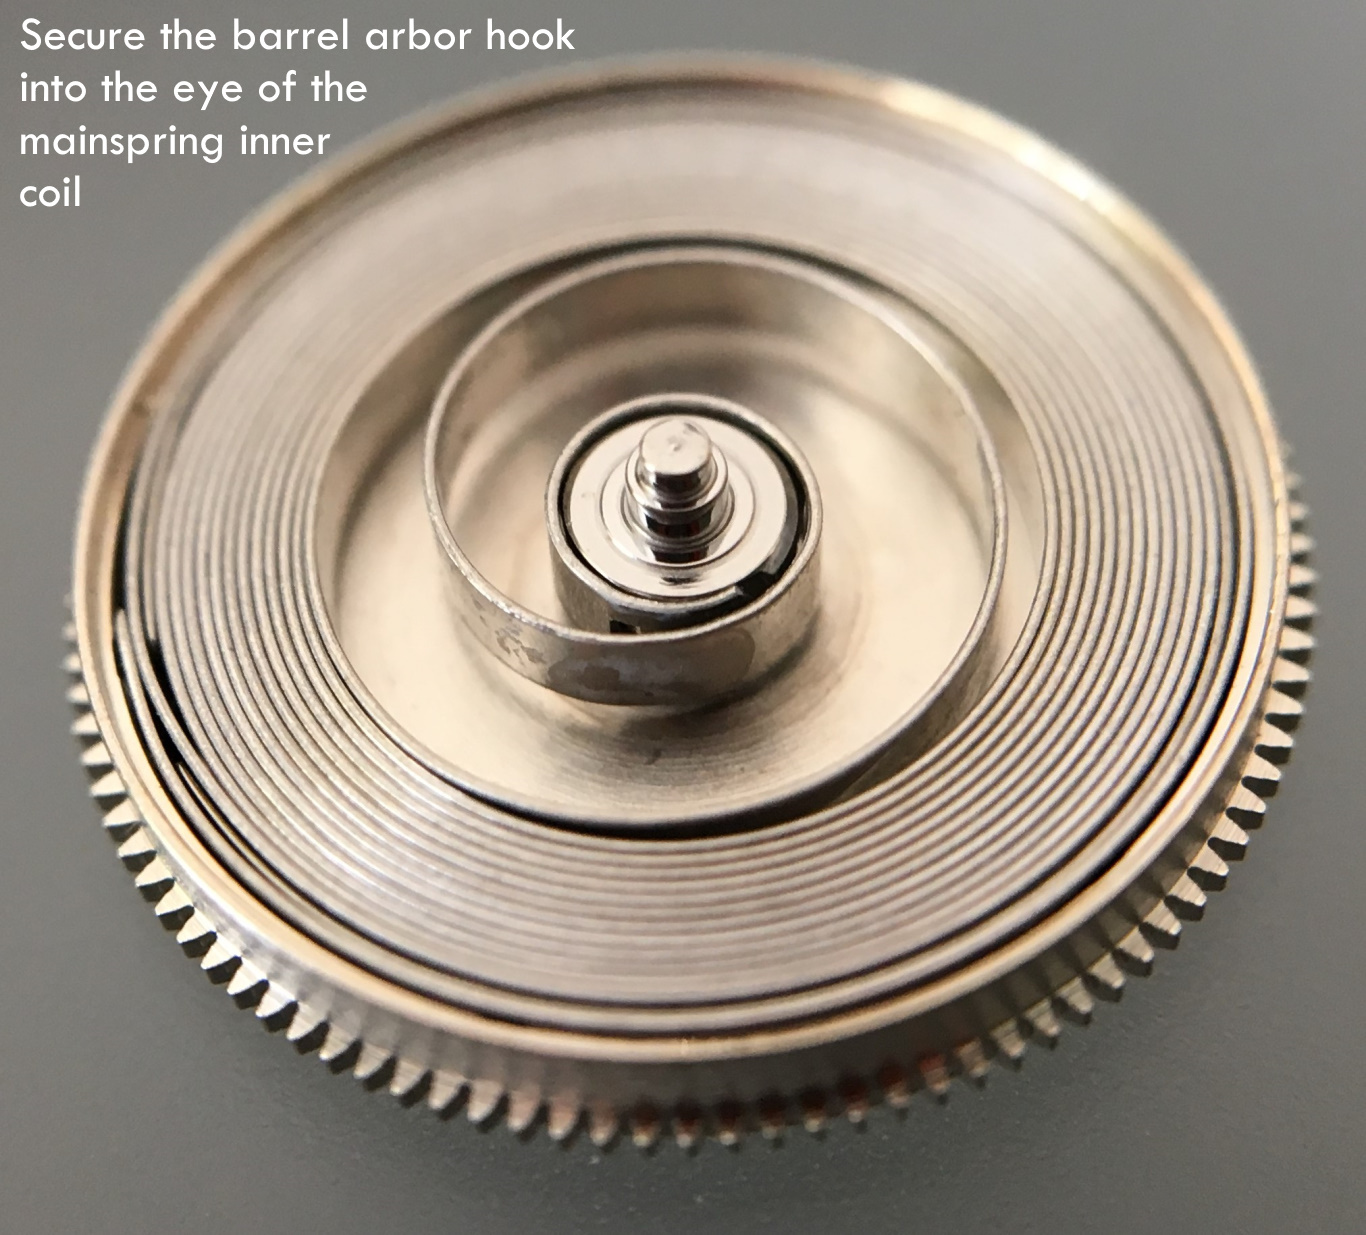
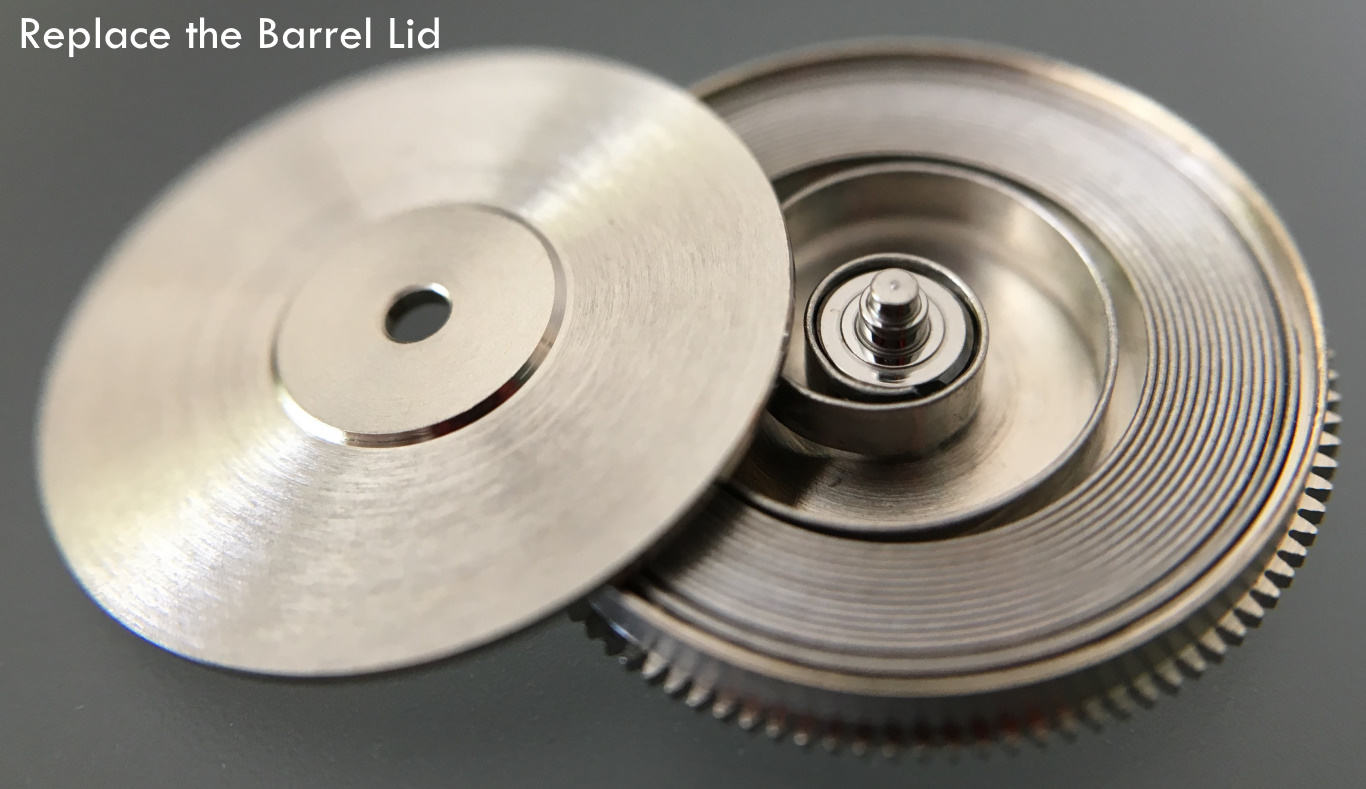
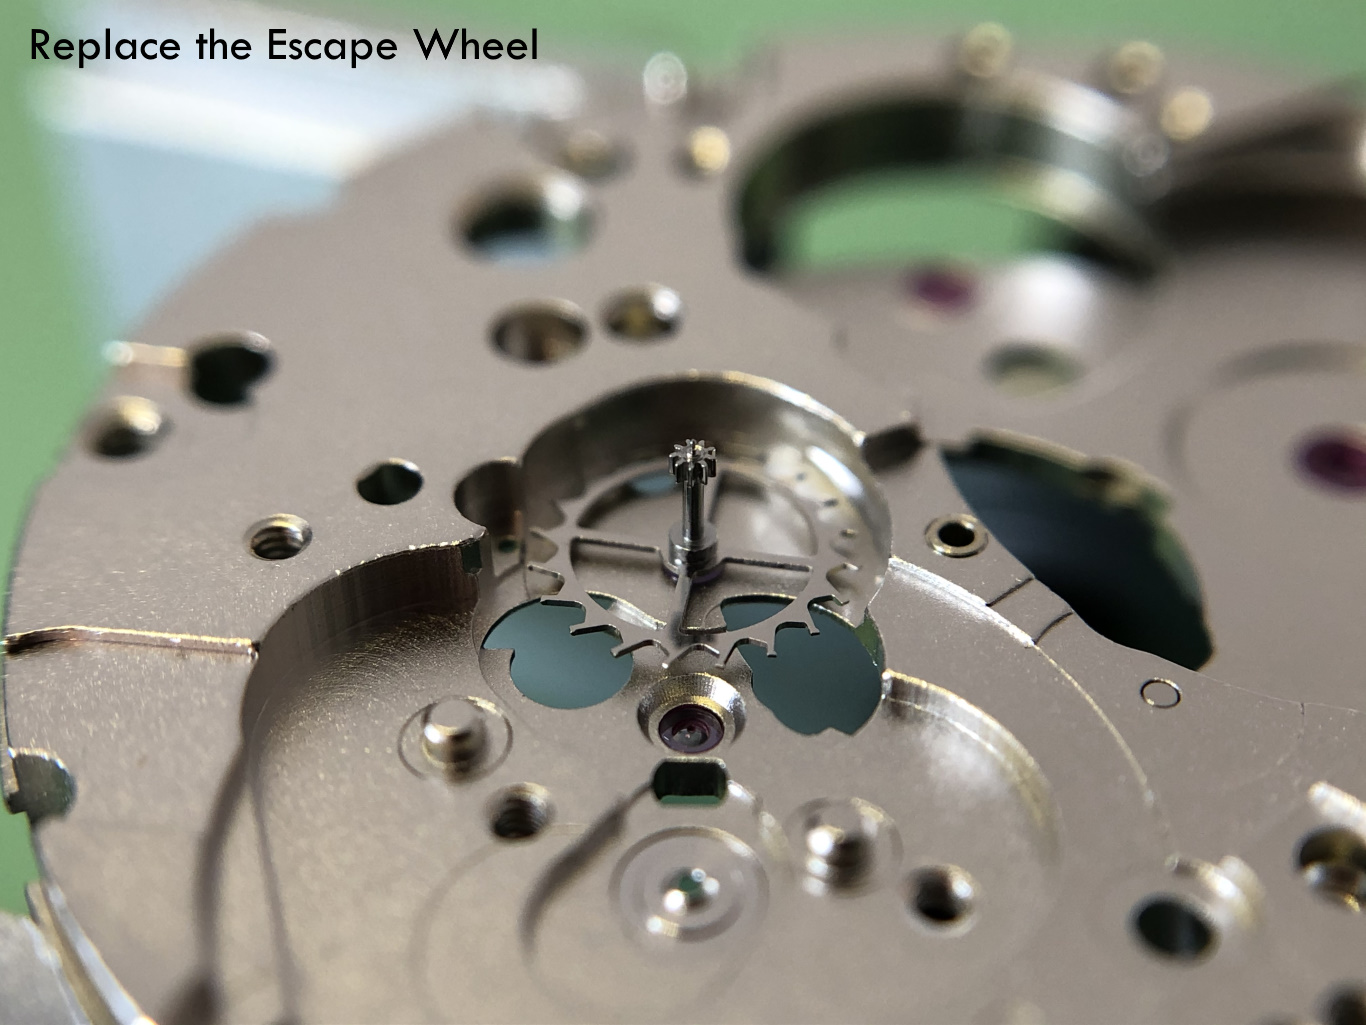
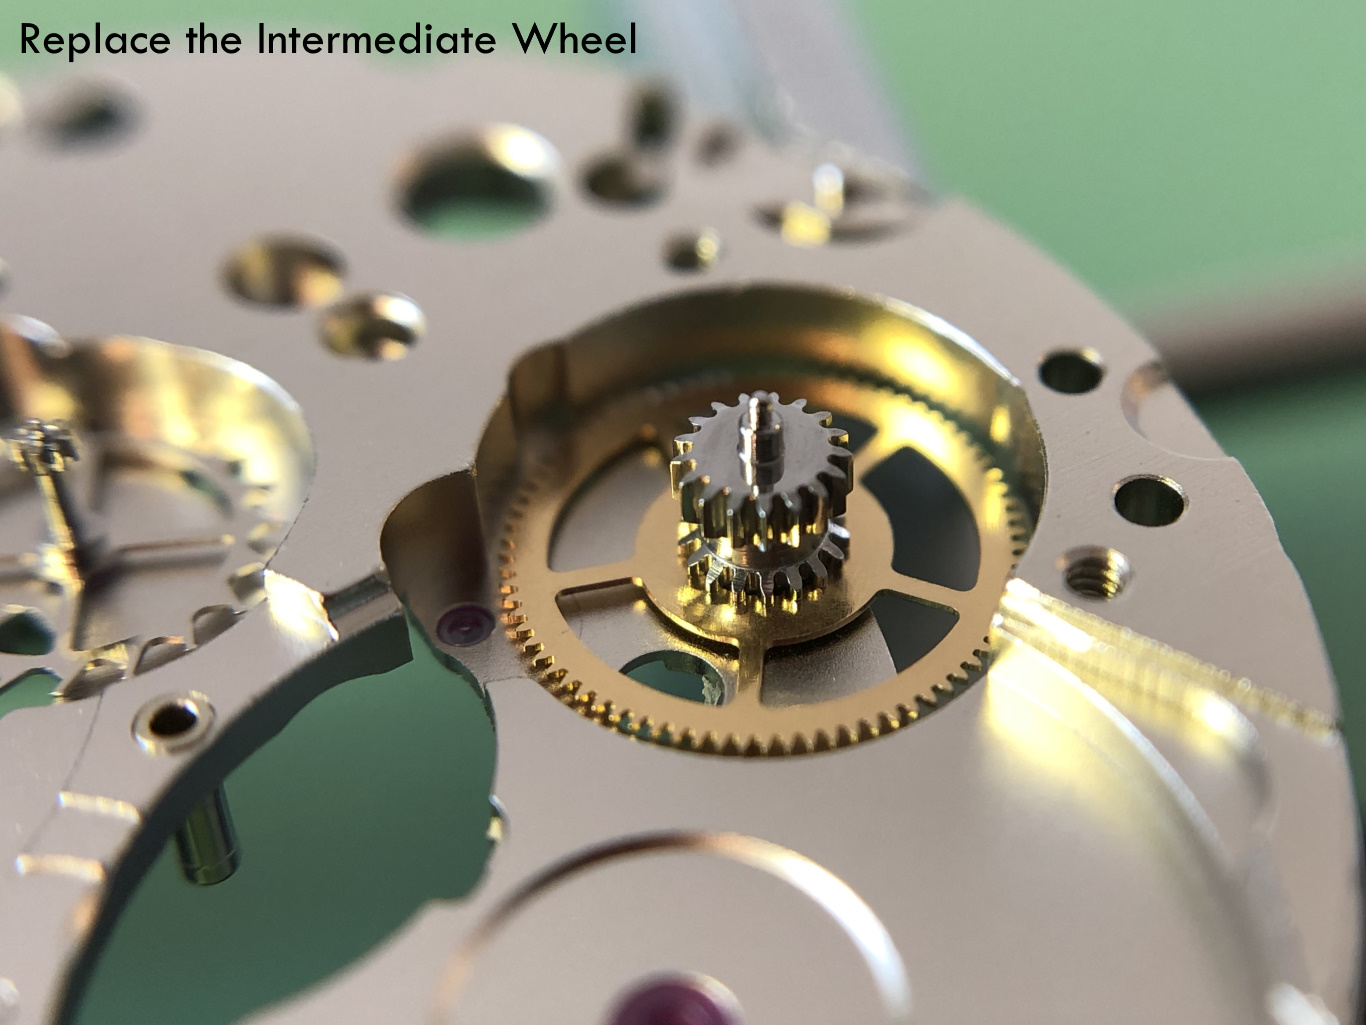
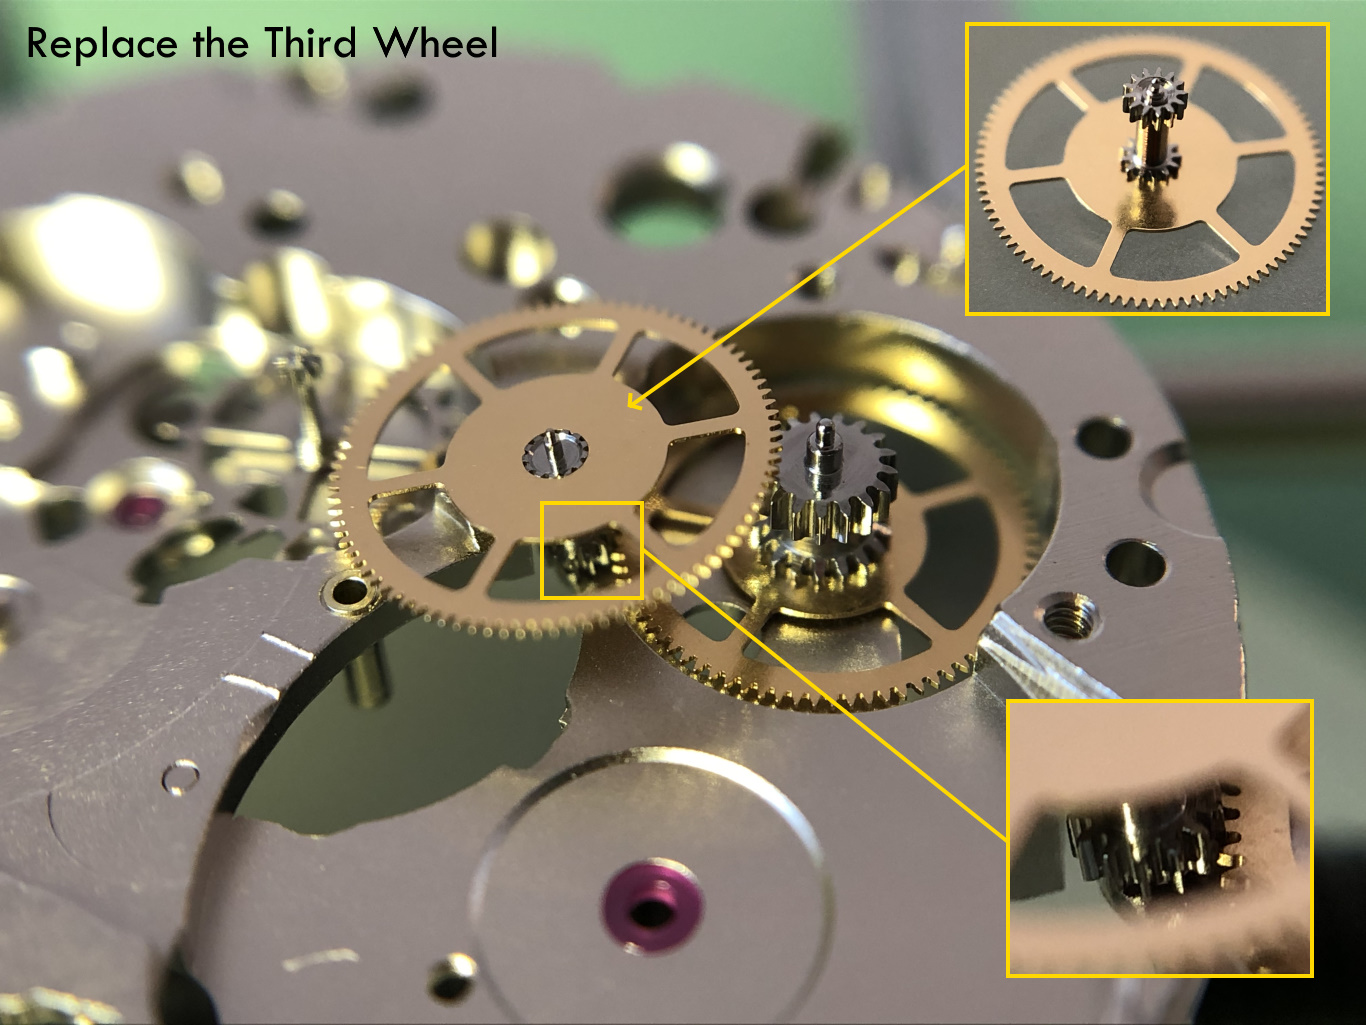
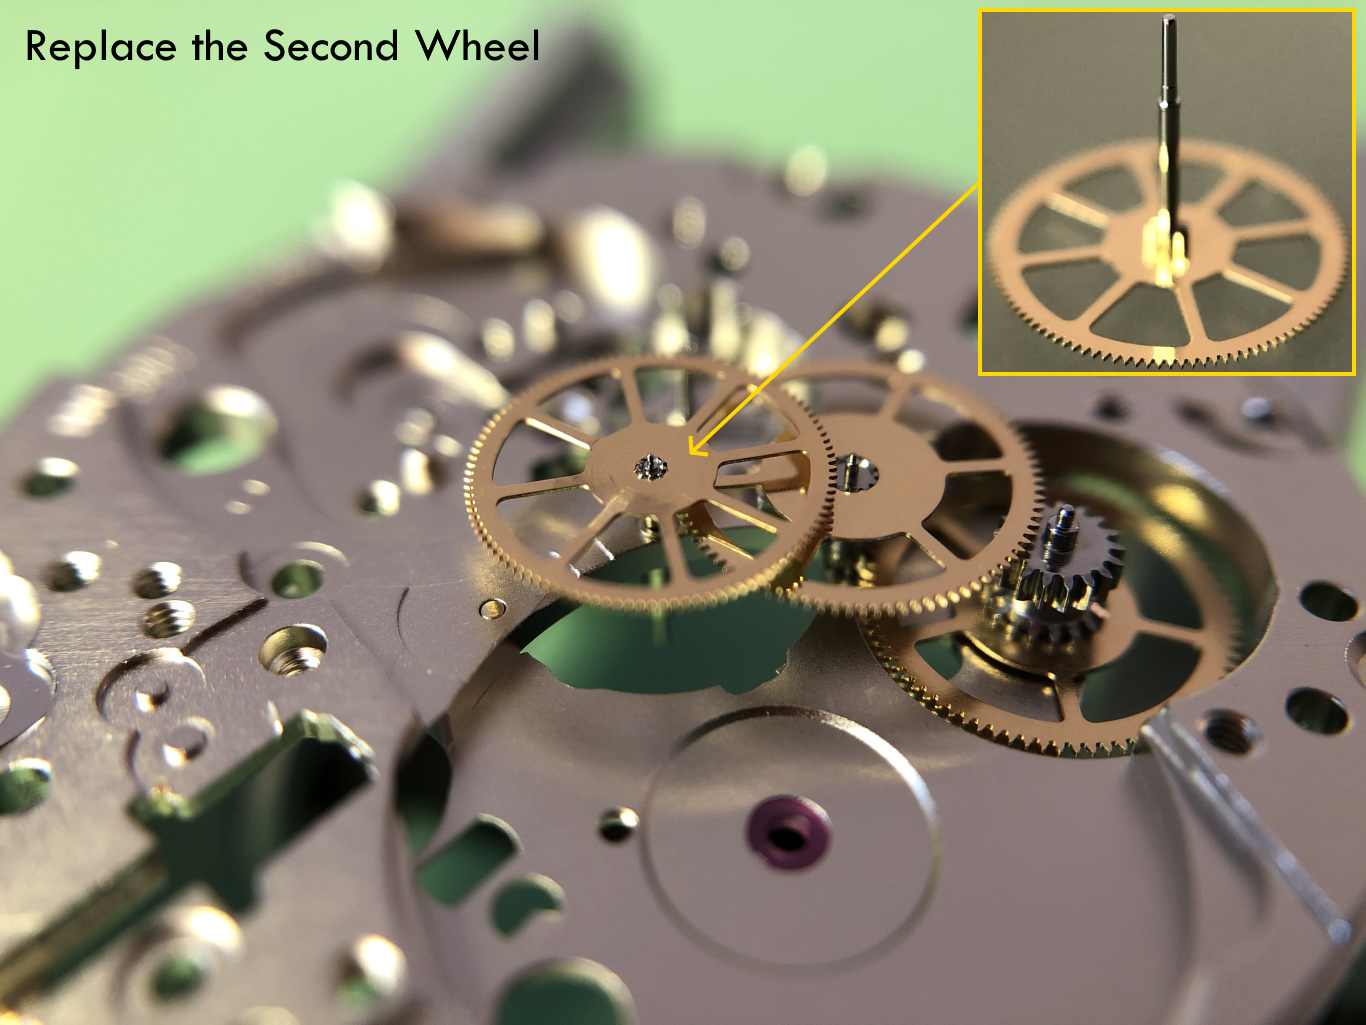
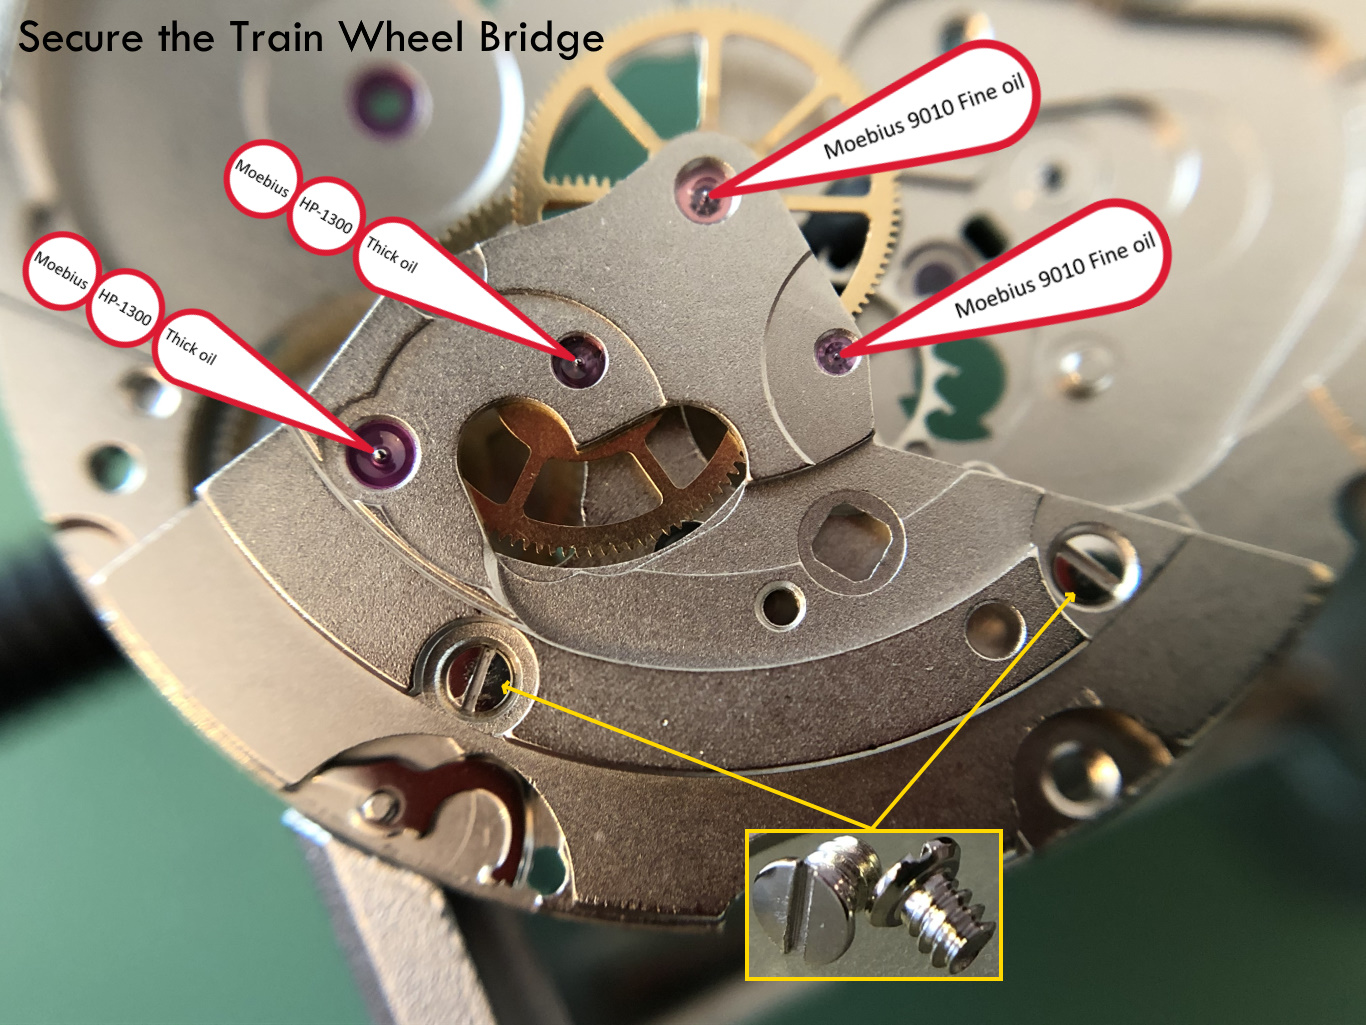
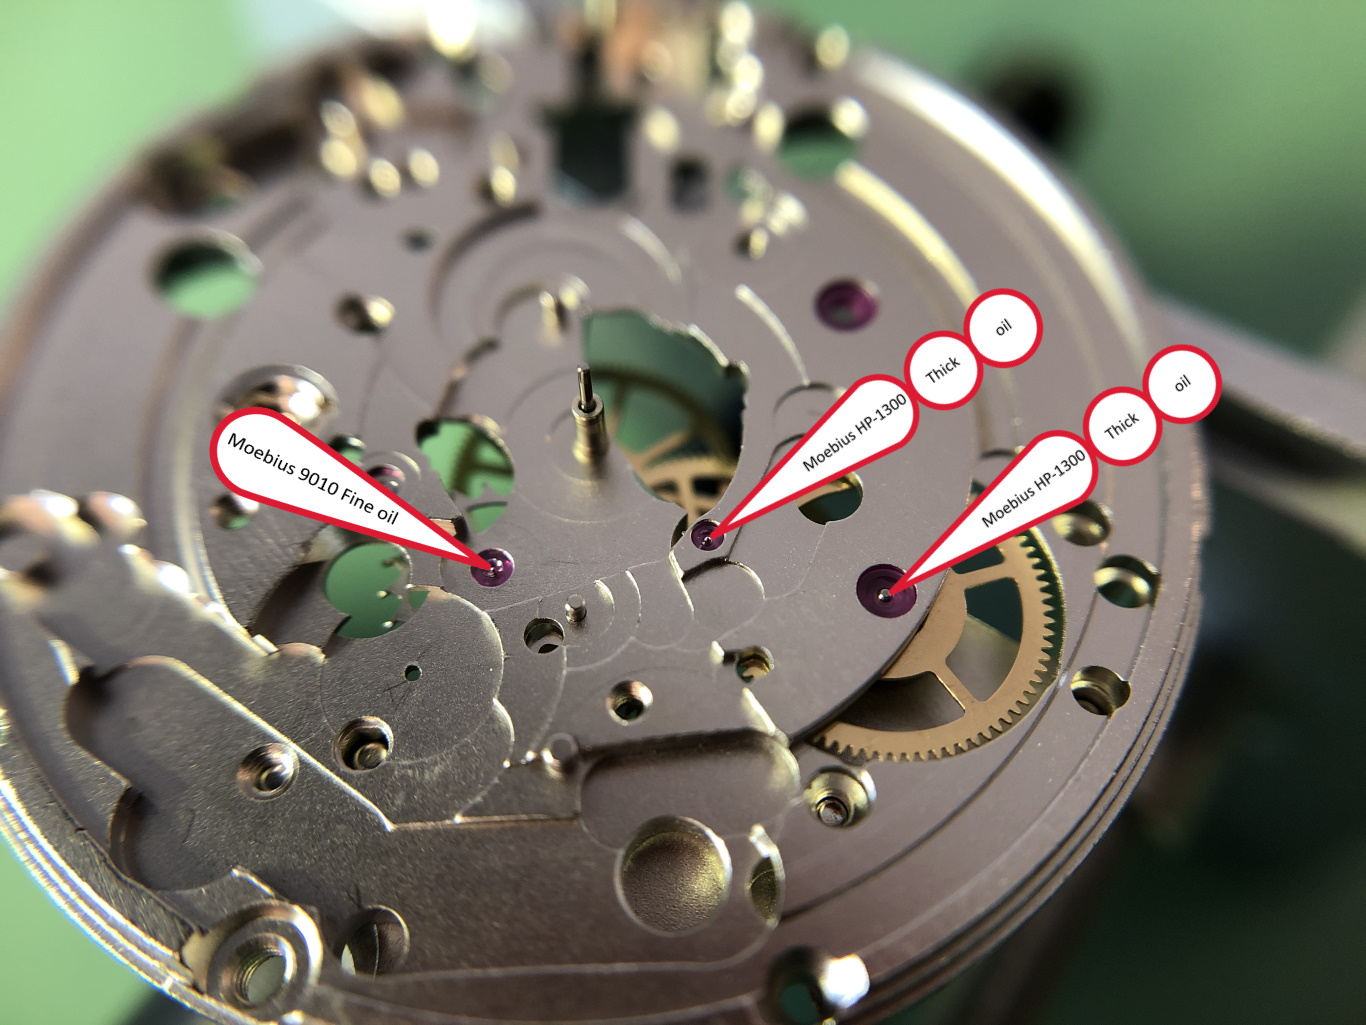
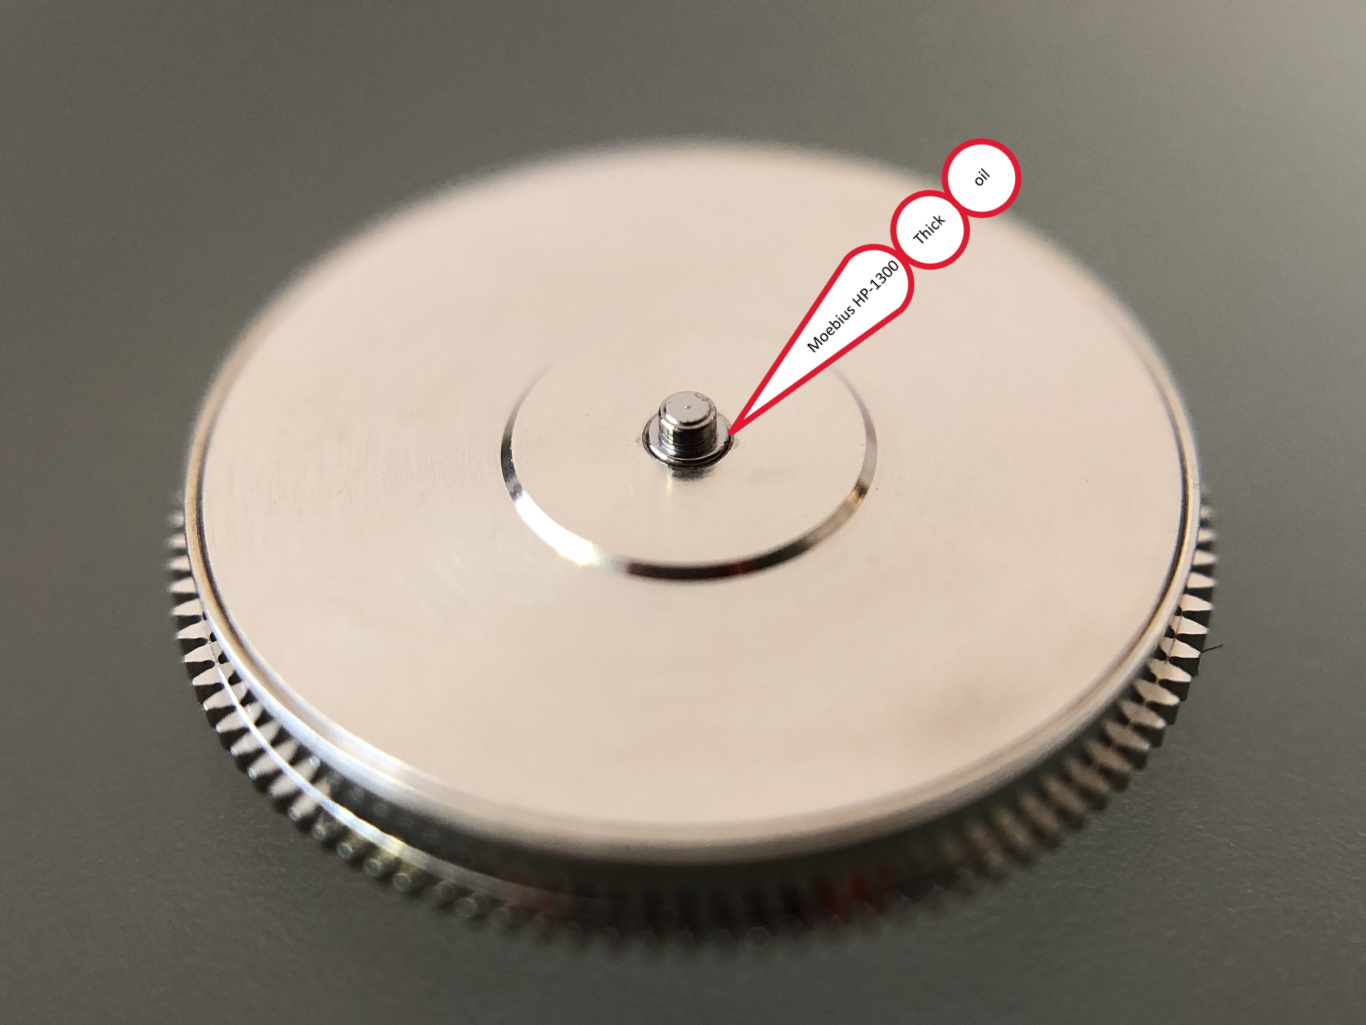
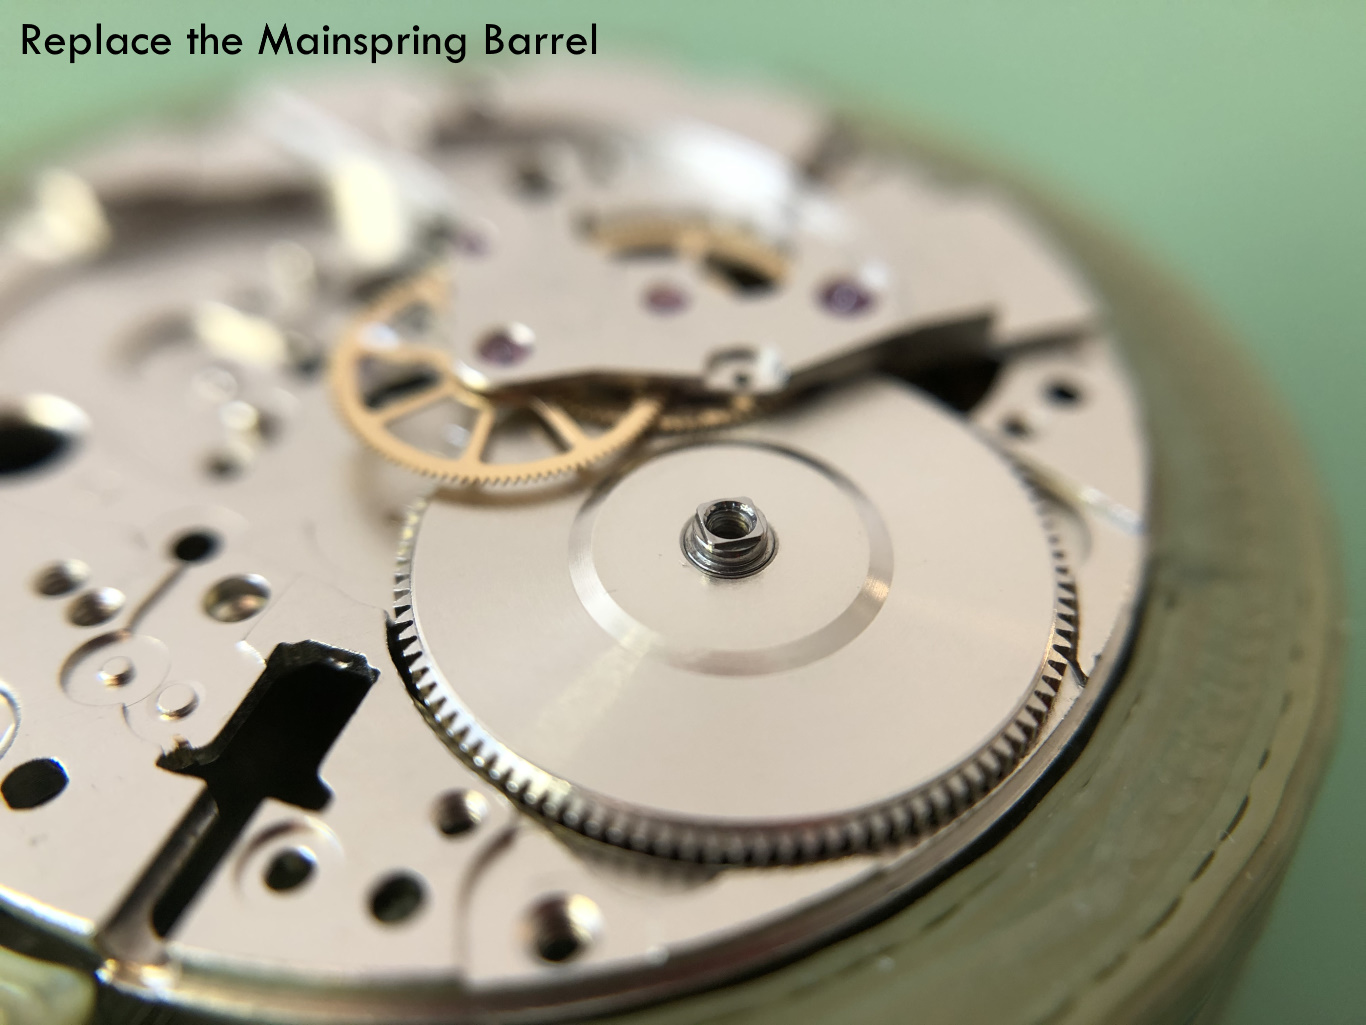
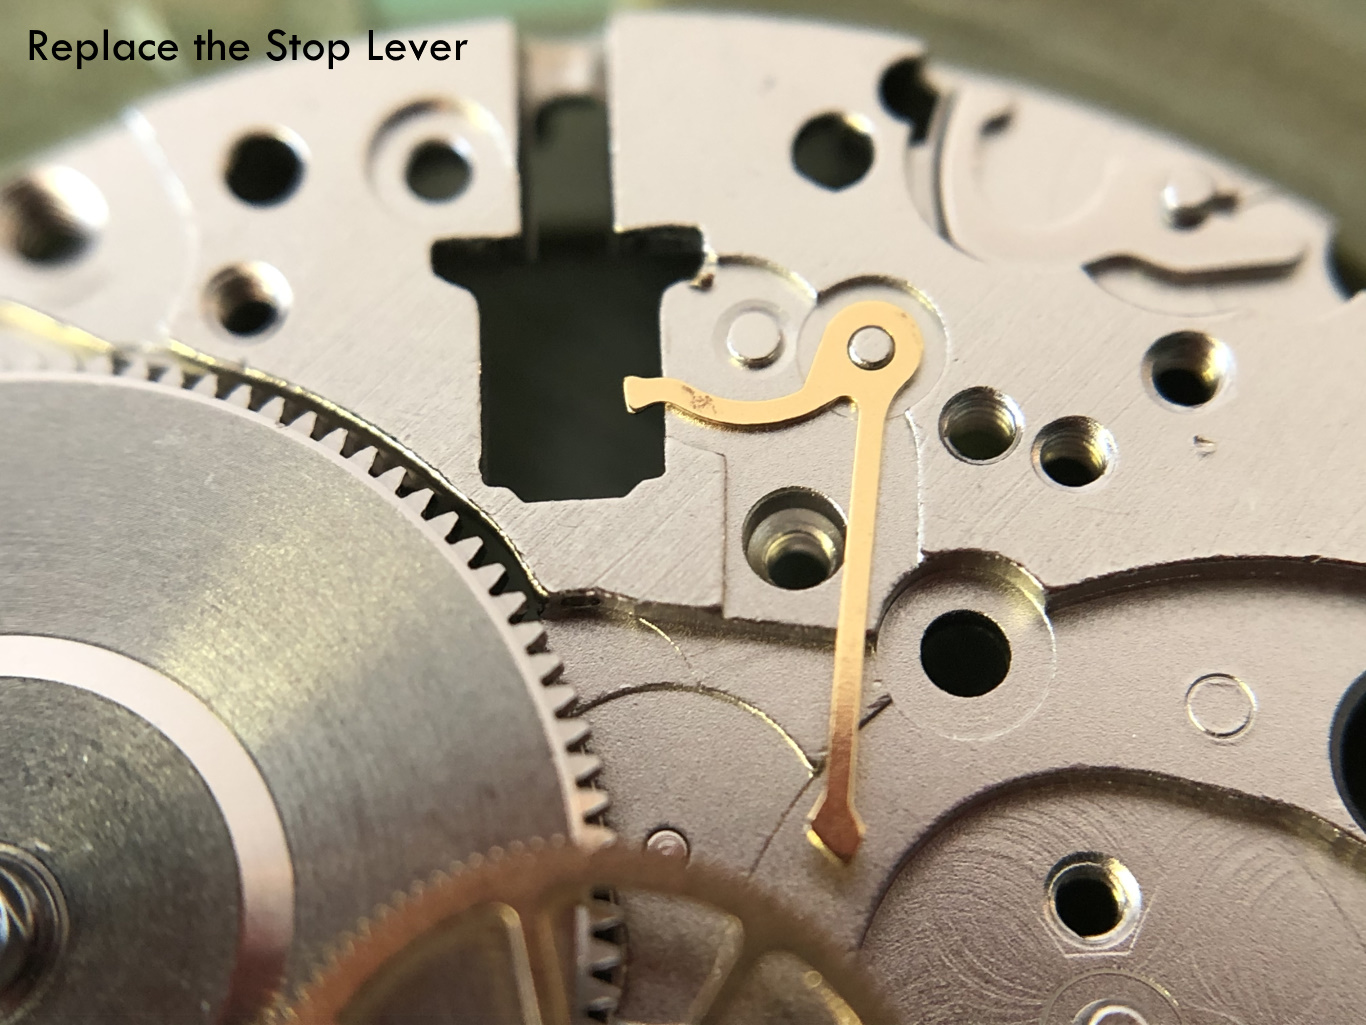
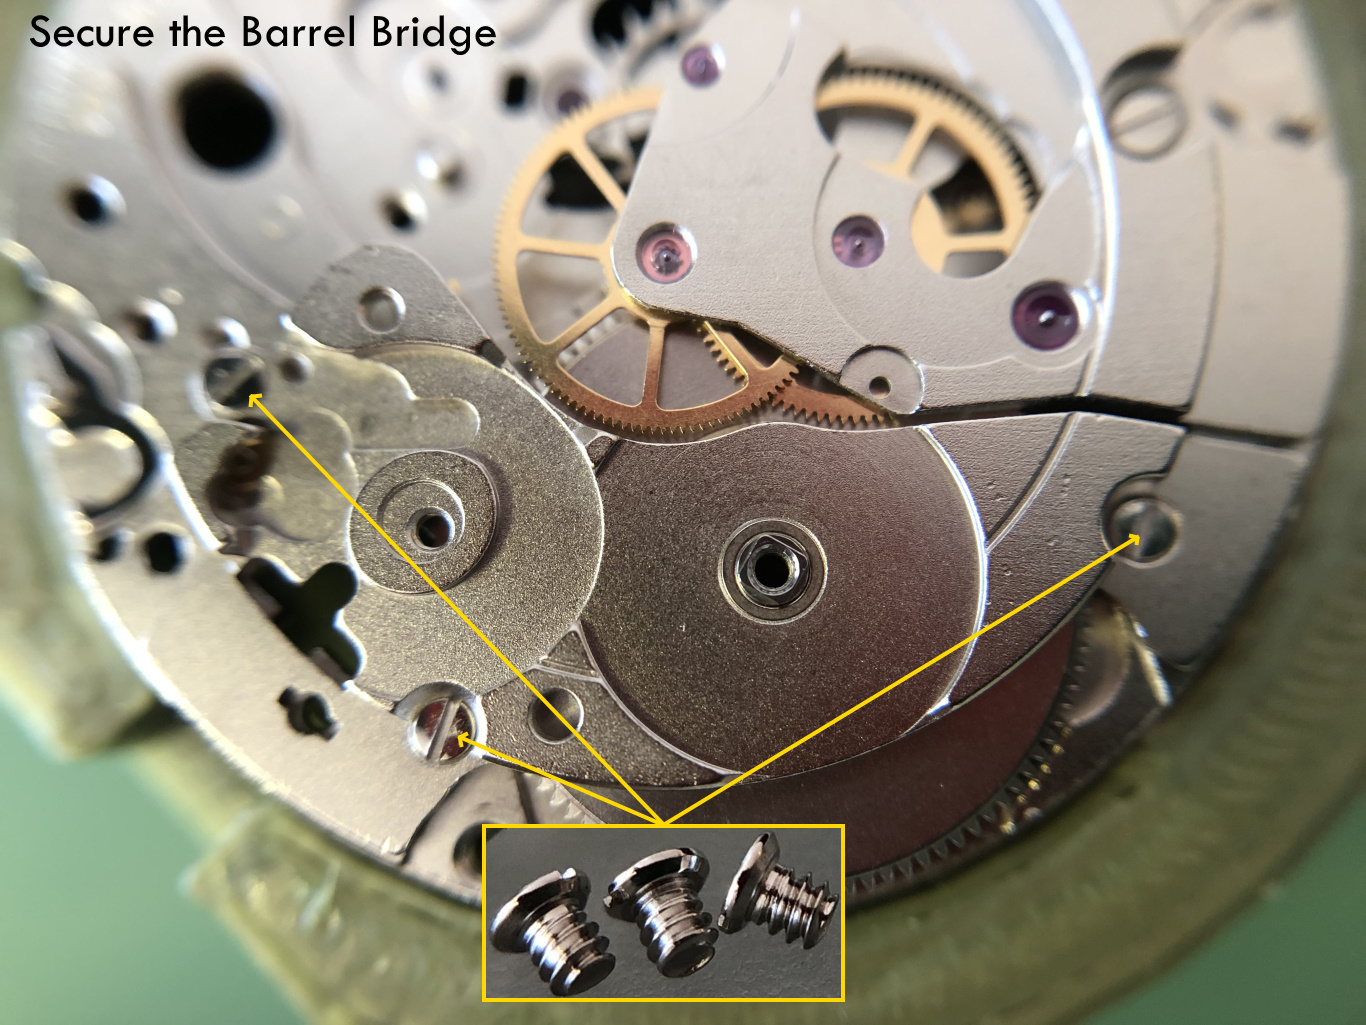
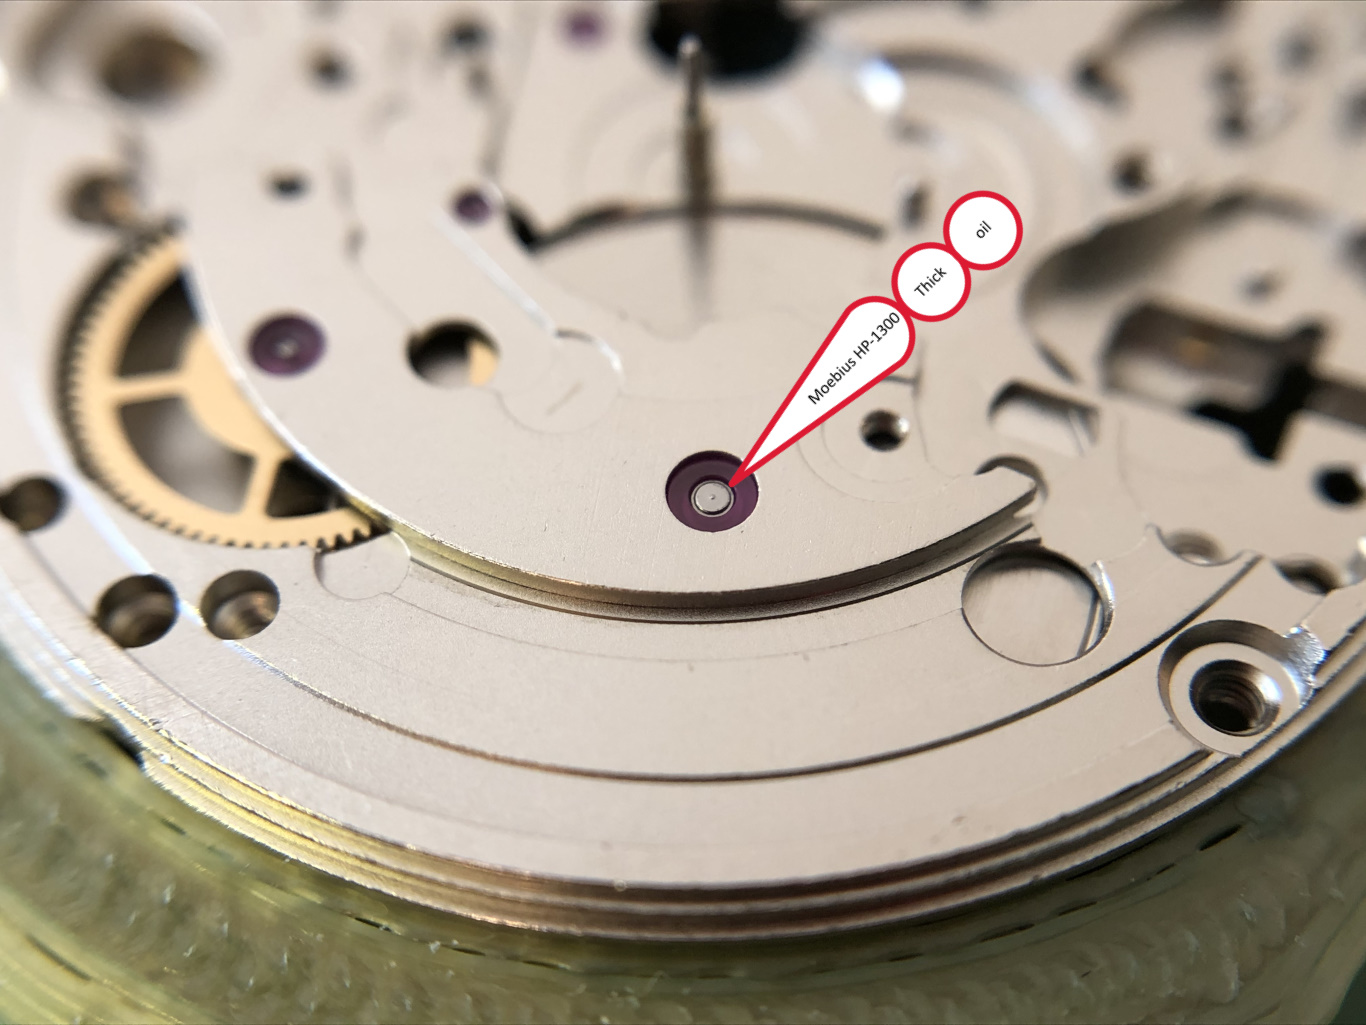
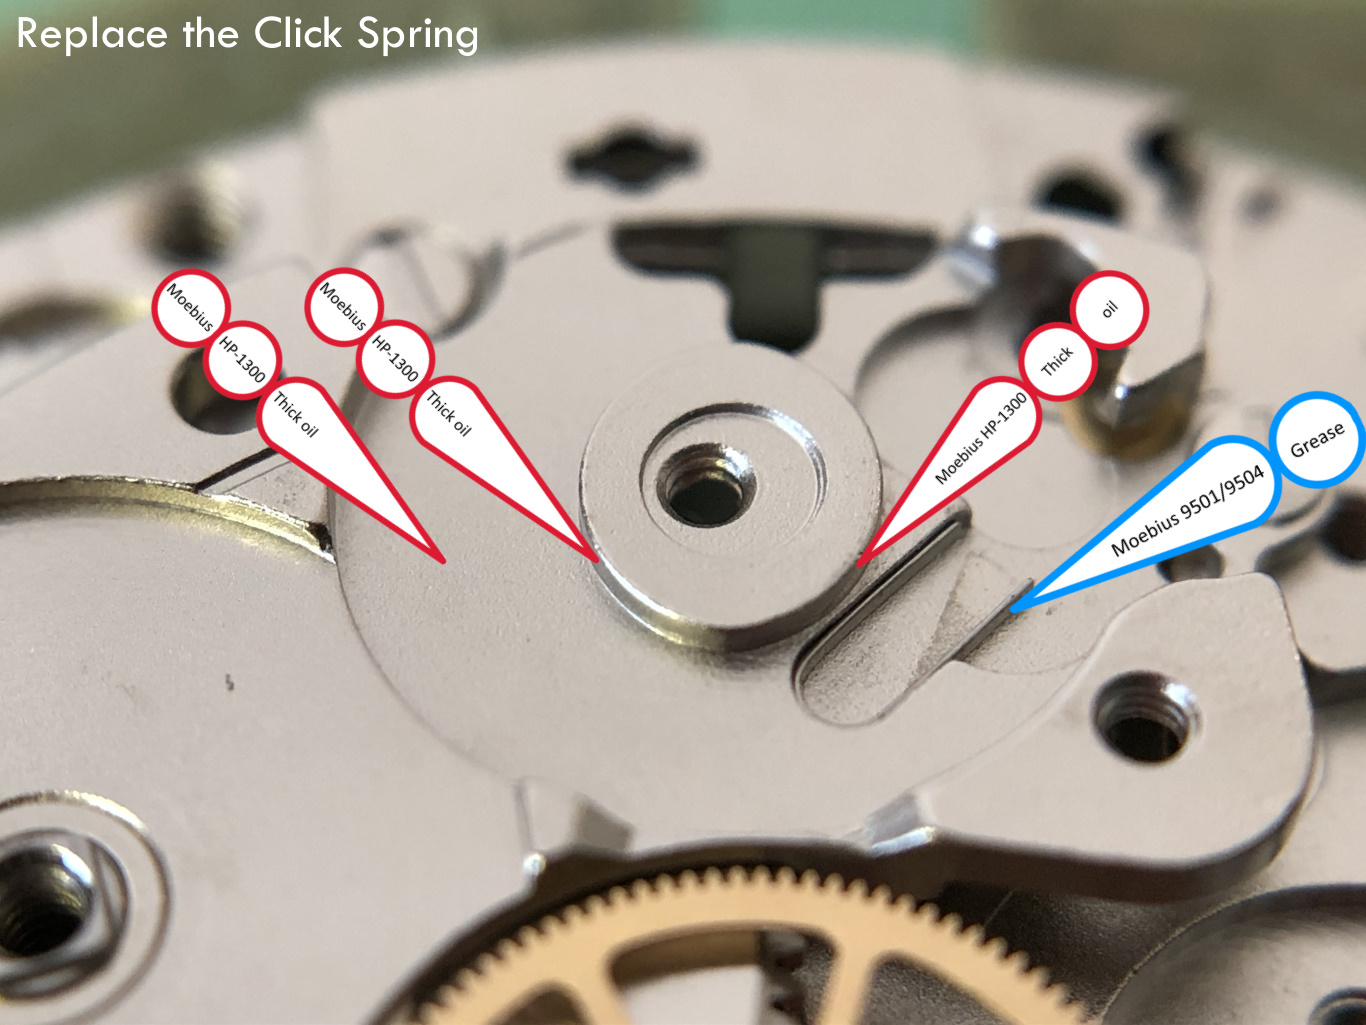
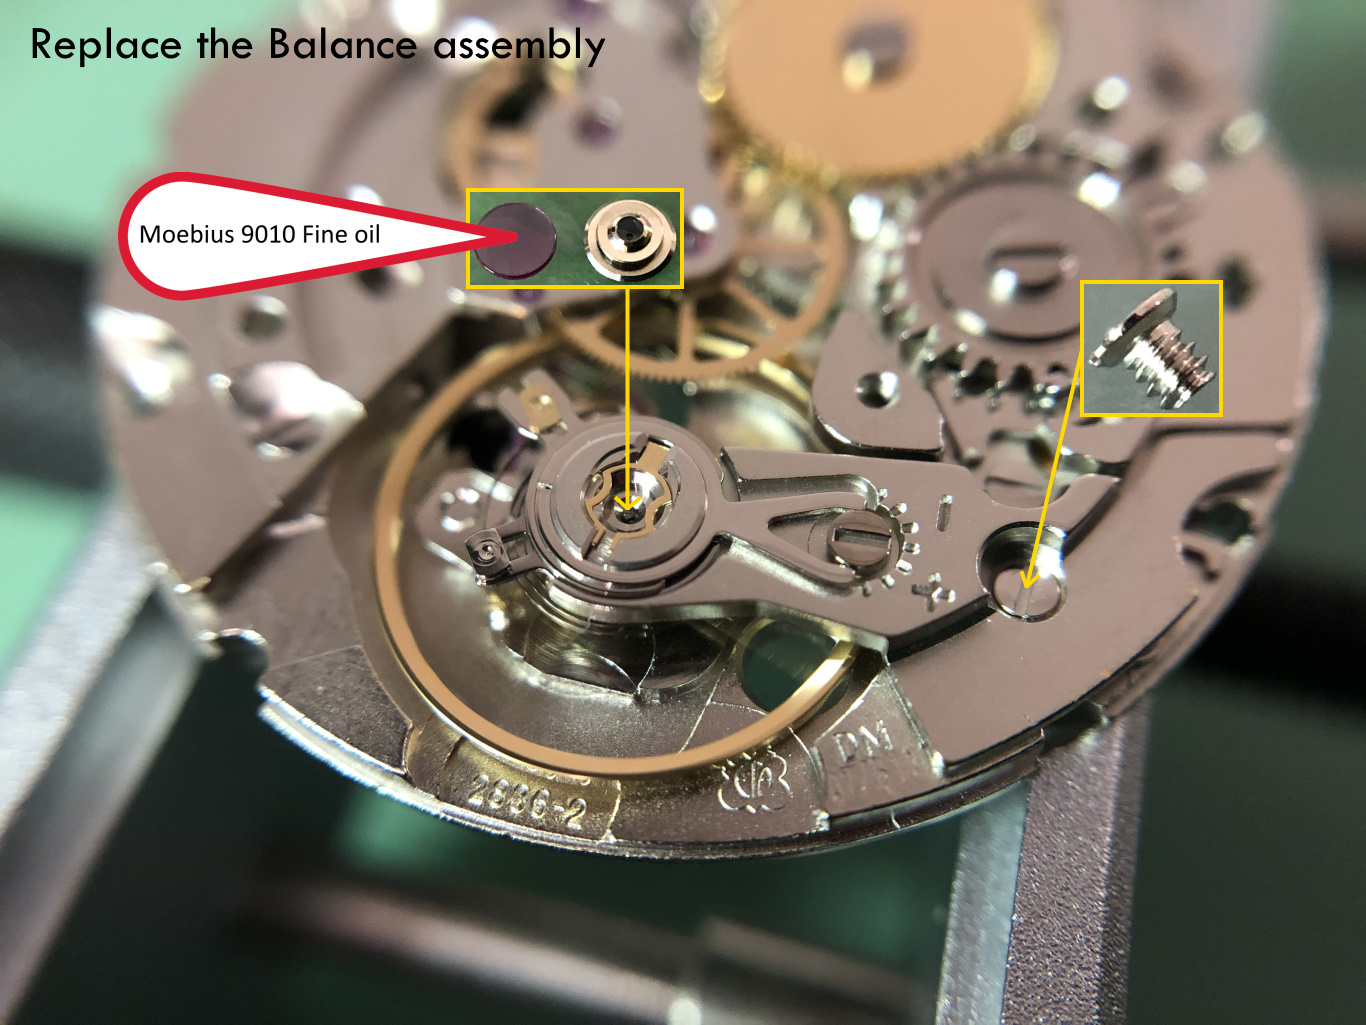
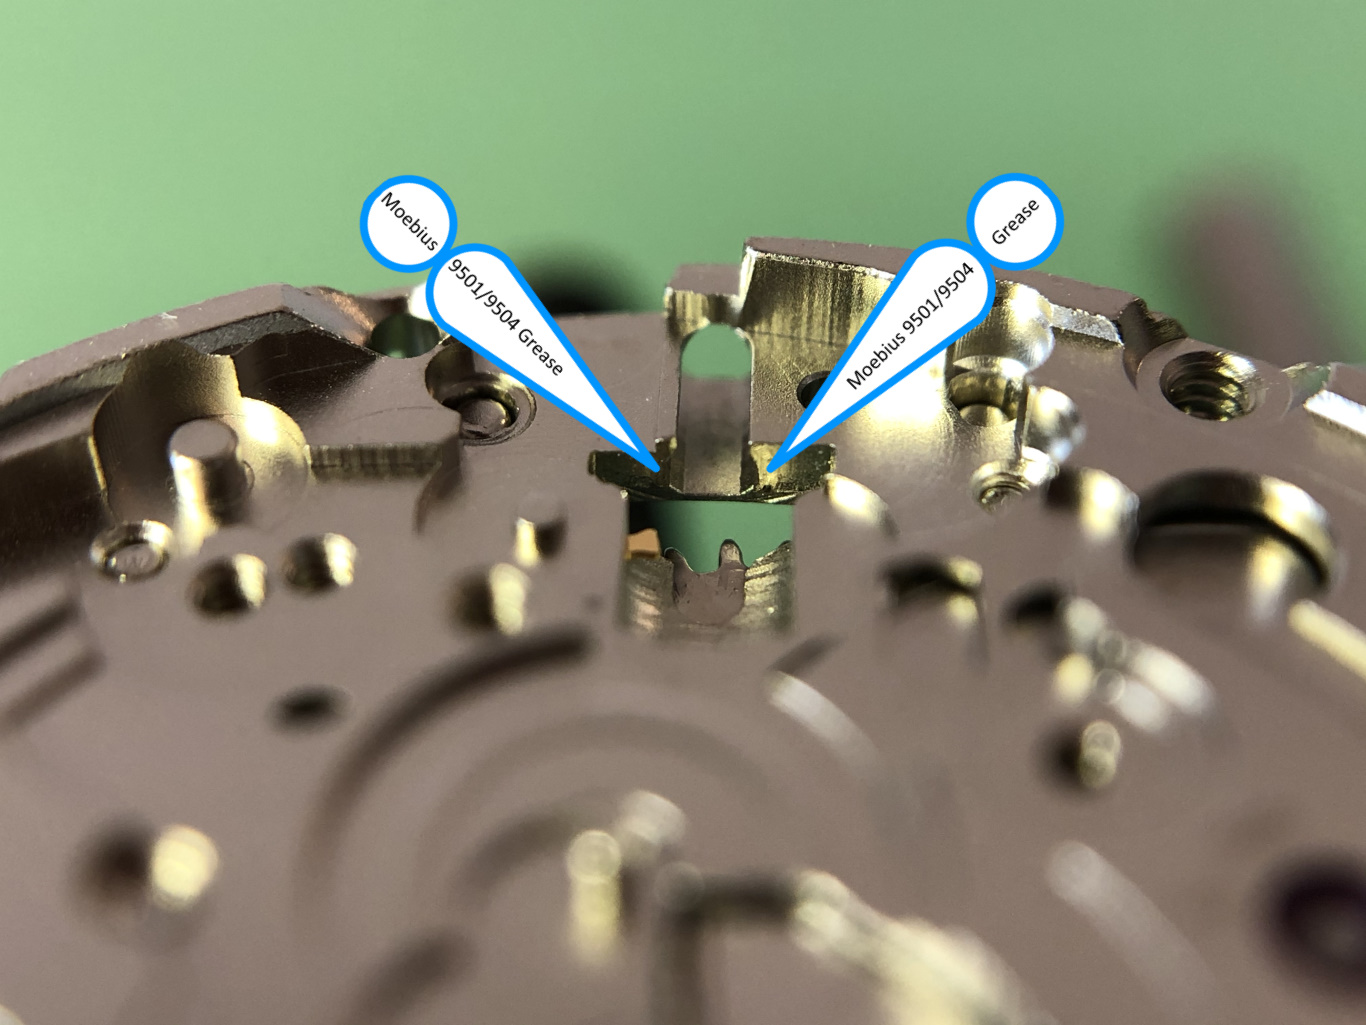
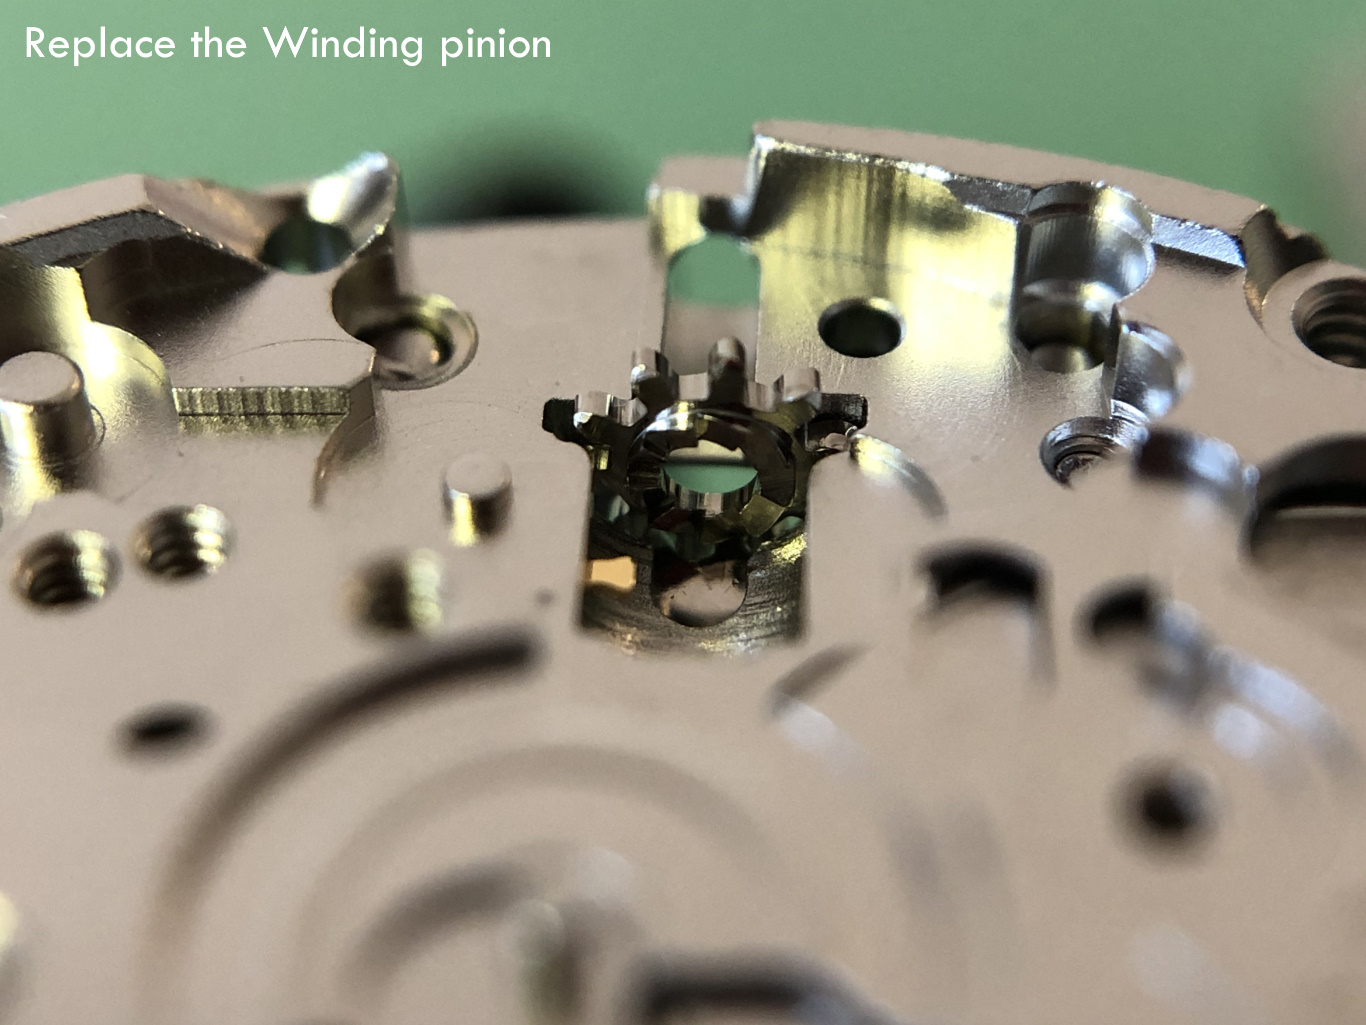
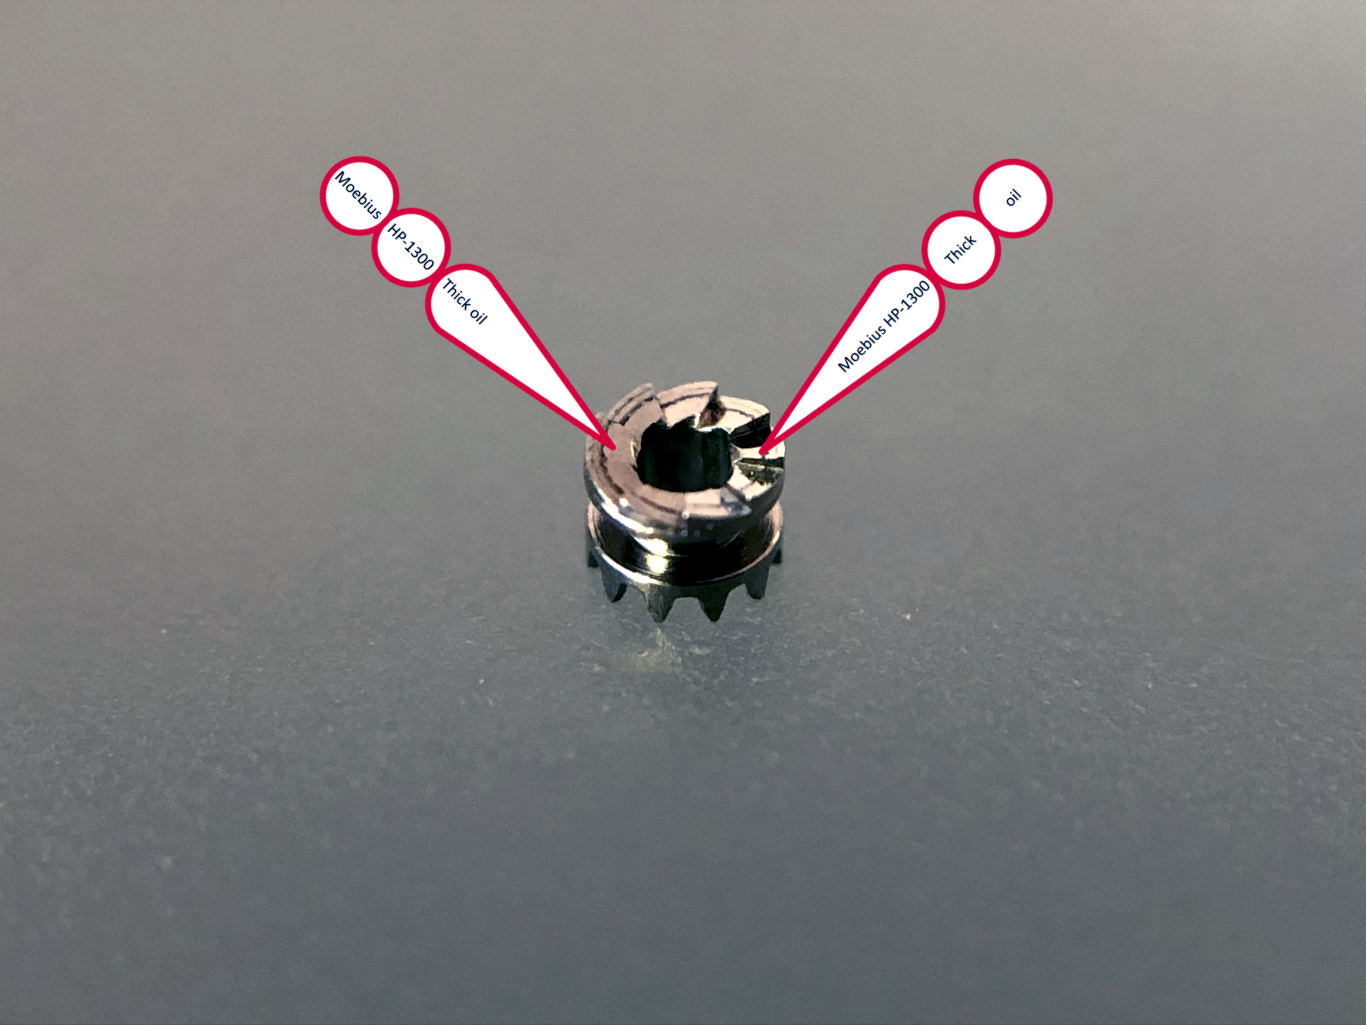
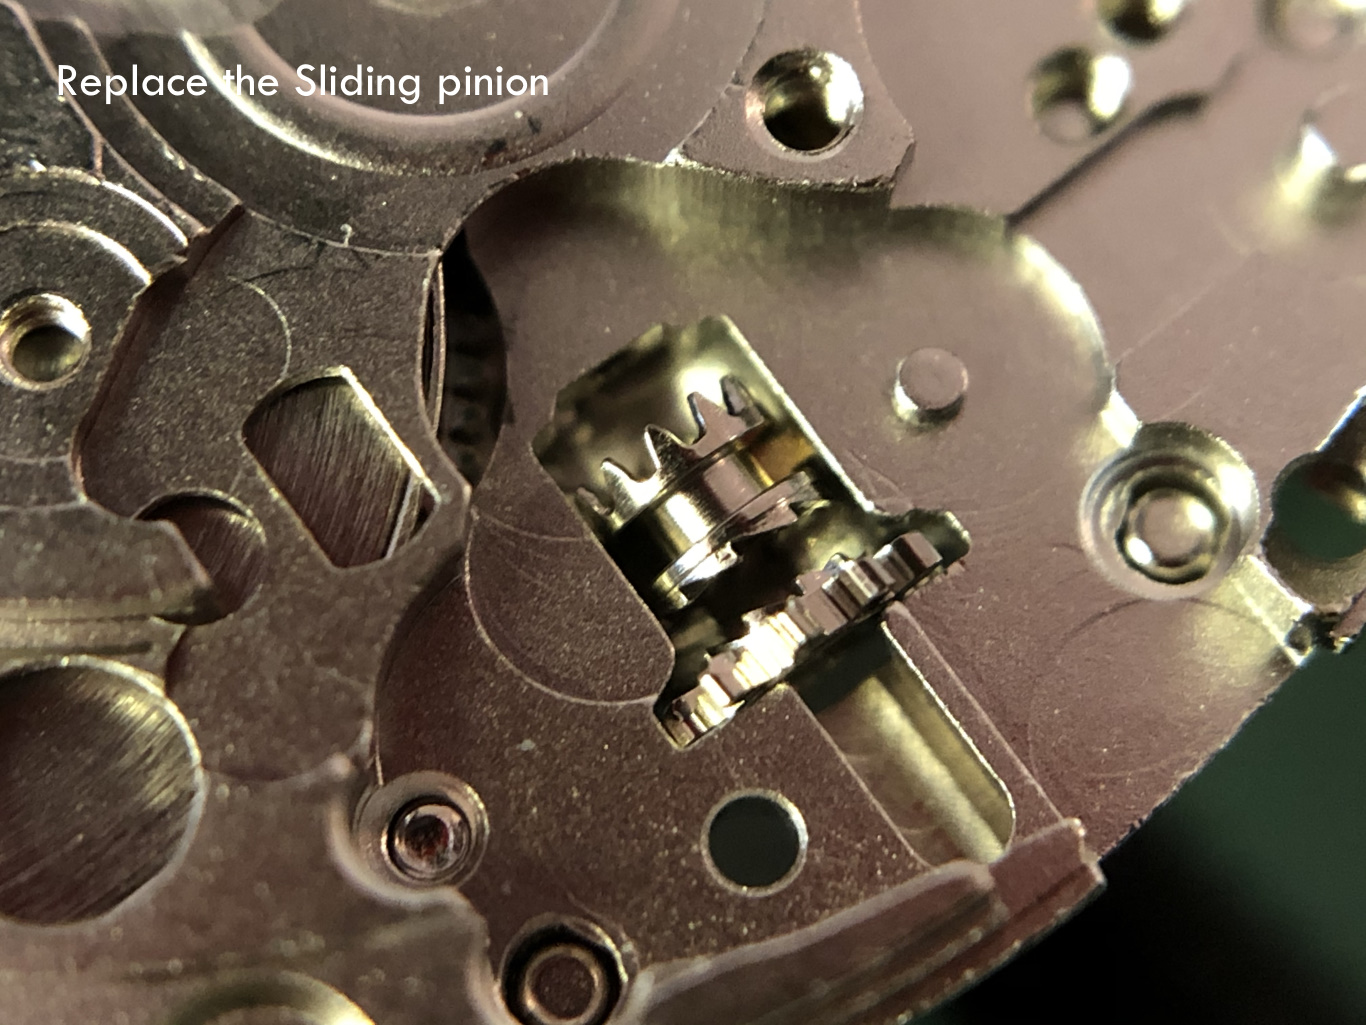
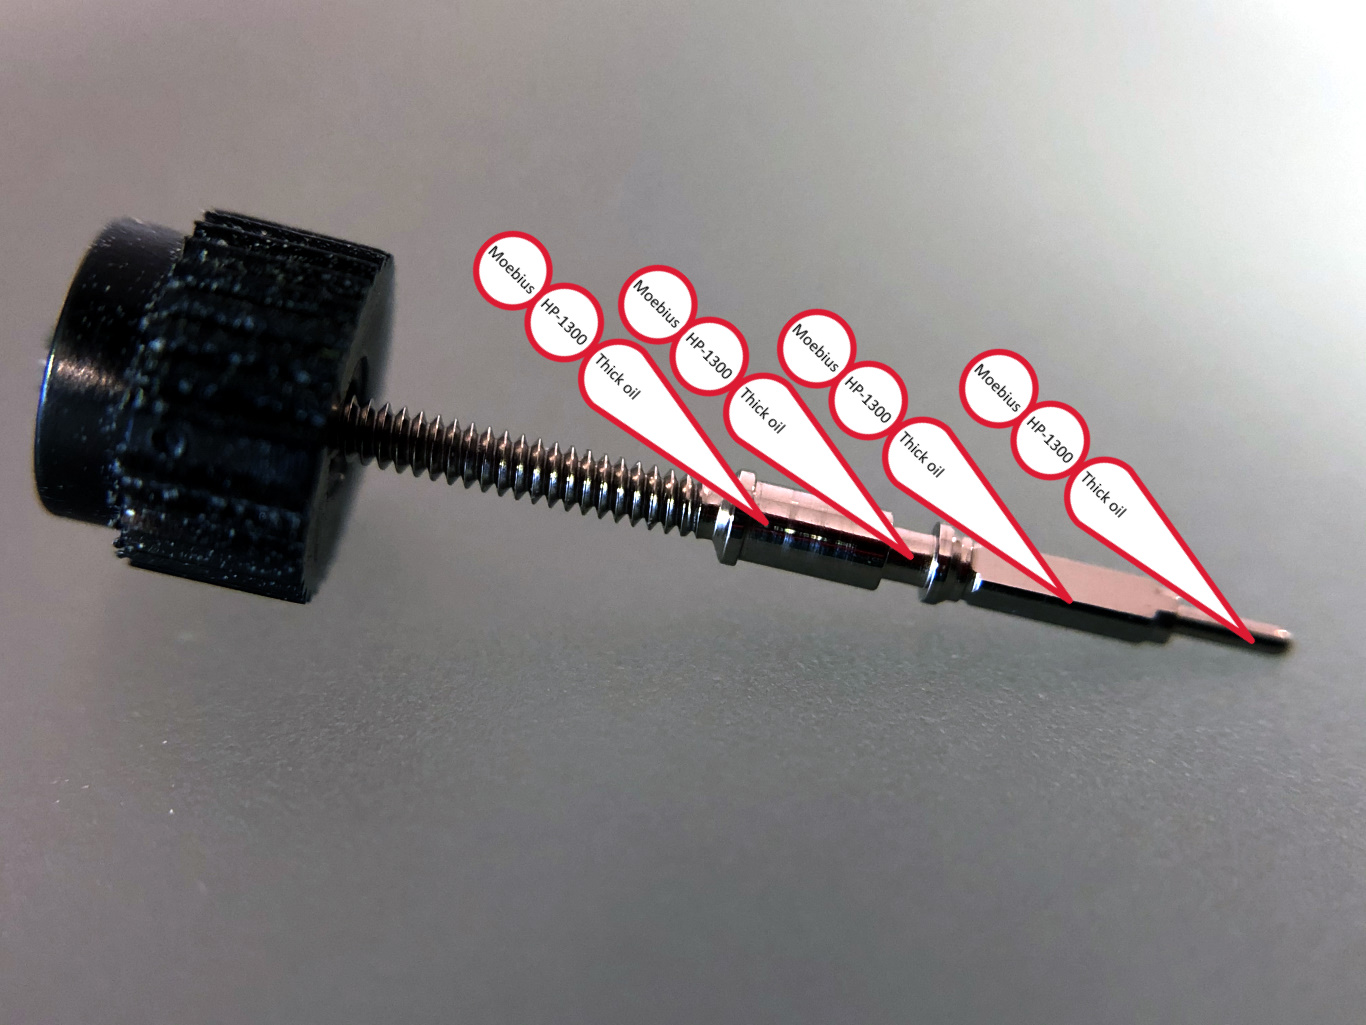
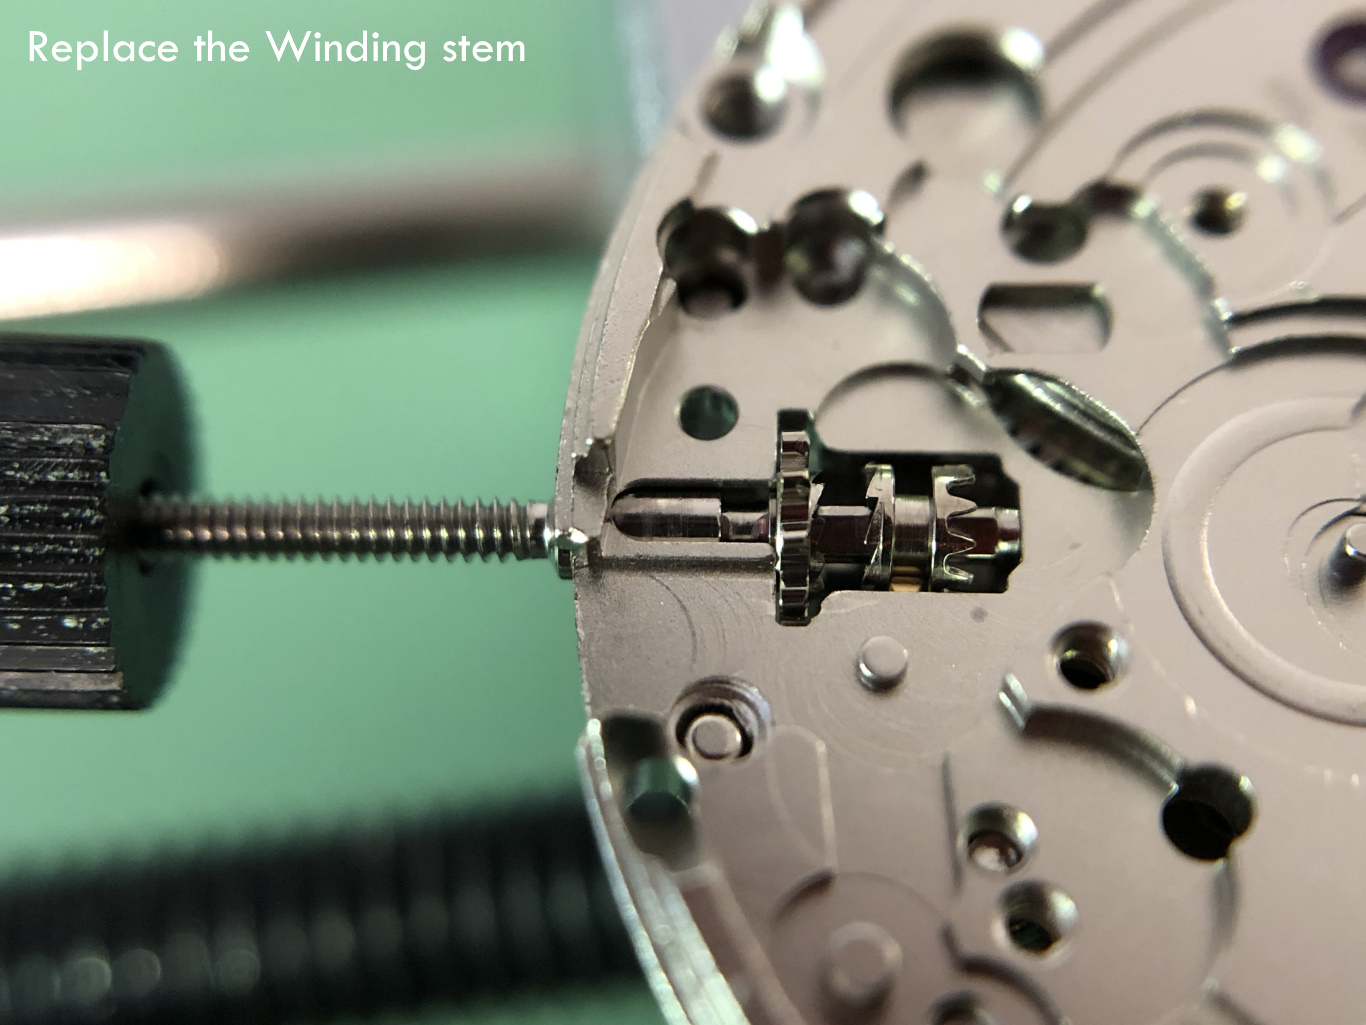
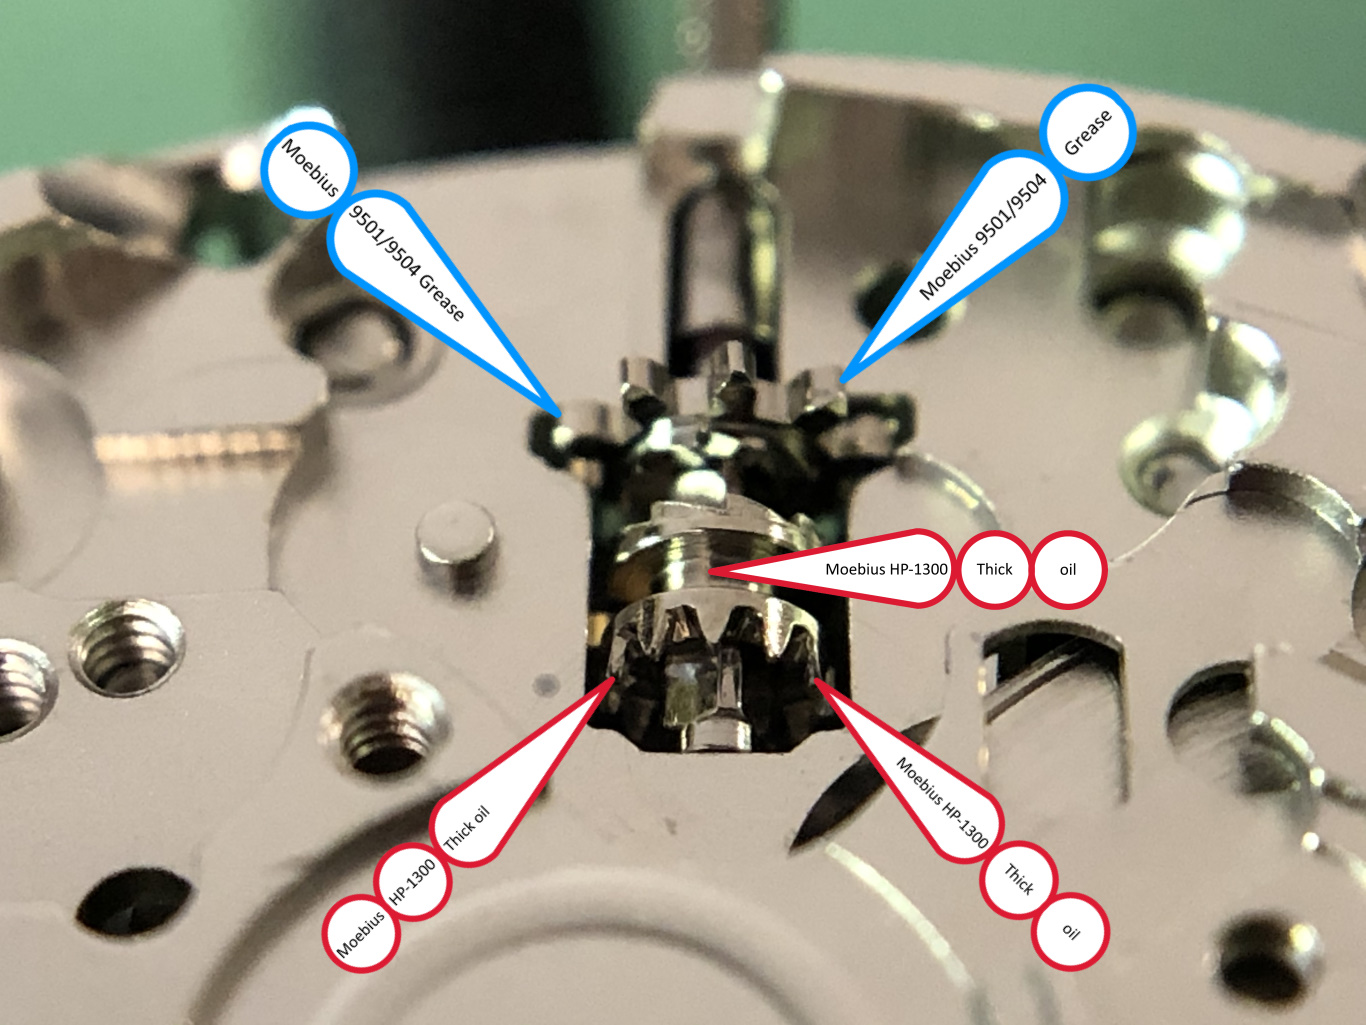
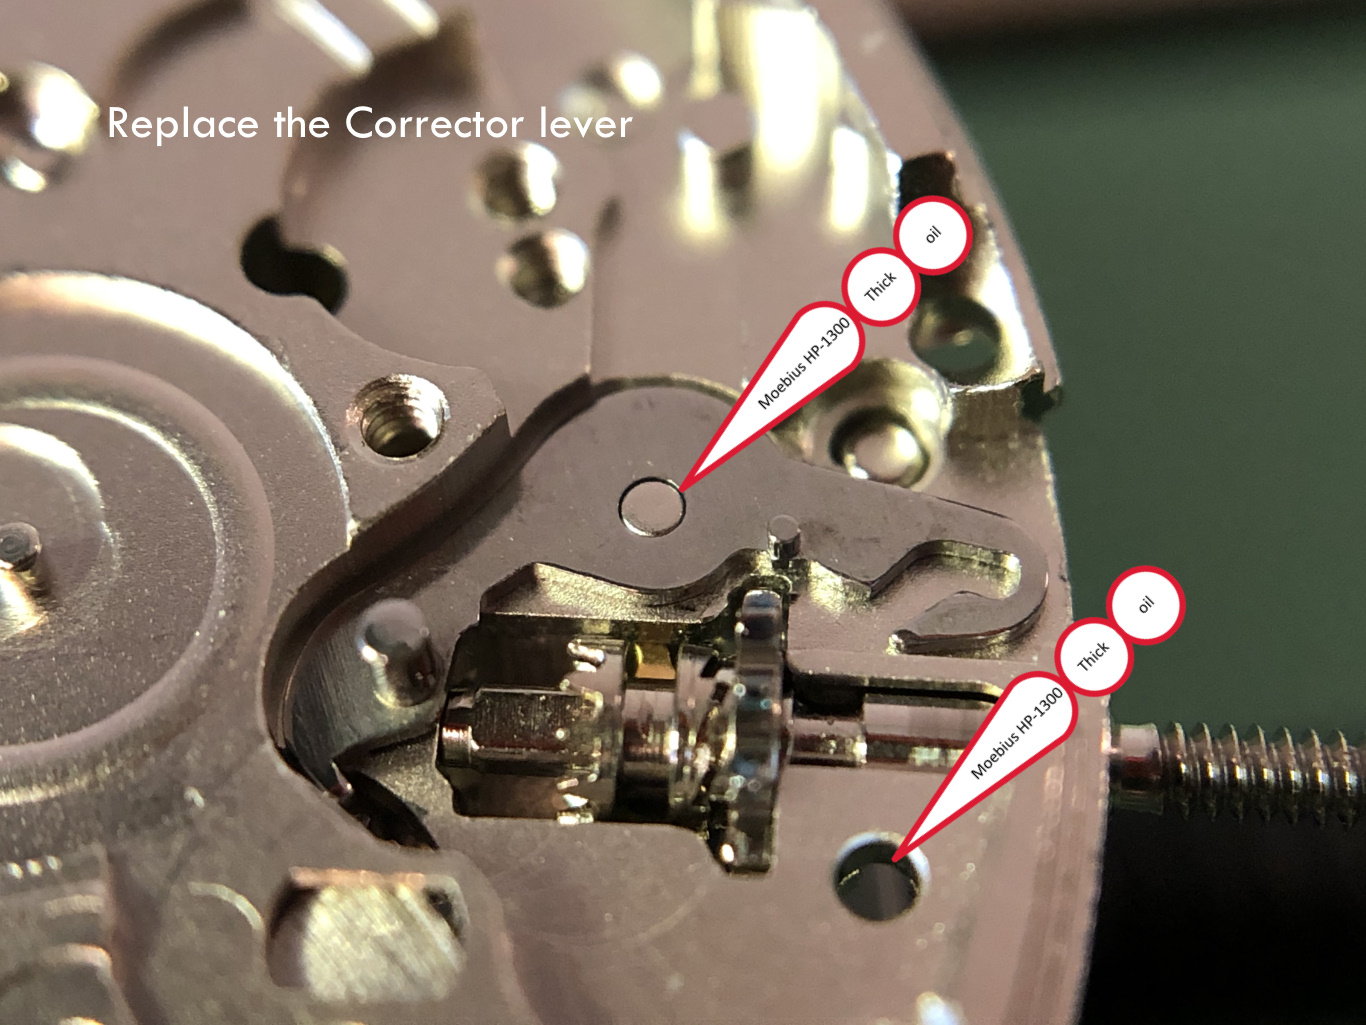
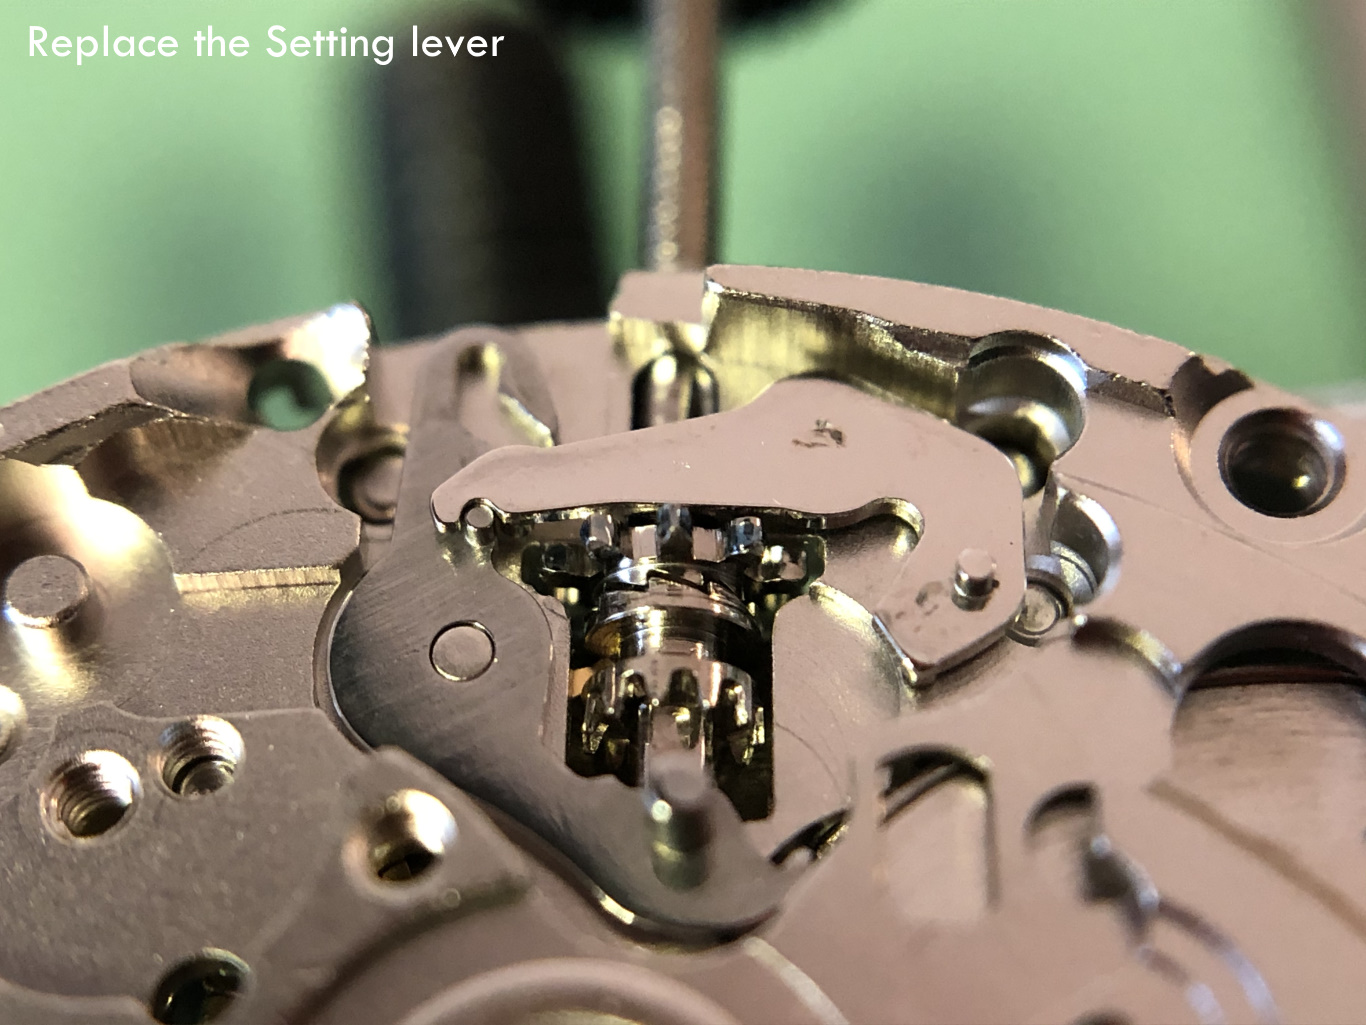
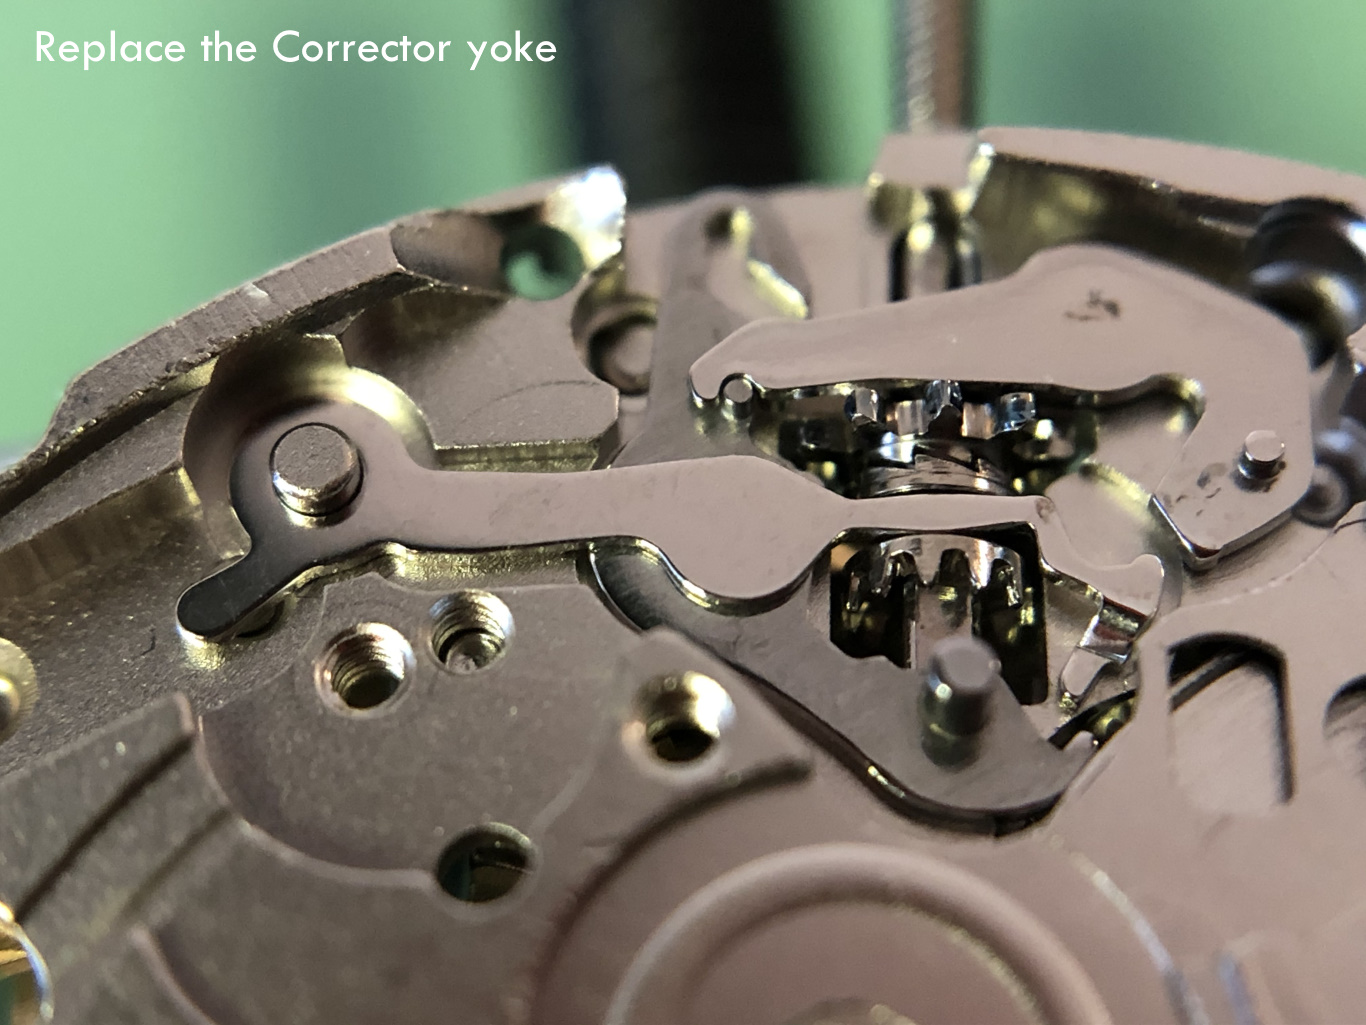
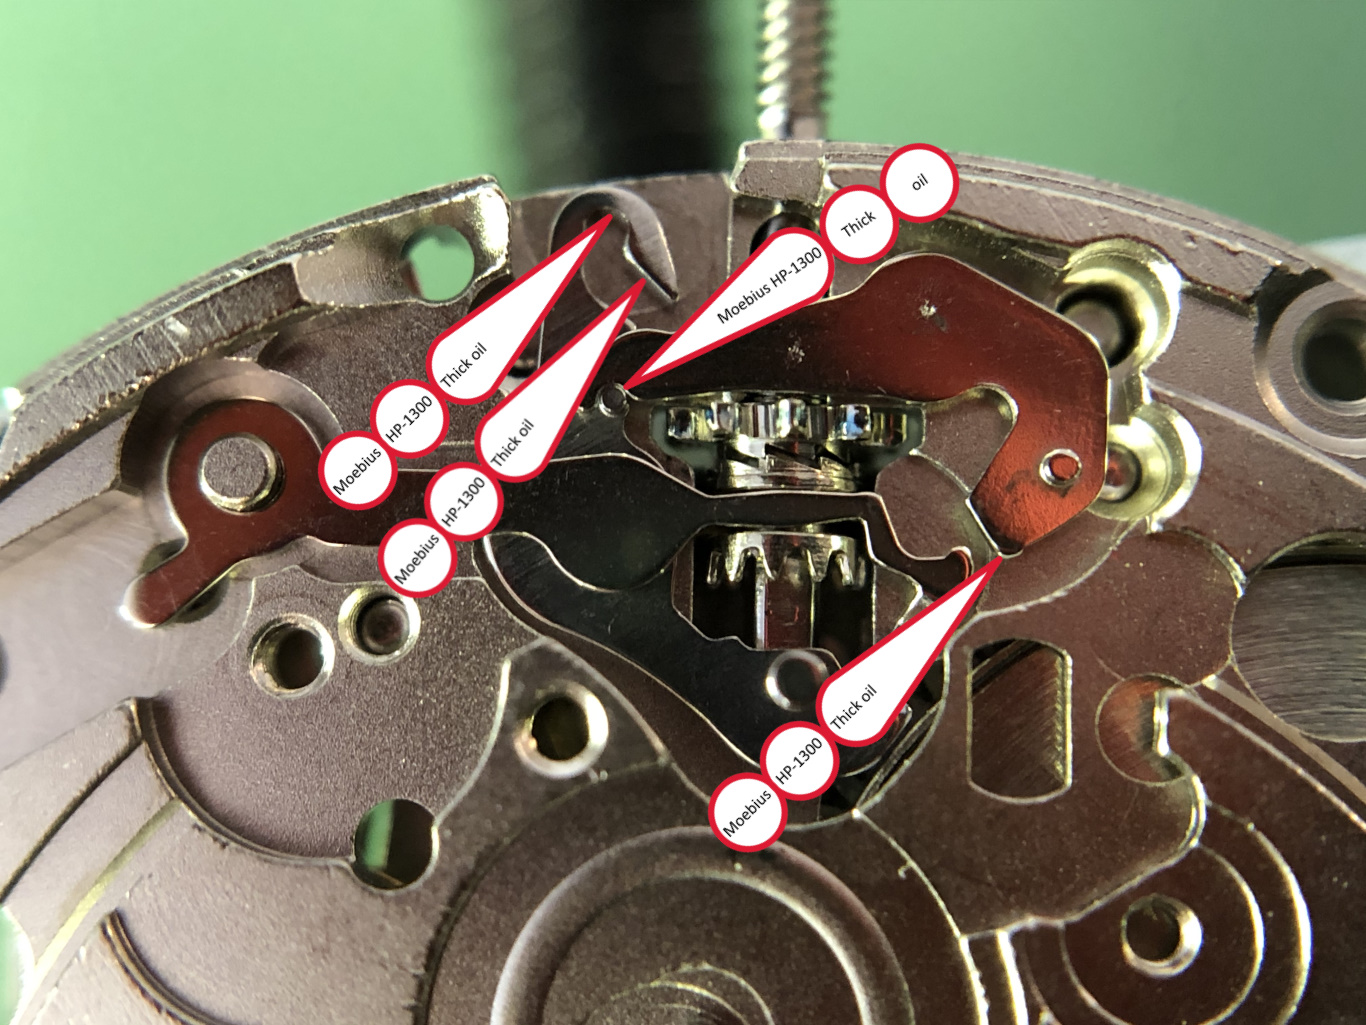
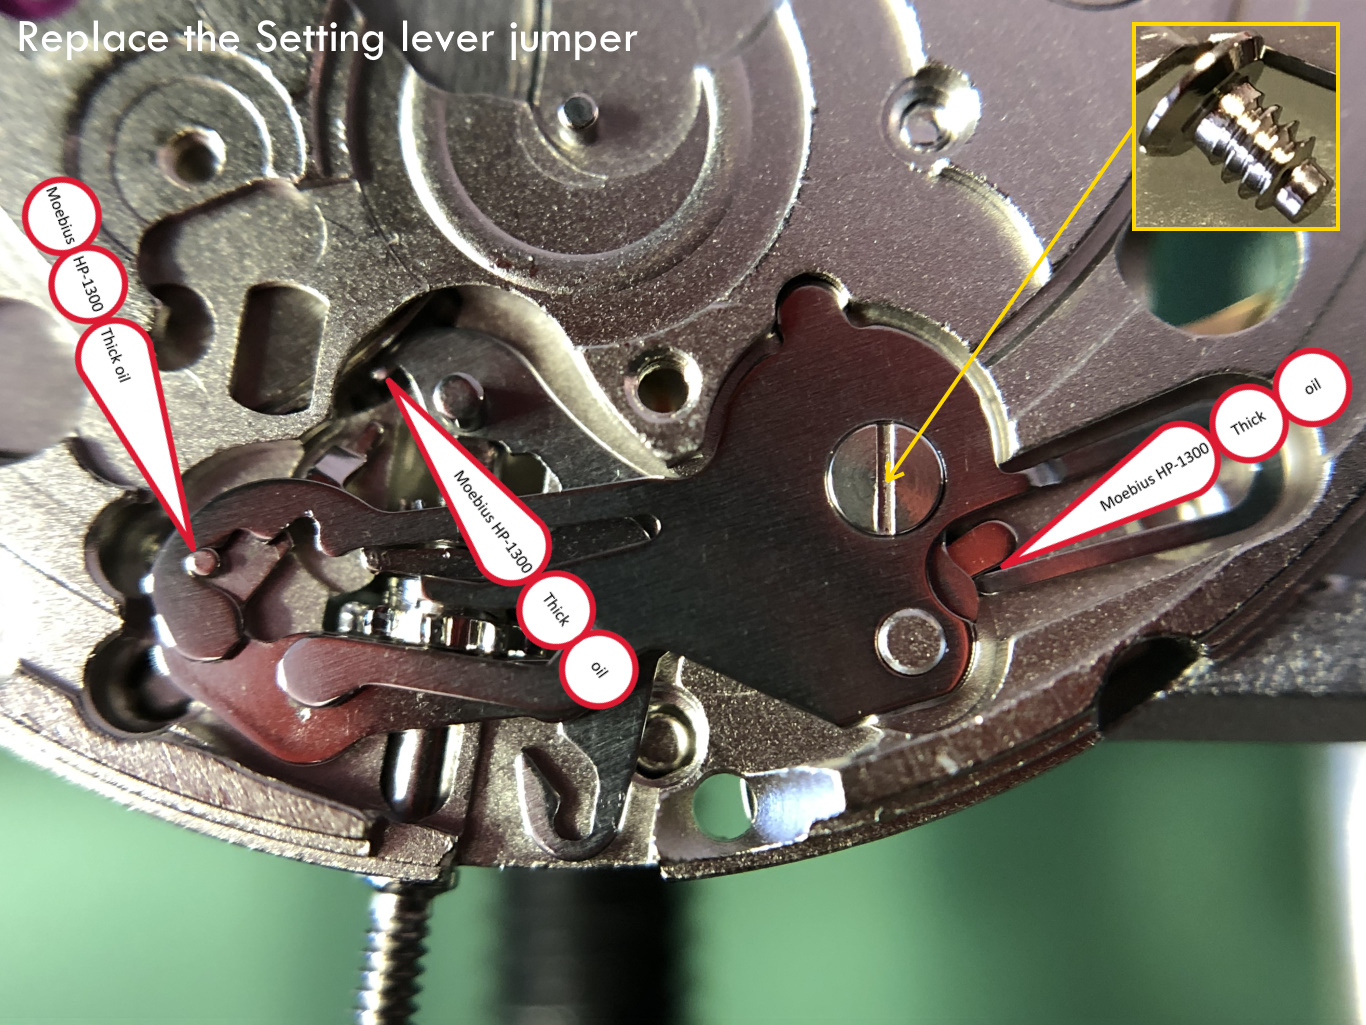
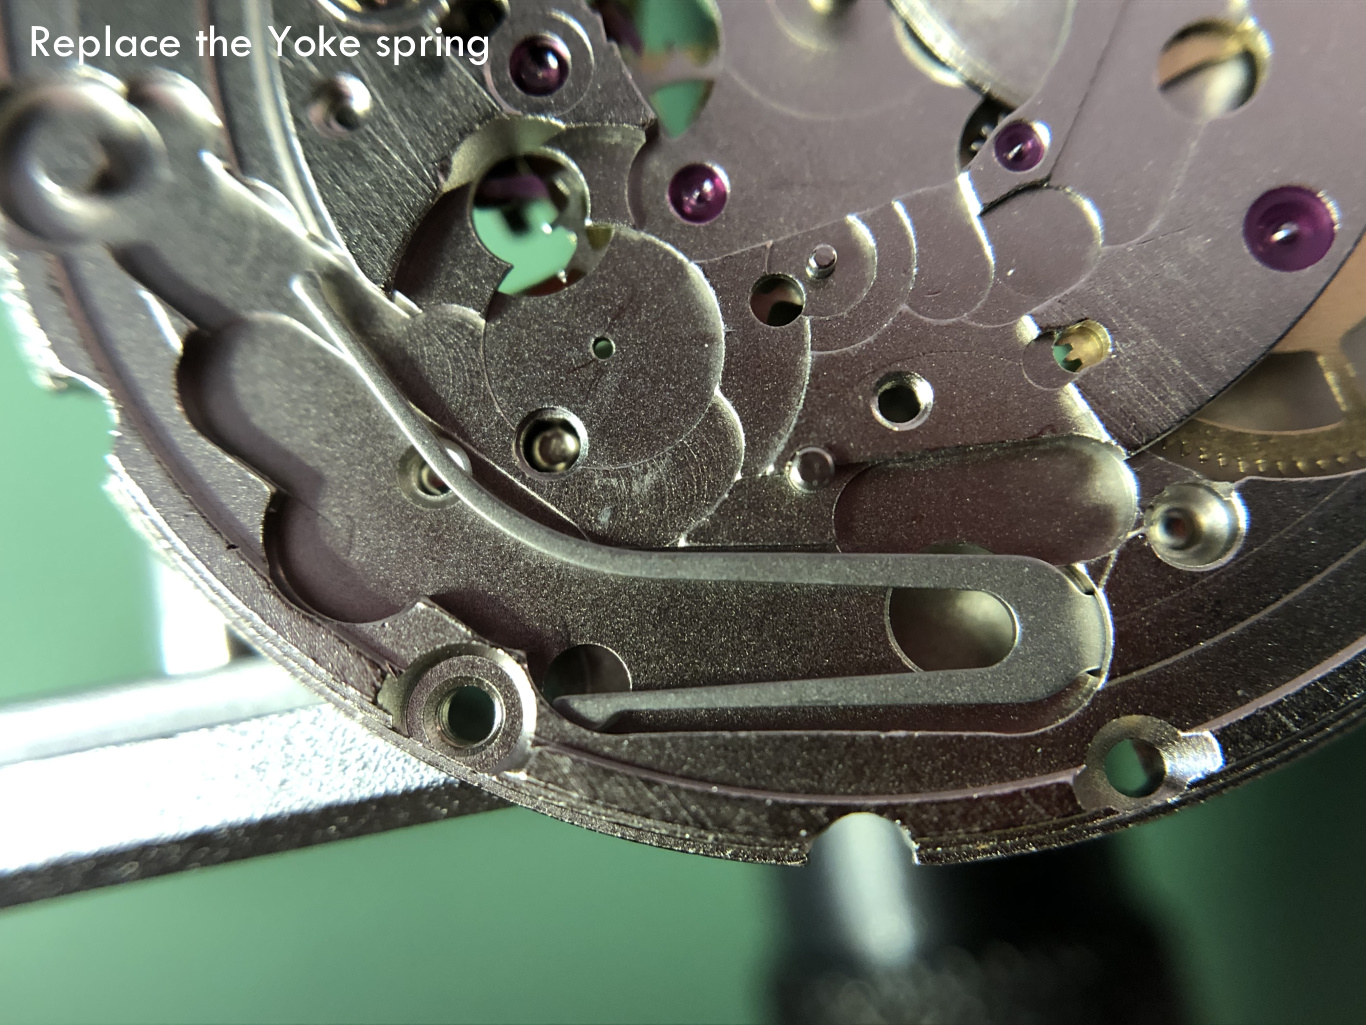
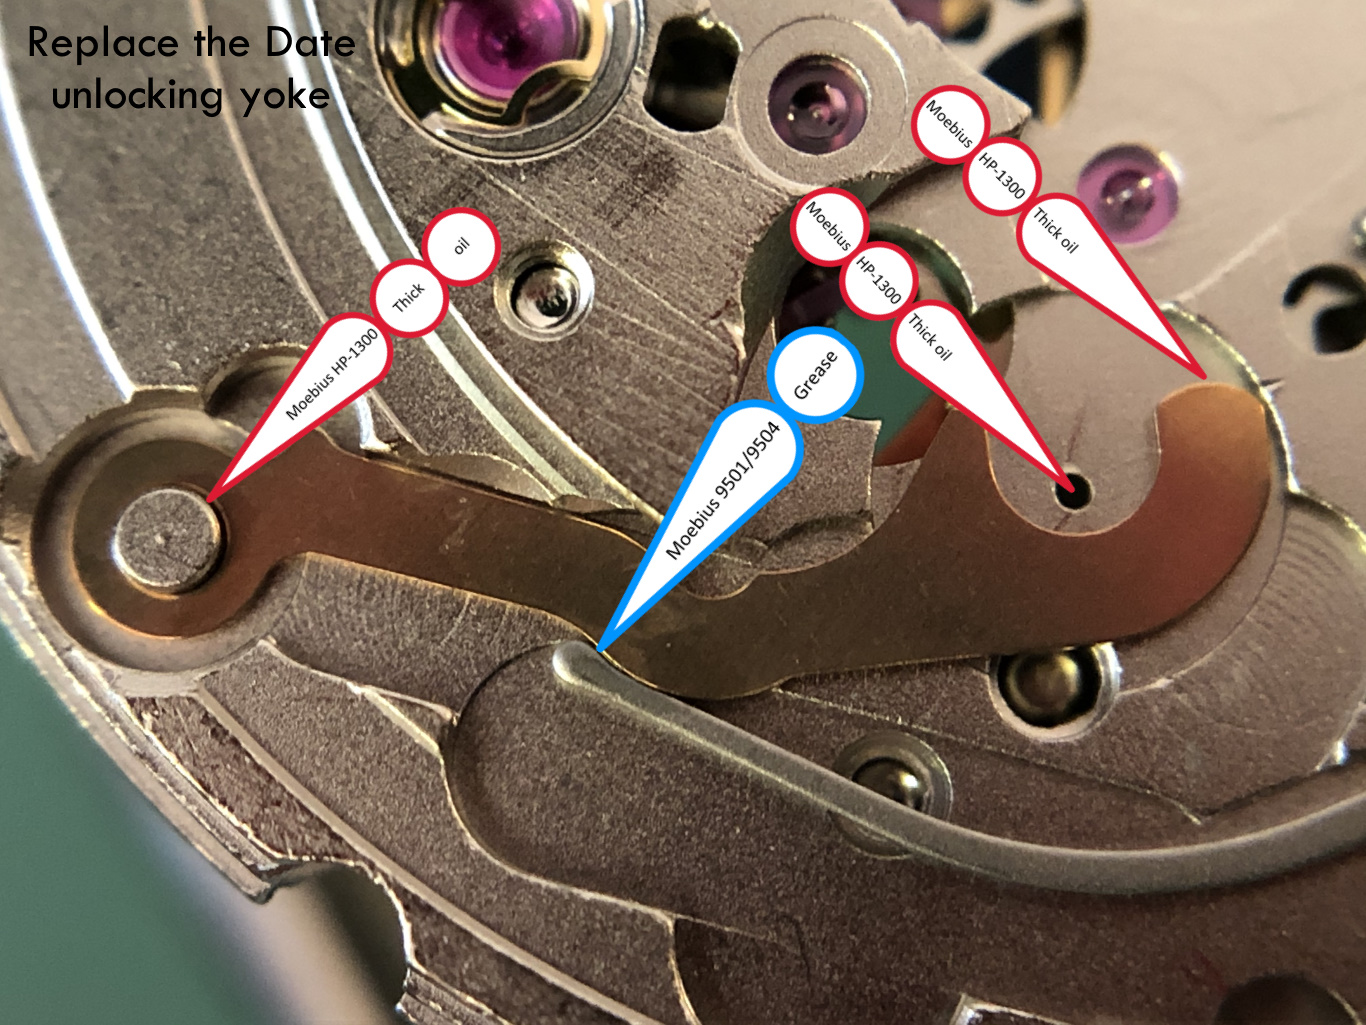
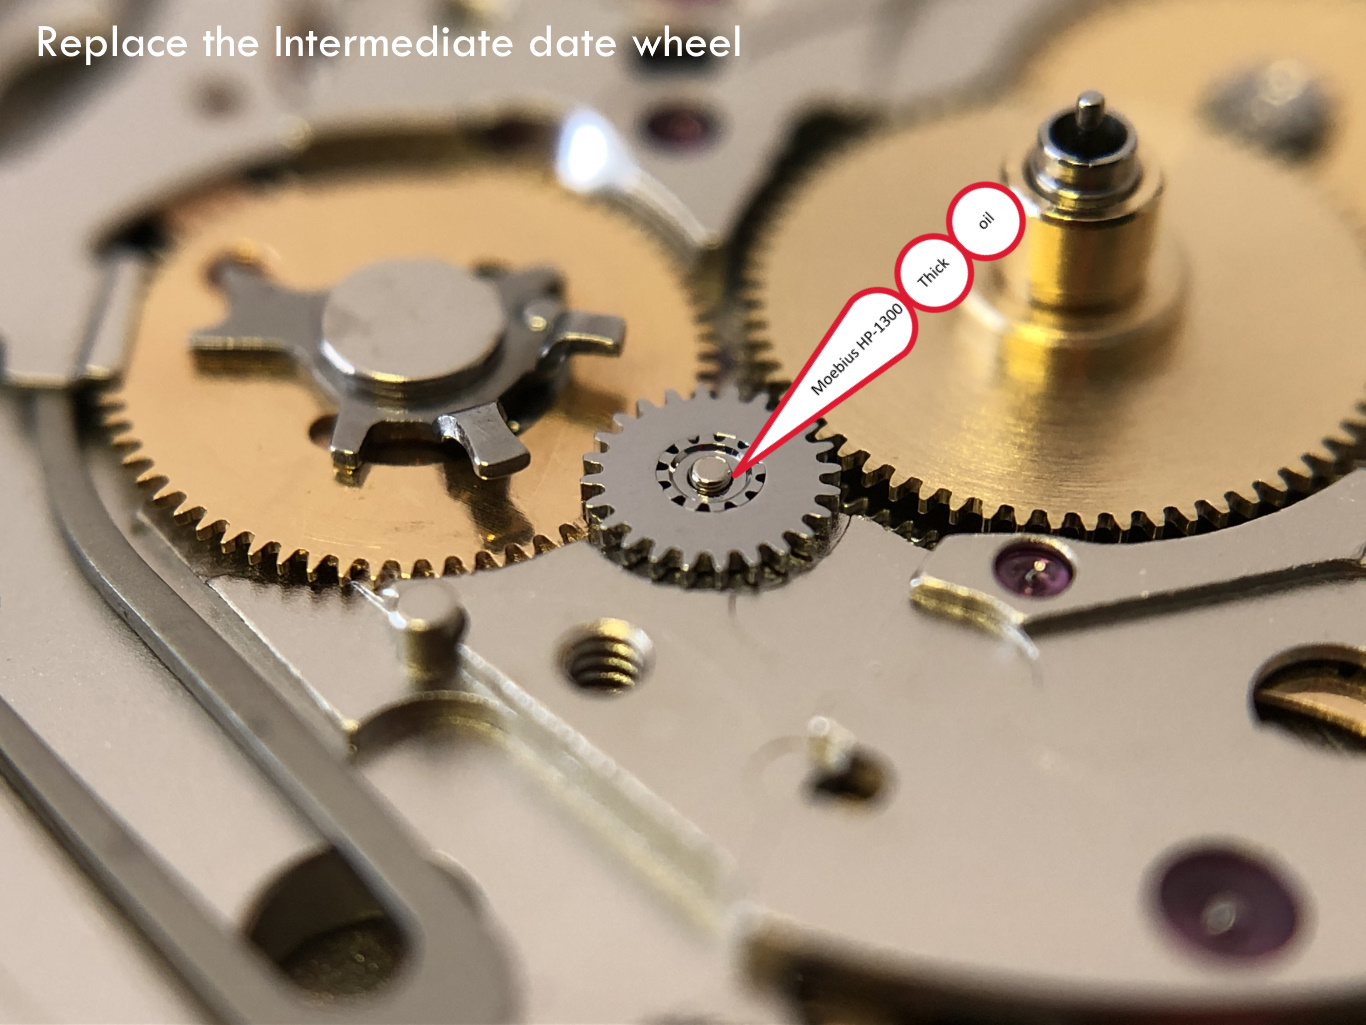
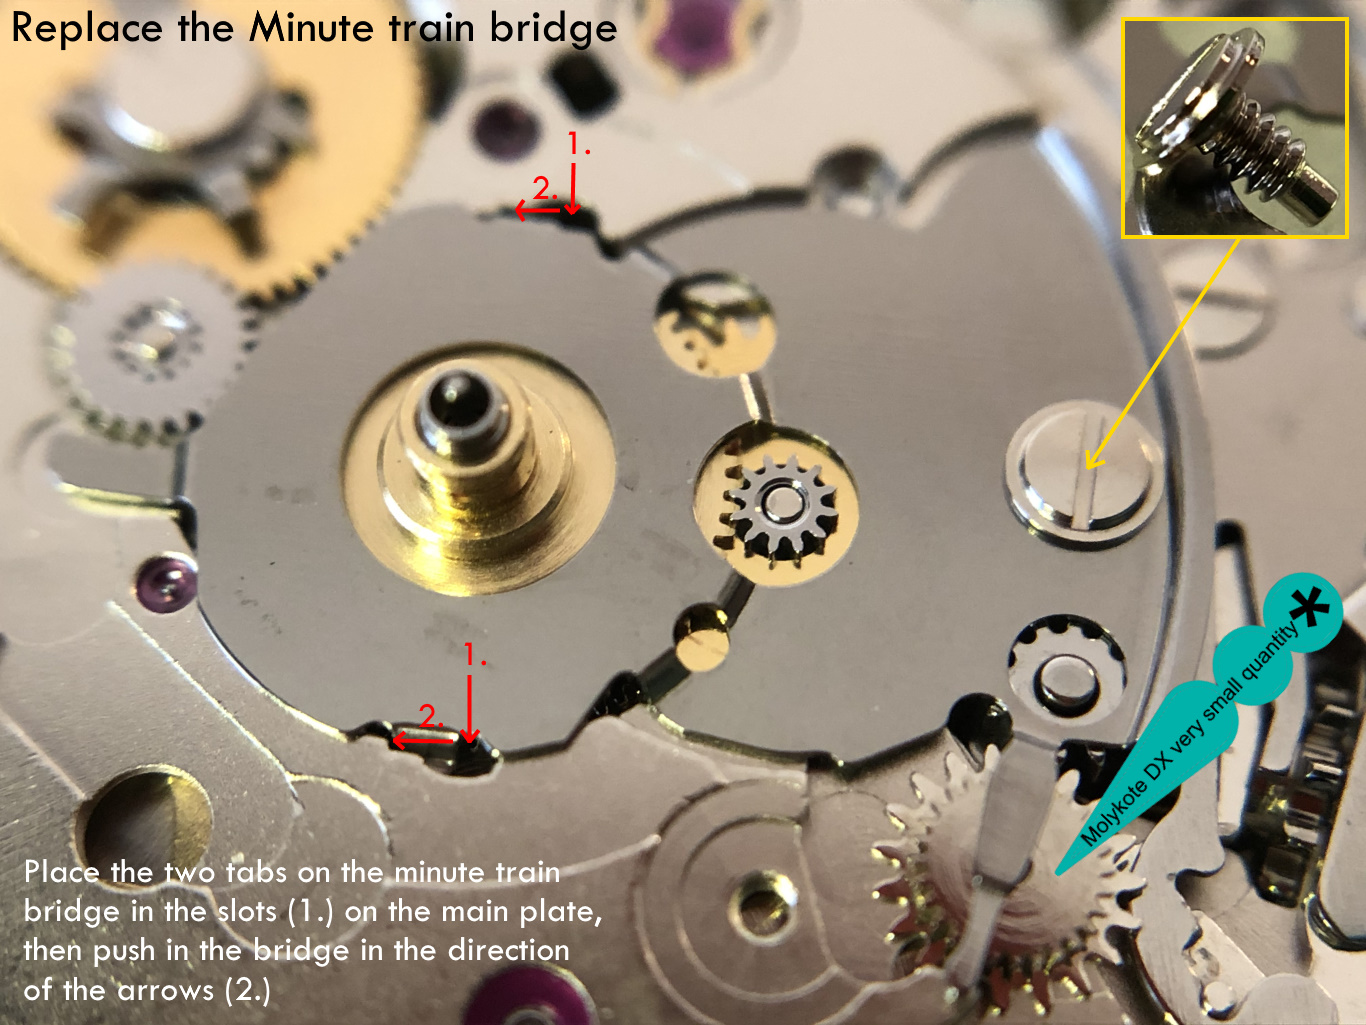
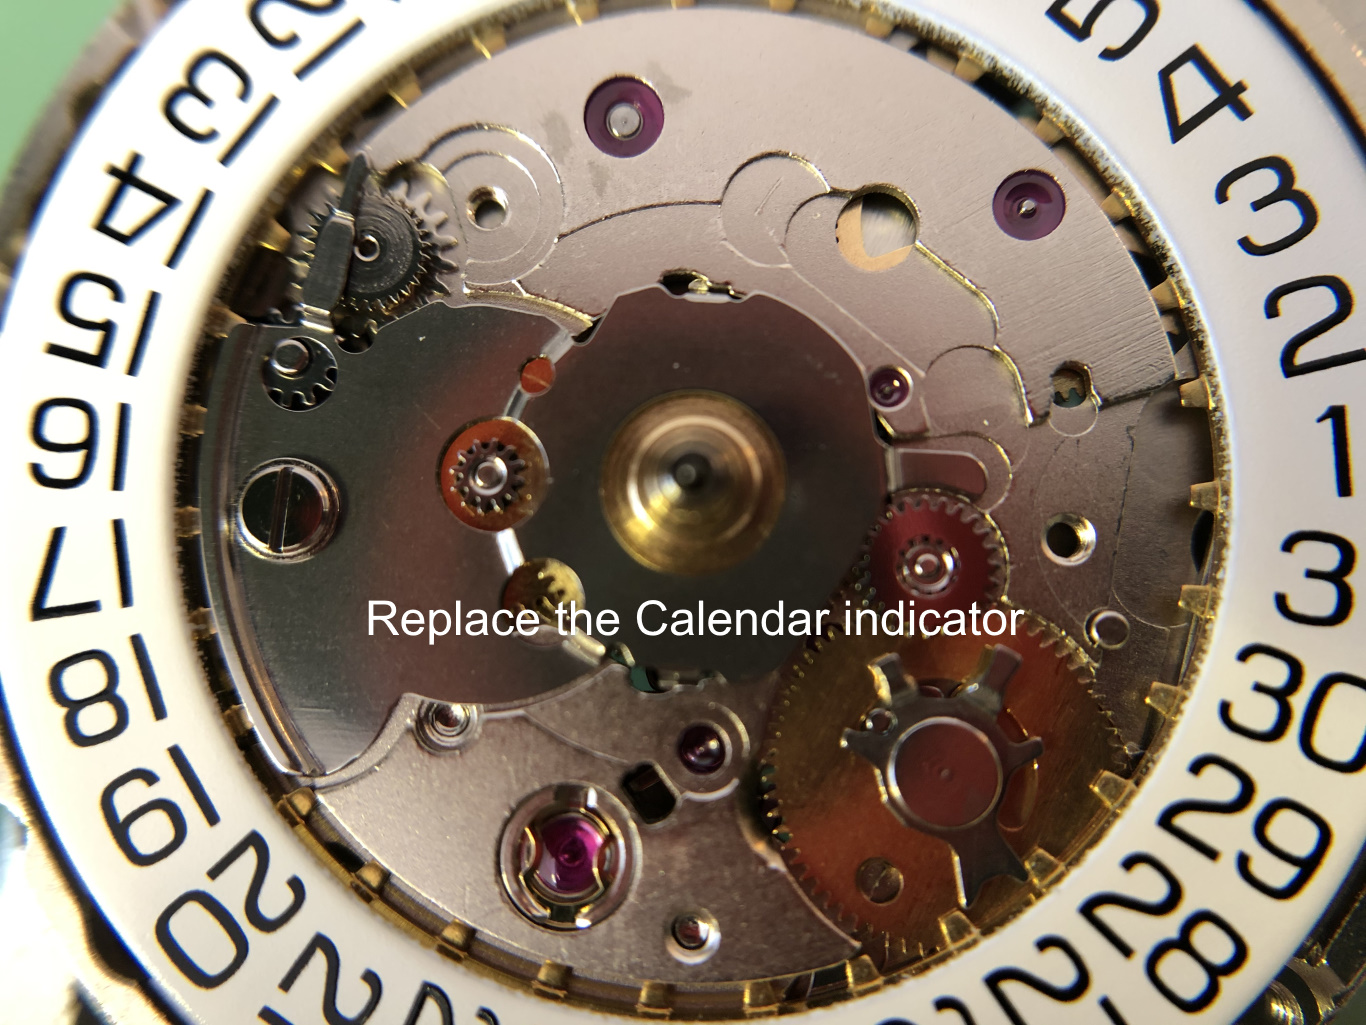
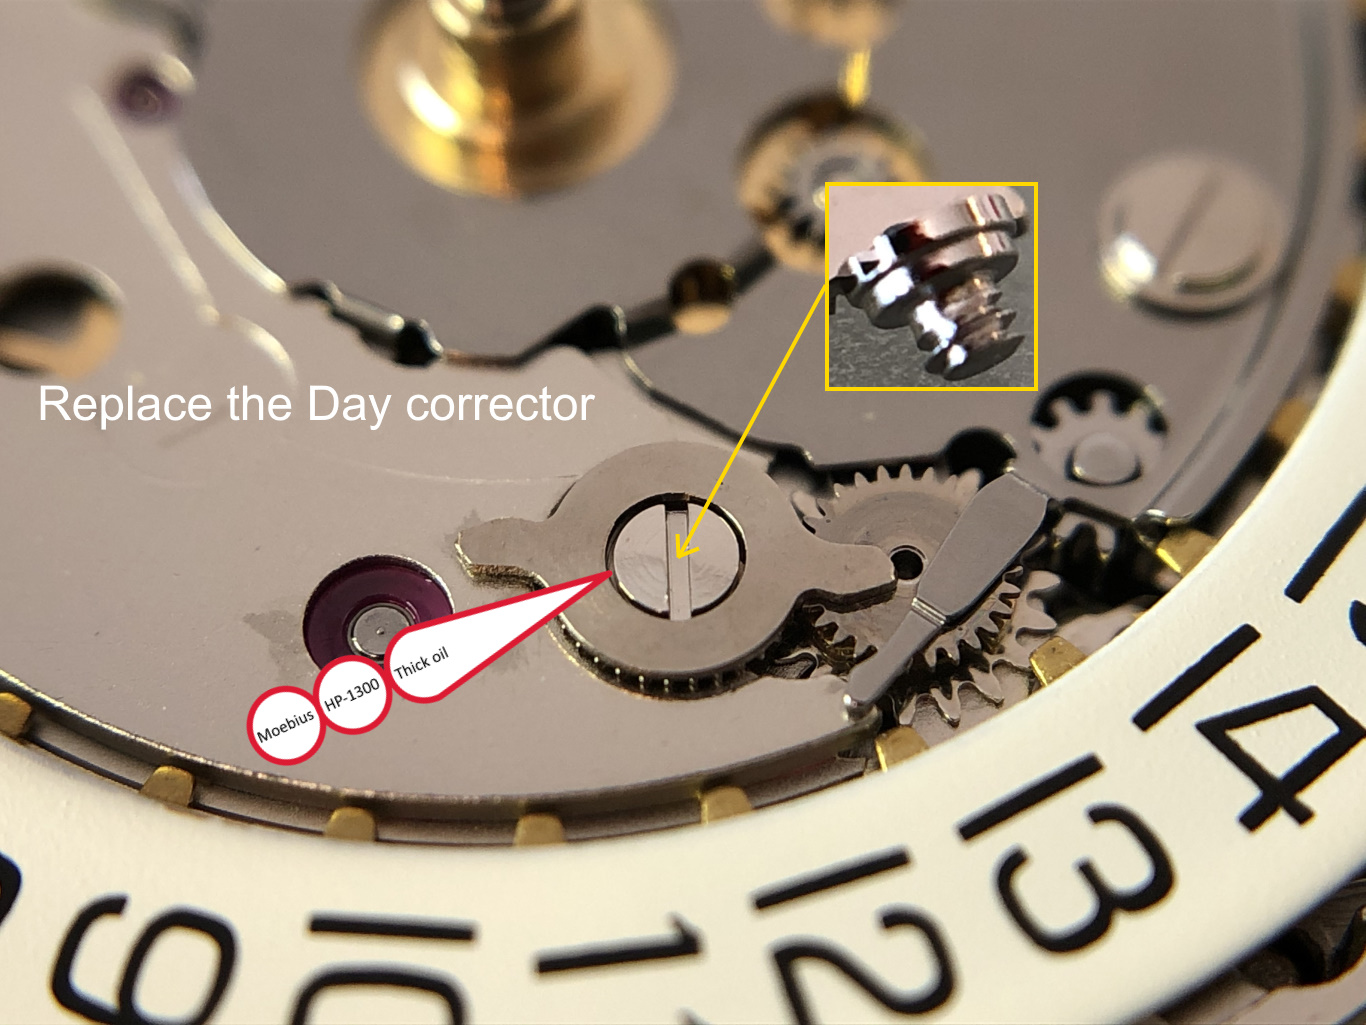
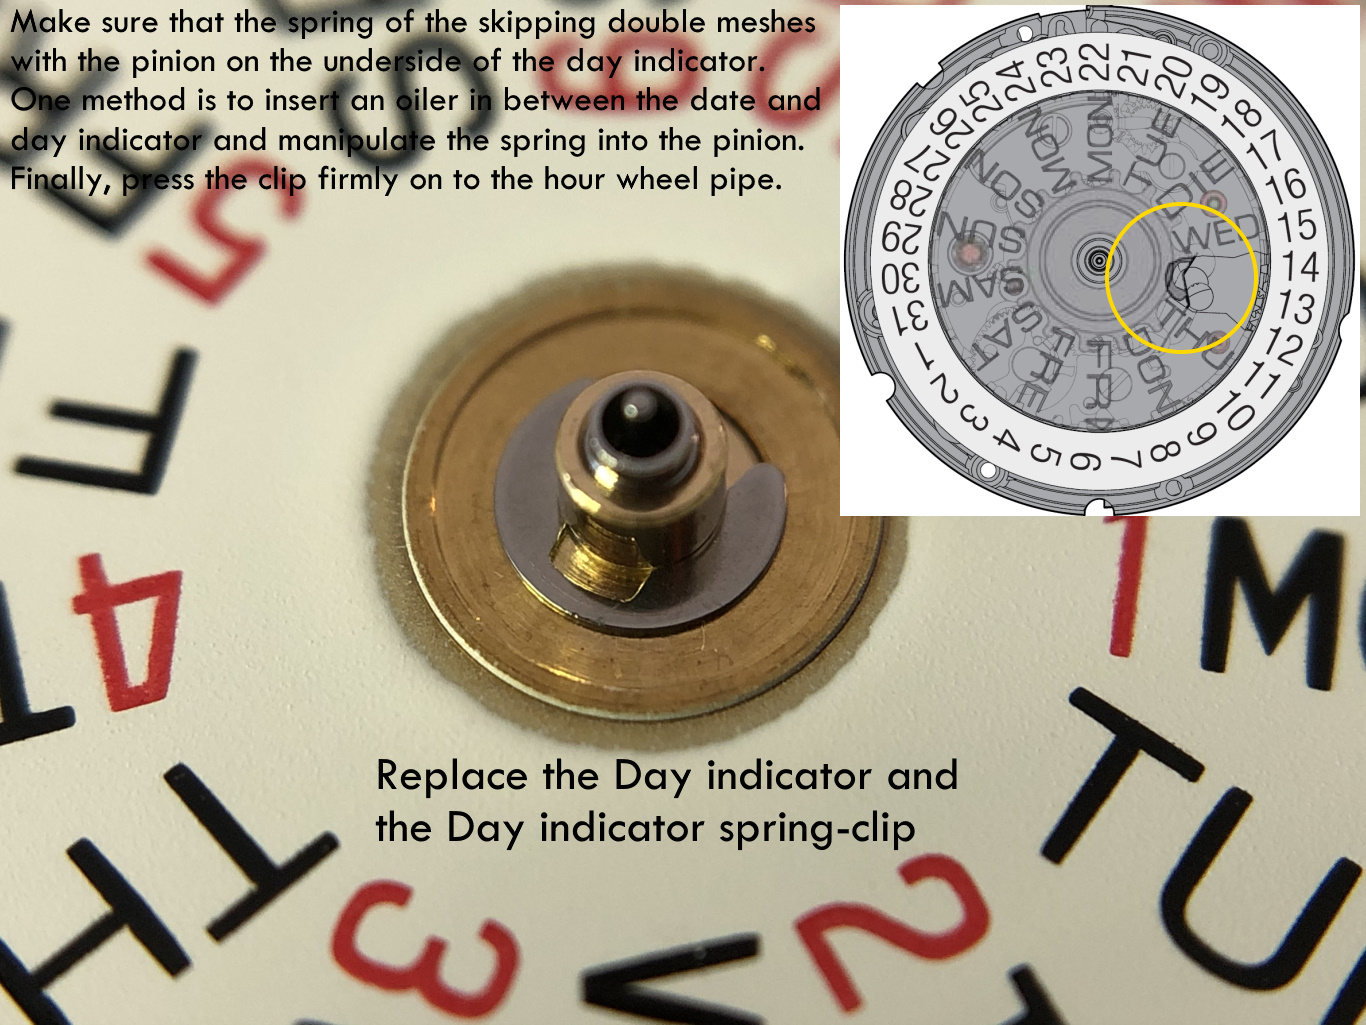
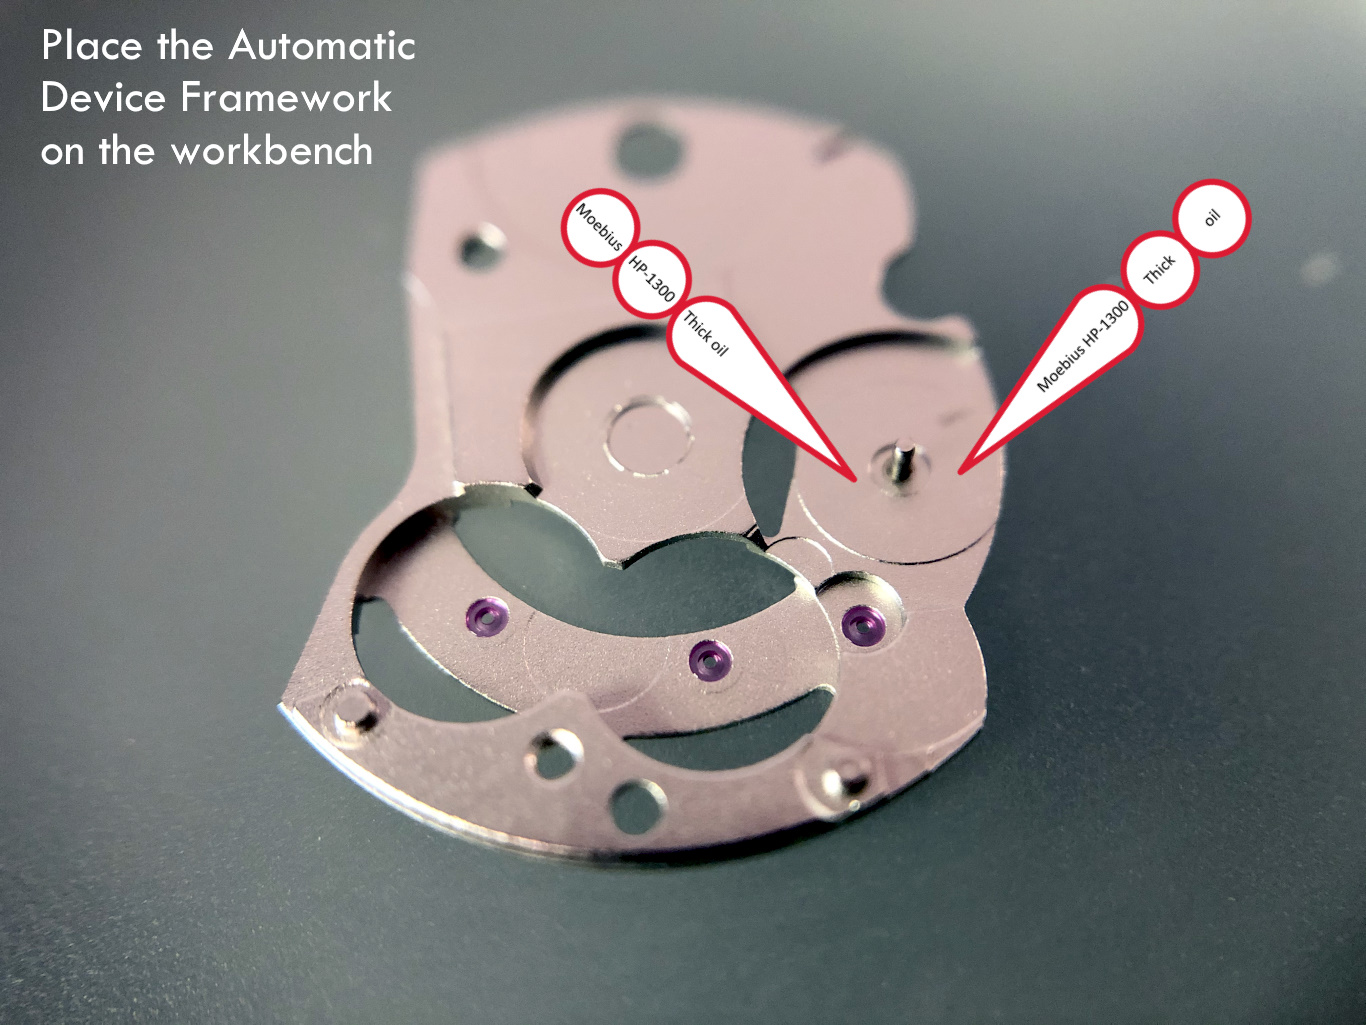
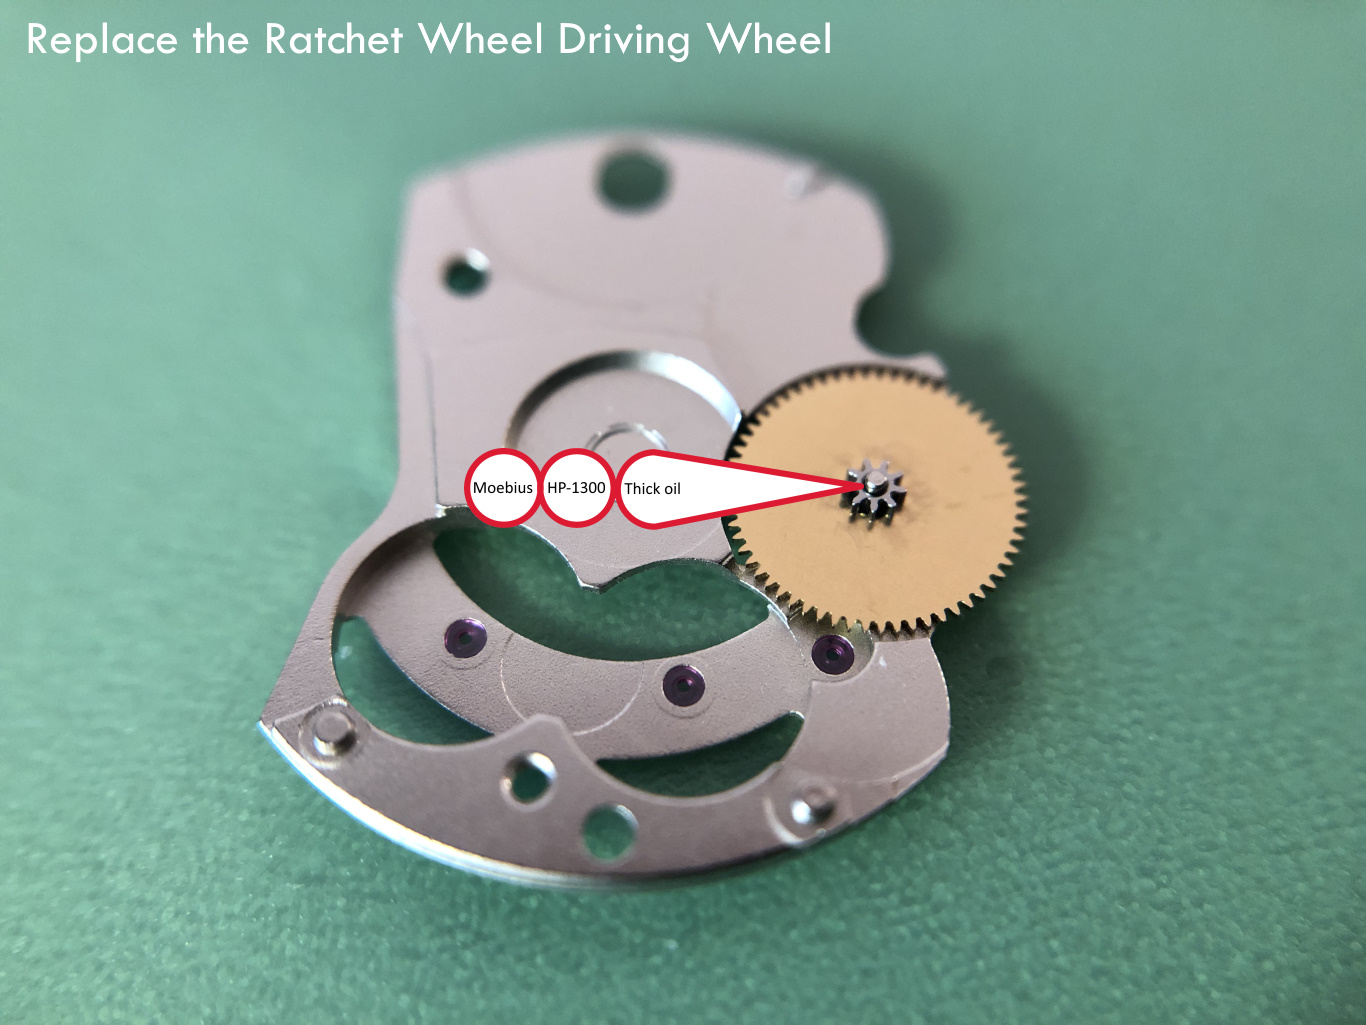
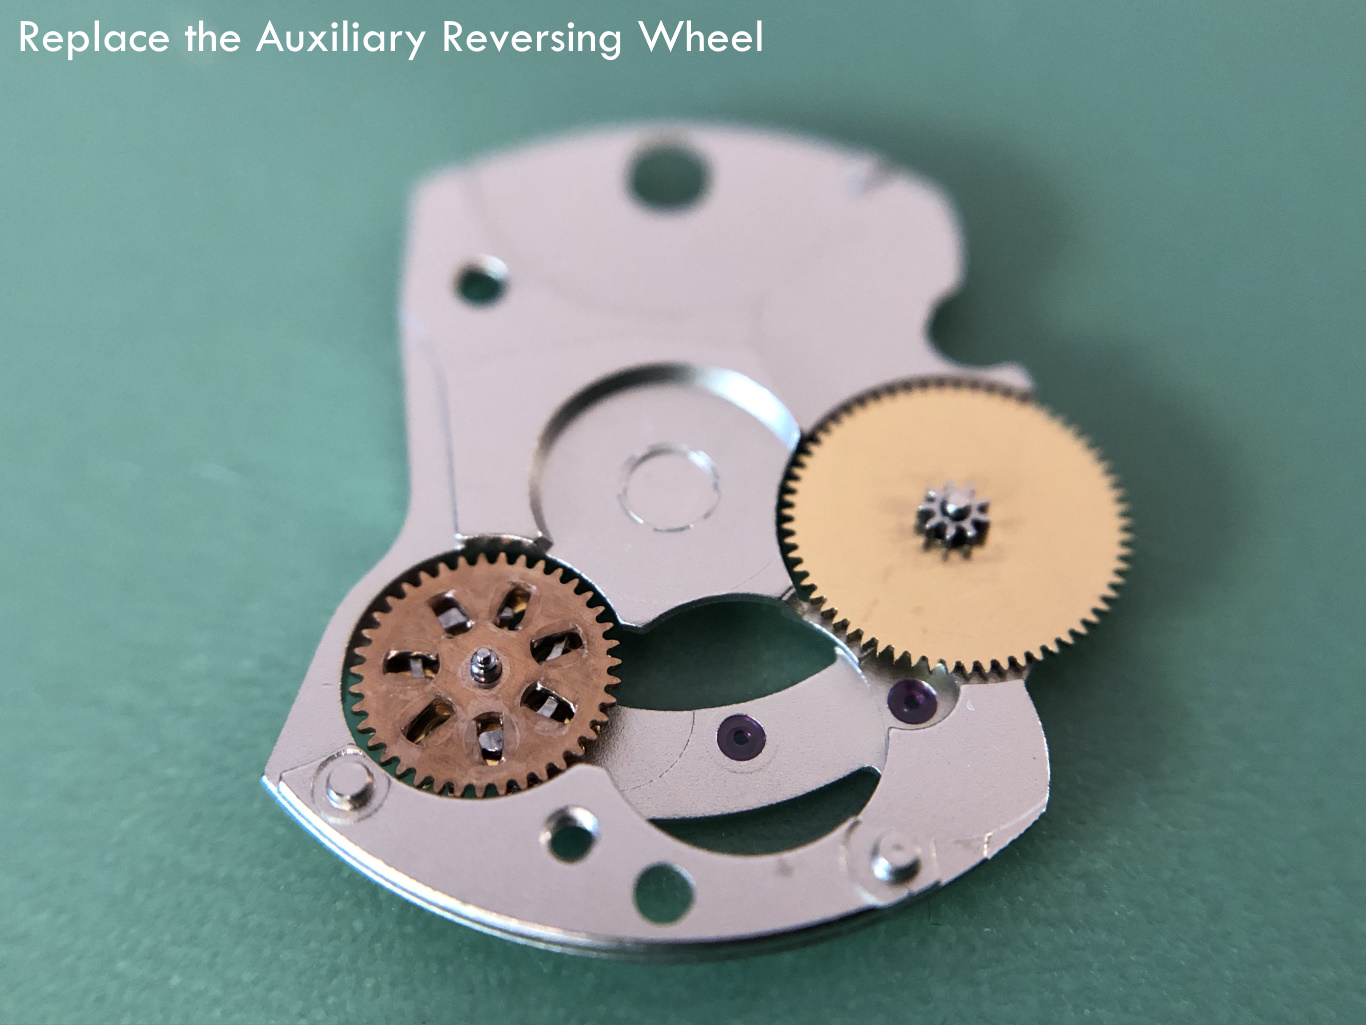
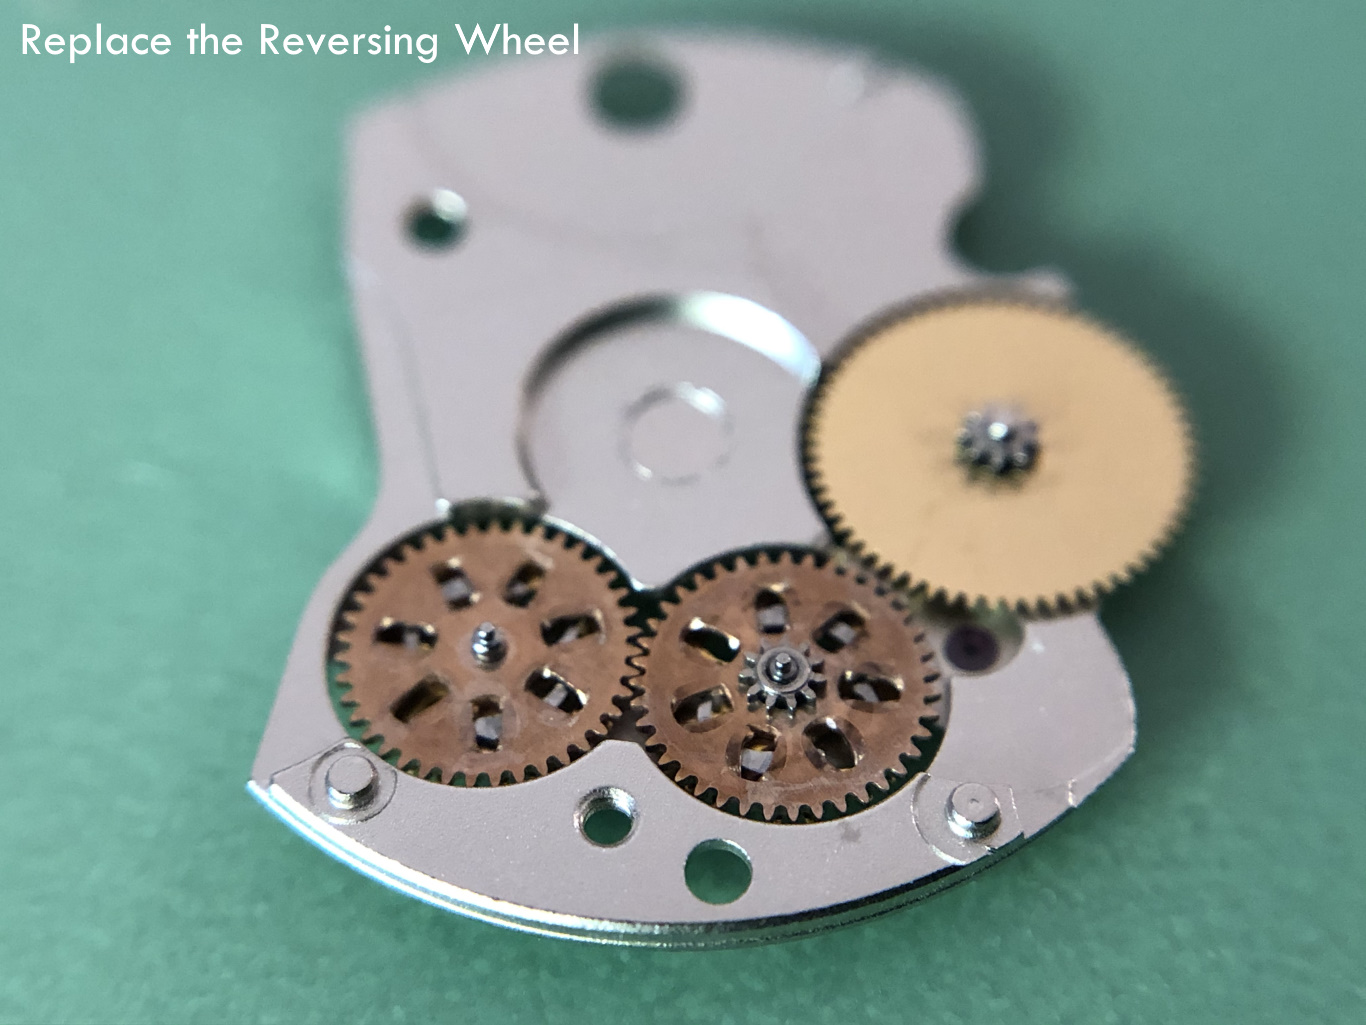
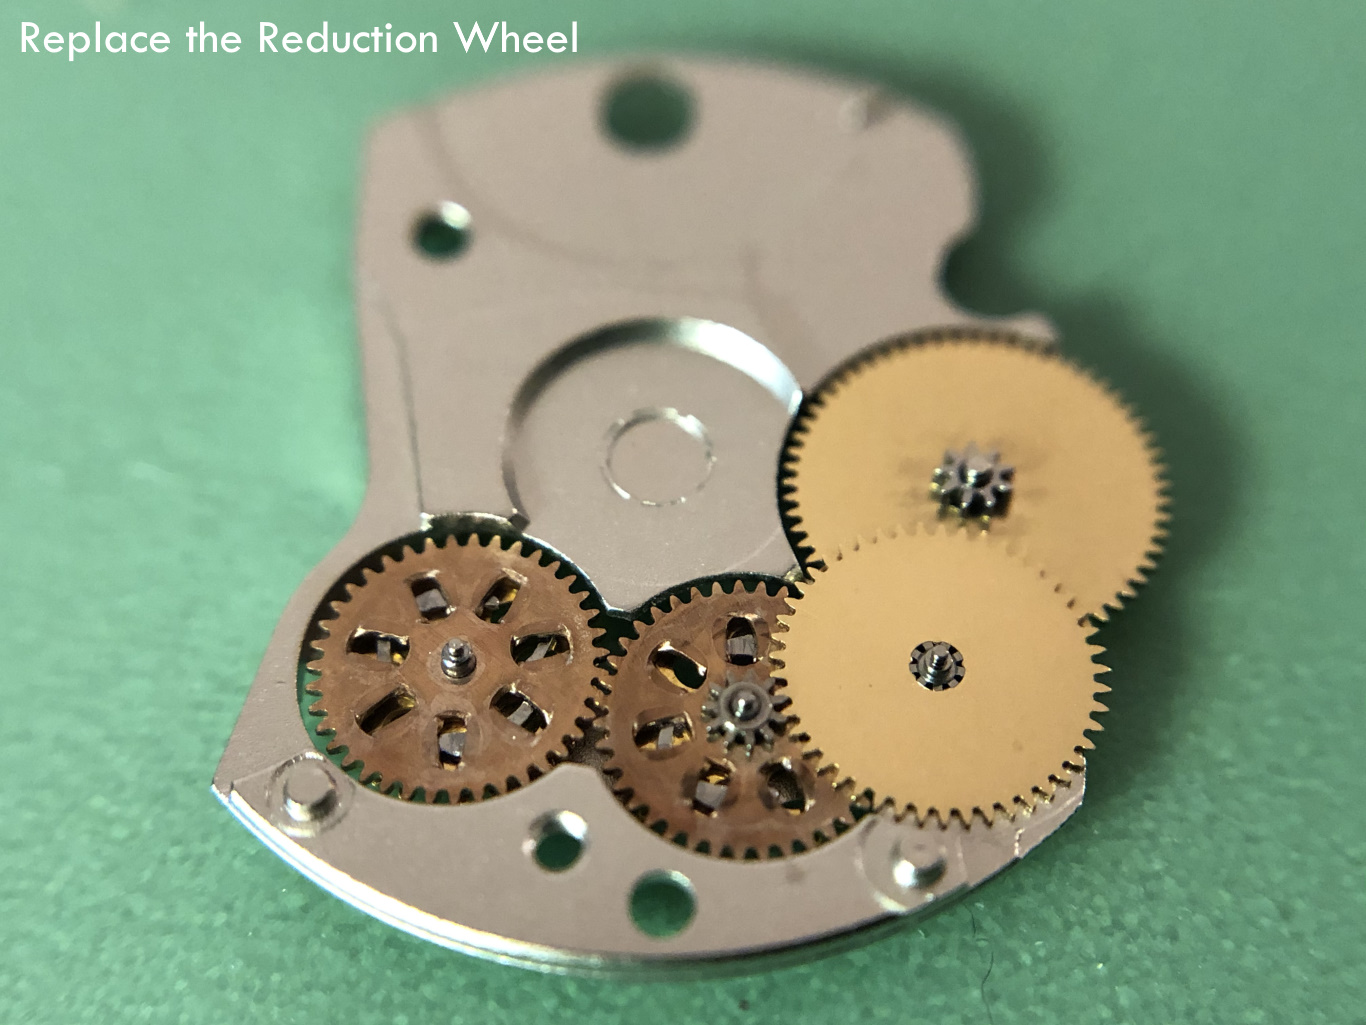
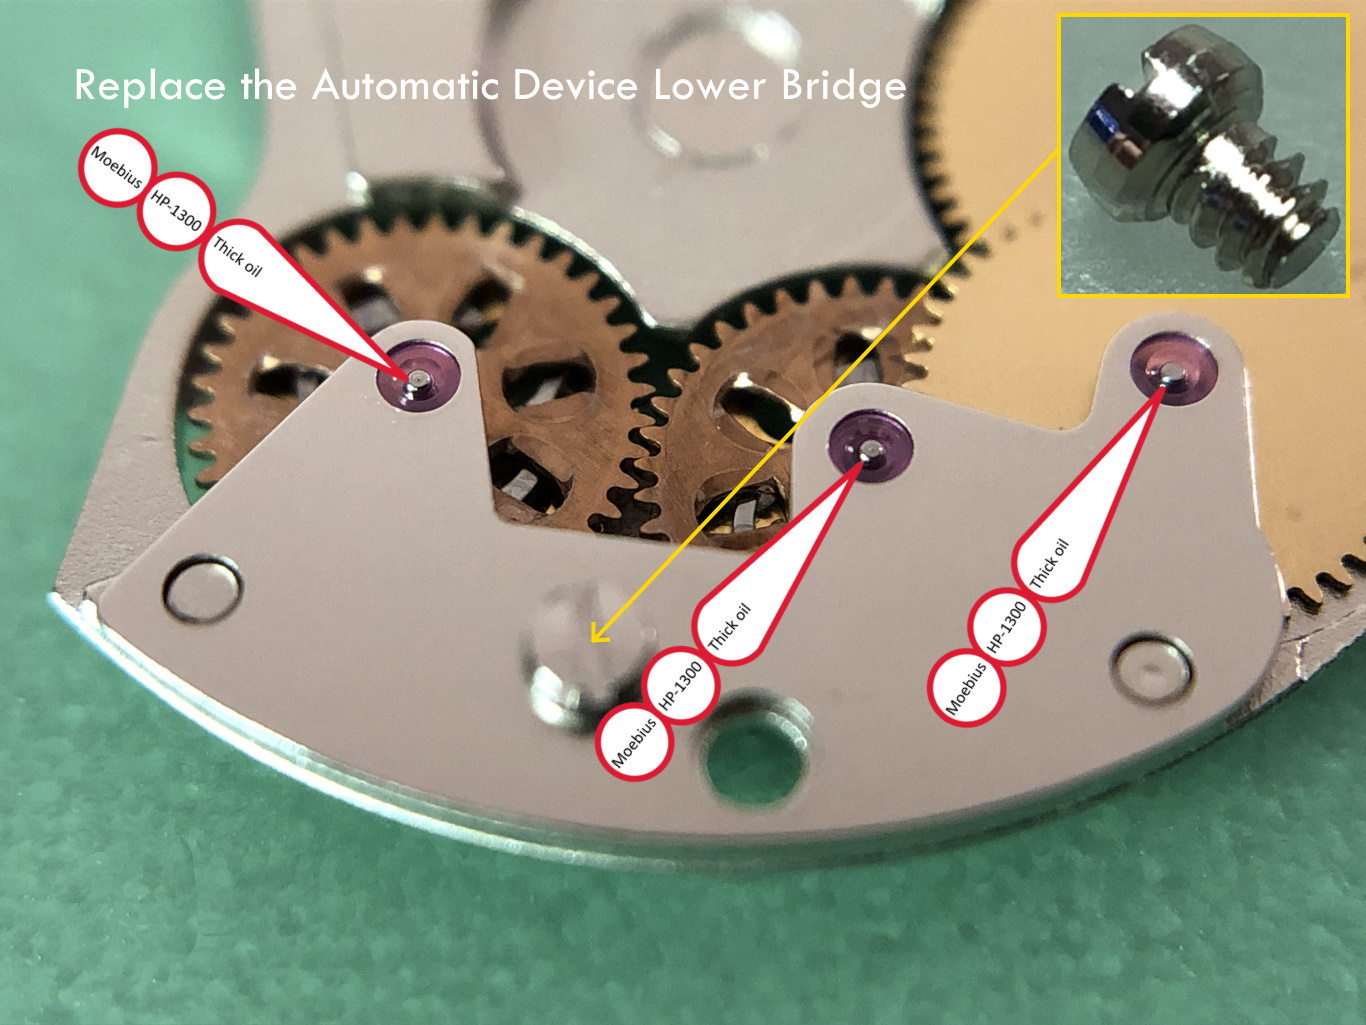
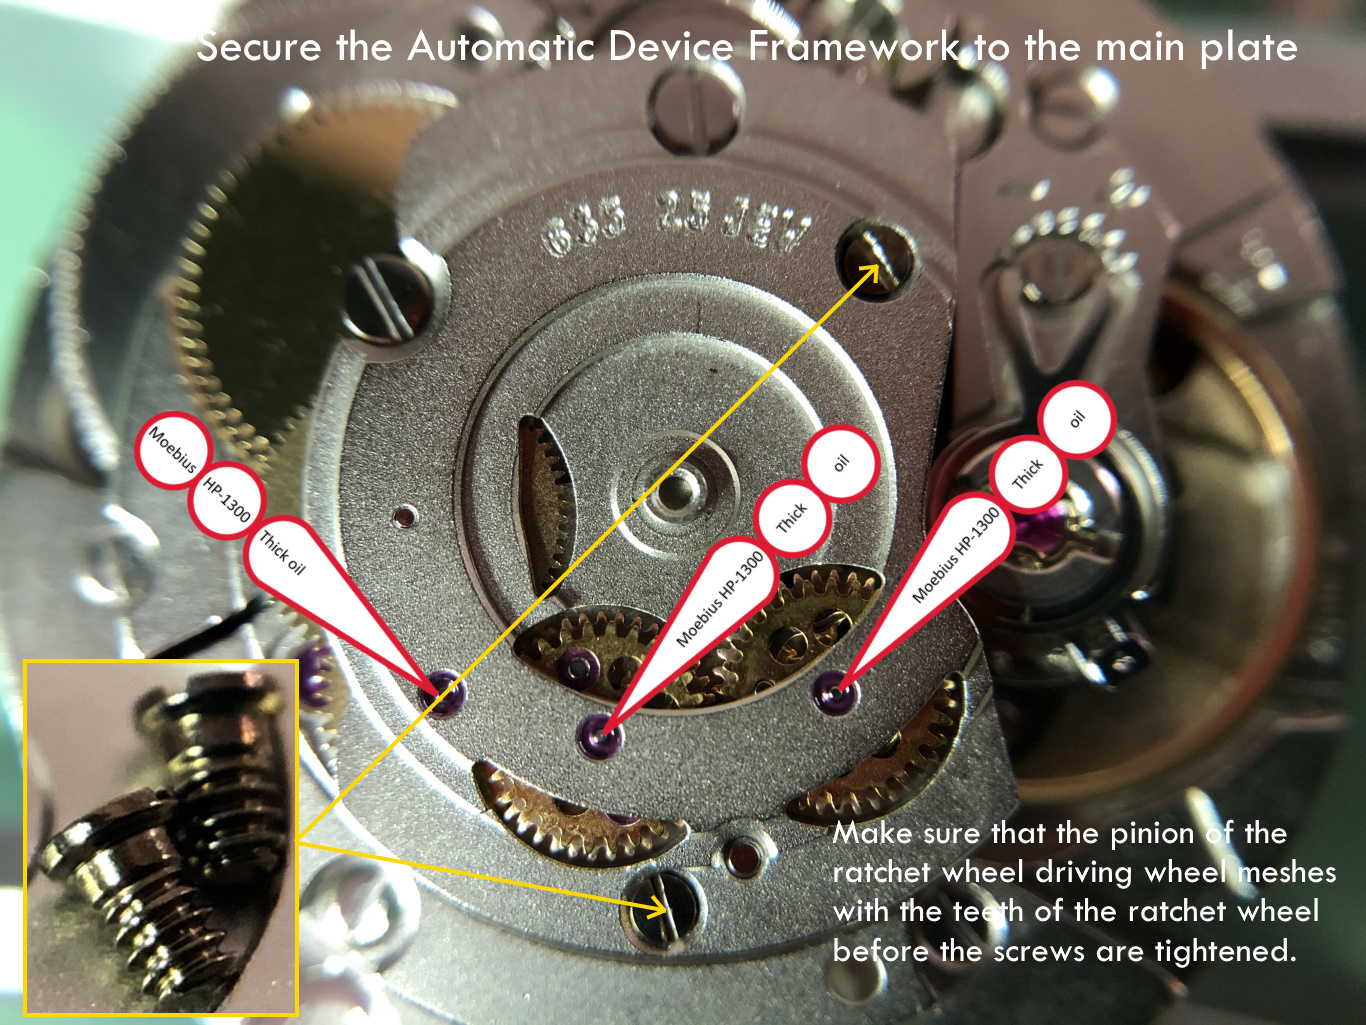
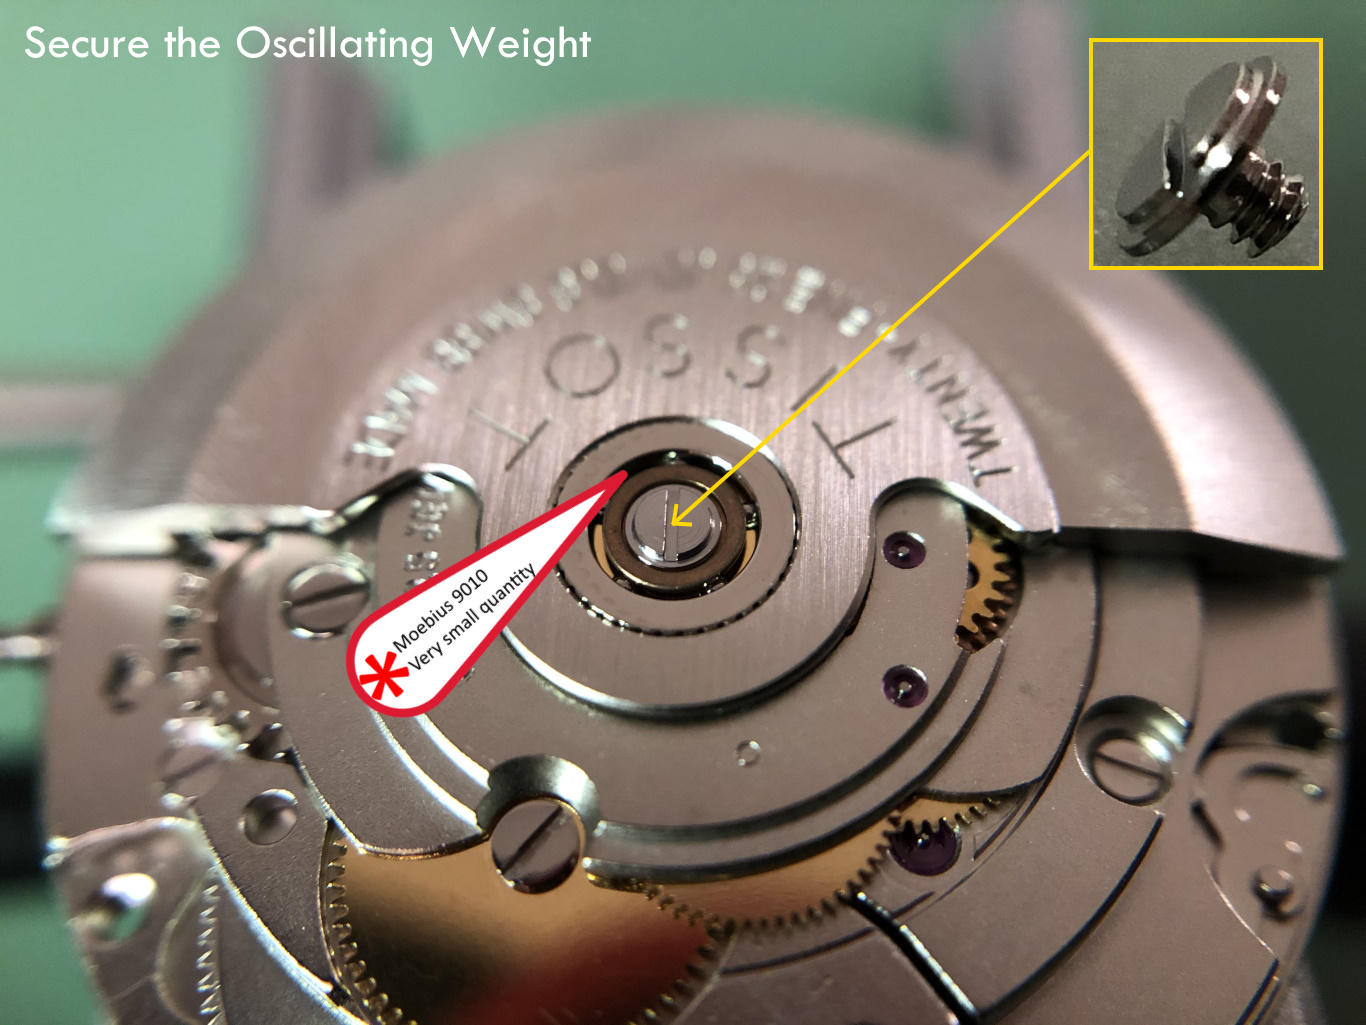
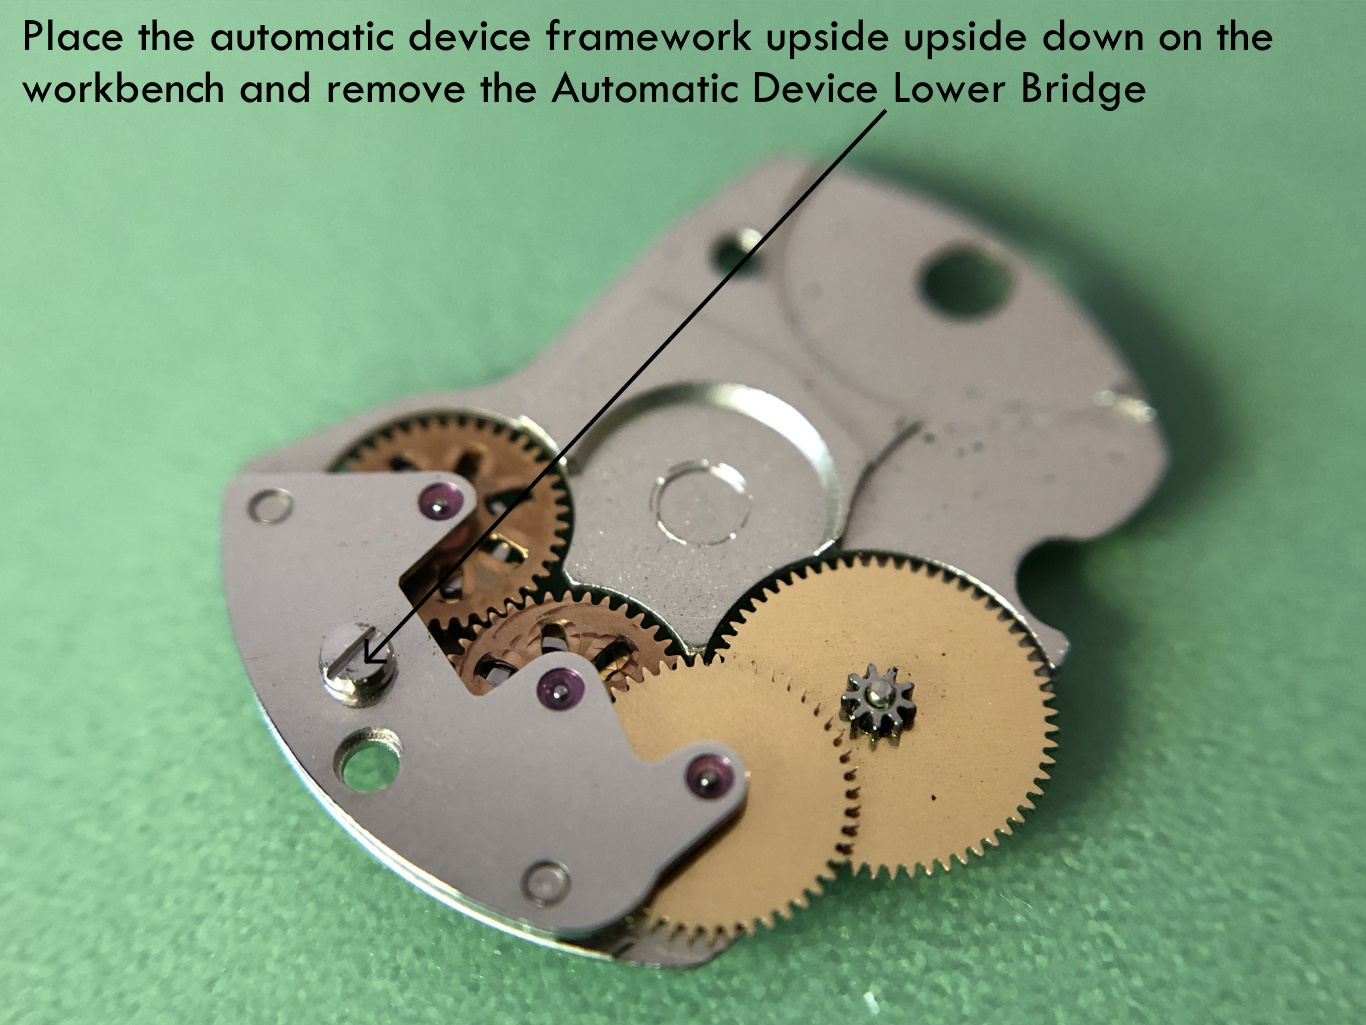
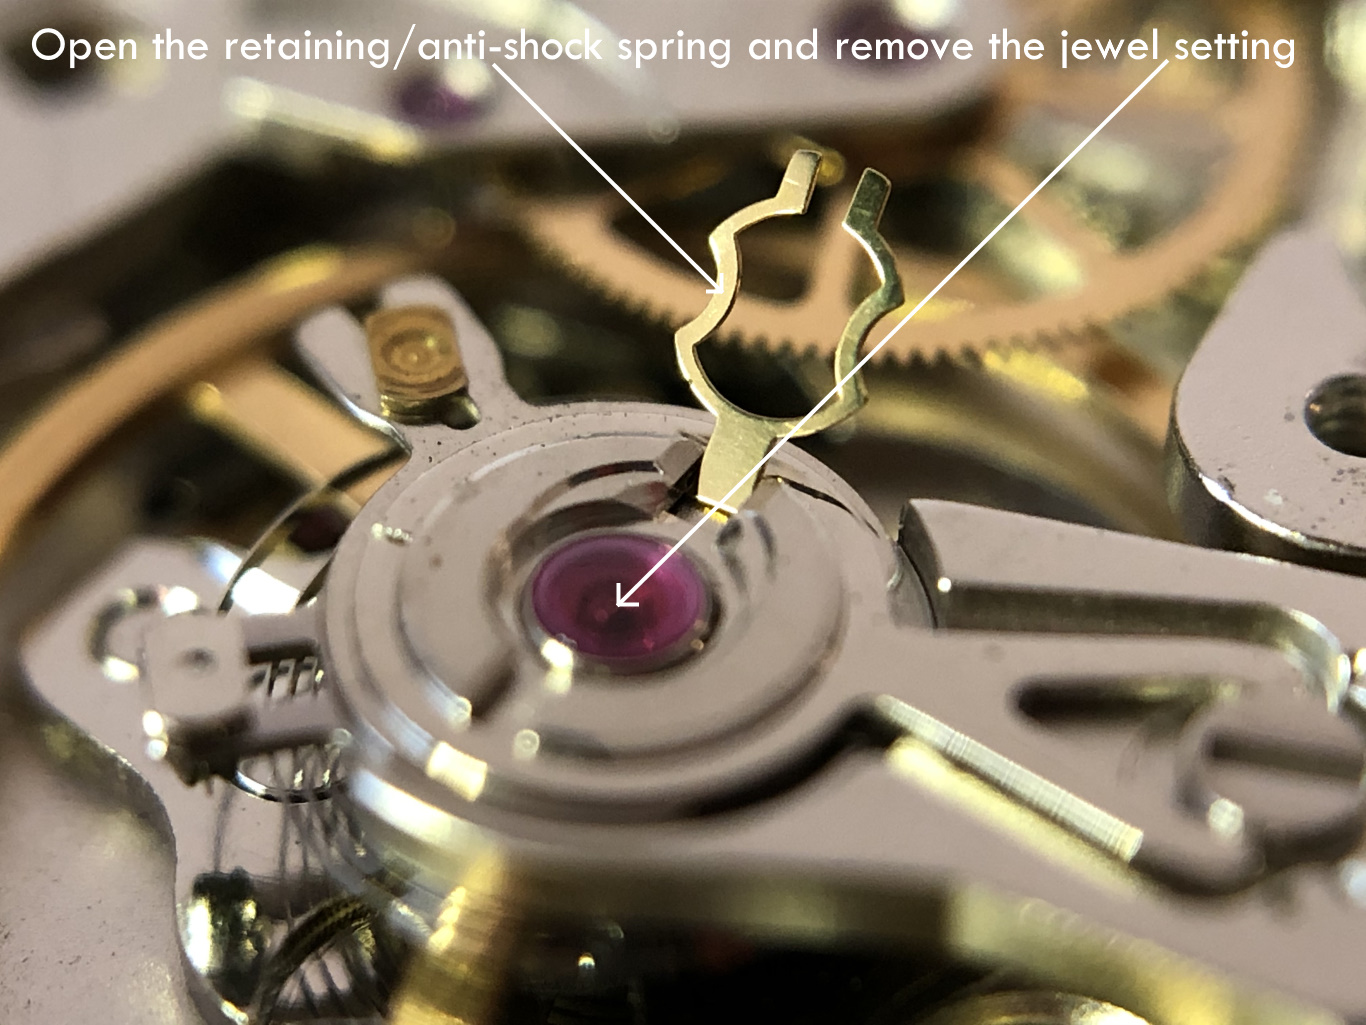
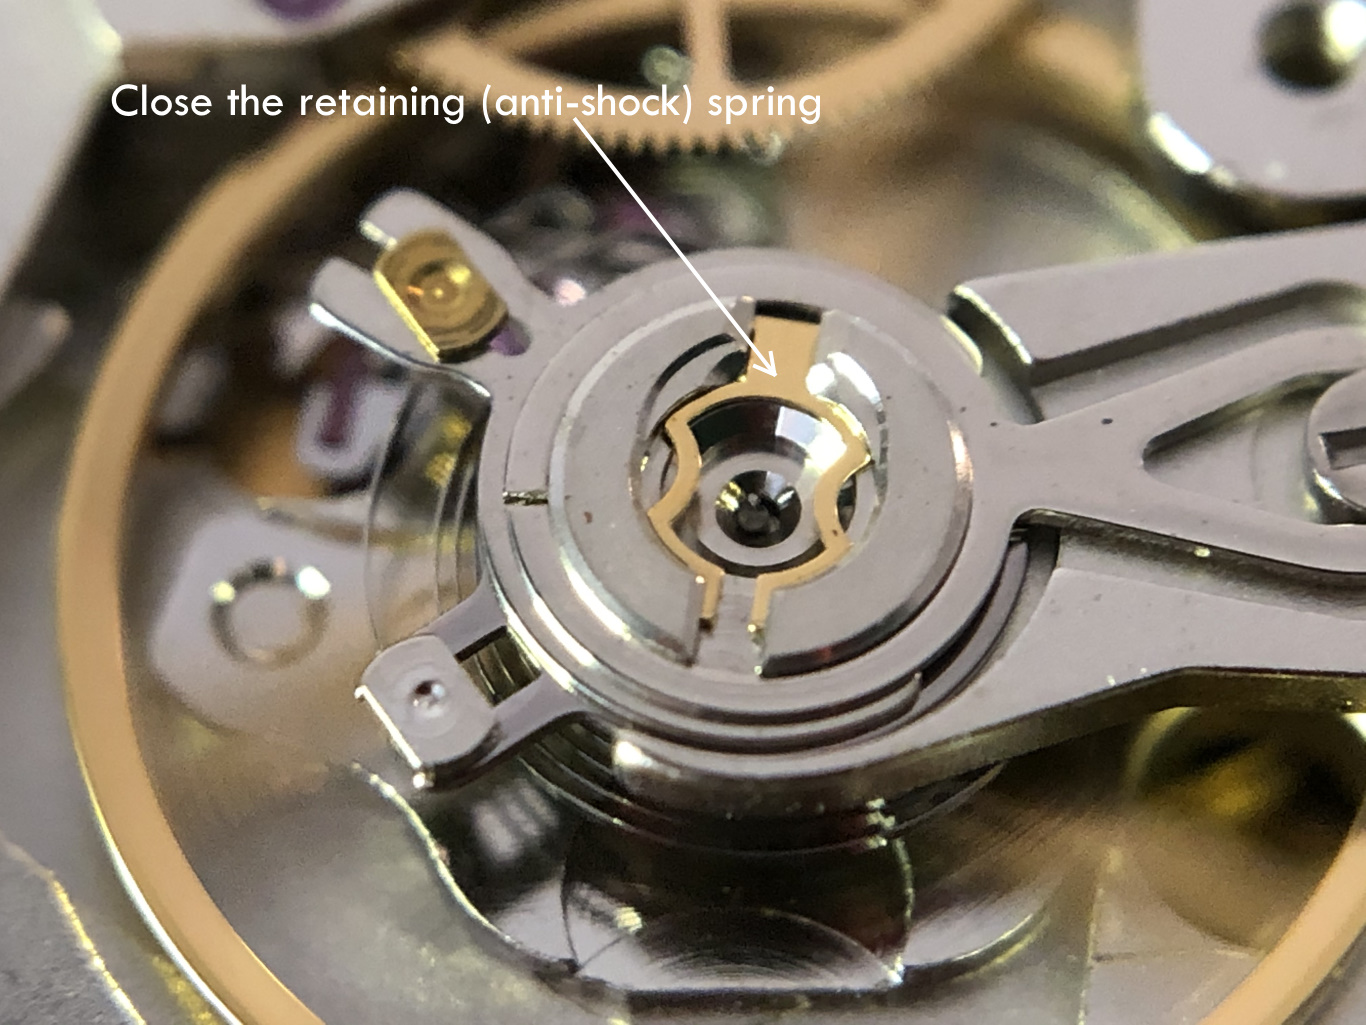
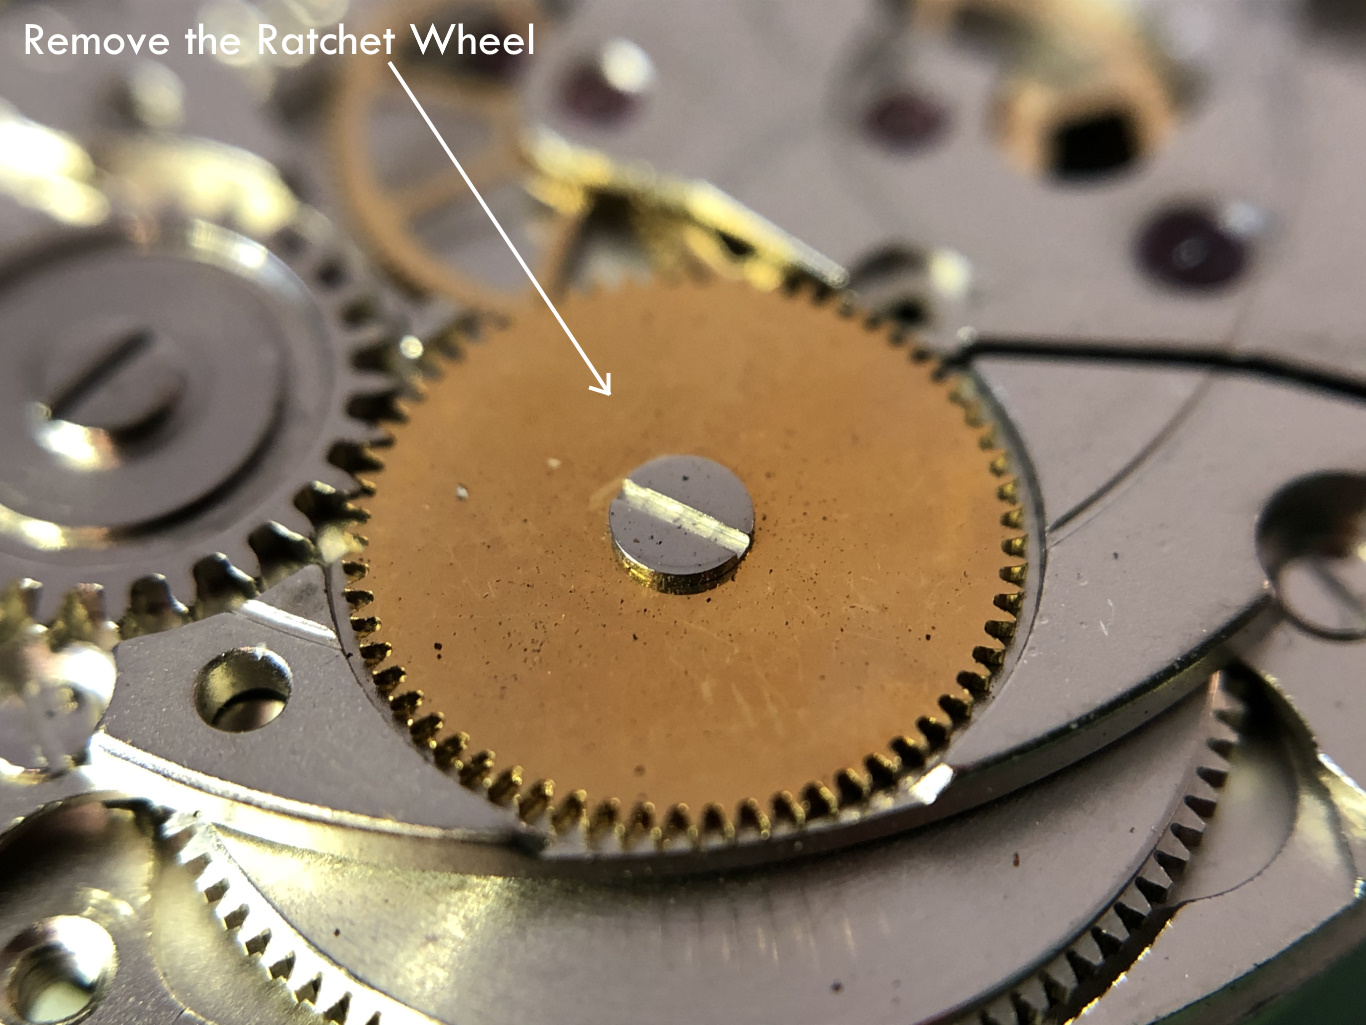
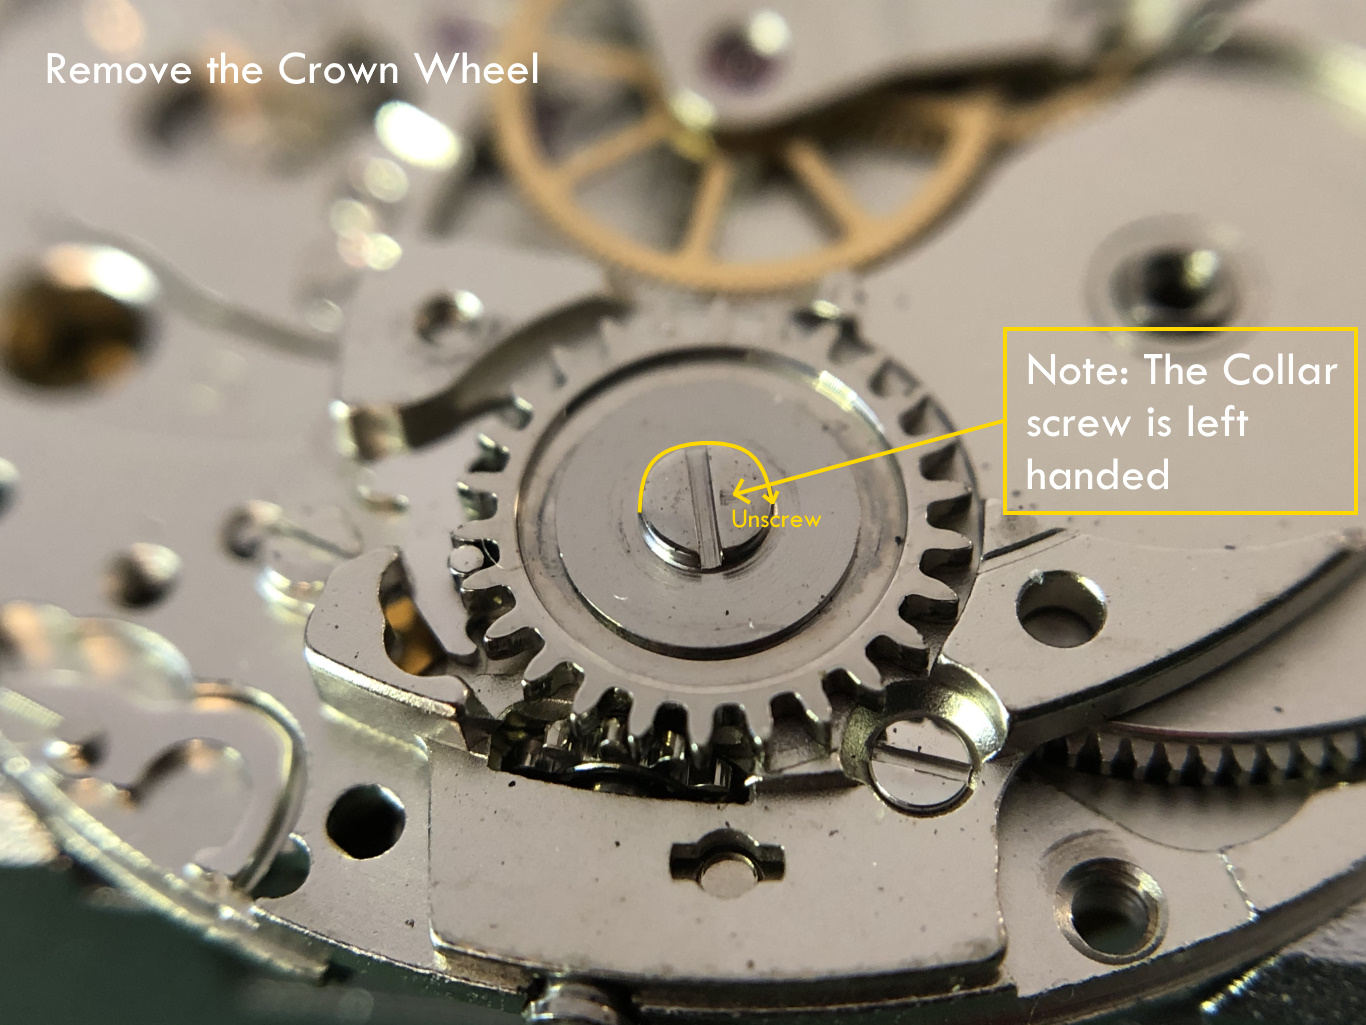
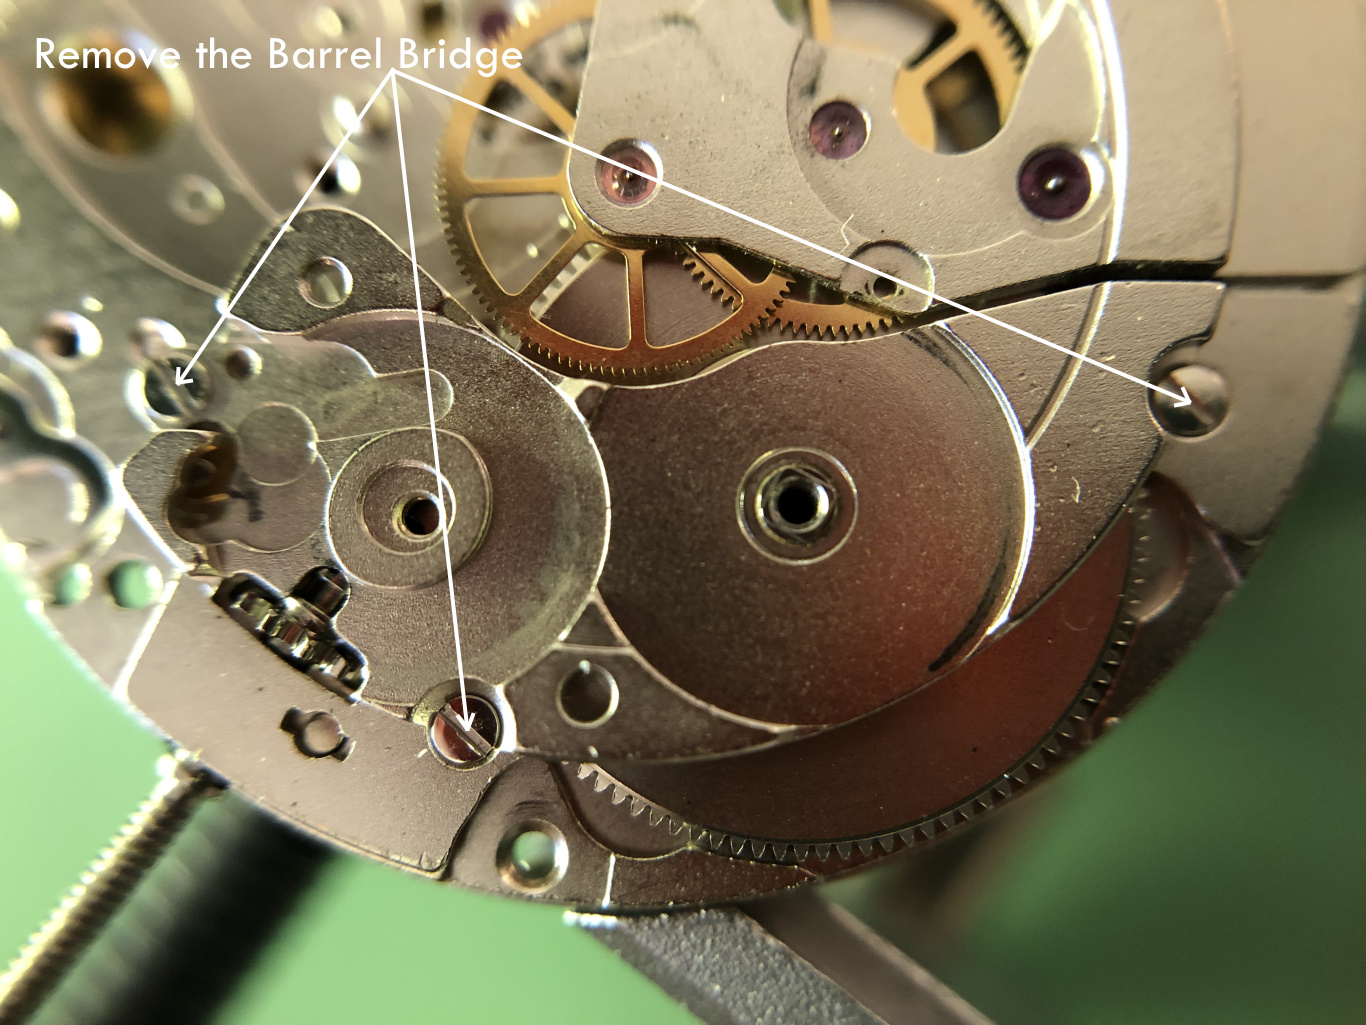
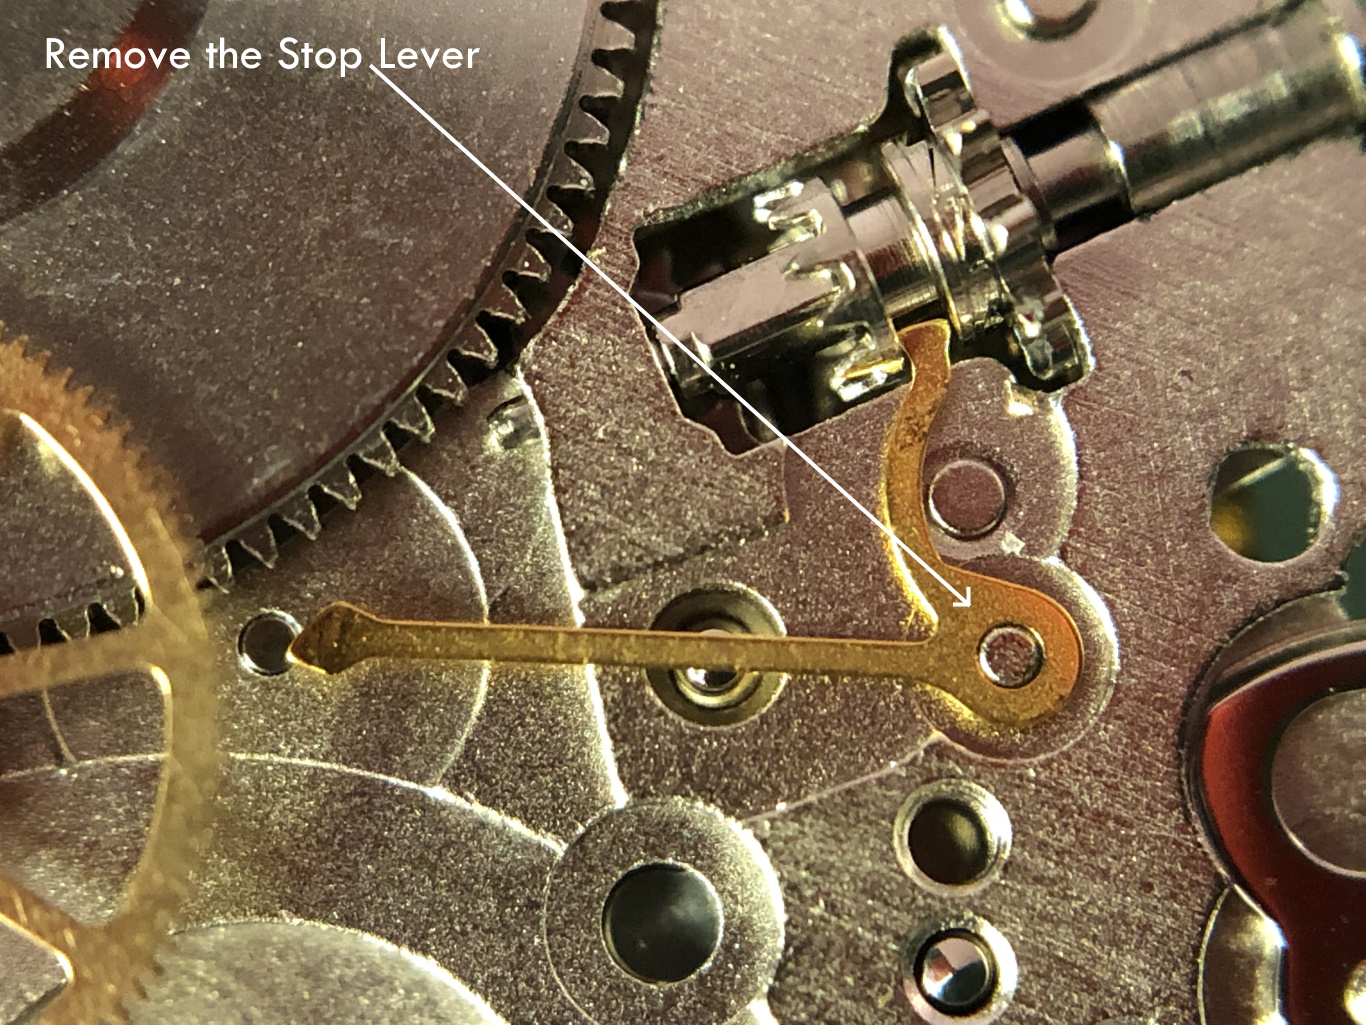
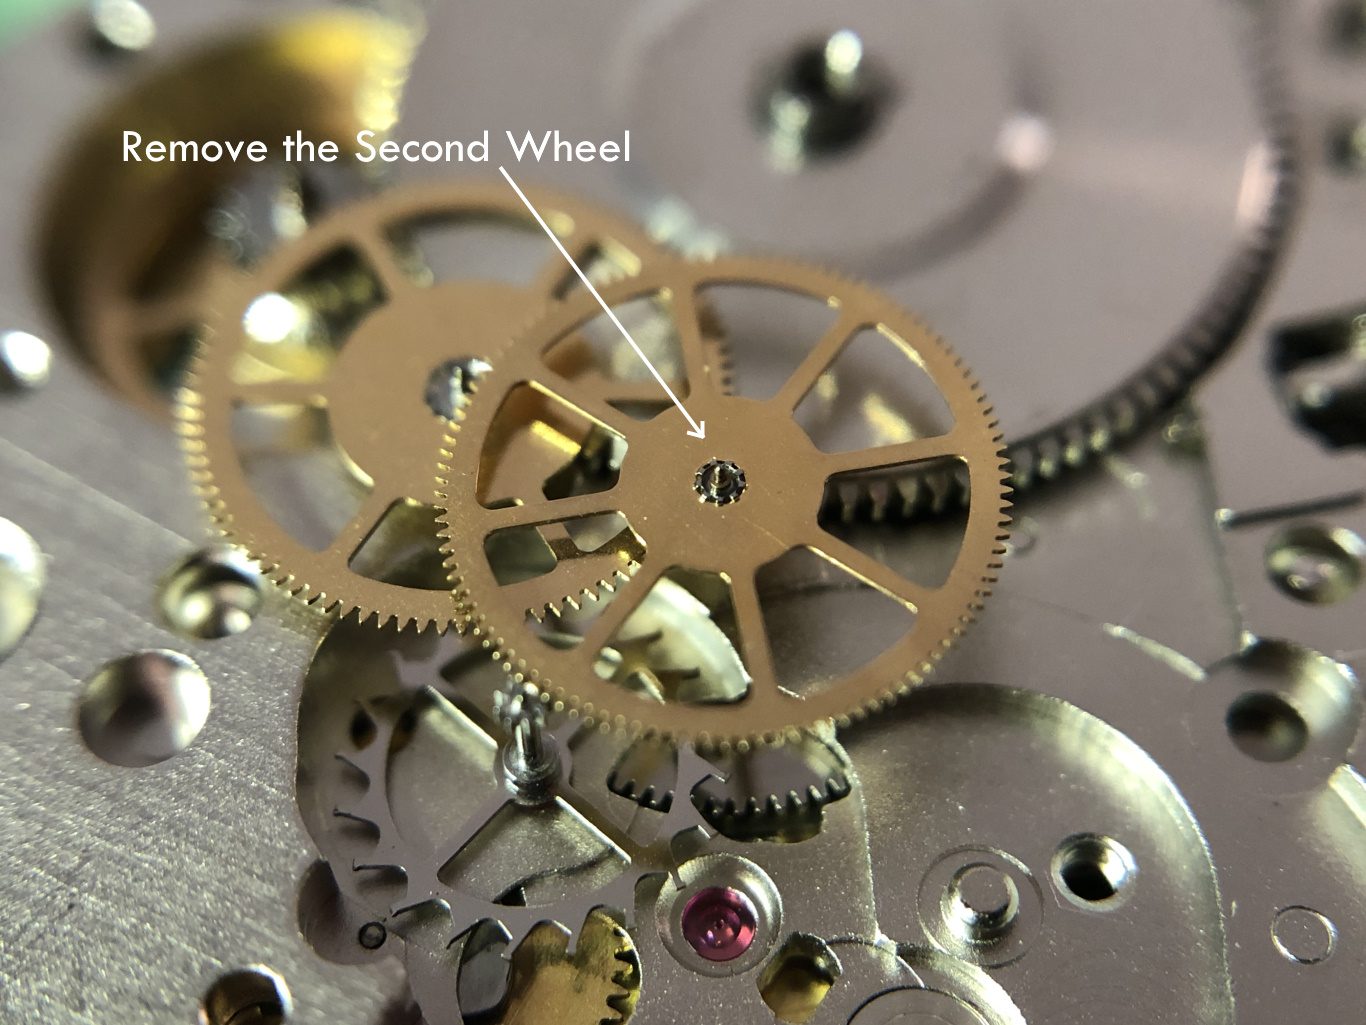
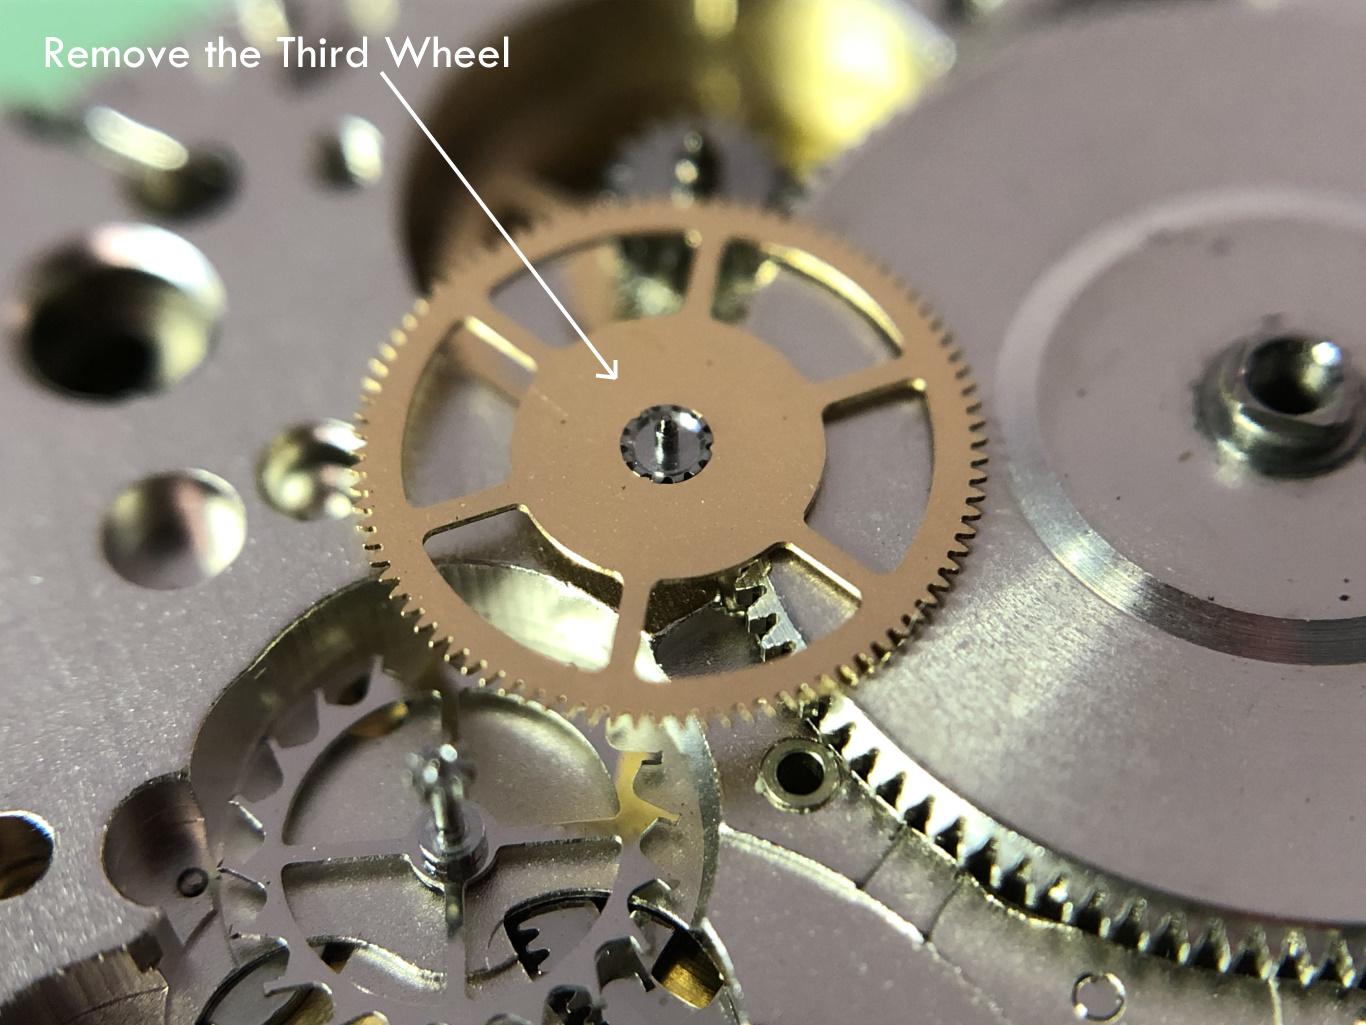
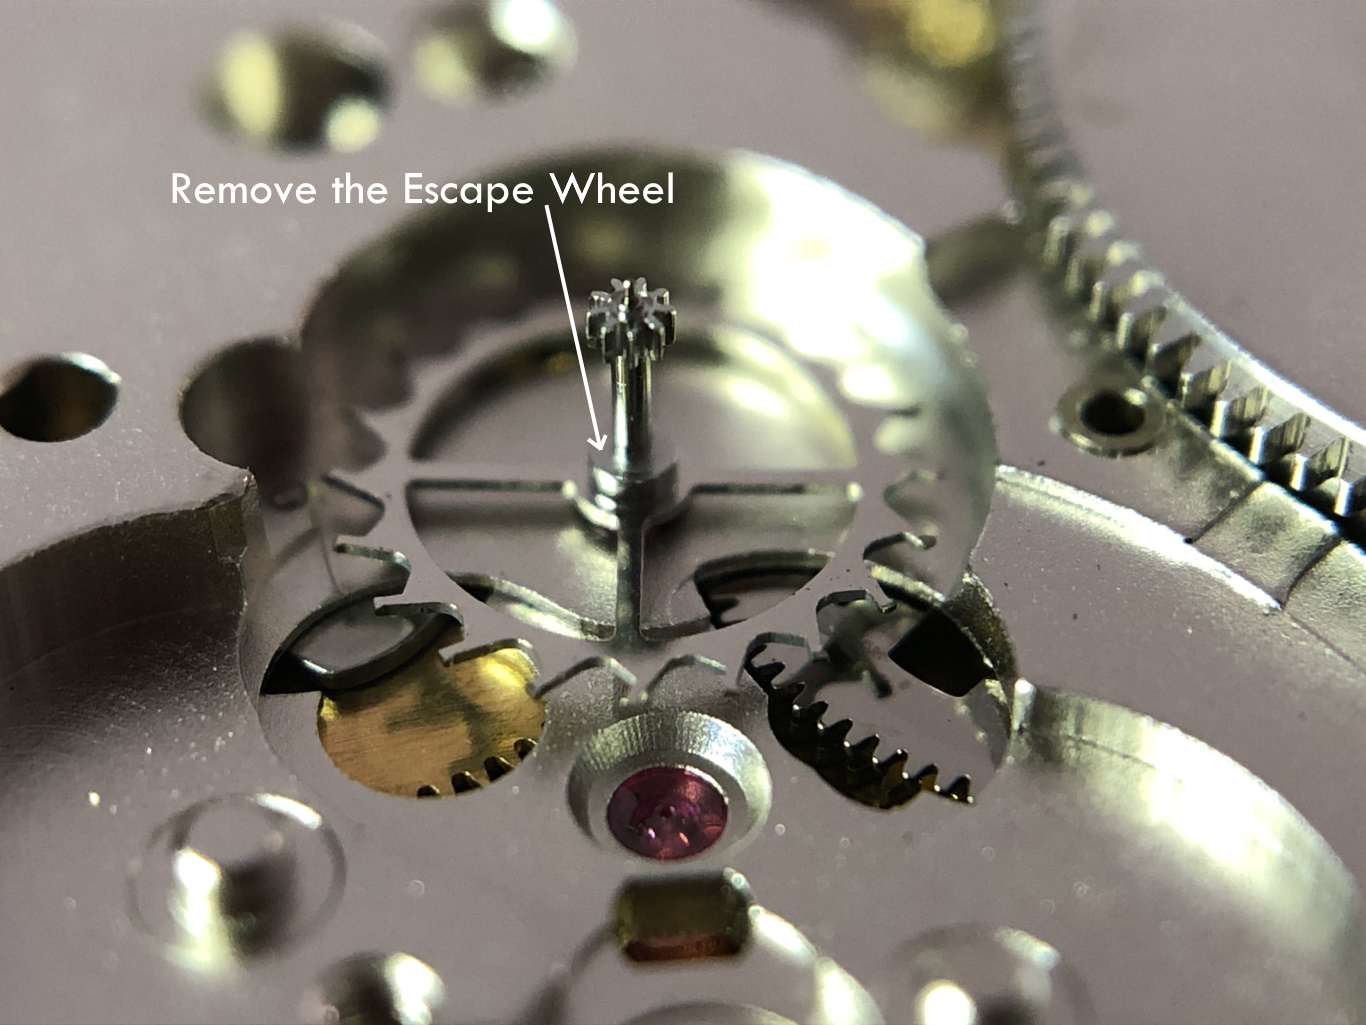
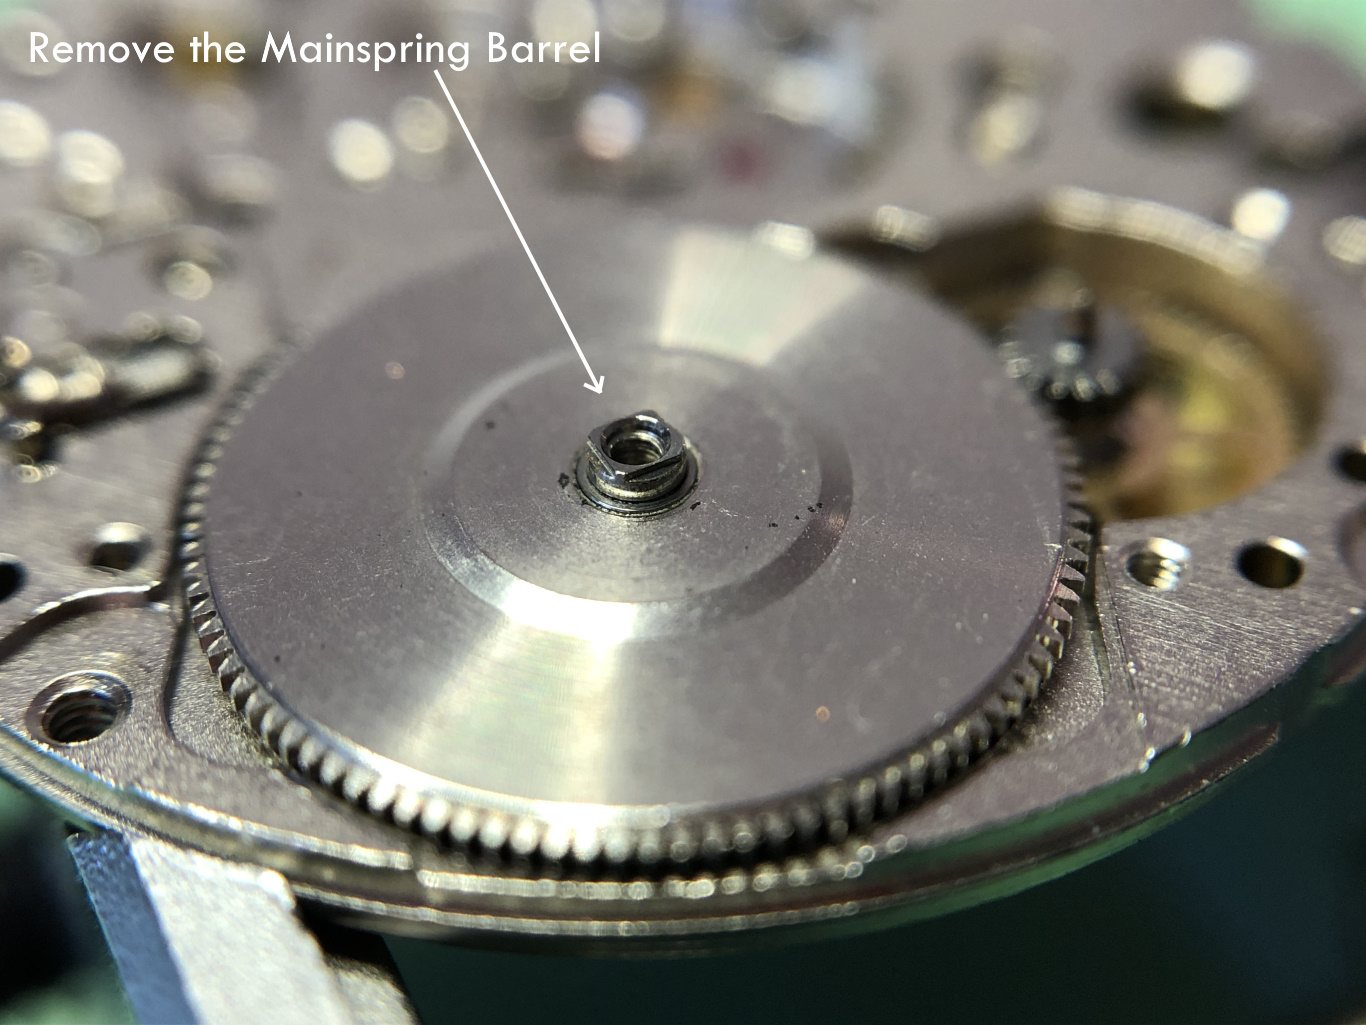
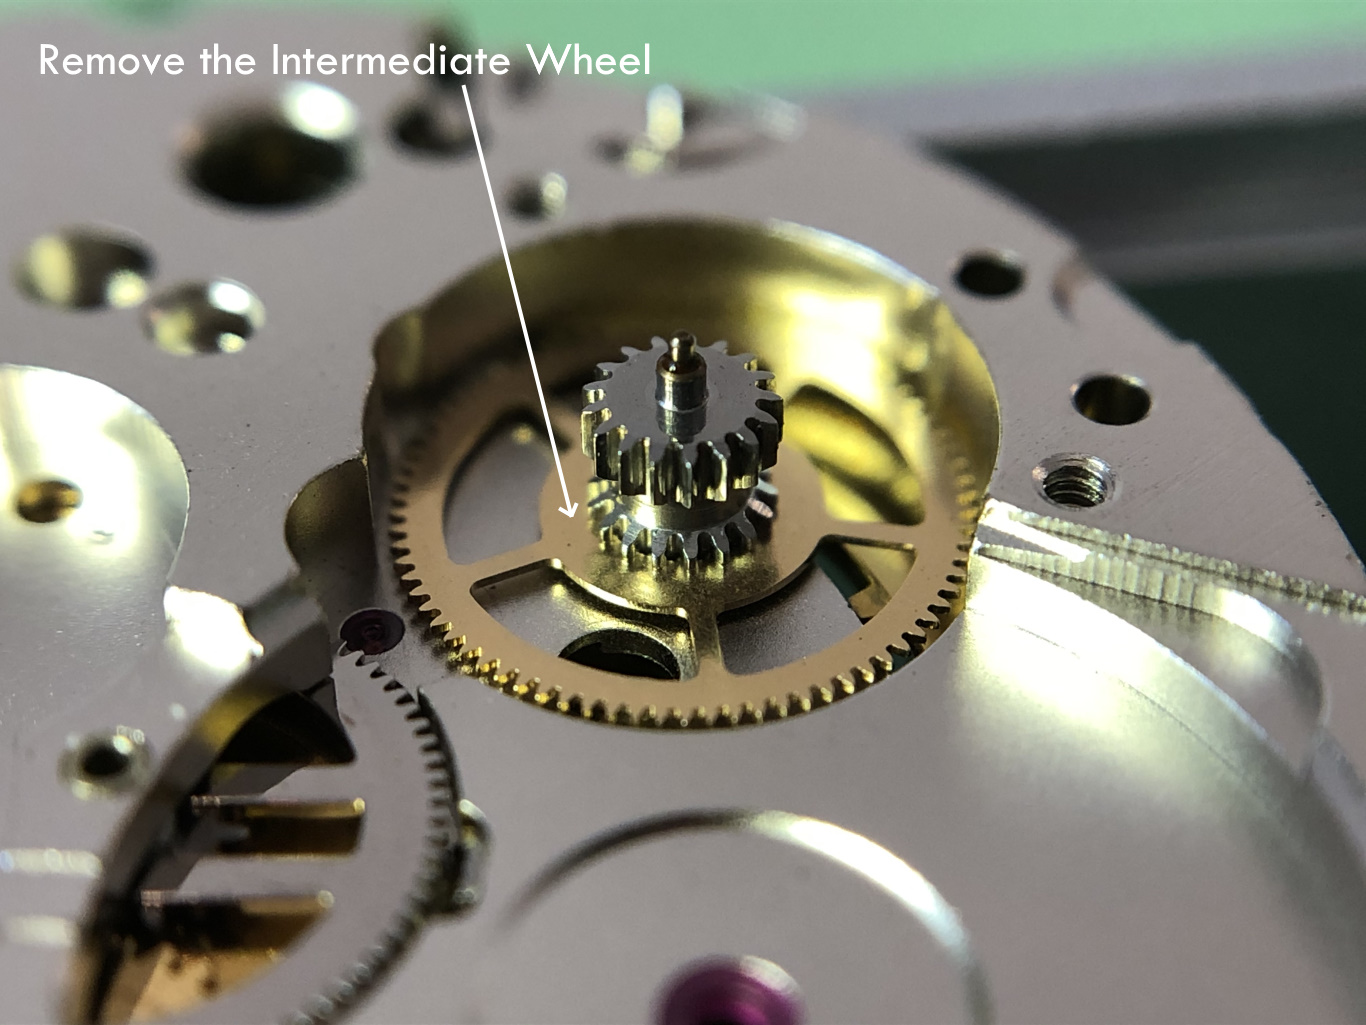
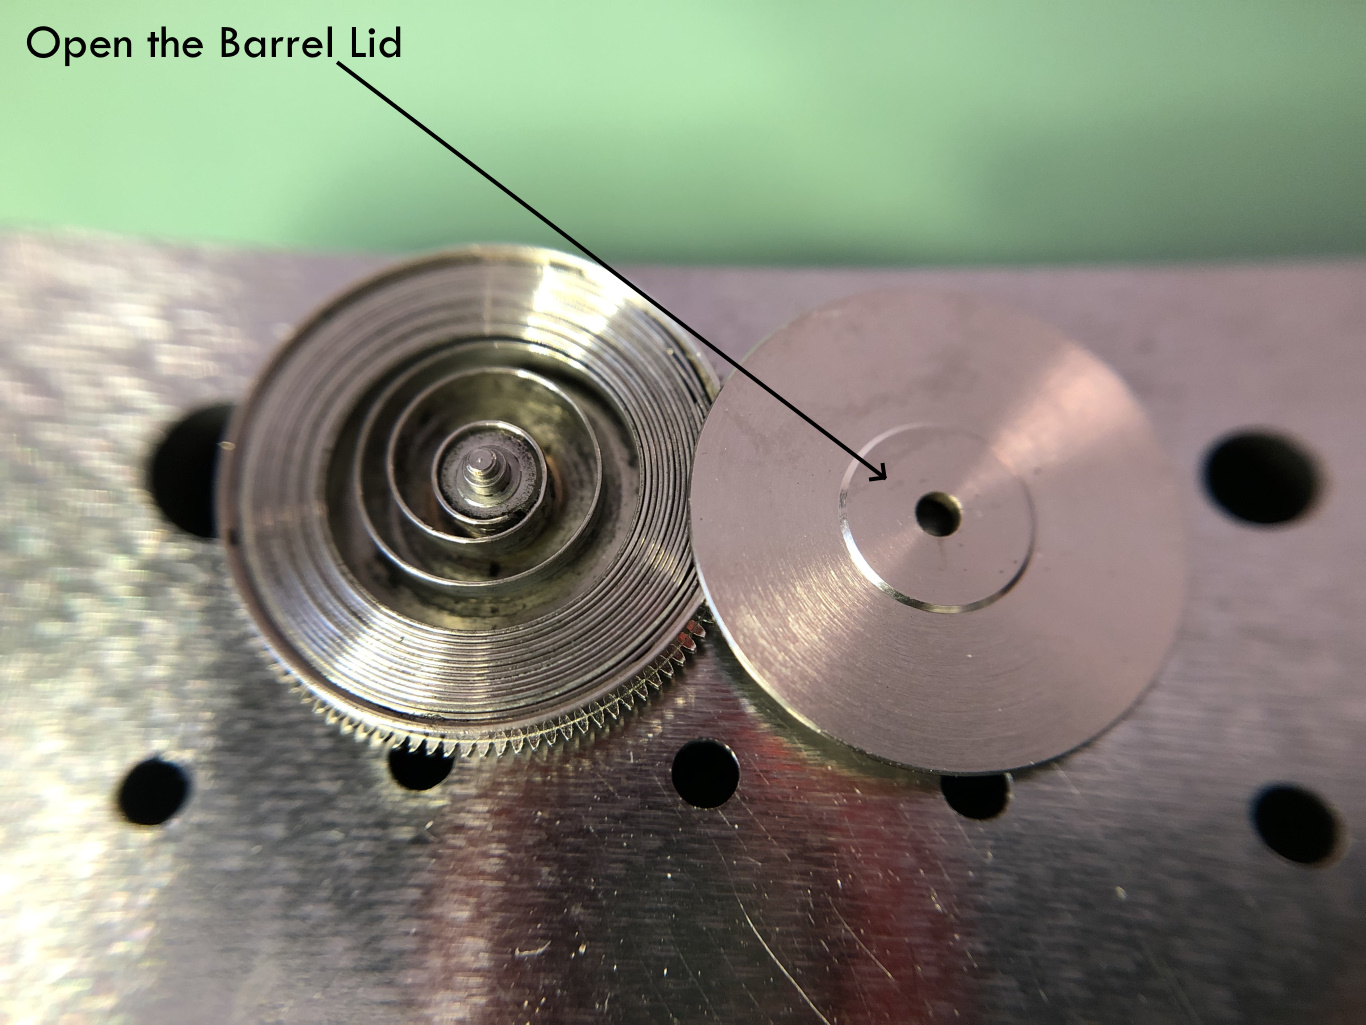
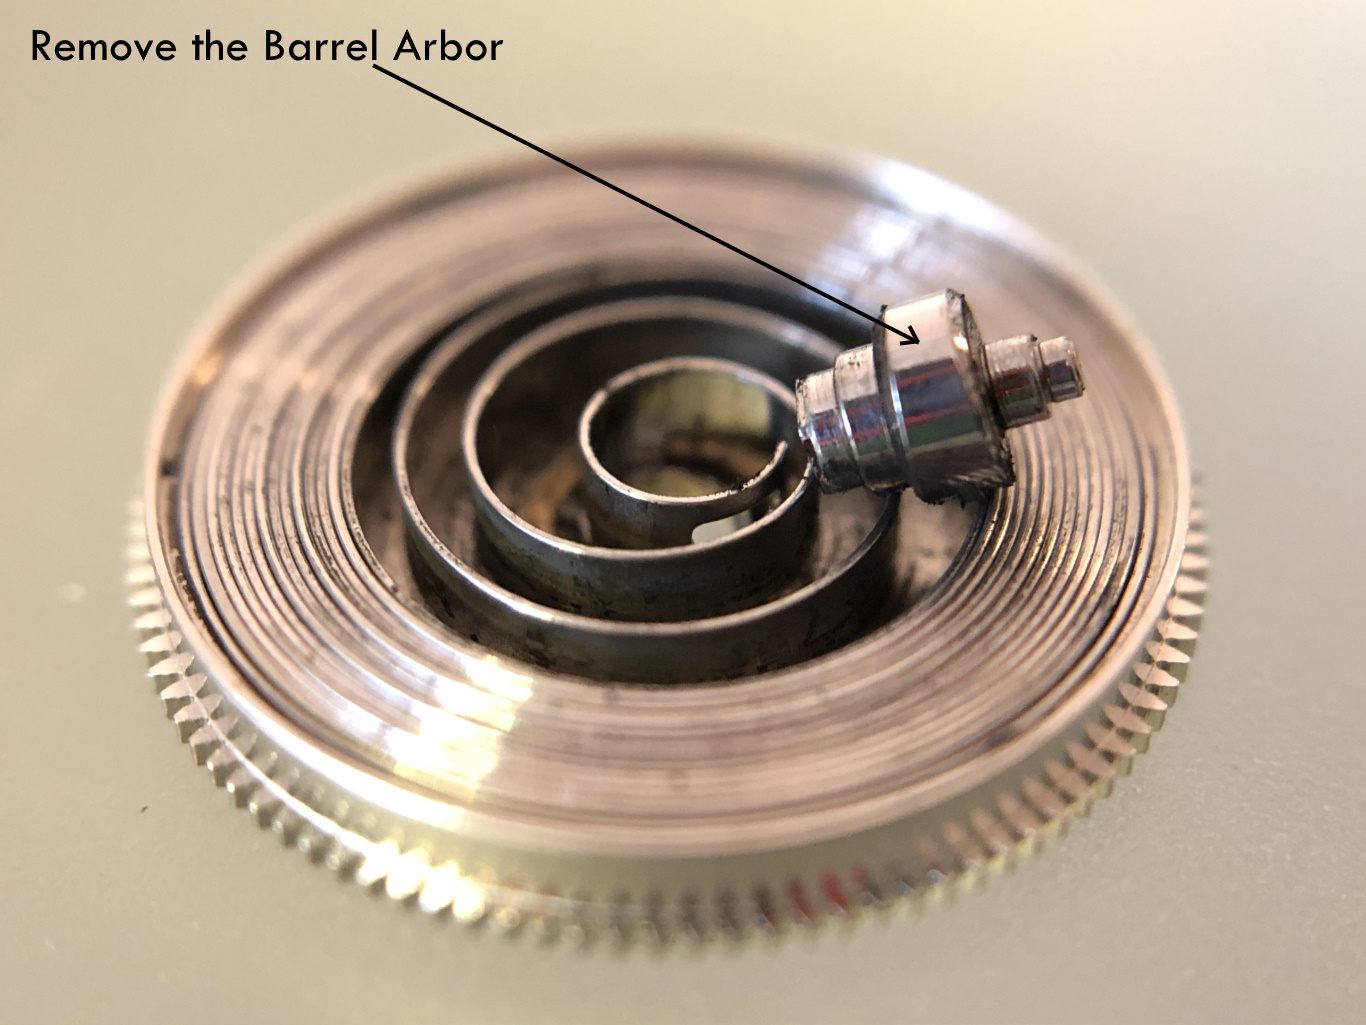
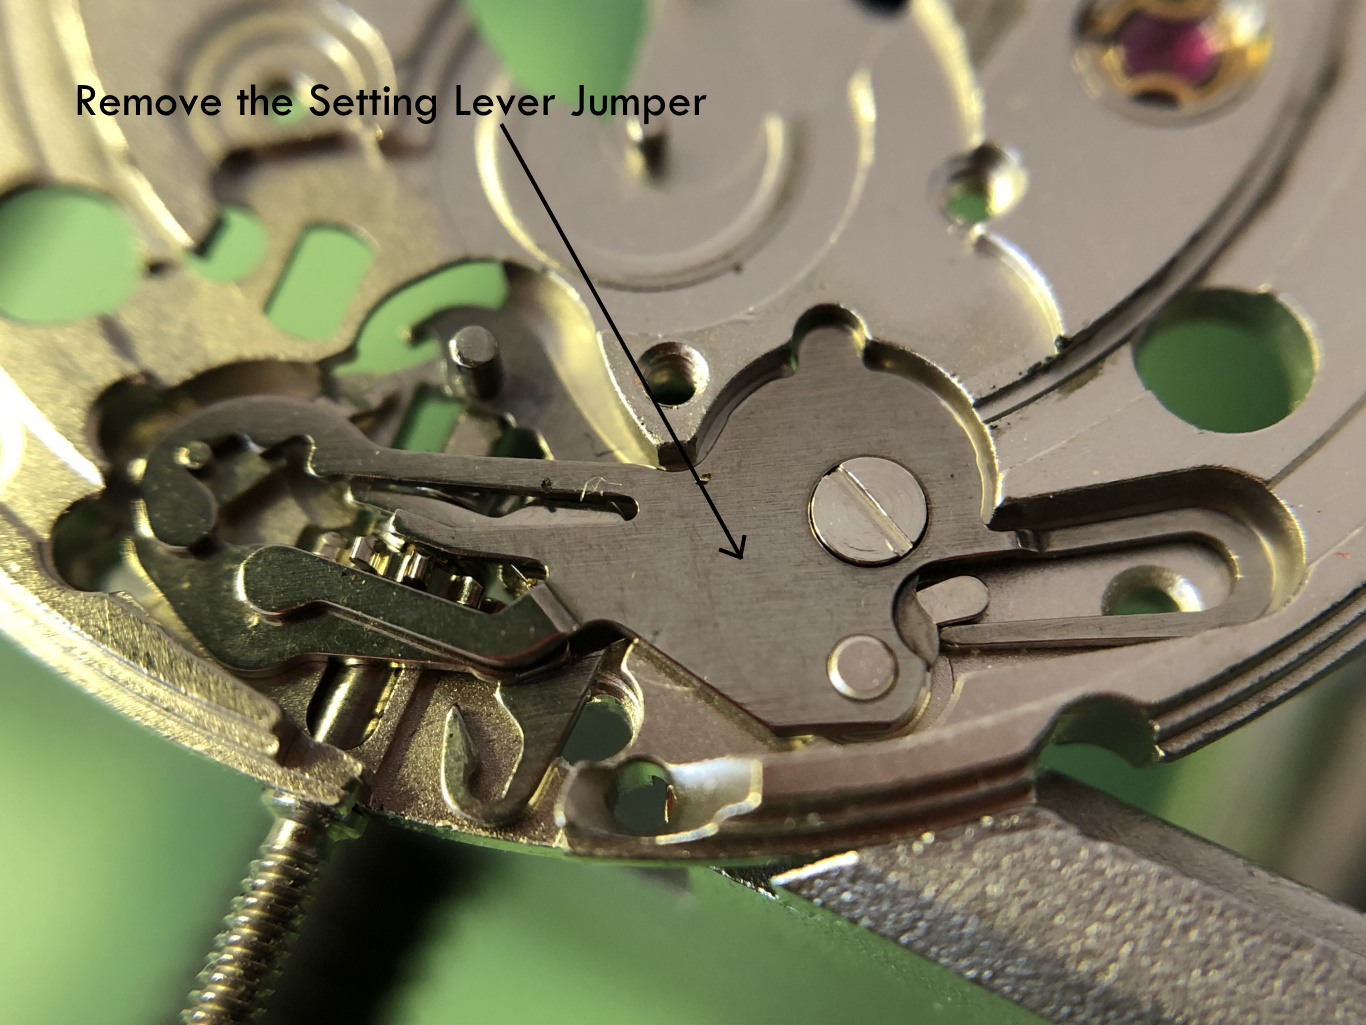
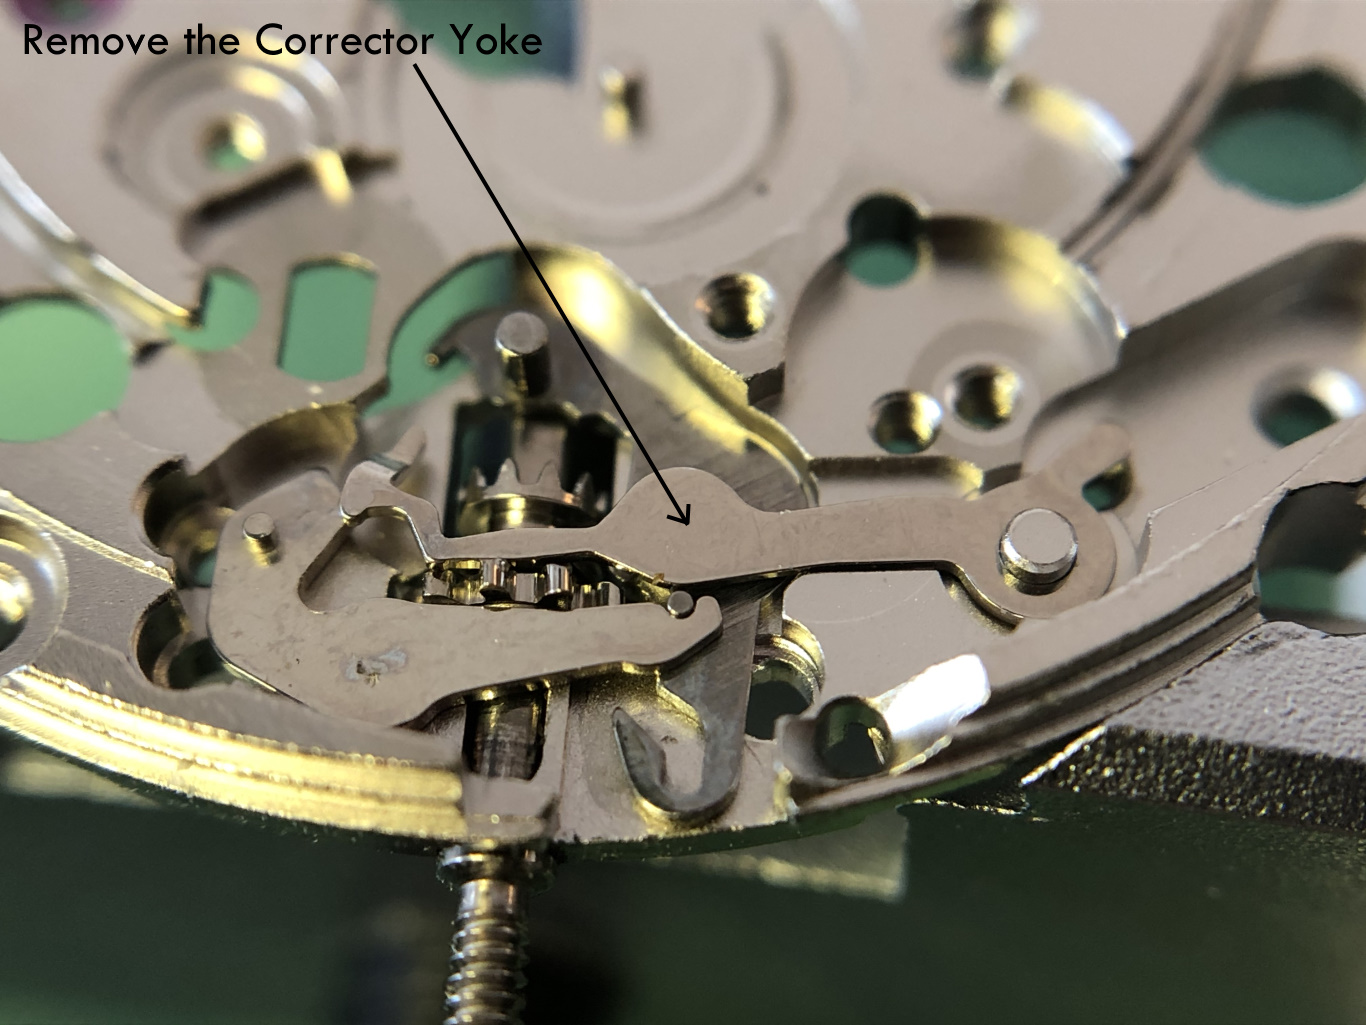
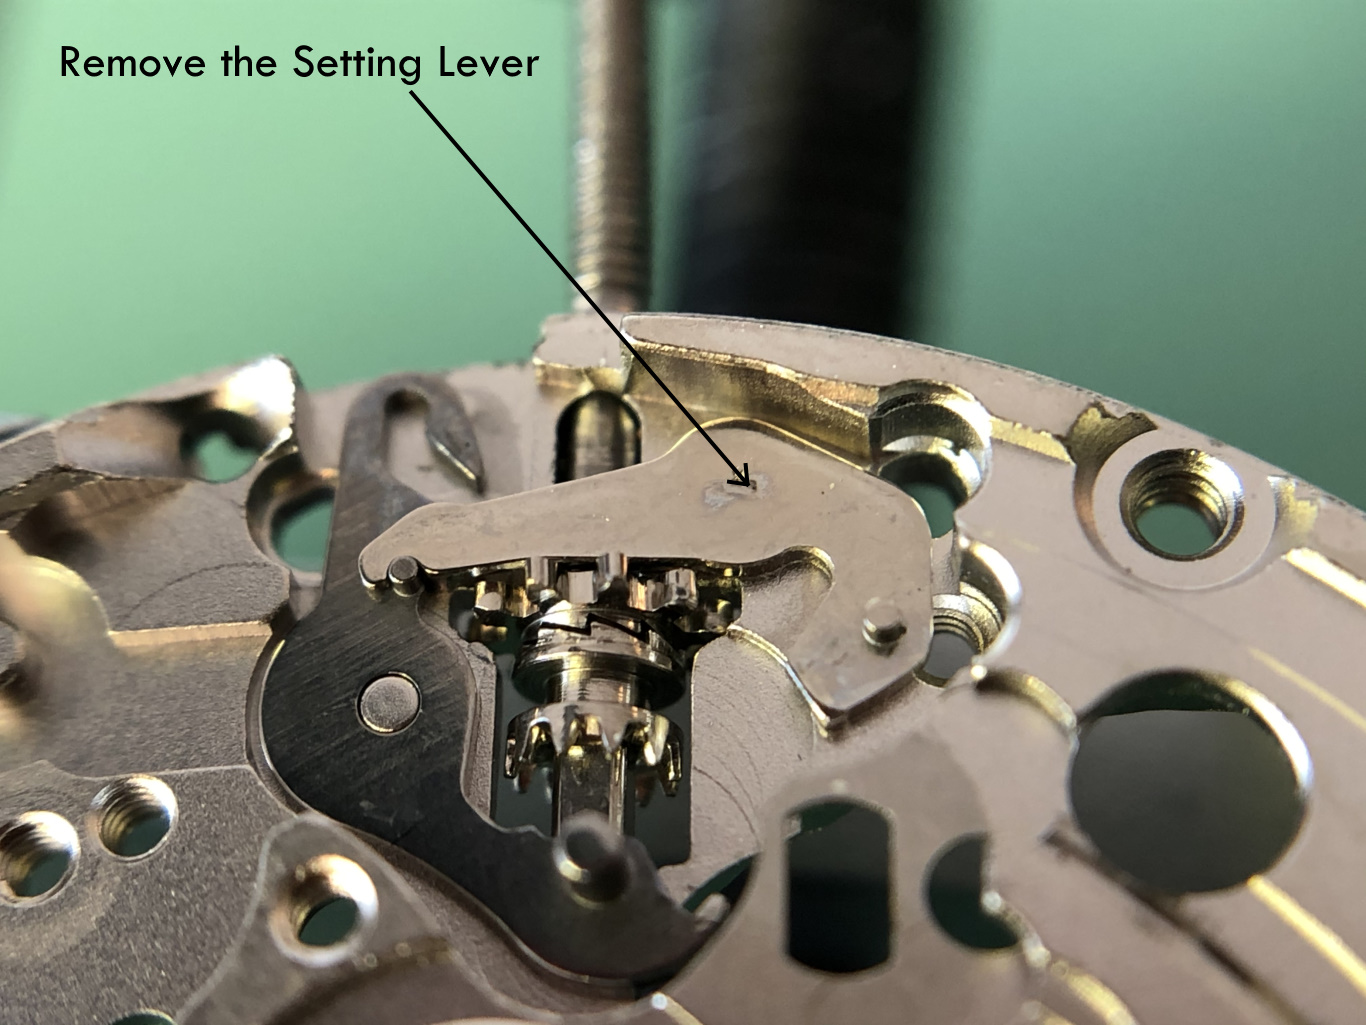
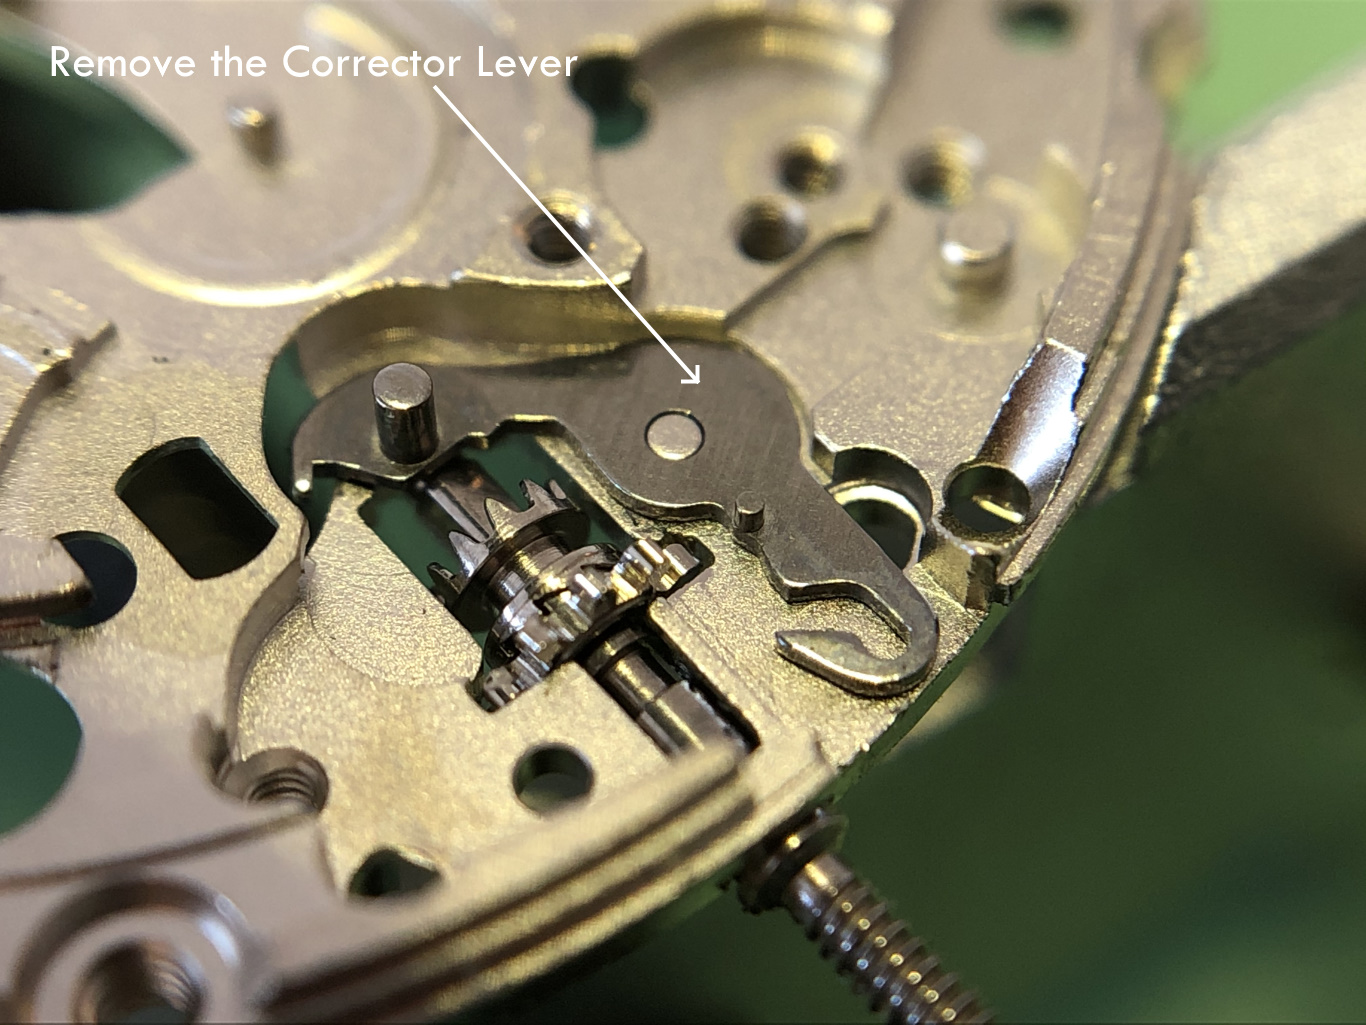
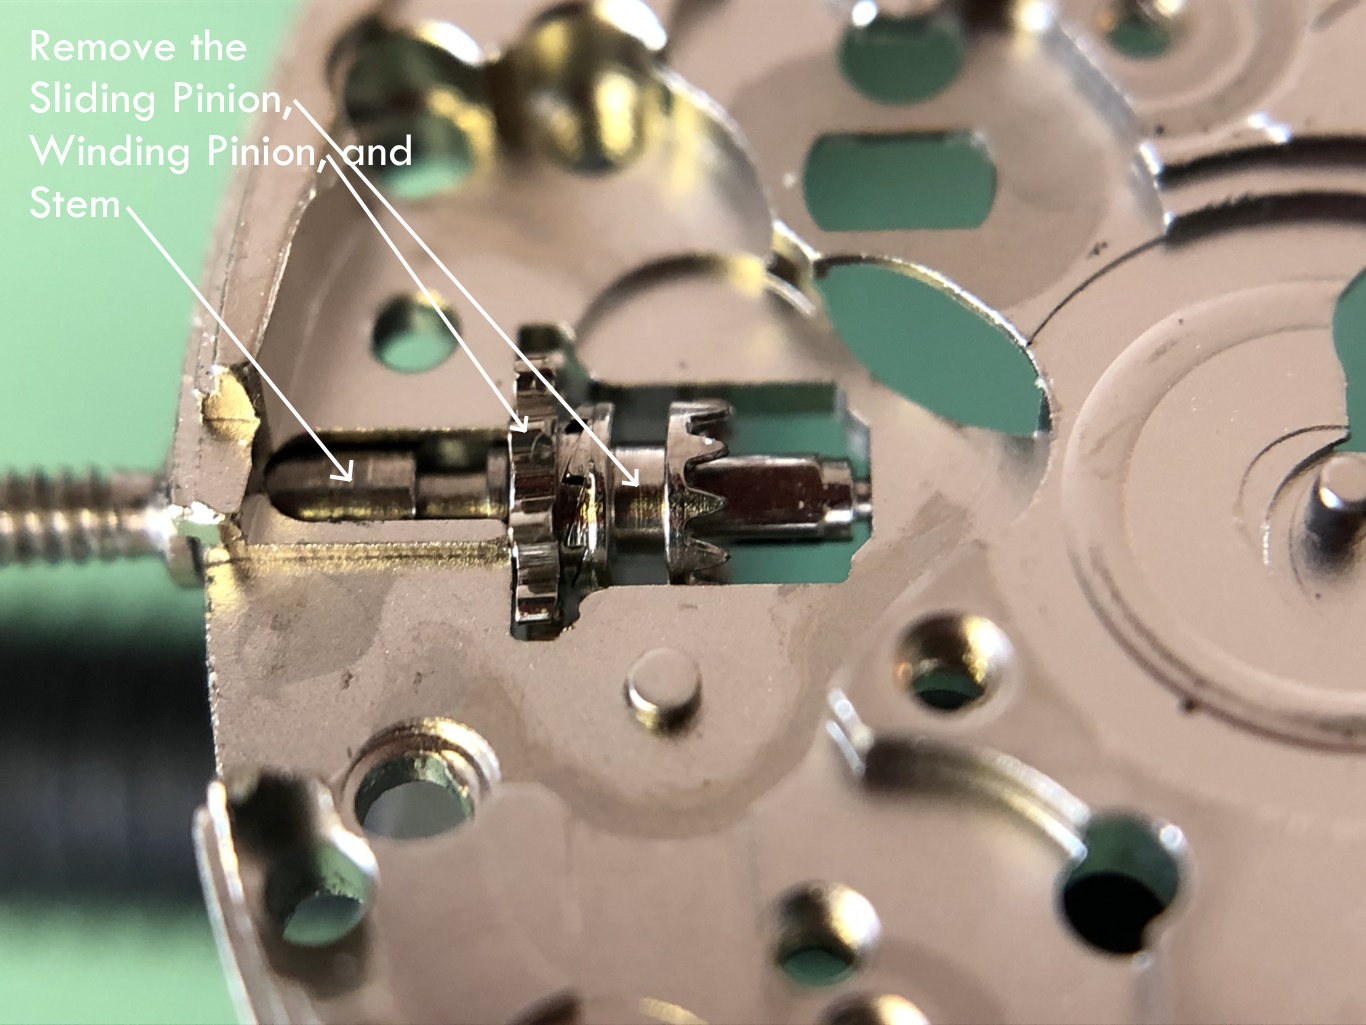
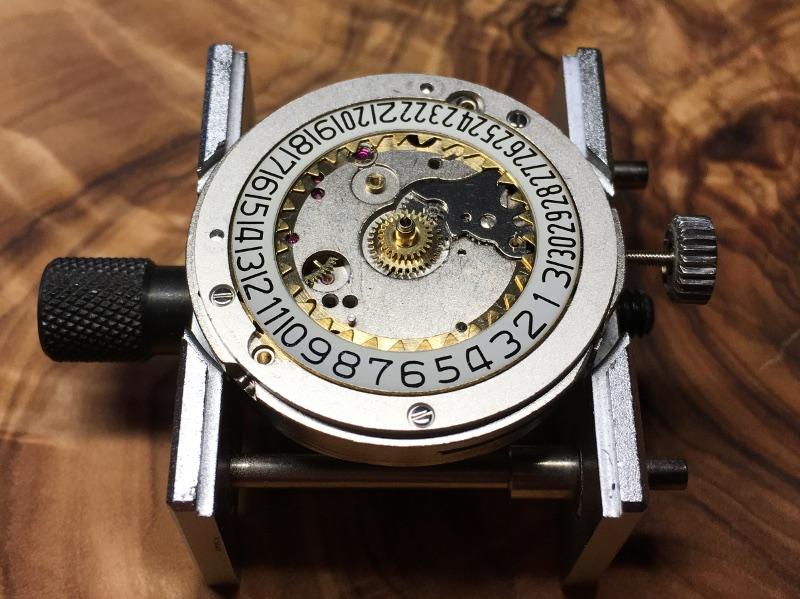
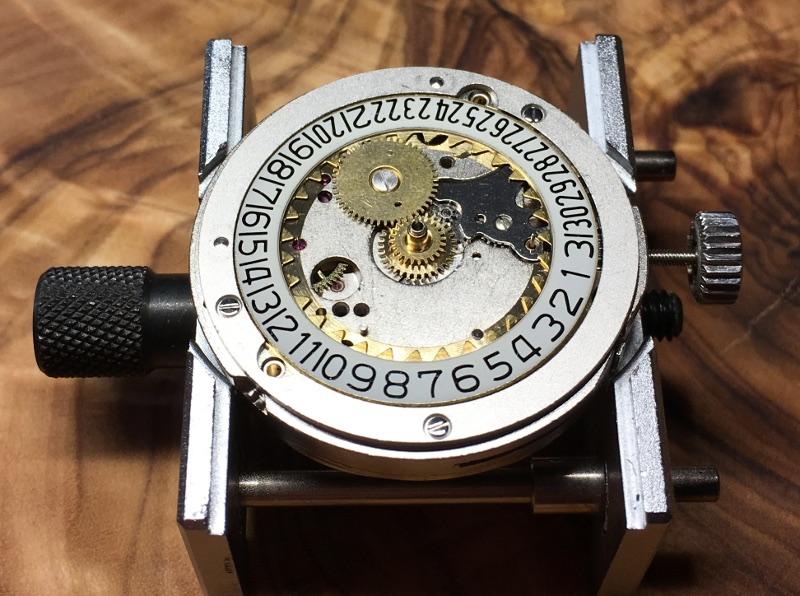
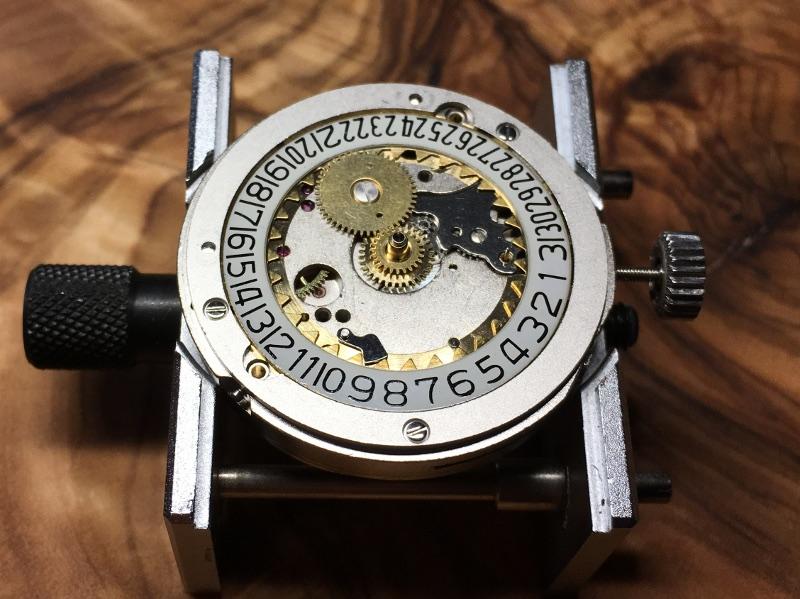
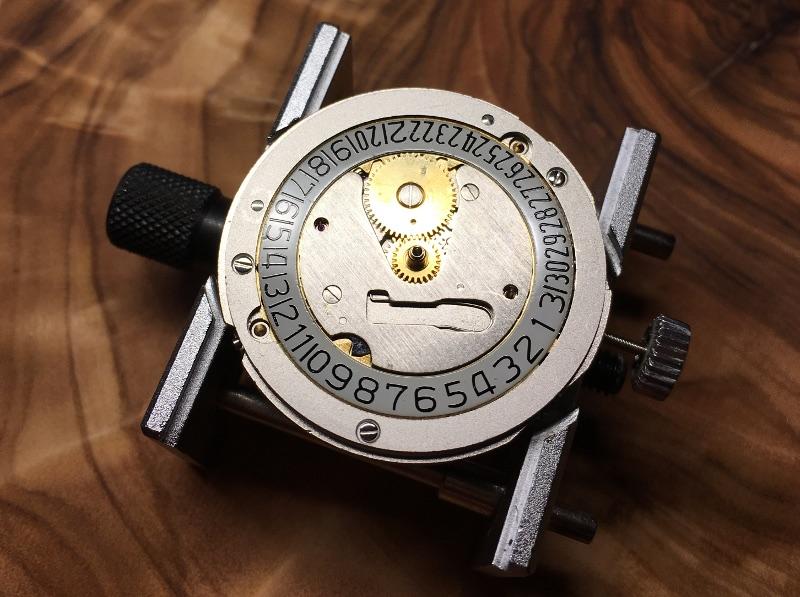
ETA 2836-2 Disassembly walkthrough here ETA 2836-2 Assembly walkthrough here When I started out servicing watches (Vostok cal. 2414) I was desperately looking for easy to follow walkthroughs and tutorials. That was several years ago. I did find a walkthrough on WUS, and I did find the YT-videos of former car mechanic Dan, the “Ratfaced Git”, and although his approach was much that of a car mechanic, rather than that of a skilled watch repairer (he hardly knew the names of parts, didn’t care much, and was proud of it), it inspired me endlessly and gave me - at that time a complete mechanical idiot - the courage to try it myself. Without those videos I’m not sure my interest would have taken off. I know Dan struggled with many difficulties in his life including cancer, and it has been close to three years since he published anything on his YT-channel. Anyway, I hope you’re still with us “Ratfaced git” and I say thank you for the inspiration and dedicate this walkthrough to you. In ETA’s technical communication for calibre 2836-2 the assembly is made in seven steps in the following order: 1. Keyless works 2. Train of wheels 3. Mainspring barrel and bridge 4. Balance assembly 5. Self-winding mechanism 6. Dial train (/motion works) and the calendar works part 1 7. Dial train (/motion works) and the calendar works part 2 However, if you follow my assembly procedure, I put it together in a different order as I find it more convenient and wish to test the running of the watch as soon possible, that is, as soon as the train of wheels, barrel, and balance have been replaced. If at that point it’s not running well, I can more easily deal with it before continuing on with the assembly. Also, should problems arise at a later stage I’ll know it’s (very likely) not related to the train, barrel or balance. The downside, of course, is that the balance is exposed to potential damage for a longer period, although it can of course be removed. So, here are the steps of my assembly procedure: 1. Train of wheels 2. Mainspring barrel and bridge 3. Balance assembly 4. Keyless works 5. Dial train (/motion works) and the calendar works part 1 6. Dial train (/motion works) and the calendar works part 2 7. Self-winding mechanism Apart from the click spring and the pallet stones, the oiling suggestions follow ETA’s technical communication. Finally, I make walkthroughs for my personal use and enjoyment. They are not meant to be tutorials (for that I wholeheartedly recommend watchrepairlessons.com), but I like to share them in case there’s someone who would find them useful. So, without further ado…2 points
-
Does an EE Ph.D. (plus adjunct professor and textbook author) qualify? You are absolutely correct...monkeying around with high voltage is not for the amateur. Even with my qualifications, I have spent the majority of my career under 50 volts.2 points
-
One has to be a bit careful mentioning voltage-multipliers, particularly where you are on this planet. In the US the mains are 110V, over here in Europe it's 240VAC. That is 240V DC equivalent. The 240VAC wave-peak lays around 240 * √2 = 340 Volt. If you double that we start talking about a lethal 680Volt which will be stored in the (hopefully high enough rated) capacitor.2 points
-
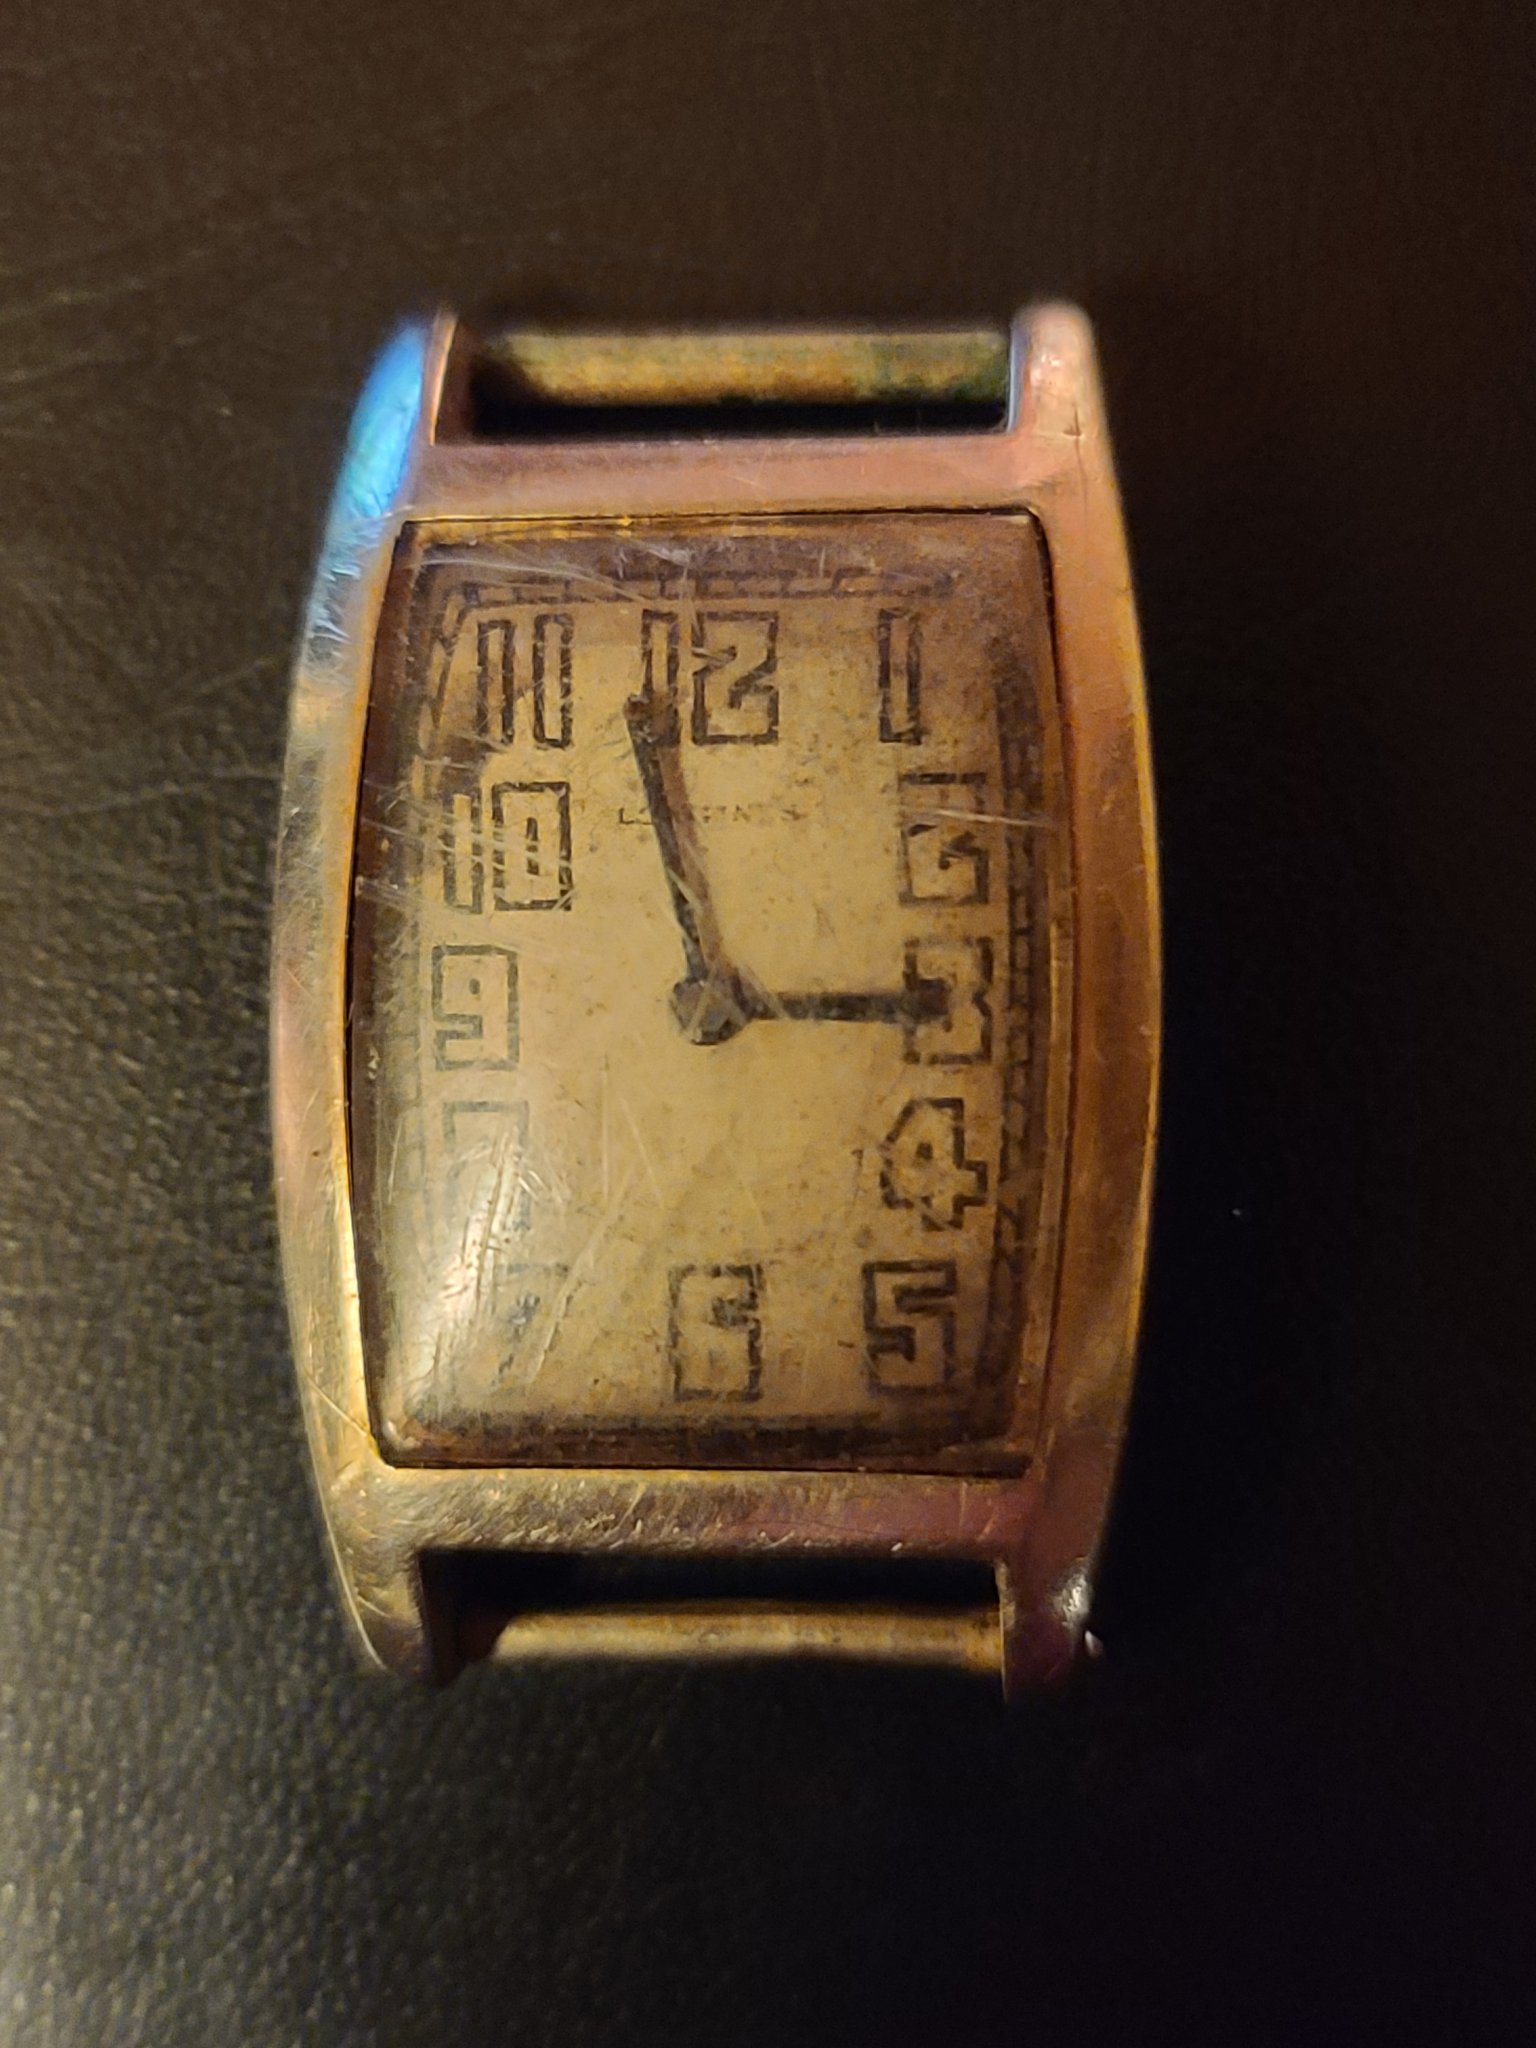
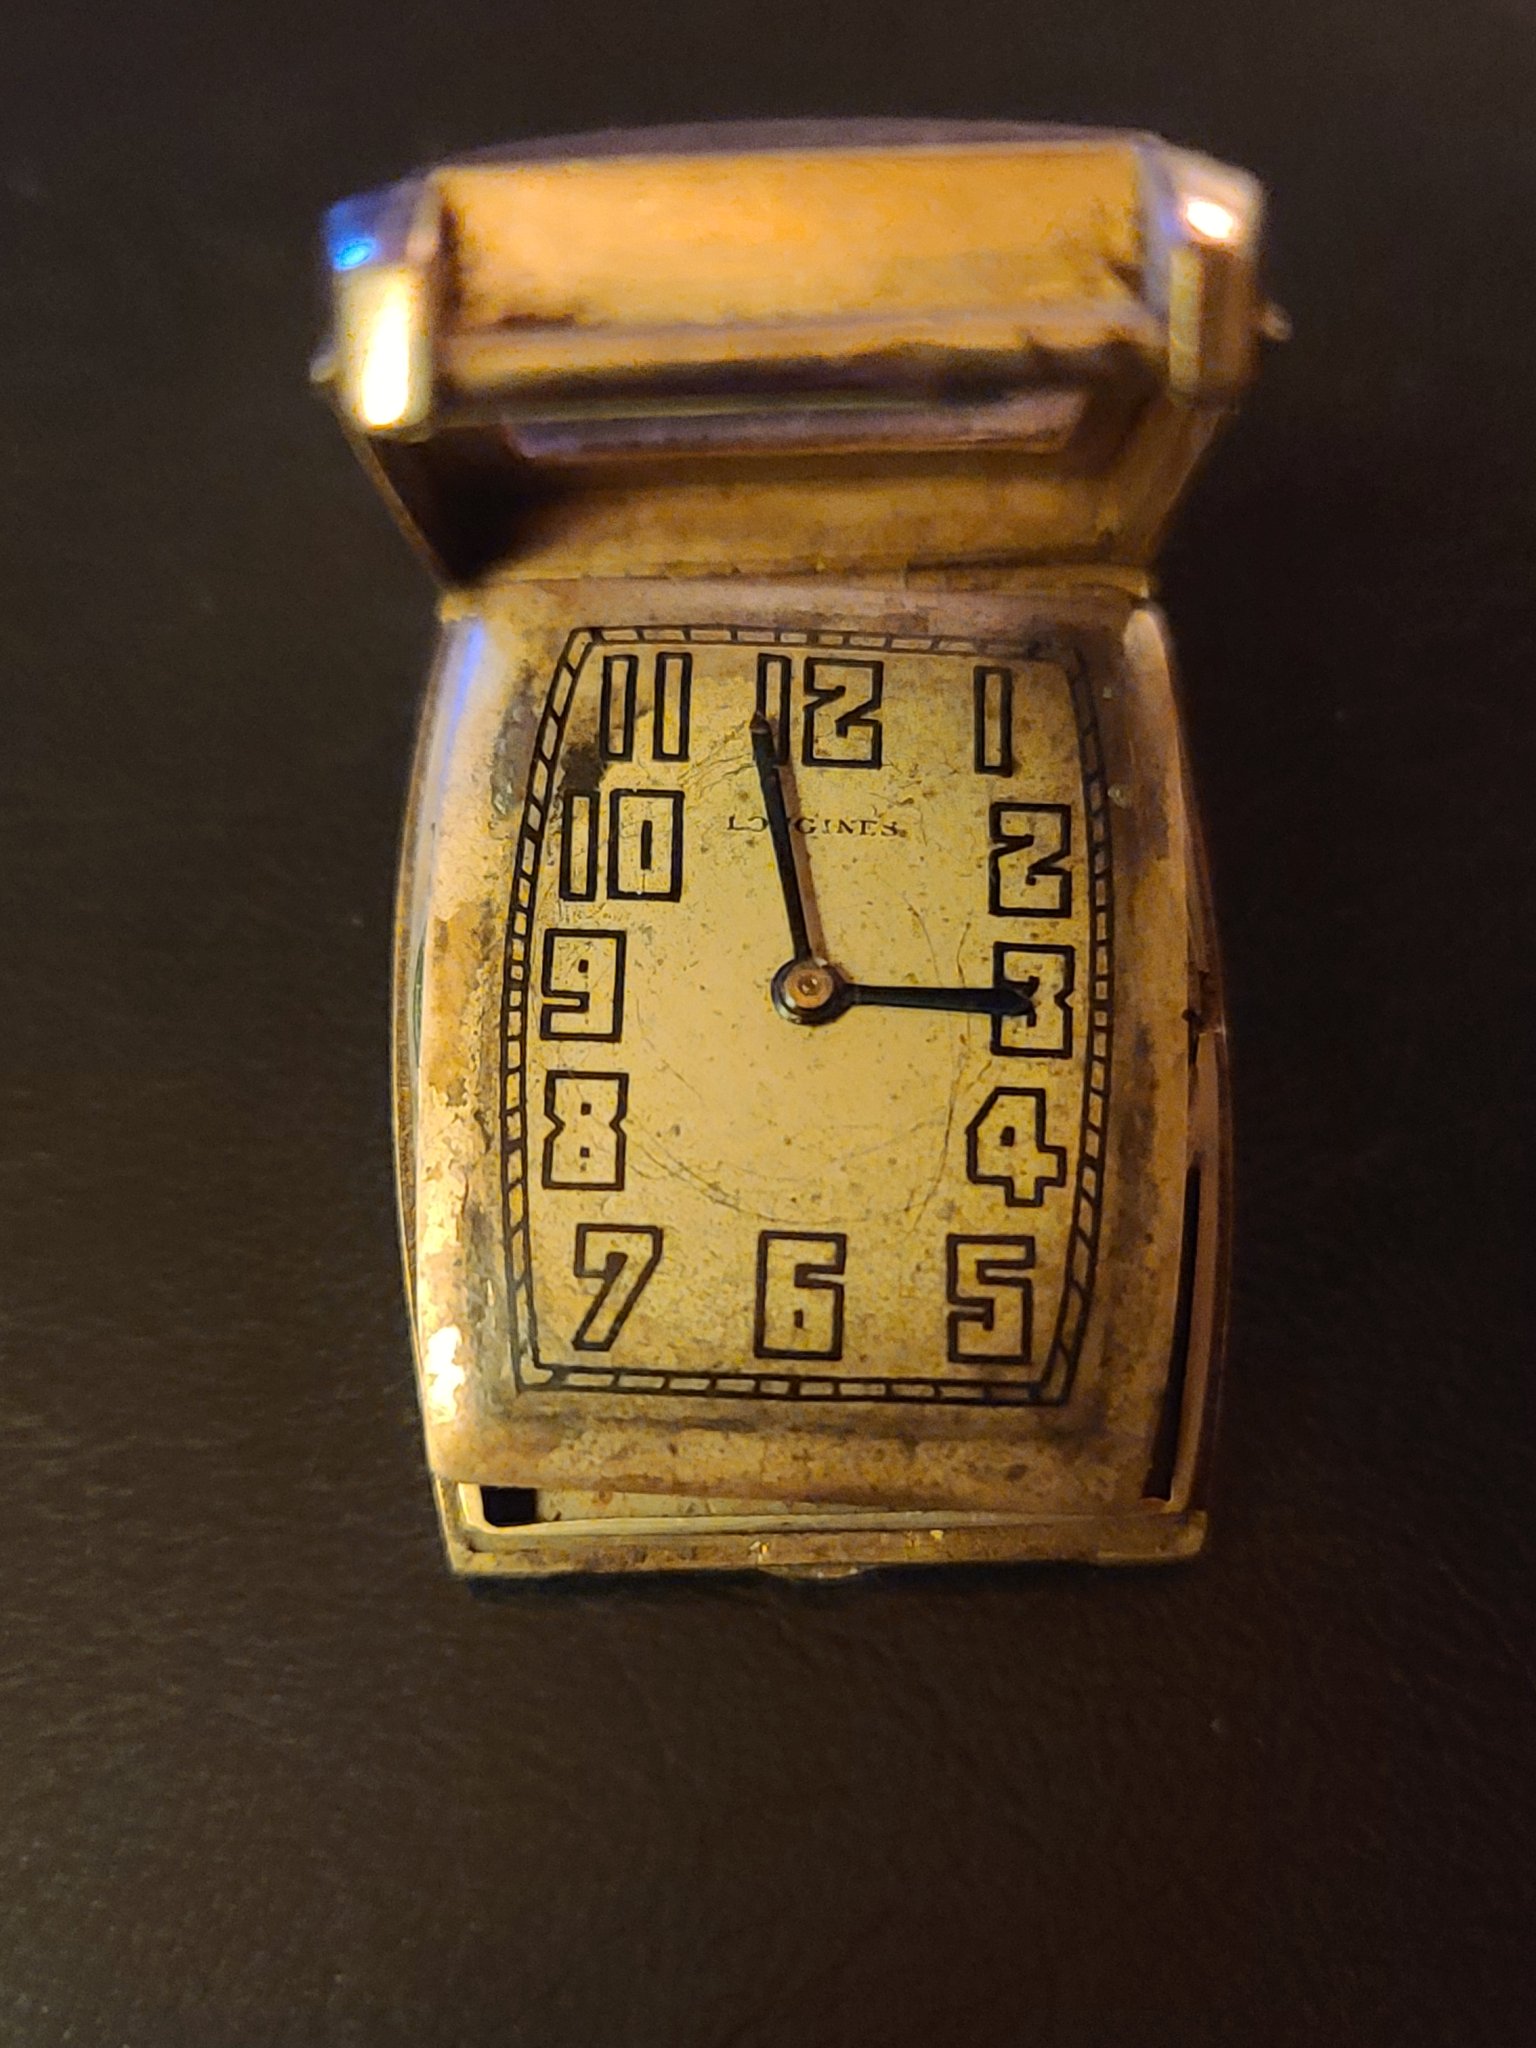
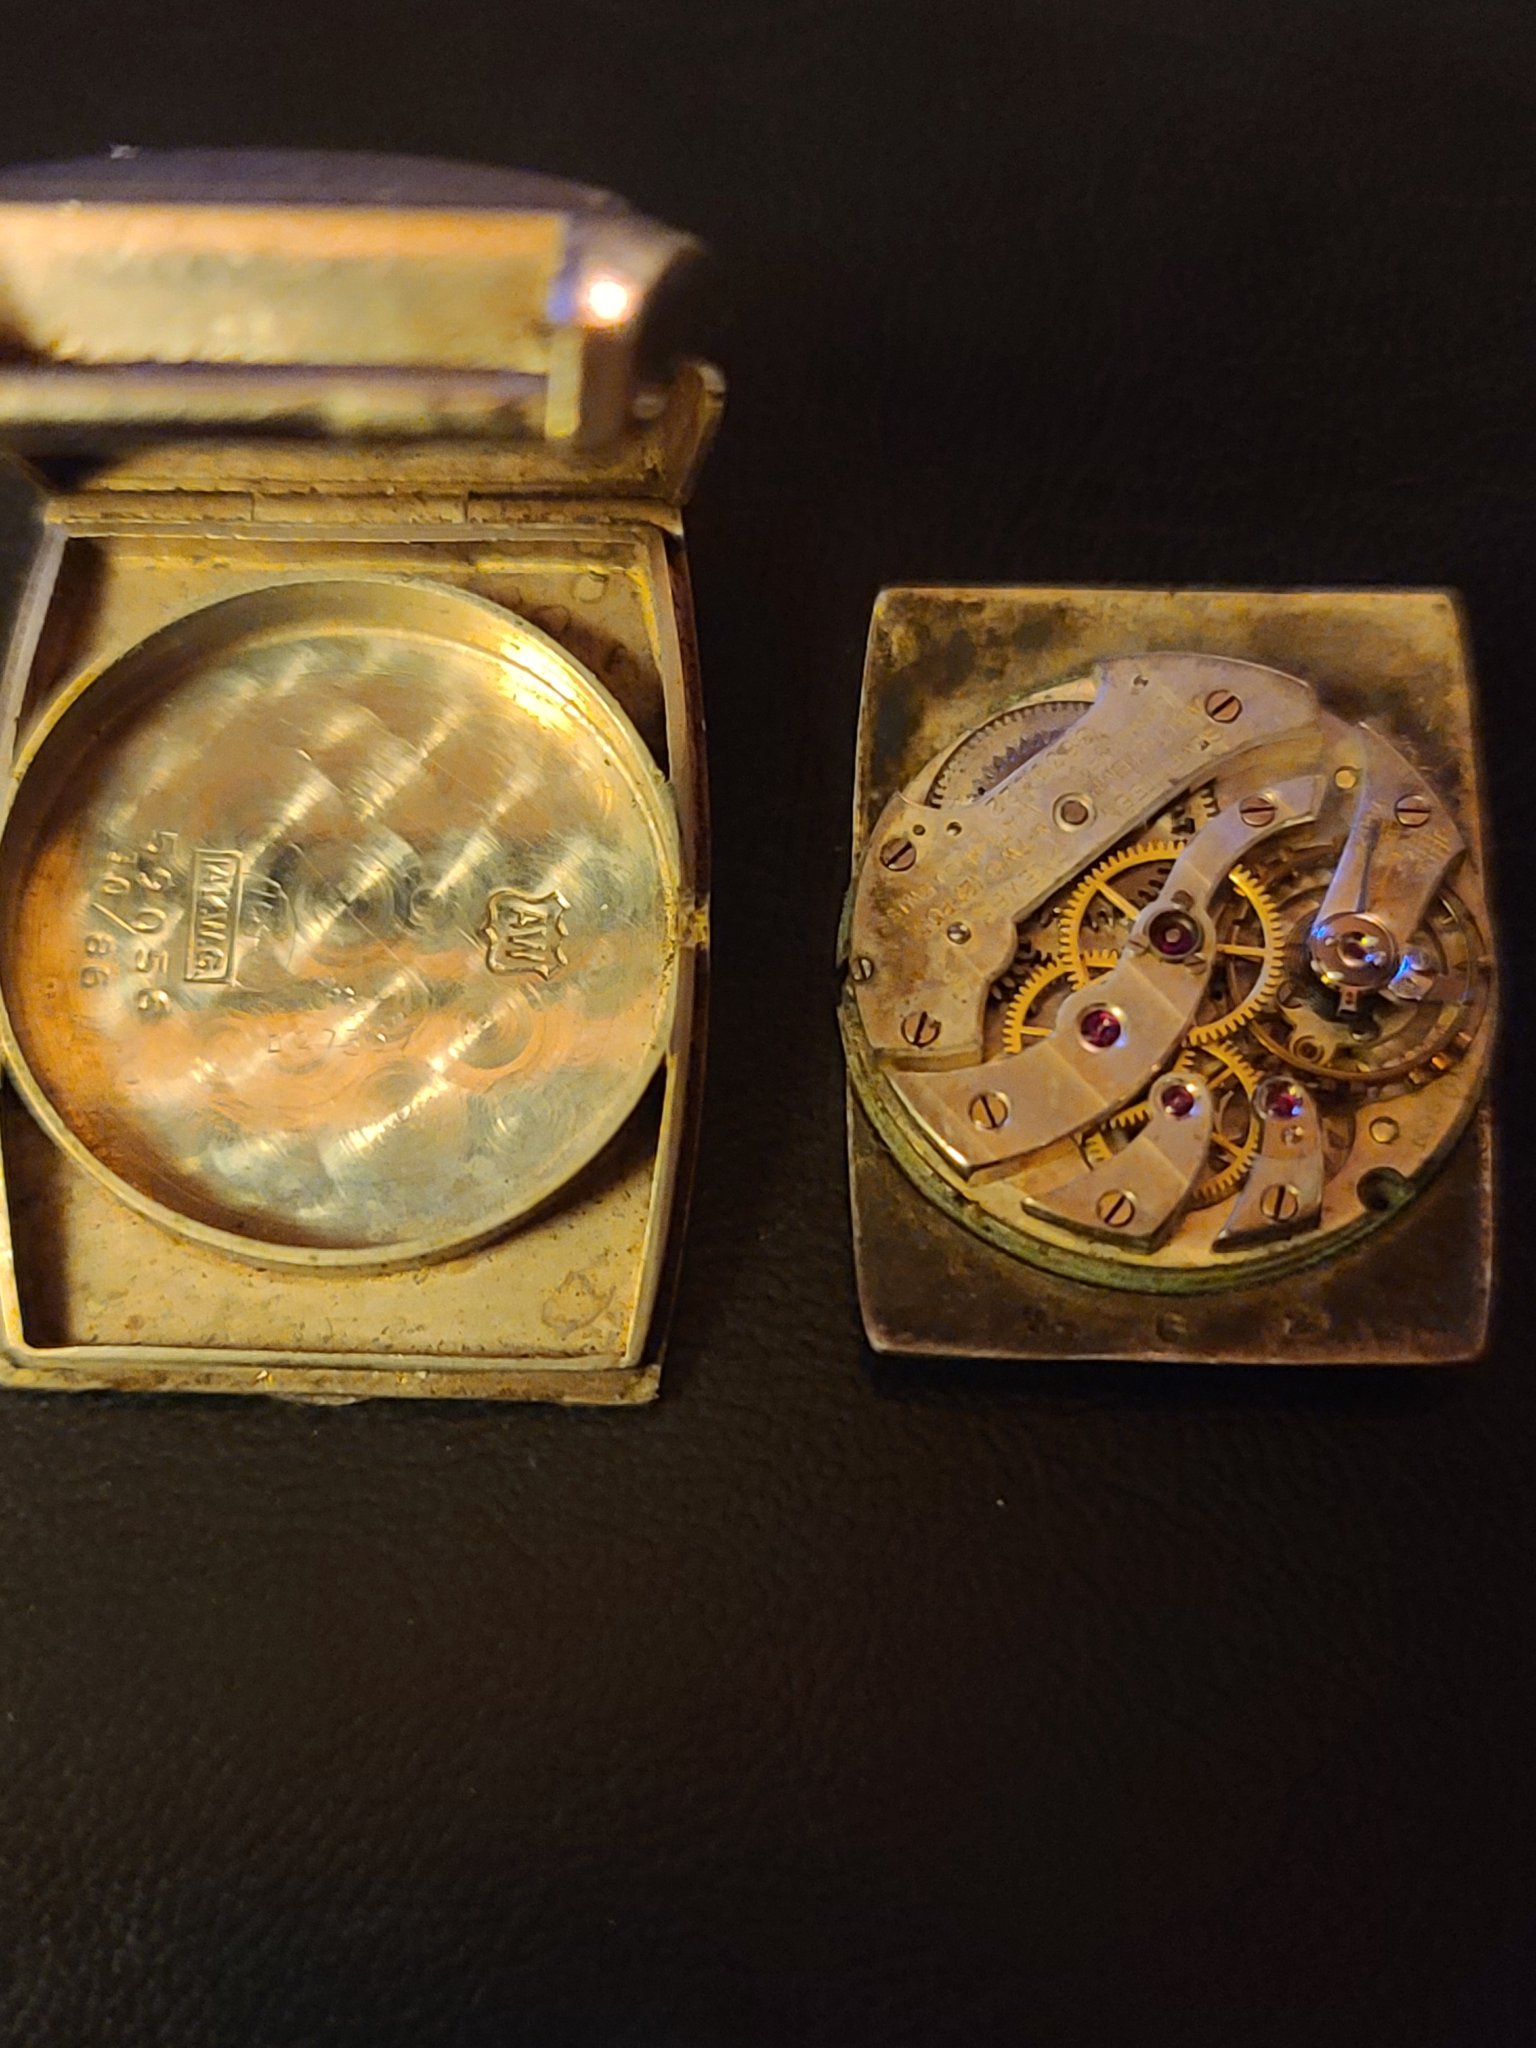
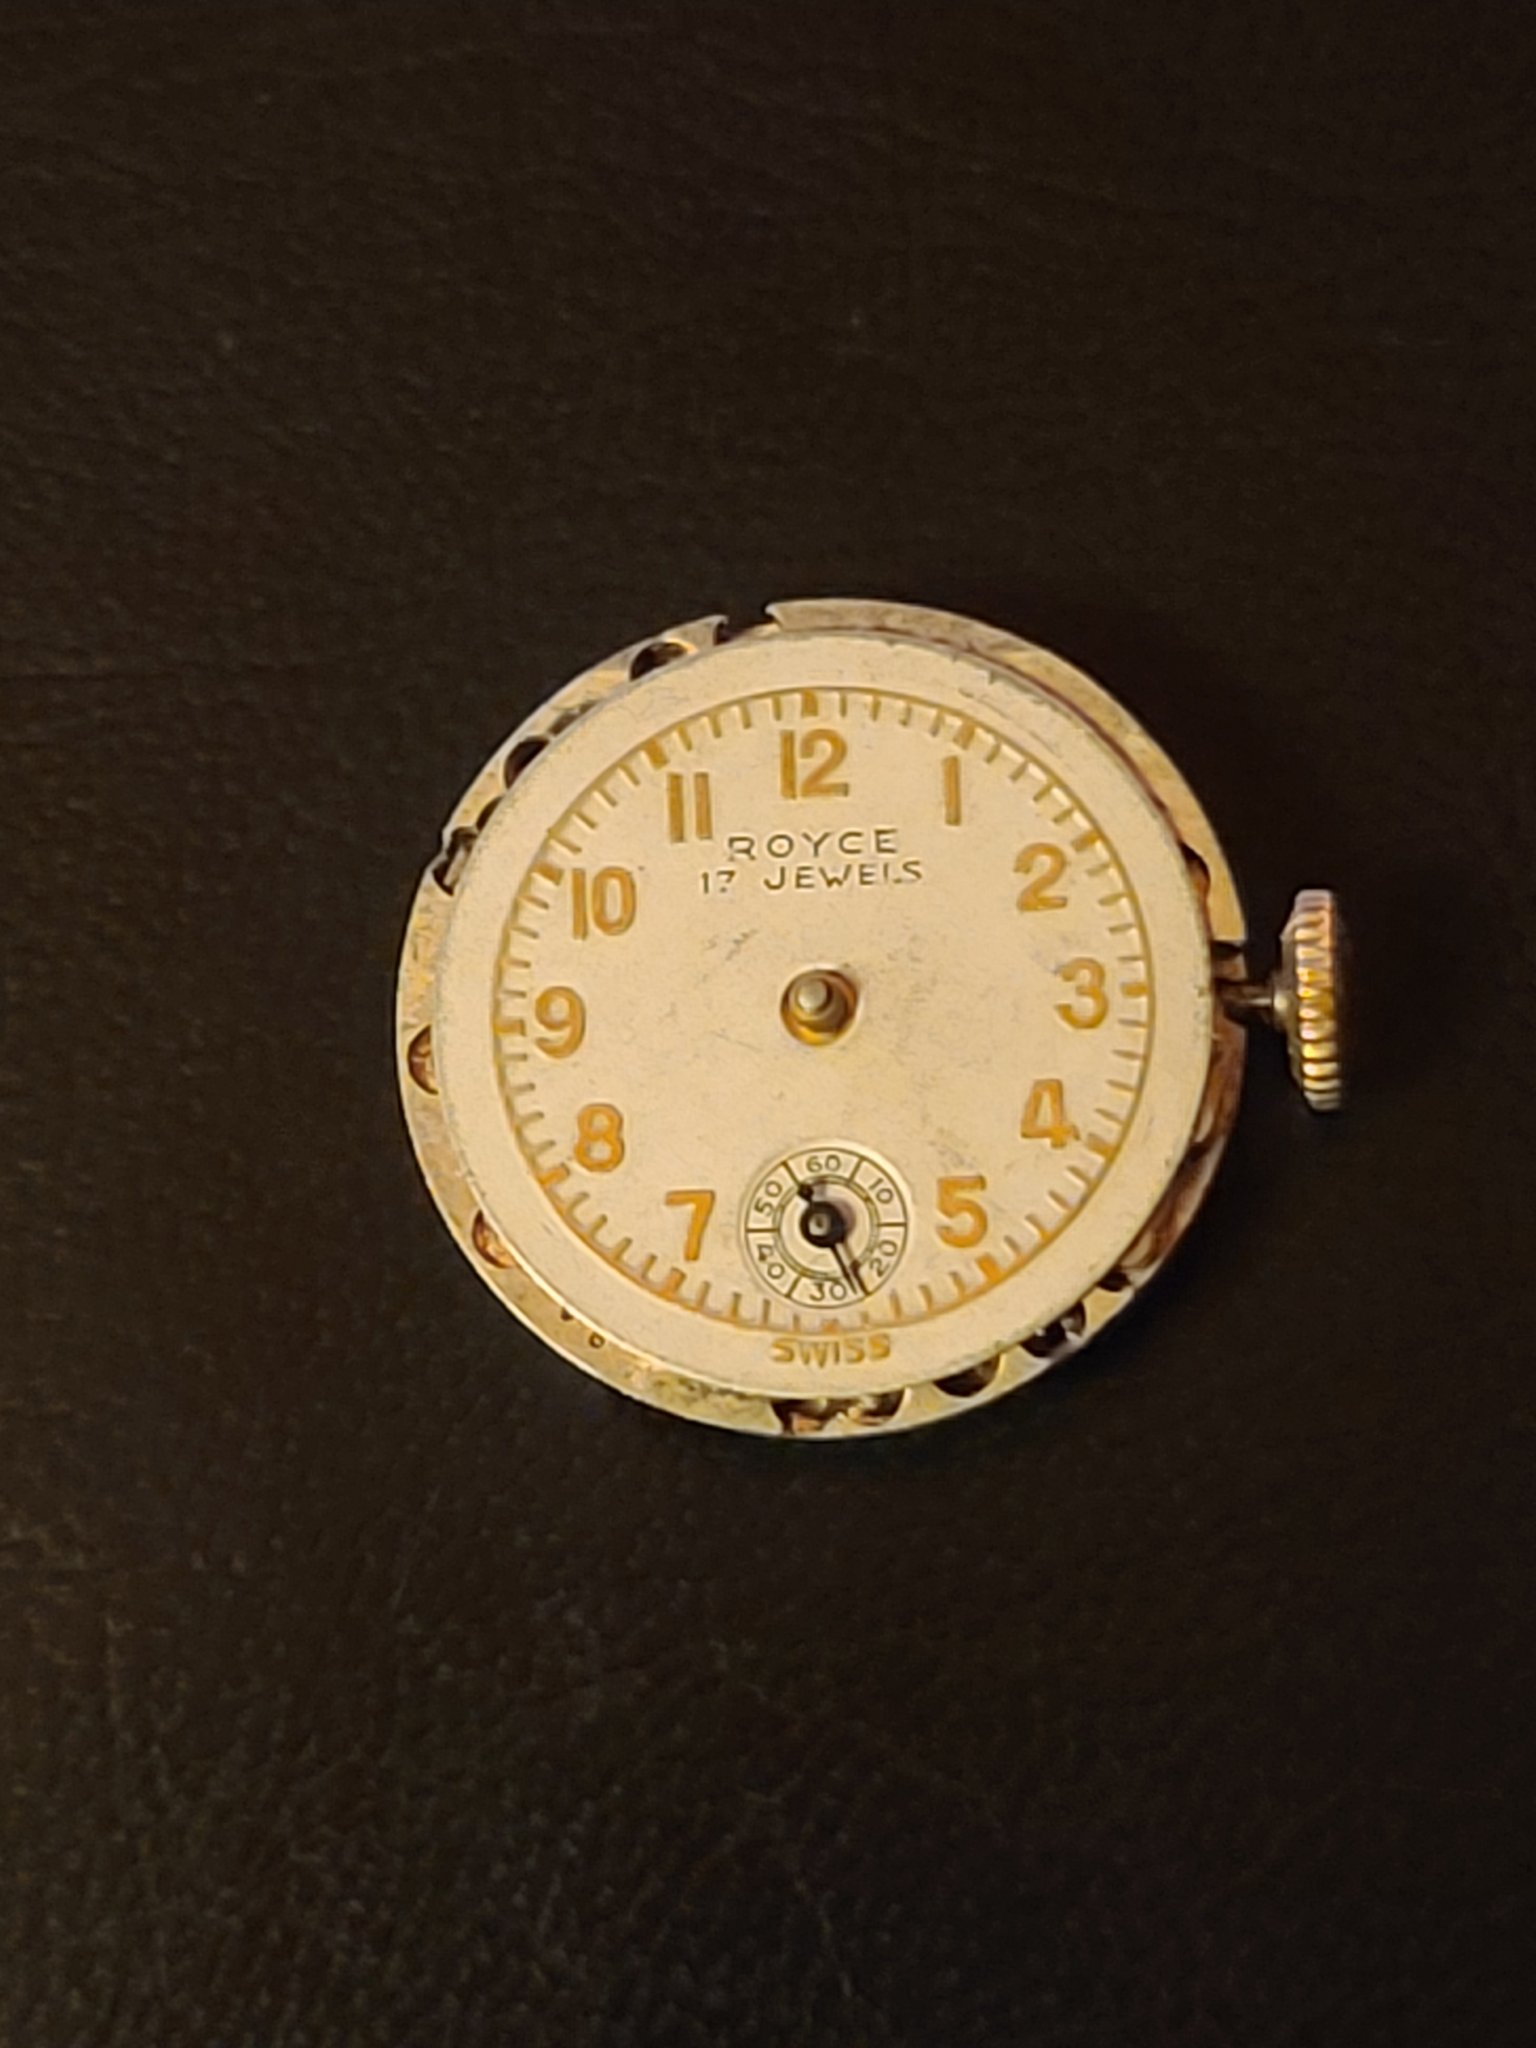
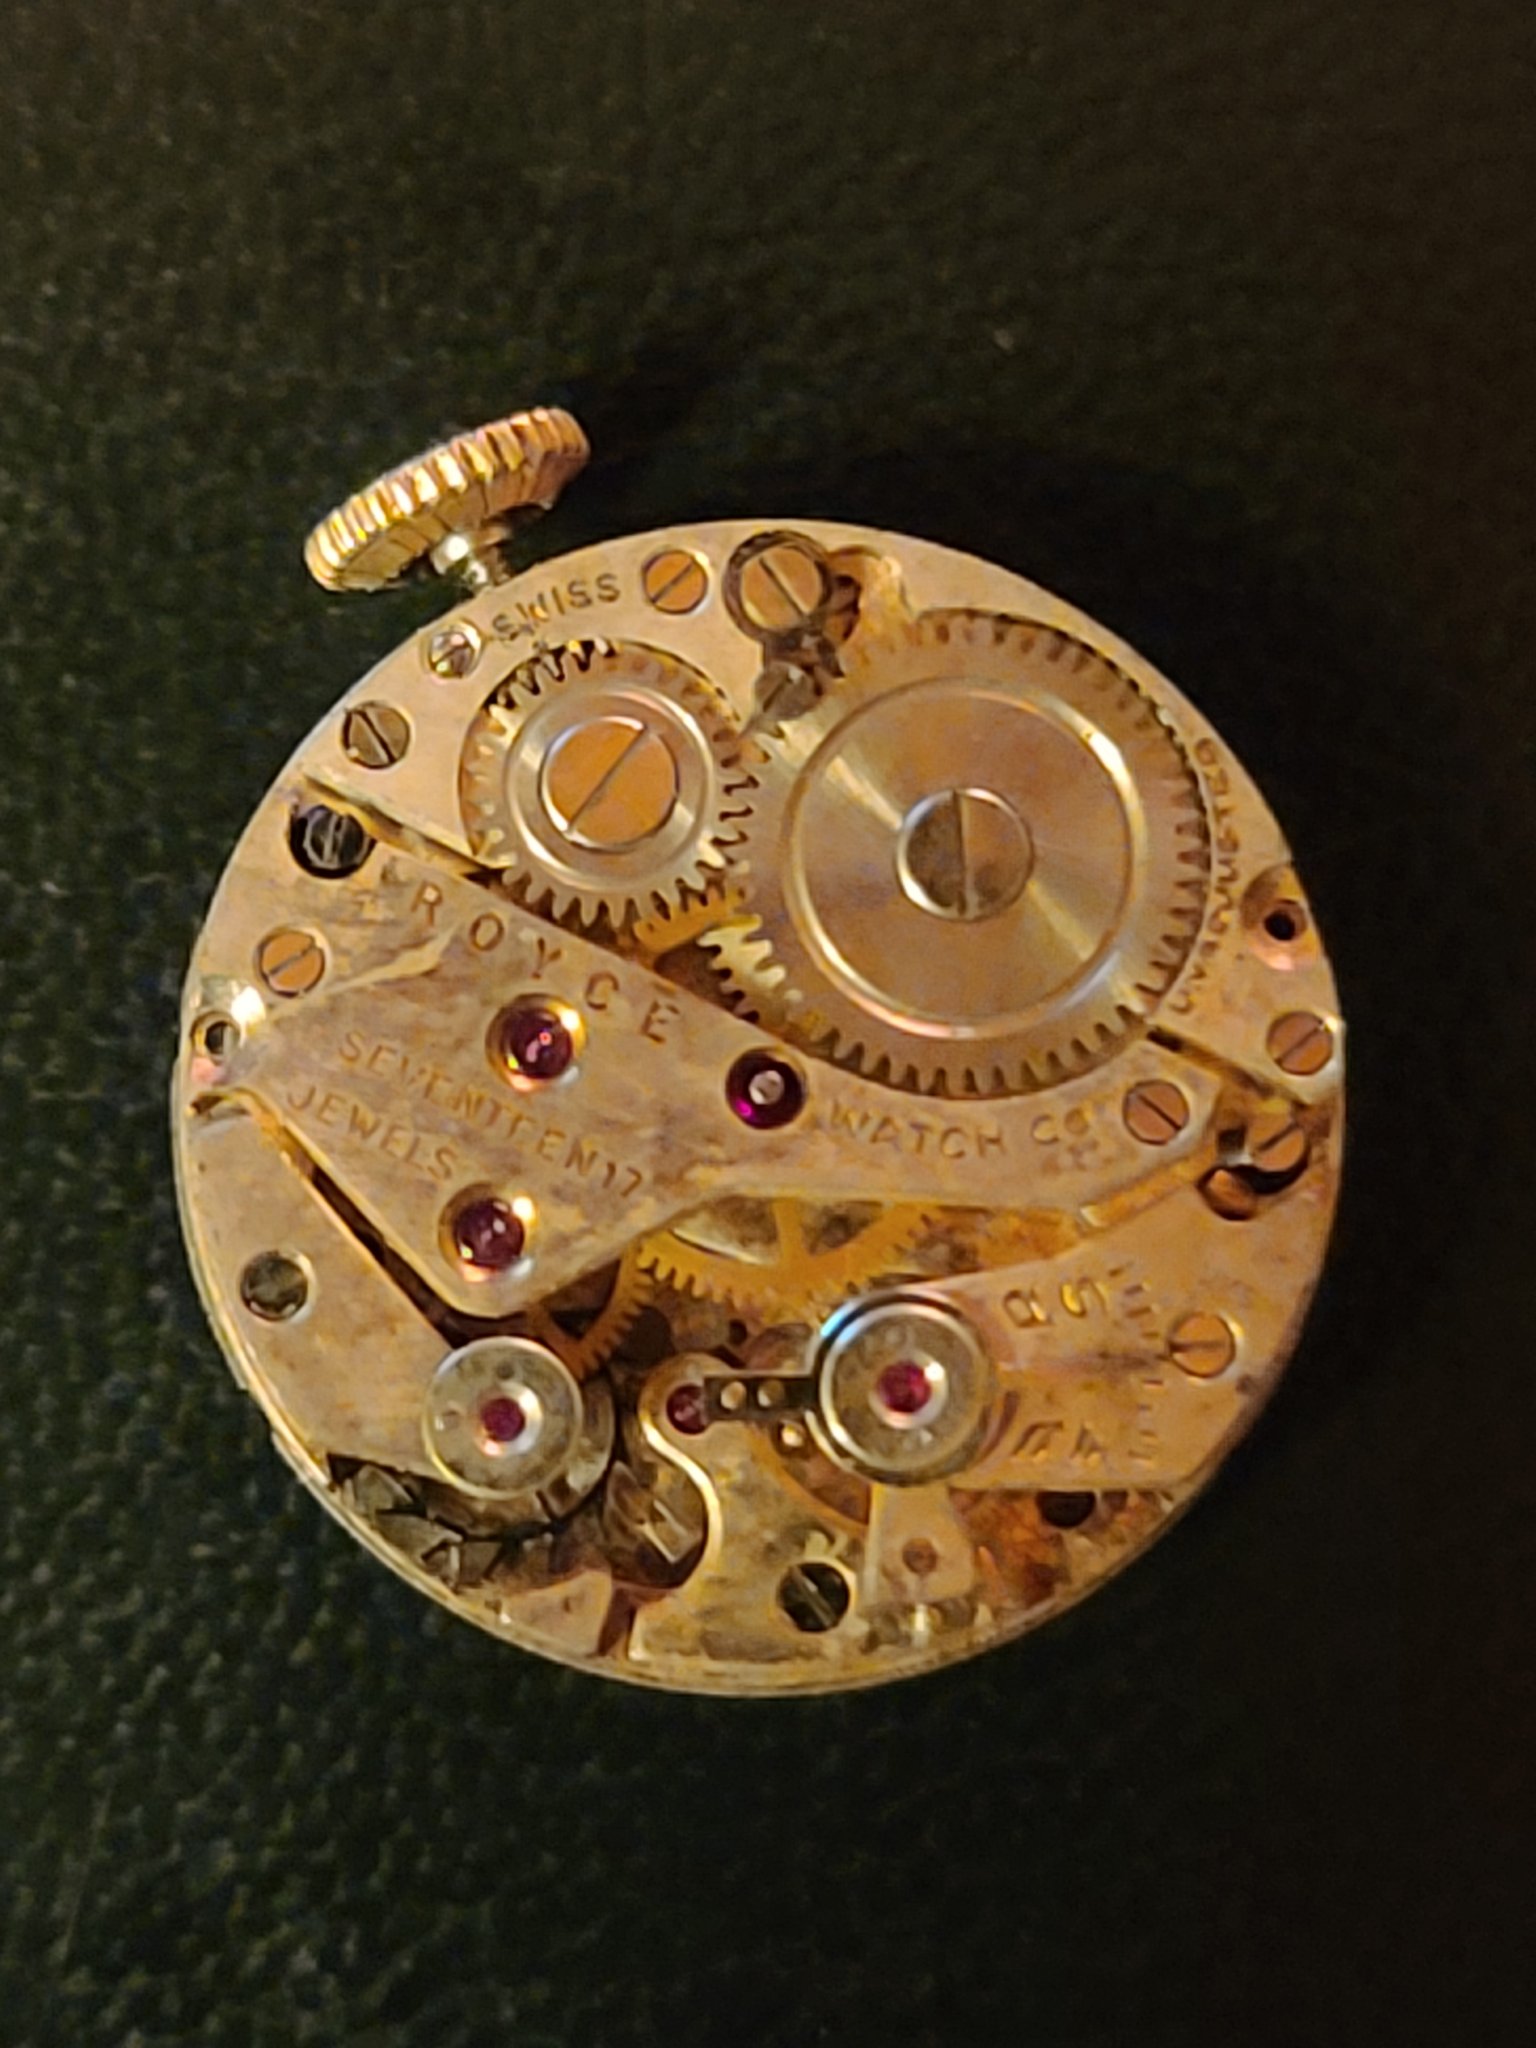
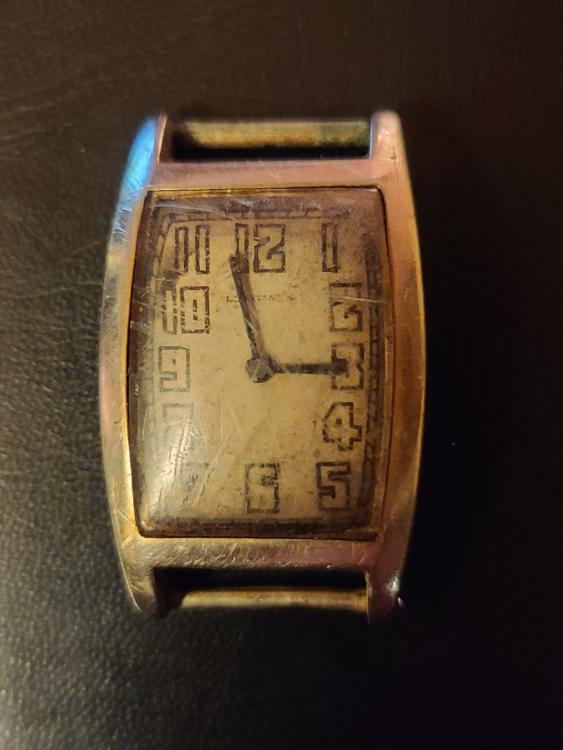
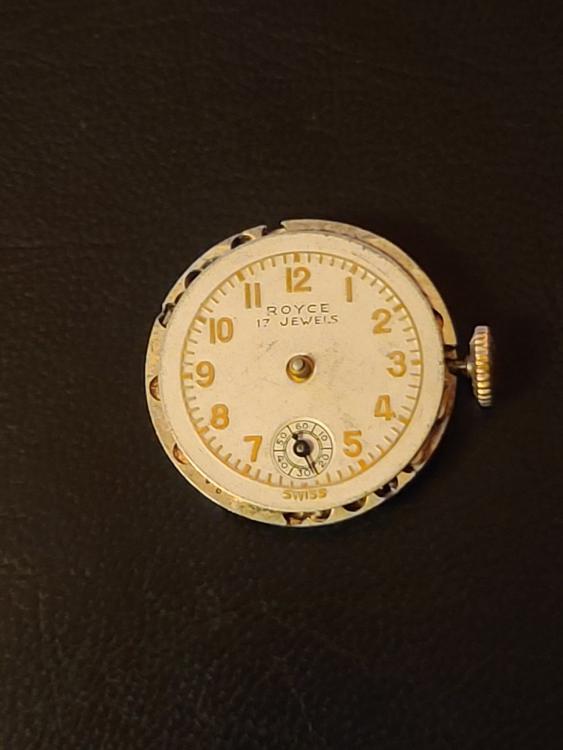
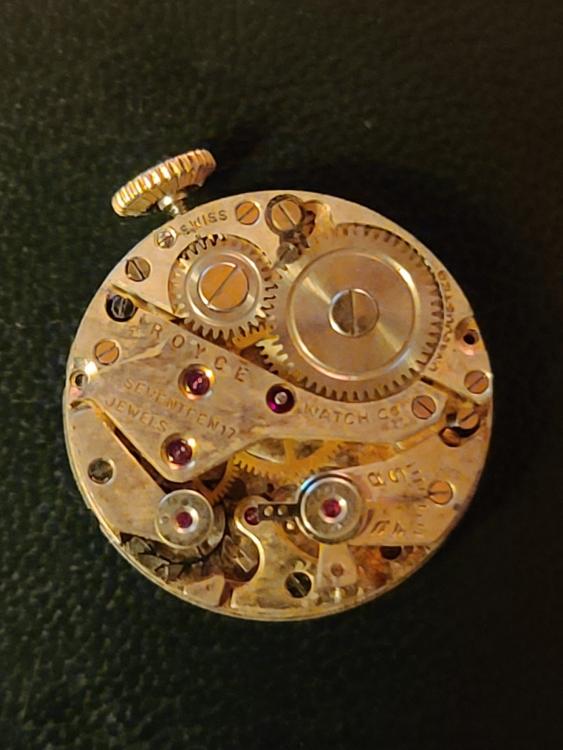
I found a couple more goodies in the watch repair kit. Any thoughts on these? The Longines inside of case says aw 14kwg.6 59056 10/86 and the movement seventeen (17) jewels adj. To temp & two (2) pos Longines watch. Co swiss 3839322 also 10 86 n it is missing the stem and crown. The other is a loose Royce movement. I have had the hardest time identifying exactly what these pieces are. I have a lot to learn


 2 points
 -
I had a HS the other day that just wouldn't demagnetise. My compass never deviated when passed over the movement which made me think it was contaminated. I took the HS off a few times and one-dipped it just to make sure it wasn't oil but it was very clean. Every so often when running you could see a few coils stick together then unstick a bit later. I must have tried 10 times with my cheap chinese demagnetiser. I finally managed it but the time wasted could have been saved with a proper tool. I'll invest in an Elma.2 points
-
That's what I do and then I'm simply done with it. These days I never measure the result, in any way, before or after. I tried with those cheap Chinese demagnetizers first but had no luck whatsoever (I believe they are configured for 110V, and I only have 230V 50Hz). So, I got fed up trying and got myself an ELMA ANTIMAG Machine and it has been working perfectly. An investment I have never regretted. I made a video using it for the first time (link below). I guess the only real reason to demagnetize is if the HS coils are sticking, but I could be wrong about that? EDIT: In the video I say that I rotate the watch 45 degrees when in fact I rotate it 90 degrees.2 points
-
I have never tried furniture polish.? I can say myself I don't like Earl Gray2 points
-
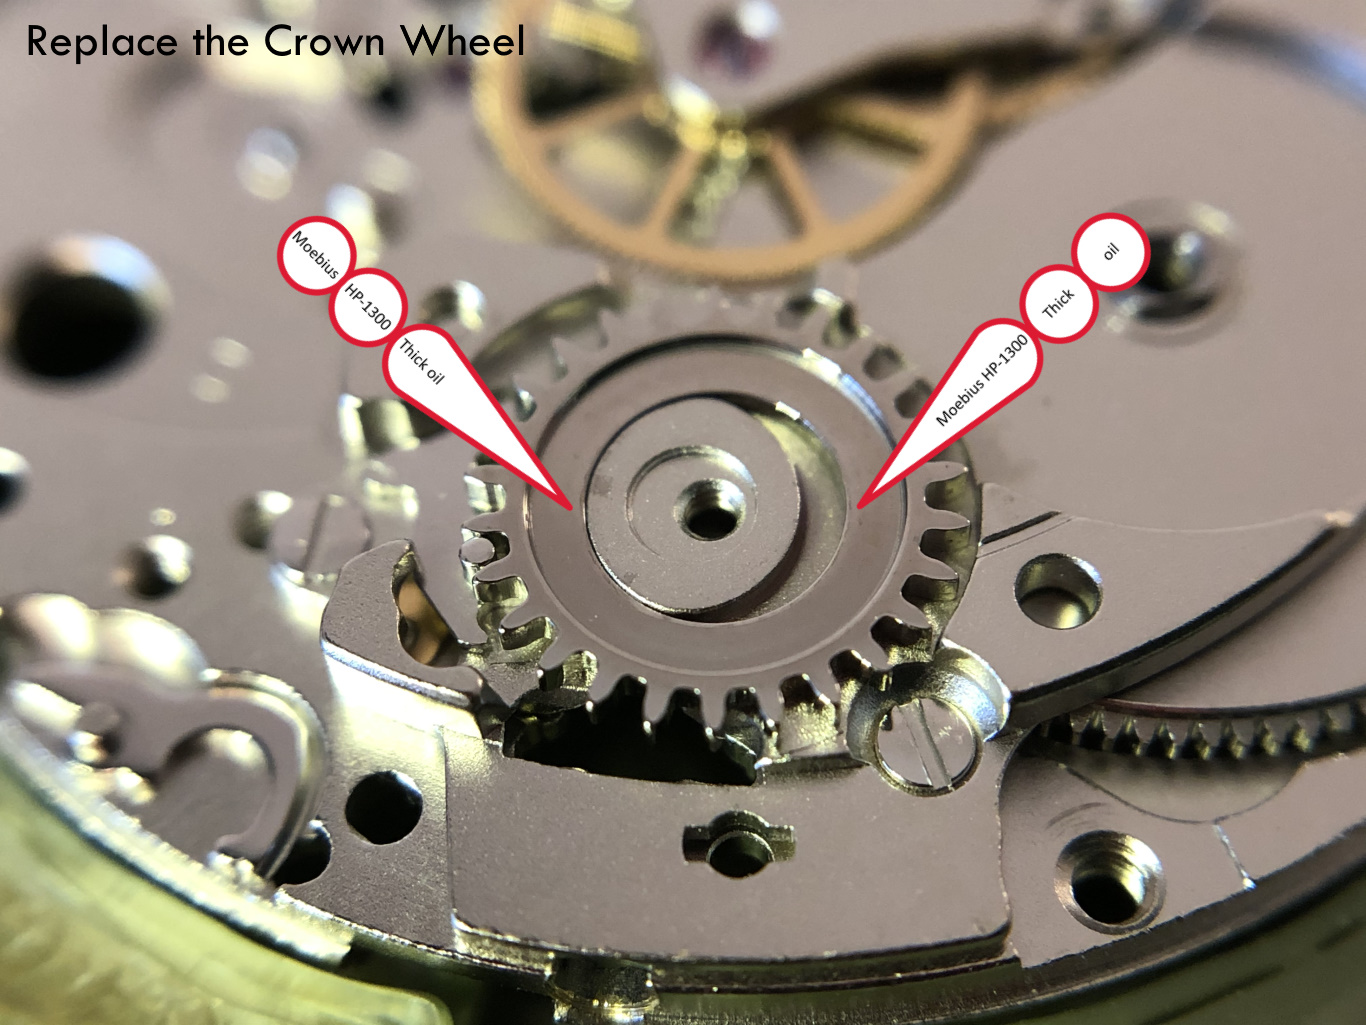
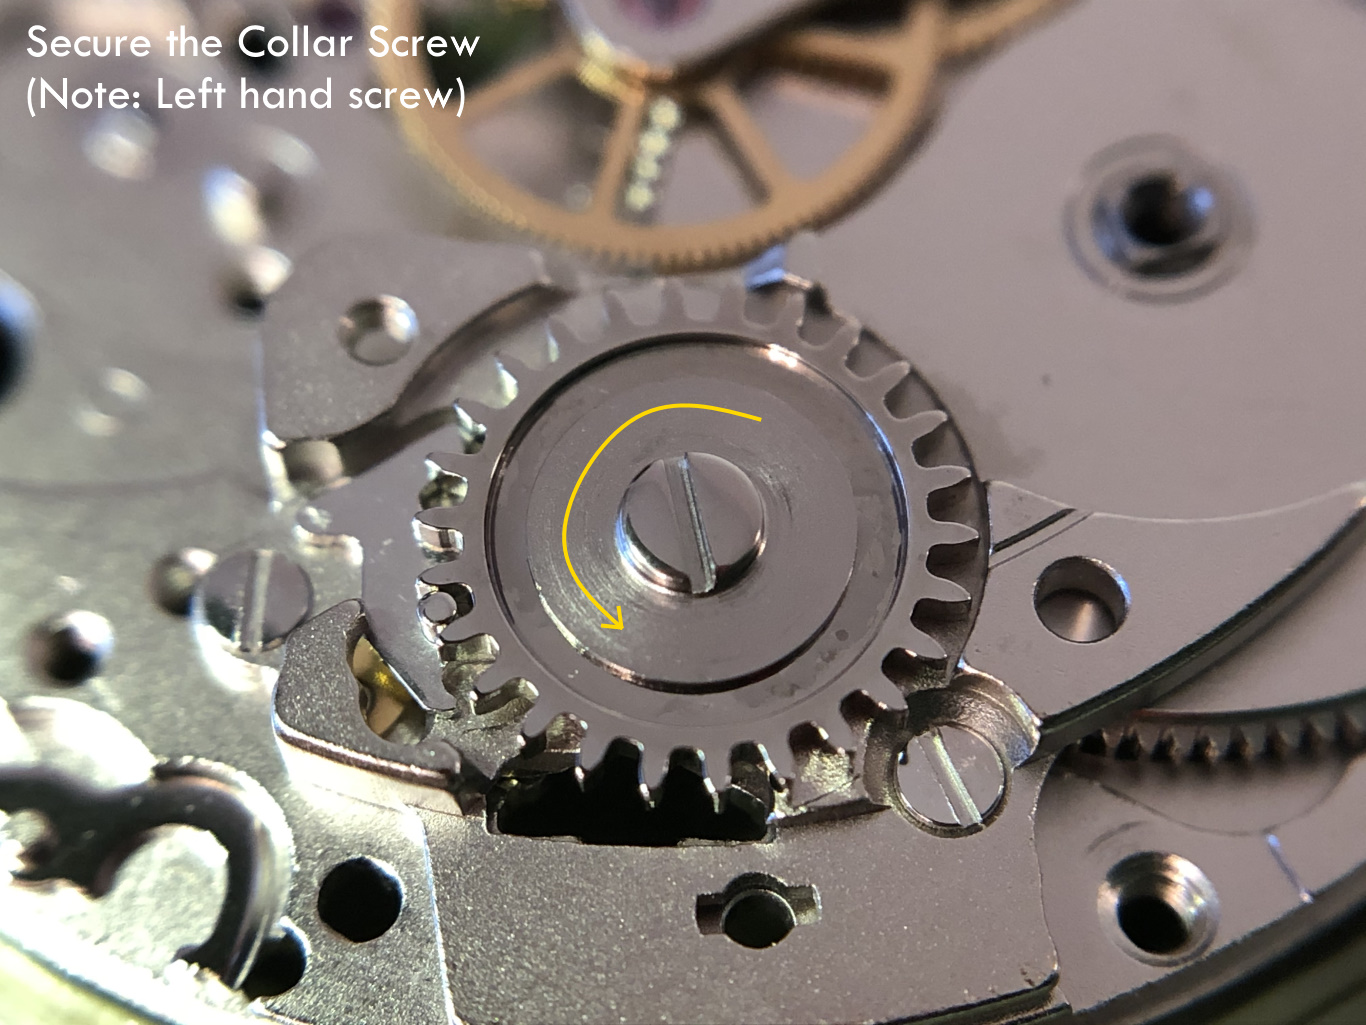
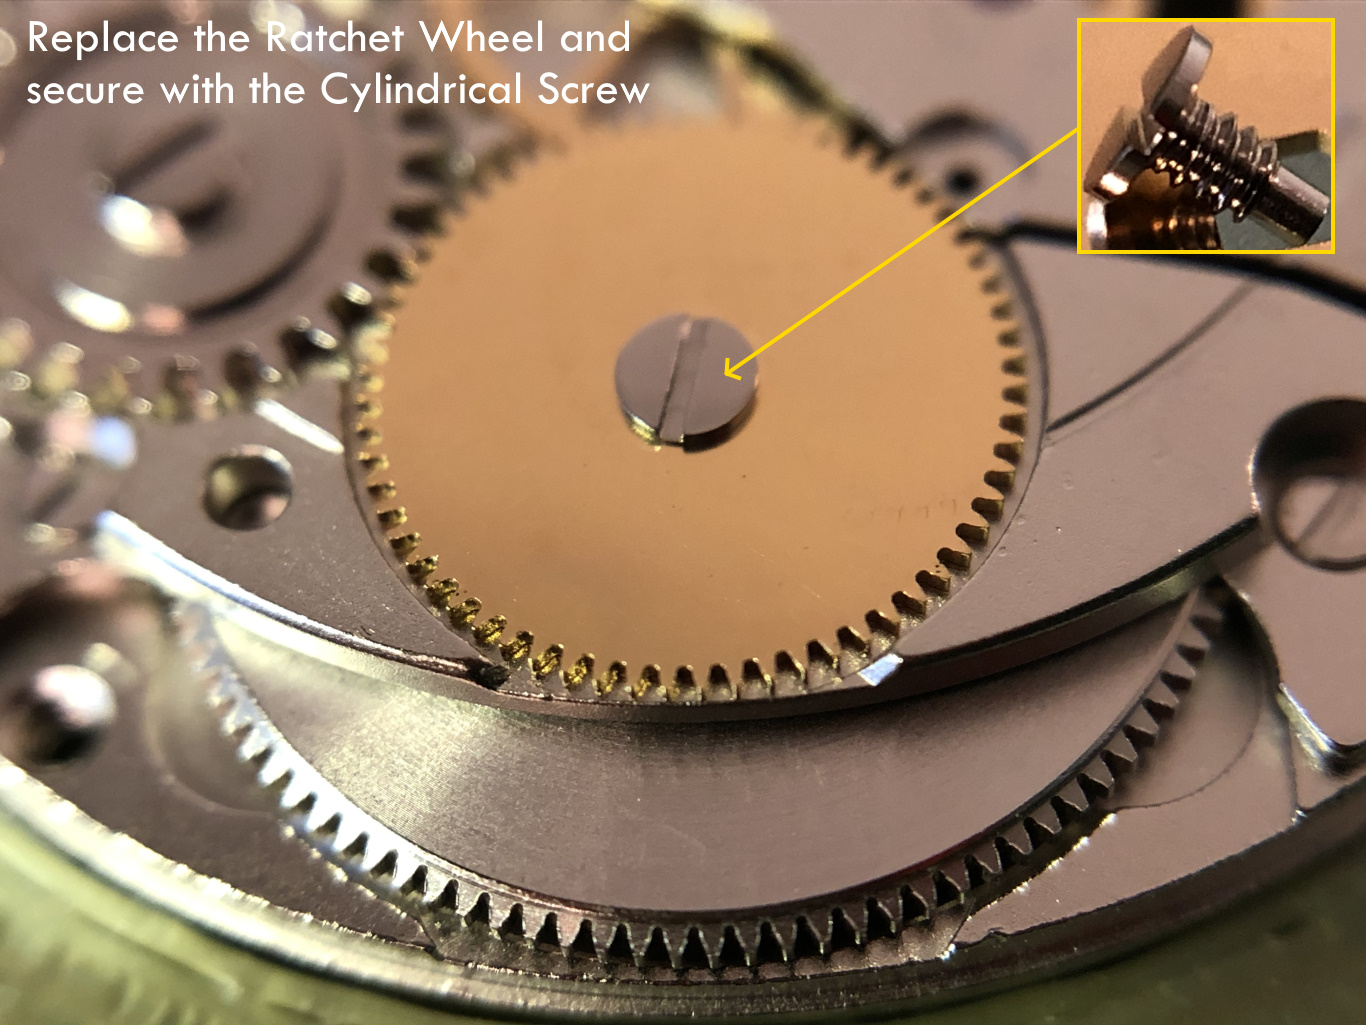
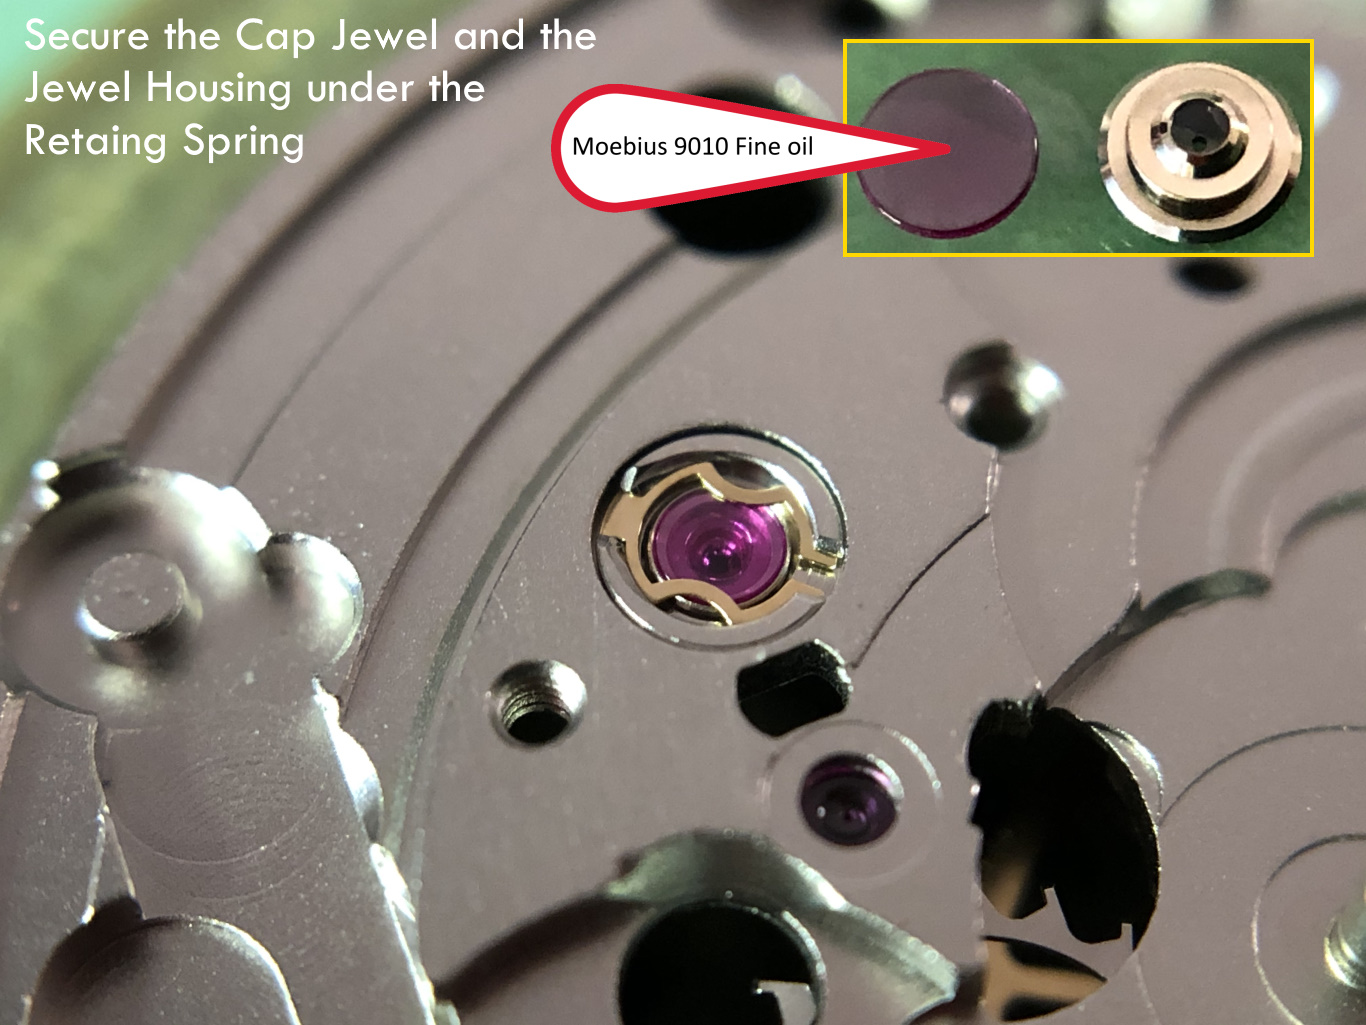
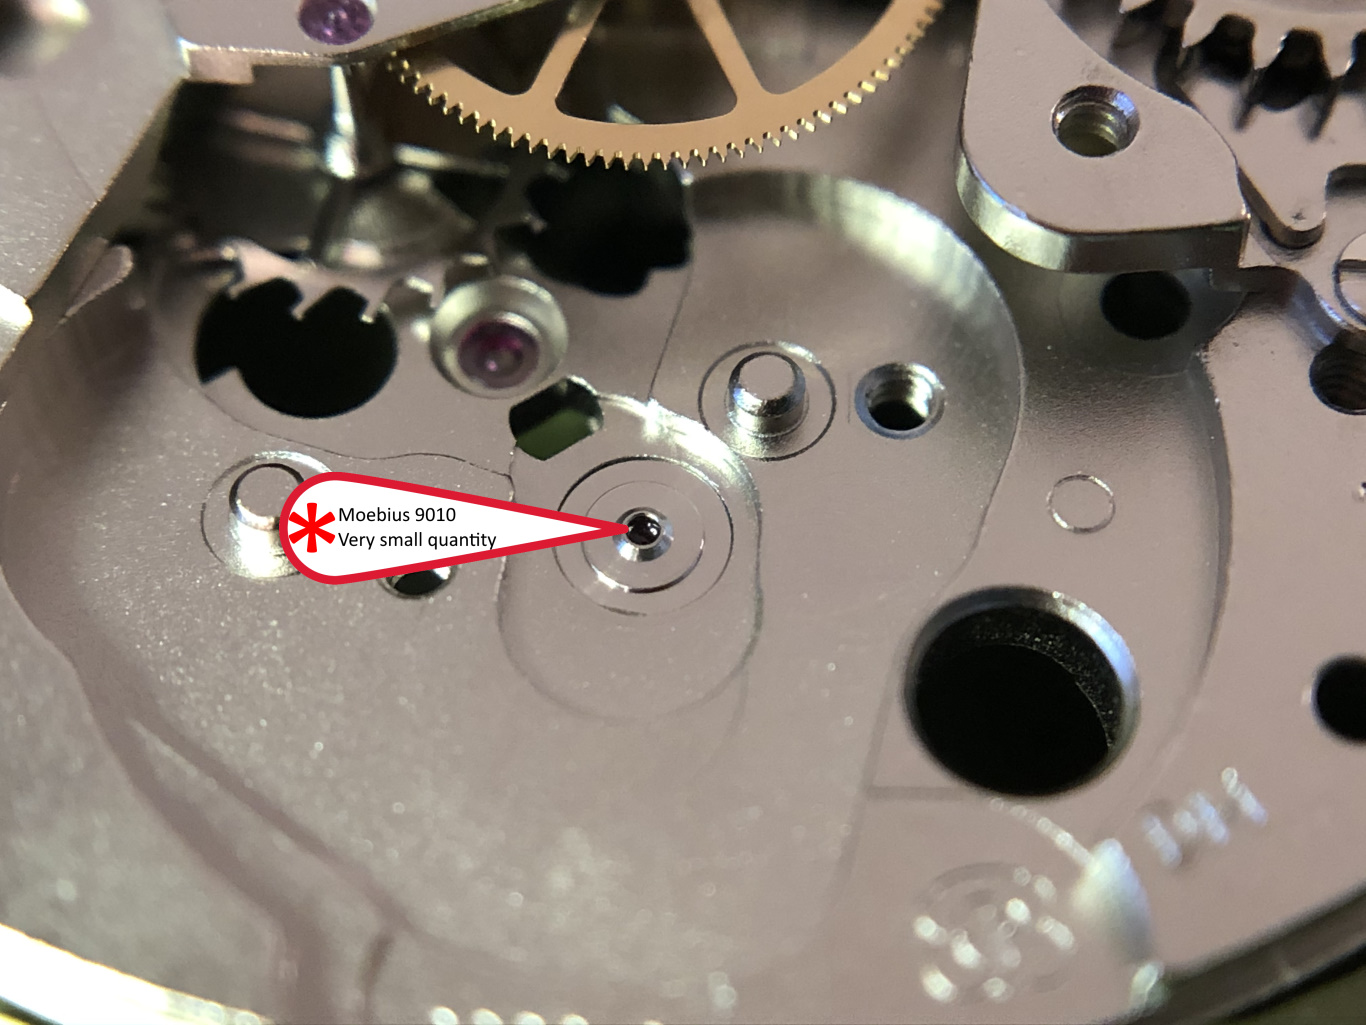
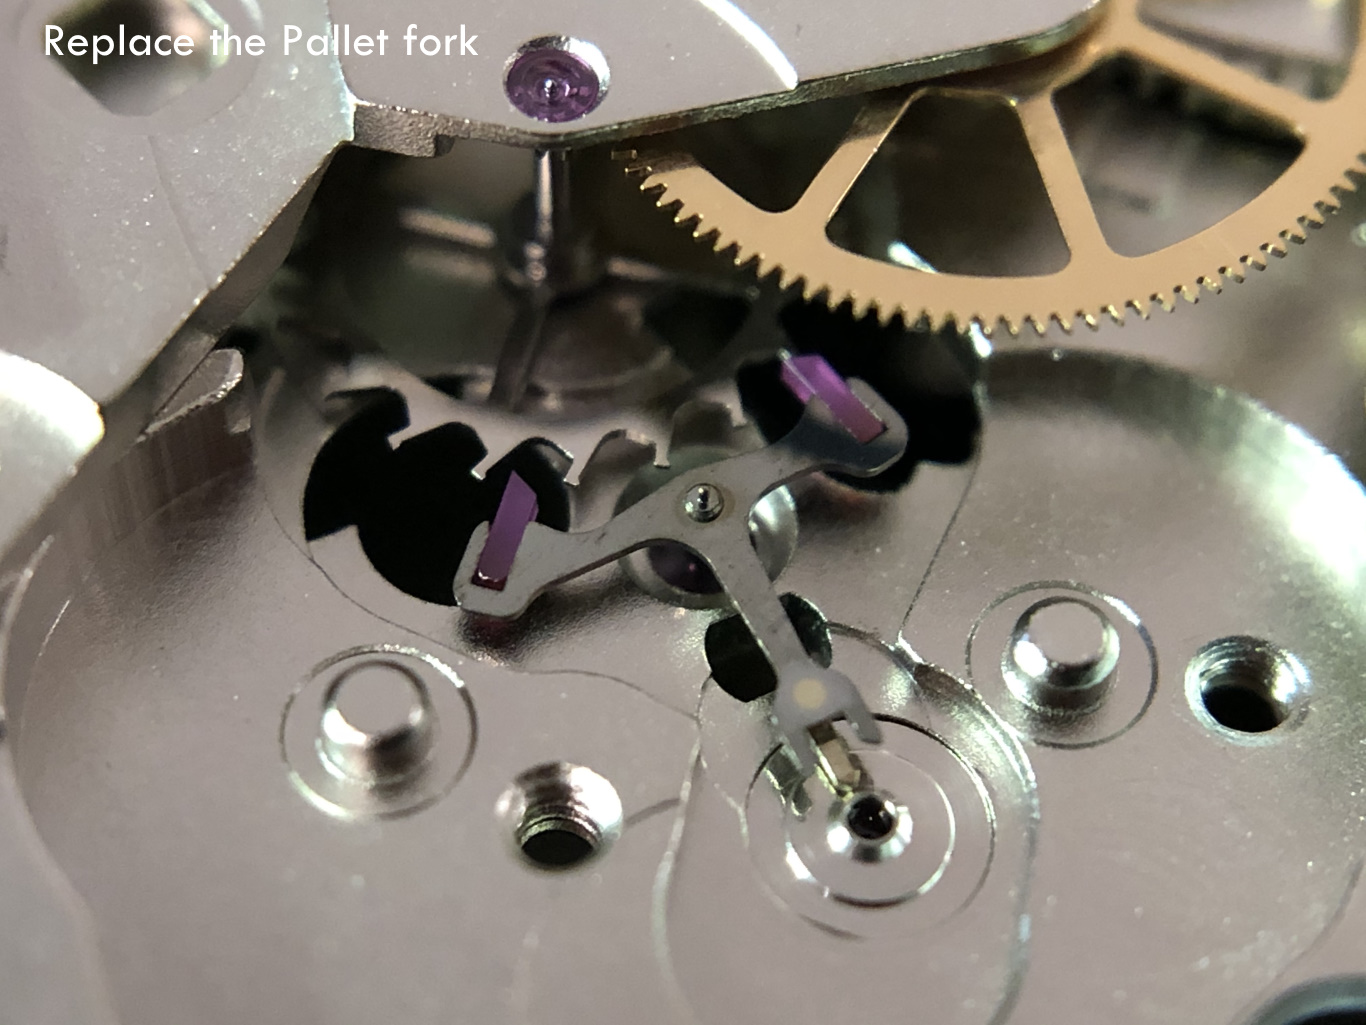
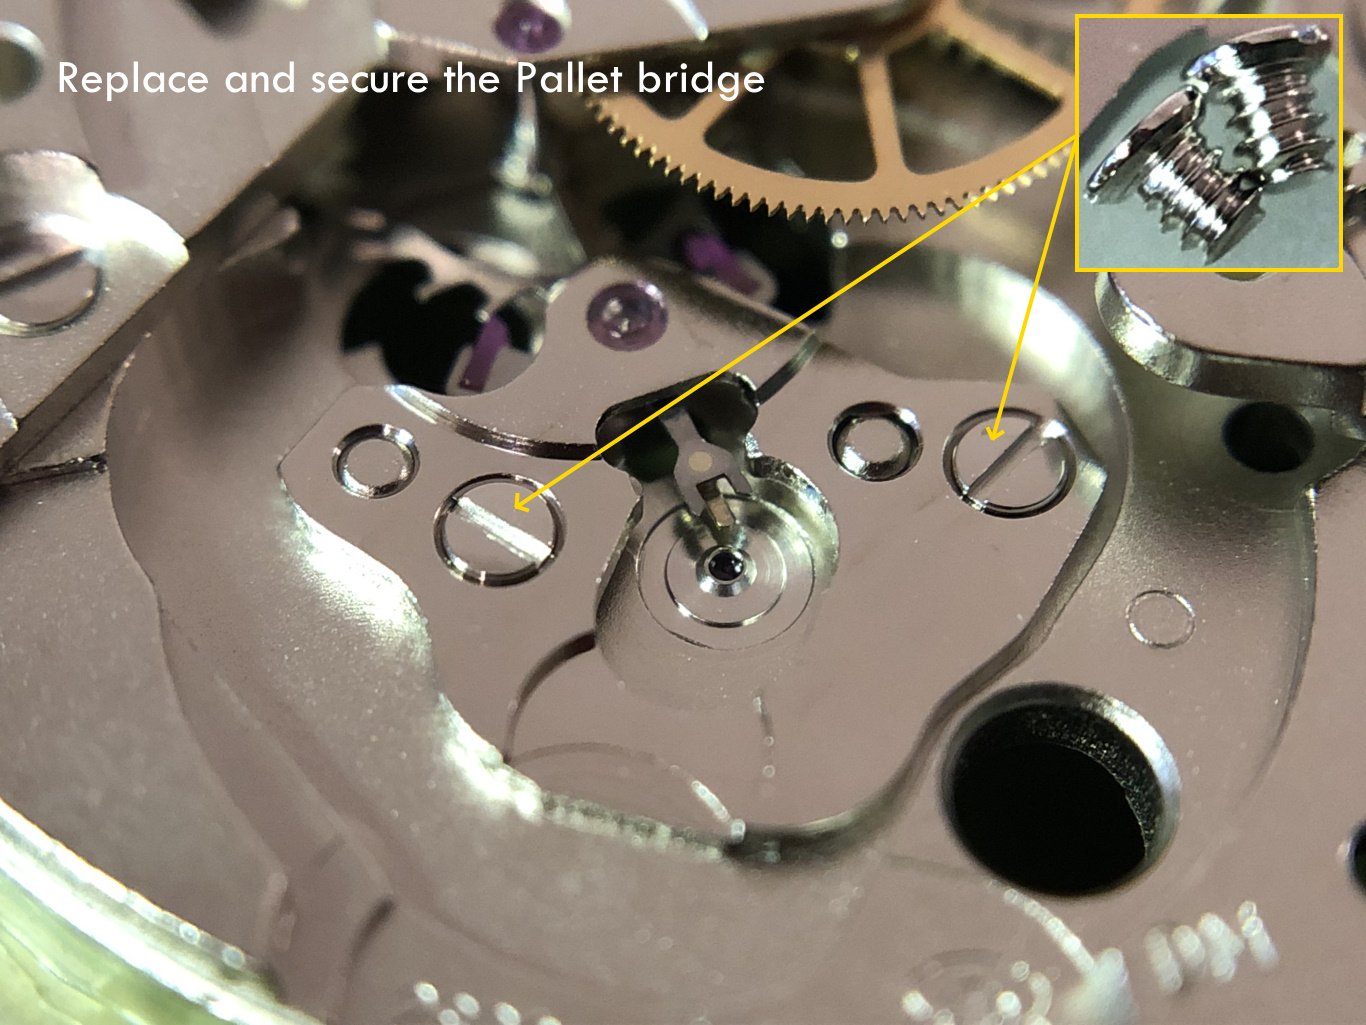
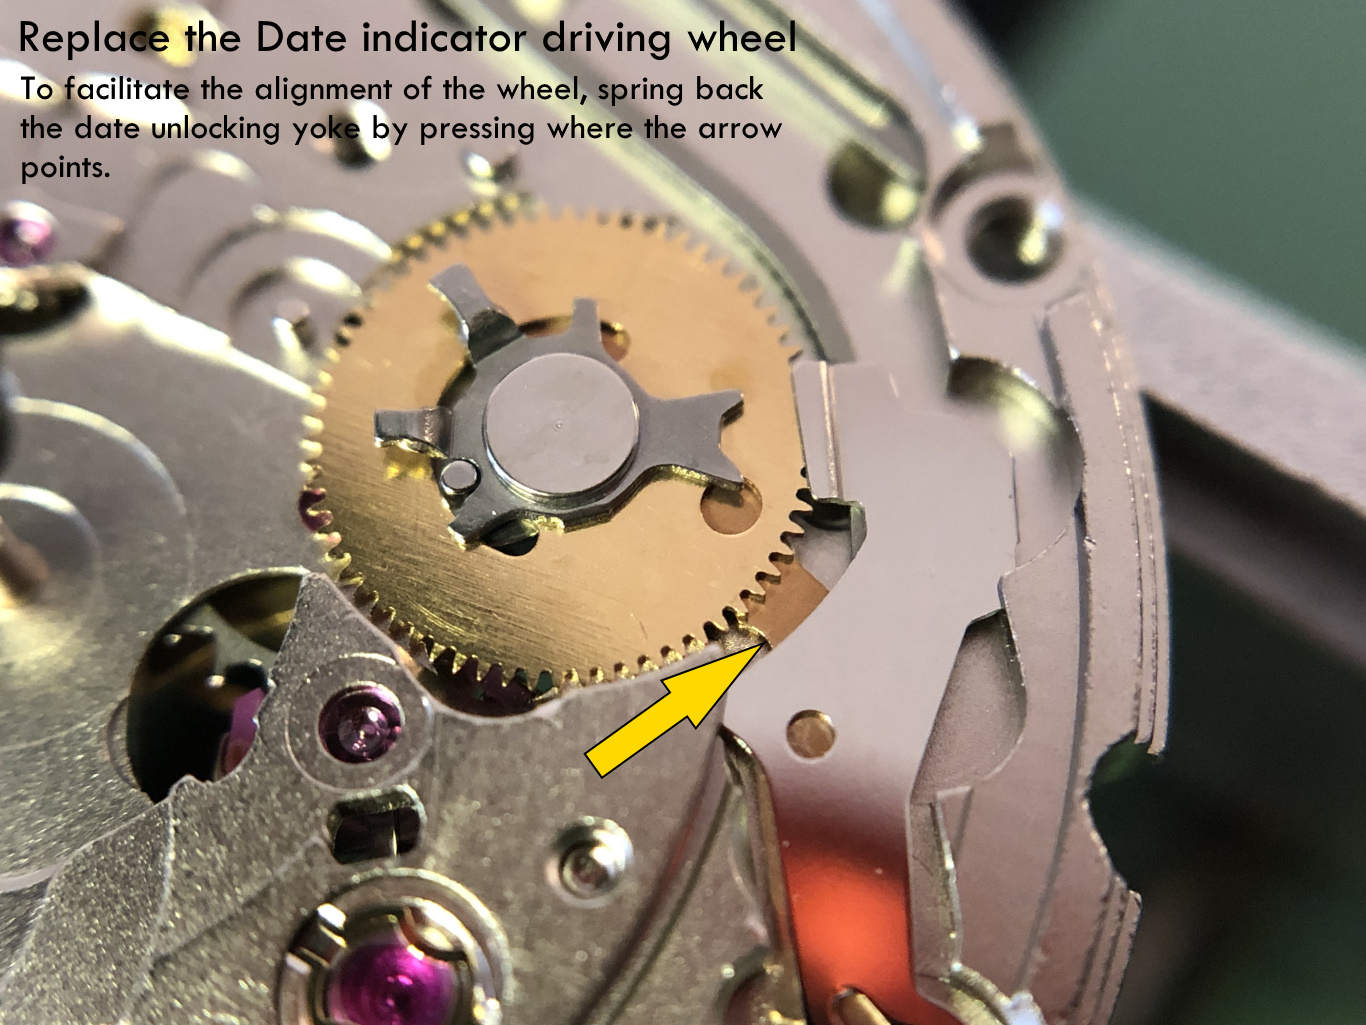
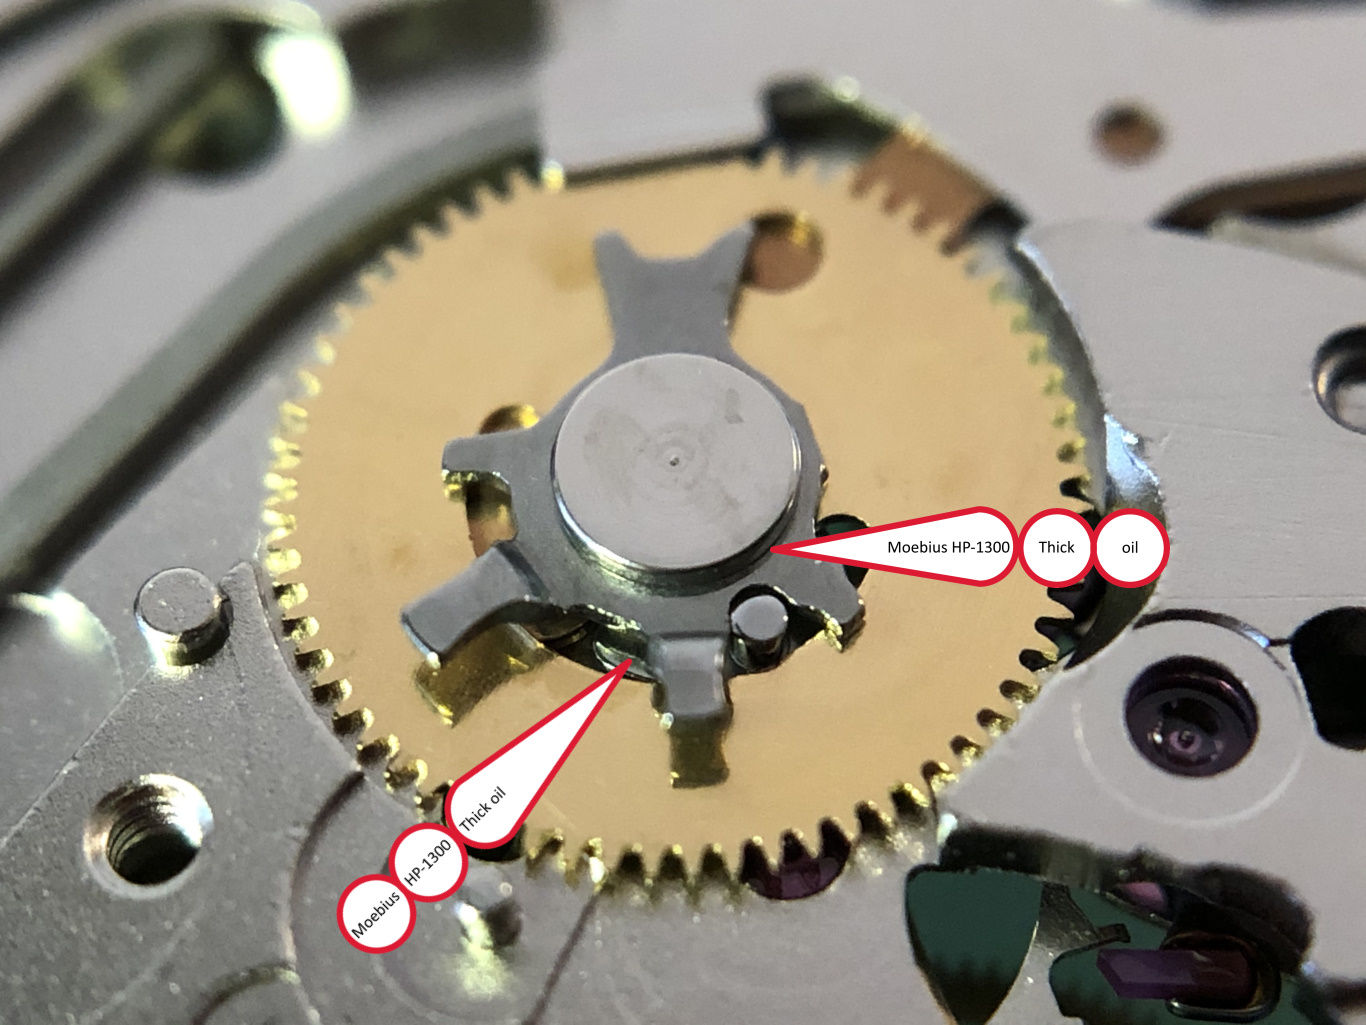
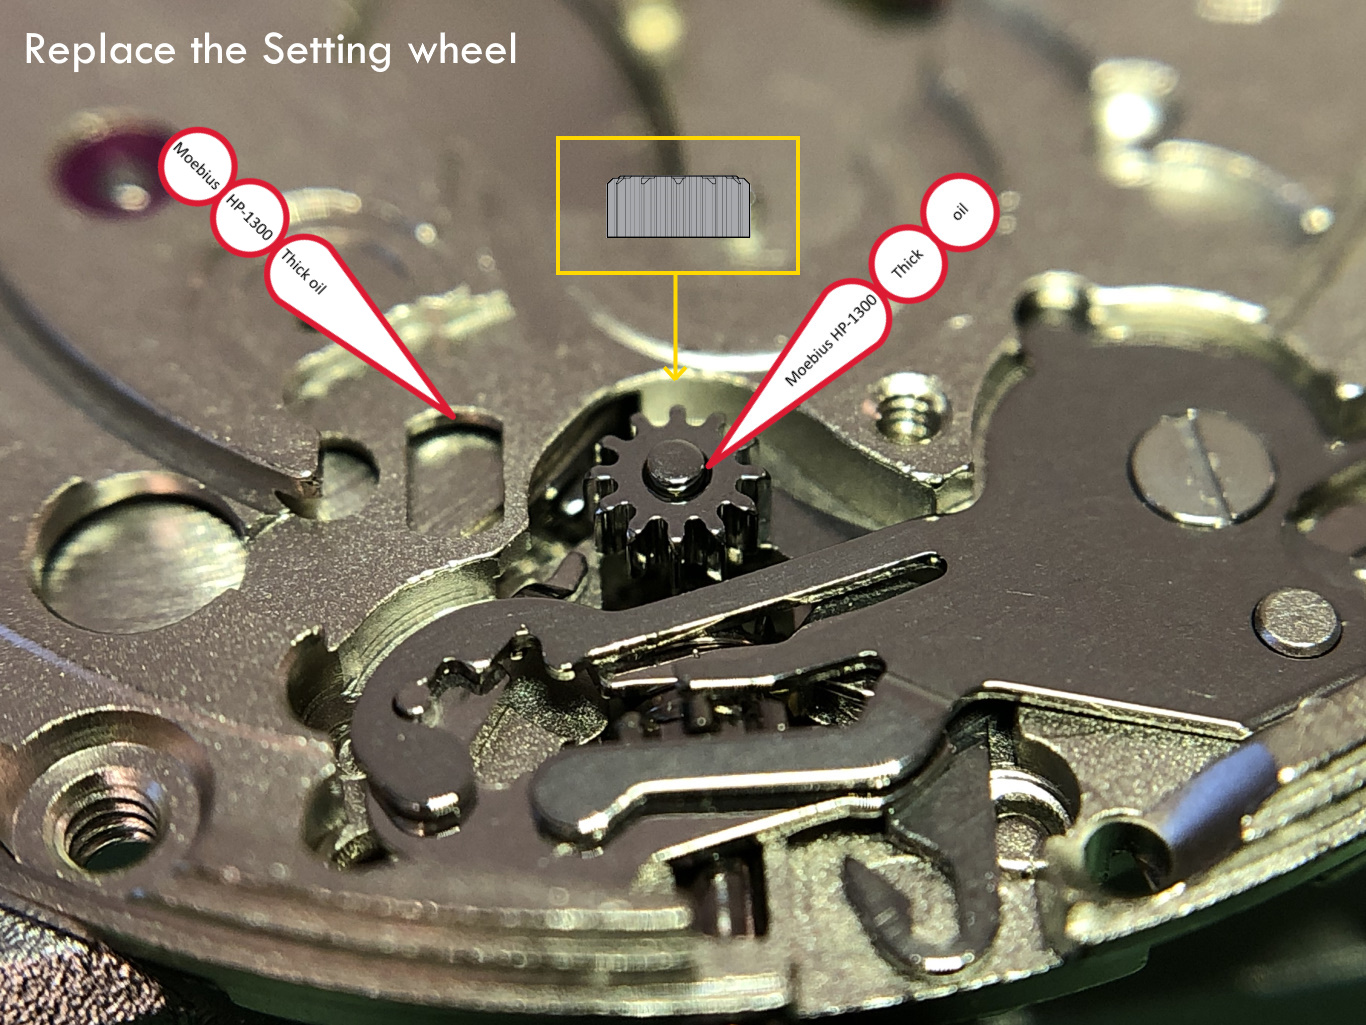
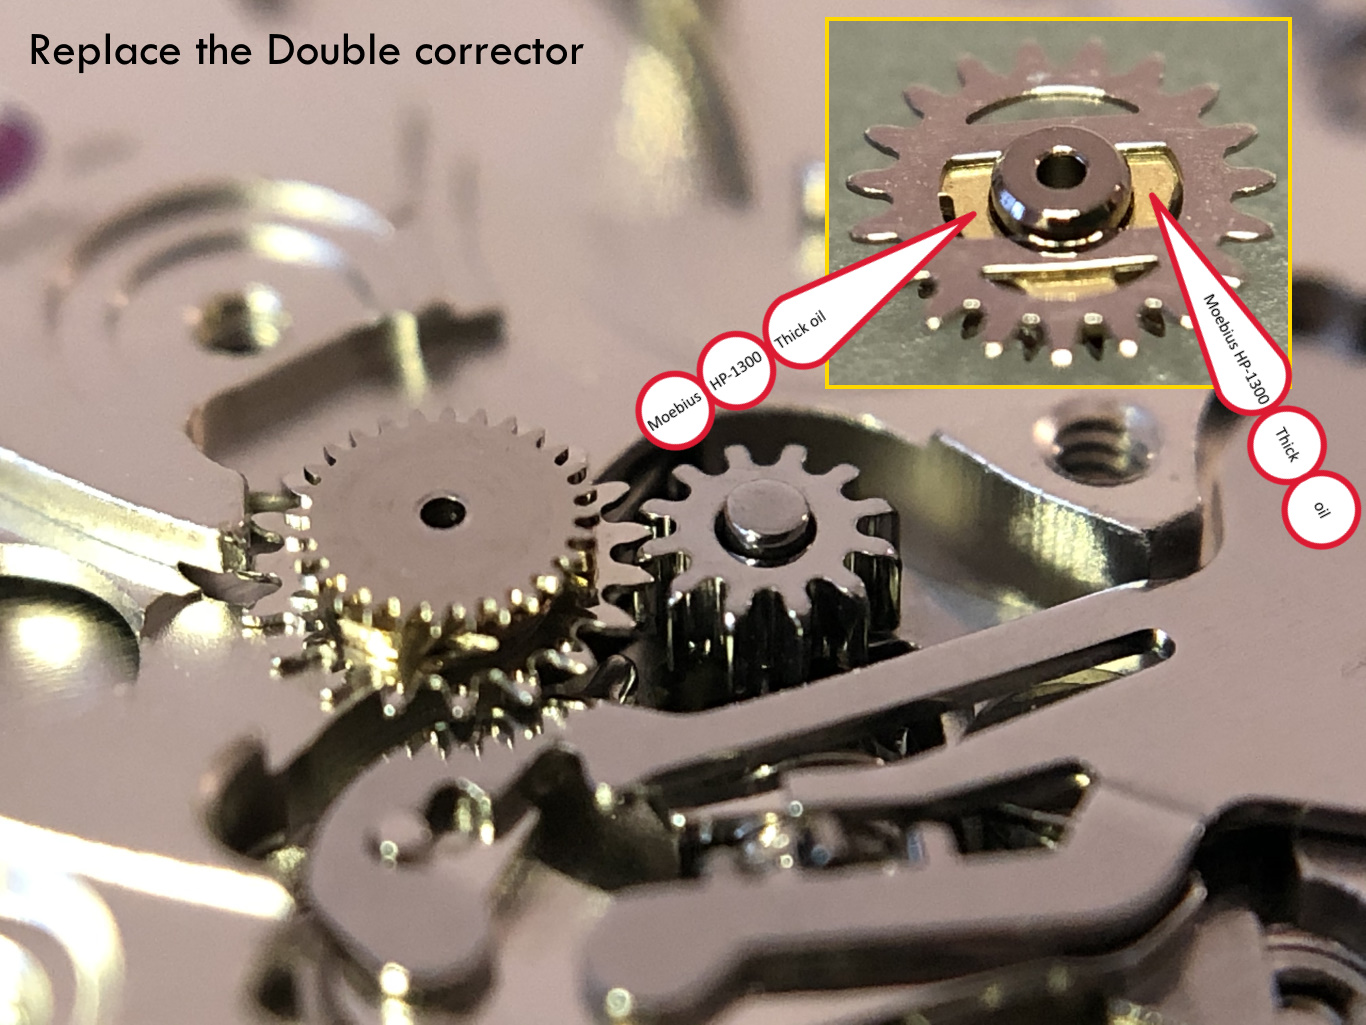
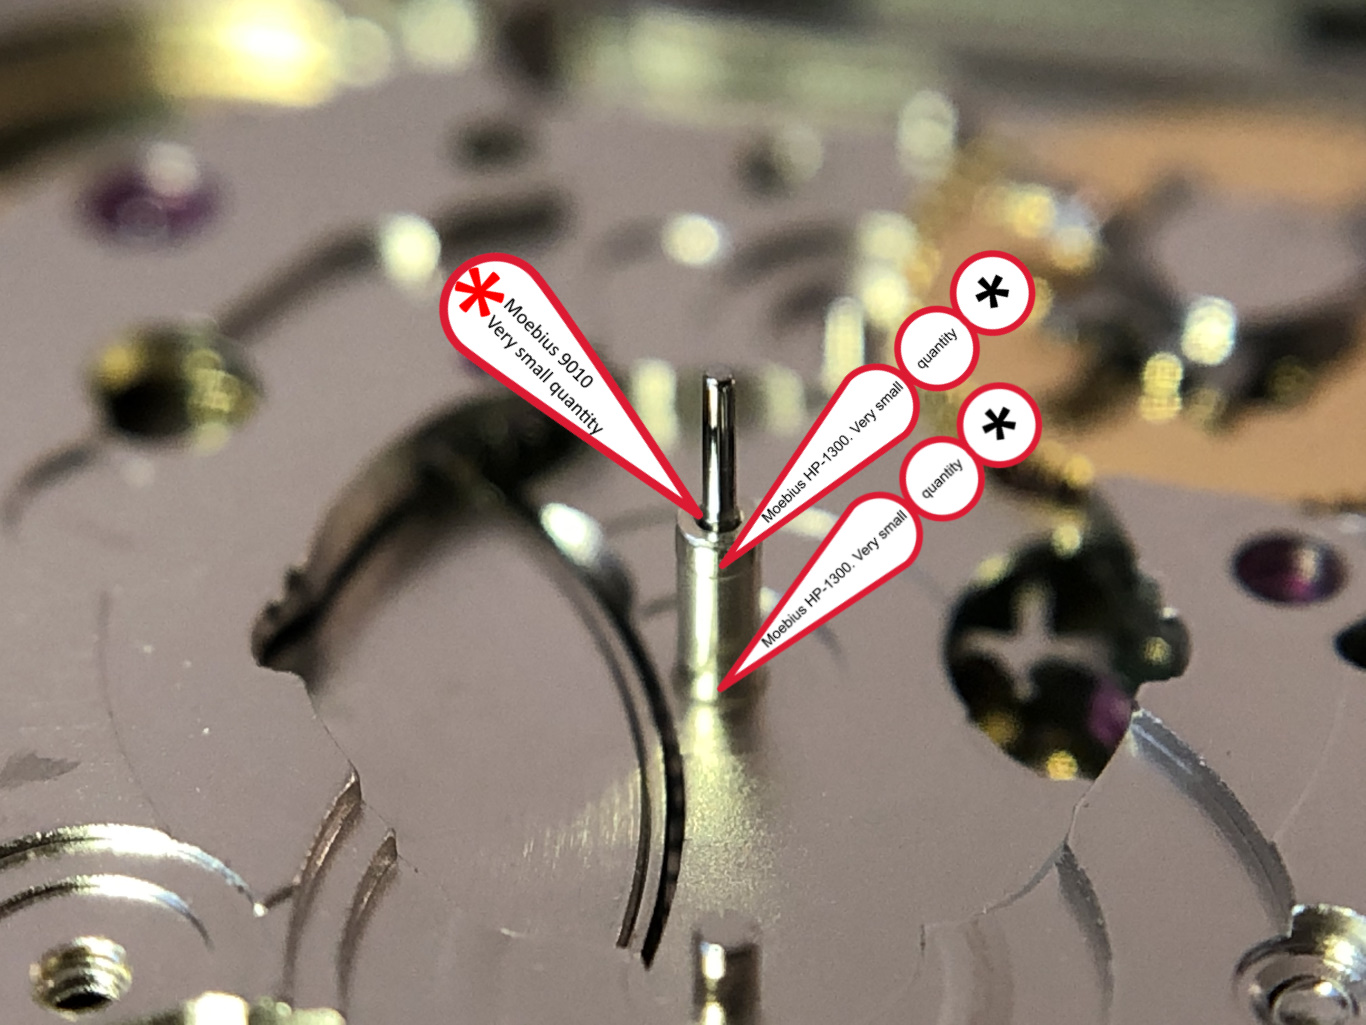
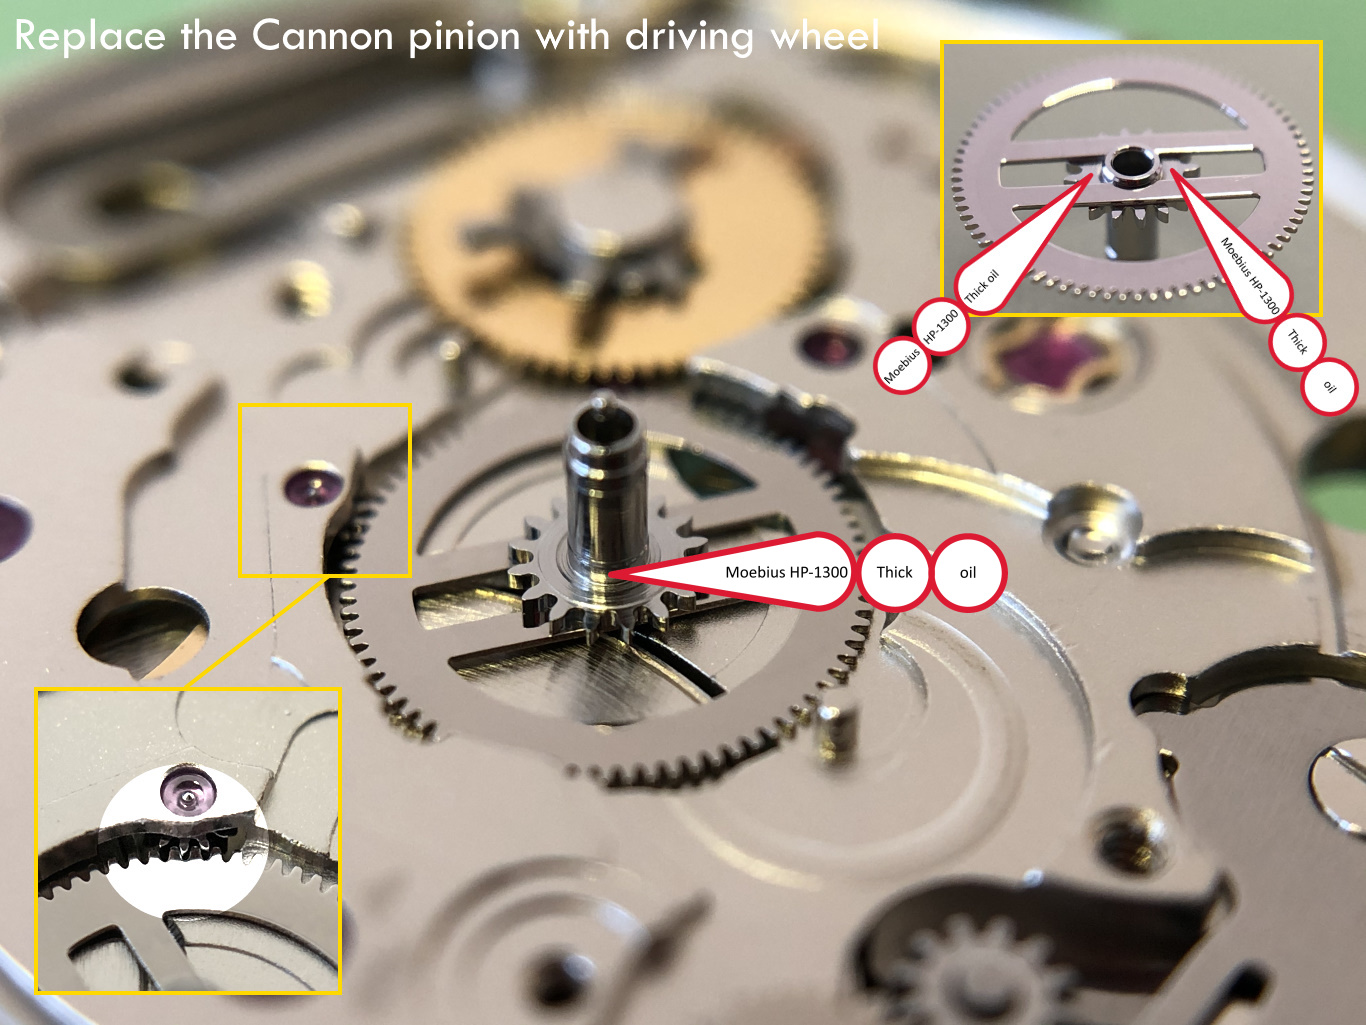
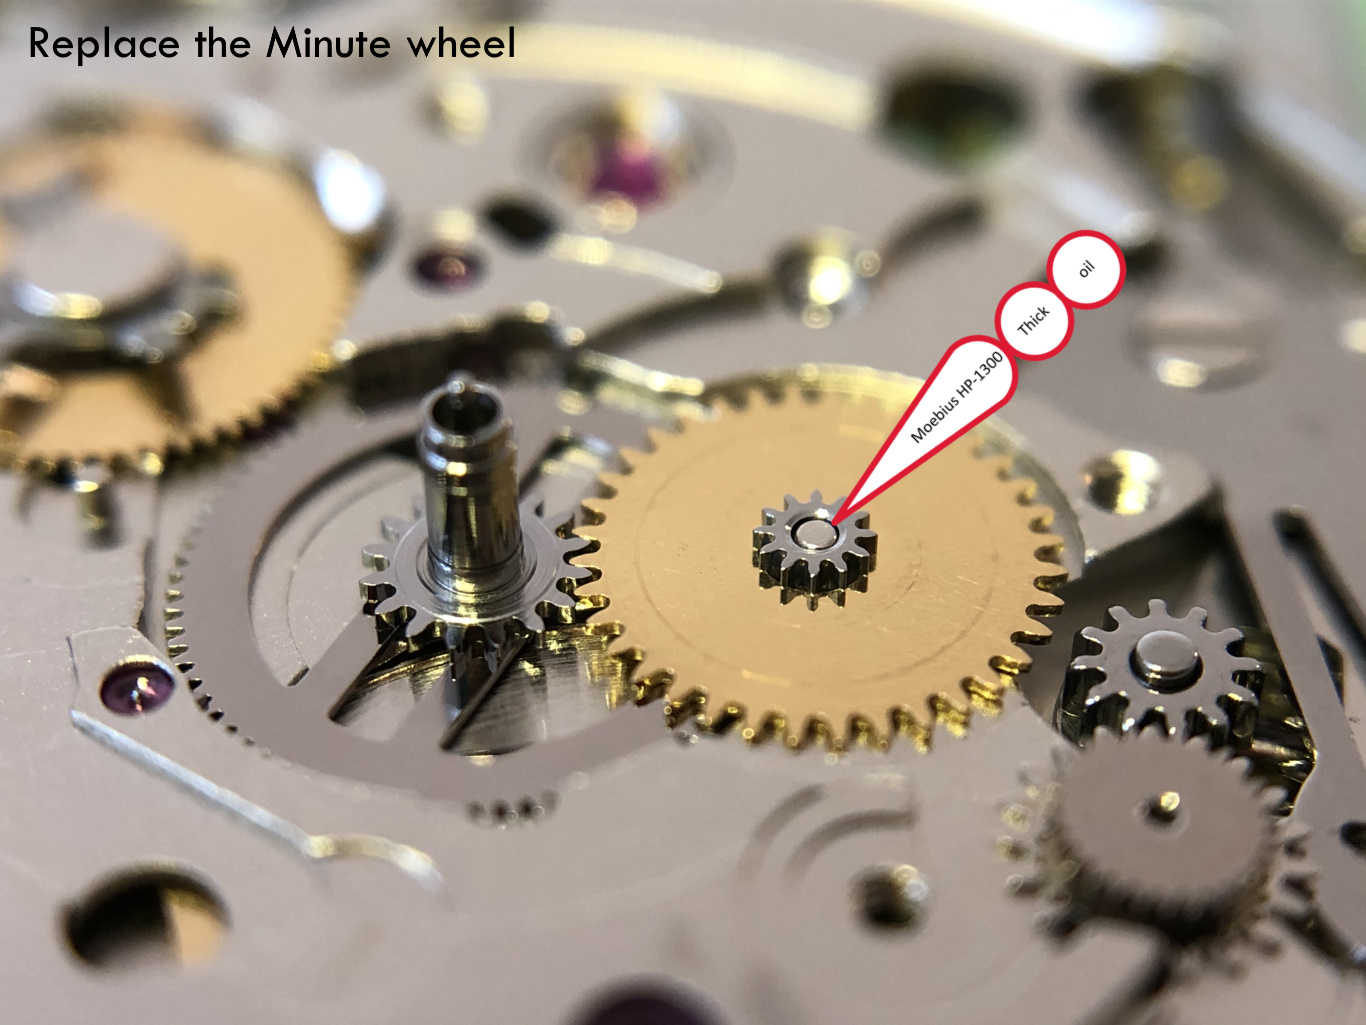
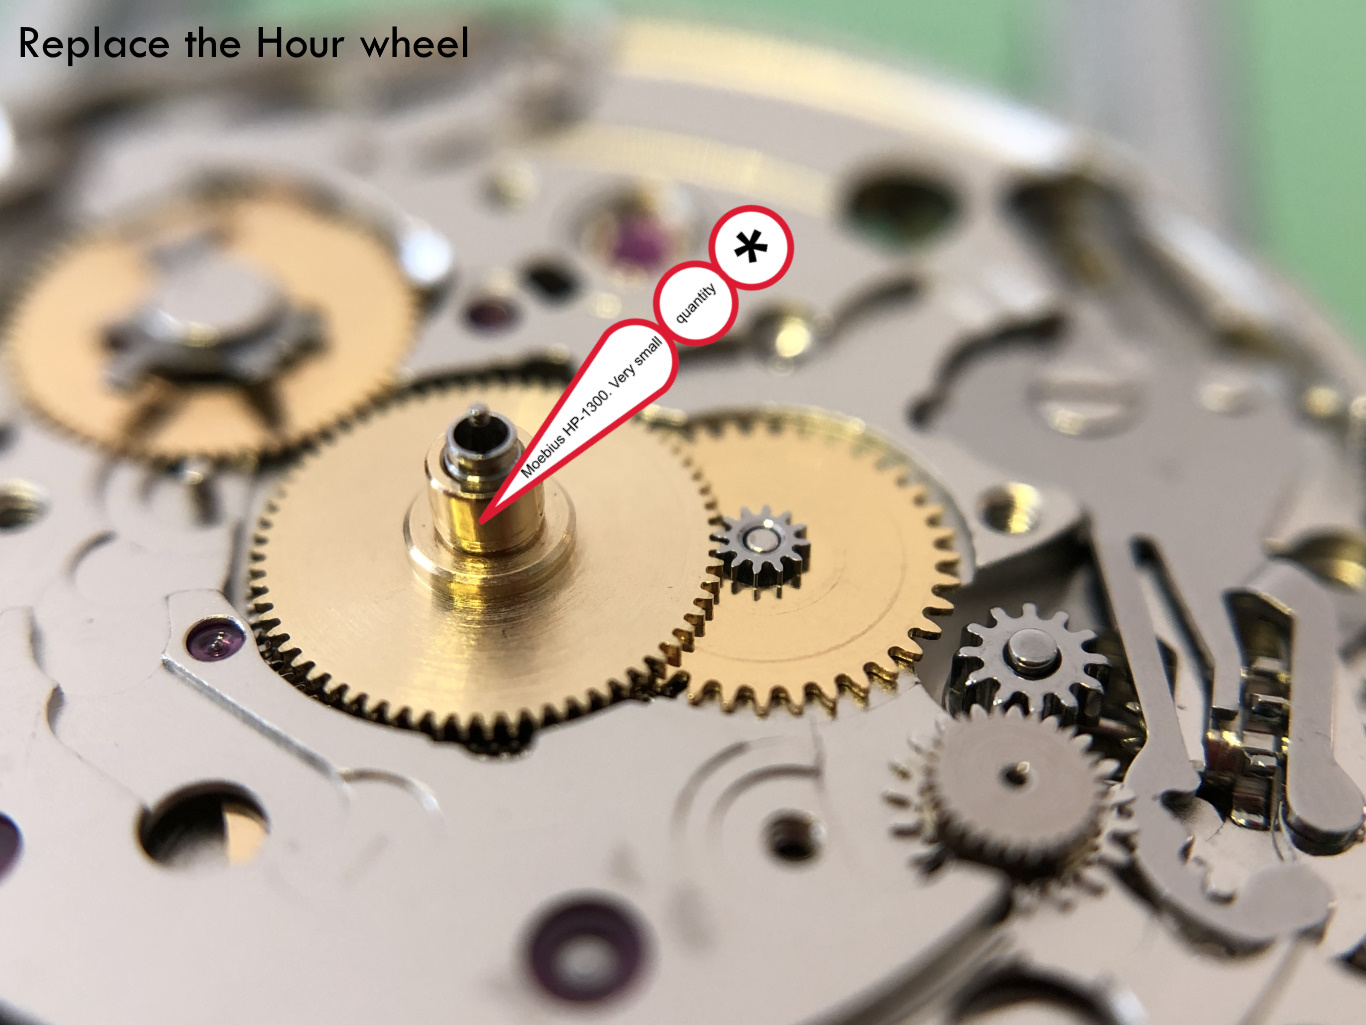
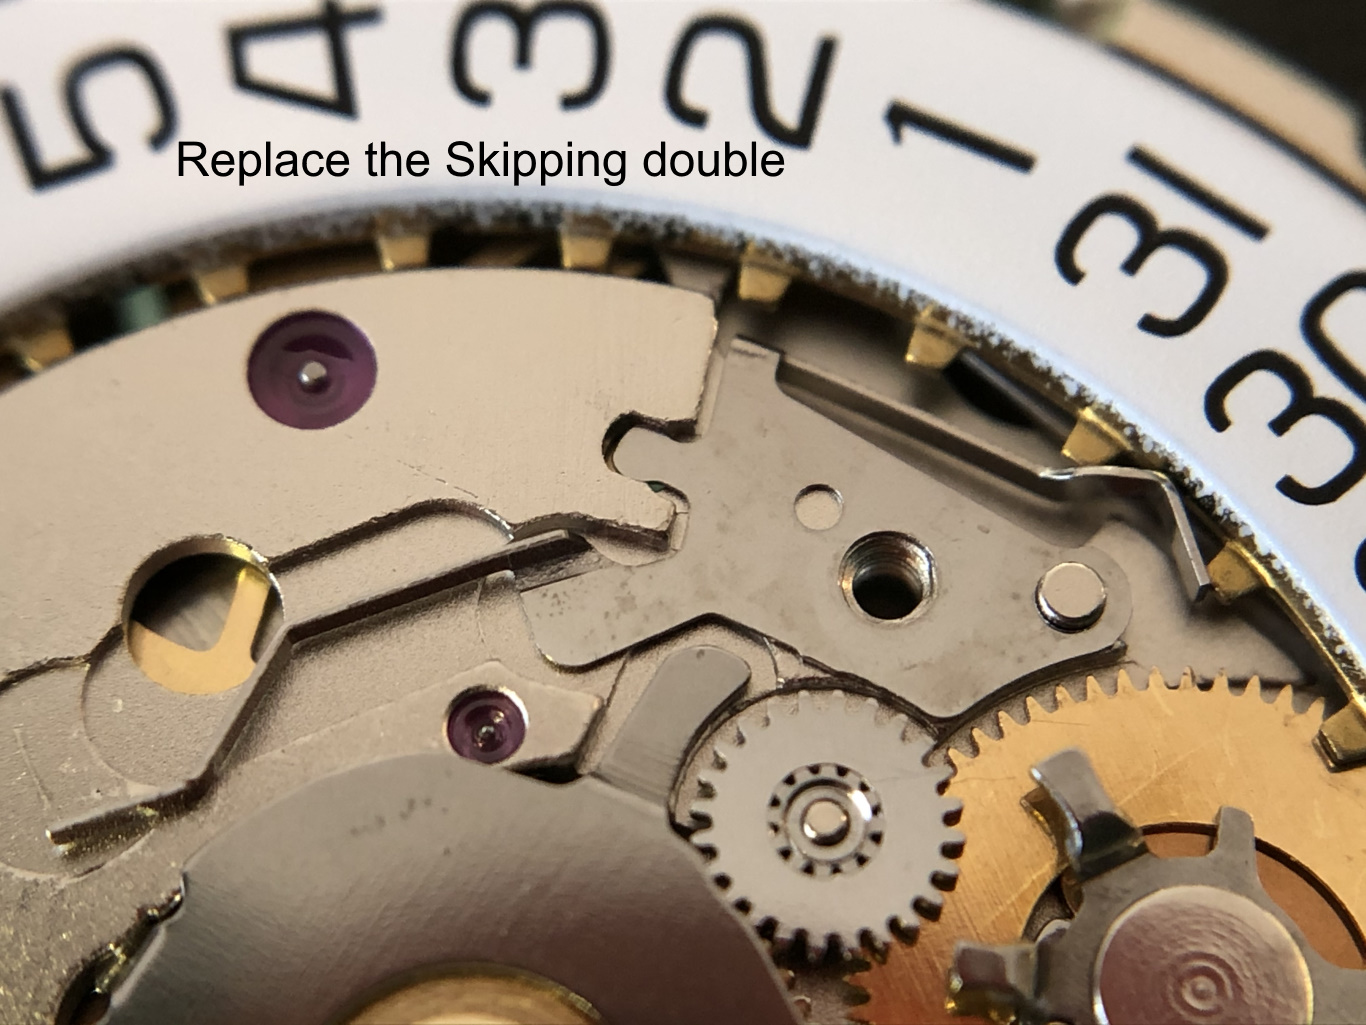
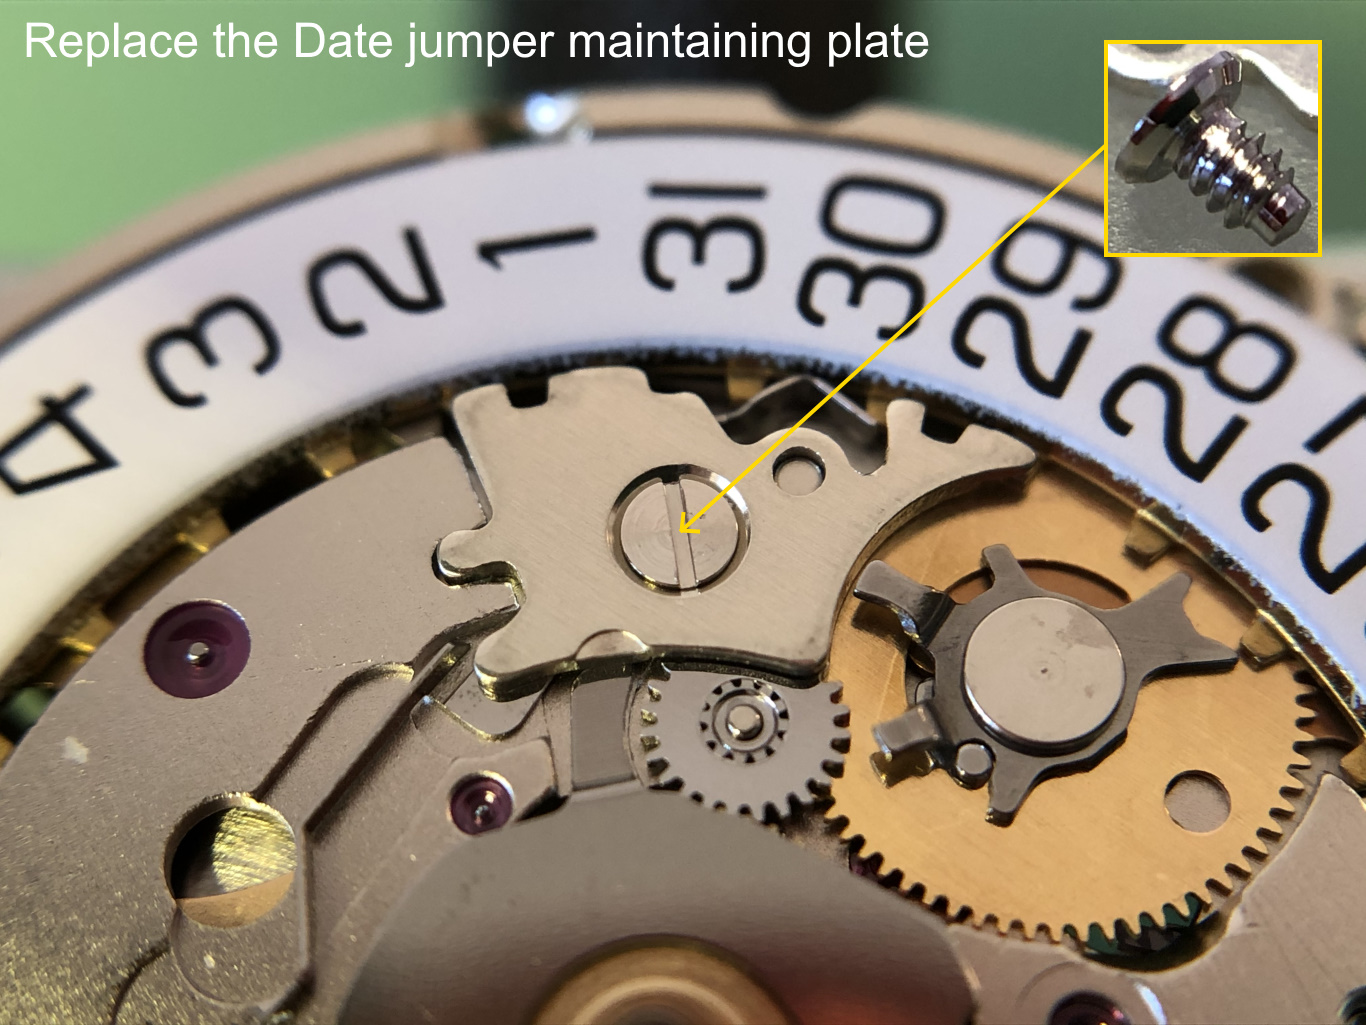
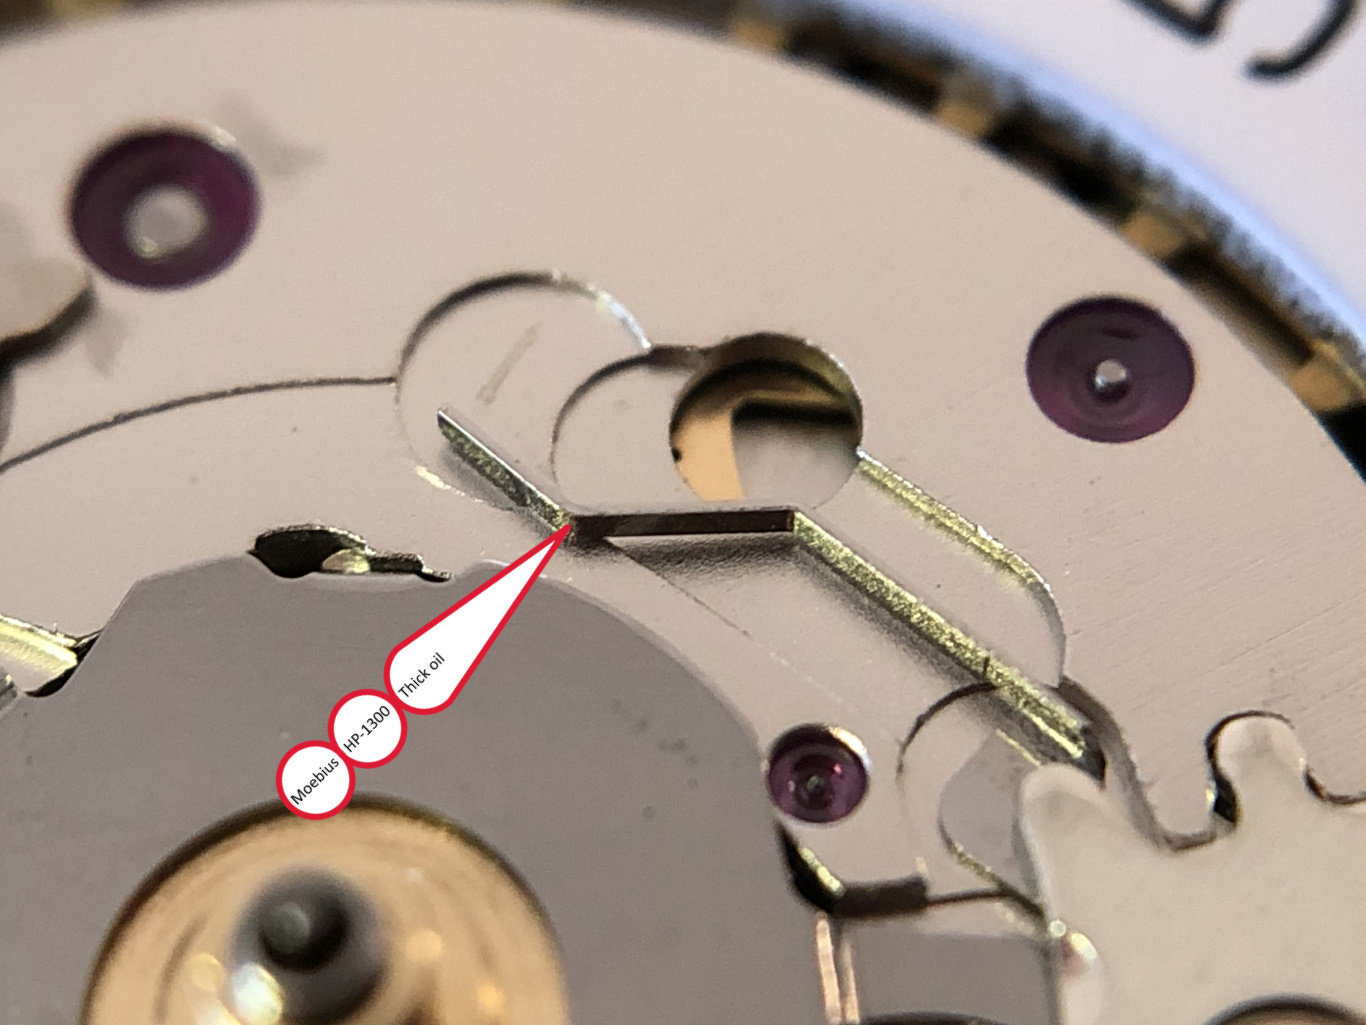
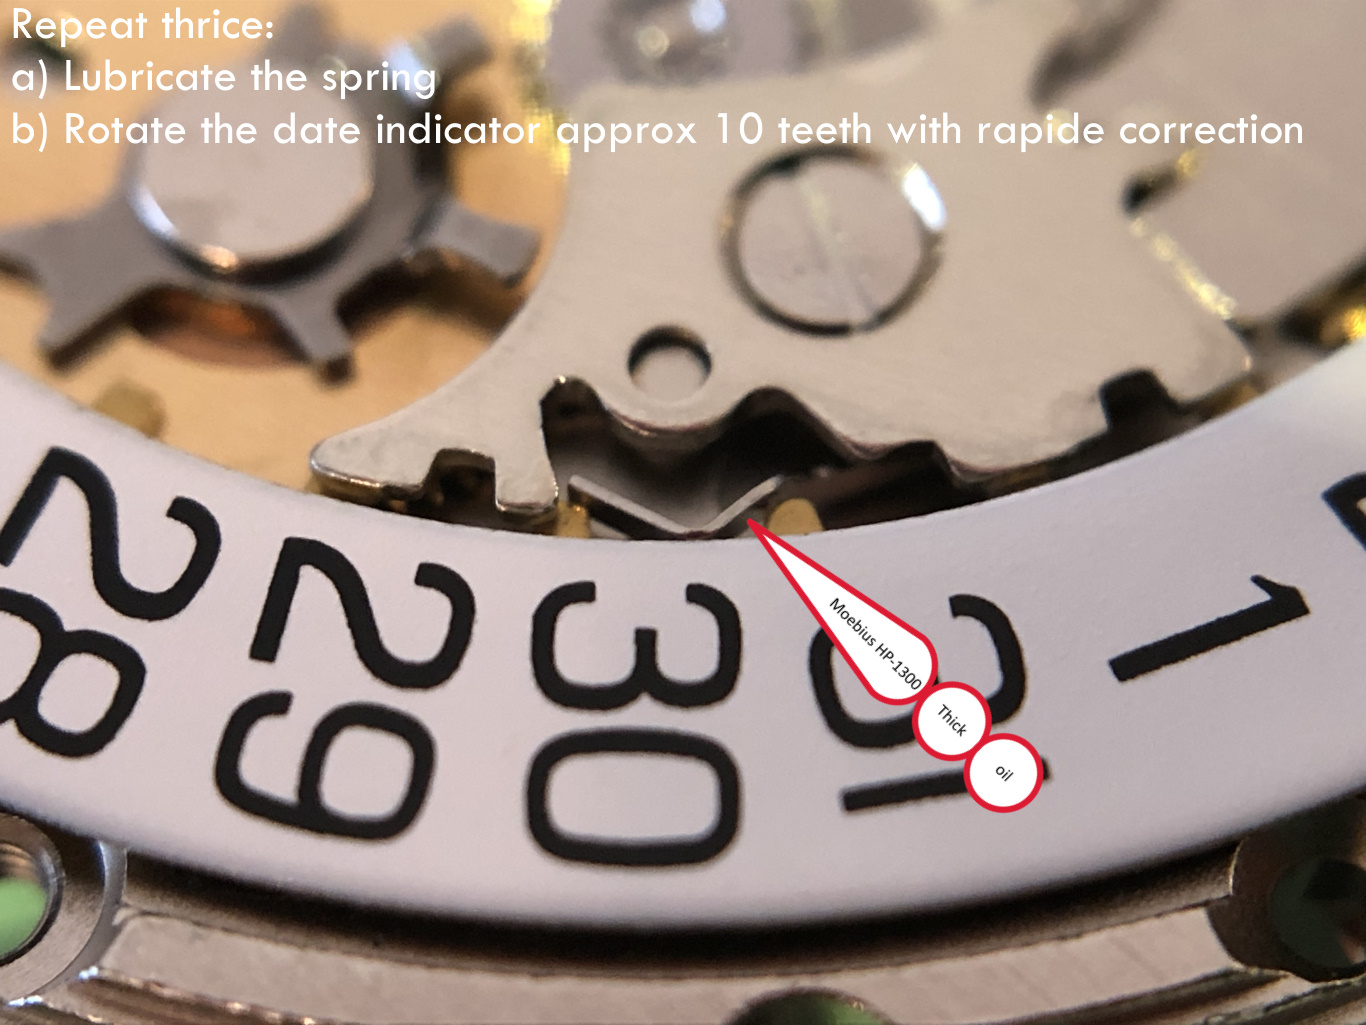
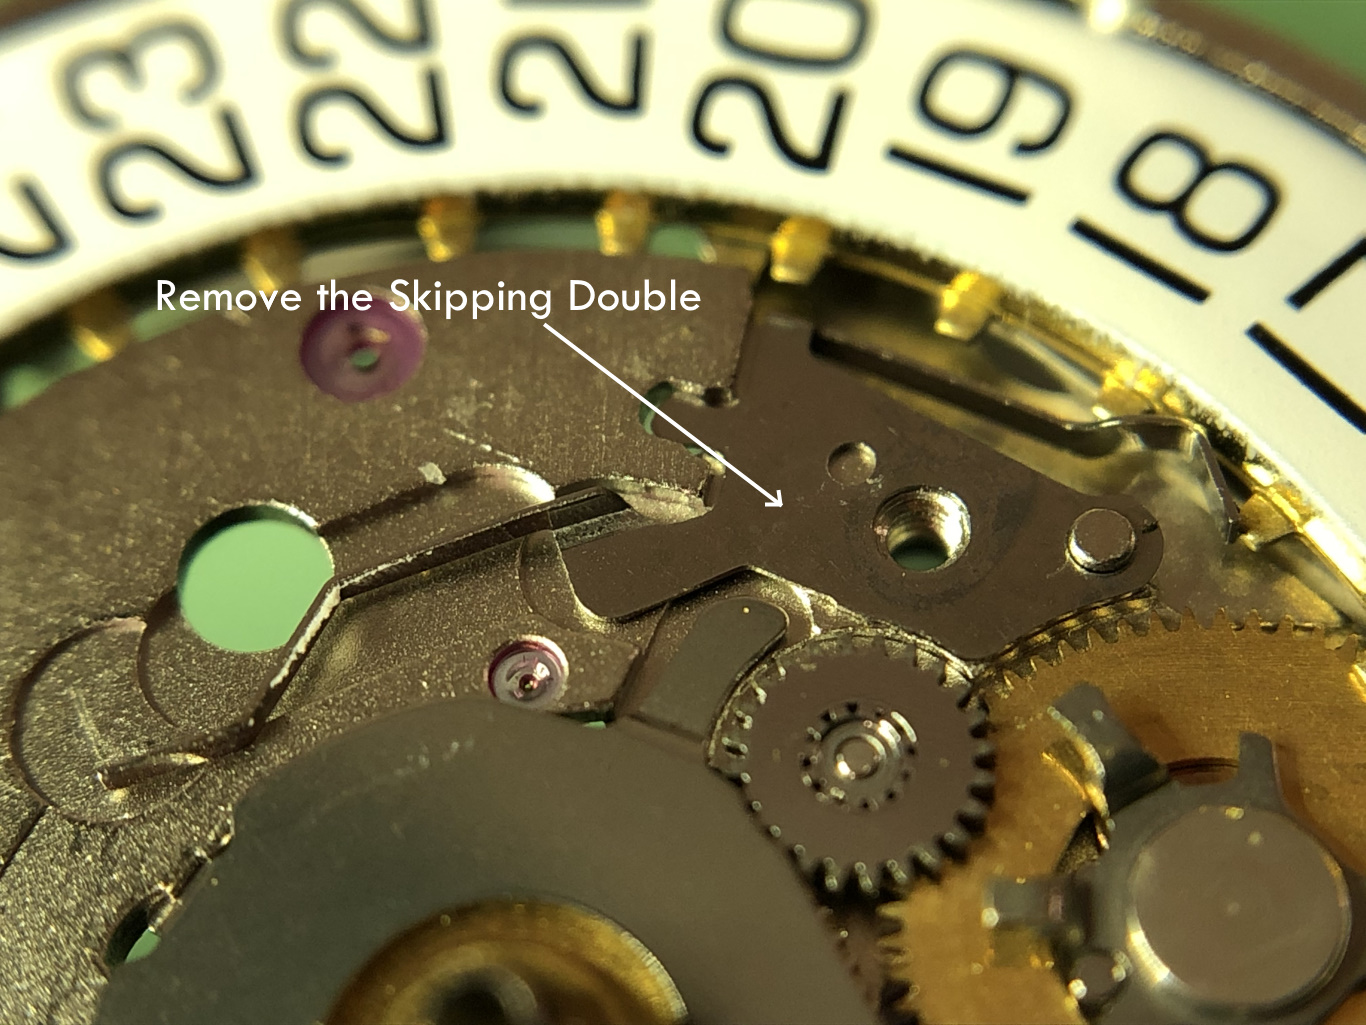
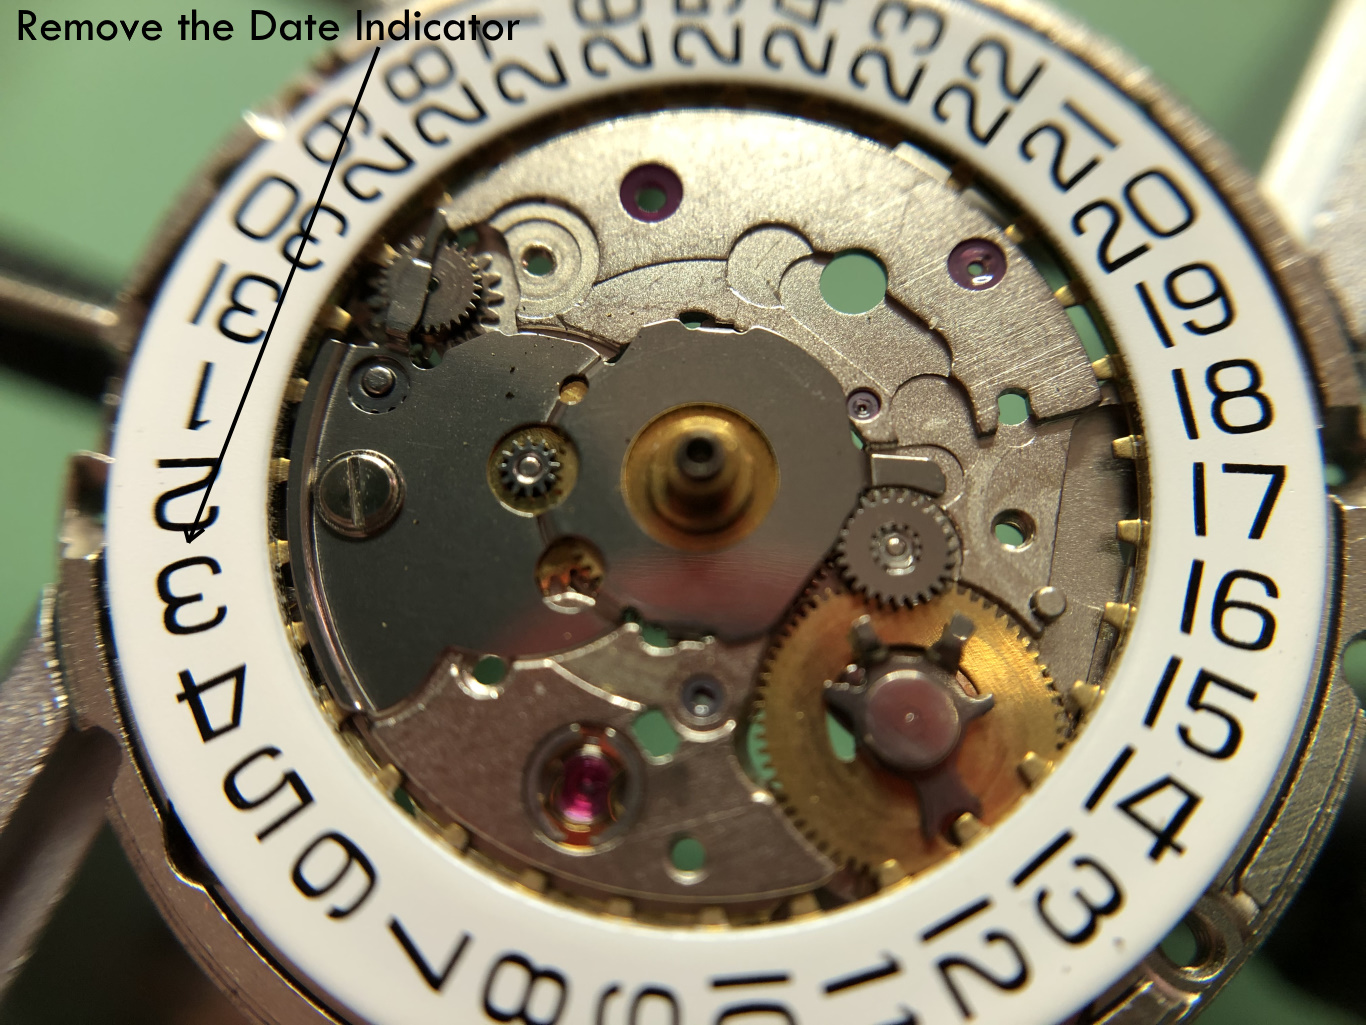
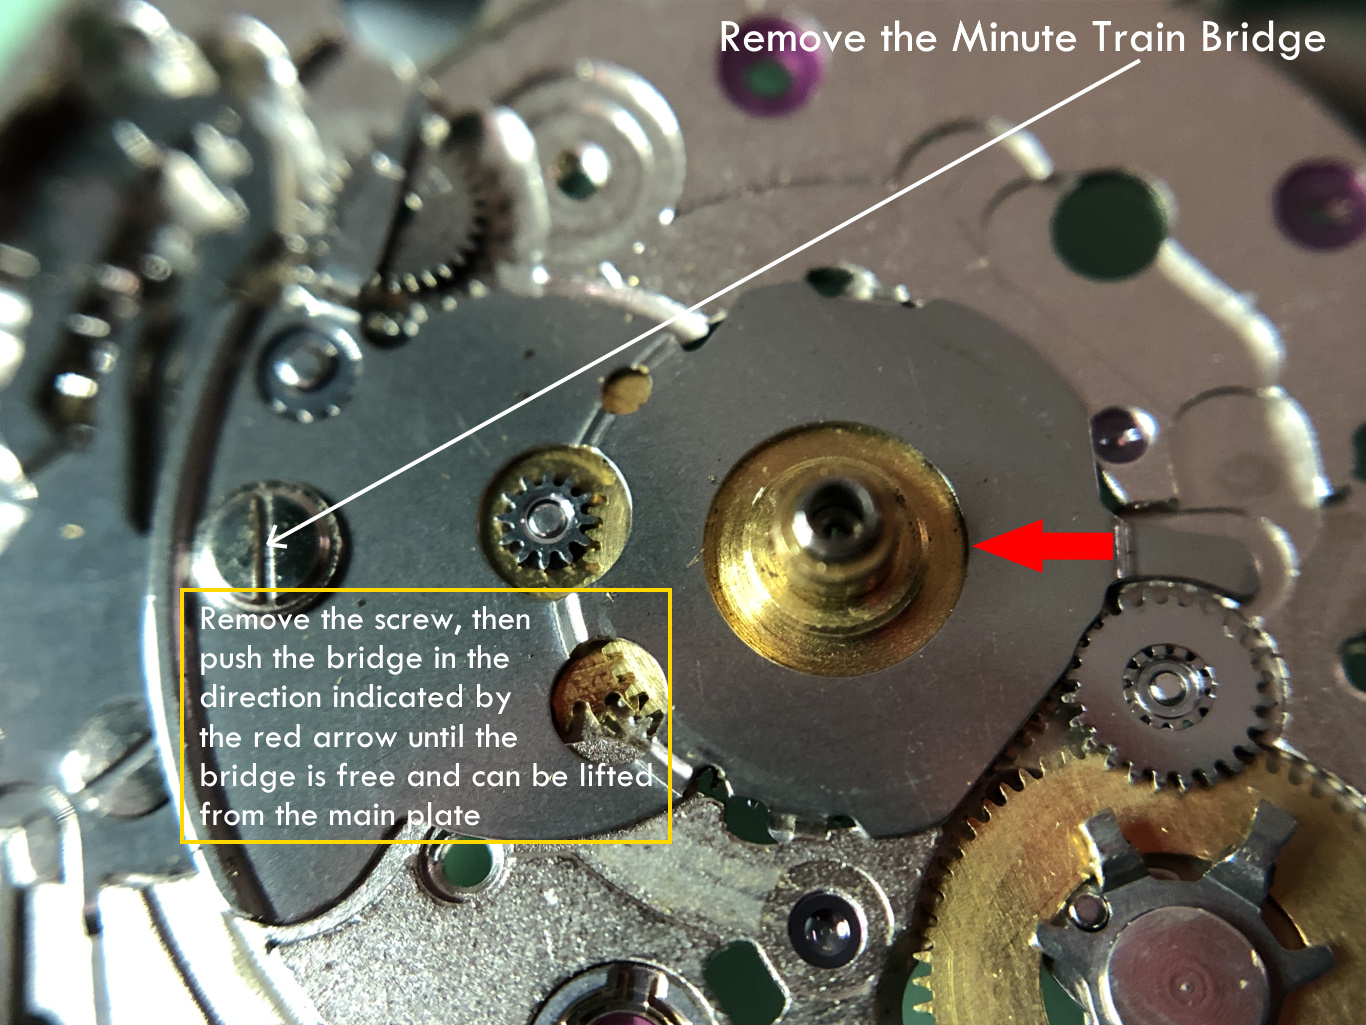
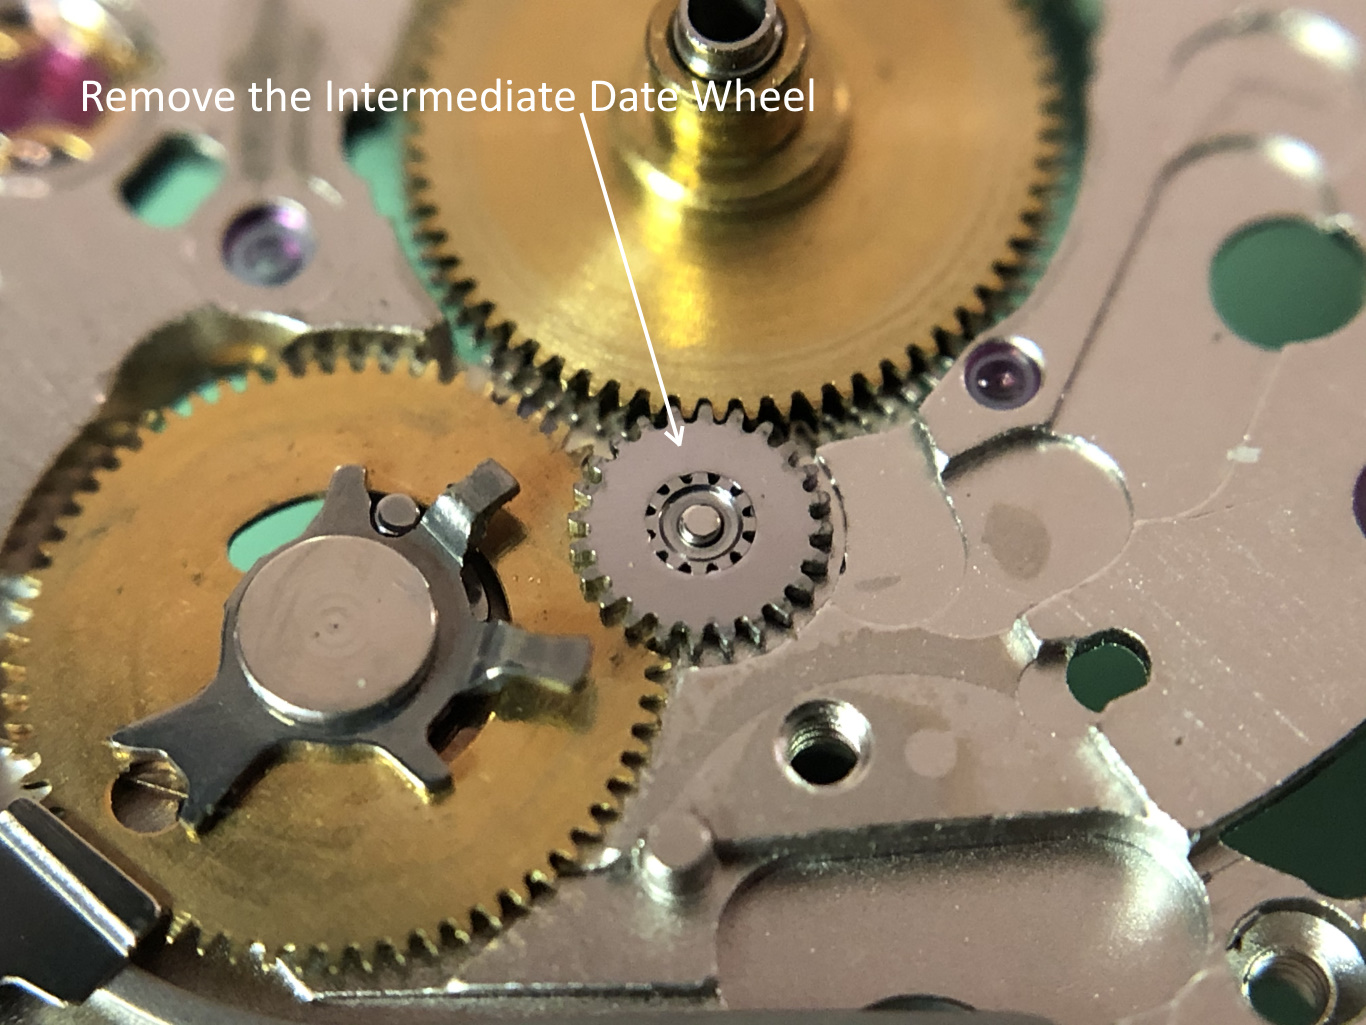
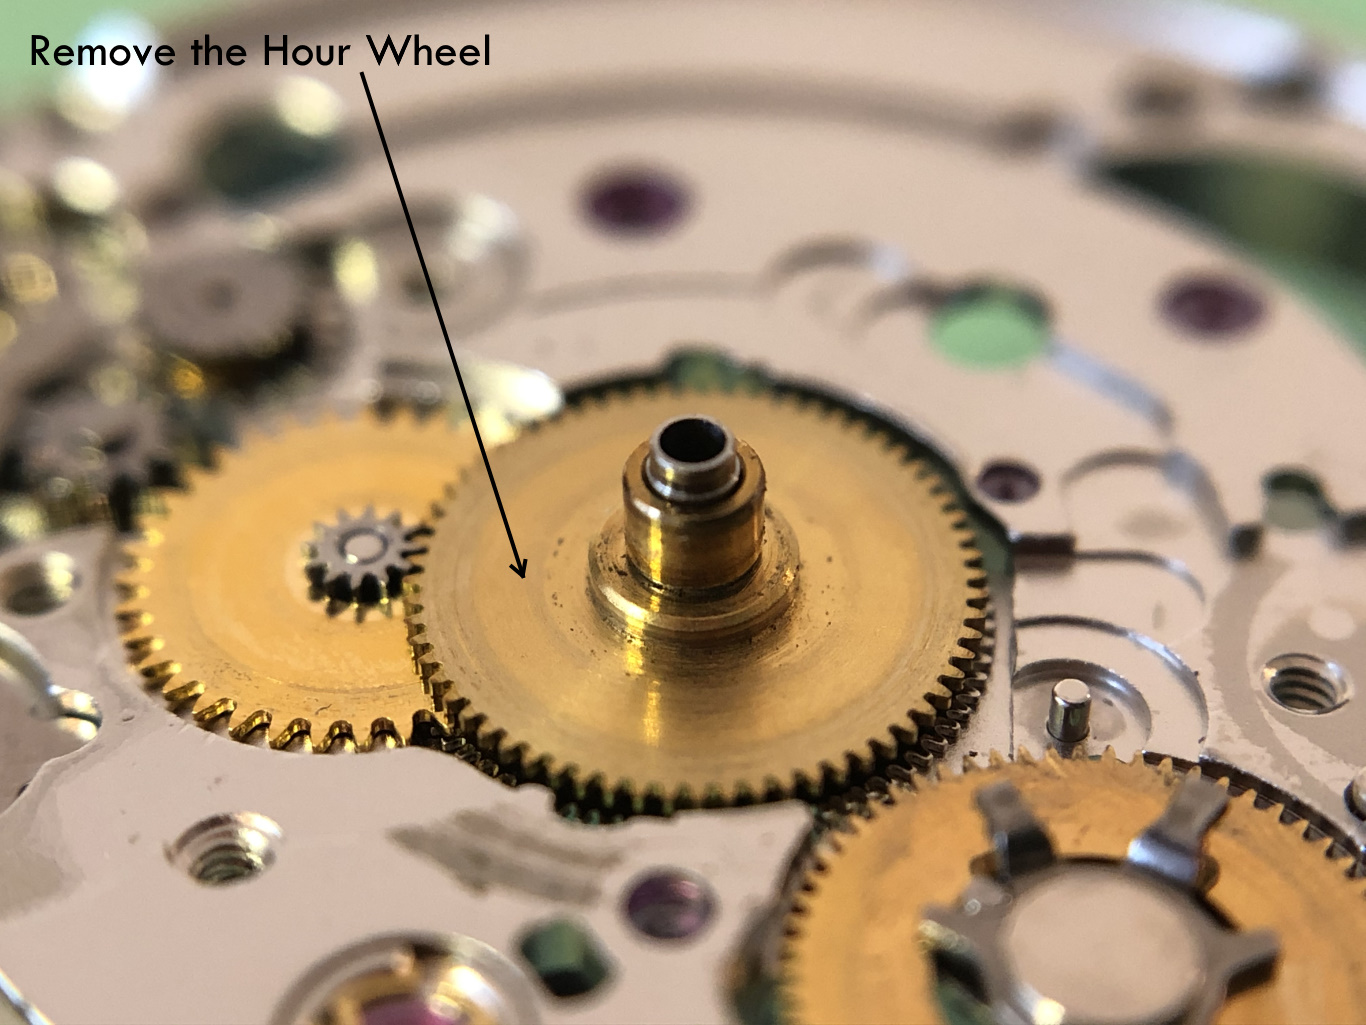
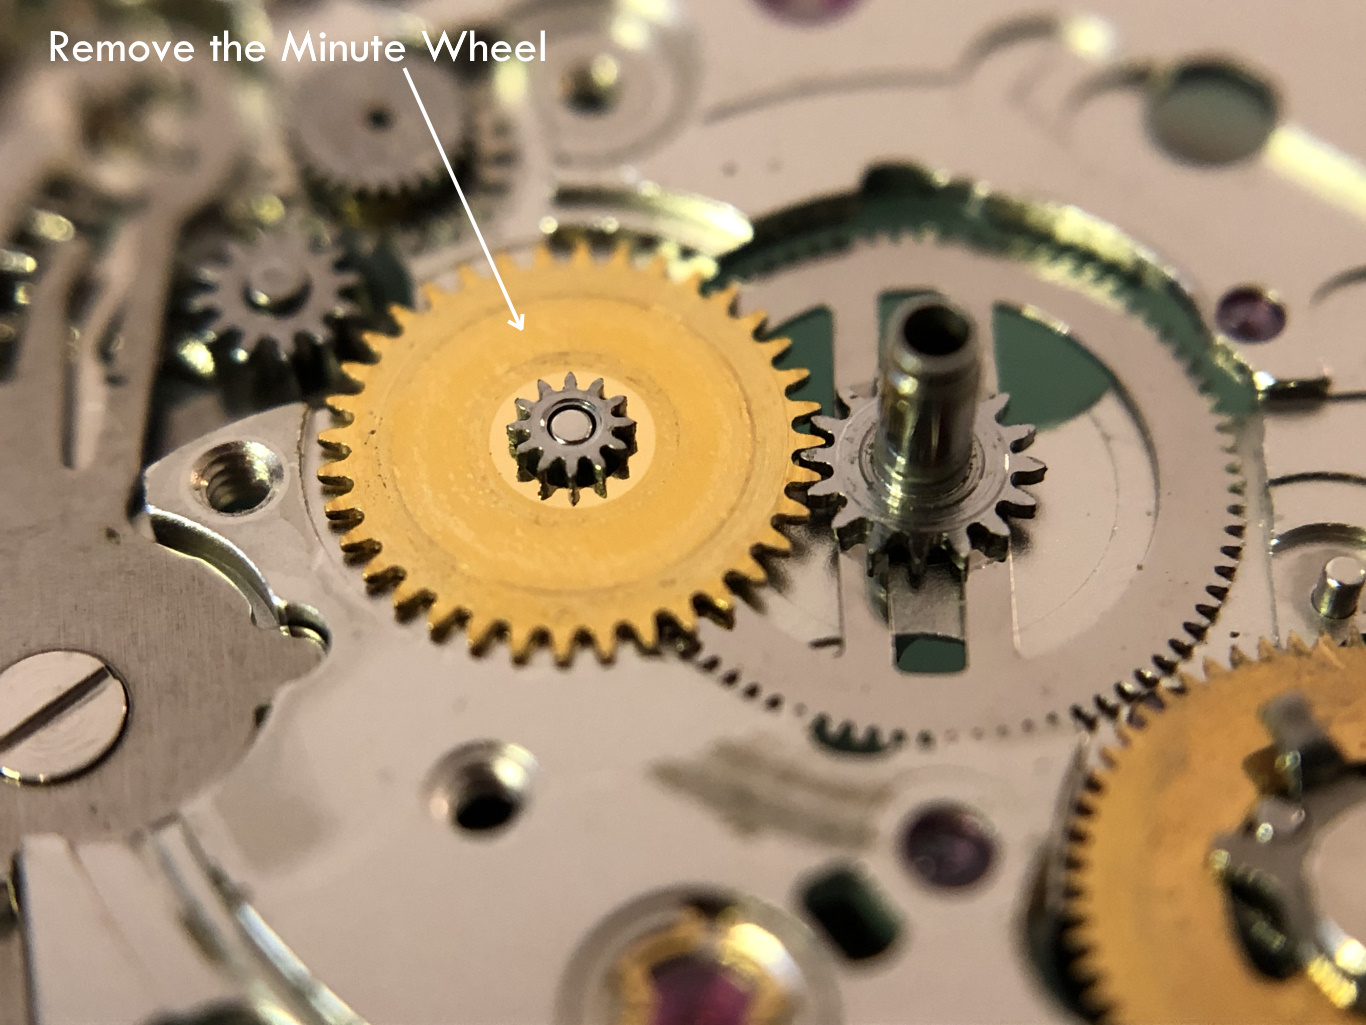
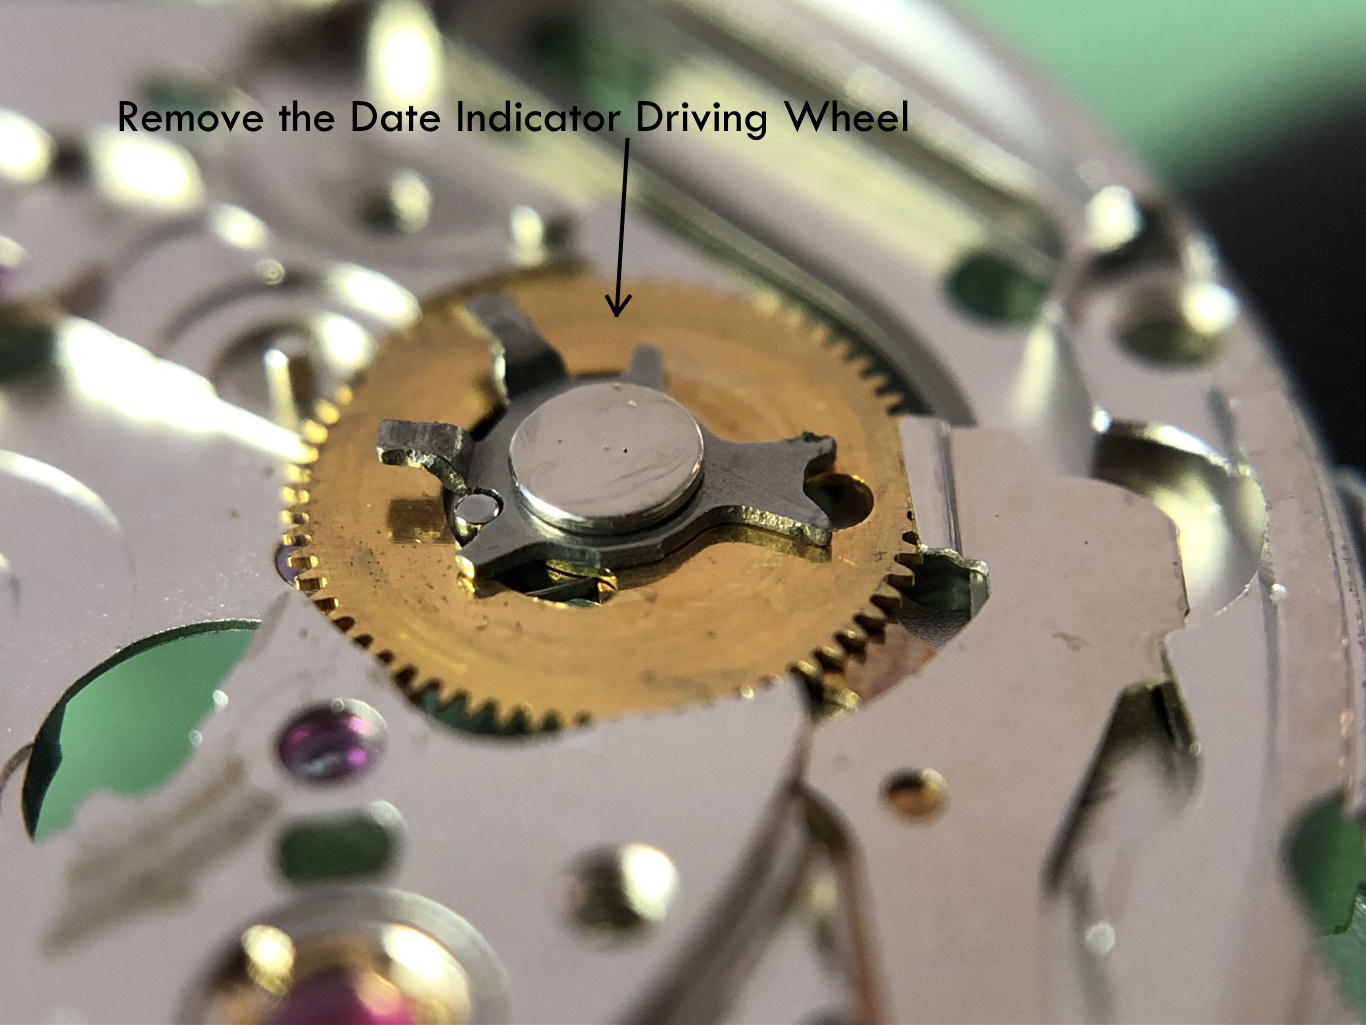
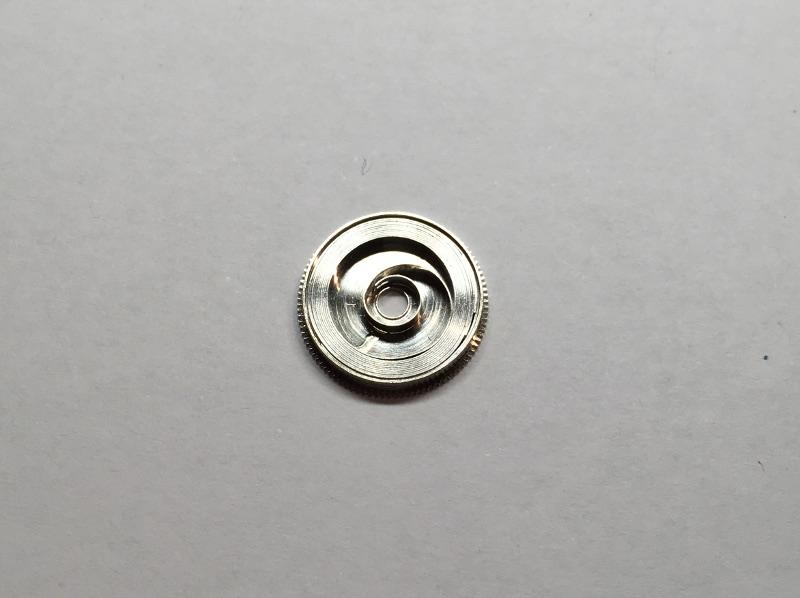
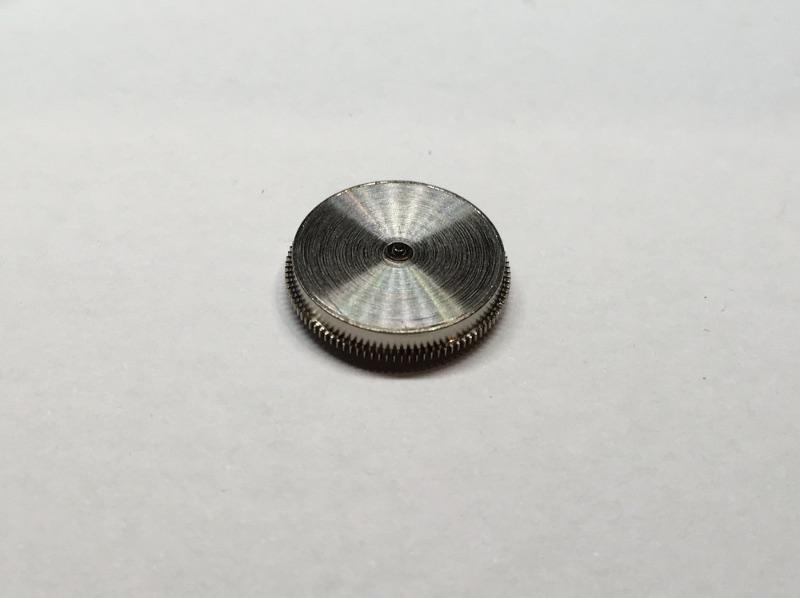
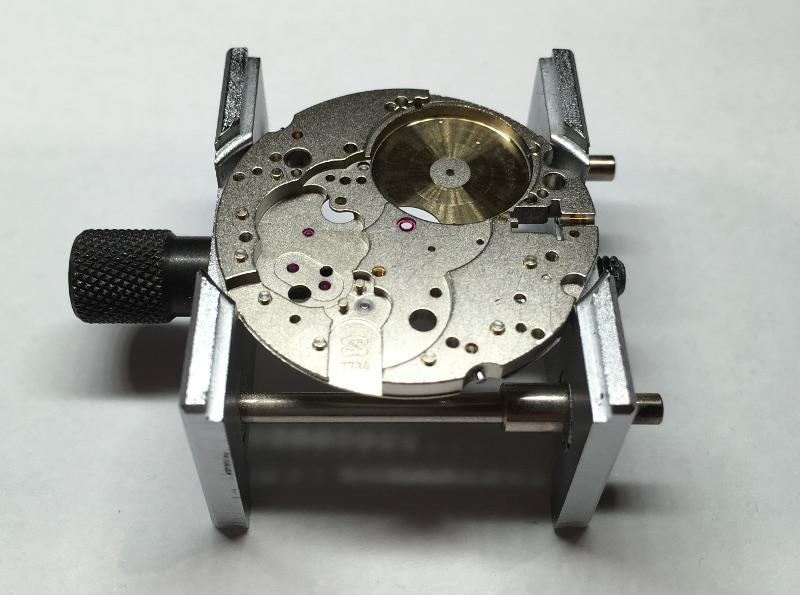
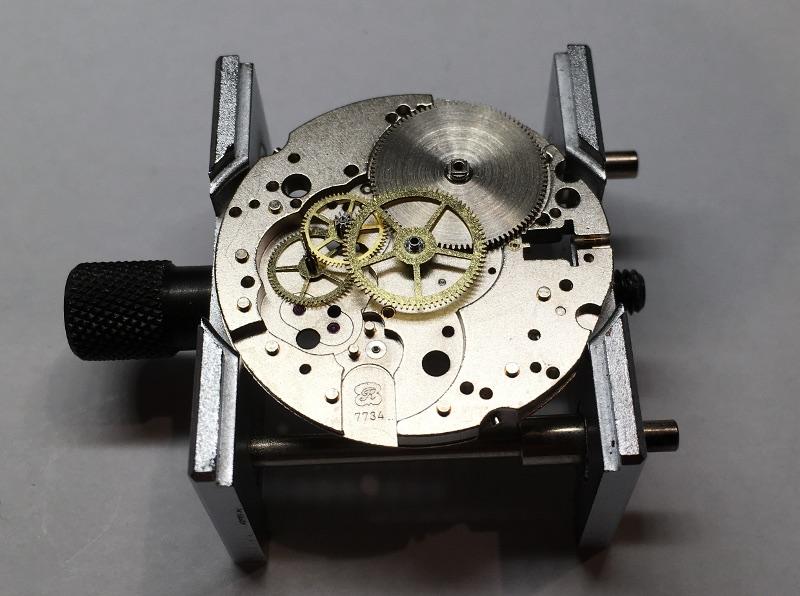
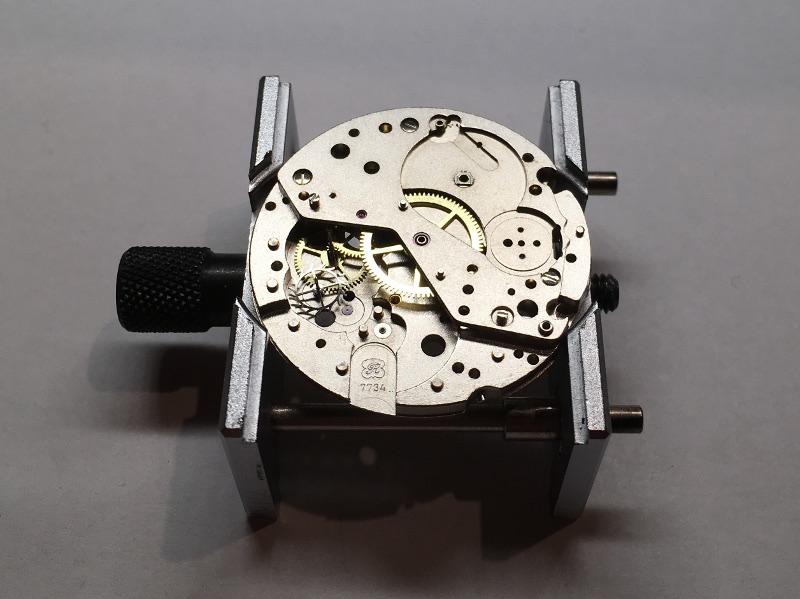
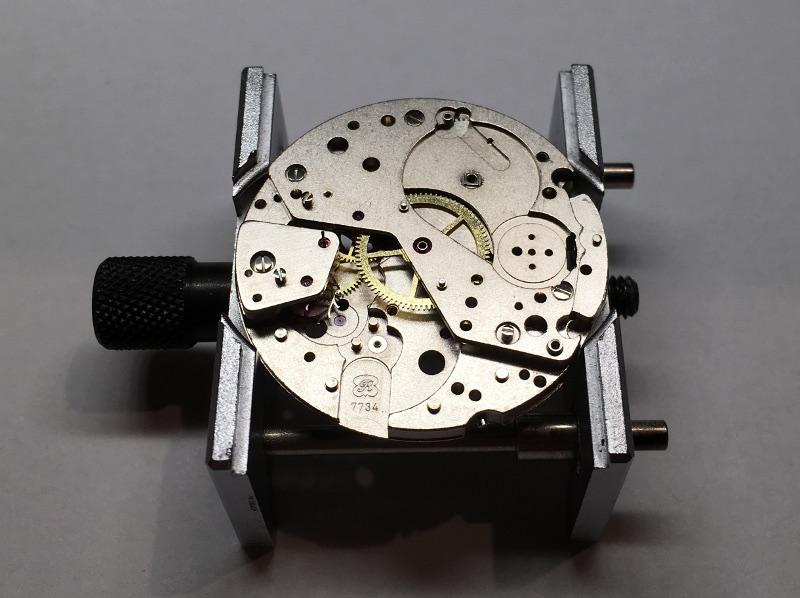
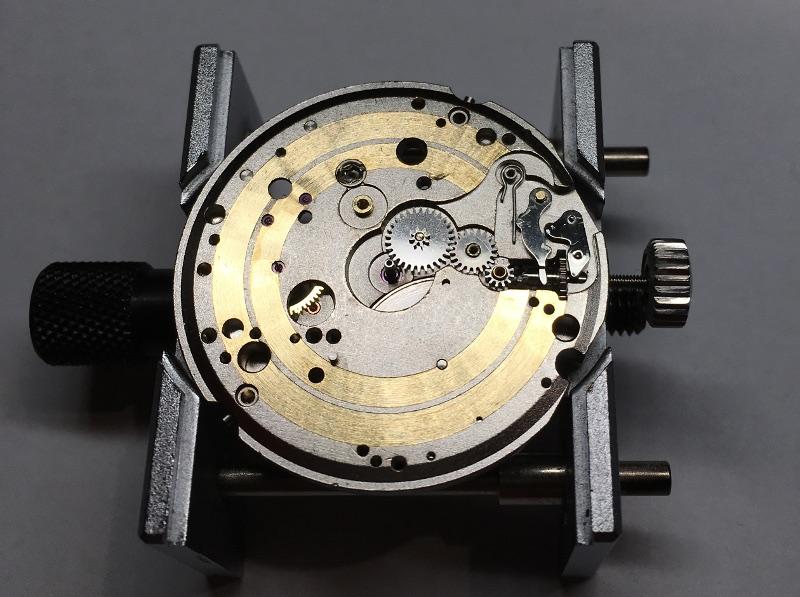
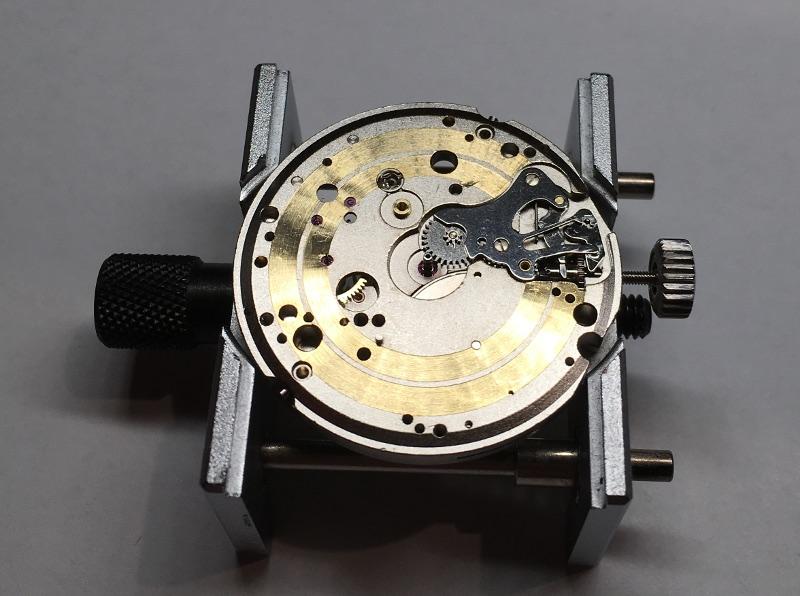
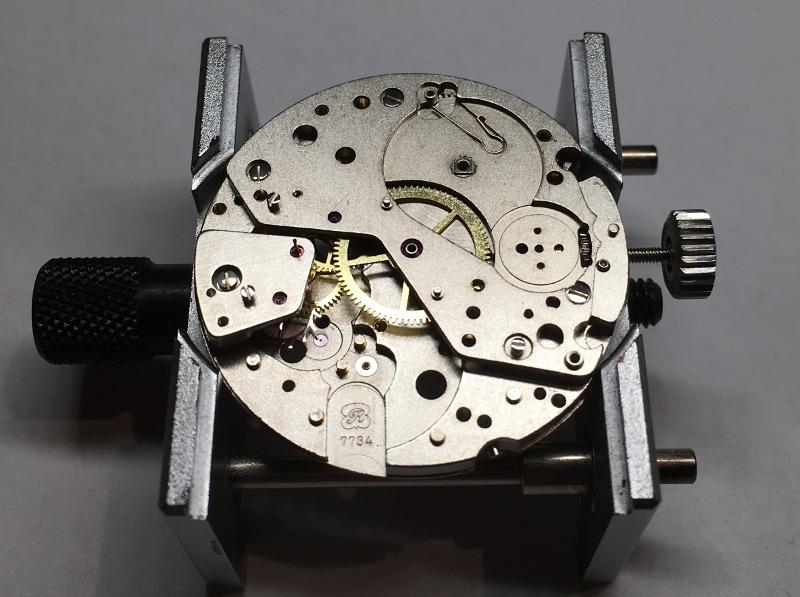
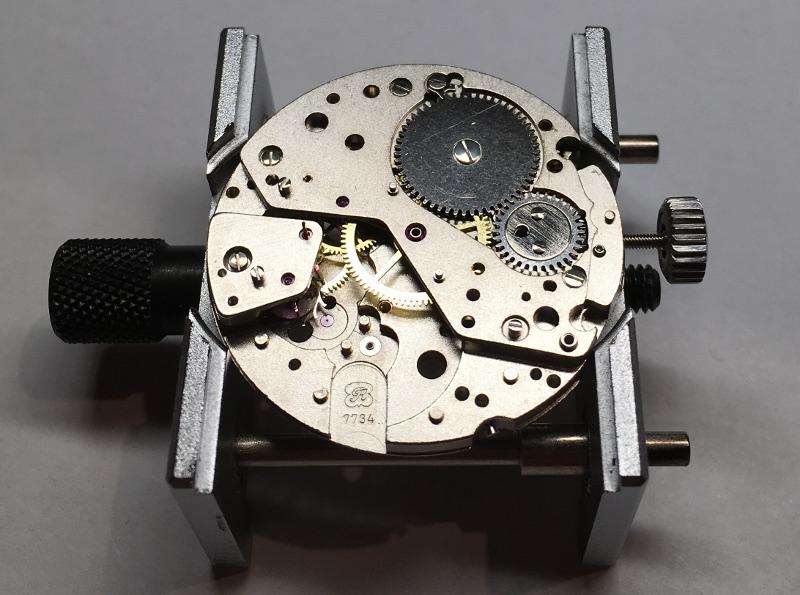
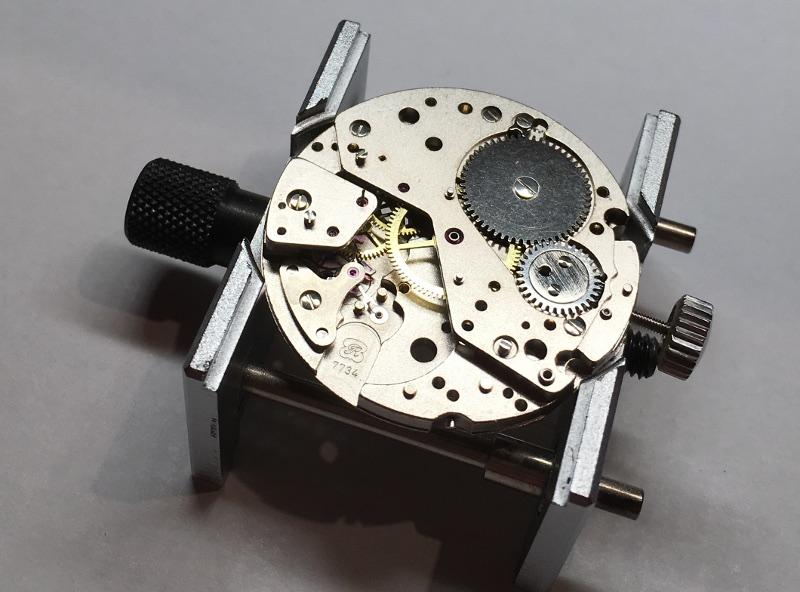
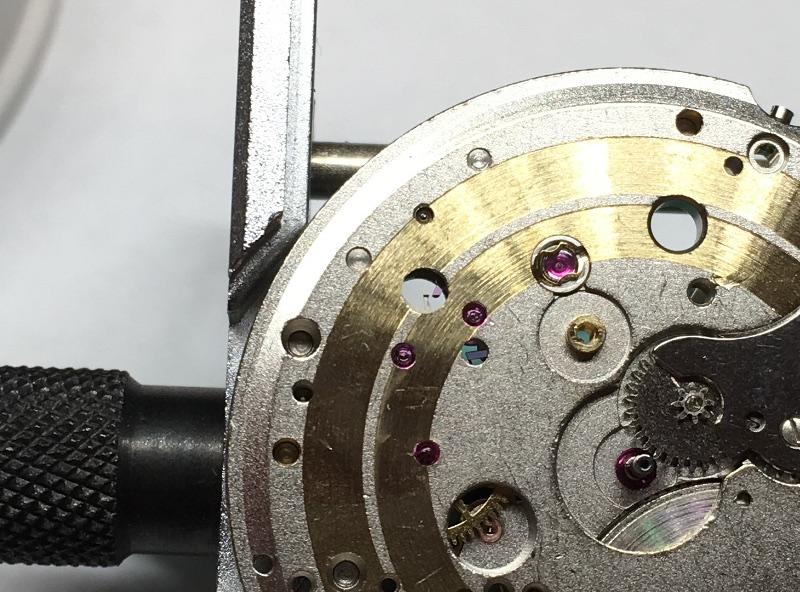
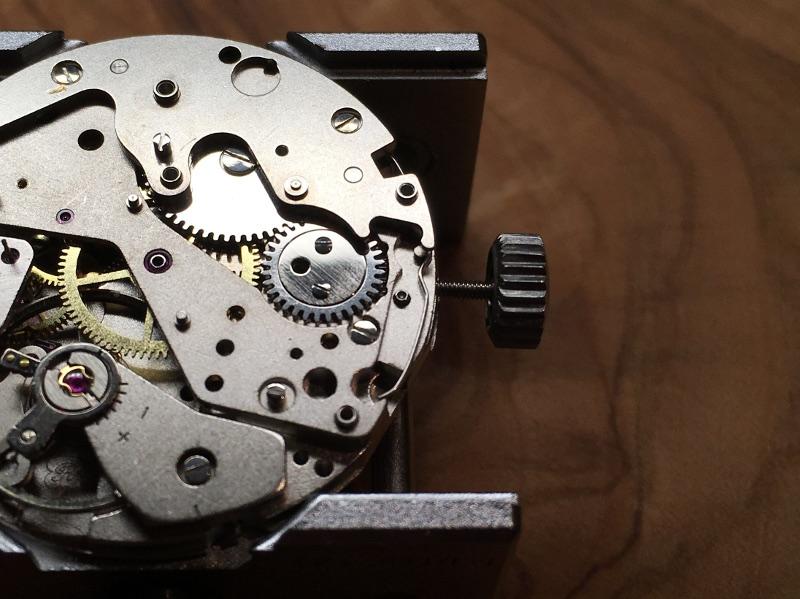
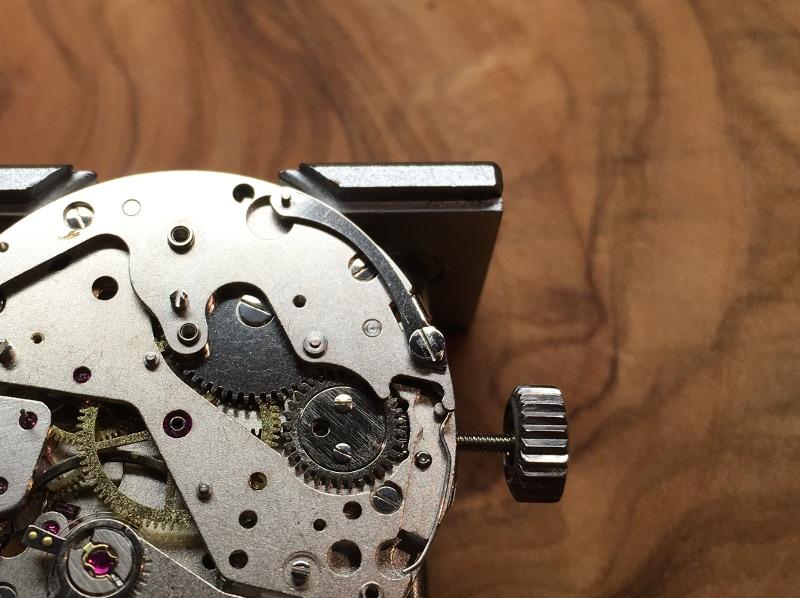
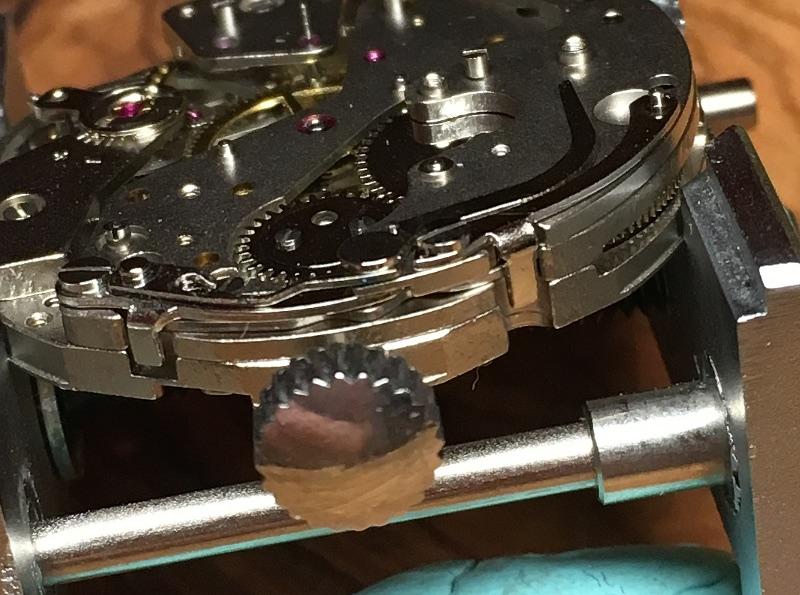
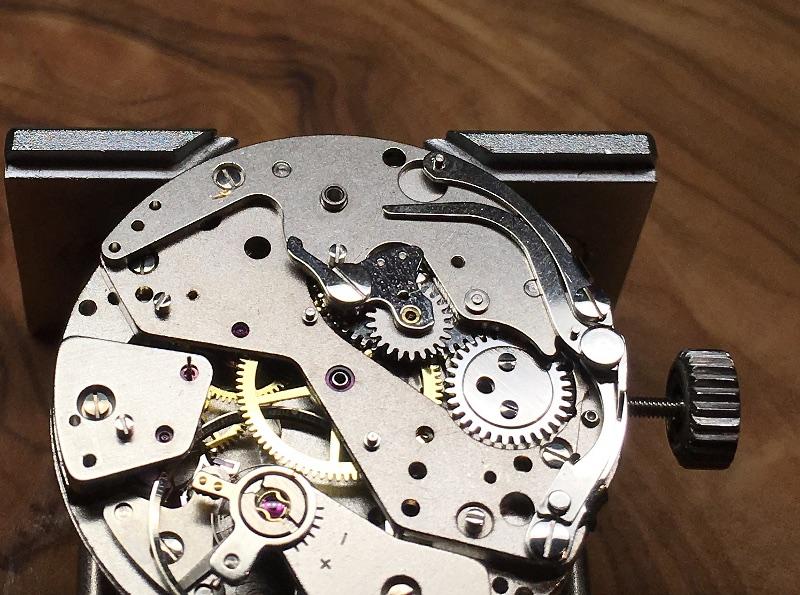
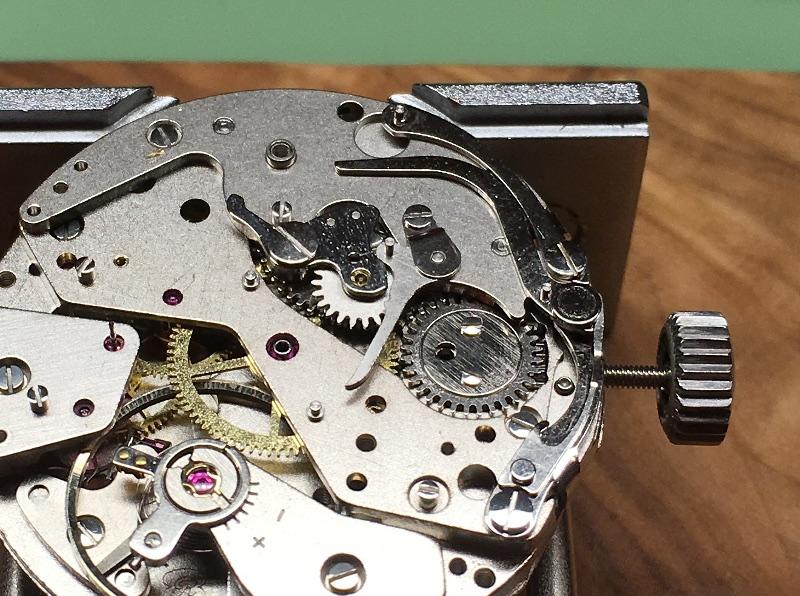
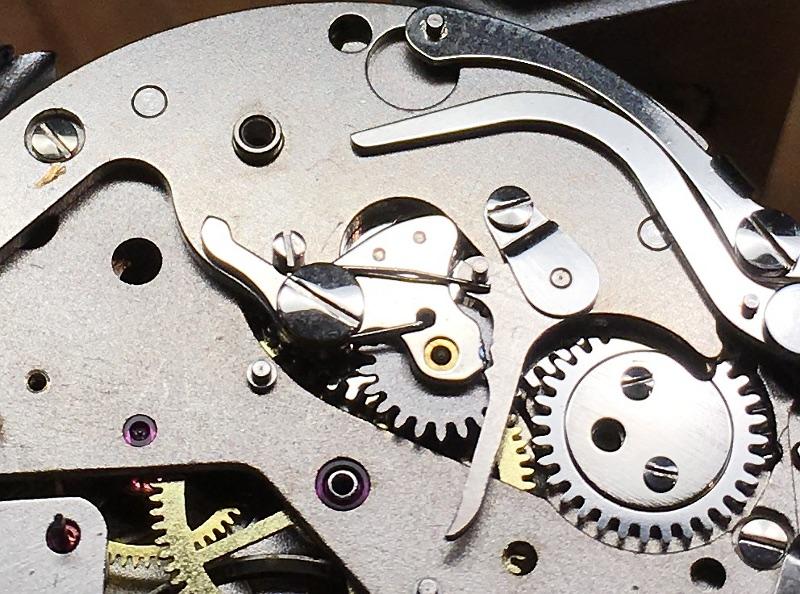
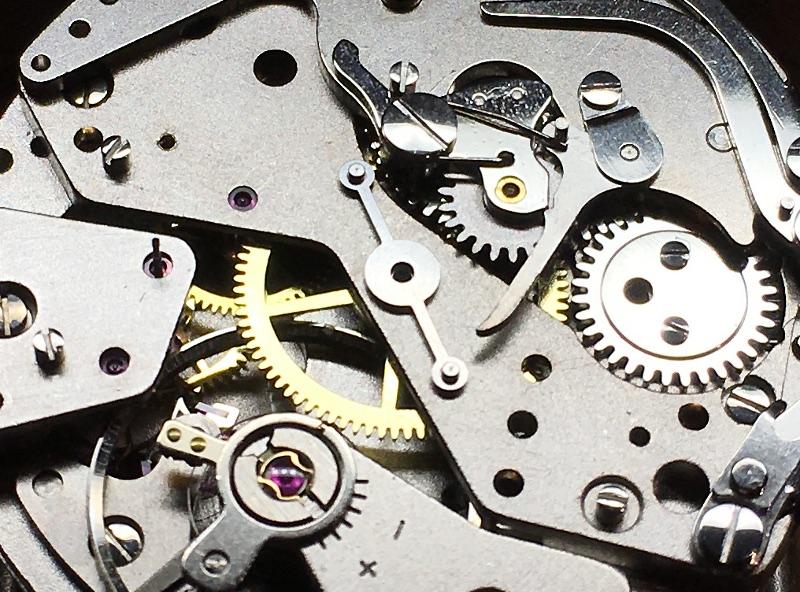
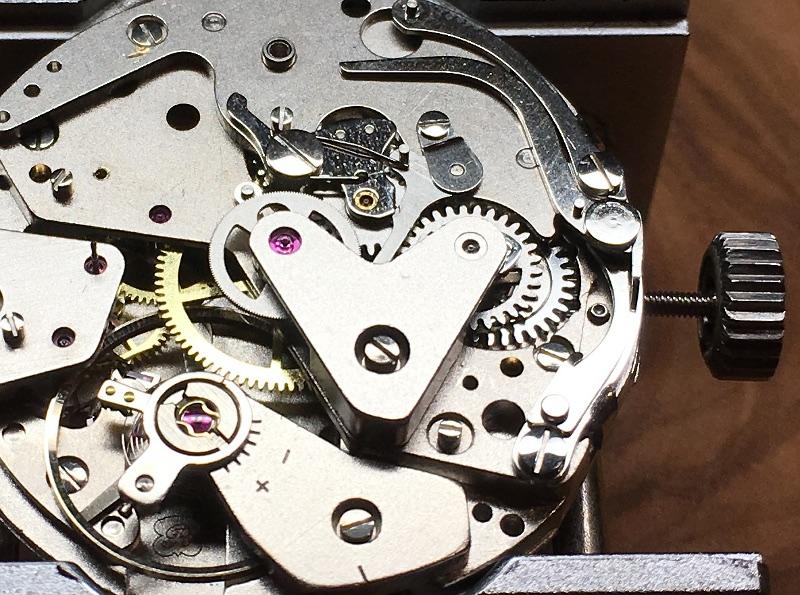
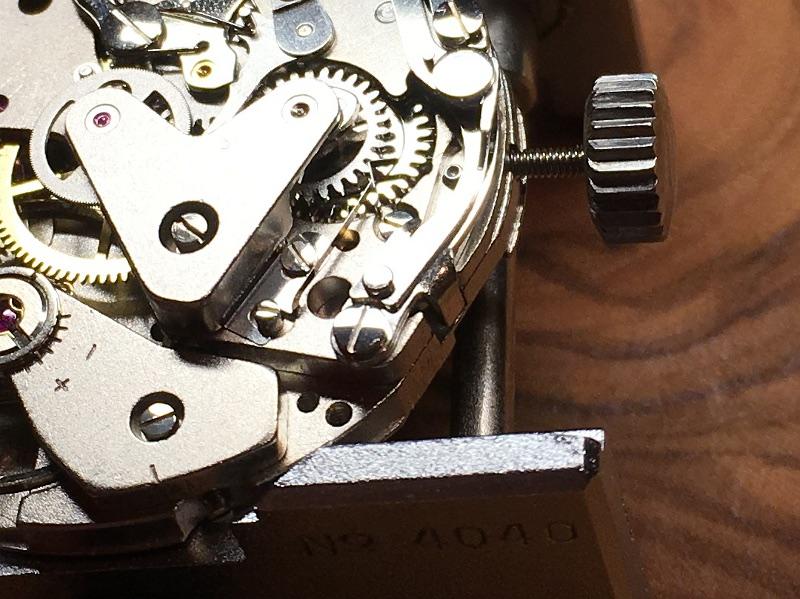
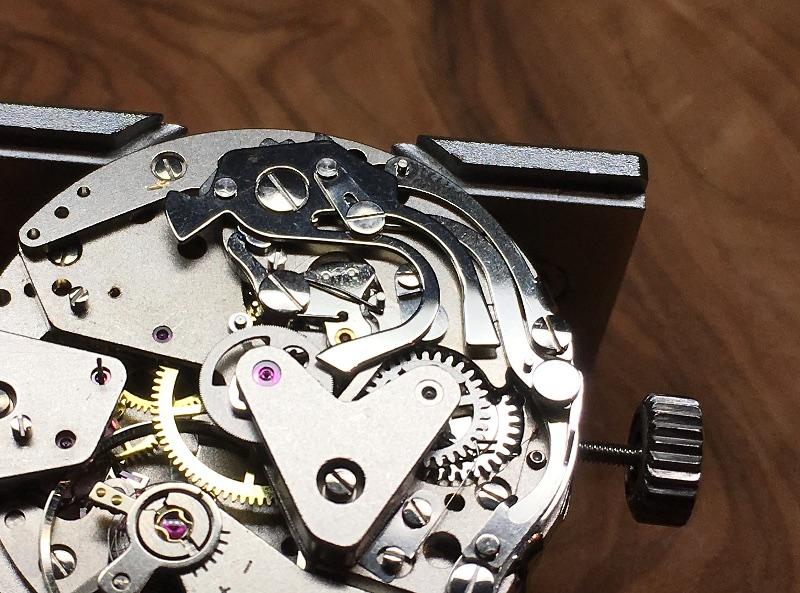
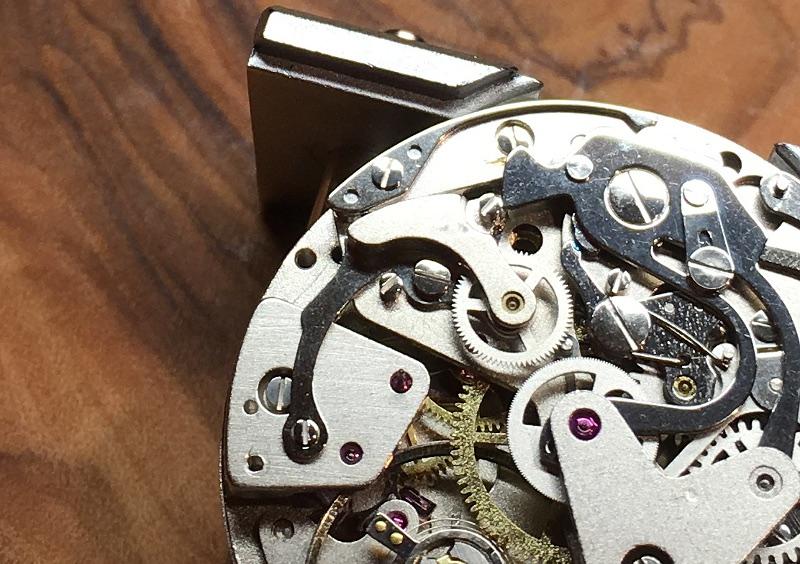
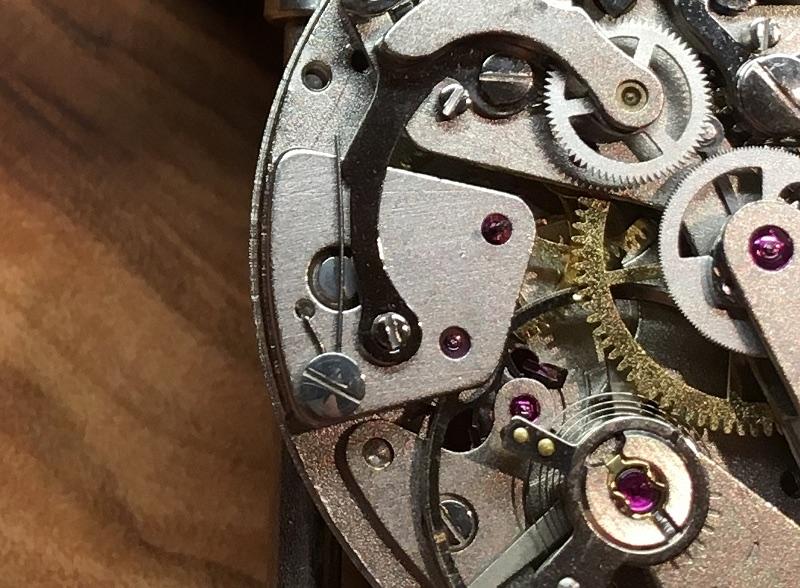
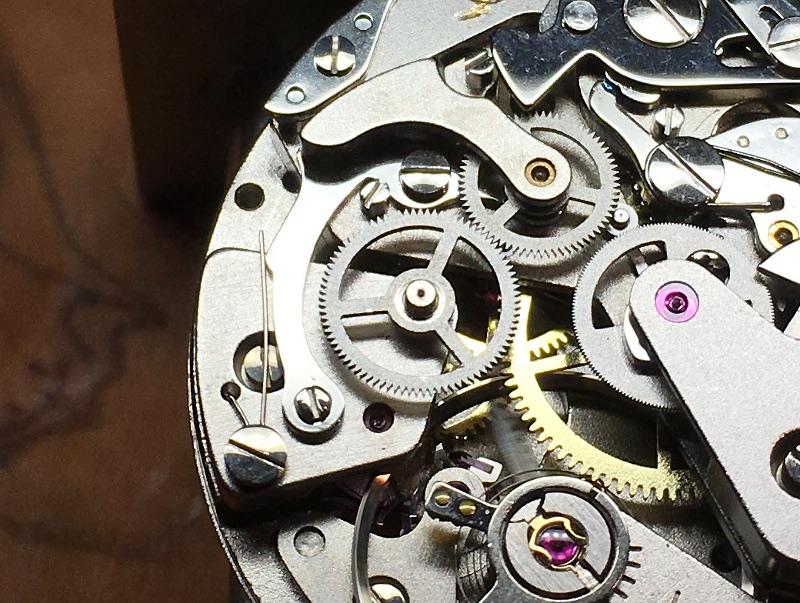
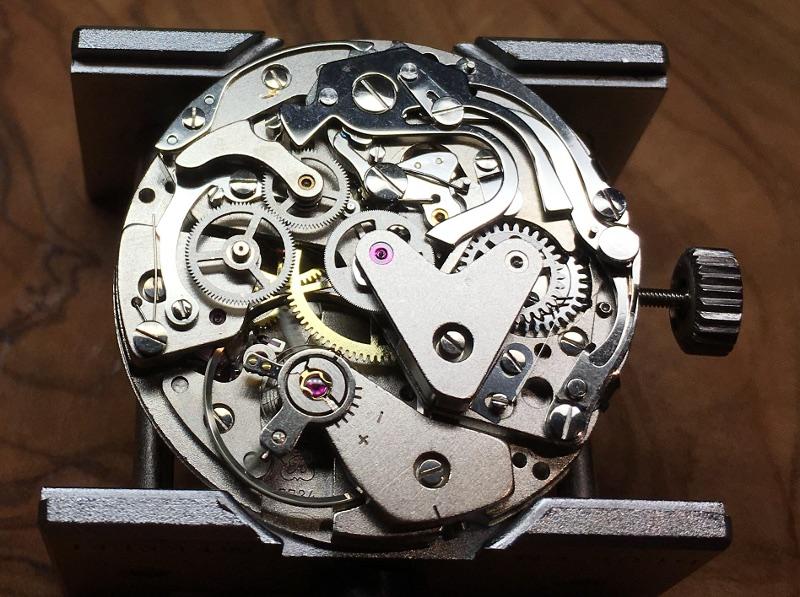
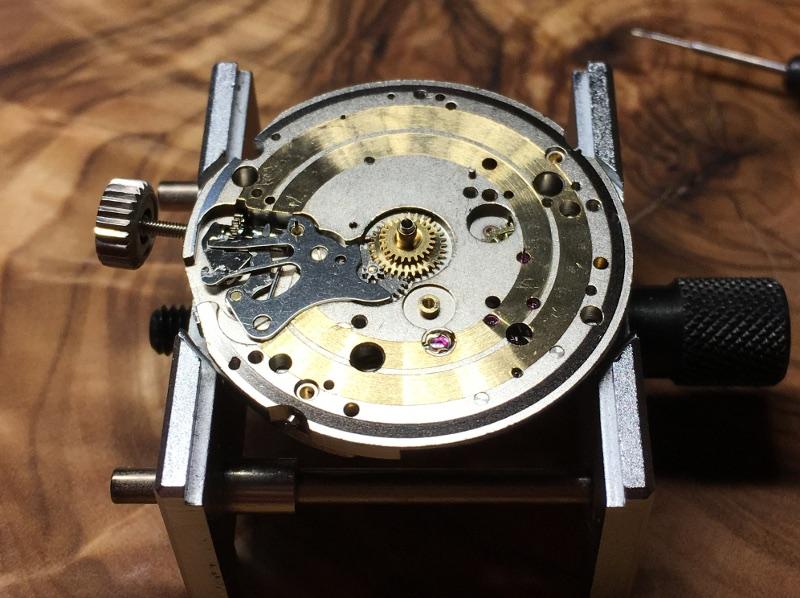
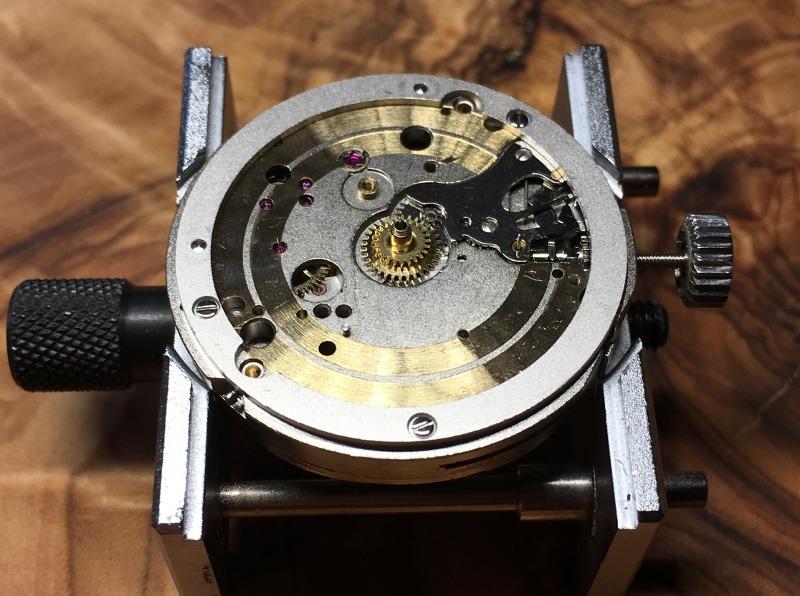
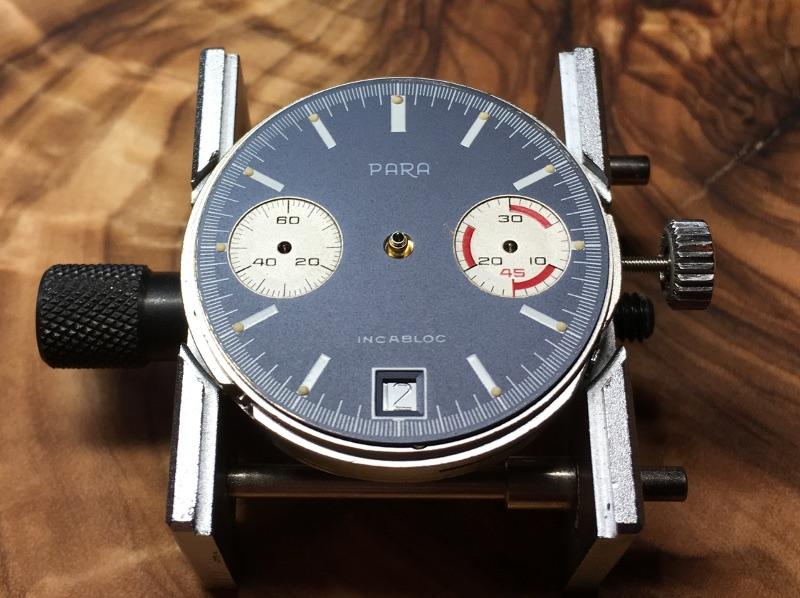
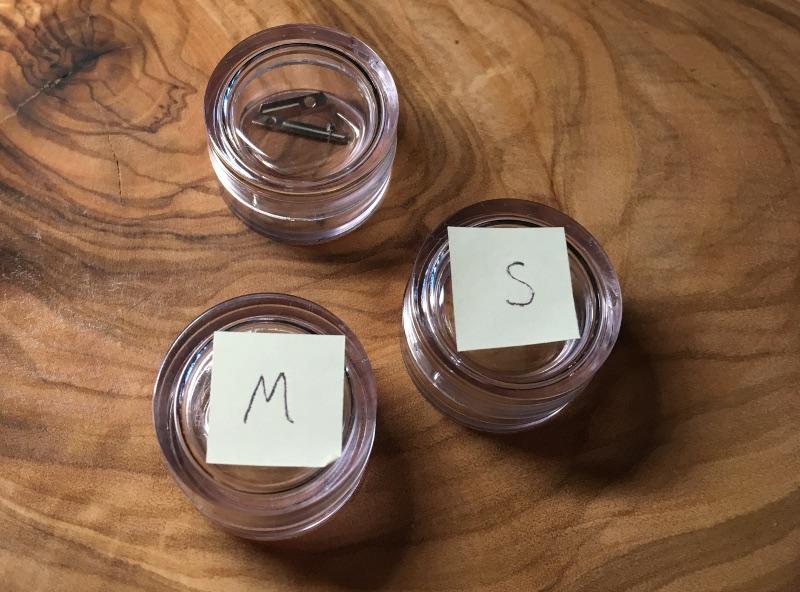
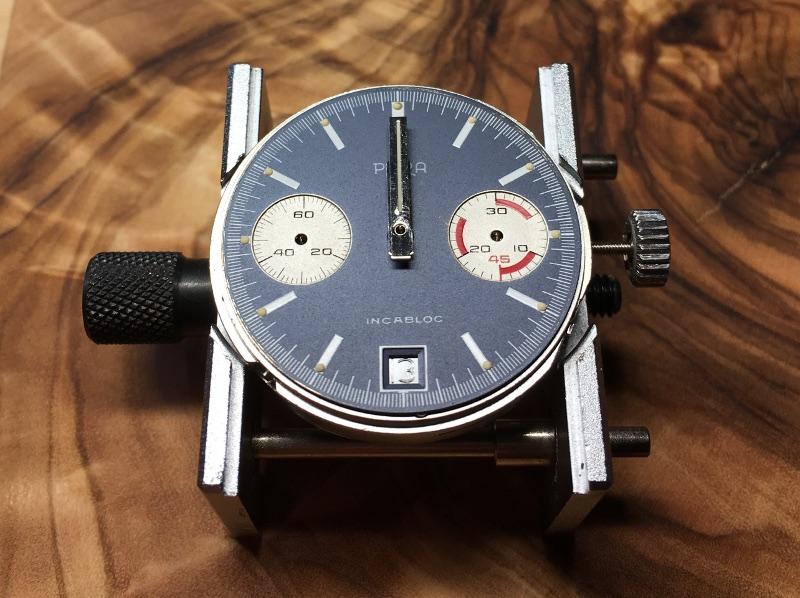
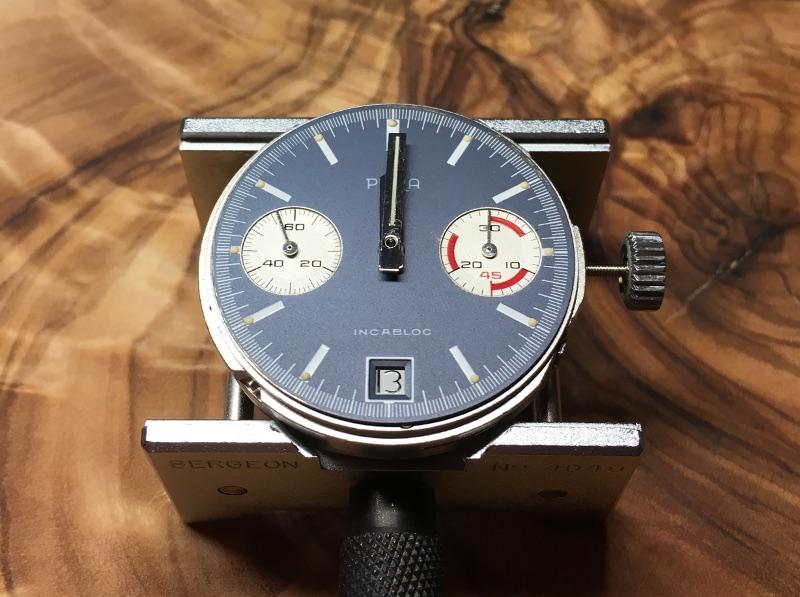
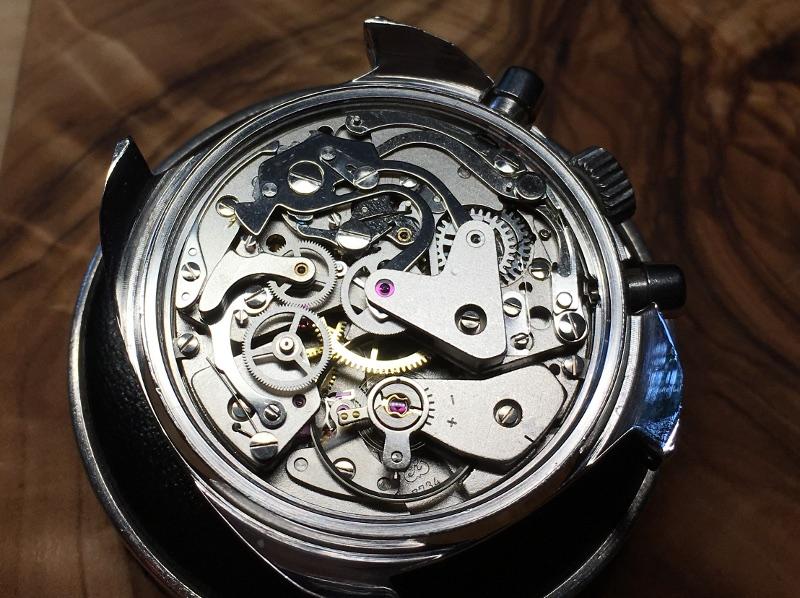
First of all my apologies for not having documented the disassembling, but the watch arrived in a terrible condition and I stripped it down right away to get rid of all that dirt. If you have worked on some watches yet and think about entering the chronograph world with a 7734 let me give you 3 advices: Do it! The 7734 is a solid construction and not too complicated. Take your time and watch all the 6 parts of Mark's Venus 175-service on youtube. Of course the Venus is a column wheel system, but the basic movement is very similar and also on the chrono layer you can learn a lot especially about lubrication: https://www.youtube.com/watch?v=EI3T-IR3AgM Download the 7734 service manual. A lot of information here: https://strela-watch.de/valjoux-7734-7733-7736-technical-documentation/ Here we go. Some 8200 for the barrel and the new mainspring goes in (got it from cousins - what I'm gonna do after Brexit? ). The complete barrel. Some D5 for the arbor. Putting in the wheels and the bridges. Lubrication: 9010 for the escape wheel and the second wheel, D5 for all others. The keyless works. 9501 for the stem and the gears. D5 for the wheels and the lever axis, 9501 for the contact points of levers and springs. The click spring. D5 for the click and the crown wheel, 9501 for the contact point of click and its spring. Finally the ratchet wheel goes in. The pallets go back in, no lubrication for the pivots. Lubricating the balance jewels with 9010. The balance back in. The escape wheel and the pallets got epilame so I let run the movement with dry pallets for some minutes. After that 941 for the pallets (work from the dial side through the window). Now I start with the chronograph. First the bridge and the spring for the levers go in. Fly back lever goes in with some D5. Operating lever, again D5 for the axis. A little bit tricky, you must upline the integrated spring with the upper lever first (9501 for the contact area). The second pictures shows the final layering. The sliding gear goes in, D5 for the lever axis, no lubrication for the wheel! At this point I forgot to put in the minute recorder runner (no lubrication). You should install it here, later its going to be more difficult. The blocking lever (D5) returns. Some 9501 for the contact area to the sliding gear. The blocking lever spring. Be very careful, this one isn't just a flyer, its a damned Lockheed SR-71 Blackbird. The friction spring (gets a drop of 9010). The chronograph runner and its bridge (9010 for the long pivot and the jewel in the bridge). The minute recorder jumper, no lubrication. The hammer. D5 for the axis, 9010 for the lever ends that hit the hearts, 9501 for the contact areas to the sliding gear, fly back lever, operating lever, jumper. The hammer cam jumper. Before installing the clutch give 9010 to the pivots of the coupling wheel. D5 to the lever axis. The spring. 9501 for the contact point. Finally line up the driving wheel with the coupling wheel and the chrono layer is complete again! The dial side. Some 9501 and the cannon pinion goes in. Hour wheel with D5. The dial rest with its 3 screws. The date indicator. The date indicator driving wheel with some D5. The jumper with D5 to its axis. As there was no lubrication described in the manual between disc/jumper or disc/wheel and the parts looked well polished I didn’t lubricate. It works - let’s see how long. The guard with 2 screws. Finally the spring. The dial comes back and is secured with its 2 screws from the side. While disassembling I put the little hands into seperate trays to prevent mixing them up. Now I turned the crown in the setting position exactly to the point when the date switches and put on the hour hand to 12. Positioning the chrono-hand exactly on zero was that tricky that I forgot to take a pic. New springs and gaskets for the pushers. Unfortunatly I’m not good in restoring cases. So just refreshing the brushing a bit and some cape cod work. The movement back in the case and secured with 2 screws. A new gasket for the caseback and here we are. Thank you for watching.


 1 point
 -
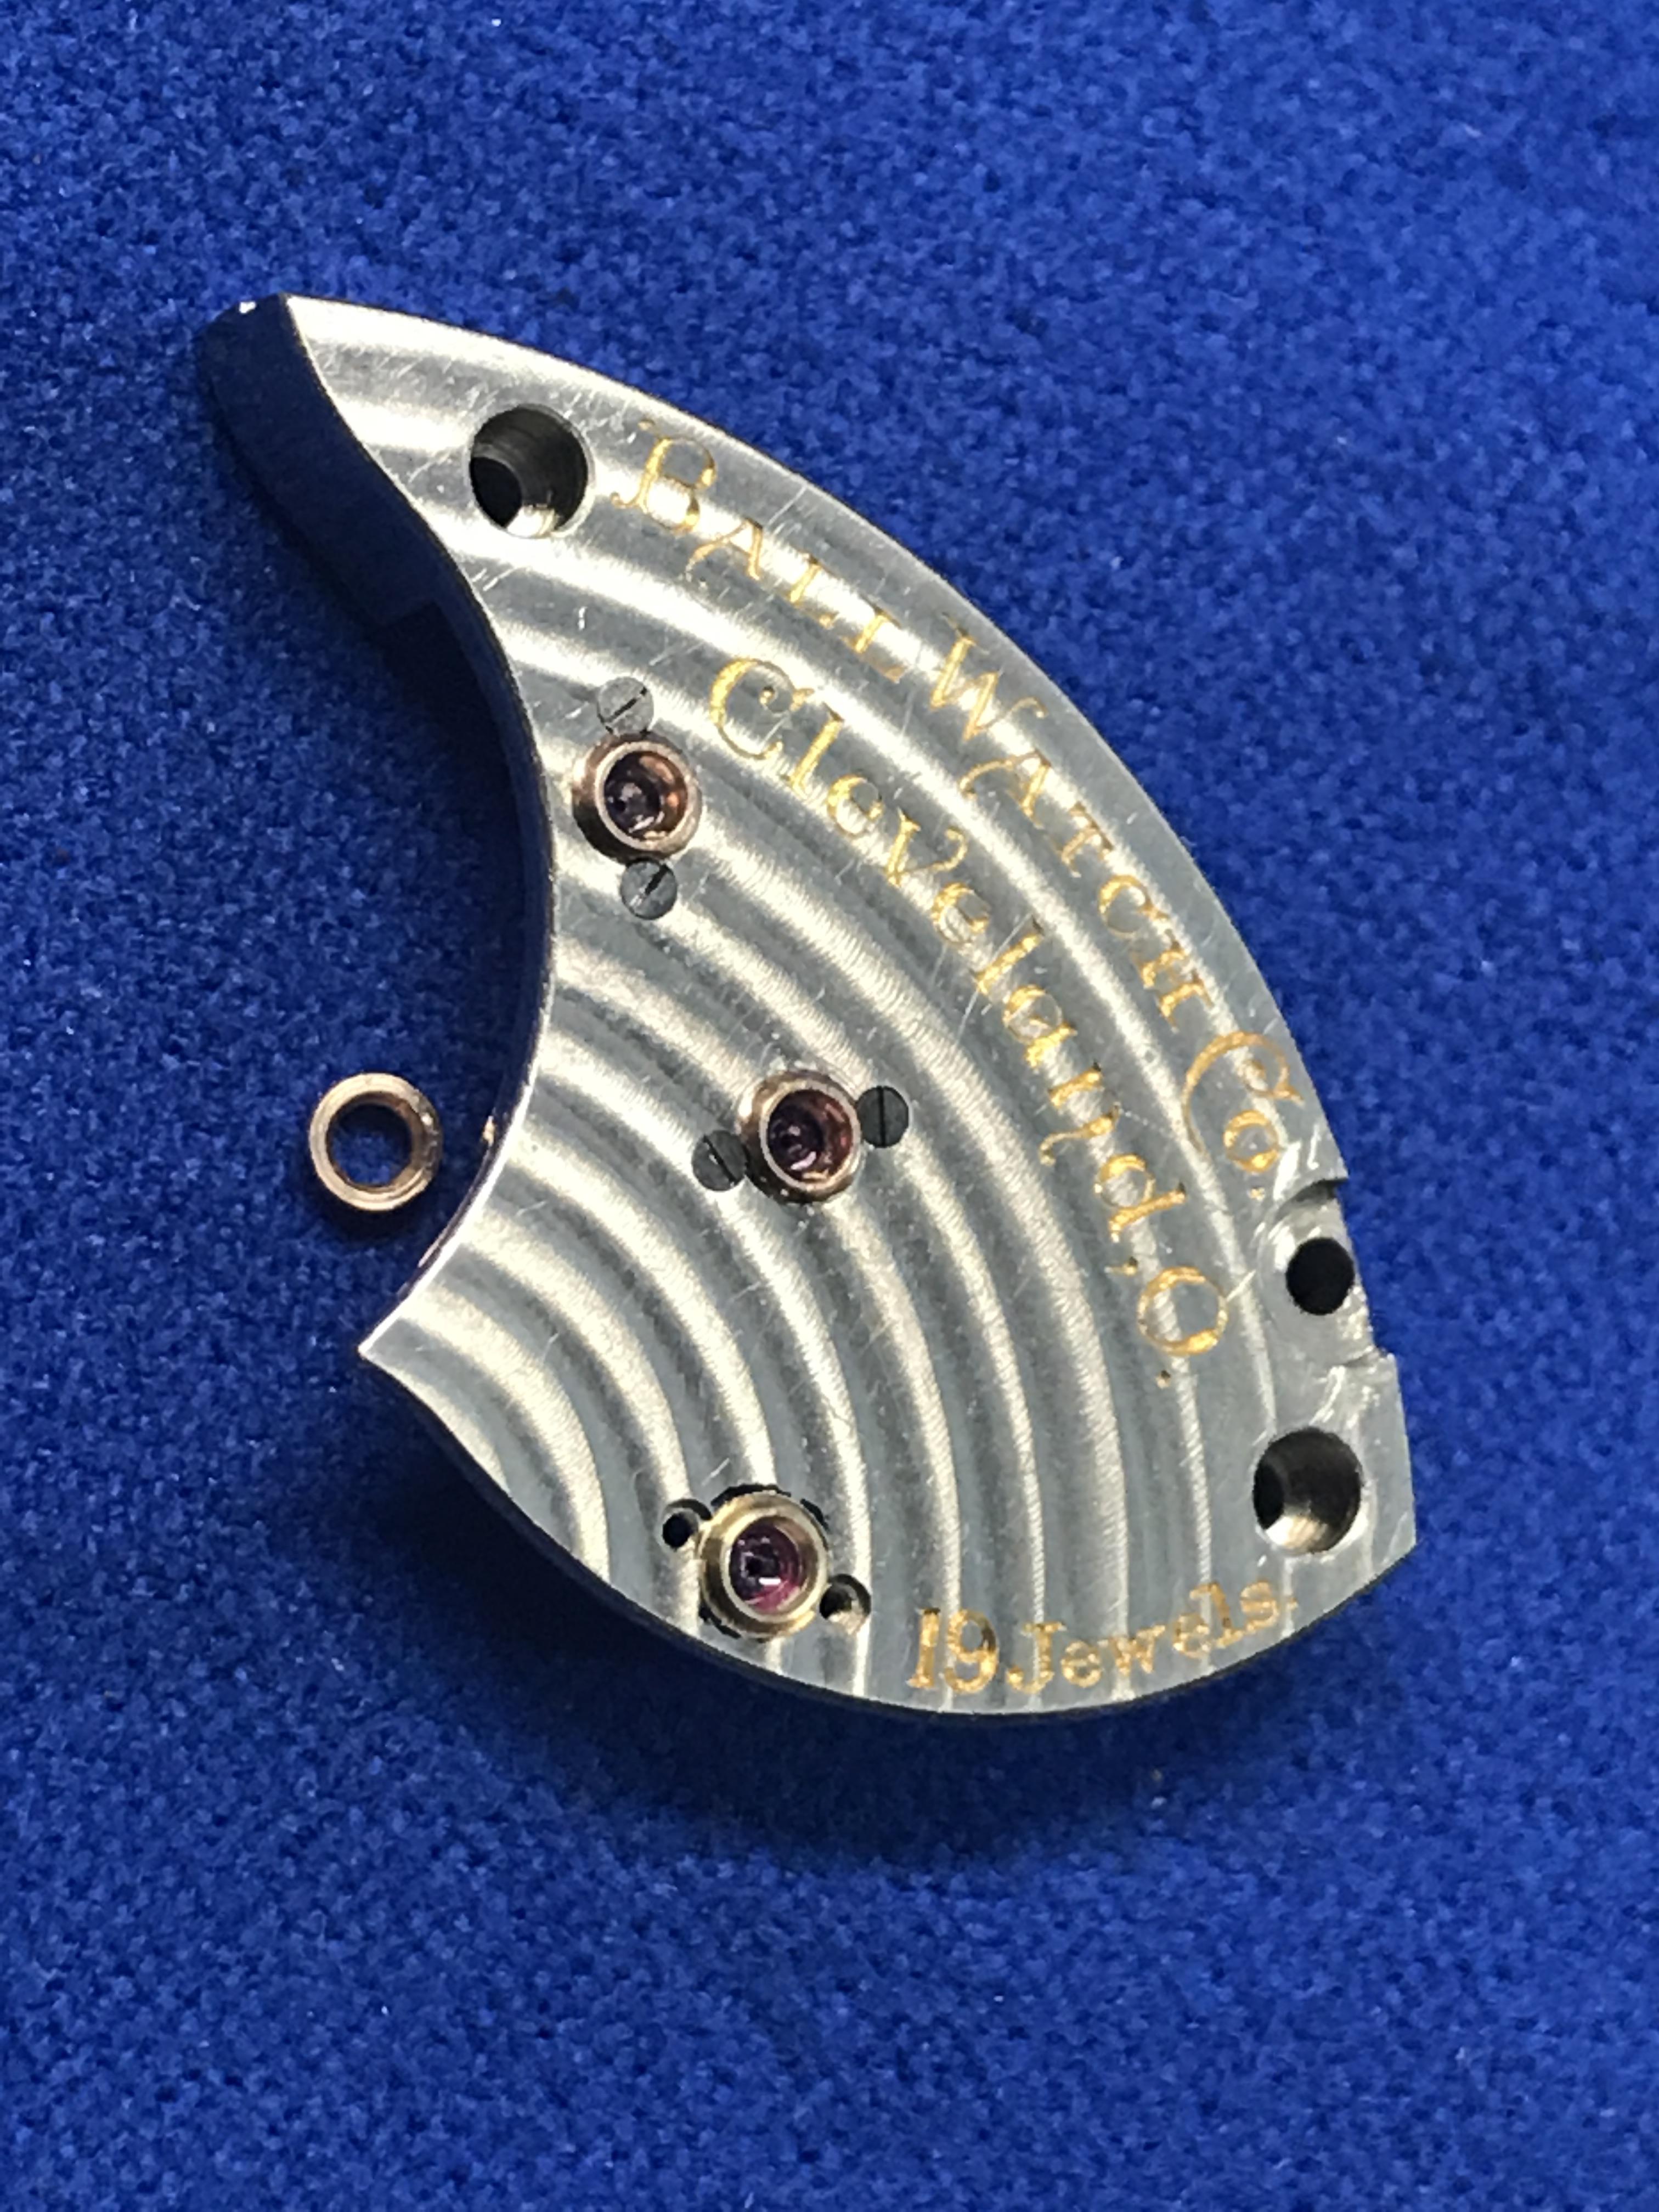
Following the Chicago School of Watchmaking Manual, somewhat, I made from scratch a raised jewel setting for a Ball Pocket Watch. I did this because the old setting had a broken jewel and the material to burnish was cracked on one side. I also put a video on YouTube and will share the link. Steps 1. Source, size and chuck the stock material 2. Pick the jewel and using peg wood, stab it to hold it on the peg wood . 3. Drill a hole in the brass slightly smaller than the jewel. Make the hole long in case of do-overs. 4. Size and drill a straight hole just deep enough for burnishing lip. 5. Place the jewel in the hole with a little spit on the end so it stays in place. 6. With a very sharp needle like graver, cut a small trench just beside the hole and only to the depth of reaching the jewel. This will be your burnishing material. 7. Burnish in the material over the jewel. May need to make a tool for this. 8. Face off the setting up to the bent burnished material. 9. With a flat stake, lightly tap the burnishing material flat over the jewel. This is to just make sure there are not any raised edges. 10. Measure the old jewel setting diameter and then cut the Brass rod to a length twice its’ height and to its diameter. Hand fit the plate hole on the brass rod until it fits snugly. 11. Mark the height of the setting on the brass rod and shape the material to look like the old setting. Work slowly. 12. Cut away the new setting just above the height mark. 13. Place the setting in a jewel chuck, top side out and face off the setting to the right height. 14. Cut the inside material of the setting removing enough material and shaping to look like the old setting. Do not cut too deep or you will remove the top material holding the jewel in place. Using a polished steel rod, carefully burnish the inside of the setting until it shines. 15. Fit the new setting in the plate for final look and fit and adjust the top if needed again in the lathe. That’s it. Thanks. His a link to my 90 min video showing all the detailed technique. Making a Complex Raised Watch Setting https://youtu.be/gkXw-JPnNPA1 point
-
Well, my post wasn't meant to be taken too seriously but was an attempt to perhaps make someone laugh, or at least smile a bit, that is, if you're into OO programming. I guess humour isn't my strong suit. ?1 point
-
Excellent & a stunning walk-through ????️ Fantastic, clearly many painstaking hours of work; this one should be pinned ?1 point
-
Excellent presentation as usuall.1 point
-
I do! When testing using the Lepsi app, it was always 100 % consistent. If any indication was present before demagnetizing, it was gone after. So, I feel I no longer need to use the app or any other device to detect magnetism. I simply demagnetize, needed or not, and then I'm done with it. I trust the ELMA Antimag 100 %1 point
-
Good stuff as usuall, nice work...1 point
-
What I also was trying to say; if you decide for self-build or work on these capacitor/coil demagnetizers, you better know what you are doing ?1 point
-
That is because pinned topics, (white icon by the title) are always shown first. The reason why there are many pinned topics is that having them in good evidence may save members from posting a question about a frequent subject that has been discussed already. To locate new postings try the unread content icon on top, it returns the section among other info.1 point
-
1 point
-
I would also check: Dave's Watch Parts too, he has a lot of vintage wrist watch cases and case parts, although he does admittedly specialize in pocket watches and antique tools and parts therefor. His site has saved my bacon a couple times when I could not find a part anywhere else.1 point
-
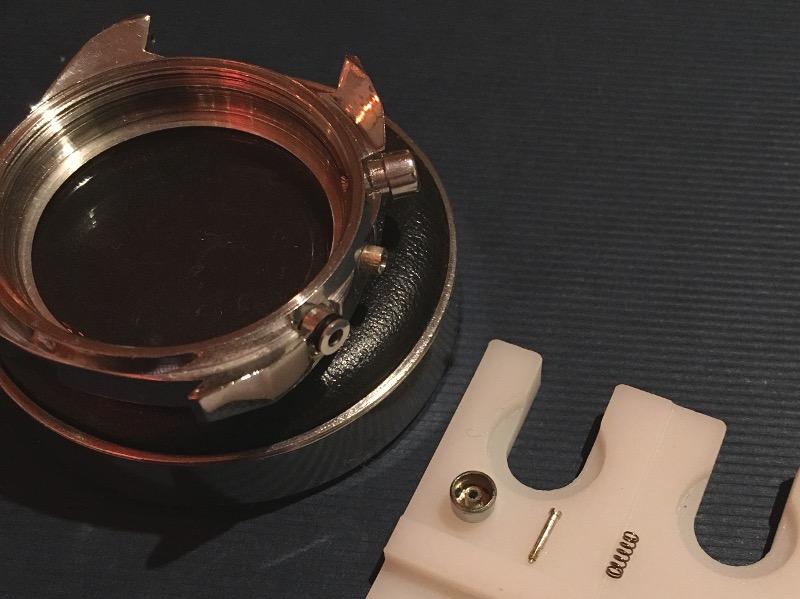
Hi from what I gather they were not made to be opened up They were supposed to have a battery life which out lived the watch. As its a one piece case when assembled it must have all gone in through the front. Whether the bezel was designed to be removed is another matter. The normal method of removing the bezel is bu using a case knife of a purpose built tool. The tool exerts pressure from all sides popping the bezel. The video shows how. Doing so is at your own risk. I cannot find any data on this watch at all.1 point
-
Well, taking into consideration your many previous achievements, I'd say probably better than the original! ?? Keep us updated! EDIT: Oh, I'd say that if you have the time and skill to make your own tools, that's always more worthwhile, money or no money!1 point
-
That's true! Sorry for straying! ?1 point
-
I wouldn't say for the HS only, but that's a discussion for another thread ? The Elma demagnetizer may well be the ultimate tool, but for me it's too expensive. We'll see how my own "Elma" will work once completely finished ..... You have the best, so you are set to go ?, me the more el-cheapo mortal has some more road to cover ..... ?1 point
-
Sounds like broken teeth on intermediate wheel to the alarm complication. Following shows datasheet, for your watchmaker to see the part number you need. http://forum.watch.ru/attachment.php?attachmentid=1287082&d=14549519471 point
-
It gets better with practice. ? The secret is in tweezering technique. Firstly, dress your tweezers. It doesn't need to be expensive Swiss tweezers. But make sure the tips are straight, gripping properly. When you apply pressure, make sure the very tips of the tweezers don't open up. Tweezers slso have different closing strength. I prefer tweezers with a light touch. You can make a tweezer lighter by thinning the body of the tweezers near where the two blades come together. Next, learn to control your squeezing pressure. Don't use anymore force than is necessary. Squeezing harder only ensures a further flight path. Some people prefer brass tweezers as brass is a little softer than stainless steel and grips better. Use pegwood to hold down parts that are under tension, like springs, setting levers, etc. Or you can stick a blob of Rodico to the spring to trap it when it tries to get away. Some of our members have advised working inside a plastic bag or a photographic tent to catch the parts when they fly. Practice your tweezering techniques on scrap parts first. Then if you are a masochist, practice on ladies watches. Some of the screws are so tiny that an ant can carry it away. Good luck and get a torch, a long bar magnet and knee pads.1 point
-
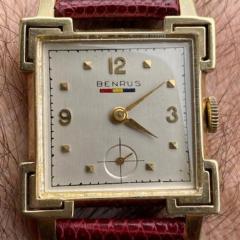
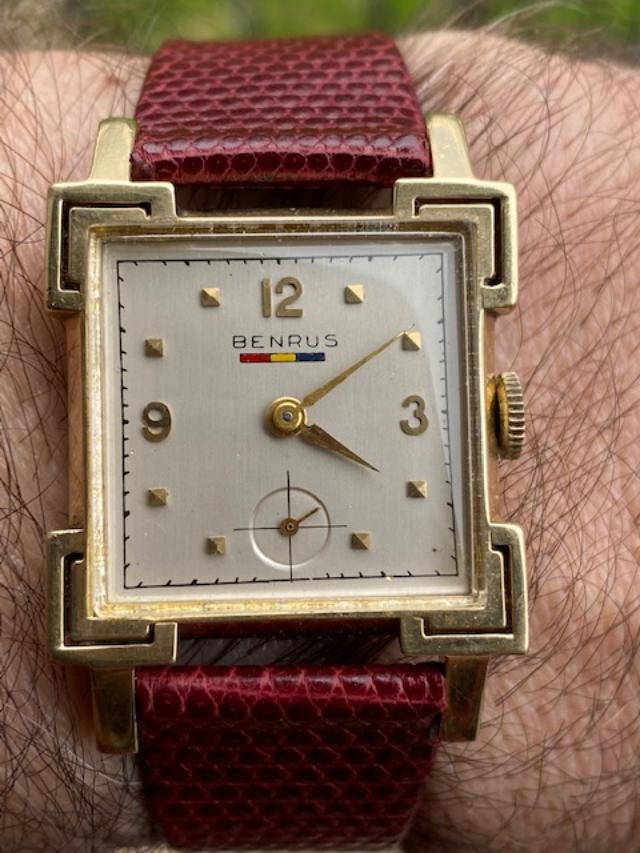
I really like the 1940's art deco style but it's hard to find a large case. This one is unusual in that it's 28mm. It's one of my top 3 & I probably wear it as much as my black strap watch because oxblood goes with almost everything.
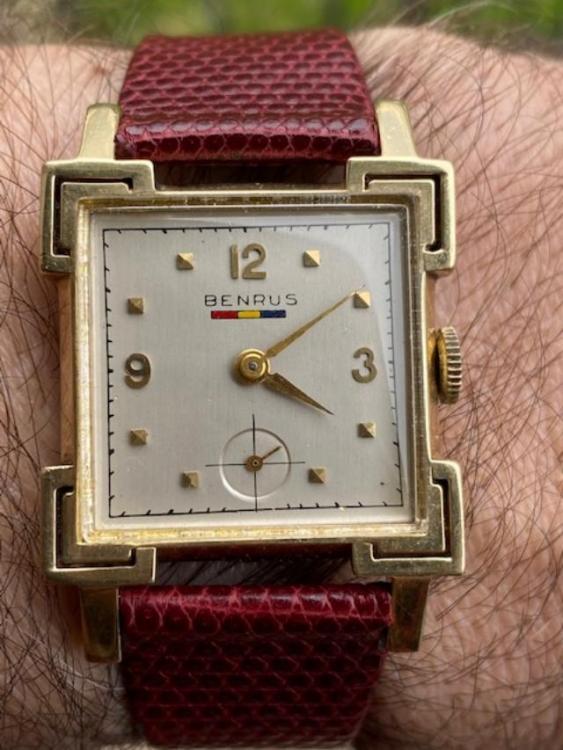 1 point
 -
See, that's the problem with forums like these...people just can't get their feelings across properly, as I'm really confused as to whether you like LS...or Earl Gray. ? Oh well, I will continue drinking both...to each his own!1 point
-
Very nice & likely gold filled, which is significantly thicker than plating. I really like tank watches w/ Arabic numerals & those particular hands. (not sure what they call them) I'd go for it. There are probably plenty of spare parts movements to be had & you could keep it running for many years.1 point
-
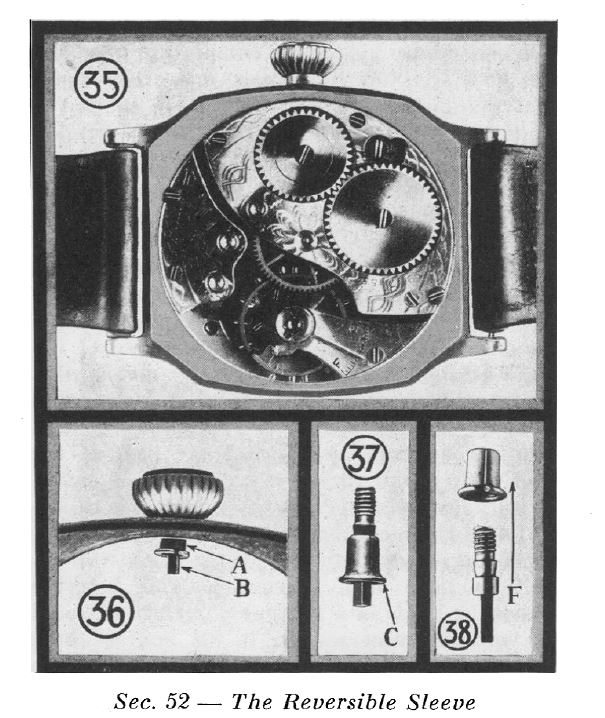
The problem is where do you get any pocket watch sleeve new anymore? The easy answer is just look in your Sleeve assortment and find one there. Don't have one no problem as long as you a time machine because I don't think they've made sleeve assortments in the long time that's a problem. Actually that's a problem with a lot of our watch material. You could search online and see what comes up like the first link. Or eBay search their to help you out I put the links below. Then there is the other problem the picture at the first link where have I seen that before? Because their picture doesn't look very good it's been shrunk so it's hard to tell and they don't have every single one in the picture. But I did take a look at a different book and printed some pages for you is a PDF which is attached. That may help you to get a better idea of what you're looking for that still hopelessly obsolete a very long time ago. Which means you're going to have to do some searching online keep an eye open on the eBay. I've had active search is on eBay for years for certain watch stuff is just what you have to do if you want to find this stuff. http://www.ofrei.com/page441.html https://www.ebay.com/sch/i.html?_from=R40&_trksid=p2499334.m570.l1313&_nkw=Sleeve&_sacat=10324 Marshall 3 pp 91 to 95.pdf1 point
-
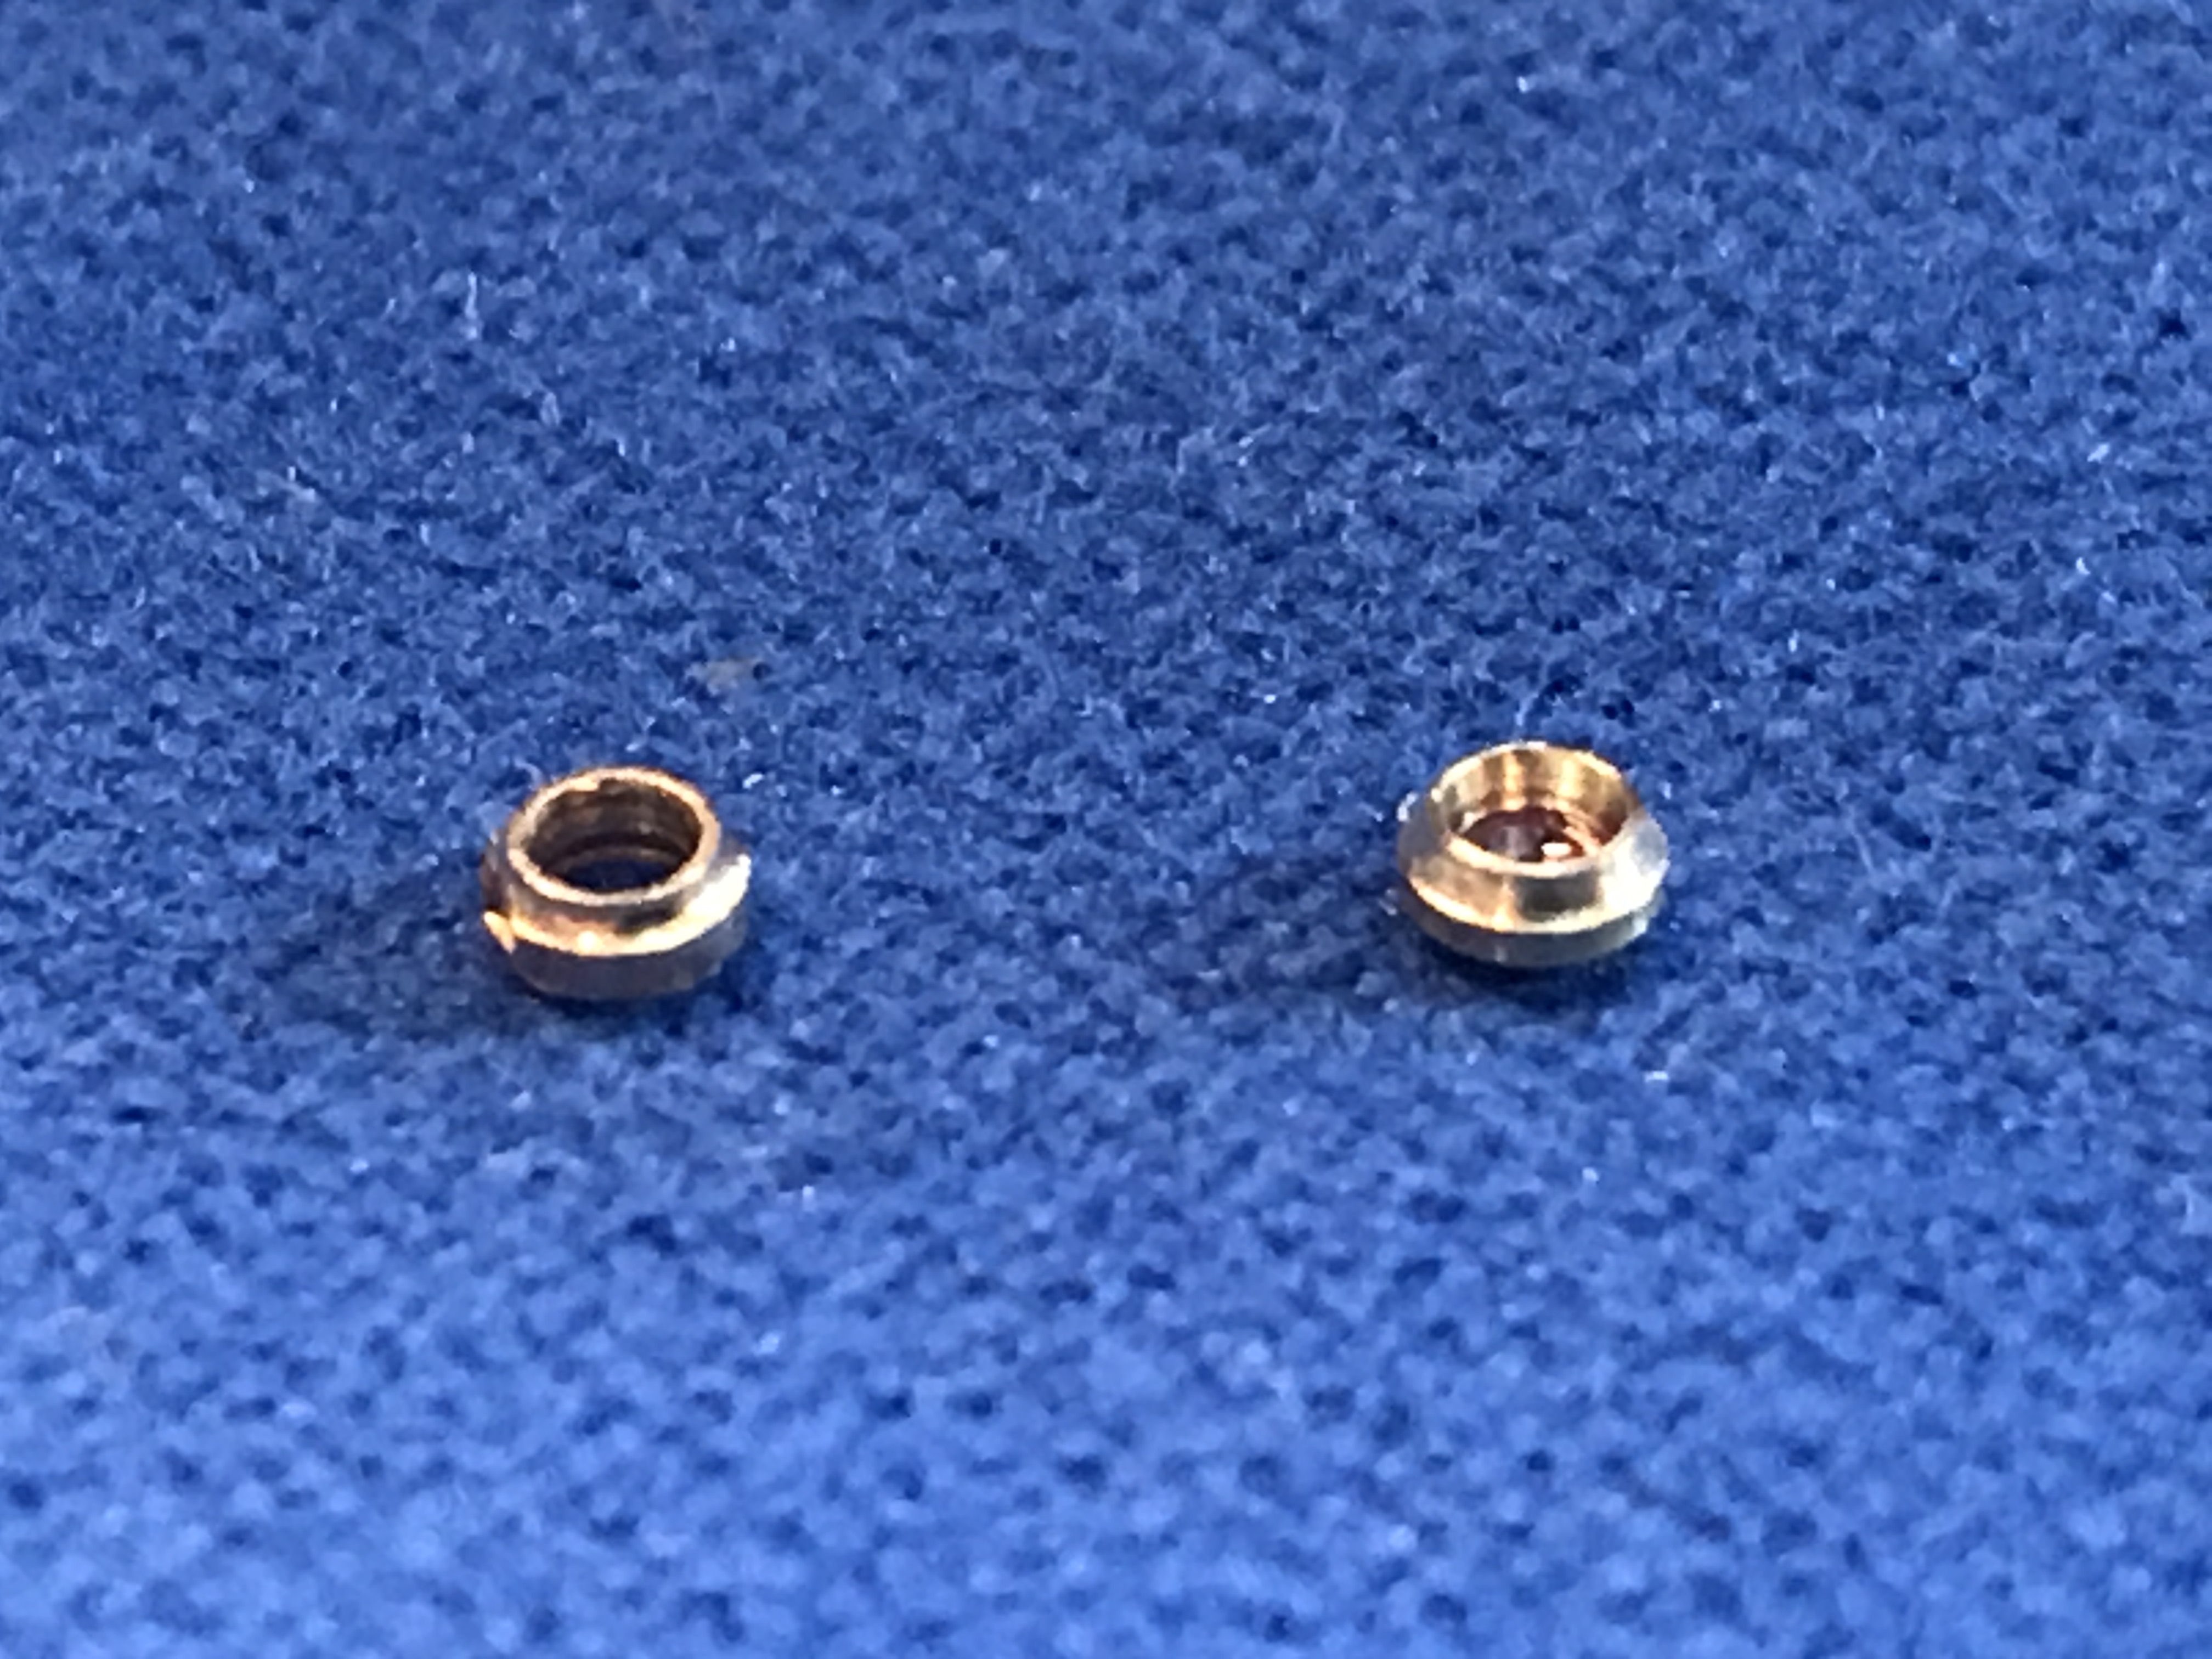
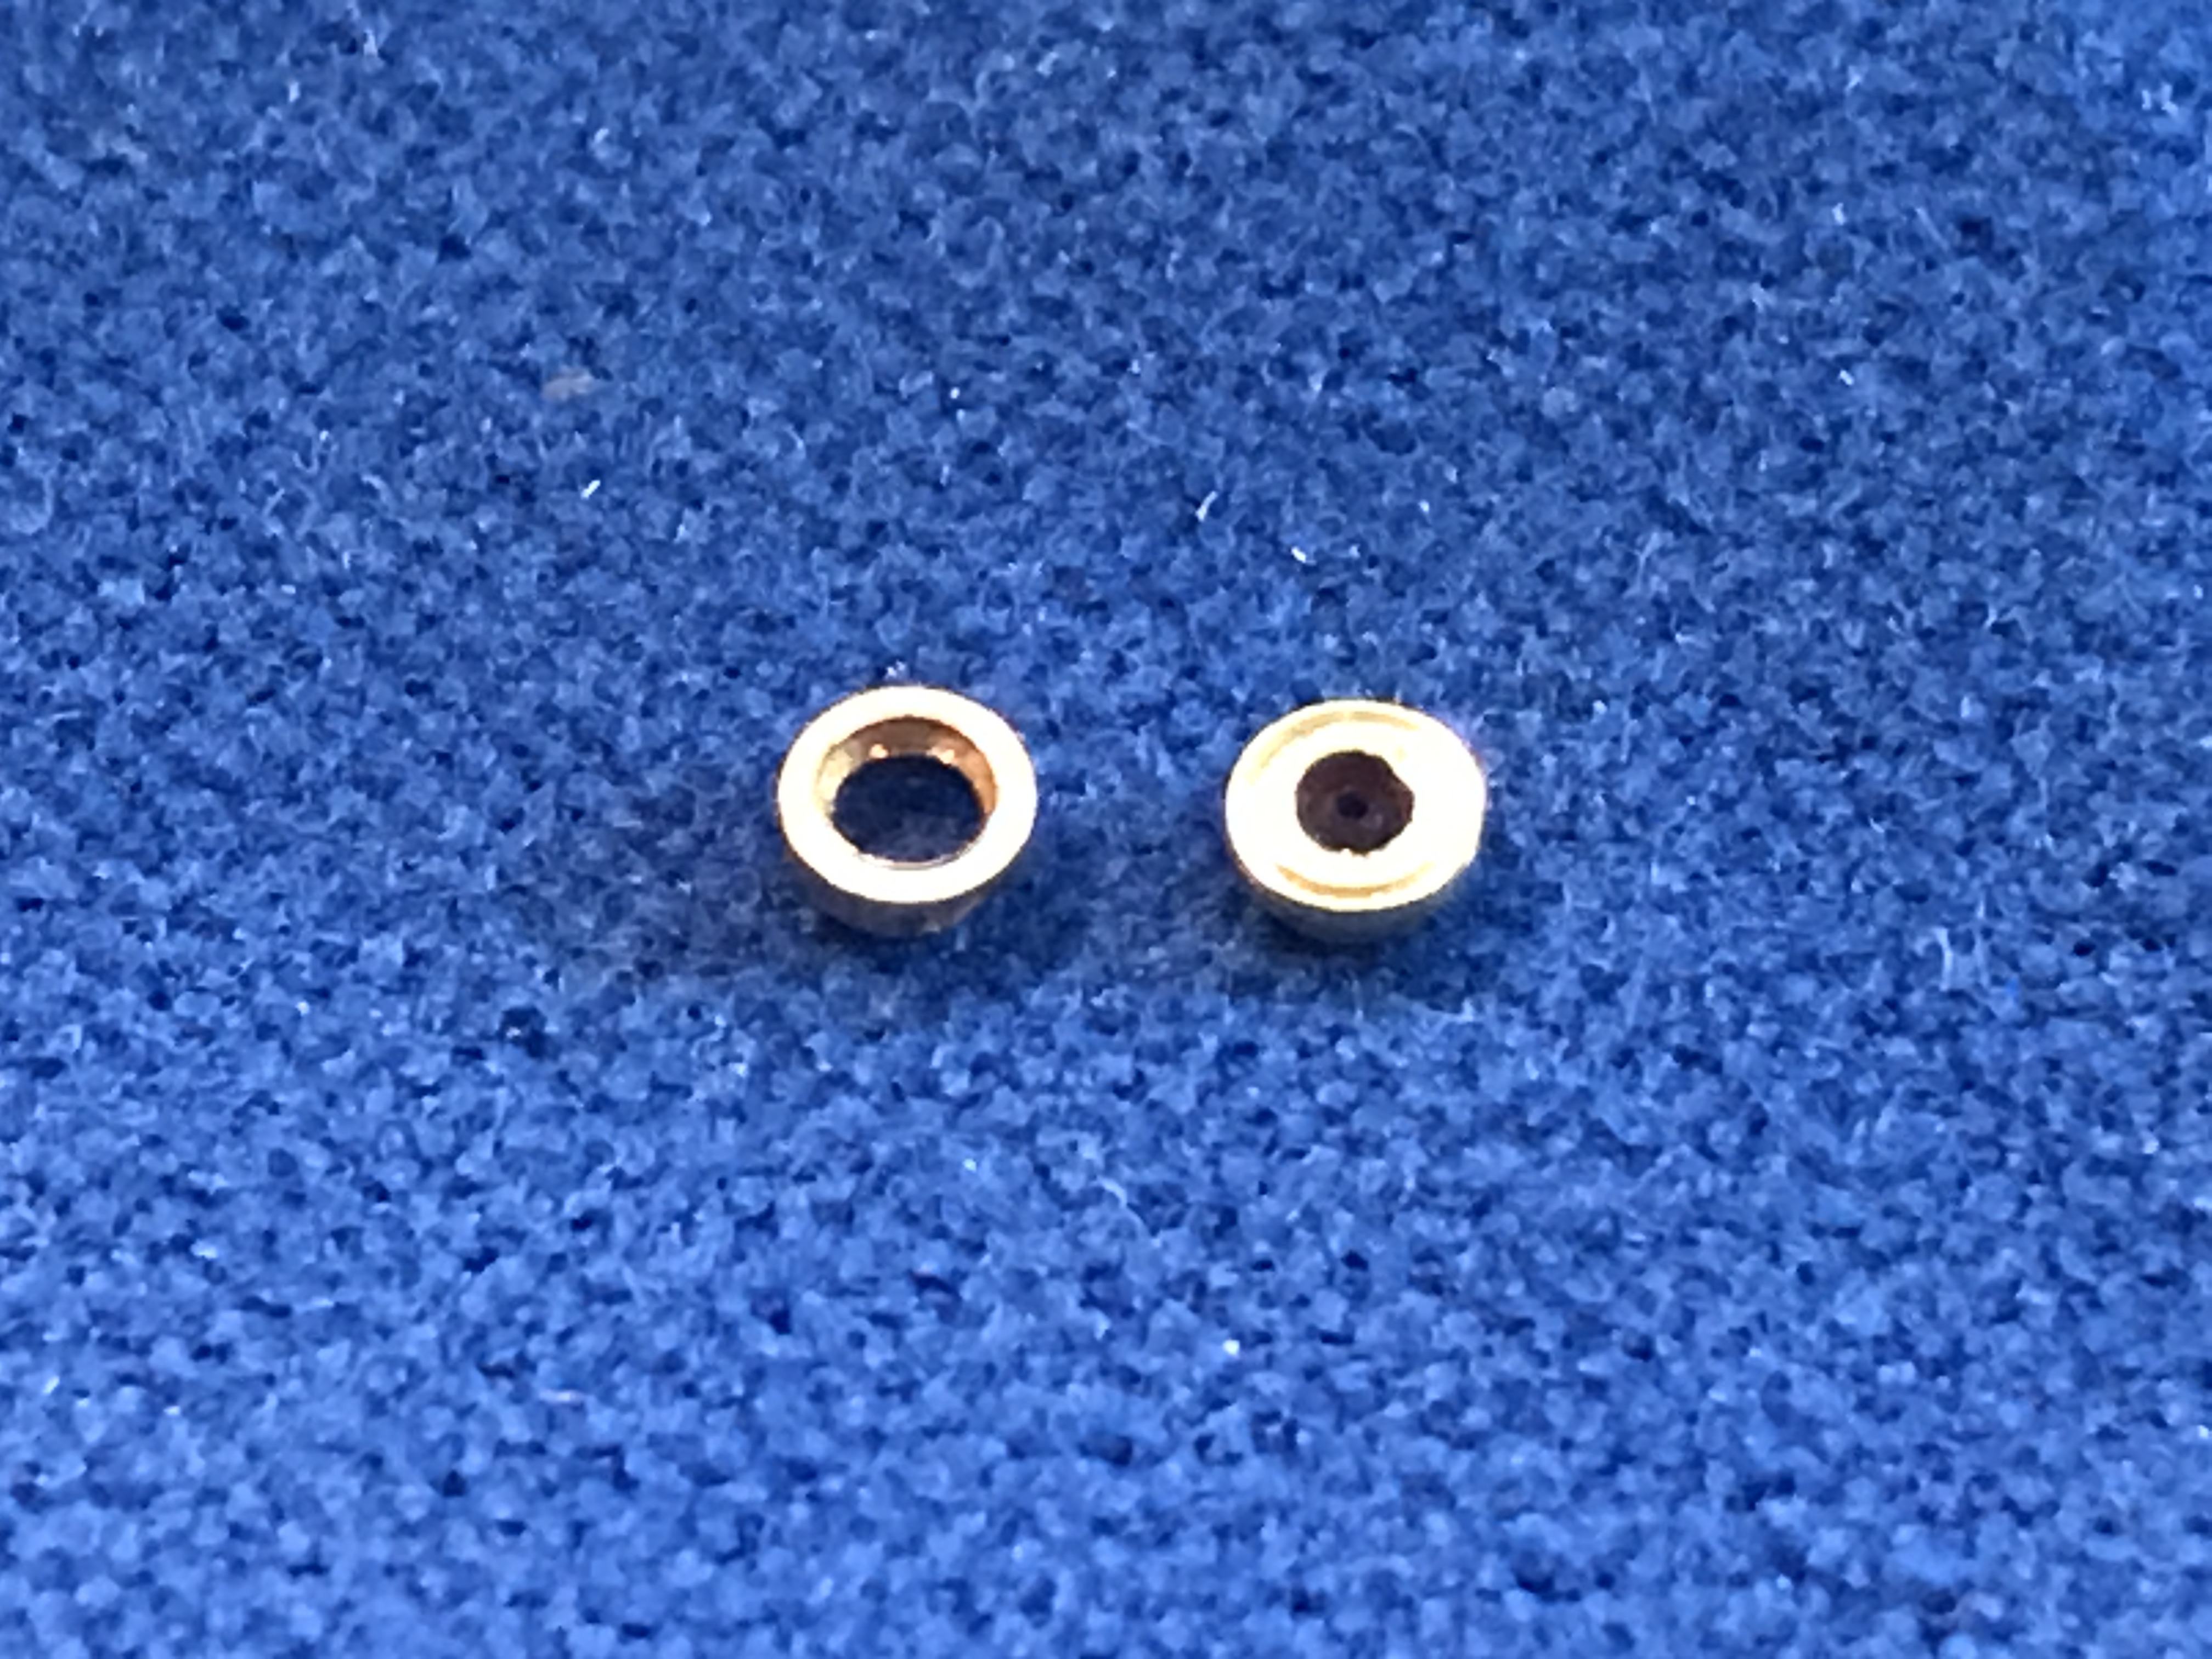
I remembered where I saw the photograph this will give you a clue. As you can see it's not the conventional pocket watch sleeve in that it does not screw in.
 1 point
 -
We haven't or at least I haven't entirely forgotten? The problem is I've seen this somewhere? We've discussed sleeves before I don't know if we covered ones for wristwatches probably have but I've seen one of these before I just need to remember where the reference was that I saw it once I remember I can find that and I'll attach it. Then the reason why we not getting copious quantity of answers is because if you notice anything related to American watches in particular earlier watches especially anything involved with casing and sleeves there aren't that many people on this group that work with those. Plus I was hoping for a better name inside the case. Because of you go to an offbrand it's going make it a lot harder and getting a sleeve to replace that anyway is going to be much much harder so as soon as I can remember where I saw the reference to this?1 point
-
Perhaps back to basic school lessons may be the answer. ? Put some iron fillings on a piece of thin paper and put this on something plastic that you can hold over the item being checked. Moving it about should see a pattern in the iron filings develop. If none then no magnetism in item?1 point
-
Put a couple in an envelope and send them to me. I will see if I can figure out what they are. 1) do some simple curve tracing, 2) crack one open and (hopefully) take a look at the die. I will send you a pm with my address.1 point
-
That is not acceptable, the hour wheel is part of the mov.t and must be supplied. Dial washers, as mentioned above, are good to have in a small assortment. With unscrupulous sellers do not waste time in exchanging messages, just open a claim with the platform and the card issuer, let them work it out for you.1 point
-
1 point
-
@JohnR725 is right about that. The movement looks very much akin to the little grade 320, which Elgin used in lady's pendant watches, and having the negative stem like that, the case would have a sleeve to retain its half of the stem and crown. The kind of stem and crown, and sleeve, that you'll be looking for will be easier to determine once we know who made the case. In terms of pocket watches, Elgin made movements and did not generally make cases; you bought an Elgin movement, then selected a case from the jeweler's offerings and he would marry them together. As to wrist watches, Elgins are still often found in some other maker's case, so I honestly don't know if they ever, at any point, made their own.1 point
-
It definitely has the same layout as a pocket watch so it does require a sleeve. You have a picture of the inside of the case back so we can see who made it.1 point
-
Very nice. If you took a note of the movement number and any serial numbers it should be fairly easy to figure out the year it was manufactured. My guess is 1930s There is a tool to do that on this site -> https://mybulova.com/1 point
-
Please refrain from making comments on my threads that are obviously intended to promote yourself as a dial maker. I find them unwelcome and not at all constructive.1 point