Leaderboard


Popular Content
Showing content with the highest reputation on 08/21/20 in all areas
-
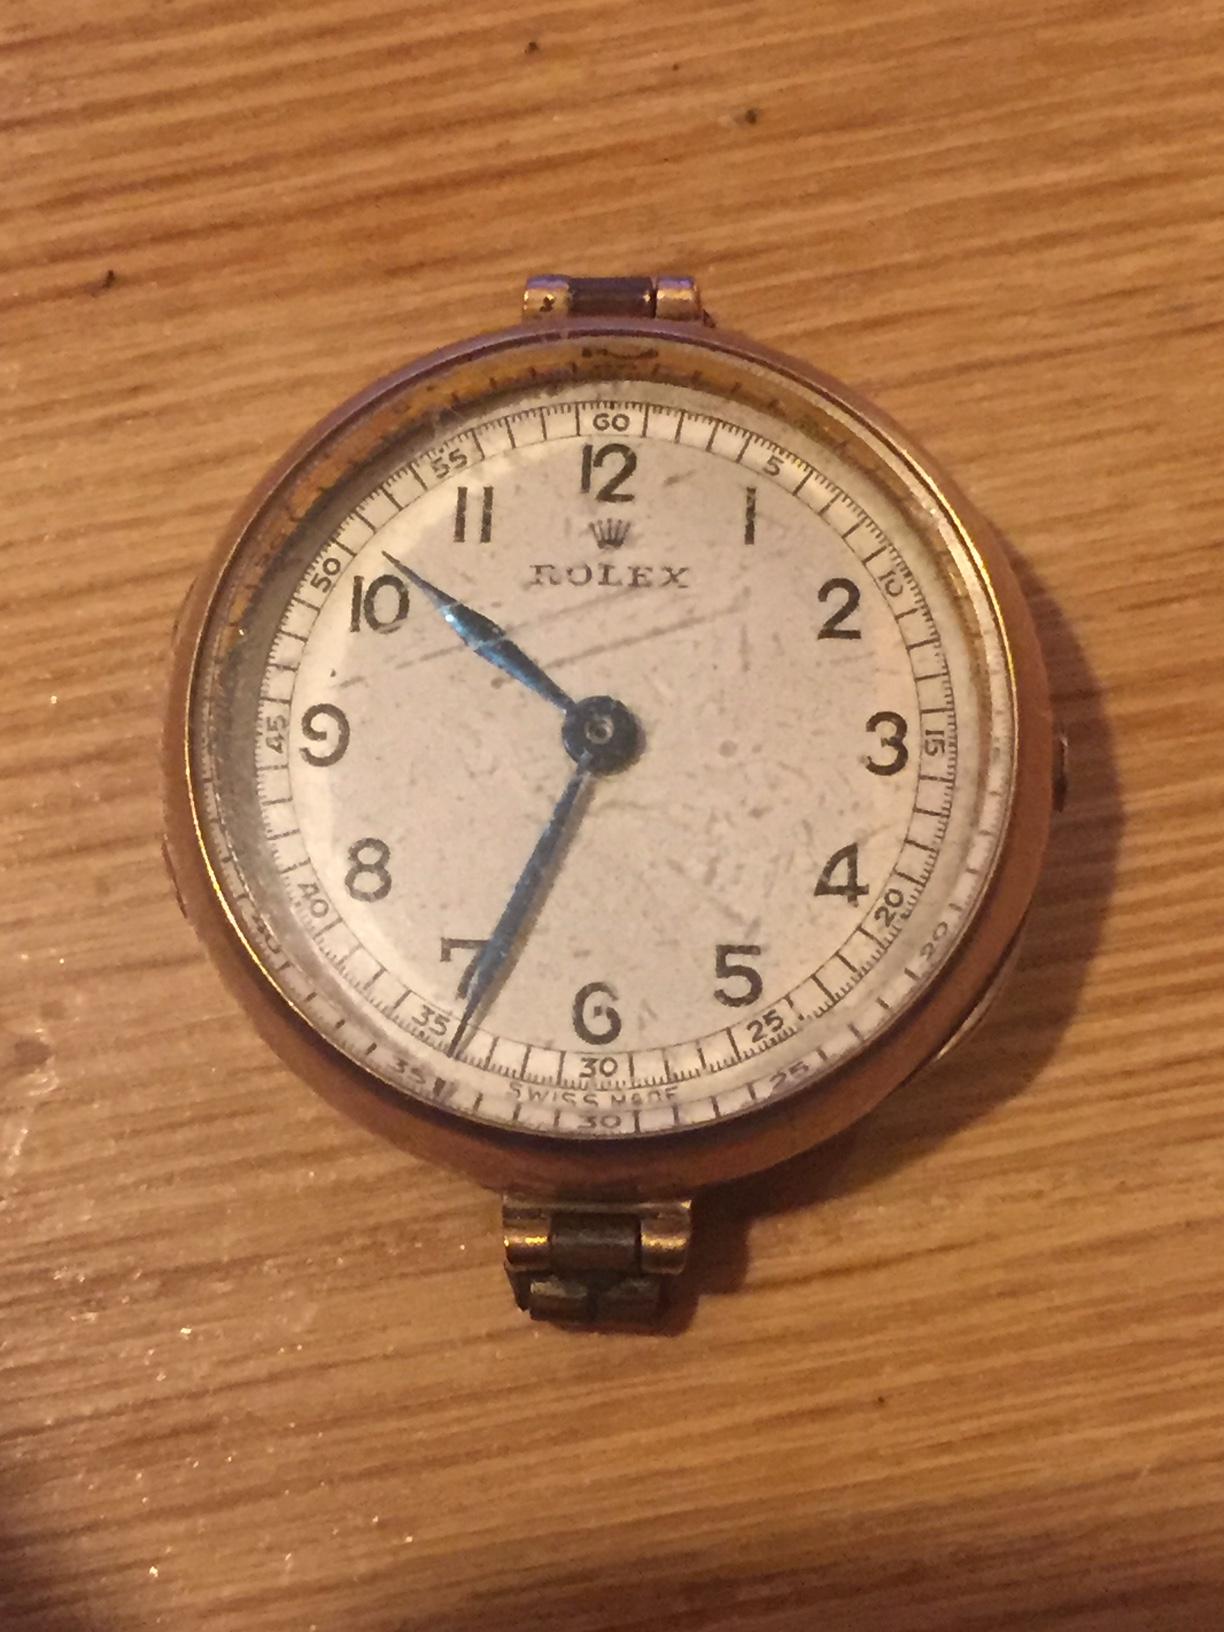
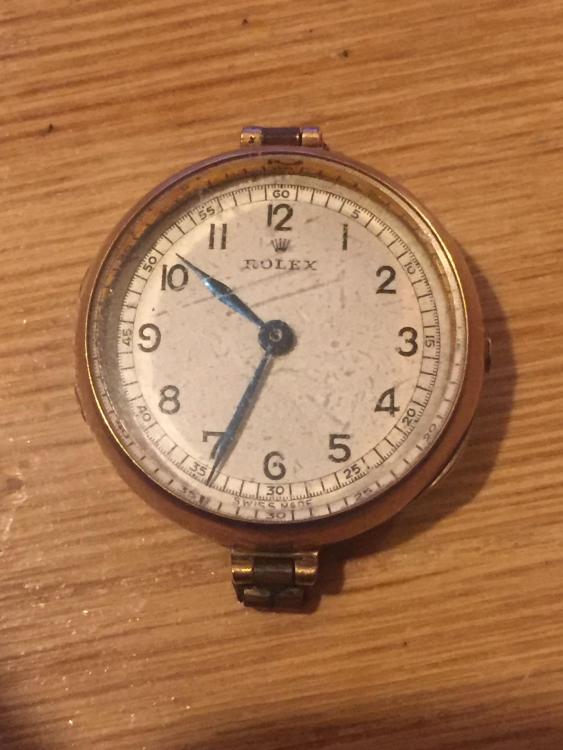
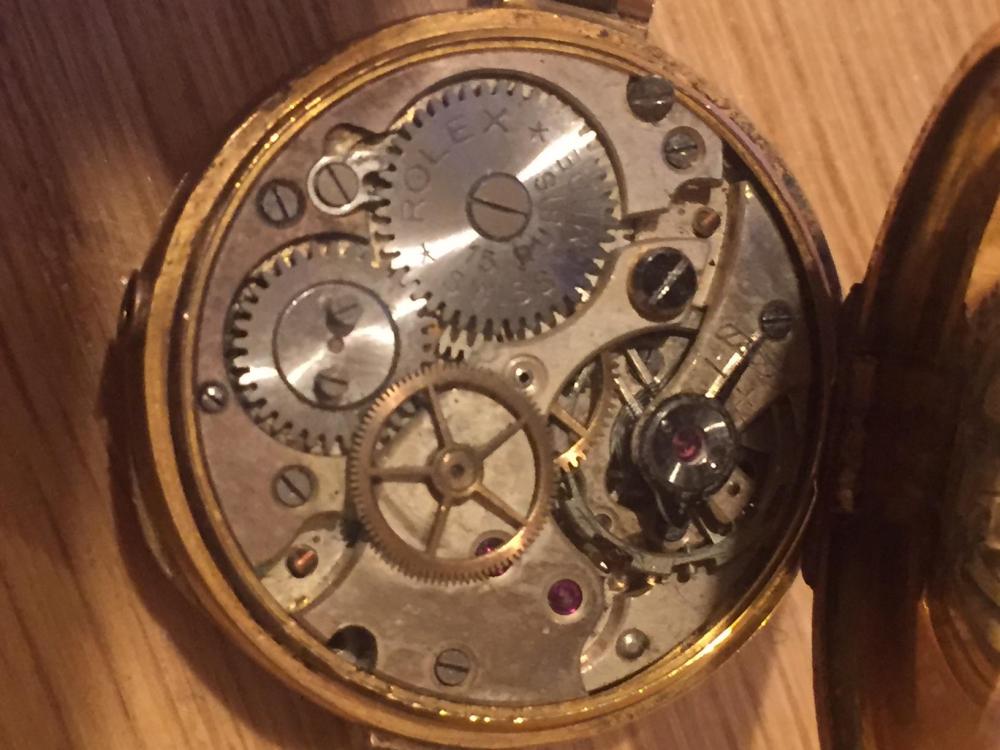
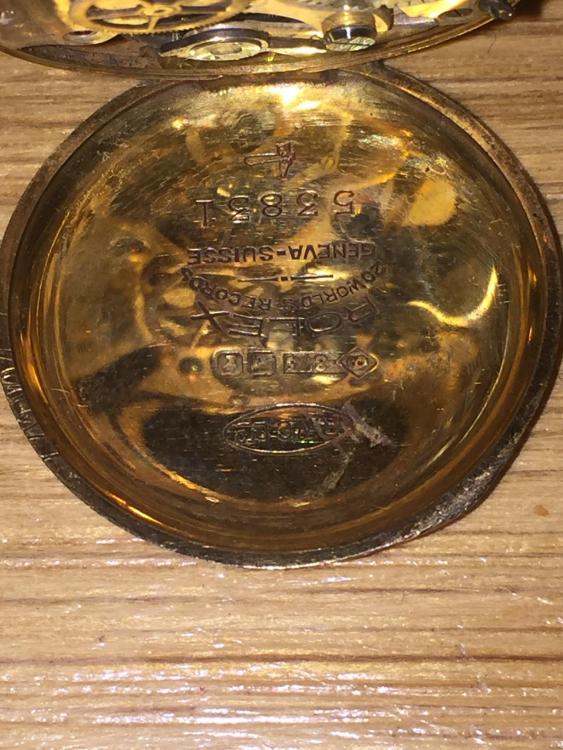
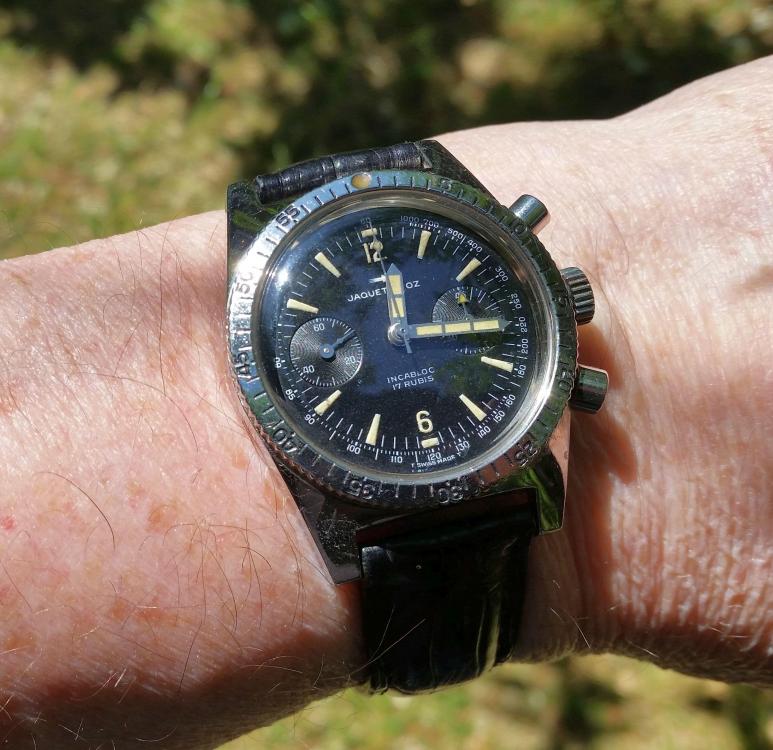
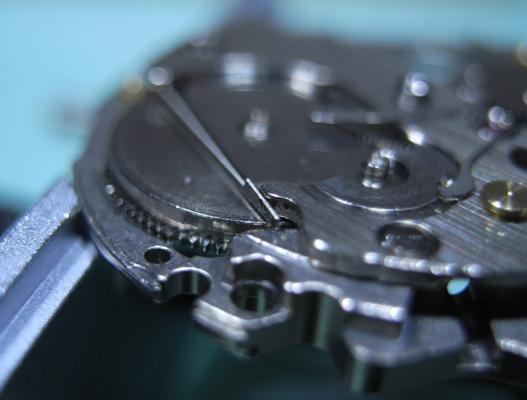
Hi all, Daughter found this old time piece when we were decorating after we moved in. It was under the floorboards so it had been there some time. We felt like DelBoy and Rodney when we wiped the dust off it and seen it was a rolex. Sadly the stem and crown are snapped off so can't wind it to test if its working. No strap either. plus the crystal is scratched. Obviously it is a ladies cocktail watch - would love to get it restored and give to my daughter as a graduation gift. (As she was the finder of the treasure) - might be worth bugger all but hey it's a Rolex. Have done all the usual searches on Google but found nothing apart from one that was auctioned off ages ago. searched with the number 53831 what I know so far: I think its possibly 1930/40's but not sure, 9carat gold, no serial in between the lugs, measurement from lug to lug is 31.09mm, diameter is 27.04mm front and back case opens. Scratches to case where it might have been repaired before ( not by me). number inside back 53831(presume a model ??). previous strap looks like it might have been leather thong type. any help appreciated to identify ( any good specialist you reccommend) thanks in advance John
 2 points
 -
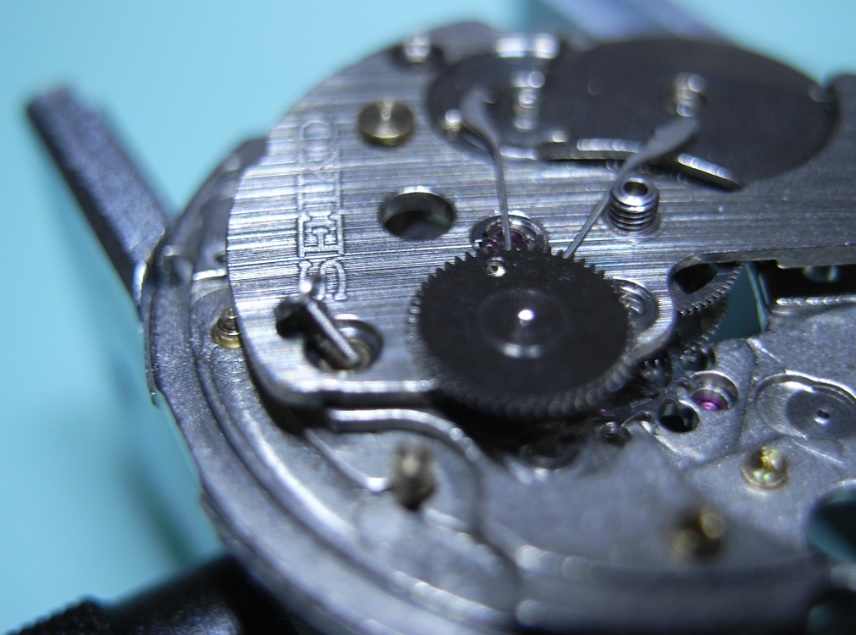
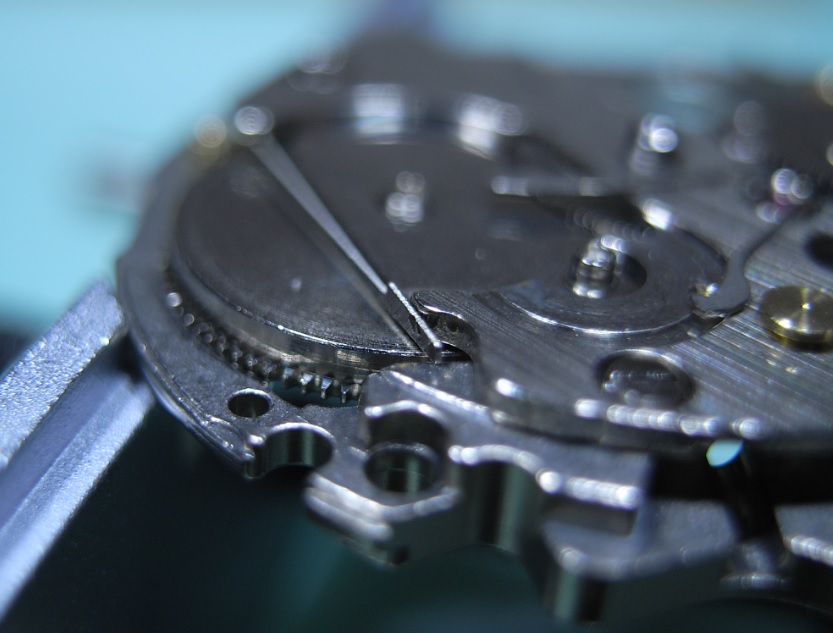
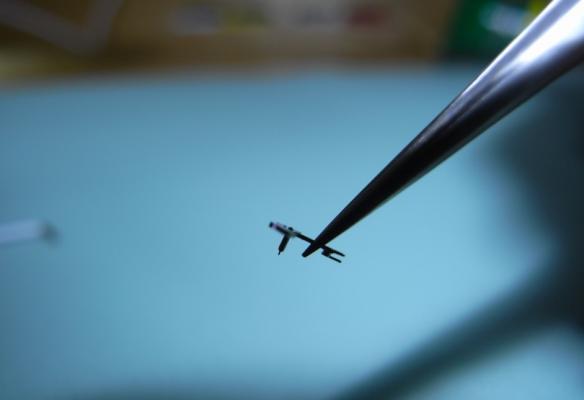
On this watch there is a pin that goes all the way through the center pinion. The canon pinion it very tightly fitted to it on the dial side, the square at the other side is for key setting. The end of the pin is sticking out the top of the canon pinion, the minute hand fits there. A sharp tap on the protruding bit will knock it through enough that the canon pinion will lift off. The pin can be pulled out the rear of the center pinion now.2 points
-
Press your thumb on ratchet wheel, turn clockwise to wind.2 points
-
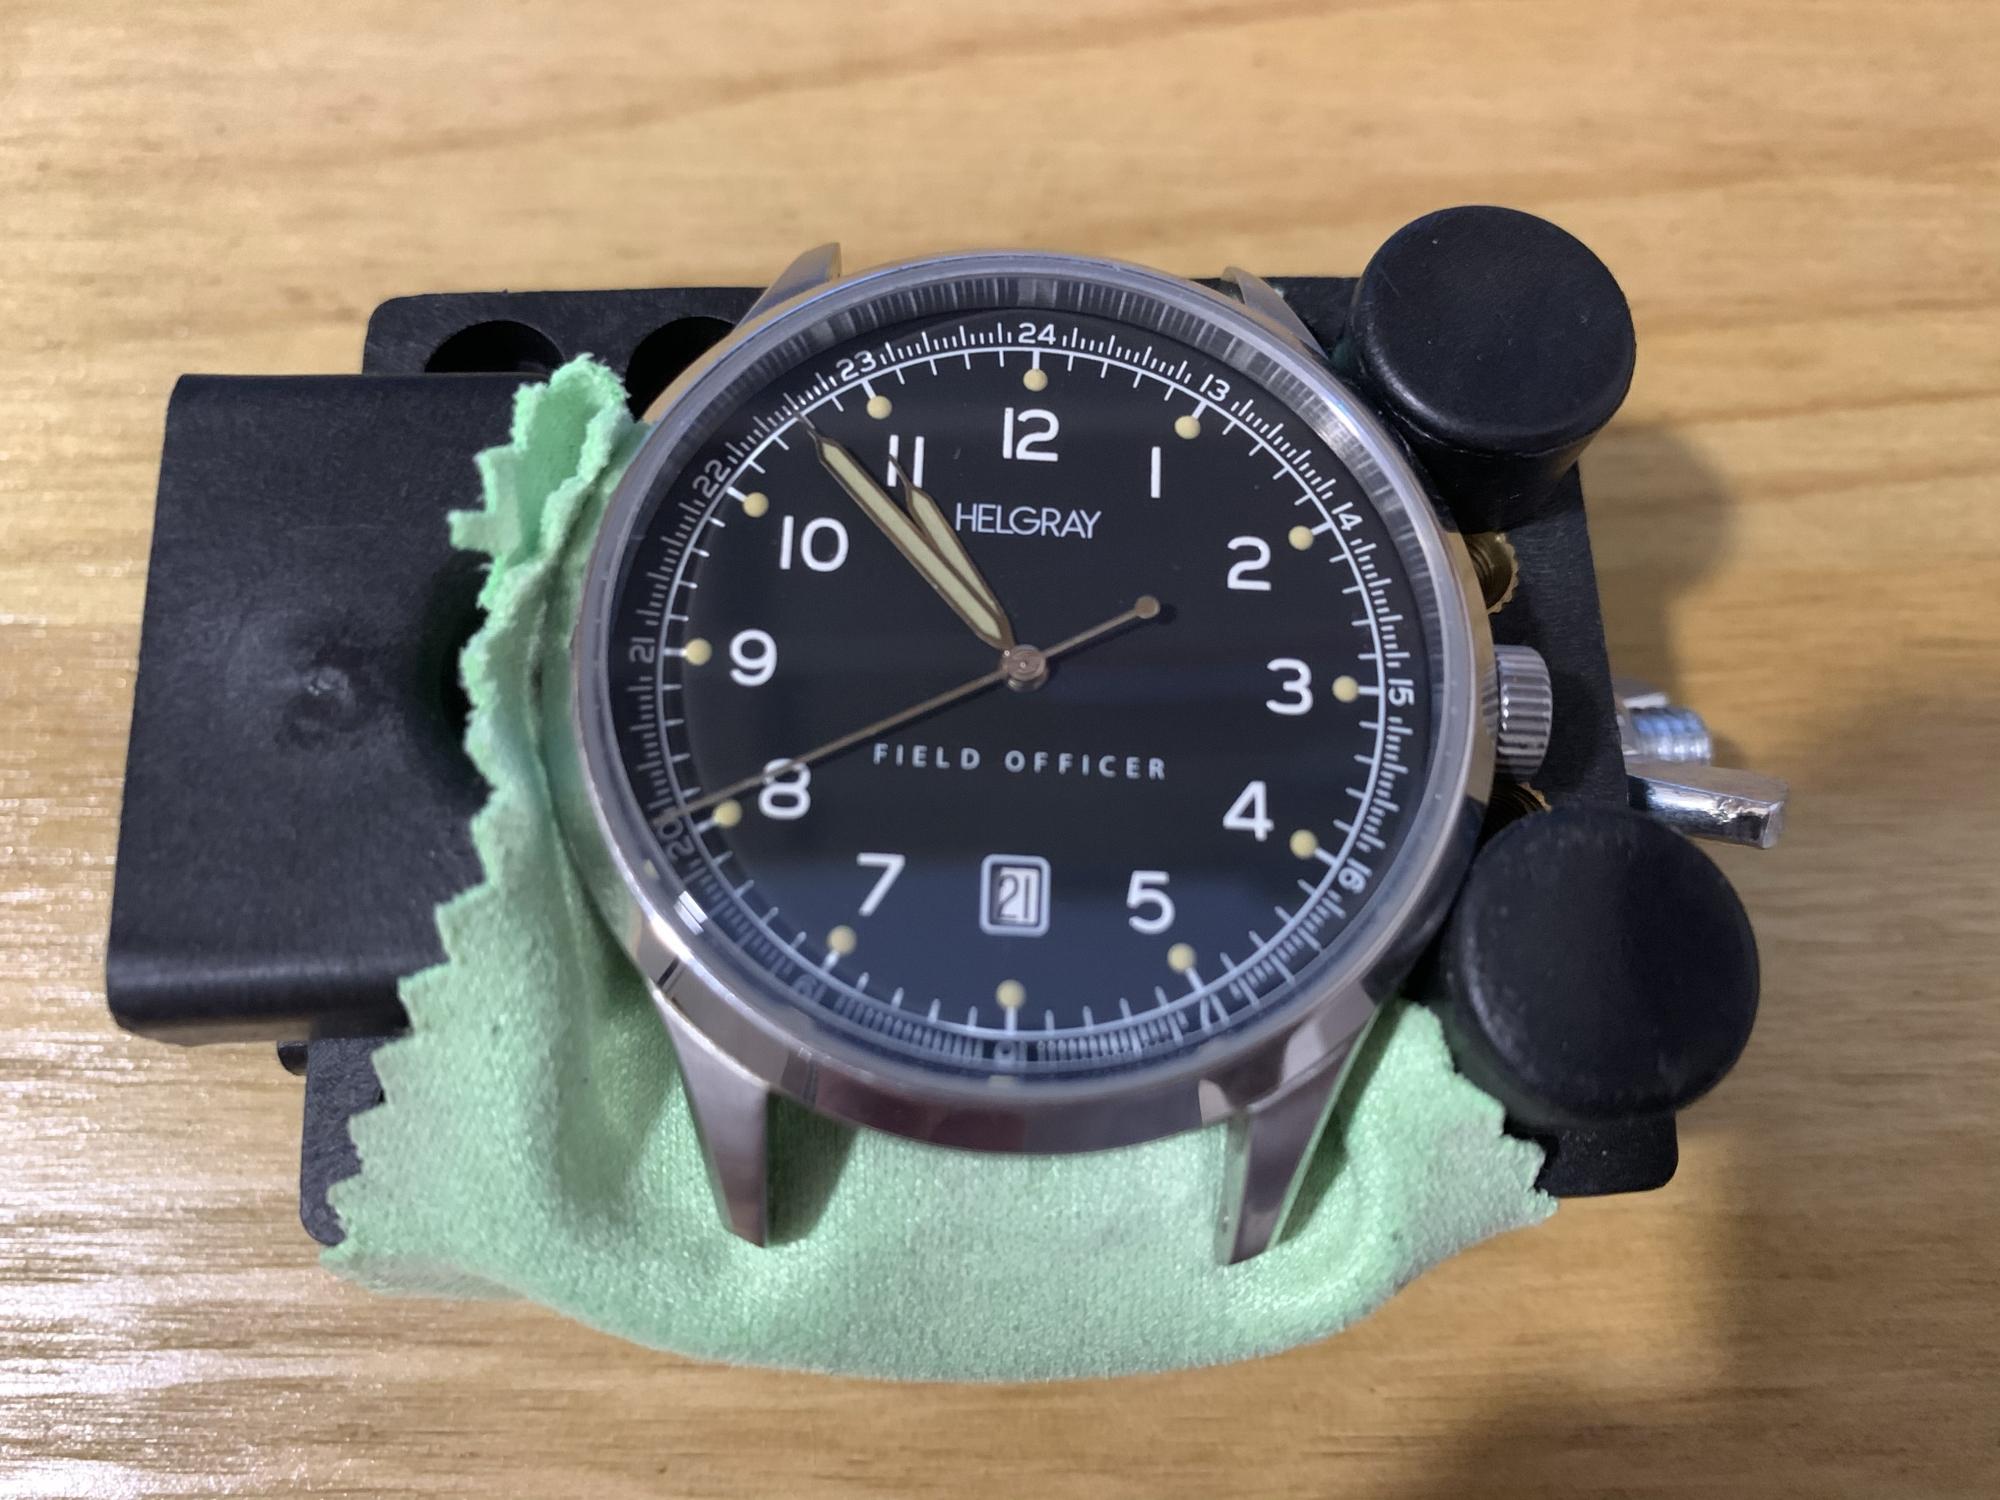
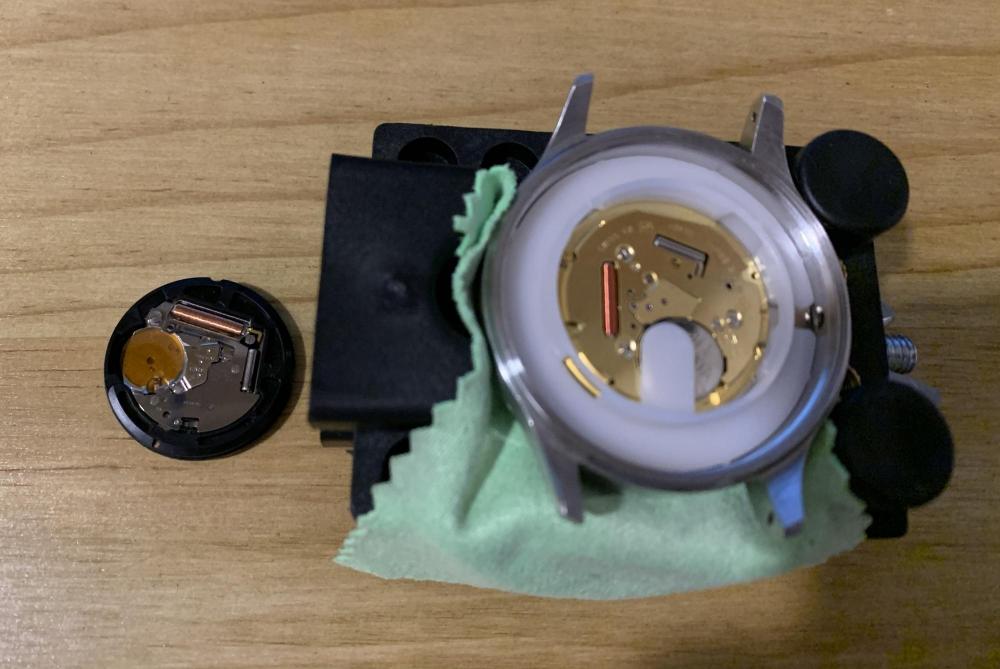
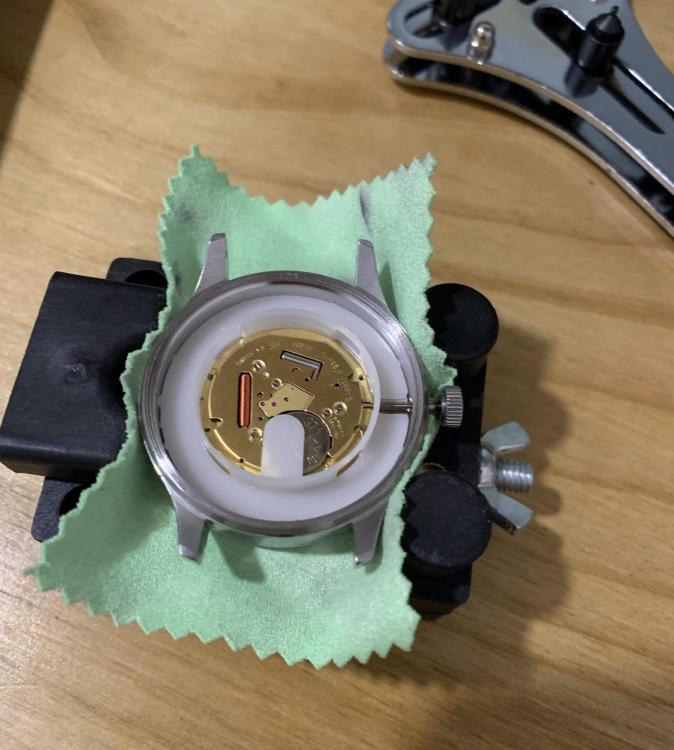
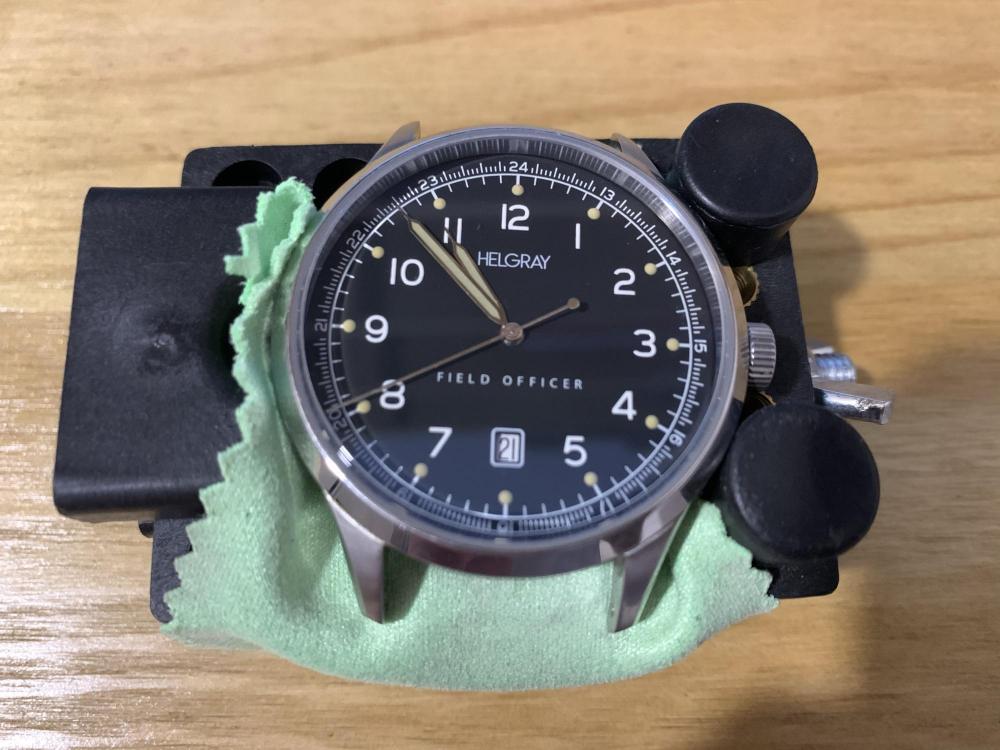
Hi all, newbie here. I guess I've ended up a bit of a watch fan with a bunch of watches in my current collection (pic below), plus a few others I've sold. I haven't done that much modding of my watches, just battery changes and realigning hands on a few occasions. But I did put together a Series One watch from buildyourownwatch.com a few years (which I've actually sold since). At some point I would like to get more into building my own design, but baby steps first Anyway, my Helgray Field Officer II watch has been a trusty daily beater for some time, with a quartz Ronda 515 movement. The battery ran out a few weeks ago, so I ordered a replacement, put it in - watch didn't restart? Tried with a different battery, nada. Both were new batteries in original packaging with expiry dates years in the future. After looking around I found a few others online saying they'd had similar experiences when replacing the battery on a Ronda 515 movement. Seems like the movement is prone to dying at battery replacement time. So after a bit of hunting around at specs and seeing what I could easily get a hold of locally, I decided to give an ETA F06.111 movement a go as a replacement (https://shopb2b.eta.ch/f06-111-f06.1111597973808.html). It's shows up on the ETA website as discontinued and replaced by F06.115, but I couldn't find that locally and there didn't seem to be much difference between them. There was a 0.5mm difference in stem to dial height from the F06.111 to Ronda 515, but hand sizes etc. were all the same, and the key deciding factor was a much better battery life - 68 months using a Renata 371, as opposed to 45 months for the 515. Good news - it all worked. Switched over the hands to the new movement - even with tweezers and a hand press, I still find fitting hands the fiddliest of all! The hands maybe did get a little beat up from pinging out of my tweezers so often. The second hand isn't perfectly aligned but maybe I'll have another go some other time on that. Seems to me there's a market for a simple watch hand-friendly clamp, with a fine x-y axis adjustment to line it up to the dial and press mechanism to fit hands accurately and softly. Also needed to switch the crown onto the new stem and cut it to fit. Once the stem is in the new movement, the crown does sit at a slight angle if you look closely from the side, due to the 0.5mm difference in stem to dial height between the movements, but the actual date/time mechanism etc all works fine. I have a Renata 395 battery on the way, which the ETA movement can take and ups the battery life to 94 months! A few pics, and the Field Officer back in the working collection

 1 point
 -
Hi Hector wrap some leather round the arbour to protect it and put in a vice turn the sleeve untill the loose end pops out then reverse the turn to expose more of the end1 point
-
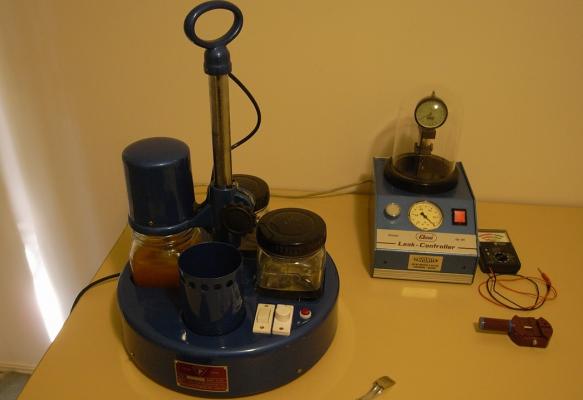
Here's an interesting machine priced at £370.00. It appears to do just about everything you want for quartz watch testing. https://www.cousinsuk.com/product/horotec-flashtest1 point
-
There has been a question about this one a couple of times, here you can see the previous post. when you come to the barrel it should be a post about that one too..1 point
-
Try Ebay and be prepared to have to buy an entire watch.1 point
-
Oh, you still have a lot to break to catch up with the crowed.1 point
-
A Nice little cylinder movement, One way to remove the canon pinion without the proper tool is to use a pin vice and using a vertical lift as any side ways movement could either bend or snap The shaft. the folowing link will explain the procedure thttps://wahawatches.com/how-to-safely-remove-the-cannon-pinion/#1 point
-
Yes, looks like a Aegler/Rebberg from the 20's - 30's with the sweep second conversion. this one has lost the seconds pinion and the tension spring. A beautiful watch and a fantastic find..1 point
-
Looks like a variant of Rolex 710.1 point
-
Daughter finds a Rolex under the floorboards. Wow. My daughters have brought me a lot of things, but nothing like that yet. Something tells me this watch, after a bit of restoration, might be worth a tad more than bugger all. Your daughter has a good eye.1 point
-
Lovely! That condition is fantastic, especially the dial and hands. That's one of the finer movements that they made rather than the cheaper Rebberg types that you commonly see. Hopefully someone can pinpoint the exact caliber reference - I had a similar one which I think was labelled "extra prima". Is it 10.5 ligne?1 point
-
Thank you. I have sent a request to them1 point
-
Hello Bill! Glad to have you!1 point
-
Welcome. You have the second toughest job in the world.1 point
-
Welcome to the adventure Bill!1 point
-
Hello and welcome Bill My hands are also always grubby, gardening etc its what keeps us going.1 point
-
Thank you for your introduction and welcome to this friendly forum.1 point
-
Welcome to the forum Bill. My professor used to call beard "cookie duster" he would have been happy to hear you have found it more versatile. Regards Joe1 point
-
Always a clue of quality when they put pretty stars on the ratchet wheel. But the original poster would like to Learn how to fix the watch and because of its quality and availability it makes it a good watch to learn on as getting another movement should be relatively cheap. Now we need to get the movement out of the case and the original poster can start making observations for us and he can learn how to repair it.1 point
-
I thought it might be a Wostok. But that poor thing looks like Ivan Denisovich was wearing it during a rough day in the Gulag. I'm sure it could be restored but there will be a bit of work involved.1 point
-
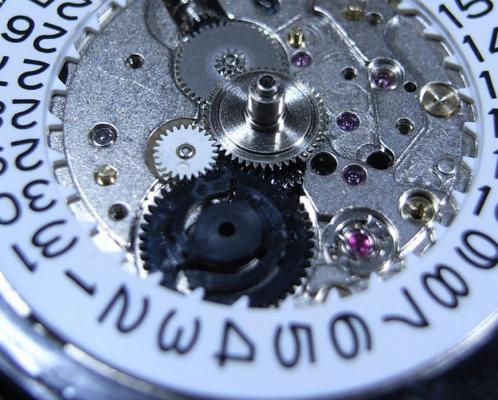
It's a Wostok 2603 or if it has a calendar 2605. The regulator is as far as it will go over to the "-" or slow side and the hair spring has been pushed way out of round. First thing to try is to carefully move the regulator back into the centre position making sure that the hair spring isn't snagged between the pins. That will hopefully give the hair spring a better shape and you may find it will then run. Judging by the state of the set lever screw hole this has been mauled by a butcher or two in its time though so there could be any number of things wrong with it.1 point
-
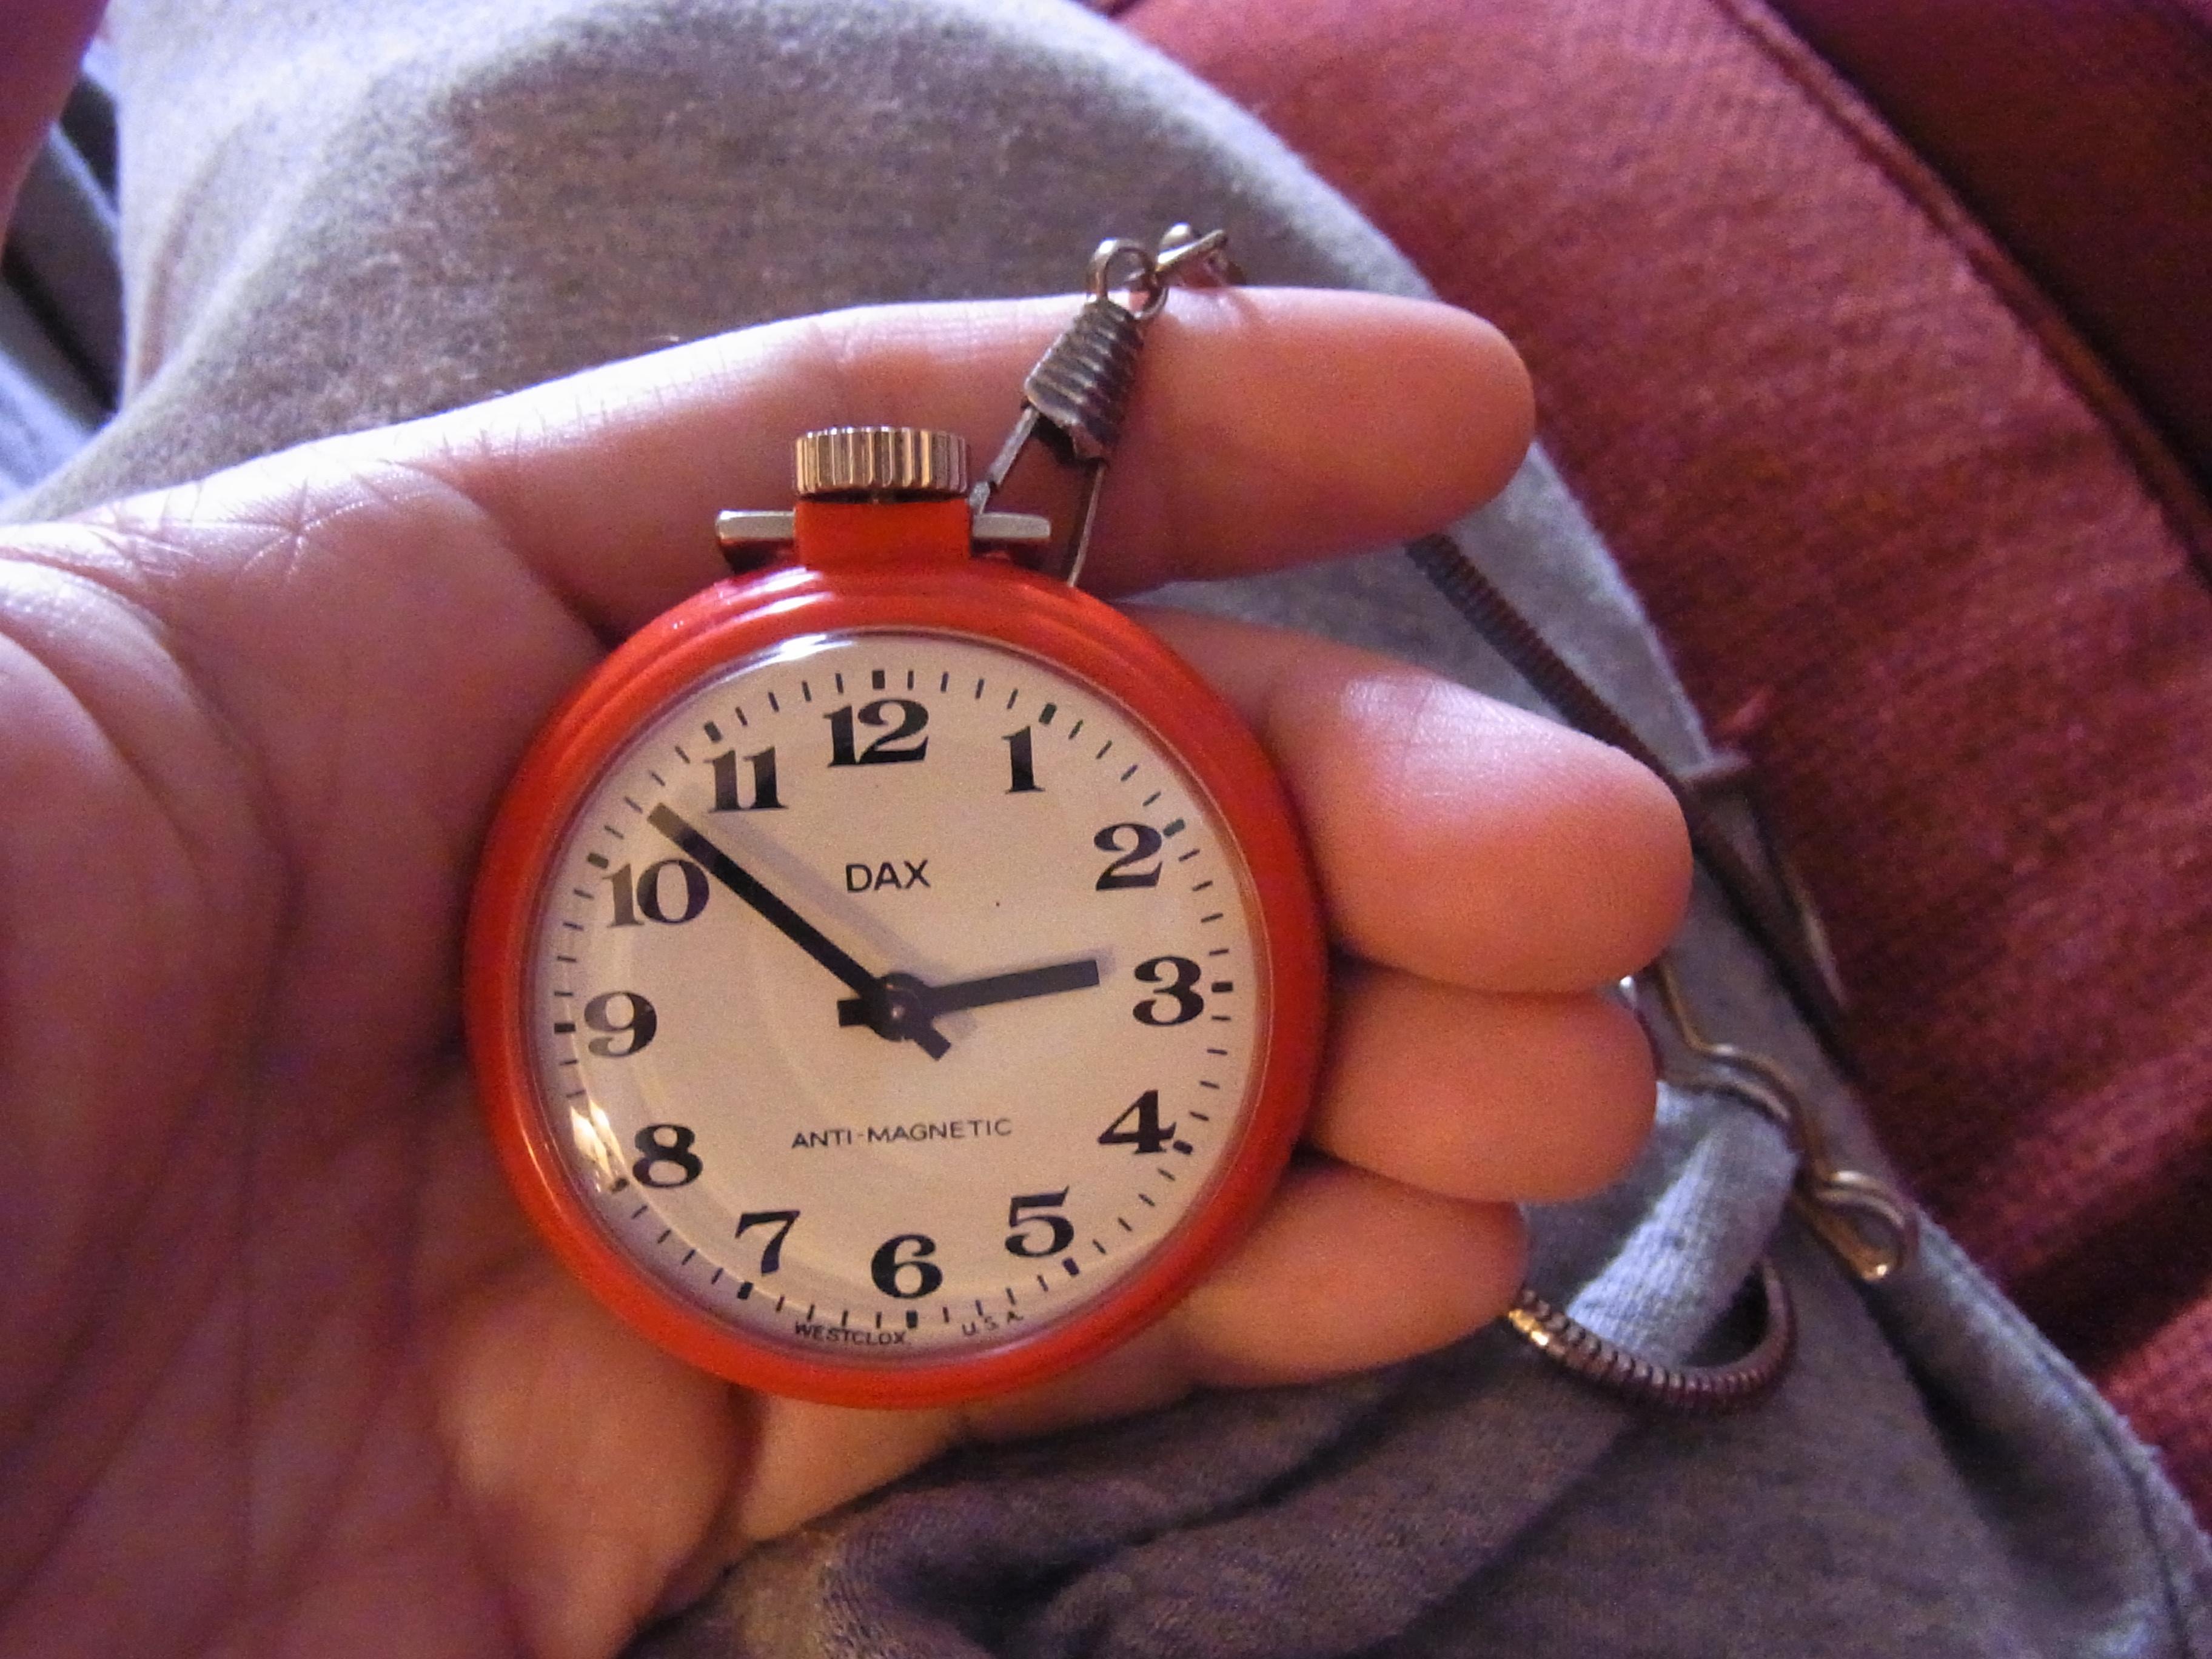
With little opportunity for wearing dressy watches during lockdown, I got to thinking, what would be the perfect watch for lounging about in baggy tracksuit bottoms and staring wistfully out of the window. The least refined, least glamorous piece in the collection. In other words what is the perfect corona virus lockdown watch? Given that I don't have to be anywhere at any given time, it doesn't even need to be accurate. It just has to fit the bill as the perfect "nobody is going to see it anyway, so it can be as daft as you like" watch. As you can imagine, the 404 club has a few contenders for this non-accolade, but somehow this one seems to capture the mood best. I just hope you can hear what I am typing above the sound of it ticking.
 1 point
 -
My first 'good' watch, had it since 1968.......
 1 point
 -
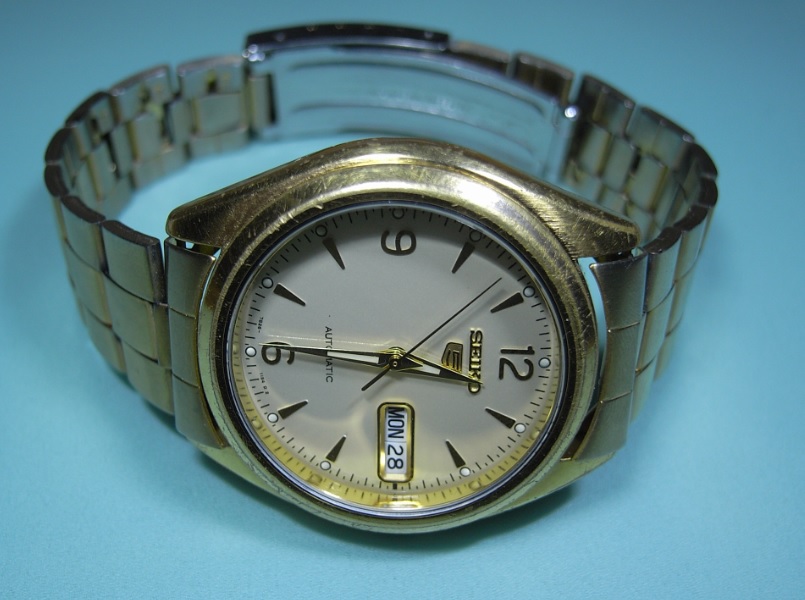
Good everyday watch bought new c 1998. Seems to be offered on Ebay around $130-200 Roamer Power 8 men's Diameter of the watch is approx. 36 mm (excluding crown) x 41.4 mm. Originally came with webbing strap.
 1 point
 -
Did they really change the dial? It could be the person who serviced it in 2007 sent it to be fixed (non-rolex shop) and the lacquer has gone 'off '? Rolex would not just swap a dial for you, they will do it as part of the overhaul package. The price your father-in-law paid should reflect that. Just my thoughts. Anil1 point
-
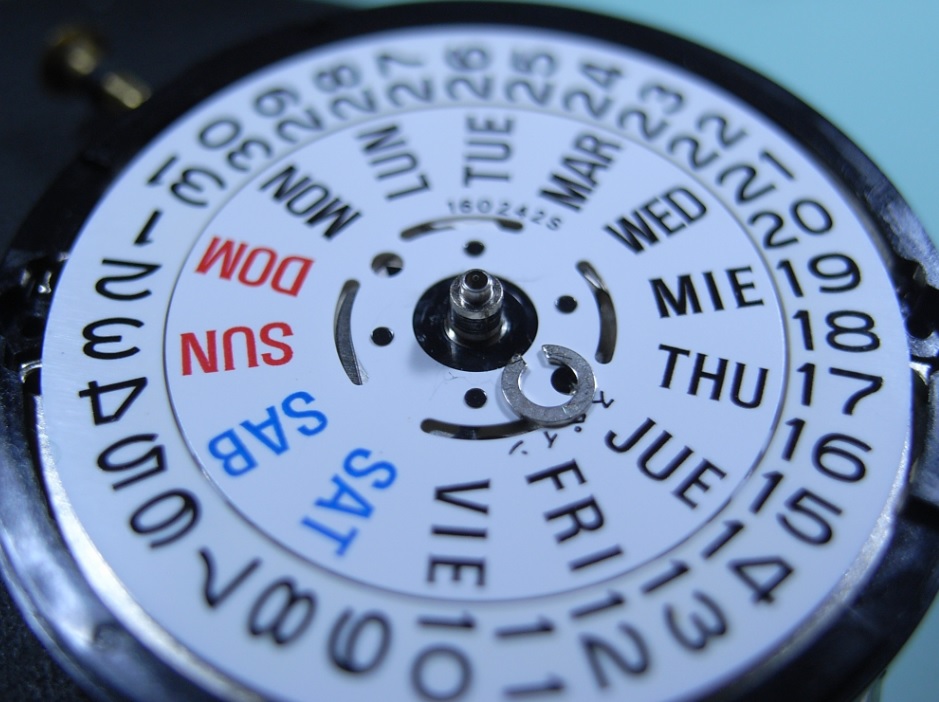
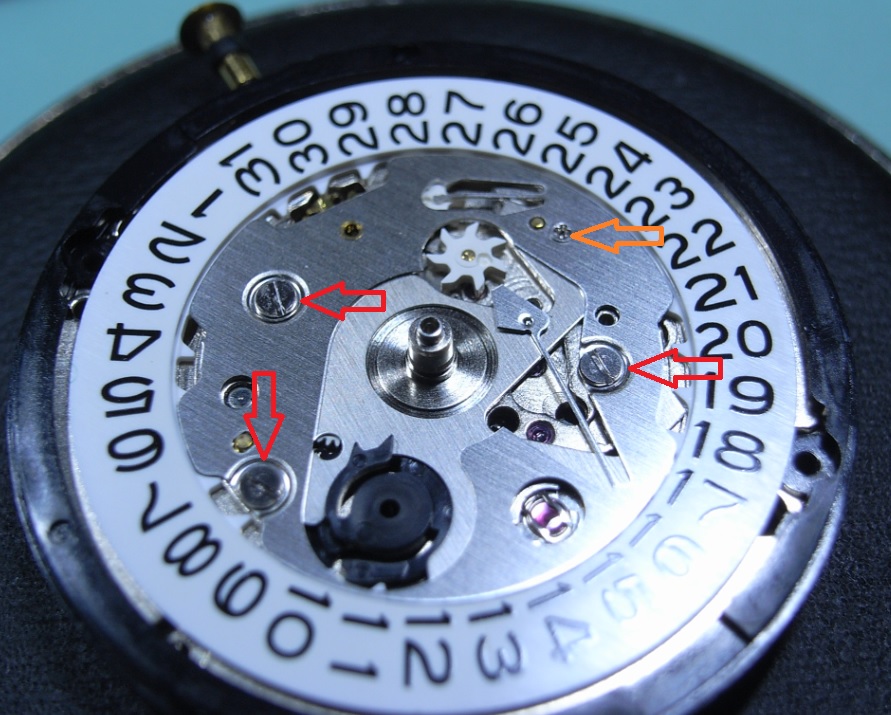
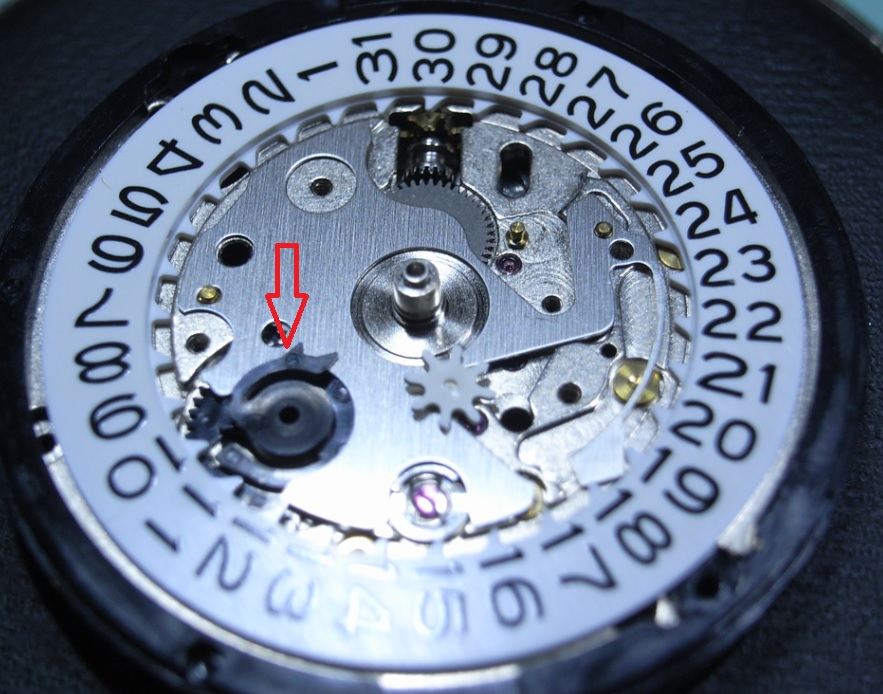
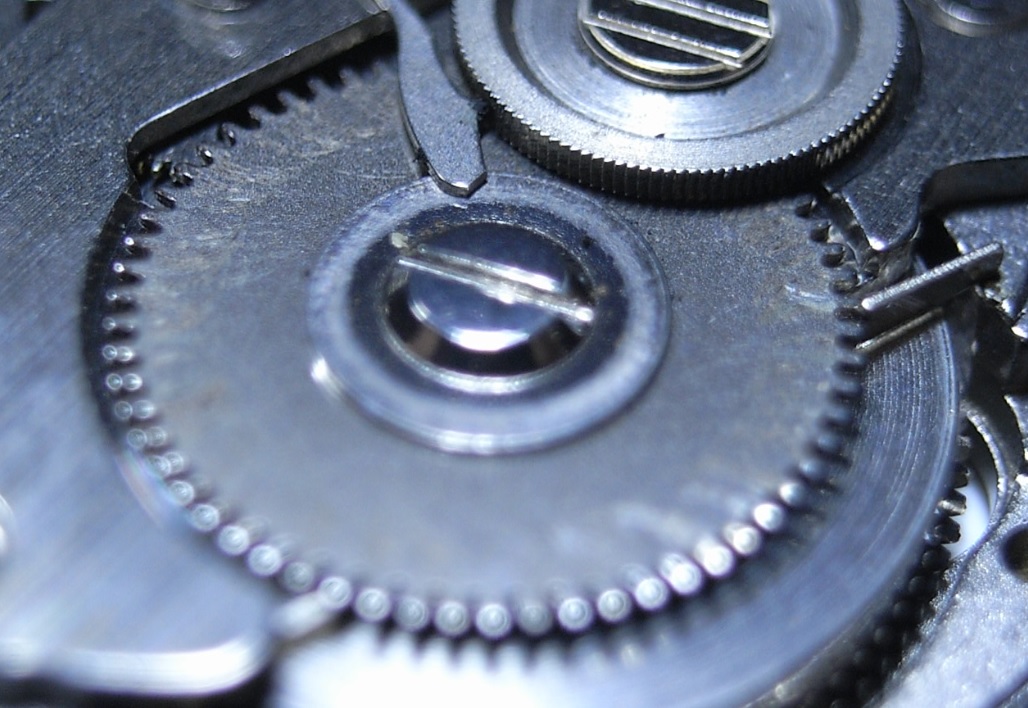
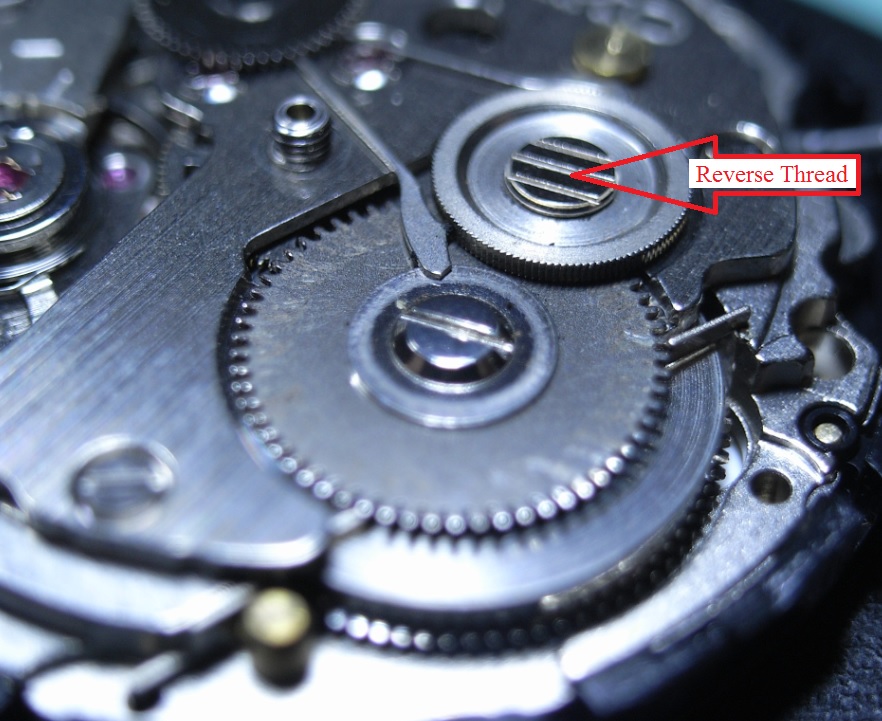
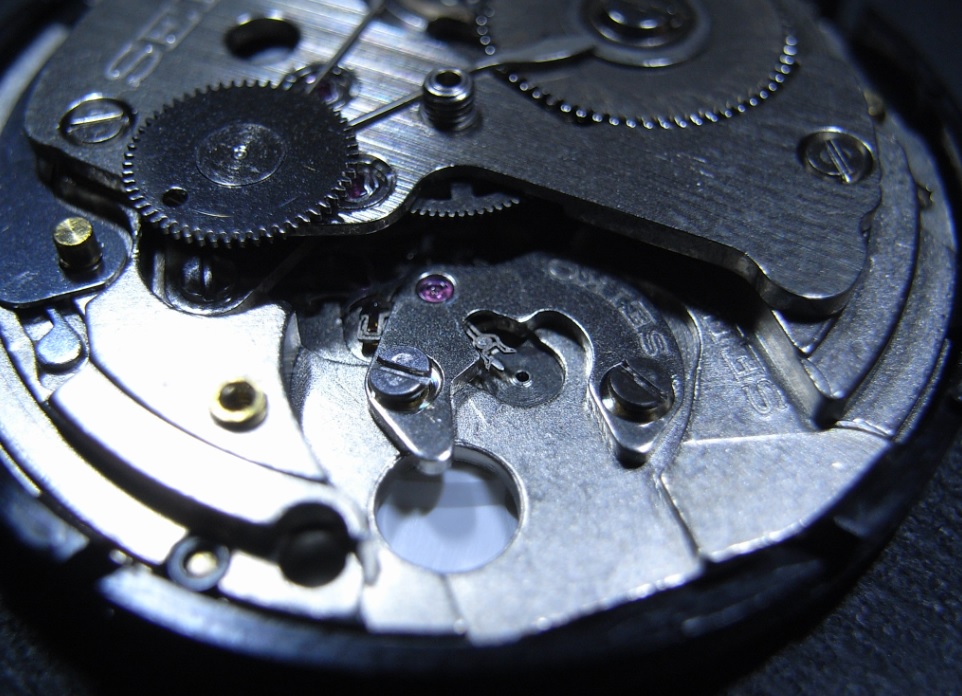
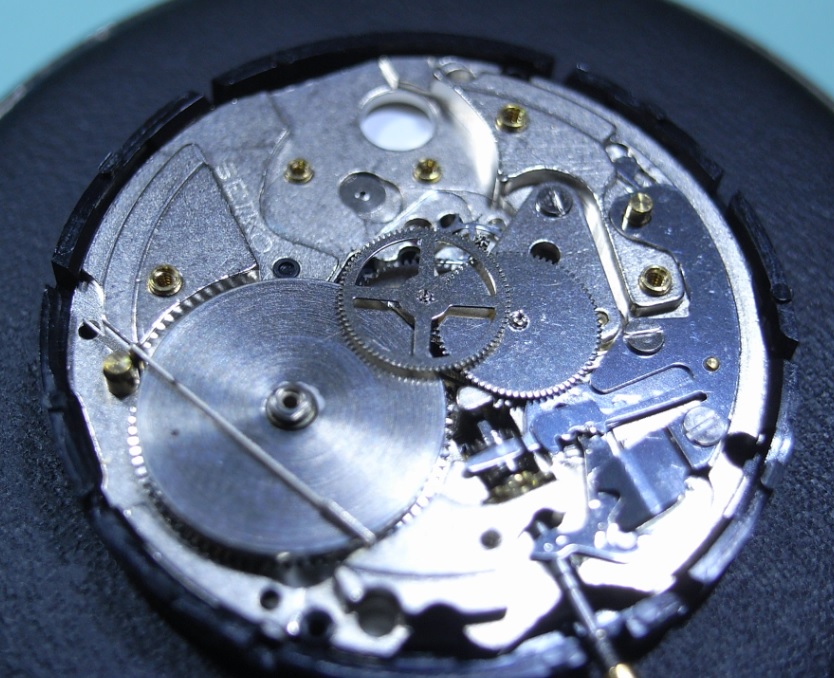
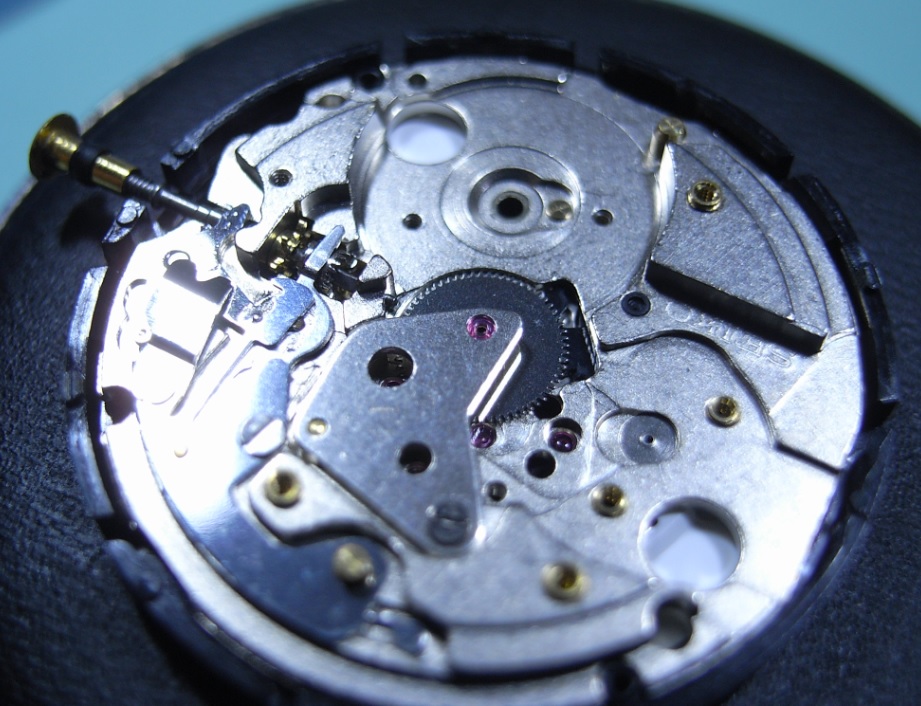
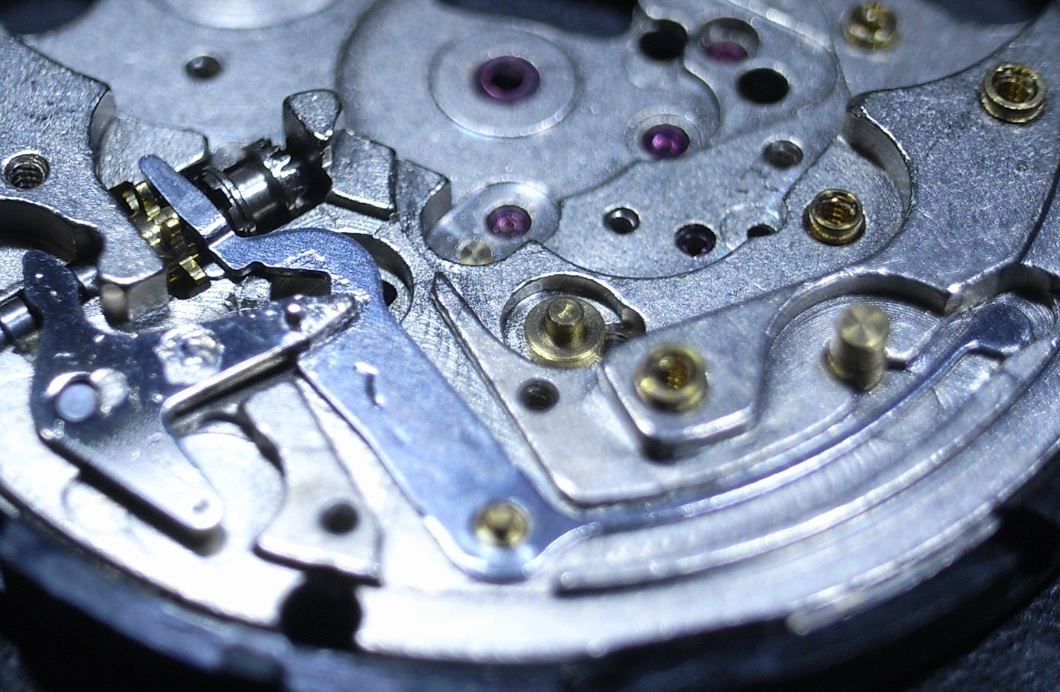
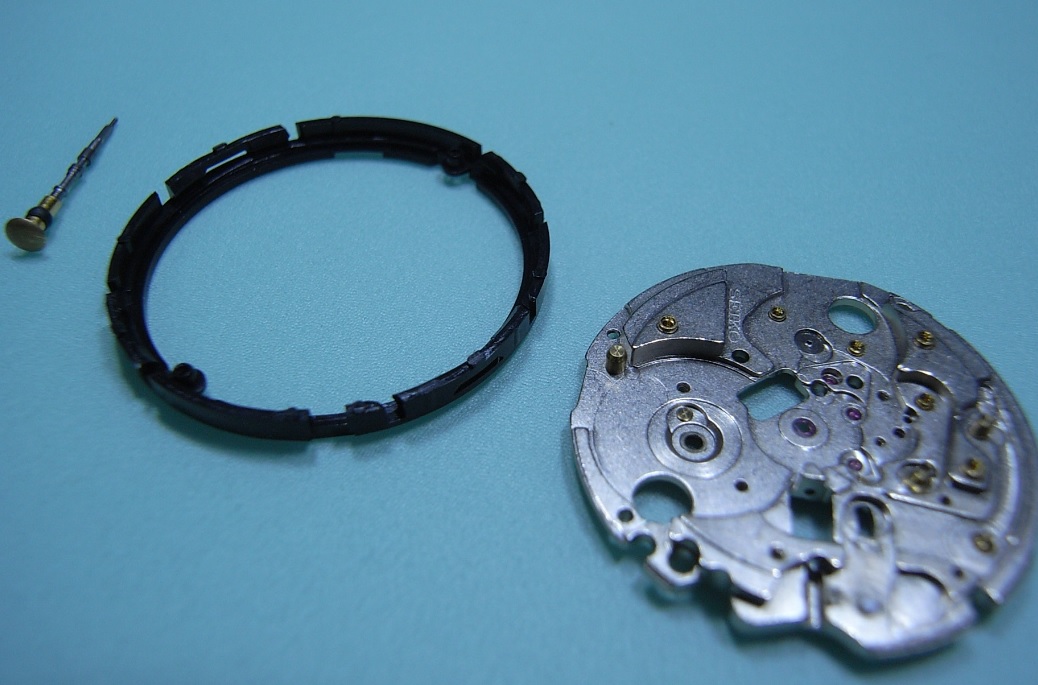
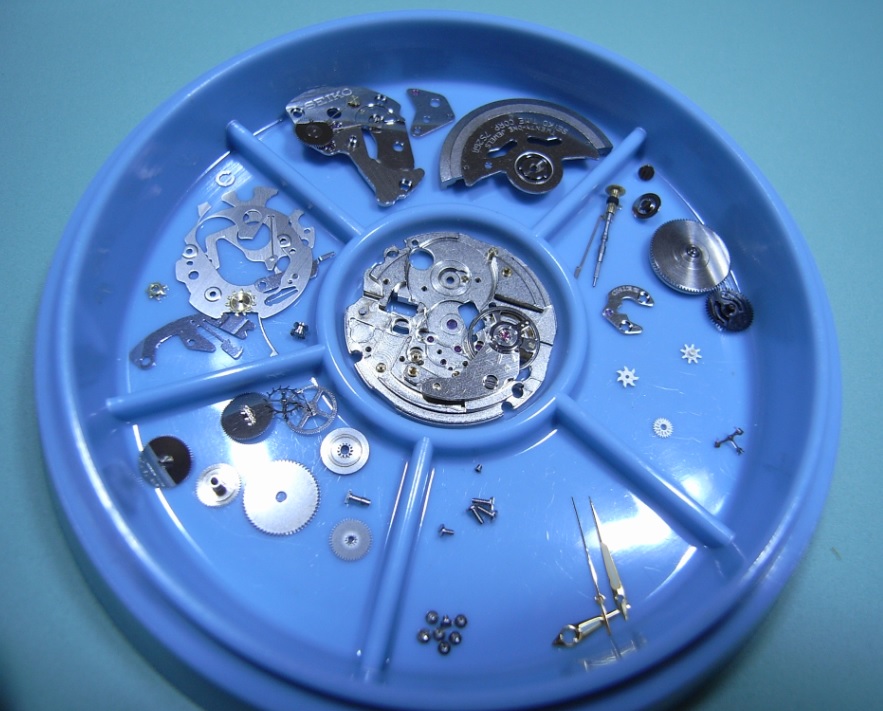
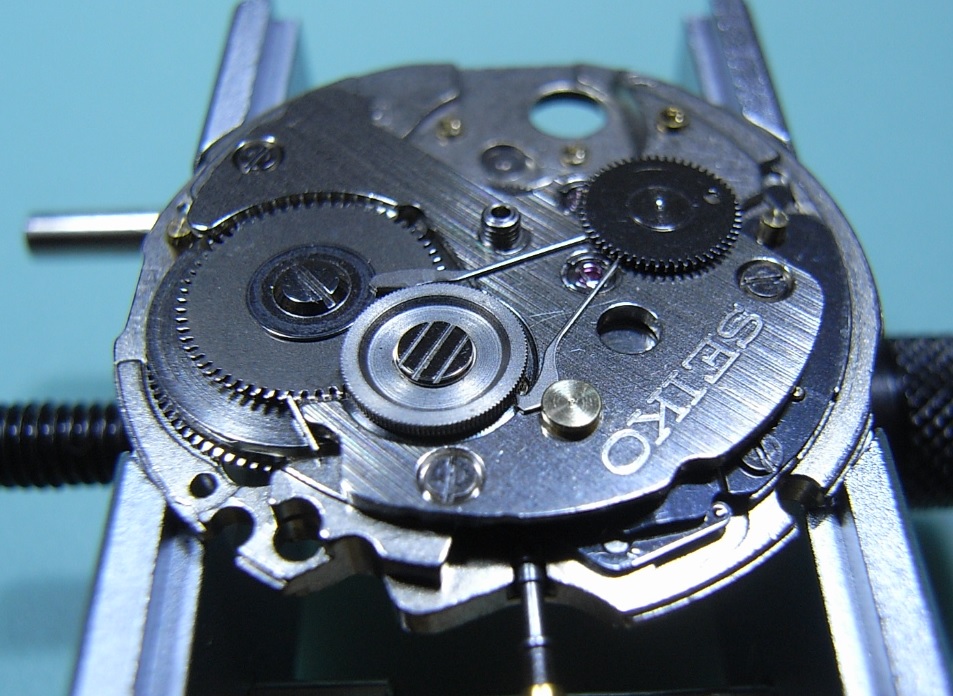
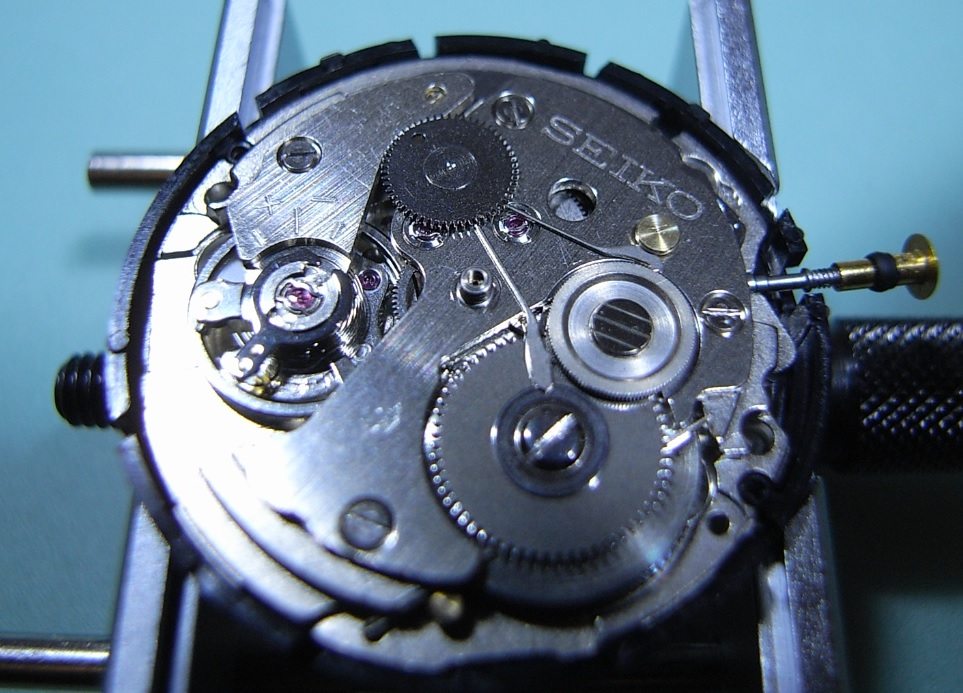
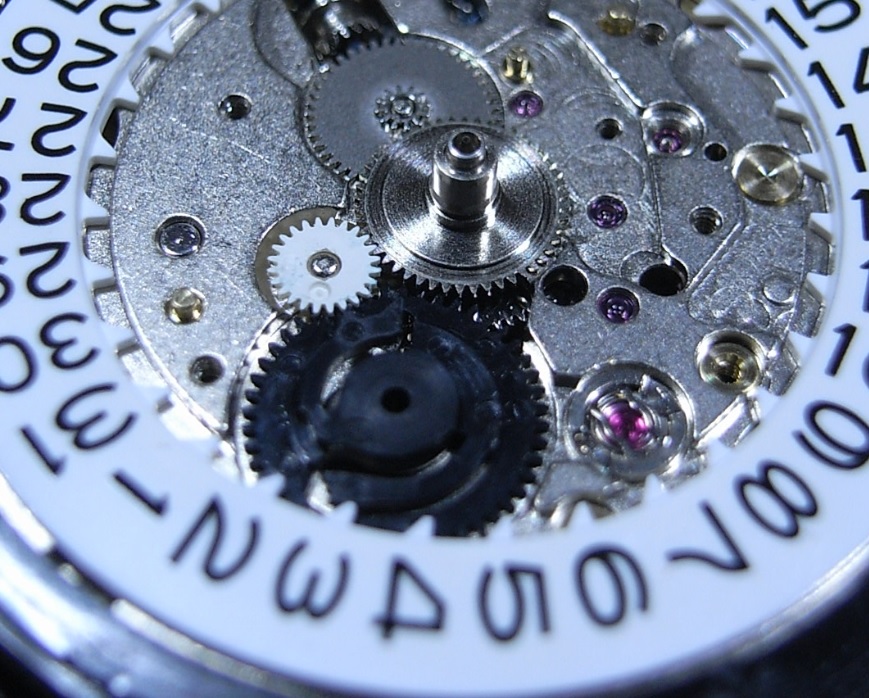
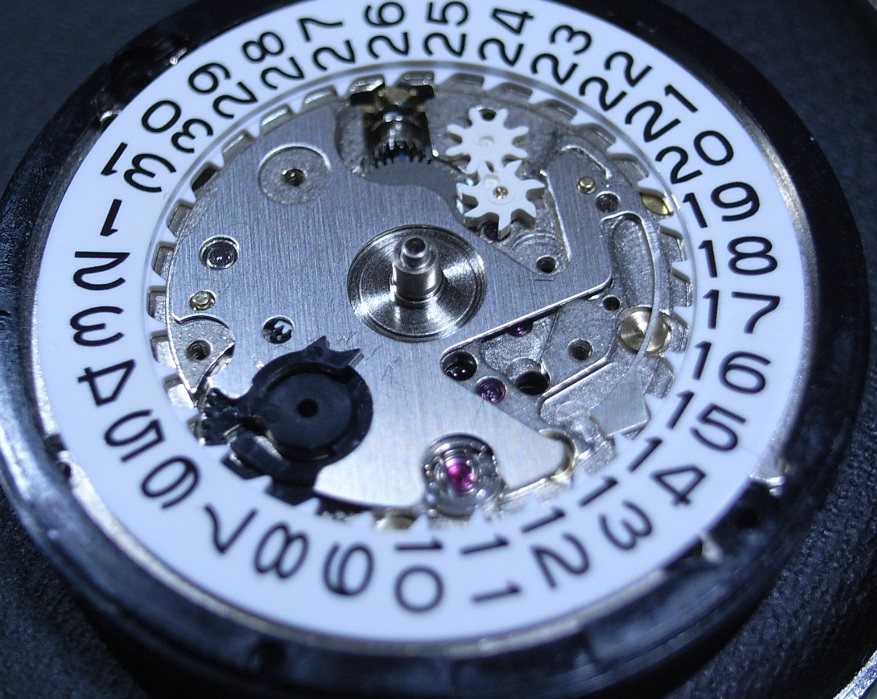
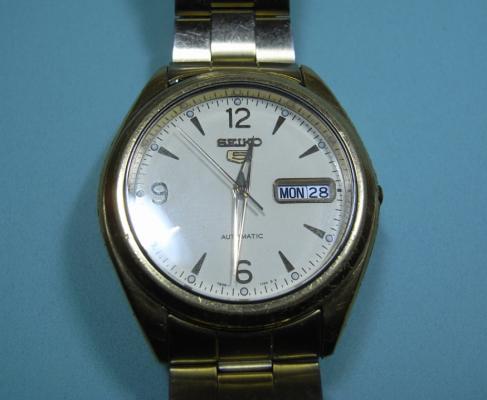
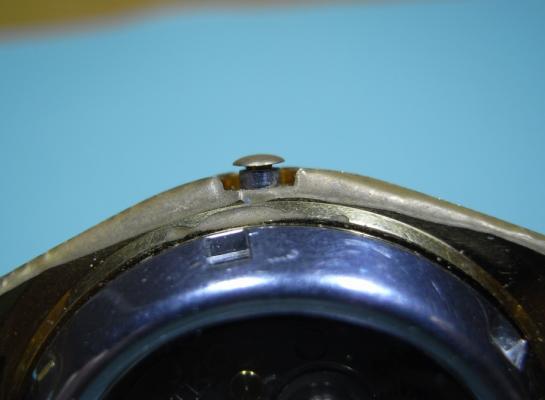
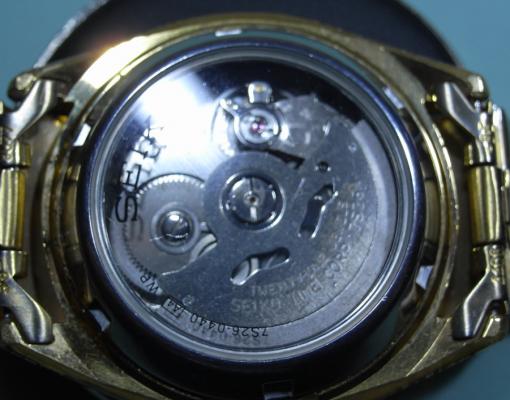
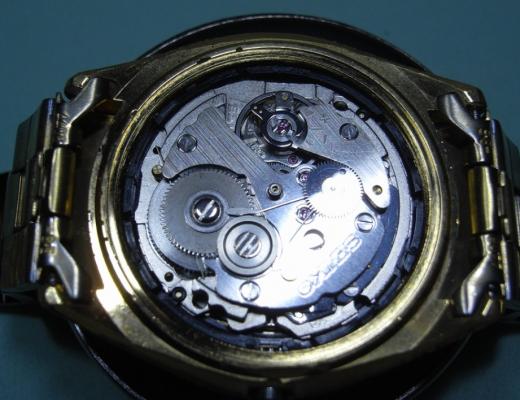
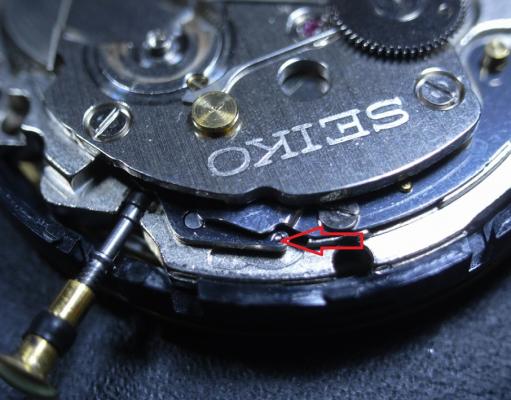
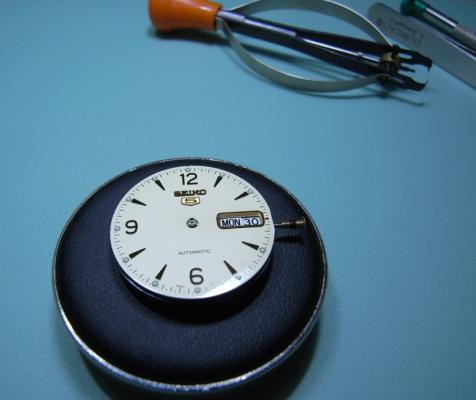
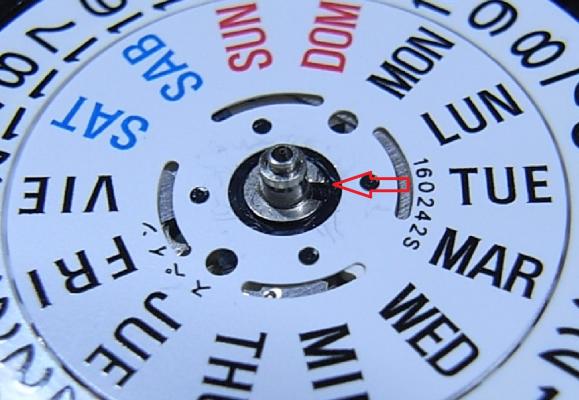
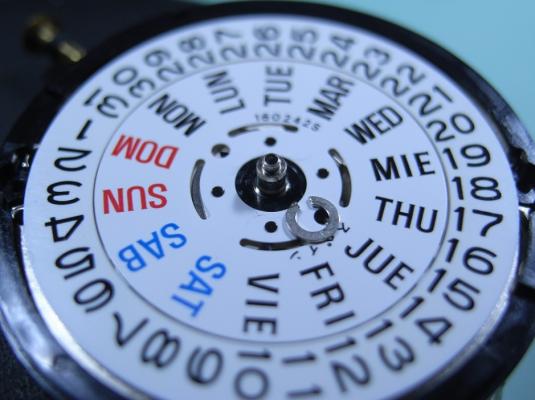
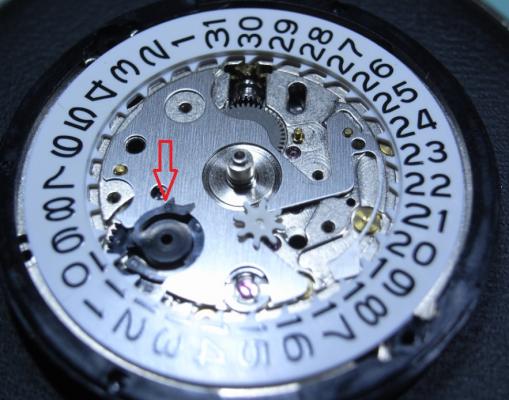
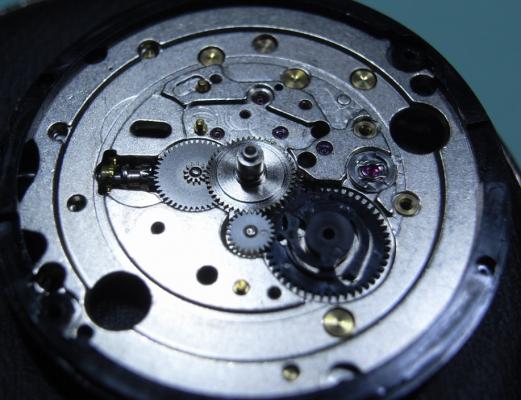
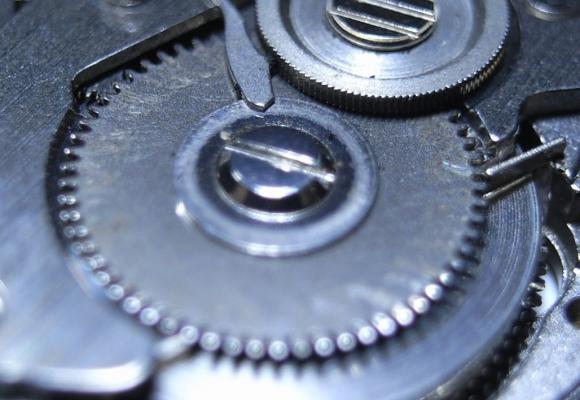
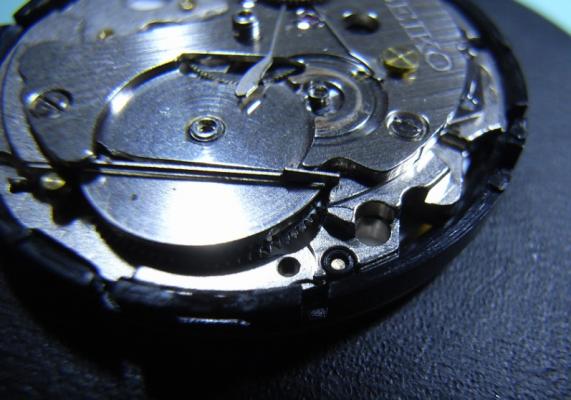
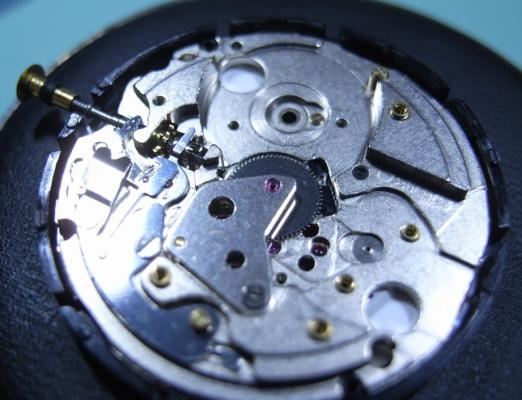
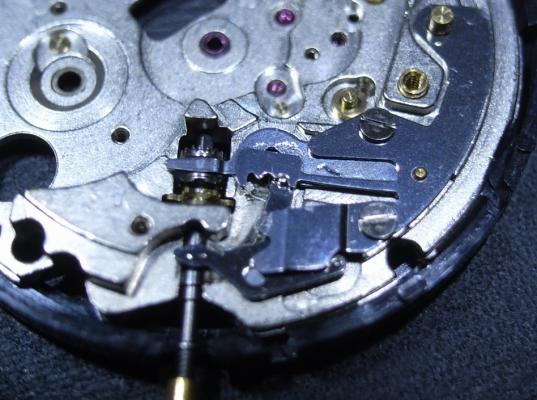
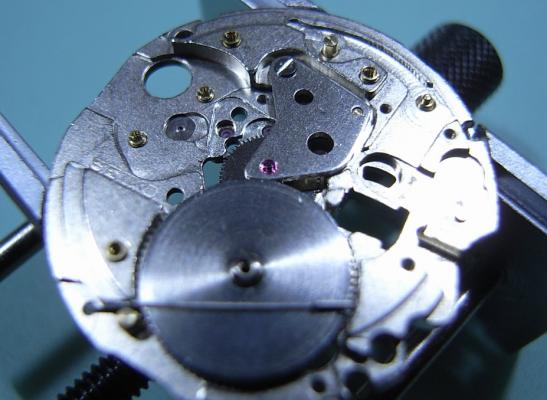
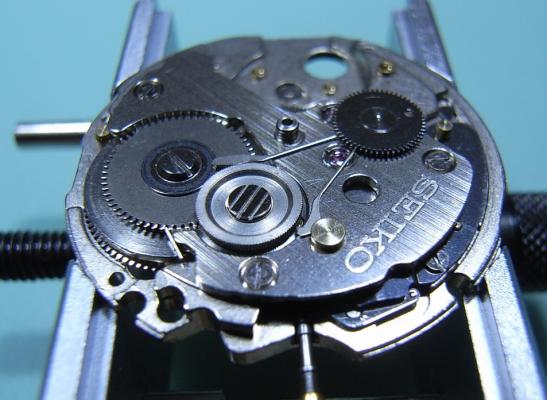
Seiko 7S26A Complete Service Background I have a good friend, a brother in Christ Jesus, who I've known for many years. He knows I've embarked on retraining myself for a new career in Watchmaking, and seen my first two restored watches. He told me that his old faithful Seiko 5, which he's worn everyday for 12 years, has recently had issues. Occasionally it will advance rapidly in time (up to an hour in a few seconds) and then just keep ticking away normally. I told him I'd be happy to take a look at it, and put it on my ACEtimer Timegrapher. The pattern on the screen looked like a B-52 drop in Nam (stupid me forgot to take a photo), and I told him that his watch definitely needed an inspection and service. So started my research on what the problem might be. After reading a "Practical Watchmaking", and the many forums that I've read, I was pretty sure it was the Pallet Fork ... either very dirty or damaged stones, or a broken/damaged fork pivot. So onward to the service... Disassembly One unusual aspect of this watch is the crown ... or lack there of, more to the point. I suppose since this is an automatic watch, they thought it didn't need to be wound. This watch also has a display back, so extra special care not to mark any of the plates, or damage screw heads! The first issue you'll face when working on a 7S26A Movement, is how to get the stem out! It isn't obvious at all, and there is a little trick. The crown needs to be pushed all the way in to expose the push plate (it is hidden in the other crown positions). I took this photo once the movement was out to best illustrate where to push. Remove the Hands, Dial and Oscillating Weight (2.0mm Screwdriver). Gently lever up one end of the circlip and carefully work your way around. You then should be able to raise the circlip up the length of the shaft without it pinging off. Remove the Day Wheel and the four screws holding the Date Dial Guard. (Use a 1.40mm Screwdriver, and this driver is good of all the screws from now on; bar one.) NOTE ORANGE ARROW: Seiko Special Tool needed for the 0.98mm Philipshead Screw (Part Number: S-921) I had to journey down to my nearest Seiko Distributor and grab one ... cost was AU$24.00 Here's a closer look at the troublesome screw. Remove Date Jumper, and note that the Date Drivewheel lips over the top of the plate. Remove all the motion work, and pull the Cannon Pinion Remove the tension from the Mainspring. Remove the Ratchet Wheel and the Second Reduction Wheel and Pinion. (remember the Reduction Wheel has a reverse thread) Unscrew the Balance Cock and remove the Balance. Also unscrew the Pellet Cock and remove the Pellet Fork. BINGO! Found the problem with my friends watch. The top pivot on the fork is broken. Easy fix with a replacement fork :) Remove the Barrel/Train Wheel Bridge Remove the Click, then the Barrel. Remove the Fourth Wheel, Third Wheel and Escapement. Unscrew the Centre Wheel Bridge and remove the Centre Wheel Now to the Keyless Work. Remove the Setting Lever Spring Remove the Yoke and the Setting Lever Pull the Stem out, and the Clutch and Intermediate Wheel will fall away. Lastly, pull the black plastic location ring off. ... and now it's bath time!!! I hope this has been of help to you guys. I'll post the Assembly steps in this thread tomorrow morning.


 1 point
 -
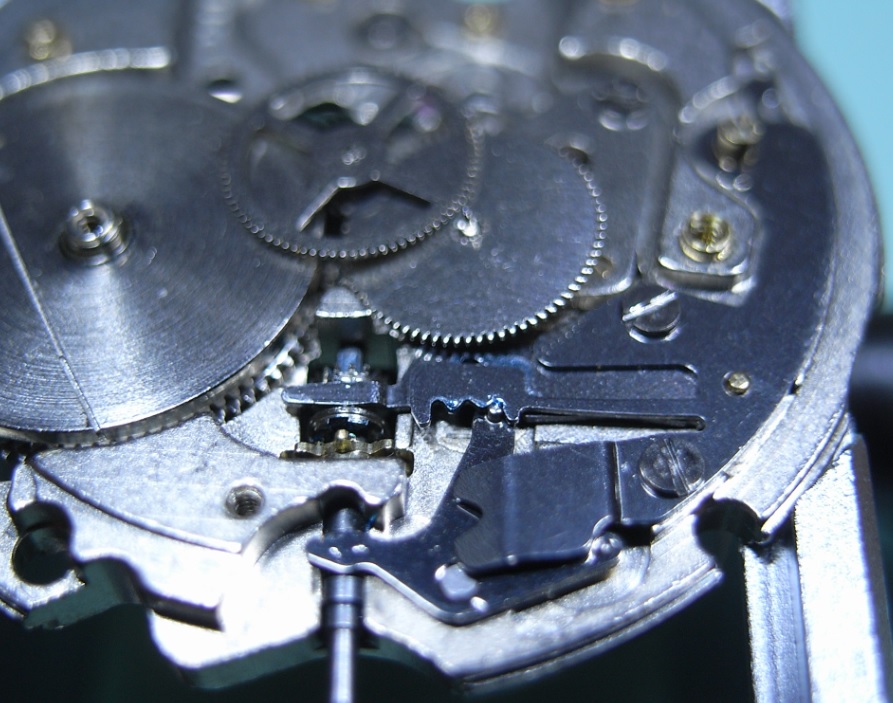
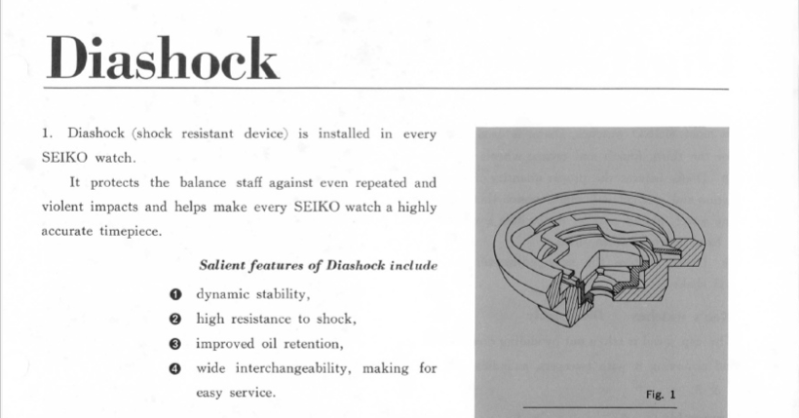
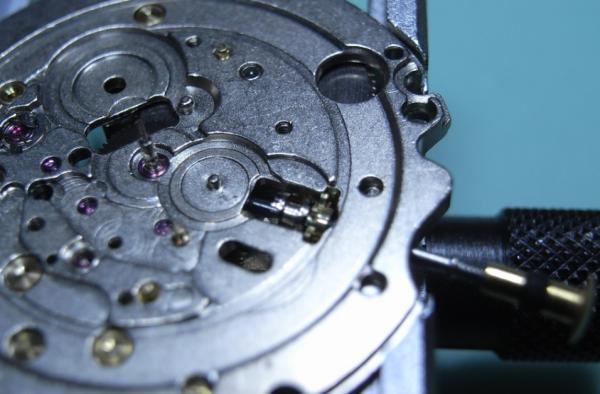
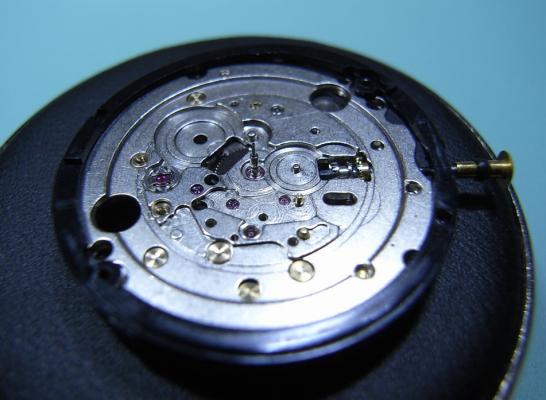
Assembly This is a very easy watch to re-assemble. In fact I'd recommend the 7S26A to be the first Japanese Movement to practice on, because it's so beautifully and logically laid out. The only downside to this watch is that you have to buy one special tool from Seiko, the S-921 Philipshead Screwdriver; but it's not very expensive and once you've got it, you have it for life. For oiling information and a parts list for your movement, please download the copy of the Tech Guide below: 7S26A_7S36A.pdf Drop in the Clutch and Intermediate Wheel. Then push the Stem into the shaft. Fit the Centre Wheel, and attach the Bridge. Then drop in the Mainspring Barrel, and refit the Click. Refit the Keyless Work, and I have to say the Seiko design is a HUGE improvement over the AS and ST Keyless Work design ... no fiddly Setting Lever screw to worry about ... Love it!! Once the Keyless Work is installed, install the Third Wheel, then the Fourth Wheel, and lastly the Escape Wheel. Next, fit the Barrel/Train Wheel Bridge. PLEASE NOTE: Be careful to check that you have pulled the Click out from underneath the bridge BEFORE you begin locating the pivots of the train. Once all the pivots on the train are in place, and you're happy it's all moving freely, use the three longest screws to secure it down. Install the Ratchet Wheel, and the Second Reduction Wheel. Two things to note here: Firstly, when screwing down the Ratchet Wheel, make sure to clear the leg of the Pawl Lever, as it has a nasty habit of wanting to slip under the screw. Secondly, as you screw down the Second Reduction Wheel (Reverse thread remember!), keep adjusting the Pawl Lever arms so they rest on either side of the wheel. Next, fit the Pallet and Pallet Cock, and then the Balance. This particular movement has the DiaShock system for the IncaBloc. To remove and refit these for oiling I suggest you make a simple tool from a plastic covered Paperclip. Straighten out the Paperclip and cut it to a comfortable length to work with in your fingers. Then pull the plastic cover down about 4-5mm ... as pictured below: Use this like you would Pegwood, over the top of the DiaShock Spring, as you use your tweezers to turn the spring and remove/refit it. The plastic cover will conform to the shape of the spring and hold it securely without damaging it ... It's works a treat! PS. Sorry I couldn't get a photo of me removing/refitting the spring with this little tool; but I don't have someone here to do the camera work, and only have two arms. Next, flip the movement over, and reinstall the plastic Location Ring. Install the Cannon Pinion, the black plastic Date Driving Wheel, then the Motion Work, and lastly the Calendar Ring. Install the Date Jumper Plate Install the white plastic Date-date Corrector Wheel and it's Intermediate Wheel Note: Remember from disassembly that the black plastic Date Driving Wheel needs to lip over this plate. Install the Date Dial Guard Place the Day Disk on the shaft and push the Circlip down the shaft after that and push down until it locates in the Circlip Groove. Lastly, reinstall the Oscillating Weight, Dial, and Hands. Case back up and your done! I really enjoyed working on this movement, and I thank my Heavenly Father for the skills and ability to be able to do this type of work ... amen!


 1 point
 -
That's a well put together post and great illustrations. Anyone about to embark on servicing or repairing one of these will find it very helpful.1 point