Leaderboard


Popular Content
Showing content with the highest reputation on 03/11/20 in Posts
-
Hi Cecking through my workshop laptop I came across these PDFs and thought they might be useful to the members new and old alike. I have several more and will post later. Cheers Witschi Training Course.pdf TZIllustratedGlossary (1).pdf handbook_of_watch_and_clock_repairsa.pdf Test and measuring technology mechanical watches.pdf4 points
-
Back on topic, latest acquisition, Montine Electronic (ESA 9157)...... apologies for the incorrect date, sadly can't yet get it to change2 points
-
A Ronda 1317 based Ingersoll Sealion 17 Jewel Day/Date from the mid seventies with, of course, a blue dial. This one fought back at every step of the way, but eventually I managed to wrestle it in to submission. It wouldn't wind (the clutch pressure spring was misplaced). The hands wouldn't set (the keyless work was all over the place). The crown and stem kept falling out (also down to the keyless work. It rattled (the mechanism retaining ring was missing). The hairspring was mangled (fat thumb disease caused by the previous "repairer"). It was filthy (blame the previous owner and Mr Fat Thumbs). The date mechanism didn't work correctly (the disk wasn't fitted correctly, and it was missing a dial washer). The day mechanism didn't work correctly, (the day jump spring was in back to front). Other than that and the fact that it had presumably not been serviced since it left the factory, it was fine. One other thing, I have yet to figure out how to re-fit the crown without the clutch jumping off its spring and eventually resorted to removing the barrel bridge and fixing it all from the back. It didn't seem to matter how much care I took, nor which position I had the thing in (winding or hand set, face up or face down) when I extracted the crown, it invariably jumped apart, either as I extracted the crown, or the moment I tried to re-fit it.
 2 points
 -
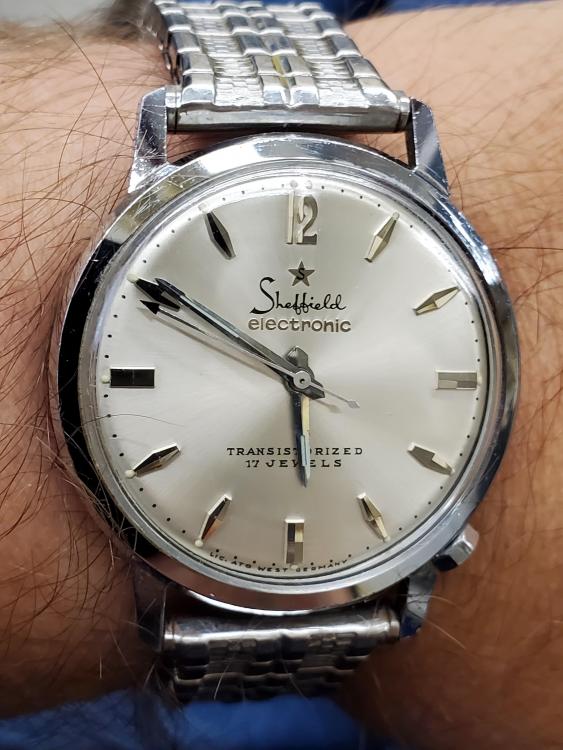
My new to me Sheffield electronic arrived yesterday. I popped a battery in it and off it went! I gave the crystal a polish this moring and here it is. I was inspired to get this watch by an earlier discussion about these watches which was started here
 2 points
 -
I feel I must apologies for the remarks I have given about the problem with this clock. My eyes are not good these days, it wasn’t until a member mentioned that the hairspring wasn’t right that I magnified the photos to take a look. I could then see what the problem was. Well done members for sorting this out. I will now sit in the corner.2 points
-
You need to watch my videos and give me some feedback jdrichard01 Sent from my iPhone using Tapatalk Pro2 points
-
I've done this technique, it works great!2 points
-
Hi all, the amazing engineering and imagination that has gone into this intrigues me.1 point
-
You should use plastic or wood levers rather than metal tweezers, and don't handle the battery with your fingers. The amount of idiots on Youtube who do this is misleading.1 point
-
Hi, I agree. Imagine having that in the lounge room1 point
-
Hi Its entirely possible, Some movements require the stem in the set position when removing the the stem, If not the crown and castle wheels displace and until they are realigned you have no chance, Remove the dial and hands and inspect the keyless work for shifted parts.1 point
-
Hiya you need a 371 battery Heres quick youtube link to help you.1 point
-
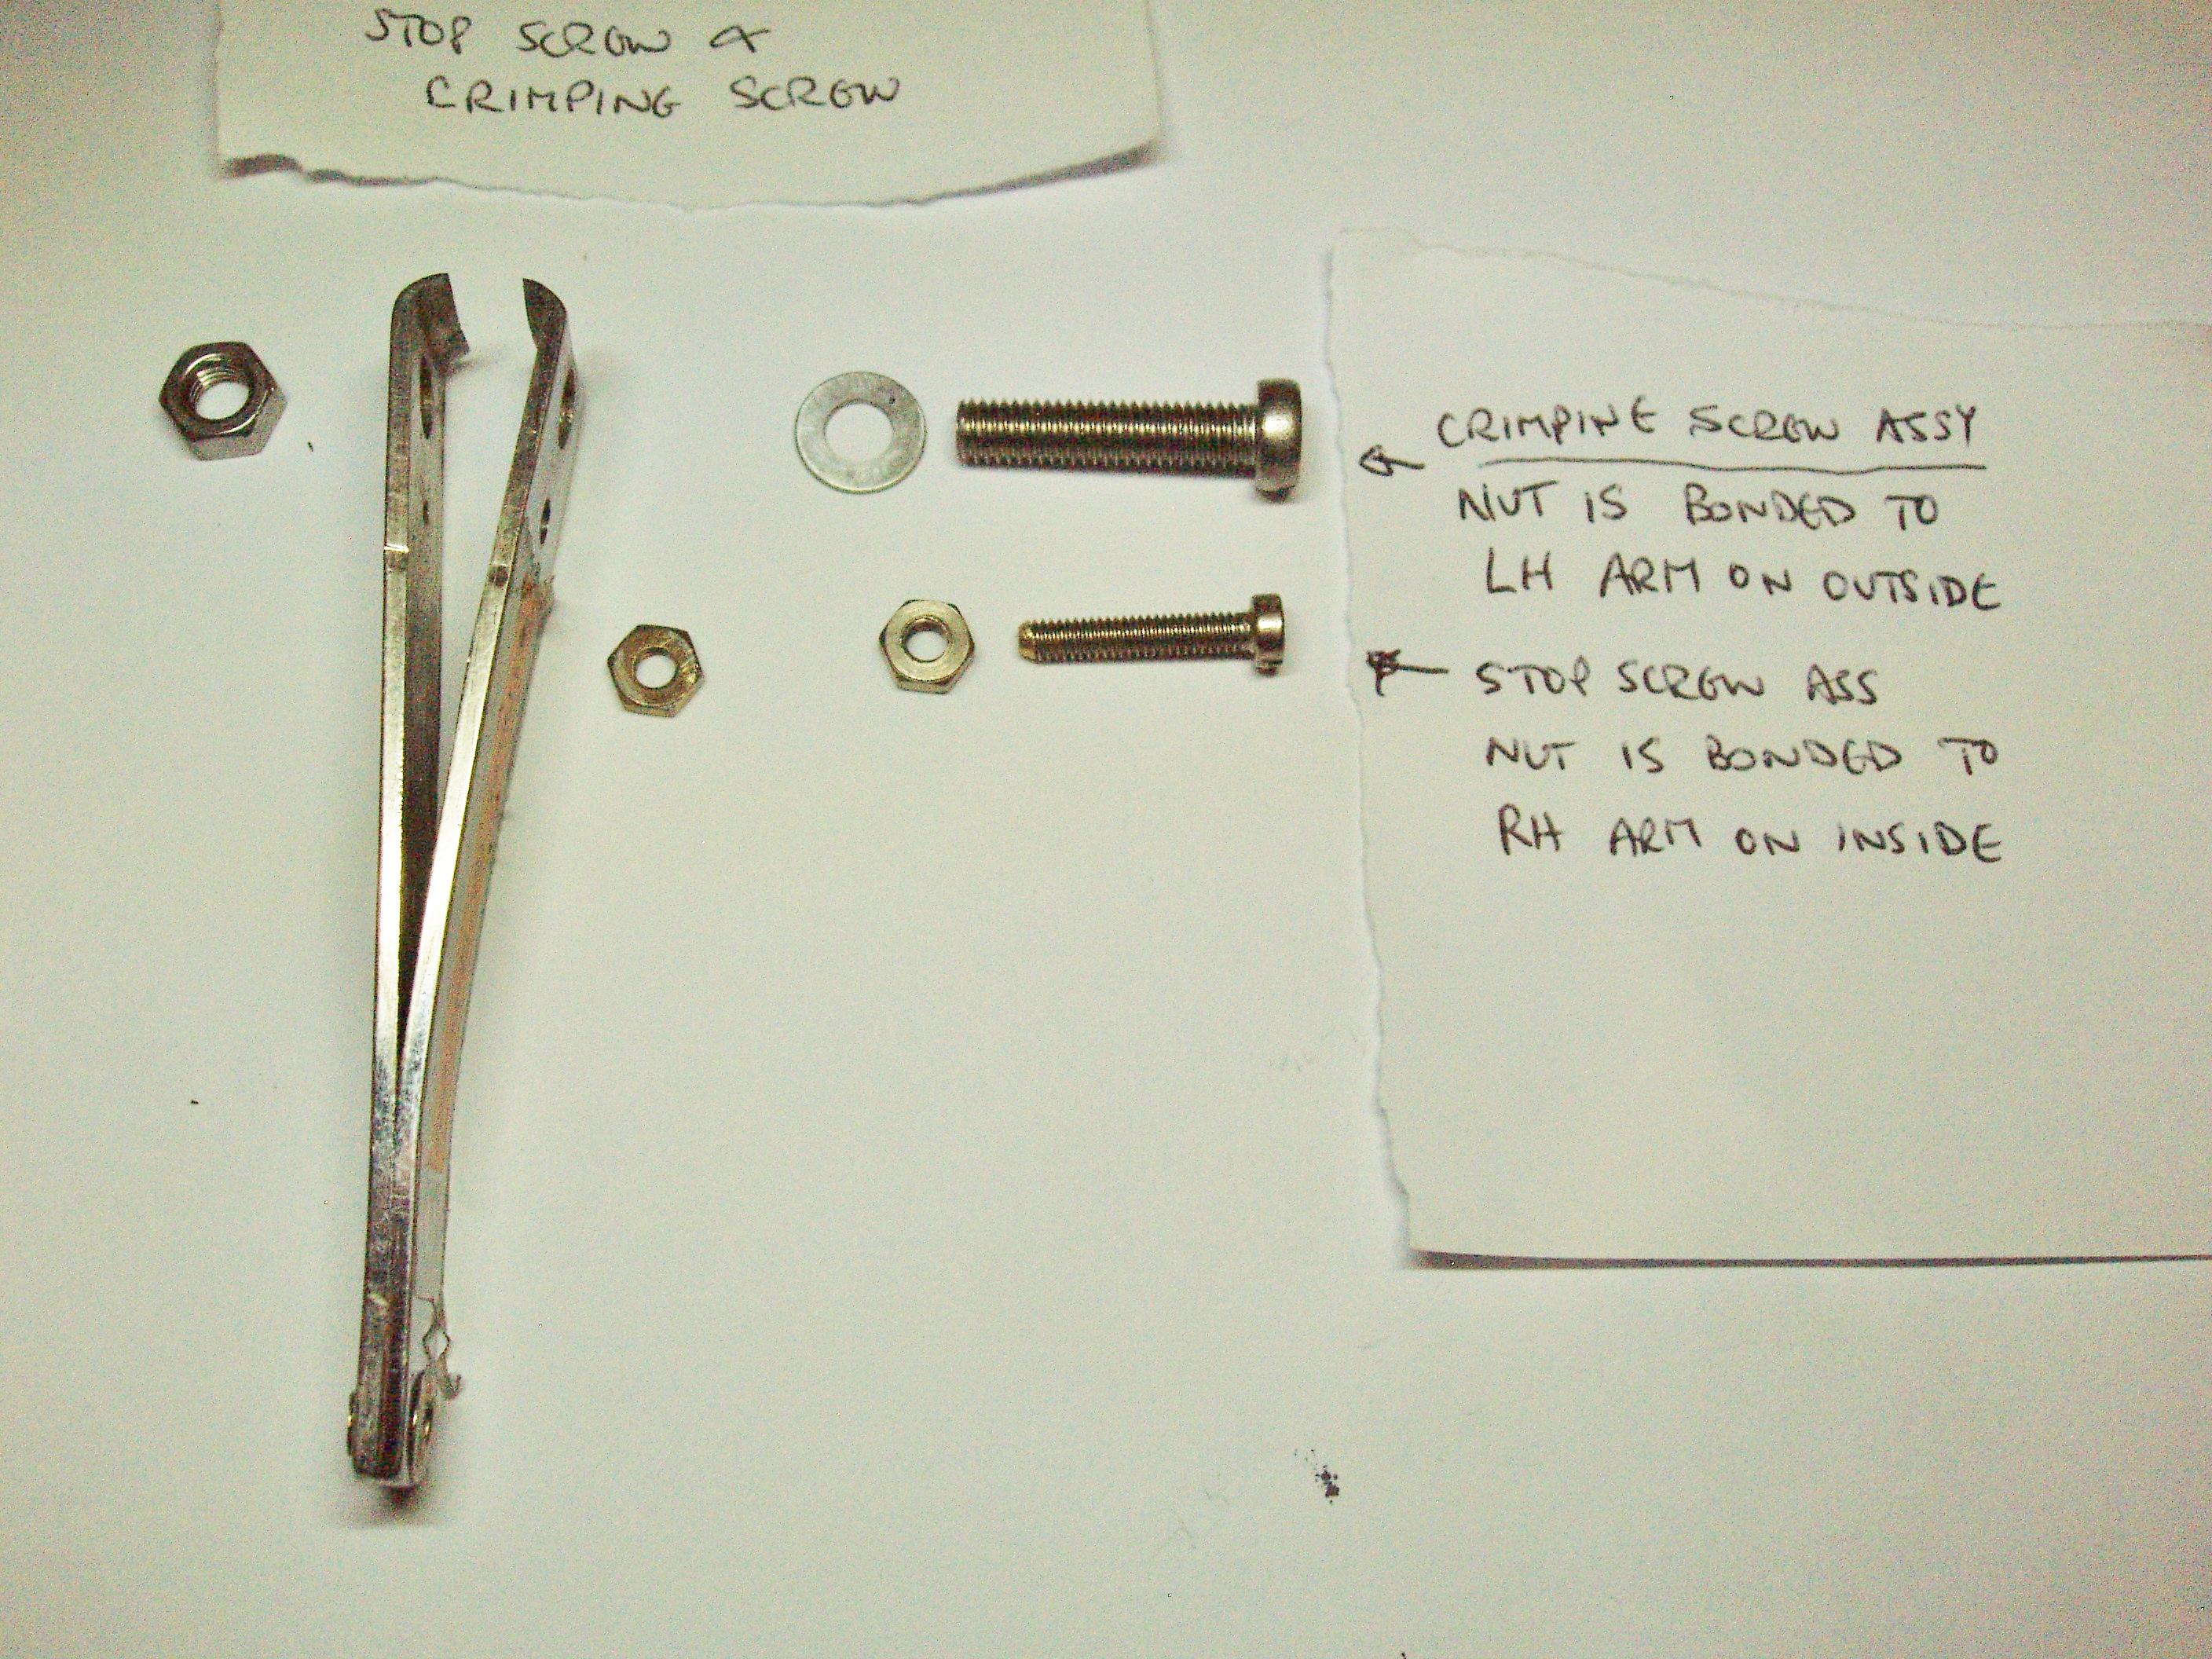
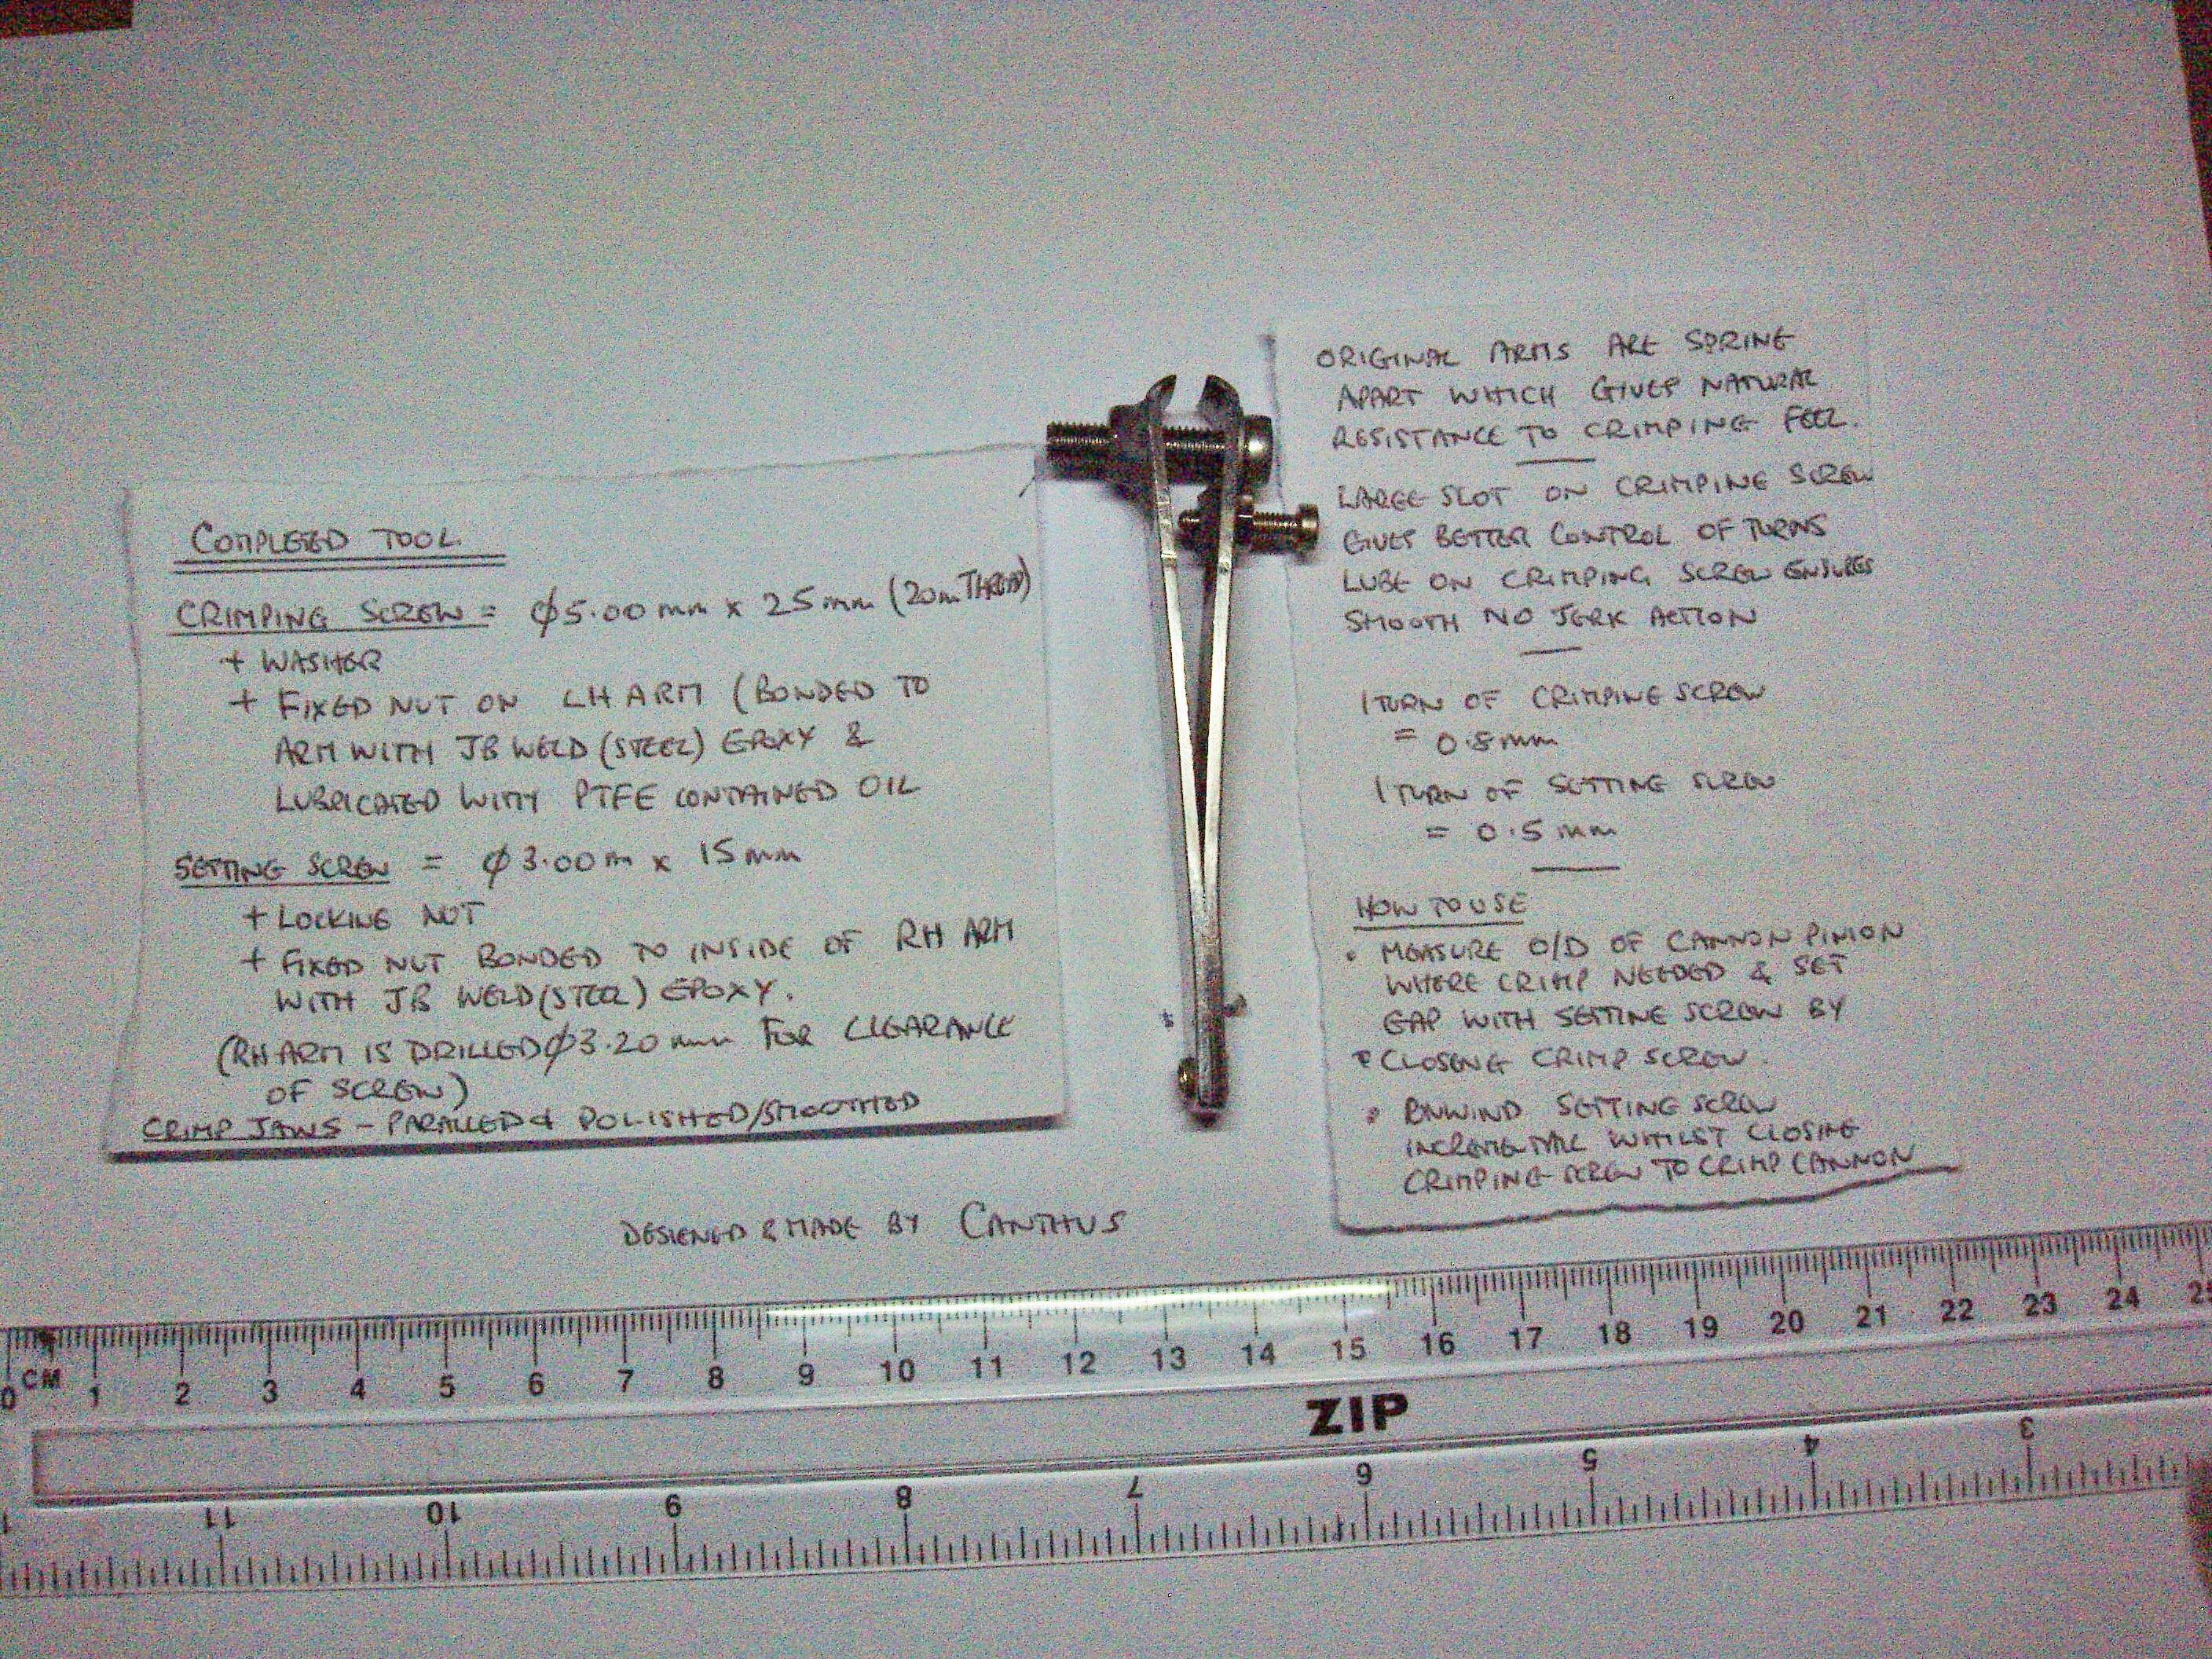
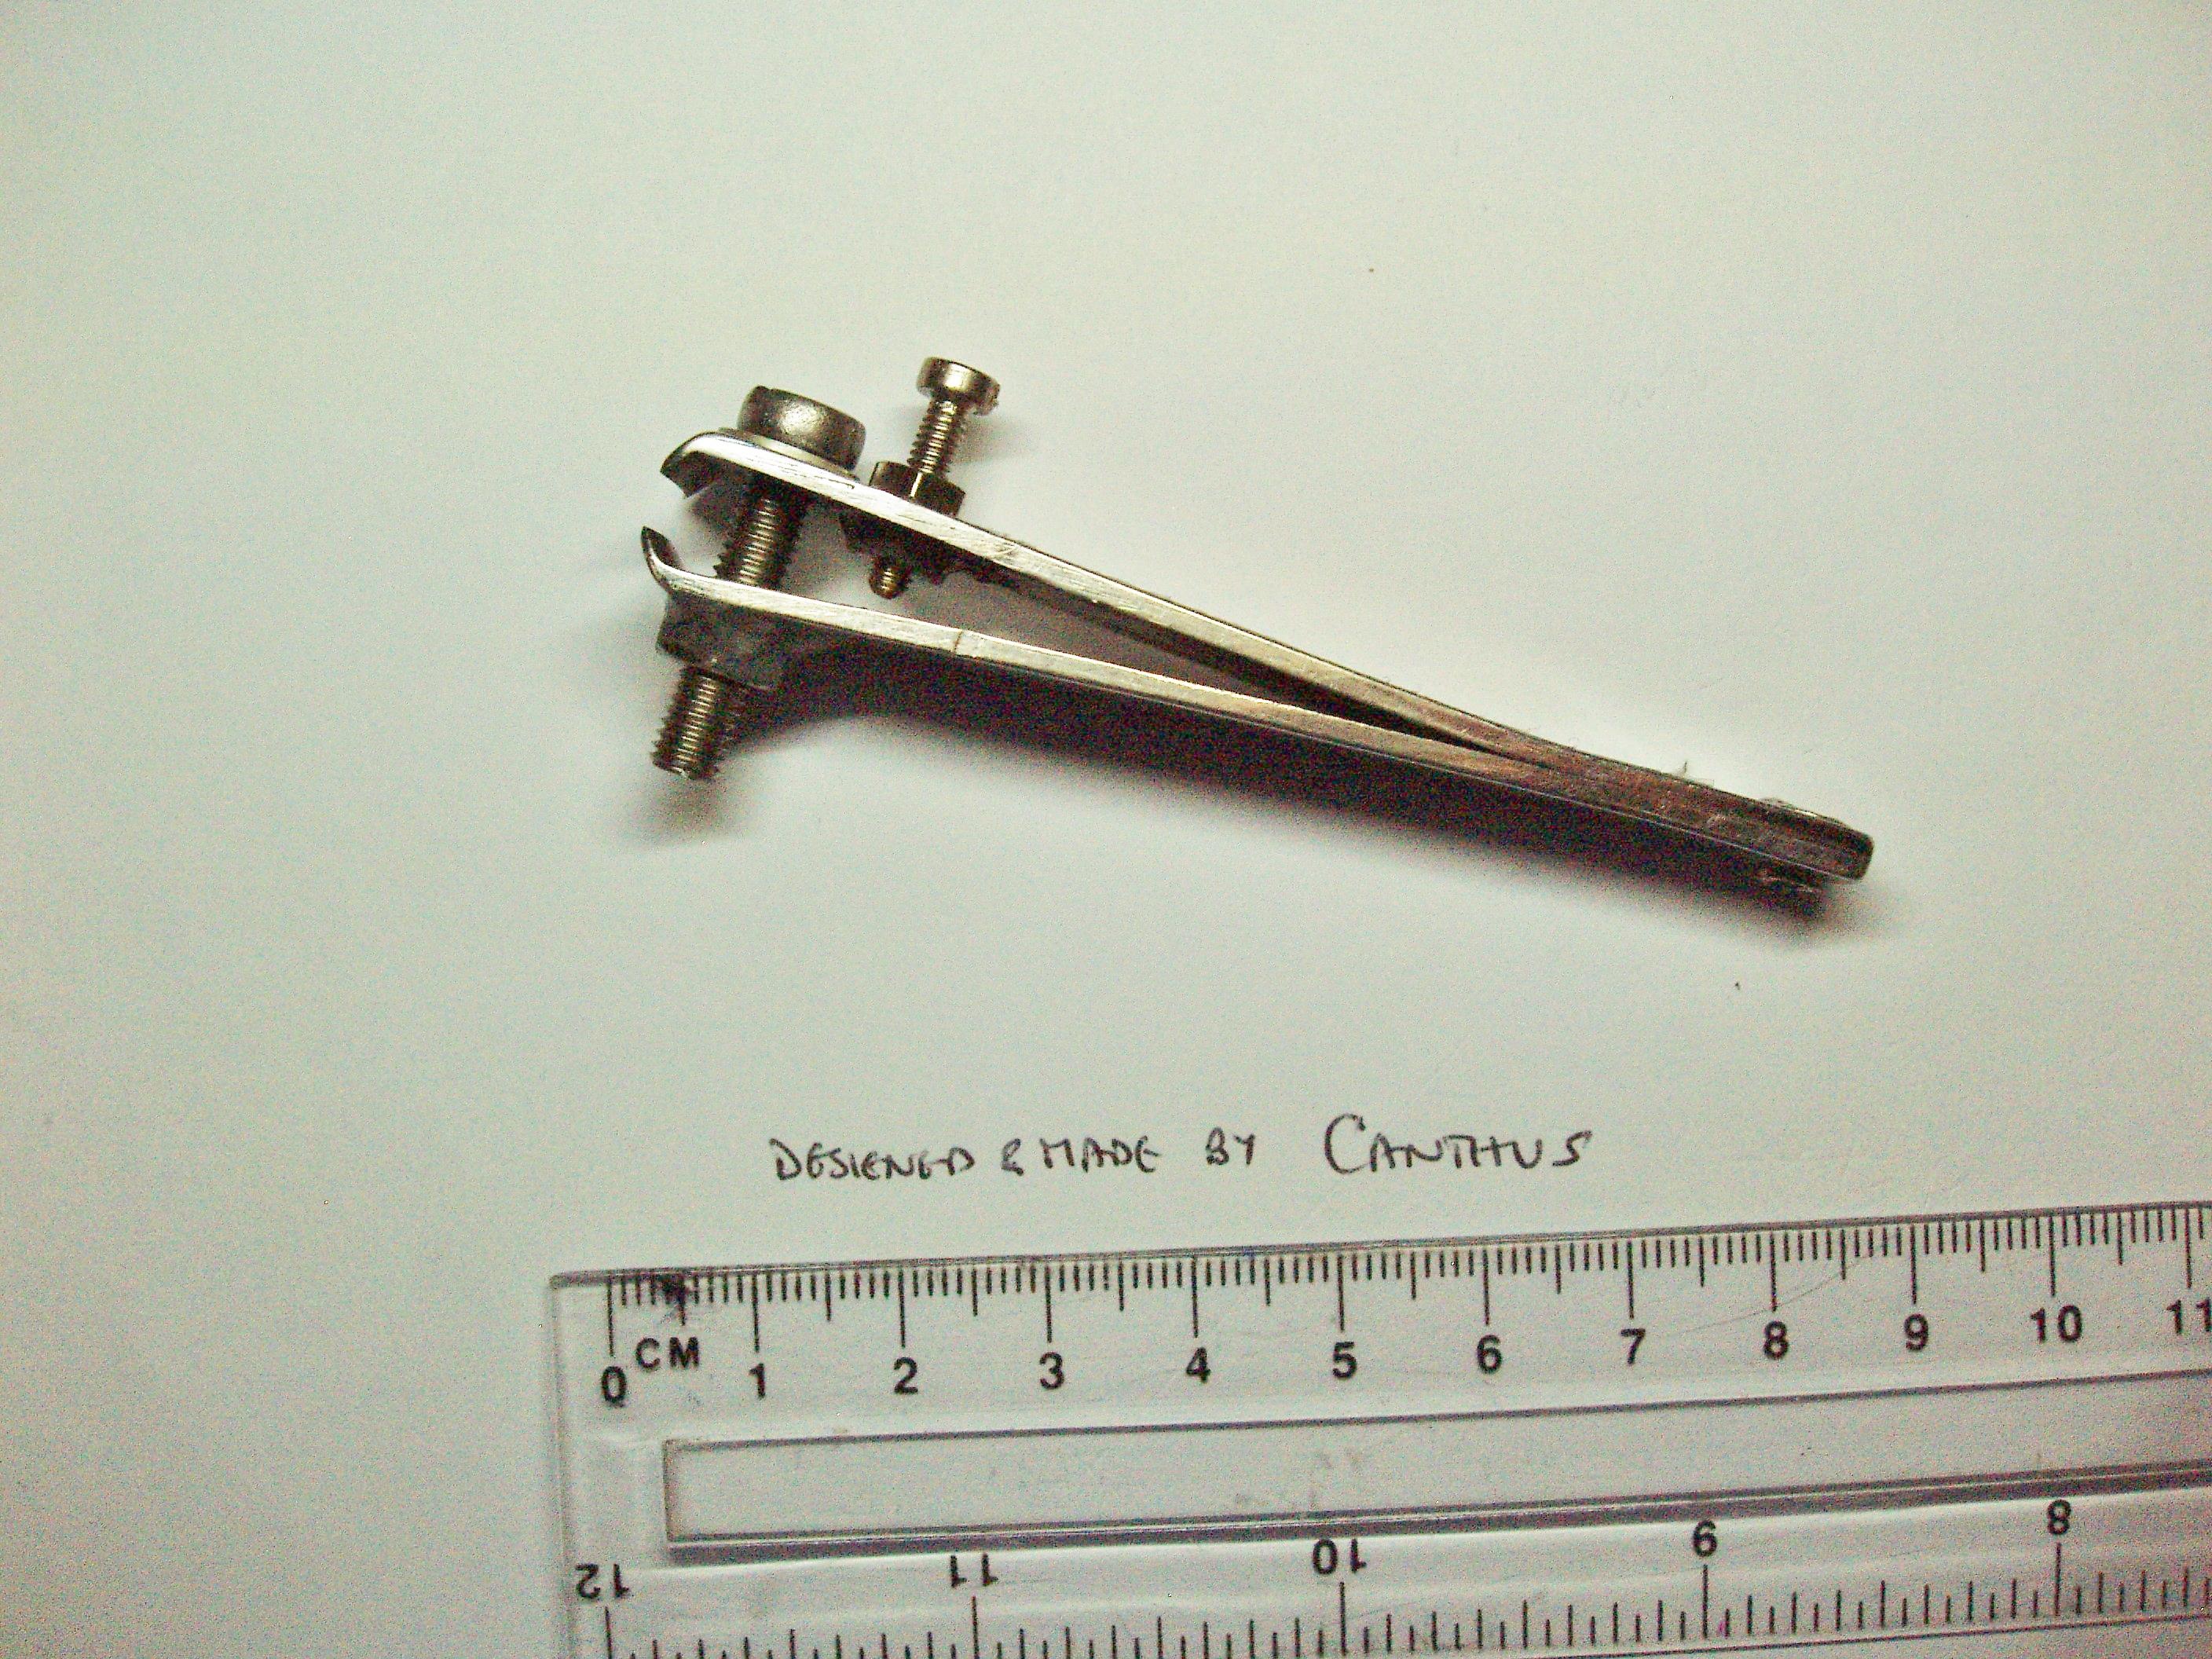
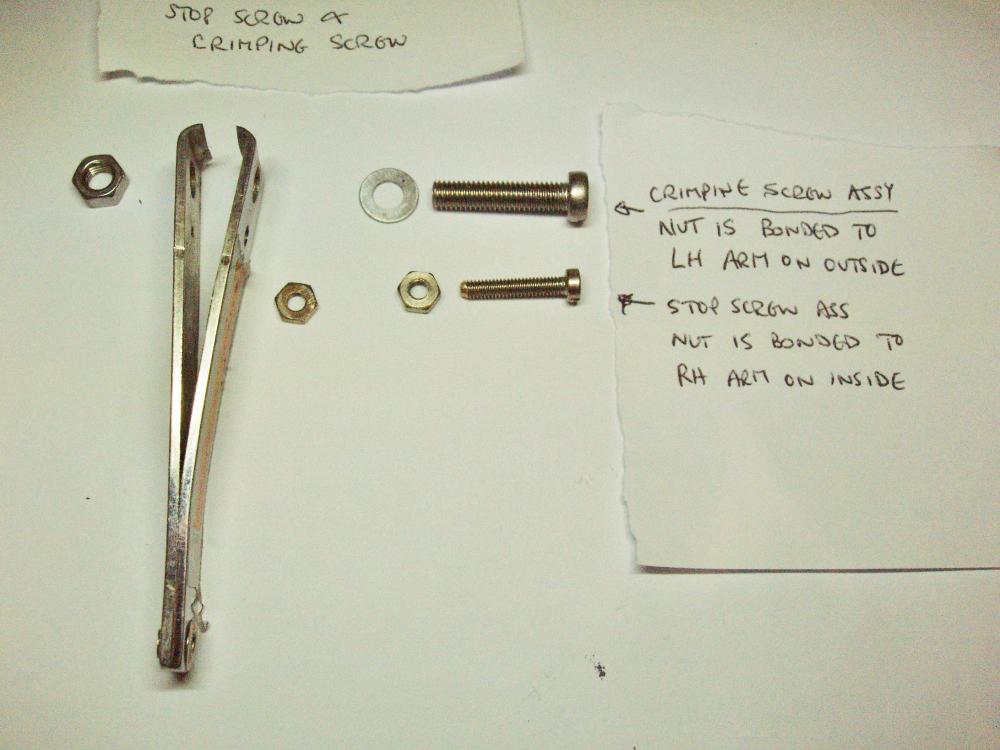
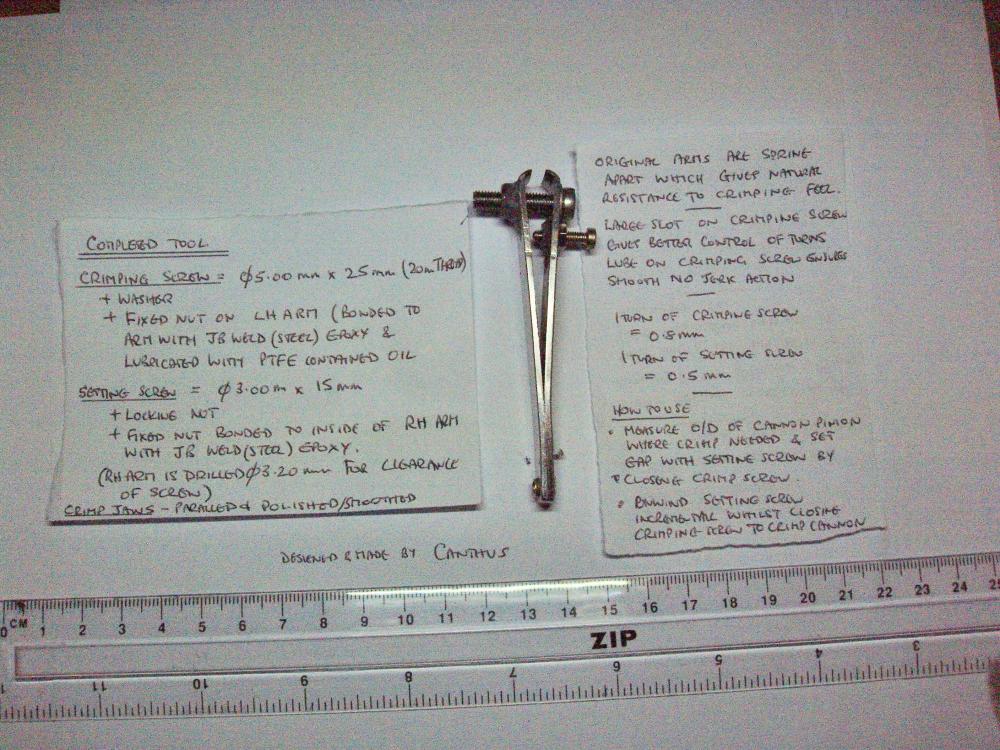
Here are some pics of my nail-clipper mods, for those hobbyists who do not have lots of cash!! Only cost would be for a suitable drill for the setting screw hole (tungsten carbide needed as material of arms is very tough), the rest from the 'bits box'. The original pin for the lever was 5mm diam hence the crimp screw diam, this could be different for other clippers. Any epoxy would do but JB weld sets very hard. The setting screw can be any size provided it does not compromise the integrity of the arm (ie weakening it across the arm) and the locking nut fit re fouling the crimp screw head. The crimp screw could be in the other way but thought easier to have both screw heads on same side.
 1 point
 -
i am intraged by how small a ladys wind up watch is. vin1 point
-
You need to post pictures to allow others help you. However the battery you removes has the type stamped on it. And even if it had not you can measure it and fin the type from the attached reference.1_Battery Cross Reference Guide.pdf1 point
-
I'm on the lookout for one of those, and that is a particularly pristine looking example.1 point
-
Hi Lui, have a look at this https://blog.esslinger.com/how-to-choose-watch-case-opener-for-watch-case-backs/ you must take your time when opening watches no matter what your doing put your loupe on and have a good look all around the watch read everything on it before you do anything. You can buy Chinese copy of bergeon 5700 screw back opener which is handy to have. Search around eBay and watch material house for the best price and quality you can afford. For some snap back cases you will need a razor blade or box cutter to get the back started. Also get your hands on a crystal press as these are good for snapping the case backs back on, a lot of quartz watches require this method. Always good to have an assortment. But as I said you must not rush you will get better with time1 point
-
He is entertaining, but his technique is a little woolly. I pointed out he had failed to re-fit the bridge screws on a Sekonda pocket watch. The whole thing was hanging together with friction and luck. He had even re-cased the movement, polished the case and declared the job done, with these three screws still sitting in the tray. I guess the lesson here, is that if you post YouTube videos, all your mistakes are up there for all to criticise, whereas when I send the same spring flying three times, and screw up the keyless work twice in the process (as I did last night), nobody will ever know.... err.. apart from you guys of course, and you wouldn't tell any one, would you?1 point
-
i think there is a few posts on this forum for "pannel clocks" auto and aircraft, electrical and mechanical. vin1 point
-
Welcome. Attention to detail probably sums up both professions. A great project to start with would be a 1940s aviation time clock like you find in a Spitfire or Mustang.1 point
-
Hairsprings coil clearly touches the regulator pin.as the coil expands in every oscillation, effectively shortening the active length of hairspring, the coil is also not concentric and unlebel unlevel. Therefore, runs fast. The issue with the main spring OH is helping with, is totally another issue.1 point
-
Everyone has their own style...and they seem to work for the most part. For me, if the watch is really dirty I will plonk the whole movement into the ultrasound (minus calender wheels and any other plastic bits). This get rid of most of the crud. I then follow my normal routine of hand cleaning in lighter fluid etc. I wouldn't depend on a watch cleaner to get all the crap out as its basically in a blind hole and stuff may vibrate loose but still be in the hole. That's what I do...give the various suggestions here a try and decide what works best for you. Anilv1 point
-
Bunn Special is OK, though he seems very confused most of the time, lol. Doctor watches and clocks is a bit of a goof.. imo. I had to remind him about shop safety after watching him run a polishing buffer while holding a wrag in his hand, very stressful to watch.1 point
-
My cleaning machine was made by Greiner, in the late 60s and made till sometime in the 70s. All the parts are strung on wires in what we call the "Christmas tree", any parts that can't go on wires go in a little basket. The balance and fork are supposed to go on a separate tree stacked on top. After cleaning the top tree with balance and fork go in the ultra clean alcohol to rinse for 15 seconds, then the rest goes in and the rise gets dumped and then refilled from the distiller. It's fabulous. In practice I leave the shock protected balance on the mainplate and fork in the little basket. Modern balances have the roller jewel press fitted so no problem there, and 7/10 watches I adjust the escapement so I'll reshellac anyways. But a quick rinse in alcohol will not hurt shellac; if the alcohol is ambient temp you can do several minutes no problem. In my machine it's always very warm and if I'm busy and leave it it's likely to at least degrade it. My escapement heater is almost always on (and kudos to Bergeon, solid piece of equipment!) so 30 seconds to reflow/add shellac if necessary.1 point
-
I think he knows more choice and colourful phrases than I do, and that is saying something.1 point
-
Hi, He left all his other watch repair items too. But they are newer and not as interesting as this piece. L1 point
-
Not too shabby. Not the final regulation however. The auto winding should be OK, it's just that at full winding the fotor static weight can't overcome the MS.
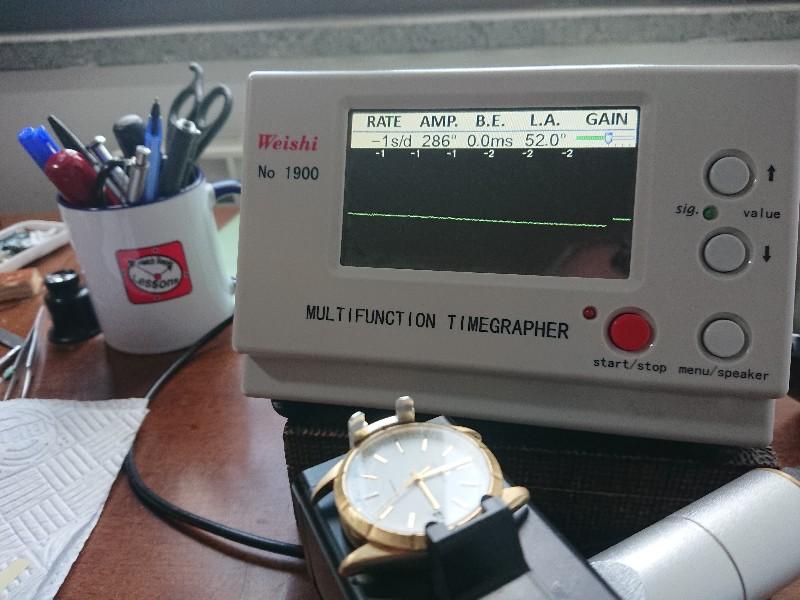 1 point
 -
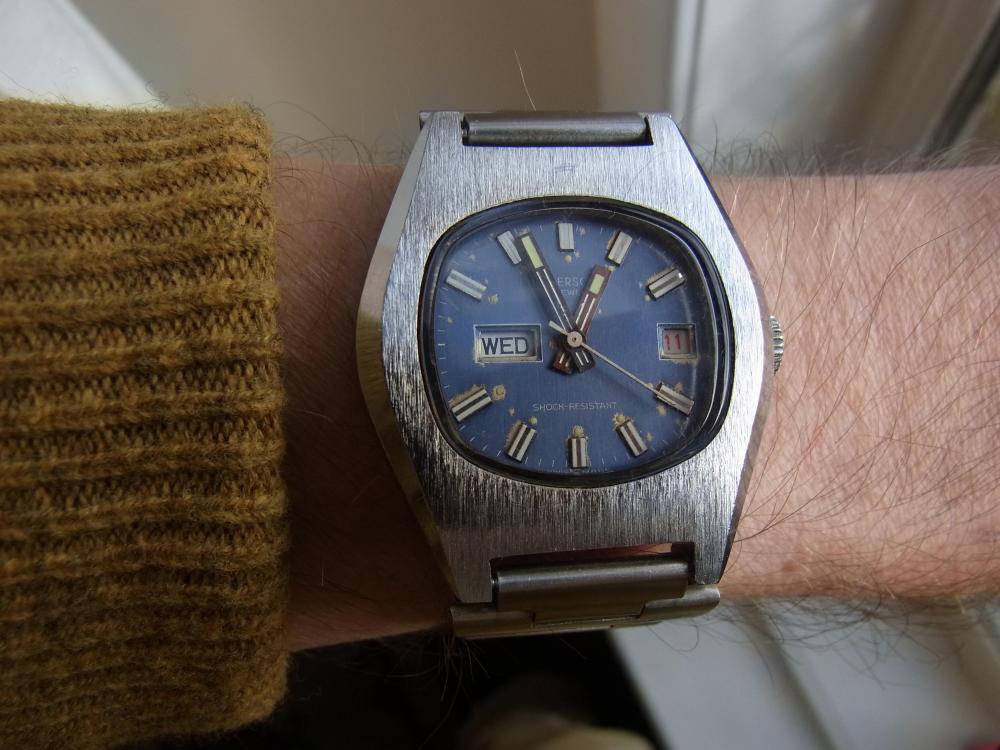
I see your Junghans and raise you my 1968 Junghans 600, electronic watch marketed in the US as 'Sheffield' 1968 advert, suggesting that it's what the trendy airline pilot of the day should be wearing....1 point
-
Hey first of all never be afraid to ask questions even if they seem redundant, you may get the occasional "there are many other threads on this topic" from certain members but I would say 99% of the users on this forum compared to other forums will genuinely still want to help, including me. Dont waste time or money on software, get a timegrapher 1000 it can be had for about $150 and it works surprisingly well. Just note it will only be the most accurate with complete and utter silence. As far as as setting a bridge goes it takes practice, when i first started it would take me hours and several attempts to get it right, sometimes resulting in bent or broken pivots, know i can almost lay it right on with perfection. just note to never put any excess pressure on the bridge. Gently resting your finger helps to keep bridge in place but i recommend trying to do it without doing this because when you are new you tend to tense up and you can unwillingly put too much pressure on the bridge. Sometimes you can lay it right on top and just jiggle it a bit to get one or two of the wheels in. Then checking them by moving the wheels up and down (do note Spin them until all wheels are set), and by doing this it will allow the teeth of the wheel to set in the pinion of the next wheel thus lining up the pivot of the next wheel in the train. I do this with movement at eye level. Under 10x+ magnification looking from the top you can actually see the pivots in their respective jewels. Slight manipulation with a pair of tweezers can also be used to set the wheels, but dont actually grab the wheel with the tweezers just gently movie the pinion until the pivot seats. Having all the wheels lined up before laying the bridge down also helps with this. Check the pivots from the top make sure they are all in and bridge is laying flat on the main plate. If all pivots are in then use light finger pressure while placing screws in, before screwing move the center wheels make sure all wheels are spinning freely, do not take finger pressure off the bridge yet you want to screw each screw in, if its 3 screws then start with the outside screws first. DO NOT screw the screws down all the way, just until you feel light resistance. Checks the wheels spinning again while still keeping finger pressure. Now you want to turn each screw a half turn one by one then check the free spin again, at this point you can remove your finger from the bridge. NEVER screw down a plate or bridge without having finger pressure it can result in bent or broken pivots.1 point
-
Welcome. You're spot on concerning Mark's production techniques. Really great set of courses.1 point
-
Thanks to all for your kind welcome, hopefully I won't explode too many watches in my learning curve1 point
-
Hi, I have just joined too and it's been great here so far. I agree re: Mark's course, has been worth every penny so far. If you would like some comic relief between lessons, check out his Q&A videos on his youtube channel (if you haven't already).1 point
-
Welcome, Enjoy the forum.1 point
-
Welcome [emoji106]1 point
-
Greetings and Salutations!1 point
-
Welcome to this friendly forum. Mark certainly knows his stuff.1 point
-
I prefer not to use your newfangled witchery machines. I just go by looks and sound.0 points