Leaderboard


Popular Content
Showing content with the highest reputation on 09/11/20 in all areas
-
Did a very big update to the forum software earlier when most of you were sleeping this has made the Forum even more mobile friendly, I’m using it now and I am enjoying the mobile version much more than Tapatalk which I personally stopped using months ago. I am keeping the Tapatalk extension installed though. anyway, just in case you witnessed the downtime, now you know why enjoy.4 points
-
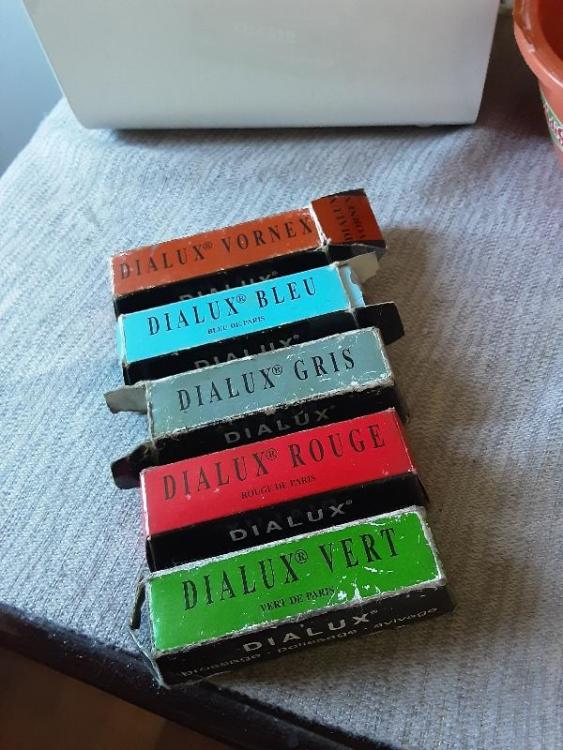
Dialux is for metals. You can see their recommended uses on Cousins UK or other sellers. For glass crystals diamond paste is used. And generic car abrasive or polish paste for acrylic.2 points
-
Hi guys … I had promised that I would make a « custom decal dial tutorial » on another thread there So here we are … There are many variations of decal dials, the best IMHO being the « negative gilt » dials which gives the best results. The process I’m showing today is aabout how to make a dial with black printings on a one color background. I had a cheap quartz diver waiting in my drawers so I’ll make a Heuer diver hommage based on the 980.016 model (quartz one too). DAY 01 : It’s 4:30 AM (I’m an early bird) and I have 2 hours to kill before a business trip to Paris (I’m French) so I decide I have time enough to begin. The first part of the process is to prepare the dial plate : - stripped it, removing all the lumes bars and dots - soaked the dial for some minutes in acetone to remove the paint - filled the tiny holes where the bars and dots go with cyanolite glue - sand everything flat I sand with 800 and don’t try to get a smooth surface as I want the paint to adhere perfectly to thedial plate. Here is the result … Then I want to spray paint. I make a tube with some painter’s tape, from a « curve » with it and place it on a plastic bottle cap. I want it curved so that I can stick the dial on it without any risk of bstructing the center hole or the date window of the dial plate. So I stick the sanded dial plate on the tape tube. As you can guess from the pic below … that’s not the first time a make an orange dial. Then I place the bottle cap and dial plate on a paper sheet and spray paint in orange. I use street art spray paint as it is « water resistant ». As you can see on the next pic, I don’t try to get a smooth surface, or even to perfectly cover the dial plate at first. I will let this coat dry, sand it with 2000 grade, then spray 1 or 2 coats until I get a perfectly smooth orange dial plate, ready for receiving a decal. So I place the bottle cap and dial under a shooter glass and will let it dry for about 24 hours before sanding and spraying the second paint coat. The 24 hours drying time is really important (though it could depend on the paint you use). The paint I use looks perfectly dry after about 5 hours but if you spray the second coat without waiting enough, that coat won’t perfectly adhere to the first and you could get a granular surface like an orange peel. And here is the dial waiting under the shooter glass. On the right is a « negative gilt » dial (third and last matte varnish coat) On the background there are two Raketa 2609 movements from the 70ies, quietly (really loudly to be honest) ticking for test after I‘ve recently serviced them. Now it’s 5:45 AM so I will have a and go to the train station. I’ll sand the dial plate this evening and spray the second paint coat tomorrow morning. Then sand it in the evening and spray the third coat (if needed) the day after. DAY 02 - DAY 03 : So here's what you get after the first paint coat … doesn't look really good but no matter as there's still some work to do to get a better result. And here's what you get after 3 coats of paint, each one sanded with 2000 grade, to get a perfect finish, flat and smooth. Now the dial plate is eady to receive the decal. DAY 03 : I won’t explain anything about Photoshop and Illustrator here … I’ll only explain how I print my decals. One thing really important, from my own experience, is the definition of the design. I’ve tried several, from 1200ppp to 6000pp and the best results I’ve got on printing decal sheets were with a 4000ppp definition. So all my dial designs are done in 4000ppp. The result is really BIG files … for example an A6 template with 12 dial desings ready to print is about 800Mo. As that dial is black printing only I open it with Photoshop and let the softwre (so ont the printer) deal with the printing quality. My printer is an old Epson Picturemate with a 1200 maximum definition. As the good quality decal sheets are not cheap and as I’m a « skinflint» I often print on A7 sheets … 6 dial designs on one sheet. When printed you should let it dry for about 4 hours then spray 2 really thin coats of matte varnish, letting each coat dry for at least 12 hours (24 hours is better). DAY 04 - DAY 05 : 2 days of speed-hiking with my wife so I didn’t worked on that tuto. You can check on the net what speed-hiking is, but to summarize it’s hiking as fast as you can with really light backpacks, trying not to run (or only short runs). On a good day you can walk 5 to 6 miles/hour … when trained you can walk up to 6,5 miles/hour … and while I trained for my first 62 miles ultra I achieved to walk (no running) up to 6,85 miles/hour (11 km/heure). DAY 06 : Today is Monday 6:00 AM. It’s been 5 days since I begun that tutorial and … my legs ache and all my body is painful (see Day 04 - Day 05) The dial plate is ready and the decal sheet too. You can see that the decal sheet looks matte now. That is because I have sprayed 2 coats of matte varnish on it, to protect the inkjet ink while I’ll soak the decal in water. Of course if you print with a laser you won’t have to spray varnish as the laser inks are (almost) water resistant. First thing to do is to chose the best item on the decal sheet and cut it round. Then you are ready to go. On the next pic you can see all you need now : - dial plate … fixed on a foam board using the dial feets - decal dial … nicely cut round - tweezers - thin and smooth brush (mine’s a watercolor brush) - some « micro set » … or just vhite wine vinegar (it helps the decal to set on the dial plate) - cold water Now you put the decal in cold water and while it soaks you brush some micro-set (or white vinegar) on the dial plate. Then you put the decal on the dial plate. Here you can see why I prefer using clear decal sheets on coloured dial plates … because it’s much easier to « perfectly » positionate the decal, using the central hole and the date-window. When you’re happy with the position of your decal you use a paper tissue to absorb the excess of water. Do that carefully as you don’t want to move the decal on the plate. And here we are … everything worked fine while absorbing the water and the decal position is OK. I’ll let it dry for about 12 hours before I cut the central hole and the date window, before I proceed to the varnish finish. Still Day 06 but 7:00 PM The decal has dried for about 13 hours so now I can proceed on cutting the decal sheet That's what I do then I : - fix it back on the foam board - apply some « micro set » around the center hole, the date-window and the outer diameter - gently press with a paper tissue so that the decal is perfectly applied (no more «air bubbles) And I let dry for 3 hours more Evening … 10:00 PM Now the decal is « perfectly » applied and dried and ready for the finish Last pic for today is after spraying the first coat of glossy varnish I will let it dry for 12 hours, sand it with 2000 grade paper and apply the 2nd coat. DAY 07 : 20:00 AM … only 1 pic today just after finely sanding with 2000 grade the 2nd varnish coat I applied yesterday DAY 08 : Yesterday evening I applied the 3rd and final varnish coat after finelt sanding and cleaning And today I can show you the final result … and say I'm pretty happy That dial is so glossy it’not easy to get a good pic, even on close-up. May I say that me hpone is nit the best at shooting pics (just like me) and the actual dial is much much better that it looks on the pictures below. I hope that you liked that tutorial and that it could be helpfull to members who want to try to build their own watch dials. I’ll try to make better pics with a real camera and a better lens … next week of the week after, after luming the dial together with the hands. Then I will still have to get a case and rework it so that it could be a 980,016 lookalike. Some of you may wonder how much time did I spend to make that dial. It took 8 days to achieve the all process but I spent only 1 hour the first day then only from 15mnm to 5mn the days after. So, apart from the design work on Illustrator and Photoshop (which took me hours), I would say that the whole process is about 2 to 3 hours. I must say that it's not my first try at dial making and I've trained for 2 years now. So if you want to try you should consider spending a few more hours but it's really worth the time spent as at the end you get your unique DIY dial.1 point
-
1 point
-
I just got off the phone with a Bulova representative. He told me they've officially closed Bulova's New York office permanently due to Covid-19. That's a lot of history that just got shut down... Hadn't seen that in any news/blogs/etc., so thought I'd share.


 1 point
 -
It's time for me to give back.. these are not expensive items but it takes time to picture and ship, give with the sincere hope of helping, Offer is for old and new members worldwide, I reserve the right to not send to opportunists. Unless noted I will send one item per person Small countersunk screws, polished, Ø available 40, 45, 50, 55, 60, 65. Beginner's polishing compunds assortement. Includes one slice per type. More items to come as time permits.
 1 point
 -
Here is another dial I made for a 36mm case with oversized crown both with raised dials
 1 point
 -
Hi Here is a couple of timex manuals to keep you going enjoy Drag files here to attach, or choose files... Other Media oy 21-22-23-26-29 timex.pdf timex 109.pdf1 point
-
I put a bit of oil on tip of screwdriver and pick the micro pin with the oil( same effect as when you pick up end stone by oiling jewel) , get the pin's bottom side prependicular to the flat side of screwdriver, with HS run through the stud hole, aim with the pin for the stud hole, insert the pin in and press it home. Remove and rinse the cock with balance complete attatched, oil the jewel, mount the cock back on mainplate. The pin wont fly if half length sunk in grease, rodico or oil.1 point
-
I just put my M109 back together a couple of nights ago. It took me more than an hour. Getting the balance wheel back into place was a real pain. And this isn't my 1st time doing it. Threading the hairspring through the regulator and then into the stud hole was a real pain. The tiny hairspring pin went flying a couple of times. Thank God it landed on my work mat each time. That prompted me to make a special tweezer for holding the tapered pin, in case I'm dumb enough to fully dismantle another Timex. One advice I have is go easy on the oil.1 point
-
Remove the bracelet, you might get a better grip there.1 point
-
Not with any certainty I'm afraid. If it was mine I would be inclined to do a bit of careful exploration with a case back knife to see if it could be safely lifted.1 point
-
I know for a fact that Tissot has produced some front loaders with one piece stems. I had a Sea Star Seven front loader on which the dial feet were a friction fit into the movement so once the crystal was out of the way the dial could be lifted off. The keyless works then had to be disassembled to remove the stem so that the movement could come out the front.1 point
-
This movement generates 2 kinds of noises. The first one would be the rotor bearing when it's free spinning in the non-winding direction. DO NOT use D5 on the ball bearing. It will kill your self-wind efficiency. Use a tiny bit of 9010. The other noise would be the ratcheting noise when self-wind is doing its thing. The click in this movement is engaging with the reverser wheel and not the ratchet wheel and also generates quite a bit of noise. To dampen this noise you'd have to grease the ratchet teeth on the bottom half of the reverser wheel. Access is restricted by the balance cock so you would need to remove that first.1 point
-
Was late trying to complete a repair and was tired. Got the Keyless works done and only thing left was the Pallet fork and the Balance complete which I didn't have installed yet. Started to wind the watch but was not getting any resistance from the mainspring. I stop and though was did I do wrong. So I pull the mainspring bridge back off, took out the the barrel, pop the lid and took a look at the mainspring, looks good, what the you know what's going on. Got everything back together then it hit me , you dummy the Pallet fork not in yet to hold the power. Moral of the story "No more work after 10pm.1 point
-
275T is an old bakelite bezel removing tool, unfortunately I'm not at my shop so I could take a picture right now., but these go quite often at Tradera and Ebay so a quick search would give you a general ide of these.. I can add a link https://www.ebay.co.uk/itm/TISSOT-Seastar-Seven-Vintage-Bakelite-Watch-Case-Bezel-Removing-Tool-Set-/2837976339111 point
-
It is an interesting topic for sure. However replacing a vintage watch mainspring with an exact sized replacement is not always possible. I have found providing you don't go a long way off the original spec and the movement has been serviced it runs just fine. However two issues to be observed. Going above the original height is risky as binding on the barrel lid can happen also going way below the original height means the arbour hook its not naturally in the centre of the spring. The length will alters its power-reserve. I have GR resources book which is really handy when faced with this dilemma. Unfortunately this is now out of print, but might be available on-line.1 point
-
A new one for me. It might be a split stem. However the bezal might lever come off which will expose more of the crystal.1 point
-
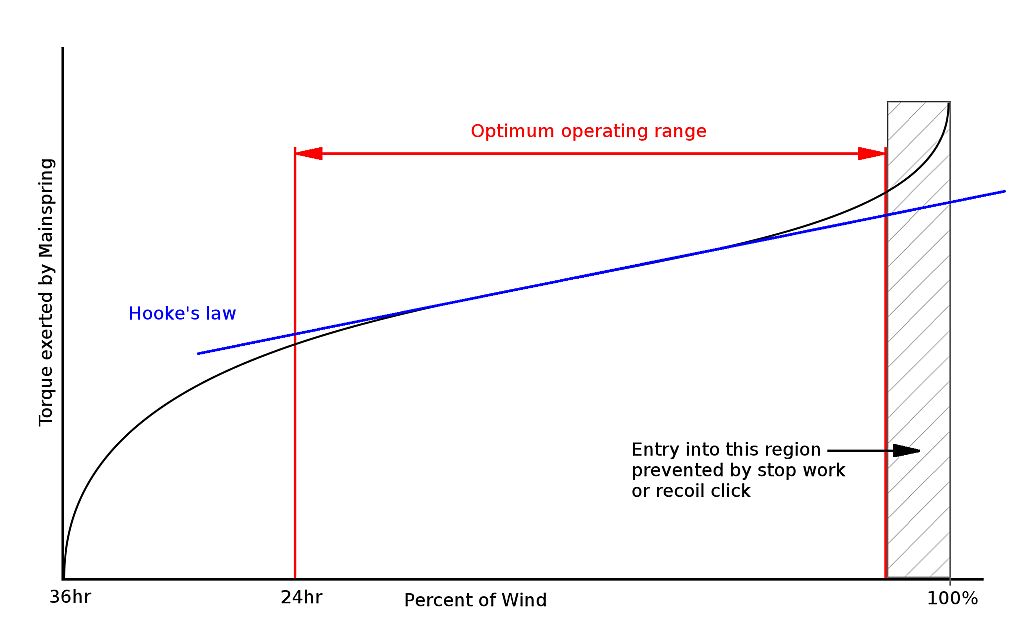
They have electronic devices to measure the power curve of the spring in the barrel, but back in the day they used manual machines. They are simple in concept but would be a lot of work to make one. The main component of the machine is a steel spring, somewhere around 1mm thick, about 35mm high and about 80cm-1m long. It is fixed at one end, and has calibration marks along its length to show the force needed to move it about 6cm. A holder for a pen can be fixed anywhere along the bar. The barrel is held by a split chuck, and the arbor in another. Through gearing, turning a crank, you can wind up the spring and then release the power; while doing that a bed moves along in front of the spring- this has paper on it. Also while winding a string wraps around a drum and is connected to the pen holder... so you make a graphic chart of both the winding power curve and unwinding curve. I can't find a pic of one but I have used them in the past, really neat machines. The graph looks like the pic- though this is just showing one of the two, there is a difference between the winding up graph and winding down.
 1 point
 -
Good point with lighting. I bought two led shop light fixtures. My plan was one above and one on either side (which obviously requires a third) but I’ve been using only the overhead light. These things are awesome! Highly recommended. I got mine at Home Depot I think. I need to improve the workspace. My “bench” is an old kitchen table, with 2x10s stacked on it with the top from a large IKEA desk on that. I keep pliers and other “big” tools on the table, under the top. Handy, but not in the way. Also a pad and pen to jot down stuff I need. The top is huge so everything is spread out on top. Next to my green mat I keep my spring bar tools, and tweezers, along with my loupe. Screwdrivers are in their swivel stand in front of me; less used tools are in a clear bag to my left; bigger stuff like bezel tool, bracelet tool and case dies are on the right. I bought a bunch of “craft” boxes at Wal mart and dollar store so I can keep a watch and the collected parts together for each project. That was a big help. Then once I have everything I can build it. Loupes: I have an old B&L with a glass lens. I bought one a couple years ago for work and the lens was plastic. Clarity wasn’t the same either. I bought a Burgeon branded one and that’s what I’ve been using mostly. Other than occasional fogging it’s fine. Movement holders- I love the dedicated ones. I have one for 15xx and 31xx movements. Also the 4040 but I’m not crazy about it. It is quality however.1 point
-
If I can add something; what would you not bother with as well? I got the cheapie mainspring barrel closing device from cousins. Solid win. Not likely something worth Bergeon money, but definitely worth having on hand. Pithwood, pegwood, and Rodico. A blower. I tried to make due with a baby snot sucker; no dice. Timegrapher. Seems the Chinese special gets the job done more than fine. I got the 1900 rather than the 1000, but can't say I've used any of the extra features (I'm a noob). Proper oils and greases. Work mat. Keeps springy sproingy parts from springy sproinging too far. Optics. Mine suck. I need to do something better. On that note, lighting. Also need to up that game. Seating/workbench. Too high, you're going to kill your neck. Too low seems difficult and obvious. Demagnetizer. I got the cheapie blue guy off Amazon. It gets the job done. There are undoubtedly options that get the job done with less fuss. I broke out my wallet for the screwdrivers and tweezers. I have a cheap eBay kit special set of tweezers, and a set of Dumont tweezers. The eBay special tweezers are essentially useless. I used to use them as a second hold down sort of thing, but pegwood does that better. They're useless now. I have a set of drivers from the same eBay kit. Useless. I got the student model Bergeon drivers, but have zero data points other than the two described. Seems like the sort of thing that falls under the same umbrella. I also have a few Snap-On ratchets, because they're so frequently used in the auto shop, and Lie Nielsen planes for the wood shop. Same philosophy. Movement holder. I got a Bergeon 4040, and an Esslinger model. The Esslinger model has soft shoulders (best way I could think to describe that), and doesn't hold movements very well. The Bergeon is solid.1 point
-
I have the generic does with the large plastic handle that works great for Rolex and Tudor. It was maybe $50 for the set. Copy of the Burgeon dies so the original/copy dies can fit the same handle. I have been eying the first for Omega case backs that fit this handle (similar pricing). I have a Chinese 2-point adjustable “spanner” type opener with like six different “bits” on each side I’ve used on Heuer and Omega cases before but it’s easy to slip and damage the back if you are not super careful setting up and using it. I have not run across a case I couldn’t get open, holding the case in my hand and the (correct) tool in the other. The China tool is a bit more fiddly. The one exception was a titanium case with a titanium back and the threads galled. I shrunk the cover with the liquid of an upside down cannot “air” and it came right off. I applied anti-gall compound after polishing the threads. And I still have a sticky ball to get the threads started straight before torquing it with the tool. Going straight for the tool is a great way to destroy the threads on the case or back. Doing that on a Rolex sports watch is financial suicide.1 point
-
There is a bunch of stuff on the subject of syncing multiple cameras on the CHDK forum, this thread for example. https://chdk.setepontos.com/index.php?topic=8810.01 point
-
"Ugly" and "Bargain" grade stuff from KEH was my bread and butter. I think that my full Mamiya RZ67 system, including a metering prism and some really awesome lenses (including the luscious 110mm f/2 lens, the 140mm f/4.5 FLE macro, and the 180mm f/4.5), was less than $400. Mamiya's 180mm f/4.5, both the RB and RZ versions, is the best lens I've ever used in over 20 years of photography. My second favorite is the gloriously fast and imperfect Minolta 58mm f/1.4 -- it's like a 10th of the cost of the f/1.2 version, is way easier to use, and has a better rendering IMO. My third favorite lens is the 50mm f/2 Schneider Xenon lens that comes attached to a Retina IIa -- a camera I've previously mailed to New Zealand for repair. The limits of my camera repair skills start and end with the Argus C3. ;-) Your story sounds fascinating @nickelsilver! (Oh, and for photography geeks: my Avatar is a cyanotype printed on cloth from an iPhone shot I converted into a digital negative (printed in negative on transparent paper with pigment inks) with added embroidery. It's NSFW, but my photography portfolio is at https://www.iggybug.com/)1 point
-
Are there any Russian manufacturers that used stainless steel cases? The thing that turns me off every single time is the pitted chromed pot metal case.1 point
-
The jokeful title is there to remark the cheapness of this watch. Of course real anadigital quartz watches are not like that.1 point
-
Been. There. Too many times to count. The worst is when the late night project is a car you need the next morning to get to work. Me and a friend once spent way too much time, and all the swear words available in both our native languages on an oil change (there were other tune up things, but the oil change is what did us). However many HOURS into trying to remove a stuck oil filter, it turns out we were turning it the wrong way.1 point
-
Welcome here, I will read with much interest and appreciation about your projects once they become reality.1 point
-
Purple locktite. Labeled “low strength” for small screws. I don’t remember the number. I use it all the time for case tubes, stems in crowns and carburetor adjustment screws. And it is applied to the male thread with the Oiler. Just enough to see color around the screw. If it’s “bulging” off the threads it’s too much. In the case of case tubes, it helps a lot with sealing. I’m a bit more generous with it there. I got a small bottle (special order from my local industrial supply) and it’ll last me four and a half lifetimes.1 point
-
I feel disappointed after I watched the video. The video is as usual outstanding but it's always amazing how the Chinese clone the stuff and just don't quite get it right. Having a certain degree of disbelief I had to go back and rewatch part of the video just to make sure I wasn't confused but very sad and disappointing. Having a brass winding Arbor just doesn't cut it. For anyone watching the video above make sure you click on the YouTube symbol and go to YouTube. Then you want to click the thumbs up to let Mark know you liked his video because it helps with YouTube's rating system. then you really want to be helpful leave some sort of review in the comments section apparently YouTube really does look at the thumbs-up people leave reviews or comments all good for YouTube creators.1 point
-
Well, that was so easy as to be anticlimactic. I figured 30 minutes was enough curing for a glue I would be removing with acetone anyway, so I gave it a shot using my desktop jeweler's vise (cushioned by some soft plastic). I wouldn't have tried this without a case vice except that I noticed the design of the lugs gave two nice reinforced perpendicular surfaces that would fit easily into a jeweler's vice without significant risk of damage. Slow, even pressure with a 1 1/8" wrench opened the caseback on my first attempt. Easy peasy. Thanks all for the advice!
 1 point
 -
Here is a watch that belonged to my late father. It was never serviced before. The caseback was so tight that it broke the jaw of my mentor's bench mounted caseback opener. We sprayed WD40, we heated it with a microtorch, we dripped acetone into the threads, we superglued a nut to the back... We didn't just go full gorilla on it. We went all out King Kong! It still wouldn't budge. In the end, I used 5 ton epoxy and glued a really big nut to the caseback, mounted my caseback holder to my bench vise and used a 15" wrench on it. Finally it opened. Broke my caseback holder in the process.
 1 point
 -
Given the right tool, it will open, no heat, no boiling .......1 point
-
Supergluing a large steel nut to the caseback will give you much more to grab hold of. You can dissolve the superglue back off with acetone, but don't get that on the crystal as it will cause damage. Also the superglue will typically fail before the watch case gets damaged if you start to go full gorilla on it. Boiling a watch sounds like a good way to make watch soup, but a very bad way to start servicing it.1 point
-
A closer look at my work. Hard to keep the glare off the clear top coat. Not an artist but I try
 1 point
 -
You can get a white laser printer toner such as this one which will allow you to print a white image onto a water slide transfer substrate. You could then apply the transfer to a black painted dial. I wonder if this is how this $1 dial has been created.1 point
-
Difficult to argue with that since you are unwilling to share your "method", however, since the subject of this thread is "CUSTOM DECAL DIAL TUTORIAL", and not some mysterious secret "method" let me address the subject of longevity of decals. Decal making has a long history, dating back through the centuries, and is arguably as old as the act of tracing an image on to a substrate, however the modern process, it could be argued really took off some time in the late 18th and early 19th centuries. (19th century "Decalomania" Vase) One of those credited with its invention was the engraver Simon François Ravenet ( a contemporary and assistant of the English painter, print maker and satirist William Hogarth). The process has evolved into a stable of modern industry, with decals appearing on all manner of substrates and in all kinds of processes. The process used in the waterslide decals described in this thread, for use on watch dials is almost identical to the process used on children's toys throughout the 20th century, with everything from clockwork tin plate Hornby locomotives to Matchbox and Dinky cars being adorned with water slide decals. Any process that can survive the actions of a child playing with it could hardly be described as anything other then very robust, assuming the surface on to which the decal is being applied, is clean and blemish free, and the decal is applied according to the prescribed method. Clearly the only way to know if these dials will stand the test of time is to wait 100 years and see if they are every bit as legible as their early 20th century counterparts, however, considering that they will generally not be subject to abrasion, moisture, harsh UV light or solvents, and that their surface is sealed with a waterproof lacquer, I have no reason to doubt that they should bear up just fine.1 point
-
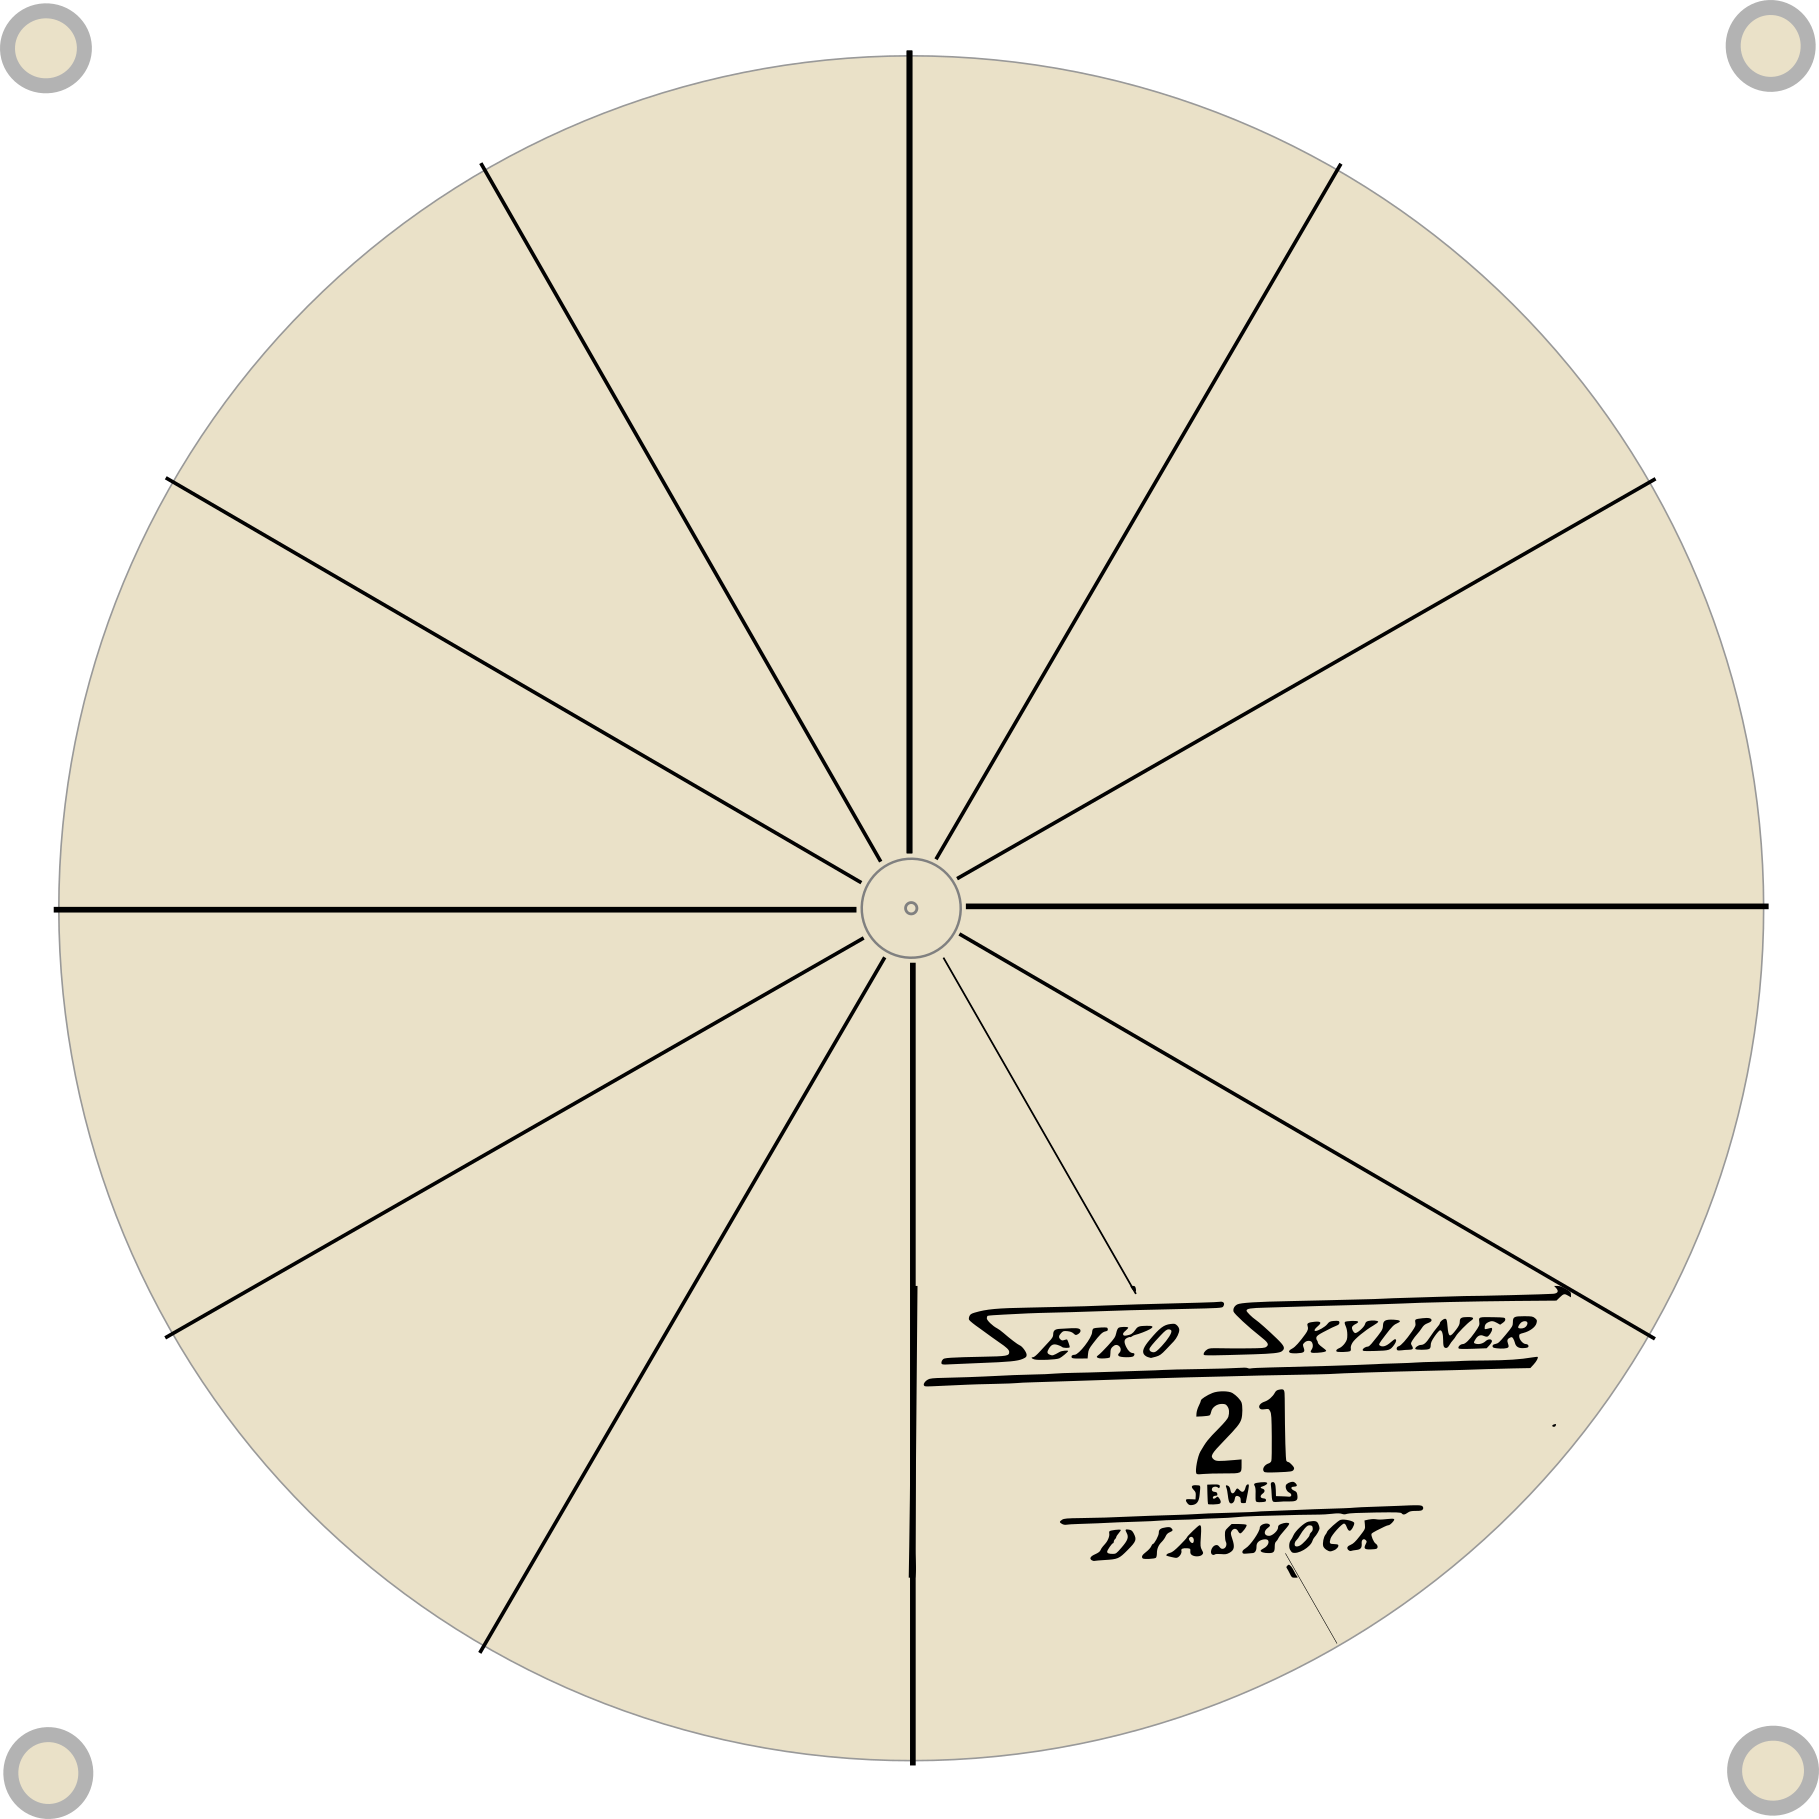
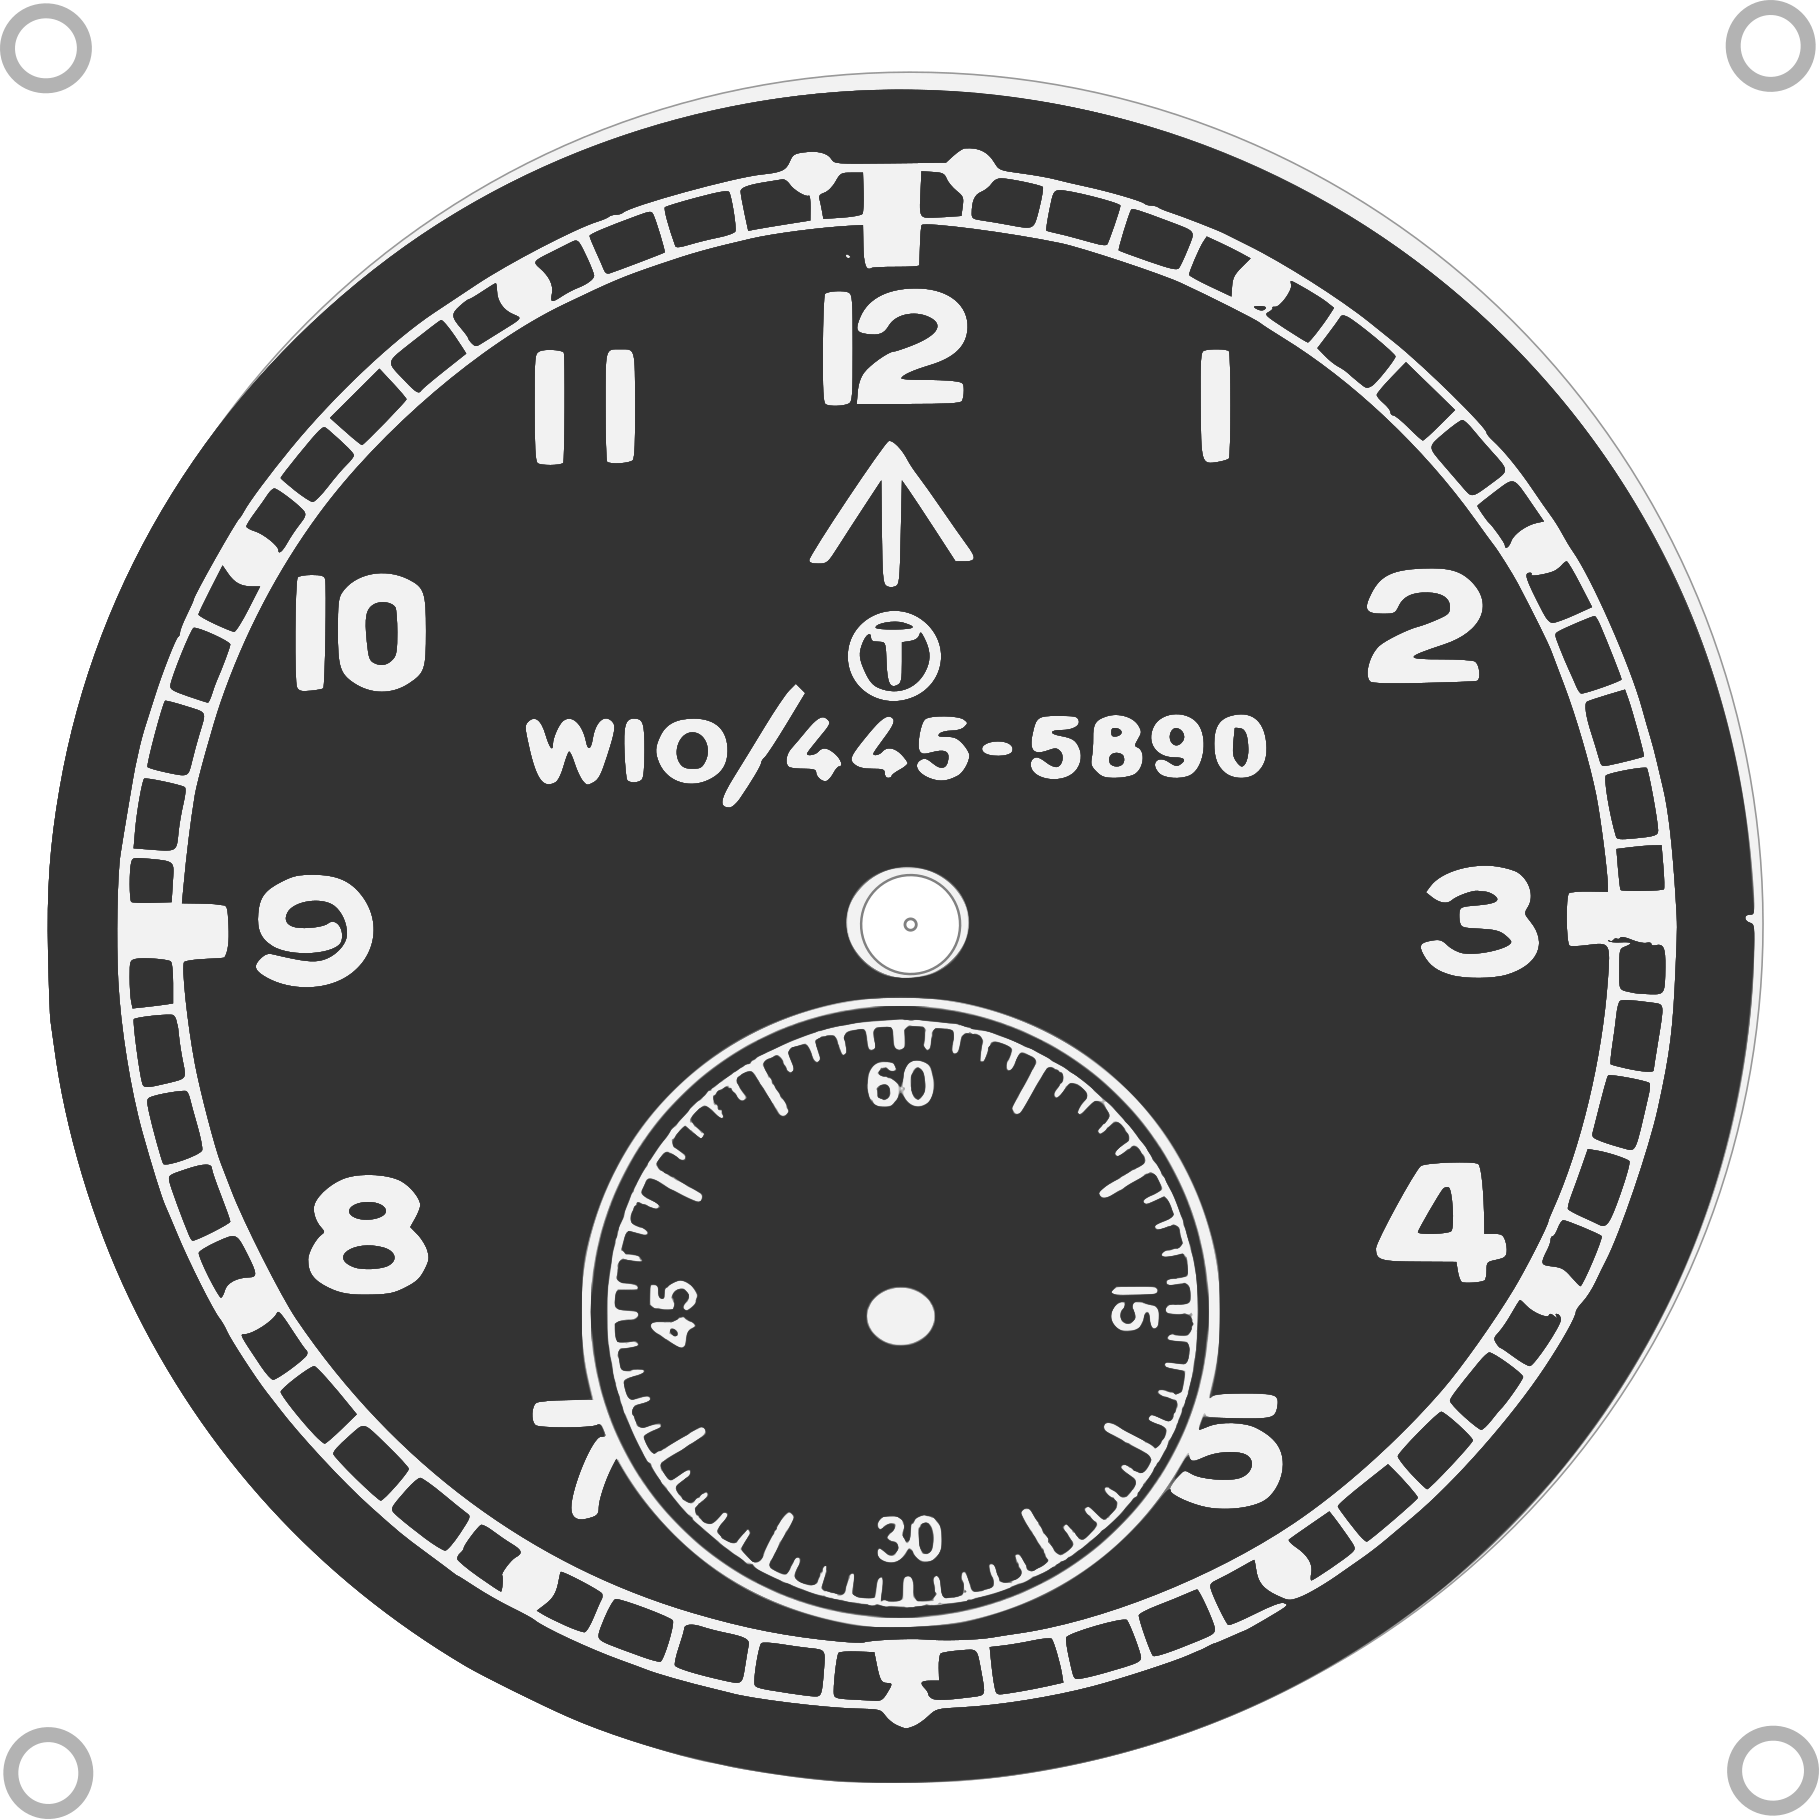
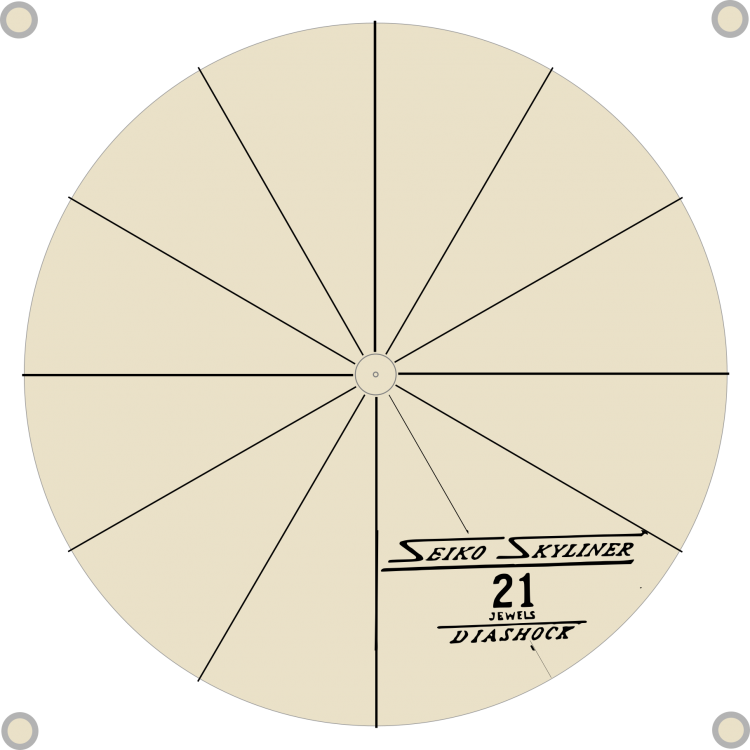
You could of course create a hybrid of the two methods, with some objects created from scratch and some created from an image of the original dial. From this.... We get this. Not perfect, but with a little more work, I think it could be reasonably presentable. You then run into the question, at what point do you replace? Is the second watch above still better in original condition?... Maybe, but what if it had lost all of the lettering? Does it matter that the two dials and my version are all very slightly different? In the top version for example, and my version, the text stretches from the six O'clock to the four O'clock, but in the second watch, the text spans two of the radials, so presumably these are pad printed from different cliches, and therefore probably manufactured in different years, and/or are different models. Skyliner30.100Centre1.79Round.svg
 1 point
 -
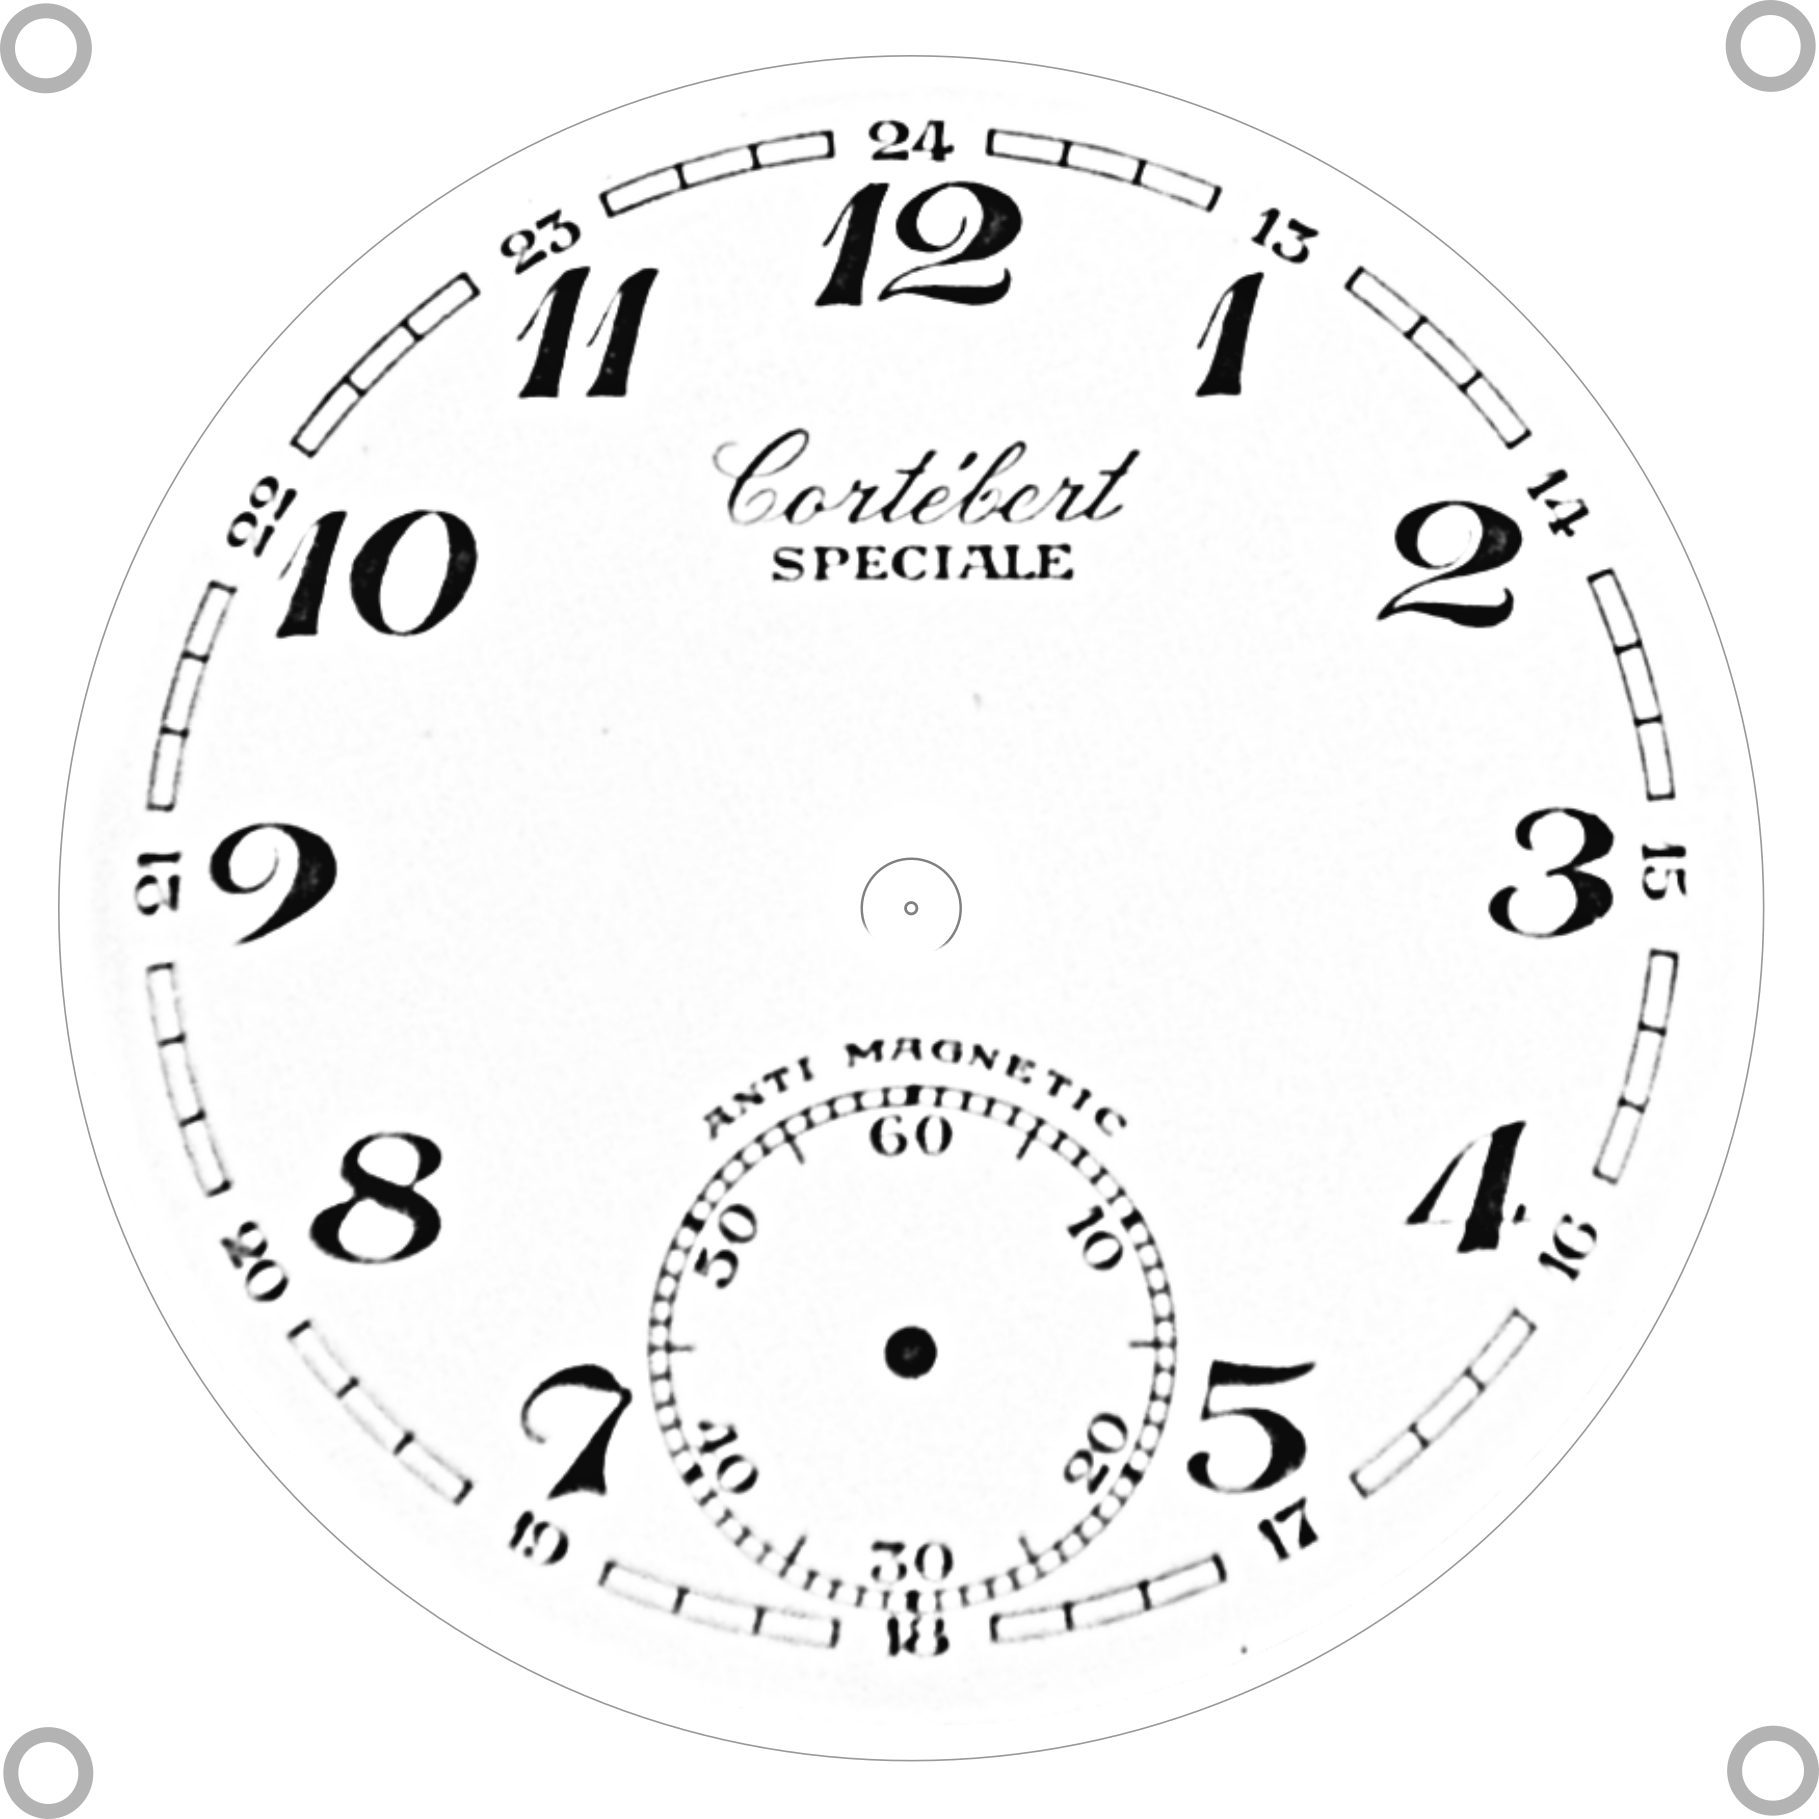
One other option is to take an existing dial and convert that to an SVG. There are a couple of tricks to this, but the basic idea is to get as clean an original image as possible, then clean it up further before importing it as a bitmap to Inkscape, then use the Trace Batmap feature to convert to vectors. Try to minimize the loss of detail, and preserve the sharpness and resolution of the original image as much as possible. A single colour image like this would probably lend itself very well to pad printing. CortebertSpecialeV1.0-30.100Centre1.79Round.svg
 1 point
 -
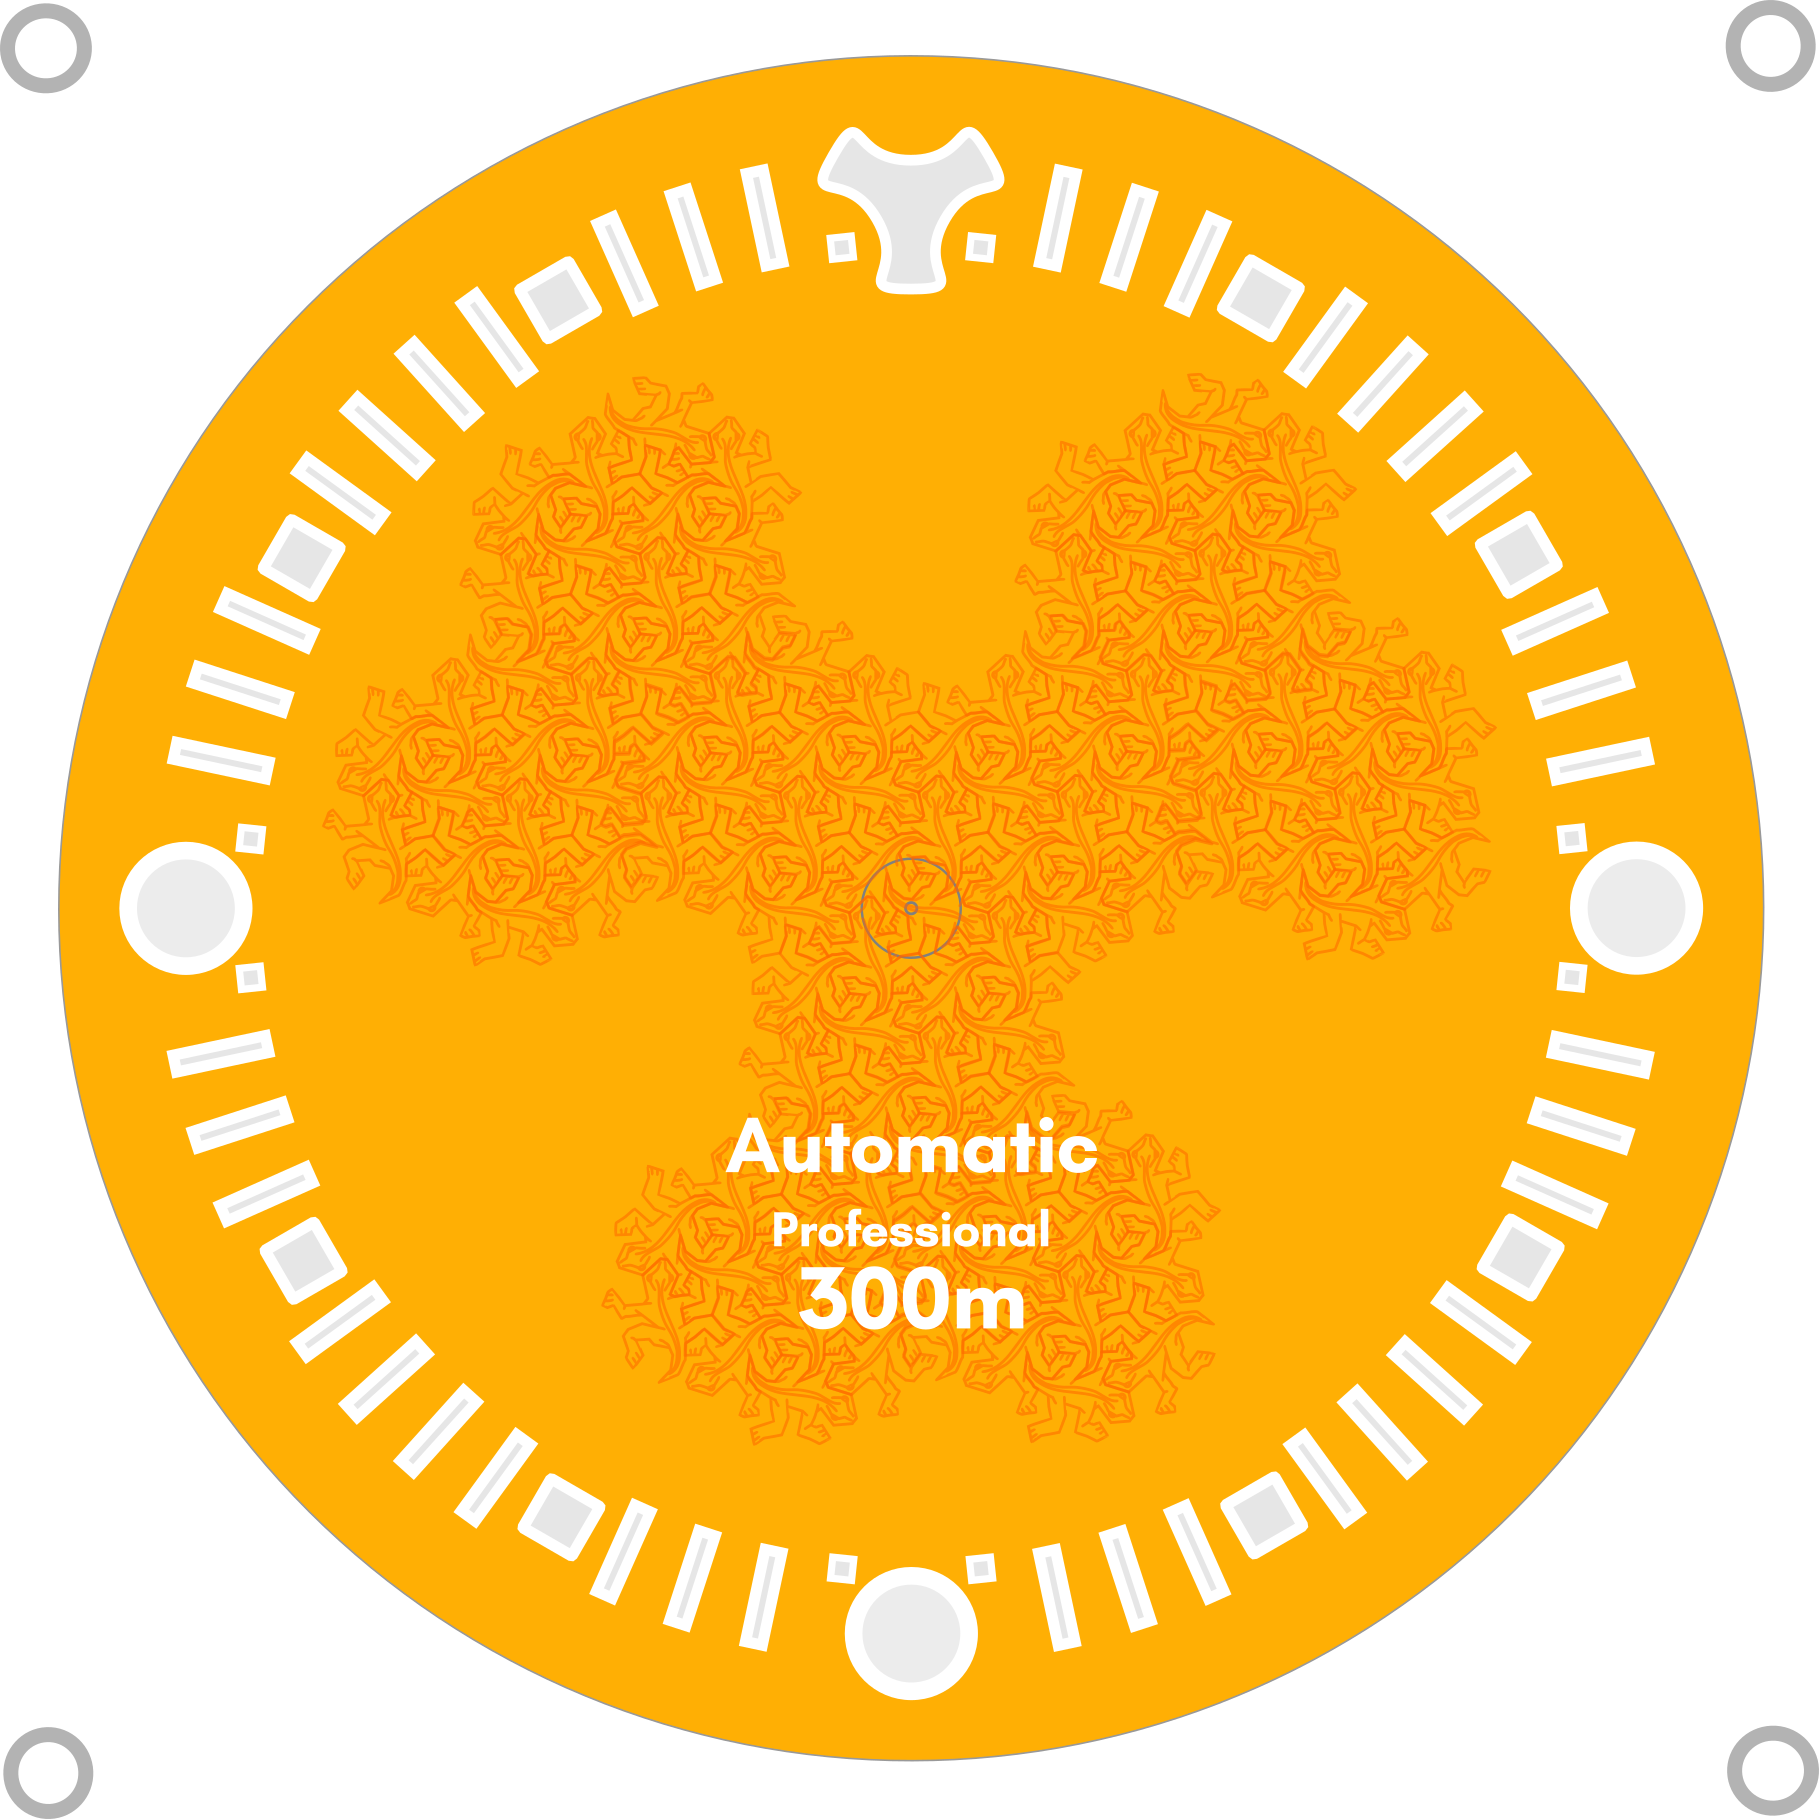
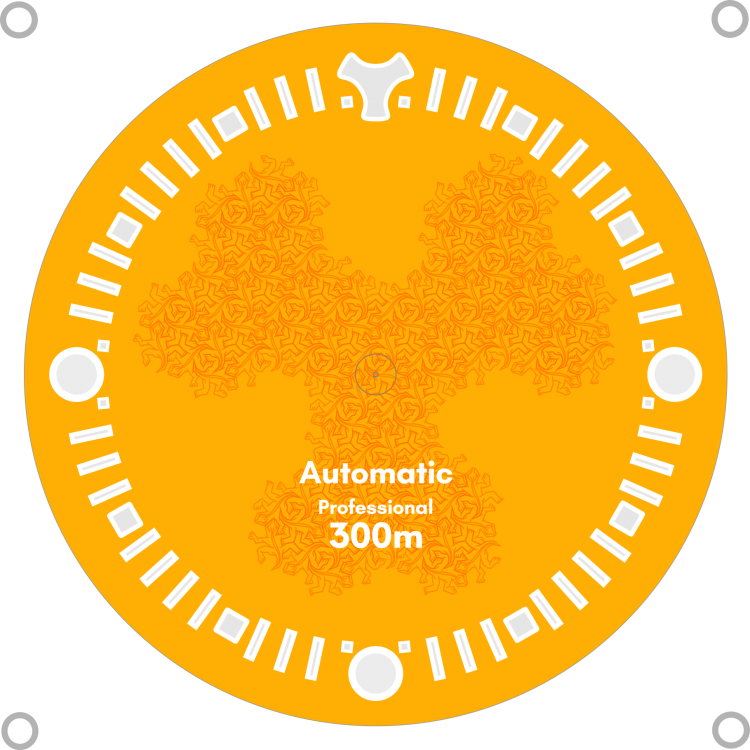
A couple of designs rattled up in Inkscape while I was lazing around in the back garden. The first is simply a variation on the orange "Dive" watch, but using the Escher lizards to give a little texture The second is a quick and dirty "Dirty Dozen", based on a couple of after market dials from Google image search. Note: The main dial and sub dial are separate objects, so you should be able to print them as separate decals at whatever scale is appropriate to your DirtyDozen30.100Centre1.79Round20%Grey.svg
 1 point
 -
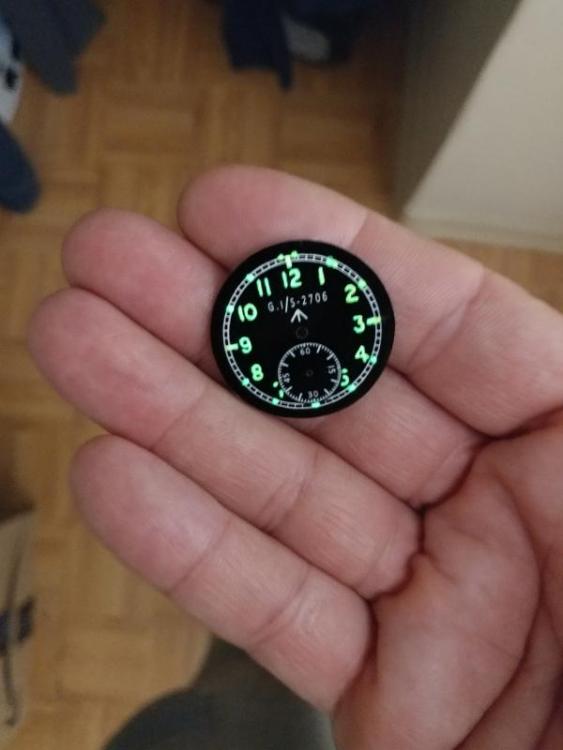
How about this custom dial that's not a decal but made by hand and lacquered and lumed by me
 1 point