Leaderboard


Popular Content
Showing content with the highest reputation on 03/22/20 in all areas
-
Have a laugh at this.
 3 points
 -
This may be of use to those restoring clocks whilst looking for a pair of Lion head drop handles I came across this site based in Devon who do a range of reproduction clock parts they will even cast parts direct from originals to order, hinges, keys, escutcheons, are hard to get the ones sold by main clock and watch suppliers can be of varying quality and usually do not look of period. They also allow the return of parts that turn out not to be suitable within 28 days https://optimumbrasses.co.uk/wp-content/uploads/clock-parts-supplement.pdf3 points
-
Toilet paper,what toilet paper ??????????2 points
-
Thank you to everyone. @Graziano provided a great way to remove the stripped screw. I appreciate @VWatchie link to the specific Seiko driver. I am also grateful for the attention to detail and professional guidance everyone provides. As a beginner, I want to do repairs well and properly. I am following @Mark’s 7S26 closely for this repair. I’ve found myself searching for the same watches he repairs and records in order to learn. Again, thank you, everyone.2 points
-
Graziano, You should probably give credit, this appears to be lifted directly from the excellent blog "Adventures in Amateur Watch Fettling". [/url]https://adventuresinamateurwatchfettling.com/2012/07/10/1964-and-all-that-birth-year-projects-part-i/ Unless it's your blog, in which case never mind.2 points
-
Its getting that expensive Bergeon may start producing it.2 points
-
Hi there I haven't got a manual but maybe this can help a bit The 7606A is a 23 jewel automatic, with day/date complications and a quickset date feature, operated using a push button located at 3 o’clock position to the crown’s 4 o’clock. It is this feature that marks this one as out of the ordinary and makes the watch just that bit more distinctive than many of the other Seiko dress watches from this period. The case has considerable presence, with square, bold lugs, a very attractive dial/handset, a wide indexed chapter ring and a very large acrylic crystal. The one I found looked presentable but with an inoperable day complication, stuck half-way between Wednesday and Thursday and a sticky half-functioning date quickset. The case back on this one is a press-fit, snap-on type, requiring a proper tool with a thin but blunt blade to prise it open without risk of damage. Once open, we can see what lurks beneath: Clearly, pretty grubby in there, some rust, and a foreign body sitting bold as you like on the rotor, which itself appears to be coming apart at the seams. A better view of the stray part suggests a badly rusted screw, its origin not yet clear but it looks like one of the dial retaining screws. So, with the movement extracted from the case, which required destruction of the case back gasket, and the rotor removed, we can take in its general state: All we get from this view is confirmation that its been a while since its last service, a suggestion of rust in the autowinding bearings (centre) but other than that it all looks pretty standard stuff. With the autowinding mechanism off we see that the underlying architecture features not the single train bridge of many of the 6 series movements I’ve worked on before but separate train and barrel bridges: This seems like a good point to flip it over and take a look at the calendar side: On this movement, the day and day change over more or less in tandem around midnight (day first, then date) in contrast to many of the later Seiko movements I’ve worked on which seem to complete the date changeover before the day gets its act together. We’ll see shortly how that works. Off with the day disk: taking the hour wheel and film washer with it. Note the angry looking star of teeth sitting on its underside. With the hour wheel back in place we can take a proper look under the hood at the calendar mechanism and see how that simultaneous day/date change works. The key to the day/date changeover is the date driving wheel on which sits the date finger and day finger (indicated above). The date driving wheel is itself driven by the hour wheel (centre), two revolutions of which turns the day driving wheel through 360 degrees. As it turns, the day finger engages with the teeth on the underside of the day wheel (see preceding photo) slowly turning it clockwise whilst the day jumper slots into position between two of the teeth, ensuring that the day aligns correctly with the date, once that has changed too, and holding it in position until the next changeover. Meanwhile, the date finger, which points in the opposite direction, starts to engage with the teeth on inner diameter of the date disk, turning it anticlockwise, with the sprung date jumper then ensuring it moves exactly one date forward. Note that in the photo above the day and date fingers in the photo above are aligned more or less at mid-day rather than midnight and so would be half way through their journey to the next changeover. Continuing to dismantle the movement, but still focussing for the moment on the day driving wheel, we get a good idea just how complex and nicely engineered these older movements are. Removing the solid day finger, we get a look at the separate date finger which is sprung and can move about a pivot sitting at its elbow, allowing a more progressive day changeover with the force gradually building as the wheel advances until the resistance provided by the date jumper is overcome. In operation the day starts to change a little before any action is perceptable from the date. The finger is easily removable for cleaning: and we see the natural curl of the spring. With pretty much everything else removed, we pause for a moment to look at the date quickset mechanism, operated by that cool little button at 3 on the case. The key parts here are the date corrector lever, which moves inboard when the 3 o’clock button is depressed. This lever in turn exerts a force on a lip at the edge of the date corrector itself which moves against one of the teeth on the inner circumference of the date disk. You can probably see better how this works from this figure taken from the 7606A technical manual: A view of the now near naked calendar side of the mainplate shows the date corrector and the spring which provides the resistance to the button and returns it to its rest position once the date has been changed (or corrected). One parting shot from this side shows two of the Diafix jewel holes with springs and cap jewels removed (an operation considerably fiddlier than for Diashock jewels, which themselves take some practice dissembling and reassembling). The two Diafixes are used as bearings for the third wheel and escape wheel. Stripping the other side of the movement was uneventful and after a thorough clean we can start to put it all back together again, paying attention to proper application of the correct amount (by my reckoning anyway*) of the correct lubricants in the proper places. Here’s the calendar side coming back together, Diafixes refitted and back to the other side, with most of the fixtures and fittings back in place: Note that only the escape wheel merits a Diafix on the third wheel bridge, the third wheel pivot making do with an ordinary jeweled bearing. study this write up and good luck .2 points
-
4 screws (3x A type and 1x B type). First we will unscrew one B type screw, part number 0016 705. It is a phillips head screw. (Another unorthodox component!). To be able to remove this screw, we would have to make a tool - a "half phillips head screwdriver". :-) Place a sheet of medium coarse (400 or 600 grade) sand paper on to a flat surface and shape the blade of your smallest size screwdriver (40 or 60 / 0.40 or 0.60mm) as per photo. Hi there hope this helps. Hopefully you will get enough traction to remove the screw.....2 points
-
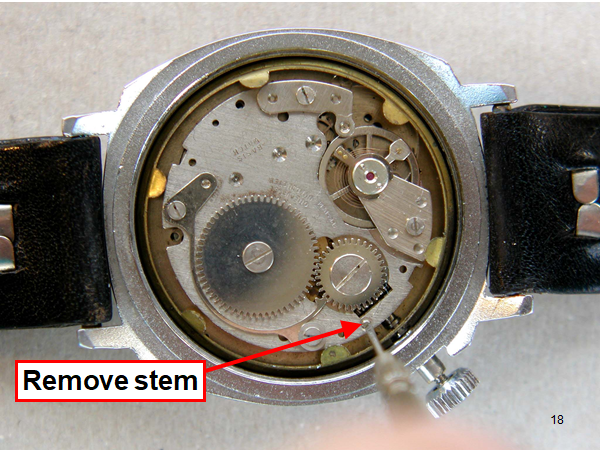
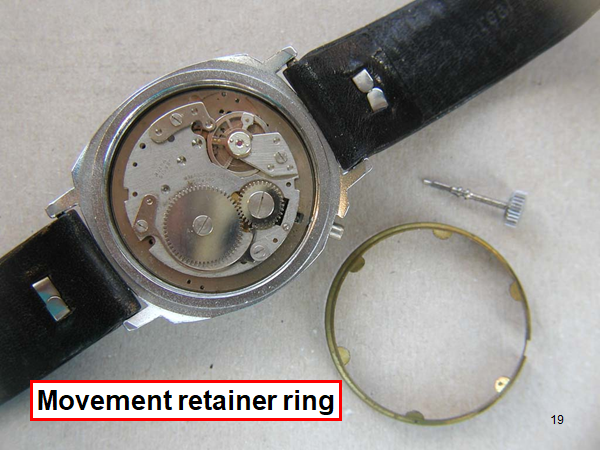
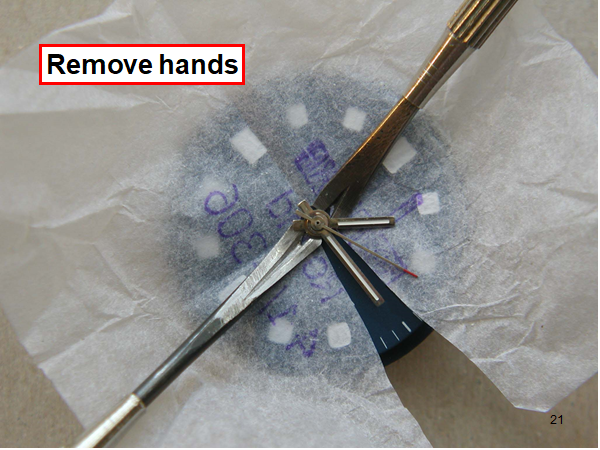
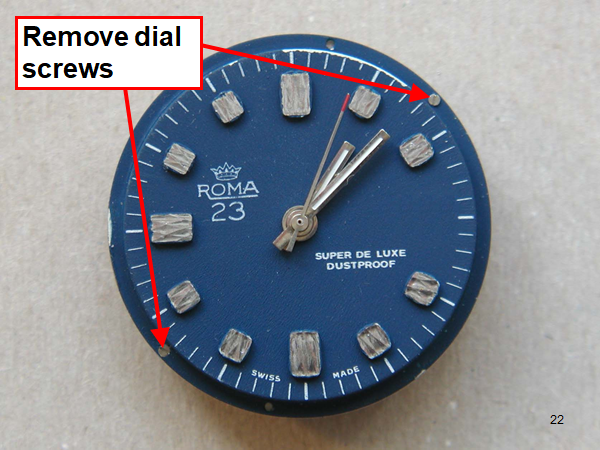
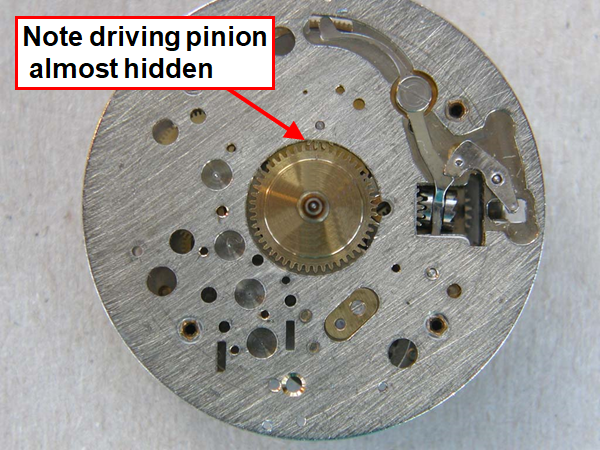
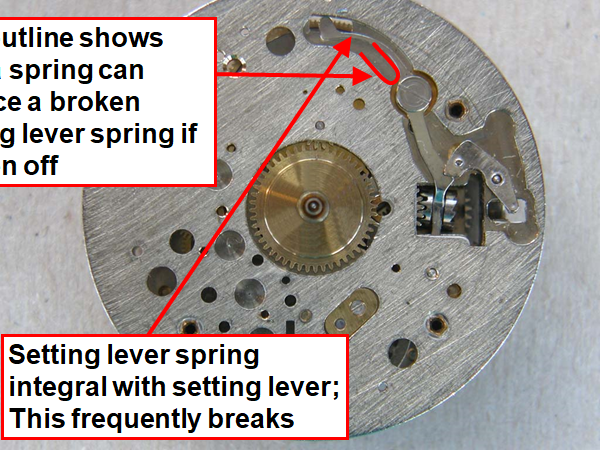
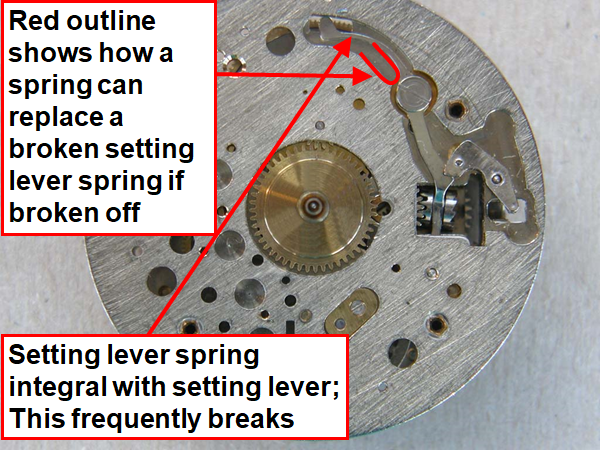
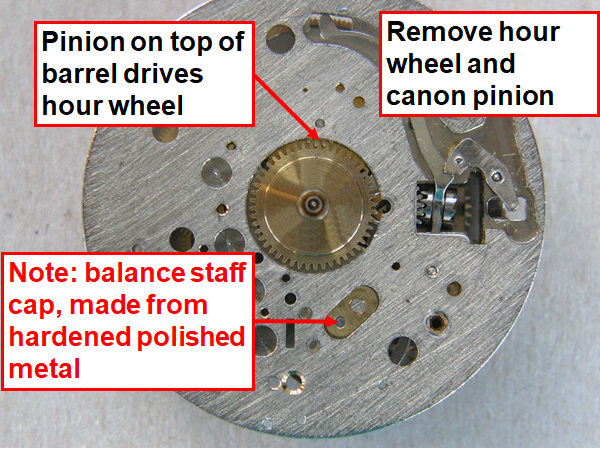
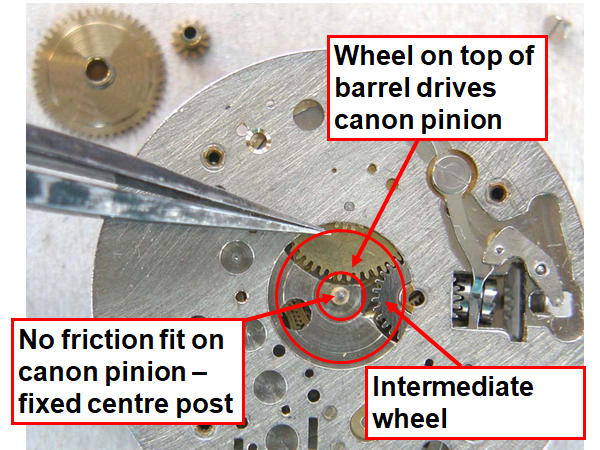
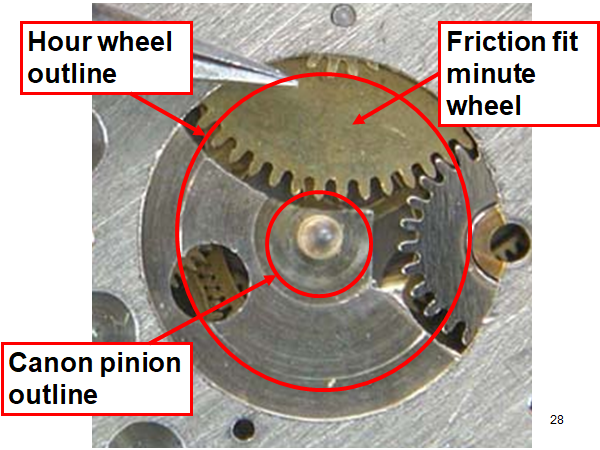
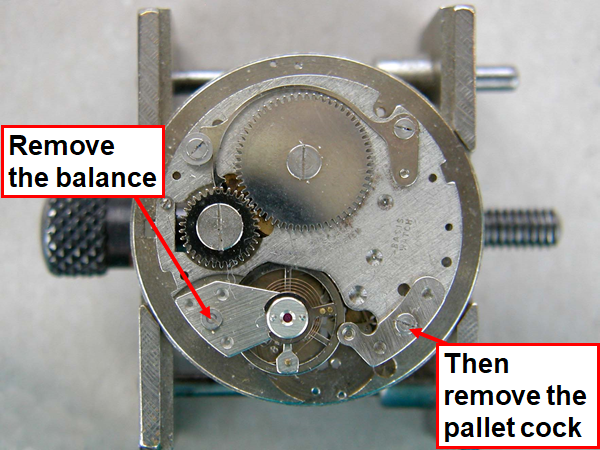
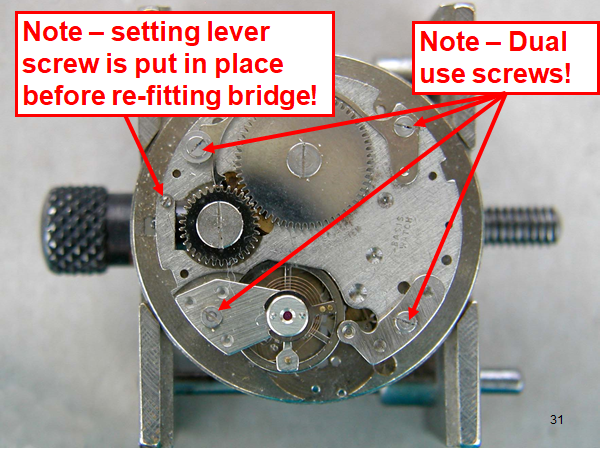
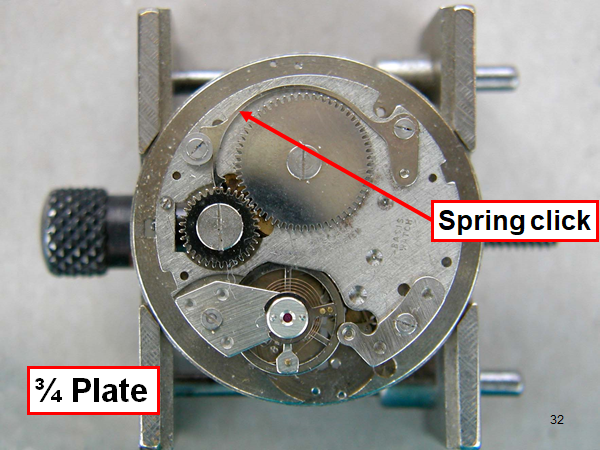
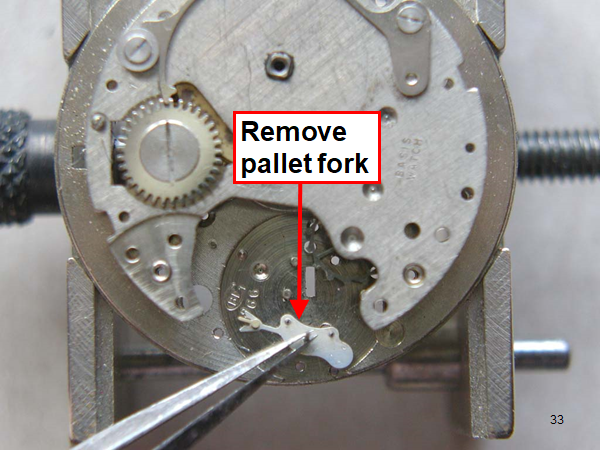
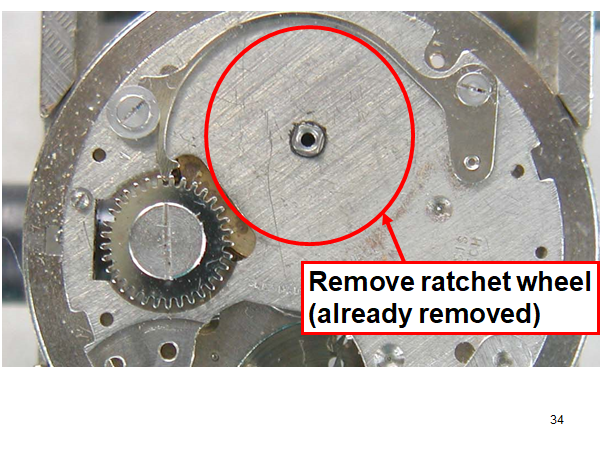
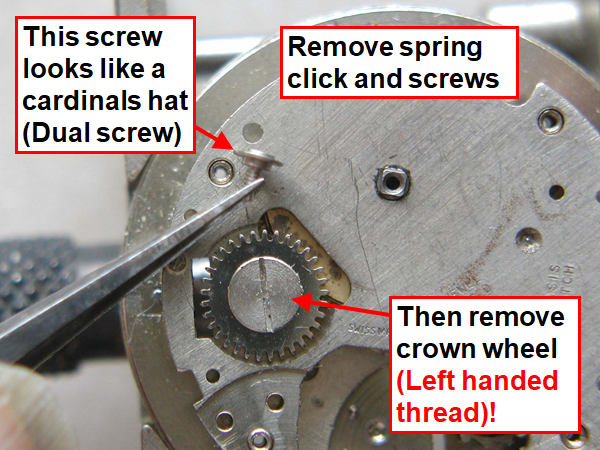
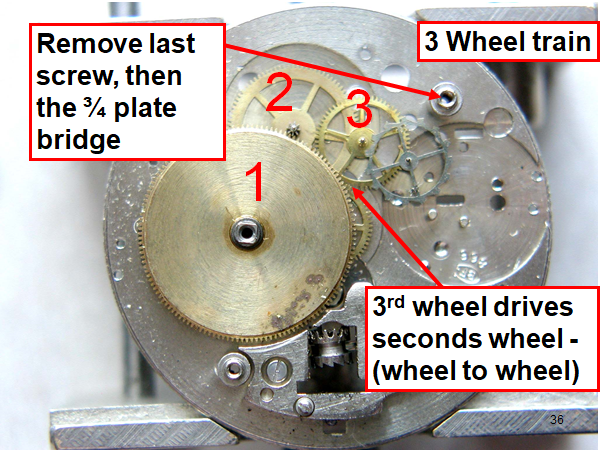
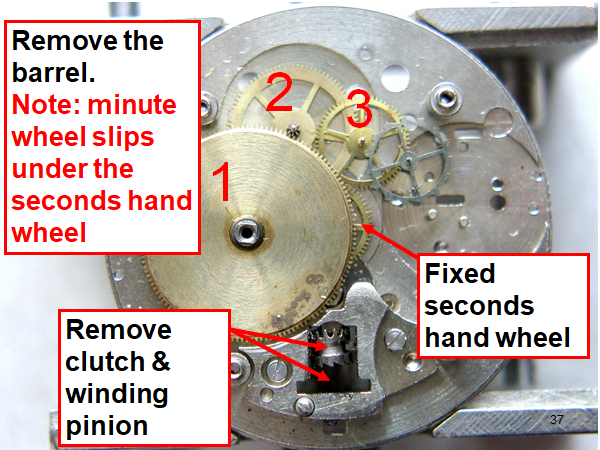
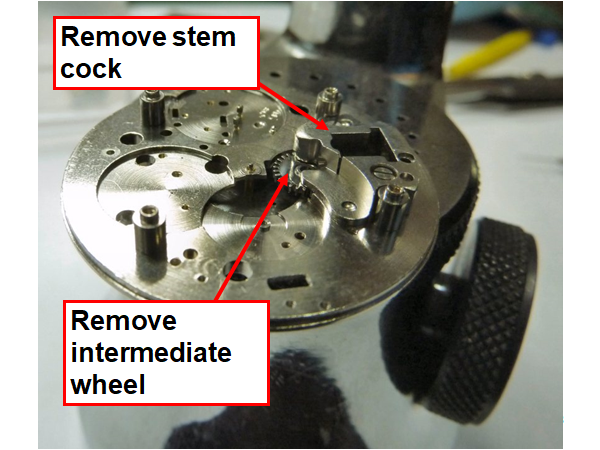
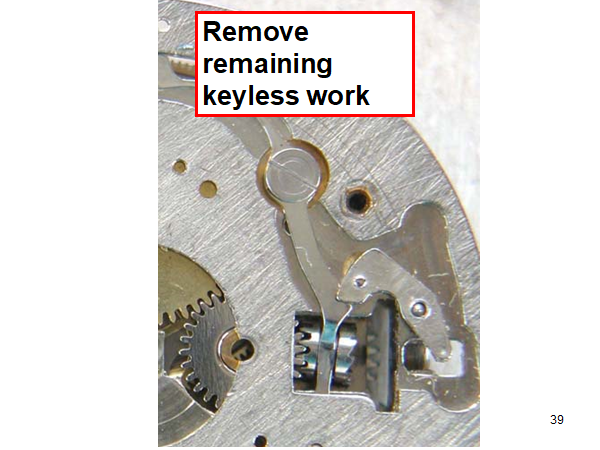
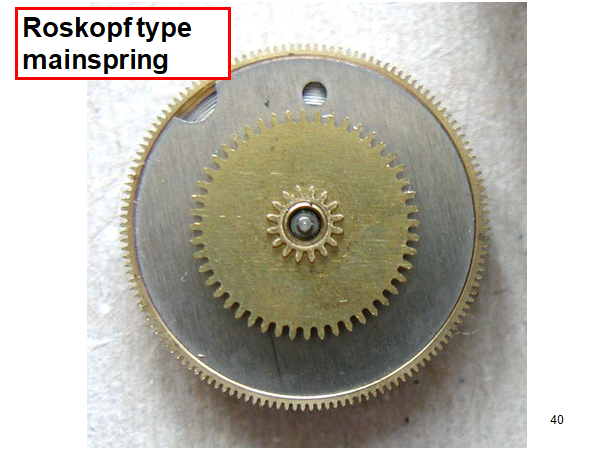
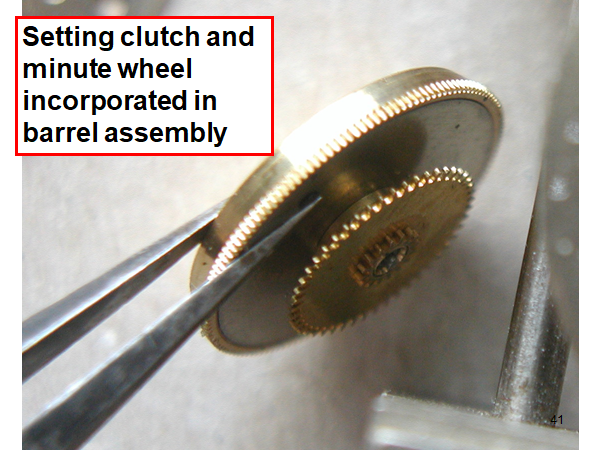
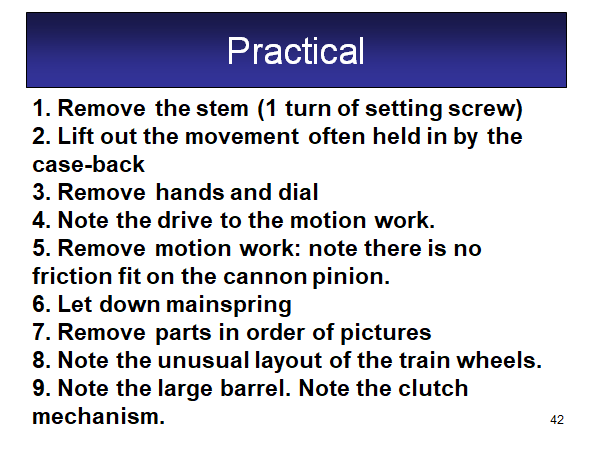
Hi, I teach watchmaking to complete beginners at Epping Forest Horology Centre, close to Epping and this is one of the lessons on the BFG 866. I wanted to show my class a classic pin pallet (Roskopf) movement and how to service it, as many watchmakers won't touch these watches as they hold no monetary value. Turn the setting lever screw 1 to 1 and a half turns to release the winding stem A piece of watch paper or small plastic jiffy bag to protect the dial, whilst removing the hands The driving pinion is part of the friction fitted minute wheel on top of the barrel. This work in a similar way to a friction fitted canon pinion to set the watch hands Remove the keyless work: setting lever, held in place by the setting lever screw, screwed from the other side of the mainplate, then the yoke, which sits on top of the clutch (castle) and also the winding pinion. I have three other lessons on this movement that cover bringing the watch 'into beat' as well as taking apart the friction fitted minute wheel from the barrel, lubricating and staking back on to achieve the correct friction setting and finally how to remove the centre seconds wheel safely and refit using a staking set. Many people leave the friction fitted minute wheel on top of the barrel, not realising the amount of old grease that can't be cleaned out from it, as well as not removing the wheel of the centre seconds arbor and again not cleaning out the pipe which has old grease inside. Hope you enjoyed the tutorial? More to come....


 1 point
 -
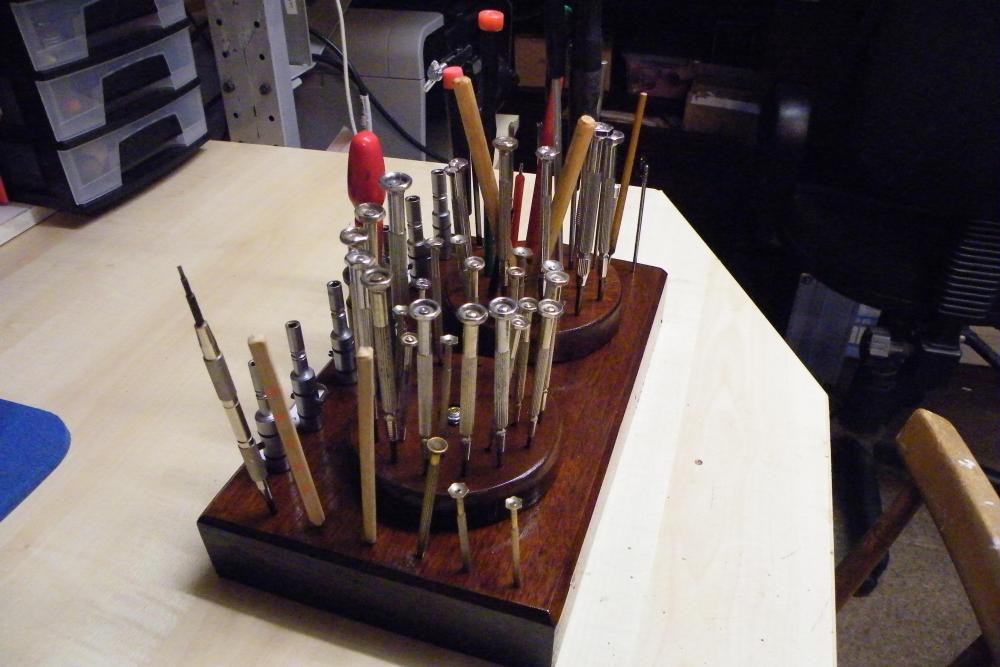
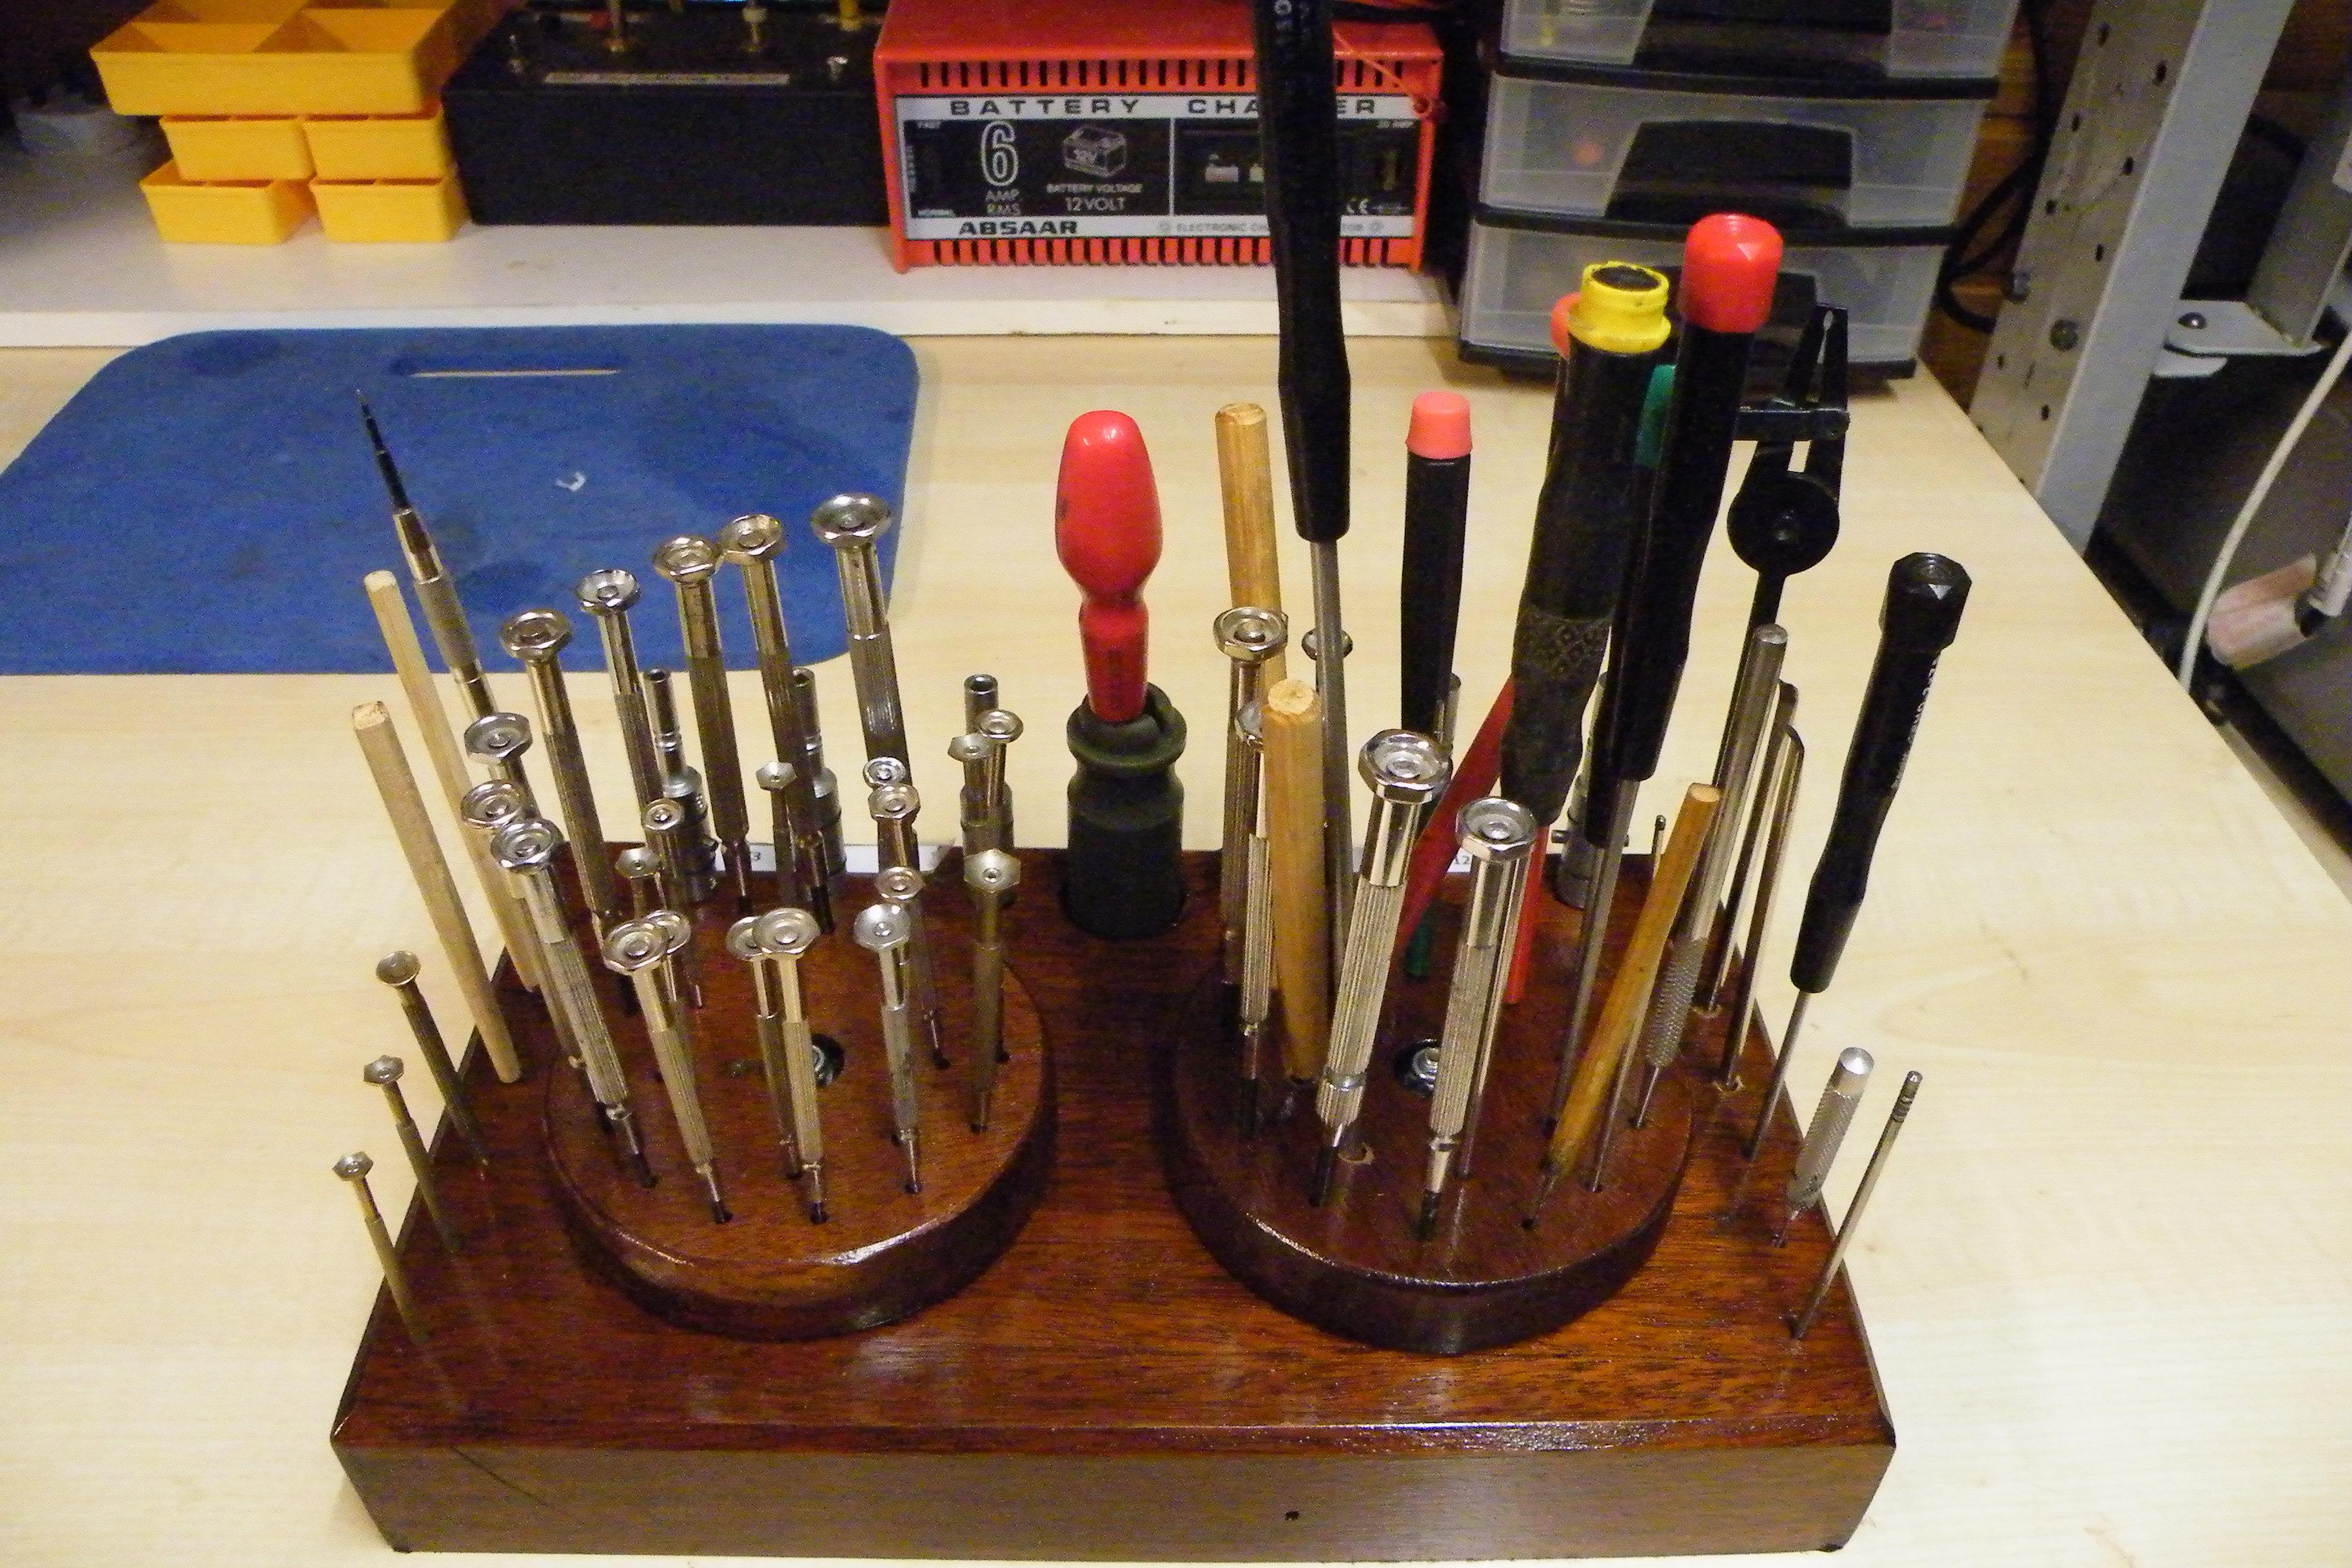
Hi In order to get a sembelance of order on the bench I build this tool holder, both tool holders rotate to enable easy access to the screw drivers, the flat bladed ones on the left and cross points on the left. My clock let down tools are fitted to the rear, probes etc down the sides. Saves scrabbling in a tin. heavy clock tools are stoed in two IKEA drawer units. Keeps the place tidy, untill I start working.

 1 point
 -
He’s so adorable What a handsome boy.1 point
-
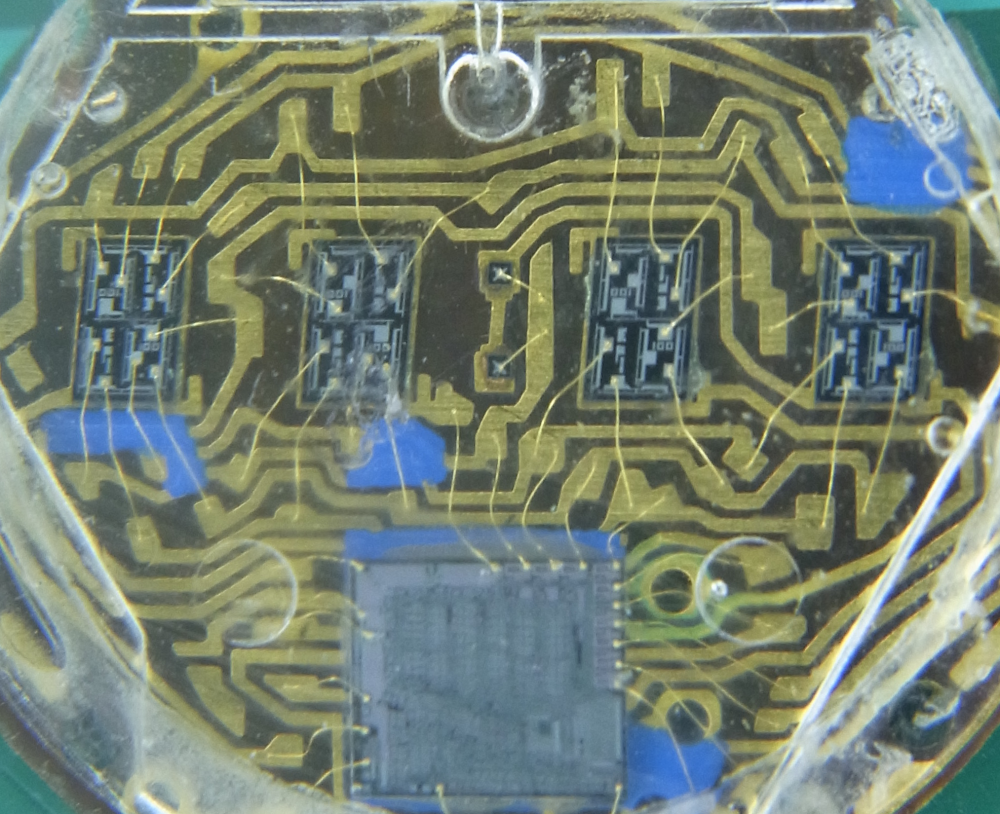
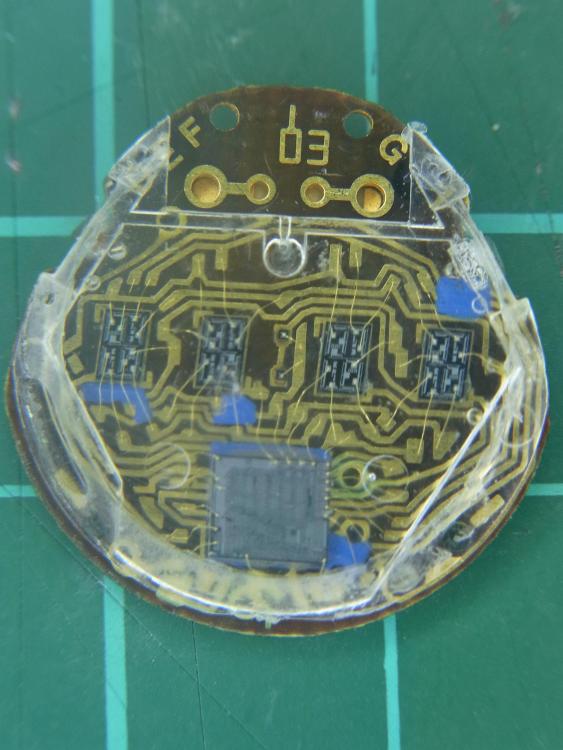
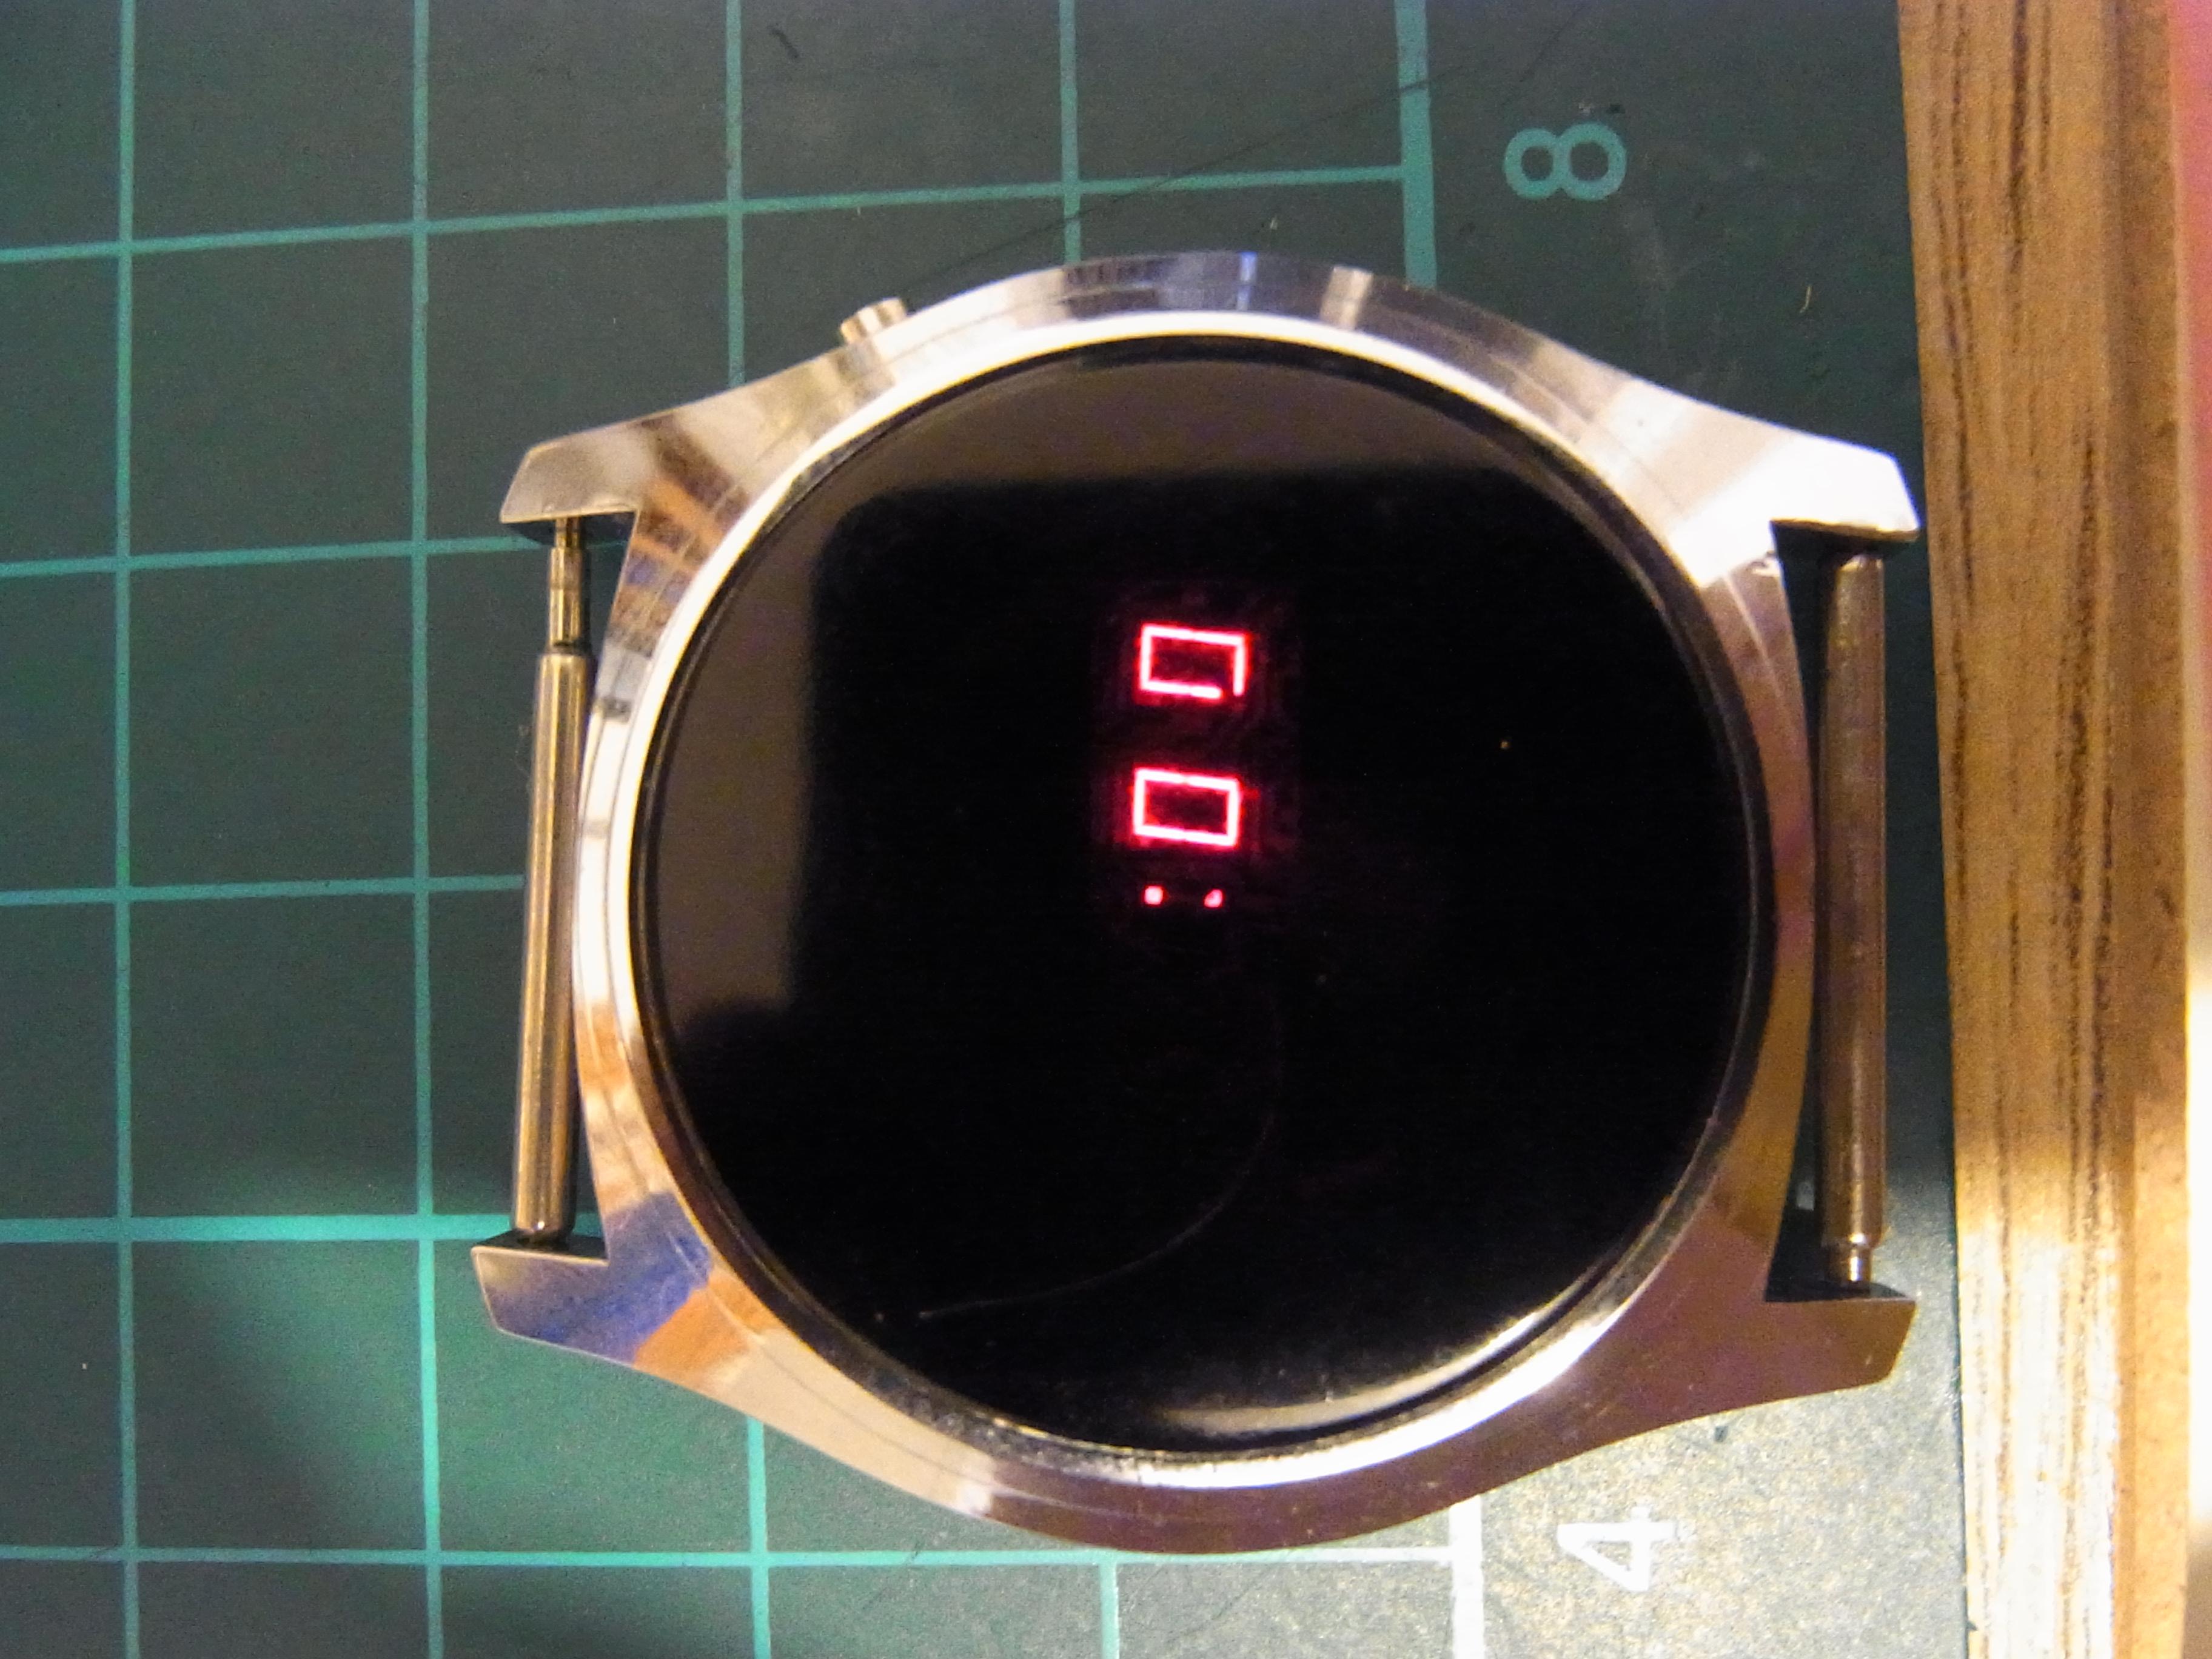
I have a sneaking suspicion that all of those bond wires, and the blue paint dabs were placed by a manually operated machine. Furthermore I suspect the PCB was designed by hand, laid out with tapes and photo reduced. Even the epoxy blob holding down the main IC die has the uneven quality of something squirted out of a syringe, rather than laid down by a robot. If you look closely, you can see the way the bond wires are used to multiplex the LEDs into a common cathode or anode arrangement. With a little more magnification it would be possible to see the individual driver transistors laid out on the die. You can also see why the display shows only certain LEDs lit on the different digits, this is because while all of the LED dies are identical, only certain lands/pads are connected on each chip.
 1 point
 -
Meet Joey. I collected him on Friday from an owner who has four dogs. He really was not happy at home, feeling bullied by his canine cohabitants. 48 hours into his new abode and he seems to be settling in just fine. [emoji6] As you can see, he is a ginger long hair, so we will both need to get used to a grooming regime. He’s like a little lion! Life is beginning to feel better again with a cat in the home. Sent from my iPhone using Tapatalk1 point
-
How do those look when finished and installed? Do they pass as originals? Not as good as the original. I may have to do some experiments with this. The trouble is that the originals are injection moulded, and therefore have details far finer then a home 3D printer can manage. A resin printer would produce something much better but I don't have access to one of those. There are some new old stock replacement around, but they tend to be rare, and thus expensive, or at least expensive relative to the price of a Timex watch.1 point
-
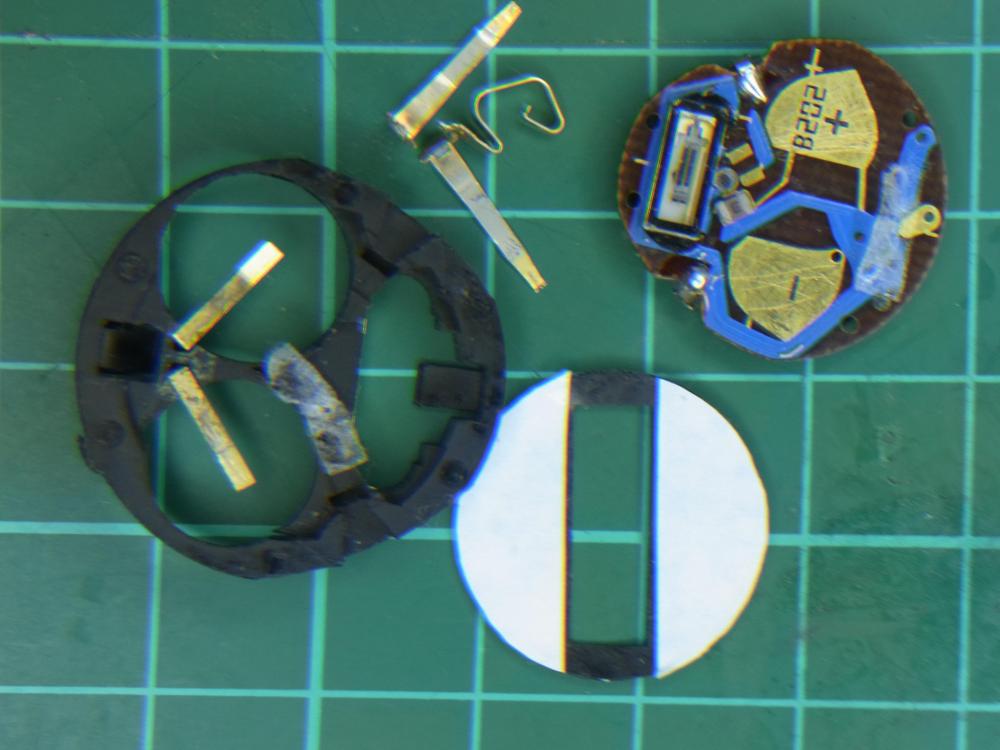
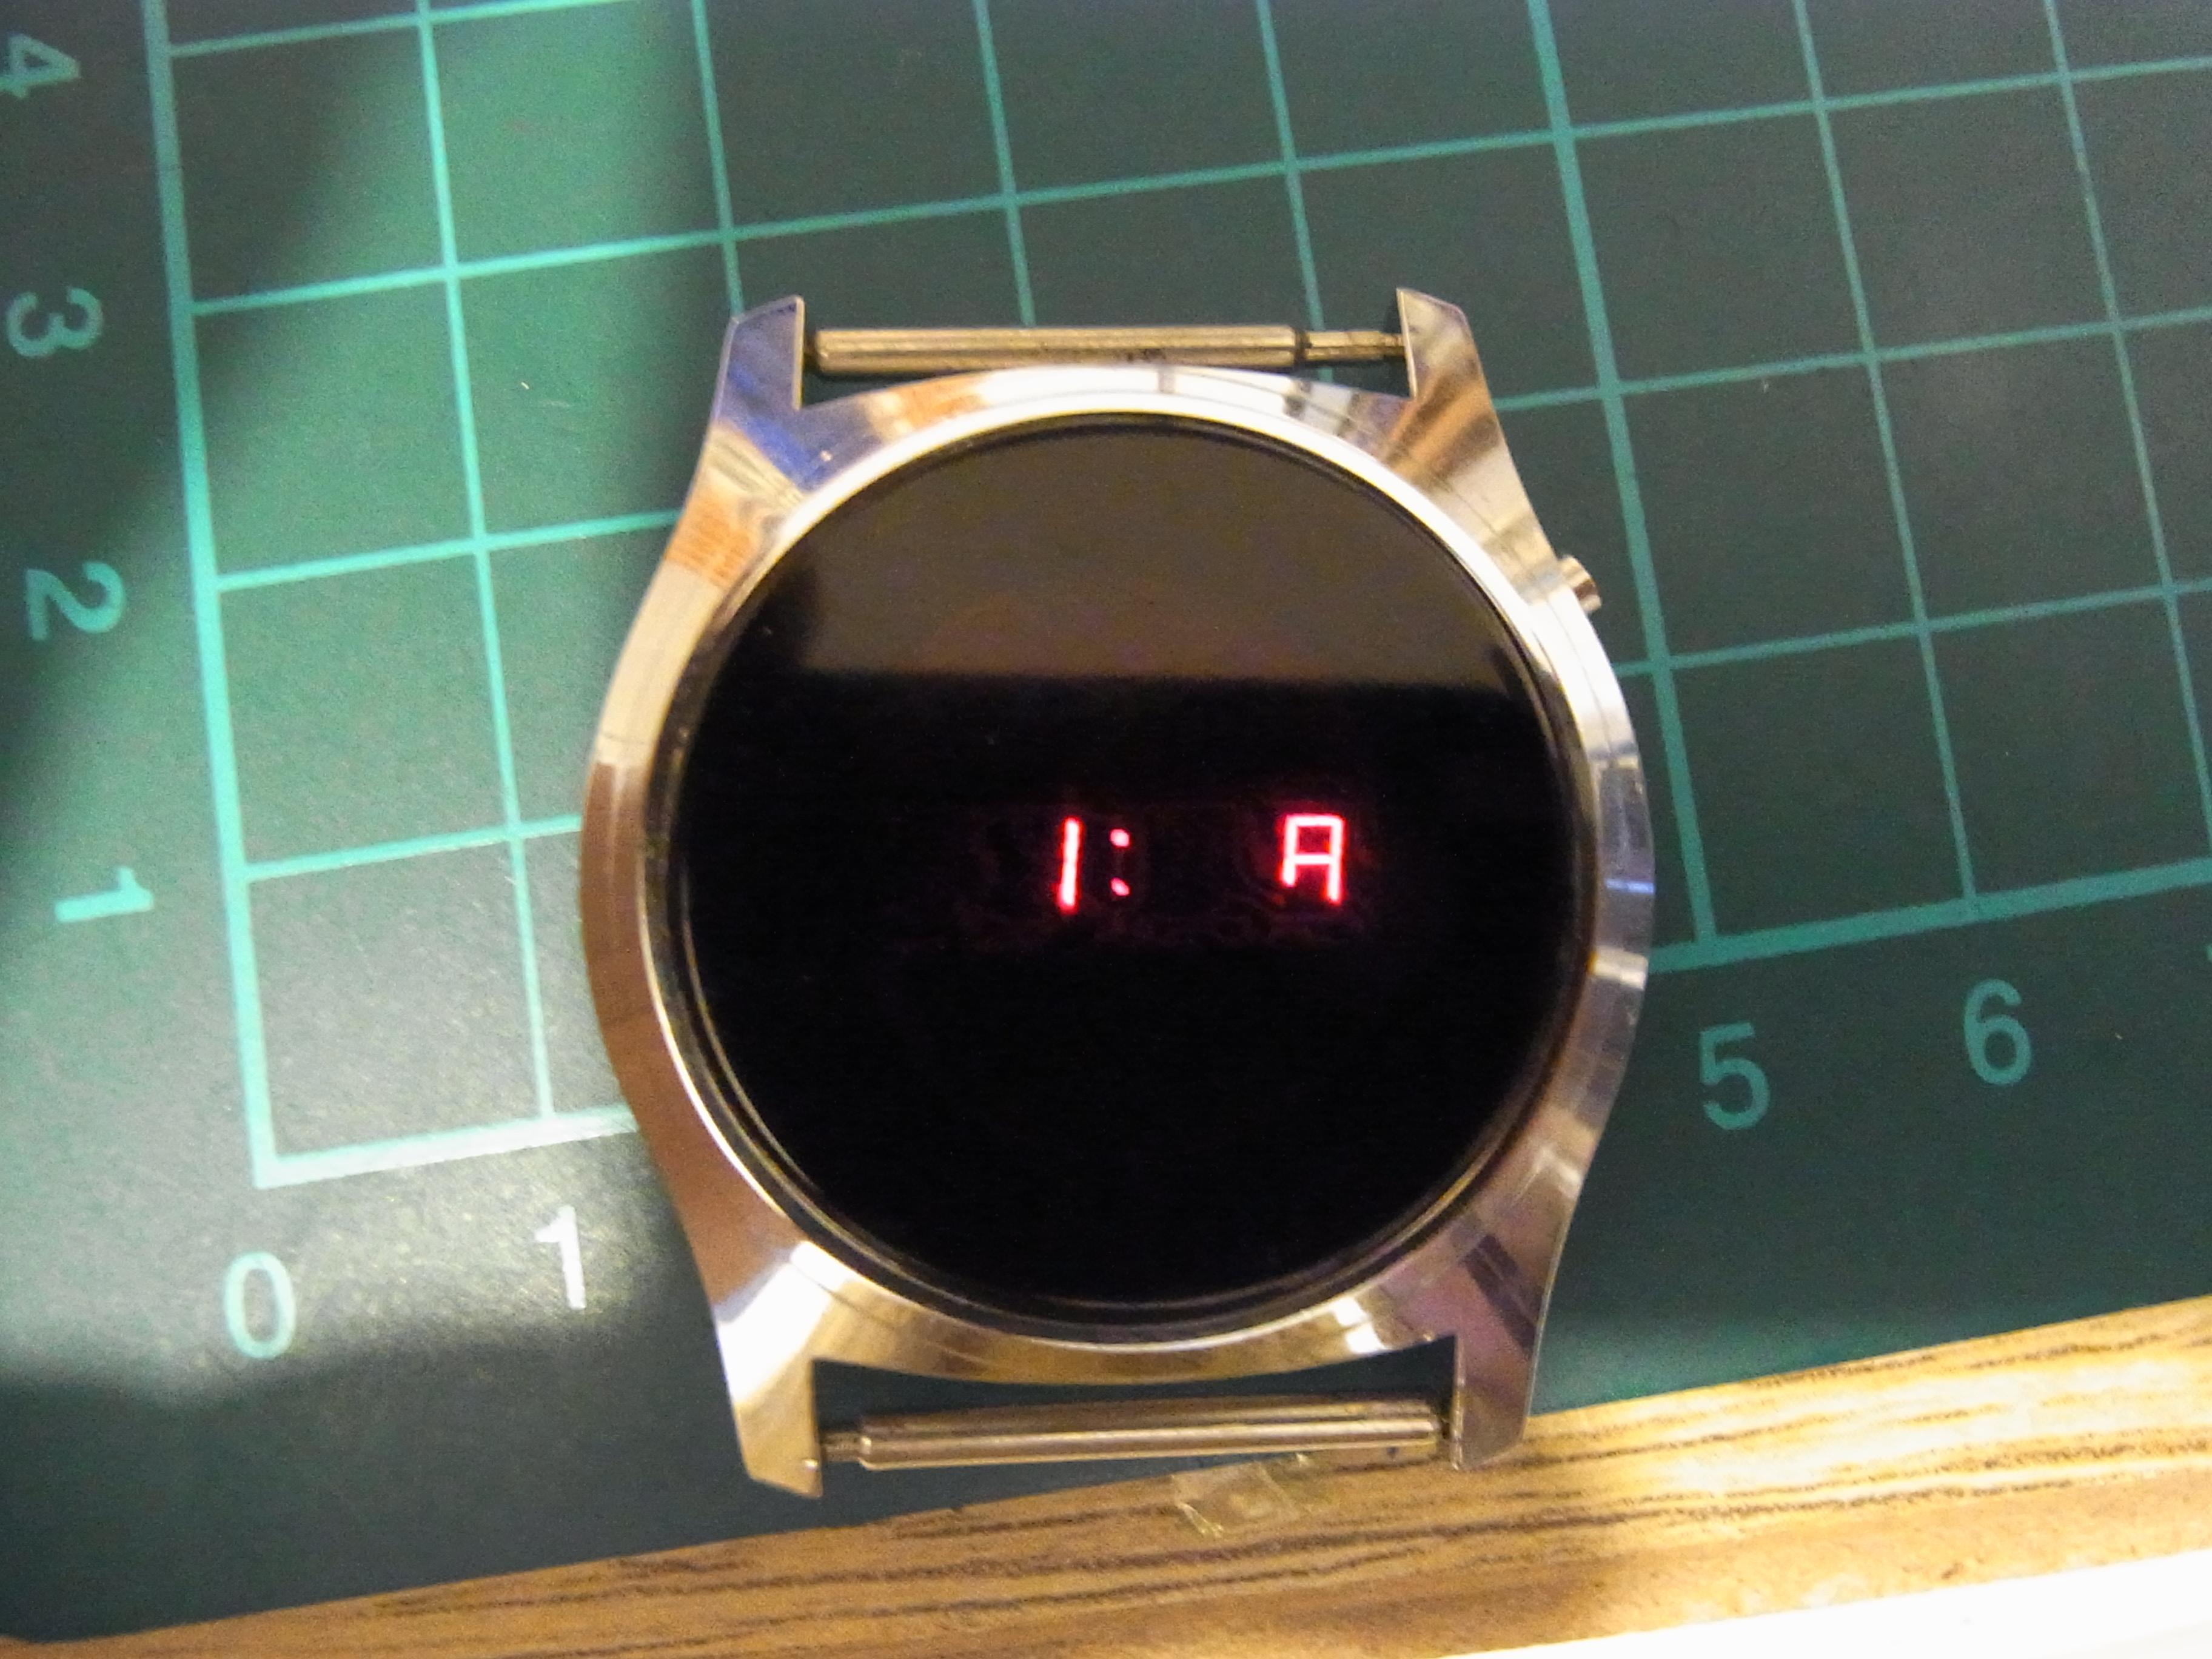
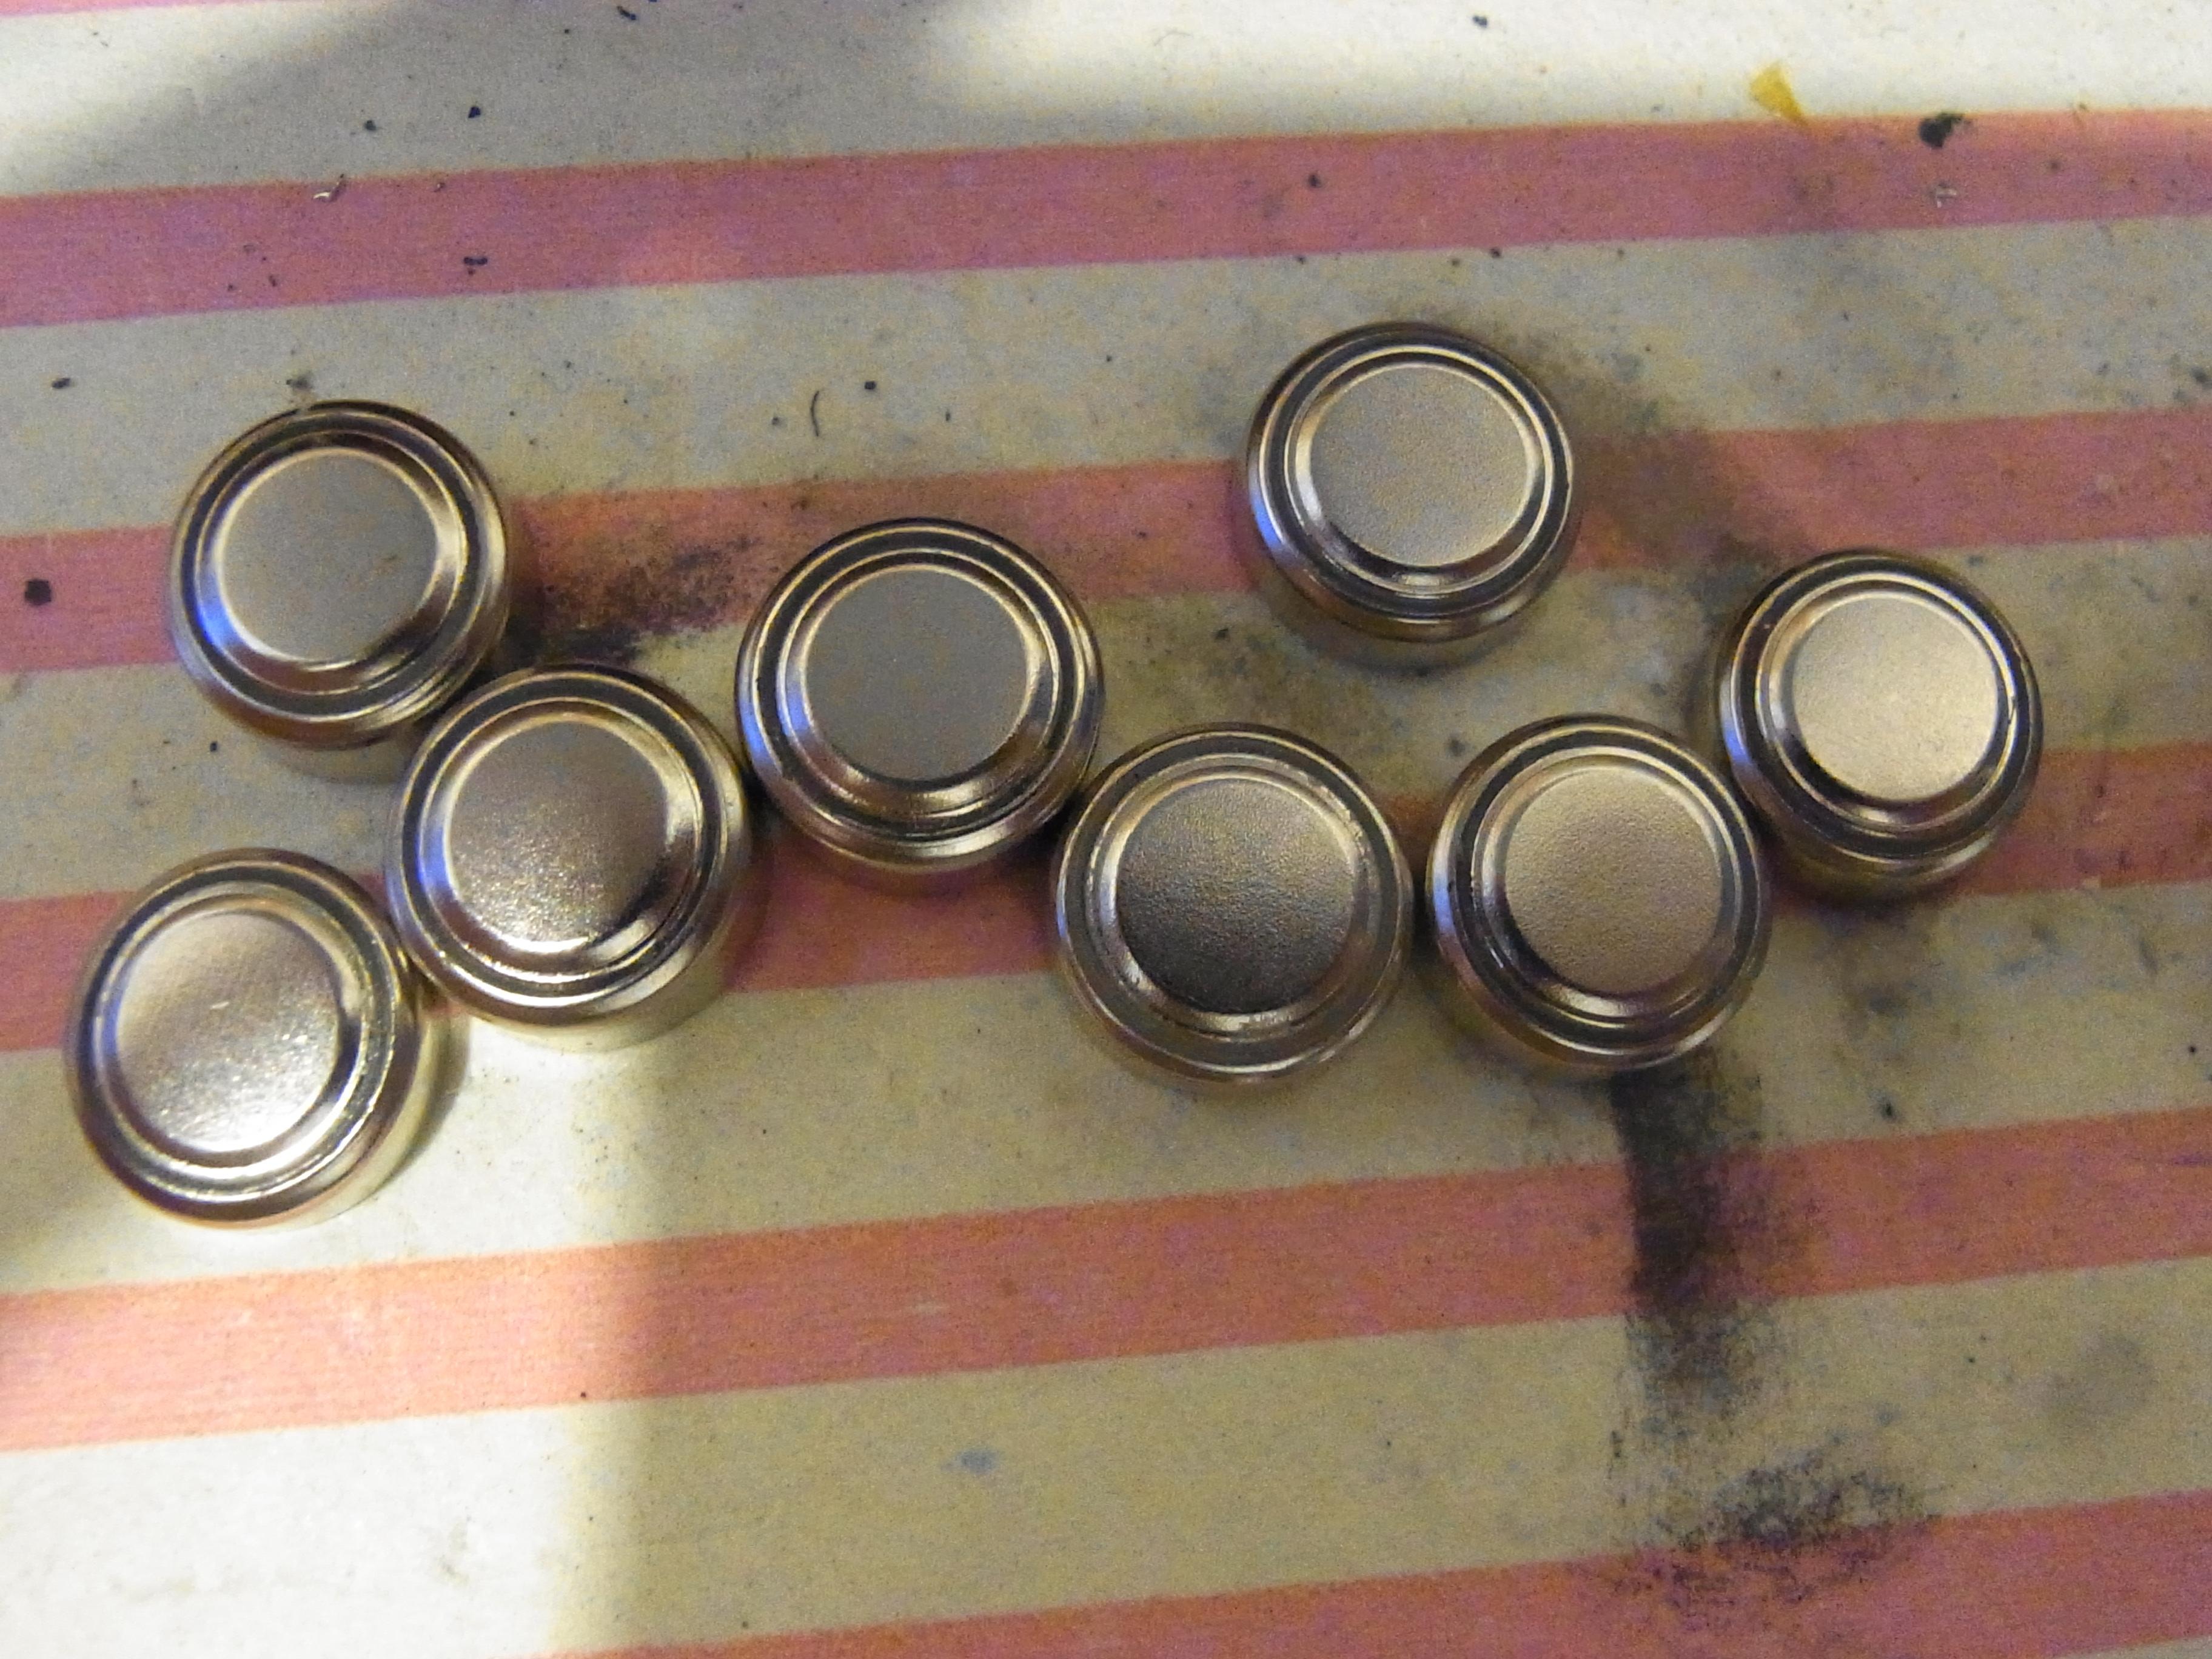
Well, if the last one was easy, this one wasn't. Today we have a Timex LED, with all sorts of issues. When I opened it, and chucked in a couple of "H" Cells (AG12,SR43SW, LR43, LR1142, V12GA - these things have more unnecessary and obscure names than members of the royal family), it blinked all the LEDs in a rather dim and uninspiring way, and neither of the buttons worked, so I dived in and tore it down. The first, and most obvious issue was that the two spring contacts that the pushers should touch were missing. Since the broken bits were not in the case, and since the case has more chisel marks from ham fisted attempts to open it than is good for it, I can only assume that they fell out a long time back. So.. I replaced them with bits of gold plated spring contact from a scrap connector in my junk bin. This was no easy task, as they are about 1.5mm wide, however with a little bit of jiggery pokery, I was happy with the results, and re-assembled the watch. Now it still blinked at me, but when I pressed the buttons, it stopped blinking for a moment, so the new contacts were doing something. Above is the module ready to re-assemble, with fresh double sided tape on the display mask, the plastic cell holder, and the cell spring retainer contacts. Those huge chunks of scrap metal are what I manufactured the new button contact springs from, and the contact springs are soldered to those nice shiny blobs on either side of the crystal. Everything about this module is designed to be admired, with clear plastic above the crystal, the LED's and the IC COB. Ahh the wonder of it, an entirely electronic watch. What exciting times we lived in back then. Next I turned my attention to the mechanical constriction. The cells seemed loose, so I fiddled with the battery contacts till I was certain they were working fine. Still no joy. I tried a couple of fresh cells, but still dim, and still blinking. so I cleaned off all of the gunk on the front of the module and checked it with good magnification. It looked fine. I grabbed another packet of batteries and tried those.. it worked! For about five minutes then back to blinking. I checked the pack of batteries. Manufactured in 2018... Hmmm... not so good. I looked to see if I had any others... which I did, but they were even older. The trouble with these ancient LED modules is that they draw a relatively high current from the cells, so this means that not only do the cells not last very long, but if their chemistry is not fairly fresh, they will be incapable of supplying the necessary voltage and current, and the module will go into sulking mode, blinking all of the display segments. So, I've ordered some fresh LR43 cells and I'll re-visit this when they arrive. For the time being however I have picked out the best of the old cells by measuring their cell voltage and it is currently working, but for how long I have no idea.


 1 point
 -
Ha! I’m sure you can find an overpriced Bergeon if you try! I opted for the $12 version. https://www.amazon.com/dp/B00RV8PREI/ref=cm_sw_r_cp_awdb_t1_Ty2DEb7PTN7QG This worked fine. Sent from my iPhone using Tapatalk1 point
-
I remember that stuff from primary school days. Here is another funny one. Don't ask how I find these.
 1 point
 -
I'd say yes! Seems the text wore away on the example I've shared.
.thumb.jpg.ffabed5a39b1ba4677394ac914b172a1.jpg) 1 point
1 point -
I'm not sure if this is meant to have a dive bezel or not. Another 404 club member on its way with 0.05p to spare.1 point
-
Hi VWatchie , thank you for your comments but don't take it to heart I'm sure that some of the remarks that are written there are only there to protect their own investment and for legal reasons .I agree with you Mr VWatchie that Marks videos are far more informative and he has respect for the hobbiest . Thanks1 point
-
I agree with you Mr jdm I was just showing the op a way of shaping the screwdriver to undo a stripped date plate screw that will allow traction enough to undo the screw ,most of the time it works .Thanks1 point
-
I think you misunderstood the scope of my comment. I have no quibble about that detail, but expressed my general opinion about the 7S26 articles by Mr. Hacko. Again to help the OP, without even leaving this forum there is plenty of detailed photographic information on the very popular mov't.1 point
-
I use a 1,2 mm phillips screwdriver from a very cheap chinese set and it works just fine for that screw. A 1.0 mm will likely work too.1 point
-
Is this the first watch that you have to re-assembly? I think that if you do the same on another (of small value) that is complete and even has a diagram, you will find that mist are very similar, oiling points are alwasys the same, etc. Also remember, to help other help you, always post clear pictures of the current problem.1 point
-
With all the due respect, I do not agree that the above is that great, or even that should be given as an example all the time. For one, is incomplete, ending with train is placed together. And some practices are debatable, for example the one of opening the barrel and fitting the mainspring without a winder. I recommend the OP to look instead at the video below by hour Host Mark Lovick. He also made some more about the same mov't. Even better would be to enroll in his training, watchrepairlessons.com1 point
-
This is great info enjoy https://www.clockmaker.com.au/diy_seiko_7s26/1 point
-
If you use the correct size screwdriver for the job and hold the screwdriver in the correct position the screwdriver should't slip. Many do not use the correct size, not only will it do damage to the screw but also to the movement.1 point
-
http://cgi.julesborel.com/cgi-bin/matcgi2?ref=GP_641 GP-641.PDF1 point
-
Graziano, this is great! I’ve been search for this special screwdriver all day, when I could have been making my own. I’m still a watch repair noob so I’m still learning these tricks. Thank you!1 point
-
Did the Keyless assembly today, so I used the fluorescent HP-1300. Works great! Shows up under a black light as bright green - very easy to see where it is, and where it isn't. So - I'm a fan! Will let you know how the 9010 looks when in jewels later. The fluorescent doesn't show well under camera - so the next video won't do it justice1 point
-
A normal canon pinion would move things too, but good catch. That micro canon pinion should be disassembled and greased like any canon pinion though. All things said, with pallet fork out, setting time or winding will have a similar effect if the fork is out.1 point
-
I cna't sepll ta eht bset fo tmies tub I acn sitil mkae teh pdenaitc udnretsnad !1 point
-
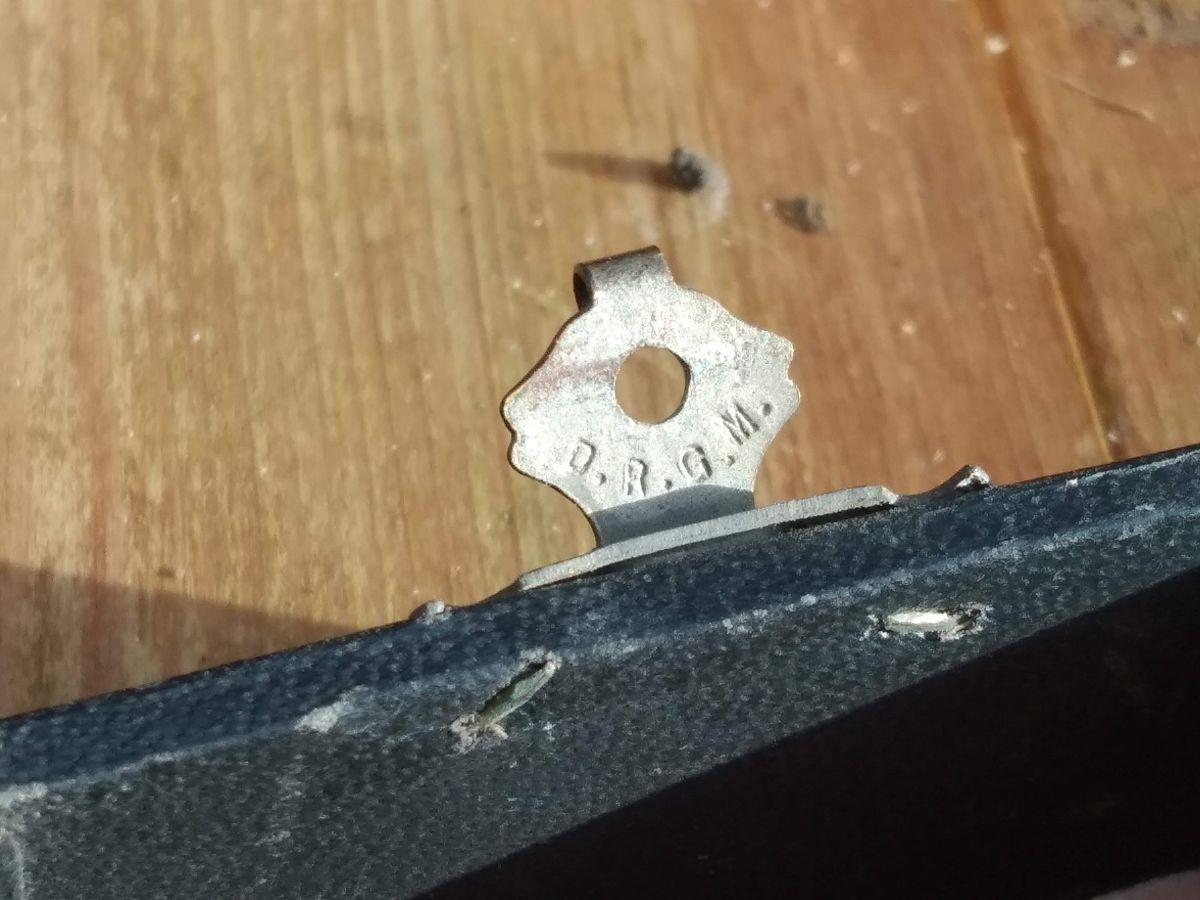
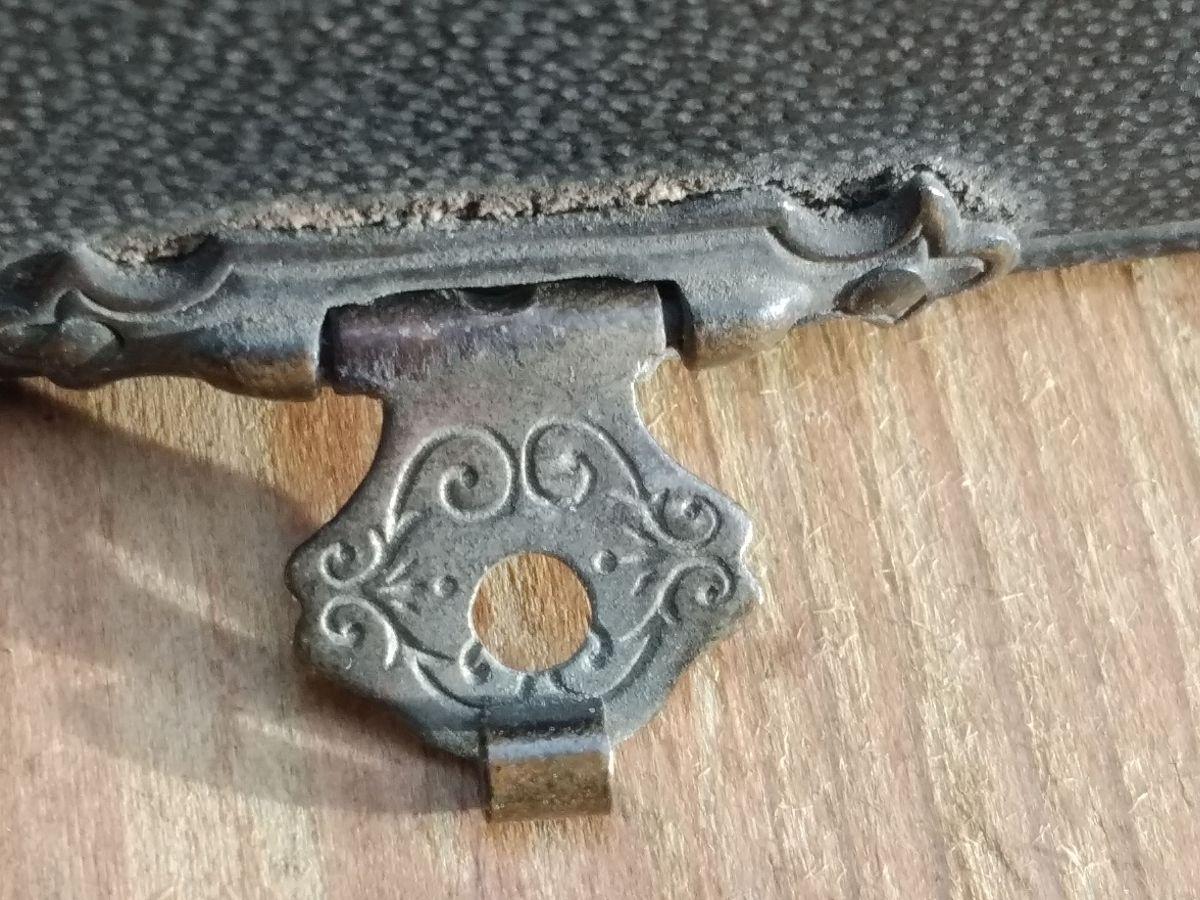
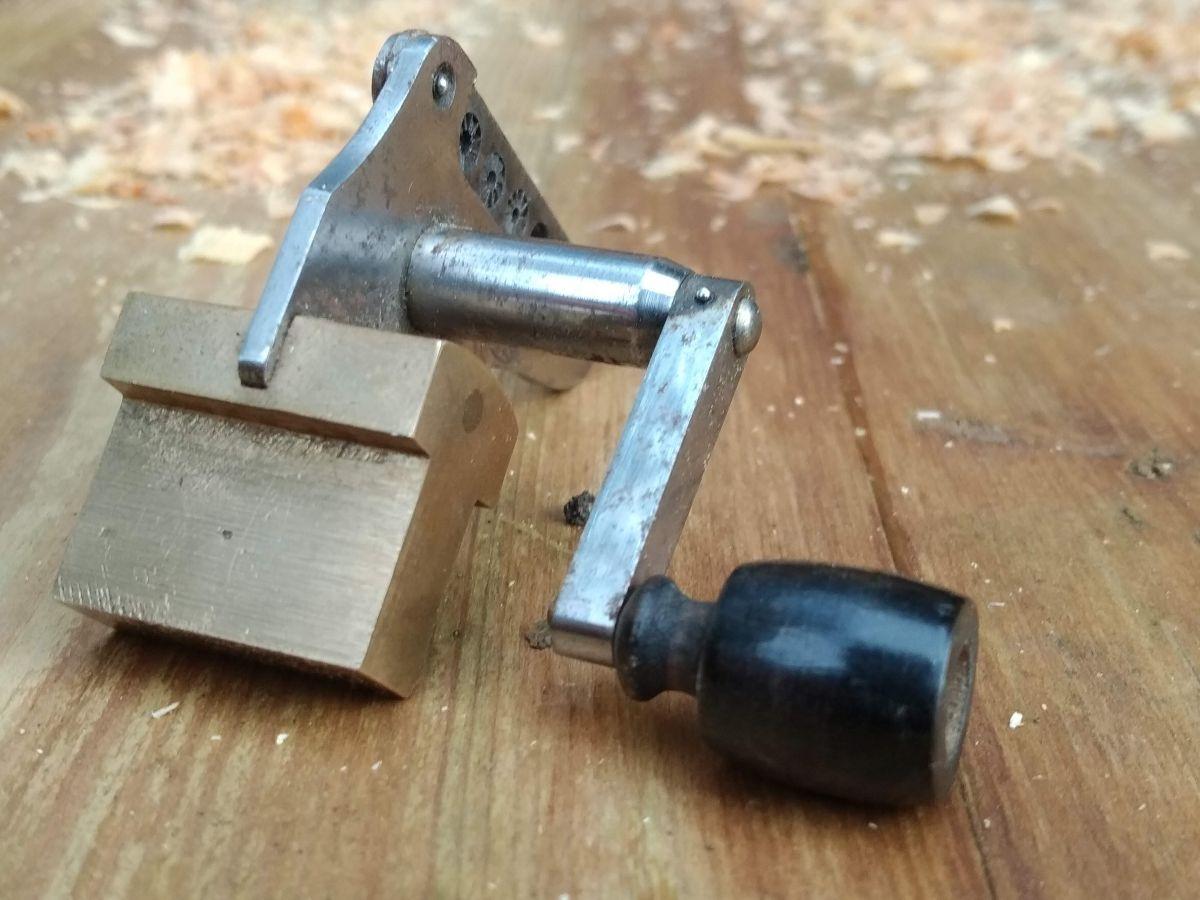
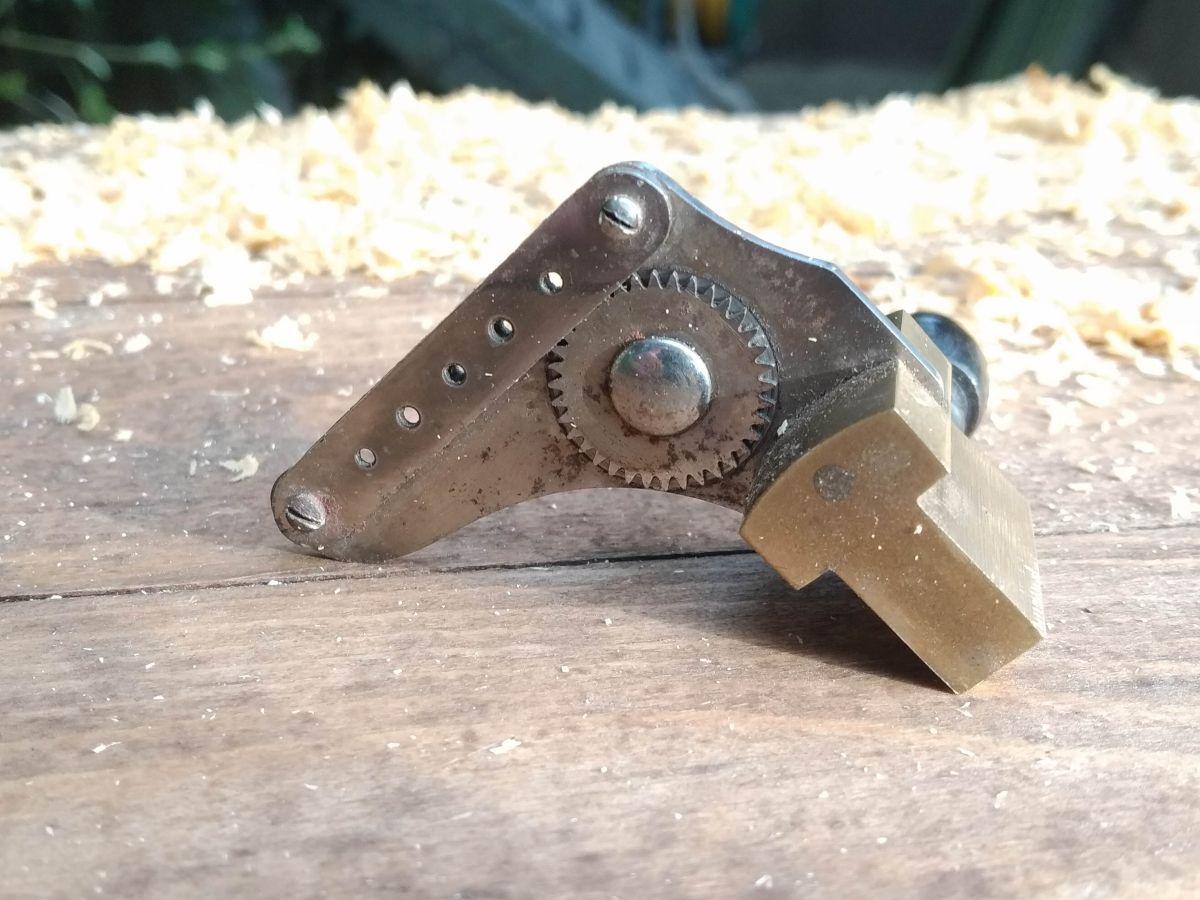
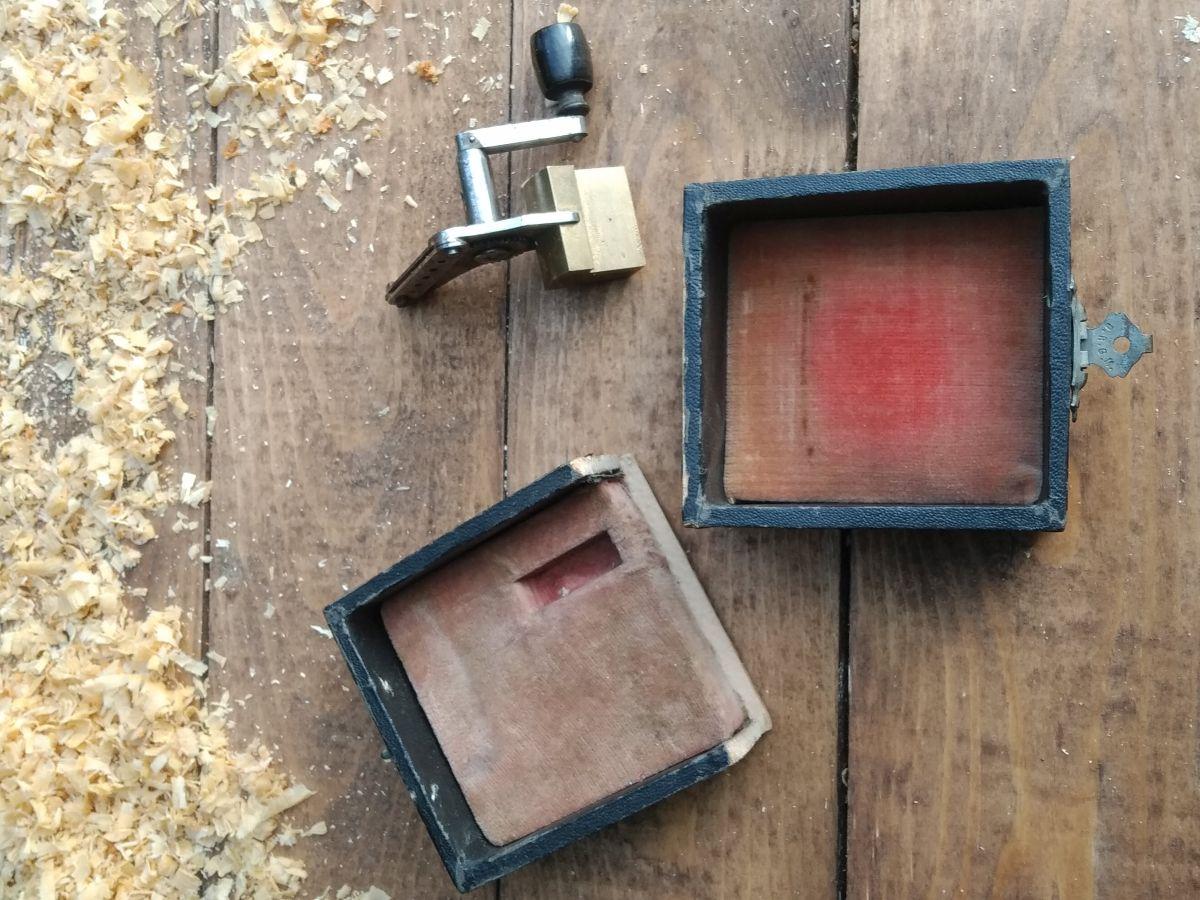
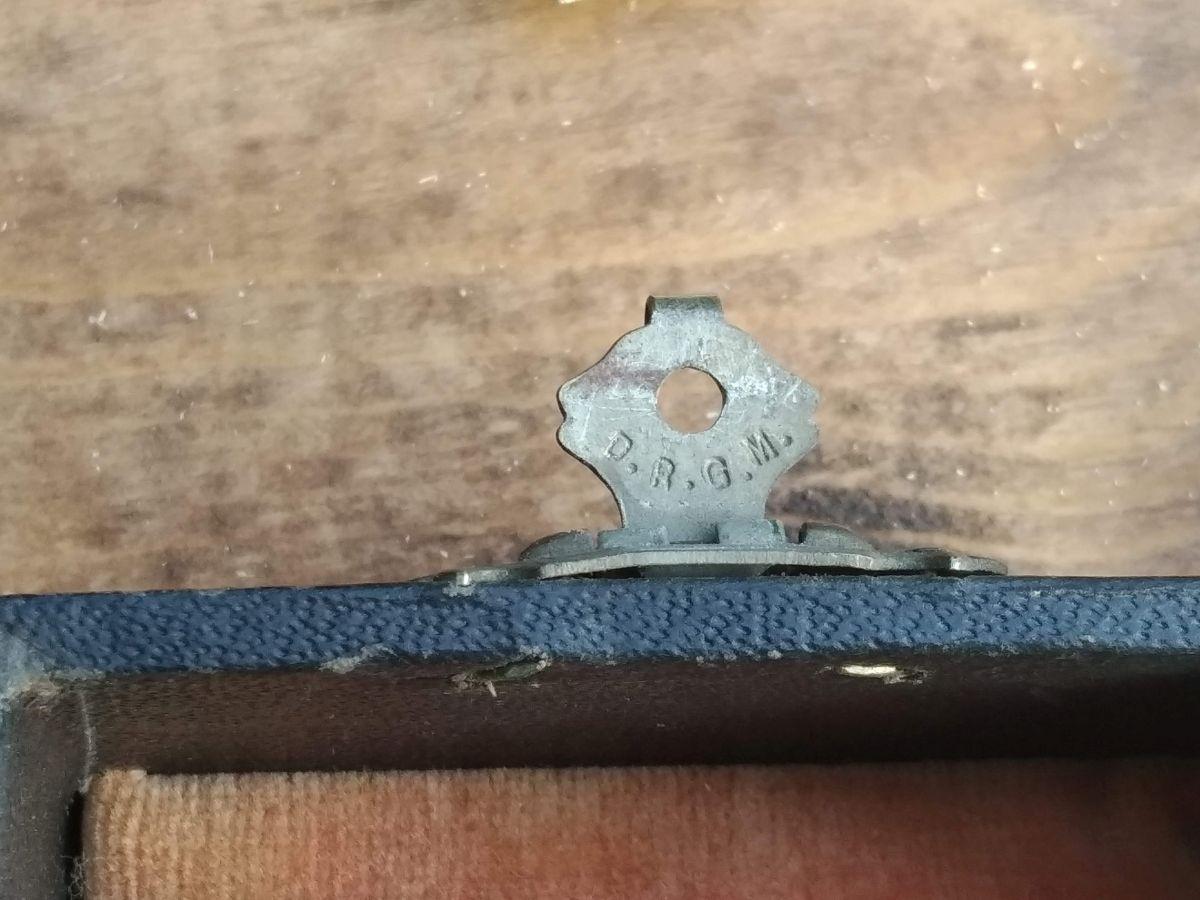
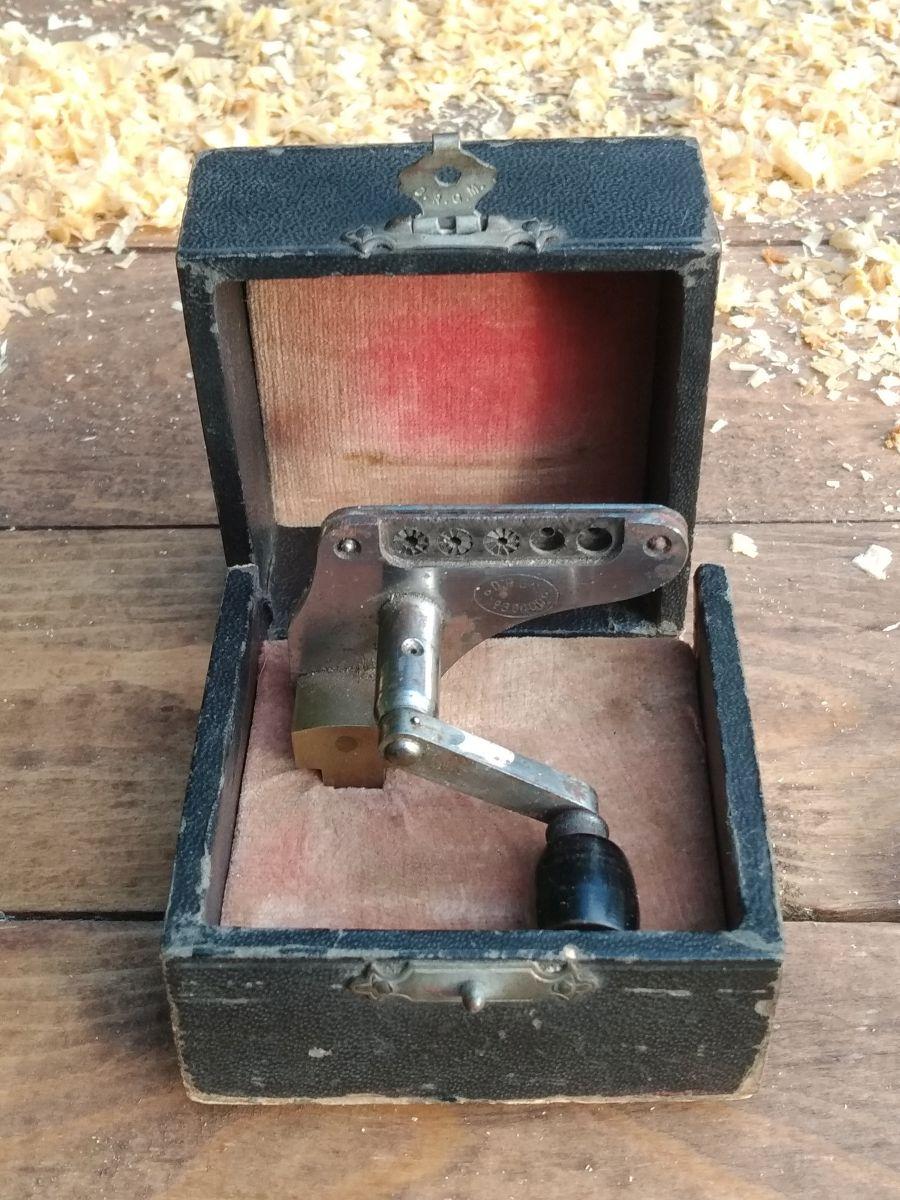
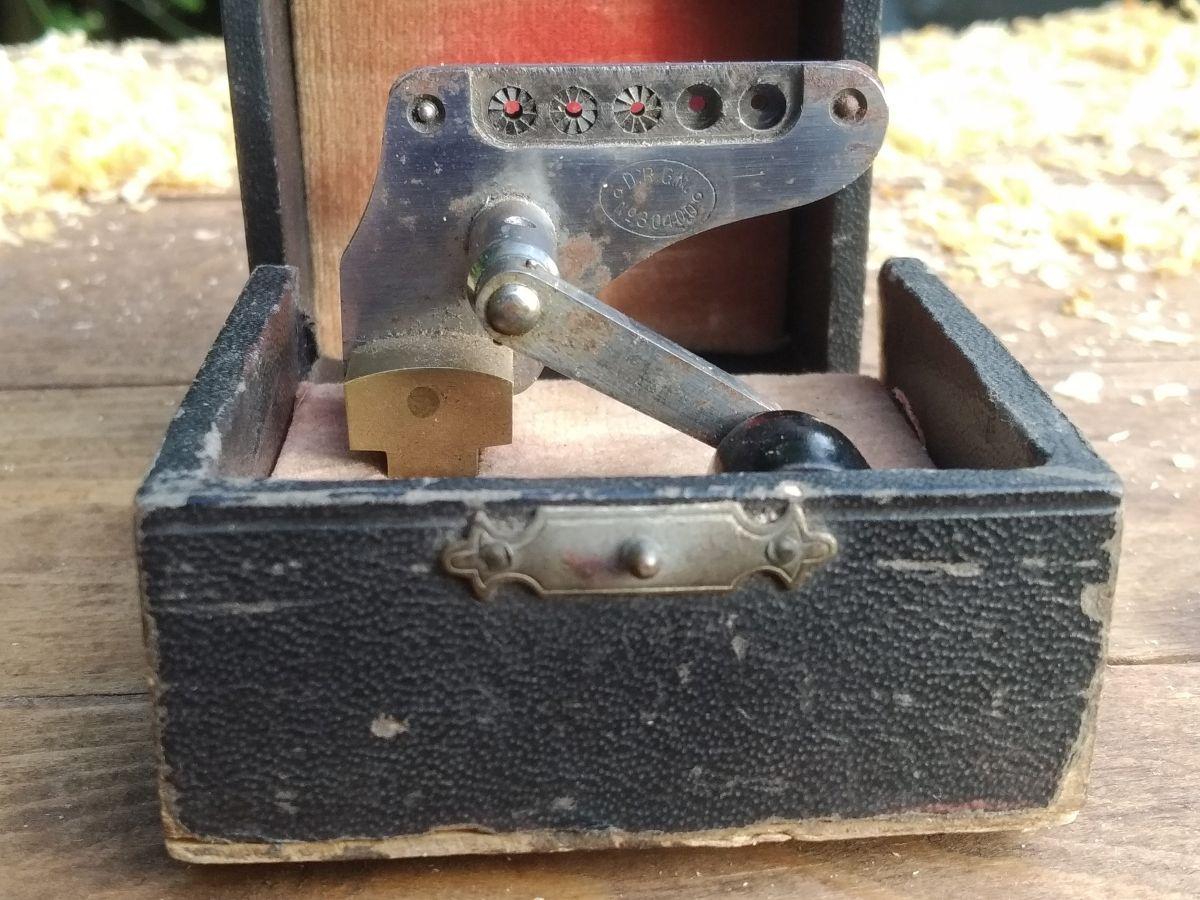
New project, a bow milling machine from Germany. Mr Deutsches Reichsgebrauchsmuster Nr 30400. Incomplete as two gears are missing, but will do my best to restore it as much as I can.

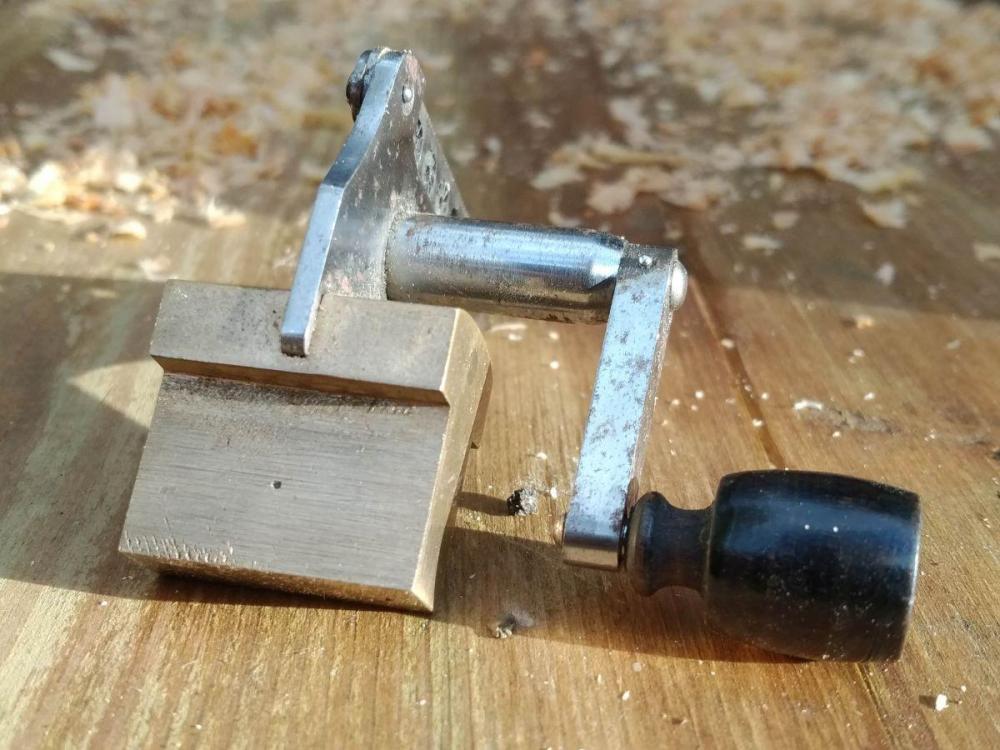
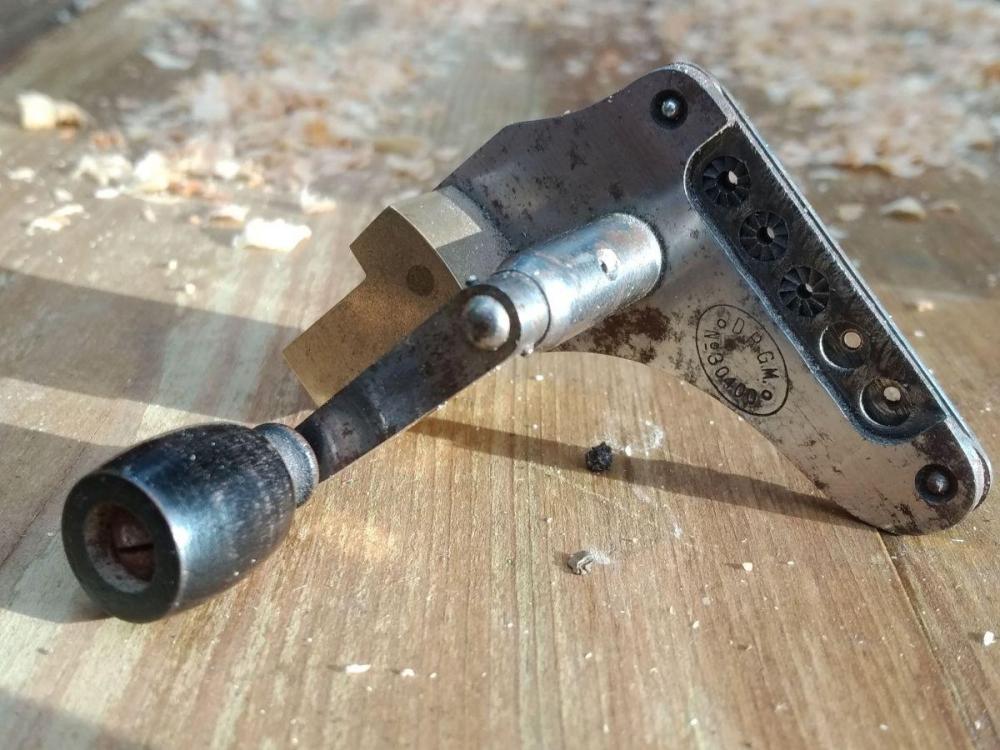
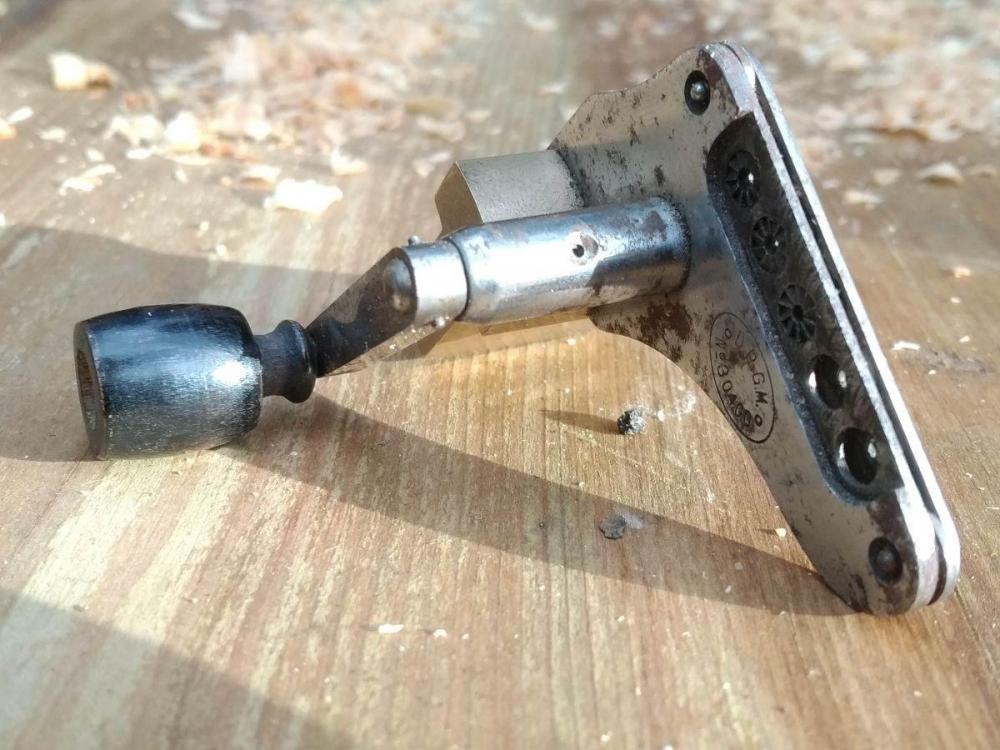


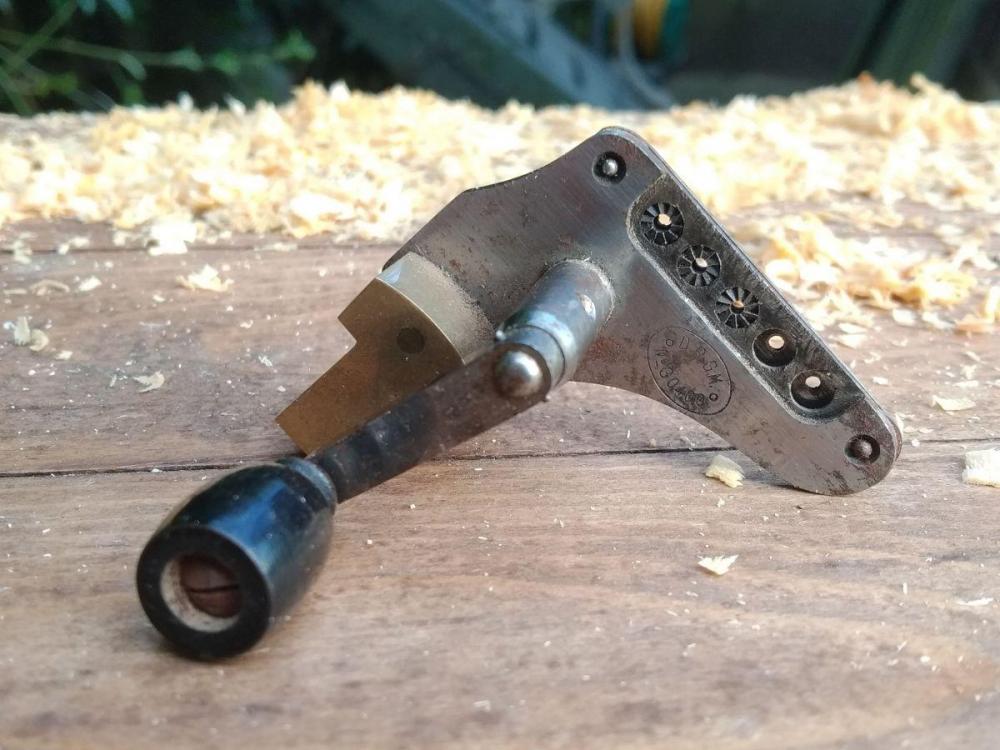
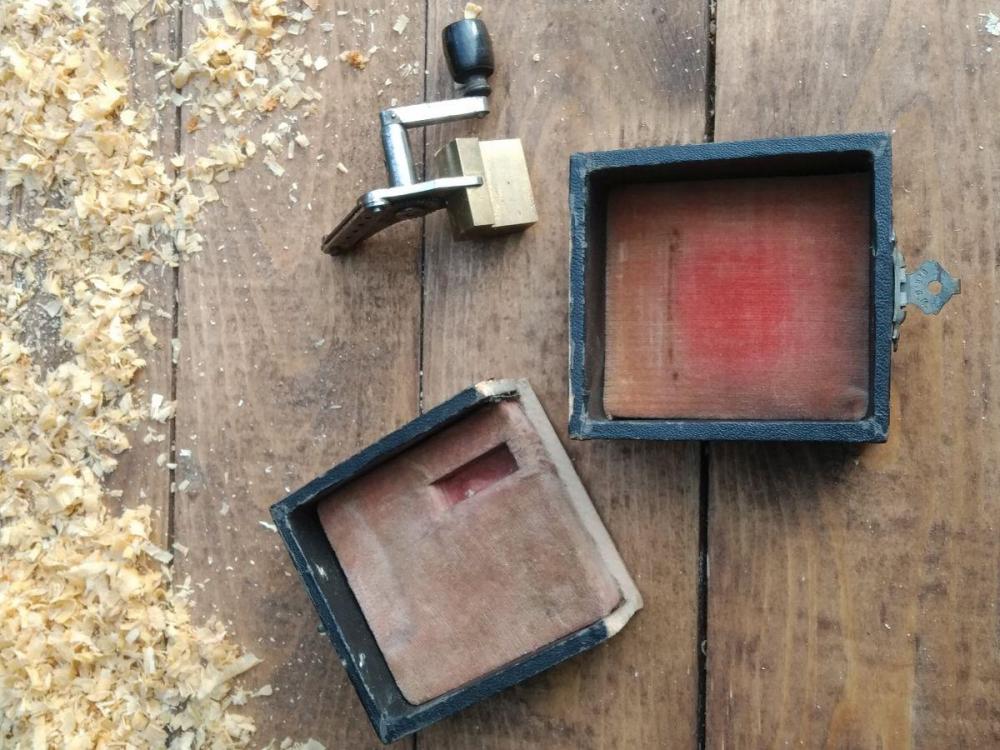

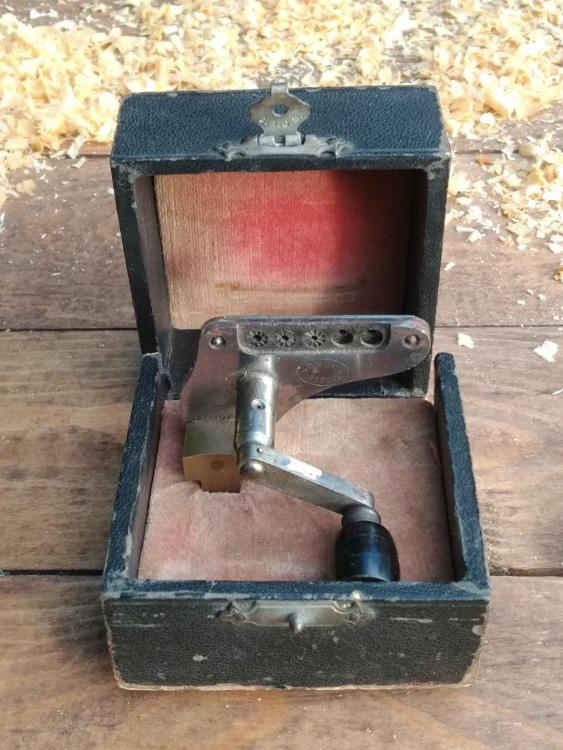
 1 point
 -
Simple.I dont!1 point
-
This Bloody awful scourge has us all on the back foot and we all have to take it seriously , The attitude It wont happen to me, has got to go. If a company like BERGEON are taking it seriously so shall we all. Keep safe and well friends.1 point
-
Hi I like the logic1 point
-
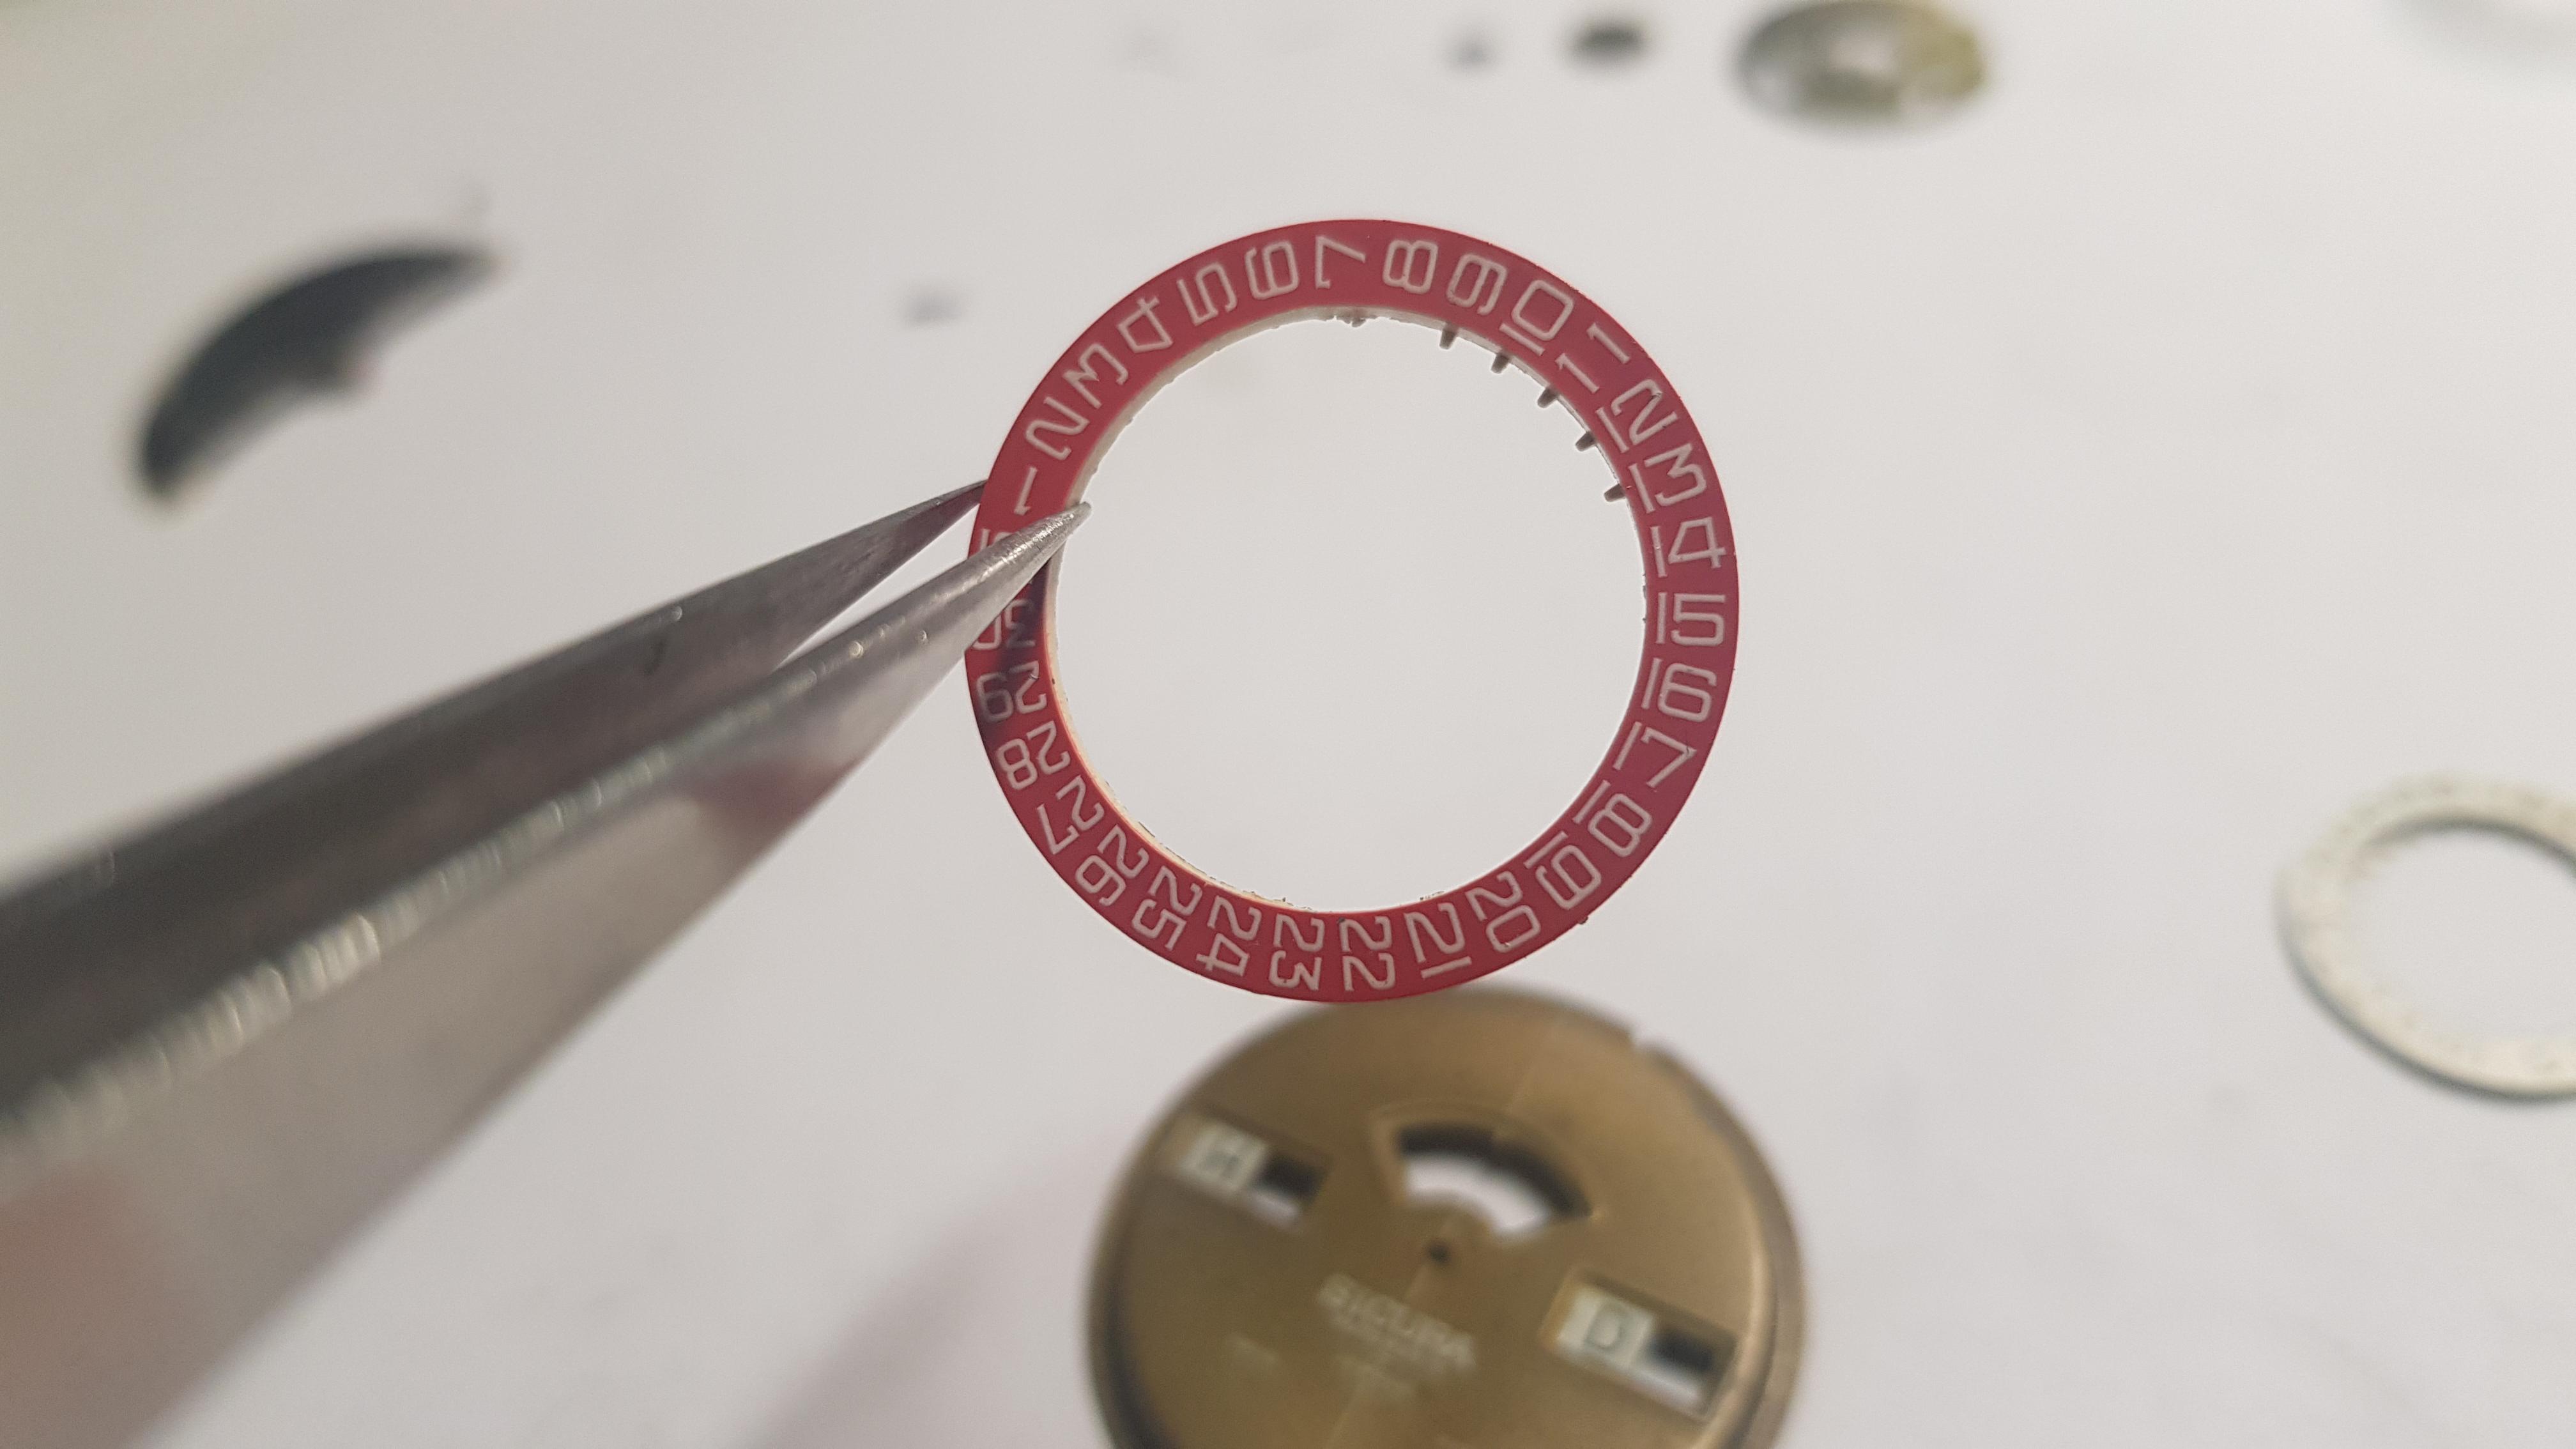
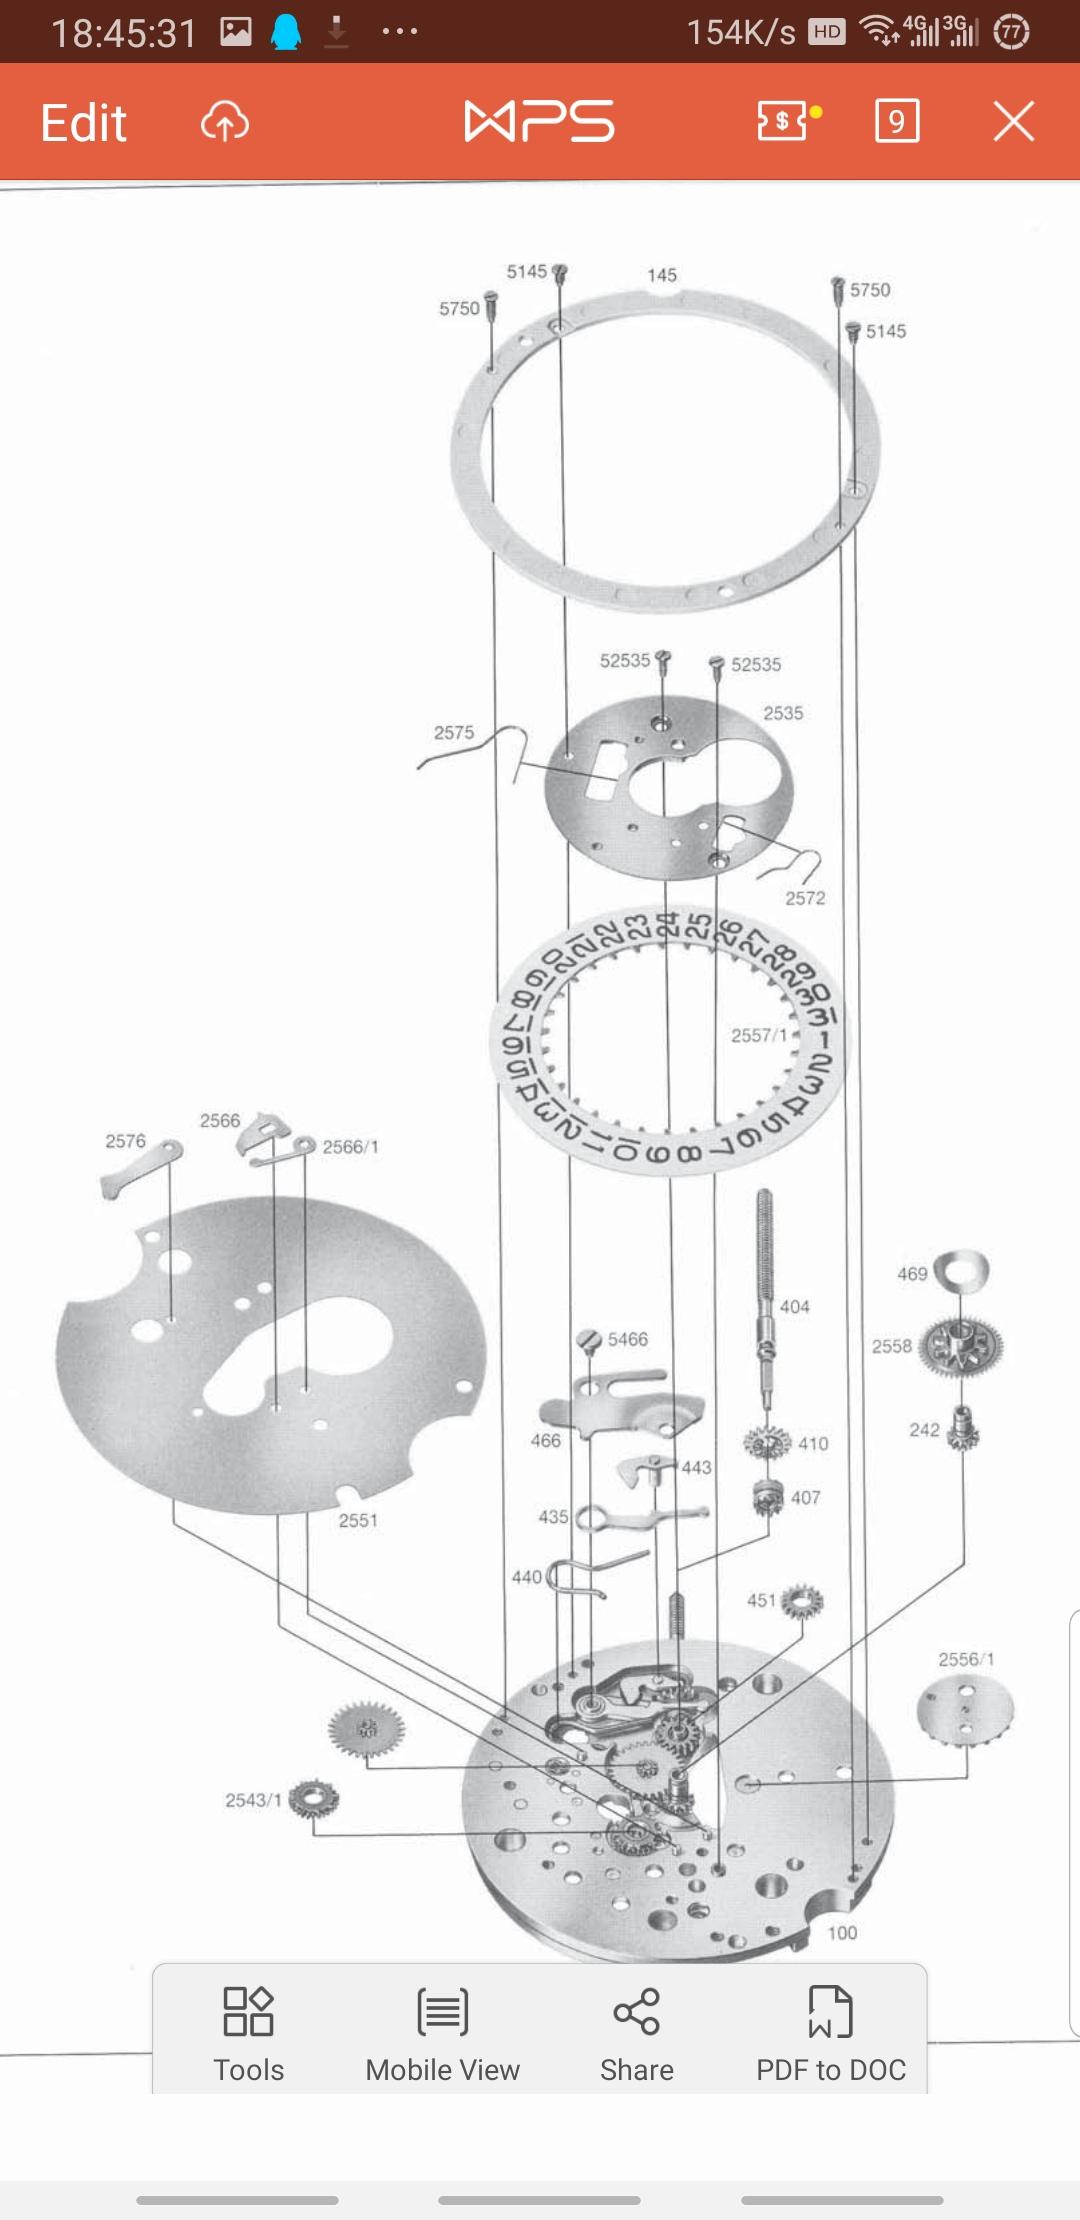
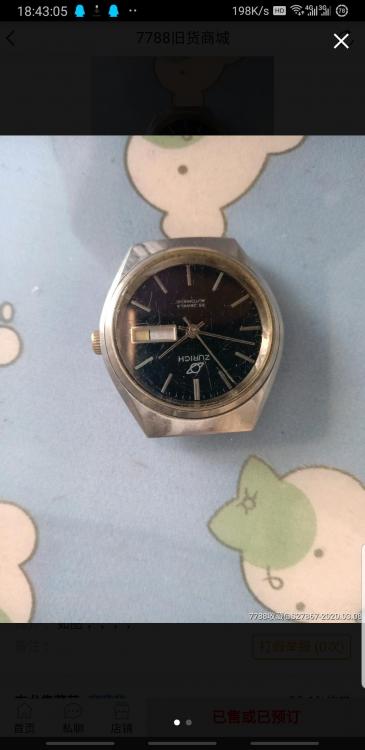
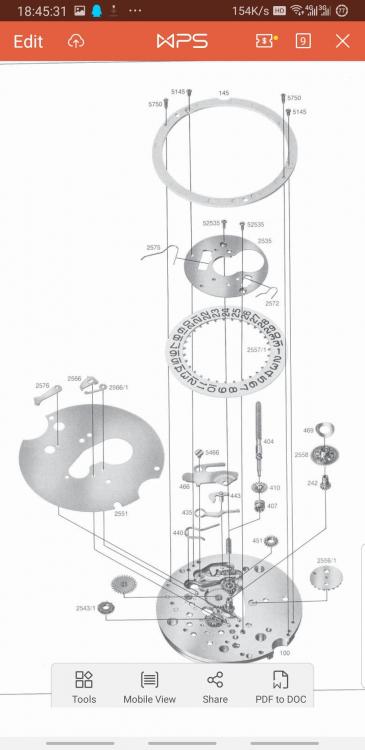
It is pretty hard to set the time. It must be something wrong with the module. And I noticed that teeth of the date ring is almost missing! And the date corrector and yoke...... I browsed the intercharge list on JulesBorel. These also can be found from BFG 582. But both are rare calibers in Chinese market...... I am searching Internet...... A day-date BFG 628! From the technical document on Cousins, parts I need (2566, 2566/1, 2557/1) look like the same. So I bought this immediately and I am waiting for 4 days delivery...... Continued
 1 point


.jpg.291b571a971efb3e2e4b2fe67271d042.jpg)