Leaderboard


Popular Content
Showing content with the highest reputation on 04/05/21 in all areas
-
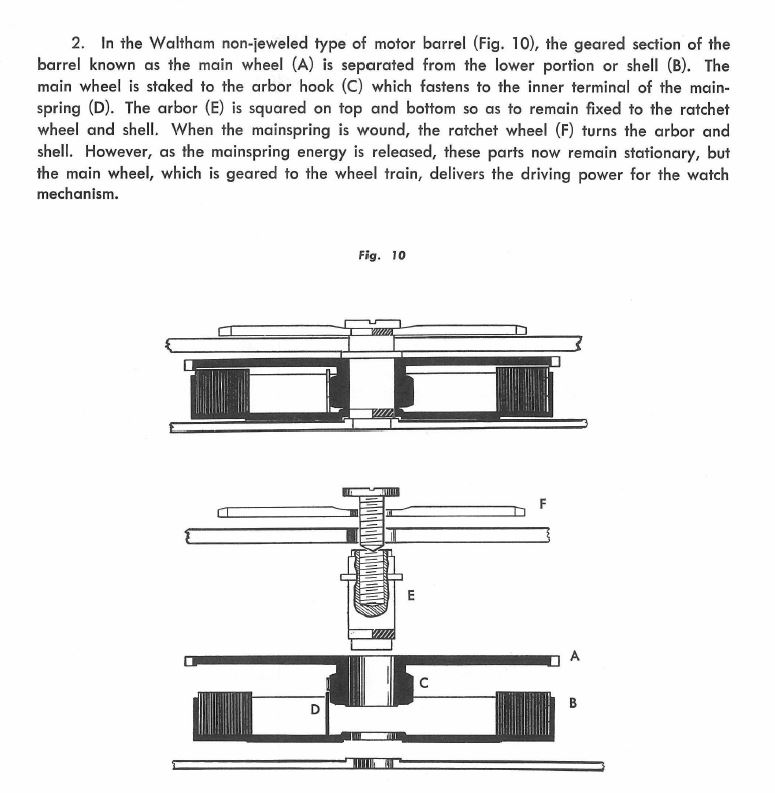
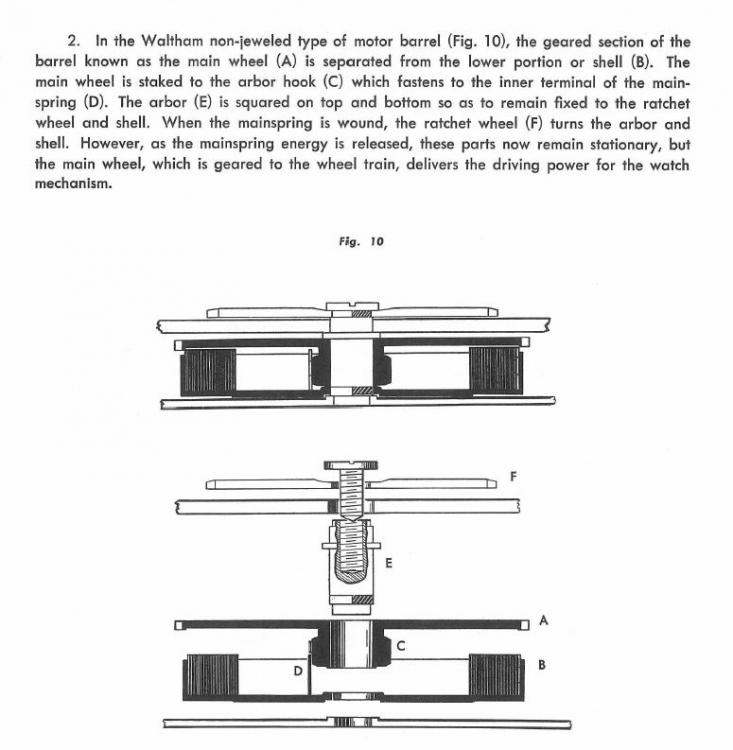
If this was their jeweled barrel things get more complicated. This looks like the non-jeweled type. You should be able to pull the arbor out and carefully separate the two pieces. I'm attaching a picture the fund will come is getting the mainspring back in again. As you normally have to modify the end sooner actually hook into the protruding part in the barrel. Yes basically the same procedure
 2 points
 -
Oh this Waltham is a beautiful mechanism; they carefully considered this. You may note a tiny, long, sliding bar - running parallel to the stem/clutch wheel assembly. Pull that outward and you should be able to wind, or let down mainspring tension along with holding back the ratchet. Isn't that the coolest way of facilitating de-cased operation?2 points
-
Coincidentally, after a tip of JohnR725, I just went through the 7750 regulator-pins exercise. Nickelsilver pointed this out also. The movement is a freshly serviced NOS 25-jewels normal grade 7750. Runs in every position with straight lines, lift-angle 49 degrees. I started off with the regulator pins nearly "full-open" and started slowly turning to reduce the gap between them, reducing the freedom of movement of the hairspring between the regulator-pins. Here are the results; 1) DD +4 333 0.0, DU +3 320 0.0, CD -13 296 0.1, CU -16 298 0.1, CL -17 292 0.2, CR -18 292 0.1 Started to turn the pins to close the gap and had to adjust the daily-rate downwards; 2) DD +5 327 0.0, DU +5 315 0.0, CD -5 291 0.0, CU -8 289 0.1, CL -3 295 0.1, CR -10 282 0.1 Closed even further till there was nearly any gap left and had to adjusted daily rate further; 3) DD +8 325 0.0, DU +7 318 0.0, CD -2 291 0.1, CU -5 296 0.0, CL -2 290 0.1, CR -7 287 0.2 4) Closed a tiny bit further, but that turned out to be too much and I had weird readings. I had to open the pins up and to start "squeezing" again. These are the readings with the pins as close together as I could get; 5) DD +1 323 0.0, DU 0 311 0.0, CD -7 287 0.2, CU -10 289 0.1, CL -7 287 0.0, CR -13 281 0.1 As can be seen, closing the gap to the point whereby the hair-spring just "breaths" makes a substantial difference in the positional error. In 1) the biggest difference between the fastest and the slowest daily rate is 4+18 = 24. After adjustment the difference is down to 1+13 = 142 points
-
I designed and printed this. It has a bearing embedded in it with a small clearance to create a nice rotation feel. The PLA I used prints beautifully and allows you to sand it a little which creates a tactile smooth finish.1 point
-
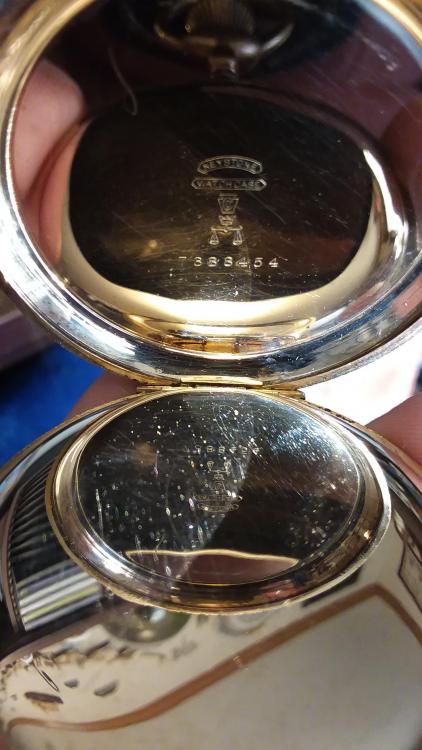
It finally came! I snatched this beauty off Ebay (for my sins) not long after I received my income tax refund. Generally I do not bother with getting a watch there if the seller does not post pics of the movement, but being a grade 339 I knew I already had a number of good spare parts if it needed any. Seller mentioned it "needed service". As a result, the price was not that dear. But I am a total sucker for a 3-finger bridge, so I took the risk and bid. And got it. Aside from a thorough cleaning I can't really tell what other "service" she may need as yet. I wound her and set her, had her on a shelf dial-up, then dial-down, then carried her around for a few hours today. She keeps excellent time! The sound she makes is flawless. She's in beat. So just cleaning and fresh oil, which I'd have done anyway. She's just a beauty inside and out.

 1 point
 -
Sharpening the edges on my Mark II gold case. Made a lapping collet out of brass. And 3D printed an angle base. Seems to work!1 point
-
The problem with the 214 hack is the instructions are not found in the service manual. They were on a separate piece of paper that almost nobody has. That's probably because no one in their right mind tries to adjust the hack because it's a major pain to get it right. I've attached the PDF on how to adjust the hack. 214 hack.PDF1 point
-
Thank you John. Yes this is the non-jewelled one. I'll take it apart tomorrow and I'll see what the end of the spring looks like. I'm keeping my fingers crossed the 2227 spring will be the right one.1 point
-
First thing is flip it to setting position and wiggle around the bail. These can get put into set position when casing, the square on the flip up bail needs to seat. The hack mechanism can be touchy and honestly is best left however it is, unless you like decasing and tweeking ultra delicate things multiple times. If it was running fine uncased it's almost certainly a simple stem engagement issue.1 point
-
I did that, that removed some of the higher pitched „plings“1 point
-
Hi This site may be of some use https://millenarywatches.com/tudor-serial-numbers/ cheers1 point
-
The problem is not unique to the Chinese timing machines. I've seen this at work previous watchmaker who was doing Rolex watches was having a bickering match with the boss over a particular watch. Which meant that I got it because I'm the timing machine expert conclusion it was watch case was too big and heavy. I don't remember what we did about the problem sometimes if you make sure the crown is touching where the sensor is it helps but not always. This comes up for Seiko watches? We get a fair number of Seiko watches in for regulation somebody wants to keep really good time because the factory just adjusts to the specifications they don't adjust to perfect. Put it on the machine looks like total crap or just really bad.. Taken out of the case and usually looks decent. It's back to the timing machine needs a good clean signal. Heavy watch cases, movement rings that insulate the movement from the case, really quiet movements a variety of things cause the timing machine that have an issue. This is also where it's up to the user to grasp the you're having an issue and see which you can do about it which means take the movement out of the case.1 point
-
I can additionally suggest that it removes the rubber insulation on the pickup, that works as a low pass filter and leaves out the most important frequencies for analysis in the WOS. The final captures are very clear that facilitates the work of WOS. Also I see on your Marshall amp, the tone control turned clockwise, if that raises the low frequencies, it should be on the other end. Good job.1 point
-
It seems you have solved your problem but if you still have a noise problem I wonder if some of it is line-frequency noise. You are using an amp that plugs into wall power. Whenever I add something to my setup that plugs into wall power, like a signal generator or scope, I get 60 Hz noise. I cured this by using a ground loop noise isolator. My unit is this: https://www.amazon.com/gp/product/B019393MV2/ref=ppx_yo_dt_b_asin_title_o04_s00?ie=UTF8&th=1 I put this between the preamp and the computer and it solves the problem. The isolator takes 3.5 mm stereo cables but mono plugs work.1 point
-
Good job and good idea !1 point
-
looks better - it should work1 point
-
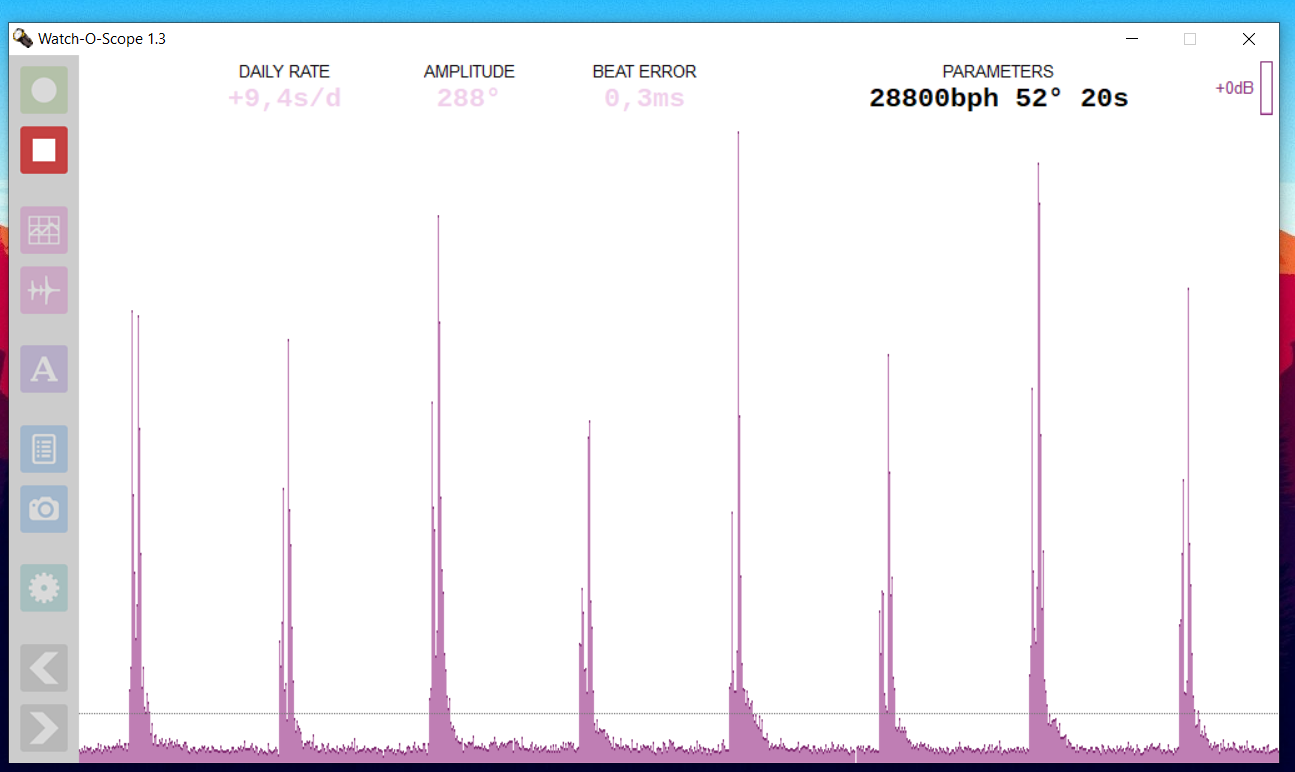
I’ve been using the volume instead of the gain knob on the amp (again...stupid), I think that wasn’t helping with the noise after listening to a few recordings my signal now looks like this, with 0dB “artificial” amplification from the software.
 1 point
 -
Yes, that happens sometime. The gain control is there for that exactly. You should be able to get virtually zero beat error and +5 s/d on the instrument. Then check what rate difference you get crown down, it can easily be minus 30 s/d and not easy to correct. Also an amplitude bigger than your is difficult to obtain on used movements. However I would not be surprised if it keeps good timekeeping even like that. Being silent is a good thing in a mechanical watch. It means that the escapement is precise and efficient, that is, less energy is wasted in producing sounds. I think they do work well and reliably. For the interested reader, below he full topic on the subject.1 point
-
This place does them in Chesterfield. Of course, I don't know where in the world you are. https://eliteluxurygoldplating.com/ I've not used them but I did contact them once and they quoted around £70 to refinish a watch case.1 point
-
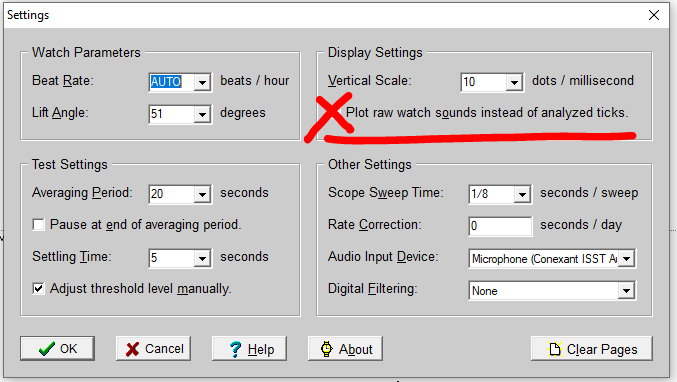
check the "Plot raw watch sounds..." I think you have a low signal to noise ratio
 1 point
 -
That definitely needs a new tube, the threads have rounded off a treat there, I wonder if they can be chased in an attempt to sharpen them up. Although that might only be a temporary fix. It really does need a new tube, I’d be surprised if one is not available, if not a Seiko maybe a generic one from cousins1 point
-
No gold in your workshop? whatever next. OK joke over. For those that are following this work. This is where we have a repair which comes under restoration or repair. Restorating would meen it is repaired by a gold replacement because that is what the original is made of. Repair means it can be replaced by a brass replacement. It depends on the customer, if it's your own then the decision is yours. It is also a tiny repair/replacement.1 point
-
I agree, you just be staying on the safe side by running the watch for a week. On a high precision piece , however, a week or longer seems a must. I learned this from whats commonly practiced in my neck of the woods and personal observation and know of no data on the subject. Regs Joe1 point
-
If you're burnishing a jewel in you should always modify the edge. Otherwise trying to burnish over a square energy is problematic even though we see people do it. There's a reason why the jewels had the shape they did you should modify the jewels to fit the setting rather than to force the setting to a modern jewel. If you're going to use a unmodified modern jewel just friction at him like you're supposed to. If you going to do the burnishing you cannot push the jewel out you will usually or as you discovered break the setting. A better way is to smash the jewel and then open up the setting. Or use the tools specifically designed to do this. Because as you've noticed the setting was holding nice and tight pushing the jewel out has a tendency to break the setting. If you have a modified jewel in other words the rounded edge you could always try because you don't have a lot of choices here so you might as well try the choices you have. But it looks problematic as to whether you have enough material. So you may be able to make a micro cut because you don't have a lot of room and have enough material to burnish. But only with a modified jewel because I doubt should have enough to go over a conventional jewel. The other option a course is because it looks like the setting is almost smooth inside would be to fit a modern jewel and not worry about the burnishing aspect. Providing there still am enough material left to hold.1 point
-
I would personally take the back off and take the stem out, drop everything in a sealable bag with a couple of bags of silica and Leave it for a few days, then replace gasket etc and don’t forget to silicon grease them before installation. Put the watch back together and see what happens then. Thats the easiest and safest option. If it still mists up, start again but pay particular attention to the case back and case for any defects in shape etc ( obviously you would of looked at this in the beginning but check again ok ) if all is ok there it’s got to be the crystal or stem seal so concentrate your activities in these areas1 point
-
Seiko does not sell the tube separately, only the complete case, that for a Sumo can cost more than 200 or 300 Euros. You need to post good pictures of threading on tube and crown to ascertain the amount if damage, however normally these are repaired by a competent watchmakers that restore the threading. An owner can avoid 99% of these problems by reducing the number of times the crown is screwed out and in, and being very careful when that is done.1 point
-
Happy Easter!! ?
 1 point
 -
I just discovered this in the supermarket.
 1 point
 -
Having only yesterday serviced a 1975 Cal.32 Timex auto in accordance with Timex's published procedures, including adjusting the rotor bearings by tightening the rivet on my staking set, I can happily report an increase in amplitude of about 100 degrees to just under 200 degrees (it was desperately in need of a clean), and a rate of +/-20sec per day. Not the performance I would expect to see from a fully jewelled Swiss watch, but not too bad at all for a 40 year old pin pallet, 0 jewel budget watch that is still on its original main spring. Not only were Timex pin pallet movements most definitely meant to be serviced, but the process is both quick and easy, and the results worth while.1 point
-
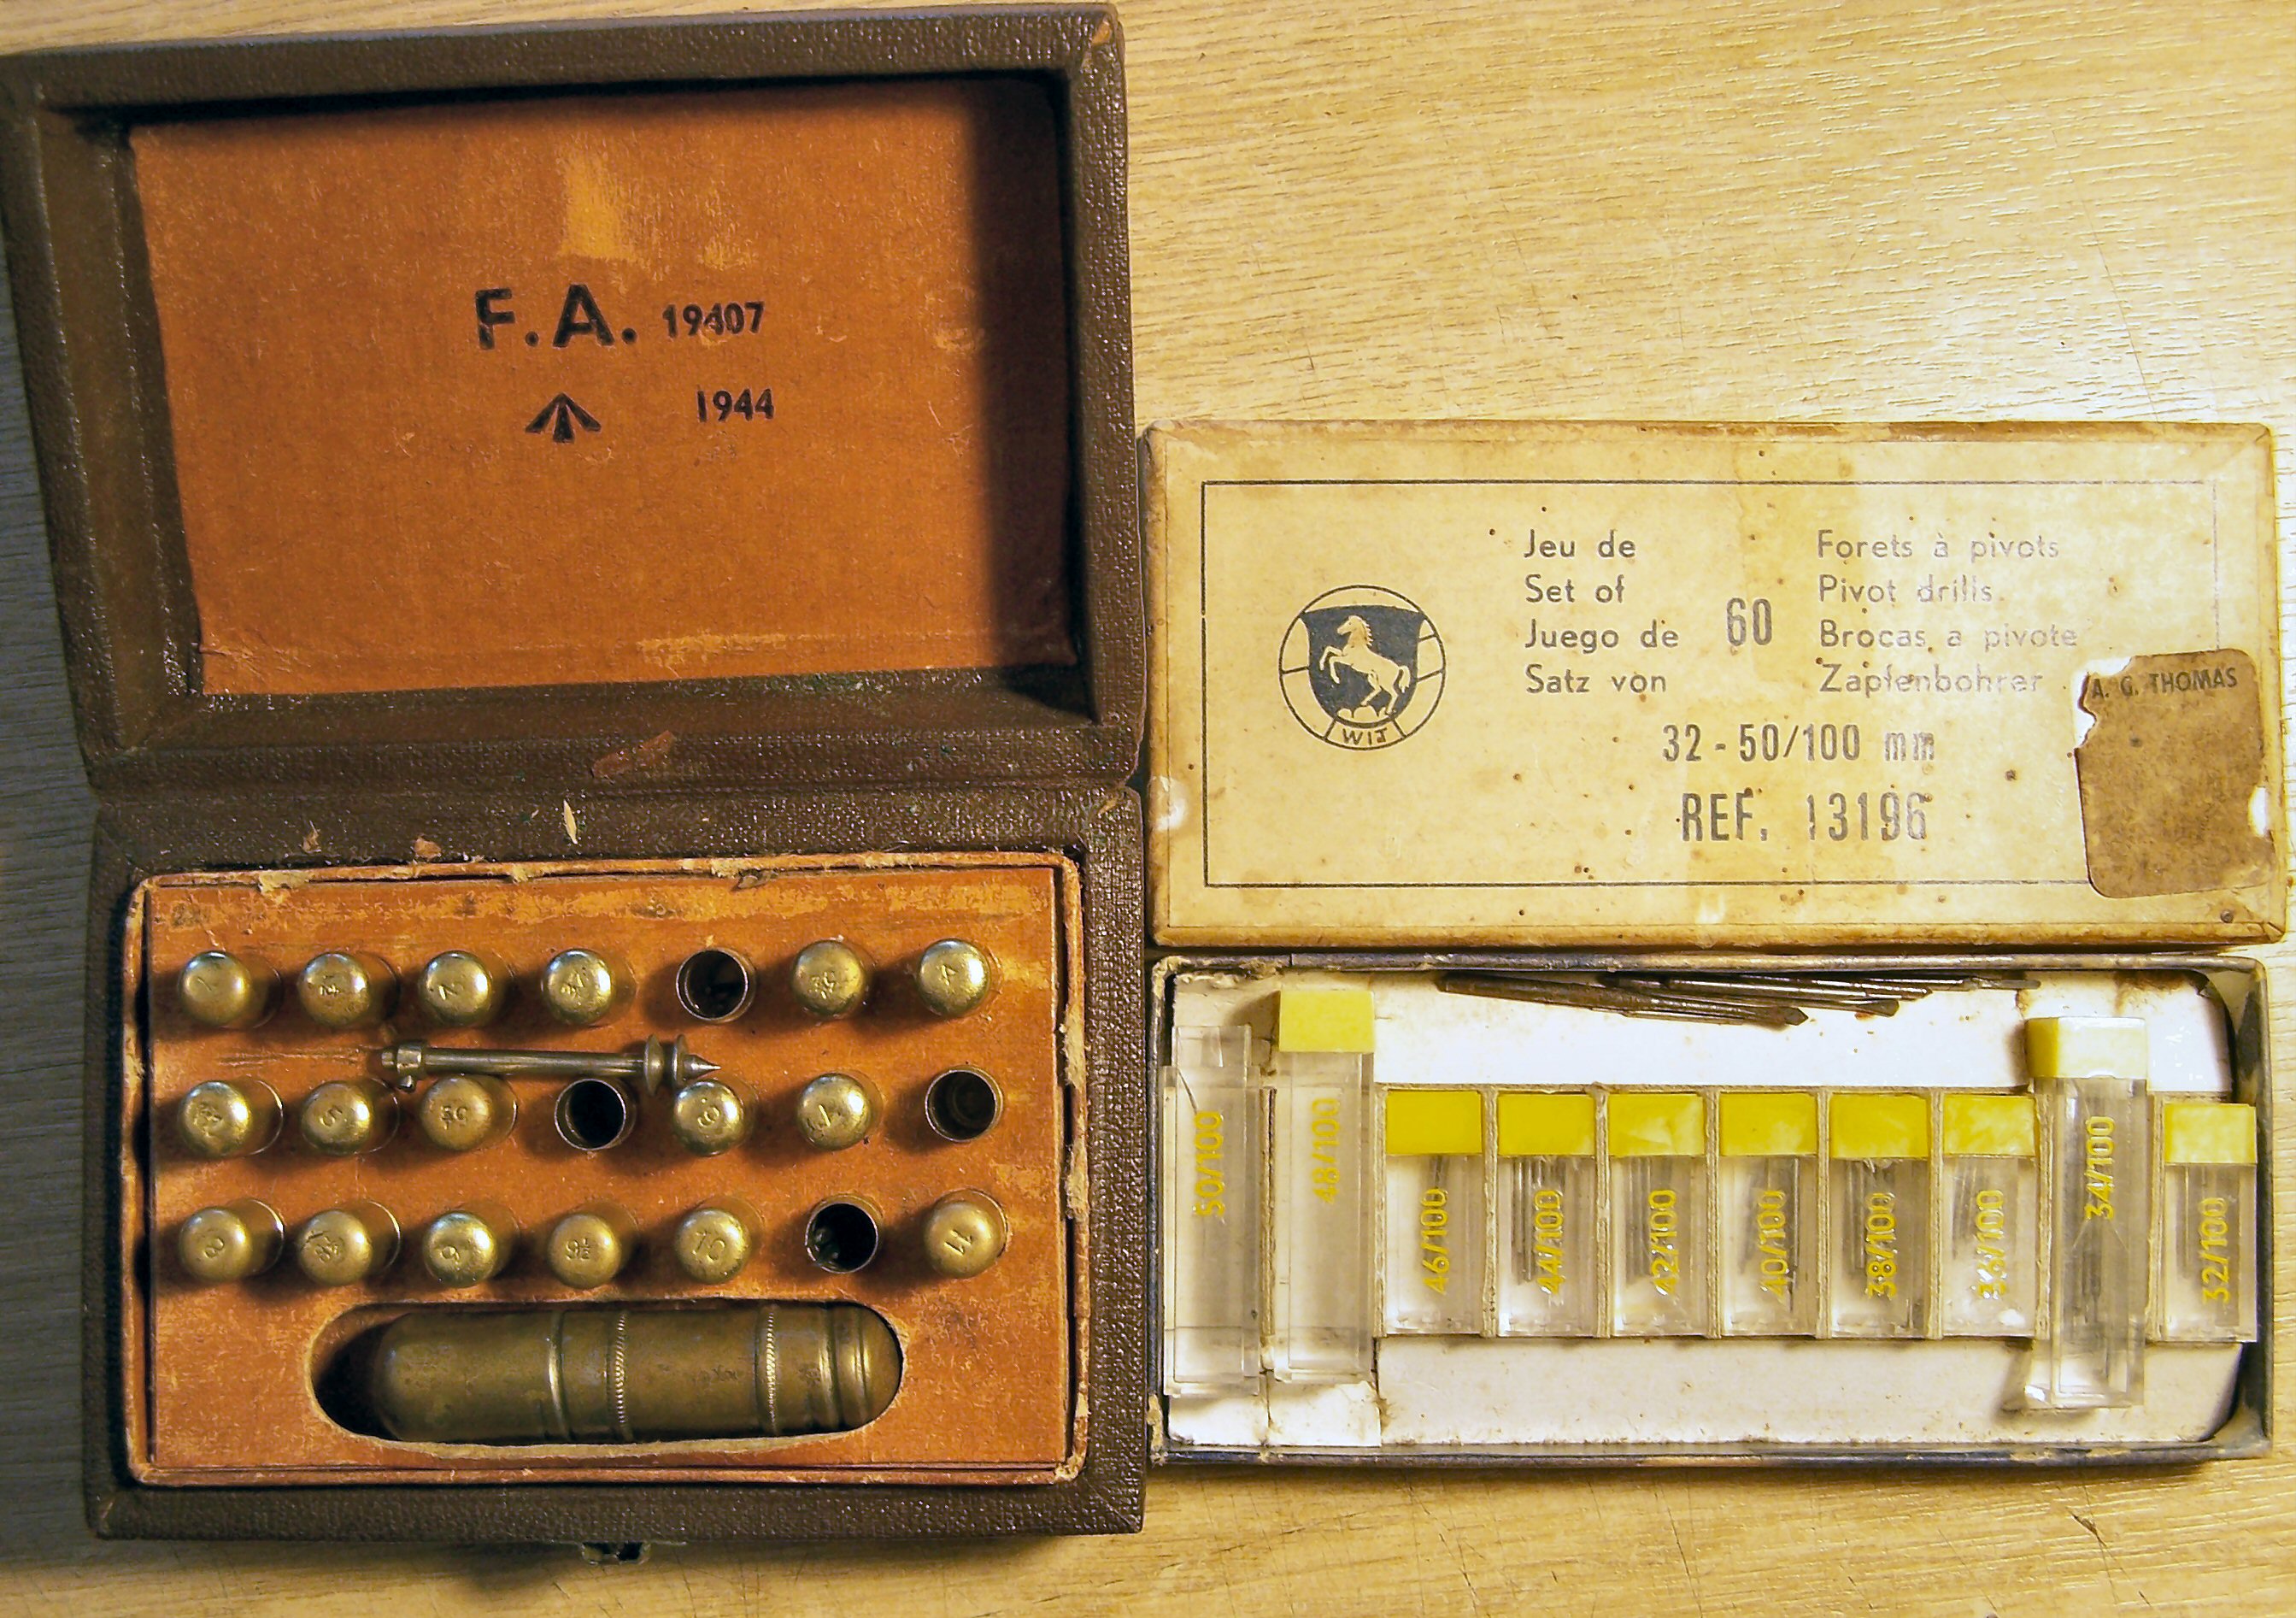
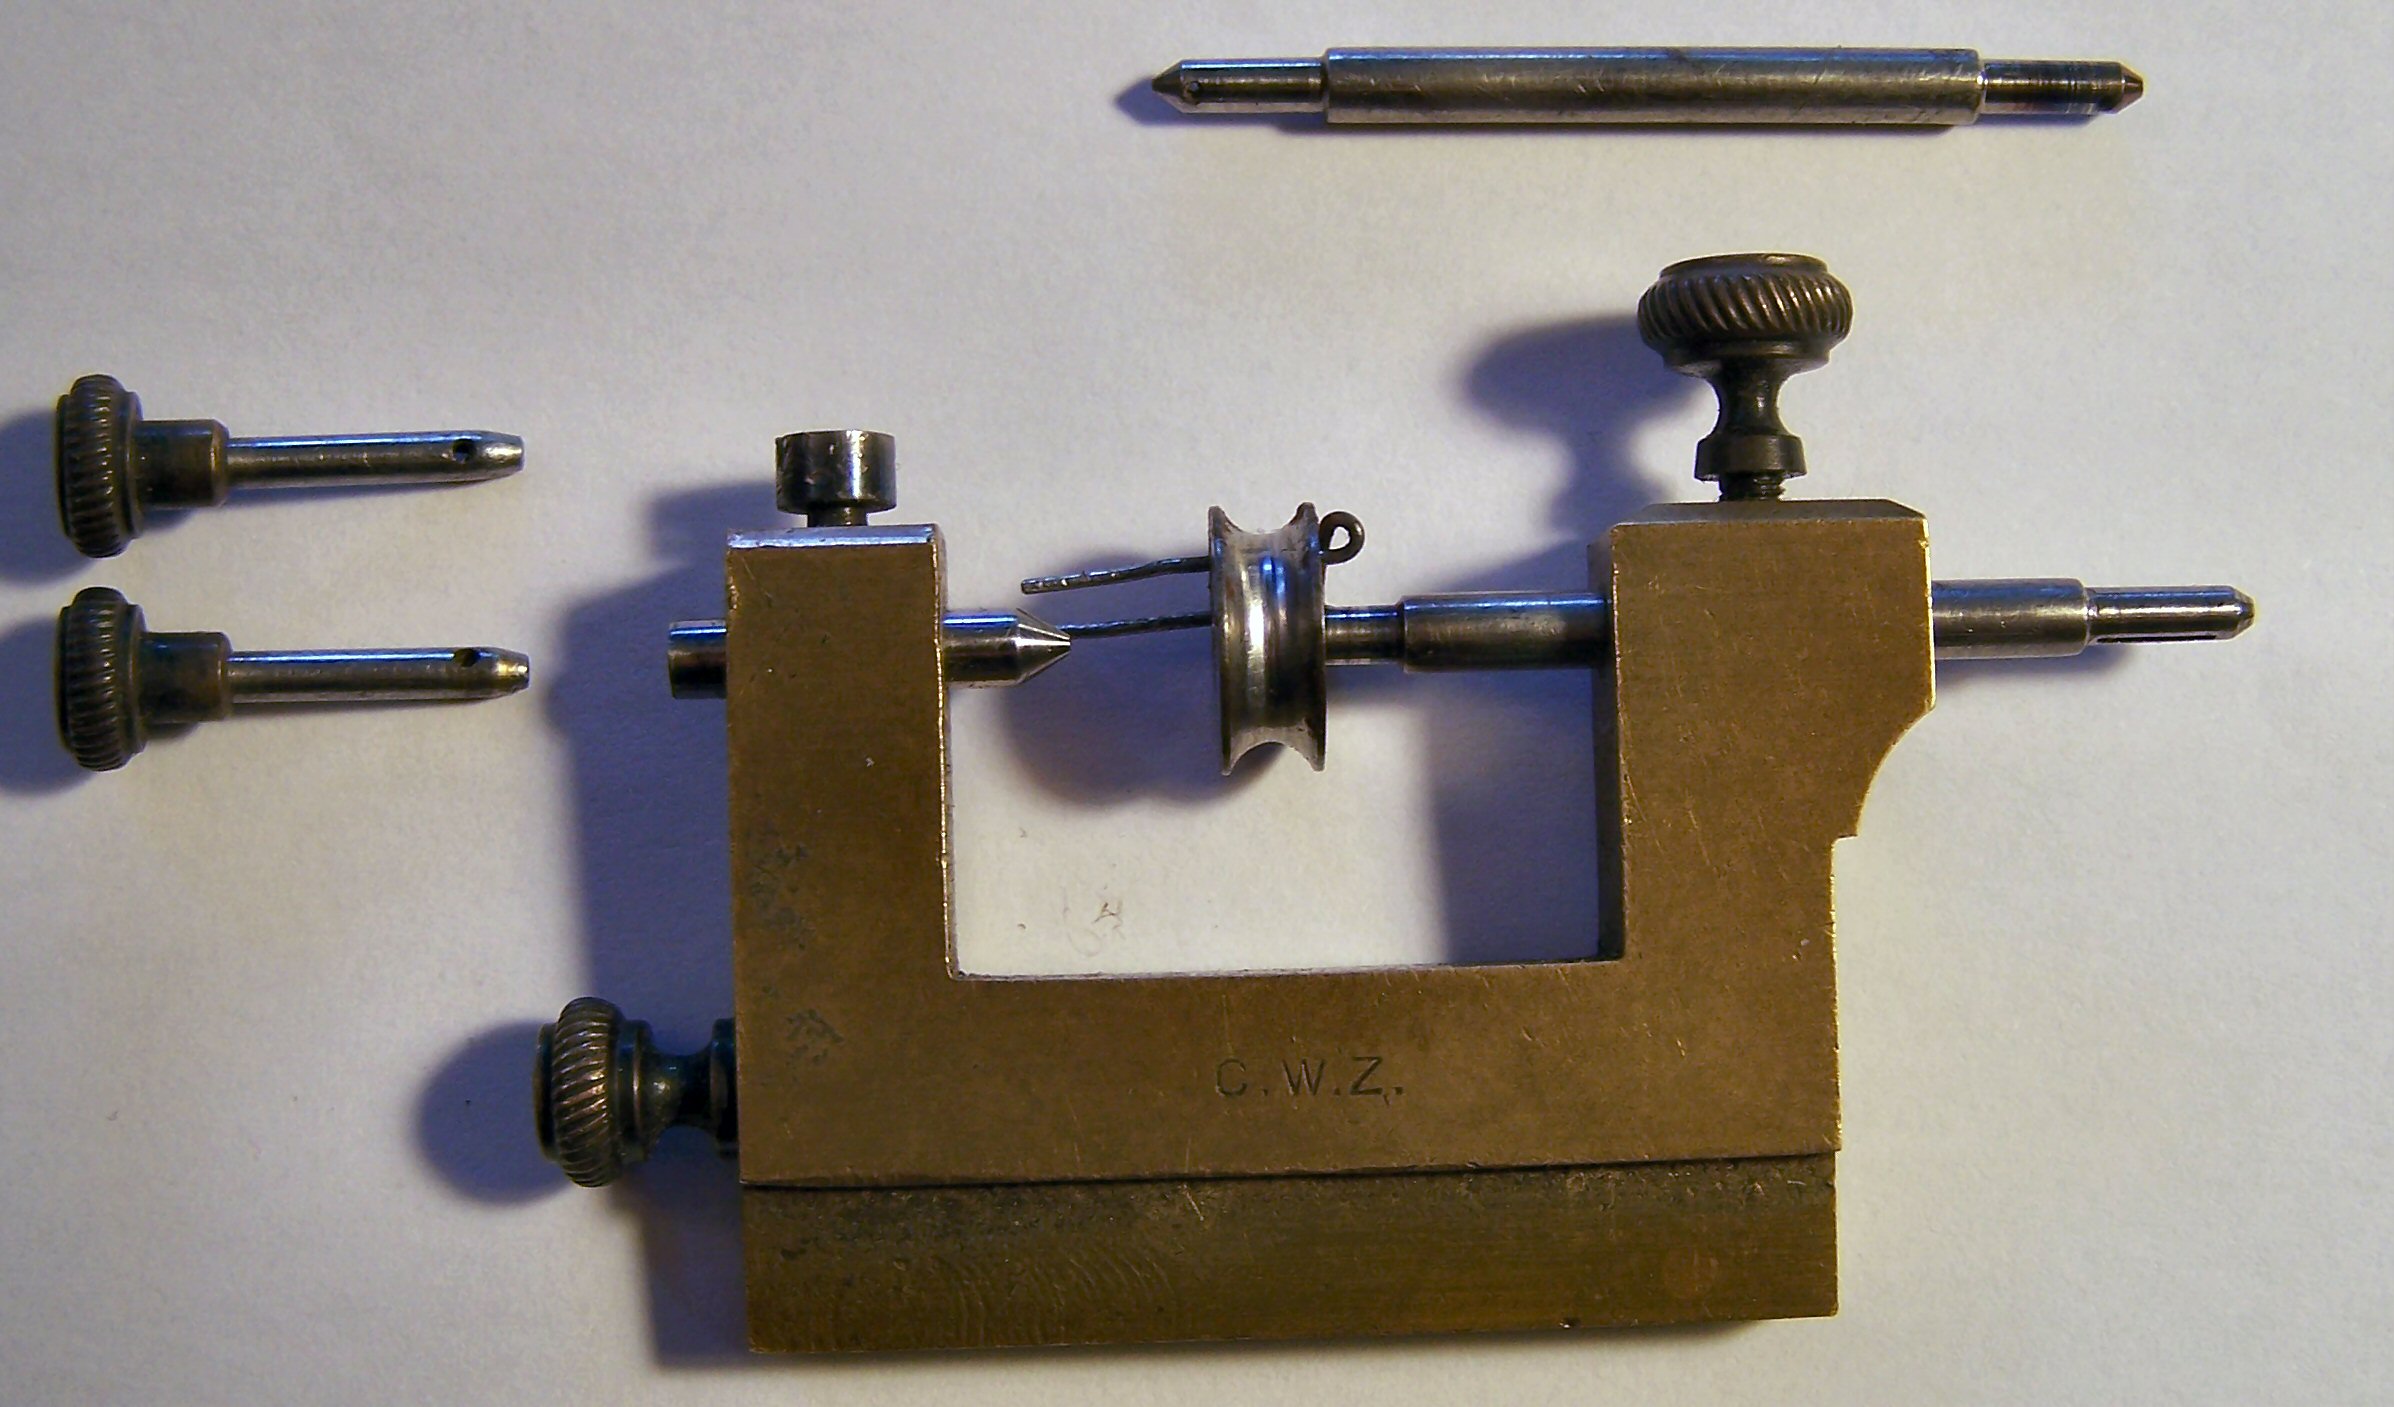
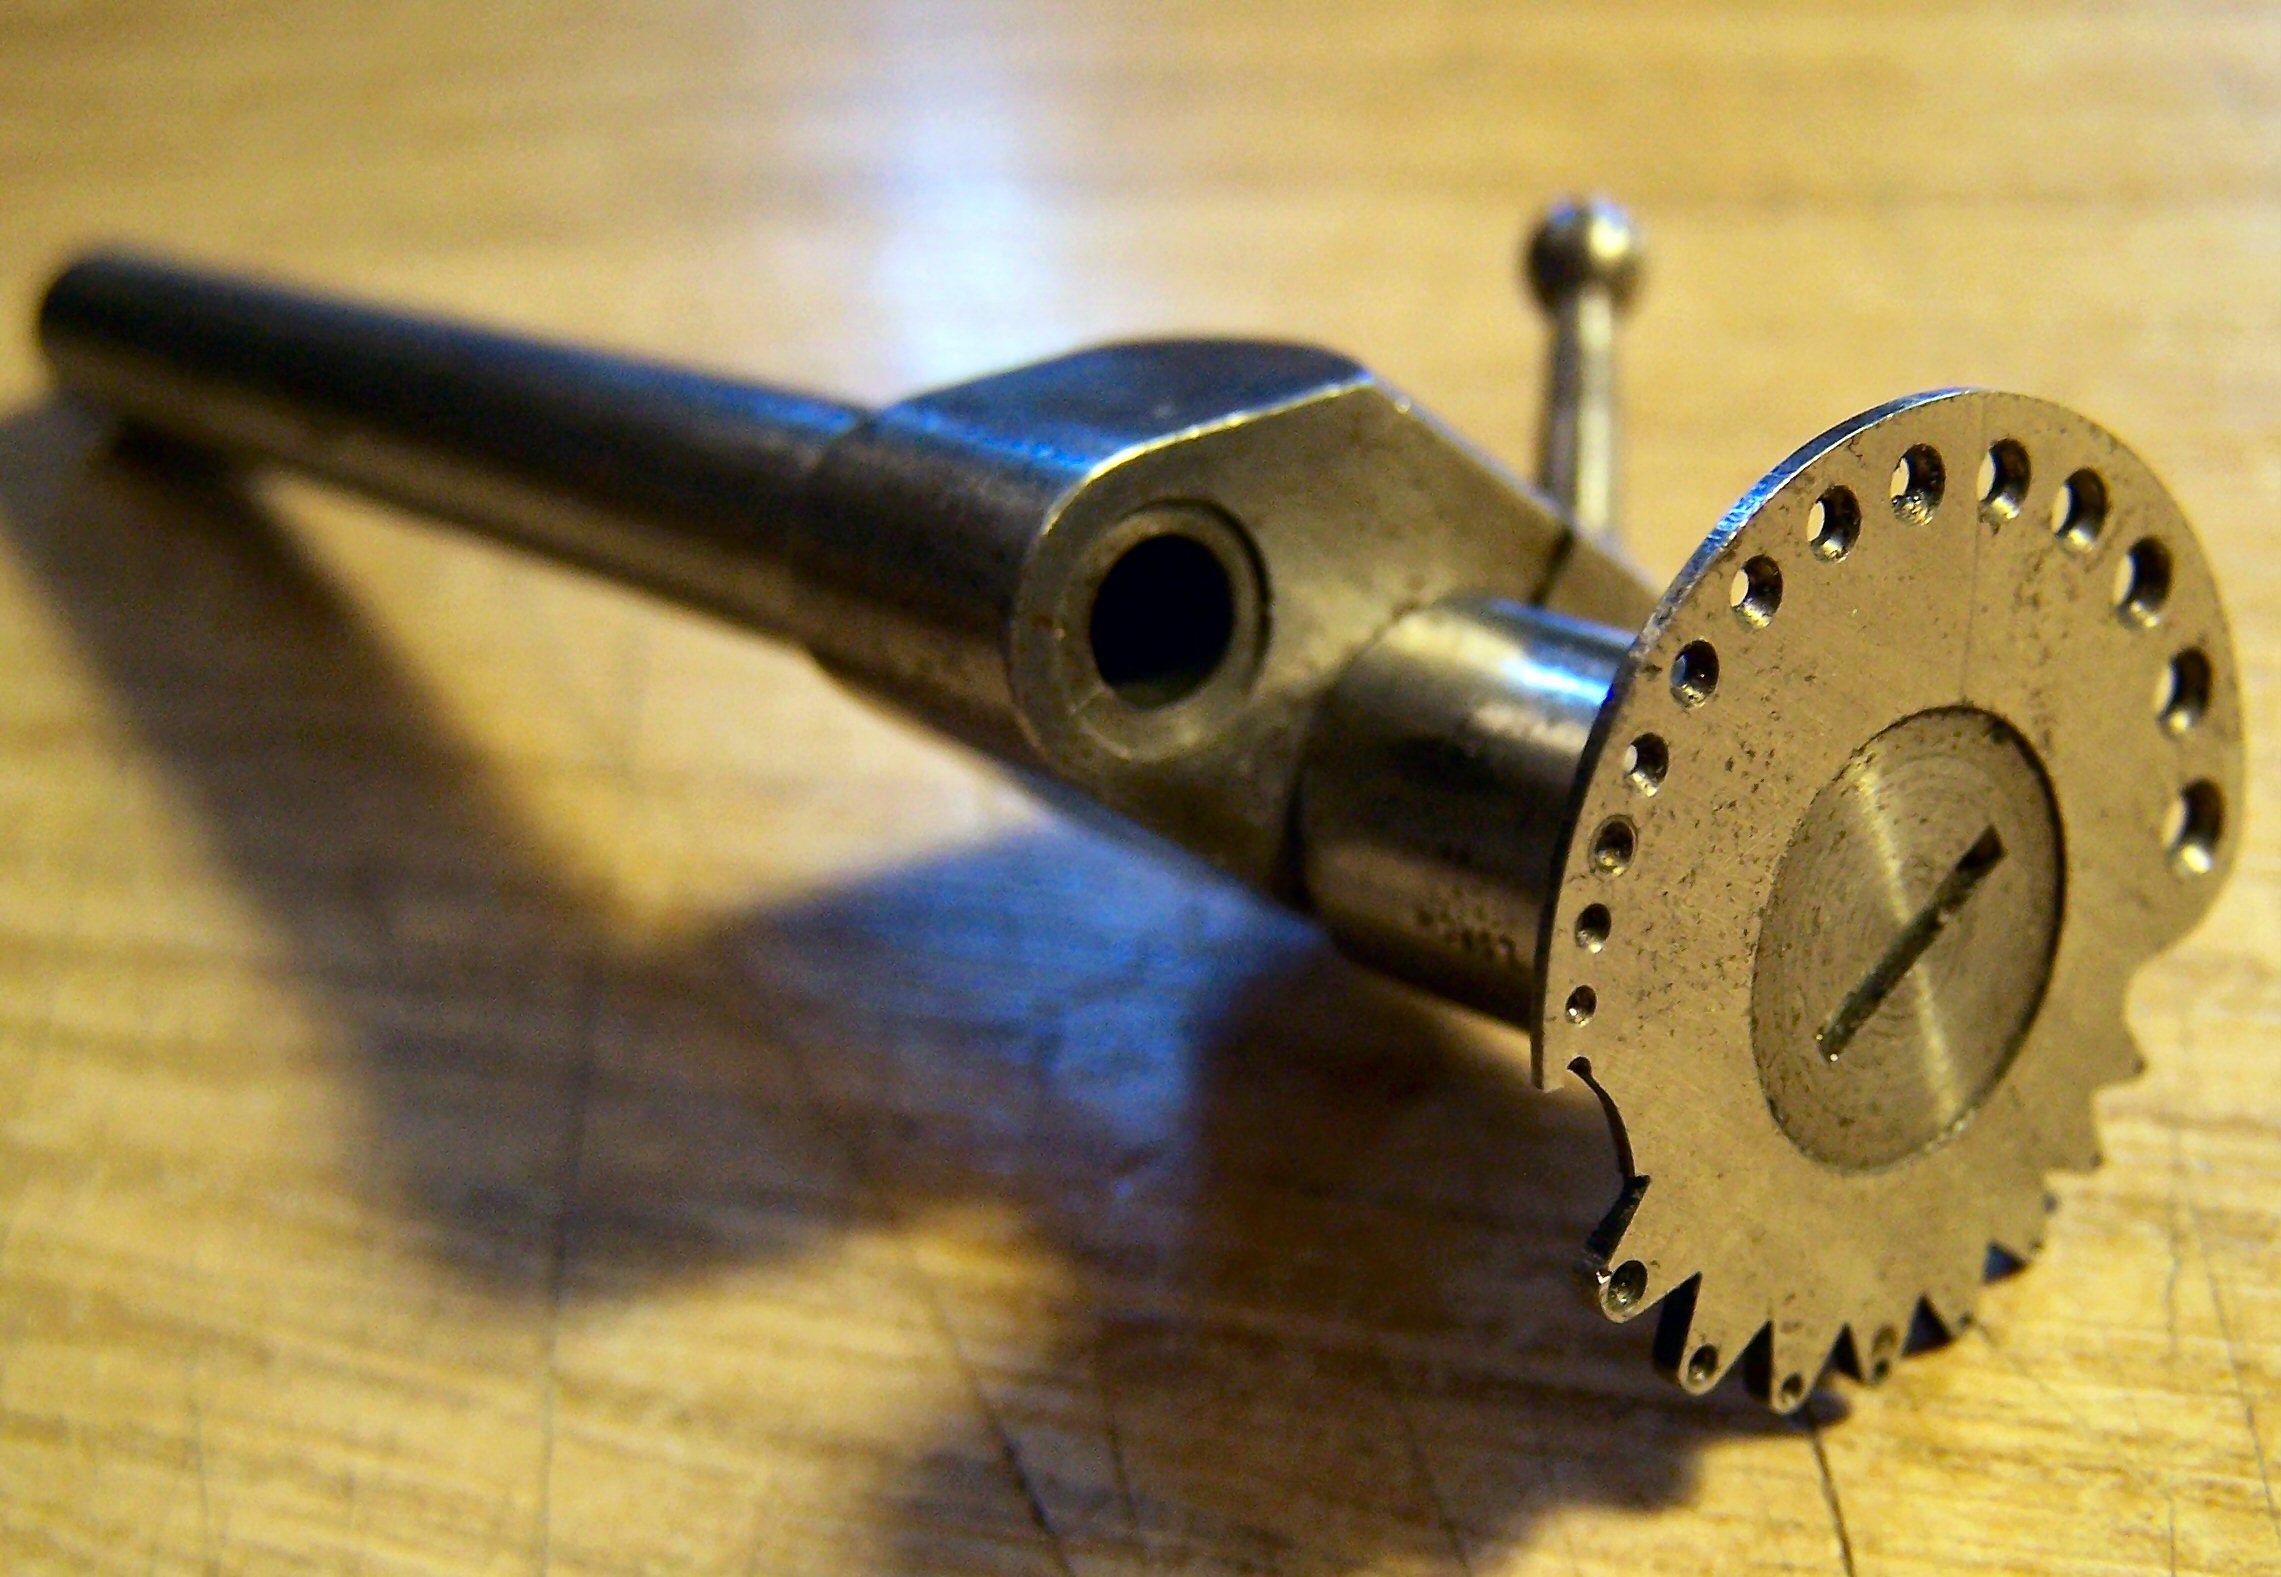
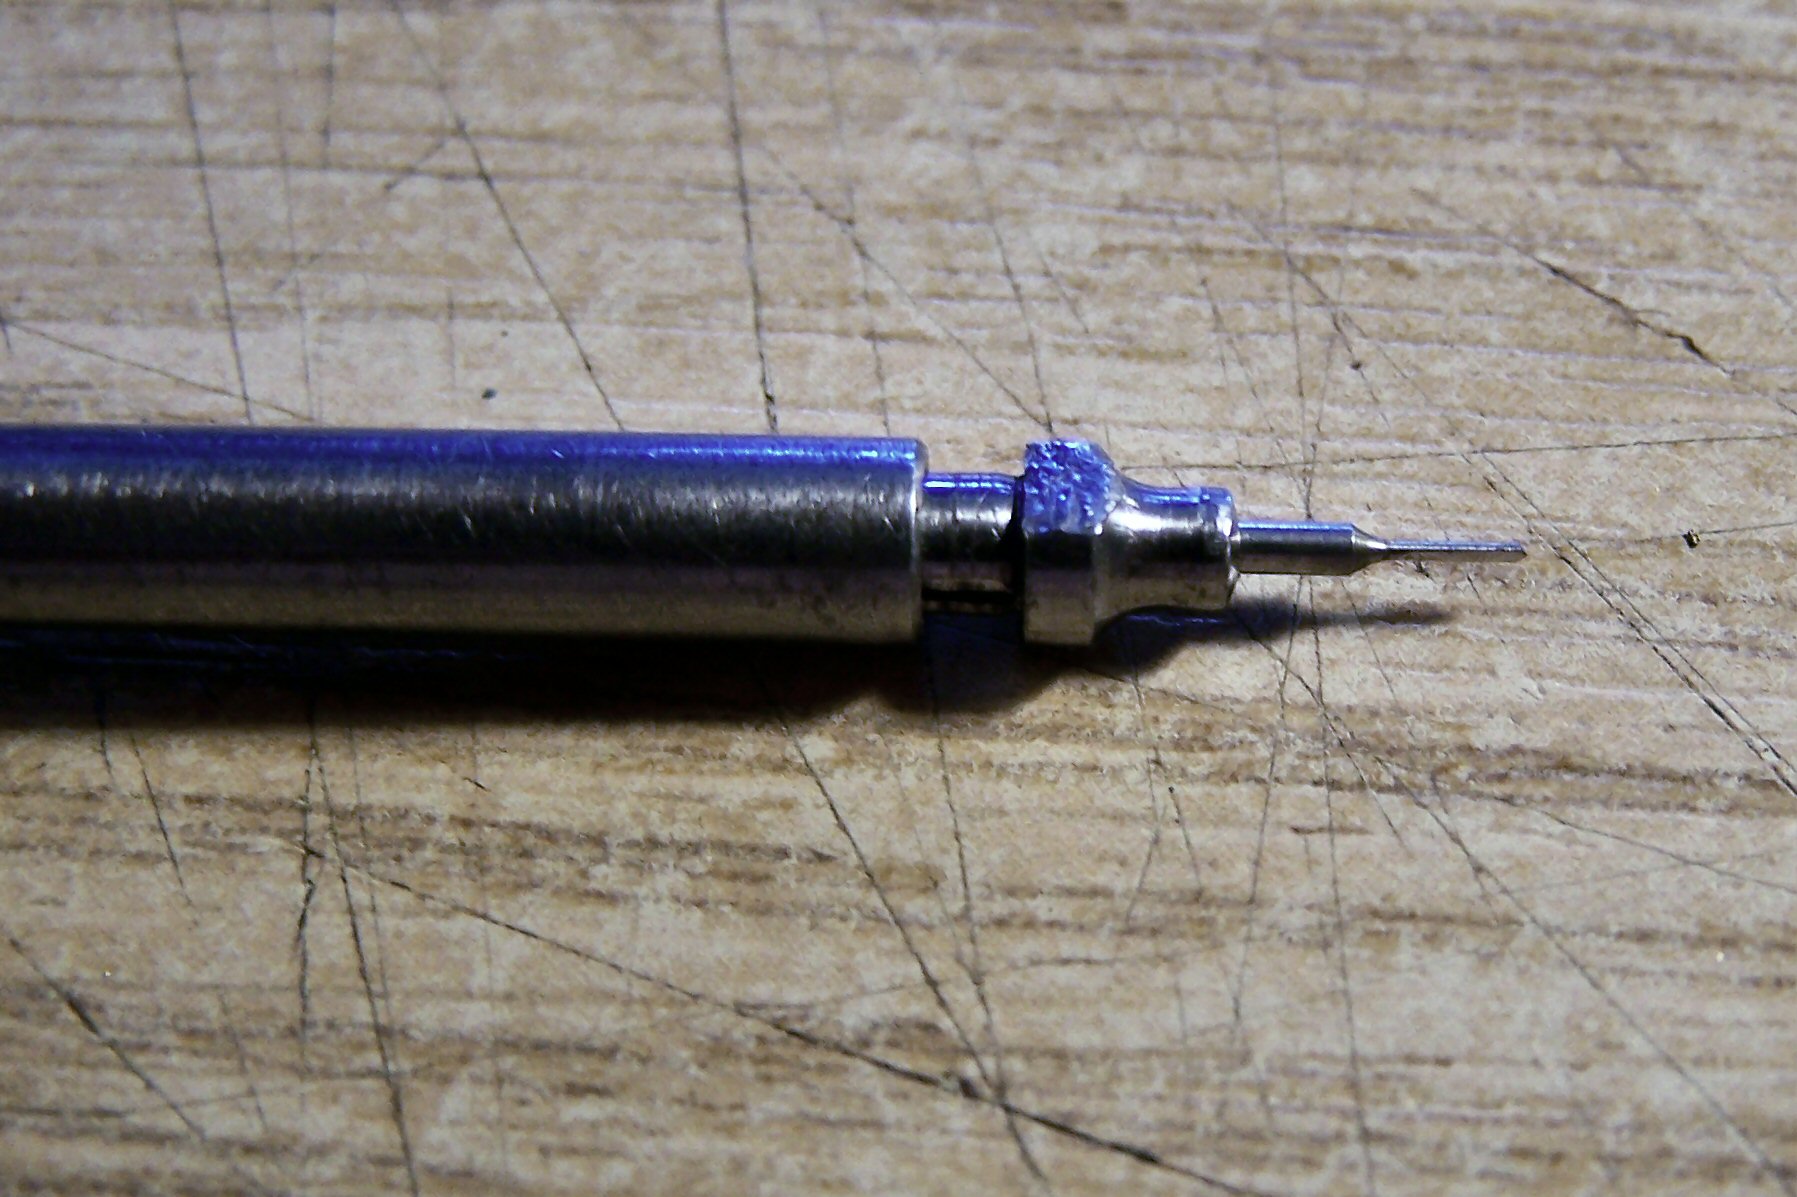
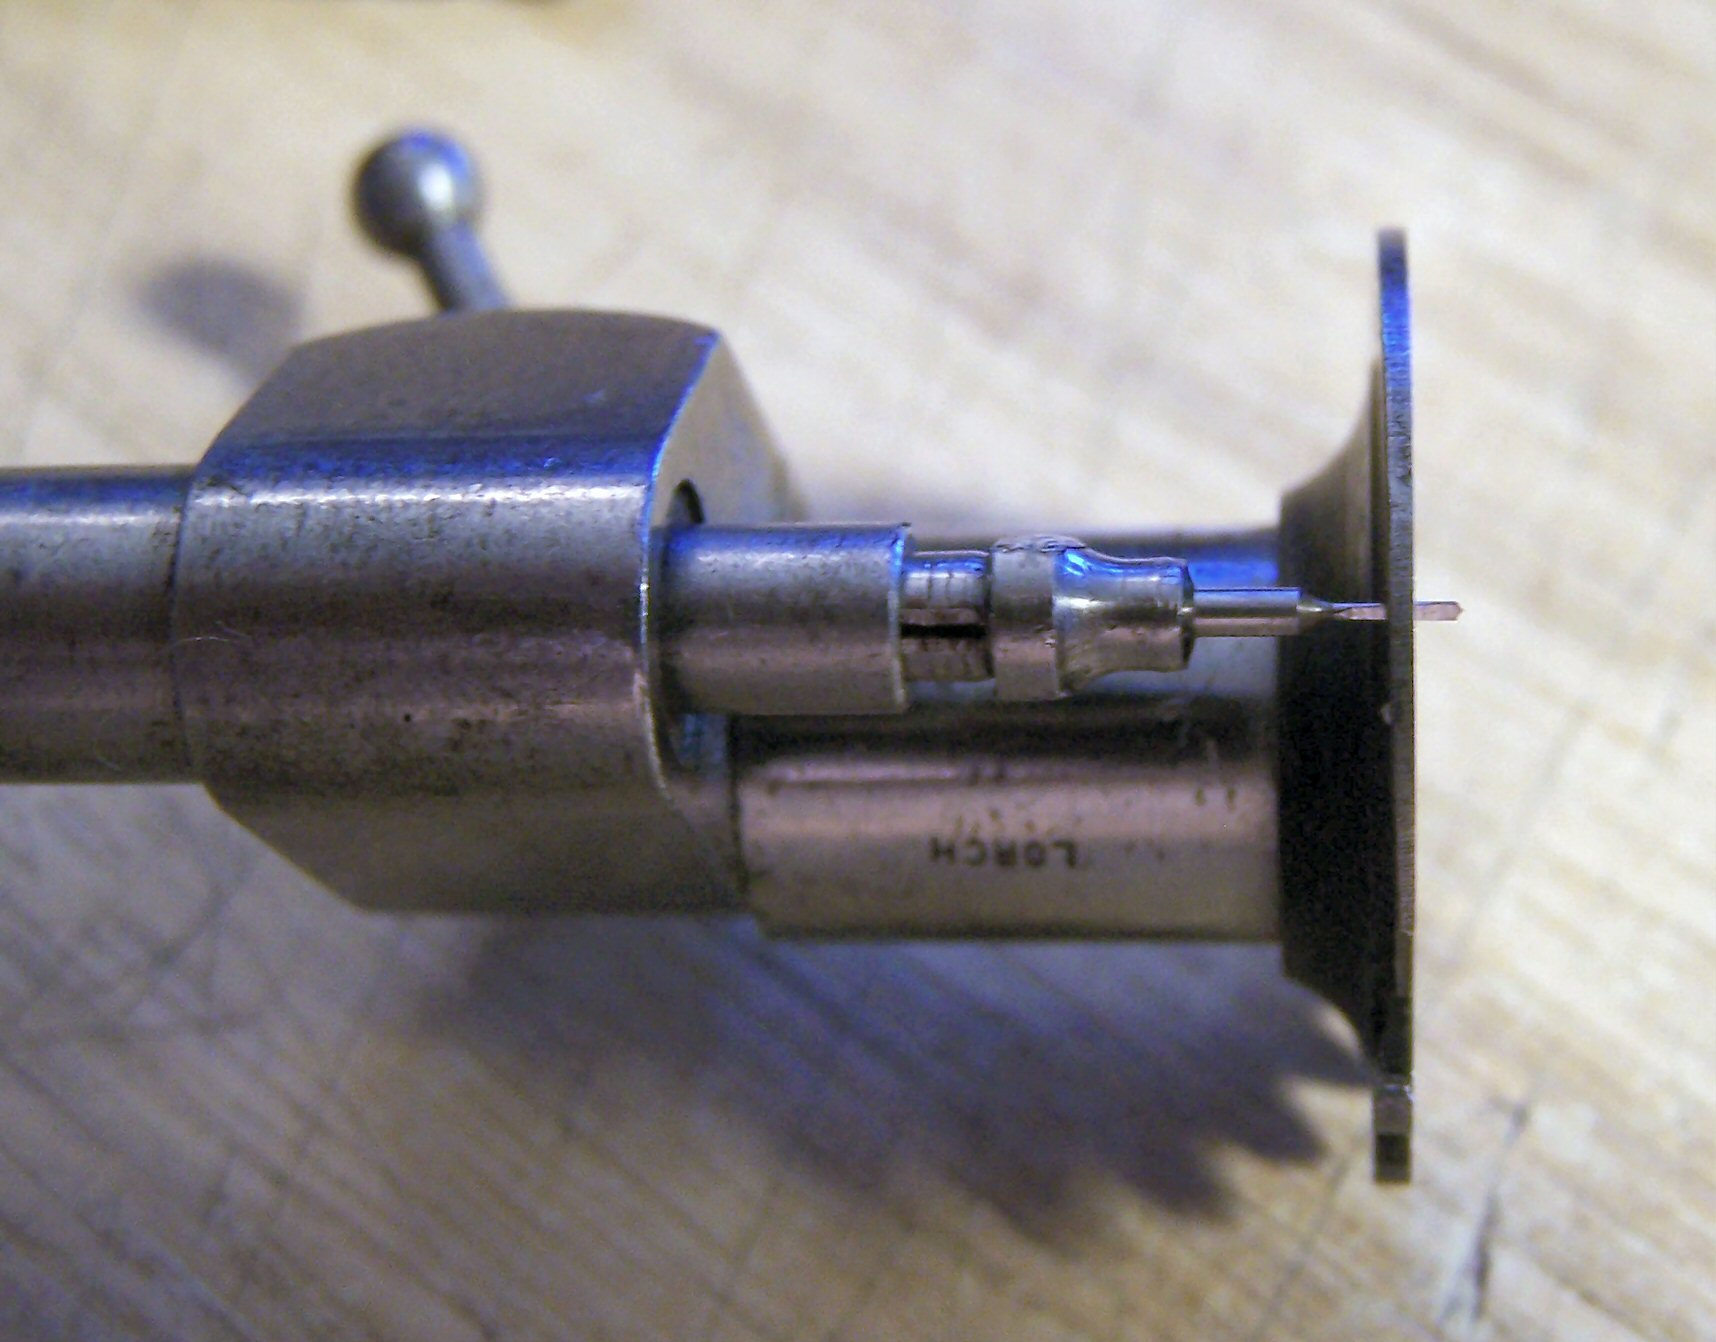
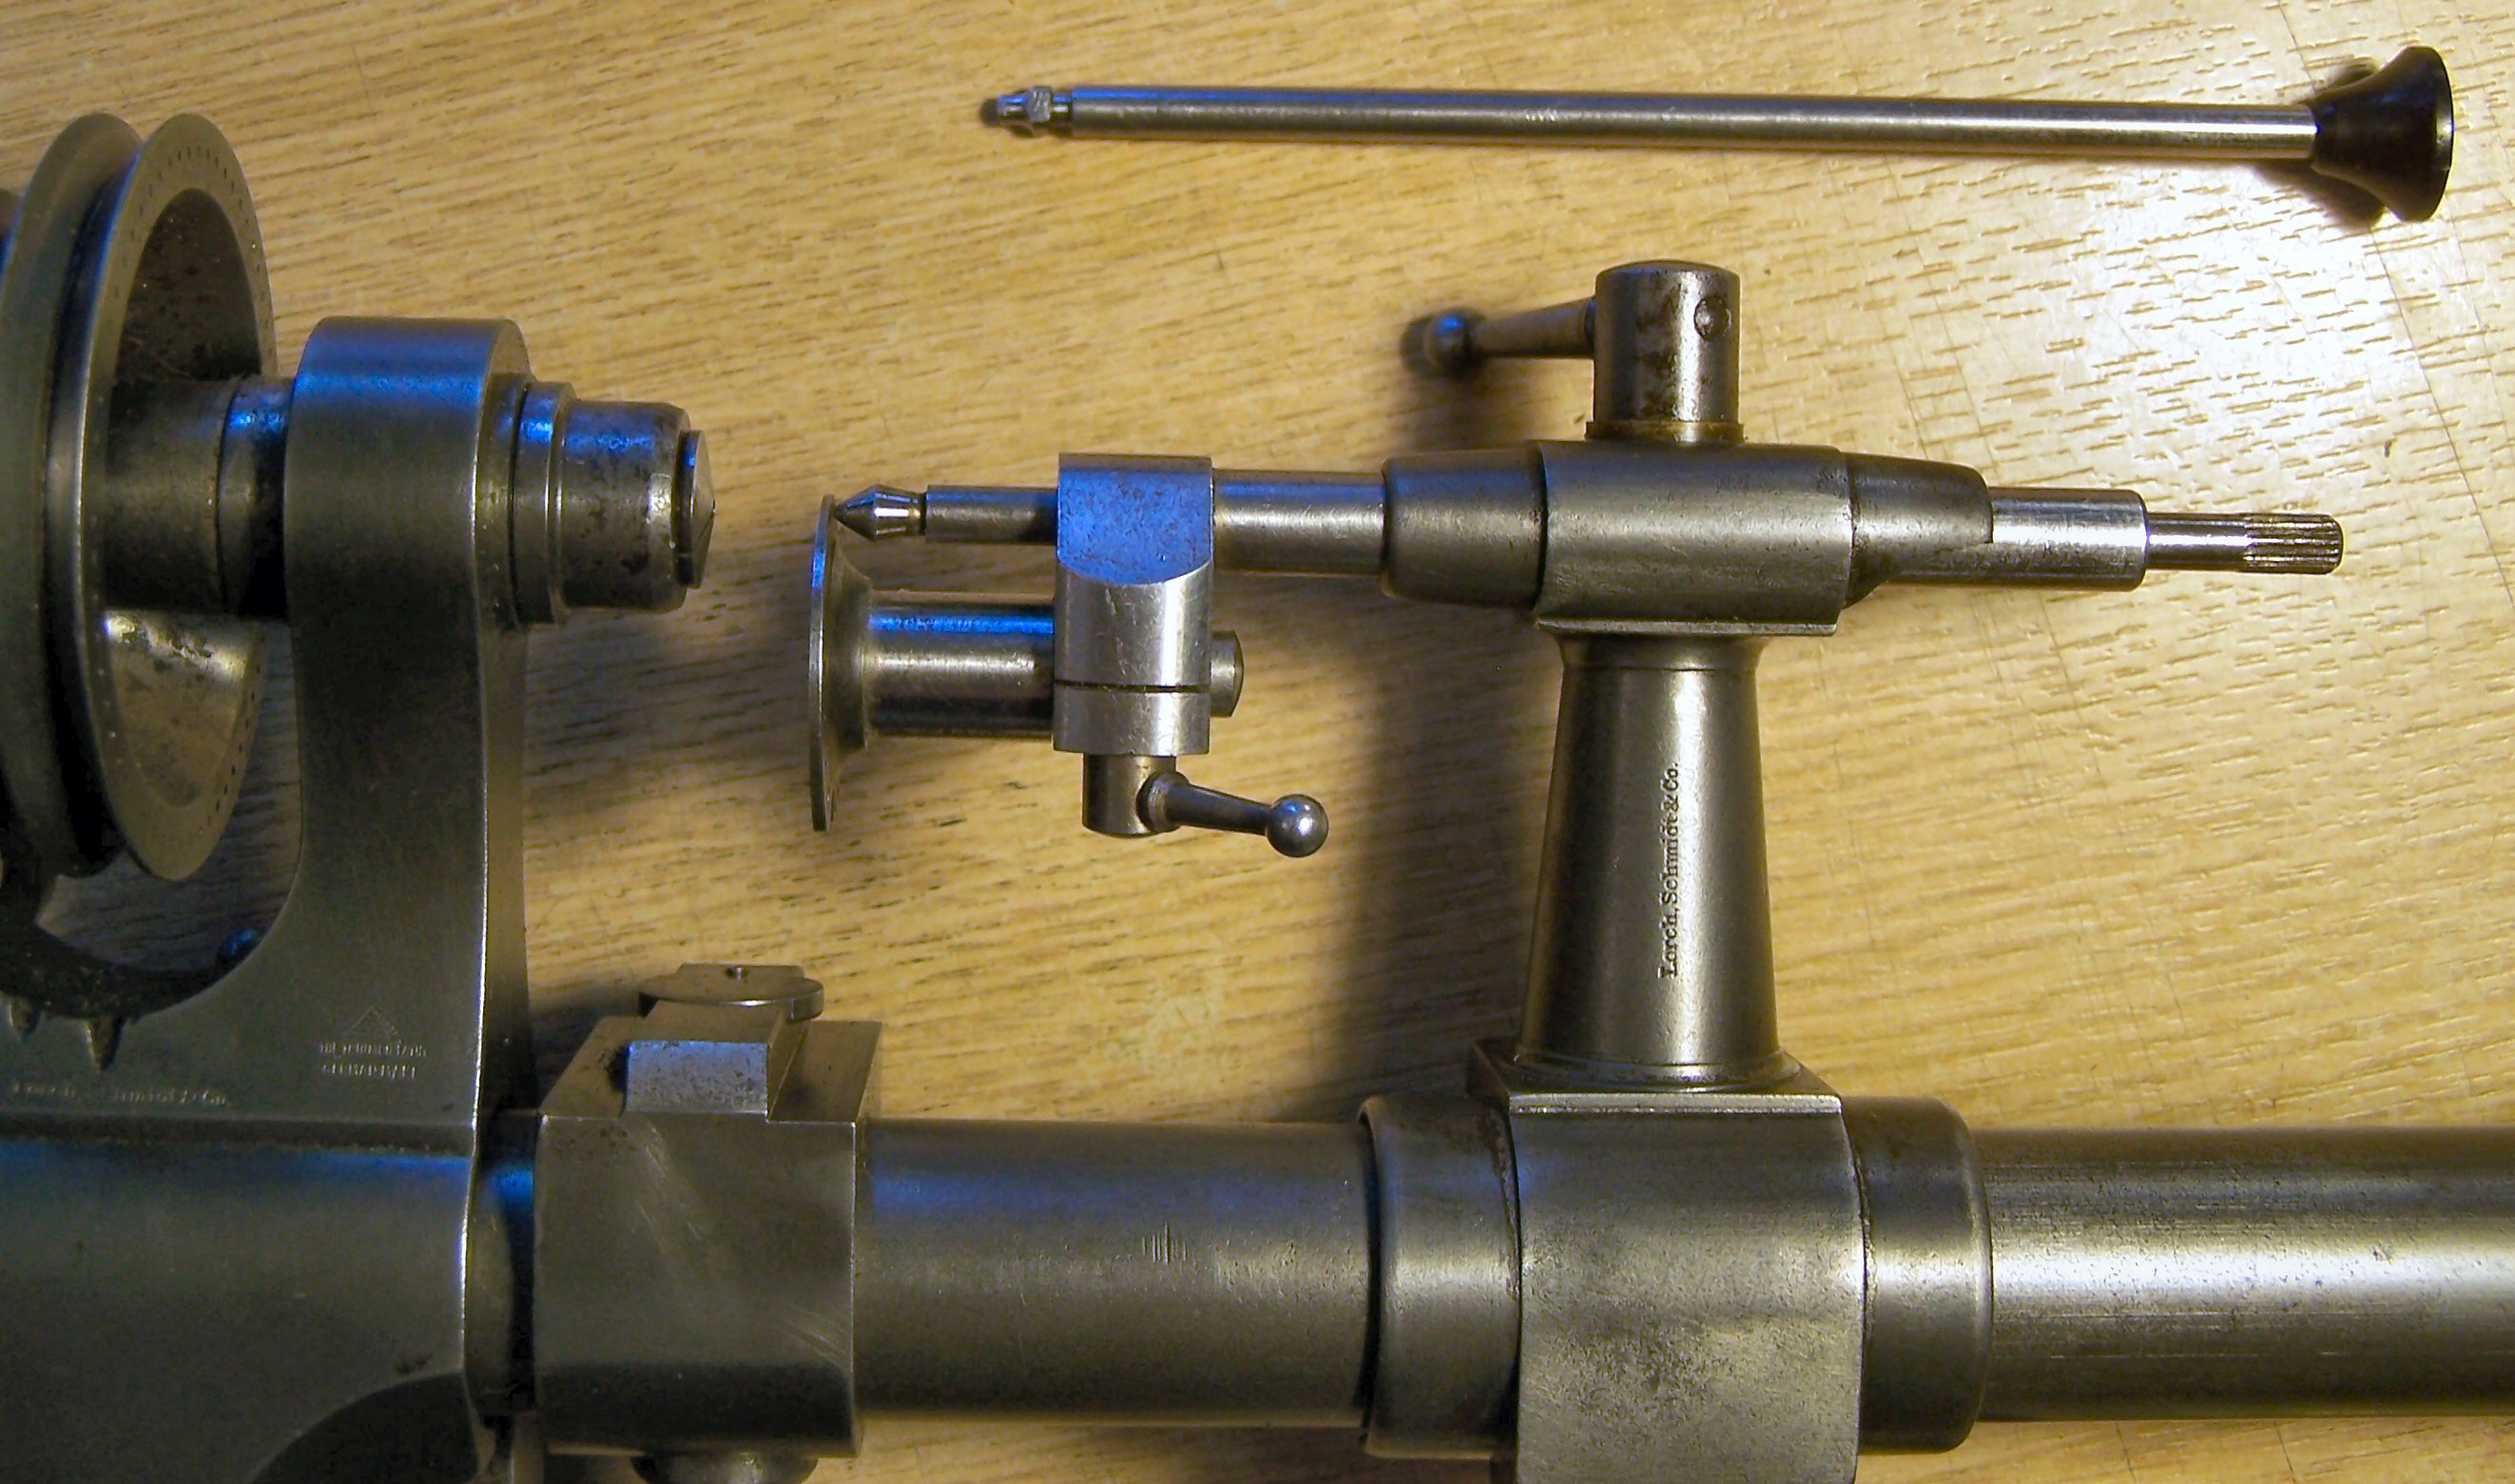
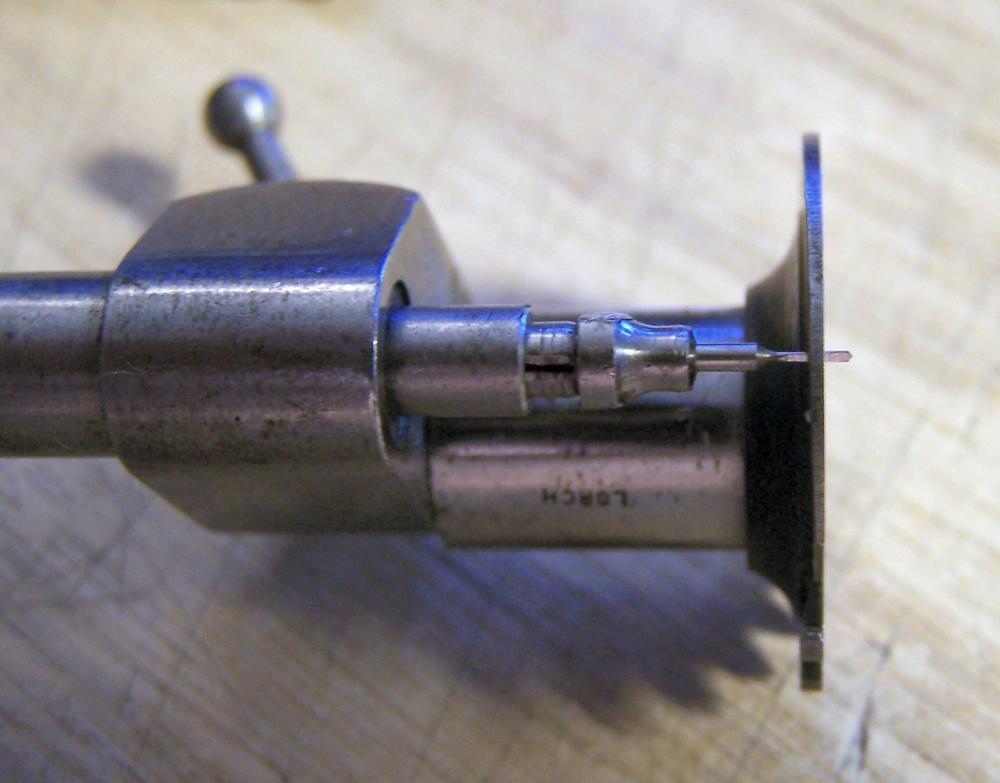
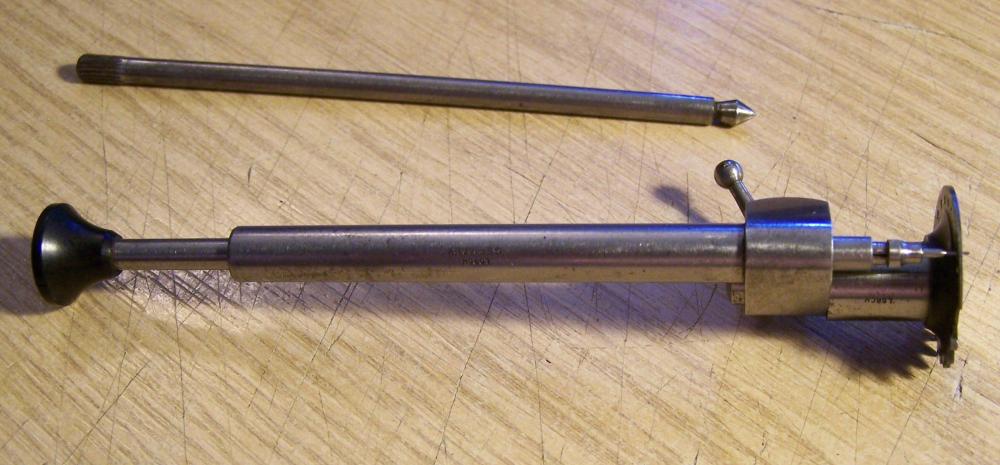
Here we go... The set comprises the tail stock attachment, an alignment tool, the drill holder, and 2 collets. This is the drill plate with a variety of different hole sizes, all with a conical profile so that the staff to be drilled stays aligned. a 0.42mm spade drill in the drilling rod. and how it fits through the back of the drill plate. All together on my 6mm Lorch Triumph with the alignment tool in place. I have not actually used this in anger as yet so I don't know how well things align between the head stock and the tail stock, but I would imagine that this set up is probably better used with a safety pulley type set up which would mean that you would be working between centres. I do have a safety pulley but it is for my BTM 8mm lathe, and this kit doesn't fit that. My lathe bits and pieces are somewhat eclectic as they have gradually been accuculated from a variety of sources and although the BTM is up and running, both lathes still need parts to get the best from them. And an assortment of drills which I think go down to 0.1mm and up to 1.1mm, although above 0.5mm they don't fit this rig. This is my other pivot drill. Almost exactly what SZB has built. Sadly I have no drills to fit this.


 1 point
 -
Hello Folks, Good news - I took delivery of a "2015 New Coaxial LCD MTG Watch Tester Timing Multifunction Timegrapher NO.1900" yesterday - Birthday present from my gorgeous wife. :woohoo-jumping-smiley-emoticon: Bad News - I did have to pay duty (£20.00) to DHL prior to delivery :thumbsd: Worse News - It was immediately confiscated by said wife and I am not allowed to even look at it until my birthday :startle: Oh well just have to survive until then :beerhat: Cheers, Vic1 point
-
If in the UK try to buy from a EU seller, that way you will avoid possible import duty & VAT. I bought a 1900 recently from a UK seller advertised as UK stock. Unfortunately they had run out and imported one direct from China at no extra cost & it arrived within 2 weeks, plus they kept me well informed. They still advertise on fleabay but have changed the item location to China.1 point