
Leaderboard


Popular Content
Showing content with the highest reputation on 11/12/20 in all areas
-
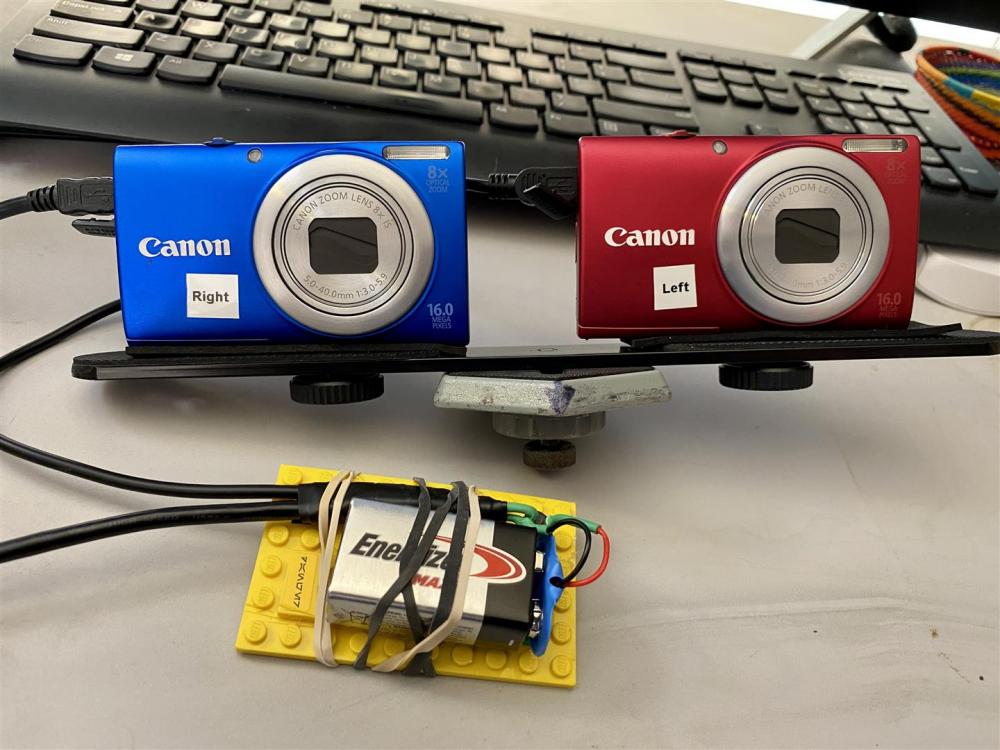
Hey everyone, here's a fun and affordable 3D photography side project. I really owe Andy Hull for giving me the inspiration and information I needed to pull this off! In addition to horology, I'm an avid photographer. I've been studying and practicing photography seriously for 20 years now, having bought my first real camera in 2000. If anyone is curious, the camera was a Canon Canonet QL17 GIII. Some of my work has been in galleries, and I'm a couple of classes away from completing a photography degree. When I became fascinated by photography, I wanted but couldn't afford a digital camera. I could afford a film camera, however, and I had free access to a nice darkroom between my law school classes at UC Davis. I learned how to process film and make silver-gelatin prints. Over the years, I've become a film snob. I embraced digital for macrophotography, but insisted on using real film when shooting people. Thanks to Andy, I've now embraced digital photography for 3D. For several years, I had been fascinated by 3D photography. I hadn't experimented with 3D photography much myself, because high quality 3D film cameras are expensive, require expensive slide film, and require a huge time investment to mount properly for viewing. I've shot a couple of rolls through Stereo Realist, ViewMaster, and Nishika cameras, but the cost and hassle were too much for me to fully embrace. Enter @AndyHull, who mentioned the "Canon Hack Development Kit" (CHDK) project to me. This is a super cool open source effort to significantly expand the capabilities of Canon point and shoot cameras. By using the CHDK, one can force old point and shoot cameras to shoot RAW files, show real-time over- and under-exposure, and execute scripts allowing for the cameras to take pictures on a programmed schedule or only after they detect movement, etc. I've barely scratched the surface of what CHDK can do -- It provides an incredible amount of power and flexibility. I purchased two new-old-stock Canon Powershot A4000IS cameras for $25/each from eBay. These cameras were released in 2012, but they work really well. Through the magic of CHDK, one can use a USB cable and a 5v power supply as a remote shutter release. In under 15 minutes, I used some LEGO bricks, a simple push button electrical switch, a couple of old USB-mini cables, and a battery to build a twin USB shutter release. CHDK does some additional magic to ensure that both cameras fire in a completely synchronized manner, within 1/1000s of each other. Here's my original rig. Please note that a 9V battery wasn't an ideal choice, and I've switched to a 5V battery. I mounted my two Powershot A4000IS cameras close to each other on a "stereo bar," but I got even better results by using epoxy to glue these two cameras together. Here's v2 of my rig. It produces better results, although I do need to rotate all of the left shots 180 degrees while processing. Combined with Adobe Lightroom and some really powerful free software called "Stereo Photo Maker" (SDM), it's trivially easy to produce 3D stereo pairs that look great. It's possible to see the 3D effect in these stereo pairs with one's naked eyes through the "crosseyed" or "parallel" viewing techniques. These methods give me a headache and are really hard to teach others to do, but the good news is that there are inexpensive and effective 3D viewers available. I'm using the "OWL" and "Lite OWL" designed by Brian May. My wife was really blown away by the 3D effect. My total cost was well under $100 and a couple of hours of time to build a super high quality 3D stereophotography rig: Canon A4000IS #1: $25 Canon A4000IS #2: $25 Battery, USB cables, and electronic switch: ~$10 OWL Viewer: $20 CHDK and Stereo Photo Maker: $0 Total: ~$80 I shot a model last Friday, and am really happy with how well my 3D rig performed! Thanks @AndyHull! First good stereo pair (Parallel Eye). I've since improved my processing technique to ensure that the colors match better. Here's a Parallel-Eye shot from my recent photoshoot. I'm really happy with these results! If anyone would like to see the full (uncensored) photoshoot, please send me a DM and I'll send the link.


 3 points
 -
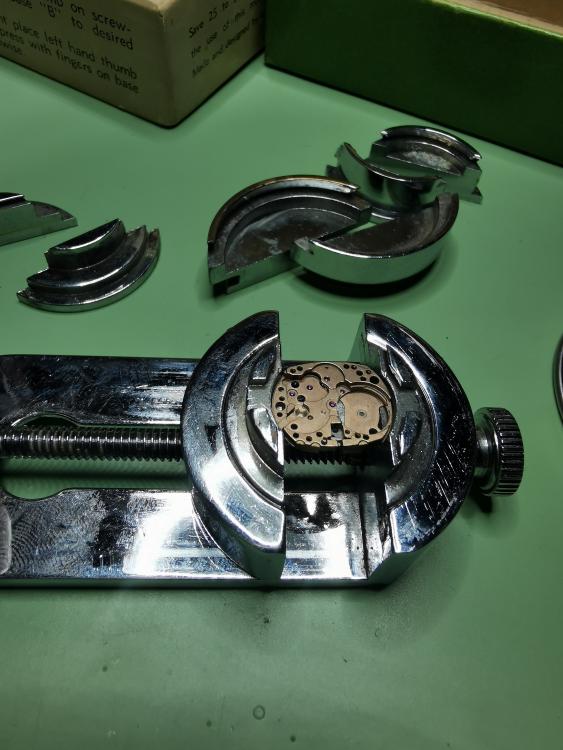
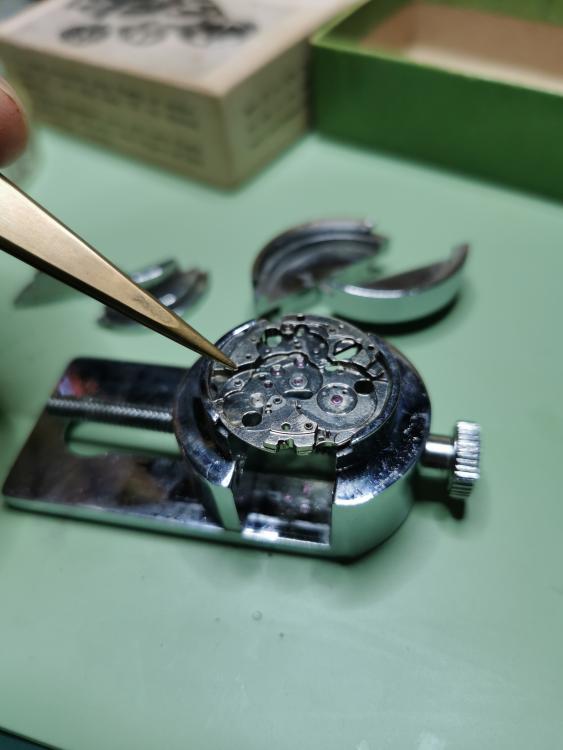
I spent the best part of 3 or so hrs trying to fit the balance wheel, it appeared stiff not wanting to oscillate, at first I assumed that I hadn't seated the pivots in the bearings and I removed and refitted it many times, on the odd occasion it appeared a bit freer and more likely to oscillate but still not right, the balance cock alignment pins are tight I thought maybe the balance cock was not going down square, maybe I had broken one or both of the pivots, not sure how firmly I need to press down the balance cock onto the alignment pins, I removed the balance cock and let it hang from the hair spring as I had observed in videos and could see the pivots were still intact, then I noticed that the end of the hair spring projects past spring stud around 3 or 4 mm and a few coils of the hair spring were looped over the projection, I looped them back with a fine wire but every time I placed the balance into the movement one or two turns of the hair spring found a way to loop them selves over the free end of hair spring. Removed again and while the balance was again hanging once more by the hair spring I bent the end of the hair spring up, refitted the balance, no coils looped over this time, a few turns of the winder and away it went, I'm amazed, I don't expect it to keep proper time but it has been a great learning tool for me, I'll continue and finish up the assembly need to do a bit with the keyless works something is not quite right there and work out how to fit the click spring.3 points
-
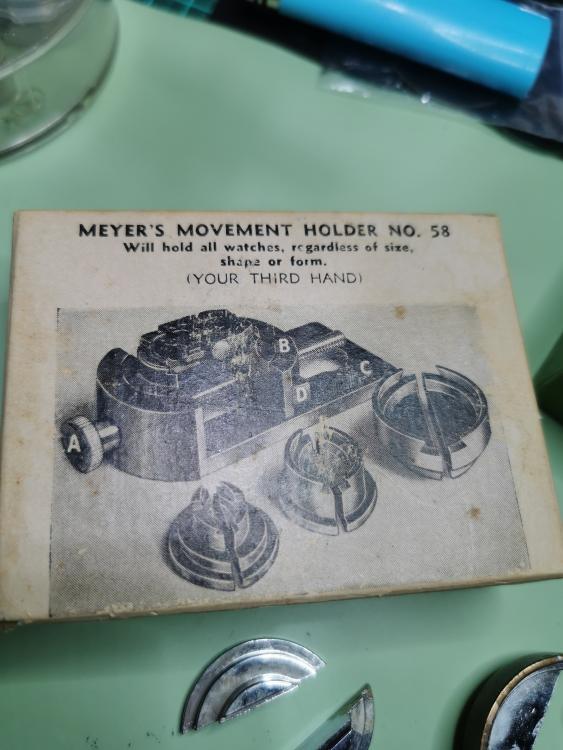
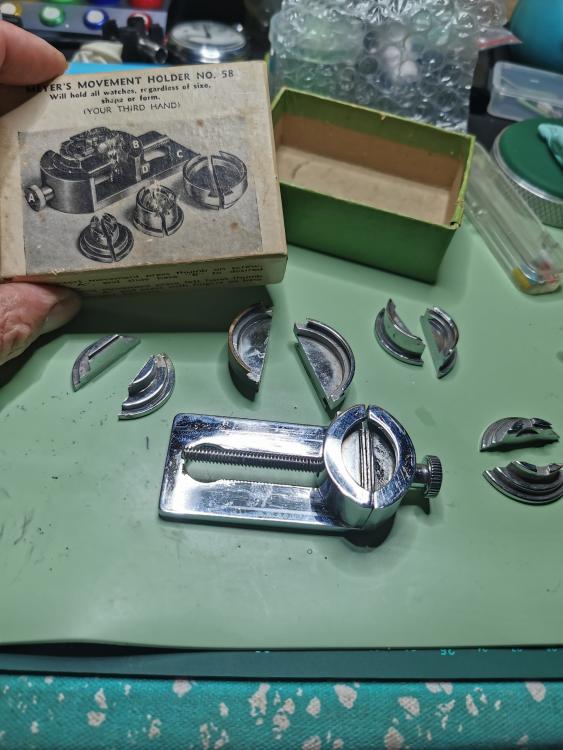
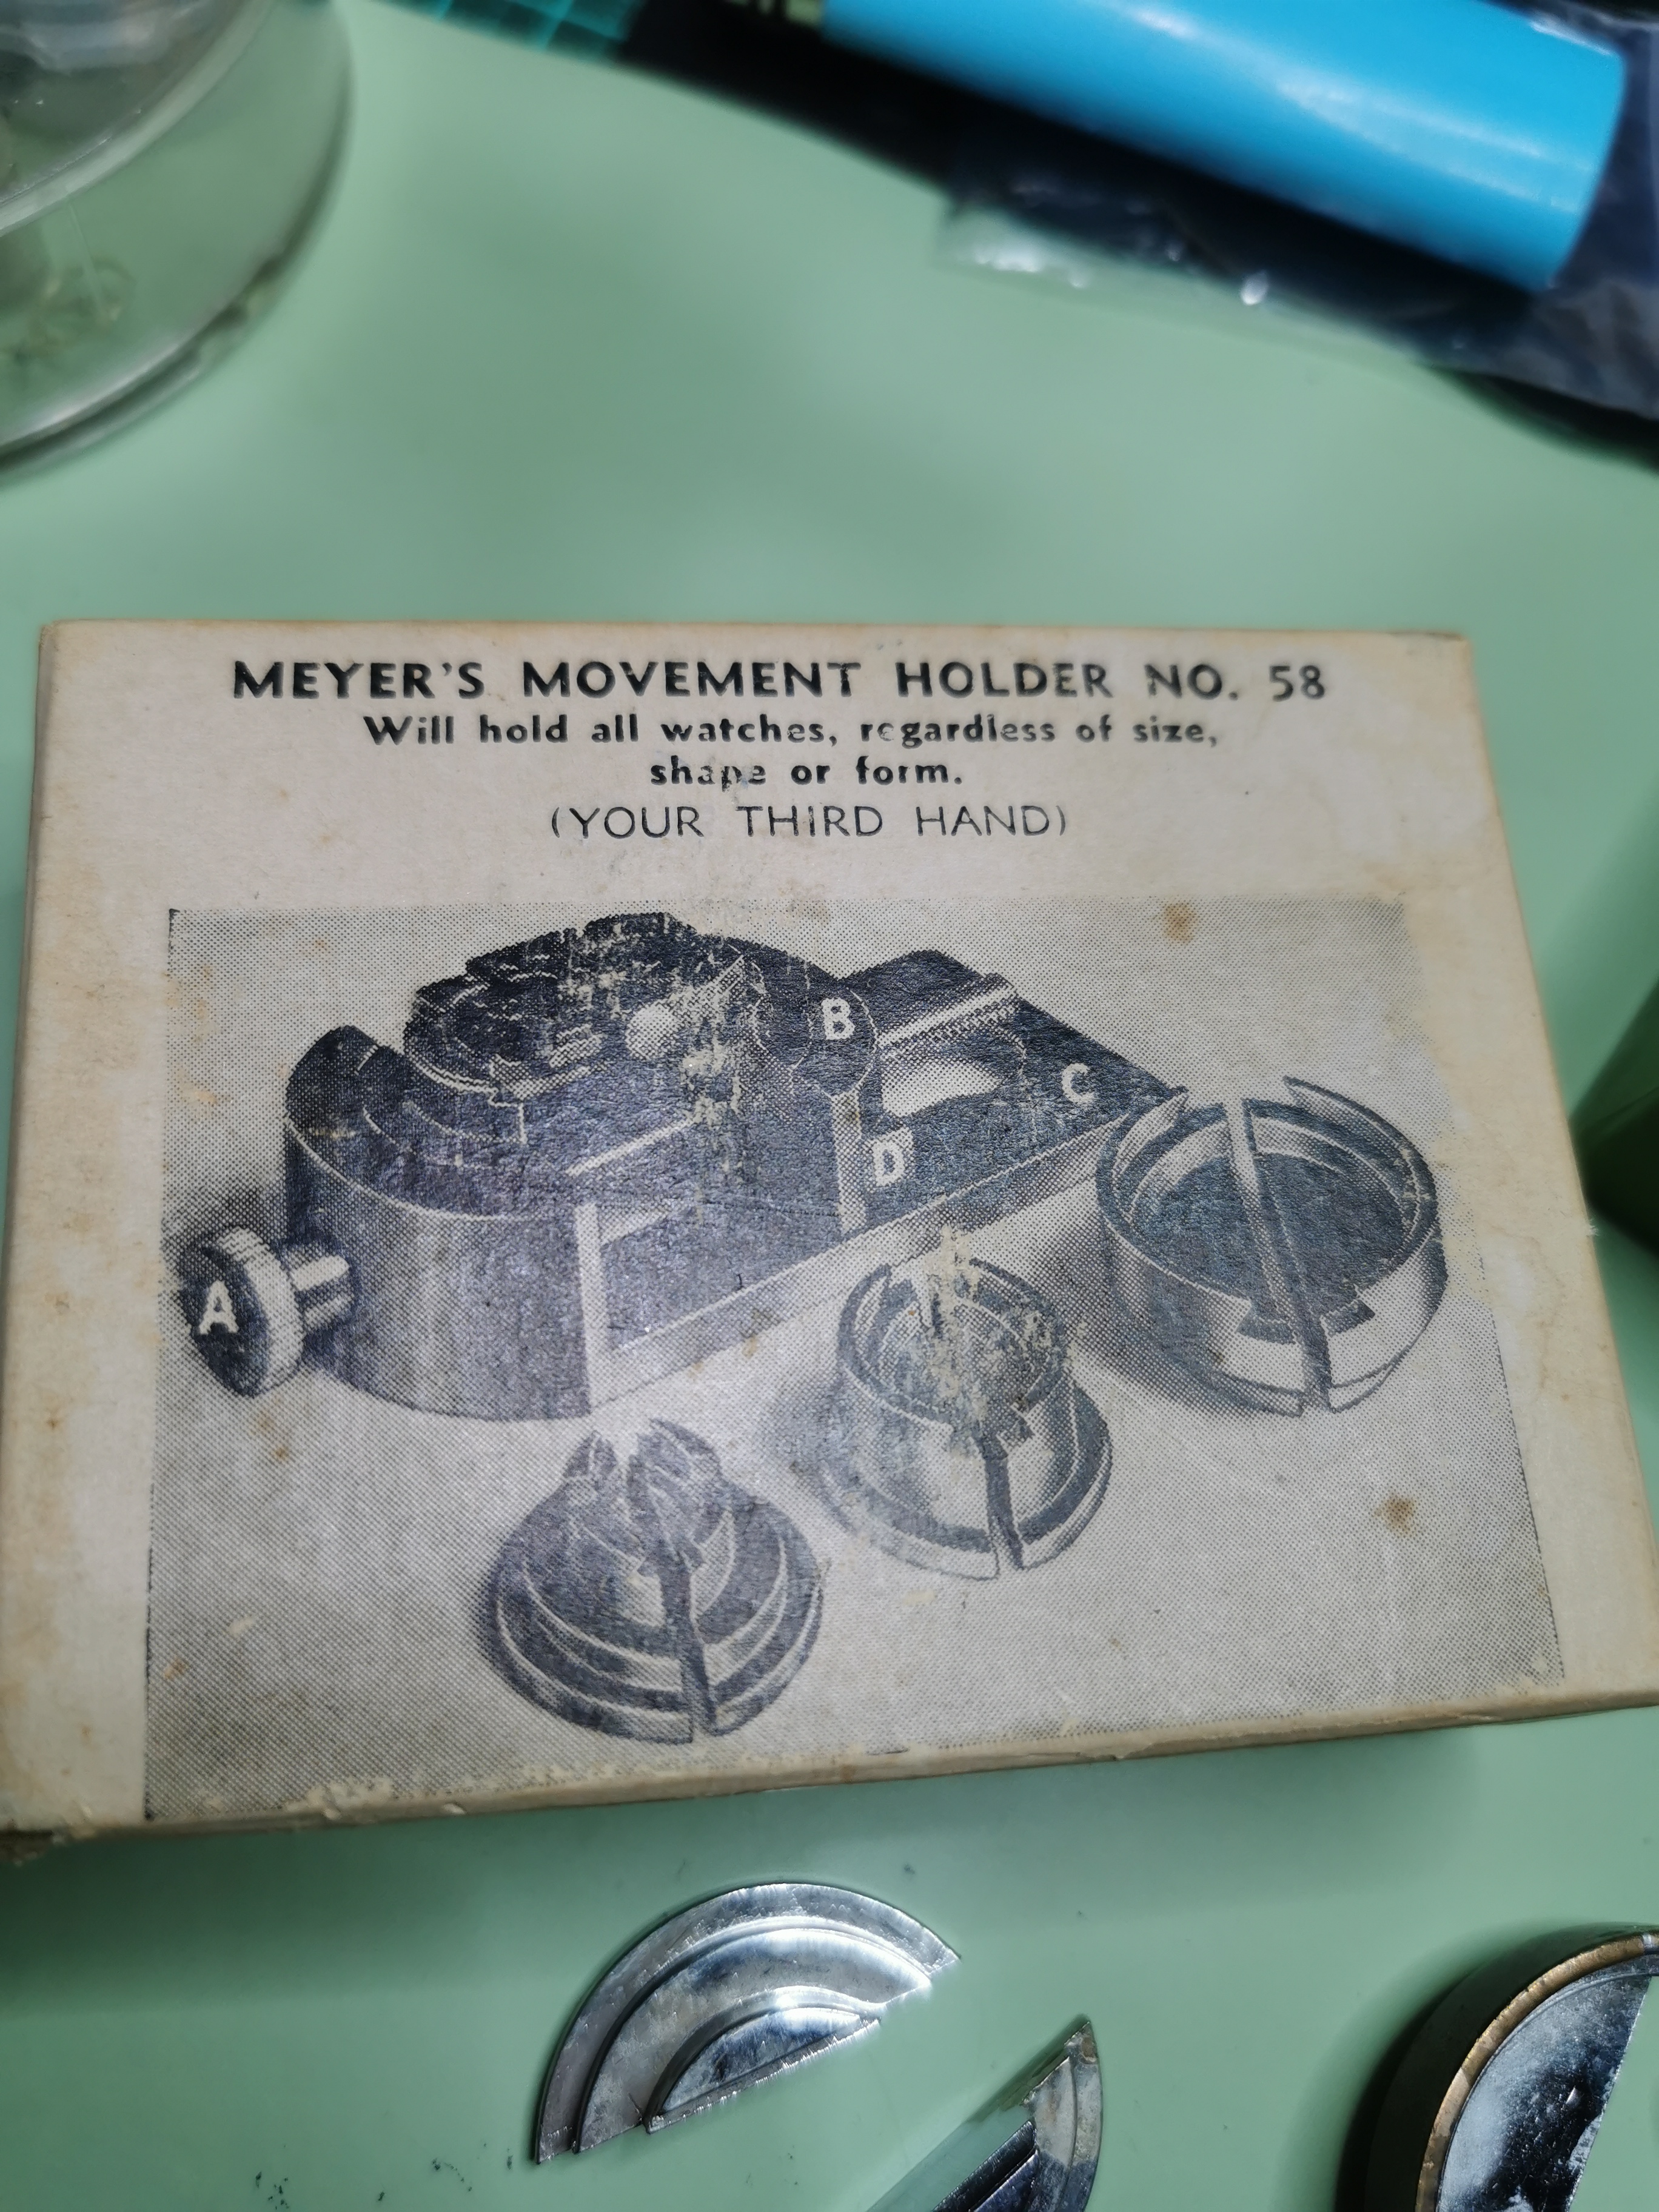
Hi all, I have been using this Meyers movement holder no58 that I perchased here in Australia for a while now and I must say, they don't make things like they use to. It's easy to set up and it holds all movements regardless of sizes, shapes or form. I have a Seiko 6309 plate in there that I just jeweled the barrel arbor port in there and the other movement plate is an omega 485 ladies movement plate. It has 4 different clamps that slide in and a quick release button where my finger is. It does not rock or come loose. The movements have no sharp corners intruding into the plate because the clamps are rounded. I have about 10 different movement holders including bergeon and this beats all hands down. What do you think?

 1 point
 -
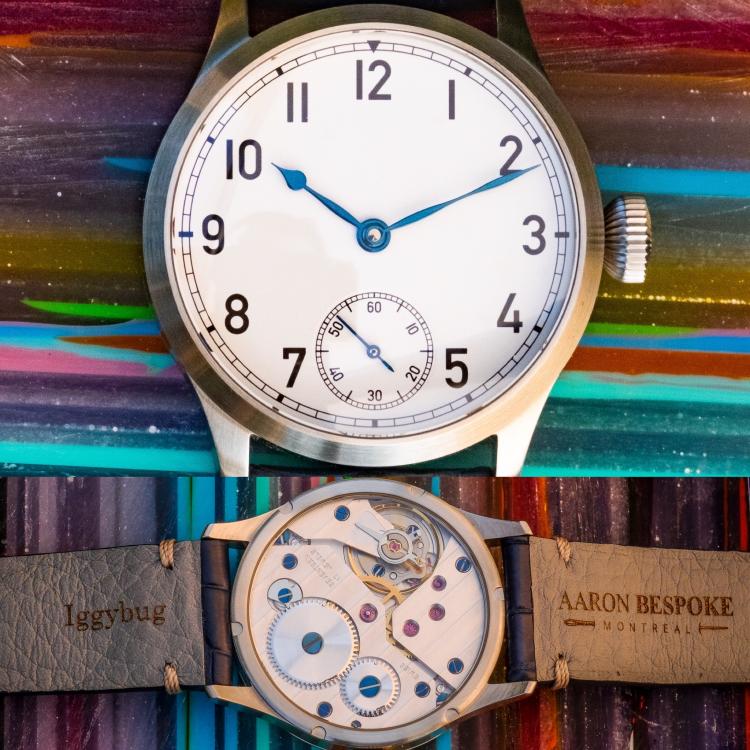
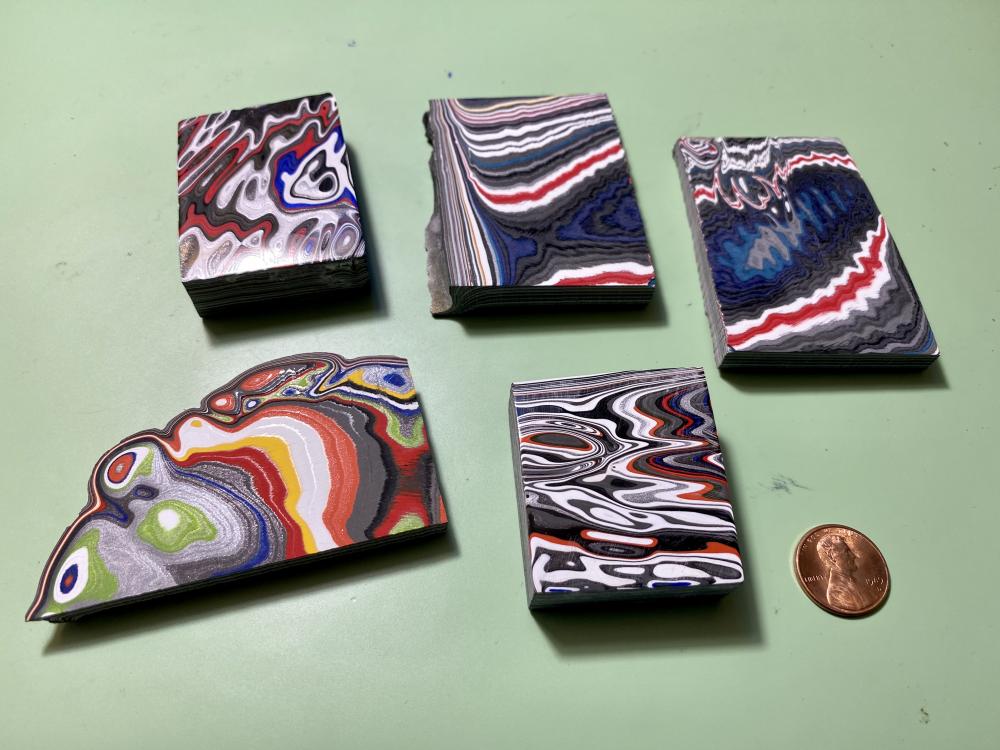
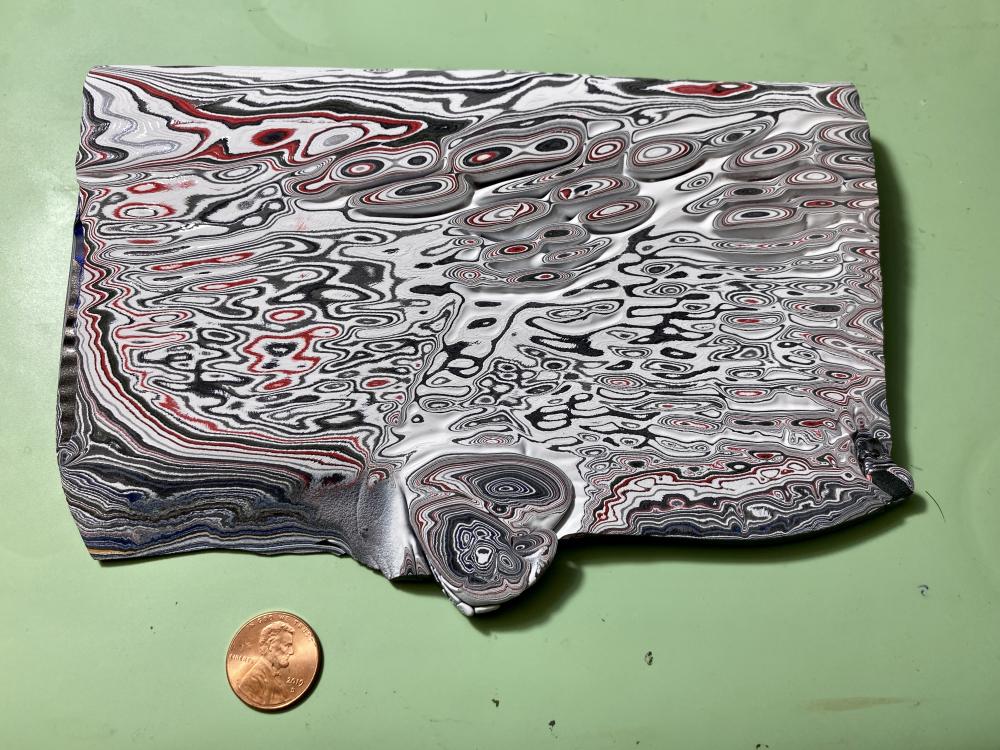
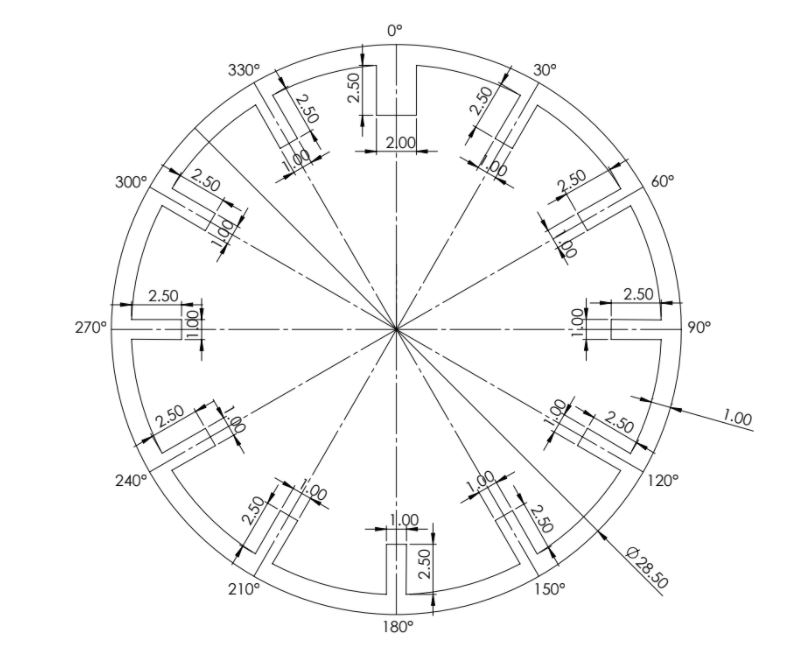
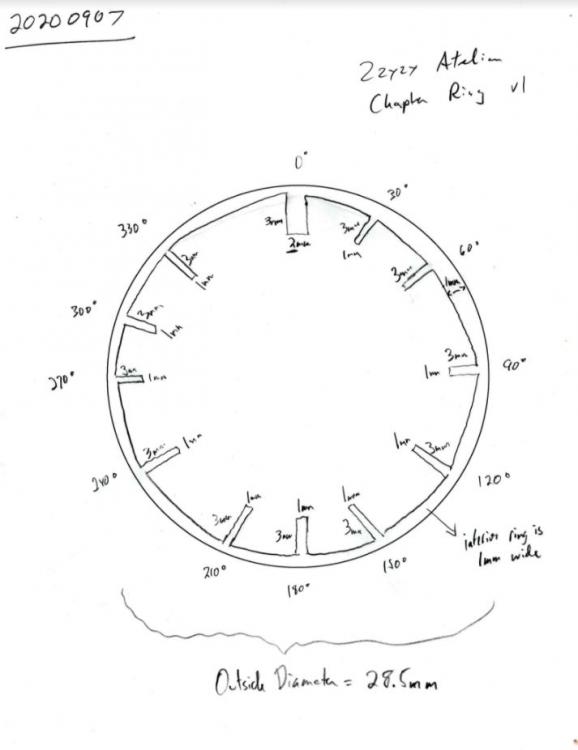
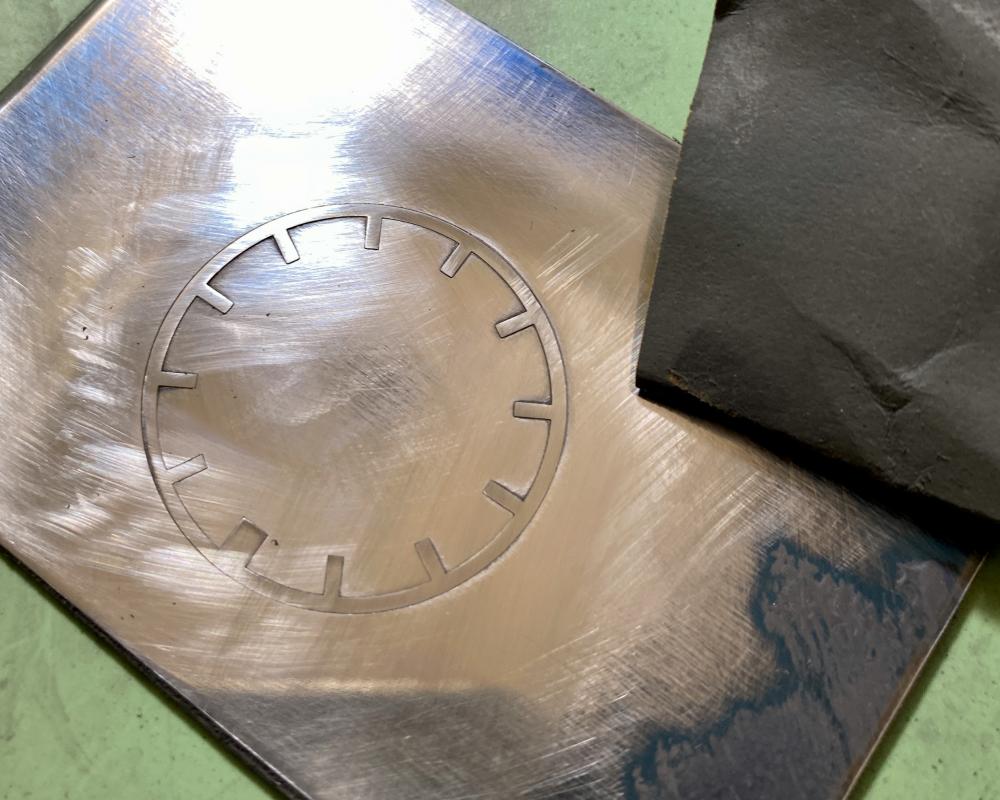
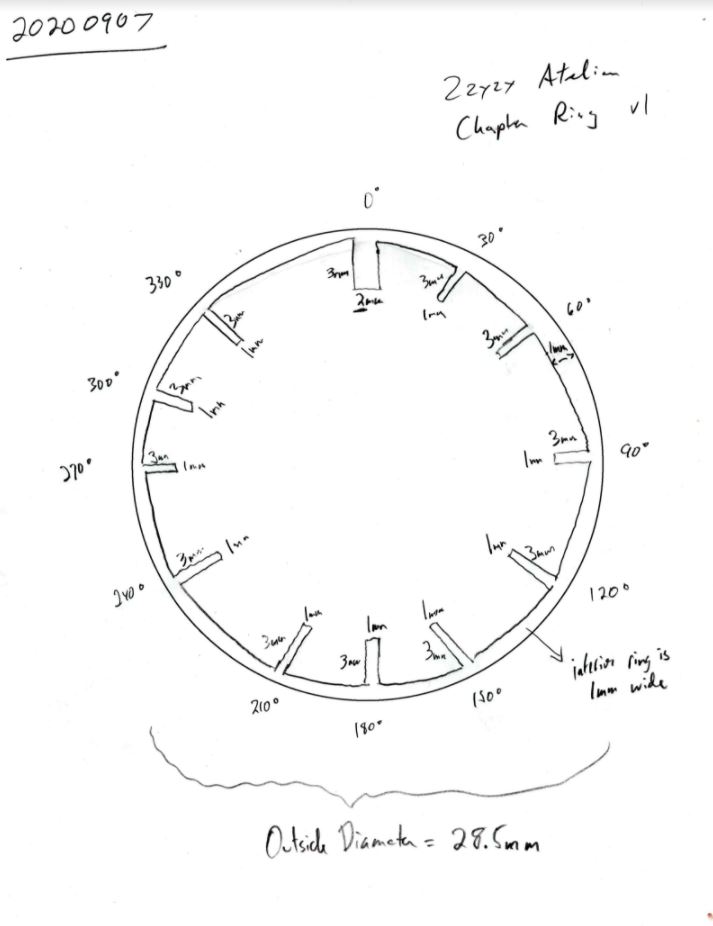
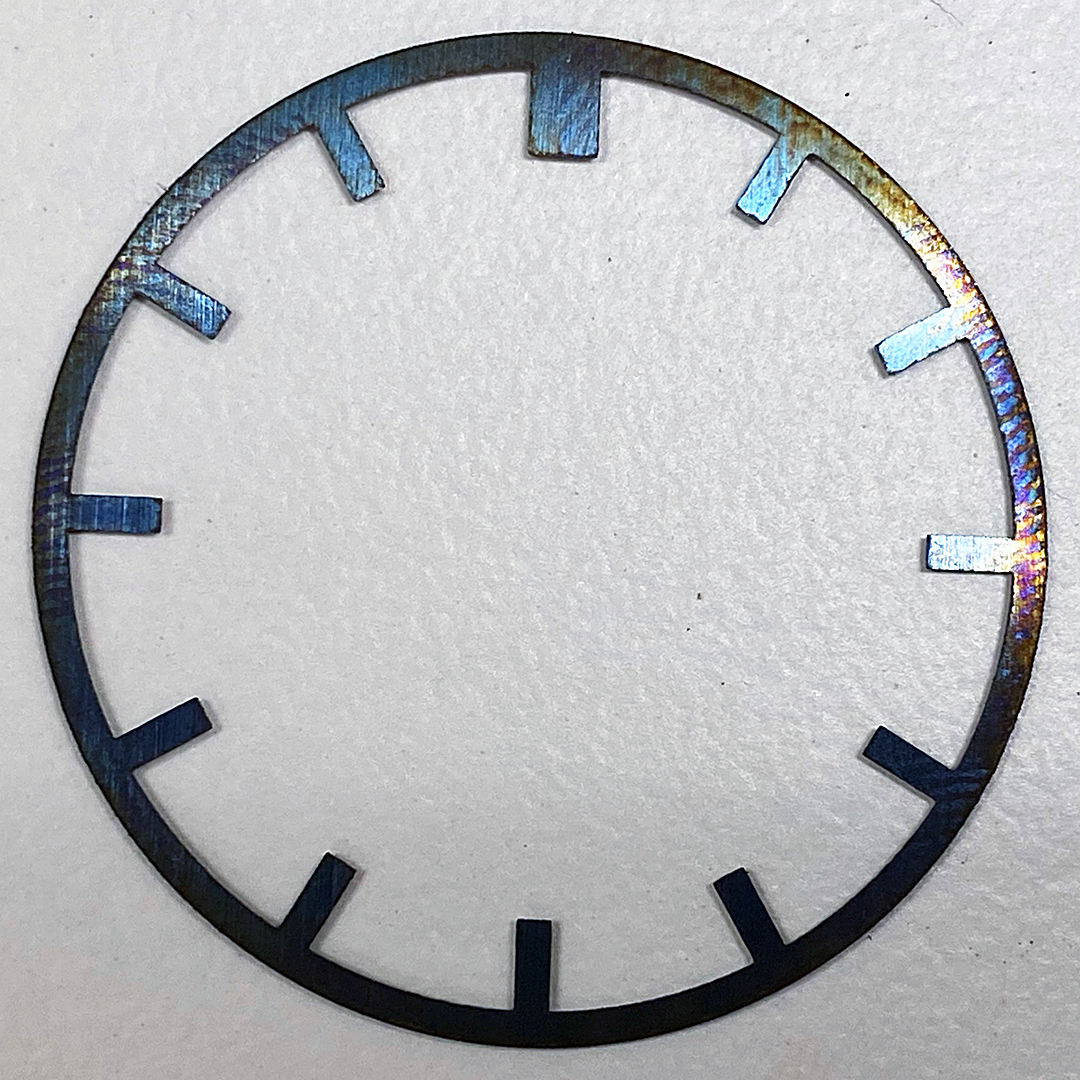
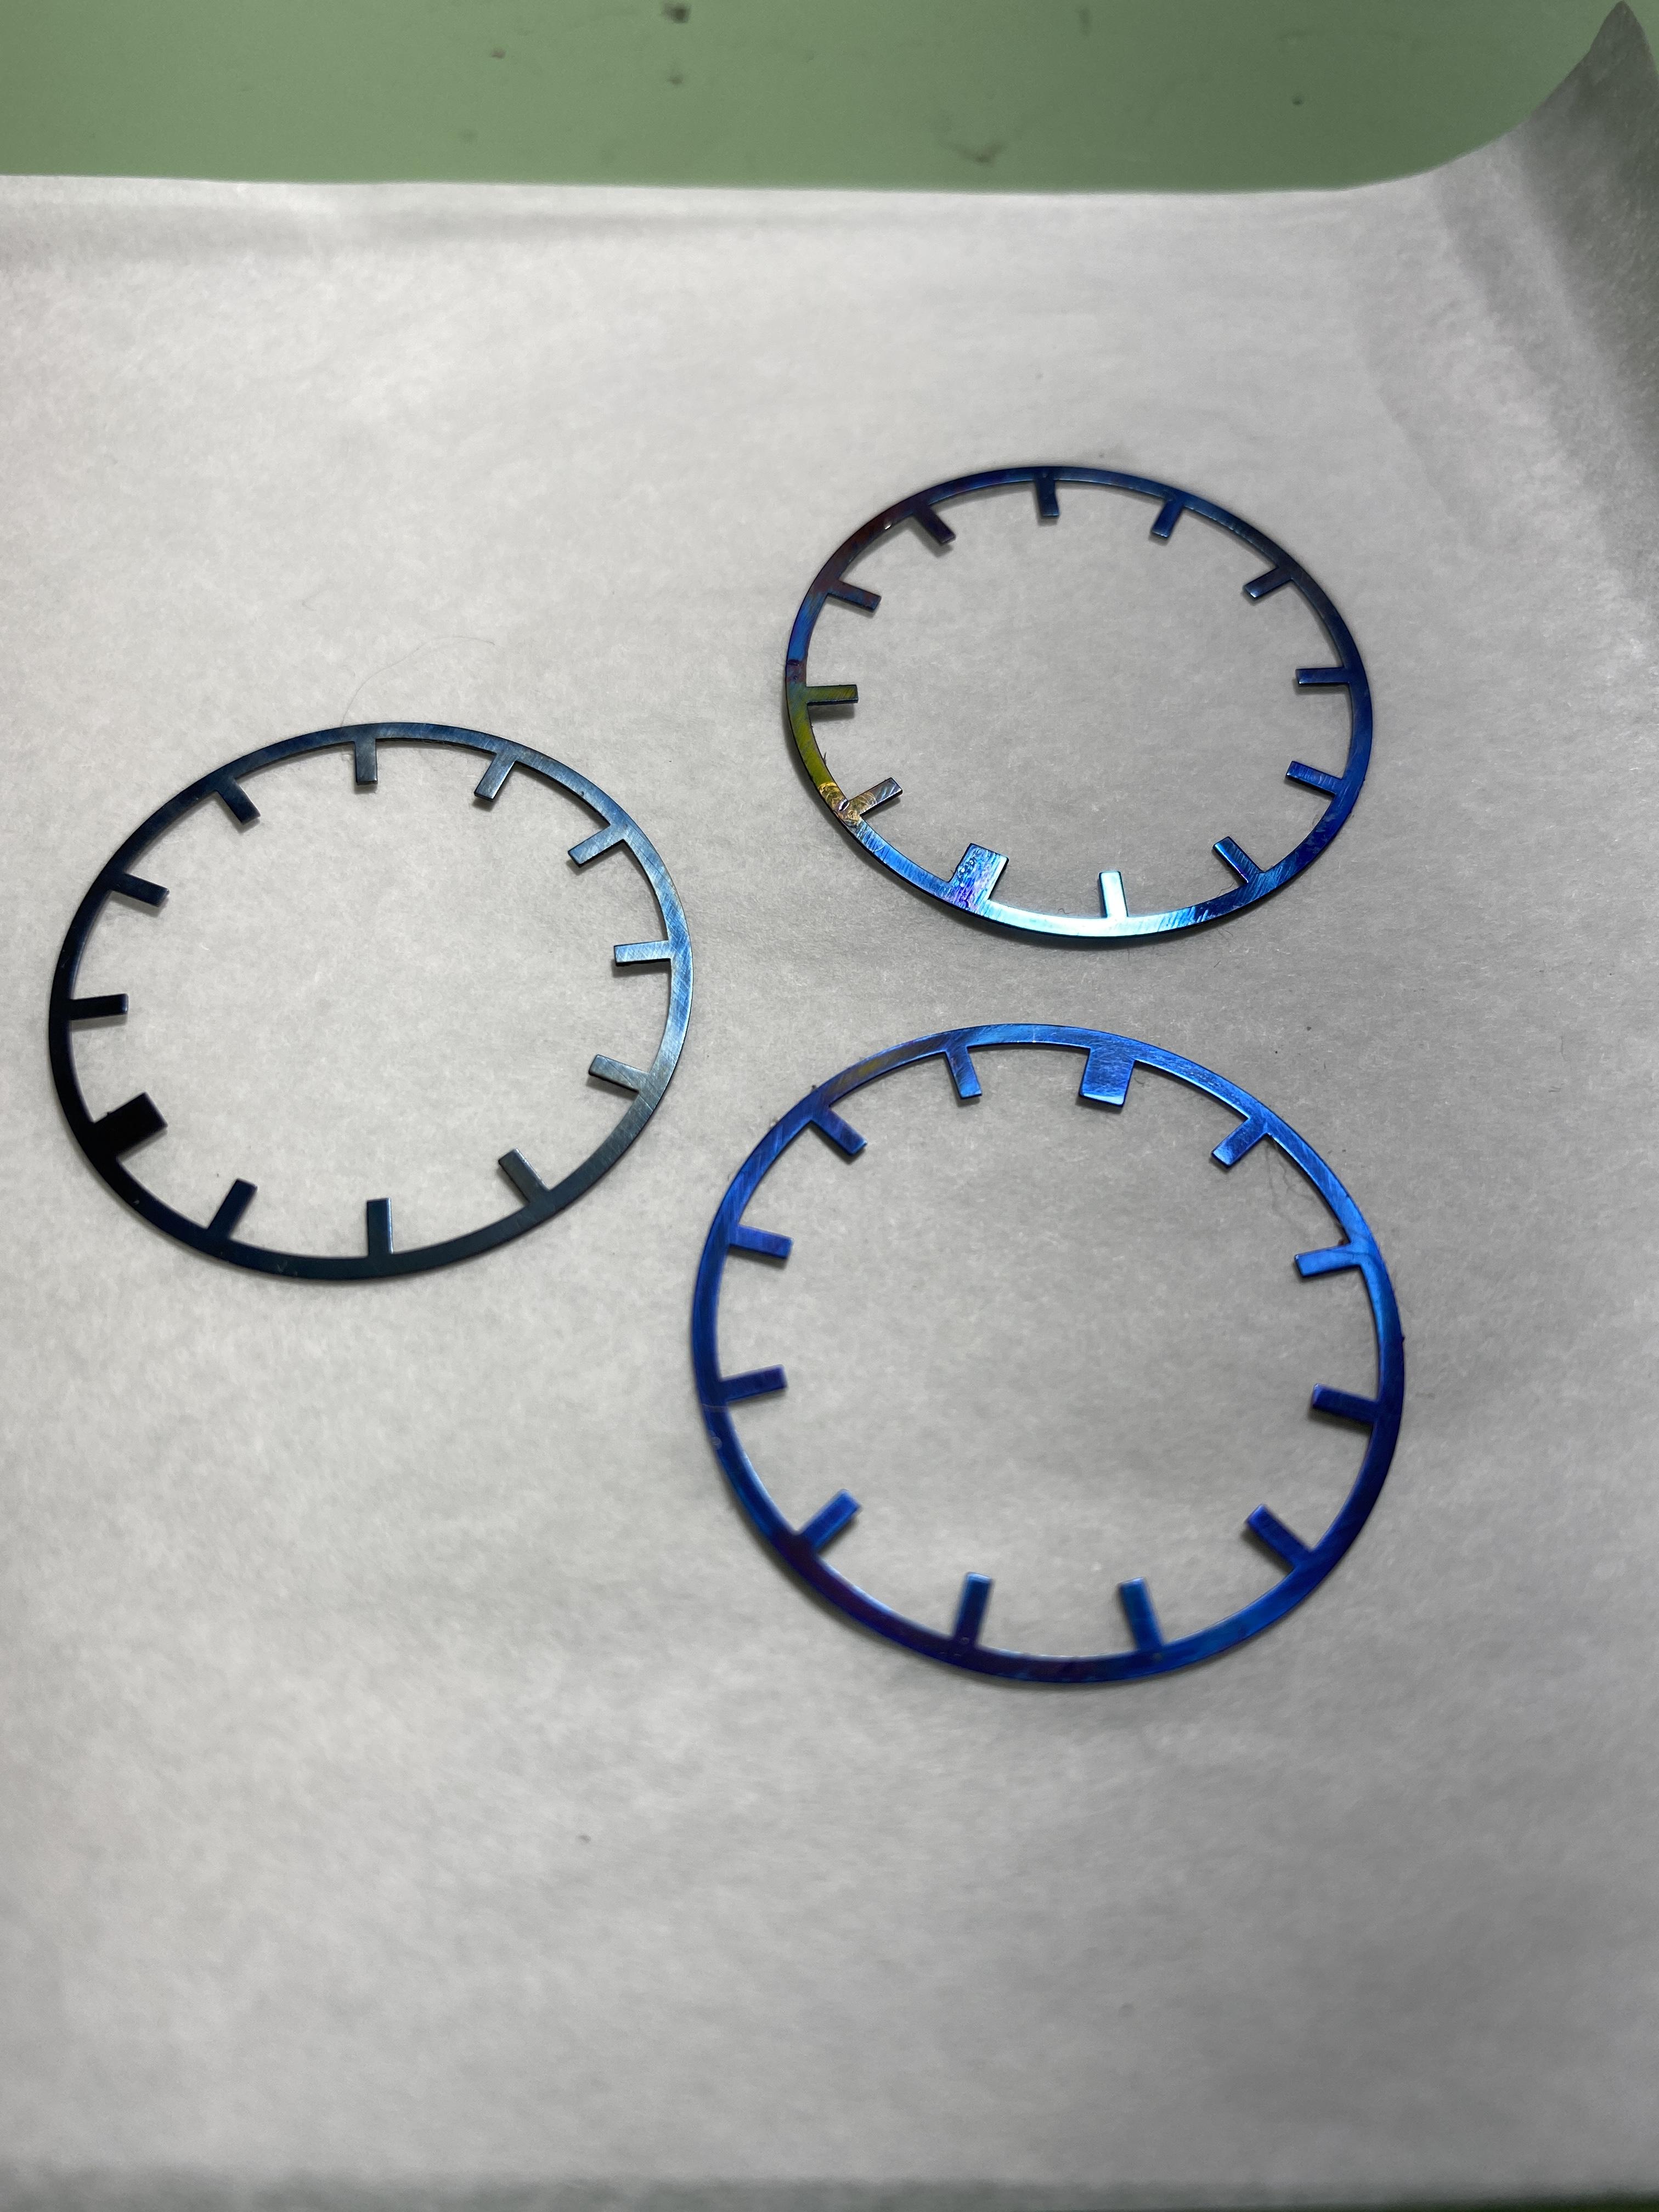
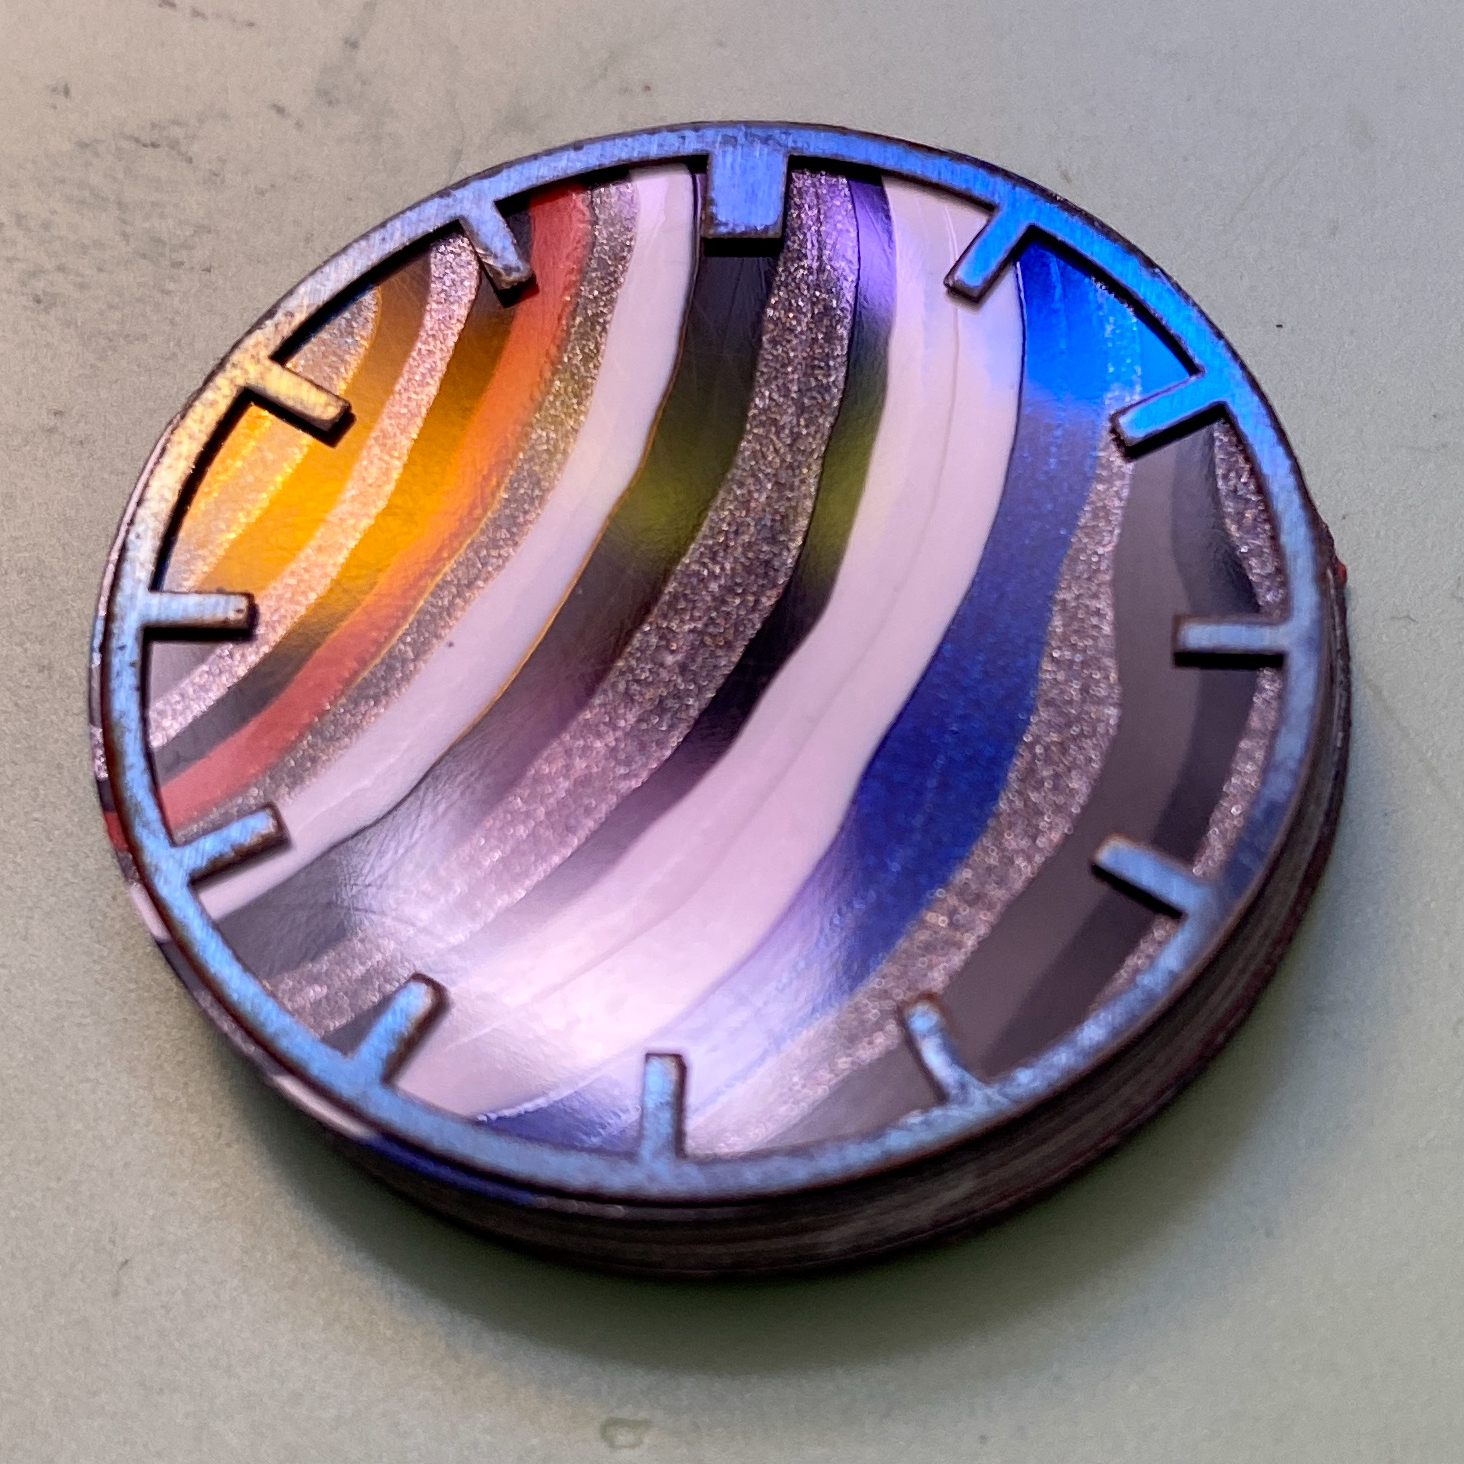
For the past few months, I’ve been working on a custom dial project. I’m still not ready to show my first production examples, but the project has gotten to the point where I’m comfortable sharing my progress. I’ve been documenting this process, and am committed to sharing my process notes. I believe in open source information, and I’ve benefited immensely in watches (and in life generally) from the wisdom and experience of other people who have been willing to share what they know with me. My hope is that by sharing my process notes, I might be able to encourage other folks to take a risk and try to make something cool. I’ve never attempted anything like this, and even if this project is ultimately unsuccessful it has been a ton of fun. I'm sharing my progress and process notes on this forum because folks here have been incredibly friendly and patient with me. If you have any questions about my notes, please feel free to let me know and I'll try to explain things better. I'm happy to answer any questions, and I'll be sharing more photos as I can. I've received a number of comments from people I've been corresponding with that essentially conclude that "this is too hard to pull off". Bur for the serendipity of finding a source of half-height Seiko dials and having free access to an incredibly expensive precision saw, I would have agreed. If anyone has suggestions or concerns that I'm missing something key, please let me know. Background: Seiko & ETA 6498 Custom Watches My project started with customizing my own Seiko watches, and with assembling several custom ETA 6498 watches using available parts from Chinese sellers on eBay. I greatly enjoyed manufacturing my own ETA 6498-1 based “marine watch” using high quality components, and produced a watch that is nearly equal to the Stowa Marine Original I wanted but couldn’t afford. I could have saved more money using lower-quality components, but instead assembled a watch using high quality components (heat-blued hands, an especially nice 41mm case with a sapphire crystal, an elabore-grade ETA 6498-1, etc.) to build a final product that was high quality but still significantly less expensive than the Stowa. Here's my 6498-based "Marine Watch" On the Seiko side of the house, I’ve built a couple of custom Seiko watches using some of the really amazing dial and hand combinations available from lots of internet sellers. (My favorite seller is called Lucius Atelier.) In browsing the offerings of several different Seiko part dealers, I saw that some suppliers sold higher-end dials made out of meteorite, damascus steel, carbon fiber, and other neat things. Knowing how much I enjoyed building my ETA 6498 watch, knowing how many people enjoy modifying their Seiko watches, and being generally fascinated by exotic dial materials, I realized that it might be possible to design my own watch dials. I enjoyed reading many articles on restoring dials using decals, and thought a lot about using electrolytic-etching or laser-cutting to customize brass dials. It was at this point that I stumbled across fordite and fell in love ... Fordite Several months ago, I ran across a limited series of very expensive TAG Heuer watches that featured unique dials made out of “fordite”. There's no way I'll ever be able to afford once of those £5,500.00 watches, but I couldn't get the idea of working with fordite out of my head. (Here are some quick shots of my first fordite samples, to give folks an idea of what it looks like in unpolished slab form.) Fordite is also known as “Detroit Agate,” and it’s actual industrial waste. Back when car manufacturers used to spray paint cars by hand, they generated a lot of overspray. This overspray accumulated over the years, and hundreds of layers of overspray built up into large chunks of waste material. This stuff was repeatedly heat cured at the same time the painted cars were heat cured, and the resulting chunks of waste are durable and nice to work with. I don’t know the first time it was discovered that cutting open the waste chunks revealed beautiful and psychedelic patterns of paint, but for some years jewelers have been using lapidary techniques to create bizarre and fun jewelry with fordite. One of the things that I find particularly fascinating about this material is that it’s possible to source fordite from specific assembly lines. Consequently, one can obtain fordite in Jeep, Corvette, Cadillac, Peterbilt, and other colors. I’ve even obtained some fordite from the “Cadillac Ranch” in the Mojave Desert. It’s much softer and more fragile than “normal” fordite, but it also has a wider variety of colors and textures. In order to work with this specific soft fordite, I'm going to need to stabilize it using some cool lapidary techniques. Heat-Blued Steel I have been enchanted by heat-blued steel watch components for a really long time. I started researching how I might myself heat-blue steel with an eye towards designing and selling heat-blued steel watch hands compatible with Seikos and other watches. For quite a few reasons, this isn’t feasible (yet?), but I’ve enjoyed polishing and bluing steel pocket watch hands. As my dial project progressed, I realized that it wasn’t practical for me to add applied hour indices, and there are some significant obstacles to using film-free decals on the dials I'm making. I realized that some manufacturers of exotic-dialed watches got around the problem by attaching a short chapter ring directly to the watch dial. This solution really appealed to me, so I set about designing a chapter ring that could be cut out of very thin (0.01” or 0.254 mm) high carbon steel, polished, and then glued to the dial face without risk of fouling any of the watch hands. I worked with an engineer on Fiverr, who converted my really rough sketch of a chapter ring design into a DXF file. My first 20 carbon steel chapter rings are currently in production at a laser-cutting facility. I don't need to share photos of the steel I've heat blued here to prove that it's a work in progress. Temperature control is critical, and I'm going to be switching from a propane camp stove to a precision digitally-controlled laboratory grade Cole-Parmer StableTemp hot plate to get consistent, high-quality results. I know that large manufacturers, including Glashütte Original, are doing essentially the same thing: In this Glashütte Original watch assembly video, one can see them using a $50 digital soldering-station with a brass attachment to blue screws. I'd go that route myself, but my chapter rings are a lot larger and so I want a larger heating area with better temperature control. I'll specifically be using a 1" thick 4" x 4" block of aluminum mounted on the hot plate's ceramic heating element to ensure uniform heat distribution. Chapter ring, from concept sketch to technical drawing to first prototype. Obviously, I'm going to need to do a lot of polishing before I re-blue these for installation! [Continued ...]

 1 point
 -
Hello again, I have a 1950 Bulova 10BM movement that is running extremely fast. I do not know the watch's history. So far, I have demagnetized, cleaned, and lubricated, and it is still gaining time. The hairspring is clean, not bent, coils are not stuck together or magnetized. I was wondering, when a watch is gaining vast amounts of time and you've demagnetized and cleaned but you don't know the watch's history, what are the next steps you would take to determine the cause?1 point
-
I thought I might. I will trawl through the suppliers etc and see if it is economical to fix or put the mvt to one side for future use or to sell for spares.1 point
-
Welcome to the forum!!1 point
-
Welcome to the forum! That attachment OH gave you is great, so we are all speaking the same "language" here.1 point
-
Wind this mainspring inside a washer of the same or a bit smaller ID than that of the barrel, rinse! ready to push in as you would new replacements MS's in. Good luck.1 point
-
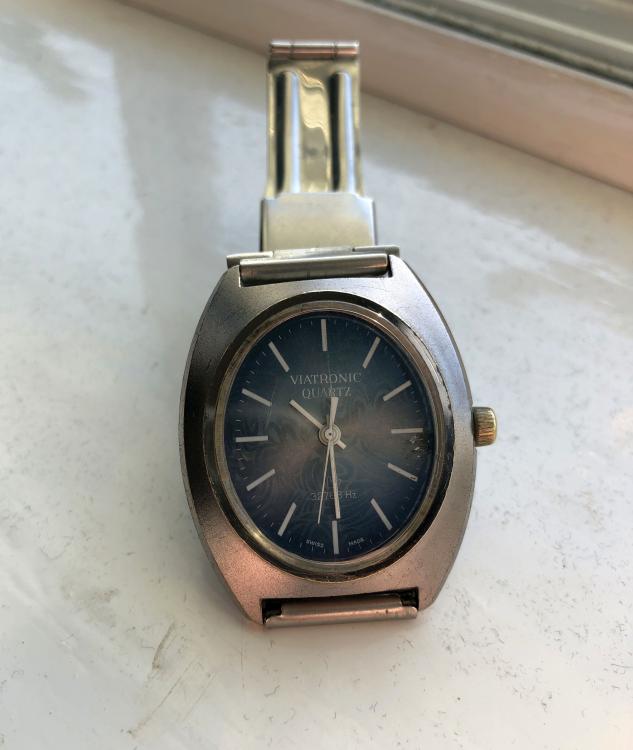
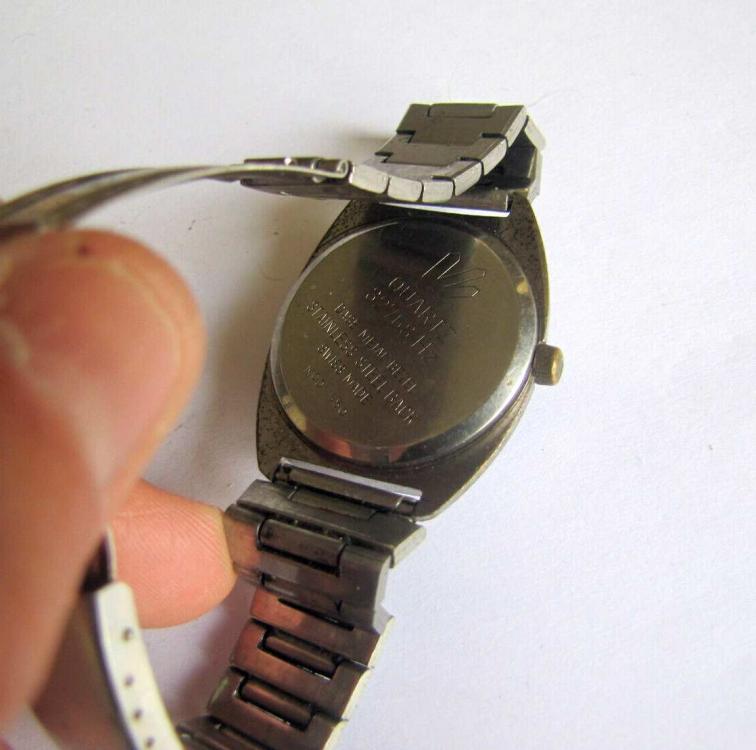
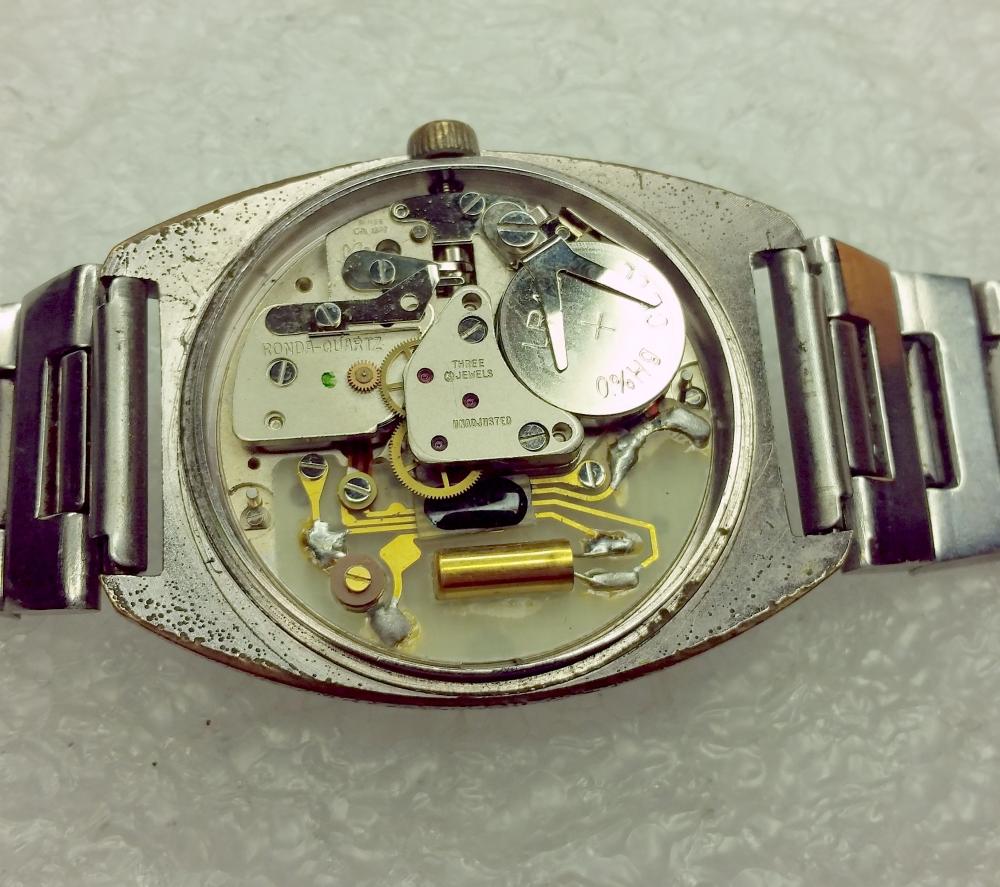
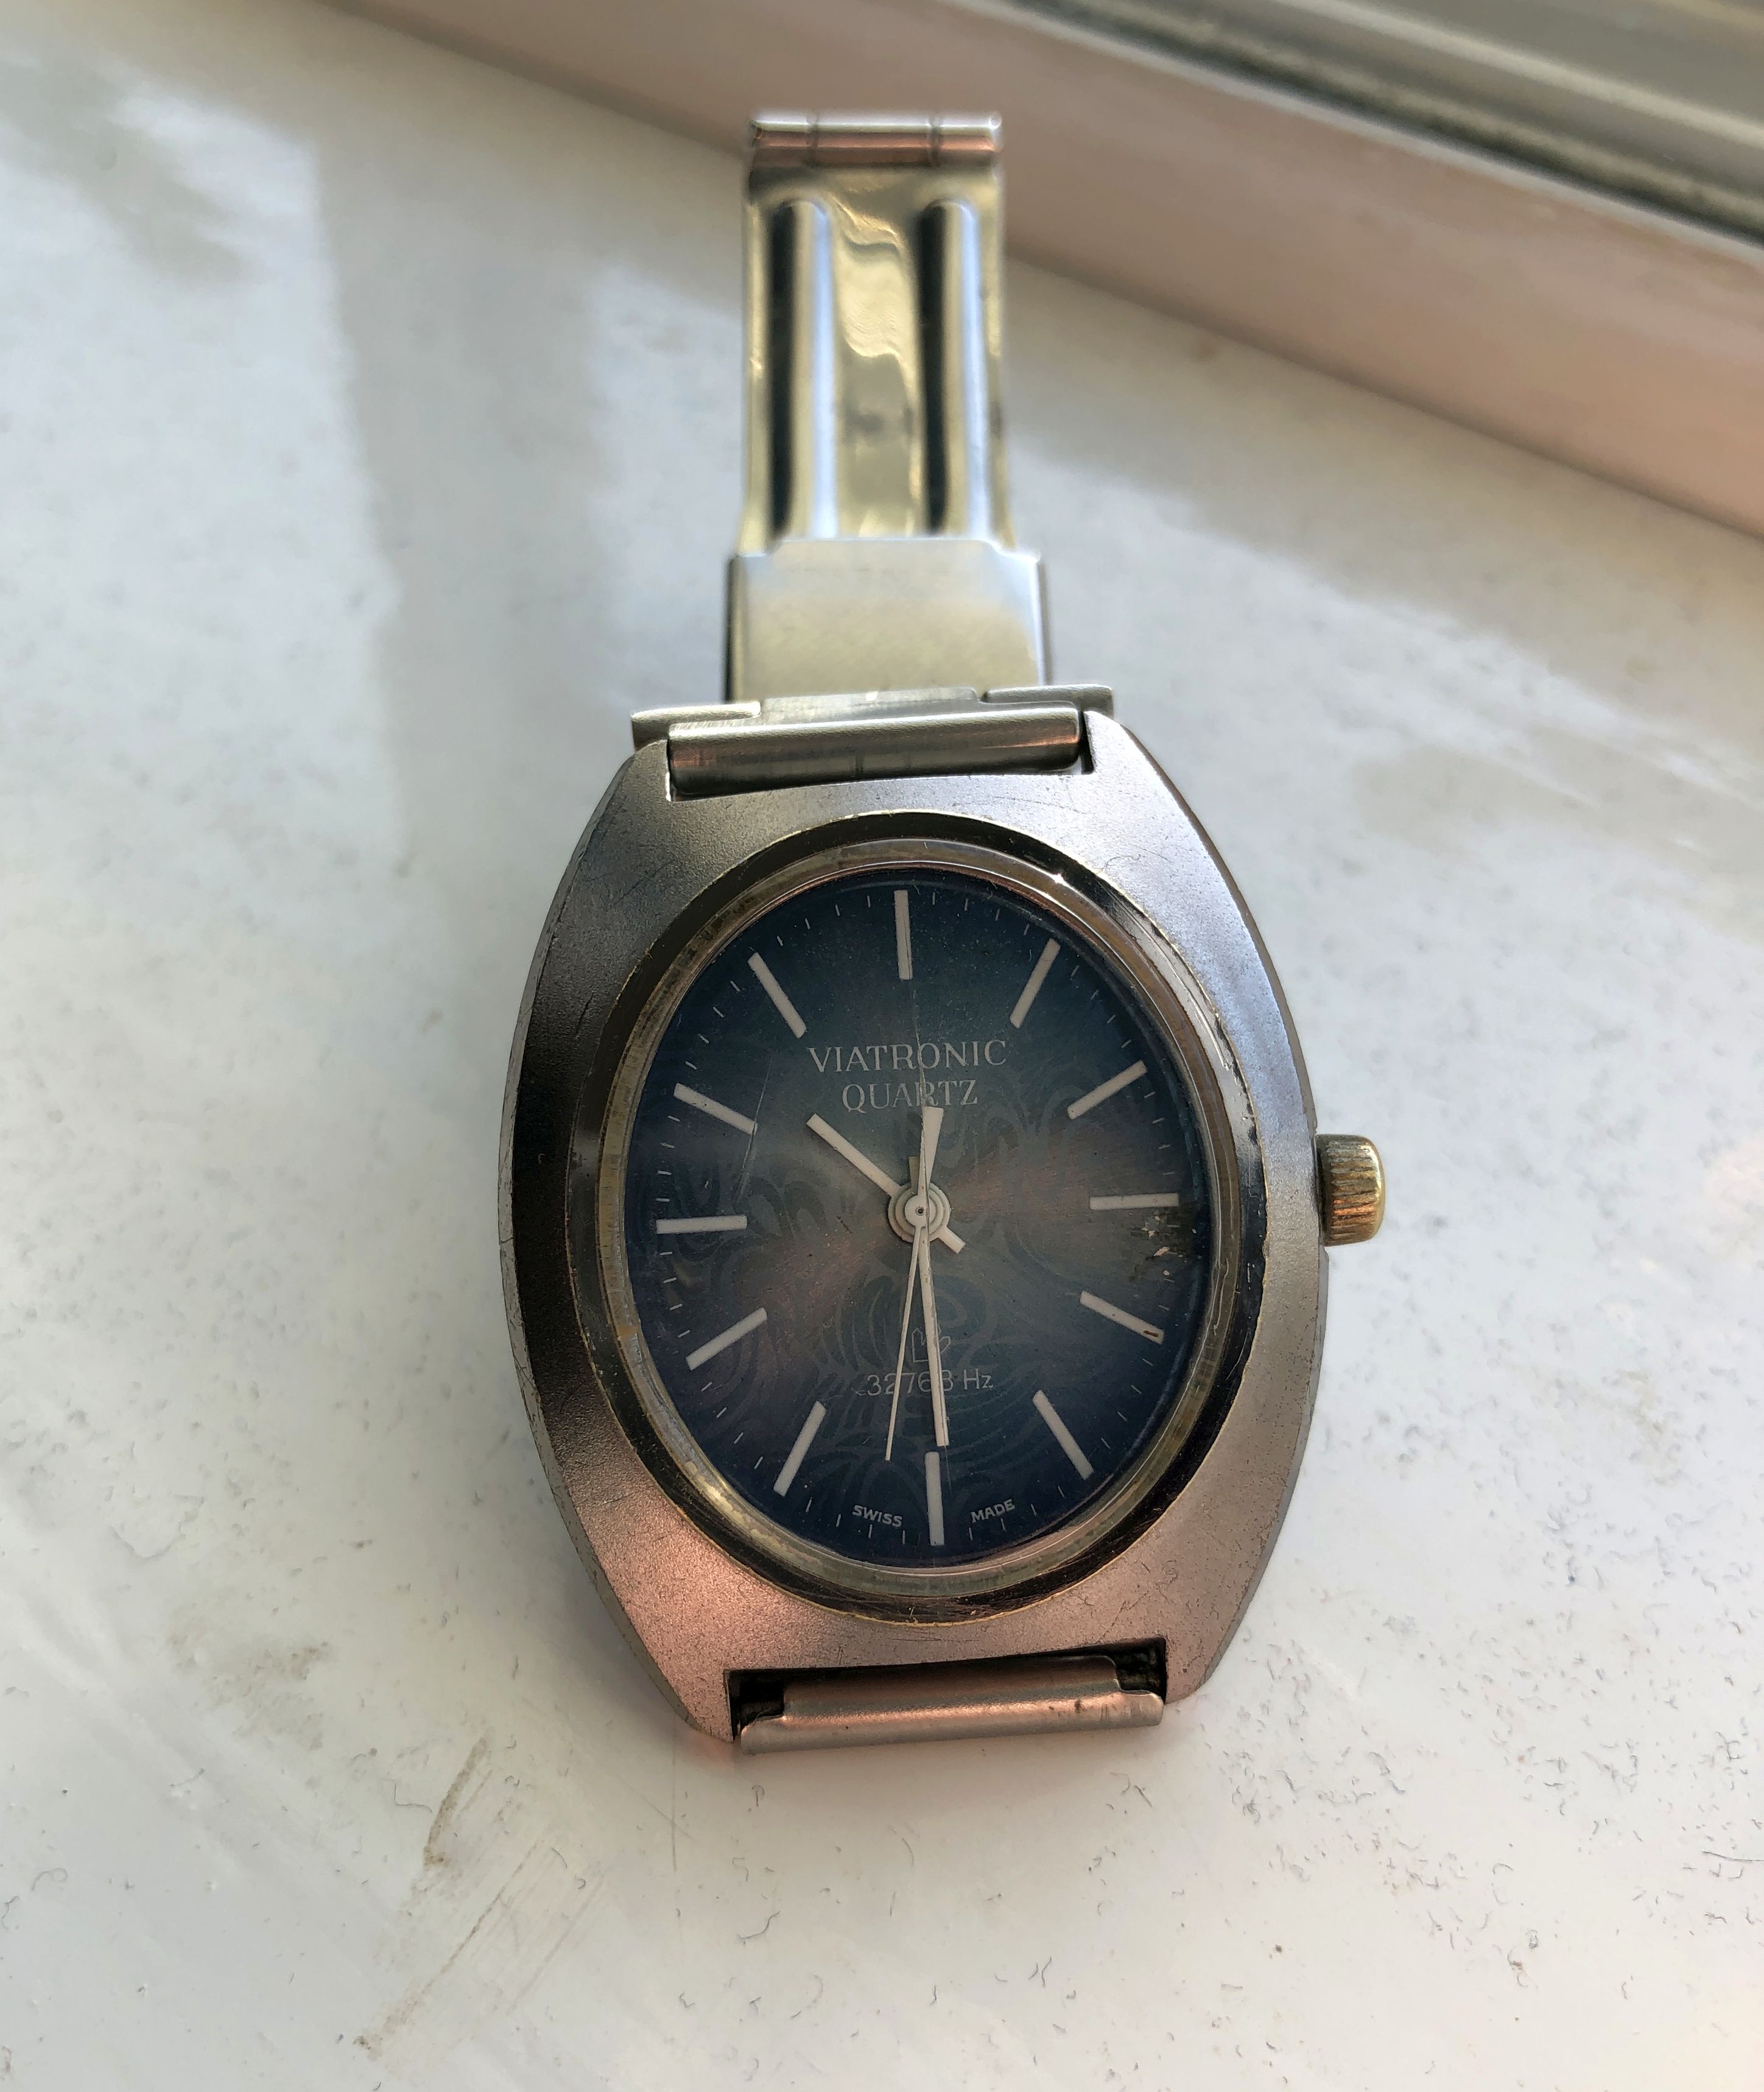
A spot of oil on each of the visible pivots on the main bridge, then 'spin it up' using a demag unit usually gets the old quartz units ticking again..... Is it THIS Ronda movement? I picked up this 'Viatronic' earlier in the year, for a very few £'s that has the Ronda 1377 movement in it....Shame about the crack in the crystal, cant find a replacement any where...?
 1 point
 -
I’ve been know for throw pre-mix on a bonfire, yes...1 point
-
Is the crown and stem fitted? In one watch I have worked on when the stem wasn't fitted the watch was effectively left in hand setting mode. After a few minutes the watch would come to a stop as the tight cannon pinion would wind against the hand setting cogs and through to the clutch eventually jamming the clutch (as the stem wasn't in it could move around and jam) and stopping the watch. In between working and stopping the watch rate would go up.1 point
-
You should lube the date mech including where jumper and its spring travel. What kind of amplitude are you getting?1 point
-
Fantastic ideas and information! I'll definitely be looking into these. Thank you! Alignment is going to be rough, but it was always going to be rough.1 point
-
I don't believe in that idea one bit. I always tell my students (IT) and my kids that the only "talent" you need in life is the will and the ability to put in the hours. In general, everyone can succeed if they put their mind to it. Unless you have a physical disability, there are glasses, eye loupes, and stereo microscopes, and hand steadiness can be acquired by practicing breathing and relaxing (Tip: training competitive shooting is a great way to improve this).1 point
-
Your mainspring is quite “set” but don’t worry about that just now.1 point
-
Absolutely splendid advice, and if I may I would suggest taking a lot of pictures (more pictures than you think you might need). It has helped me a lot. Not one bit! This is what WRT is for!1 point
-
Welcome from an 'aged' engineer, that has travelled the same route....(retired 15 years ago after over 40 years in engineering)?. Only been 'playing' with watches for about 6 years now, wish that I'd started it earlier.....?1 point
-
found a different picture of the regulating screw and spring. the things you find with these movements are a lot of variations of things. Even in the Swiss tech sheet there's a note about variations are a variety of parts they conveniently don't say what those variations all. So they would be things like movements of a skeleton I used, or the screws are blued rather than the normal steel color. But they're all basically the same watch.
 1 point
 -
Regulator spring.1 point
-
Welcome!1 point
-
I believe the part you are looking at is the micro adjuster for the regulator. It allows you to adjust the regulator by turning the screw in it, and keeps pressure on the regulator to keep it from moving once adjusted.1 point
-
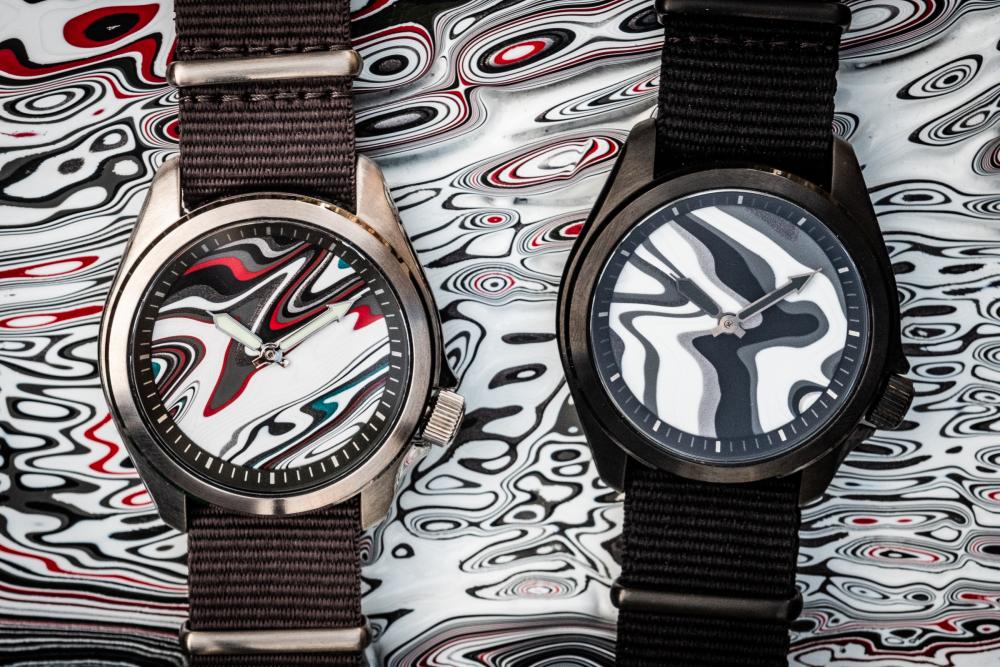
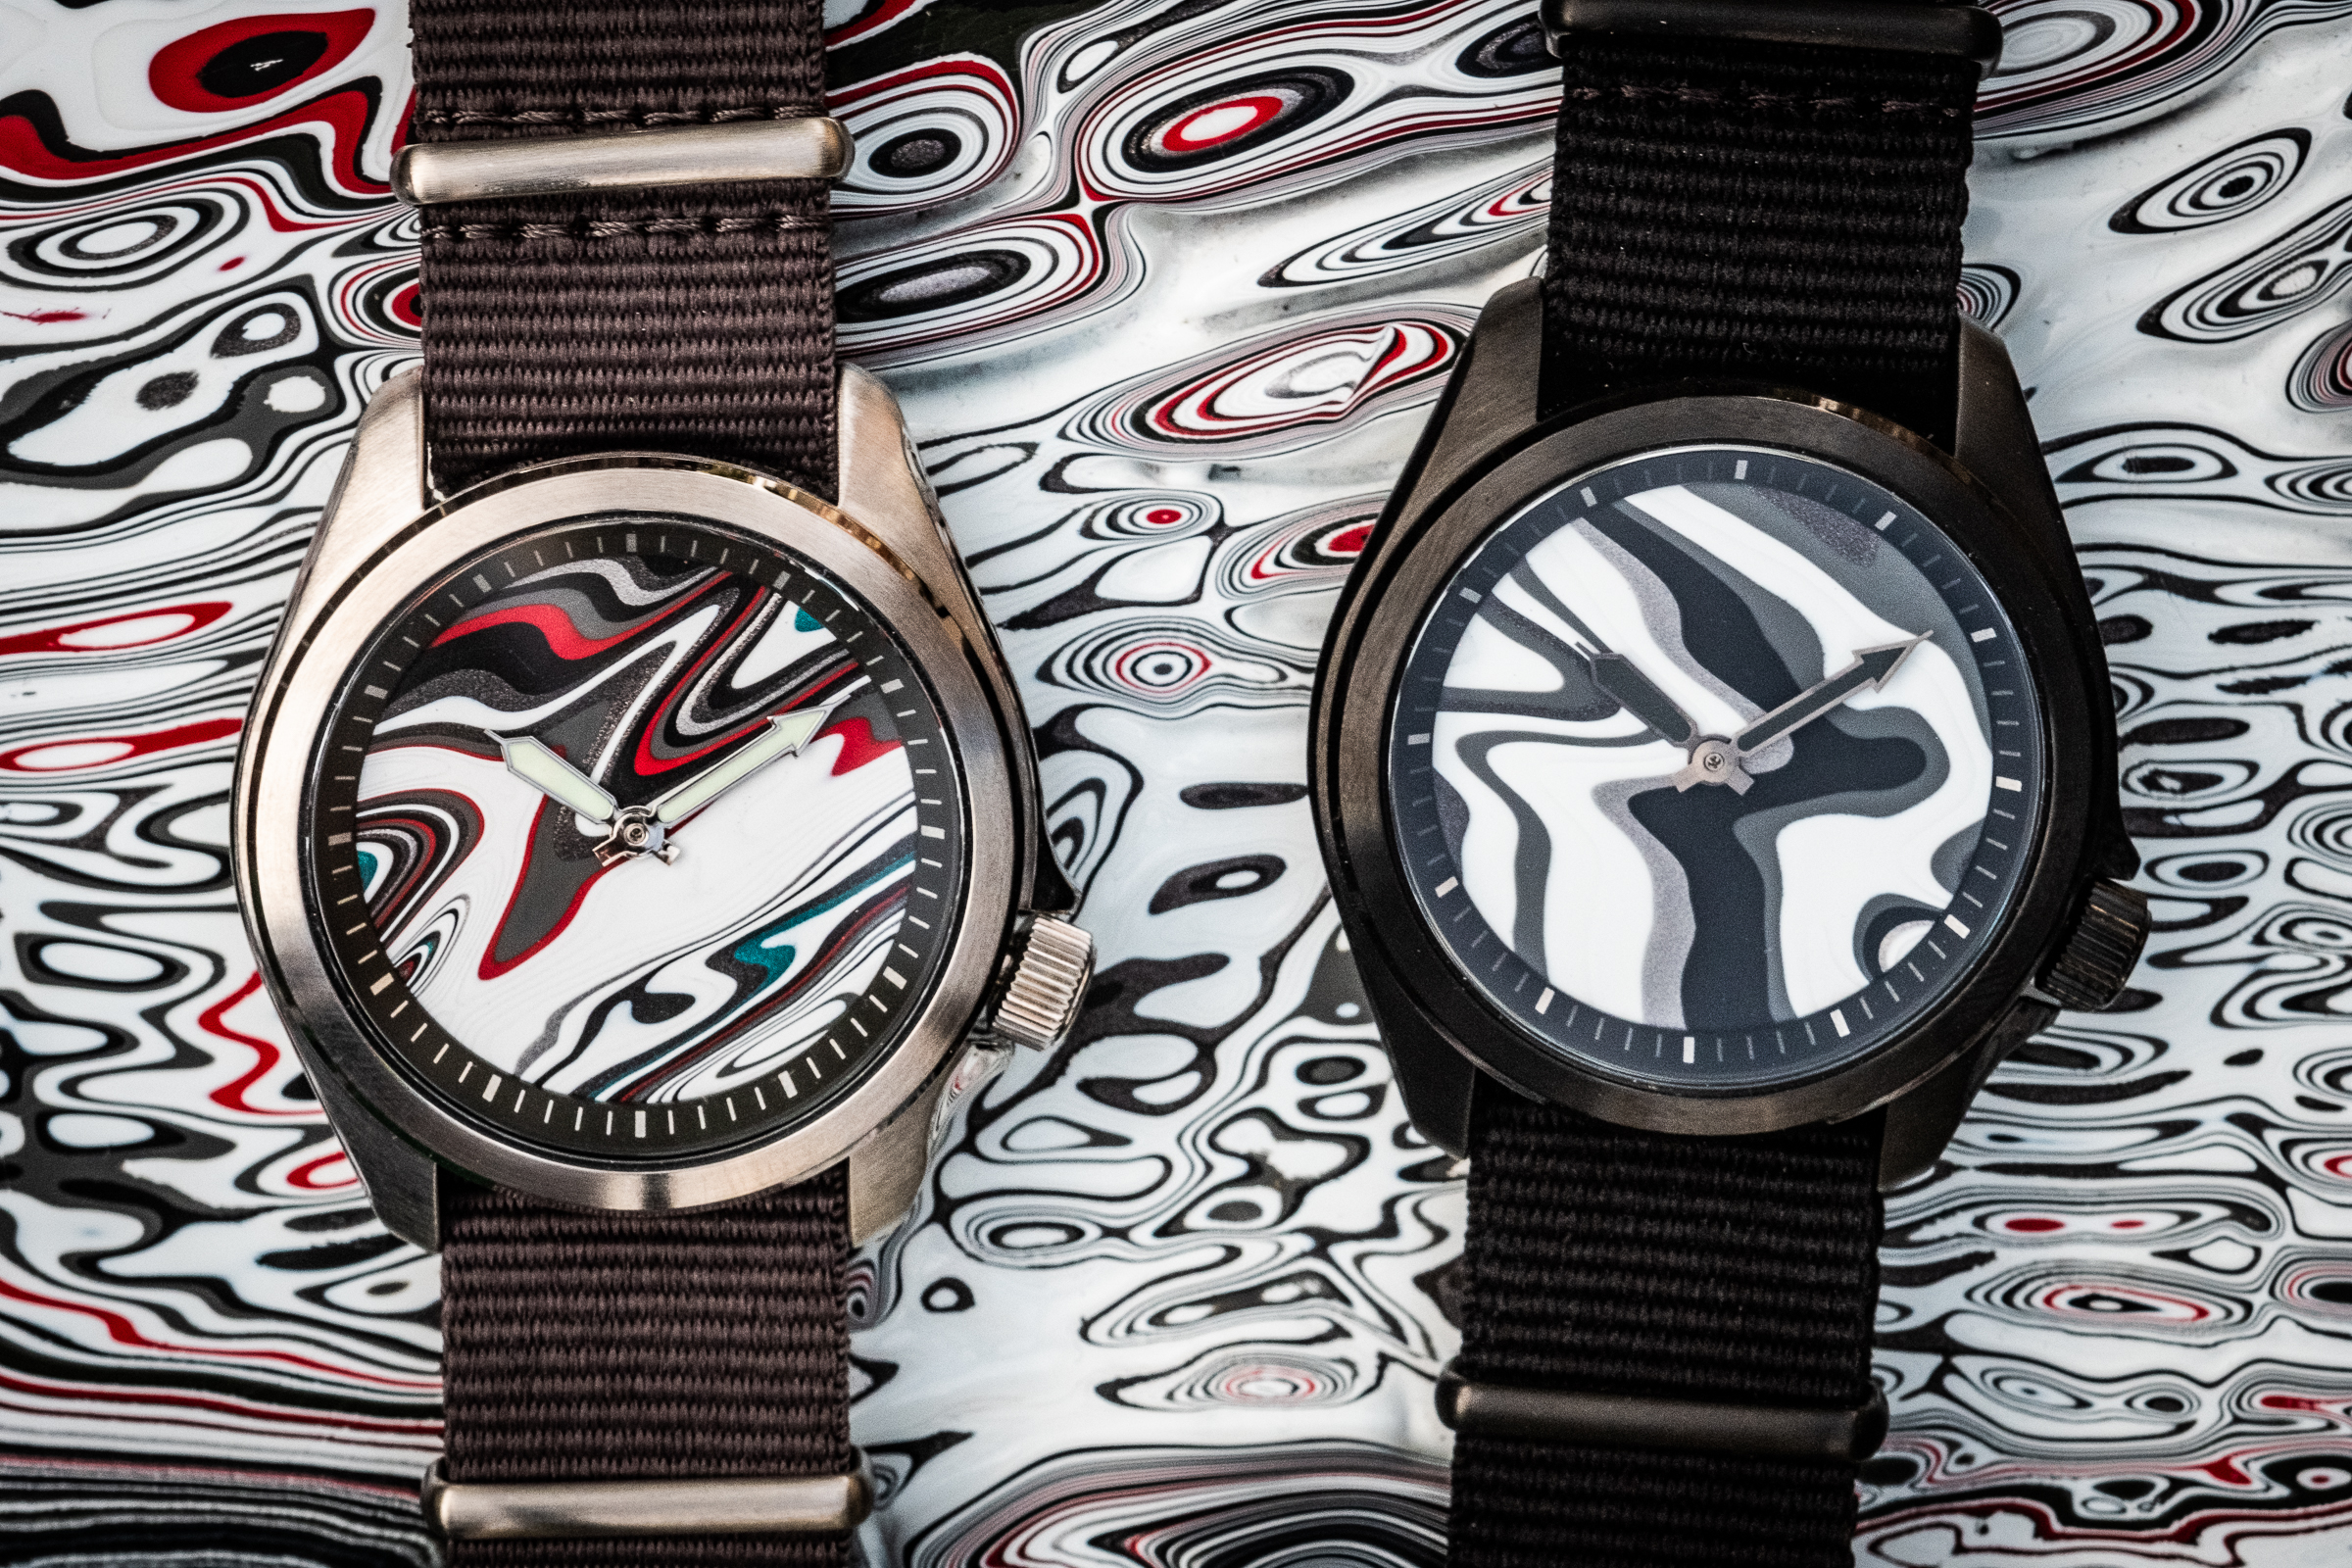
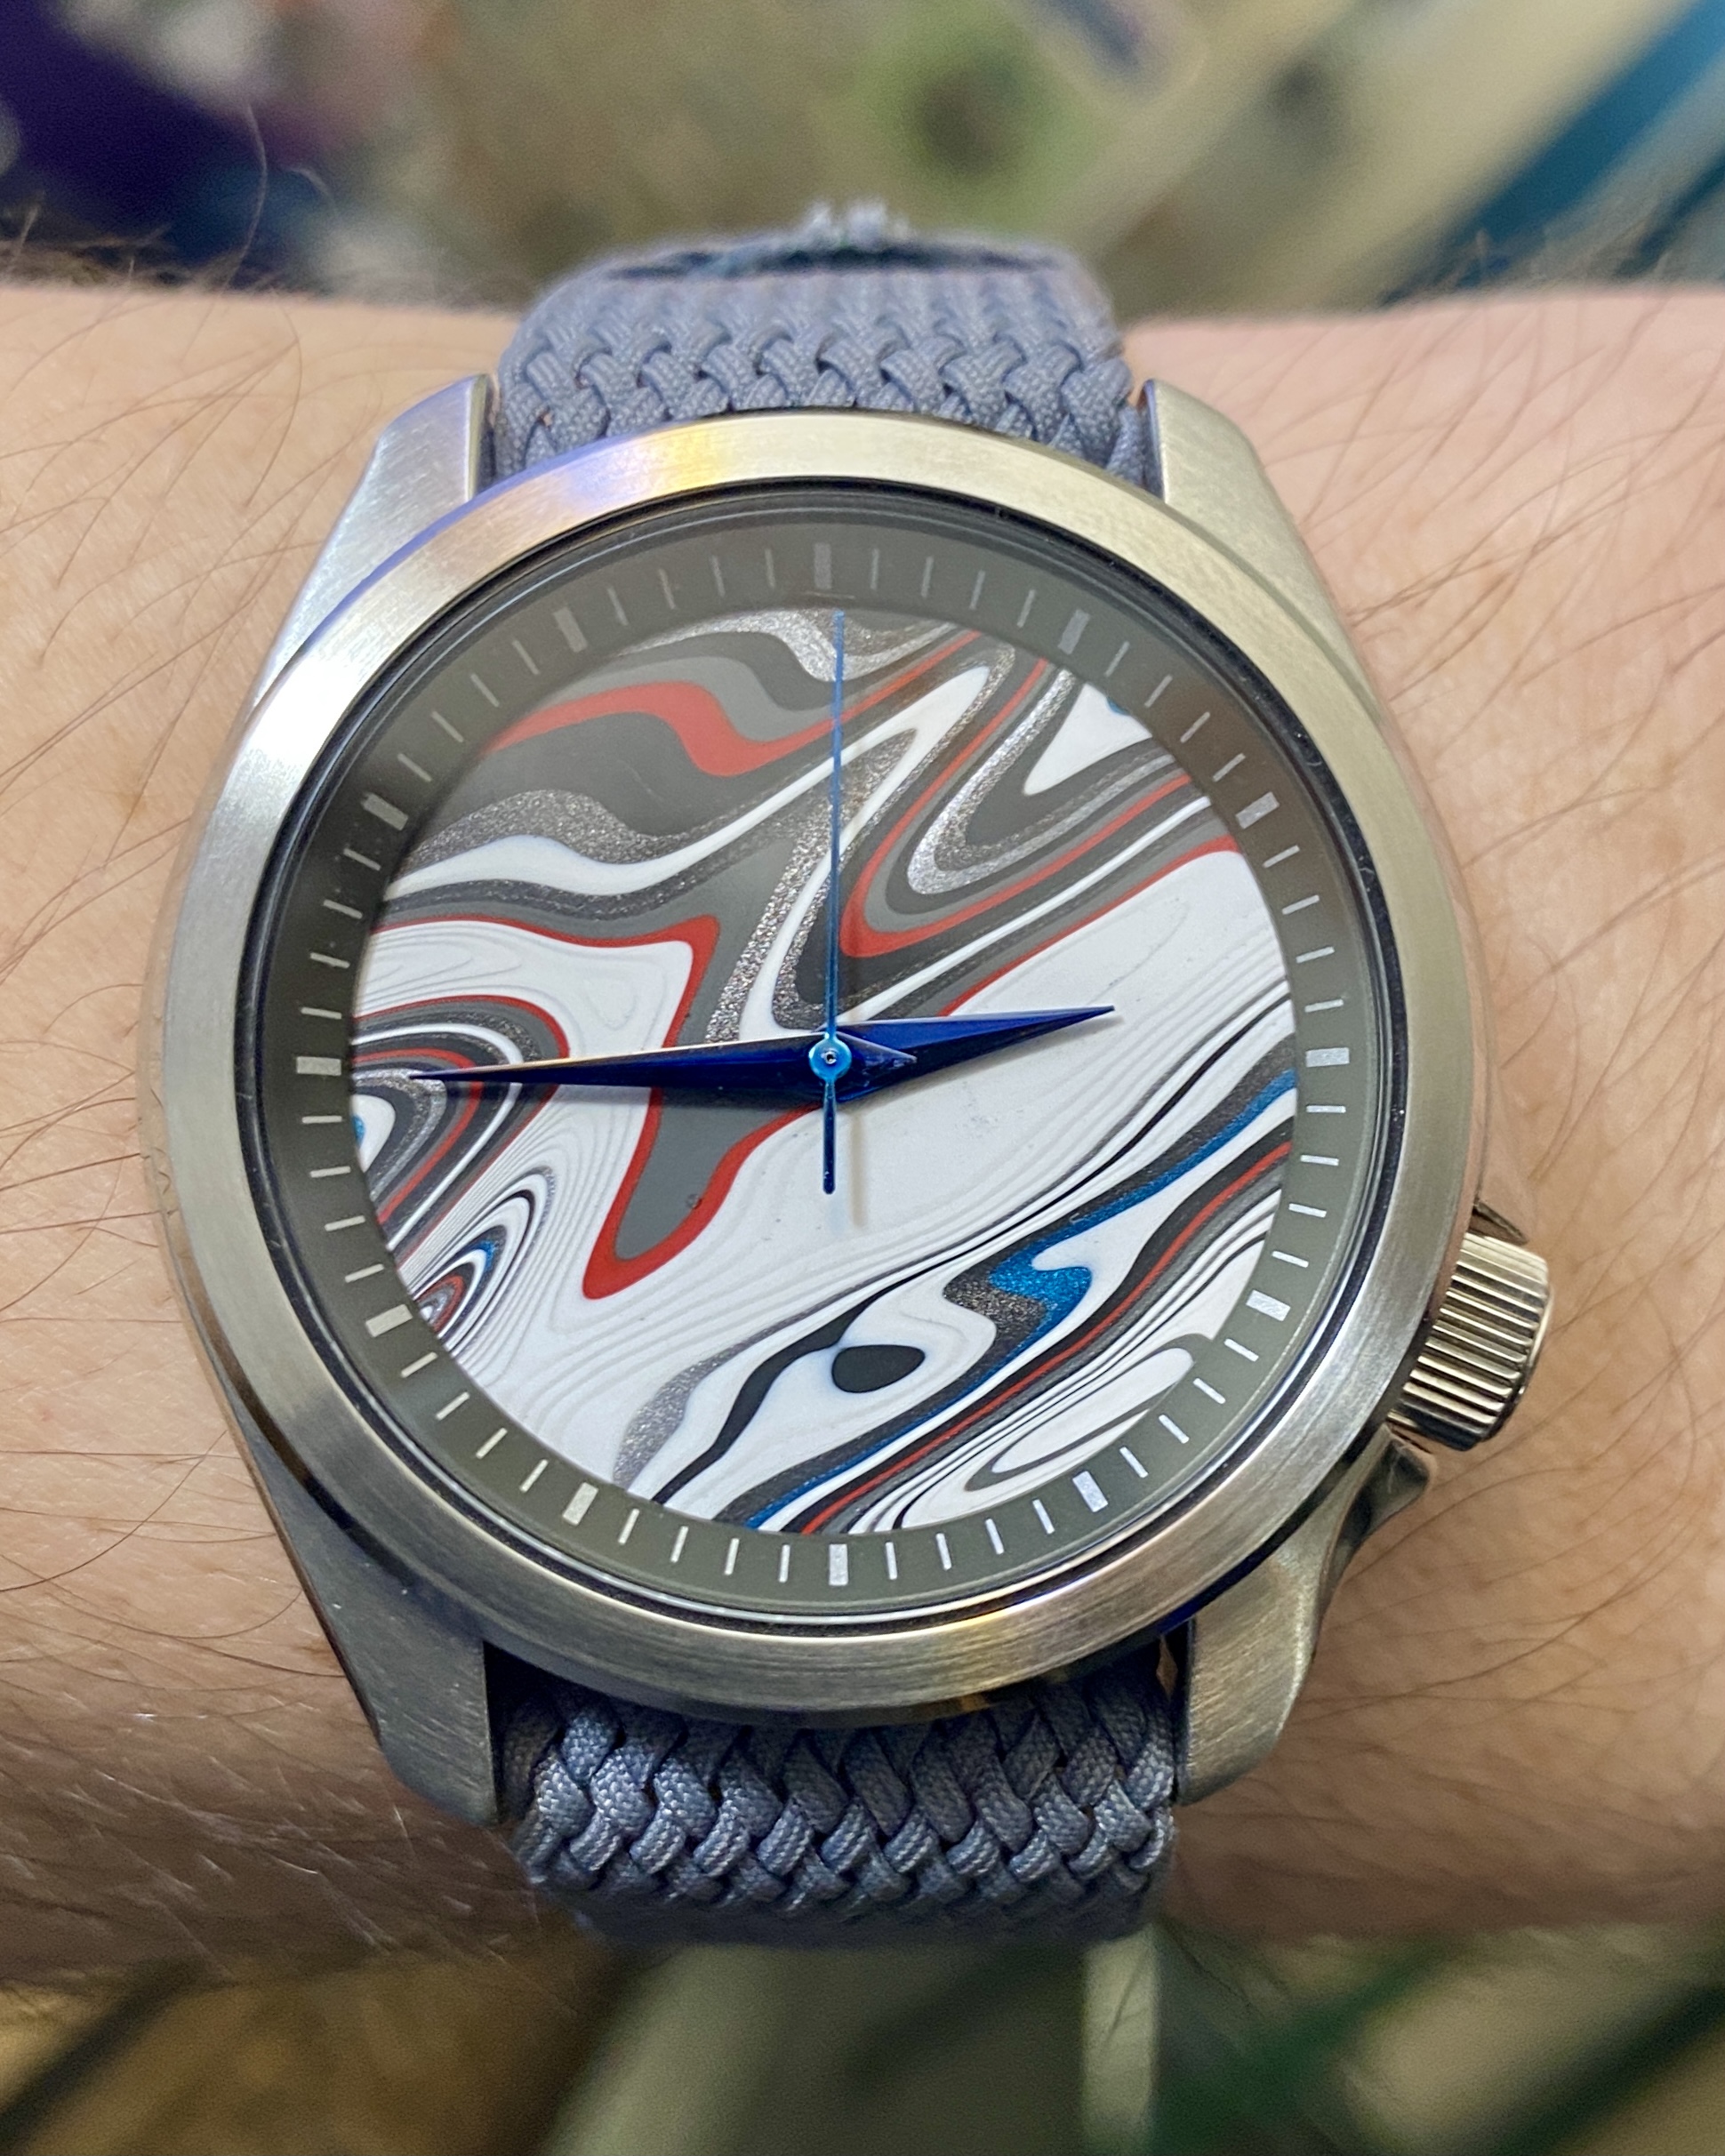
Here are my two completed fordite-dialed watches. I didn't install their second hands 'cause I wanted to show more of the dials. I've got lots more in the pipeline.
 1 point
 -
Welcome and enjoy WRT1 point
-
Welcome!1 point
-
Welcome to WRT Lurch. I'm still trying to make my my mind up as to what I am going to do. ?1 point
-
Hello and welcome to the forum Lurch enjoy the fun1 point
-
Welcome to the forum Lurch.1 point
-
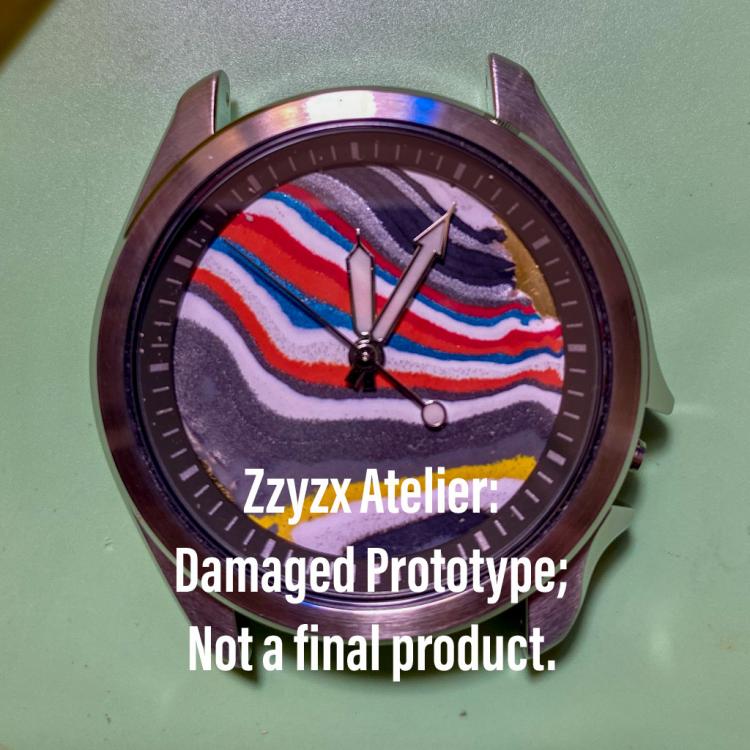
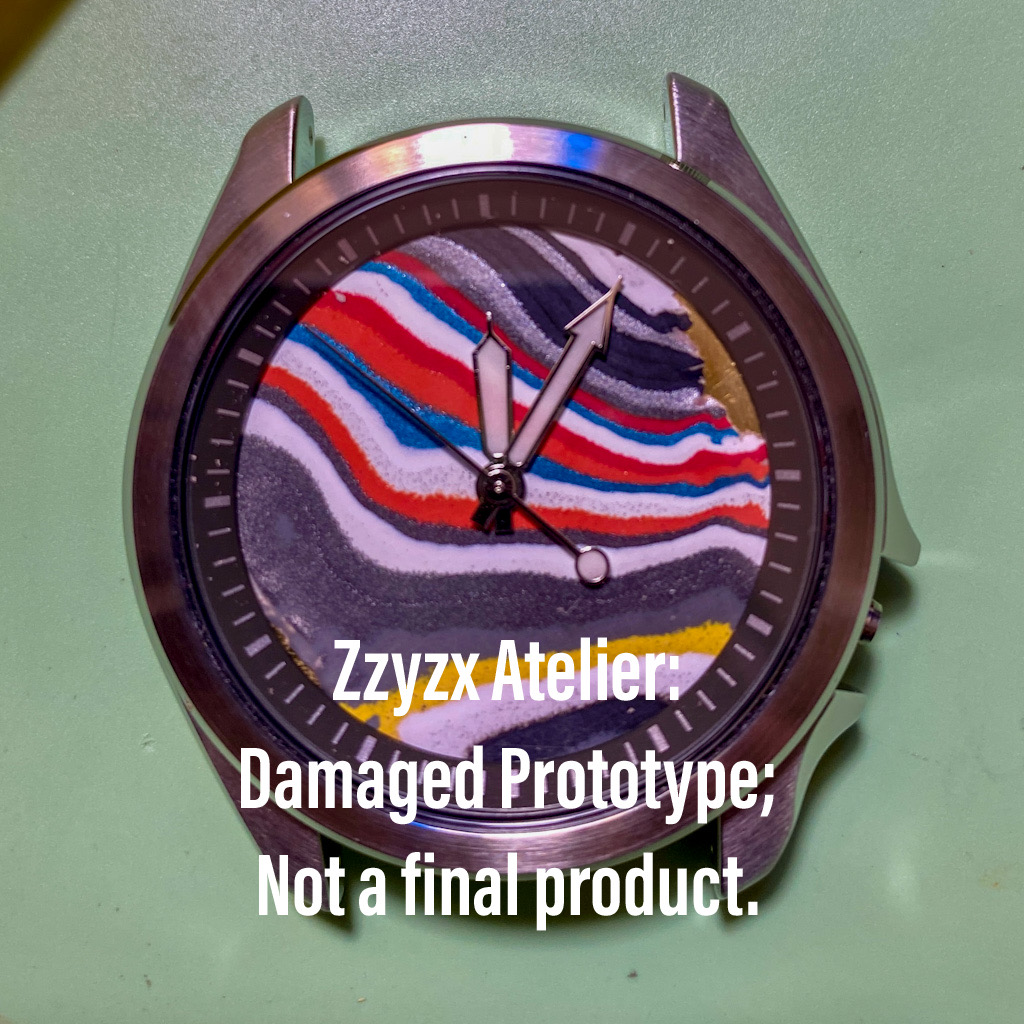
Please forgive the poor quality snapshot, but it all came together. I am over the moon! Here's my first completed fordite-dialed watch: I'll provide a more complete write up, better photos, and another completed watch example ASAP.
 1 point
 -
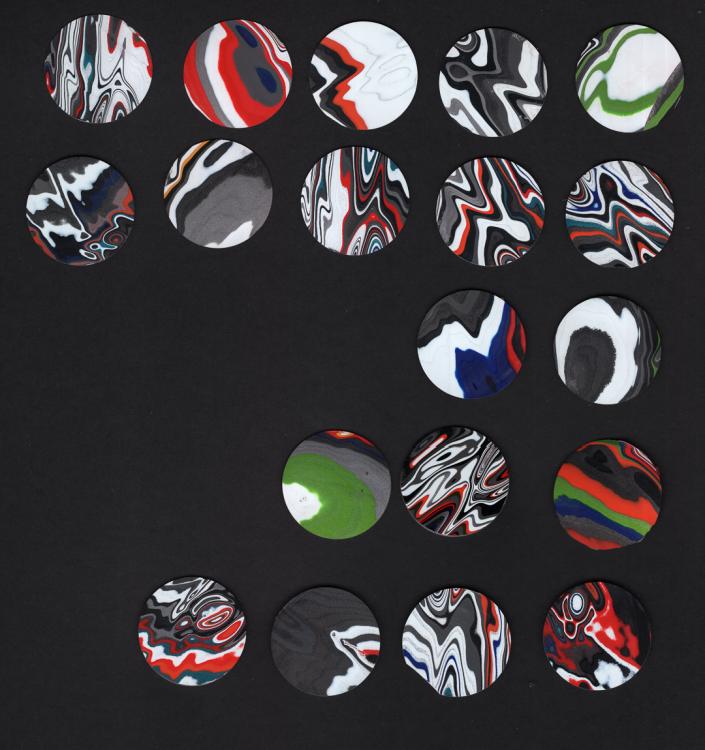
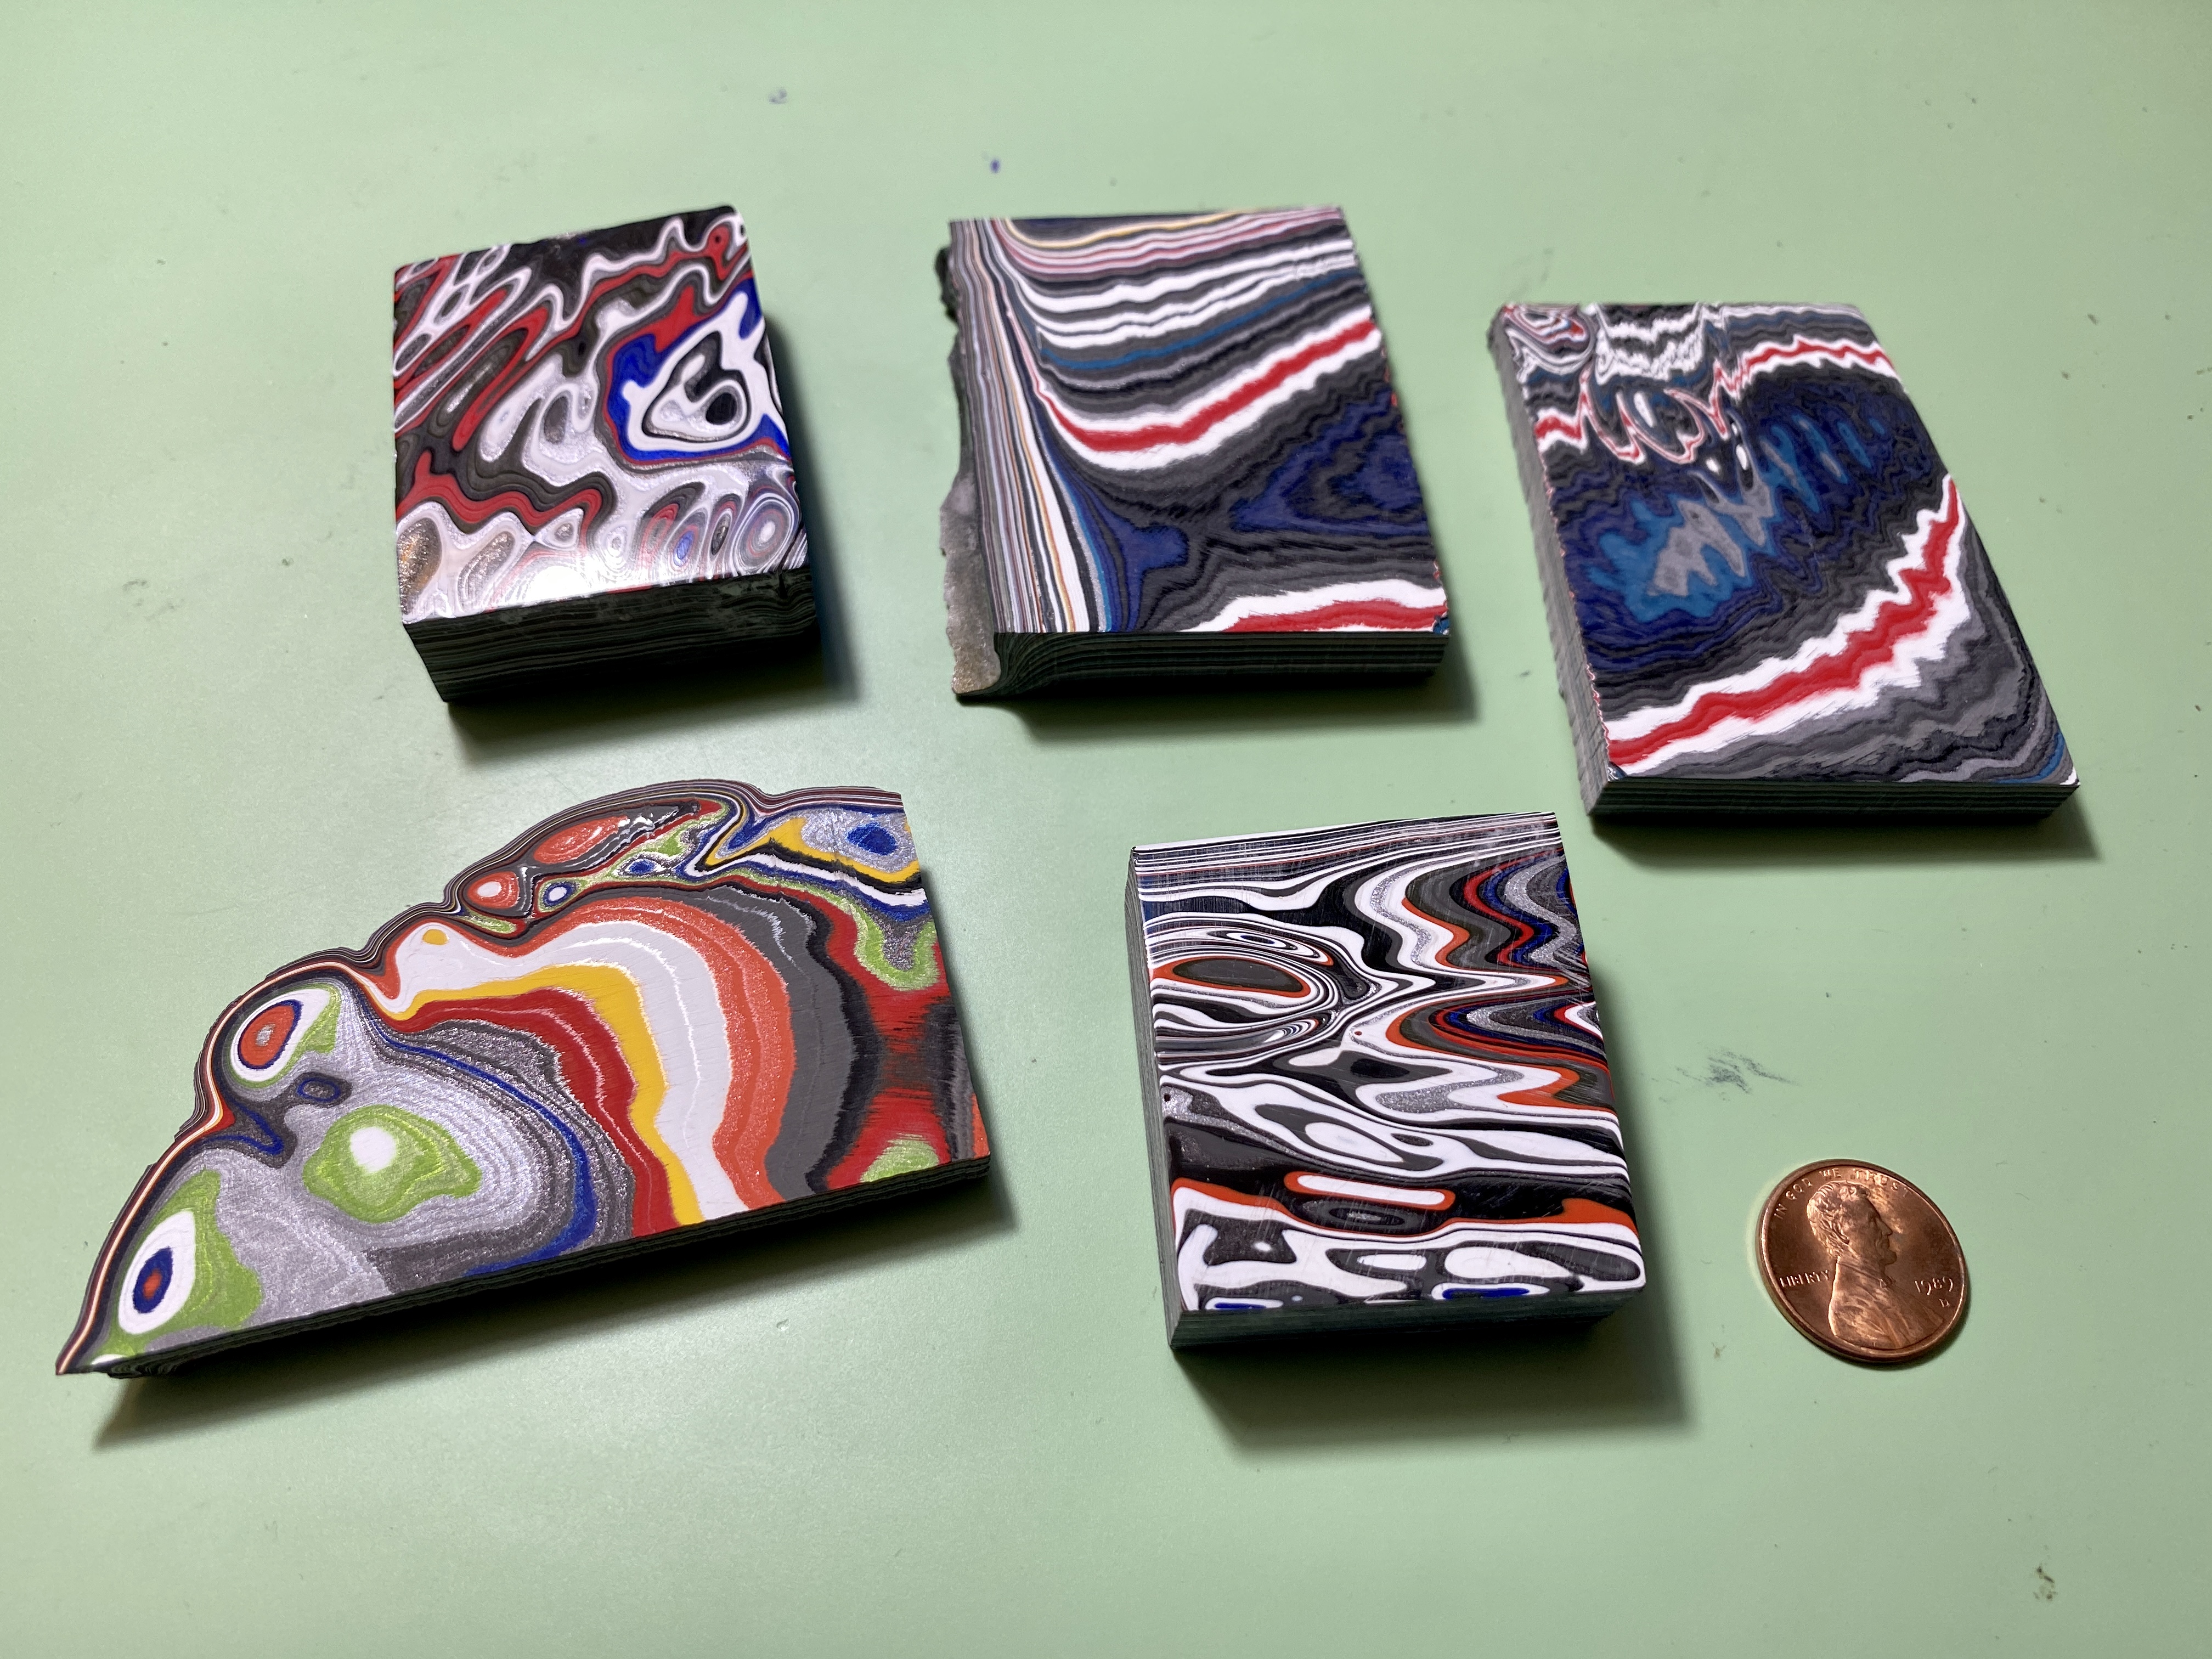
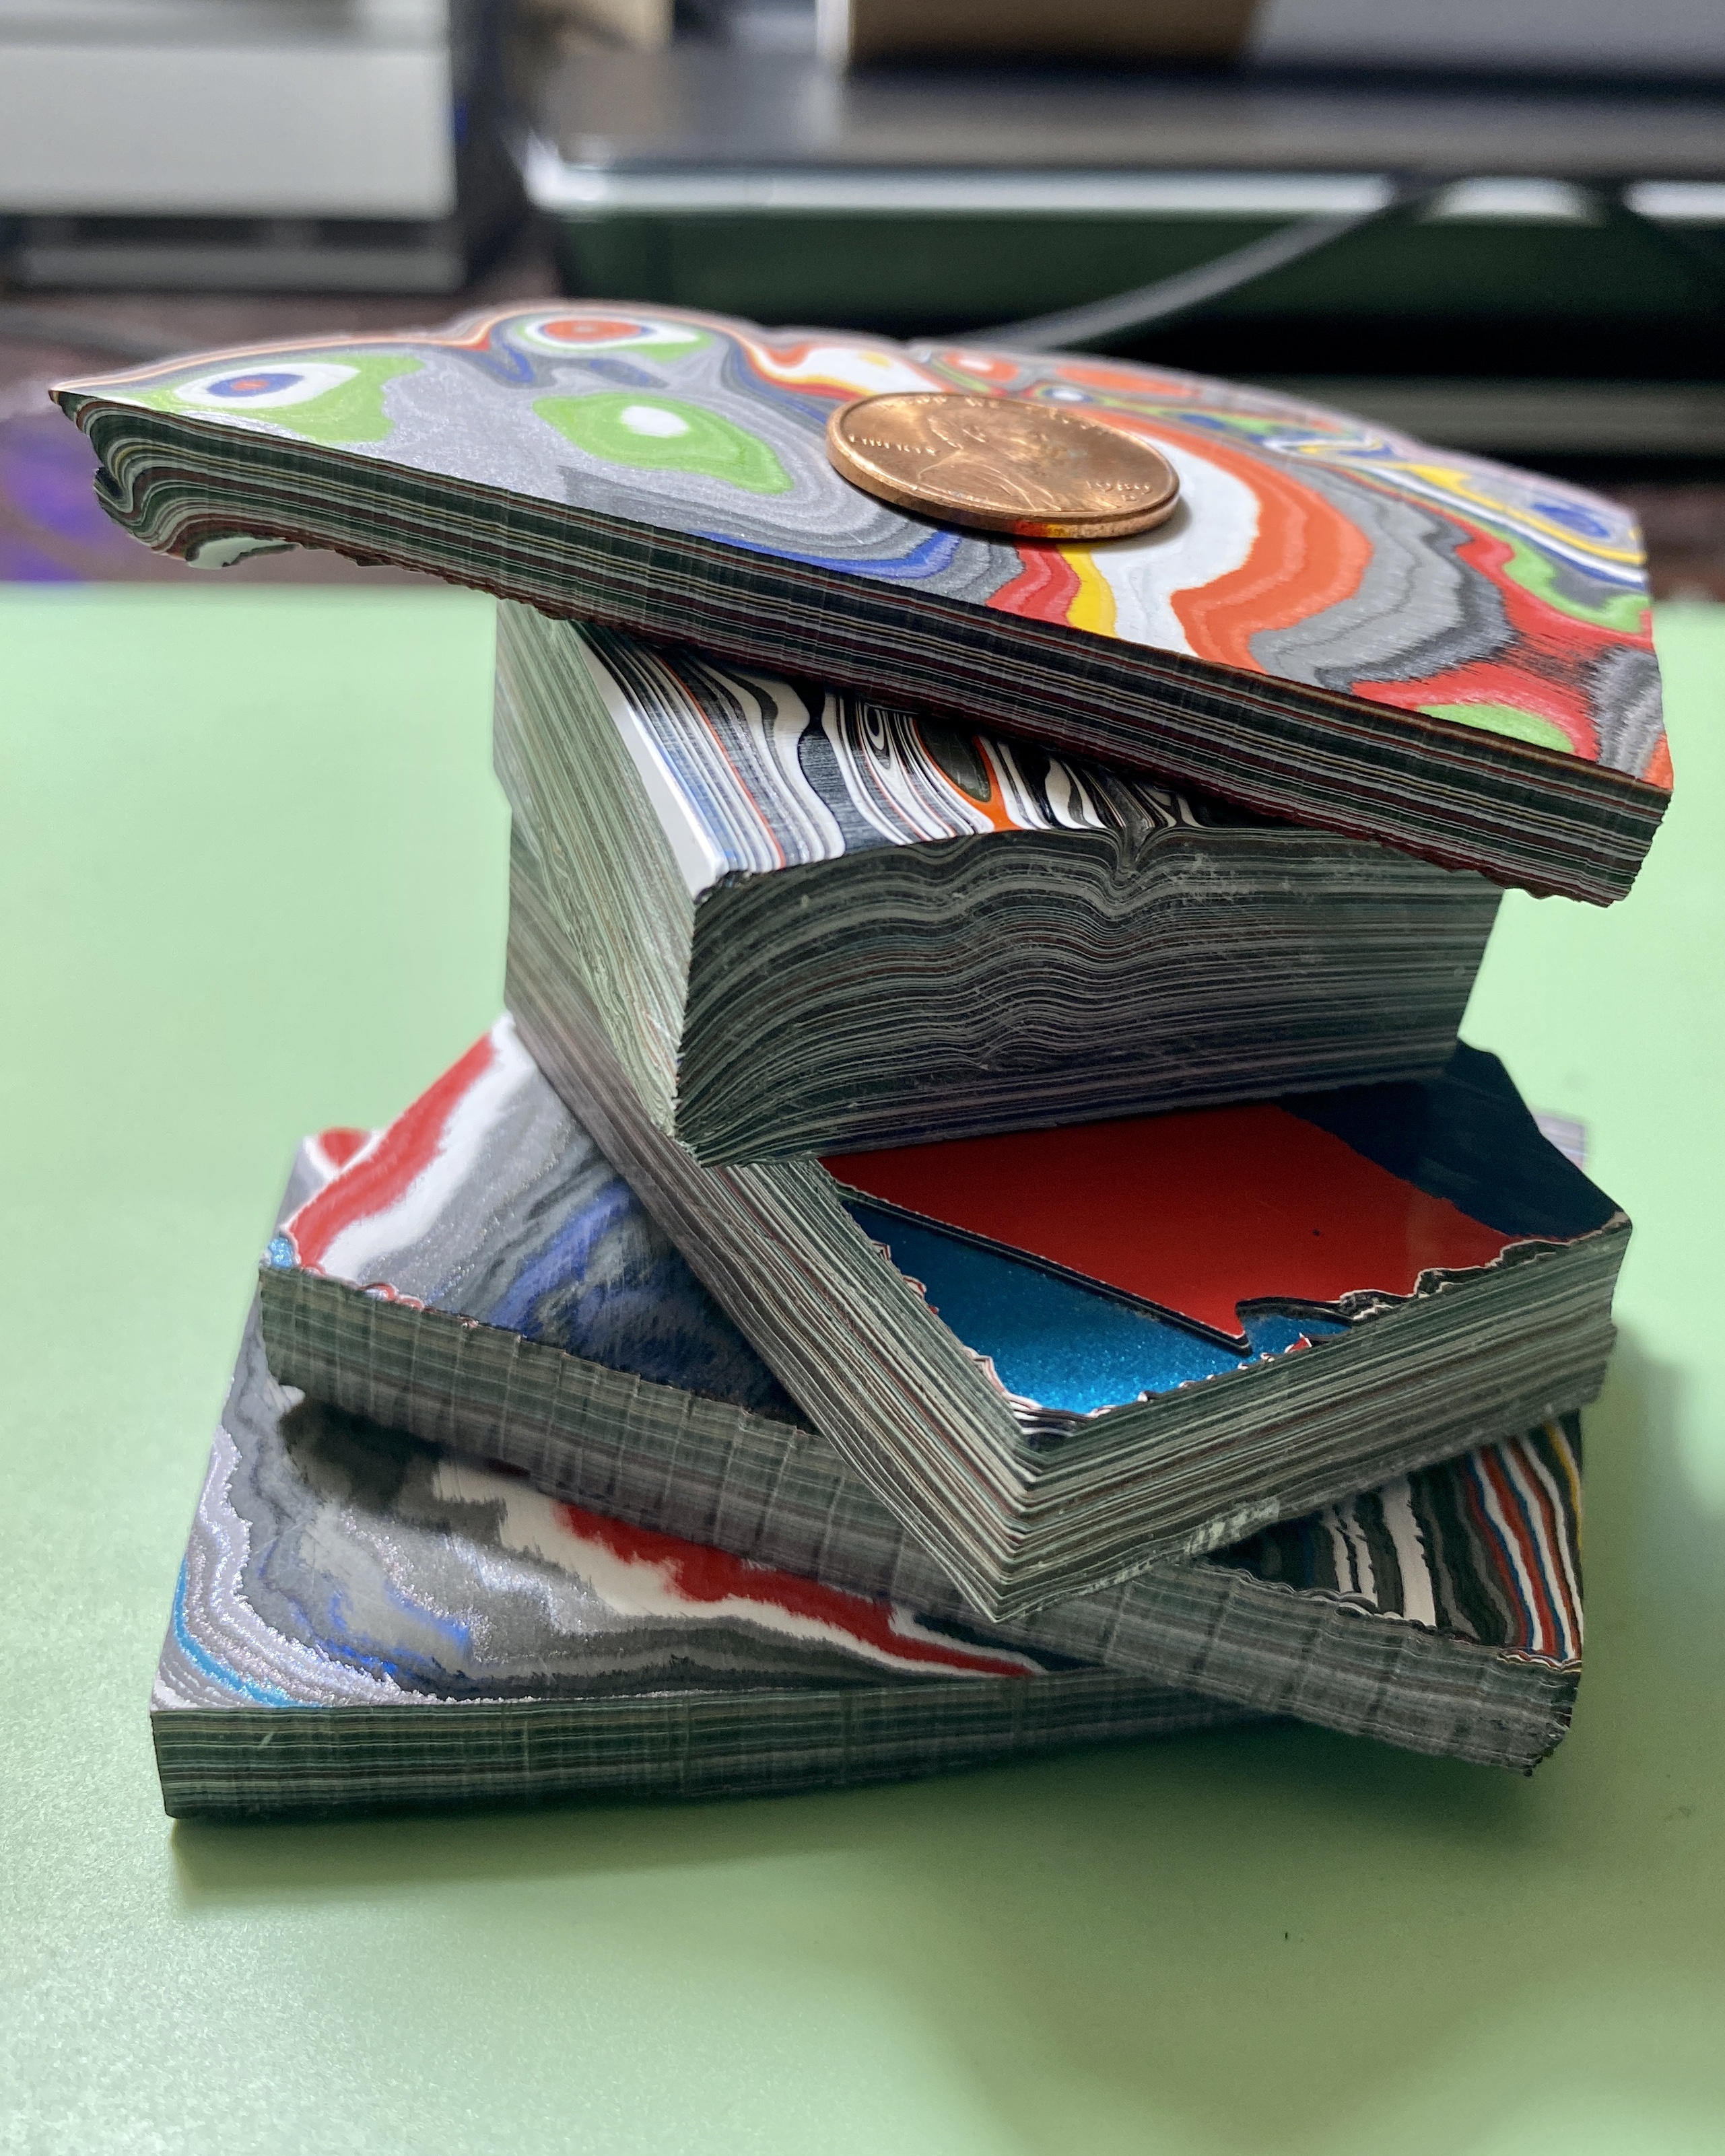
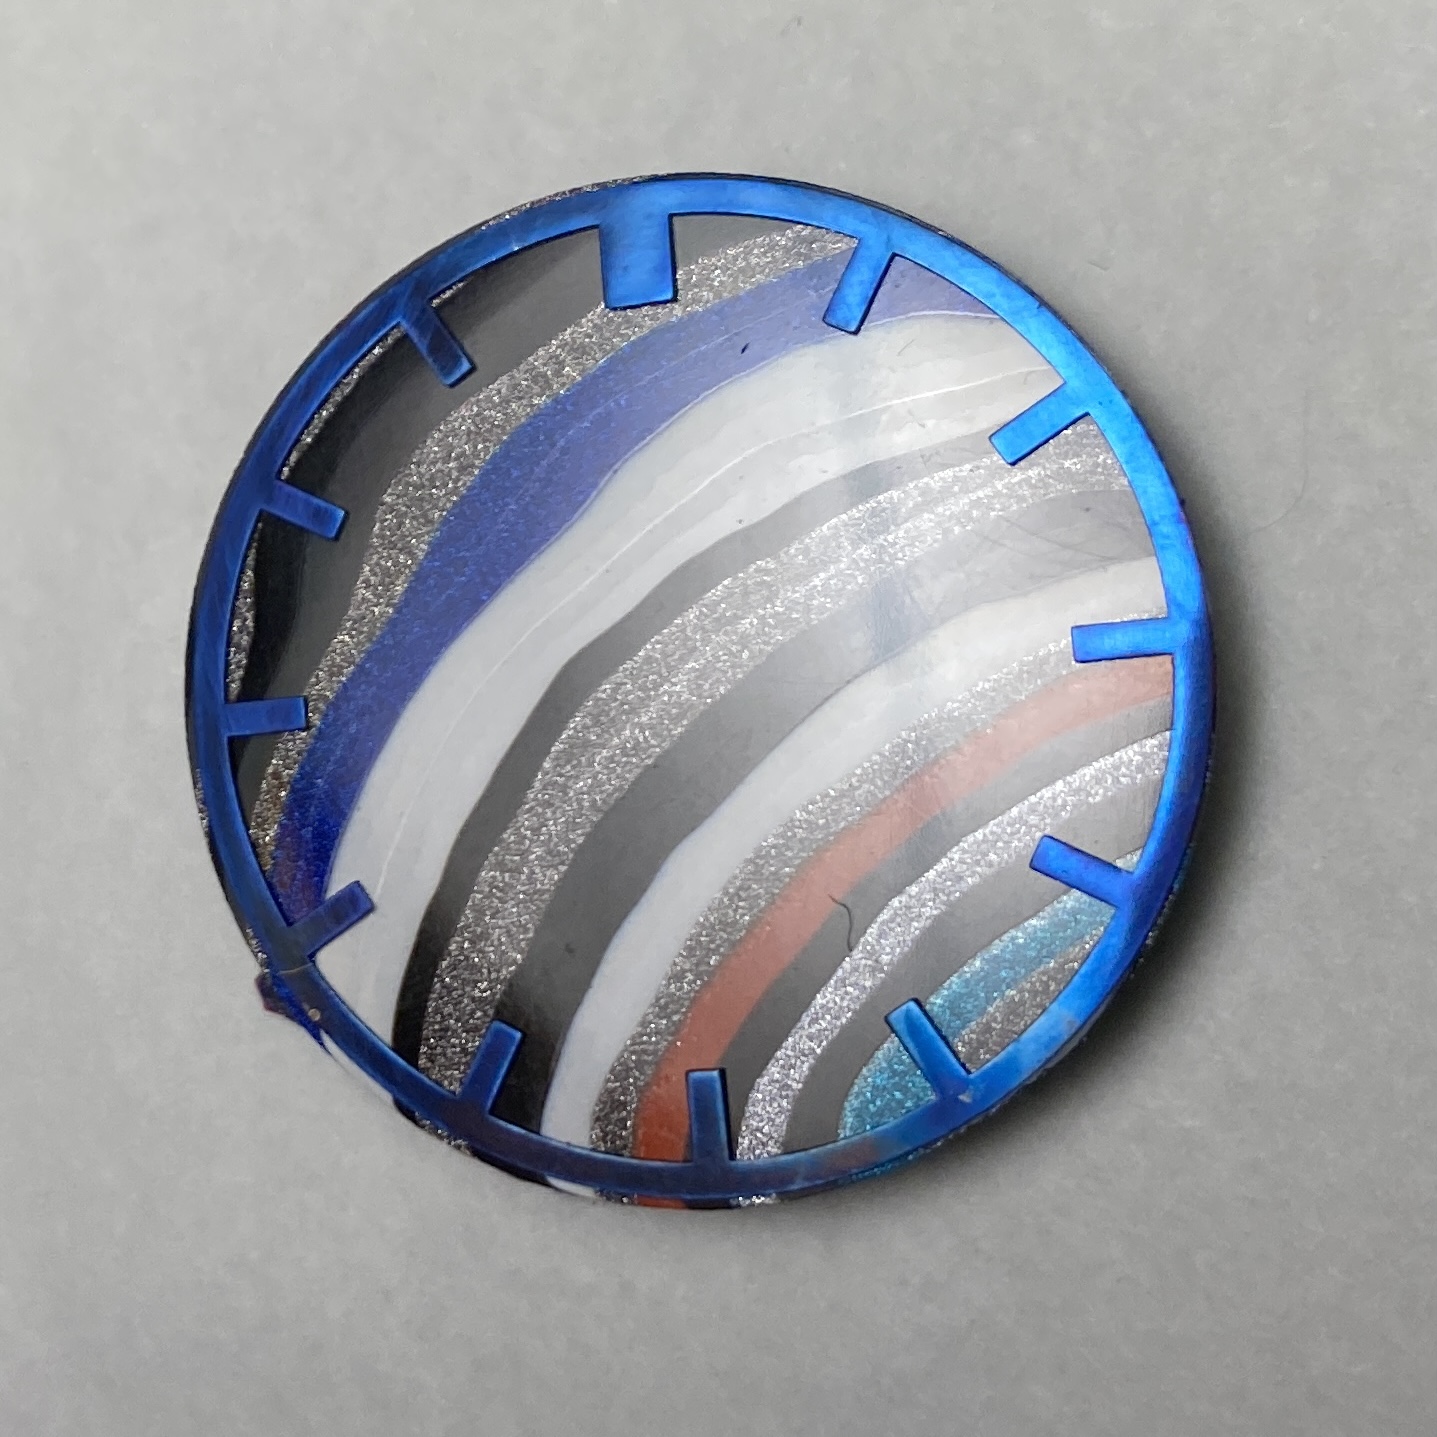
Quick update: I've cut my first series of fordite veneers, and I'm in the fun-but-difficult stage of assembling my first run of dials. Here's a scan of my first workable batch of fordite sections (ranging in thickness from 0.3mm to 0.5mm). The final patterns of these will change, as I'll be grinding them down to their final height. (This is a good thing, as some of the patterns below are pretty uninspiring. It'll also be heartbreaking, as some of my favorites below will likely shift too.) It's coming together!
 1 point
 -
Here are two pdf files for you with the names of the watch parts. 1033305402_TZIllustratedGlossary(1).pdf 704789946_TZIllustratedGlossary(2).pdf1 point
-
A quick picture of some of my polishing/bluing efforts. I’ve decided that the “satin” finish works better than a high gloss finish on the Fordite.


 1 point
 -
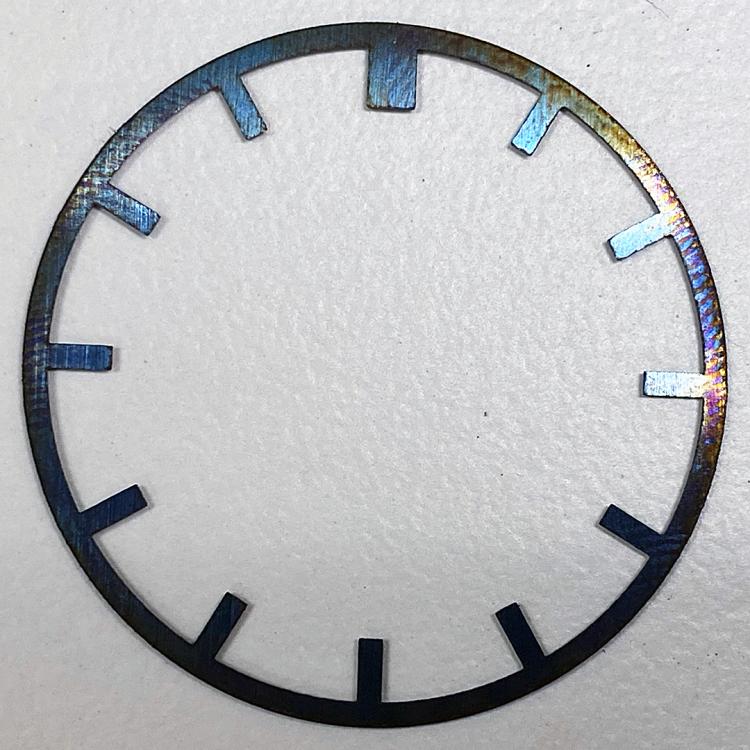
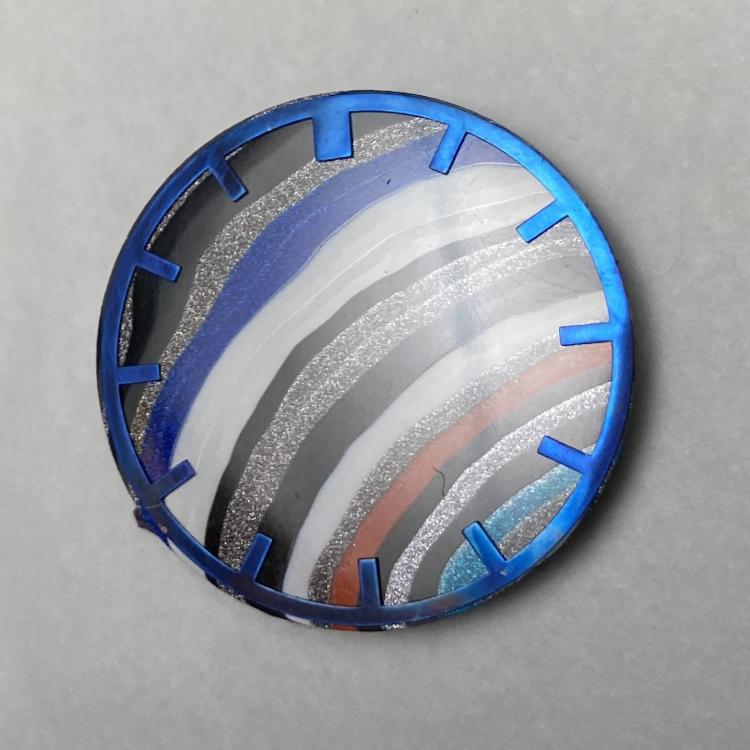
Couple of brief updates: 1. I have a "for parts and repair" Buehler IsoMet 1000 on the way. The new tool sells for $8,900. Even if repairs are pretty expensive, I'll likely be saving a ton of money. I hope. 2. My chapter rings came back from the laser cutter. I had them cut a little die for holding the rings during polishing, and it works quite well. I'm waiting on some jewelry-polishing dremel attachments to arrive, so that I can give these a great polish. I'm also waiting on the precision hot plate I ordered to arrive, so that I can blue these. Here's the die I had cut to facilitate polishing. I can get a nice finish by hand, but it's not good enough to sell (working from 400 grit sandpaper to 3000 grit). Hence the expensive Dremel jewelry-polishing attachments I've ordered. Here's a quick hand polish on a fordite core, so y'all can see what the final dial will look like. I'm likely going to offer the chapter rings as an add-on in polished, polished+blued, and maybe polished + gold plated. Here's an unpolished, straight-from-the-laser-cutter example. I'm just sharing this to get an idea of what a blued ring is going to look like.

 1 point
 -
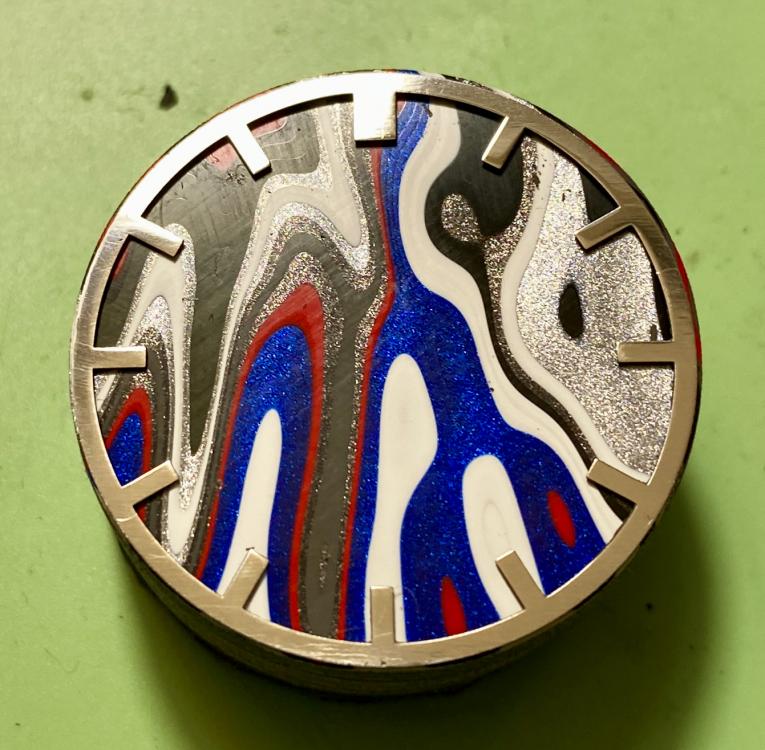
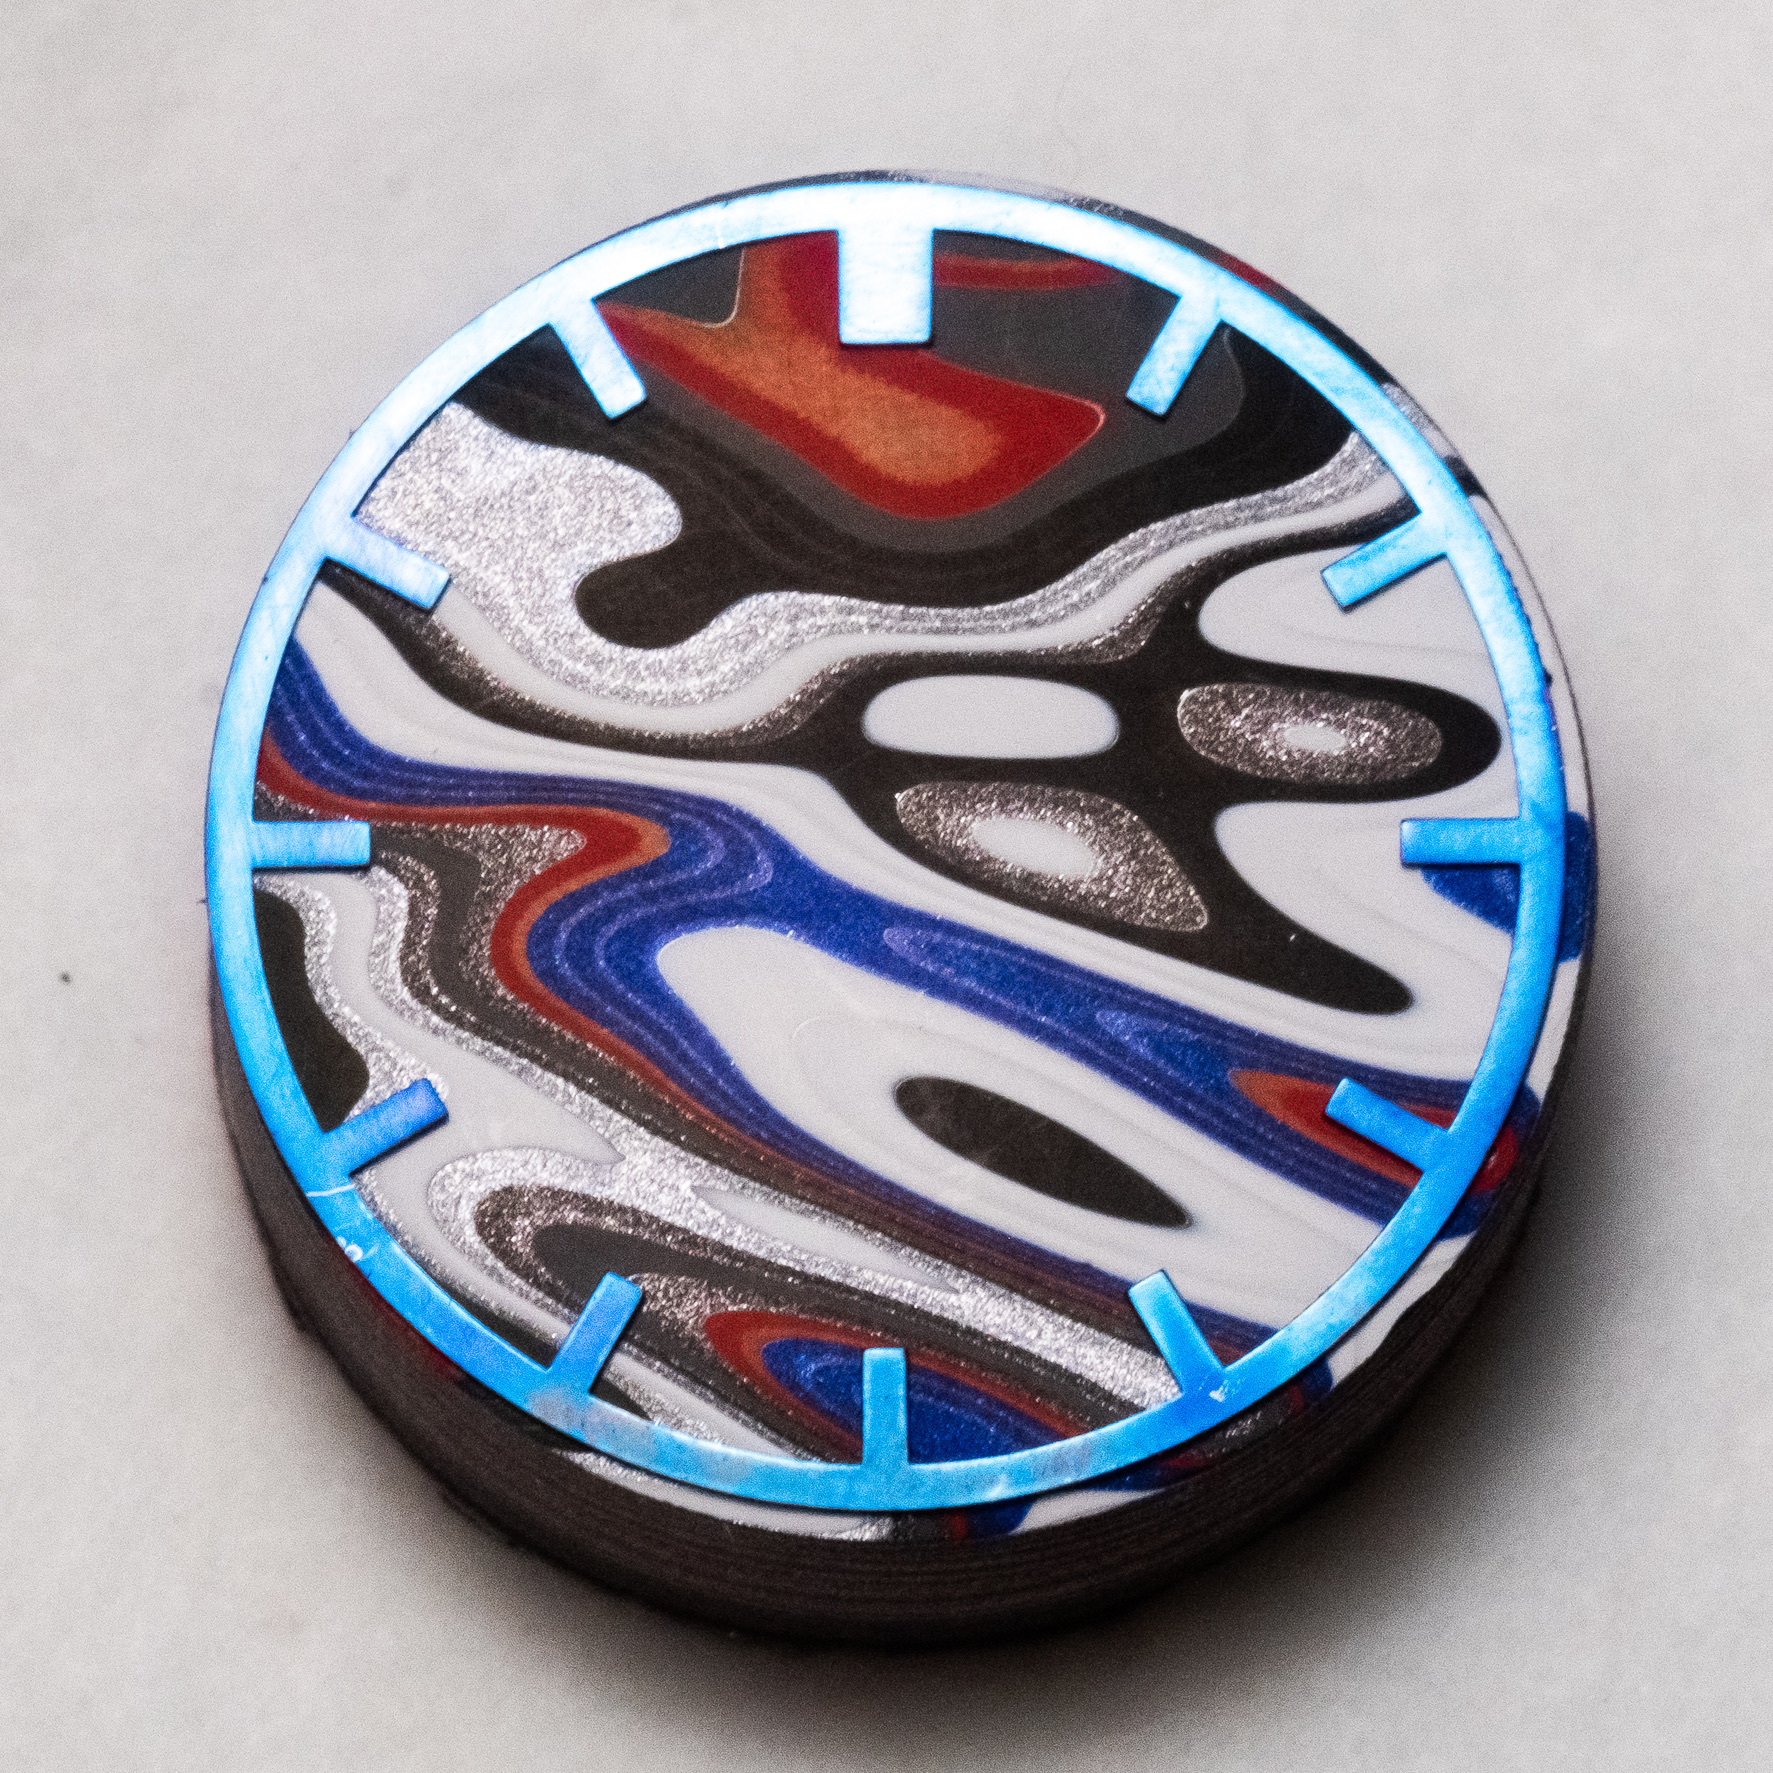
So, I've debated sharing the proof of concept picture below, as it's with an imperfect fordite dial slice and the fordite itself hadn't been polished. It's not even a particularly compelling cut of fordite; I'm going to be selecting the most visually appealing dial veneers I can. The failure rate of the section cuts is quite low (the material is really easy to work with, and stronger than it looks), so I can afford to be selective in my dials. This was one of my first attempts at a complete dial. The problem here is that I didn't start with a perfectly flat and even piece of fordite -- after gluing it to the brass dial, my total dial height ranged between 1.05 and 0.95mm. I ground this down by hand using 400 grit sandpaper, but inadvertently exposed brass on the dial underneath the fordite in doing so. Starting with a thinner, perfectly even disc of fordite will prevent this from happening in the future. The new larger saw blade should be arriving in a couple of days, and I'll do some more cutting ASAP. Here, I also glued the fordite with G-S Hypo jeweler's cement, which may have encouraged the thin parts of my fordite veneer to peel if the adhesive wasn't even in spots. My next attempts are going to use a very thin layer of 330 epoxy instead, which I've "thinned" by heating before mixing. So, this picture is not a good end product. As proof of concept and feasibility, however, I'm really proud of this picture. Total dial height here was 0.5mm, not the 0.4mm I'm shooting for. Despite that, the hands cleared everything quite well. I will say that the case I'm using does have a protruding tube -- the stock dial for this case has a very small notch cut out of it to accommodate the tube. The brass dial blanks I'm using *dont* have this cutout, so I'm going to need to file one in future attempts. It's going to take a lot more work to get everything to the point where I'm satisfied, but I'm confident that I can pull this off based on last night's progress. Also, I'm committed to sharing my techniques and process openly. So it's honest to show failures, even if they're embarrassing. Finally, I scanned another piece of fordite. I'm sharing it not because it's particularly interesting visually, but because it shows the colors embedded in the "Jeep / Dodge" fordite I'm using. I love the metallics!
.thumb.jpg.34a18c413397c74bc35e1b8743539a58.jpg)
(Large).thumb.jpg.b068ca0747bf62ec1bf8d11c583fe836.jpg) 1 point
1 point -
So, here's where I am to date on this project. I've scheduled as much time over the weekend with the Buehler precision cutter as I can get, so hopefully I'll have some additional progress photos and maybe a completed dial ready to show in the next few days! Again, I'm more than happy to answer any questions or talk about any part of this project/process. I'm committed to seeing it through -- maybe I won't be able to ramp up to a large production run, but I'm confident that, at a minimum, I'll be able to build a small number of fordite-dialed Seiko watches. [Update: I see that this thread was moved to the Walkthroughs and Techniques forum. I read that forum description as requiring a finished step-by-step process. As my work here is still in process and subject to change, I didn't think it appropriate to post in that forum. I will say that my commitment to open source information and collaboration is genuine. As I complete my first run of dials and get my manufacturing process dialed in, I'll do my best to post an updated & concise process that other folks are welcome to use. Even if my dial project is a complete failure, I've really enjoyed this research and the work I've done so far. If my work makes it easier for someone to take on a similar project, I'd be absolutely delighted. I'm hoping to be able to sell enough dials to cover my costs, not develop a proprietary process and be the *only* source of fordite-dialed watches. If someone can take my process and figure out how to do it more cheaply, I'll be happy for them and consider my work successful.] Cheers, Dan1 point
-
Not sure how you would recondition epilame. I wonder if 'reconditioned' is a mis-translation for 'decanted'. The price of epilame is high, but a large bottle (100ml) may still yield good returns when decanted into smaller (1, 2 5 ml bottles) even taking into account the containers costs. Epilame can also be purchased as a concentrate and a diluent added for end use, maybe this 're-constituted' is meaning of reconditioned, and probably more profitable a venture. The supplier on the bay is based in France so language issues may apply. Need to ensure it is the correct grade as there are fixodrops (epilame) for plastic, ruby metal etc. I also need to restock small amount, so may just give it a try as I am only a hobbyist and no 'customers' to answer to !!1 point


.thumb.jpg.91aeb08765b4f2b7f0fc10182999bcc2.jpg)


.jpg.f9e5ca9178adbfbd0f1d132f207b1659.jpg)
(Large).jpg.809688ec2170ed6ed2fc1c64a9a56e32.jpg)
