Leaderboard


Popular Content
Showing content with the highest reputation on 03/17/20 in all areas
-
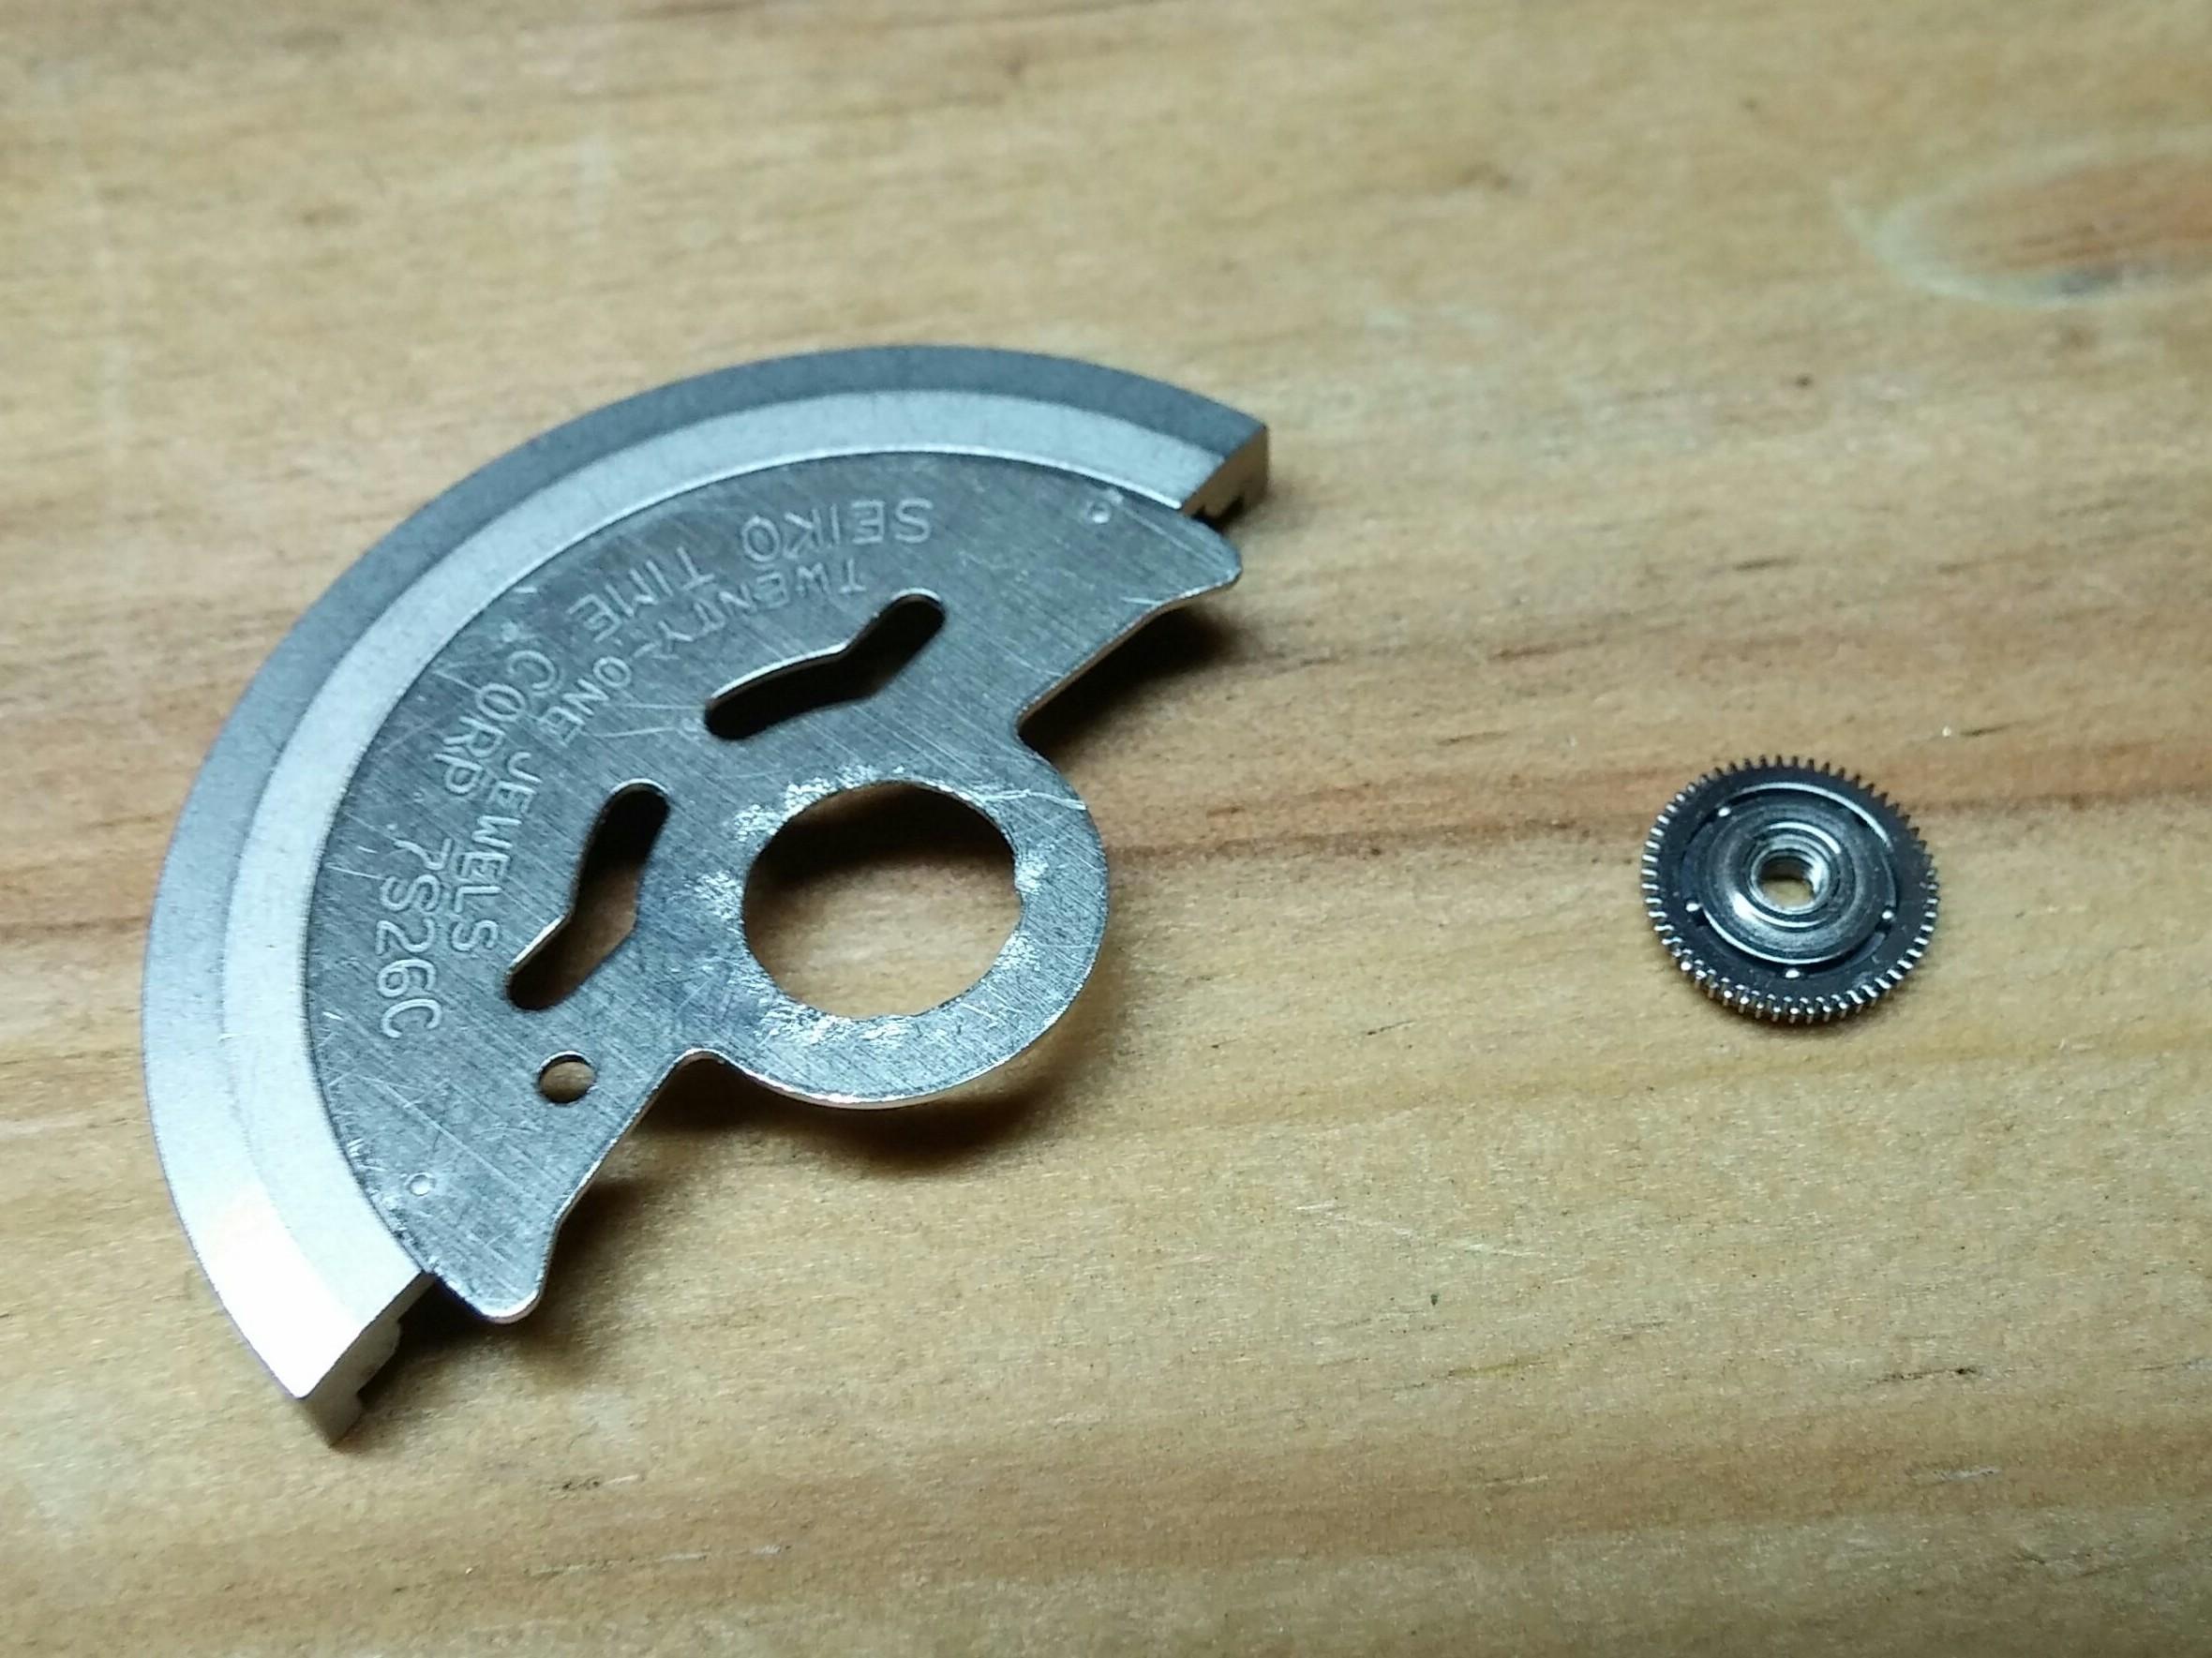
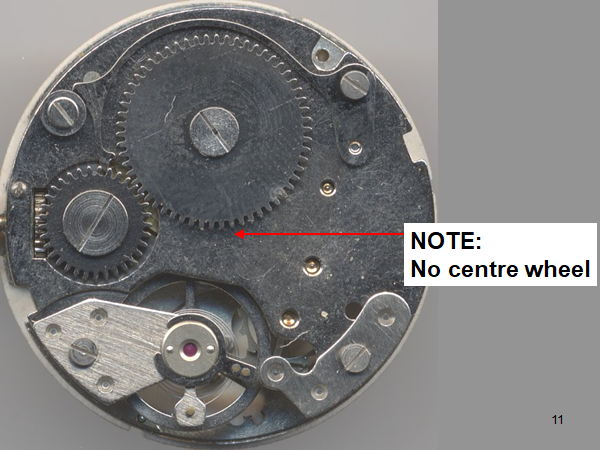
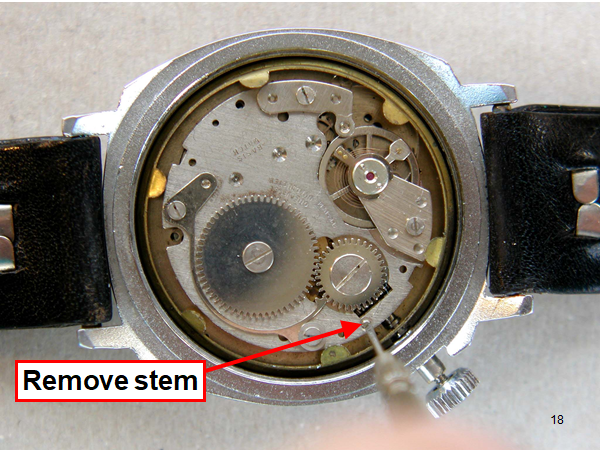
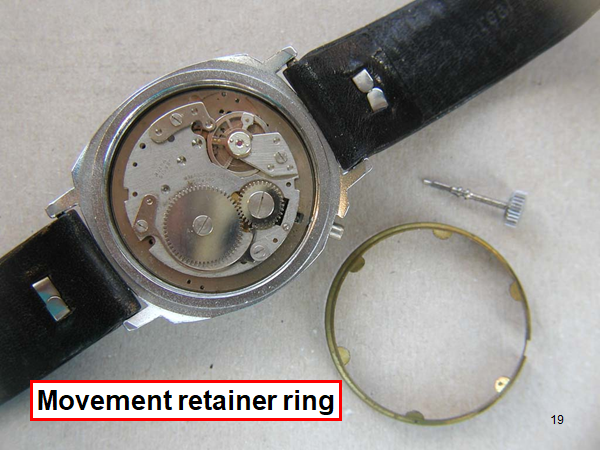
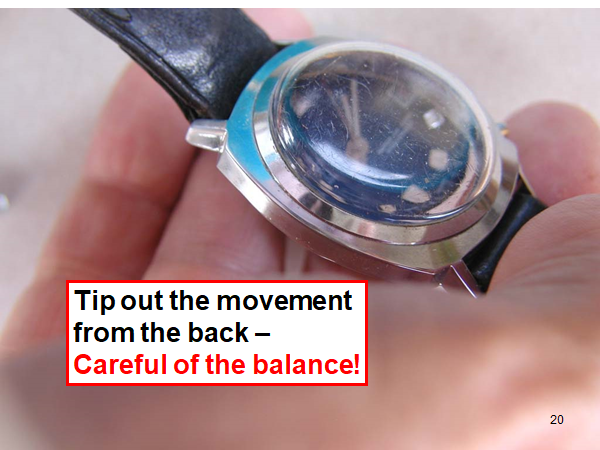
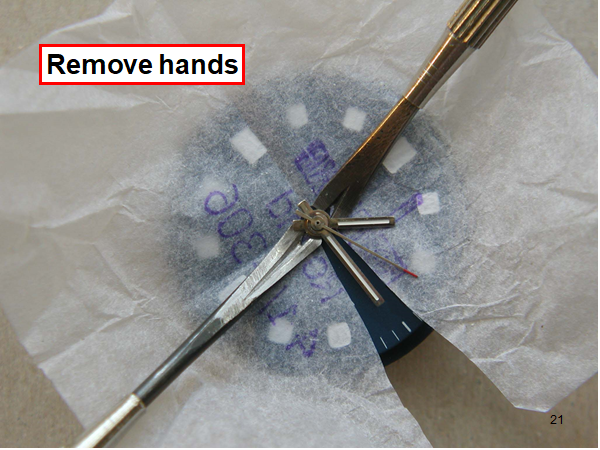
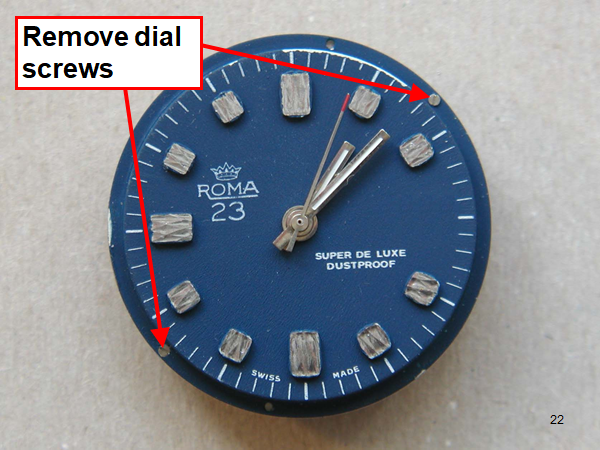
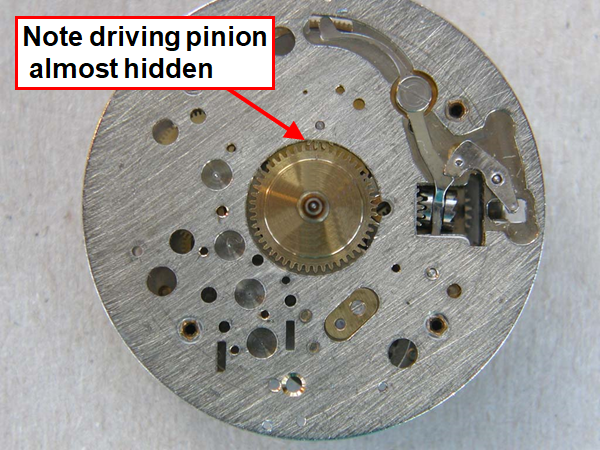
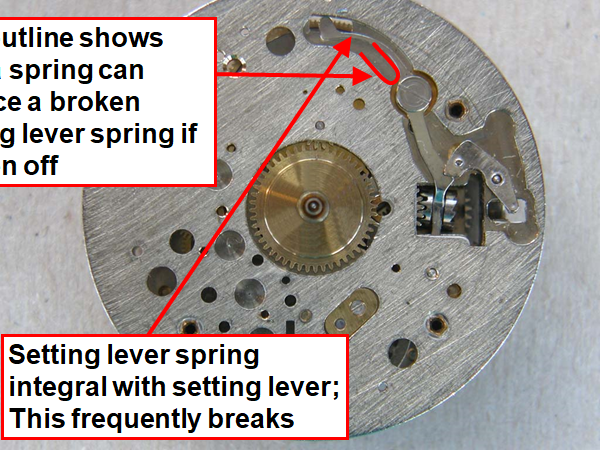
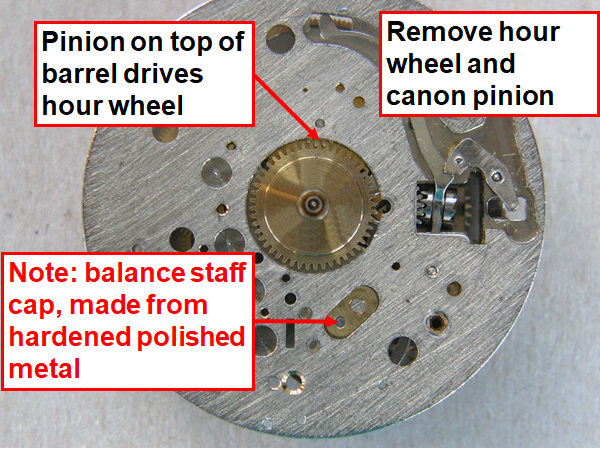
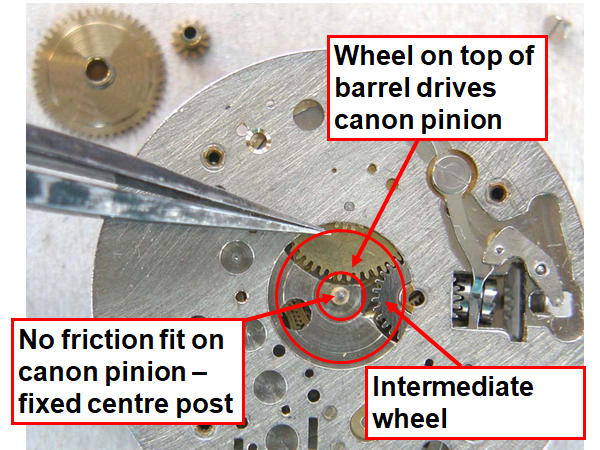
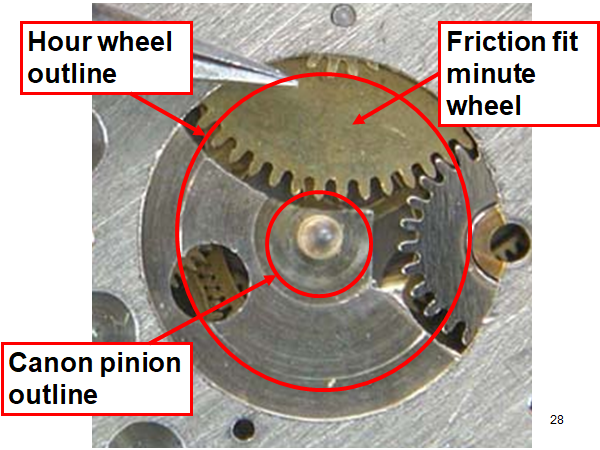
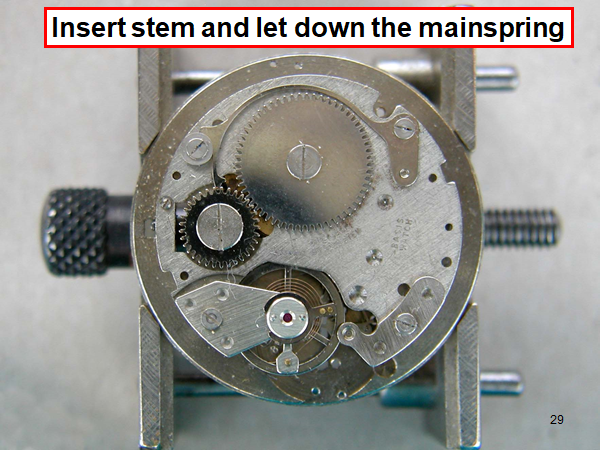
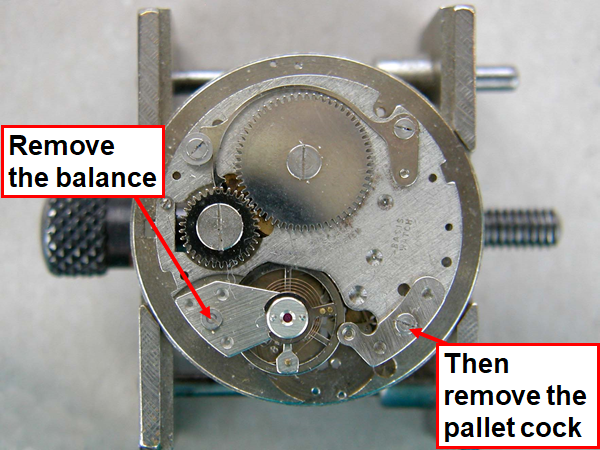
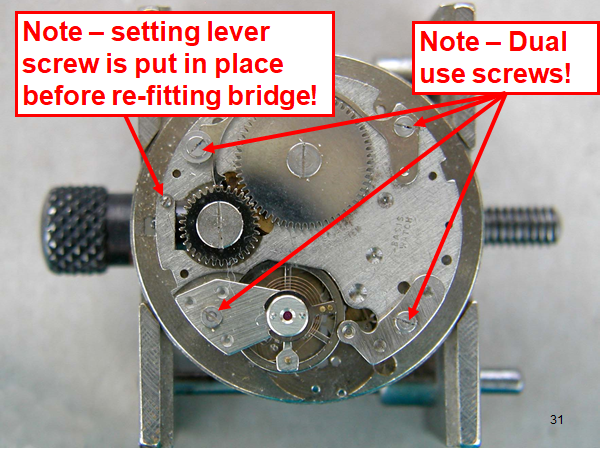
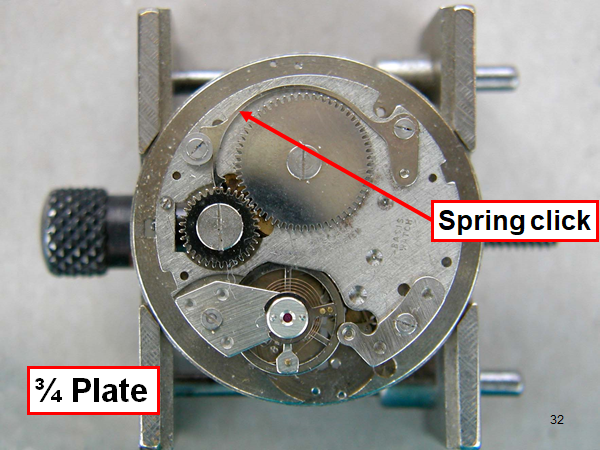
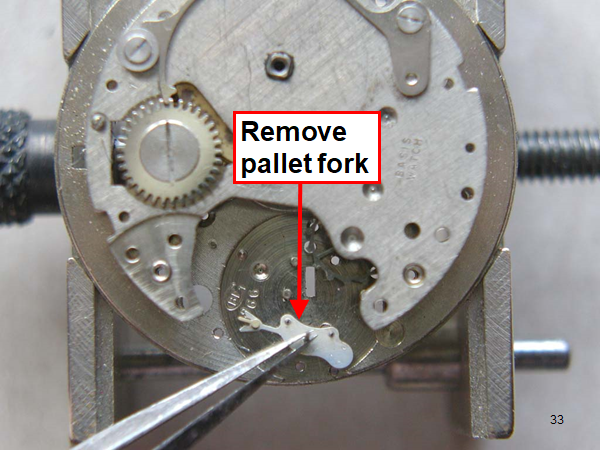
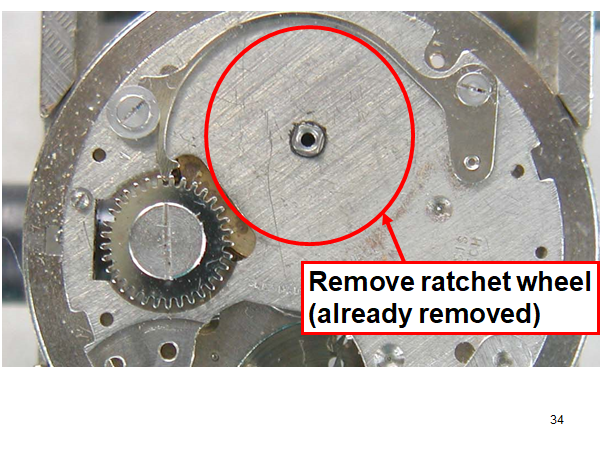
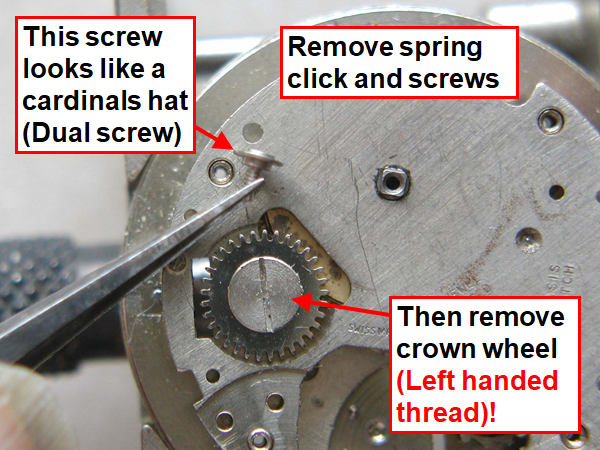
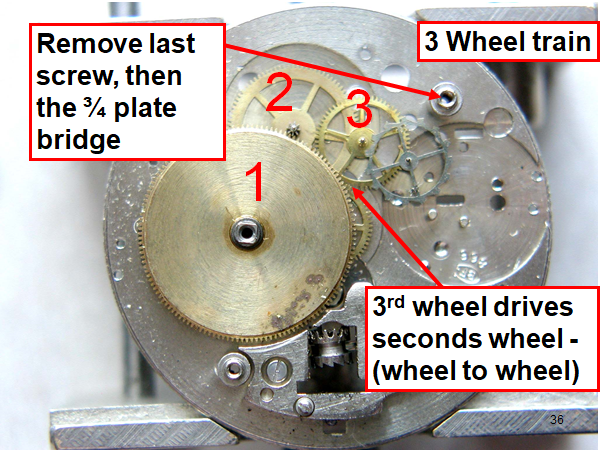
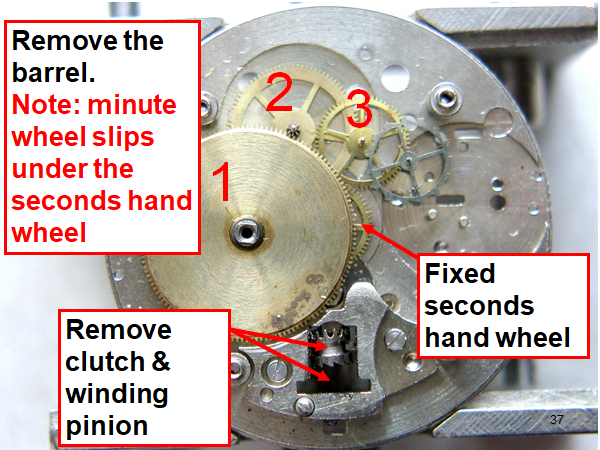
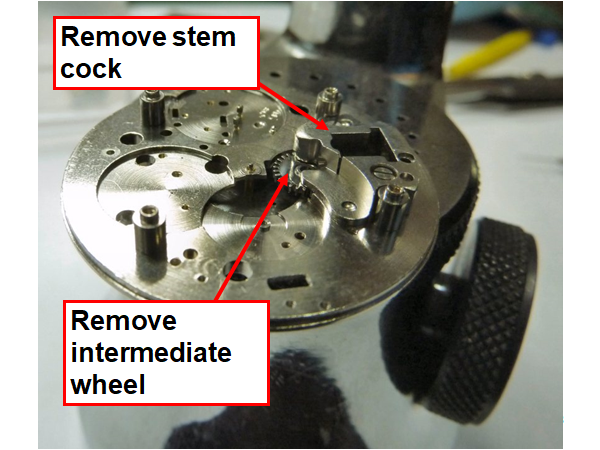
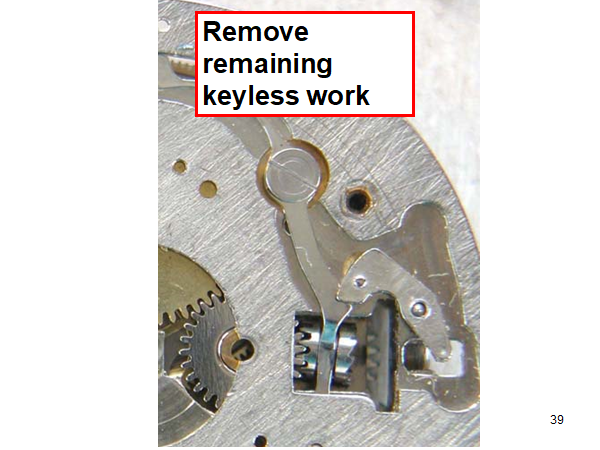
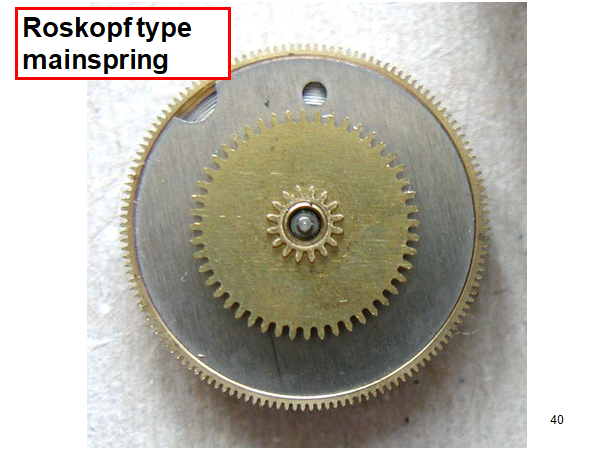
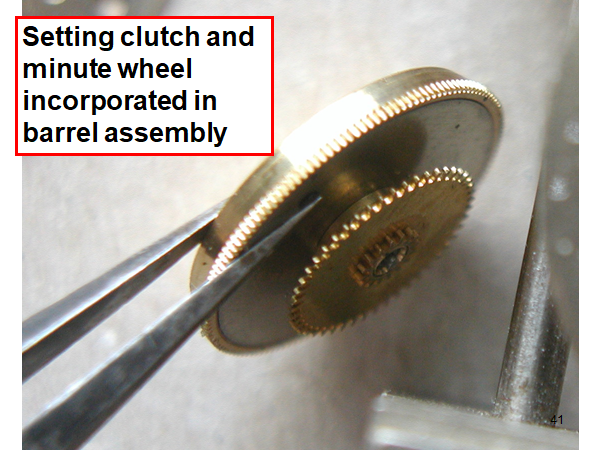
Hi, I teach watchmaking to complete beginners at Epping Forest Horology Centre, close to Epping and this is one of the lessons on the BFG 866. I wanted to show my class a classic pin pallet (Roskopf) movement and how to service it, as many watchmakers won't touch these watches as they hold no monetary value. Turn the setting lever screw 1 to 1 and a half turns to release the winding stem A piece of watch paper or small plastic jiffy bag to protect the dial, whilst removing the hands The driving pinion is part of the friction fitted minute wheel on top of the barrel. This work in a similar way to a friction fitted canon pinion to set the watch hands Remove the keyless work: setting lever, held in place by the setting lever screw, screwed from the other side of the mainplate, then the yoke, which sits on top of the clutch (castle) and also the winding pinion. I have three other lessons on this movement that cover bringing the watch 'into beat' as well as taking apart the friction fitted minute wheel from the barrel, lubricating and staking back on to achieve the correct friction setting and finally how to remove the centre seconds wheel safely and refit using a staking set. Many people leave the friction fitted minute wheel on top of the barrel, not realising the amount of old grease that can't be cleaned out from it, as well as not removing the wheel of the centre seconds arbor and again not cleaning out the pipe which has old grease inside. Hope you enjoyed the tutorial? More to come....
 2 points
 -
20 seconds of scotch brite, passed in one direction only.2 points
-
I've got a copy as Nickelsilver says its written as a text book for a classroom. If you want the formula for just about anything in Horology this book has it. Likewise if you want the theory of how something works its probably in this book. If you want a book that will teach you how to make a balance staff, replace a cracked jewel or any other 'hands on' technique this is not the book you want. If you are a hands on type of person I would not recommend this book, if you like to know the underlying theory on why things work than this is the book. If you have limited money and are looking for books to teach you how to carry out complicated repairs look for Archie Perkins's books. If you want to know the linear coefficients of expansion of different materials along with the formula to work out the length of a pendulum clock and the effect of temperature on the daily rate so you can make yourself a super efficient clock this is the book for you.2 points
-
The secret of not having the whole movement, fall apart on these M40 derivatives, when removing the balance, is first when you remove the cover plate over the balance assembly, is to replace the fixing screw and re-tighten BEFORE undoing the two similar screws that hold the balance assembly in place. Also be aware that the screw that holds the cover plate in place, while looking the same as the other two screws is slightly shorter and can be recognised by a slight chamfer on the head. If this screw gets mixed up with the other two the longer screw will interfere with the day wheel on watches with day/date complications....I stripped and rebuilt a Dynabeat watch three times (which came with a jammed, non operative day/date change), before I realised that the wrong screw had previously been fitted and that was what was stopping the day/date operation....2 points
-
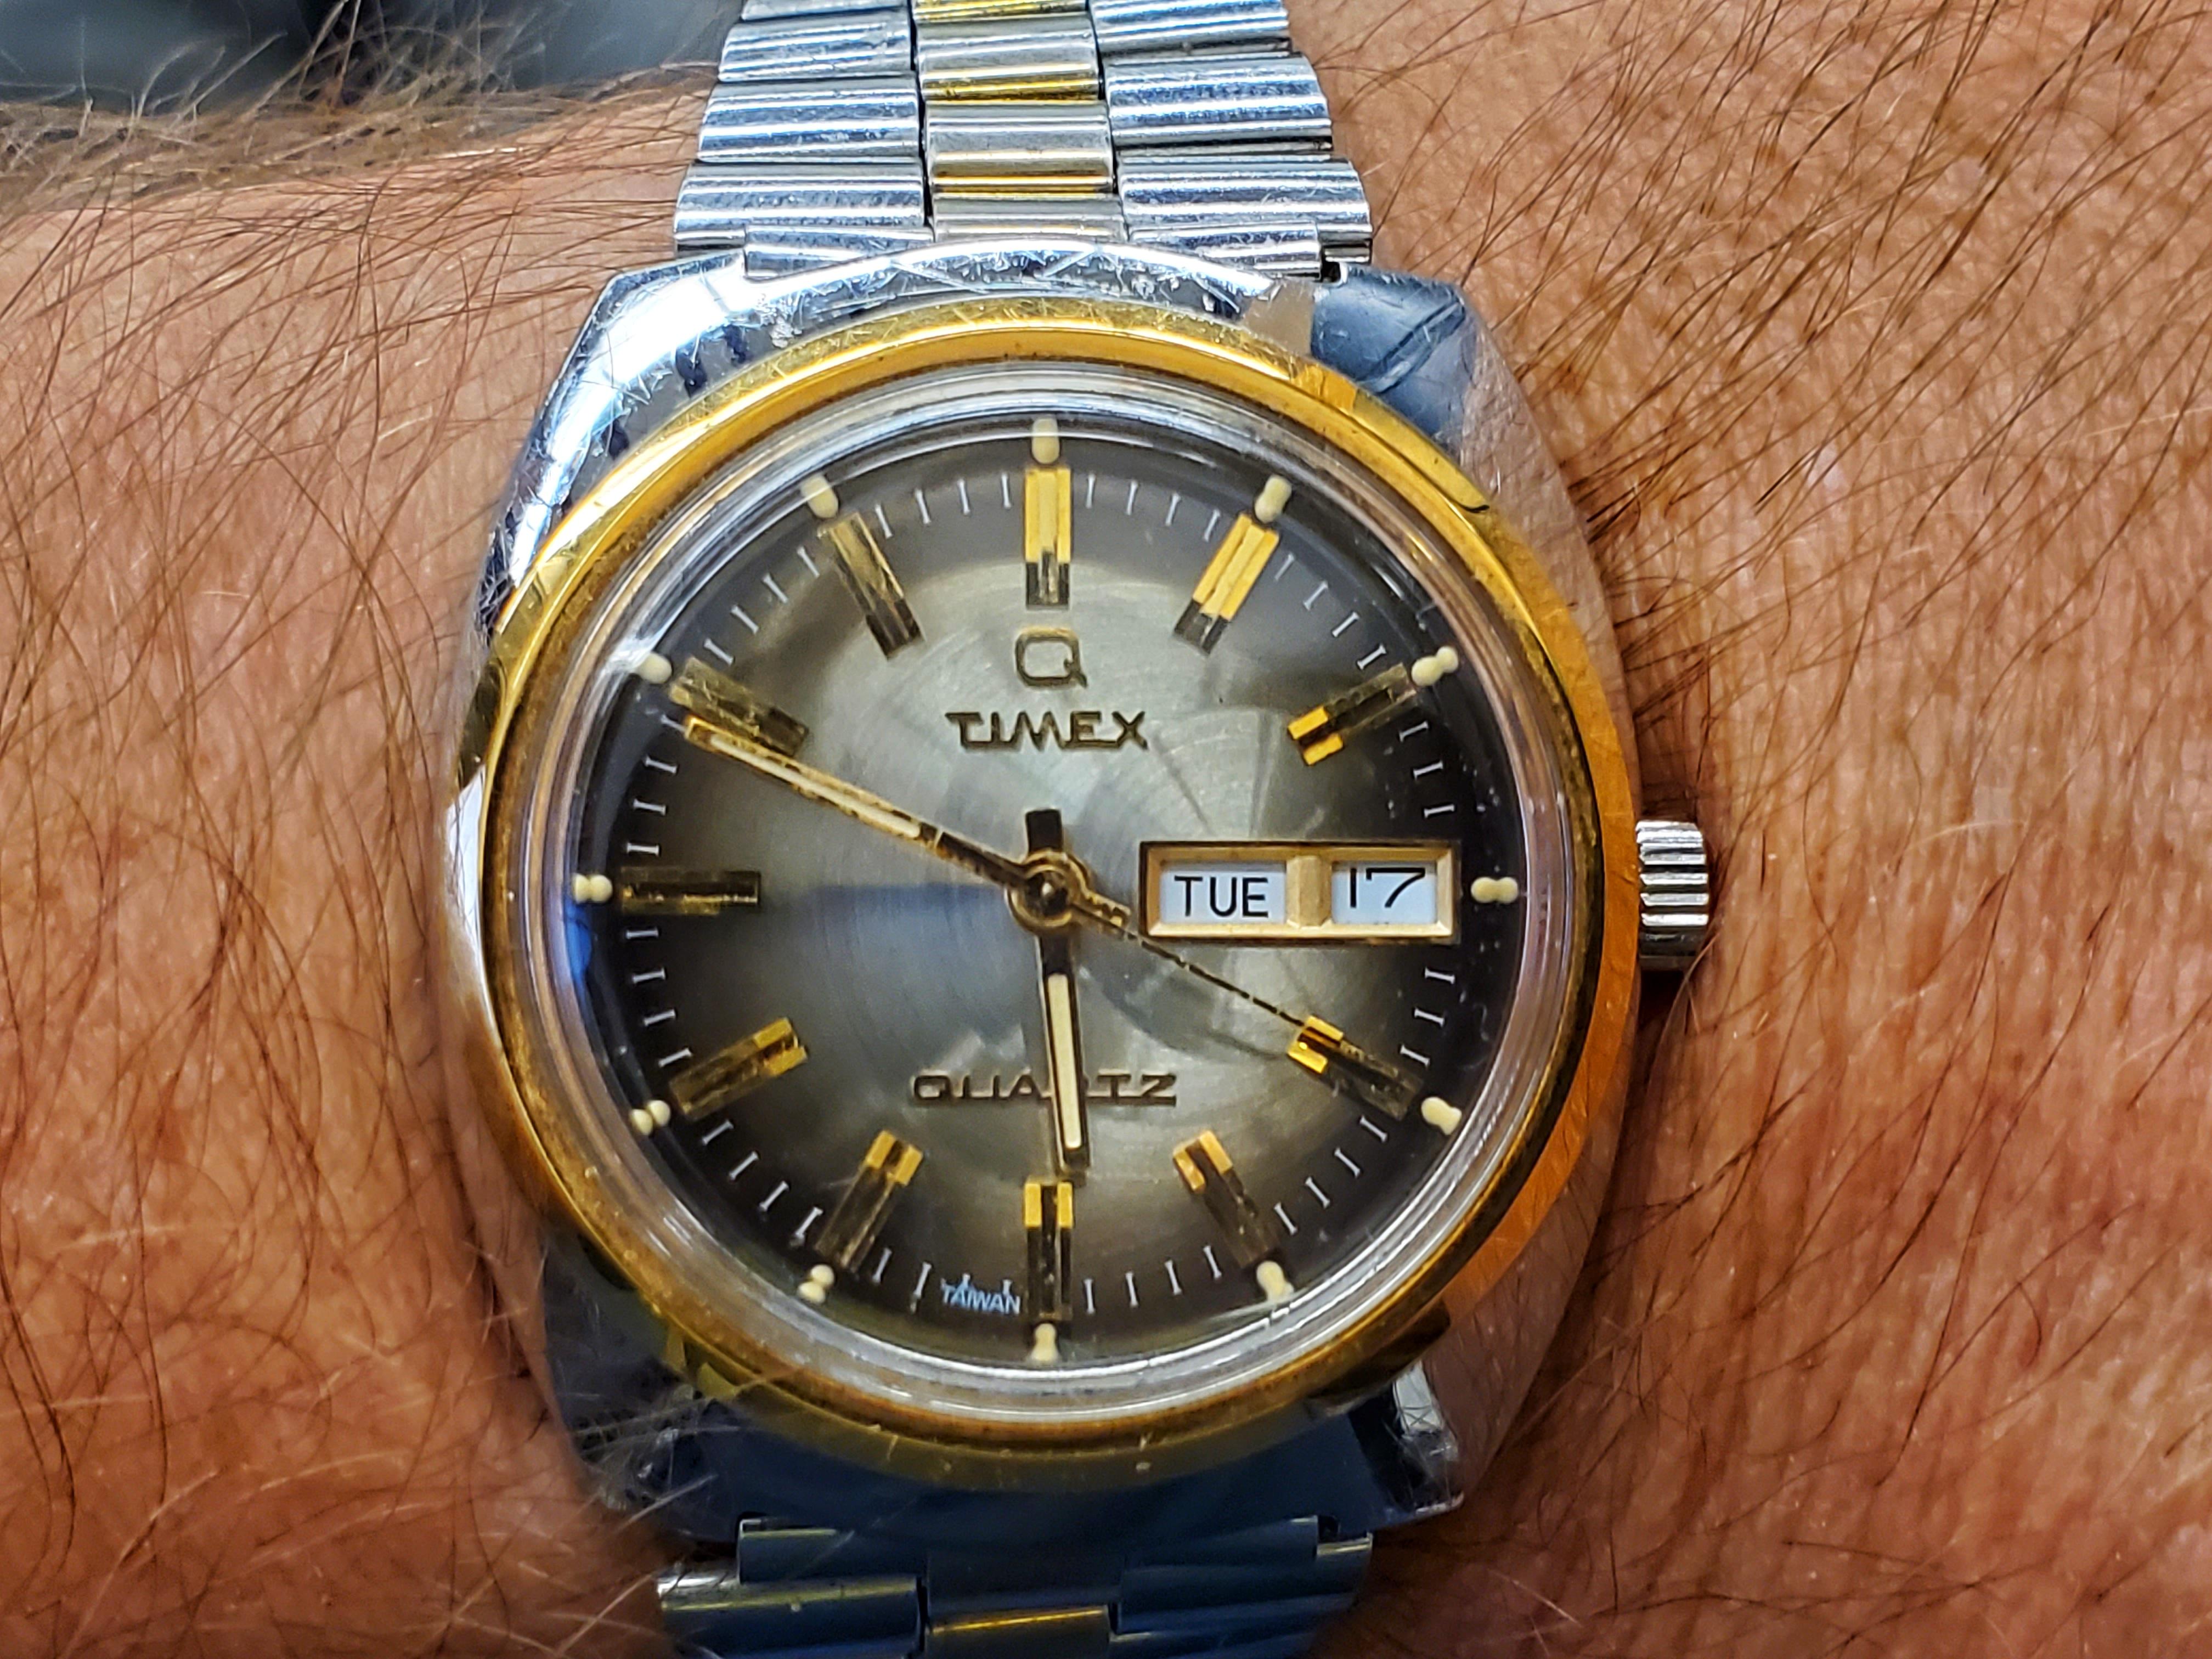
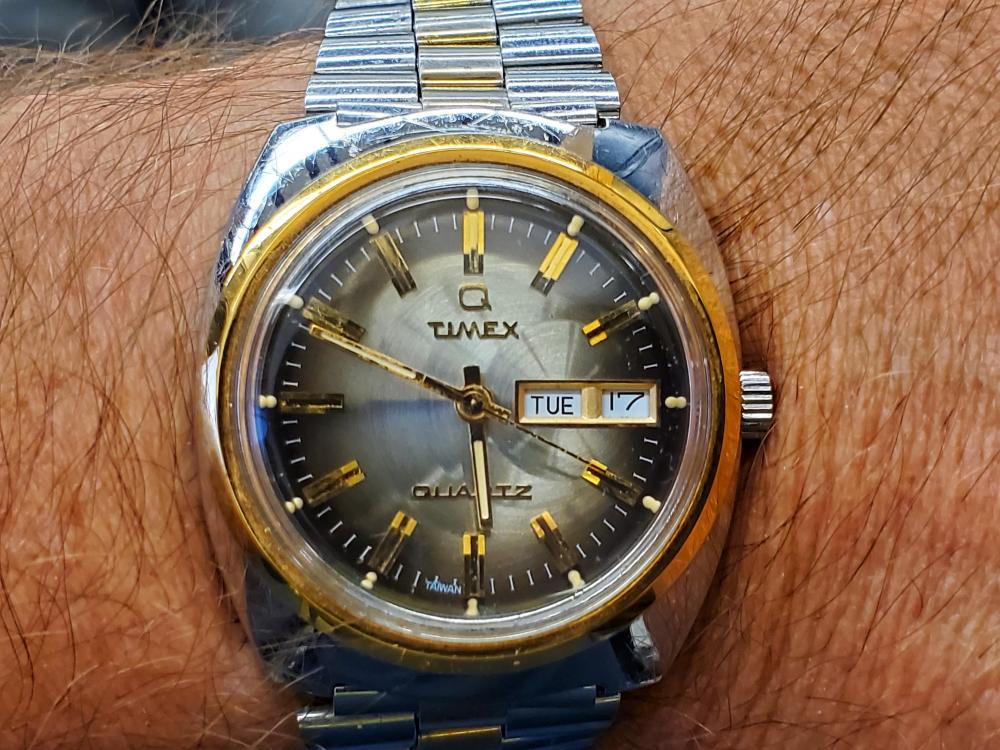
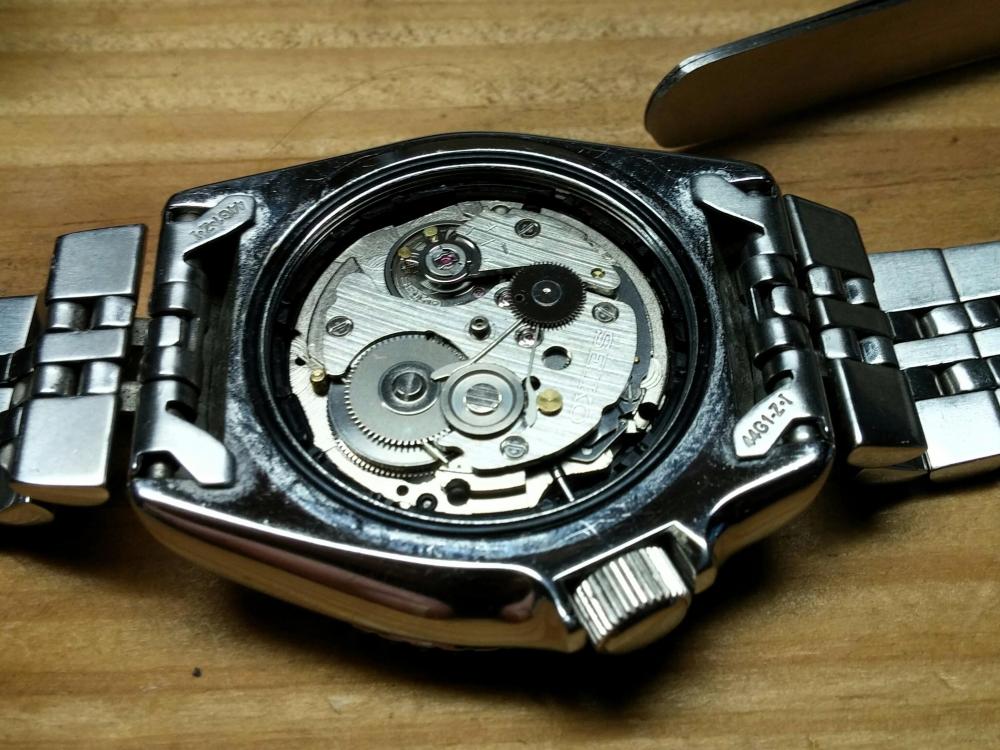
Today I'm wearing my newly acquired 1978 Timex Quartz Watch. Visually it is the brother to the Falcon Eye with many similar styling cues. As with every new watch I acquire that has a balance, I gave this one a shake to see if the balance would swing. After several attempts, there was zero movement. This was definitely troubling because of the unknown element. When I got the watch open, I discovered the balance was overbanked. I tried fiddling with what I could gently reach with a screw driver to coax it back into the correct position, but to no avail. I ended up having to disassemble the balance and set everything in the correct orientation. After trying to place the balance back and losing the battle with the permanent magnet I ended up pulling the hands and removing the magnet, dial and date assembly and assembling the balance that way. After all of that I placed a battery in and off it went, Running like a champ! I polished the crystal this morning and it is currently on proud display.
 2 points
 -
It's very normal; nearly every Vostok movement does that...... it's called the "poor-mans"-hack. Nothing to worry about and certainly not a reason to send it back or "fix"-it. These are great watches and unbeatable with regards to Value/price ratio. In fact they beat nearly all, if not all Swiss watches as for sophistication & design for the price. Just have a look at this link; what a fantastic piece of engineering for slightly over $40 !! ; https://forums.watchuseek.com/f54/vostok-2415-2416-self-winding-function-reversing-wheels-revised-5134701.html2 points
-
Yard sale. $1.
 2 points
 -
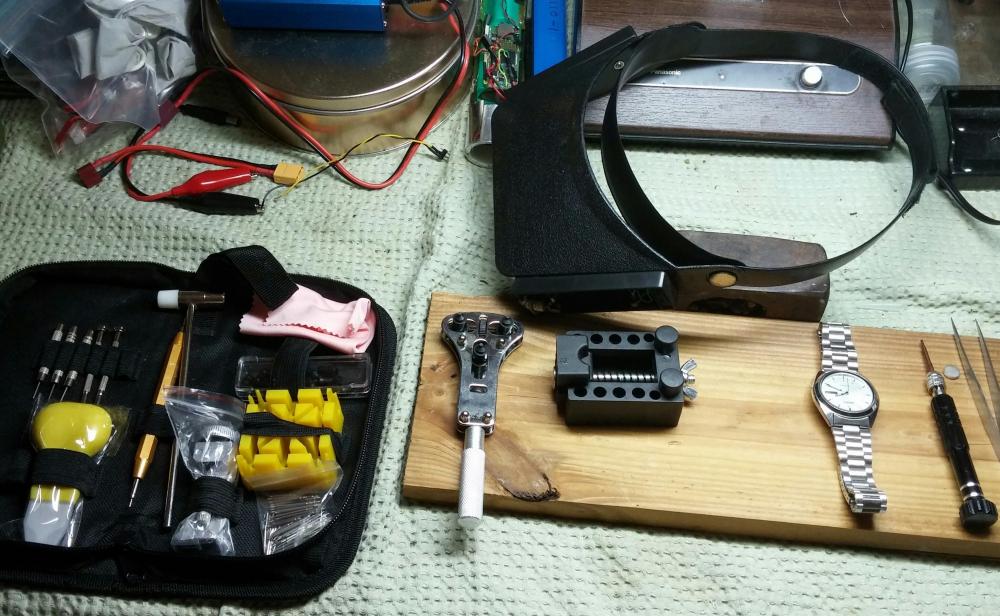
I never had a tidy bench. I had bits and pieces all over the place. The more mess I had the happier I would be. People would often say to me how can you find anything in that mess.2 points
-
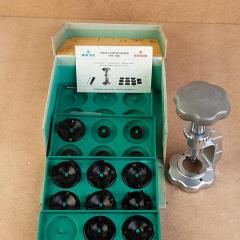
Hi Cecking through my workshop laptop I came across these PDFs and thought they might be useful to the members new and old alike. I have several more and will post later. Cheers Witschi Training Course.pdf TZIllustratedGlossary (1).pdf handbook_of_watch_and_clock_repairsa.pdf Test and measuring technology mechanical watches.pdf1 point
-
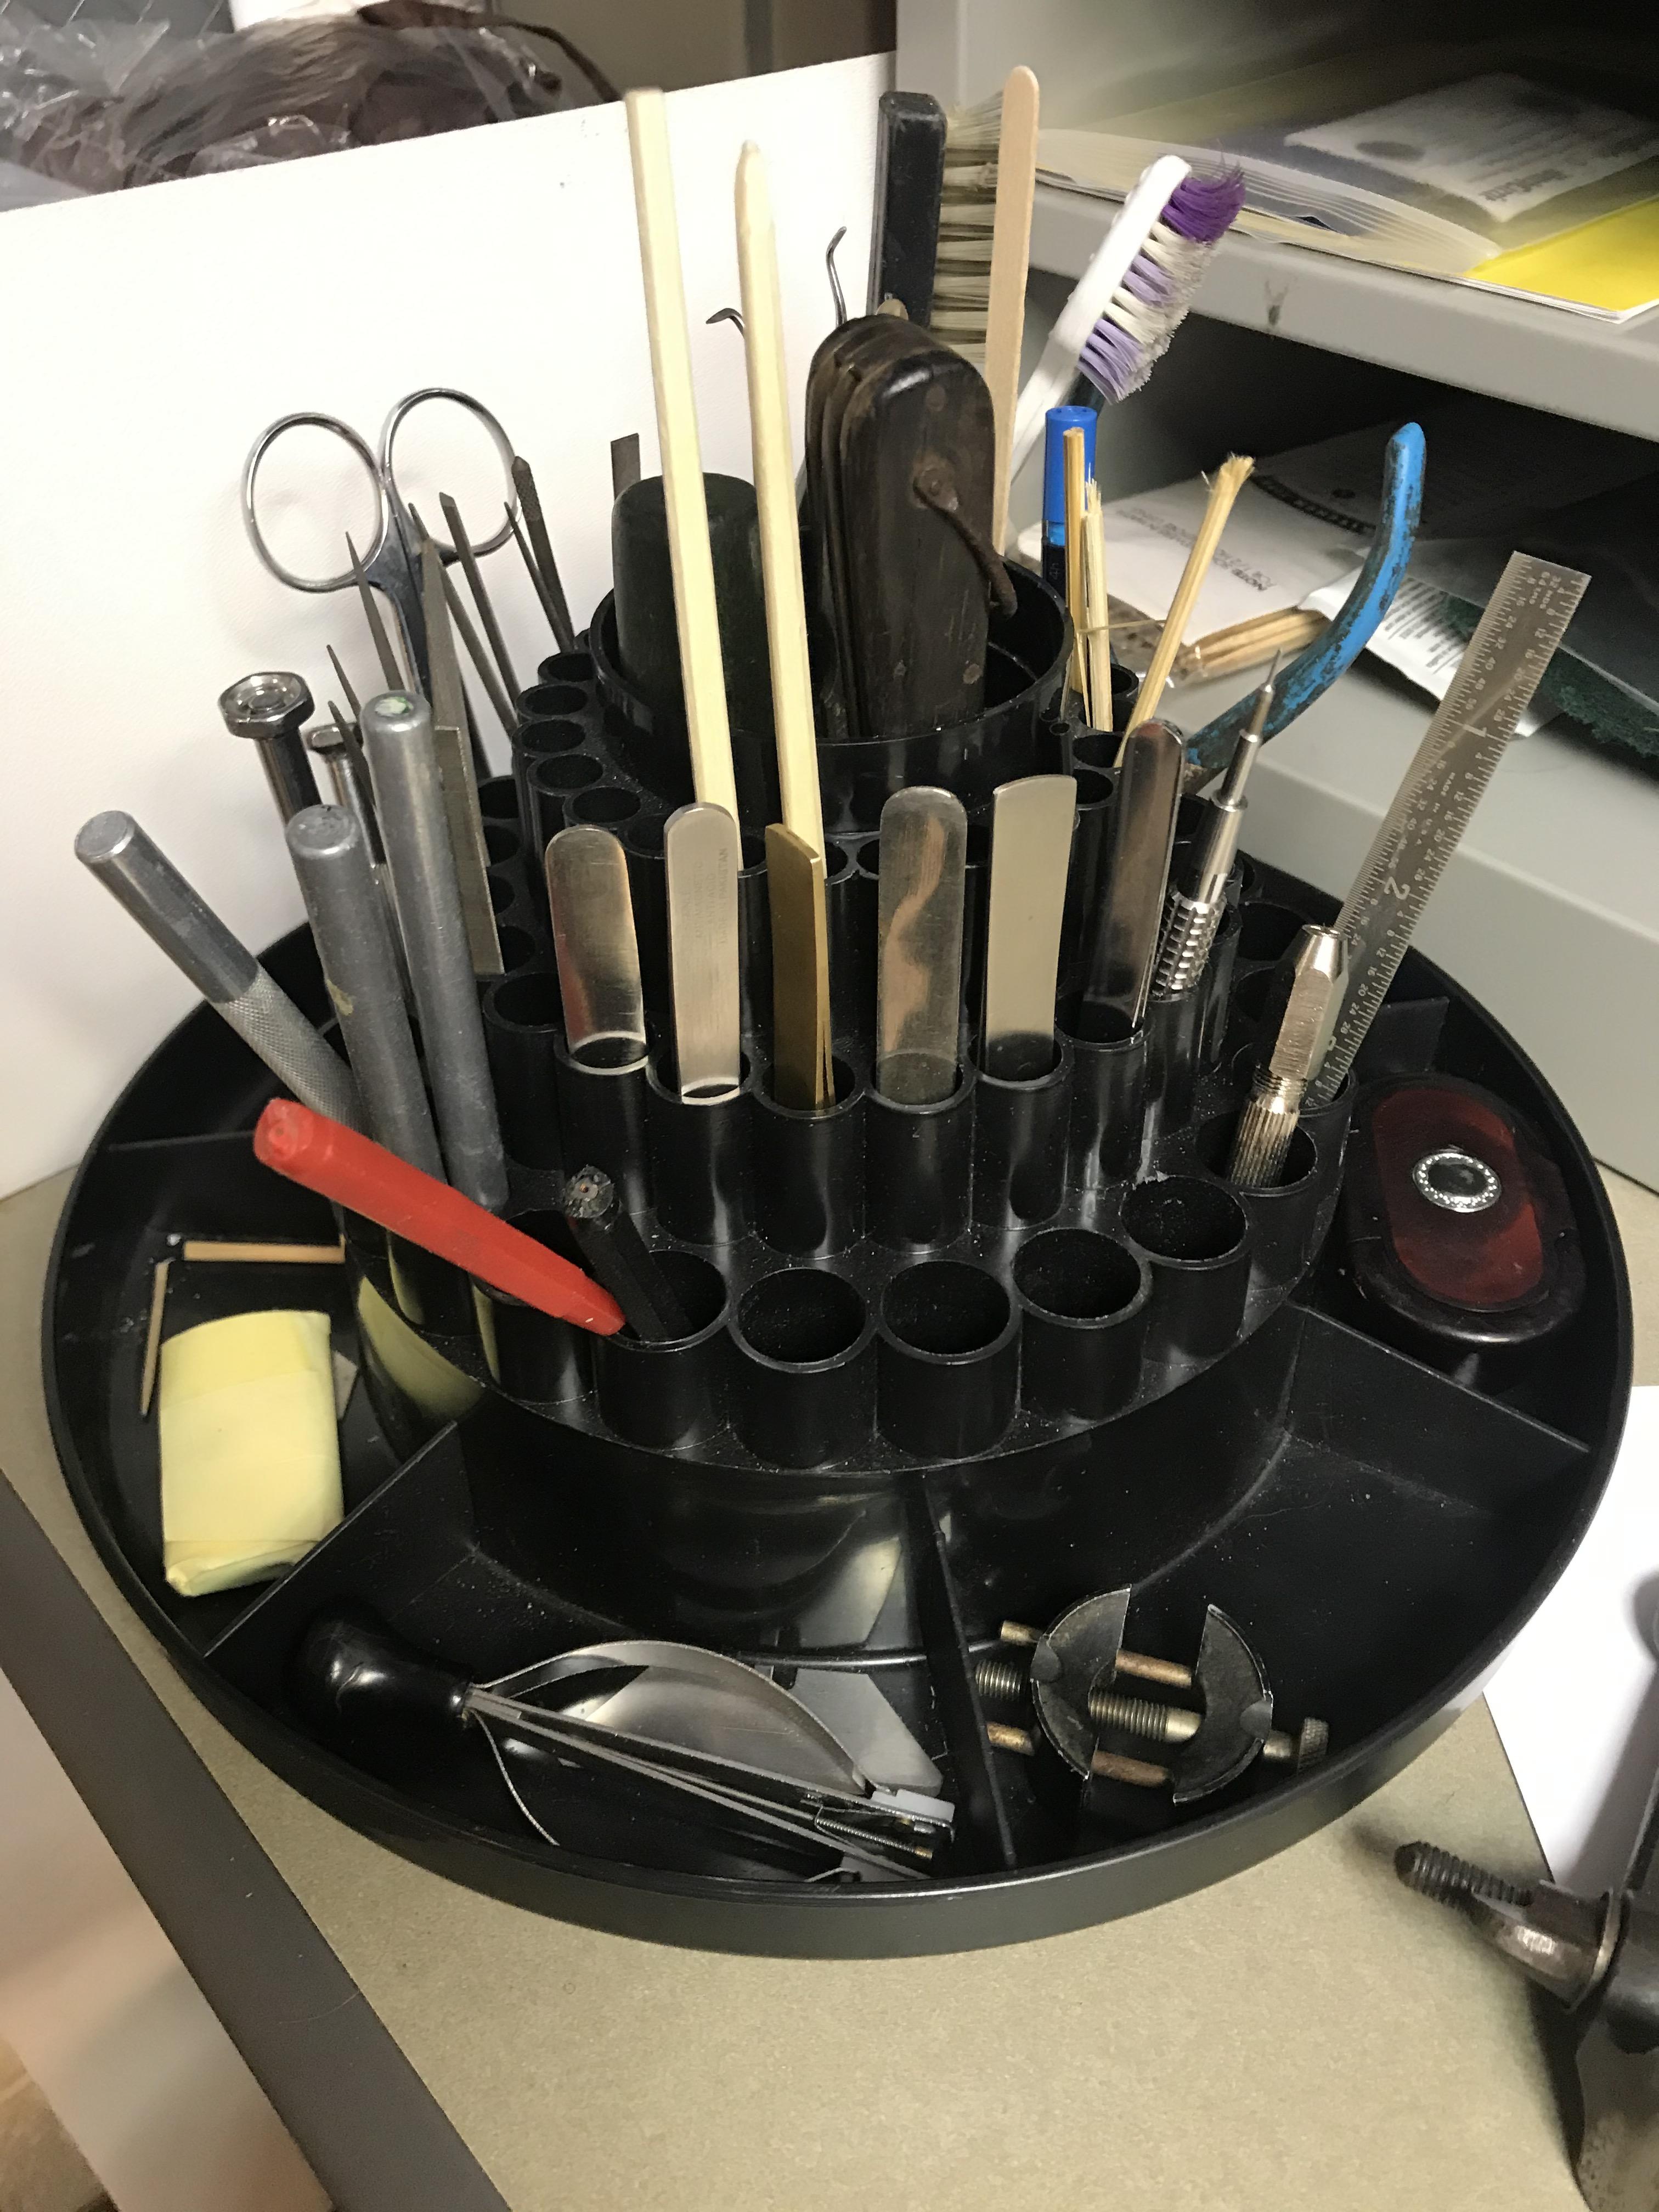
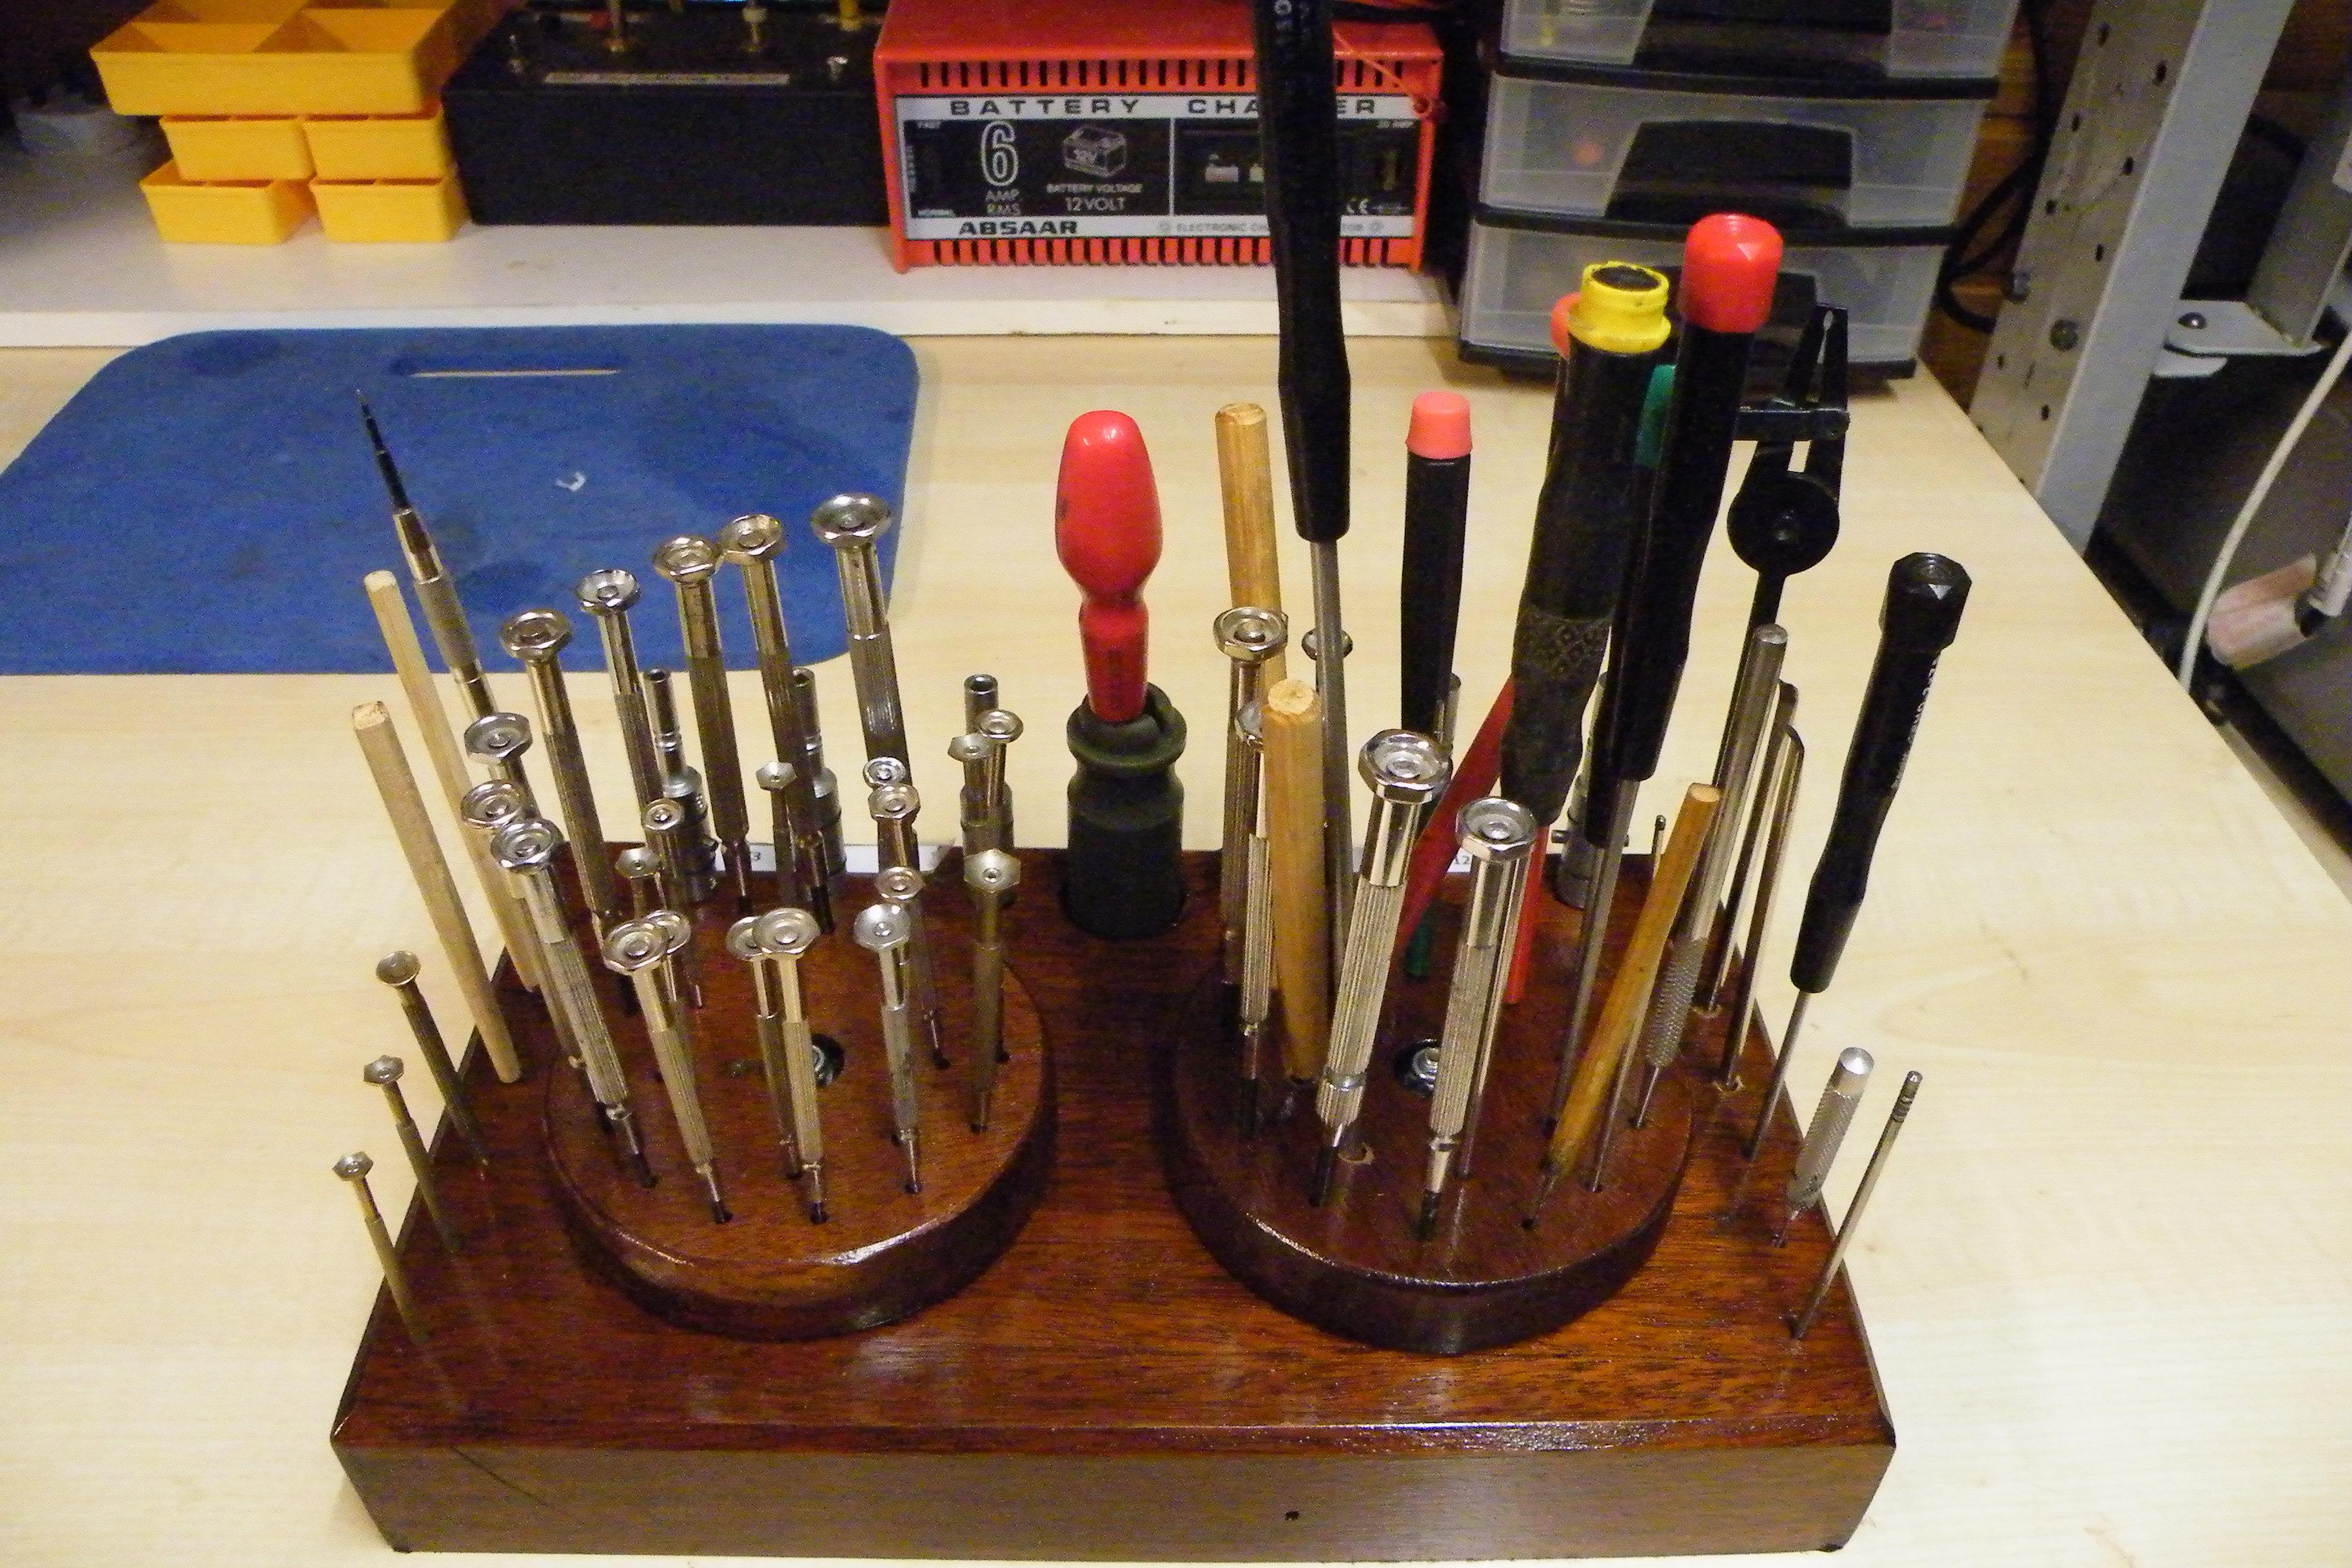
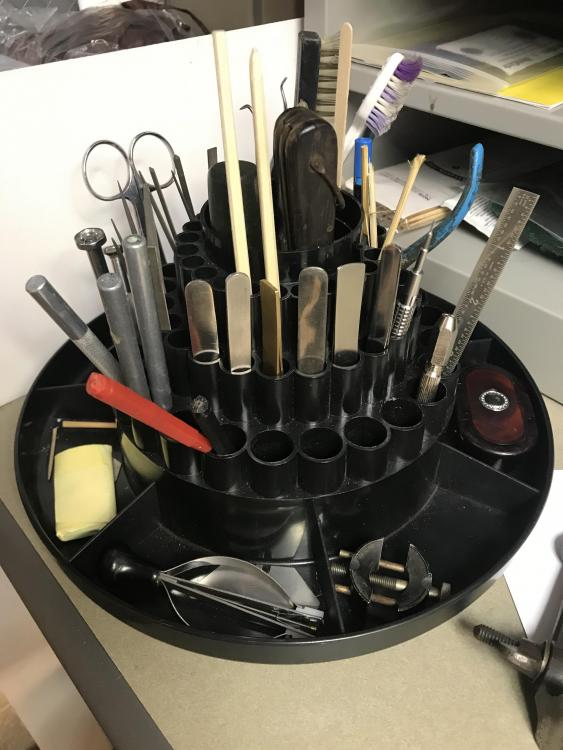
Hi In order to get a sembelance of order on the bench I build this tool holder, both tool holders rotate to enable easy access to the screw drivers, the flat bladed ones on the left and cross points on the left. My clock let down tools are fitted to the rear, probes etc down the sides. Saves scrabbling in a tin. heavy clock tools are stoed in two IKEA drawer units. Keeps the place tidy, untill I start working.

 1 point
 -
Yes Thats the stuff and a wee bit of elbow grease1 point
-
Hahahahaha They are very much indeed tapered. Maybe not much from a casual perspective, but massively from a machinist perspective. A broach might change diameter of 0.2mm over its length of 50-100mm. The twists- go gently, like 1 or 2, then check. This is a physical burnishing, if you're making heat on more than a molecular level you're over motivated.1 point
-
This Bloody awful scourge has us all on the back foot and we all have to take it seriously , The attitude It wont happen to me, has got to go. If a company like BERGEON are taking it seriously so shall we all. Keep safe and well friends.1 point
-
If you straighten it a little where the stud is . And make the curve a little tighter after the stud up to the adjusting arm. I think it will be much closer to the center .1 point
-
Thank you for your introduction and welcome to this friendly forum. I always recommend you start with a pocket watch. Just practice taking it apart and putting it together. Most are like a watch movement. Get to know the names of the parts as well. Don't touch the fusee pocket watches as those are completely different. Some thing like this is a good start.
 1 point
 -
Thank you for your adivices. As you mention it is best to start with some cheaper mechnical watches. And this is my intention. Therefore I started to look for some Seiko's but they are a little to hard to come by cheap options here, so at the moment Im looking for anything mechanical, maybe prefereble hand wound. Im sure I'll back here looking for answers1 point
-
Welcome aboard! As @Jon stated, teaching yourself watchmaking on more expensive watches is a potentially expensive lesson in the making. In line with Jon's statement, $10 to $20 watches are a great place to start. May I suggest old mechanical Timex's as there are heaps of mid 70's models available for a song on eBay. They're super simple and generally easy to troubleshoot and fix and once you do, they become surprisingly reliable timekeepers. Good luck and don't be afraid to ask us for help should you get stuck.1 point
-
Welcome, If I might suggest, that you don't go pulling apart your vintage, rather expensive watches you named in that list, until you buy some £10 - £20 watches and played around with those to get a feel for what you are doing. We are all here to help and before long you will have the confidence and a little more experience to tackle those watches you mentioned1 point
-
welcome, enjoy the knowledge around here1 point
-
Hi Jon That's great pictorial and easy to follow. Should be great help to the less experienced In identifying all the relevant parts and sections.1 point
-
I must have done about a dozen balance assembly removal/replacements on these movements, and while aware of the magnet influence on the balance, when replacing it, I have not yet had to resort to removing the magnet to get it back together and in place.....perhaps I've been lucky? I am surprised just how resilient the balance spring is, on these movements, and how much 'mishandling' they will take with out permanent distortion....1 point
-
I've just uploaded the first instalment of the BFG 866 in the 'Walk through' section and I've got a few more to post when I've got time within the next few days.1 point
-
Hi Very instructioal Jon excellent training document.1 point
-
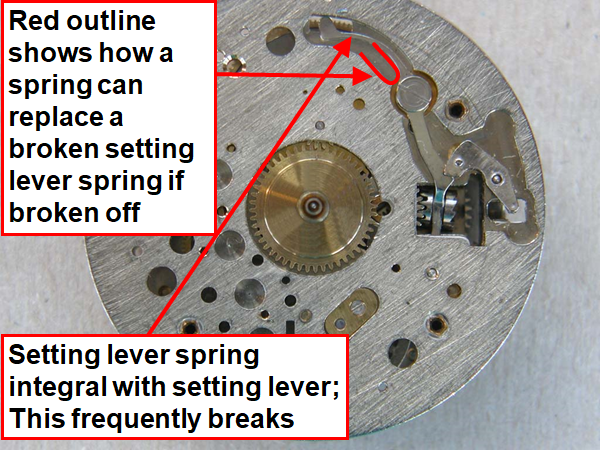
I've attached a lesson I wrote on the BFG 866, which includes refitting the hairspring. Just make sure to turn the boot 90 degrees with a screwdriver of appropriate size to enable the hairspring to sit between the boot and curb pin. Fit the stud, then close the boot. If your hairspring needs refitting to the stud, you'll need a small brass pin shown in the photo. I prefer to fit the HS when it is clear of the balnace Lesson 15. The Baumgartner 866 continued.ppt1 point
-
Hi I was Born in Scotland Brought up in Yorkshire I cant hear the accent but evry one else can.1 point
-
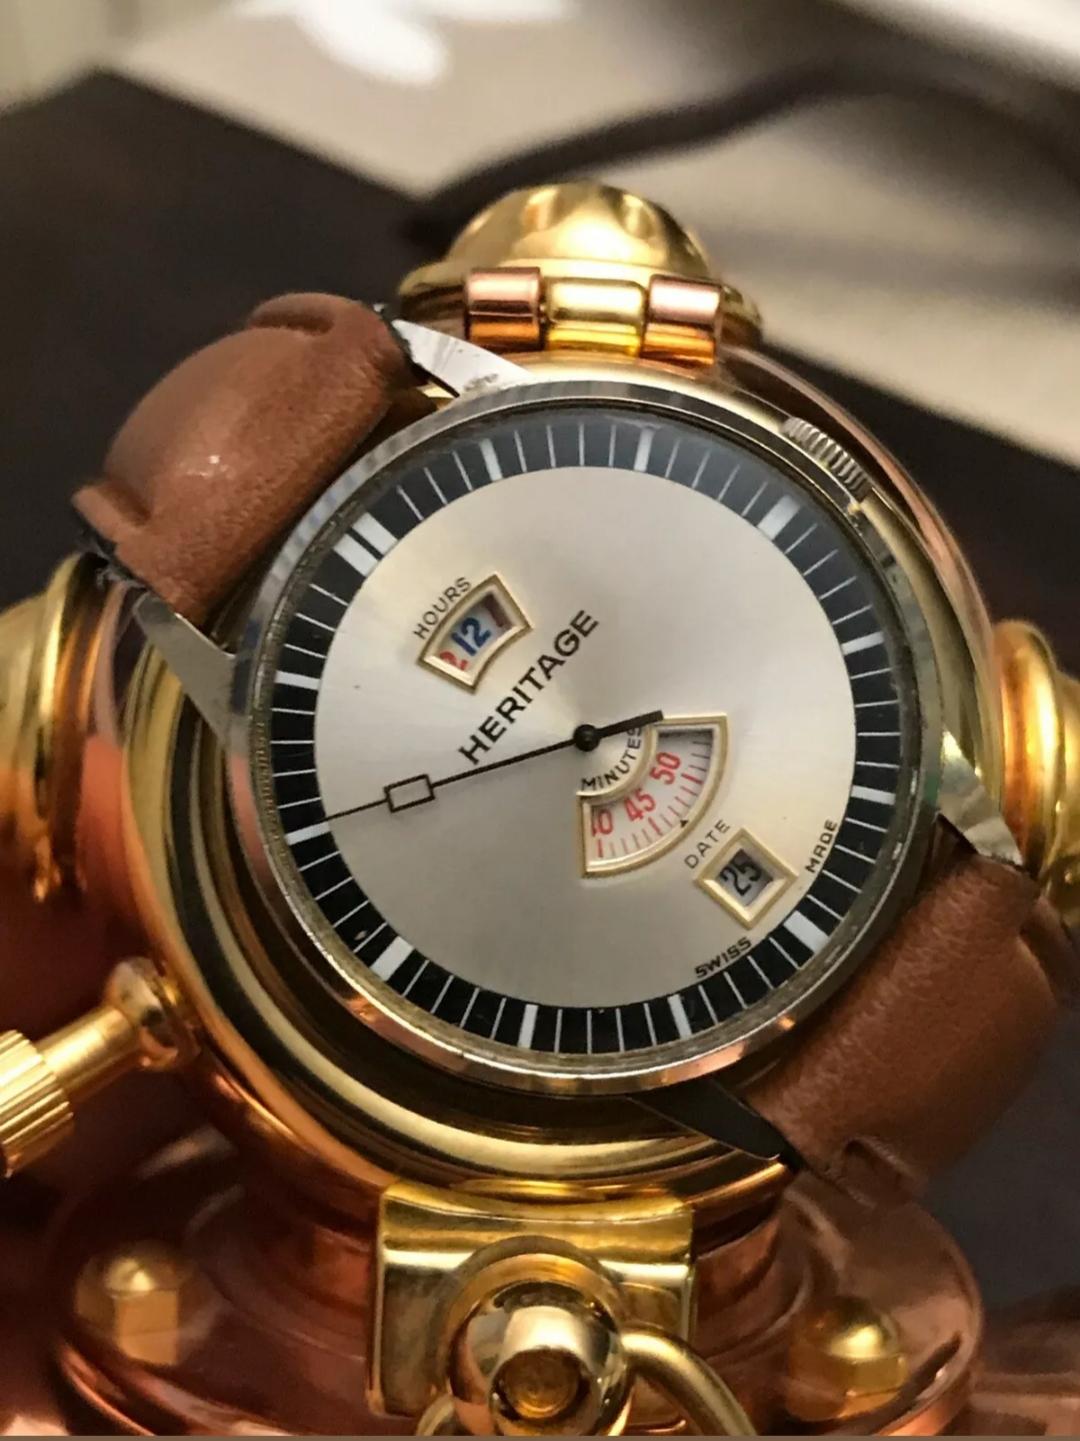
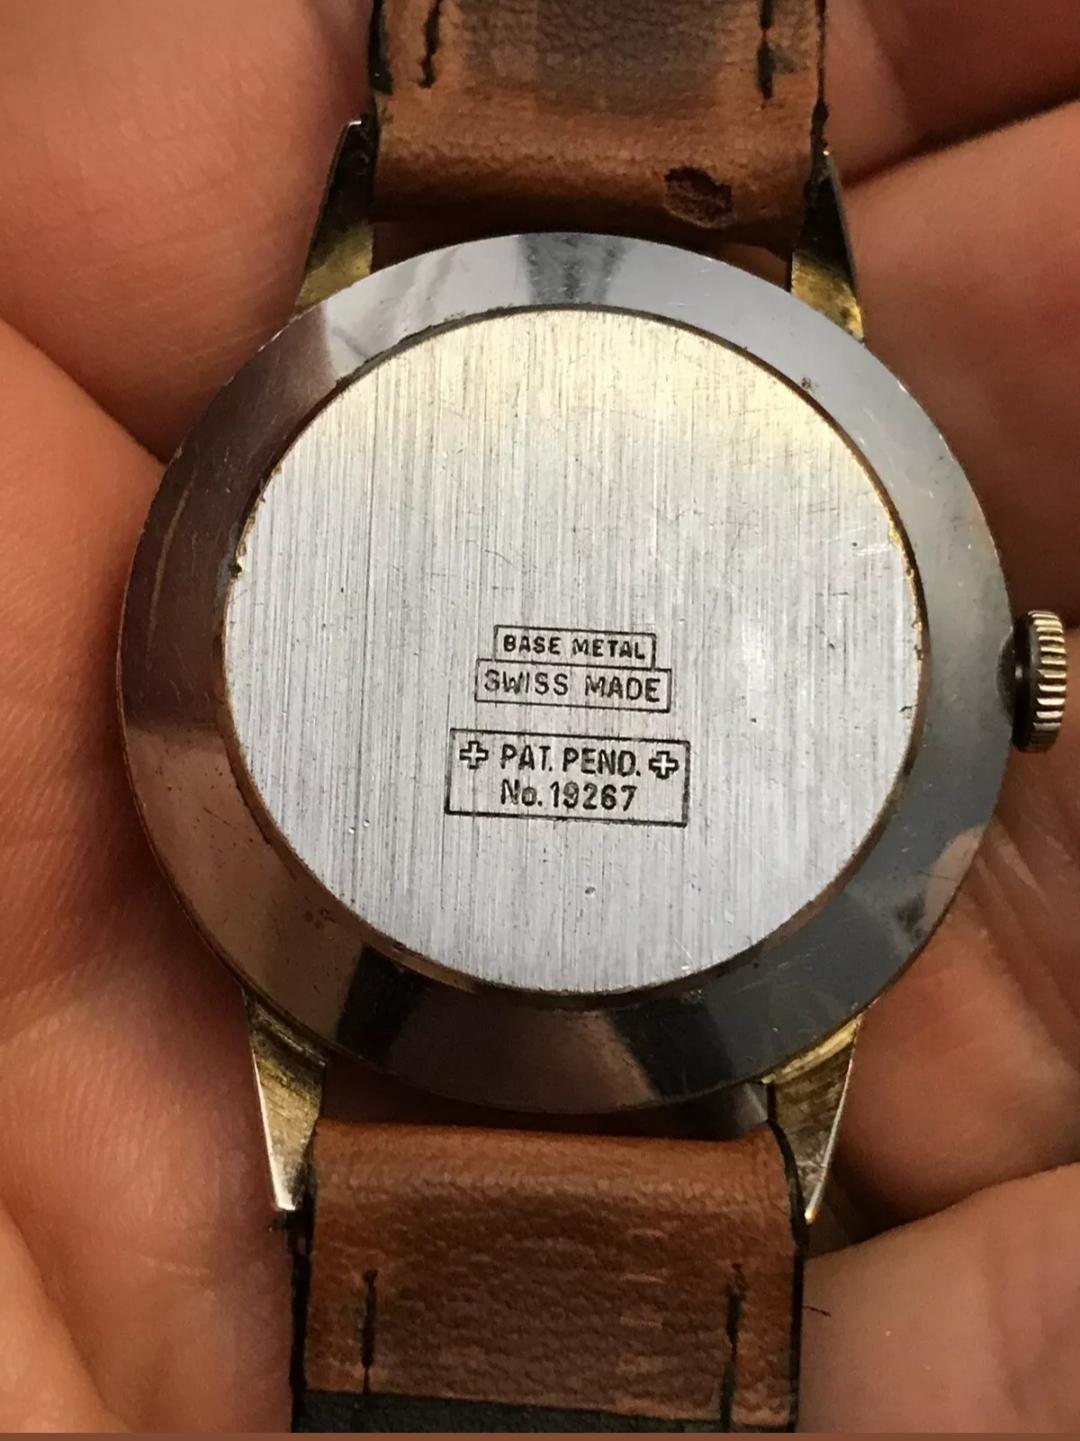
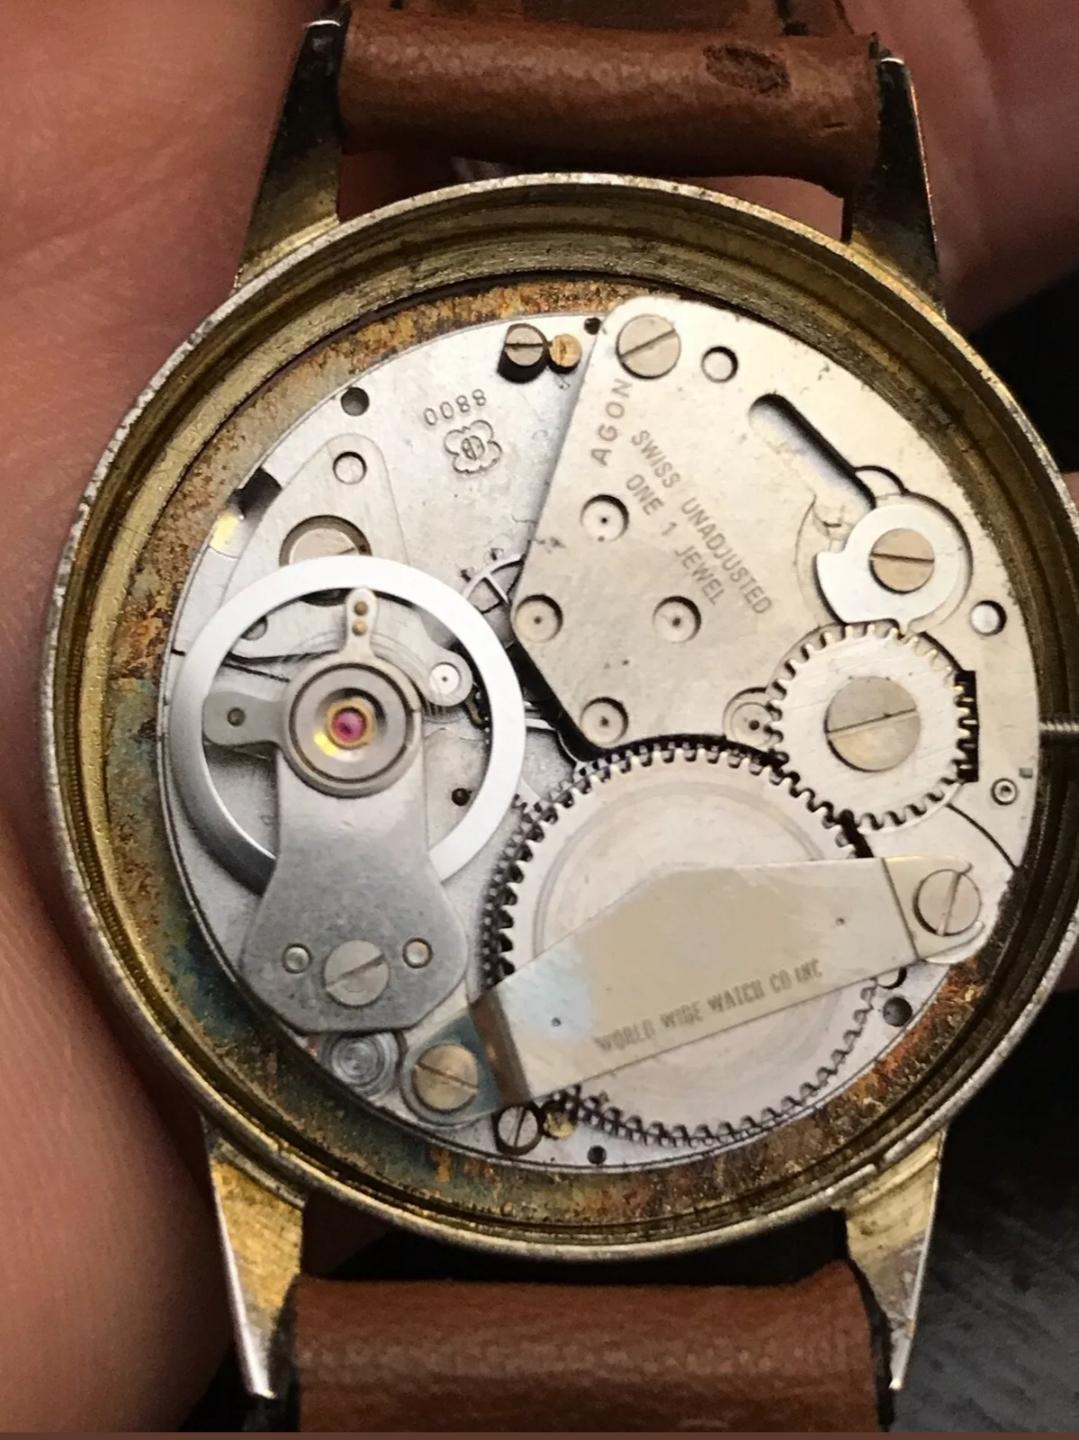
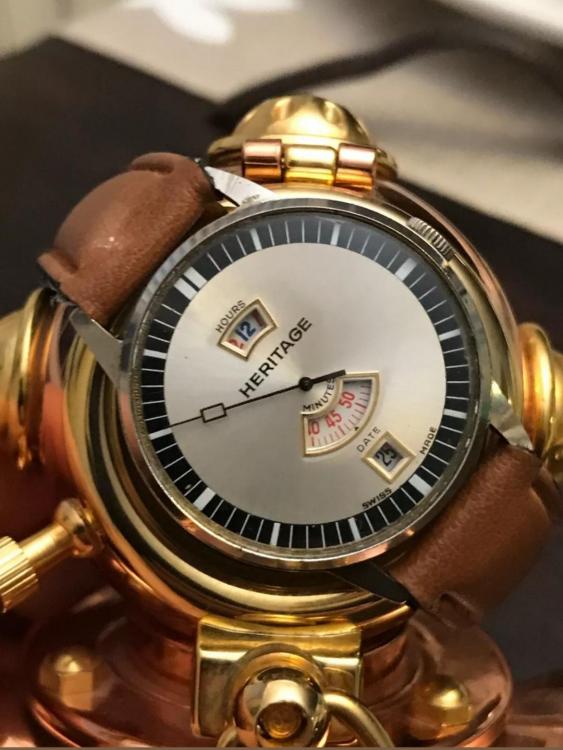
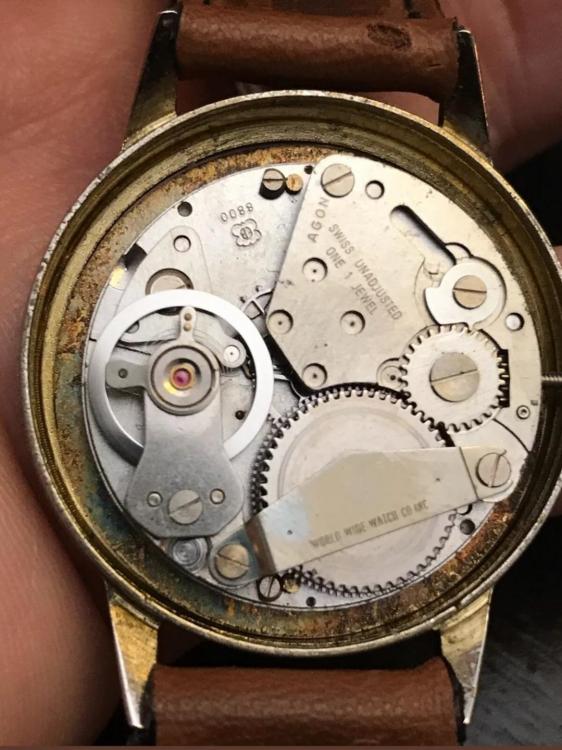
I've always wanted a jump hour, and now one is on its way to me. I've seen these Heritage ones before. They're the same exact configuration as a dozen other brands except the dial is unique. There is an ubiquitous EB8800 beating on the inside, hopefully the blurred balance means its actually ticking as I know these wear out without proper attention. On the outside it's clean as hell, the inside however, looks like ass! That will be the first task when it arrives! The second task will be to fit a black band, it seems more appropriate for the black printing on the dial and overall silver tone of the case.

 1 point
 -
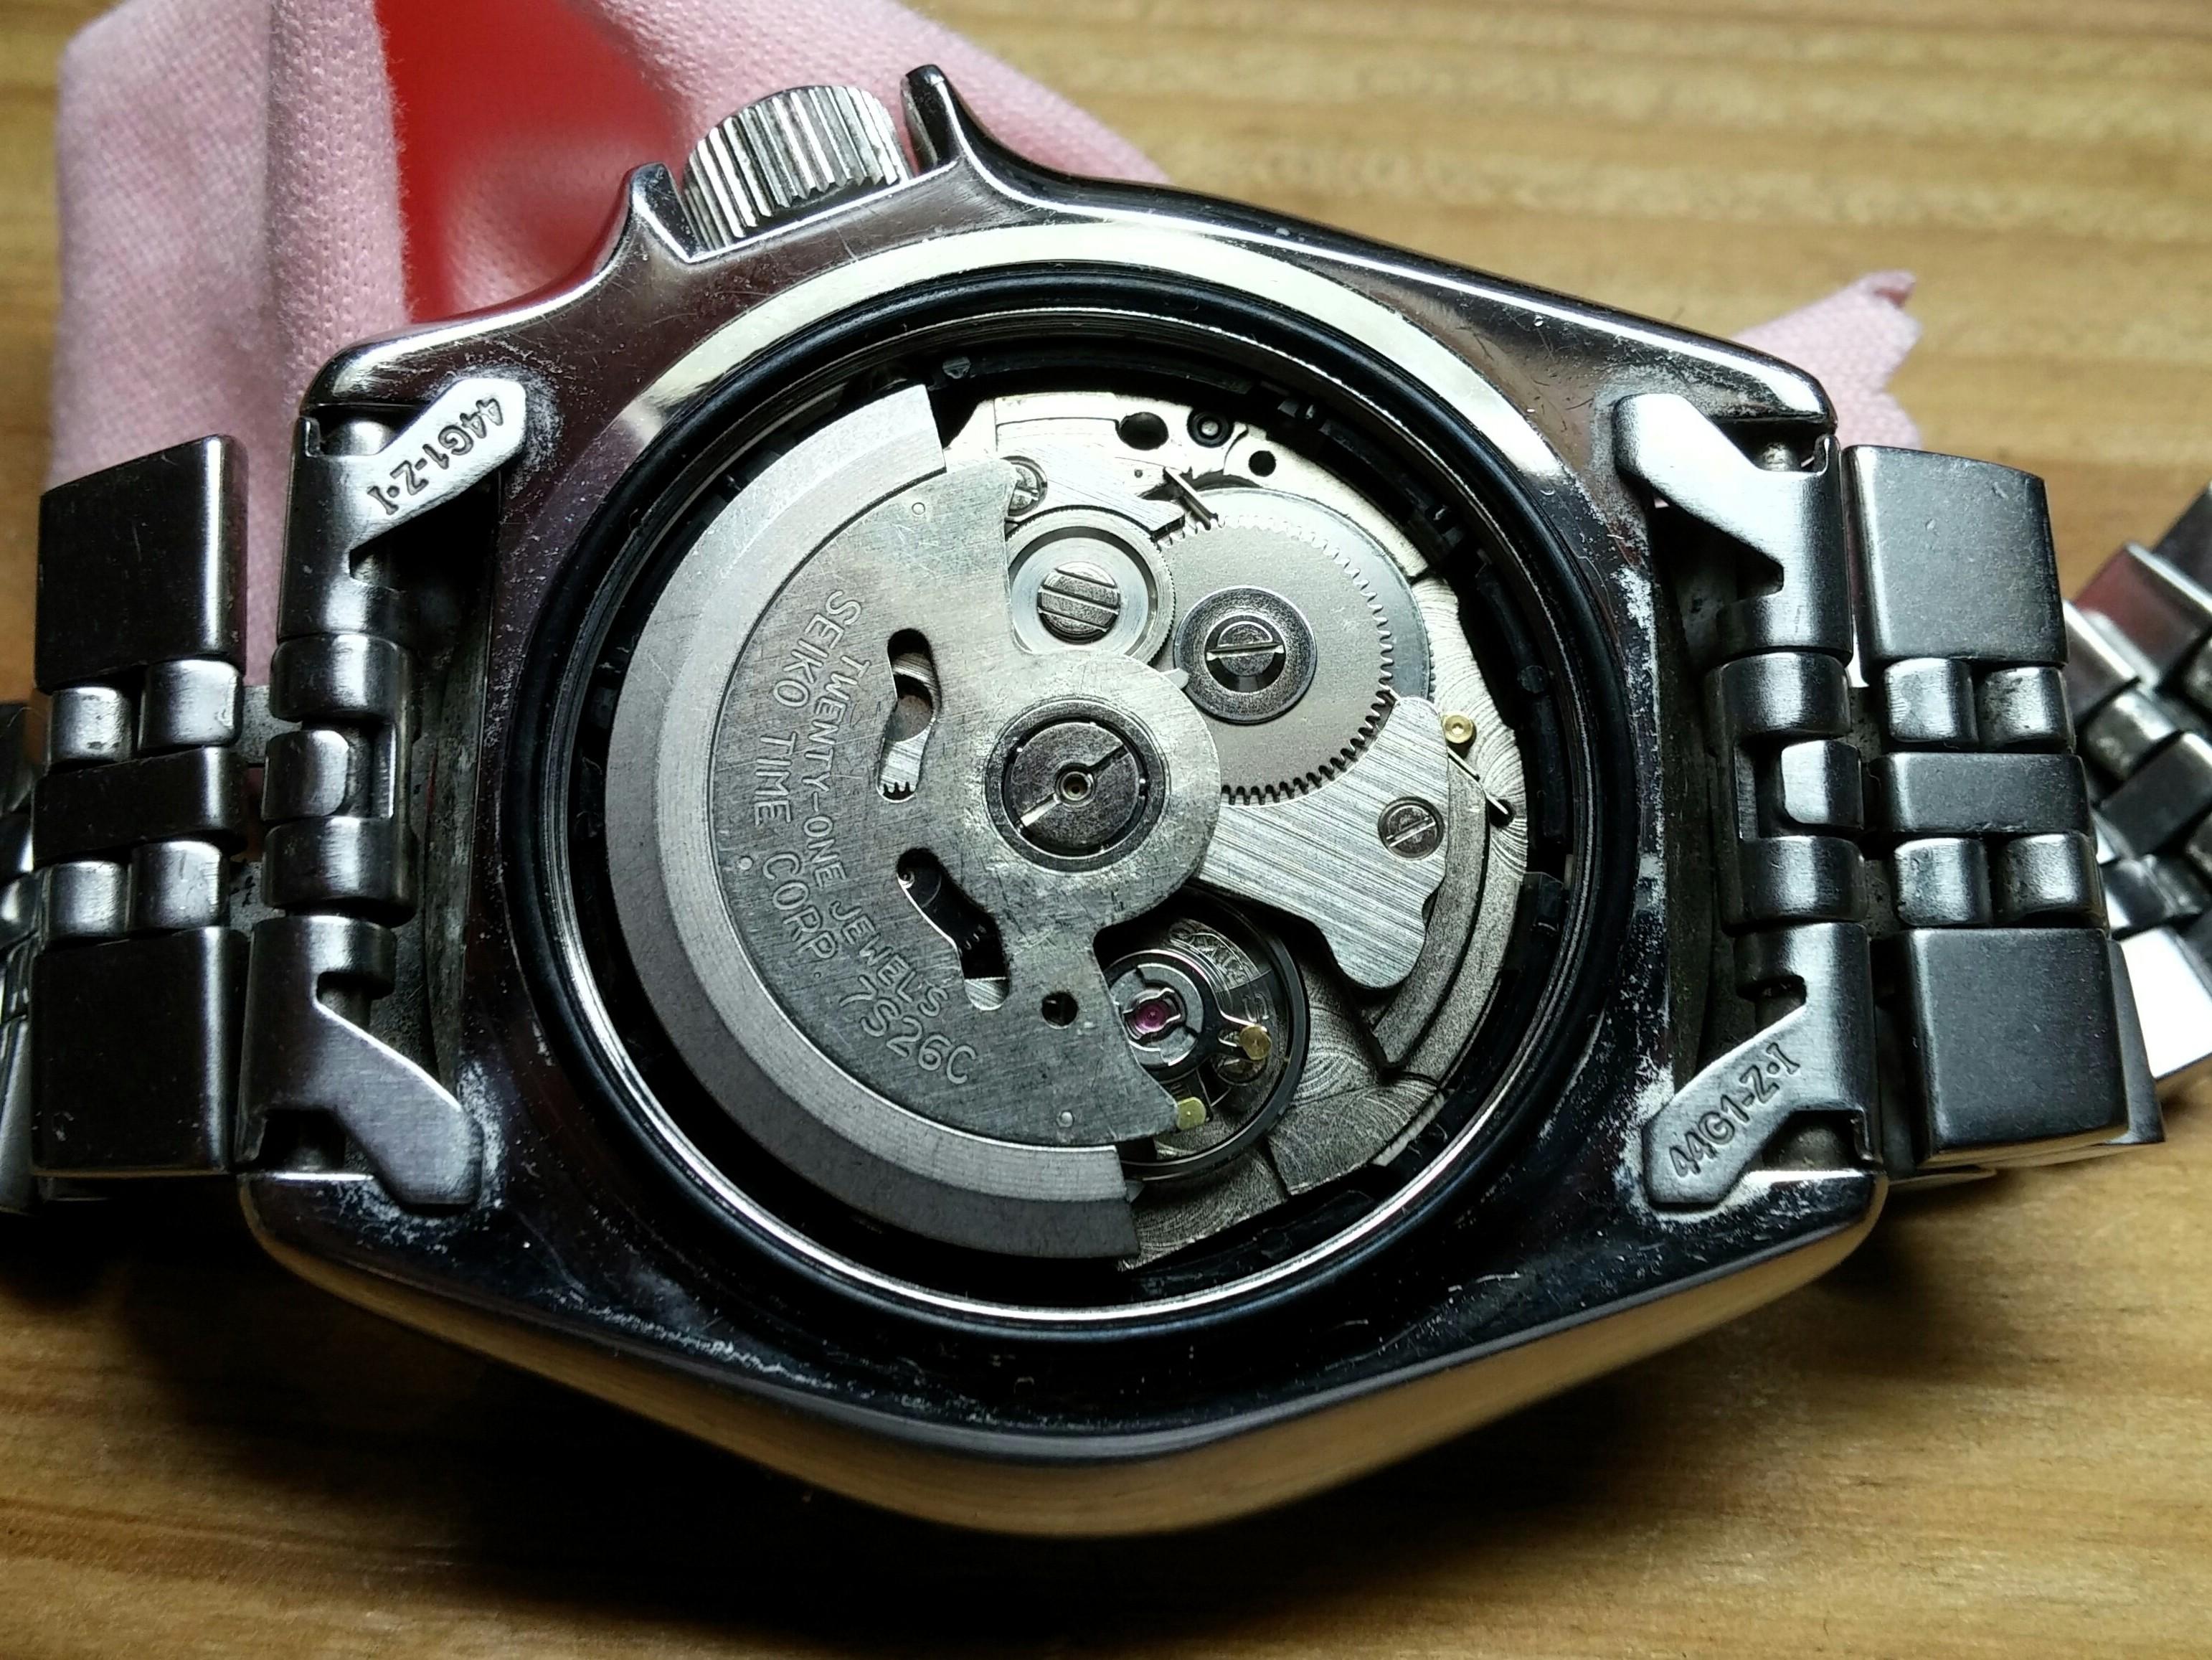
Howdy, Well, this is my first effort of a watch repair. I have been fascinated with watches, clocks and all kinds of mechanical things since a young age. I decided at this time that working on watches would be a great hobby/interest to take up in my later years. I have already spent some time learning to refurbish and repair fishing reels in the last few years. So here is my first repair attempt. Interest in tinkering watches started when I dropped my Seiko SKX009KD diver to the tile floor in the bathroom. Was not too good an idea to put a watch on there with a towel thrown over it, pulled the towel and down comes the watch, face down on the tile floor. Needless to say, I picked it up and took a look, nothing seen. Then I shake it and hear a rattle. Not too good! So I did some research on the 7S26C movements. Read a lot of information and watched a lot of videos. Thanks to all that makes this information available. So I purchased a cheap watch tool kit from Amazon. I had other watches that needed batteries and some strap work anyway. I knew the kit would not be 'pro' grade, but it was a nice kit with all the basic tools needed. Back to the rattle, I figured the Oscillating Weight (OW) had become separated from the bearing. So I used the case back wrench in the kit and opened the back, and sure enough that was the problem. I looked on-line for a replacement OW but could not find any except one on Ebay for $35! So I decided, what the heck, I'll try to repair this one. So, here is what I did being a little mechanically inclined but never at this small a scale, I performed the following: 1) remove case back. 2) examine the OW, it was dislodged/loose from the bearing. 3) remove center OW bearing from center post. 4) place OW on a small anvil, then use a small pin punch from the kit as to carefully work the metal around the OW's hole as to make the bearing hole smaller. 6) After enough working with the punch, I took a smooth round stone and gently kept working the ID of the OW hole until it just would friction fit to the surface of the OW bearing. 7) carefully press fit the bearing into the OW, I knew too much pressure would ruin the small bearing races and ball bearings. 8) finalized fitting of the bearing to the OW by applying a very small amount of red Locktite thread locker using the end of a pin as an 'oiler'. 9) I then let the OW set for a day to cure the Locktite 10) install OW per alignment instructions in the 7S26C technical guide. At this time I also wound the mainspring up 8 turns to check the power, it ran for about 40 hours. 11) did not have any watch oil, so I used a very small amount of some 10W synthetic engine oil using a small pin as the oiler to lubricate the OW bearing ONLY. It appears to be a successful repair for now, watch been running great and keeping good time for about 2 months. I'm sure something else might have gotten damaged during the fall, especially the balance assembly, but then again the watch is working fine for now. I might use this particular watch to dive deeper into the 7S26 movement at a later time. Kind of happy for now. Got 2 other watches running with new batteries, fitted some straps and having fun with my new hobby. Look forward to learning some more. Now to find a 'bag o watches at a flea market and get busy. I know I'm going to need more and quality tools down the road, that's OK with me. Cheers, Chip ---


 1 point
 -
They come in sets, and are tapered. The video shows distinctly not the way to use them hahaha. You slide them in the hole, and give a little twist. Sometimes you give a few twists. They don't really remove any metal (yeah microscopically). They burnish the hole. Going from both sides evens out the taper. You want one that fits, but it could fit anywhere along the functional part of the broach.1 point
-
You don't want to use any loose abrasive on a barrel bearing, there's a very real chance it will imbed and then wear away at the barrel arbor. The most common method to improve the finish would be a simple smoothing broach and oil, a little bit from both sides.1 point
-
Back in sept 2018 when mike had posted picture of hole in the jewel, it must have had trouble opening the picture as it often happens at my neck of the woods and had given him a thumps up for the good amplitude he got. The pic opened today, I once went down similar path, change the jewel and finished the task. Later widened the rim of the Chaton and popped the damaged jewel out, faced similar damage around the rim of the hole. Pivots inflict this kind of damage, when we tighten the cock screw before we properly fit pivot inside the hole, we feel of the balance and that causes the pivot to jump inside the jewel hole, runs and we are happy. As the pivot jumps in, it breaks the jewel as in this picture, this much damage could take couple of such wrong fitting procedure. Proper procedure is to get the pivot inside the jewel, gently push the cock down with you peg wood, observe the balance oscilation , then comes tightening cock screw. Regards1 point
-
what a wonderful video, thank you so much for spending the time to record this.1 point
-
Canon pinion friction may be a bit tight, in some cases it will actually stop the watch. Some watchmakers back in the day considered it "right" when it'd stop the watch, it gave a sort of hack system. Imagine if you grab the center wheel pivot going up through the dial, and twist anticlockwise. You're going against the power from the barrel. This is what the canon pinion is doing.1 point
-
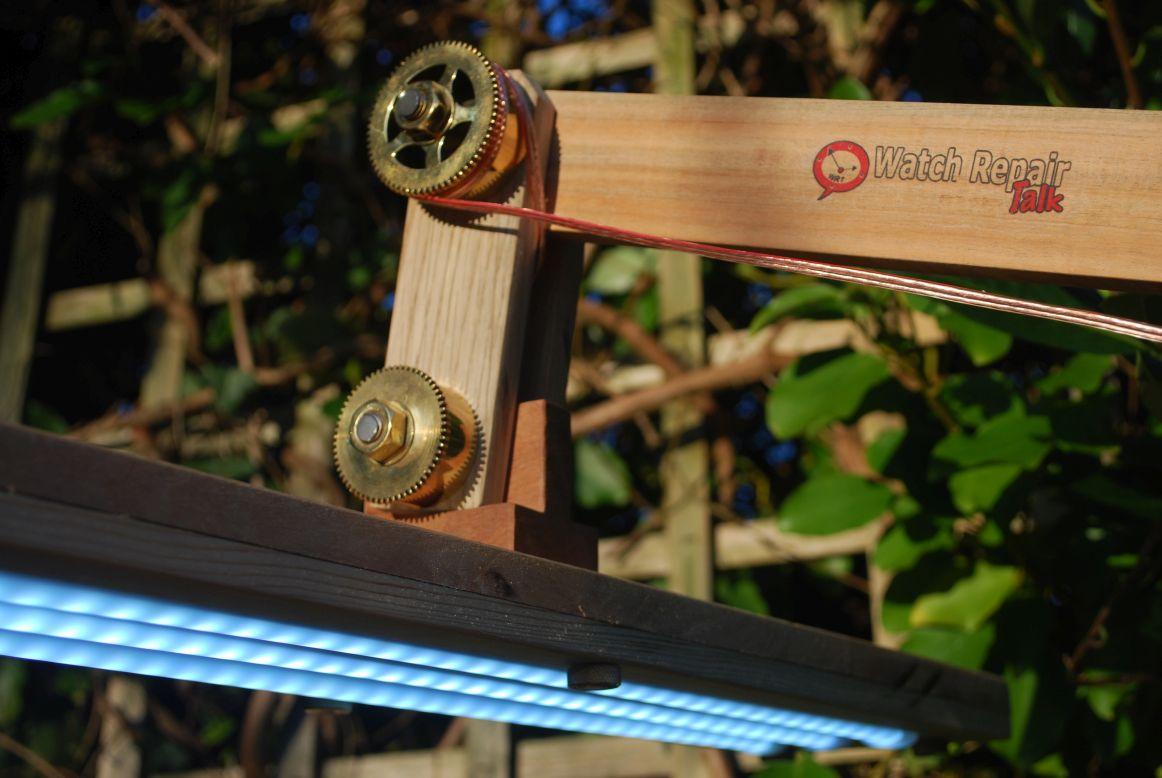
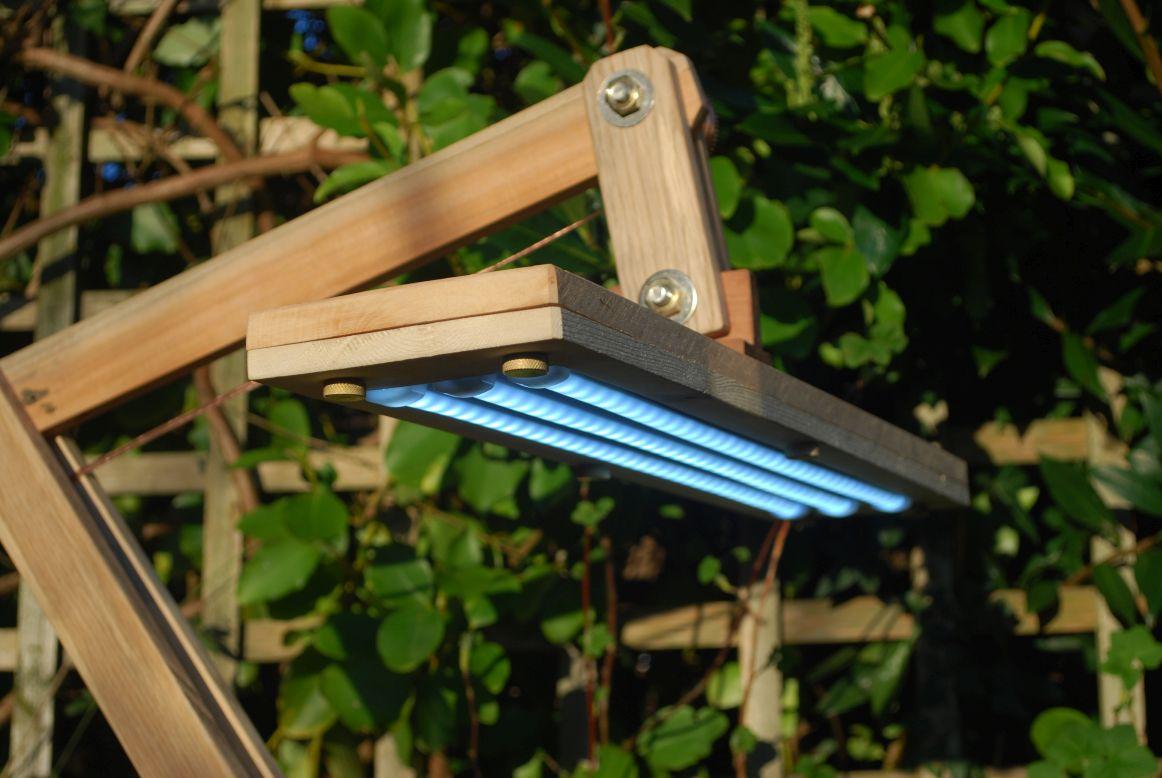
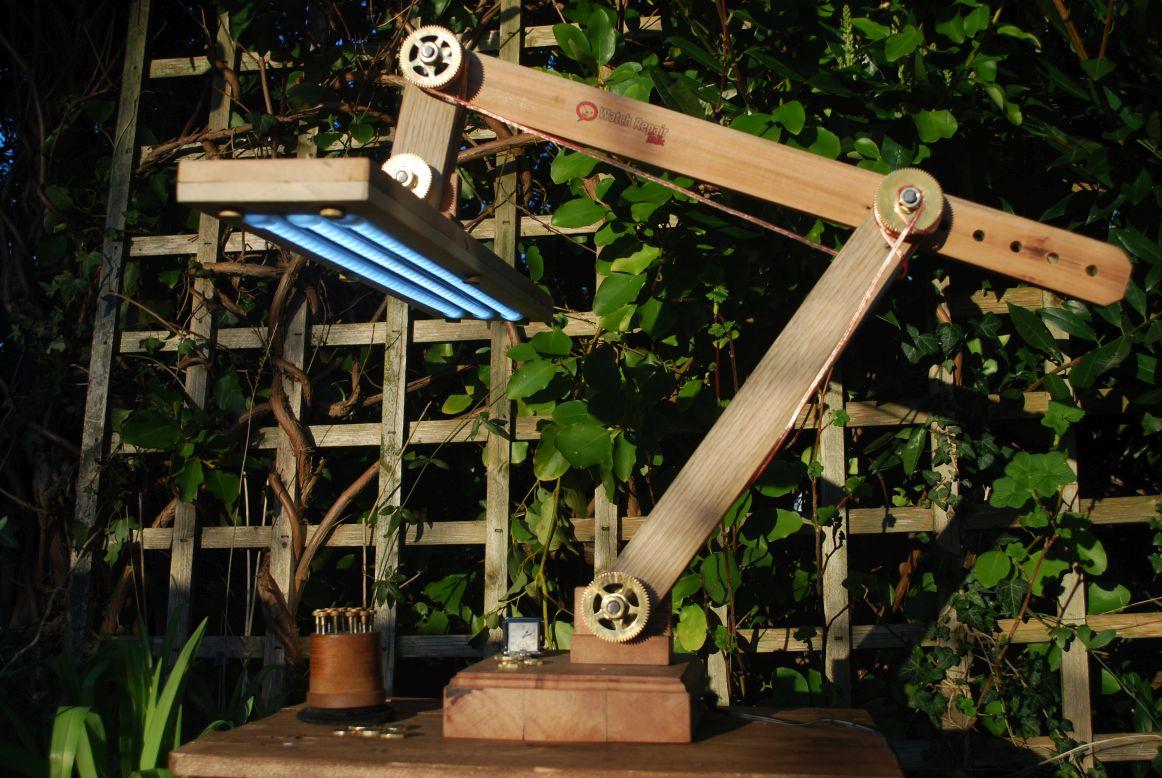
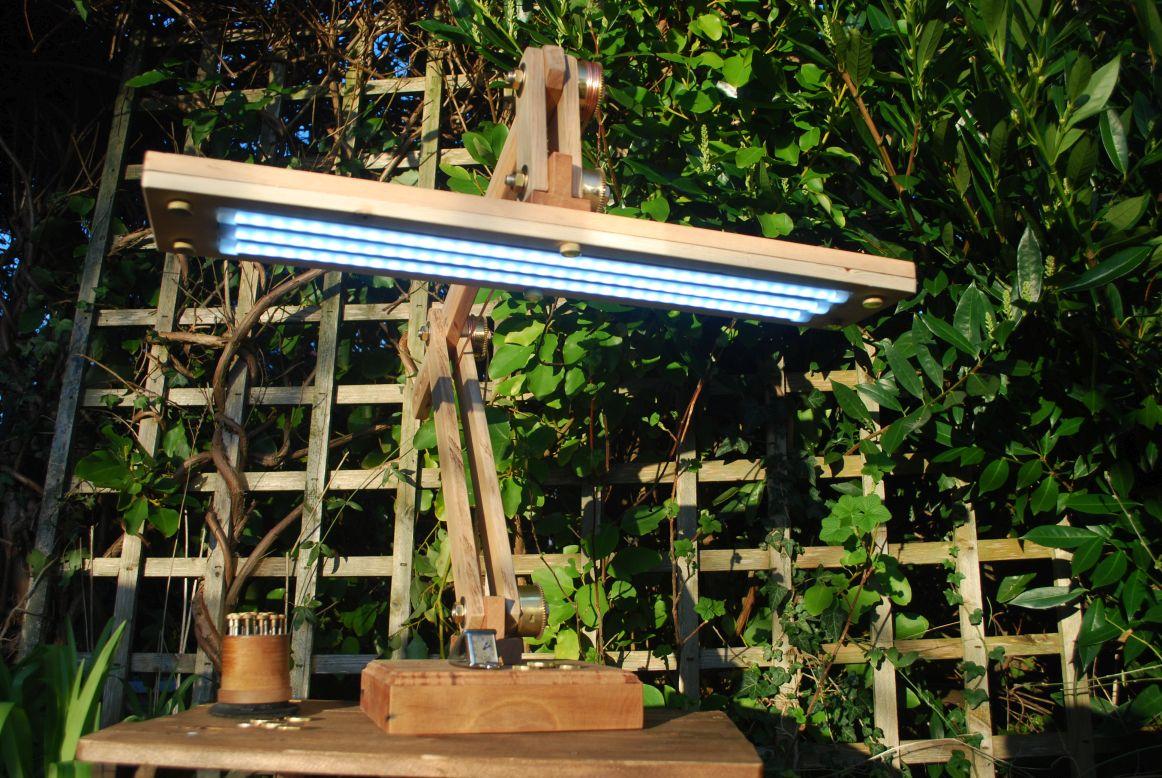
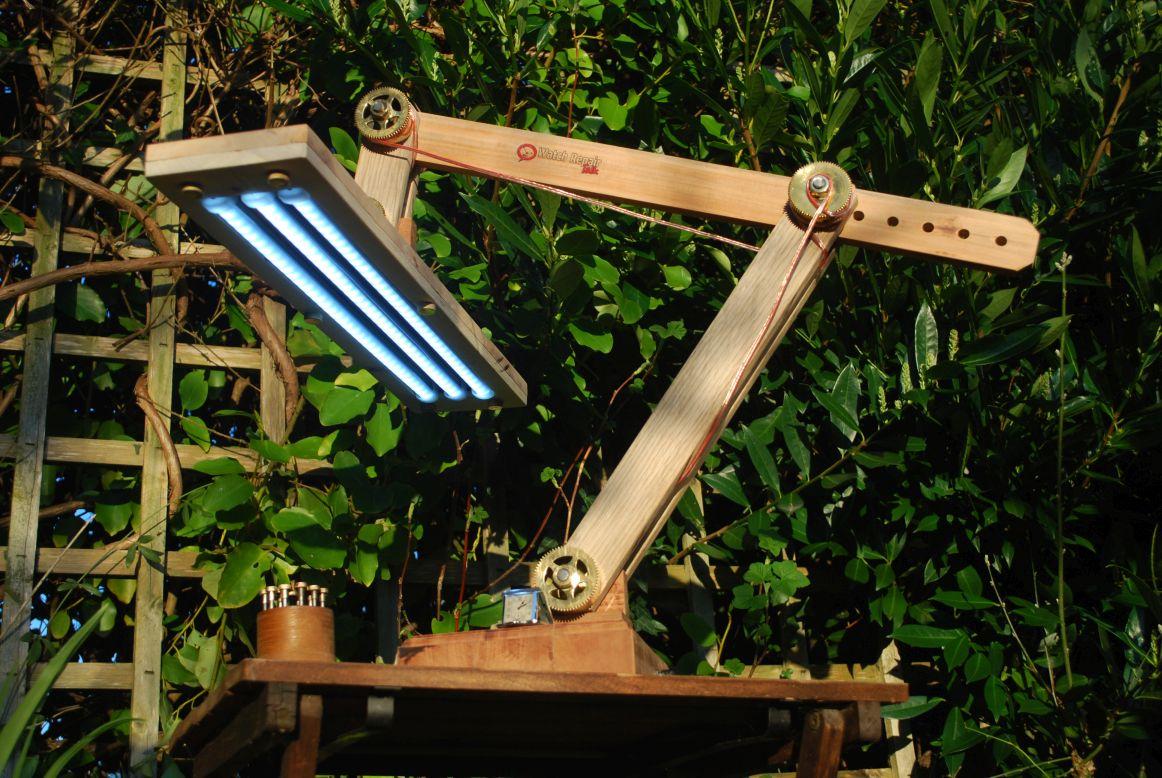
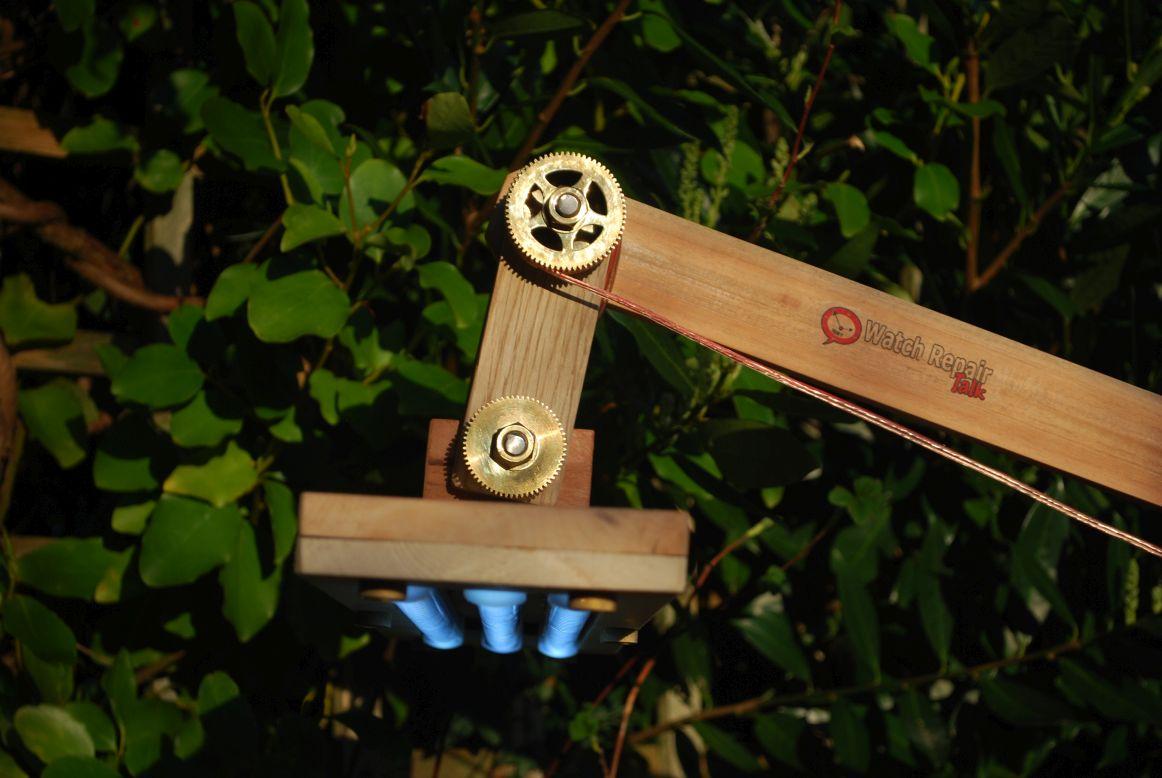
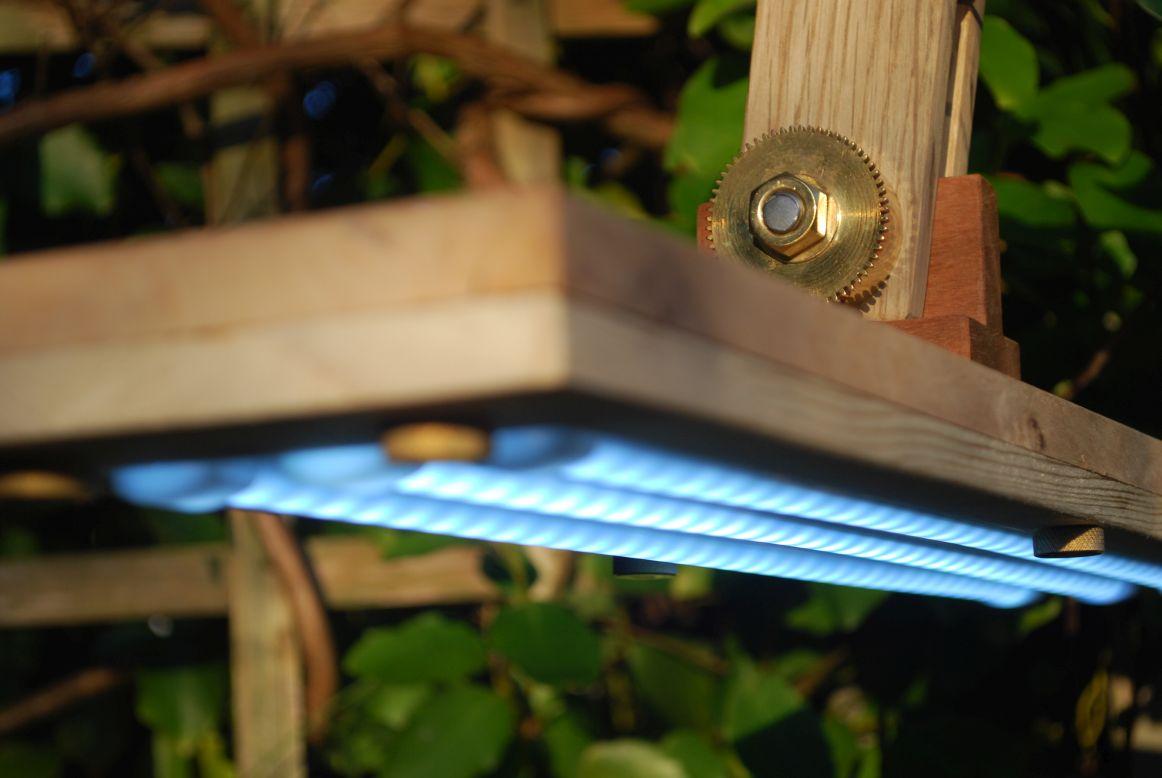
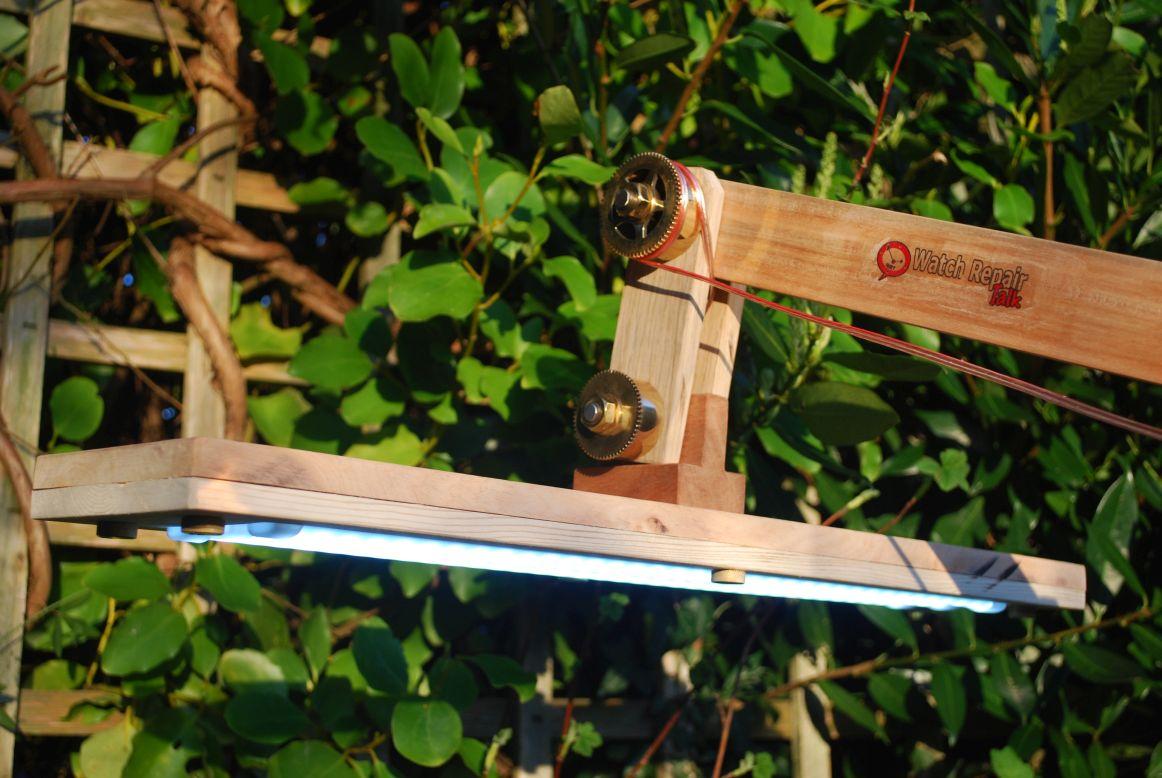
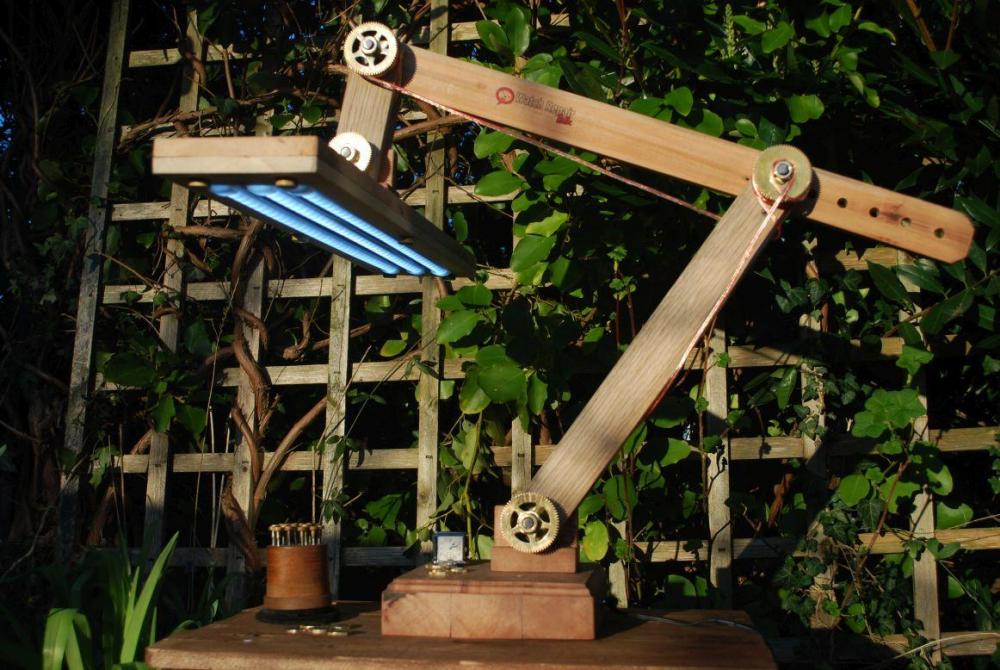
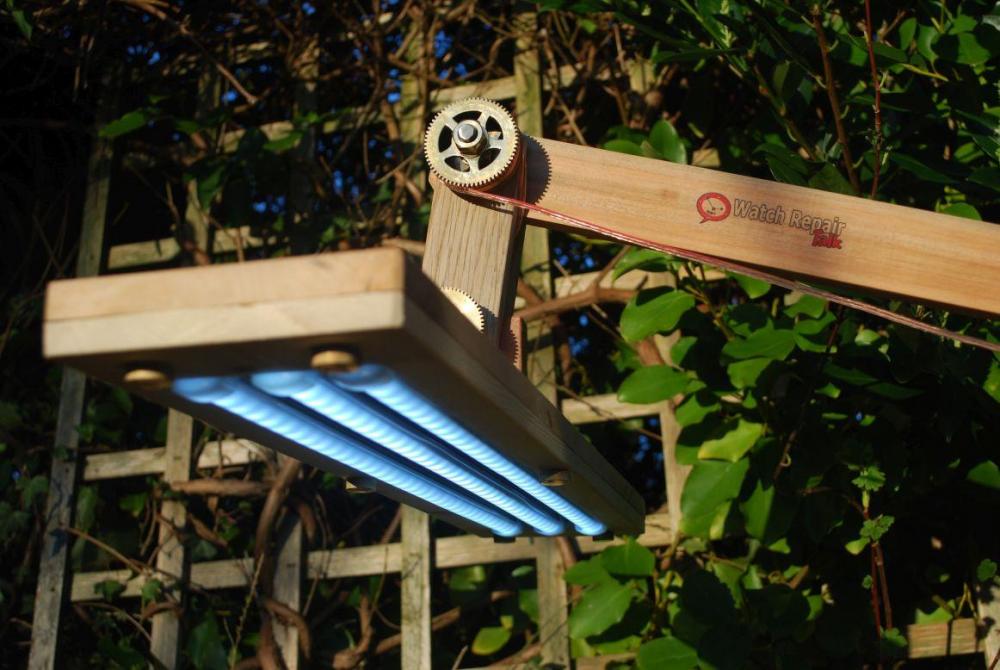
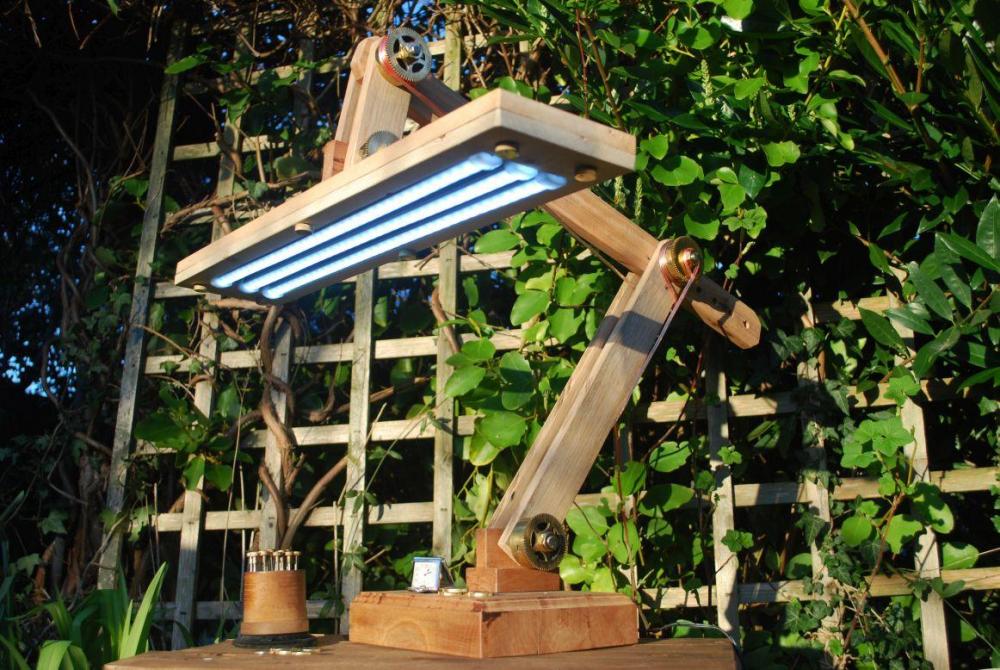
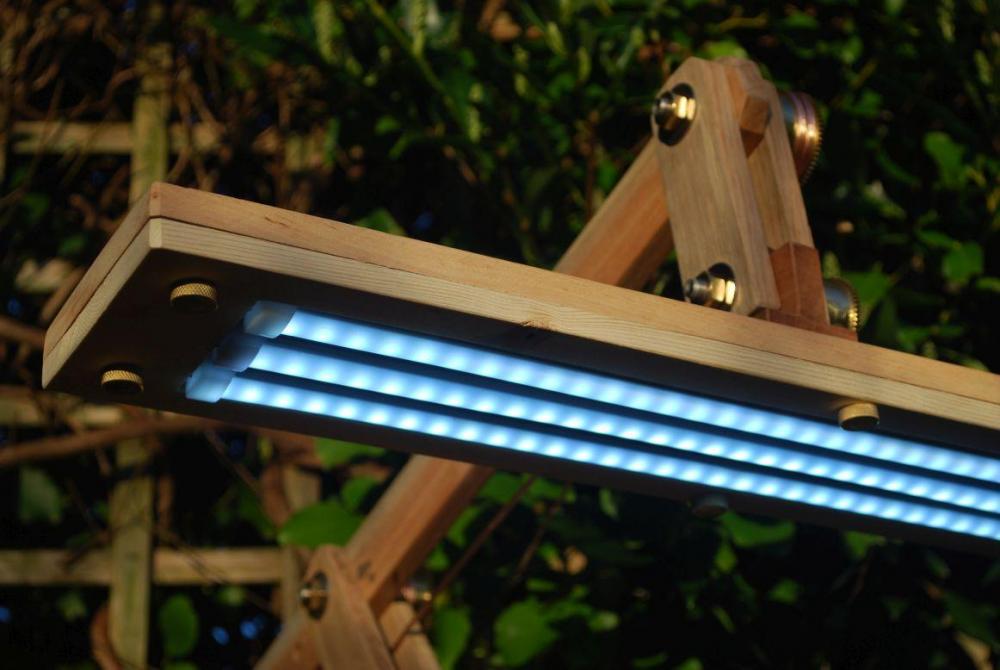
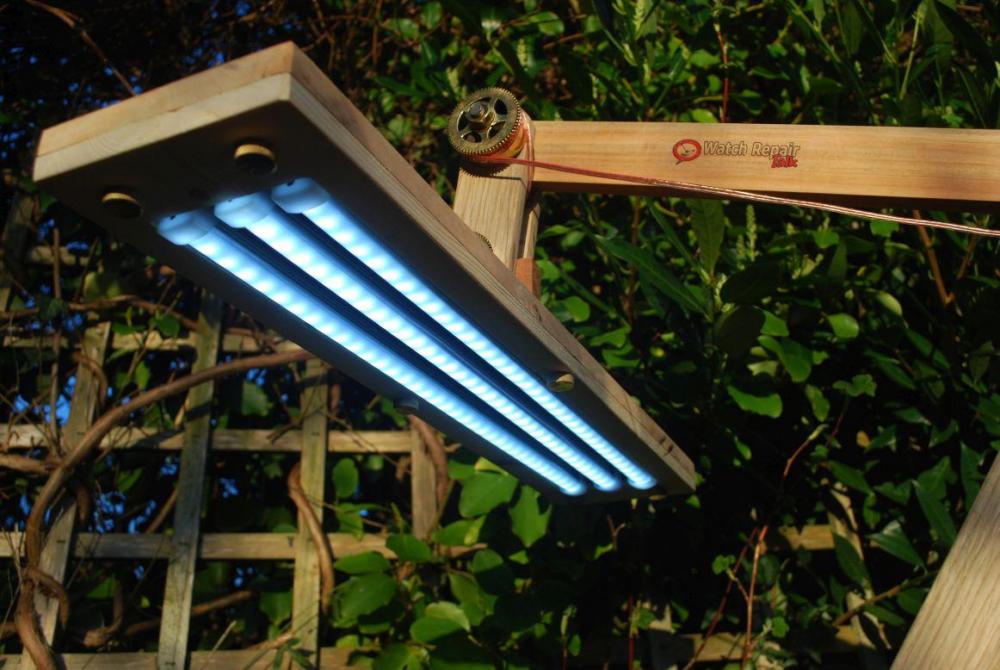
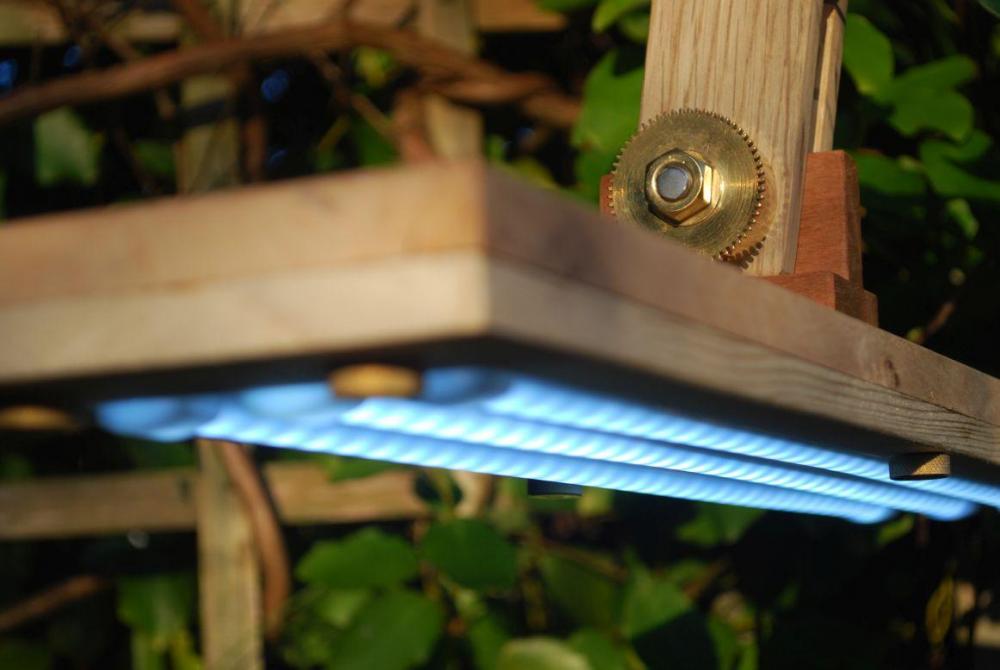
I have been busy with this bench lamp, I think I spent at least about 30 hours with it and even if it is not perfect I am pleased with the end result. Would I do it again? My immediate answer would sound like: Not a chance! Second thought: Maybe I would be happy to set up the tools and processes for a kind of a mass production. It was worth it economically as I have not spent much money on it, and it was worth it because I enjoyed bulding it and learnt? some new skills like knurling. Question mark is there because I am not sure if I learnt it, the result is again acceptable, but I dont really know how should the end result for knurling look like, when it is kind of perfect. I made, as always many mistakes during the process, blood was also shed when I tried to use my hand as a machine vice, and that spring barell tried to slice me up when I failed to hold it, instead it only could get some of my skins of one finger. Luckily my company sends me to regular first aid trainings so I could quickly apply an oily rug lying in the dust around my bench to the wound and carry on with the drilling. It also gave me the opportunity to suck some blood when I was hungry/thirsty. They say money is time so if you dont want to spend about 30 hours with sawing/planing/drilling/polishing/gluing/sanding/swearing and soldering you just could go to cousins and buy that led lamp which is a lightweight bench lamp with dimmer and you can even position it better over your work piece compared it to mine. I think this lamp will be a usefull addition to my bench from now on anyway. I used pallet and crate wood and you can see nail holes here and there and i left them there on purpose. I am going to add a switch to the base and I am in the process to decide how to lead that cable in a nice looking way still to be able to move the upper arm in and out if needed with the cable in place. Skills what were used: - some woodworking - some soldering - skip diving - time finding Tools what were used: - different kind of woodworking tools (planer and thicknesser/ chisels / sanding paper/ router / table saw / mitre saw) - angle grinder - pillar drill (used it for drilling and polishing) - laser printer - unimat 3 - cordless drill - and other tools like screwdivers / pencil / ruler / caliper / etc.. Materials what were used: - threaded stainless steel rods from the skip - copper bolts and nuts and washers from the skip - 2 core speaker cable (i had from previous project) - spring barells (i had a box of them / bought them from eBay earlier without knowing what to do with them) - a BT hub from the skip for the 12V power supply and the connector - I bought 5 led strips ($10.78) but only used 3 of them as the power supply was rated to 1.5A and one strip is using about 400 mAmps. - used pallet (collected earlier for other projects and firewood) - used building materials crate (collected earlier for other projects and firewood) - wood glue (had it, its like bread and butter you need it every day ;-) - gel medium for the photo transfer (had it from earlier project) - polishing material (had it) - some wood screws (had them) - bought a switch for £3.64 If you ever thought about what skip diving is, I can teach that to you, but be prepared that you have to give up some of your dignity. I am a professional skip diver and I can stay there longer than 10 minutes! Years of practice!


 1 point
 -
Outstanding .You just took a practical look at it, rubbed your brain cells together and came up with a plan. I use synthetic motor oil as well. It is perhaps "improper"but it does work.I often wonder if "watch oil"isn't just mobil 1.1 point