Leaderboard


Popular Content
Showing content with the highest reputation on 12/17/18 in all areas
-
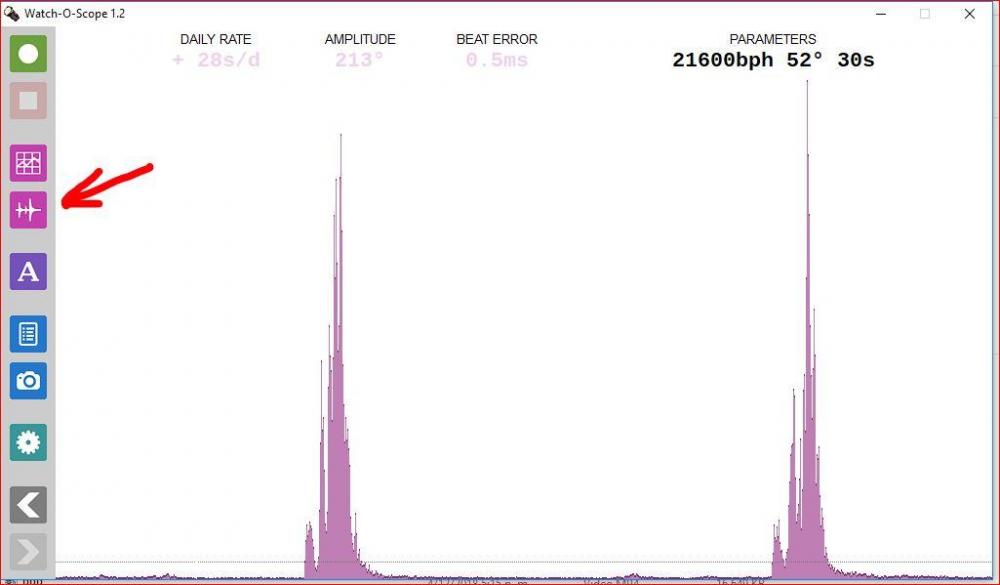
So I managed to get everything together and got my first readings using a standard stereo pre amp I bought for a turntable several years ago. Sadly i still didn't manage to get my diy microphone preamplifer kit to work (the one i mentiont in one of my earlier posts). At the moment I think about ordering a already built preamplifier board but I do not have the qualifications to judge with would do the job (or at least would lead to better results then with my current solution. That's why I am again counting on your help. There are some pretty cheap options but I don't know how to judge the all over amplification from the specifications given. My current preamp has the following technical specifications: Input Impedance 100kOhm, 5mV, Output Impedance 100kOhm, 250 mV, S/N-Ratio: >50 db, 12V DC, 100mA The options I'm most into at the moment is something like that cause its cheap and and may be an improvement (however I'm not sure about that) https://www.ebay.de/itm/TDA2030A-Audio-Power-Amplifier-Board-15W-AC-DC-12V-Assembled/292336674126?hash=item44109fa54e:g:nUAAAOSwKrhVZbo1:rk:28:pf:0 or even simpler: https://www.ebay.de/itm/TDA2030A-Audio-Power-Amplifier-Board-15W-AC-DC-12V-Assembled/292336674126?hash=item44109fa54e:g:nUAAAOSwKrhVZbo1:rk:28:pf:0 There are more fancy options like https://www.gearbest.com/other-accessories/pp_009478010615.html?wid=1433363 or https://www.gearbest.com/other-accessories/pp_009478010615.html?wid=1433363 but I have absolutely no clue if they would be suitable for the task at hand. The thing is that (as you surely have noticed by now) do not know the first thing about electronic. But I'm eager to learn, I just don't know where to start. So thank you for your time cleaning my mess. On the bright site as I said, I managed to get my first signals and I'd link to share some pics of that: This is my set up at the moment and some readouts from two of my watches (I hope it's okay to post the watch-o-scope screenshots). Today I broke the piezo trying to replace the cabels between it and the jack with shilded ones and now I have to get some more piezos to get my DIY-timegrapher running again. Let me know what you think and thank you very much!2 points
-
Round mineral glasses are available in all sizes for little money. Thickness starts at 0.8mm afaik. They are glued in or pressed using a gasket. Window must have 90 deg edges. A too thin back can be an issue, test before cutting! Frank2 points
-
For those that are interested in clocks. Here is a month duration Longcase clock. In case you have never seen one. Looking at the movement you can see how much bigger some of the wheels are in order for the gearing to be able to last a month on one single full wind. It’s a nice clock. https://www.ebay.co.uk/itm/Grandfather-Clock-month-duration-strikes-hourly/264092034953?hash=item3d7d1ca789:g:4goAAOSwfgRcDm2e1 point
-
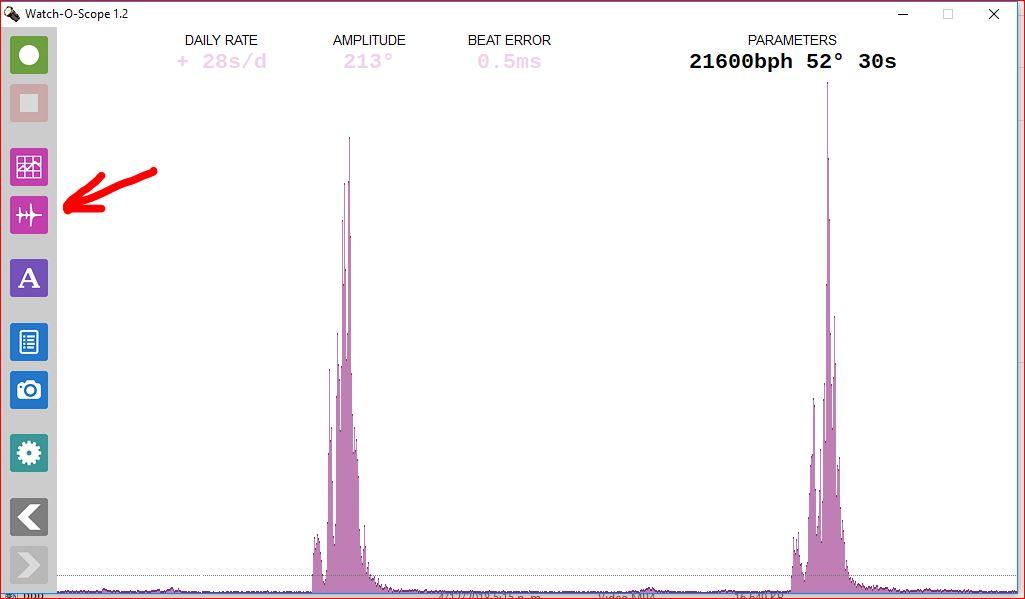
Good job Eland. Congratulations, you are doing a good job. And do not despair about the broken discs ... I have already lost count of how many I have destroyed, due to excessive heat, excessive force, etc. It could be that my response is a bit hasty, but I'm sure you do not need any of the devices that you indicate in the links. they are all POWER AMPLIFIERS. And what you need is a pre-amplifier. And seeing what you used in your project, I would consider that what you need is accurate and nothing more. It is possible that some modifications could be made but they would be minor. I would like to ask you to share an on-screen capture of the waveform to determine the level of the signal you are getting. I send you an example of what I am requesting.
 1 point
 -
One observation I made is that very small movements are less forgiving than larger ones when it come to pieces of lint, etc.1 point
-
Flatline______________________ J1 point
-
Darn.. no worries just drove it over with mt car...1 point
-
the watchmakers i have known to have done that, are not talking. since it is a case mod., try several ideas, let us know. good luck, vin1 point
-
I think if you try to shrink fit it it will break, if not upon installation then down the road from being under tension. As above, a gasket or glue are the usual ways to install. Be wary when cutting away the inside of your back as you get toward the tapered sides you will lower the level of the glass, possibly crashing into the movement. On one odd customer request I once added a pressed in stainless ring to the opened back which blended in and added the necessary height.1 point
-
Its a m/s gauge. I had one made of brass. I had a chart so I only used one side, the circles I think are for sizes of barrels.1 point
-
It is not like a well you would have if the pivot were jewelled. Besides those circles are so big if you filled them with oil you would flood the plates and the movement would not work correctly. He is a new member and at a guess inexperienced. BobHadababyitsab, no question is dumb.1 point
-
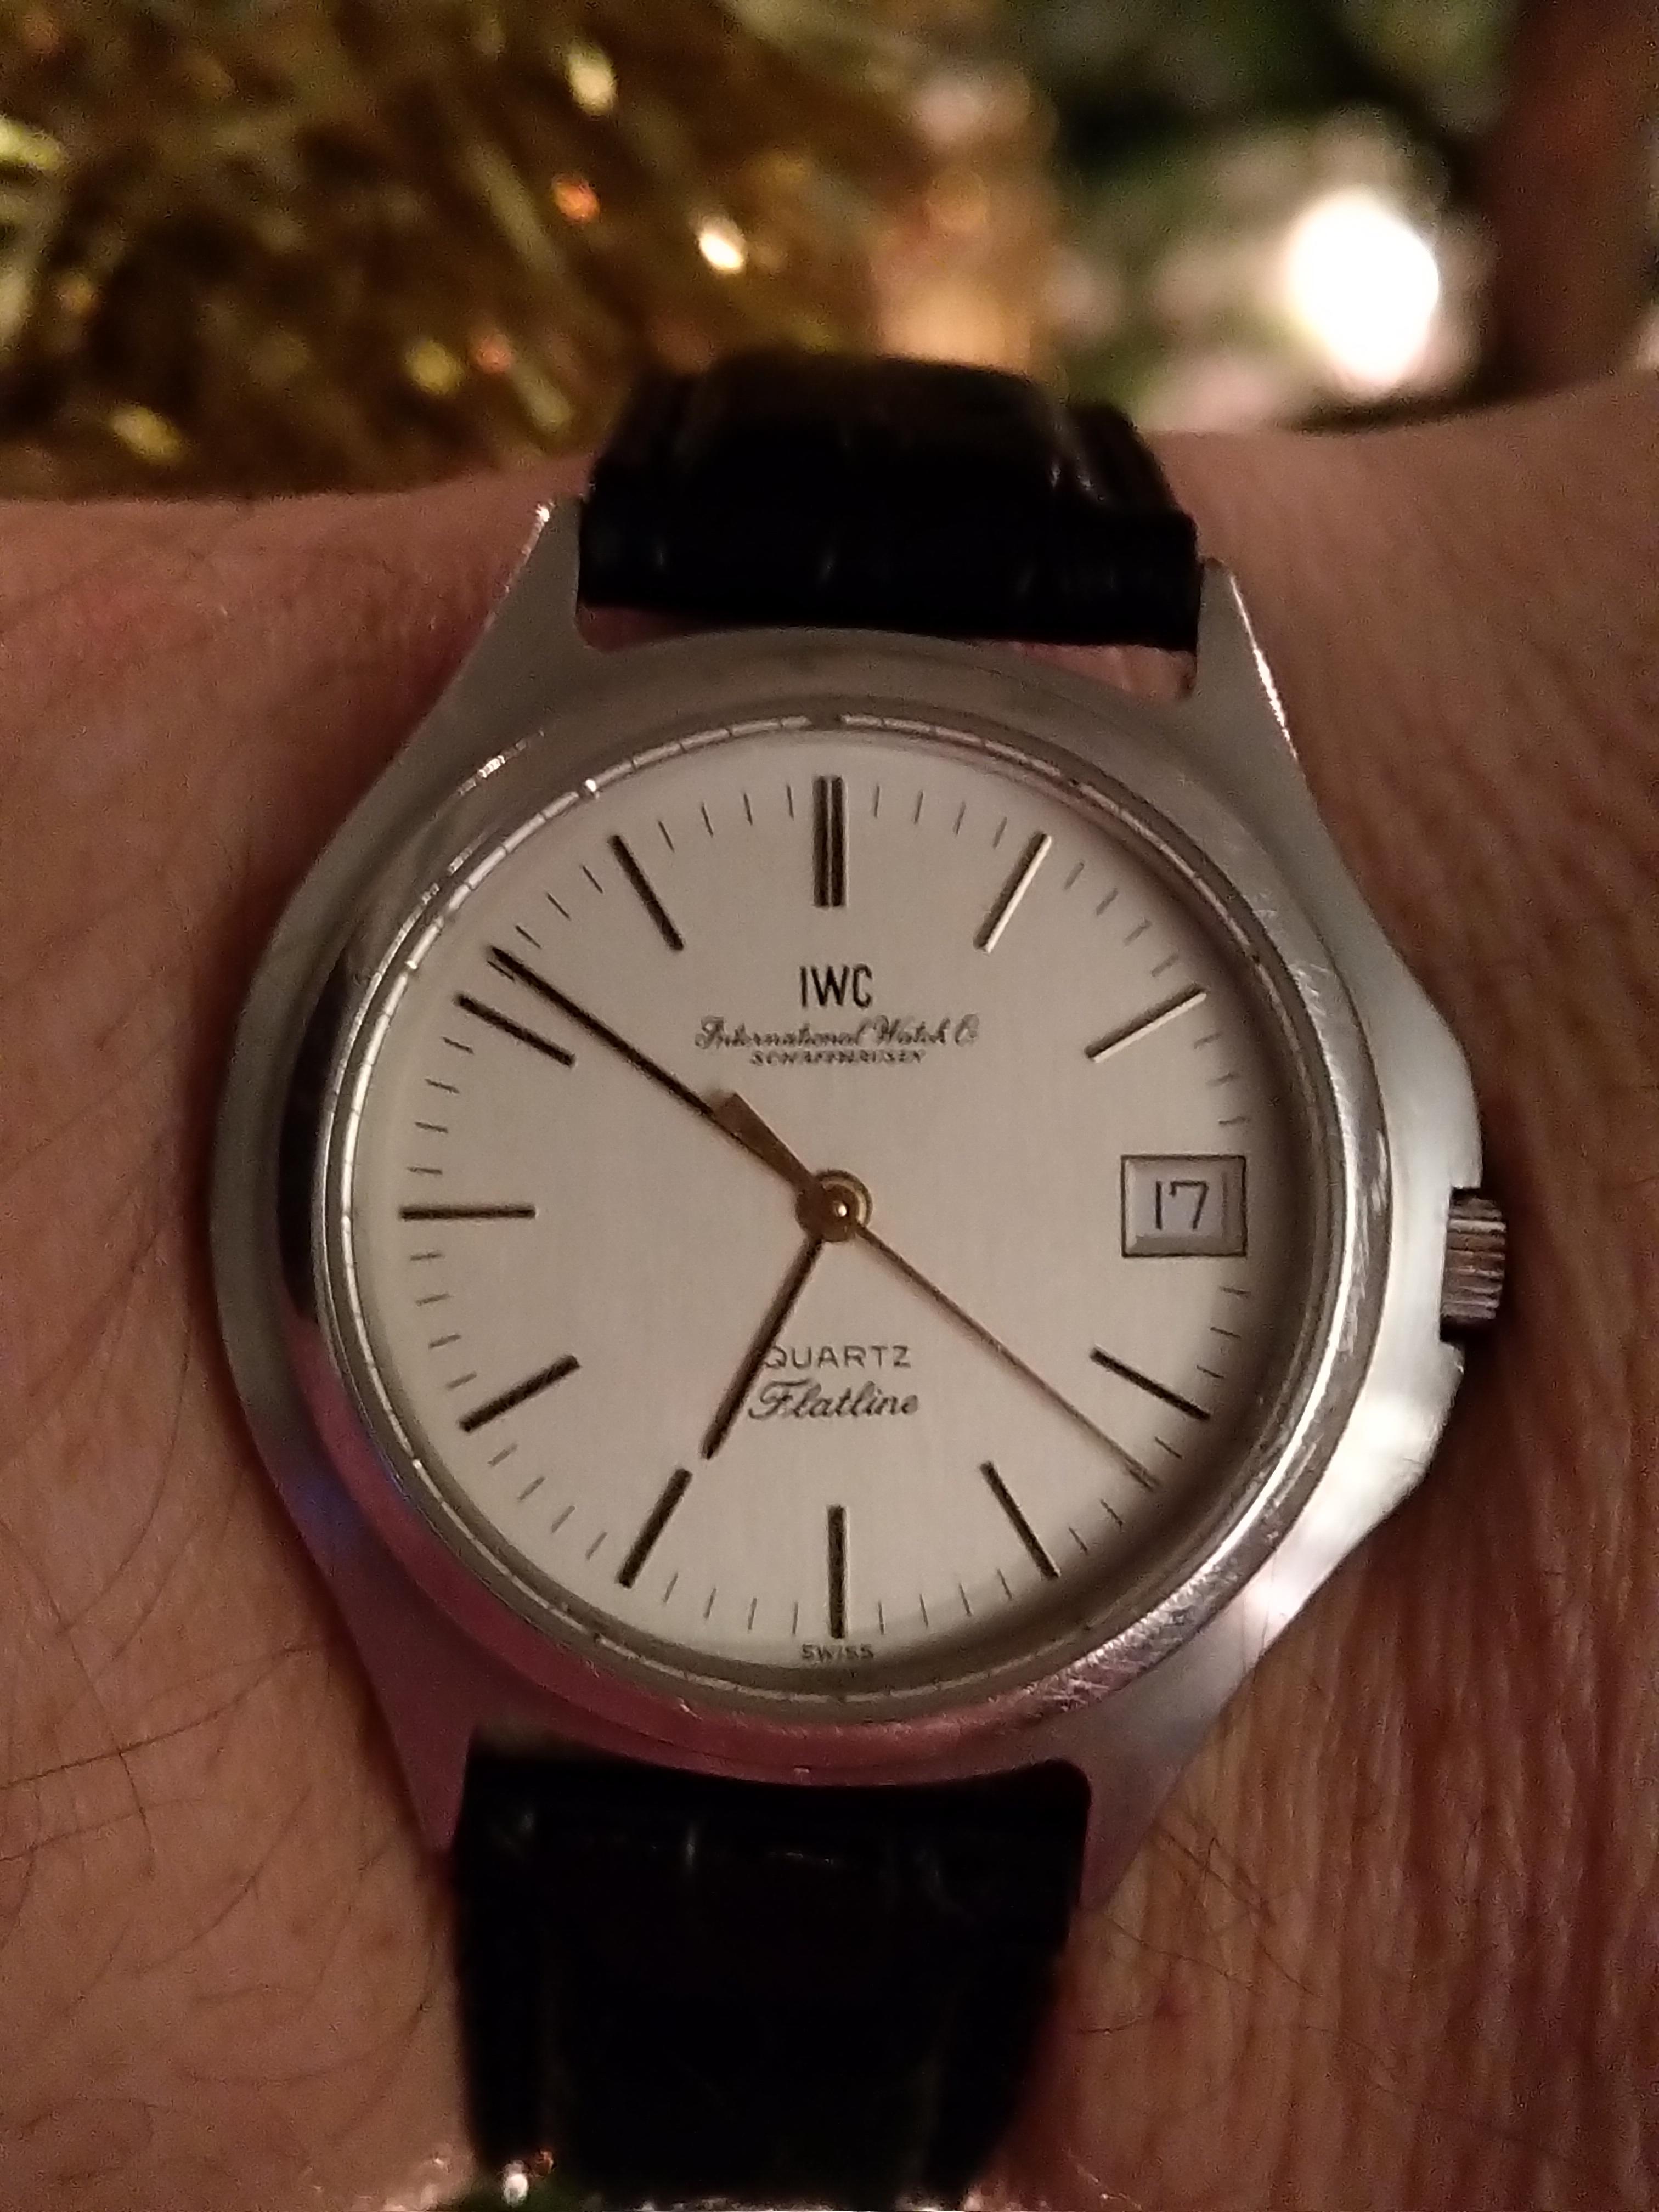
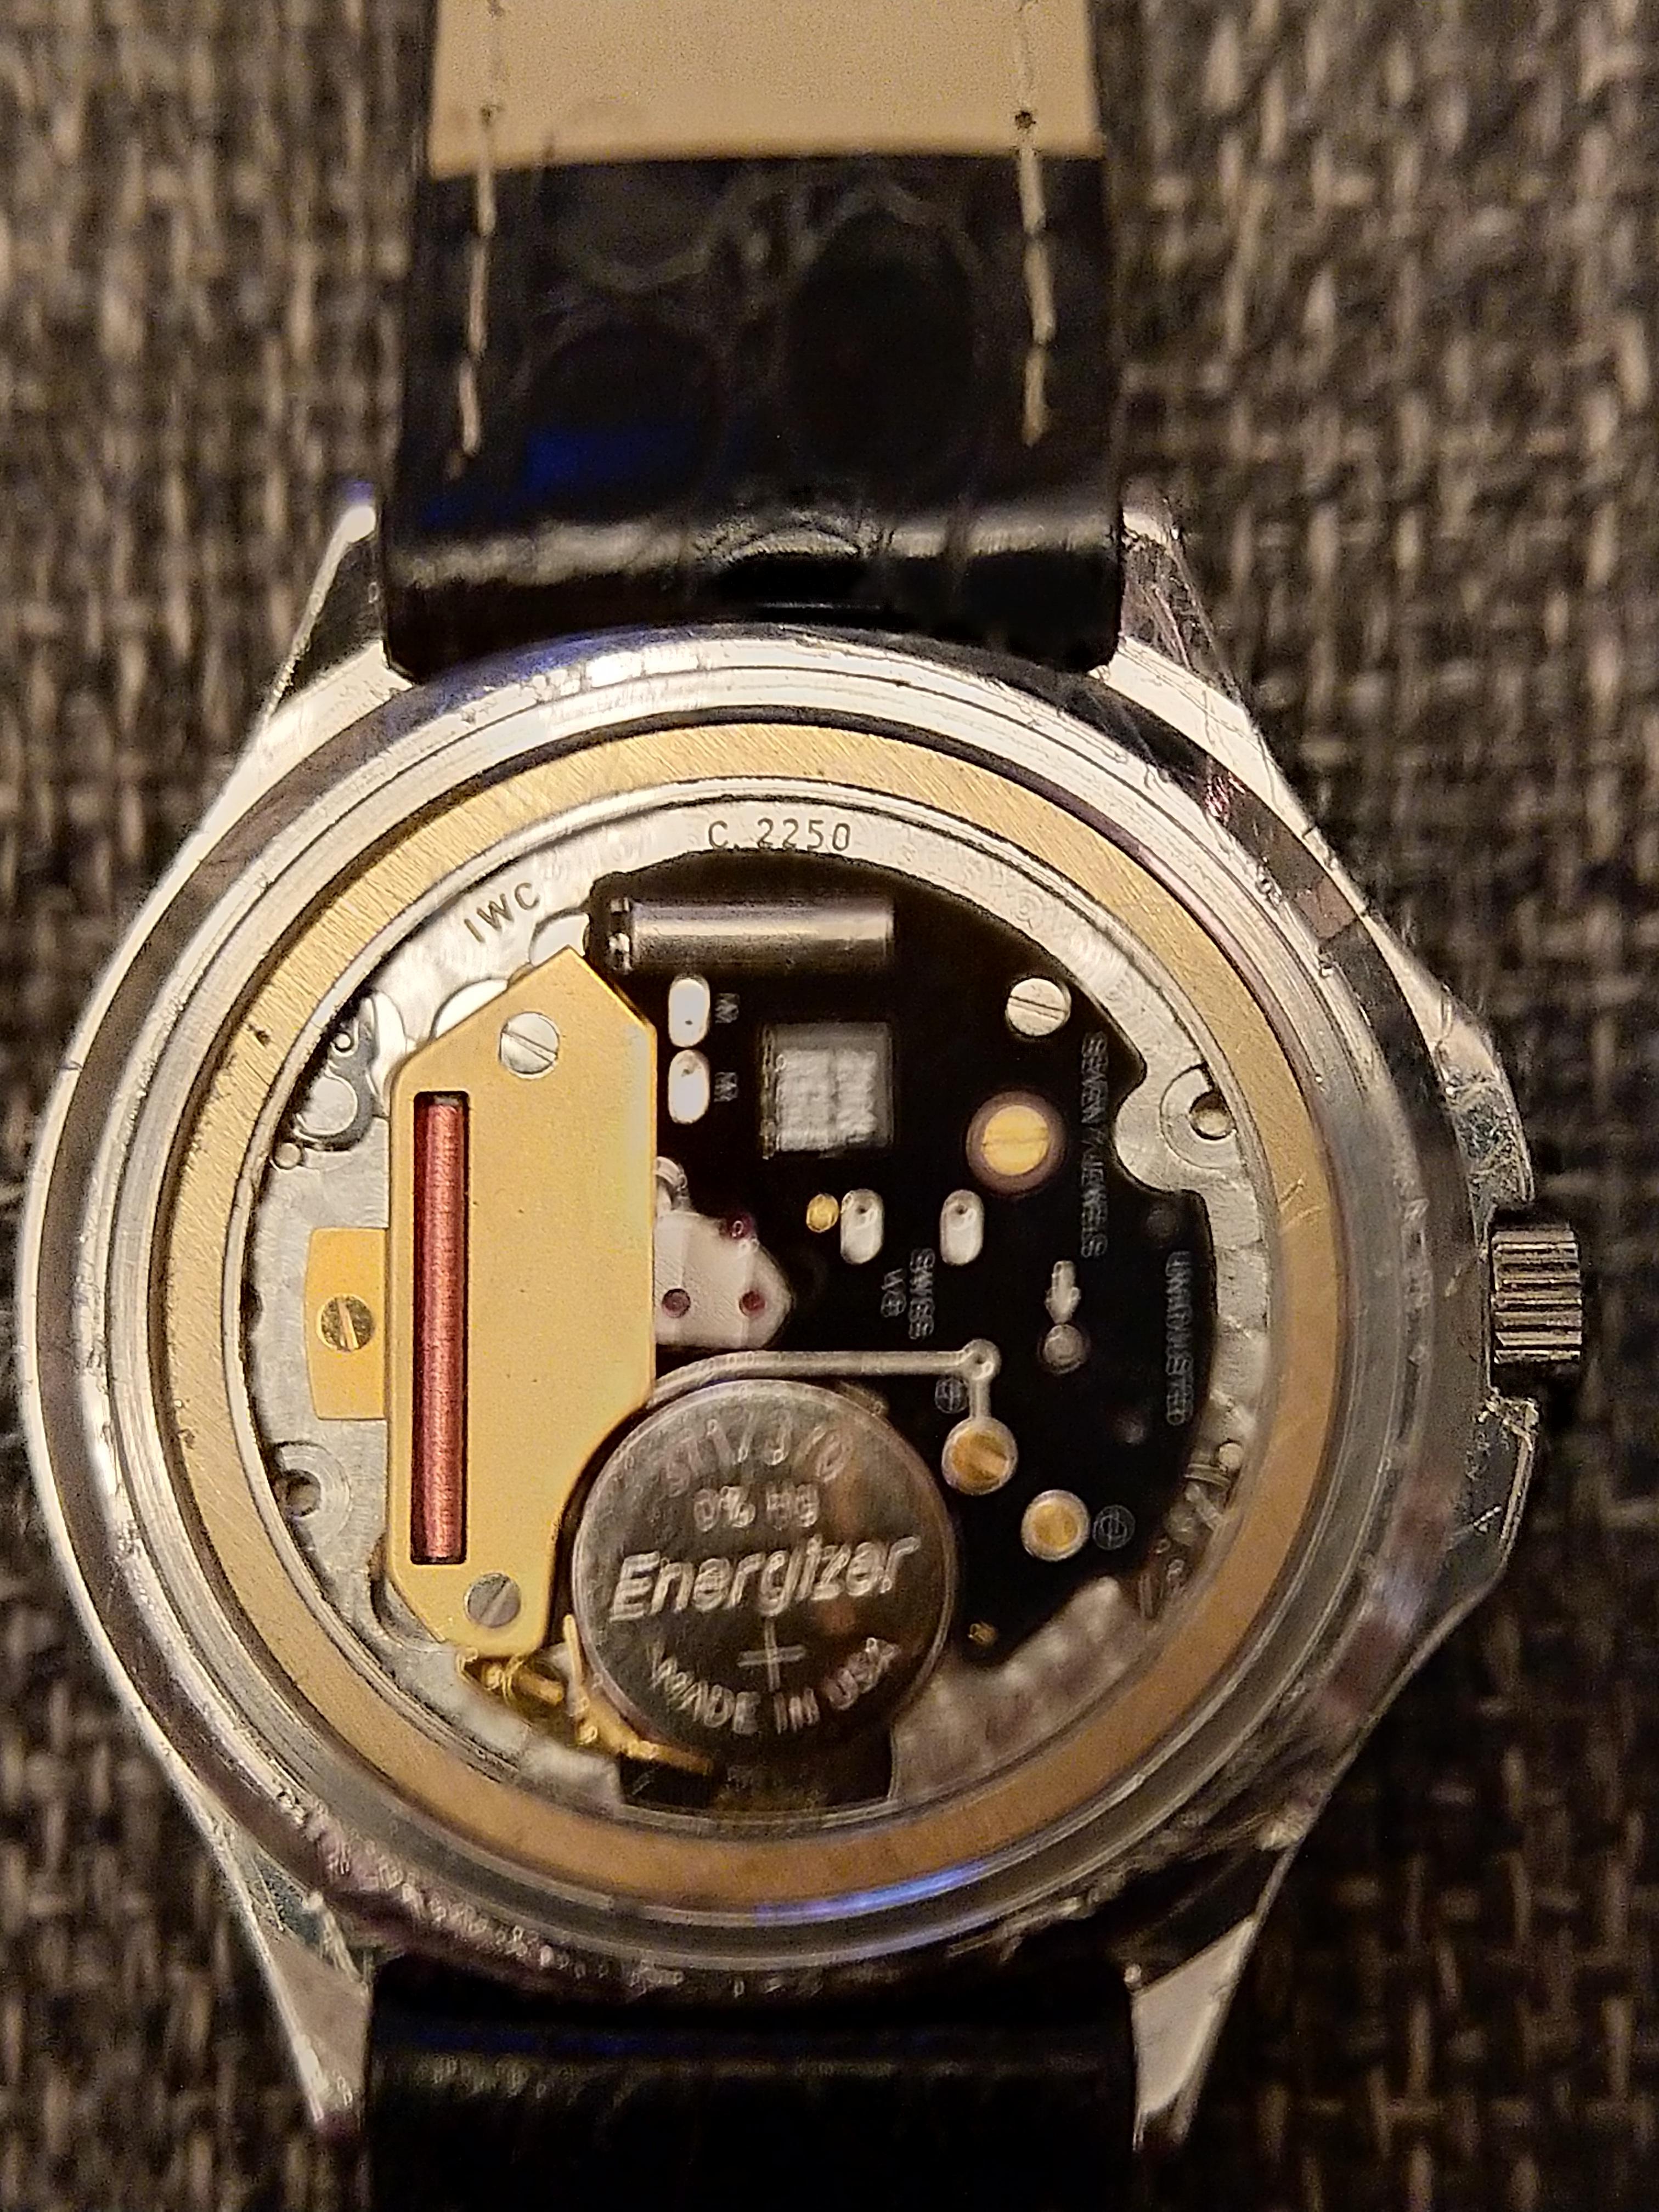
Here comes a surprise IWC Shaffhausen Watch Co.. Flatline Quartz.. Have I gone over to the dark side.. No curiosity killed the cat but not me, something with the high end quarts still resembles an mechanical movement, it just misses an escapement and balance otherwise you find a 7 juvel train bridge and a nice movement work. The powerhouse is an IWC C.2250 with the stamp of V8 promising an roar when applied on the wrist. I have seen the V8 sign is associated with Tissot but it pops up on al the modern quarts movements and mechanical movements I have looked at lately, what does it stand for?

 1 point
 -
Yes you should oil. The trick is movements like the one showed do not have oil wells. So be careful not to over oil, You do not want to flood the plate, so make sure it doesn't come out over the pivots circle. The tiniest amount of oil on the pallet pivots.1 point
-
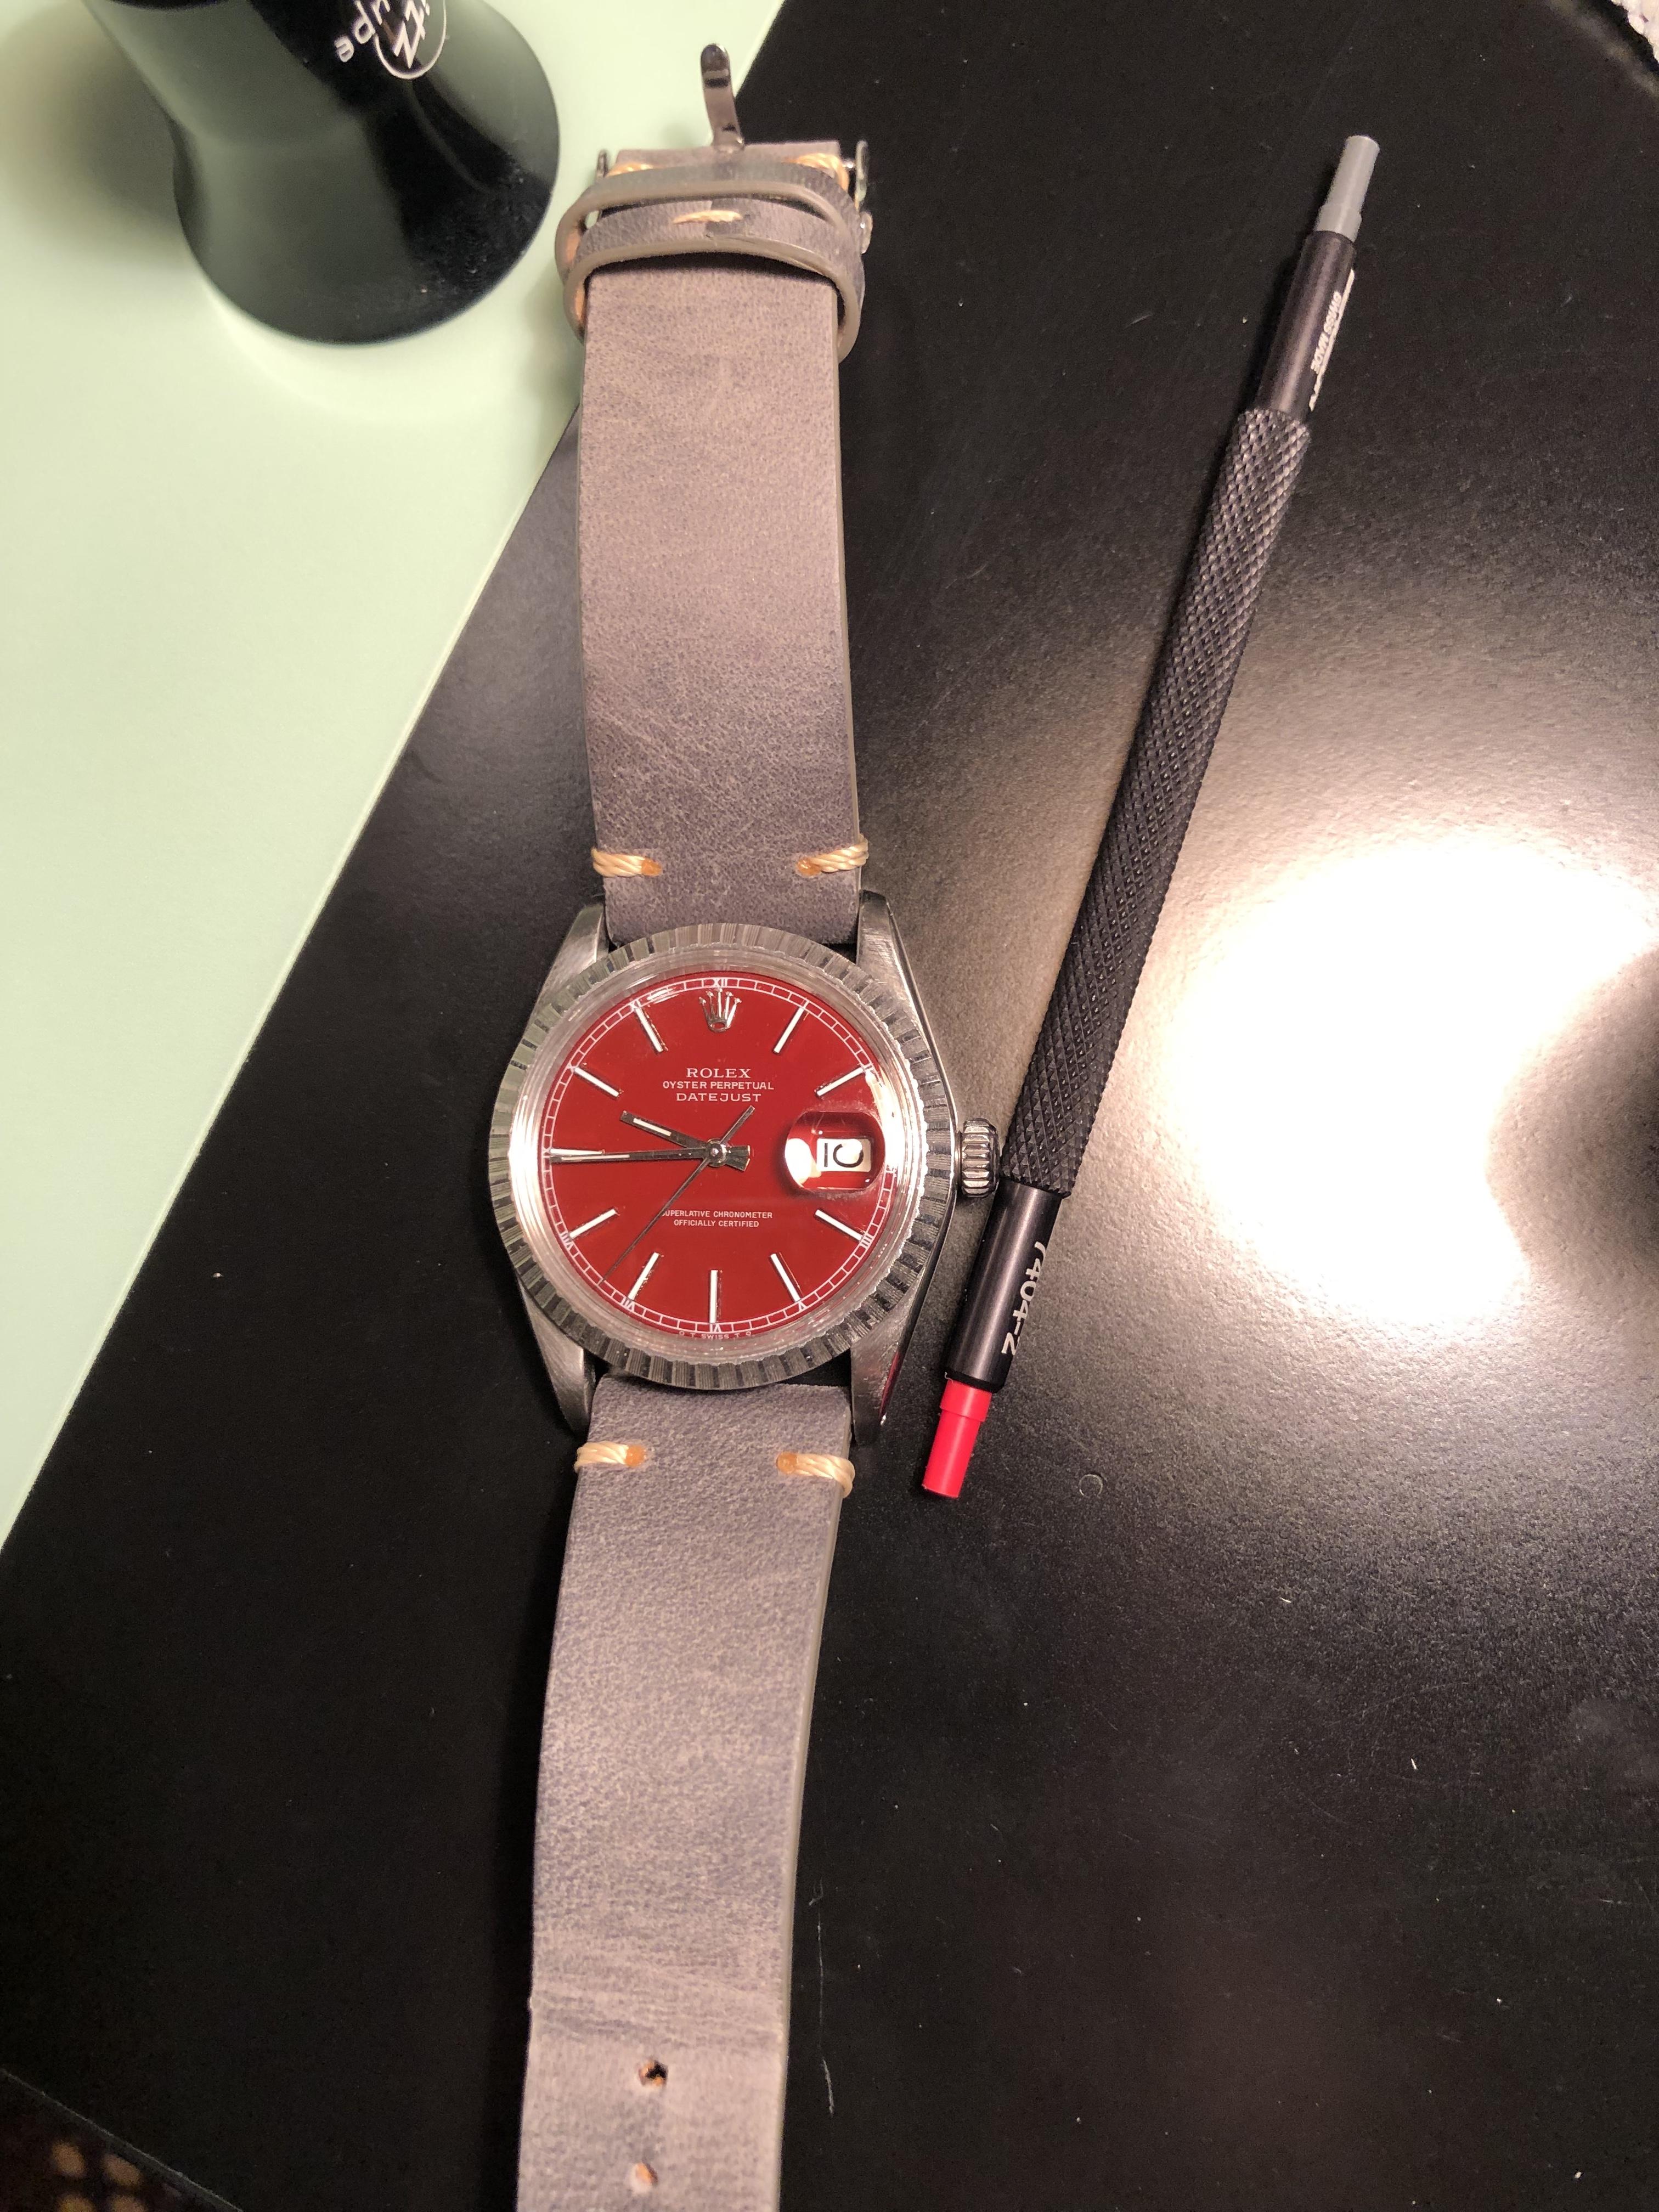
Manodero and anilv, Thanks so much for looking at my intro and commenting on my watch! I apologize for taking so long to respond here! I won’t let that happen again! I’m full blown committed to watchmaking these days and am actually going to switch careers and jump into watchmaking full time at the beginning of 2019. I’m so excited as I am so bored with being a software consultant for a large fortune 500 company, although it has repaid me with a comfortable life which I am truly greatful for. To answer your questions about how I made that dial I’ll list out the steps I took, but how you paint on the “Rolex oyster perpetual Datejust... superlative chronometer officially certified” is something that you will have to choose how to do on your own. You can have a dye made of the dial with the writing and use it as a trace, you can use an engraver and punch the letters a bit more into the dial so that when you paint your first layer you can still see the outline which is what I did. I’m sure there are several more ways. Step 1) if you are working with a Rolex dial and I suggest you do so so you can form this template, take a sheet of paper and trace the dial, at exactly each hour and each marked minute, draw a line from it on the paper so that at the end your paper looks like a sun with a bunch of rays but make sure you make the lines longer where the hour tacs are. Now take a compass tool and put the pin in the center of the dial and stretch the compass to the inner ring of the minutes tics. That is your distance that you need on your dial so make that ring on your template sheet. Do the same for the outer ring. 2) I took an engraving tool and went over the letters on the dial with it so that they were deeper set into the dial. I also went over carefully and this takes a long time.. the inner and outer rings of the minutes area and engraved each minute tic. 3) clear the dial by picking off the tacks and the Rolex crown insignia with a tweezers. Clear the paint by using solvent or by using a professional jeweling hand held polisher or sander if the dial is metal. Take a brass brush and lightly remove the metal. Make sure you do not go too deep. Try to make it as even as possible. 4) place a toothpick in the center of the dial, suspend the toothpick (I did it with a clamp that usually holds wires that need to be soldered), make sure no dust in on the dial, and spray acrylic spray paint onto the dial making sure to hit the dial from directly above and spray from 6-10 inches away. Make about two quick sprays and let it dry. Take a look and make sure no dust particulates are stuck in the paint. Also because you engraved the letter make sure you can still see them as the paint will be dented at the lettered spots. 5) use acrylic paint and micro brushes and paint the letters in. Do not paint in straight lines. Instead make small dots.. this takes practice to get right. Because the dial is a bit dented in those spots the letters will not look raised from the rest of the paint.. you wouldn’t think it mattered since you have to clear coat it at the end but it does make a bit of a difference to me. The small dots will Give you a better idea of how straight your line will be. Connect the dots when you’re confident of your line. You need to do this with a 15-20x loupe or a microscope. If you make a mistake you have to soak your dial in solvent and start again or decide to live with it. Let the letters dry overnight. 6) reaffix your dial with a toothpick in the center and suspend it. This time use a clear coat that a) dries fast b) is heat resistant c) will not yellow in the sun d) will not crack for many years. I use spraymax 2x glossy clear coat. Spray just once and let dry. 7) You can buy Rolex crown stickers and you can also use the original Rolex crown that was in the dial but if you do you need to put two pieces of peg wood into the holes of the spot where the crown is and work with them in the holes each time you spray. You can also purchase diamond sticker tacs for watch dials. I use these because it’s way easier than putting peg wood into each tack hole in the dial. Put the dial in your template and stick each diamond stick exactly where the hour markers are. It’s coming together now right! 8) I usually spray one more spray of clear coat onto the dial when I’m done setting the diamond stickers. This ensures me that the hour marker diamonds hand on tighter. This last spray must be thin however because you can get bubble type weird bunches of clear coat at the edge of the diamonds. Here is a picture of a dial I did with ticks but this took a really long time and I made a mistake when I was writing in the letters but I lived with it. Btw I’ve seen dials just like mine online actually for sale by an Asian company. They are not too expensive but the process of purchasing them is a pain. It’s a western union type of thing.. Personally I’m Leary of the whole western union deal but can see why it’s needed. (The dial is kind of oily sorry) I’ll write out instruction for printing dials tomorrow! Hope this helps. Again there are many ways to copy the letters and get them into the dial! You just have to research!
 1 point
 -
BINGO !!! I’m 90% certain this movement is a quartz Timex M902 Does it looks like the pic below ? Envoyé de mon iPhone en utilisant Tapatalk1 point
-
I certainly didn't intend to gore anyone's sacred ox by my post. Neither was I attempting to sway anyone's opinion. I would sooner attempt nailing Jell-o to a wall. Any hobby has start-up expenses whether it be golf, scuba diving or horology. I have tools and I do alter bracelets to fit me, change crystals and a whole host of other tasks that are within my capabilities. Tearing down a mechanical movement, cleaning it and correctly reassembling it isn't on that list of "can dos" though. For me, the answer was to retire my Seiko and purchase an Invicta 7044 at a steep seasonal discount. I paid roughly 25% of the quoted cost of the repair to the Seiko for a new, in the box, watch with a full guarantee. It has the SII NH36A movement, a 40mm body size and a host of other features that worked for me. I can't feature being without one mechanical watch in my modest collection. I too am old enough to recall the introduction of quartz watches. Actually, I'm old enough to recall the introduction of Seiko watches to the US. For anyone interested, Jerry Della Femina, a NY advertising executive wrote a book about being the ad agency chosen to make the market introduction for Seiko. The title of his book is "From Those Wonderful Folks Who Gave You Pearl Harbor: Front-Line Dispatches from the Advertising War. You can imagine the issues facing the introduction of a consumer product from a former enemy in a world war. Further, much like today's Chinese reputation for quality, Japanese products were considered inferior and disposable. We may have been down this particular road before, eh? I found this forum via Mark's YouTube videos. Aren't they something else? I do repair my quartz watches btw, as I've had extensive training in electronics and they pose no mysteries for me whatsoever. I'll post about my experience with a Ronda 715 movement repair in another post at another time.1 point
-
I know what you are saying, I spent a lovely day bringing a pinset pocket watch back to life the other day, a fully polished movement and case sat working away and kept time to within +5 mins over 30 hours in dial up position, ok not cosc standard but hell I remembered later on that I had forgotten to oil 2 of the train wheels whoops!! That's a job for the next couple of days. Anyway my point is this, although working away on watches, pocket watches and now clocks is very satisfying and very relaxing and very rewarding could you do it everyday and make enough money to pay your mortgage bills and everything else. I learnt that turning a hobby into a business is very hard and to be honest I'm keeping mine as a hobby.1 point
-
Well that's sorted, I now know exactly what I will be buying my mother in law for Christmas!1 point
-
I have a 31 coming in the post. Hope it fits!1 point
-
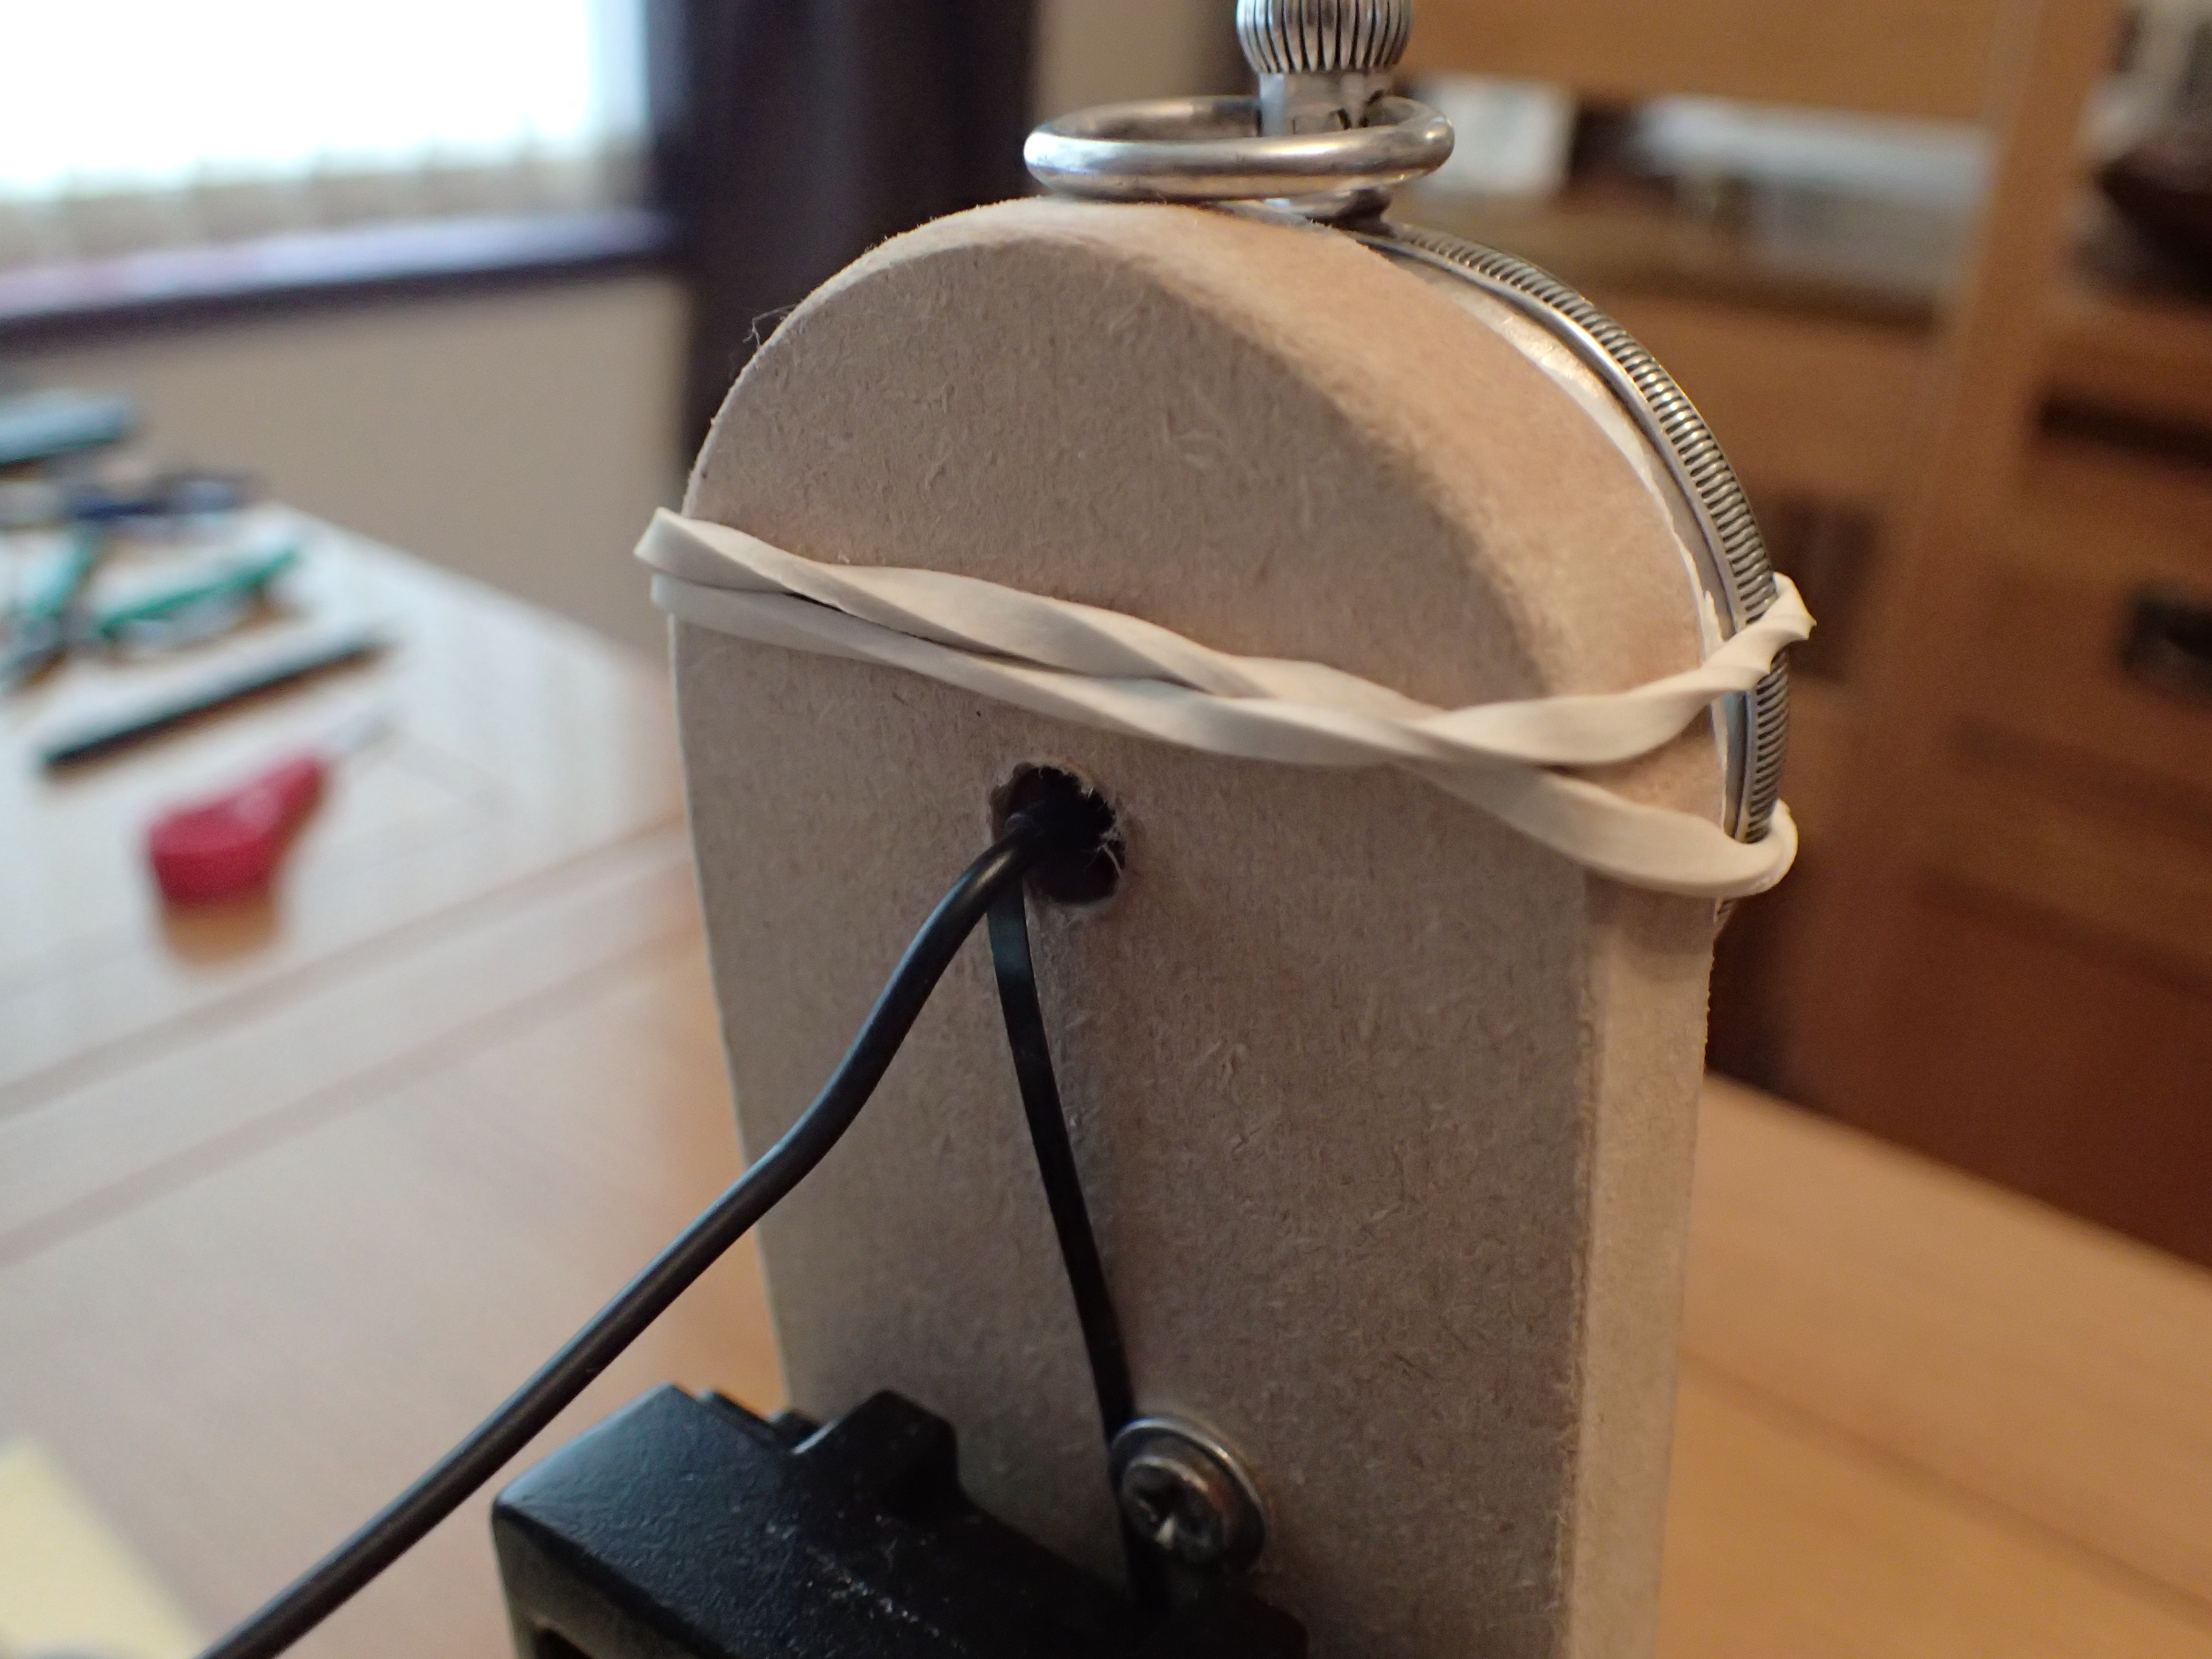
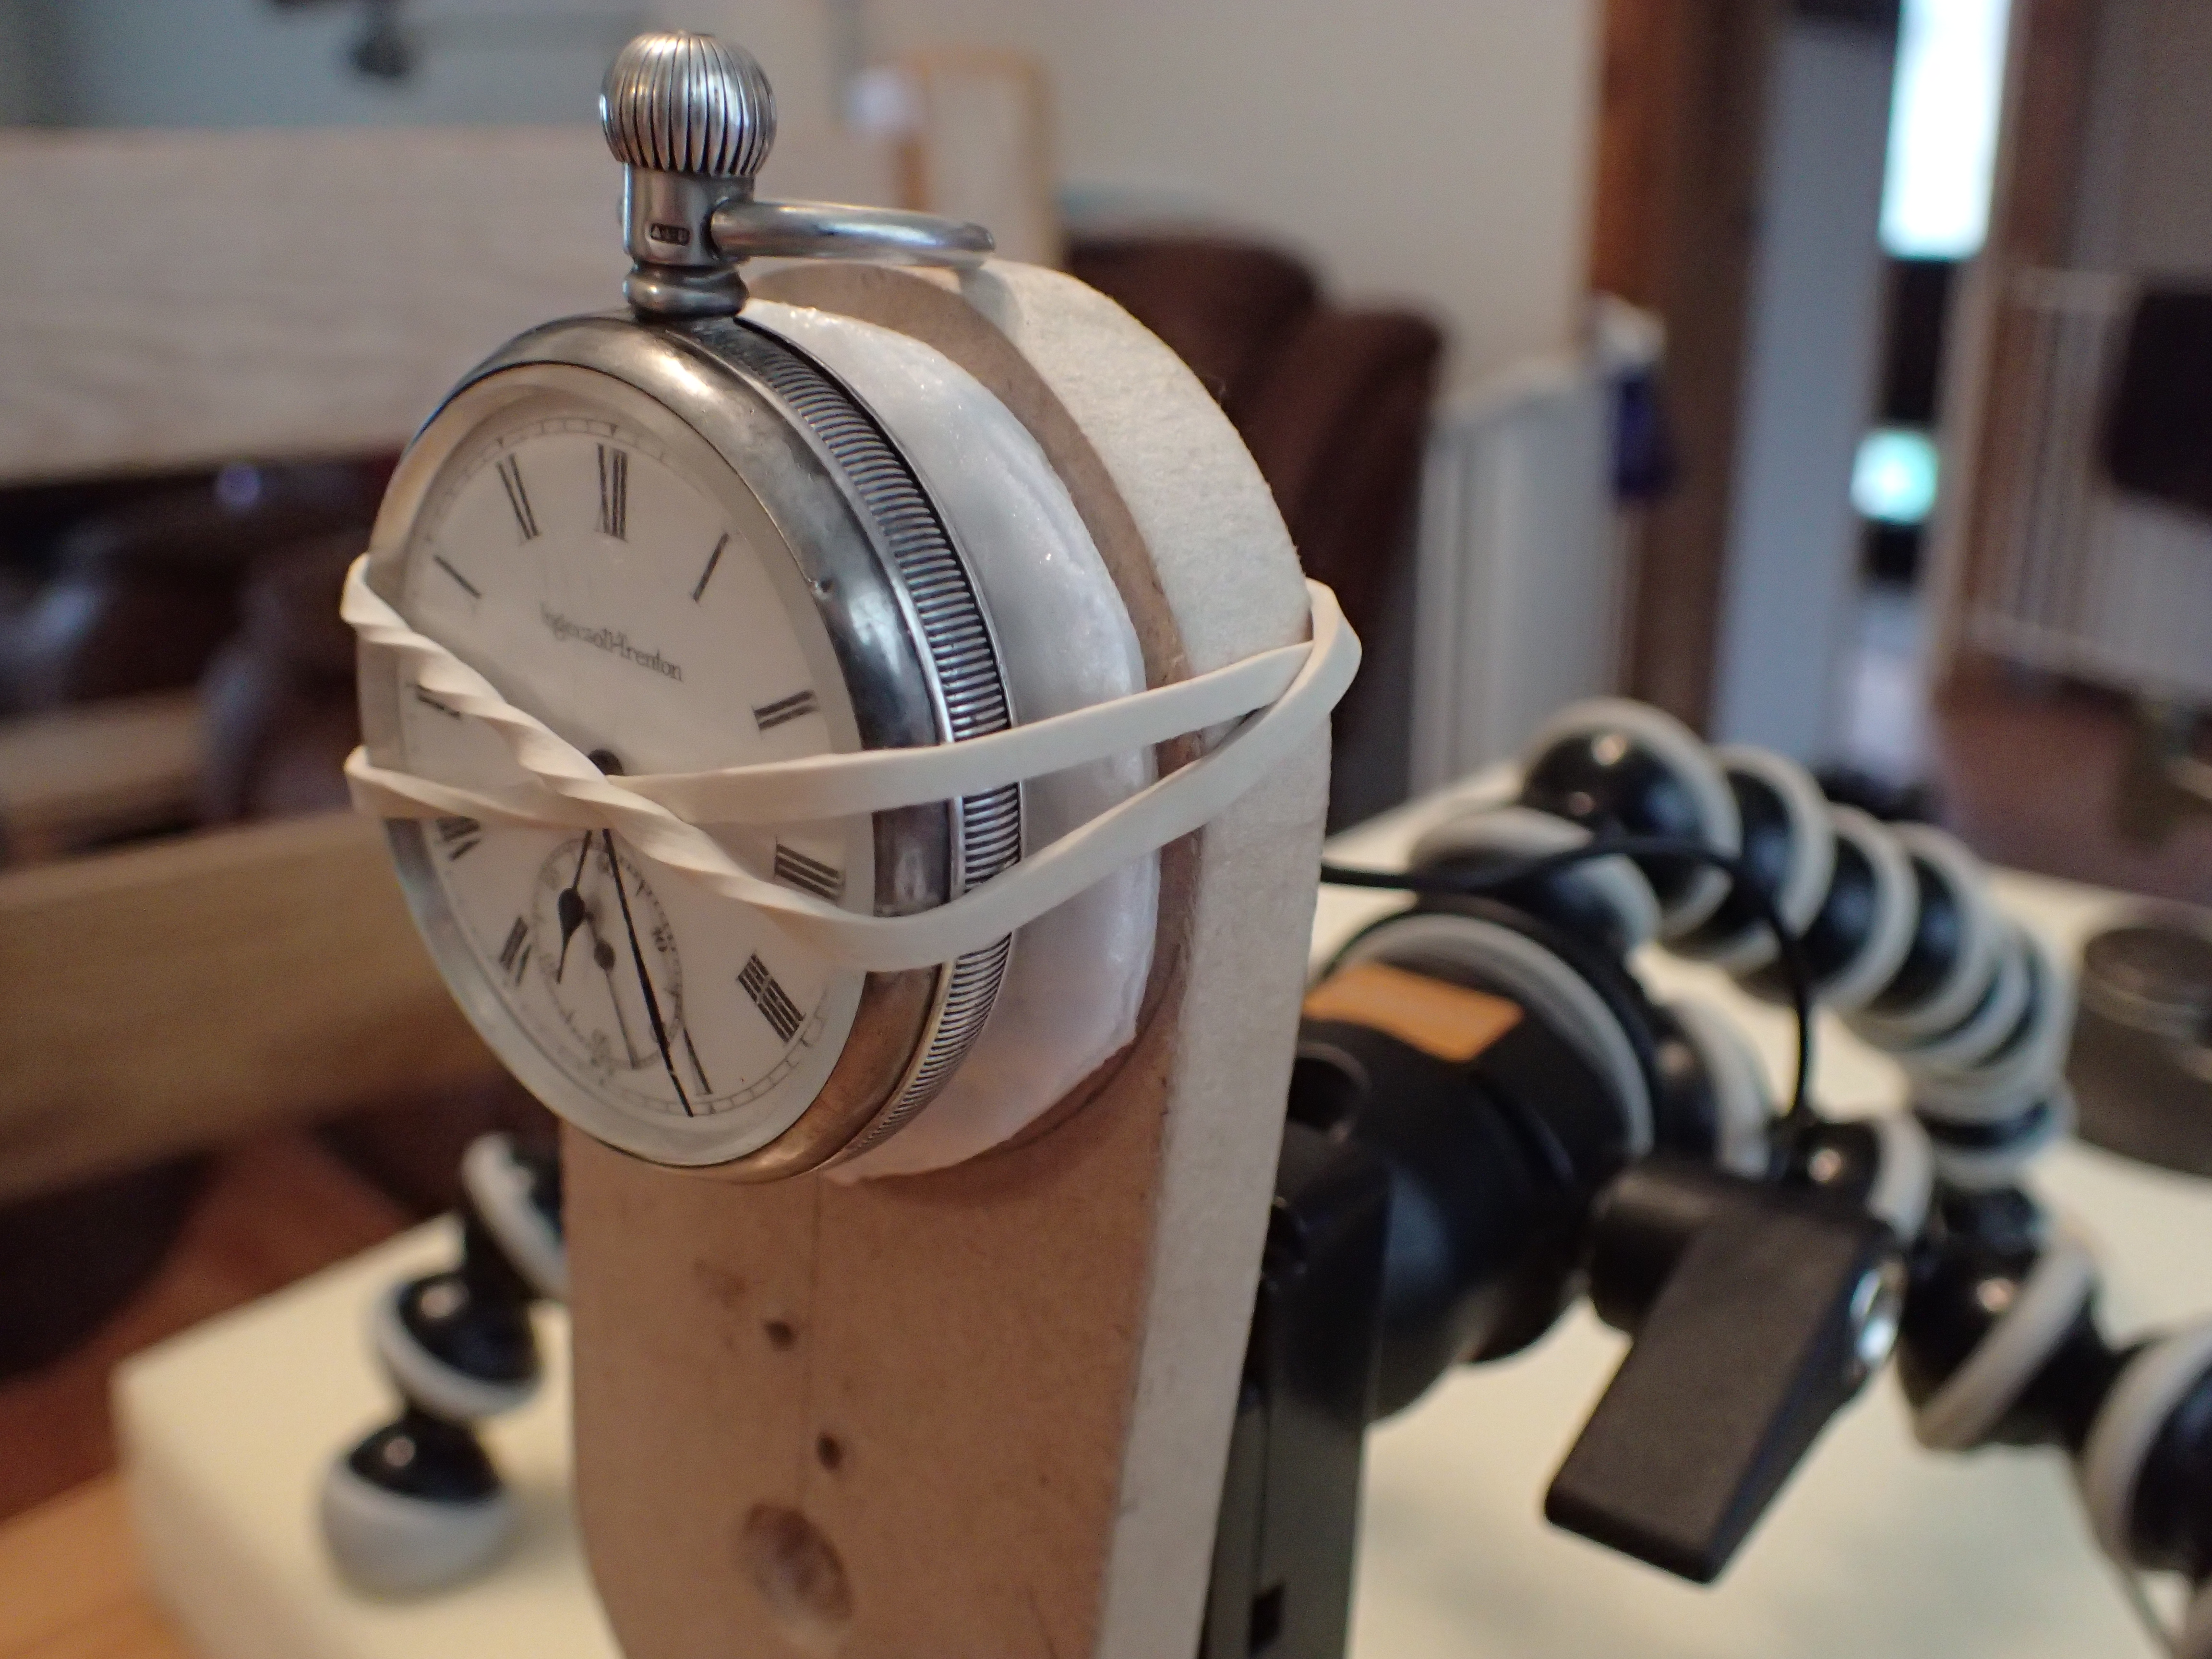
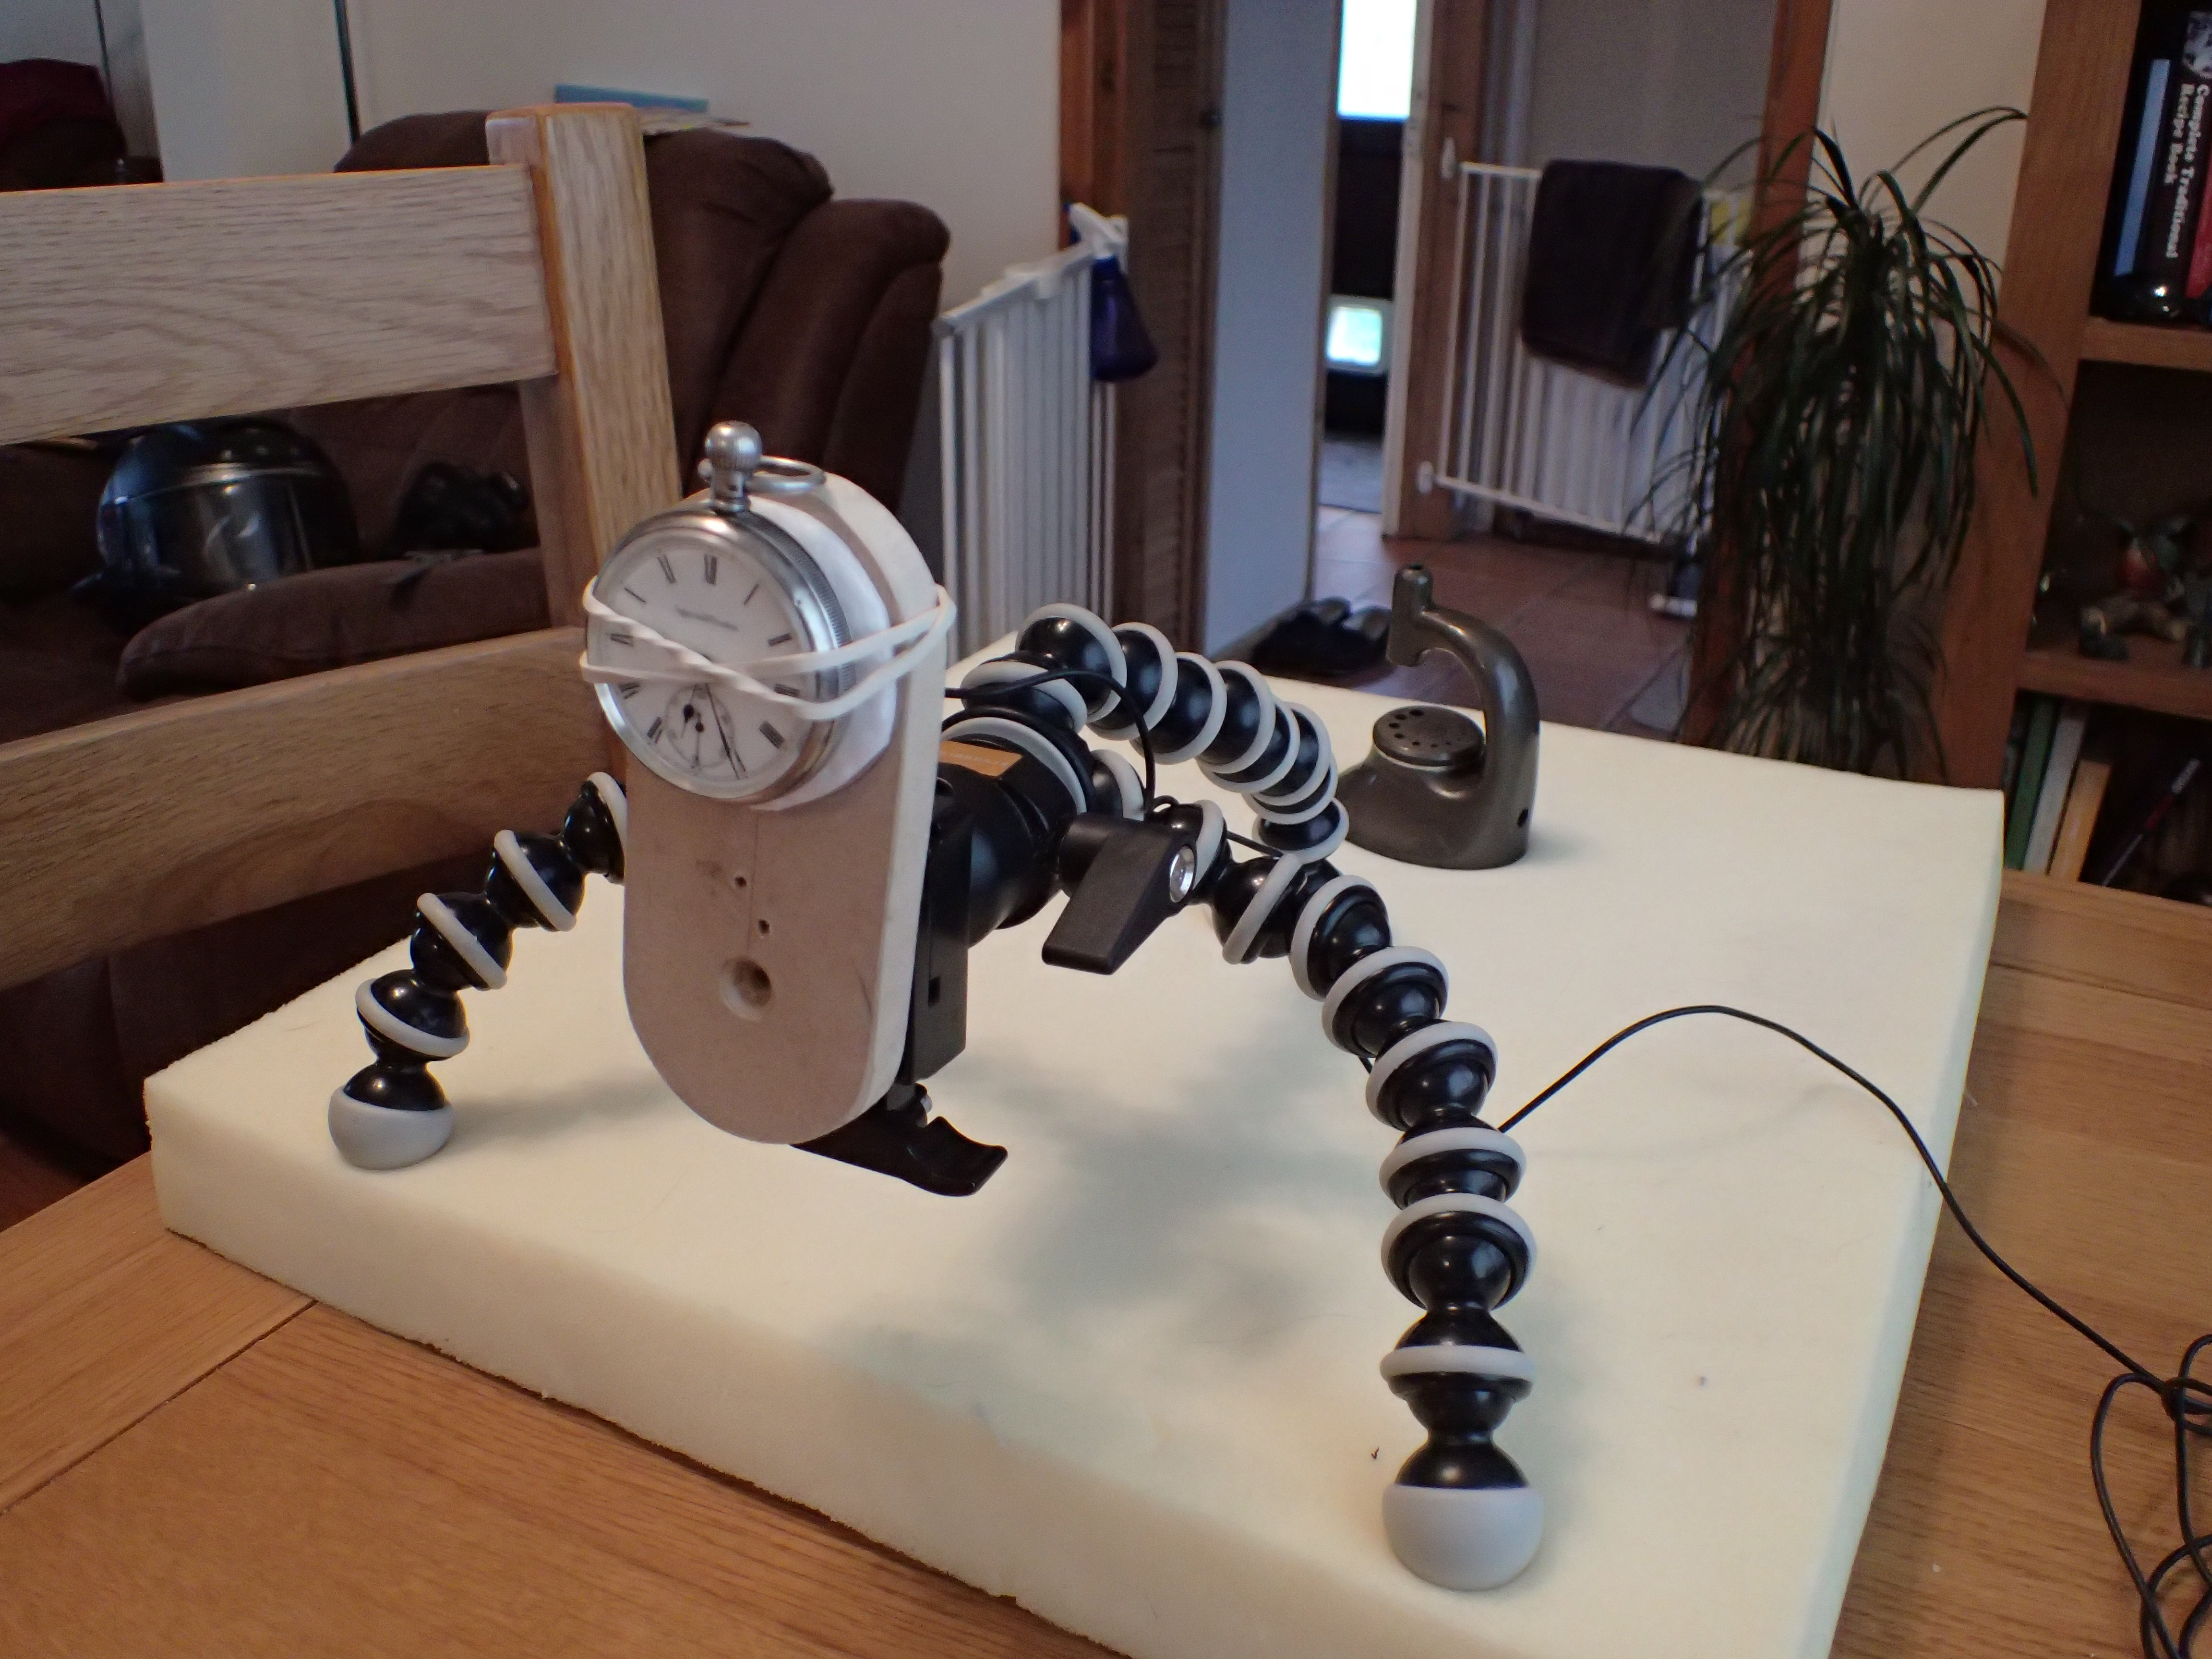
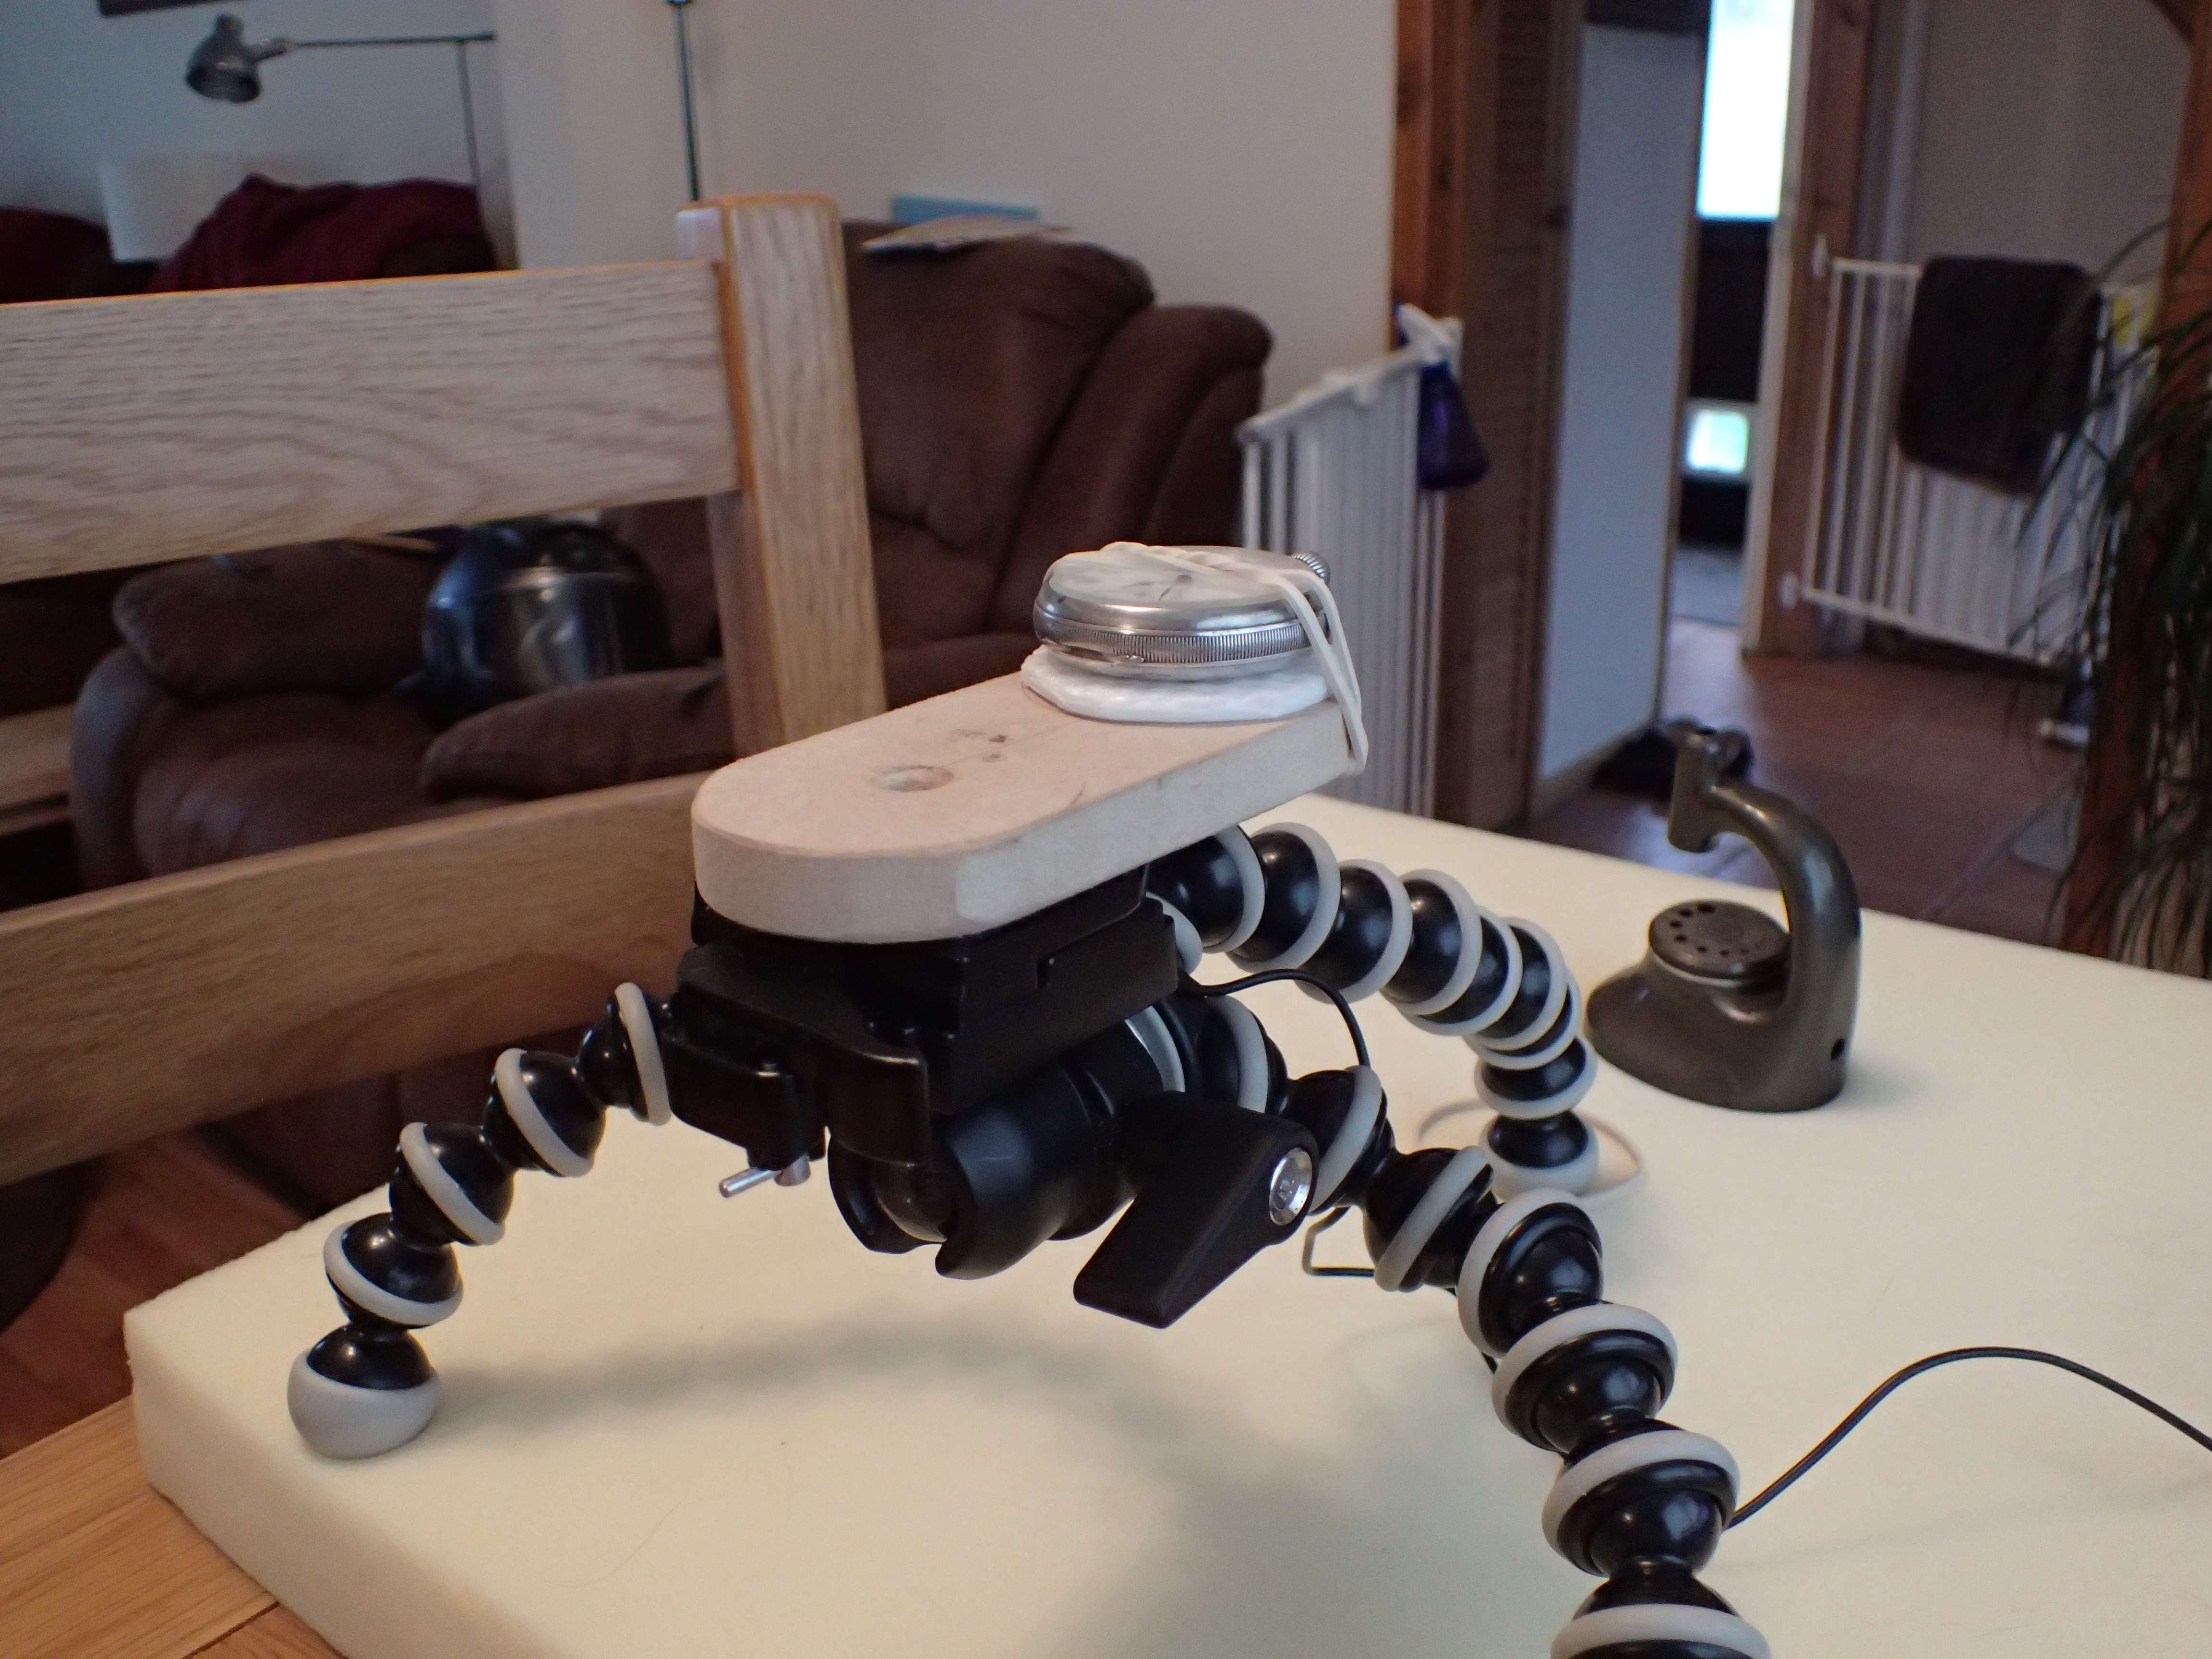
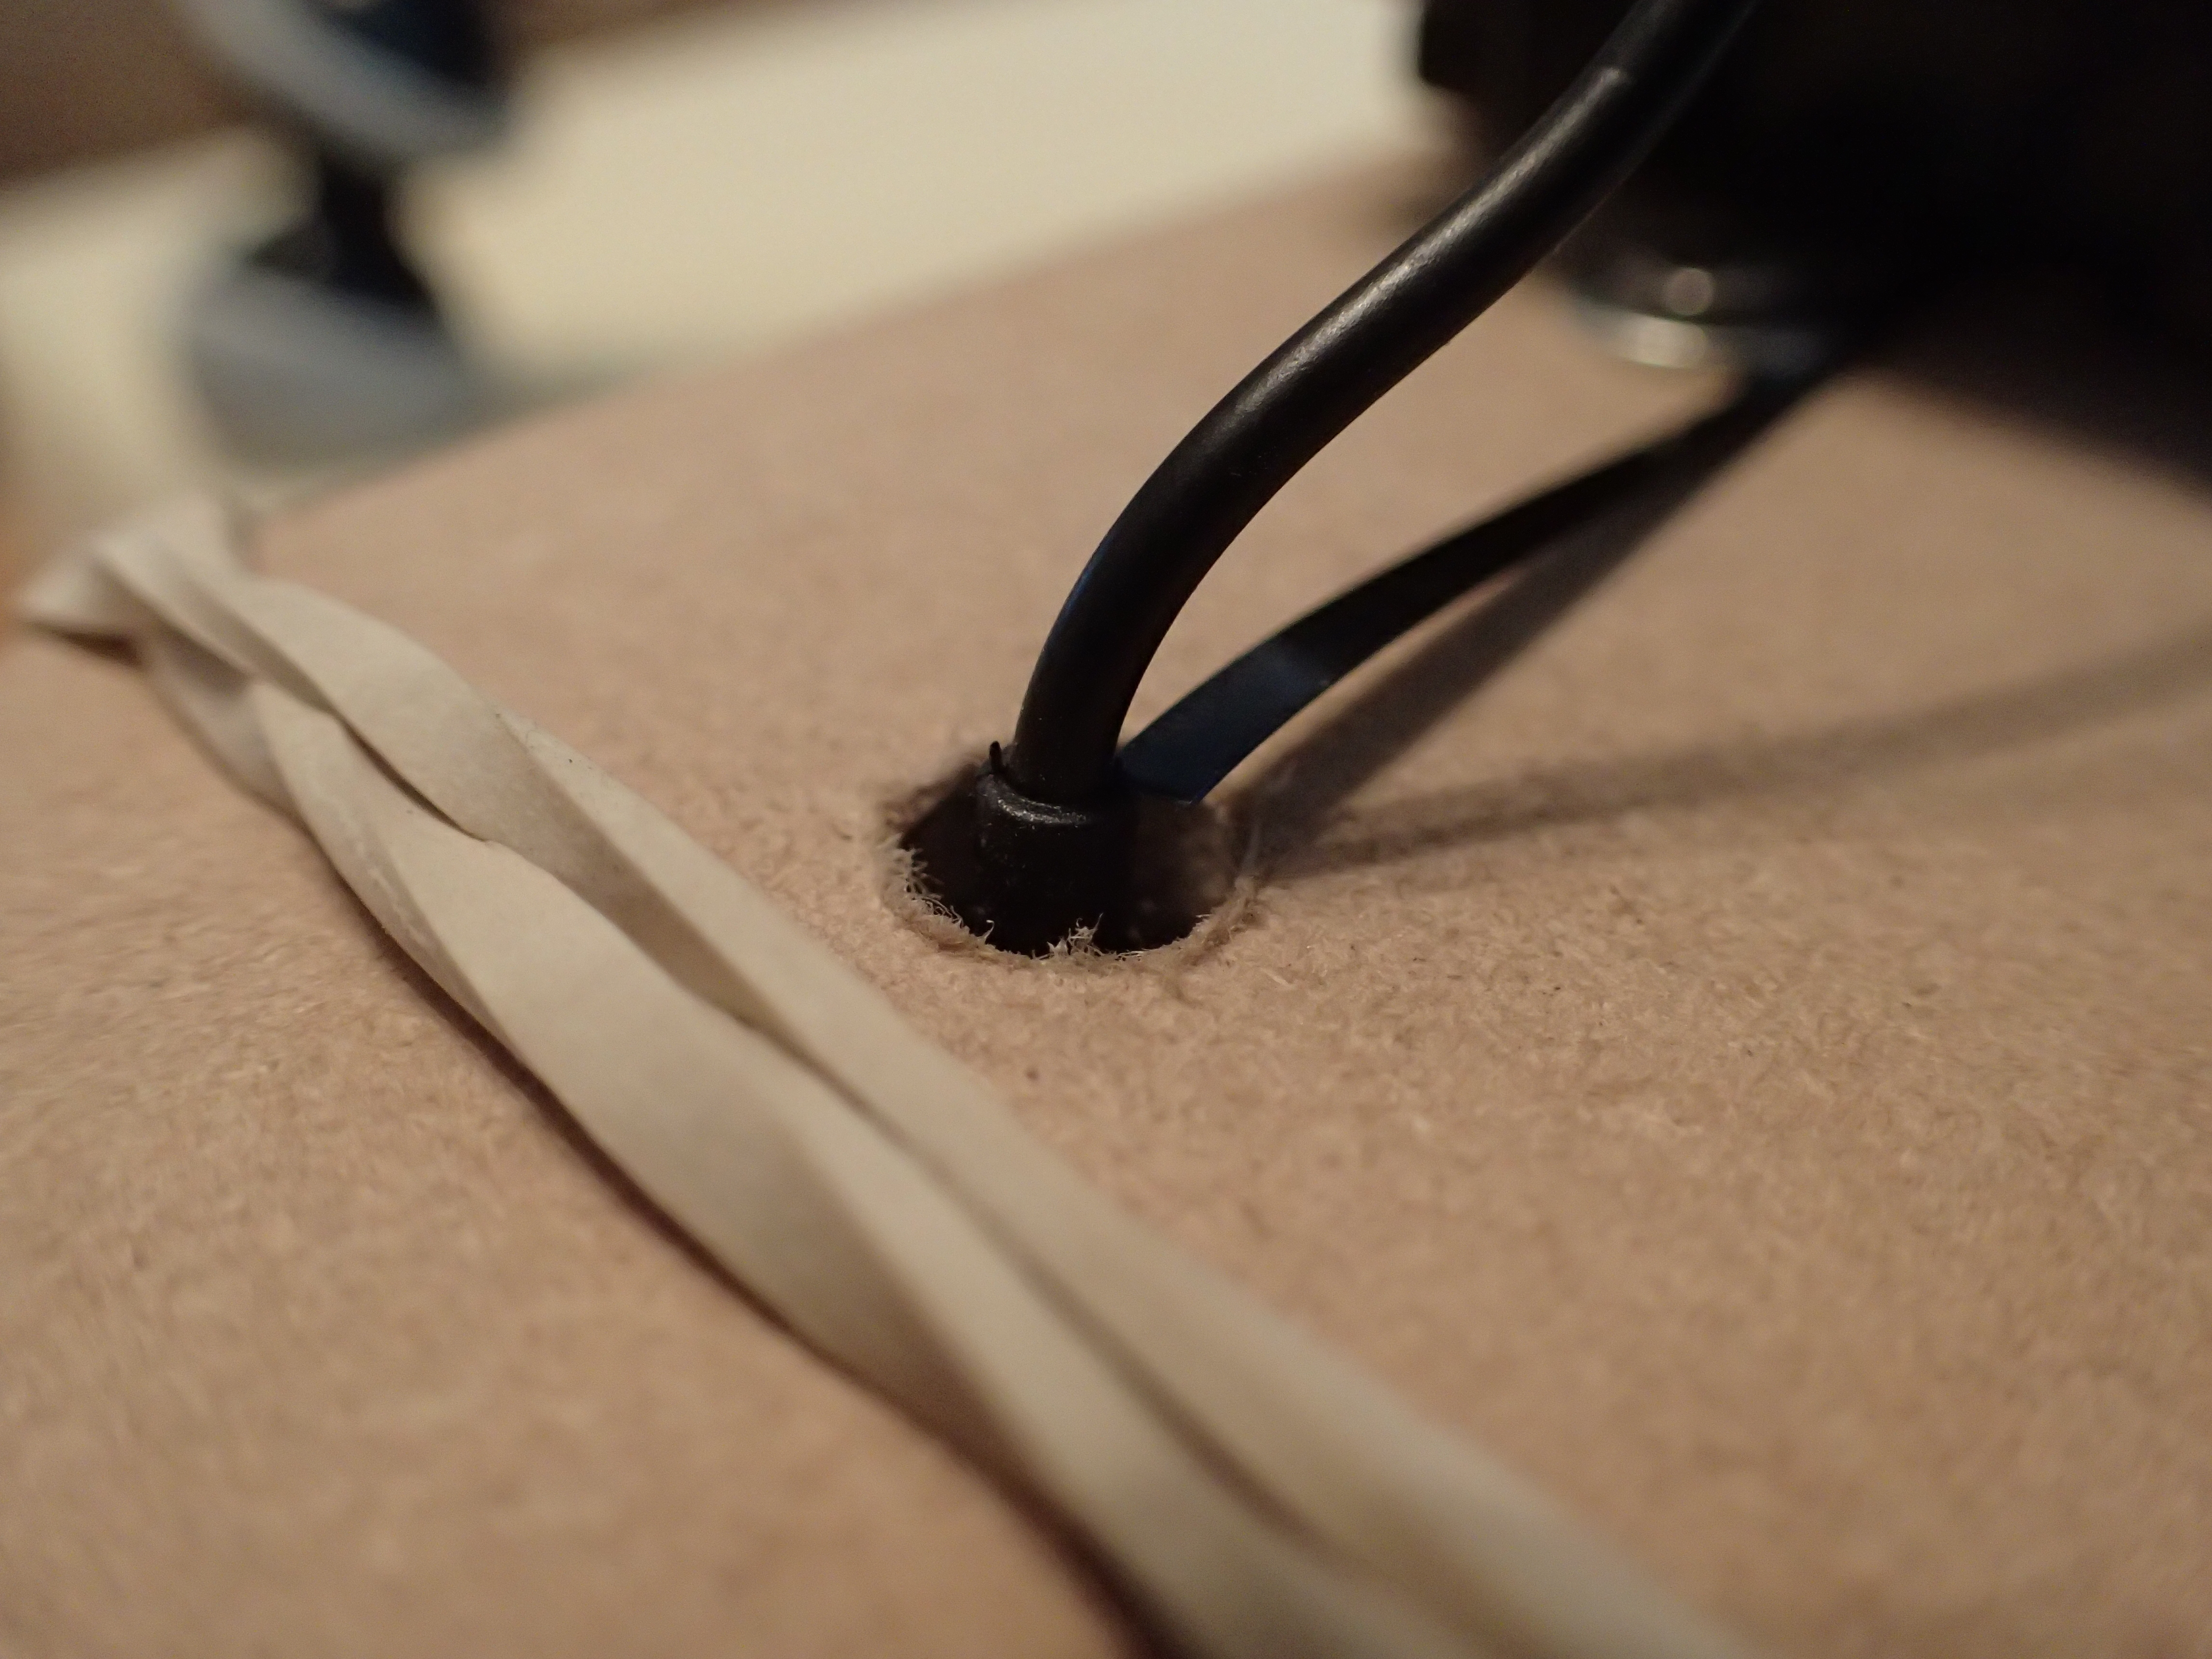
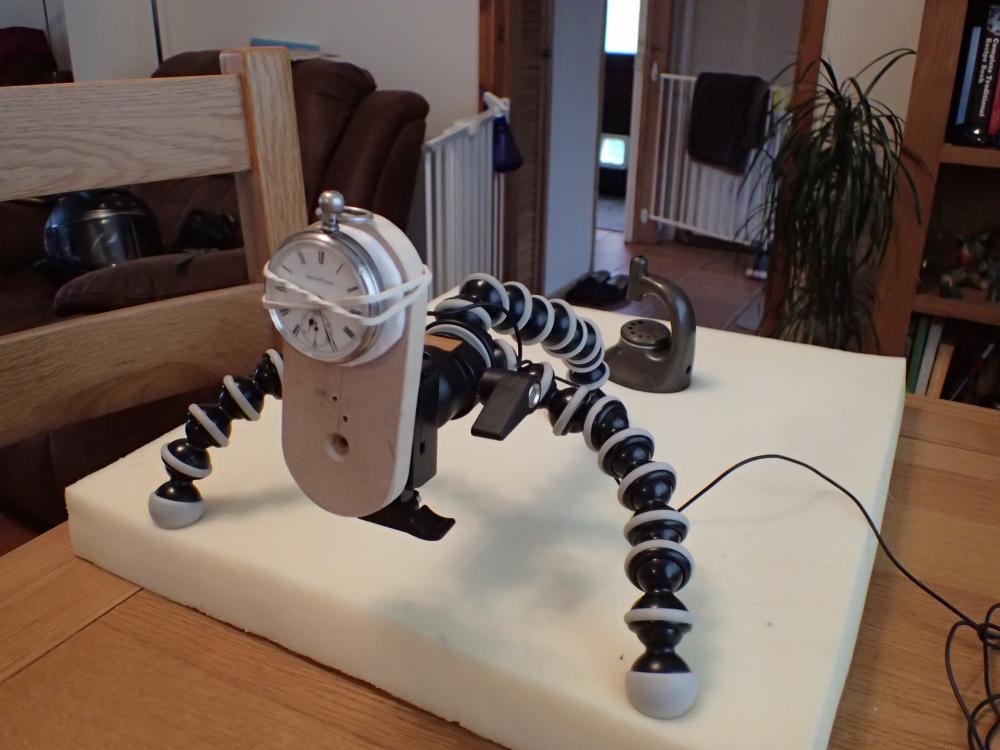
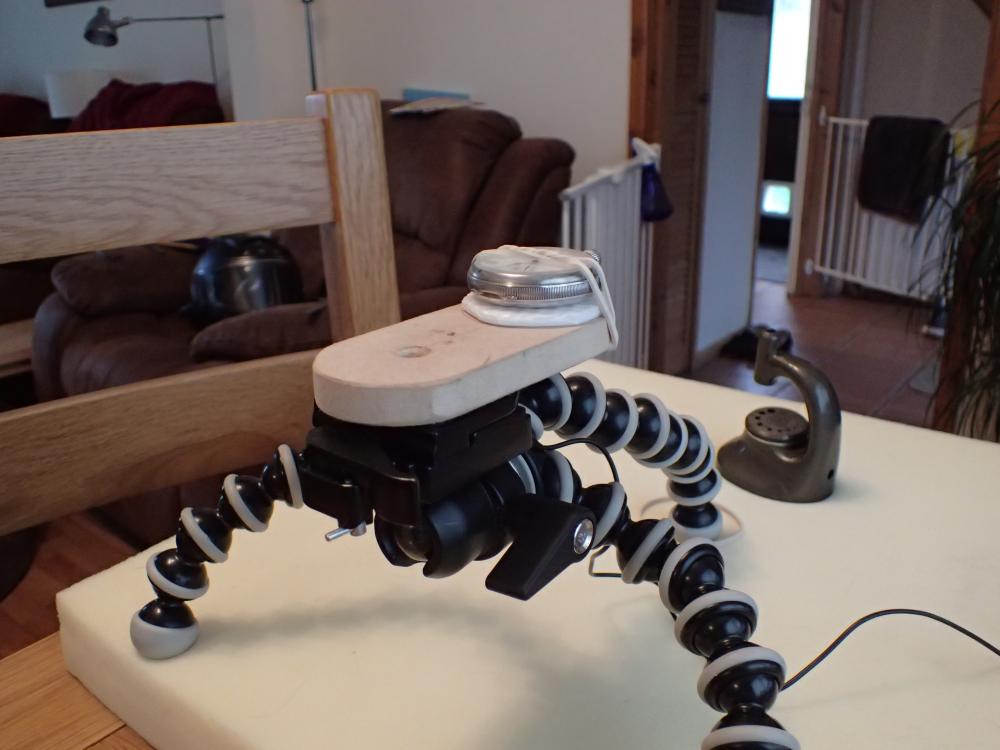
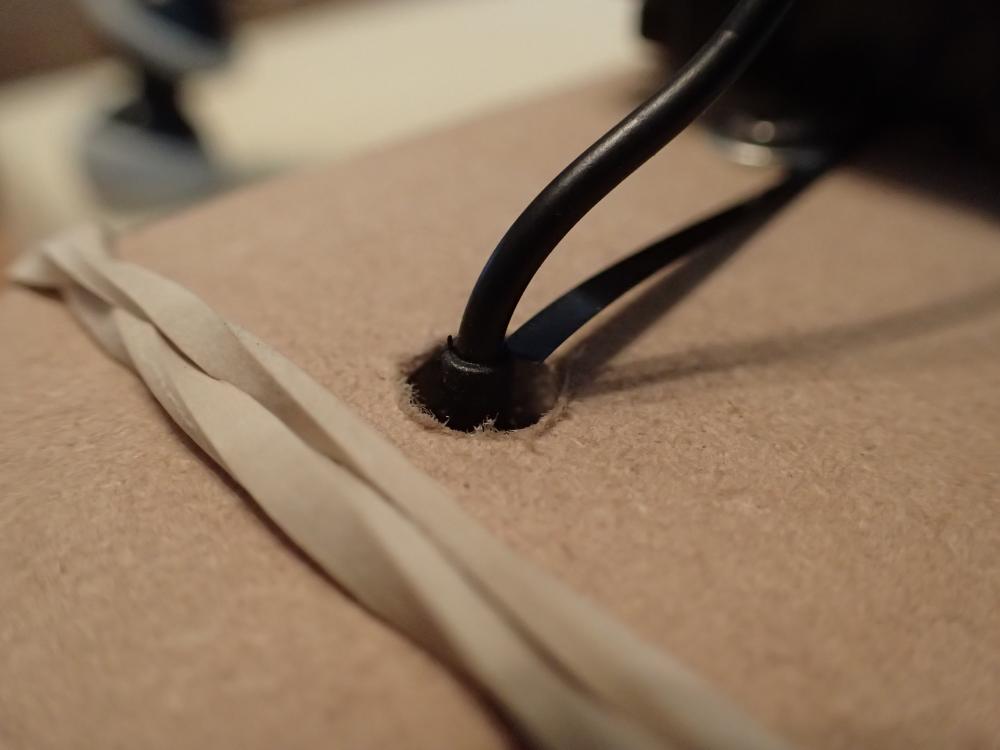
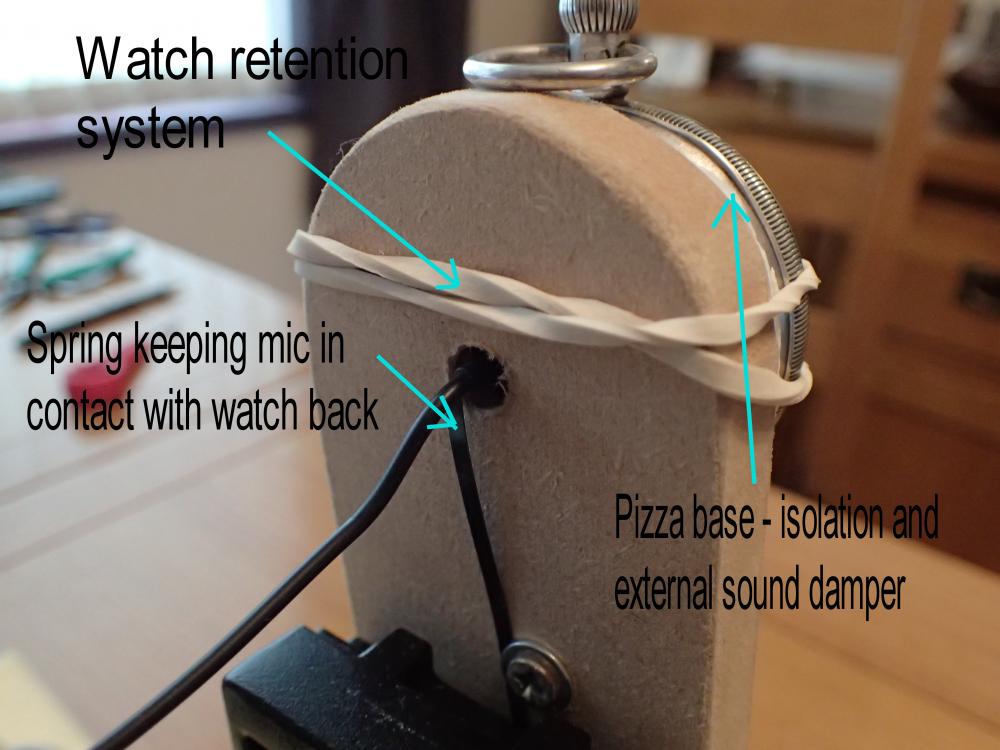
Here is my Heath-Robison mk 1 watch holder mic assembly. Fully adjustable to any position. Using: Lapel mic Camera ball mount Elastic band Polystyrene pizza base Chair foam Bit of old watch mainspring But first - here is a trace obtained from this. (Remember no pre-amp, just a lapel mic) So here we are: And the chair foam provides vibration isolation. For the mark two I'm going to replace the gorilla pod with a proper stand with foam feet. Swap the elastic band for a sprung retainer of some form and use a more expensive pizza base - maybe Hawaiian or pepperoni.


 1 point