Leaderboard


Popular Content
Showing content with the highest reputation on 08/03/22 in Posts
-
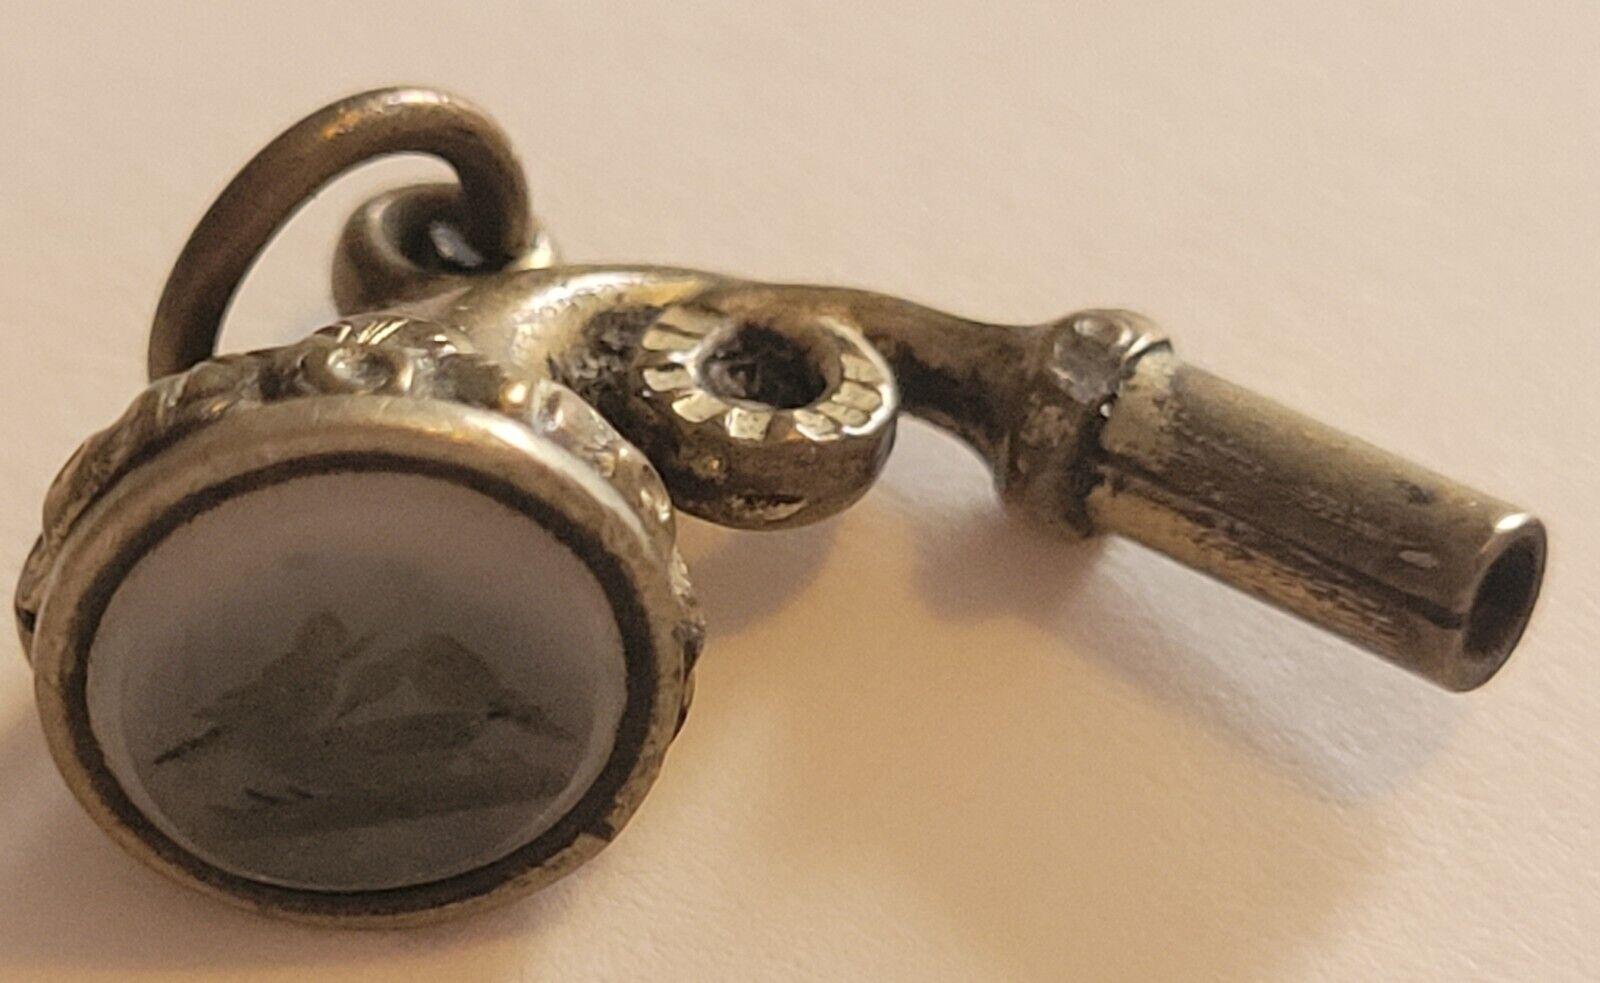
Not actually a watch, but rather a silver gilt or plated pocket watch key and wax seal with two love birds on it. I was on the hunt for some pocket watch keys at a reasonable price. I'm not sure why, but some optimistic sellers seem to think their keys are worth more than the watches they wind. This one was 99p which seems much more reasonable. When it arrives I have an excuse to play with matches and hot wax. What could possibly go wrong?
 4 points
 -
Hi there if you want to try and make one here's a video for guidance , enjoy Graziano4 points
-
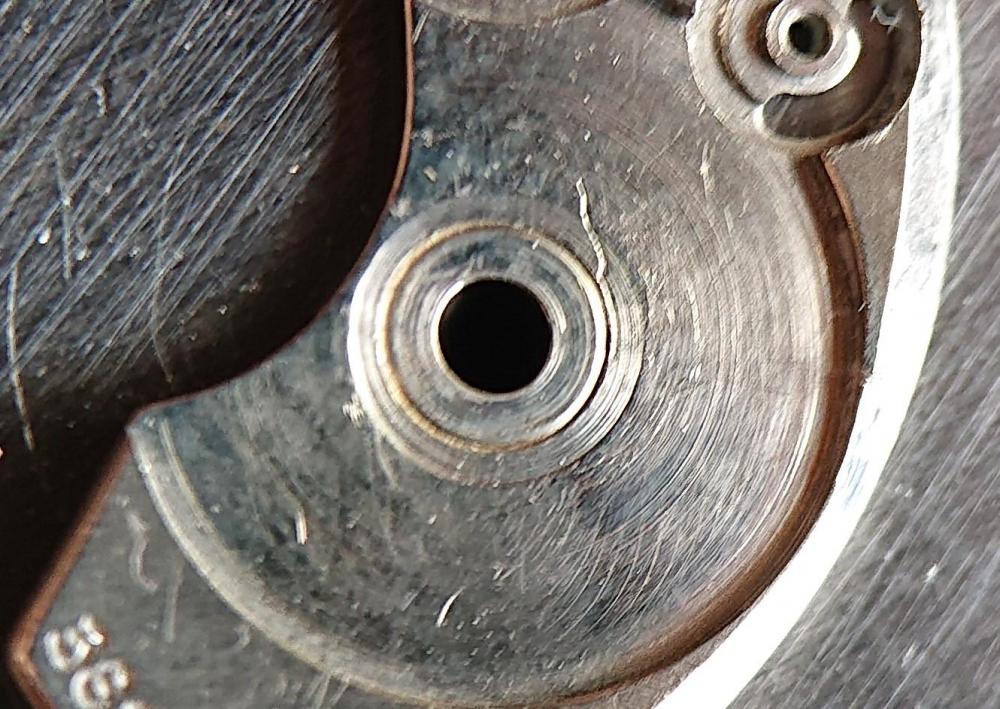
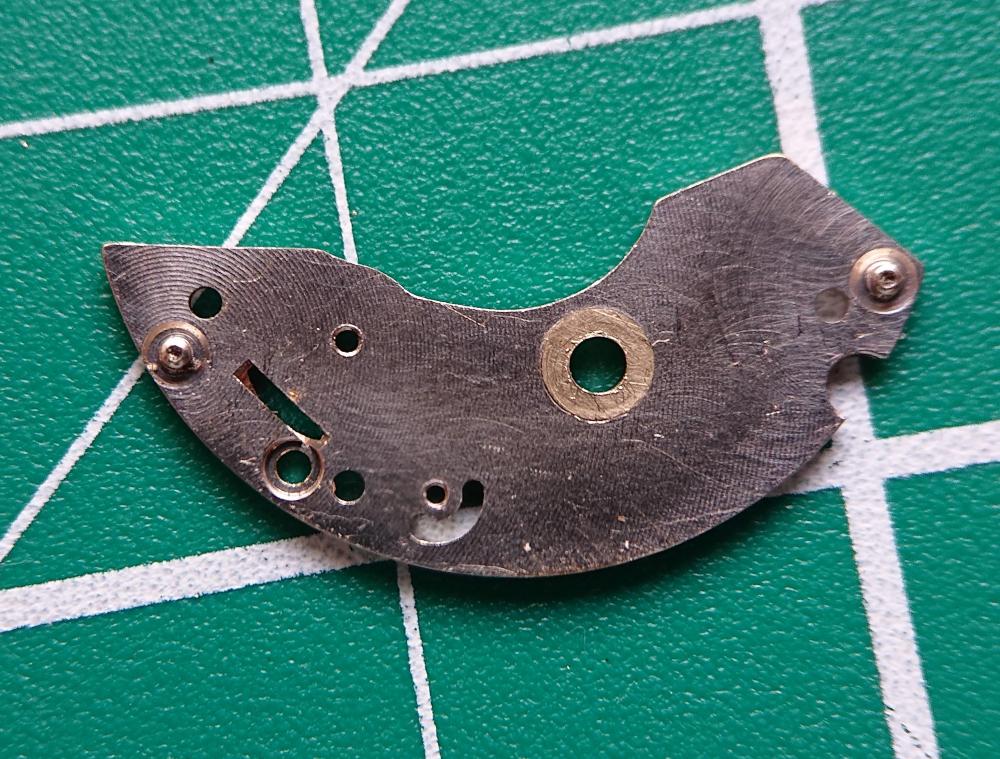
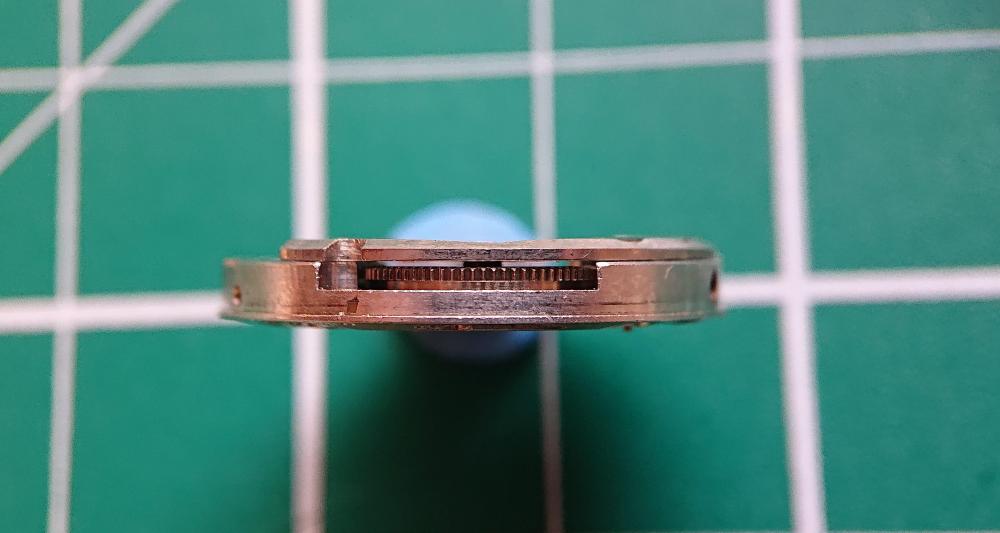
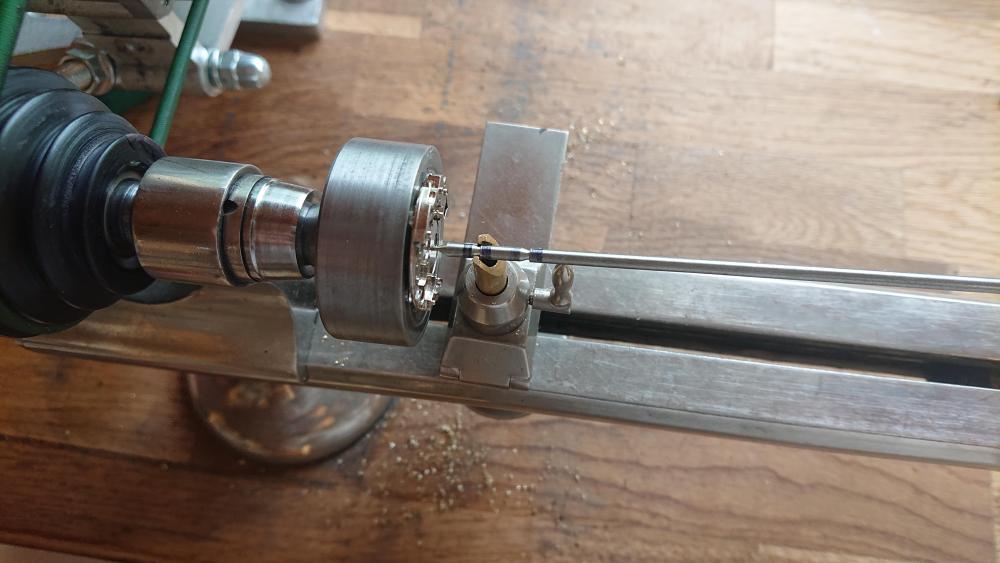
I've taken possession of an Eterna wristwatch belonging to a family member, in need of a service. It's in a sorry state externally. It barely runs and has terrible variation in between positions. It has been serviced in the past. There are four servicing marks in the case back and scratches on all of the bridges. It definitely requires deep cleaning. On examination, I found two significant challenges requiring attention, which are damage to the barrel bridge and the setting lever spring. Spares are no readily available for this movement and donors rarely come on the market. Plus it's time for me to move on from fault finding and parts replacement on to greater challenges. 1: The mainspring barrel bridge pivot hole is ovalised. The barrel arbor is no longer orthogonal to the plate and bridge. There is obvious wear to the upper side of the bridge from the ratchet wheel. I've resolved this issue by fitting a bushing to the bridge. I practiced the technique, refining each time on a couple of old citizen movements before working on the eterna: Having mounted the movement on a wax chuck I centred it on the lower barrel pivot using a wiggle stick, ensuring the movement was fully flat on the chuck: I then fitted the barrel bridge, and bored it out to about 2.7mm to regain the centring. I then bored the hole to 2.99mm using a seitz reamer. Following Perplexr's instructions on youtube, adapted to the tools I have available I turned a brass bushing 3.00mm in diameter and 0.44mm in thickness, pressed it in to place and broached it to size ready for a test fitting. If the fit is good I'l deburr it and re-plate the bridge. Happily the barrel now sits square, rotates freely without side play and with correct end play I then finished the bore with a burnishing broach, deburred and replated the bridge. Regrettably I scratched the surface of the bridge when boring the hole. You can see the scratch running up from the chamfered circle where the bushing meets the original material of the bridge. Oh well, it's only one more of many. It niggles me as I managed not to to do this on the practice pieces. Part 2 of the challenge (the setting lever spring) is rather daunting and I'm struggling to find the materials. I'll post it as a question in the other forum.
.thumb.JPG.f77e6c0f7280d844d01b1fb6c240f50e.JPG)
.thumb.JPG.2acbe8abb07c058a52ca57b1f626c63e.JPG)
 2 points
 -
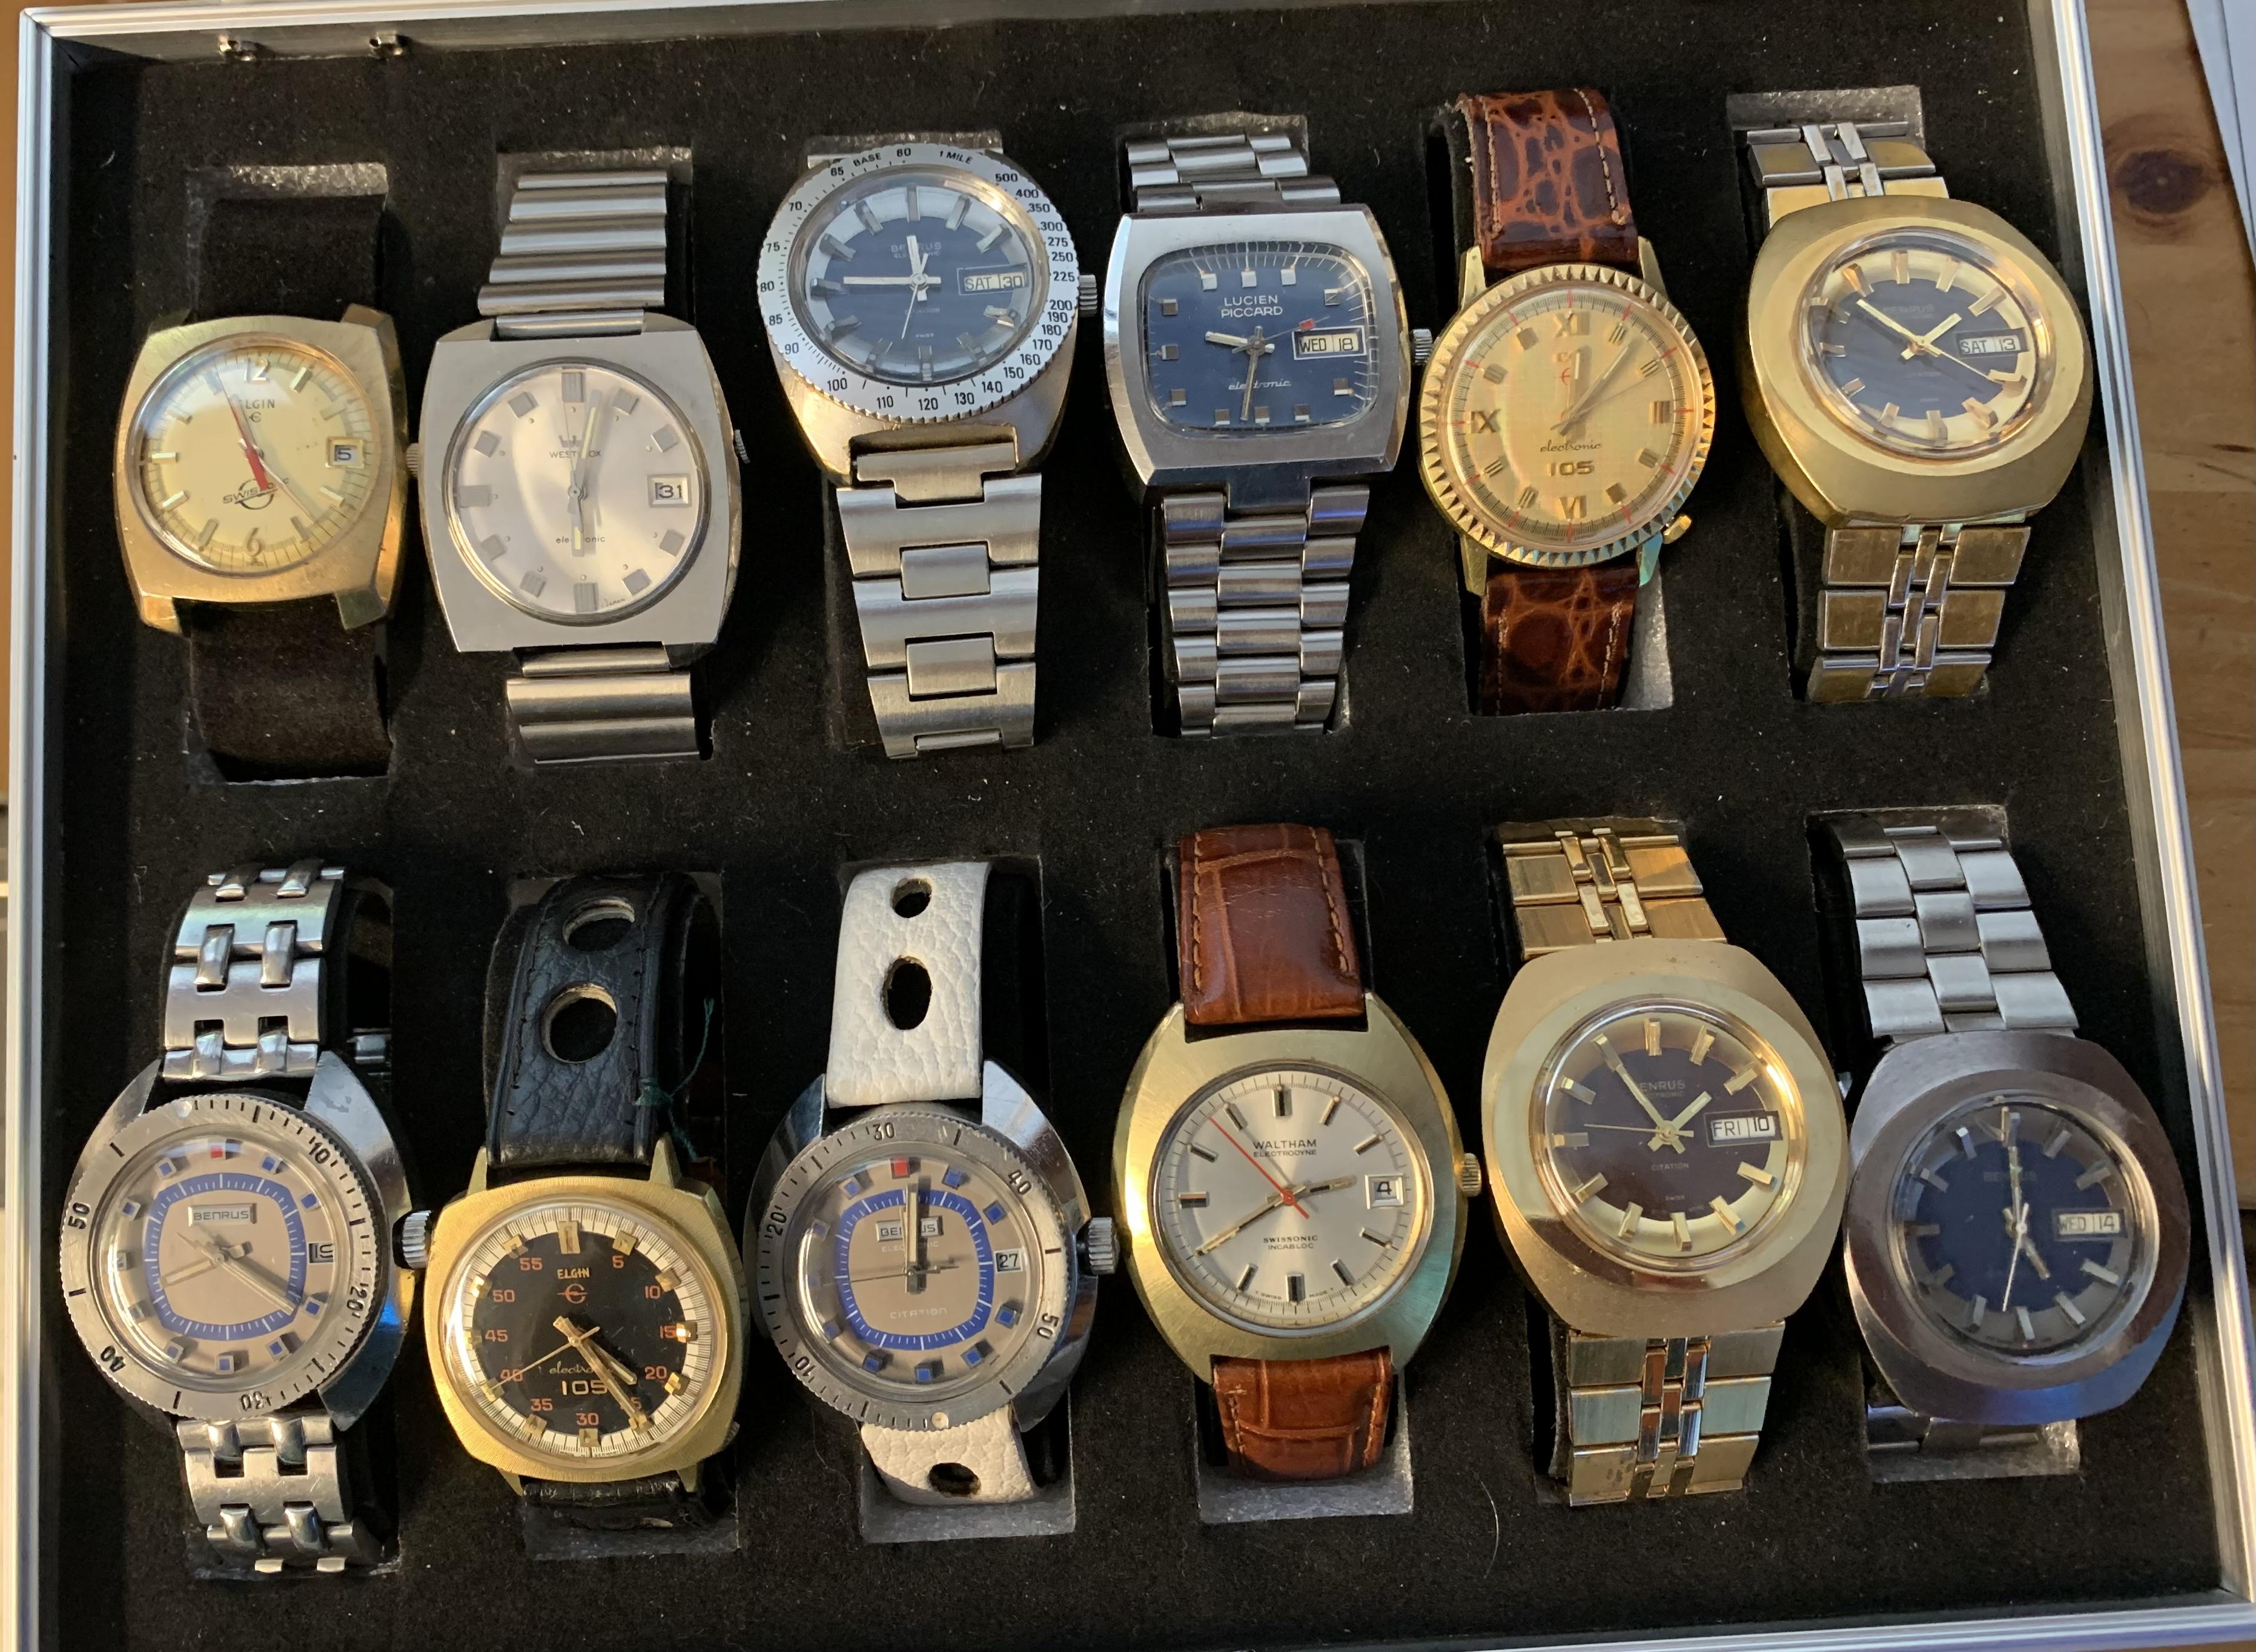
this one is from 1961 I have been adding to my collection of 1970's "electronic" watches.
 2 points
 -
This is a great video. It shows using the jewelers saw with a bench pin (home made), and all of the steps involved. I like his little vise, that's one of the things that I need for doing this kind of work and I'm going to make one for myself. His layout and freehand sketching of the arm is awesome I had planned on leaving the template on the material during sawing, but I think I'll scribe it out like he did and see how it goes. I actually have a broken setting lever spring from a Bulova that I had saved to use as a template to try this. This thread and this video has motivated me to move this closer to the top of the ToDo list. Thanks!2 points
-
I had the exact same situation happen to me recently so I understand your reluctance and apprehension. I am writing it all up for the accomplishments section of the forum but I needed to give you some encouragement here and now. Try not to have the value of the case in your head while working and remember the rest of the job is only a standard watch movement. The fact it's already not working and your just trying to help really helped me and everything turned out great. Everyone was happy. The best of luck. Shane2 points
-
You definitely want a hardenable steel, high (mid to high) carbon, like O1 or 1075 or similar. It cuts with a saw and files fine in the annealed state. McMaster Carr sells both the above alloys in various thicknesses (very big choice in 1075) in small quantity. These are easily hardened with a common propane torch and oil quench. If using feeler gage or hardened steel shim stock it really needs to be annealed otherwise you're stuck using carbide drills and grinding the profile. Sticking the old part to the raw material is a tried and true technique. Super glue, shellac, or soft solder all work fine. A particularly good soft solder for this is Tix, with its accompanying flux. Silver solder (braze) requires too much heat, all temper would be lost if trying to repair it, and doubtful it would really hold up. It would be way overkill for holding the parts together for cutting out a new one.2 points
-
Thanks @mbwatchand @Nucejoe. It's just over 15mm so 6 3/4 ligne, and 18,000bph so the AS969 looks like the best match of that family. The keyless works is a perfect match to the photos on Ranfft. Apologies for the blurry picture but it's getting dark: I'm now confident I can find spares and it's a simple movement so I'll crack on I think. Many many thanks!
.thumb.JPG.4c9ce9694d0138ba2b1200fbd482e28d.JPG) 2 points
2 points -
Certainly not advisable to mess with it in any manner. There is practically no grease inside.2 points
-
I just ordered some boards and LM10. Will report back on this next week.1 point
-
If you need step 2 there's something wrong. The official method according to the Seiko Casing Guide for that particular movement and case is as I listed above - pull out the crown, then depress the lever.1 point
-
No is the answer.....the 105 and 25 share very few interchangeable parts. BTW: adding pictures greatly helps others to lend assistance.1 point
-
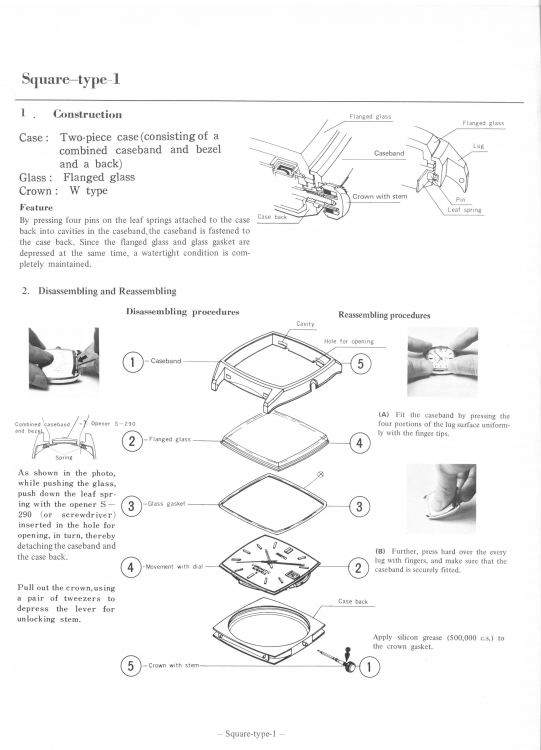
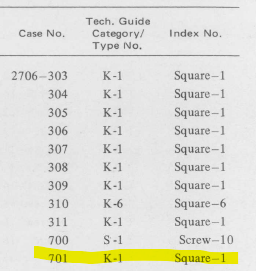
As @Paul80 says, it's a standard movement. According to the Seiko casing guide, it's a 'Square 1' type case, in which the back comes off. It then says just depress the lever to remove the stem.
 1 point
 -
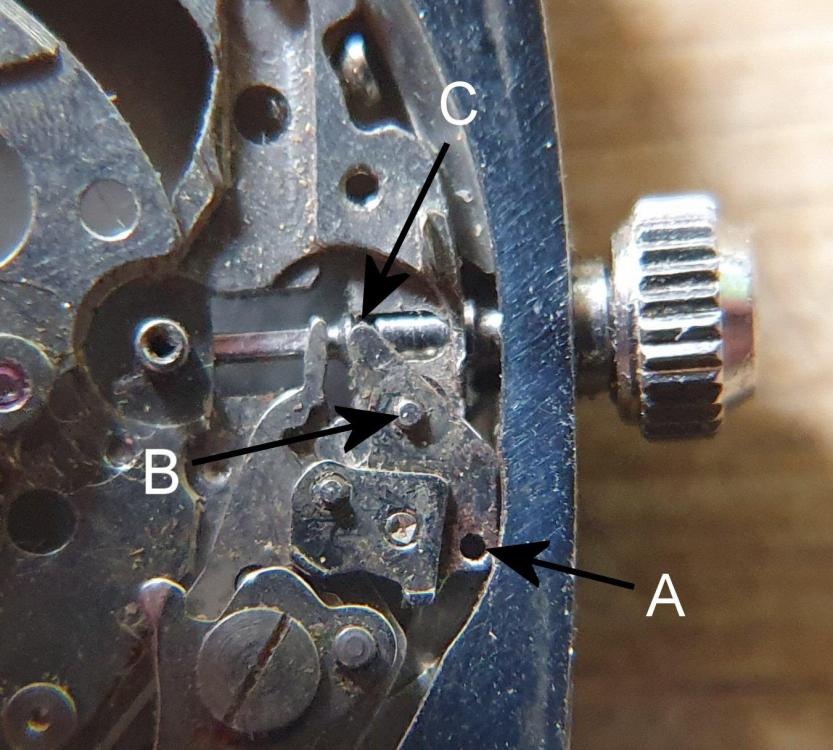
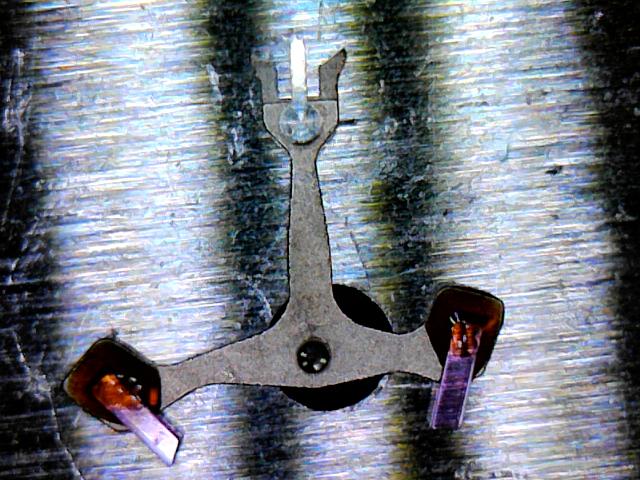
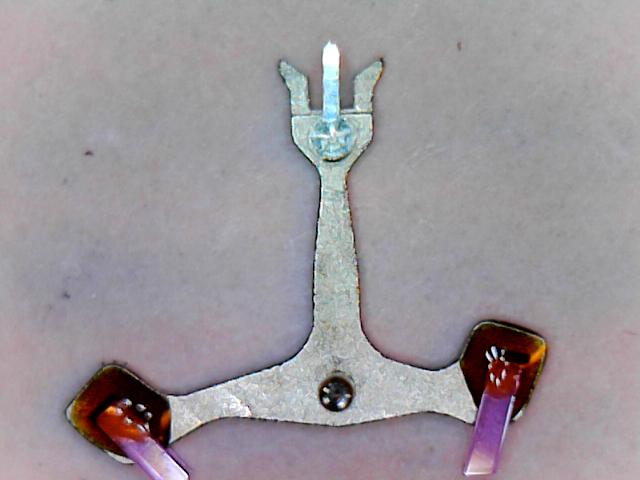
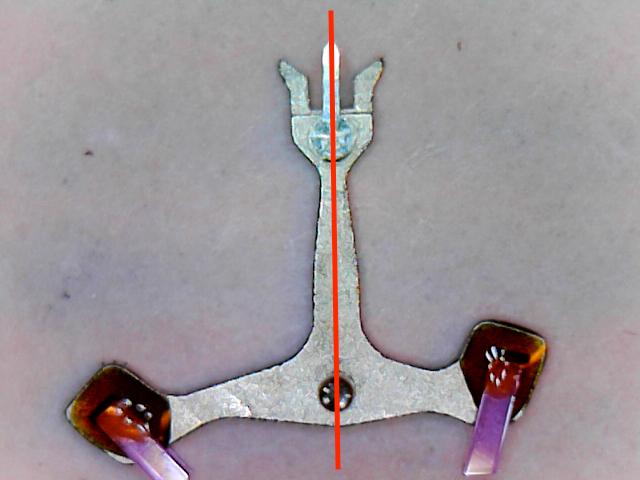
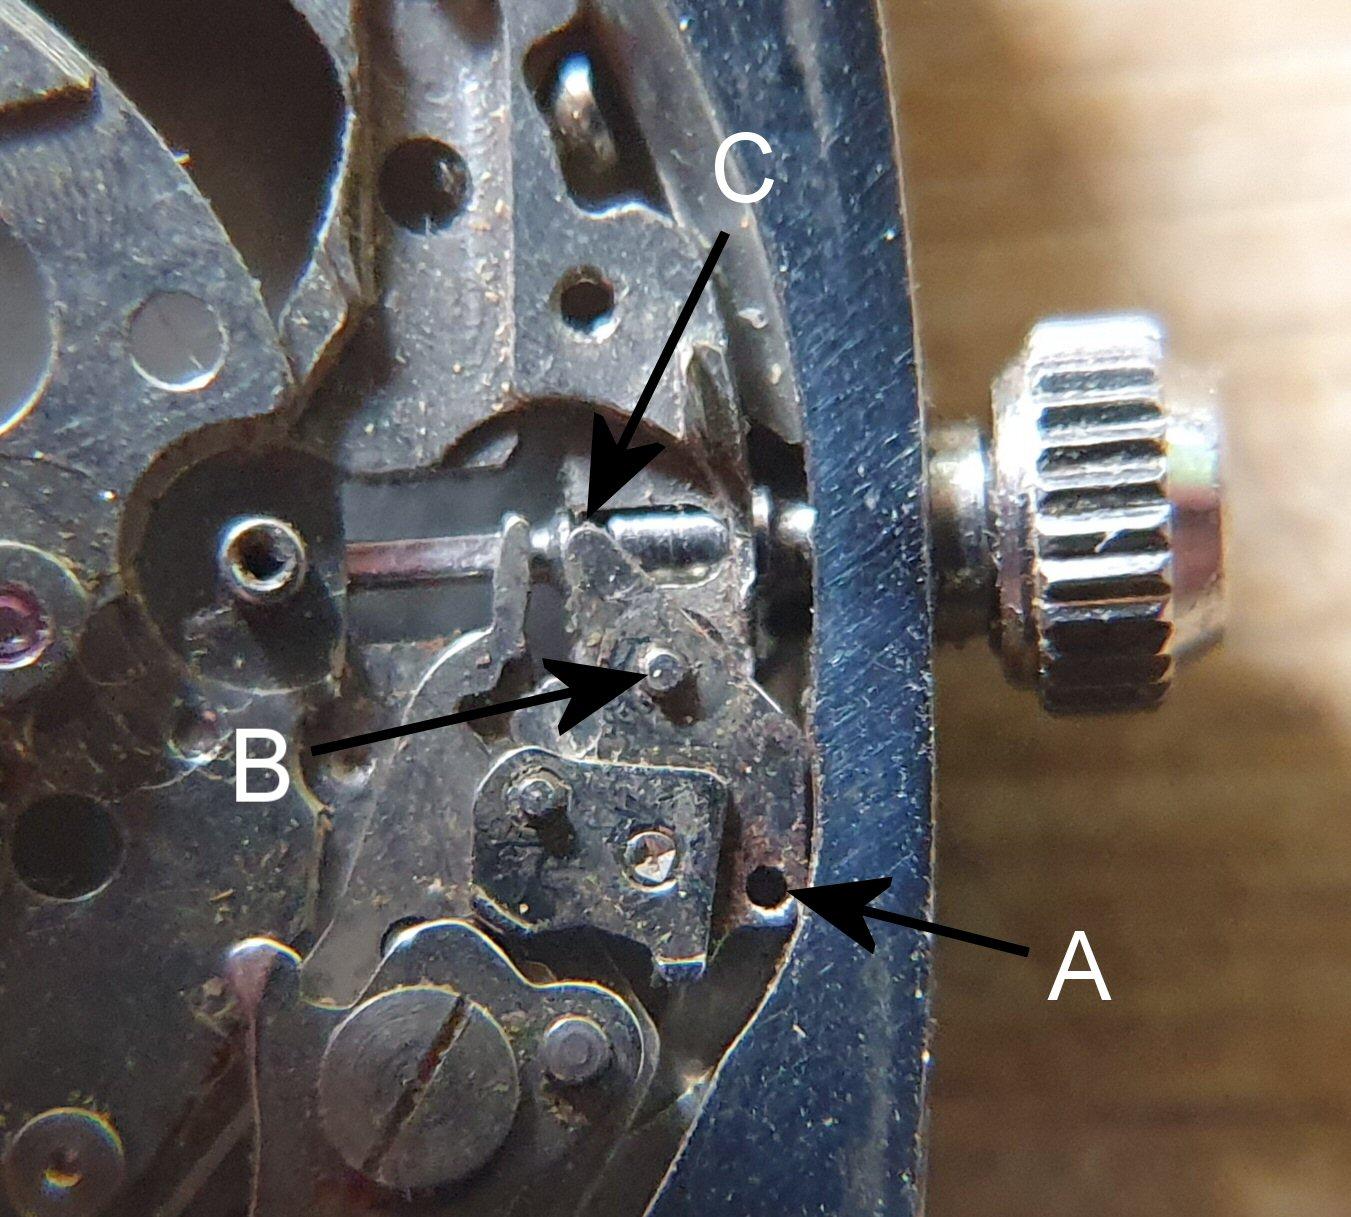
I have no direct experience of the 2706 and am struggling to find any videos showing 2706-7010 stem removal so that I can see how it may work, but I have experience with other Seiko movements in monocoque cases with one piece stems. Above is a 5606-5040 with enough bits removed to show how it works in this particular case. Pressing down on point A causes the setting lever to rock backwards about the pivot point B, lifting the pip on the setting lever (point C) out of the groove in the stem, releasing it. 2706A.pdf The attached tech document for the 2706A shows an exploded view of the arrangement for the OP's movement (page 5 "setting mechanism") where it also describes the setting lever as being modified for one piece cases, I believe to effect the same operation. Although I'm always happy to be proved wrong ('cause that's how I learn) I'm pretty confident that the OP's stem release is intended to operate in the same way as the 5606 set up. The set up that Seiko has come up with allows for stem removal from either side of the movement with only a minor modification to the set lever. From the back it is accomplished by pressing down on the other end of the set lever pivot (the other end of point B in my pic), and from the front by pushing down on point A as described above. Clever little blighters these Japanese
 1 point
 -
A better way to get your case number would be to take your case back off and see what it is. This way you avoid any unpleasant surprises just in case for some reason it's not the same.1 point
-
Ok. But according to all the videos I have seen on YouTube where this watch was featured they all had trouble releasing the stem pushing that leaver and all ended up finding out it had to be pulled. It's just a standard movement with no access from the back, the whole movement would have had to be remanufactured to make the release lever work in the opposite direction to all their other movements. Let's wait till the OP posts back to see if either of us is correct shall we1 point
-
@praezisJust checked the pictured (mainplate) anti-shock, the domed side of the balance staff jewel is facing the cap-stone. Will check the anti-shock in the balance bridge later.1 point
-
If you look at the photo that @Marc posted above, the 3 wheels should have the bevelled teeth facing up. Accidentally fitting the wheels in the wrong orientation will result in the symptoms you described.1 point
-
Hexane or any petrol based fluid does not remove rust at all. Ammonia based neither do, but make brass shine. To remove rust use tea or vinegar.1 point
-
Good idea which appears feasible to me! Whateve you do you should start with a soft carbon steel followed by a heat treatment imho.1 point
-
Got confused by the terminology ........ will check the balance staff jewel
 1 point
 -
Yes, that was one of the things JohnR725 also mentioned and it was on my list to check today. The pictures are taken by an el-cheapo electronic microscope with, obviously, cheap lenses. Judging by eye, looking over the pallet-pivot, the guard rivet and the tip of the guard, it seems pretty in center of the horns. I tried to make some pictures with the microscope but when slightly off center one gets already a parallax "fault". It's hard to say, perhaps very slightly to the right ??
 1 point
 -
I agree that it has quite an unusual strap. I don't think I've seen one with such radical taper. @QuadMachine, It can be frustrating to try to find the right factory crystal for wrist-watches. If the maker didn't provide a catalog with crystals to match the case number, which not all did apparently, your best bet probably is going for something generic. G&S, Steinkreuz, etc. G&S catalogs do list a lot of their "PA" and "ET" (Ever-tite, which have tension rings) crystals with watch brands noted. Good luck. I hope you have an easy search and replace job.1 point
-
I have one and it is not a screw back it is a front loader the 107 tool is to remove the crystal. The ring on the back just holds the special band on. I have a Tissot that is the same.1 point
-
https://r.search.yahoo.com/_ylt=AwrIQdf5BOhiXccA2QV3Bwx.;_ylu=Y29sbwMEcG9zAzEEdnRpZAMEc2VjA3Nj/RV=2/RE=1659401594/RO=10/RU=https%3a%2f%2fwww.cousinsuk.com%2fproduct%2facrylic-glasses-by-size%23%3a~%3atext%3dMost%20Popular%20diameters%20used%2cby%20Omega%3A%20%C3%9829.6mm%20%C3%9830.6mm%20%C3%9831.6mm/RK=2/RS=sbr4TJAncHsVxVxJaNPSuaYRmMc- This is the page from cousins website regarding omega acrylic glasses. As you will appreciate there are many sizes. The normal way is to remove the offending crystal and measure it across 9 -3 position then add 0.01 to the size. You will still need tools to fit the replacement1 point
-
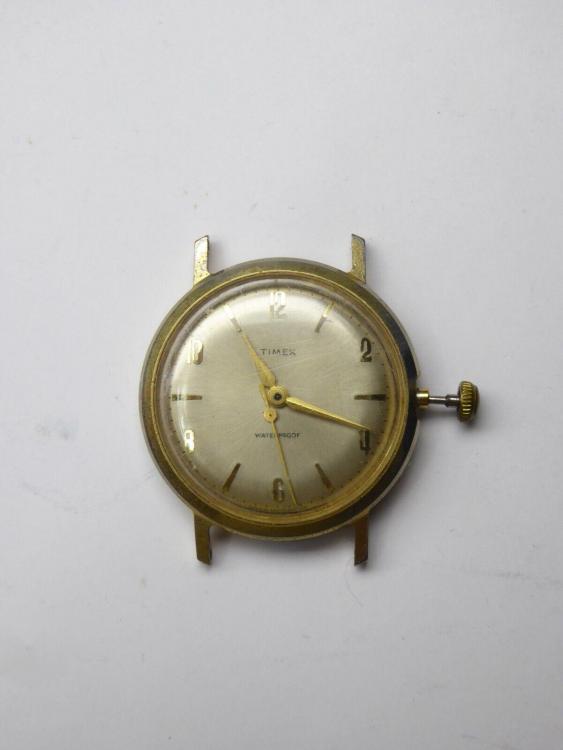
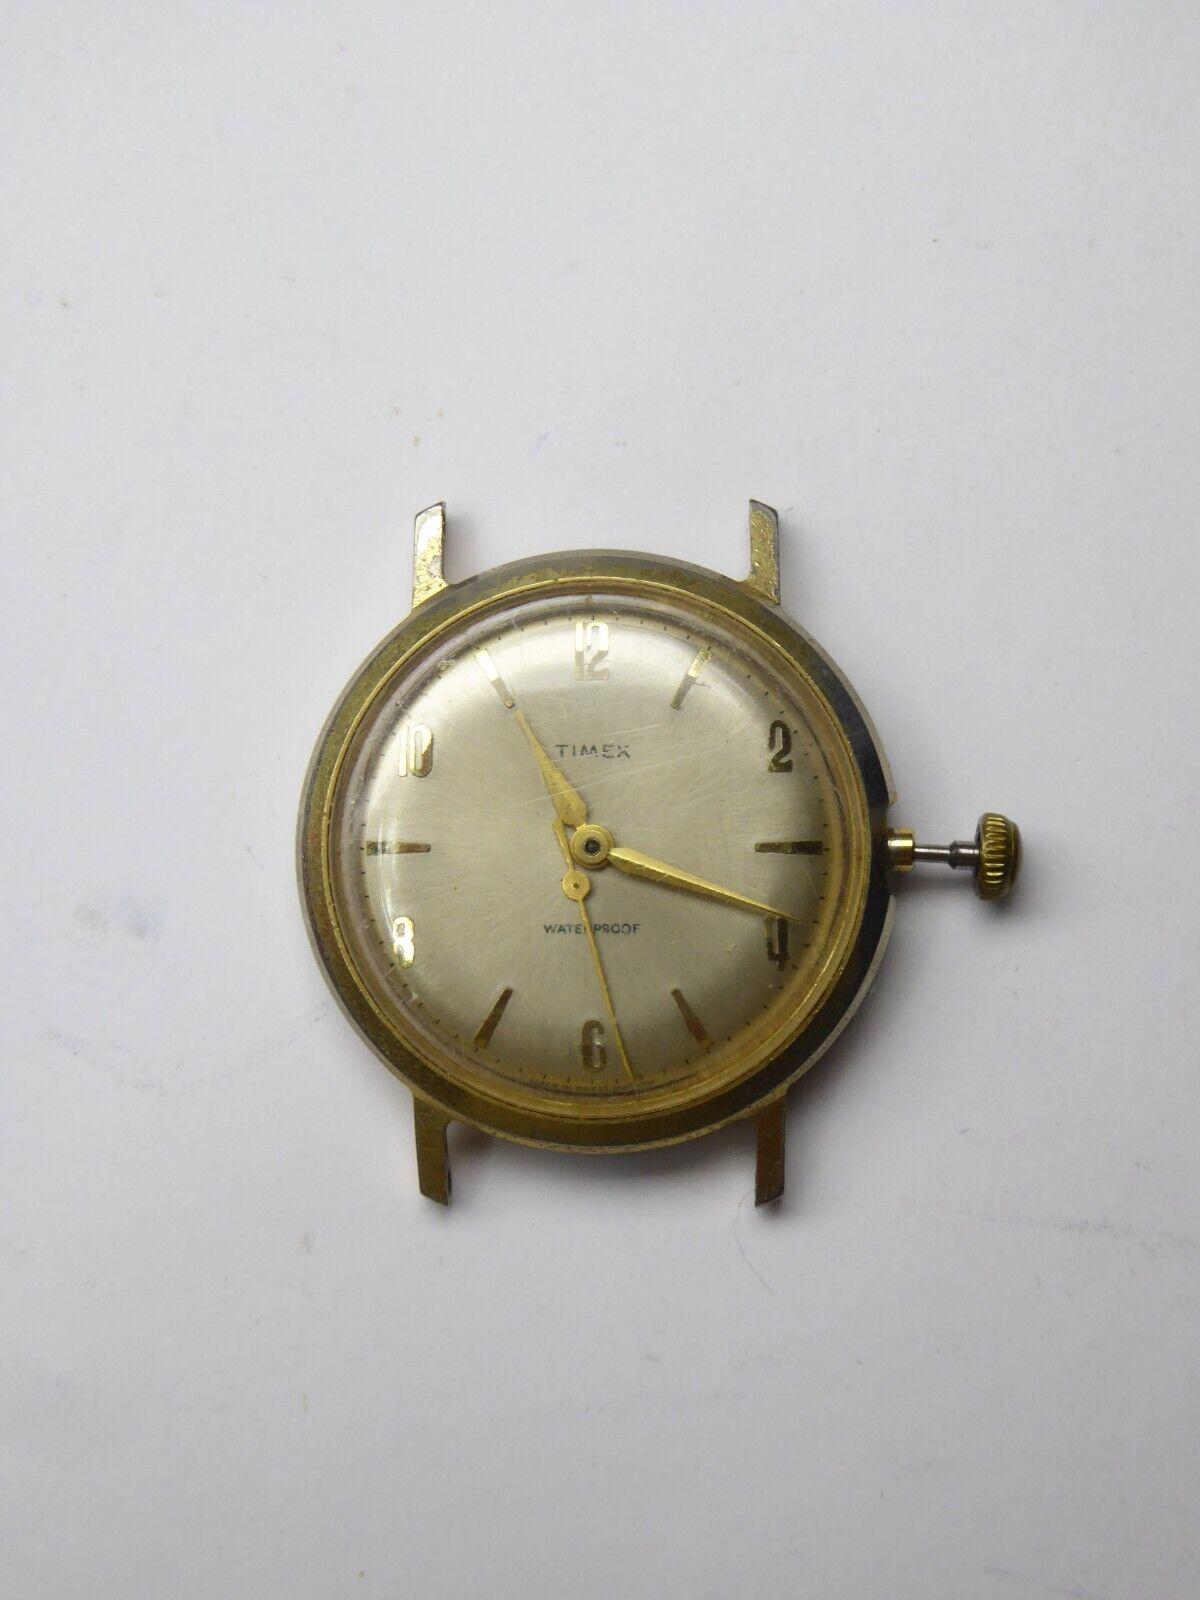
Early Timex Marlin. Possibly late 1950s or more likely early 1960s. According to the seller "Mens Timex Watch Second hand is loose, winder is loose ? For parts." Colour me pedantic, but that looks more like "second hand has fallen off and the winder is no longer attached". Hopefully both should be easy to remedy. As to the "For parts." comment. I think I probably have plenty of parts. I'm hoping to wear this one. If not I guess it will be 0.99p worth of parts.
 1 point
 -
Yes Kappa. They are a pain in the arse. Hope this helps Sorry mate i couldn't resist. I have stripped and reassembled a few like these when i first started. This part of the movement is bloody awkward to put back together and definitely needs some photo recall. I also got stuck at this point for a good hour trying to figure out the best way. I do seem to remember i did some reassembling of this from the dial side, possibly that return spring. If you are really stuck i will see what i have that i can strip back. That has just jogged my memory. The pin on the back side of the gear rocker plate fits behind the long side of the spring. This then returns the plate and gears to winding position. The arkward part is getting the spring in front of the pin. The easiest way is with the gear train removed, fit the spring after the setting and winding gears are in position then reinstall the train . You've probably already figured that out by now. The other lever is a duplicate of the stem setting lever.1 point
-
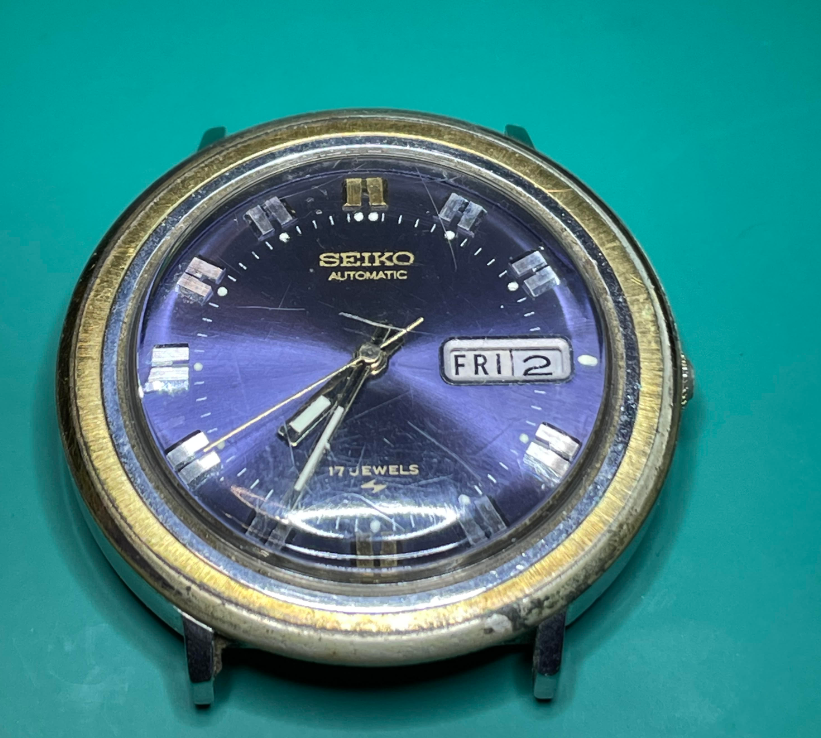
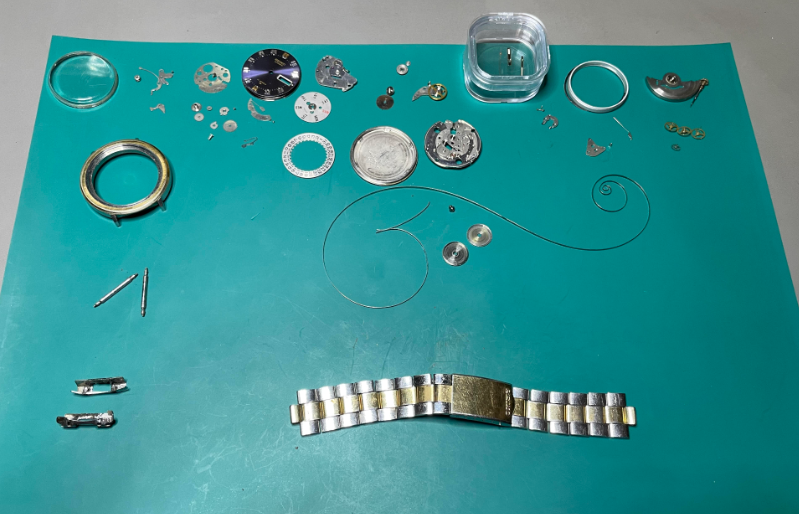
It's not much in the big scheme of things, but I'm pretty happy with the results thus far. I've purchased a small watch lot on eBay and have been messing around inside one of the non-functioning watches just to get the feel of things, practicing steady hand techniques with the tweezers and screwdrivers, etc. BTW, the tweezer manipulation seem to come naturally for me, but screwdrivers are another skill entirely! I felt confident enough after messing around with the throw away watch in the lot that I decided it was time to tackle my first full service. This little Seiko Automatic dates to June of 1974, and I thought it looked pretty cool. It did function, barely, and the keyless works felt sluggish (speaking kindly). Nevertheless, I thought this watch had character and decided to make it my first. I got through the full disassembly without losing a single screw, without a single spring flying away, etc. Needless to say I am pretty proud of myself! I laid everything out on the mat, with all of the hardware sitting beside each individual component. I still don't understand how watchmakers can put all of the screws together, get them all mixed up while cleaning, and then remember where everything goes. They make it look so easy. I'm definitely not at that point, and have a plan in place to keep all of the screws and other parts organized throughout the process. It will be tedious, but it will provide me with the comfort that I'll know exactly where everything goes without have to find the correct screw during re-assembly. On a side note, I had considered leaving the barrel assembled, as I've read that Seiko said that they should not be serviced, but rather replaced as a whole unit. Well what fun would that be? I found an excellent short video that Mark uploaded showing how to separate these Seiko barrels. It's a good thing I did take it apart as it was filthy with remnants of that old graphite grease that Seiko used. For now everything is getting organized into parts trays and stored for a few days while my new cleaning solution comes in. I've now done a rough first cleaning by hand already, but have some L&R cleaning and rinse solutions on the way. I also have plans to build myself a crude, but I believe it will be effective, cleaning machine using an old drill press motor I have laying around. I've got some properly sized square jars already, and am waiting on the cleaning basket to arrive. I am leaving for a work trip next weekend, but hopefully in a few weeks I'll be able to post pictures of my first full service on this good looking 70's Seiko.
 1 point
 -
Lots of very interesting information to digest Daunting, but very interesting ! The good thing with this Omega is that I'm in no hurry and each time I discover that there is so much more to learn ....... comes back to my slogan on the bottom of each of my post: “The more I read & learn, the more I realize how little I know. And even what I think I know, I start to doubt" ! Thank you very much indeed !!1 point
-
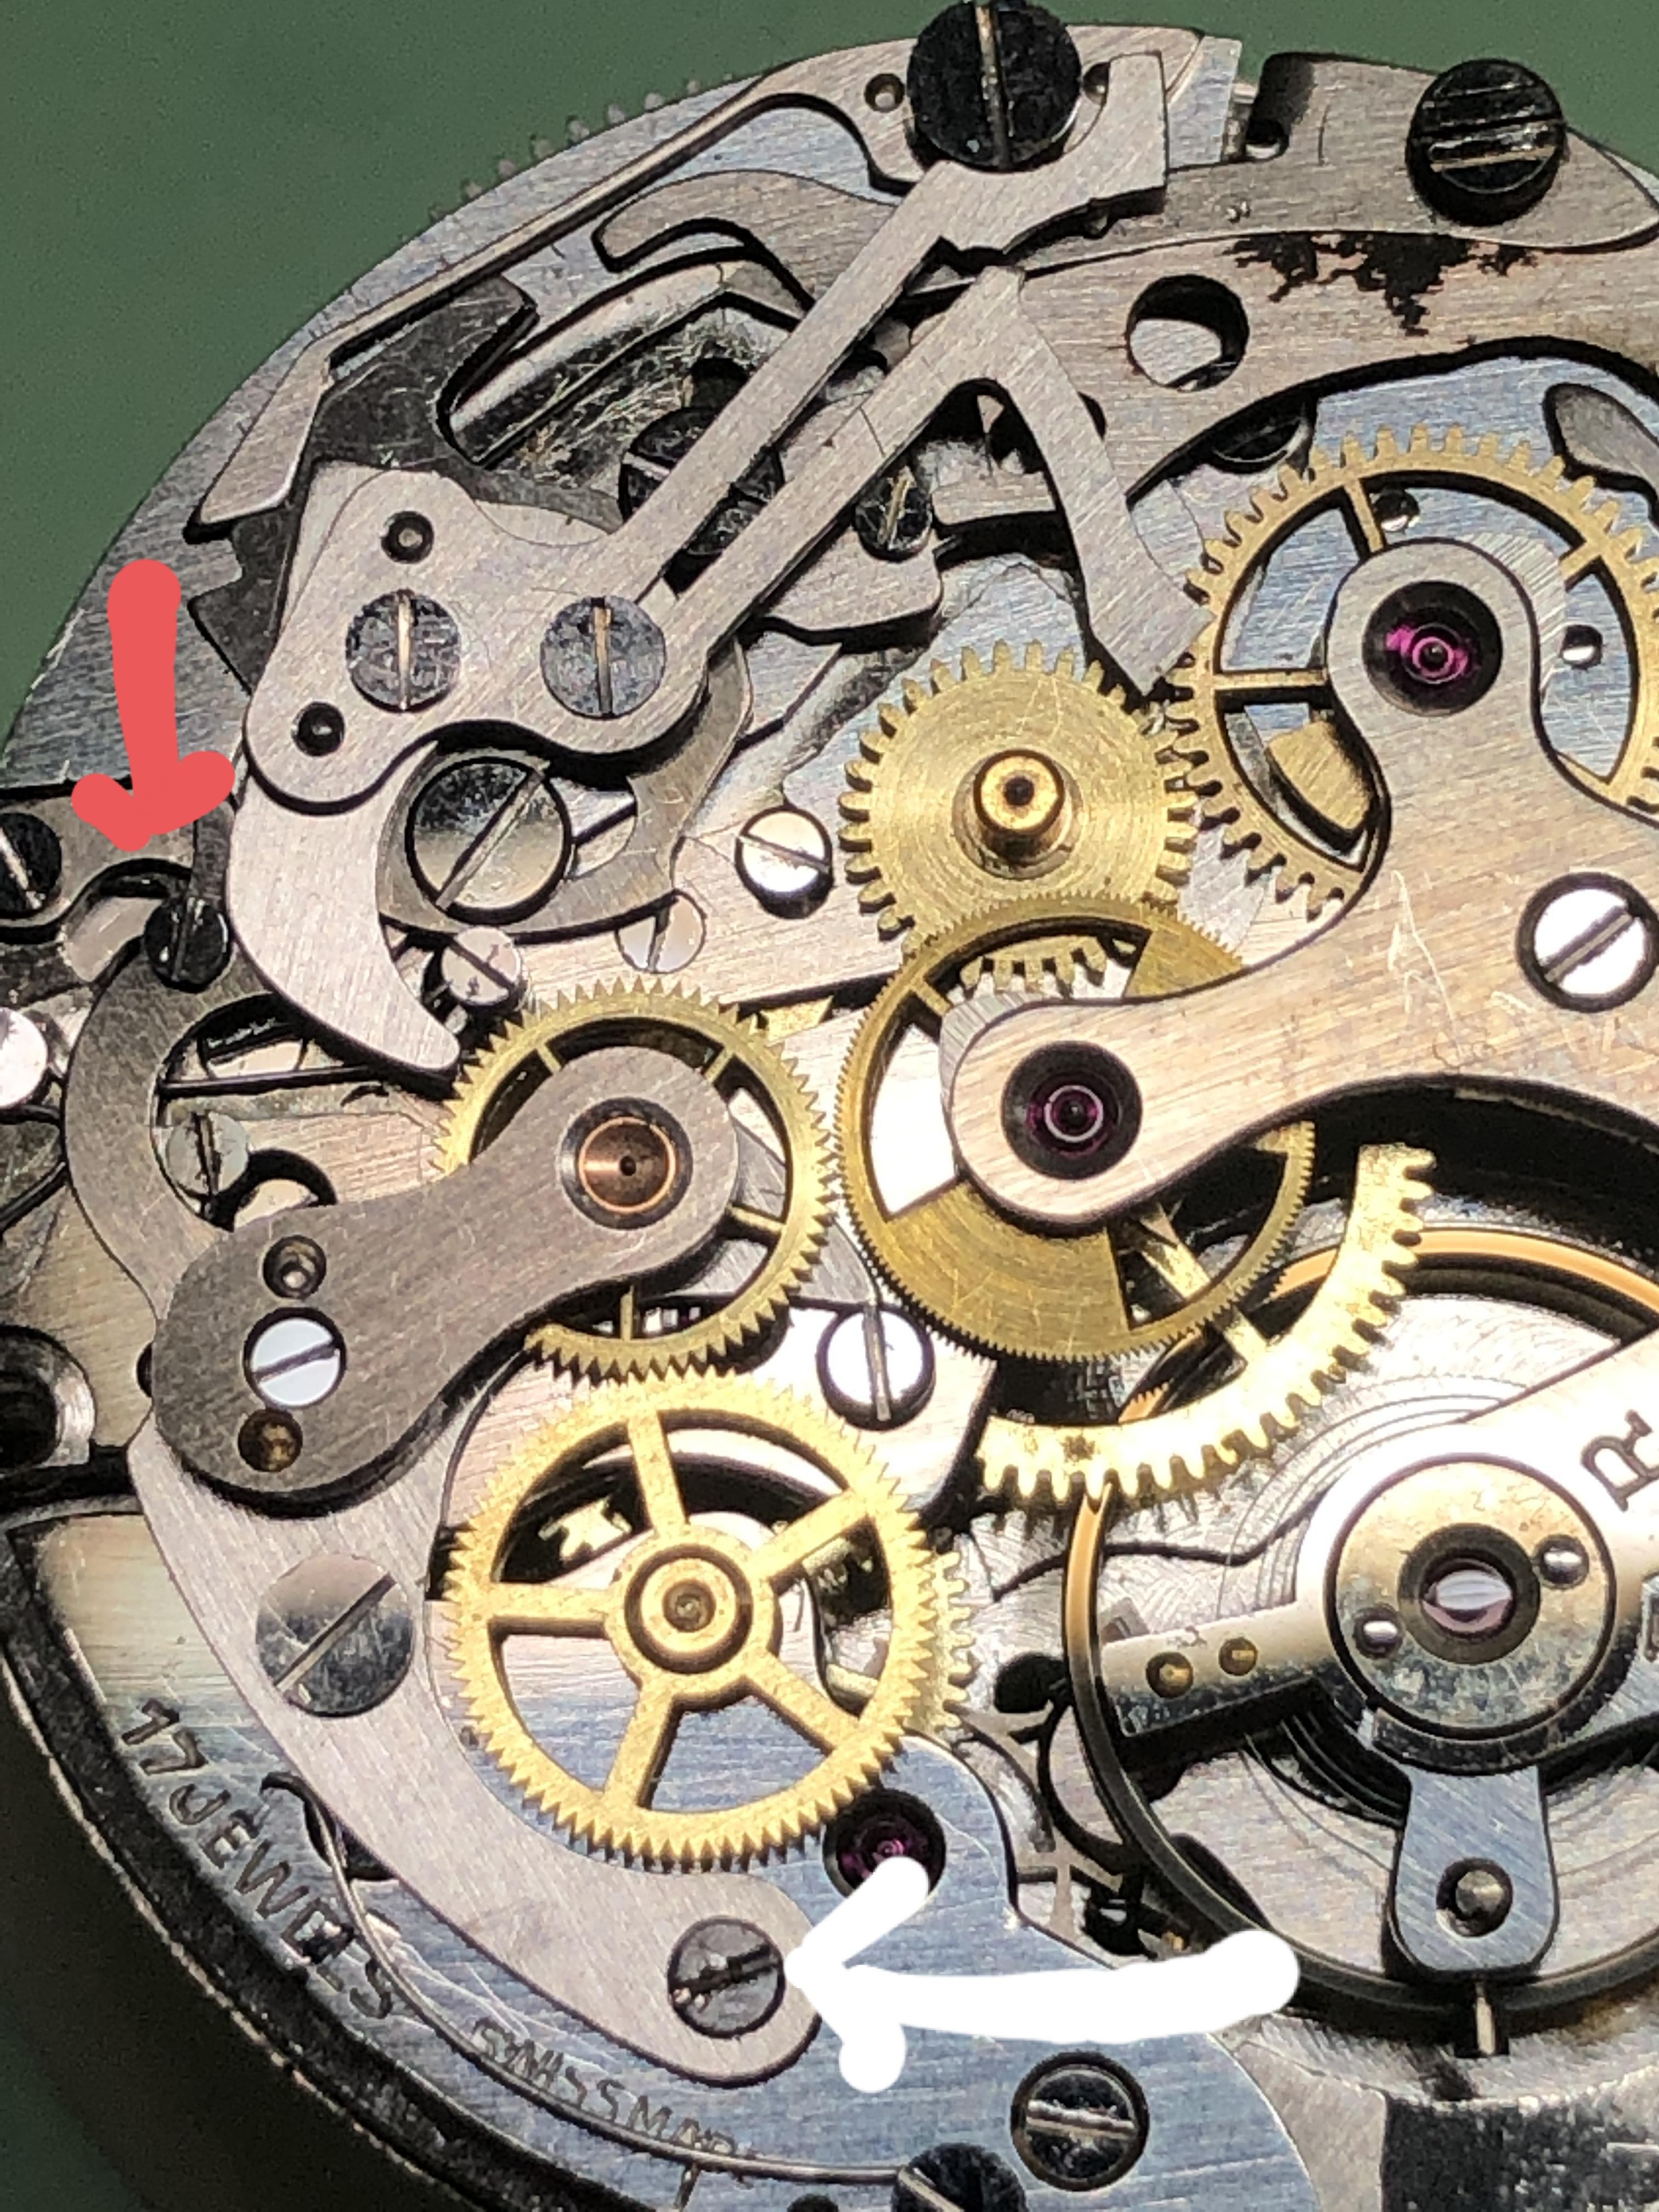
The entry lock does look quite strong. From the pic the exit stone looks a little light too, but could be just fine. The thing is with the escapement you have to check everything- total lock is just one aspect. Briefly, to check (mind you in school some weeks are spent on this): All checks done with balance in, some power on train rotate balance slowly and observe drop lock, it should be minimal and equal on both sides at the moment of drop, manipulate the fork to check for freedom, this is "corner clearance". There should be freedom, and the escapement shouldn't unlock move the balance further a few degrees, check the fork freedom again, this is horn clearance to roller jewel face, should be small enough the escapement doesn't unlock continue moving the balance, now you will be checking guard pin clearance. Should be smaller than the horn clearance, and if so it will also be safe The above checks are checking the function of the pallet jewels relative to the roller jewel and safety roller. Observe how much lock is left with the fork horn against roller jewel- this is an indicator of how much adjustment you have as far as moving the stones in. The lock must remain safe with horn in contact with the roller jewel. All checks done on both stones of course, and in theory over the course of a whole escape wheel revolution. Next, moving balance slowly, at the moment of drop lock, observe the travel of the fork to its banking (looking at the escape tooth/pallet stone, not the banking). This is the "run to the banking". It is essential, but can be very small, bearing in mind that there are sideshakes that can eat up some of the clearance between fork and roller table in vertical positions. Run to the banking plus drop lock = total lock. So to boil it down as simply as possible for practical use, you can check the fork horn clearance, observe the lock remaining, and that amount "minus a little" is about the max you can move the stone in. *** If the total lock is large, and there is a lot of run to the banking, you can also close the banking. Easier said than done on many movements, as this might entail forging the banking with a punch in numerous cases. ***One very important thing to keep in mind with drop lock: moving one stone affects the drop lock for both itself and the other stone. If you move the entry stone into the fork, you reduce drop lock on the entry stone, but the escape tooth will also be released sooner on that stone, reducing the drop lock on the exit stone as well. And vice versa. After moving a stone, you must recheck for safe drop lock and safe fork horn clearance. Moving a stone affects drop lock similarly on both stones, and total lock on that stone. Moving a banking affects total lock for that stone, and run to the banking for that stone. No effect on the other stone. Can't really see much regarding the barrel holes in the bridges, but that could be some wear there in the upper one.1 point
-
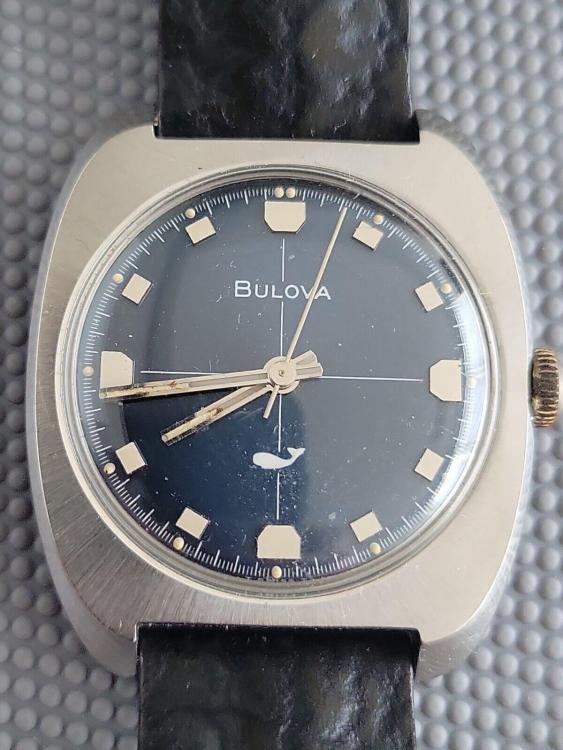
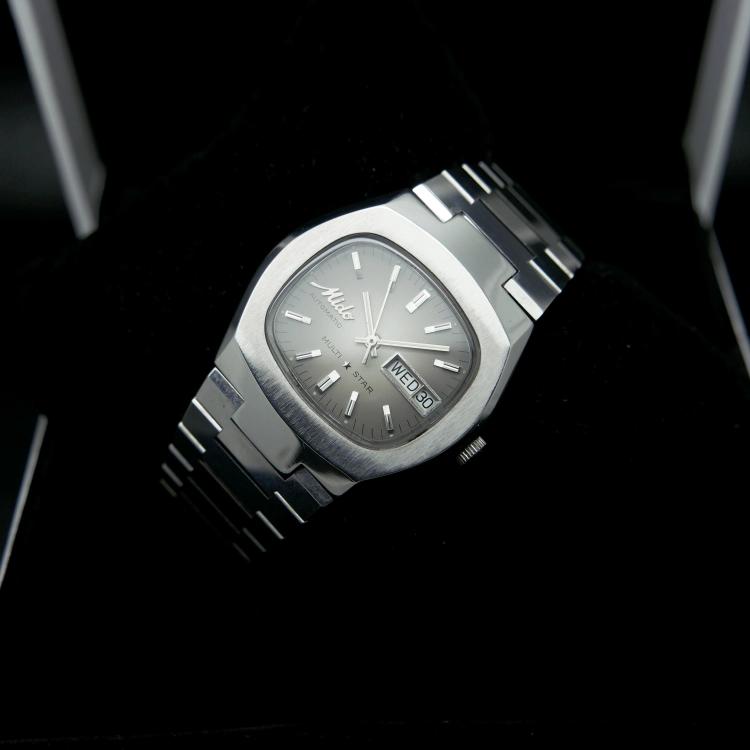
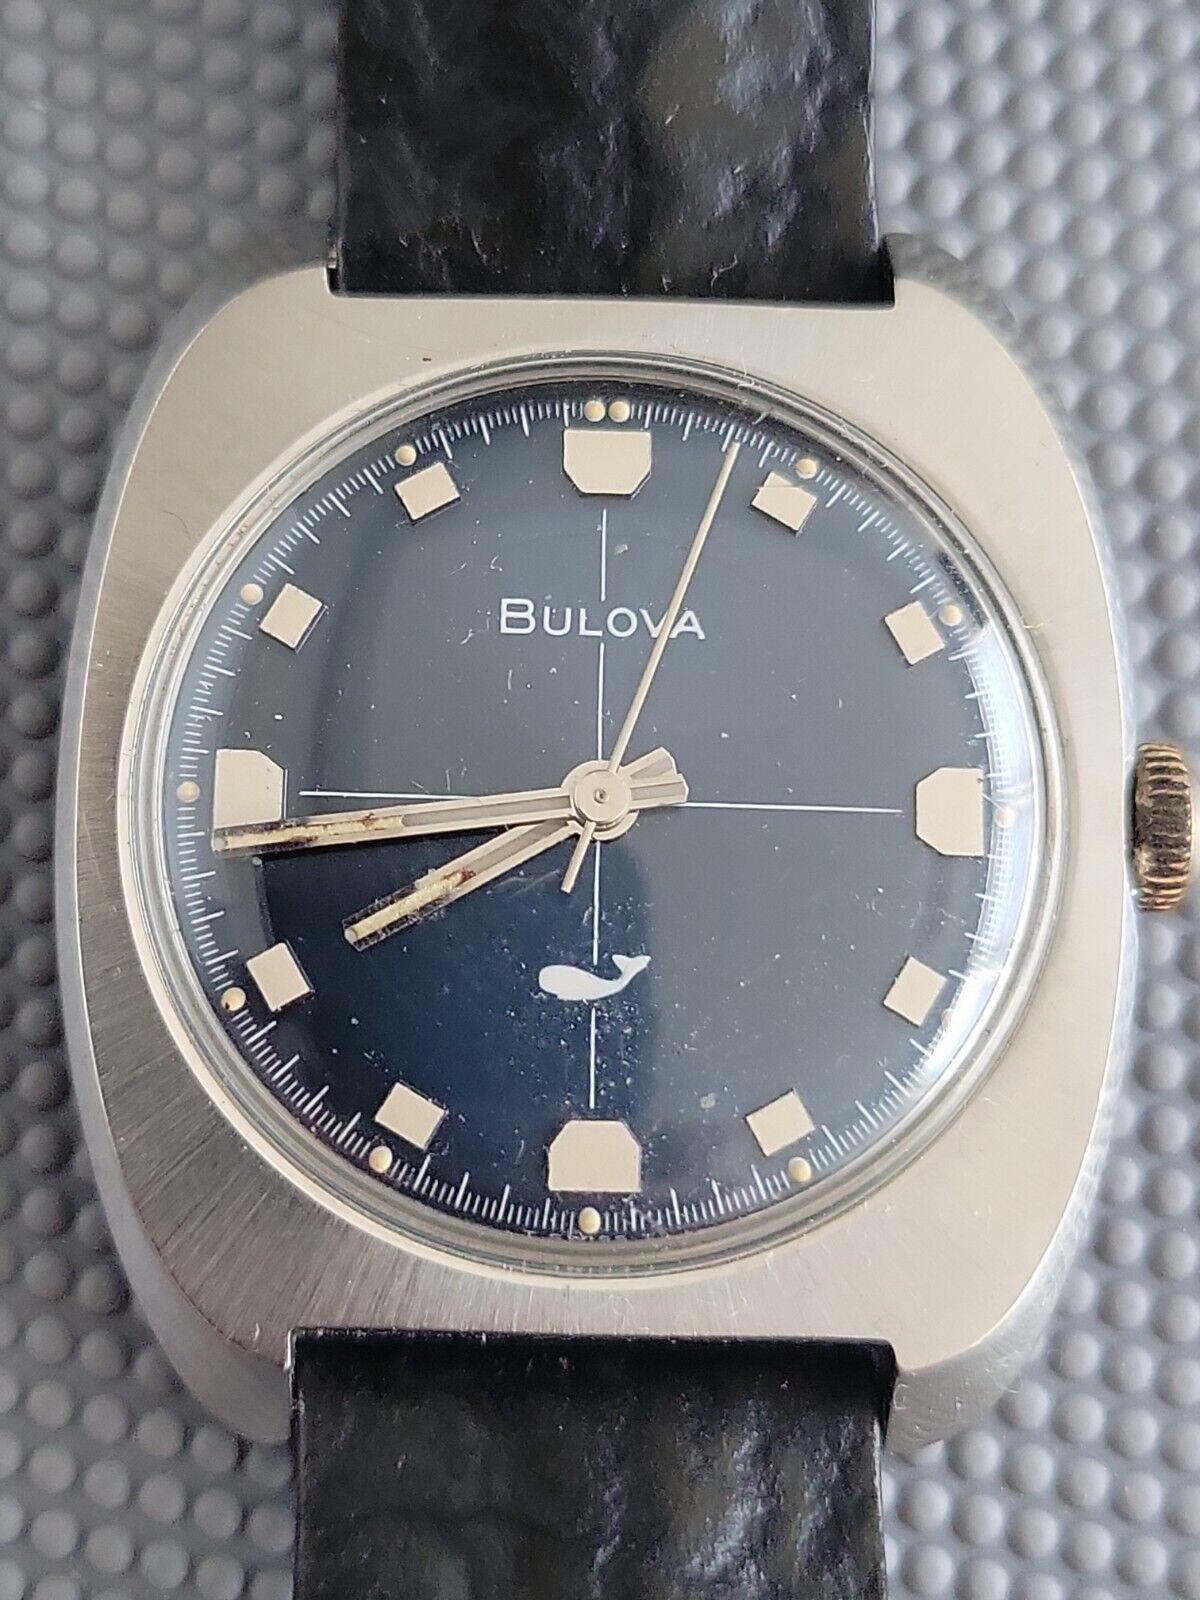
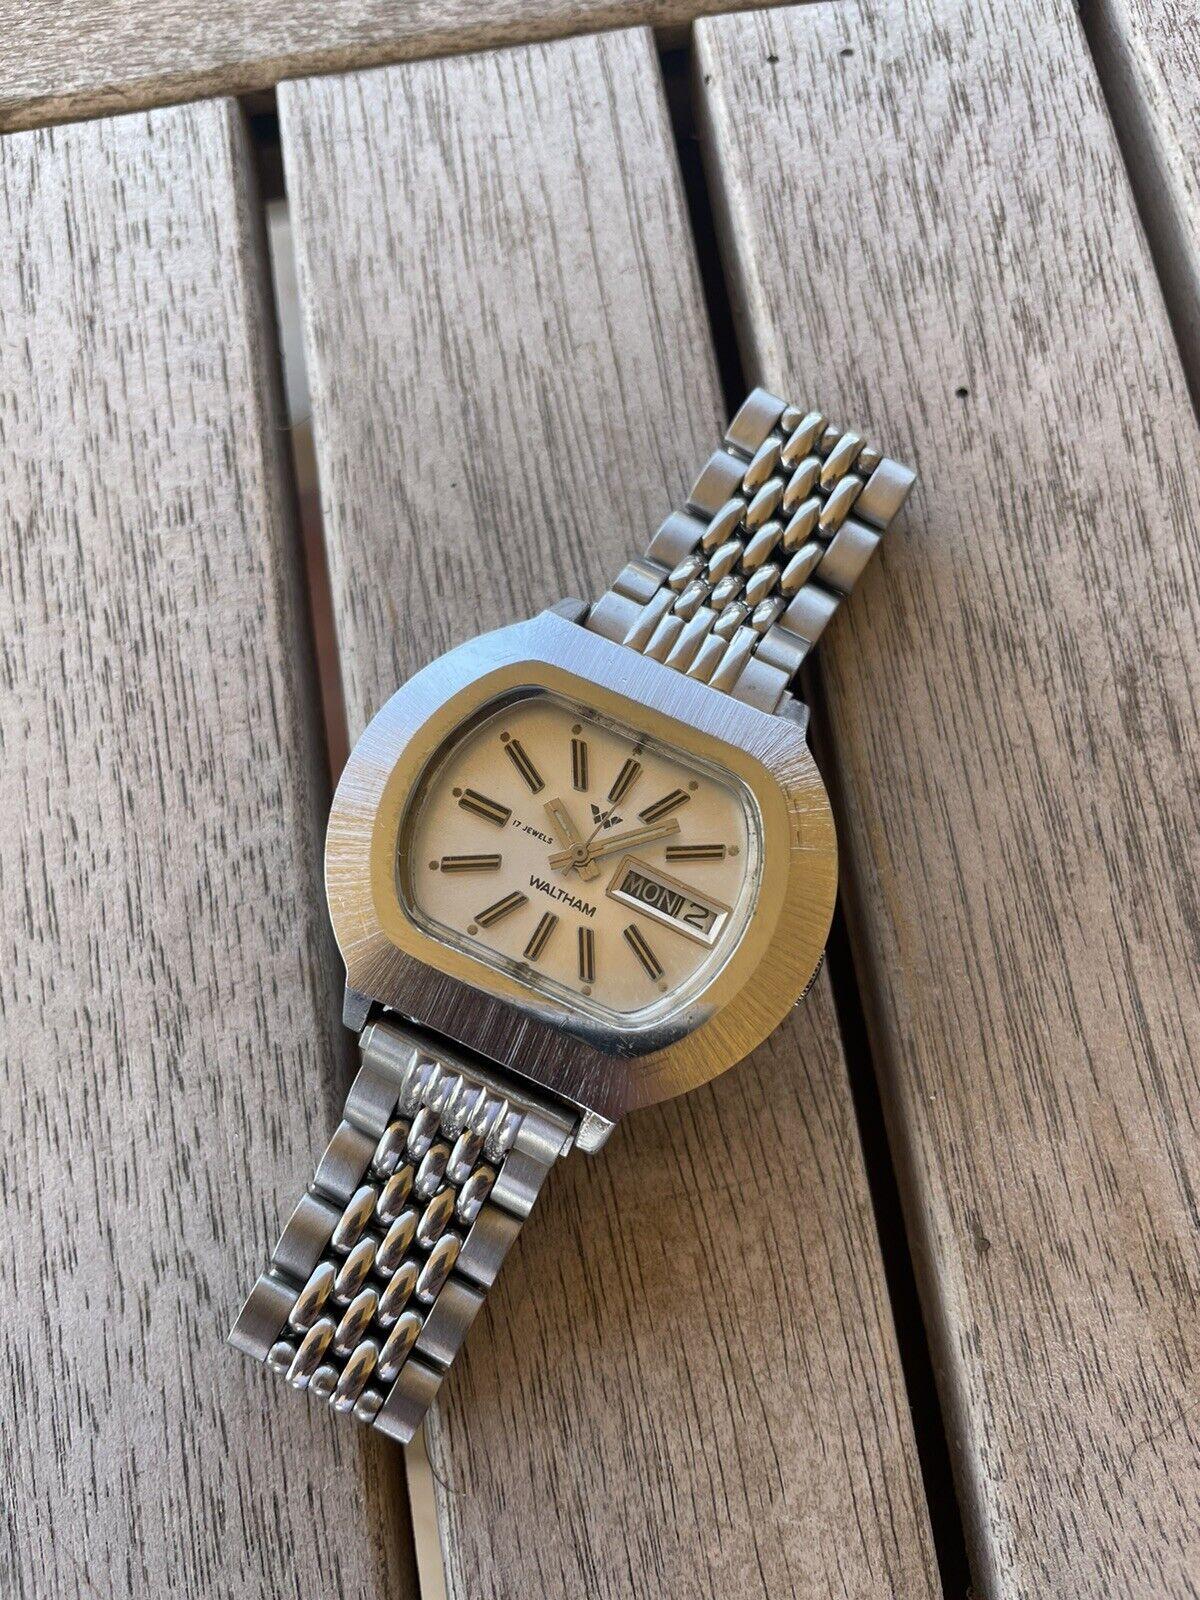
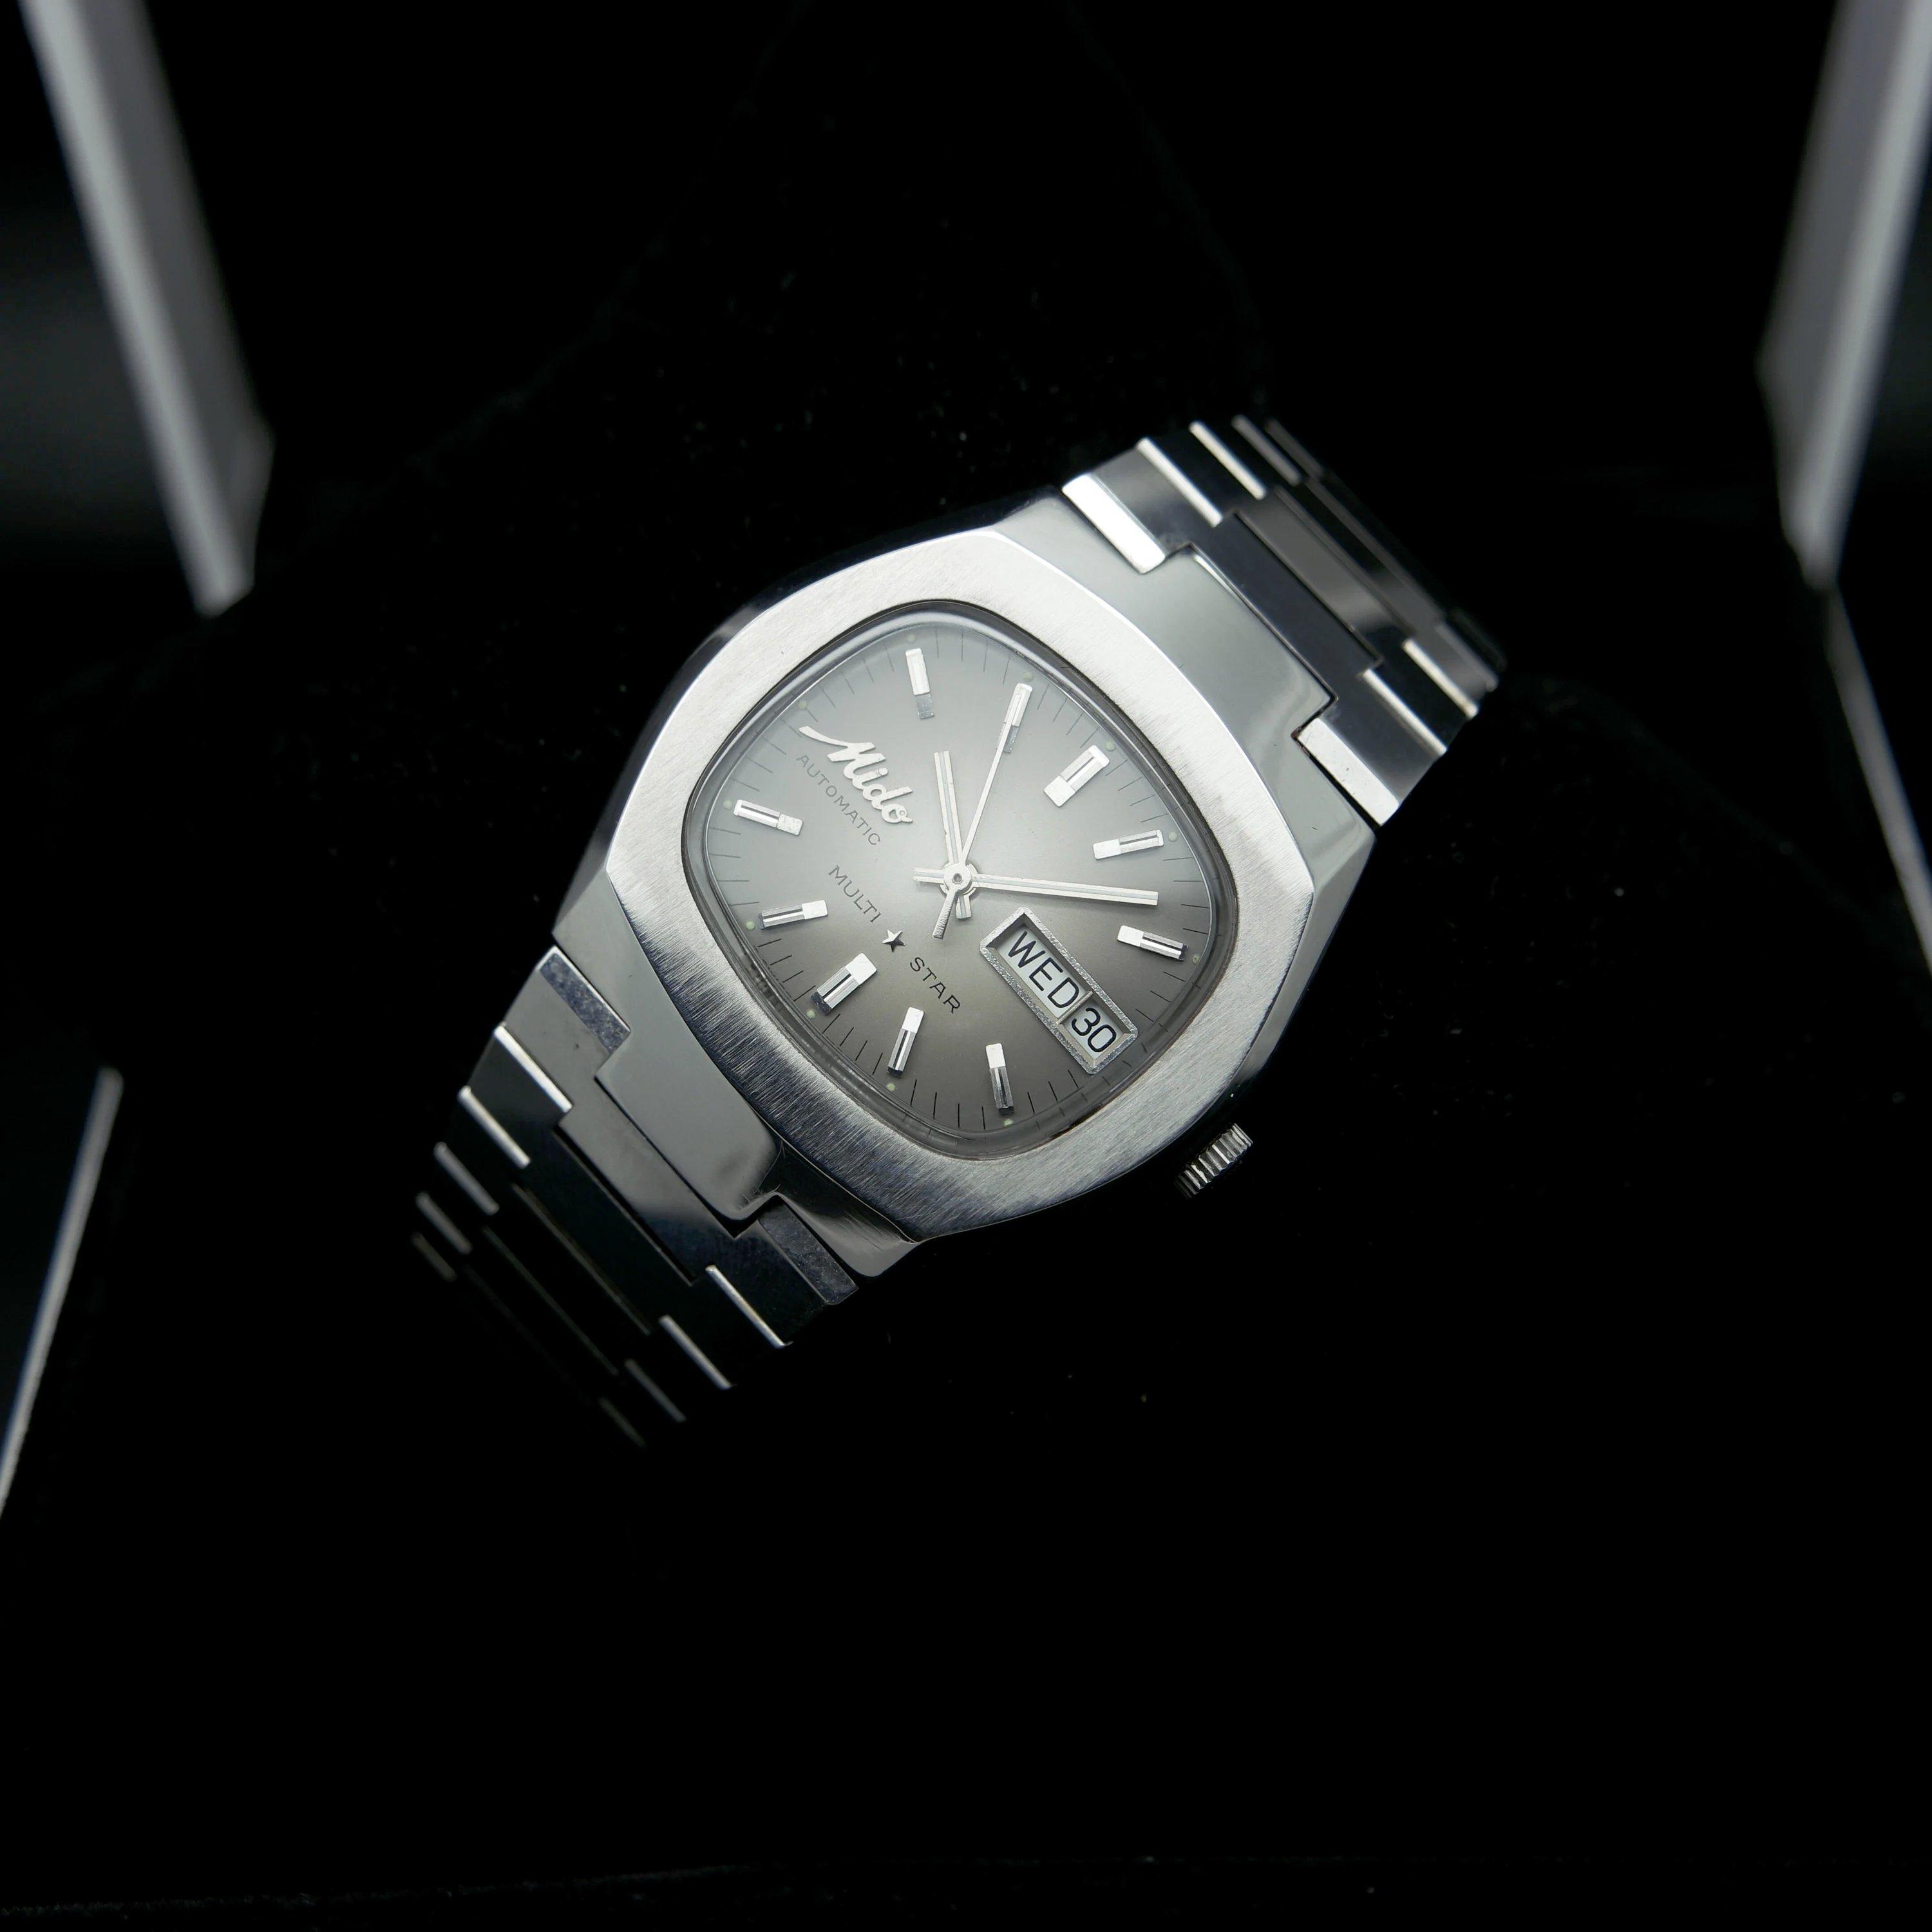
Too many in the latest haul! Sometimes the stars just align that way at the expense of the wallet. Got these 4 coming, and I have a NOS dial/hands for the 2nd watch, a Bulova Sea King 'FL', which it looks like it will need. That first Bulvoa with original band is straight out of the 1970's, chunky and bold, something I could see either Starsky or Hutch wearing :). I have a soft spot for Mido's and this one looks NOS, can't wait to give it wear on the wrist. The Waltham was so clean looking and fairly inexpensive that I couldn't pass it up:

 1 point
 -
Sliding gear wheel and min.-recording wheel must spin absolutely free without the least resistance. But your picture looks like pin and tooth are blocking each other. This happens if sliding gear and pin are not meshing deep enough. Adjust the sliding gear deeper with its eccentric (can't say which one, find which stops the movement of s. g.) Frank1 point
-
White arrow is the eccentric for depthing of driving wheel to coupling wheel, red arrow for depthing of coupling wheel to chronograph runner.
 1 point
 -
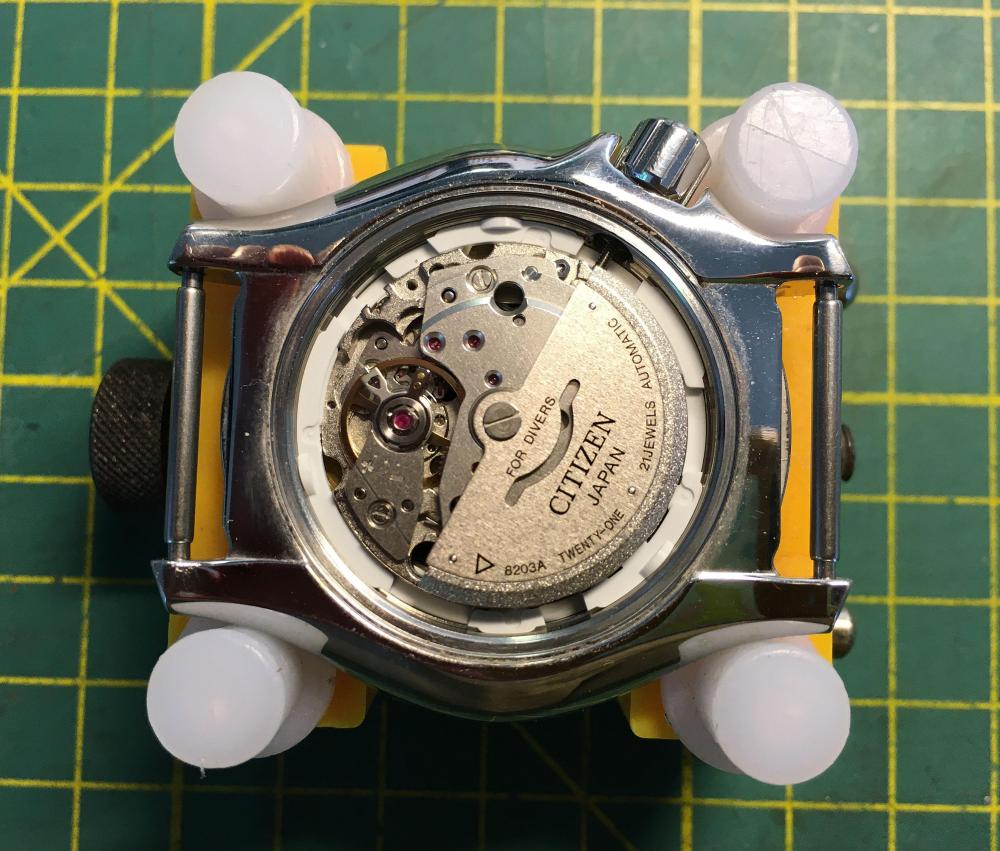
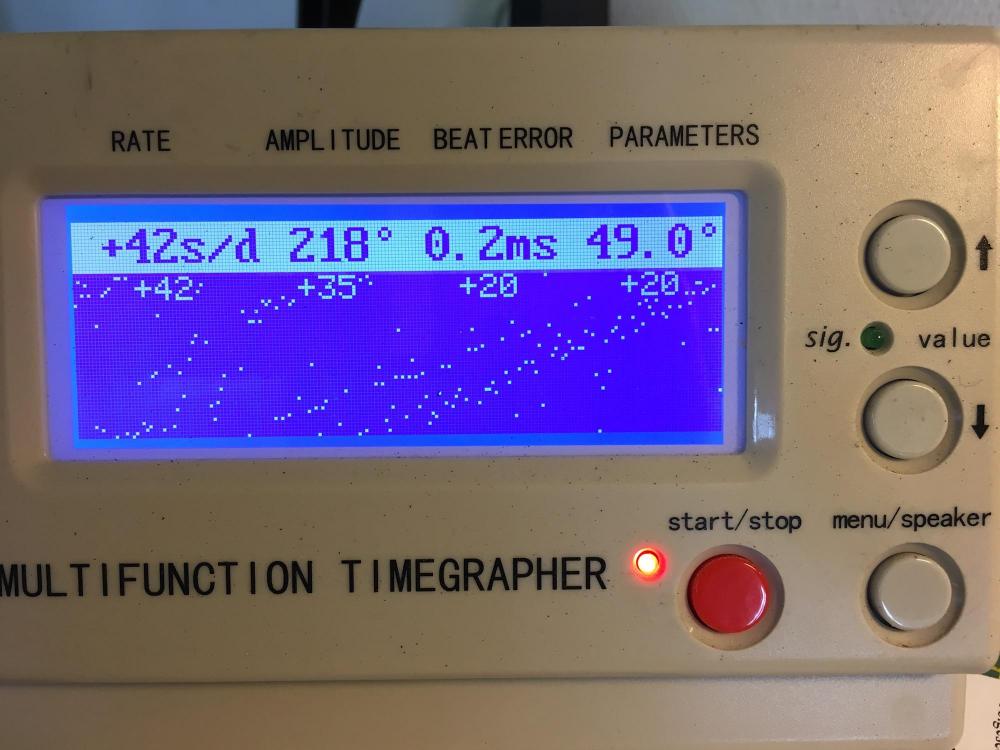
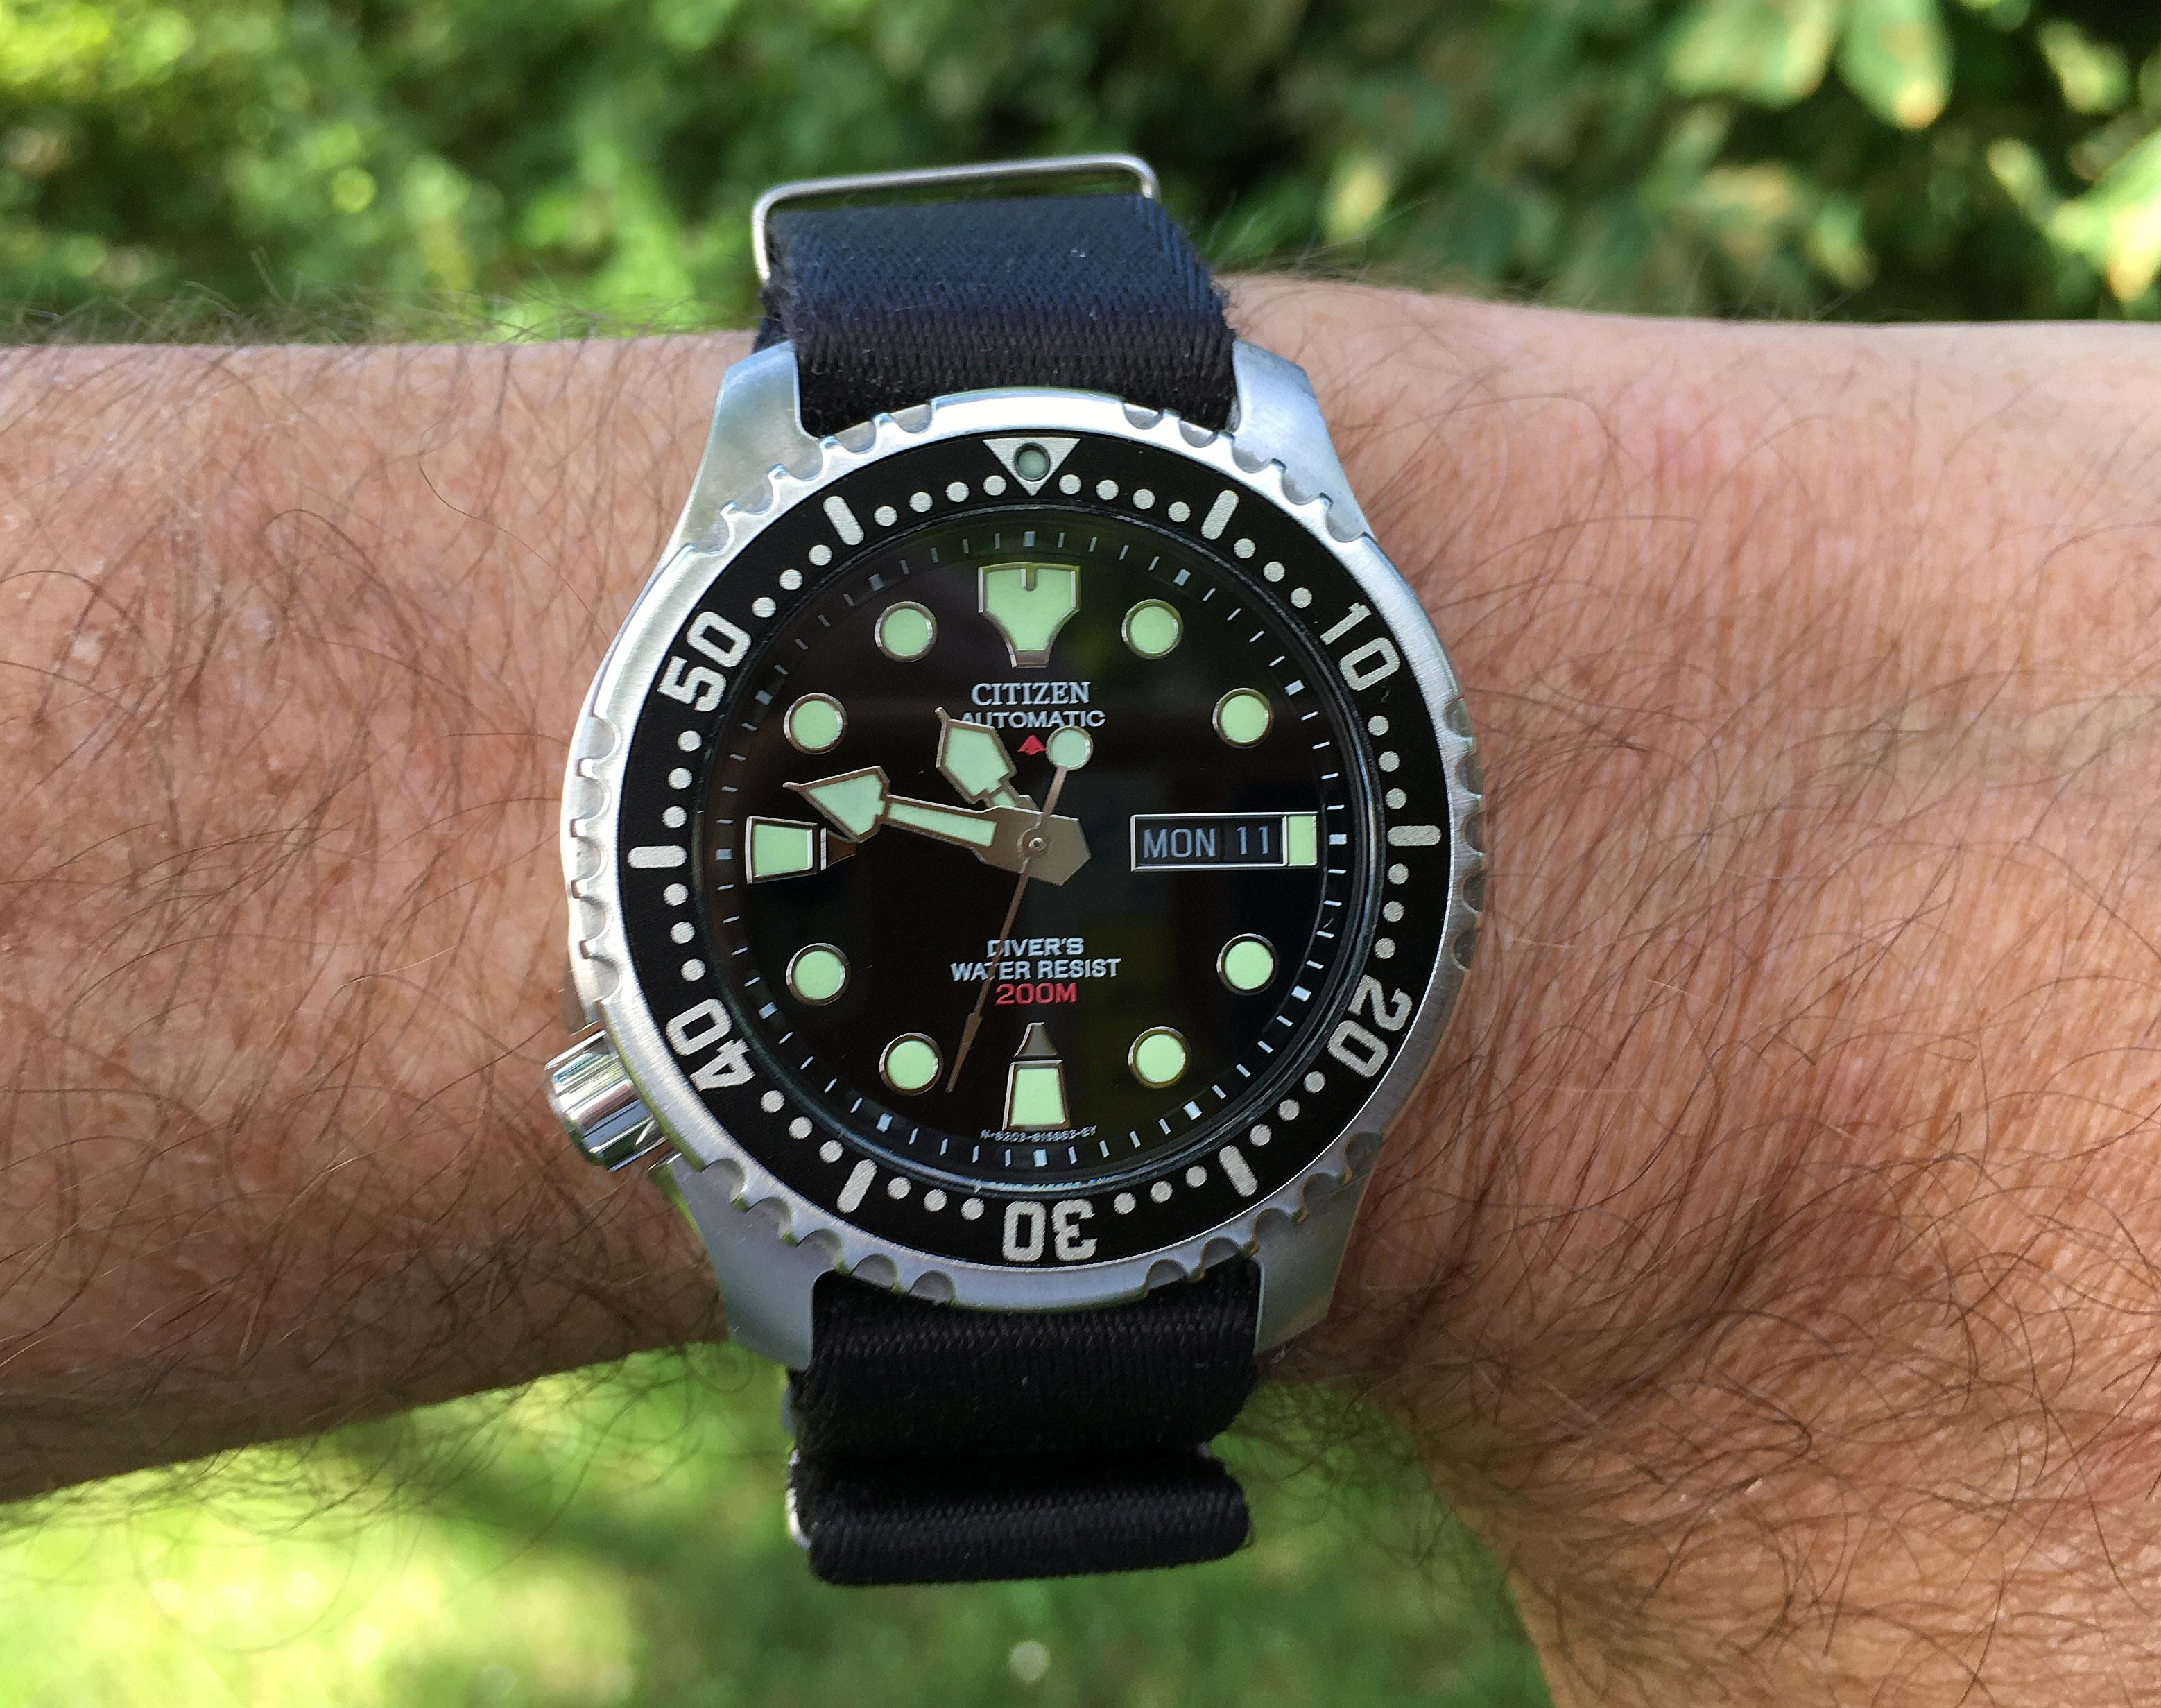
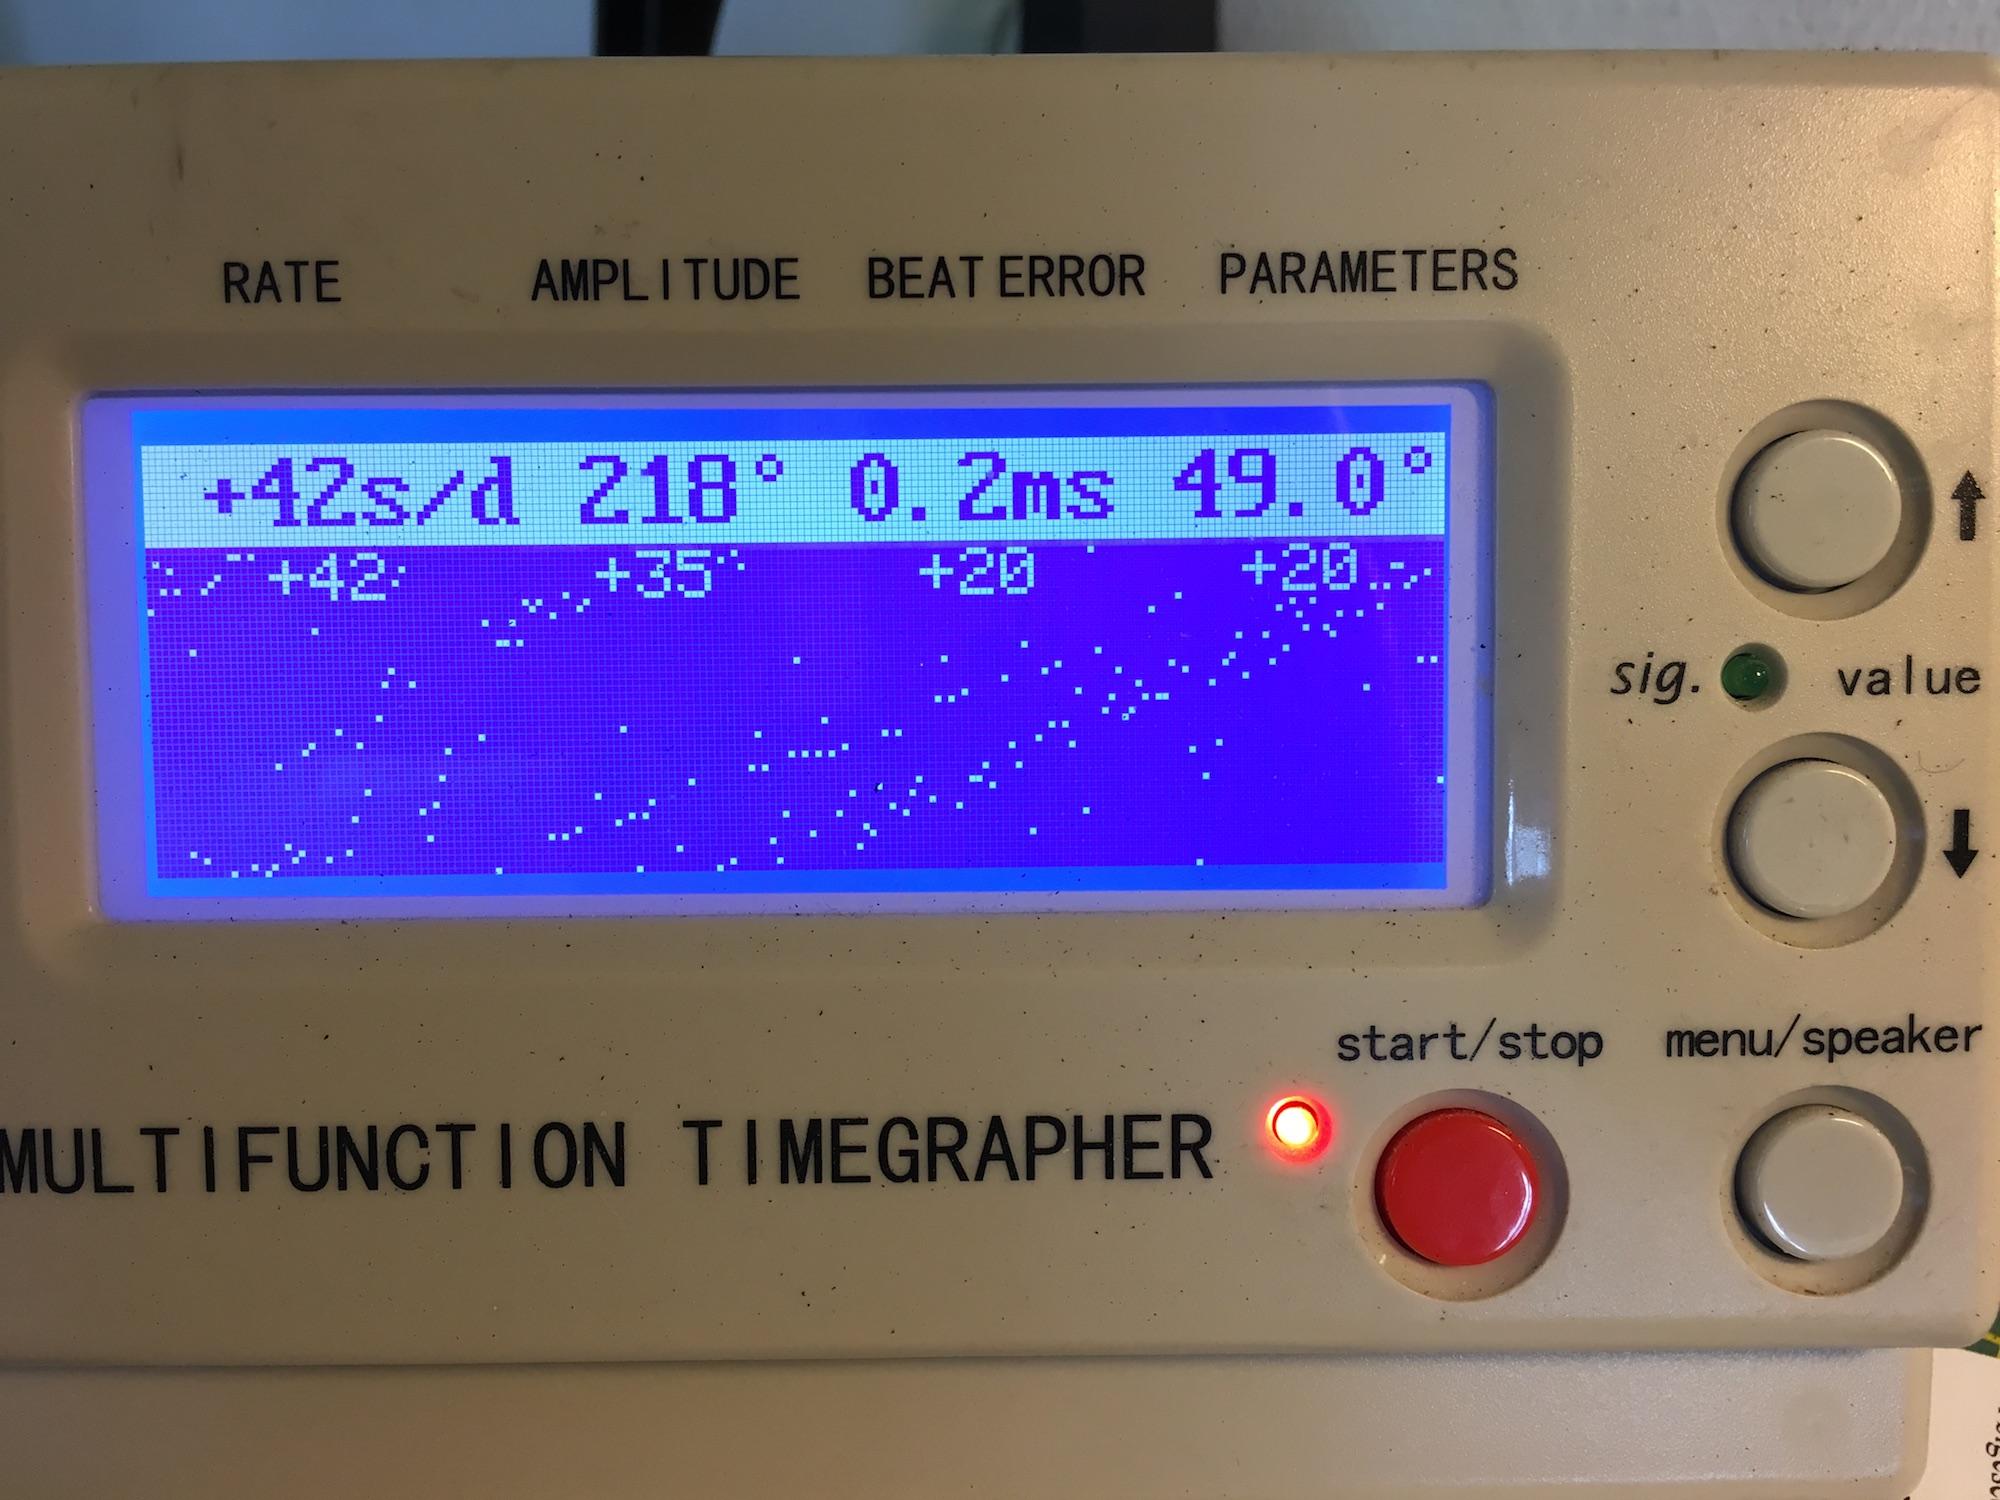
The Citizen has via a D-tour (Germany-Denmark-Sweden-Denmark) arrived. First impressions are that the watch is nearly as new. No scratches on the crystal, hardly any on the bezel and no signs of ever been opened. The movement looks untouched. However, the movement runs but has a tendency to stop. Perhaps no wonder if you see the "heavy snow in Switzerland" picture on the timegrapher ...... but this is the reason why we are here

 1 point
 -
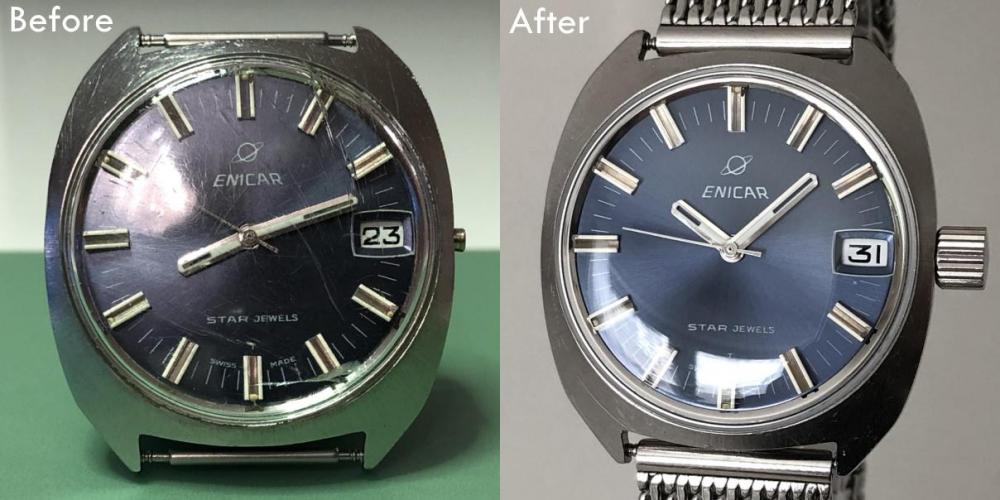
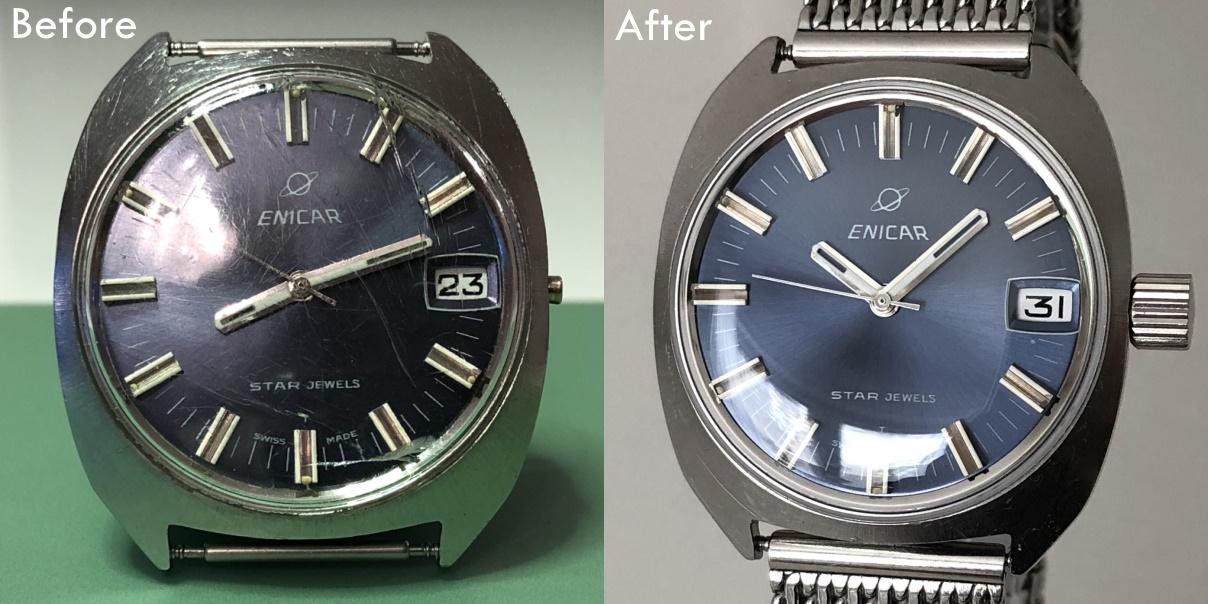
Disassembly sequence here (Please sort by name in ascending order) Assembly sequence here (Please sort by name in ascending order) The watch is an Enicar Star Jewels Ocean Pearl from the 1970s A bit of background I bought this watch on tradera.com (Swedish eBay) listed in the category "Klockor/Renoveringsobjekt" ("Watches / Renovation items"). It was listed as "working" despite lacking the winding stem. I bought it for three reasons. I wanted to try my hands on an inexpensive watch in visual need of renovation. I was curious of the Enicar brand and their in-house movements, and I thought the blue dial with its applied indices had potential. It was clear that the watch needed a new winding stem, crown, and armoured crystal. I found an original stem on eBay from Spain for less than €10 including shipping (a bit of a bargain I think). I bought a bunch of inexpensive waterproof crowns from CousinsUK.com so that I could select the most comfortable and at least somewhat nice looking. I also bought a couple of inexpensive Sternkreutz armoured glasses from CousinsUK.com Overall the movement looked pretty OK except for a third wheel pivot that was rusty. Removing the rust (using vinegar essence) the pivot became Coca Cola bottle shaped so I burnished it and in the process had to remove approx. 2 to 3/100 mm. This in turn created too much side-shake so I replaced the jewel as well. The mainspring looked pretty OK too so I kept it. The cannon pinion also needed a bit of tightening. I guess the friction between the centre wheel arbor and the cannon pinion really can't last forever when a watch is being used for many, many years, perhaps even for decades (looking at the case back of this watch it has seen massive use). Anyway, to tighten the cannon pinion I first tried with my Seitz jewelling pusher and stake for lanterning cannon pinions, but it feels like the edges of the pusher and stake are somehow too blunt or perhaps not designed for wrist watch movements?! So, I resorted to my cannon pinion tightening tool (Bergeon 4733) which is really a bit scary to use but works very well once you've destroyed your first two or three cannon pinions learning how to use it. The trick is not to alter the position of the screw (unscrew it) once it reaches the inside of the handle. As soon as the screw touches the inside of the handle it's time to press. That will usually tighten the cannon pinion the required 1-3/100 mm (I would guess). To give back some of the luster to the dial and hands I simply used a Dial & Hand Cleaning Pen from CousinsUK.com. It worked better than I had expected. The old lume was partly missing and what was left was completely crusty so I simply scratched the remains off and didn't bother to replace it (the blue colour shining through the hands looked pretty great and I don't care much for lume anyway) Despite throwing everything in my arsenal of collected knowledge and experience on the this watch I couldn't get it to run perfectly. The amplitude (as well as the rate) in the horizontal positions fluctuates between 260 and 280 degrees but mostly stays around 260 degrees. I did adjust the curb pin as the hairspring was pinched between the boot and the curb pin and made sure it bounced evenly between the two, but the effect was only marginal. I suspect that the hairspring touches the lower part of the boot. Anyway, I decided to wait with further investigations, put it together, wear it and enjoy it. Despite this shortcoming it performs very well as a daily wearer, only varying in rate between about +1 and -1 seconds per day.
 1 point
 -
Regarding meters...it is not easy to find a 25ua analog meter. That is why I recently bought two accutron test sets because they use a rather large 25ua FS meter. I am planning on building a test platform using one of them. I know nothing about servicing accutron and don't plan to head that way...just hijacking this thread to add my thoughts on meters1 point
-
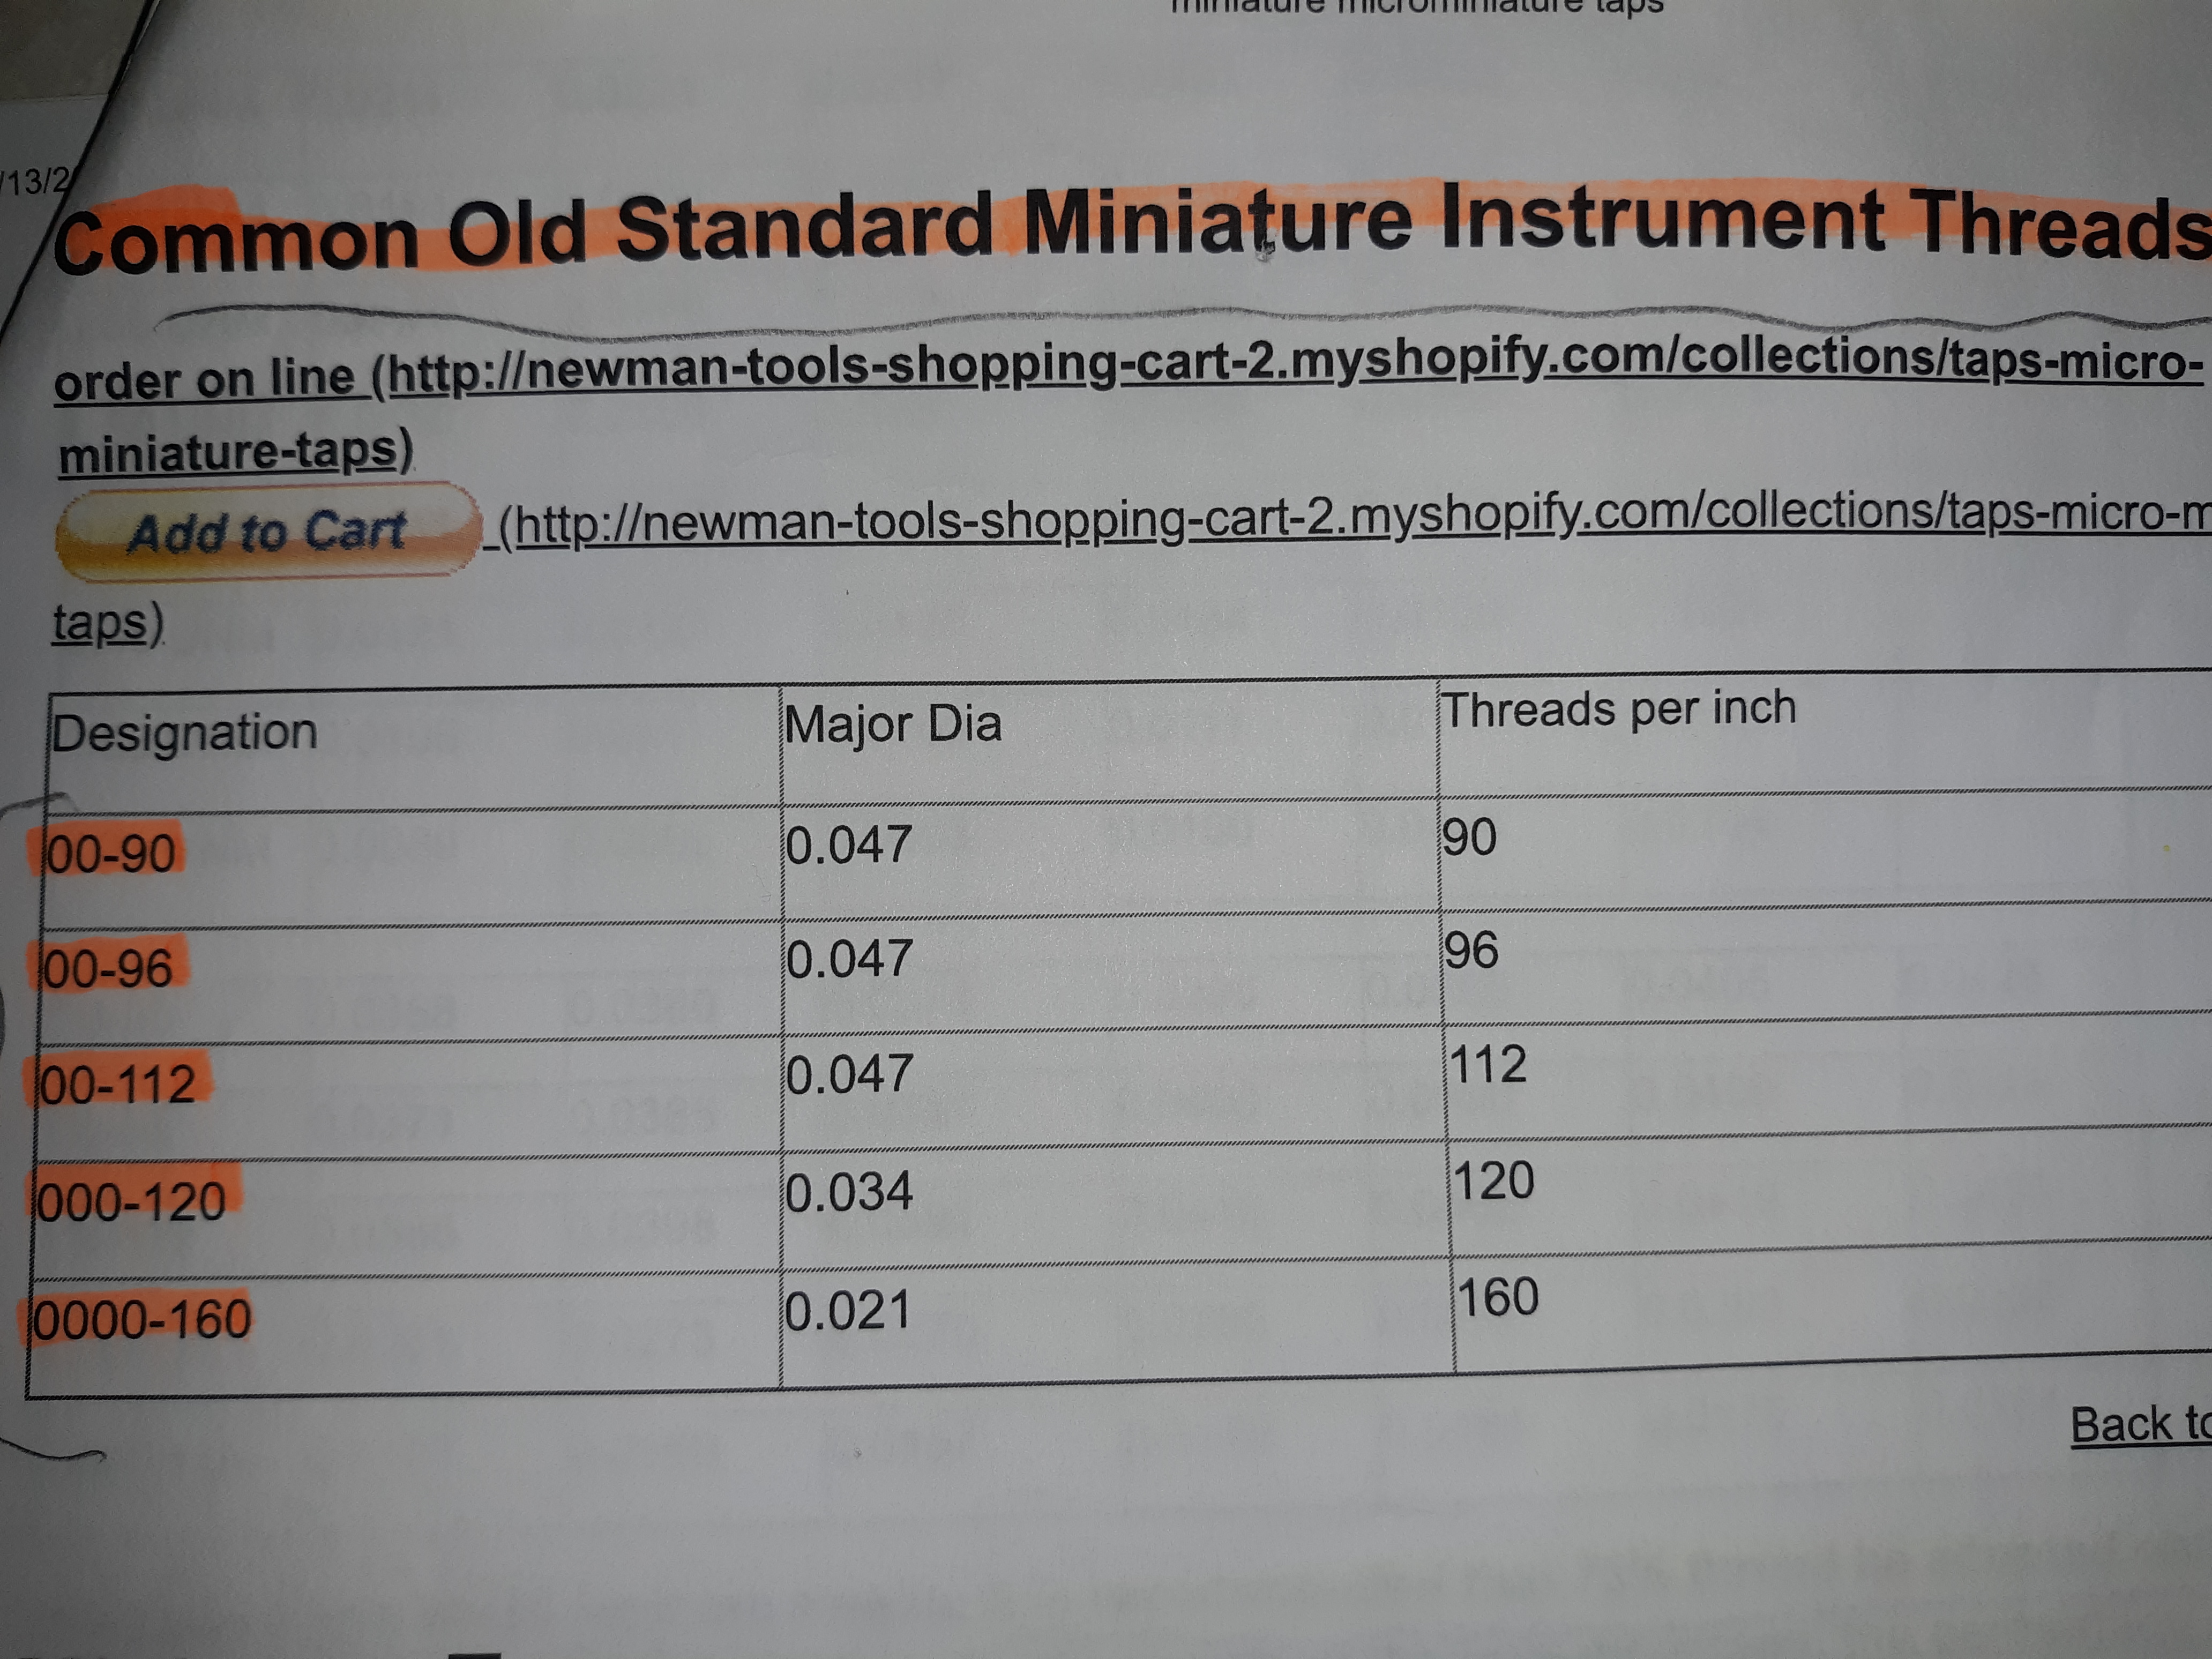
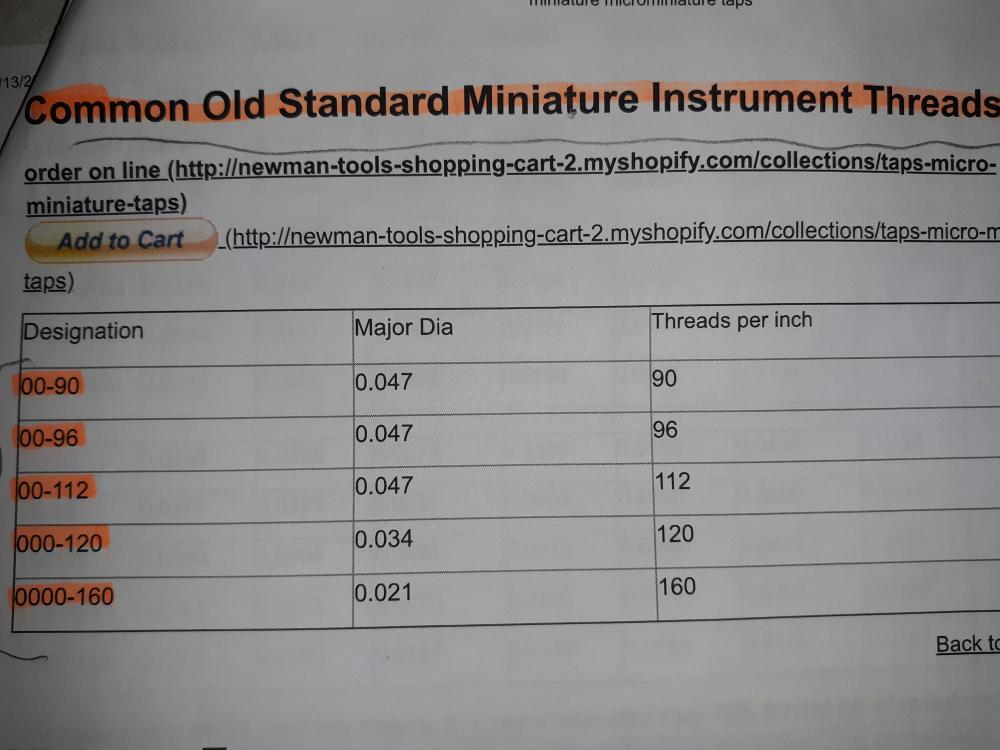
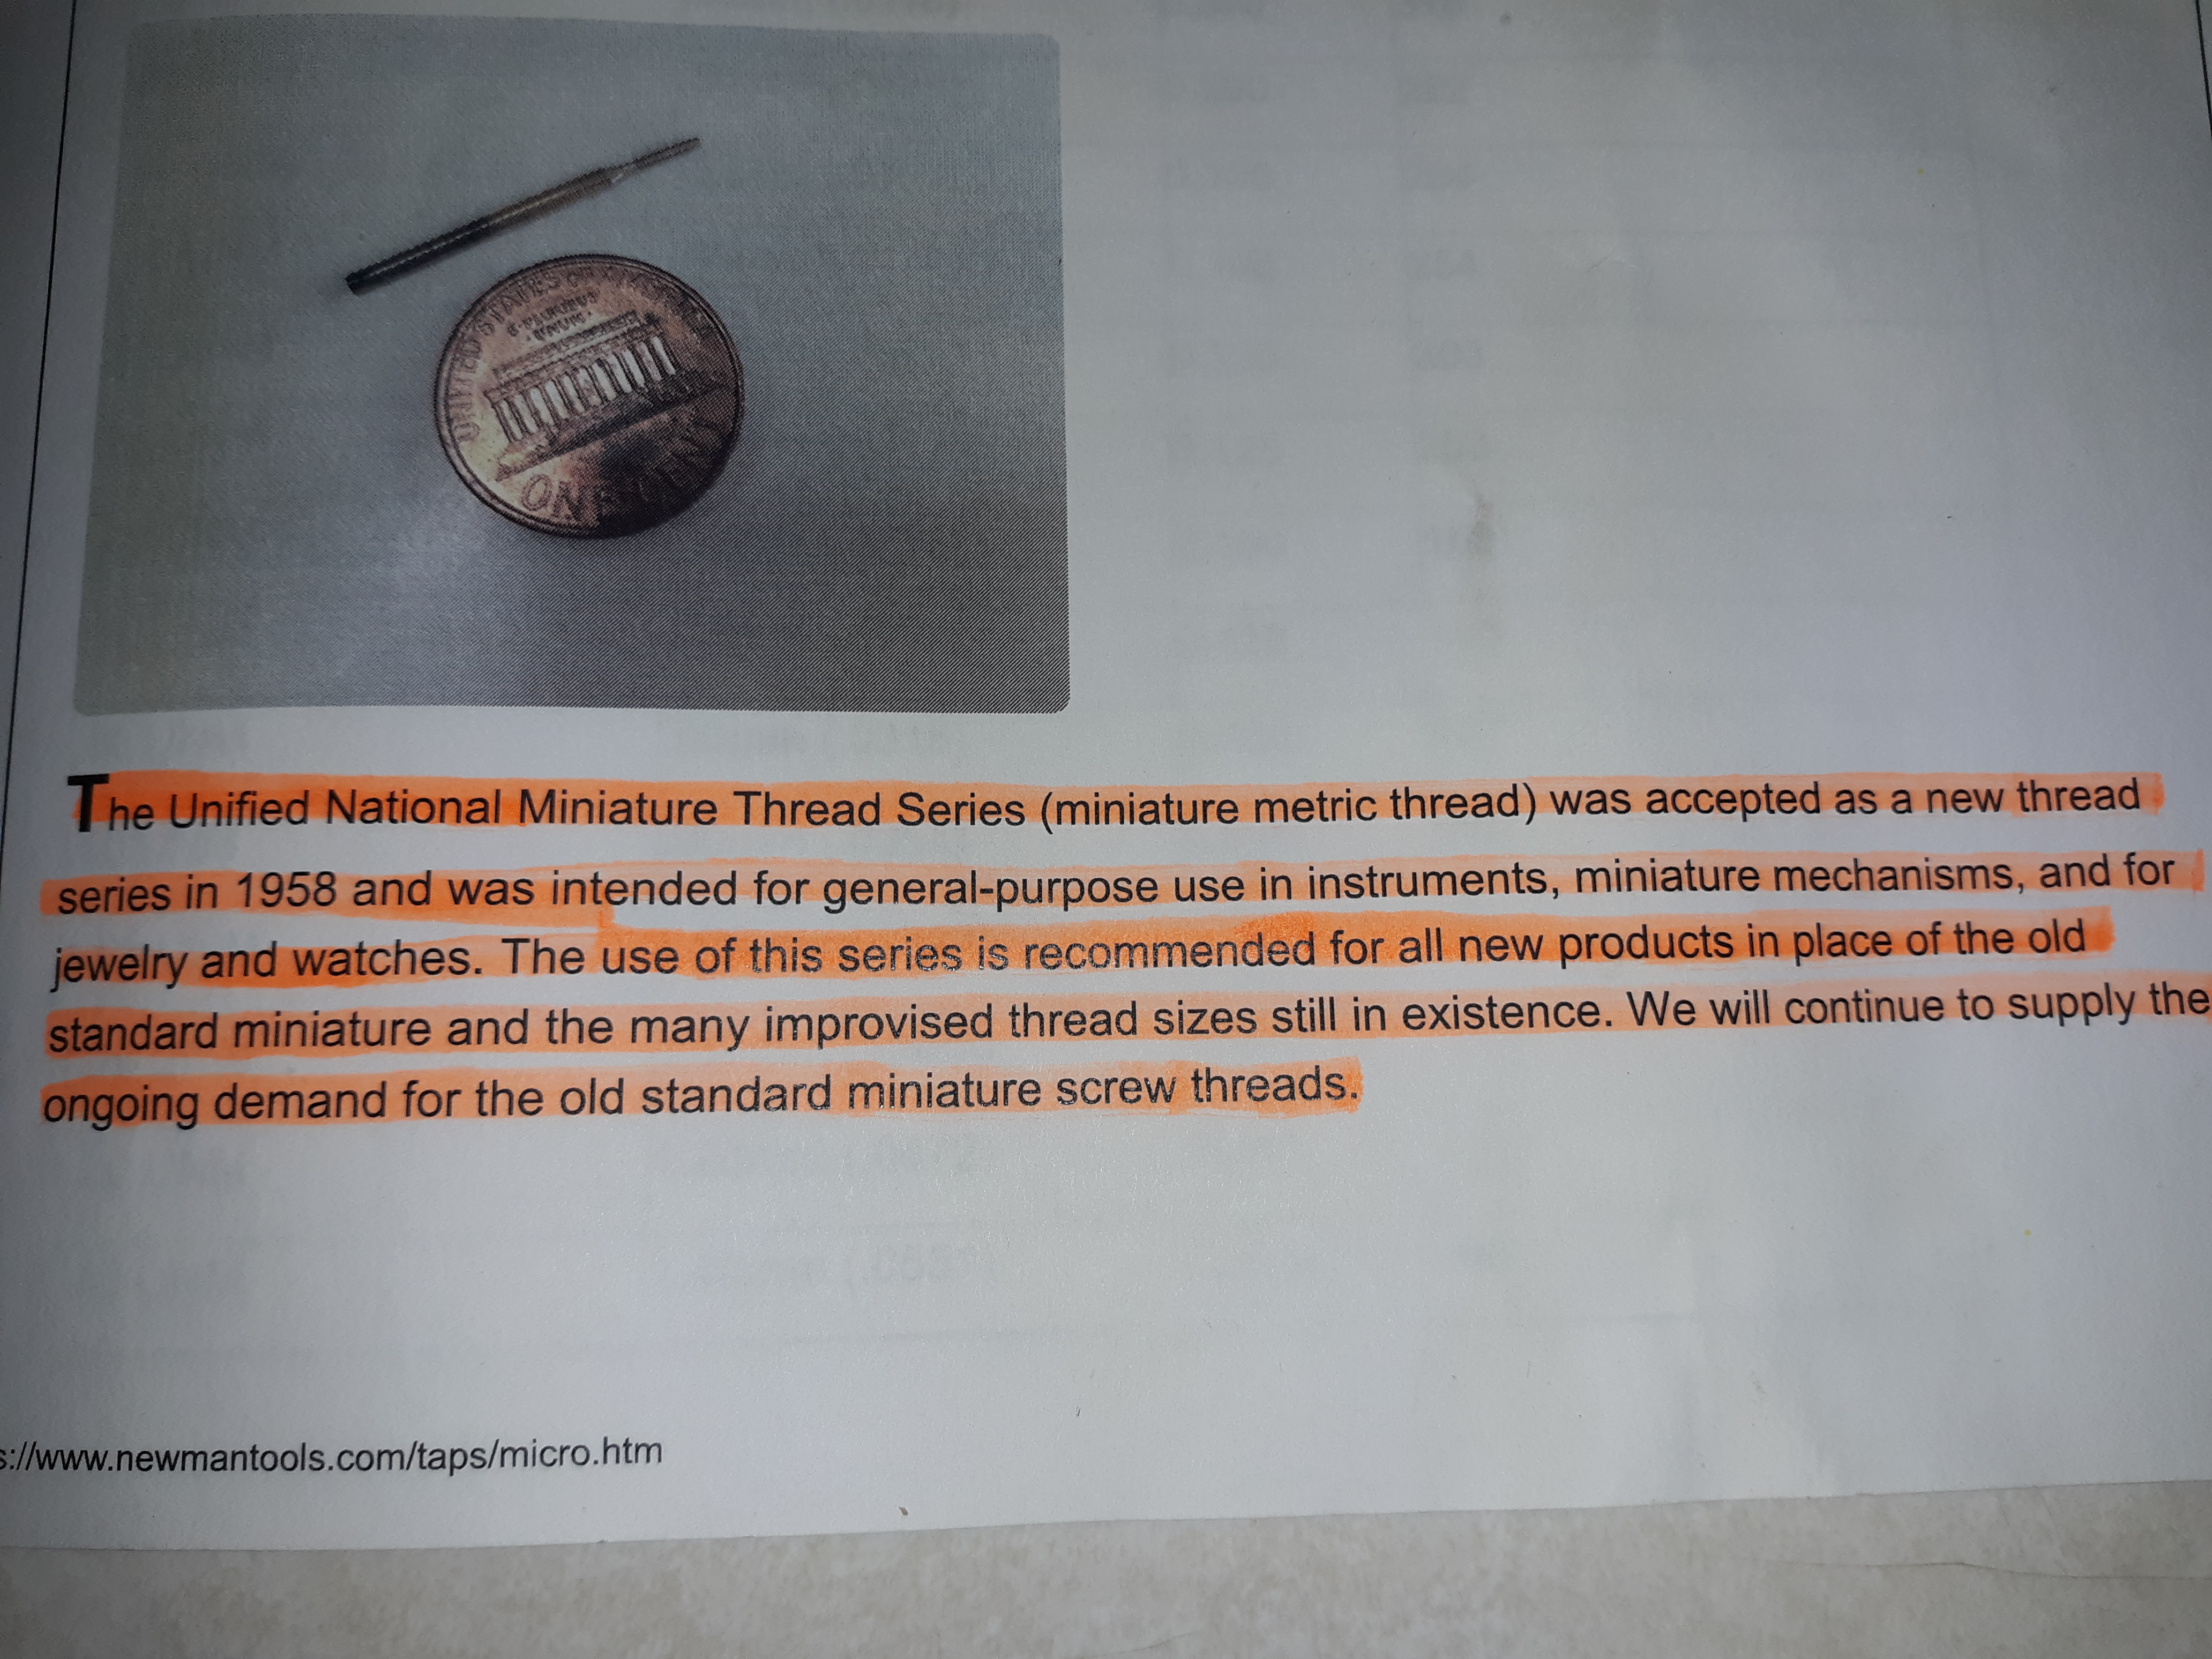
I think I found the "common old standard miniature instrument threads" which I think includes vintage american pocketwatches.

.thumb.jpg.e1f1f8ed0e1e5ab936c6f141fde1cce5.jpg)

 1 point
 -
the Elgin watch company had a interesting way of liquidating their main factory simplistically the parts spread out across the countryside which means there's lots and lots of new old stock parts. Wikipedia just doesn't quite describe what really happened. so for instance if you do a search for Elgin watch screws you might find a link like this one. http://www.ofrei.com/page1388.html this means if you know what you looking for conceivably the screw assortments will show up on eBay as they should be out there somewhere.1 point

.JPG.68ac26a3118309d2571a83e3b84d865b.JPG)
.JPG.75c1633fc6f73ff1c2e486a63444b737.JPG)


.JPG.d6ff12db672e34afd9f2a3807d2106b3.JPG)


.jpg.7fd407418c012e42c7c30ed1a6a0933b.jpg)