Leaderboard


Popular Content
Showing content with the highest reputation on 05/23/20 in Posts
-
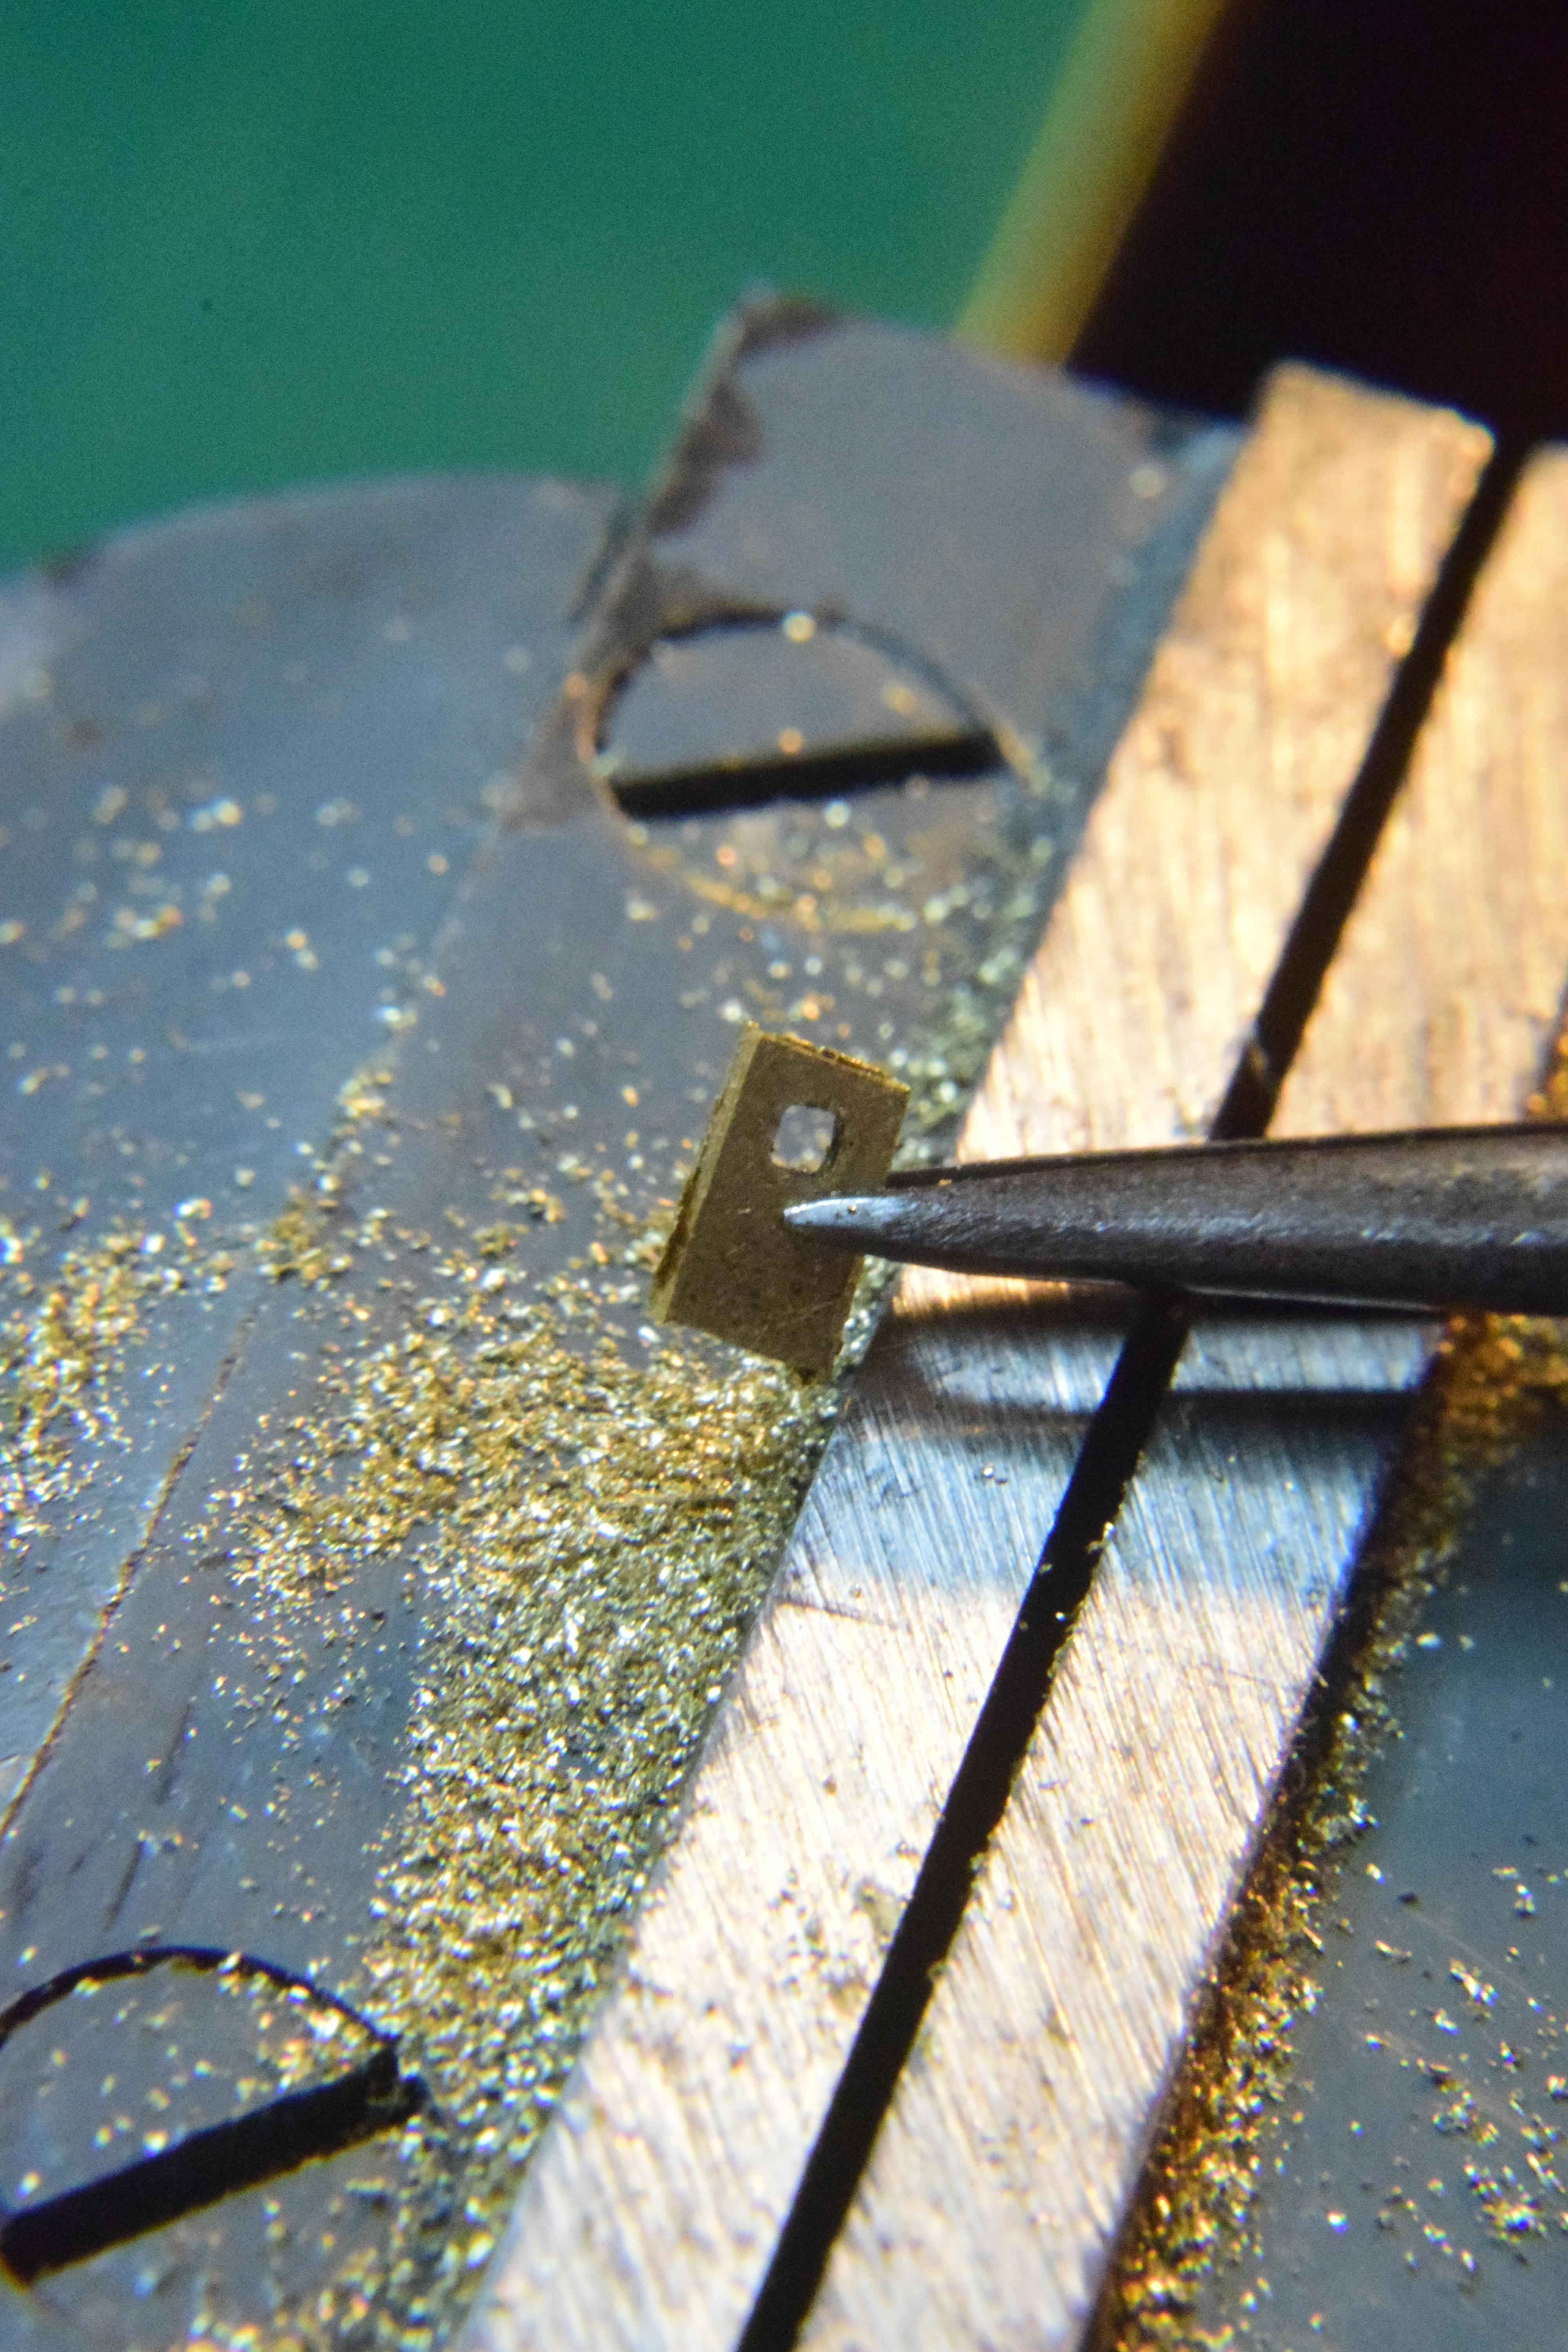
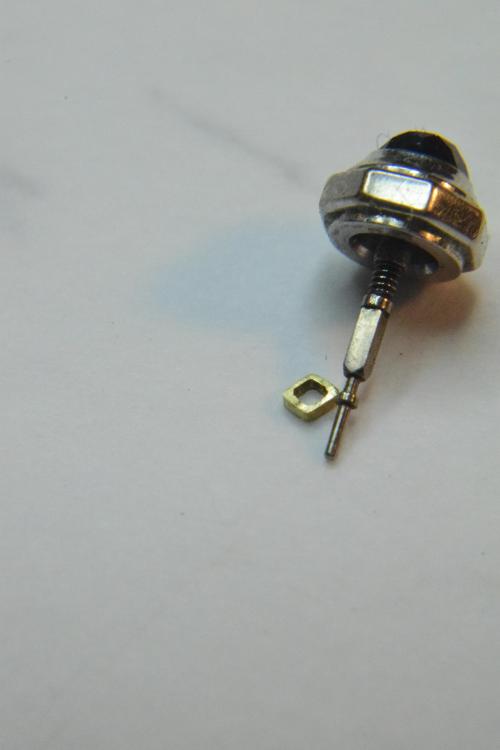
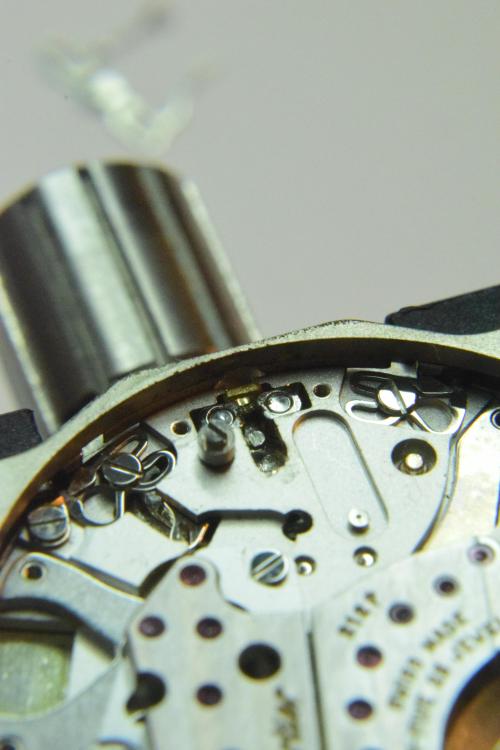
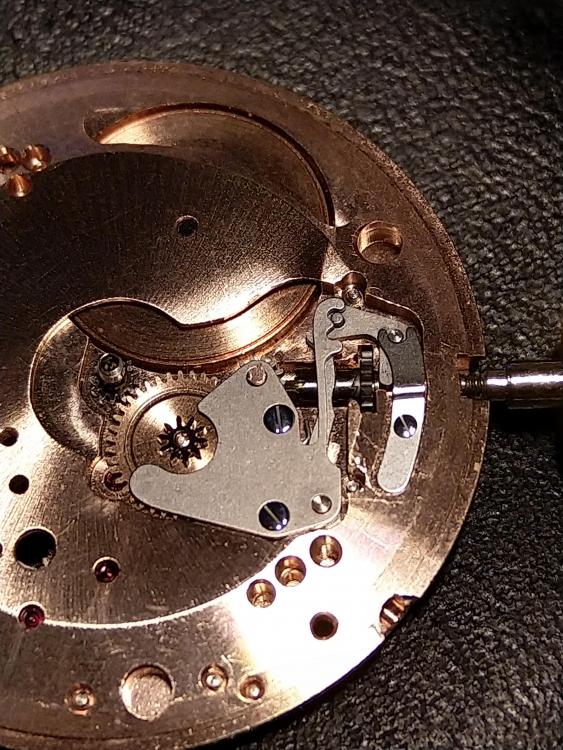
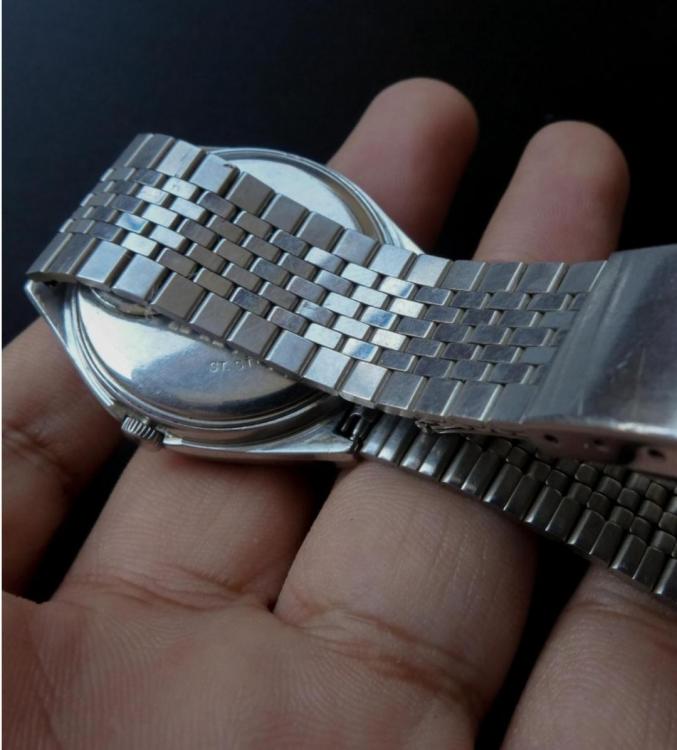
I was forced to make an operating cam, which was a 3 hour job with a piece of 0.4 mm brass. It had to get honed down to 0.2 mm to fit in the slot. Total dimensions were 1.2 x 1.2 x 0.2 mm, with a 0.7 mm square hole passing through it to accommodate the winding stem. The last picture is with the operating cam in place. Damn fiddly work, but very gratifying seeing it work. Lord knows how much Cartier would have charged me!

 3 points
 -
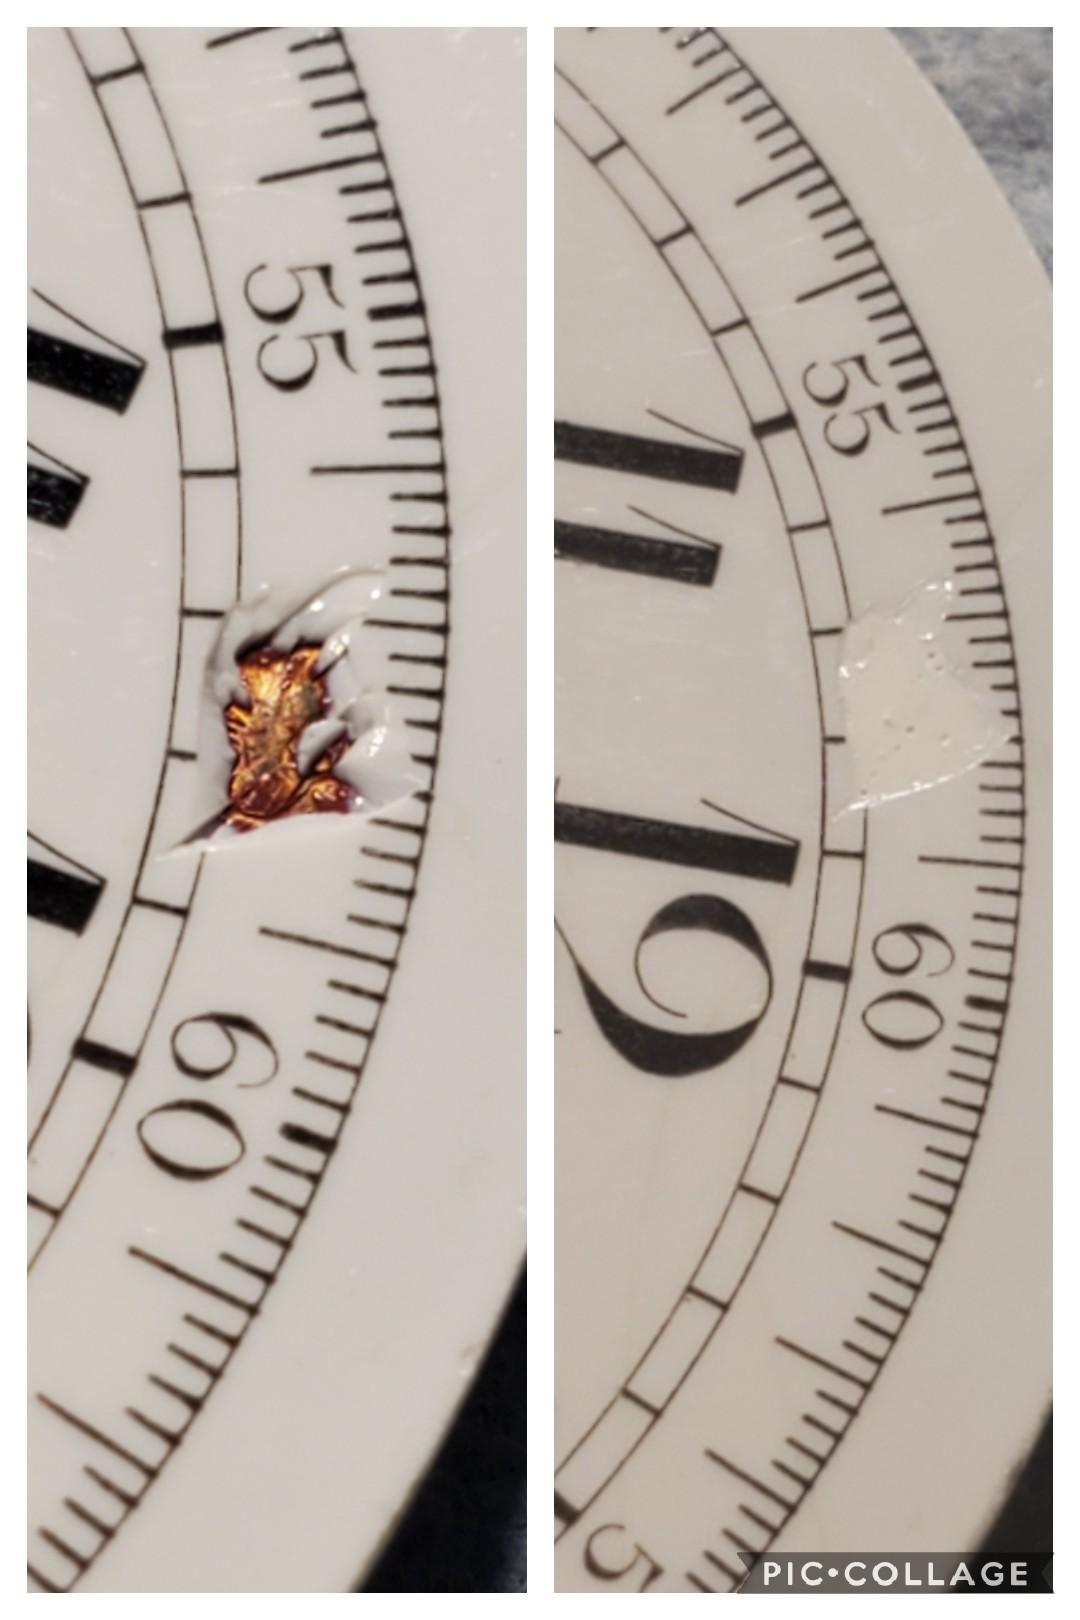
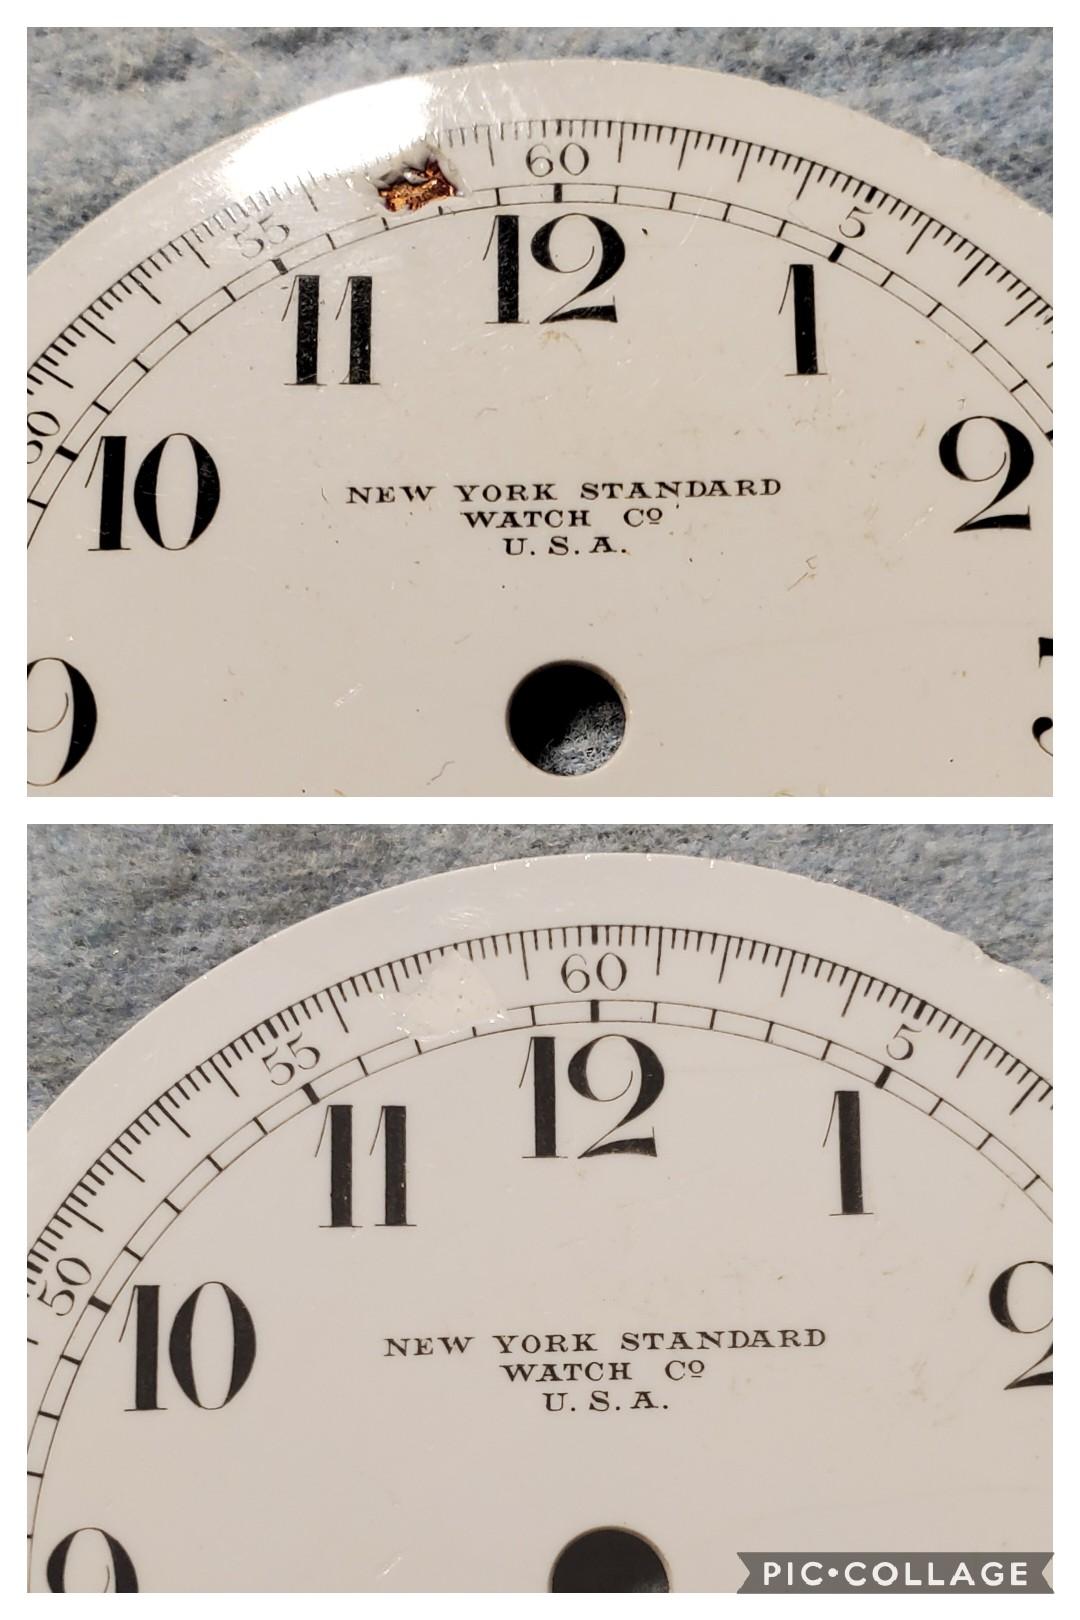
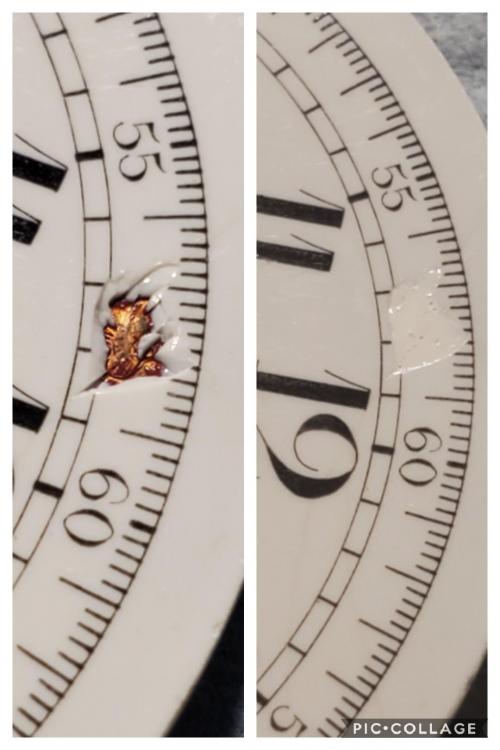
Recently purchased a pocket watch with a chipped dial. You can see the copper substrate. This is unsightly and distracting. As an experiment i dug out a damaged old dial I had and a small bottle of white nail polish. After about 3 coats I gave it a light wipe with a shop towel wetted with acetone. It only took a couple very light swipes to achieve the look I wanted. All in all it looks pretty good. Yes there are a couple bubbles close up but it's nearly impossible to see from a normal viewing distance. My next goal is to see if I can find a black pen with a fine enough point to attempt to restore the black minute index lines. I consider this an open experiment, I want to try other dials with other colors of enamel besides white.
 2 points
 -
Hi thats quite an effective repair job.. I have seen a ceramics expert use an artists brush that was so thin it must have had most of the hair pulled out re lining a damaged clock dial I think it was with Indian Ink. did a brilliant job.2 points
-
Alum disloves steel or if you ready to invest 70 bucks on a dedicated brgeon tool, otherwise it is down to applying penetrating oit and see what you can do with needles and sharp poiinted screwdrivrs, sometimes heat-quench helps.2 points
-
Sent from my iPhone using Tapatalk Pro2 points
-
Wow, your attachments are great. I wish I had these prior to destroying 2 ETA 2824 clones. That's one suggestion I would give to a new person starting out. Practice on the cheap ones first.2 points
-
Hi There are probably more answers than tools available as to what constitutes a list of tools for watch repair, but here goes. A good quality set of screwdriver,the French screw drivers are good value for money, I you want the best Then its Bergeon but you pay the price, Likewise tweezers, there are good mid range tweezers, by Idealtek and others but the best are Doumont. these I wouldn't skimp on as they are the extensions to you fingers. They come in various styles and sizes and you will no doubt be advised by others as what to buy or what they recommend by way of sizes. Next is a good loupe (eye glass) again these come in various sizes and types X5 X10 X15 all determined by the focal length. Some are binocular Visors with interchangeable lenses. A good movement holder, you can get a good Bergeon movement holder around the £20 mark. Stay away from the cheap chinese ones they are cheap for a reason. I have attached two PDf's to get you started. TZIllustratedGlossary.pdf Oils_and_Greases_June_2019.pdf2 points
-
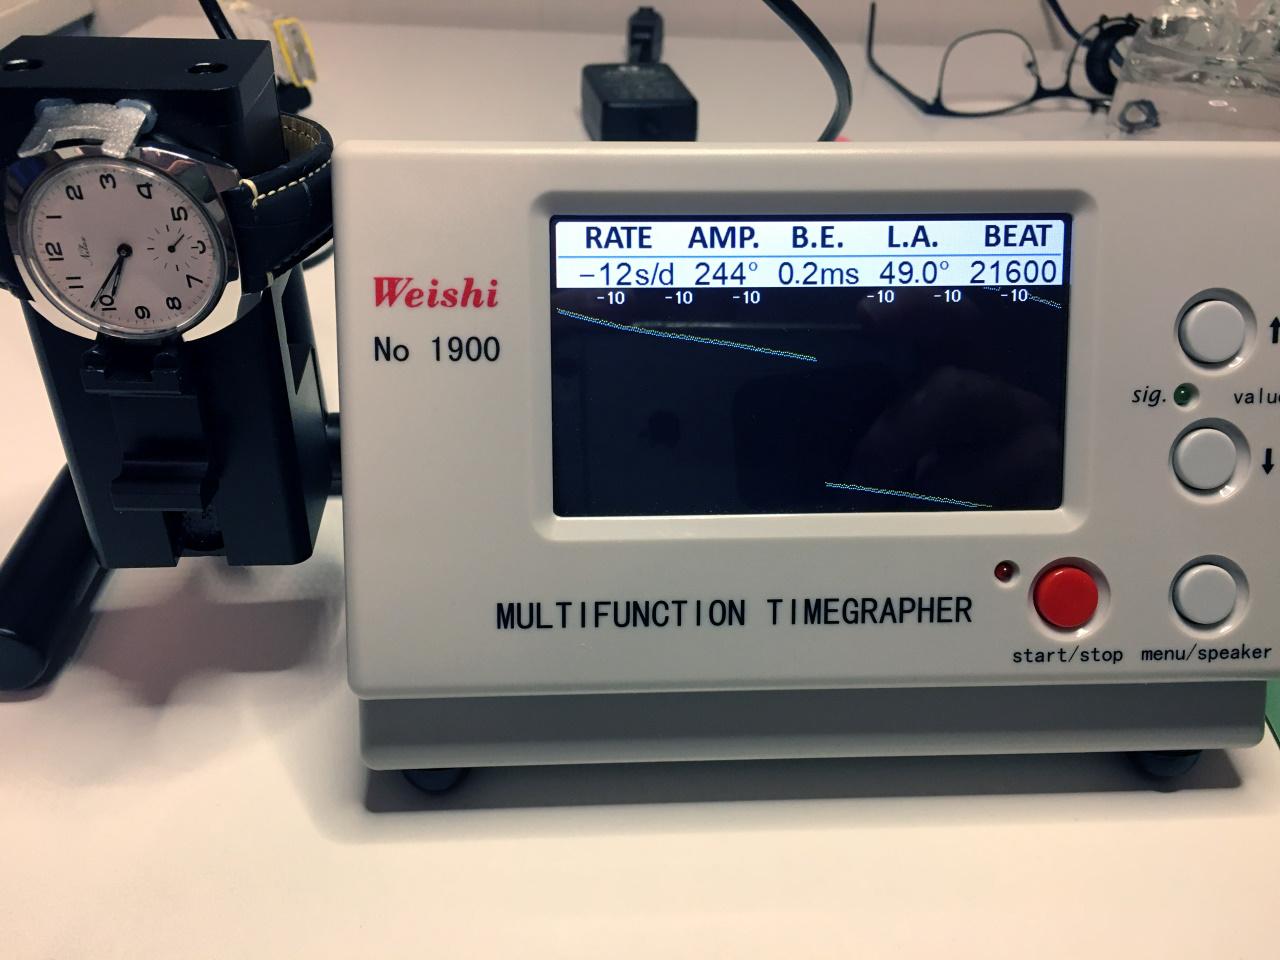
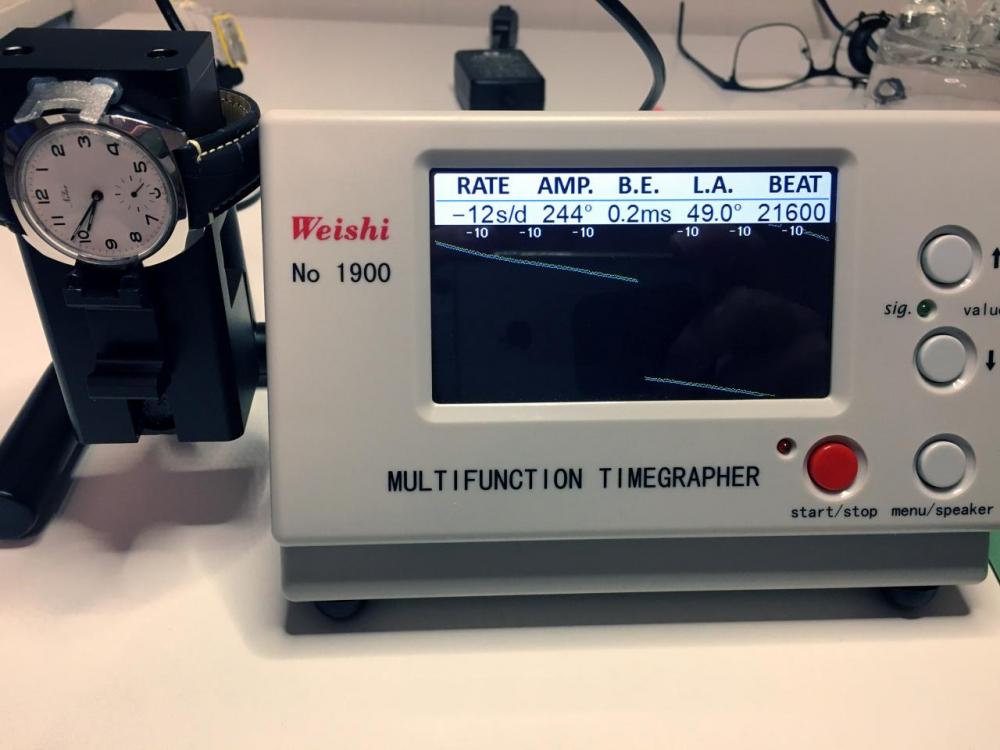
I have 270 to 280 in DU and DD positions. 210 to 240 in all other positions. The beat error increases when not in DU/DD. For a 1940’s movement I’m happy with this. The hair spring is as well formed as I can get it and I fear if I tweak it any more it may fatigue and break. Poising is definitely out, but I shall not be trying to rectify that just now as I don’t have the correct tooling. All that will come later - hopefully[emoji848] Have you considered installing a new mainspring? That is after all the root of all energy in the watch. The stored spring energy is converted to kinetic energy in the balance minus some losses due to sound and kinetic energy required to move the indicators (hands). Sent from my iPhone using Tapatalk1 point
-
That is actually the correct amount when the oil has expanded by the capilary forces, so when you inspect the jewel assembled and ready it should have spread to that extent. There is some good advice in the AWCI pages, they show a nice picture of this effect. (And many others with good illustrations) https://www.awci.com/watchmaking-excellen/cap-jewel-preparation/1 point
-
LOL! I was getting the "WTH" eye while i was in the nail polish department.1 point
-
Great work. Now I need to buy white nail polish; darn Sent from my iPhone using Tapatalk Pro1 point
-
Welcome aboard @Jimmy2shoes. I'm not sure if you're aware of the site or not, but the Pocket Watch Database is an excellent resource for American pocket watches. All you need is the brand and serial number to begin investigating your watch. Plus, you can add your watches to their archive. I've uploaded 9 of my watches already. Here is the link: https://pocketwatchdatabase.com/ BTW, don't be shy, feel free to ask any questions you may have, we're all friendly and between us all, we have enough knowledge and experience to answer nearly any question you may have.1 point
-
Must say that generic spring doesn't look right, but it probably will do the part. Since the setting lever spring already looks like it been almost worn out the rest of the parts must be in a good nick. So I recomend to tear the whole keyless apart, clean it rigourosly and lubricate it again. Dont forgett to inspect and lubricate the stem too. Otherwise the increased friction always will push that setting lever spring up due to its poor fitting. The lever nob on your still looks good but will wear down if you try the setting as it is now. I add some action photos from an original Omega 601 so you see how the setting spring should interact. Winding. Setting. PS. If you don't get it working I can send you some genuine keyless parts for free, just pop a PM.
 1 point
 -
Hi VWatchie well done tenacity and patience pays off and the never give in spirit. Great1 point
-
Not just the build quality, but the intrinsic limits of geometry and tolerances. Since the driving element a spiral groove that is common to all jaws, which must also work reversed, some design compromise must be taken so keep it acceptably smooth. For example, on my Unimat 3 copy I have less than 0.01mm runout at the spindle chuck spindle register, but about 0.12mm with a precision 7mm round bar in the 3 jaws - which is the same as the Ebay example above. There are ways to improve concentricity on self-centering chucks, but in the end if precisions is needed either use collets, independant jaws, or turn between centers. There can be more ways also, as machining is full of ingenious methods. All that being said, here we are talking about hobbyist / non-precisions chucks only. I'm sure that watchmaker's and and professional machines chucks have a different precision class. Not all 4 jaws chucks are of the independant type, and not all sellers do specify. Look for square sockets on the body in line with the center of all jaws. Below an self-centering 4 jaws chuck, again for the Unimat 3. These are mostly used for woodwork where high precision is not important, but you need to grab square section parts often.1 point
-
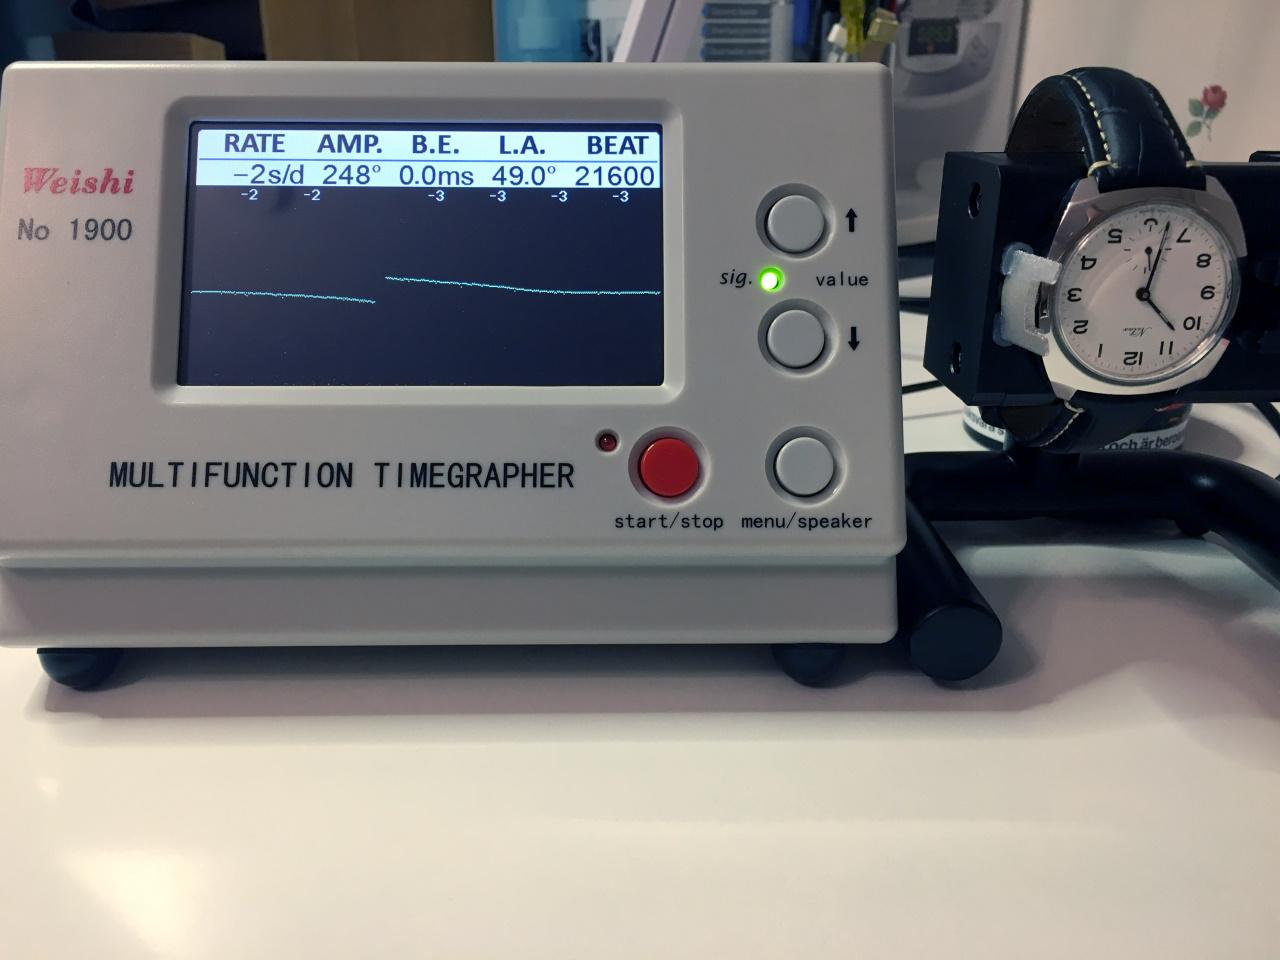
Thanks guys! Adjusting the HS, replacing the cracked jewel, and adjusting end-shake using my jewelling tool were the three major learning points for me. What caused the low amplitude is of course difficult to determine having taken so many actions at once, but I guess the combination of adjusting the HS and replacing the cracked jewel probably is what did it.1 point
-
Nice performance. You should be pleased with yourself.1 point
-
Found it. Mark says, "Aim to cover roughly 30% of the stone's surface, but no more." I took a screenshot from the video showing his perfectly centered drop. I've done that 50 times now it seems. My "drop" usually looks more like a lightning bolt, but I'm improving greatly.
 1 point
 -
Hi, VWatchie. You and I attended the same (only) "watch school," and I'm going by memory. If it serves; Mark states the drop should be about 1/3 of the diameter of the stone. Then, when put together, the resulting "bubble" observed will be approximately 50% to 70% when viewed through the end jewel looking down at the holed jewel in the chaton. At some point I'll rewatch that video and report back, unless you beat me to it. I'm very grateful the videos are available for life. Mark put A LOT of work into the production of those superior videos.1 point
-
Wuh.... Mind lost. I'd never buy anything from Horror Fright that could kill me when it fails, but I have a half dozen sets of jack stands I've accumulated over the years that came with cars and engines and whatever. One is one of the killer sets they just recalled. Turns out, Horror Fright has a small selection of watchmaking tools at a combined cost that I think comes in under what they'll give me for the jack stands. This looks identical to the press Esslinger is selling for $36, and given the way manufacturing and white labeling works, I'm pretty sure they're identical. I know what I'll be doing next time I'm down in the flats!1 point
-
Welcome, Jimmy2Shoes. I can tell you one thing, if you're getting into American pocket watches right now you're getting in at a very good time. Your pocket watch dollar goes a lot further than it did 5-10 years ago. You can buy some amazing quality American PW movements, without cases, for very little money today. With gold prices being pretty high right now the "meltables" are coming out of the woodwork. While it's best if you can get your hands on the complete watch, sometimes you/we get there a little late to save the case from melting. I learned to work on pocket watches about 20 years ago. I purchased a set of VHS tape lessons that were made by a guy named Bob Tascione. He's still selling his courses, only now they are almost exclusively done online. But I'll bet you can still get a set of DVD courses from him. Sometimes you can even find them second hand on the auction site. On the WatchRepairtalk site here, you get a mix that is mostly guys who work on wrist-watches. That's not to say they don't know pocket watches, just that they have chosen to work on wrist-watches for now. I am just a hobbyist type. Most repairs I do are relatively simple, i.e., don't require great lathe, or other specialty tool, skills. Get good with screwdrivers, tweezers, etc., and you'll be on your way. Oh, and try to use your head as you go. You want to see problems happening before they occur, and thereby avoid creating them. Good luck with your collecting and repairing journey. That's a nice looking Rockford. And it's in a sturdy Silverode/Silveroid/Nickelsilver case with a nice thick crystal. Even your holder is cool. Enjoy. Cheers.1 point
-
Um... I thought vintage was 20+ years and antique was 100+ years....1 point
-
Great tip my friend. But I do like making balance staffs:) Sent from my iPhone using Tapatalk Pro1 point
-
Very cool. It will be vintage in 100 years Sent from my iPhone using Tapatalk Pro1 point
-
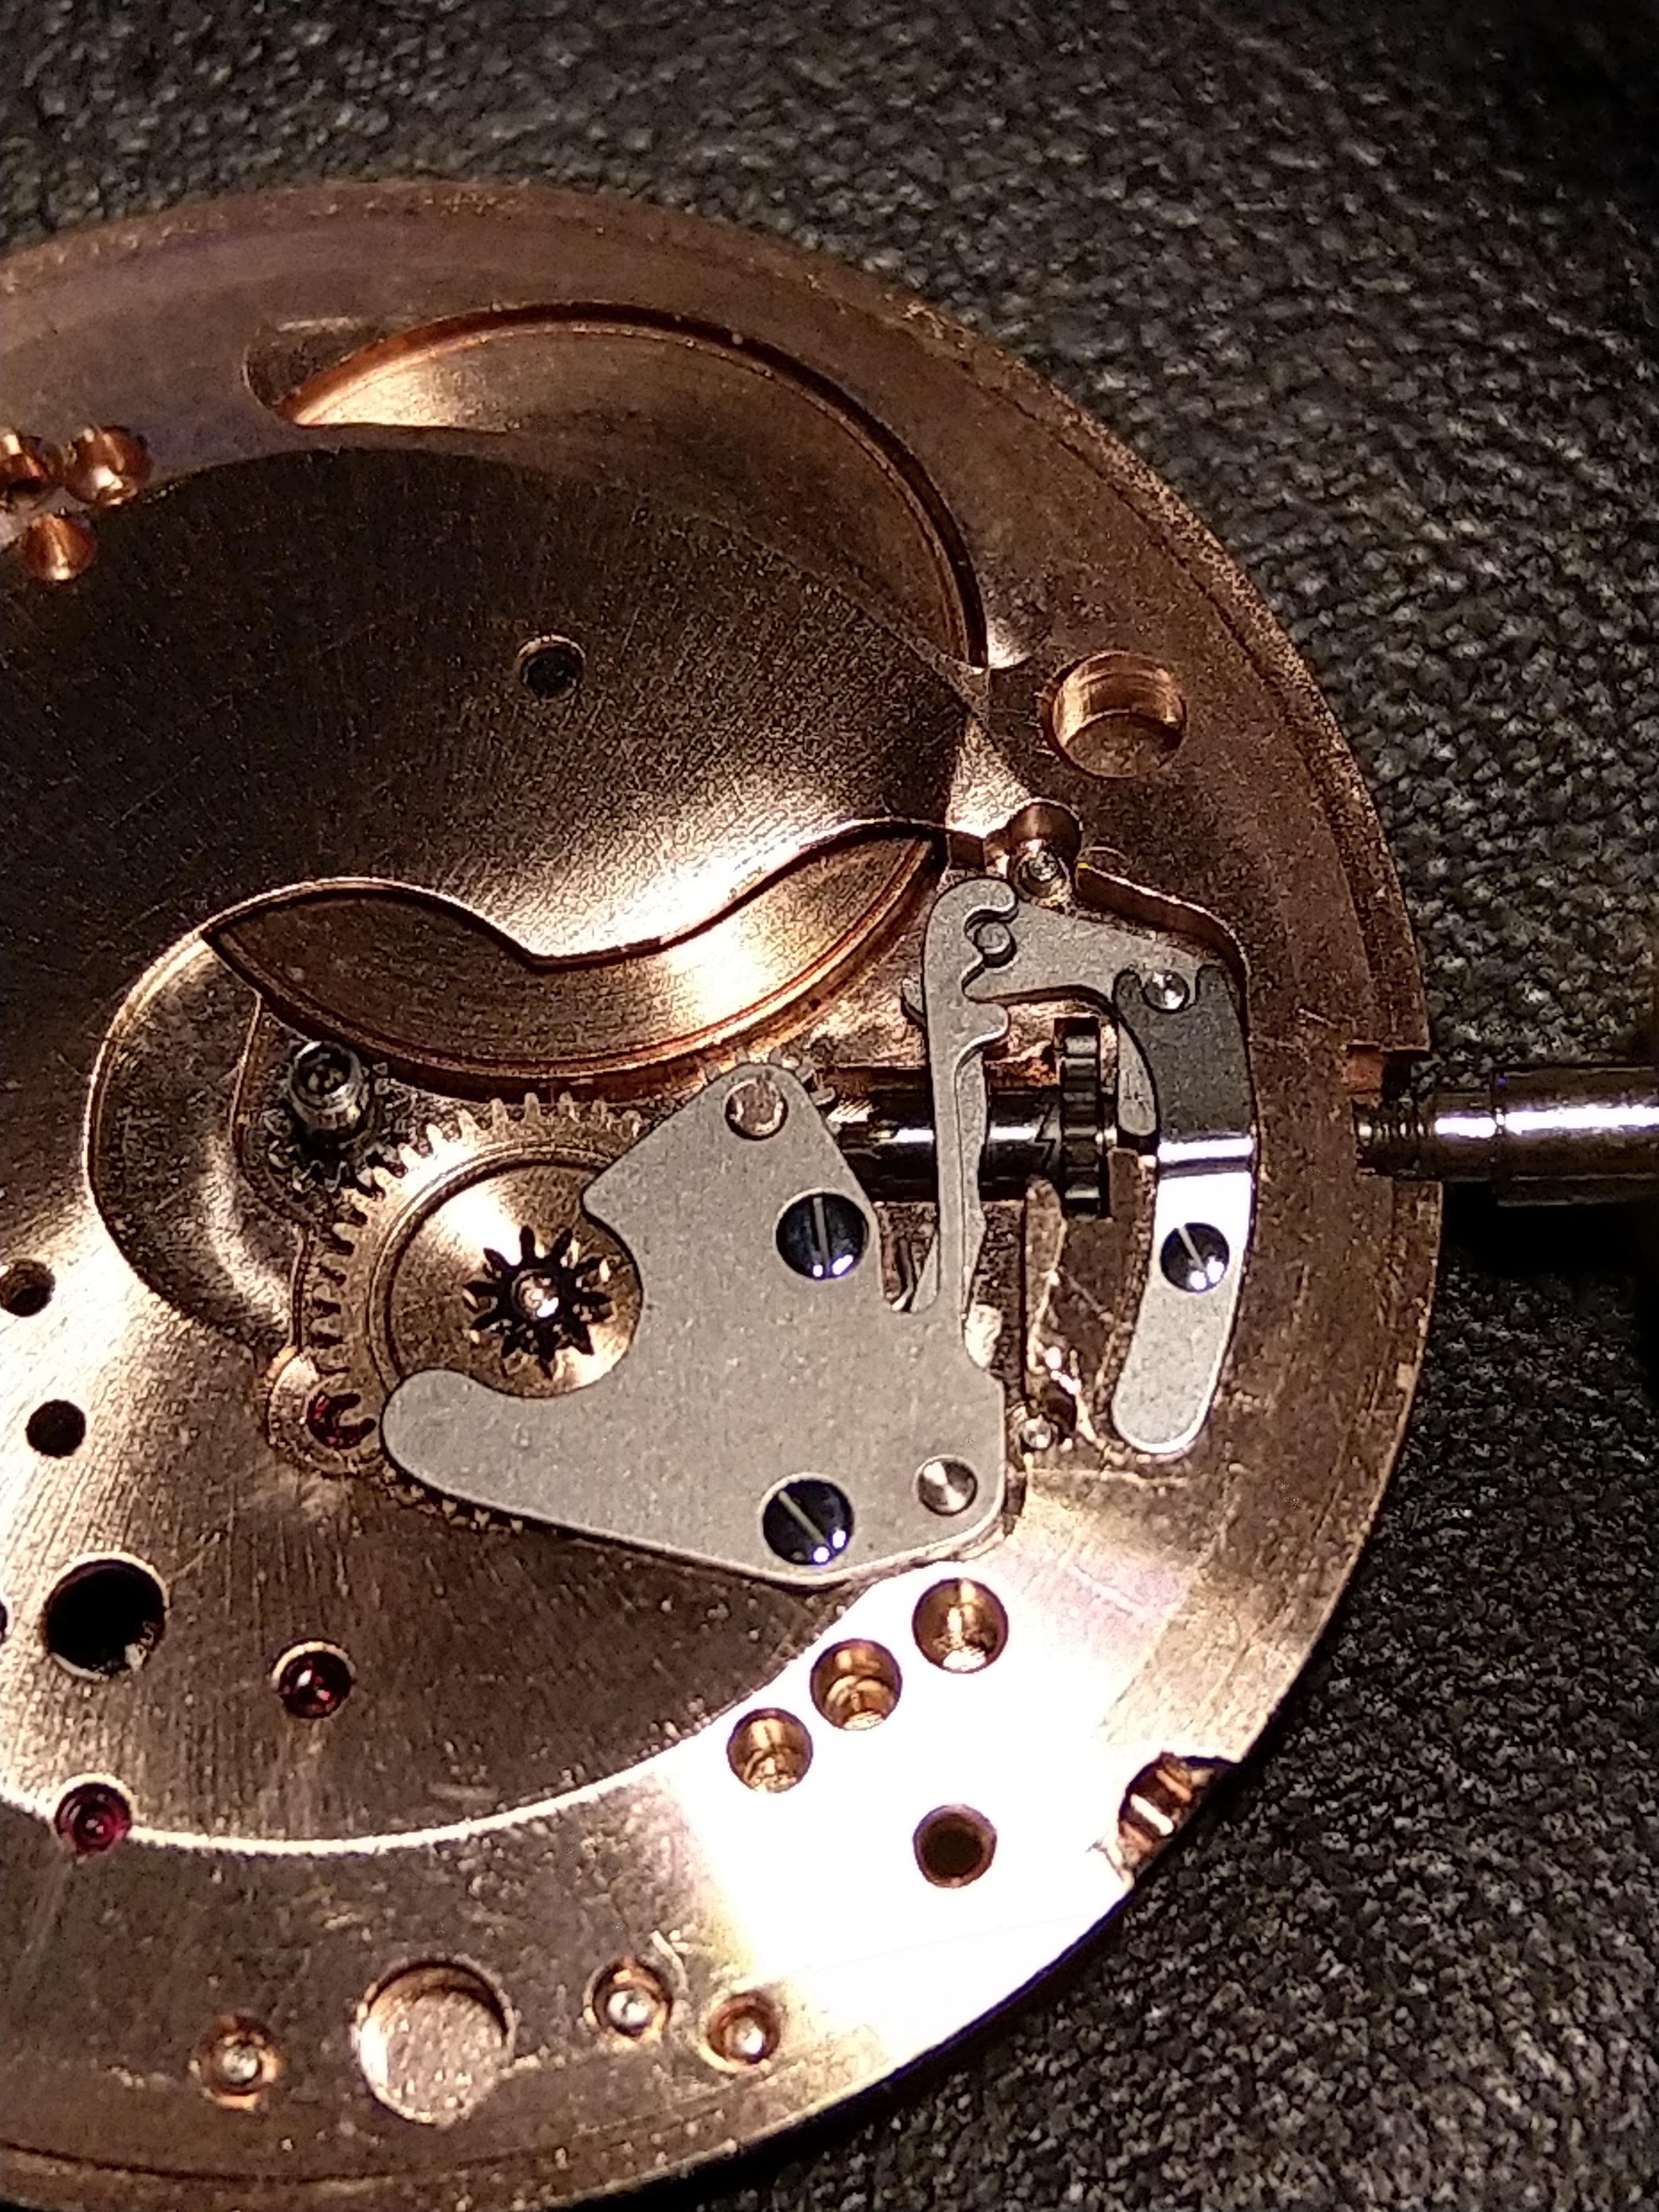
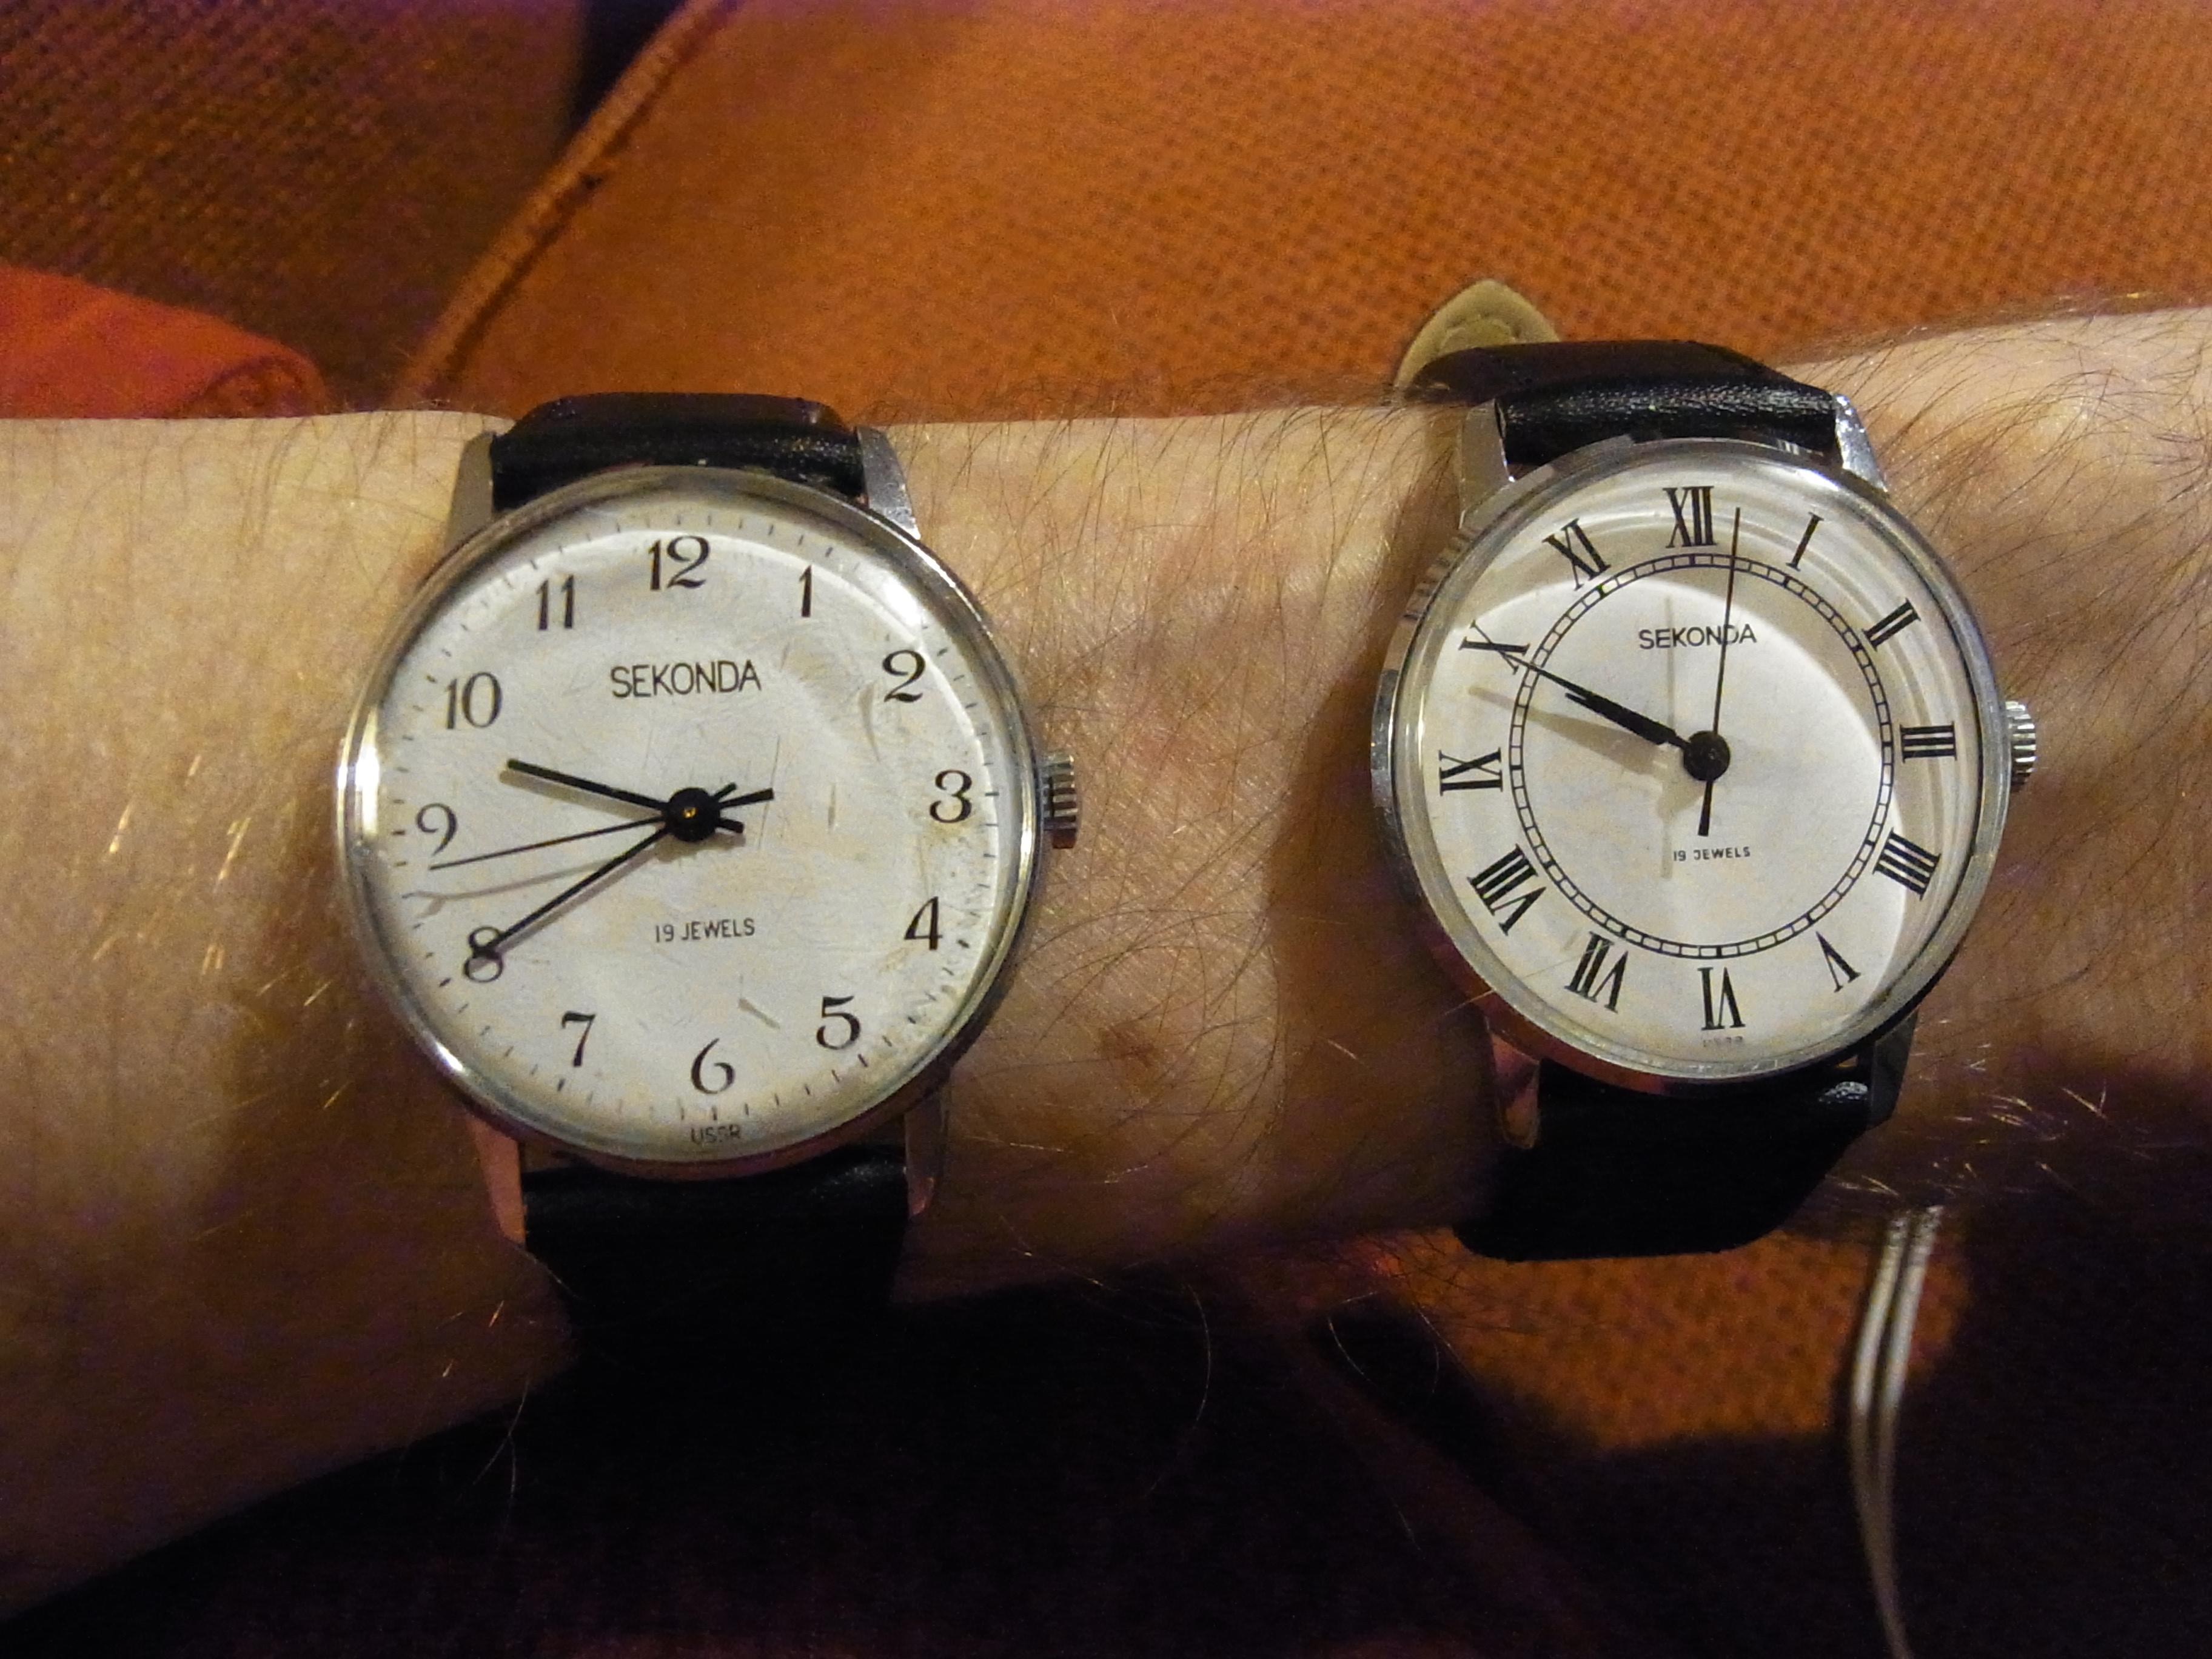
More USSR keyless work repairing this evening. I've finally run out of spares for the keyless work on these, so time to start hunting for more donors. I actually stripped the necessary parts for this example from a basket case Raketa 2609A, which has almost identical keyless work, but I'm not sure if it has much else in common with the 2609HA. The 'HA' .. compared with the 'A' The strange pink lighting effects on the dials is just some weird digital camera artefact, they are in fact both white, although the one on the left did need a little bit of a touch up just above the 12 O'clock mark. Other than the dials, these two are virtually identical Raketa 2609HA engines inside.
 1 point
 -
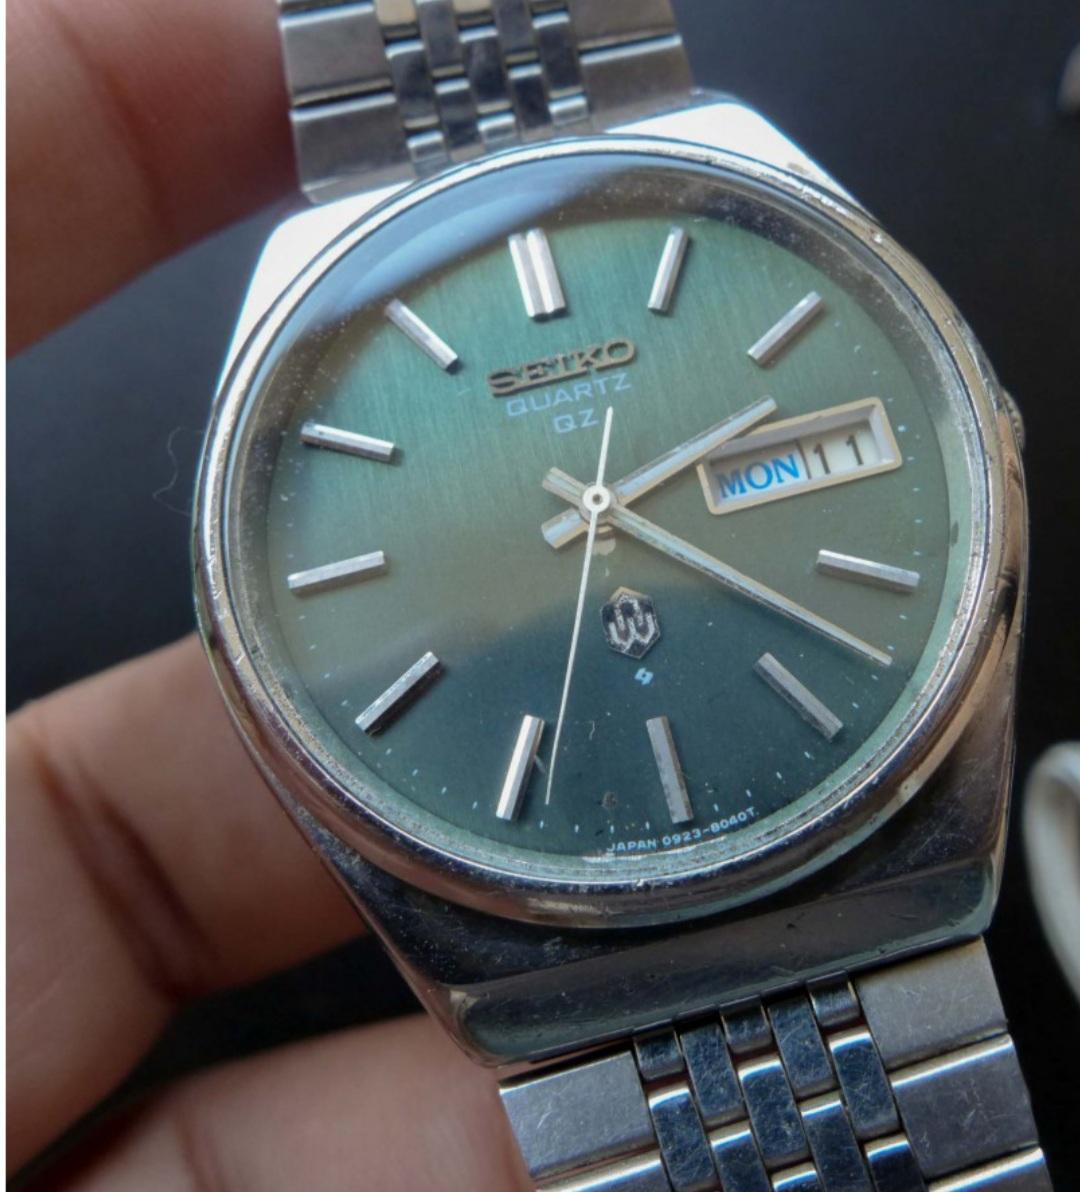
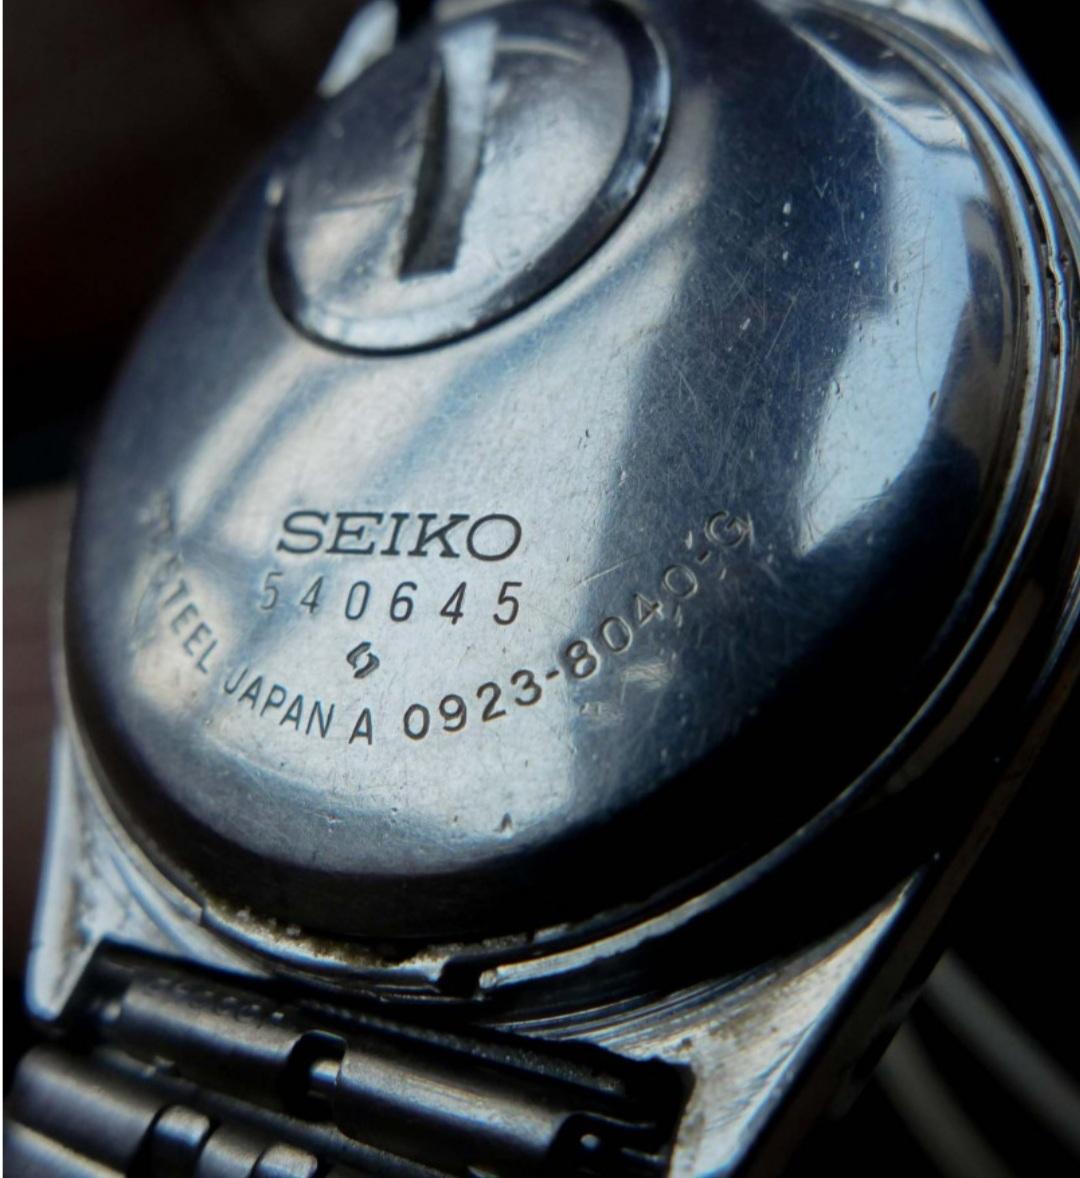
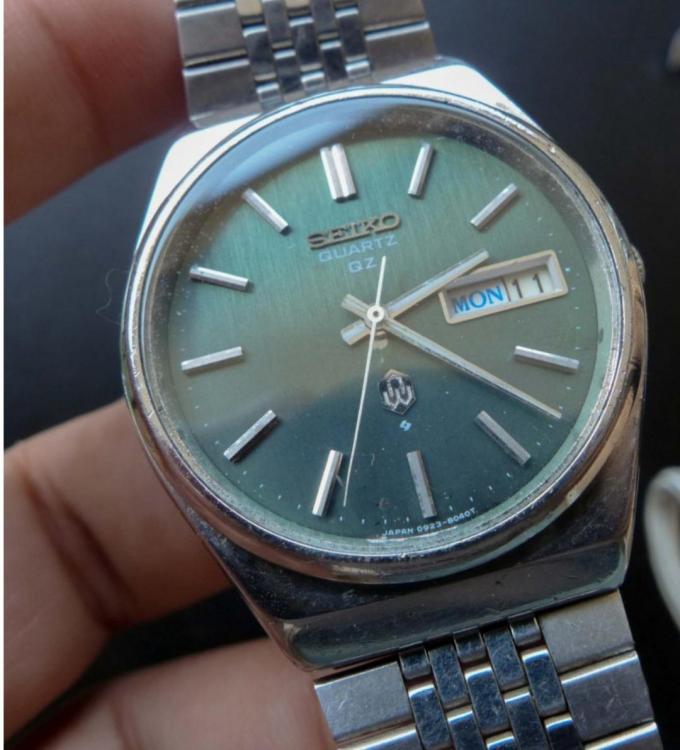
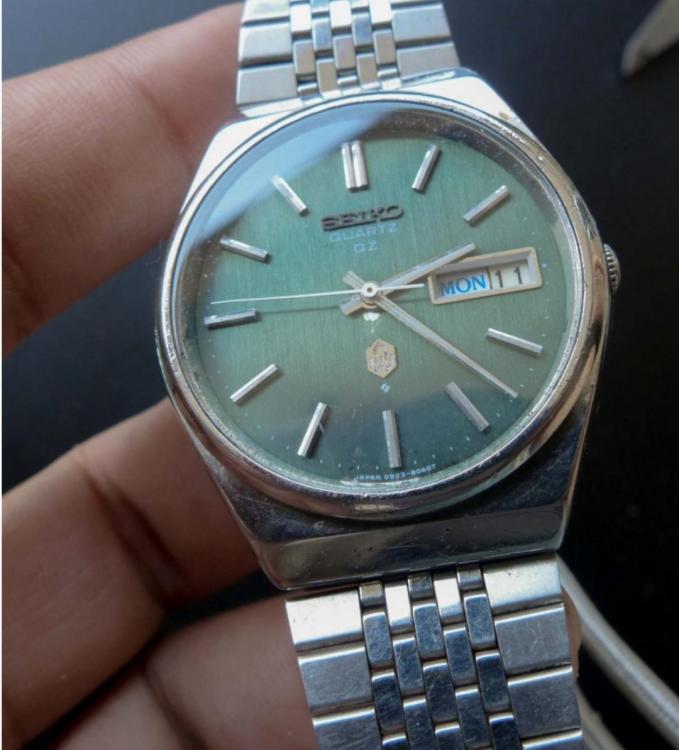
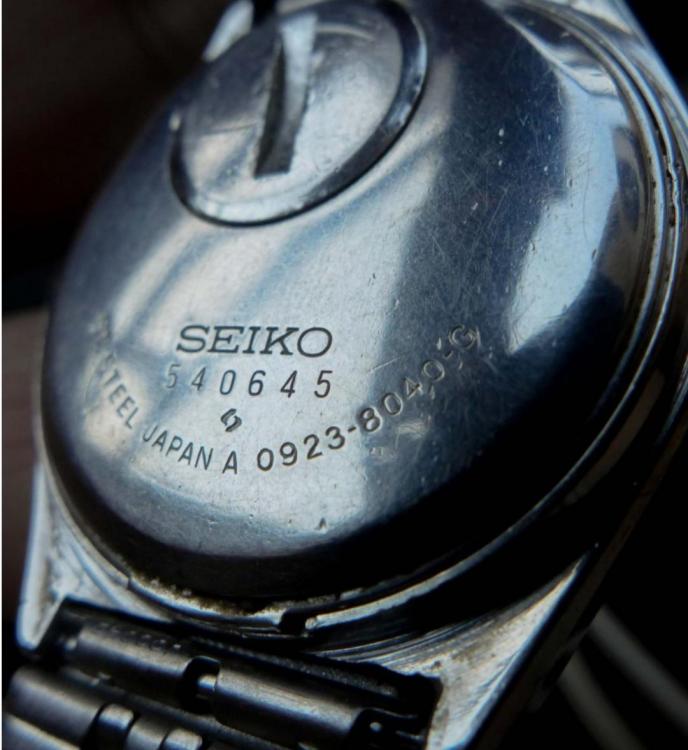
Have had my eye on a 70's Seiko with a quartz movement for quite some time. I picked up this green dial little honey this morning. It has a quartz heart oscillating at a steady 32,768 cycles a second! It's a model 0923-8040. The serial says it is of a 1975 vintage, exactly the time frame I was searching for. Pictures I've seen online of others, look fantastic, fingers crossed it's the same in person.@JohnD has several vintage quartz Seiko's with blue dials and I believe he has this exact same model with a blue dial, possibly with a different case. Will definitely share this when it arrives.
 1 point
 -
I'm only 17 so money is limited. This trick saved me a lot of problems. Changing the balance staff would be a pretty convenient skill though.. Thanks for all the help!! Keeps excellent time now1 point
-
220° is where positional errors disappear.1 point
-
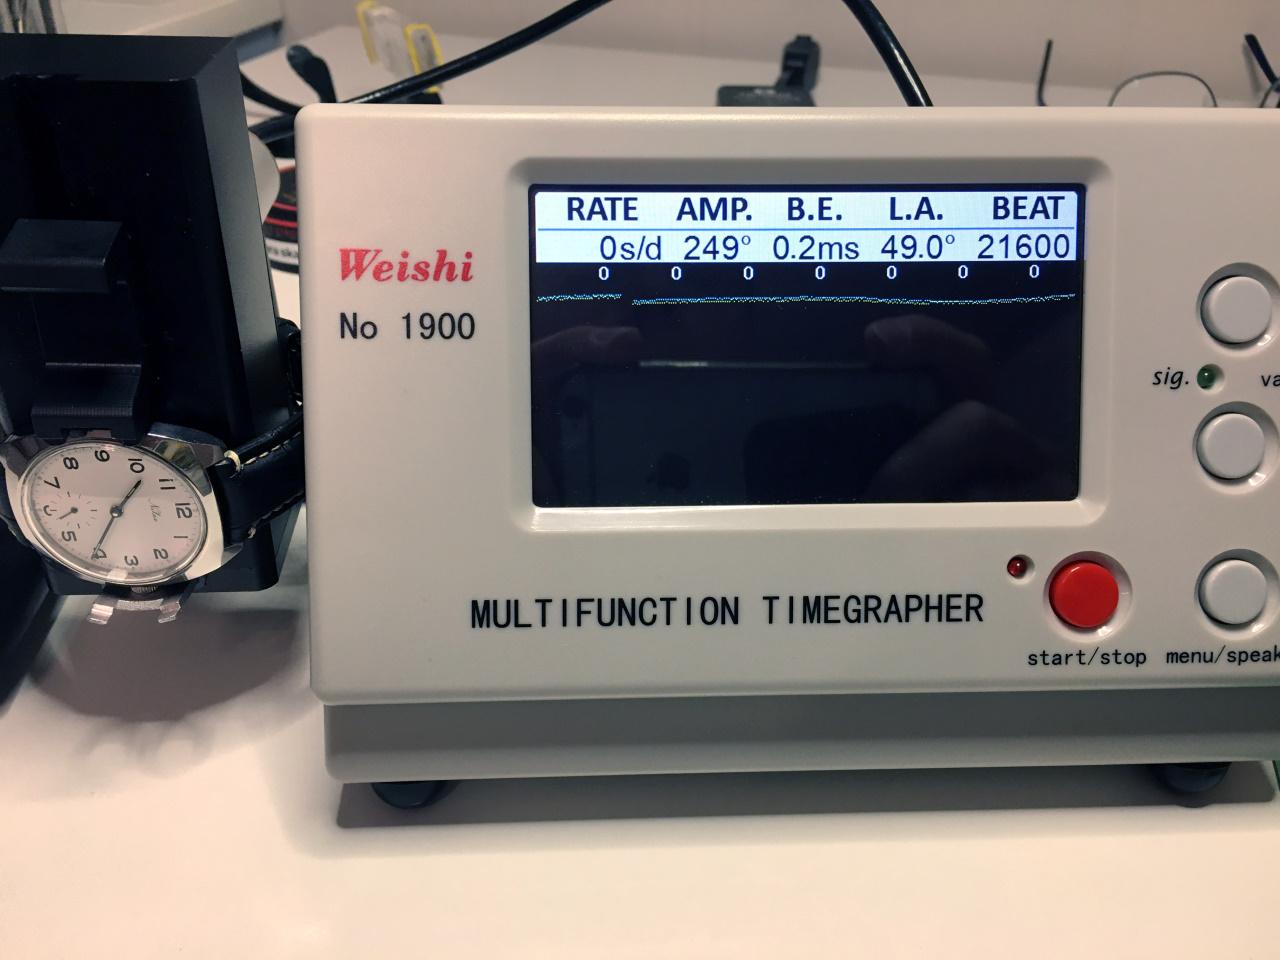
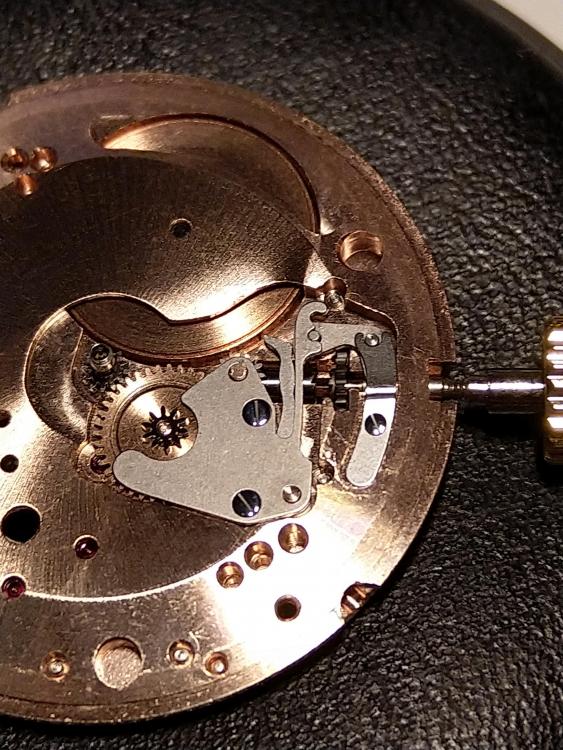
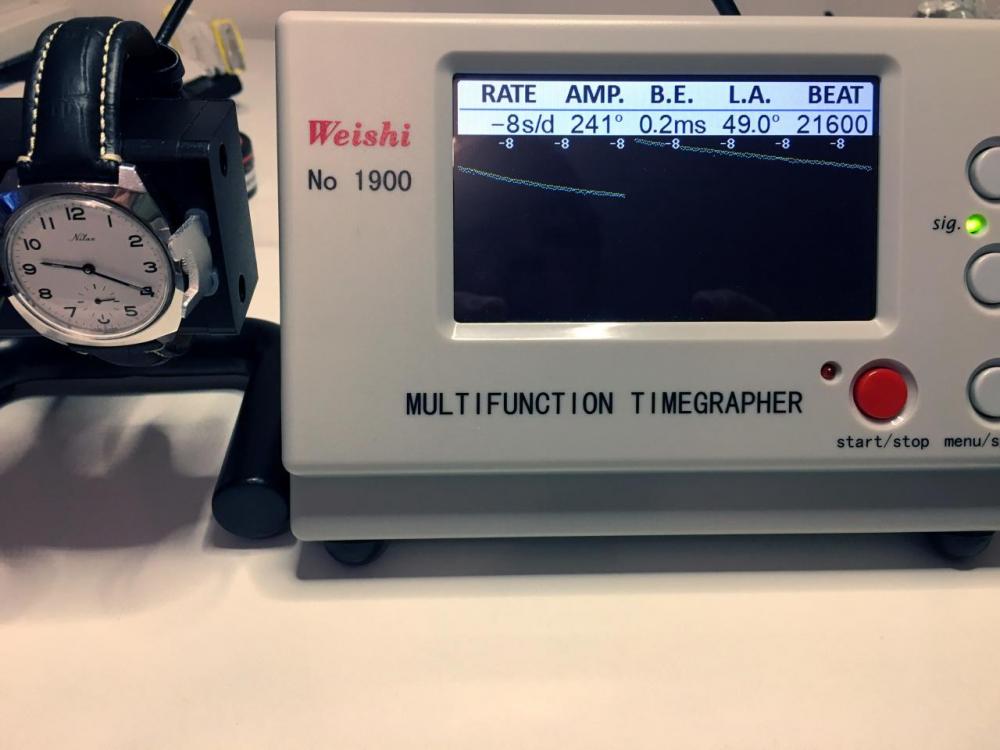
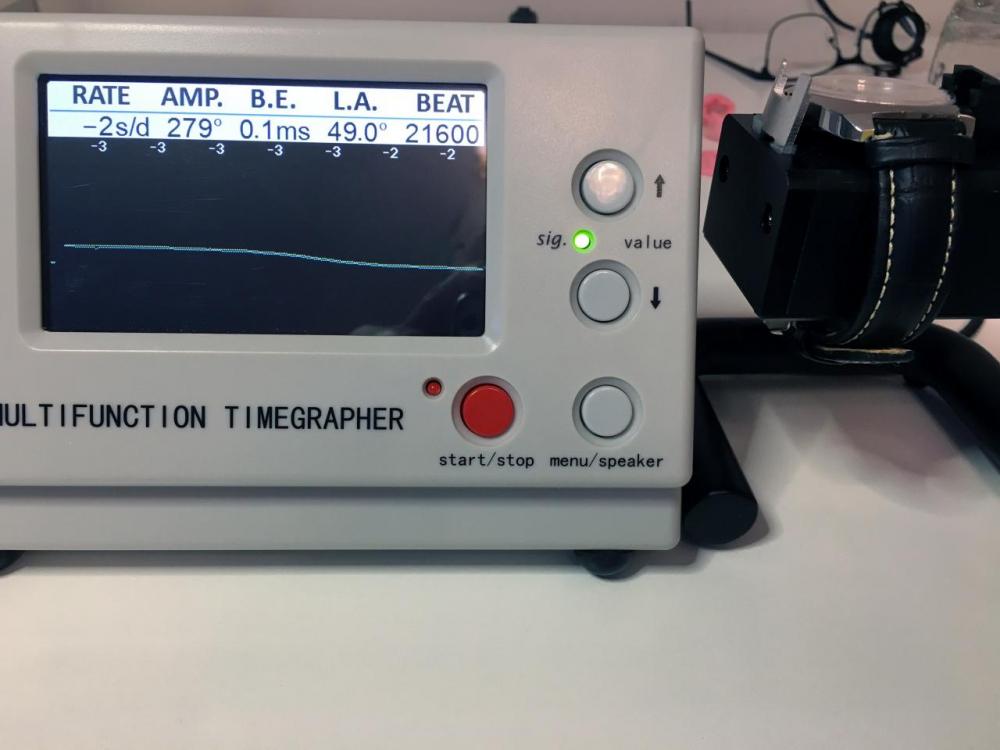
So, finally my very legible Unitas 6325 ”amplitude problem child” has been re-assembled. Timing machine images below. I started the reassembly weeks ago but as I was fitting the click spring it decided to launch for outer space, never to return. Anyway, CousinsUK had the click spring in stock and delivery to Sweden usually just takes a week. However, my local mail delivery “decided” not to inform me and not to deliver it after it had arrived. Instead, three weeks after my order, they informed me that they would send the package back to England if I did not pick it up. How very, very annoying! Anyway, when into watches there’s always something else to do meanwhile, like servicing an ORIENT movement and replacing an ETA cannon pinion with driving wheel, and… The current amplitude is maybe not perfect (not sure what is to be expected from this calibre) but it is now in the acceptable range, especially considering it started out at 200 degrees dial up/dial down. The graph is a bit wavy and I guess the reason could be that for some reason the power isn’t perfectly and evenly transferred to the escapement. Anyway, I think I can live with that, and as I said, not sure what should be expected from this calibre. Perhaps my copy is a bit of an odd one. My original plan was to try to locate the source of the low amplitude, but I ended up doing several adjustments before reassembling. This is what I did: Adjusted the hair spring with the help of @nickelsilver's excellent illustration. Again, thank you! Stripped it and ran in in my (ancient) ELMA cleaning machine. Meticulously pegged every bearing and jewel hole including the barrel. Then rinsed and brushed the parts in IPA to get rid of any peg wood residue, carefully inspecting everything to be spotless. Polished every single pivot. Replaced the mainspring with a brand new Generale Ressorts spring. Replaced the jewel for the third wheel in the main plate as it was slightly cracked. There was a super tiny groove on the pivot, but I decided to keep the wheel as this post by @rodabod made a lot of sense to me. Checked and adjusted the end shake of every train wheel individually. By doing it one wheel at the time I could use my stereo microscope to actually see and not just feel the end shake. To the best of my ability I adjusted the end shake of all wheels and the pallets to about two hundredths of a millimetre. That is, barely visible even at 40X magnification. I used my jewelling tool for this operation and with this in mind for inspiration. Applied Fixodrop on the pallet stones and lubricated with Dr. Tillwich 1-3. I think I’m beginning to prefer this oil over Moebius 9415. I have no evidence whatsoever that it is “better”, but it has worked well for me several times now, so I will probably stick with it Putting an end to this chapter I’d like to thank all of you for all suggestions, help and inspiration! A special thank you to @Endeavor who kept my spirits up when I was feeling lonely and lost!


 1 point
 -
An understanding wife and a great project and a bonus too well done Mo look forward to the thread. enjoy.1 point
-
Sorry to hear about your disaster, maybe you could help me avoid the same result. As a nubee I'll purchase a crystal press in the near future. Can you please describe the technique for using it for me?1 point
-
It is a truly excellent lamp - I was going to keep it packed away until next week, but I could not resist giving it a test :)1 point