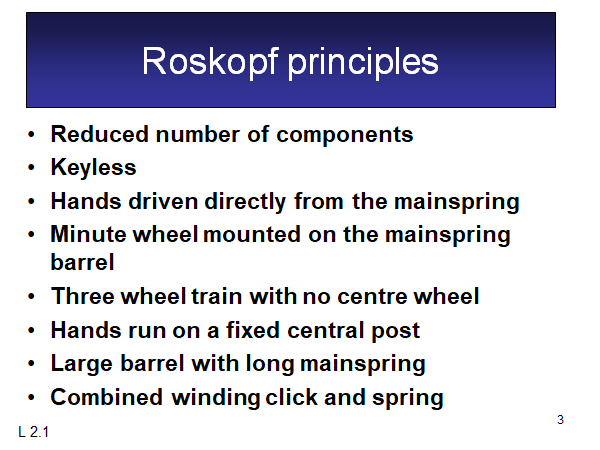
Leaderboard


.thumb.jpeg.5943fc3130d74bf2c7471fb8d6eef962.jpeg)
Popular Content
Showing content with the highest reputation on 12/04/23 in all areas
-
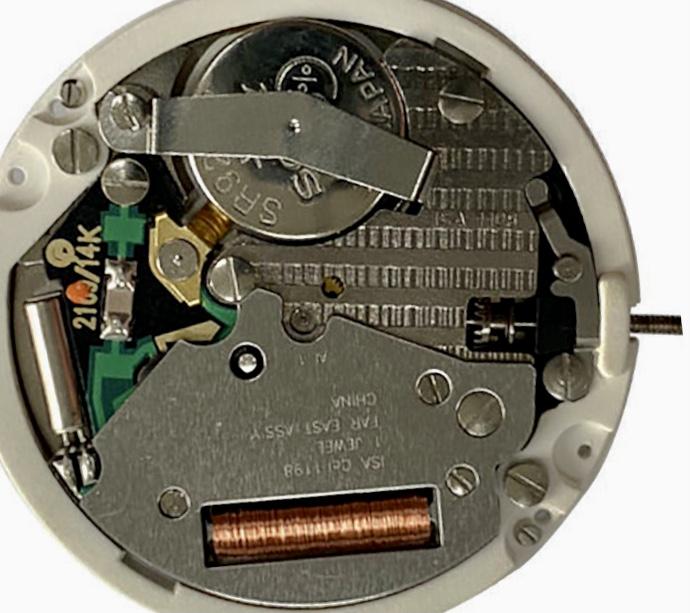
Should be an ISA Cal. 1198
 3 points
 -
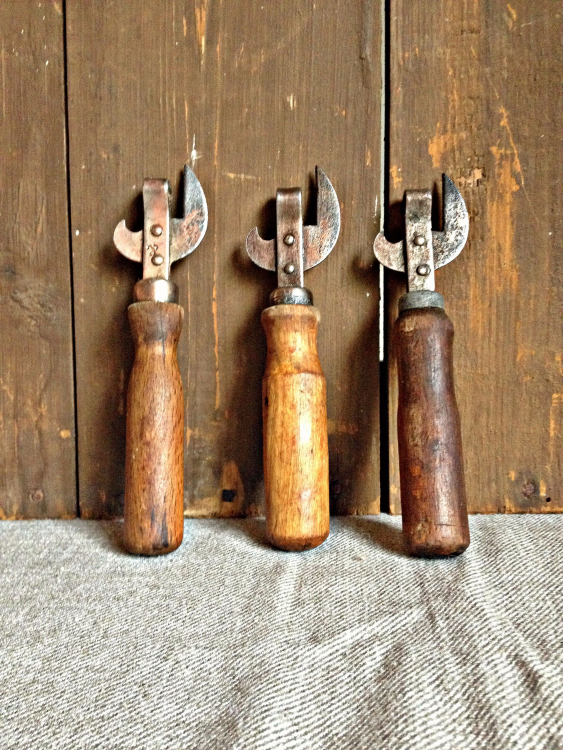
Just finished this watch, original bracelet
 3 points
 -
Image of a typical keyless shown here, http://horology-student.org/movements/modern-eta-and-clones/eta-2824/2 points
-
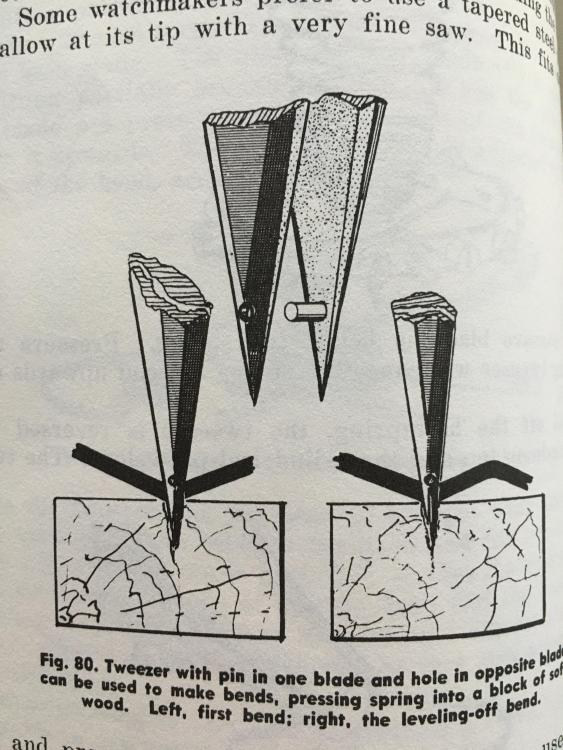
Some hints: - position the hairspring blade perpendically to the grain. - pushing too deep can be avoided by the laughed upon hammer taps. - the hairspring will slip up if the tweezers is too weak. Else: congratuations on your progress! Frank2 points
-
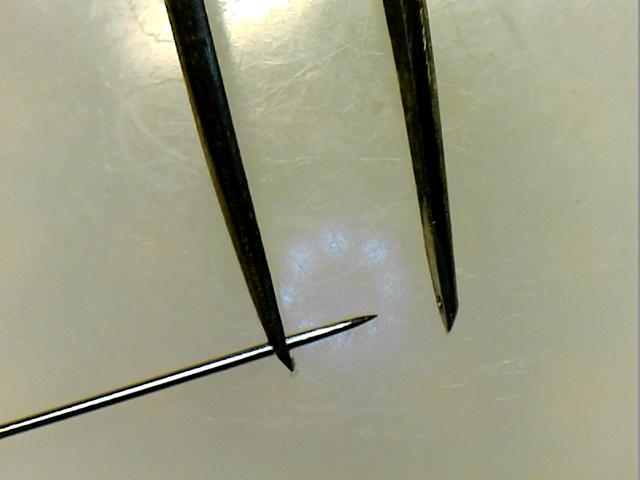
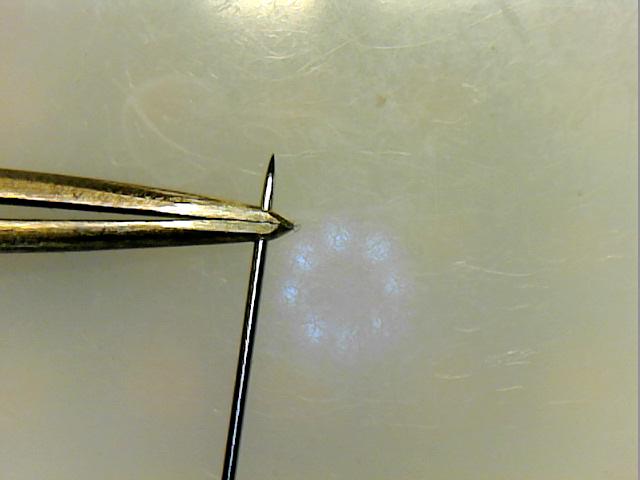
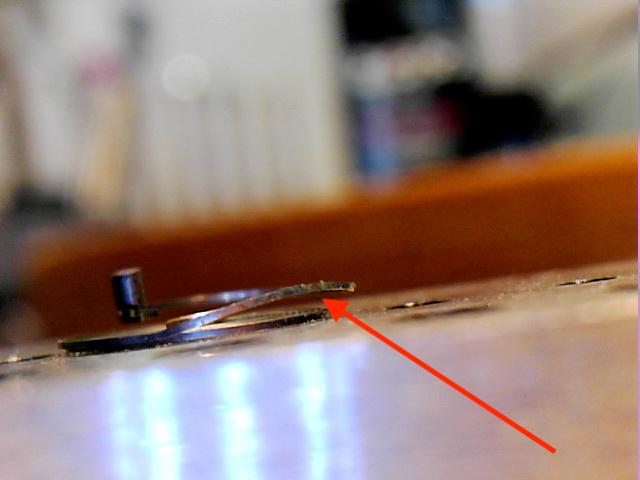
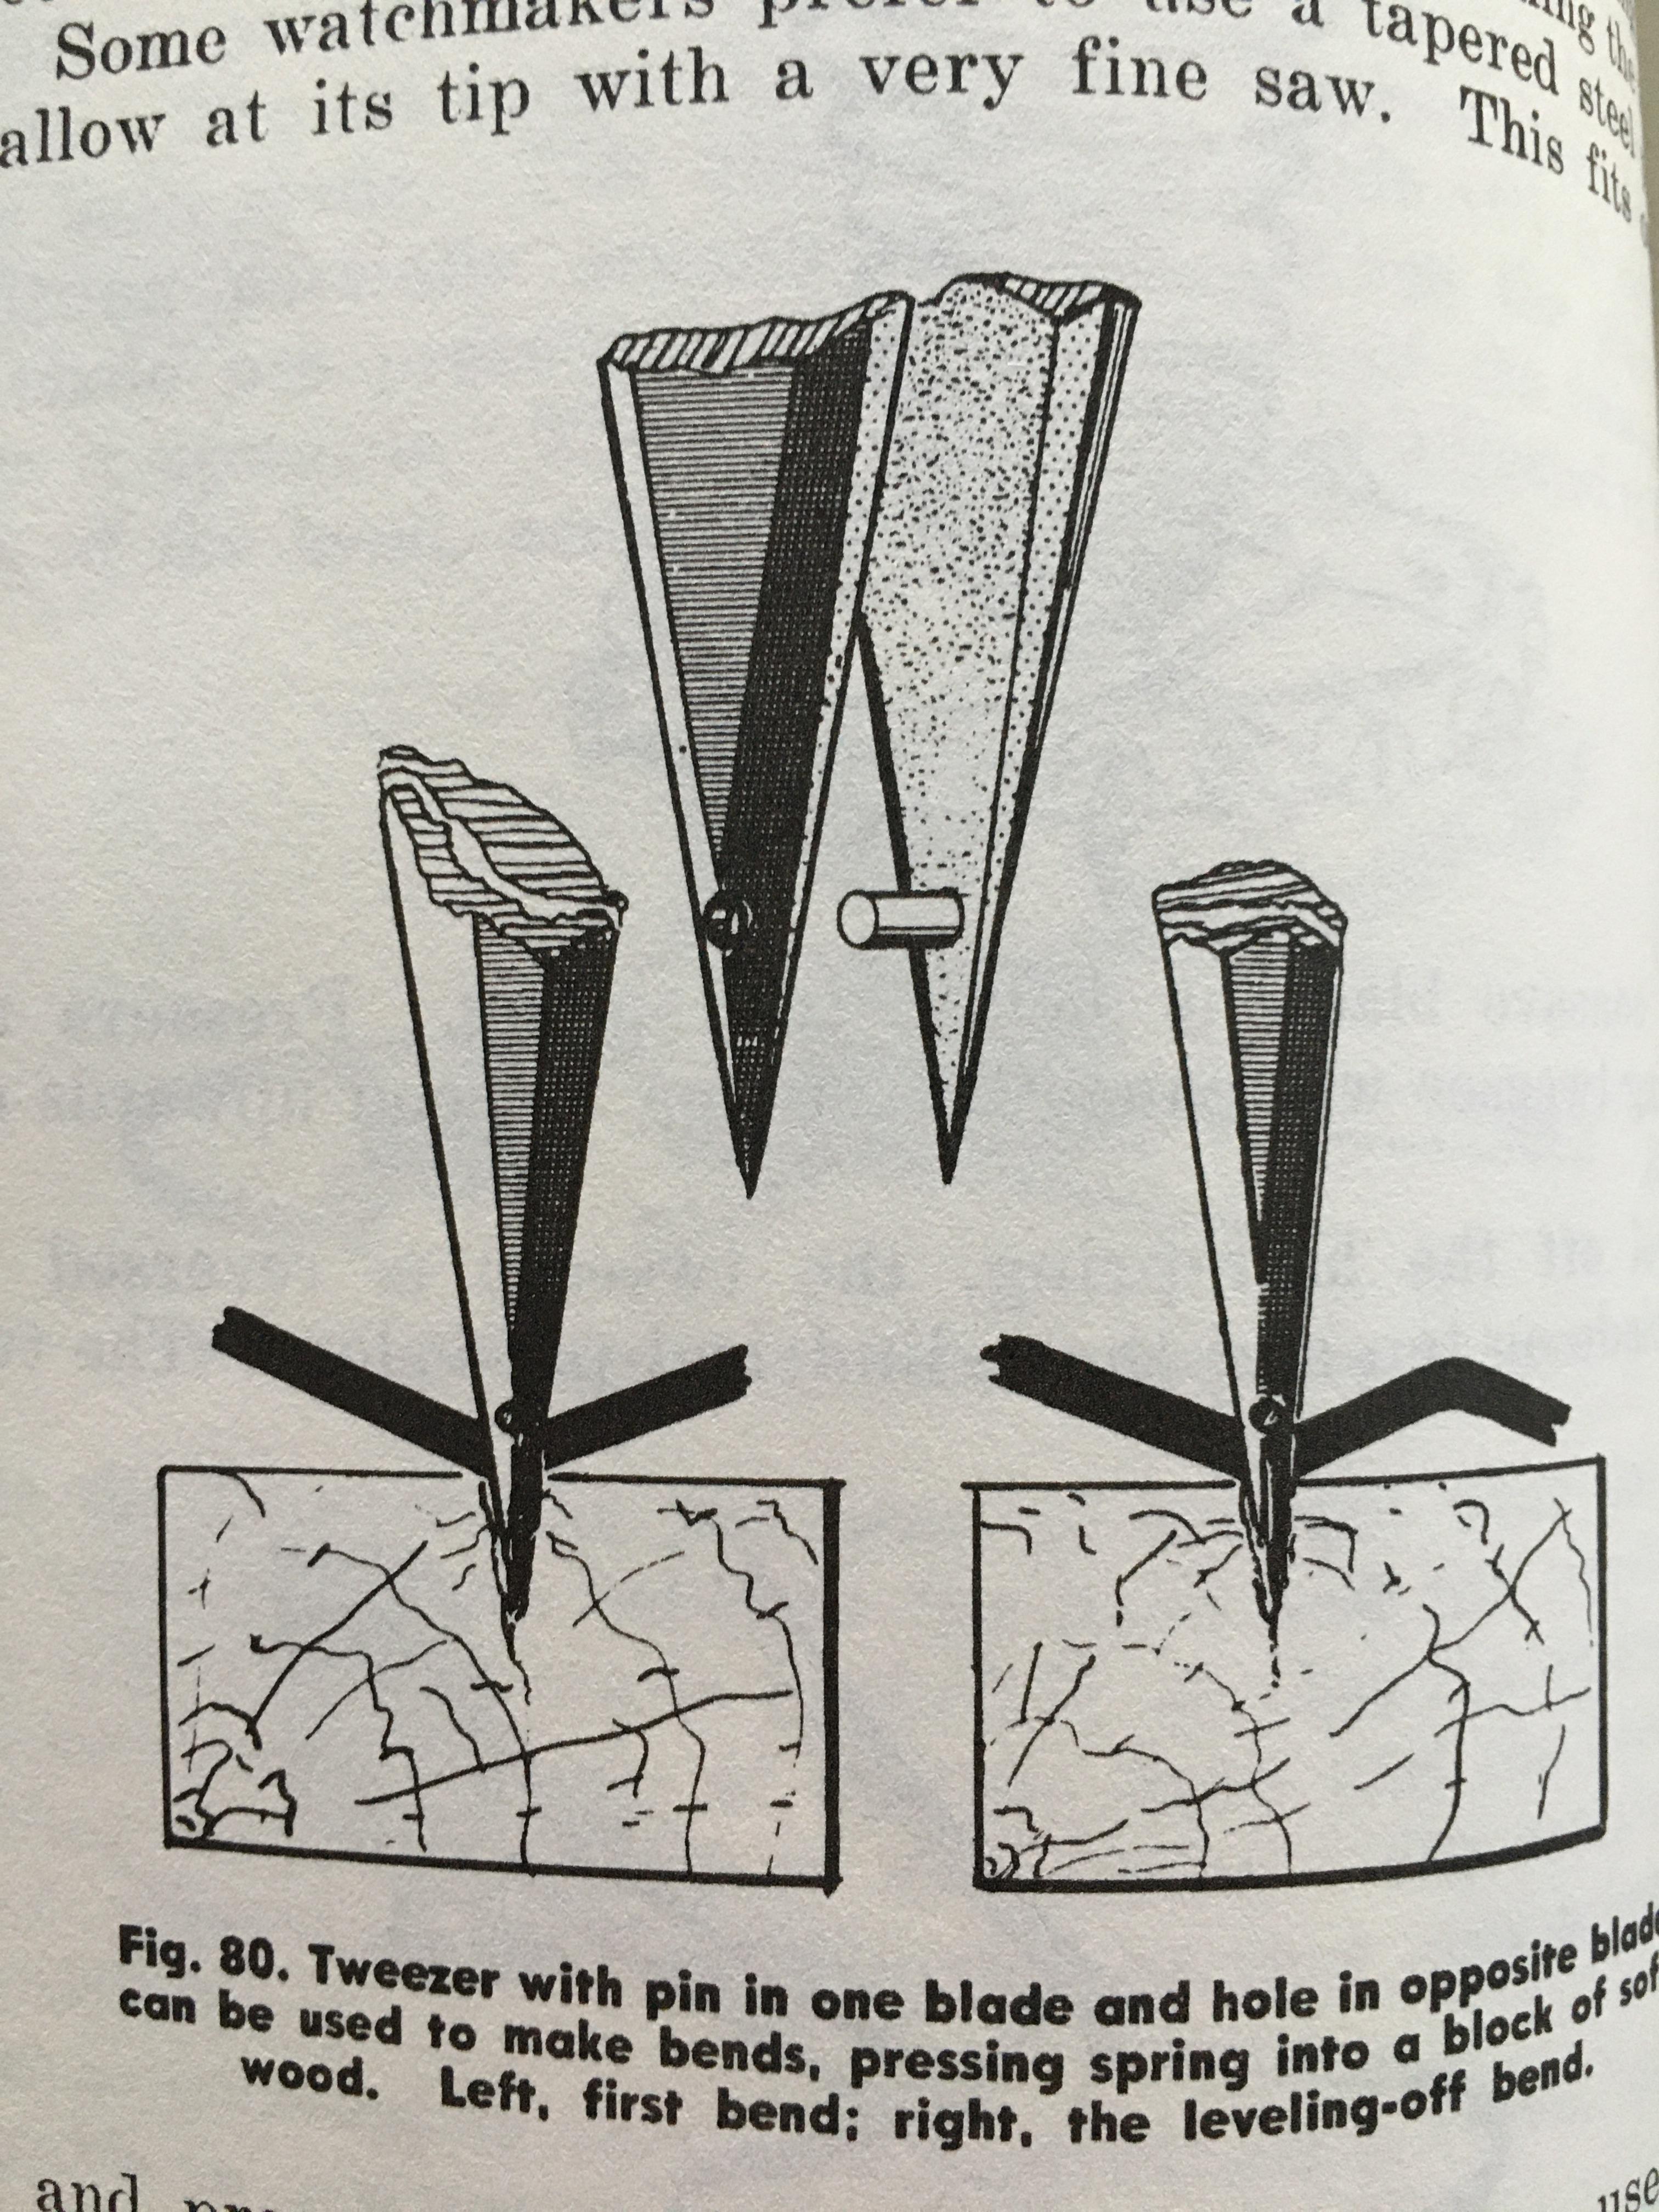
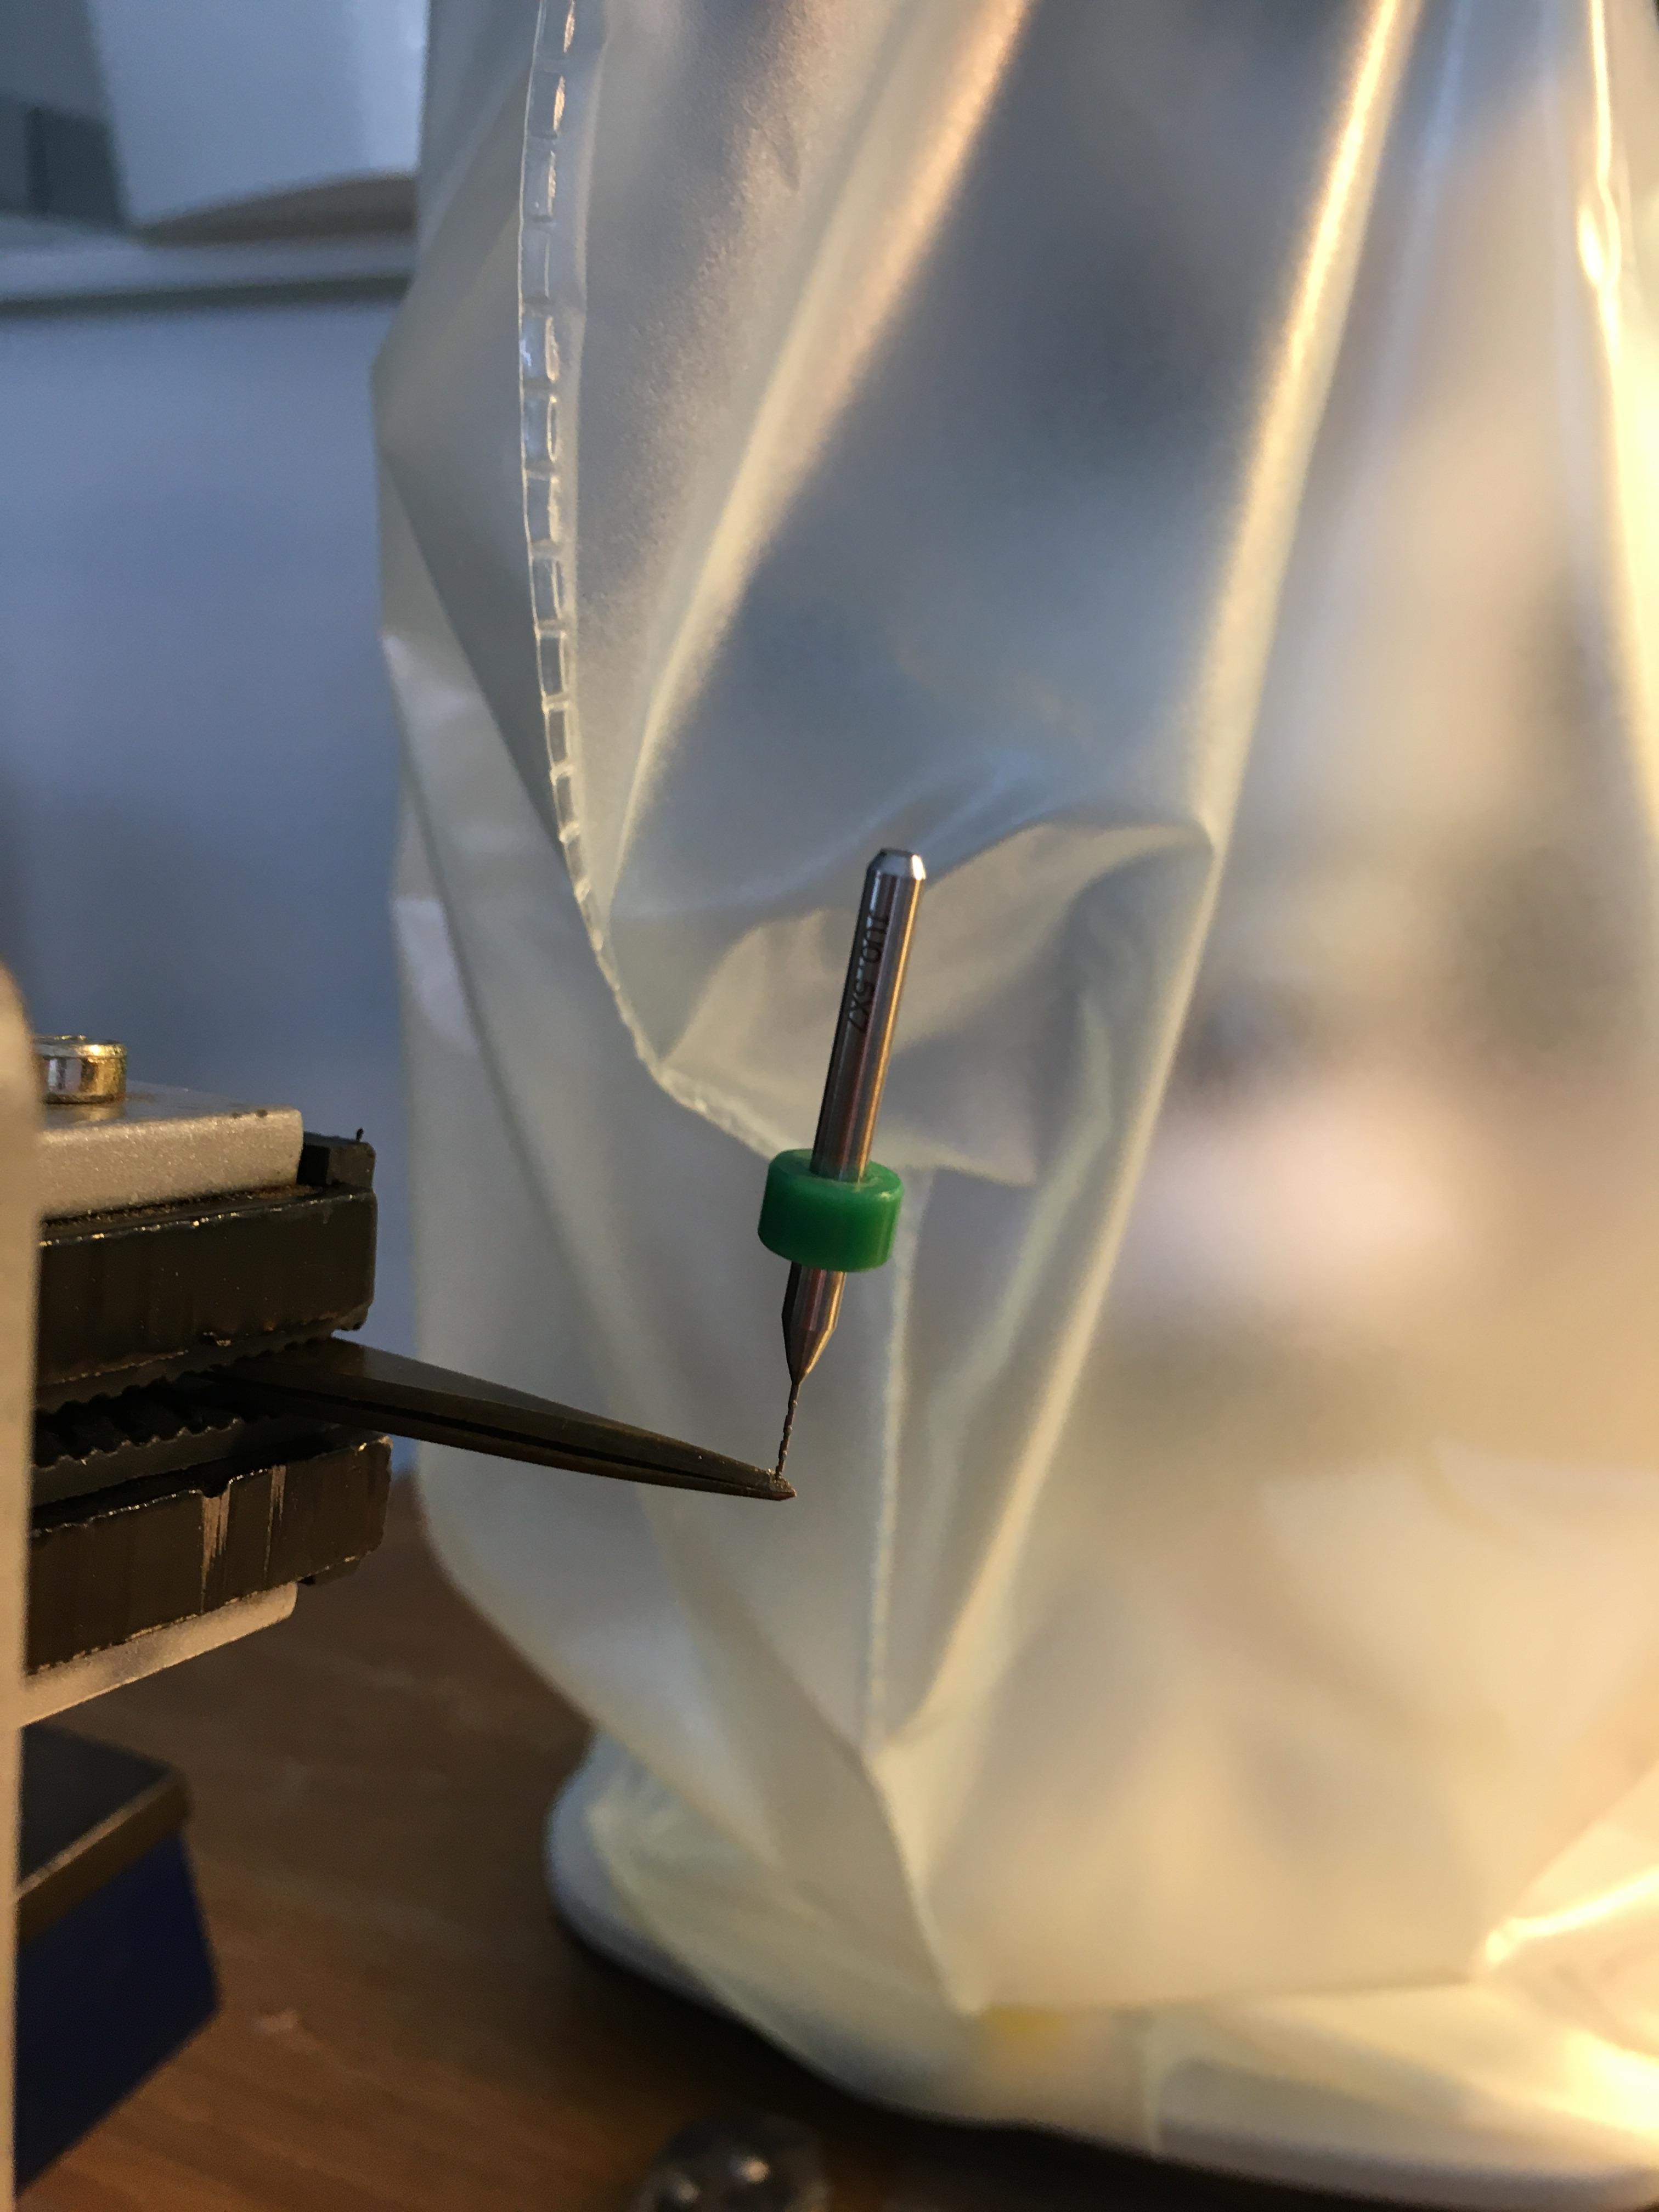
Yesterday I did several bending attempts (with "normal" tweezers) on a small (ladies-watch) hairspring and the results were poor at best. I noticed that while pushing the tweezers in the wood that either the hairspring slipped upwards in the tweezers, or that the tweezers would suddenly "sink" in the wood and bent the spring beyond repair. The soft-wood I tried was everything but consistence in its resistance. At a certain spot on the wood one had to push hard to penetrate the tweezers, on a spot next to the previous, the tweezers would sink in deeply when applying the same force. I decided to make an attempt to mimic the tweezers depicted on page 68 ("Bench practices for Watch repairers" by Henry B. Fried) For that I took some some pointy brass tweezers. The "pin" chosen was the thinnest needle I could find: 0.6mm Hand drilled a 0.5mm hole through both legs, close to the dressed tweezers tips: With the needle inserted; I could have trimmed the needle off, but as it turns out, either end of the needle do act like a safety, preventing the tweezers from "sinking" too deep into the wood. I also started to use another, more homogeneous "hard-wood", offering a more consistent resistance. I did a few more test on another PW-hairspring and the results were very good, very controlled and producing consistent bends. The bend produced is, due to the relative large radius of the needle, not as "sharp" as the first bend, but it does the job very nicely. Because the needle extensions are starting to "rest" on the wood, the bending goes very controlled. I'm not done yet with my hairspring, but the second (down) bend sits in without damaging the "one-off" hairspring. Adrenaline back to normal levels On the picture it looks like that the 2nd bend is a bit "over-bend", but that's only when you take the twisted continuation of the spring as a reference. In reality it's spot on, back to horizontal Next is to sort out the terminal curvature ........

 2 points
 -
it is stamped ISA 1198 on the movement plate, that is the base movement2 points
-
one of the problems with aftermarket mainsprings are there not actually made to exacting specifications. Like the center circle should be of the right size but often times it's either too big or small. personally I wouldn't do you believe in what noticed are worried about this at all probably because I've seen so much worse. so I don't think this is enough to be concerned about at all.2 points
-
Sometimes you just need to be persistent. And sometimes you need to be very persistent. …also effective on a Seiko Tuna2 points
-
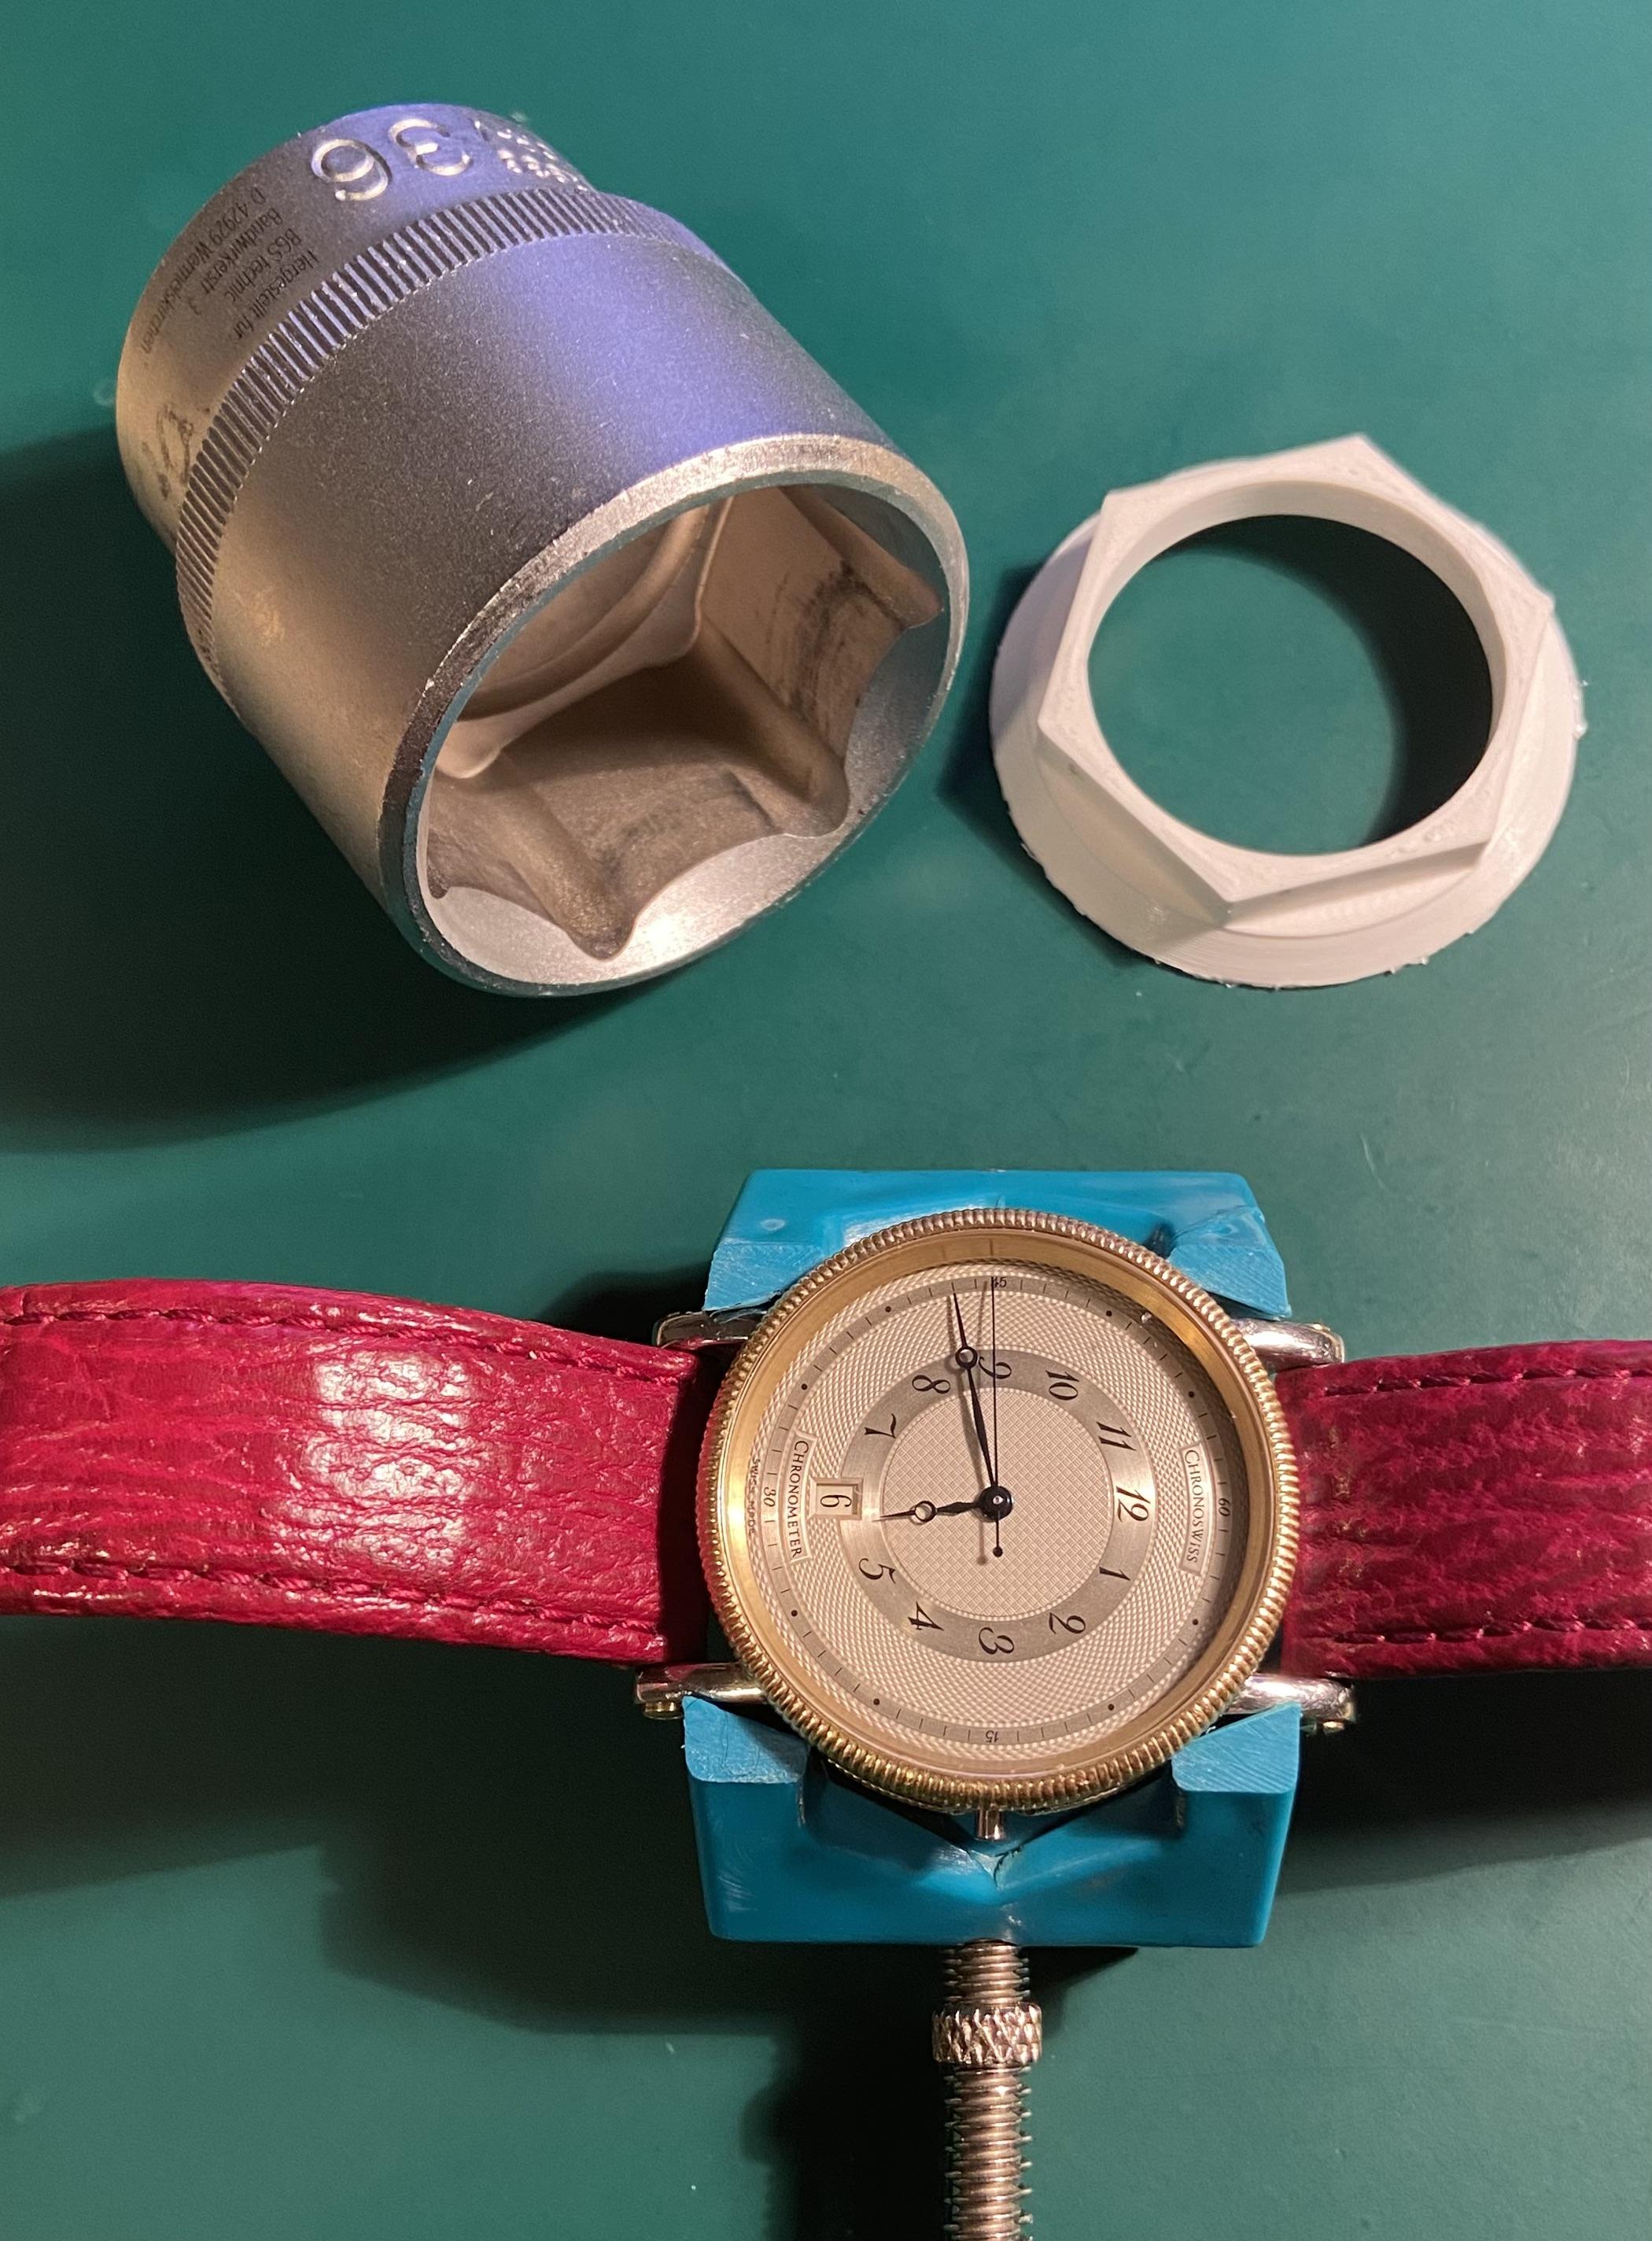
A 3D-printed insert for a 36mm socket did the trick in combination with a super thin, double sided sticky tape. The tool is beveled to make sure that it grabs the bezel and not the protruding crystal. The bezel was really tight!
 2 points
 -
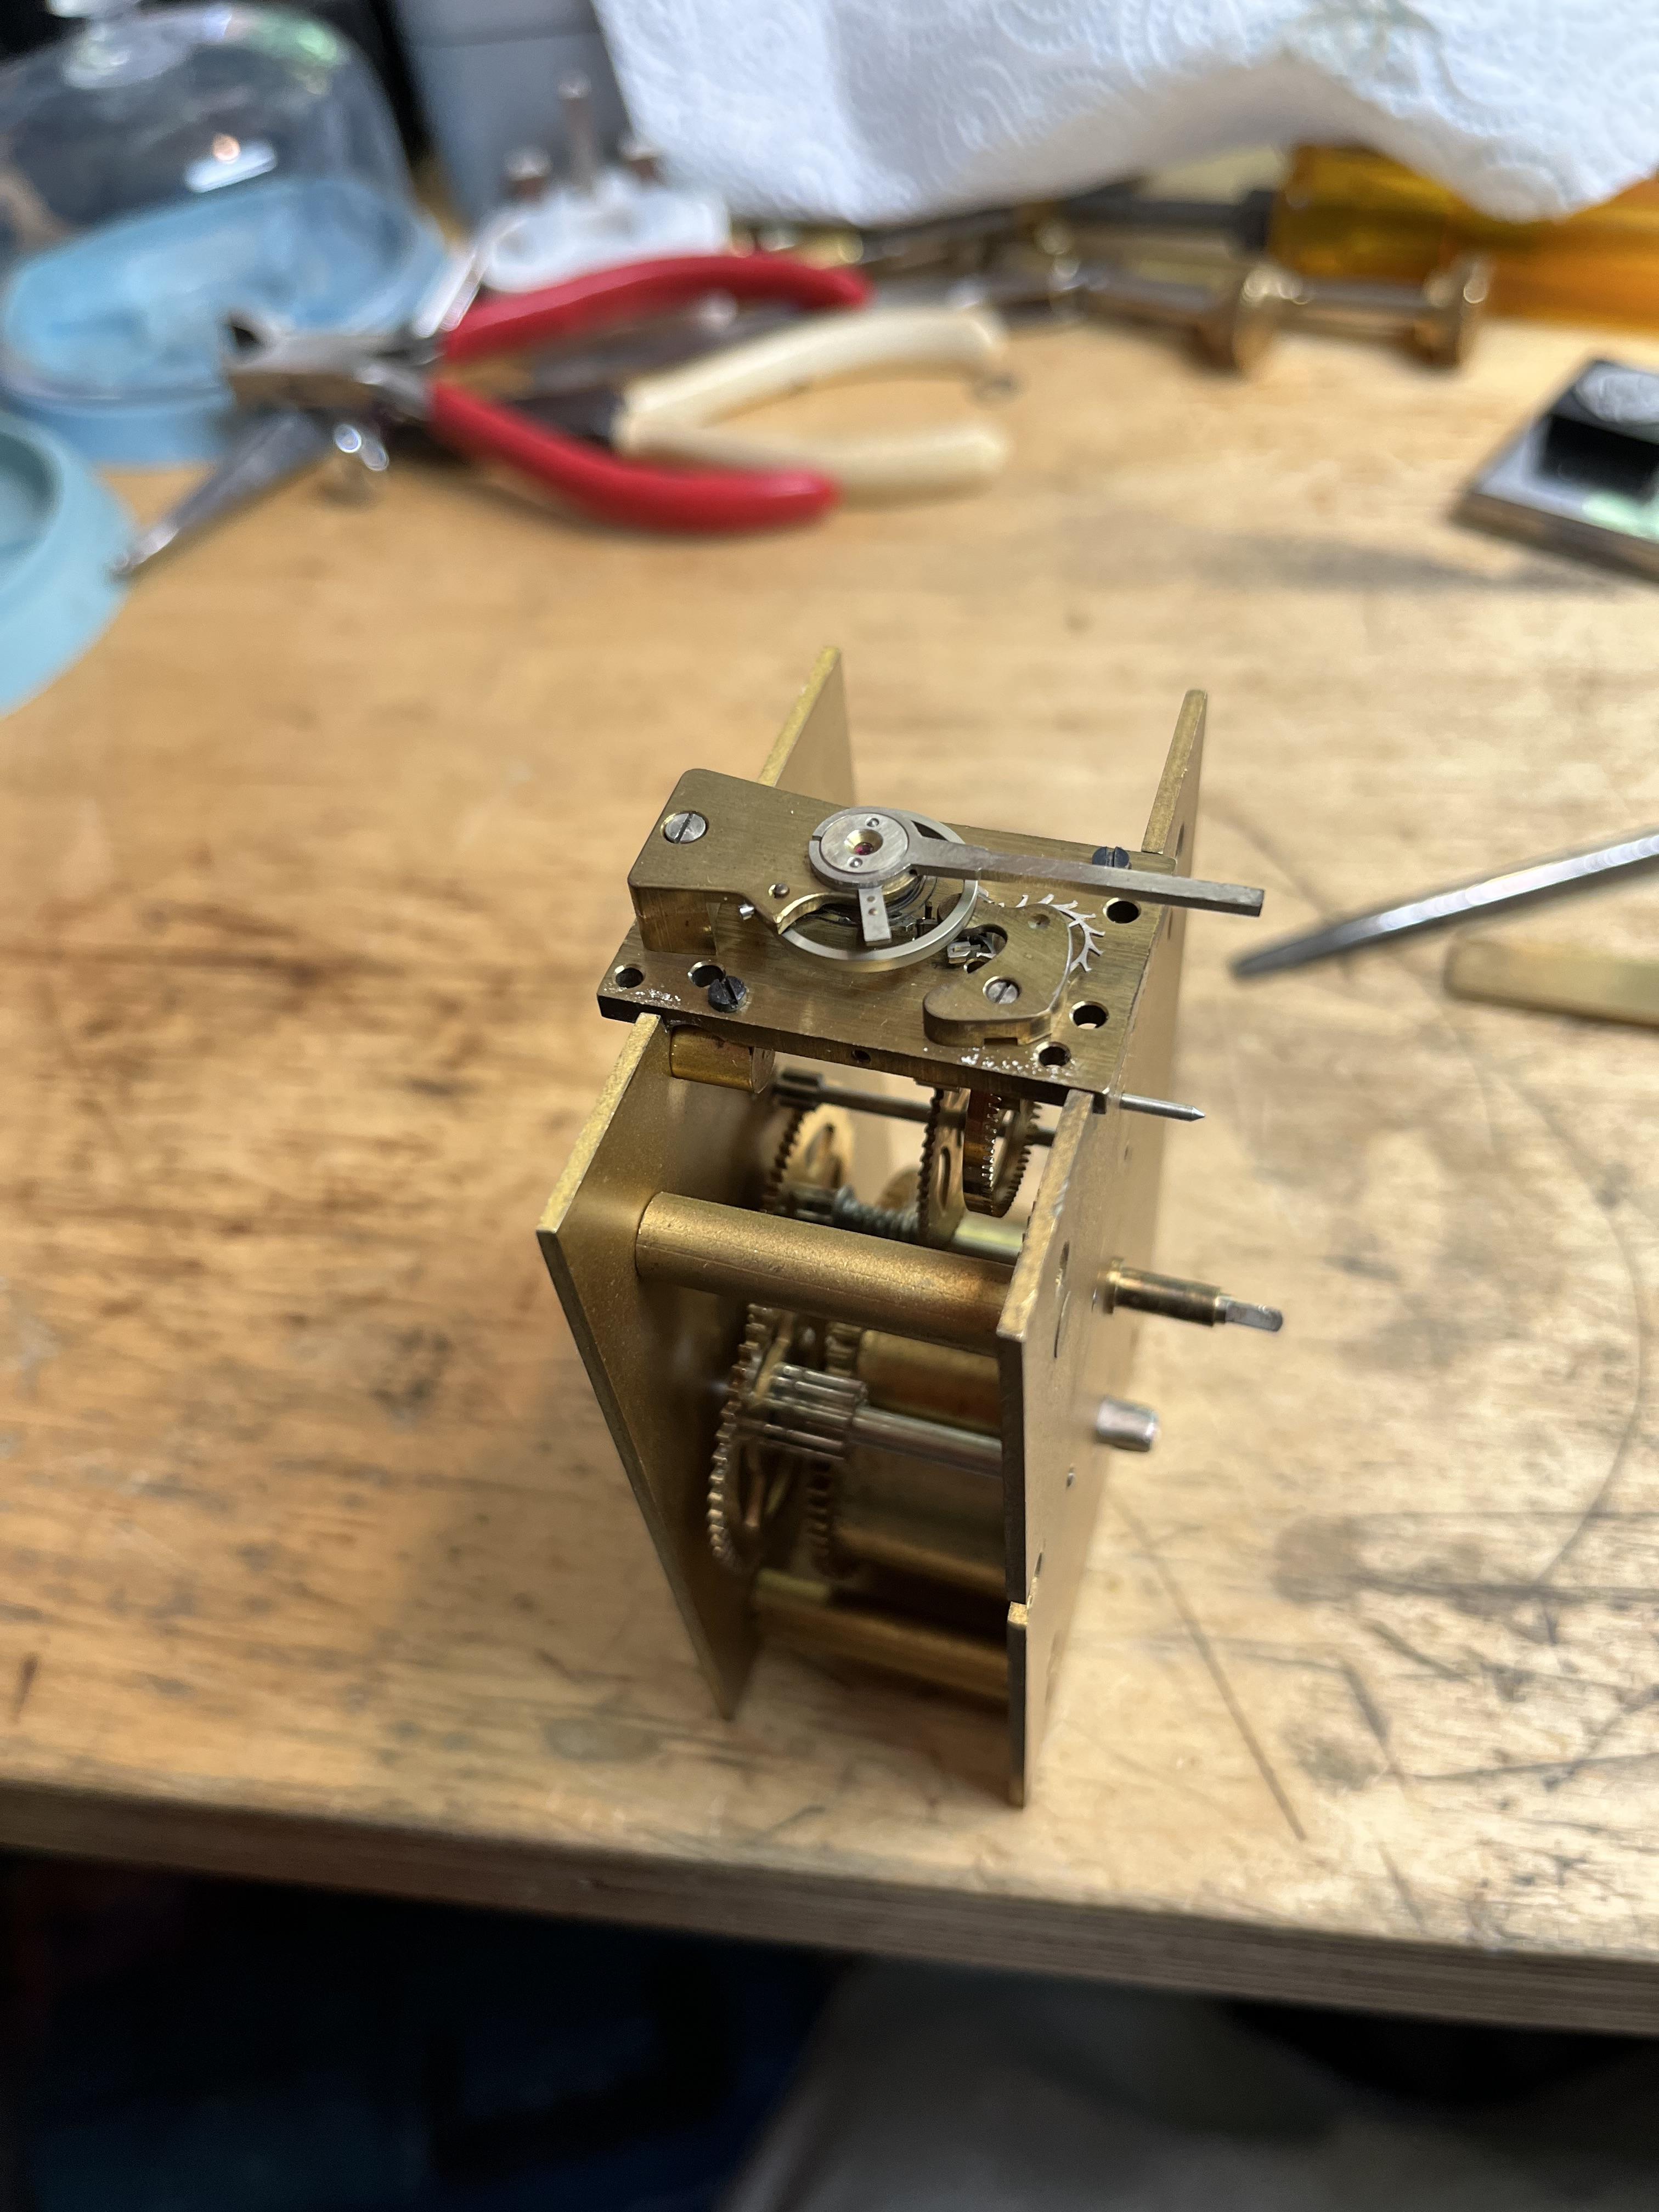
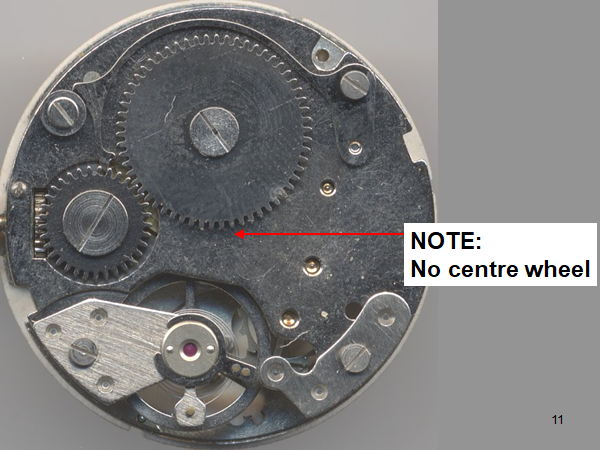
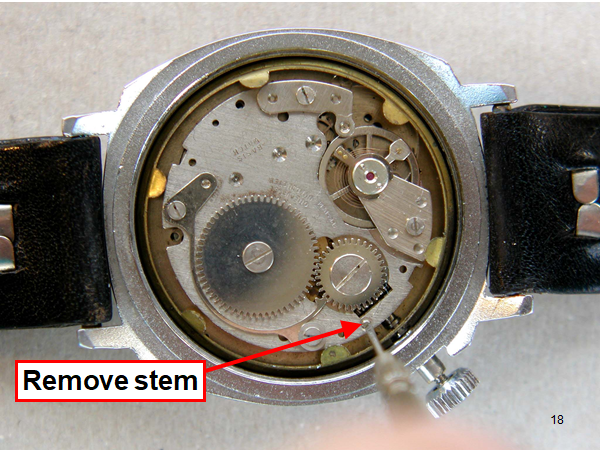
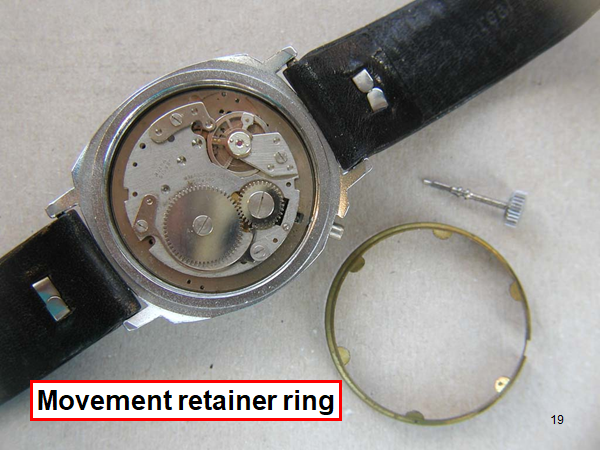
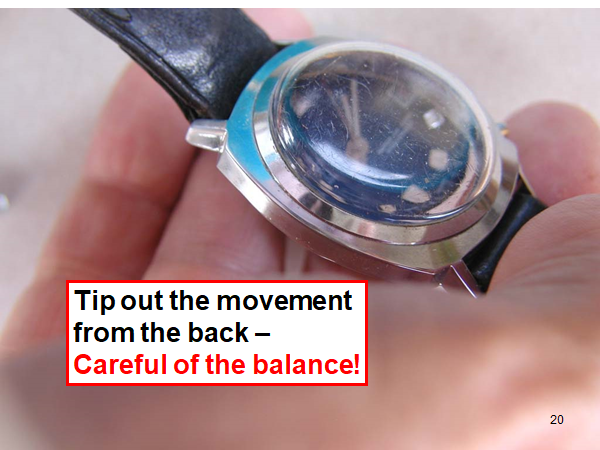
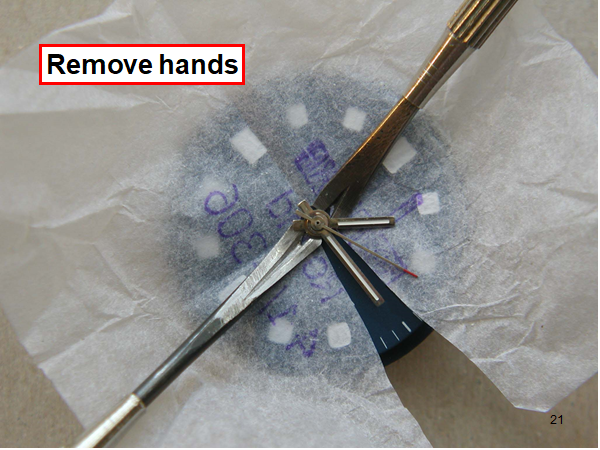
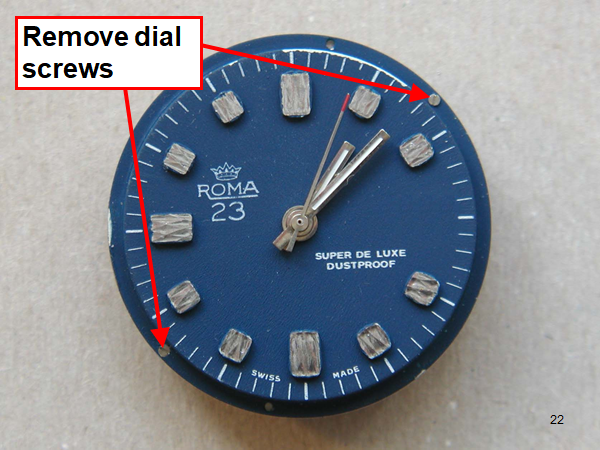
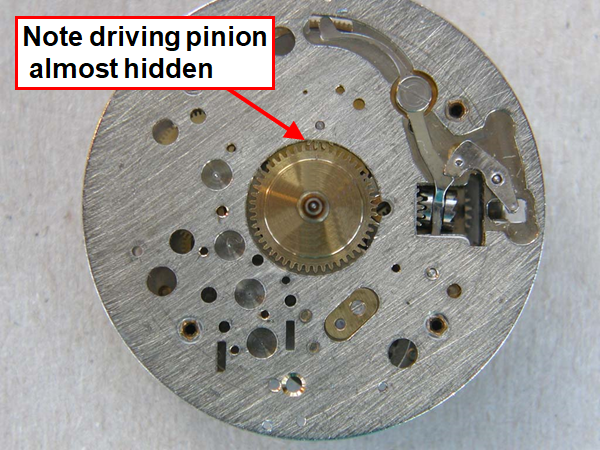
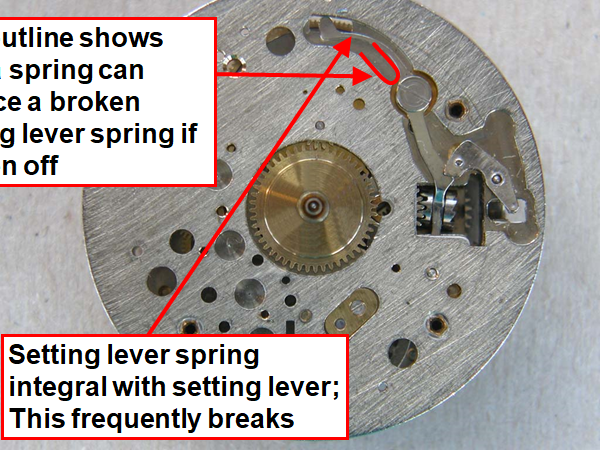
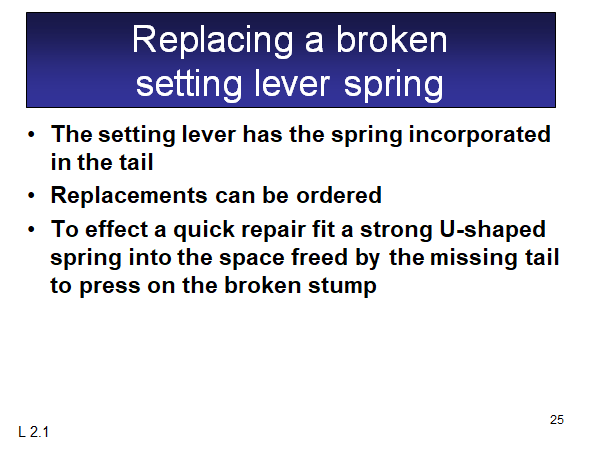
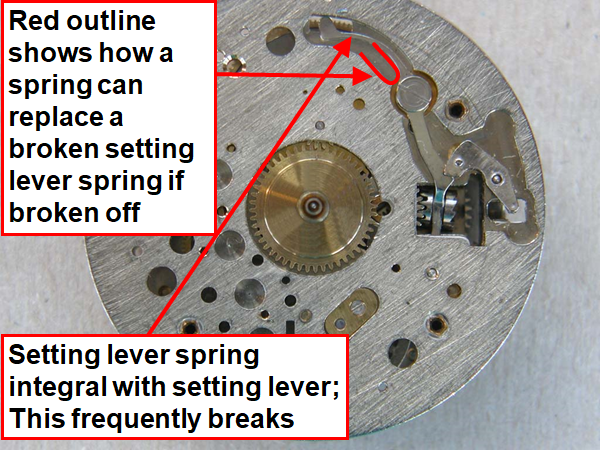
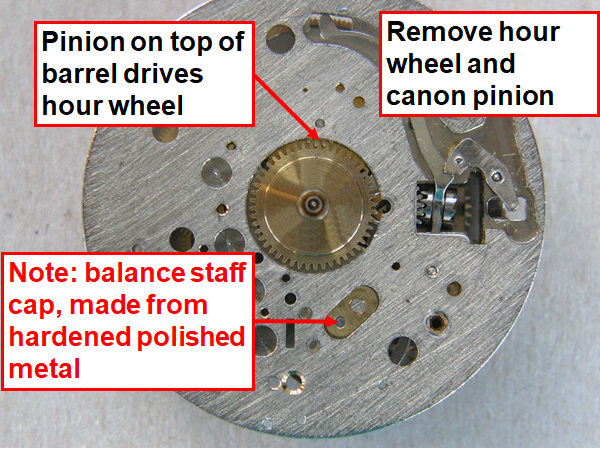
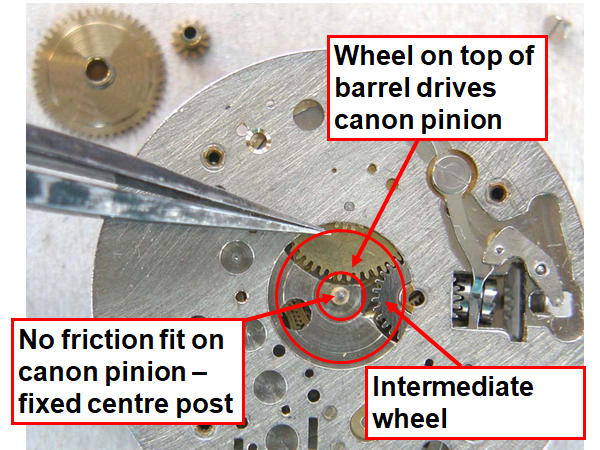
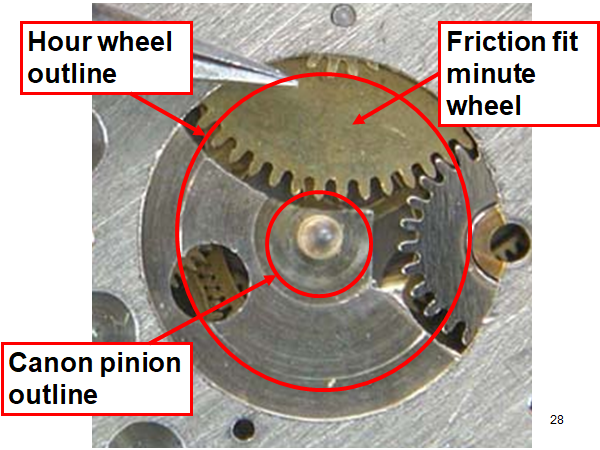
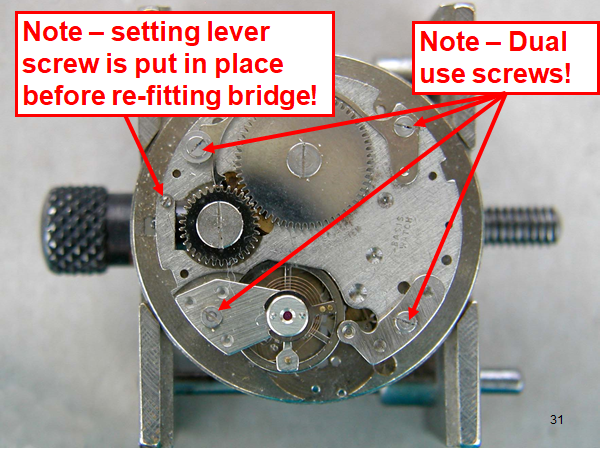
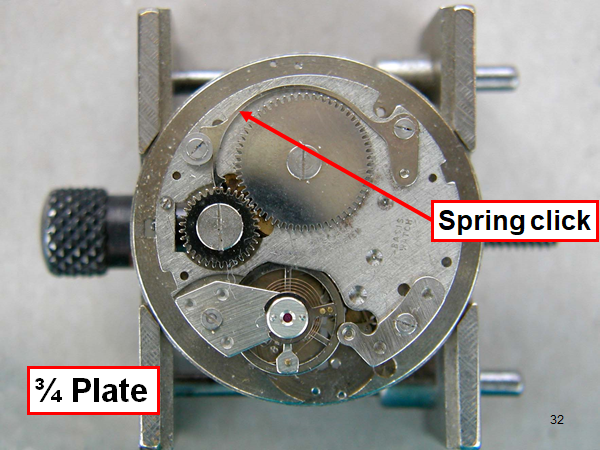
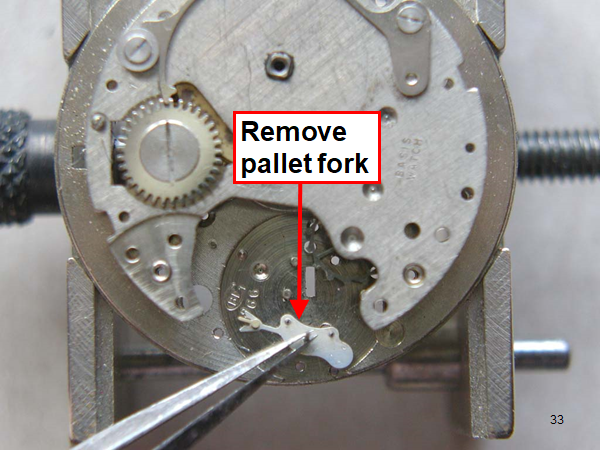
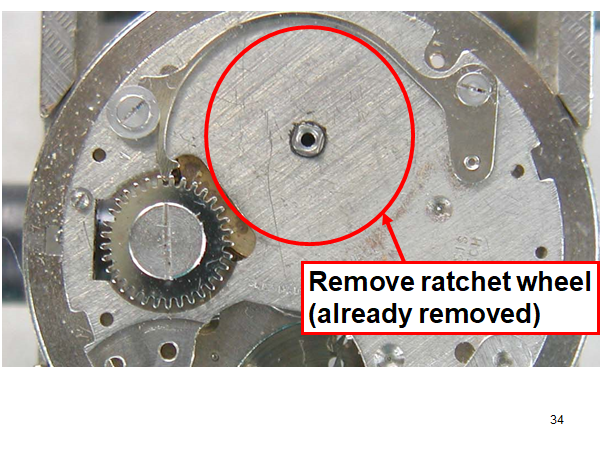
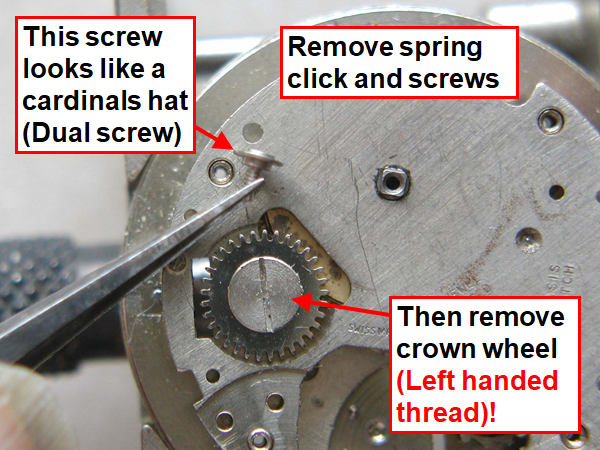
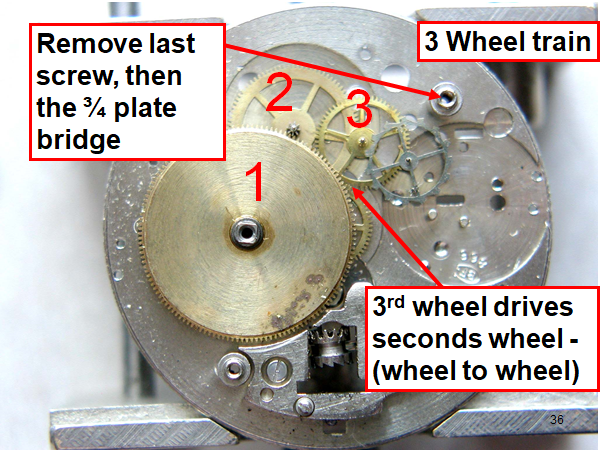
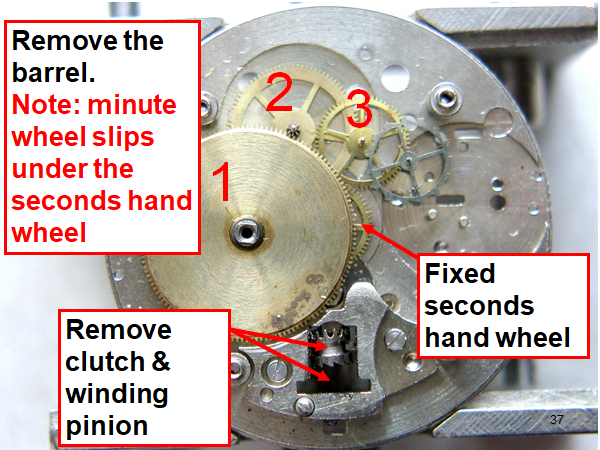
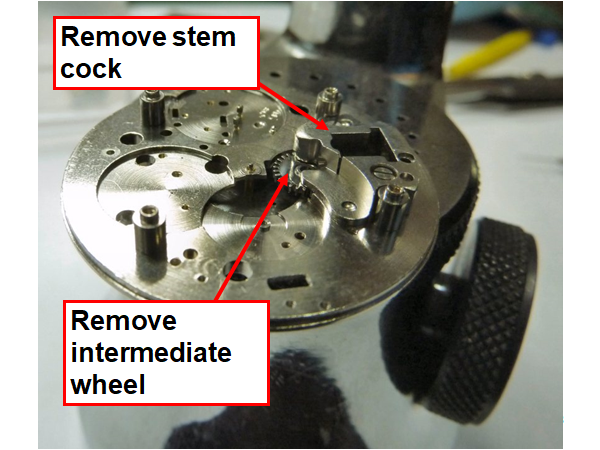
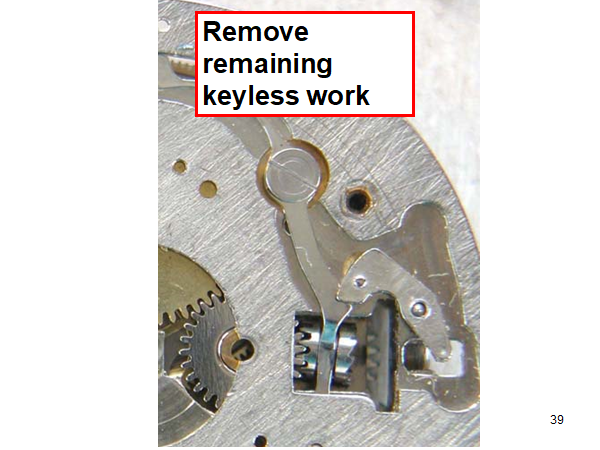
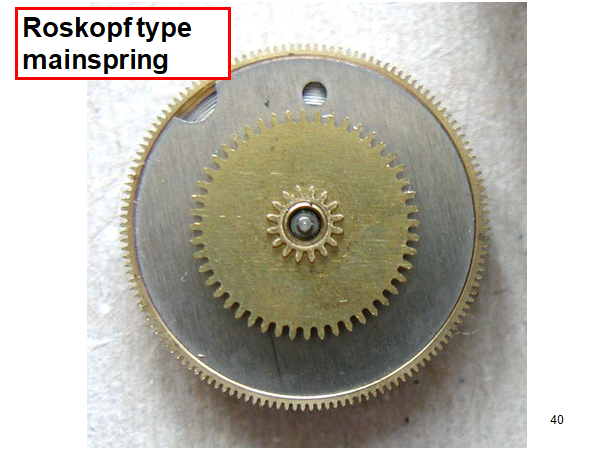
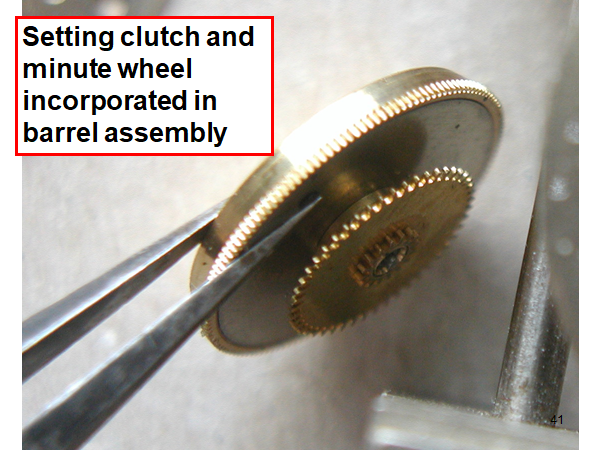
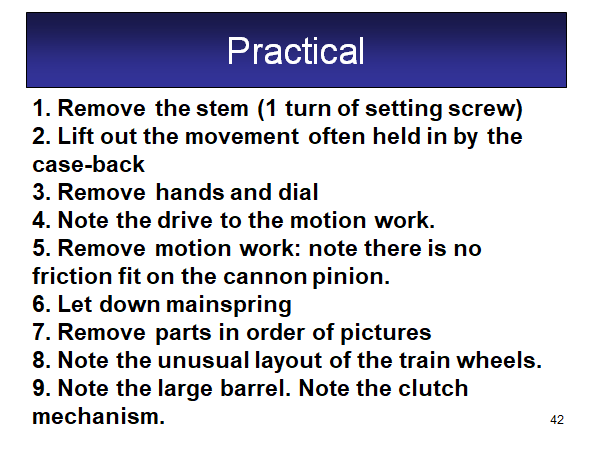
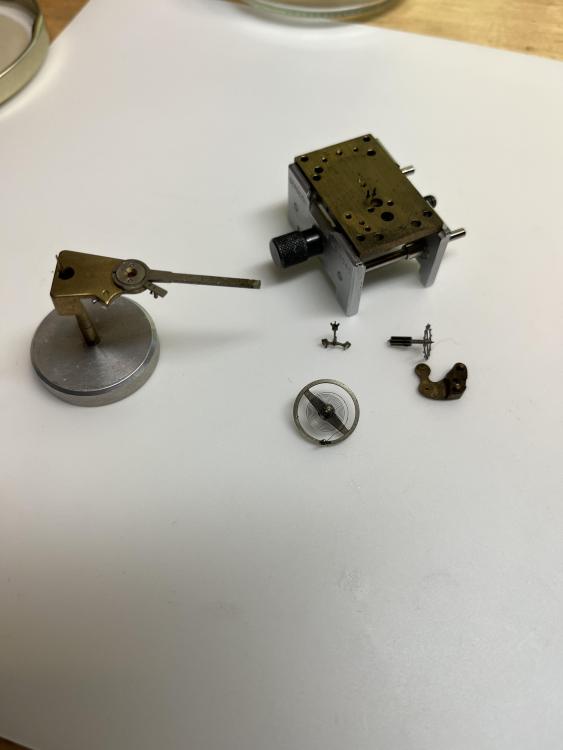
Hi, I teach watchmaking to complete beginners at Epping Forest Horology Centre, close to Epping and this is one of the lessons on the BFG 866. I wanted to show my class a classic pin pallet (Roskopf) movement and how to service it, as many watchmakers won't touch these watches as they hold no monetary value. Turn the setting lever screw 1 to 1 and a half turns to release the winding stem A piece of watch paper or small plastic jiffy bag to protect the dial, whilst removing the hands The driving pinion is part of the friction fitted minute wheel on top of the barrel. This work in a similar way to a friction fitted canon pinion to set the watch hands Remove the keyless work: setting lever, held in place by the setting lever screw, screwed from the other side of the mainplate, then the yoke, which sits on top of the clutch (castle) and also the winding pinion. I have three other lessons on this movement that cover bringing the watch 'into beat' as well as taking apart the friction fitted minute wheel from the barrel, lubricating and staking back on to achieve the correct friction setting and finally how to remove the centre seconds wheel safely and refit using a staking set. Many people leave the friction fitted minute wheel on top of the barrel, not realising the amount of old grease that can't be cleaned out from it, as well as not removing the wheel of the centre seconds arbor and again not cleaning out the pipe which has old grease inside. Hope you enjoyed the tutorial? More to come....
 1 point
 -
This is what you may find Ian when you decide to venture under the dial.
 1 point
 -
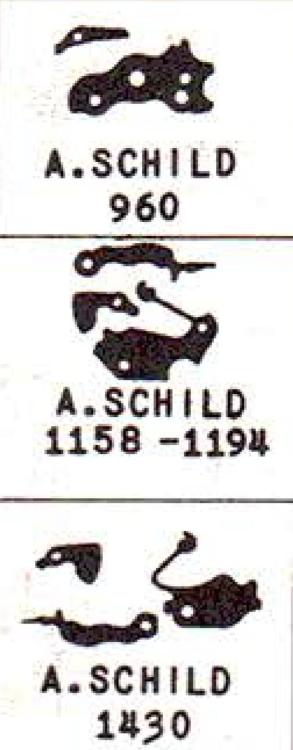
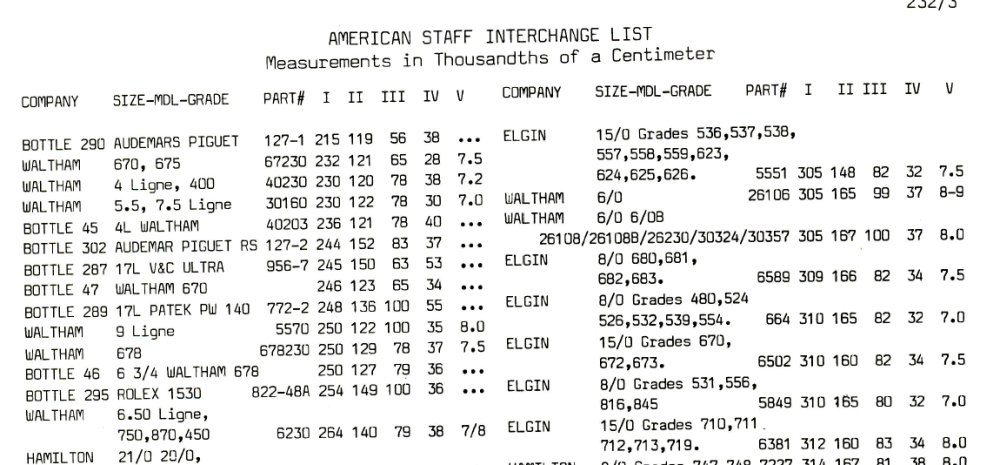
As mentioned earlier by myself and now Joe the setting components of the movement such as the setting lever ( pull out piece ), the yoke ( clutch lever, castle gear wheel lever ) set bridge with setting lever spring ( sometimes called a jumper spring ). Usually 3 pieces can be used to identify a make and caliber, sort of a finger print . These components can be checked against a documented list, books that contain these lists are the Bestfit watch material catalogs ( American ) Flume ( German ) Catalogue Officiel ( Swiss ). As far as i know these list systems finished sometime in the 70's.1 point
-
I think following the TZ illustrated glossary's nomenclature is the "lingua franca" of the watch community.1 point
-
even though I have several of his books I think of the best if you didn't reference the nomenclature anymore other then to have a laugh. Because I don't think I've ever seen references to the terms he is using. Plus if you look at the picture just before what exactly does he call the plates screws? this is why I think it's best to go with the Swiss terminology it forms somewhat of a standard perhaps. yes one of the minor problems of watch repair knowledge actually is required if you're to be successful. Which means you should do some studying. out of curiosity why did we rule out 1194? then from the images on the website at the link below it also shows why taken the dial off is good because often times as it shows in the picture they mark the movement number on the dial side plus the amusement with this watch it actually exists in two different sizes and away http://www.ranfft.de/cgi-bin/bidfun-db.cgi?10&ranfft&0&2uswk&AS_11941 point
-
Hi MSB. find attached the Generic lubrication document fron the BHI in the UK regarding lubrication. BTI-The_Practical_Lubrication_of_Clocks_and_Watches.pdf1 point
-
Excellent advice, much appreciated.1 point
-
Yes, that's exactly the one I use1 point
-
Since that post, I acquired a Levin with a cross slide and four-jaw chuck on FB marketplace for $350. It was truly a deal. The only downside was that the cross slide is English rather than metric. A minor disturbance. I have nearly a complete set. That is where the real money went!! I bought lots resulting in duplicates.1 point
-
Where did you see that? EDIT: I found it! There is no reset with this movement. It‘s either an electrical or mechanical fault. For further non intrusive diagnostics I recommend this cheap device:
 1 point
 -
Looks like there might be some corrosion (blue powdery looking stuff) under the pad to the bottom left of the battery. I know very little about quartz movements, but if it were mine and it had no real value, I'd clean what I could and reflow the solder under that pad to see if that doesn't wake it up.1 point
-
You cannot over wind a clock it is a myth. You can only wind a clock up to its full, if it doesn't go then there is something wrong with it. Sorry watchweasol I disagree with the watch oil for the escapement pocket watch is best that is what I would use on such as this type of escapement. You will need to check the pivots of all the wheels and the holes for wear. You will also need a clock mainspring winder to remove the spring from the barrel and check the ends for sighs of wear, sometimes the end of the spring that hooks on the barrel can split. Pivots need to be smooth and burnished.1 point
-
Can you see any lettering under the balance? (BTW There looks to be a lot of flaking radium from the dial and hands. So read the postings about the precautions you need to take before removing the movement)1 point
-
Hello @pent, these are shock springs from the formerly communist East Germany. "DDR" (in Wikipedia) stands for Deutsche Demokratische Republik or German "Democratic" Republic (GDR). East German watchmaking was mostly located in the famous town of Glashütte that is today still known for brands like Lange & Söhne, Nomos and Glashütte Original. During the communist regime, all these old German watchmaking companies were integrated into a state owned enterprise called "GUB" (Glashütter Uhrenbetriebe= Glashütte Watch Enterprises). Long story short, you can relatively easily and cheaply find donor movements with that shock spring type if you search eBay for "GUB movement" e.g. cal 69, 70, 09-20. Just have a close look, some of them also have Inca shock springs (maybe the newer ones). Best regards, CK1 point
-
Hello and welcome to the forum and greetings from Geneva (you must be somewhere close). Taking good pictures of EVERY step and every screw has been my recipe as well. For the particular picture below, don't forget to note that the screws with three grooves are reverse-threaded (you screw them in/out the opposite way to normal). Cheers, C1 point
-
Hi restored a couple of these movements this year. They are very well made with a balance escapement (see pic). The movement will need stripping down, cleaning and lubrication. Also the balance assembly needs stripping, cleaning and lubrication.

 1 point
 -
Wow, thanks for that. I reckon as a novice I’m best going low tech, brush and lighter fuel to start with and then as I gain experience introduce other methods. There’s plenty of time (pun) Thanks Ian1 point
-
Looks like a Seiko 7S26 clone. Finishing is definitely Chinese--it has the patented fingerprint on the bridge1 point
-
My mentor taught me a method which I haven't used yet. That is to embed the metal in a small piece of soft charcoal, like those artist use for drawing, and set it alight. The embers will continue to burn for awhile and the carbon dioxide produced from the combustion would prevent fire scale from forming.1 point
-
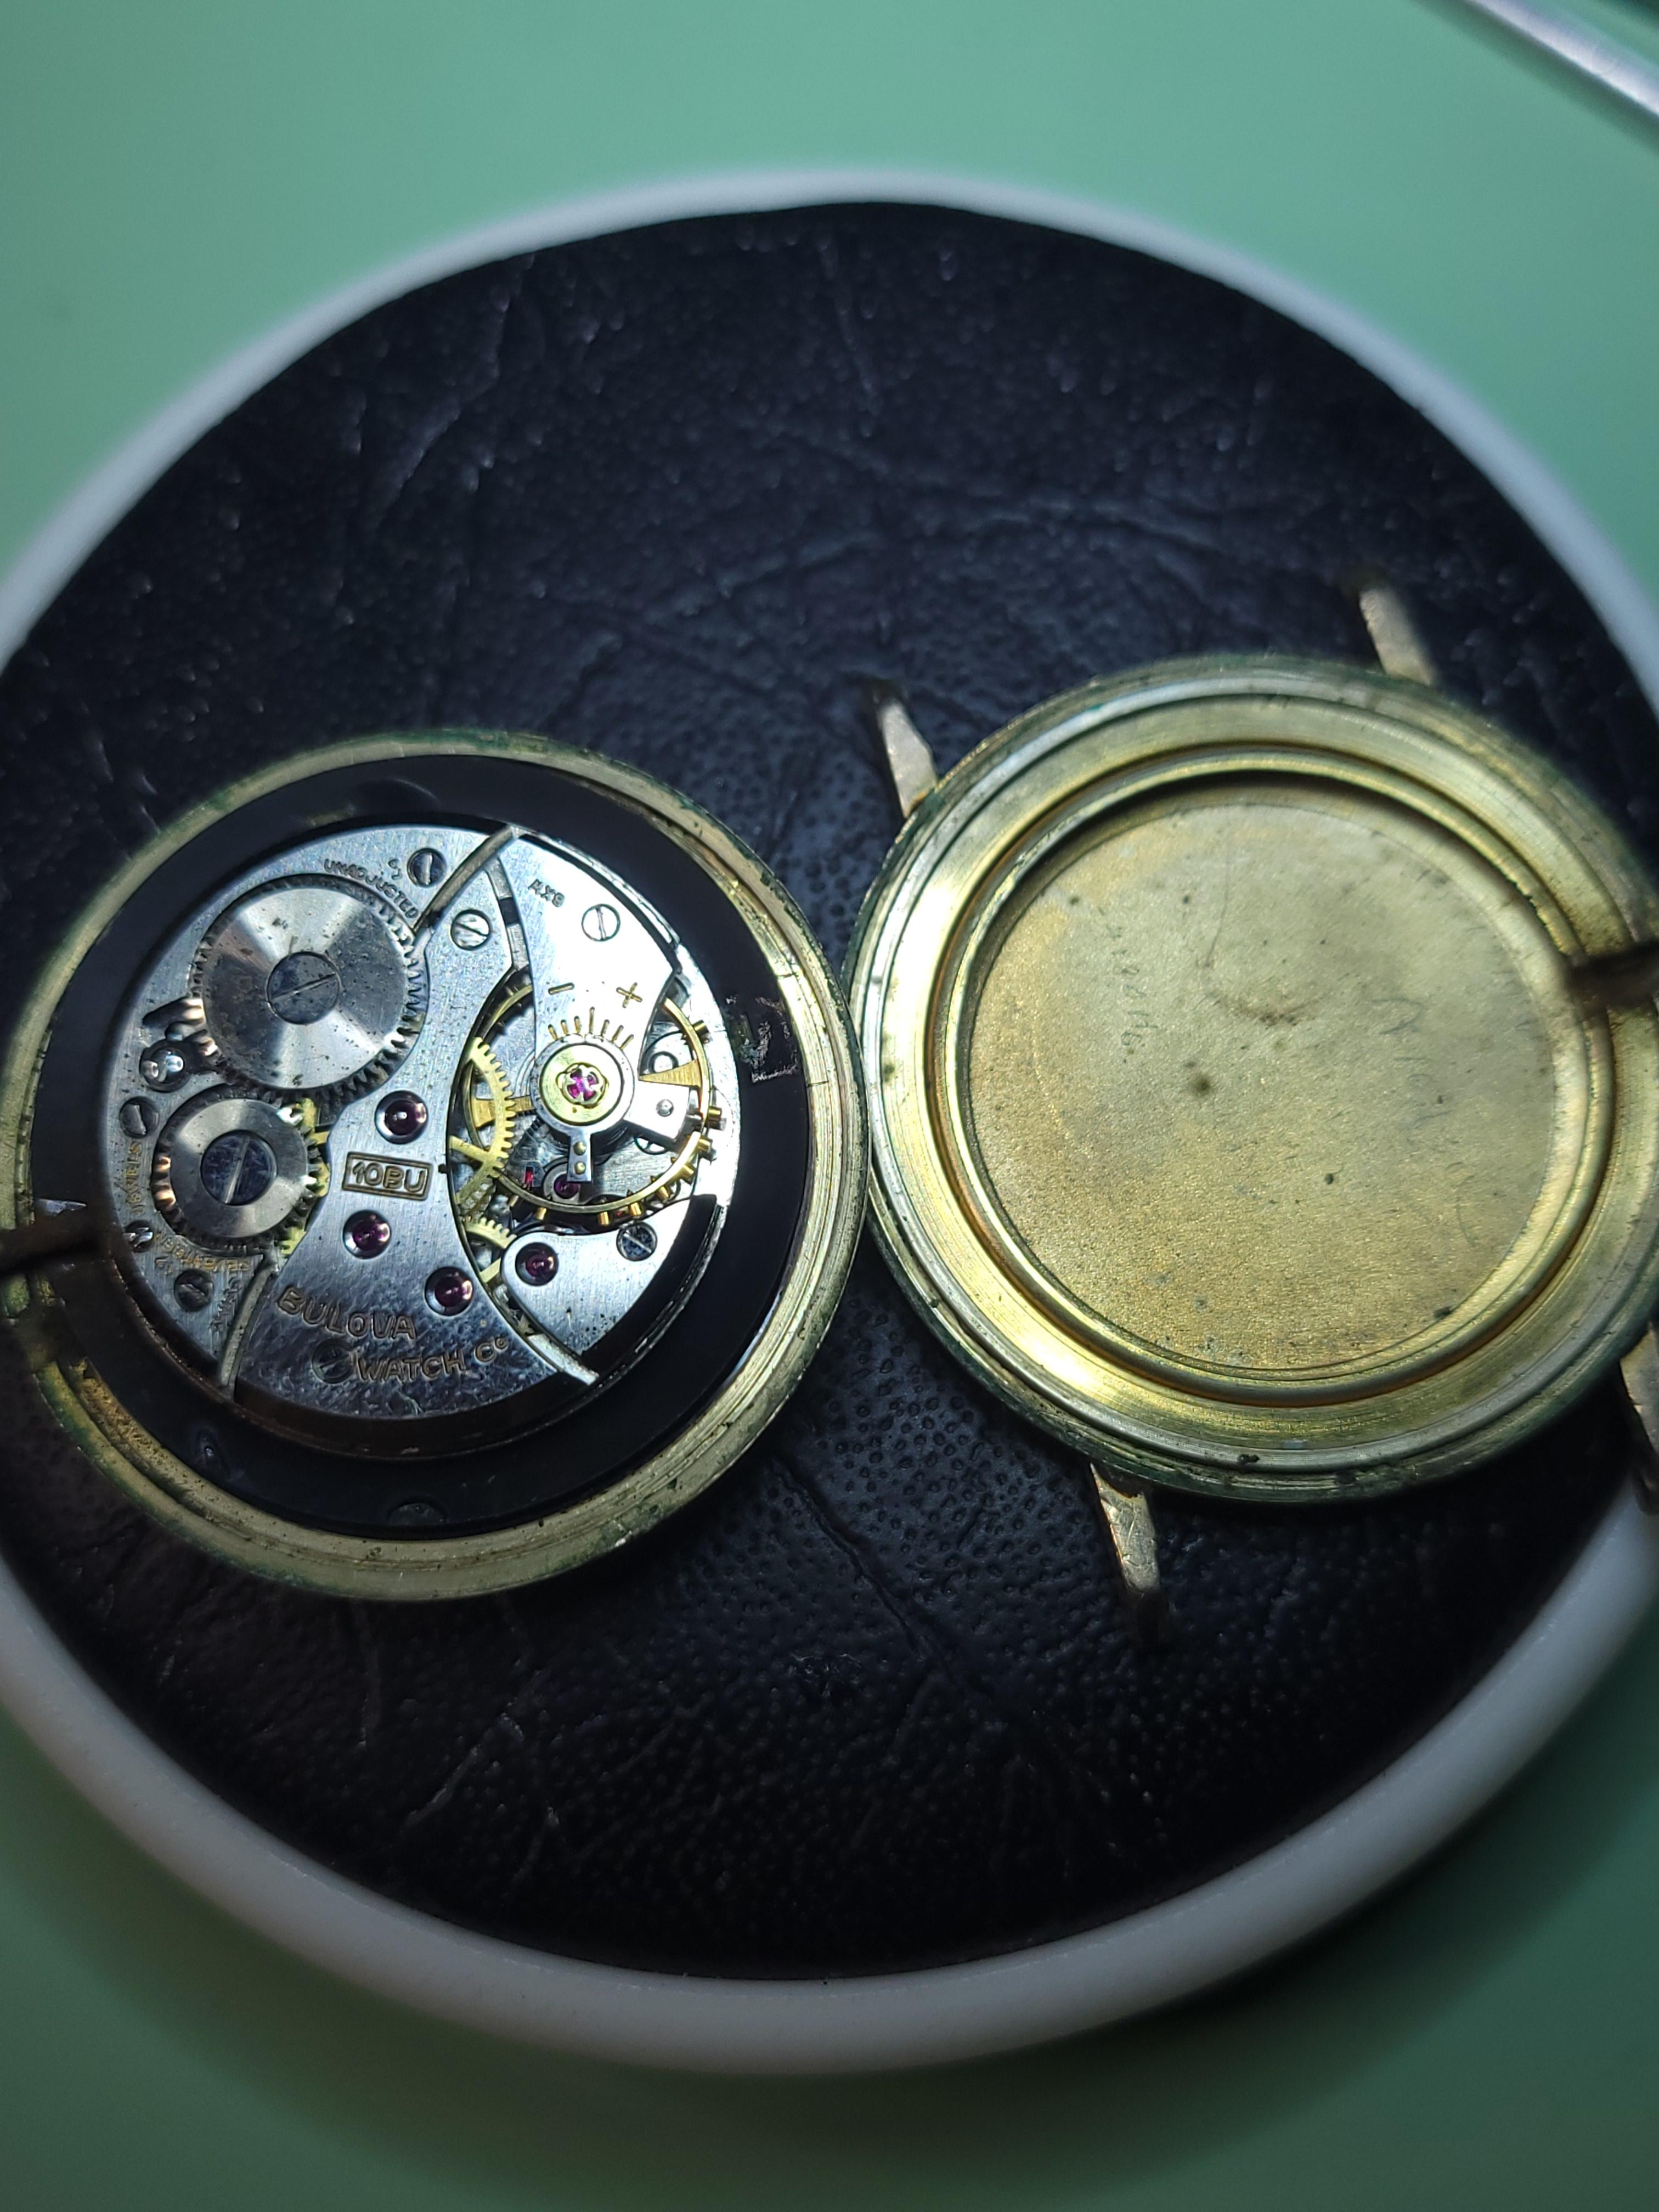
Sorry, @rehajm! I totally spaced out on replying to you. Yes, the case is very thin and splits along the winder line. Both of the cases I have are very chewed up on the side opposite the winder because the metal is so thin there. Here's a shot from the thread I posted on my other Bulova President ("P" model).
 1 point
 -
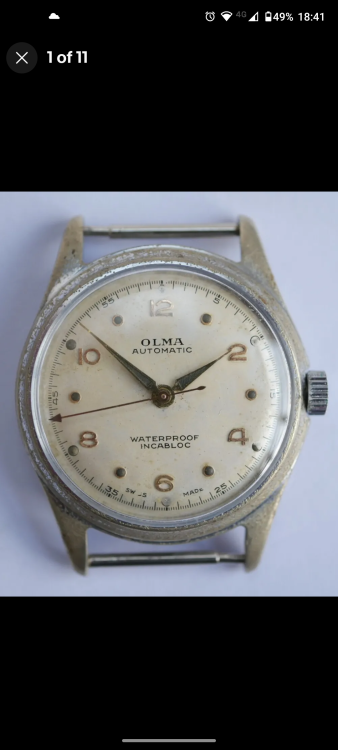
Olma watch due soon. Looking forward to reluming the hands and dial dots. ETA 1256 movement.
 1 point
 -
vivat Thank you. I'm happy. Regards Ross1 point
-
Hello and welcome. All I can tell you is it's a Chinese movement but I don't know which one.1 point
-
Hi. Well that limits the methods you can use. The only option open to you is cleaning ny hand and for that you could use an artists brush and lighter fuel or benzine or isopropyl alchol which is probably the best. Do not soak the pallet and the balance in any of them just dip brush clean and rinse then dry. This method will get you by untill you c a pick up an ultrasonic then it’s a different matter. You will be weighed down with the different opinions you will receive sound them all out and pick the one that’s best for you. Apart from Lubrication this is an other contentious subject.1 point
-
Ah, and it was staring me right in the face.1 point
-
Sometimes you just need to be persistent. And sometimes you need to be very persistent. Edit: If you were looking for a serious answer, I think the Bulova case splits along the line of the winder, so its probably a front loader.
 1 point
 -
They would have to pay me to take it away (and then I'd bin it) Cheap pin pallet movement, radium dial, lots of entertainment. You could put a lot of time and effort it, and it still might not run very well. I'd go for something Swiss with at least 15 jewels, that way there's a fair chance of it running pretty well after all your effort. It's amazing what you can find for £10-£30. I recently bought two great quality ladies watches (Movado and Longines) for less than £30.1 point
-
I always thought it was anodized aluminum but that's just what I thought It's always interesting what I find lurking in my computer vintage service guide just in case you don't have one. Then you Need to be careful about a standard operating procedure of demagnetizing as there is a magnet found somewhere in this watch. You'll see is a reference to used for the breaking of the sweep second hand. 2030-2035 rolex tech.pdf1 point
-
No such thing as a perfect measurement, only good enough for the task. Some applications, within 10m would suffice, others 10mm, 10 microns etc. A bit like " no model is correct but some are useful "1 point
-
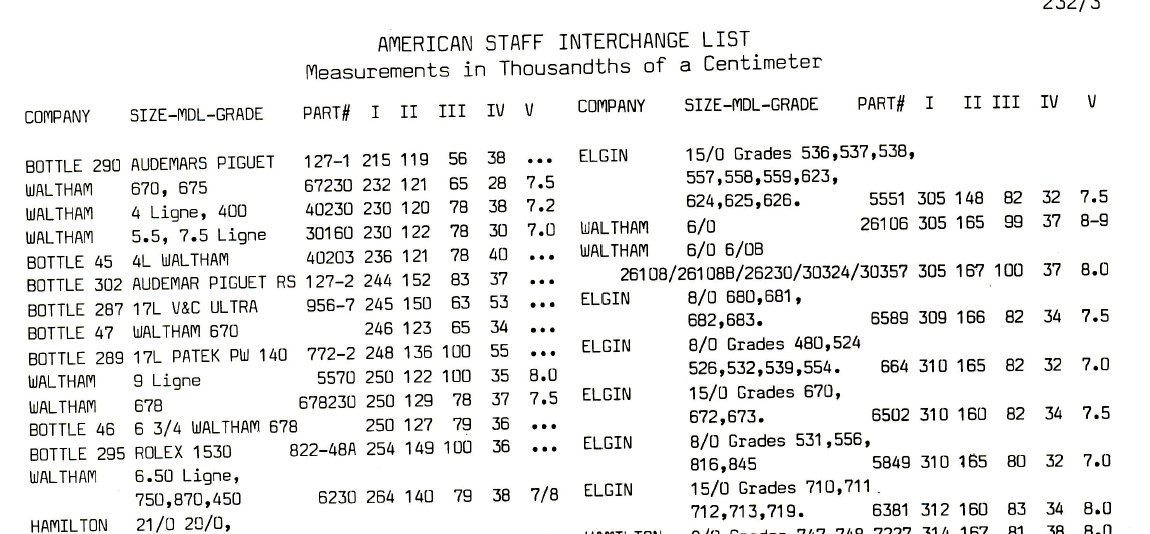
Oh other complications with getting the right staff. I have a theory at least for aftermarket American pocket watch staffs that some of them were deliberately made over size. In other words they expected the watchmaker to reduce them to the proper dimensions to fit. Although one another discussion group somebody suggested that theory was wrong. I based it on one particular balance staff which was a Hamilton 992B staff where there's only one staff it's of friction staff and the aftermarket was physically too large and needed to be reduced just a little bit to fit. So I get suspicious of aftermarket staffs versus original from the company staffs. Which brings up the problem of especially with eBay you have no idea where the staffs came from when they're not in the original package. Thinking about measurements the book that I got the dimensions from its real purpose is listing of American pocket watch staffs by size. Here's a sample at the very beginning of the book. It doesn't actually say that but my understanding is somebody took a very large assortment of balance staffs and they went through and measured all of them that's were always dimensions came from. But once again there are conflicting theories are thoughts that some of these dimensions are wrong. Or because I can't quite remember the book may be action made up of several people doing measurements and unless they calibrated their micrometers you can always end up with minor little variations because well you just can always have minor little variations.
 1 point
 -
I usually make only pocket watch staffs, as I have claimed I do not work on modern watches as this is waste of time and eyes, and I consider as modern all that is younger than 80 years. But I have to make exclusions to this rule for friends… I don’t use that much sizes, but yes, this 5 sizes in catalogues are not enough. Actually, I will need two more important sizes to make the staff – will name them C and D on the drawing. And, I will not need to know G, J, K and pivot diameters, as I do this sizes in order to fit the parts, that seat there. Further more, there are some rules, that will determine the pivot shape, like that the pivot length should be about 3X pivot diam, so I shape the pivots more like a sculptor than measure and keep exact drawing sizes. And, I usually use the size E for holding the staff in a special collet when I flip it in order to turn the bottom side, so I always do E 1.8mm for pocket staffs and 1.4 for wrist staffs, as this special collets I have have made with this sizes.
 1 point
 -
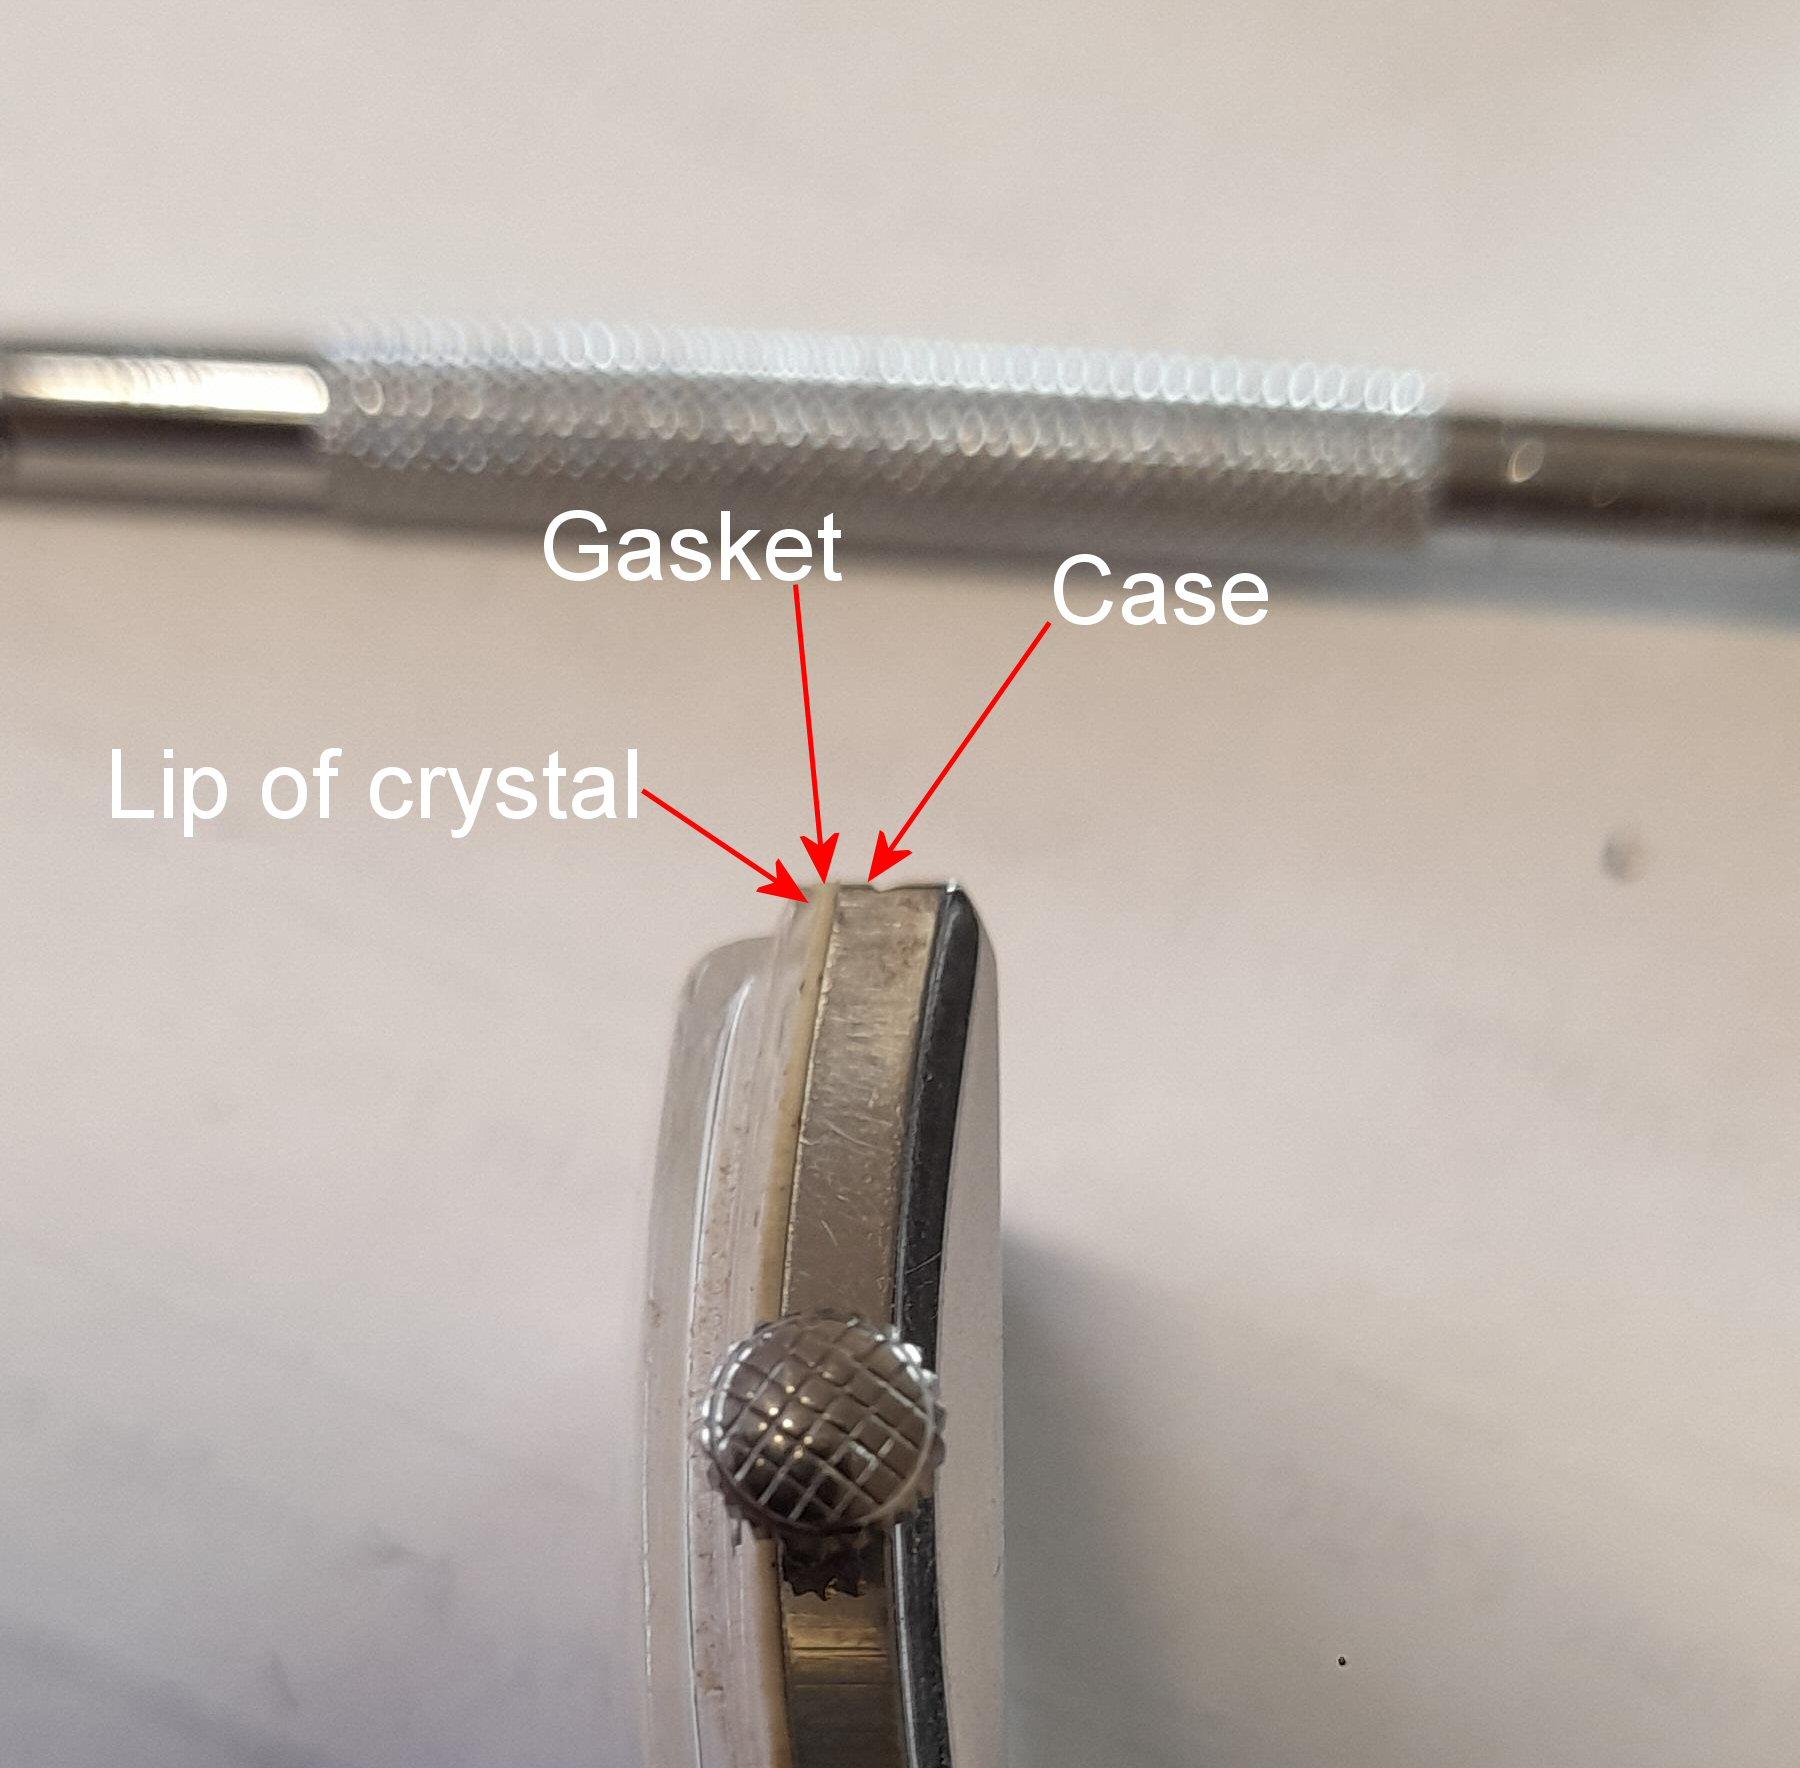
Looks to me like the crystal has a lip which just sits on a gasket, which in turn just sits on the one piece case to form a capsule. The whole lot is then clamped tight into the bezel to seal it by the four grub screws. You've got the capsule out of the bezel ok and I reckon that he crystal, gasket, and case have simply glued themselves together over time. A razor blade gently inserted between the gasket and the case may be all that is needed to get them to separate, but be careful not to damage the gasket. It looks like a two piece stem too so once the crystal is off you will need to either pull the stem apart or try turning the whole thing upside down and slowly rotating the crown until the movement drops out.
 1 point


.thumb.jpg.cb17a66989f1e796fd4217db2e9ca9df.jpg)