Leaderboard


Popular Content
Showing content with the highest reputation on 09/07/20 in all areas
-
is amazing when you grasp what the problem is you can find like this link https://omegaforums.net/threads/tinkering-with-a-dubois-depraz-module.38806/ as were just looking for generic guide we find out which Omega watches have a module. The module should be more or less similar I would suggest of someone's taking a module apart take lots and lots of pictures take too many pictures. So here's the Omega version of one of the modules complete with lubrication 4436_Omega 3220 dubois-depraz-module.pdf2 points
-
I was a bit tired when writing yesterday night and I see it is a bit unclear, a lesson learned, never sleep and write. Yes there are two different versions of what sometimes is called Calibre 12 one vintage and one modern. The vintage (which I assume this adress based on the title) is called Chronomatic Calibre 12 and are using the chronograph module shown above 8510. The lower picture is the lubrication scheme from its Tech manual using as usual just two lubricants, Synth-a-lube (Moebius 9010) and Bergeon KT22 (Grease). This one you can see serviced in three links from @JohnR725 Watch Bloke, Watch Guy and Ranfft and i think described by @nickelsilver The they made a modern version based on the 2892A2 which is using a Dubois-Depraz 2008 Chronograph module. For this one I have no lubrication shematics. This is the link shown to watchbase.com.2 points
-
The screw might come loose if the bearing is bad, the screw mostly is attached on the top of the automatic winding mechanism, not the barrel arbor . The screw head is tightened onto the inner ring of the bearing which allows the oscillator to rotate the outer part of the bearing which is attached to the oscillator weight. If the balls inside the bearing isn't moving then the inner part of the bearing might move too and slow but sure loosen your screw. If you used the wrong screw, slightly to wide it will case the same effect.2 points
-
Hello everyone! My name is Benjamin Marn, I am a 20 year old college student who has been interested in horology for about 4 years now. I have since aspired to be an independent watchmaker, most likely as a hobby or a side gig but possibly as a full time career, assuming people appreciate the watches I would design and build. More immediately, I have been planning to make my own bespoke, finely finished watchmakers tools, everything from tweezers to mainspring winders, to jeweling and staking tools, as I am fortunate enough to have access to a 1934 South Bend lathe, a 40's LeBlond lathe, a surface grinder, and a Bridgeport mill. Eventually I would like to build my own watchmakers lathe in the style of a Bergeon 50, from my own iron castings (I also have access to a furnace that is hot enough to melt iron), and after that, perhaps even a rose engine.Hopefully, I will build up a collection of tools that exceeds the quality of brands like Horotec and Bergeon at a price of only the raw materials and the time taken in the machine shop, which I enjoy anyway. In the meantime, I have slowly begun to build up my library of books, starting of course with the great George Daniels' Watchmaking, but I am always looking for more books, especially on the theory behind horology and movement design, as right now one of my biggest struggles is grasping the concepts behind gear trains, tooth counts, mathematical ideas, etc etc. I am also a bit of a visual learner, and another thing I struggle with is visualizing the complex diagrams and explanations of the complications in Daniels' book. Perhaps that's why I like Mark's channel so much, I can see things like keyless works in action.1 point
-
Her is what I see obviously is missing. All from the alarm function. 7294 - Alarm setting connection wheel 7292 - Alarm intermediate unlocking wheel 7305 - Coupling yoke for alarm setting Maybe someone else can spot some more.1 point
-
The tech sheet for this movement isn't very good but maybe with some imagination one could find out the missing part. JLC 815.pdf1 point
-
As mentioned, if the threads seem sound, a tiny drop of purple would be fine. Apply with an Oiler to avoid fouling the bearing. It also is dissolved by acetone, but can also be released with the tip of a soldering iron on the screw, thought it usually isn’t necessary. Intetesting that Tudor not only used thread locker, but that they used too much!1 point
-
Welcome! Great to see the enthusiasm to take on making all your tools!1 point
-
The base movement was a Buren/Hamilton, and the rest was a mix of Hamilton, Breitling, Heuer, and Dubois Depraz doing the module. There's a good write up on the history at Hodinkee https://www.hodinkee.com/articles/chronomatic-heuer-breitling-hamilton-50th-anniversary Interestingly in some service literature I've seen they recommend cleaning the module assembled. Since these are all 40 something years old it's best to ignore that and disassemble for cleaning. There are a couple of thin springs in the winding system that really like to disappear. The rotor assembly is not meant to be taken apart, and it's tricky getting oil in to the axle but very important. The click for the auto reversers has a long fragile spring that needs to be carefully managed. Overall it's down on my list of movements I like; I think it was a case of "too many cooks"- but they do work well.1 point
-
I have a confusion found some links below no lubrication guides no service manuals and one of them appears to be different than the rest? As far as lubrication goes just find a modern chronograph and follow those suggestions. https://thewatchbloke.co.uk/2018/09/22/heuer-calibre-12/ https://watchbase.com/tag-heuer/caliber/calibre-12 https://watchguy.co.uk/repair-heuer-autavia-buren-12/ http://www.ranfft.de/cgi-bin/bidfun-db.cgi?10&ranfft&0&2uswk&Heuer_121 point
-
Hello and welcome to the forum Benjamin , A young man on a mission. You have the tools now aquire the knowledge, I wish you well on you quest and for the future.1 point
-
Hello Benjamin. Many thanks for your thoughtful introduction. I wish you the best of luck!1 point
-
Welcome to the forum. I must say, you have an envious bit of access to tools that could render other tools. And of course, I admire your plans to put them toward furthering your passion for horology. Glad to have you join us.1 point
-
what I find interesting about the subject is I was once in a room with 12 people that were supposed to know what they were doing and a instructor. You want to take a guess at how many variations of how to lubricate the escapement there were? how can we have a can of worms it's only in escapement how complicated could it be to lubricate that? the unfortunate reality can be depending upon how opinionated everyone is worst-case every single time we discussed anything related to lubrication we open up a dozen or more cans of worms. But there's a solution is a video found at the link below with the interesting title of "The Watch Escapement & Oiling Procedures". The title procedures is interesting oiling procedures is that mean there's more than one that would be acceptable how strange? I think you'll find the video really really good and yes he really does cover the lubrication you just have to watch the video. https://youtu.be/Gy0o0KKBqeQ1 point
-
good show, welcome to the best watch forum. vin1 point
-
Welcome to the forum.1 point
-
Welcome to this forum. It's nice to see a young person so passionate about horology. Wishing you all the best in all your endeavors.1 point
-
Advice might turn irrelevent when we don't know the caliber. If rotor and its module (attached) can be taken out together, I use epoxy 5 as I konw it will disolve in acetone so leaves unscrewing again possible, otherwise put the glue on screwhead so it be reachable and scraped off again.1 point
-
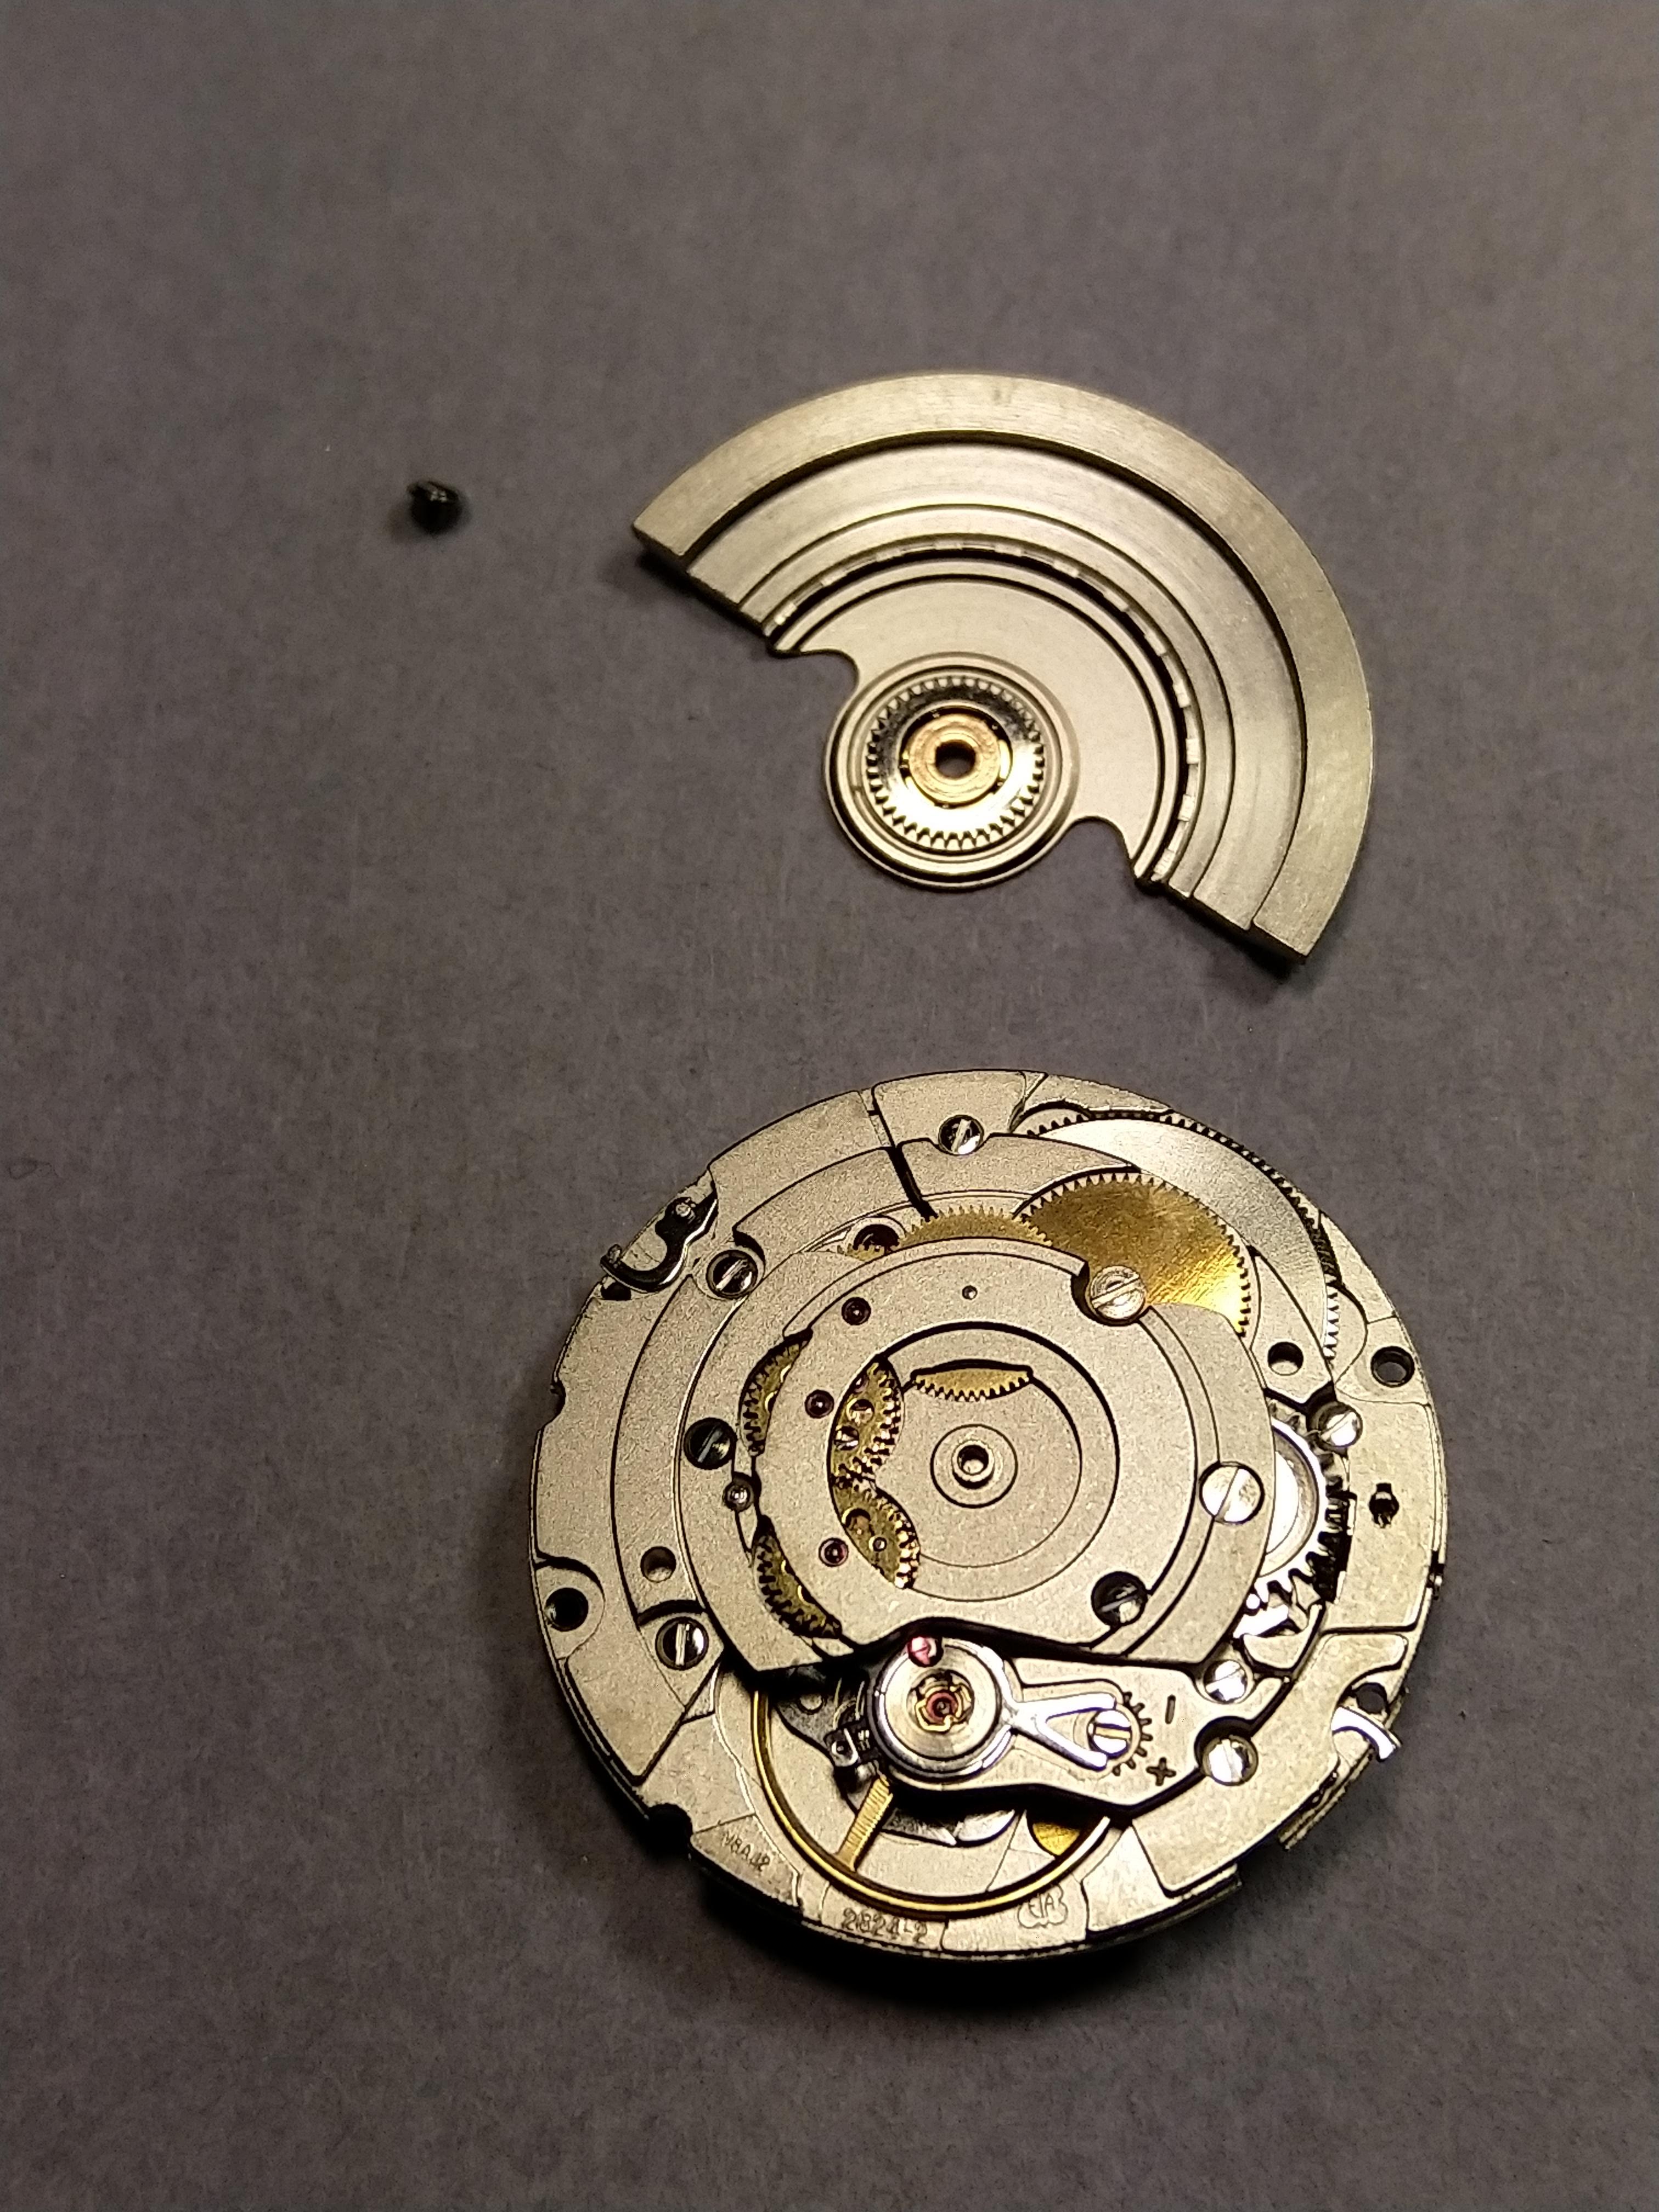
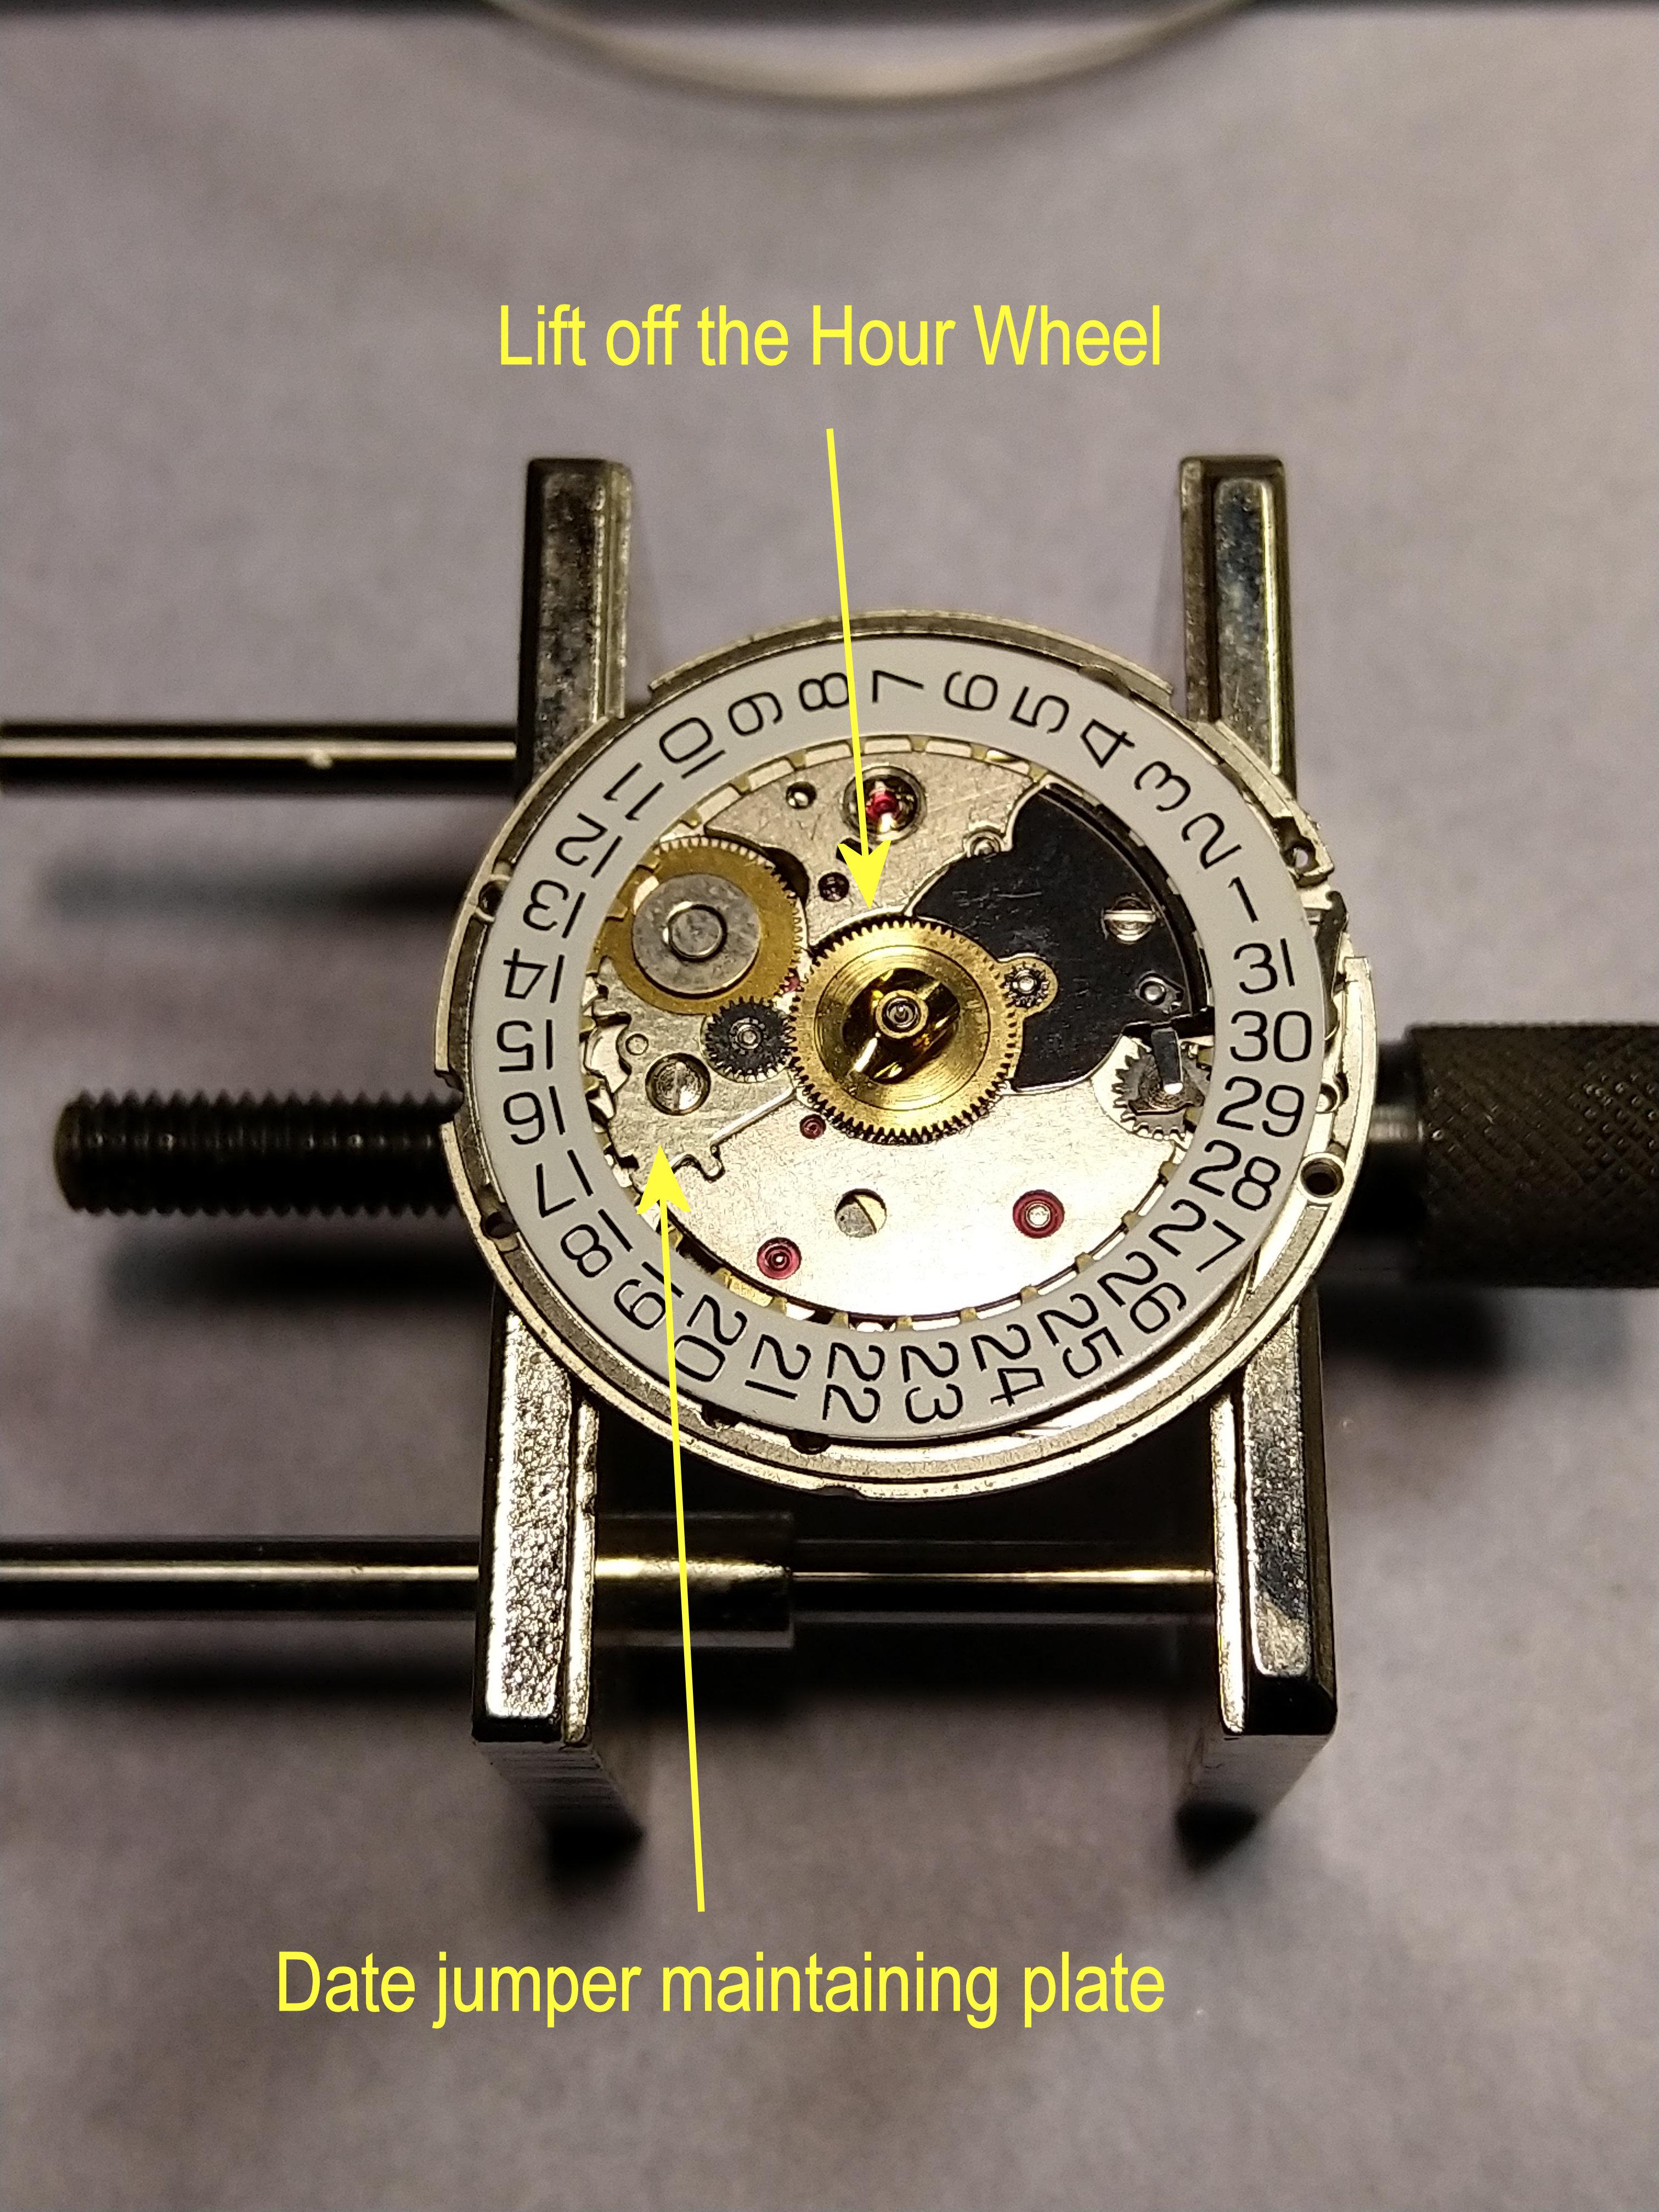
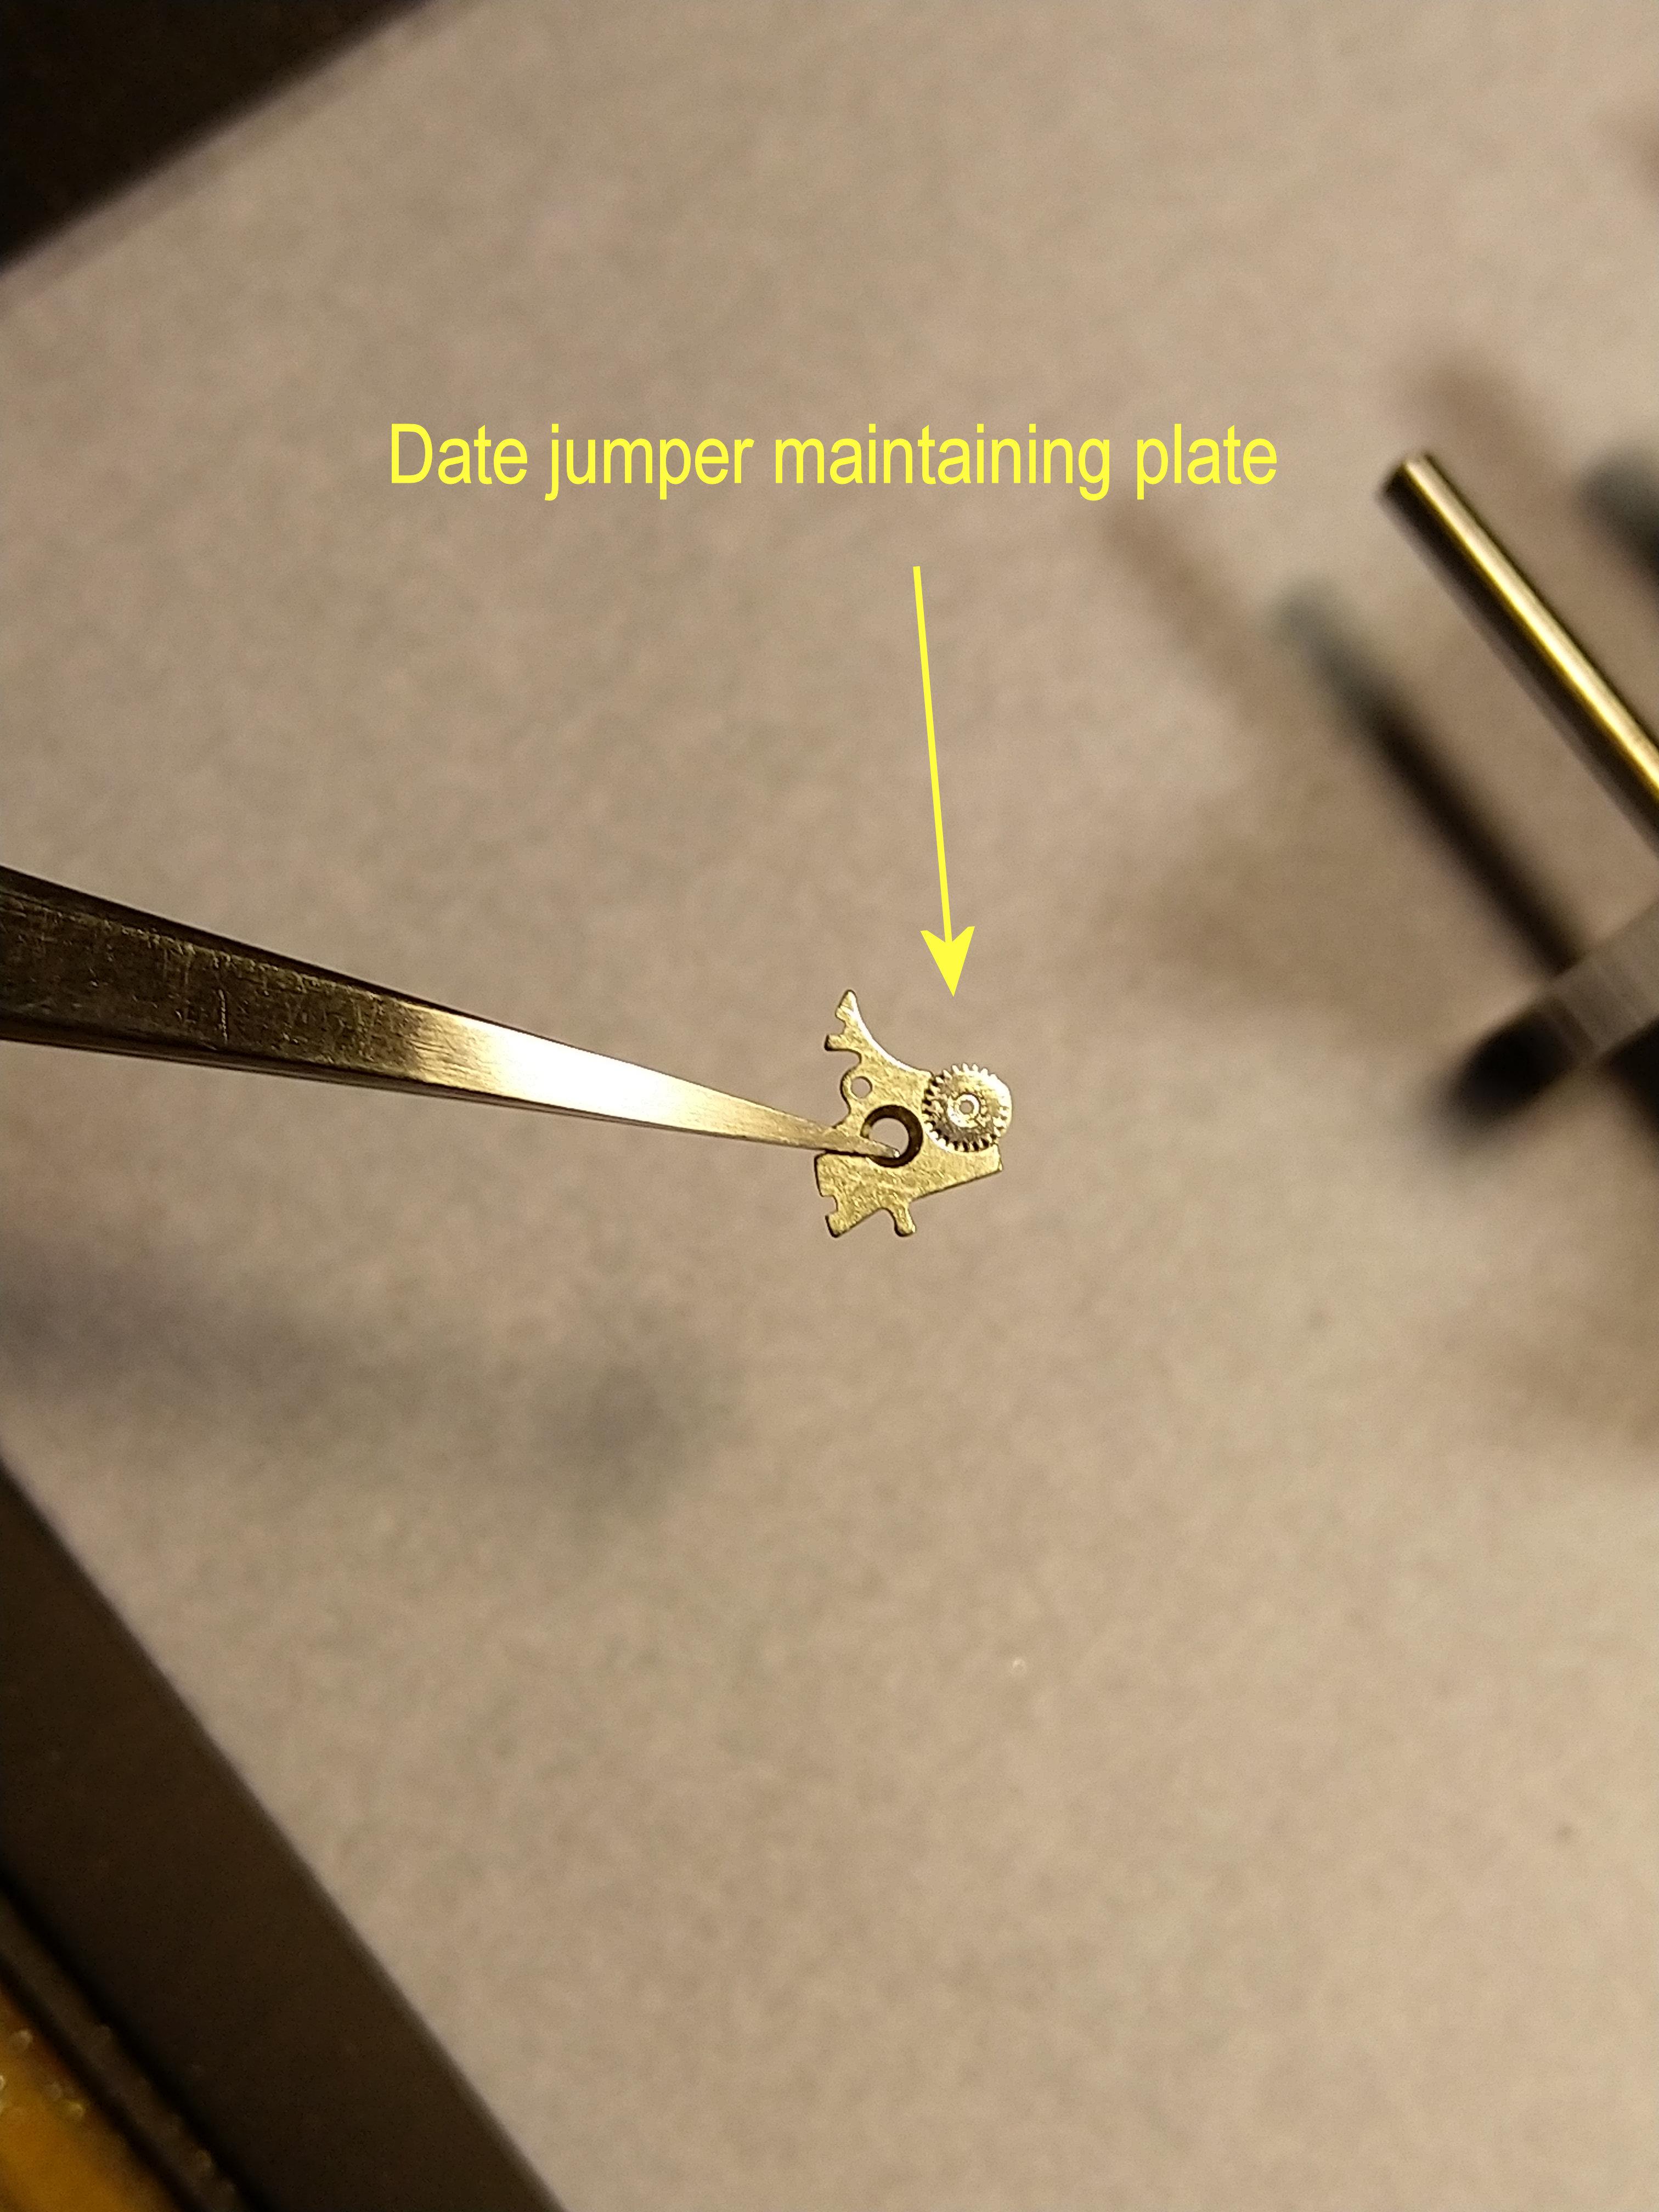
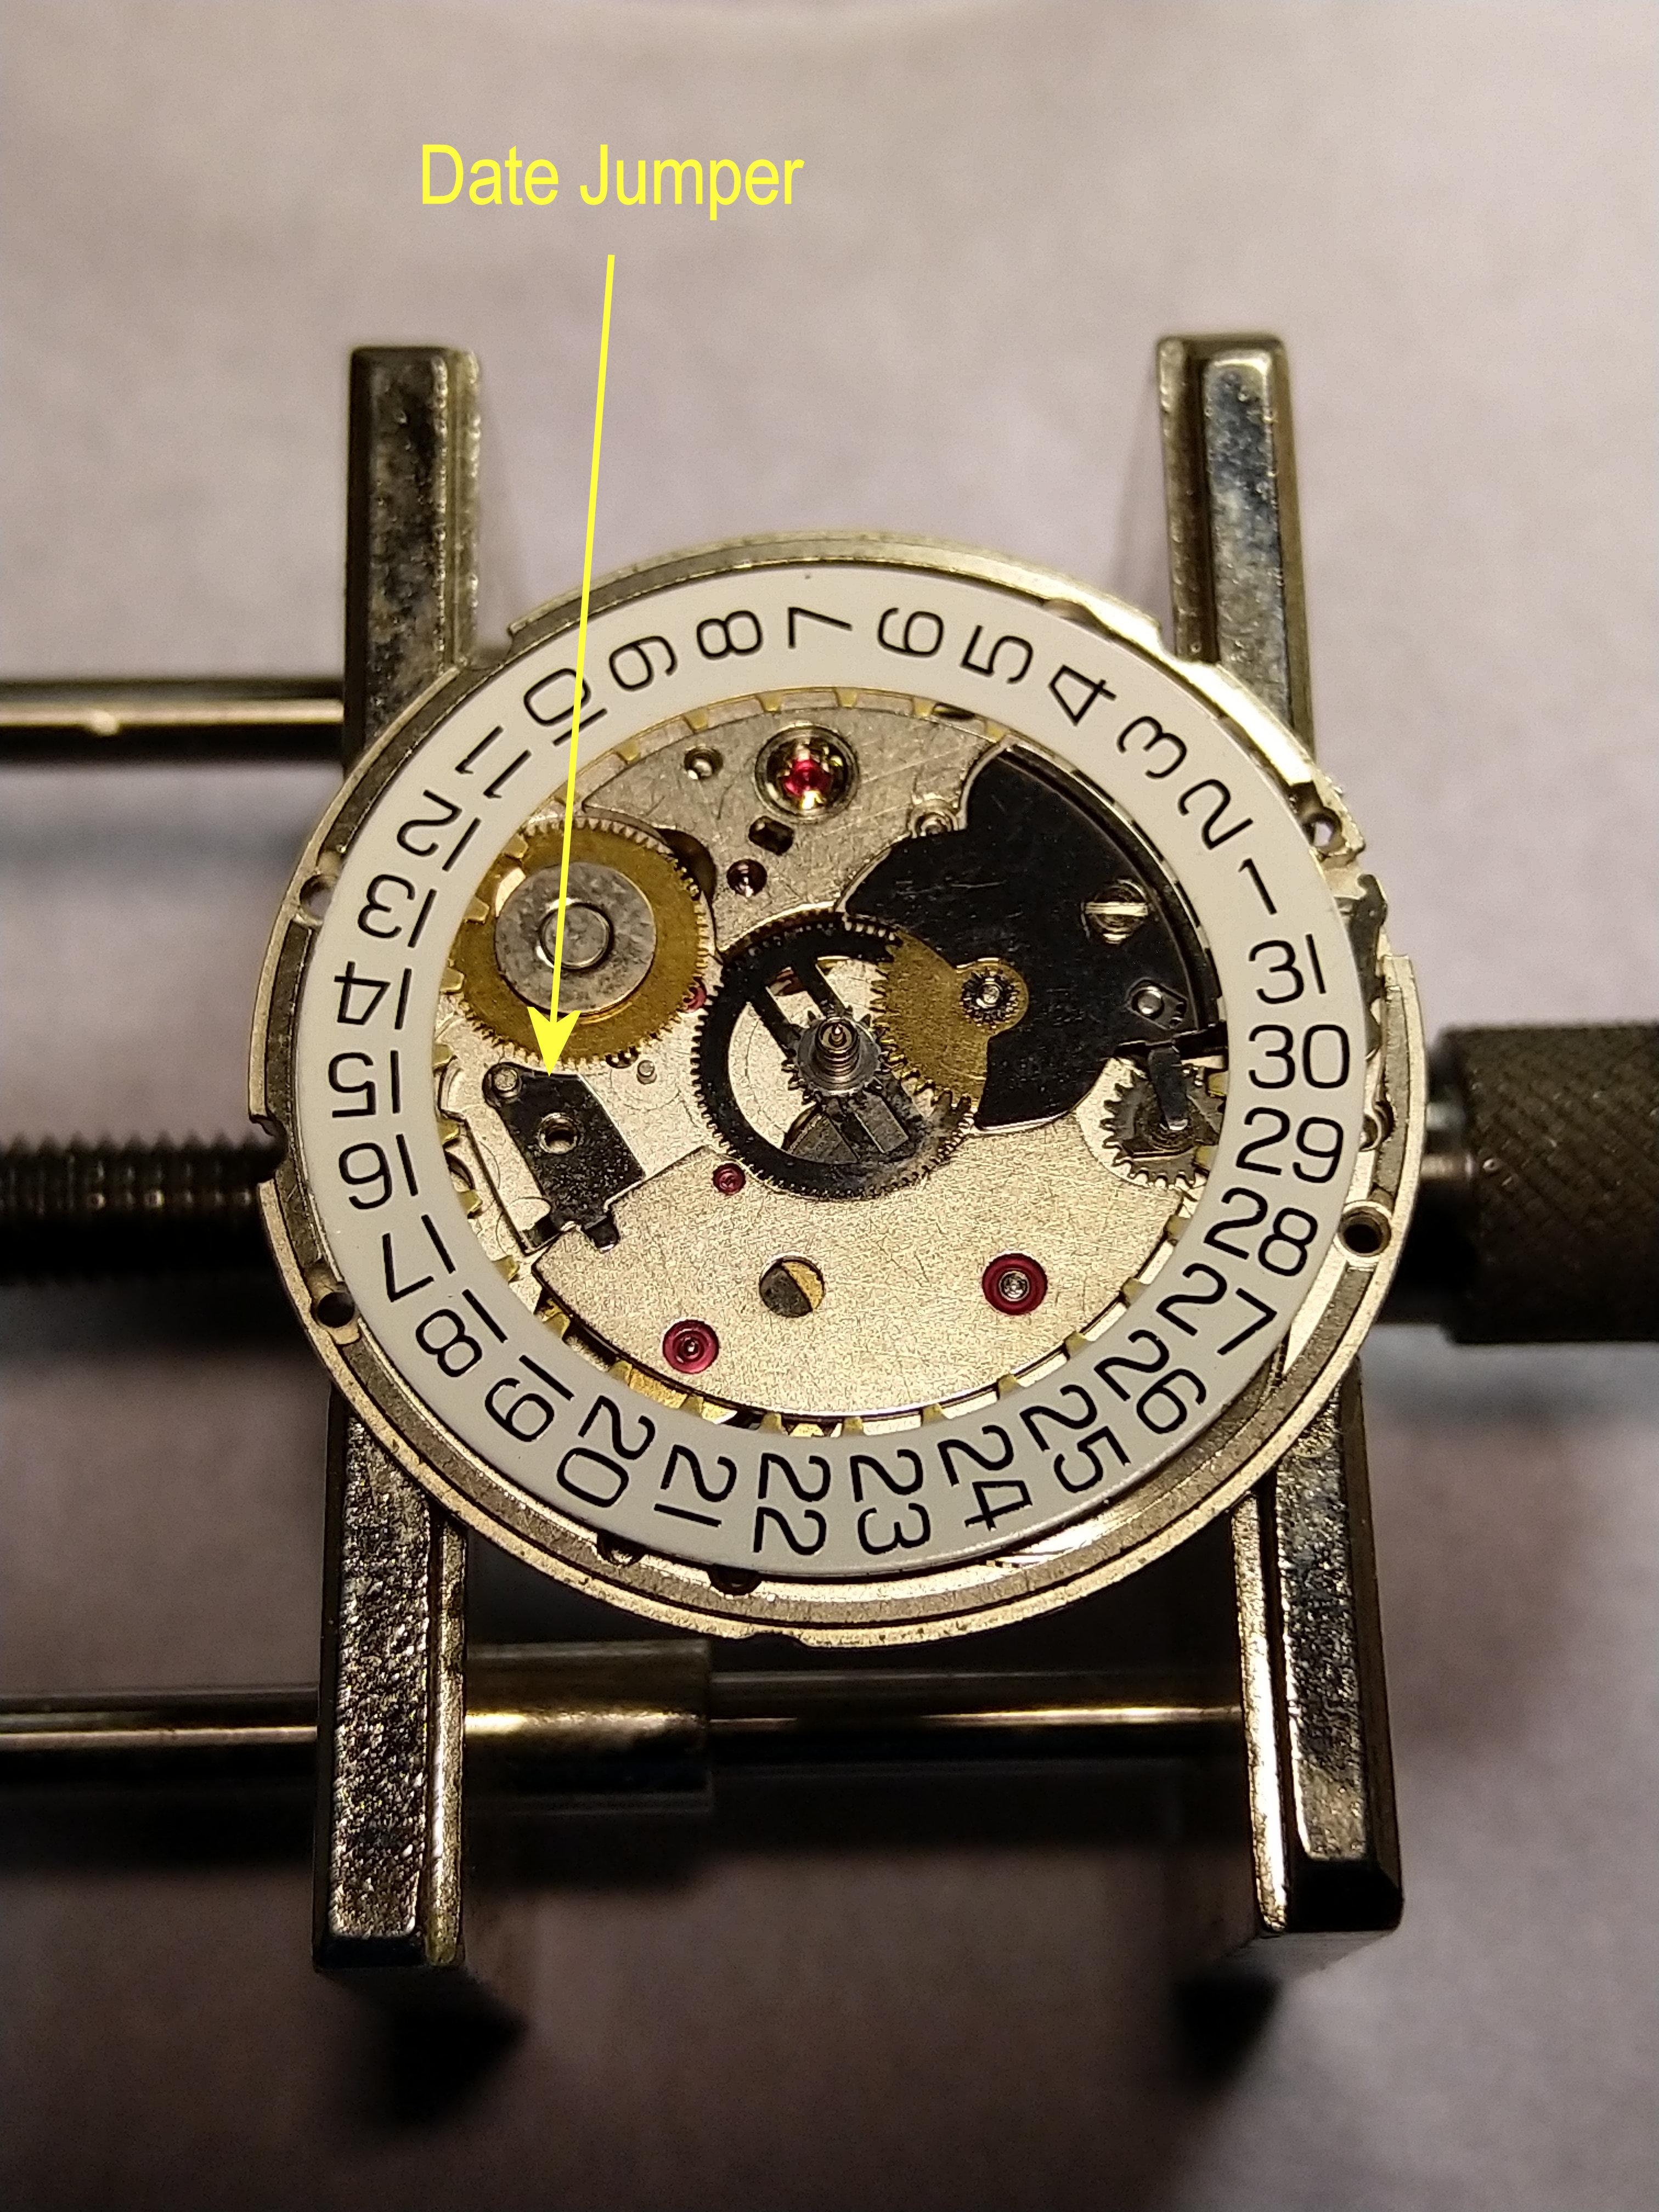
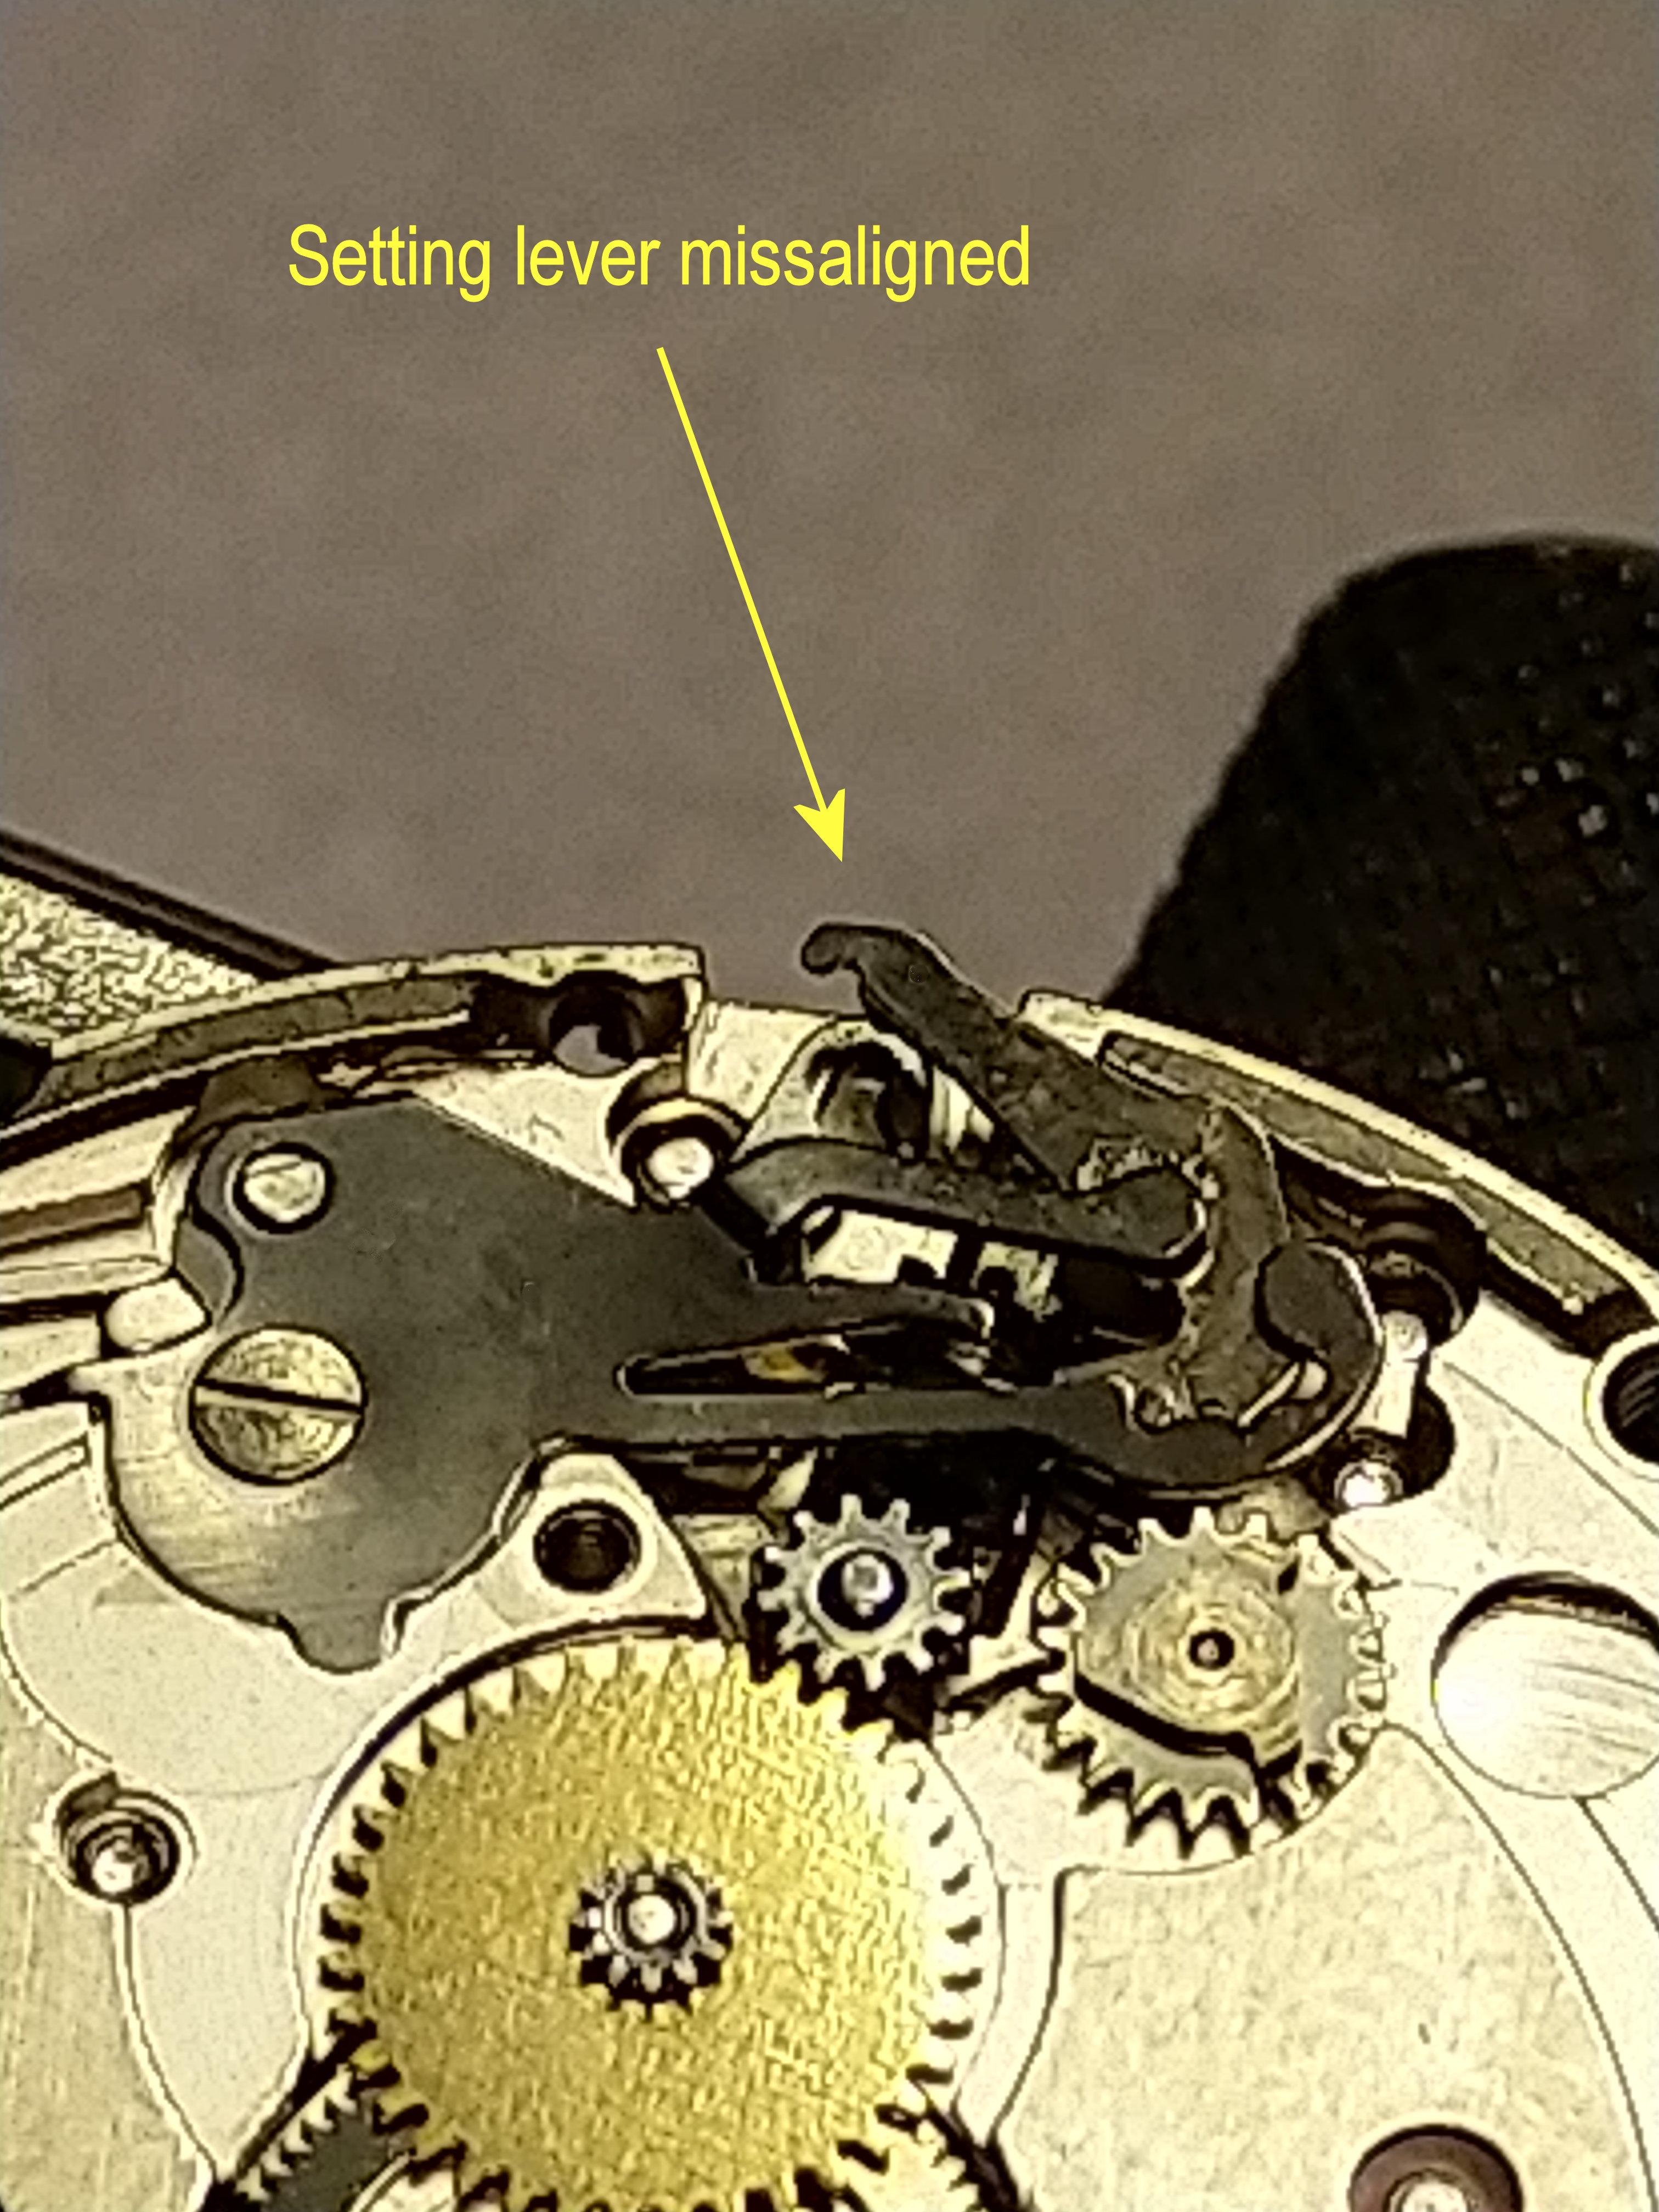
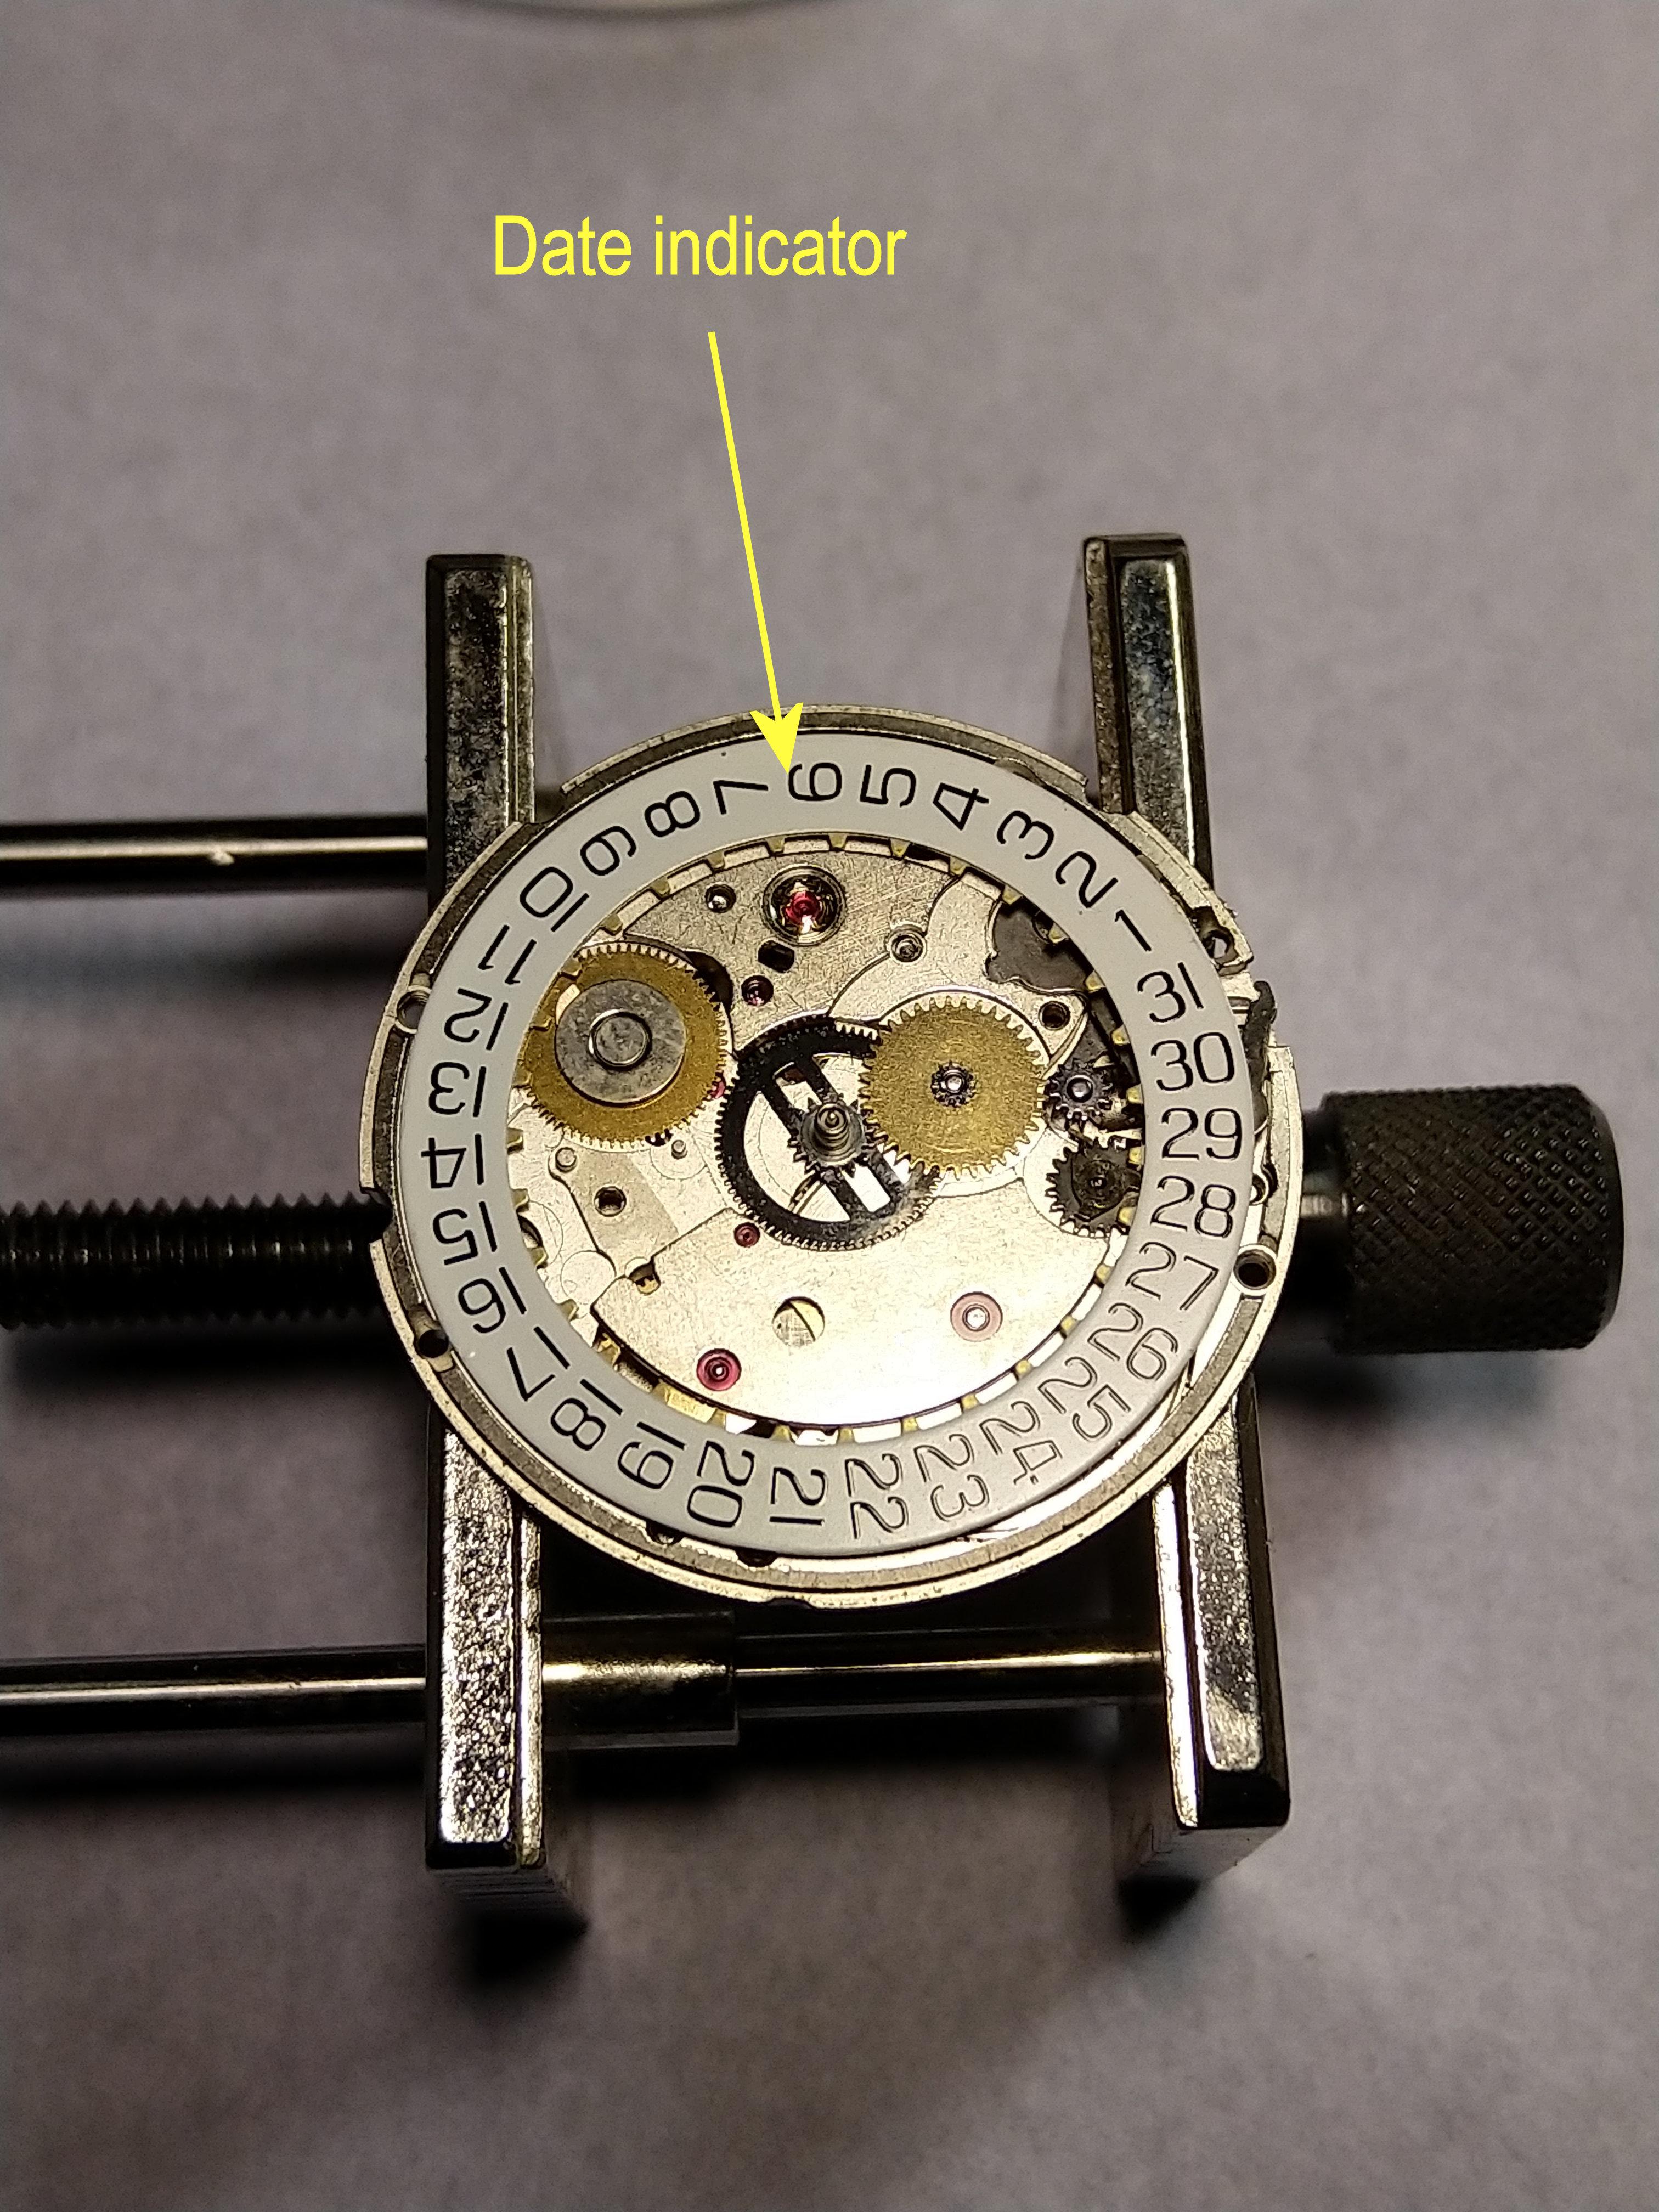
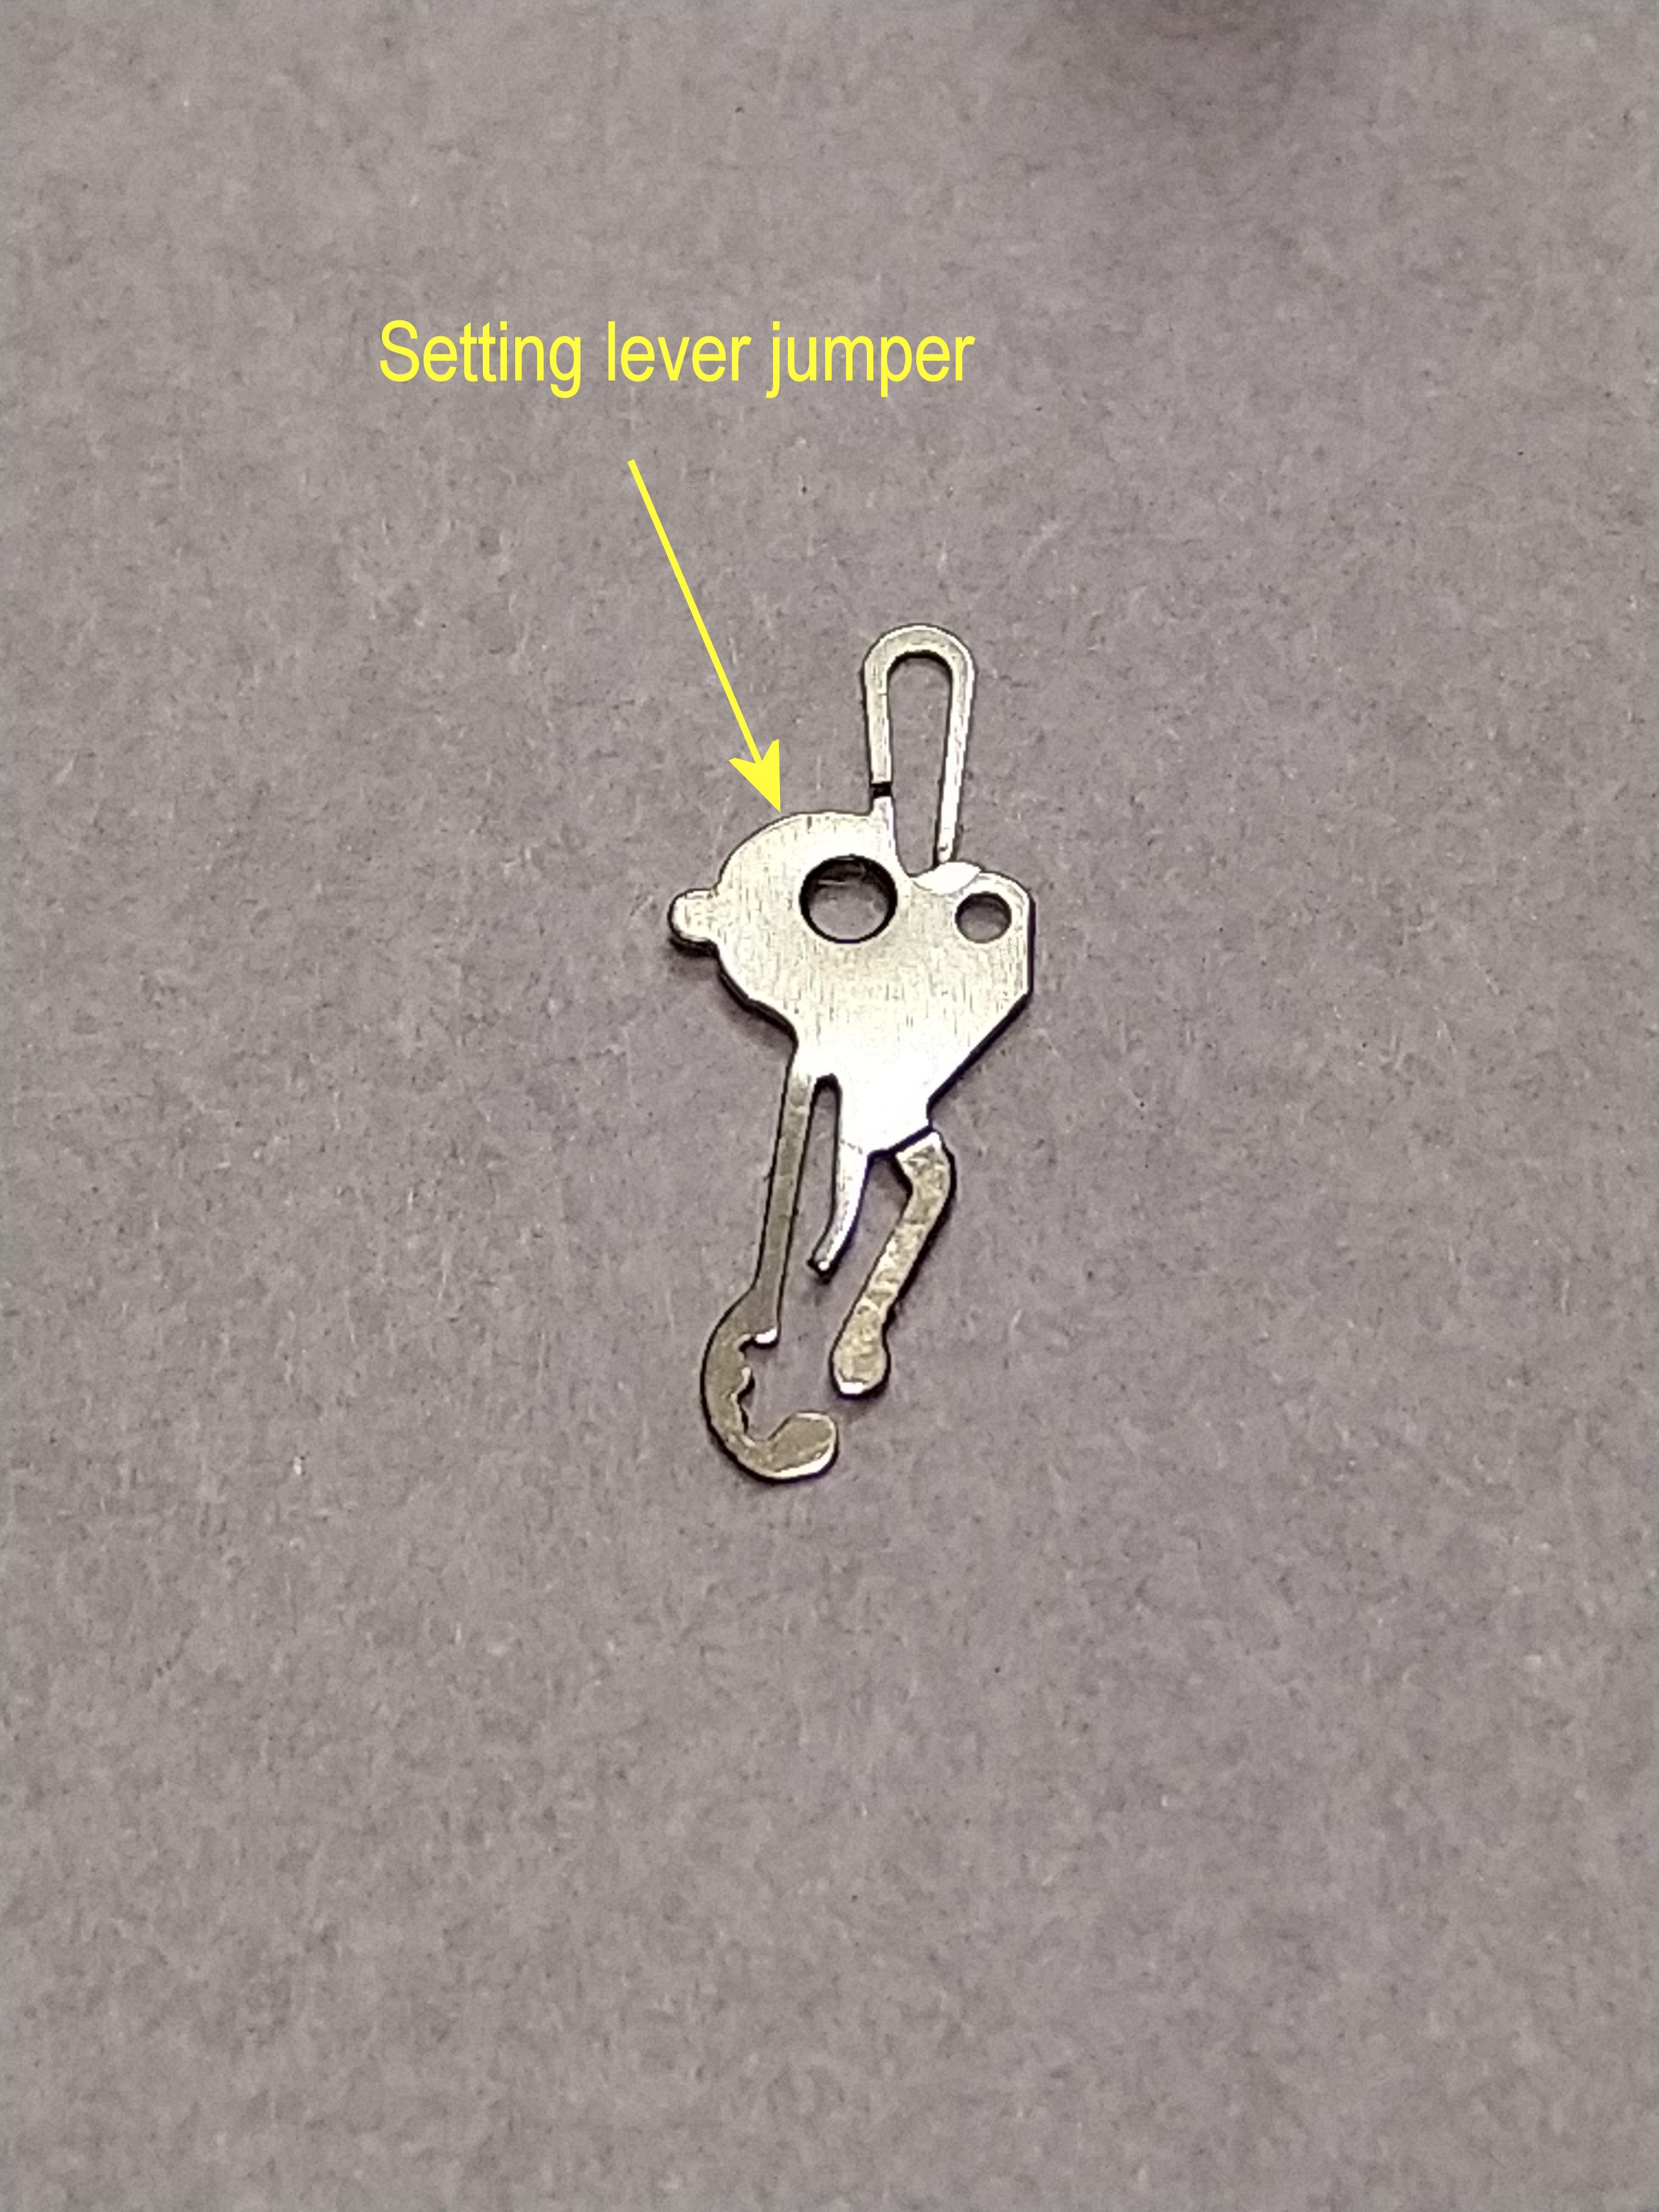
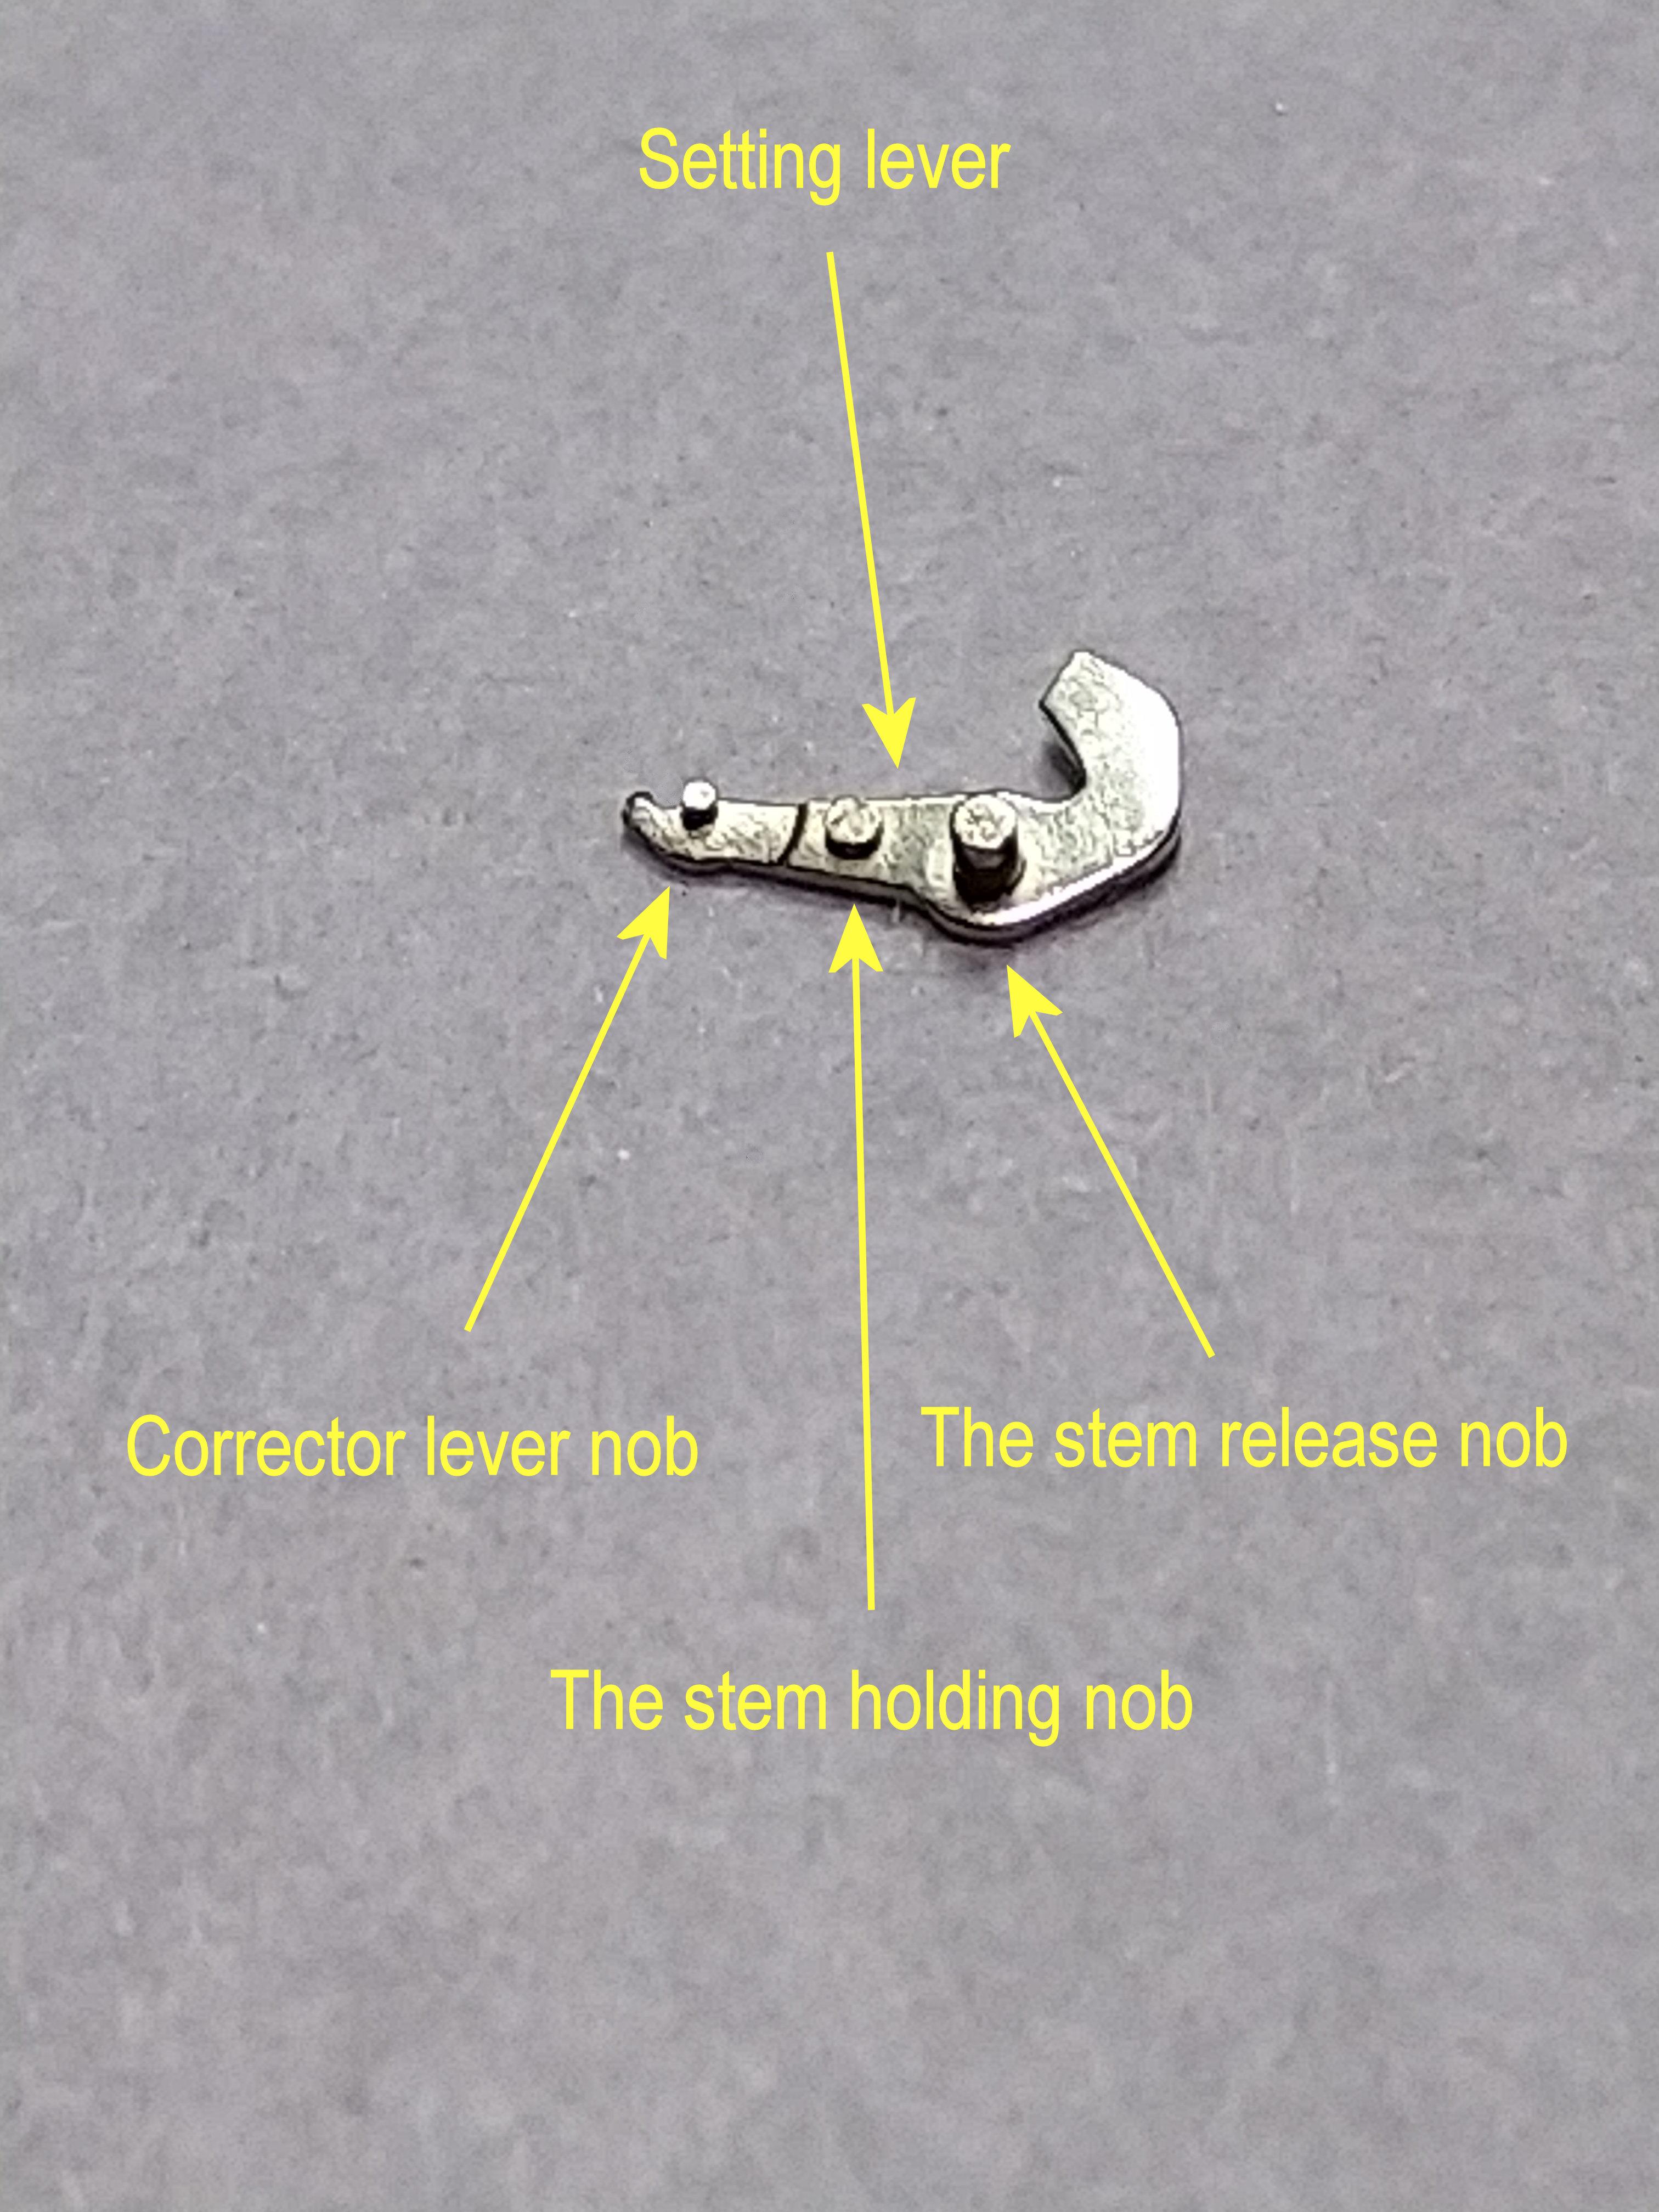
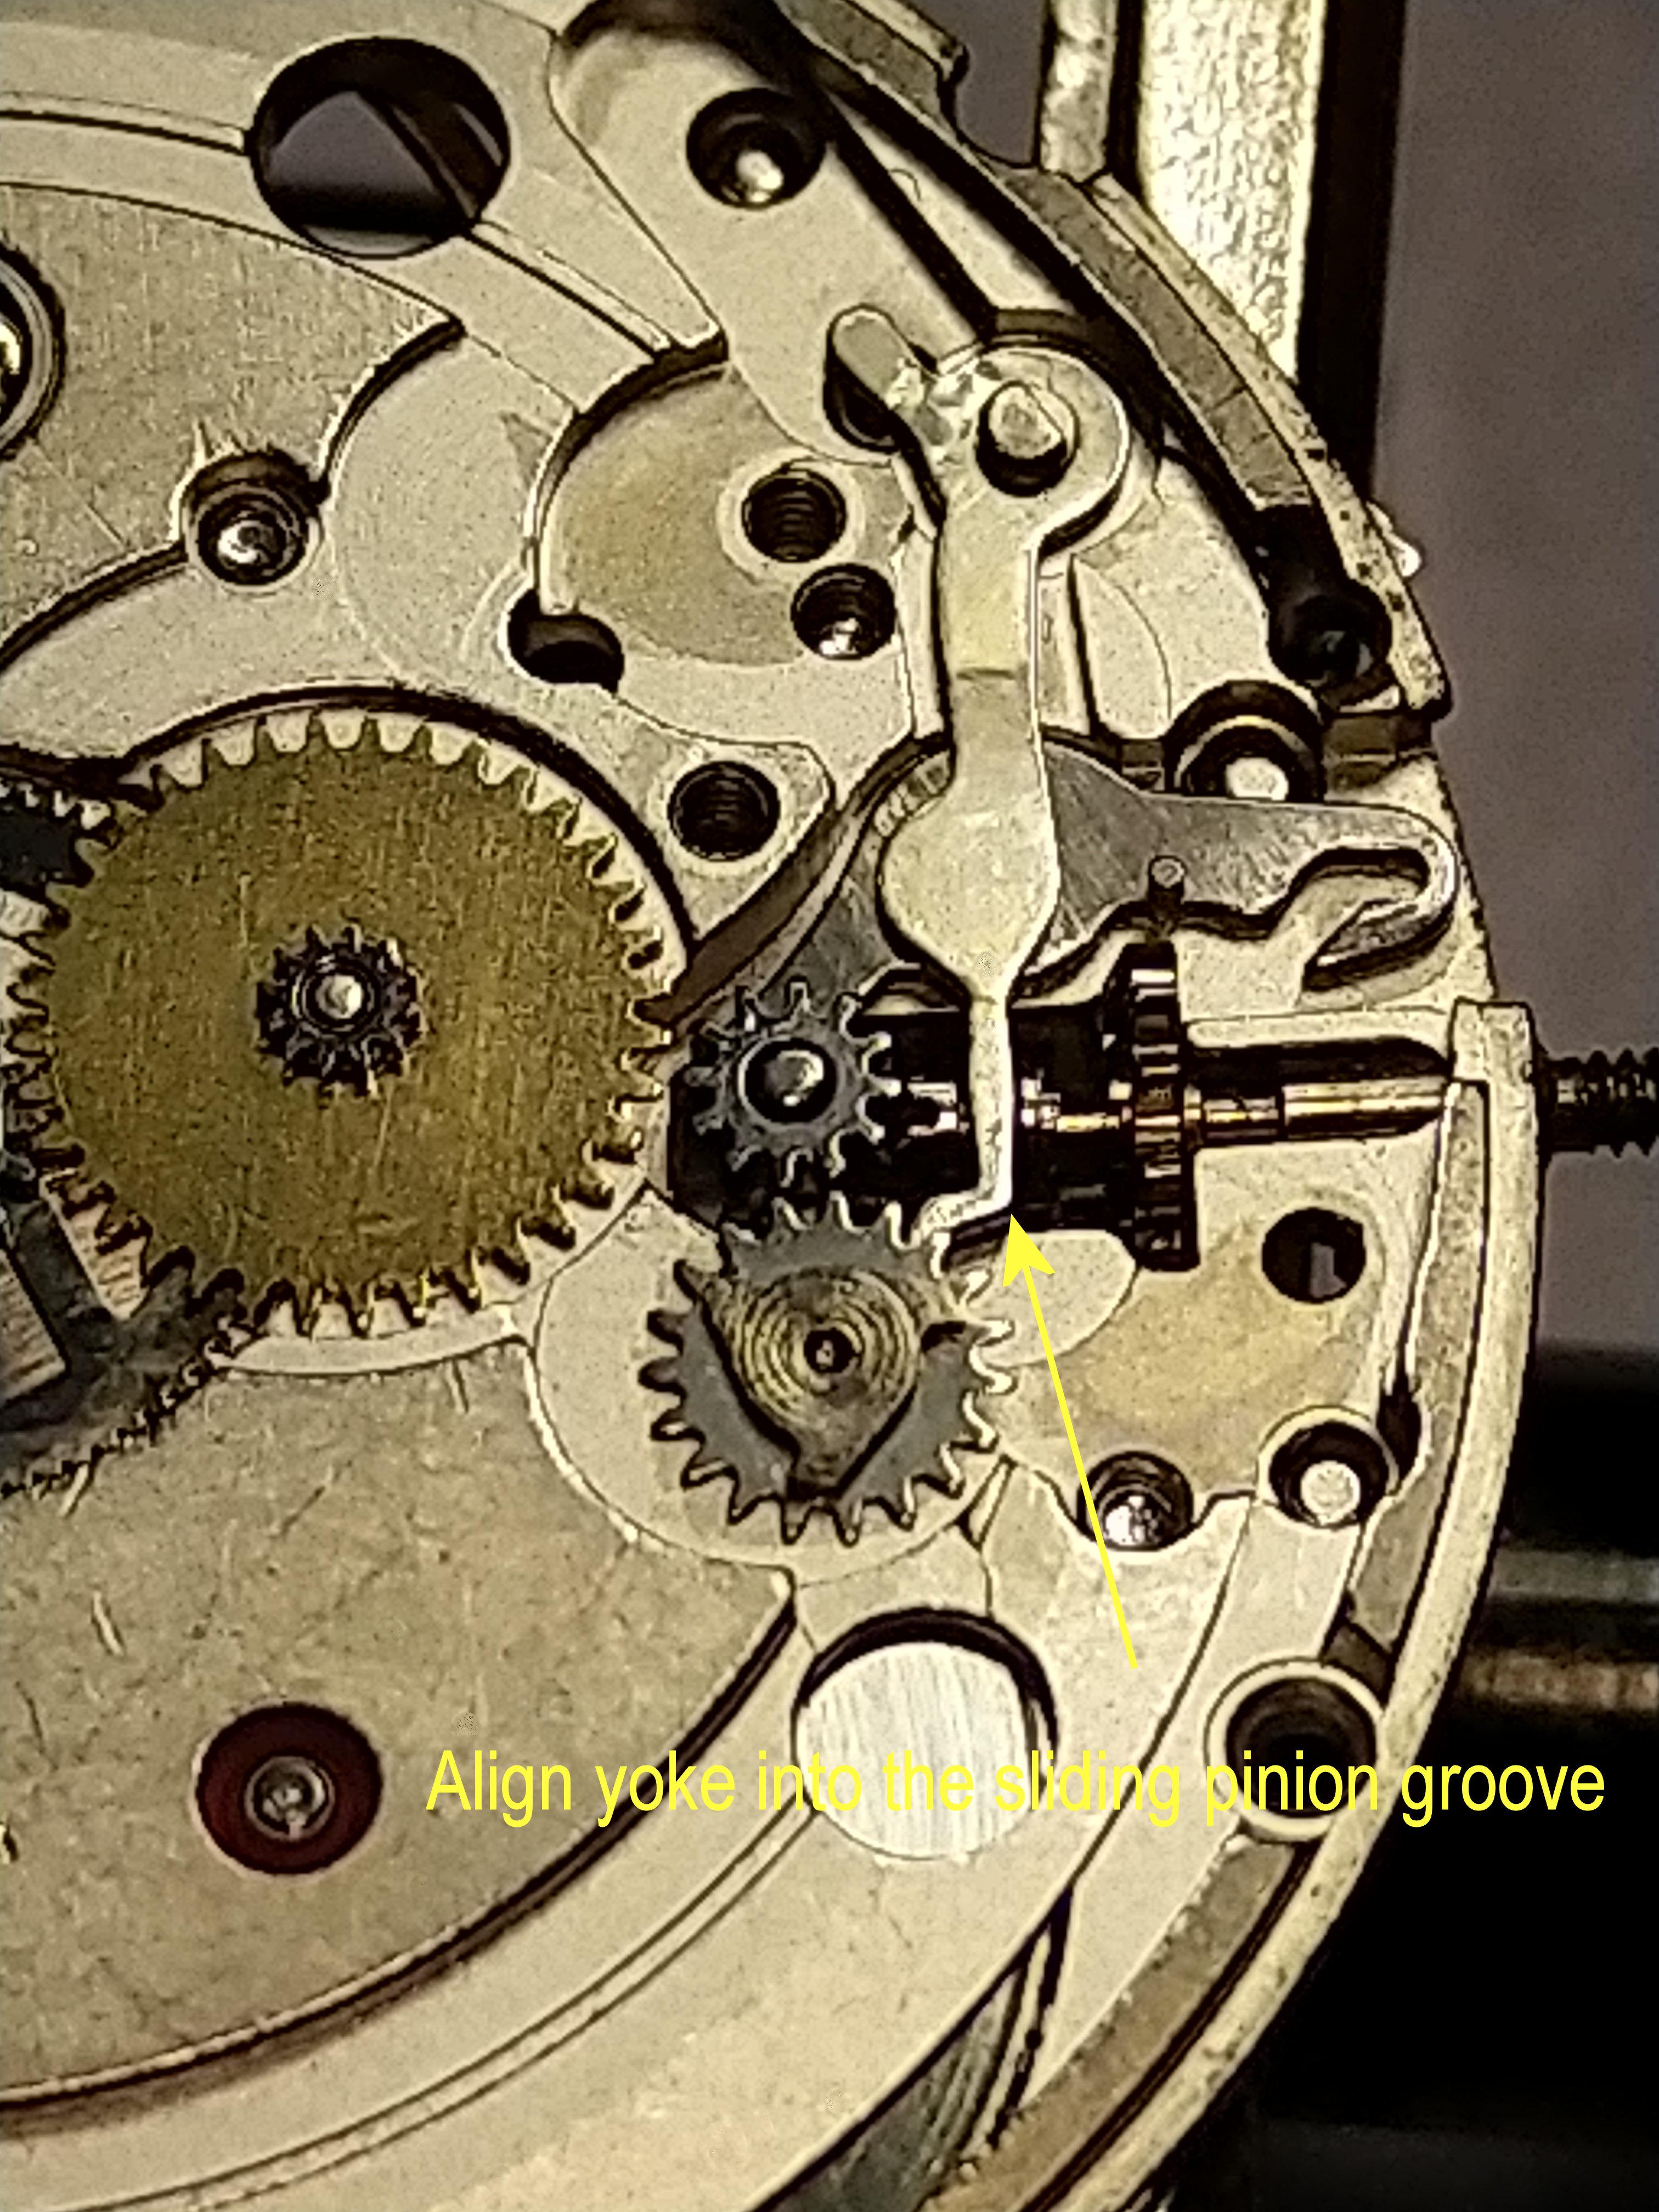
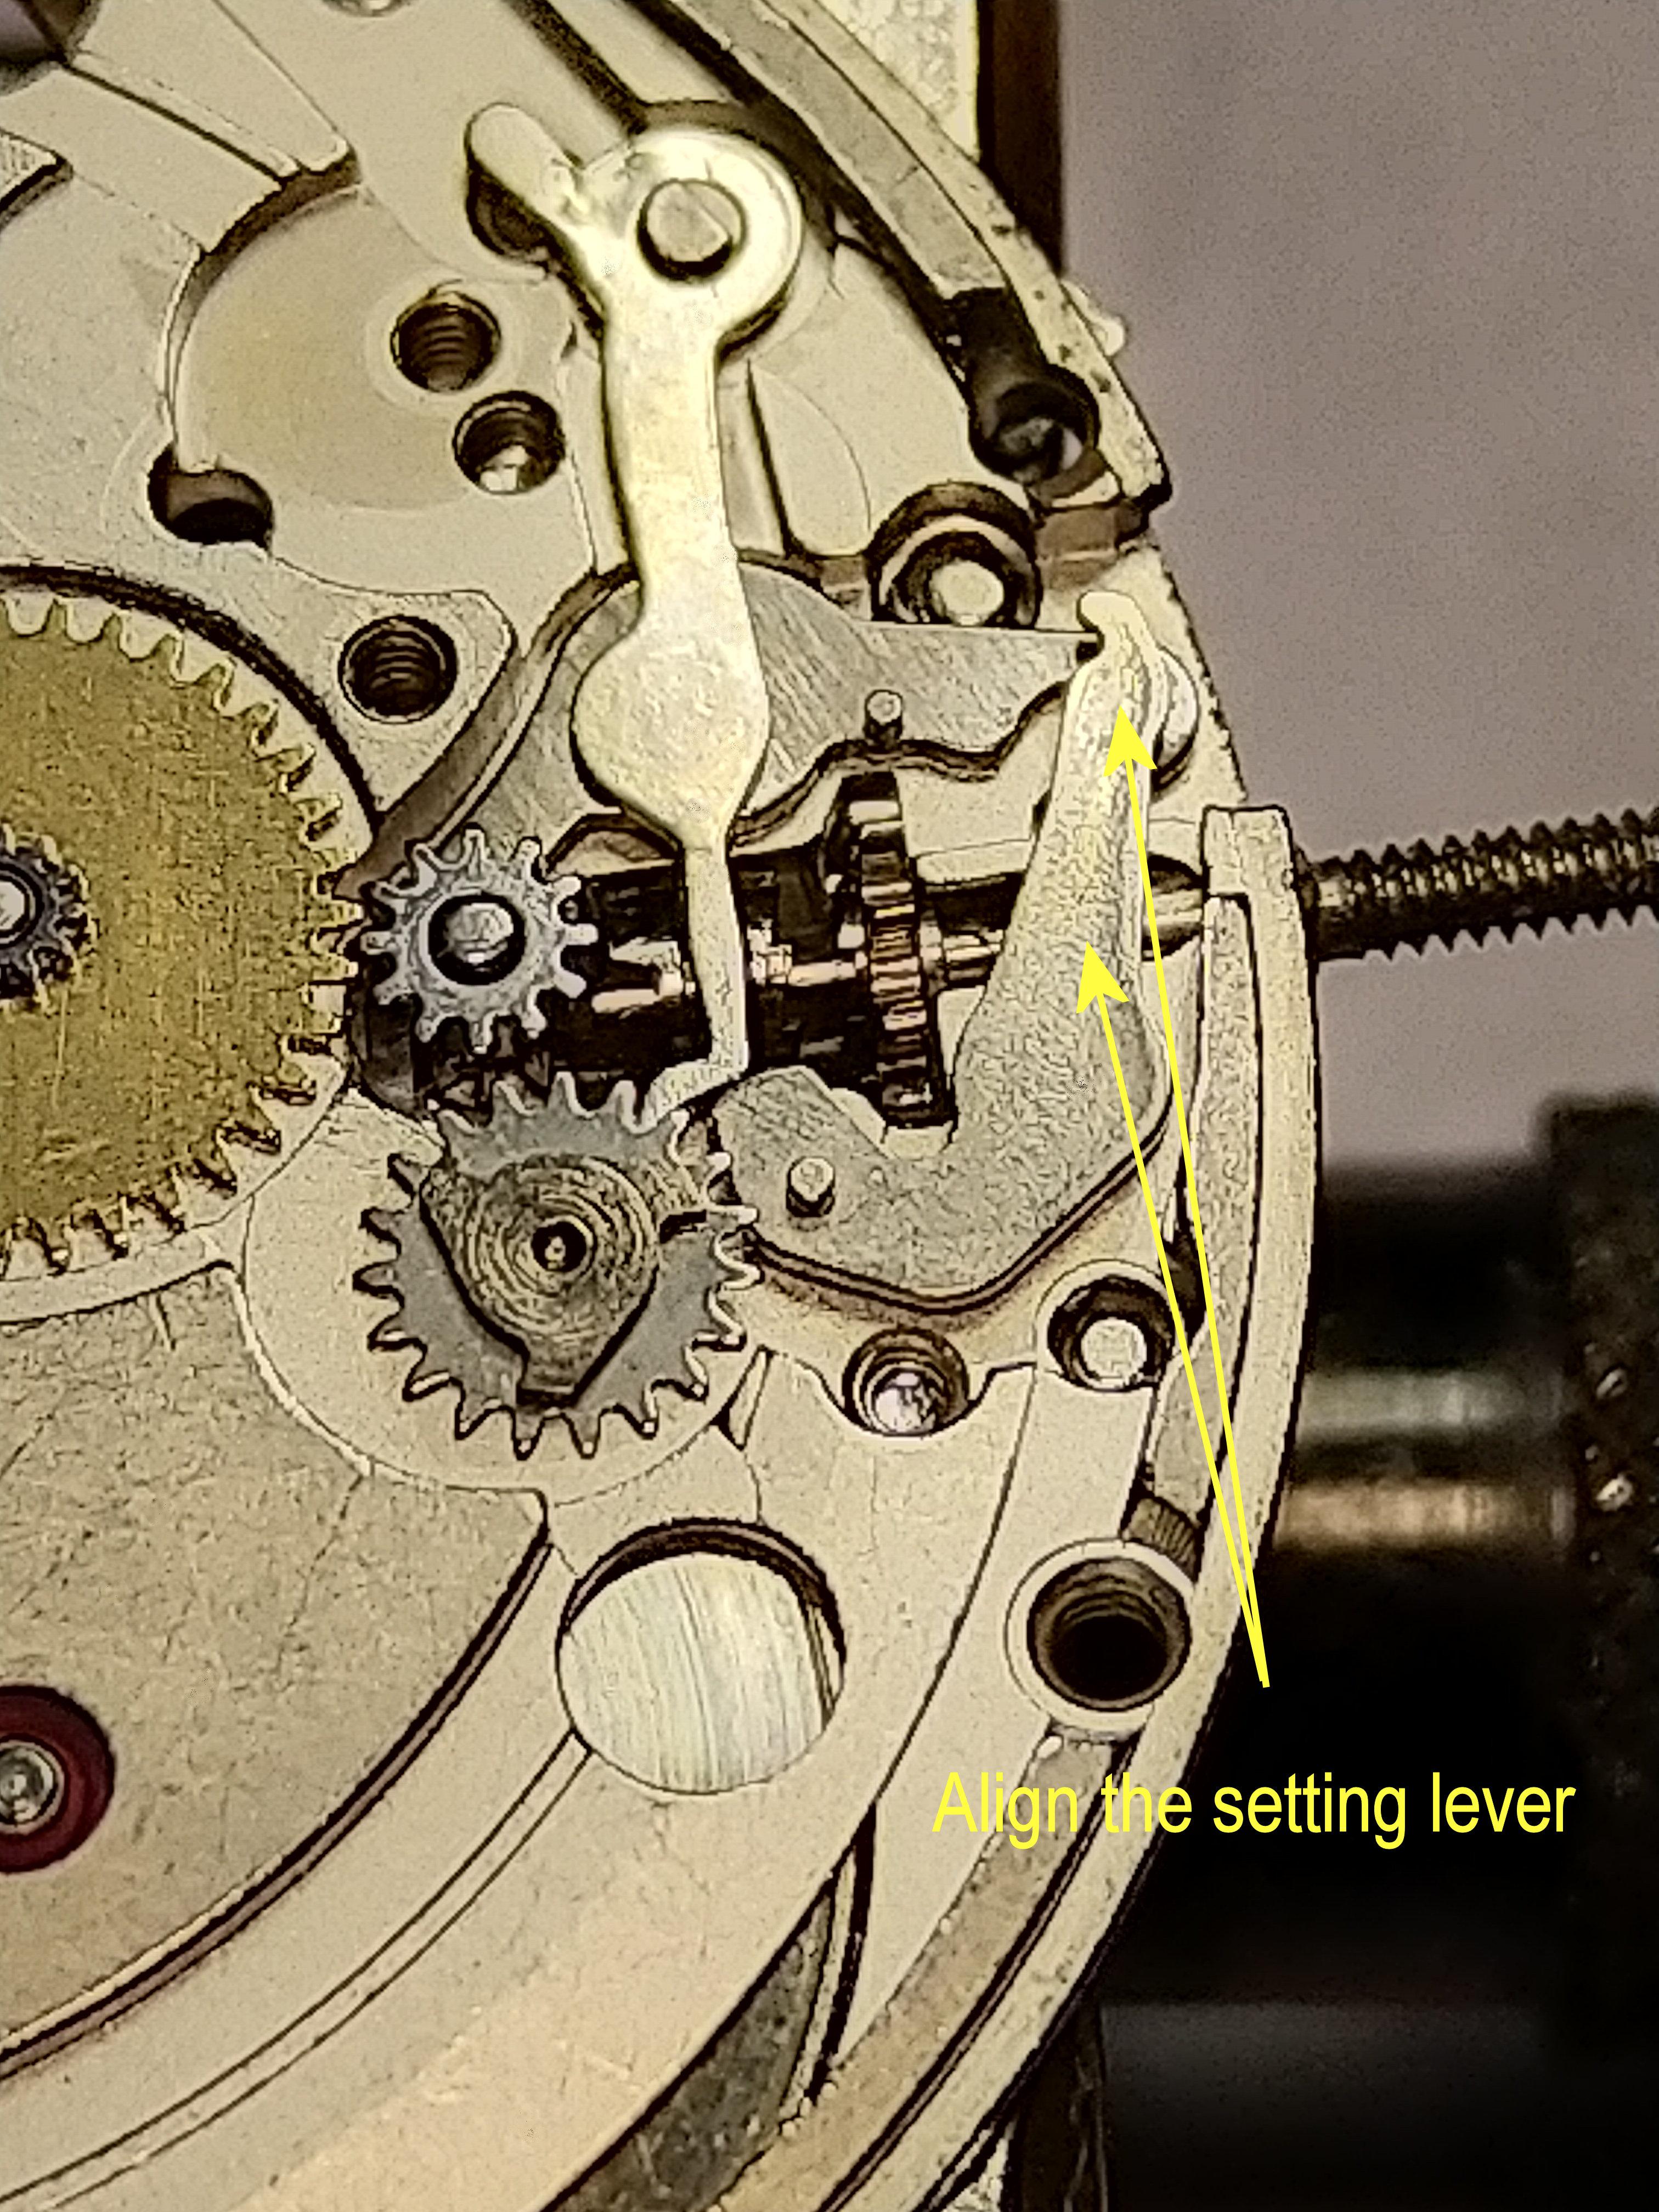
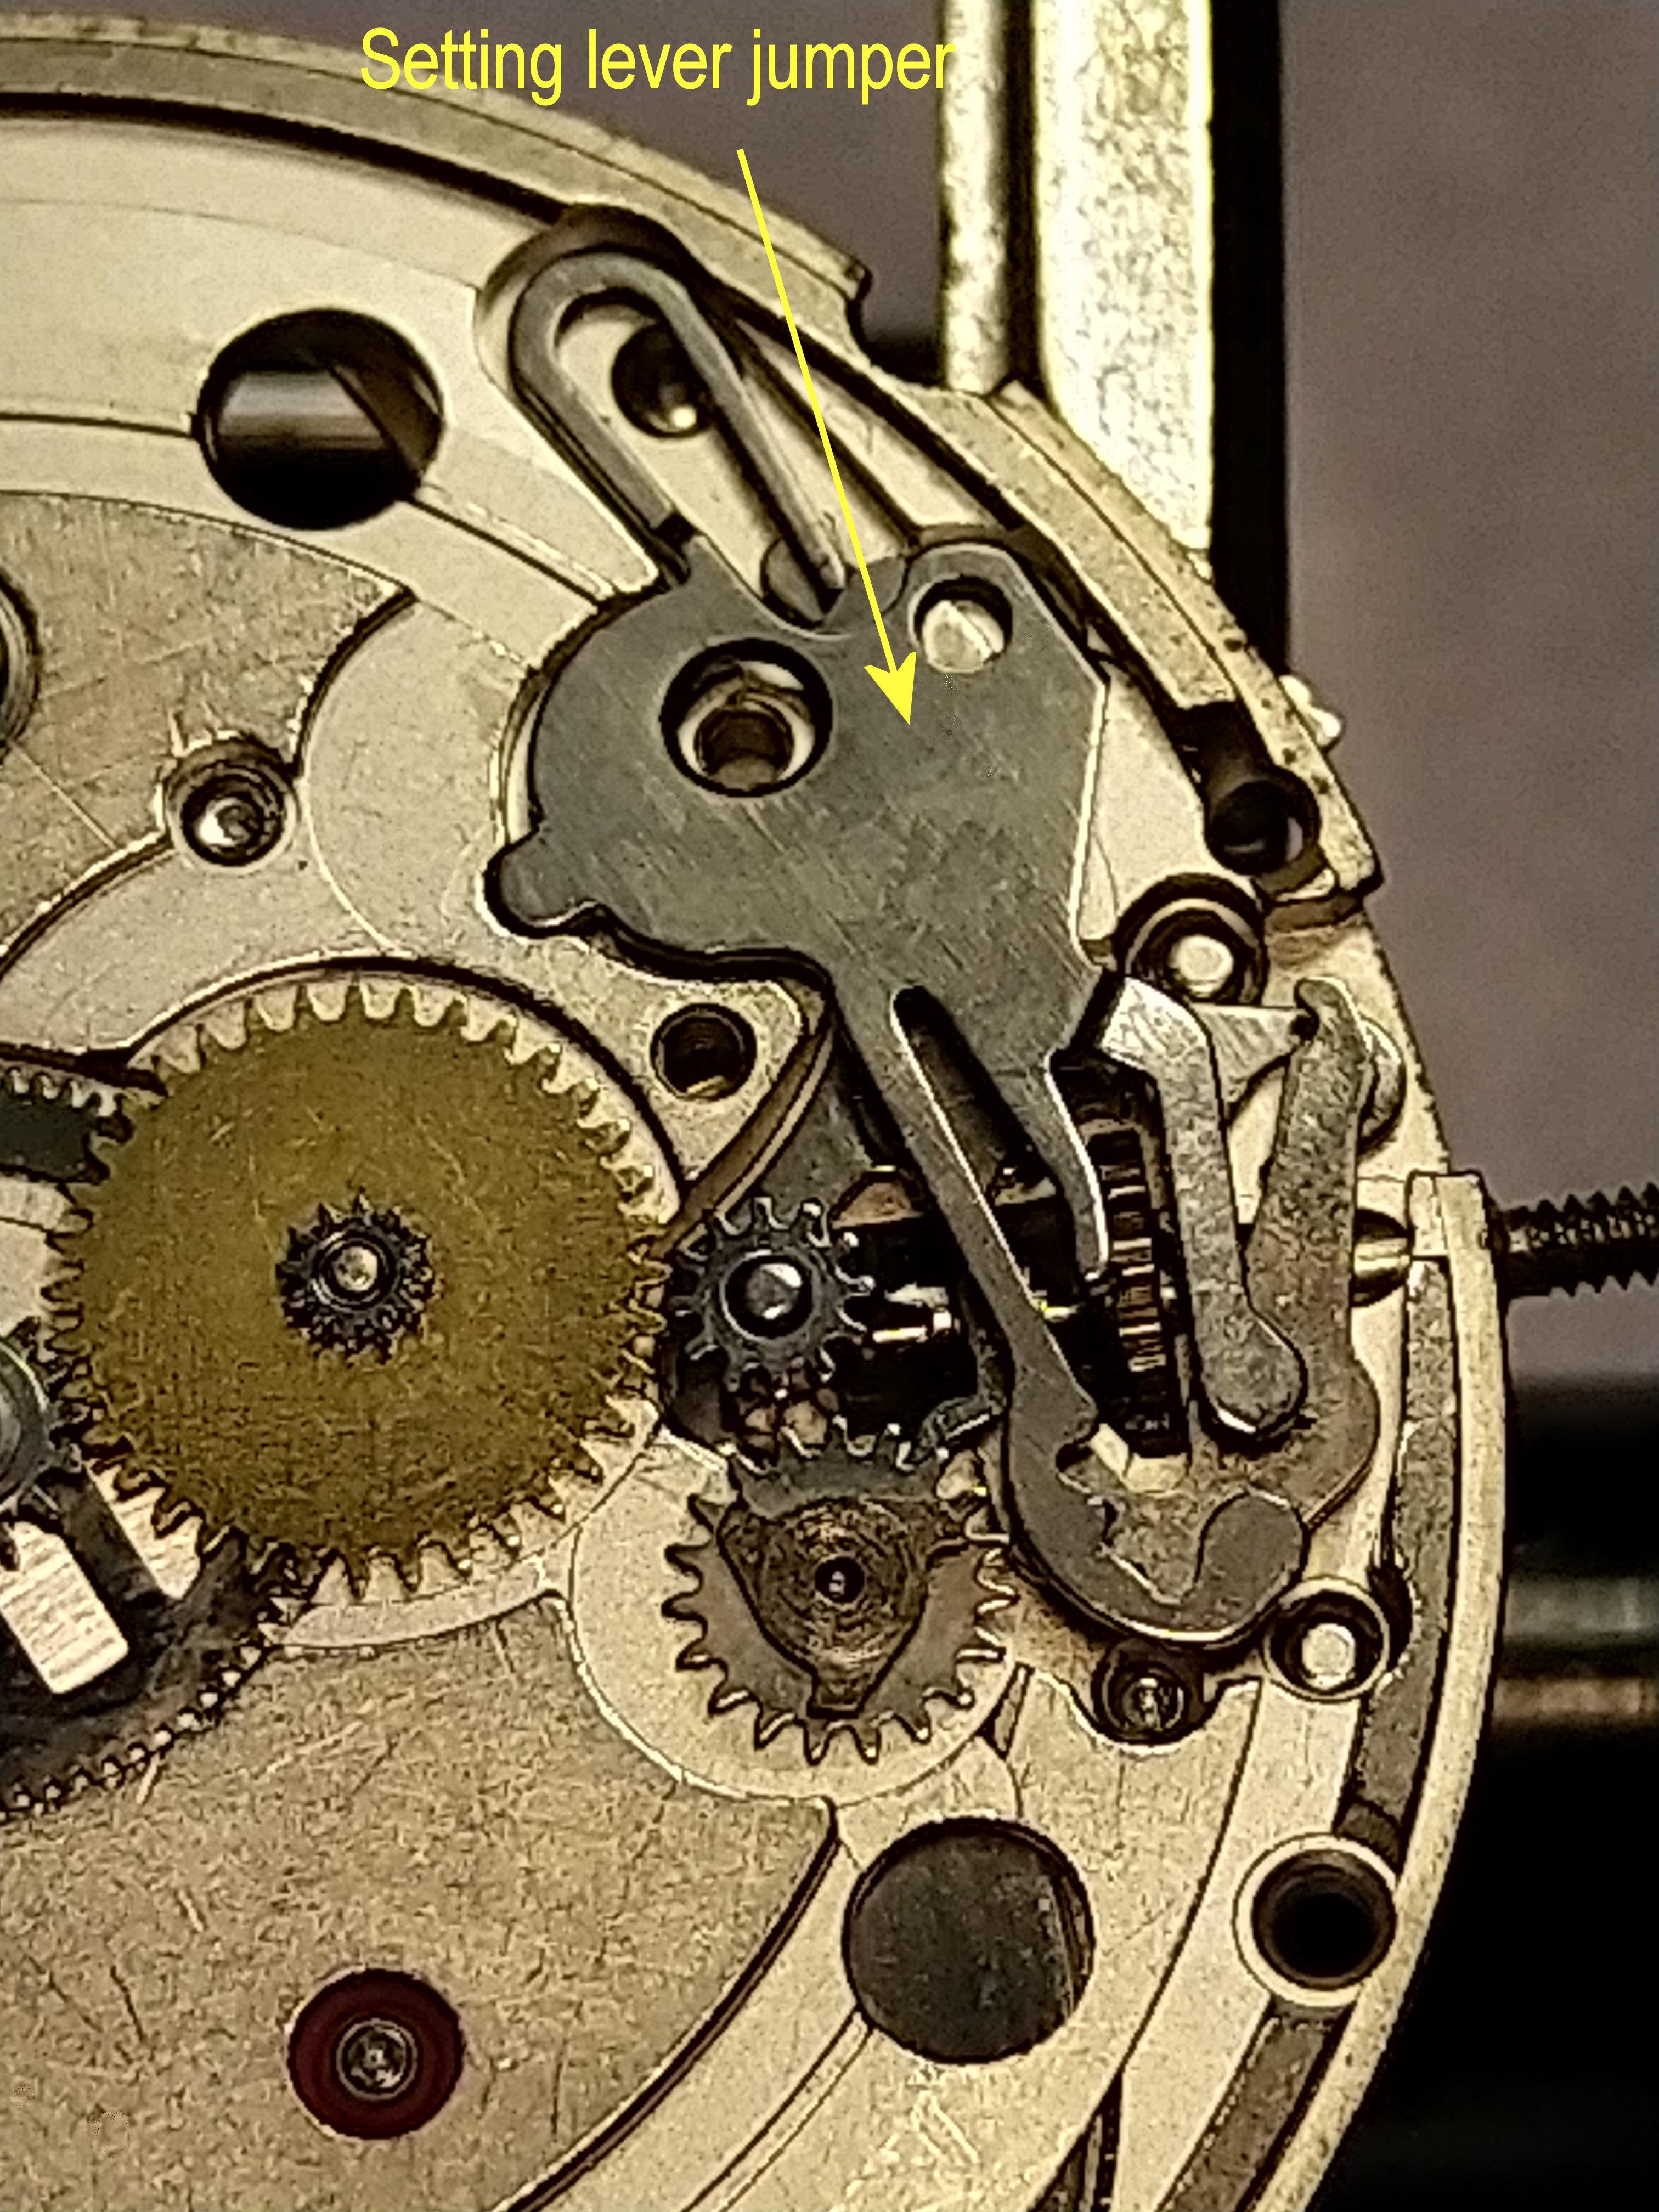
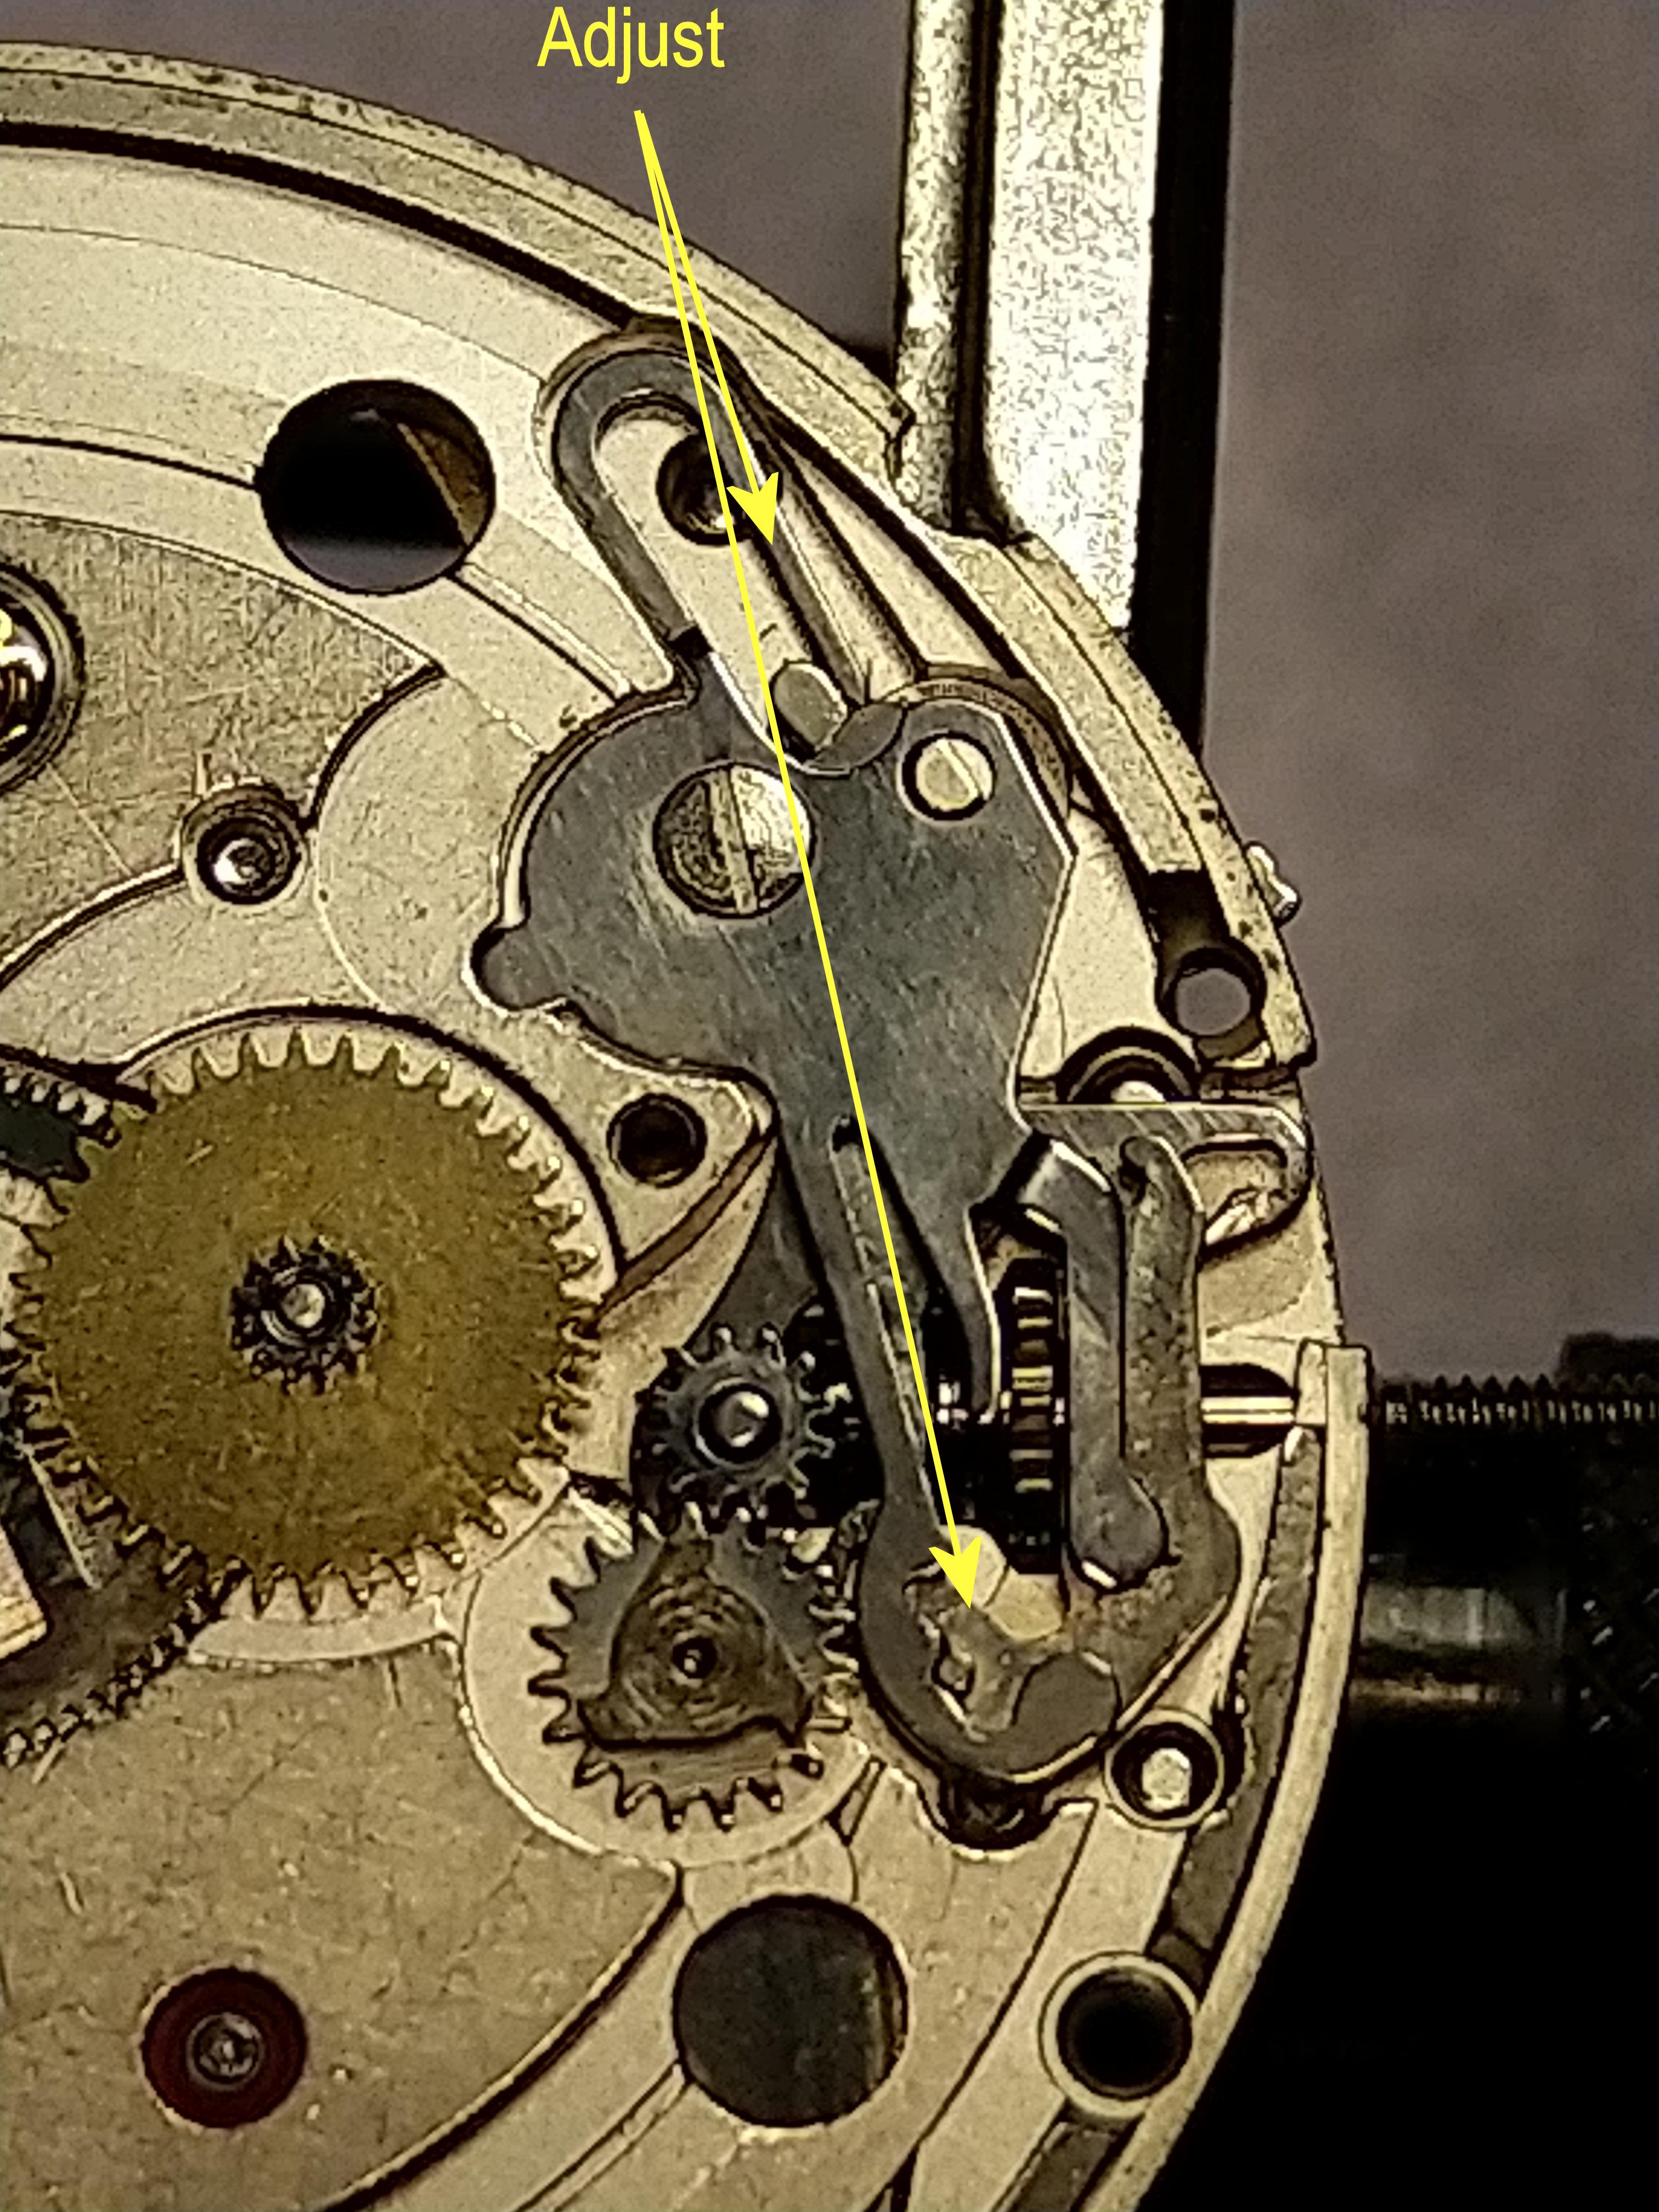
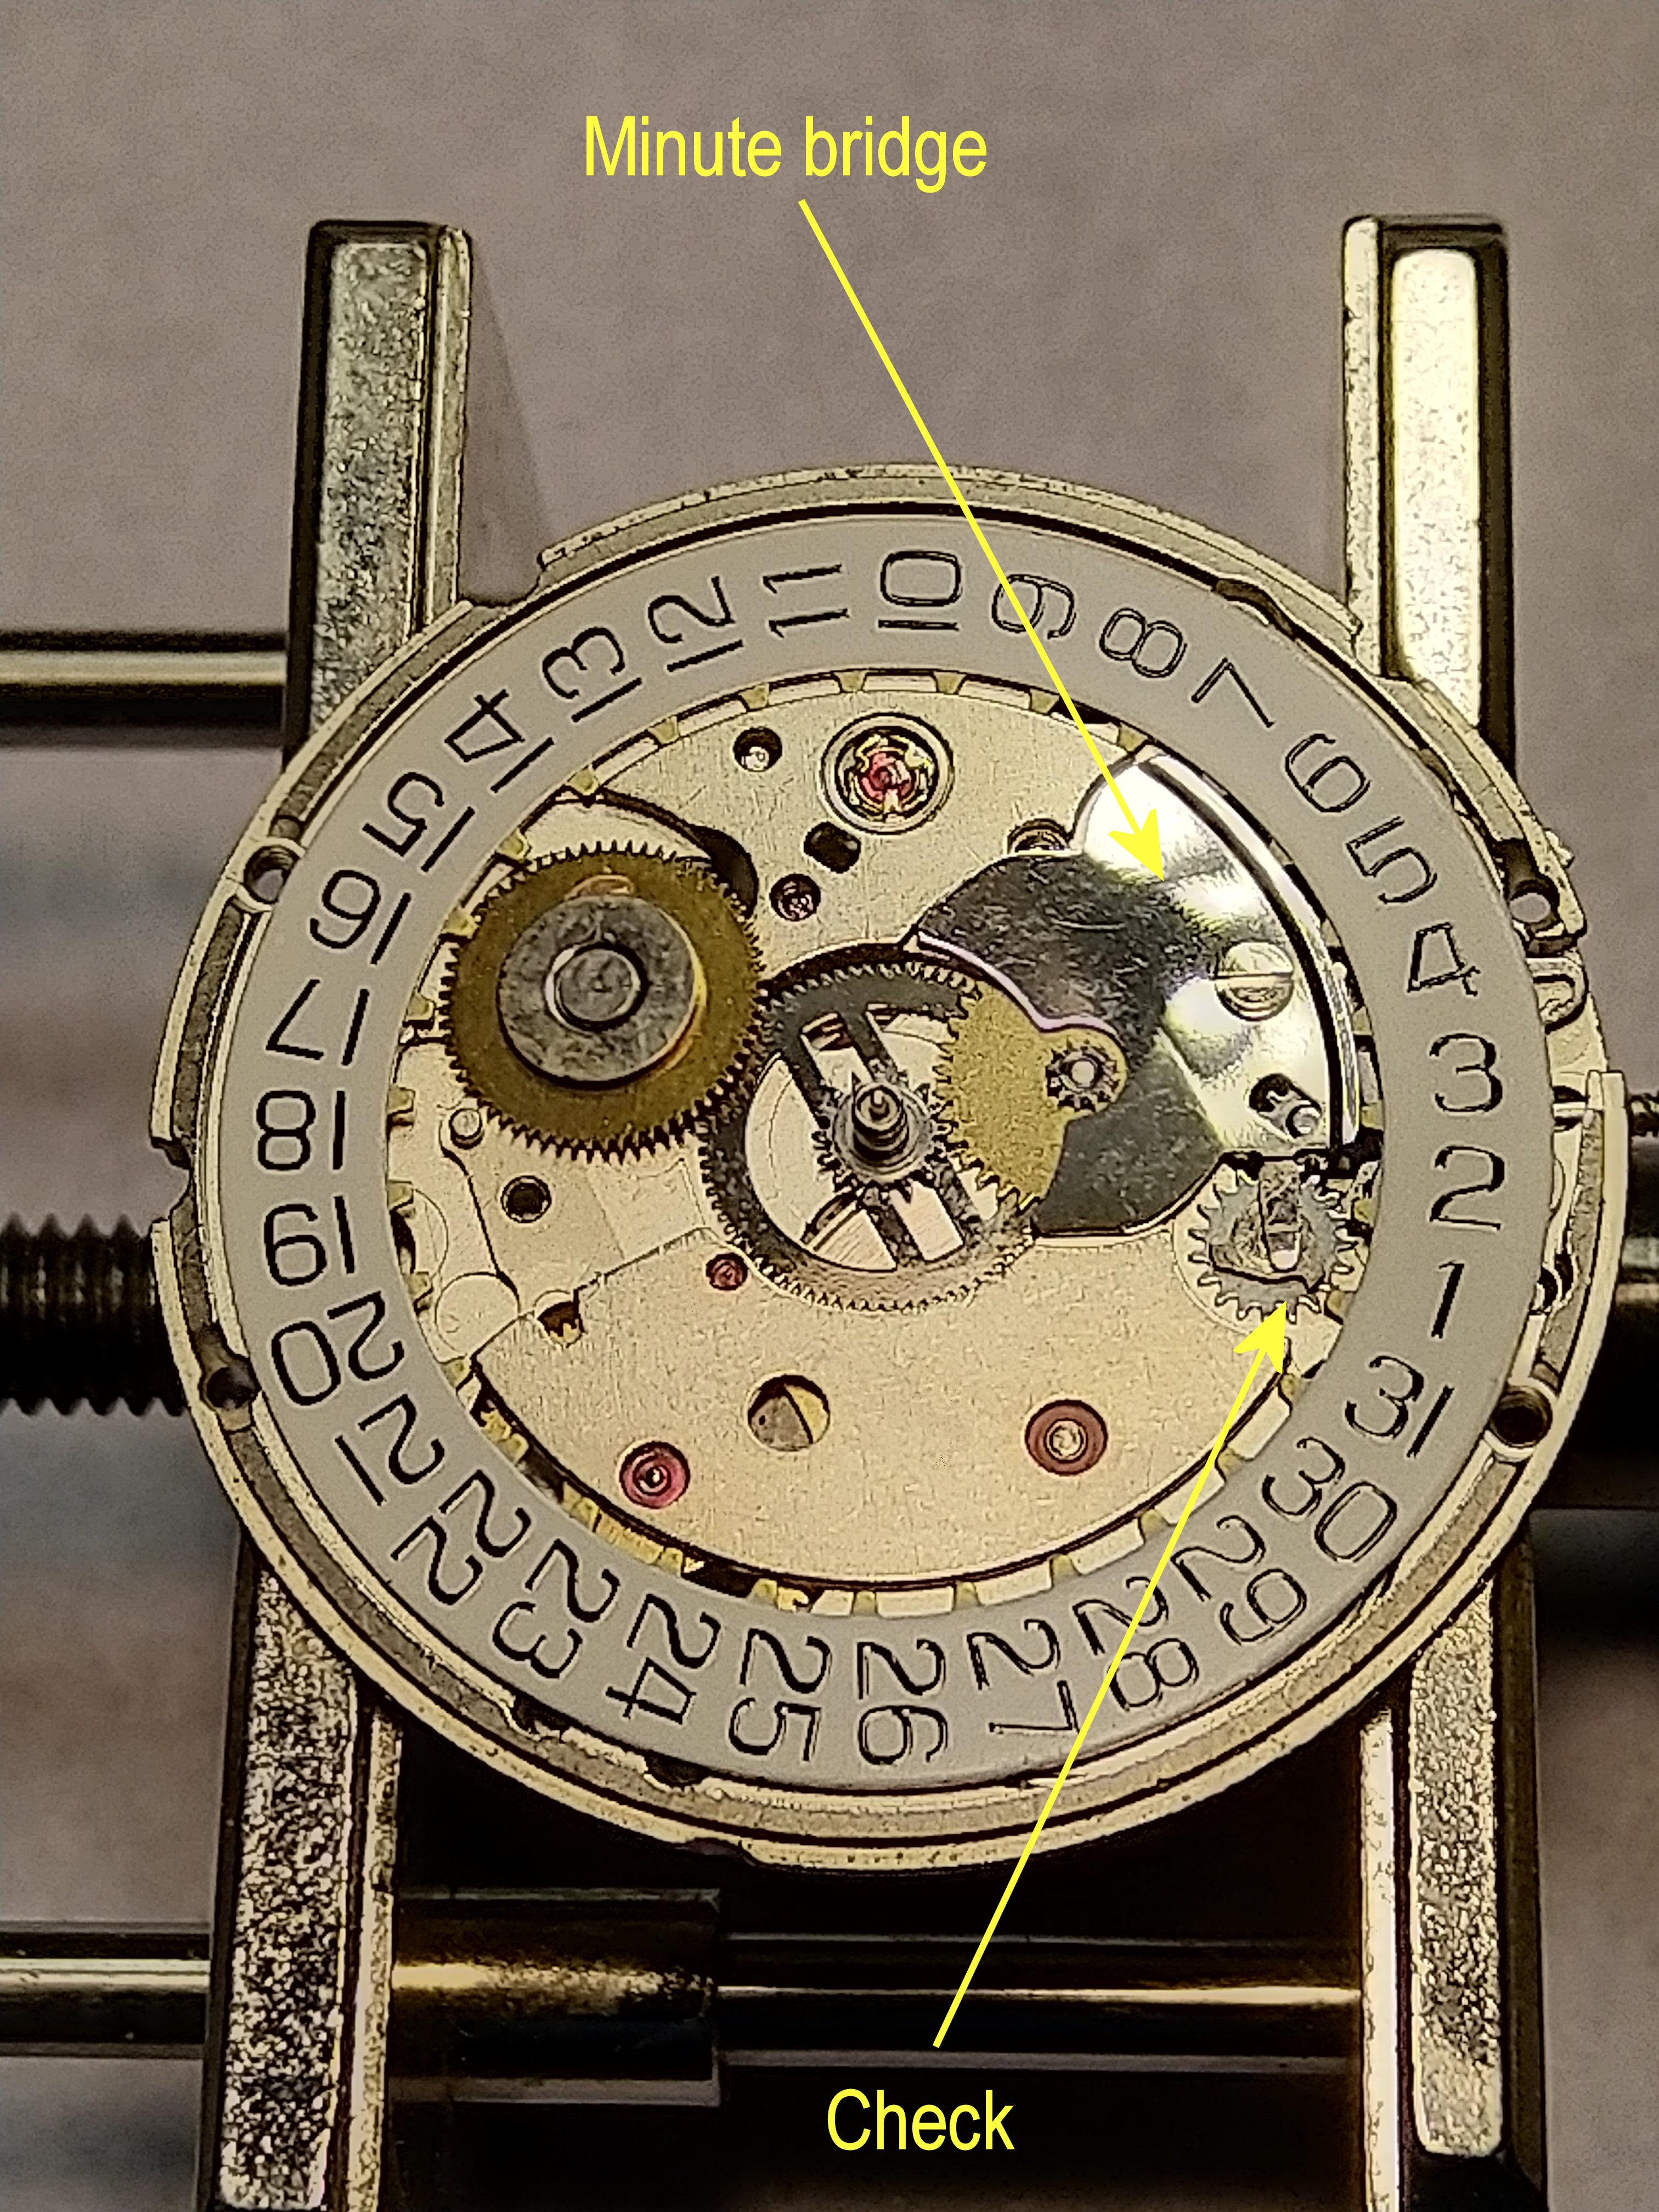
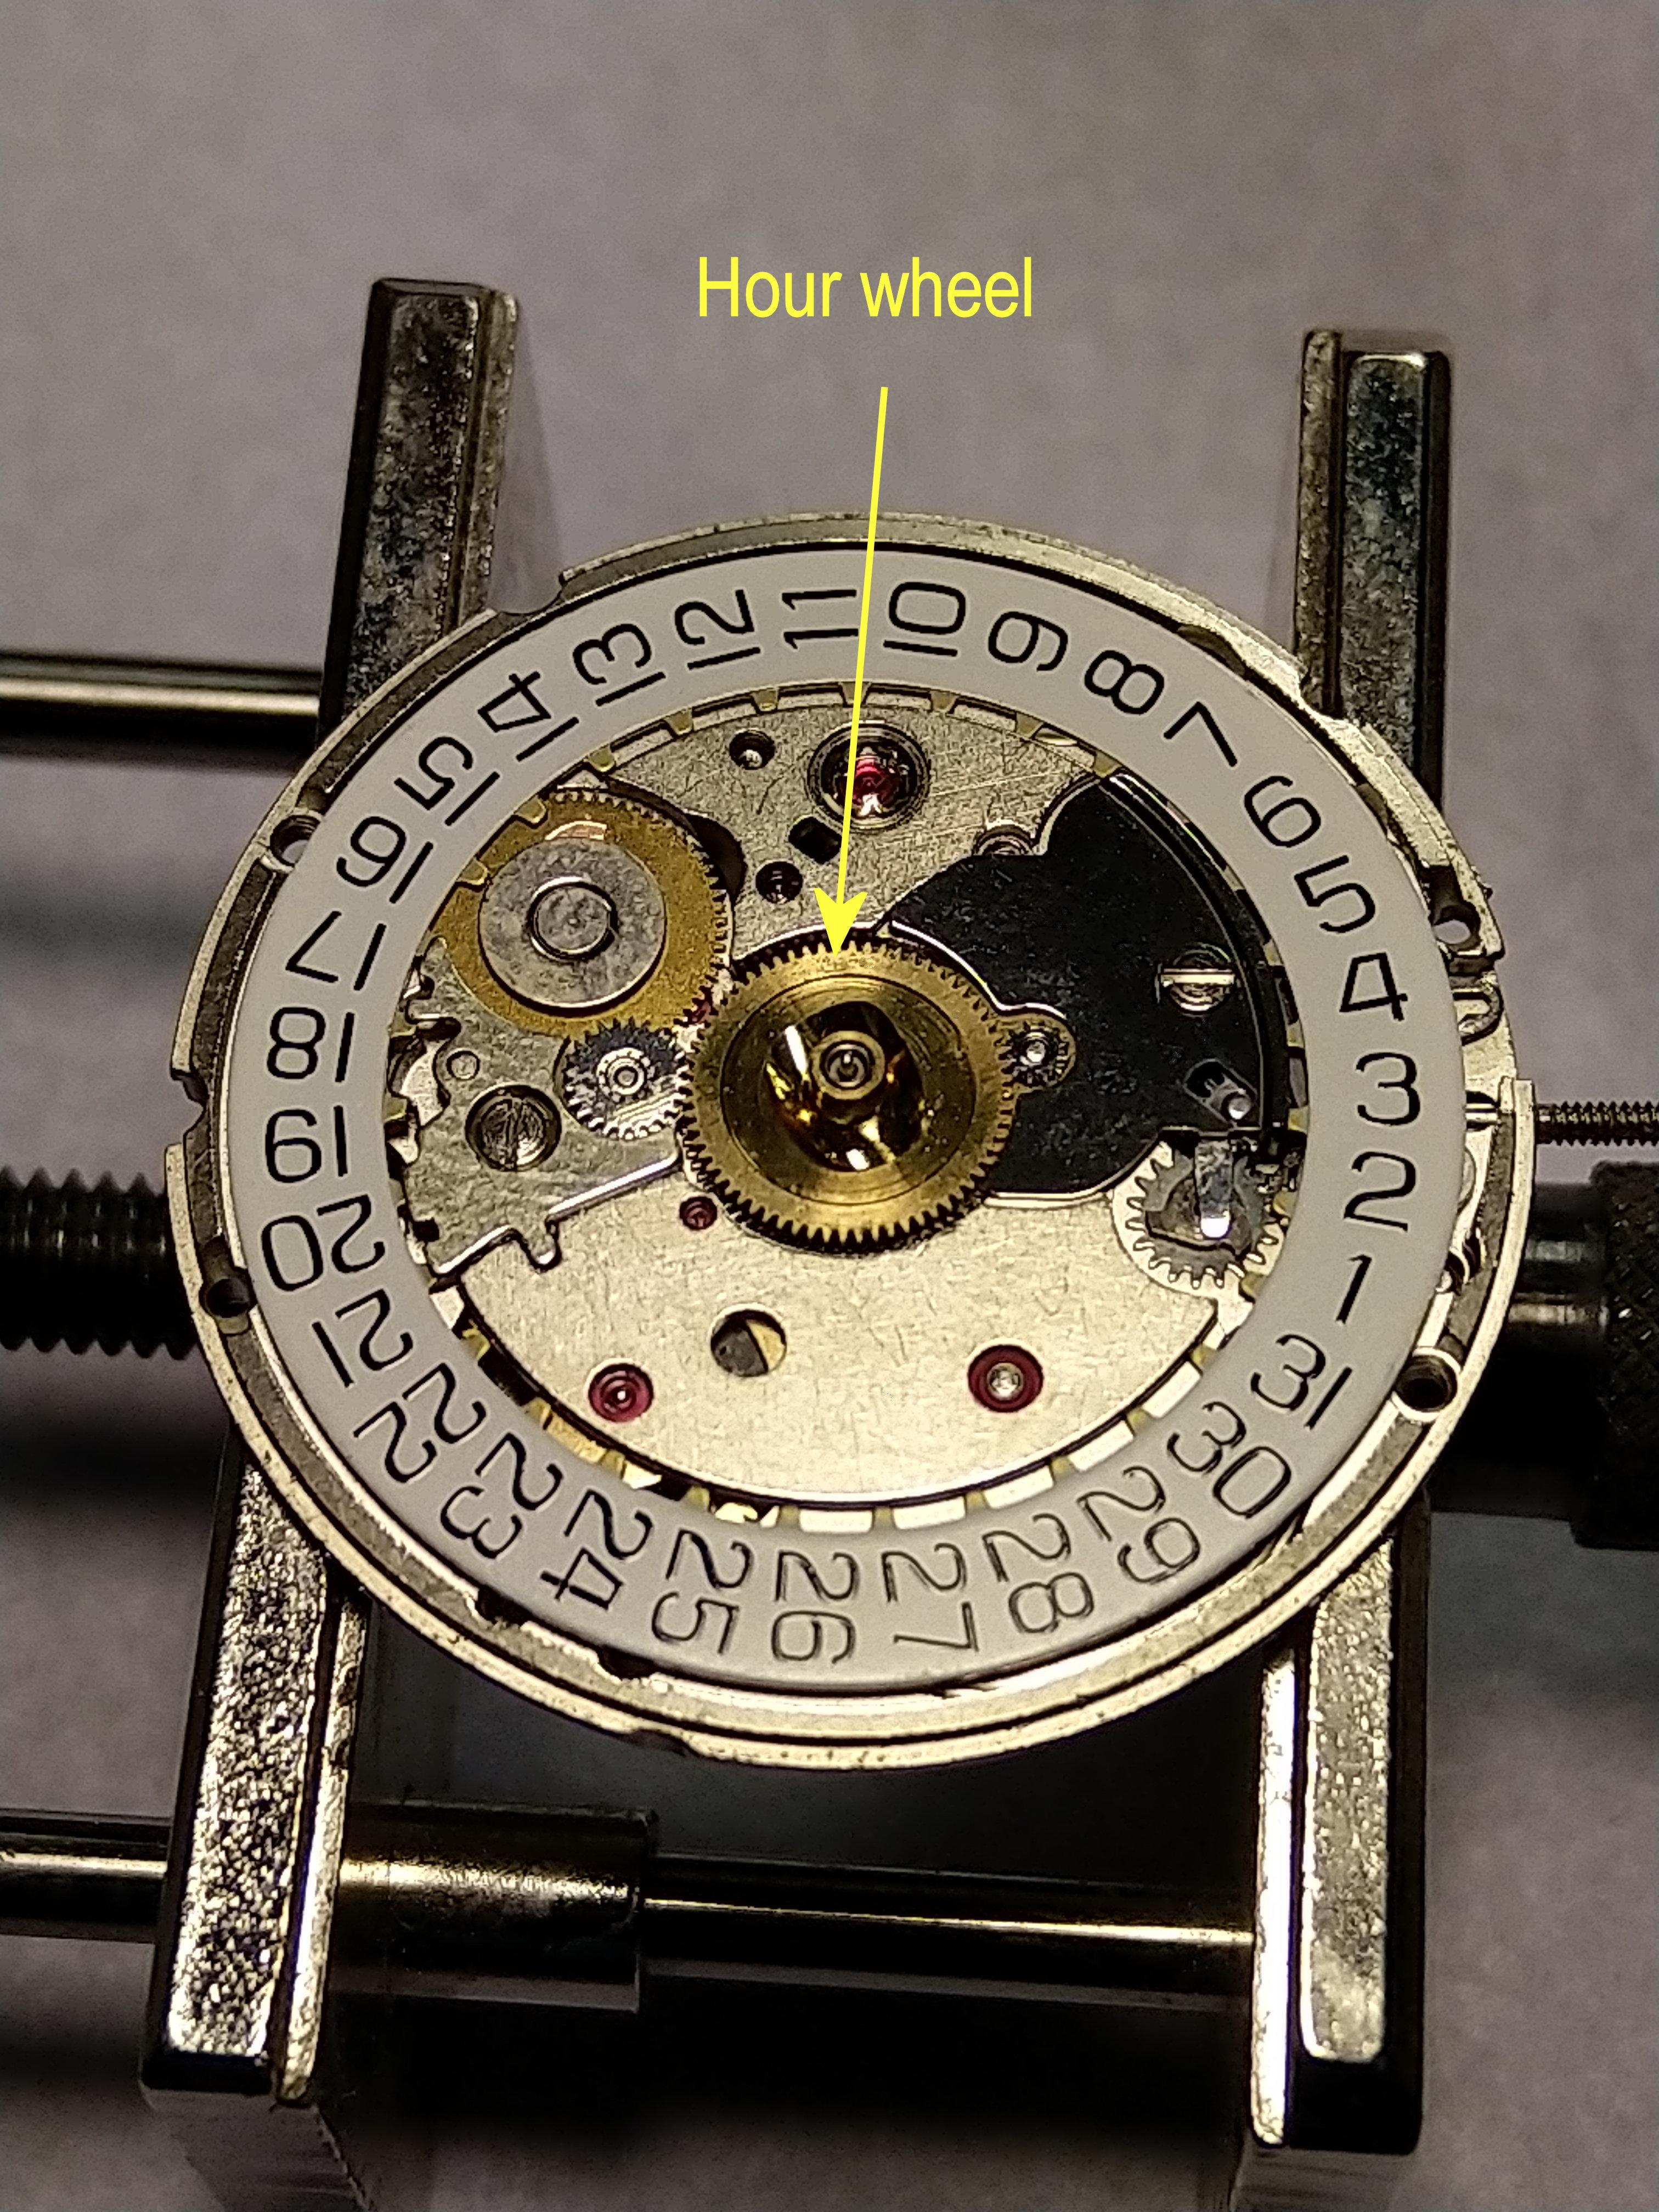
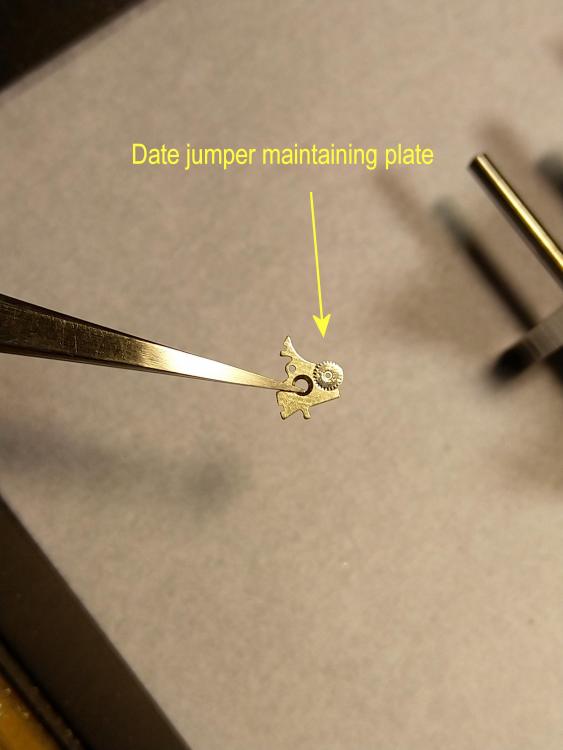
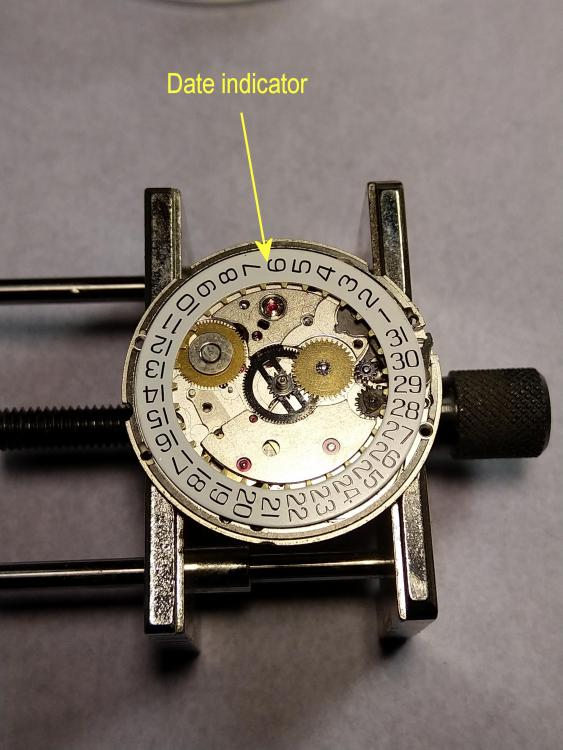
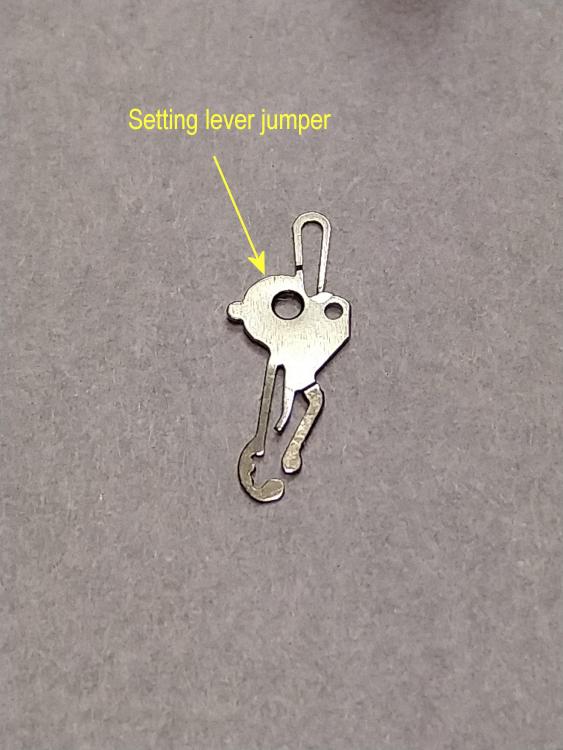
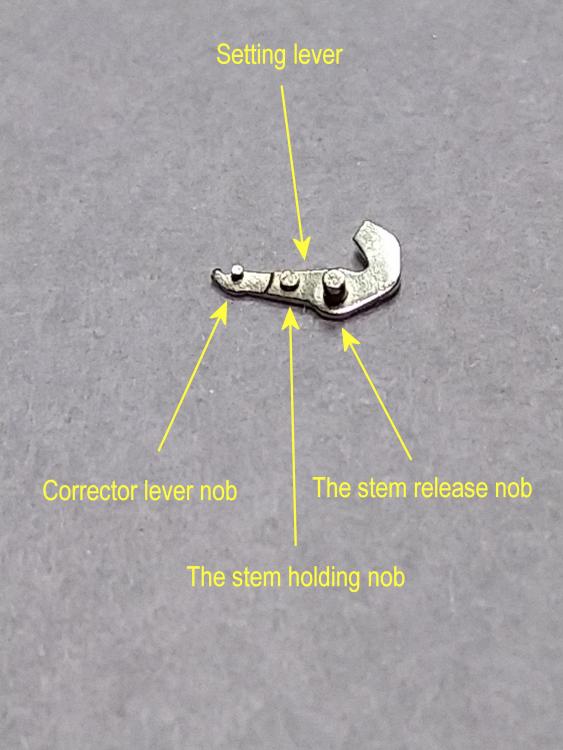
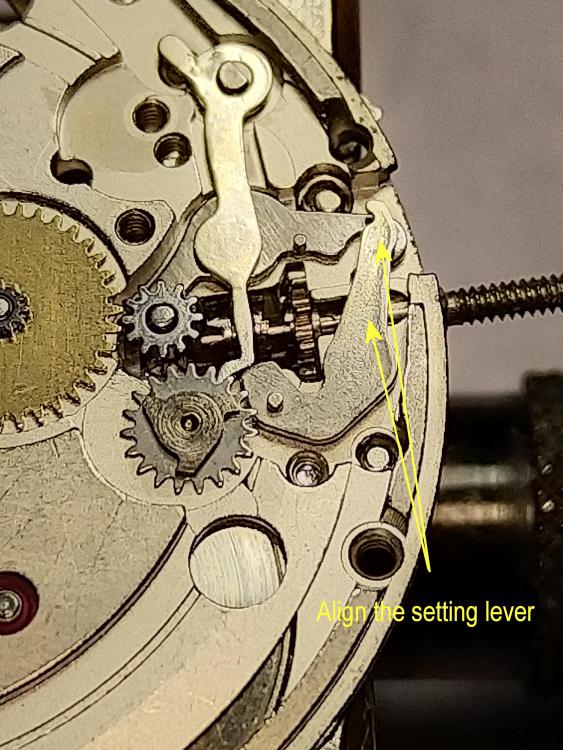
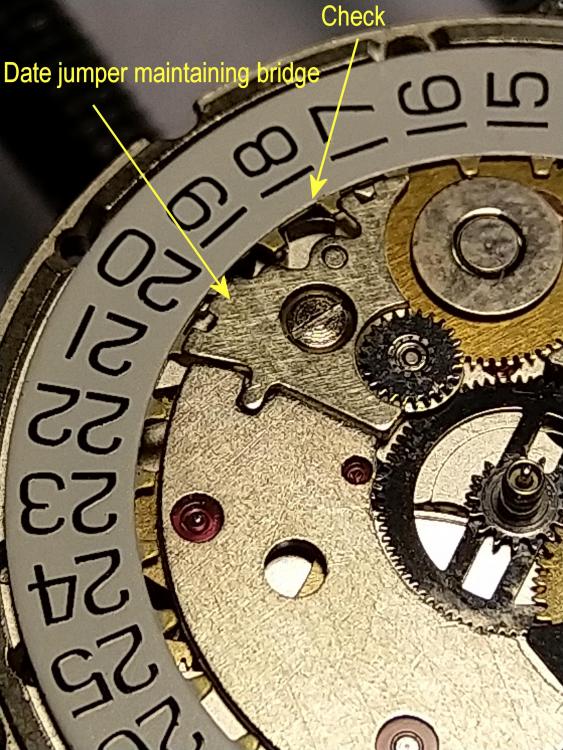
Yes it is safe to do so since the click is securing the barrel at this time. I very seldom post pictures without saving them in a PDF but since the pushing the pin too deep is a common accident I will do a small walkthrough in the wrong section, guess one can show what happens in one picture but not how to correct it. To begin with I usually just take off the oscillating weight, just to ensure it will not be in the way in the movement holder. It is kept in place with one screw. Since the stop lever is operated by the sliding pinion, we will assume the lever is still in place but is not working because of a faulty keyless work. Now one can safely put the movement in the movement holder. I now lift off the hour wheel. Next I remove the date jumper maintaining plate. I think it always is best to remove the date indicator so you don't risk to damage it and create more problems. Since this small instruction probably is applicable on other movements too, I would warn that the small pinion on the plate sometimes can be very loose so keep track of the parts. Next, we remove the date jumper. Now we remove the minute bridge, when taking these away keep track of which screw belong to what since they sometimes are slightly different. Now you safely can remove the date indicator. Now one can see what really happens work when one push the setting lever nob too deep. The lever is popping out and misaligning the most of the parts in the keyless work. Now the setting lever jumper is taken off and inspected. This one still looks good. There are three small pins or nobs on the setting lever. These has to get into the correct places in order to get the correct function. One now can see the pin holding the stem isn’t very high, so it will just take a gentle push to get the stem released. Most of the times the corrector lever is still in place. Here you make sure the yoke is in the sliding pinion groove and everything lies flat and nice as in the picture. The setting lever can now gently be lifted into place. At this moment I put the winding stem into place so I can be sure the setting lever comes into the correct positions. Make sure to align the pins in the setting lever to the correct places. The stem pin goes into the groove in the stem and the corrector lever pin goes into the hook shaped part of the corrector lever. Now you just position the setting lever jumper onto the movement and tighten the screw loosely. Don’t fasten it whole the way yet just tighten it until you feel a slight resistance. With the setting lever jumper secure in place you now can push the yoke spring and the lever spring into place. You can see the correct positions in the picture. With the springs in position and loaded you can tighten the screw all the way. Now you gently can put the date indicator into place again. Make sure the date indicator driving wheel and the date corrector isn’t pushing at the date indicator. Put the minute bridge in place. Just make sure you took the correct screw so the bridge isn’t squeezing on the date indicator. Here I accidently moved the date indicator driving wheel a bit but we just push it back in place. The date jumper comes into place. Push the jumper so it ends up between two teeth’s and not under the date indicator. Put the date jumper maintaining bridge into place. Check the date jumper still is between the teeth and not under the date indicator. To be able to test the modes fully you have to put the hour wheel back. And that would be it. Since you picked the keyless work apart one could clean of the parts and lubricate them while you are at it. Correct lubrication procedure can be found here. ETA2824-2_en_es_it.pdf


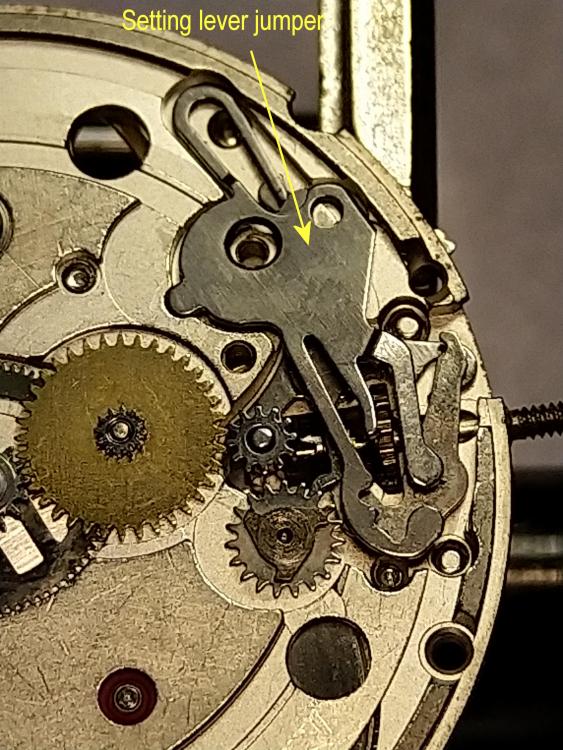
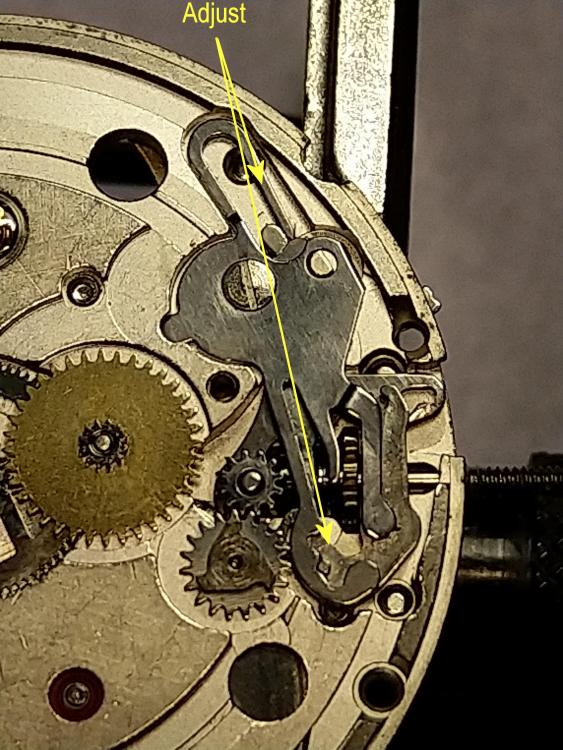
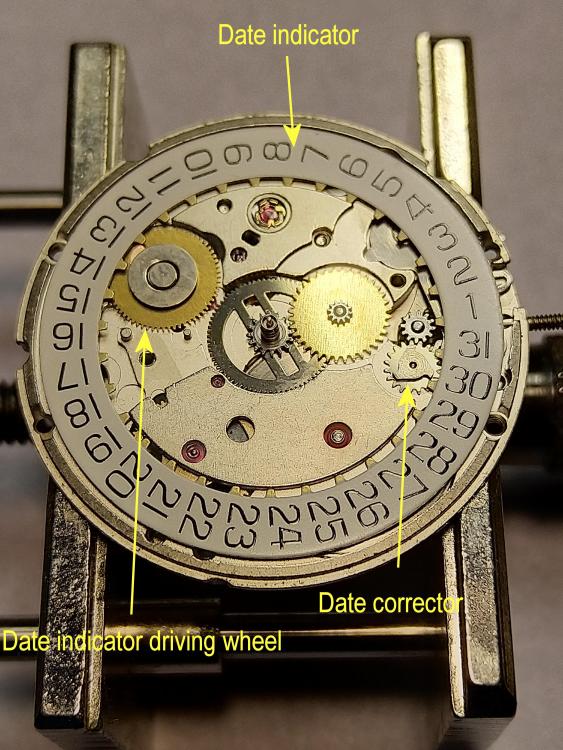

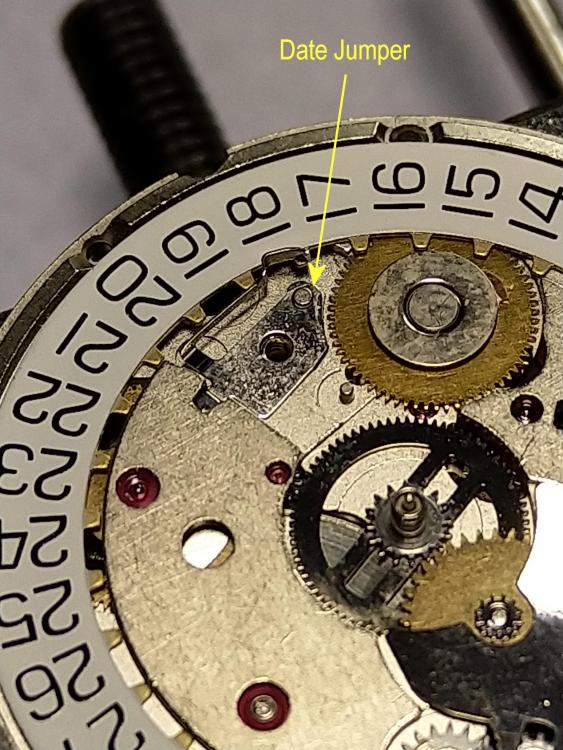
 1 point
 -
If you accidentally pushed the stem release (setting lever) button too far in, welcome to the club. That was what sucked me into the world of watch repair years ago. Mark has a video that shows a shortcut of how to fix a yoke that has jumped out of the groove of the sliding pinion. But going by your description, I think your setting lever is completely pushed in. That means you have to go in from the dial side and fix the keyless works. Good luck. We are here to help.1 point
-
Must say I haven't had the bad luck as some of these guys who moved the whole barrel drum by pushing in the stem. If one is careful and push the button with the screwdriver in the slot while taking it out you shouldn’t get anything misaligned. But if you push to deep the keyless work might get messed up. The best way to solve that mishap is to fix the keyless and check the stop lever is in place. I guess the SW200 has a stop lever just as the 2824-2, if the keyless gets messed up it might also affect the stop lever which will block the watch from running. Think that is actually what happens. The 28XX and the 2824-2 might also have different stems. But if you are using the stem for 2824-2 then it would be OK even without filing on it. If my memory isn’t failing me there should be a post here somewhere on how to fix the keyless.1 point
-
Sent from my iPhone using Tapatalk Pro1 point
-
I disagree with any test, wind, count with lid off and barrel in open. MS can come out flying and hurt someone. I grease or whatever you want to do, instal the barrel with retaining bridge and ratchet wheel screwed on. -- wind through the ratchet say with your screw driver, listen close for the sound of power discharge from the barrel (it will discharge at some point). You want to count the number turns on the ratchet wheel so mark a dot on the wheel and count the number of turn the dot goes by. Dispower the barrel fully, wind again, stop winding just short of the number you counted before power discharge. Let the watch run on bench and note how long it runs to stop. That is the actual power reserve your watch retains. The main advantage of this approach is, that you can still see with your eyes. Both of them. Regards1 point
-
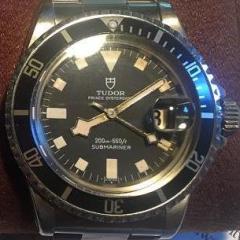
Thread lock may be acceptable industry practice. Was taking the rotor off of a Tudor Blackbay 58. Screw was was not budging until something gave and it unscrewed the rest of the way without resistance. I looked down the screw hole with a microscope and found a whole bunch of translucent semi-circular chunks of residue had fallen bellow onto the fourth wheel jewel. This isn't the first case I've seen either.0 points