Leaderboard


Popular Content
Showing content with the highest reputation on 12/10/19 in all areas
-
With a noisy movement and lazy pallet fork I'd first look the pallet fork and escape wheel pivots and jewels, be sure they are clean and correctly installed (yes, sometimes I've reinstalled the pallet and that did the trick), pallet fork jewels dry. If the pallet is not moving fast I don't think the main problem is oin the balance.2 points
-
Hi guys … I had promised that I would make a « custom decal dial tutorial » on another thread there So here we are … There are many variations of decal dials, the best IMHO being the « negative gilt » dials which gives the best results. The process I’m showing today is aabout how to make a dial with black printings on a one color background. I had a cheap quartz diver waiting in my drawers so I’ll make a Heuer diver hommage based on the 980.016 model (quartz one too). DAY 01 : It’s 4:30 AM (I’m an early bird) and I have 2 hours to kill before a business trip to Paris (I’m French) so I decide I have time enough to begin. The first part of the process is to prepare the dial plate : - stripped it, removing all the lumes bars and dots - soaked the dial for some minutes in acetone to remove the paint - filled the tiny holes where the bars and dots go with cyanolite glue - sand everything flat I sand with 800 and don’t try to get a smooth surface as I want the paint to adhere perfectly to thedial plate. Here is the result … Then I want to spray paint. I make a tube with some painter’s tape, from a « curve » with it and place it on a plastic bottle cap. I want it curved so that I can stick the dial on it without any risk of bstructing the center hole or the date window of the dial plate. So I stick the sanded dial plate on the tape tube. As you can guess from the pic below … that’s not the first time a make an orange dial. Then I place the bottle cap and dial plate on a paper sheet and spray paint in orange. I use street art spray paint as it is « water resistant ». As you can see on the next pic, I don’t try to get a smooth surface, or even to perfectly cover the dial plate at first. I will let this coat dry, sand it with 2000 grade, then spray 1 or 2 coats until I get a perfectly smooth orange dial plate, ready for receiving a decal. So I place the bottle cap and dial under a shooter glass and will let it dry for about 24 hours before sanding and spraying the second paint coat. The 24 hours drying time is really important (though it could depend on the paint you use). The paint I use looks perfectly dry after about 5 hours but if you spray the second coat without waiting enough, that coat won’t perfectly adhere to the first and you could get a granular surface like an orange peel. And here is the dial waiting under the shooter glass. On the right is a « negative gilt » dial (third and last matte varnish coat) On the background there are two Raketa 2609 movements from the 70ies, quietly (really loudly to be honest) ticking for test after I‘ve recently serviced them. Now it’s 5:45 AM so I will have a and go to the train station. I’ll sand the dial plate this evening and spray the second paint coat tomorrow morning. Then sand it in the evening and spray the third coat (if needed) the day after. DAY 02 - DAY 03 : So here's what you get after the first paint coat … doesn't look really good but no matter as there's still some work to do to get a better result. And here's what you get after 3 coats of paint, each one sanded with 2000 grade, to get a perfect finish, flat and smooth. Now the dial plate is eady to receive the decal. DAY 03 : I won’t explain anything about Photoshop and Illustrator here … I’ll only explain how I print my decals. One thing really important, from my own experience, is the definition of the design. I’ve tried several, from 1200ppp to 6000pp and the best results I’ve got on printing decal sheets were with a 4000ppp definition. So all my dial designs are done in 4000ppp. The result is really BIG files … for example an A6 template with 12 dial desings ready to print is about 800Mo. As that dial is black printing only I open it with Photoshop and let the softwre (so ont the printer) deal with the printing quality. My printer is an old Epson Picturemate with a 1200 maximum definition. As the good quality decal sheets are not cheap and as I’m a « skinflint» I often print on A7 sheets … 6 dial designs on one sheet. When printed you should let it dry for about 4 hours then spray 2 really thin coats of matte varnish, letting each coat dry for at least 12 hours (24 hours is better). DAY 04 - DAY 05 : 2 days of speed-hiking with my wife so I didn’t worked on that tuto. You can check on the net what speed-hiking is, but to summarize it’s hiking as fast as you can with really light backpacks, trying not to run (or only short runs). On a good day you can walk 5 to 6 miles/hour … when trained you can walk up to 6,5 miles/hour … and while I trained for my first 62 miles ultra I achieved to walk (no running) up to 6,85 miles/hour (11 km/heure). DAY 06 : Today is Monday 6:00 AM. It’s been 5 days since I begun that tutorial and … my legs ache and all my body is painful (see Day 04 - Day 05) The dial plate is ready and the decal sheet too. You can see that the decal sheet looks matte now. That is because I have sprayed 2 coats of matte varnish on it, to protect the inkjet ink while I’ll soak the decal in water. Of course if you print with a laser you won’t have to spray varnish as the laser inks are (almost) water resistant. First thing to do is to chose the best item on the decal sheet and cut it round. Then you are ready to go. On the next pic you can see all you need now : - dial plate … fixed on a foam board using the dial feets - decal dial … nicely cut round - tweezers - thin and smooth brush (mine’s a watercolor brush) - some « micro set » … or just vhite wine vinegar (it helps the decal to set on the dial plate) - cold water Now you put the decal in cold water and while it soaks you brush some micro-set (or white vinegar) on the dial plate. Then you put the decal on the dial plate. Here you can see why I prefer using clear decal sheets on coloured dial plates … because it’s much easier to « perfectly » positionate the decal, using the central hole and the date-window. When you’re happy with the position of your decal you use a paper tissue to absorb the excess of water. Do that carefully as you don’t want to move the decal on the plate. And here we are … everything worked fine while absorbing the water and the decal position is OK. I’ll let it dry for about 12 hours before I cut the central hole and the date window, before I proceed to the varnish finish. Still Day 06 but 7:00 PM The decal has dried for about 13 hours so now I can proceed on cutting the decal sheet That's what I do then I : - fix it back on the foam board - apply some « micro set » around the center hole, the date-window and the outer diameter - gently press with a paper tissue so that the decal is perfectly applied (no more «air bubbles) And I let dry for 3 hours more Evening … 10:00 PM Now the decal is « perfectly » applied and dried and ready for the finish Last pic for today is after spraying the first coat of glossy varnish I will let it dry for 12 hours, sand it with 2000 grade paper and apply the 2nd coat. DAY 07 : 20:00 AM … only 1 pic today just after finely sanding with 2000 grade the 2nd varnish coat I applied yesterday DAY 08 : Yesterday evening I applied the 3rd and final varnish coat after finelt sanding and cleaning And today I can show you the final result … and say I'm pretty happy That dial is so glossy it’not easy to get a good pic, even on close-up. May I say that me hpone is nit the best at shooting pics (just like me) and the actual dial is much much better that it looks on the pictures below. I hope that you liked that tutorial and that it could be helpfull to members who want to try to build their own watch dials. I’ll try to make better pics with a real camera and a better lens … next week of the week after, after luming the dial together with the hands. Then I will still have to get a case and rework it so that it could be a 980,016 lookalike. Some of you may wonder how much time did I spend to make that dial. It took 8 days to achieve the all process but I spent only 1 hour the first day then only from 15mnm to 5mn the days after. So, apart from the design work on Illustrator and Photoshop (which took me hours), I would say that the whole process is about 2 to 3 hours. I must say that it's not my first try at dial making and I've trained for 2 years now. So if you want to try you should consider spending a few more hours but it's really worth the time spent as at the end you get your unique DIY dial.1 point
-
Hi Wound it up last night by the auto winder and its still going and its the correct time. I have watched the clutch and crown gear and i cannot see a slipping movement. But i think it may be the crown gear so i will have to strip it and see. If it is i will post pics tomorrow. Thanks for all the advice and sugestions its much appreciated. cheers gary1 point
-
I use purpose made watch cleaning fluids and rinse fluids. I find these to be the most effective. In any case I find properly disassembly and cleaning of the 3rd and escape shock assemblies to be an indispensable step. In my experience Japanese movements are especially sensitive to proper cleaning and lubrication so you'll want to get every nook and crany. I do achieve around 300 amplitude with these but only after very meticulous cleaning and precise oiling.1 point
-
Feels like meshing but wheels are fine1 point
-
Do you mean slipping as in you feel tension build then suddenly release which would point to the slipping spring which may be weakened or as in you feel like the teeth of the winding pinion are catching and disengaging? This later would point to a meshing problem due to wear on winding pinion/crown wheel teeth or pivots or an assembly problem.1 point
-
Hello Watchmaker It worked! I really appreciate your time in describing it step by step as easy as possible.1 point
-
Same age as I am...only far better preserved.1 point
-
Forgive me if my terminology is off..slipping could only be but so many things.provided all your gear teeth are good and properly engaged.it could be your mainspring. Even if it is broken the watch could run.I have seen it happen friction and pressure are often enough to hold the spring in place up the a certain amount of tension..and then slipping occurs. You could also have a cracked barrel. Inspection is in order1 point
-
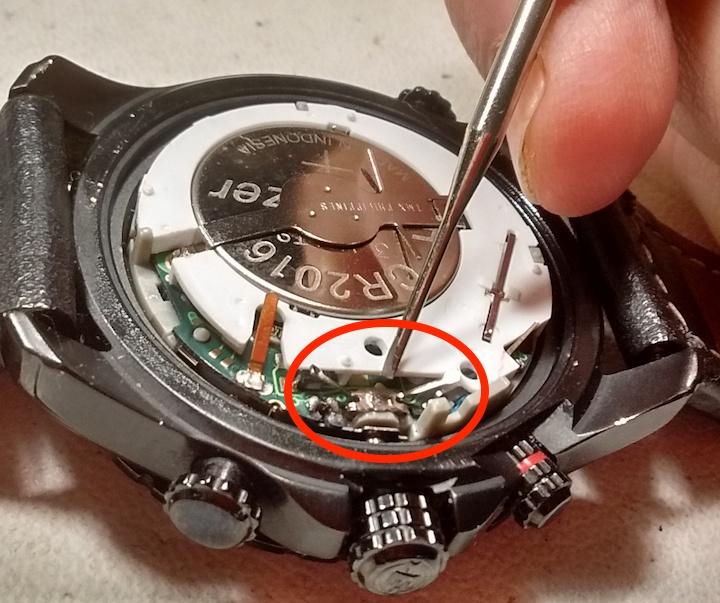
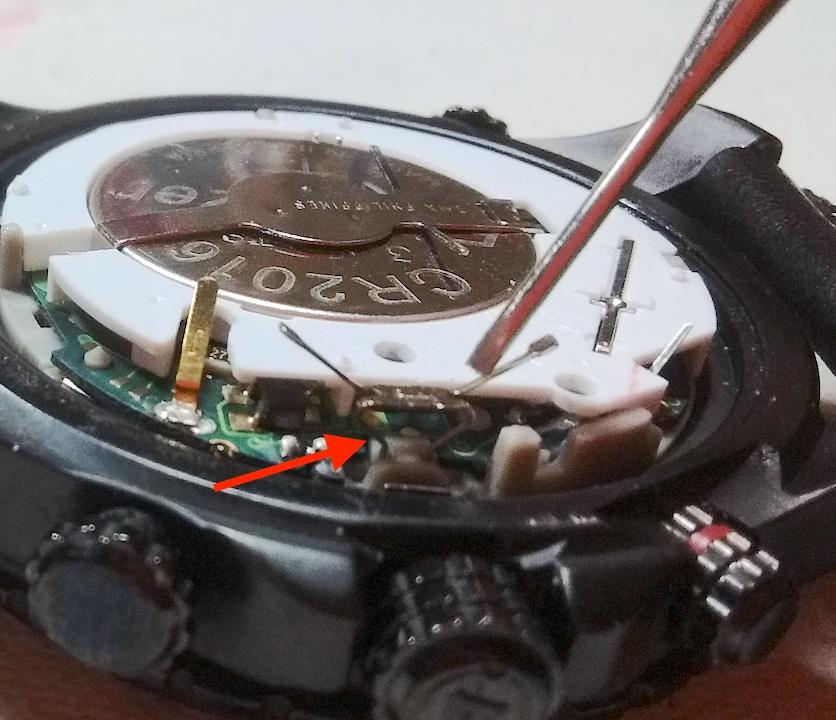
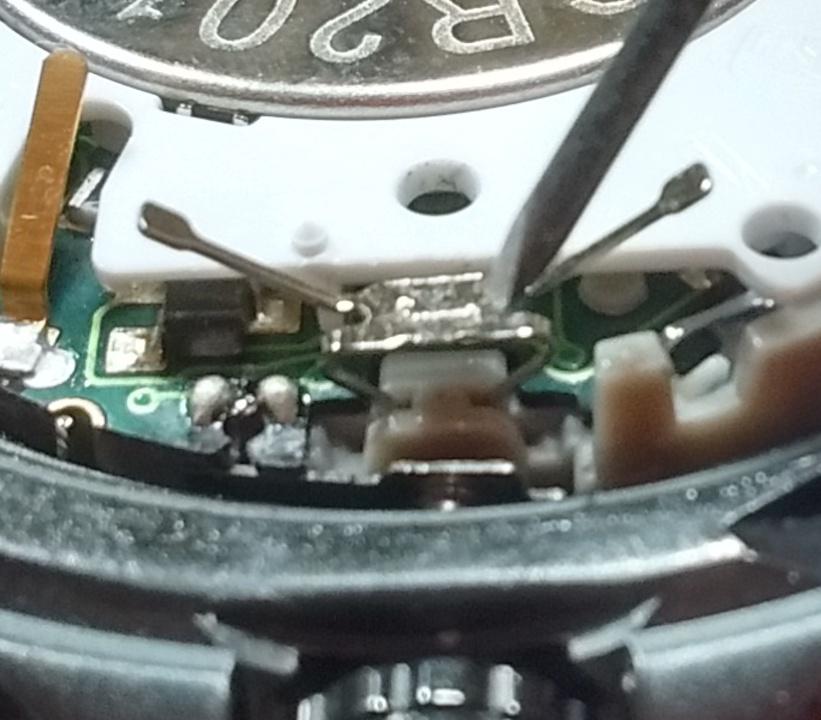
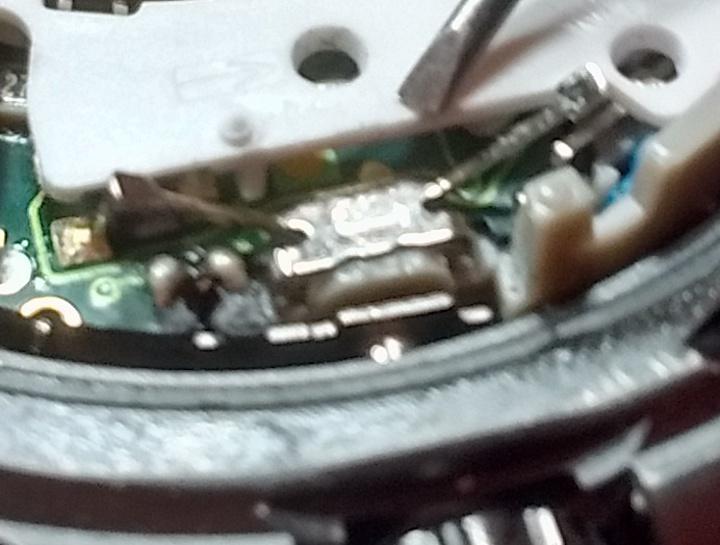
Hi, watchweasol - Tnx for the service sheet. I just took more pics, these should be clearer. Showing the spring assembly in the open and closed positions.
 1 point
 -
Simplest check, losen cock, does amplitude improves? And give a good look to pivots, lens or camera. BTW are pallet pivots spotless clean, bit not oiled.1 point
-
I usually lay the cap jewel flat side down on a piece of clean paper and rub it back and forth a few times. This will get rid of the residual oil. Next a rinse with lighter fluid and it should be as clean as it can get. Usually wear on cap jewels is pretty much centered in the middle of the jewel, I suspect its dried up oil. But if the watch is only 2 years old and never been serviced before it should be pretty much pristine! Its a puzzle all right. Anilv1 point
-
The cap stones are the same both sides. I never seen such defects on the many I worked on. In some way it seems to me that is the domed side up, but it shouldn't. Before blaming the train check well the escapement, balance pivots, end-shake, hairsping shape, that there is no rubbing, etc.1 point
-
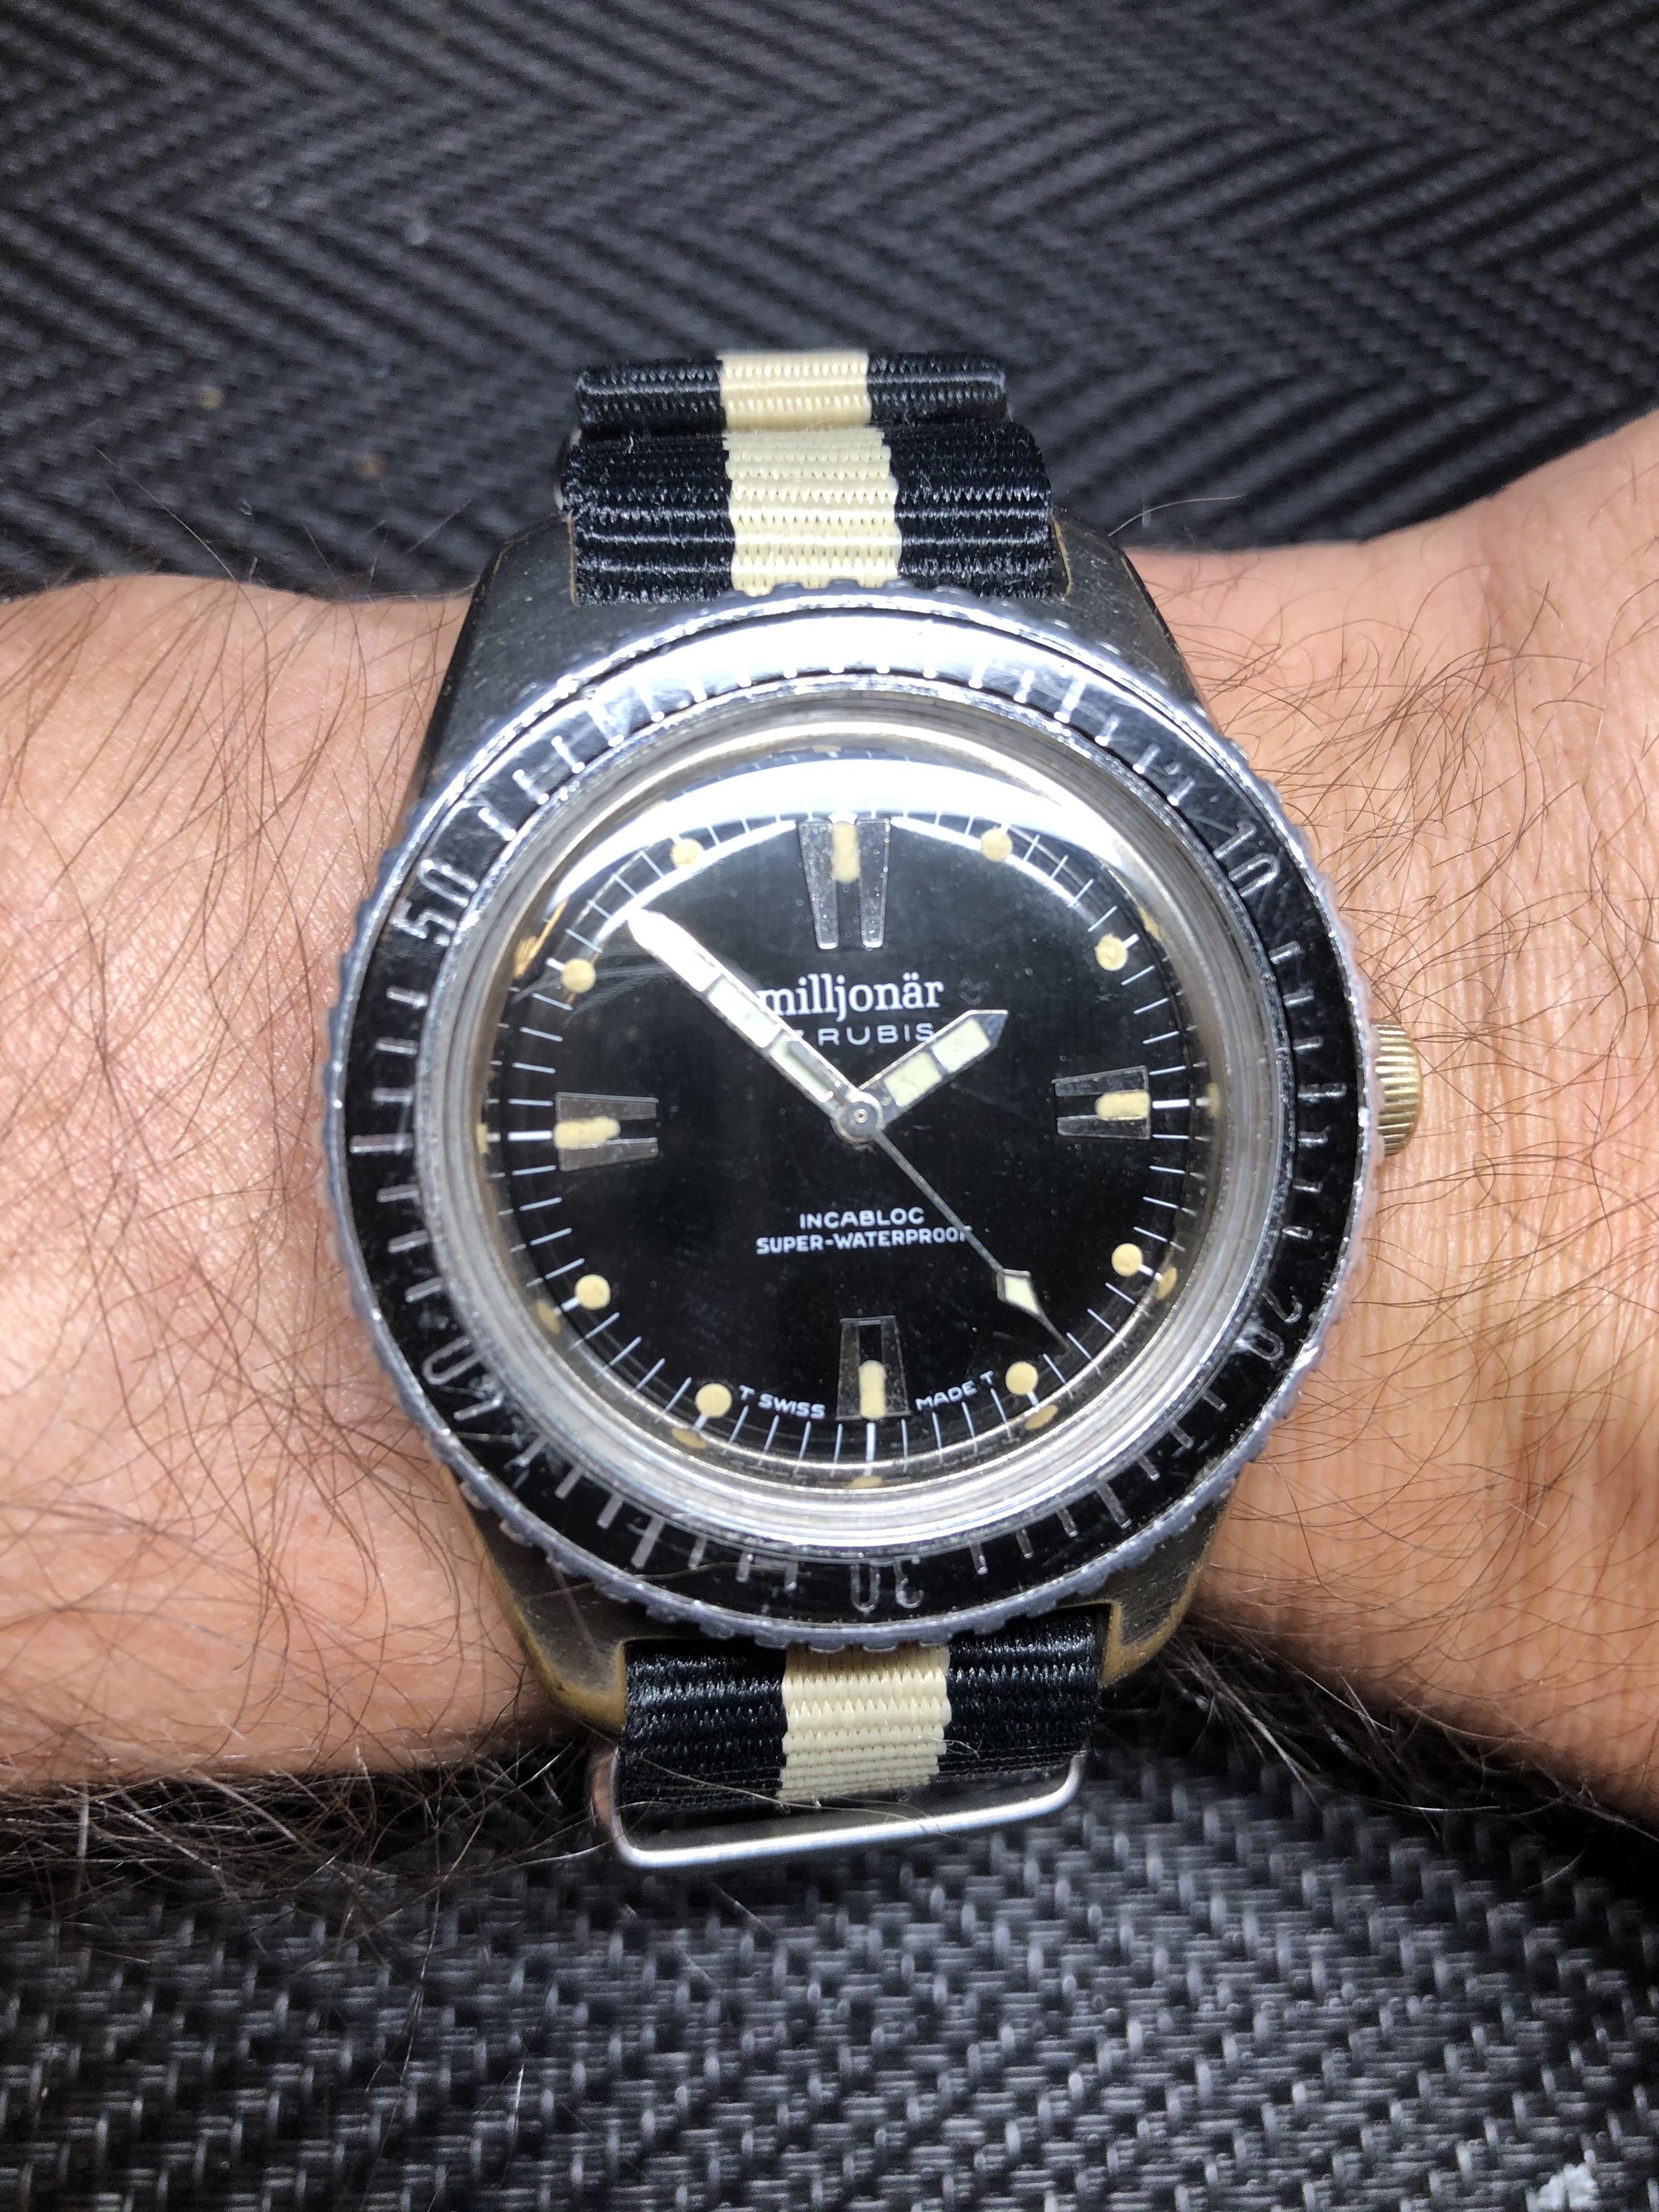
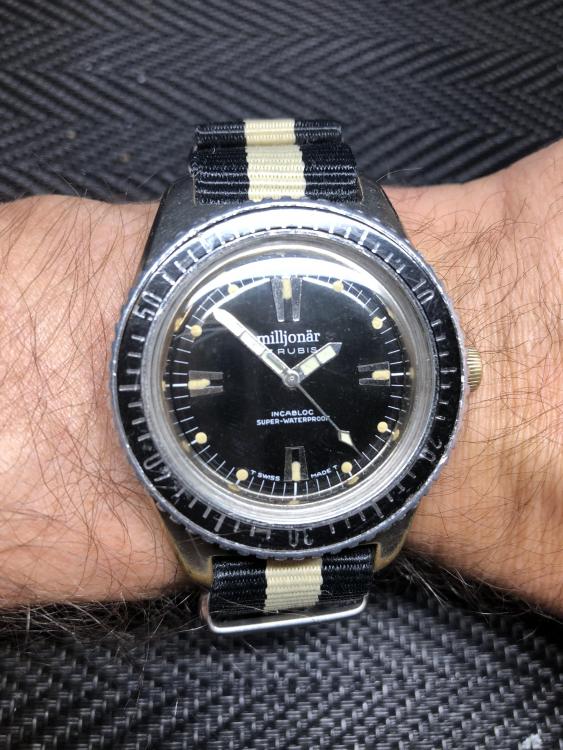
Bought this vintage MILJONÄR Swiss Made 1970s old diver wrist watch 17 Jewels couple months back from ebay very cheap (like 50 euros with delivery). Just liked the looks of it and thought I might get it back to working shape, so I can use it as my cheap tool watch for rainy days and just to get involved into watchmaking a bit. Watch was not running at all, glass broken, unable to unscrew the case back (well, that explained the price). MILLJONÄR is some Scandinavian market brand, usually they are non-expensive watches with AS movements. There are quite a lot of them around, but I couldn't find online another one divers watch. This one had AS 1686 movement with rotating bezel and claims to be 20 ATM waterproof on case back. 40 mm diameter. Tried to open case back myself, no luck. Asked local watchmaker in Helsinki - no luck. He suggested oiling the case back for a week using WD-40 and try later - no luck. As last resort he suggested gluing with superglue to watch case some big nut, so I can use some wrench to unscrew the case. Went to Riga, Latvia, asked watchmaker here to try to open it (they bragged they are best watchmakers in 8000km radius), he glued something to watch case, opened and cleaned reminds of glue with ultrasonic in less than 10 minutes, while we were talking. After that I disassembled the movement (stripped the lefty screw on crown wheel due to luck of experience), cleaned, oiled, assembled - it started to run pretty well. Ordered new set of screws from ebay, got all of them, except the one I needed (for crown wheel) - seller forgot to add it to package. After finally receiving it, I realised it's not the screw which is stripped, but the bridge over mainspring needs to be replaced. So ordered that from the same seller, replaced and watch was almost completed. On next trip to Riga got glass replaced and bought some non-expensive nato strap on ebay. Quite happy with end result and experience gained during the process!
 1 point
 -
The coarseness of the abrasive affects the texture of the finish. If you use a finer grit, say 400, 600 or 800, you will end up with progressively softer, more satin effect, 100 grit will give you a more textured, but a harsher feel. If you progress from coarse to fine, remember to clean the part between each grit, so as to avoid a mix of grits, and inconsistent results. You can also use 000 steel wool to soften the effect of harsher grit. The trick is to take care to accurately and carefully mask off any areas that you don't want to become "brushed". If you need to restore parts to a mirror finish, then it is sometimes easier to do those first, then mask them off and "brush" the other parts. For the best results, you need to keep your parts moving in a very straight line across the abrasive. Each pass has to be exactly parallel to the previous one, otherwise you end up with a sort of wavy inconsistency. Several soft passes tend to produce a better effect than a couple of passes pressing heavily on the abrasive. Practice on an old spoon or some other piece of scrap stainless until you get the effect you are looking for. With care, you can produce some very interesting textures and patterns with simple abrasives, and careful masking of the part. I find that electrical tape is more robust than painters masking tape for this. You can cut very straight fine strips of your tape by taping it first to baking parchment, then cutting it with a rotary cutter or a scalpel and a steel ruler, then peeling the thin strips from the parchment and applying them to the work piece. Another trick is to glue strips of abrasive paper on to wooden coffee stirrers or other flat strips of wood. Use them as you would a small file.1 point
-
amazing attention to detail.1 point
-
Warning, Mugshot alert.. DSC07795 by Micky Aldridge, on Flickr1 point
-
The problem with that particular video is it's showing the final product of hours of work. Then is your vibrating tool is missing the base? I wonder if it came this way? If you look at the video there's a a heavy base with a lever that you push to get the thing to rotate. Then there is a major problem with using the tool today the supply of hairsprings. August 2007 the British horological journal has a article "Anthony Randall FBHI gives a brief history of Balance Springs". So the article gives a history talks about hairsprings and explains briefly about the CGS numbering system. The other reason for the article is there are no more generic hairsprings being produced by the Swiss. So in the early days multiple companies producing generic hairsprings purchased by watch manufacturers who vibrated them for their own watches. So today there's only one swiss hairspring company producing hairsprings for specific calibers only no more generic Springs. Or the watch companies themselves produce their own Springs for their specific watches. Then to understand hairspring vibrating start to finish I have a link below to an article written by a student in a school learning watch repair. the amusing aspect of the article written 2003 is the remark made about endless supply of hairsprings. in the same school today I can't quite remember the details but I think they only do one balance and very limited number Springs to learn with or they just don't do it. Conceivably at some point in time there will be no more vibrating Springs taught at the schools as a have nothing to vibrate. http://www.tp178.com/jd/watch-school/6/article.html Then a must-have book for hairspring vibrating as it explains in detail about the CGS numbering system how you use it to pick your hairspring vibrating precision timing all those helpful things to make use your tool. Watch Adjustment by Hans Jendritzki ISBN-10: 2883800294 ISBN-13: 9782883800298 Format Hardcover Author Hans Jendritzki Publisher Antoine Simonin, 2006 Pages 1071 point