Leaderboard


Popular Content
Showing content with the highest reputation on 01/26/23 in all areas
-
I find it is more convenient to mount a large cylindrical neodymium magnet on my workbench. That way, the case is affixed to a known stationary position while I work. I NEVER lose parts with this method either.7 points
-
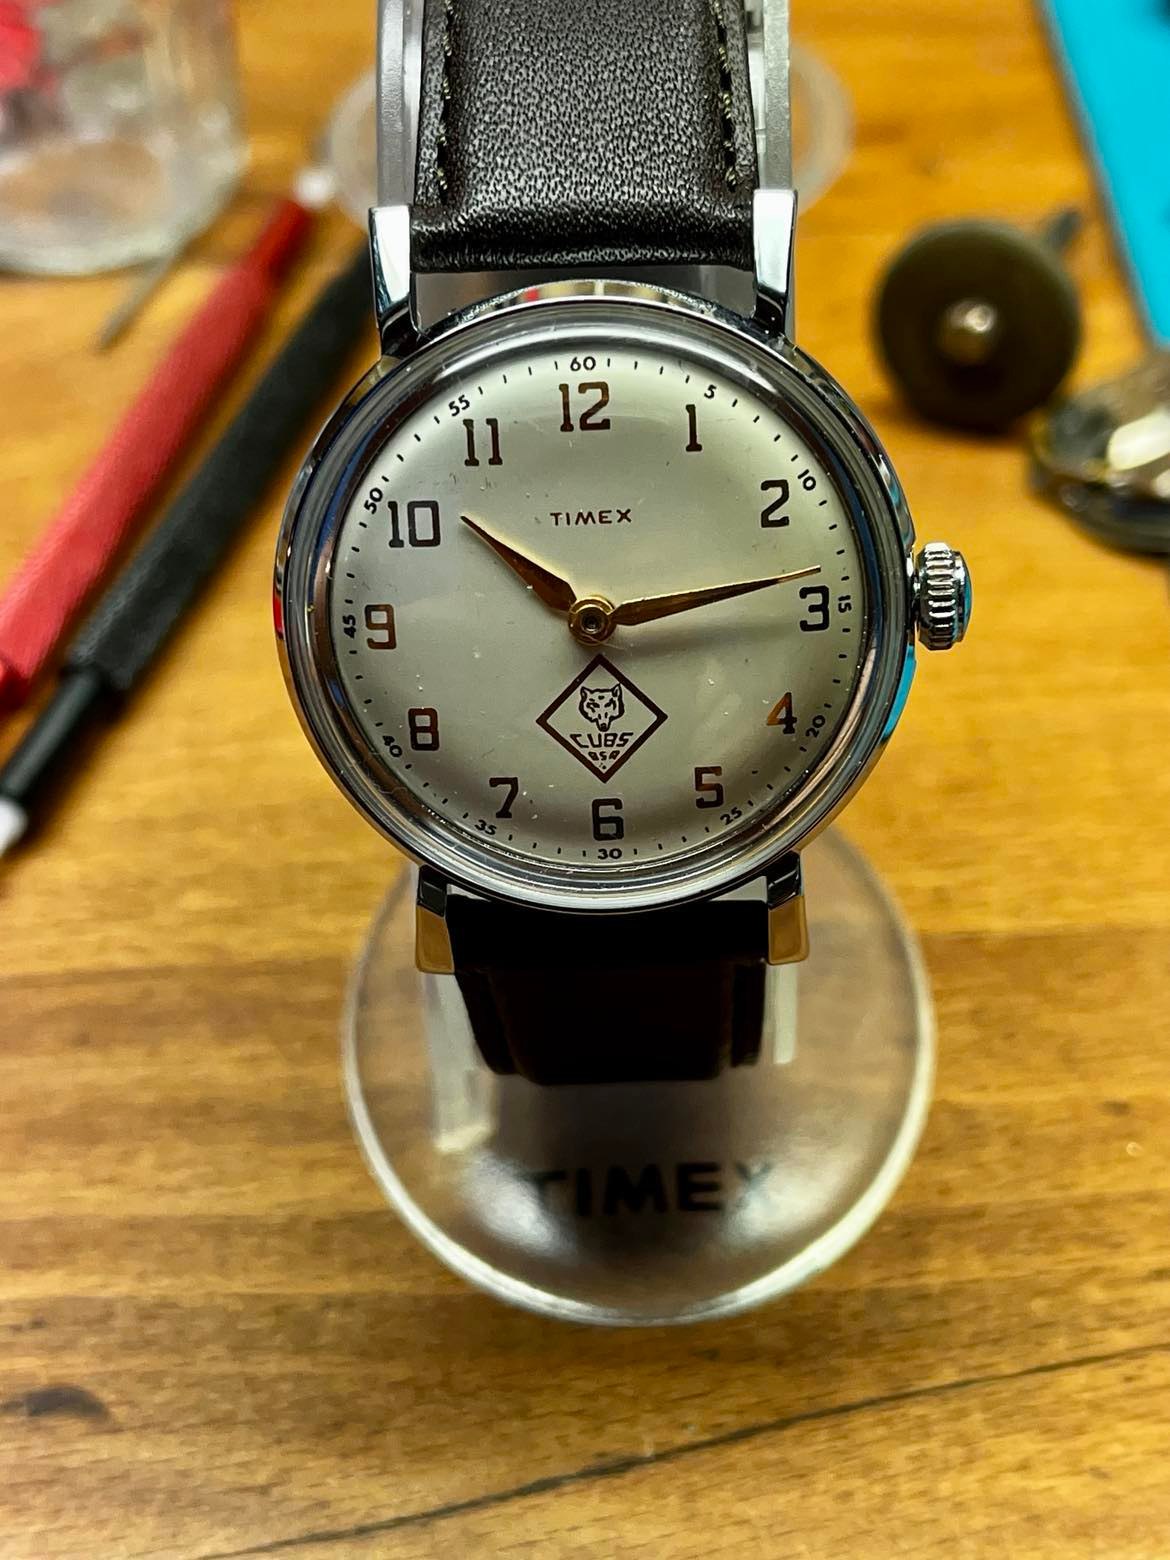
Just off the bench is this 1959 Timex. Powered by manual wind M22 movement. Look at how that chrome shines! Great cream dial with gold painted numbers.
 4 points
 -
1973 Bulova model 11636-8W with an 11AOACB movement on (I believe) the original bracelet. This one looks to be the same as the Ambassador model but was sold overseas and lacks the "Ambassador" model name on the dial. I didn't think I would have a hope in hell of finding a new crystal so I was lucky that it polished up nicely.
 4 points
 -
It's easy to get confused with angular units, as we aren't used to using them. The moment of inertia isn't increased with velocity. It's how the mass is distributed. The moment of inertia is the sum of the mass x radius² - which is why the radius is so important. What does increase with rotational rate is the "angular momentum", L = I x w (where w is the angular speed in rad/s) So yes, a high beat does give higher angular momentum, so the friction forces will be relatively lower than a low beat.
 2 points
 -
Hi if these are non removable settings some use an oiling pen ( not cheap). Or a fine wire/needle to capillary the oil down the wire into the setting. I use an old diabetic needle works ok .2 points
-
I was searching for something ETA 2836-2 related and came across this photo on Amazon. The genius of this method had escaped me up until the moment I laid eyes on this. Could this watchmaking technique help me take it to the next level? Why have I been wasting time on "traditional" movement holders. Clearly, this is where it's at. What is this method called? Is it the Floating Alligator Clamp Borg Optic (FACBO) Method? Whatever it's called, sign me up!
 1 point
 -
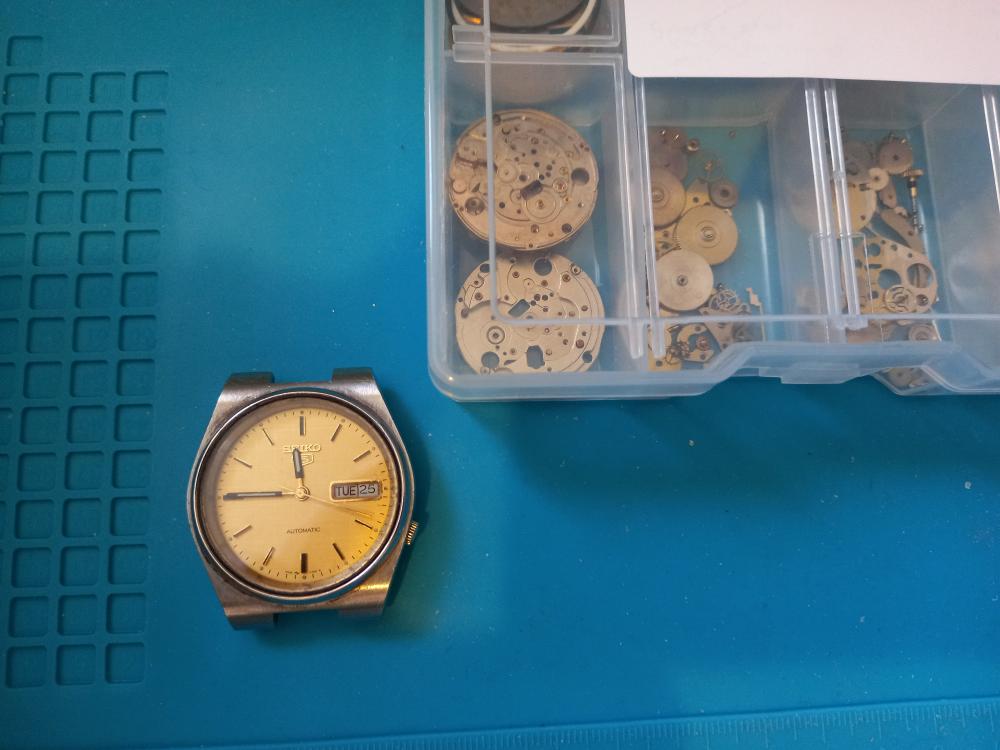
I know it's not much. I feel quite chuffed. I would like to inform that I have completed a full restore of a watch. Been a while in learning, but a good feeling. Seiko 7S26. Working well.
 1 point
 -
I wish I were submitting my way of doing this but instead I'm here to ask how to do this: what is the technique for tightening the curve at the arbor side of the mainspring? The new mainspring (MS-48T) is to large a radius where it meets the arbor and does not lock on. I need to tighten the curve to lock on to the arbor. I've heard heating the spring red hot then bending is a technique that works - but it was from an unverified source. What is your method of doing this? Thanks!1 point
-
I've just finished this Citizen quartz Alarm. I picked this up a while ago and it went on the "take a look at it later" pile. The alarm bleeps rather than playing any strange tunes, or rather this one *now* beeps, since the fault on it when it arrived was that the alarm didn't work. The reason it wasn't working, which I totally missed the first time I looked at it, was that the round battery contact was touching the piezo speaker, and effectively shorting it out. The quick fix is that triangle of masking tape. I was going to cut a dainty half moon out of kapton tape, but I can't find the kapton tape anywhere, so the temporary fix may well become permanent. It shows little sign of ever having been worn, so perhaps the alarm never really worked in the first place, and it spent its life unloved in a drawer. I'm not sure of its exact age, but the metal rather than plastic construction of the movement, and the serial number suggests it is possibly from the late 1980s (1989), but it could be a little later.
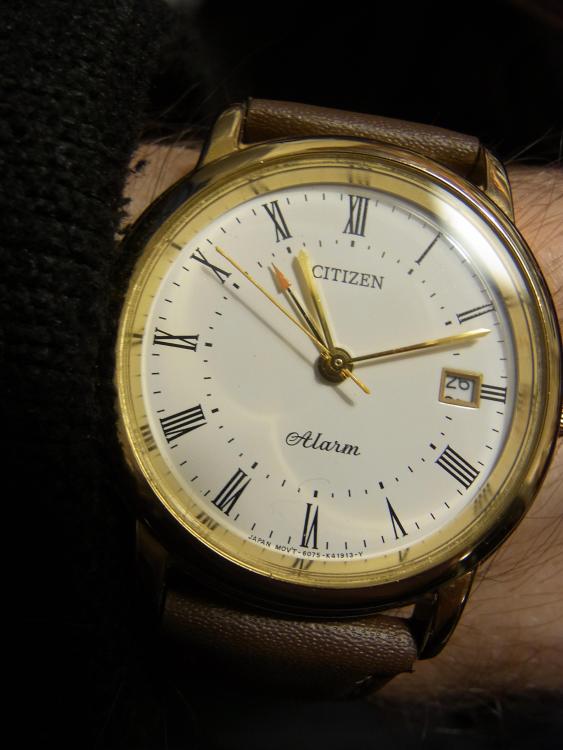
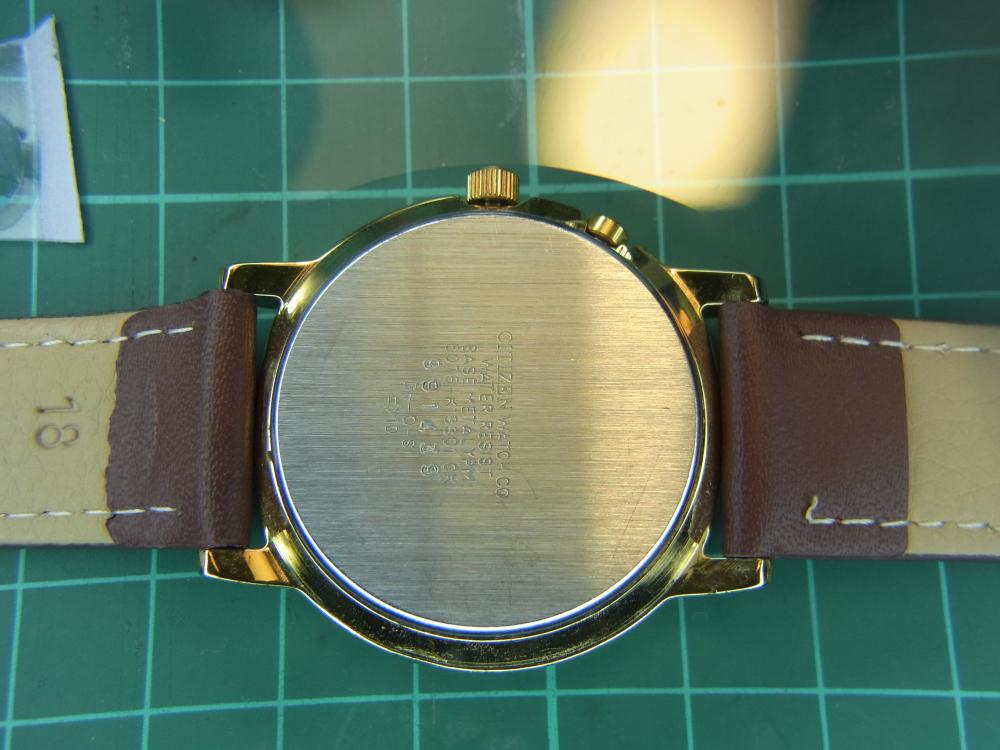
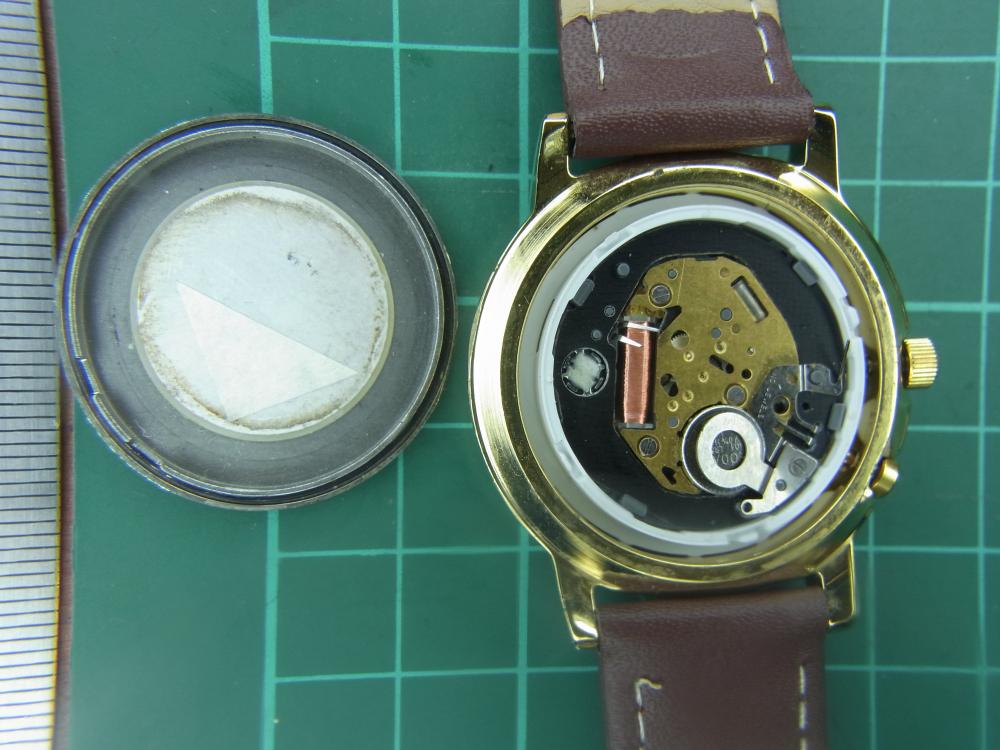 1 point
 -
You have to remove them to properly clean the cap jewel and the jewel hole. If you don't have an automatic oiler, my suggestion would be picking the cap jewel with a jewel picker from the top side, oiling the jewel and putting it back in its place with a help of tweezers. Jewel picker is much safer than tweezers if you don't like flying parts. I also clean cap jewels by picking them with a jewel picker and rubbing against paper with and without IPA. https://www.cousinsuk.com/product/jewel-picker-upper-with-silicone-tips1 point
-
The experts will weigh in I am sure (I am an amateur). I think the answer is yes, you do. If you do not, you will not thoroughly clean the area between the bearing and cap jewel. This is a personal choice if it is your own watch and are not striving for perfection. However, if you are aspiring to be a watchmaker, you have to be willing to take on all the tasks that professional watchmaker would take on. If you watch Mark's videos, there is not a single screw left unscrewed (as I recall). These, are easy. Yes those screws are small, and you risk losing one. I would remove the cap jewel, drop it in one-dip, then put it on watchmaker's paper...rubbing it along to clean it thoroughly. Then put oil on the cap jewel and replace it. All this, of course, after running the plate through the normal cleaning cycle.1 point
-
So I have those plier and tried to adjust - it snapped. Decided to try the annealing then tempering process. I heated the tip of the inner coil red hot with a butane torch. Let it cool, bent into shape. After annealing it was pliable and held position. After getting it bent into shape I heated red hot again then plunged in water for a fast cool. Dried it with denatured alcohol to rid it off the water - I'll install and test tonite.1 point
-
I don't think this is correct. A pendulum's moment of inertia depends solely on how its mass is distributed around the pivot point, not its velocity. It's an interesting question though, why are high-beat movements usually preferred? There's the obvious advantage of a smoother seconds hand of course. I've also heard that high-beat movements recover faster from shocks and are therefore more accurate. But the balance spins faster in a high-beat movement which increases friction. Is this the reason why you need more power? In my mind, if you disregard friction for a moment, a high-beat movement shouldn't need more power to operate compared to a low-beat movement, but I'd love to be corrected on that. Of course, adding friction forces means you need larger impulses to the balance to maintain a given amplitude, but then again, you're giving more impulses per second in a high-beat movement, so each impulse could conceivably be smaller. Lots of tradeoffs, lots of misconceptions, looking forward to hear the expert opinions...1 point
-
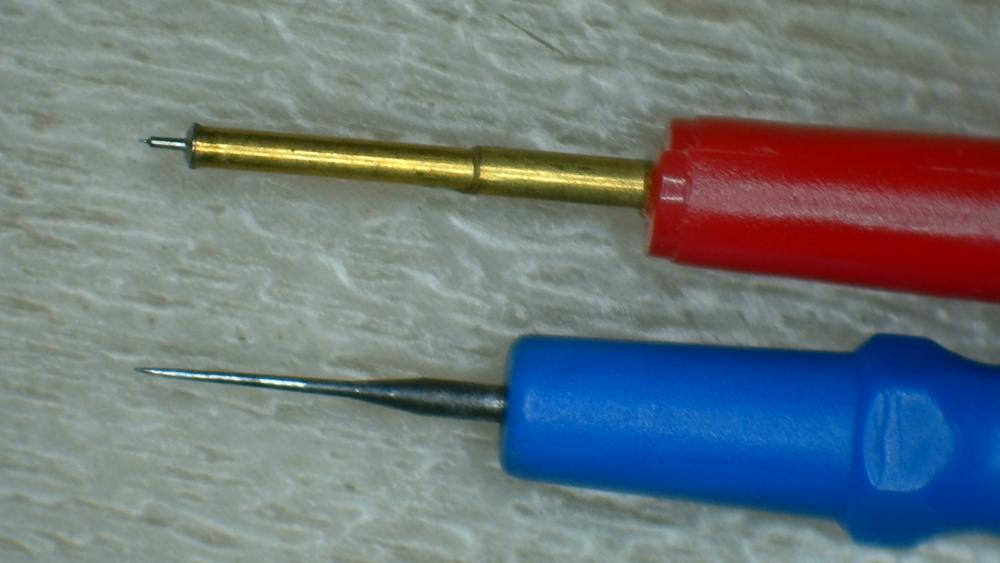
I made my own tools - the red one is an old balance staff stuck in to some brass tube. The blue one is just a broken oil which I sharpen to a point,
 1 point
 -
Round nose pliers. Be very careful these new springs do not like to be altered and sometimes they snap.1 point
-
It may be time to move up from using the ink tube of a Bic pen to push on hands and collets1 point
-
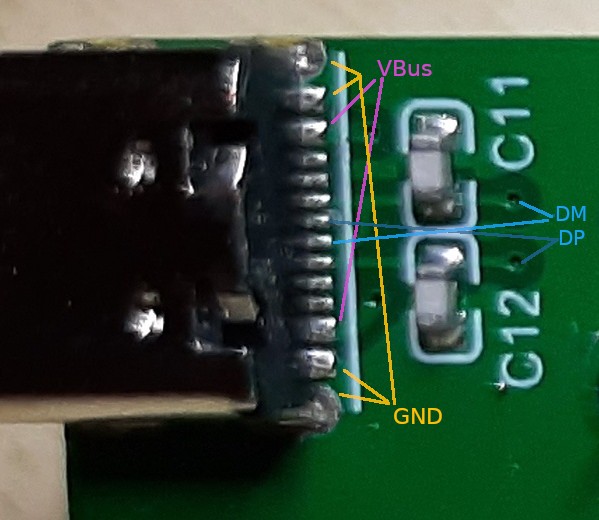
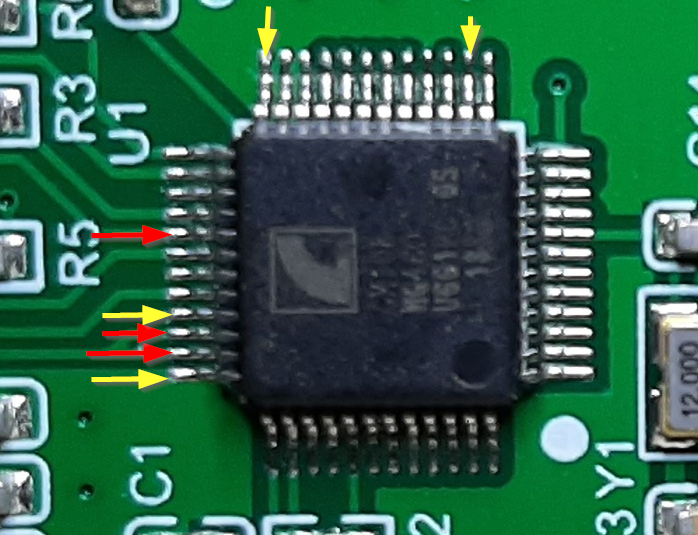
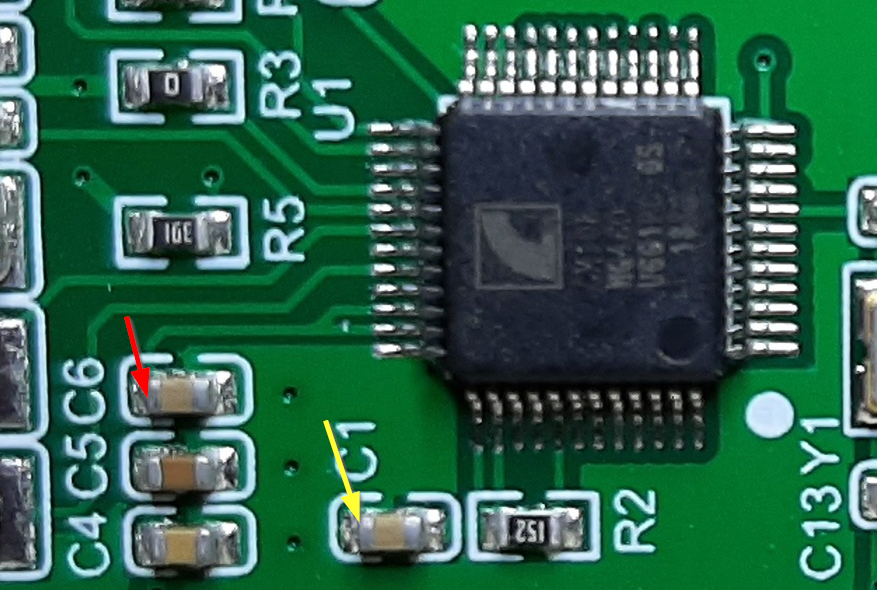
LittleWatchShop has shown exactly what I meant. To get a small probe, you can use an oiler and then touch the probe to the oiler. The ground probe clipped to something, e.g. the metal shell of the USB connector, or the black wire to the piezo, can act as a hands free ground so you can use both hands for the other probe. I've also used small gauge wire. Extract a single strand from some random bit stranded wire. Twist it around the probe tip and leave a tail sticking out. Needs to be somewhat short since the wire is not stiff. Then use that. And as shown in LittleWatchShop's picture, the pins on the chip connect to the components, which are somewhat larger with more space around them. Anyway.... I think you are measuring the data lines on the USB connector instead of the power lines. There are four pins of note on the connector. 5 volts (called Vbus), ground, and two data lines called DP and DM. The LED should light up if you have 5V and ground. So measure that. Here's where I think they are: The light green color is copper trace, the dark green are gaps. So the lines of light green are the "wires" on the PCB. You can visually follow them. It looks like the pads labeled GND above touch the big light green area that covers most of the PCB, so this area is all electrically connected to ground. This is a pretty typical design. You can see all the yellow arrows in the LWS's picture appear to touch this area too. If the VBus pads are too small to probe, try to follow the traces. You can see each has a short stub going to the right that ends in a tiny hole called a via. This is a connection to the other side of the PCB. Flip it over and you'll find the via on the other side and the trace it's connected to and can continue to follow the circuit. Eventually it might connect to something larger. I think it connects to the left side of R3 (you can see the via it come back to the front side to the left of R3), which should be an easier spot to probe. You might notice there are two pads connected to DM and two pads connected to DP? This is why you can flip the connector over and have it still work. Only one set is connected at a time and changes when the cable is flipped.
 1 point
 -
Yellow is negative. Red is positive.
 1 point
 -
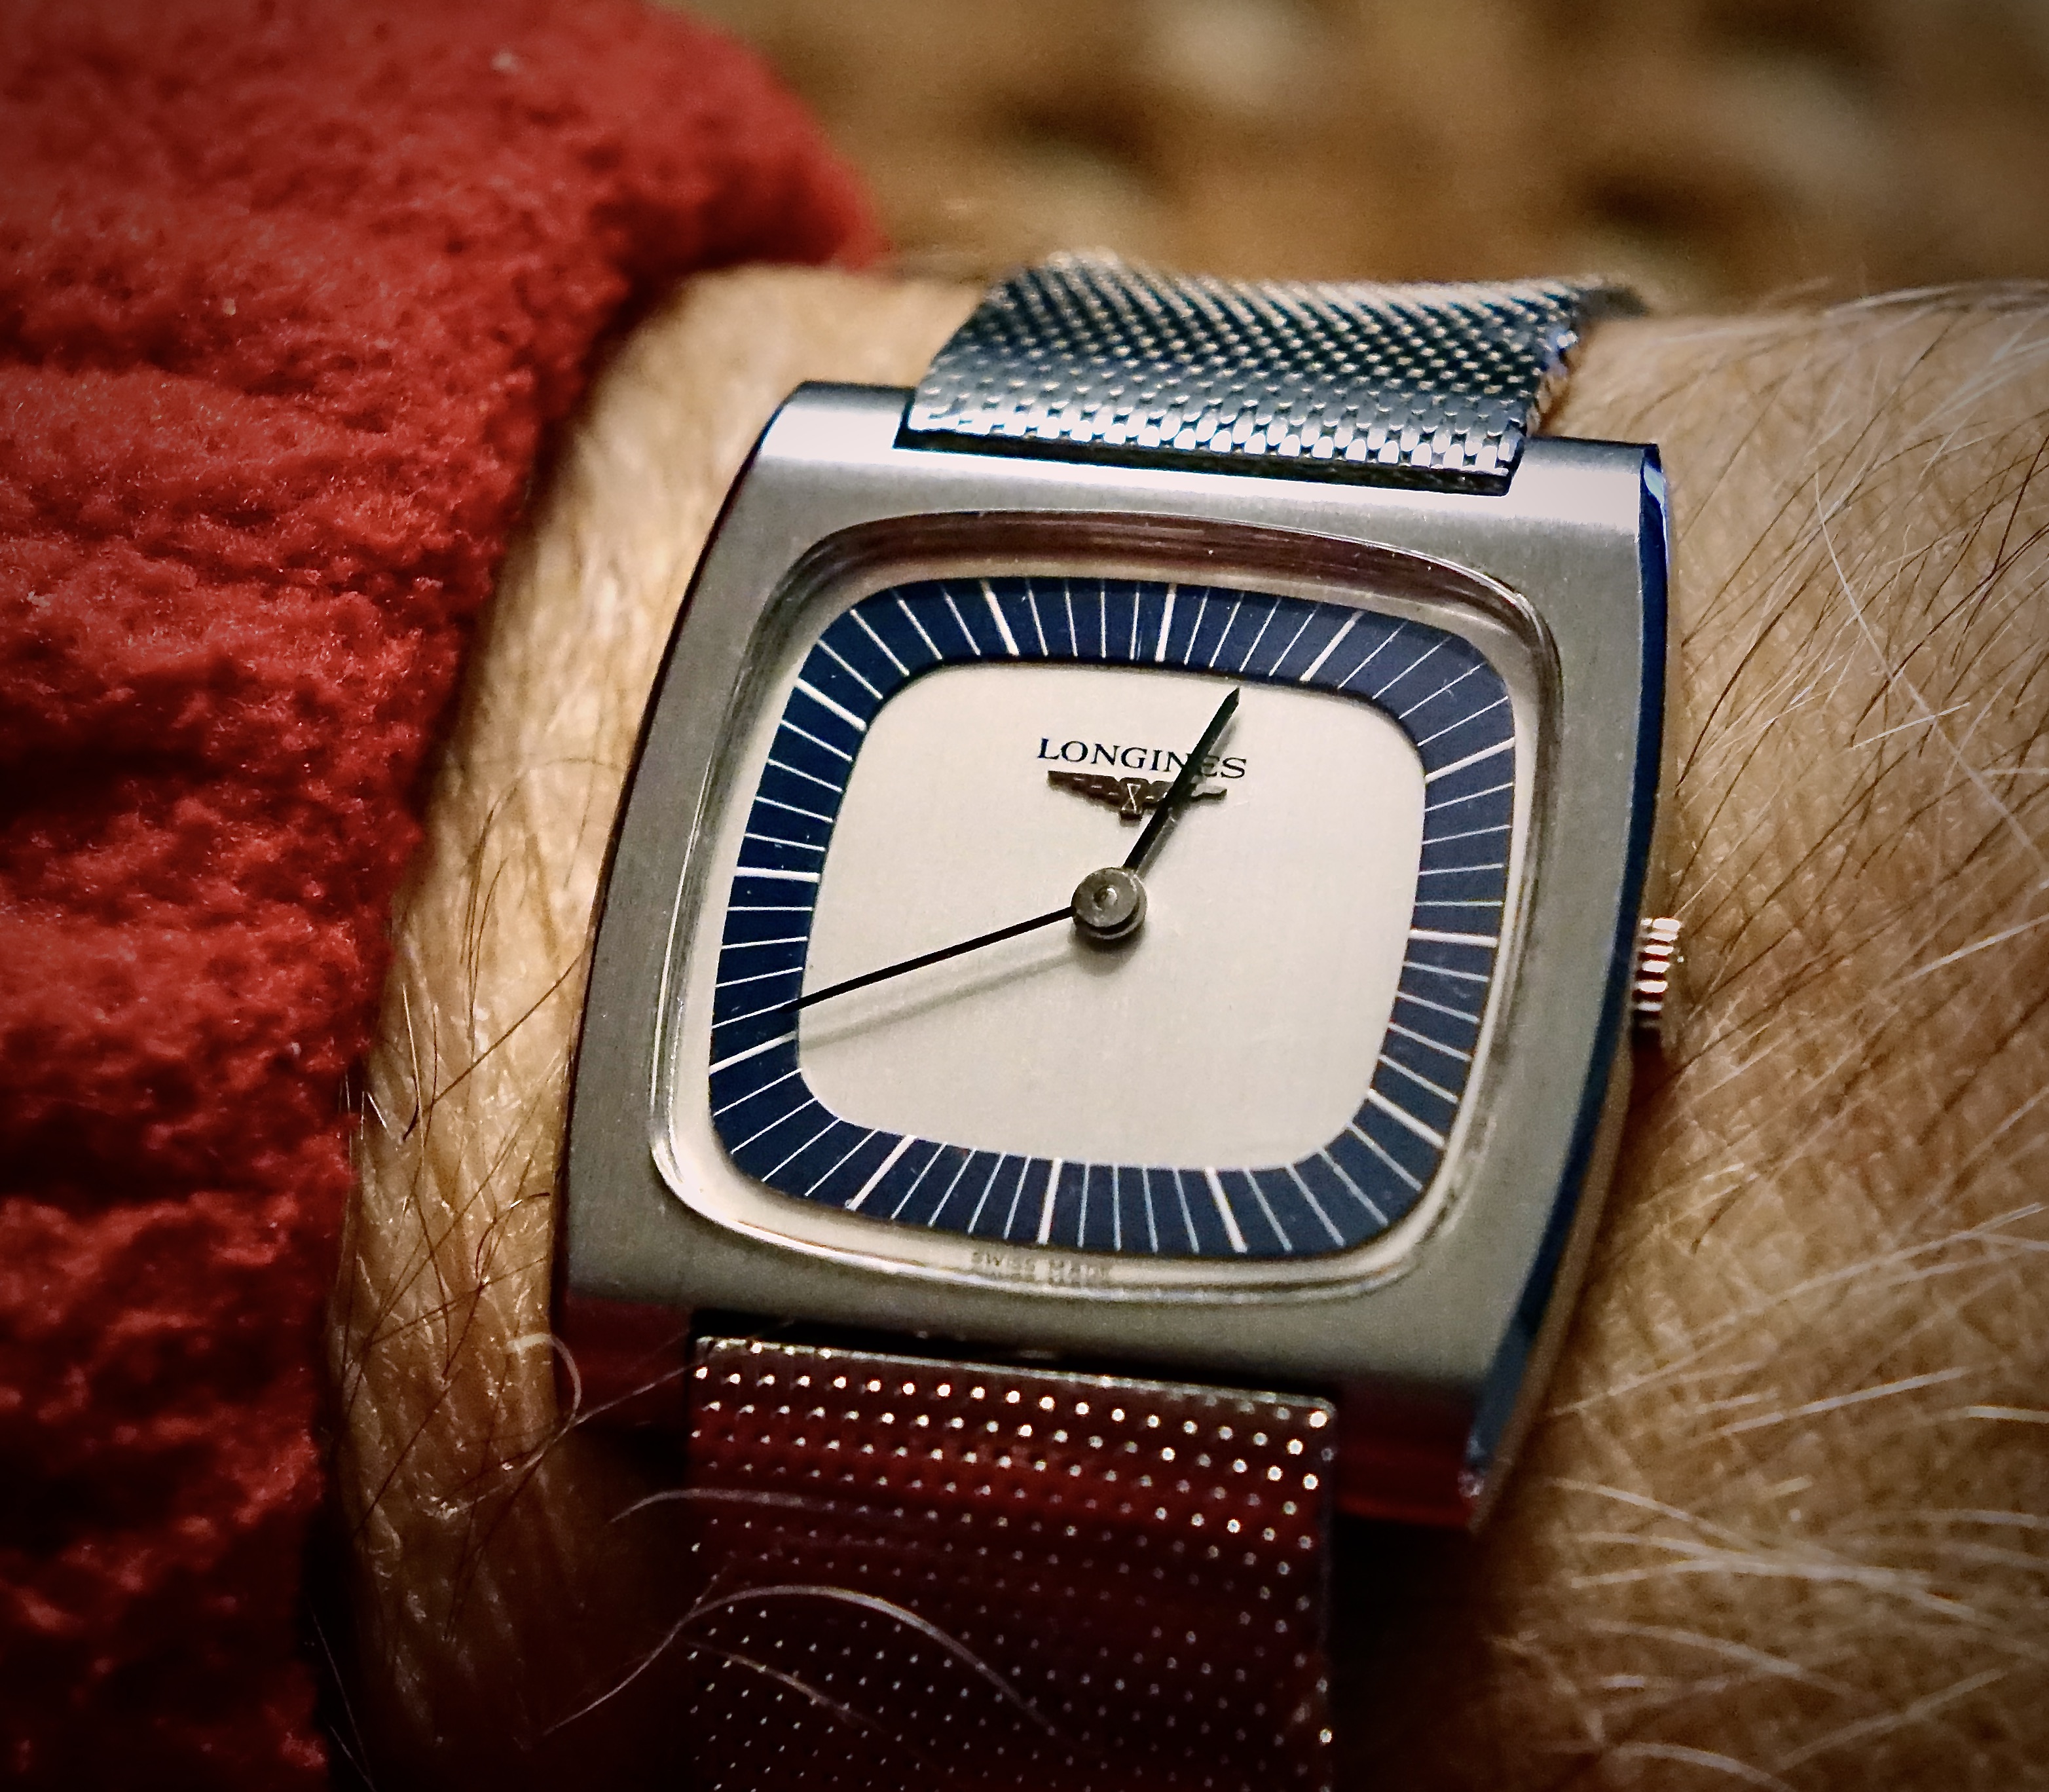
Now that is interesting....Longines Super Thin 1970, caliber 428, 17J
 1 point
 -
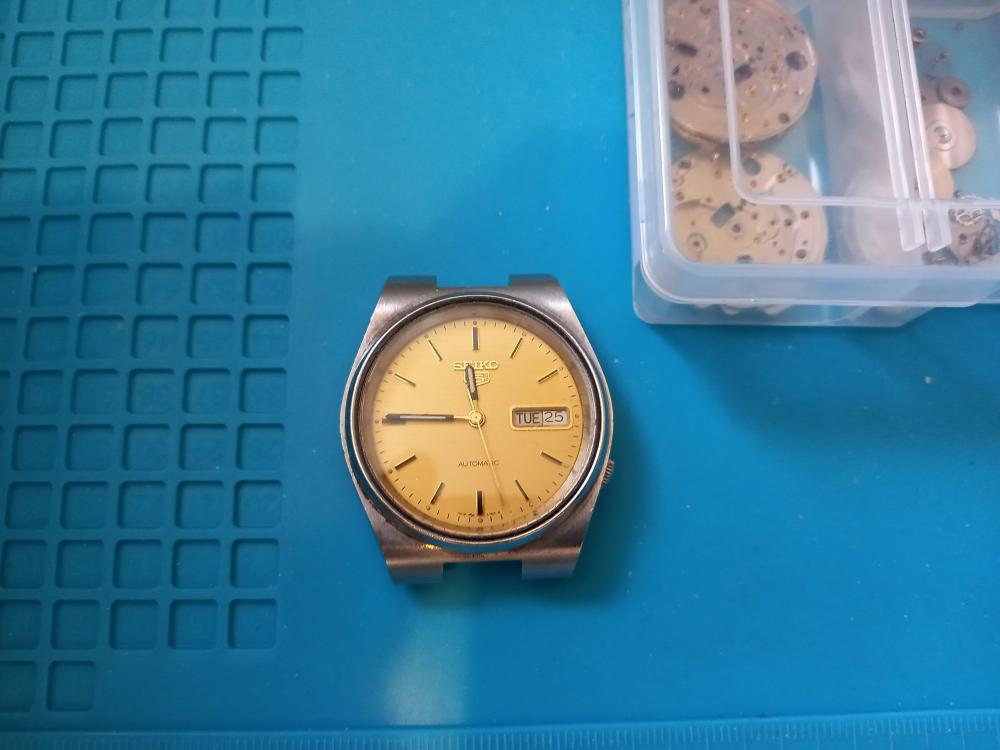
Good to see you working on the second piece of the same caliber as 7s26 and 7009 are sibblings. I usually have several piece of the same caliber on the bench undergoing repair.1 point
-
On a roll Having done my first. Now, my second. This is the one I wanted to do when I first started. A Seiko 7009. YouTube has been of great assistance. The advice and enthusiasm of members here on this forum has been a driving force for me. Isn't this hobby great? Regards to you all Ross
 1 point
 -
Then buy a cheap watch from a branded manufacturer that looks like a Rolex, there are plenty out there. Or better yet, build an homage. I wouldn't knowingly buy a counterfeit purely because I don't want to put money into the hands of counterfeiters. Not that Rolex is struggling for money. But if you're trying to get unsuspecting people to buy something that isn't what they expect it to be and making them pay more than the sum of its parts just because you put someone else's logo on it, that's criminal, and I don't want to be part of encouraging that.1 point
-
It's called "helping hands". They're used to hold small electrical devices for soldering that have components or shape such that they won't sit still/at a workable angle on the bench, wire splices, and myriad other similar things. They sorta work some of the time... kinda depends on how heavy something is and whether or not you need to apply any force, if the arms are long enough and/or can be positioned in a useful way... I've never thought to use one for watchmaking, and not sure one would want to to be honest. Regardless: https://smile.amazon.com/Helping-Magnifier-Magnifying-Jewelry-Soldering/dp/B08C2RG5SZ/ref=sr_1_70?crid=195PGQLQO3MUA&keywords=helping+hands&qid=1674570570&sprefix=helping+hand%2Caps%2C147&sr=8-70 This one is exactly like the one pictured above (the magnifying glass has been removed), exactly like the one I have, and is the cheapest delivered on Amazon. Sorta like anything marked "Bergeon", only without anything making sure you use it properly save guilt over the cost.1 point
-
I have quite a collection of high quality well made Chinese tools that are so identical to the Bergeon and Horotec tools that I am totally convinced that Bergeon and Horotec and many others all have their tools made in China and then just pack them in boxes with made in Switzerland printed on them. The tools are absolutely identical in every way apart from branding, they have identical machining marks, the parts are fully interchangable. The only difference is the price. Don't think the Swiss would do such a thing, remember the whole Swiss watch industry is based on a lie, many claim to be watch makers but are only bracelet and case makers, dropping in some generic movement they bought from the likes of ETA etc, then charging a high price just based on their name. Some of them even though they have a multi million turnover are listed as charities so don't pay a cent in tax (Rolex) for example. If they are dishonest with their tax they are going to be dishonest in ather ways as well. The Swiss watch industry is a shady business from end to end so I find it quite easy to find they have products made in China and claim they make them themselves so they can hike the the price by in some cases a huge amount. Take the Bergeon 4 plunger hand setter, almost a grand, the identical one from China is £100. I have one and compared it side by side with the Bergeon, other than the branding and box there is absolutely no difference with all the parts being fully interchangable. Obviously not all tools from China are worth even their low prices but many are, just do your research before hitting the buy button. That's it, off my soap box. Hat coat door bye1 point
-
I guess beauty is in the eyes of the beholder. I cringed when I was asked to service this beauty. It belongs to a colleague's mother. Perhaps it was the style in the 70's, along with bell bottoms and platform shoes. And I think it wasn't a cheap watch as it housed an ETA 2858 and the gold looked like solid 18K. It polished up very nicely.
 1 point
 -
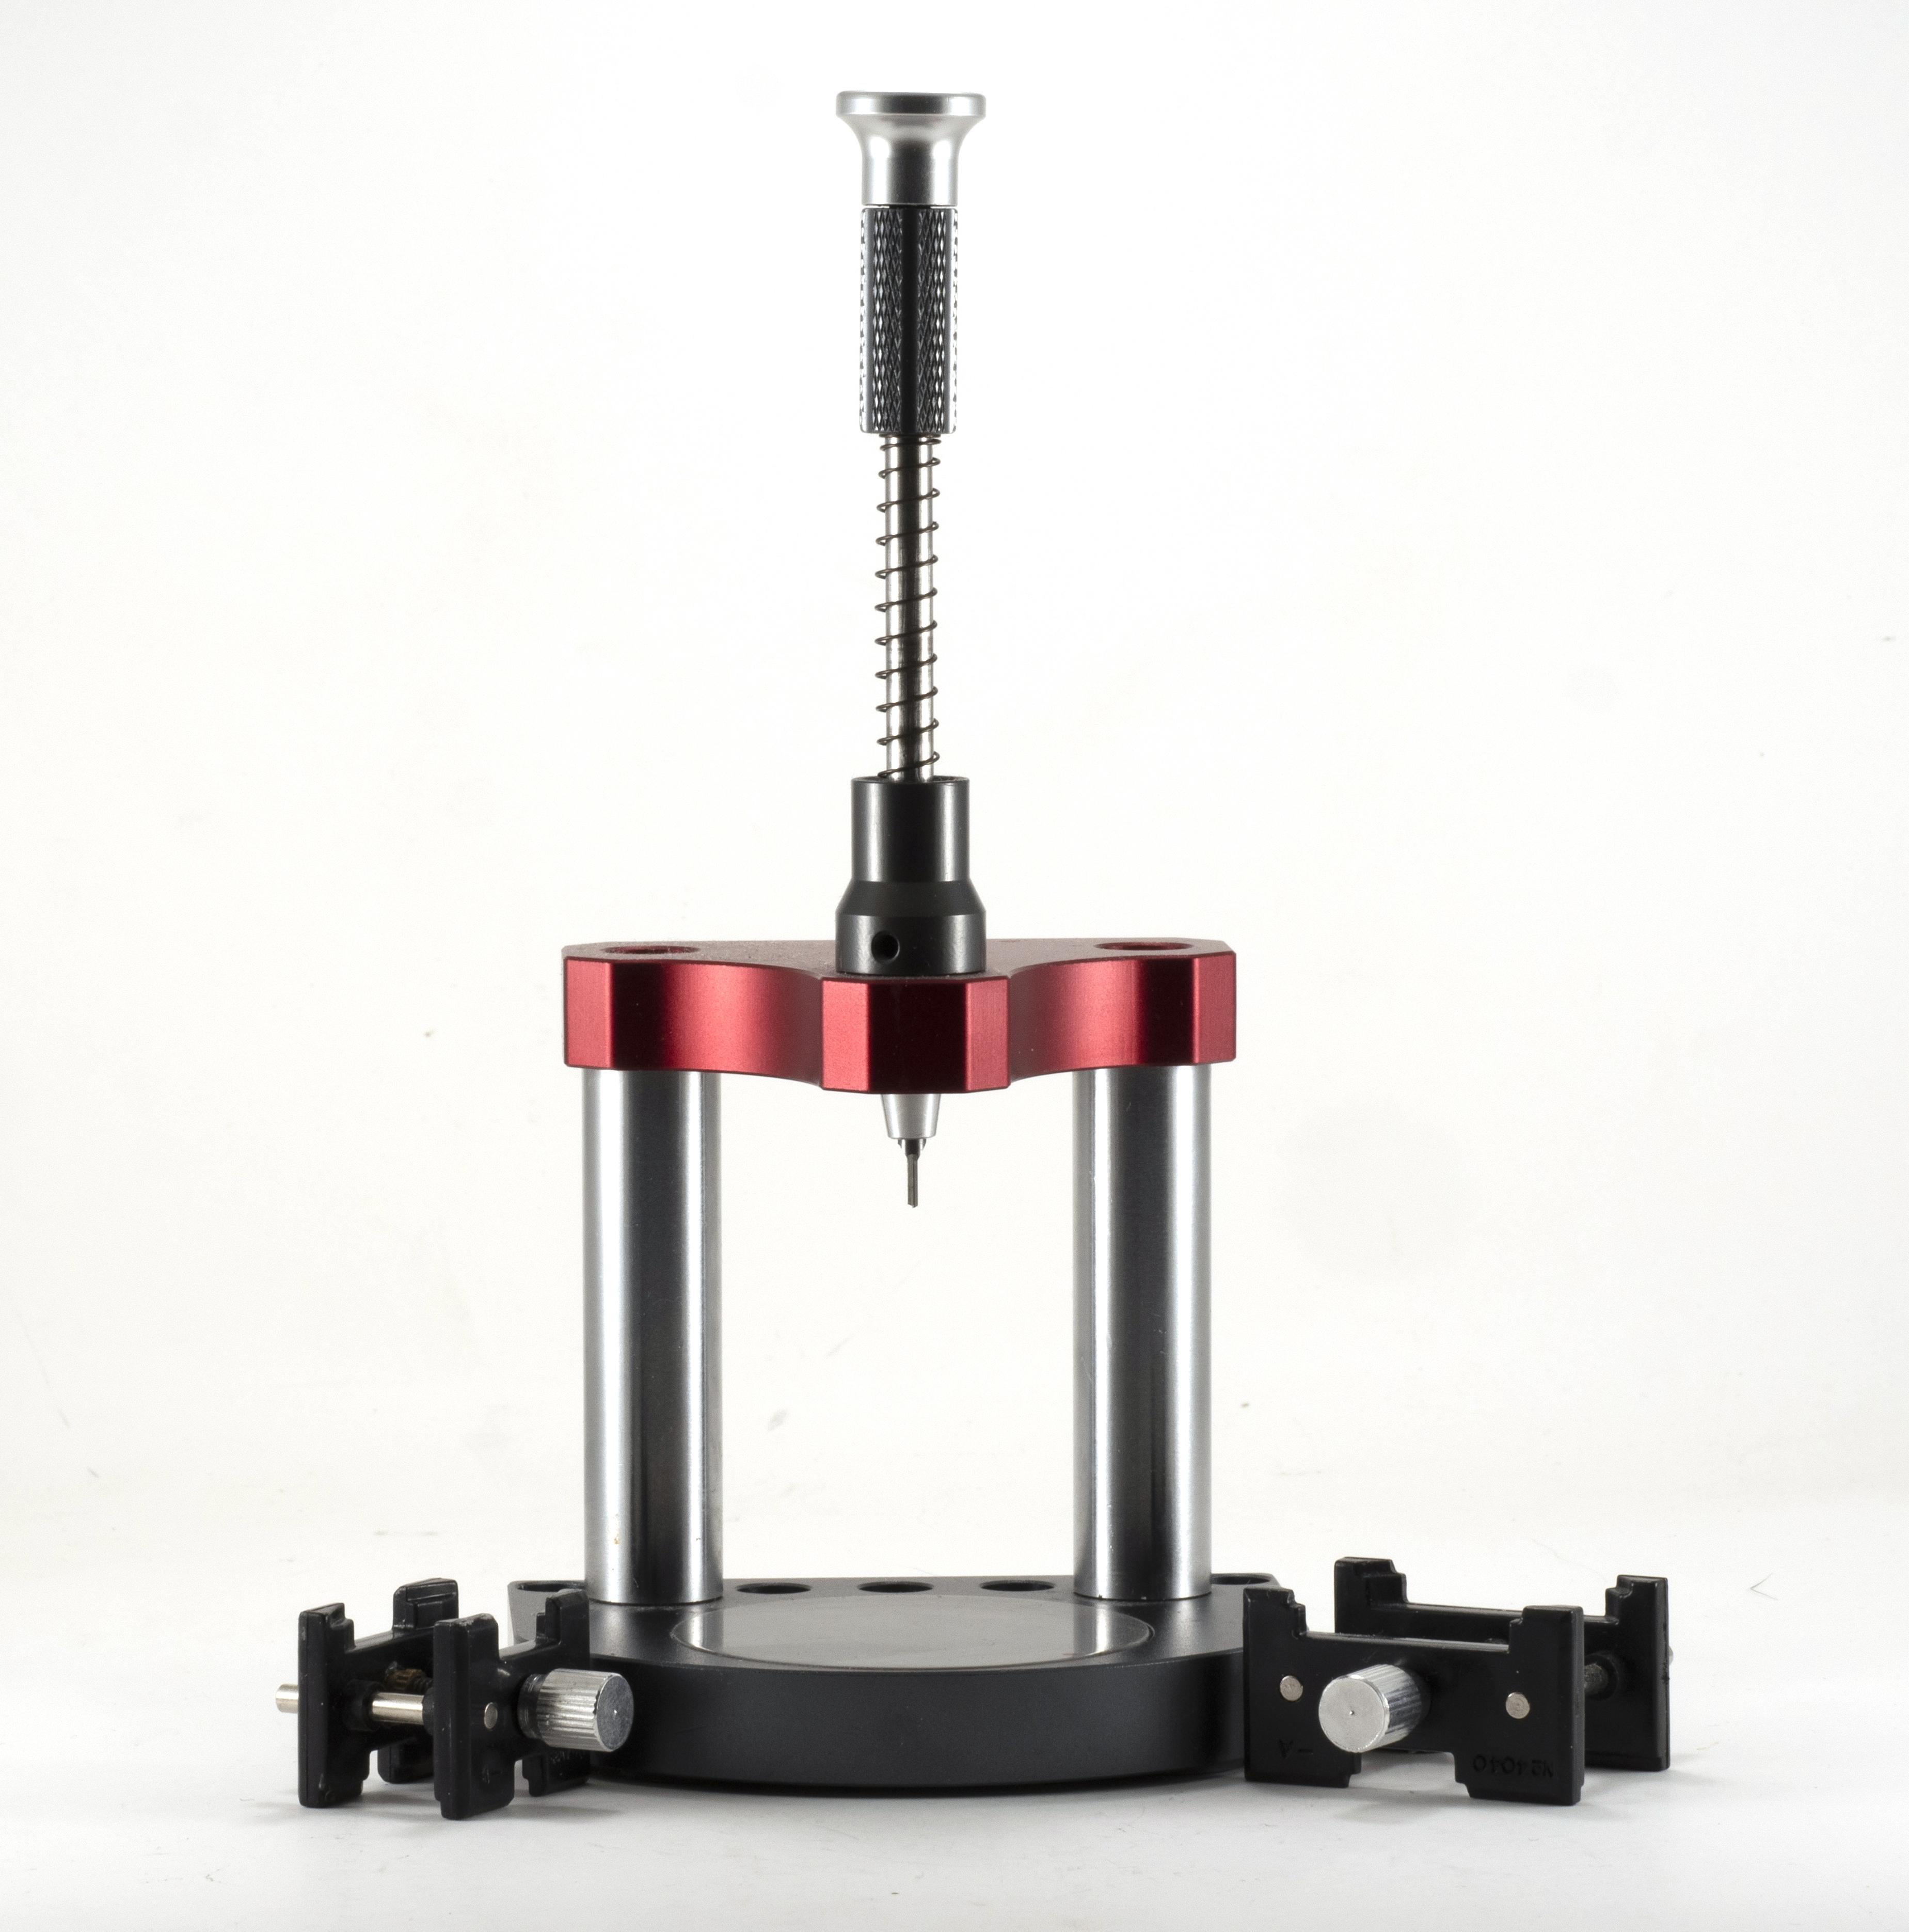
To go with the dial feet repair theme shown in the welding machine shown above a cheaper option is the brass replacements that are glued into place, the downside to this is if just glued to the back of the dial the head of the brass foot can raise the dial enough to give fitment issues, so whats needed is a tool to mill a flat bottomed hole into the back of the dial, just deep enough for the head to be flush with the back of the dial. Prices vary so look around for other deals but this one is £63 https://www.aliexpress.com/item/4000539391167.html?spm=a2g0o.detail.1000023.1.254a6e72zaGioL Another well made tool that does what it is designed to do Kit includes the tool & Cutter, replacement cutters are available if you break the supplied one, 2 plastic movement holders and an assortment of feet in the common sizes
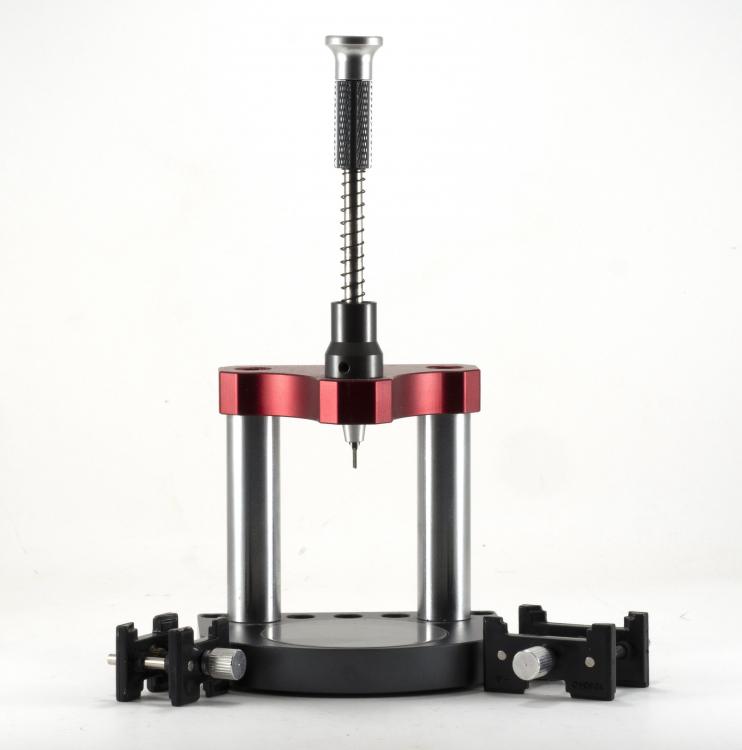
 1 point
 -
Yes to both above. Ideally you have a mainspring arbor holder (yes this is an actual tool and darn handy), basically a slide locking pinvise for distinct diameters. With this you can confidently coax the most stubborn arbors into the mainspring loop. I have a bunch of them but honestly most of the time I use sturdy nickel tweezers and the tilt-it-in technique. I also have a number of hours of barrel arbor floor searching under my belt.1 point