Leaderboard


Popular Content
Showing content with the highest reputation on 02/02/22 in all areas
-
Finally the new crystals (back and front) arrived so I could finish the watch, complimented with a new Ostrich leather strap. Project done

 4 points
 -
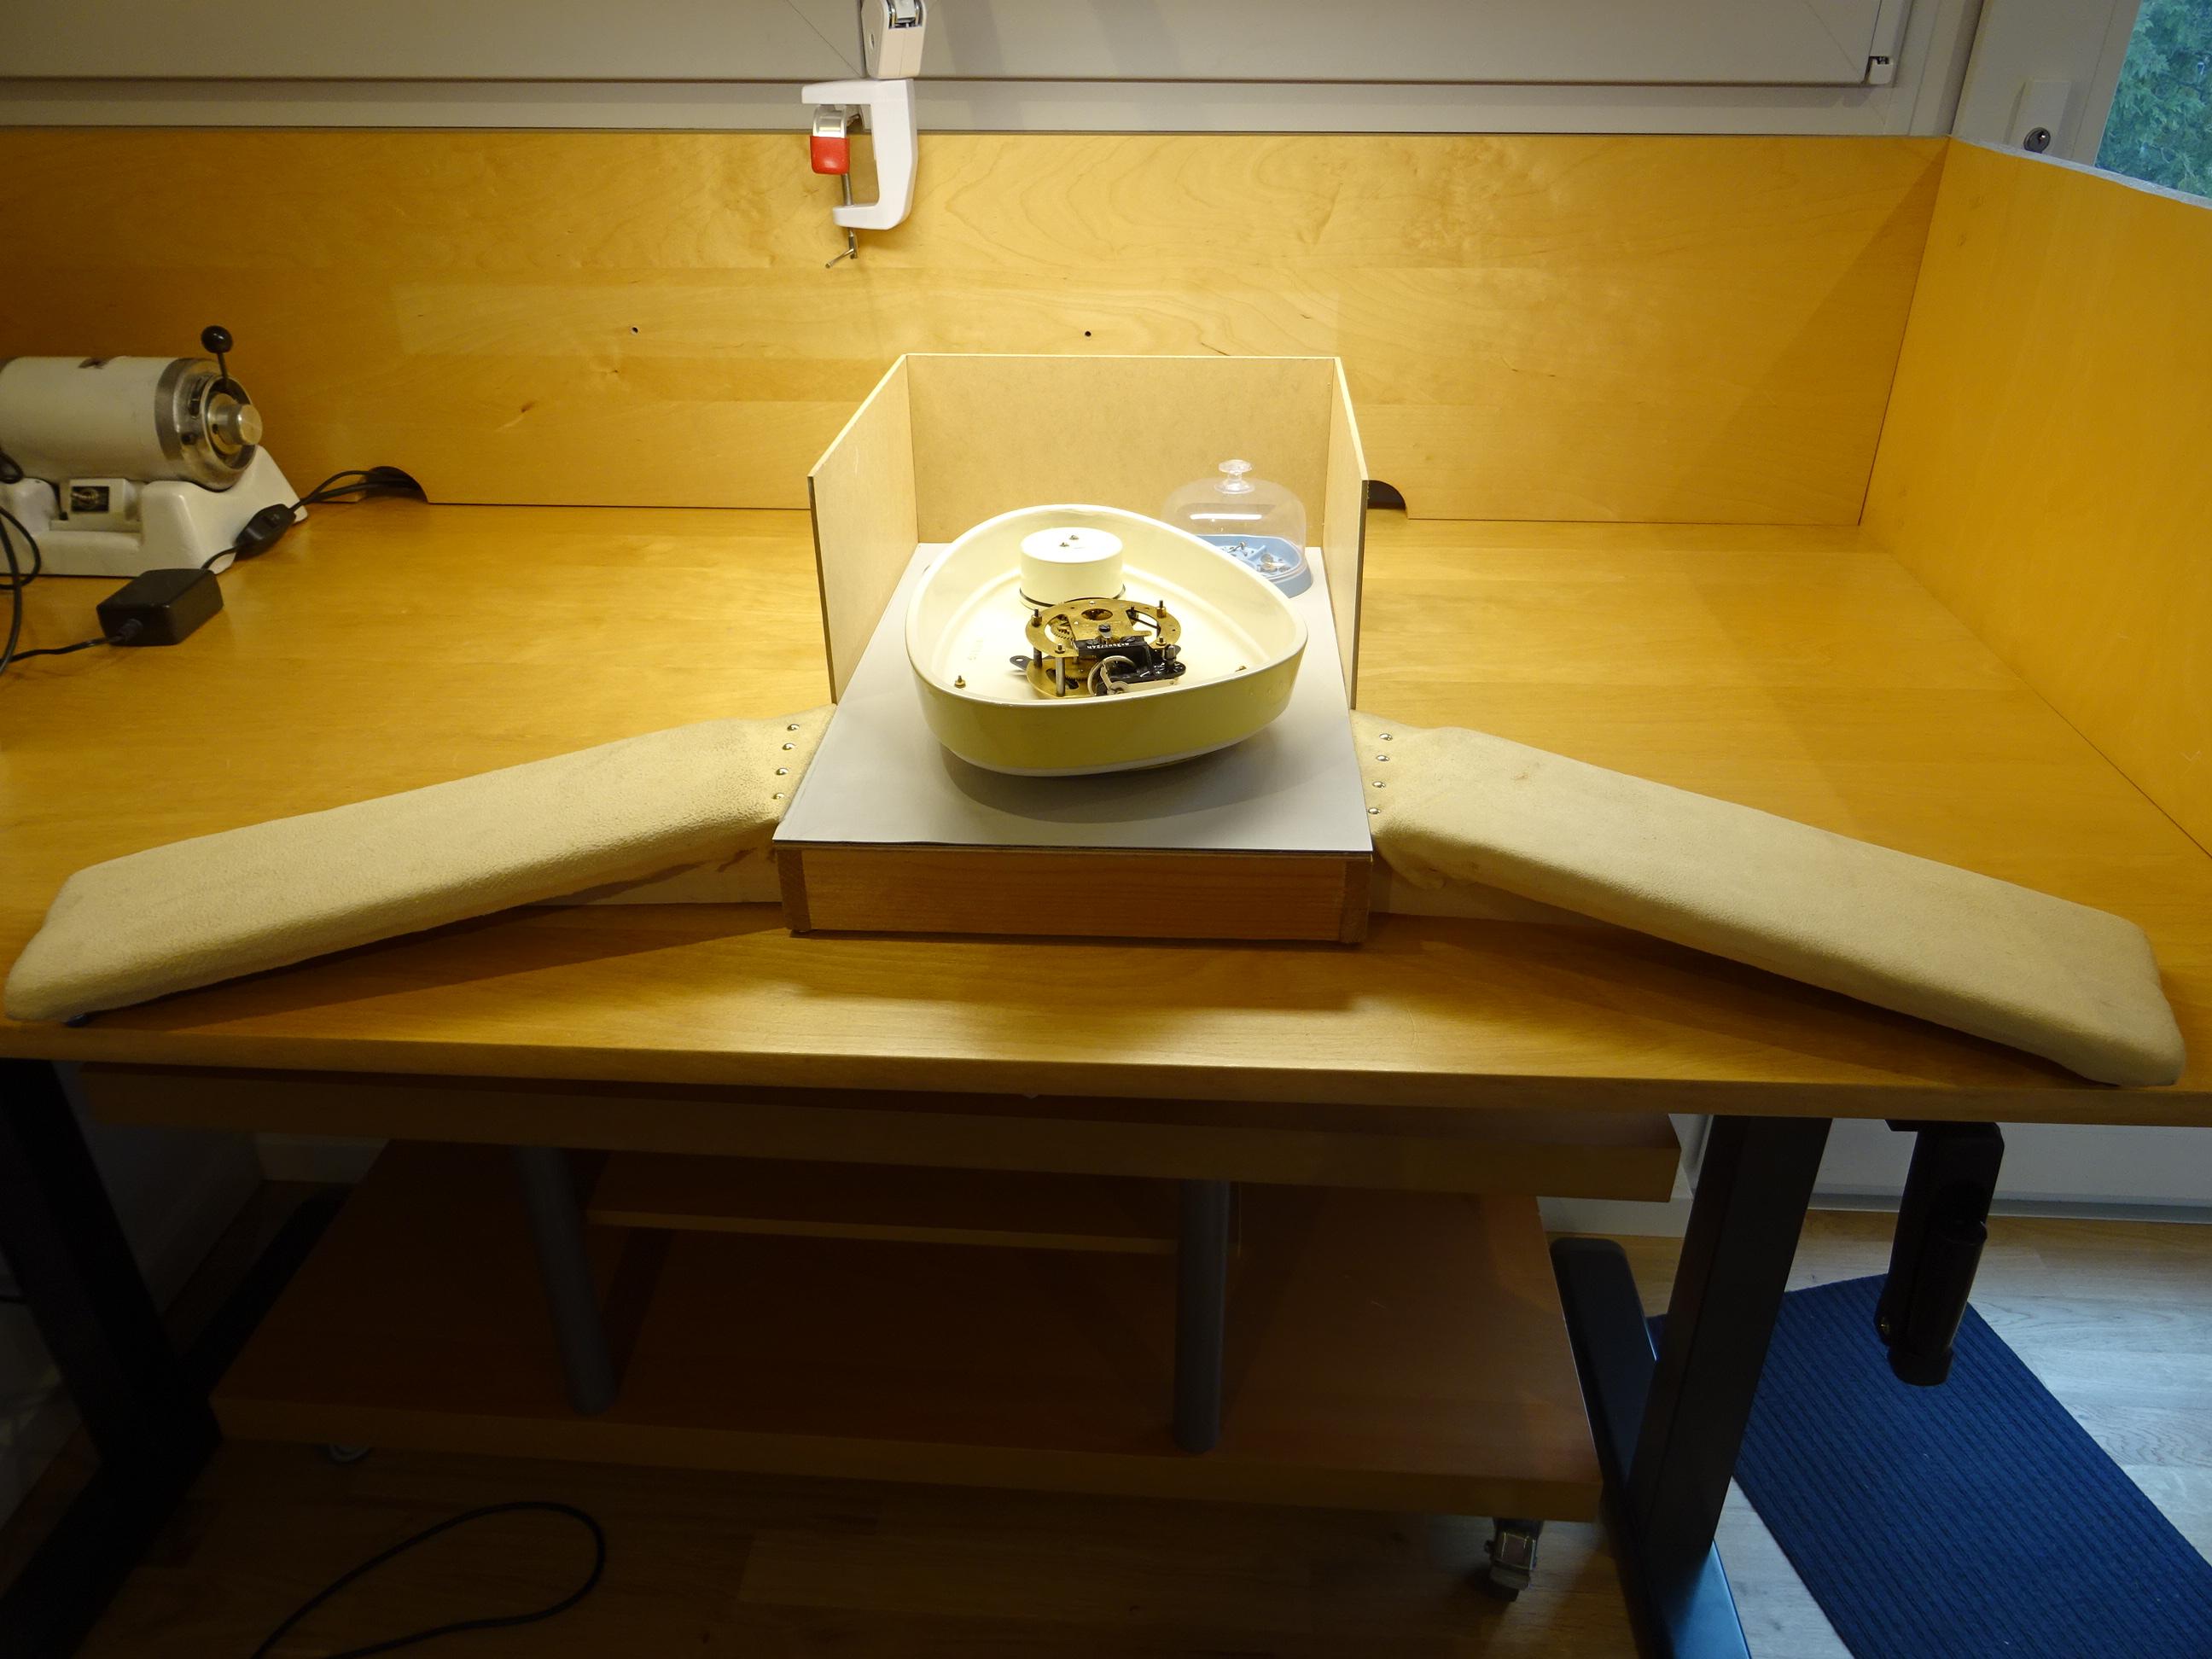
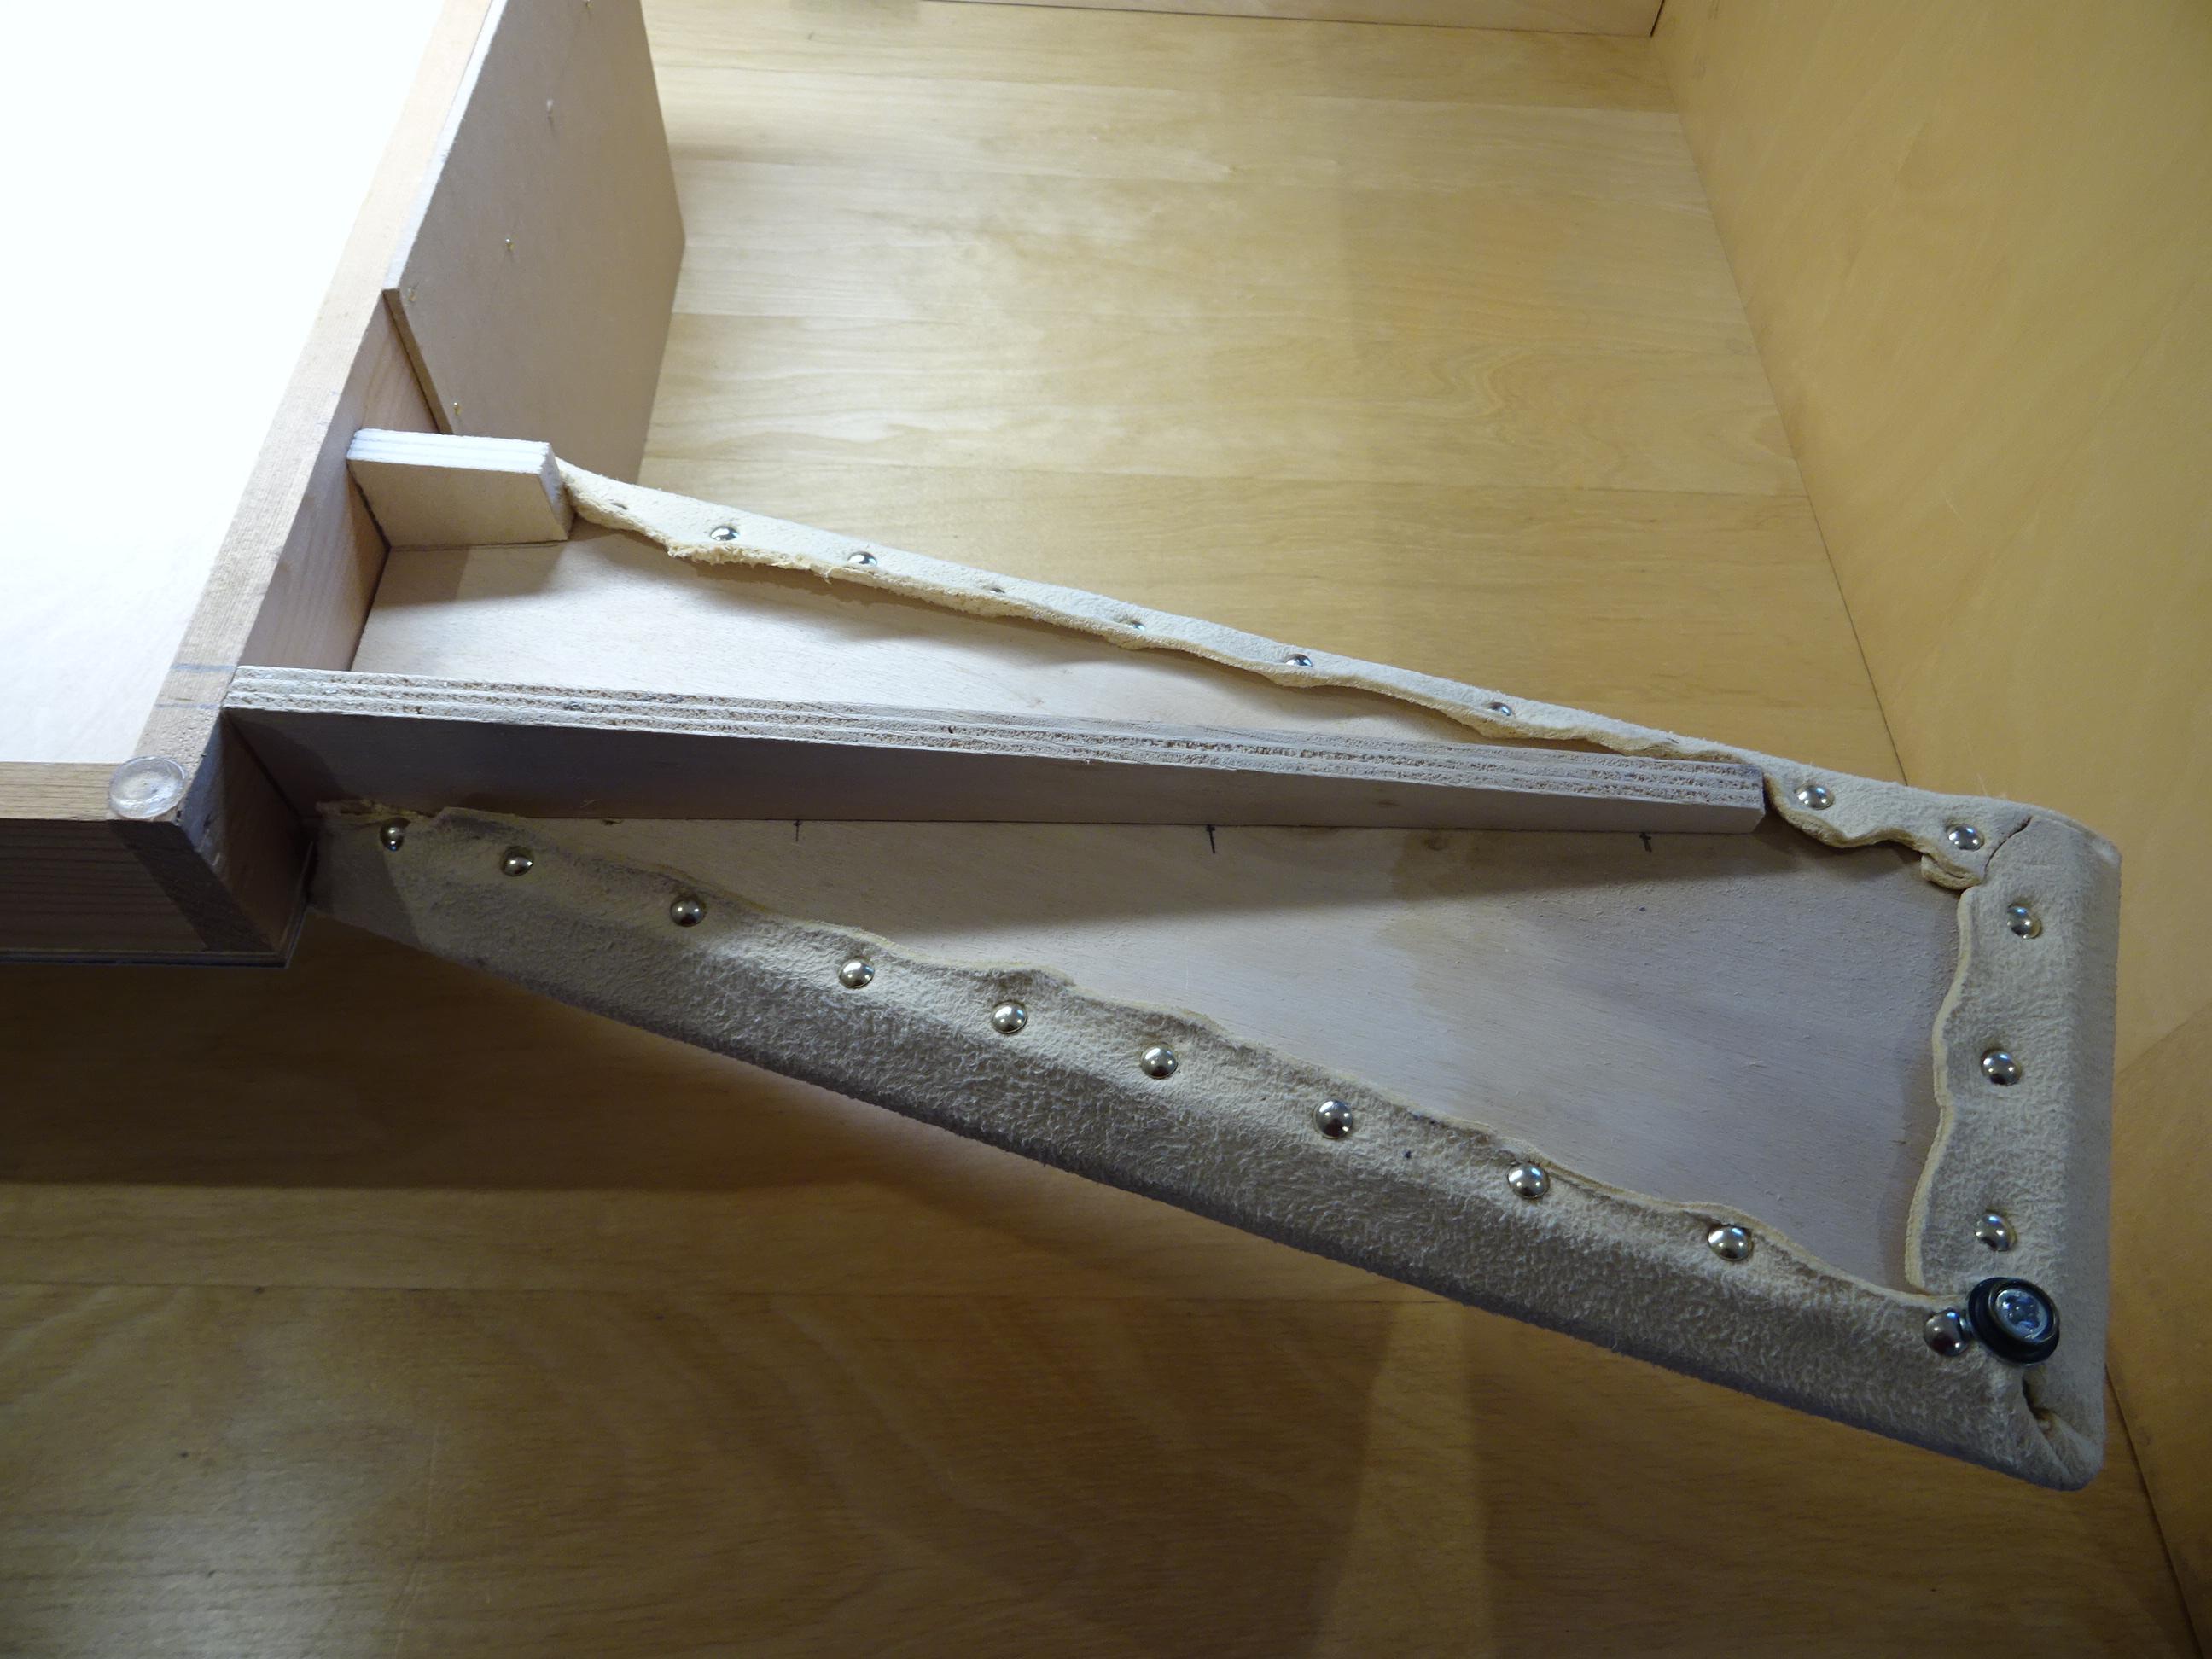
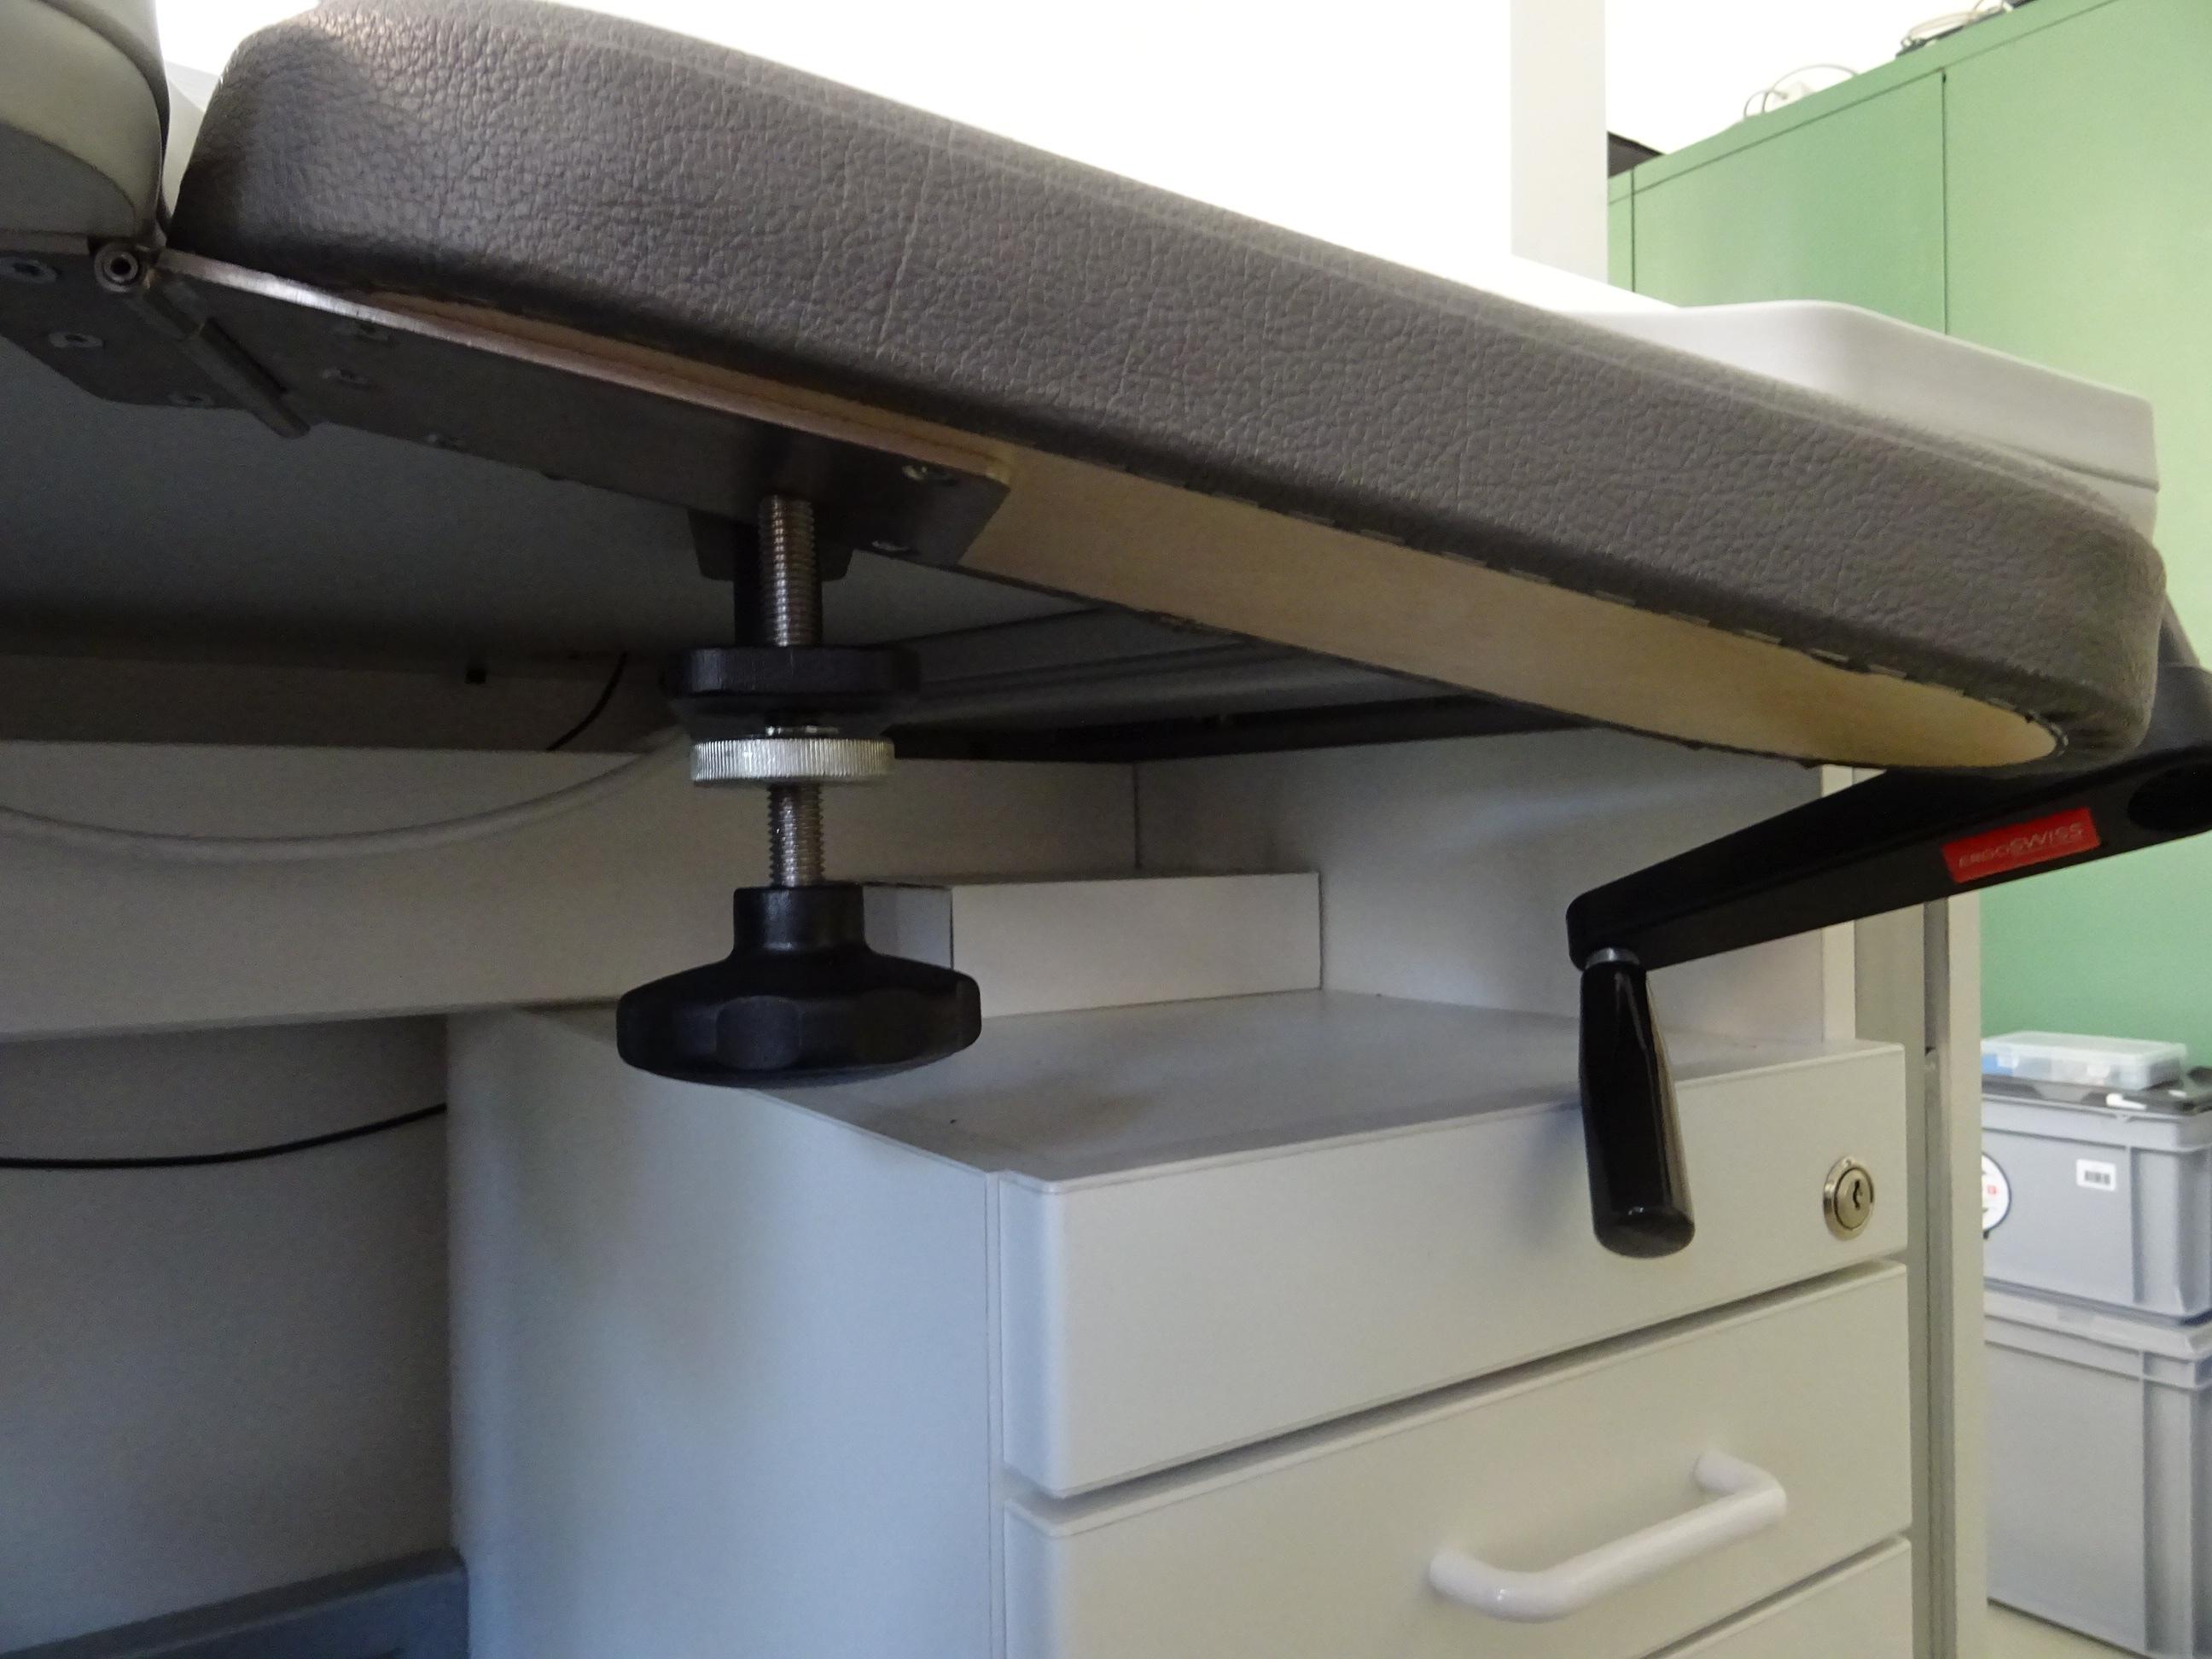
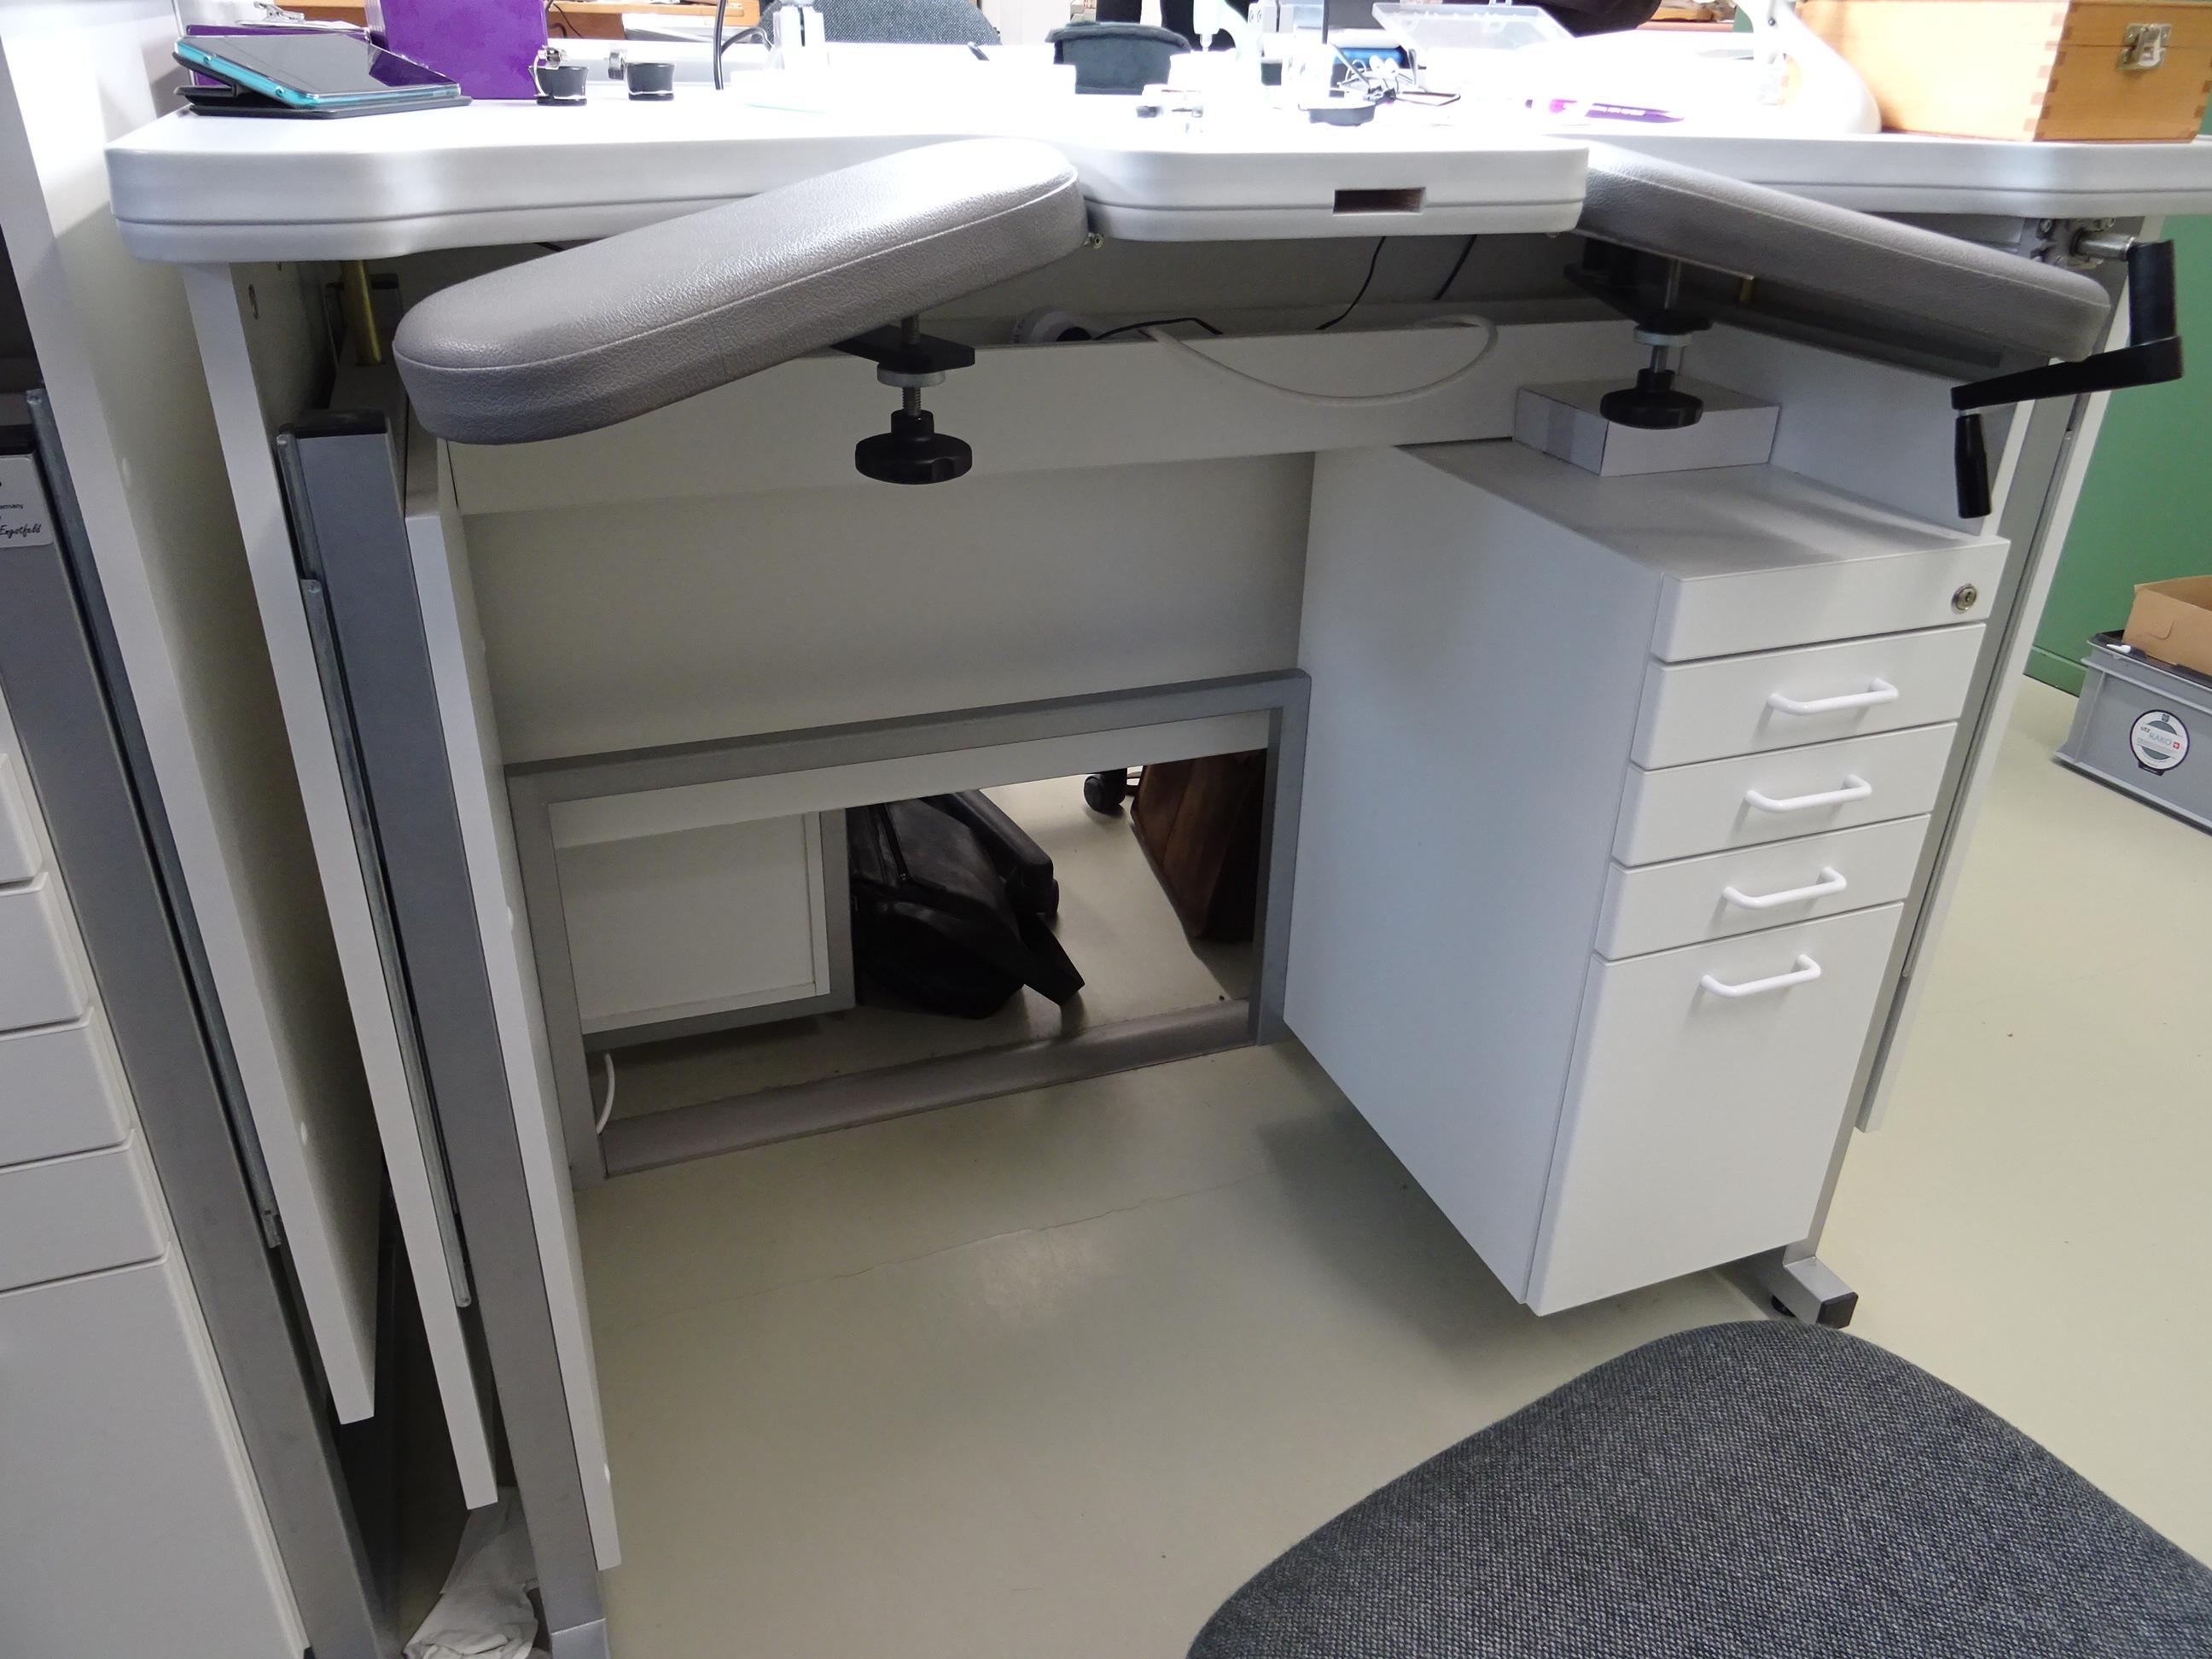
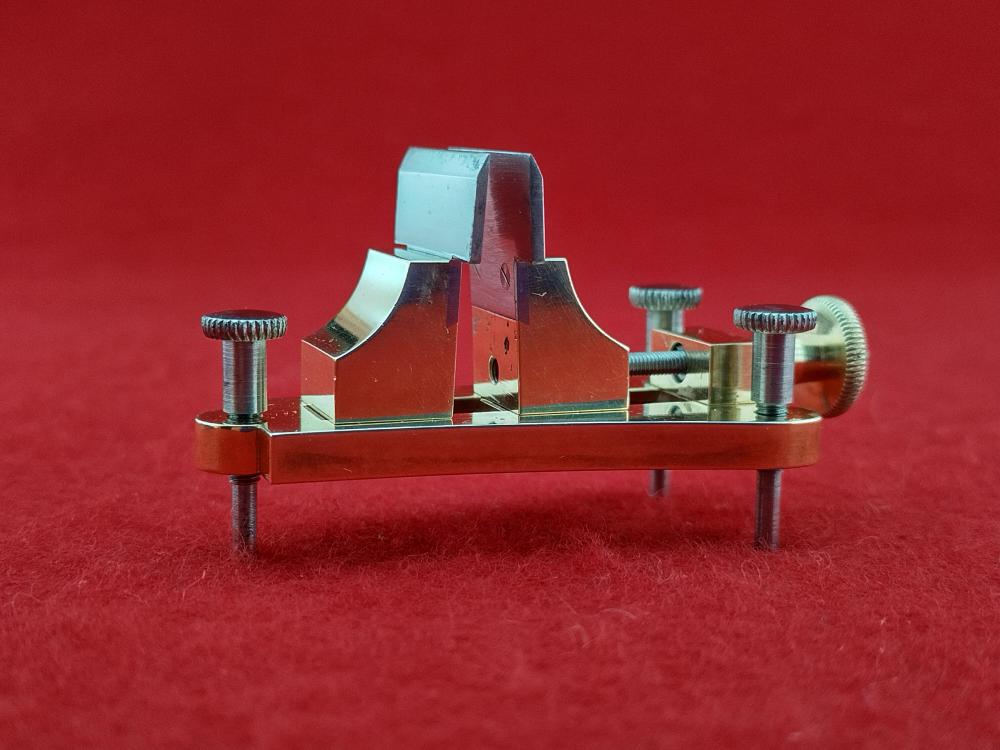
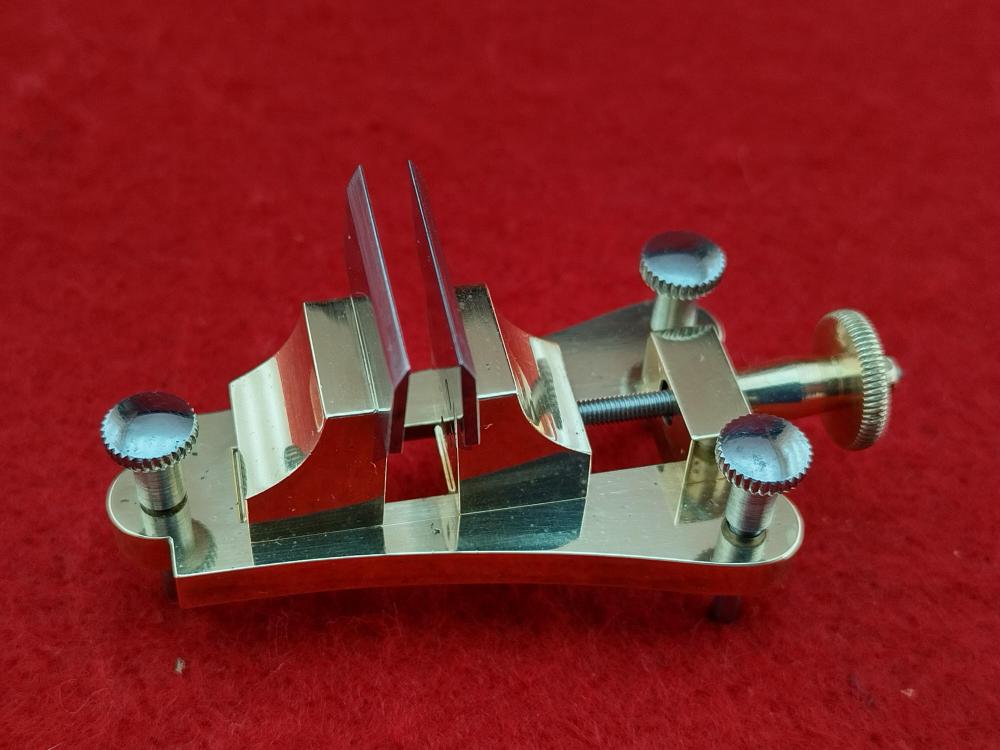
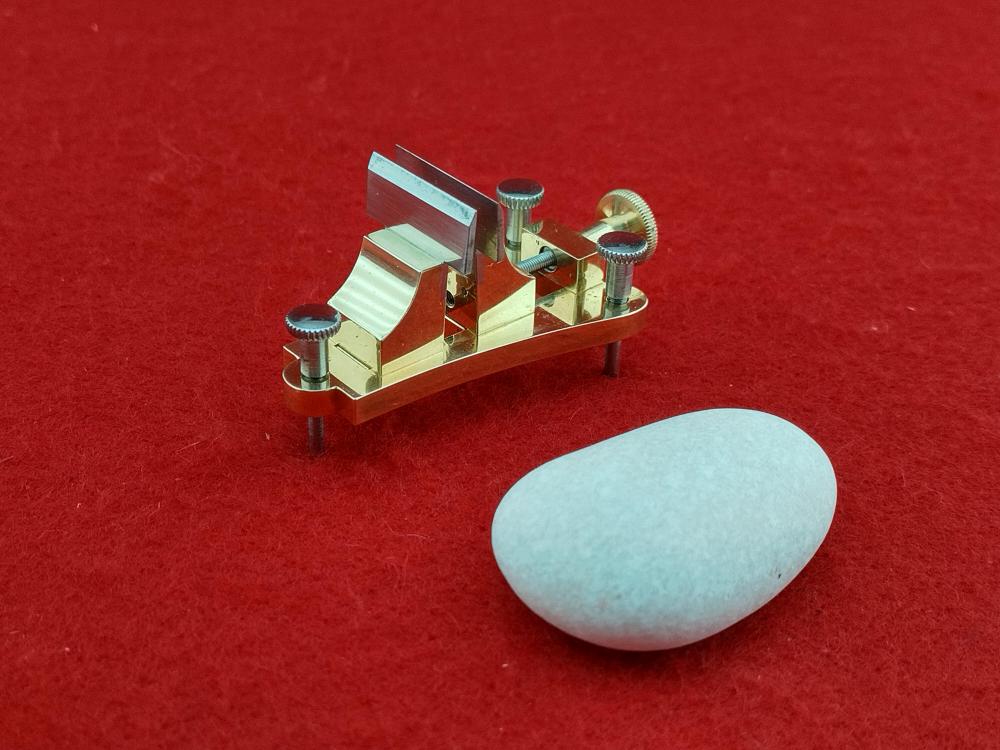
Pictures of the top and underside of my home-made table-top work area. The pads are covered in chamois leather from the DIY supermarket. Everything else was scraps I had lying around. The work surface ended up 55mm higher than the level of the main bench top, and is 270mm by 400mm in area. The slope of the armrests is not adjustable, and might be too shallow for some, but works fine for me.

 2 points
 -
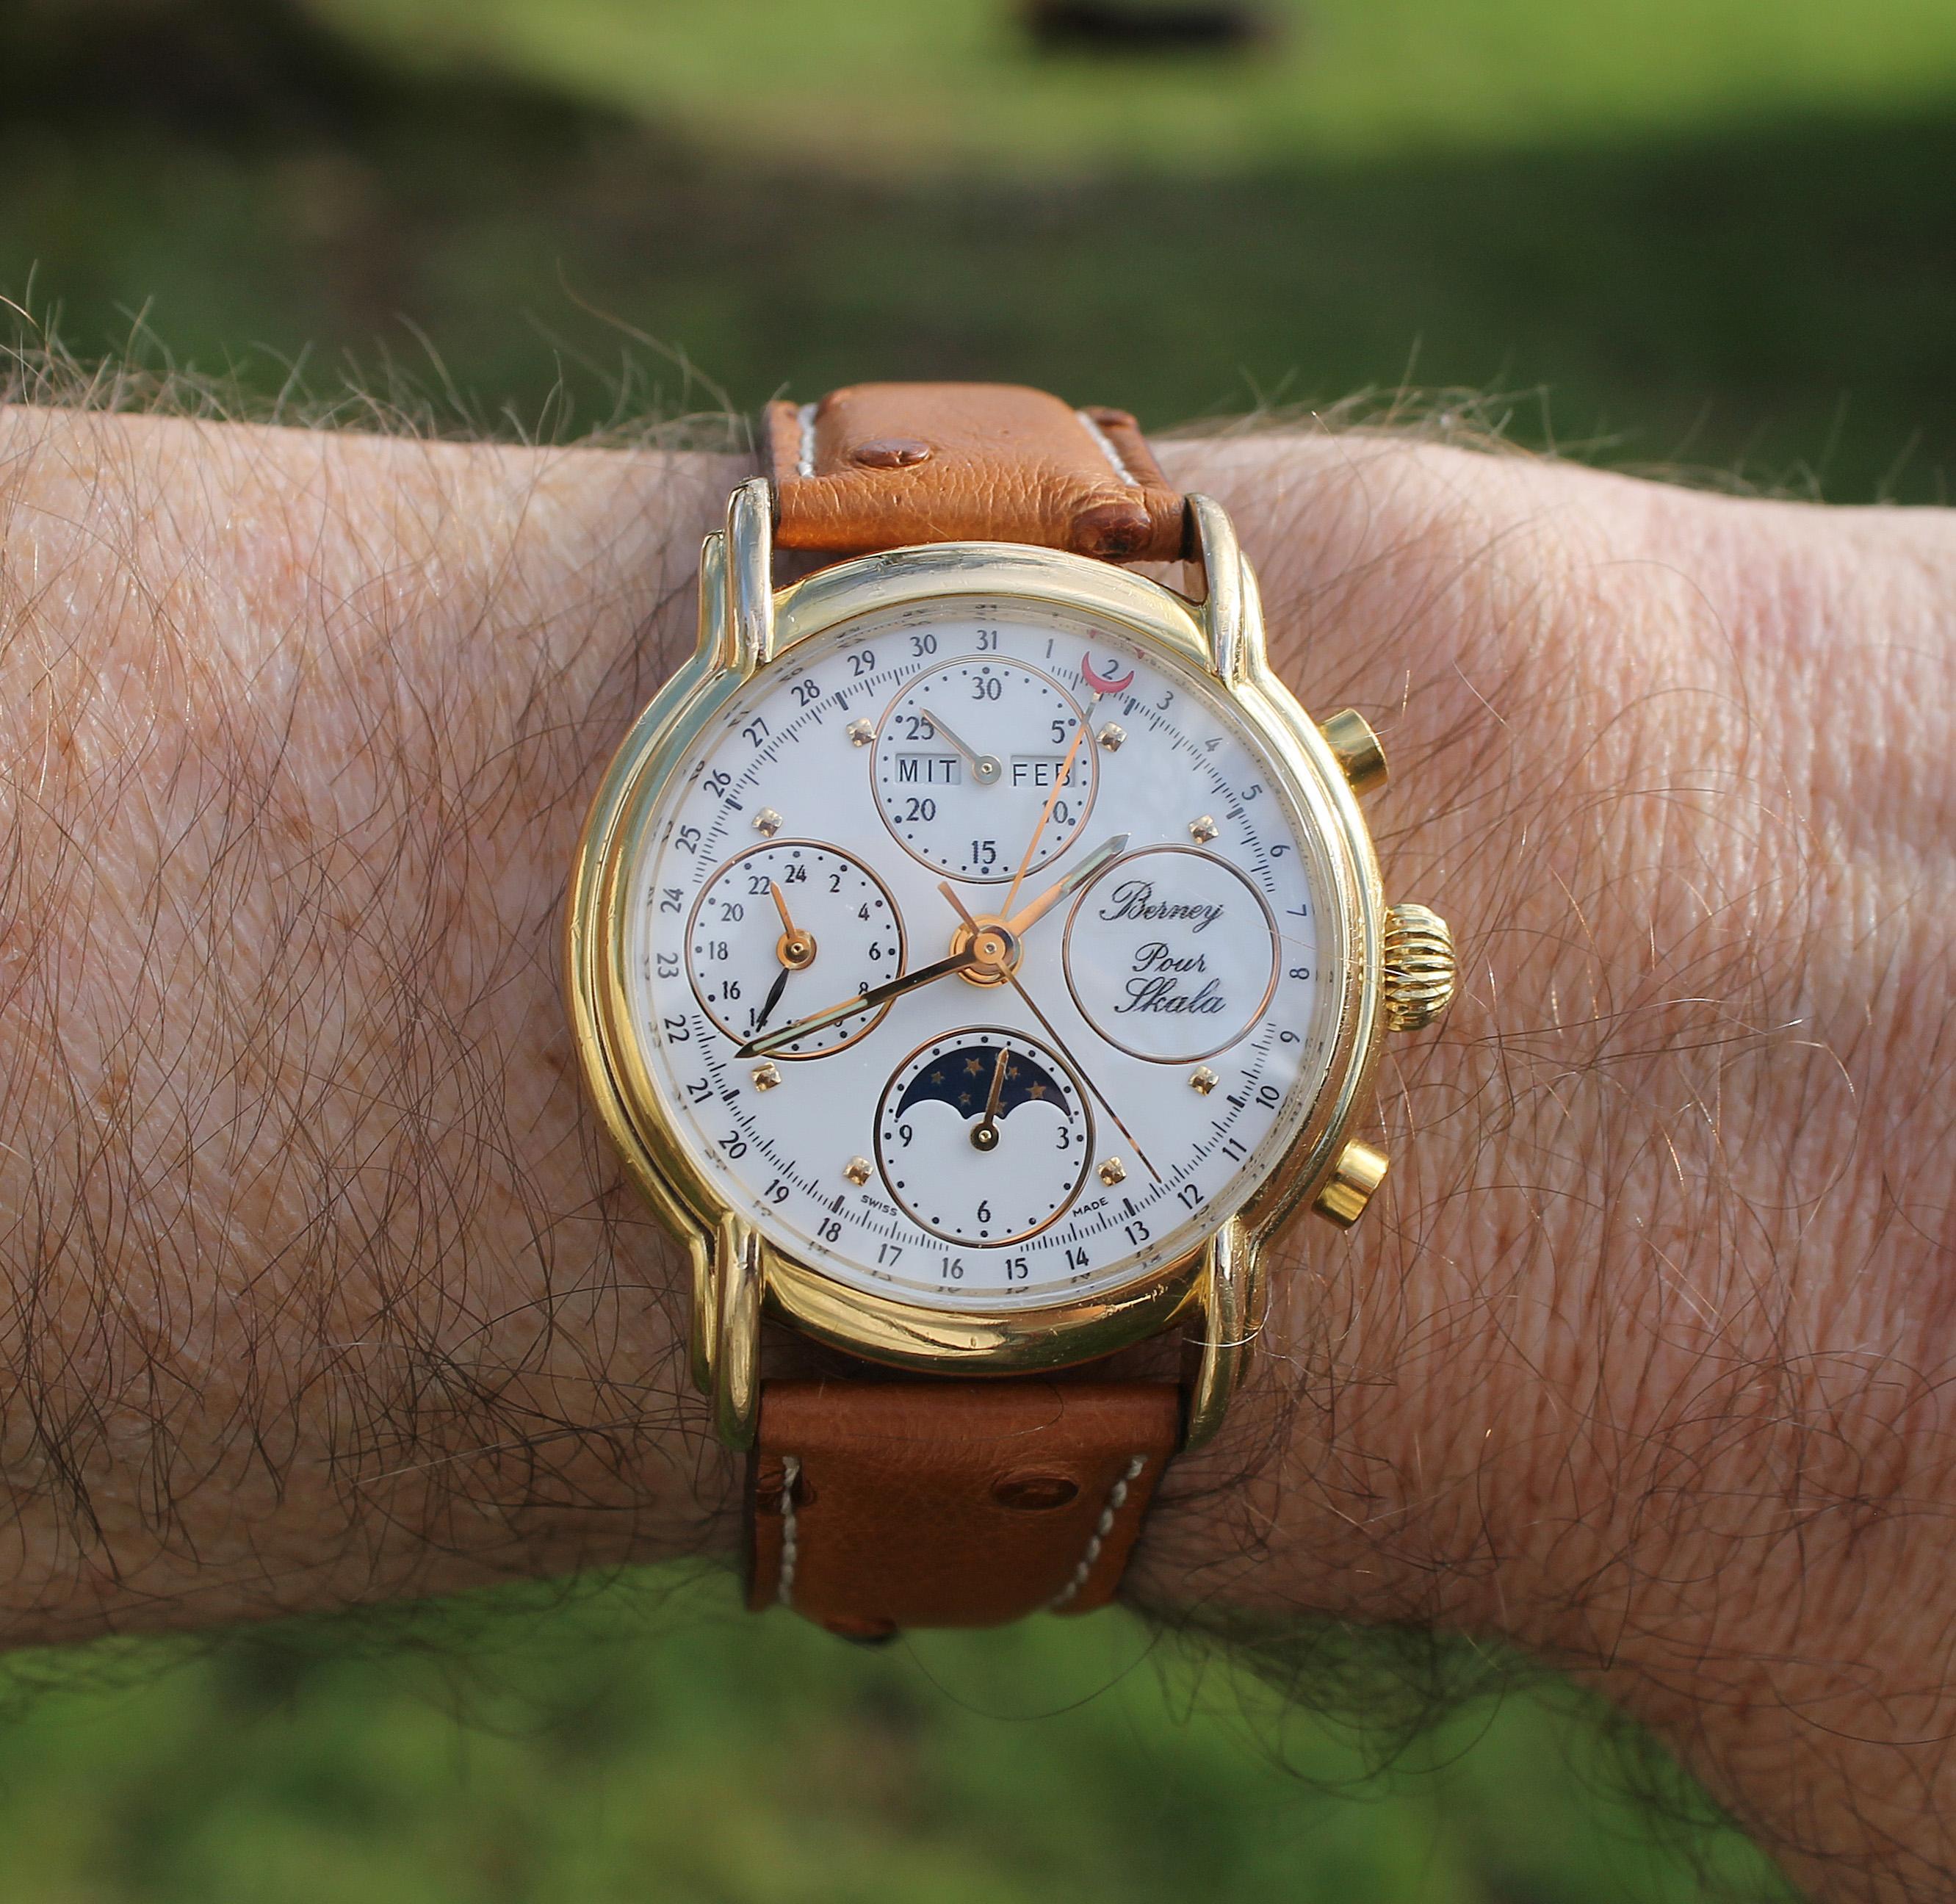
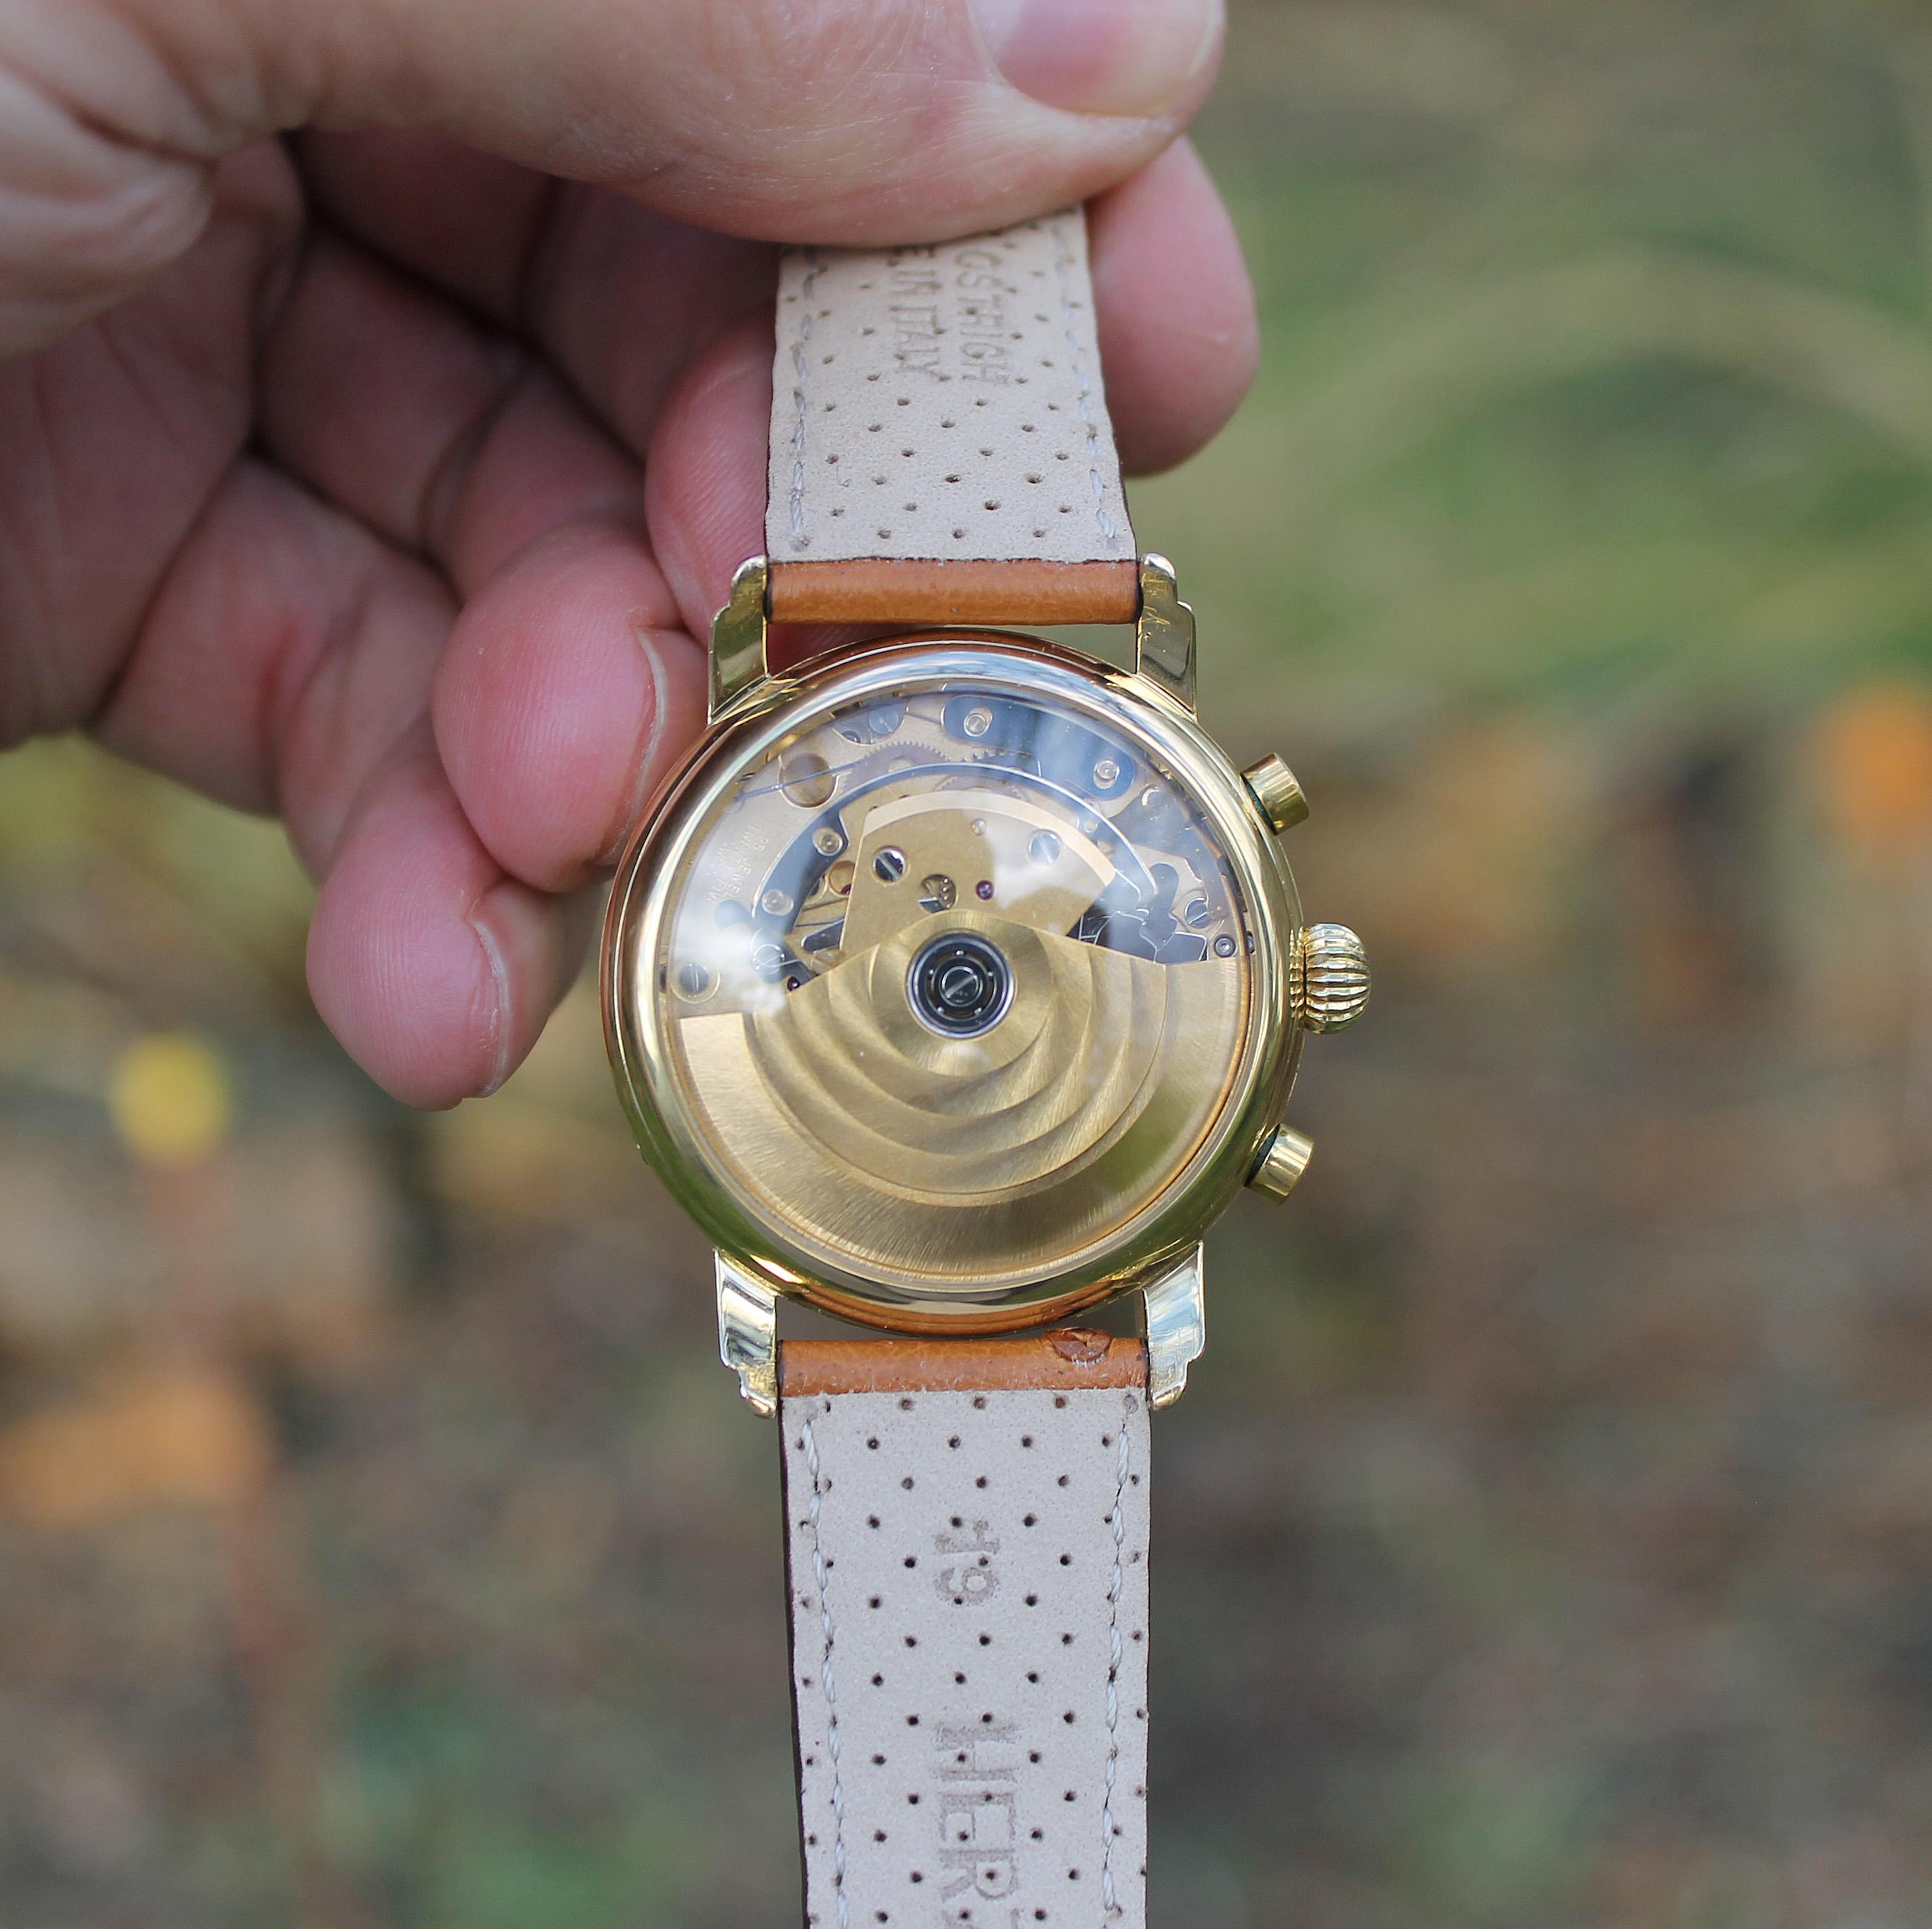
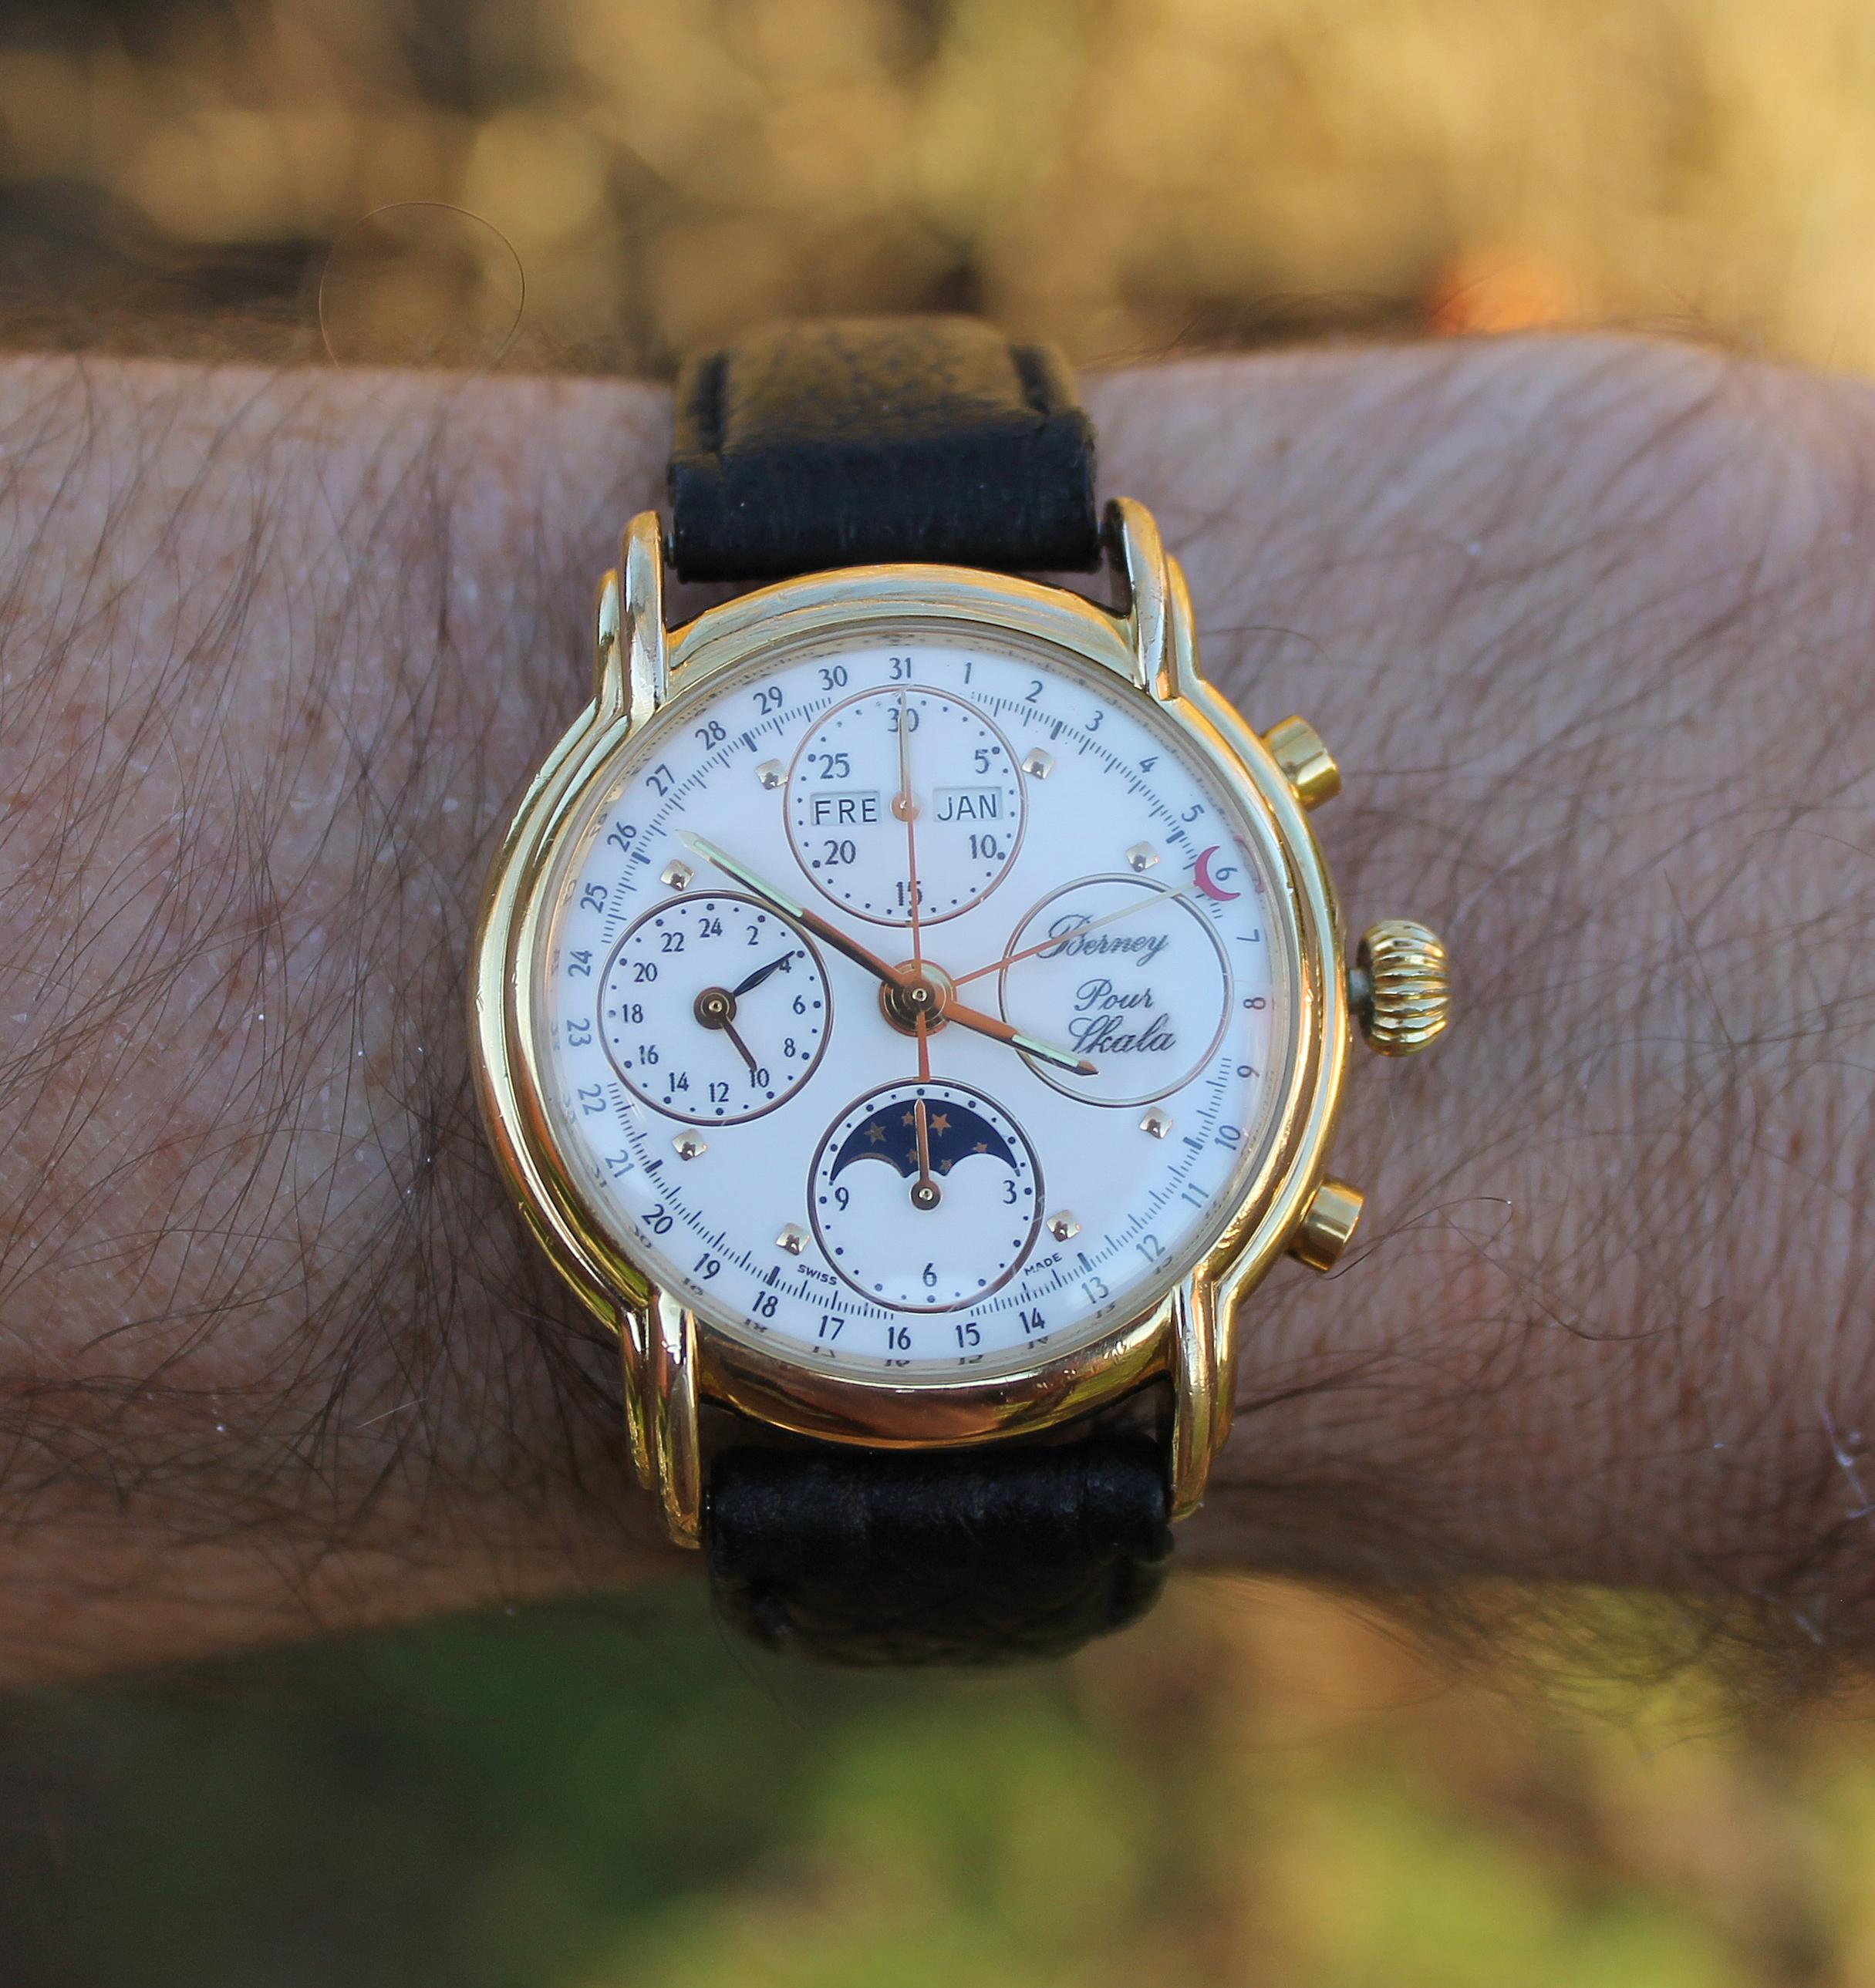
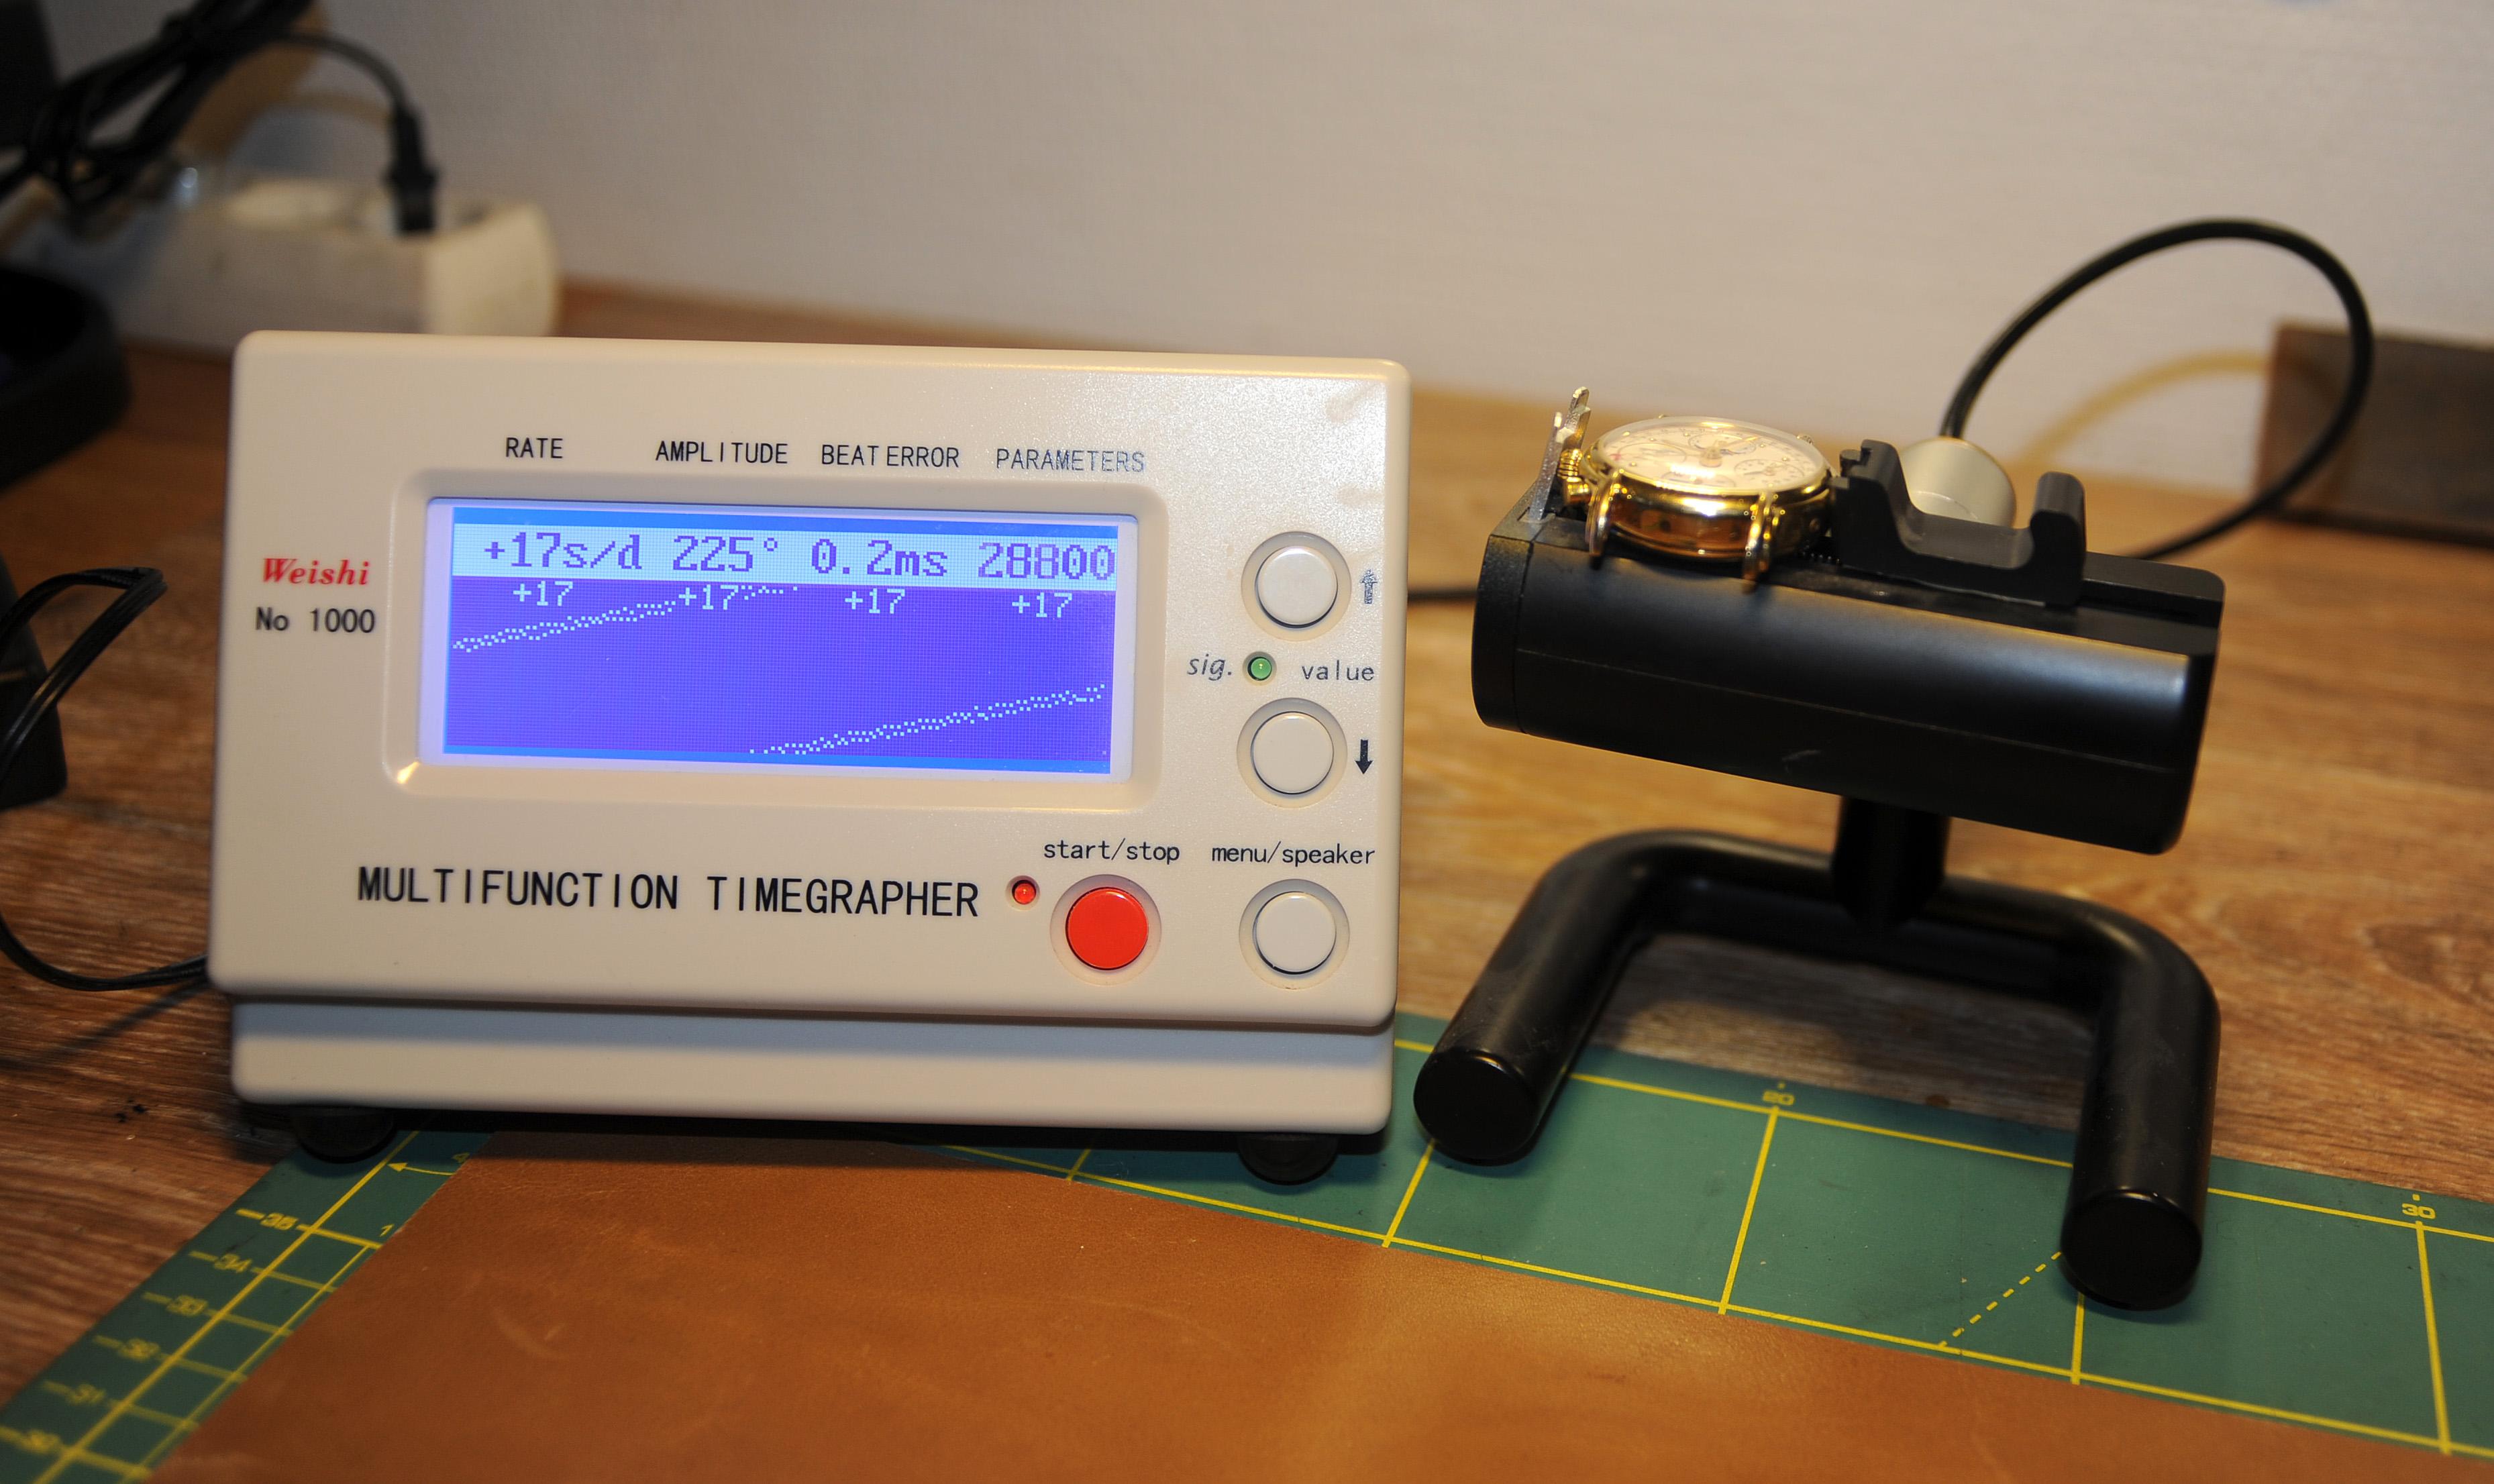
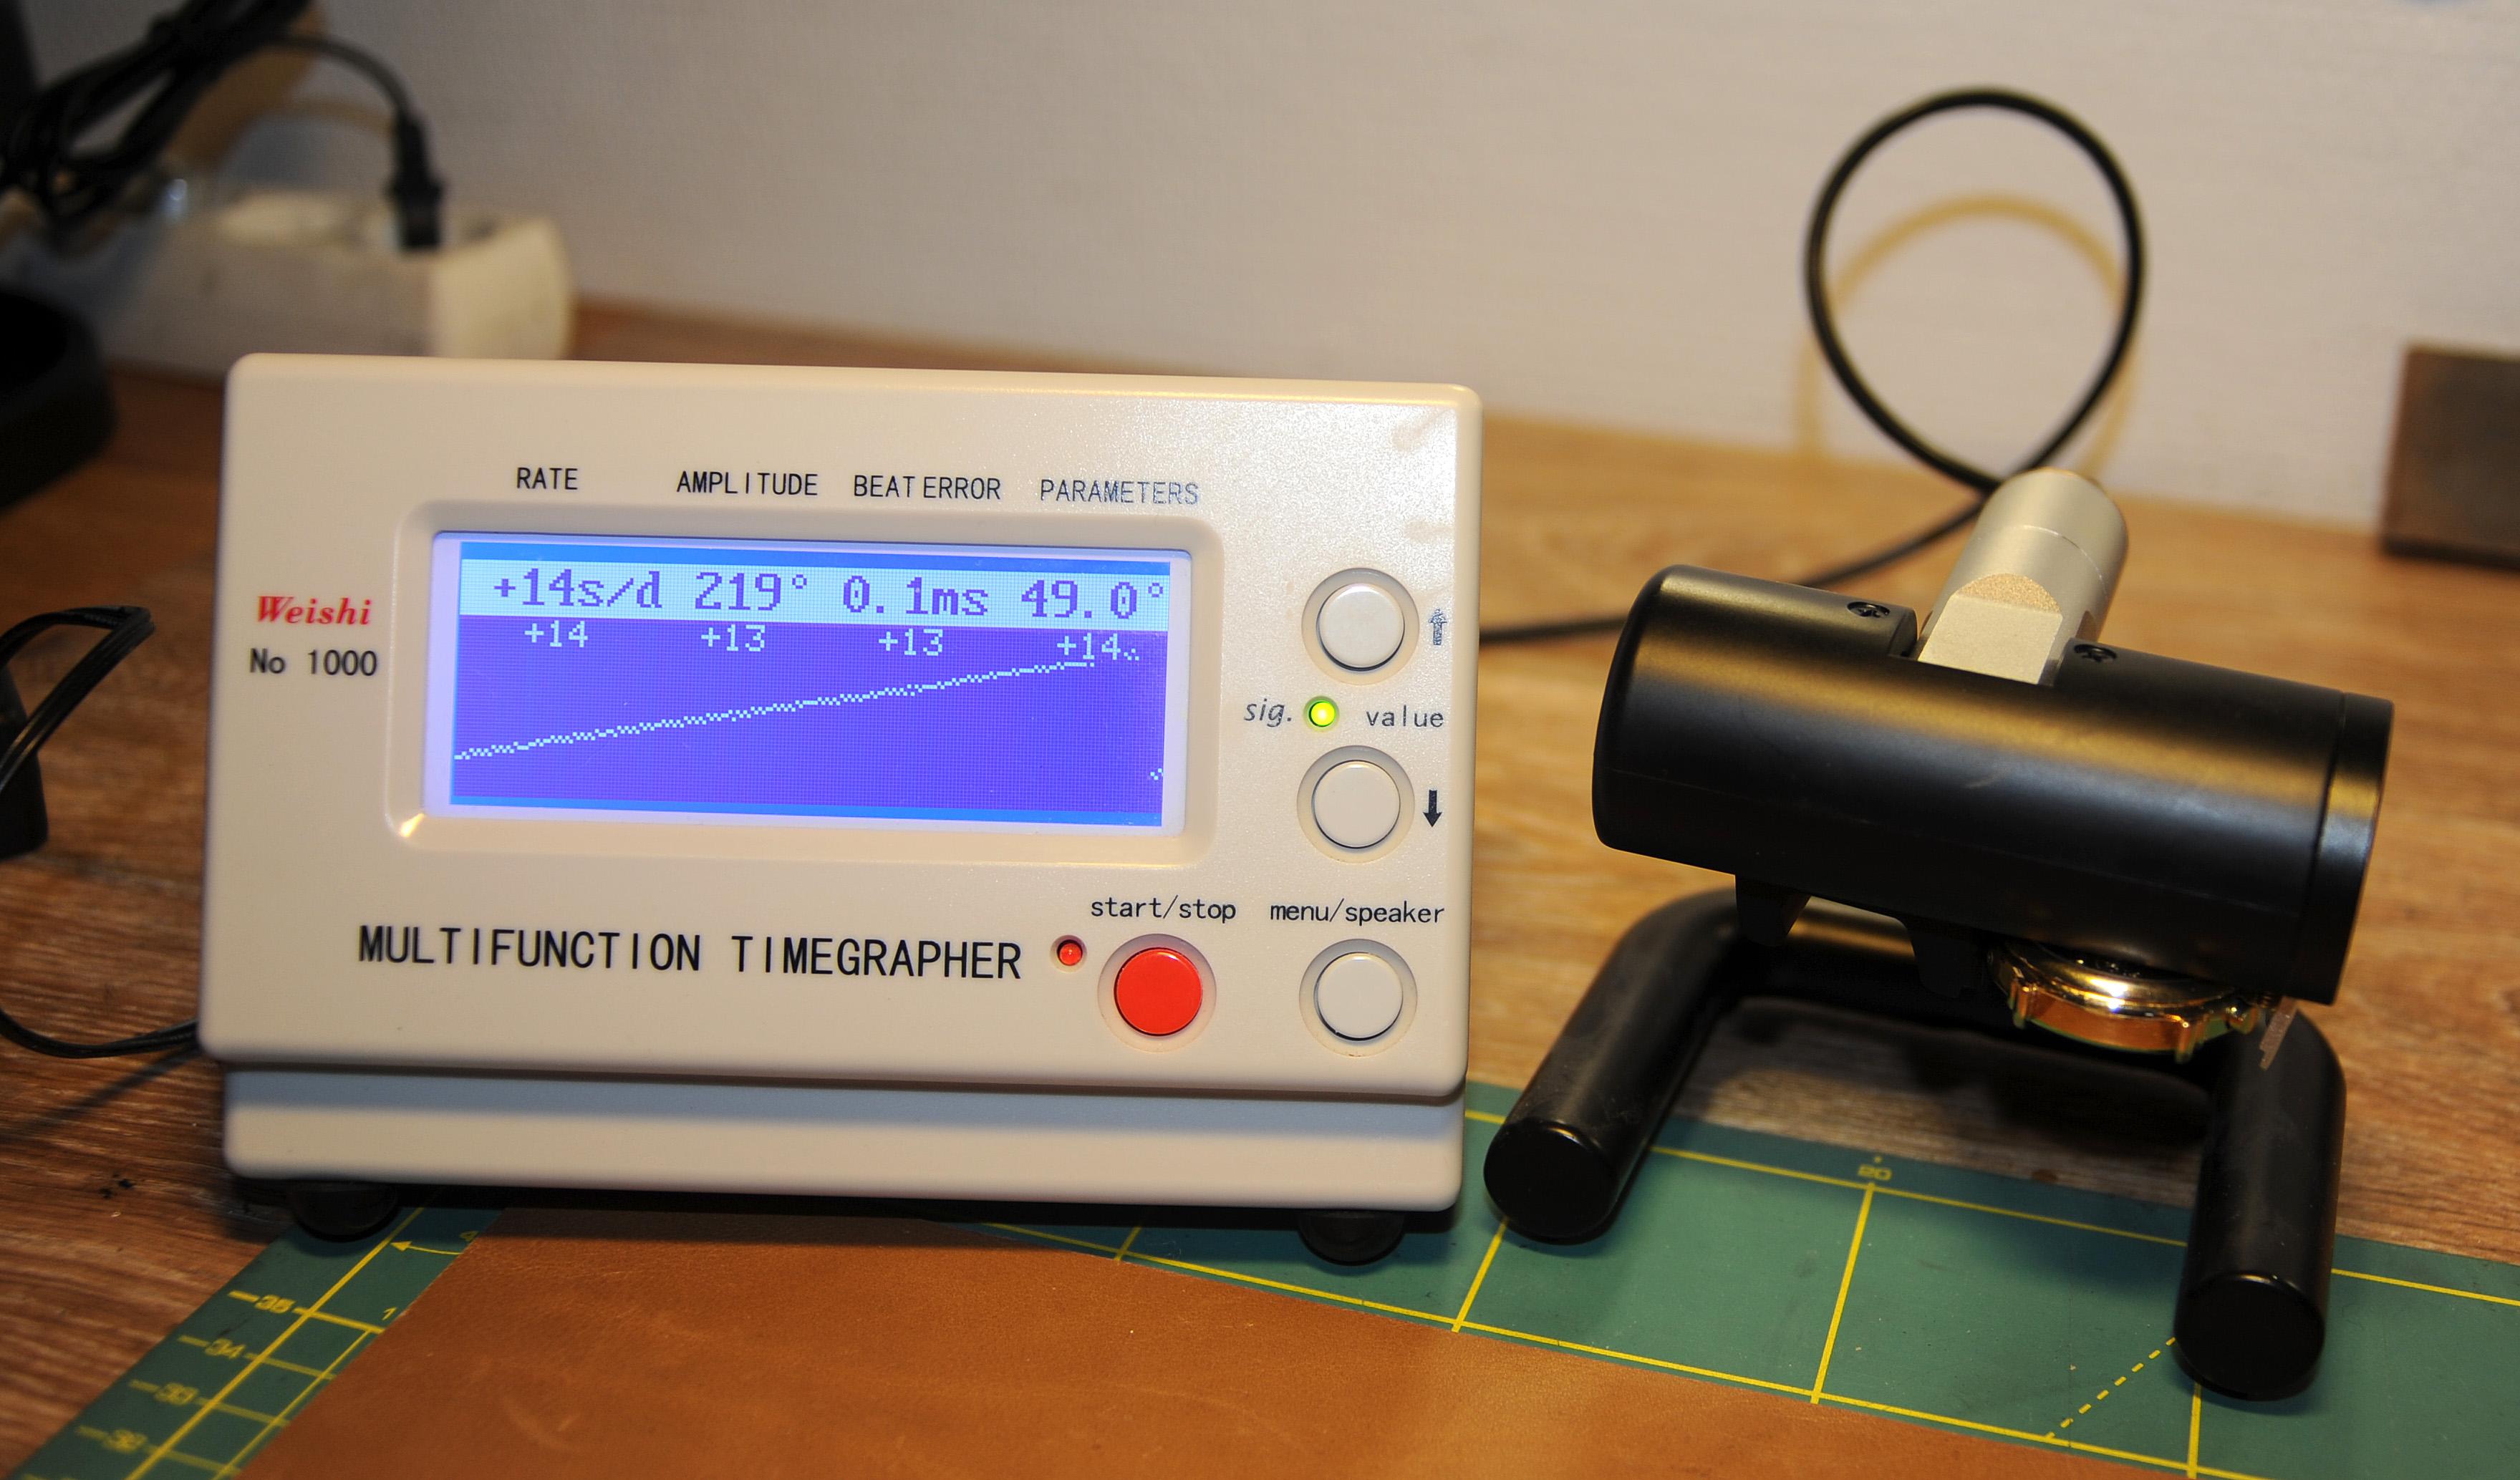
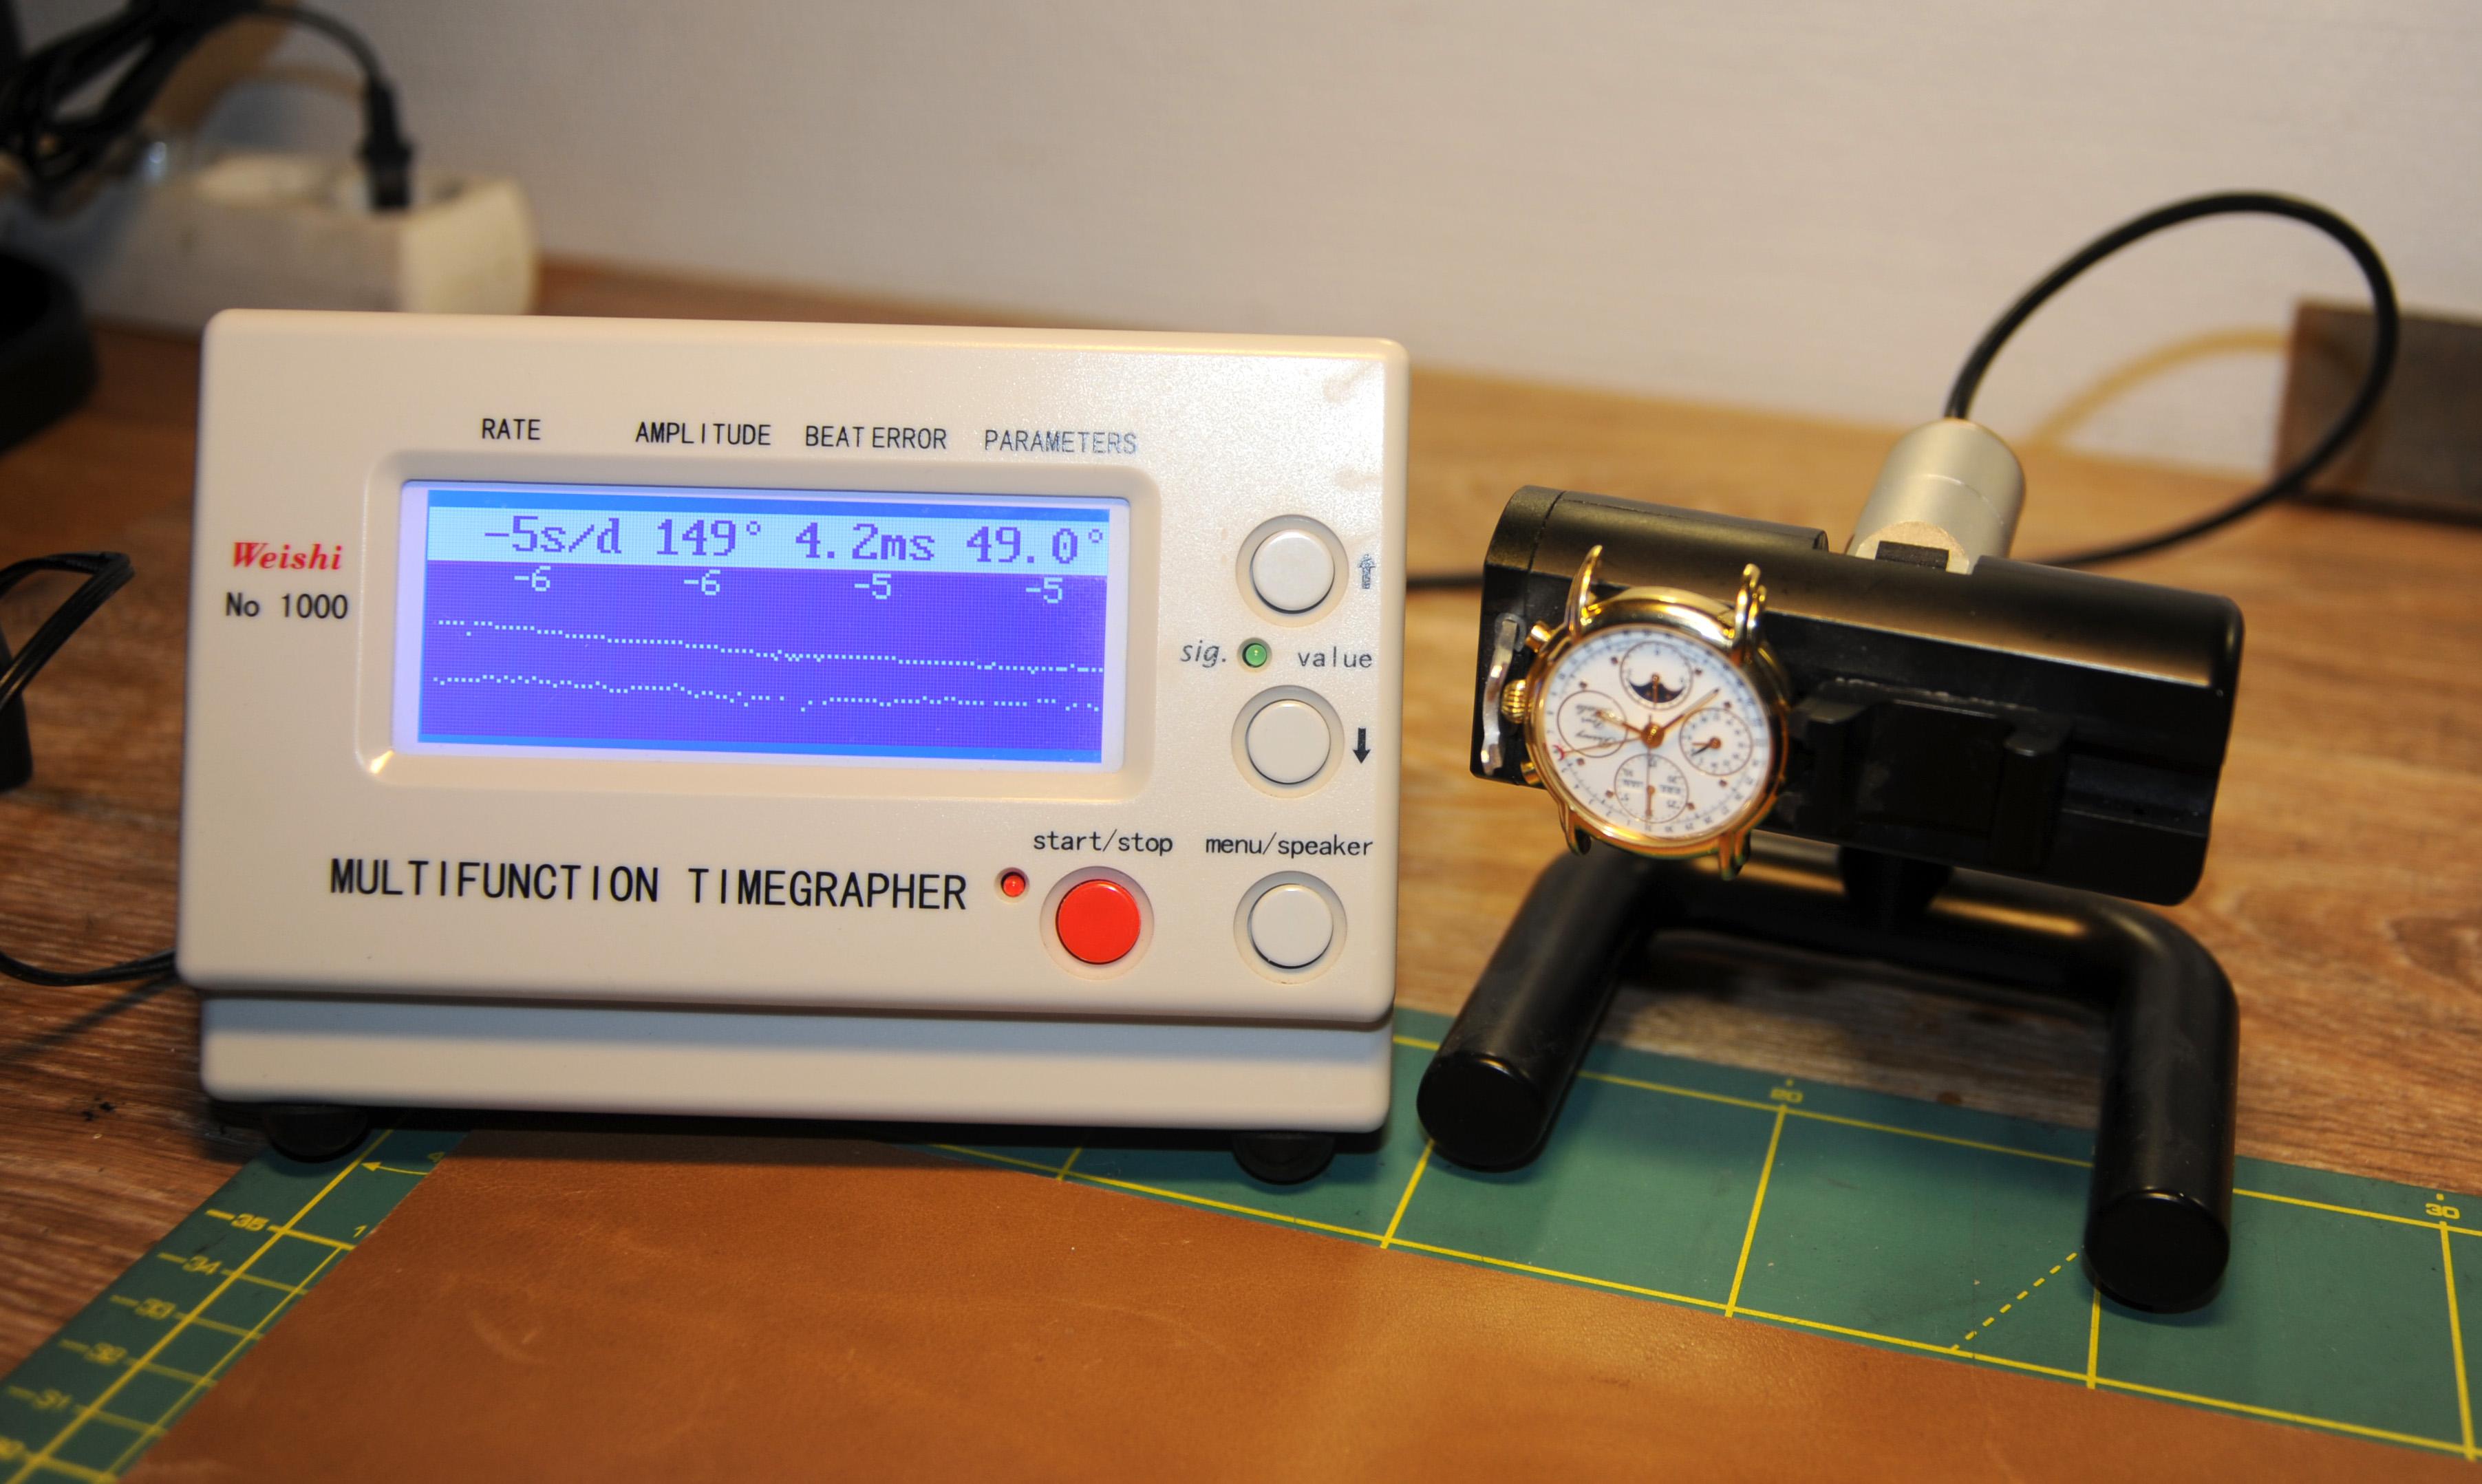
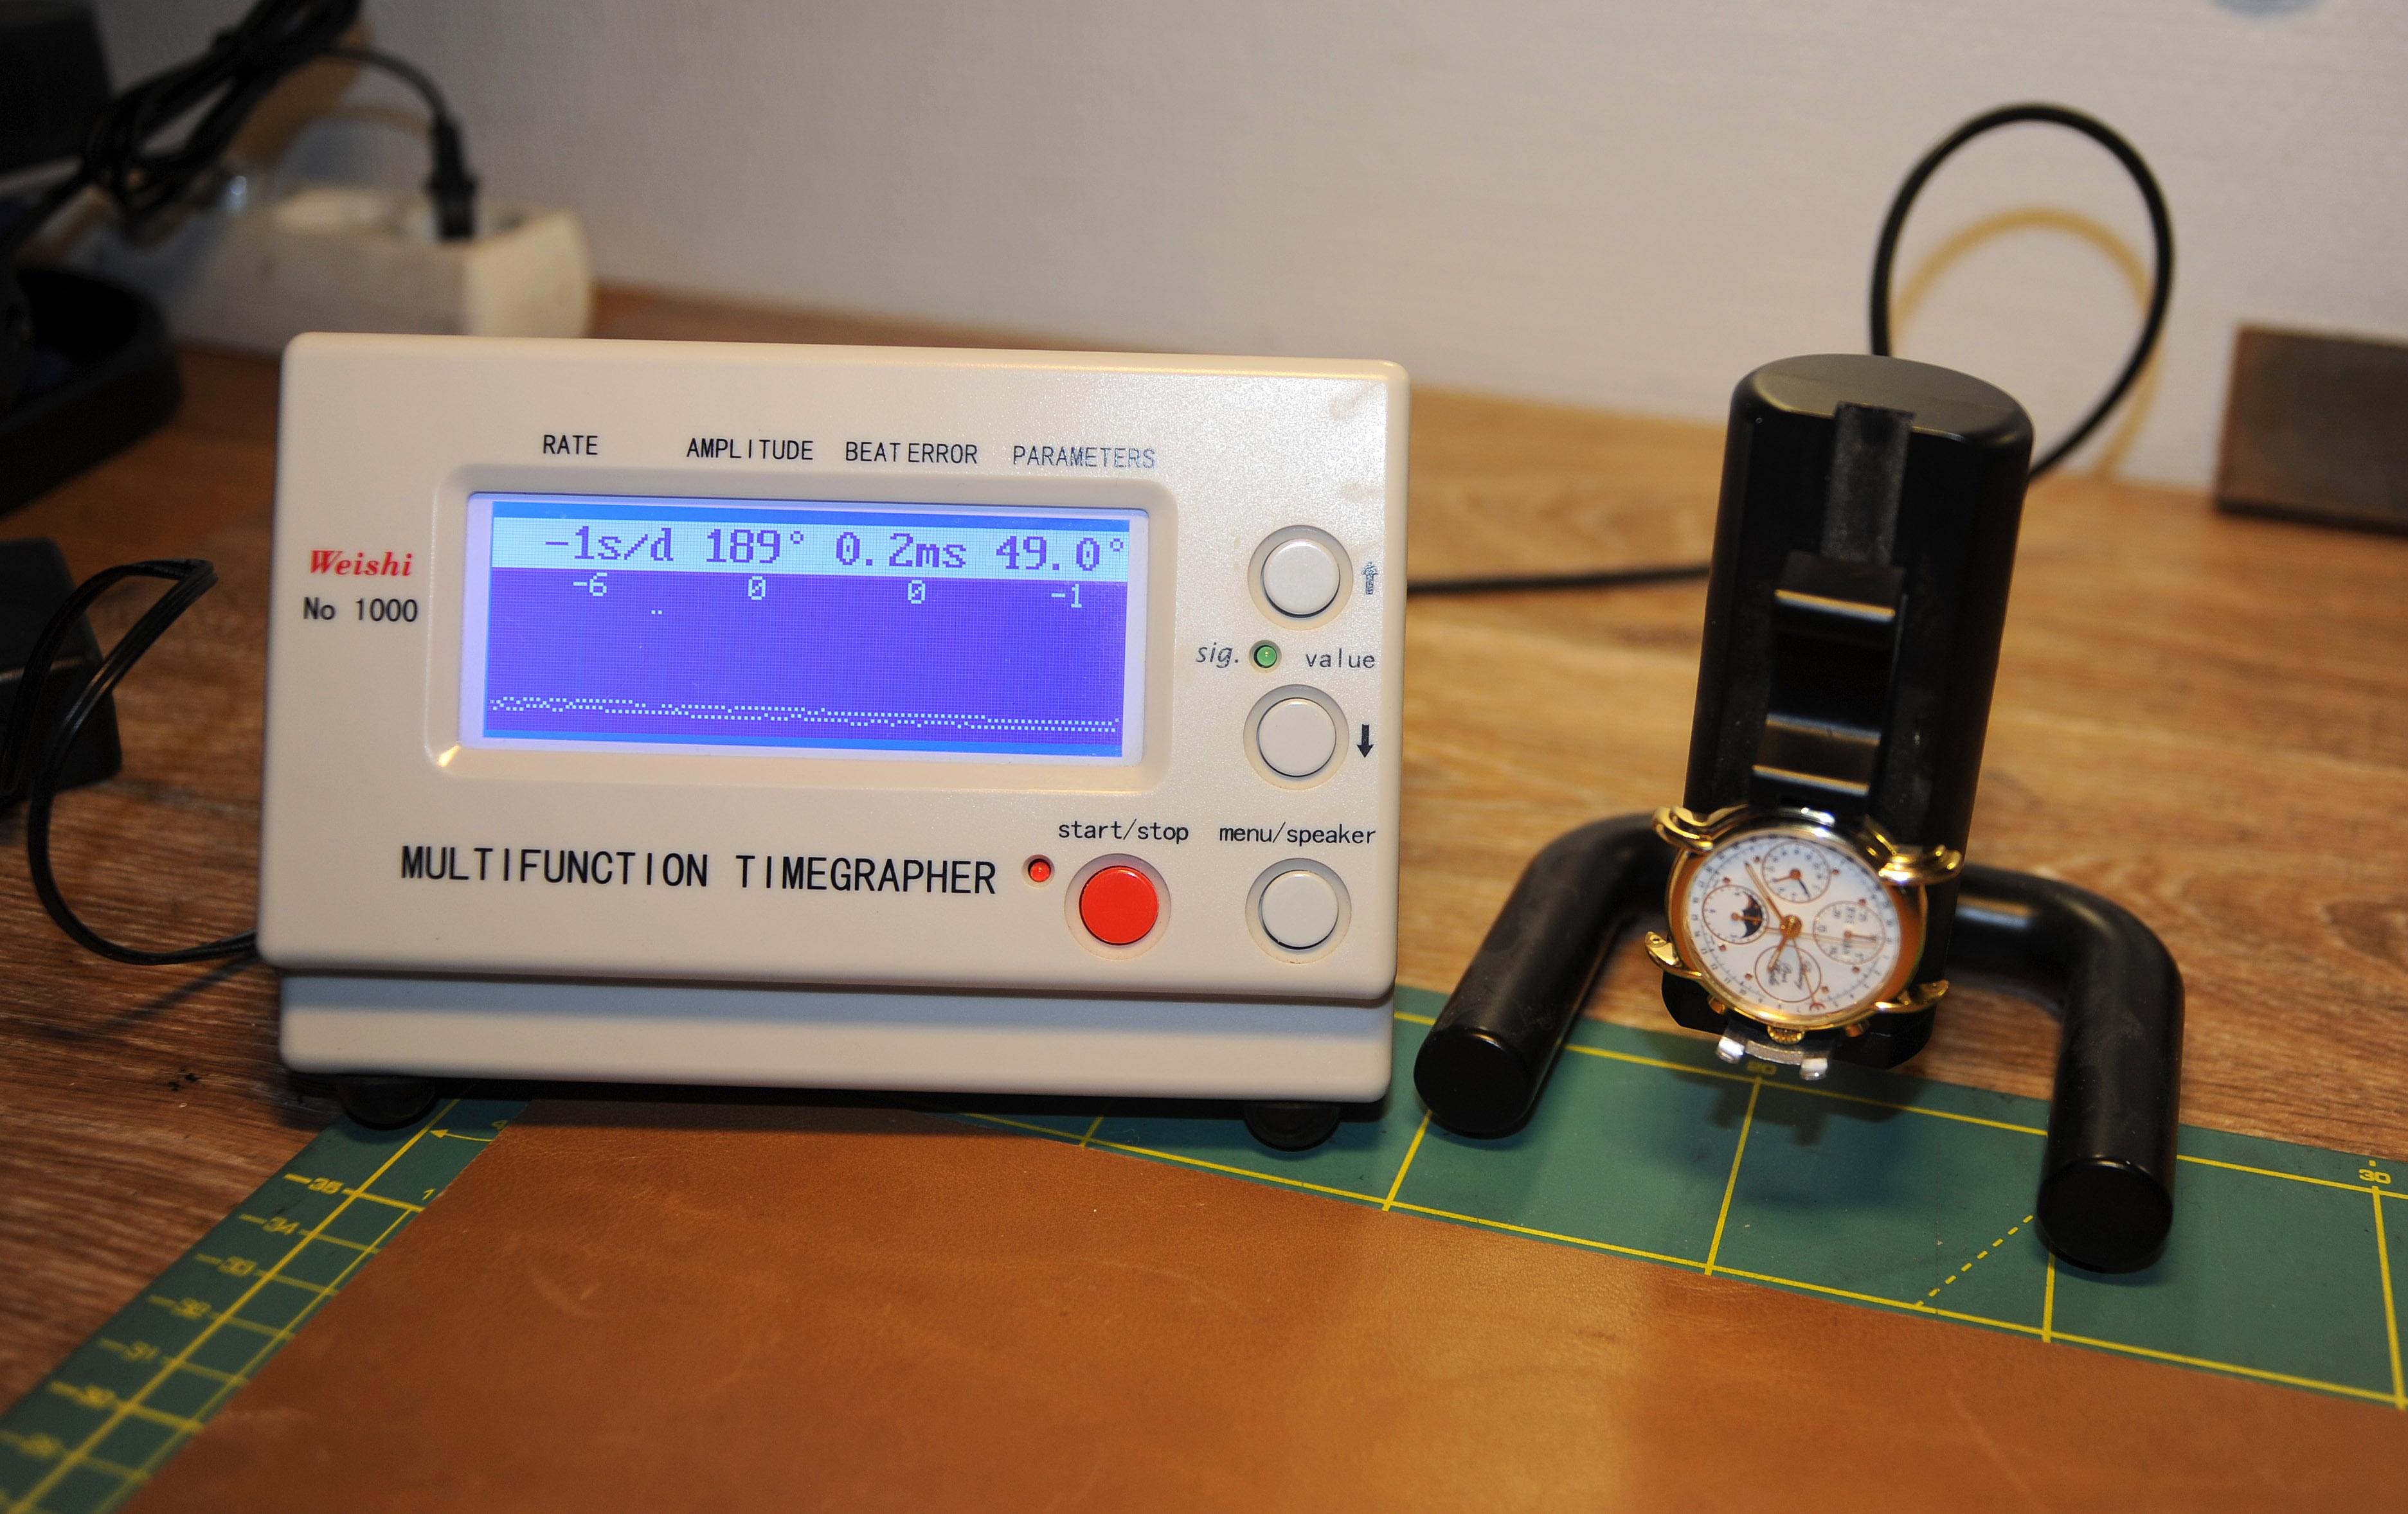
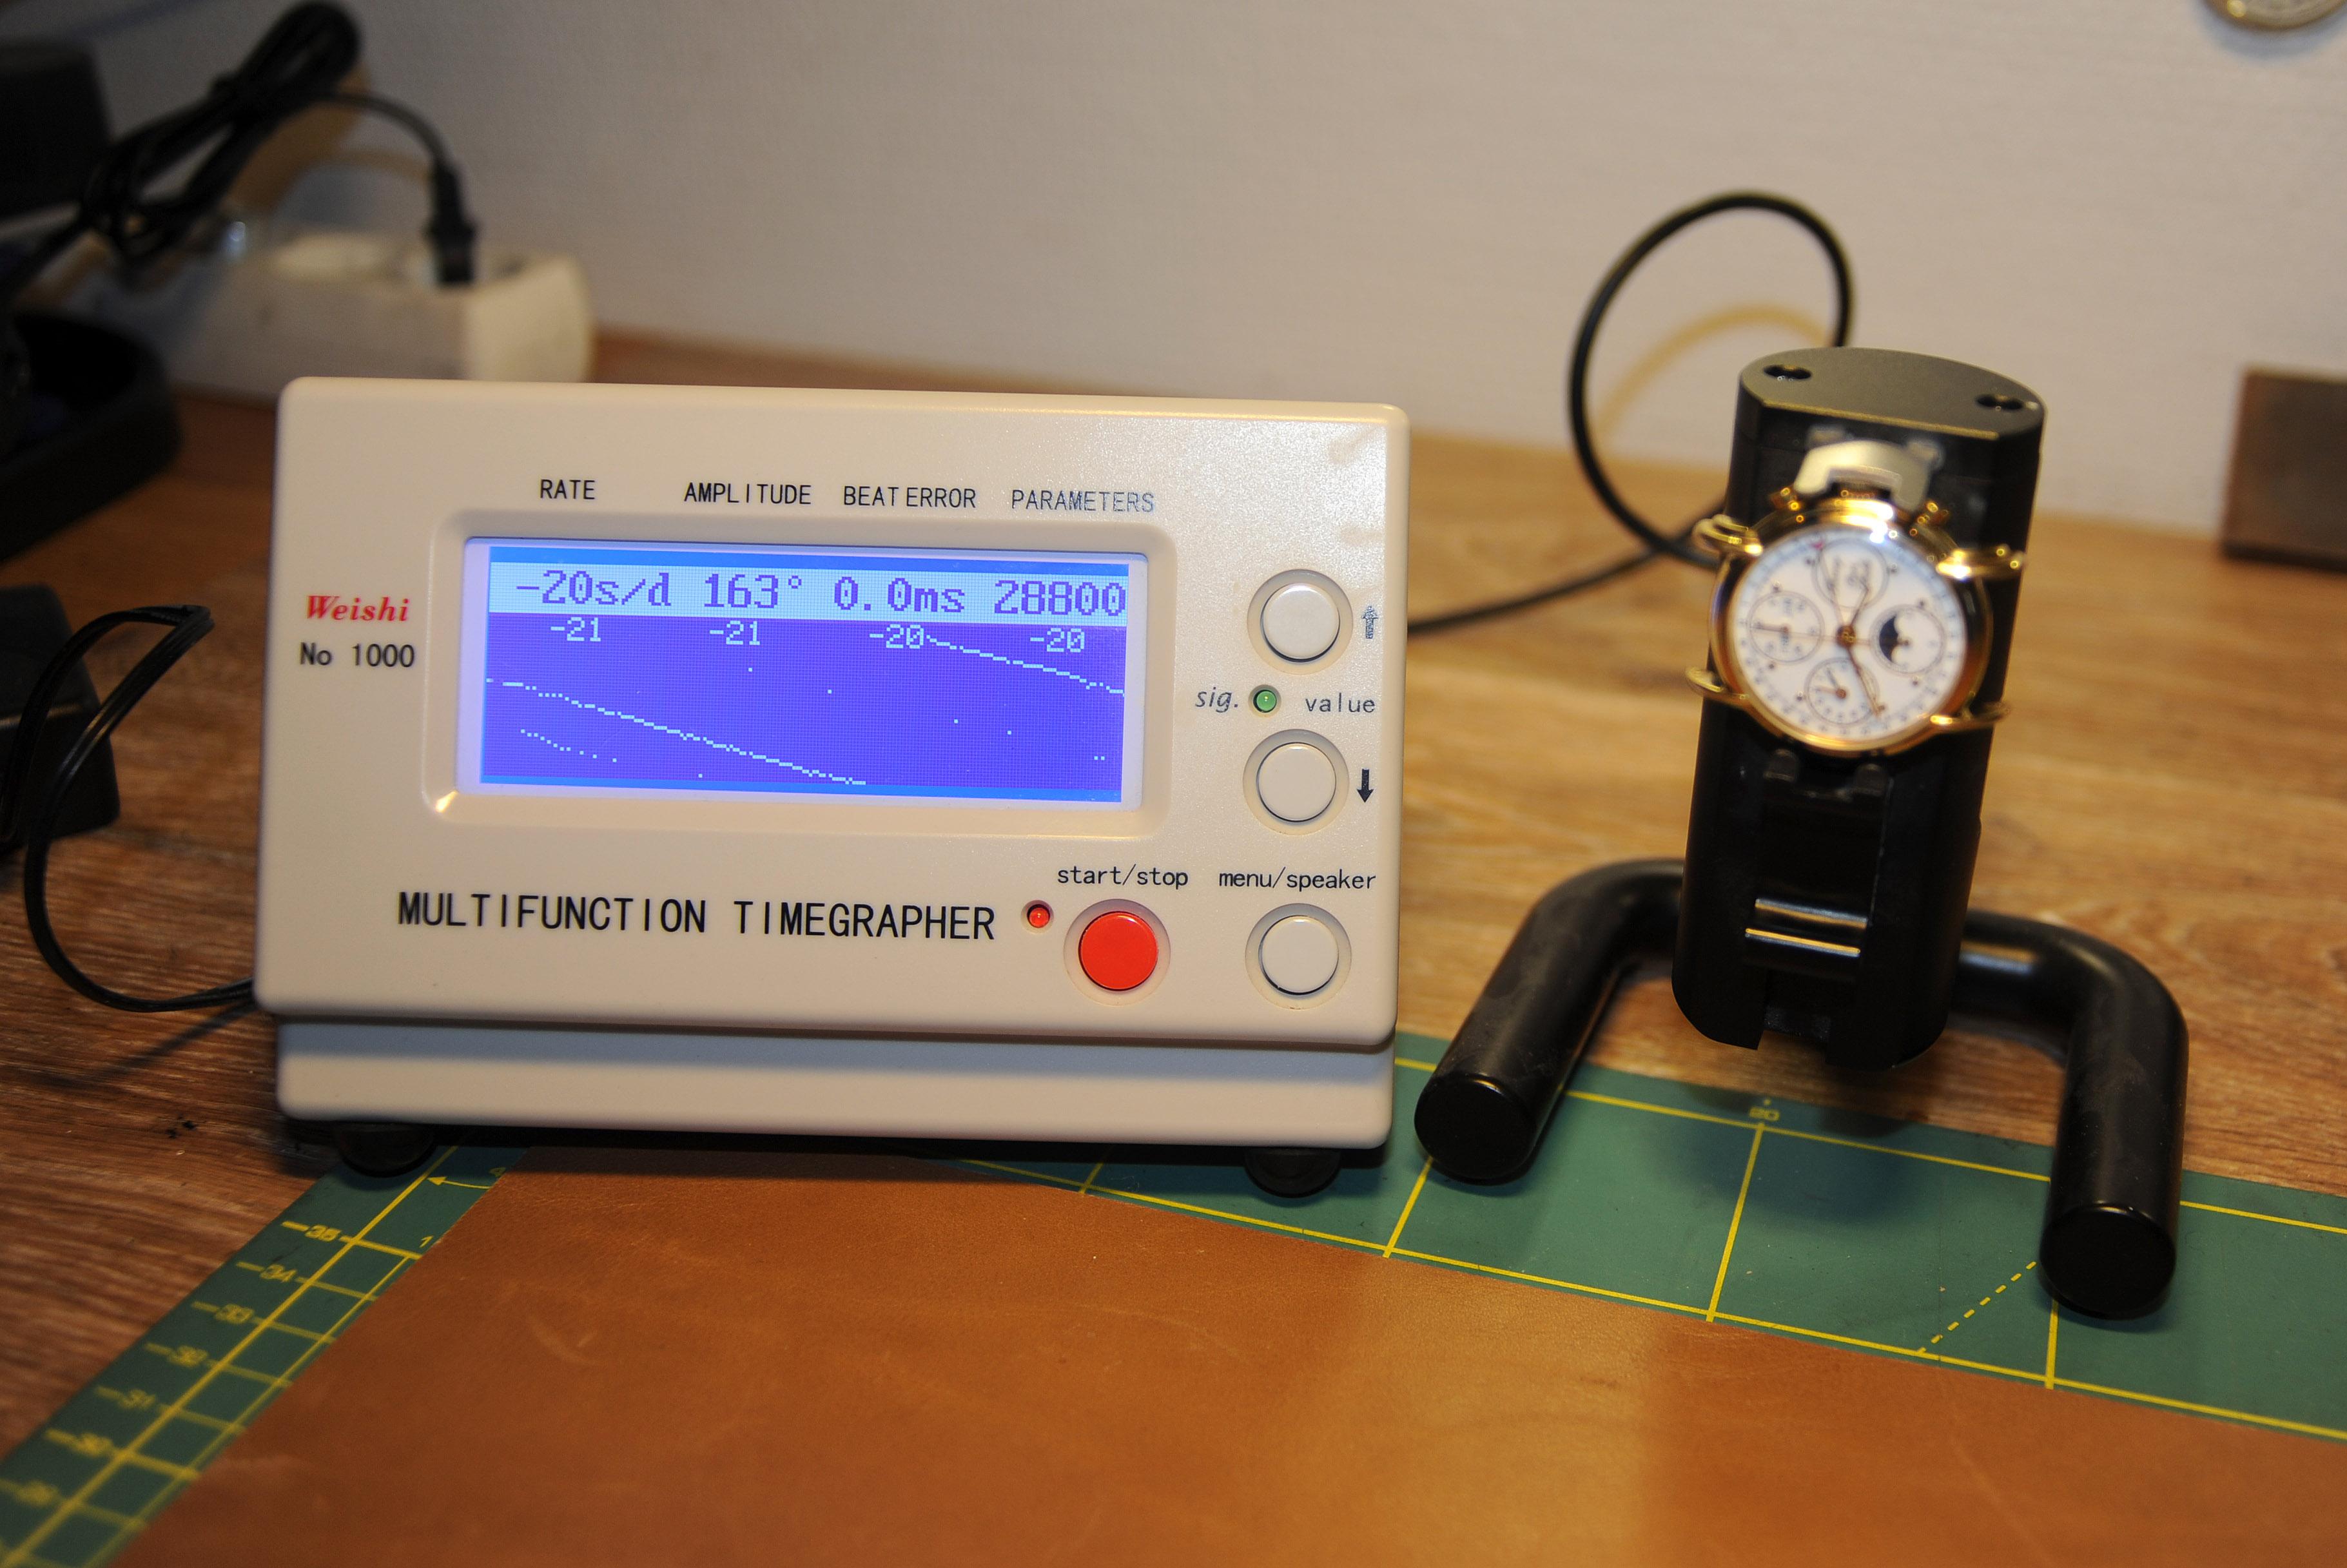
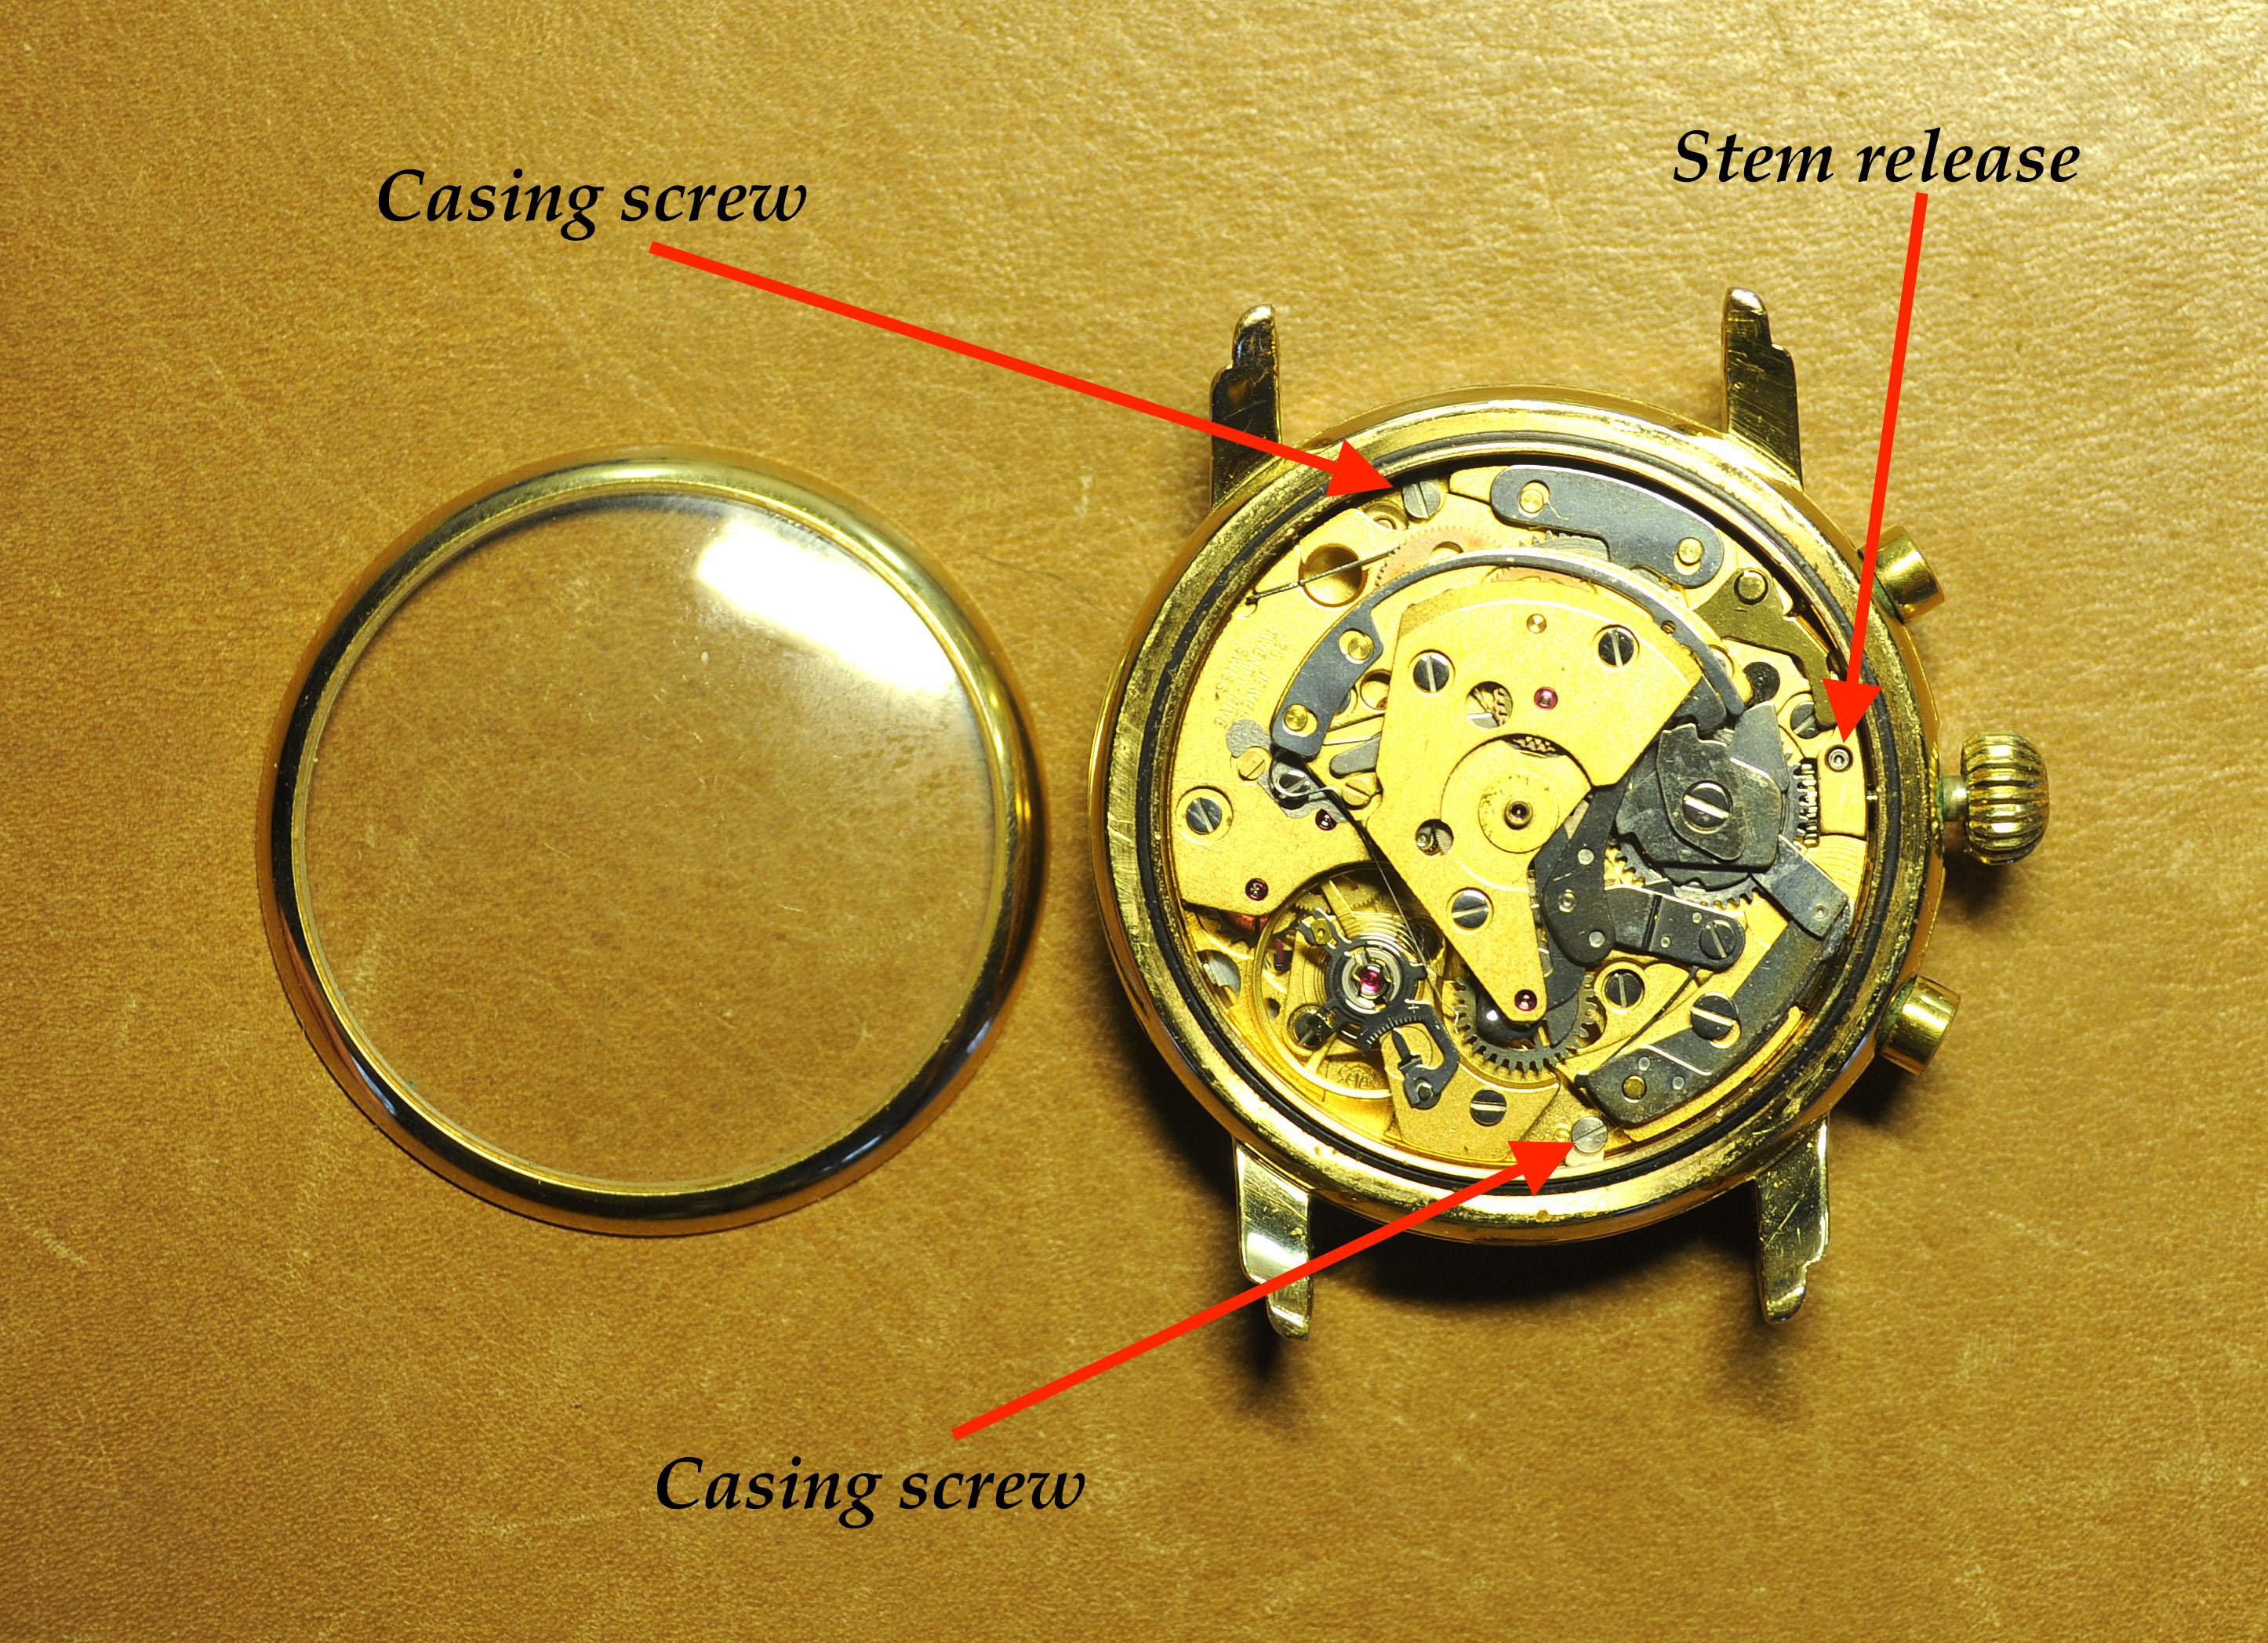
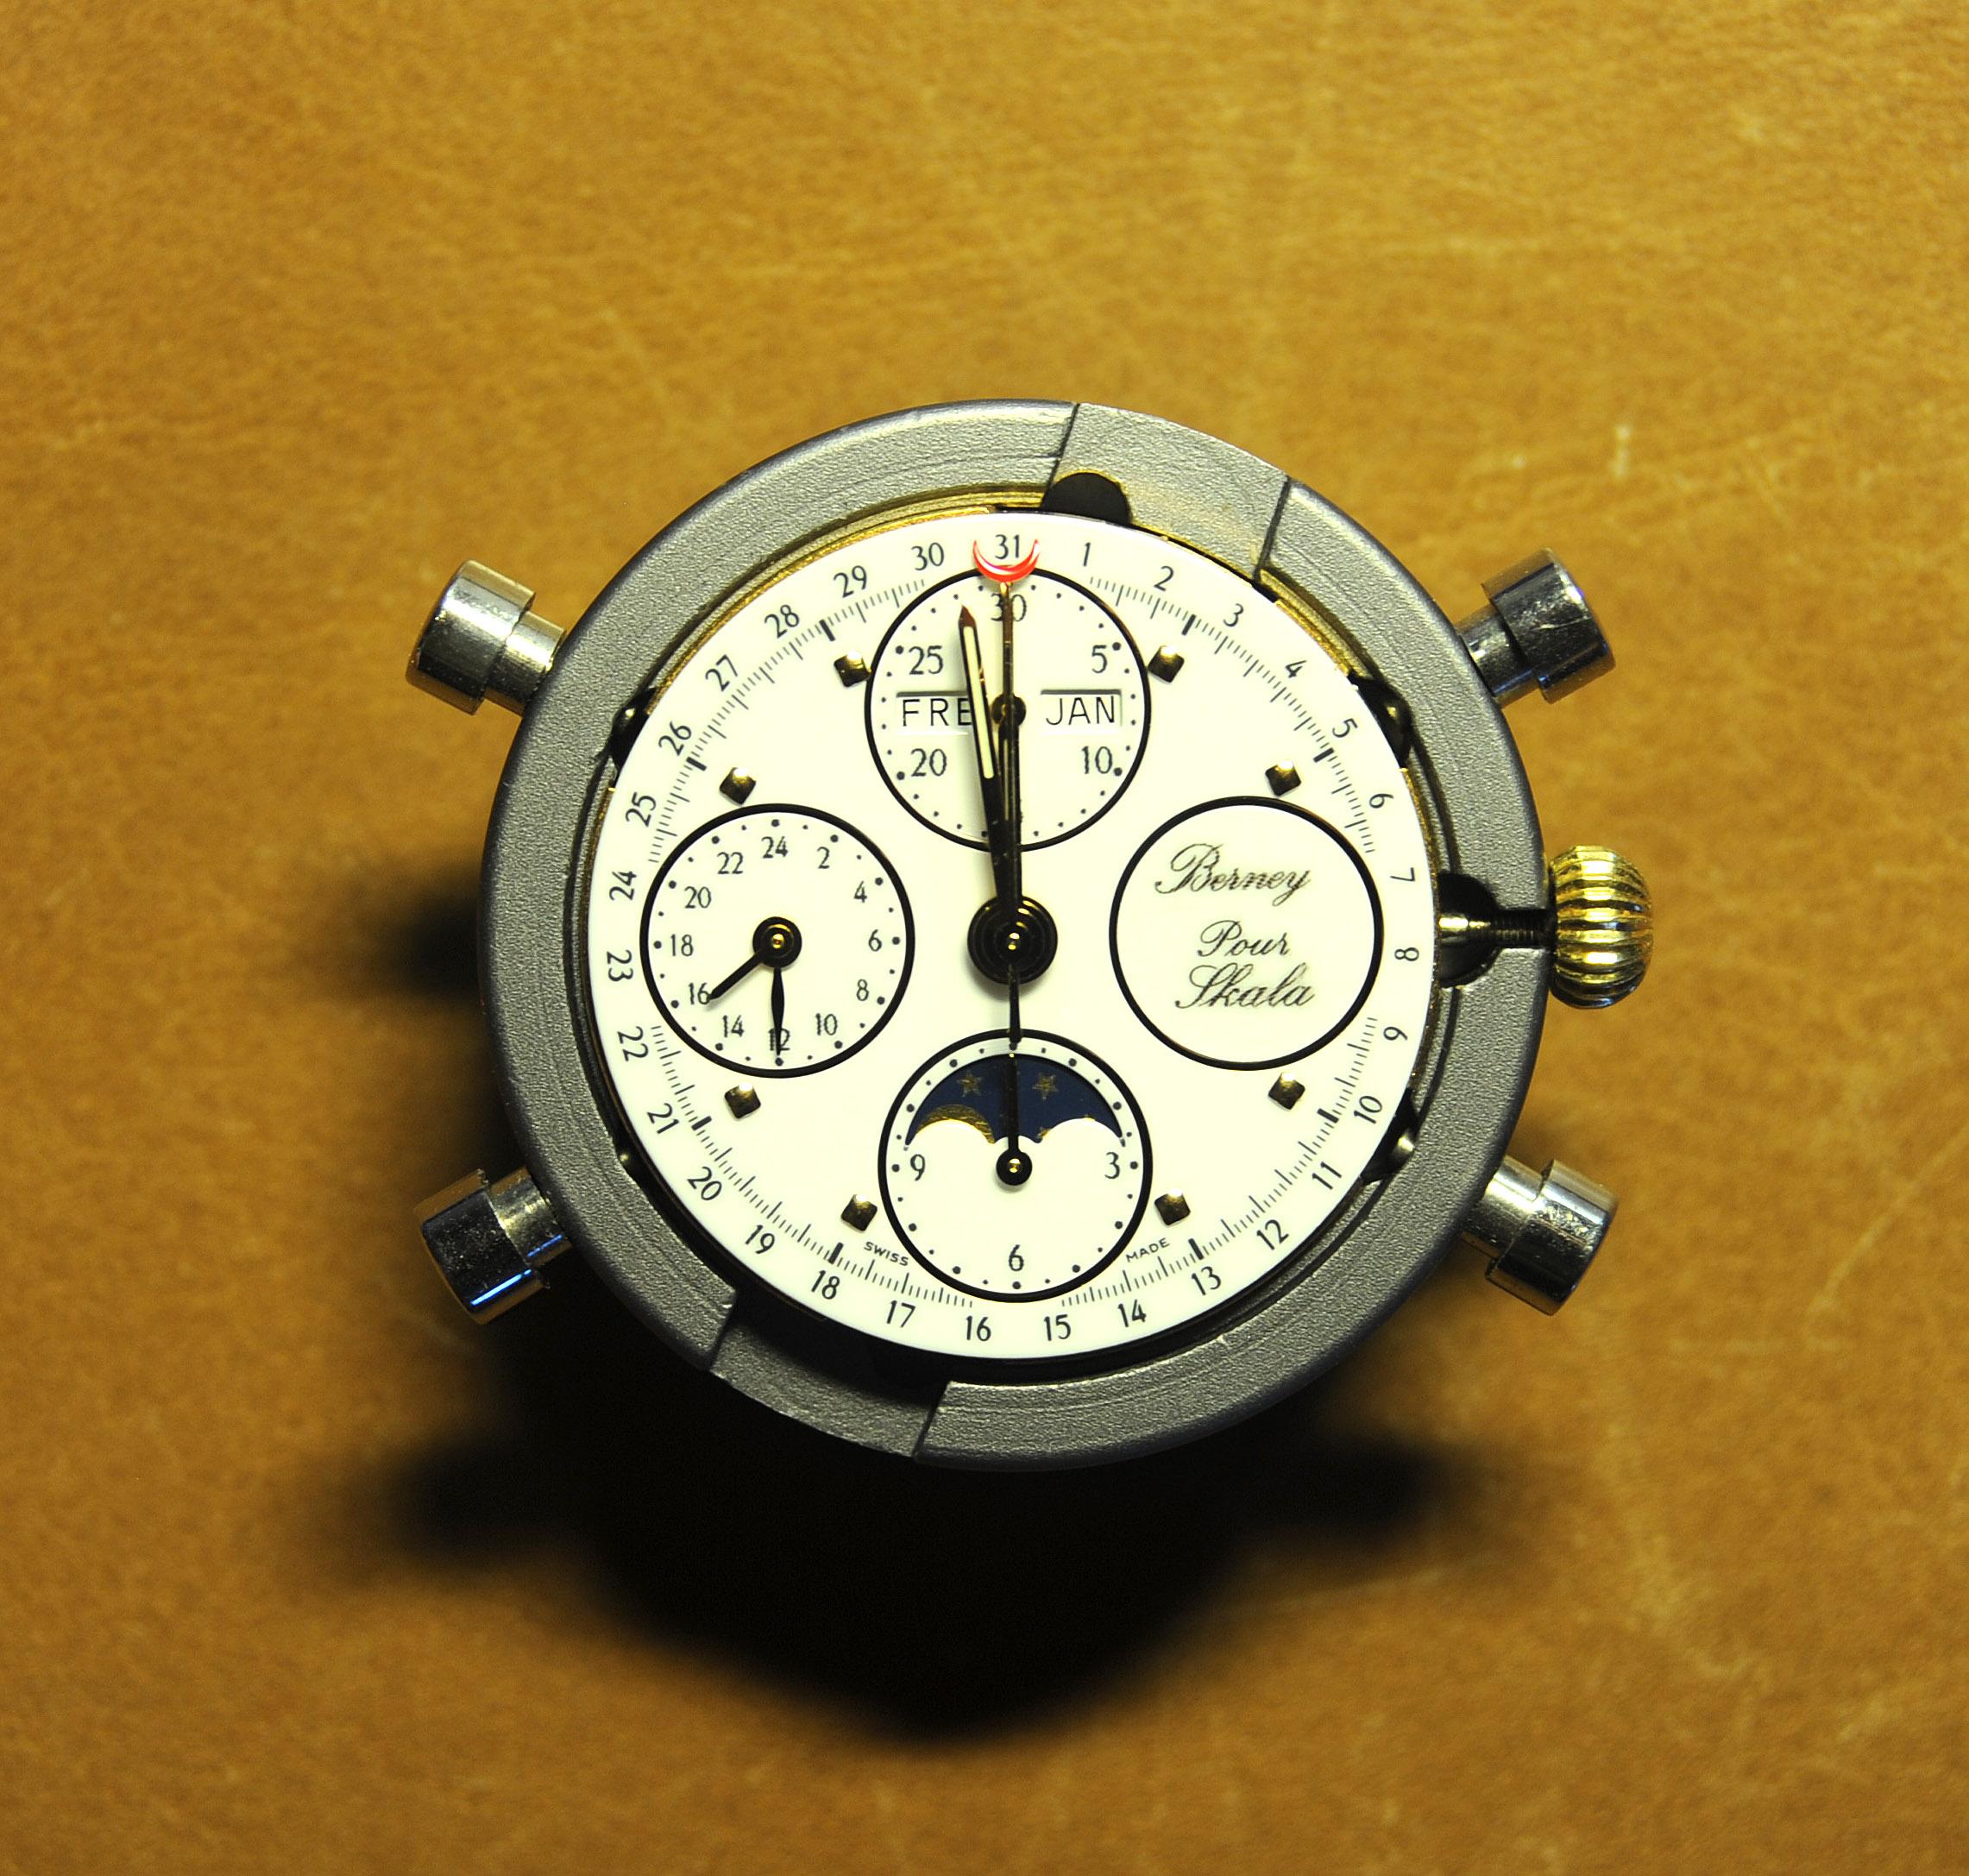
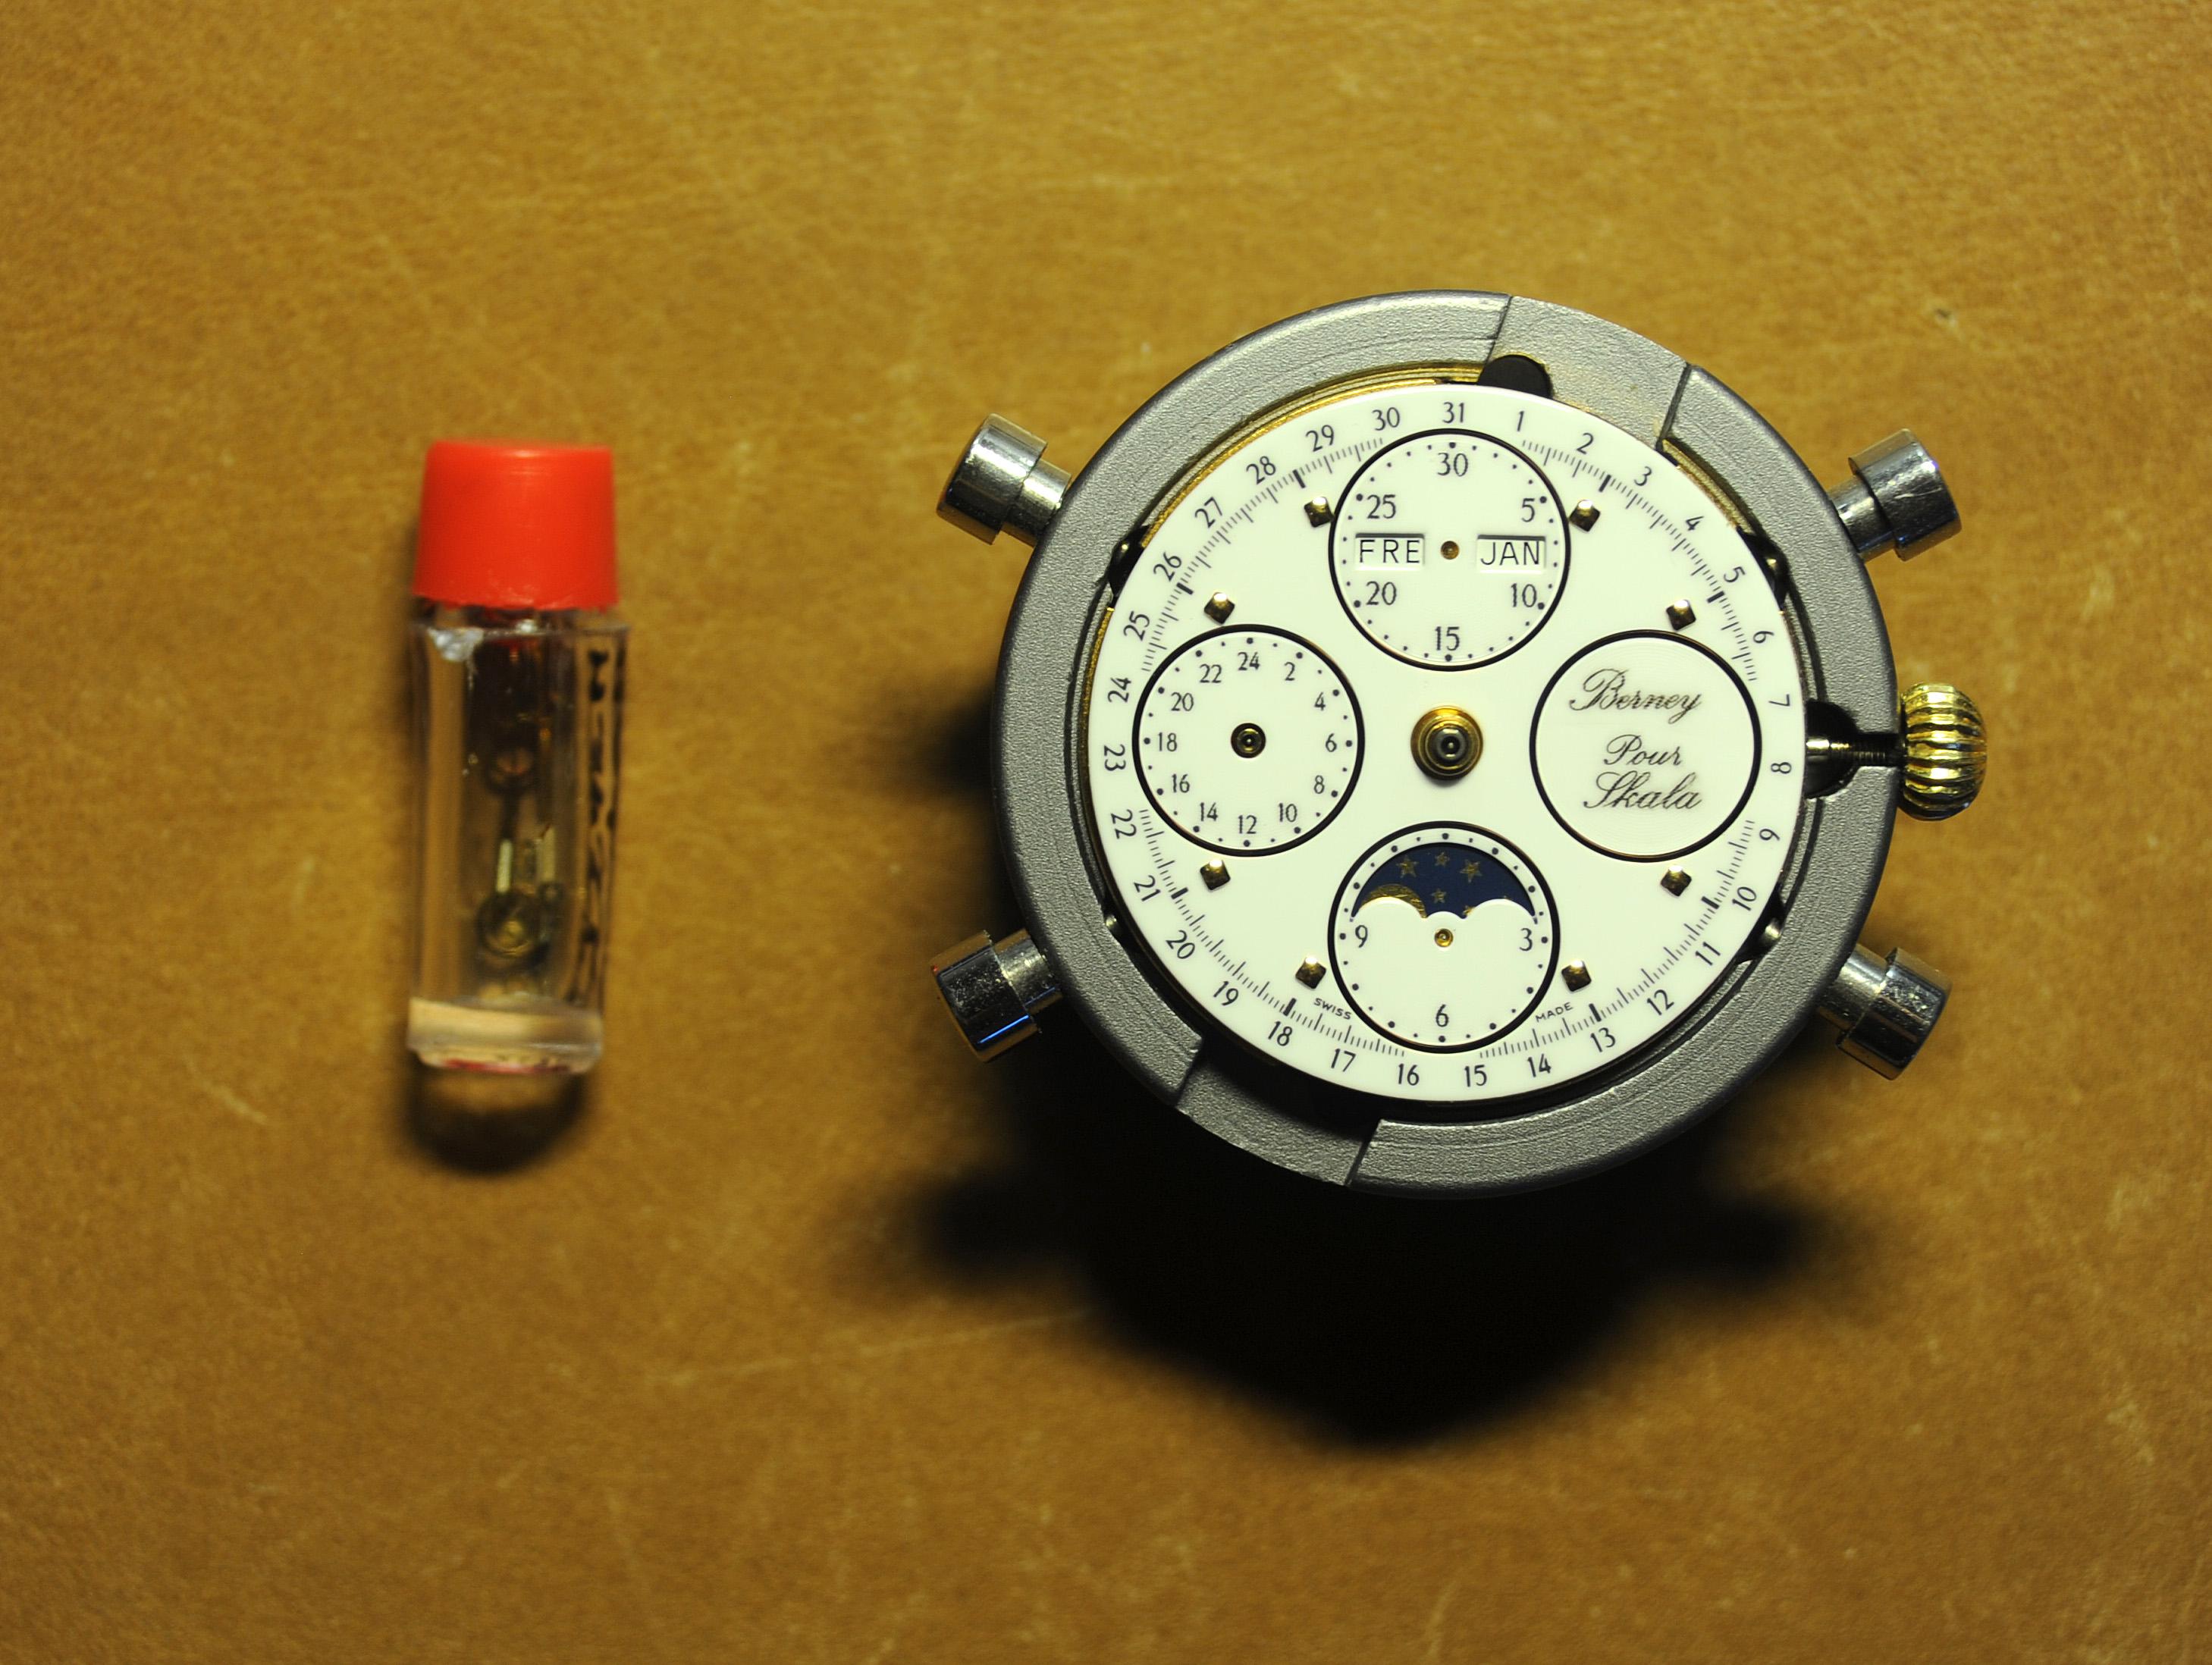
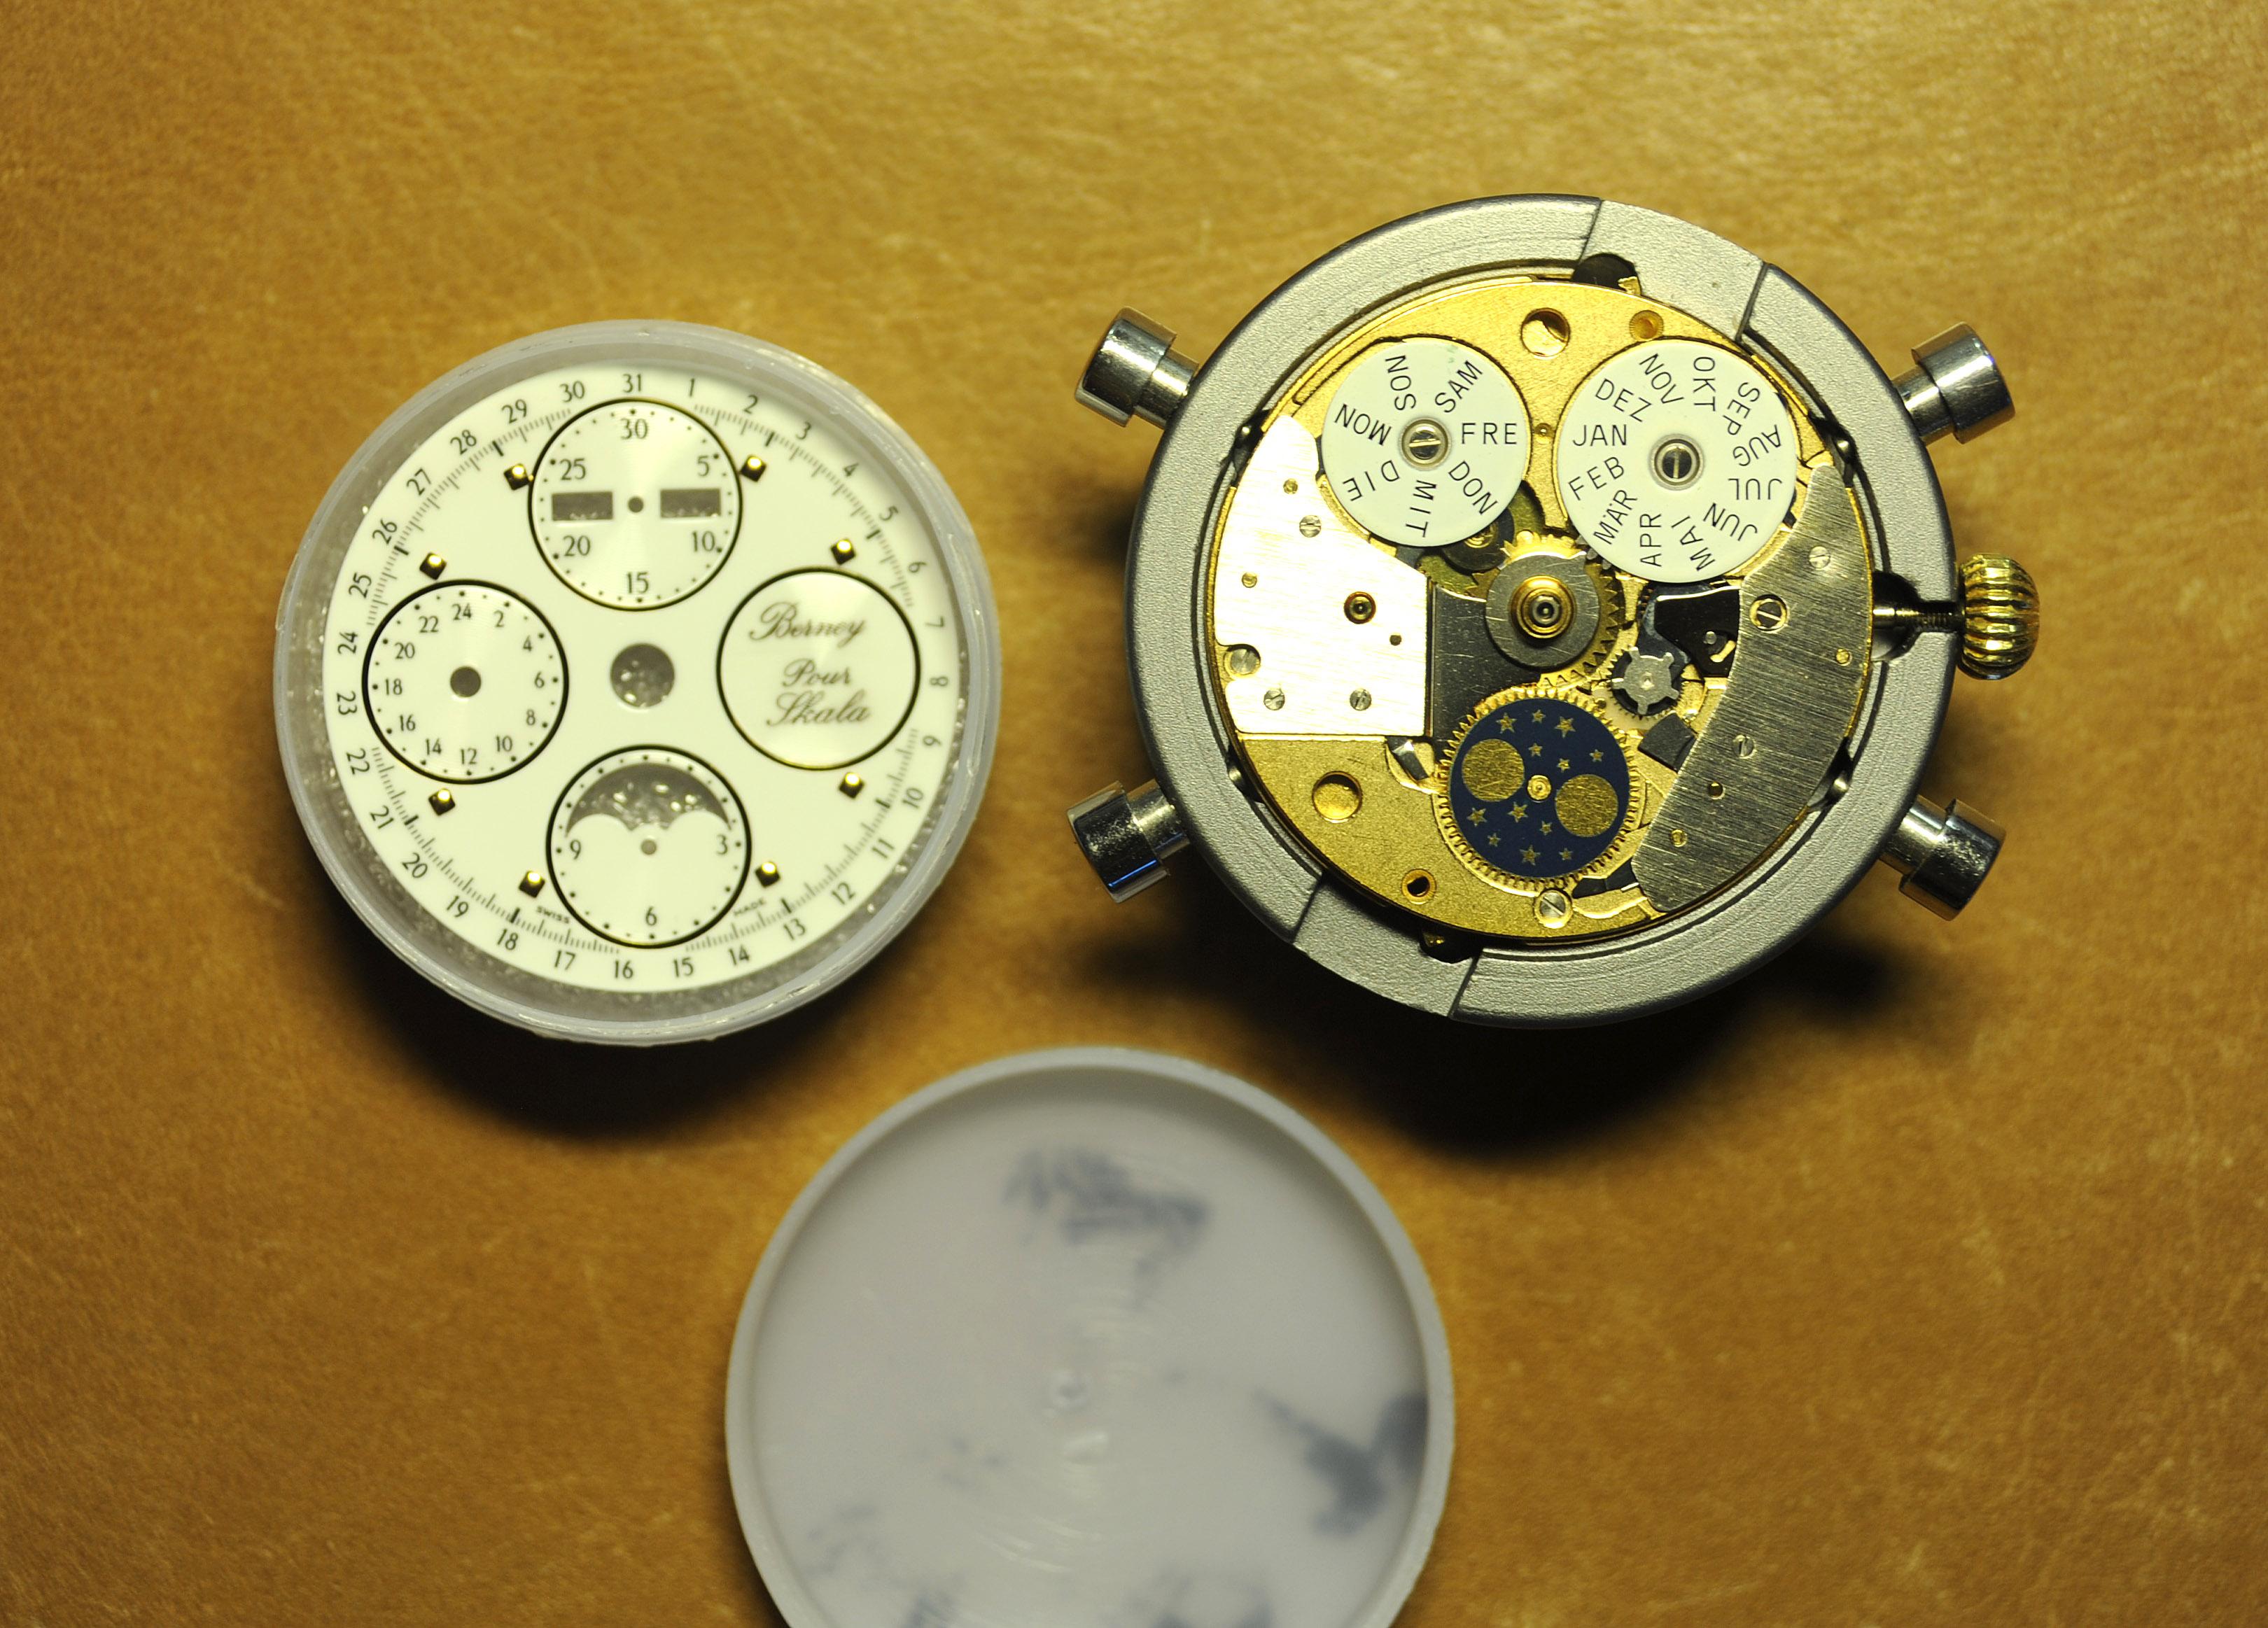
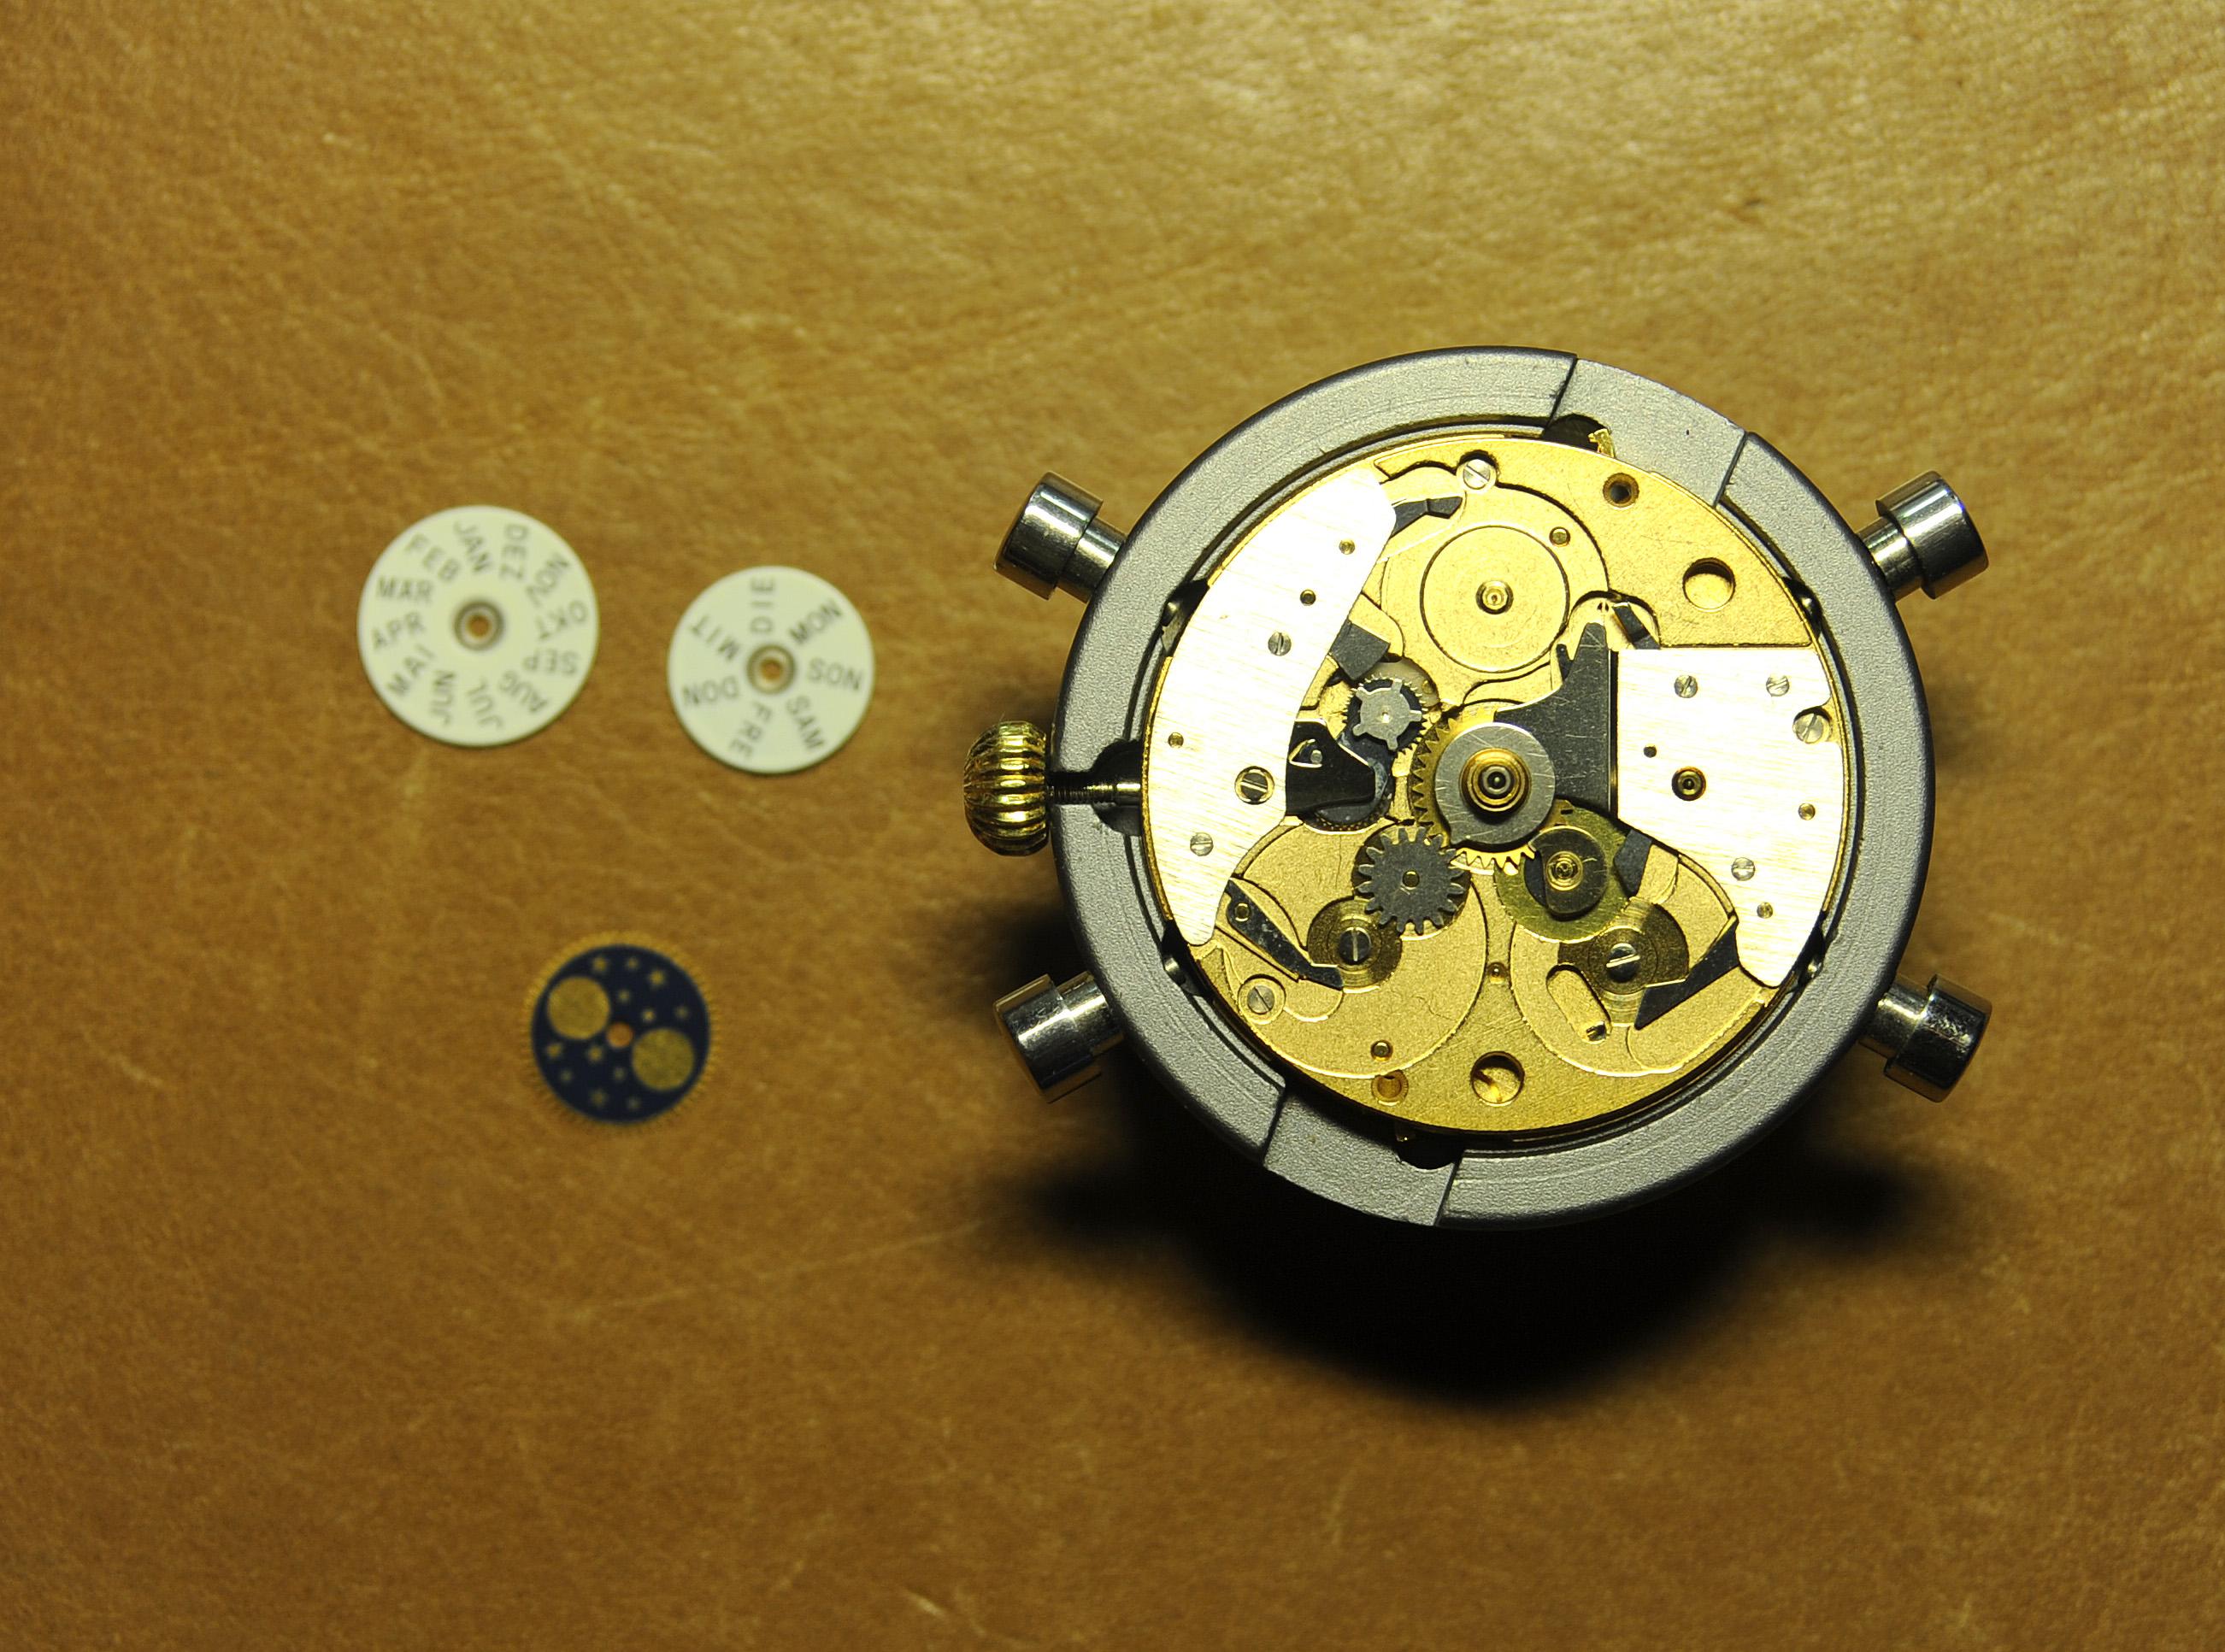
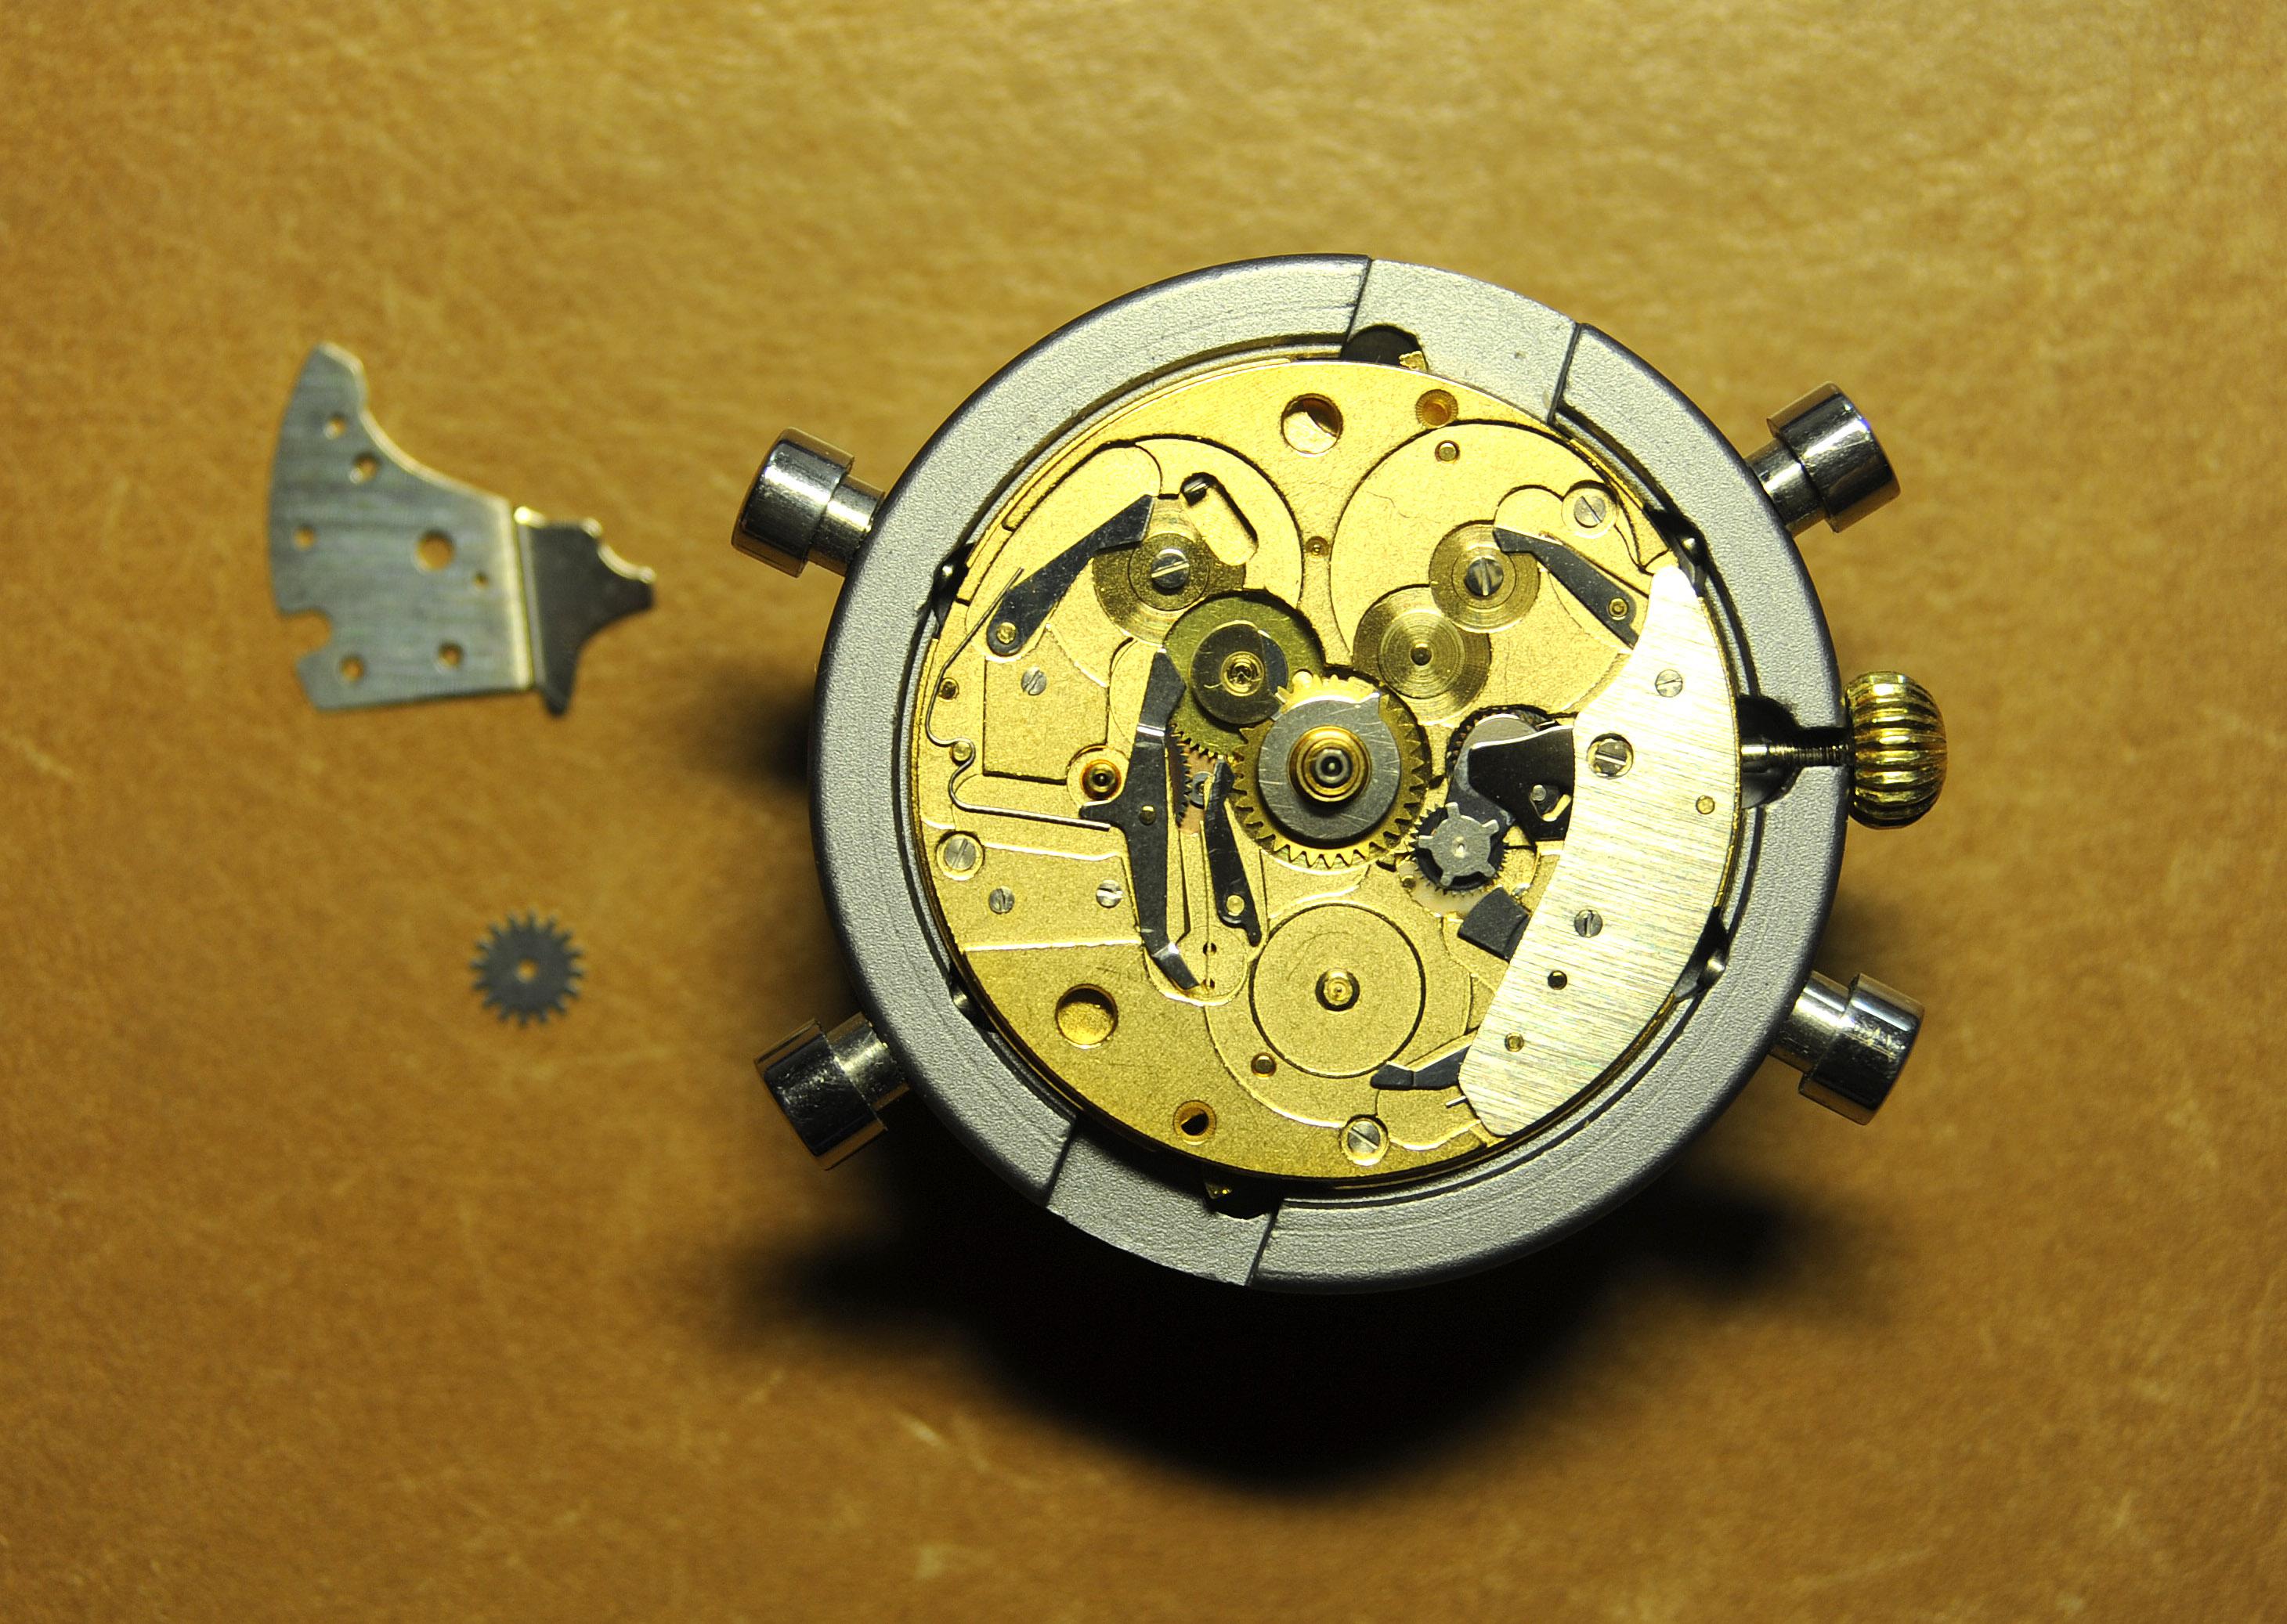
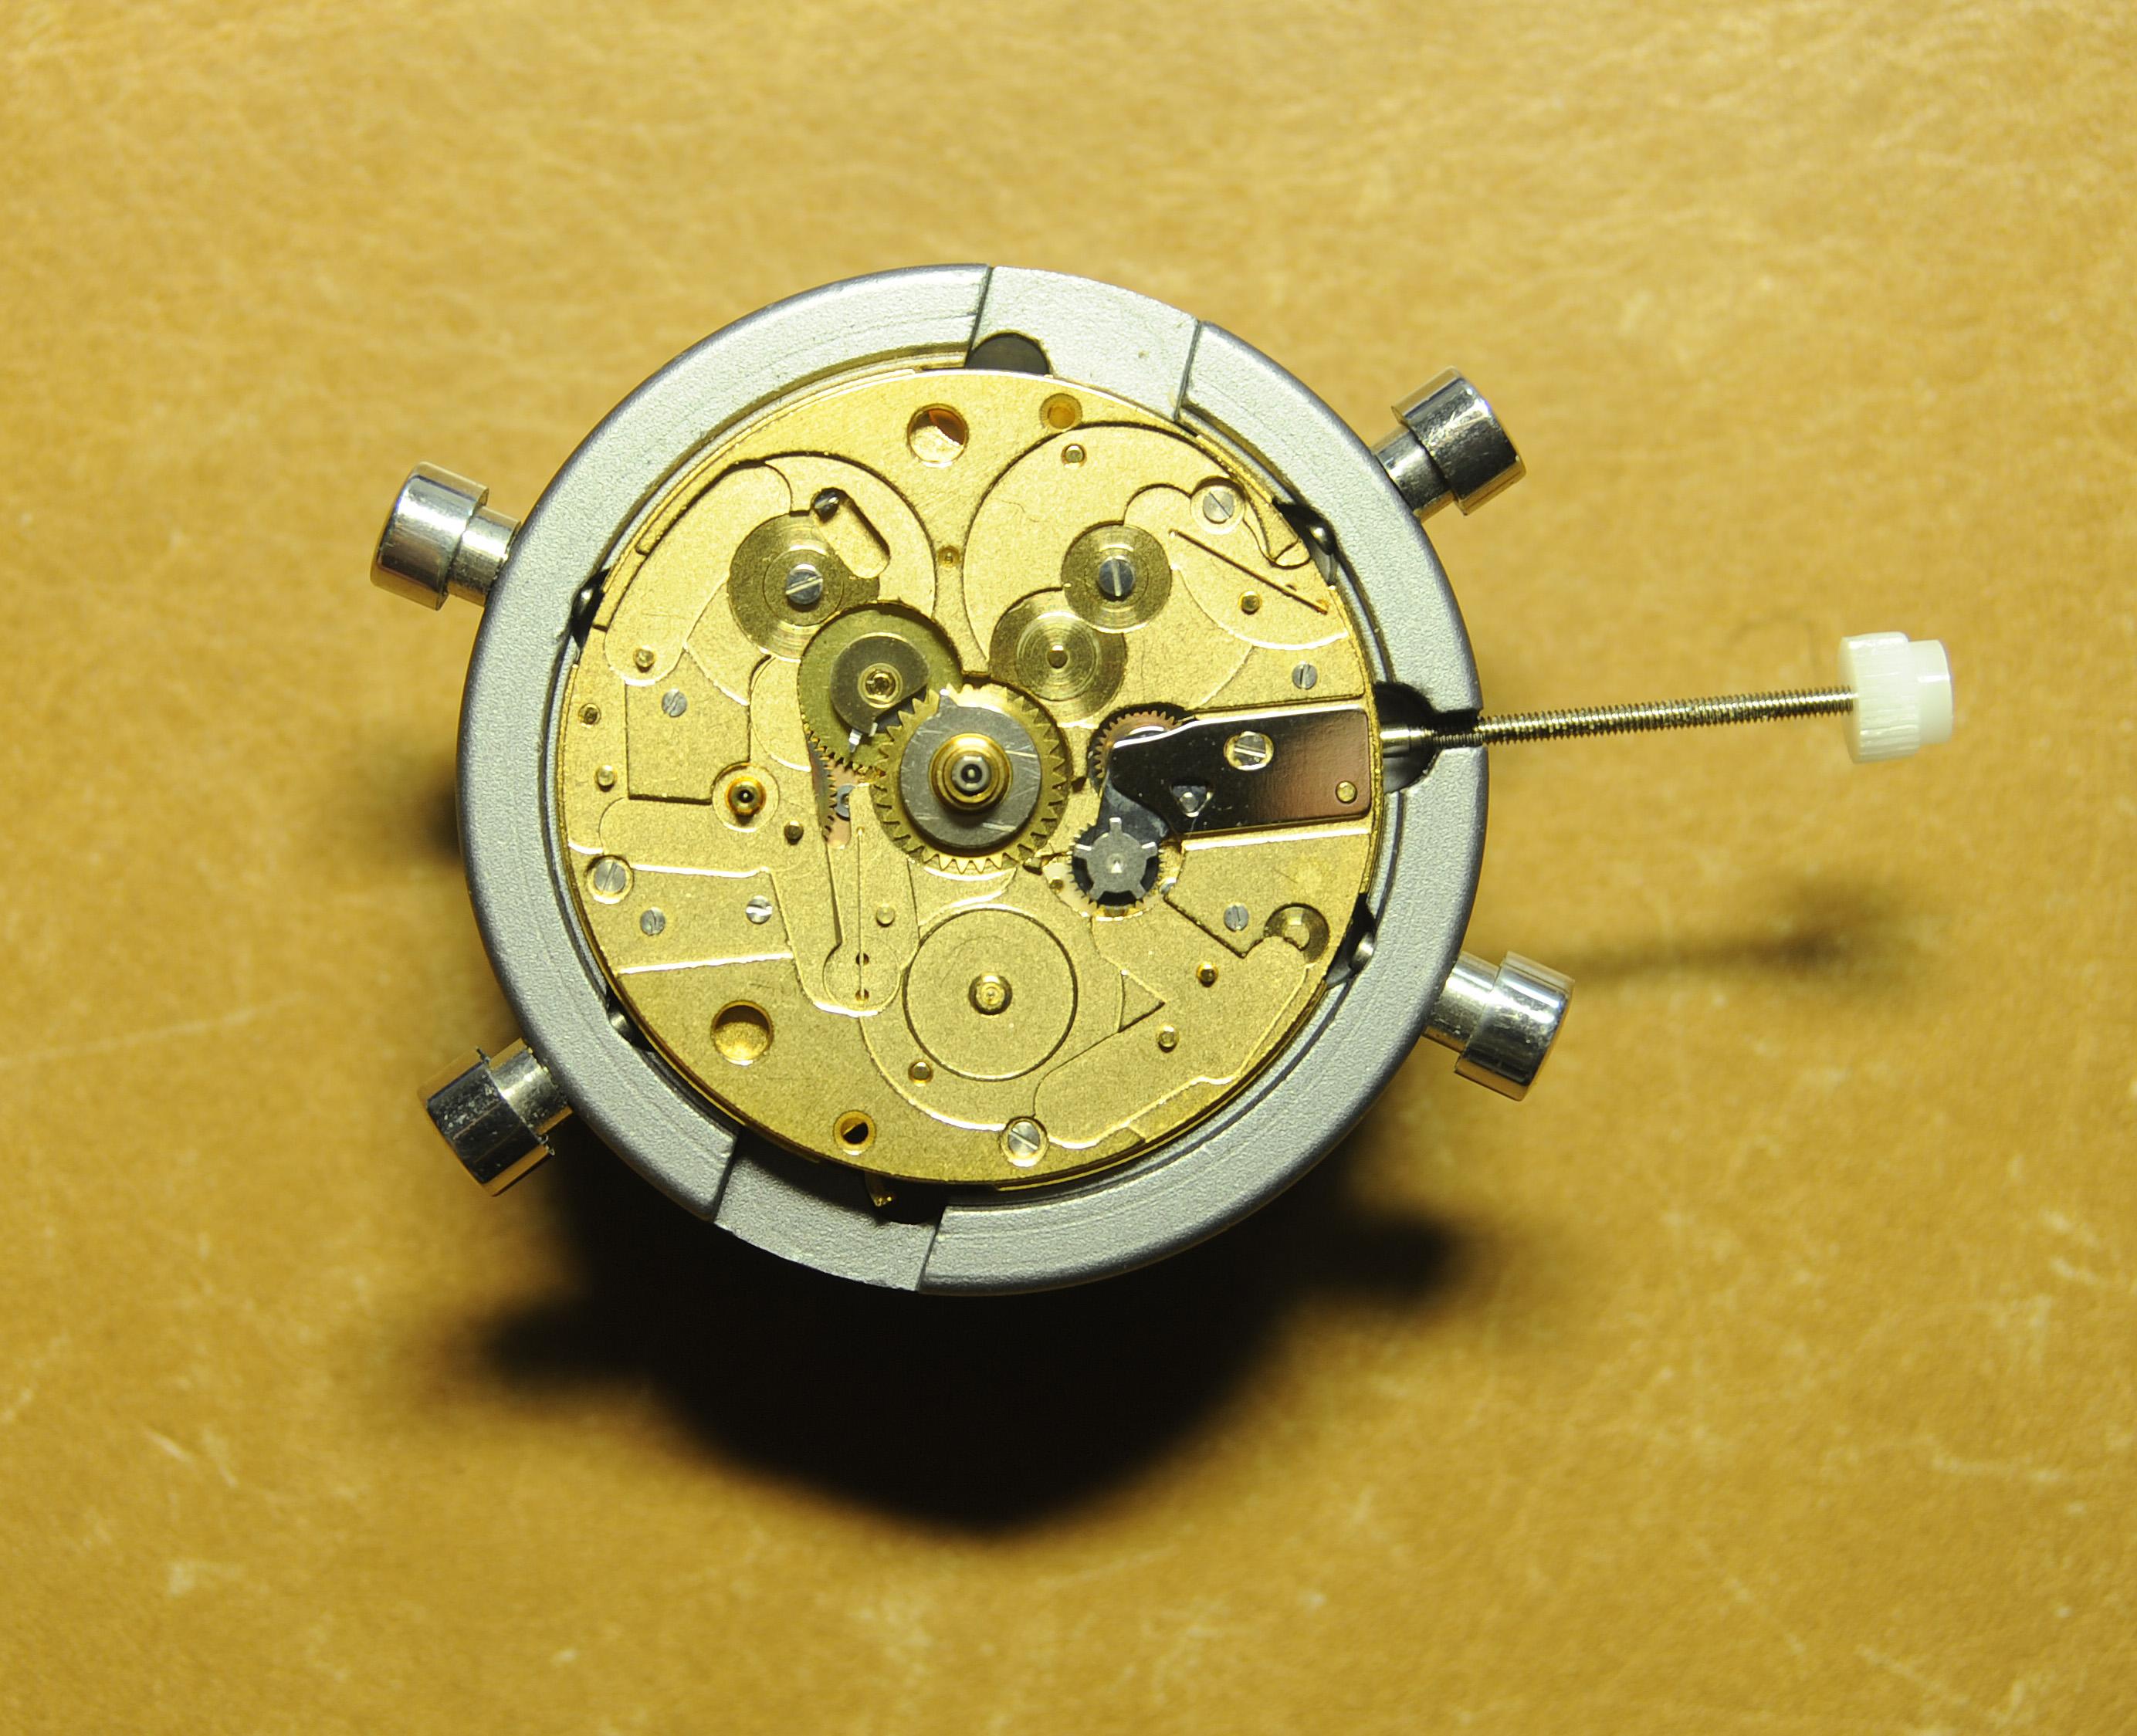
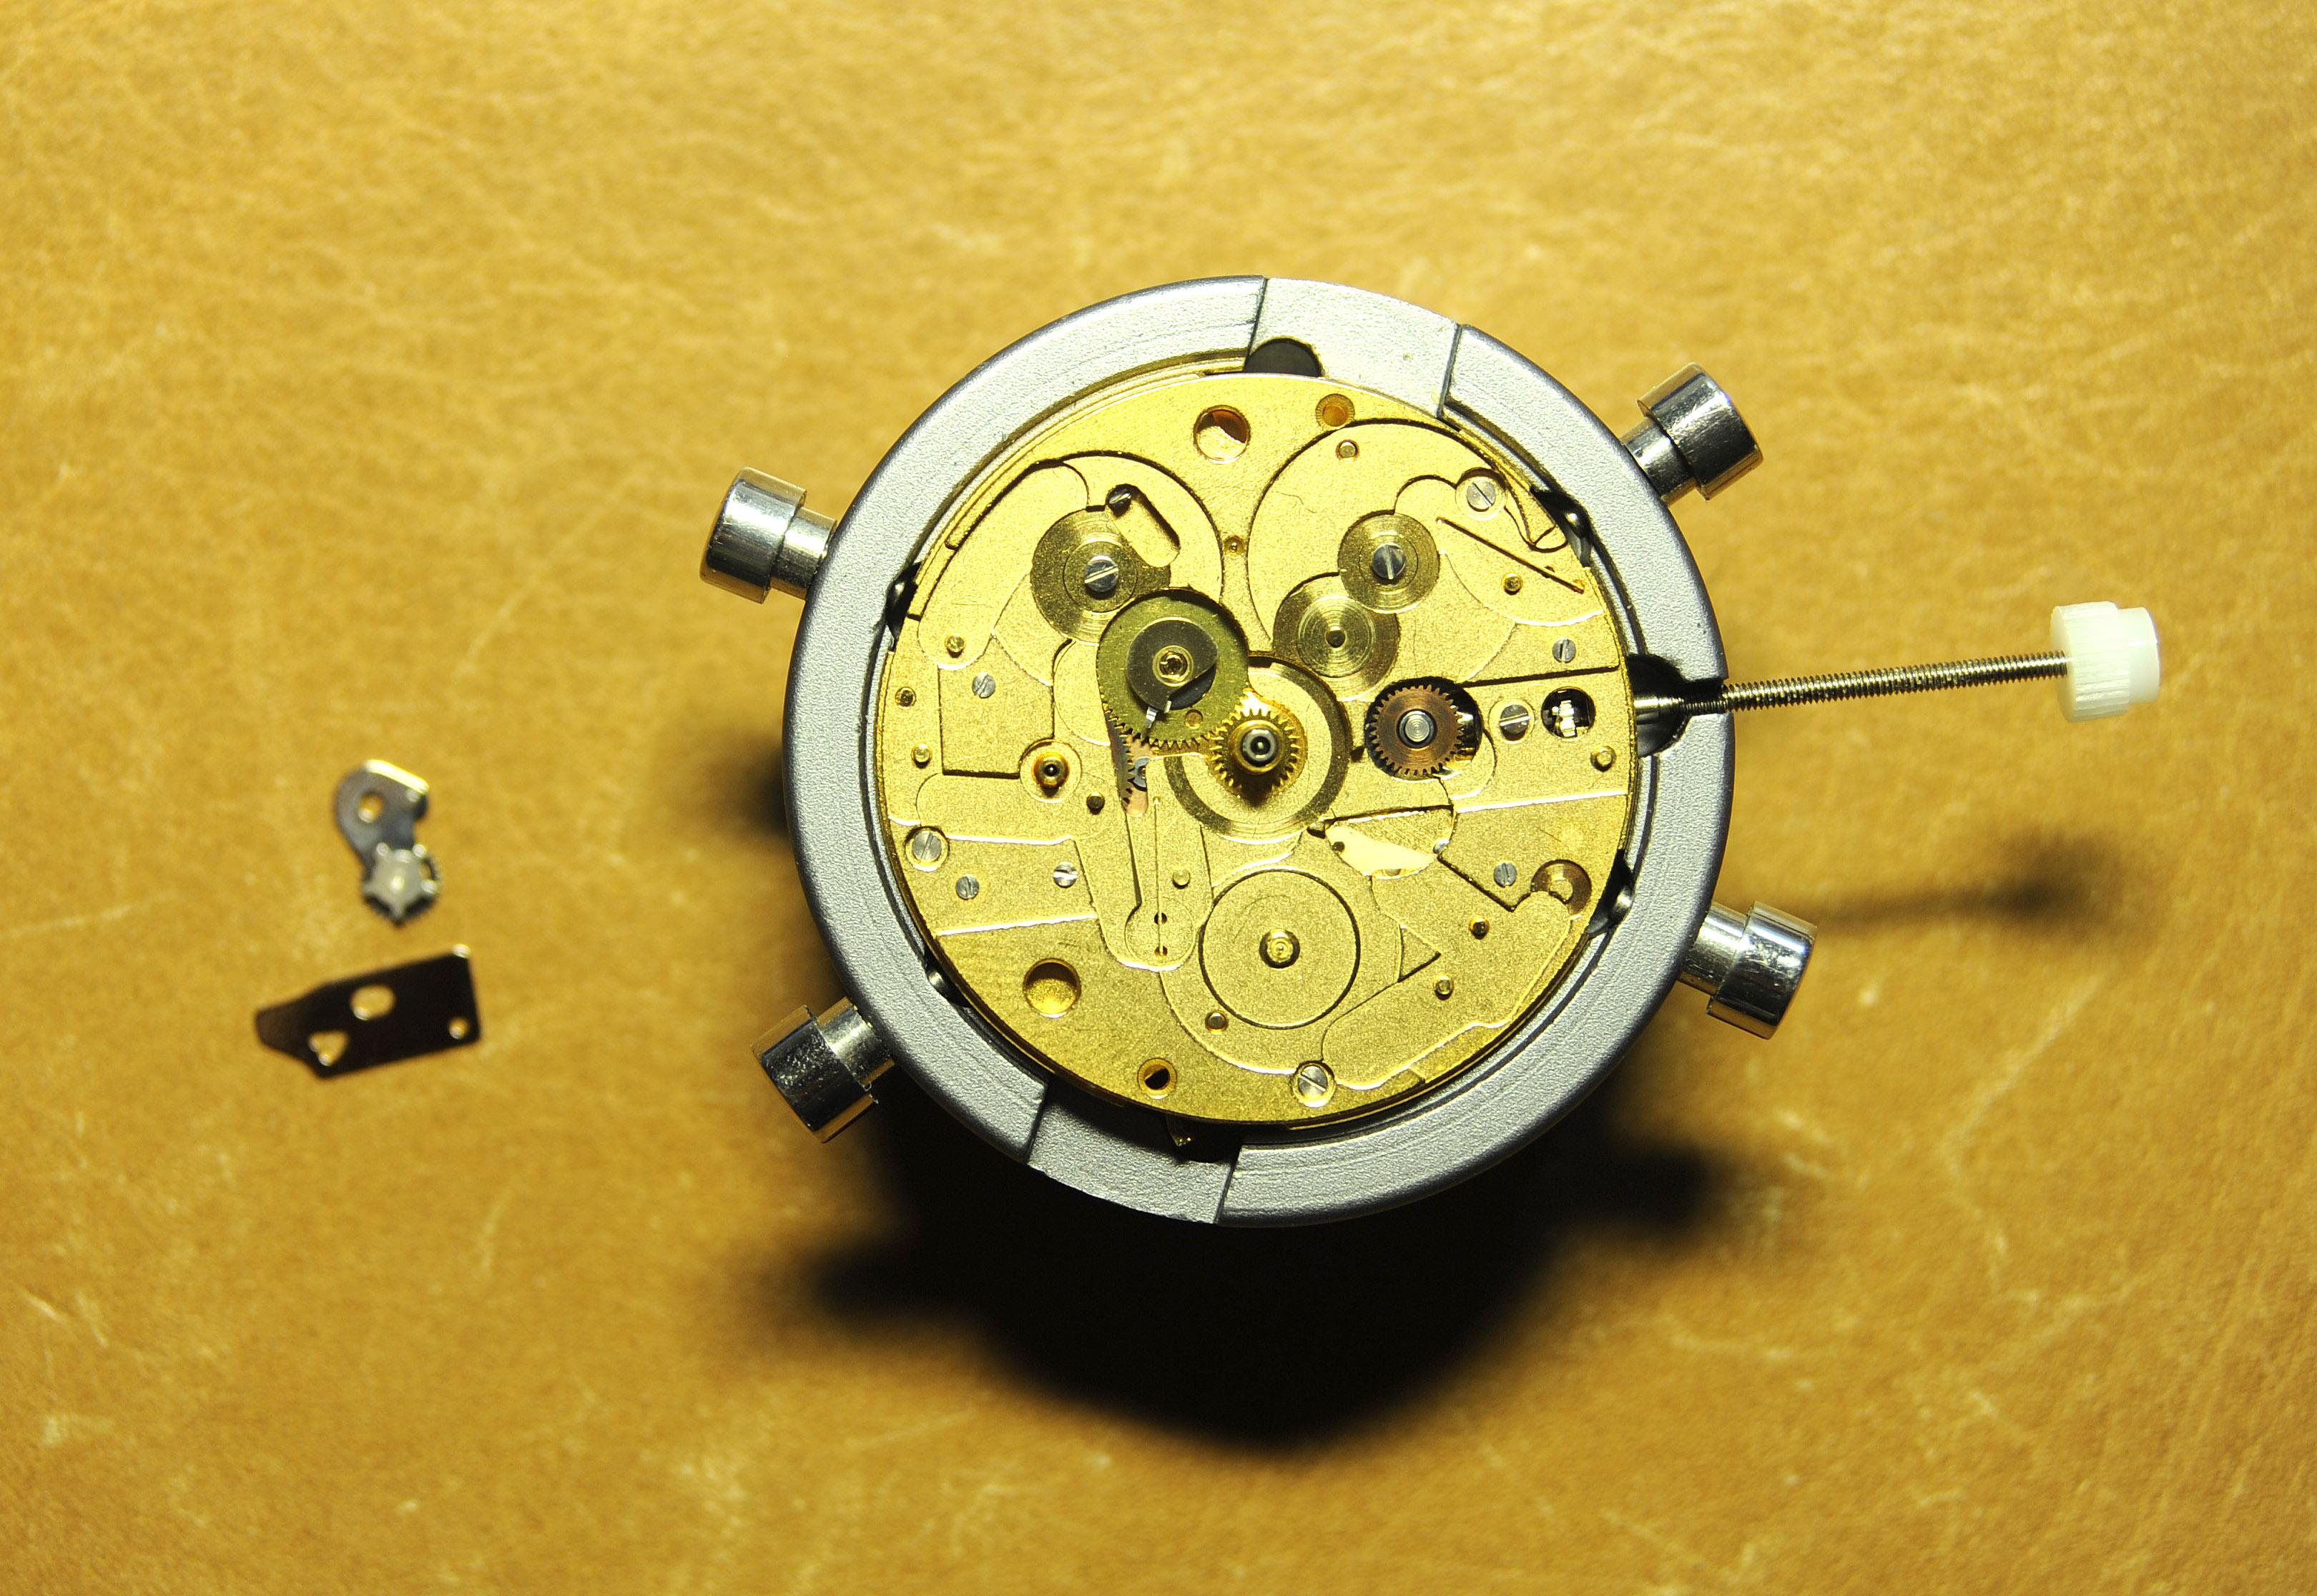
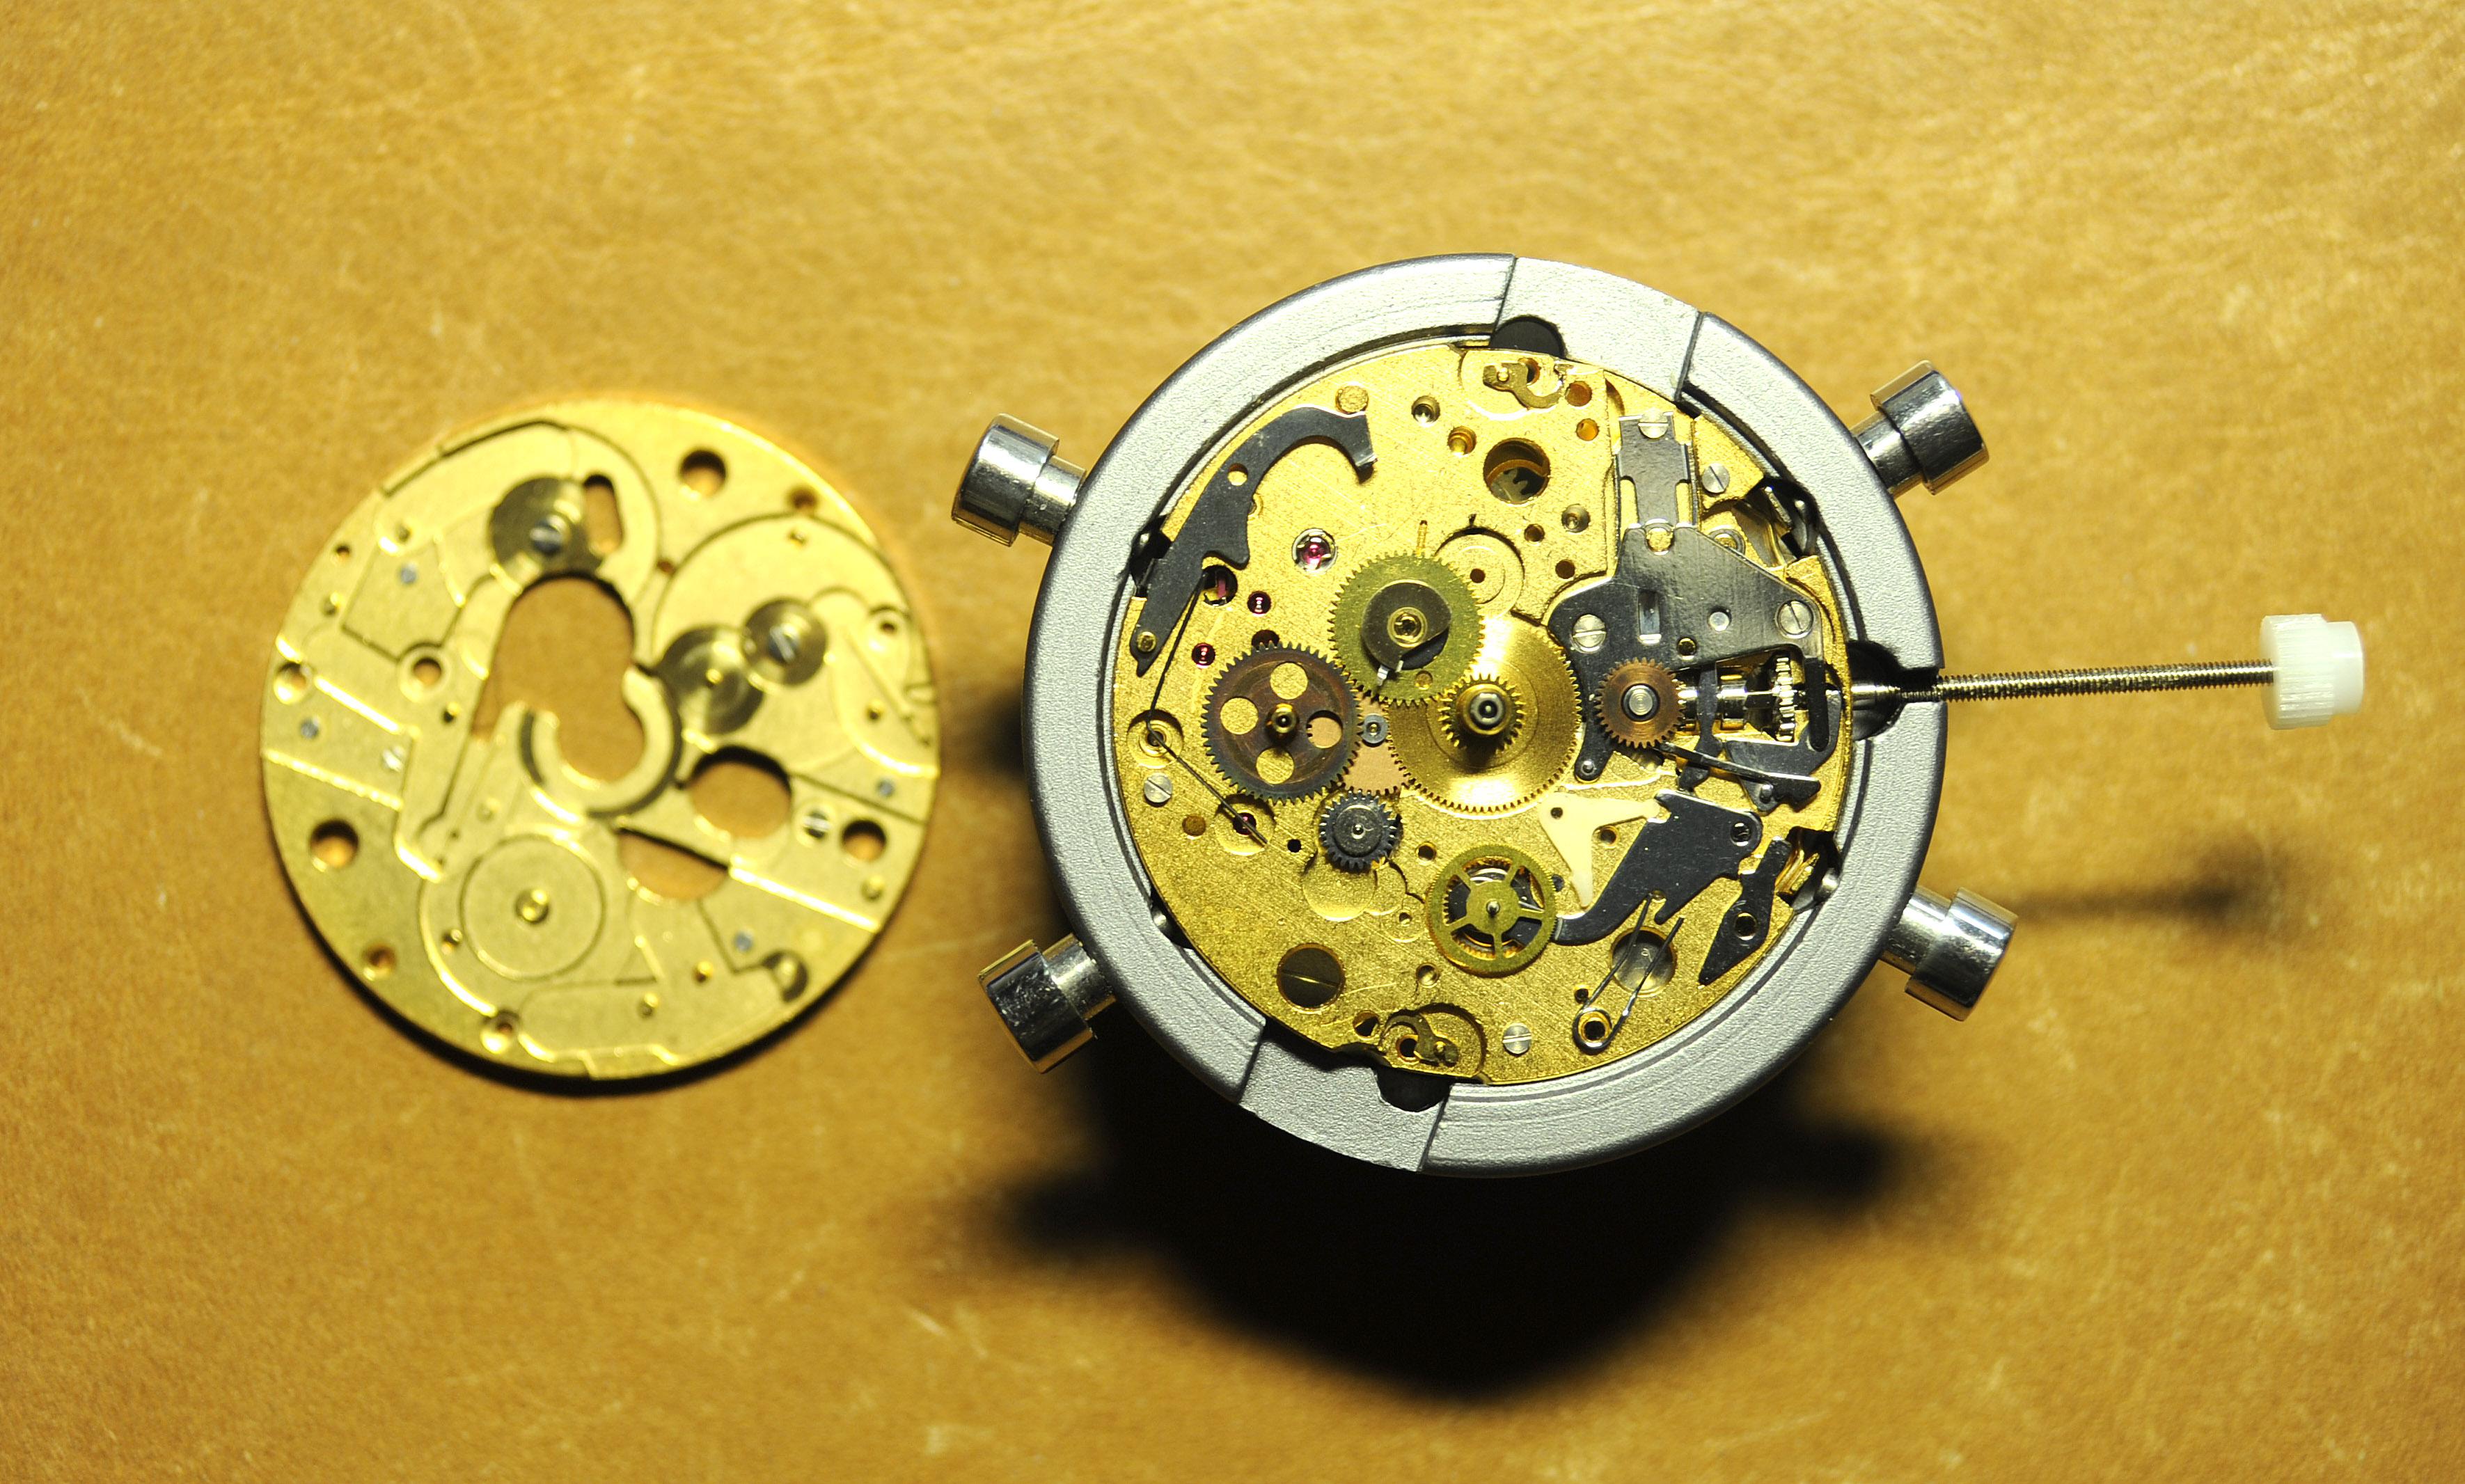
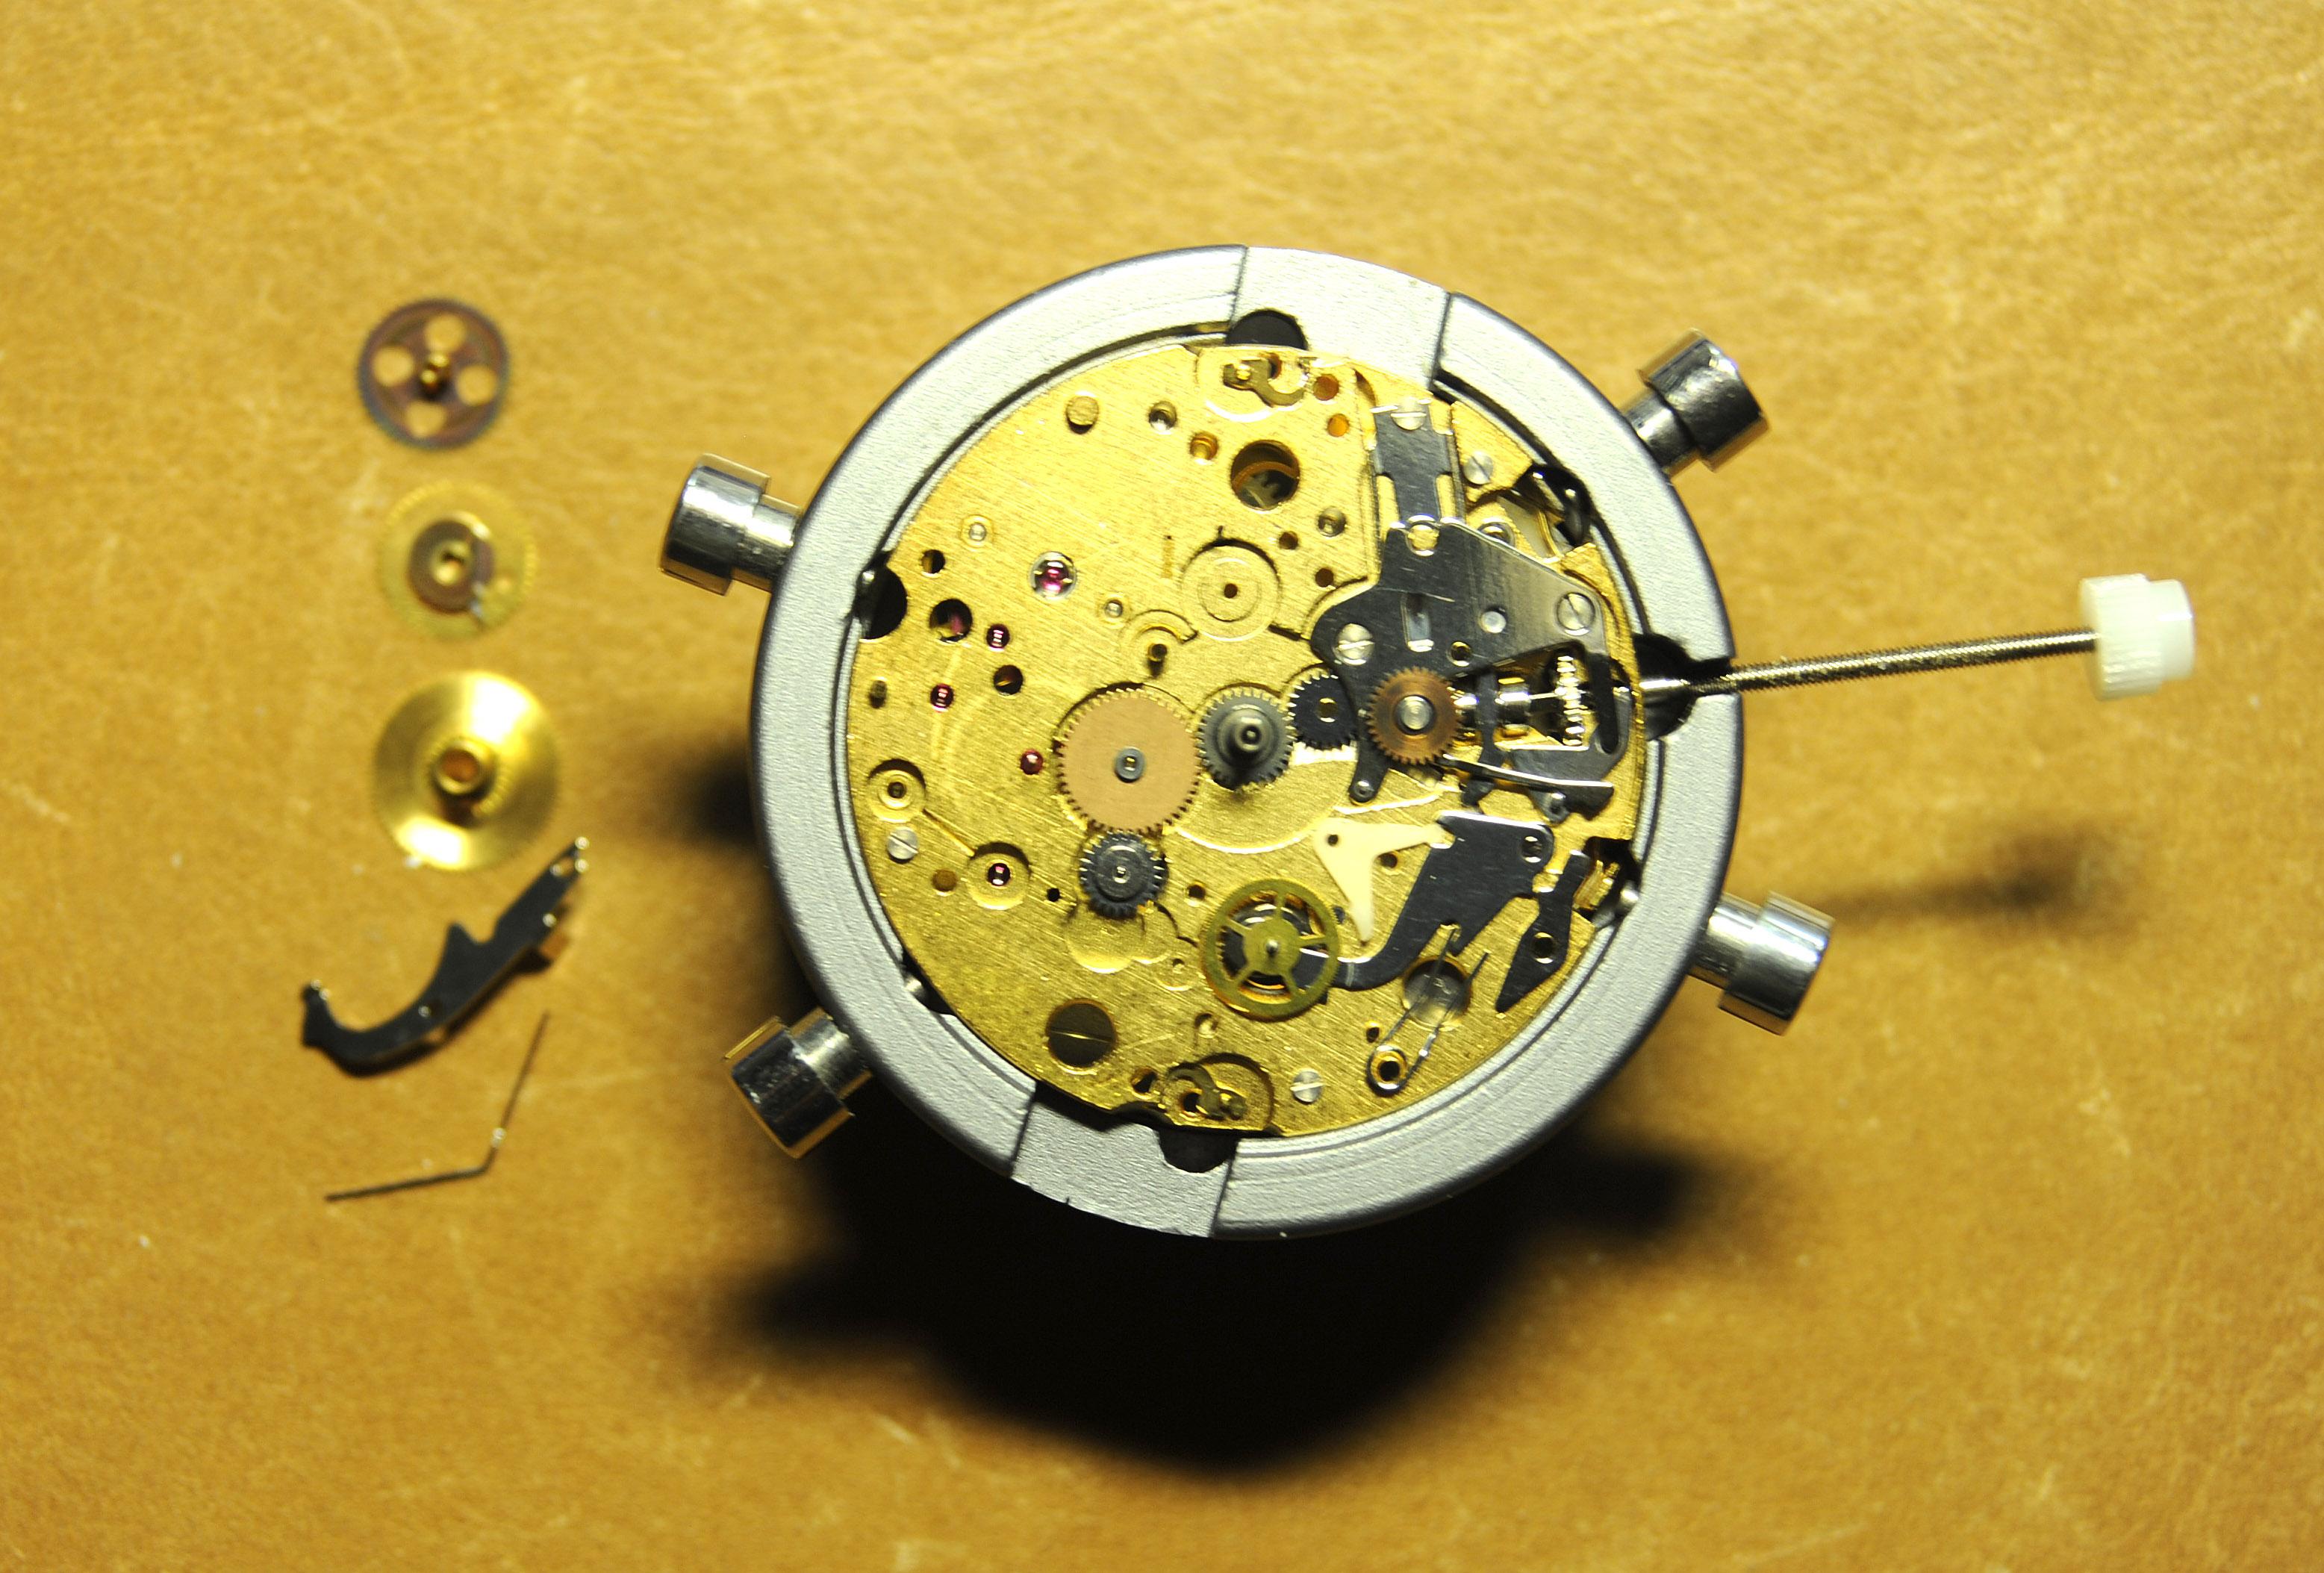
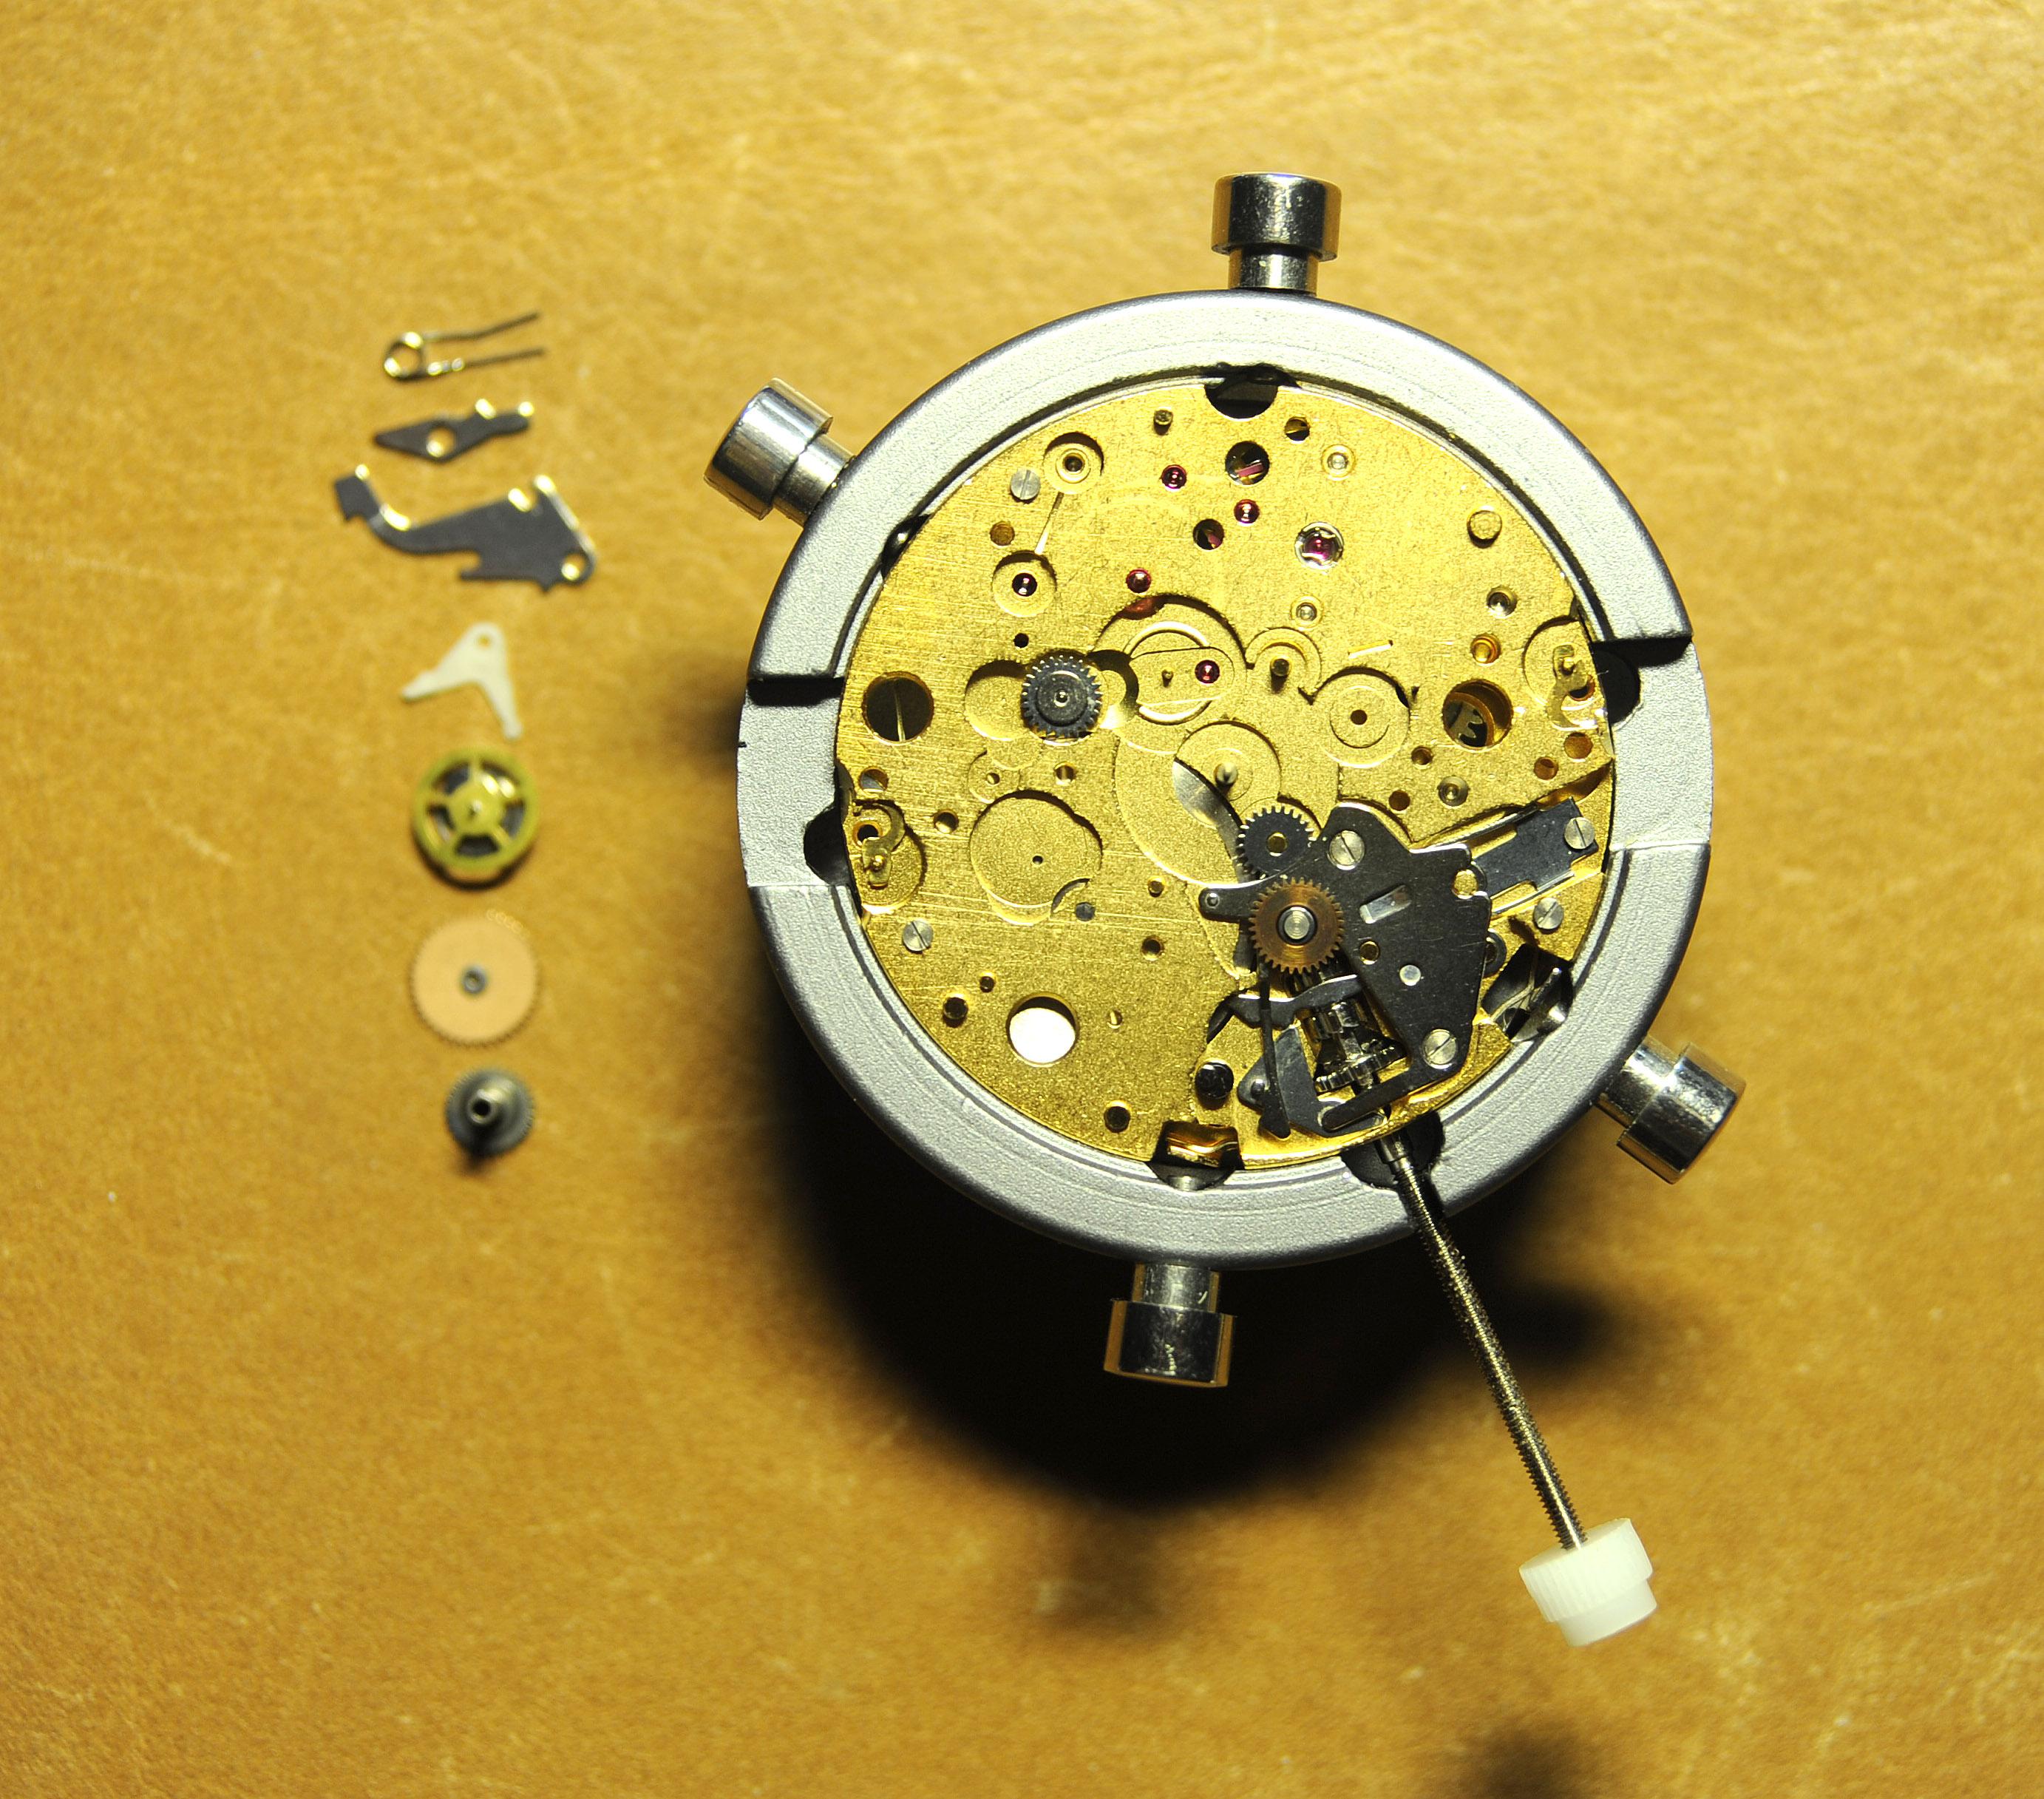
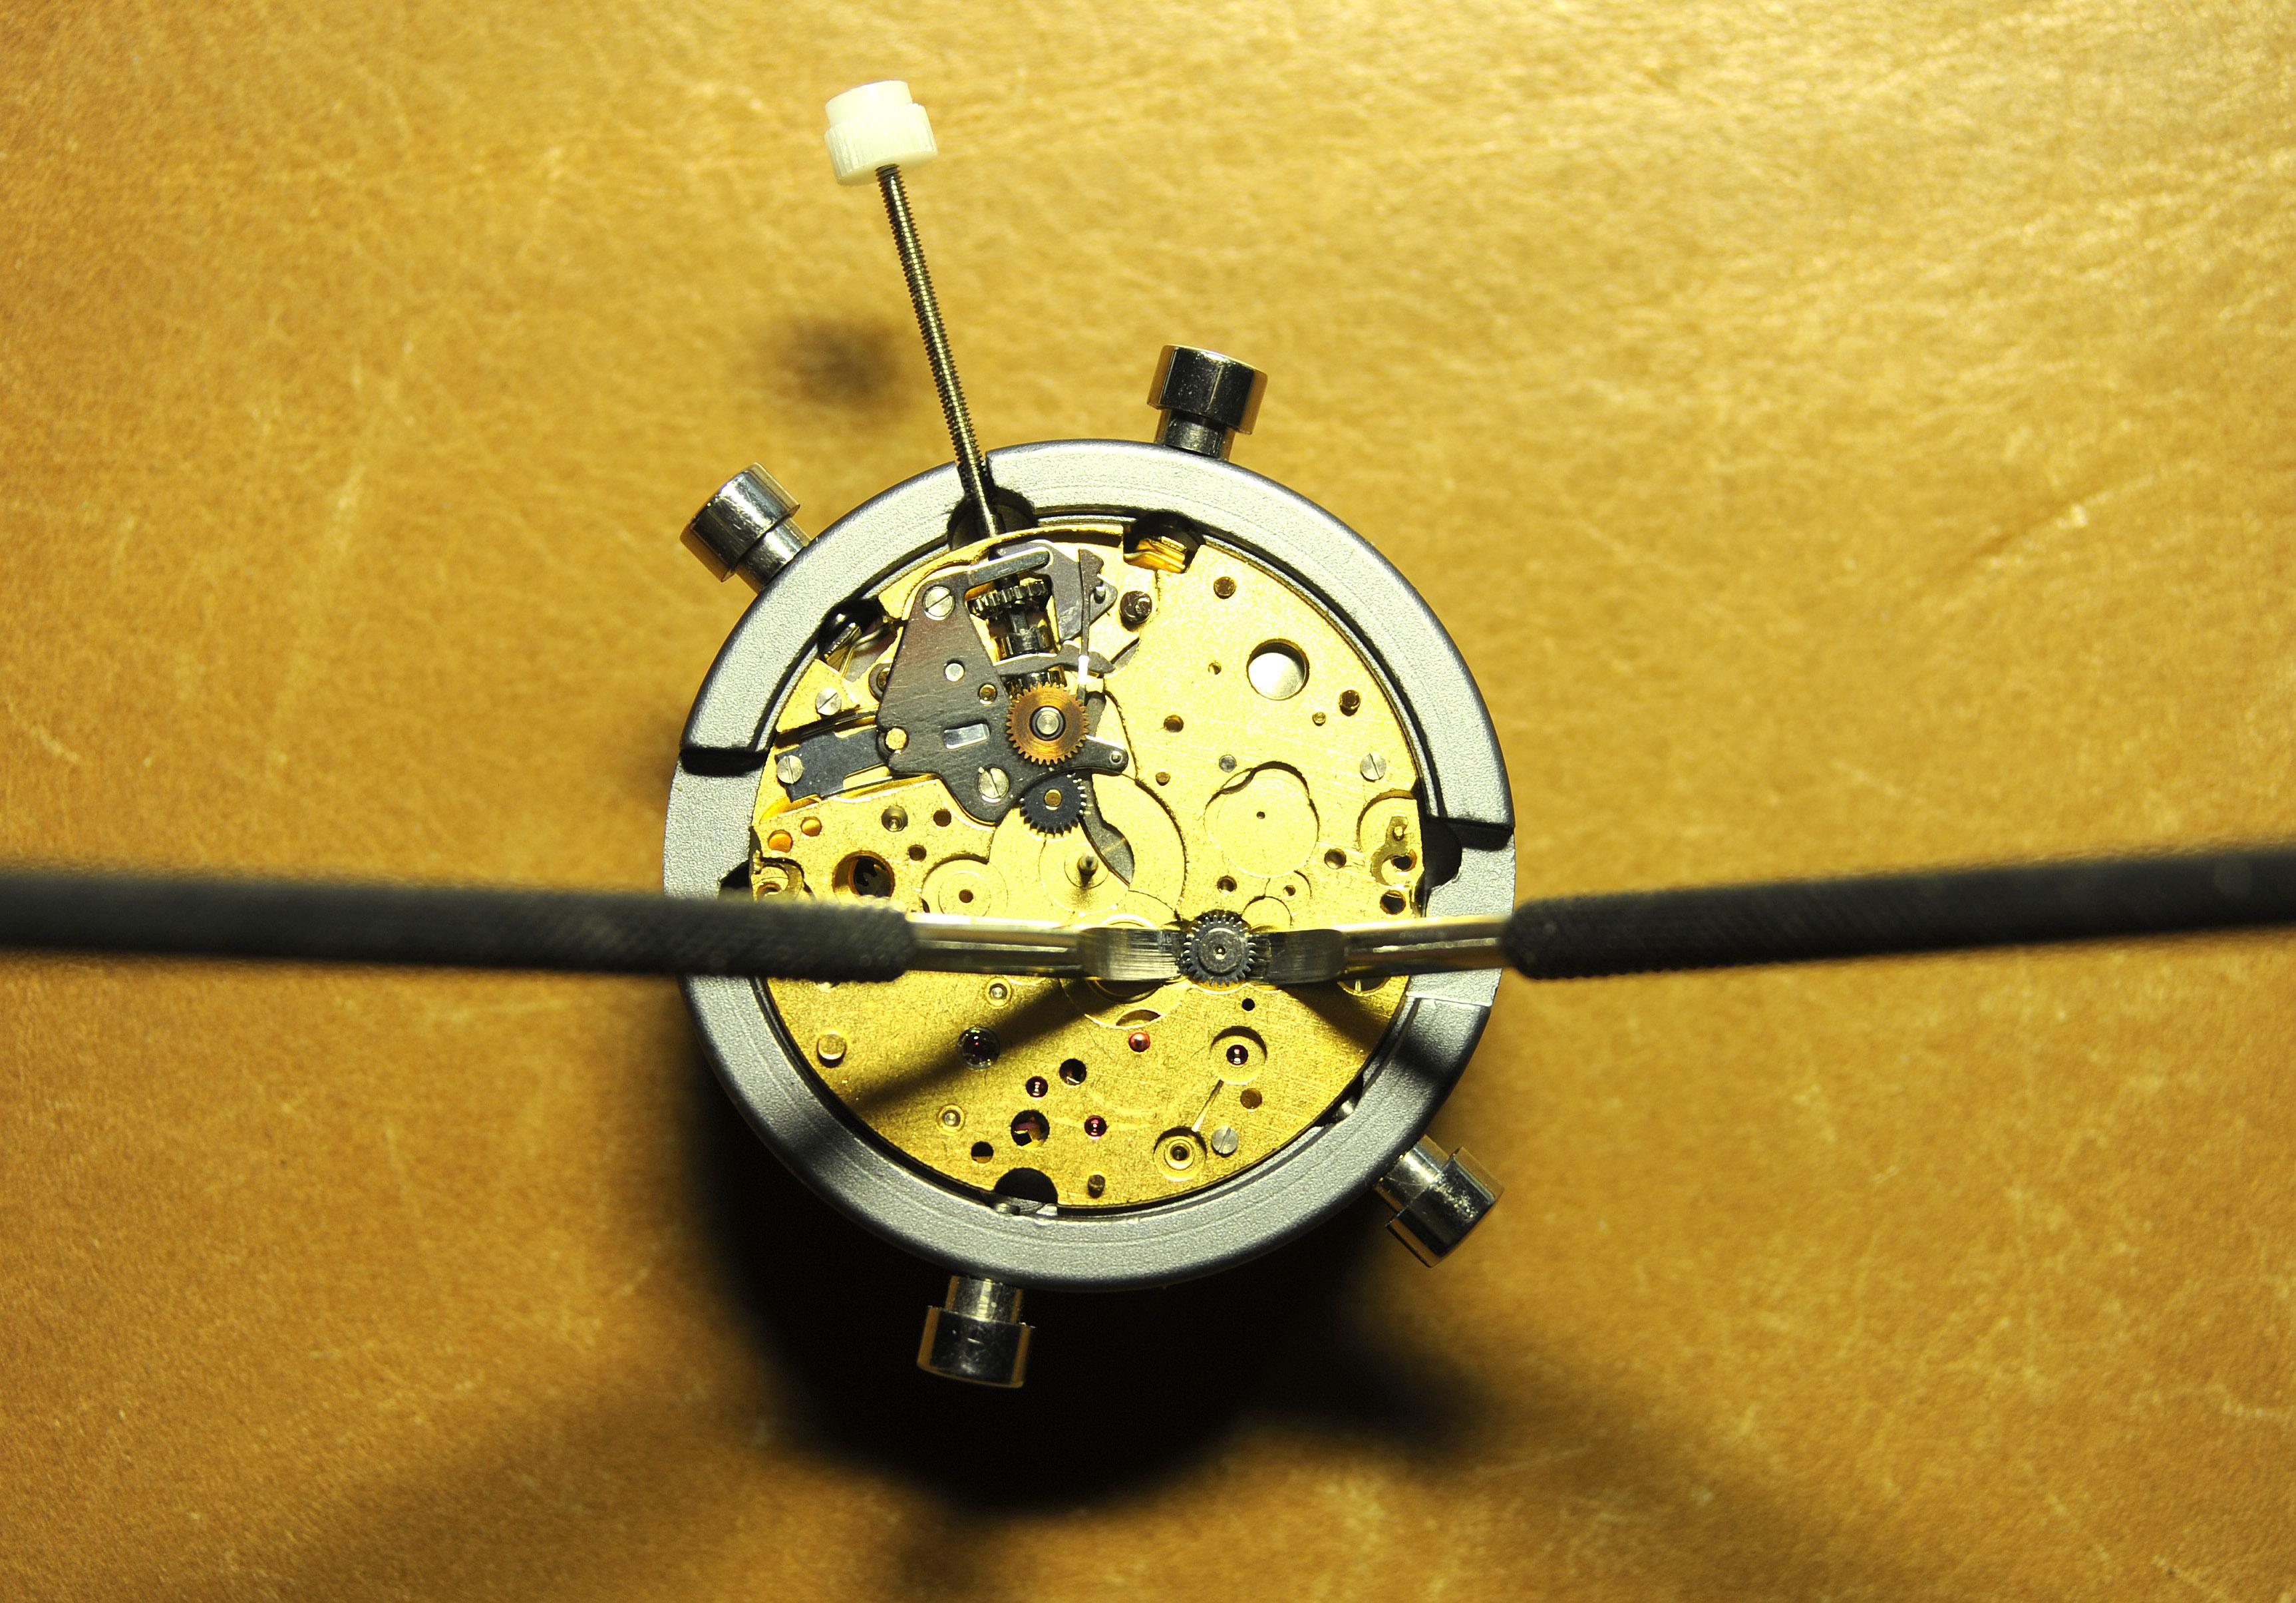
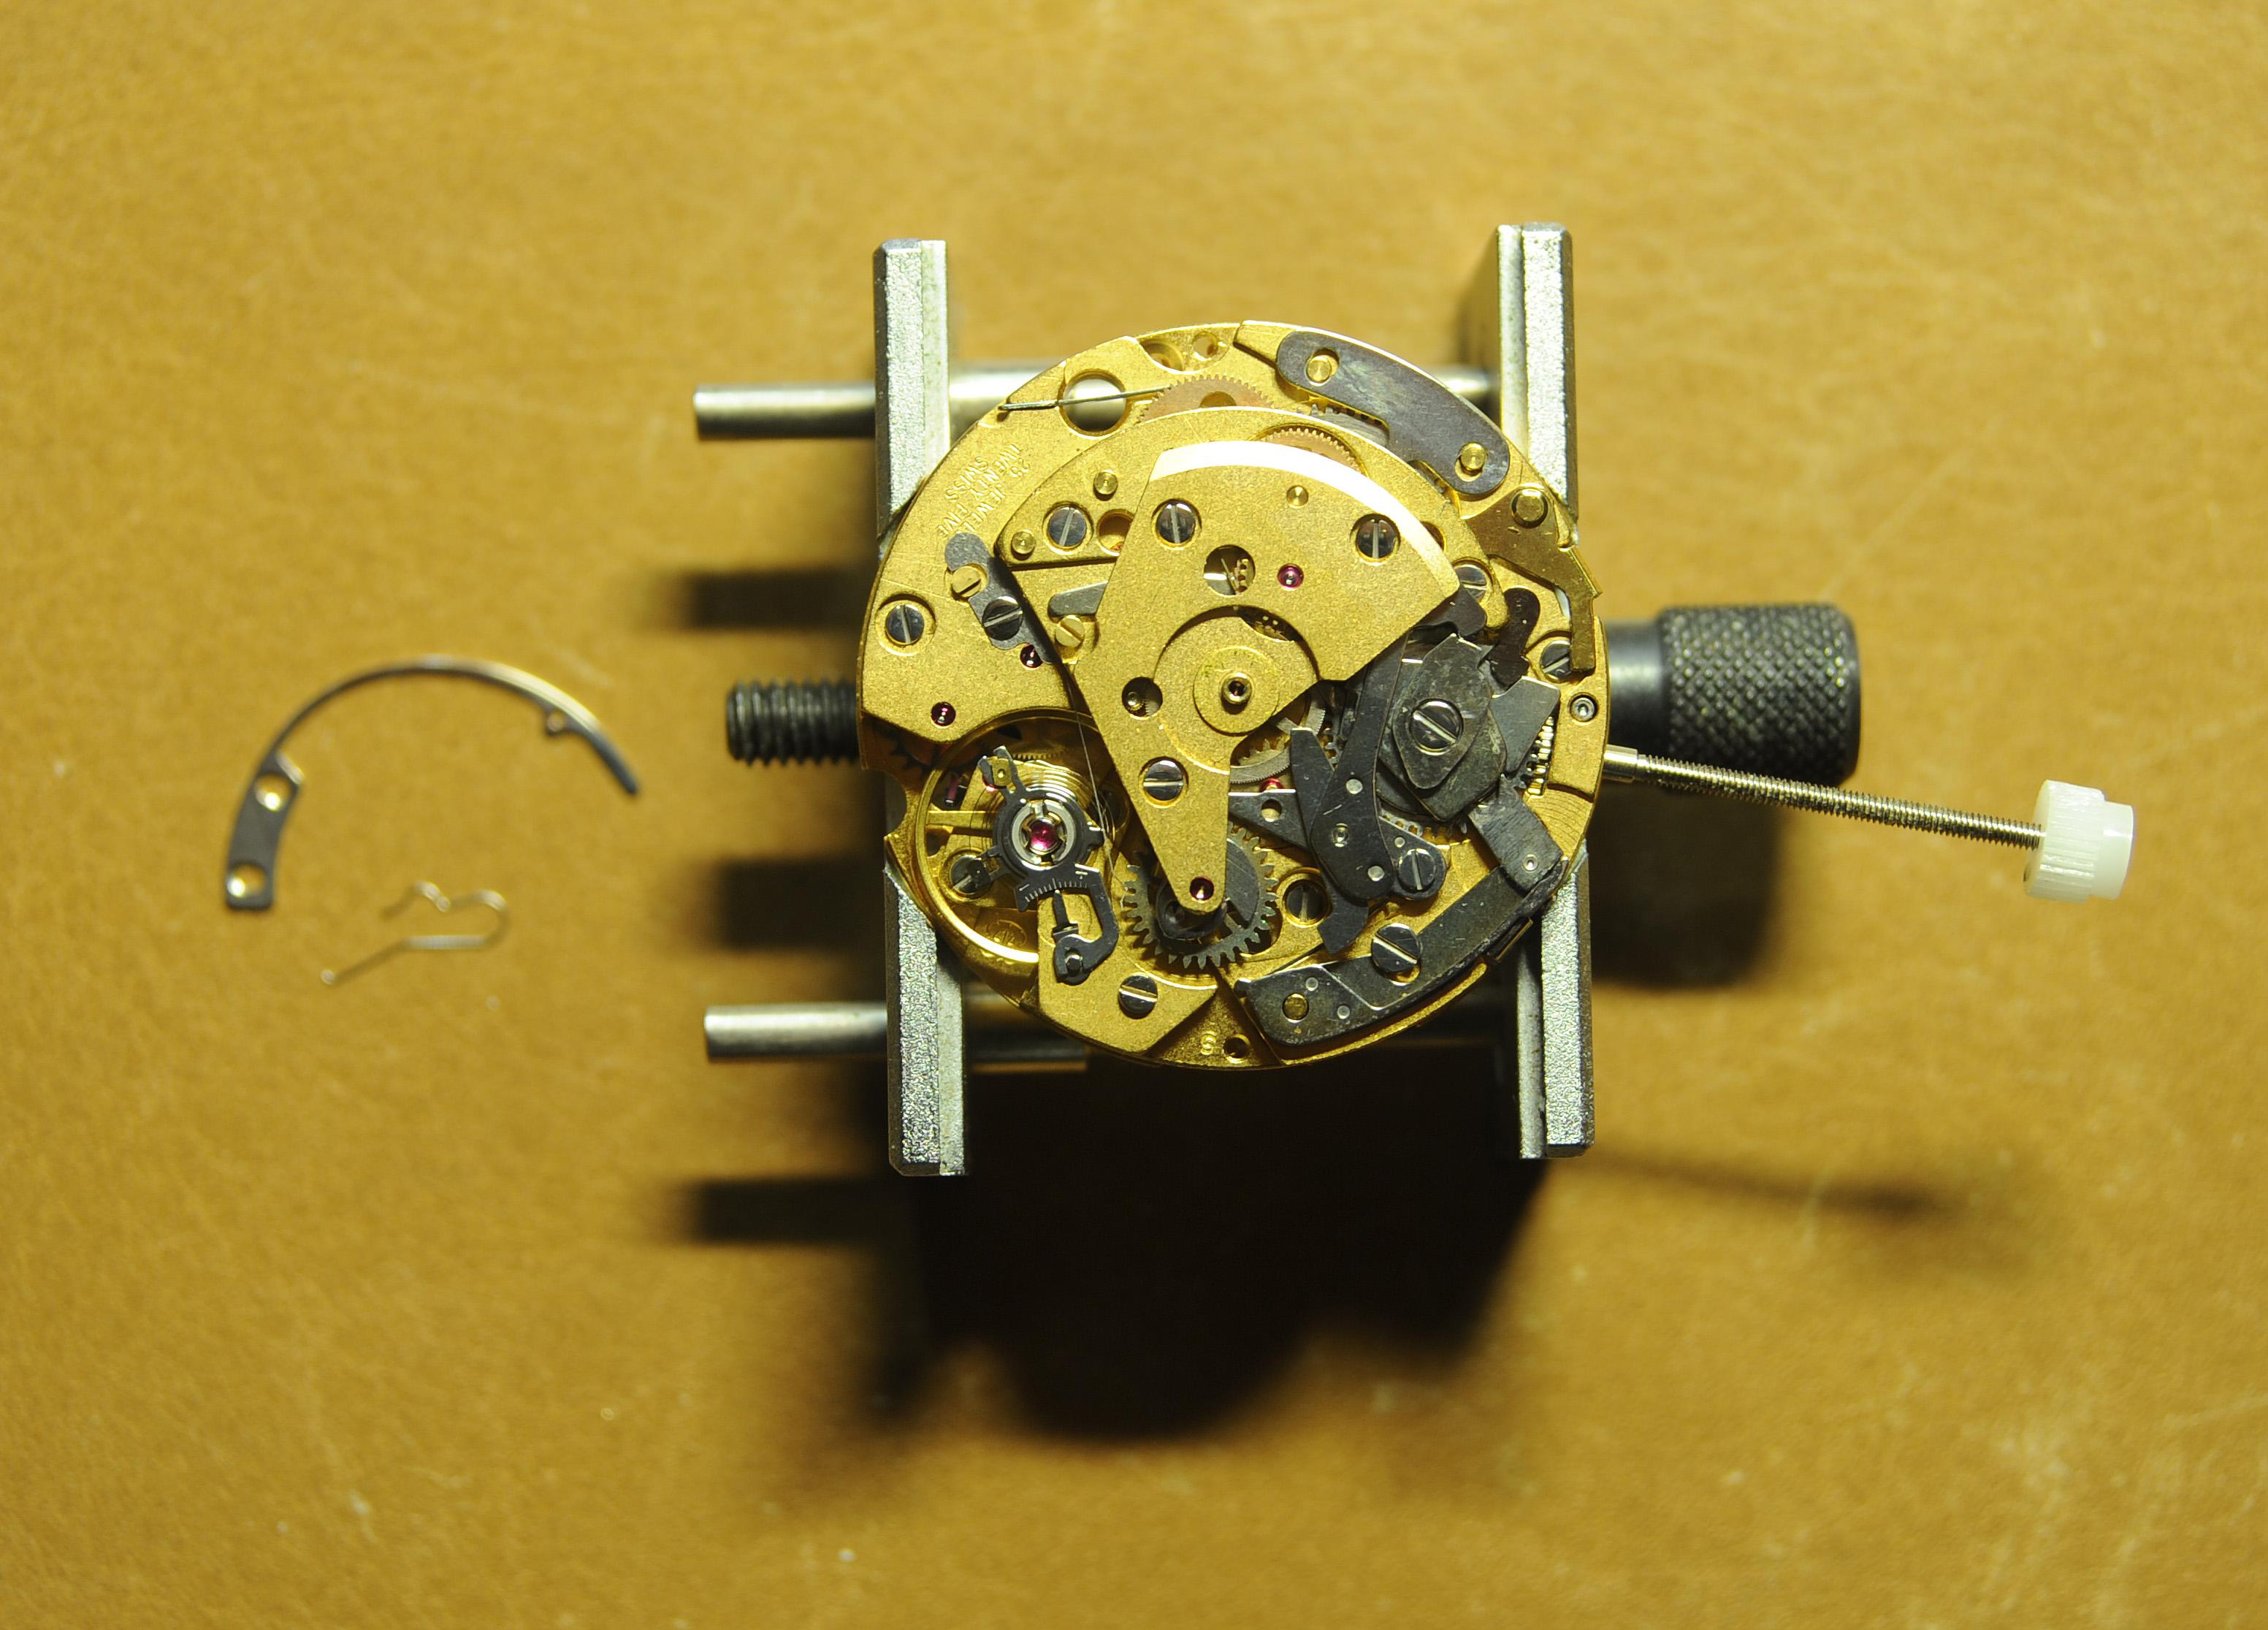
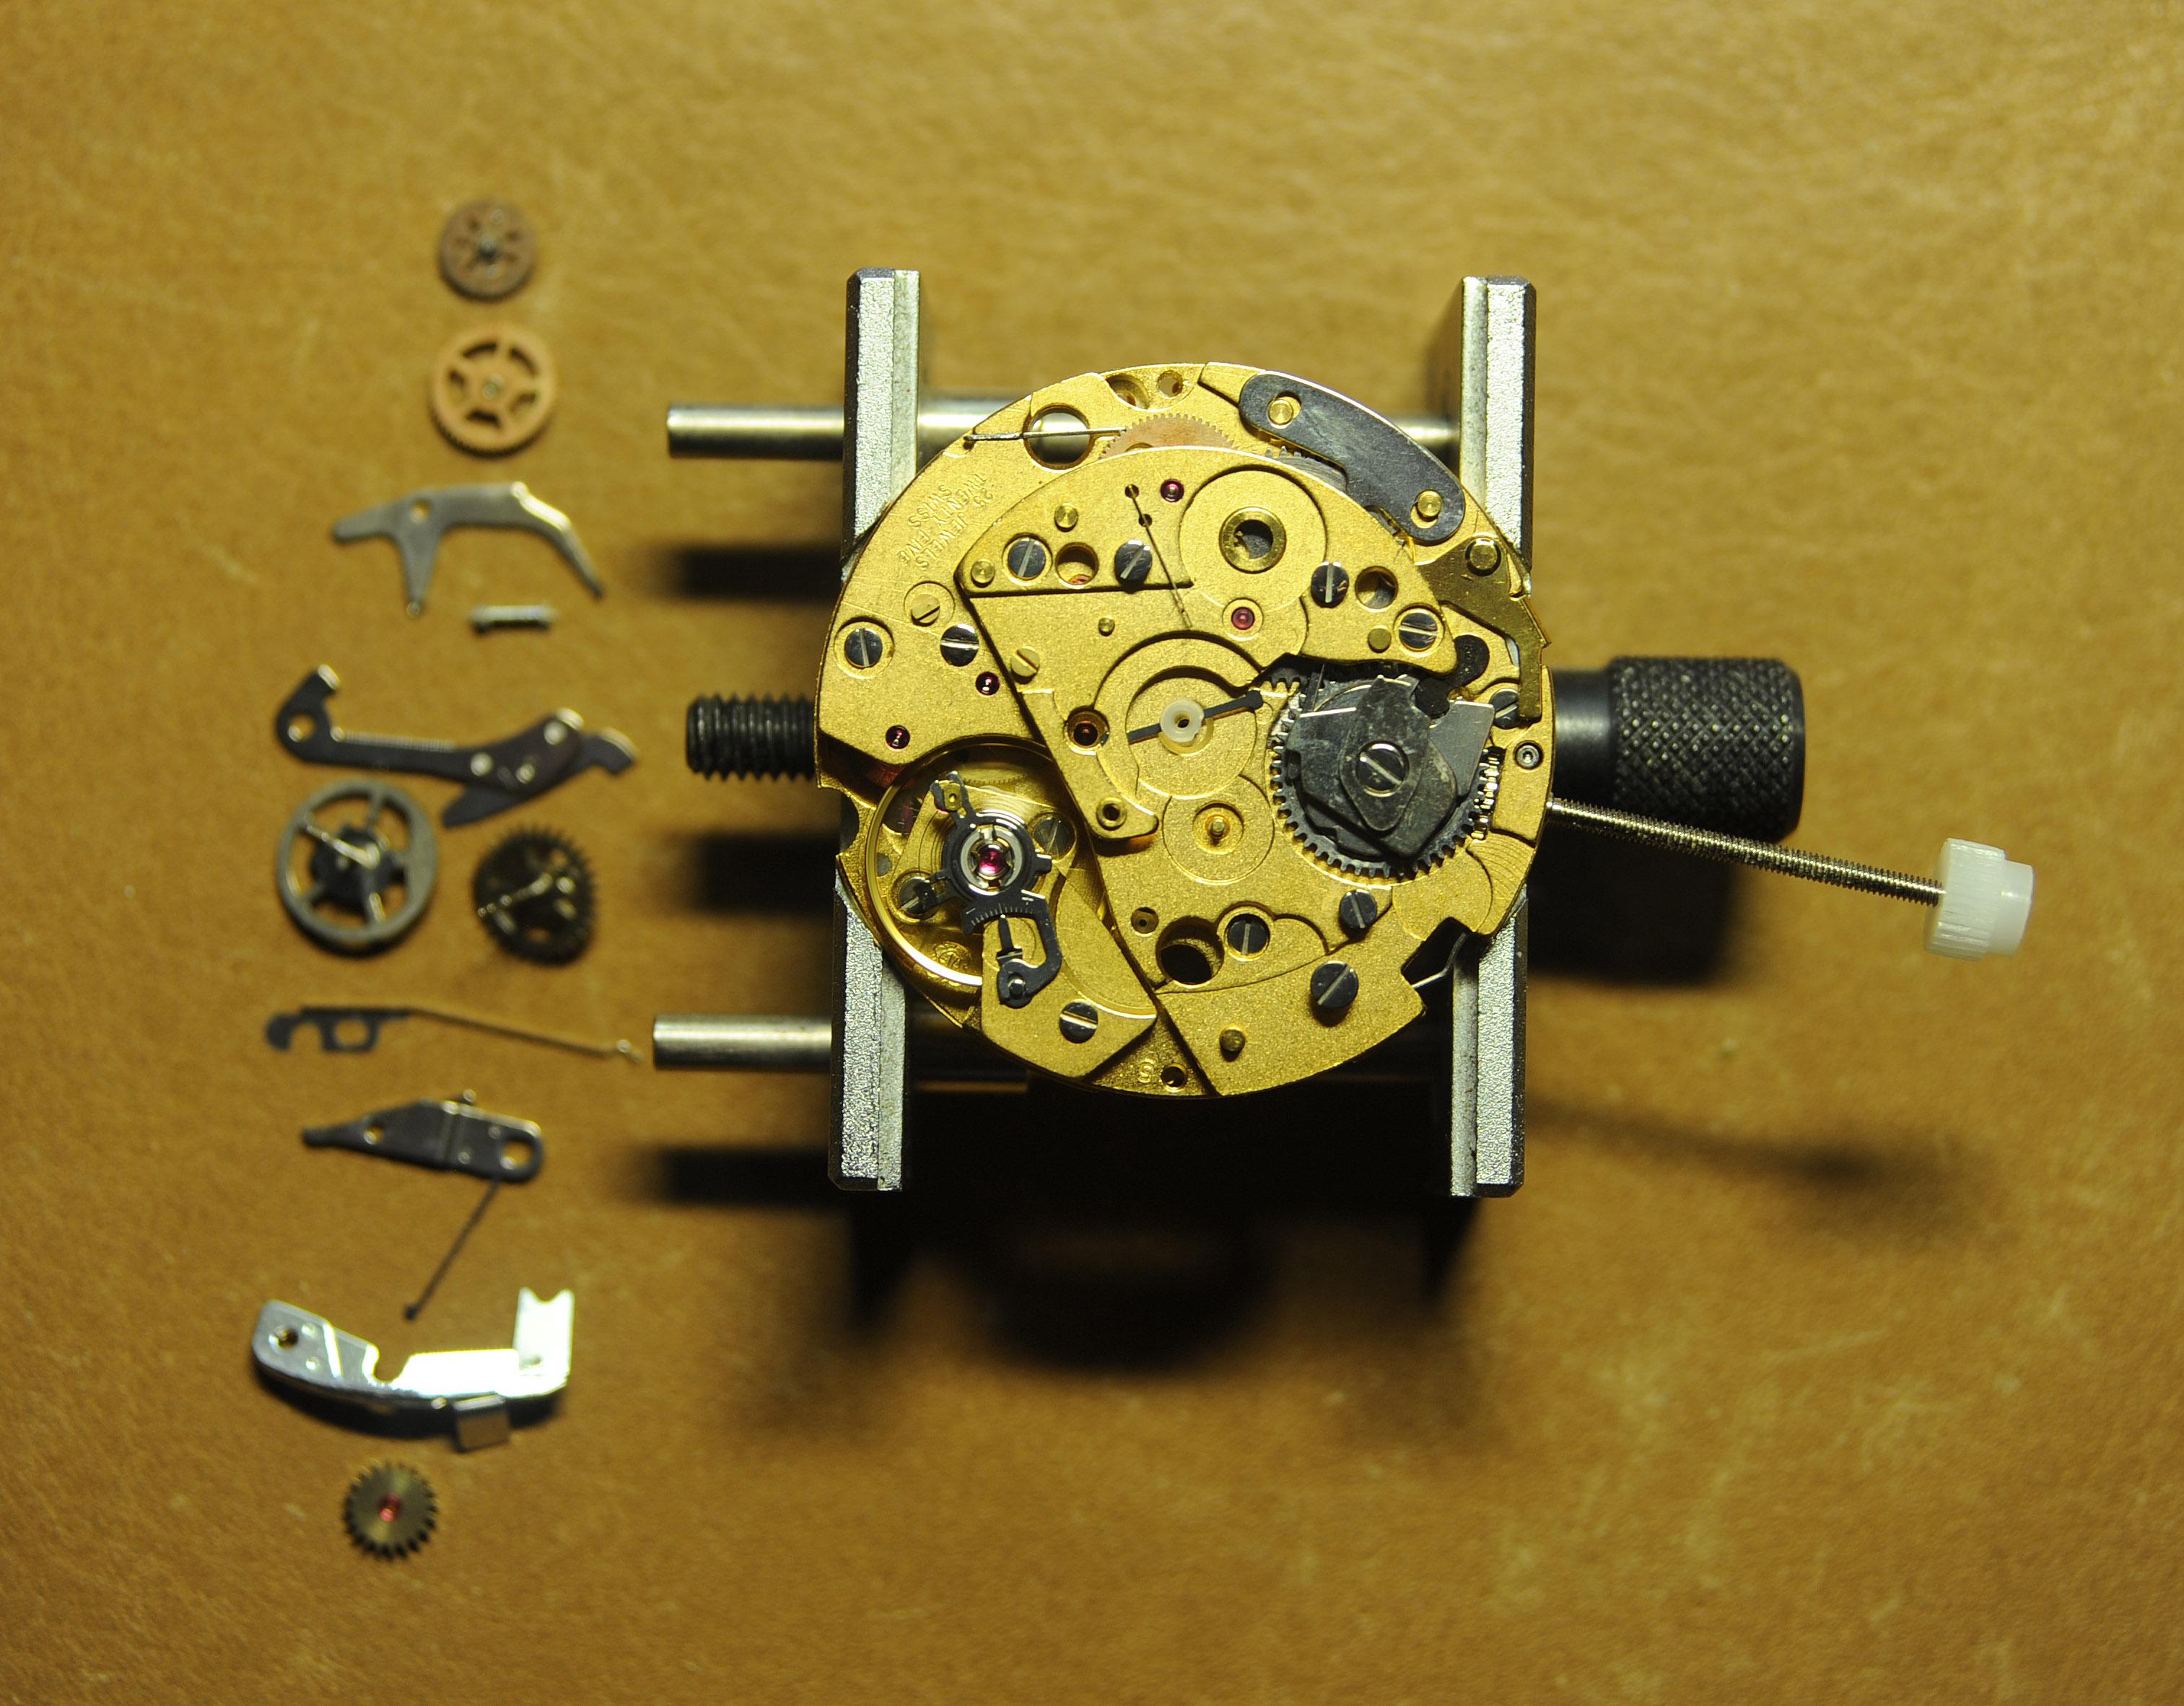
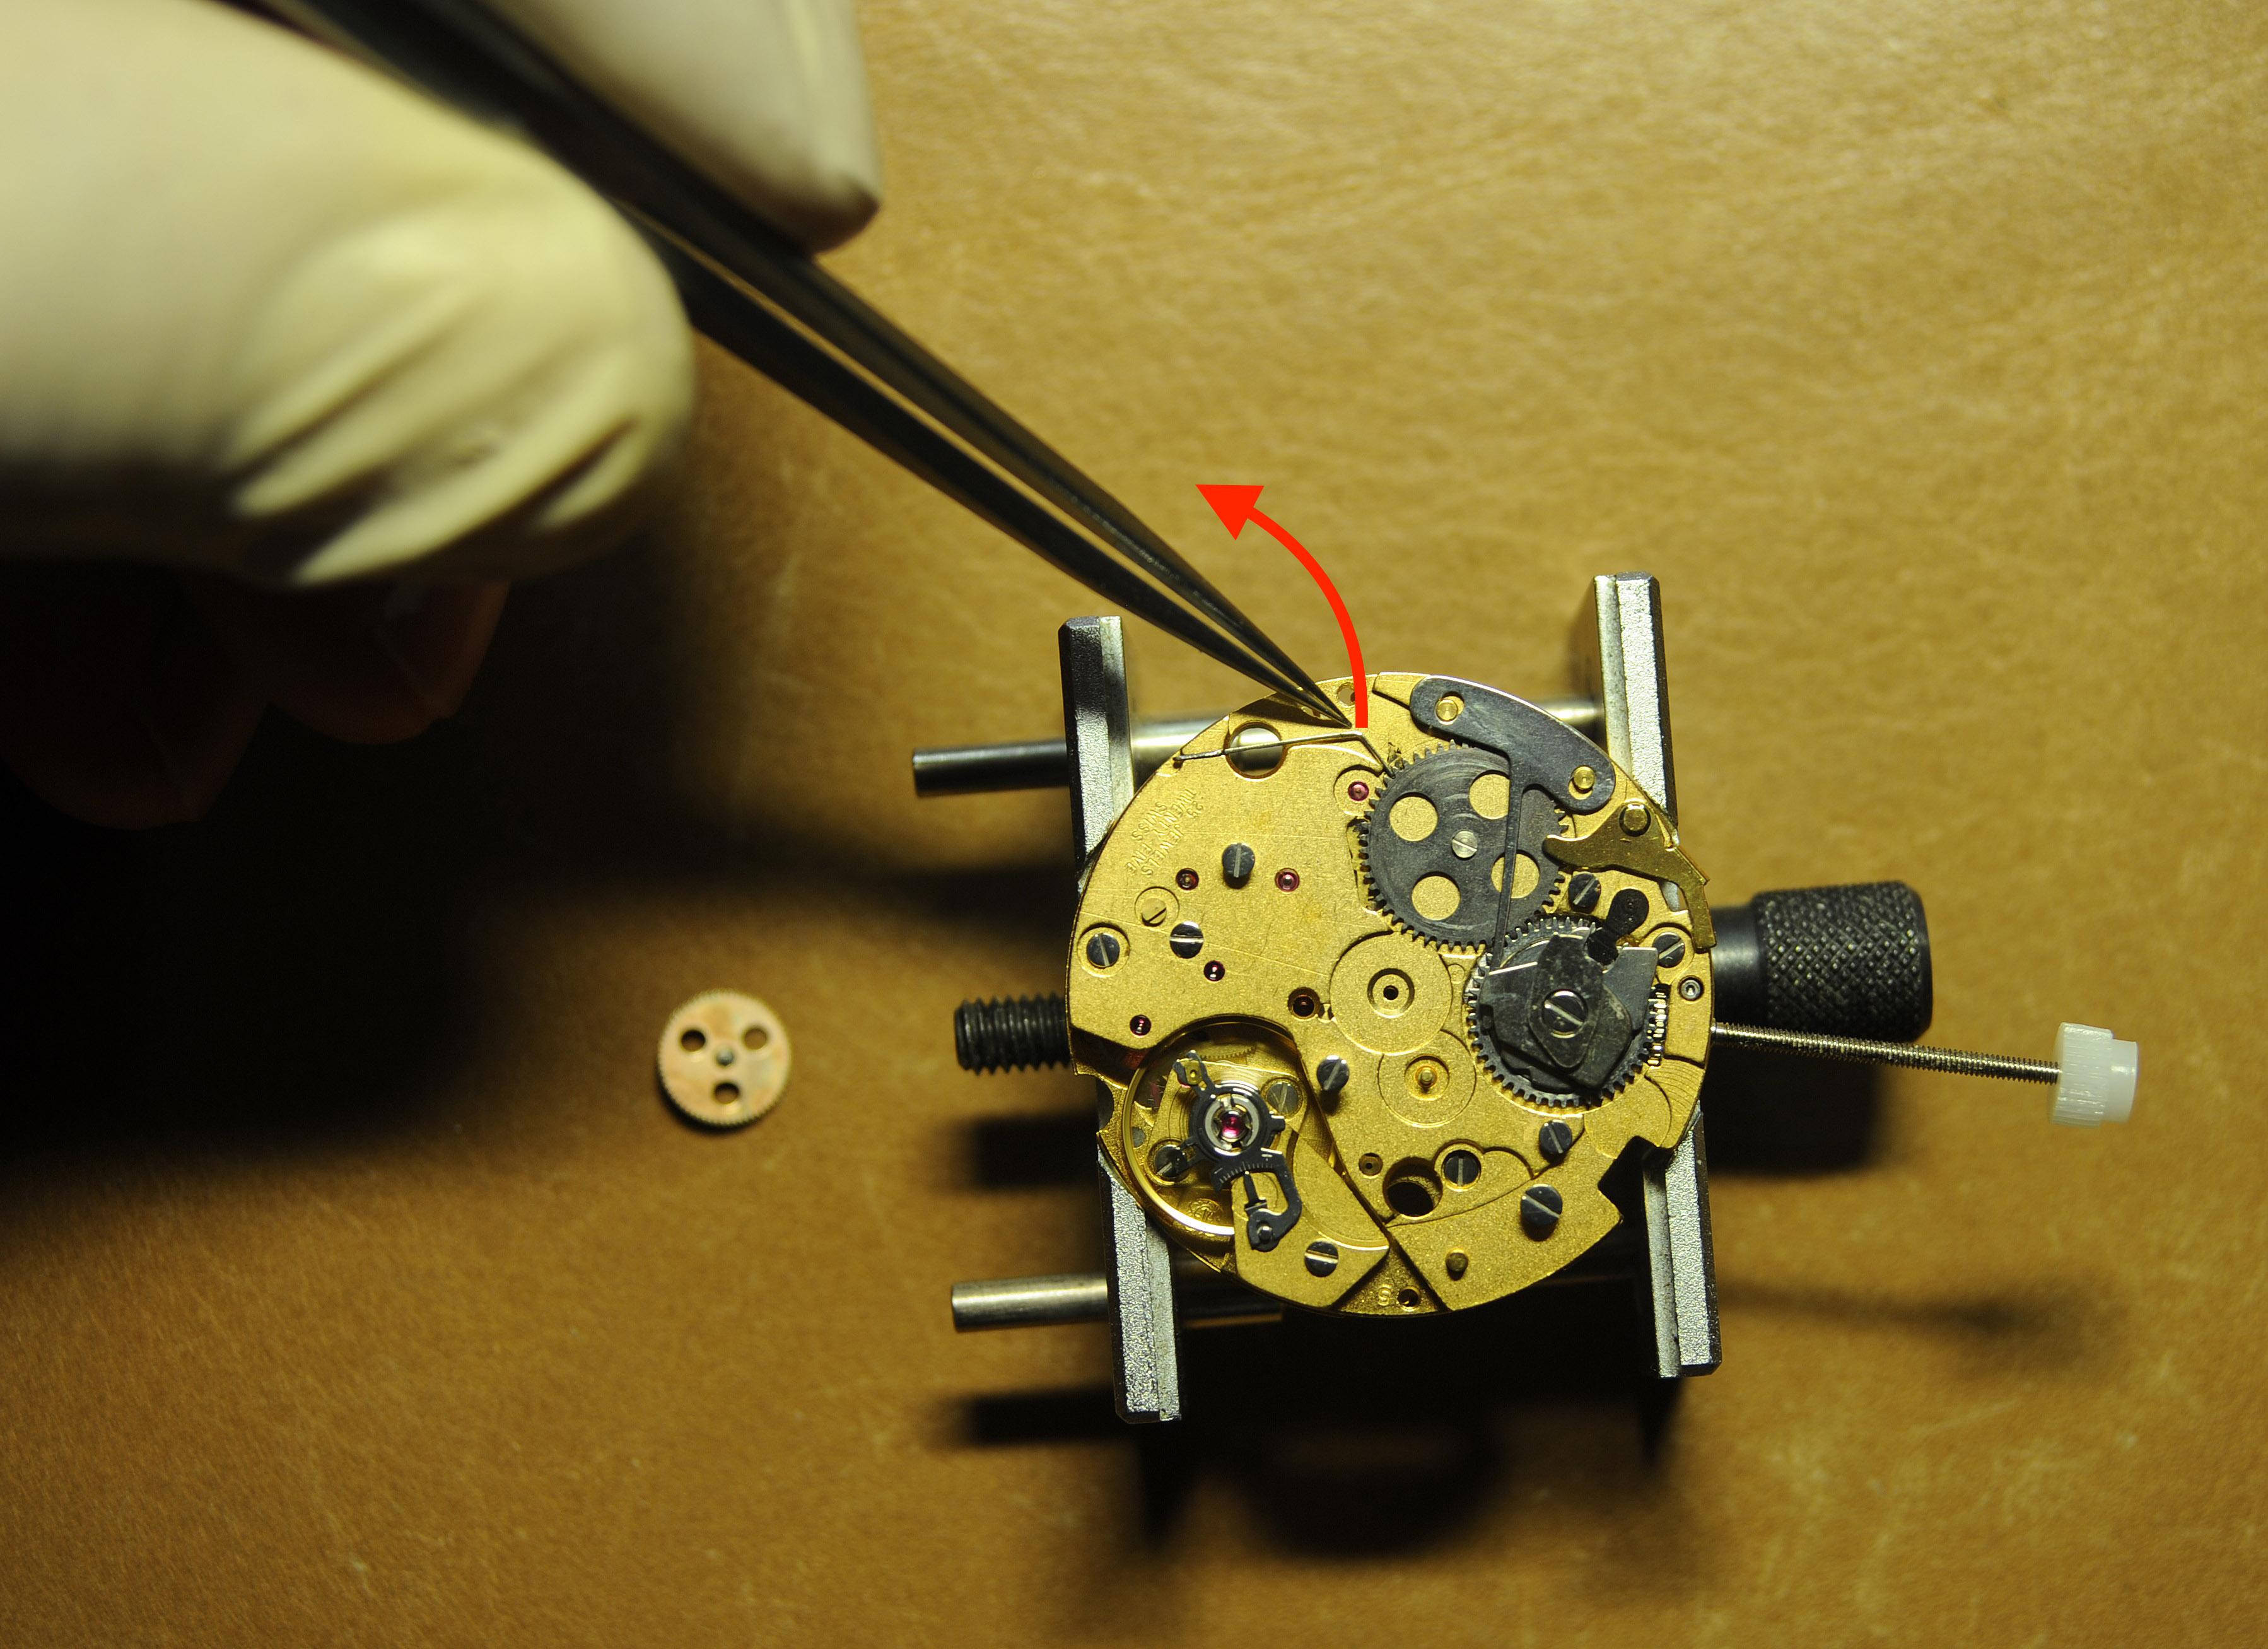
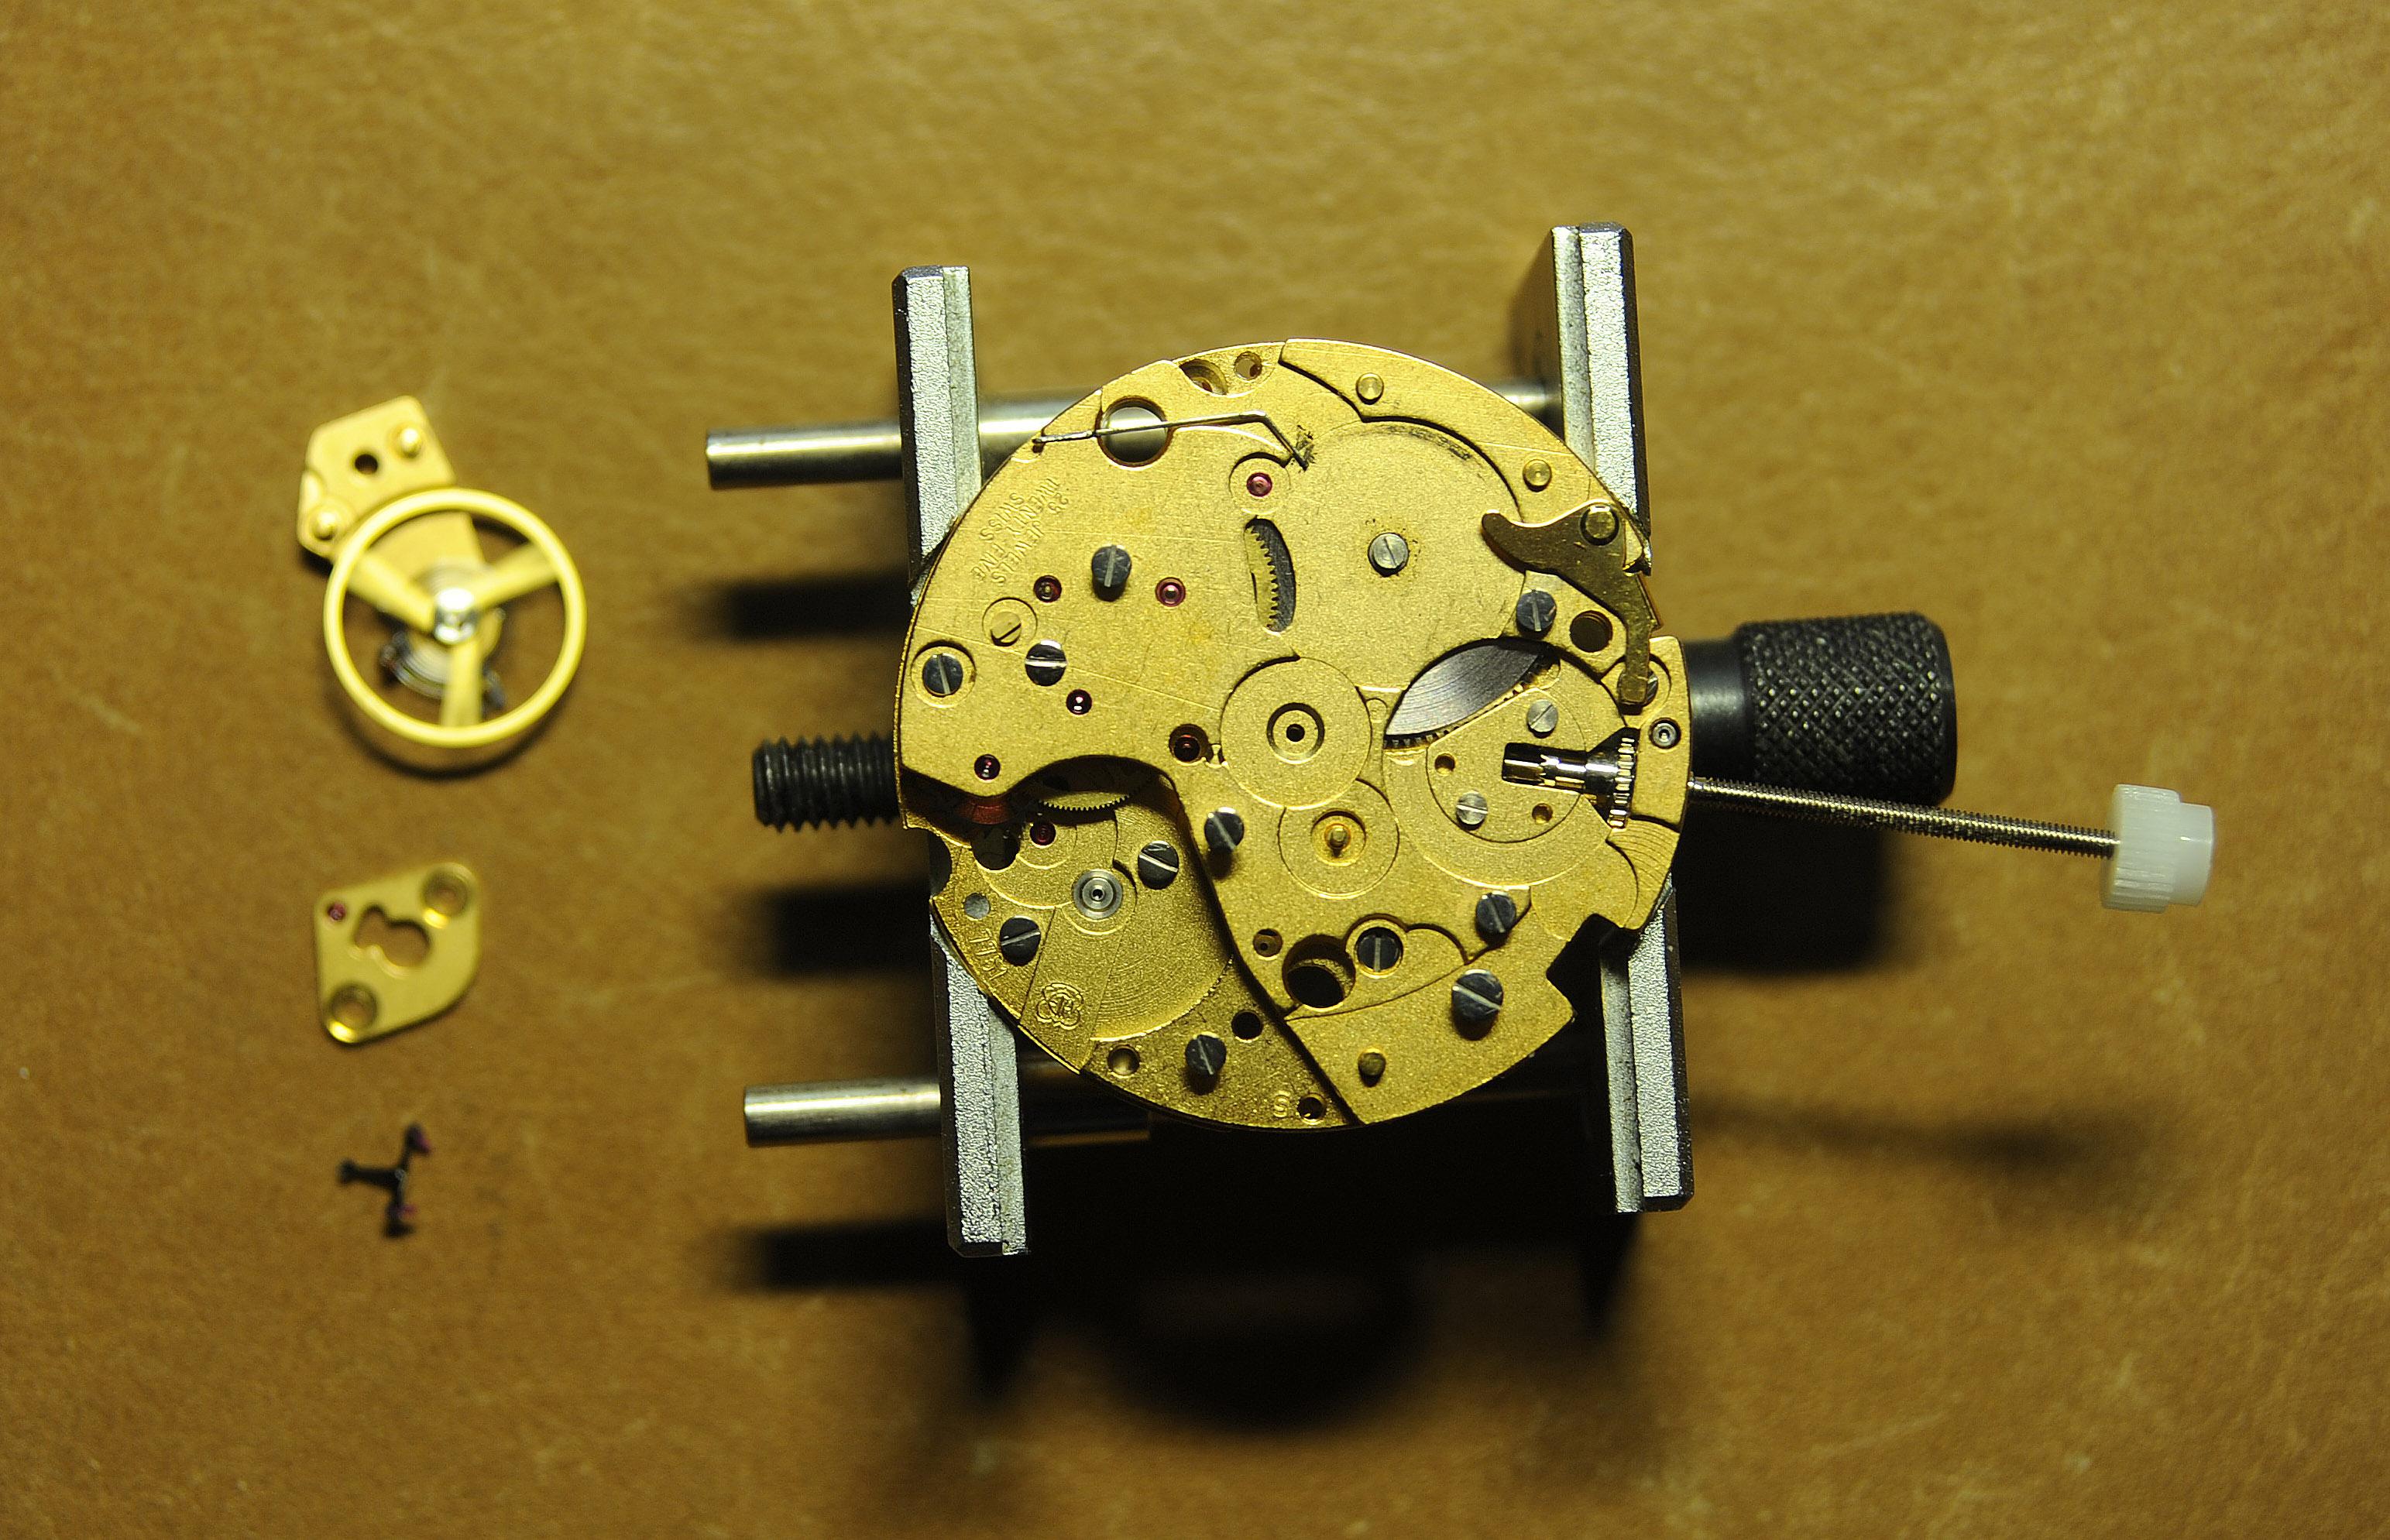
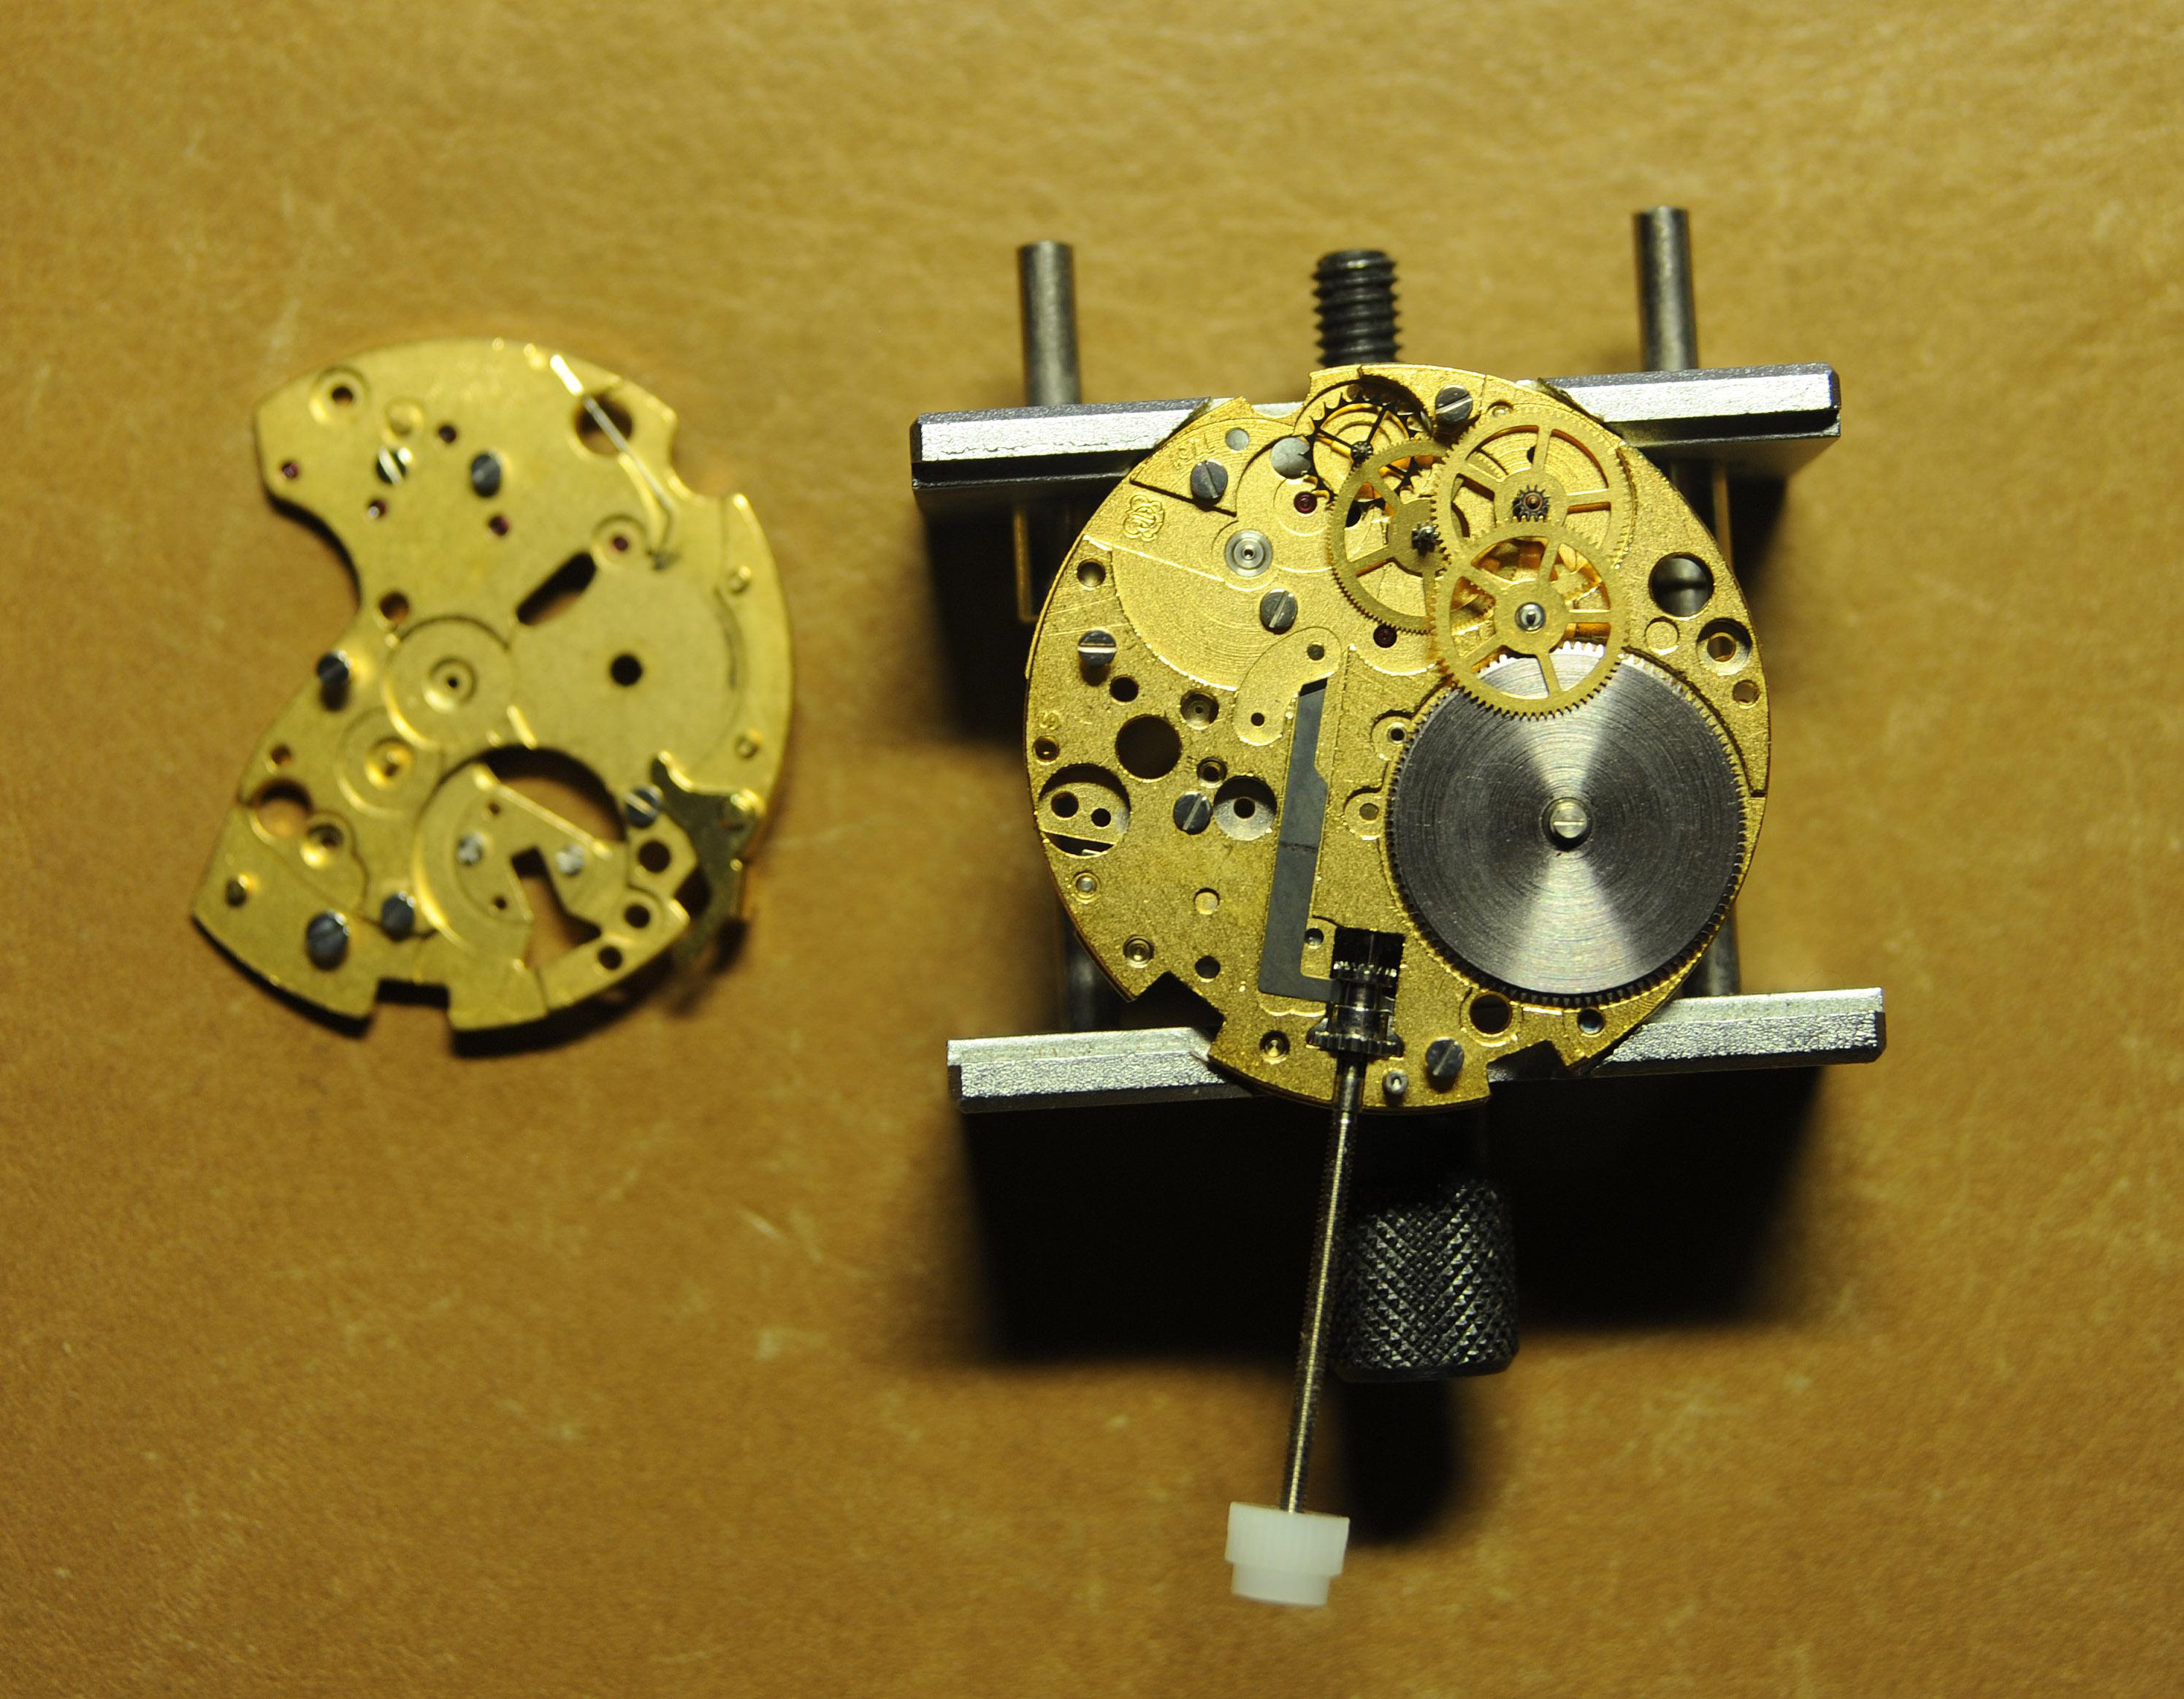
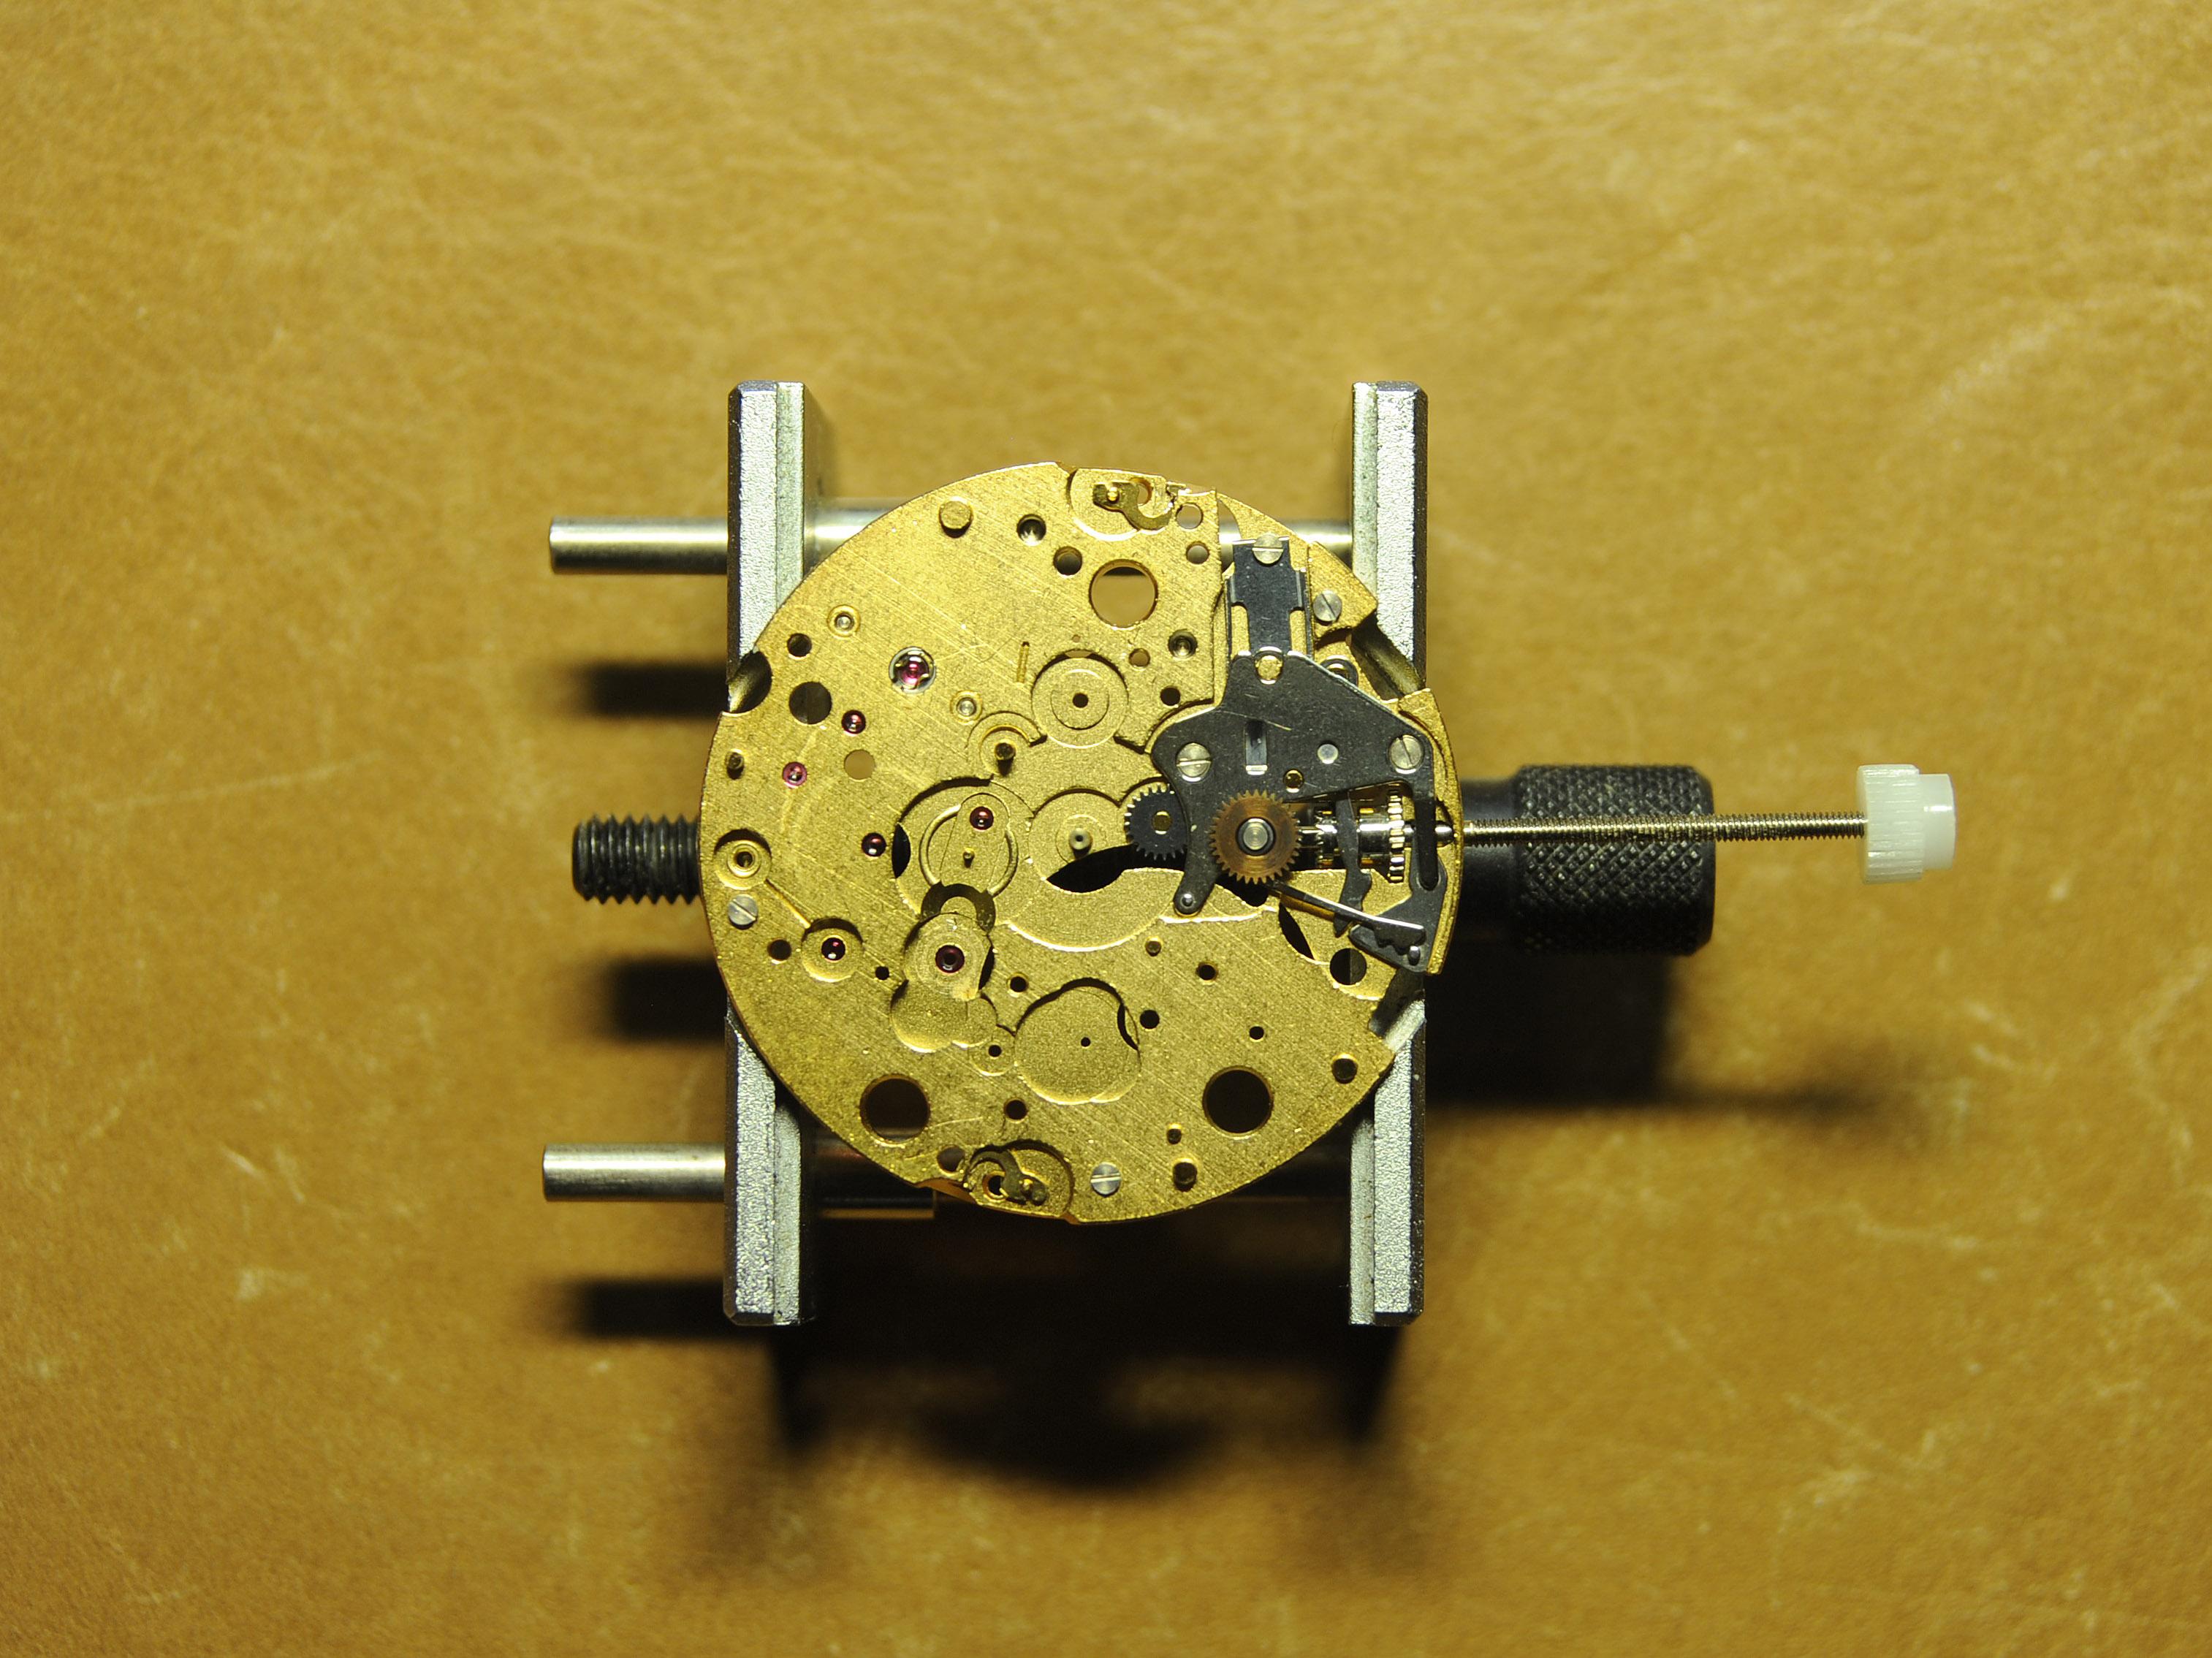
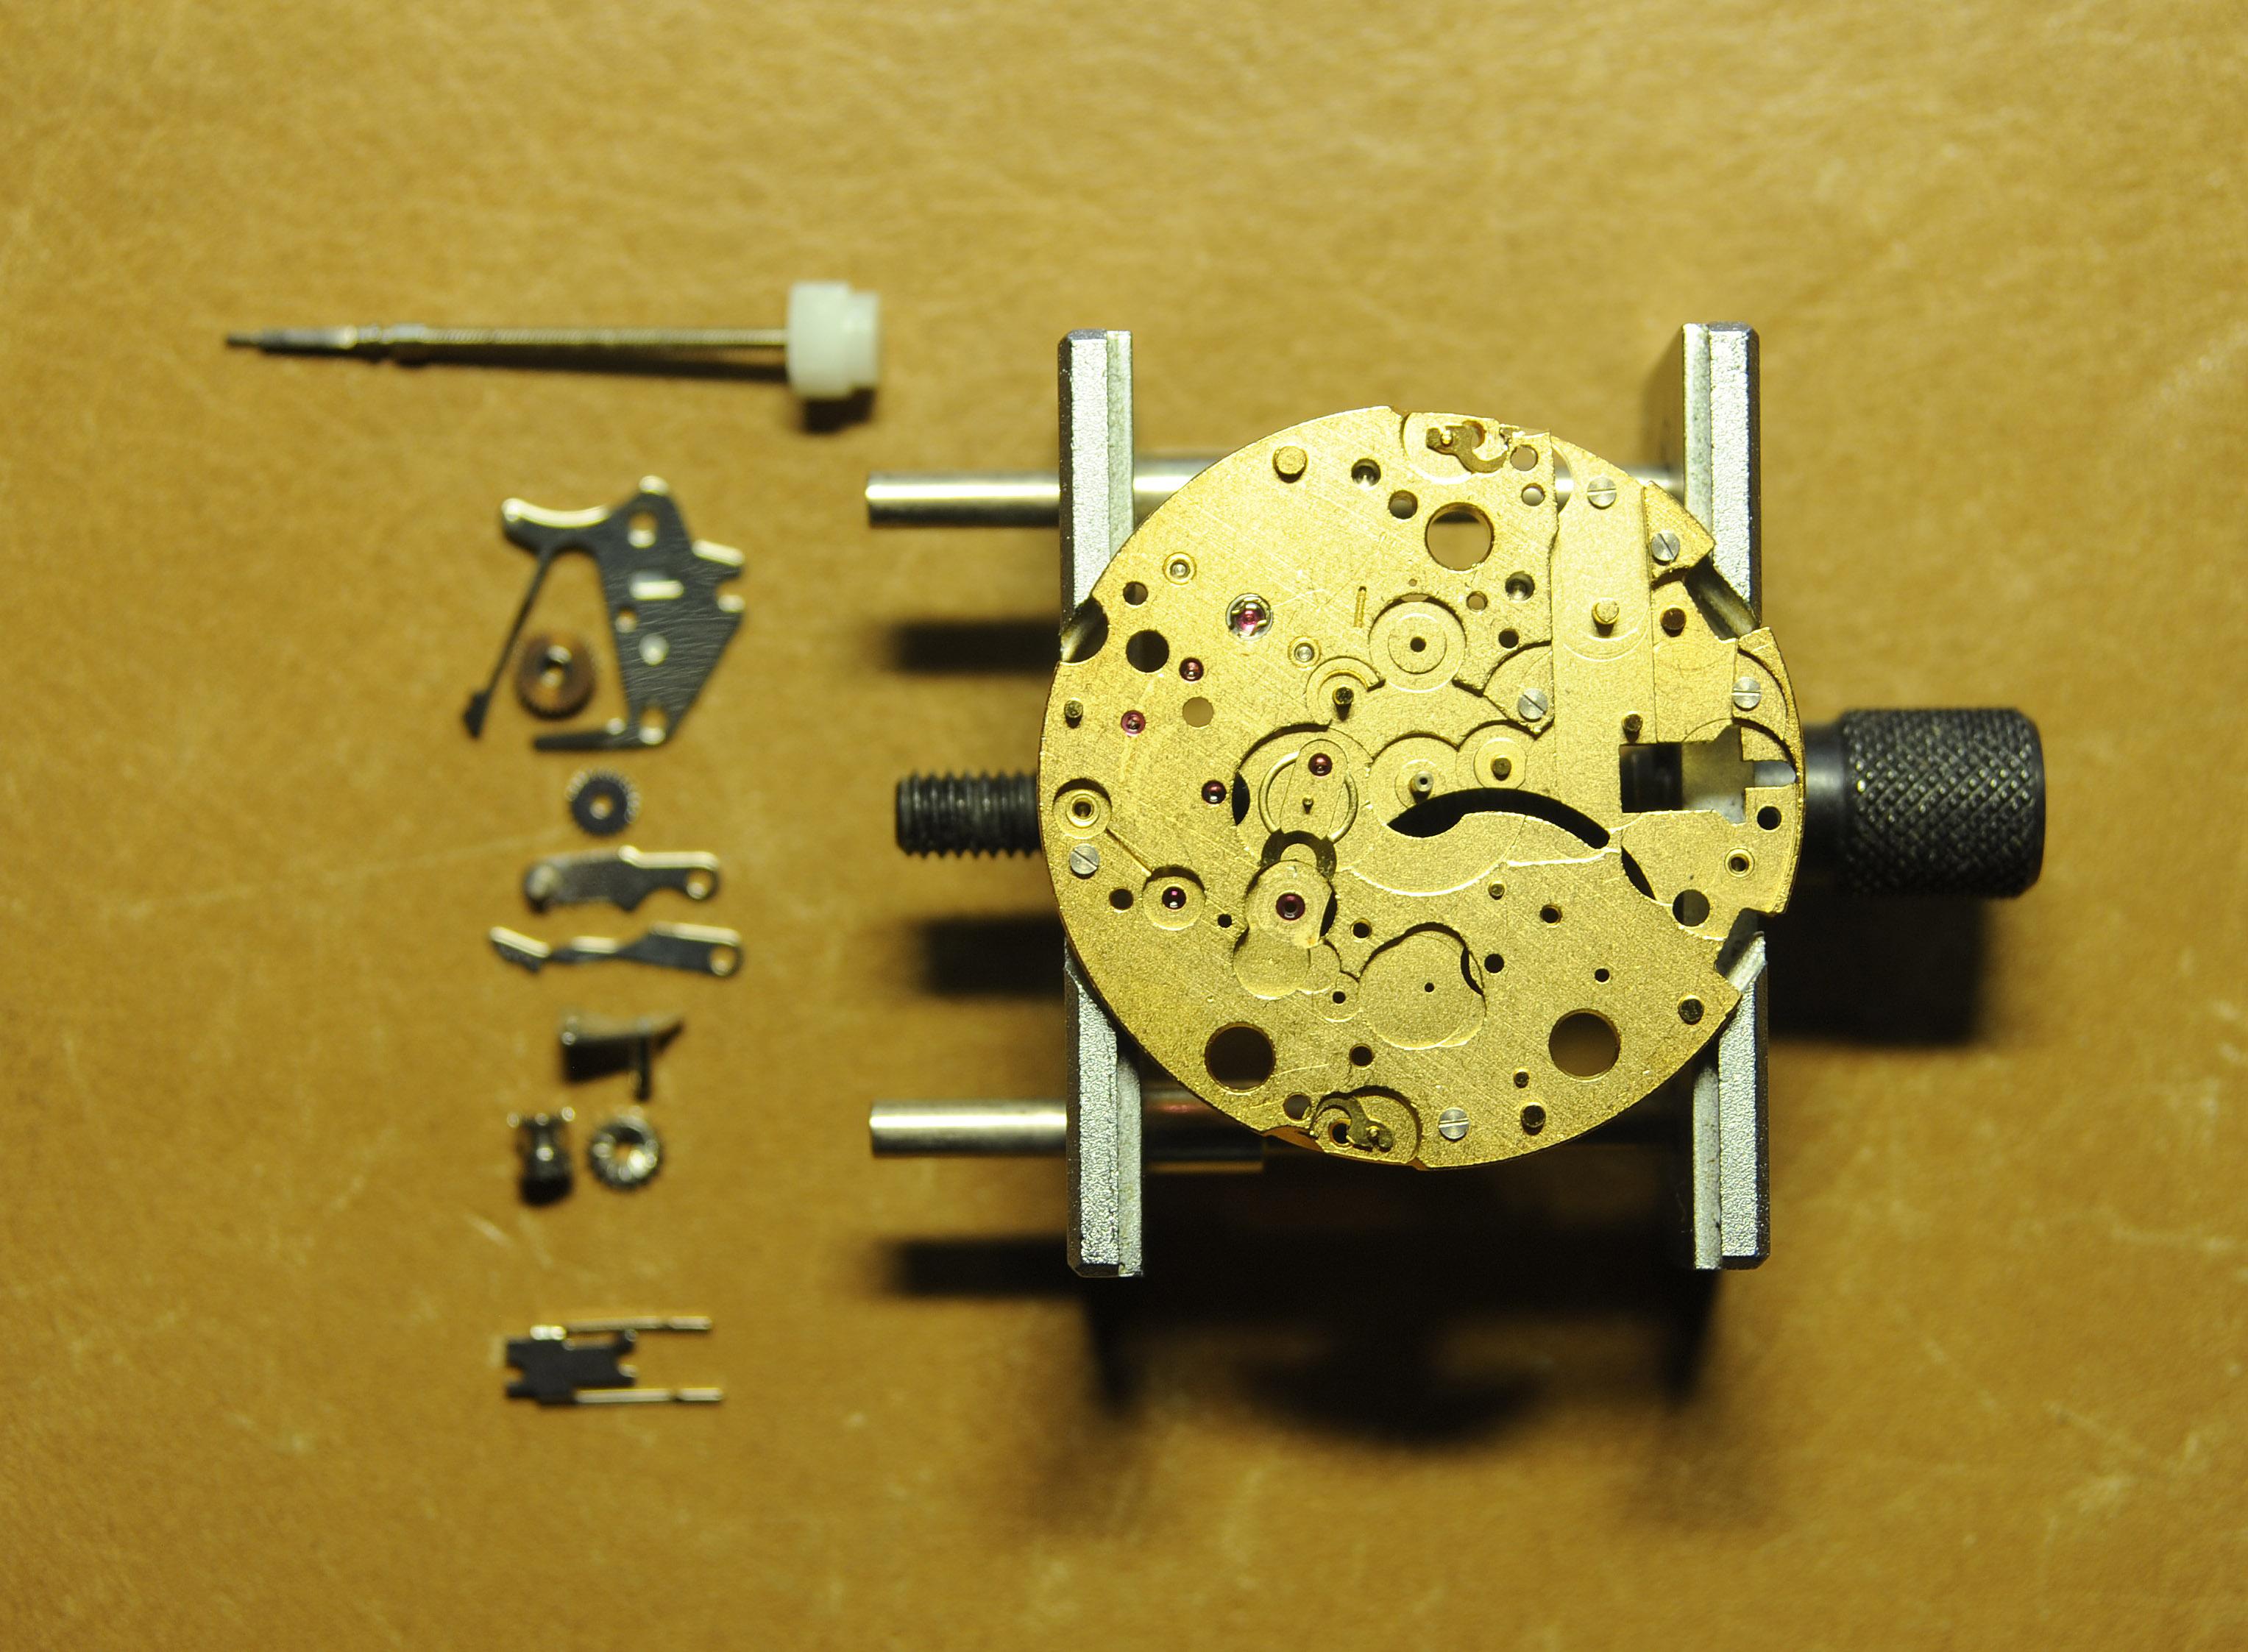
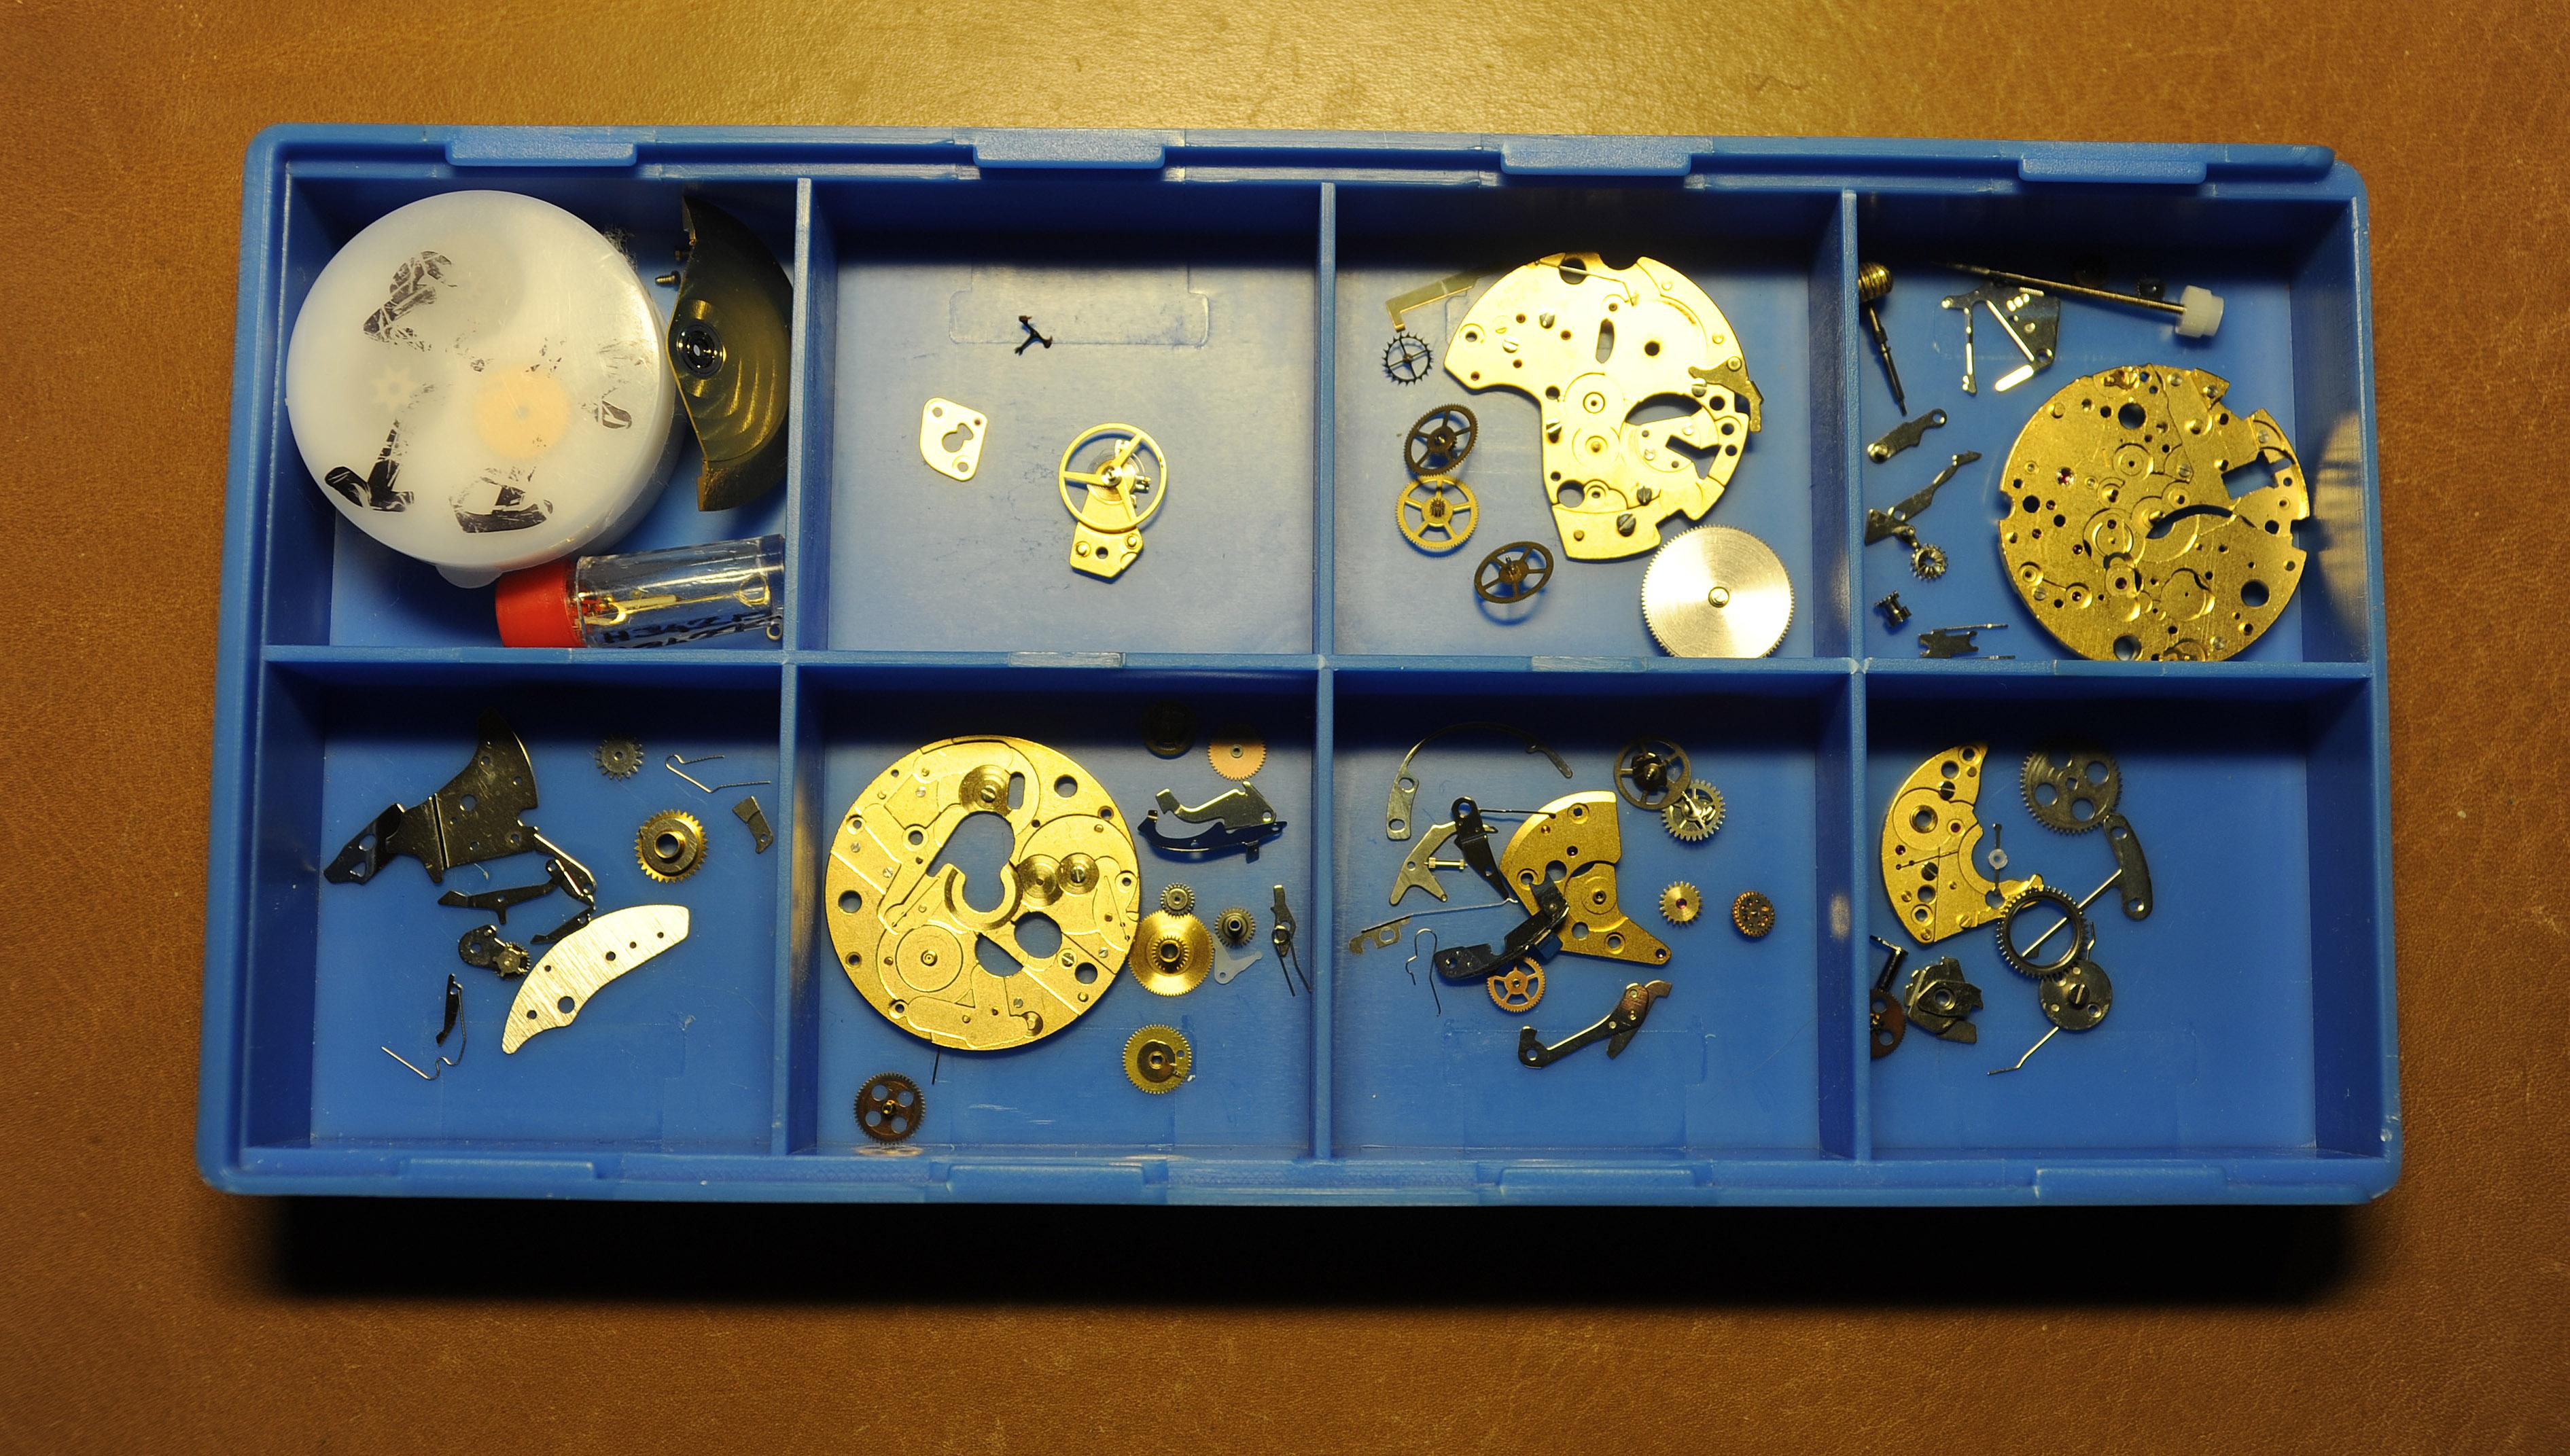
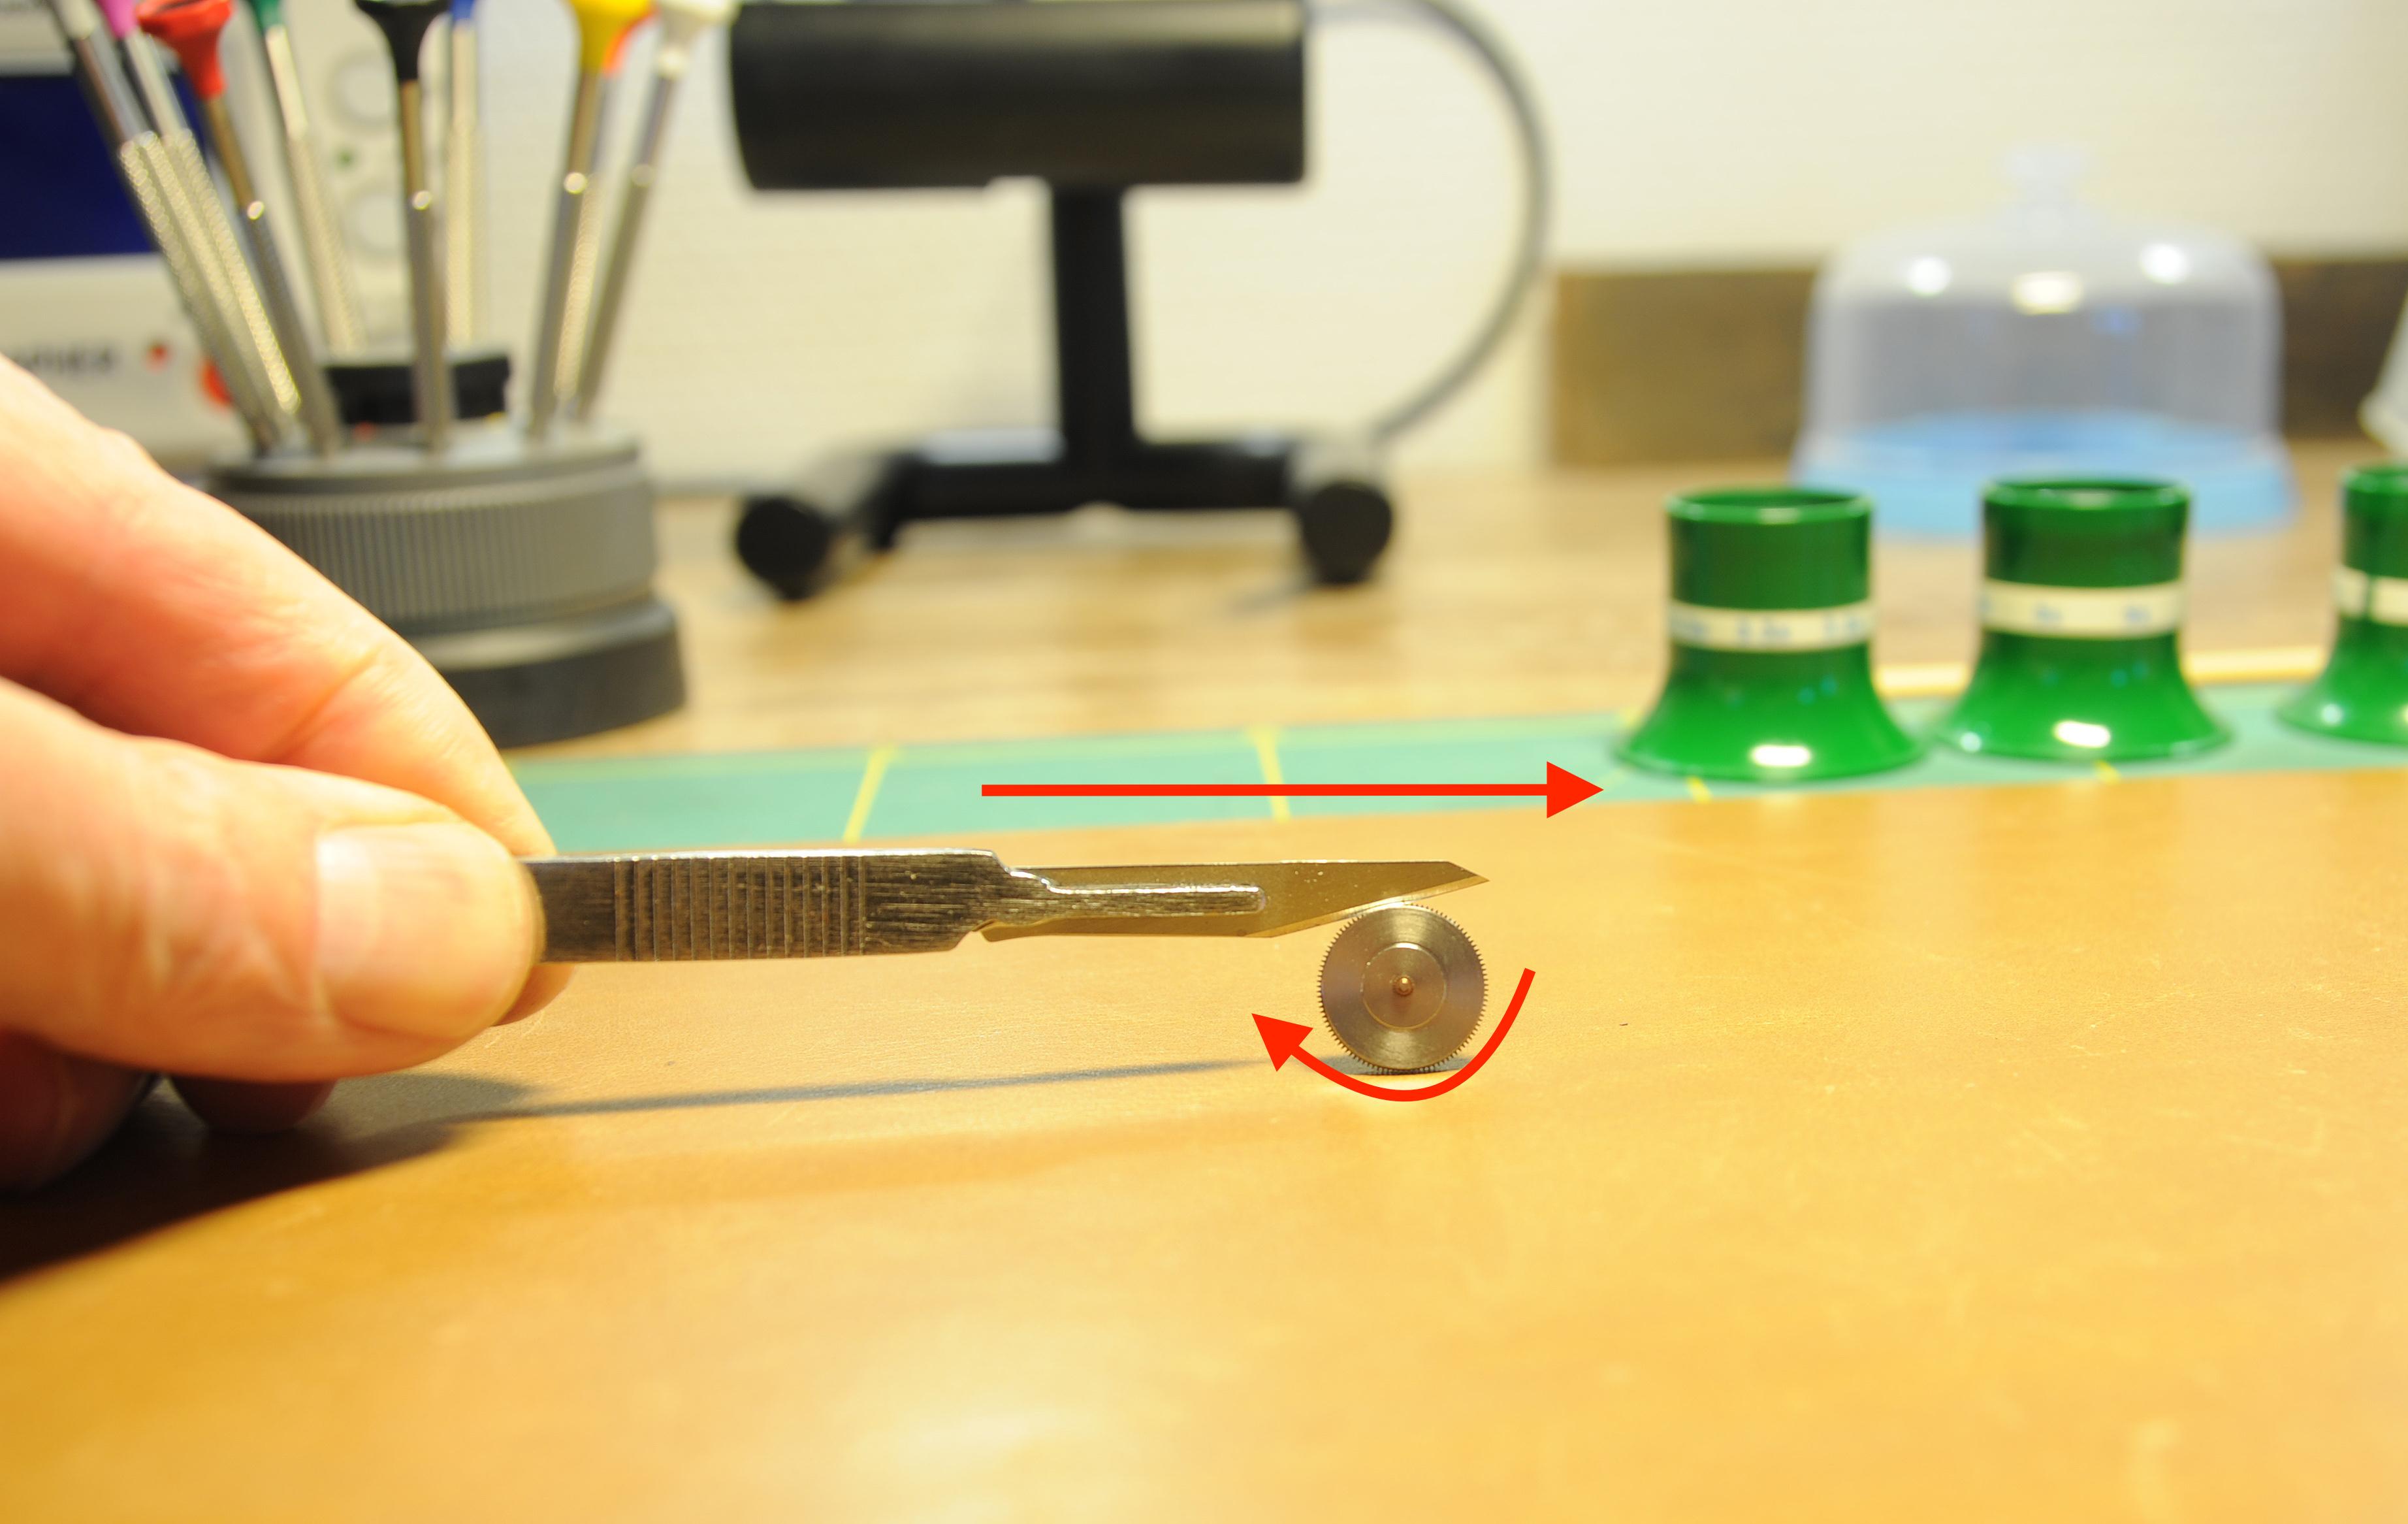
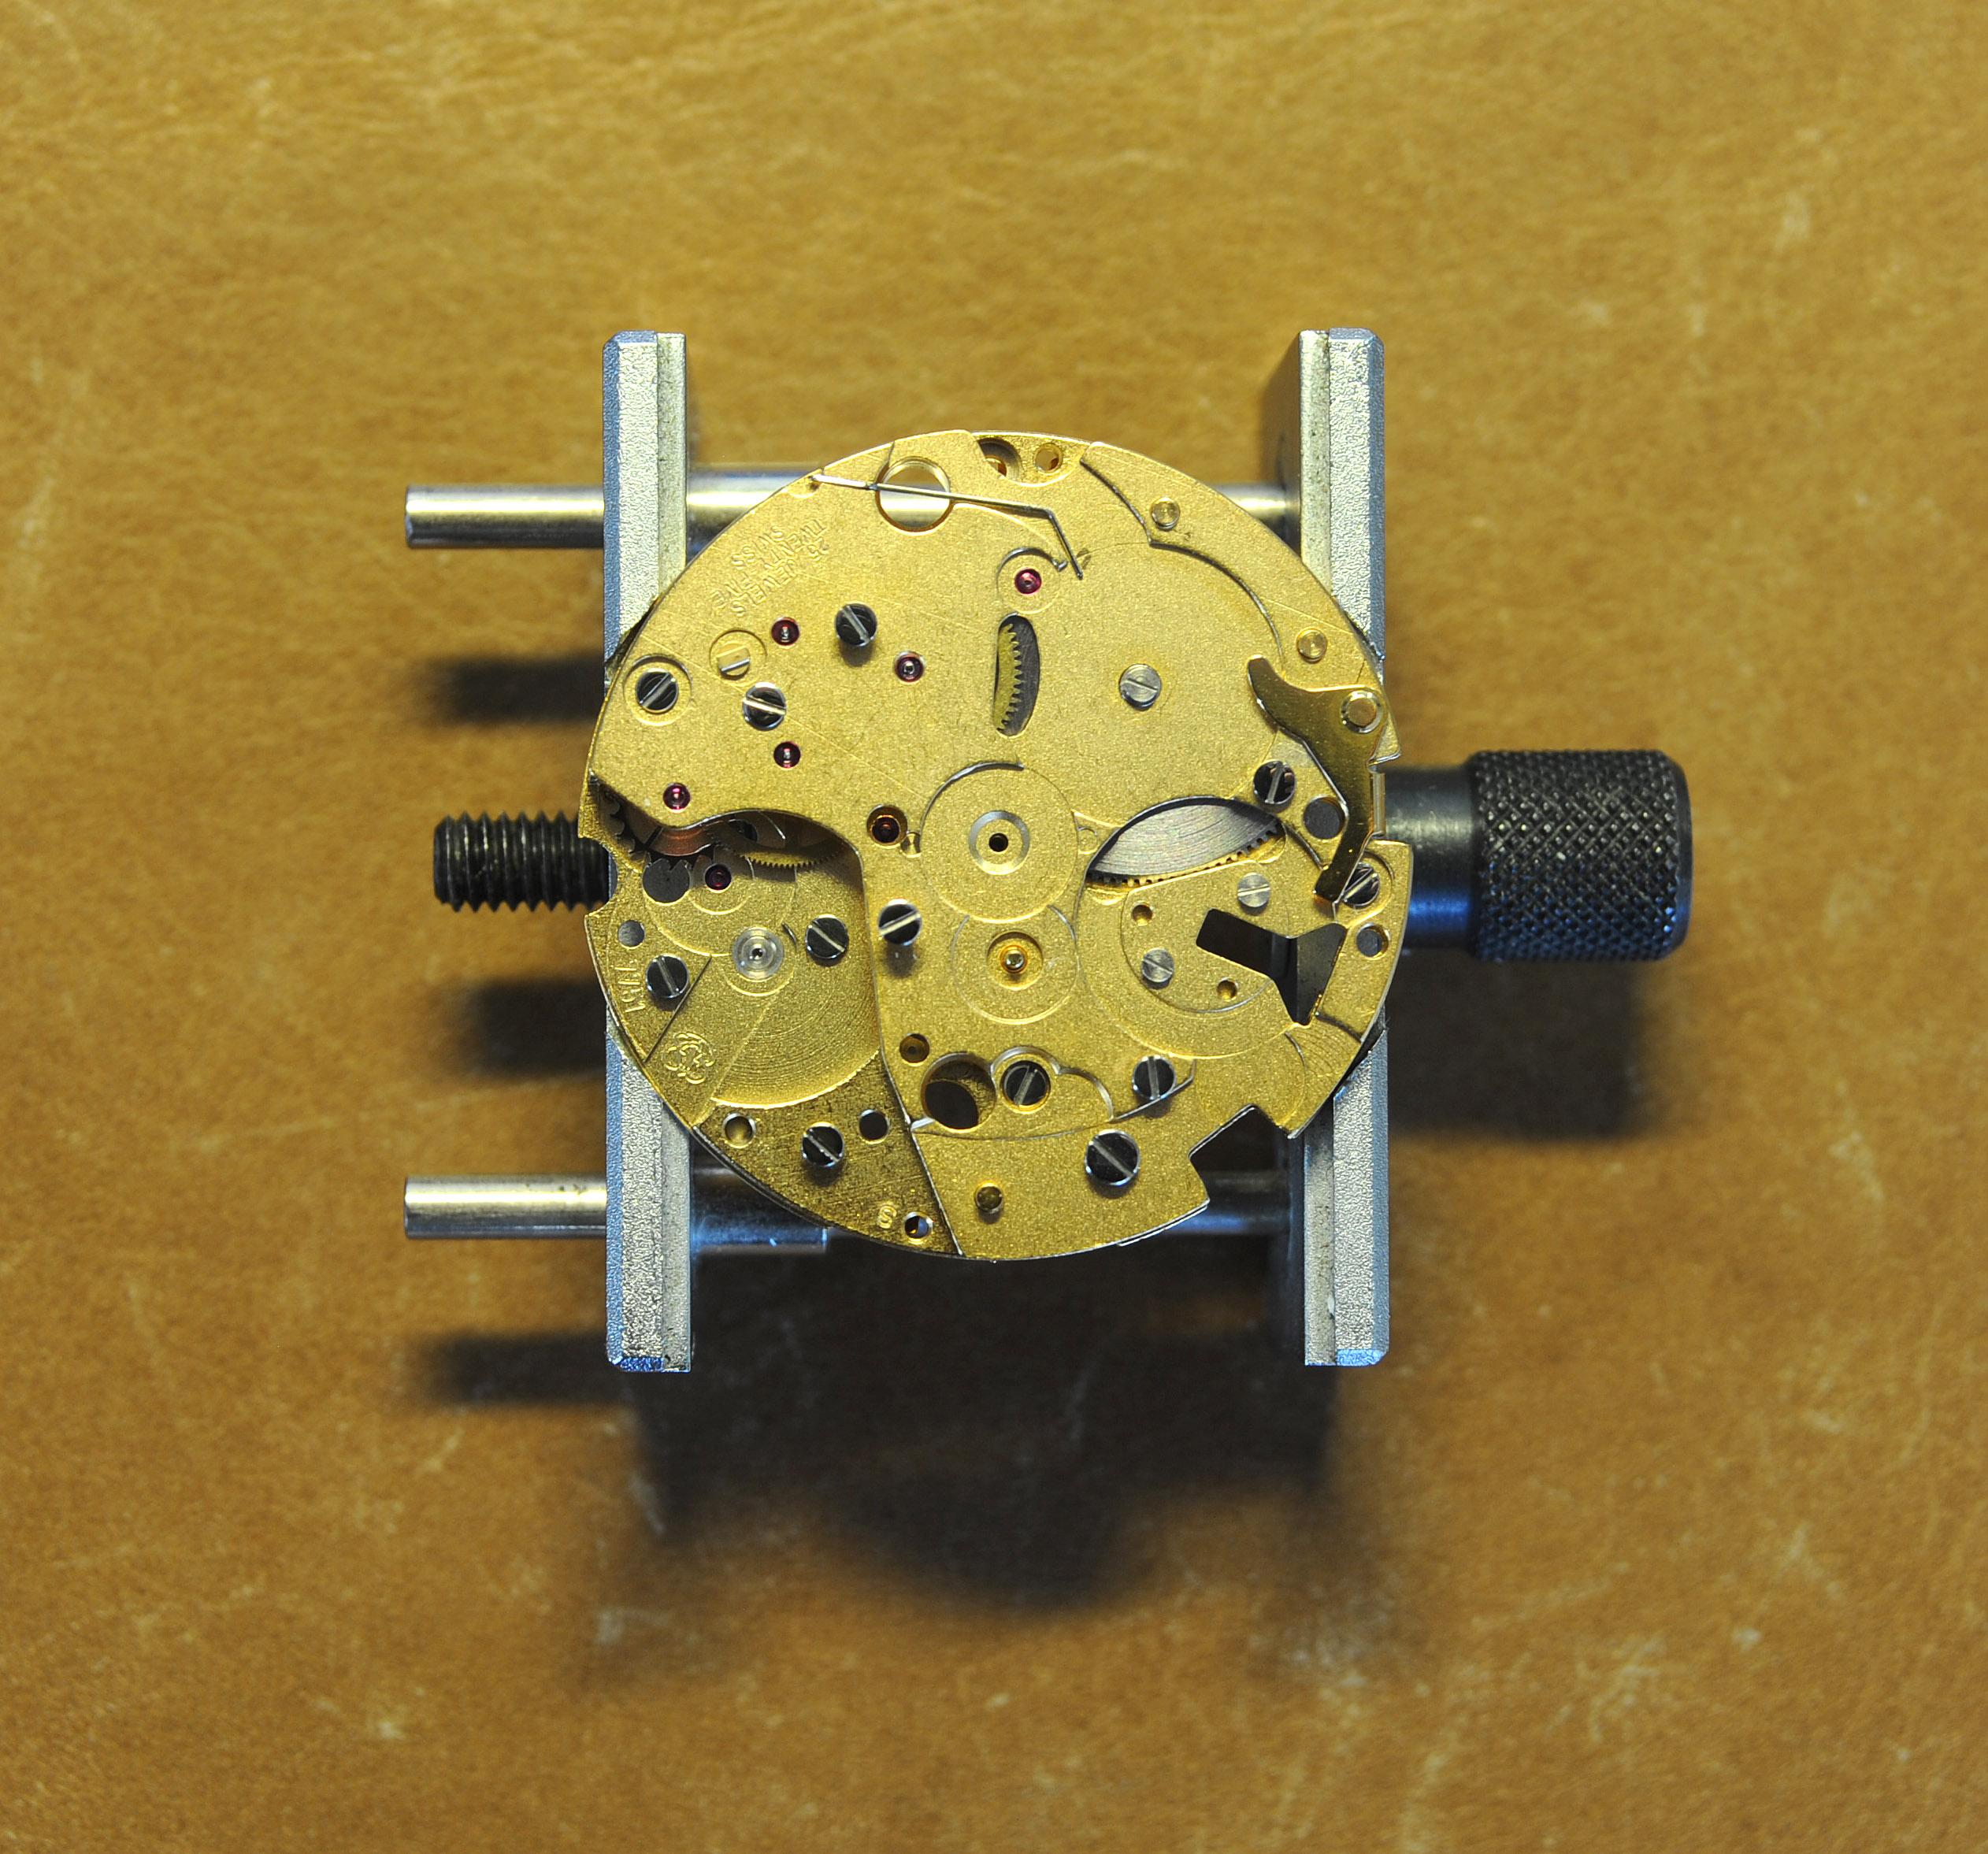
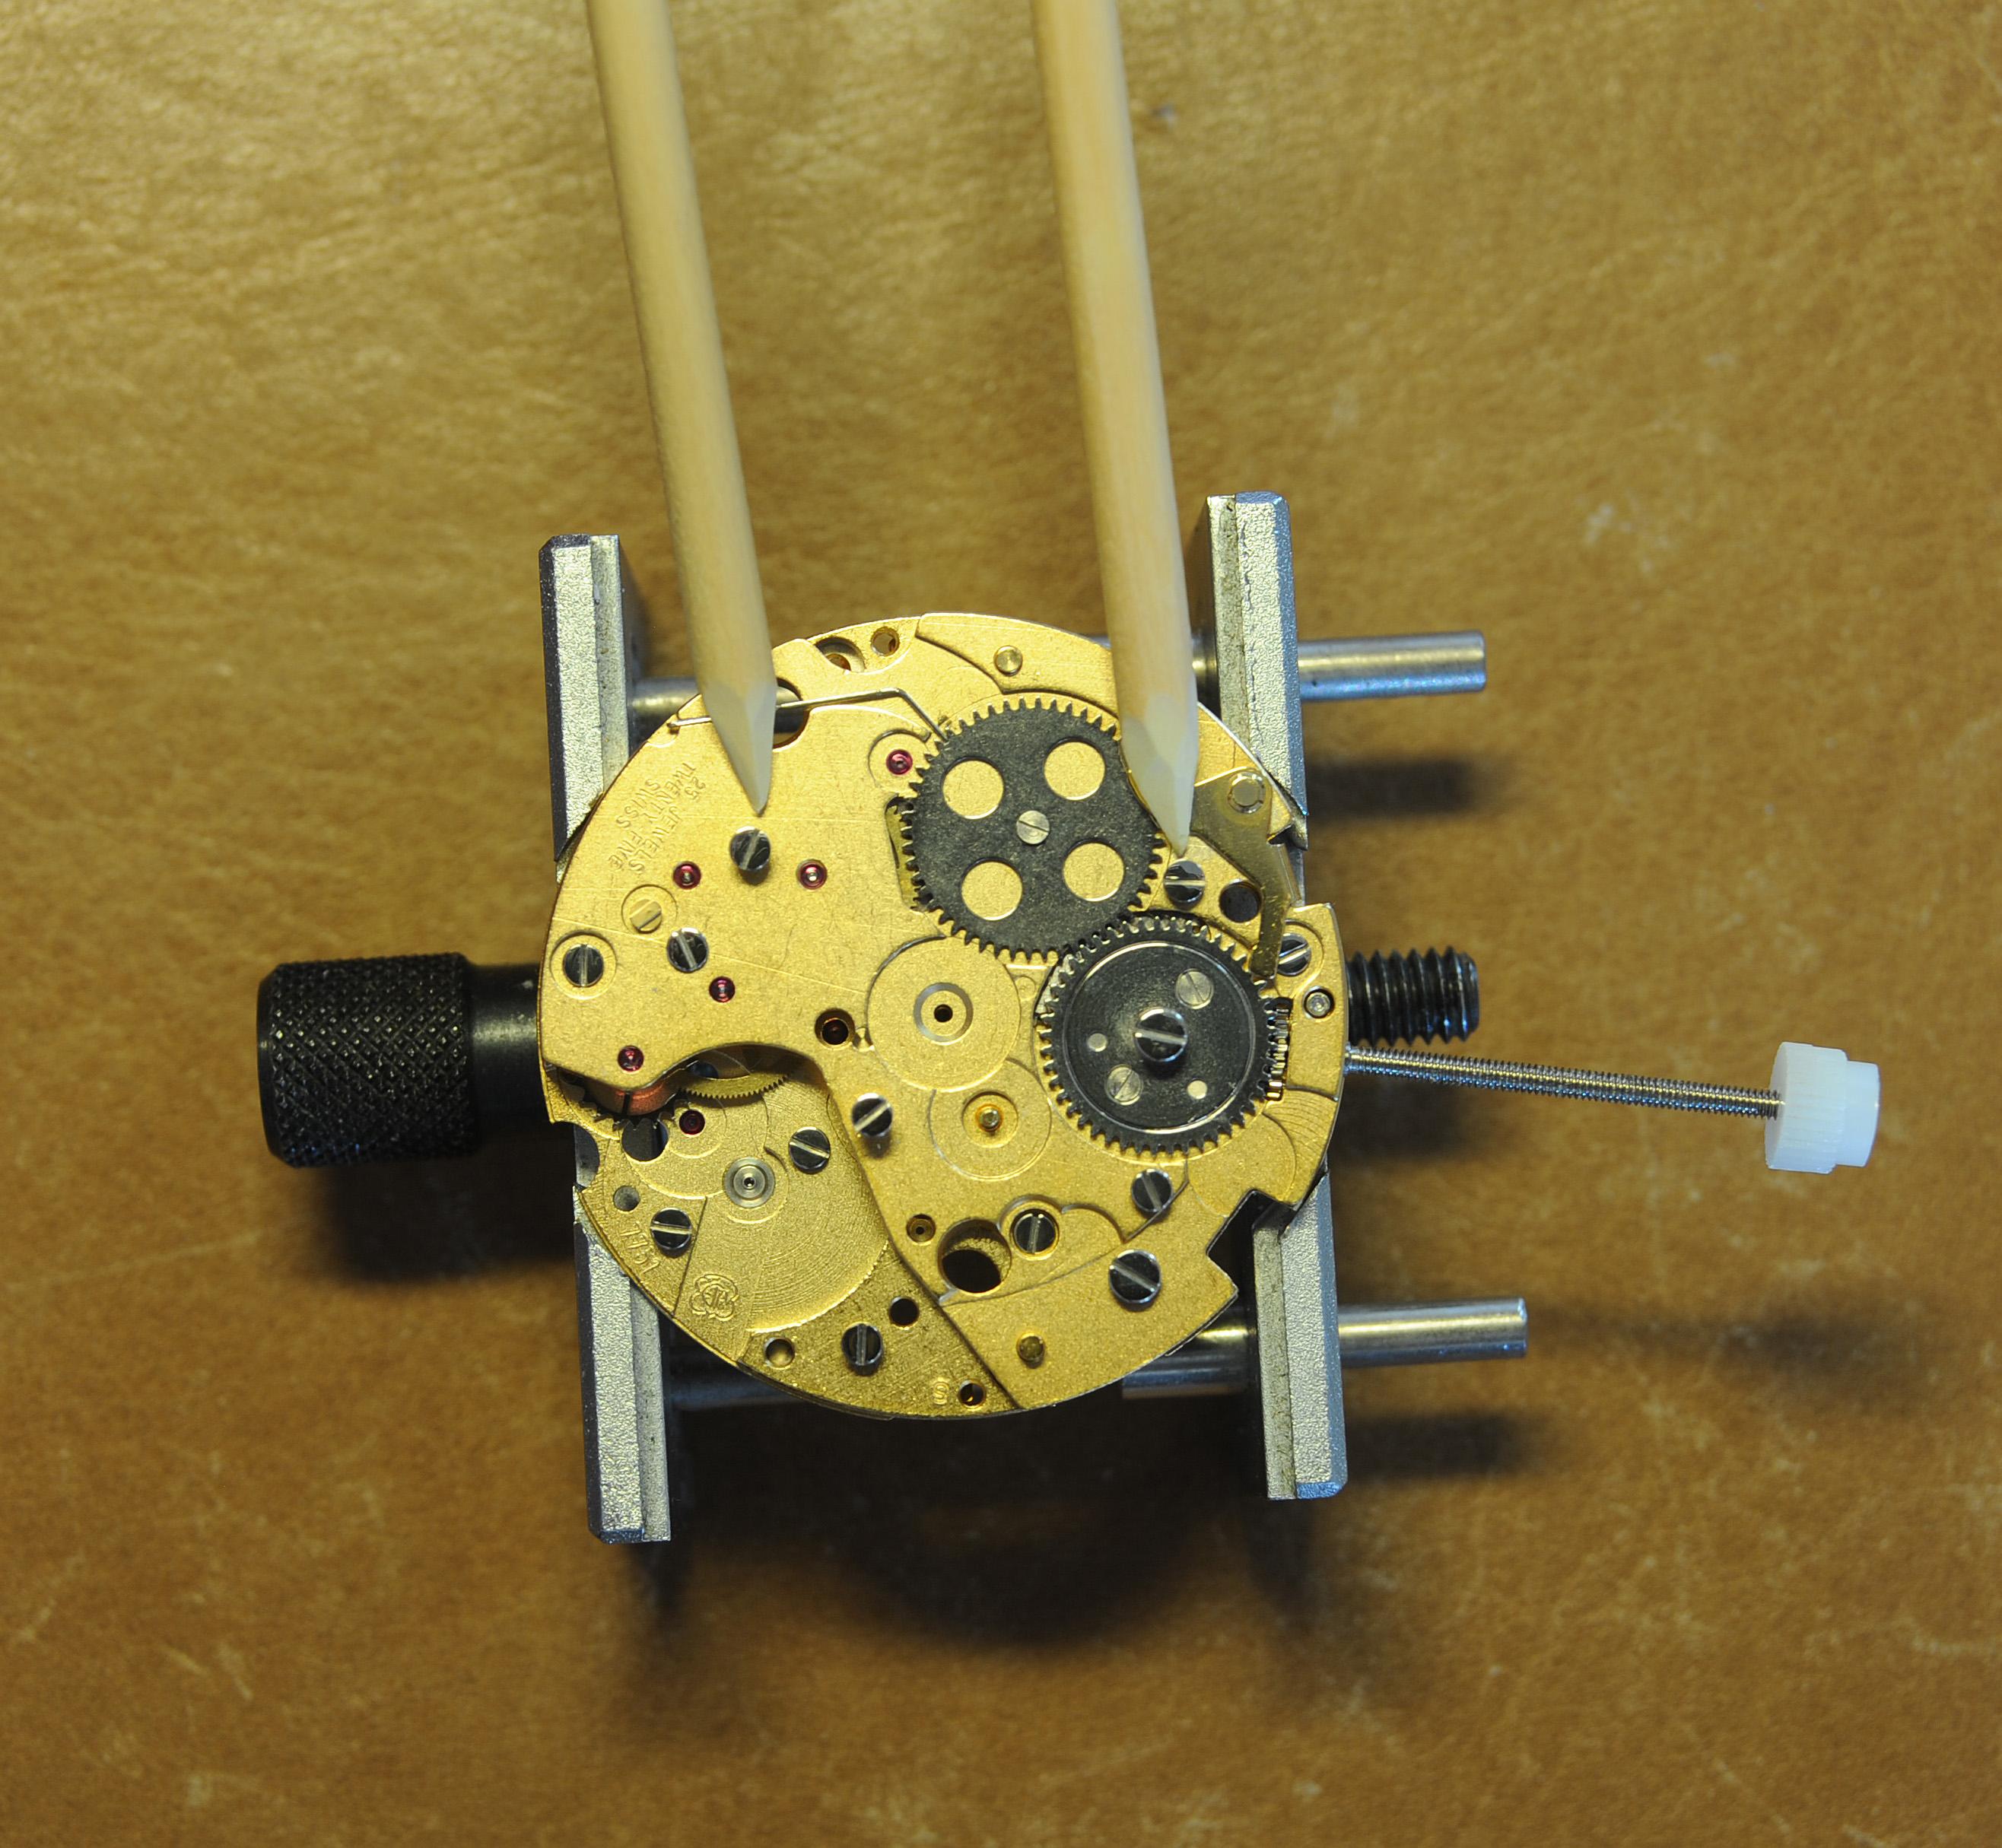
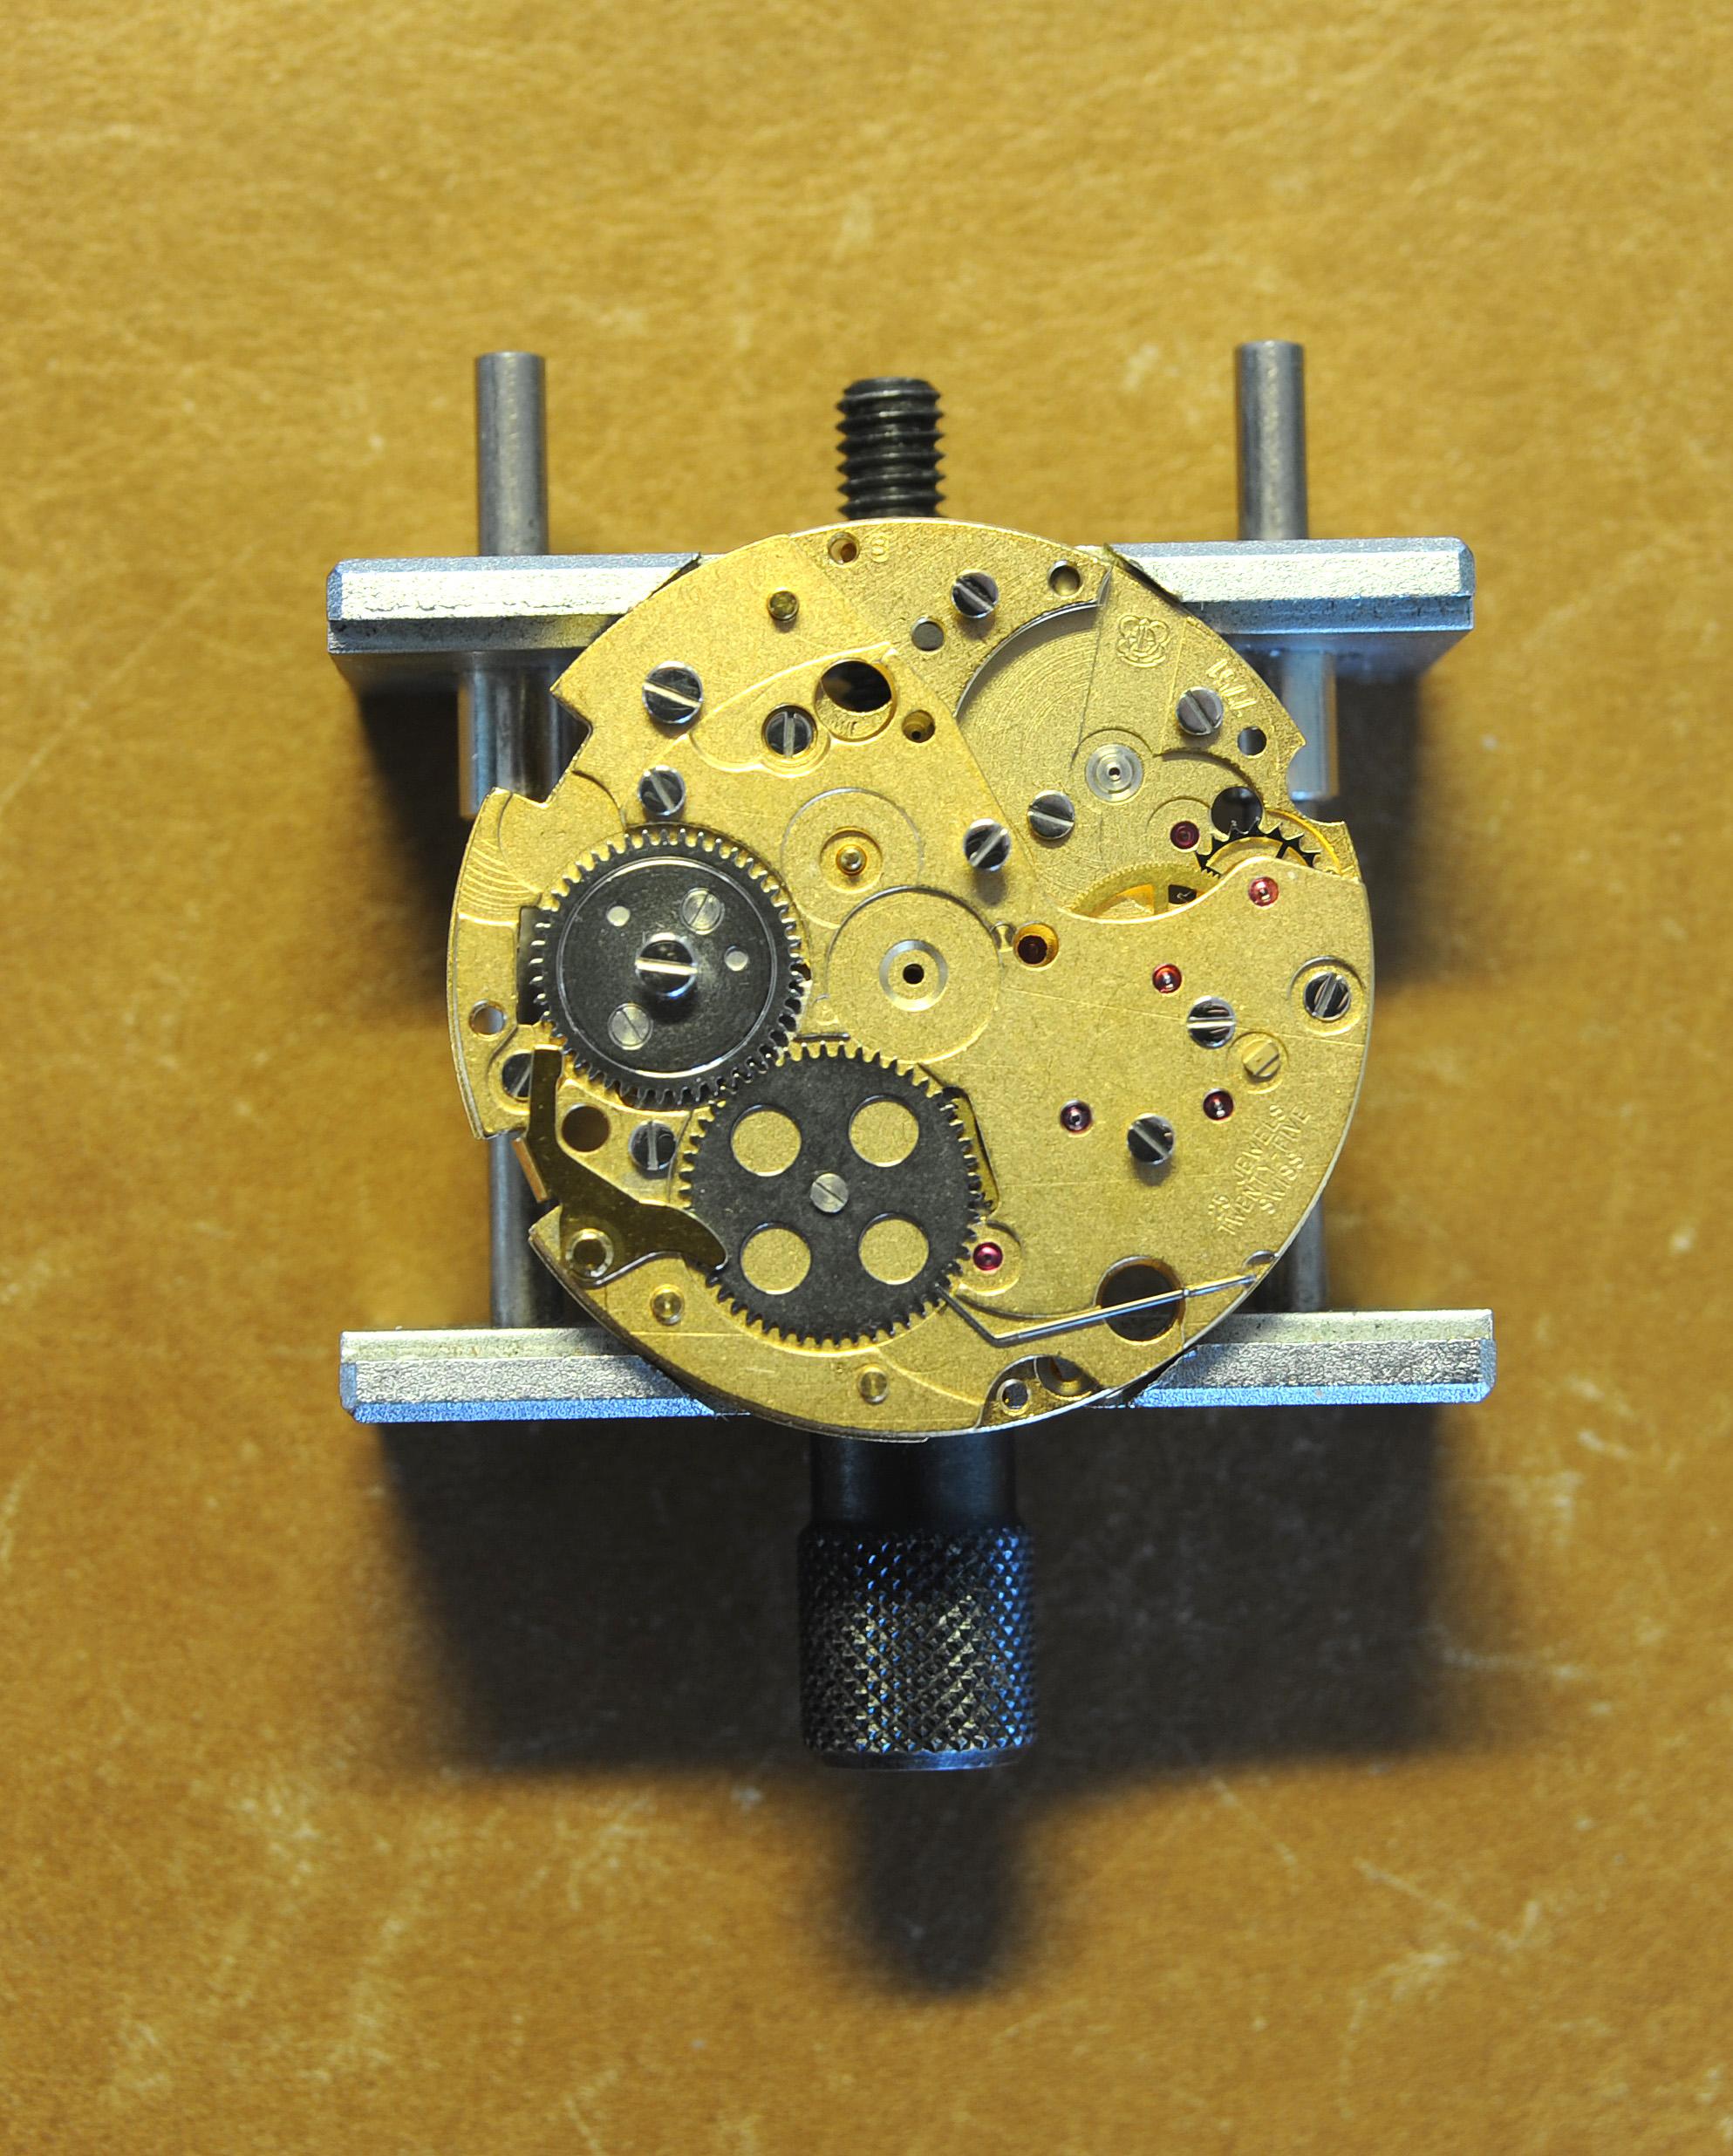
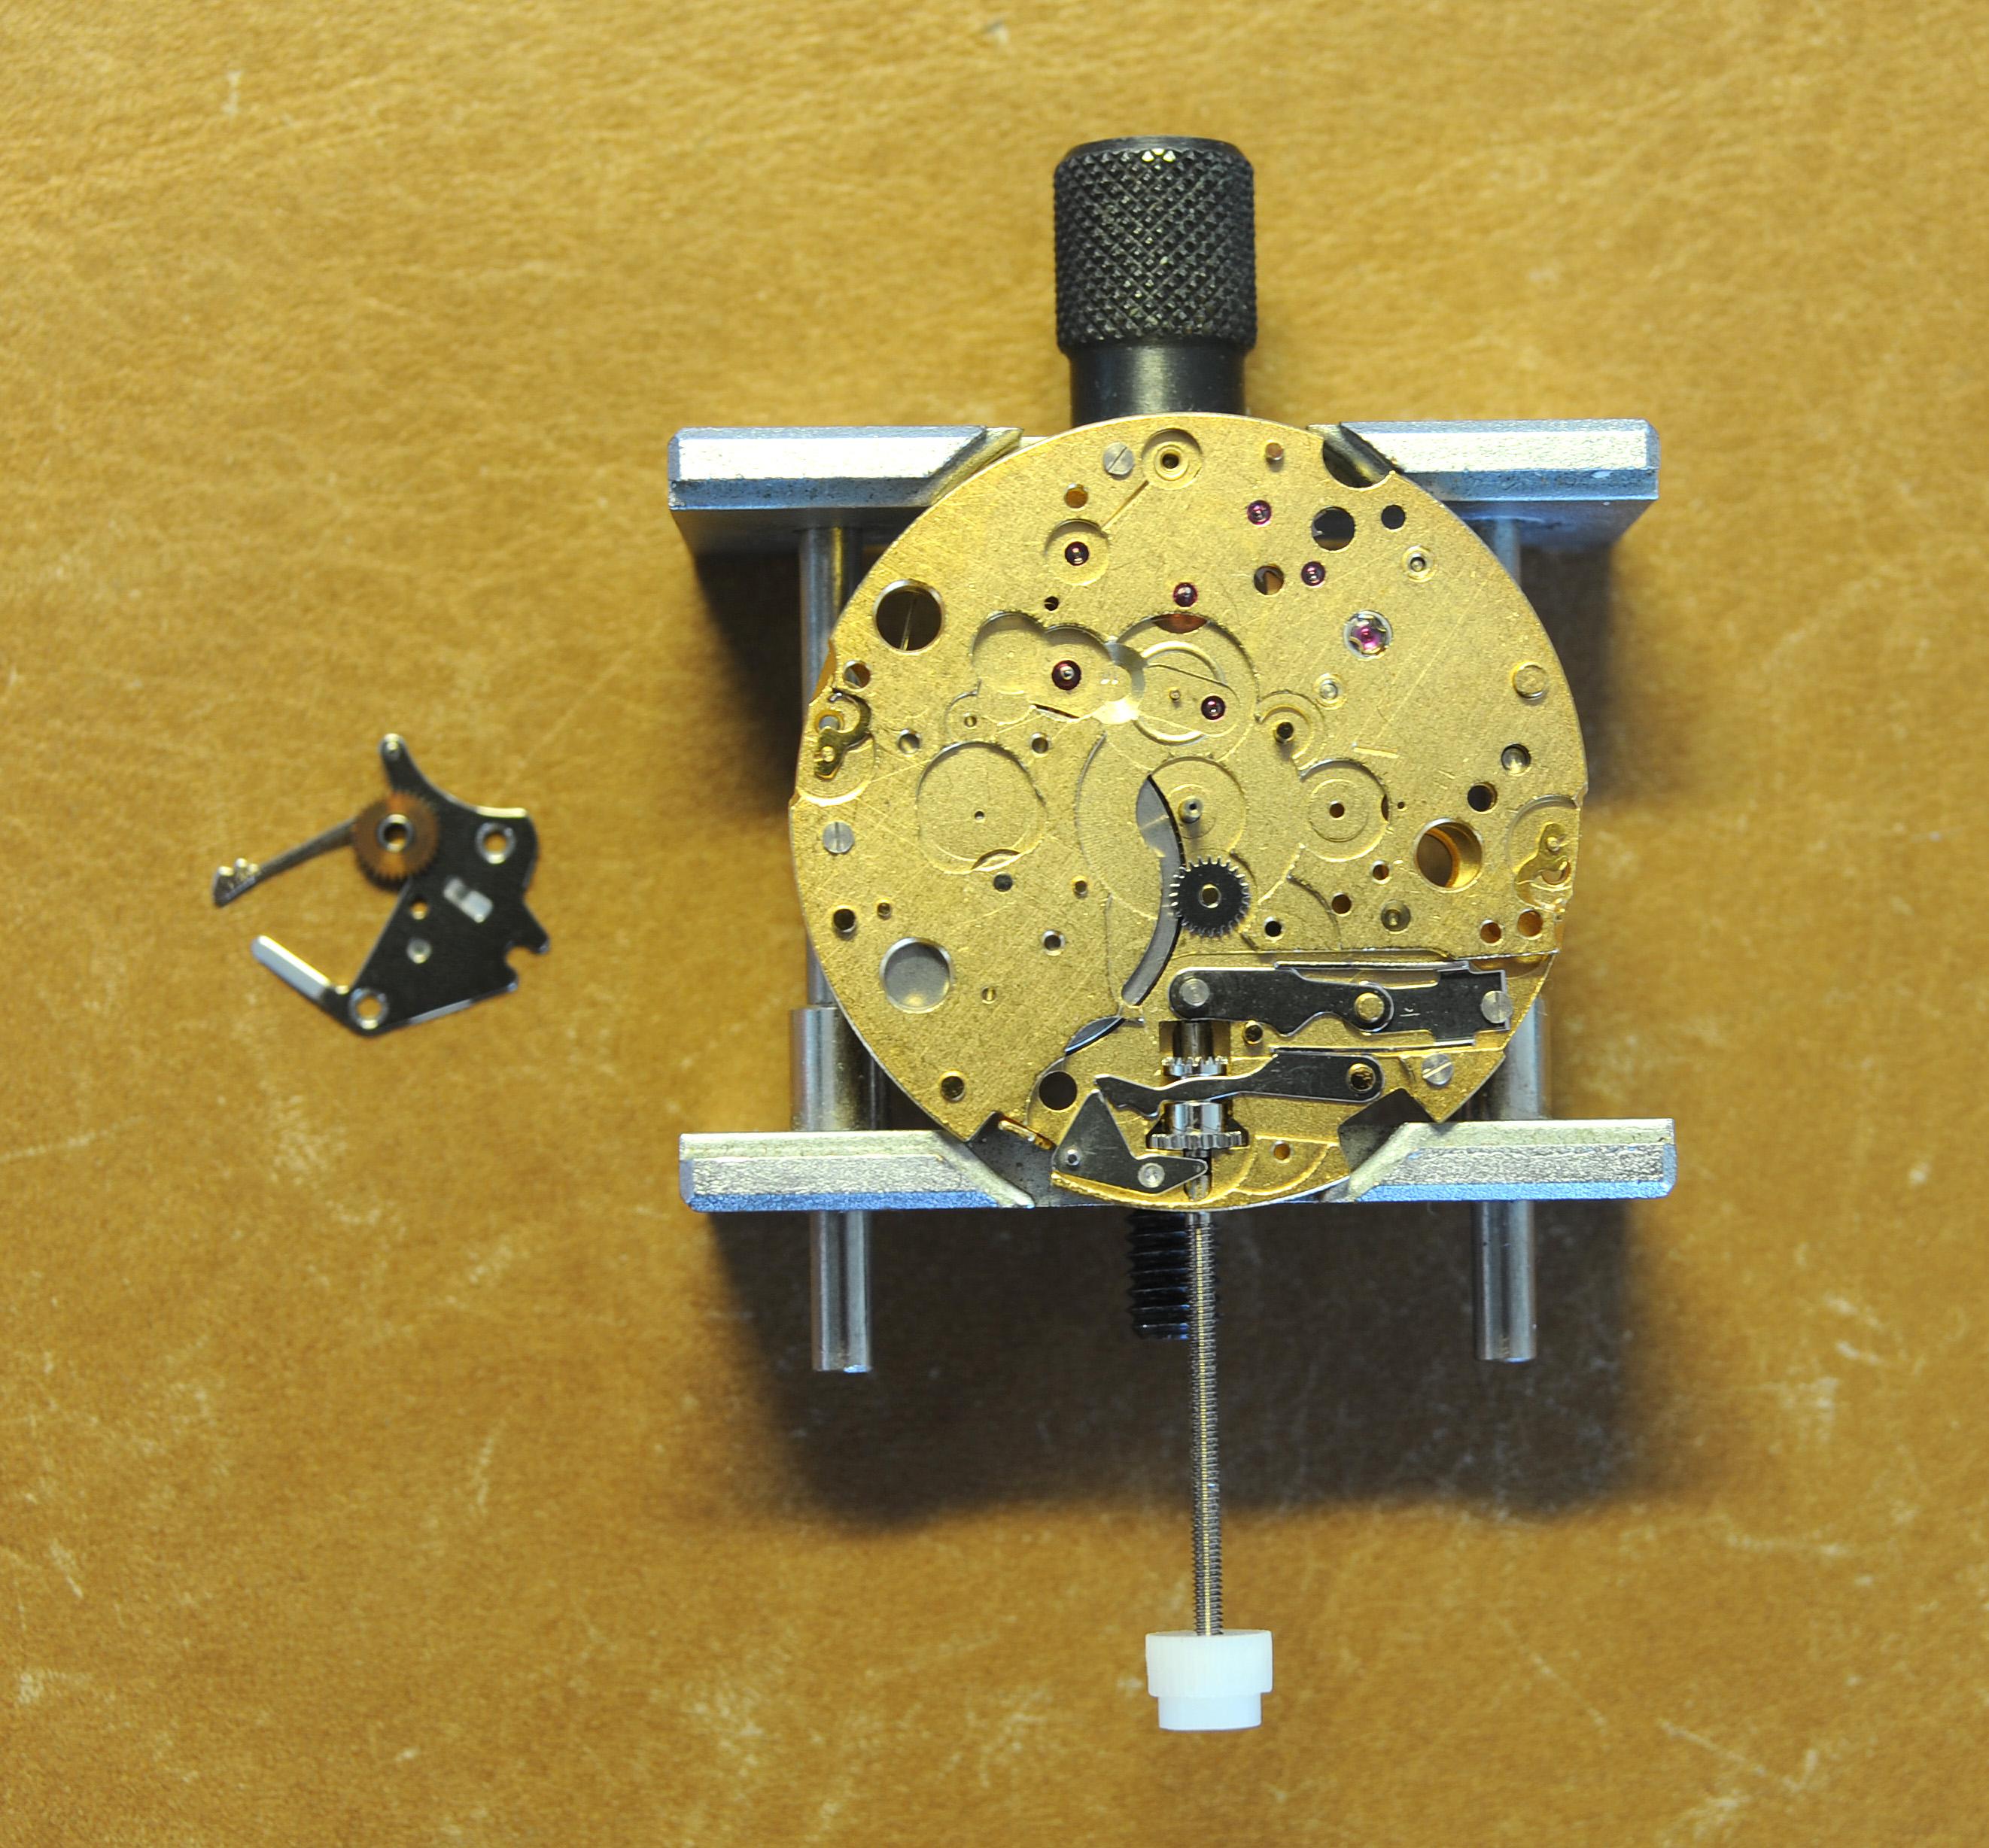
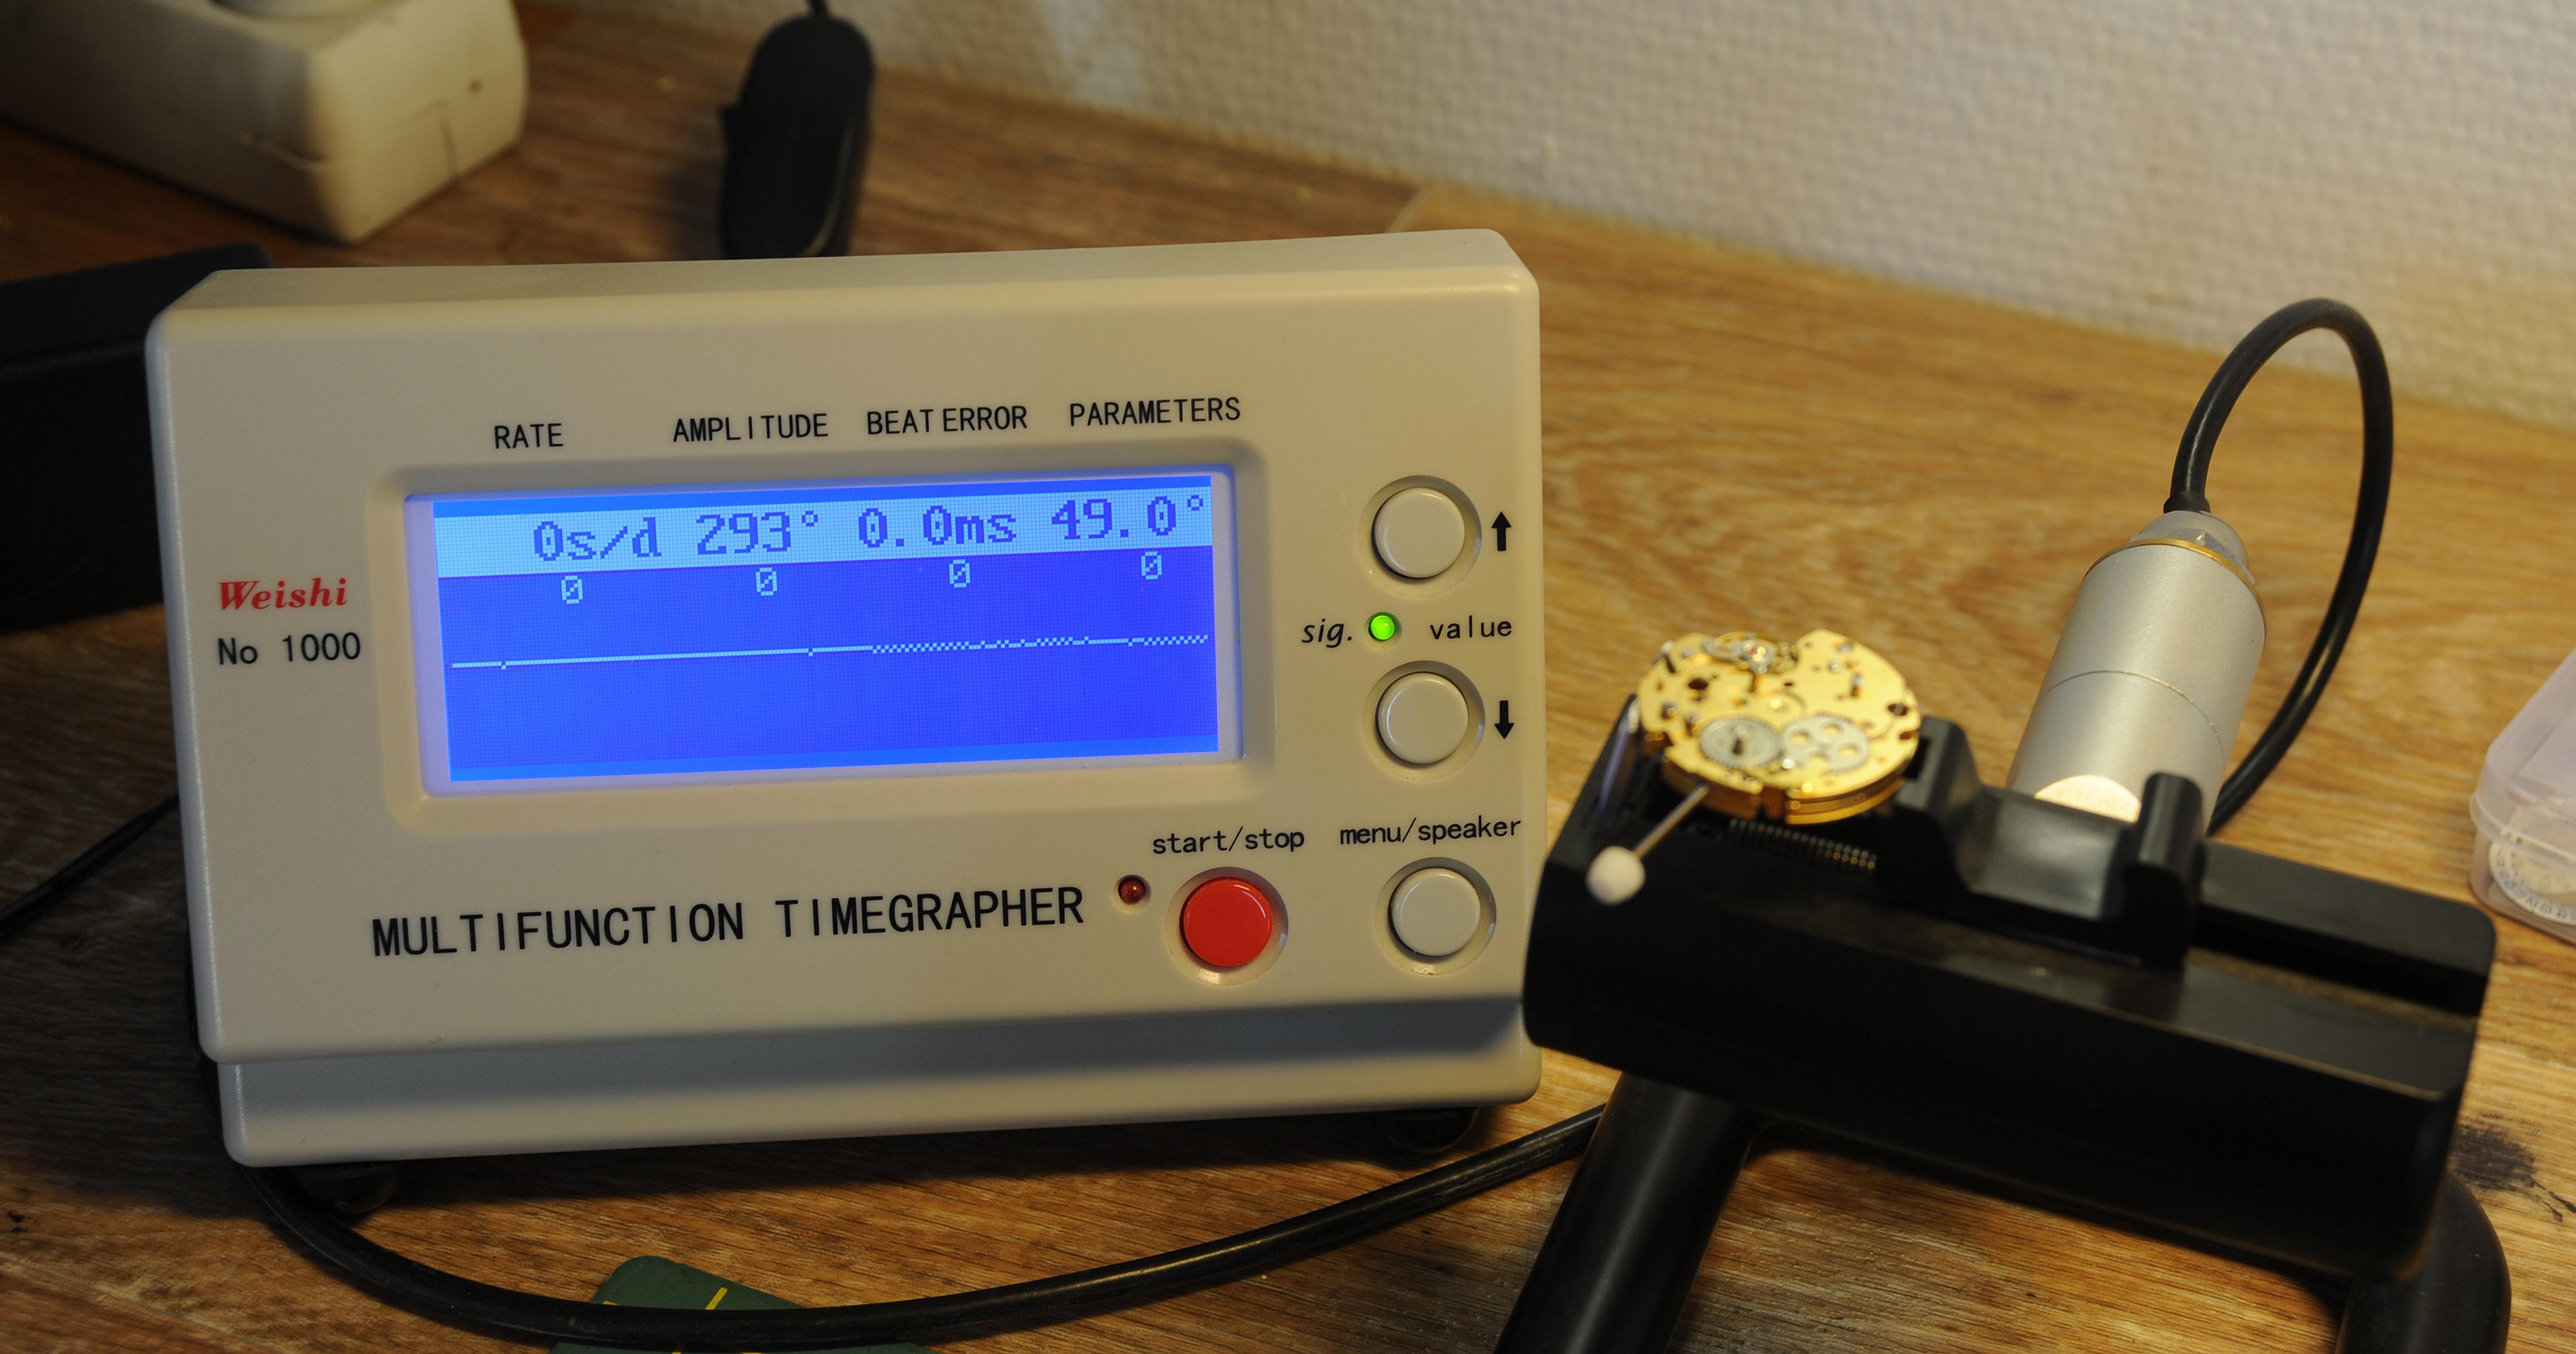
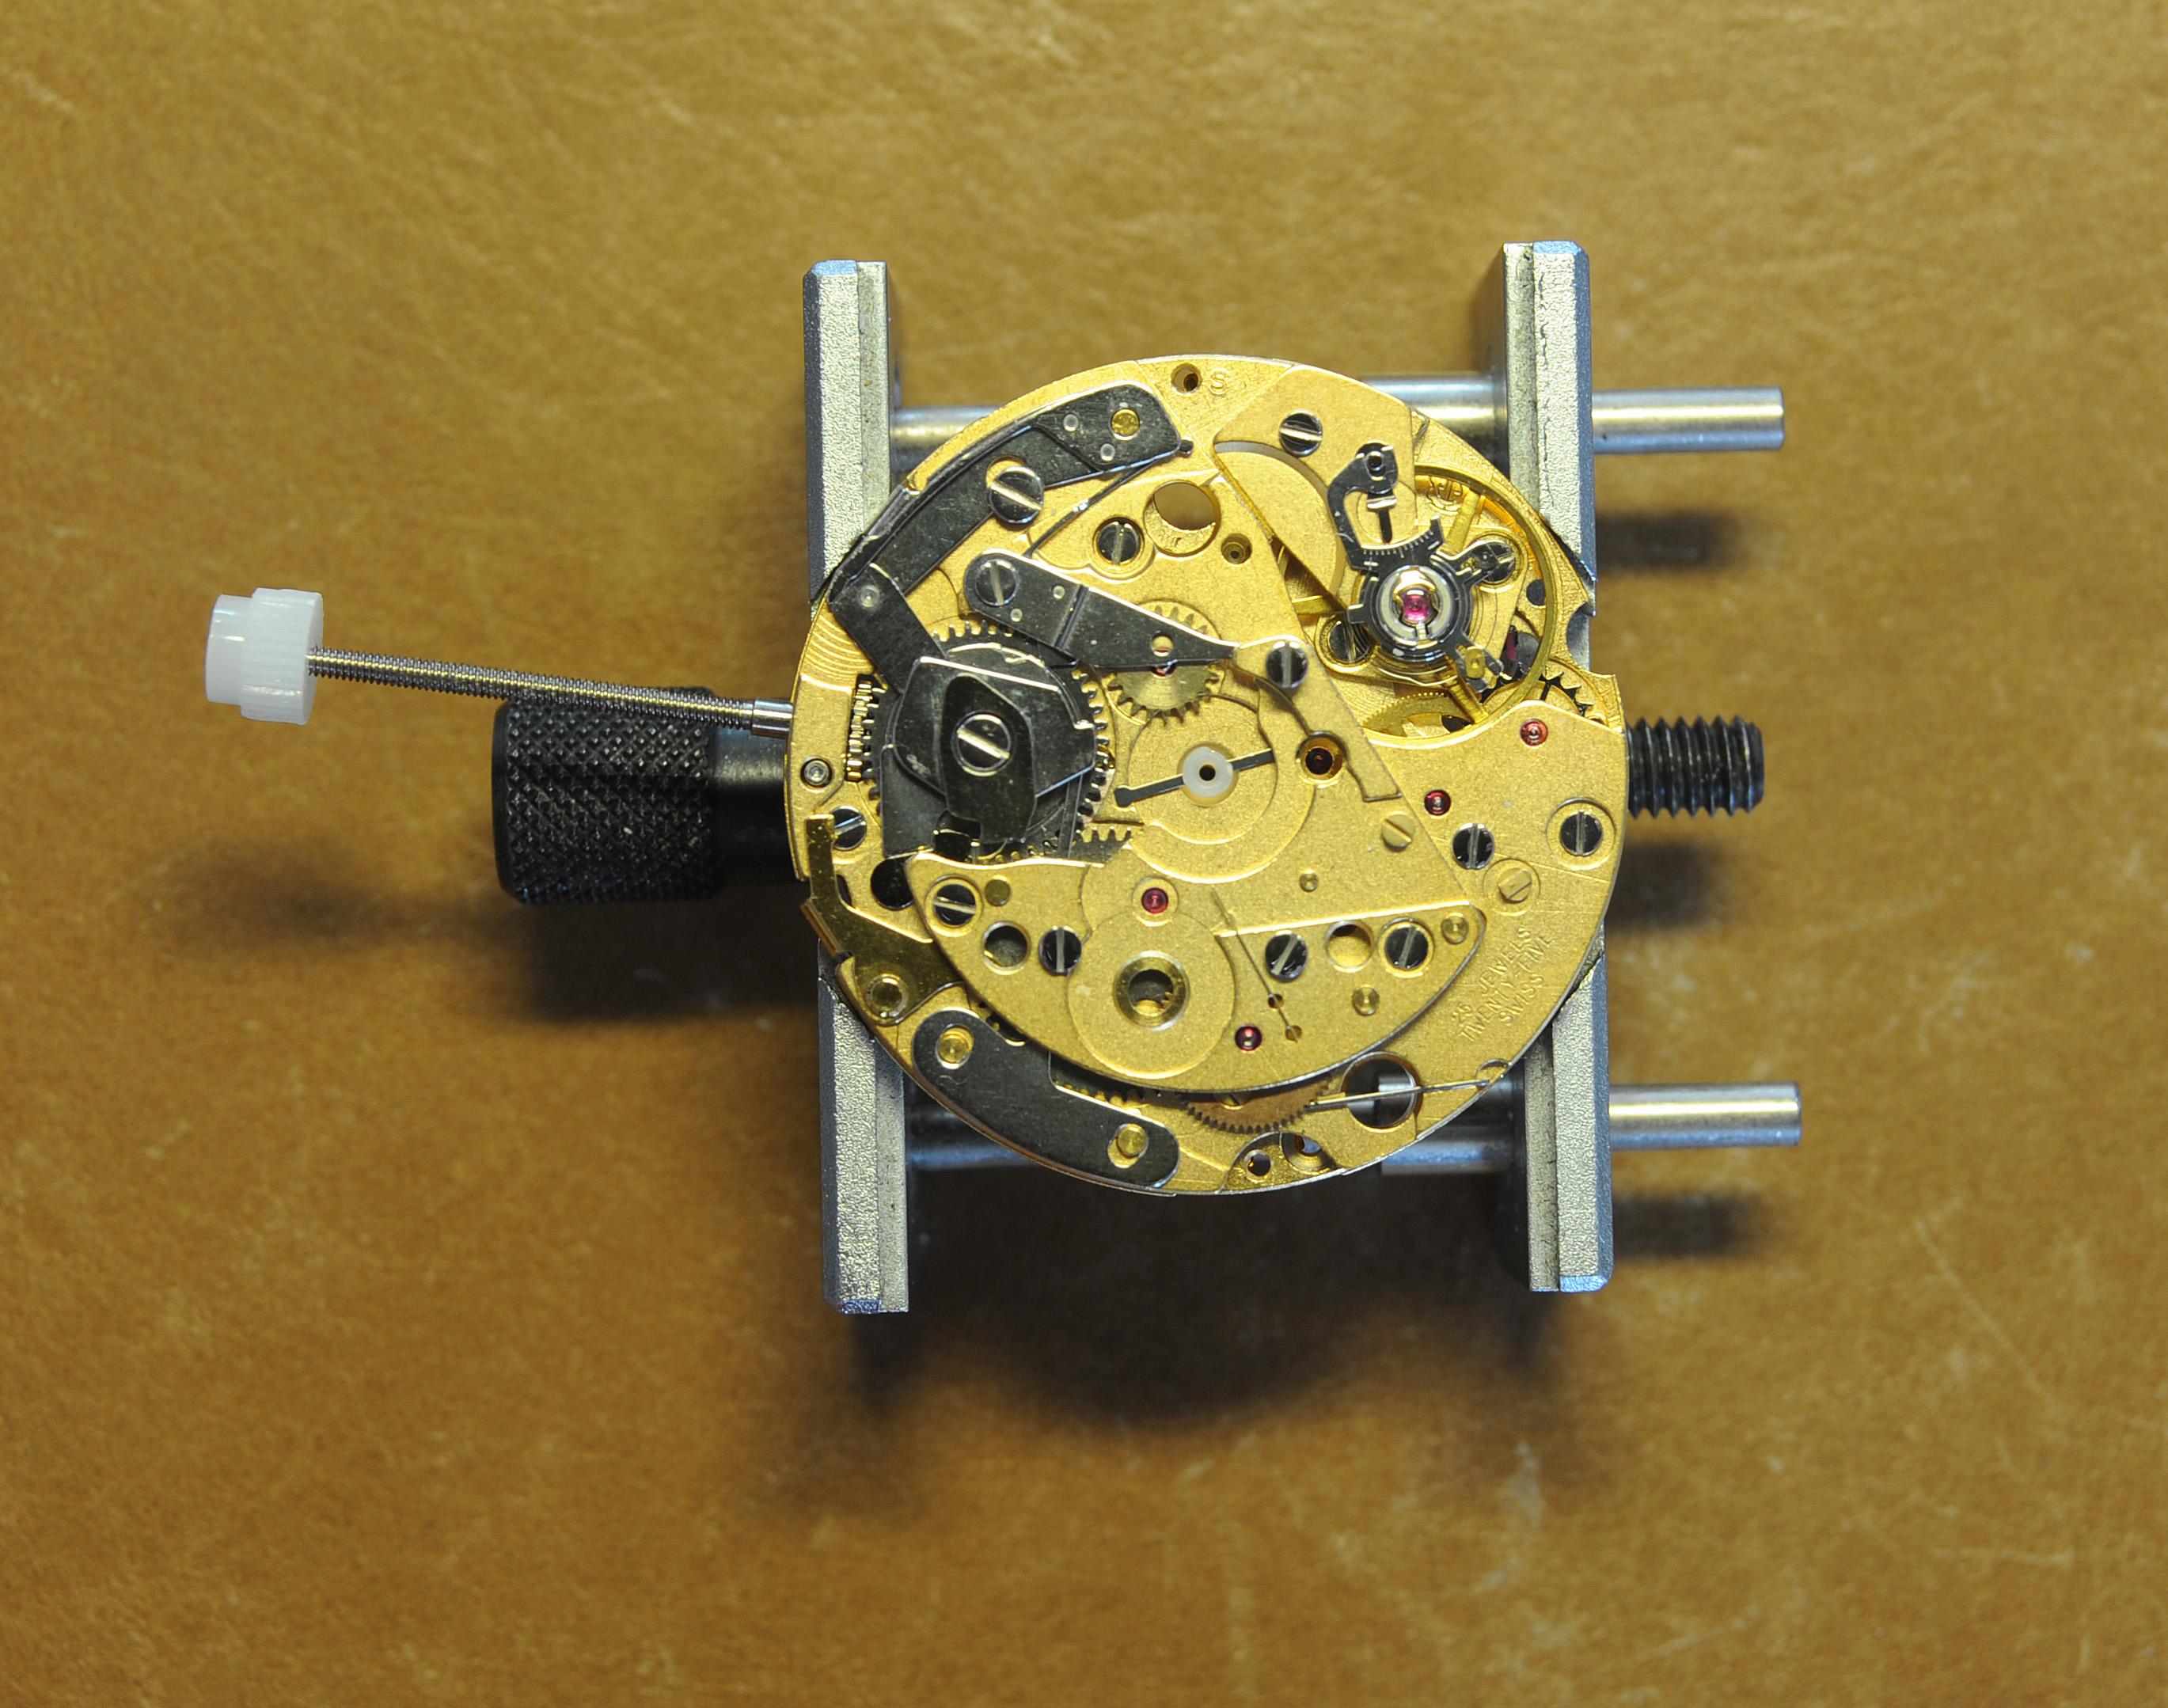
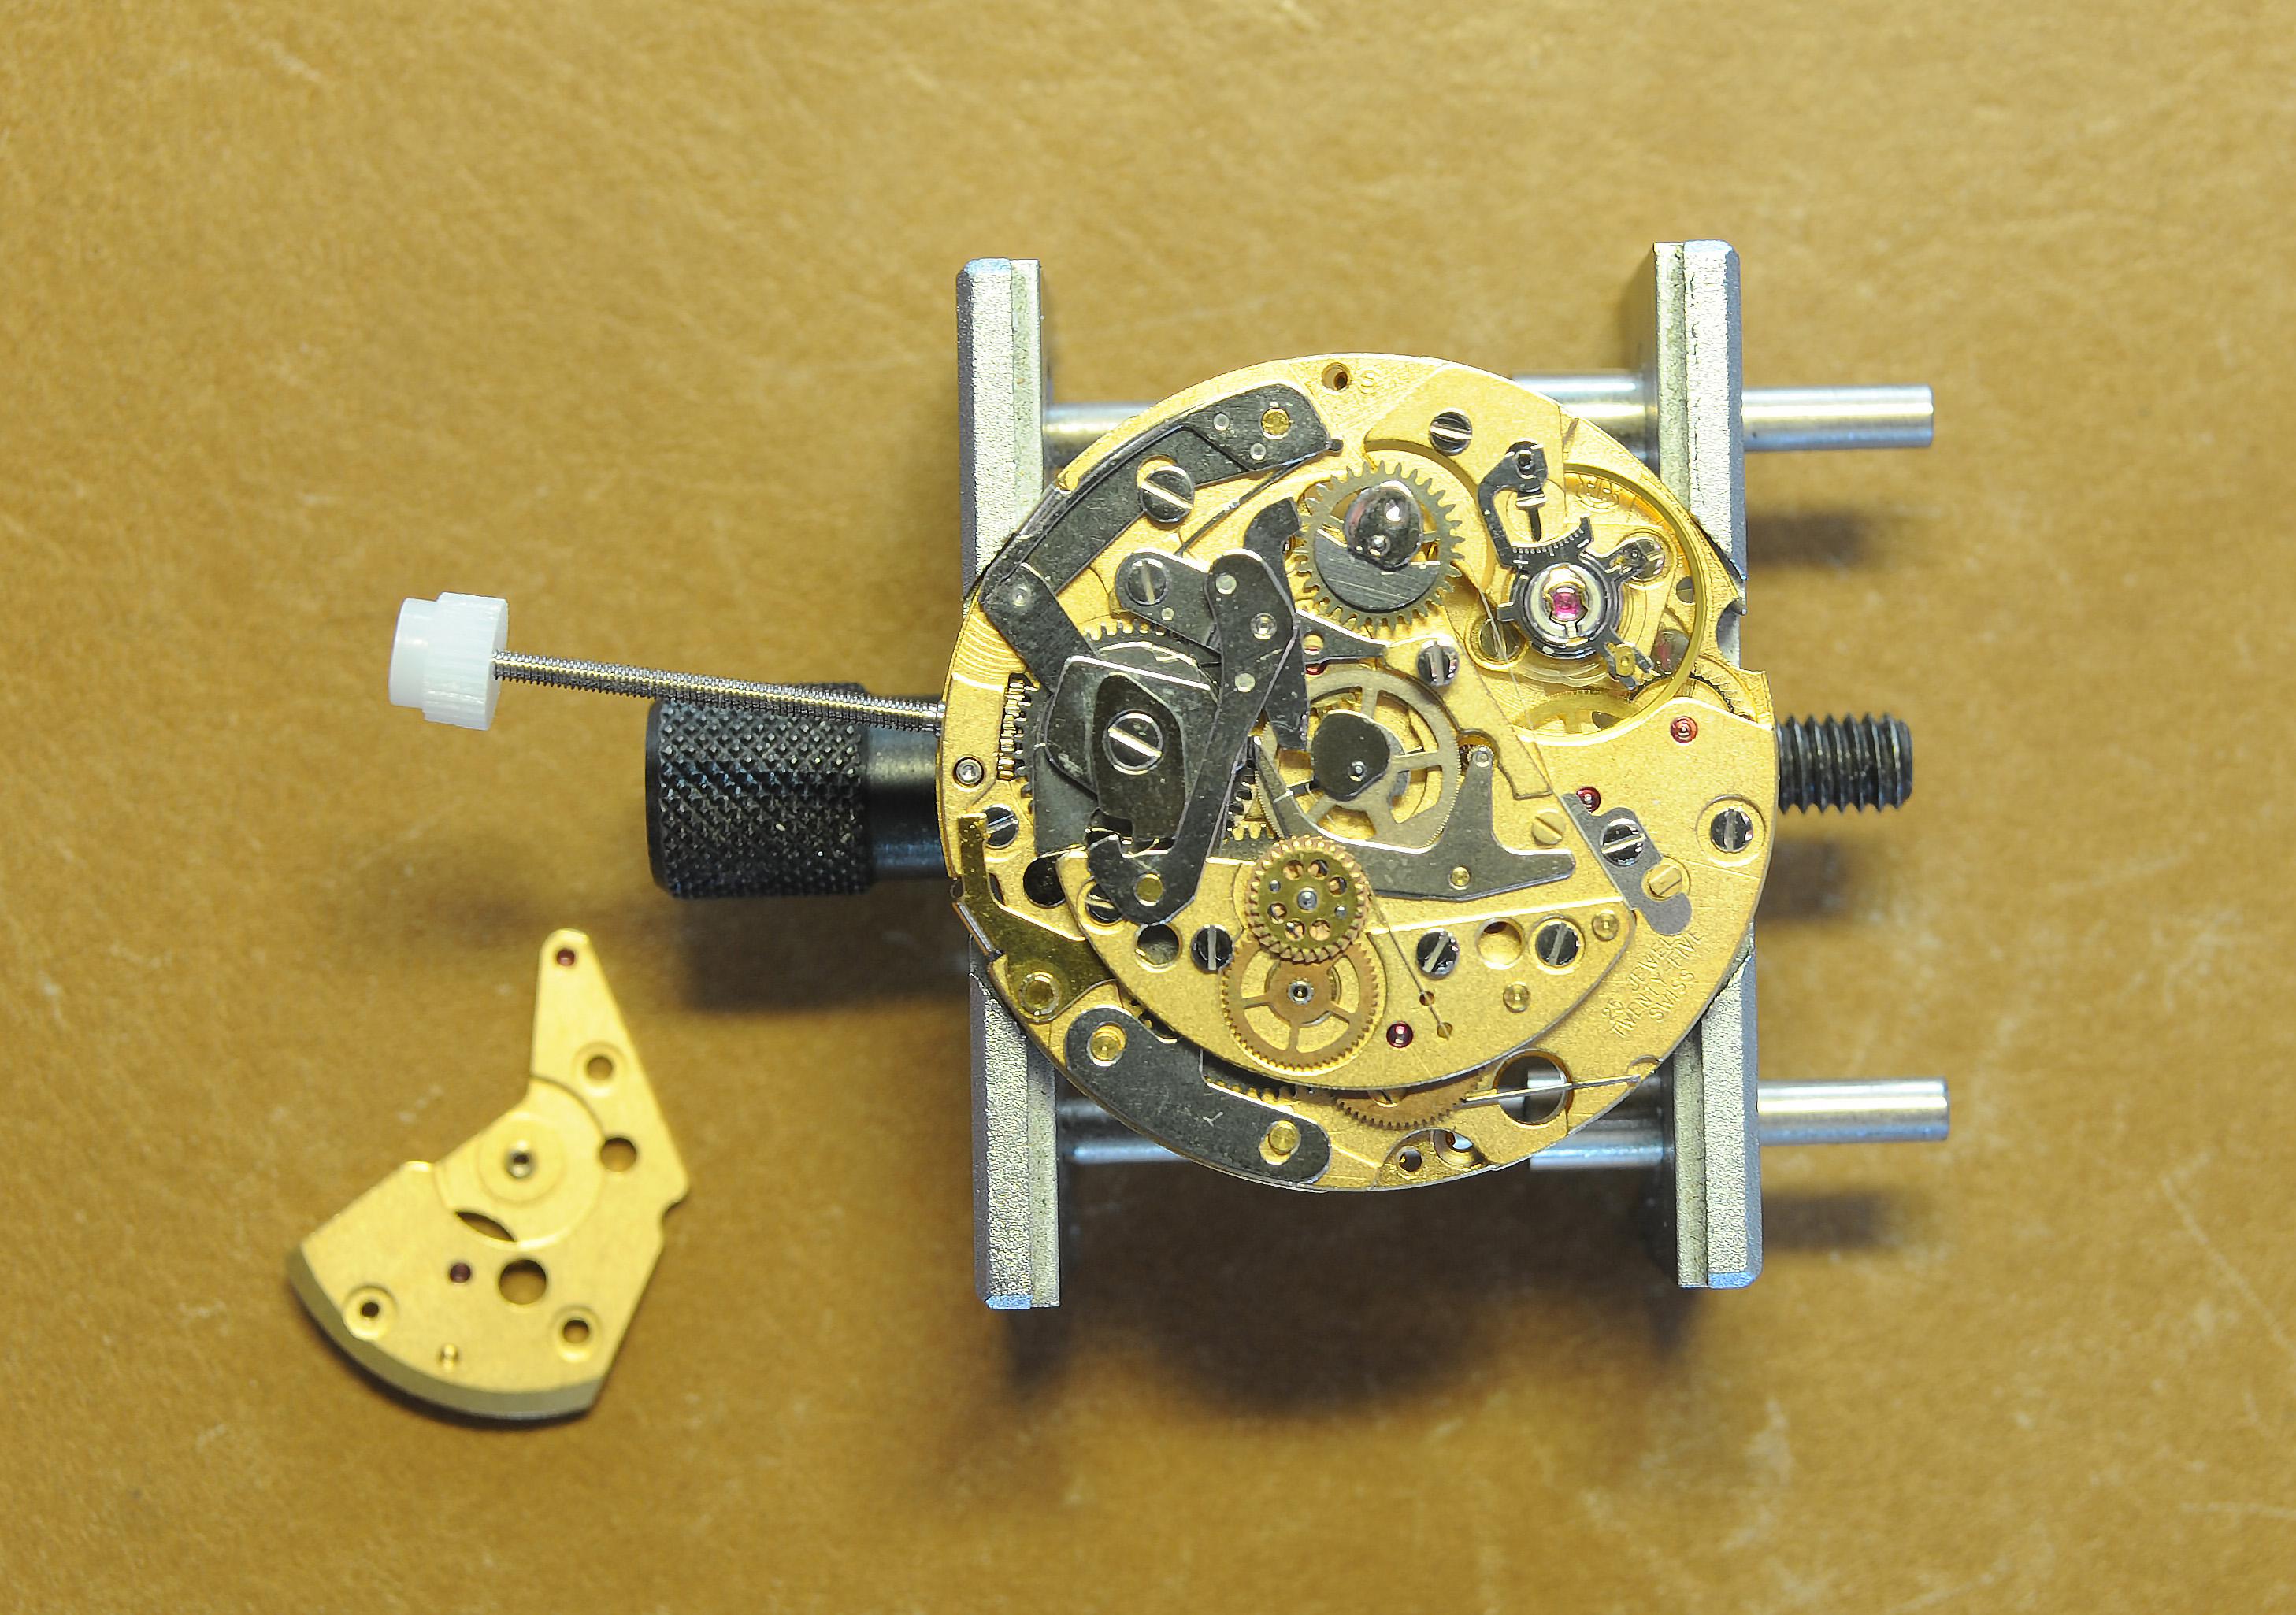
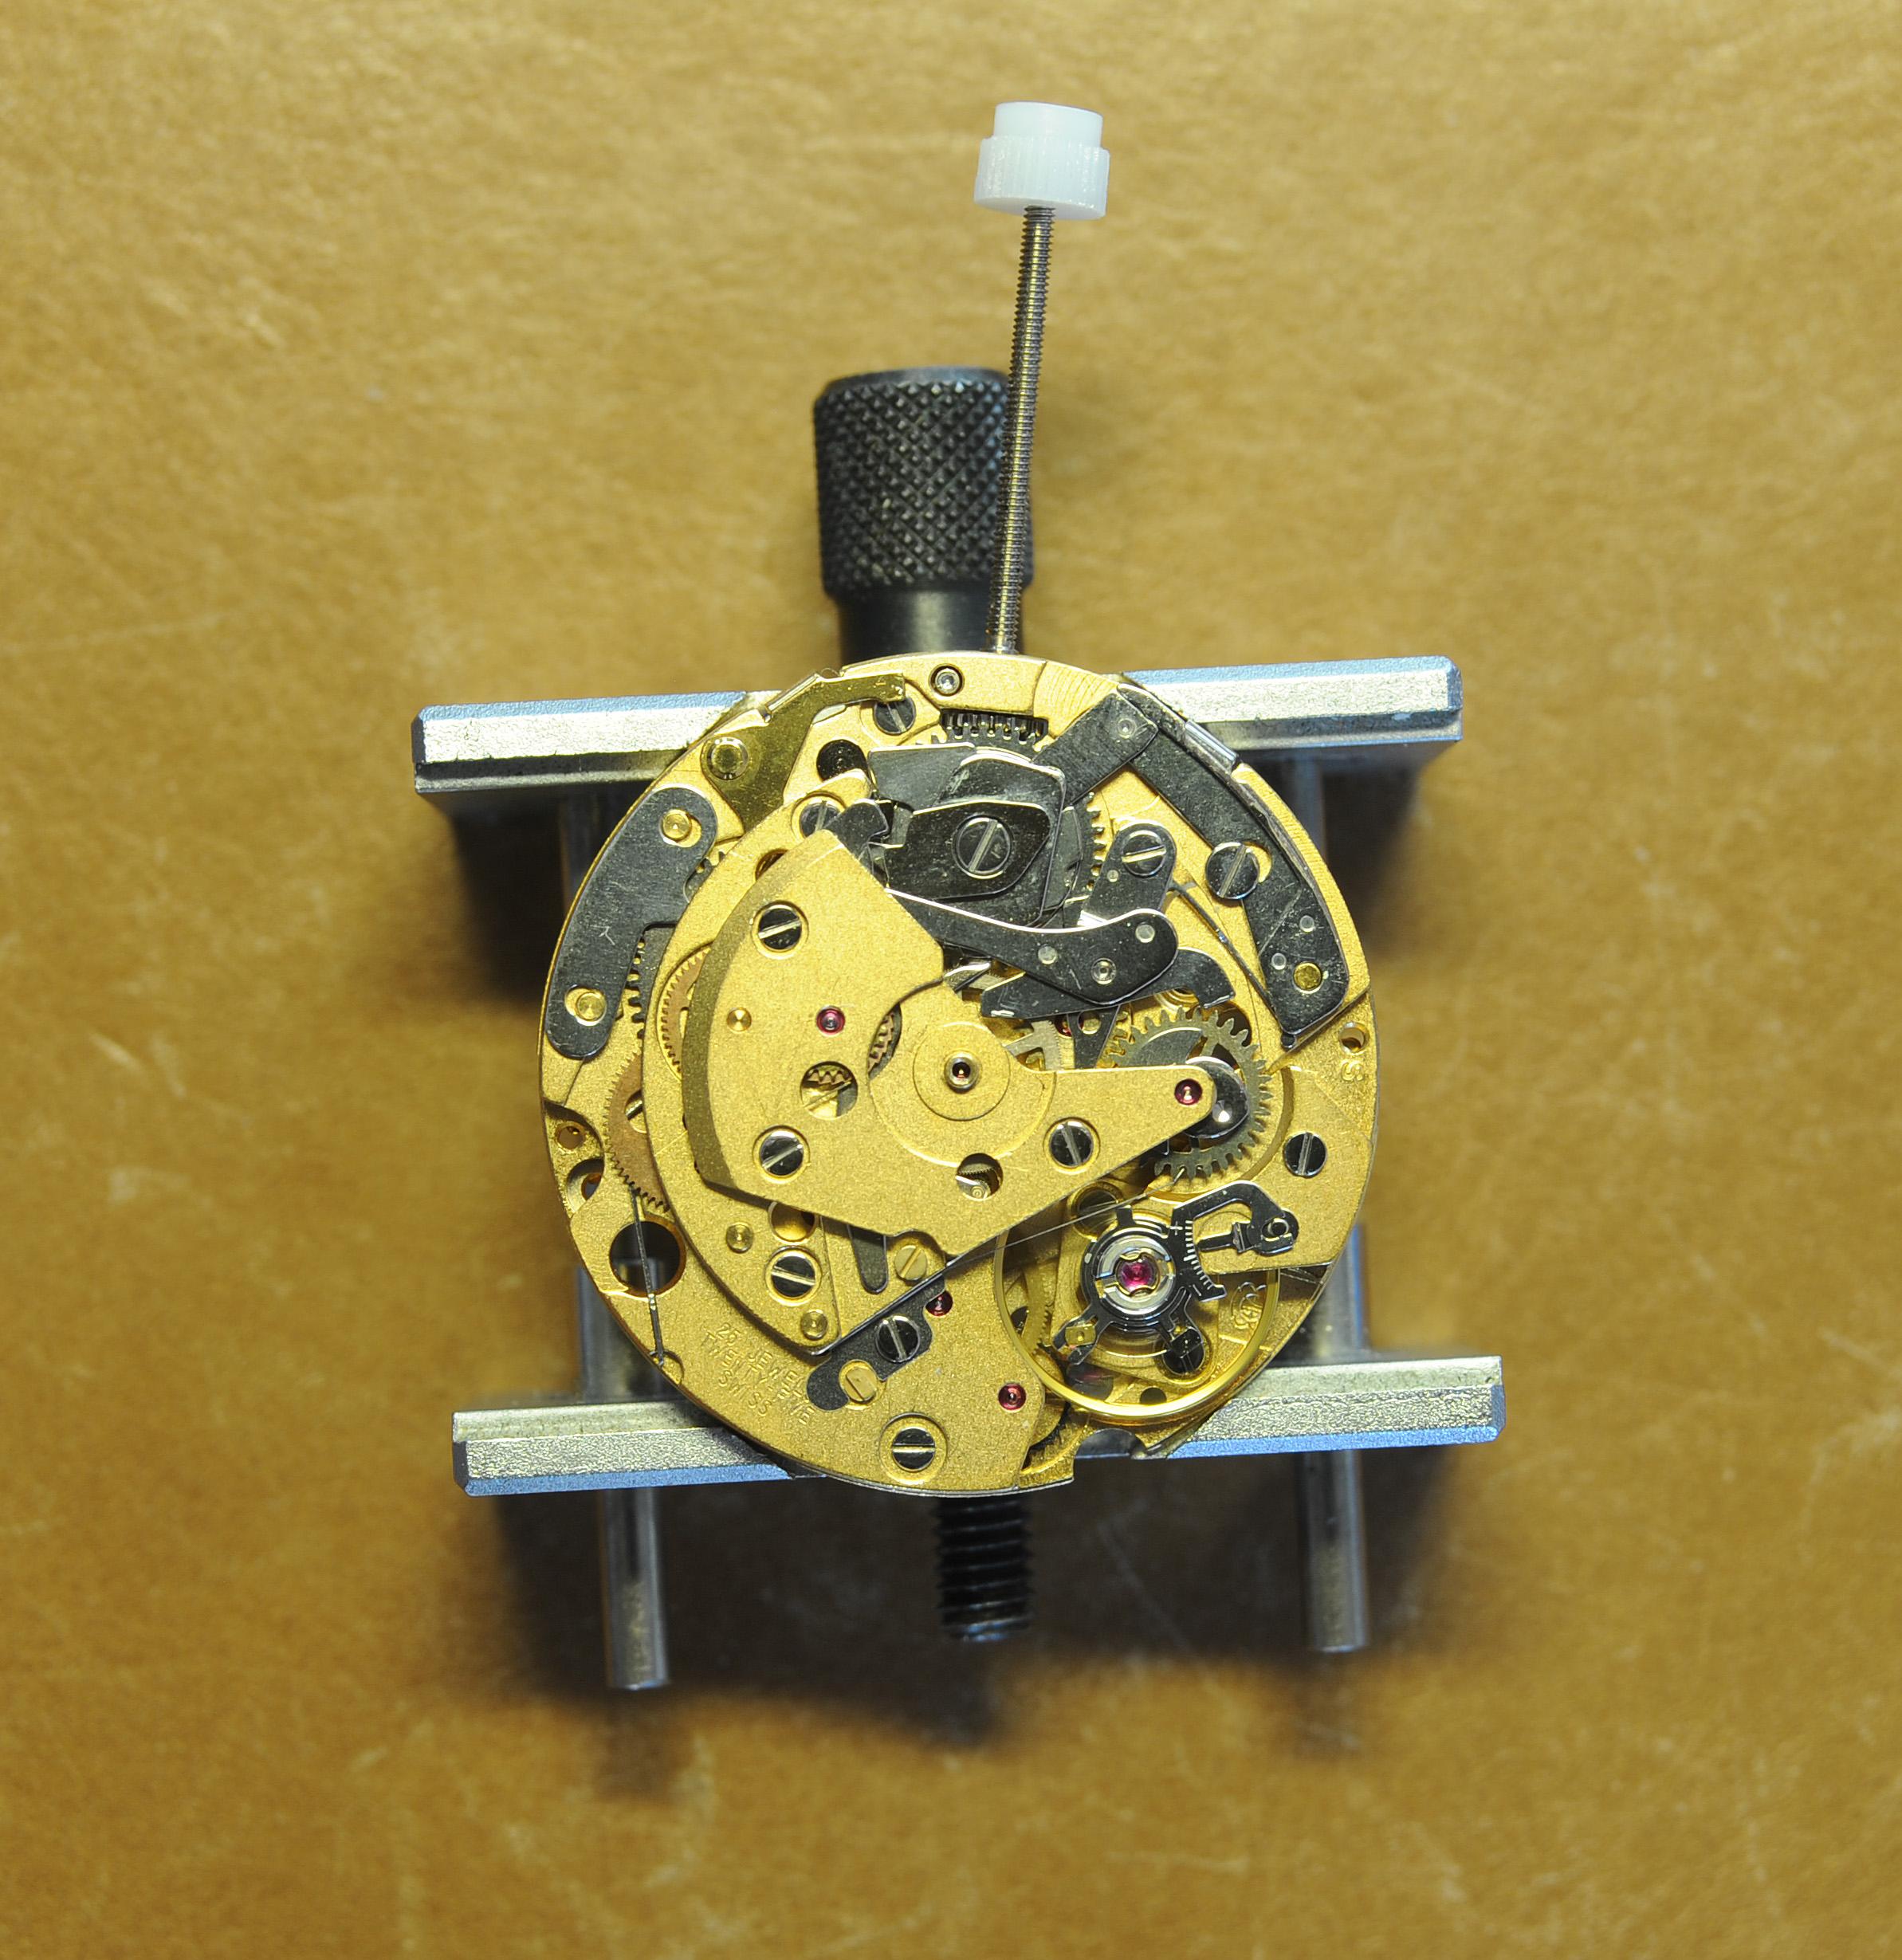
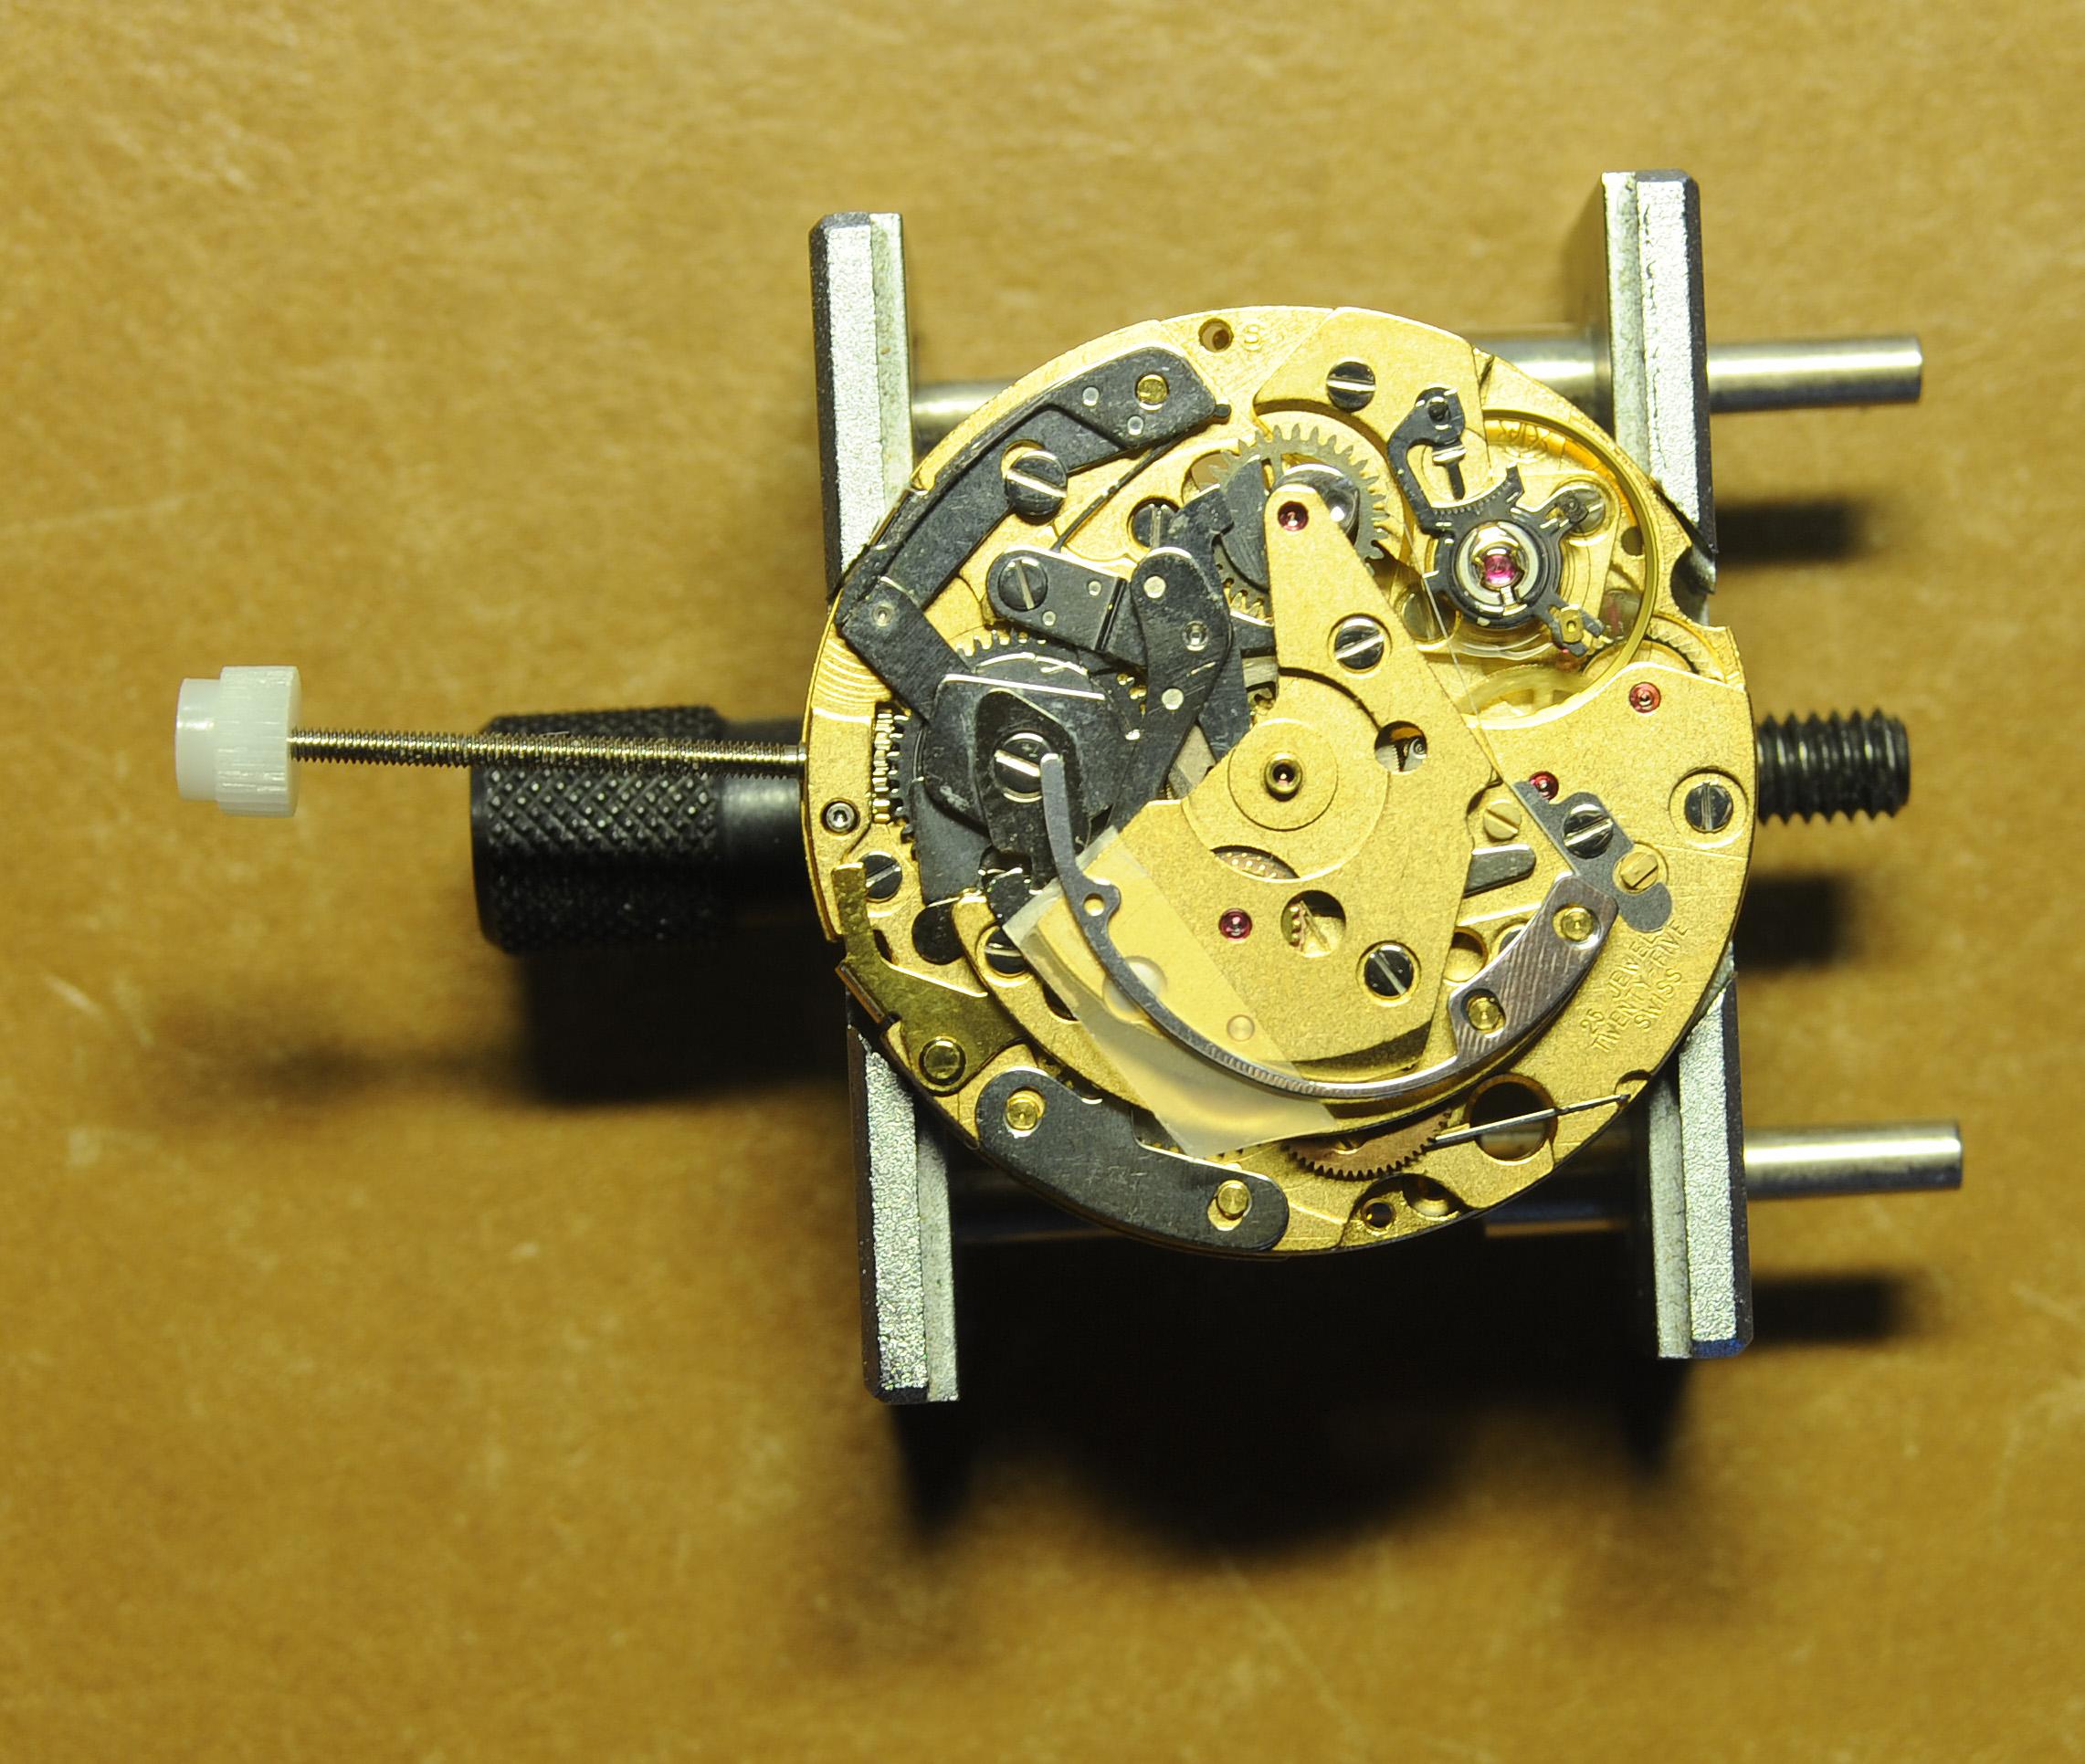
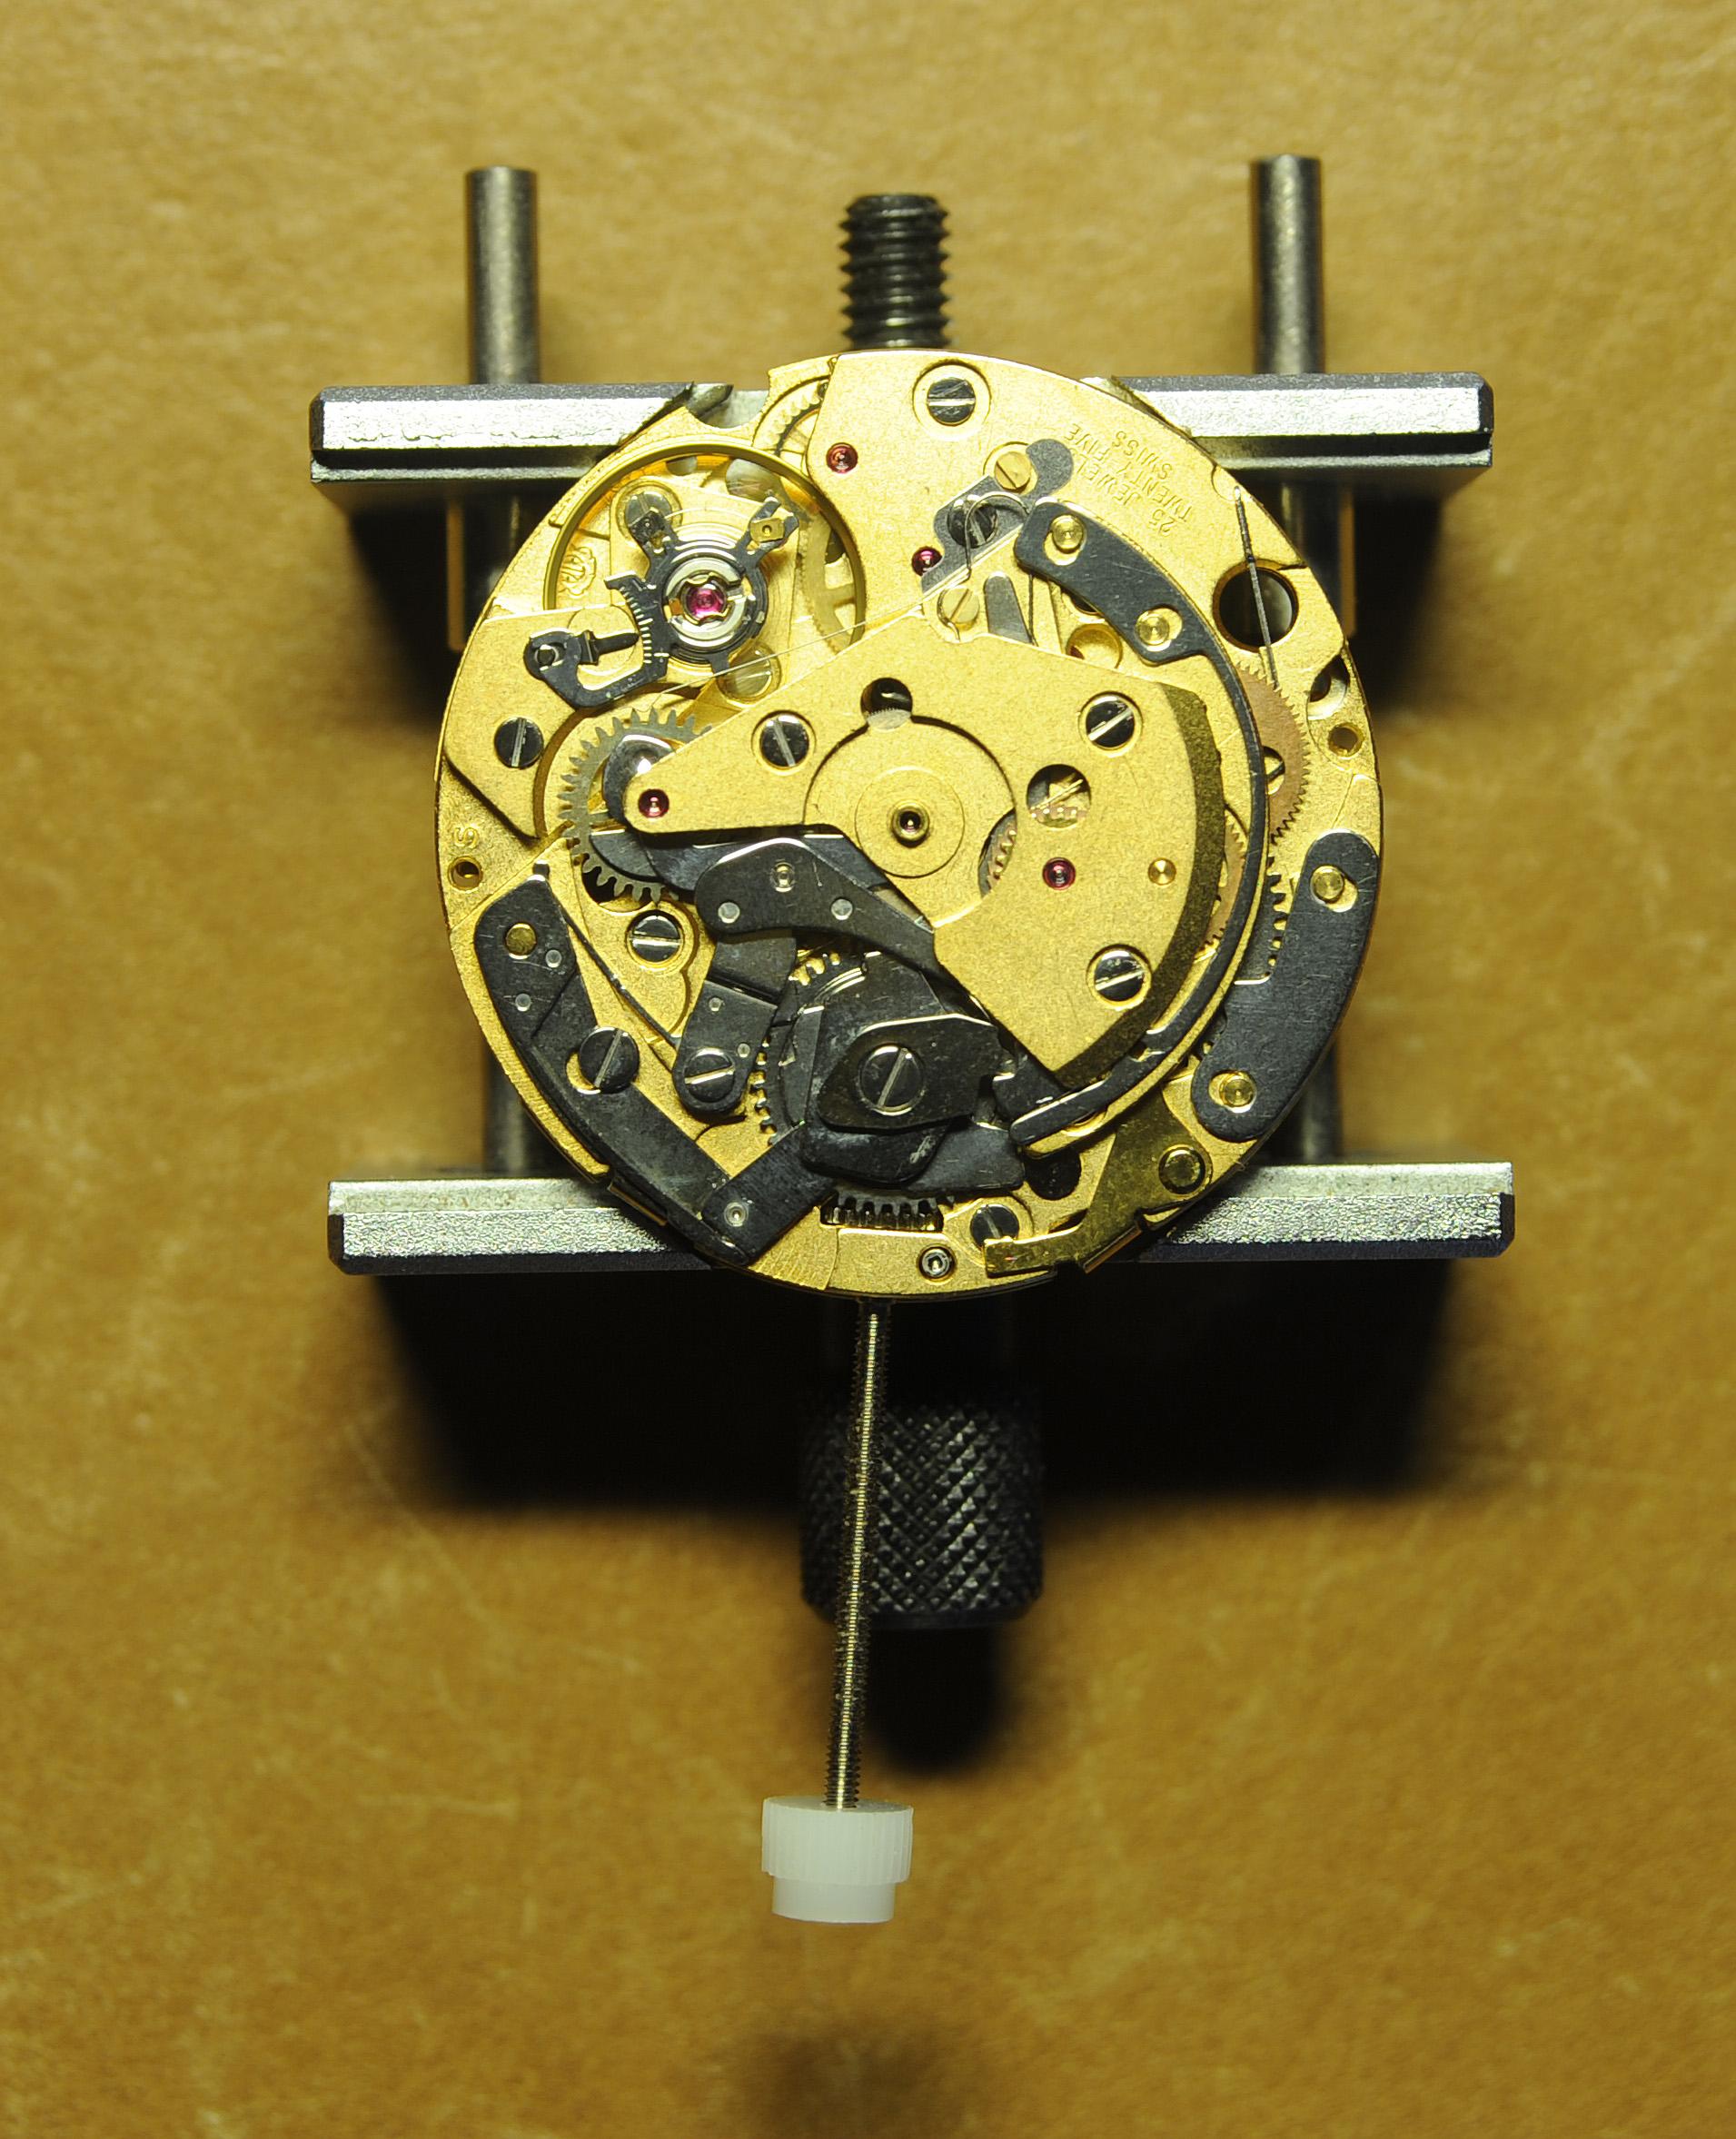
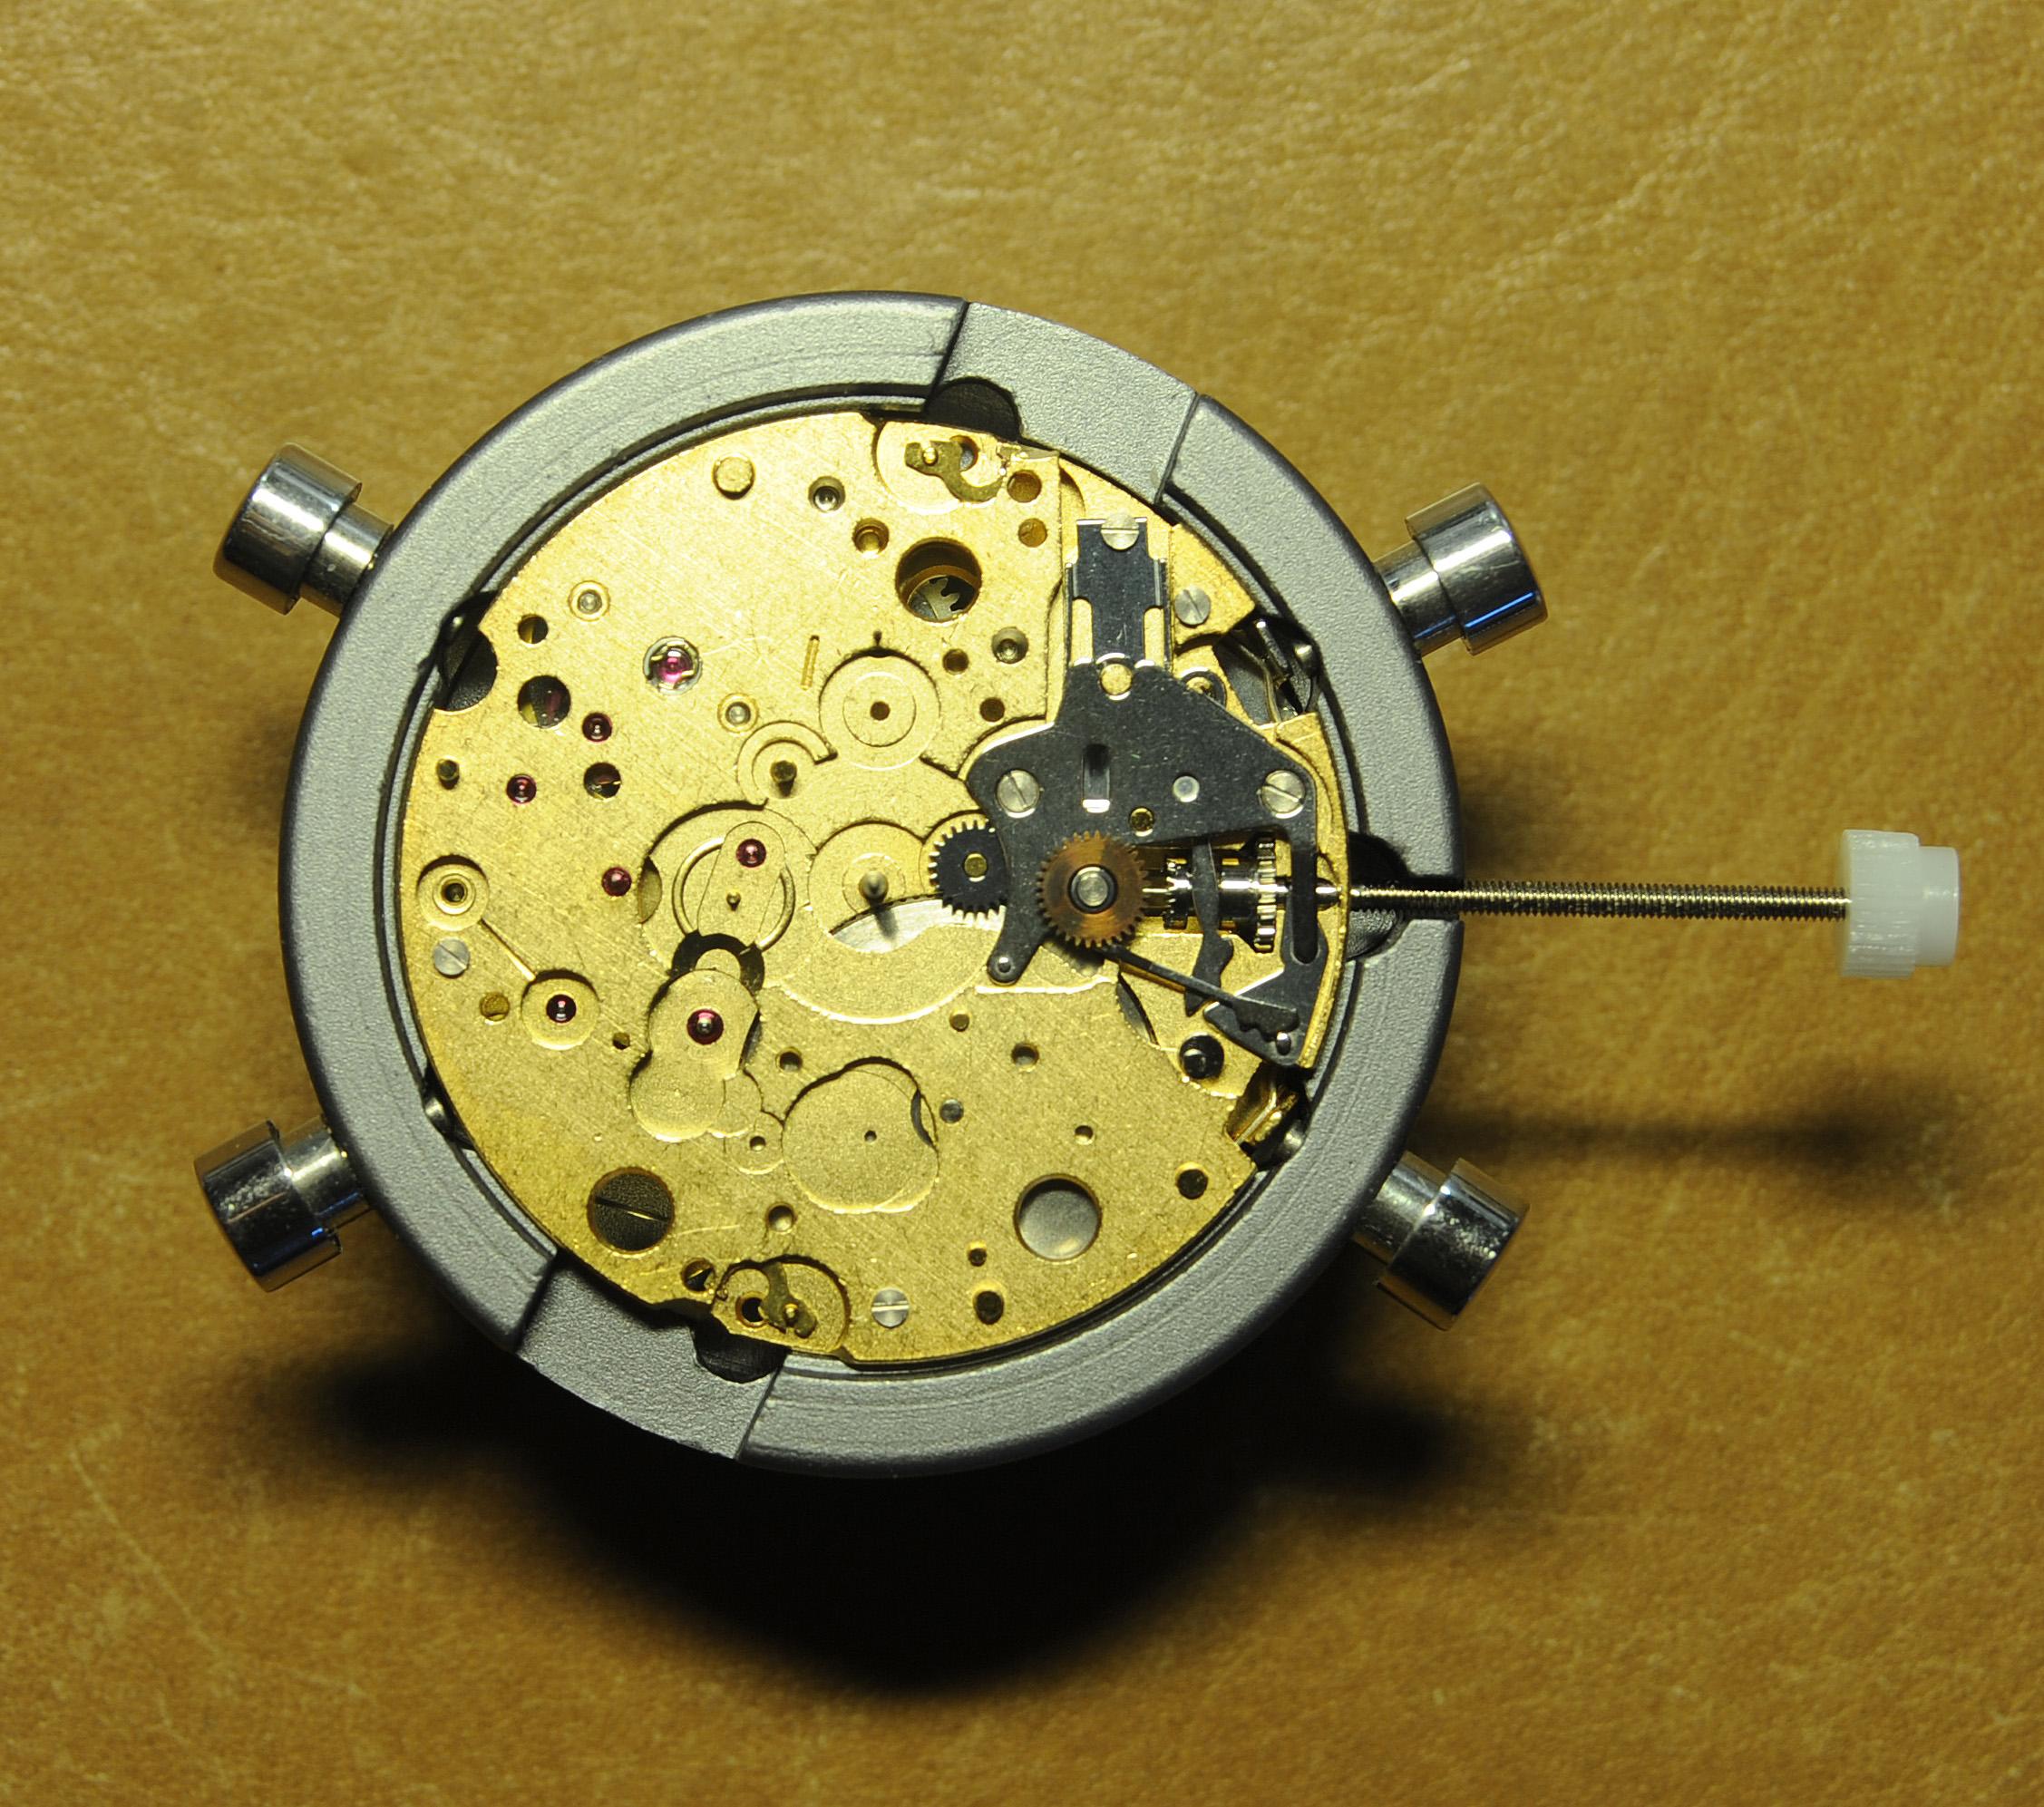
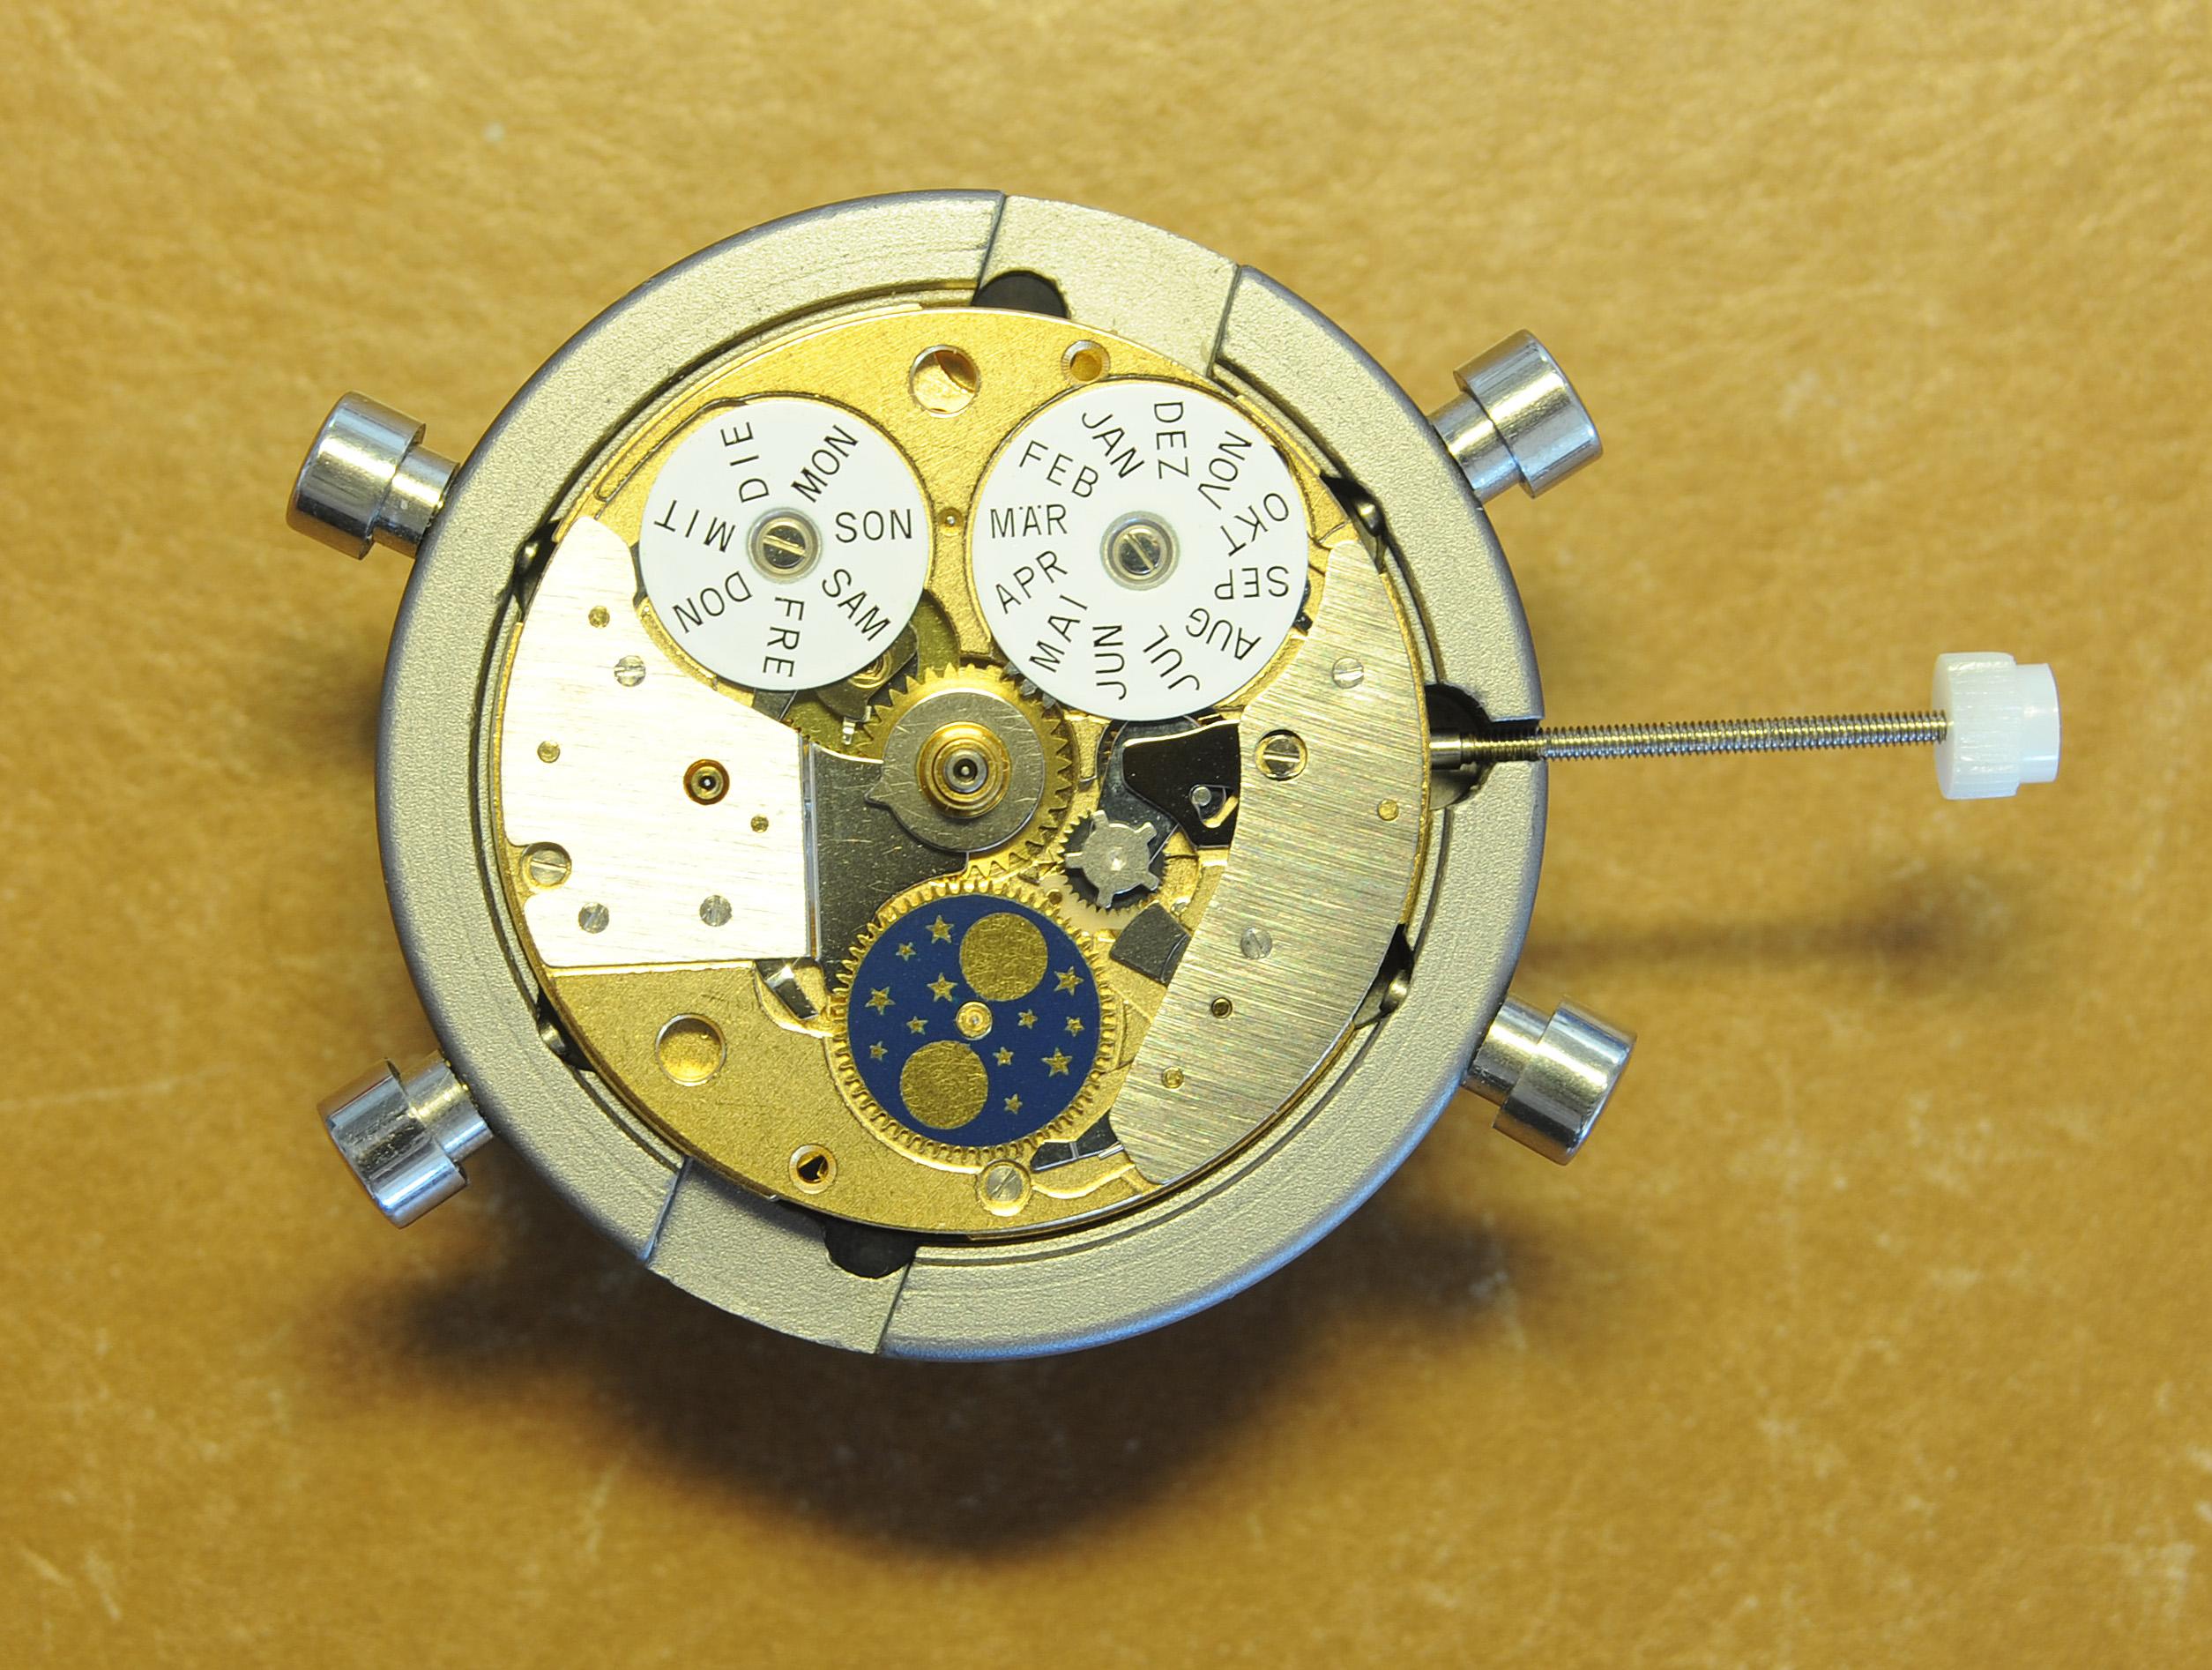
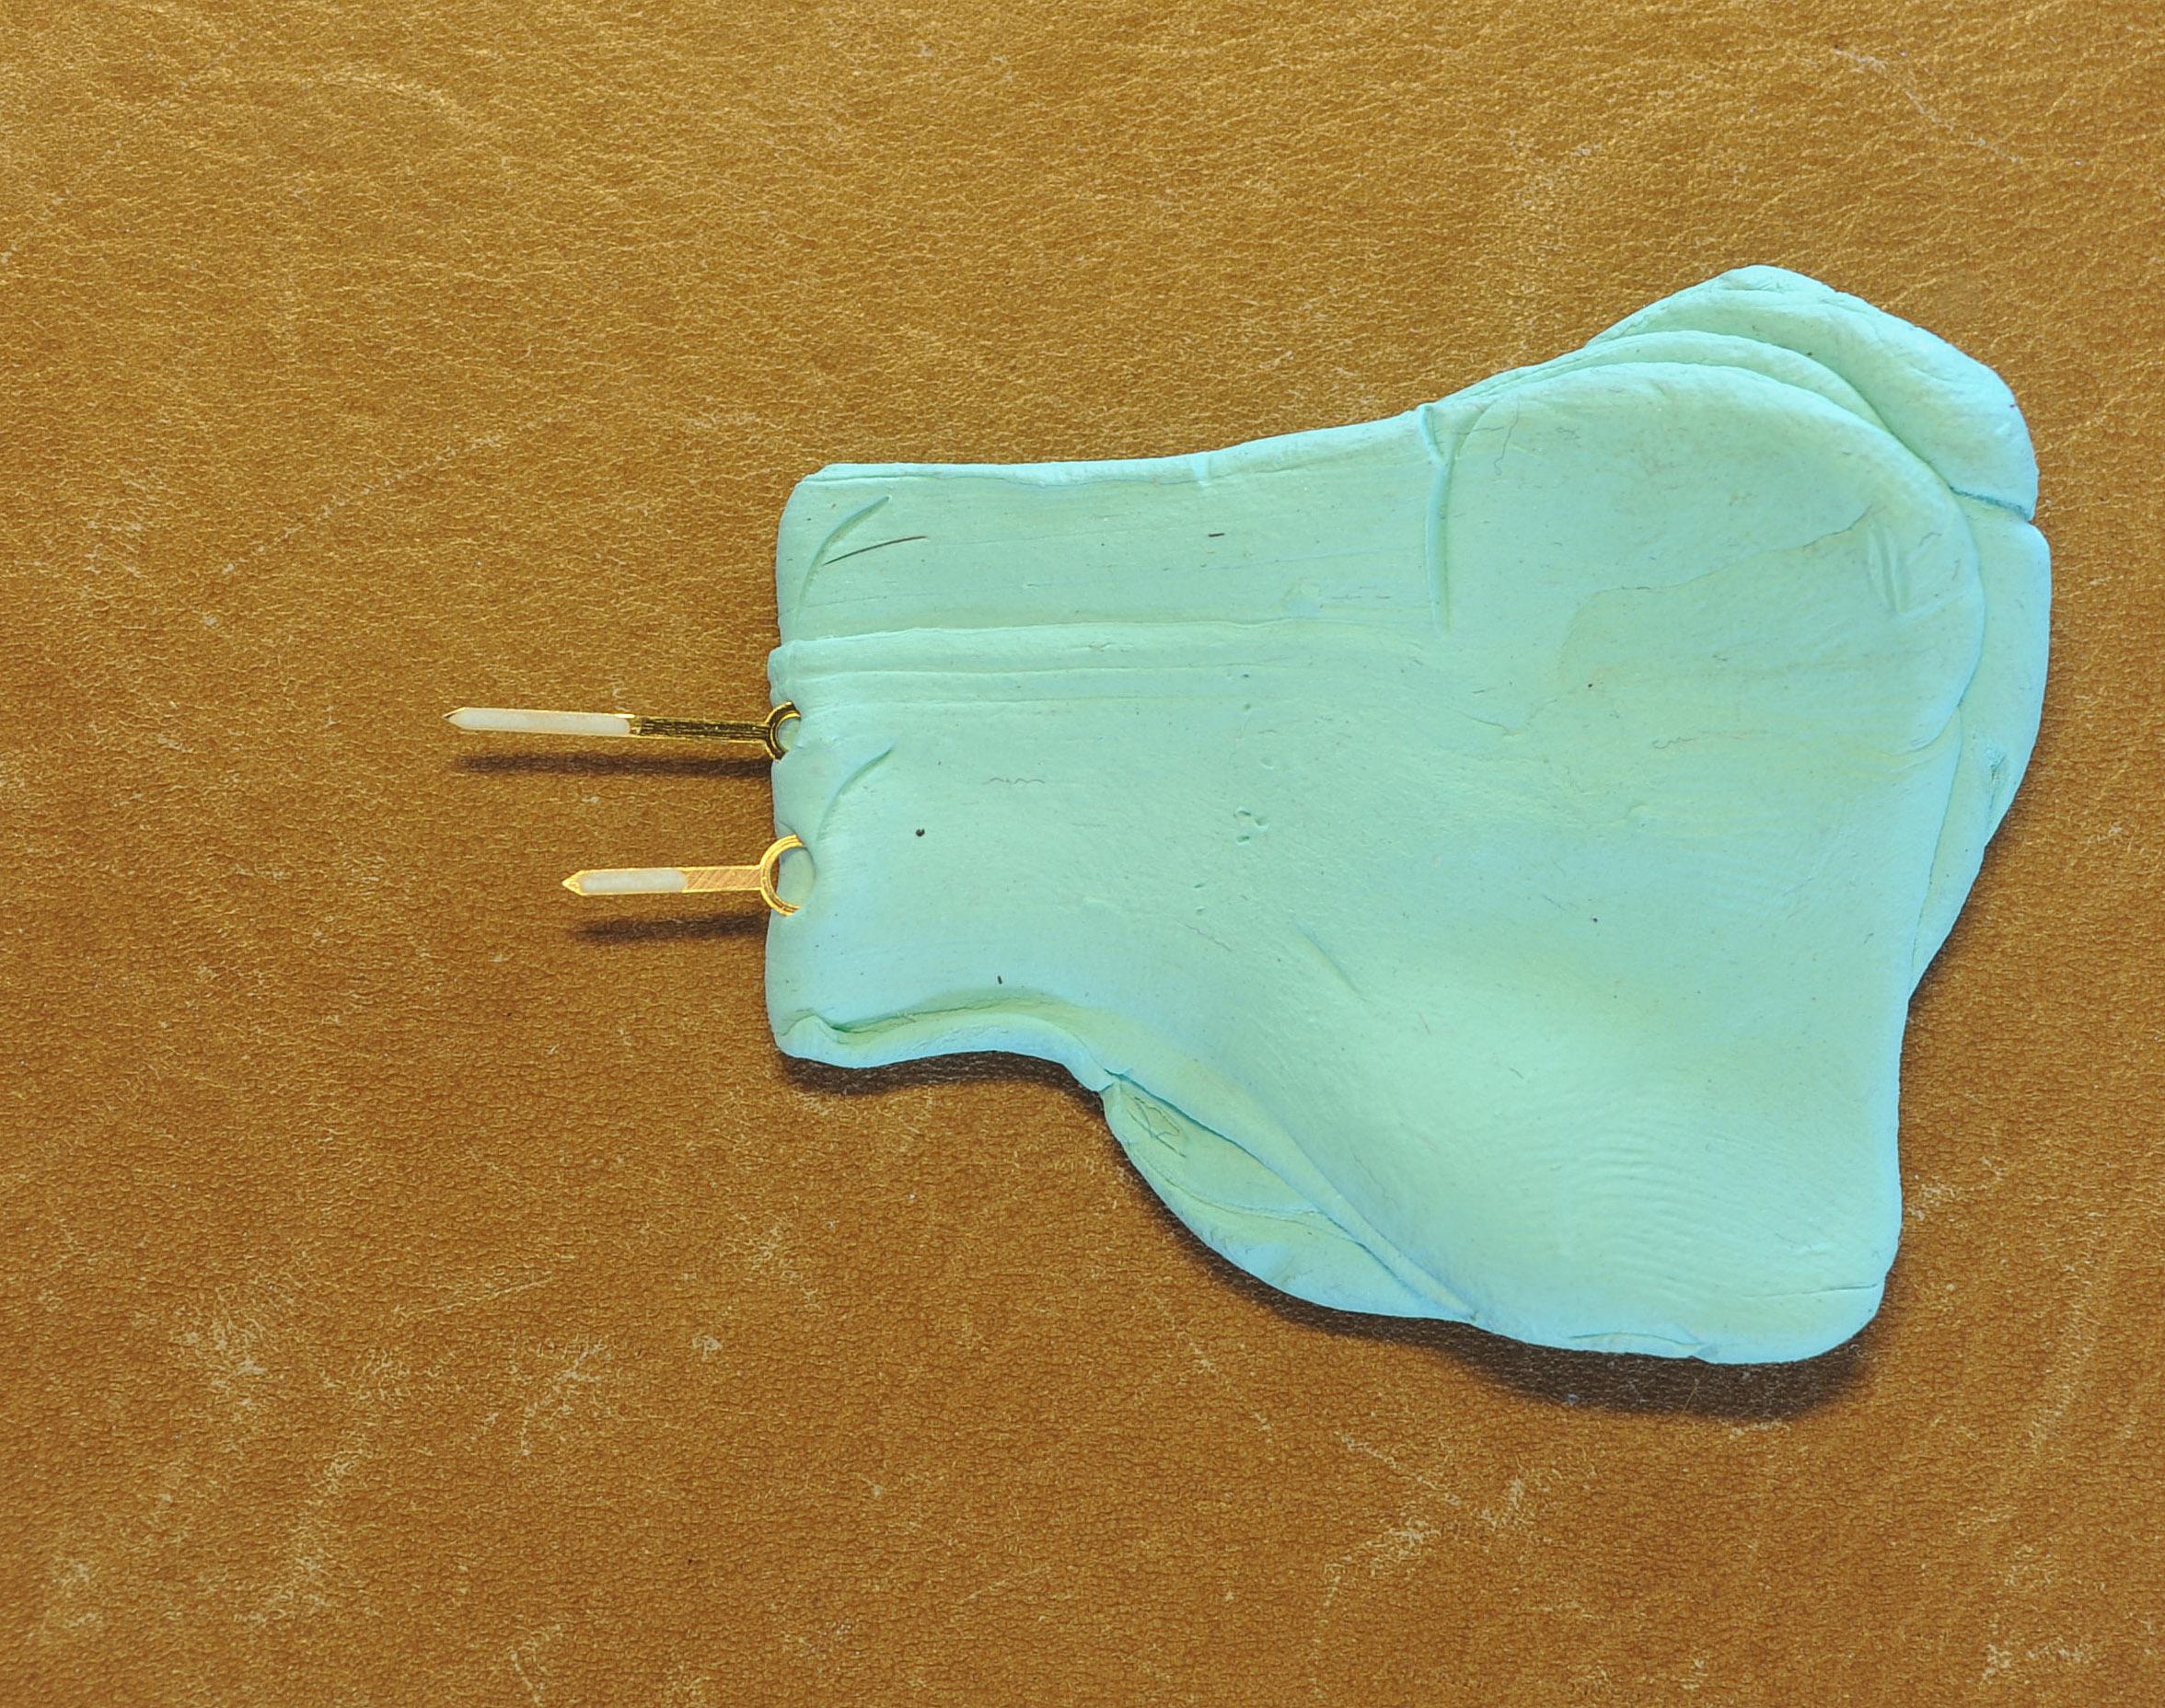
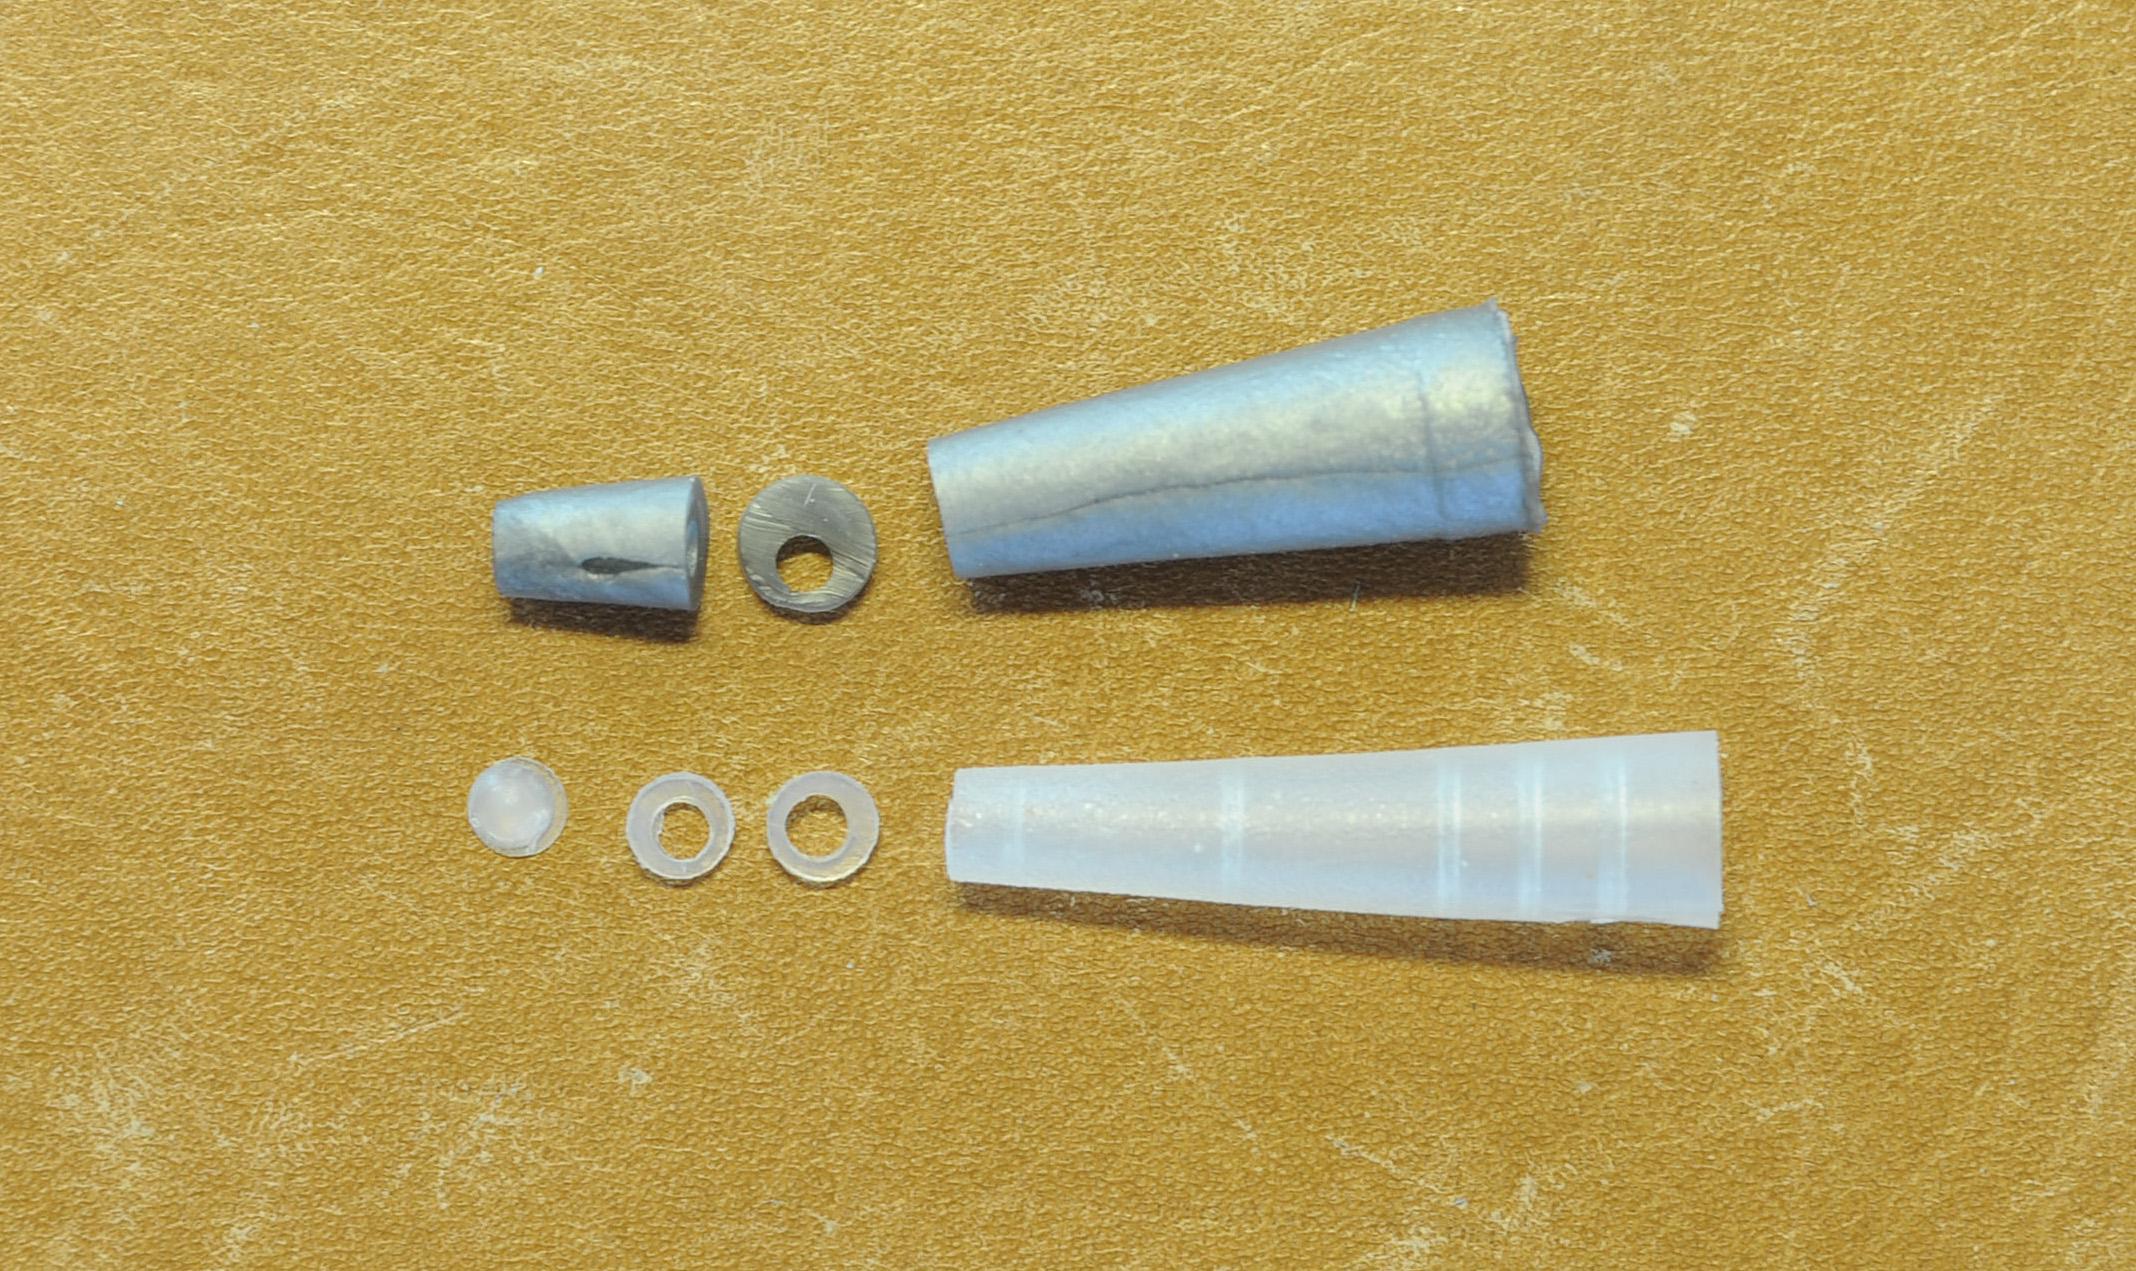
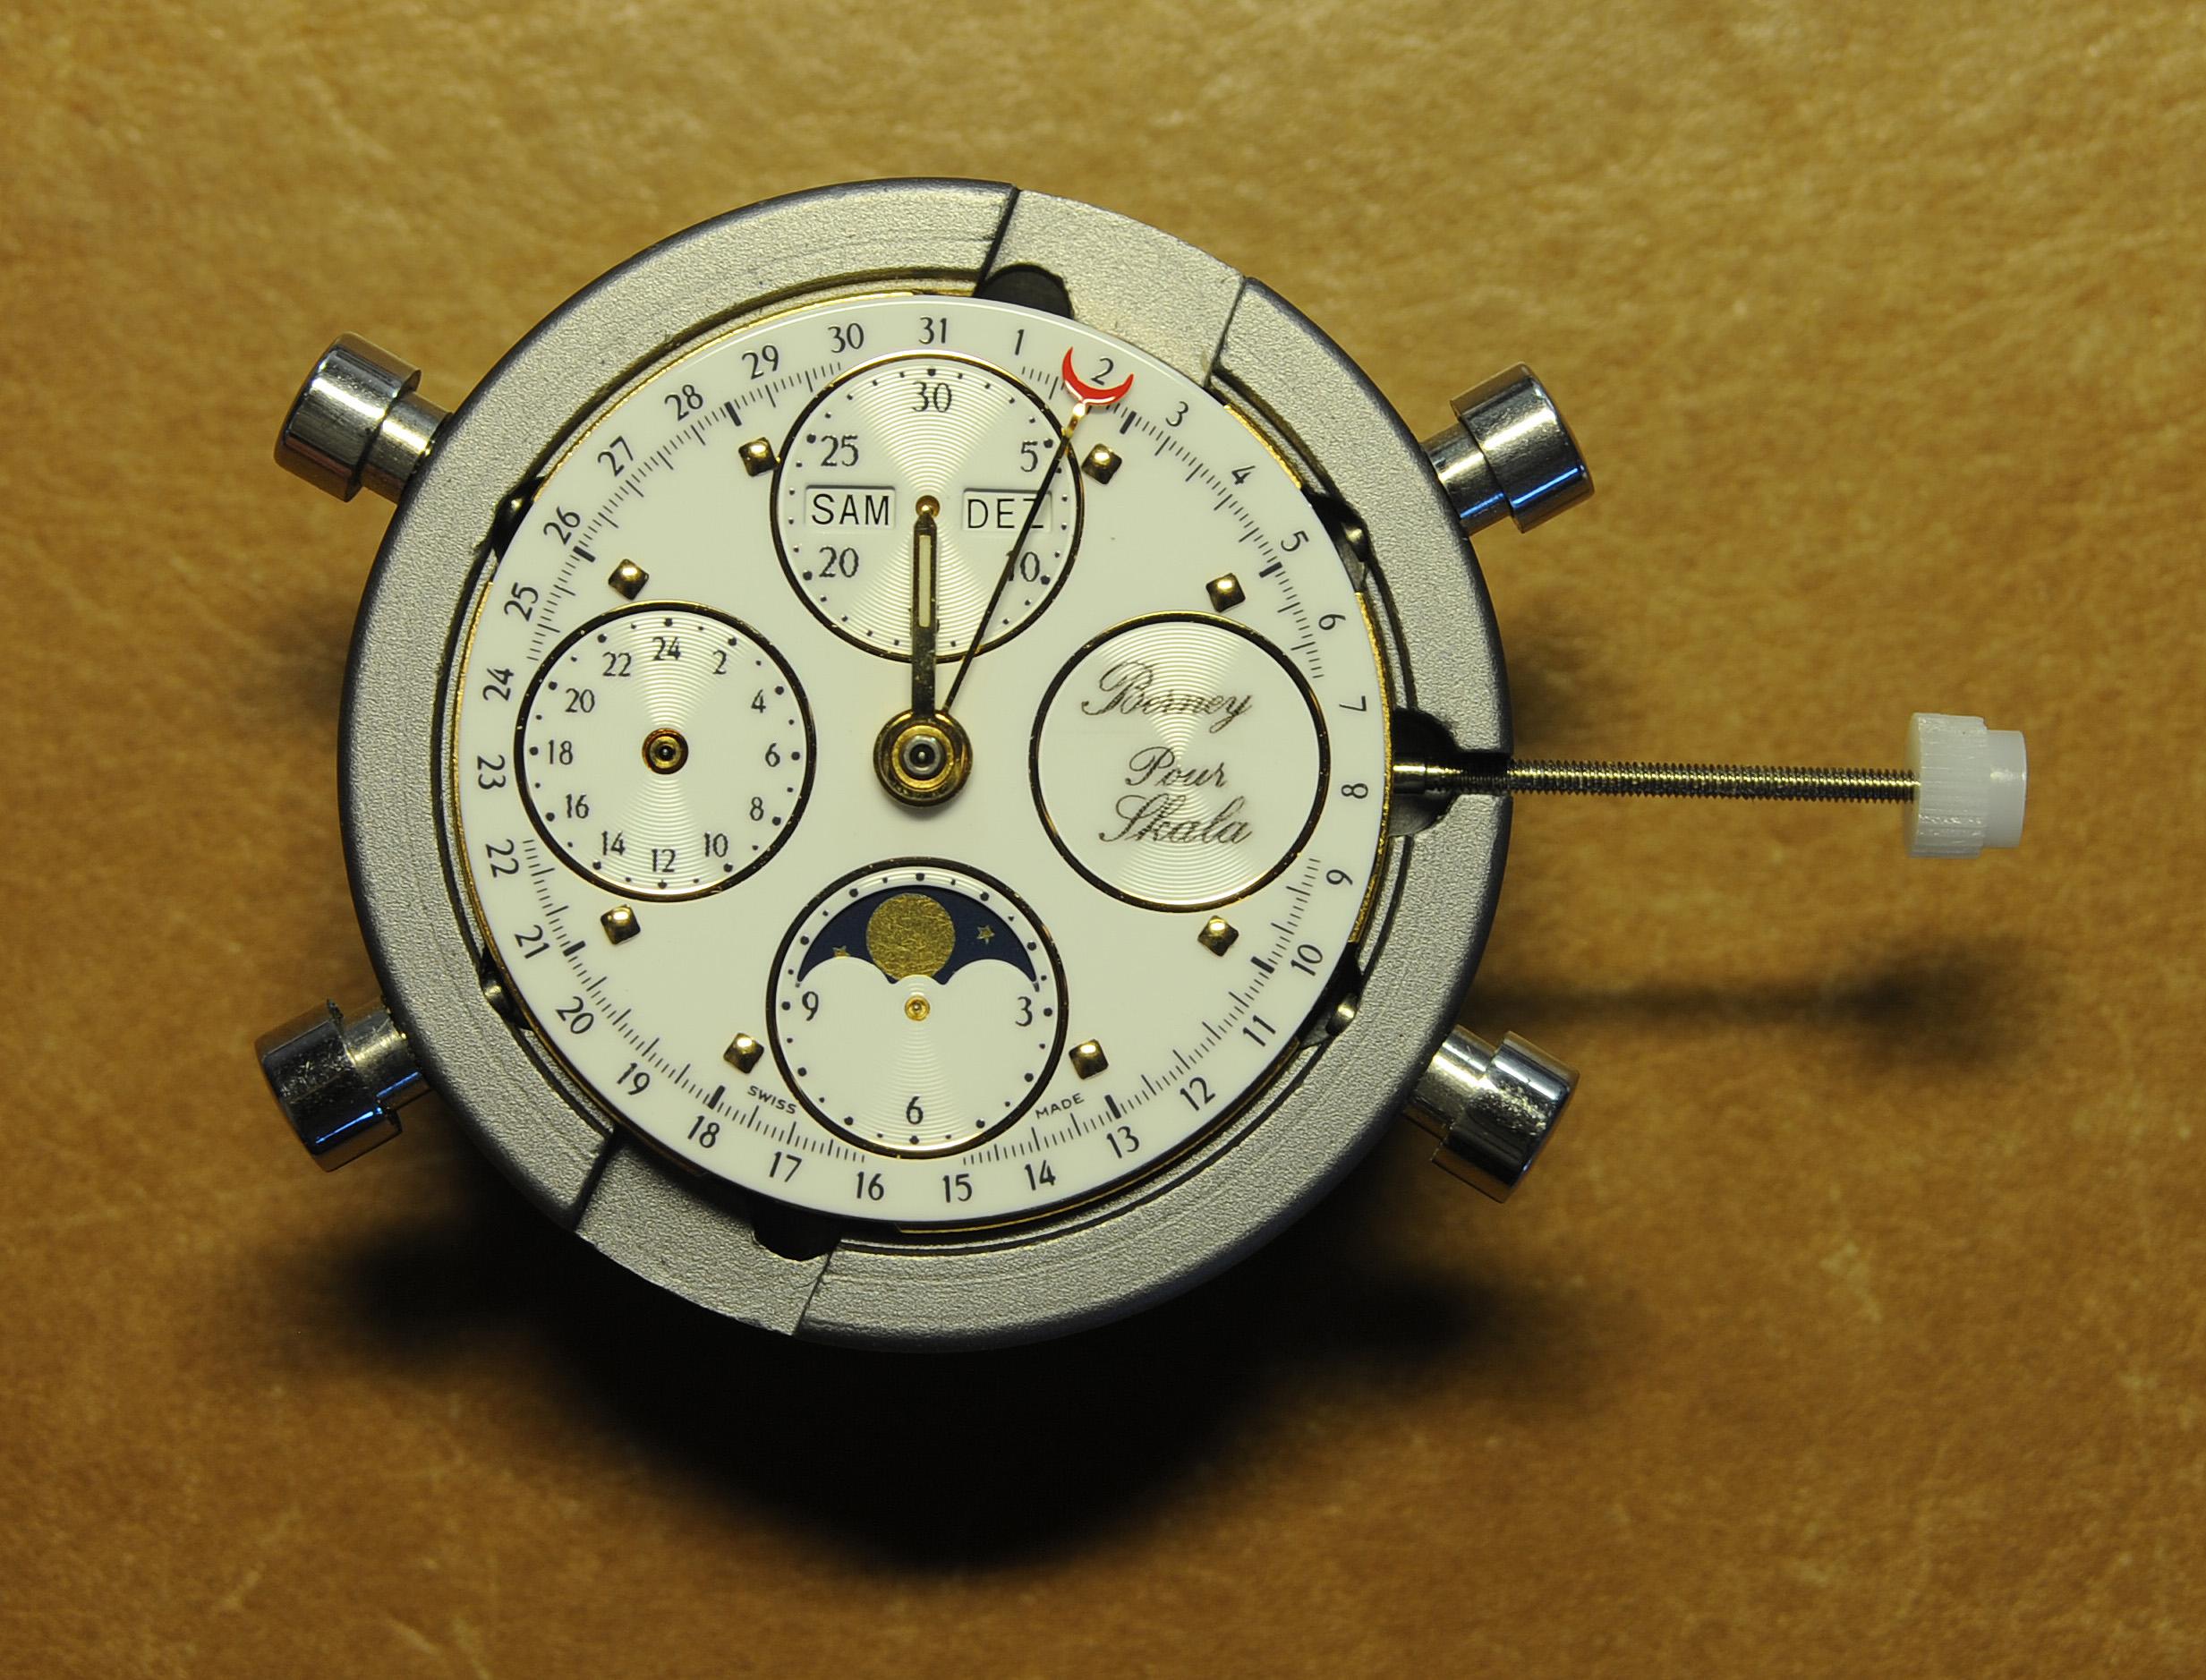
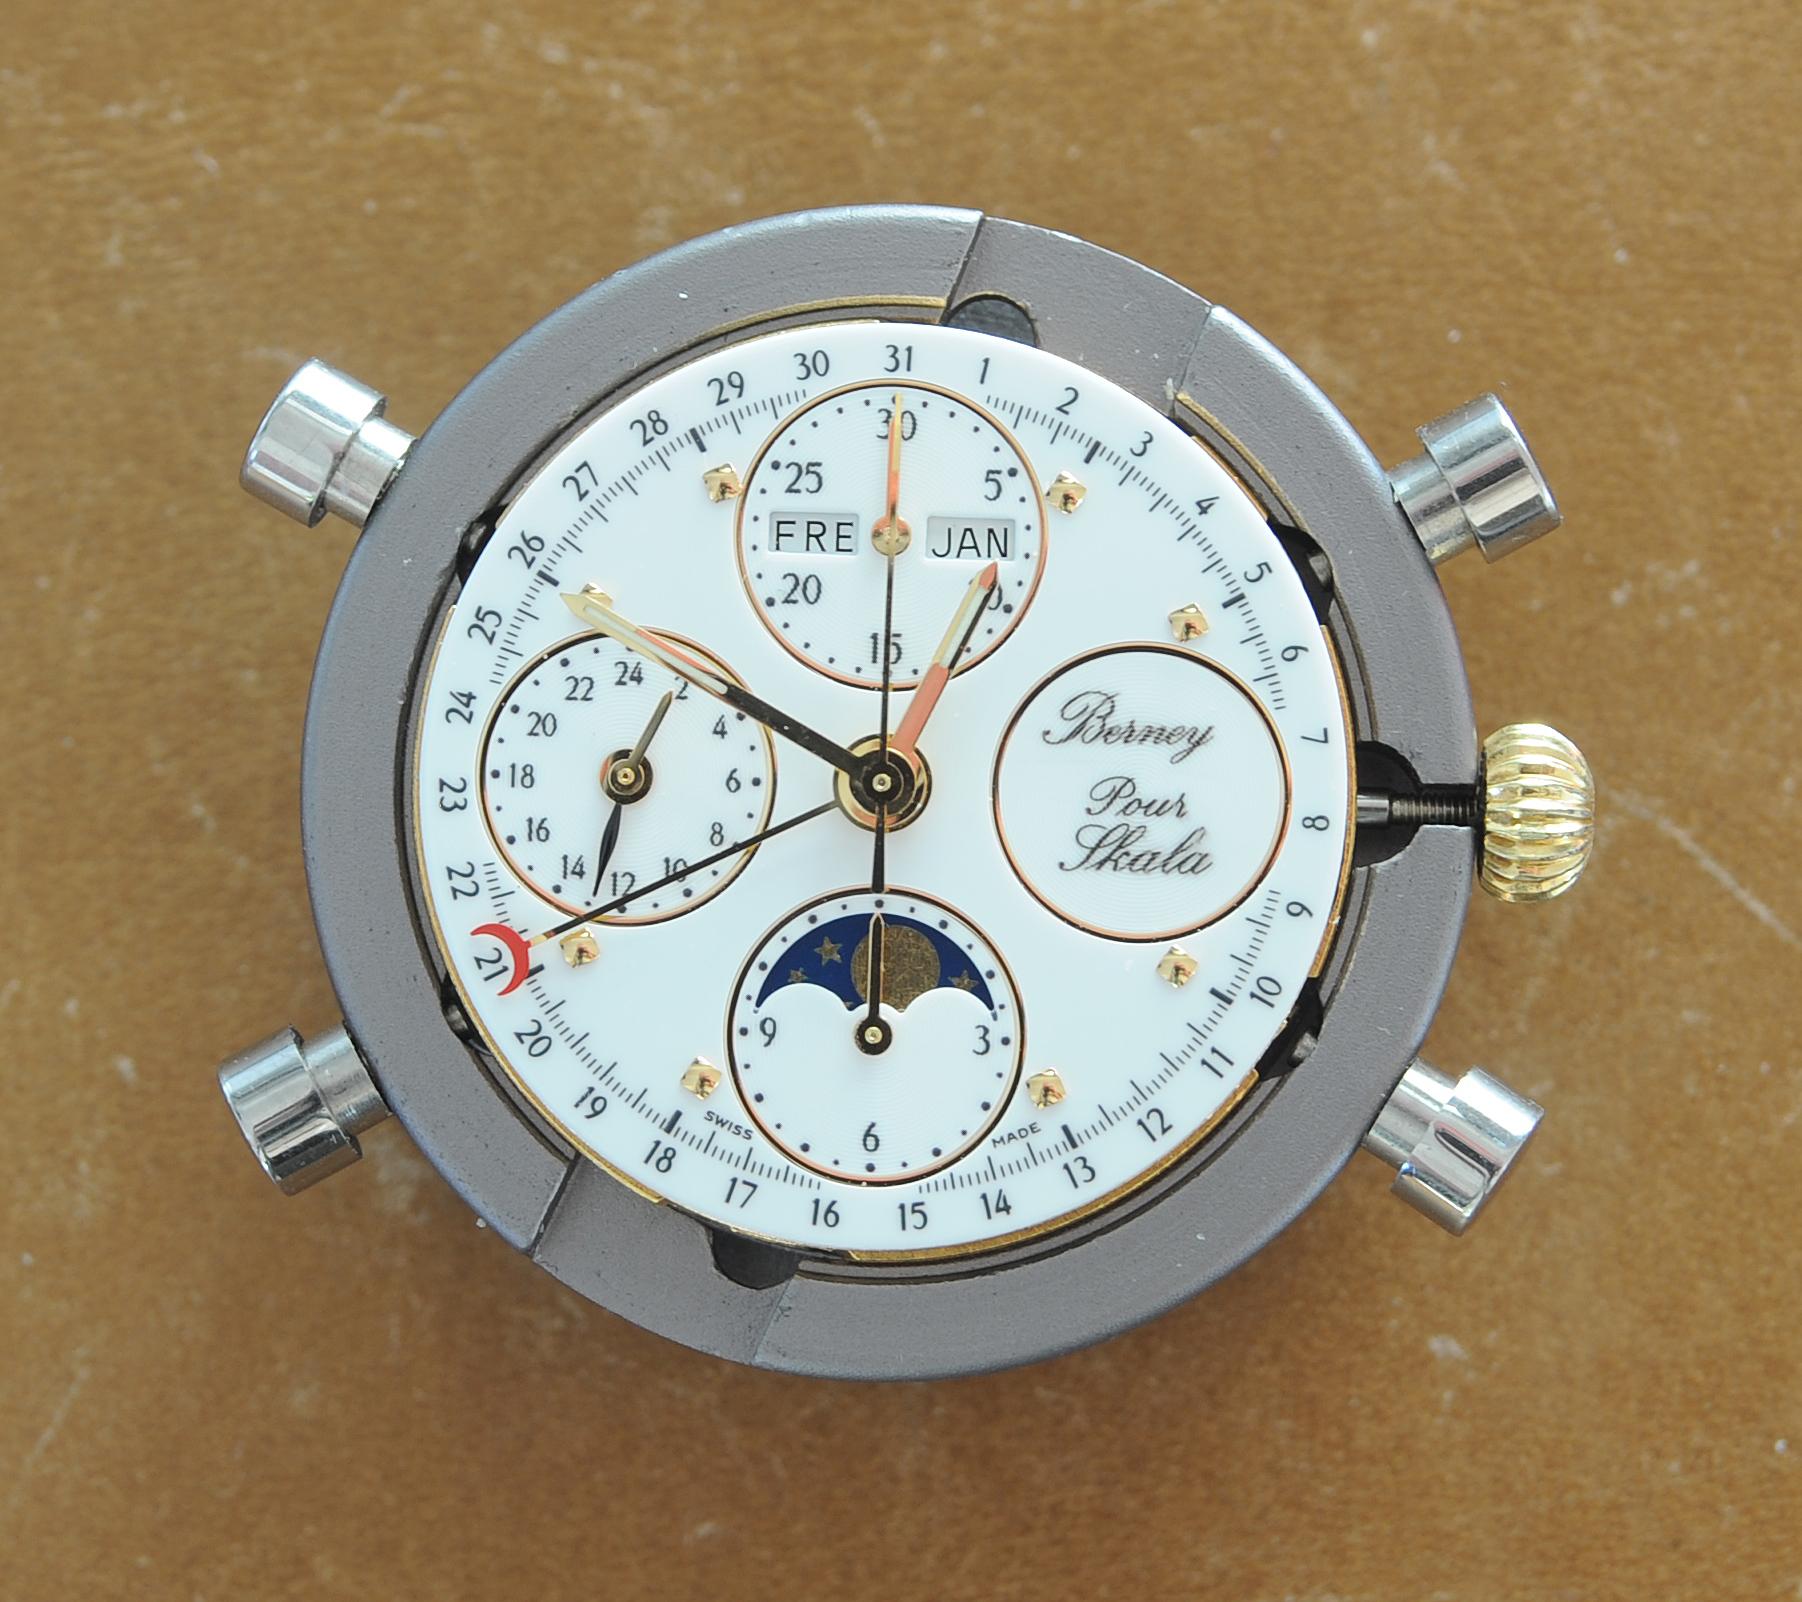
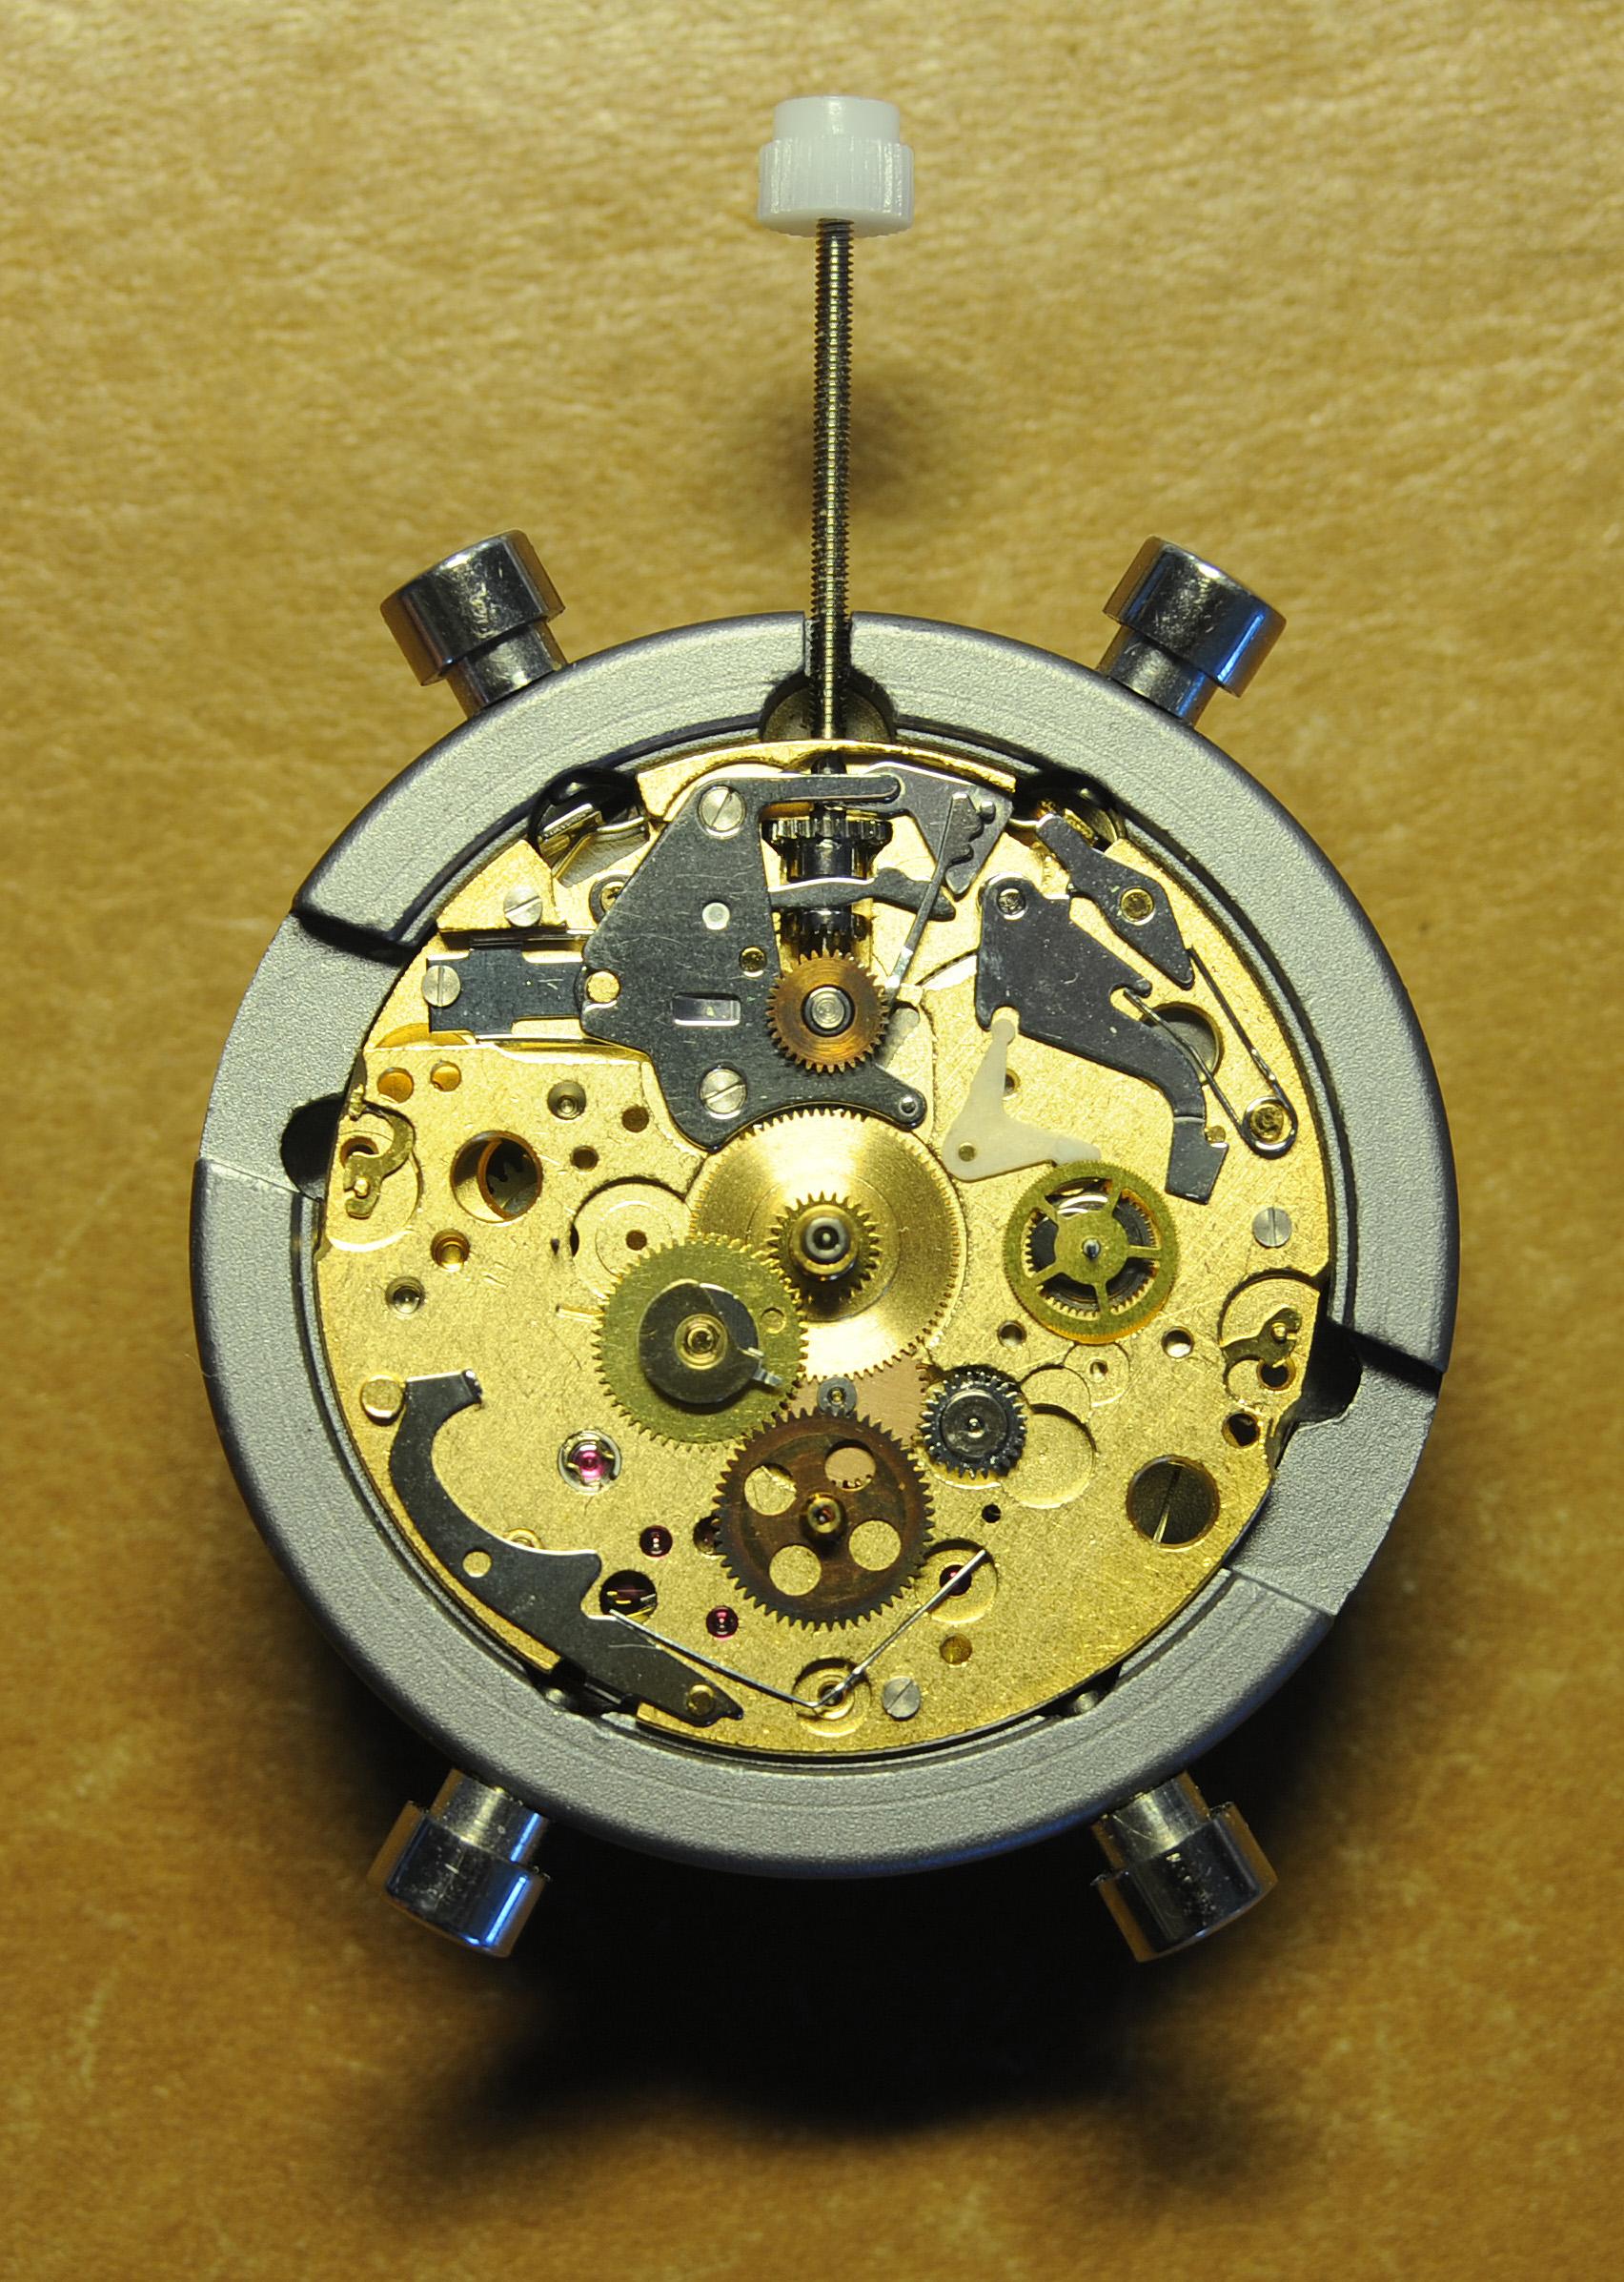
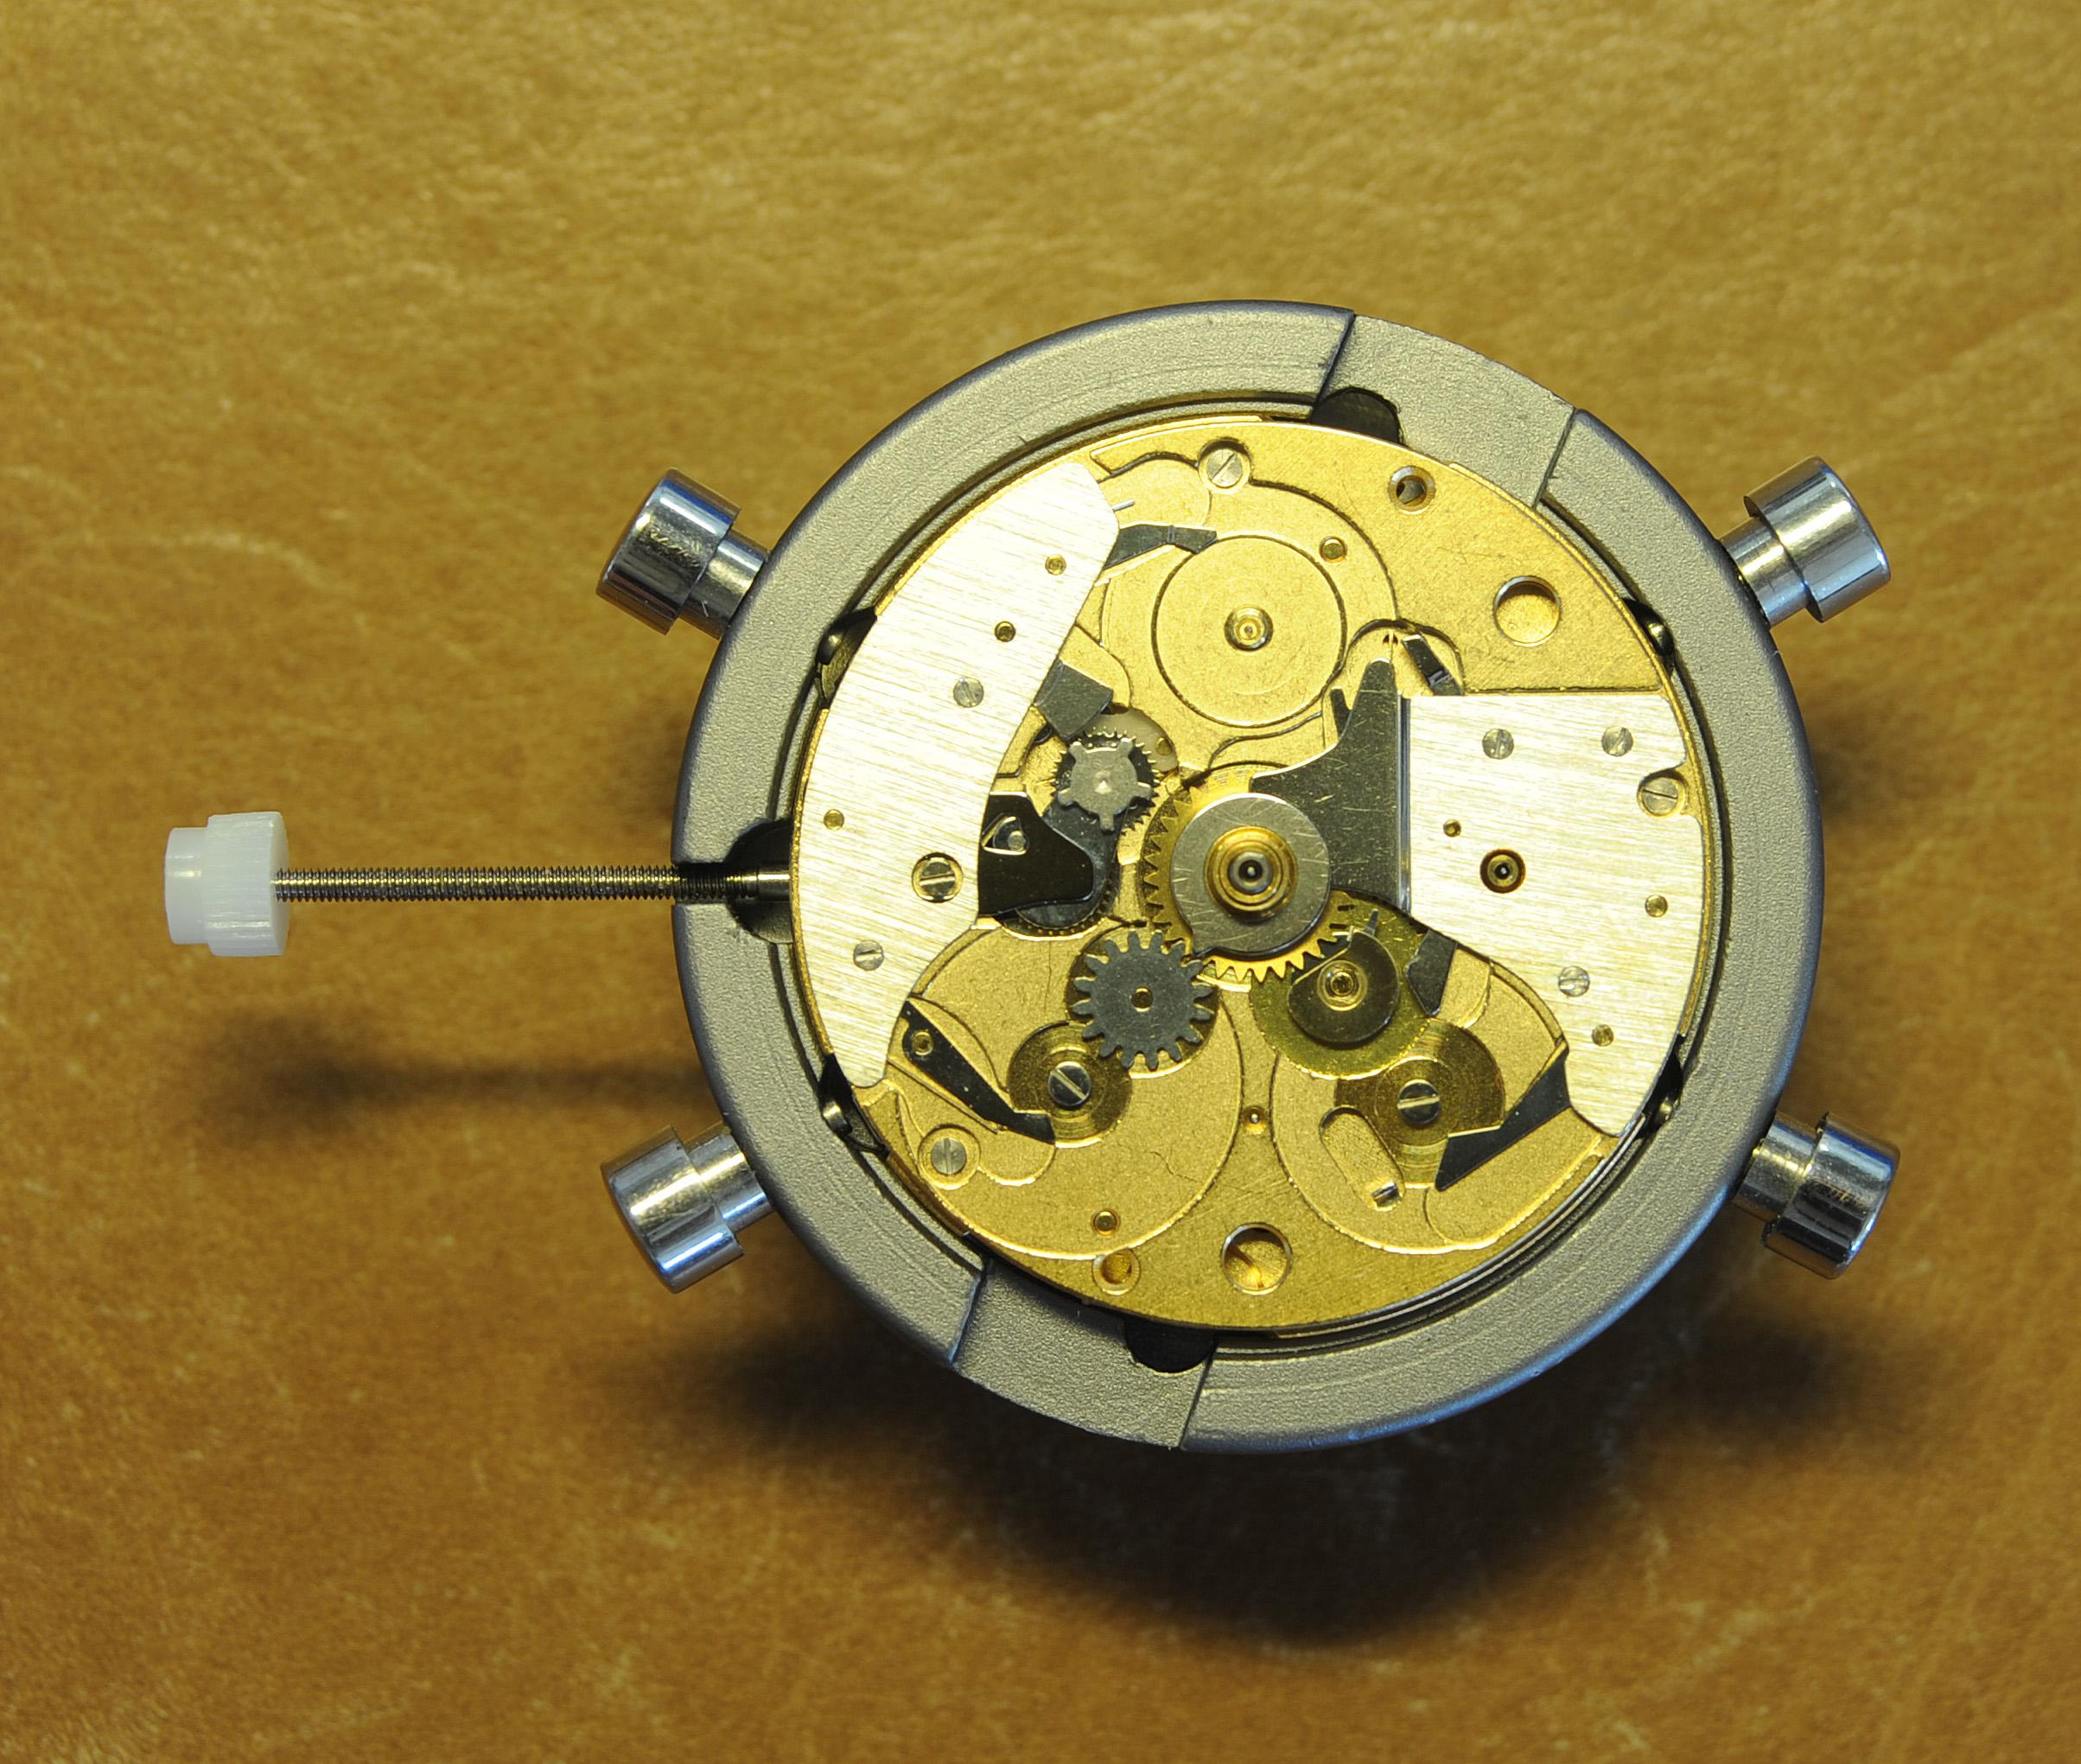
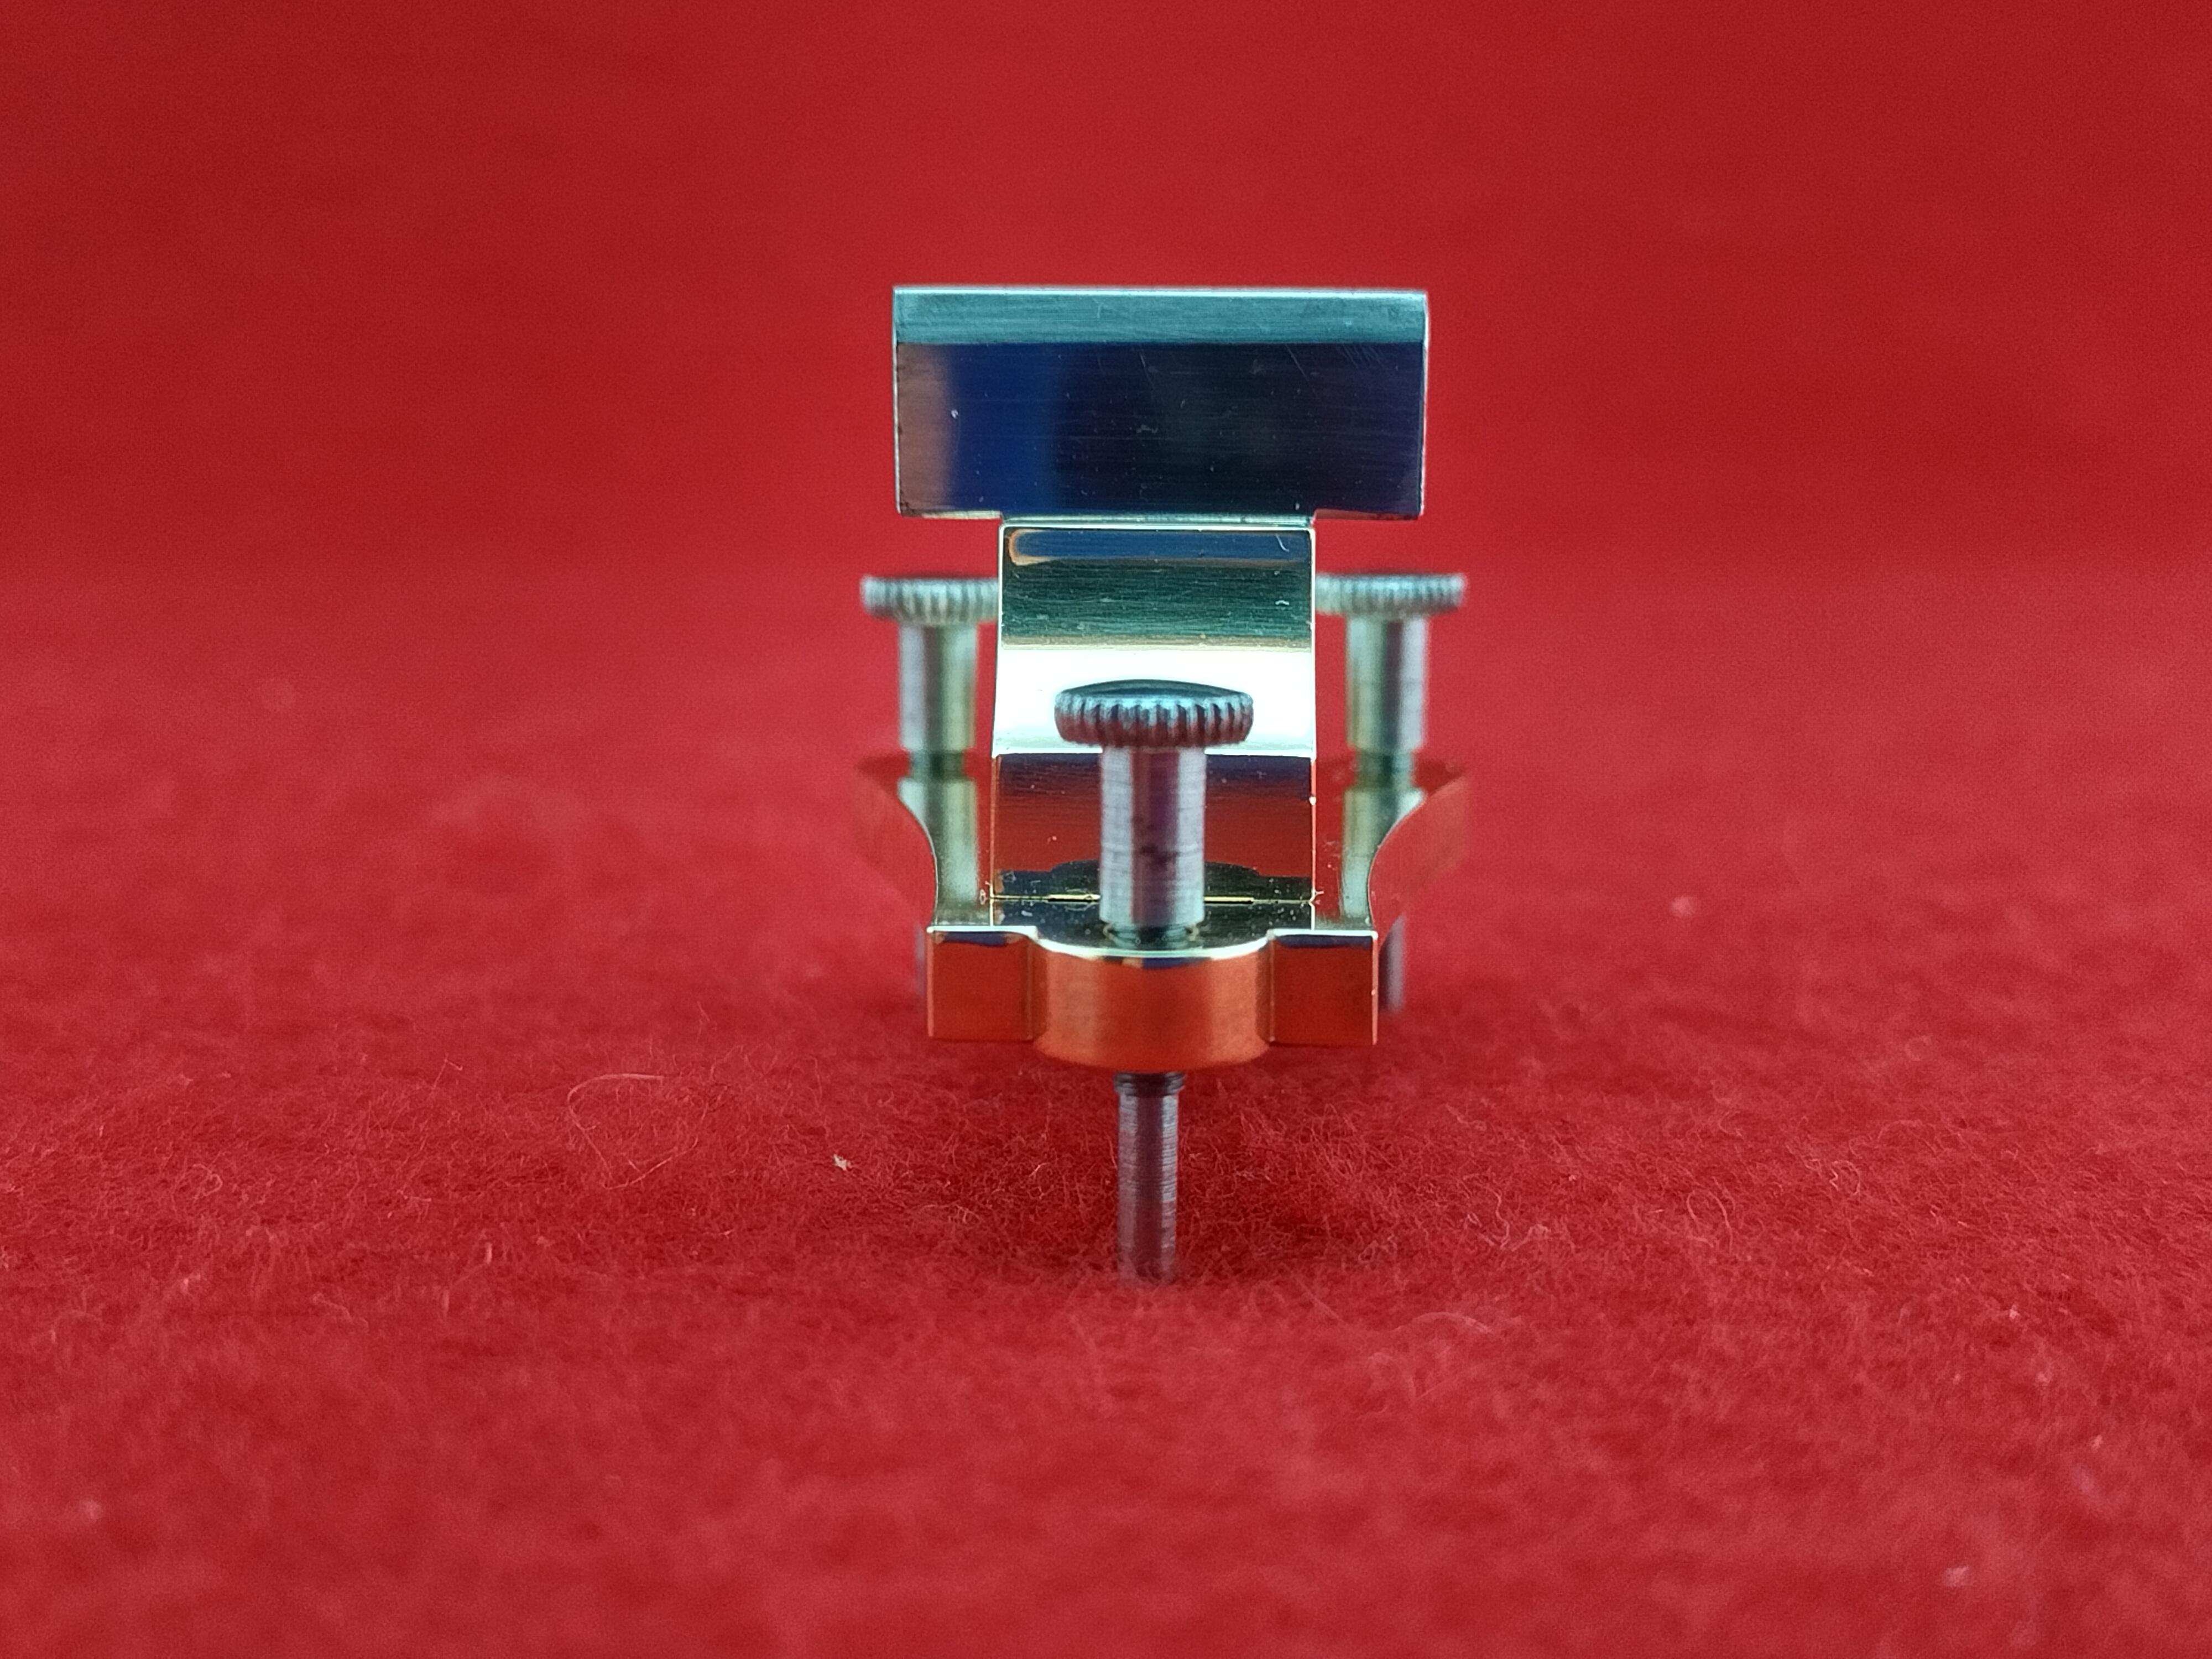
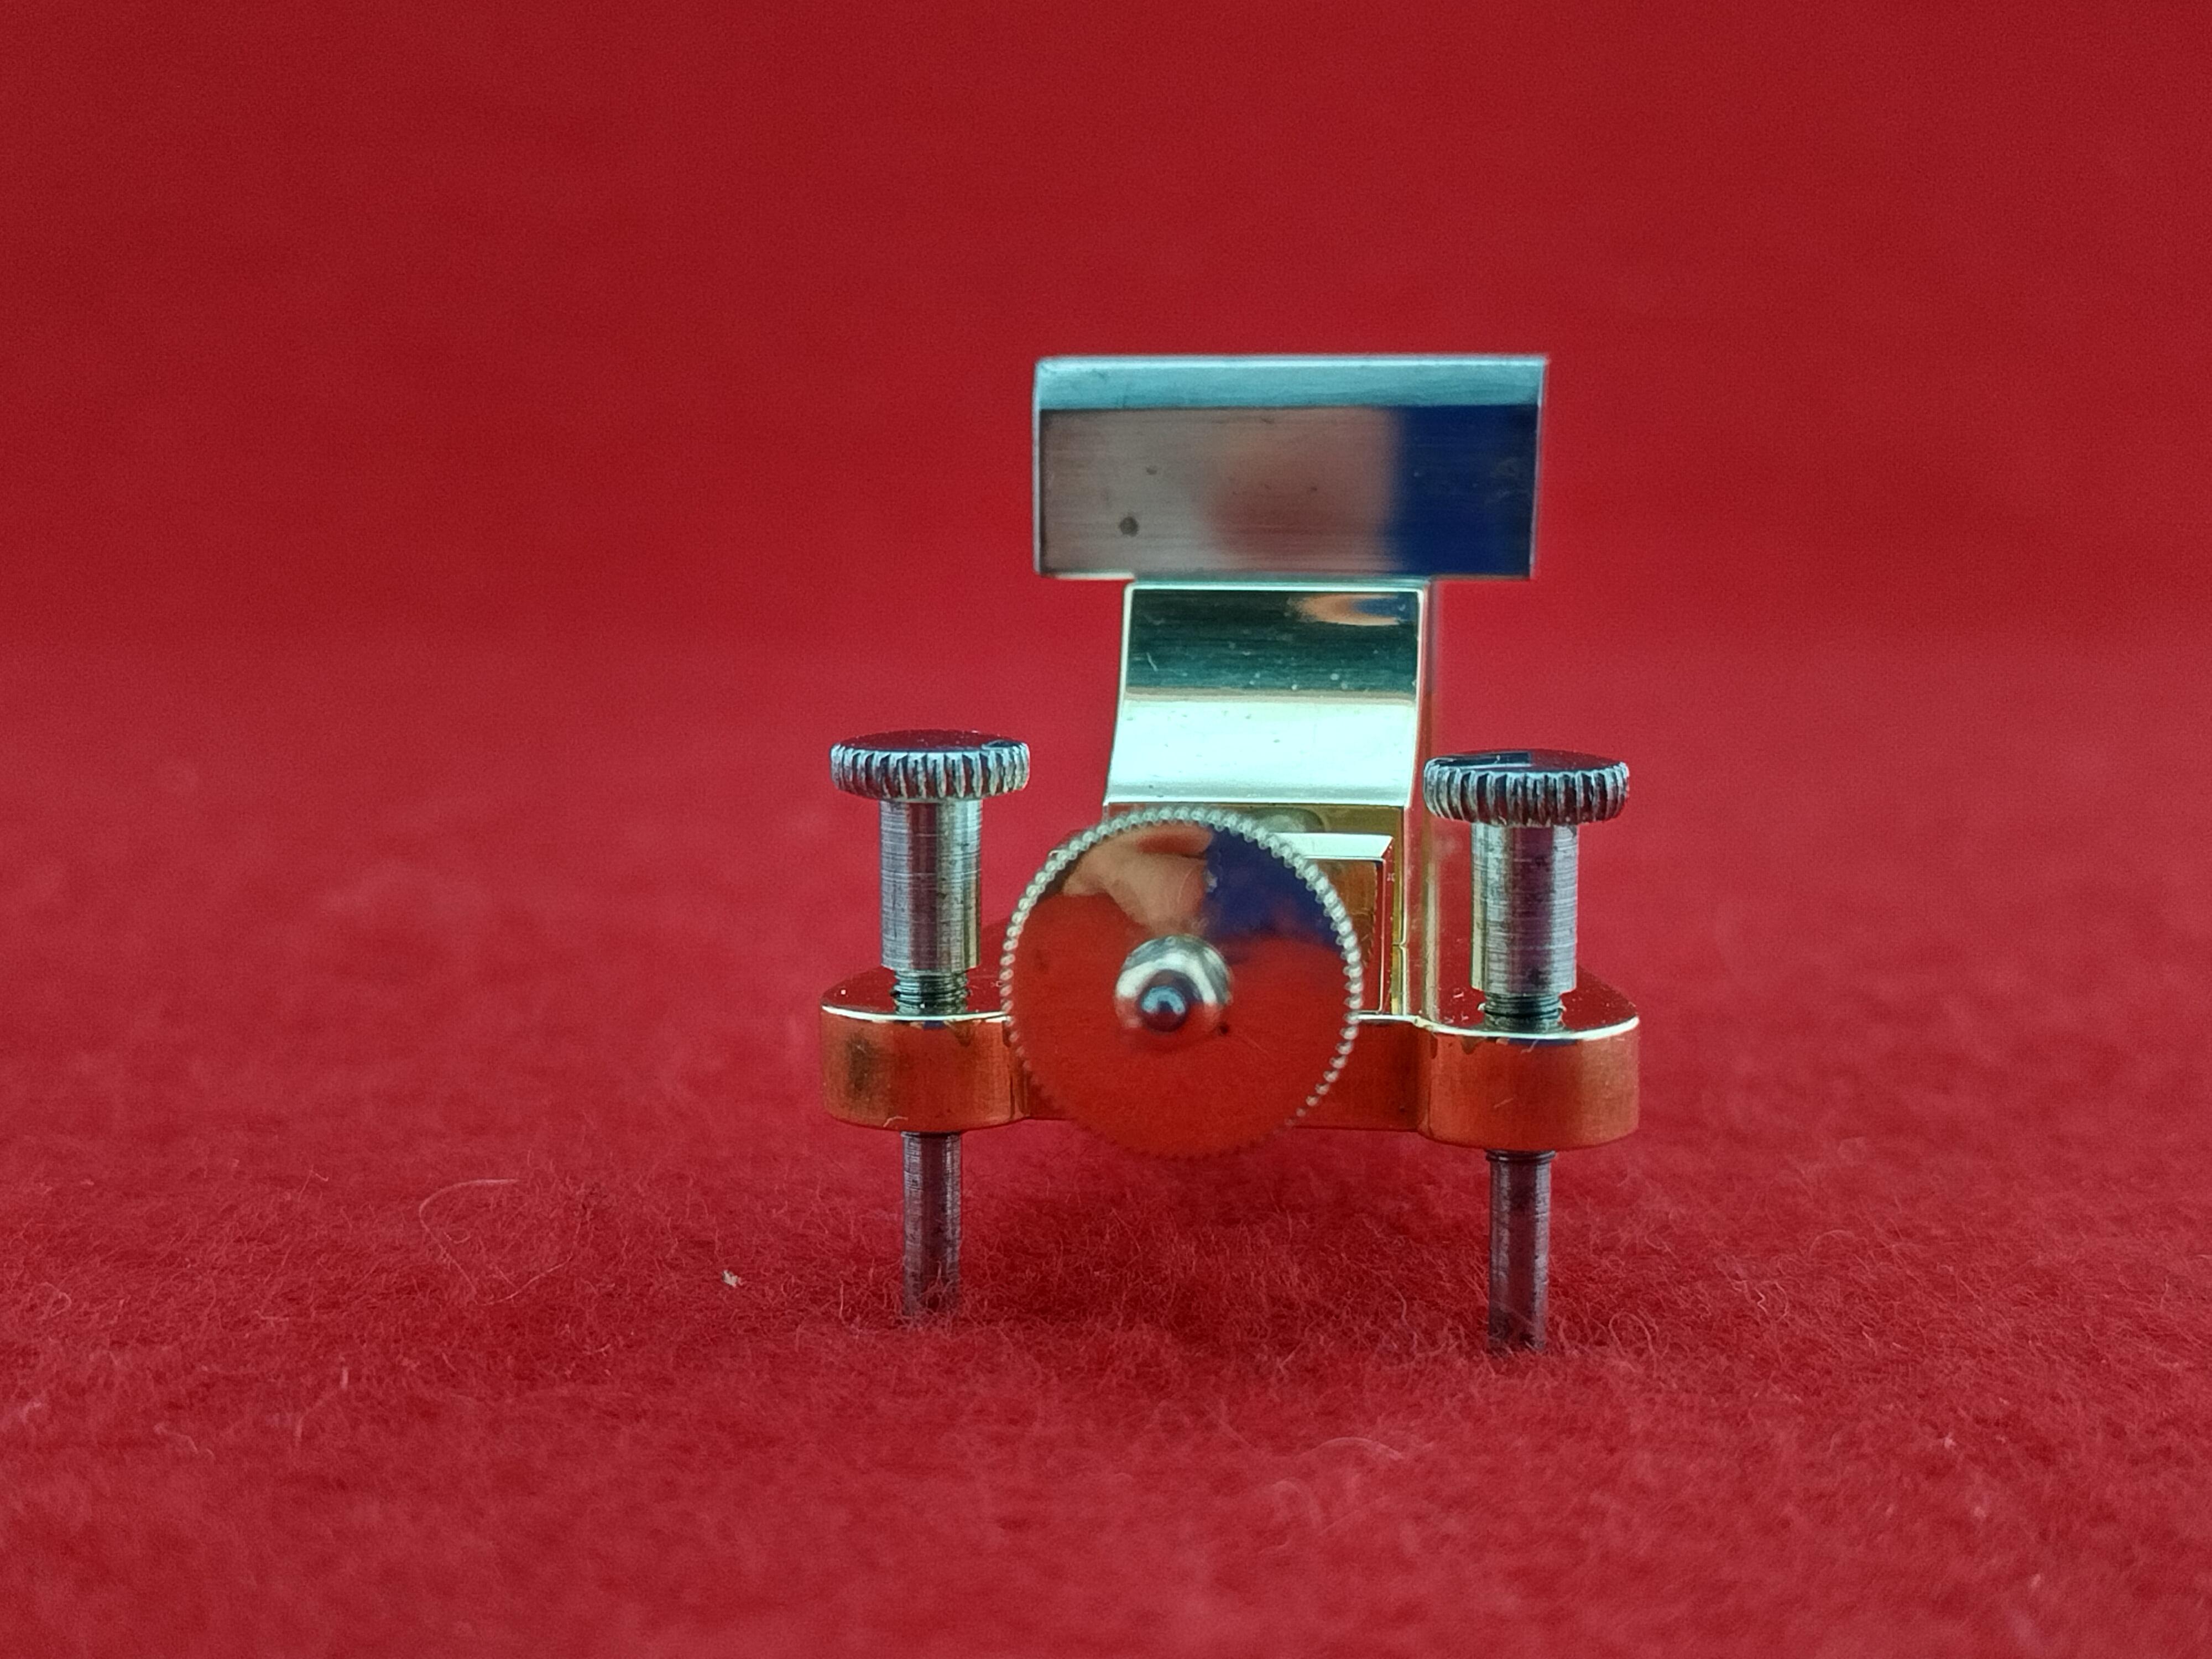
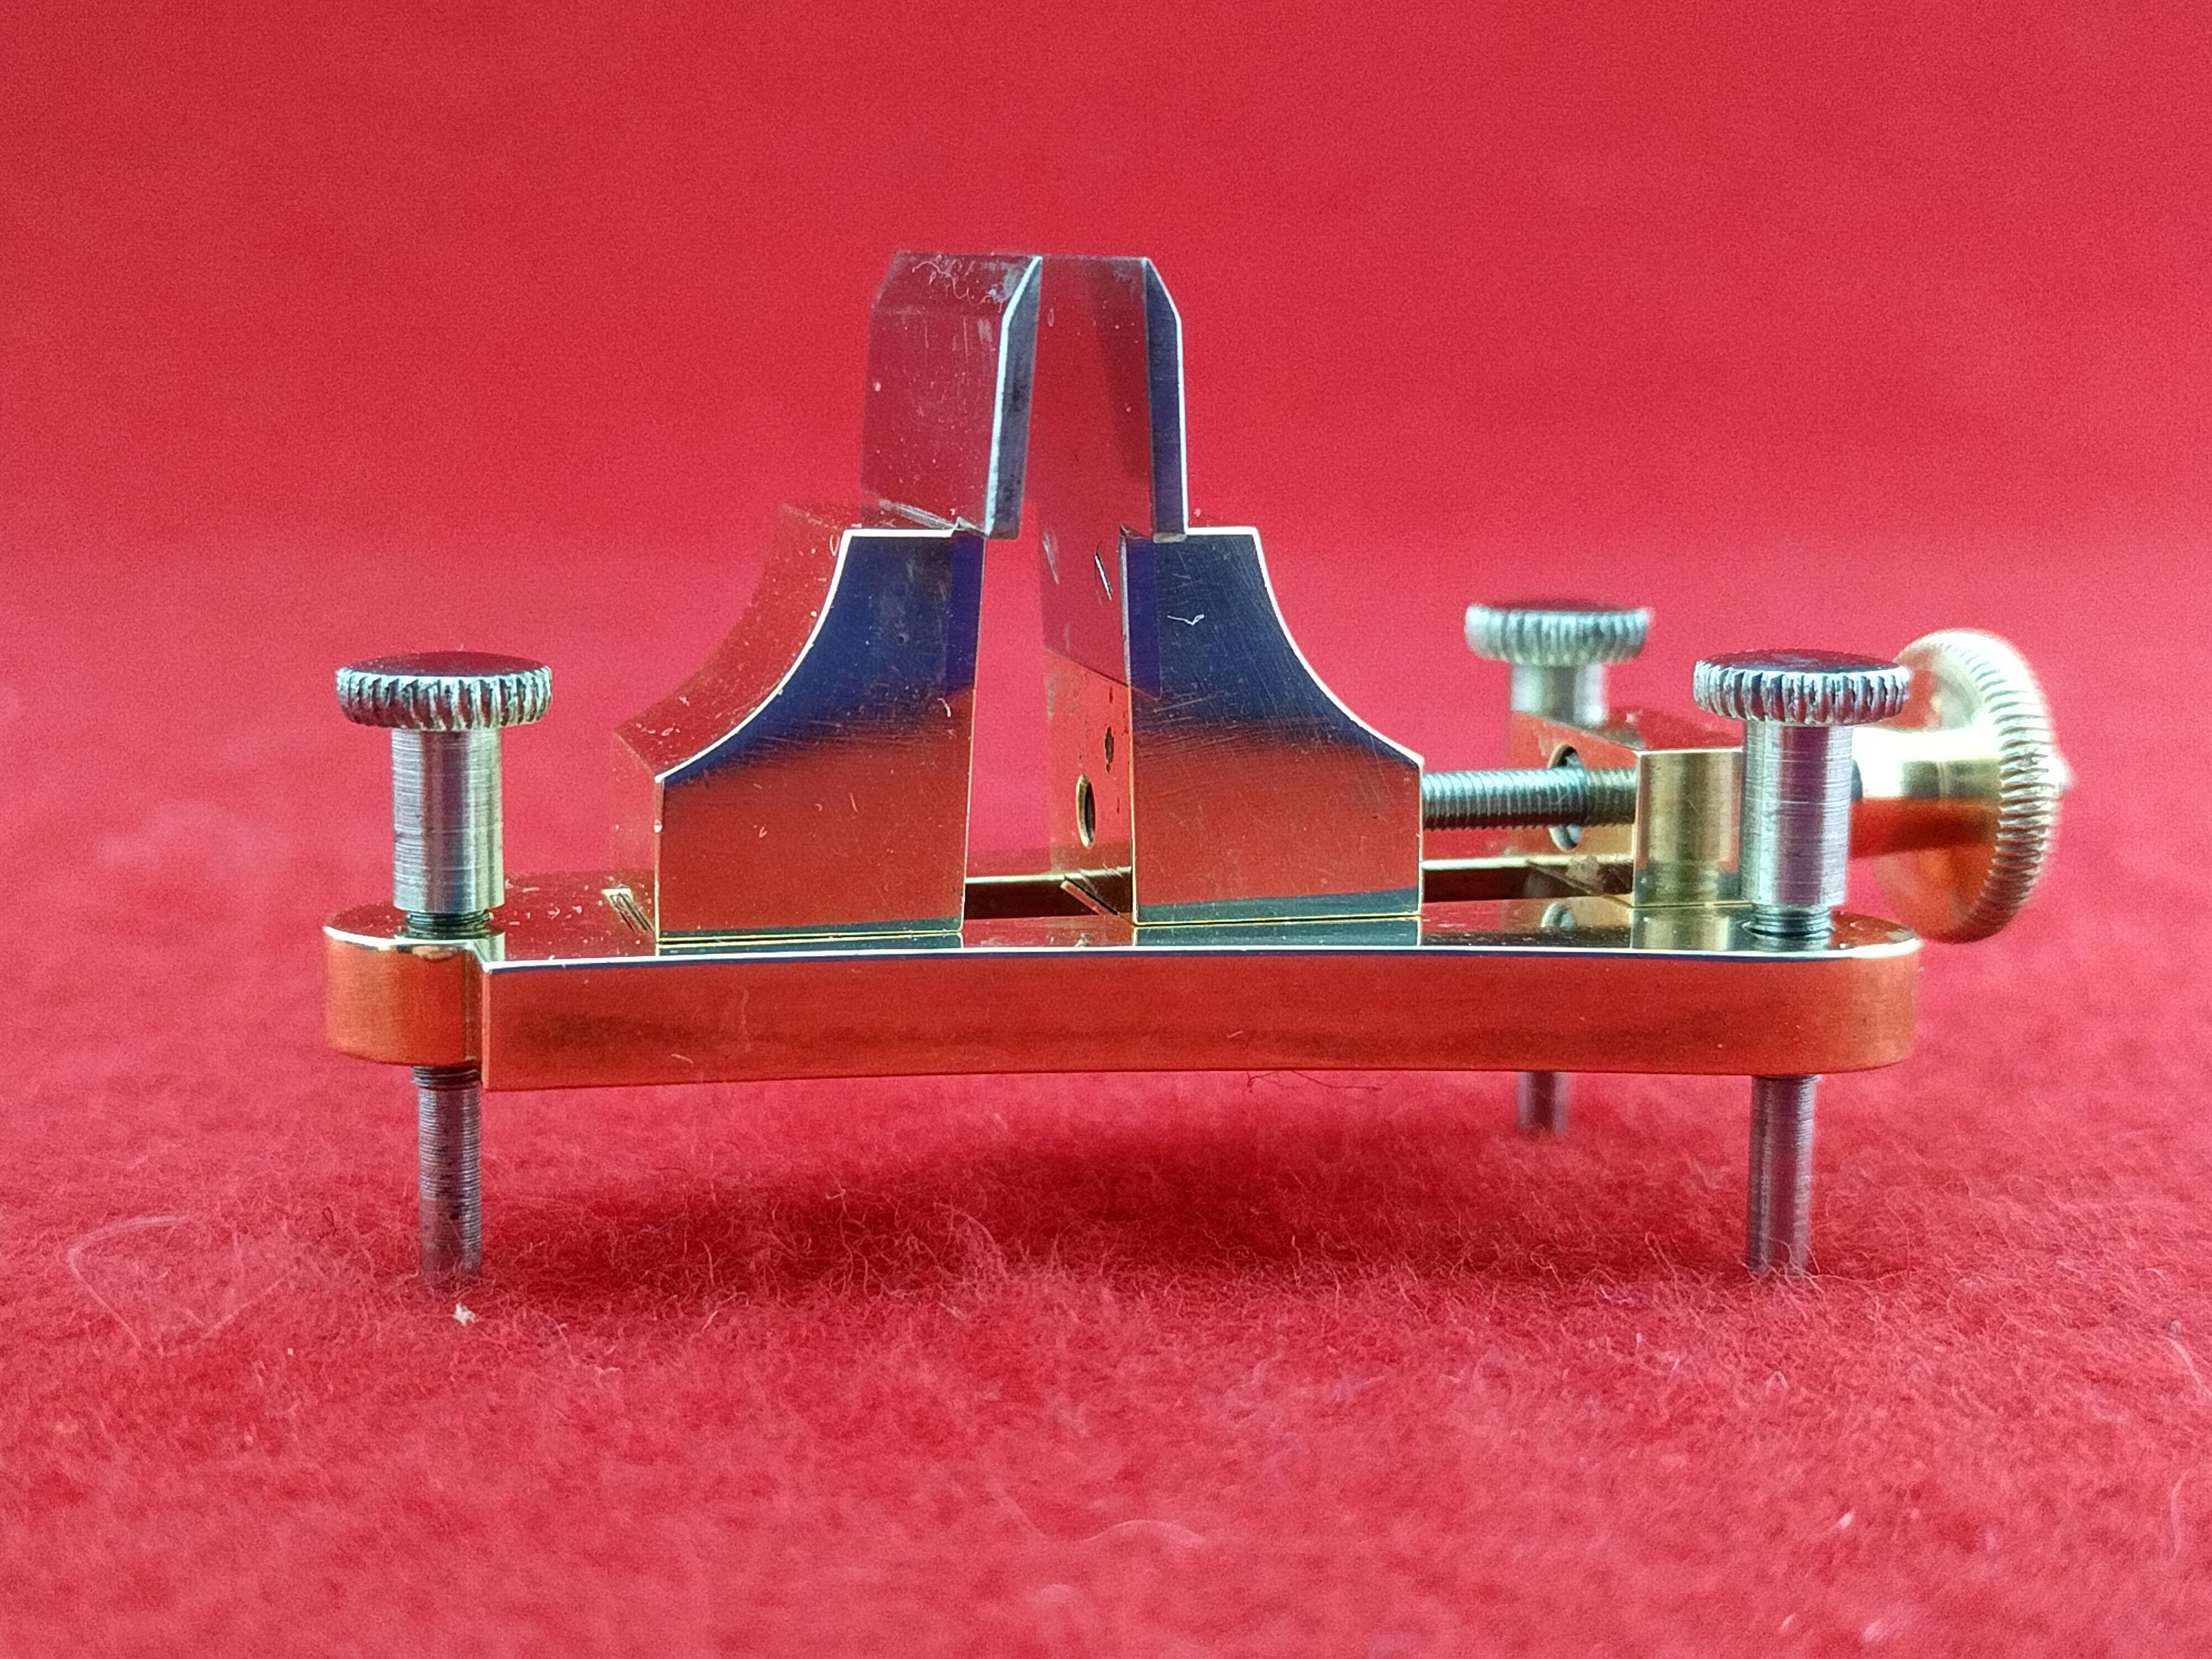
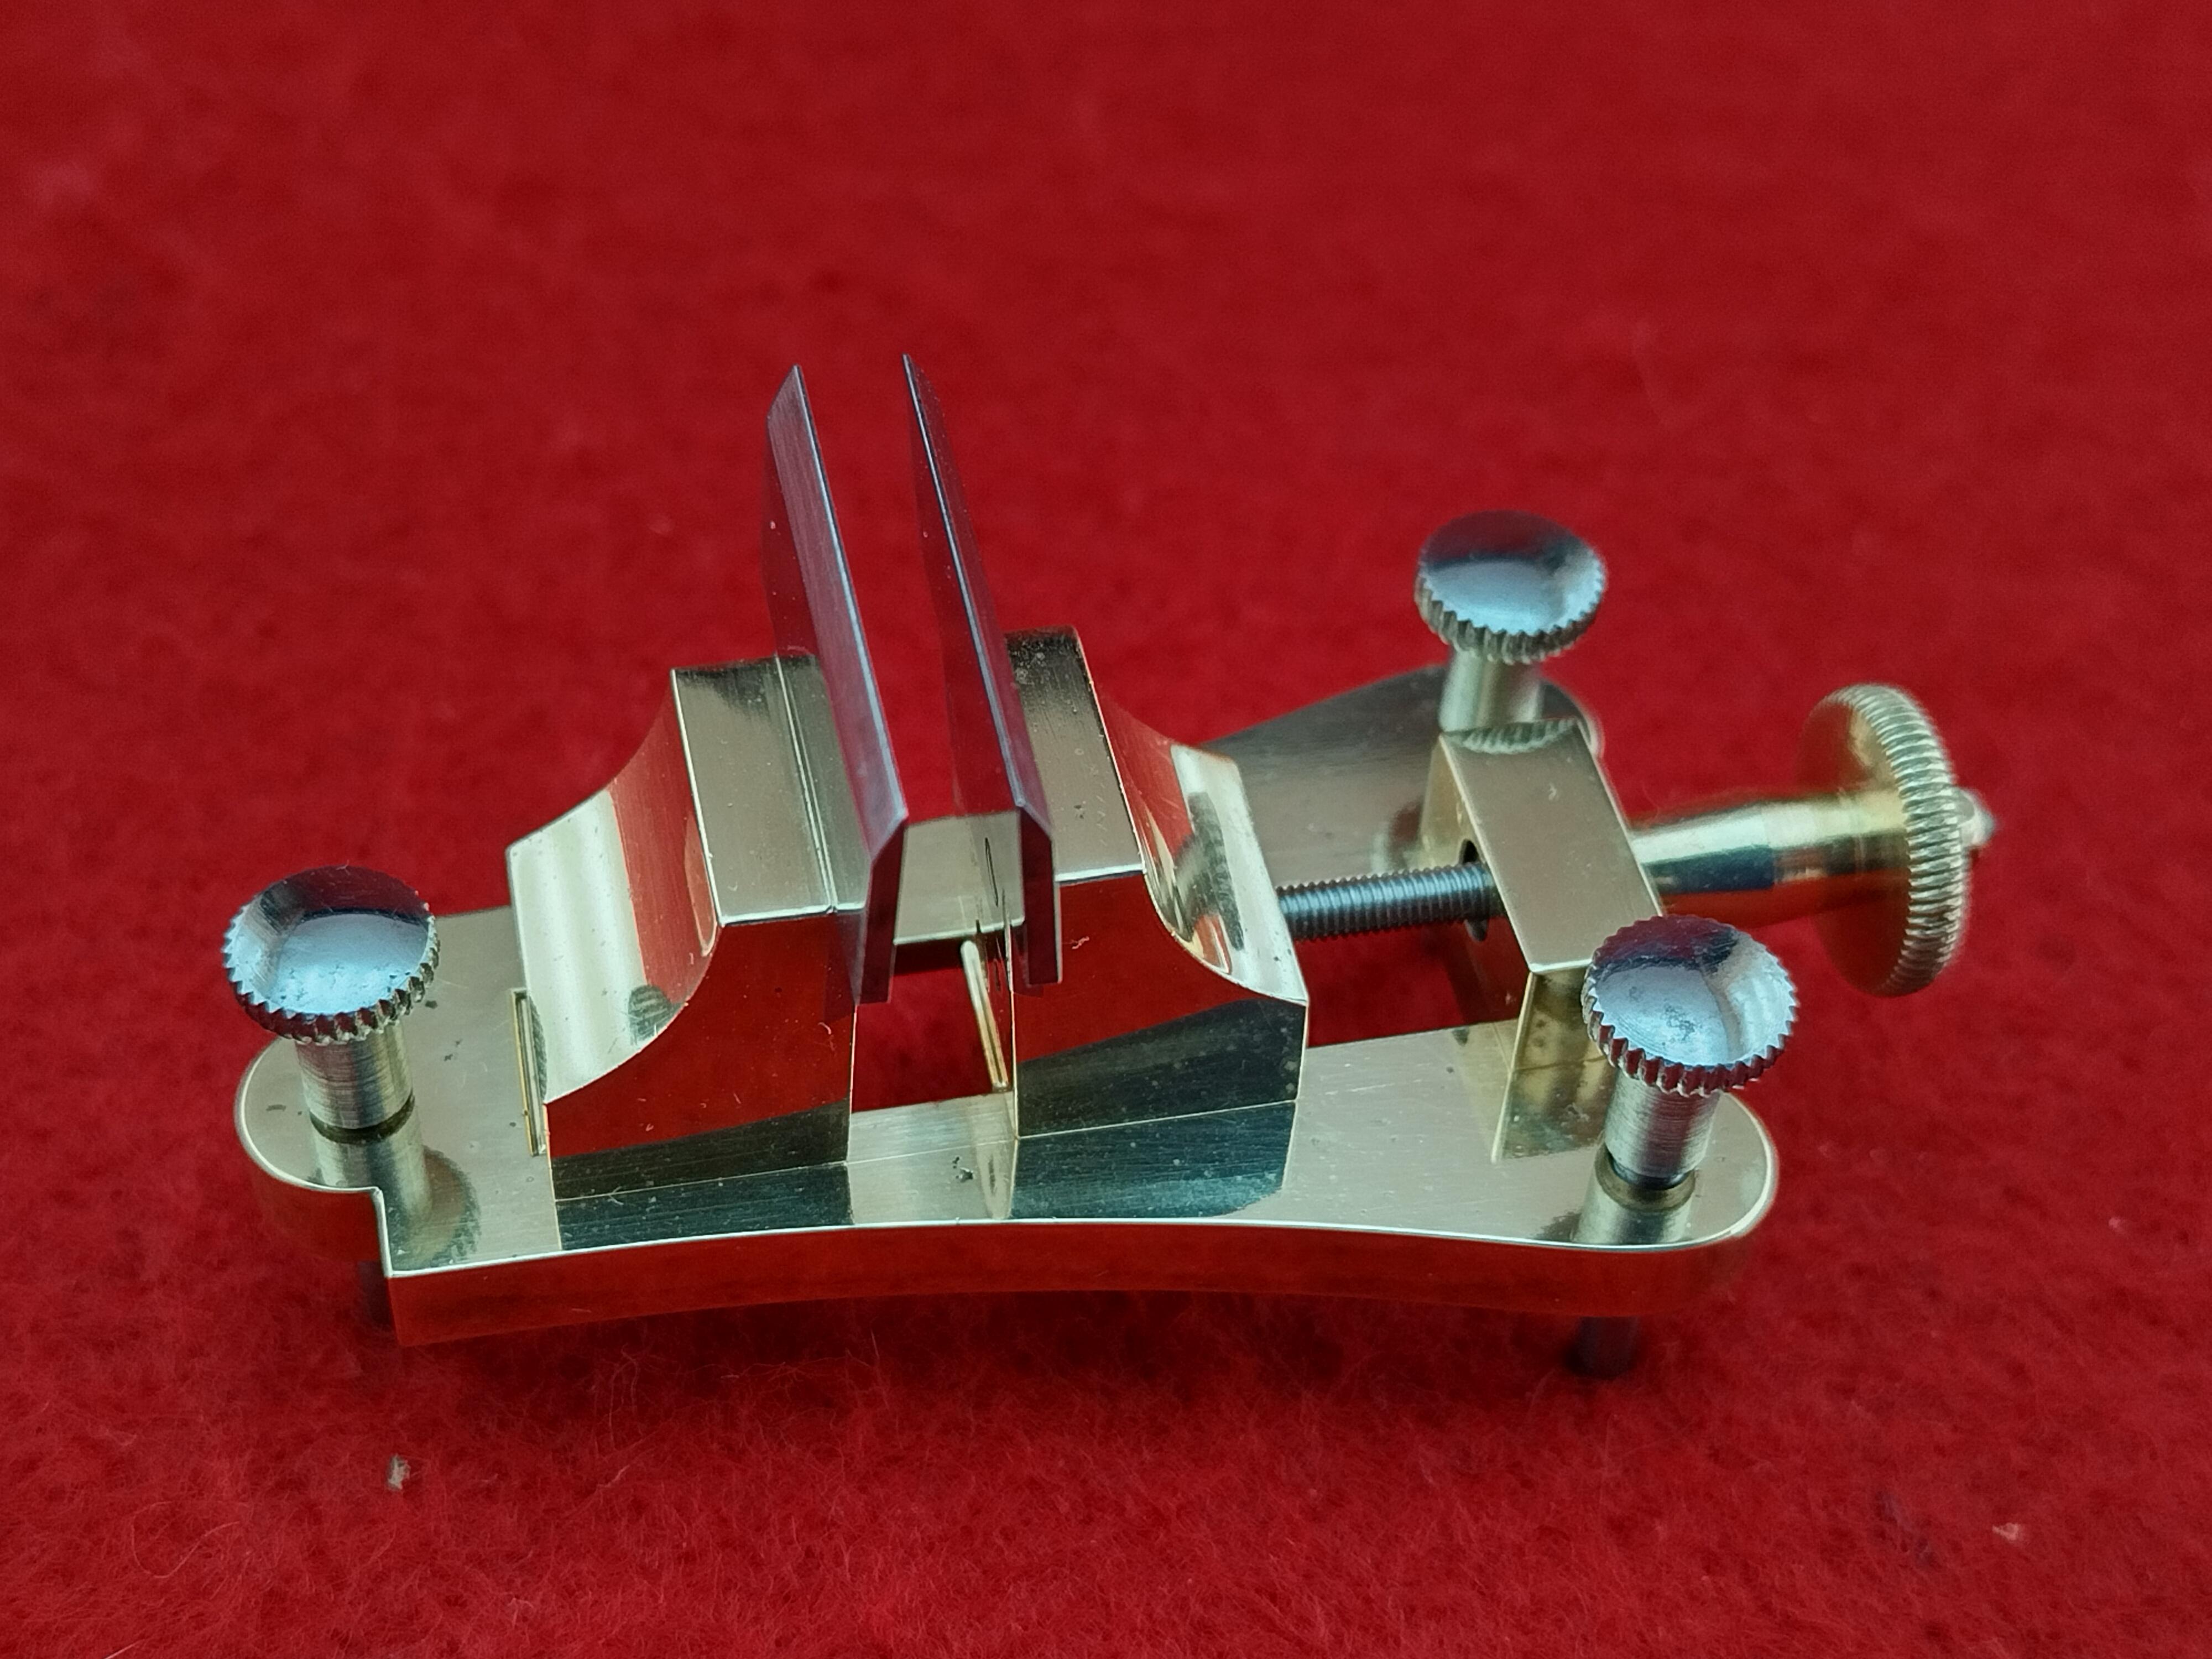
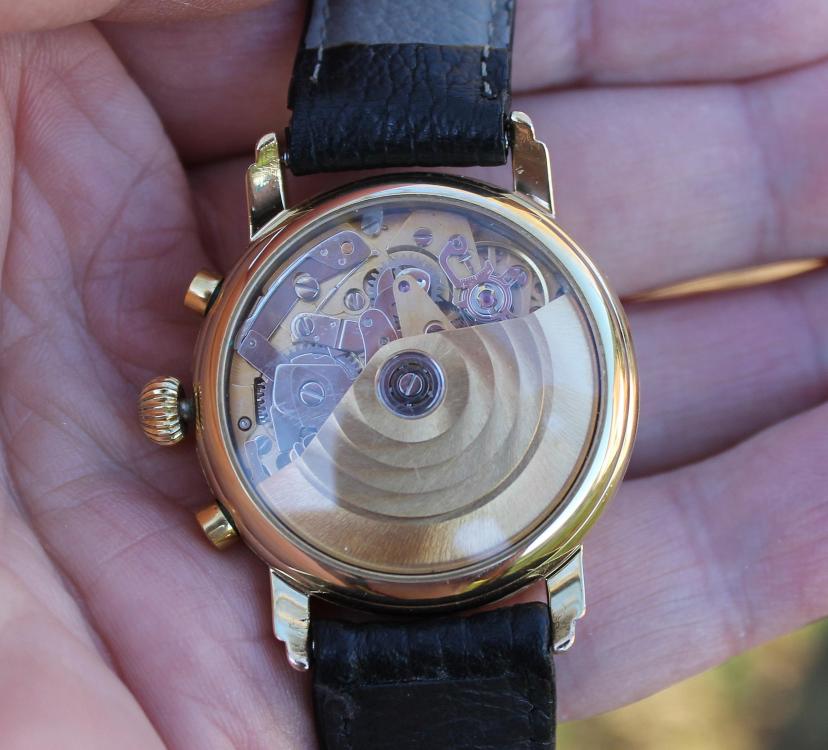
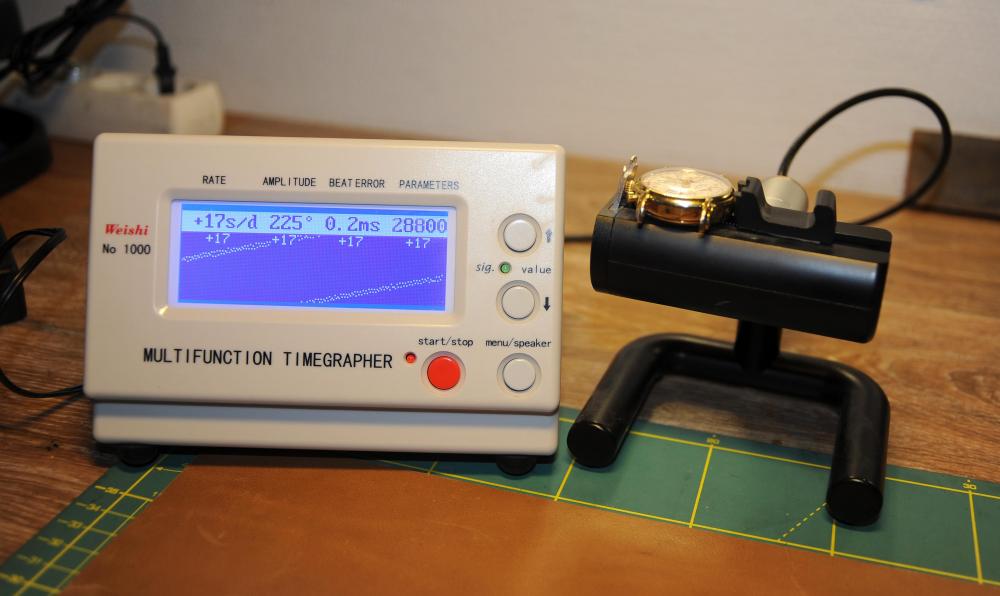
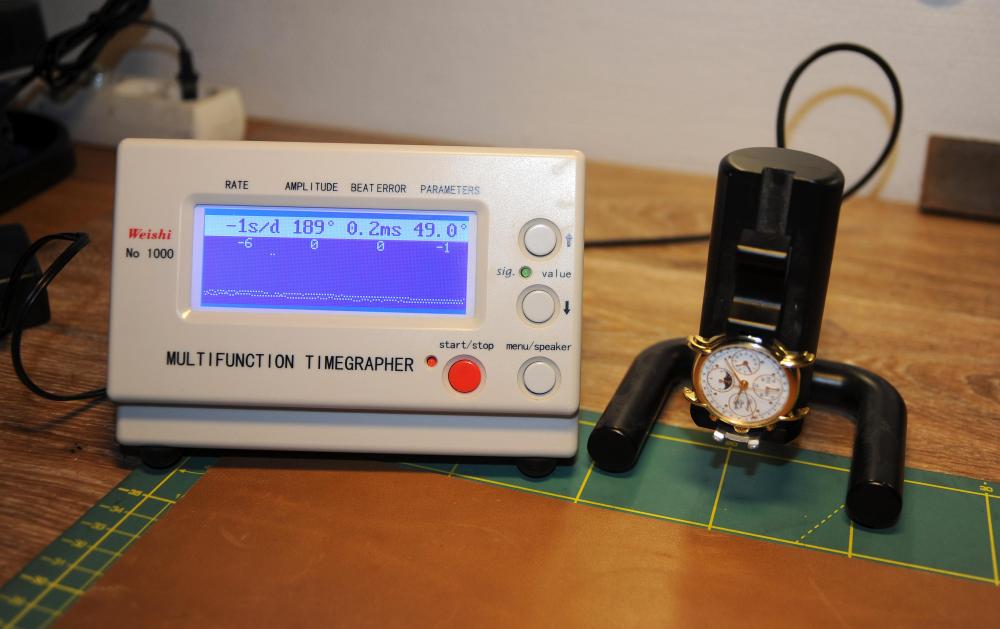
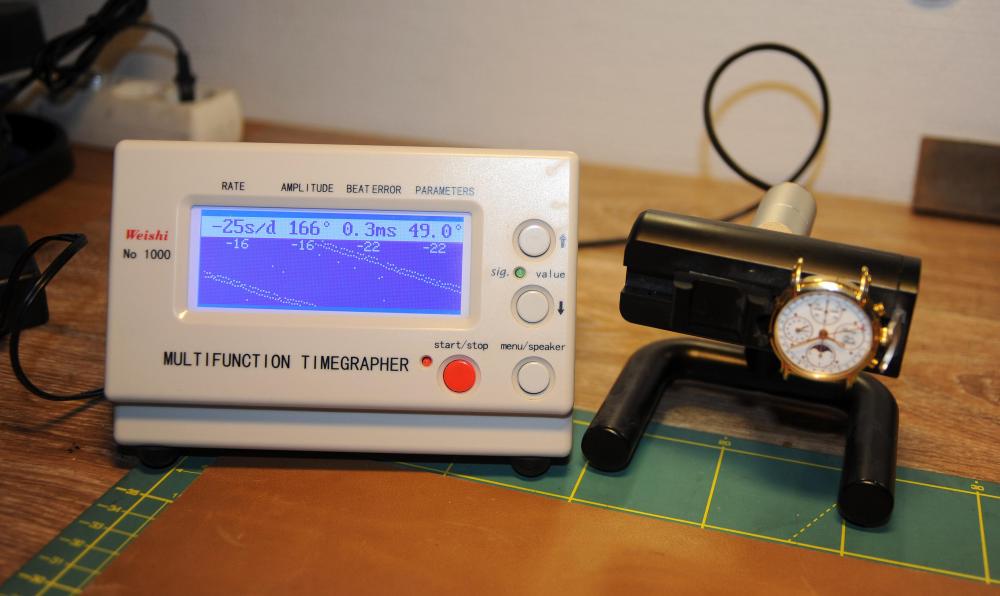
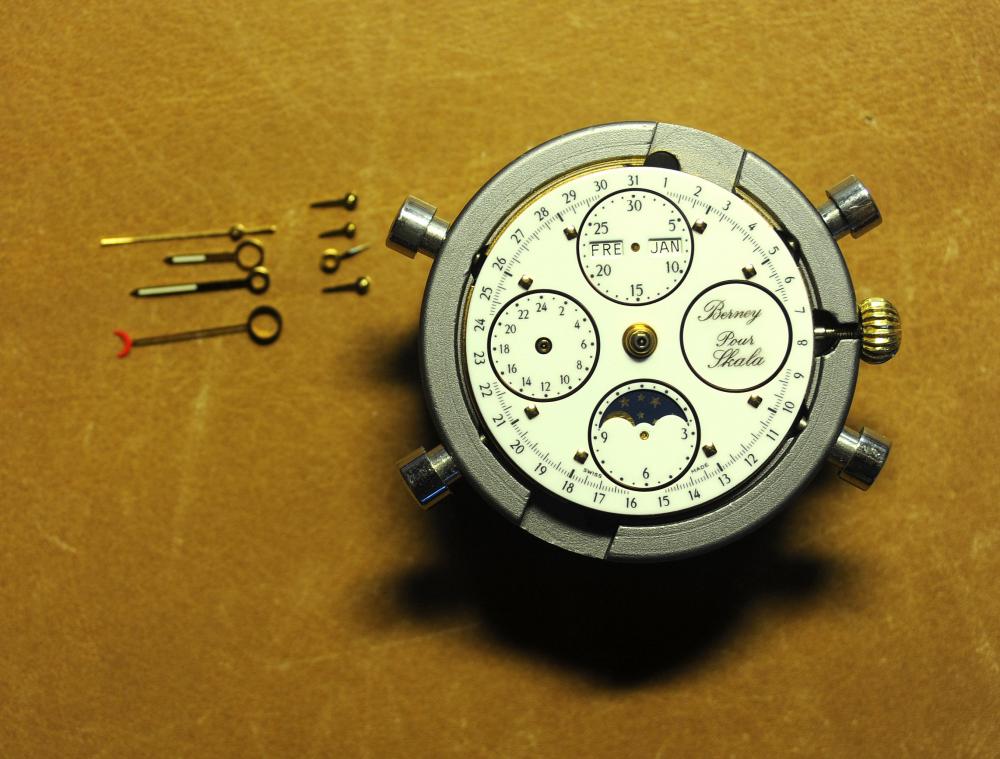
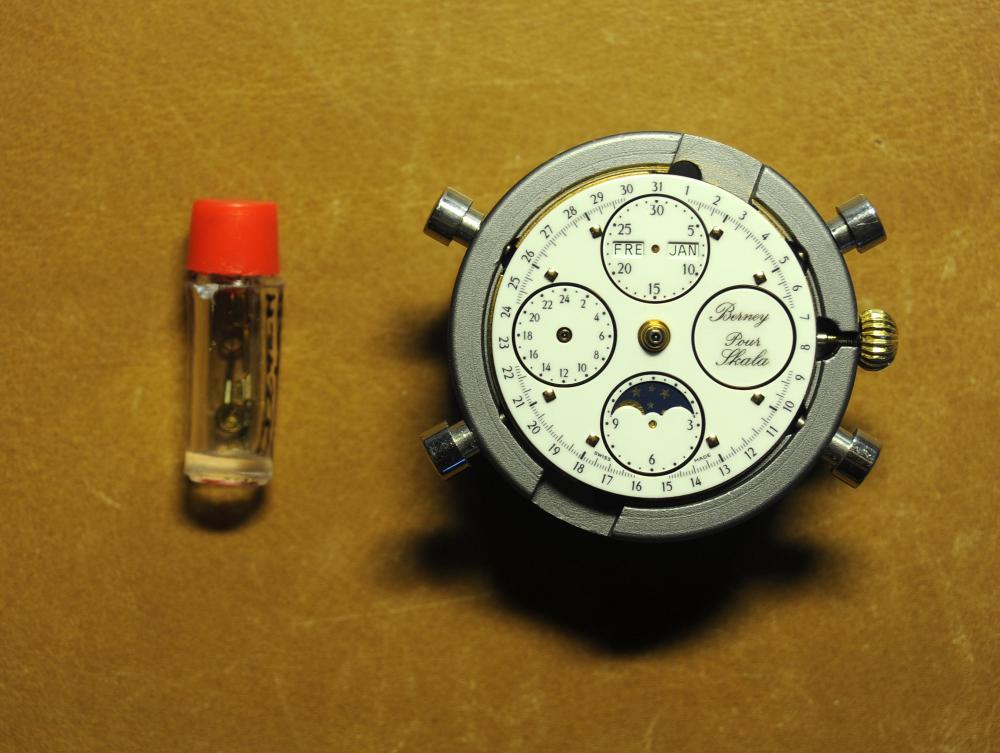
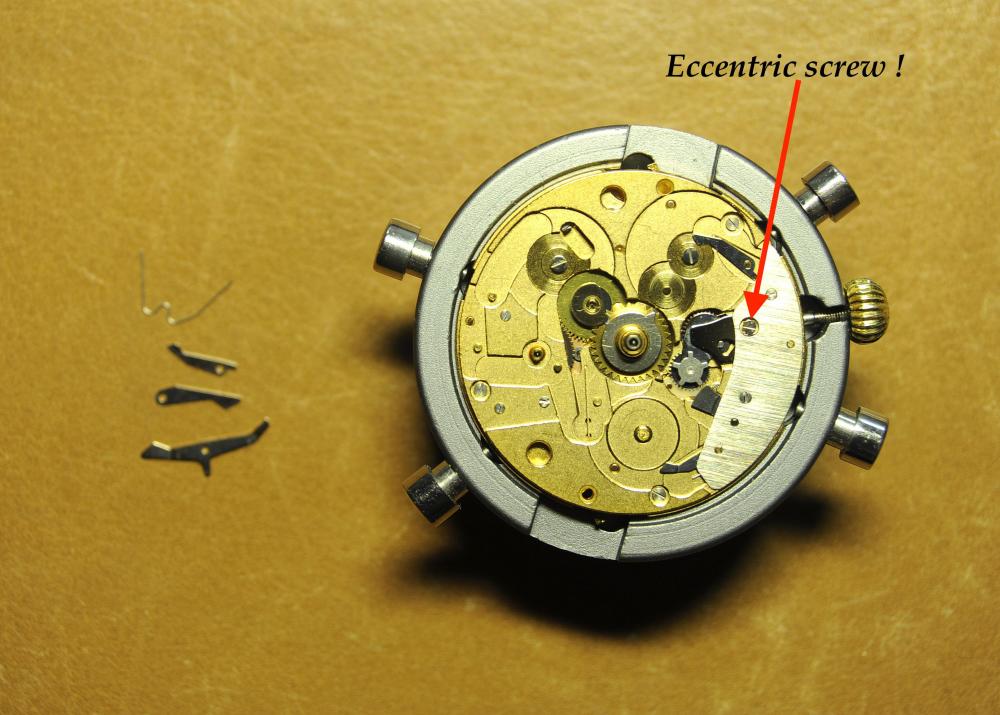
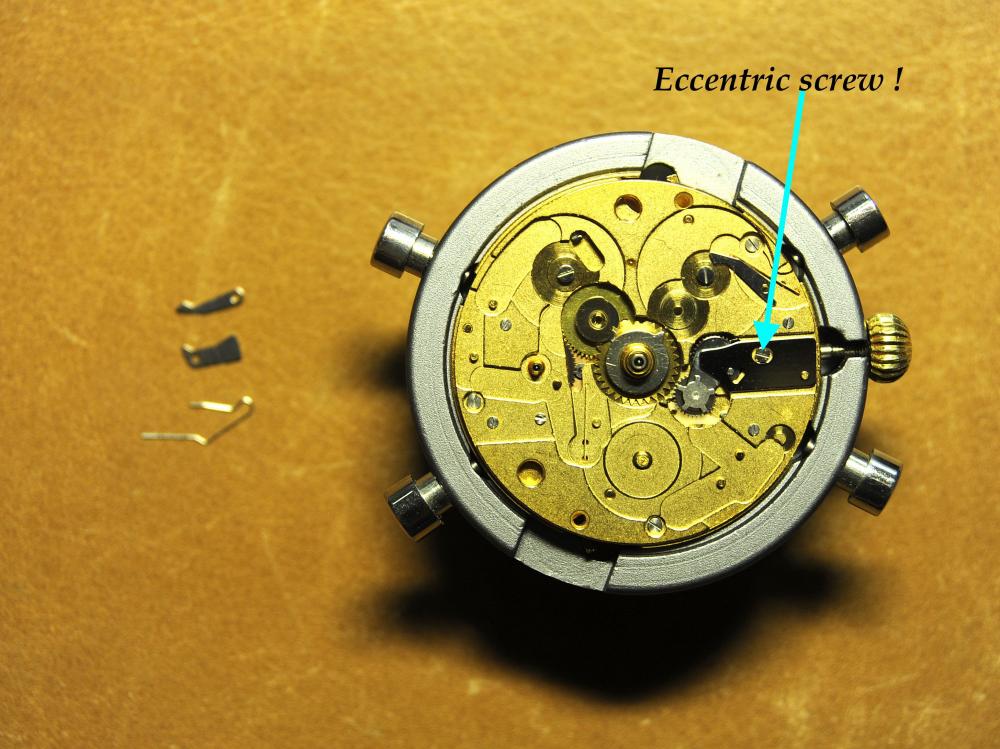
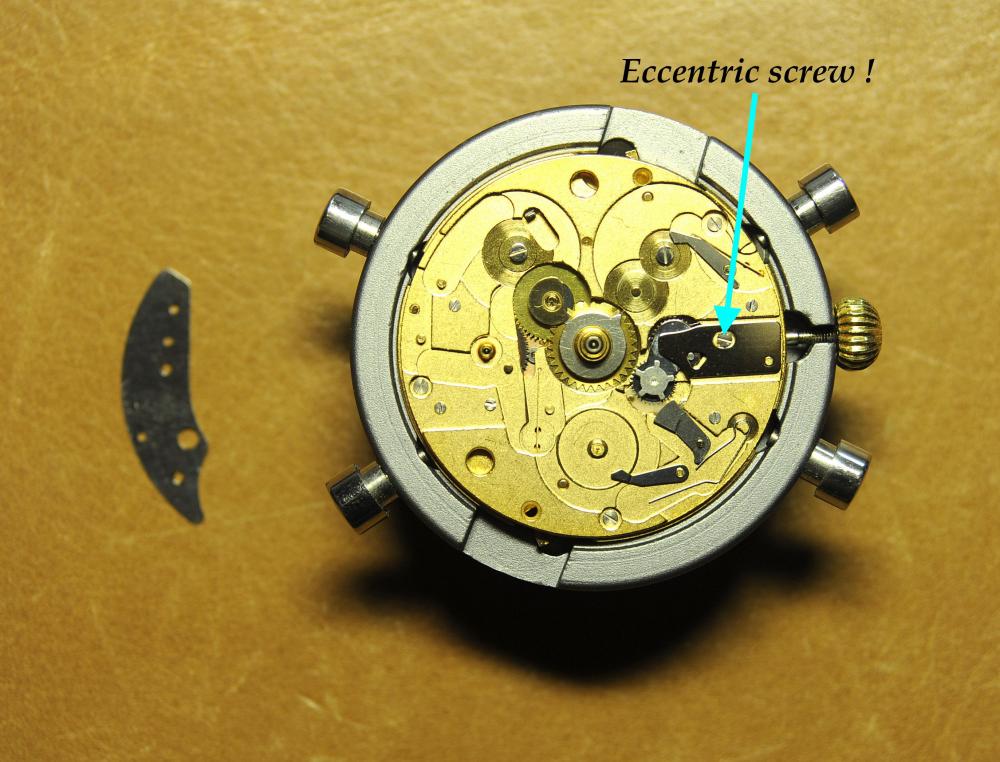
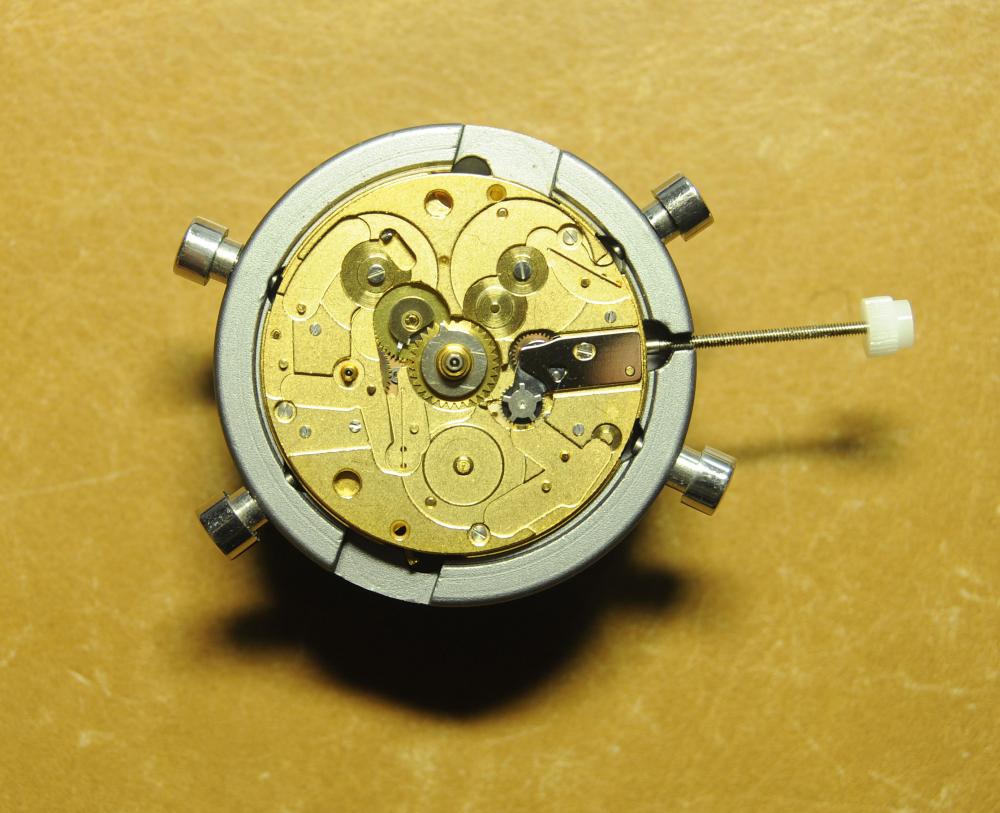
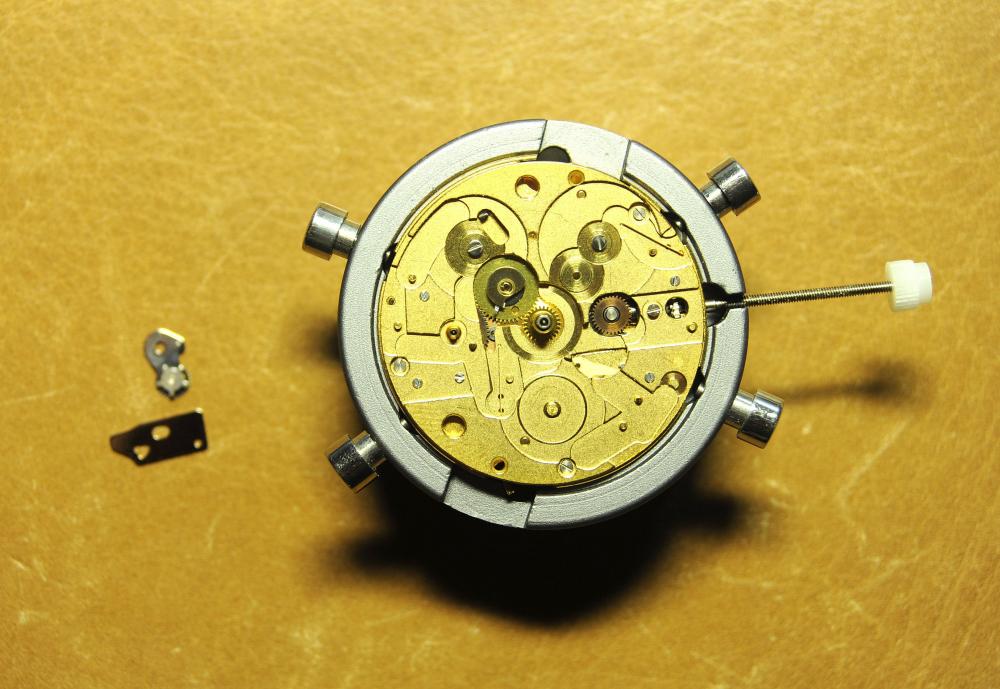
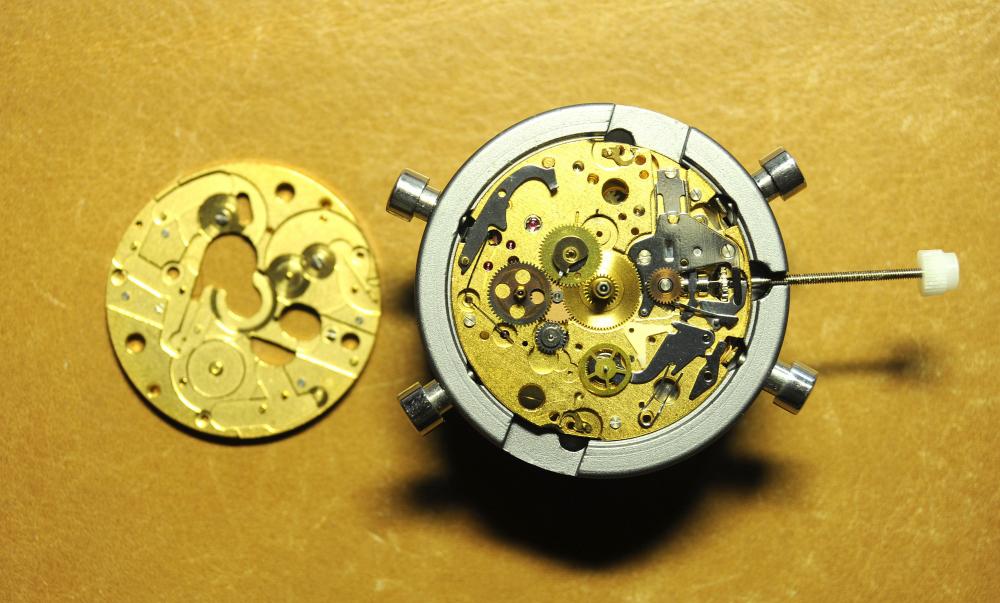
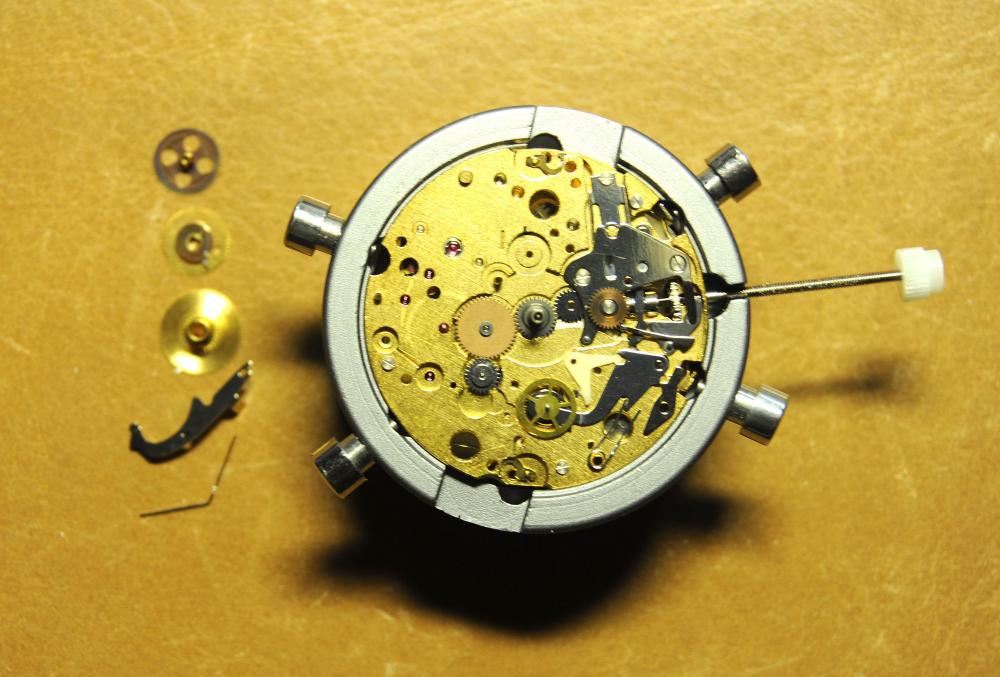
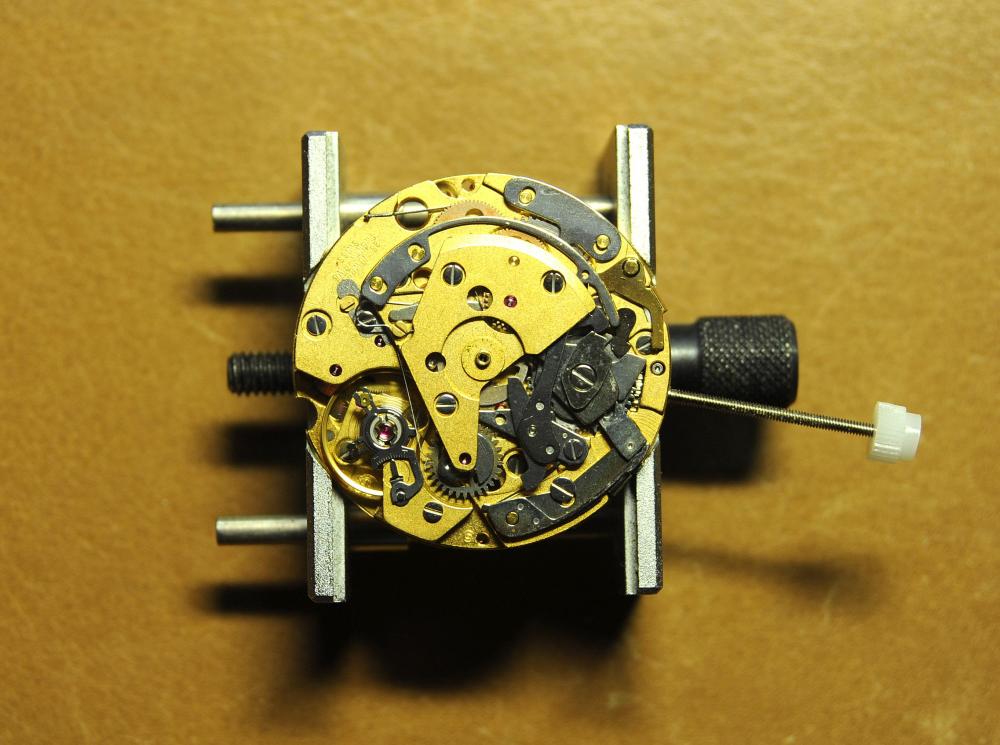
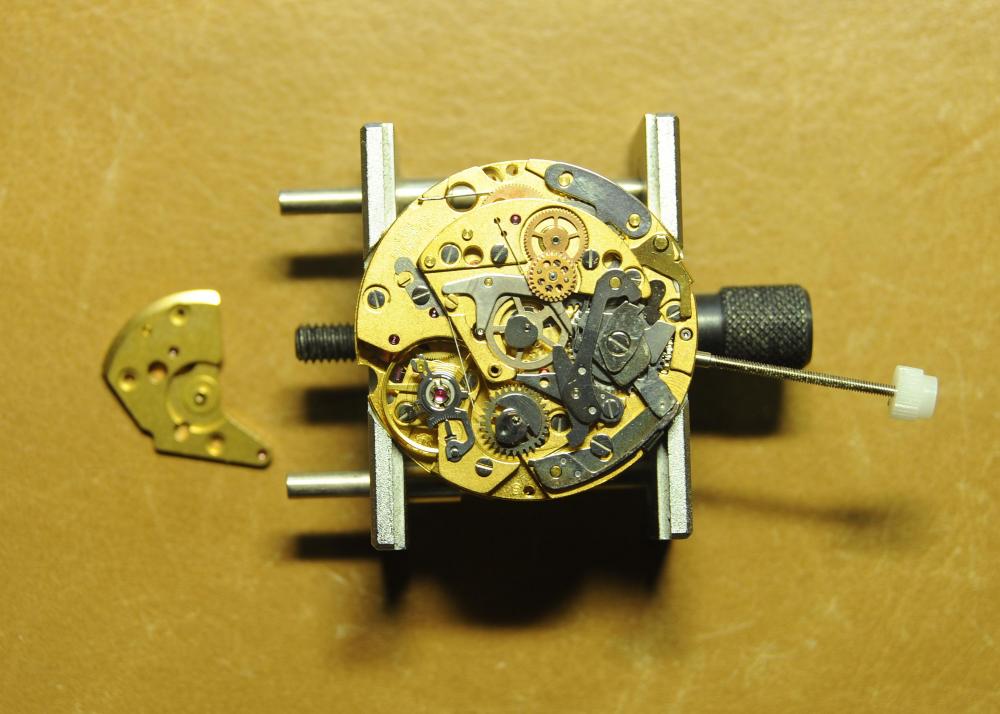
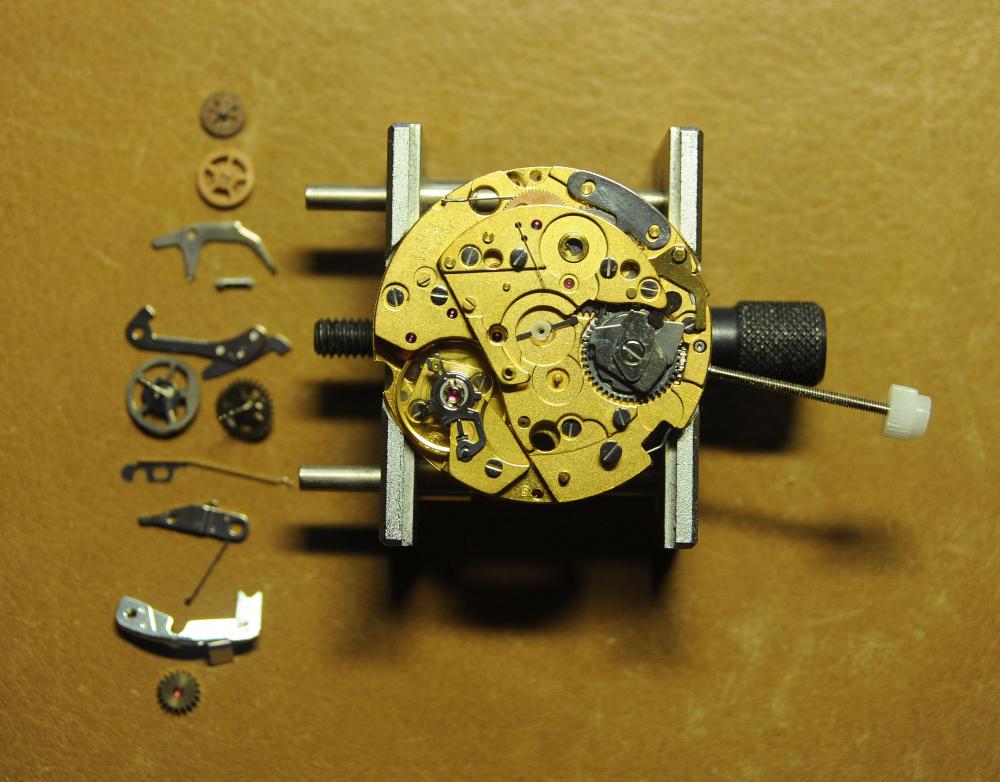
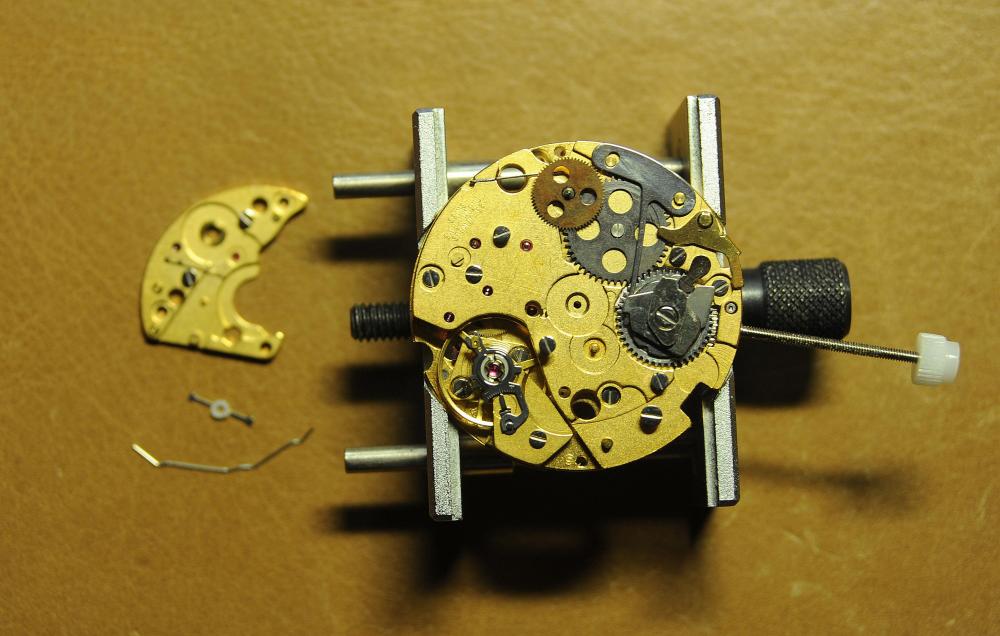
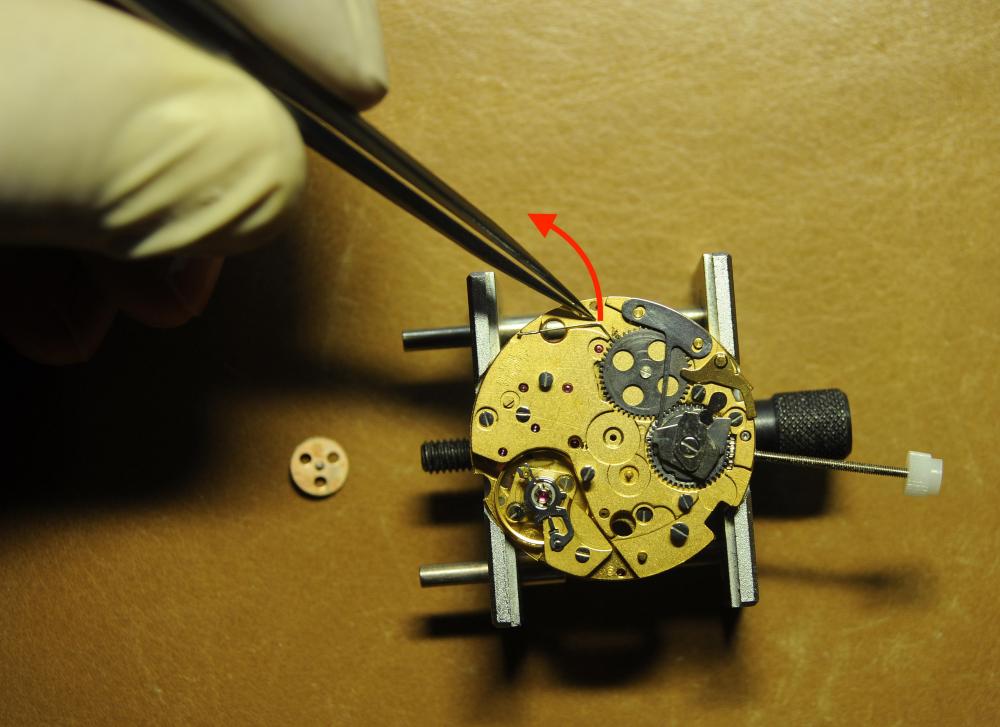
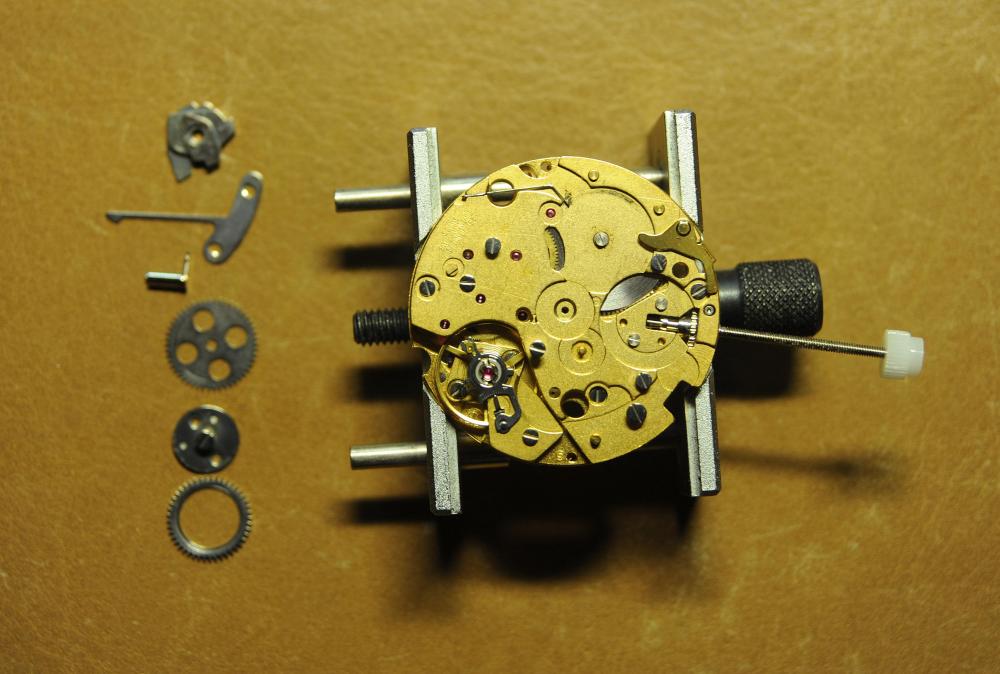
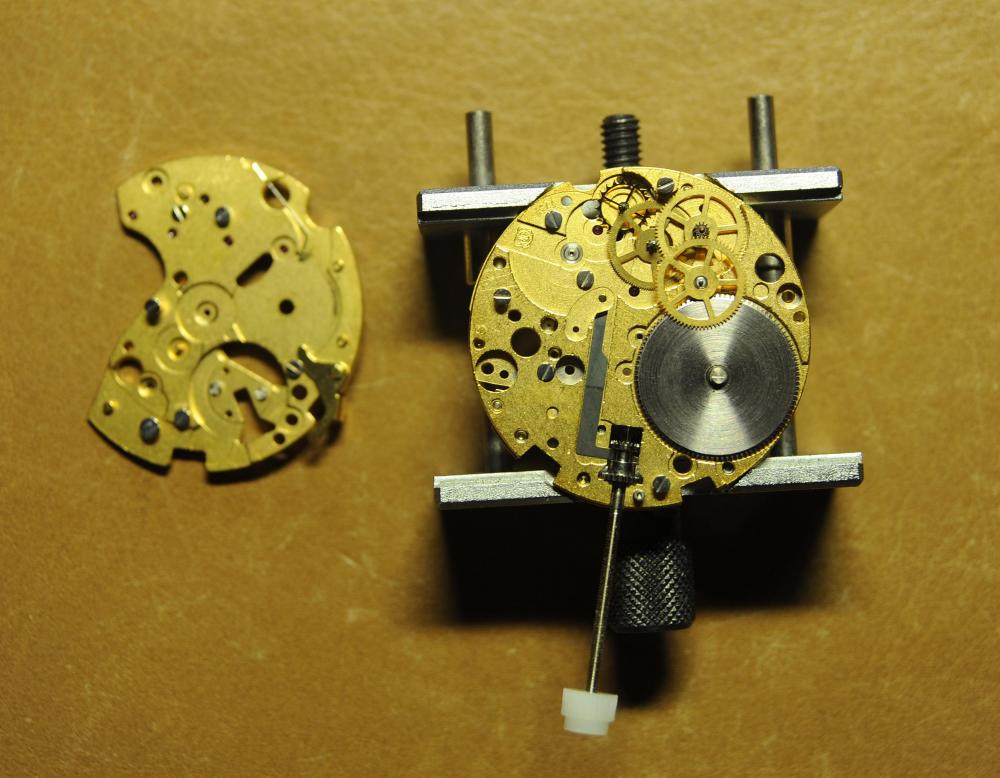
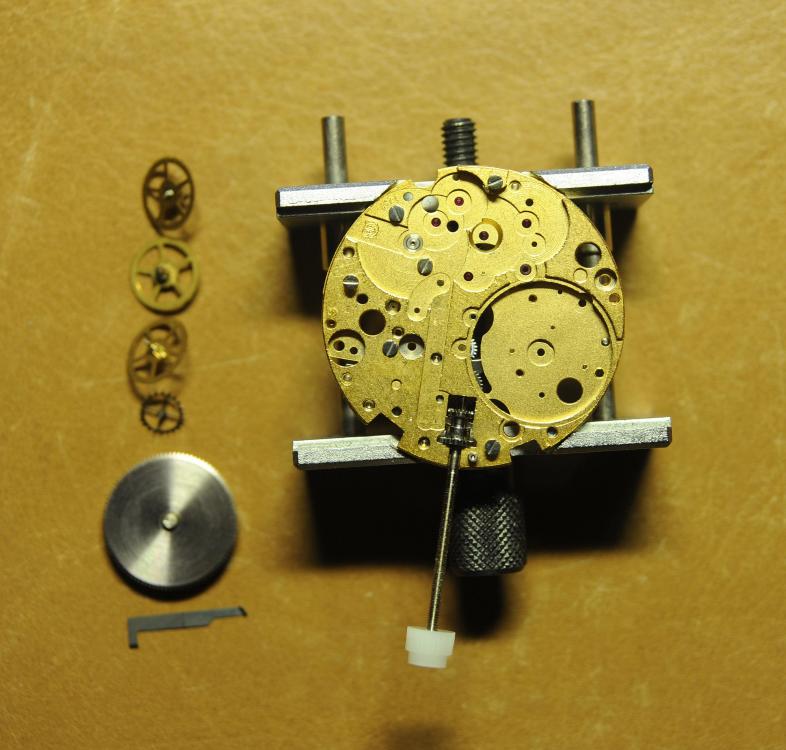
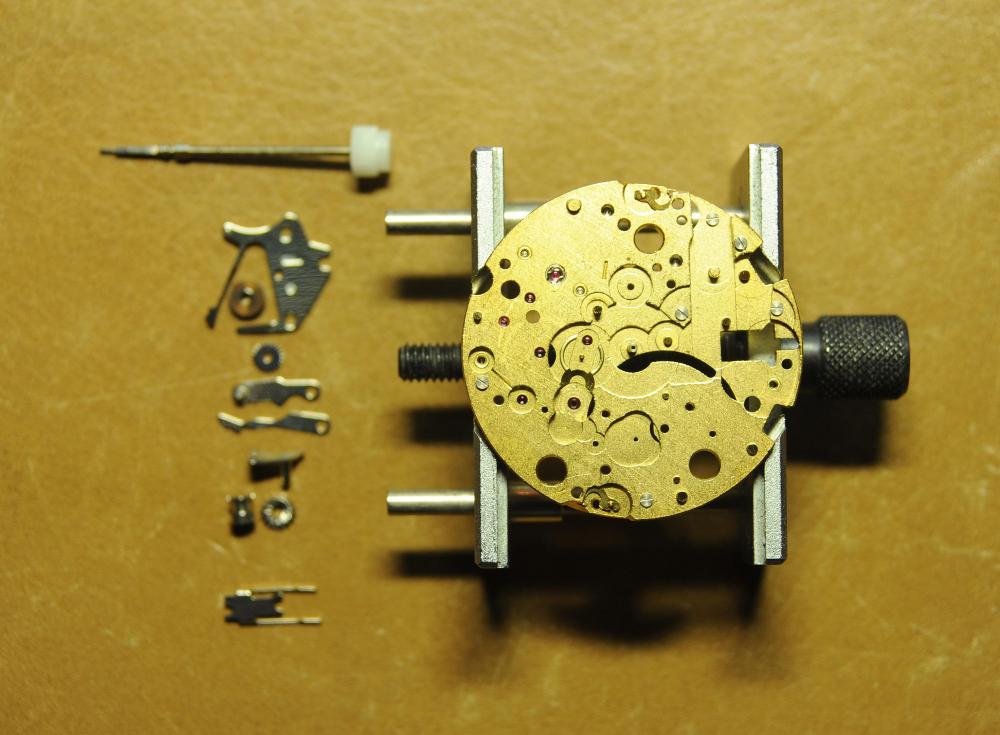
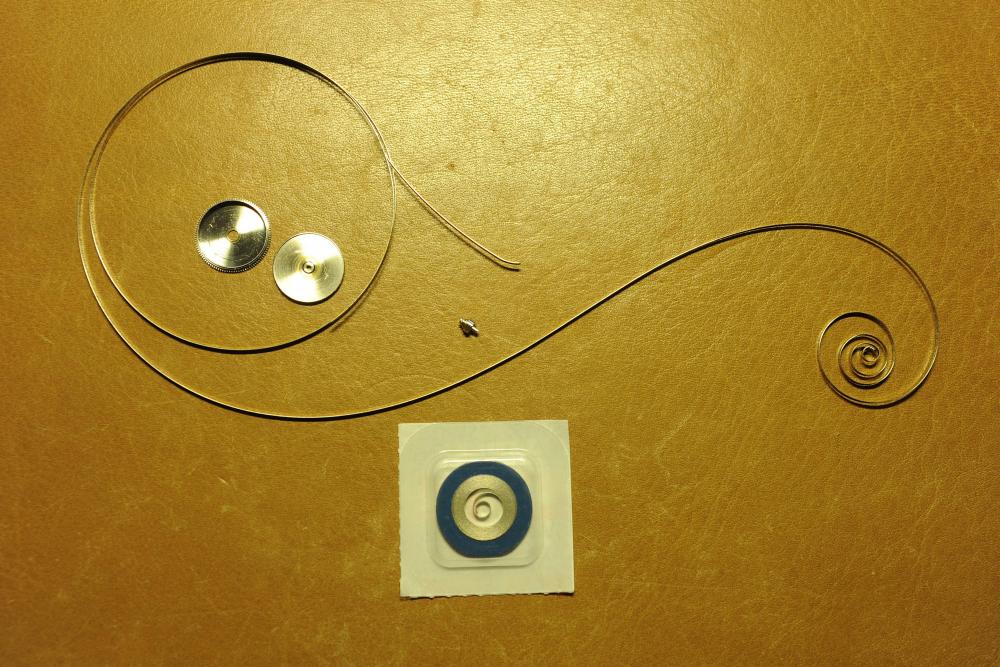
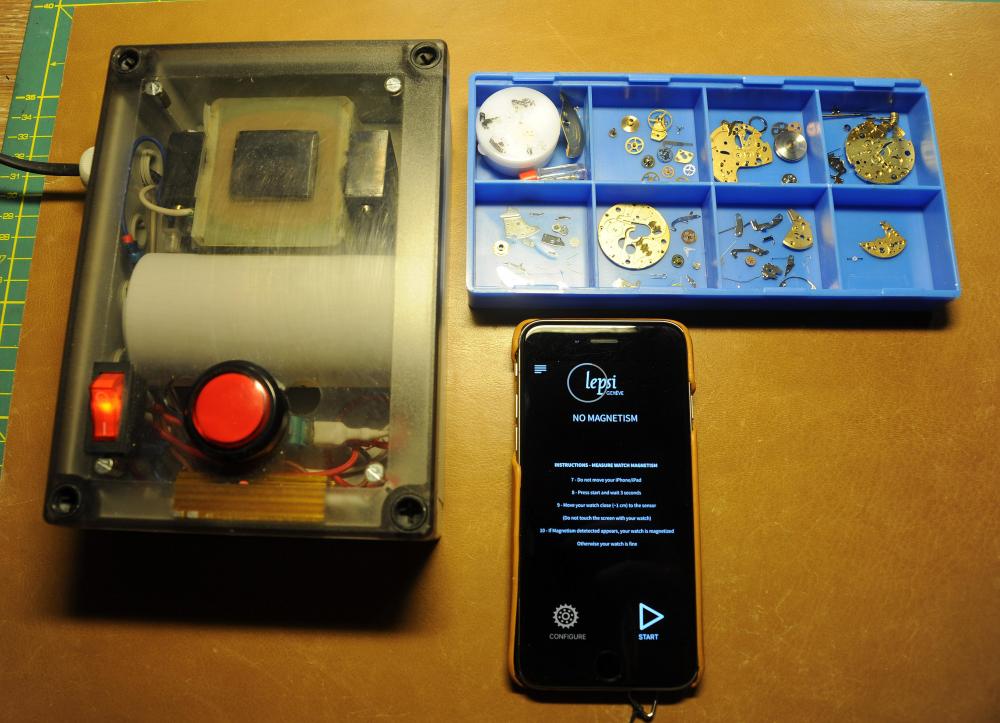
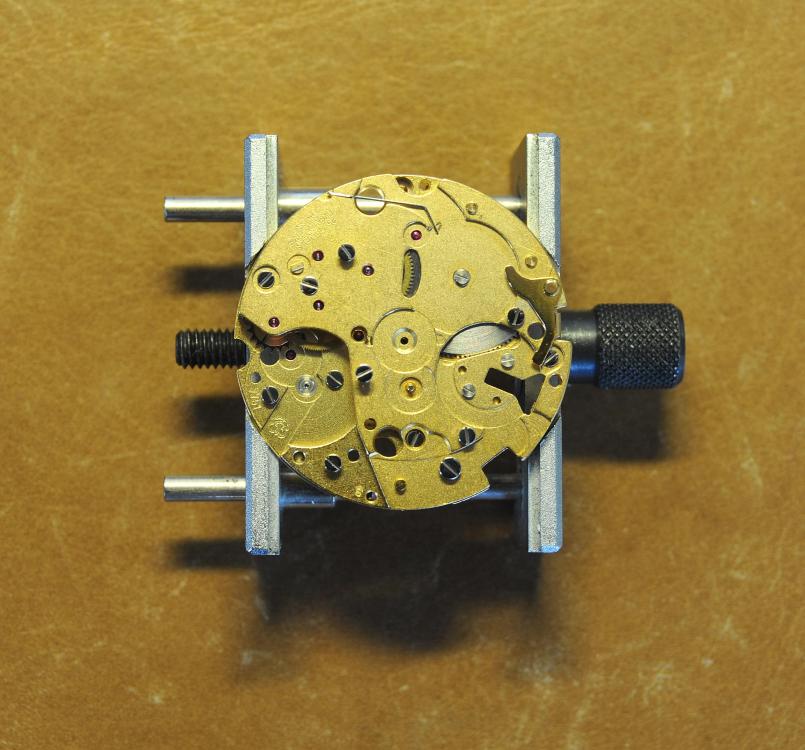
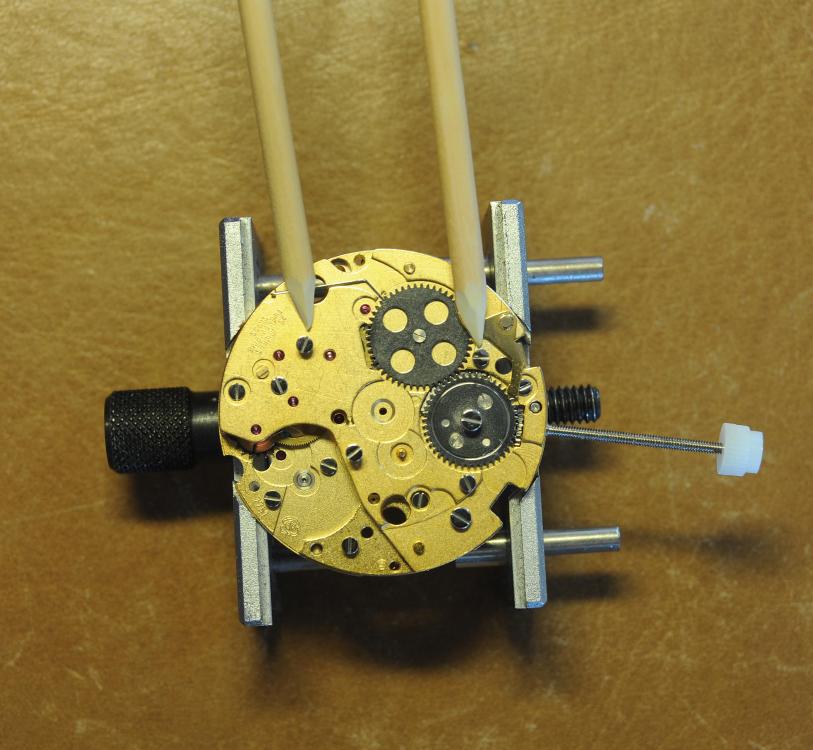
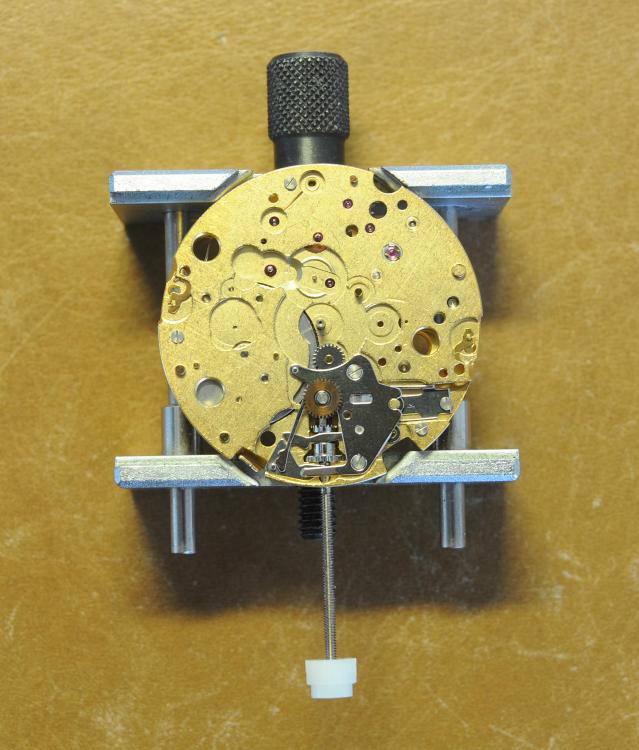
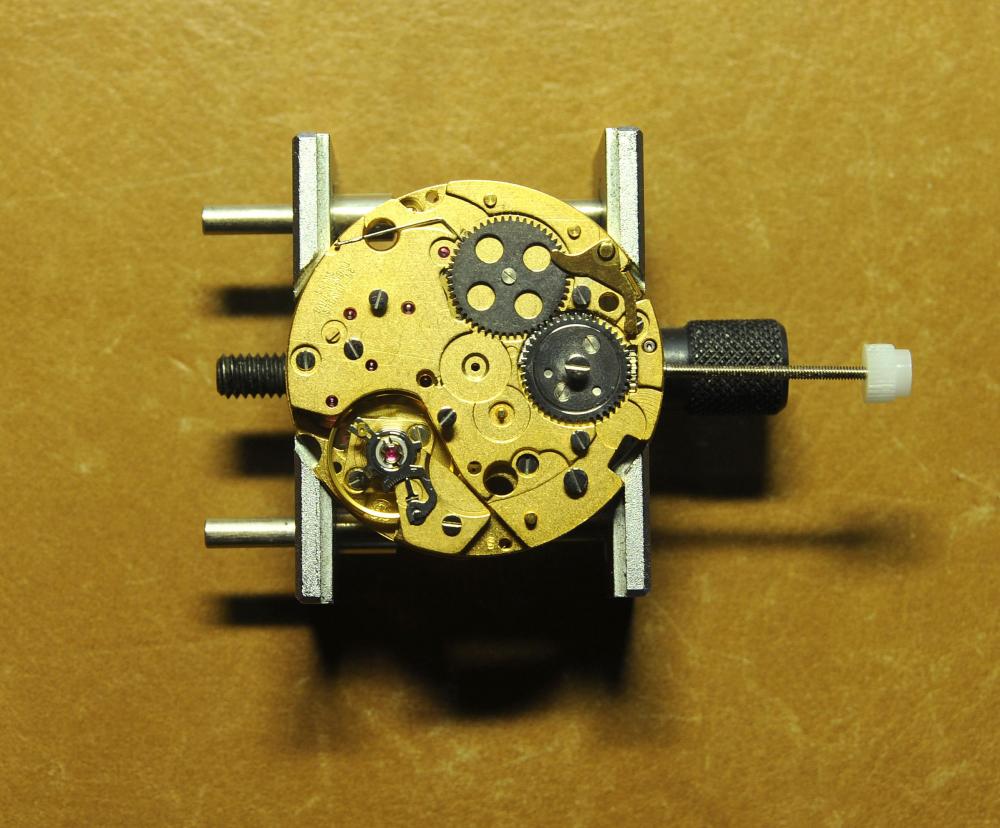
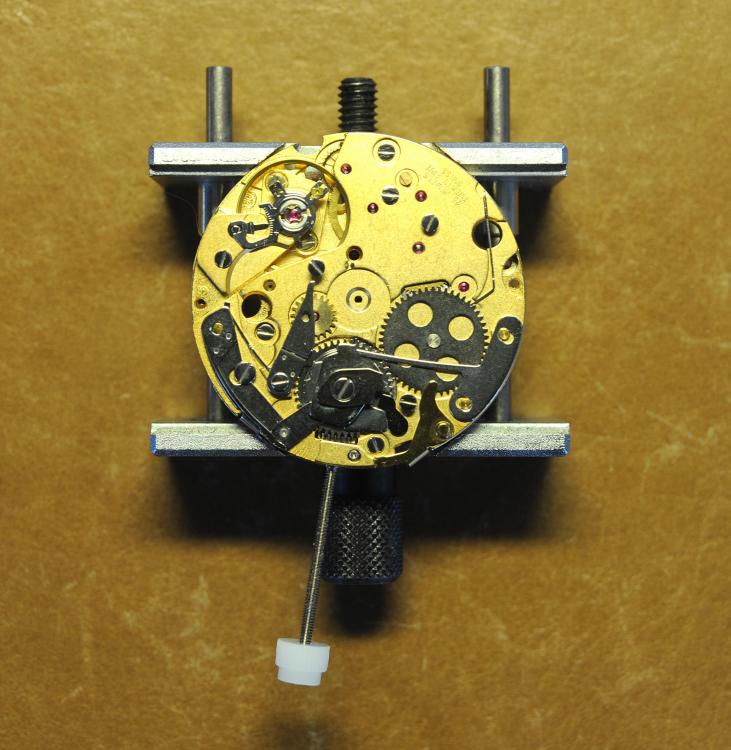
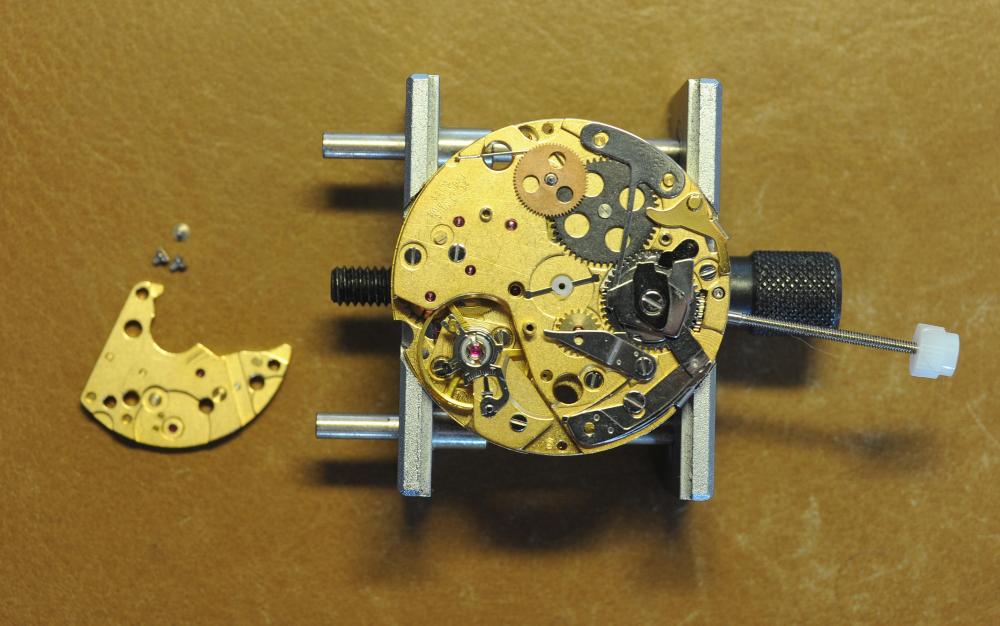
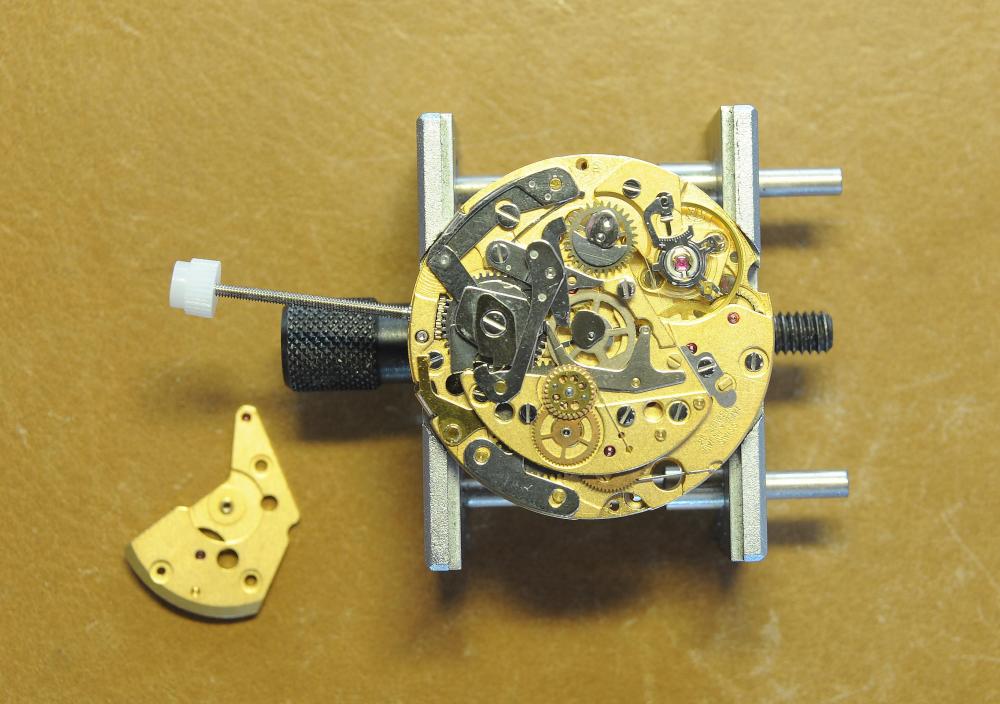
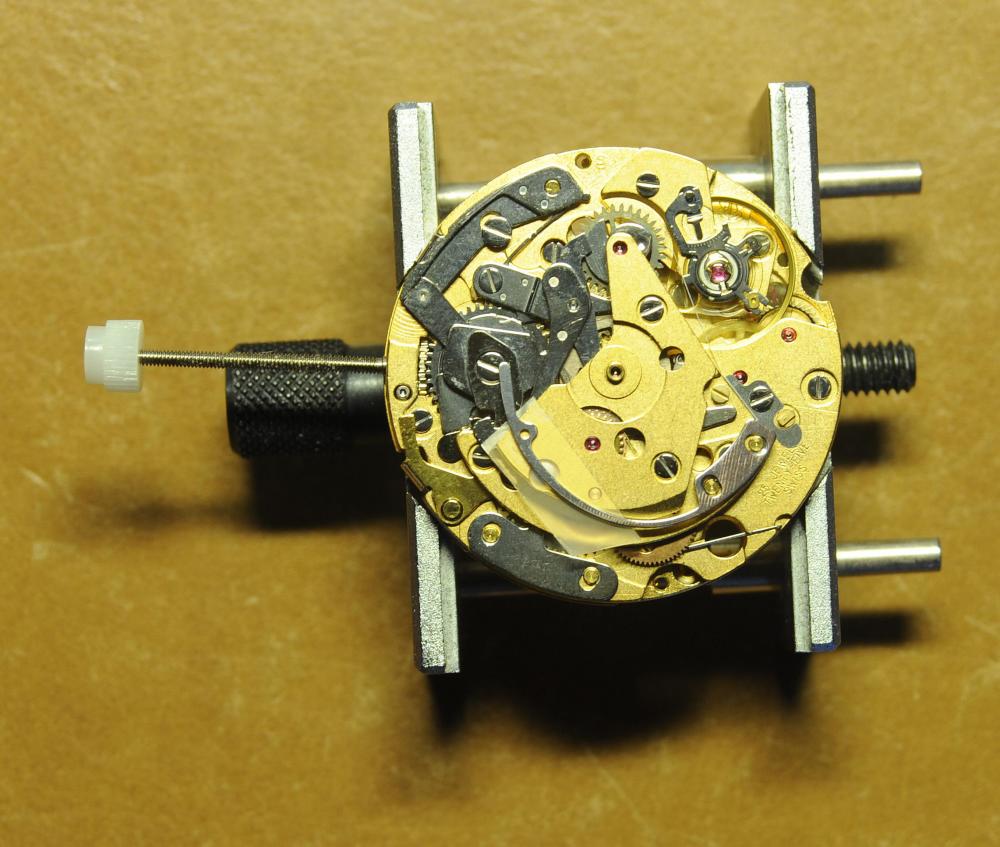
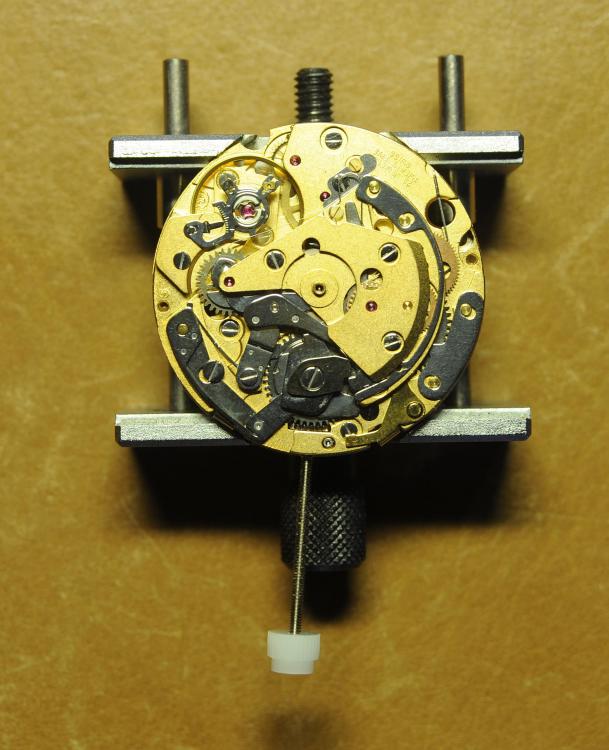
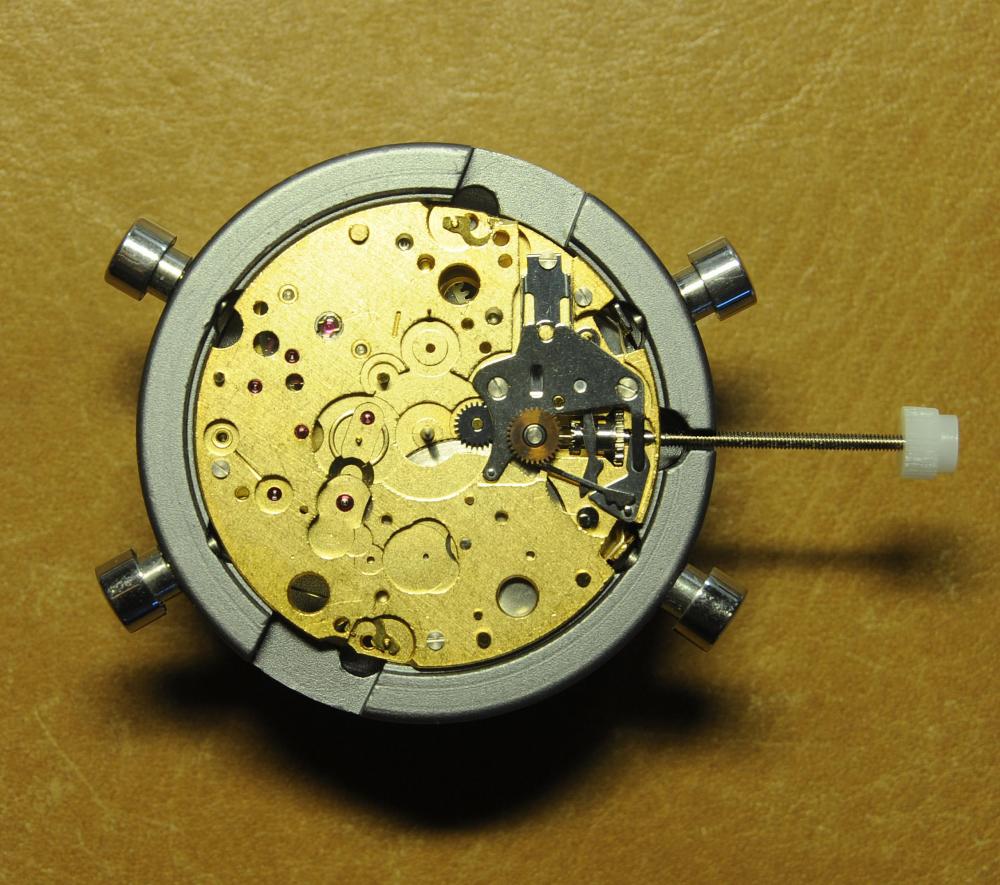
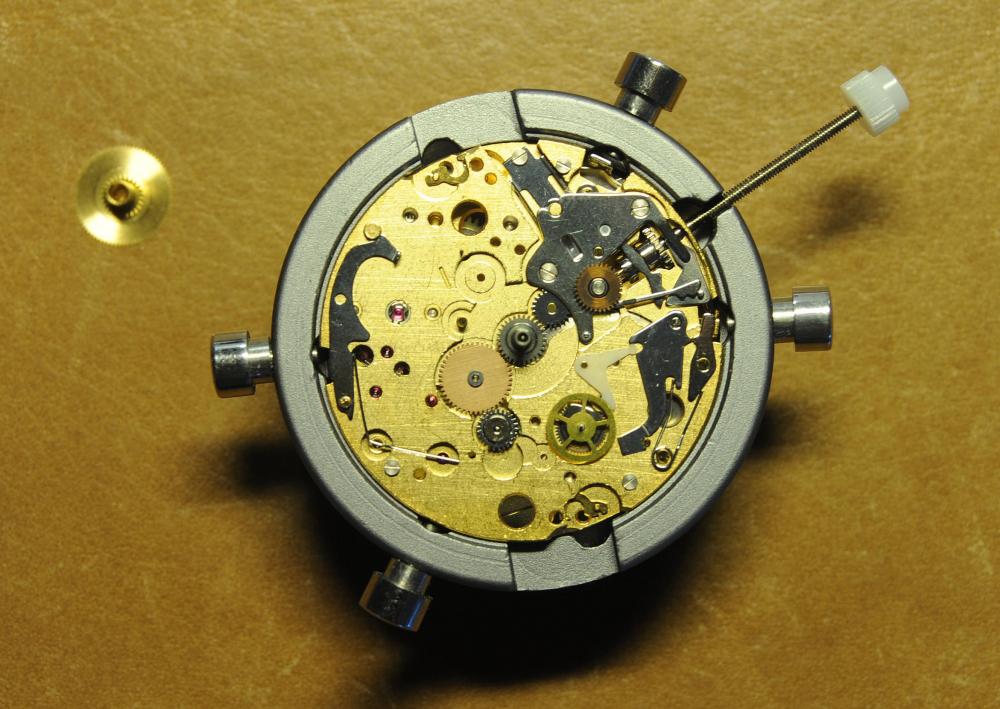
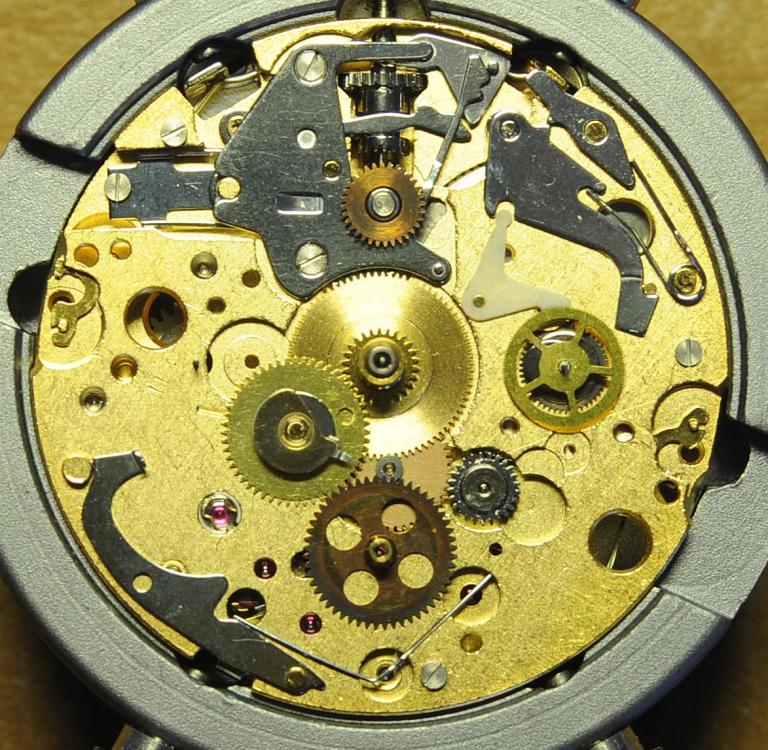
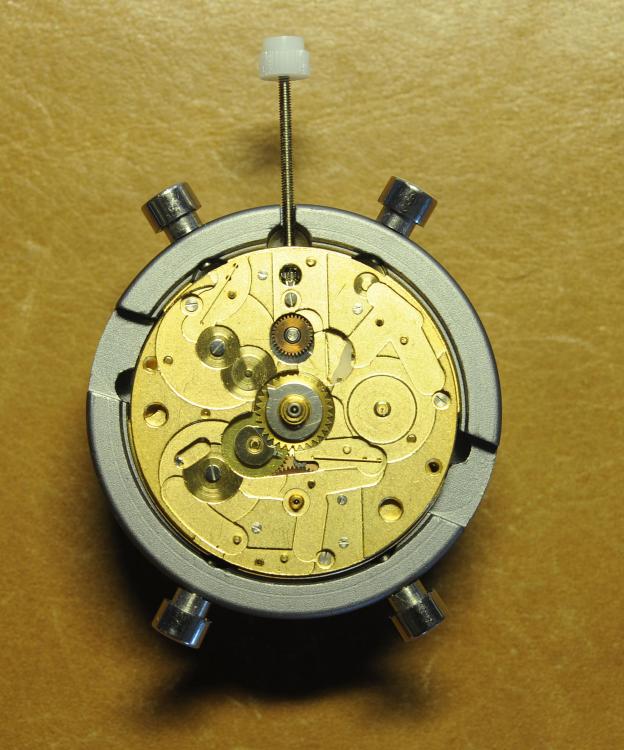
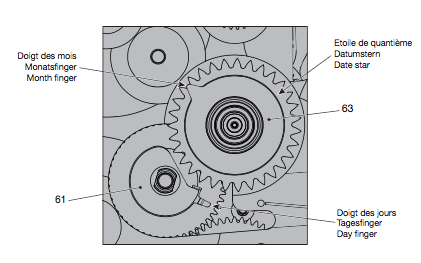
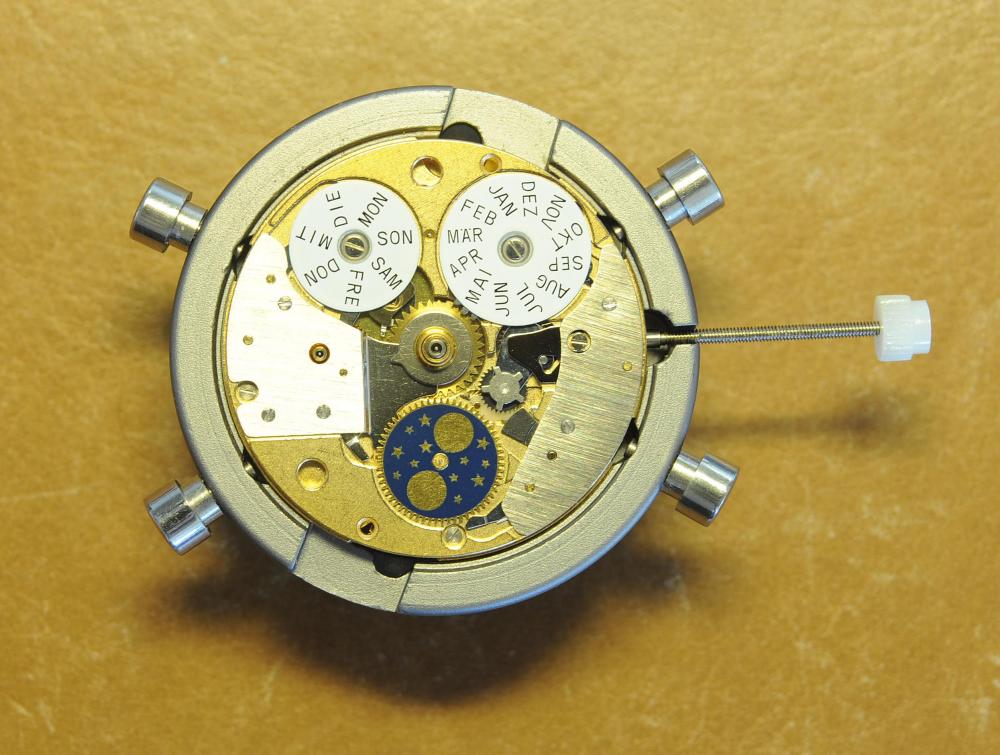
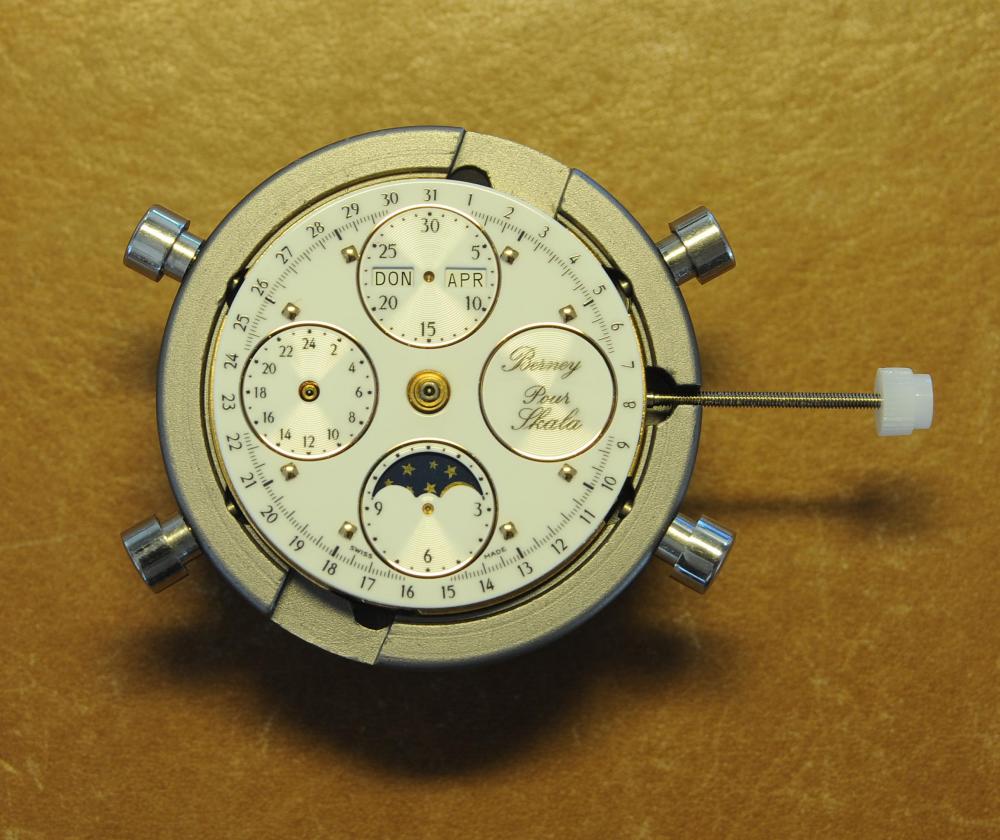
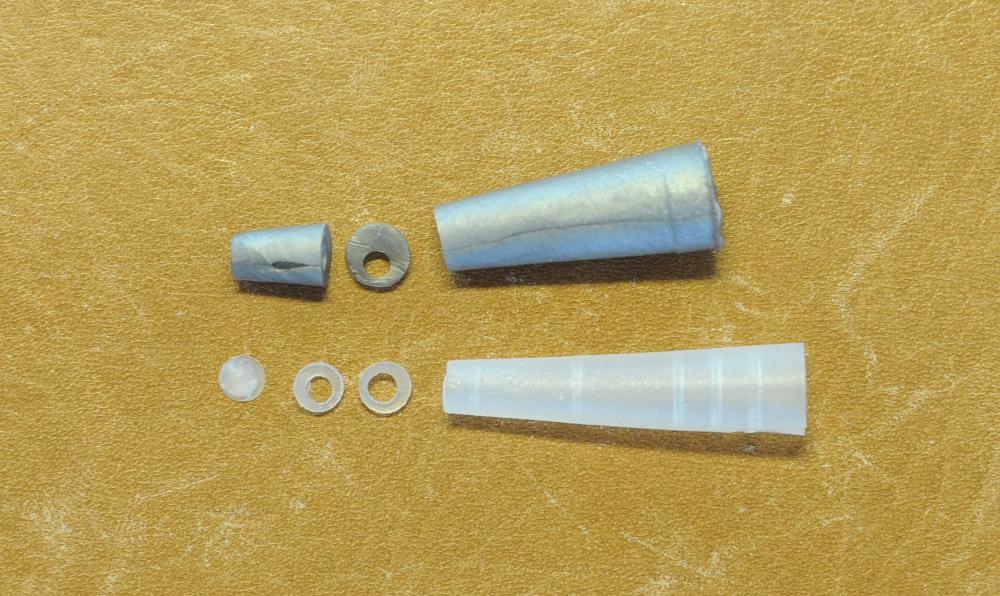
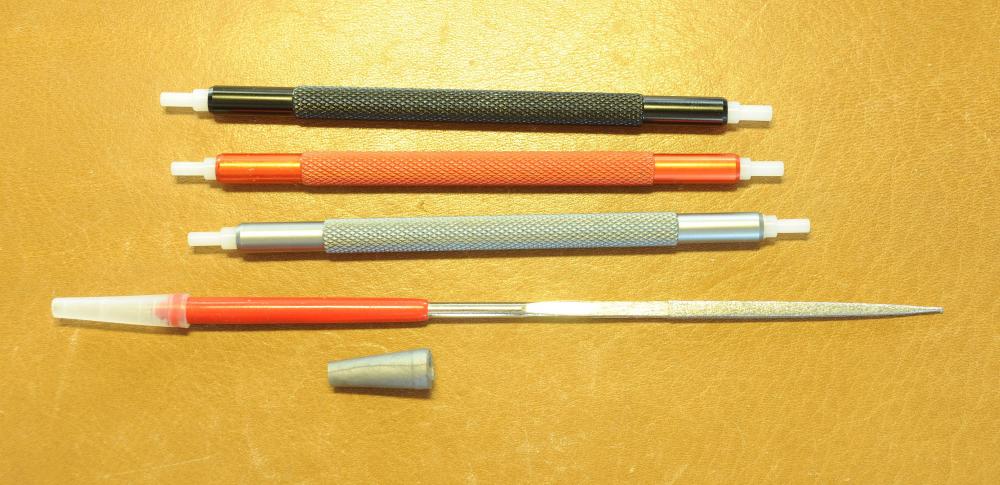
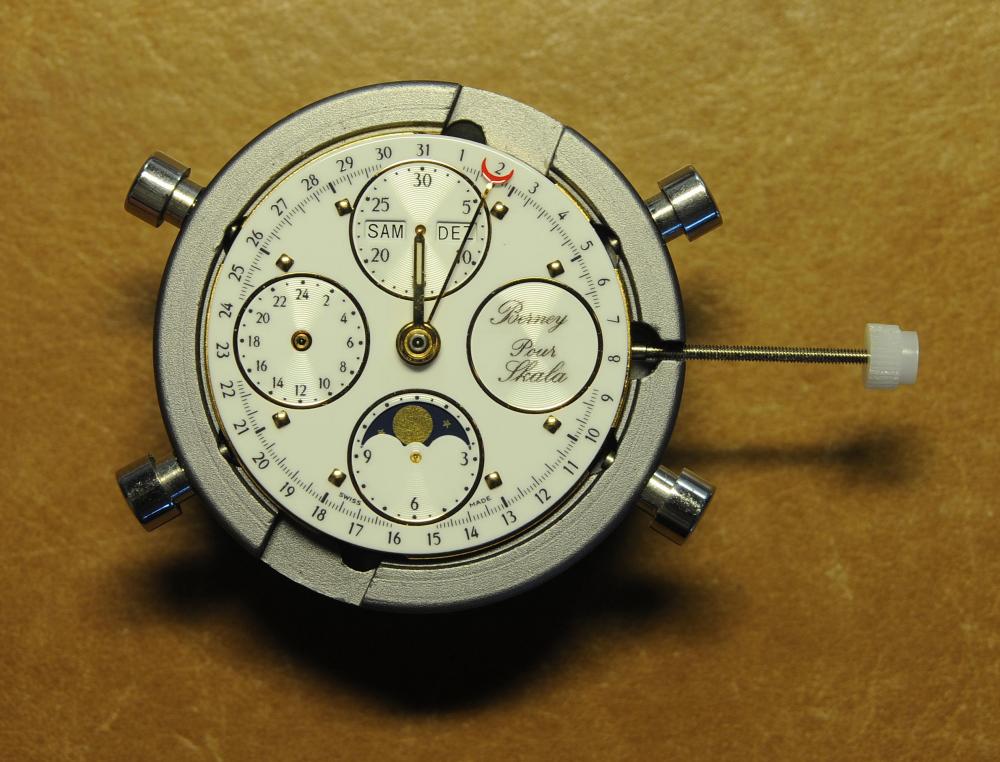
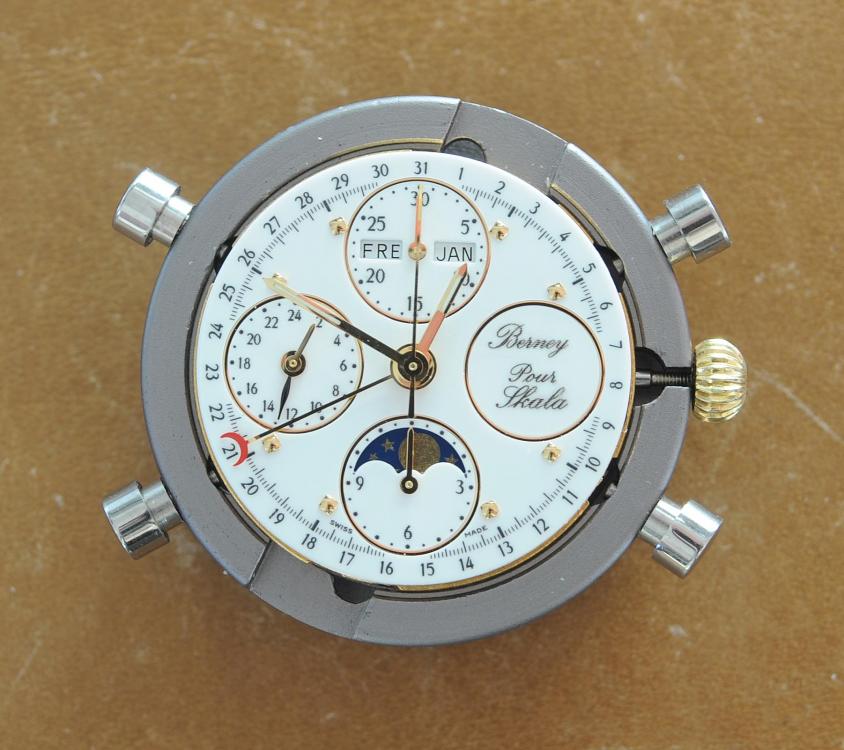
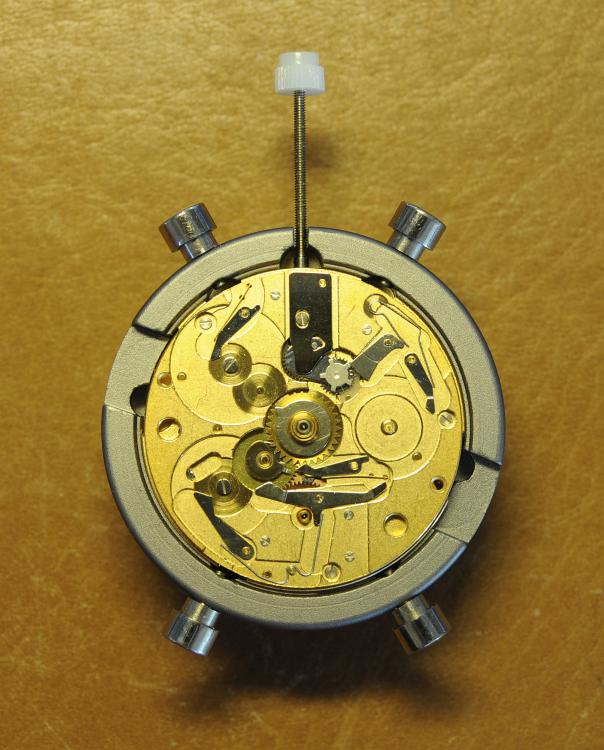
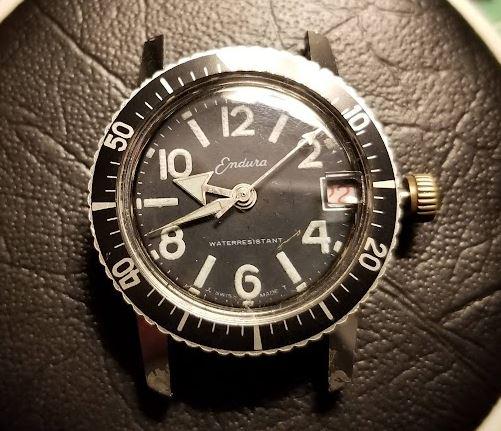
Valjoux / ETA 7751 Triple calendar moon-phase; This gold-plated Berney-Blondeau S.A. with an ETA 7751 belonged to a German gentleman who received it new on his 60th birthday in 1995. Through the years he kept the original box, the warranty card as well as the 1995 price-list and the dealer’s business card. He has worn the watch only on social accessions and the watch spent most of its time stored in a "Panzerschrank". According to the original price-list, the 1995 purchase price was 1450 CHF. As you can see, the watch held up pretty well, only a few small scratches in the front- and rear mineral-glass crystal and on the top of the lugs some of the gold-plating has worn through. The watch ran, all function did work. It had never been serviced nor opened Disclaimer; This walk-through is written in the way I do it. That's not to say it's the most correct way of doing things but as they say: there are many ways to Rome, all leading to the same result. Neither do I, as a hobbyist, have fancy horological equipment such as a cleaning machine or a "sterile" & "dust-free" room and therefor the end result will not be "Rolex"-standards. All I can say is that I'm always give it my best shot and I will mention problems encountered or were I went wrong, so you don't have to Without any further ado, let's dig into this beautiful & complicated watch ...... First make sure that you downloaded the latest ETA 7751 "Technical Communication". Throughout this walk-through I'll use the same parts reference numbers as used in the "Technical Communication". Below the currently latest September 2021 version; 7751 manual.pdf Before having done anything to the watch, I tested all the functions for proper working and took the timegrapher readings to see if there was anything which needed special attention. These readings can later be compared with the readings after the service. Dial-Up; Dial-Down; Crown-Right; Crown-Down; Crown-Left; Crown-Up; From the readings, it's clear to see that the watch needed a proper service. The back-lid, just like the front-crystals found on pocket-watches, required a knife-type case-opener. Checked out the oscillating weight ball-bearing, it had next to no play and therefor good for another round. Removed the oscillating weight (48). Removed the two casing-screws and clamps, pulled the stem and flipped the case over onto a soft pillow. With the watch-case removed, the winding stem re-inserted and the movement was placed in a proper 7750 (or family) movement-holder. To me, working on these movements a proper movement-holder is paramount. During the disassembly of the movement I encountered some problems and without this holder I most likely would have made scratches or worse..... Pulling the 8x hands; they all came off without any problems. All the hands safely nicely stored in a small plastic container. The same counts for the dial, after the removal directly stored in a plastic container with on both sides of the dial a soft lining. Removal of the Day & Month indicator disk (78) and the Moon phase indicator (79) The keen observer may have noticed that there are no screws next to the movement holder, for example the two screws holding the Day & Month indicator respectively. When working on complicated movements or movements which I'm not familiar with, I took on the habit, when possible, to replace the screws in the same hole as they came from. For sure, it's more work, but some movements do have multiple types/sizes screws and it will become a big puzzle if you store them in the same container / basket. Replacing the screws works (most of the time) very well for me, but in some cases the replaced screws shoulder-out deeper than as they would have done when holding the part above. The protruding screw may touch parts below or when replacing bridges, prevent the bridge from not seating fully "level". To me, replacing the screws thoughtfully is far simpler than facing a huge sorting puzzle later. Removal of the combined maintaining plate (76) and the Month star driving wheel (77). The three tiny screws holding the maintaining plate (76) were extremely tight. I couldn't loosen them with my standard (new) screwdriver bits so I had to grind the screwdriver bit to match the exact the same shape as the screw-grooves. Only then, with "force", they came loose and I was glad for having a proper movement-support! One slip of the screwdriver, with the force that was required, could / would have easily made a deep score in the plate or worse ........ Removal of the Day jumper spring (71), Day & Month jumper (70), Day jumper (72) and the Moon phase yoke (73) plus an early warning ! With those parts out of the way, the Moon phase platform (75) had to come off. Assuming that the with the arrow highlighted screw was one of the screws holding the platform down, I turned the screw only to discover that it was the moon-phase corrector eccentric ....... Oops !! The setting of the eccentric has to be checked at the end anyway, but now I know for sure that it's set wrongly. Removal of the Moon phase jumper (69), Corrector maintaining small plate (66) and the Moon phase jumper spring (67). Still in the picture the Date & Month jumper (74) which should have been removed before this picture was taken. The original stem was replaced by a longer stem to adjust the Calendar driving wheel (61) which was holding the Date-star (63) down. Removal of the Date-star (63, shown in the previous picture) together with the Date-corrector (65) and the corrector maintaining small plate (66). Removal of the calendar platform (62). Slowly back to familiar ground; a standard ETA 7750 starts to appear ... Removal of the Hour wheel 24hrs H1 (59), the Calendar driving wheel (61), the Hour-wheel (60), the Day corrector (58) and the Day corrector spring (57). The removal of the Hammer-spring (56), Set hour-hammer operating lever (53 & 54), Hour counter lock (55), Hour counting wheel (52), Minute-wheel (51) and the free Cannon pinion (50). Pulling of the Driving pinion (49) has to be done carefully; either with a pair of hand-levers or two small screw-drivers. The upwards force on either side of the pinion has to the equal or you may break the pinion of the great wheel (16) (a previous experience has taught me so !! ) Flip the movement over and from here on I'm using a Bergeon 4040 movement holder. First the removal of the Hammer-spring (45). When removing this spring I had up till now difficulties avoiding making a small mark in the Automatic device bridge (44). It was our WRT-member "Nickelsilver" who tipped me off using a piece of Scott tape over the edge of the bridge. This worked very well and for the first time I was able to remove the hammer without leaving a mark! Thanks Nickelsilver! The hammer-spring (45) and the Clutch-spring (47) removed. Remove the Auto device bridge (44). Removal of the Reversing wheel; (43), Reduction wheel (41), the Clutch (40), Oscillating pinion (39), the Hammer (42), Chronograph wheel (37), Minute-counting wheel (38), Minute-counting jumper (46), the Lock (33), the Operating-lever (36) and the Minute counting driving wheel (19). Removal of the Chronograph bridge (34), the Friction spring (32) and the Operating lever spring (35). After the removal of the Ratchet wheel driving wheel (33) it's time to release any residual power in the main-spring. This can be done by holding the crown, lift the Click-spring (20) and slowly release the tension by letting the crown slip through your fingers. Removal of the Chronograph cam (29), Cam jumper (28), Detent (30), Ratchet wheel (23), Crown wheel core (22) and Crown wheel (21). Removal of the Balance Assembly (26+27), Pallet bridge (25) and Pallet fork (24). Removal of the Barrel bridge (18). Removal of the power-train; the Great wheel (16), Third wheel (15), Second wheel (14), Escape wheel (13), the Movement barrel (12) and the Stop lever (17). Flip the movement over for disassembling the keyless works. Removal of the Setting lever jumper (11) together with the Intermediate setting wheel (10), the Time setting gear (9), Rocking bar (8), Yoke (6), Setting lever (5), Winding stem (4), Winding pinion (2), Sliding pinion (3) and the Yoke spring (7). All the parts safely stored in a compartmentalized box with lid, ready for cleaning & demagnetizing. Regarding the "wear & tear" of all the watch-parts; it was clear to see that the watch hadn't seen a lot of use. The Oscillating weight ball-bearing (48) was good, reversing wheel (43) looked good etc. However, I decided to change out the main-spring. This type of barrel has a lid which cannot be "pushed" open. To open the lid, I place a sharp knife in the groove between the barrel and the lid and while pressing down on the knife roll the barrel, in my case on a "soft" leather underground to avoid doing any damage. This widens the groove into a small gap and with the smallest screwdriver one can pry, going around the barrel, the lid off. When done carefully you won't leave any marks. Barrel & Arbor cleaned, braking-grease applied ready for the new spring. Apart from a few (see "technical communication" !) the parts were soaked for 24hrs in Zippo lighter fluid and pegged; all the sprockets, pivots and jewels. Thereafter all the parts were checked for magnetism. Instead of using the unreliable compass method, I'm using an App called "Lepsi" on my iPhone. This App doesn't tell you how much magnetism there is, it only indicates whether there is any. The distance of the object above the screen, by which magnetism is detected, gives you some indication of the strength of the magnetic field, but nothing more. For me, when magnetism is detected, that's enough reason to "Zap" that part on my no-nonsense self-build demagnetizer. Of course, in reality the demagnetizer is not placed anywhere near my iPhone or the other watch-parts / metal-objects like here on the photo. Also, it may be a good idea to take your watch off during the "zapping” operations! Quite a few parts, particularly in the calendar works, were magnetized. With the main-plate anti-shock Chaton cleaned, pegged, cap-stone oiled and re-installed in the main-plate (1), the assembly of the 7751 can begin. Escape wheel (13), Second-wheel (14), Third-wheel (15), Main-spring barrel (12), Great-wheel (16) and Stop-lever (17). Installation of the barrel-bridge (18) (by a 7750 the wheel-train the and barrel-bridge are combined in one bridge). Make sure that all the wheels turn fine before tightening the screws; check, check and double check. Again, if you using the re-installed screws method, some screws may protrude the bridge. (I took the "warning picture" below a little later, so don't look at any additional installed parts) All the Lubrications as per the ETA 7751 "Technical Communication". These two re-installed screws do protrude the Barrel bridge (18). The one on the left will touch the Great-wheel (16) and the one to the right may just touch the main-spring barrel (12). Back them out far enough so they don't cause any trouble. The installation of the Crown-wheel (21), Crown-wheel core (22) and the Ratchet-wheel (23). With the movement turned over, installation of the keyless works; Sliding-pinion (3), Winding pinion (2), Winding-stem (4), Setting-lever (5), Yoke-spring (7), Rocking-bar (8), Yoke (6) and placing of the Time setting gear (9) before placing the Intermediate setting wheel (10) and Setting lever jumper (11) as a "combination". Keyless work completed. Check for proper working! Installed the pallet-fork (24) and the complete balance assembly (26 & 27). Cleaned, pegged the balance Chaton and oiled the cap-stone. Before going any further with the assembling, I tested the power-train and escapement for any irregularities. On the timegrapher the readings were looking a whole lot better than initially. Instead of picturing each position, here are the readings; DU & DD both 292-294 degrees, 0 ms and 0 s/d. CU: 244, 0.1, -14 s/d CR: 249, 0.2, -16 s/d CD: 252, 0.1, -6s/d CL: 262, 0.0, -5 s/d Even though I adjusted the Etachron as good as I could, that's to say centring the hairspring between the two regulator pins and thereafter reducing the regulator pins gap to the point that the hairspring could still, but just "breath", the positional deviation with max. 16 seconds is slightly higher than I was hoping for. Then again, it's not a chronometer grade and each position produced straight lines, so I think that with some daily-rate adjustments the watch will run just fine. Once satisfied with the running of the power-train and the escapement, the assembly of the chronograph can start. Cam jumper (28), Chronograph cam (29), Detent (30), Minute counter driving wheel 30 minutes (19), Lock (33), Operating lever spring (35) and the Operating lever (36). As said; lubrication as per "Technical Communication" and test the proper function of the start/stop and reset levers. Placement of the Ratchet wheel driving wheel (31) and the Friction spring chronograph wheel (32). Install the chronograph bridge (34); don't forget the lubricate the Reversing wheel jewel on the bottom of the chronograph bridge before placement. Also pay attention to the reset-lever, it has to be pushed in so the bridge can sit level & flush. Check the working of the Ratchet driving wheel (31) and the reset lever before tightening the bridge screws. The placement of a well lubricated Reduction wheel (41), Minute counter jumper (46), Oscillation pinion (39, biggest sprocket down), seconds recording Chronograph wheel (37), Minute counting wheel (38), the Clutch (40), make sure that the oscillation pinion pivot is engaged), Reversing wheel (43) and finally the Hammer (42) before the Automatic device bridge (44). Before installing the Automatic device bridge (44), lubricate the jewel for the seconds recording Chronograph wheel underneath the bridge. The installation of the Automatic device bridge can be very tricky. It's very easy to touch the Clutch (40) and the pivot of the Oscillation pinion comes out. Before inserting or tightening the bridge screws, double-check the placing and working of every component!! Once the bridge is installed and with the relevant lubrication done, before mounting the hammer-spring (45) and the Clutch-spring (47), all the functions of the chronograph can be checked & tested; the engagement of the oscillation pinion, the smooth running of the seconds recording chronograph wheel, the advancing of the minute counting wheel, the start/stop- and reset-levers etc. Next is the installment of the Hammer-spring (45) and Clutch-spring (47). To prevent scratches on the Automatic device bridge (44), as per brilliant idea of WRT member "Nickelsilver", a piece of Scotts tape was taped over the edge of the bridge. With the installment of those two springs, the assembly of the chronograph is completed Movement flipped over and placed in the 775x movement holder. Installment of a well lubricated Driving pinion (49), The Cannon-pinion (50), the Minute wheel (51), Hour counting wheel (52), Set hour operating lever (53+54), Hour counter lock (55) the Hammer spring (56), the Day corrector spring (57) and the Day corrector (58). The build-up, up till the Day corrector spring (57) and the Day corrector (58), was identical as to a standard 7750. The Hour wheel 24hrs (59) drops over the Second wheel (14) pivot. Attention: Sadly, no picture but when installing the Hour wheel (60) over the Cannon pinion, one has to lift the Minute wheel (51) slightly and to make sure that the hour wheel teeth do engage in the small minute wheel sprocket. Once they engage, both wheels can be lowered in place. Finally, before installing the Calendar platform (62) the Calendar driving wheel (61) with the "day finger" pointing as shown. From here on I pulled the winding stem to stop the running of the movement and thereby avoiding the advancement / altering of the positions of the wheels. The installation of the Calendar platform (62) can be a bit tricky. It's all too easy to dislodge the hour lever (53) and the Hammer spring (56). Make sure that the platform sits flush with the Main plate (1) before tightening the 3x screws. Place the Day star (63) as shown in both above pictures. Placing of Date + Month jumper (70), the Day + Month jumper (74) (Both jumpers are identical), Day jumper (72), Moon phase yoke (73), Day jumper spring (71), Date corrector (65), Corrector maintaining small plate (66), Moon phase corrector (68), Moon phase jumper (69) and Moon phase jumper spring (67). Installation of the Moon phase platform (75), the Combined maintaining plate (76) (Be aware that the top of the Combined maintaining plate slides in the gap of the Day Star) and the placing of the Month star driving wheel (77). Placing the Month & Day indicator disk (78) and the Moon phase indicator (79). Adjusting the Phase corrector eccentric (64) wasn't that hard as I feared. By adjusting the eccentric one determines the "depth" of the Date corrector (65), shown by the blue arrows. Set too high and the top-sprocket of the Date corrector (65) won't even touch the Moon phase corrector (68). Set too deep the top-sprocket of the Date corrector will jam the Moon phase corrector (68) into the Moon phase indicator. The "depth" has to set such that the sprocket of the Date corrector (65) pushes the Moon phase corrector (68) just far enough so that it will just advance the Moon phase indicator by one click before the top Date corrector (65) sprocket releases the Moon phase corrector (68). There is clear information about the Moon phase corrector "depth" setting in the ETA 7751 "Technical Communication". With all parts installed and tested as far as possible, the dial goes back on. Before re-installing the hands, I re-lumed the minute & hour hand with new high-class LumiNova. Both hands now re-lumed and drying before the installation. Placing the long Date indicator hand required a bigger size hand-pusher which I didn't have. The idea was born to cut a tweezer protector-cap from the top until the required size was obtained. Stuck to protector cap onto the handle of a diamond file for more stability / pushing-power. It worked like a treat Turn the date quick-set until the month indicator disk changes month, that will be the first (1) day of the new month. The rest of the hands (8! in total) to be set at 24:00 midnight when the day indicator disk changes. Detailed instructions about the "shift tolerances" are described in the ETA 7751 "Technical Communication". All the hands installed and correctly set on the month / day / date and moon phase. The 18th of January 2022 had a full moon. The German gentleman received the watch when he turned 60 in 1995, now I'll continue with his watch as from my (65th ) birthday in January 2022 I'm still awaiting new crystals and once the case has been restored, I'll add the final picture of the fully restored/serviced watch. I really enjoyed working on this watch and even though I sometimes feel that contributing to this current WRT-forum has sadly become a bit of wasted time, I do hope that my write-up, perhaps found via Google or some other search machine, will be of some use to somebody, at some point in time Endeavor, Denmark


 1 point
 -
OK, so I disassembled the back of the movement again and took a look at the 2nd wheel. As I suspected, the clutch was shot and that is what was causing the problem. It took me an hour to get the top plate back on...dang pin lever movements. This one has 7 jewels but only the escape wheel is jeweled...the rest are tiny holes in the plates. Anyway, it's back together and the hands are moving. I need to do a little more work on the Timegrapher, but it's very close. I also need a crown; I have no idea what happened to the original, probably got scavenged for another project. I bought this watch in 2016... Anyway, I've included photos of the 2nd wheel for anybody else that encounters this issue. The top of the wheel is like any other, but the bottom has a clutch that engages the setting pinion. It's a neat setup, but when it wears out, this is the result. Basically you grab the bottom gear with a pair of tweezers, and if you can easily rotate the top of the wheel, the clutch is worn. Just like any clutch (whether car, watch, etc) it needs "enough" friction but not too much or too littel. Thank goodness for parts movements.
 1 point
 -
This is normally a sign that the stones or at least one stone is seated too far into the fork. Rather than an escape tooth falling on the locking face of the fork it falls on the impulse face, then the other impulse face and you have this result.1 point
-
Hi In the old days we used telus 33 a Hydraulic oil, but these days a synthetic 10/40 is ok, egg cup to 1/2 pt. still using the old scale. But remenber to wash with hot soapy water and dry well. Just take care they clean up real well, although I dont use brasso liquid I prefer the non abrasive silver polish.1 point
-
That unfortunately is standard operating practice for most watch schools in the US. Personally I always find it amusing that you have to take it entrance test that shows that you have watchmaking skills so that you can go to a school to get watchmaking skills. It's a shame you didn't have a time machine You can travel back in time and go to the Bulova school it was in New York somewhere. Was a really excellent school but it's gone like most of the schools in the US. There aren't that many decent schools left unfortunately. If you want to grasp the US school situation for watch repair look at this link https://www.awci.com/educationcareers/research-and-education-council-rec-schools-u-s/ This is an interesting school I don't think driving is going to be a problem at all. They even have a website with testimonial information and I wouldn't waste my time here at all. The description of the master watchmaking class is interesting and I think interesting is probably the nicest thing I can say about it. https://ohe.ct.gov/heweb/PosaInfo.asp?F=1757 http://jwrschool.com/ Too many choices too many problems? If you can get in the Patek-Philippe school You would really be set for life. For those that don't grasp the school I have a link it talks about the school. The biggest problem is getting in and really would be nice if you had prior knowledge? But as there's a phone number and you know where they're located It's worth giving them a call talking to them. Who knows maybe they have an opening right now maybe have a waiting list of the end of time. The only way to find out is give them a call. https://mailinwatchrepair.com/sample-article-1/ As you don't want to leave home your choices become extremely limited. Maybe you should listen to your mother? Start the college get something practical get something Practical that you can make money with but don't give up watch repair? Here's a nice suggestion that I've quoted The nice thing about Mark's course is you don't have to physically go anywhere. It's recognized and well respected by everyone on this group. It's being taught by somebody who actually knows what watch repair is. Take the first course find out if you like watch repair.1 point
-
The key is usually soft (soft compared to the spindle itself), and can be drilled. The spot you see on the tapered bearing surface is it, you can drill out the old one. Some folks stop there, as the key isn't strictly necessary and if you have a mix of collet brands might hang up on some and be loose on others. I like having a key. To make a new key you will need to turn a plug the correct diameter to fit the hole, with a (tapered) shoulder. It should be a tight fit. Get it in, file flush- a file shouldn't even mark the spindle if the spindle is properly hardened. Then give it a few punches with an automatic center punch. It's very fiddly work. Finally, you can go up inside the spindle with a fine file and fine tune the size. Collets that bind on the key will not turn true, and collets that have burrs raised by the key must have those burrs removed with a stone or perhaps a file and then a stone. Be as careful as you can to not remove more material than the burr itself. On a proper* 8mm lathe, the bore in the headstock is exactly 8mm, -0 +0.005mm; the collets are specced at 7.99 +0 -0.005. With a total window of 0.02mm but most often 0.01mm of freedom in the spindle it doesn't take much of a burr to bind up. *Some cheaper makes of lathe will have the bore loose on size to the large size, and collets loose on the small size, for one because it's easier to manufacture to loose tolerances, and also to make it easier to ensure different makes fit. There is a loss in precision though.1 point
-
This is how I used to restore these movements. All brass parts polish with brasso with a soft brush and a clean cloth. Wash out in petrol and dry in sawdust then French chalk using a brush that is just used for the job, this prevents the brass from tarnishing quickly. All steel screws to be cleaned up by means of files mostly needle files, then polished by different emery sticks grit sizes in the end they will have a good shine, this I would do in my lathe. All the screws that had originally been blued would be blued again. I used a bend penny held in a small vice, when the right colour is achieved screws are then put in clean oil I used 3 in 1 this leaves a nice sheen. I would then clean them in an old watch cleaning fluid using an old cleaning machine that I had. You are going to need a clock mainspring winder for the springs, these are also cleaned in petrol I used pipe cleaners near the end where the arbors go as cloth would not fit between coils. Springs are to be lightly oiled with Windels clock oil. Winding arbors to be de burred and polished in the same way as screws don’t forget the end of the arbor that will be seen at the front of the dial nothing like seeing a highly polished square, also the tip of the centre wheel and the square of the brocot fine regulator that can be seen above the 12. All pivots cleaned polished and burnished. It has already been said how brittle the steel is so be very careful. Any re bushing is also undertaken and if you are very skilled when done you shouldn’t be able to see the repaired hole. Don’t forget the pendulum brass parts these are also polished and also the screw is also tidied up but not blued. If the collet is steel polish that as well. I think I have covered it all. Windels clock oil is used for all the oiling not just the springs. I forgot to mention don't forget to peg out every hole using peg wood until the holes are showing no dirty marks on the wood.1 point
-
"You might want to polish the "crystal", there are several videos about it on youtube, pretty simple and relatively quick." As I mentioned, the photo above is a "Before" photo. The crystal has been polished and is ready to go. I use automotive sandpaper (600 - 2000 - 5000 followed by automotive paint swirl remover) and it always turns out nicely. The chrome plating on the lugs has started to peel a bit, but overall it's pretty nice considering I paid next to nothing for it. I did pull the hands/dial and I don't see anything wrong. I'm going to take it back apart and replace the 2nd wheel from one of my spares and see if that fixes the problem. This watch was a non-runner that I bought in a lot of dive watches to get a bezel for another watch I had rebuilt, and so I expected I'd run into something along the way.1 point
-
Hi It will be an expensive clean using isopropanol, Paraffin is ok, I use turpentine /white spirit with a drop of oil in it to clean and degrease then washed water and detergent rinsed and dried brushed with chalk for a polish, I have done the odd one in the machine using Priory polishes Ammoniated cleaner with good results and no problems on the plates. drying is the key1 point
-
That looks ok If you take to pieces one with the V Conic pivots you will understand the thinking behind the timex design, robust. fine pivots break easily. the timex boast was "It lakes a licking but keeps on ticking" and whats more they did.1 point
-
That is good practice. What I forgot to say one of the reasons why they are painted black is the marble ones were far more expensive. I didn't need to mention the steel because that has already been pointed out to you. Do not clean it in an ultrasonic tank, clean by hand.1 point
-
I have serviced/ repaired many of these movements. As already stated the pivots are very hard but can be burnished/ polished. Normally if it has not been serviced some bushing will need replacing. As OH has said change the mainspring.1 point
-
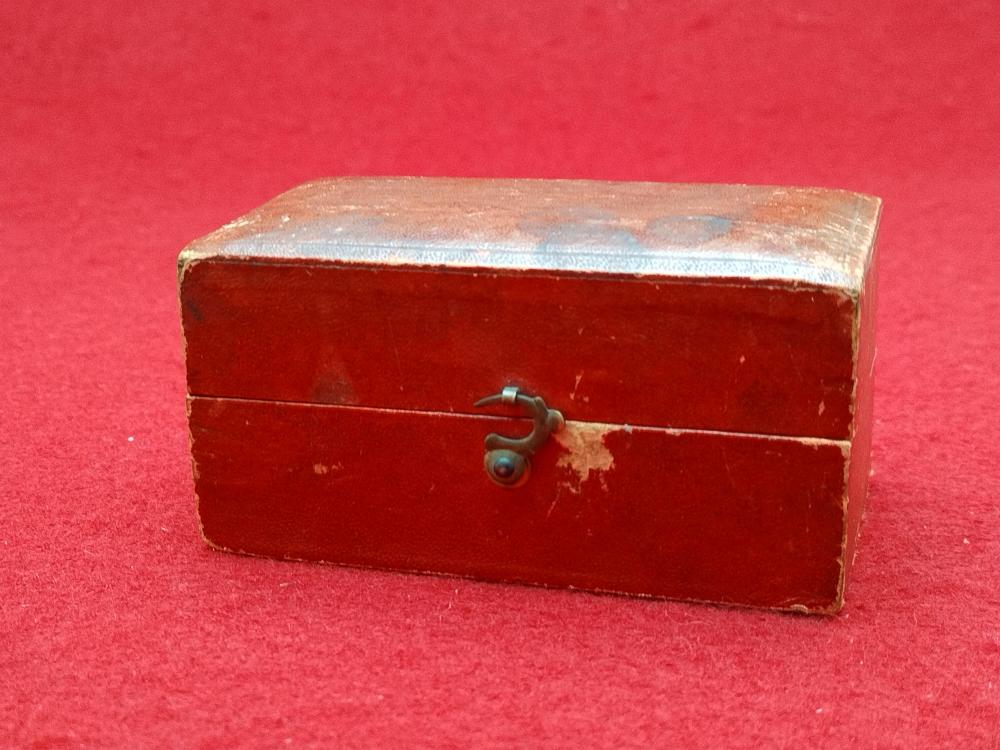
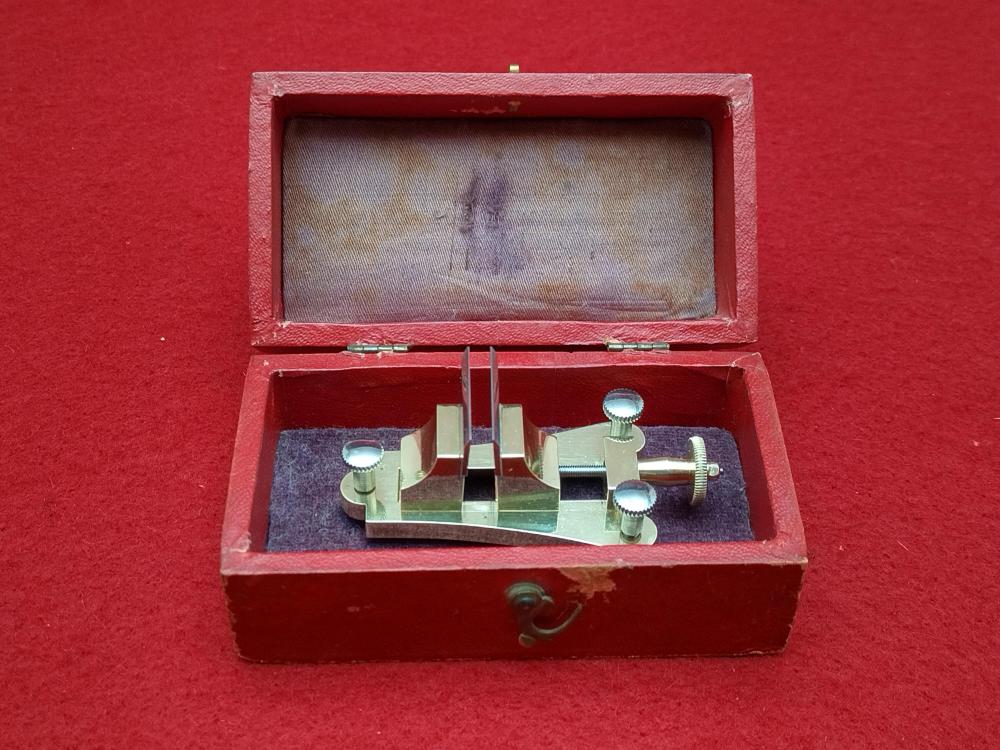
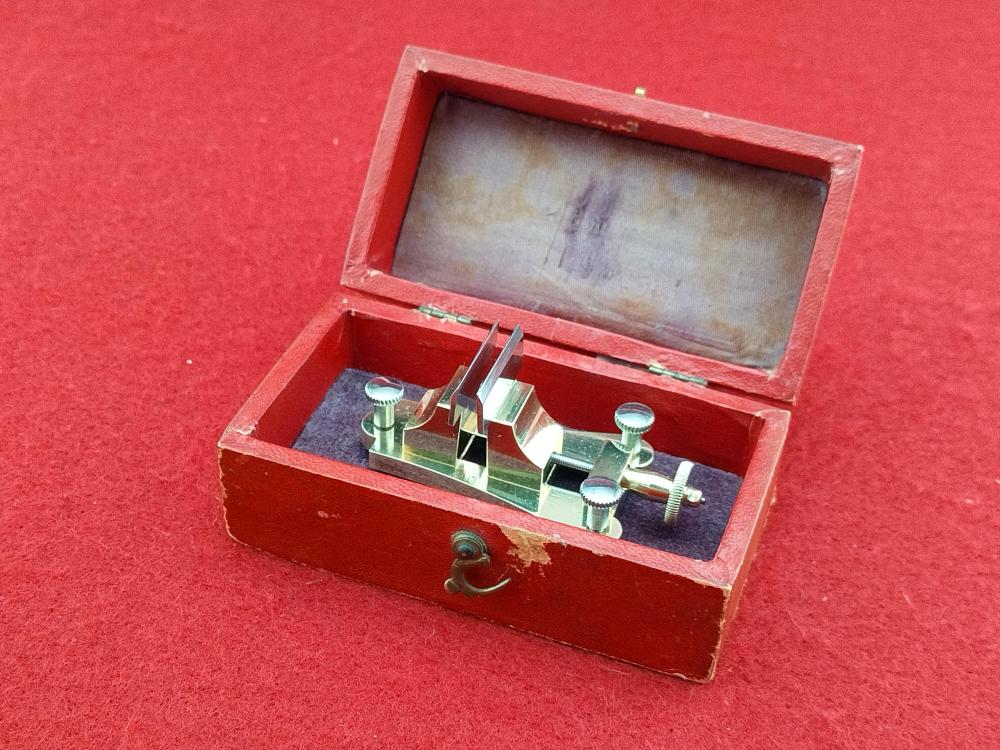
Here are some photos of an Engstfeld desk (who unfortunately only supply the trade). I will post some photos of my effort later.


 1 point
 -
I think the resistor would work just fine. It's just a coil of resistance wire encased in a ceramic shell. But if you want to replace it.... go ahead. If you can't find a correct size bearing puller, you can build your own by using a long hex bolt. Trim the head until it can fit through the hole of the motor casing but still engage the internal raceway of the bearing. Then on the inside, get a short length of pipe that is wide enough to rest on the rim of the casing and not press on the bearing itself. Thread the modified bolt through the bearing from the top and place the tube on the other side. Put a large washer over the tube and screw down a nut. This will put an axial force on the bearing and pull it out.1 point
-
Gotcha, yeah I should have clarified, when I said I know it works, I was talking about the existing ceramic resistor and that I would like the option to get a newer component, like the one you mentioned1 point
-
If it were the impulse jewel both tracks would likely have issues. In this case only one trace is off. Exit pallet not smooth. Loose pallet fork jewel perhaps.
 1 point
 -
Another one is cleaned and lubricated. Simple tool but managed to put it together 3 different ways.


 1 point
 -
Its not a marriage. This is how these types of french clock movements were fixed in wooden cases. I have seen hundreds of them. They were painted black to make people think it was black marble or slate. Every thing fits all the numbers are the same bezel, pendulum and movement. It will be 8 day duration, replace that spring with a new one. The style of the hands are called Moon. The info on the dial is the name of the seller and the address. It still has its original suspension spring.1 point
-
I think jdm summed it up pretty well and out lined the options. If it was me I should go for thr course offerd by Mark Lovick and get some training on my own account , thay way you can prove to youself its what you want to do. After completing the course you will be able to converse with any prospective employer/customer kowledgebly and have a thorough grounding in watch servicing and repair. A spring board to further your chosn carrer/1 point
-
I would say that the OP introduced himself very well, much better of many others actually. The only thing we don't know if he started practical repairing on his own already, if not he should readily do that. Which requires exams in-presence in the UK for at least 5 of the very many course units if you want to be certified. Other units may be sit elsewhere, but reading through their website which is full of long formalities I didn't managed to understand where, when and for how much. Anyway, my message to the OP is that he should now be able to perceive the elitist and almost secretive world of professional watchmaking. Schooling it is not done to popularize the knowledge but to prepare few future top-grade professionals, formed with the mindset of 100 years ago, while earning a good buck. I also think that these schools cater to people starting maybe a couple years or more older than him, and that have already have some experience and skills, as it's inevitable when there's a driving passion. My opinion is that since this is 2022 not 1922 one should take full advantage of that. As mentioned, high quality, practical, results-targeted training is available from our Host Mark Lovick at watchfix.com. An average person can learn well how to service, diagnose and fix (by parts swapping) a watch in 6 months, working everyday from home. Tools are easily ordered online and not terribly expensive when the goal is to learn how to use them not collecting big brands - do we remember that gladiators trained with weapons heavier than the ones they used in combat? Out there service offering is so thin that owners are desperately searching someone that maintains and repair their watches, from heirlooms of modest value "for sentimental reasons", to crystal replacing on fashion watches, to popular mechanical Seikos, all they way up to multi-thousands dollar watches for which the manufacturer wants big money to service them. Reputable watchmakers have years long waiting lists, I think that a young man able to show he's good at hit should have no difficulty in finding work with one of these, before being ready to open up his own shop. Then later on if he has the funds and disposition may consider enrolling a big name school far from home, but again IMHO isn't necessary to preserve the trade and make and honest income from it.1 point
-
Locust 7J pocket watch movement. Someone decided it would be cool if the train bridge had a convex surfaces for the train wheel pivots to dance around on. But also, yes, these low-jewel-count pin pallet movements are so noisy that the Weishi 1000 is at a complete loss.1 point
-
I am still very new...but I thought it would be fun to work on a Timex and as mentioned above, learned a hard lesson! I had a model 74 from 1968 which is kind of a pin level but the pins were jewels! It was just that dang keyless works! Having everything lined up between the two plates sucked, but adding that keyless works...3 days...never again...ok, maybe...it did feel great to get it together again. Honorable mention to Pulsar pusher c-clips...1 point
-
I guess the lesson to learn is, small movements = avoid. I have an Omega 455 (16mm dia) waiting for a new hairspring. I thought I had the skills to 'tweak' the hairspring. But as it's only about 3mm diameter, I didn't stand a chance !1 point
-
From your description, I gather a worn pivot, not a broken one.1 point
-
Check the end stones, they generally are domed on the outer side and concave on the inner. The idea is to benefit from the said diference. End stone on the dial side is set in a retainer plate, remove and flip it over, so to have the domed side of end stone facing balance pivot, you have reduced the end shake. Though this trick might be frowned upon, it works and extends the life of the staff for a good ten years of running. Hopefully in future you will have acquired the skill and a staking set to replace the balance staff. Mark Lovic teaches you how to replace a staff and we are your classmates here. Regs1 point
-
Lovely collection of watches Timely, thanks for sharing. really like the tissot, i'll have to keep my eyes peeled on ebay.1 point
-
To understand part of the problem we need to go to the link below and look at the size chart. It's only part of the problem because of the thickness of the movement. So a modern replacement watch would have to be the same size or it could be smaller but the thickness will be wrong. Because it's a military movement they made a lot of them you could keep an eye on eBay and see if he can find another movement. But the military movements tended to have a hard life and finding one in good running condition is a bit problematic. Then from your description of the balance wheel it's probably a broken balance staff and of course a complete overhaul. It's very common for these watches the end up with broken staffs because the balance system is not shock protected like modern watches. https://blog.esslinger.com/watch-size-ligne-conversion-chart/1 point
-
Are you sure that you used the correct screw for the end float adjustment and not the one with the slight chamfer on the head?........With every single one of these that I have worked on the balance can be locked by tightening the screw too much...... In true 'Blue Peter' fashion, here's some I did earlier......1 point
-
I finally got down to fixing this watch. I disassembled it completely, cleaned and oiled it. Put a new battery in and nothing happened. Took the balance off, inspected it under my microscope. Tested coil for continuity. Cleaned and polished the contact spring. Put it back together. And still it wouldn't move. Finally, I remembered JerseyMo's advice of using contact cleaner. I was skeptical at first. I use a lot of contact cleaner for electronic and electrical repairs. But I've always thought of contact cleaner as a lazy man's hack. But.... It's finally alive! Thanks Mo. 20200701_084351_001.mp41 point