Leaderboard


Popular Content
Showing content with the highest reputation on 03/03/21 in all areas
-
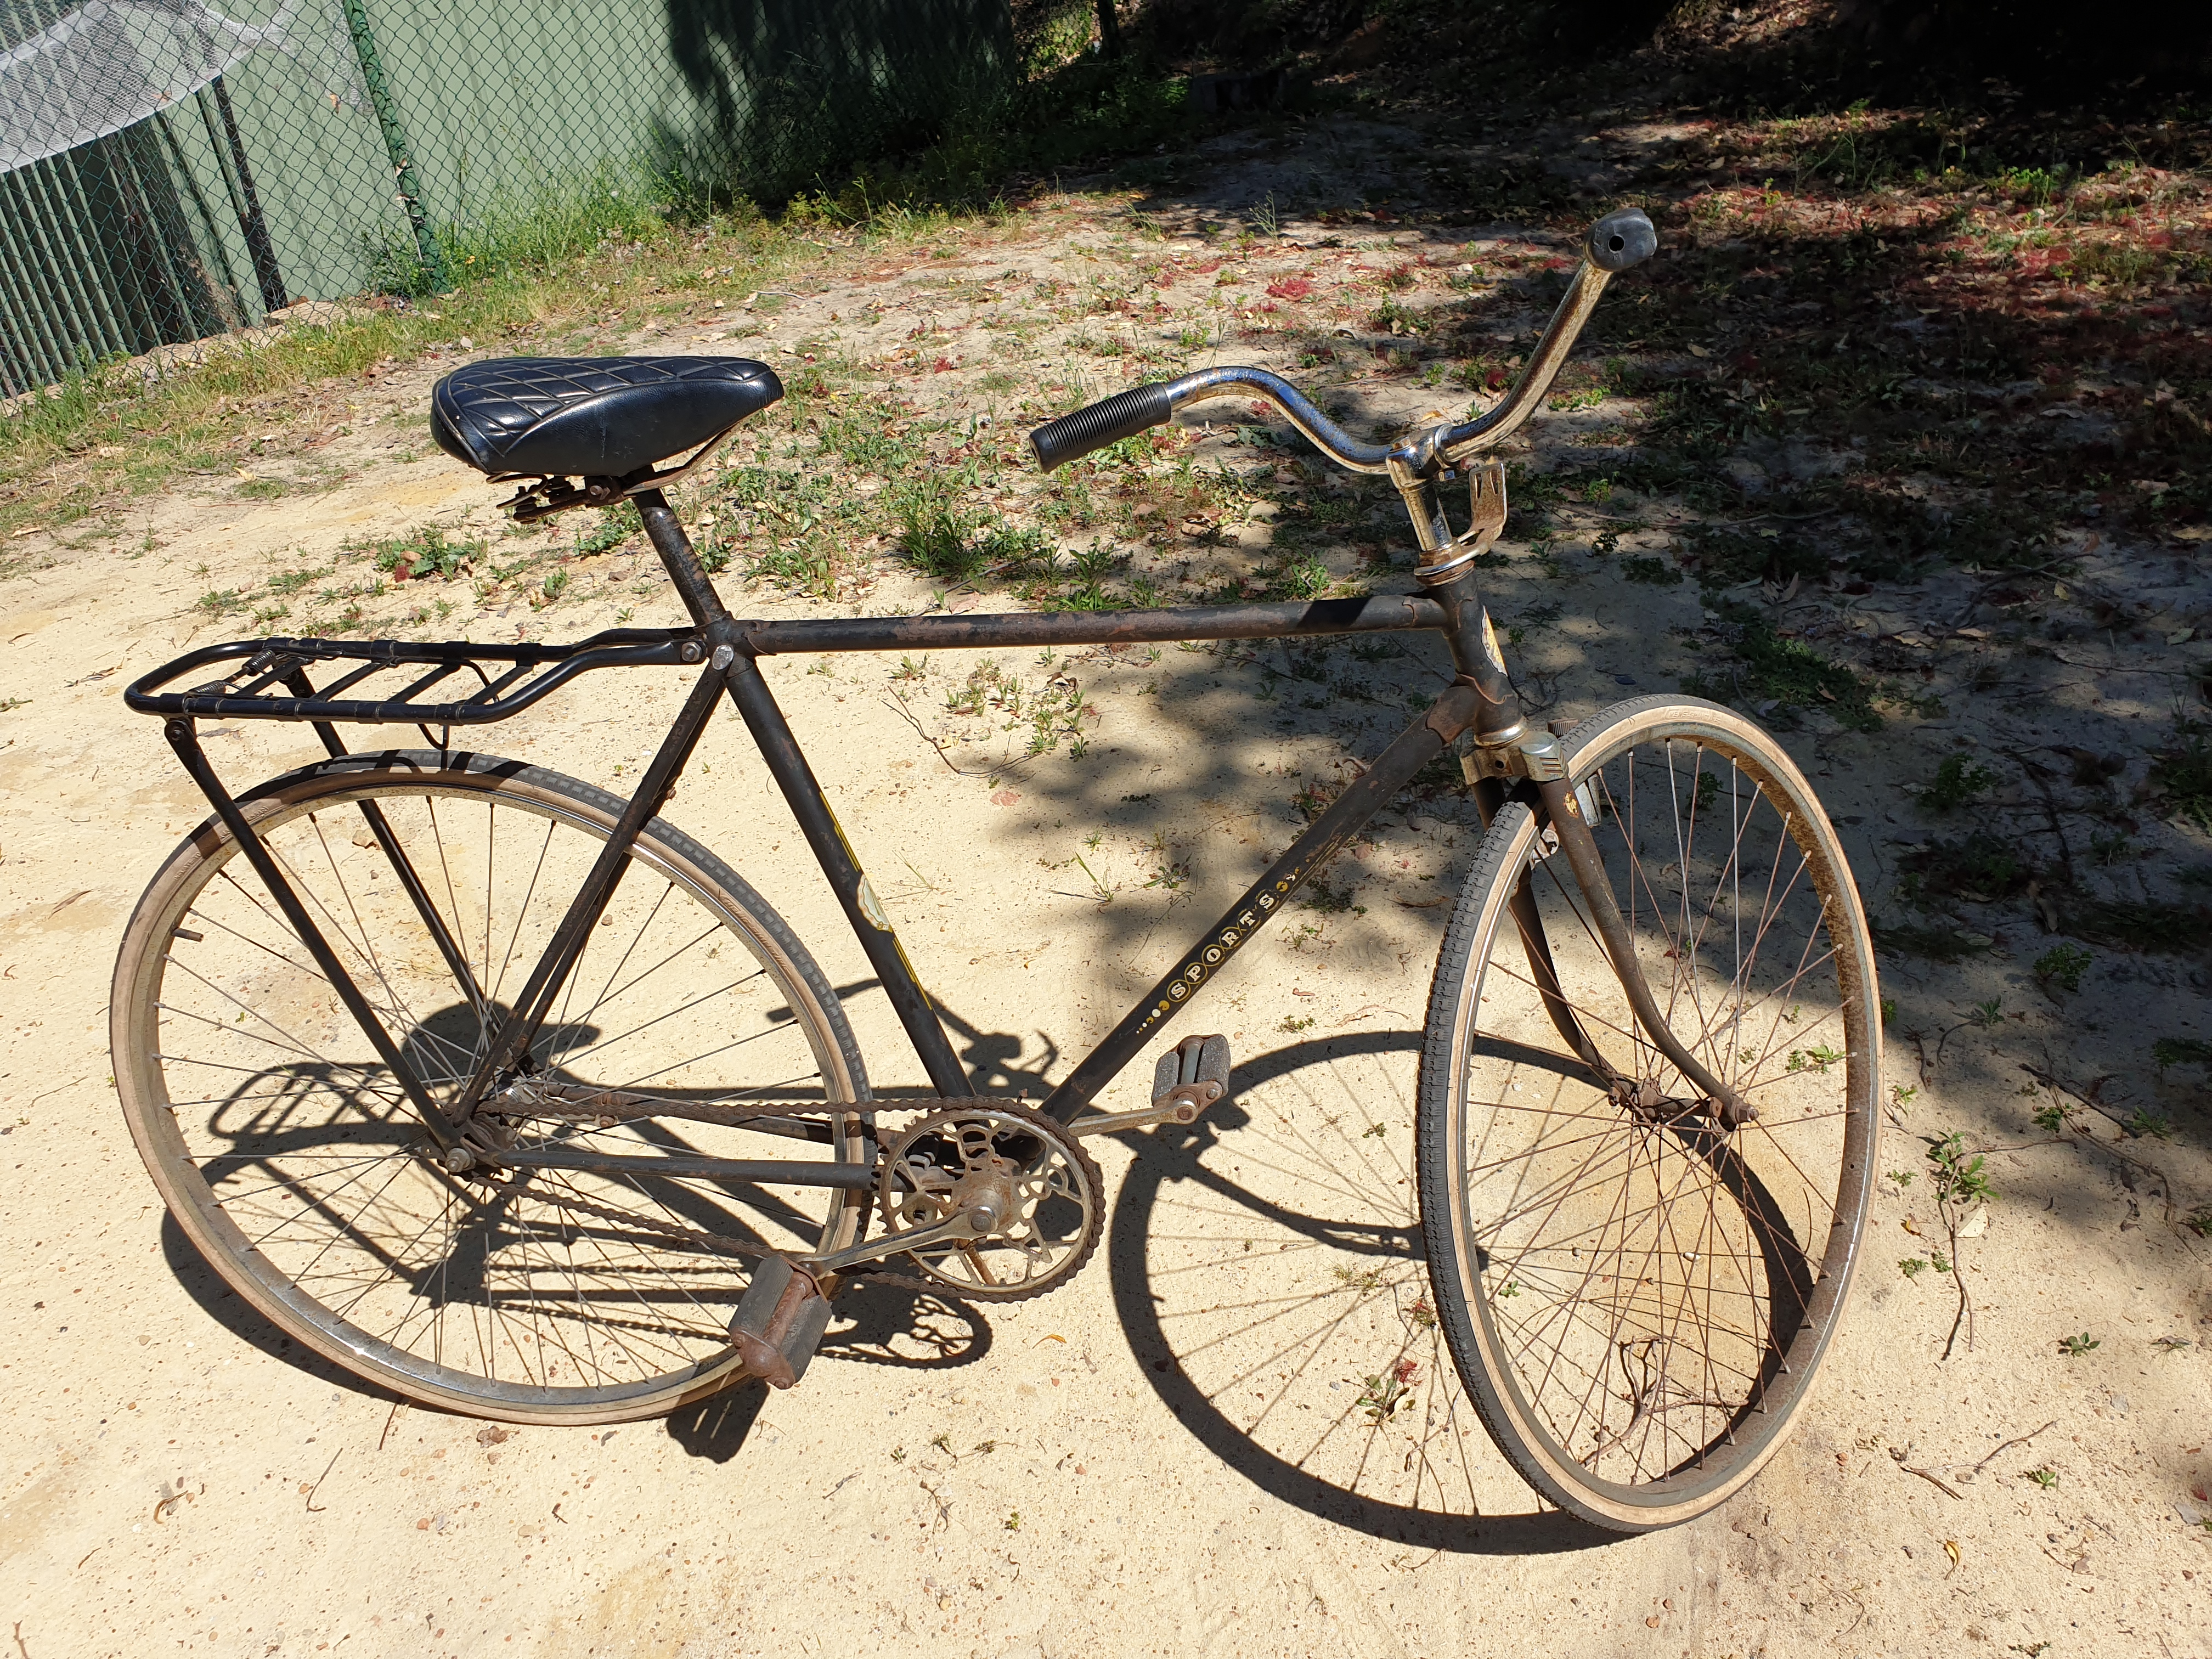
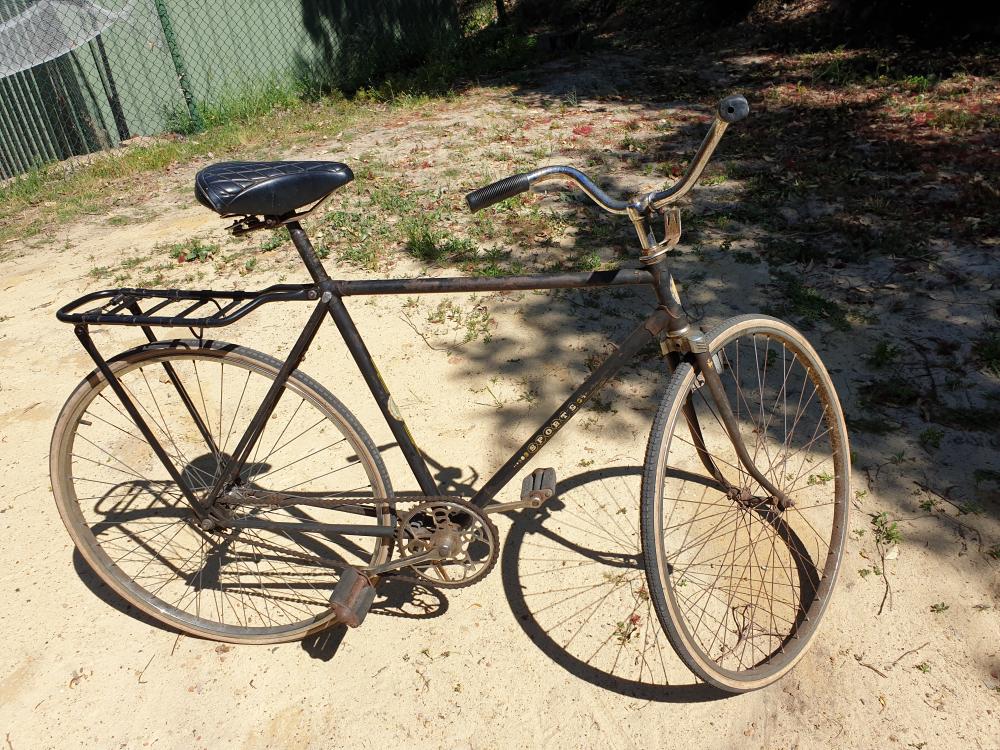
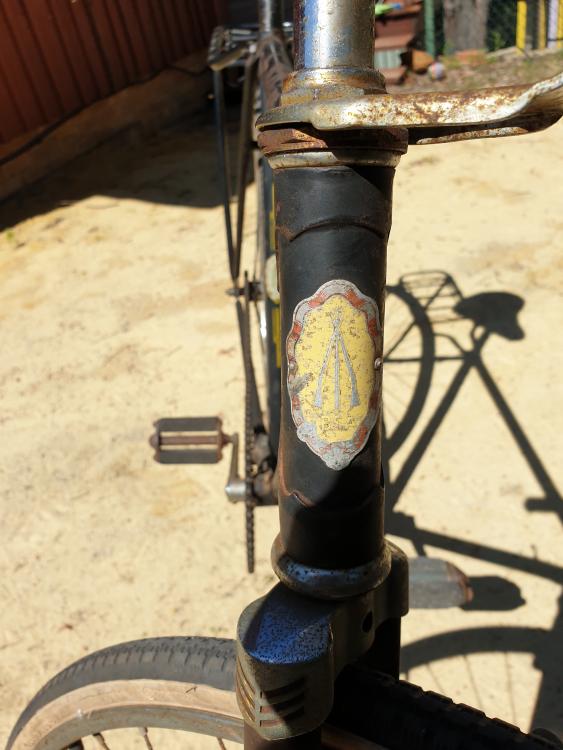
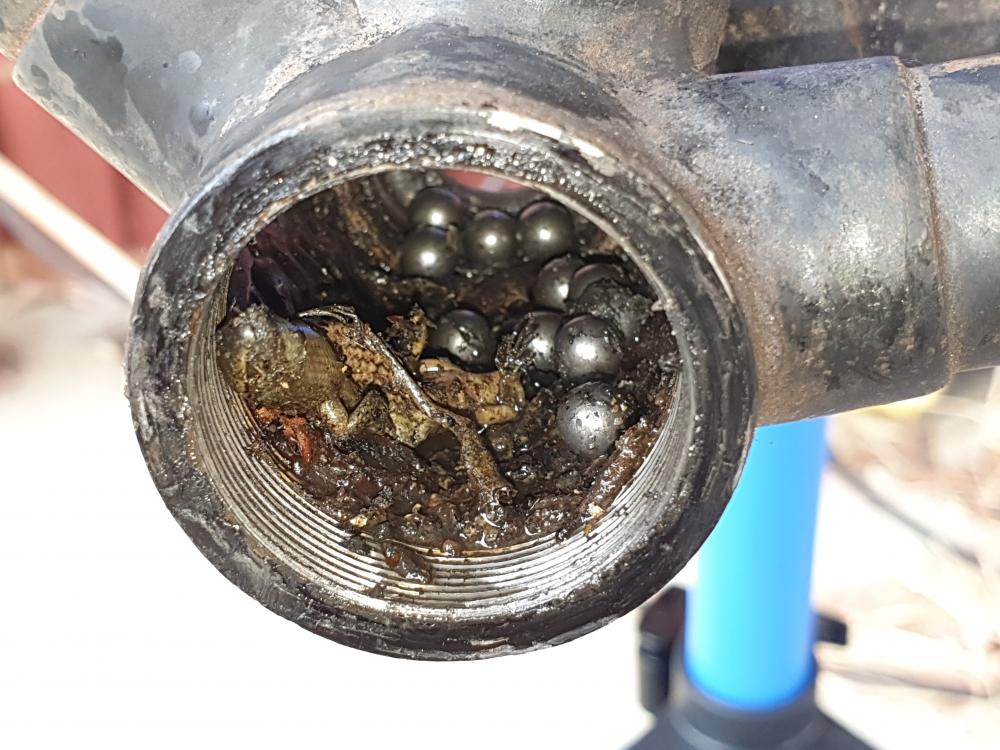
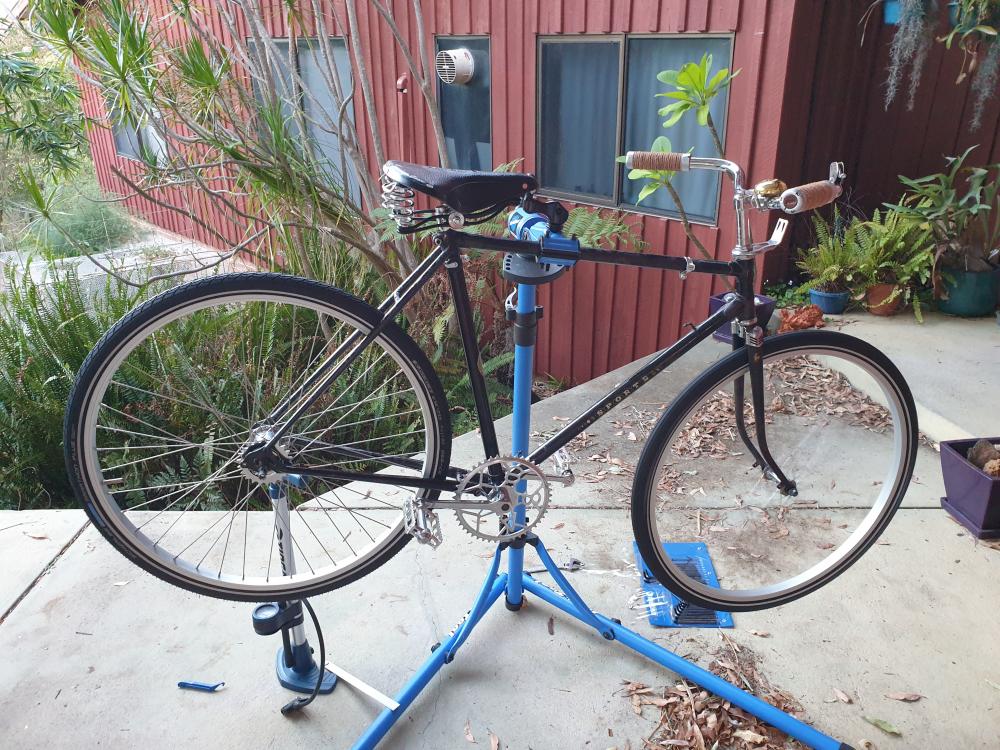
I don't know if anyone had noticed, but I haven't been on here for a few weeks as I have been distracted by something else on and off for the last few months and it has been taking a lot more of my attention over the last few weeks, but its nearly finished now, so I have time to come back to here. In November last year whilst browsing 'Gumtree' (Australia's version of Craigslist owned by Ebay) I looked up 'BSA' to see all the nice motorbikes I can't afford to buy and in amongst them was a BSA bicycle. It was made in the 1960s so not a 'real' BSA bicycle, but a BSA badged Raleigh Bike as BSA had sold them the rights to make bikes in 1959 or 1960, but it still has the BSA logo head badge and BSA written in the cranks and best of all it was cheap. So I snapped it up. The bike had the incorrect seat, stem, handlebars and wheels, so I really was just buying it for the frame, forks and cranks. When I started to strip it down I got a surprise in the bottom bracket in the form of a dead lizard (skink) it was still pretty fresh so I can only think as I removed the seat a few days before stripping the rest of the bike it climbed on the bike and fell down the seat tube and got stuck. With the bike stripped down it got given a wash and about 8 hours polishing with T-Cut on the frame being careful not to damage the pinstriping and all the chrome was given a long bath in a weak solution of oxalic acid then just a rinse with clean water and a wipe with a rag and it all came back looking like new. Then I sourced the correct 650A rims out of the UK, a 1966 Sturmey Archer 3 speed AW hub, period correct front hub and after servicing the hubs sent the wheels off to be built. Meanwhile I got the correct seat post and a new Brooks seat as the bike would of had originally, the correct style handlbars and I took a liberty and bought some Brooks plump handgrips and a new English made brass bell then sounds cleaning and loudly enough to be fitted to any good clock. Since taking this photo I've fitted the chain and measured what size brake calipers I need and they are in the post along with a replacement handlebar stem and once they are fitted the bike will be ready to ride. It's cost me probably more to fix this bike between the parts and tools I purchased to work on it than a new reasonable quality bike, but this bike is way cooler than any new bike I could buy, plus it looks good leaning against my 1961 C15 BSA.
 2 points
 -
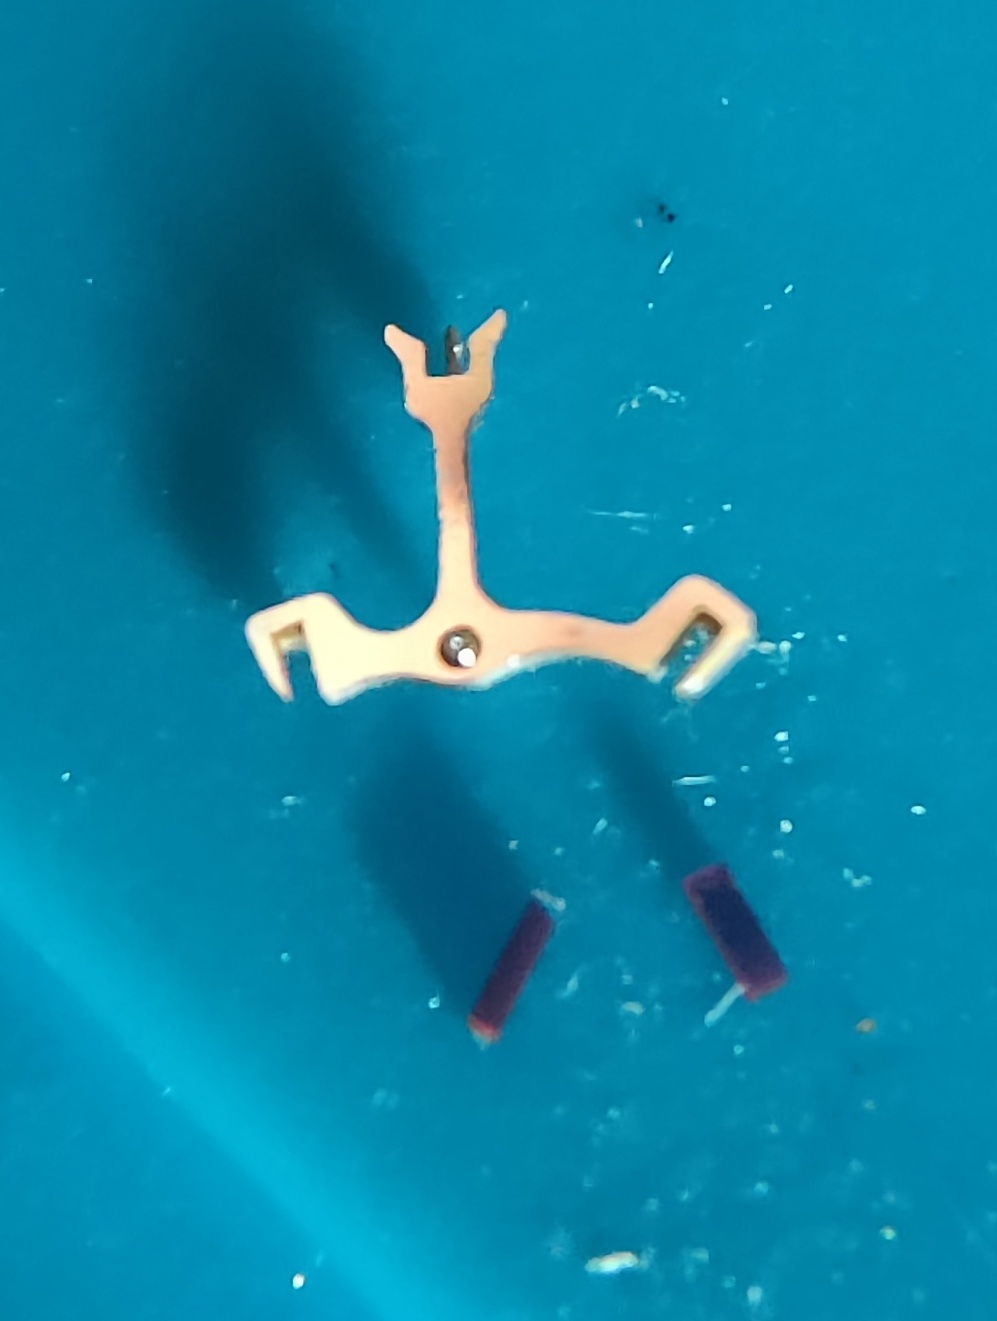
I frequently find that I need to file hammers on chronographs. You will want to check how the hammer is holding the minute counter wheel in relation to the minute counter jumper; it likely is pulling it one way or the other so the jumper isn't centered on two teeth. File the hammer face in a direction that will correct this, while introducing the freedom needed. Go very slowly, a little goes a long way- you don't want to start going back and forth between the hammer faces! When it's to the point that it is just making contact with the seconds cam, then you need to finish the hammer face. I do this with micron graded self adhesive abrasive paper stuck to a stiff slender steel backer, usually start with 20 or 12 micron, then down to 5, then 1. Ideally you want a mirror finish but as long as there aren't deep scratches "shiny" will do. A tiny vice is a godsend for this kind of work, and I do it under a microscope.2 points
-
This reminds me of my 13 year old son's declaration that he is not afraid of heights, just of falling.2 points
-
They Eat Their Own? ? Oh.. to each their own... ... well if you think that thing is off the wall, I'm sure I have some much, much odder stuff. Maybe I should start a separate thread for the most off the wall watches.
 2 points
 -
It was supposed to be a simple job. Just replace the battery... But then I noticed there was a speck of dust under the crystal... So I took out the movement to clean inside the crystal. Then I noticed the minute hand wasn't centred on the hour... So I removed the hands to realign them. Then the minute hand stops moving... I took off the dial and discovered that the cannon pinion popped off when I lifted off the hands. ? Now I will have to do a full disassembly to fix it. ? I have to stop being so OCD.1 point
-
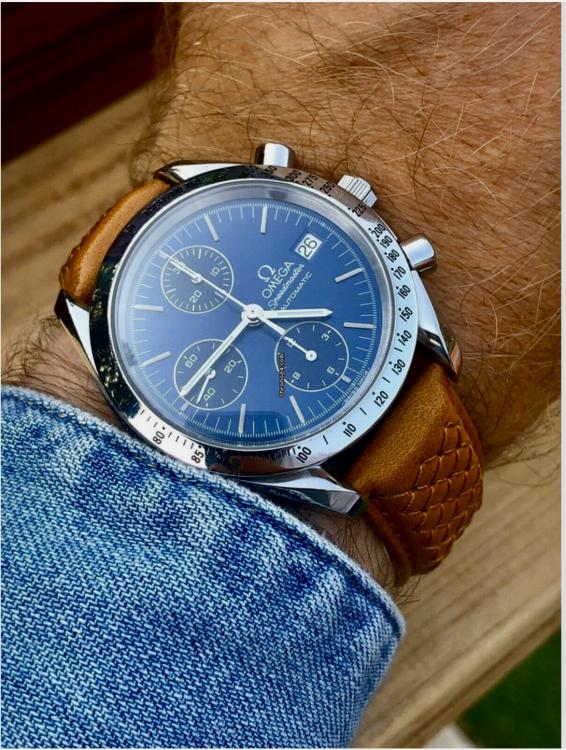
Hi Guys, just got this Omega from 1998, what do you think
 1 point
 -
Wrist Watch, as opposed to pocket watch.1 point
-
You've set "off the wall" bar pretty high there. Here's a ... well I'm not actually sure what it is to be perfectly honest... but it is what it is.
 1 point
 -
Off the wall Navajo....
 1 point
 -
I would remove the brass collar from the seconds wheel. It's likely the remnant of a second hand tube, which will need replacing anyway.1 point
-
In addition to John's suggestion above, it would be interesting to see how it does with just 1/2 turn of wind. Without getting into a course in escapement checking and adjusting, there is an excellent article with some very good basic checks by Joseph Rugole from the Horological Times magazine. Normally you have to be a member to access the old issues but for now they seem to be available online (all of his articles were offered as a book by AWCI as well). His article starts on page 44 https://www.awci.com/wp-content/uploads/ht/1979/1979-09-web.pdf1 point
-
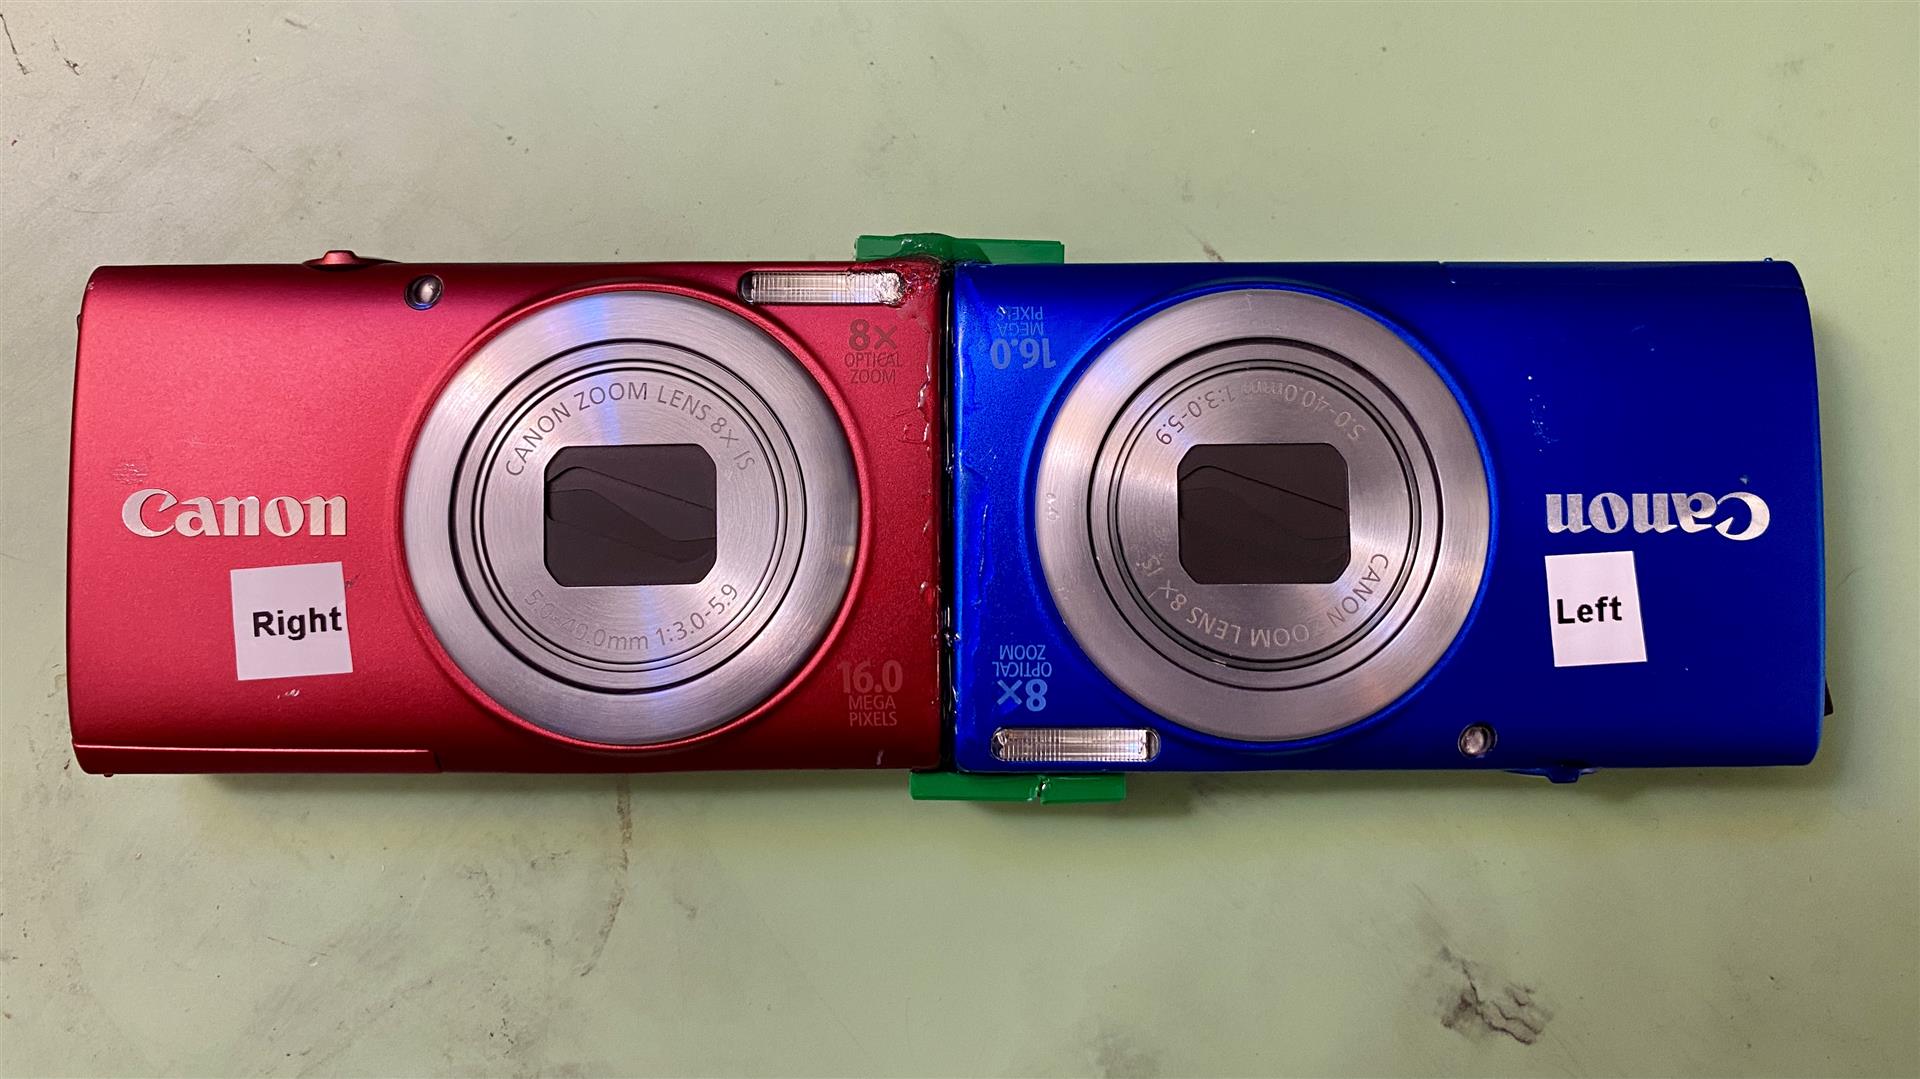
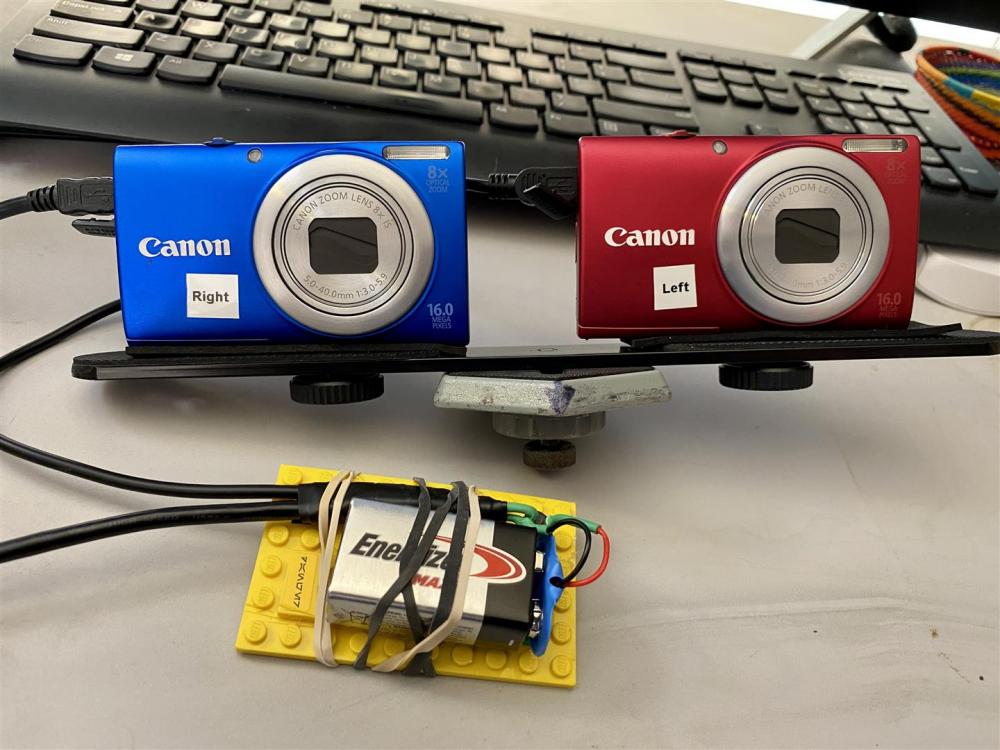
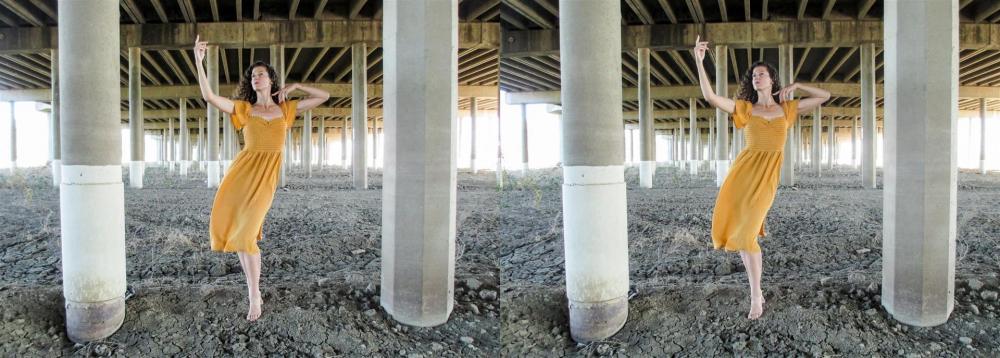
Hey everyone, here's a fun and affordable 3D photography side project. I really owe Andy Hull for giving me the inspiration and information I needed to pull this off! In addition to horology, I'm an avid photographer. I've been studying and practicing photography seriously for 20 years now, having bought my first real camera in 2000. If anyone is curious, the camera was a Canon Canonet QL17 GIII. Some of my work has been in galleries, and I'm a couple of classes away from completing a photography degree. When I became fascinated by photography, I wanted but couldn't afford a digital camera. I could afford a film camera, however, and I had free access to a nice darkroom between my law school classes at UC Davis. I learned how to process film and make silver-gelatin prints. Over the years, I've become a film snob. I embraced digital for macrophotography, but insisted on using real film when shooting people. Thanks to Andy, I've now embraced digital photography for 3D. For several years, I had been fascinated by 3D photography. I hadn't experimented with 3D photography much myself, because high quality 3D film cameras are expensive, require expensive slide film, and require a huge time investment to mount properly for viewing. I've shot a couple of rolls through Stereo Realist, ViewMaster, and Nishika cameras, but the cost and hassle were too much for me to fully embrace. Enter @AndyHull, who mentioned the "Canon Hack Development Kit" (CHDK) project to me. This is a super cool open source effort to significantly expand the capabilities of Canon point and shoot cameras. By using the CHDK, one can force old point and shoot cameras to shoot RAW files, show real-time over- and under-exposure, and execute scripts allowing for the cameras to take pictures on a programmed schedule or only after they detect movement, etc. I've barely scratched the surface of what CHDK can do -- It provides an incredible amount of power and flexibility. I purchased two new-old-stock Canon Powershot A4000IS cameras for $25/each from eBay. These cameras were released in 2012, but they work really well. Through the magic of CHDK, one can use a USB cable and a 5v power supply as a remote shutter release. In under 15 minutes, I used some LEGO bricks, a simple push button electrical switch, a couple of old USB-mini cables, and a battery to build a twin USB shutter release. CHDK does some additional magic to ensure that both cameras fire in a completely synchronized manner, within 1/1000s of each other. Here's my original rig. Please note that a 9V battery wasn't an ideal choice, and I've switched to a 5V battery. I mounted my two Powershot A4000IS cameras close to each other on a "stereo bar," but I got even better results by using epoxy to glue these two cameras together. Here's v2 of my rig. It produces better results, although I do need to rotate all of the left shots 180 degrees while processing. Combined with Adobe Lightroom and some really powerful free software called "Stereo Photo Maker" (SDM), it's trivially easy to produce 3D stereo pairs that look great. It's possible to see the 3D effect in these stereo pairs with one's naked eyes through the "crosseyed" or "parallel" viewing techniques. These methods give me a headache and are really hard to teach others to do, but the good news is that there are inexpensive and effective 3D viewers available. I'm using the "OWL" and "Lite OWL" designed by Brian May. My wife was really blown away by the 3D effect. My total cost was well under $100 and a couple of hours of time to build a super high quality 3D stereophotography rig: Canon A4000IS #1: $25 Canon A4000IS #2: $25 Battery, USB cables, and electronic switch: ~$10 OWL Viewer: $20 CHDK and Stereo Photo Maker: $0 Total: ~$80 I shot a model last Friday, and am really happy with how well my 3D rig performed! Thanks @AndyHull! First good stereo pair (Parallel Eye). I've since improved my processing technique to ensure that the colors match better. Here's a Parallel-Eye shot from my recent photoshoot. I'm really happy with these results! If anyone would like to see the full (uncensored) photoshoot, please send me a DM and I'll send the link.


 1 point
 -
Loose pallet jewels would do it. This is an uncommon fault, so it's worth reflecting on the cleaning procedures to see if something could have dissolved or softened the shellac. You might also check the roller jewel, which is also secured with shellac. Replacing the jewels is not too hard, but replacing them to the proper depth is another matter. It's interesting and worth trying, but you might source a replacement pallet fork for now while you read up on it.1 point
-
A true optimist is the guy who falls off a skyscraper and after 50 floors thinks to himself – well, so far so good!1 point
-
I'll see what I can come up with.1 point
-
Pallets are usually shelaced since it wont harm the base metal forks are forged out of, Marks shows how to make this tool to warm the fork on and shelac the pallet jewels, I use epoxy five on cheap pieces. Pallets adjustment is no easy task, nevertheless if you like to give it a try, there be plenty help and advice besides Marks lessons. I couldn't find a link to relevent threads , some one may have more luck than I and find em.1 point
-
Solved I think... I decided to give everything another look and low and behold the pallet fork stones basically fell out while I was inspecting it. I decided to check them with just a little pressure and the moved. Best to get a new fork or can these be glued back in?
 1 point
 -
I'll second that it's a good practice to replace just the balance complete prior to assembly so you can get a good look at the hairspring. After doing that, you can add the pallet fork and bridge to see how the fork and jewel interact.1 point
-
Agree with the above comments but also check the escape wheel teeth, just one tooth being a touch out of shape will cause the stops.1 point
-
Observe the coil from side view of the balance while running, a close up video of balance looking streight down on the bridge and side view showing the coil helps. Coil should be flat, level with concentric circles and not foul itself. Judging from the previous video, amplitude seems good which is a sign of hairspring free from rubbing, however you give the balance plenty of swing when you nudge it, instead gently move the wheel see if it picks up and go at some point. (I think the balance is out of beat) I always put just the balance complete and bridge back( no other part) on the mainplate for final adjustment leveling etc. it will give you almost 330 access to the HS around the balance wheel What happens if you turn a gear, third or center ?1 point
-
It looks like something is rubbing or scraping. The above suggestions seem likely. For these watches, it is common for the hairspring to rub against the arms of the balance wheel or against the underside of the balance cock. You might confirm that the wheel isn't rubbing against the pallet bridge or the center wheel.1 point
-
Hi In addition to Joes comments check end shake on the balance, and the alignment of the balance spring that its not catching or rubbing on th balance cock.1 point
-
Untimely/ faulty impulse delivery or damaged staff/ jewel assembly. -Check entire escapement under good magnification. - Adjust for in-beat impulse. Good luck1 point
-
On a cross slide, I’d expect that thread to be carbon steel. Not that it makes a huge amount of difference. I’d use shock (tap with a light hammer) or heat (but only just too hot to touch so as not to adjust temper) to help loosen jammed parts.1 point
-
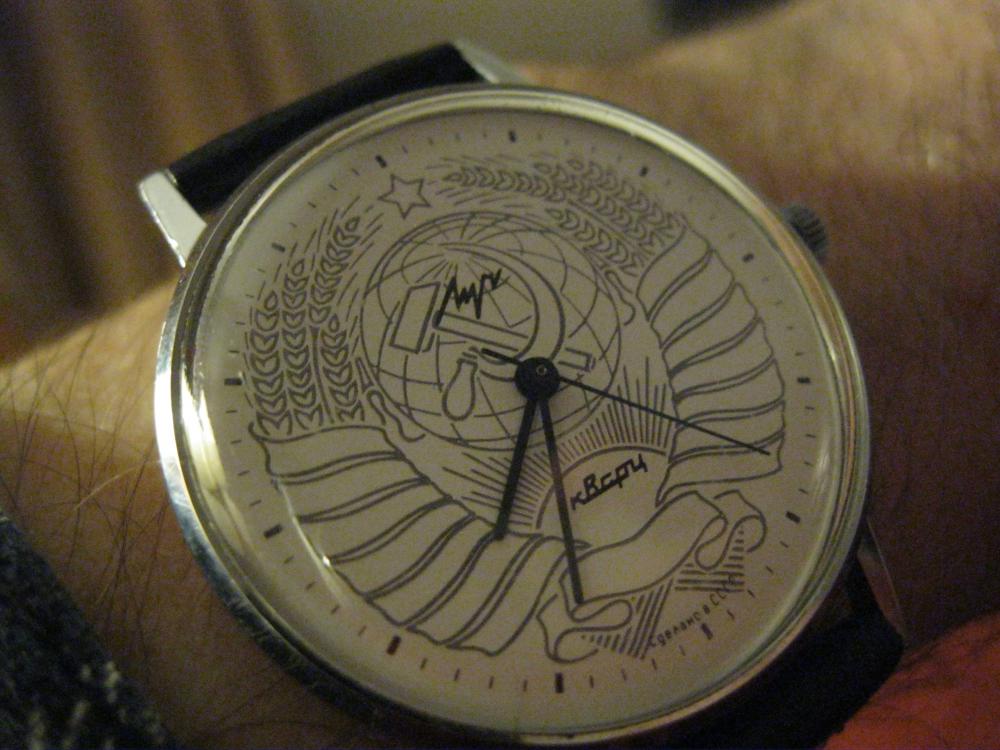
I've not worn this USSR era Luch quartz for a while, so I decided today was a good day to give it an airing.
 1 point
 -
Friction pinion all fixed up and reassembled. On further thinking, is this a design weakness? If the minute hand is fitted too tightly,the chance of the pinion separating from the wheel again is very high. Or is there a safer method of taking off the hands?1 point
-
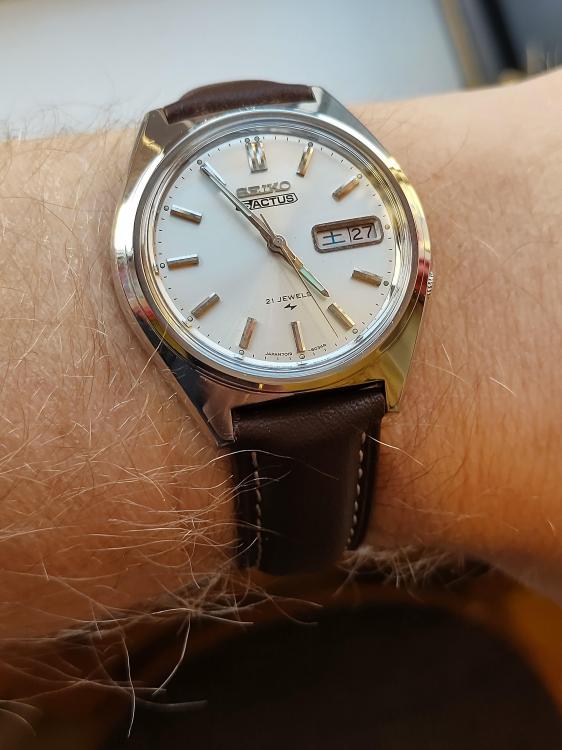
Just finished, Seiko Actus 21 Jewels 7019, Push crown for day quickset.
 1 point