Leaderboard


Popular Content
Showing content with the highest reputation on 02/11/21 in all areas
-
The fork height should be the same as the diagram in the book, if not it can cause what is called fluttering which can upset the running of the clock, a tiny drop of oil between the fork where metal touches the brass will also help the clock so when it escapes it doesn't jitter.3 points
-
I didn't say it quite right in previous post. Actually only the sliding pinion gets driven towards the winding pinion.2 points
-
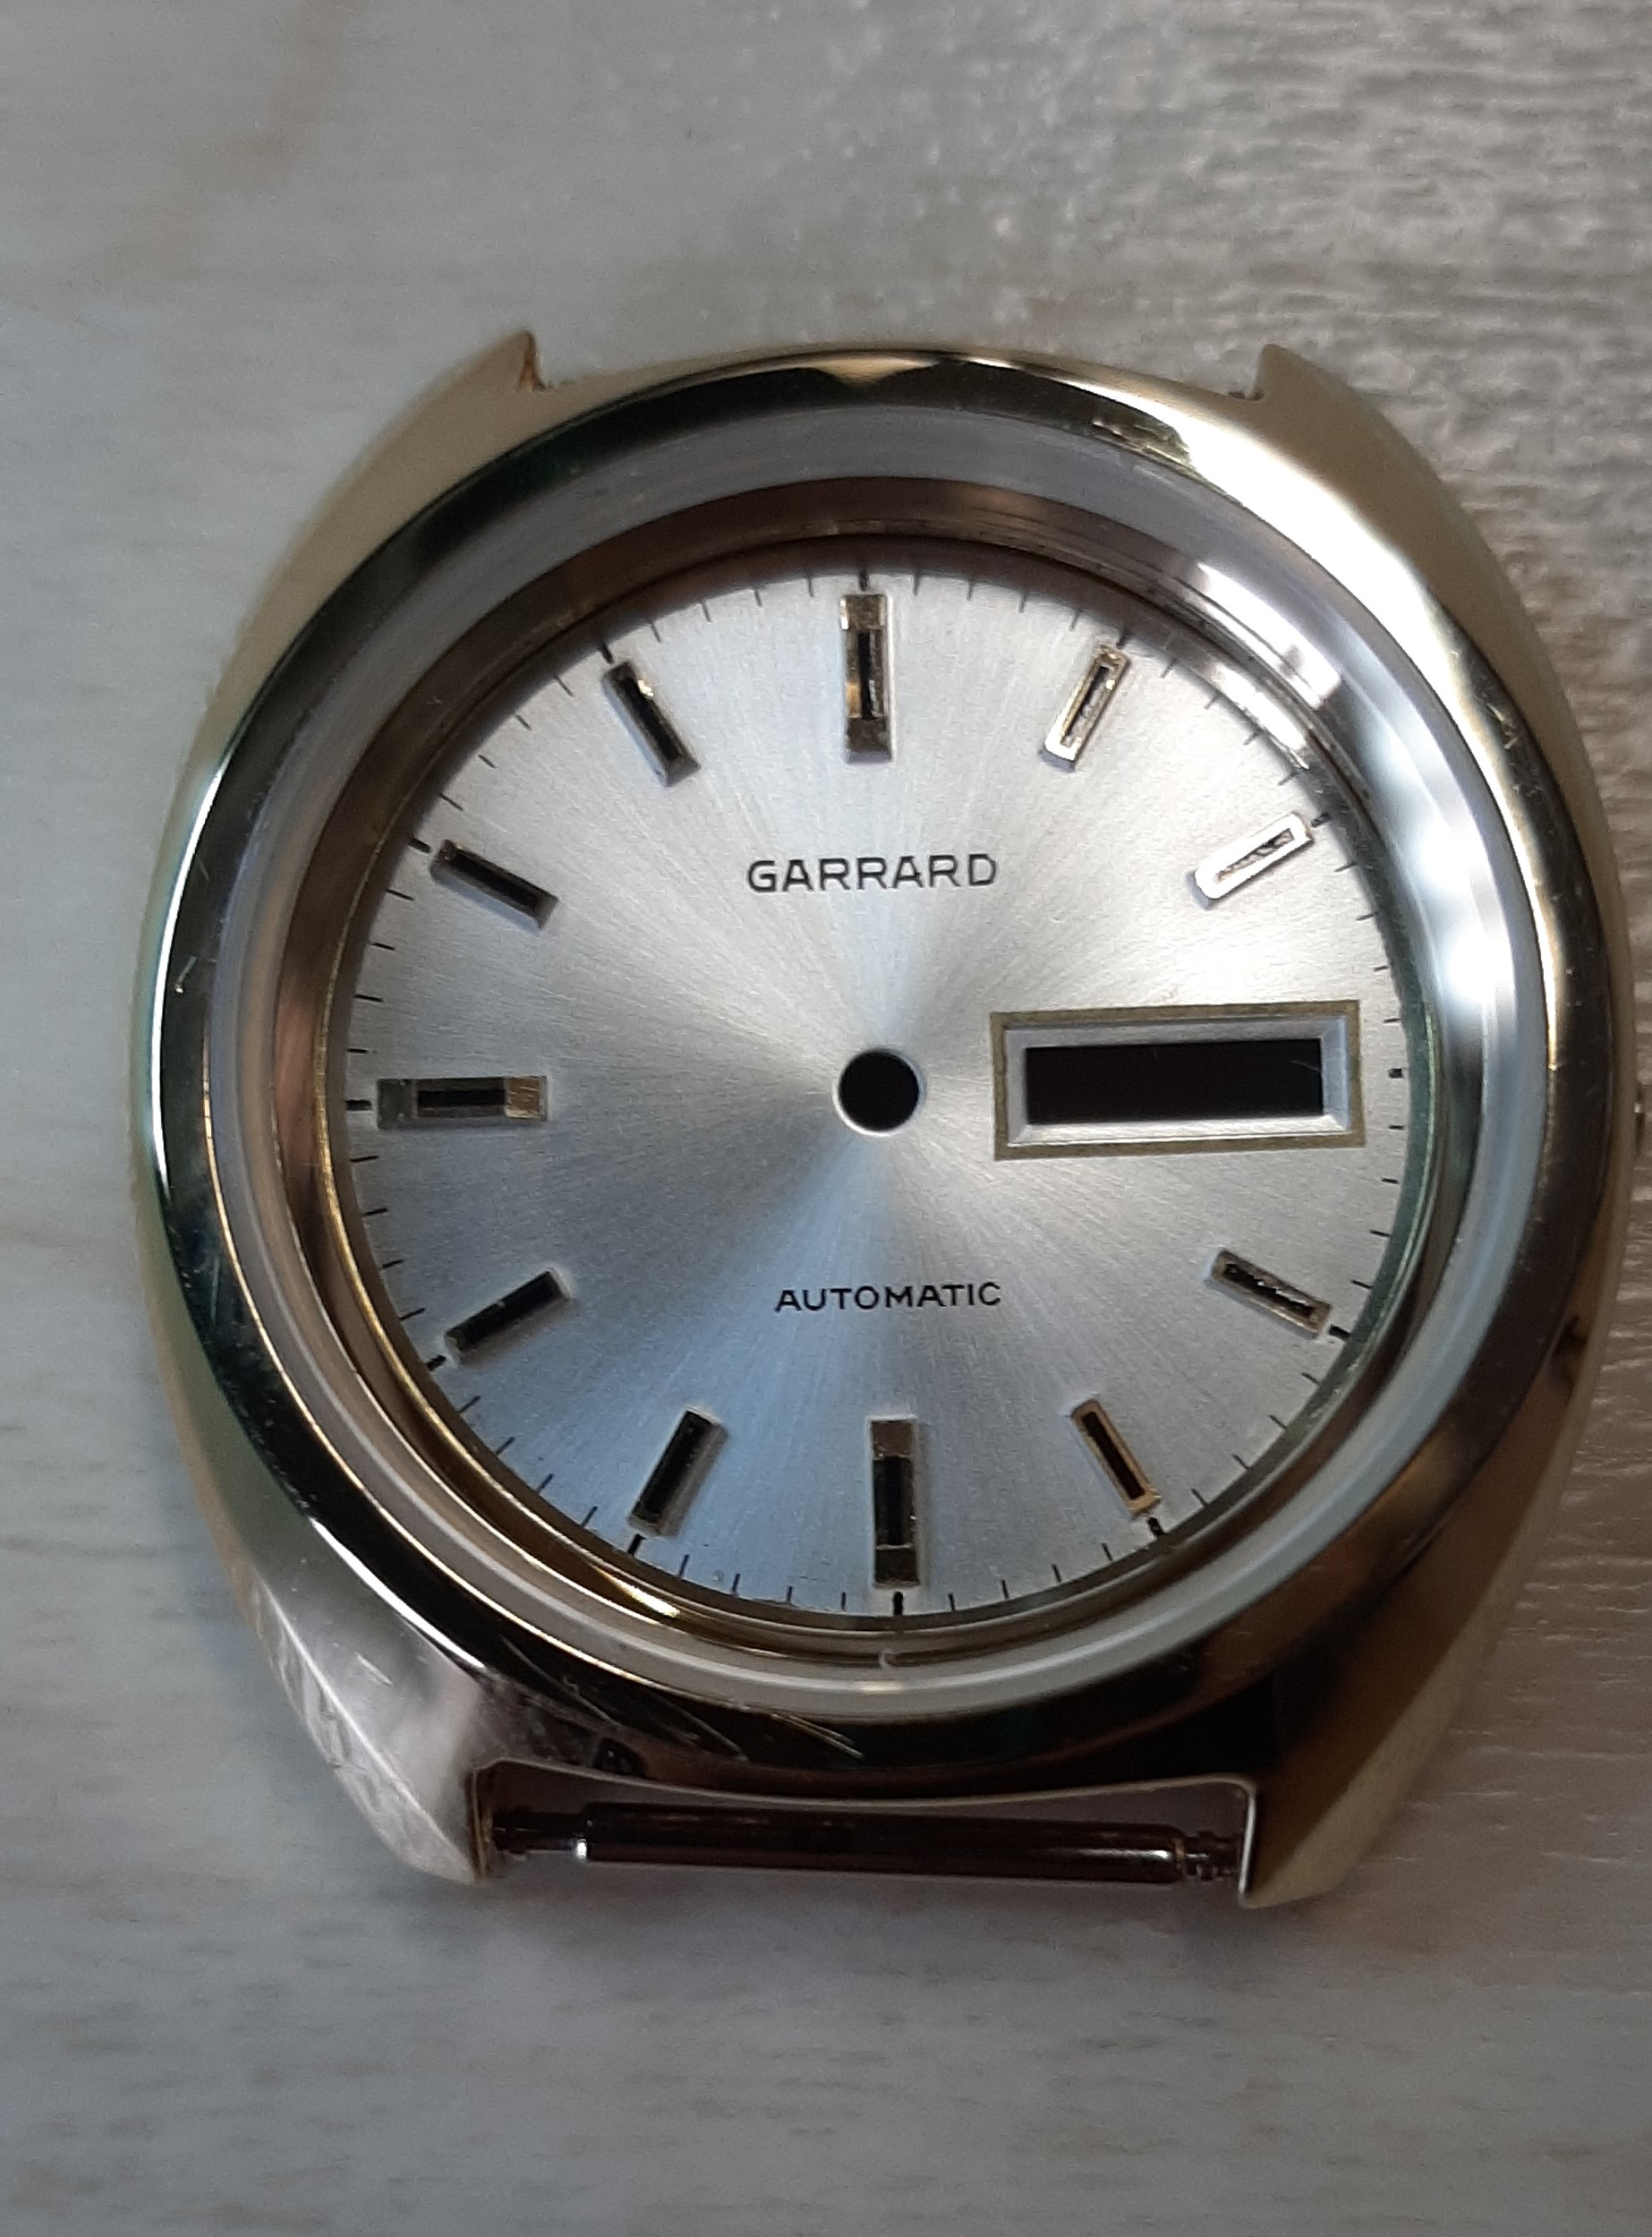
Hi @Nucejoe. I solved the problem. I pushed the ring on to a felt cone polisher on my electric drill. With the drill clamped to the desk, I used a fine file to take the ring diameter down until it fit. ( I wish I had a lathe) The only problem then was about a 0.5 mm gap between the dial and the inside of the case. Fortunately I found a thin gold tension ring from a glass which fitted perfectly. As @LittleWatchShop suggests, a 3D printer would be good for making this sort of part.
 2 points
 -
Question 1 "How tight should the fork be on the anchor pin?" My answer, a piece of copier paper should slide between the pin and fork. (with the pin vertical) Question 2 "How level does the clock need to be" My answer, The pendulum base needs to be within the cup, but not touching the base of the cup, 2-3mm clearance is fine. Use the leveling screws under the base to centre the pendulum in the cup. No bubble needed, except to check the shelf that the clock will eventually be on. Question 3, "How long should the suspension spring be?" My answer, adjust the spring length via the top block, leaving the excess sticking out of the top, the spring is not cut to length till the clock is running well. Adjust the fork hight as necessary for proper running. Bod2 points
-
Photos when it comes in.2 points
-
There is an old thread here that shows a YouTube vid of how to remove the EtaChron stud from the stud support, which I think is a bad idea, as there is too much downwards pressure on the stud support when using tweezers. It can be done that way, but isn't ideal, especially when working on a clone movement where the stud support isn't as strong as an ETA movement. I put a lesson together for my class at https://efhc.org.uk/wordpress/index.php/centre-facilities/ to show how to do it without risking damage to the stud support and how to save over £60 making your own tools to perform this task (That's another lesson on hardening & tempering, if anyone is interested) Here's the PowerPoint presentation. The video's within the presentation are marked in the top left hand corner of the slide 'Video' Enjoy... Lesson 7. EtaChron adjustment & regulation.pptx1 point
-
This watchmaking renaissance I am going through (following my dad's footsteps) is costing me a lot of money--but I am having fun. I bought another watch bench to set next to my dad's. It is custom made (not to my specifications, but to the designer's). It will arrive in a week. I can't keep my eyes off of Ebay...nabbing this and that. Oh well...you can't take it with you!!1 point
-
Hi Just joined, newly started pocket watch collection and repair as hobby. I am based in Kent U.K Just wanted to say hello1 point
-
Hi Michael the name is derived from the fact that the almost friction free escapement and the slow rate coupled with a strong spring they would run for approx 400days or also known as Anniversary clocks as they were wound once a year on their anniversary. I have six of these and two quartz driven ones, They are interesting to work on but require patience as they are very touchy and must be level1 point
-
Hello everyone, my name is Andrei (it’s easier to just call me Andrew) from Transylvania, Romania. I joined the forums as I intend to try out watchmaking as a hobby. I’ve been collecting vintage pieces for a while now but this whole thing with watchmaking started after I “kind of” repaired my mother’s old watch to celebrate a recent family event. So the long story short is that my mum bought herself a watch sometimes in the 1970s communist Romania. This was the only watch she ever bought herself and was quite an important expenditure. Being single at a time when the pronatalist policy of Nicolae Ceaușescu was in full effect in the country, she did not benefit of many of the social policies implemented by the communist regime (for example, she had to pay for her flat) and had to also take care of some of her family members. Everything was ok until she broke it by running it over with a baby stroller when I was 1 or 2 years old. Transition period in Romania hit many working class families hard and wrist watches were the least of their concerns. Even today they consider it a dubious way to spend your hard earned money as one may never know when the economy will take a turn for the worse. As I was collecting time pieces, I offered her to pick whichever she linked but she insisted that she liked best the one that broke several decades ago, and could unfortunately not be repaired (according to one watchmaker at the time). So after a trip to my grandparents’ house, there it was, all broken and messed up, a quartz Orex (Romanian producer) from the 1970s. Now, I know that this might sound awful to some of you, the case and crystal could be restored, but I could not find a replacement movement anywhere. Being pressed for time, I just retrofitted a modern movement in there, meaning I had to also replace the watch hands with some that fit and I had laying around. Good news is that I can undo „the butchering” when I find the right movement. Even better, my mum really did not seem to care about these small matters (for her), what mattered was the gesture and that she enjoys the watch greatly. So, back to collecting. I guess I collect both watches and, when possible, the stories that accompany them. So no outstanding pieces from a horological point of view but simple, affordable pieces worn by “run of the mill” working class people from Eastern Europe. Since these watches have no particularly complicated movements, I figured I should be able to eventually service them myself, if it turns out I will have enough patience and skill. For that I plan to start the watch repair course. In the meantime, I will mostly have questions regarding the tools I need to start with in this hobby. Thanks to whoever read this wall of text and I’m looking forward to meet you all. Ps. apologies for any grammatical errors as I am not a native speaker.1 point
-
Welcome to the forum Andrei. I'm from America, where we pronounce everyone's name wrong, but I can still type it correctly.1 point
-
I'm Andrea, nice to be here!1 point
-
Im trying to resist doing the same things. It's not working.1 point
-
The very old early 400 day clocks never had adjustable feet, with disk type pendulums you couldn’t have a built in cup as a guide, the same goes for the early ball types as well.
 1 point
 -
The twist drives the winding and sliding pinions towards each other which enhances the grip for their clutch action.1 point
-
Thanks Joe! I broke my first one the same way with tweezers.1 point
-
Sorry to disagree clockboy but the length is critical it has to be a certain length in order for the locking mechanism to work correctly.1 point
-
If the case has adjustable feet at the bottom you get the level by adjusting them is not you should move it to a place which is level. If the pendulum when attached to the suspension spring is touching the cup the spring needs to be shortened by a tiny amount, make sure the pendulum adjustment is back about half way, this gives you plenty of adjustment to play with. Sorry to say but it looks like its is going to be a trial and error repair so it could take a long time before you get it right. A tiny sprit level is what you need not a poising tool.1 point
-
I don't do that nearly enough!1 point
-
Very clear to understand lesson Jon. I remember breaking the first etachron regulator I tried to remove with tweezers. Thanks for sharring. Regs Joe1 point
-
I am not sure if your poising tool will work as you intend here. The bubble in it is for getting IT level. You cannot guarantee that you have the three legs in a plane parallel to the plane of the bubble when sitting it on the clock base. You can not be guaranteed that it will be showing you the level of the base. For that you would need a proper bubble level. This would work if you sat the clock base on the poising tool straight edges, but for the price that would cost in damage, go and buy a round bubble level at your local hardware store.1 point
-
Easy to get rid of. Mail it to me.1 point
-
PaulnKC's original post.1 point
-
Hi clockboy i don't think MachanicMiike is saying it's running fast that was me and i did mean slow so my apologise if i gave that impression, if i understand him right it's the length of the spring and the pendulum is touching the bottom of the cup.1 point
-
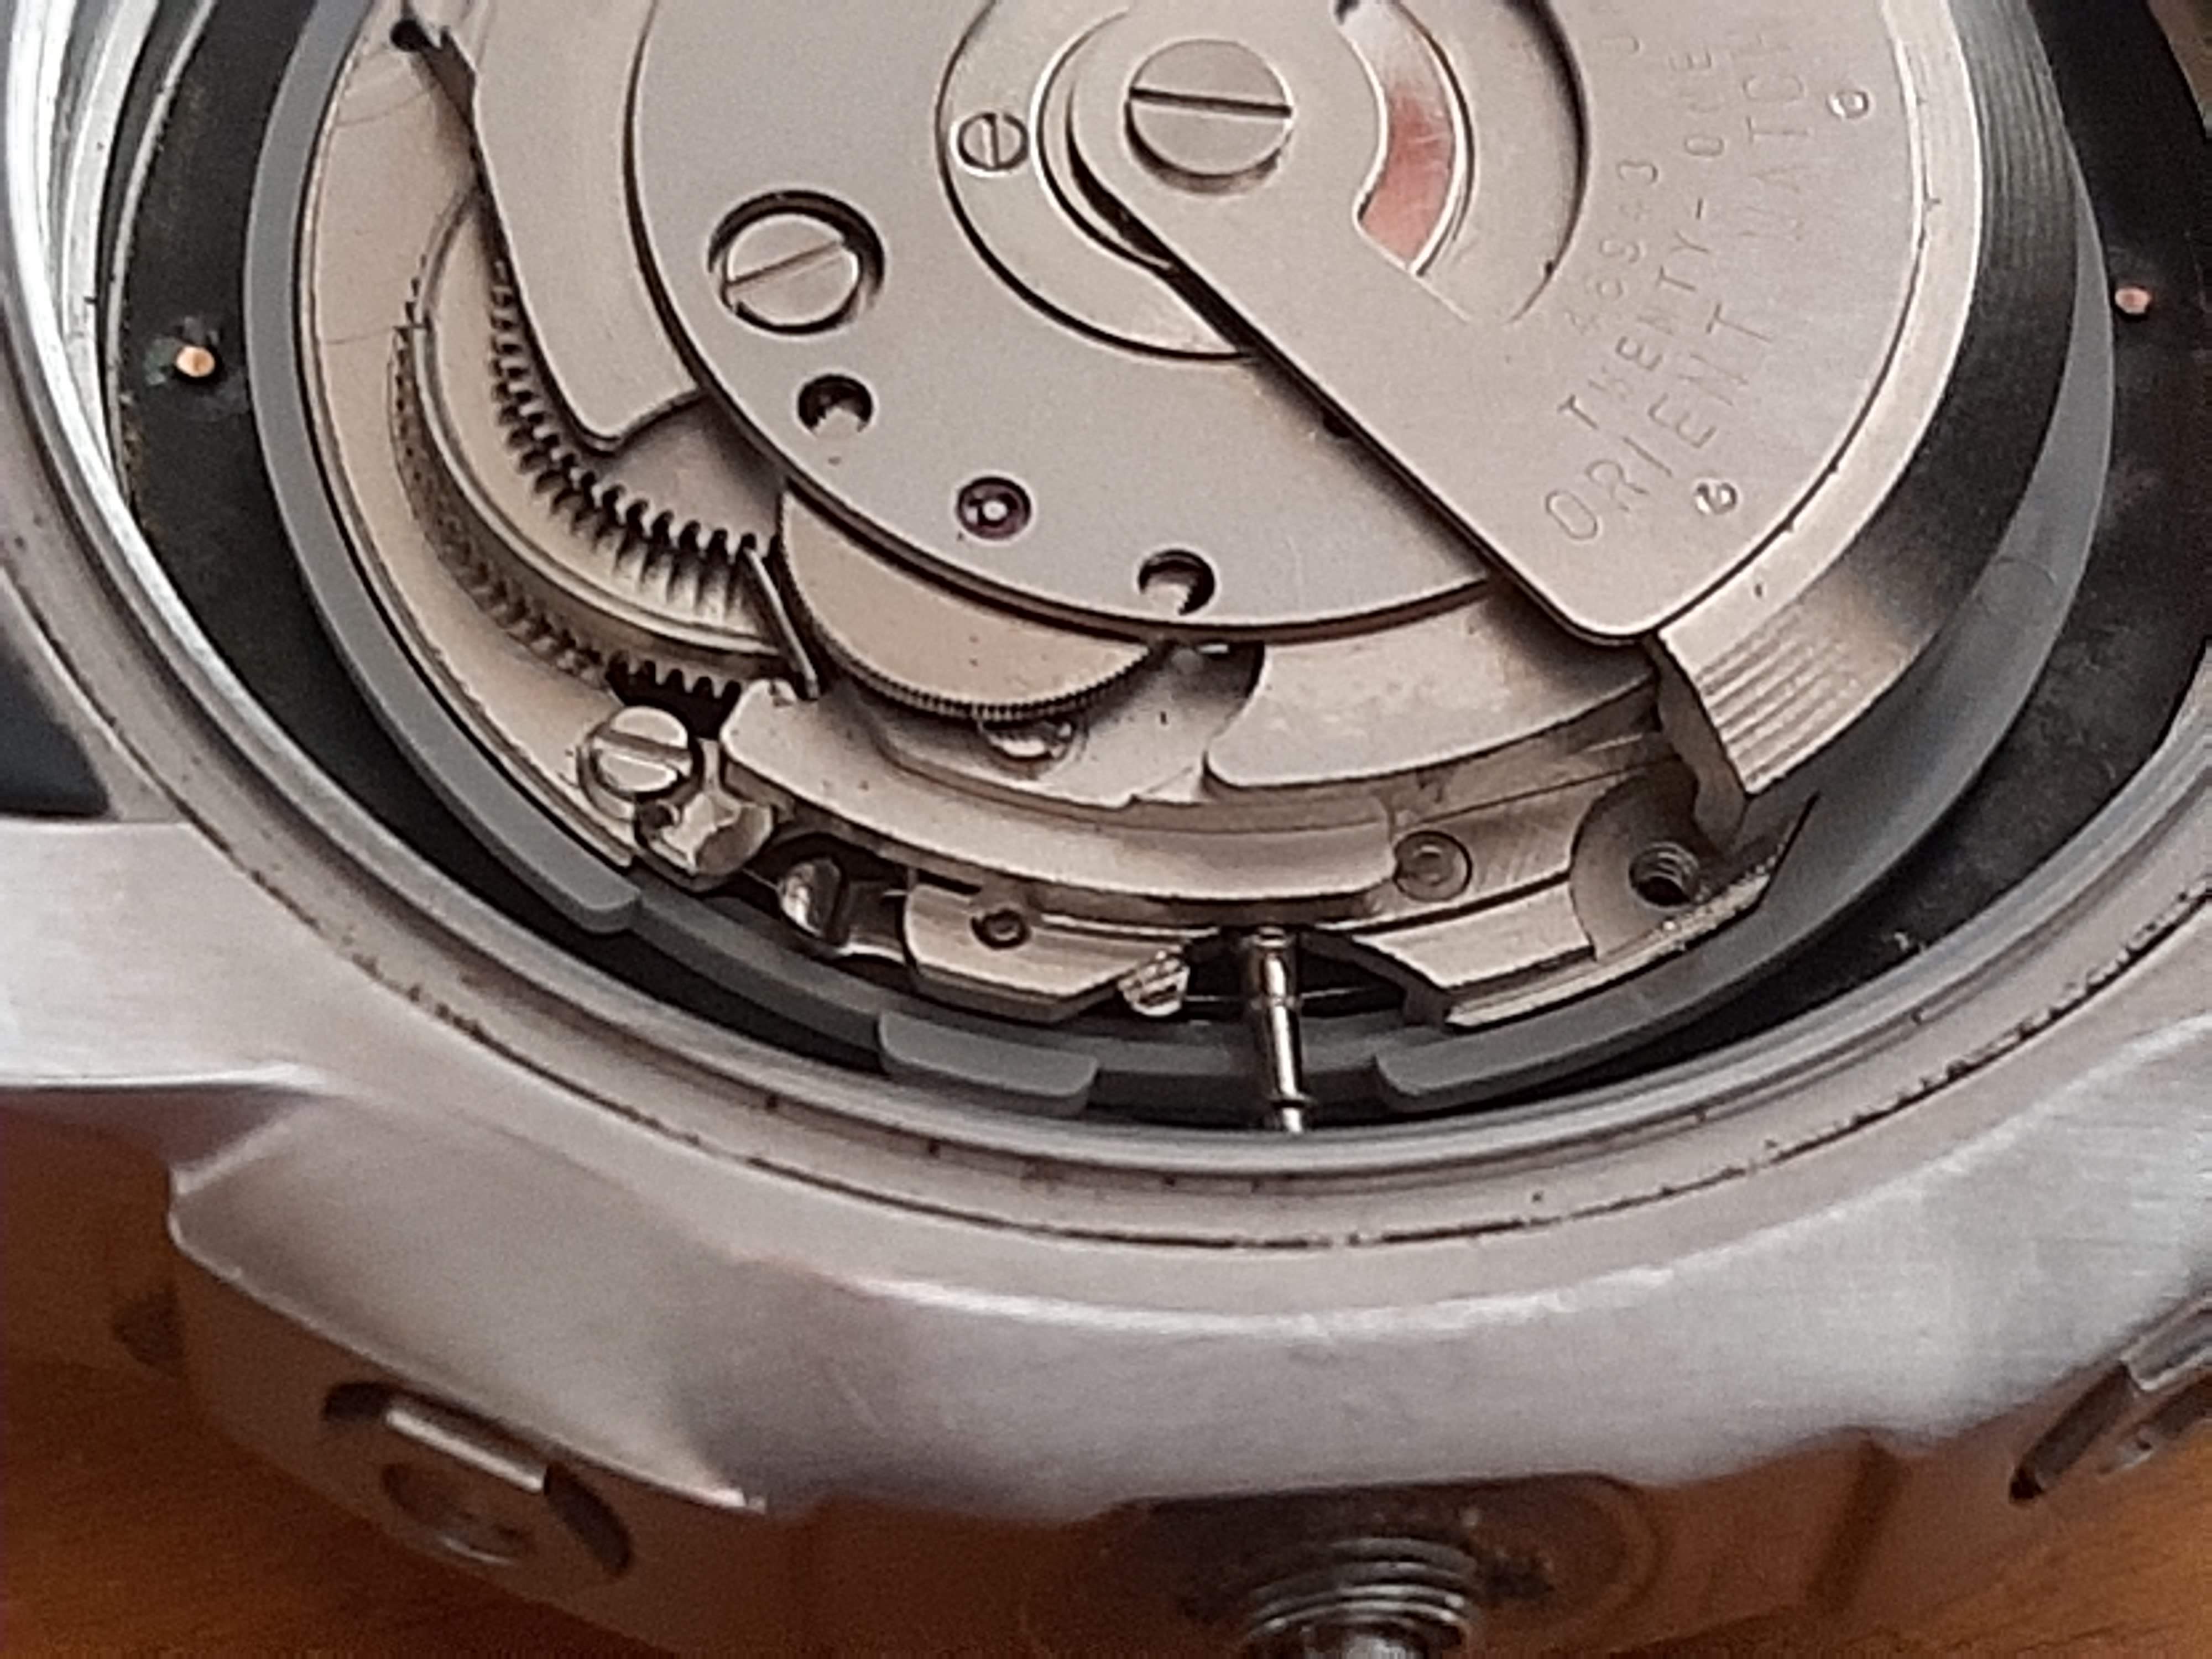
Once I removed the movement case ring it became obvious when I pulled out the stem to its furthest position. The hidden lever appeared almost like a puzzle box. The big lever btw is for the quickset day even though there is no pusher for it on the case. This set up is contrary to all my experiences with Swiss watches where you push the lever before pulling the stem. JohnR725 was right.
 1 point
 -
Mike the length of the spring does not alter the speed of the clock with these movements if it is running too fast it is the strength of the spring is wrong.1 point
-
Some here at 8:13. A few more at 6:311 point
-
Hi MechanicMike i went through 4 springs before i got it right, ?and still running fast ? i have bought another pack next size up to see if that solves the problem its cost me more in springs then it did for the clock at least you got it on first go well done hope that gives you some encouragement and you solve your problem?1 point
-
I was lucky I bought most of my tools , 3 lorch watch lathes, old 1890 tissot turns, jacot turns, Touton plastic flat crystal cutter, 1000's of old VTF crystals for watches and pocket watches, ruby balance poises, spring winders, staking presses, rose cutter for pocket watch pendant rings, spare parts, 3 boxes of pocket watches, boxes of broken watches, movements etc etc from a deceased estate. The chap that passed away was a watchmaker for 50 years and the sons and daughters were clearing the house as it was to be sold. All the antique dealers there were after his clocks (200+). I saw in the corner a stacks of old cardboard boxes covered in dusty blankets. underneath was my treasure find. All the parts, tools, everything was all mixed up so it nobody was interested. I made an offer and got a call 2 days later to pay and collect as no other offers were submitted. Filled up a 1/3 of my Toyota quantum / Hiace Van. Wife said what crap have you bought now and how much. I say you'll see put your hand in that box grab a watch 1st one was a 36 rolex, next a 60 seamaster, then a small plastic case which contained a 1 carat diamond. Best buy ever for the equivalent of US $68.1 point
-
Well I was able to understand everything that you wrote. I have met quite a few people for who English is their first language and you speak/type it better than them. Welcome to the forum Andrei.1 point
-
Hi andrei; Andrei is a beautiful and world renowned name. Andrie Gromyko is how I first learned how to pronounce the name correct. I,d like to call you by your real name. Welcome to the forum ANDREI .1 point
-
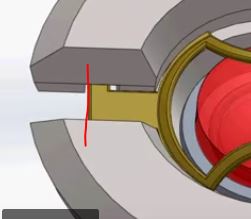
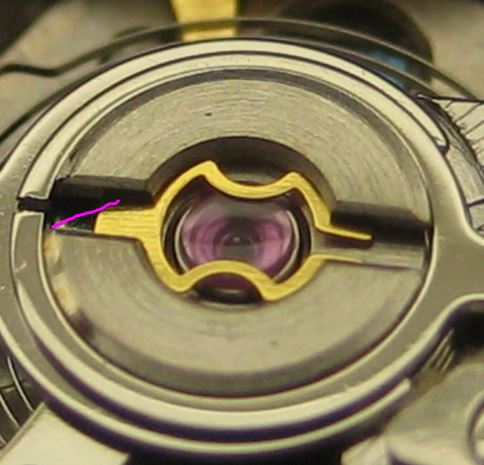
So I have far too many pictures to go through but I haven't given up but in the meantime I'll try to explain taking something out of the video above. So the very beginning it shows how things go together. At around 11 seconds to get a silhouette. If you look at the image I have attached notice I drew a red line and then look at the video you'll notice that the tail end of the Gold spring hinges In that convenient slot. Because there's a slot spring almost never comes out. But in the Chinese version cutting that extra groove was complicated so that's missing. This means when you hinge it up there is nothing to hold it in place it typically falls out. So found some of the pictures. I labeled one bad clone this is where should be the same setting that you have I do not recommend taking it out I only did it to get a picture. So you notice there is no cutaway slot like in the video there's nothing holding the spring once it's released its free to go where it feels like. Then there is a Omega setting and you'll see the cut part and the spring is also in there so you can see that does not come out. Now comes the problem attempting to describe something that I don't have a picture of. So in the picture labeled putting back in notice the pinkish colored line going at the angle? Whatever you do do not force the spring if you get it right it almost just floats in to place. So you need to put the spring in at a angle in other words basically Corner to corner of the open area underneath I can't remember if You have to stick one of the tabs in first I vaguely think you can just literally drop it in the corner to corner. Then basically rotated so it's in the correct position and then it hinge right down. Then I'm sorry if my description sucks hopefully it makes sense.
 1 point
 -
This video shows how to repair the luminous compound on a watch where the old is dis-coloured or broken away. It's a relatively simple job to do if it is done right.Repairing the luminous compound on watch hands is not a very difficult job, but it does require patience and a steady hand. It is important not to apply the new compound too thickly otherwise the hands will catch on each other once the watch is re-assembled. There are two kinds of luminous compound available (and several different colours). Pre-Mixed Provided pre-mixed in a bottle ready for application. Powdered Provided in powdered form. Mix with a binding agent. Which should you use? Well, the pre-mixed compound is quite convenient and allows you to get on with the job faster with less preparation. This can be advantageous should you be in a hurry to get the job complete for a client. However, there is very little flexibility with pre-mixed compound and it can dry in the bottle with time thus going to waste. The powdered compound (which is what I use and recommend) takes a bit more to prepare but it does allow you to create a compound mixture in the consistency (or thickness) you desire. For example - I like to apply the compound very thin and so I usually mix it down accordingly. This makes the compound much easier to apply. Applying the mixture Once you have prepared the hands, as shown in the video, then you can apply the compound with a fine watch oiler or needle. Simply dip the oiler into the mixture. This draws a quantity of compound onto the oiler tip. Now you can apply the compound to the watch hands in a spreading motion and the compound should end up suspended within the gap in the hands. It can take a bit of practice to get this right so when you first start the process you should mix slightly more than you need in case you have to attempt the job more than once. Drying Time Once the compound is applied, you will want to let the hands sit under a dust cover. Depending on the mix, the drying time will vary. I would recommend you should leave them drying overnight to be fully sure. They should not be touched or disturbed whilst they are drying. Re-Assembly When re-assembling the hands onto the watch - make sure there is the normal amount of clearance between the hour, minute and hour hands and that they will not touch each other as they turn. Potential Pitfalls If the hands are seated correctly and the compound is too thick, then this can either rub on the dial (hour hand) or a sub dial's hand may catch the hour hand (on a chronograph for example). Likewise, if the compound on the minute hand is too thick then it will catch on the hour hand. What if I did apply too thick? So it is very important to make sure you do not apply the compound too heavy, but if it is too heavy then I do not recommend trying to scrape it thinner as you could end up with dark and light spots. The best practice would be to start over. Yes - that would be annoying, but you will be much more satisfied knowing you have spent the extra time to make sure the job was done correctly. http://youtu.be/aQUN2A4iHok In summary Three words: Patience, Patience and Patience! You cannot really rush a job like this, but the more you get used to doing it, the more confident you will be. It is not a particularly difficult job, but it can make such a difference to the look of a watch. Enjoy the videos.1 point