Leaderboard


Popular Content
Showing content with the highest reputation on 10/06/20 in Posts
-
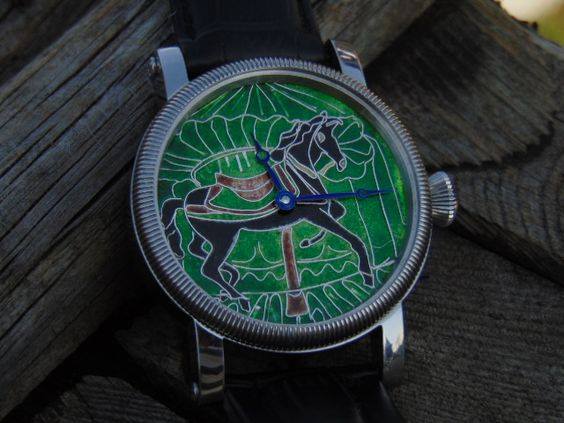
All the technique here. Thank you
 4 points
 -
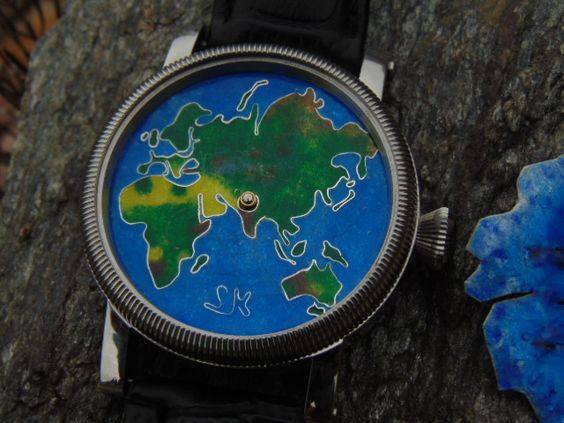
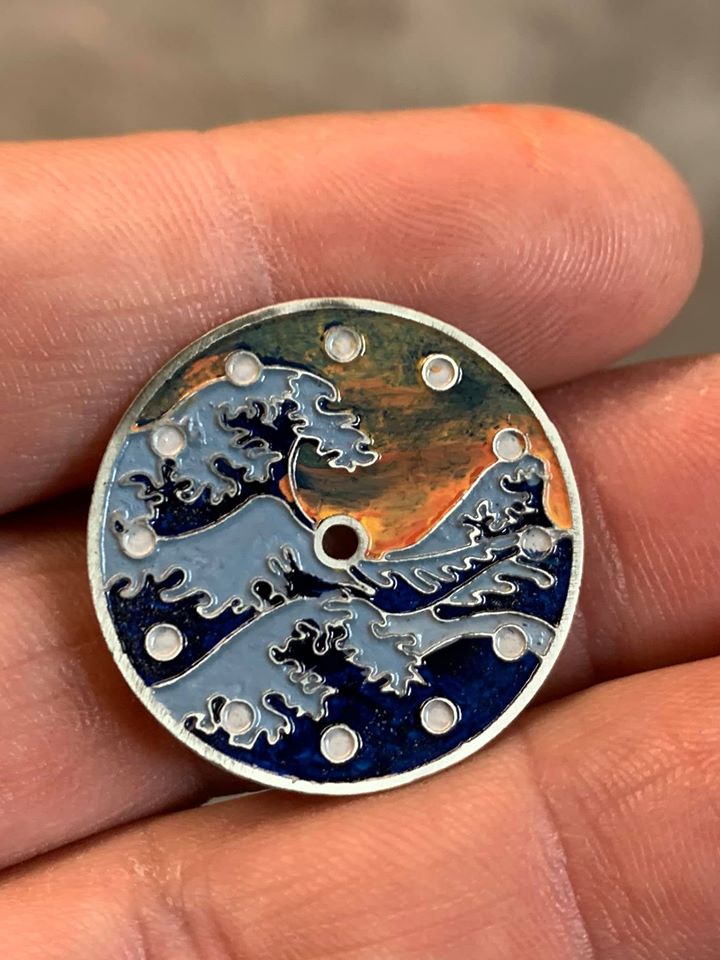
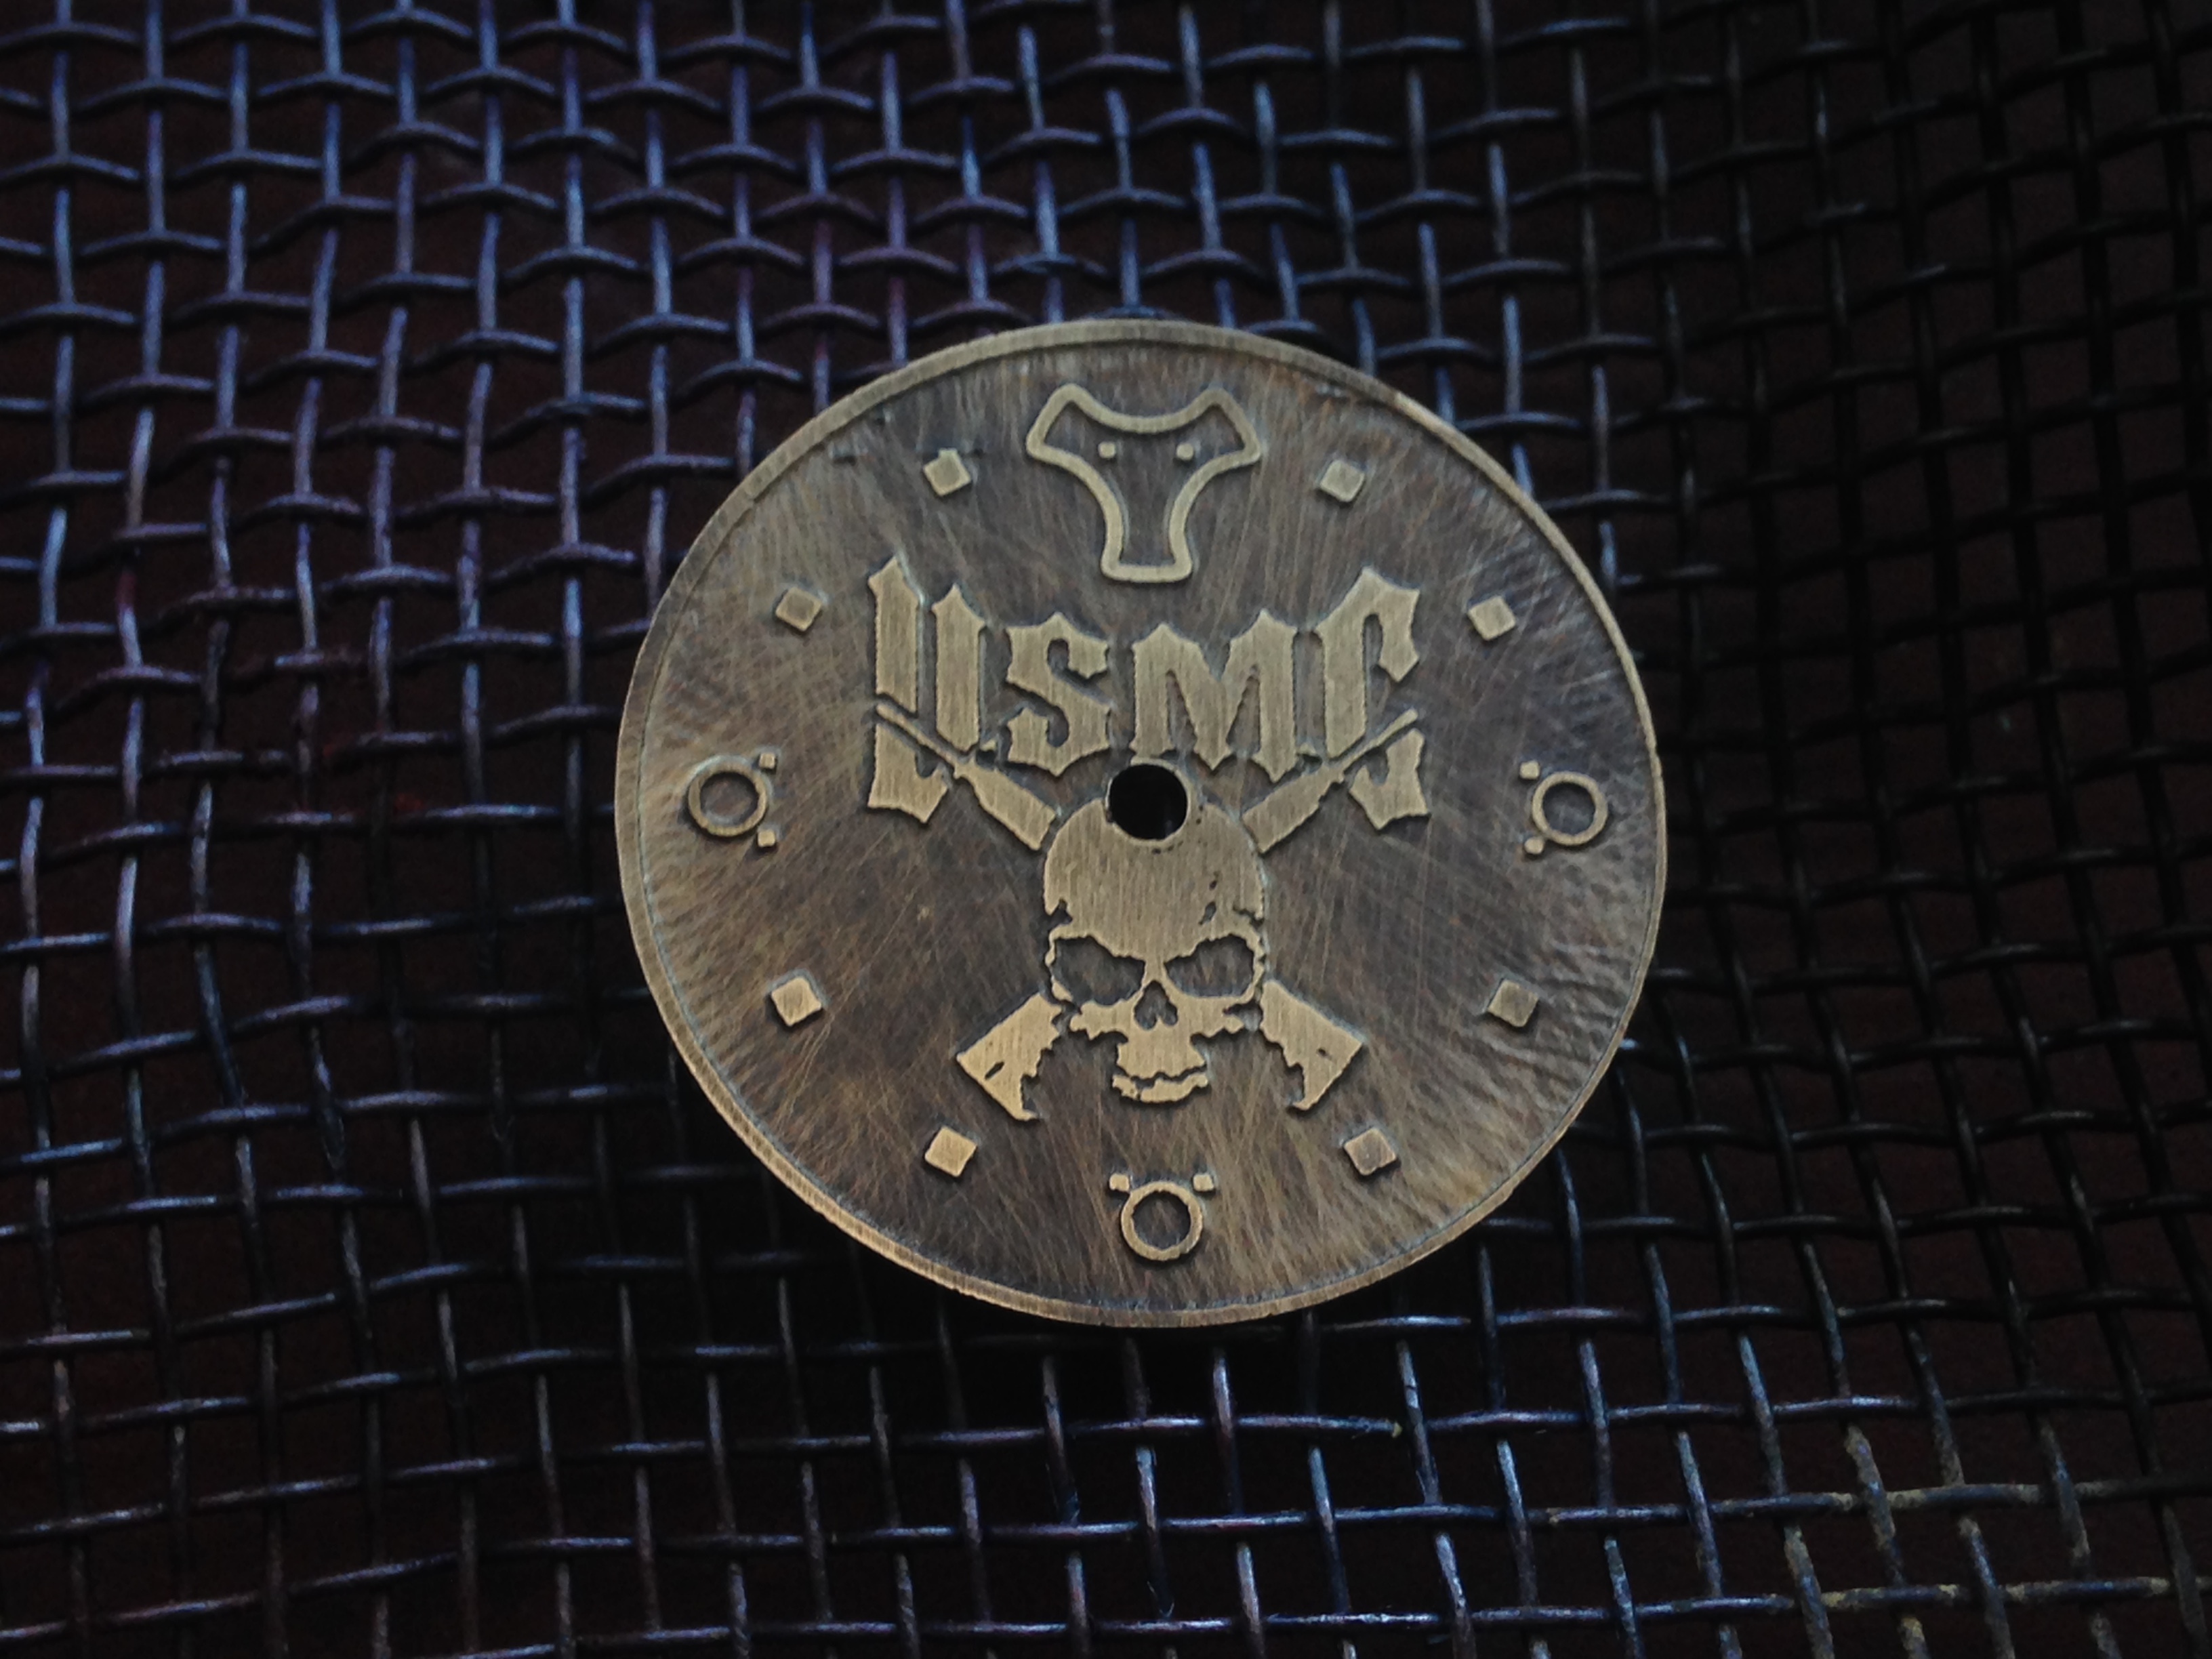
Iron chloride does not digest steel poorly - I add HNO3 I use an iron and laser print on blue foil (ebay) This is how I can selectively apply hot enamel - I can do whatever I want in the enamel. I used your design - etched on brass


 3 points
 -
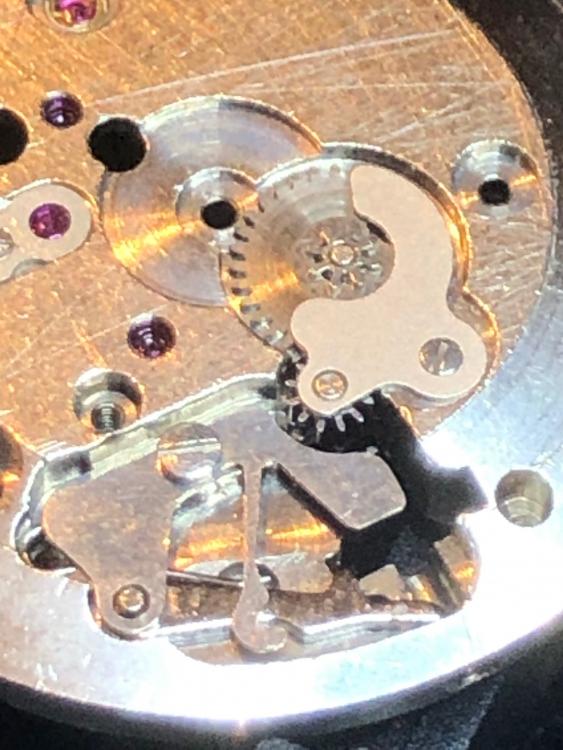
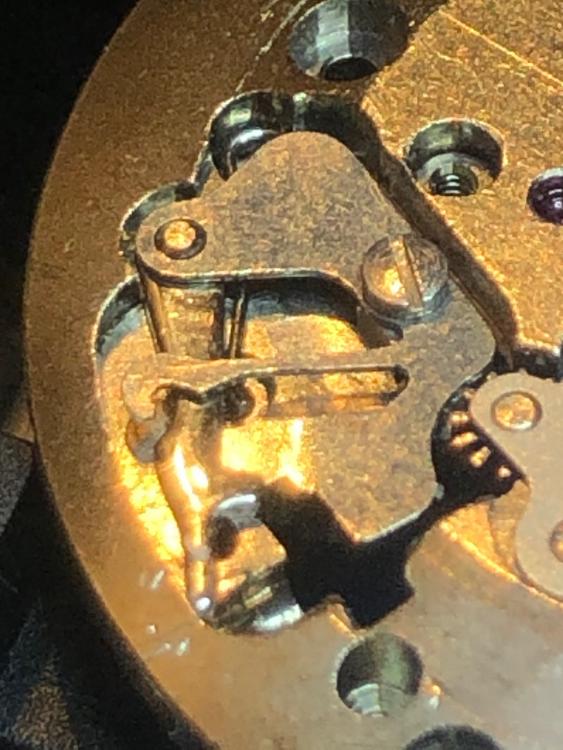
minor problem with the previous tech sheet it appears to be at the parts list only? So I'm attaching the tech sheet at 52 pages you should breeze through it in no time. then as others have mentioned cheap tools are usually a waste of time. then in addition to all your regular watch repair tools a few other things are going to be. Nonmagnetic tweezers are very nice. Microscope is a definite must. Some test equipment variable voltage power supply and a meter that can measure microamps. Then they make a special movement holder for working on the watch that's rather nice to have also. I think that statement is a little bit harsh the movement will survive just fine the index wheel or as they call it click wheel will not survive. then it's not just taking the hands off that will break your index wheel there is a variety of other ways to do it. With the added problem of their really really hard to get if not impossible. There were some on eBay within the last year or so I think there were at least $100 each but conveniently and not seeing any right now. then some additional information at the link below http://members.iinet.net.au/~fotoplot/acctechesa.htm ESA 9162 Repair Manual.pdf2 points
-
I had to look up to see what an iPhone X was. I don't own mobile phone. ? I like pigs.2 points
-
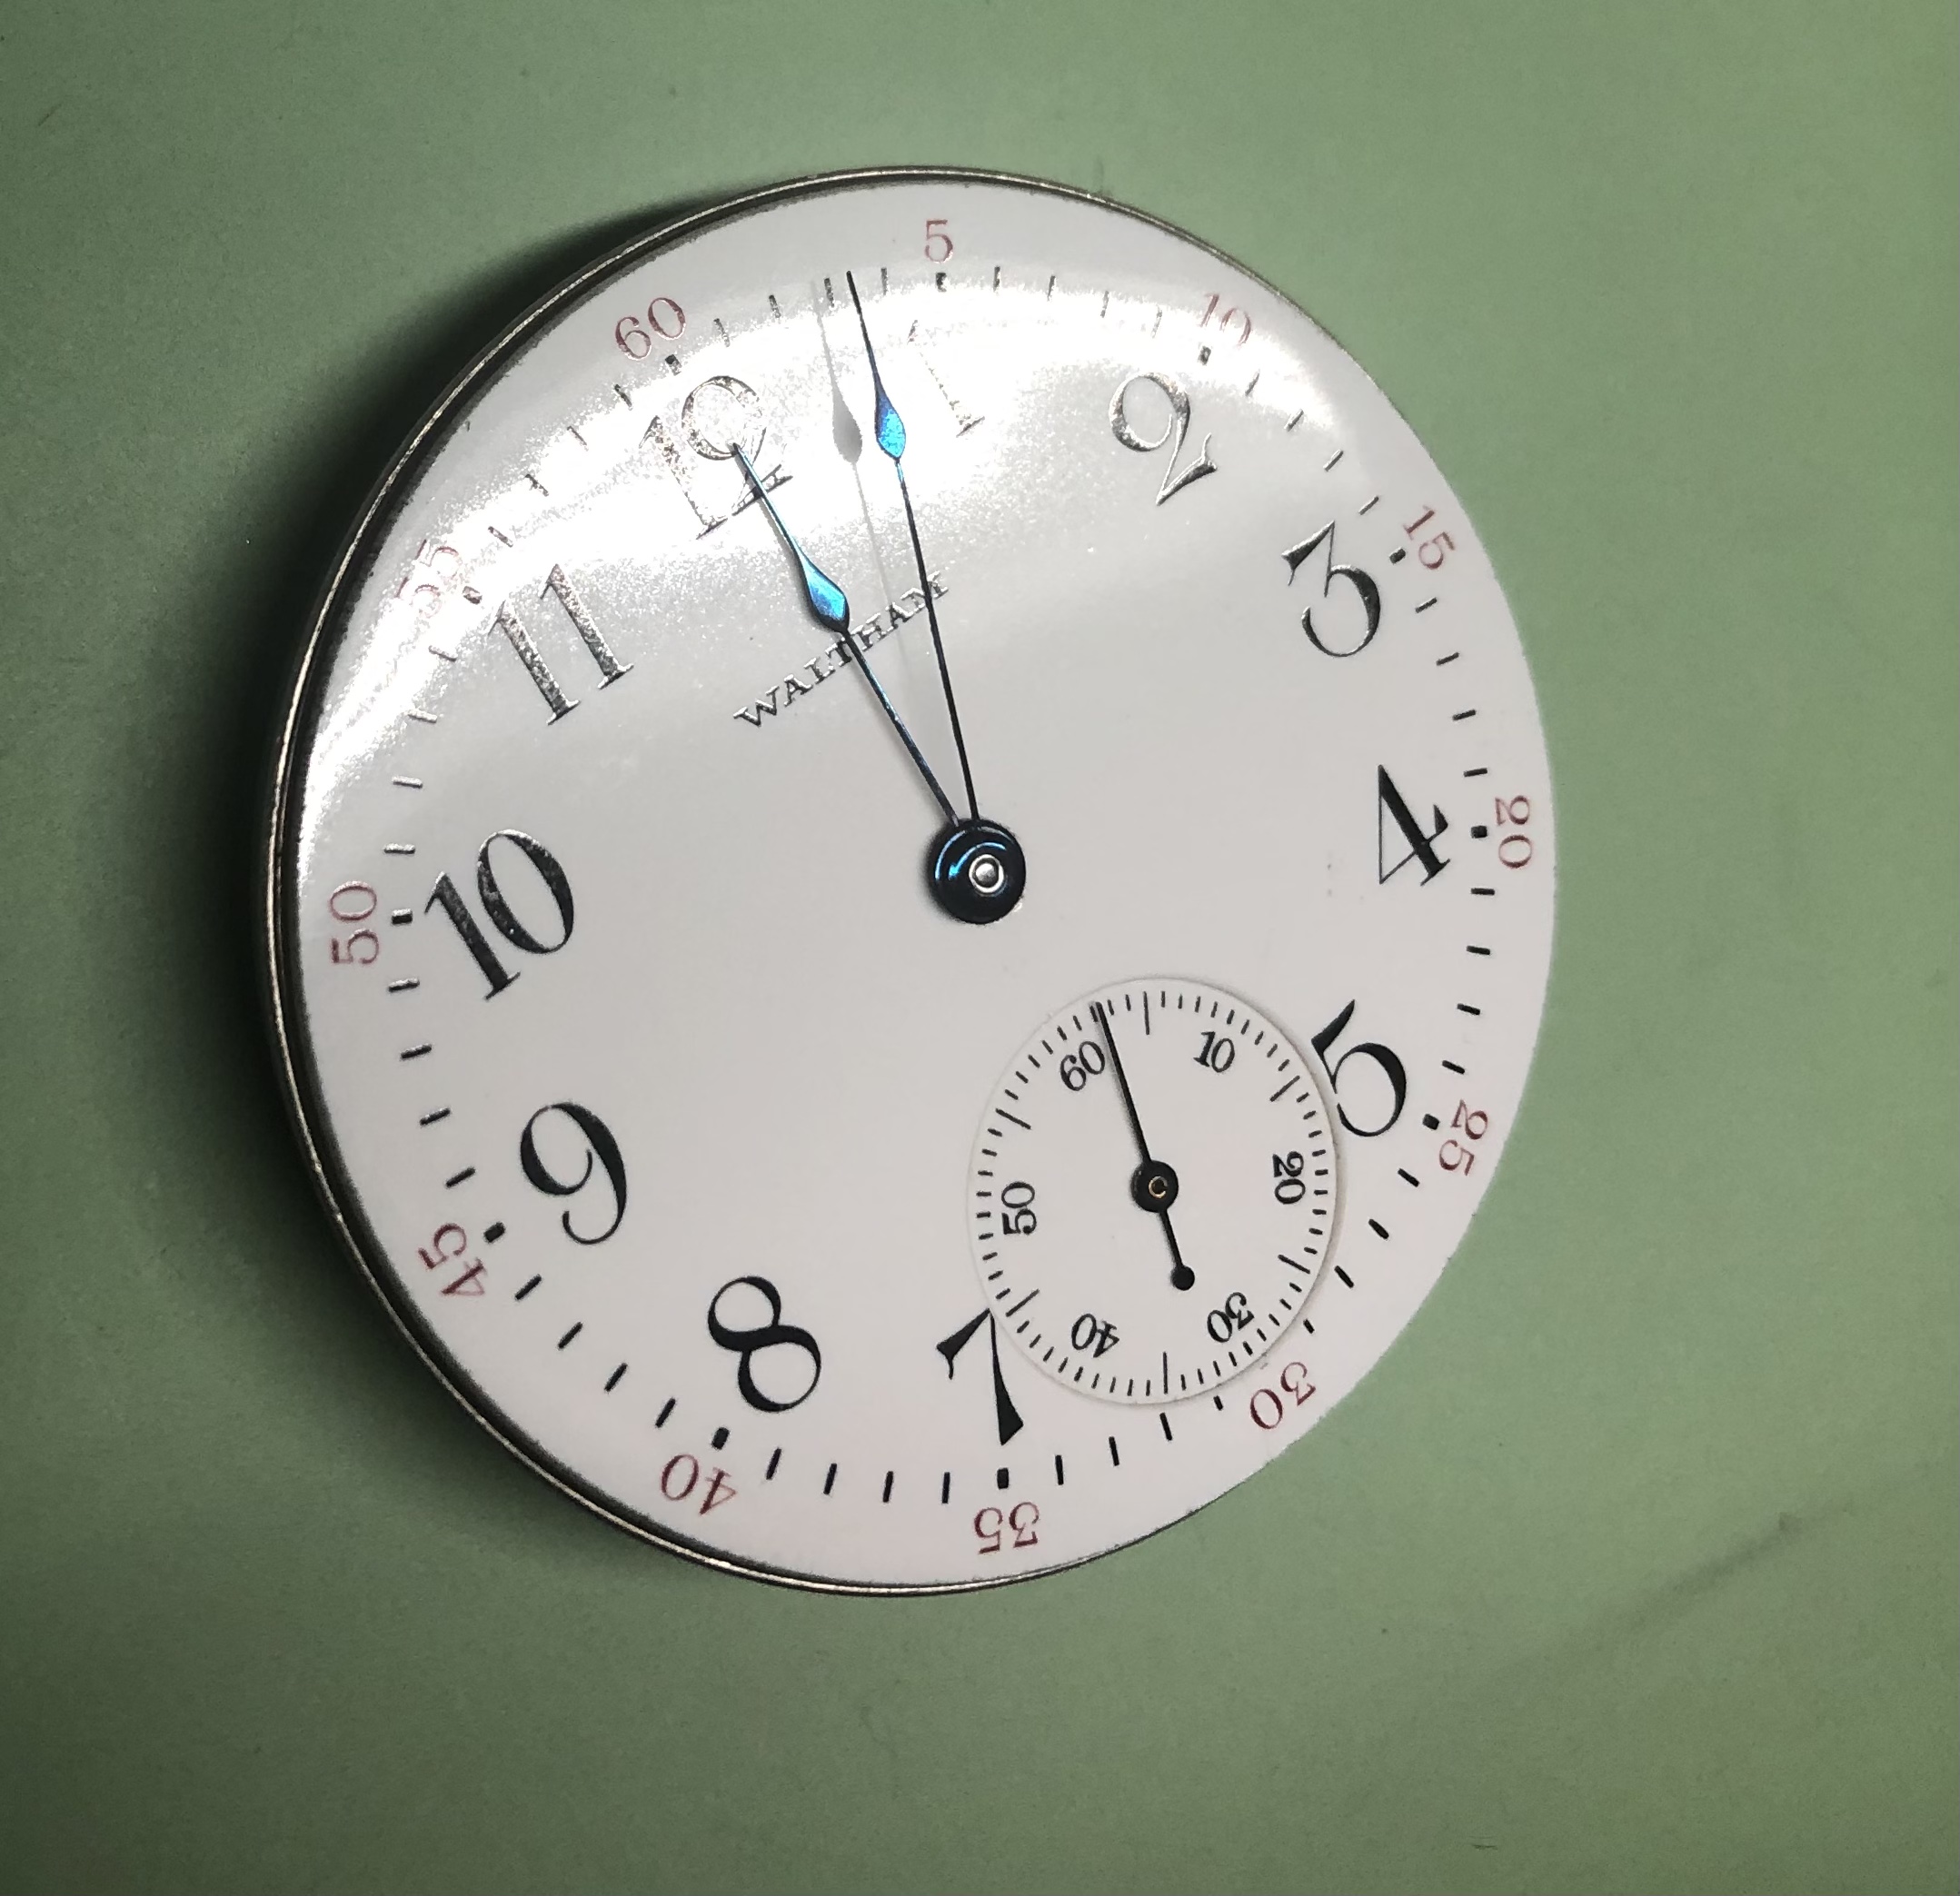
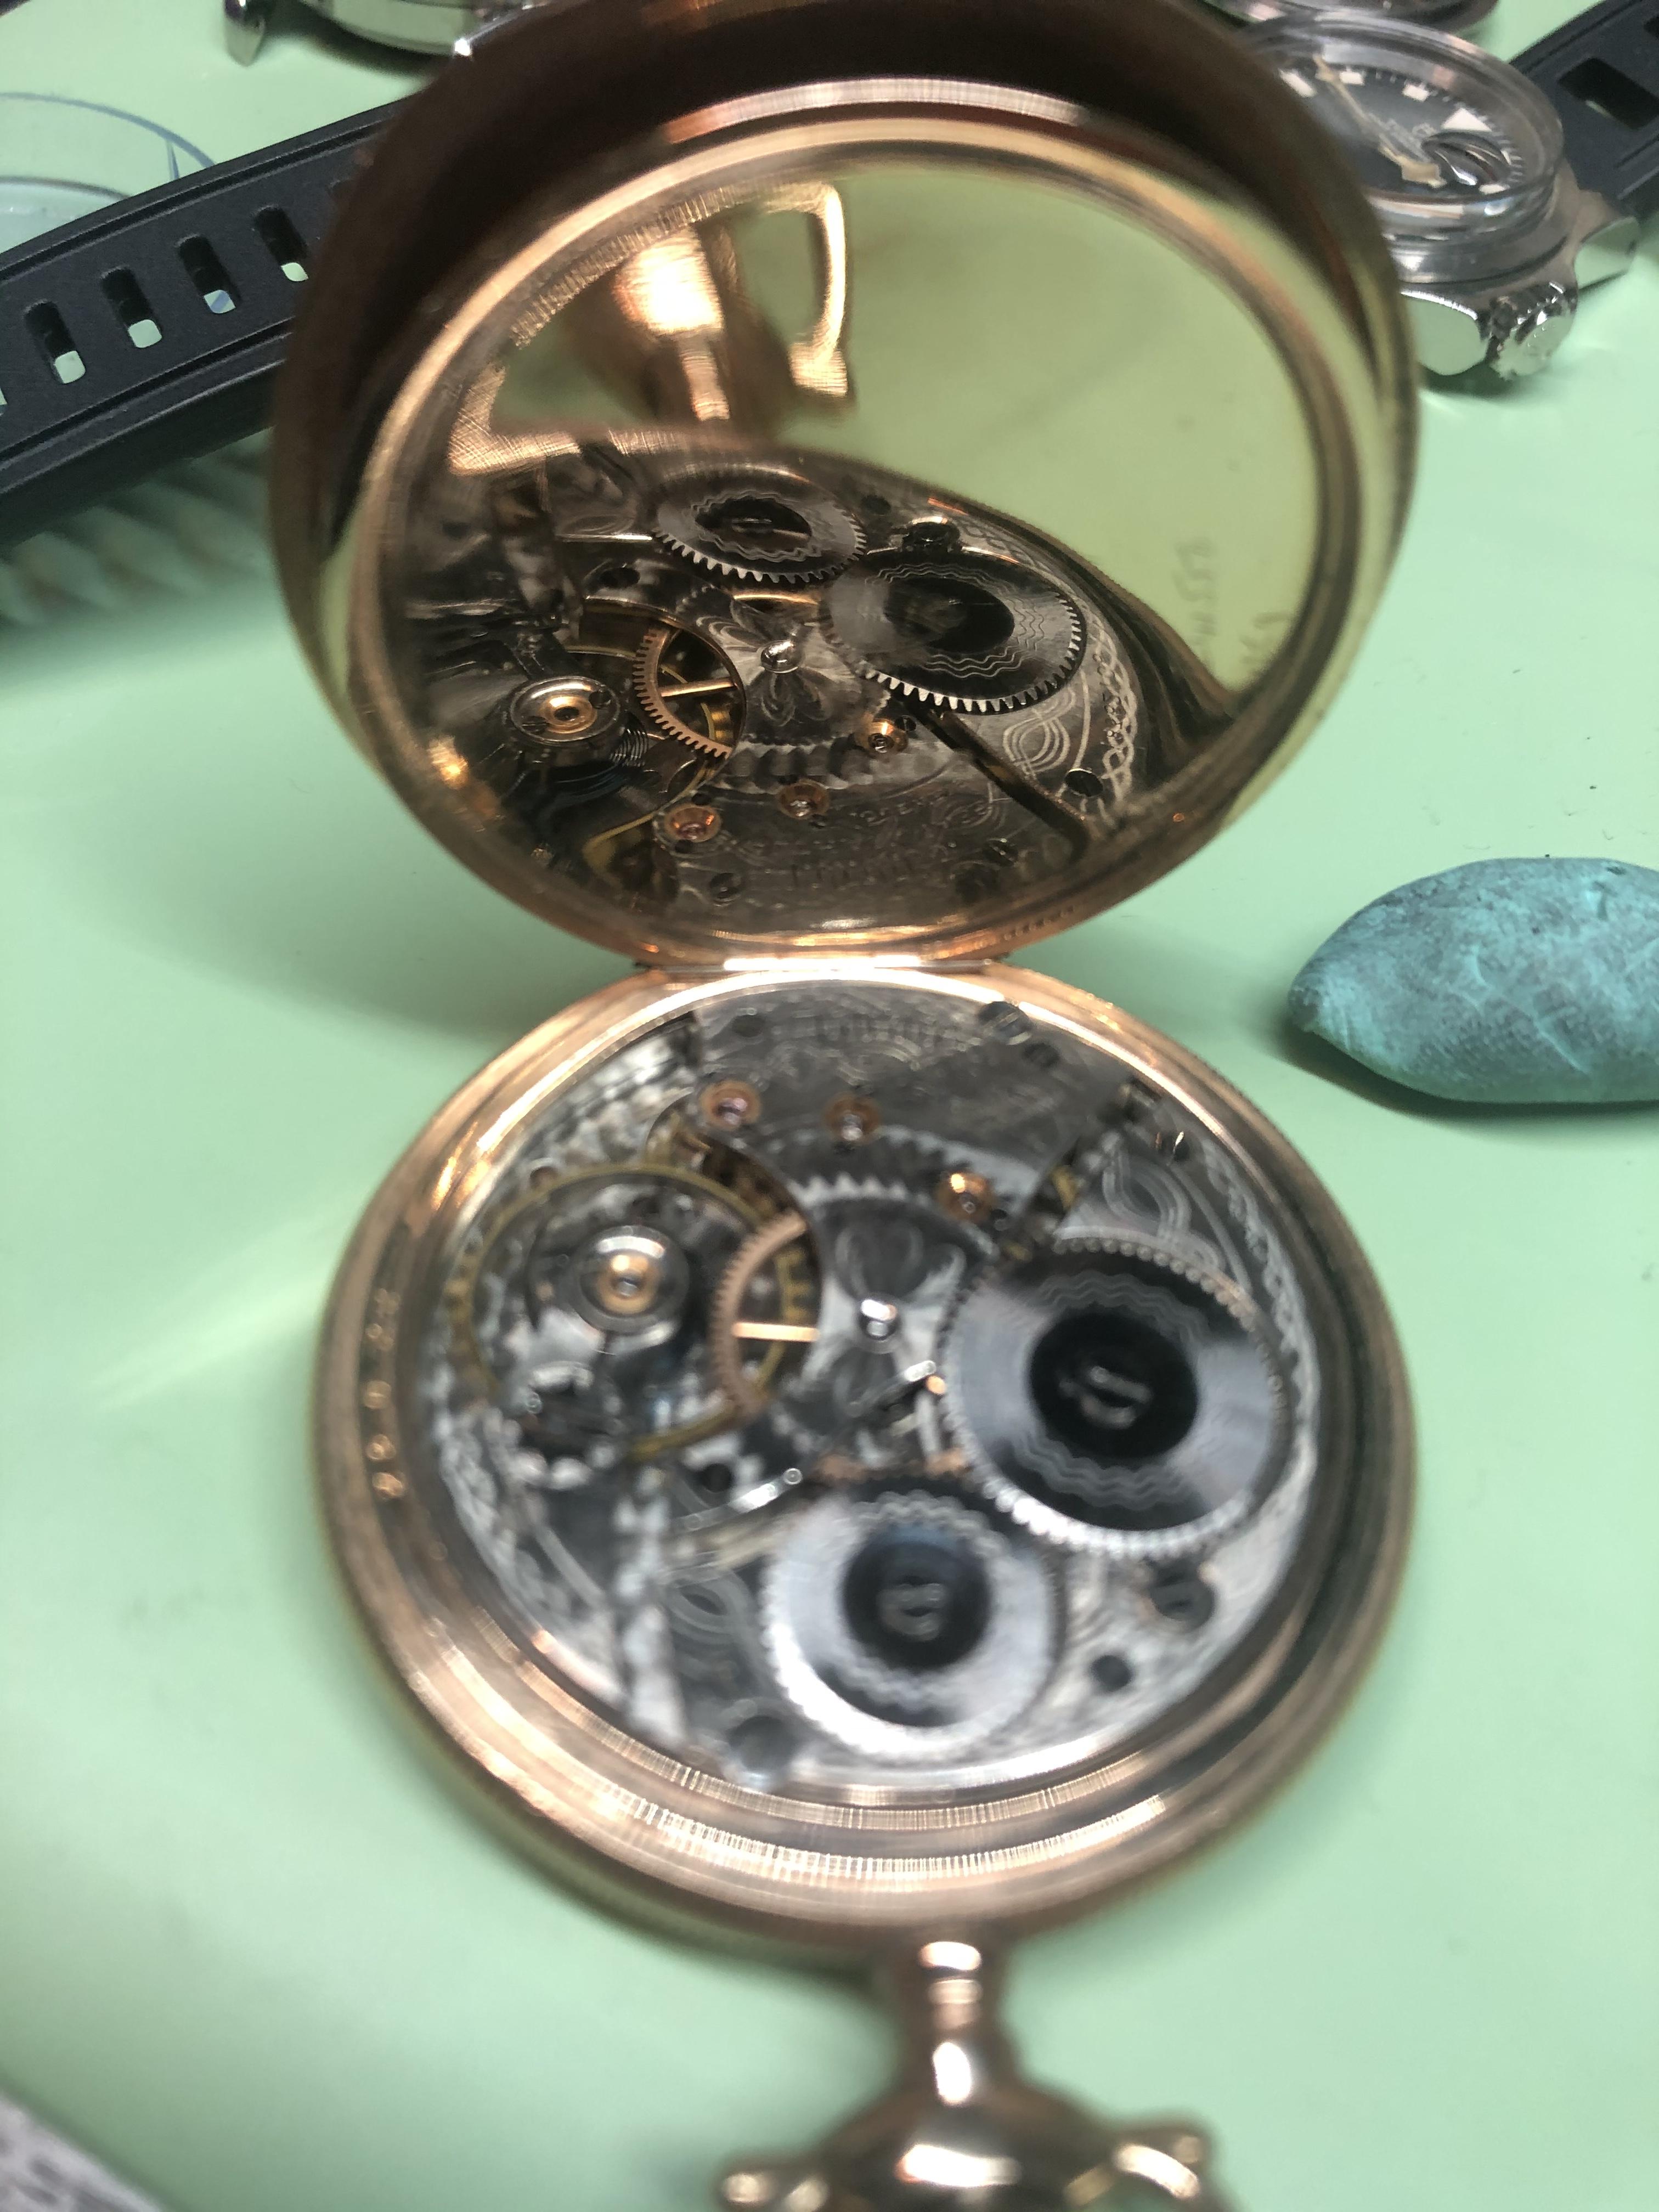
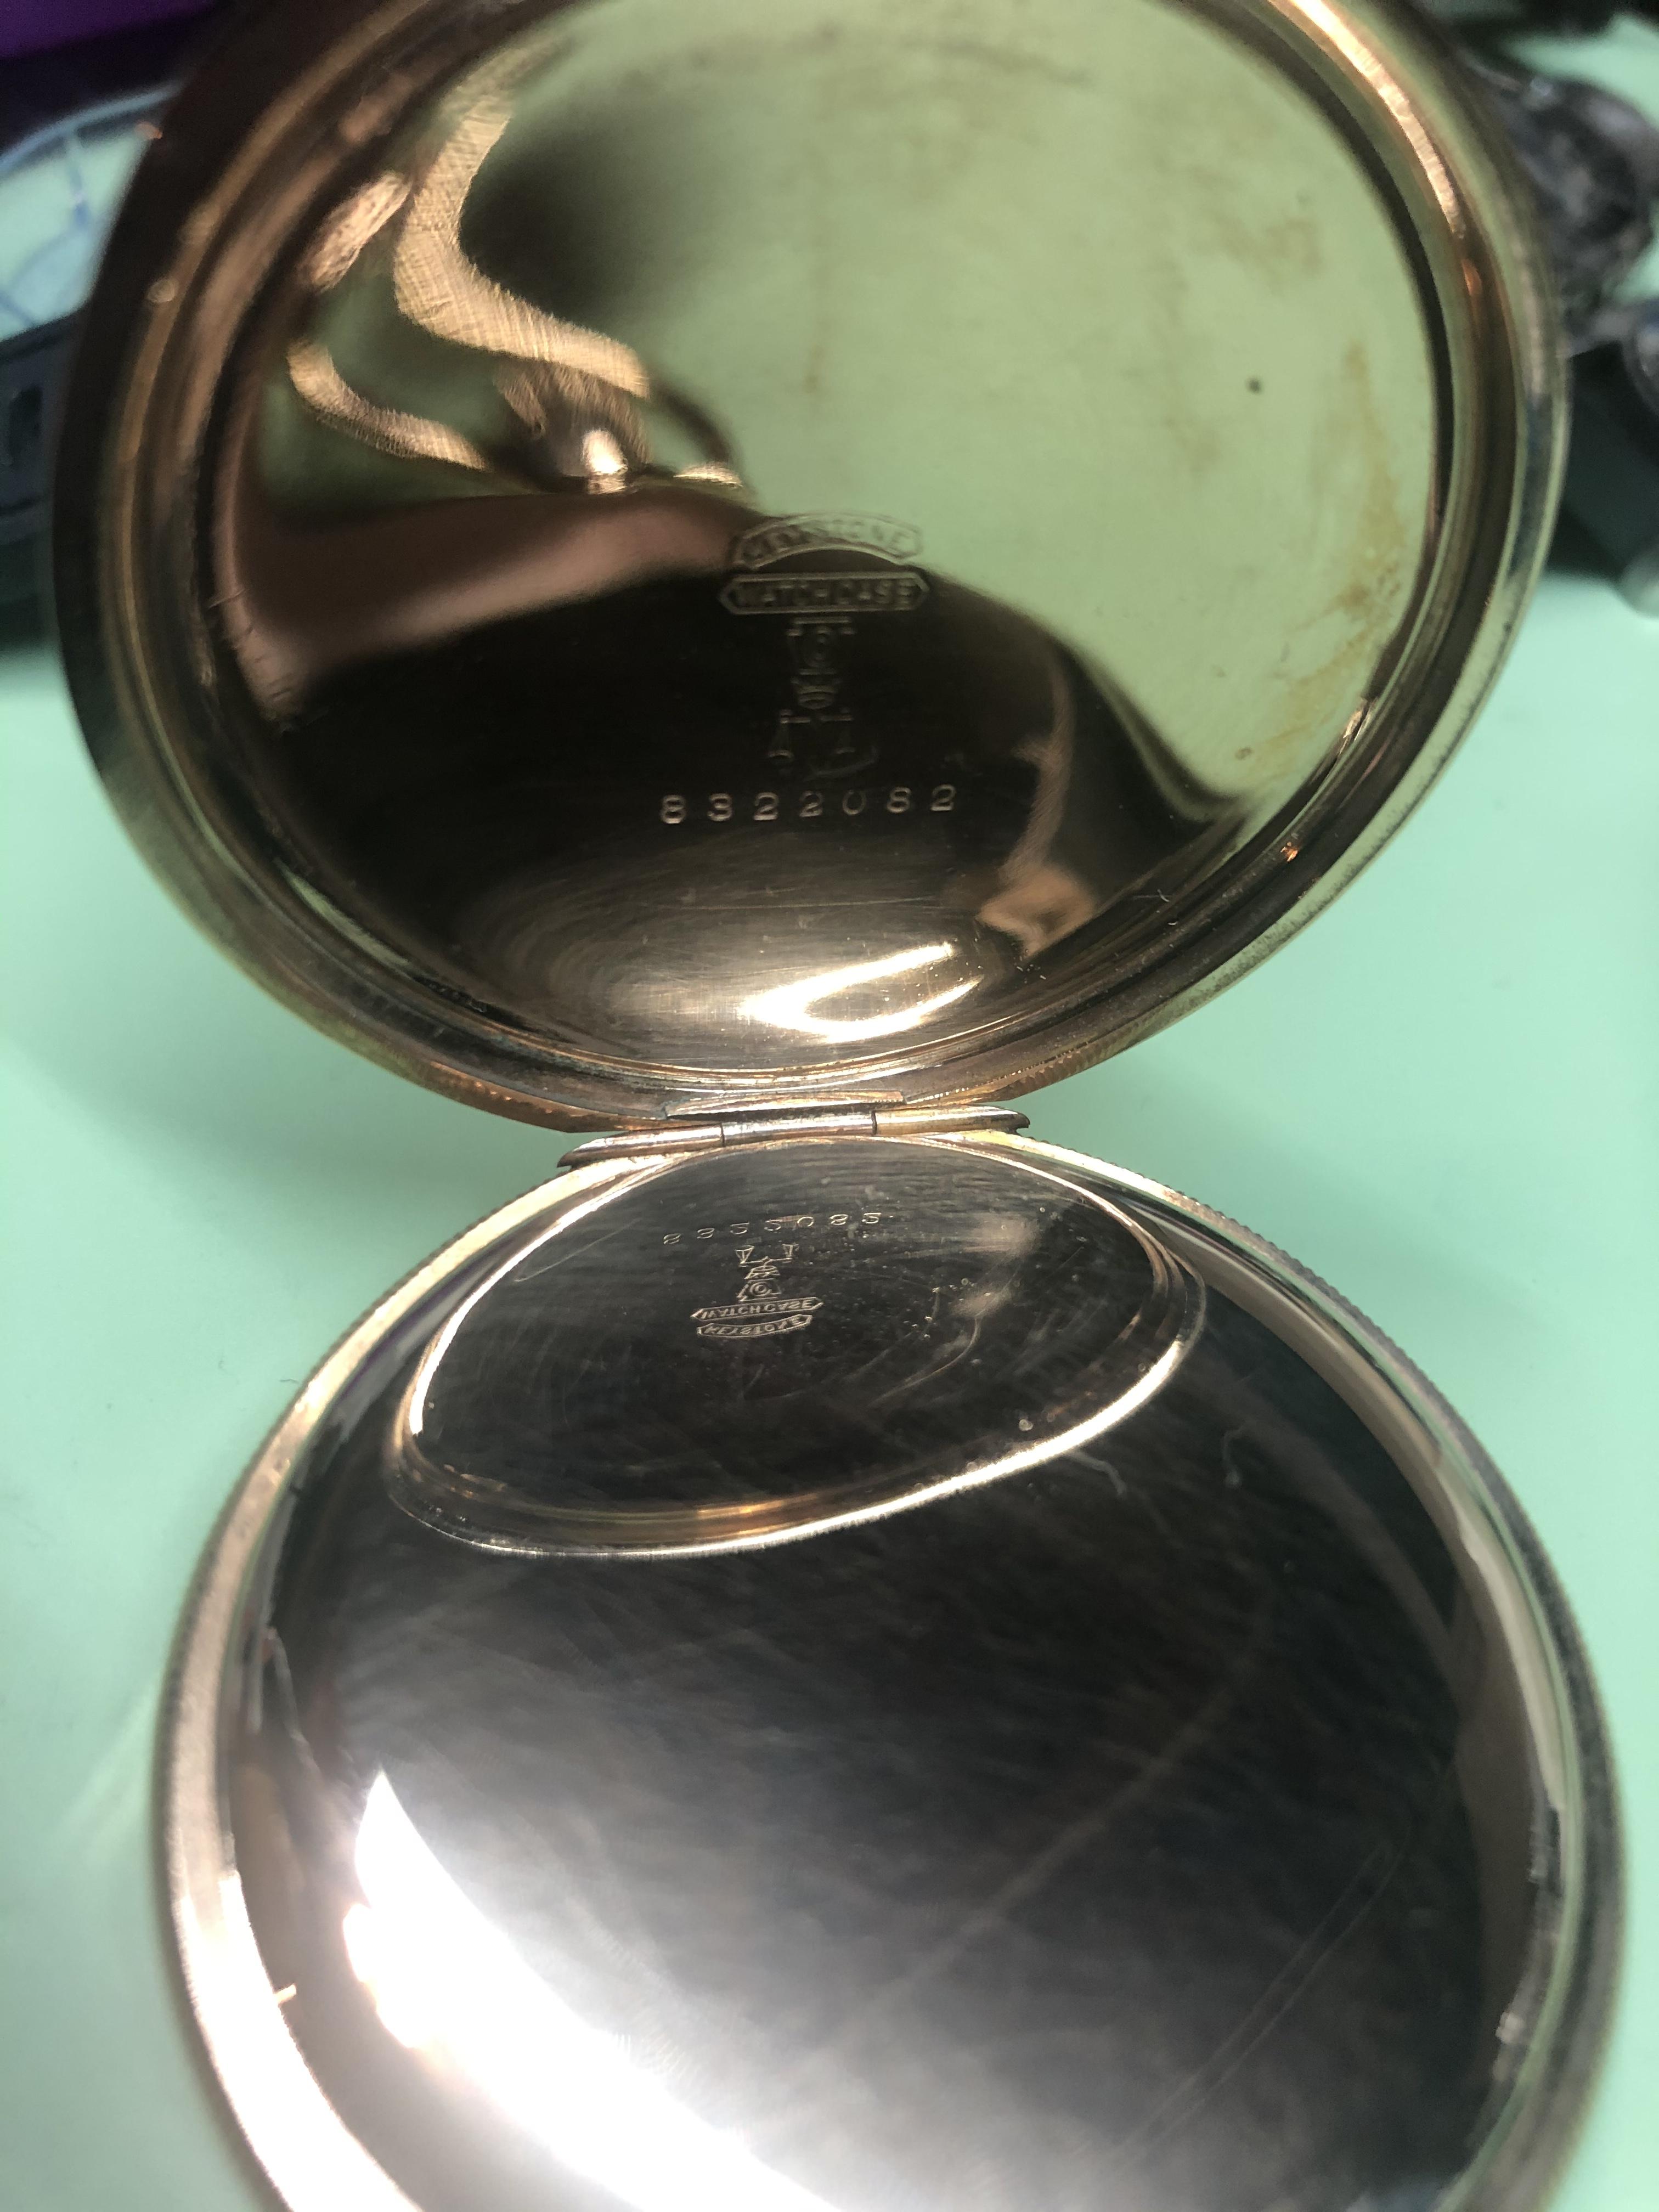
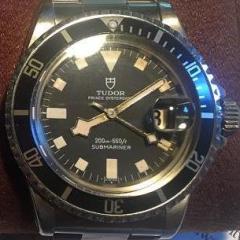
Brands means little. Post a clear picture caseback removed to enable others to help.2 points
-
The assortment box was a great way to be covered in case of incidents and spend less. Last time was out of stock at Cousins, now it disappeared, the answer I got: Unfortunately the item you have requested is restricted and no longer available for distribution from the manufacturer. I see there are ungraded cheap boxes on Ebay but with these on doesn't know what he gets exactly. Oh, and the price of "non-Swiss gaskets" went up by 50%, for no apparent reason.1 point
-
If you can’t find one that fits exactly then buy an oversized one and stone the edges down on a diamond lap until it fits.1 point
-
No confusion; just some watch geek humor...1 point
-
Number 3. Flat to flat. I see it is not very deep a socket either, so once you find the right size, you'll want to dress the end of the tool to keep the corners sharp to avoid rounding out the hex. Maybe heat the screw with a soldering iron first too, in case there is any threadlocker in there.1 point
-
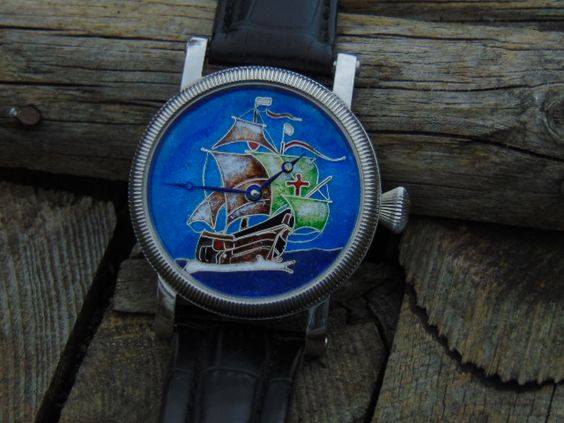
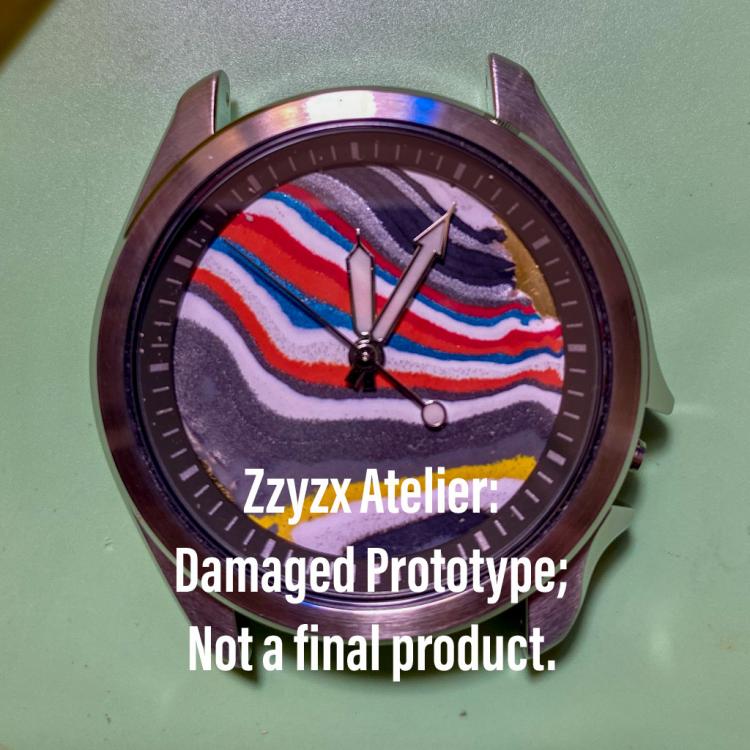
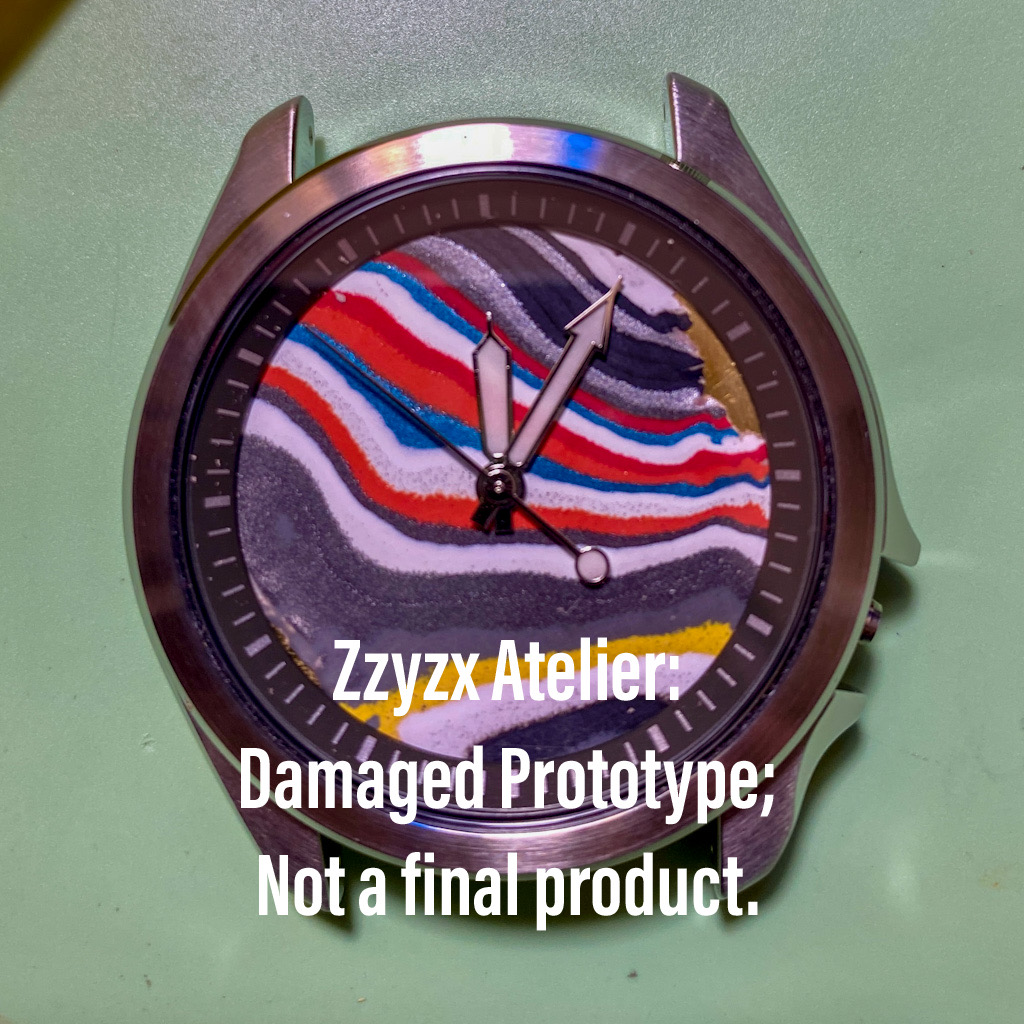
So, I've debated sharing the proof of concept picture below, as it's with an imperfect fordite dial slice and the fordite itself hadn't been polished. It's not even a particularly compelling cut of fordite; I'm going to be selecting the most visually appealing dial veneers I can. The failure rate of the section cuts is quite low (the material is really easy to work with, and stronger than it looks), so I can afford to be selective in my dials. This was one of my first attempts at a complete dial. The problem here is that I didn't start with a perfectly flat and even piece of fordite -- after gluing it to the brass dial, my total dial height ranged between 1.05 and 0.95mm. I ground this down by hand using 400 grit sandpaper, but inadvertently exposed brass on the dial underneath the fordite in doing so. Starting with a thinner, perfectly even disc of fordite will prevent this from happening in the future. The new larger saw blade should be arriving in a couple of days, and I'll do some more cutting ASAP. Here, I also glued the fordite with G-S Hypo jeweler's cement, which may have encouraged the thin parts of my fordite veneer to peel if the adhesive wasn't even in spots. My next attempts are going to use a very thin layer of 330 epoxy instead, which I've "thinned" by heating before mixing. So, this picture is not a good end product. As proof of concept and feasibility, however, I'm really proud of this picture. Total dial height here was 0.5mm, not the 0.4mm I'm shooting for. Despite that, the hands cleared everything quite well. I will say that the case I'm using does have a protruding tube -- the stock dial for this case has a very small notch cut out of it to accommodate the tube. The brass dial blanks I'm using *dont* have this cutout, so I'm going to need to file one in future attempts. It's going to take a lot more work to get everything to the point where I'm satisfied, but I'm confident that I can pull this off based on last night's progress. Also, I'm committed to sharing my techniques and process openly. So it's honest to show failures, even if they're embarrassing. Finally, I scanned another piece of fordite. I'm sharing it not because it's particularly interesting visually, but because it shows the colors embedded in the "Jeep / Dodge" fordite I'm using. I love the metallics!
.thumb.jpg.34a18c413397c74bc35e1b8743539a58.jpg)
(Large).thumb.jpg.b068ca0747bf62ec1bf8d11c583fe836.jpg) 1 point
1 point -
practice movement is an interesting question in this discussion because ideally you should have hand eye coordination for working on a mechanical watch before you even think about this watch unless you have lots of money in which case just get another one of these to practice on. If you look on the discussion group there are quite a few discussions on getting people started with watch repair. For instance I have a link that will get you started. https://www.watchrepairlessons.com/ as far as practice watches go I usually recommend a brand-new Chinese clone of the 6497/98. the reason why this is my choice is it's relatively inexpensive and it's running. It's very important to start with a running watch typically people want to start with broken watches and fix them. If they aren't running after they attempt to fix them they blame the watch. If you disassemble and reassemble preferably several times a running watch and it's no longer running it is a lot easier to narrow down whose fault that is. Everyone breaks stuff when their learning and the easiest way for new person to see that is to start with something running and break it. but once it's broken you still can practice taking it apart and putting it back together multiple times to get your hand eye coordination so that the next watch you work on you probably won't break hopefully. one of the problems with electronics is typically you cannot look at it and ascertain whether it's good or bad. So this is where you'd hook up your electronic test equipment usually specifically made for watches and see what it's doing? this is actually outlined in the manual. You hook the watch up to a power supply you measure the current consumption and see if it's oscillating. If it's not oscillating you can attempt to measure coil resistance in figure out which coil is probably bad. Fortunately this is a slightly easier watch to work on as you can remove the electronic module without even taking the watch out of the case.1 point
-
I would like to ask: can someone with the proper decal skills make me a dial? I'll send the particulars to whomever want to step up- I have some art (original machine plaque) I can photograph and provide parts or funding... My machining mentor is retiring, and he had always asked me to build him a watch... I normally repair/restore them so it just never worked out. Now I'd like to send him a decent watch of my design, including the company logo (the old logo) from which he is retiring. No super-emergency, but I'd like to get it going within the next month or so if possible. I figure either a Seiko or Eta movement to keep parts availability simple. PM me (for any monetary discussions) or post here if you like. Thank you!1 point
-
Be careful and have fun! Landeron-48 tech data.pdf1 point
-
Looking good rocket man a couple of more rounds and you are ready for the next level! .. After that the Landeron 48 ?1 point
-
The main issue is shape, not tempering. Spring arms notorious of breaking are usually too thick and/or too short and their form ignores the internal torque. Frank1 point
-
More than once I saw that these chinese TMs seem to have too much vertical magnification. Don't know if this is fixed or selectable (I don't use a chinese TM), but it often makes the graph look frightening and provokes advice to 'better adjust the beat error' though 0.5 ms is near to perfect. The above pictures correspond to about 3 ms beat error on a swiss TM in standard mode, without extra vertical magnification. Frank1 point
-
That is how I *clean* pivots, but added a bit of fine polishing paste to the front of the peg wood before. It can avoid a jacot tool in many cases. Remember the many balance wheel pivots spoilt by burnishing. Once cylindric, they have poor tapered shape now. Frank1 point
-
Hi jdm is right on pin pallet and in its due state only a practice piece as parts would be un likely due to its age and cheapness of manufacture. Pity as its a nice dial.1 point
-
Hi Attached below is a recomendation from one of our members DrG who took the time to put on paper a list of tools etc. Most of these can be sourced from the likes of Cousinsuk watch parts or from Ebay AliExpress in the east. If it your intention to enter Horology as a hobby do not waste money on cheap tools as they do not stand the test of time and use. Mid range brands such as A*F swiss or french , Horotec and Bergeon being the top of the range and the dearest. 1612608791_ToolsfortheHobbyist.pdf1 point
-
I repaired a 720 megasonic, found and replaced the faulty part, it ran, couldn't figure out whereto though.1 point
-
It's Roskopof pin lever, these were the cheapest watches one could buy at the time. Some parts are missing possibly because it had broken. Good only to practice with tweezers and drivers, and to learn the name and function of each part.1 point
-
The hairspring will not expand totally evenly as it is a flat type and does not have an overcoil. You get side-thrust as it breathes open and closed. I can see what you mean about the spacing of the outermost coils, but this is not a problem unless they touch. I’d regard your beat error as perfect and would suggest you don’t touch it!1 point
-
When I make parts like this (frequently) I start with stock as close to the desired finished thickness as possible. 2 or 3 hundredths of a millimeter is plenty for finishing. Taking more than that off is a long process, and there's the possibility that it gets thinned unevenly. The old school technique for a set bridge would be to shellac/glue/soft solder the old part with the broken bit in place to the metal stock. Now you can drill through the original holes, and with a jeweler saw and files it's pretty quick work to shape it up using the original as your template. When you're happy with it remove the original and heat treat.1 point
-
I'm getting close enough to feel it. I did a bunch of cutting today, and have come to the conclusion that I need to replace the 4" blade on the Buehler with a 5" blade. This will allow me to make my cuts thinner and flatter. It really is a cool machine though -- I was able to get three really good cuts that I've been grinding down by hand to make my first dials. Right now, the fordite veneers are coming out of the Buehler at 0.6mm thick, which I then hand-grind to the correct thickness. Because I'm having some flatness issues, I need to get the larger blade before continuing. (It's complicated -- the size blade I'm using is perfect for archaeology stuff, but too small for watch dials. As a result, I have to cut my dial sections in two passes rather than one smooth pass. Upgrading the blade will help a lot.) Here's a video of the Buehler in action: I also assembled my first watch with an (imperfect and unpolished) Fordite dial. The concept works -- I'm focusing on execution now to be able to share something I'm really proud of.1 point
-
Finding a replacement jewel would probably be more difficult than winning the lottery. I have only replaced a pocket watch balance jewel once. It was one of those rubbed in ones in a brass chaton. My vintage Seitz jewelling tool had a few canisters of chatons, but as luck would have it, the can with the size I needed was empty. In the end I made a bushing from a brass rod and inserted into the plate, then used my jewelling tool to ream the hole to a jewel size that I had. That worked great. But I messed up and soaked my pallet fork for too long and the jewels fell out. ?1 point
-
If you want to clean/polish pivots, you can just rest the pivot on a piece of box wood (or other wood) with a suitably sized groove cut in it and some metal polish of some sort applied. I’ve described it here previously, and I think it’s shown in DeCarle’s book. A think using a jacot tool for that purpose would be over-complicating things.1 point
-
are you sure there is an industrial standard? the problem with a generalization of industrial standard is it can't possibly be correct. That's because the tolerances of a super tiny ladies watch versus an ancient American pocket watch are not going to be the same thing. even Rolex for their balance and shake is not universally the same for all of their watches. But what we could have as a general rule of thumb that it would be nice if your end shake is between this and this. Accepting that earlier watches probably were not made to the same tolerances and attempting to modify early watches to fit the perception of a modern standard is not what you're supposed to be doing. Unless you're just doing it to have fun and prove you can do it.1 point
-
So, it would seem Anthony de Haas knows what he's talking about. At 40X magnification under a stereo microscope I believe end-shake can be visually assessed pretty precisely. To get a good feel for what the 0.02-0.06 mm feels like I've secured the bridge with one train wheel at a time to get a good look at the end-shake play, and then I've adjusted the jewel until I basically no longer can see any end-shake but still have a spinning wheel. After that, I've adjusted it back so that I can see that <= 0.02 mm gap. Eventually, I hope to be able to assess the end-shake just by feel. Time consuming but good fun ?1 point
-
Funny I just did one of these they can be a pain. Was I did was to hold the the spring vertical with my tweezers with the tabs in line with the grove then I turn my movement holder a 1/4 turn and it felt right in. You have to remember they enough room to do this since the spring with hing up for service. I did do this work under my microscope.1 point
-
Hi I have attached the tech sheet which I think is your model, If you decide to do it it will give you an idea whats involved. Personally I would heed Nicklesilvers advise and gain some experience before attempling this one. ESA 9162.pdf1 point
-
I have a link below that you might find helpful. Scroll down until you get to Joseph School of Watch Making. Then you want to download unit four. at the bottom of PDF page 7 you going to find something of interest. notice there is a reference to the shape because the shape of the curvature of the burnisher has to correspond the shape of your pivot. Then notice and they follow up with a reference to refinishing. Unfortunately just because something is called a burnisher doesn't mean there is a universal standard of what the finish should be. I've noticed they range from being very course to basically shiny smooth. Elgin watch company made a sapphire burnisher one and was slightly frosted and the other was really really smooth and shiny. then with your nifty new tool at find something to practice with before jumping in with a good watch. It's an interesting tool to learn how to use and requires a lot of practice if you want to be good with it. But if you know what you're doing you can produce some incredibly beautiful finish on the pivot. https://mybulova.com/vintage-bulova-catalogs1 point
-
The Vallorbe tool is good but for watch work I'd stick with the Bergeon. The Bergeon is tungsten carbide vs hard steel on the Vallorbe, and the Vallorbe has a larger radius for conical pivots that doesn't work well on small watch sizes. With all commercially made burnishers to be used on a Jacot tool you want a "left hand" tool for holding with your right hand. This is because they are often used with the part in the lathe and the burnisher held under the part, which inverts it.1 point
-
The Bergeon you linked is the standard tool. It has a grained surface which acts as a micro file. Oddly if you hold it in your right hand you want the "G" model (gauche or left). One side is for conical pivots the other for straight shouldered pivots. Like Rodabod said it does remove metal, slowly, while compressing it. For example I tend to leave balance pivots 0.01 or 0.02mm oversize before going in the jacot, a 0.09mm pivot will reduce to 0.07 in about 30 seconds. A larger pivot, say 0.30mm, would take more time to reduce in size.1 point
-
I would think not, no.1 point
-
These are awesome movements and they can be repaired (unlike most quartz watches). This is the Bulova tuning fork movement. I have some Bulova info but I don’t think I have any Omega specific info. Either way, this will need to be torn down completely, because unlike the quartz movements (that aren’t totally dead) more than a mere battery swap is required for resurrection.1 point
-
The burnisher removes a small amount of material. But that is not it’s purpose. It’s purpose is two-fold. It folds over the surface grains of metal which makes them smooth and achieve a polish. So this helps to reduce friction. Secondly, the process hardens the surface of the metal which in theory may improve longevity.1 point
-
Yesturday afternoon. I started to work on the donor st96 movment. It is in much, much better condition, than the one I started with. Nice experience! It feels that the skills are imroving. But springs and clickworks are still my nemisis! ?(but starting to get a hang of it) A few pings. But only a clickwork yokelevel/cam lost. Also have to say, it seem to be a bit better production quality. I always seems to forget to fit the yoke, the one that is connected to the stemscrew..Ofcoarse when the barrelbrige is all set and done. Including the clickspring! ? During the night. I discovered that the tweezers needed better dressing. Made a noticble improvment. Eventhough I was getting tired. Bit had so fun, I couldnt stop working. Finding ”pings” in a better way. I took some extruded pvc board (commonly named Forex) that is used for advertising/signs ect. Fitted a few feet of selfadhisive magenticstrips. To sweep the floor and desk with. Had a few lucks with that. Things seems to ”ping” to other places, directions. Than you actually think they do. ?? The movment was quite clean. But did try a regime of letting it soak in 3M industrial cleaner. Then rapidly flushed with hot water. Then final rinse in IPA. (Not the beer, though it’s nice) Pallet fork and balance did have a bath in lighter fluid. Did take my time oiling. Including first proper removal and cleaning of the cap jewels. This morning it was up and running! ????? What a joy! ? Sitting there watching the movment ticking away friskly! Albeit tired and with sore eyes and neck. It feels really nice! Realized a few things. I need a stem and crown! Also a few screwdrivers needs dressing. So I went to order a stem, crown and the classic dressing tool. While browsing cousins. I realized, it would be nice to see how well the thing ticking on the desk. Actually runs.. So clicked and added a timegrapher to the basket. Expensive morning. Cant wait for the stem though! ? Wish you all out there, a nice sunday! Dont forget to fika! (Google Swedish fika)


 1 point
 -
Those are some very fine looking watches. Thanks for sharing.1 point
-
Seiko 5 dials don't have screws nor clips. They normally align very precisely thanks to a rising of the plastic casing ring. Normally, the most common reason for calendar misalignment is due to using the wrong parts. The day disc has come with alignments for crown at 3h or 4h, and the date ring has two types of alignment depending on the mov.t version they were made for. All that is in my document below: https://docs.google.com/spreadsheets/d/e/2PACX-1vRN2UULQKTfKmhRStZhDdIOIQrqd6sPB-g6x2SKyQQjOvTBjG_7TQXQhAT4f1WqAX5QAPkIimi-3jqd/pubhtml That being said in the OP case it seems something has not been installed correctly so after the P/N check above attention must be given to how the jumper engage to the date ring.1 point
-
And the case up. It’s a bit unnerving casing this up. I feel like I’m “jamming” the thing together. But I did a little cleaning of the case, jammed the movement in, and it’s still running! Bonus: the mysterious keyless works, works. The stem soaking in oil seems to have done the trick. Once back together, I can move from winding to setting abs back again with no issue at all. Hands are not perfect but beautiful blue regardless. I caught the color nicely in at least one shot. We’ll see how it’s running tomorrow. Hopefully good enough.


 1 point
 -
If I see the serial correctly, is a 16 Size from about 1912. Nice!1 point
-
Hi everyone, I put together this document after my experience with watch tools and oils as a hobbyist. This is my humble opinion based on my reading and experience. I understand some things (like the lubrication) may not be up to standards, but I tried to make this with the beginner/hobbyist on a budget in mind. All suggestions are welcome and please post your experience as well. I have attached it as a PDF for simplicity. I would also like to thank everyone in this forum and especially Mark Lovick for all your teachings and suggestions. best, Guido Tools for the Hobbyist.pdf1 point
-
This just came out and I thought I'd share it with you guys. I've written lot of articles for Home Shop Machinist magazine over the years and this is a four part how- to-build-it series starting this month. The tool is an aid toward aligning machine tool ways when you scrape them, its my design but is patterned after a commercial one unavailable now for decades (It think mine has a number of improvements) . Fairly esoteric, but it generates a good bit of interest as scraping is a very cool thing in that with fairly simple hand tools you can take best of breed machine tools and restore the bearing surfaces to their original accuracy or better. Tenths of thou territory (microns for you guys across the pond ). Probably not many here into machining, but its my main hobby and what got me interested in clocks and watches. Cheers1 point
-
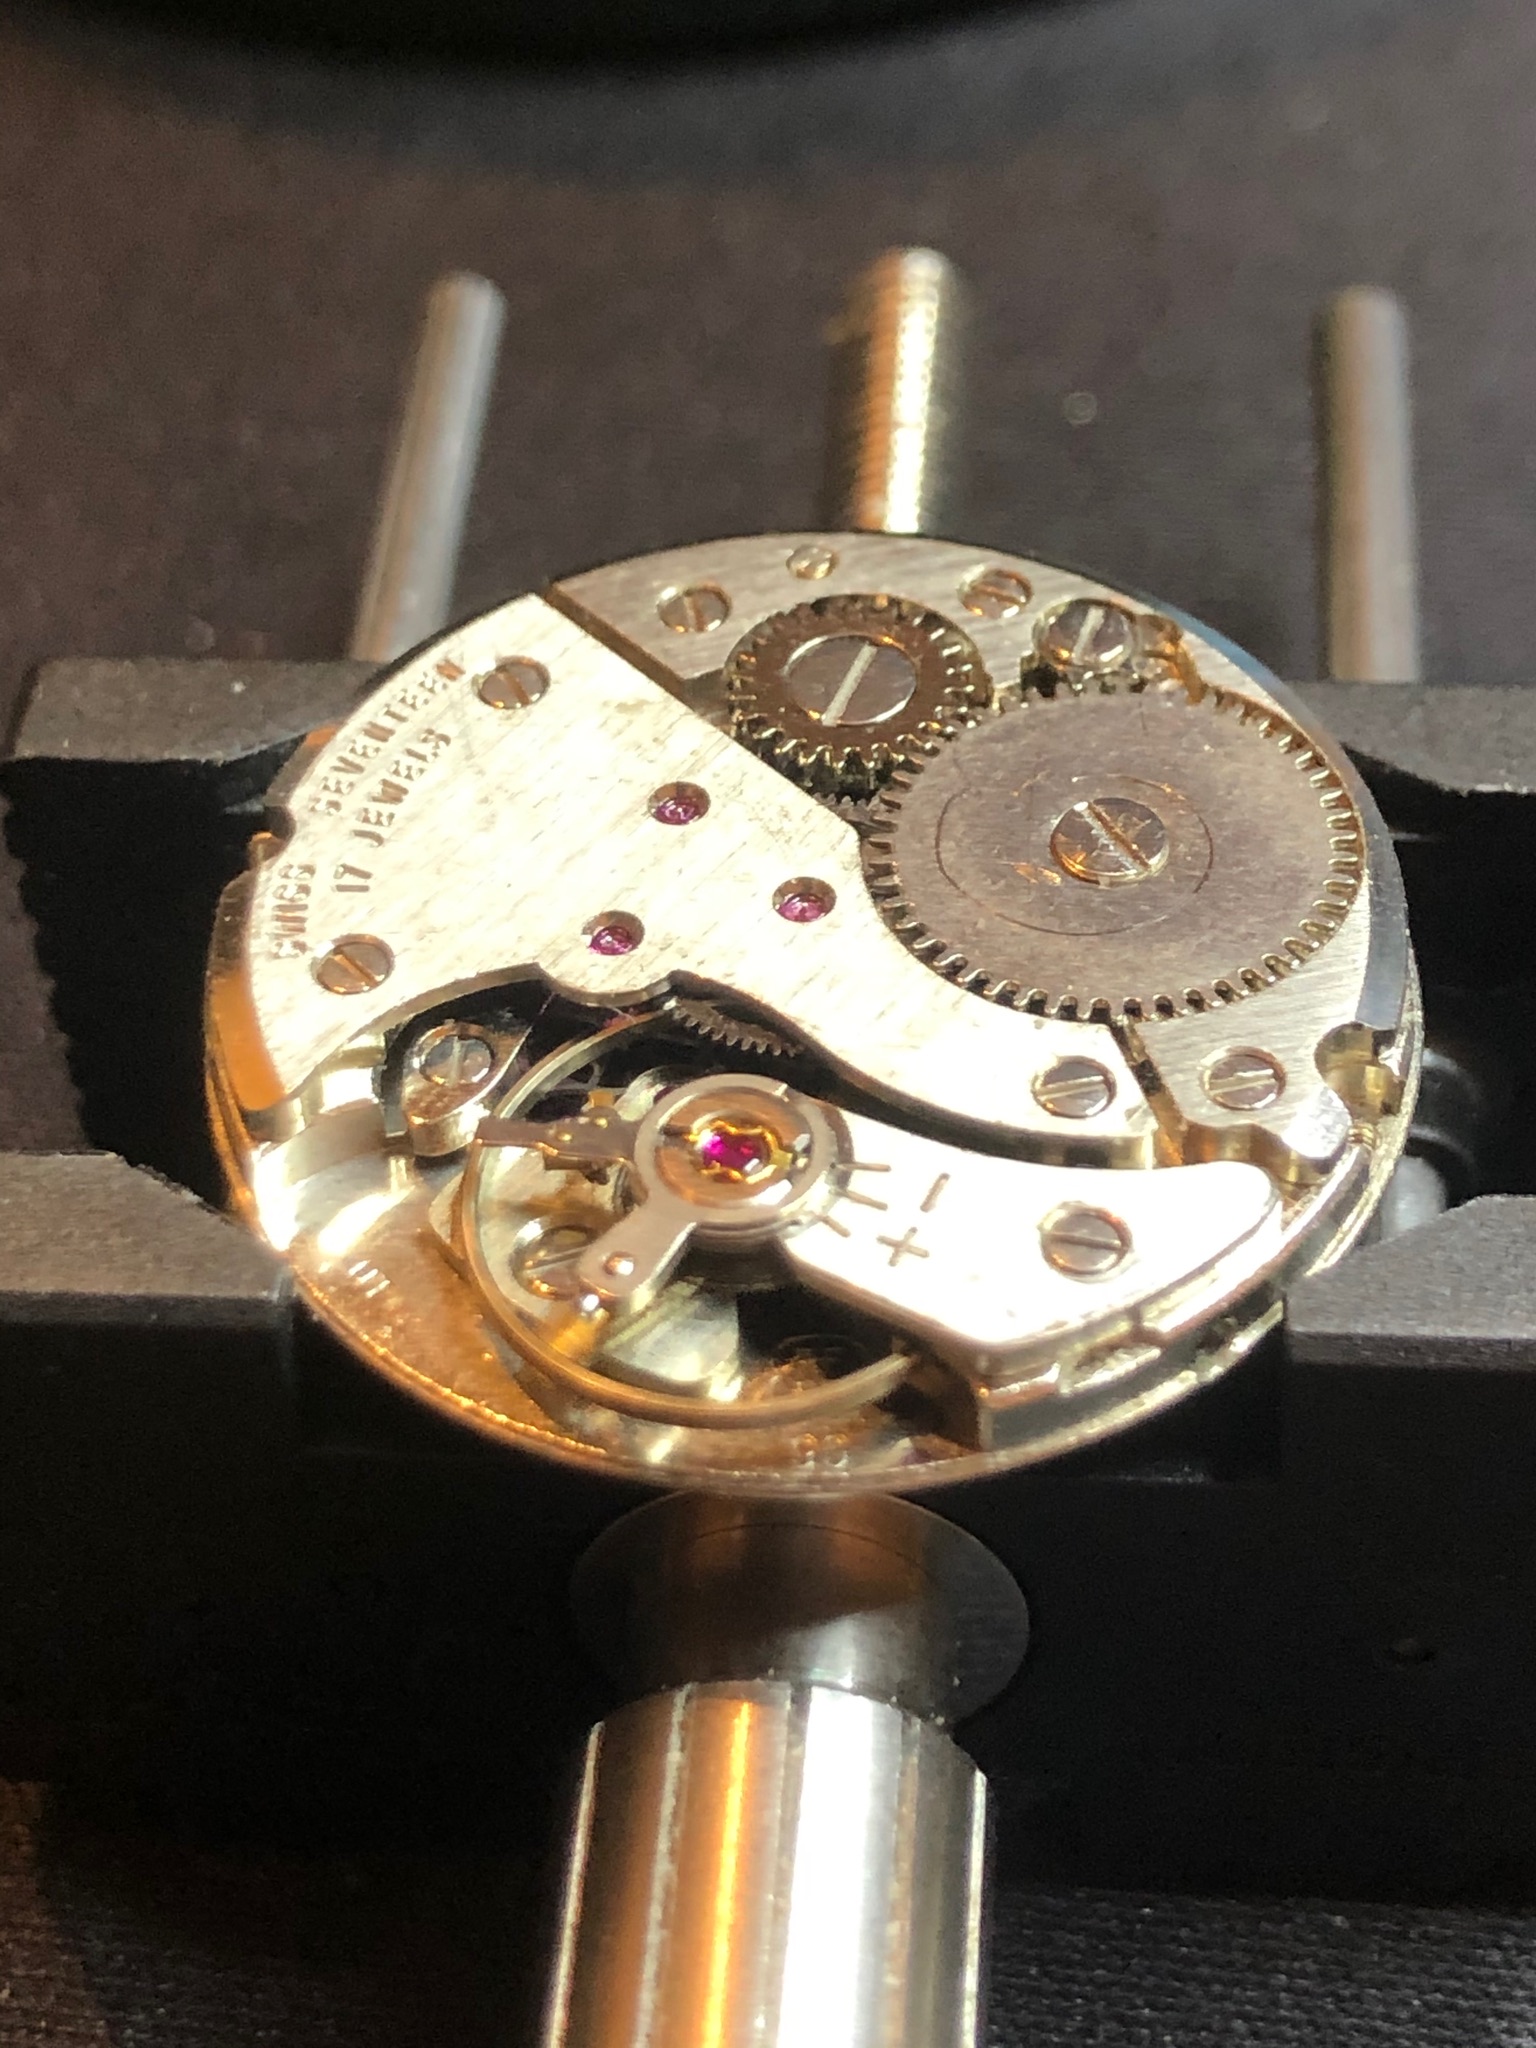
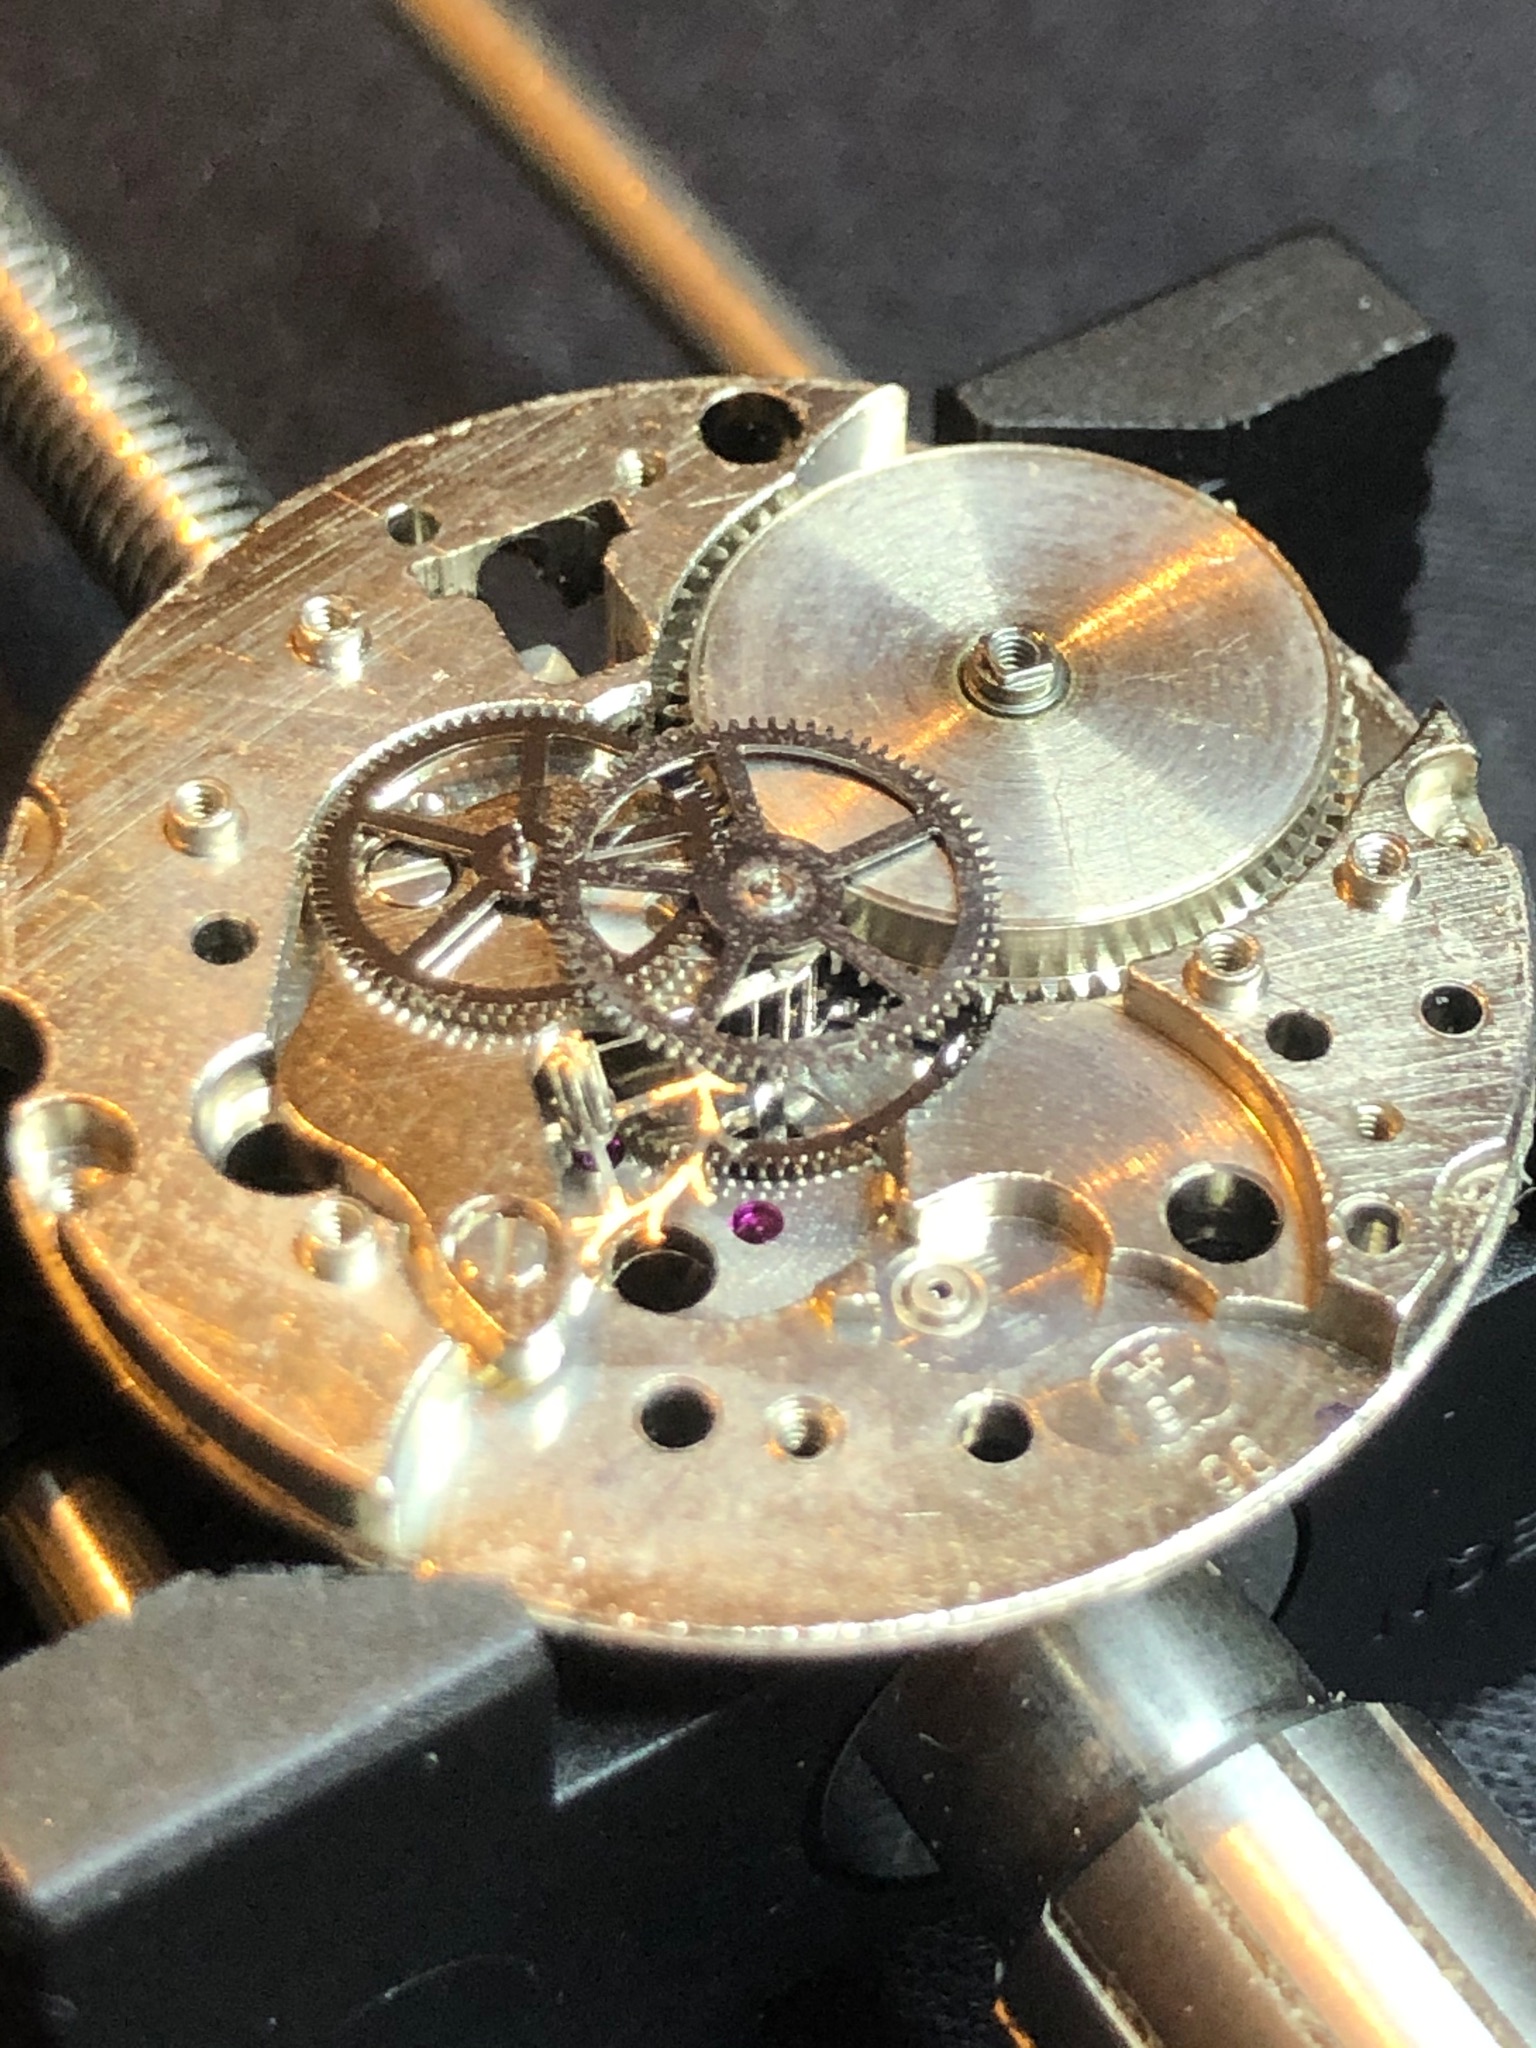
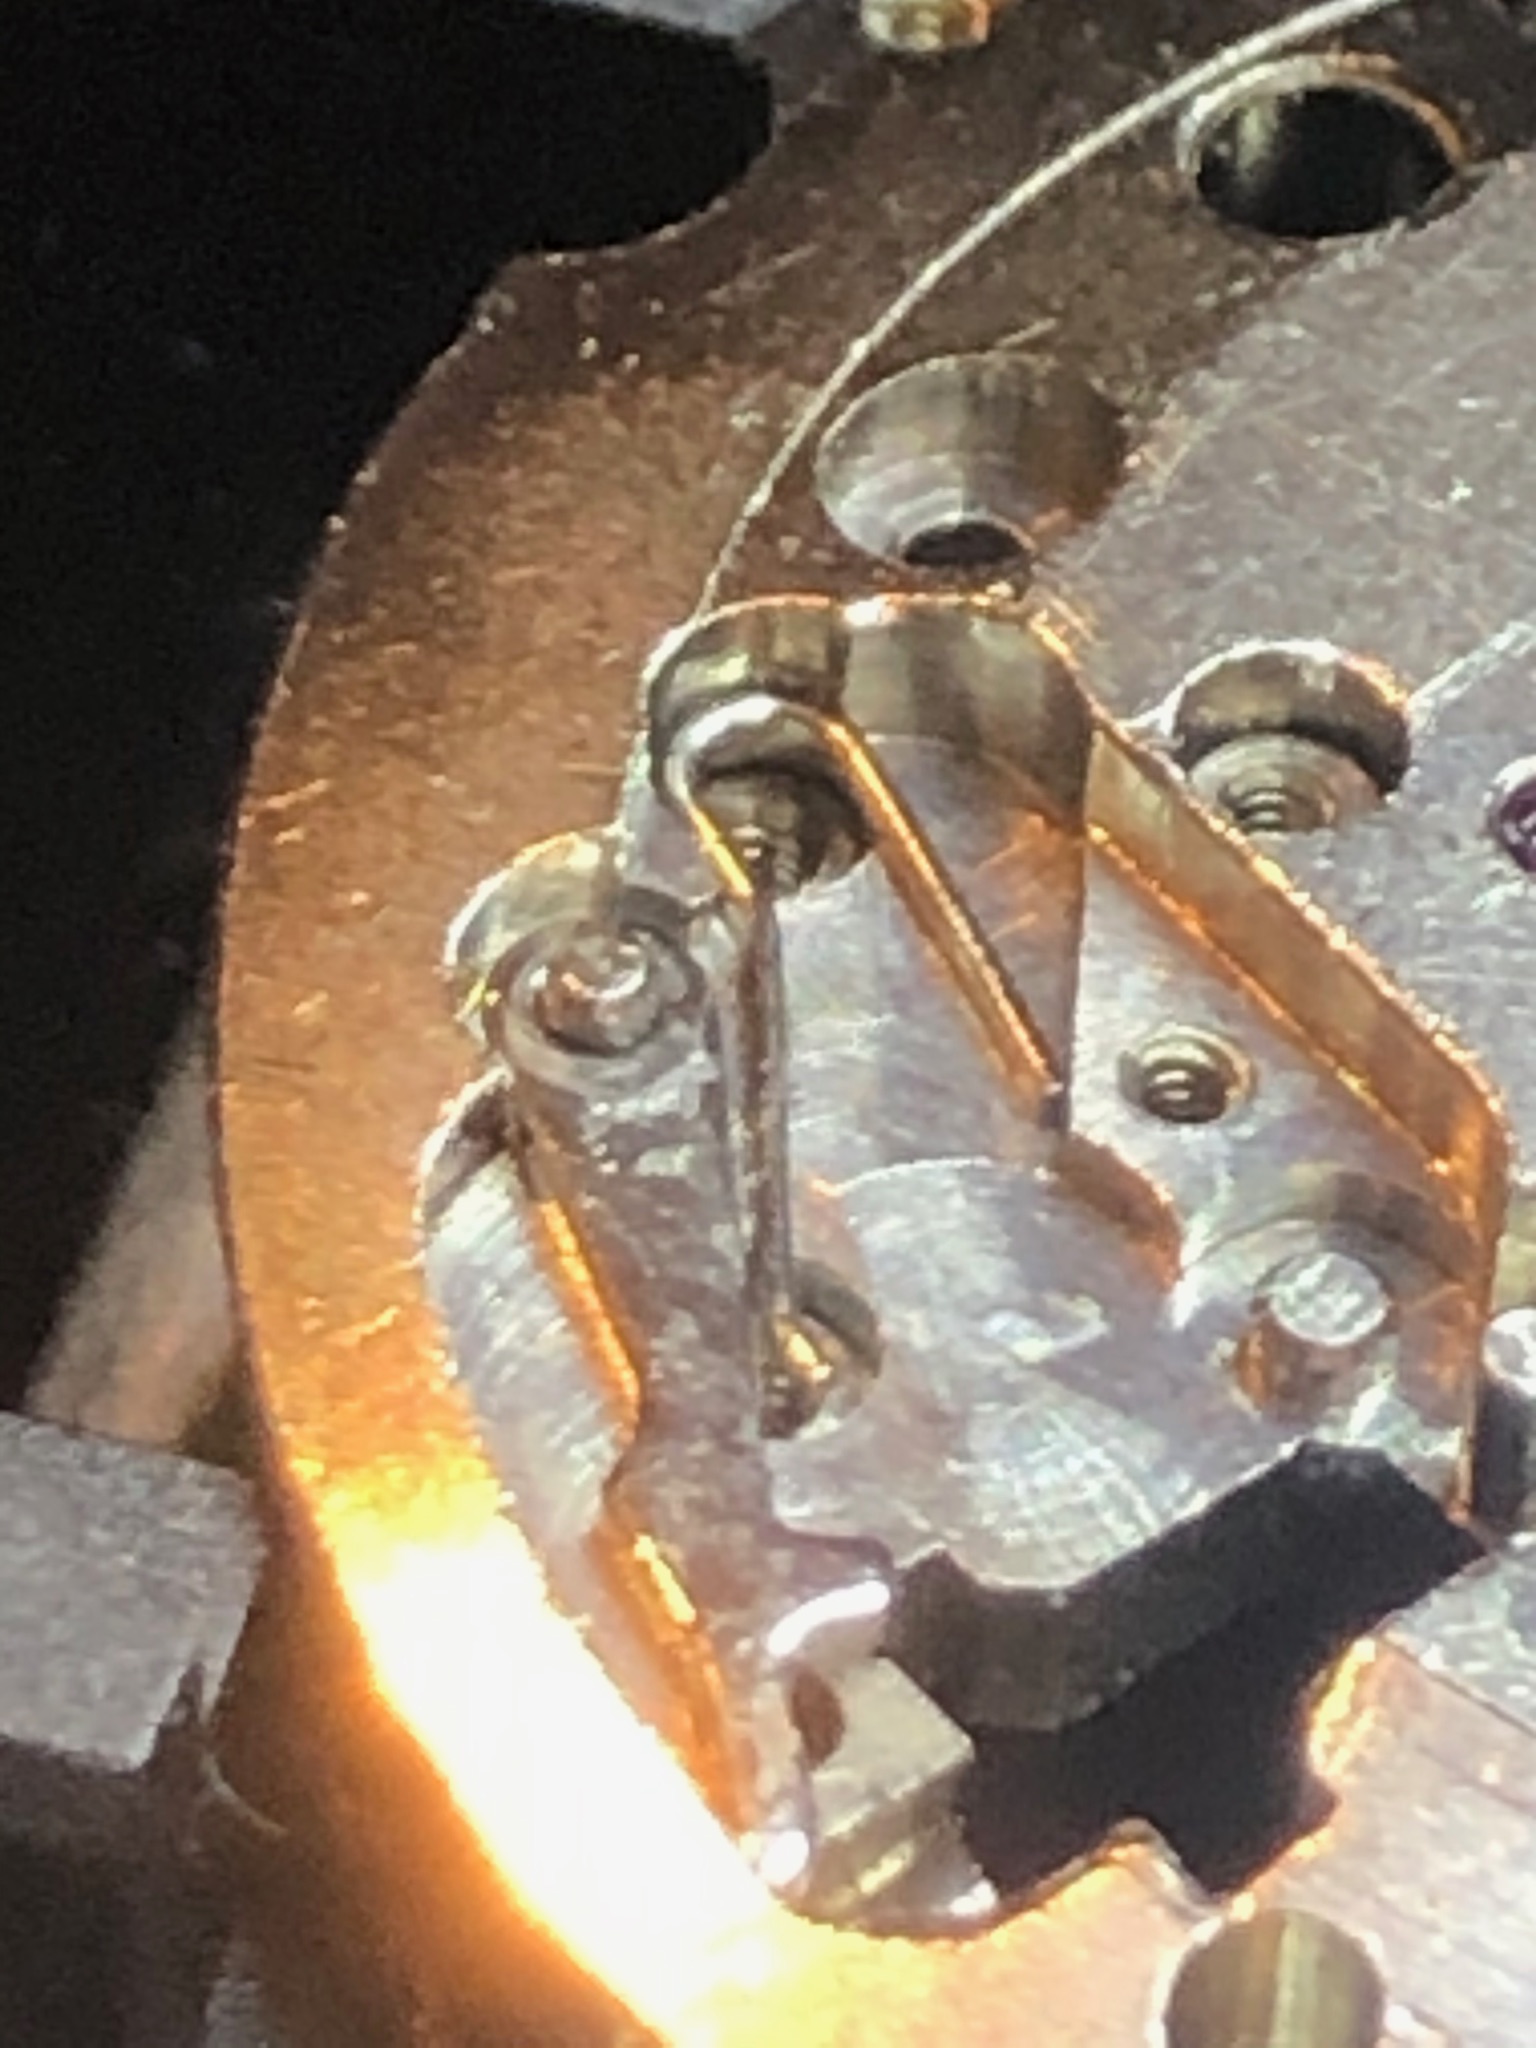
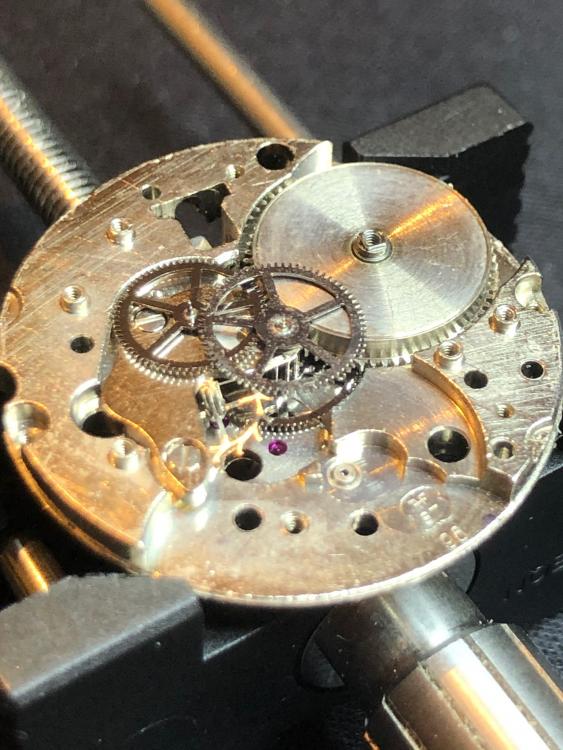
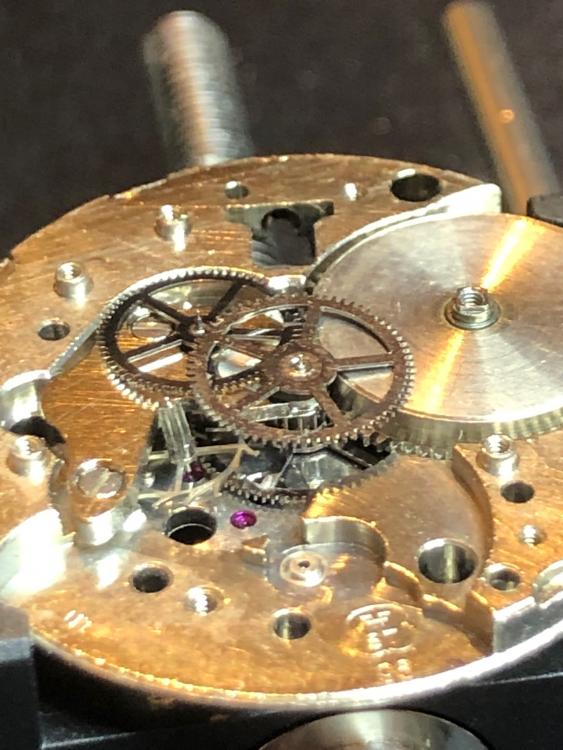
You have had the right advice above, that is not the right watch to practice on, whatever is it's value it can only lose more in the hands of a total beginner. Cheap kits are to open watch cases, and sometime not even that.0 points
-
That is an ESA movement made under license from Bulova. Definitely not for beginners. You can destroy the movement just taking the hands off. Set it aside until you have some experience.0 points


.jpg.f9e5ca9178adbfbd0f1d132f207b1659.jpg)
(Large).jpg.809688ec2170ed6ed2fc1c64a9a56e32.jpg)