Leaderboard


Popular Content
Showing content with the highest reputation on 03/03/17 in Posts
-
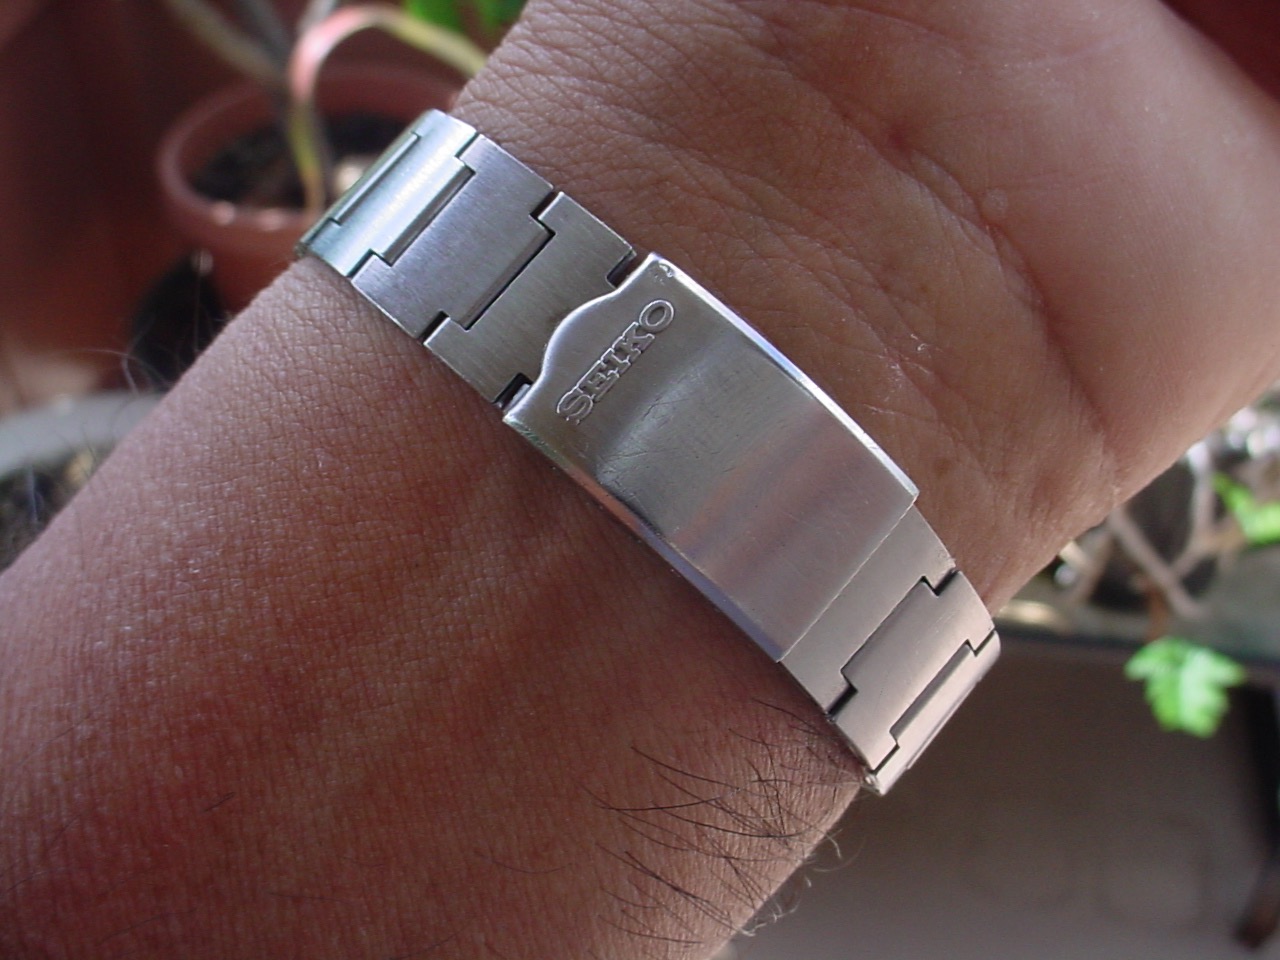
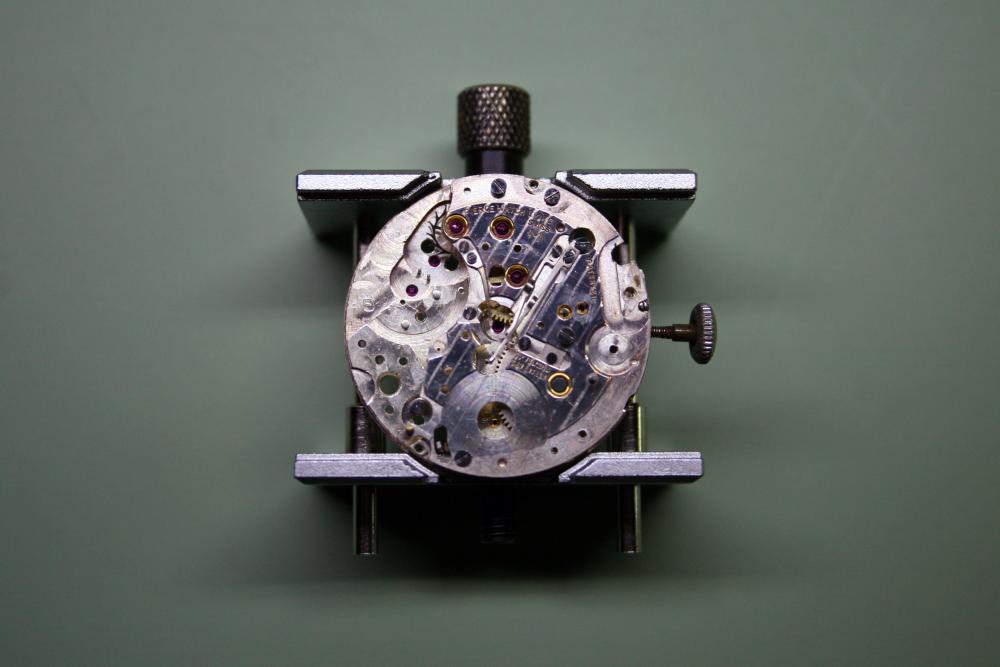
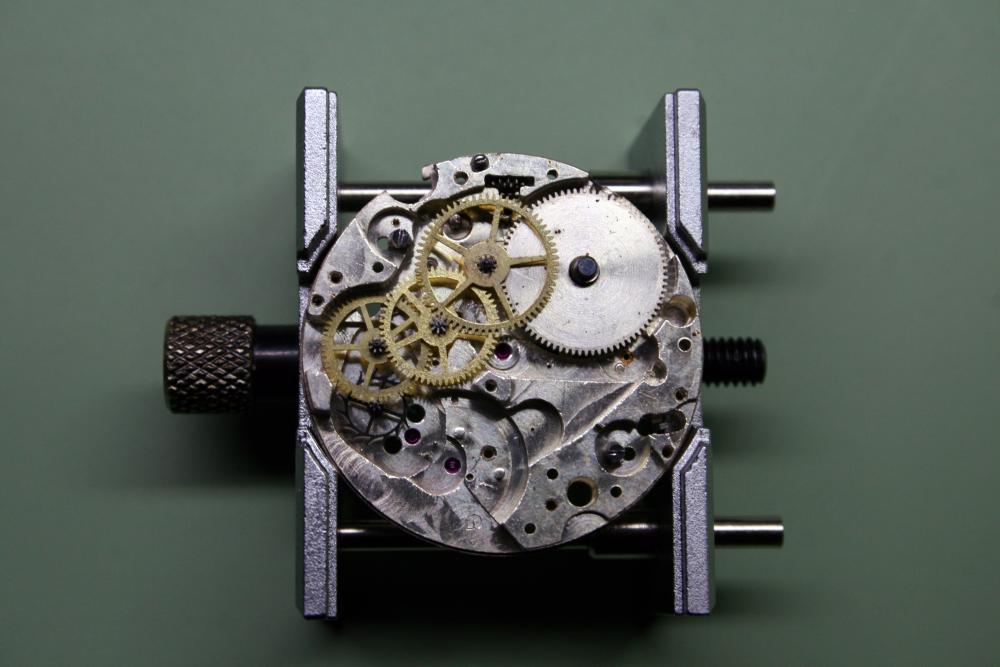
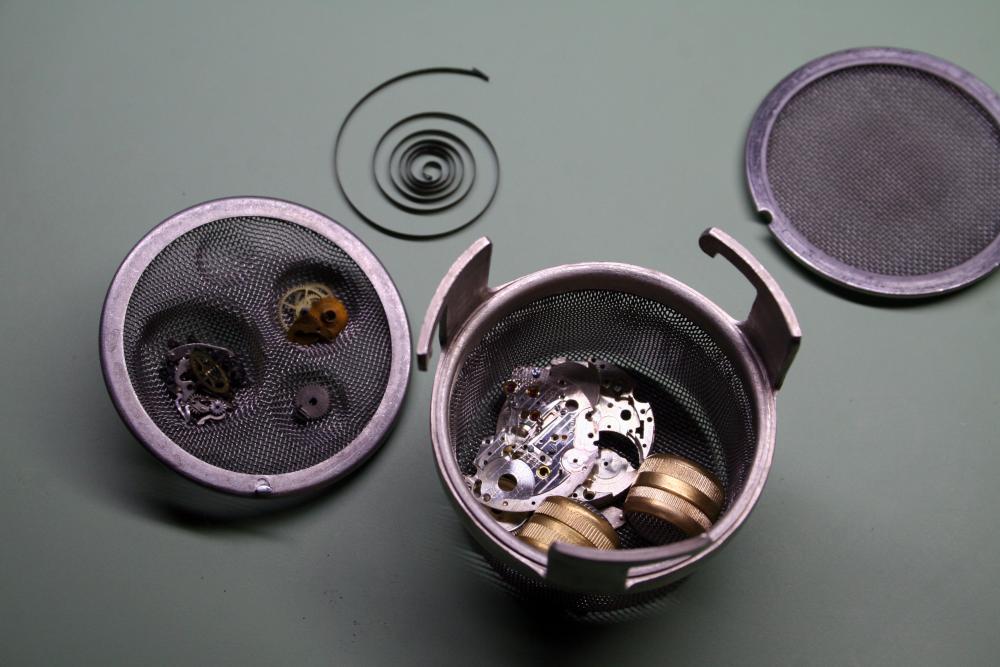
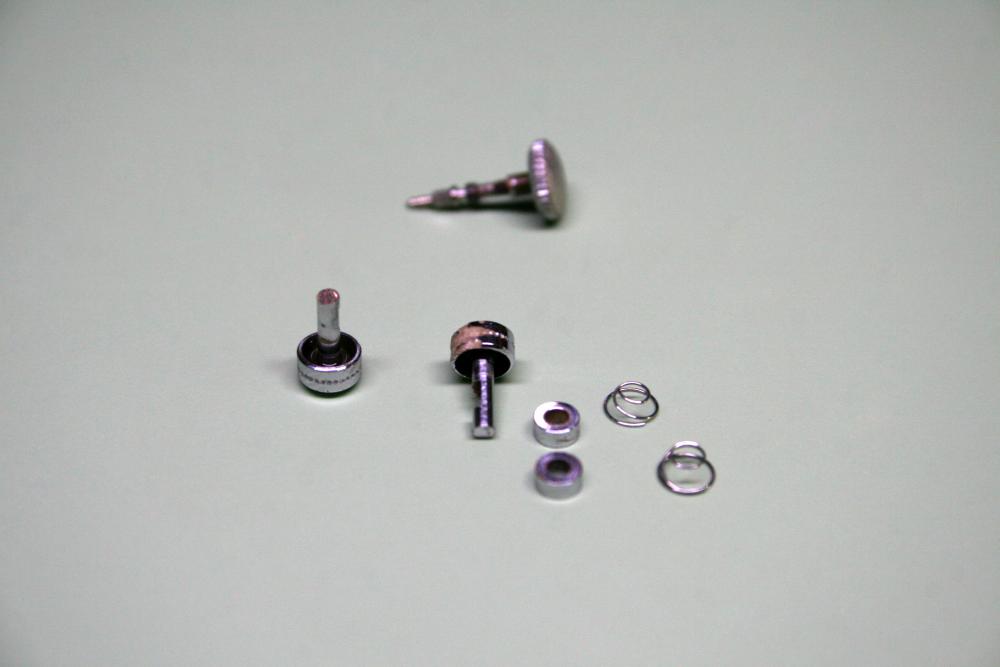
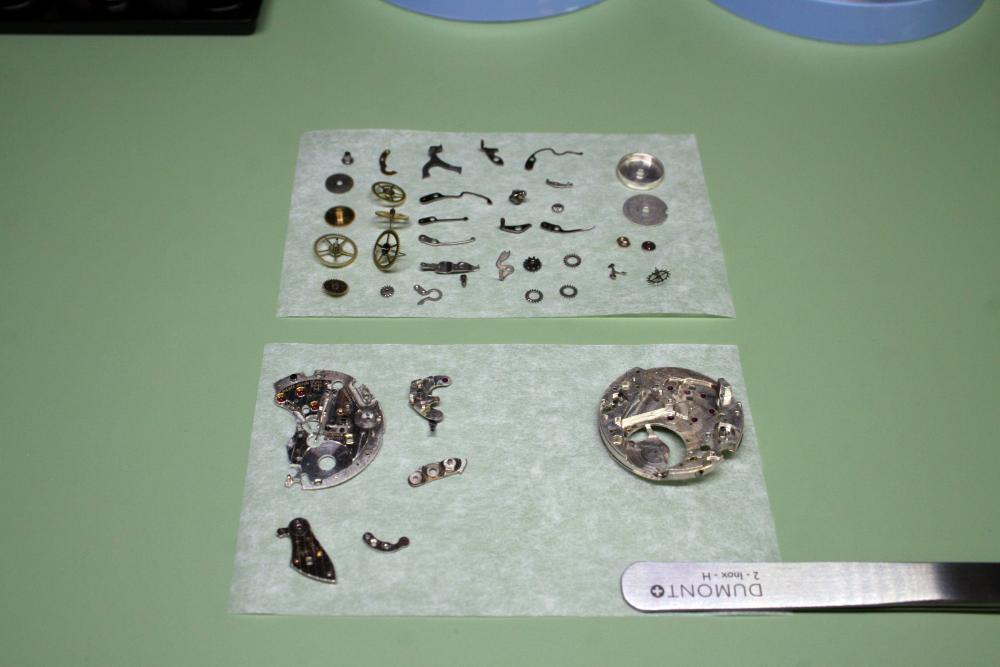
I just finished working on this Seiko Bellmatic project watch . I received a beat up Bellmatic that had a filthy knicked up case and bracelet , broken pallet fork , broken hairspring , a paperclip holding the band to the case , about a quart of oil in the movement , BUT , nice blue dial and rotating chapter ring . I bought a working Bellmatic on the bay with no bracelet , and Poof !! , it morphed into this very nice , properly working project watch . I have worked on Swiss , Japanese , and other mechanical watches including chronographs . Accutrons , Hamilton electrics ., and AS 1475 alarm watches that are used by a few different Swiss manufactures , But these Seiko Bellmatics are a bit of a challenge to work on . I have the Seiko manual in a binder that has the tech sheets for this watch , and the info goes on for page after page .

 3 points
 -
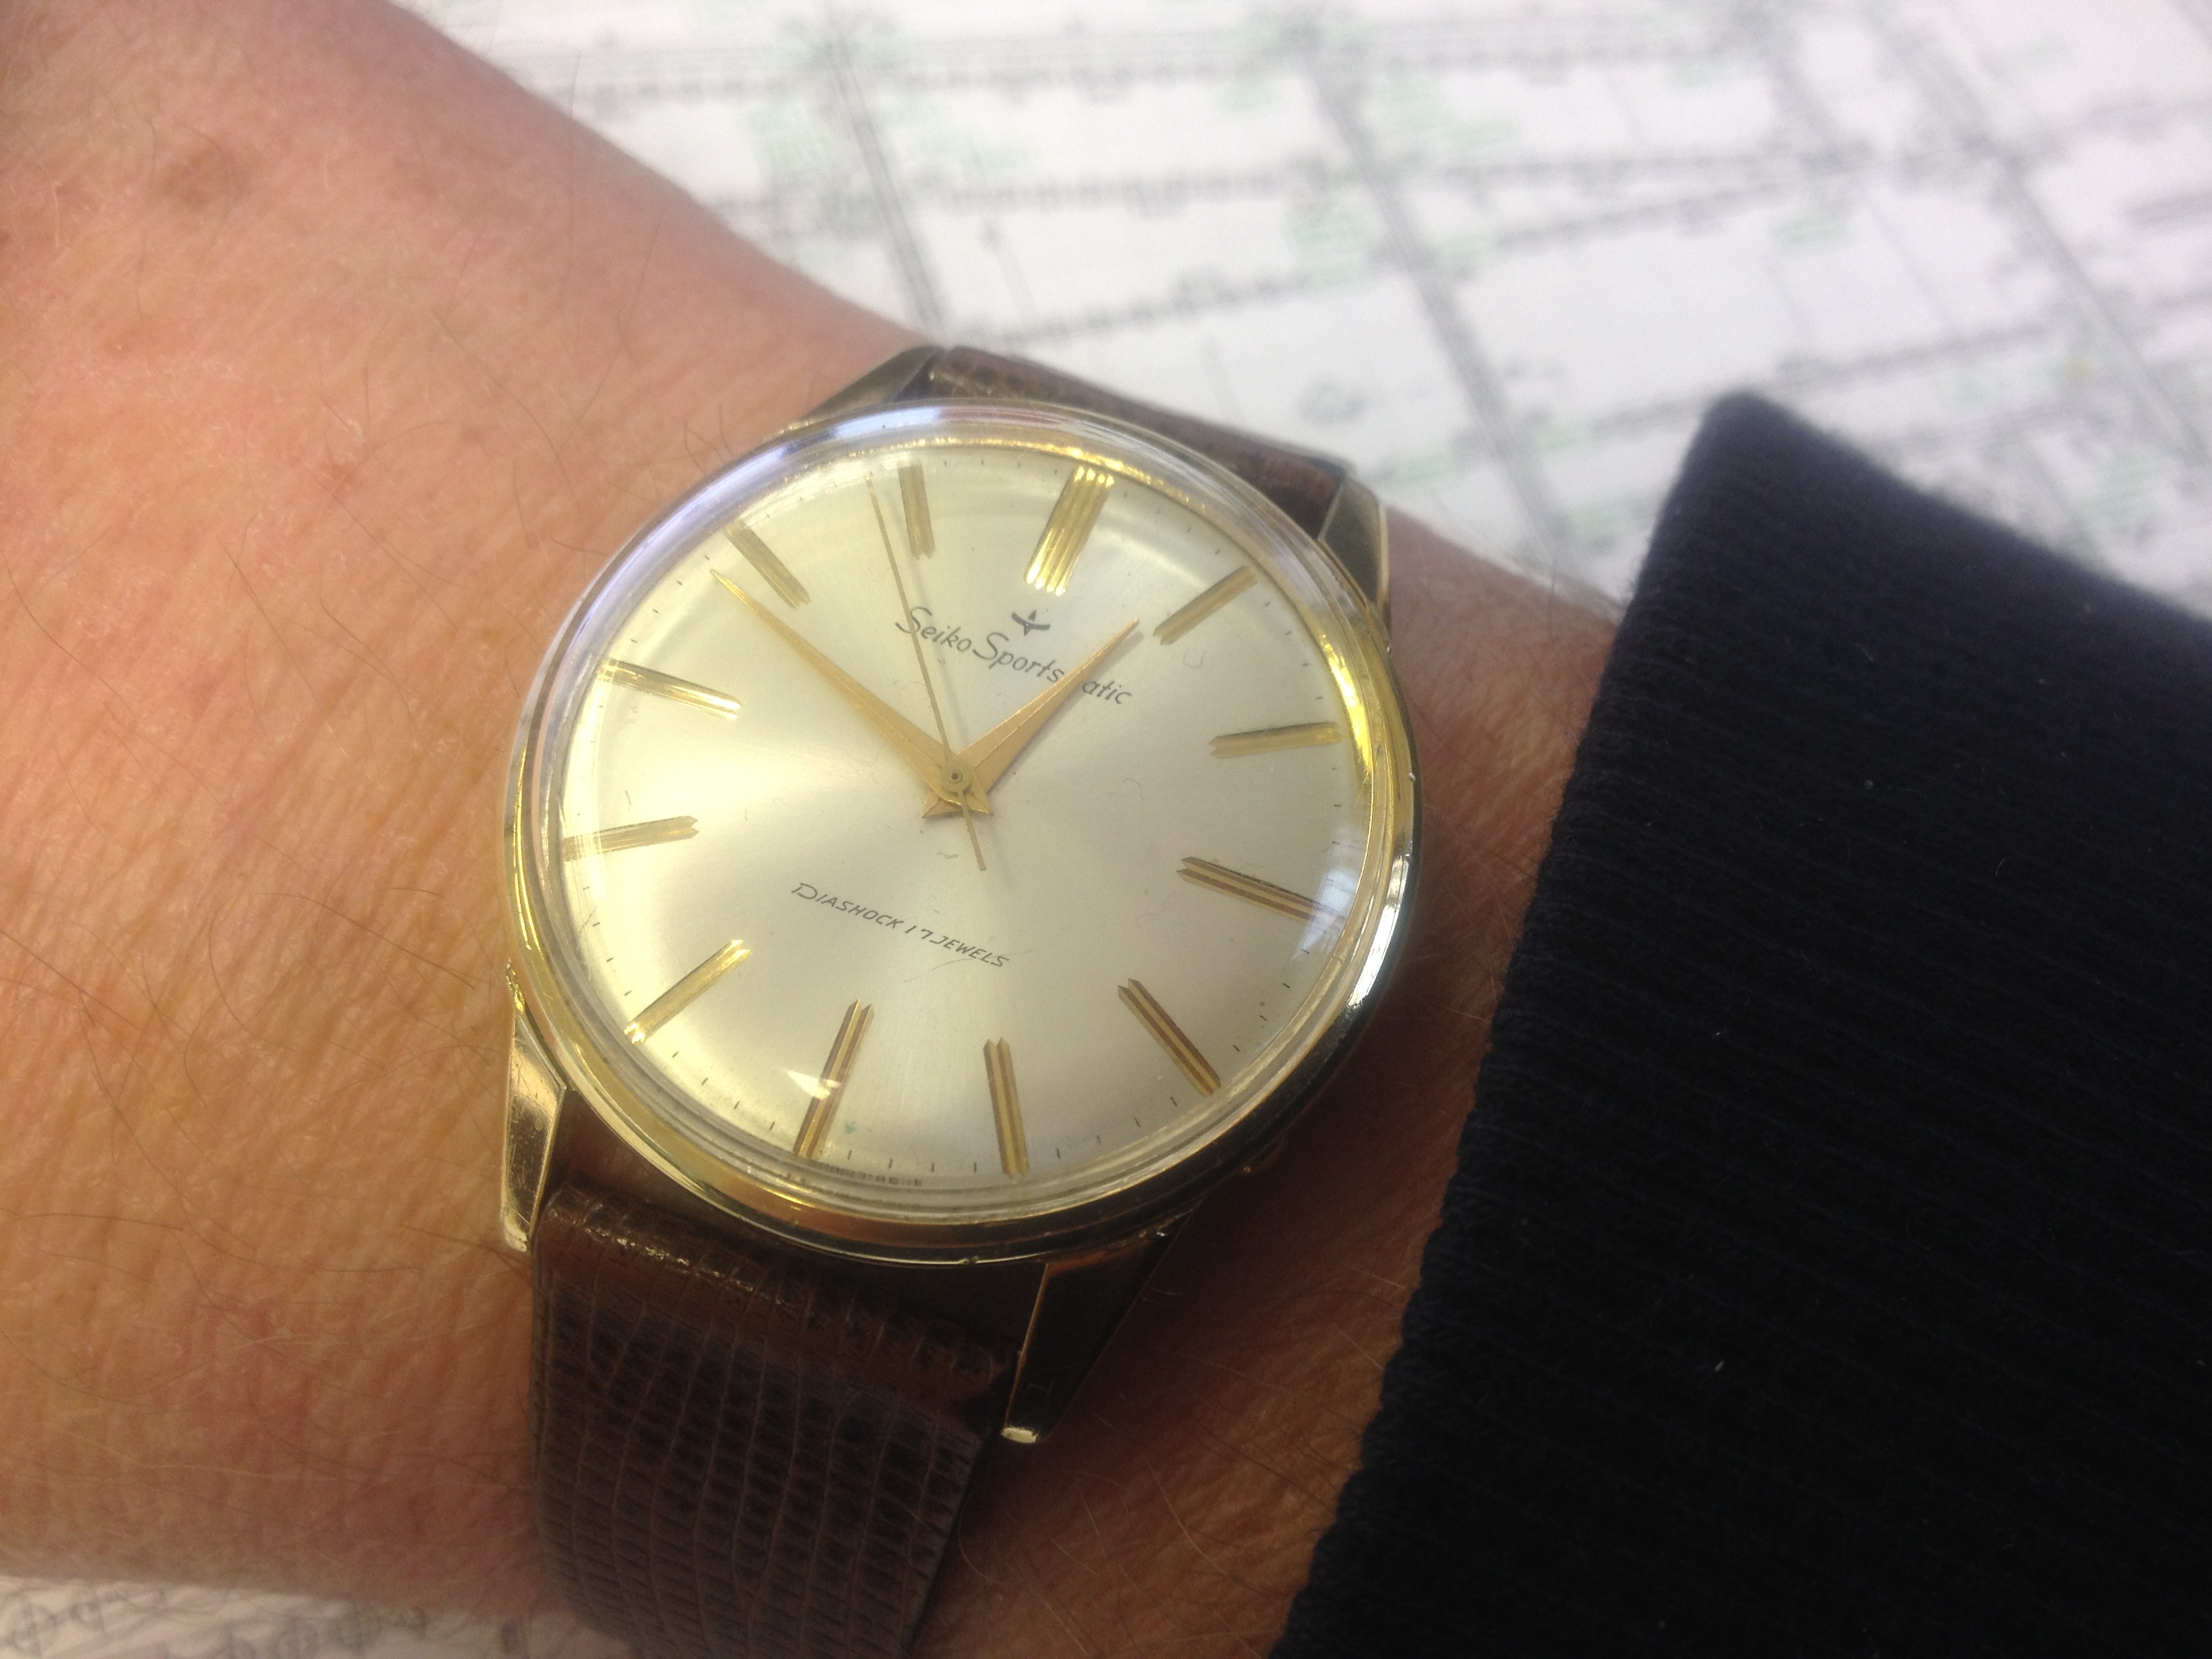
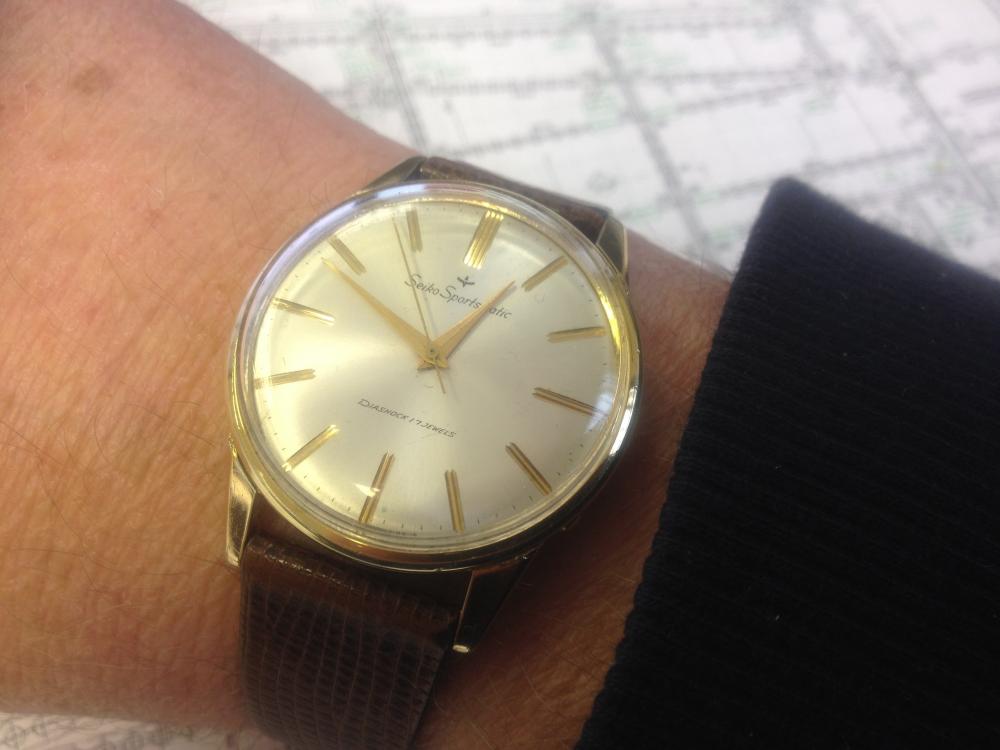
Off to a family gathering tonight so i thought I'd power up my favourite watch the old Sportsmatic 6601-1990 manufactured May 1965 which makes it a year older than me and it works better and looks better than me too.
 2 points
 -
Richard, A snap-back case consist of two parts with a 'lip' or even a taper. What usually causes snap-backs not to 'snap' back in place is a slight distortion in the case back. Place the caseback on a flat surface and see if it 'rocks'. If it does you need to fix it by applying pressure locally. Use blunt tools, sharp tools are no good here. I have use a piece of card-board to fix this. Place a piece of cardboard about 5 mm wide on a hard surface, align the high spot so that that is sits on the cardboard and apply pressure on either side. Finger pressure is usually sufficient. In some cases, the mating surface on the case and caseback may get bent/distorted so that they don't 'snap'. Judicious tapping with a hammer can usually expand the metal sufficient enough so that it 'snaps'. This is not so common and proceed with care.. you just want it to expand a bit otherwise you'll have problems getting it off in the future. Finally when it comes to base metal cases... the metal gets eaten away until it will never snap back. The case is junk. I've seen cases glued with araldite, JBweld etc but this is not proper horology and besides, having chemicals next to you skin is never a good ides. All the best! Anilv2 points
-
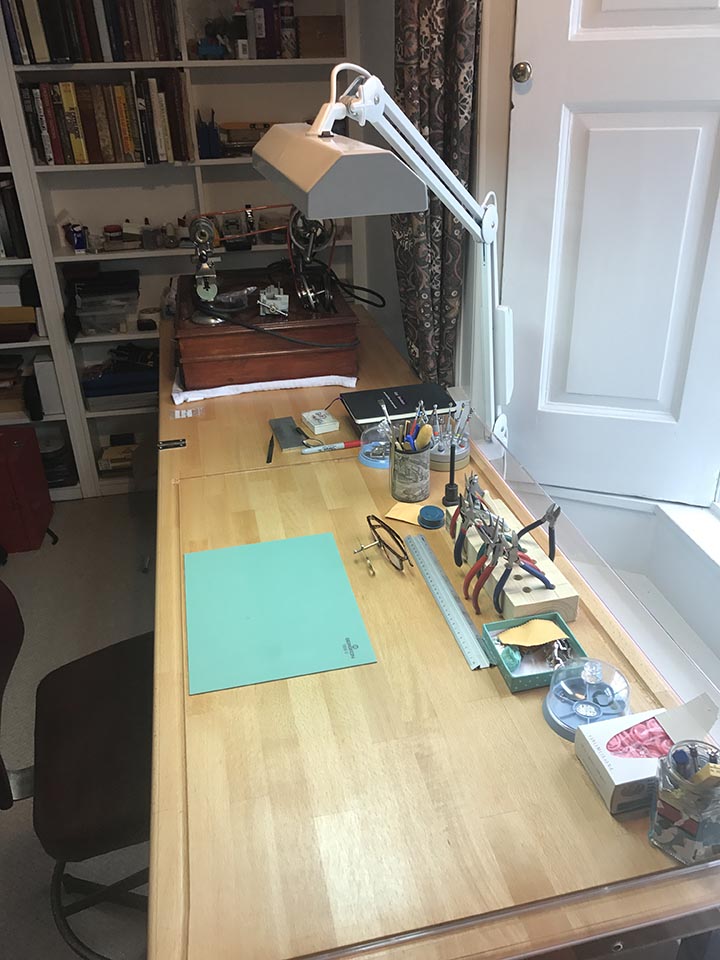
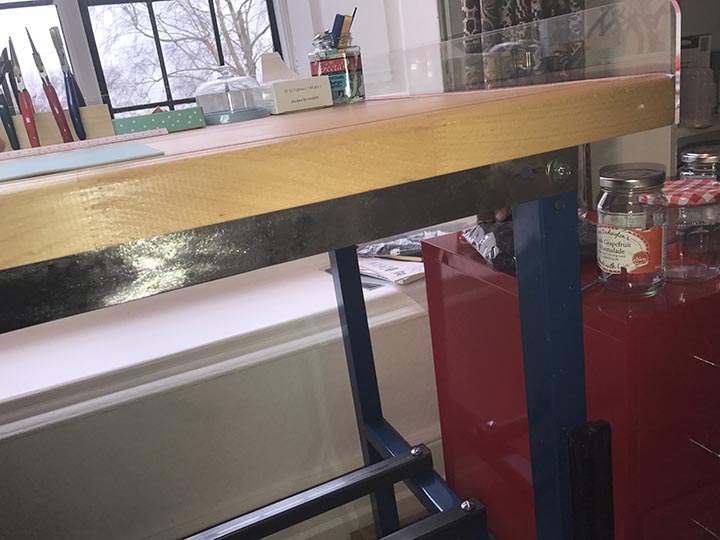
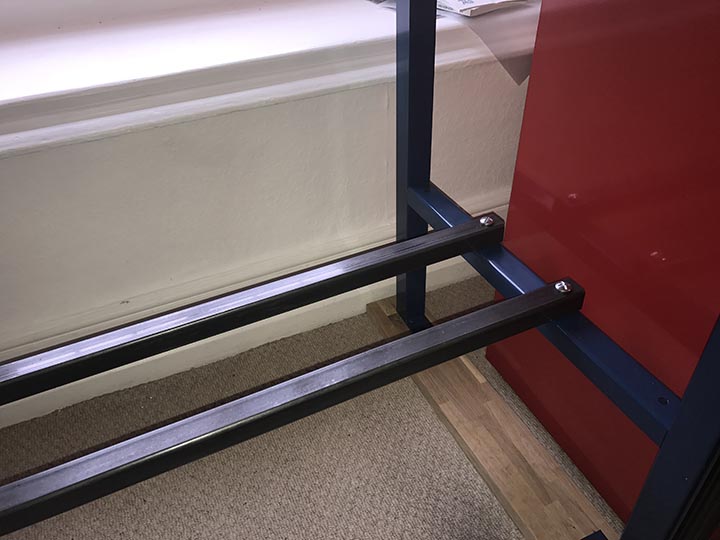
Like a proud father, I feel the urge to show off my latest creation. We recently moved to a new house which finally gave me the space to have an office/workshop. I have been working on a tiny little homemade bench the past few years and have been dreaming of a proper bench. Sadly the ready made ones I wanted are way out of my league. My design goals were: Affordable versatile Free standing (i rent the house and cant drill bolts into the walls) Sturdy I got the original inspiration from Dan Spitz. http://danspitz.com/for-sale/ His concept is to make stunning workbench tops. You then supply the legs. However at £2,000 for the top, there was that budget thing again. I did however steal his idea (I don't actually know if he or someone else came up with it) of the routed groove along the edge. It has already proved to be a godsend in terms of catching small screws, and the odd tool. I decided to add a perspex screen on the back and down one side as I am notoriously rubbish at not flicking click springs etc across the room. So, the basics. Worktop: 40mm solid Beech kitchen work surface from Ebay 2000mm x 620mm - £85 Legs: Steel workbench legs from Machine Mart about £40 including shipping Bench support: 2 L shaped steel struts from an old Victorian bed. £5.00 from a salvage yard, cleaned up with an angle grinder then polished. Struts: 30mm square steel tubing from steel merchant £20.00 Danish oil for bare wood: £5.00 (four coats on either side) £20 for bolts and screws. So I made the whole thing for well under £200. The top is extremely heavy and I haven't totally managed to eradicate minimal side movement and ideally I would bolt it to the wall but as I said I can't. Still it isn't going anywhere and I love it. Of course you don't have to make it 2m long but I wanted somewhere for my lathe. I am building a perspex divider to protect the workbench from cuttings from the lathe. Anyway, I hope it might give some of you some ideas.


 1 point
 -
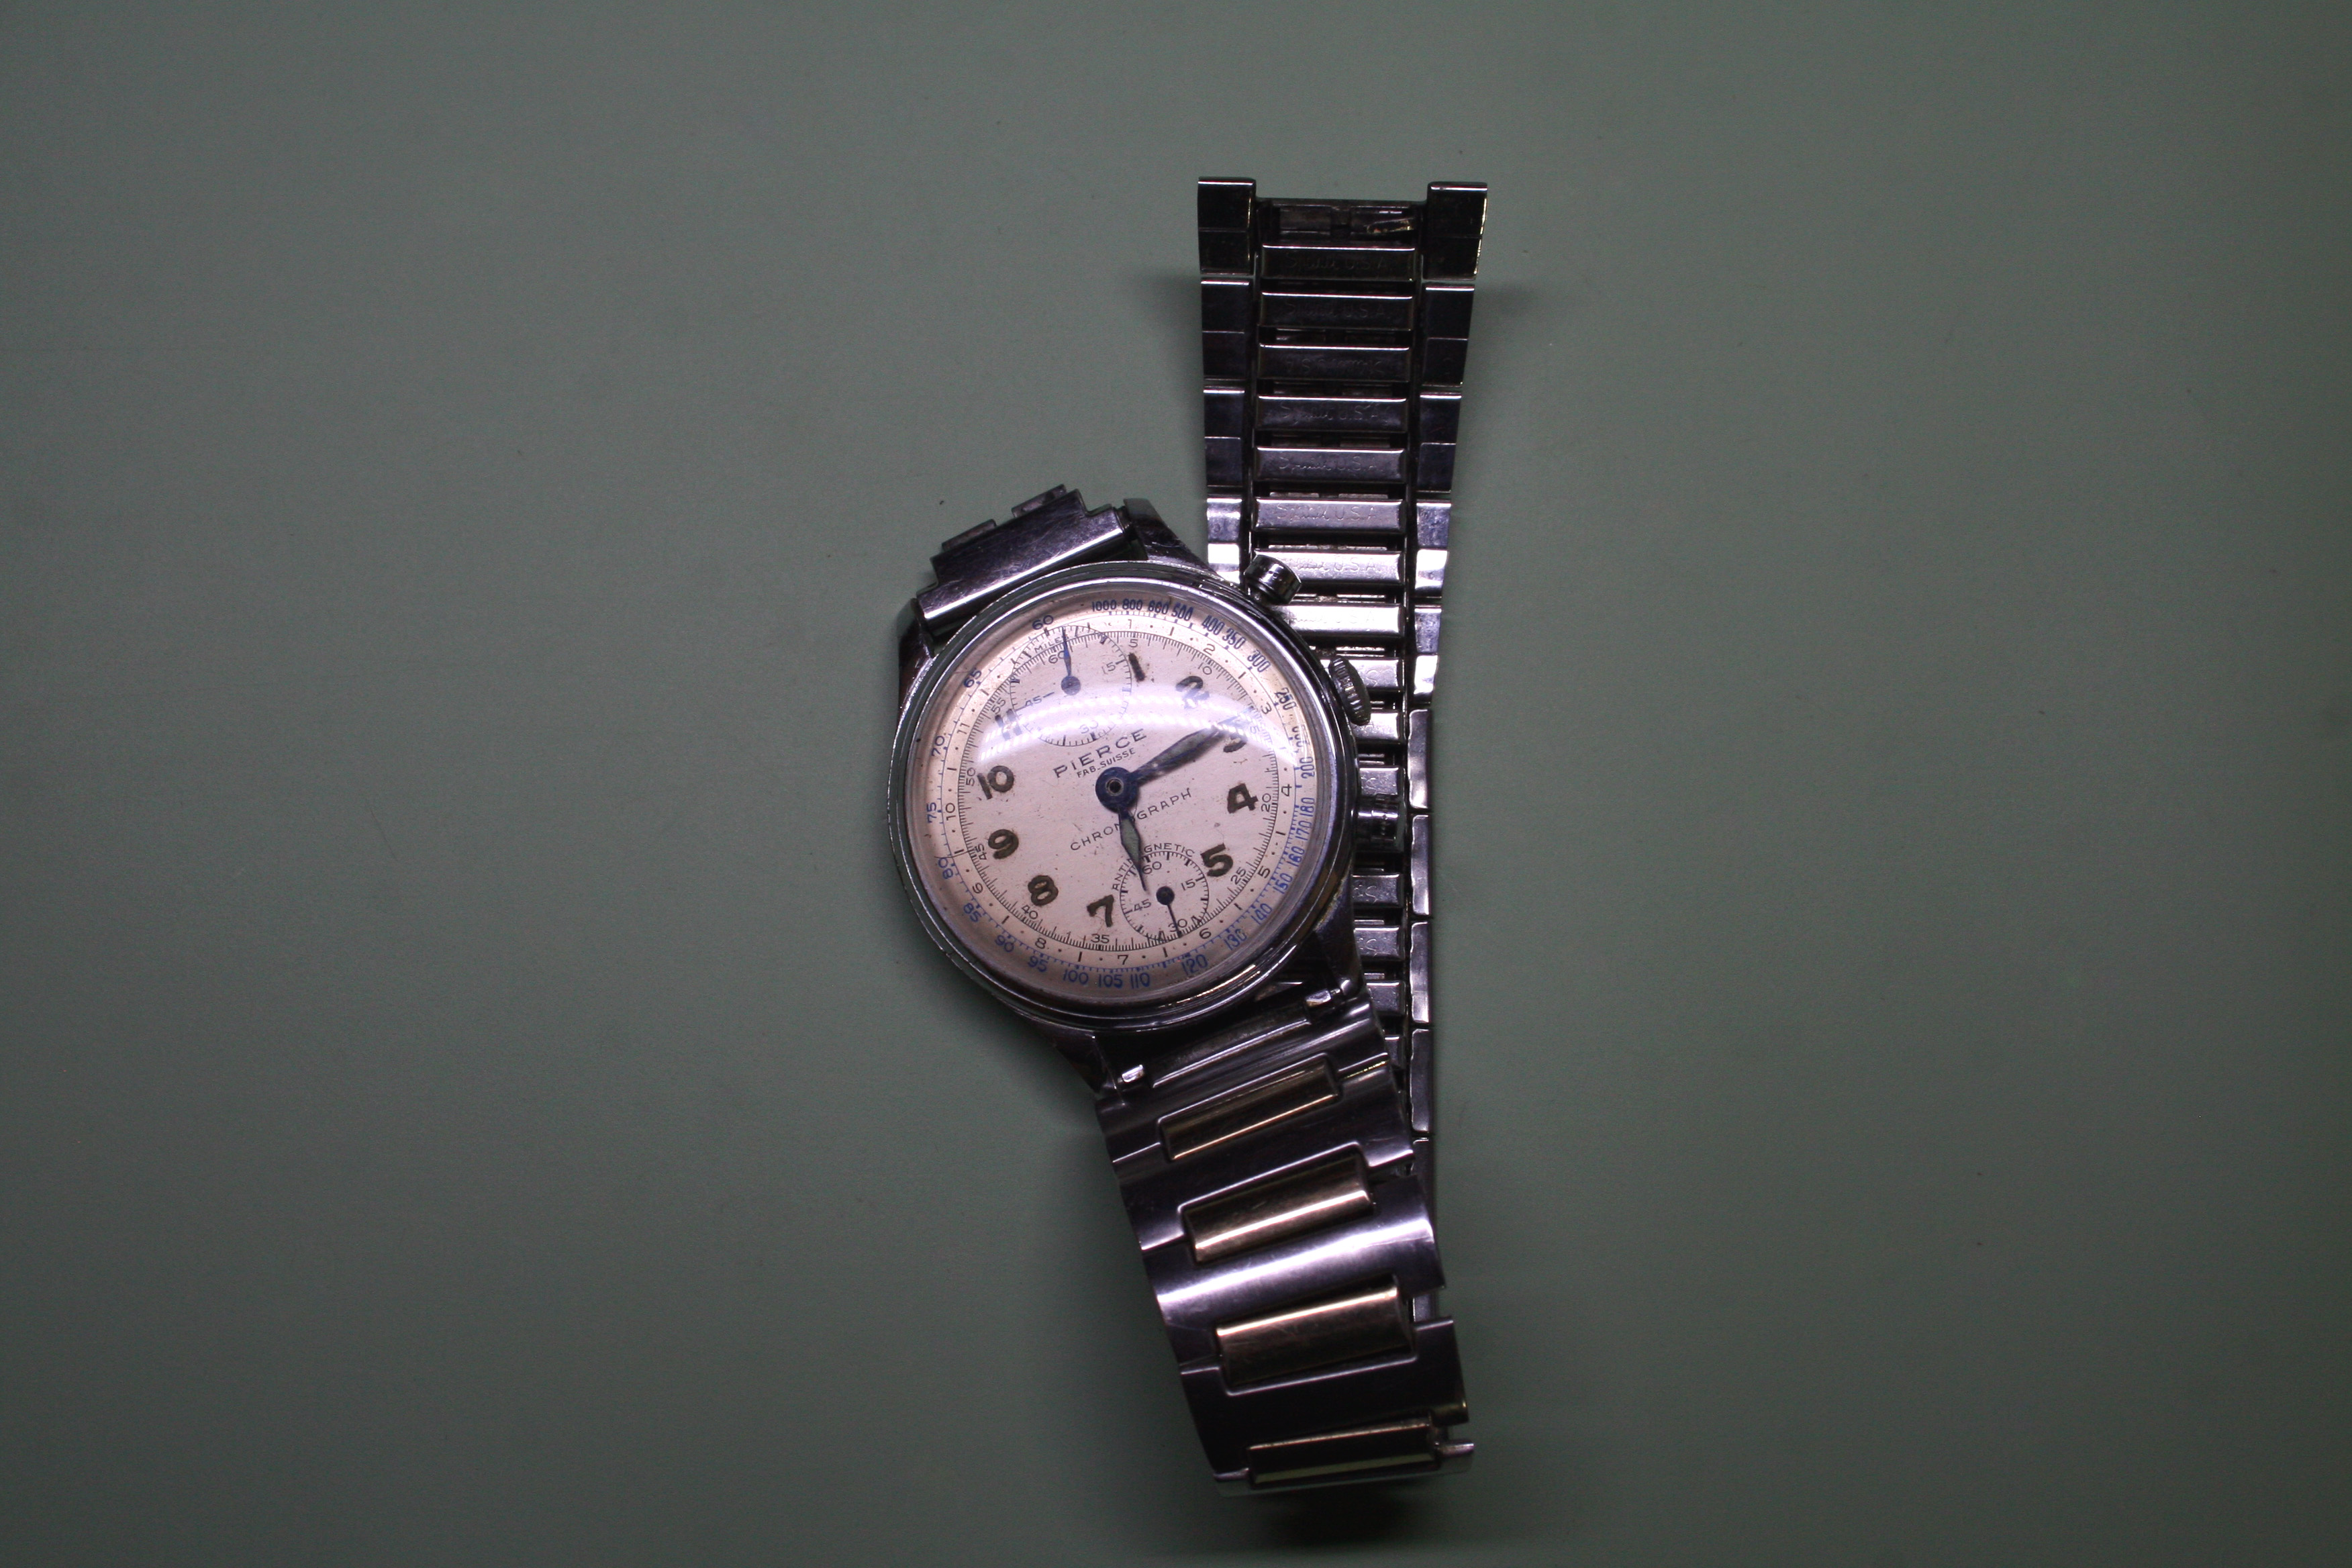
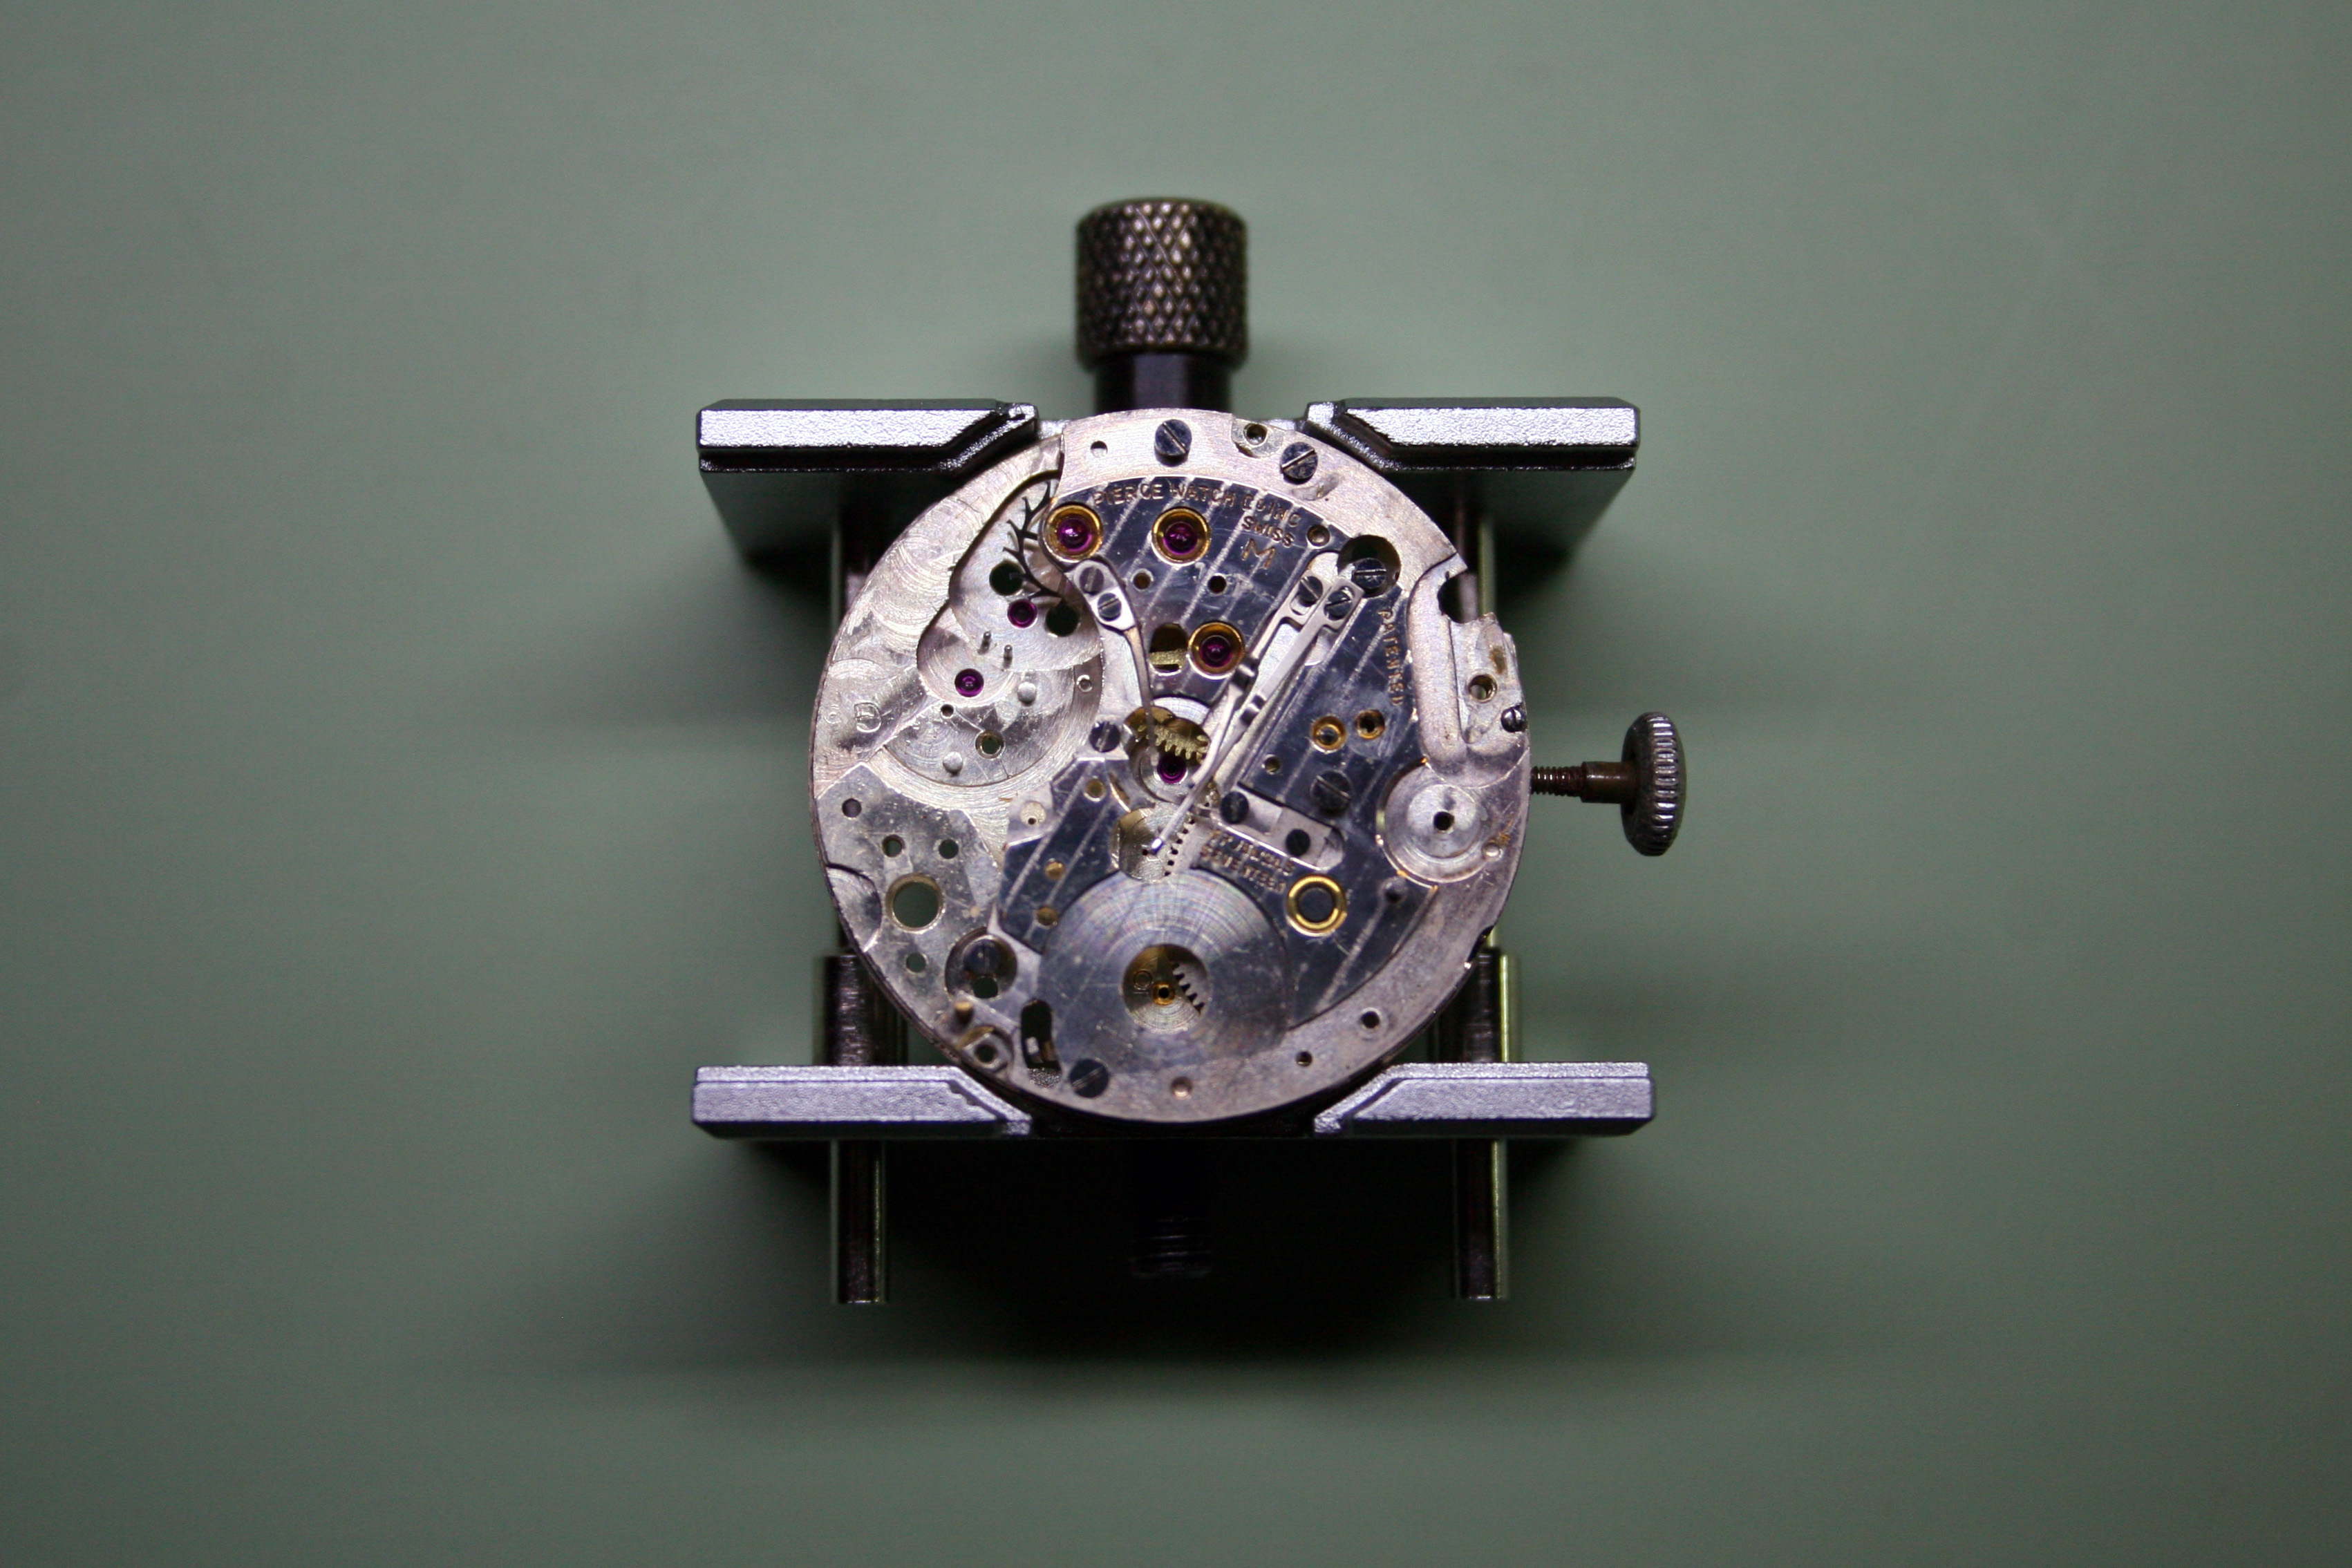
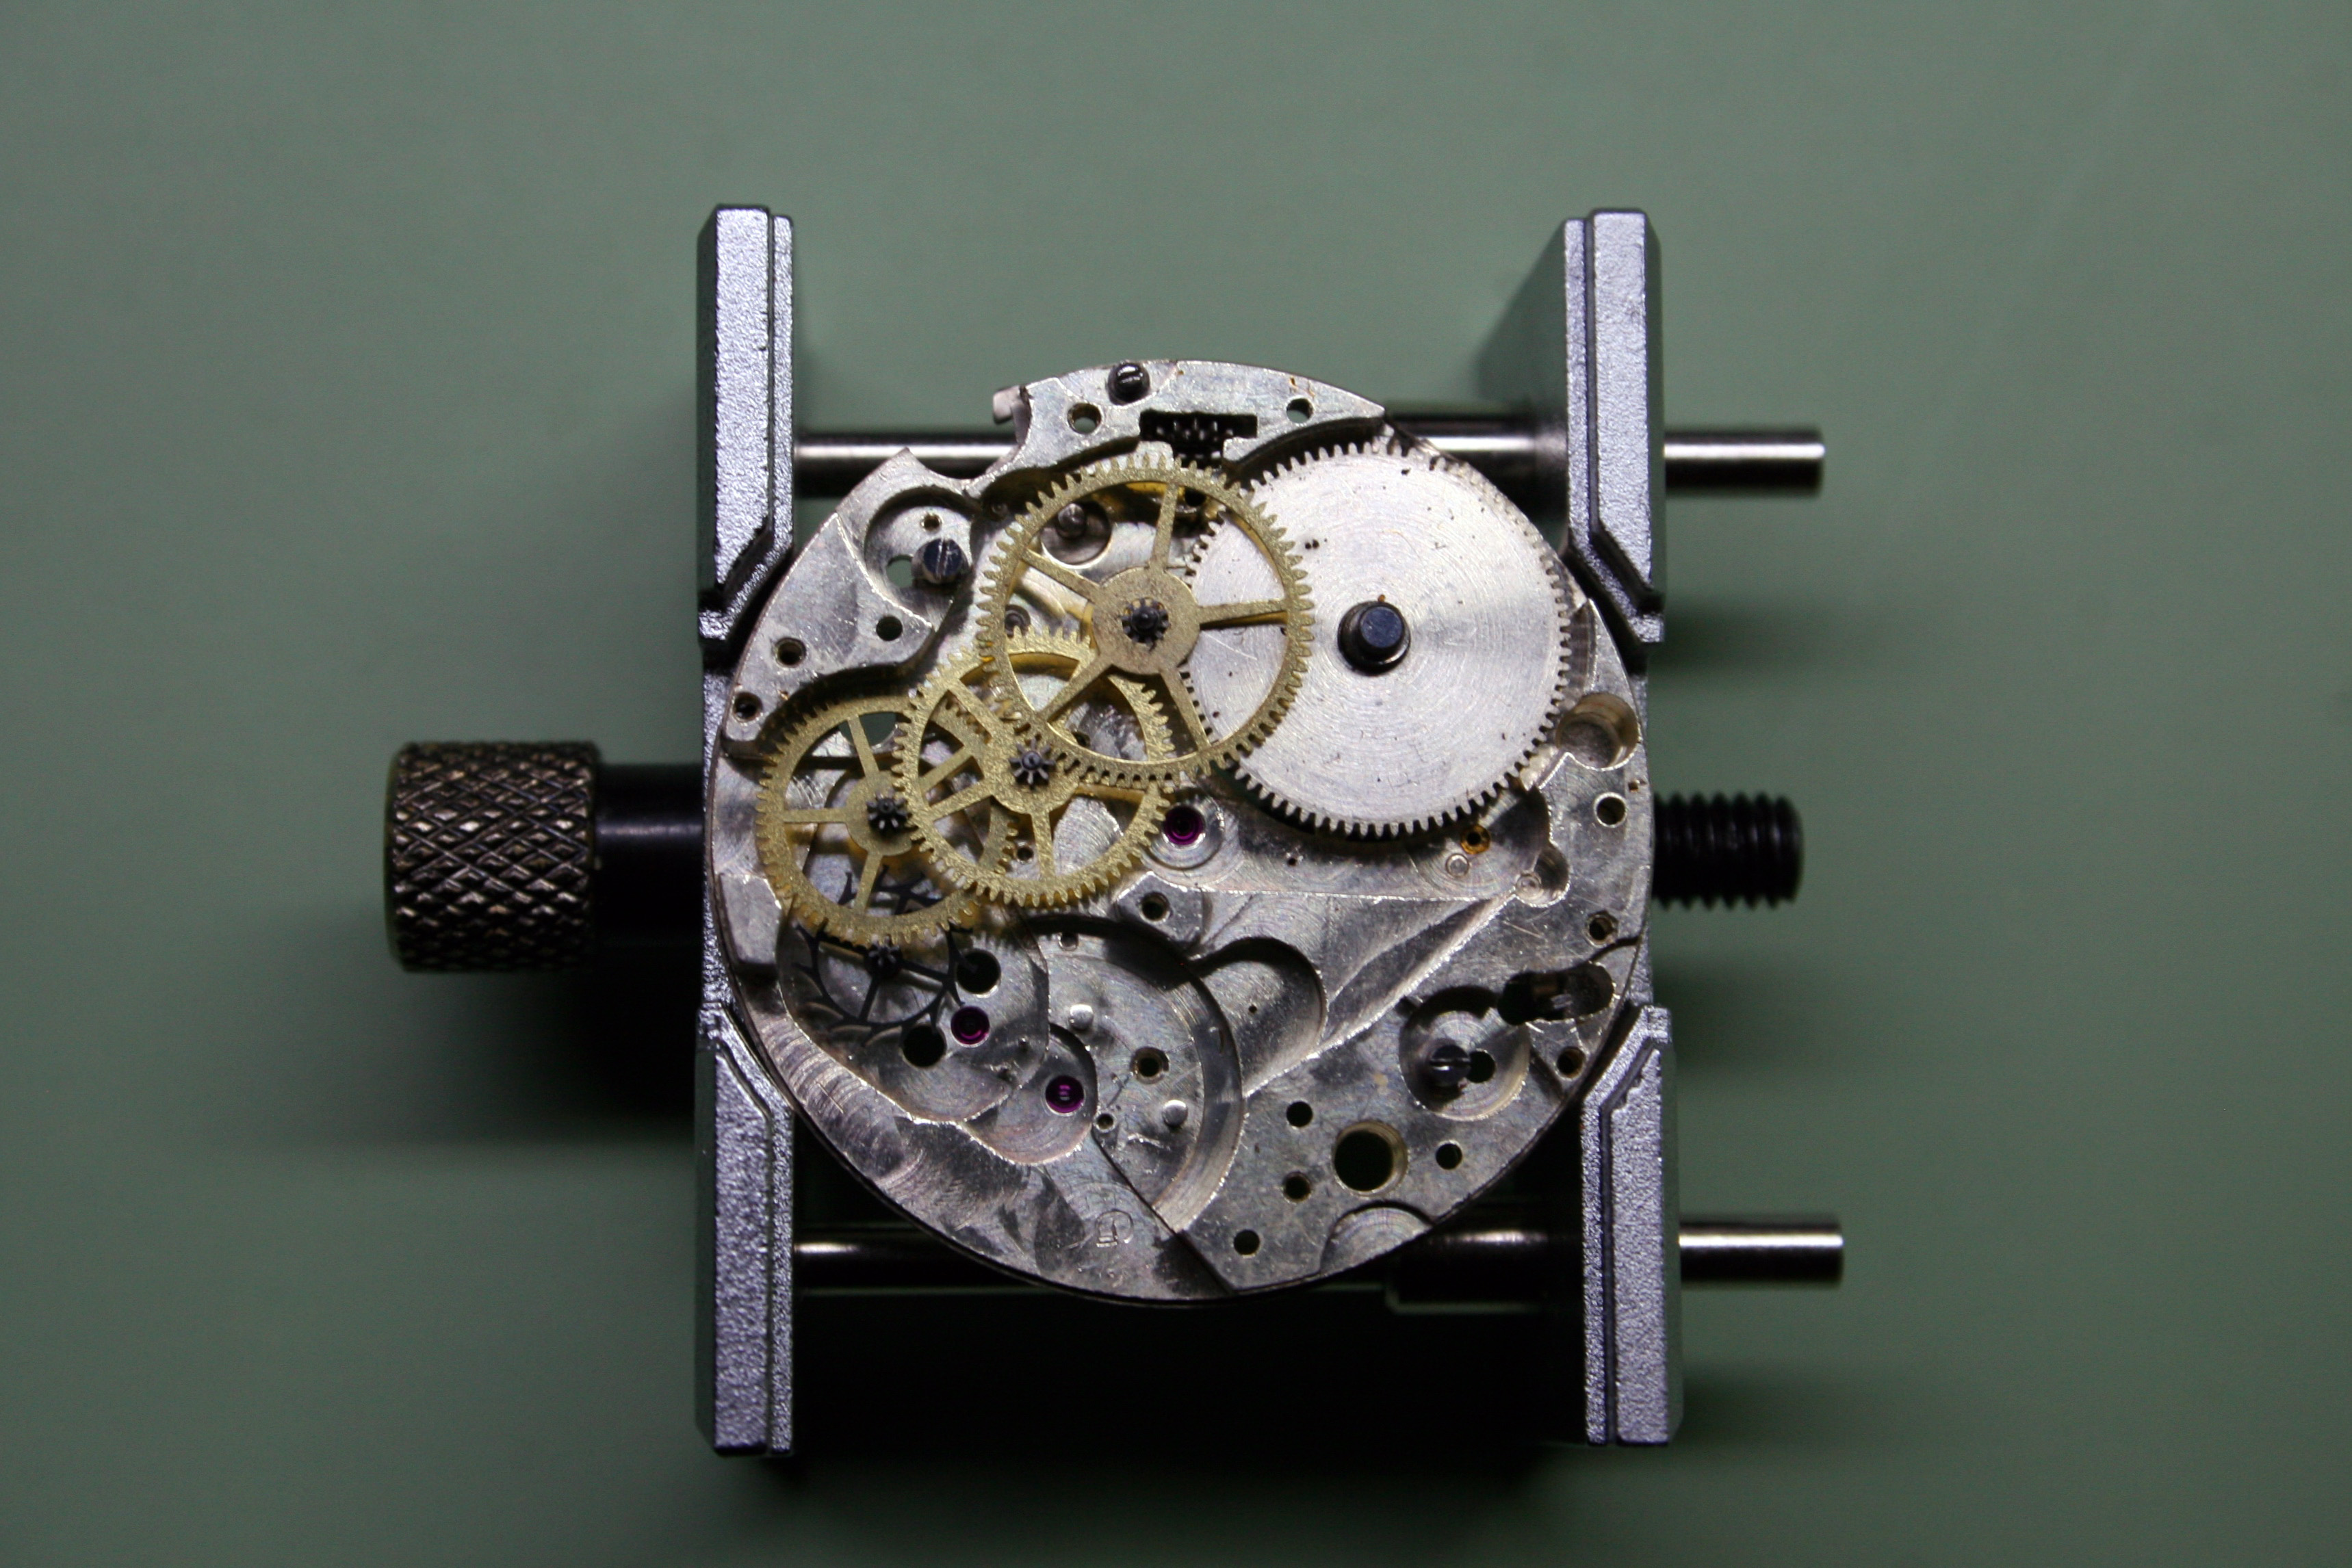
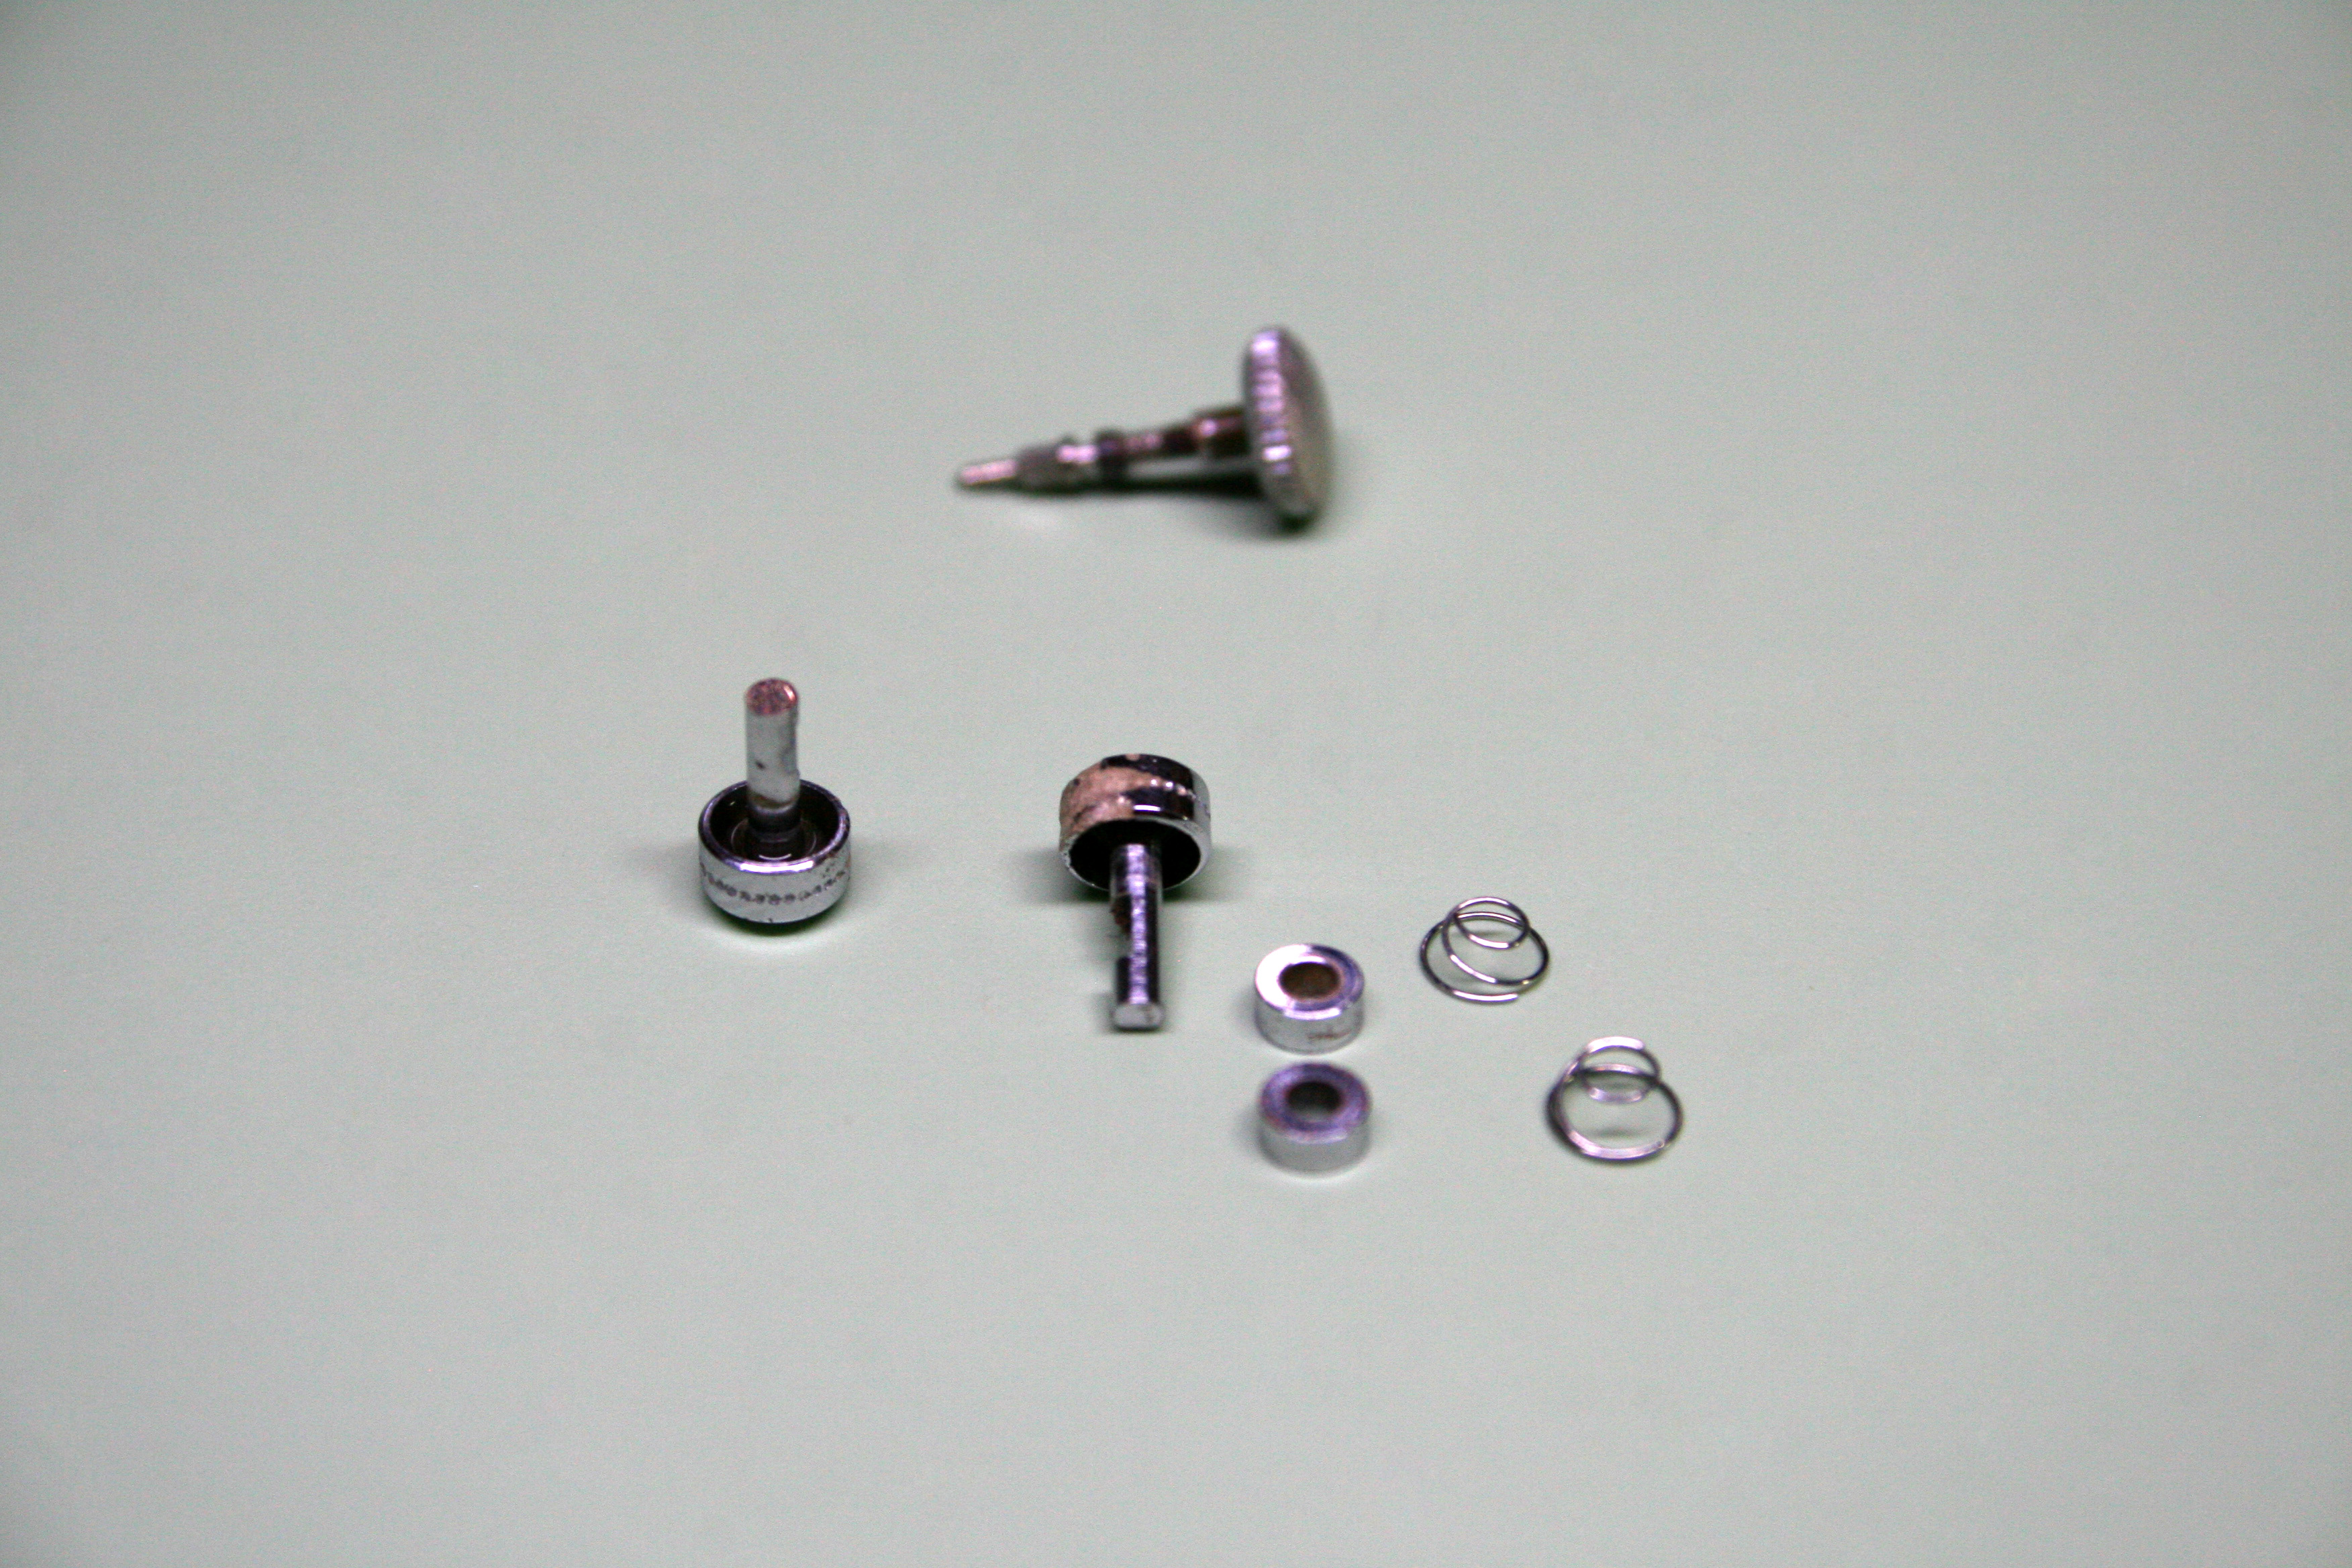
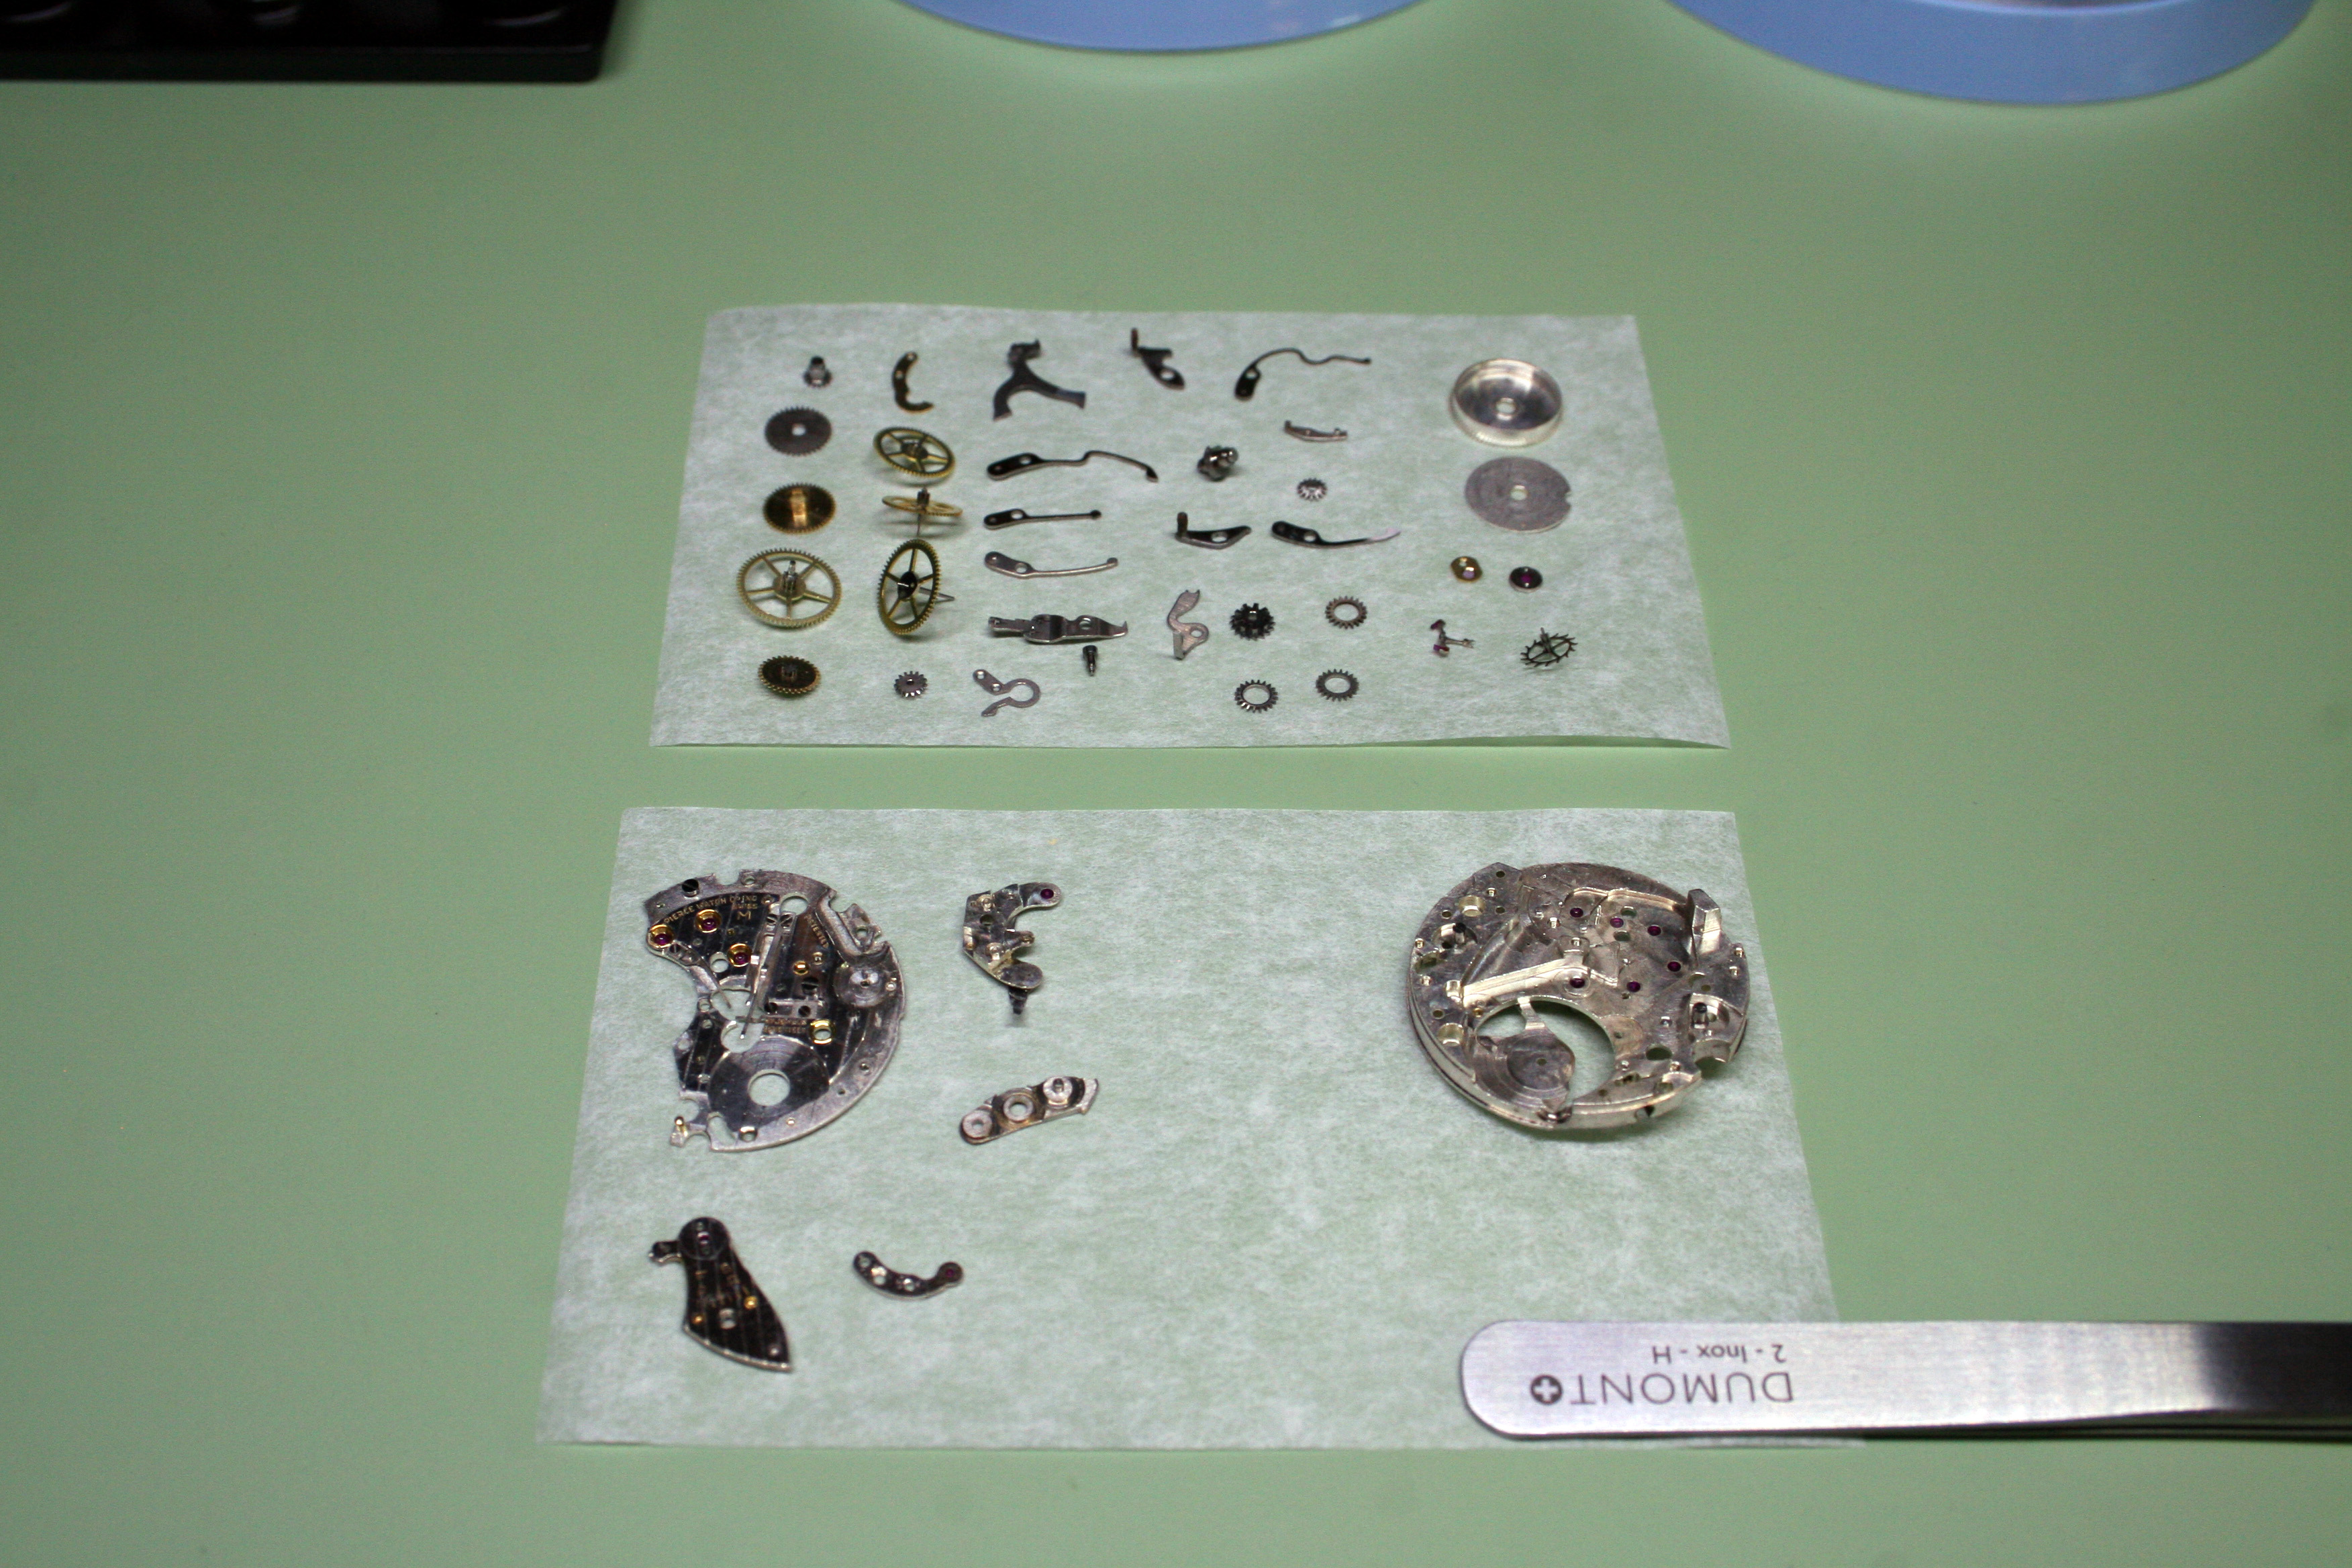
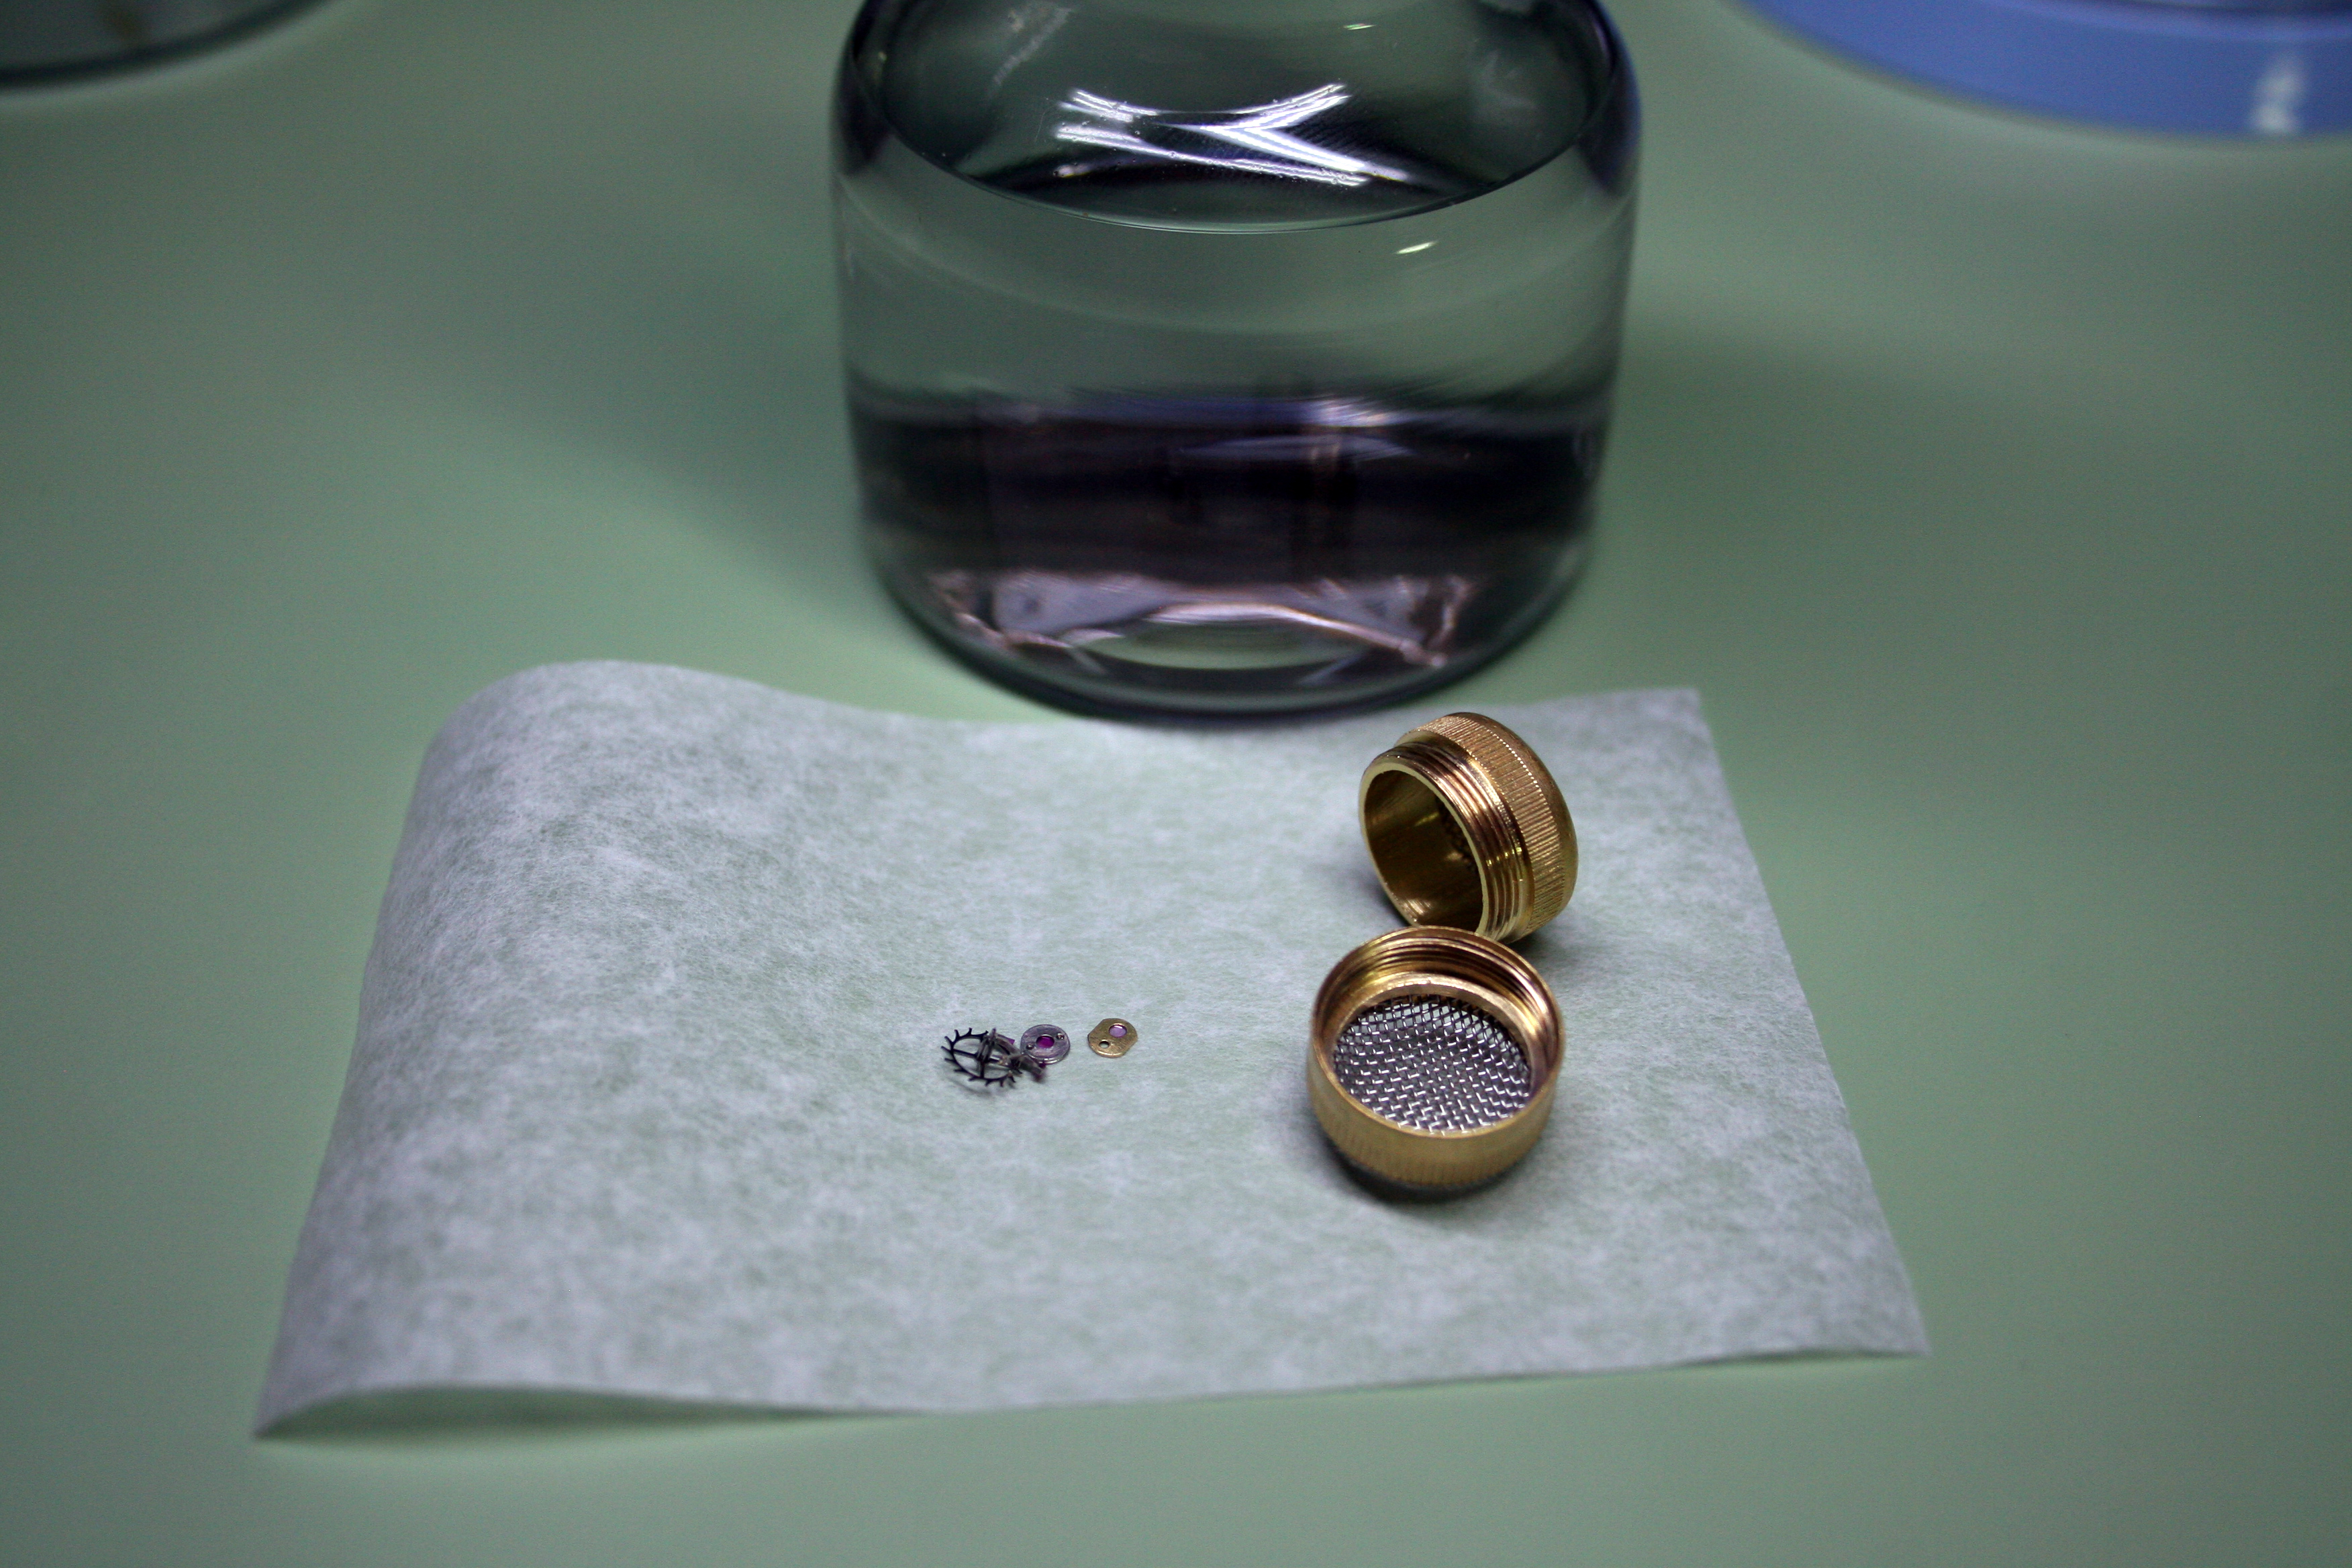
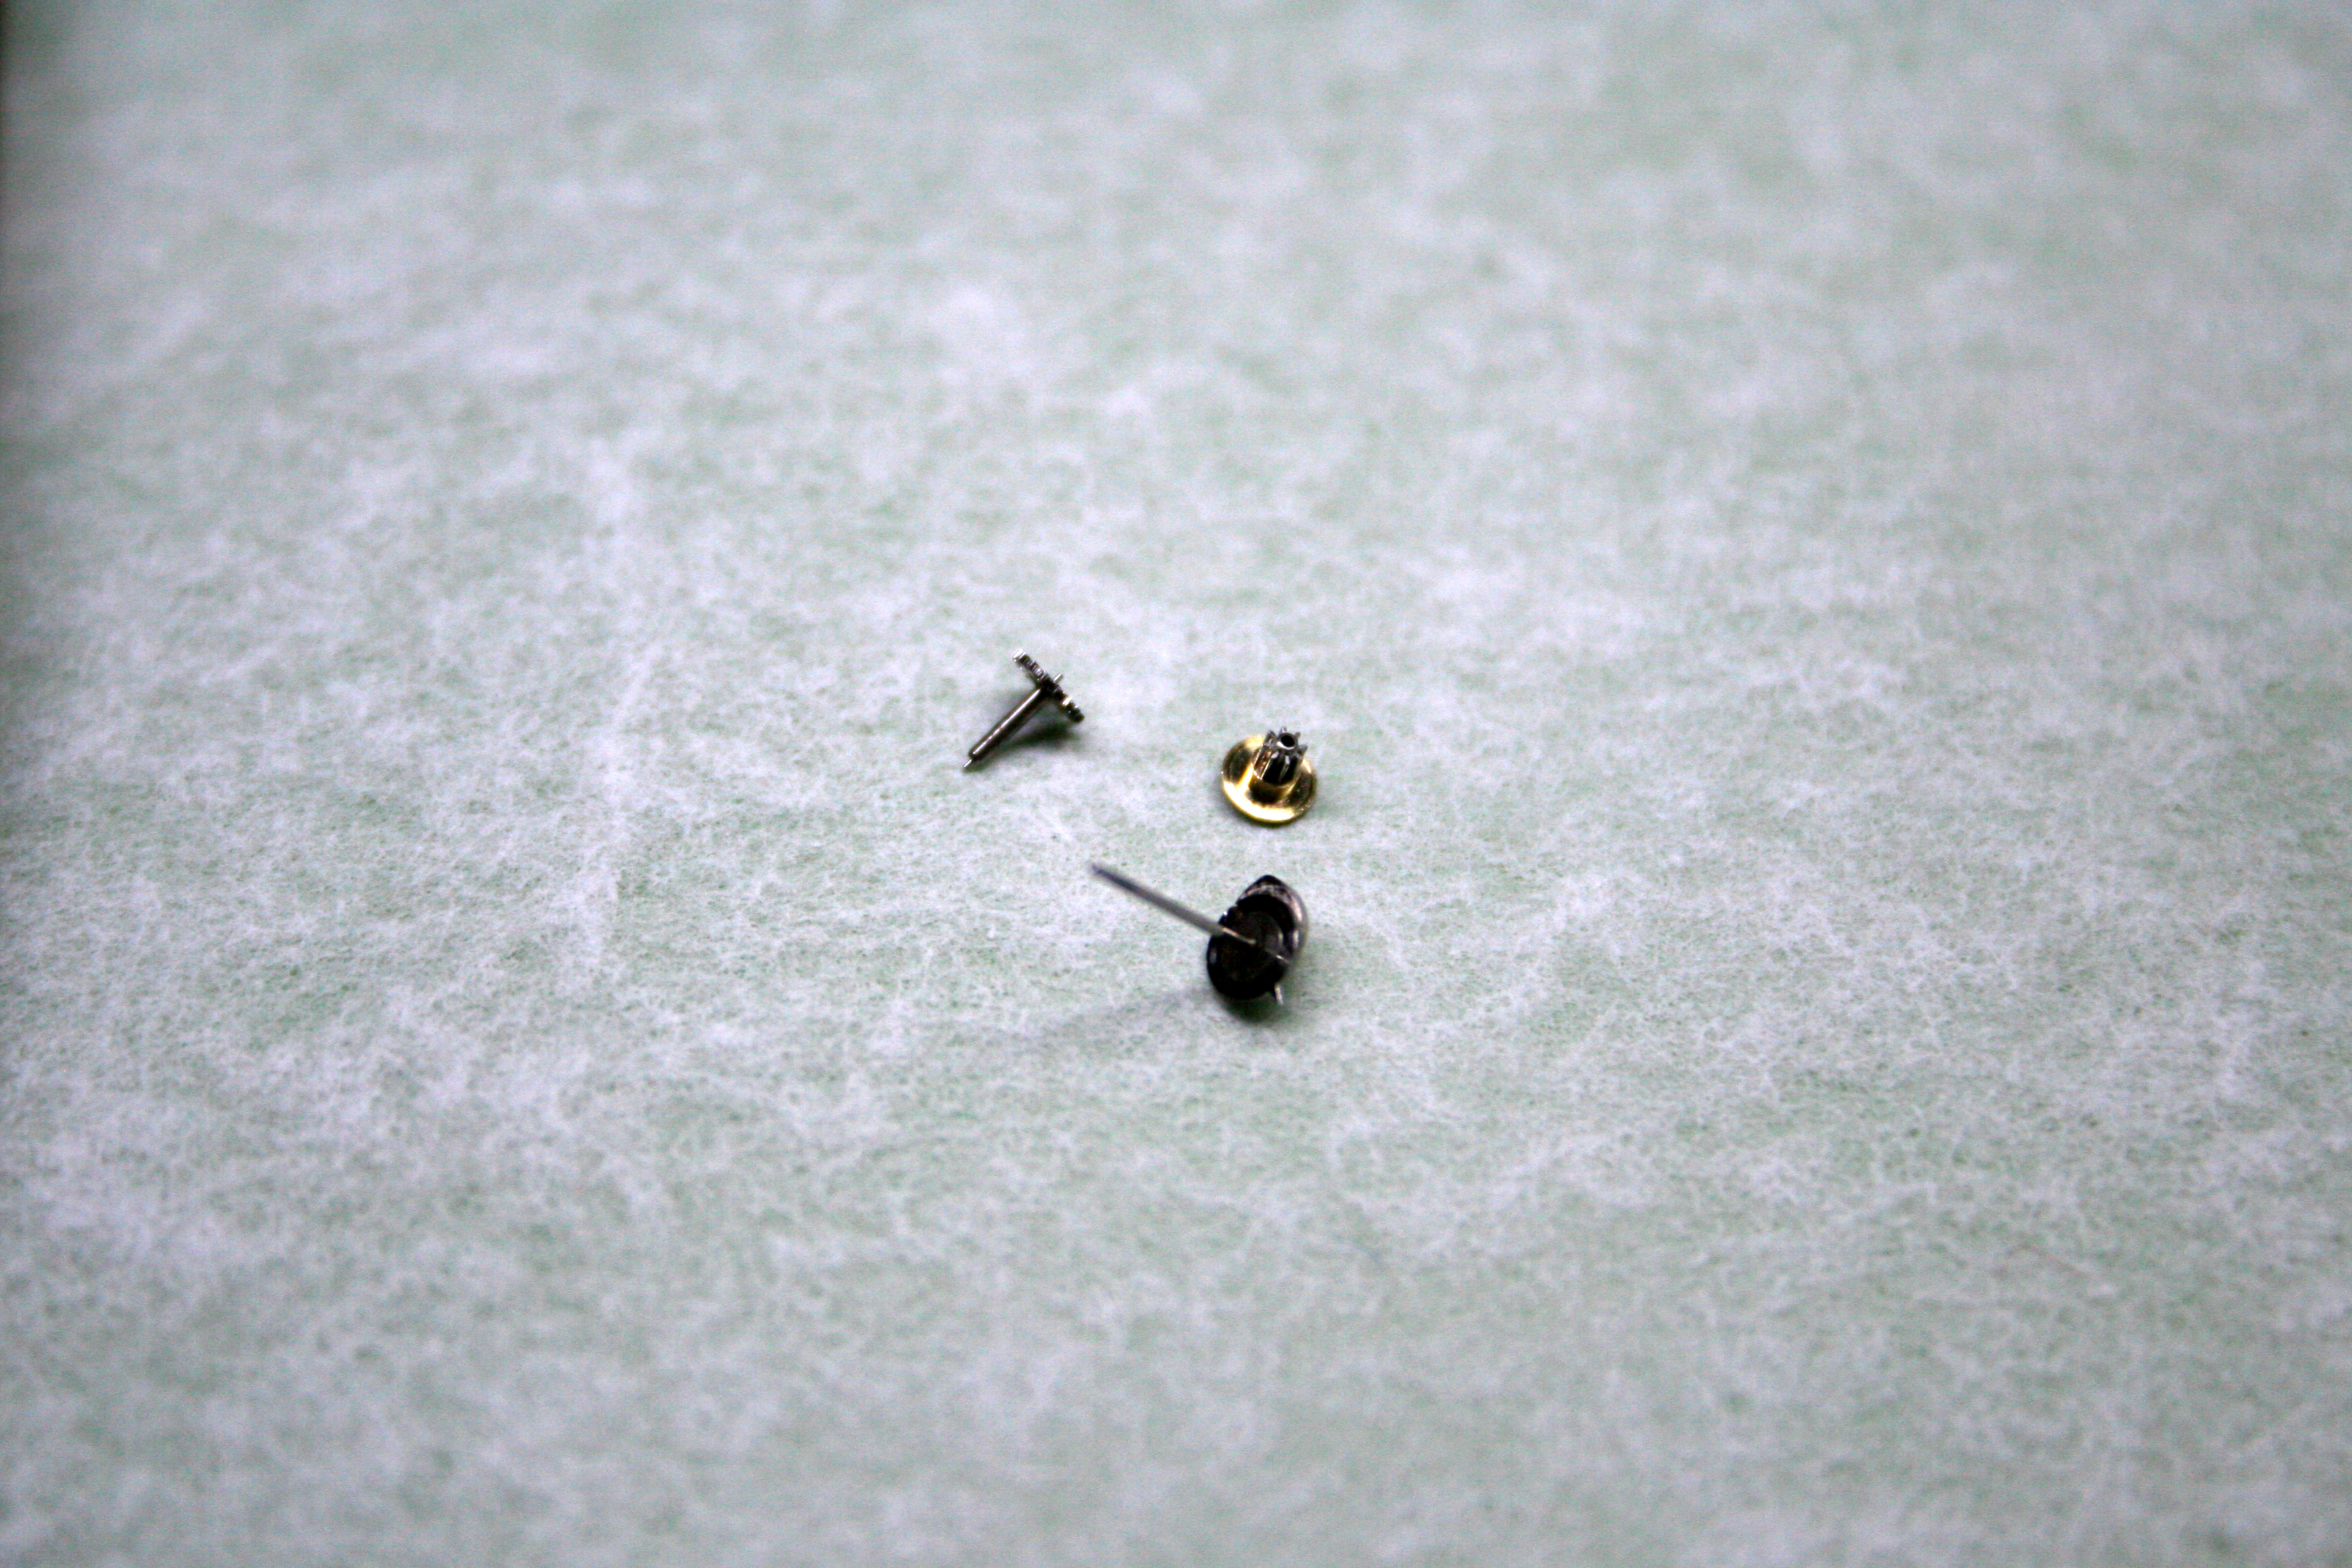
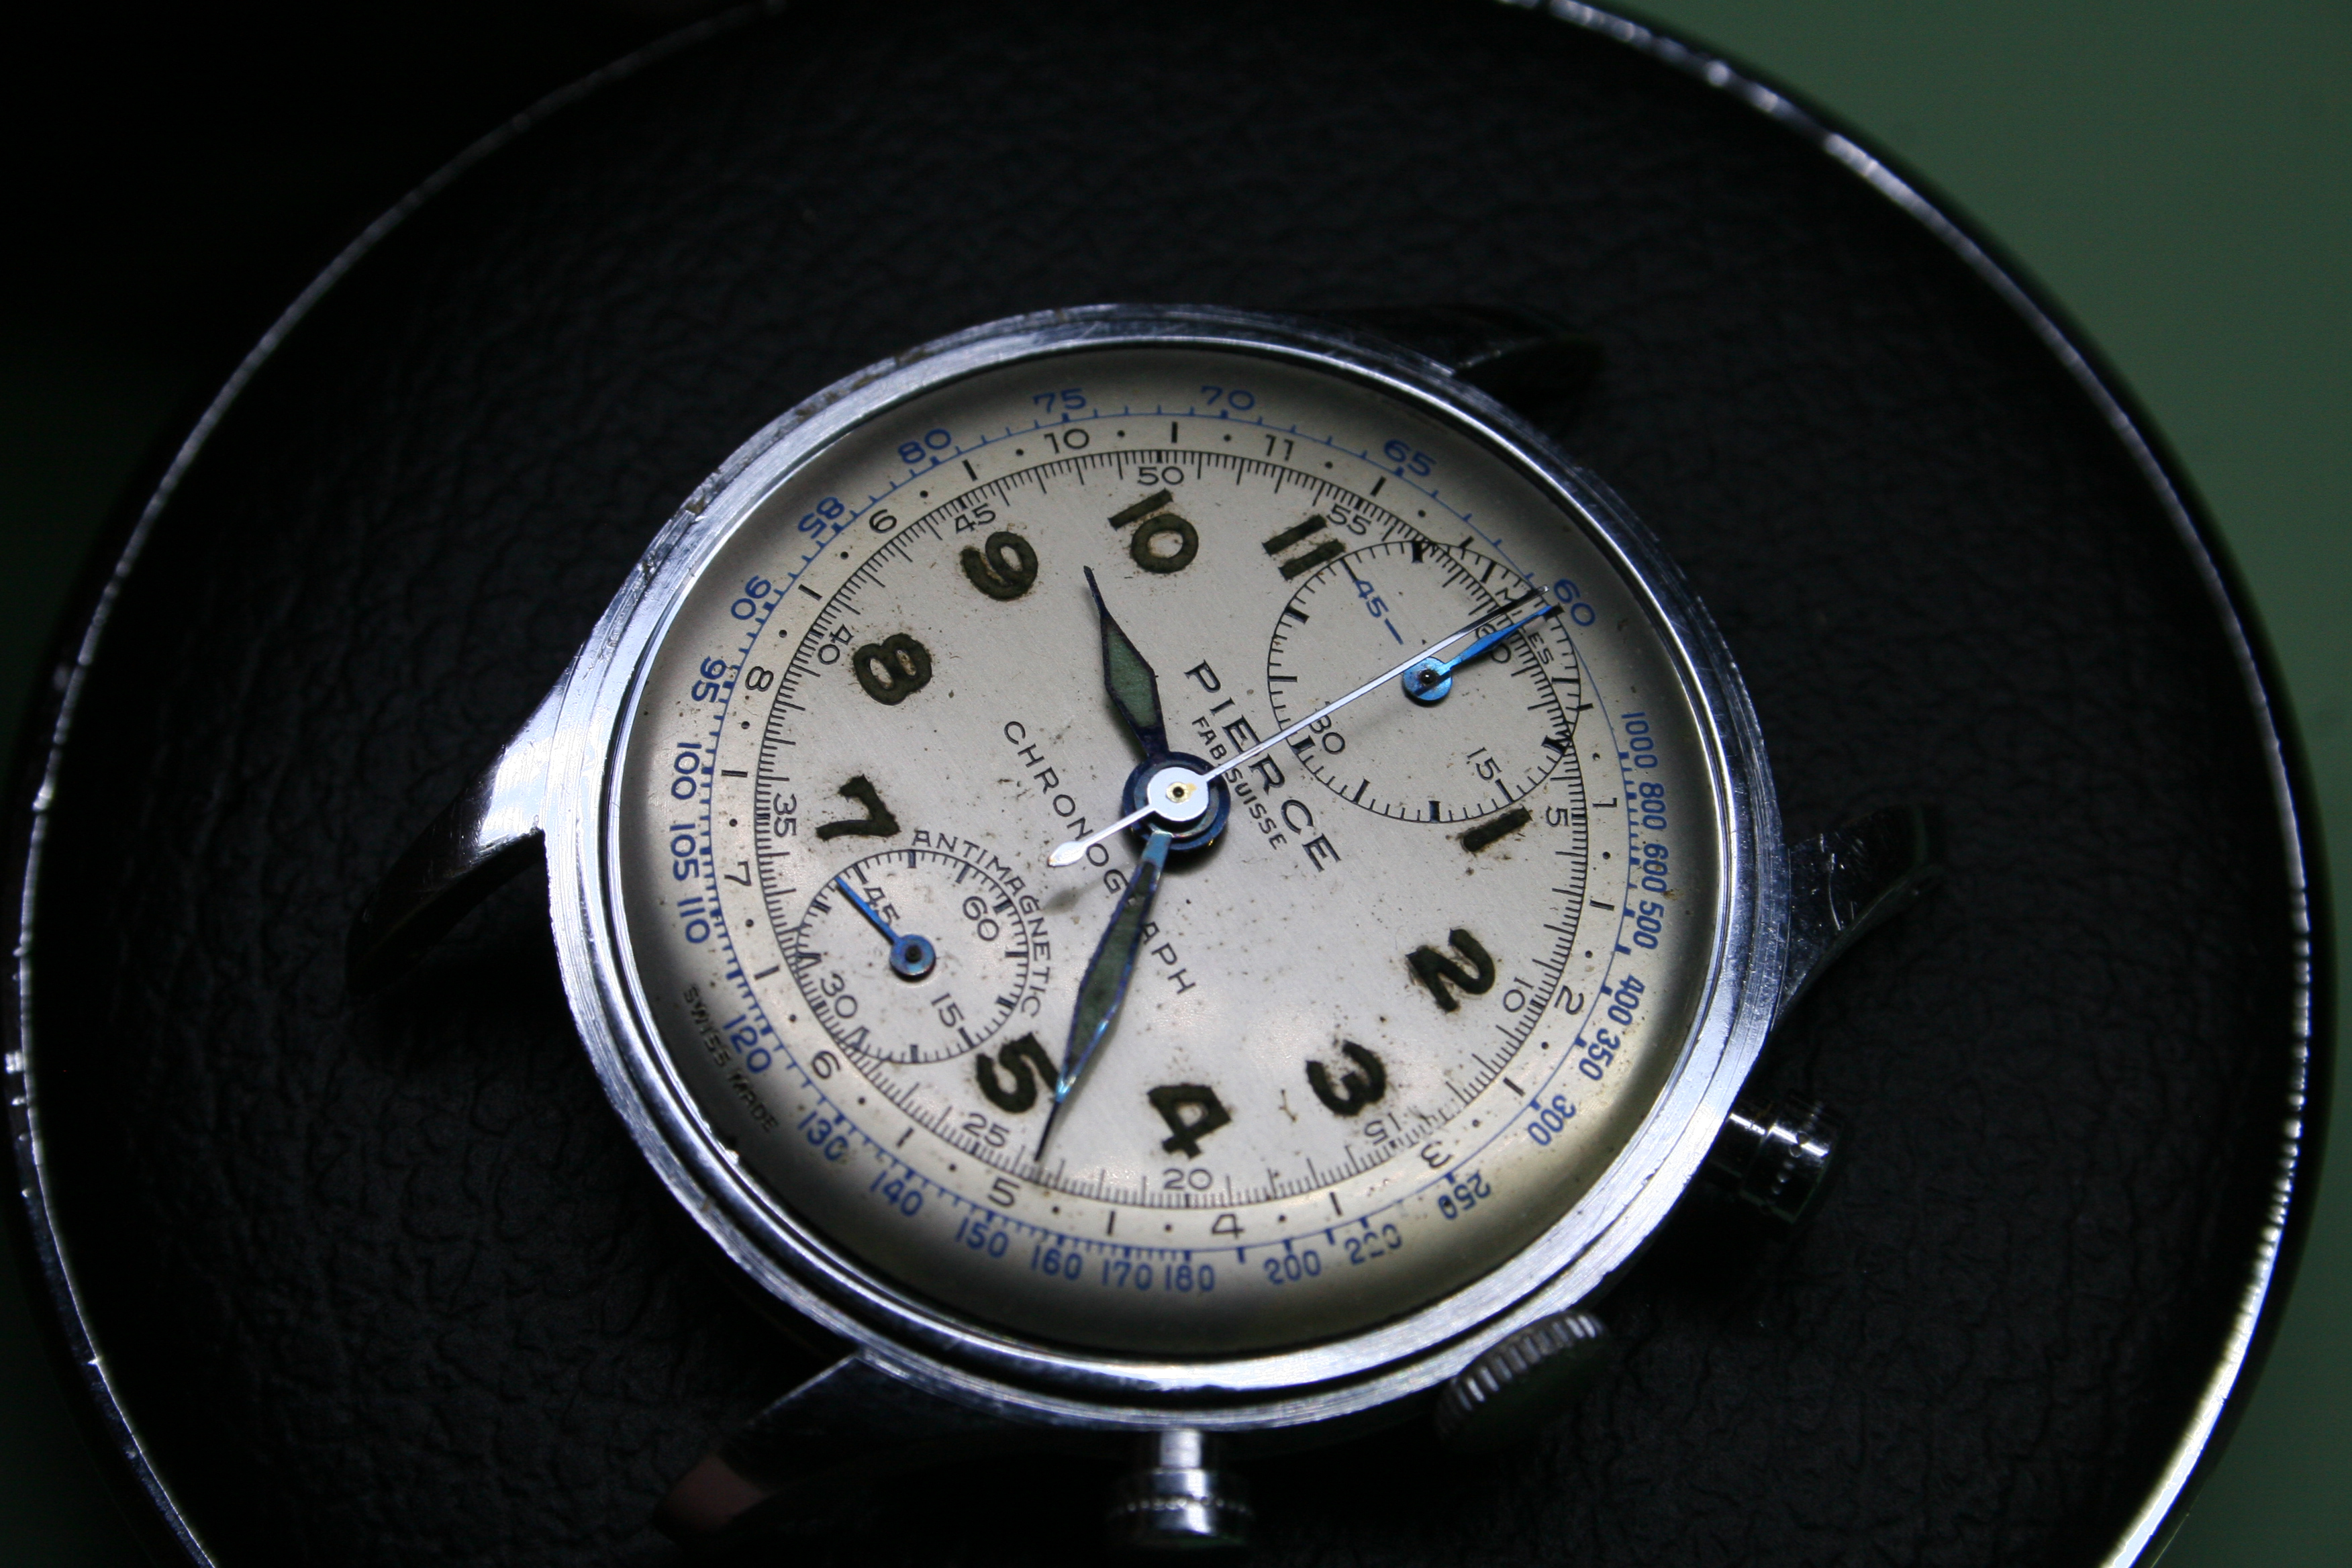
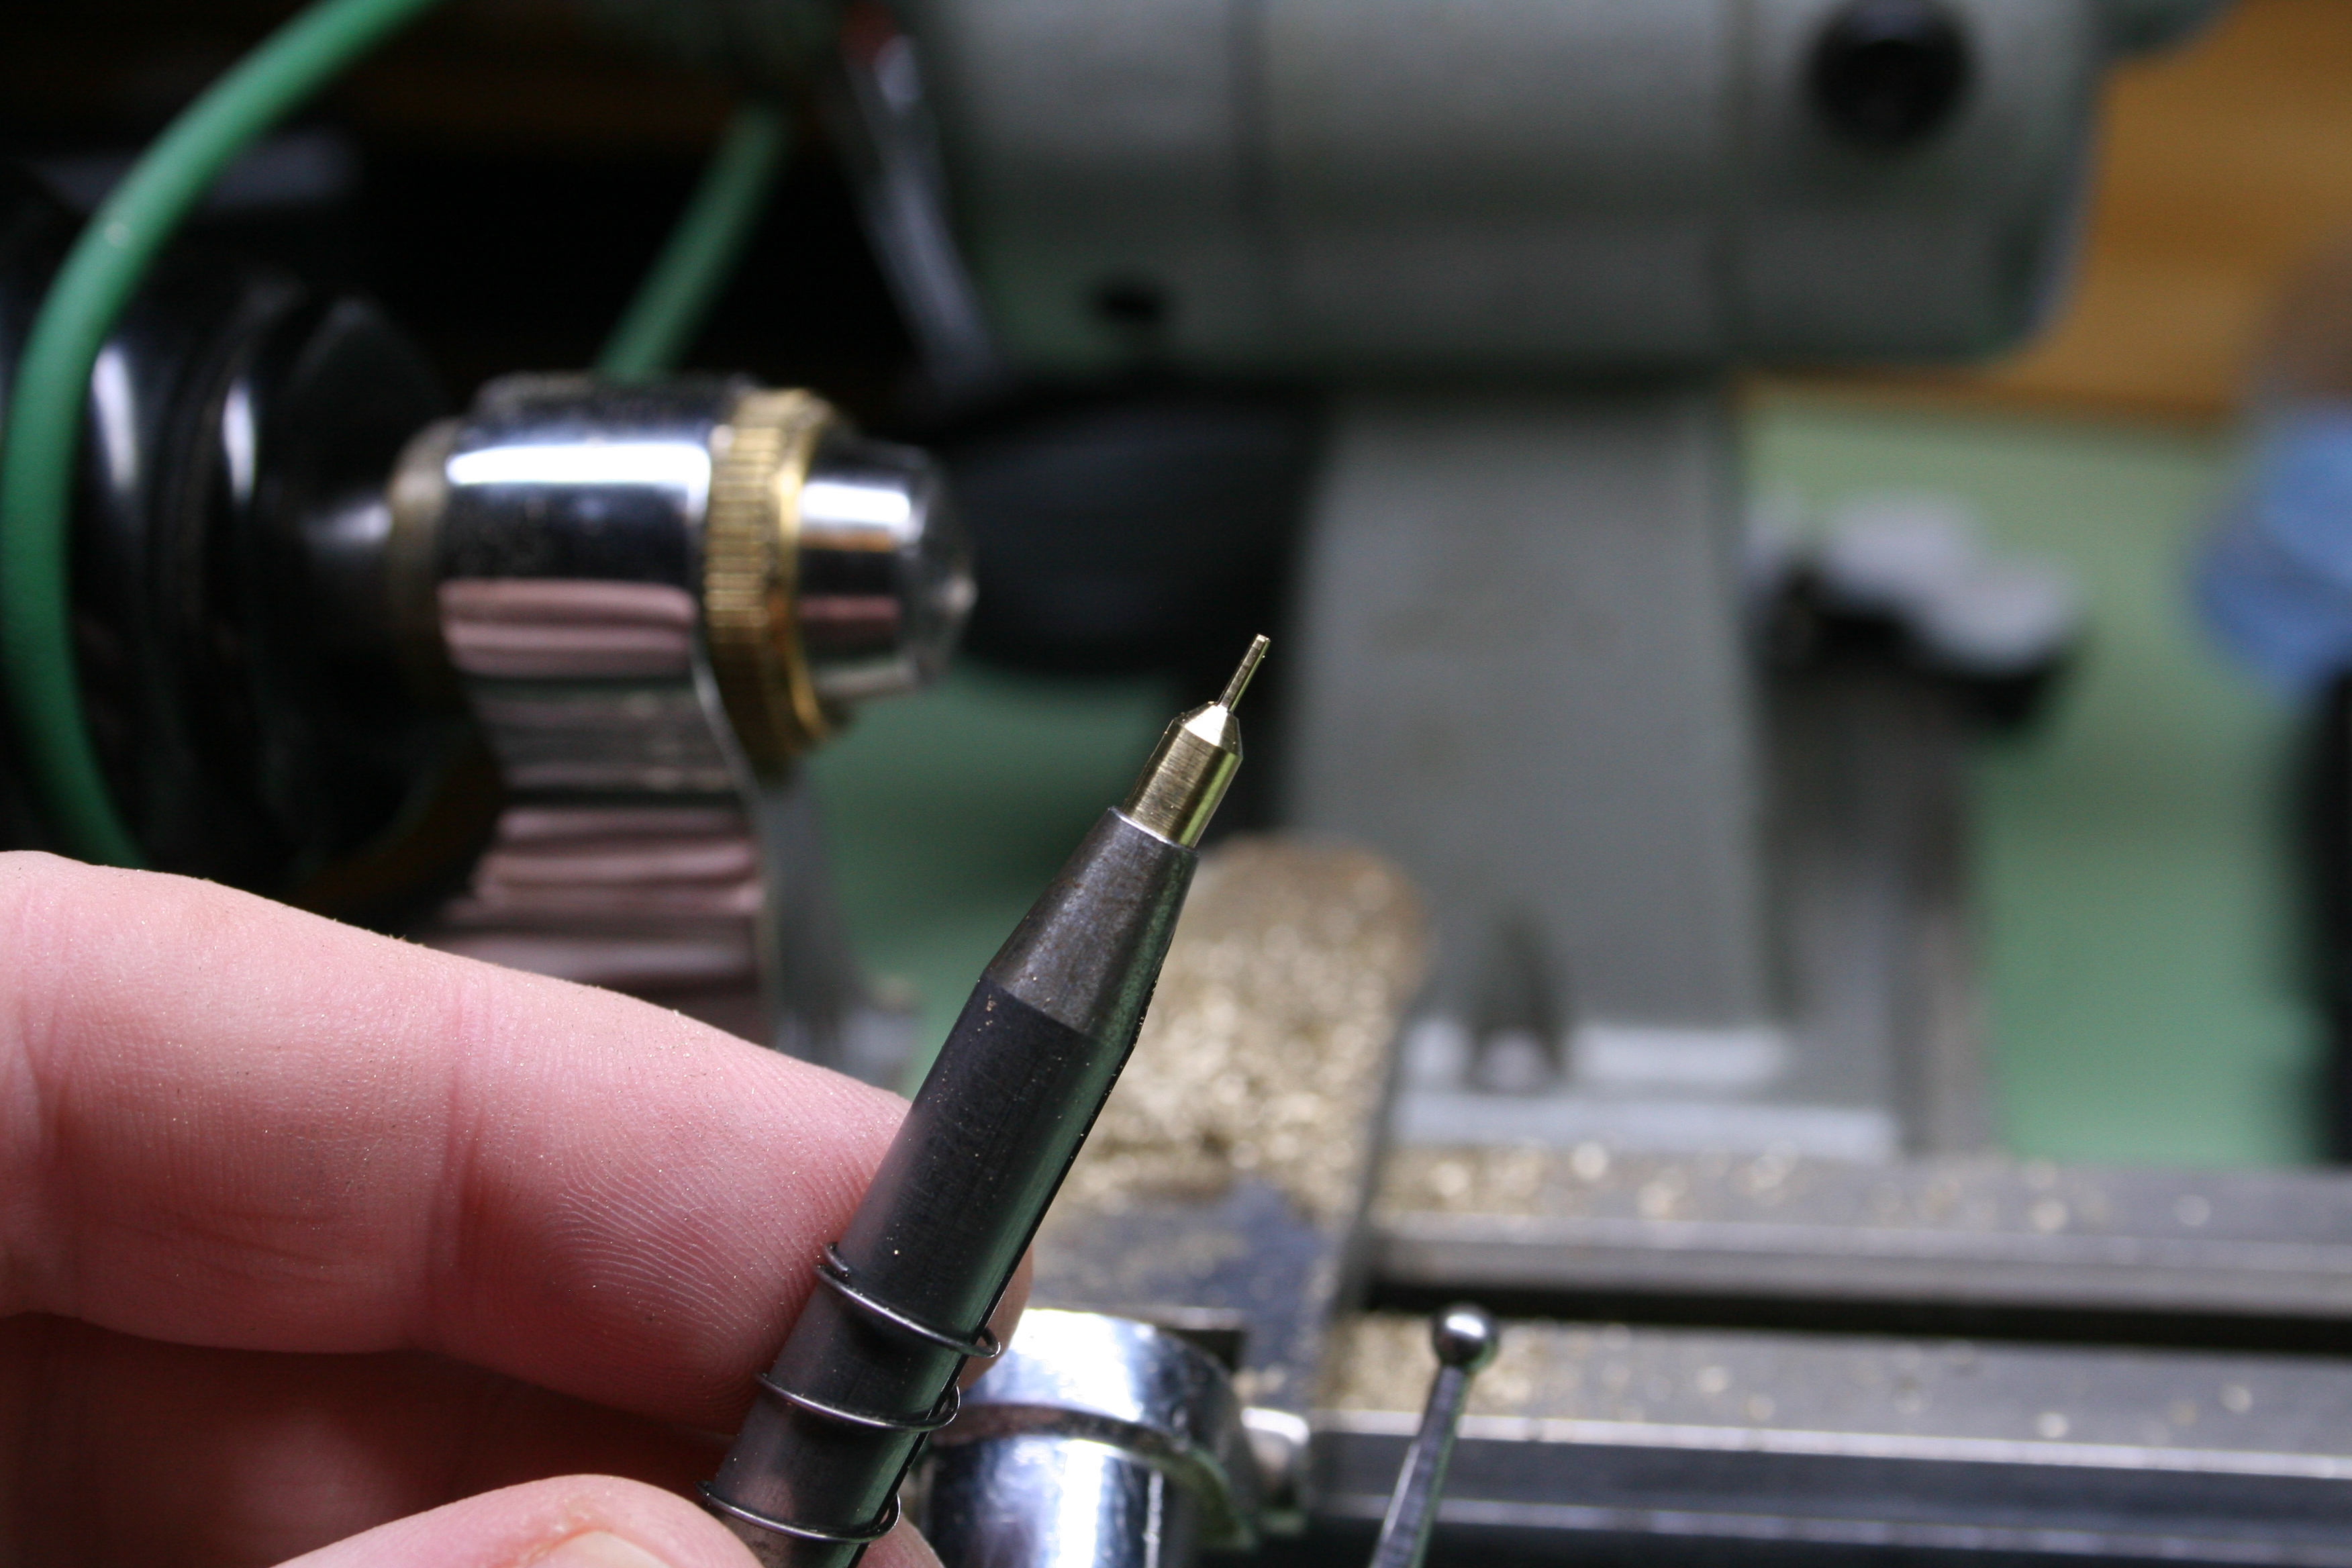
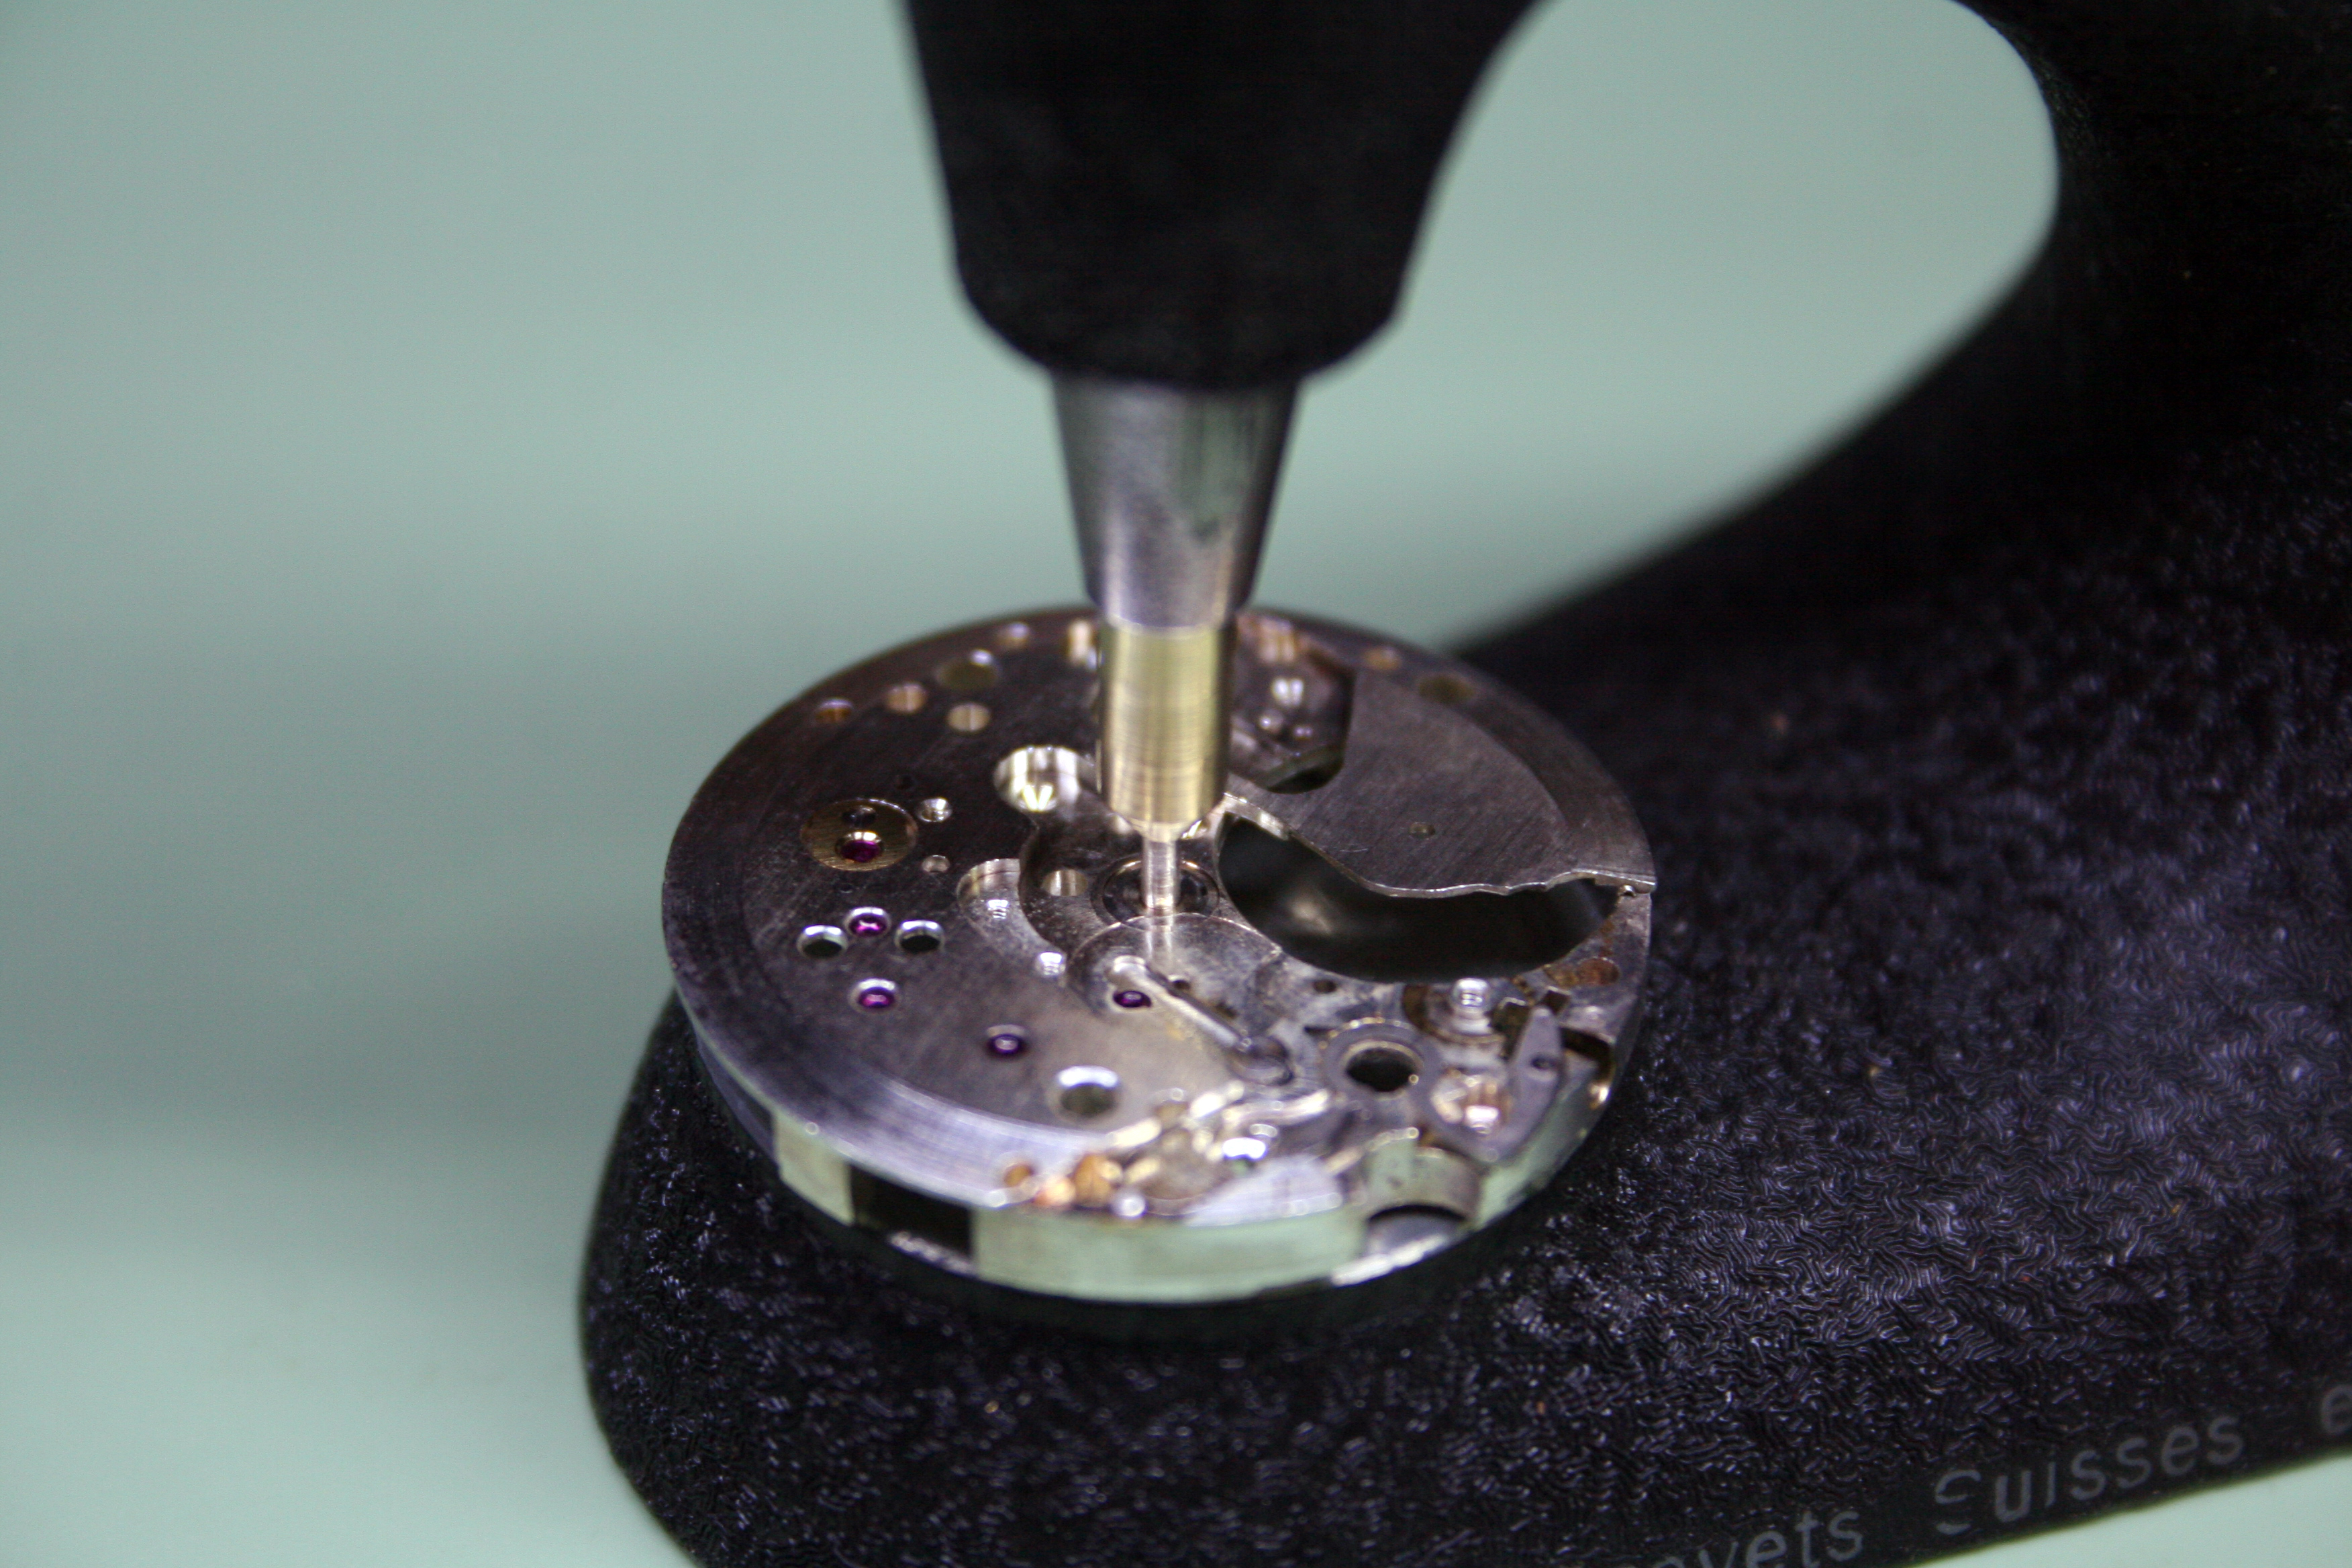
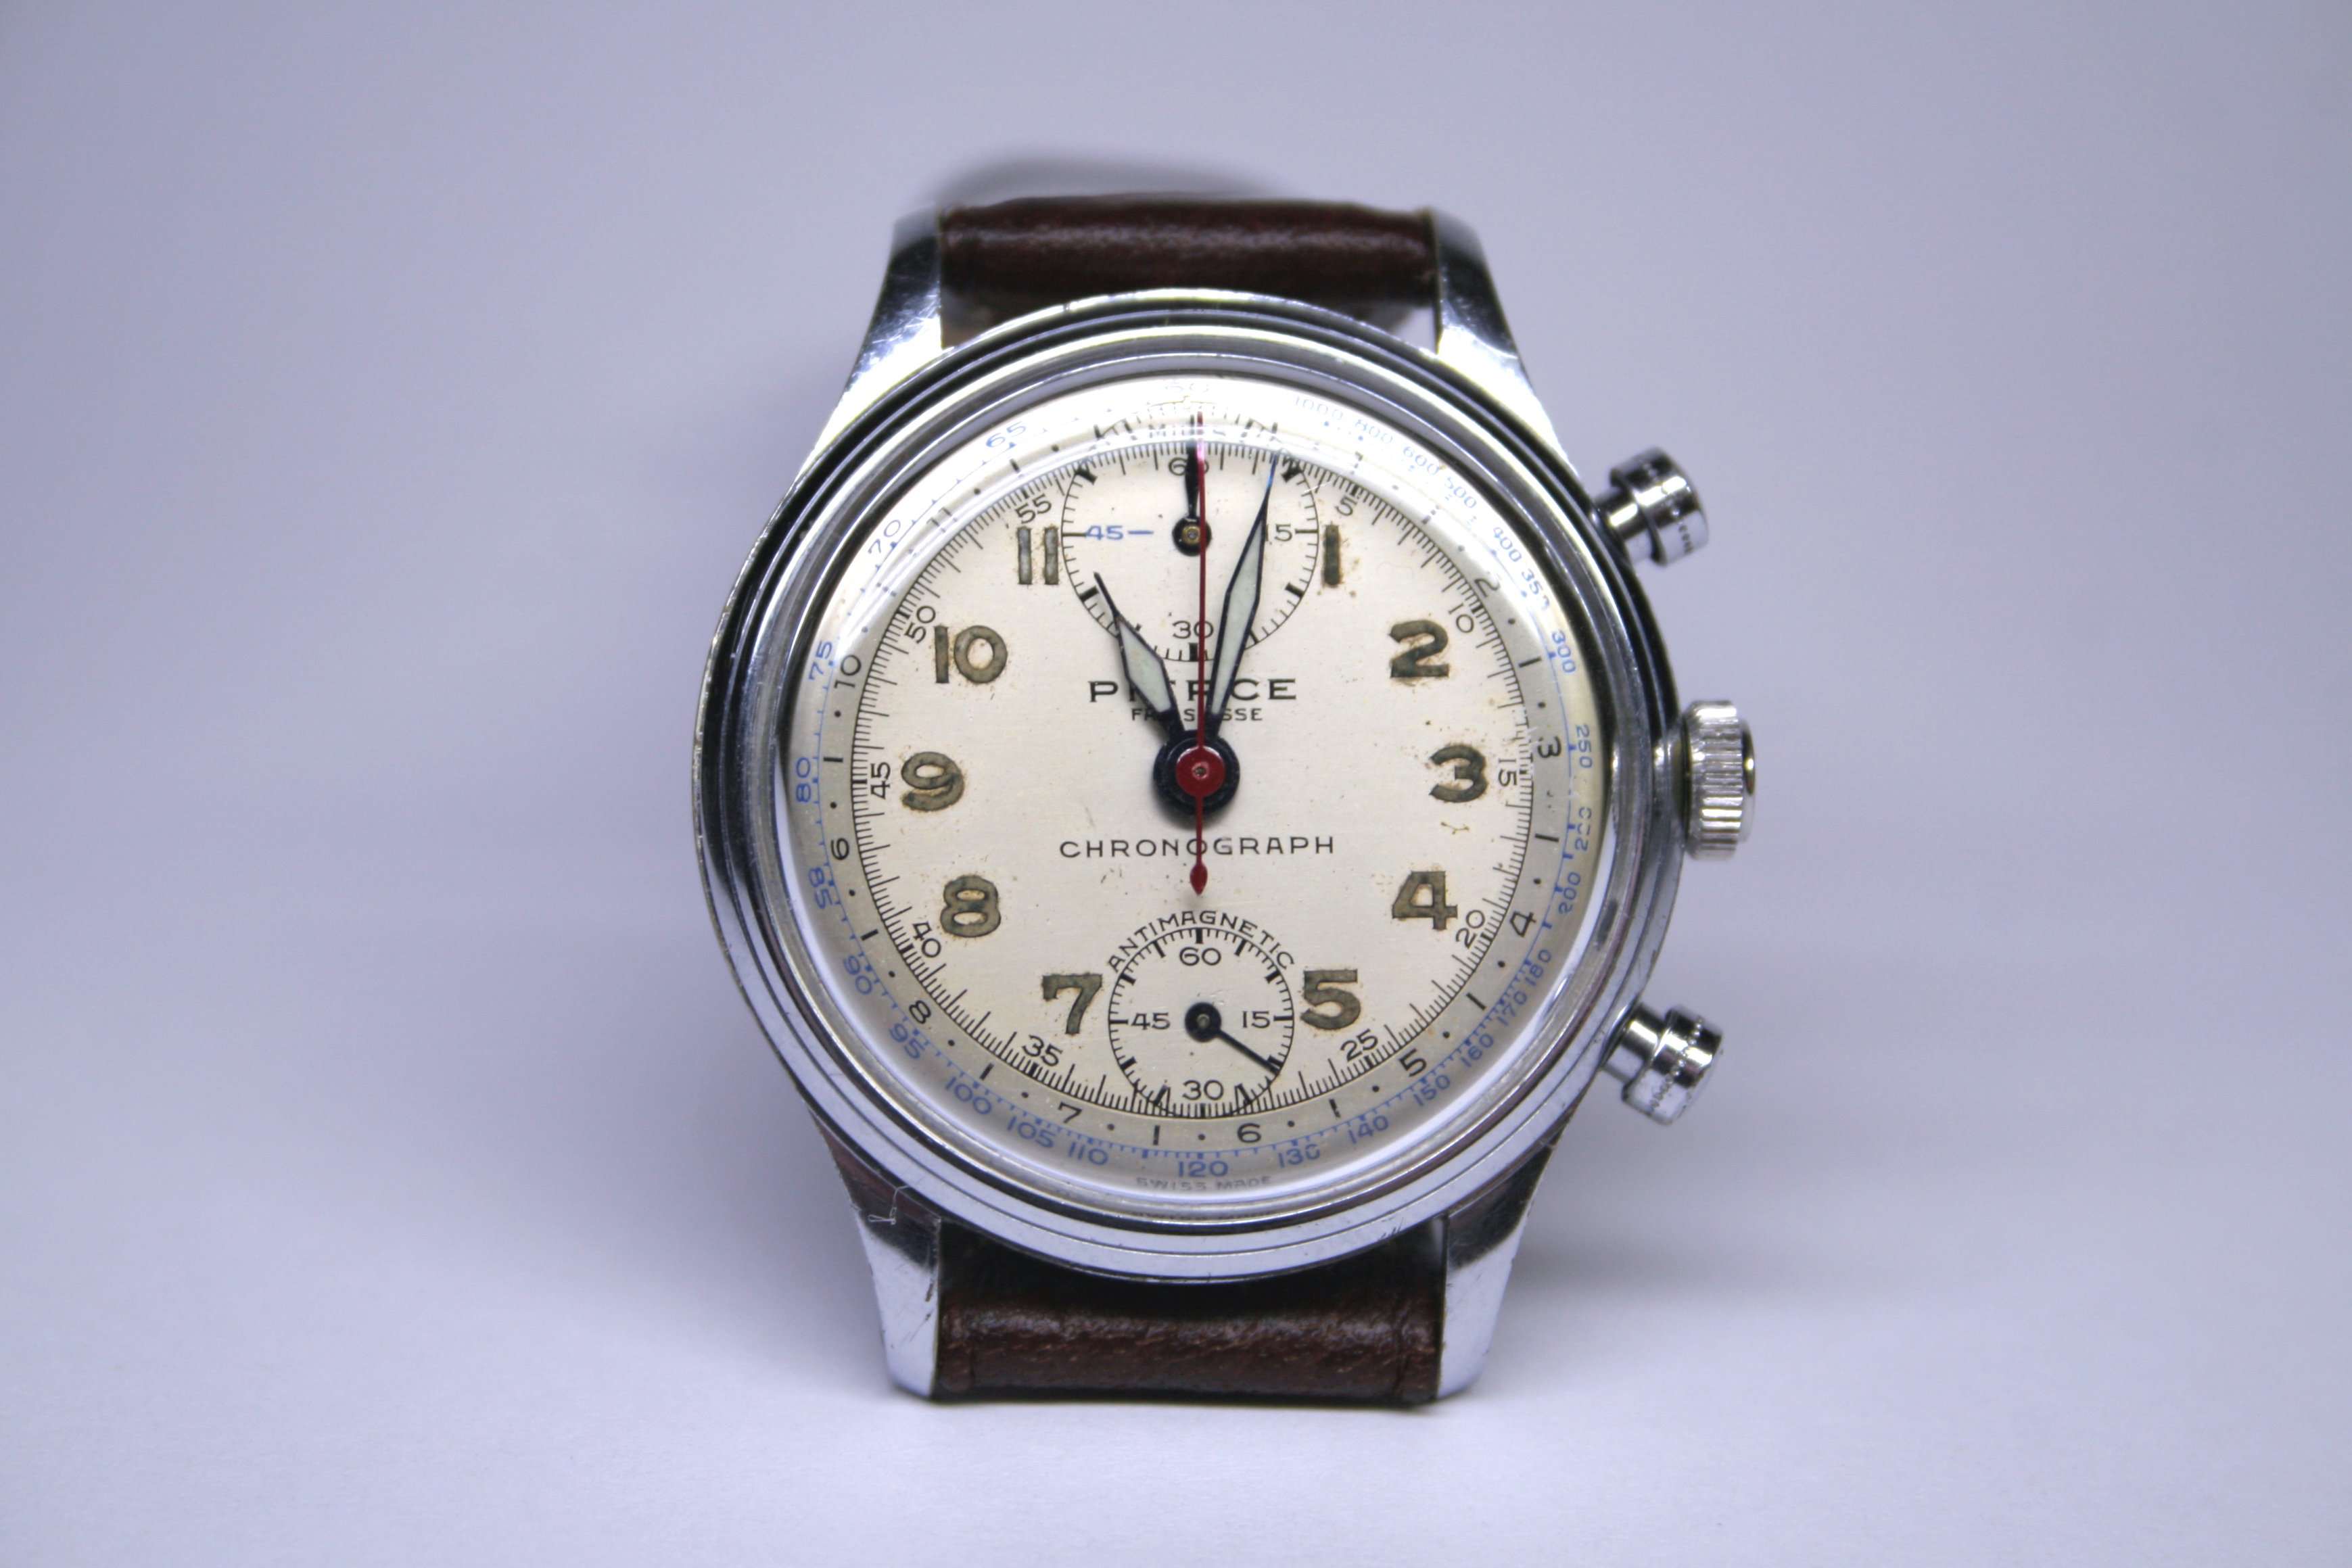
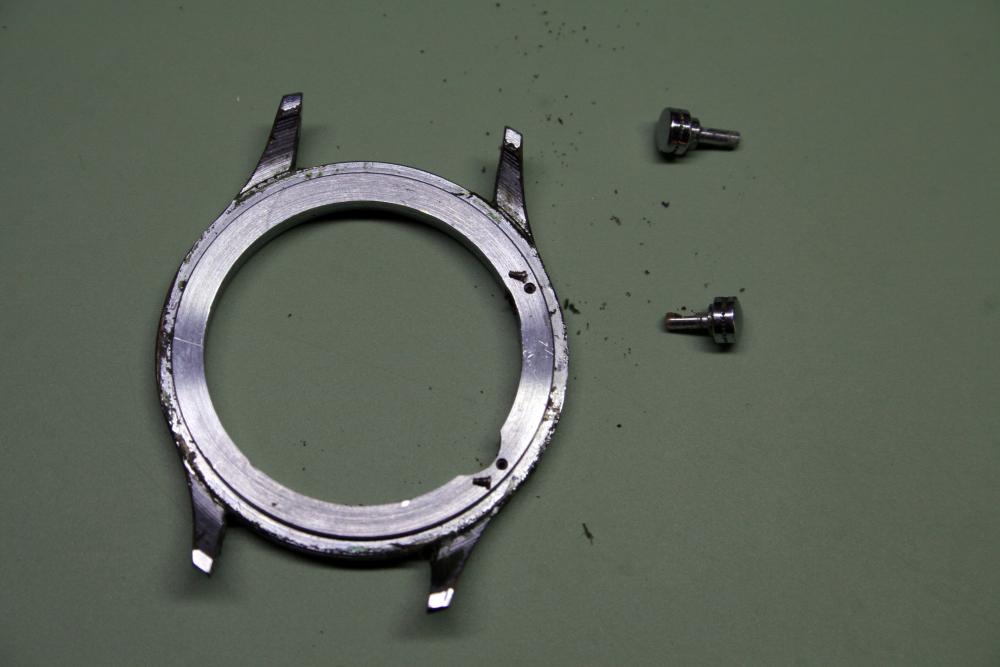
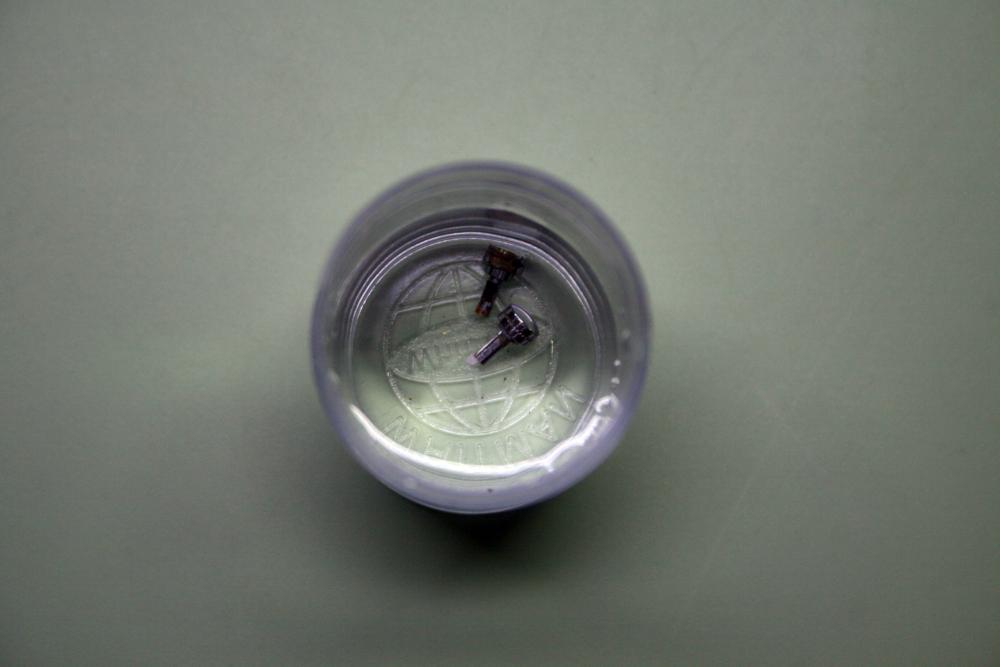
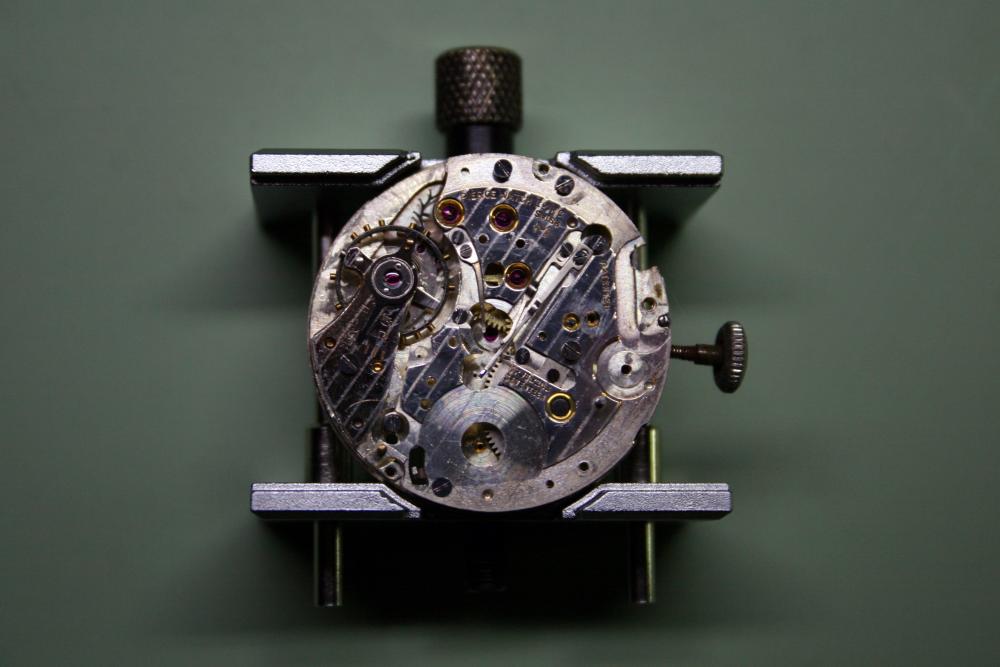
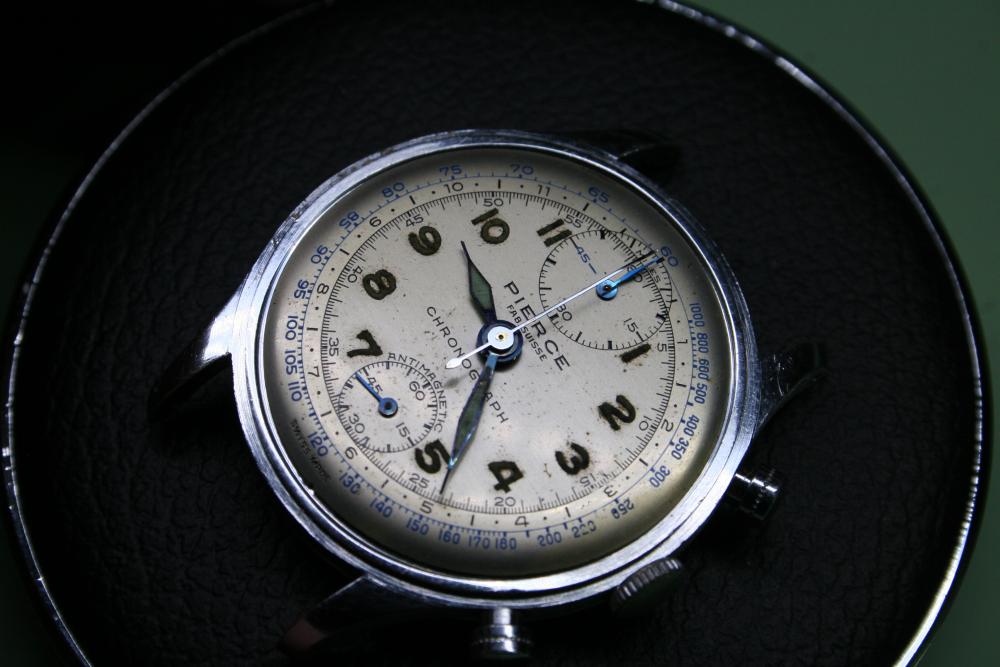
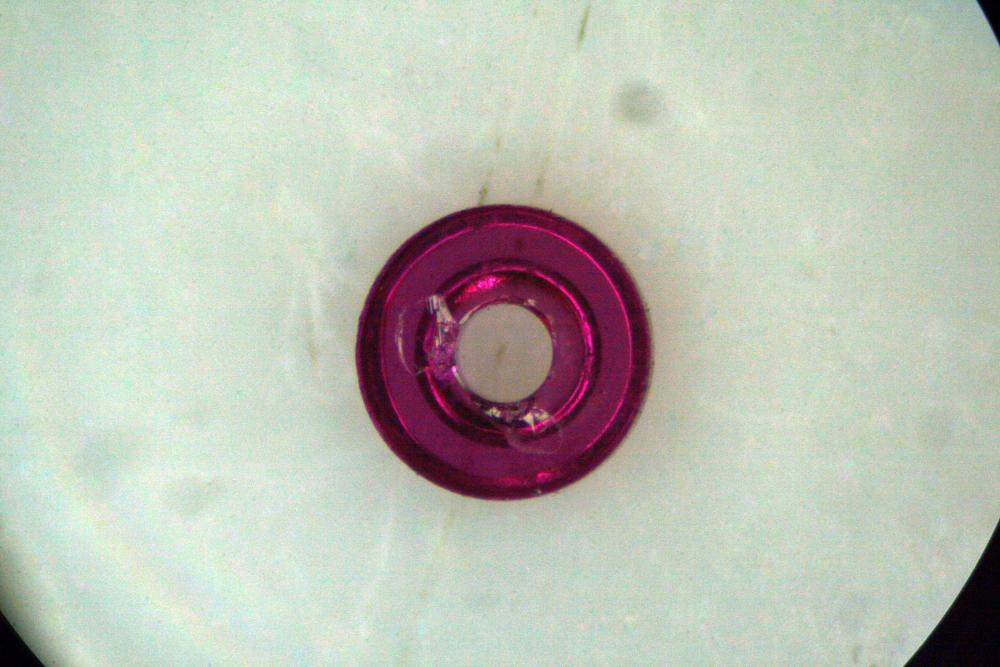
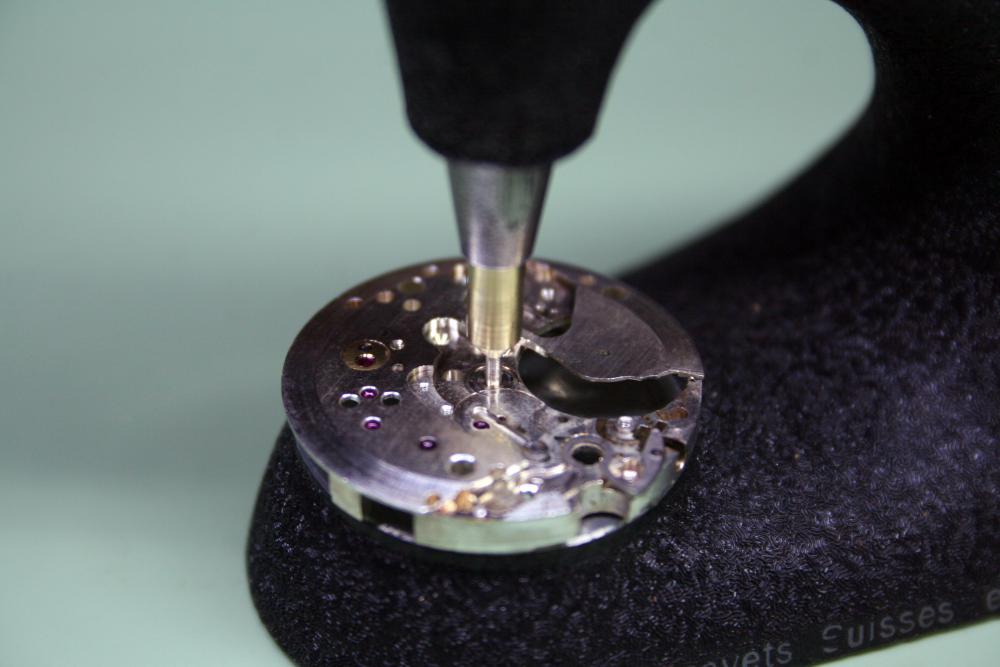
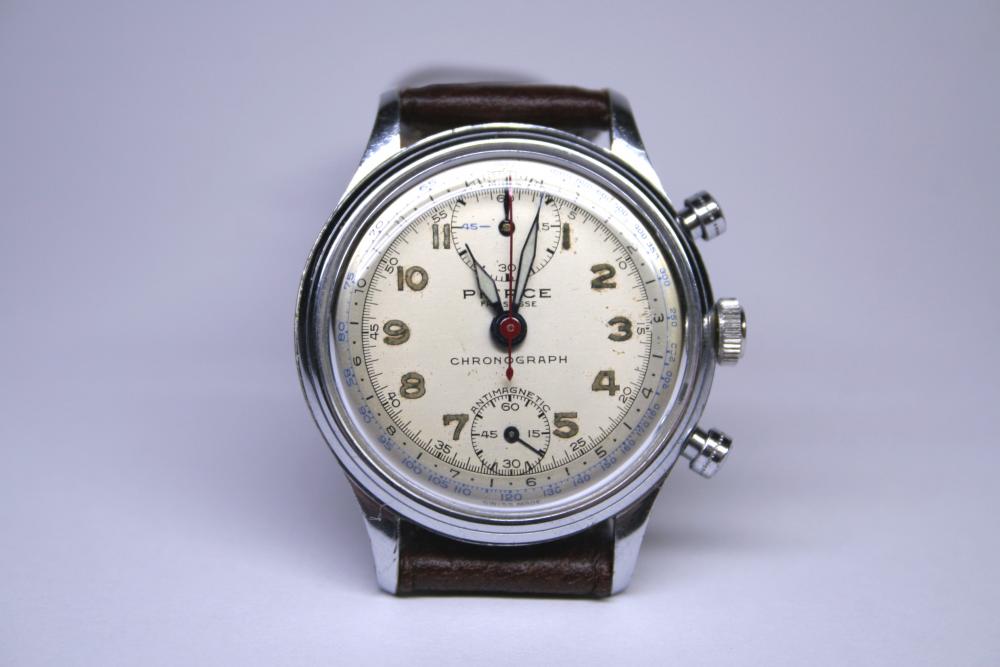
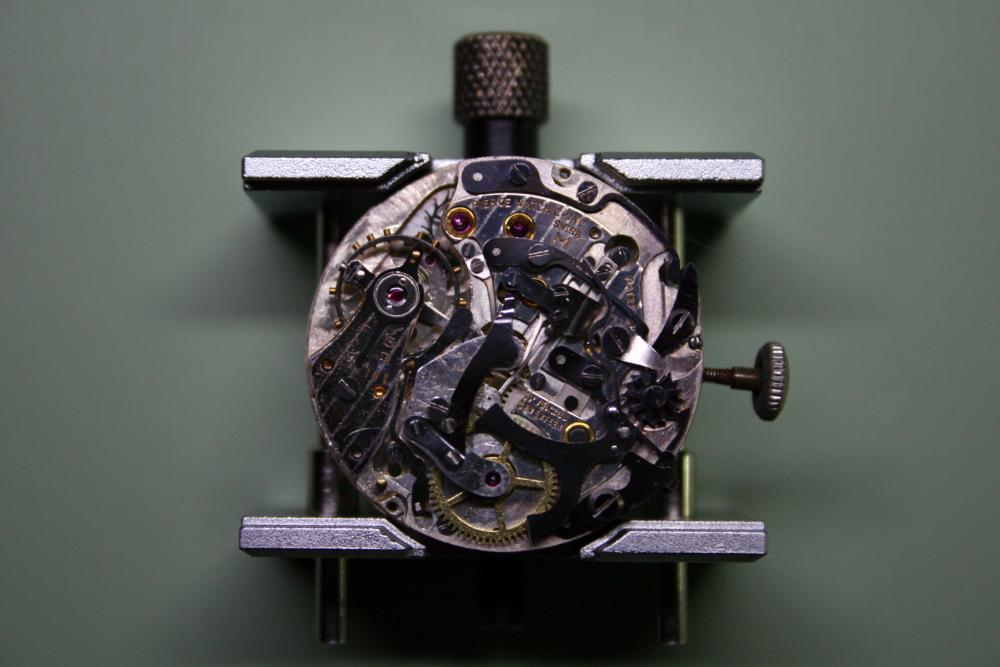
I've done a lot of Pierce Navigator repairs in the last year but this one was a bit special as it was the first I completed for someone other than myself. The watch is an heirloom and as such was received in much better condition than the those I've purchased off the bay. The bracelet was broken and would eventually be replaced and right off the bat I noticed that the sweep second hand was missing. The crown was also stuck in the setting position and therefore it was impossible to wind the watch. With the caseback off I could see that the chronograph staff and pinion had actually been removed sometime back. Also missing was the intermediate wheel which activates the minute recording wheel when the chronograph is engaged. My guess is that the rubber clutch for the chronograph had failed sometime in the past and the watchmaker simply removed the other bits as opposed to attempting a fix. I also noted a chip in the upper balance cap jewel. I've never seen a defect such as this before. With the dial removed, the normal accumulation of dirt and debris came to light. The setting lever snapped back into place smartly and with that I was able to check the timing. With the movement out I turned my attention to the case and pushers. The spacers for the pushers often become jammed inside the pusher button as the result of an accumulation of grime beneath the button cap. The springs, which sit between the spacer and the button, are made of stainless steel and generally hold up well over the years. I've discovered that a good soak in vinegar will usually free the spacers and springs from the buttons. With the pushers soaking I turned my attention back to the movement. As I said before, this Pierce 134 is in much better condition than those I've restored in the past. It's clear the owner has taken good care of the watch over the years. Generally I'll follow the Esembl-O-Graf (volume 15) in reverse order when disassembling a Pierce movement. I've done a few now and am getting used to the process. Looking the parts over I didn't find any that required immediate replacement so the only order placed was for a mainspring and crystal (in addition to the missing chronograph staff, pinion, and intermediate wheel). The old crystal was in fair shape but a little loose in the bezel so I opted for a new one. The damaged cap jew was chipped only on the topside and therefore I opted not to replace it. The parts were whisked off to the L&R cleaner and I turned my attention back to the pushers. The vinegar bath succeeded in freeing the spacers and springs from the buttons. I set the parts out for cataloging after cleaning and drying. At this point I'll also do any rust remediation. This movement was in fine shape but the levers for the chronograph did suffer from a bit of oxidation. The rusted bits were placed in a bath of vinegar for a good soak, then any pitting was smoothed using the Dremel tool or a rub on the Arkansas stone. The replacement chronograph staff, pinion, and intermediate wheel arrived in time for assembly. The staff needed a new clutch plate. In the past I've cut these out of nylon and although this is an adequate solution, it makes the final adjustment a lot more difficult since the nylon has so much less give than rubber. A while ago I began experimenting with rubber o-rings as a substitute. I use a rubber o-ring which had a thickness of 2mm. By sharpening an Exacto knife and lubricating it with a bit of watch oil I can cut through the o-ring with very little compression. This results in a disk that is thin enough and flat enough to use as a clutch plate for the chronograph. A punch I made on the lathe is used to place the center hole. Unfortunately since I made the o-rings before I began this service, I didn't have any images of the procedure. Assembly is straightforward provided all the gremlins have been discovered beforehand. The pallet, escape wheel, and cap jewels receive epilame treatment. The balance wheel is cleaned separately with One Dip. Put back together I noted a funky reading not the timegrapher. The culprit was a slightly bent pivot on the pallet. I replaced the pallet with one from my own stock and this resolved the problem straight away. I let the watch run overnight before beginning on the chronograph layer. It comes together a little slower as there are many more parts to lubricate and adjust. A missing sweep second hand can be a real problem with Pierce watches as the center post is 0.35mm (which is large). Fortunately I had a hand in my stock from a parts movement that would do- once I attached a post to it! I have some brass tubing that has an inside diameter of 0.35mm so I just needed to turn the outside diameter down on the lathe and rivet the post to the hand. Here I test the fit of the hand prior to painting. Once that was settled I discovered the post on the minute hand was loose also. A new post was turned on the lathe for it as well. Problems with the chronograph became apparent after fitting the hands. The culprit in this case turned out to be a damaged center jewel. This must have occurred during assembly as the jewel checked out after cleaning. Bad luck. The jewel is pressed in from the topside and so it must be removed by pressing from the bottom side (dial side). Unfortunately the jewel sits at the bottom of a long tube which required me to turn a special adaptor piece on the lathe for my Seitz tool. A replacement jewel was sourced from a donor movement and I was back in business. The owner decided on a replacement crown and a new strap and the watch finally came together. I have a bit of a thing for Pierce watches but at the same time I don't think it's much of a coincidence that the watches housing a Pierce 134 movement only seem to exist from the late 40's and early 50's as they can be a bear to get running right. In the end I was really pleased with this service though.


 1 point
 -
Its a Omega of course it has value, its a mid thirties stainless steel Lepine or open face pocket watch if working i would put it at about £80 to a £100, the dial is a little grotty and the bow is'nt original but clean it up its a nice watch. the calibre is a 40.6LT1 or 40.6LT2 this movement ran from 1923 to 1936.1 point
-
I had trouble with a ladie's oval snap back of a brand watch once. The issue was that pressing on its center distorted it enough not to fit. Once I made a wood die to press on the sides only, it went in just fine.1 point
-
I'm wondering if reducing the hardness of the steel by annealing, or normalizing, it first would work? Once the machining is completed and to size, it could then be hardened and tempered, followed by final touch ups if required. Would this work or would it result in a distorted or unworkable piece? Are there other reasons for not doing this?1 point
-
put the caseback in the freezer and warm the case a bit, the difference helped me out sometimes(make sure you dry the caseback before putting it on.1 point
-
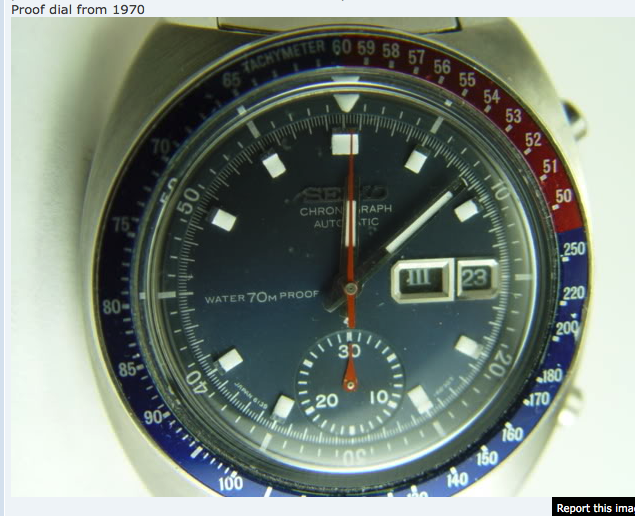
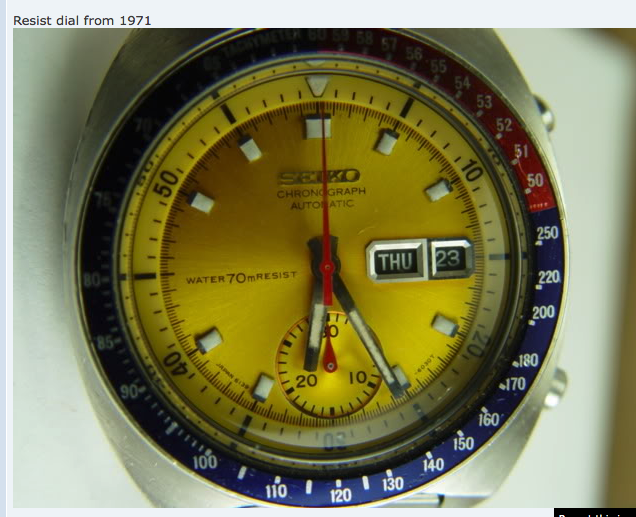
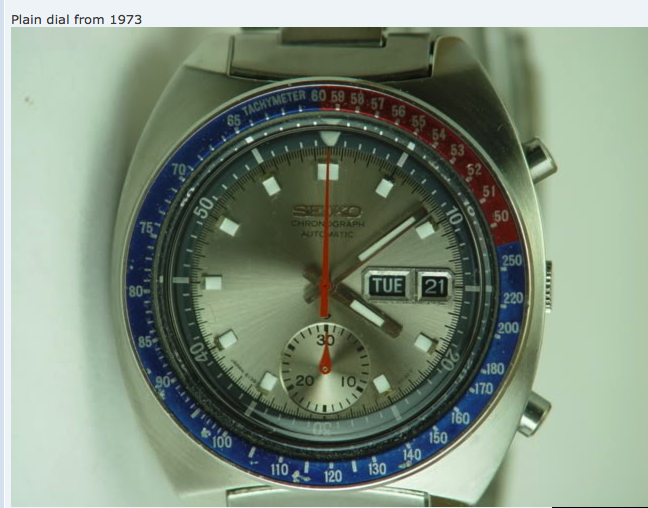
I'm not sure when the styles changed but I do know that as the Seiko Pogue 6139 - 600x evolved from the first model , 1969 I believe , the words on the dial changed from "Water70Proof", to "Water70Resist " . to no depth markings . If you see a watch that says Water Proof on the dial or case back you can be sure it is pre 70's ......... i think that there were some regulation changes that mandated this because most of these watches were not in fact waterproof to depth , but water resistantant for swimming , showering , etc .
 1 point
 -
Hi, I don't want to get involved in the watch side of this, except to say if you are in the Uk and that part has failed during warranty period, if the manufacturer (tag) will not play ball then discuss making a claim under 'latent defect'. You will be surprised how many corporations soon give you their full attention and you will soon get satisfaction. Look up 'latent defect claim' on google for more information. Good luck and I hope it helps Sent from my iPhone using Tapatalk1 point
-
Nice piece Tony1 point
-
Nice example [emoji106] Would suggest you post it in "Watch of Today" thread where it would be seen by more people. Sent from my Honor 5c1 point
-
very interesting ! can you back it off and get total image of a large pocket watch?1 point
-
Sitting in Eye Hospital outpatients with drops taking effect so apologies if blurred. Sent from my Honor 5c1 point
-
I really like this watch with its retro styling "WATER 100M RESIST" Takes me back to the 80s - 90s Do any of the guy's on the forum know when the styling changed to its present day format Sent from my SM-G920F using Tapatalk1 point
-
the mvt. may have moved out of place, or - if there is a notch in the rim of the case back - it goes over the setting stem, hope you got this info before it was crushed, cheers vinn1 point
-
OK then....time for pics of caseback front and back, and a close up of the watch case itself. J Sent from my SM-G925T using Tapatalk1 point
-
Lol. That's ok! Thanks anyway Sent from my iPhone using Tapatalk1 point
-
I think your best bet would be to send it direct to Tag Heuer and request a repair under warranty their service centre is based in Manchester if you live in the U.K, you can request a repair online then ship your watch to them, they will even send out a shipping kit to your home address in order for you to safely send the watch, the whole process from sending to progress of repair can be tracked online. http://customer-service.tagheuer.com/en-gb/home If not in the U.K you need to find the service centre in your country. My feeling is they would treat this as a warranty repair but you would be notified if they wont and told how much the repair will be.1 point
-
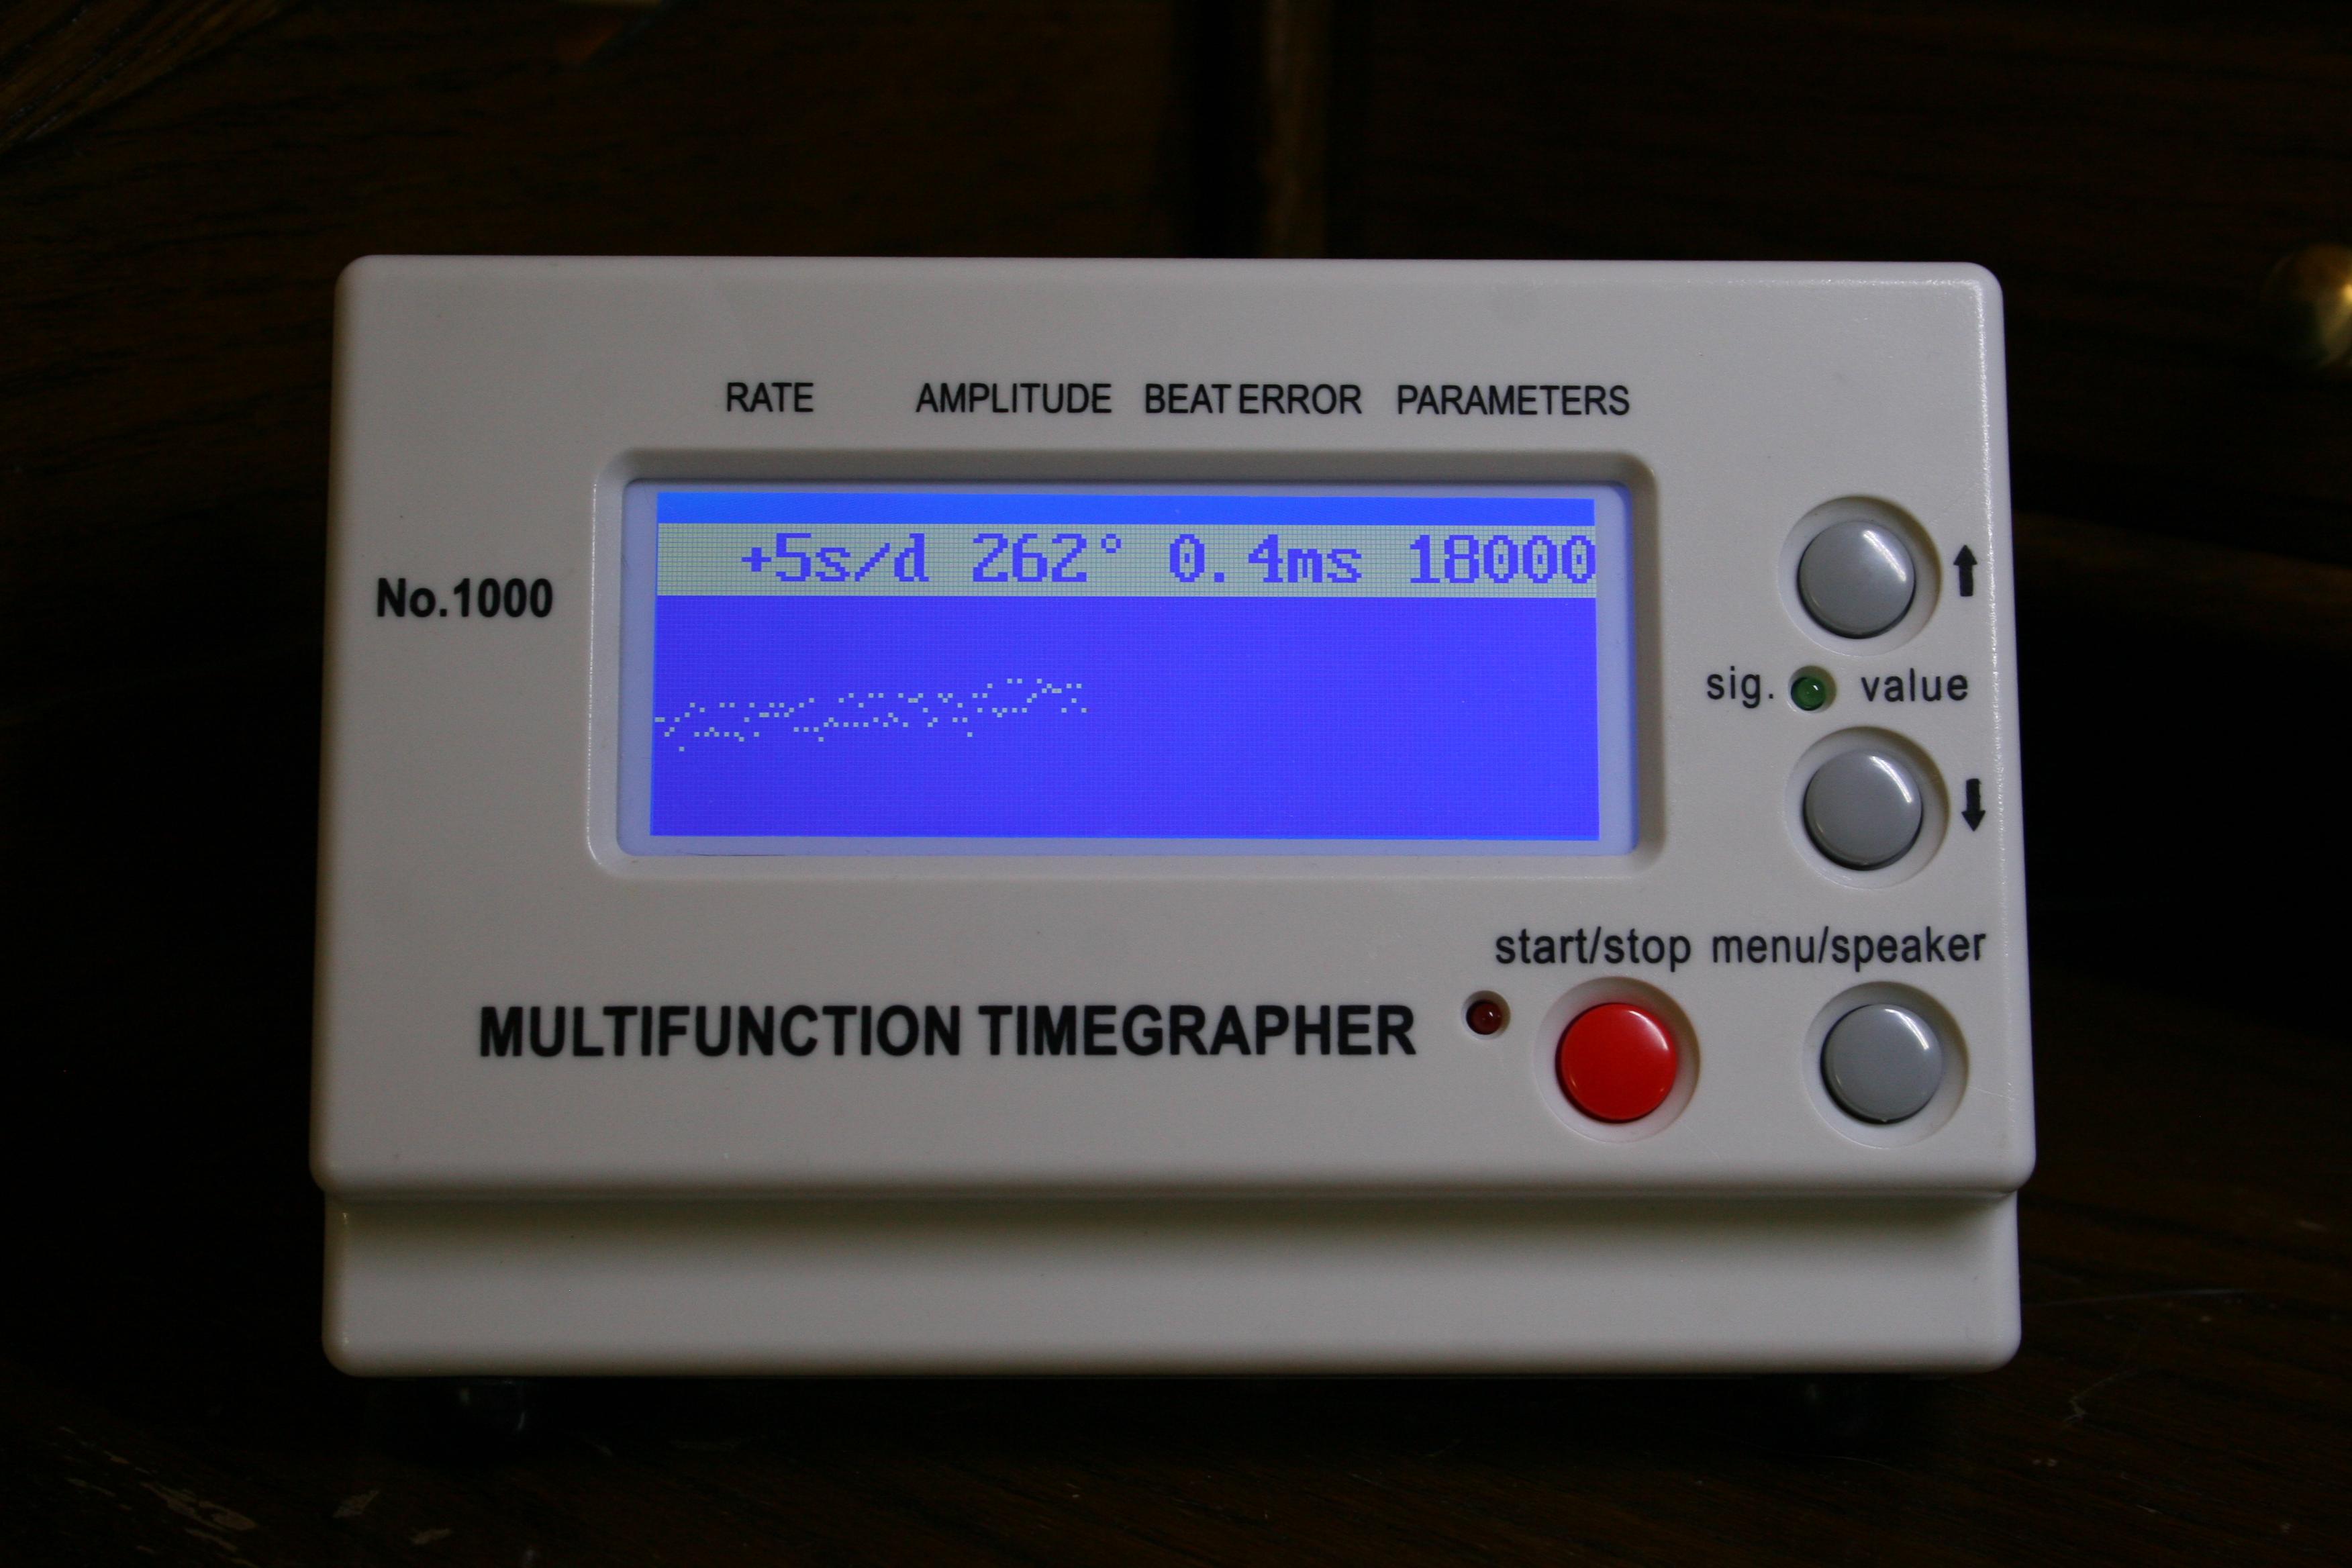
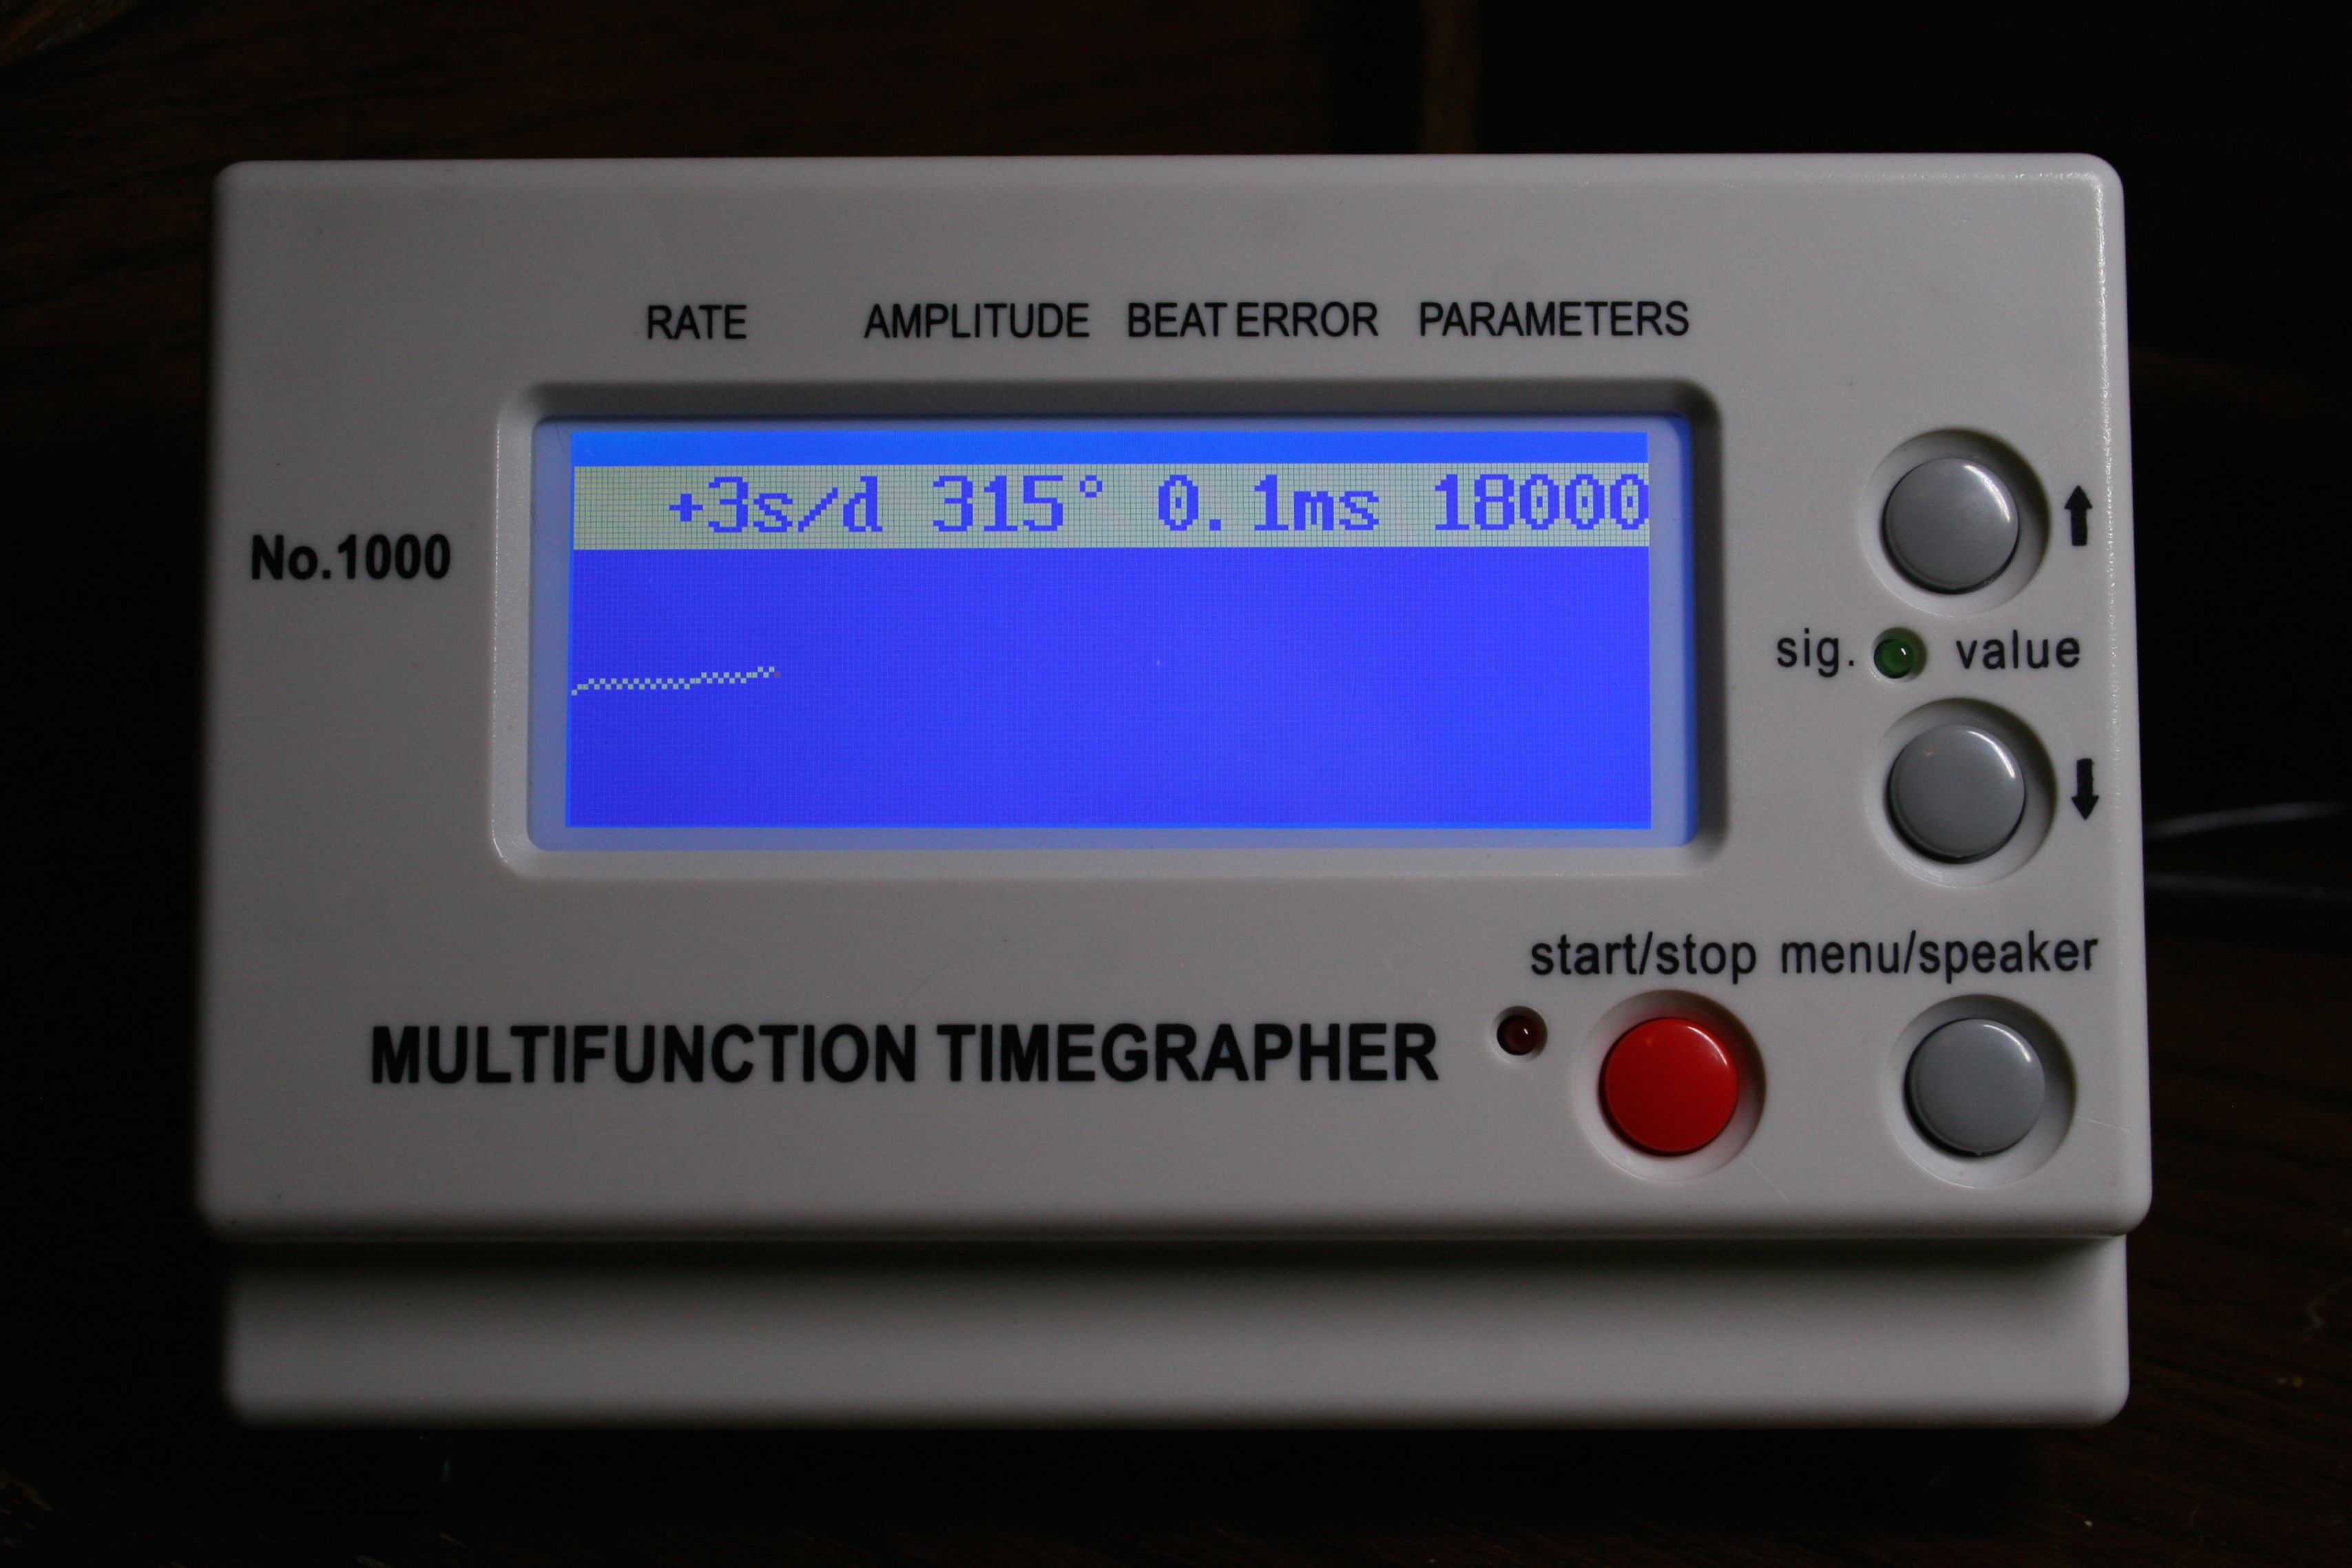
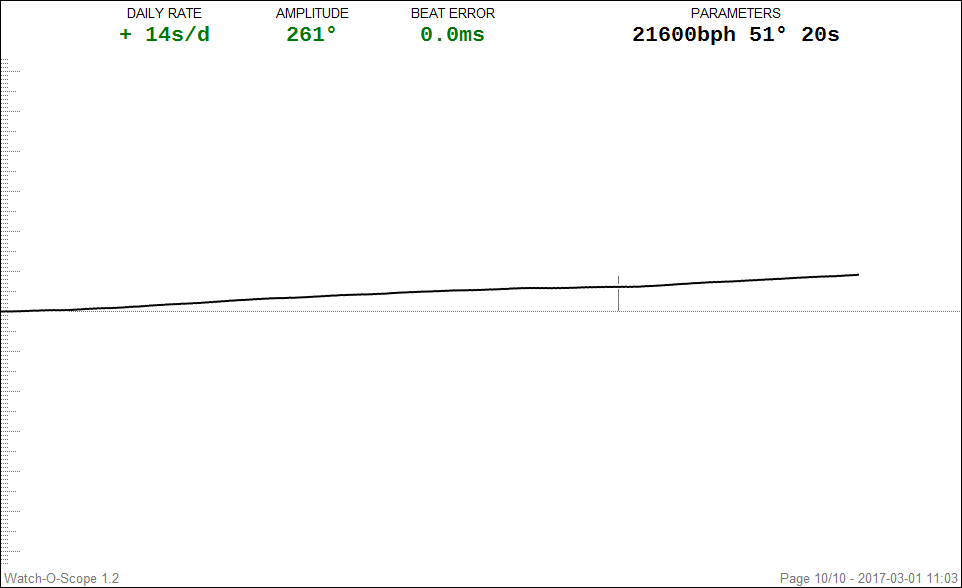
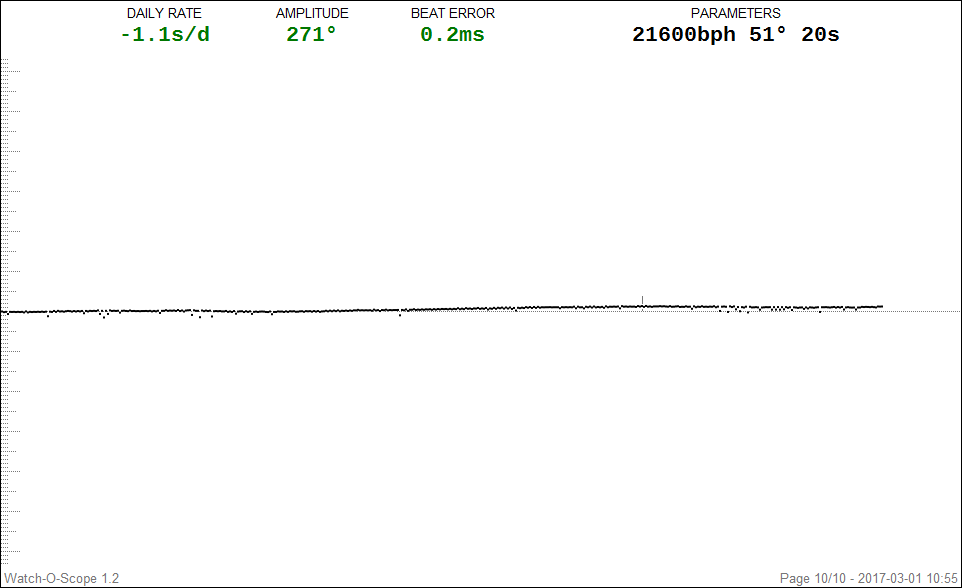
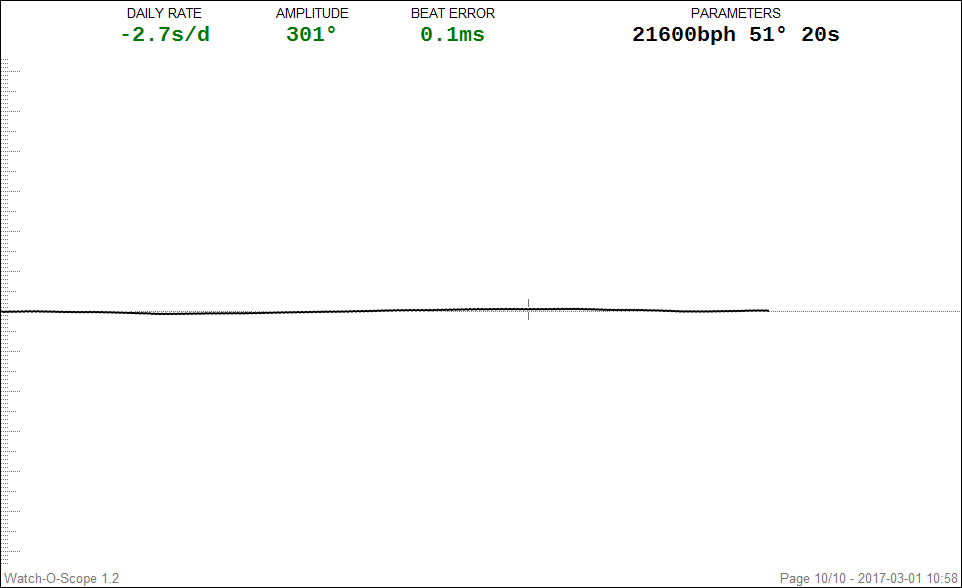
Latest update (2nd of March); Looking back at some other pictures I took, the above mentioned hour-wheel / planetary wheel positional error didn't and couldn't have happened. It was during the re-assembly for the 2nd time, that I though that I made that initial mistake. There is "no way" one can assemble the calendar works the wrong way around without noticing something isn't right or "off". I think it was more my brain wishing to find a plausible cause for the low amplitude. To end with another positive note: the amplitude is on the rise, both dial-down and dial-up are already well above the 300 degrees Will test the movement for a few days more before installing the dial, hands and the re-casing.1 point
-
You will need a new crown. Not all jewellers can do this. If you are in the UK then premier watch repairs in Bristol can help you otherwise you will need to find an authorised Tag repairer in your area as many Tag crowns are restricted in supply. Sent from my iPhone using Tapatalk1 point
-
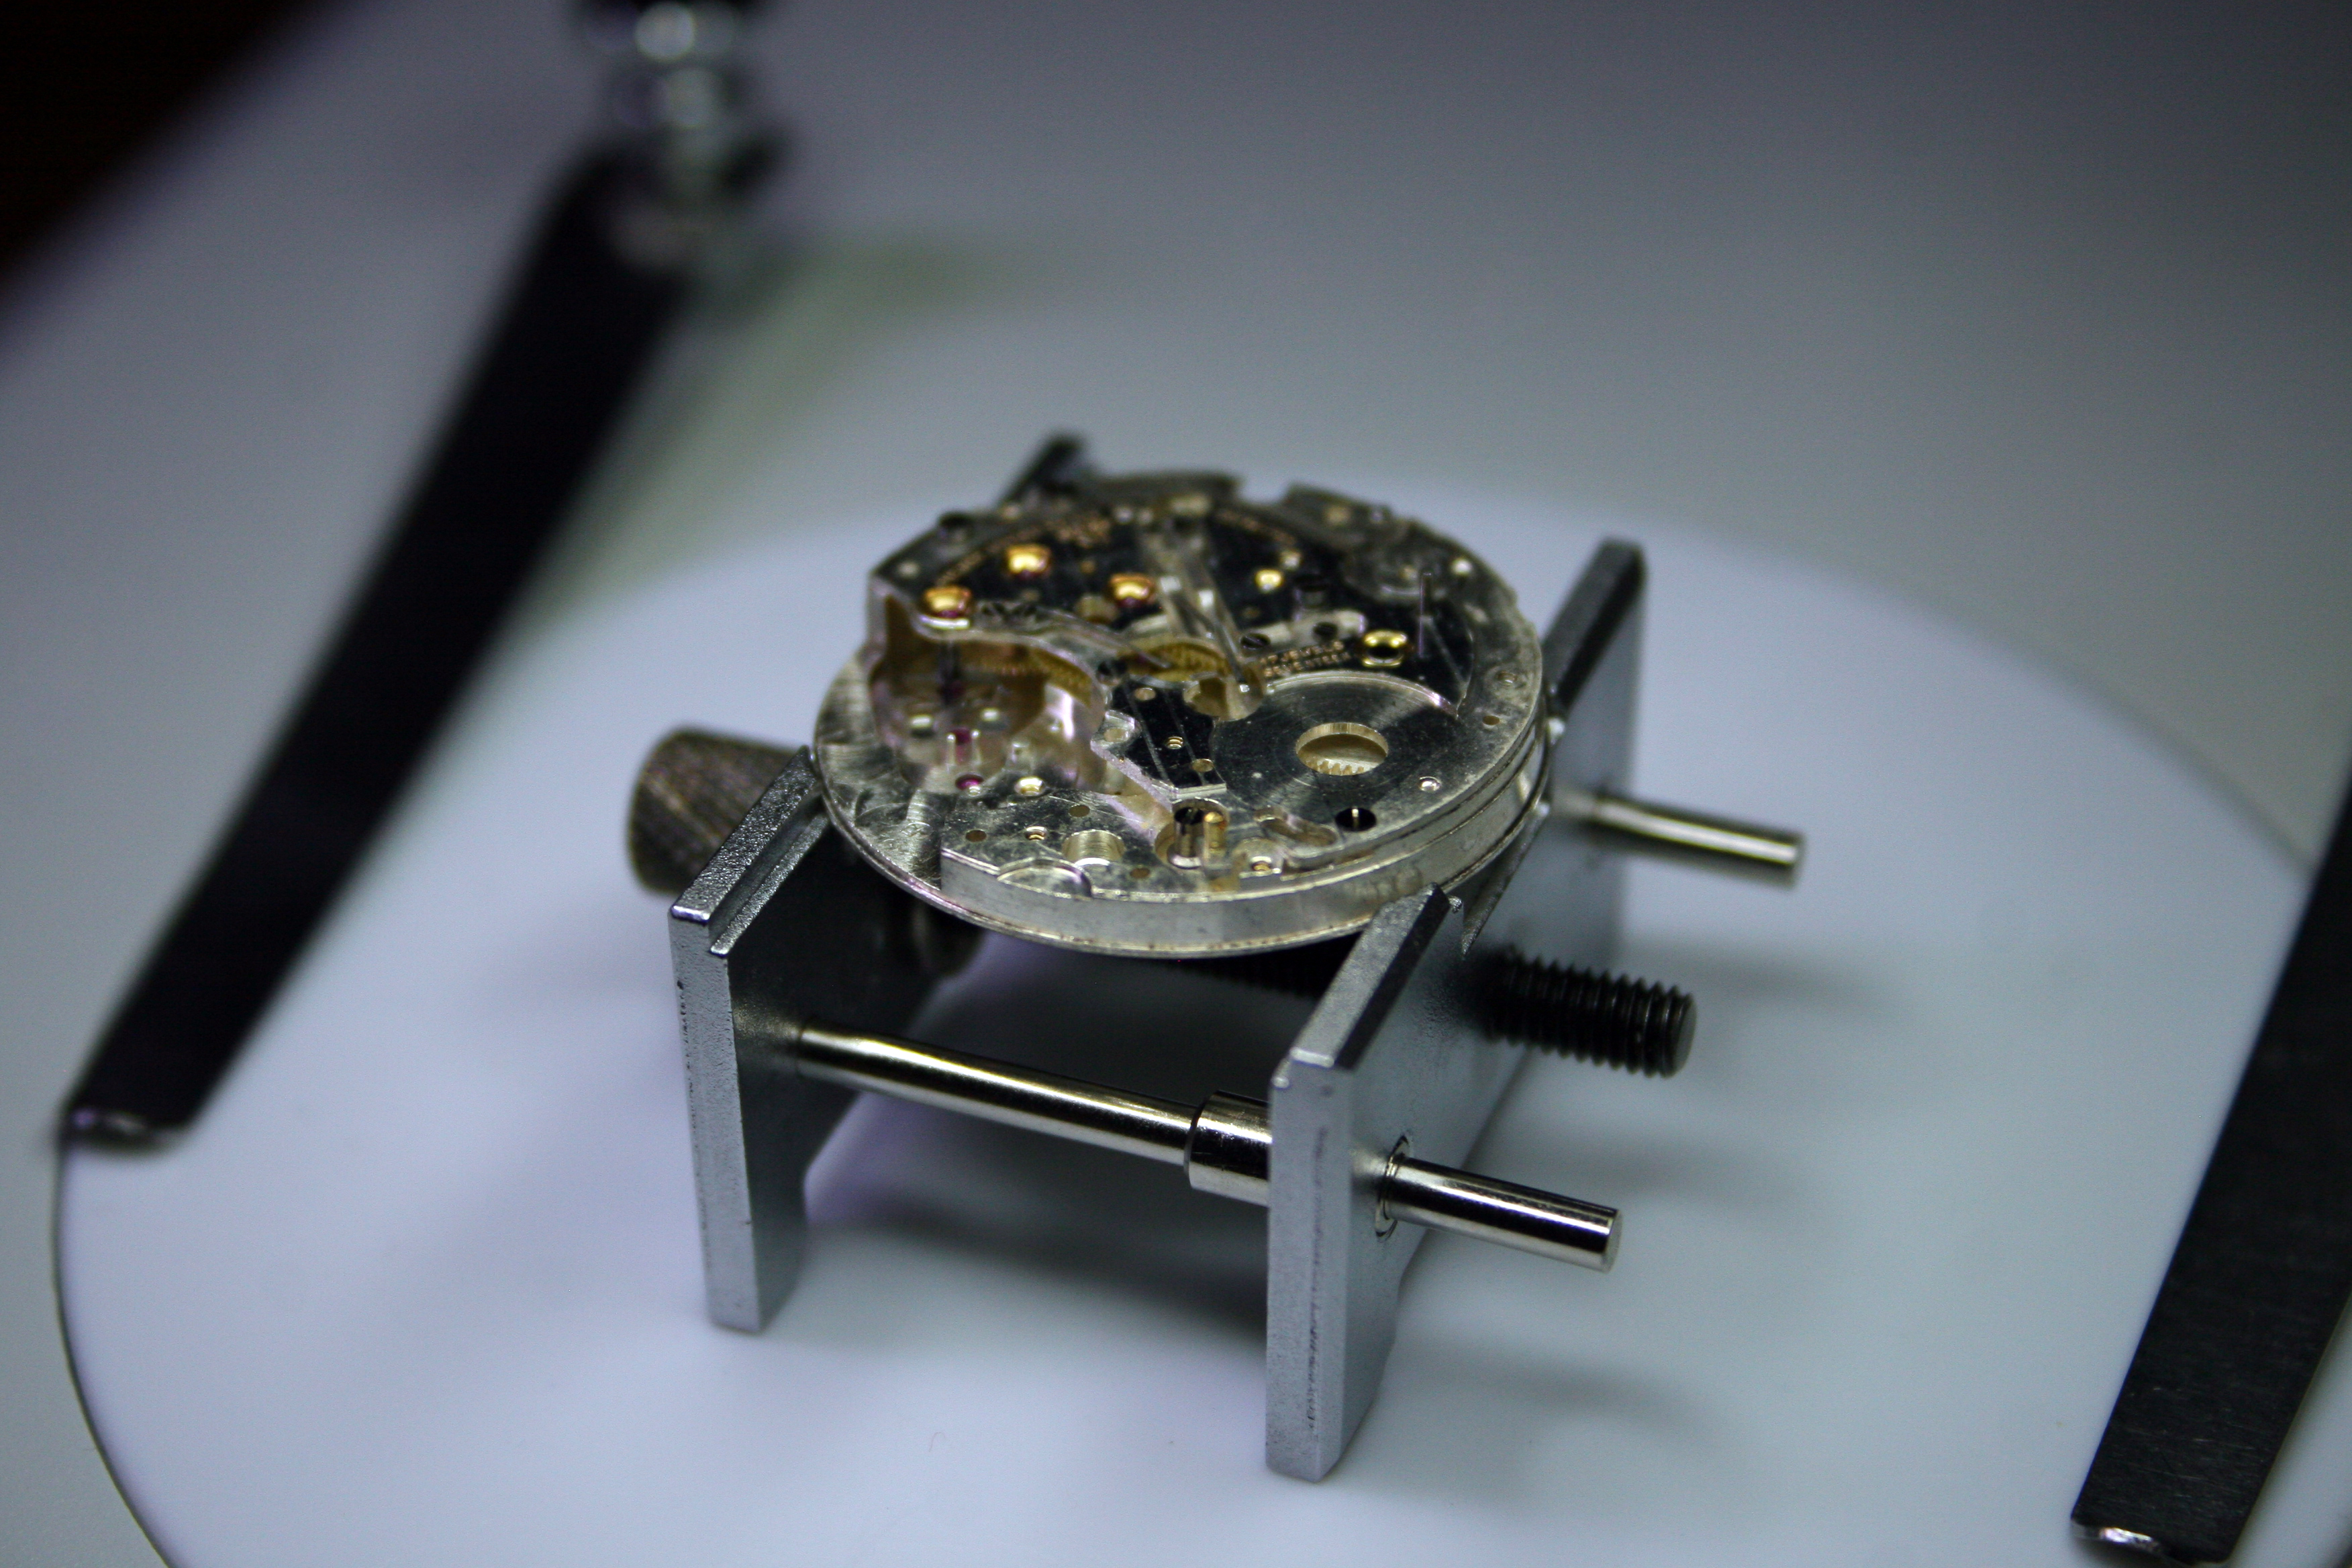
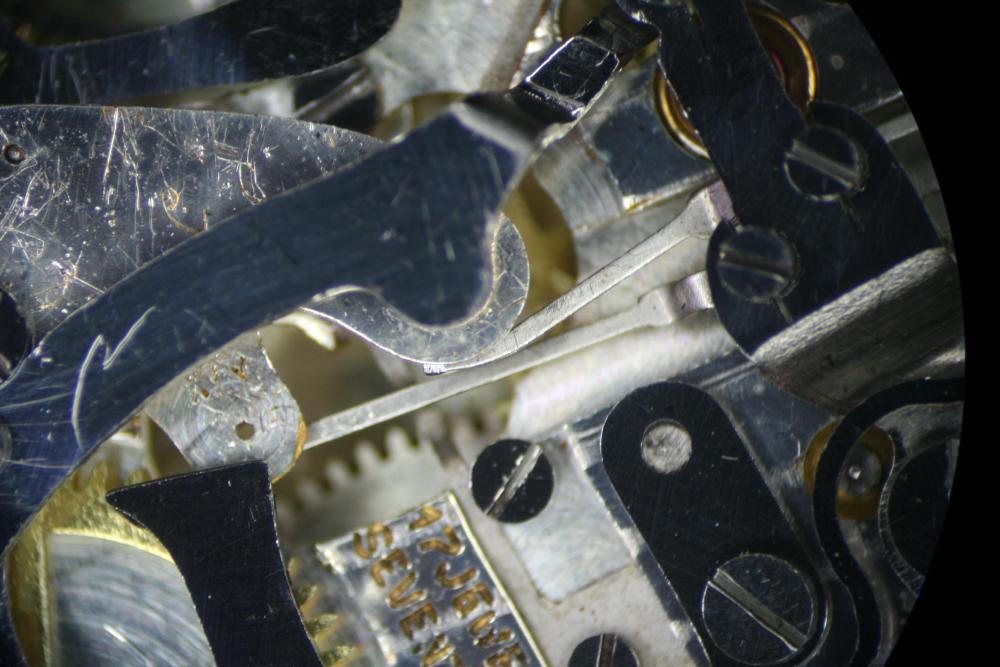
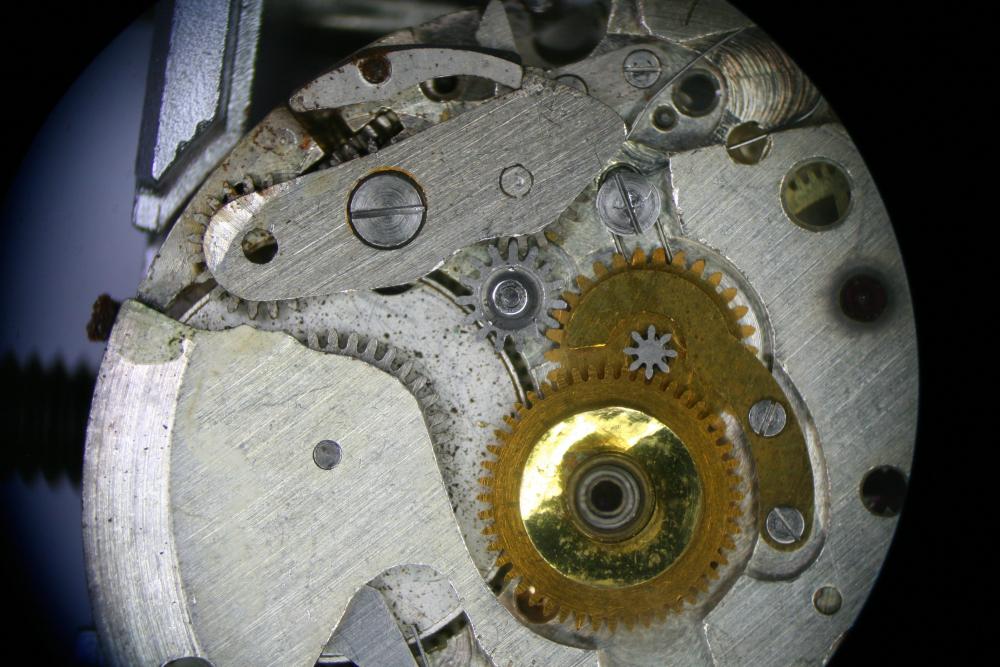
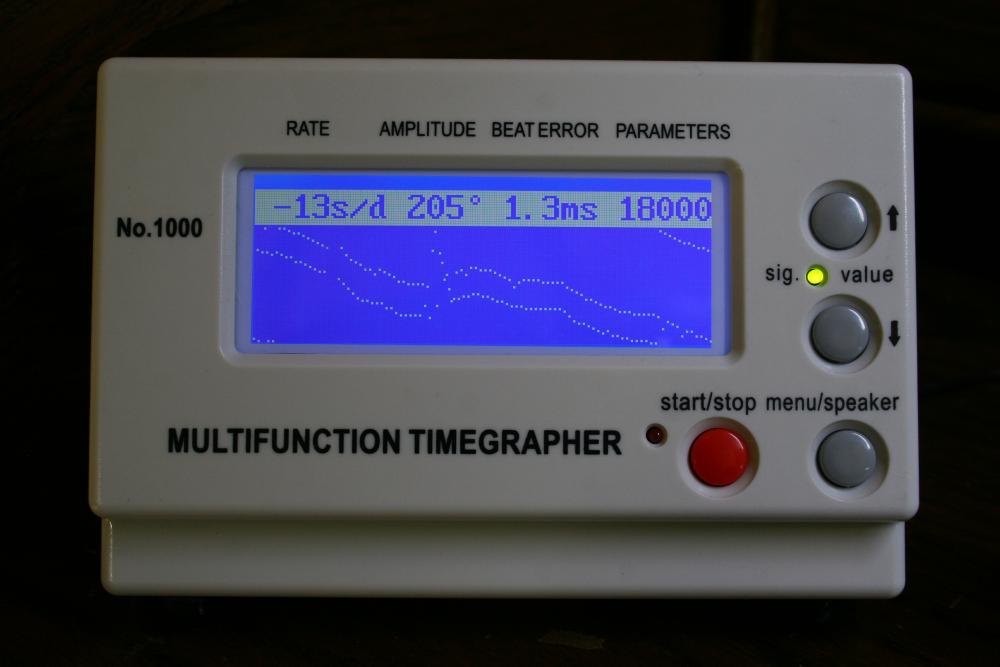
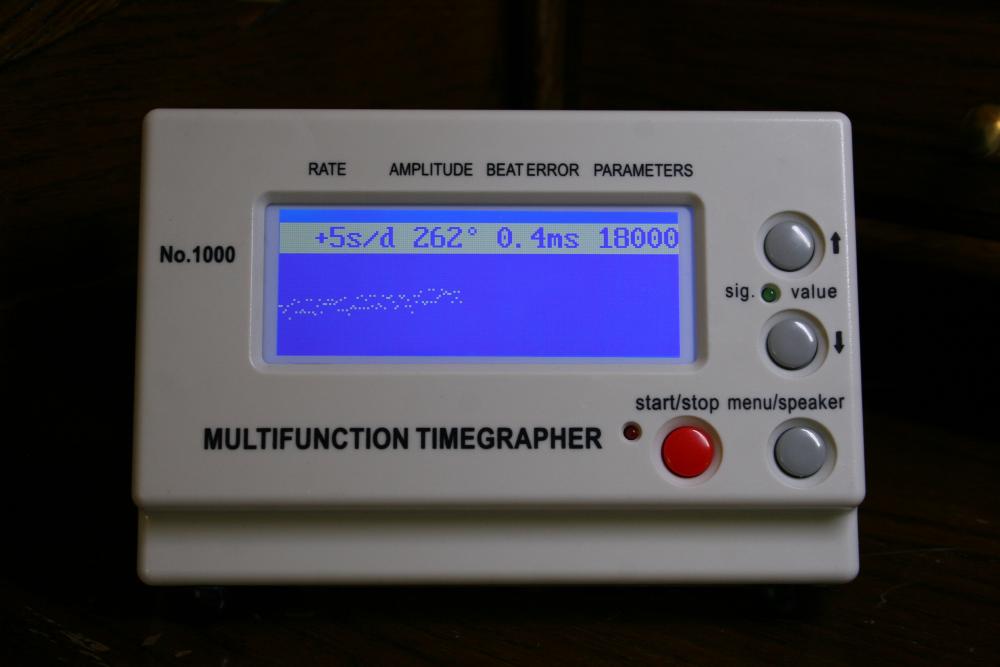
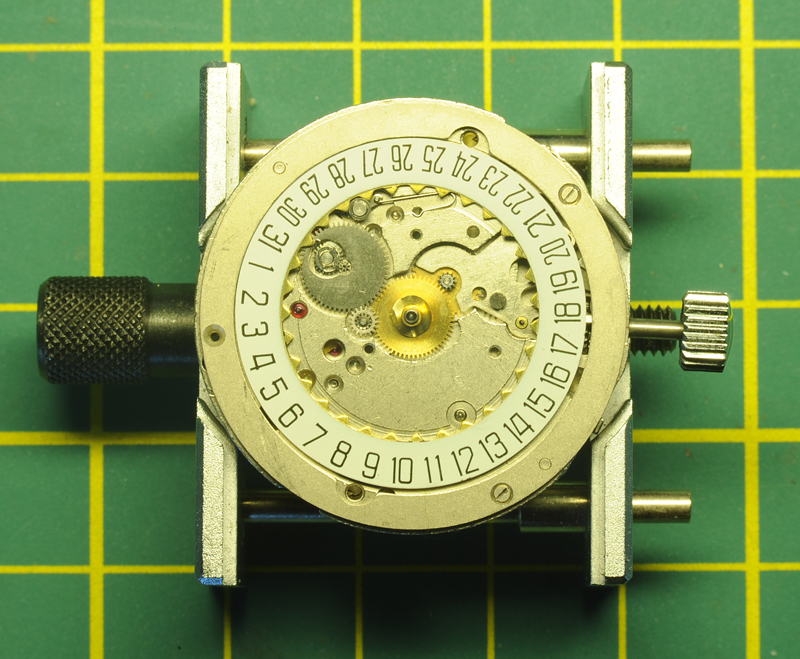
Thank you all for the nice compliments ! Last night I was wondering over the low amplitude. This morning I opened up the calendar works and disconnected the hour wheel, that helped, but then again not. However I noticed a mistake that the hour wheel was on top of the planetary calendar wheel. This has to be the other way around. The calendar works did function, but it's for sure not a help in lowering the friction ! Anyhow, here are the Watch-O-Scope pictures. As you can see there is a long-wave and the amplitude isn't the highest I've seen (obviously the chronograph is not engaged). I demagnetized all the parts before assembling. I'll let the movement run for a couple of weeks and see whether the amplitude improves. The irregular "off-line" dots are probably interference. Dial Up; Dial Down; Crown Up; Crown Down; This concludes this walk-through, unless I find something worthy to report about this Poljot 31659 movement. At least now it has some fresh oil and time will tell how it performs. Hopefully I can re-install all the hands safely, close the case and show the watch some daylight. BTW; it's getting summer so lots of light and other activities ........ .

 1 point
 -
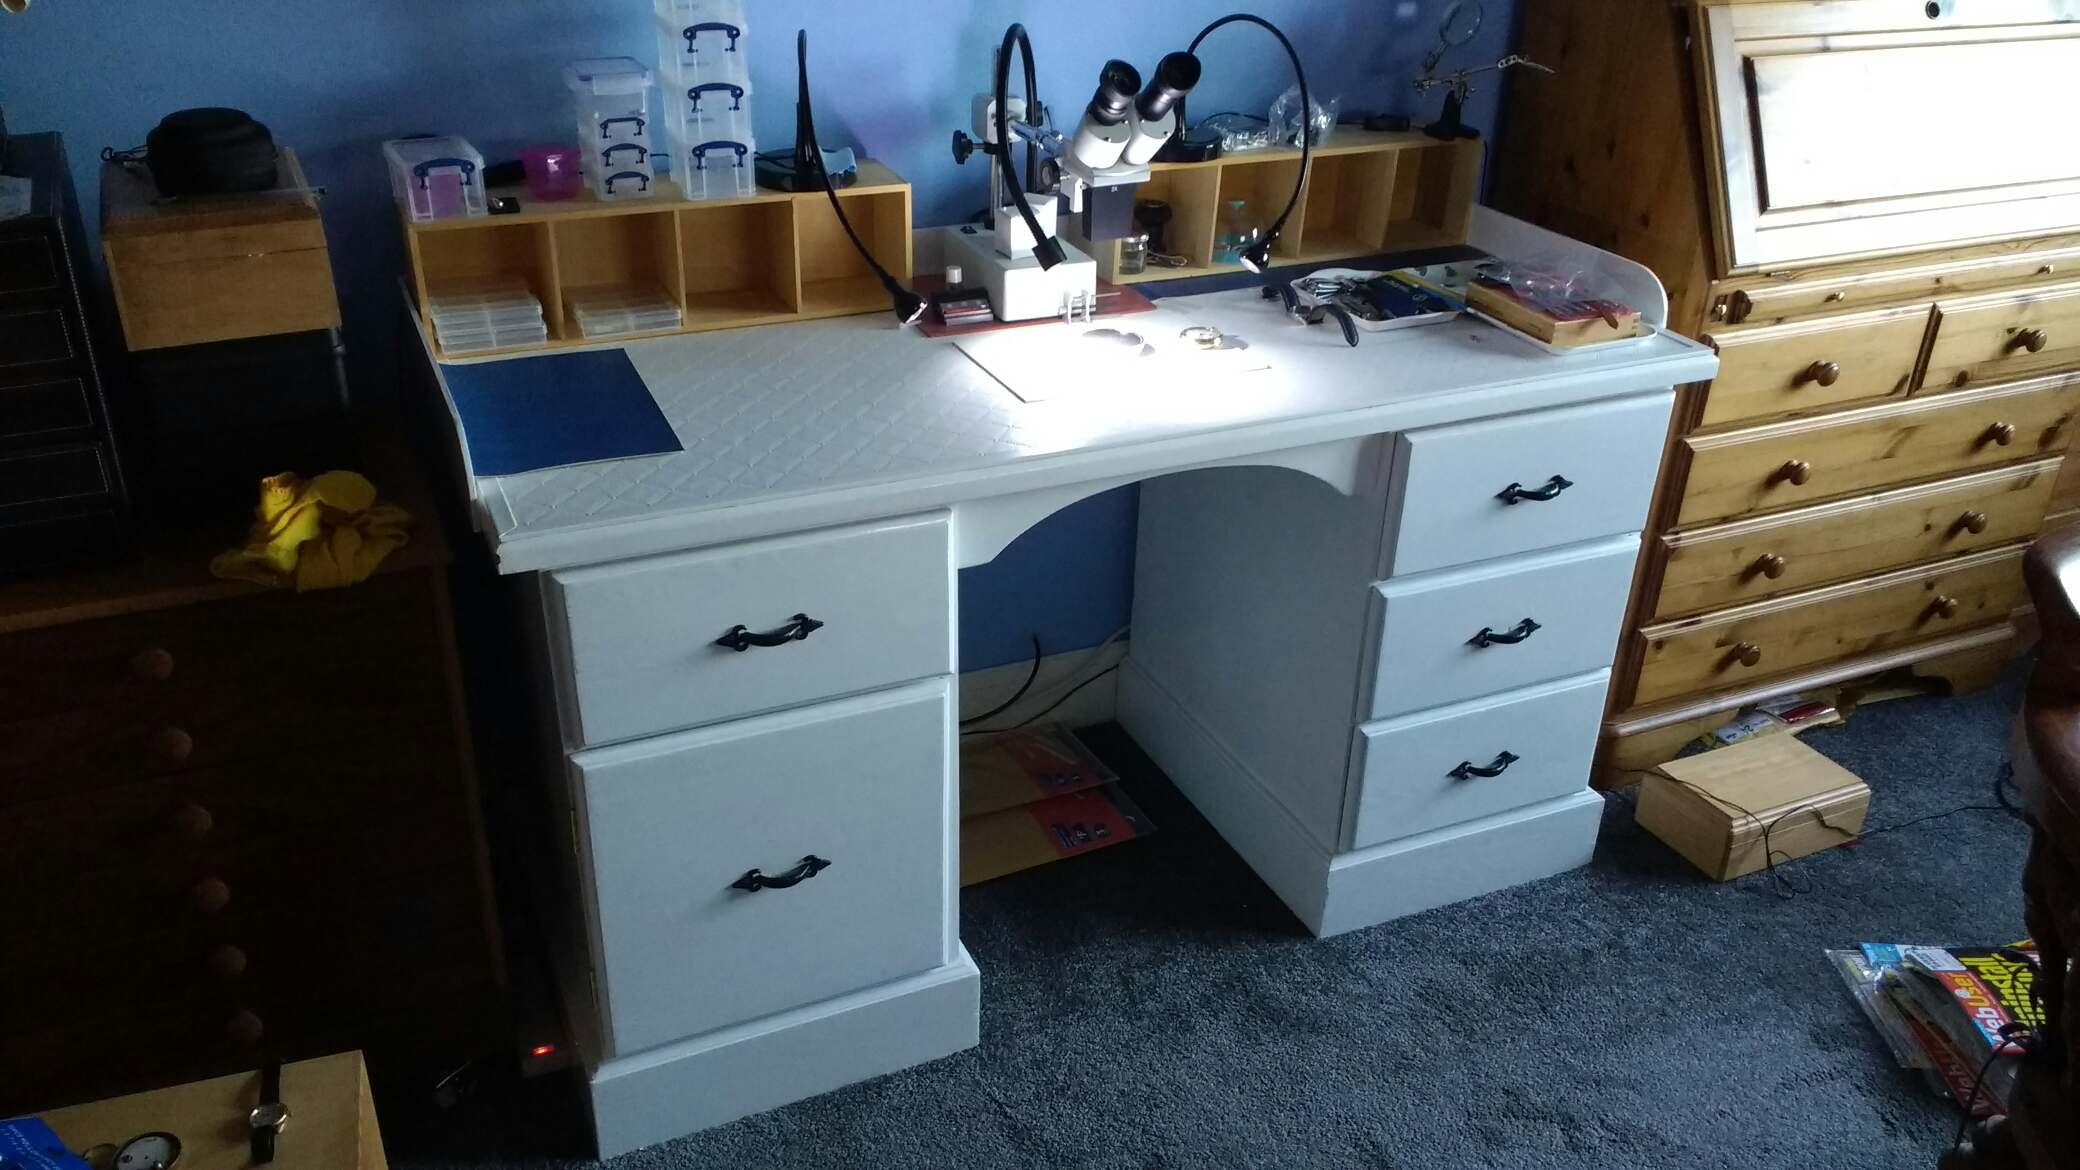
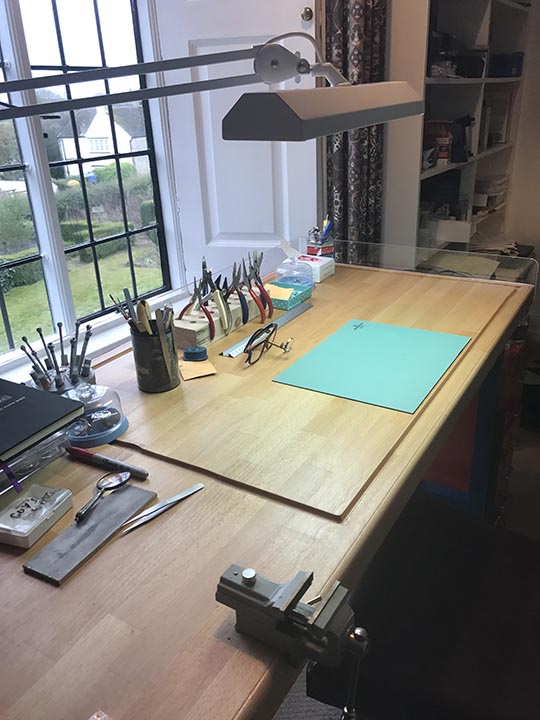
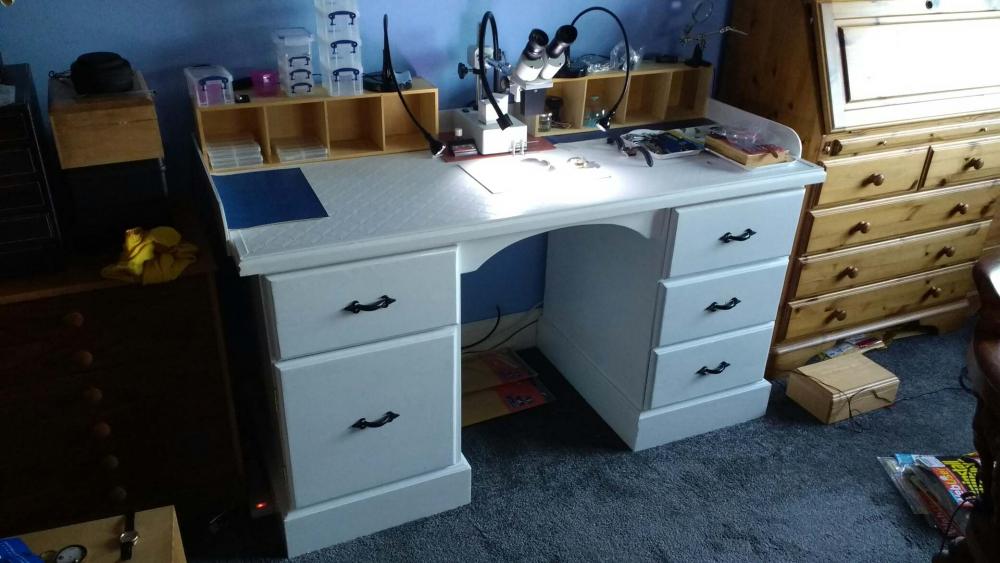
Hi Nick That looks really nice.... Natural light helps too. I see you have carpet...Hope youve got a big magnet....My daughter has left home (ah sad) but the upside is Ive moved my watchmaking gear in. Ive just finished my new bench too. it was an old pine desk purchased at auction for very little money. How can they justify £2000 for a top without legs? Here is a pic of mine. Chris
 1 point
 -
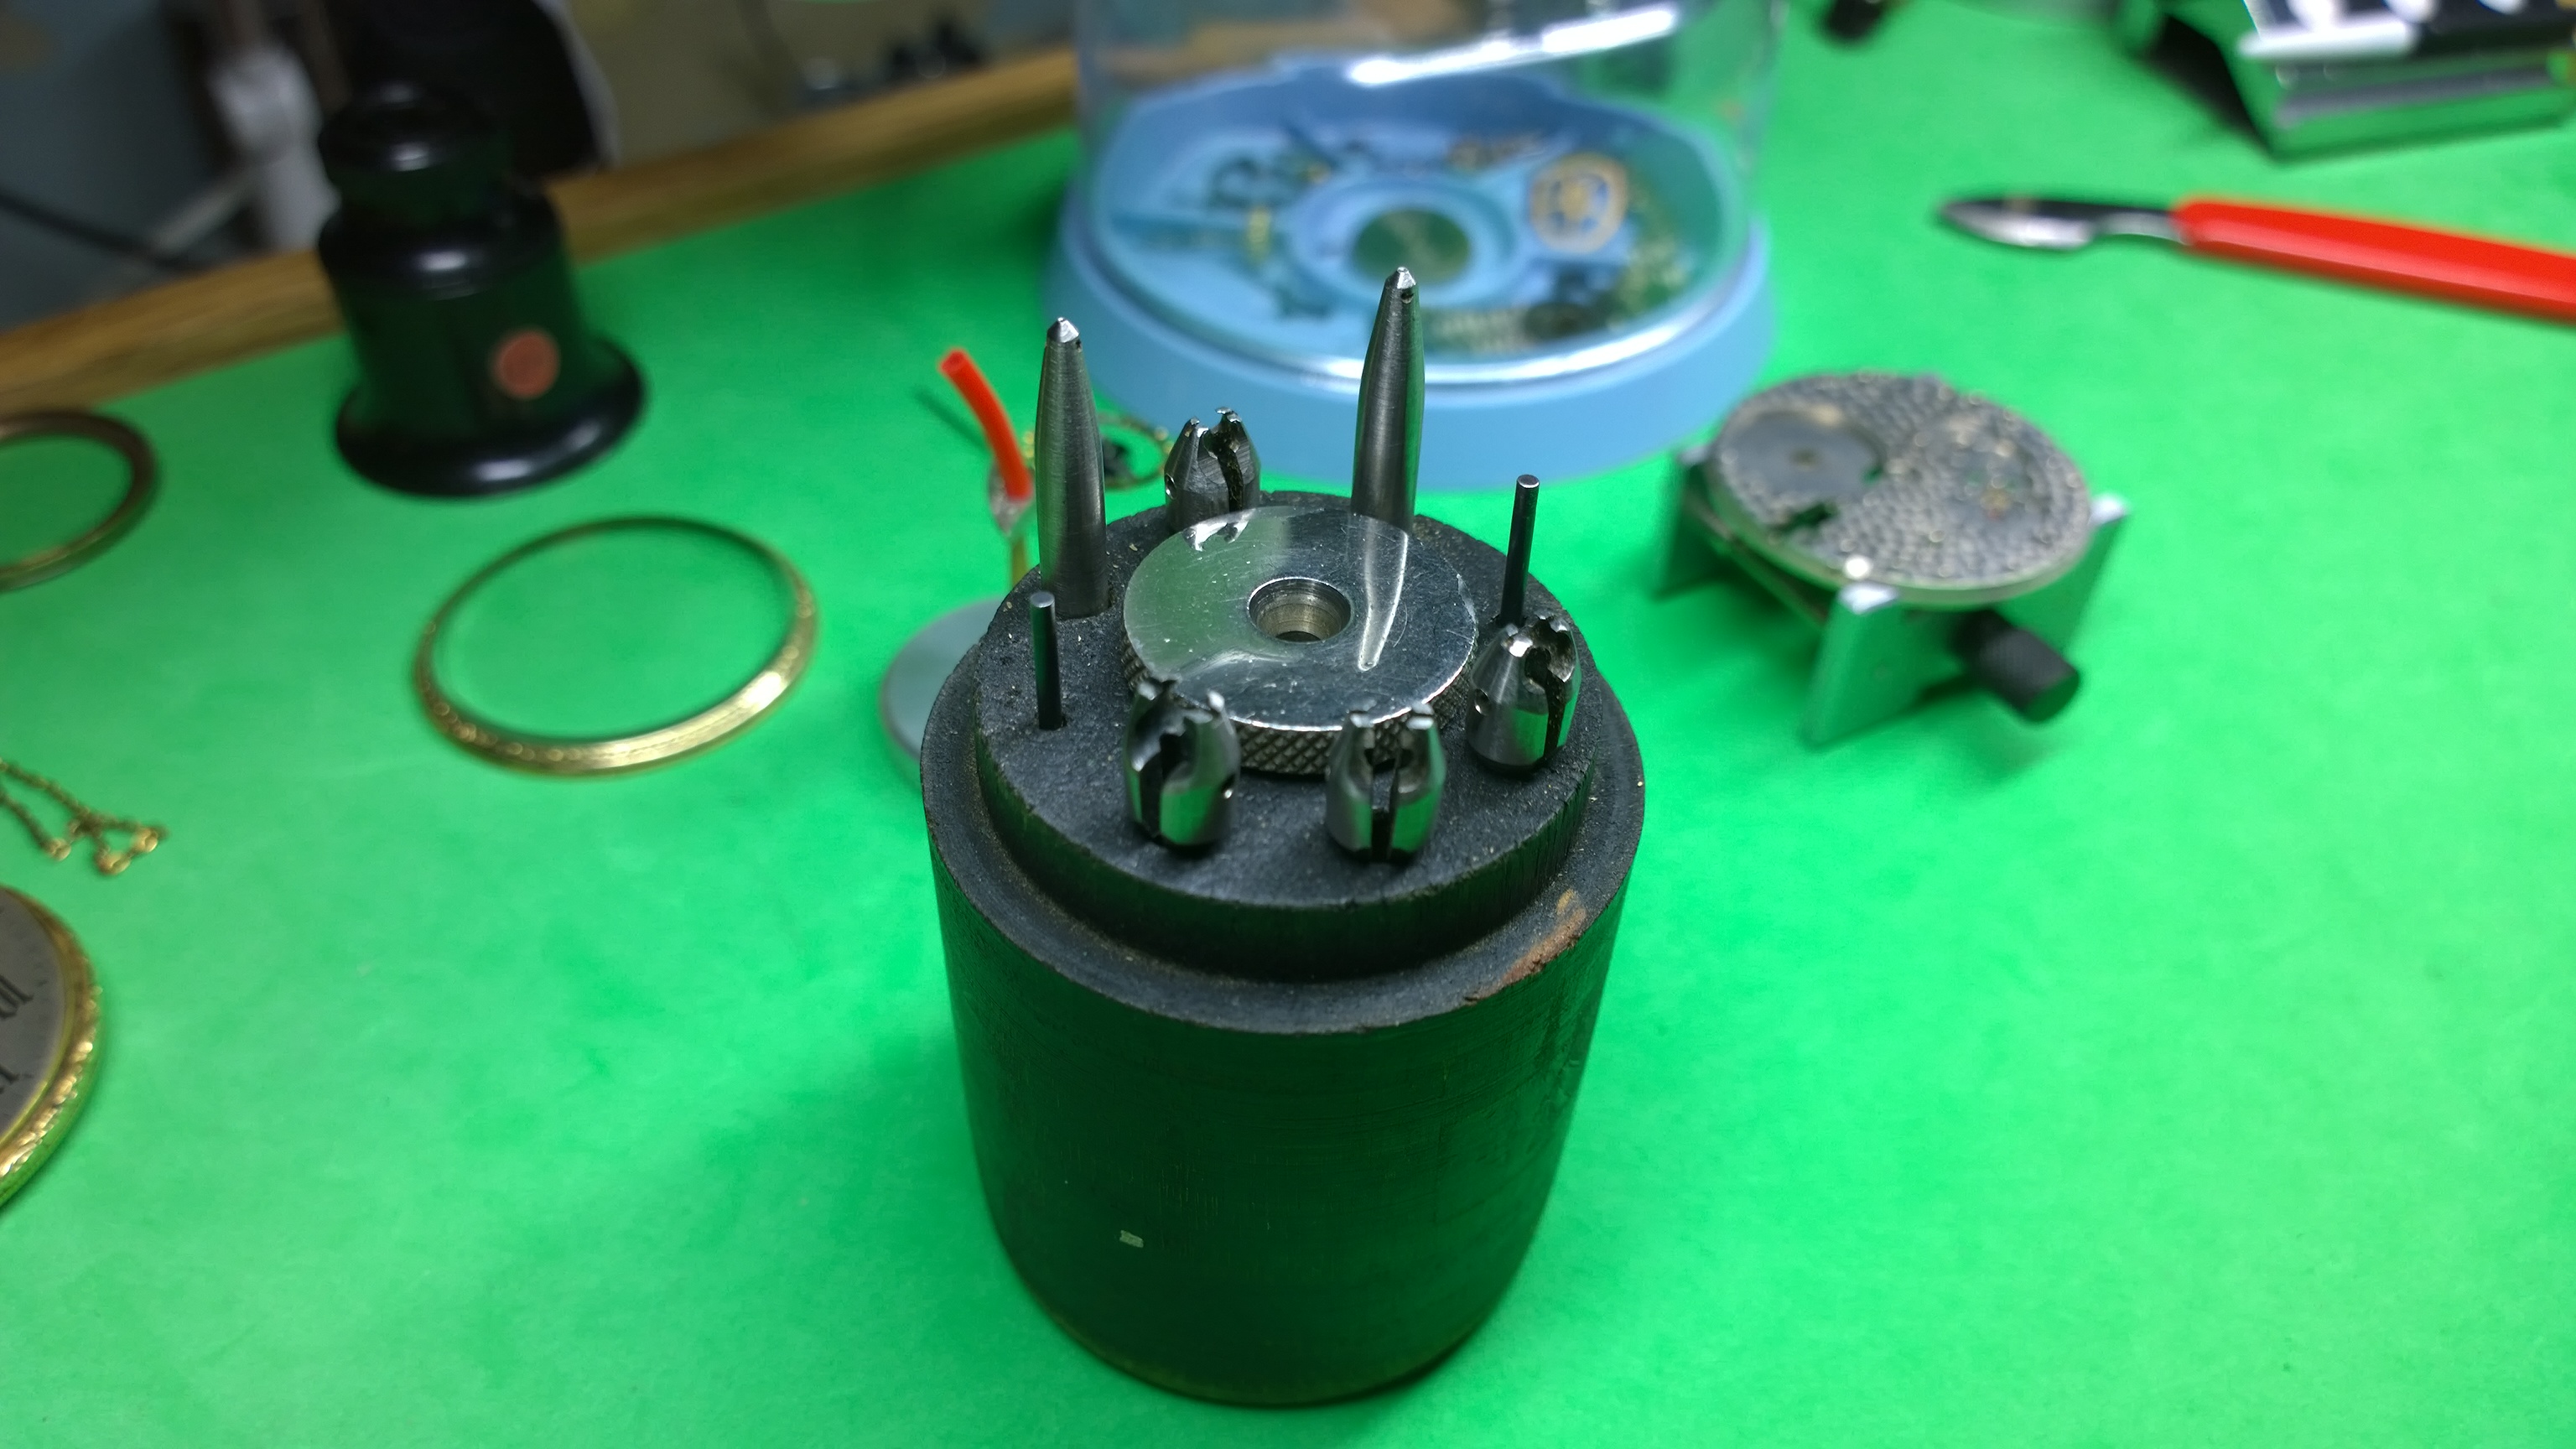
Well, after much, way too much, thought and cogitation, I took the plunge and purchased a Peerless watchmaker's lathe from my best friend Uncle Larry. It was in great shape and came with a good selection of collets, some gravers, and a bag of raw materials to practice on. I've since rounded out my set of collets, made a few additional gravers, and bought a used Jacob's chuck. I know Peerless lathes aren't as highly regarded as, say, Boley but I'm really impressed with the quality and design of it, and it had obviously been treated well during its life with a old lady who only ever drove it once a week, to church on a Sunday. Oops, I'm confusing my purchases; that was the car I bought with only 350,000 miles on the clock! Anyway, I have been practicing on it for some weeks and am now considering upping the ante and purchasing a cross slide so I can use it as a conventional, albeit tiny, lathe. My question is, is this viable, or would I be wasting money by doing so, given the expense of purchasing a good, but used, cross-slide for a 8mm lathe, which will be around $600, which is actually more than the lathe itself cost? Why would I consider this, well I'd like to get into model building, small steam engines and the like? I certainly can't do this without some sort of lathe unless really ugly will do, which it wont. I will be guided by opinions on this so please let me know your thoughts if you would be so kind. Cheerio for now. Roger Adams1 point
-
Dont know but yesterday i have found the perfect app to use this camera with. It is the NCH Debut software. I have tried Media Player HC, VLC, Youcam, free2xcam and even WIndows Movie Maker ... all had some issues, random but great picture delay which made lathe work hard, no fullscreen... Even a simple picture was sometimes a headache. But this Debut seem perfect so far.1 point
-
My new tool got delivered yesterday very happy
 1 point
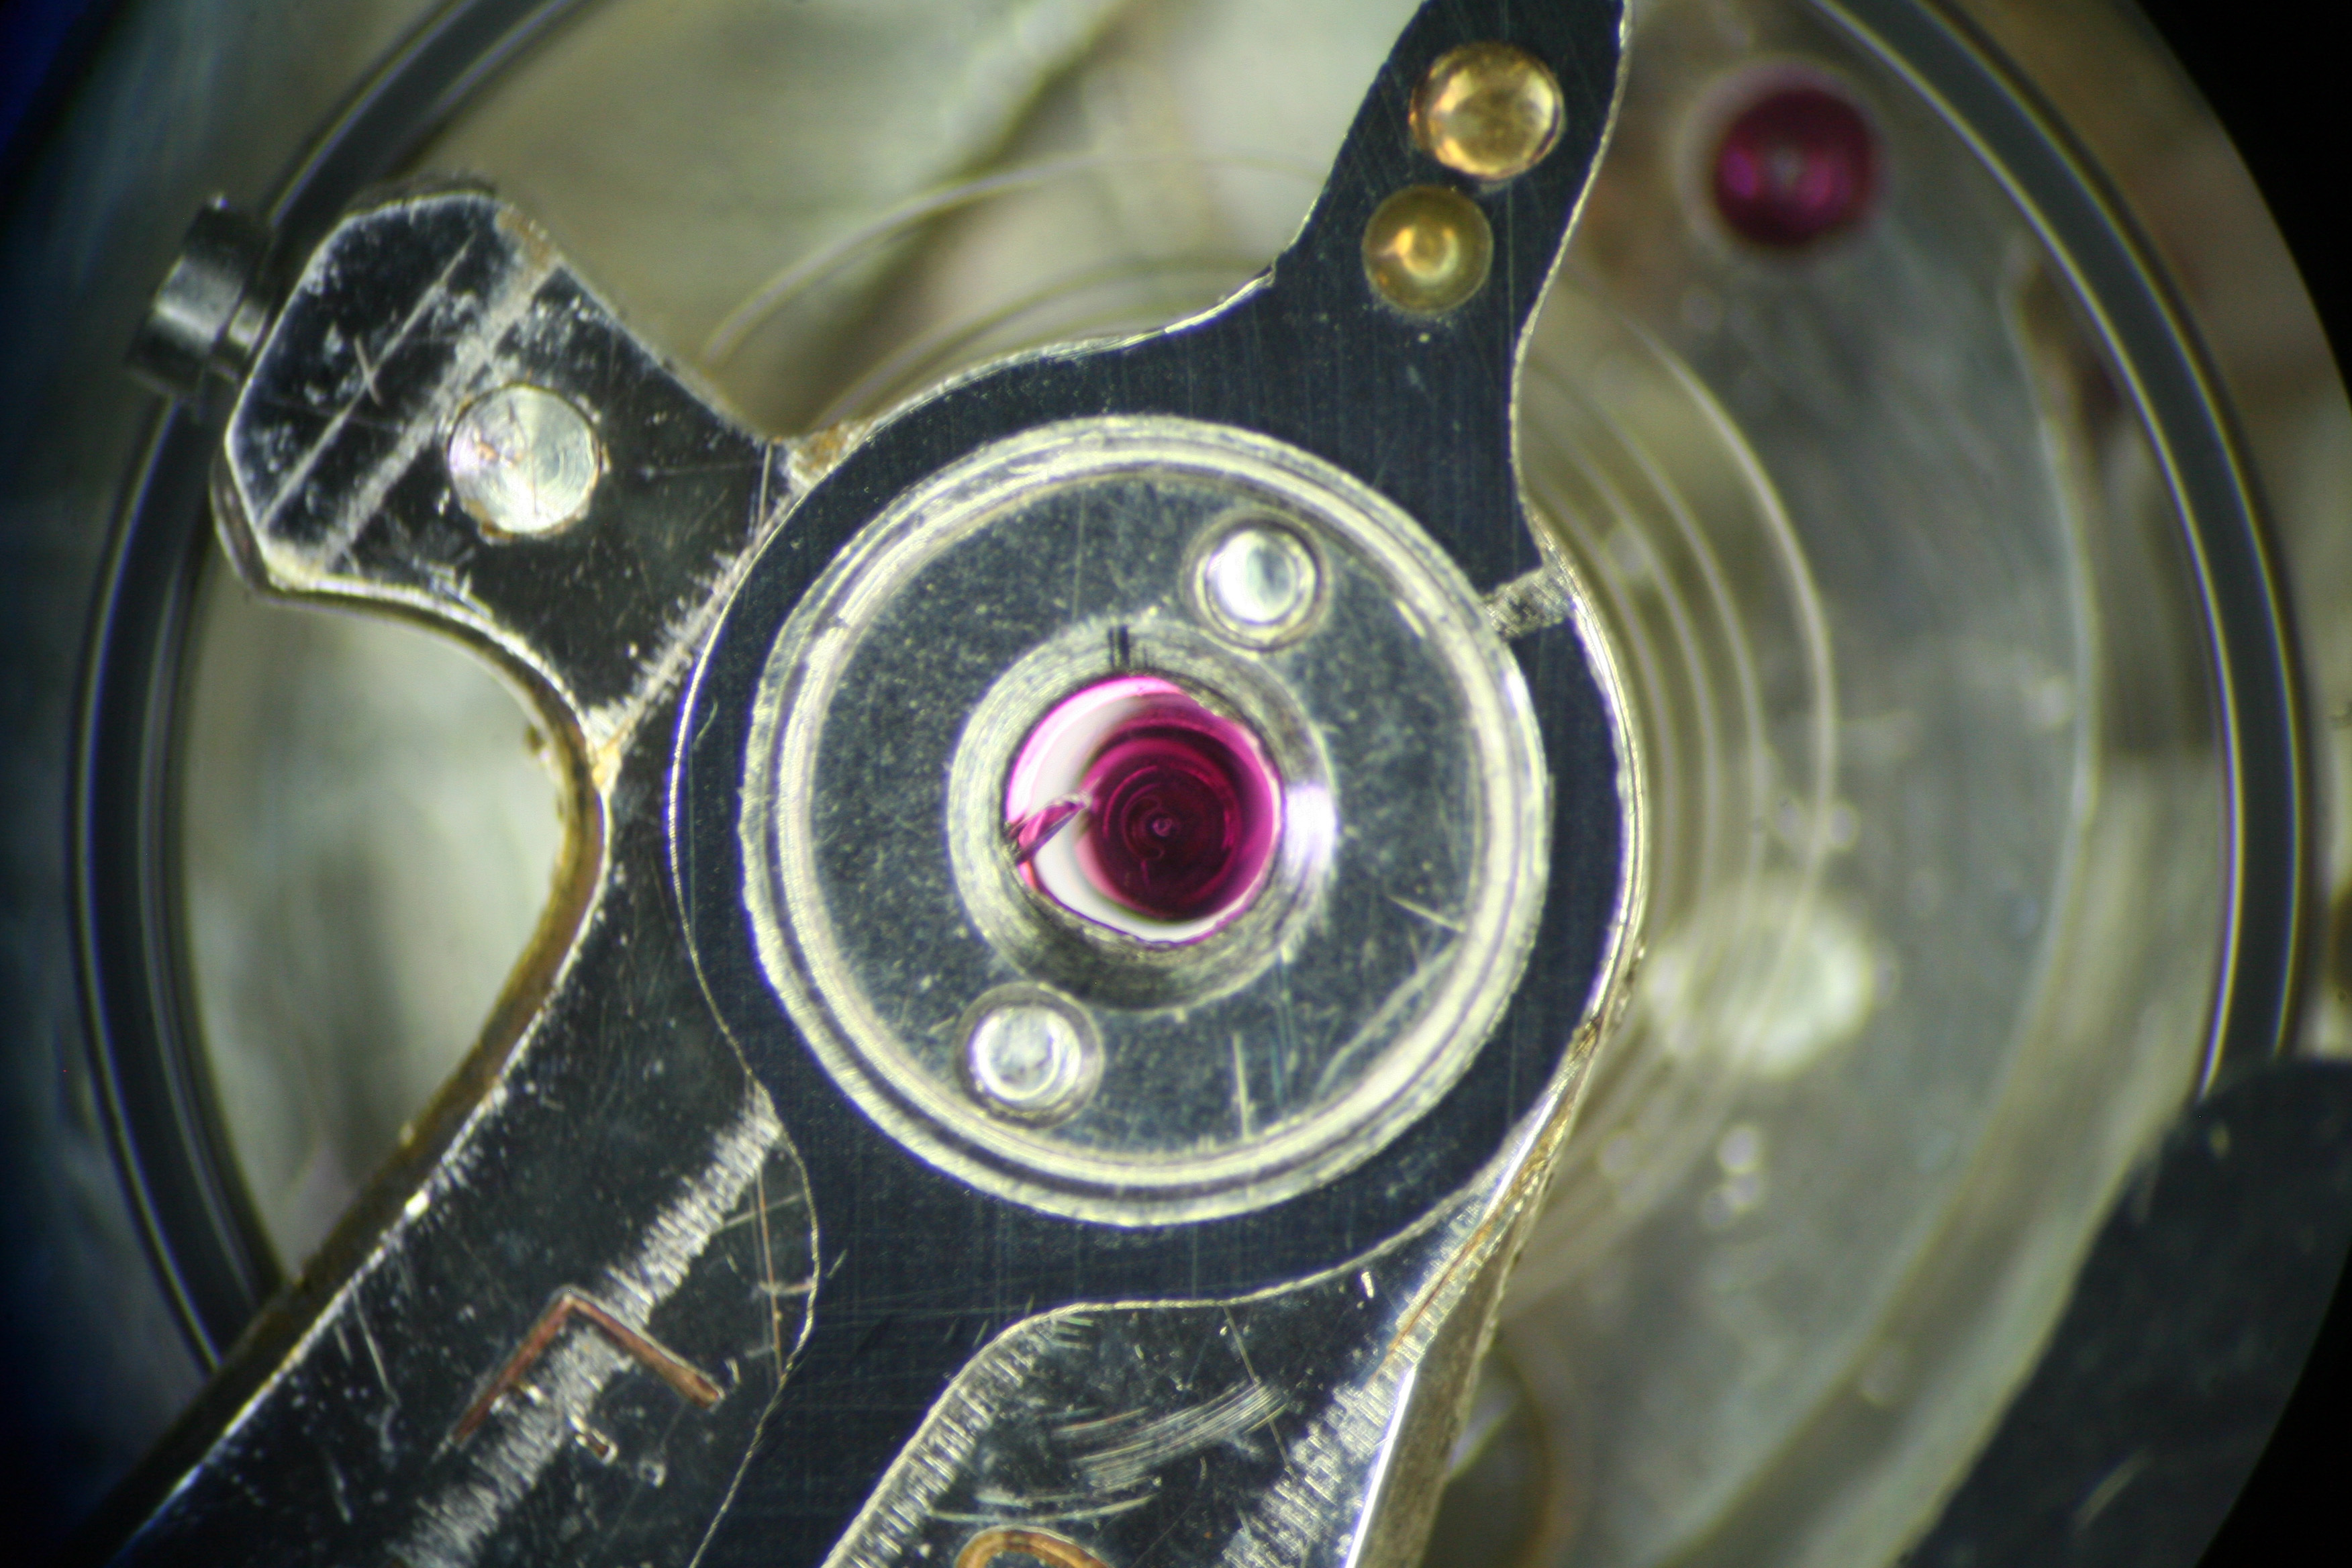
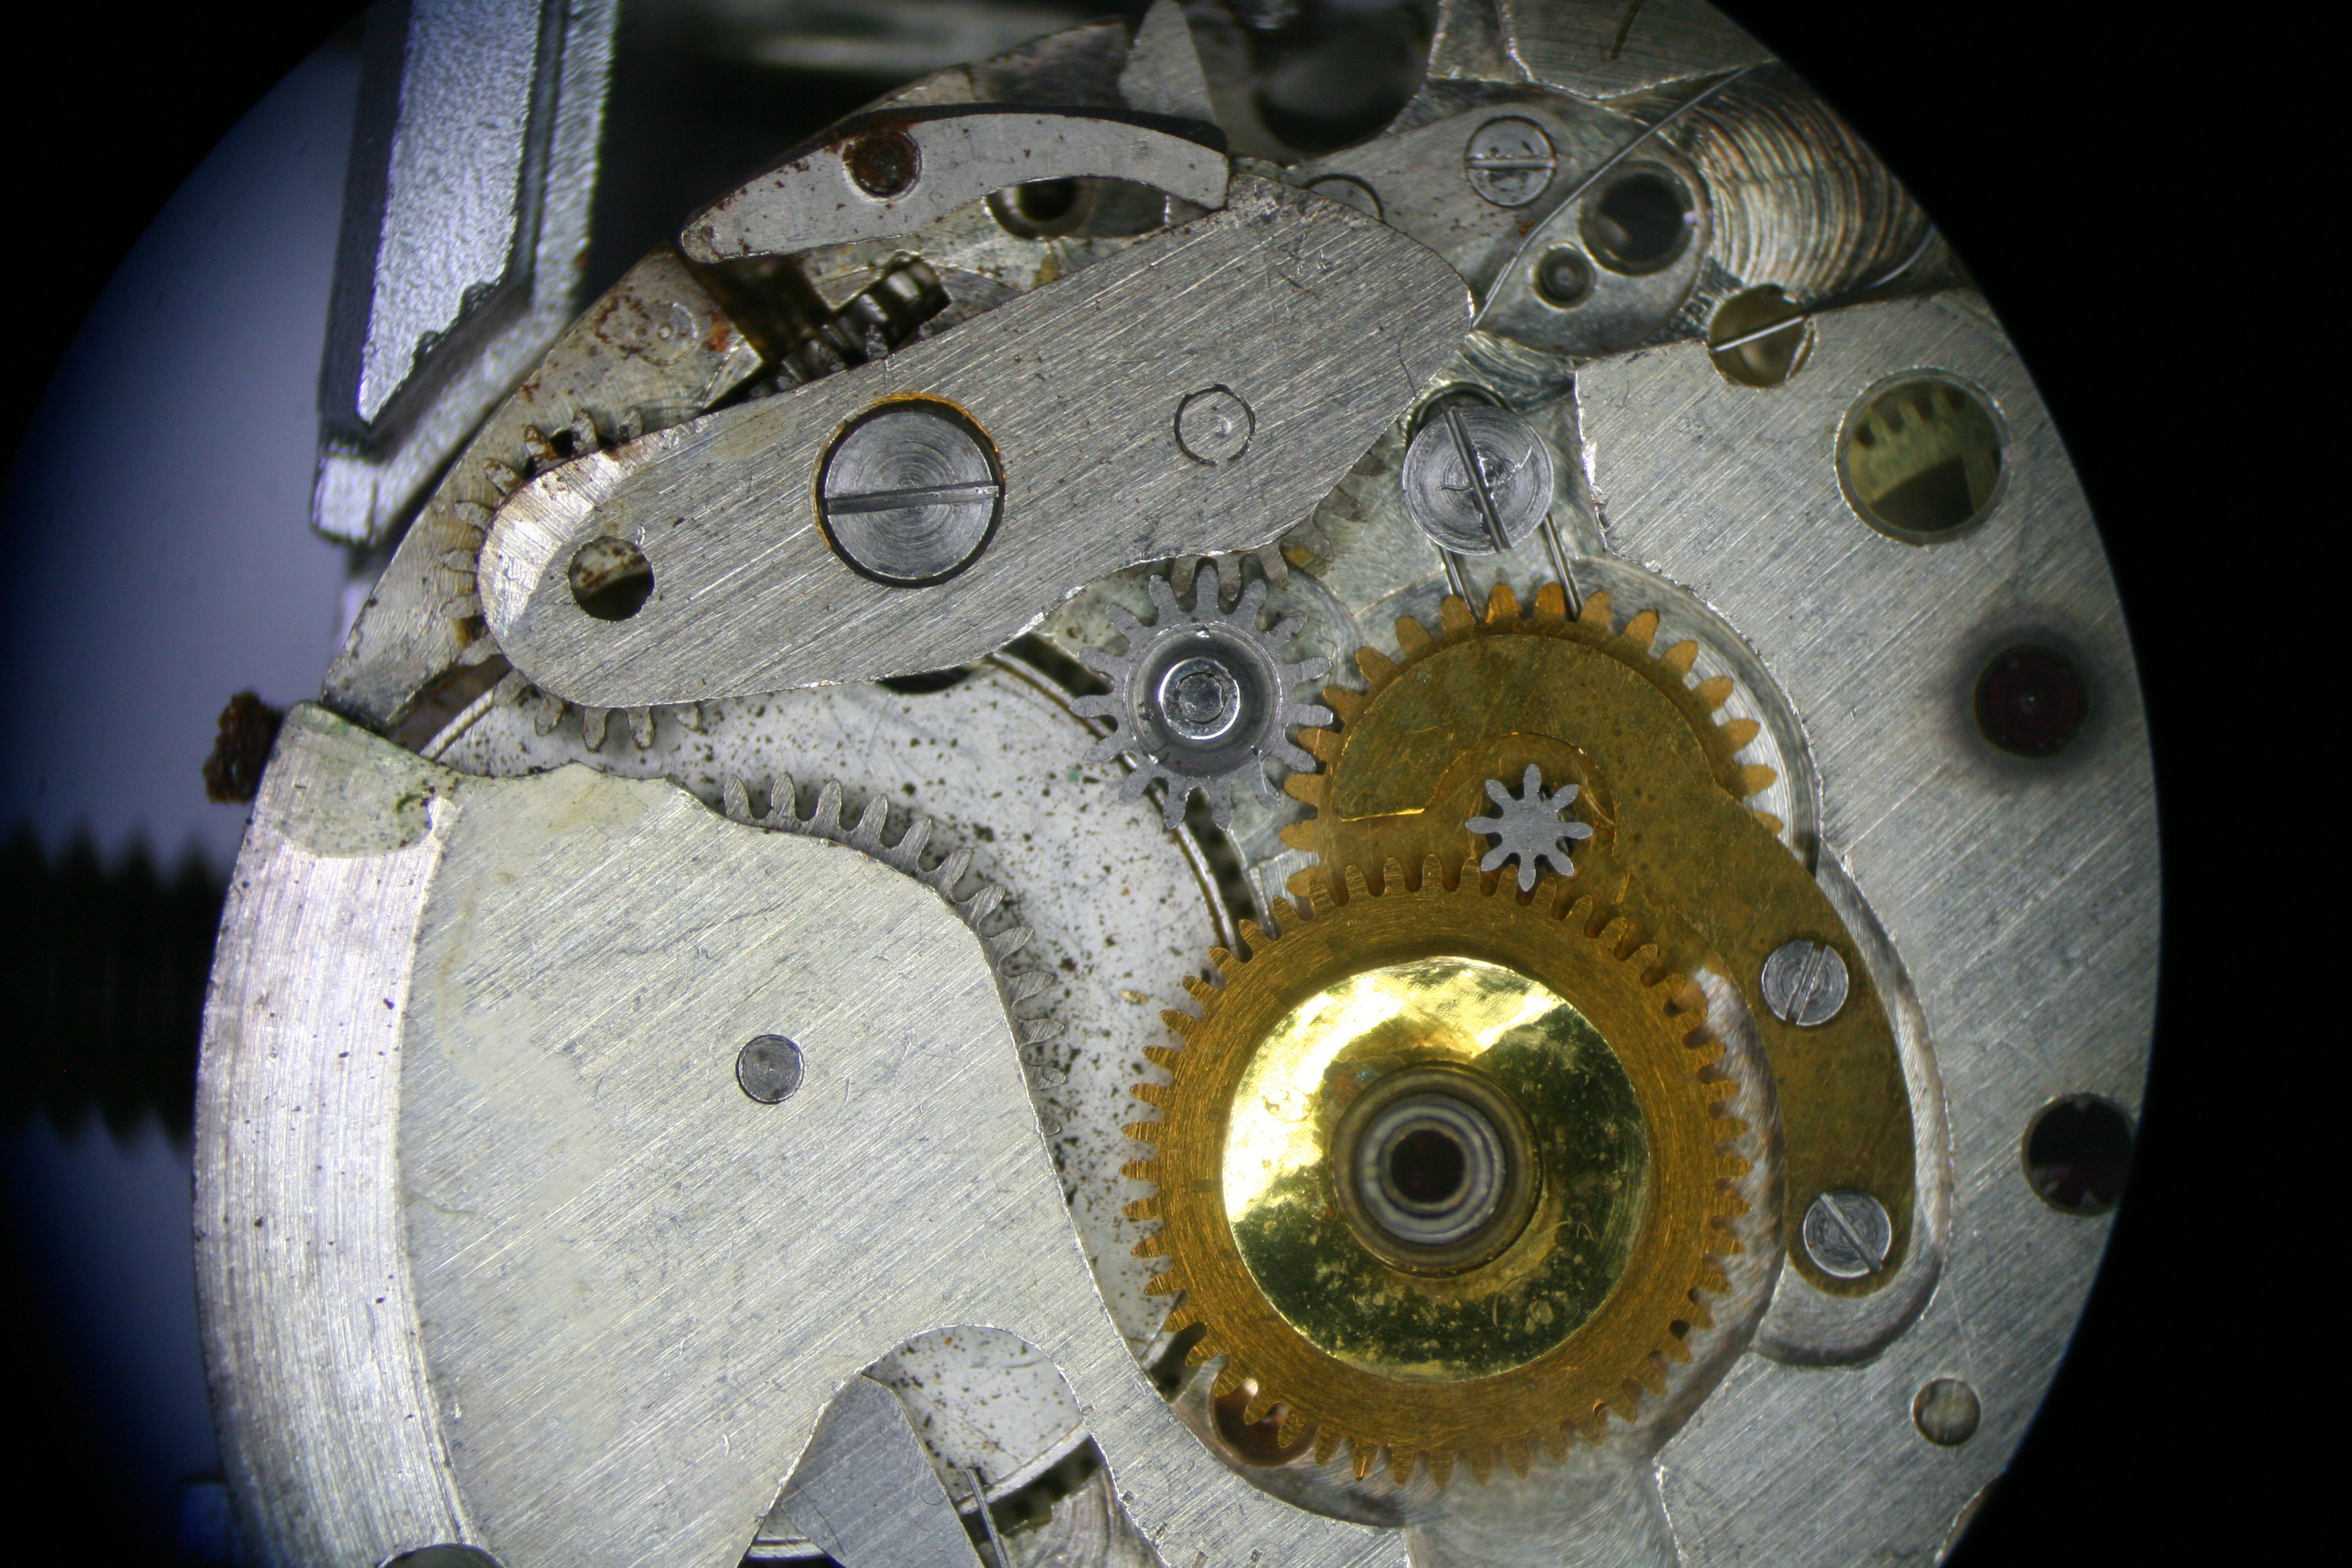
 -
Jewel closeup with new cheap but good USB microscope camera. Good for examining jewels and gears for damage Sent from my iPhone using Tapatalk1 point
-
Having a lathe is a great step forward. Many simple parts can be made by simple hand turning. Really widens possibilities. I am using a Dremel or ER20 collet system (5-10 USD the staff, 2-3 USD/collet), with that i can make new stems, punches and even new balance staffs. Lot and lot of parts and tools. For me with 2-3 hour watchtinkering per week as a hobby does not worth to buy a proper lathe. Although, i didnt gave up acquiring one sometime See my posts and videos for Dremel and ER20 "lathe" examples!1 point