Leaderboard


Popular Content
Showing content with the highest reputation on 08/28/16 in all areas
-
I used to belong to another forum that initially was a platform for a free exchange of ideas. Unfortunately the forum was hijacked by two horological know-it-all's who were legends in their own minds. If somebody would post an article that had information they never thought of, they would post a response stating that "they were doing it incorrectly" or "they gave incorrect information". Often their post would start out with the phrase "DON'T YOU EVER". The owner of the forum was so impressed with their credentials that he made both of them moderators. Unfortunately for that forum the impressive credentials these two had did not manifest into evidence of either of them having any real horological knowledge. Neither of them ever posted anything of great value to the rest of us who wanted to learn. The forum members who did contribute ended up either leaving or no longer passed tips and discoveries on to the other members. From what I have seen so far, this forum is set up in a much nicer member friendly way. I am glad to have found it and hope it continues to remain that way. david3 points
-
Hi Lace, Welcome from Miami, Florida! Yes, don't waste your money on substandard tools! It is not like in our field -- I'm a computer tech/network admin, whatever...yes, it is gotten that way! . In any case, your handle reminds me of when I used to play classical guitar and I -- sometimes -- used LA BELLE strings! I particularly loved the logo on the package and the high standard ones sounded great with one of my guitars...then I switched to AUGUSTINE (blue), D'ADDARIO (normal and high) and finally to SAVAREZ (high tension on one of my other guitars). In the end I will mix an match brands looking for that special sound... but, well I digress...ahem! Back on track: There are online classes you can take, check the TimeZone classes (moderately paid: http://www.timezonewatchschool.com/WatchSchool/), The Seiko course (http://www.clockmaker.com.au/diy_seiko_7s26/), Tascione (mostly clocks I think) and others. I personally recommend to watch Mark's videos and maybe take the TimeZone classes and complement with the free Seiko course...I did a long time ago and it was worth it. One warning though, you will learn by what you do (experience mostly) so expect to ruin and loose many parts and some movements so work on stuff you can replace, learn to dress your tweezers and screwdrivers, and use working movements to learn with so you know, when you are done, you did well if it is still "alive"! To wrap it up, ebay is a good place to find your Guinea pig watches (I use Ramon, the watch collector, a lot) but to find good quality tools, ofrei.com, julesborel.com, cousinsUK.com (parts and documentation) and Esslinger are your best bets for starters! We have a section of suppliers on the resources section you can check out. You will need good optics (I personally favor the true Donegan Optivisor the true glass version and have it in several graduations but you should prioritize a 4X and a 10X), good tweezers (two #4 or #5 and a #2 or #3 and a battery plastic one) and good patience...mainly, in addition of good screwdriver's set (no less than nine in the set), oils (at least 2 oils and a grease), cleaners (cleaner and rinse), demagnetizer, cleaning machine (ultrasonic would do), parts baskets for the machine, parts trays, some assortment of pliers and cutters, presses, case opening tools (divers accordingly), rust brushes, polishing stuff and abrasives, vises and such, expendable supplies (lint less paper, rodico, pegwood, pithwood, etc), movement holder, case holder, blower, more patience, a good bank account if purchased all at the same time... In time you will need to build up on spares, starting with band pins and other pins, crystals, gaskets (crystal and back 's), sticky dots for dial feet and spare dial feet, crowns, stems, stem extenders, band parts, wheels, springs, etc. Recycle all you can! Check out the TZ course listings of tools and supplies, they do a good job for a starter watchmaker. Beyond that, comes a stake tool set, general upgrade of what you already have being it in numbers and/or quality, jeweling set, and other different things you will need or think you will need while progressing in your hobby. My take on this, start small and patiently, expand! Ofrei page is messy to navigate but very instructive. Read as much as you can find there too... Good books are invaluable ("Watch Repair" by De Carle can be downloaded free in pdf.) But we are trained to only read the manual if everything fails...after a re-boot. There, in a nutshell, all you need to know about watches!! Cheers, Bob3 points
-
Don't forget that there is a gear that fits the stem to operate the inner bezel . I've attached a post from the SCWF forum that may offer useful Info . Good Luck . http://www.thewatchsite.com/21-japanese-watch-discussion-forum/130906-getting-right-stem-crown-6139-6002-a.html2 points
-
hello everybody! I'm Uzi joining this amazing forum after watching many of Mark's videos. I'm a watch enthusiastic from the early childhood fascinated from the tiny mechanics. In fact, I love any kind of mechanics starting from very large mechanics such as car fixing all the way through watch mechanics. Although my profession is computer engineering, this is my #1 love.... I'd like to take this opportunity and thank Mark for sharing his experience and knowledge. I can't even express how each and every video contributed to my knowledge and answered so many questions I had over the years. On top of the high quality and professional videos, these are the explanations that are so clear.... THANK YOU MARK, this is a real treasure!!! uzi.2 points
-
Sometimes I am quite happy that I know ba (or not a lot) that I would ever take a firm opinionated stance on. I think this forum is excellent from so many different perspectives not the least being humour. No room for stuffed shirts here, however looking at my current shirt straining against my breakfast I think I shall now vanish from this thread. Cheers, Vic2 points
-
When you first cleaned the movement did you open the mainspring barrel? and if so what state was the main spring in? When there is a problem with insufficient power at the output end of the system it's worth bearing in mind that as well as losses within the system the problem could be insufficient power going into the system at the other end. If you took the mainspring out for inspection, cleaning and re-ubricating, how did you get it back in? hand winding or mainspring winder? The main spring should lie flat on the work bench without any twisting or buckling. If it doesn't then power will be lost in the barrel as the edge of the main spring bears against the barrel lid and base. It is very easy when hand winding a spring back into the barrel to introduce out of flat distortions which is why a main spring winder is so useful; it significantly reduces the risk of this kind of problem. With the spring out of the barrel did you check the end shake, side shake, and free rotation of the barrel around the arbor, this is another potential source of loss. Once you are happy with all of the above and you have checked that all of the pivot holes are really clean and there are no cracked or chipped jewels then the next step is to test at each stage of reassembly. Sometimes the only way to isolate the problem is to test each wheel individually, even if it means lots of taking apart and putting back together again. Start with the barrel bridge. Install the barrel and test its freedom to rotate in situ, then move on to the train bridge and install just 1 wheel and put the bridge back on. Test the freedom of the wheel using a blower, and check side and end shake. Once you are happy add the next wheel, replace the bridge and test again. If all is well then add the next, if not then take out all of the wheels except the last one installed and test that one on its own. If it doesn't spin freely on its own then the place to focus on is the pivots. If it does spin freely on its own then reinstall the next wheel back to see how it performs when it interacts with that. If that is where the problem is then inspect the teeth on both wheels and pinions; you're looking for debris, and damaged or worn teeth. Also check the pivots again. It is possible that a pivot which is slightly bent can still spin freely in its jewels on its own but has a lateral oscillation which can interfere with the depthing with its neighbour. Follow this systematically through the entire train from main spring to escape wheel and you should find the issue.2 points
-
I'm wearing my trusted speedy today... Have a great week end all2 points
-
Yesterday I purchased a Harbor Freight Plastic Welding Kit (item# 96712). I tried it out this morning and was very pleased with how well it worked. It has 10 heat settings so I set the dial to 6. I then took a shellac flake and hit it with a couple of passed from the heat gun. It pulled a beautiful string and did not burn the shellac. The tool blows a stream of hot air out of the nozzle that is extremely controllable. I am going to try it out on some pallet and roller jewels and also see how it works on a wax chuck. From what I have observed so far the process should work beautifully. david1 point
-
Hi all , first please excuse my English , my name is vasilis and i am from Greece . I own a jewlery shop here in Greece .i sell jewels and watches . i like watches and beside selling them i try to repair them too , all those diffirent kinds and mechanisms are a real chalenge and seems that no tools or parts are enough when you decide to deal with them . Marks videos were those that lured me here and i am happy for it:)1 point
-
Greetings masterful wizards. I'm Lace, from Nebraska, which is located in the middle of America. Pleasure "meeting" you. This is some group. I'm more than a bit awestruck by the talent here; a bit envious too. As a neophyte, many post shoot over my head like a meteor shower. Learn something with every post I read. Always "liked" watches, and fell in love when I finally was able to afford a couple sweet skeleton, jeweled tickers. Still have plenty of "knock around," but nice, battery operated watches, which seem to be in sync and die all at once. Decided it didn't make sense to pay to have a bunch of watch batteries changed when I could do it myself- or so I thought. My first attempt, grabbed my trusty Swiss Army knife and commenced prying a couple backs off. Massacred them. Terrible scratches. Didn't really need those two fingers anyway. Ahem. My learning curve isn't as sharp as I'd expected, but my knife sure is. Tell me, good people, how did you get started? (I offered three different jewelers money to show me some of the basic tricks-of-the-trade. They all looked at me as if I'd asked for a kidney, and offered to do any repairs/maintenance for me. Phooey! As a tech/electronic goddess, I'm a DIY'er who has the aptitude to learn this skill. I hope...) Is there a remedial watch course somewhere? Must be. I've also purchased cheap, and worthless tool sets. What are the most useful, and necessary tools does one really need? Appreciate any feedback you have, and I am thoroughly enjoying reading, and mentally grappling with, all your fine posts. Thanks for letting me join the party. Tic-toc. Gotta go save civilization. Tootles for now. ps. Perspective~~~ The photo is the inside of a violin.
 1 point
 -
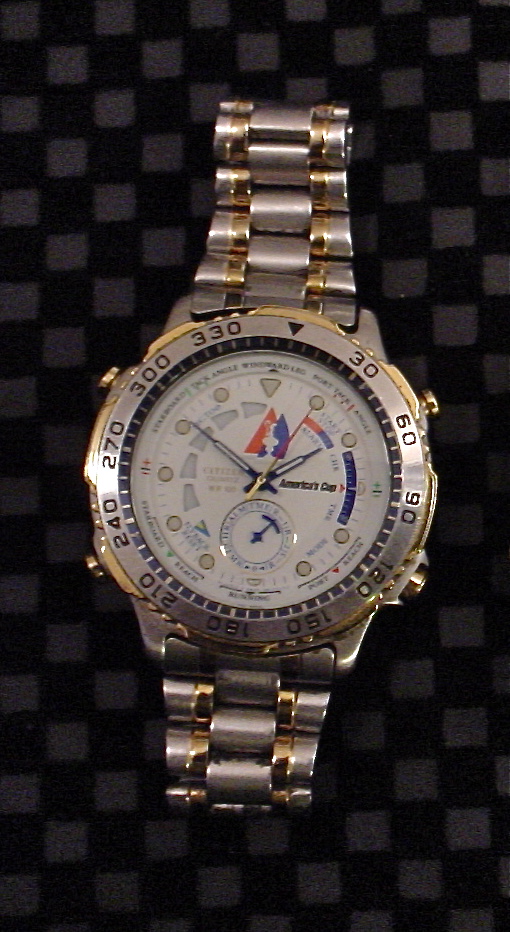
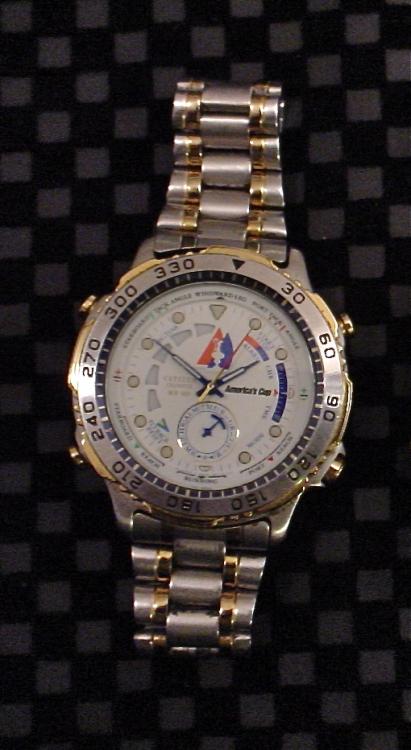
I'll go with one of my old favorites today . A Citizen 1992/95 Americas Cup Cal. 6840...
 1 point
 -
Well whether it's fortunate or unfortunate for me, I'm retired and my wife has the patience of Job. I'll never get a lathe though, but would love to spend an afternoon or two turning some brass. And the level of blueing he achieves on the steel is phenomenal. When you polished your case was it by hand or a buffing wheel.1 point
-
Looks like the lacquer is thinned 50/50 before dipping. Here's a recent video starting just before he dips it. These videos are every bit as addicting as Mark's and make me wish I had a lathe to play with. Dipping pendulum in lacquer1 point
-
The worst are the Rolex fanatics..any questions about Rolex from an amateur hobbyist and they are advised to take it to an AD...While they are quality products and regulation is not easy...they are quite simple and well within the scope of an experienced hobbyist to take apart and put together. Anil1 point
-
I have over the years refinished a few Speedmaster MkII cases for friends. They are fun to work on as they are,usually quite beat up och the surfaces have been polished a few times to many. Last week a friend of mine told me that there was a 1970 MkII for sale on a Swedish auction site. I was born 1970 so this watch I just had to have! On Sunday when the auction was about to close the website where the auction was held started to act up and I could not log on......... About thirty seconds before it closed the webpage loaded and I was able to submit my offer....then it was down again......did I win or not!!??, I waited for the usual confirmation mail when you have won an object and five minutes later I had mail, -Yesssssss..... The watch arrived On Tuesday and looked like this: Not to bad, but the sunburst was gone and the top surface had......"straight graining" .....I guess the previous owner used a abrasive rotating mop or something! The case was practically free of deeper scratches and dings so a good prospect for a lapping session! The case was stripped and I started with the sides: I do this part in my small Boley lathe with 90mm discs that I have made and a small tiltable table to set the angle. Depending on the geometry of the case you can either slide the case directly on the table or use a adaptor to get the right angle - in this case no adaptor was used. First run on one side done: First disc is 400P so you have to be careful, especially with the start/edge where the case can grip the disc - and you do NOT want this as you will have a case with scratches in places they where not intended to be! After 400P I move up to 1000P and finally a last run with 2000P. This usually gets the surface almost up to mirror finish but,a quick final touch with a mop gives it,that final shine. When the surfaces are flat and when needed polished, it is time to grain the sides and lapp the sunburstpattern on the top. This is done in a small mill I have with a tiltable spindle using a 305mm rotating disc and another home made tiltable table. For this case I use a 120P paper so you really have to take it slow and be sure all the angles are set up correct or the disc will chew material in places you do nor want it to! The result I was not 100% pleased! There where some spots there the graining did not go al the way up to the grained edge around the glass. This was obvious in the pictures and reflections in some angles on the wrist - I relapped to top surface.... Some grease from my fingers on the chamfer in the pictures but the graining is better now! I am waiting for a NOS dial and crown - when they get here I will strip and clean the movement as well.1 point
-
Hello after reading the posting from Digginstony I got it out and tried a few watches in different ways and JD is right. With the strap removed and taking out or inserting the green fixing you can rotate and access all the watch back. It works perfectly with a bit of lateral thinking. I am however, going to use a bit of thin foam plastic to protect the watch glass when I use it. Cheers, Vic1 point
-
I think that it the notch is at 6 or 12 you have to remove the strap one side, rotate the case 90¤ and fit it with the lugs straddling the green or black protuding part. As long reaching with the blade is not impeded by the lugs.1 point
-
Hello and welcome Elko. What type of spring is it a nice close-up pic would help.1 point
-
Not sure if any of you have seen any of the Clickspring videos on Utube where he builds a clock from scratch but he dips the parts in the lacquer. Would be one way to avoid brush strokes and insure 100% coverage. Been awhile but I believe he thinned the lacquer first. Great looking watch TimFitz.1 point
-
I was somewhat confused with my reading the question until I finally grasped what you're getting at. It's always assumed today that the pocket watch came together case with movement. Quite a few times that is true but in other times movement was sold separate from the case. To understand watch cases at least for American pocket watches I have an interesting link below. http://mb.nawcc.org/showwiki.php?title=Watch_case Then even if you do have a case for a lever set watch you still have to Be able to pull the crown into a setting position to get the movement out. You going to notice quite a few watches stems set in lever set cases because they will work. Worst case you're going to have to adjust the sleeve to get the Depth thing right.1 point
-
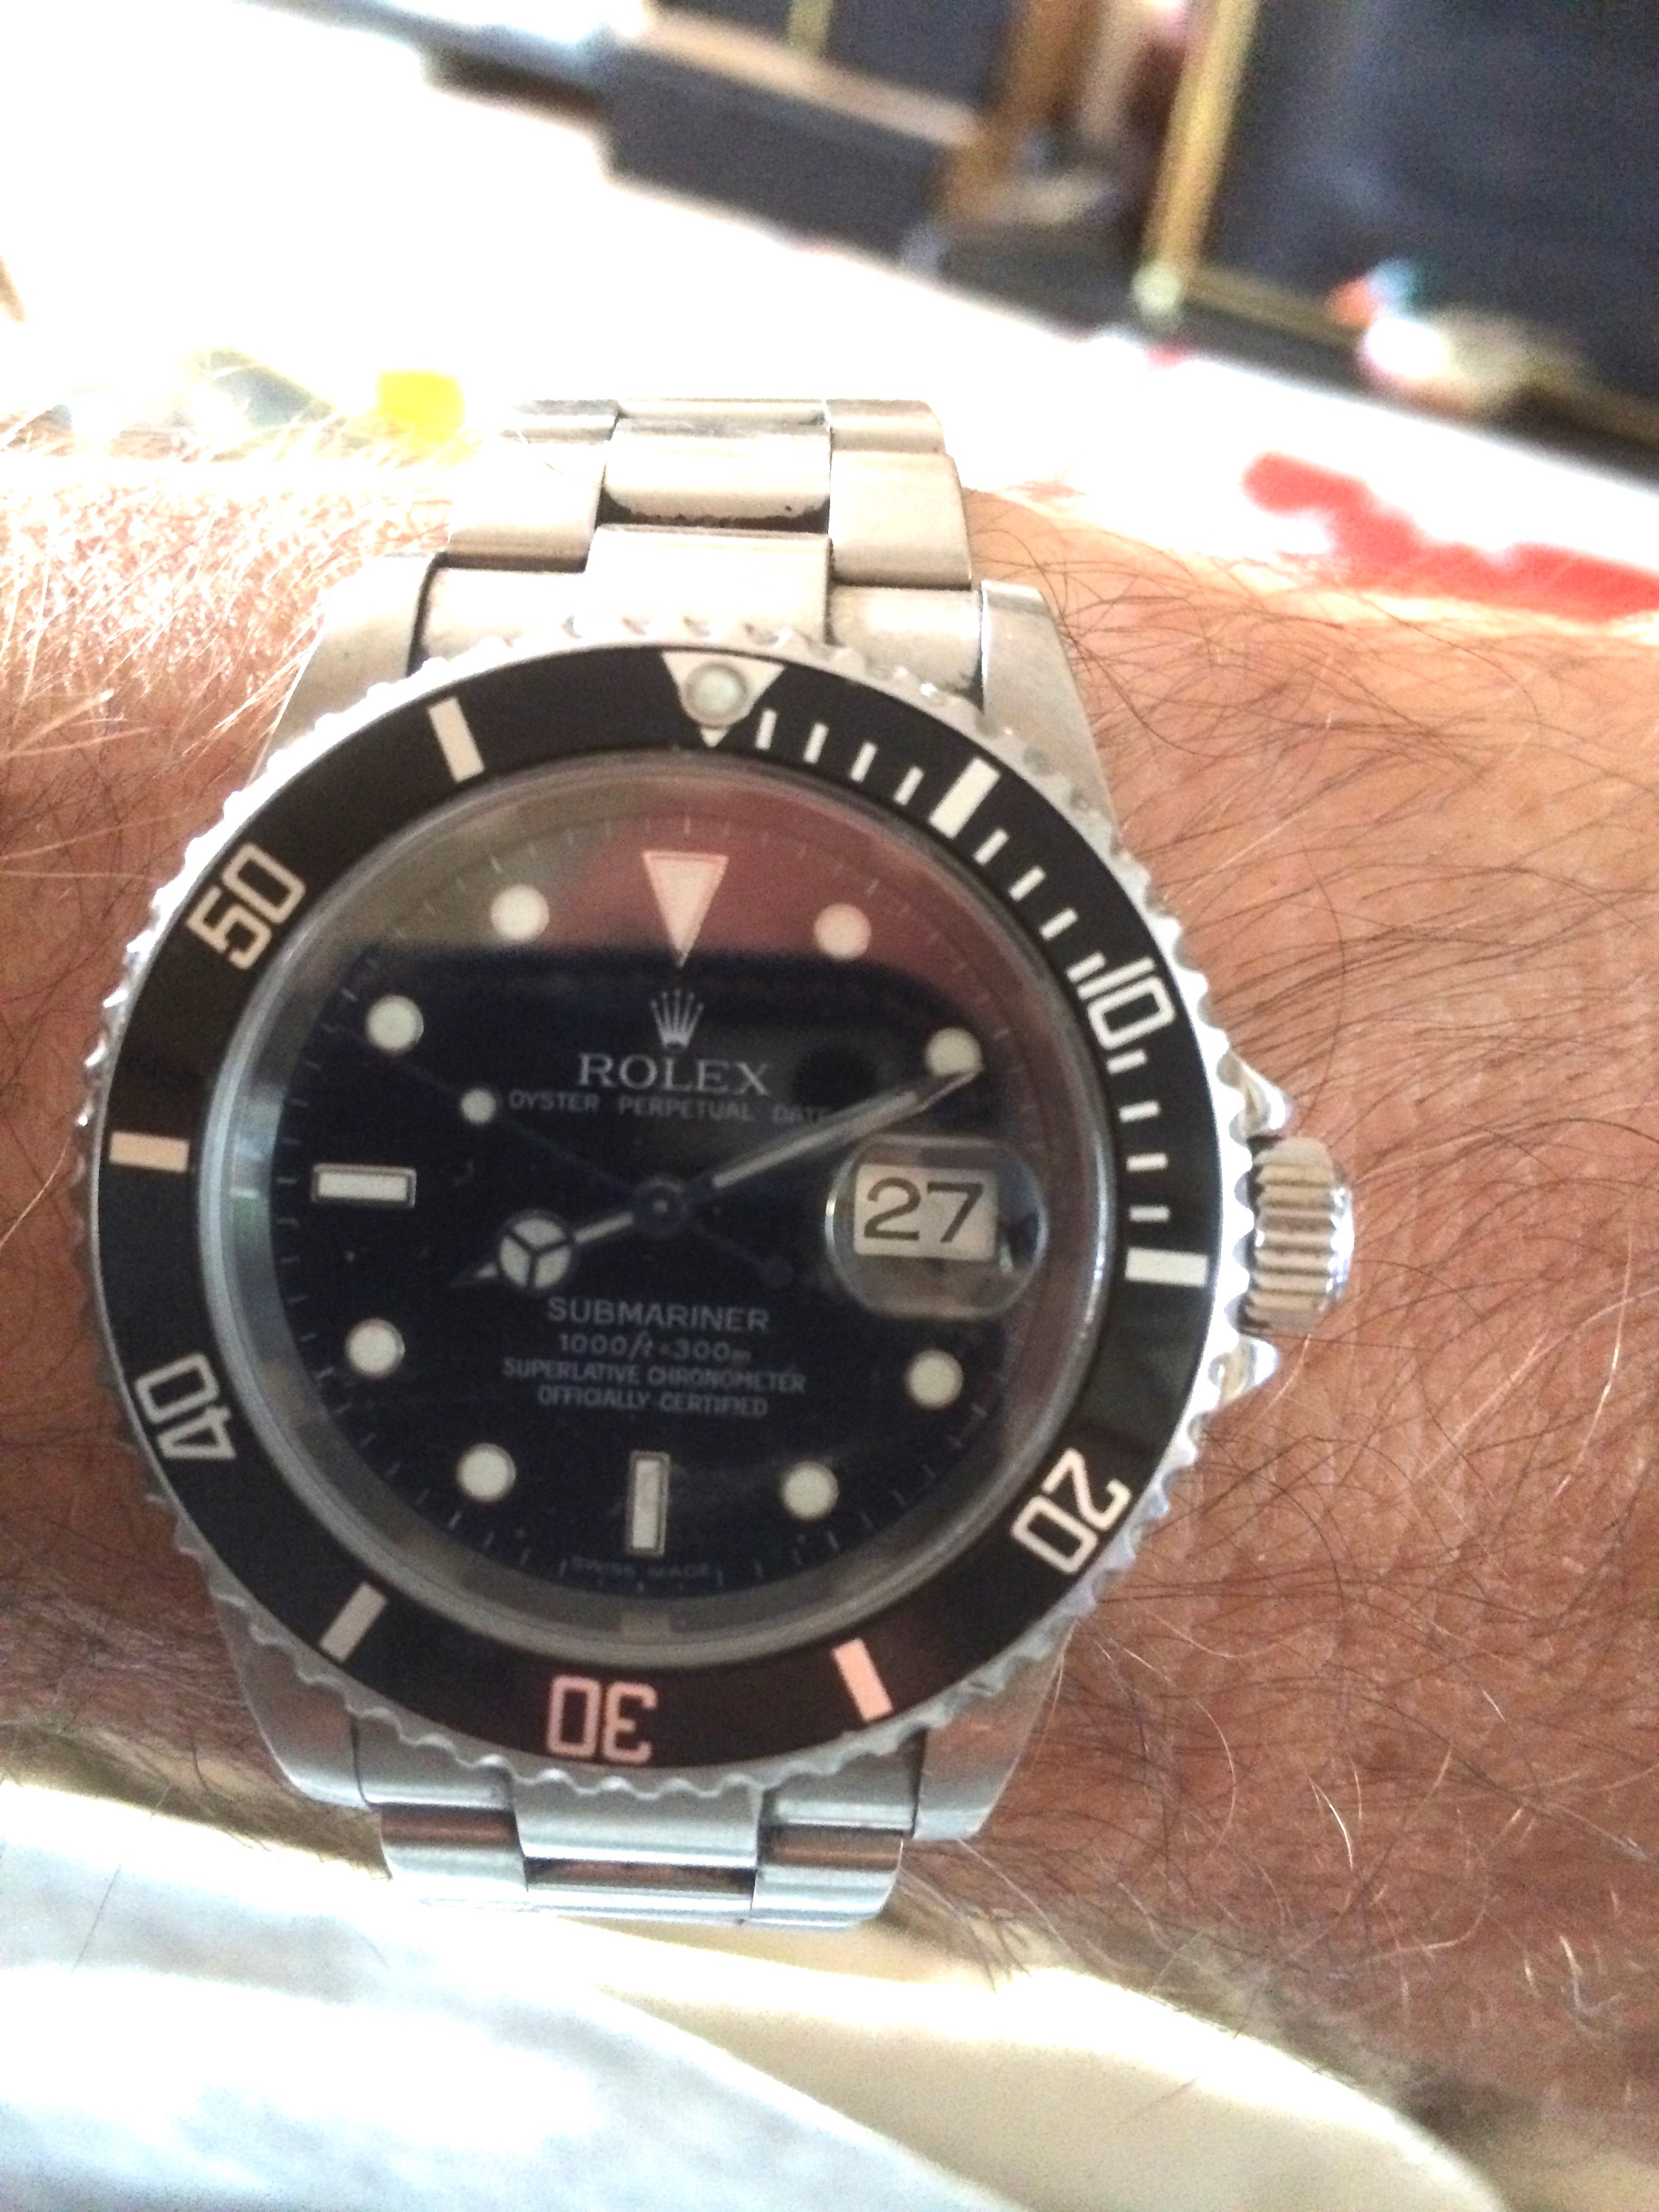
I have owned two of these beauties & wish I still had one . Now I have a boring submariner. As you can guess I love Rolex.
 1 point
 -
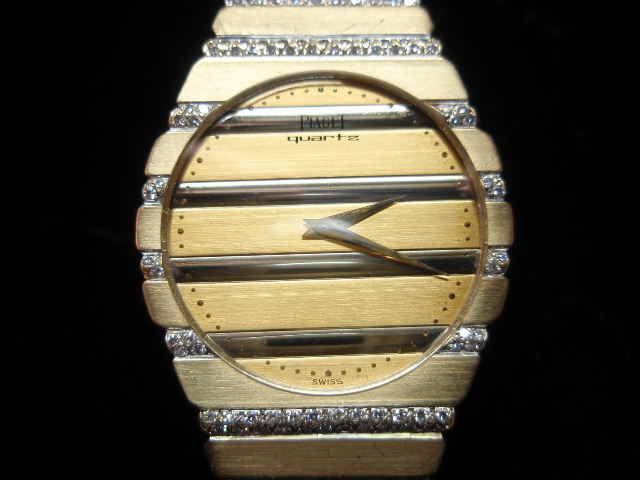
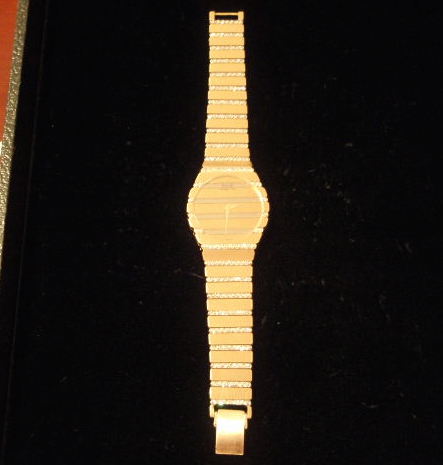
Old school 80's 18k and diamond Piaget Polo....unfortunately it doesnt fit me anymore but I just can't let it go
 1 point
 -
Thank you for joining the forum, and a huge thanks to all the all guys for comprehensively welcoming you aboard.1 point
-
My lapping attempts have been posted on other sites as well so it's probably my mill you have seen before! Lapping can be done in many different ways but with a disc seams to be the easiest way! I actually built a small machine from a belt sander where I can index my existing chuck to the right angle. This will produce 100% straight graining IF I can get hold of good sanding belts that have no overlap (where they are glued together to a circle) => same thickness all around! A lathe is a good starting point for setting up a lapping rig but my mill actually has one big advantage - I can set x, y AND z (the height) This makes setting pup the tiltable table and chuck so much easier! " Do you think one could achieve a good setup with a lathe (provided it can take a 305mm grinding disc of course)? I have been thinking along those lines... " Do not get stuck with my 305mm discs - the commercial lappingmachines I have seen all have 240mm discs! A titable table on you cross slide and a suitable chuck or holder for the case and you are good to go! Simple chuck I used when I started testing different lapping setups:1 point
-
Just found out how a safety pinion works when I released the mainspring and it still had power that I thought was dissipated. BOOM! The pocket watch blew up and the Center wheel, 2nd, was spinning. Thought I screwed it up as the smaller gear was riding high on the pinion and no longer seemed right. Turns out they are threaded in the opposite direction and this takes the force from the mainspring.1 point
-
The case is presented to disc at 270deg as close to the edge as possible and at the horizontal center using a tiltable table shown above. The case is rotated in this location using a specialy made holder/chuck and "viola" you have a sunburst pattern! As the length of the case in contact with the disc is so short the brushing will be almost straight, but it will NOT be perfectly straight - that is the reason I want as big a disc as possible! For now I have settled for 305mm as this is the largest dimension I can get pappers for - easy! I'm using standard paper right now but have a set of old cast iron discs that have been used by my grandfather to lapp using glue and a special absrasive mixture he had when lapping diamonds. To use them I firs have to renovate the matching headstock of the lathe he used - but I think it will be woth while as that lathe will be a good base for a more advanced lappingmachine! Here is a video of the principle for getting the pattern: Sunburst lapping a Omega I like to use a much lower rpm setting and use a fixture for the watch case - but thats just me! Here is another machine1 point
-
Early setup testing with a 240mm disc1 point
-
Hello Lace, there are lots of experienced watch repairers on the forum that will help with any problems and a search through the forums on a particular topic will often provide answers. As for tools get better quality ones as you need them, for instance if you were to try to service a watch such as an ordinary mechanical that is still ticking bought from the bay choose a simple one, perhaps with a face that only has a second hand, hour and minute hand as a starter then take it apart but take pics at each stage and you will have a record on how to put it together after cleaning the parts with lighter fluid / is Naptha or the like. The tools you need will become apparent as you go and if you arrive at a problem you will have a pic to post to evince the help you need. Oils are a whole subject on their own but unless you have bottomless reserves when starting out get a cheaper "watch oil" that will suffice for your project, and take your time. If you have to force something there are three common possibilities something is wrong with it or with the way you are trying to do it or the tool you are using. I like tinkering with watches and have serviced a few now but I make plenty mistakes as well and the guys on the forum have helped me out and I am sure you will get help if needed. Cheers, Vic1 point
-
Hello LaBelle and a big welcome to the nicest and most knowledgeable watch repair forum there is ( well that's my opinion anyway) I would agree with clockboy full heartedly don't by cheap tools just because they look ok trust me there not if you intend to stick at this hobby it pays to spend that little bit more. And a running pocket watch movement is a great piece to work on. Just practice stripping it down take photos of every step so you can work backwards to reassemble it and see if it still works do this over and over again until you get that feeling for your drivers and tweezers and you can handle parts with confidence. Good luck and have lots of fun and don't forget everyone is here to help so don't be put off by asking what you might think is a stupid question we all had to learn and if you don't ask you don't learn. Mick P.S That's an impressive pic.1 point
-
Sorry here is the link.1 point
-
Gentlemen, we have a diagnosis! On re-inspection, I noticed that the reflection of the escapement wheel pivot (in its jewel in the top plate) was variable as I manually caused that wheel to turn. I disassembled the watch—again!—and find that the upper escapement wheel pivot (on the pinion side of the wheel) is worn away to almost nothing. (See photo). So, indeed the problem was a pivot. But instead of the lower pivot being too tight, the upper one was too loose. I don't have the skill or lathe to create a new arbor for the escapement wheel, so I'm going to try to buy a replacement for it. Thanks for your help, advice, and encouragement. —Eric Sent from my iPhone using Tapatalk1 point
-
1. It ran well before. 2, It started to run erratically. 3. Cleaning didn't help. Assuming that the cleaning was done well, this probably means something else has happened to cause the erratic running. This usually happens when the watch is dropped, resulting in.. a. Mushroomed pivots.. if the watch is dropped dial down, the pivot will mushroom at its tip. Perversely it will run ok dial down but when placed dial up, the mushroomed bit will 'hang' on the hole jewel and the watch will stop. b.Hairspring got caught up on the regulator or the regulator has moved as a result of the drop. c. One problem I encountered was where the screw for the pallet cock was not correct, the head of the screw was too thick so that when the watch was dial down the hairspring touched the screw head and resulted in the watch stopping. Worth checking on this. In your case, the original problem could have been a dirty movement but an oversight during the service may have created a new problem. Go back to basics, assemble the train without the pallet fork and balance. put some wind on the mainspring..see that it winds down smoothly. On a handwind movement, you should see a bit of 'backspin' as the last ounce of energy from the mainspring is dissipated. If you nudge the escape wheel and it continues to spin another few rounds then your escapement needs attention. Once you're satisfied that the escapement is fine, remove the train and fit the pallet-fork and balance (the escapement). At rest the pallet fork should be at the center of its travel with the balance installed. Your watch seems to have a movable stud holder so this is easy to do. On watches with a fixed stud holder the hairspring will need to be adjusted at the collet. Here you would also examine the pivots closely and triple check that the hole jewels are clean and clear. Endshake should be present but not measurable, The balance should move slightly when you move the movement (balance installed). Next re-assemble the train wheel and pallet cock, wind the barrel a turn. using a trimmed down pegwood, manipulate the pallet fork to and fro while observing the interaction of the pallet jewels viz escape wheel. Its hard to explain but one stone should catch immediately as the other releases... no dead space. If after all this and it still doesn't work, put the watch away and start with another.. this will relieve your frustration and allow you to come back with a clearer frame of mind after a decent interval. Anil1 point