
Leaderboard


Popular Content
Showing content with the highest reputation on 08/15/19 in Posts
-
Since lubrication technics and material seems to be a frequent returning subject I thought one could collect some links and pdf files on the subject in ONE Place so it is easy to find them. Here comes my contribution in this link Collection. Moebius ------------------------------------------------------------------------------------------------------------------------------------------------------------------------ Home (list of lubricants) http://www.moebius-lubricants.ch/en/products/oils New (Just a lubrication chart) http://www.moebius-lubricants.ch/sites/default/themes/moebius/extras/pdf/tableEN.pdf Old (Moebius sales program, more detailed information) Moebius Sales program.pdf British Horological Intitute (BHI) ----------------------------------------------------------------------------------------------------------------------------------------------------------------------- http://www.nawcc-index.net/Articles/BTI-The_Practical_Lubrication_of_Clocks_and_Watches.pdf American Watchmakers - Clockmakers Institute (AWCI, Nice and detailed pictures.) --------------------------------------------------- Train Jewel Lubrication https://www.awci.com/watchmaking-excellen/applying-oil-to-train-jewels/ Cap Jewel https://www.awci.com/watchmaking-excellen/cap-jewel-preparation/ Pallet Fork https://www.awci.com/watchmaking-excellen/lubrication/4 points
-
This is how I was taught. Movement in movement holder. Add a tiny amount of power. Balance complete attached to balance cock. Balance cock held by tweezers, You need to get the impulse pin between the pallet forks, lower the cock in your tweezers between the forks. If you miss rotate the movement holder around until the impulse pin is between the forks, depending which side the pin is to the fork will depend which way you rotate. Make sure the balance is home before you tighten up the screw.3 points
-
The way I was taught (by trained watchmakers, but I myself am not qualified) was in line with what you are describing. In detail; 1. set the pallet fork against the left-hand banking pin. This ensures that the impulse jewel enters the fork. 2. introduce the balance assembly with the balance cock at least 90 degrees anticlockwise of its final position 3. seat the lower balance pivot without disturbing the pallet fork 4. rotate the balance cock clockwise (or the movement anticlockwise, whilst holding the cock still) into its final position, and rest gently on top of the balance wheel 5. locate the upper pivot in the jewel. The balance begins to swing 6. Drop the screw in. Hold the cock steady with a piece of pegwood or a toothpick and slowly tighten the screw. 7. If the balance stops swinging, immediately back off the screw. I guess you could also reverse the directions described in steps 1 to 4. At no stage are you coiling or uncoiling the hairspring.2 points
-
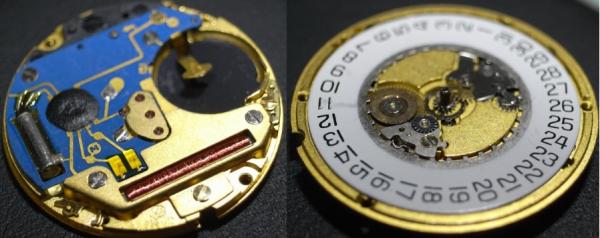
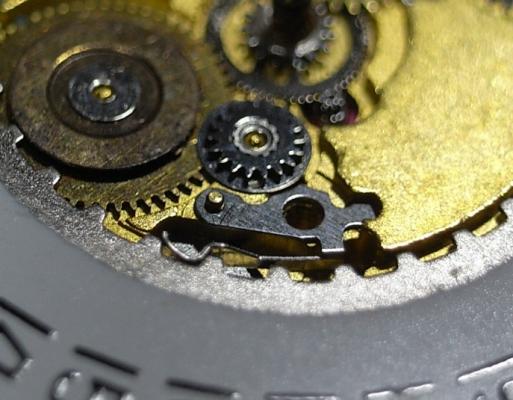
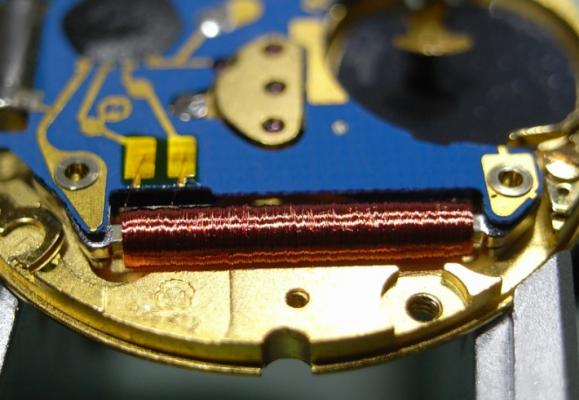
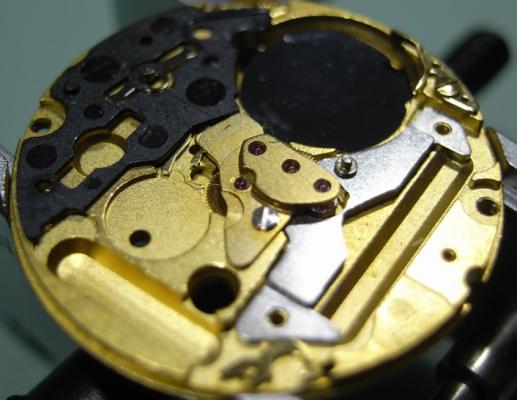
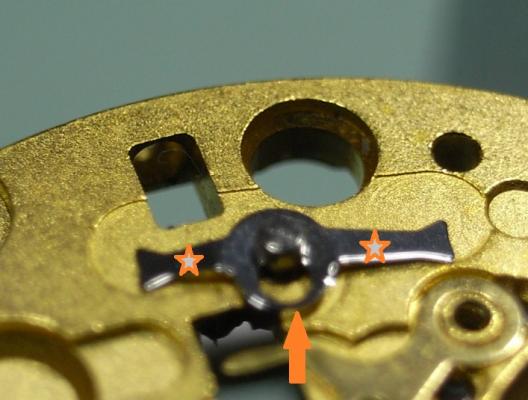
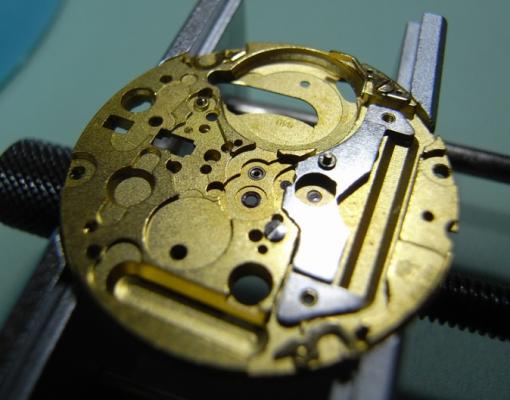
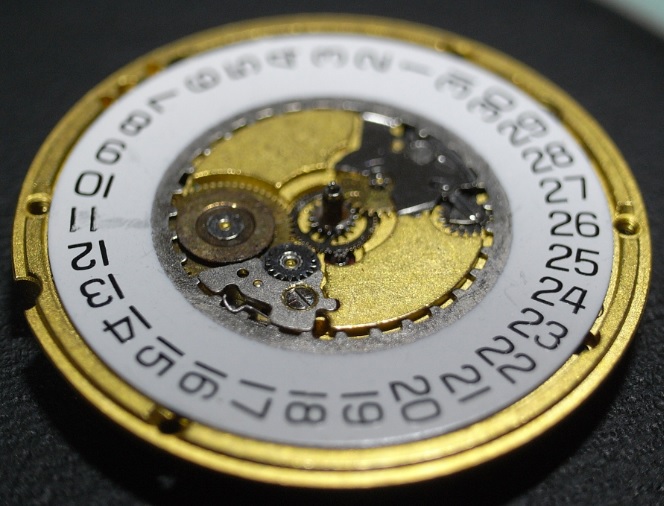
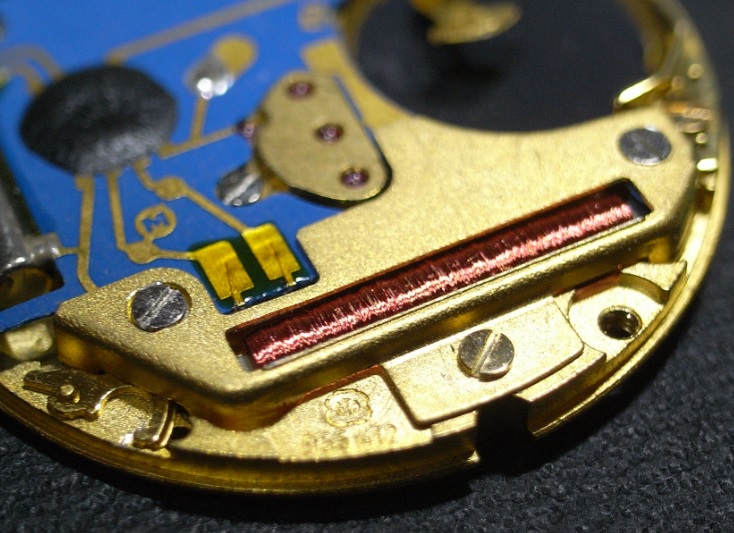
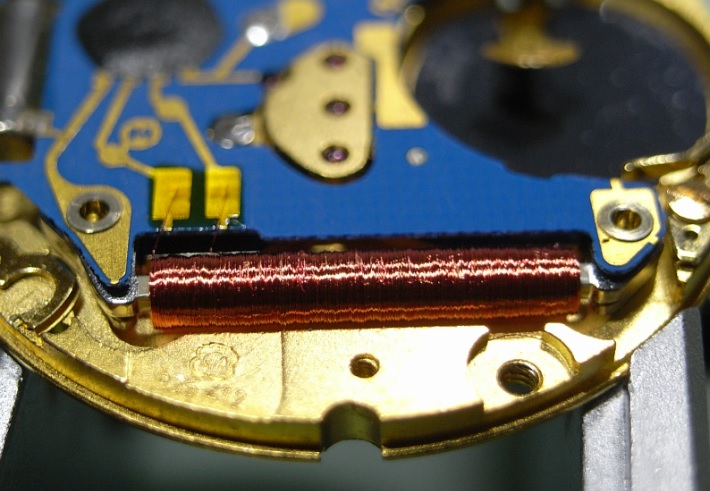
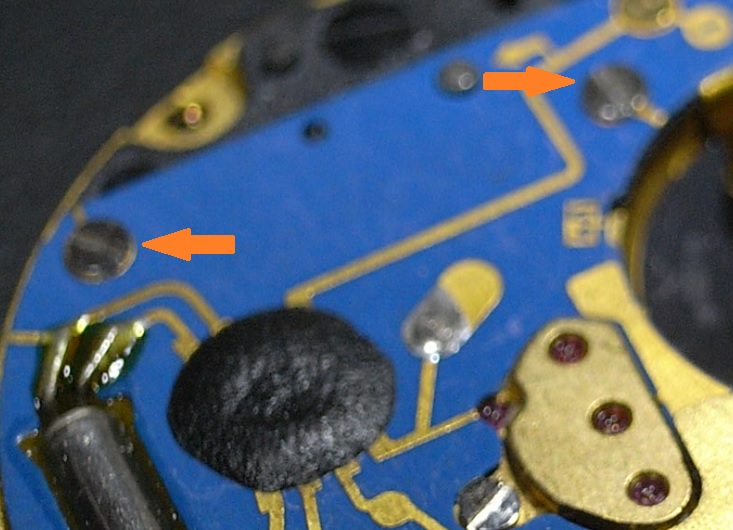
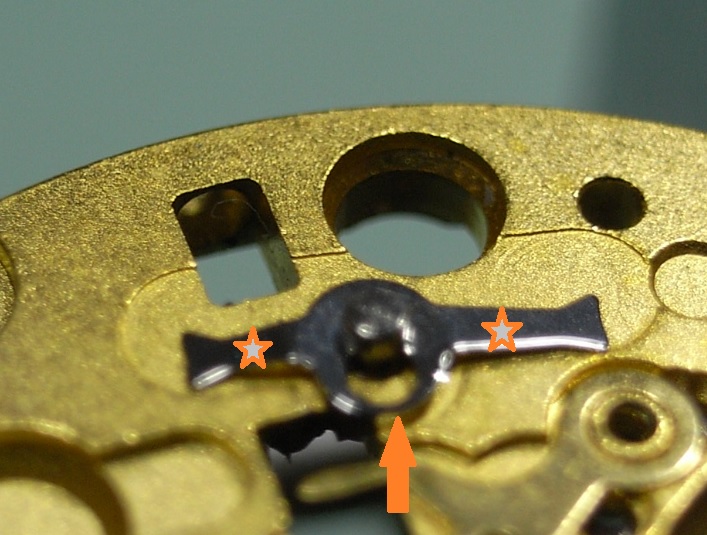
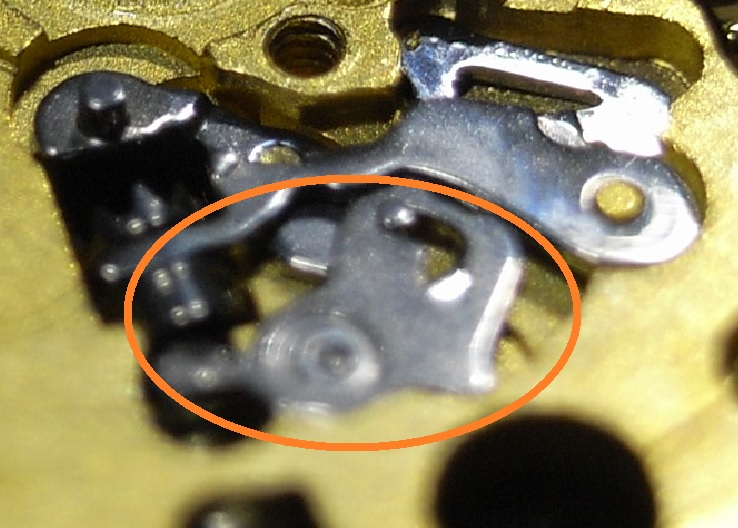
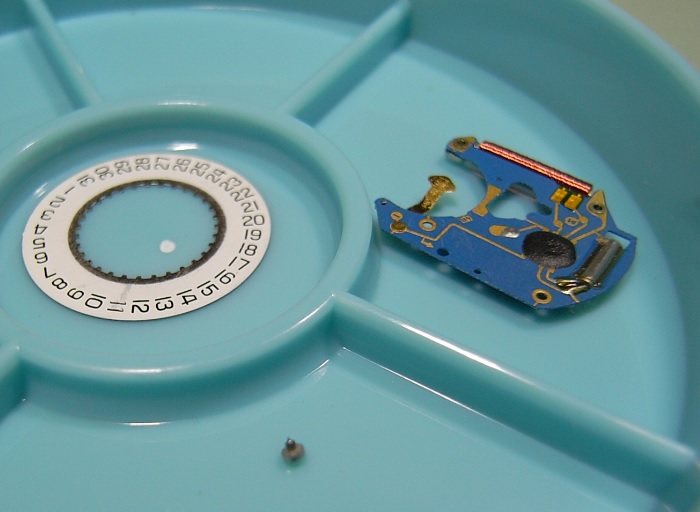
ETA 955 Service Walkthrough "The Workhorse of Highend Quartz" The ETA 955 and 956 Quartz Movements are the most commonly found movement in high-end quartz watches with three hands and a date feature. You will find them in Omega, Tag, and many other brands on the market. For this walkthrough I will be using an 955.412 Movement as my example; but the 956 is so similar to the 955, that this walkthrough will suffice for both. Please note that the numbers after the decimal place only relates to the factory in which the movement was made, so yours could read 955.112, or another factory number ... regardless, the parts are identical and interchangeable. As with all movements, quartz or mechanical, they have a service interval that should be adhered to for longevity of the movement. With quartz movements when the lubrication becomes dried out, or the movement becomes dirty, they will draw more and more current from the battery in order to maintain accurate time keeping. The ETA 955/6, when in optimum condition should draw around 800nA ~ 1.5uA, if the movement is drawing more power than this, a service is required. If a service is not performed, the battery life with decrease markedly, and can go as far as drawing more power from the battery than it was designed for, and damage the battery and cause it to leak and corrode your valuable time piece. Service Manual for the 955/6 Movement CT_956412_FDE_493024_06.pdf.PDF Disassembly Remove the two Date Wheel Keepers. I always start with the one holding the Date Jumper Spring in place. Sometimes the Date Jumper Spring can ping out of place, so be careful when removing the keeper plate above it. Here is a reference photo in case it moves before you see how it's properly seated. Next remove the Keepers and Date Wheel. Then remove the Date Jumper Spring, Motion and Calendar Work. This will leave only the Keyless Work; remove the Yoke and the Sliding Pinion only. We need to flip the movement over, and disassemble the IC Board before we can remove the rest of the Keyless Work. With the movement flipped over, remove the 3 screws holding the Coil Protector. Note for re-assembly the Gold Screw in the centre. Now that the Coil Protector is removed, GREAT care must be taken not to damage the exposed fine windings of the Coil. Then to remove the IC Board, simply remove the 2 remaining screws that hold it. Do this slowly and carefully, as you do not want to slip off the screw and damage this delicate circuit. The same level of care needs to be taken when removing the IC Board from the Main Plate. Take your time and carefully lift it off and store it immediately out of harms way. Next remove the black Insulator Block, and Battery Insulator. This will expose the Setting Lever Spring Clip, which will enable you to remove the rest of the Keyless Work. To remove the Setting Lever Spring Clip, place both points of your tweezers on the locations where I've placed the stars and gently push down on the spring. Then with a piece of Pegwood, push the spring in the direction of the arrow until it moves to the larger opening slot. This will now allow the Setting Lever to be removed, along with the rest of the Keyless Work. Next remove the Stop Lever and Switch, and remove the one screw holding the Train Bridge in place. Then carefully remove the Gear Train and the Rotor. The movement is now completely stripped and ready for inspection and cleaning. There are some parts that you do not place in the parts cleaner, they are as follows: Date Ring Rotor IC Board The rest should be demagnetized prior to cleaning to avoid any metal particles in your cleaning solution from sticking to your parts. When cleaning I also including the Insulator Block, and Battery Insulator in the basket, normal watch cleaning solutions do not harm these items and it is essential they are completely clean to provide the best insulation possible. The Rotor should be cleaned by use of Rodico. As you can see from the picture below, it's surprising the dirt and old oil this will remove ... and it is sufficient cleaning for the Rotor. I hope this has been a help to you, and I will post the assembly procedure later today, if time permits.


 1 point
 -
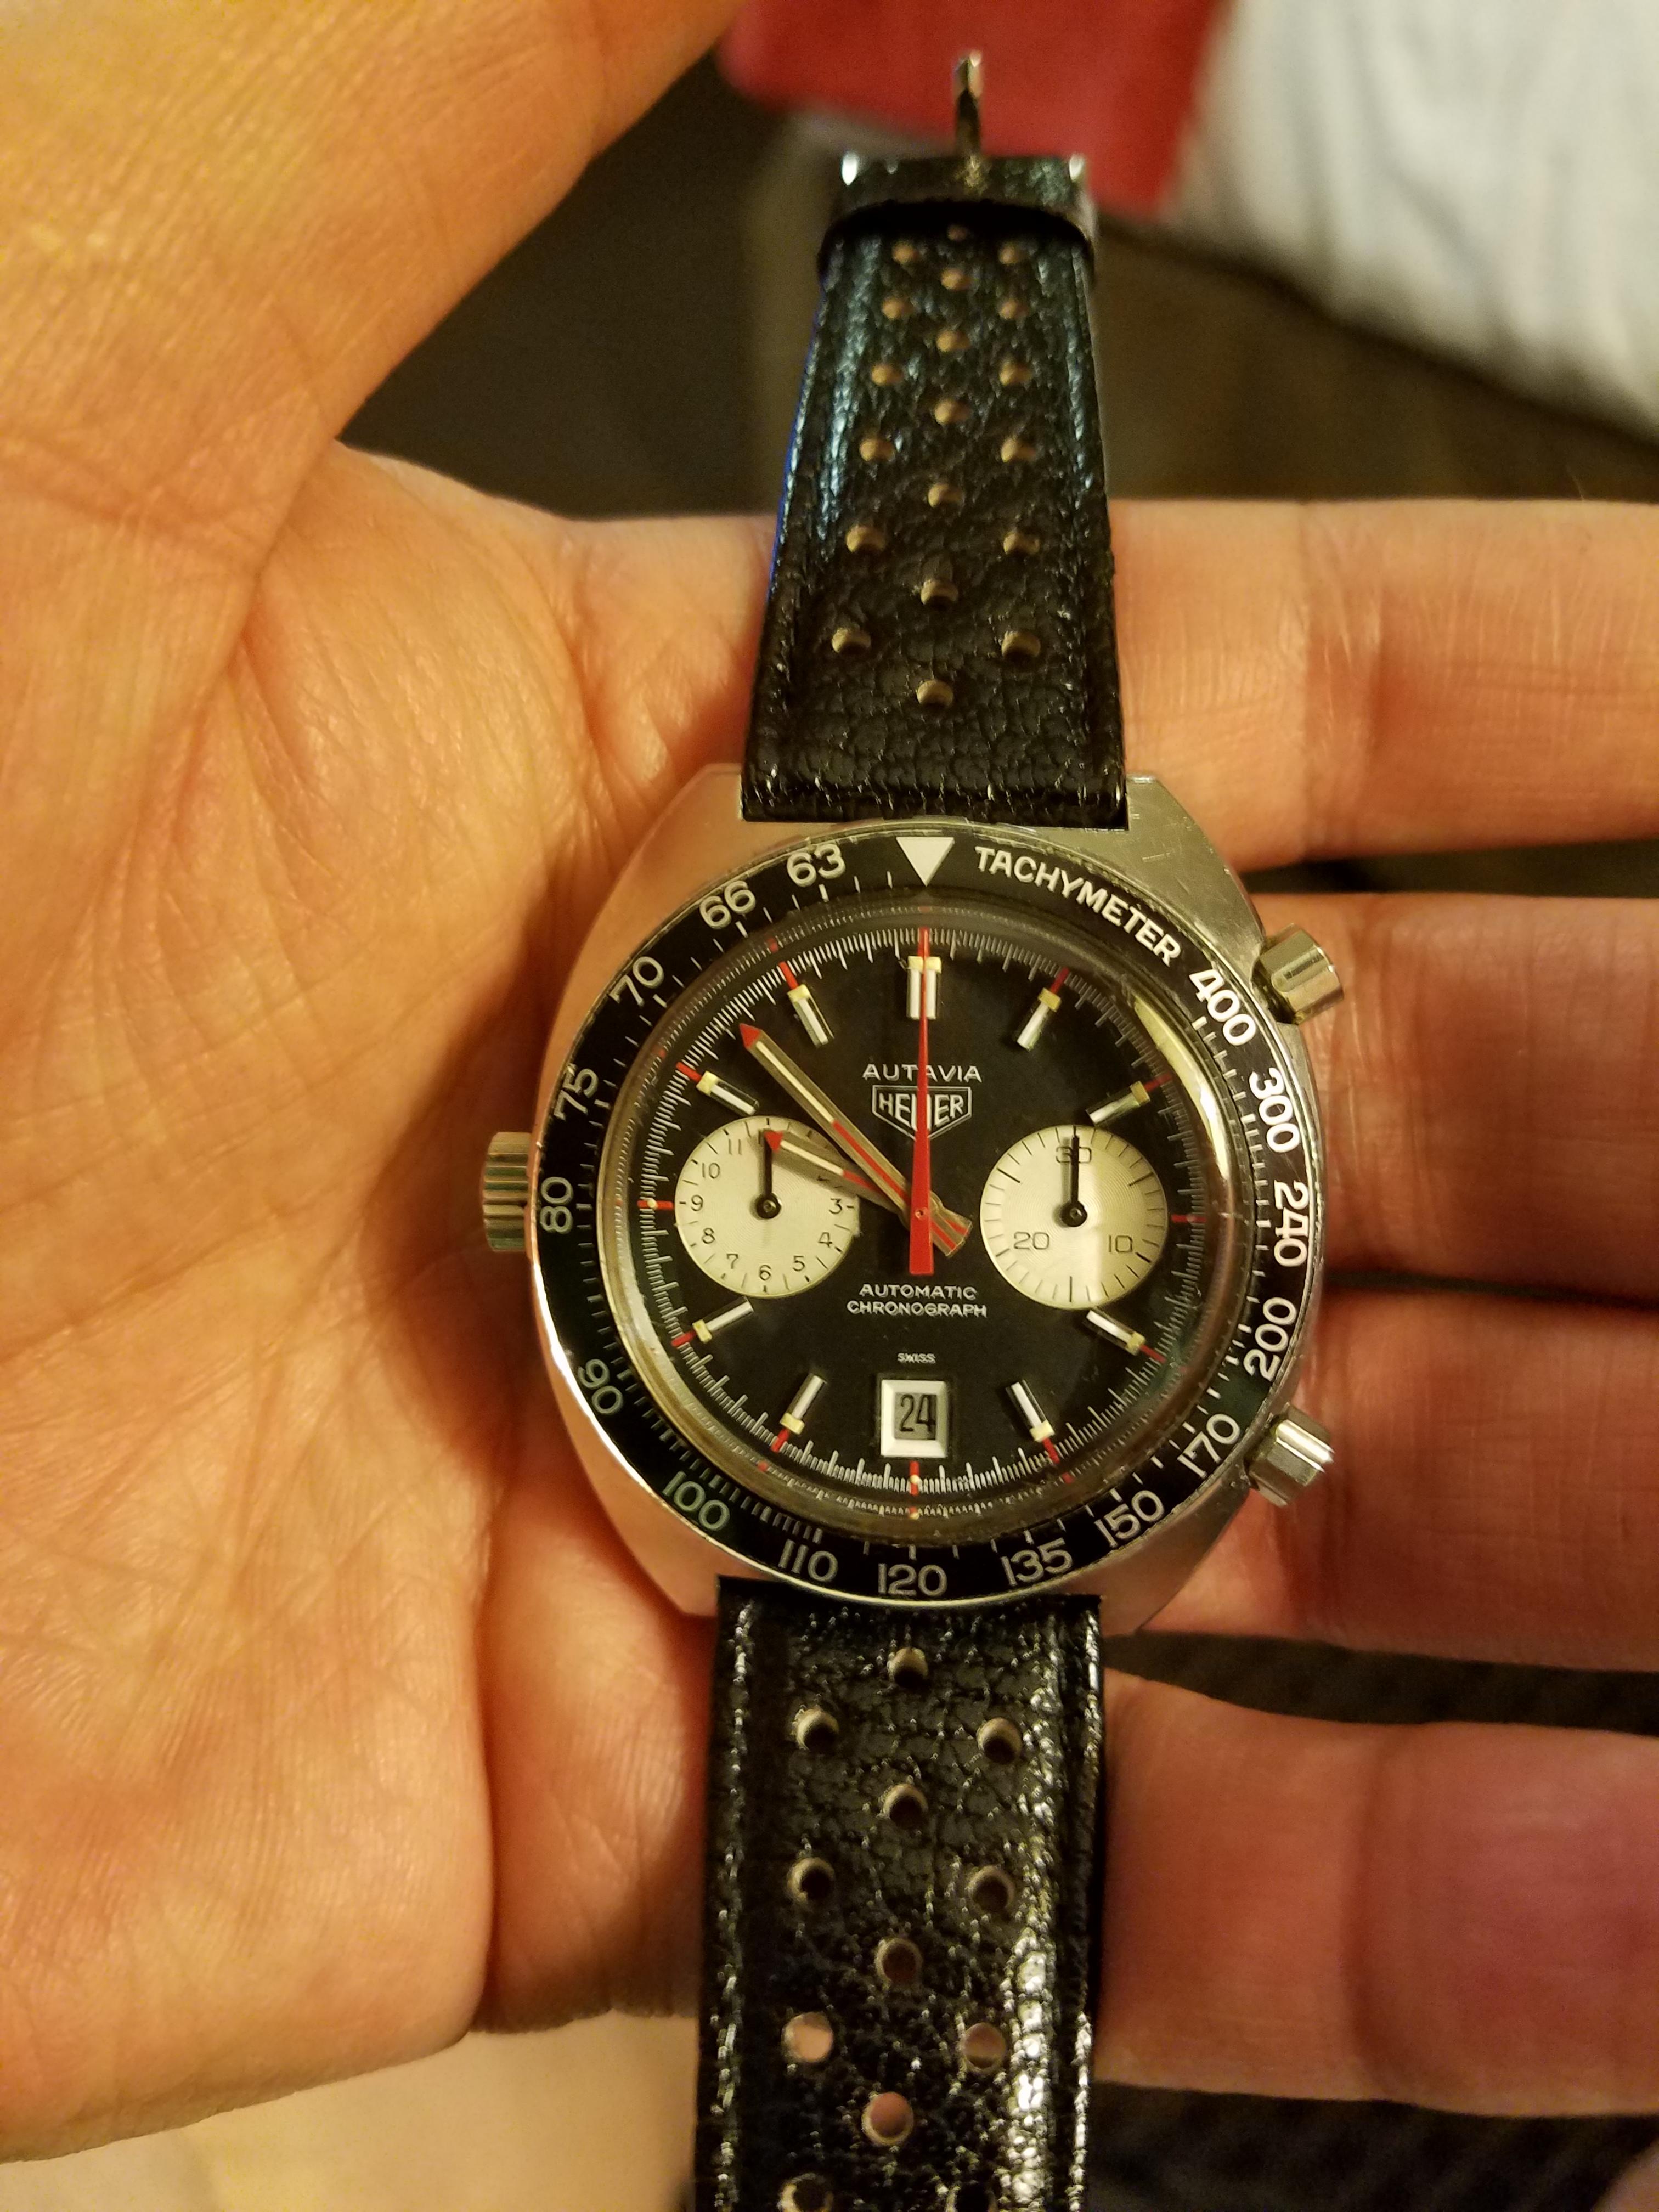
Hello All, this is my first contribution to this thread. I have been doing the lessons for sometime and thought that it is time I meet some of you! 1972 Heuer "Viceroy" Autavia fitted with a NOS Corfam band vintage Heuer buckle.
 1 point
 -
welcome to the repair forum. you have probably worked on vntage railroad watches. the ones that were calibrated and those that were just named RR. i have my grandads RR. vin1 point
-
Thank you for your introduction and welcome to this friendly forum.1 point
-
Hi and welcome to WRT forum.1 point
-
Welcome to the forum, everyone here is happy to help1 point
-
I have always cleaned any watch with shock protection (Kif, Incabloc etc.) with the balance and cock on the mainplate but with jewels out. On watches with no shock protection the balance comes off the cock, cap jewels off, everything cleaned disassembled. I've used both machines that agitate (spin) and ones that don't, and have never damaged or broken a pivot during cleaning. We were taught this in school.1 point
-
I love the band! Makes the rest of the watch pop off!1 point
-
Thanks, Jason =)1 point
-
Welcome Jason!1 point
-
Welcome Jason you will soon become the chinese watch expert.1 point
-
Hi jason and welcome to WRT forum.1 point
-
Well... It may be true that the variations may be within tolerance for most horological applications, but it depends heavily on what device you're using and how it allocates processing time. There IS an undeniable fluctuation, even if it's by a fraction of a millisecond on a good device. At least at the time I researched this and compared a dedicated timing machine and PC based software to an app on a phone, it gave conflicting results and the general consensus was that the technology was a decent indicator, but not precise enough to beat the other options. I mentioned it mainly as a trivial addition to the knowledge base since it may come in handy sometime. I didn't do it to rain on anyone's picnic.1 point
-
Thanks Koen for sharing your philosophy. It's interesting, because I have also bought once a piece of s*** Chinese scooter, but I didn't even tried to resell it, I just gifted to a friend which was able to use it sometimes. I'm not the kind of person that sits aching about money lost. Now for the specific of the professional machine that you linked I think it's good that someone makes a less expensive alternative to Witschi, which prices are robbery. Unfortunately seems like they haven't got much success so far, because I don't know of anyone using it, and I suppose that our resident expert John doesn't either. In the end anyone is free to spend his money as he wants, and to think as he wants. And in this case my thinking stays the same: a beginner amateur that has never worked on watches before has no rational justification for buying an €2,000 tool when a €200 one does the same job, as you can read in the 5 preceeding pages of this thread. The same money can be better spent on other things. Note that I have used the word 'rational', watchmaking is 100% about that.1 point
-
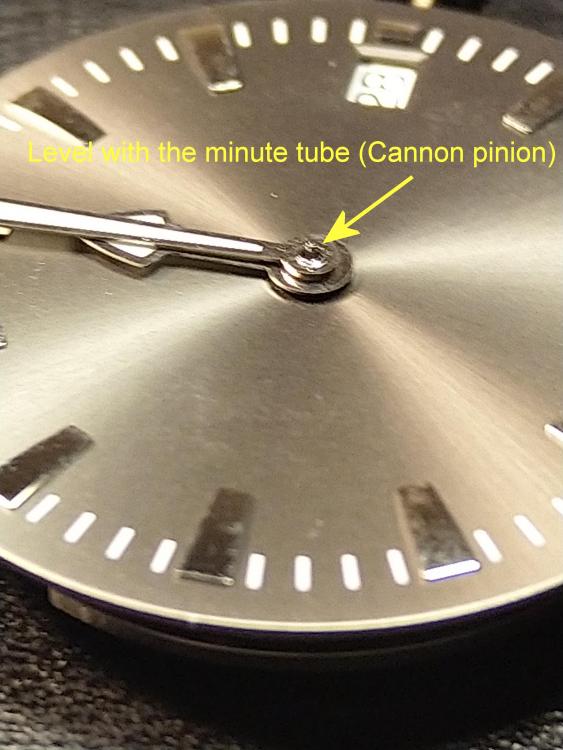
I guess you bought this set as a kit with the parts indicating they are fitting together so before buying even more new parts try some moves mentioned below. When one compare your movement Pictures with mine the parts looks ok. The distances between the cannon pinion and hour Wheel is normal. The symtoms seen in your Pictures strongly indicate you just might have made some common misstakes, investigating and correcting these might get you in the right track again. 1. You forgott the dial washer on the hour Wheel which probably makes it fall out of Place; lift slightly upwards, Always use a dial washer. 2. The dial isn't pushed far enough down so it hovers a bit above the dial support. 3. The dial support is slightly bent; the nick in the bend is resulting in wrong distance between the dial and movement. the dial support has to be totaly level to the movement. 4. The dial is thicker than recommended for a H1 setup. The obvious thing is the distance of the hour hand as stated before so that too has to be fixed. I strongly recommend to use hand setting Tools since these have holes fitting the different tubes. To set a hour hand the hole most be big enough to pass through the minute tube but not the hour tube, and so on. It's probably hard for a novice to imagine how the distances should be but looking at a Picture mostly helps, so when using these Tools you will get the following result. As you see if the hand is straight you automaticaly get the correct distance to the dial. You just repeat the process with the minute hand. (sorry for the shitty Picture, but one still can see the result). A straight minute hand will fitt snuggely to the hour hand. A slightly bent will as i earlier said attache to the hour hand when setting the time. I have earlier made an Quick and Dirty tutorial but without any theories which you can take a look in maybe there are some answers to your questions in that one, it is by far any ultimate solution but might help you on your way.

 1 point
 -
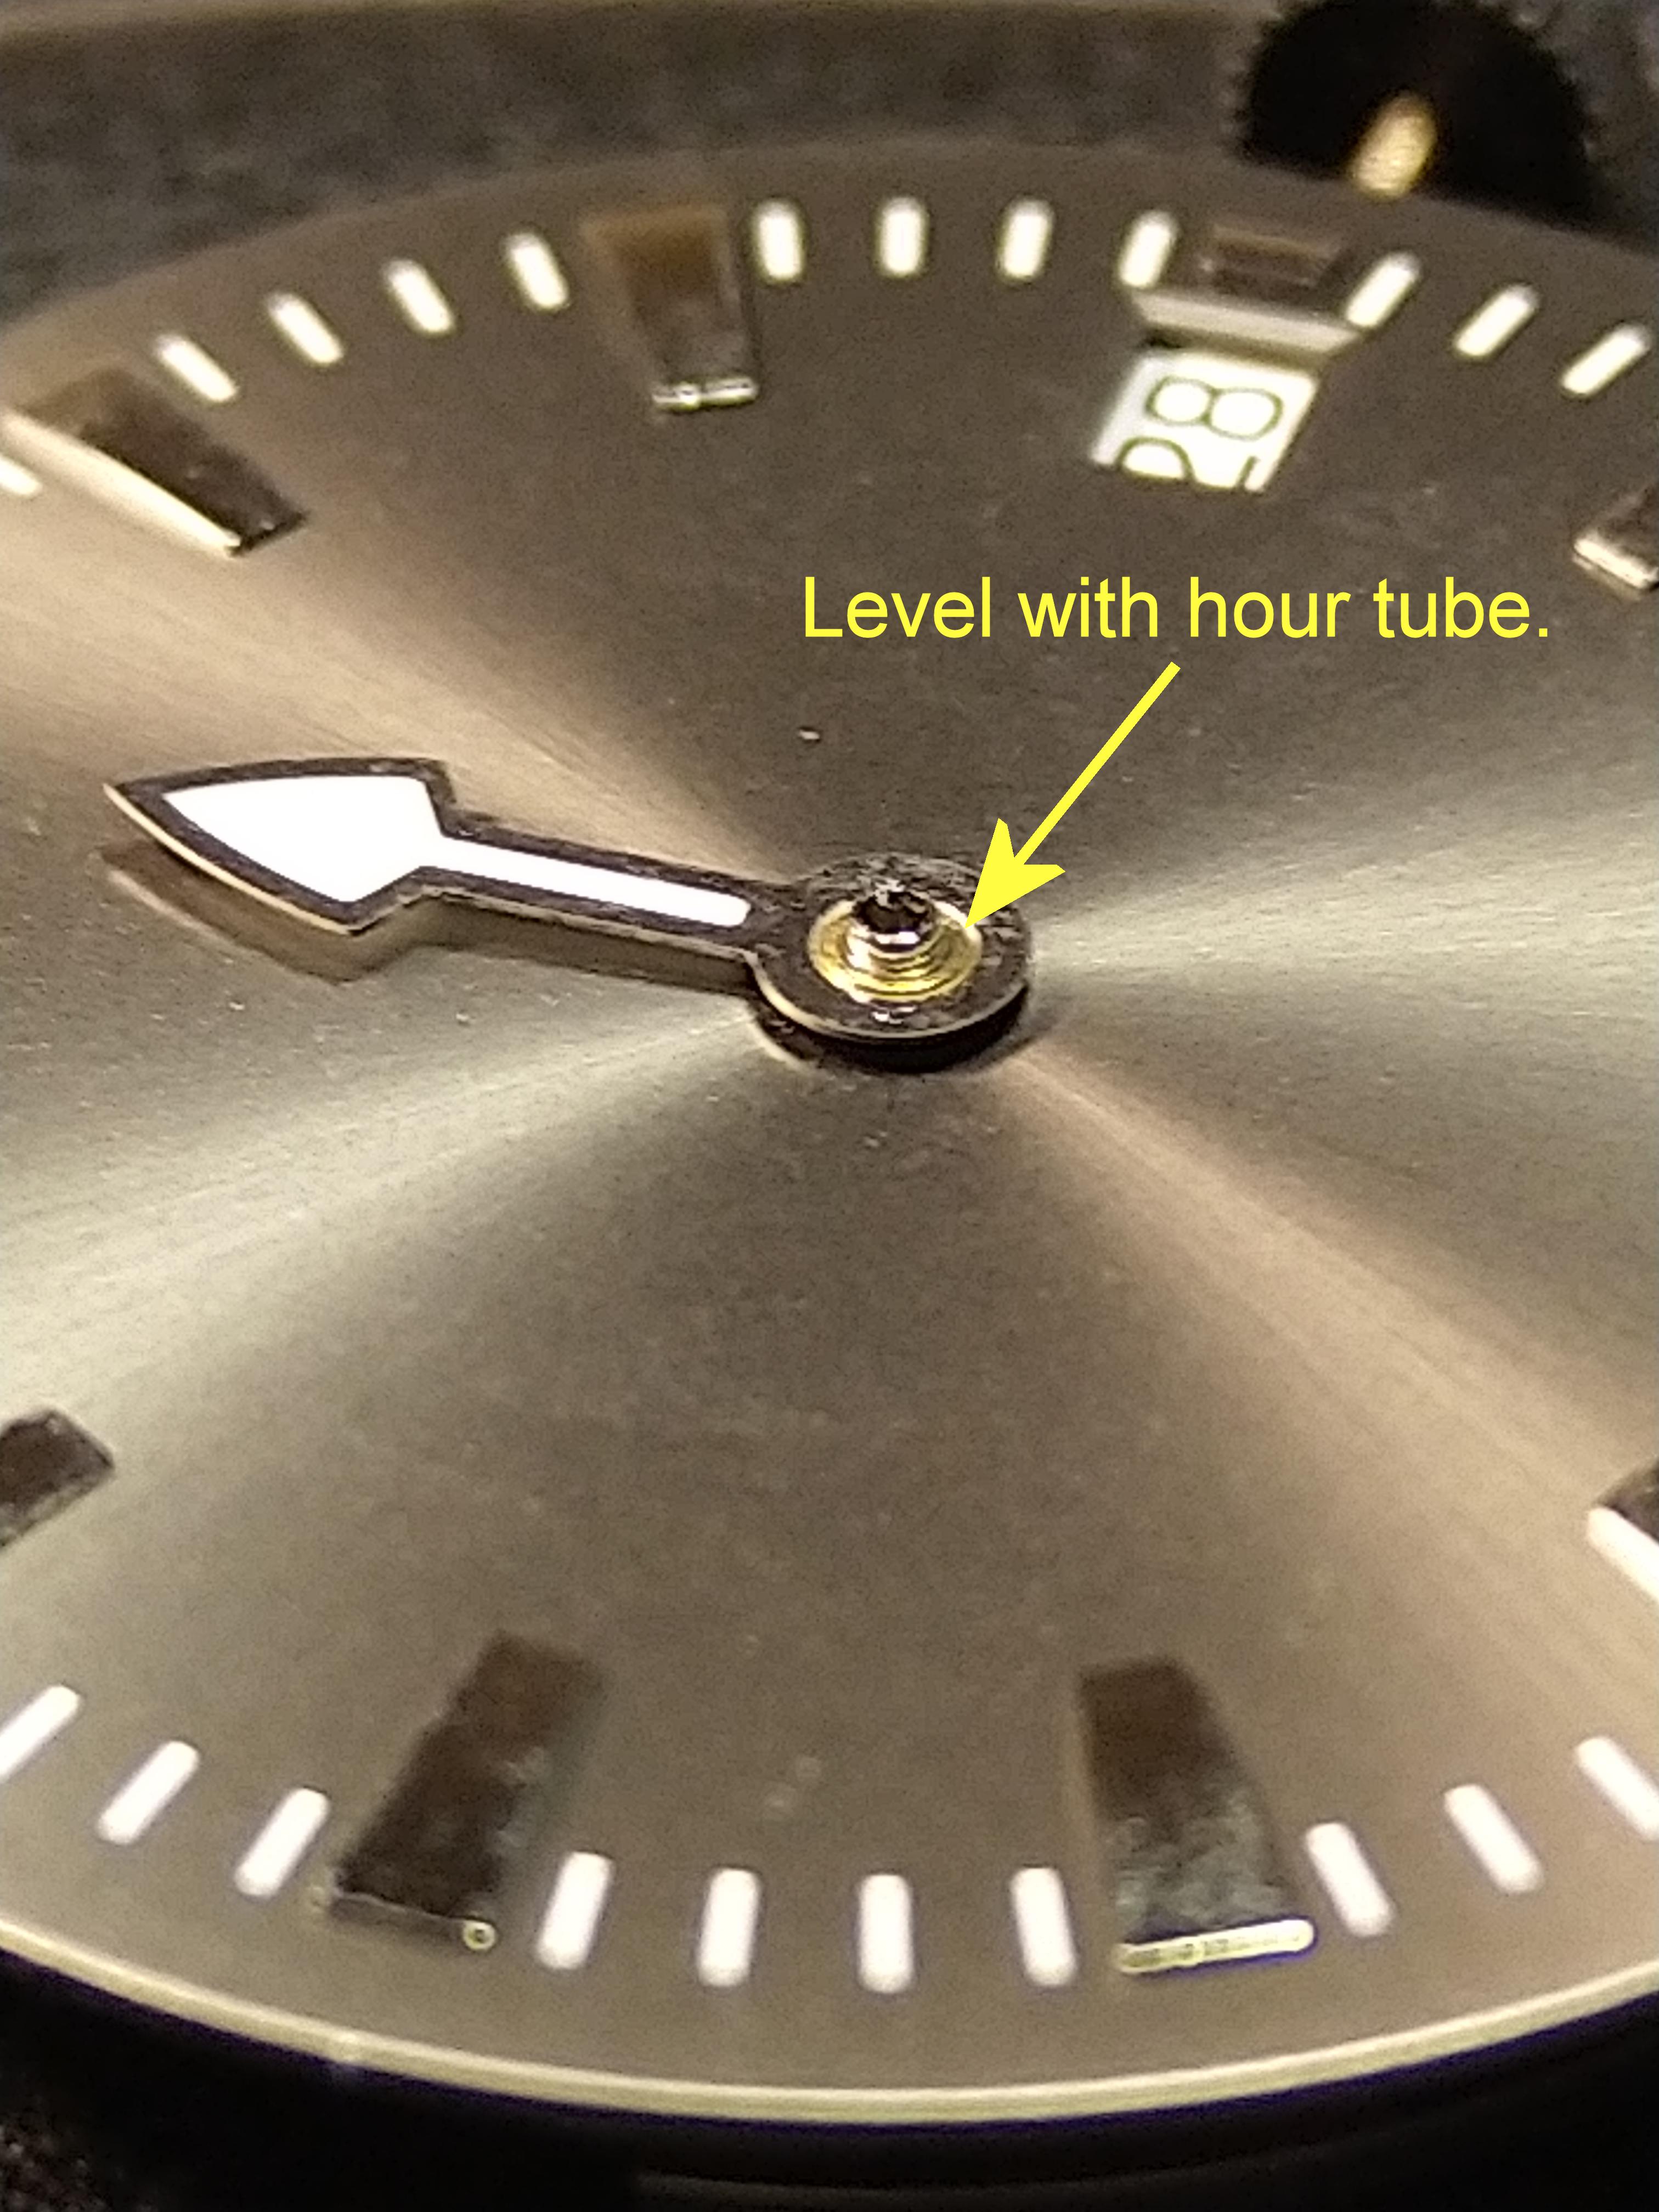
When the dial and the hour hand aren’t mounted, the distance between the end of the hour wheel tube and the end of the cannon pinion, as indicated by the yellow arrow, looks perfectly fine to me. However, when the dial and hour hand are mounted, it looks like the hour hand has been pressed down to such an extreme extent that it lifts the hour wheel away from the movement. In this state, I’d be surprised if you can set the time of the hour hand when you rotate the crown, but if you can’t, as I suspect, I think my analysis is correct. You only have to press down the hour hand until it is flush with the end of the hour wheel tube. Anyway, the best way to solve this little mystery is to understand how the motion works operate in detail and to this end you'll find @HSL's posts the most useful. Well, JM2C!1 point
-
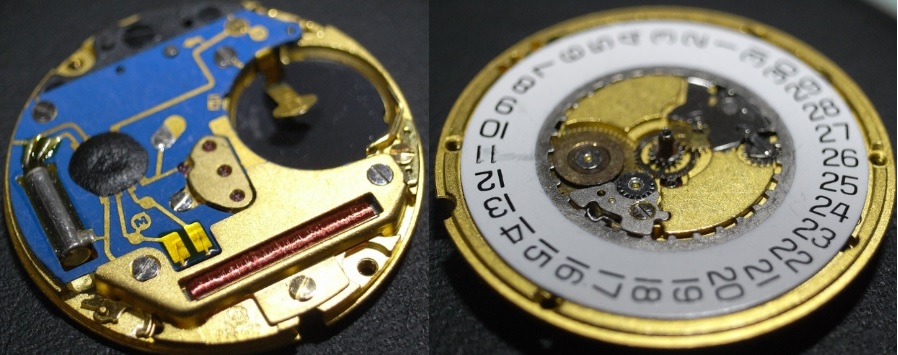
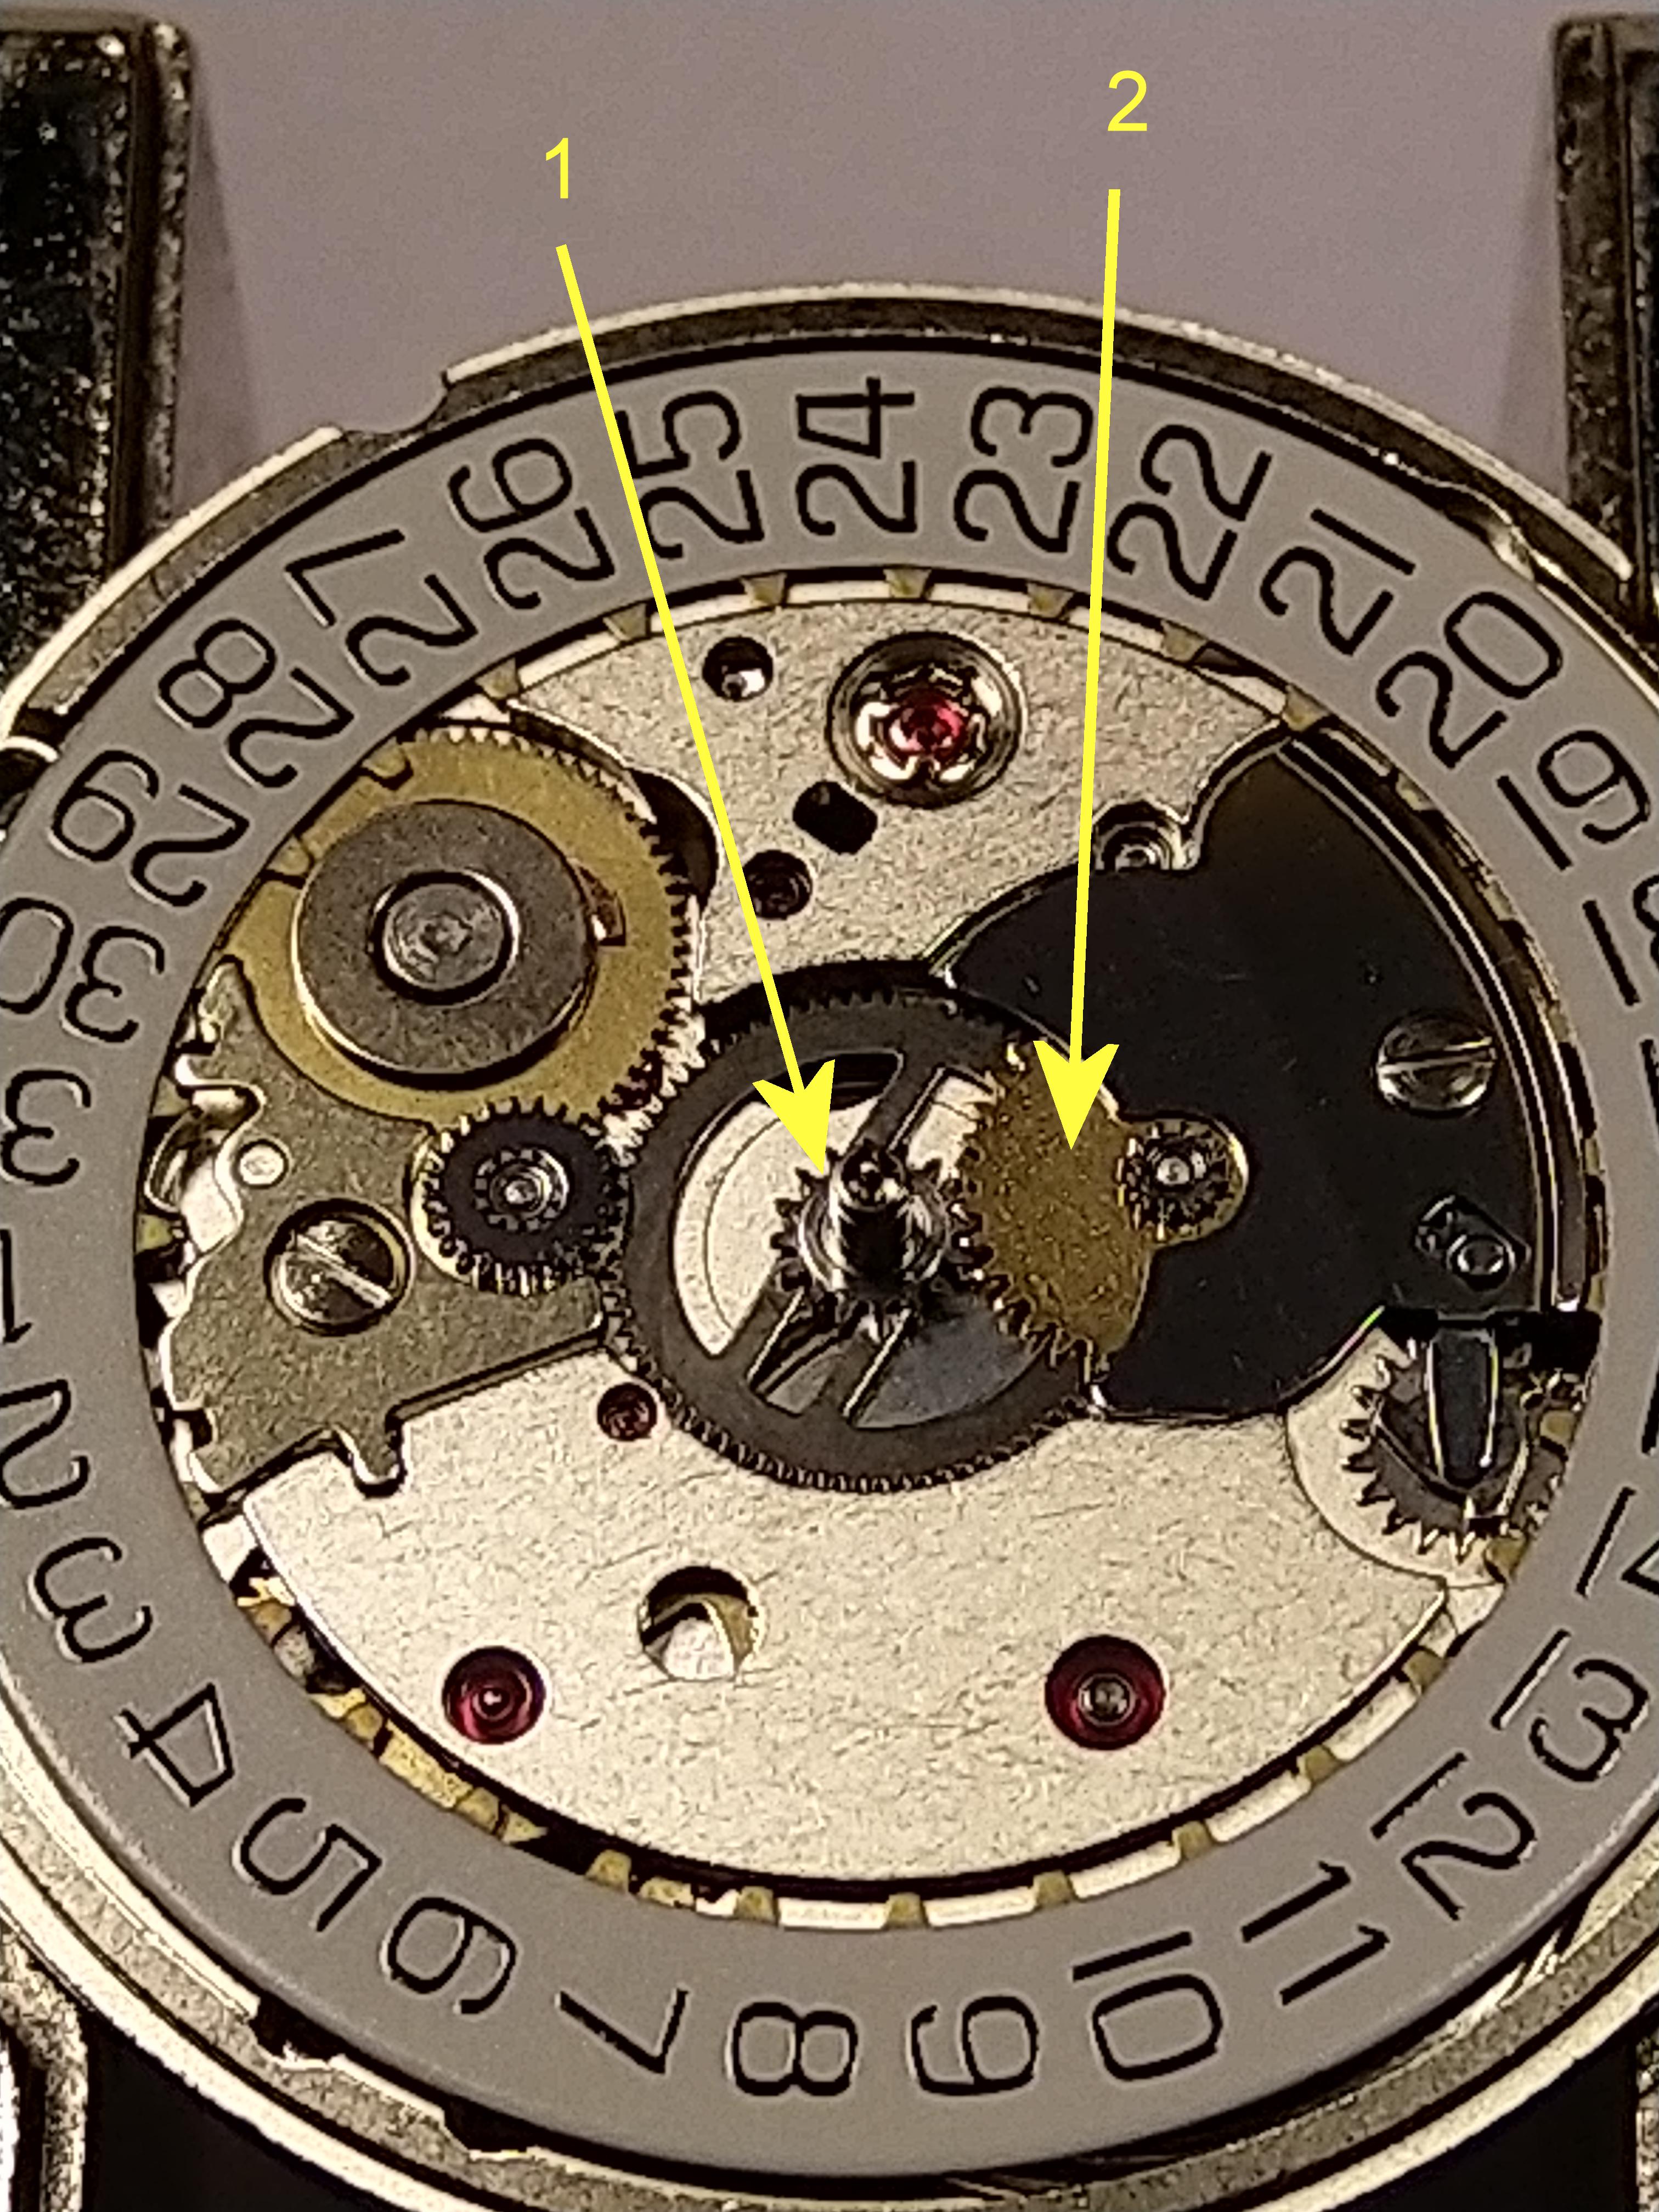
Well I have worked with a whole bunch with movements were the setting of the hour and minute as I discribe in the text is direct driven by the setting wheel and the minute wheel, below is an example. When the watch is in normal mode the drive gear is run by the drive train and the drive train is powered by the barrel. So since my native language isn't English I make a small guide explaining what I tried to communicate with that sentence how the time is set with the watch in "setting mode" not normal drive mode. I dont have a watch for service right now but lets pop a fresh one. In the bag we find "the kit" with the dial ring, hour wheel and an extra winding stem. We look at the movement put in a movement holder. On the 2824-2 we can see .. 1. The cannon pinion with integrated drive gear. 2. The minute wheel. In normal conditions the drive gear is moving the cannon pinion and the minute wheel, but in "setting mode" the setting wheel is drivig the minute wheel and the cannon pinion. Here we can see the.. 1. Hour wheel 2. The small pinion on the minute wheel driving the hour wheel. 1. The whole setup when the 2824-2 is in the setting mode. 1. The hour wheel conected to the.. 2. Minute wheel conected to the.. 3. Setting wheel. And to me the lenght of the "minute pinion" loooks OK for this type of movement. This is how much a H1 cannon pinion sticks out from the hour wheel pretty much what one can see on mcoultons last picture. So my theory still is the hands were wrongly attached or of the wrong type of hands, but who knows.


 1 point
 -
Thanks Nucejoe! I've enjoyed reading the public posts for a while so I know I'll like it here. The NAWCC message boards are sometimes a little ranty when certain people start having "friendly" disagreements on technique or tools. Lol.1 point
-
Hi Dylan and welcome to WRT.1 point
-
ll,I have the same problem with that slipping clutch wheel.Can some one helps me,I need one!My one is broken.Please let me know if some one can help me find one for the same movement?Many thanks in advance.Ves1 point
-
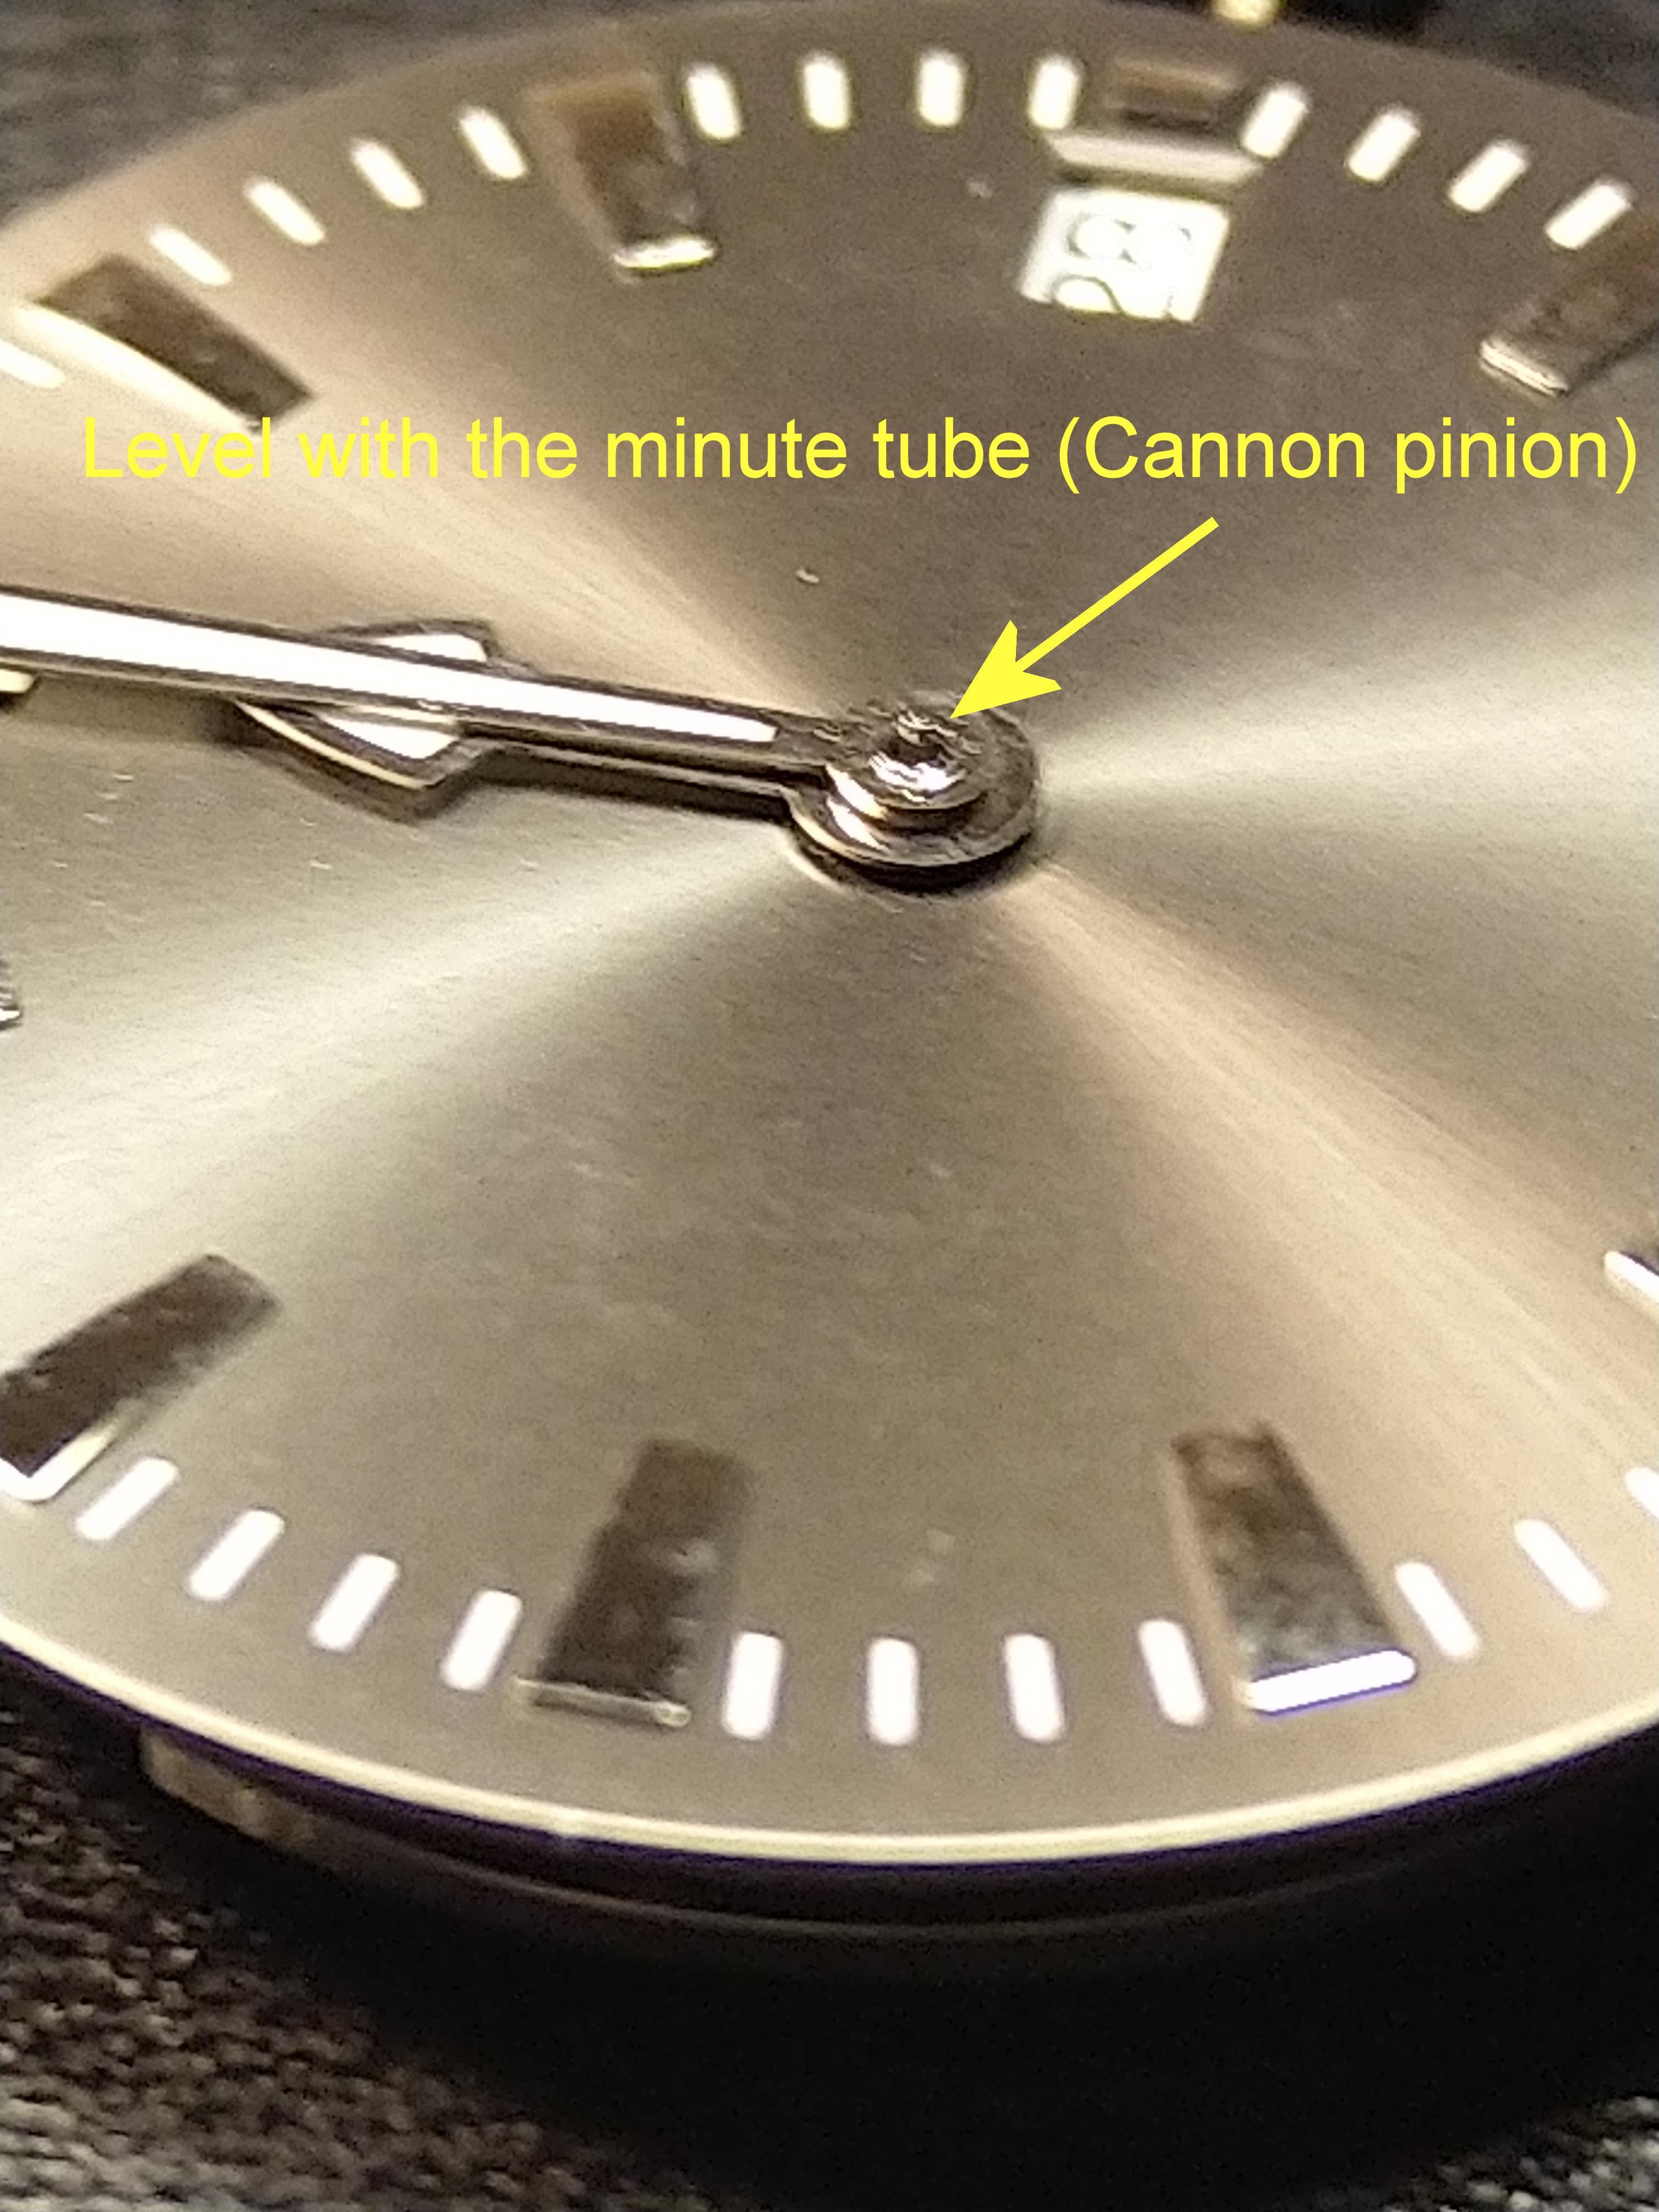
It looks like rather the minute pinion tube not protruding enough, it is the hour wheel that's somehow lifted too high. Also the hour hand is way far down the tube than needed.1 point
-
I had a bottle of Lubeta V106 . Can't say i use it a lot. So when i open the bottle it was dry. Had closed as hard as i could . My experience say 9010 diluted in naptha is as good as Lubeta V106. If you don't use it every day. It's evoporates very fast so gets thicker as times go by.1 point
-
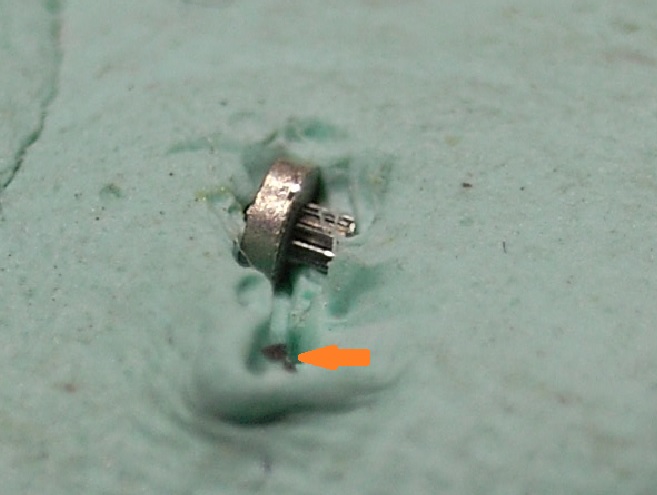
I can,t remember if stud holdef is mobile or fixed on this. Small damage or fault at escape teeth requiring high magnification, may have gone undetected.1 point
-
Fixodrop retains the oil in. Yes that is correct, it is very expensive, my personal opinion is it is not worth the money.1 point
-
Always wondered what they used long time ago before all these modern oils? The expensive of some areincredibly high.1 point
-
Would lubeta v106 solely suffice for reversers? Or do we still need to add fixodrop, I hear fixodrop retains the oil in.1 point
-
Just as VWatchie has noted, without Pictures it is impossible to know. But lets try anyhow 1.) First of all the cannon pinion pivot is your minute hand position, it is mostly driven by the minute Wheel, ontop of the minute Wheel is a small pinion driving the hour Wheel (small gears are called pinions and the larger ones are Wheels), so when you pull the Winding stem out the minute Wheel is engaged by the setting Wheel and both the cannon pinion and hour Wheel is turned by the minute wheel, nothing special with that since one wants to set both hour and minute. It's only the ratio between the Wheels and pinions that set what rate the hands are turned in. But sometimes one have pushed the minute hand too Deep so you don't have any space between the hour and minute hand or the minute hand is slightly bent. In that case both the hour and minute hand moves simulaniously at the same rate, the hour hand is just friction fitted after all, this is not a good state and is solved by lifting the minute hand up a bit with hand levers (after put somthing on the dial to protect it from scratching) or taking the second hand and the minute hand off and gently straighten the minute hand. 2.) Impossible to say right now since we dont know any meassurements of the hand hole diameters nor what movement they are to be attached too.1 point
-
Found them . The springs are 1,60 mm . Have some . They look NOS.1 point
-
If one takes the time to read the entire Moebius catalogue there are many more subtle variations, that are not actually available to retail. As an hobbyist I think one should concentrate on more important issues, like applying correctly, etc.1 point
-
You never lubricate the whole mainspring. Depending on the type and material uses on MS and barrel all it's needed is very little specific product on the top and bottom of the barrel, and even that is subject to debate, . If it's an automatic some "braking" type product is applied to the wall of the barrel. BTW, it's appreciated that new members introduce themselves in the dedicated section of the forum.1 point
-
The lubrication you require is Moebius 9010. There are lots of vids on YouTube re-lubrication of watch jewels Mark has many showing the procedure. However found this that deals specifically with the shock jewels.1 point
-
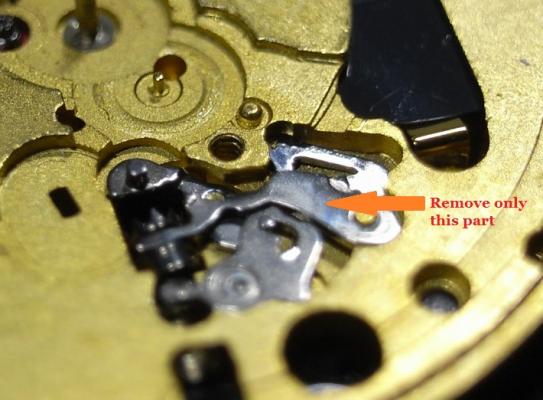
Yes I was talking about the balance pivot. And roller table is the same as impulse roller. John is right with the terminology, stumps and anvils are the same, stakes are the "pushers" in a staking set, and pushers are pushers. The bottom right 6 pieces in your Seitz are stumps. You'll definitely want more. Horia sets often come with a stump for every pusher. A nice thing with Seitz (and Favorite and Chatons SA) is the spindle that carries the pushers has a 4mm hole, the same as the locating diameter of the stumps (also most staking set stumps), so the stumps can be also used as pushers. I do this all the time. Including a pic of "some" of the stumps and pushers I have around. The middle rack with 50 or so stumps are the ones I use the most. Also a Horia with a stump in as pusher.
.thumb.JPG.b3910c67c0bb2e5157878654fb82d2cc.JPG)
.thumb.JPG.b44bf7971e95e45de8a420626412c9ee.JPG) 0 points
0 points


.JPG.a89b767813922532639e0a4c453f81e3.JPG)
.JPG.d4751037eee2613e2aa8a9fa027eb7f5.JPG)