Leaderboard


Popular Content
Showing content with the highest reputation on 08/03/19 in all areas
-
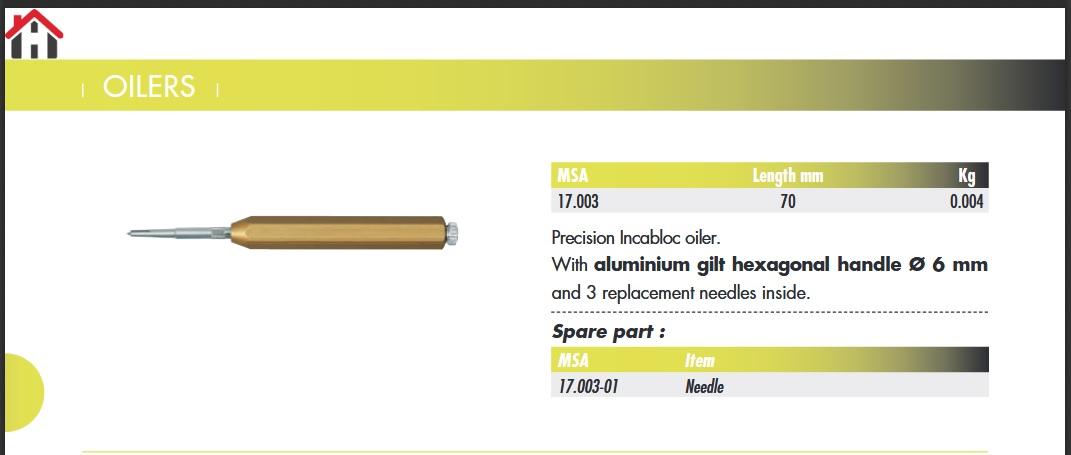
There's a commercially made "oil pusher", Bergeon doesn't list it anymore but Horotec does. It has very very fine needle like tips, just for getting the oil through the hole jewel on to the cap. Why it's called an Incabloc oiler is a mystery, as it would be useless on 99% of incablocs (only very few are like Kif, where the chaton doesn't have a "chimney"). It's handy, and fragile, and won't get into the very tiny hole jewels like on an old ladies model LeCoultre or similar (often 0.07mm jewels). For those I use fine hairspring taper pins.
 2 points
 -
No thanks, I keep pushing taperd HS and oil with acupuncture needles.1 point
-
It's from Horotec's website, they have the 700 page catalog in pdf with a pretty good index. Bergeon should get an award for least user friendly site, ugh.1 point
-
Good point Joe! I somehow thought, or rather hoped, that an automatic oiler also would take care of oiling the jewel hole (not just the end stone), but I guess "the oil pushing wire" or hs pin (taper pin I assume?) that @nickelsilvermentions is the way to go.1 point
-
I am happy to look in my parts box if needed....1 point
-
Have a look here. You might find something in this lot. https://www.cousinsuk.com/product/battery-clamps-insulators-kits?code=A00091 point
-
I guess a drawback with automatic oiler is, you can,t be ceratin of successful oiling without actualy seeing the oil. In your demonstration of auto oiler when you lifetd the endstone, the amount and spread of the oil looked " just perfect" to me , despite later advice from knowlegable members and books indicated 60% of endstones surface area, I remain unconvinced. Auto oiler dispenses the perfect amount and by your approach, right in the center, where it should be. Hoping extra oil, stuck between endstone and jewel will flow back to center and pivots seems wishful thinking, I have faced too many cases of oil dried between the jewels in vintage watches. Regards joe1 point
-
If you have the old clamp or draw a picture of it. Post it here and I'm sure members will be able to help you. I myself cant find a photo of one.1 point
-
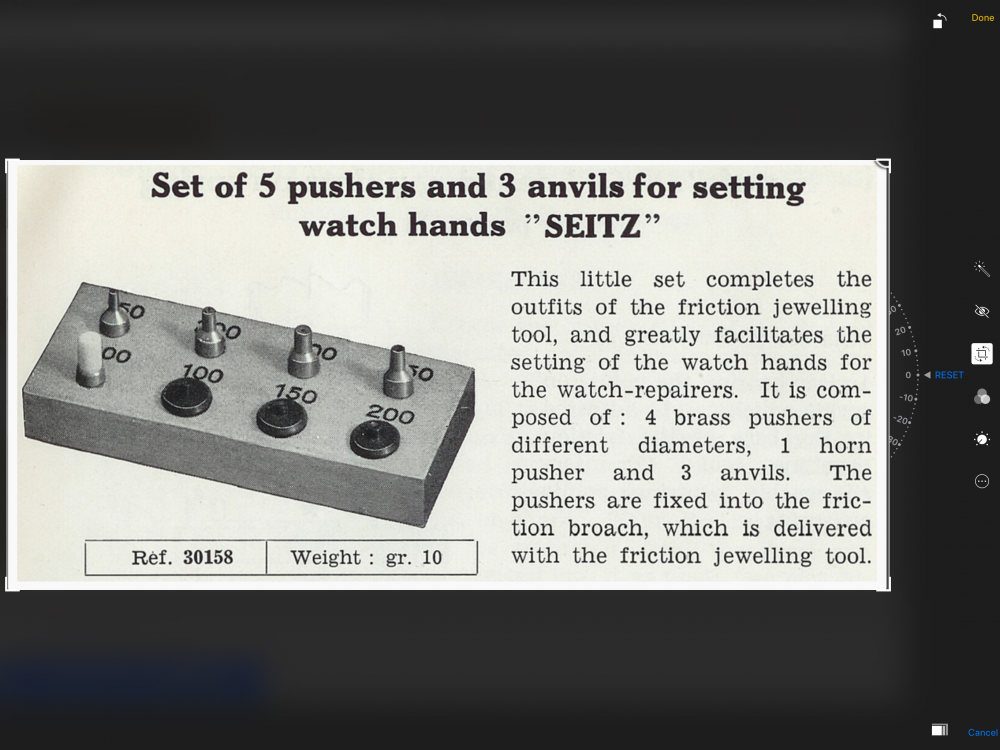
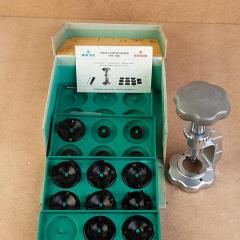
Yes I was talking about the balance pivot. And roller table is the same as impulse roller. John is right with the terminology, stumps and anvils are the same, stakes are the "pushers" in a staking set, and pushers are pushers. The bottom right 6 pieces in your Seitz are stumps. You'll definitely want more. Horia sets often come with a stump for every pusher. A nice thing with Seitz (and Favorite and Chatons SA) is the spindle that carries the pushers has a 4mm hole, the same as the locating diameter of the stumps (also most staking set stumps), so the stumps can be also used as pushers. I do this all the time. Including a pic of "some" of the stumps and pushers I have around. The middle rack with 50 or so stumps are the ones I use the most. Also a Horia with a stump in as pusher.
.thumb.JPG.b3910c67c0bb2e5157878654fb82d2cc.JPG)
.thumb.JPG.b44bf7971e95e45de8a420626412c9ee.JPG) 1 point
1 point -
Another reason could be that fix-o-drop / epilame agent could have remnants on one of the stones that appears to be a smaller diameter drop.1 point
-
This picture shows what the pushers and anvils look like. Numbers 100, 150, and 200 are anvils.
 1 point
 -
Stakes, stumps, punches, pushers and anvils: This is how I understand the difference in terminology between a jeweling tool and a staking set, which are related tools. A pusher or punch in a jeweling set is called a stake in a staking set. What is called an anvil in a jeweling tool is called a stump in a staking set. Will be interested if anyone else has a different understanding of the terminology.1 point
-
I wonder if the thicker end stone has a smaller radius of curvature to its top surface, resulting in greater magnification, like a stronger lens. If so then identical size drops placed onto the flat surfaces of each jewel will look different sizes when viewed through the jewel, with the thicker jewel showing the greater apparent size. .... just a thought. :-)1 point
-
agreed . to the best of my knowledge I have never INGED . not once.1 point
-
I think the gremlins ate your description.1 point
-
Welcome in that friendly forum [emoji846] Never forget that human being can be just like good wine ... aging makes them better. I'll enter my sixties in a few months and they'll be "roaring sixties" ... well, I hope so [emoji6] Envoyé de mon moto g(7) power en utilisant Tapatalk1 point
-
Look under Generic Watch Parts Stem Extensions on the Cousins site. I've used the female extensions in the past. They screw into the crown and you need to cut them to length to ensure that it engages correctly with the male inner stem. They currently only show a limited number of tap sizes. As such you may have to replace the crown as well if what they have available is a different tap size to the current crown. Sent from my moto g(6) play using Tapatalk1 point
-
So finished reassembling and lubricating my grandfather's ETA 1080 today and took a couple of pictures of it before putting it back into its case. For anyone interested I assembled the movement in the order shown by these pictures (000A.jpg, 000B.jpg, 001.jpg to 073.jpg). The pictures were taken during disassembly so the parts in the pictures are somewhat dirty. The pictures were intended for my personal use, so some of the text and coloured arrows might seem somewhat cryptical. And finally, a slow-motion video of the balance in motion can be seen here. This watch was last used some 40 years ago or so, so just wonderful to see it tick again! This was my first ETA movement and compared the Vostoks and Poljots I've been working on before I must say the fit and finish is indeed a notch or two better. I really enjoyed doing my first Swiss watch (except for the Unitas 6498 in Mark's watch repair lessons).1 point
-
So, I’ve started to reassemble my grandfather’s ETA 1080 and went about it as I always do, with the train wheels. However, when mounting the train wheel bridge I just couldn’t get the pivot of the escape wheel to reach into the cap jewelled pivot hole on the bridge (seen in the first picture in my first post above). Scratching my head, I removed the escape wheel and inspected it, suspecting the pivot might be damaged. It was not, it looked perfect. So, I tried it again and by holding down the bridge with some peg wood, I could get the pivot to just barely reach into the jewel hole. Yet, as soon as I tried to secure the bridge the pivot would fall out of the hole. Having struggled with this for probably more than half an hour, I began to feel pretty frustrated. I’m not a very technical person, I don’t have a lot of experience of watch repairing, and in all honesty I guess I’m not too smart, but all of sudden I realized, or rather remembered, that the jewel hole on the dial side has a cap jewel as well and that the escape wheel pivot on the dial side probably fell too deep into the jewel hole as I hadn’t mounted its cap jewel. Said and done, I oiled the cap as instructed above (it worked out perfectly, thanks!), mounted it on the dial side and then tried to mount the train wheel bridge again. Bingo! This time around the escape wheel pivot reached into to the jewel hole on bridge perfectly. At this point, I felt pretty proud of myself! Well, just thought I’d share in case someone else who’s new to cap jewels happens to find this thread in the future. I'll try nickelsilver's method the next time around which would have eliminated this problem. Thank you all for helping out!1 point

.JPG.a89b767813922532639e0a4c453f81e3.JPG)
.JPG.d4751037eee2613e2aa8a9fa027eb7f5.JPG)