Leaderboard


Popular Content
Showing content with the highest reputation on 11/18/18 in all areas
-
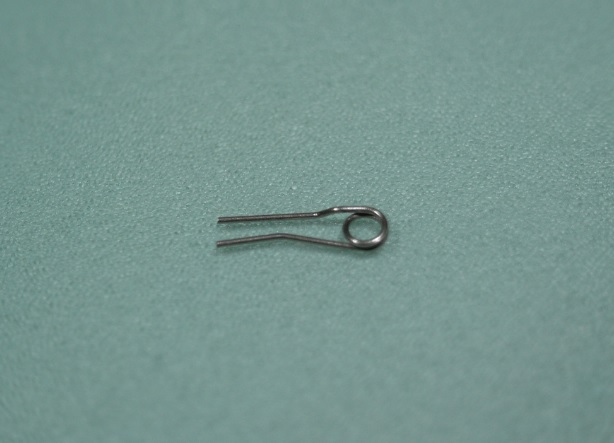
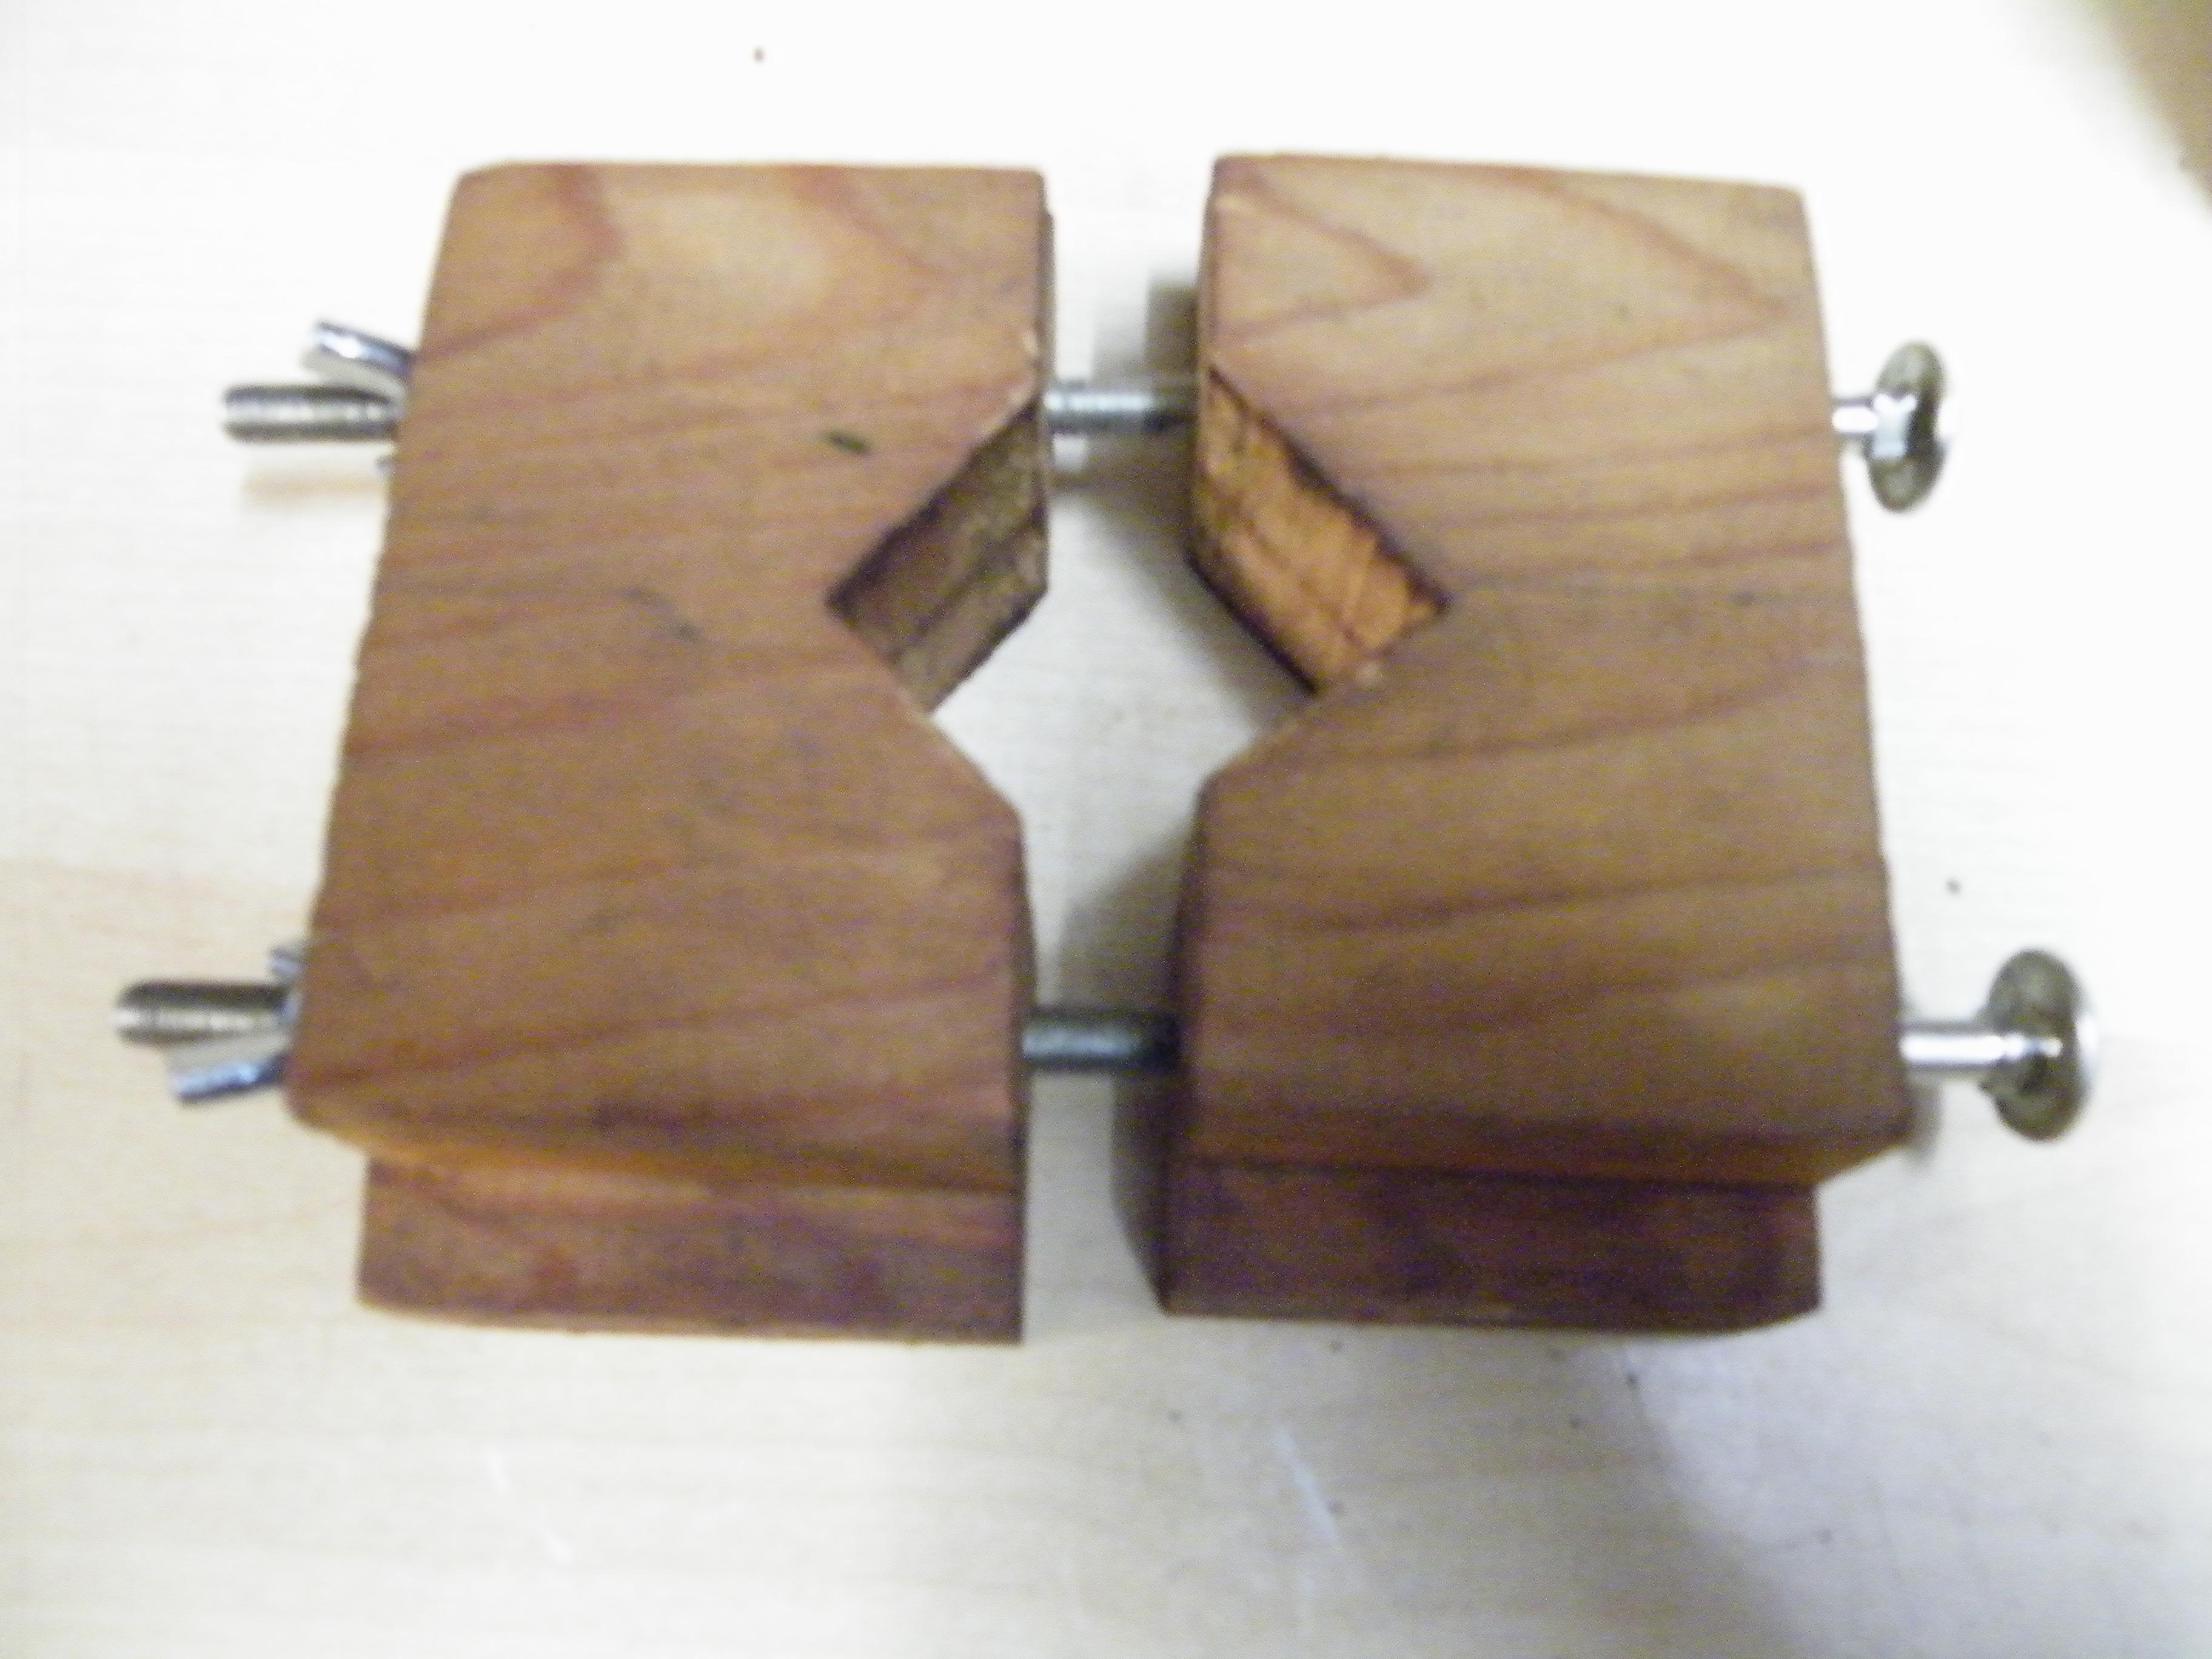
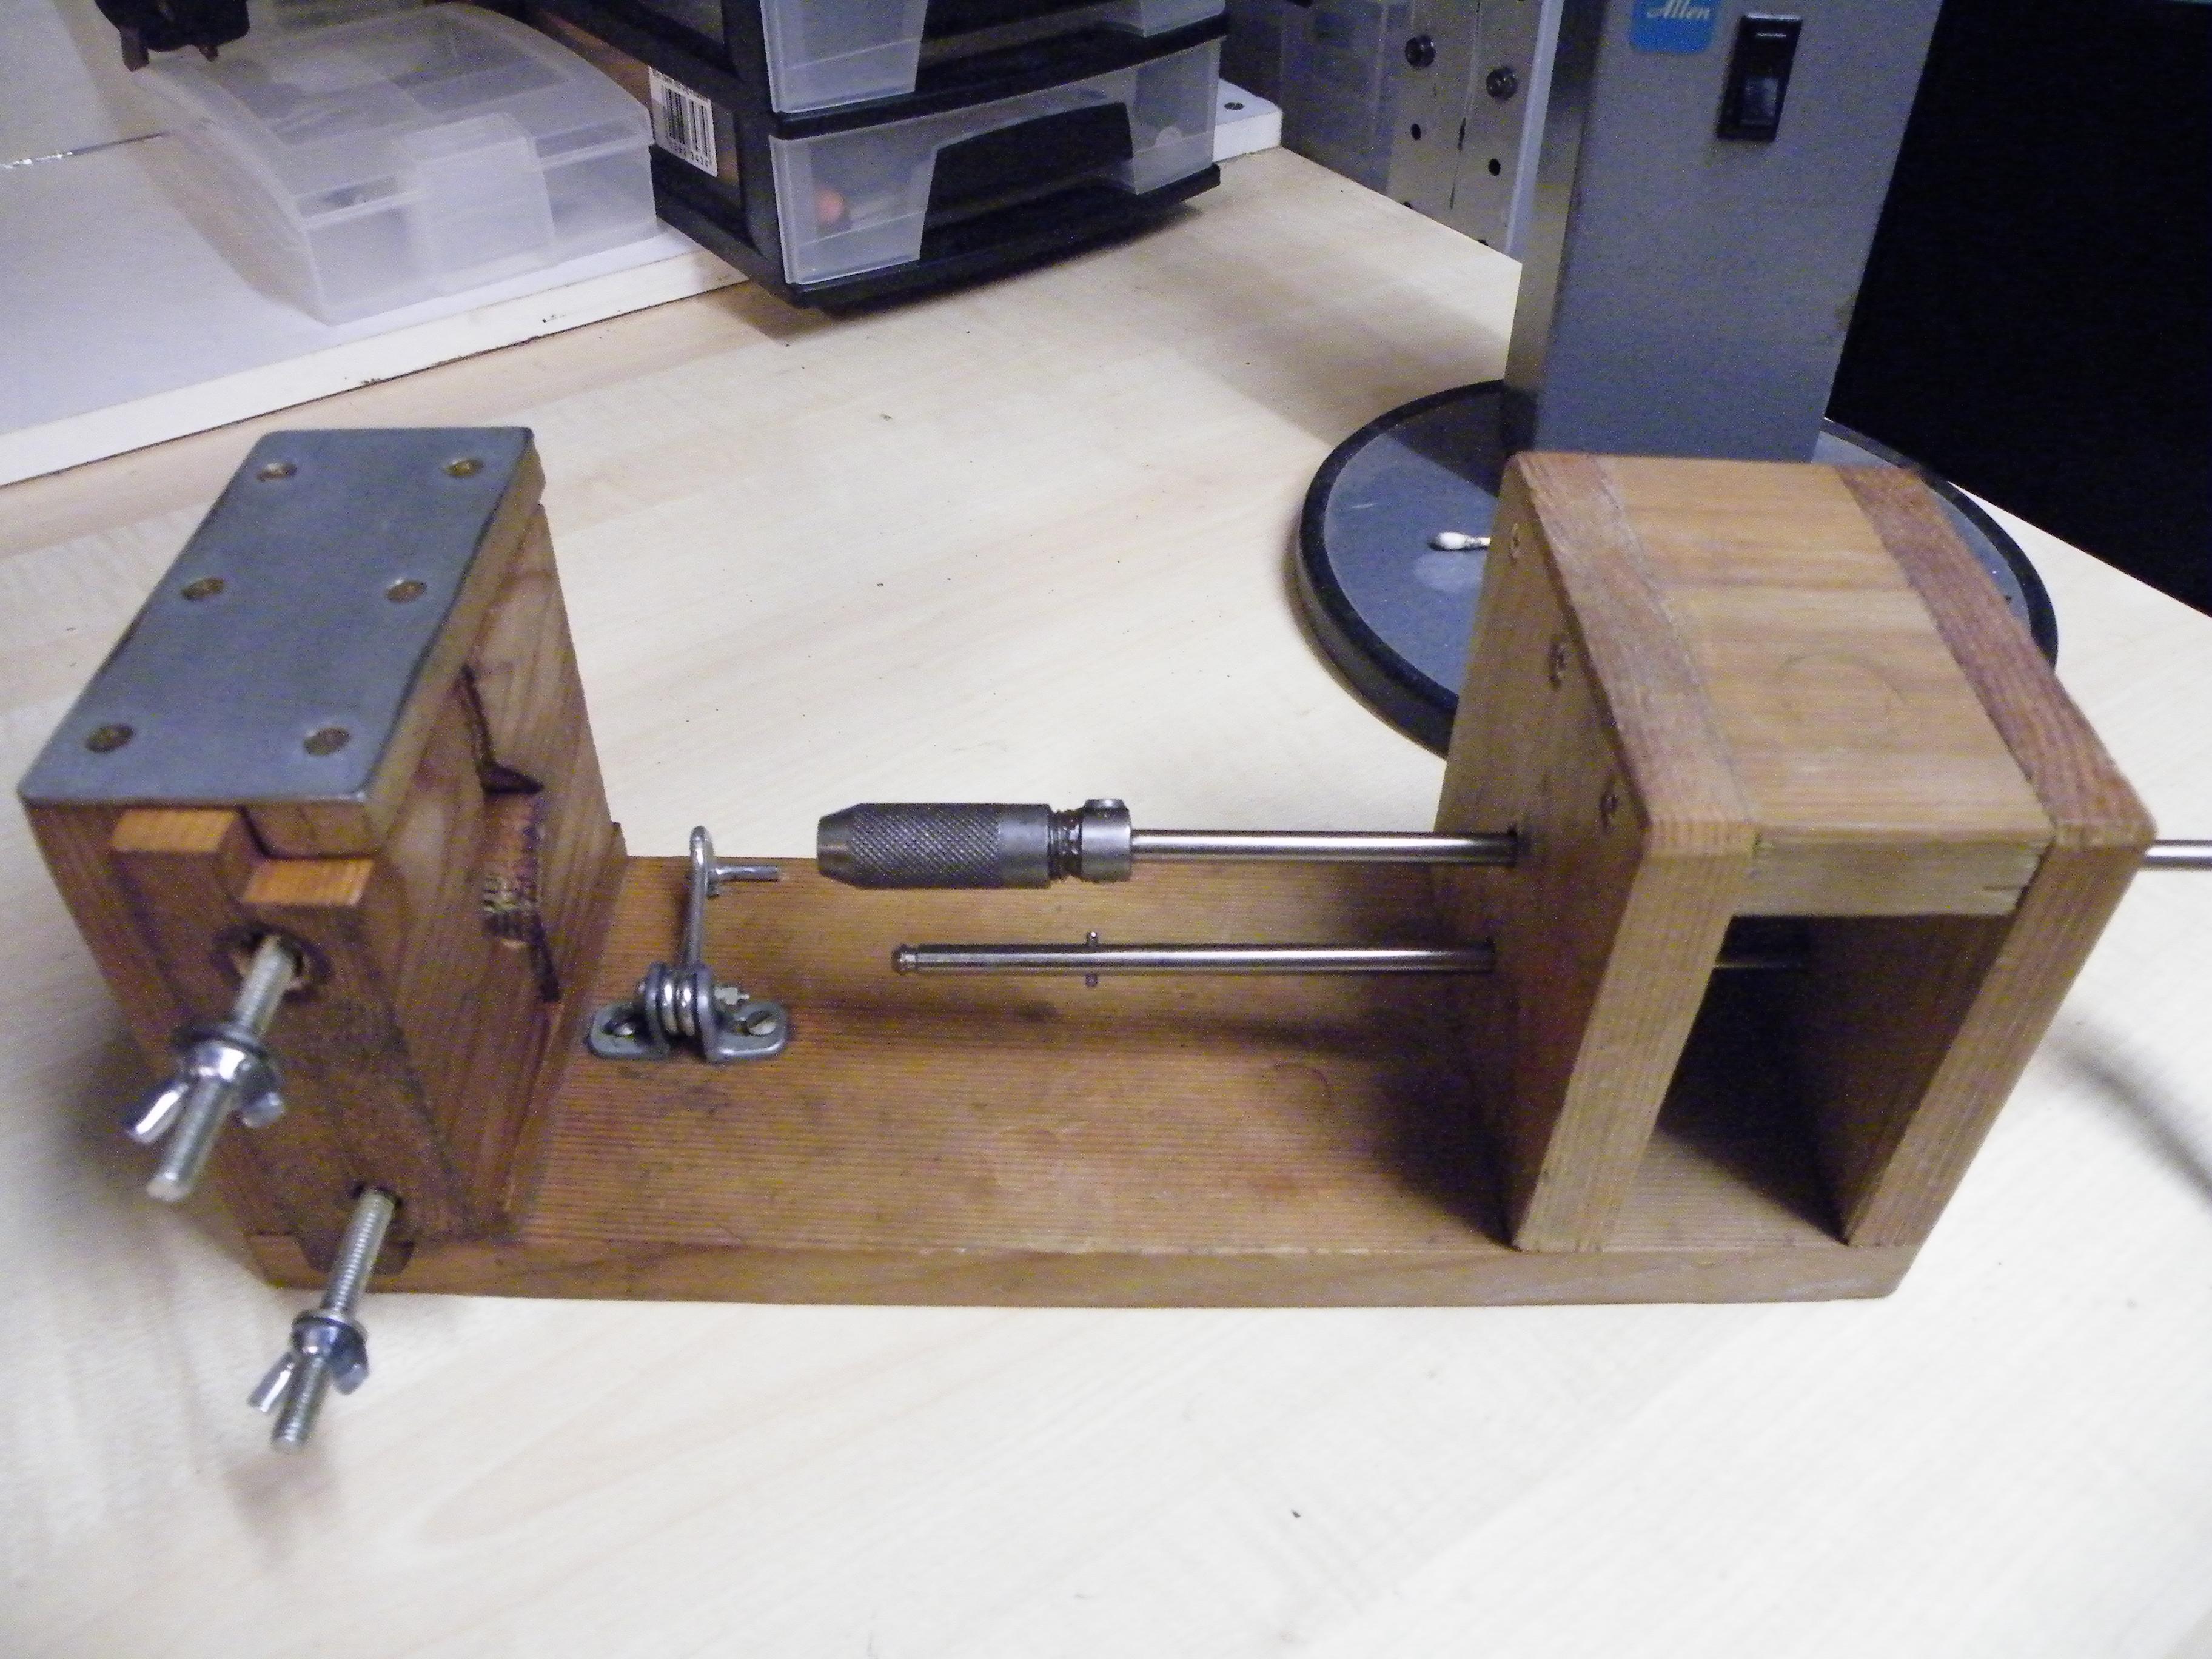
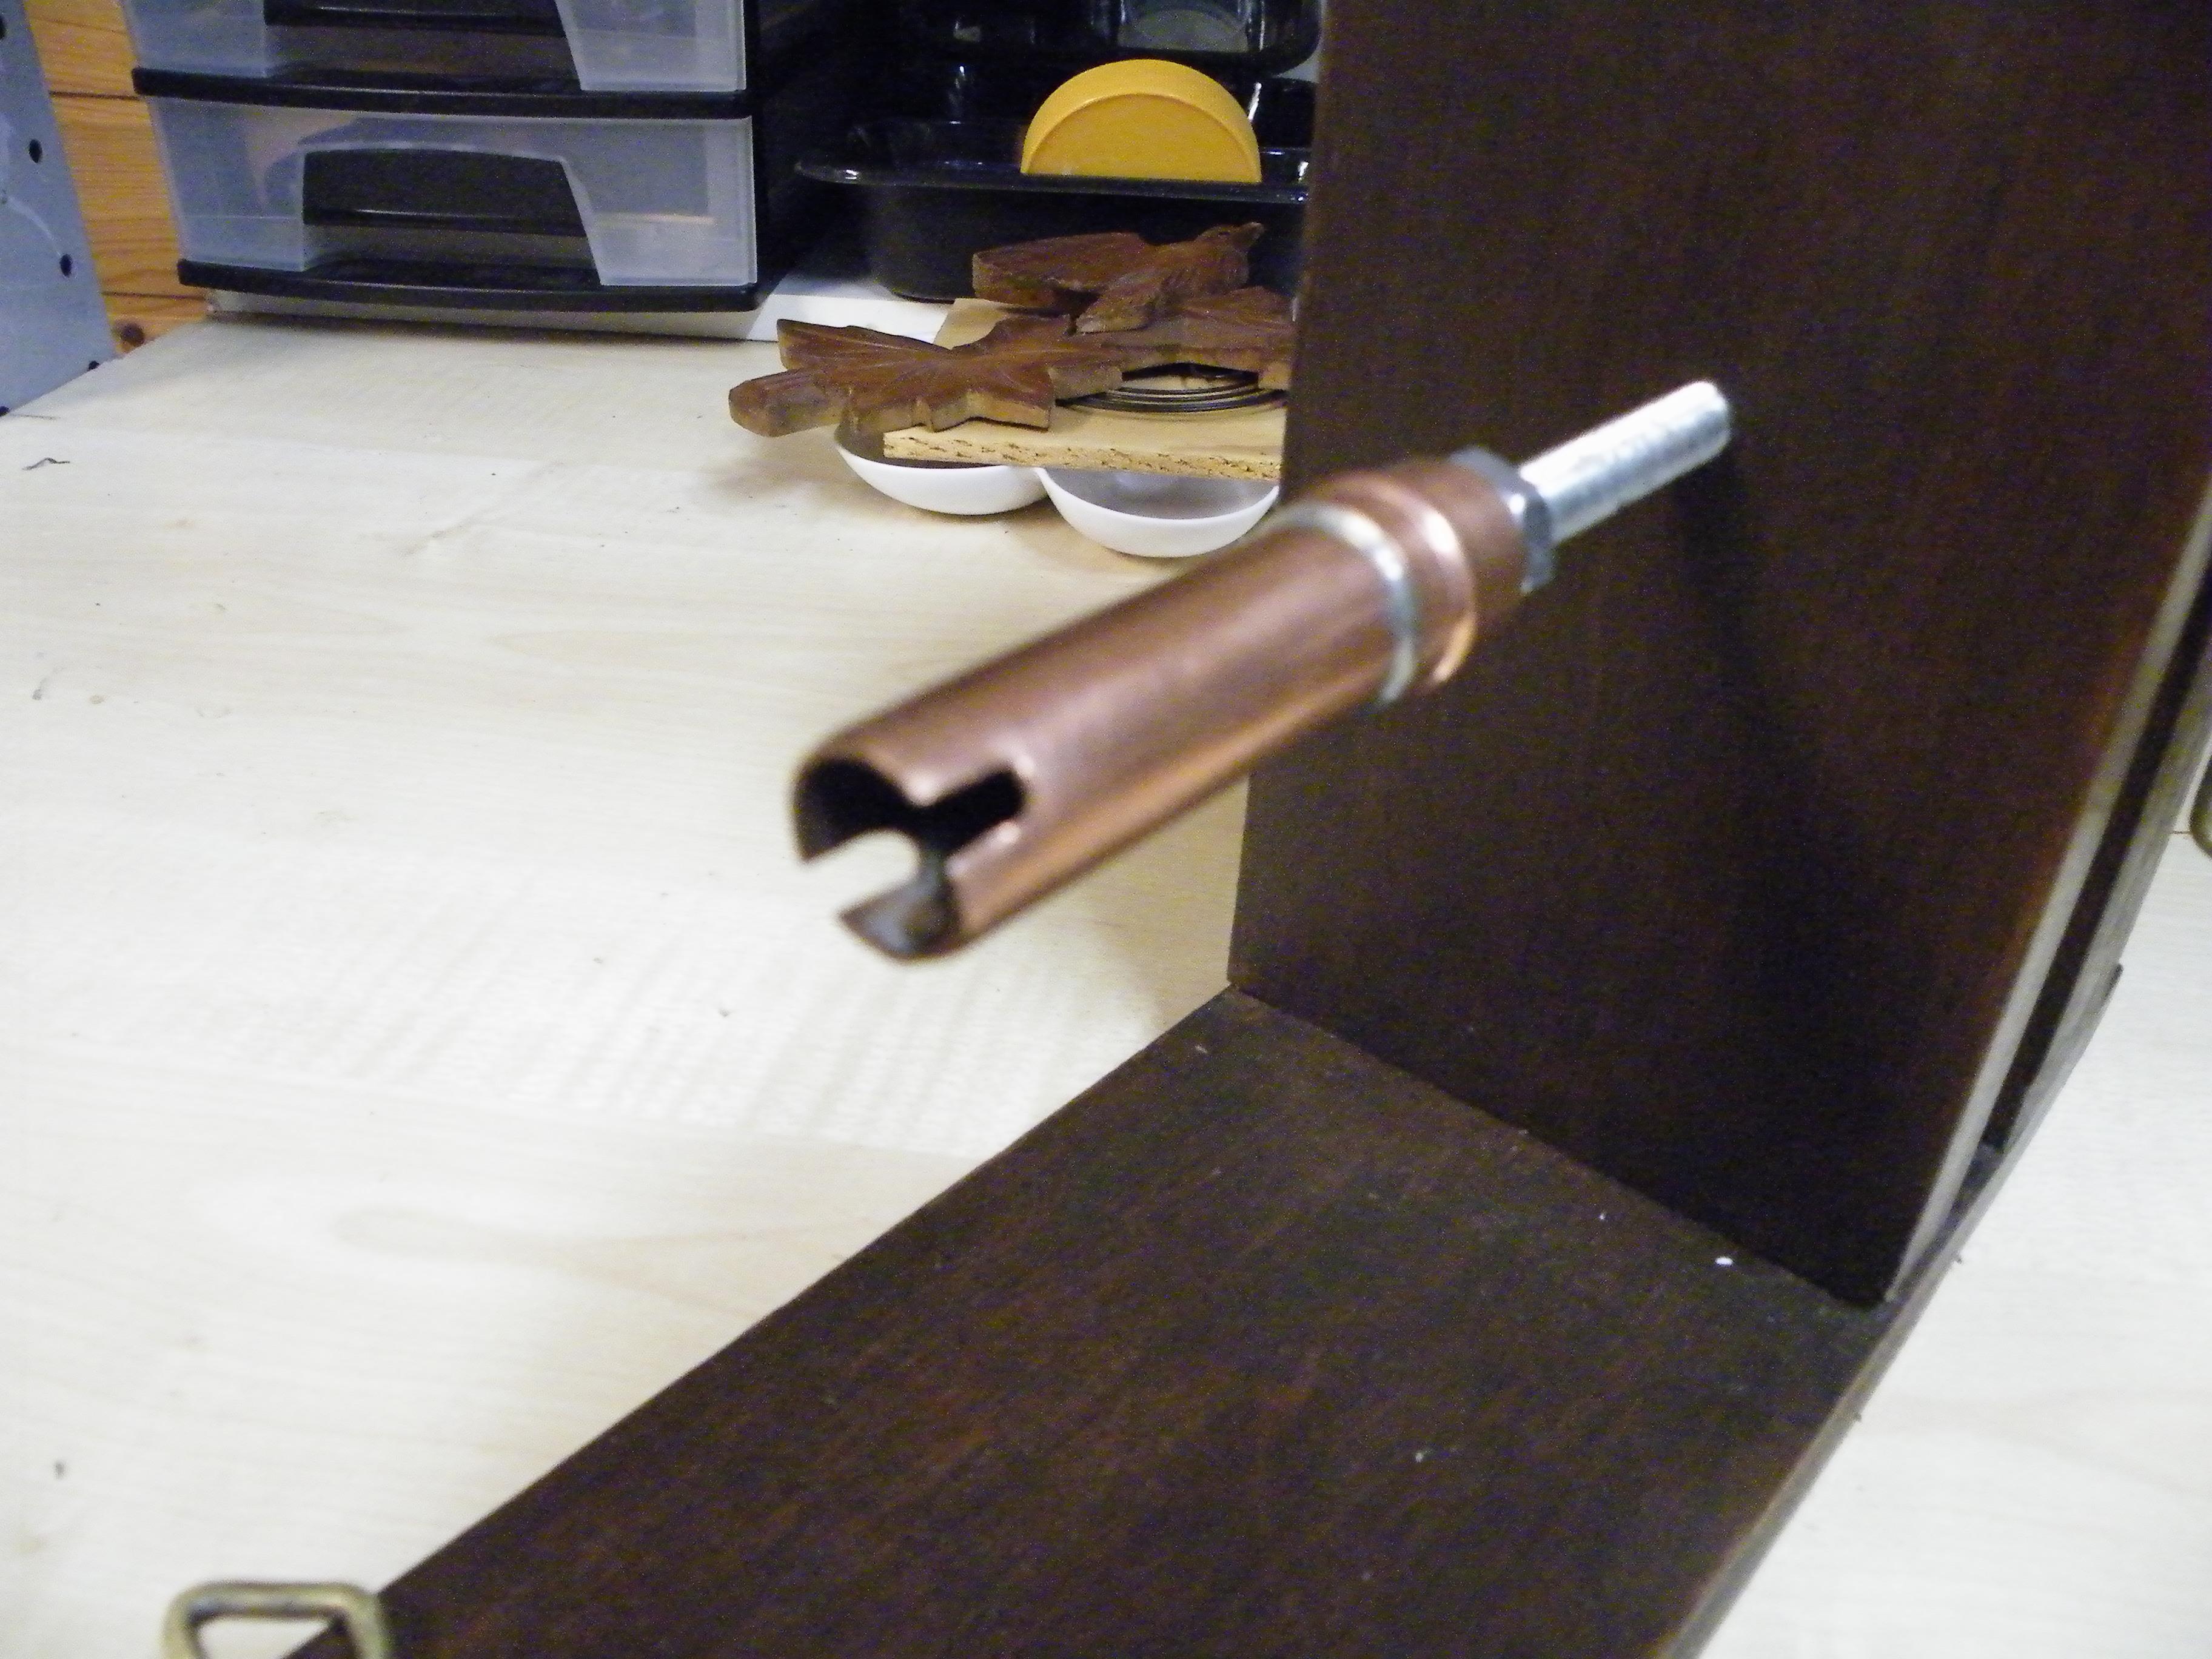
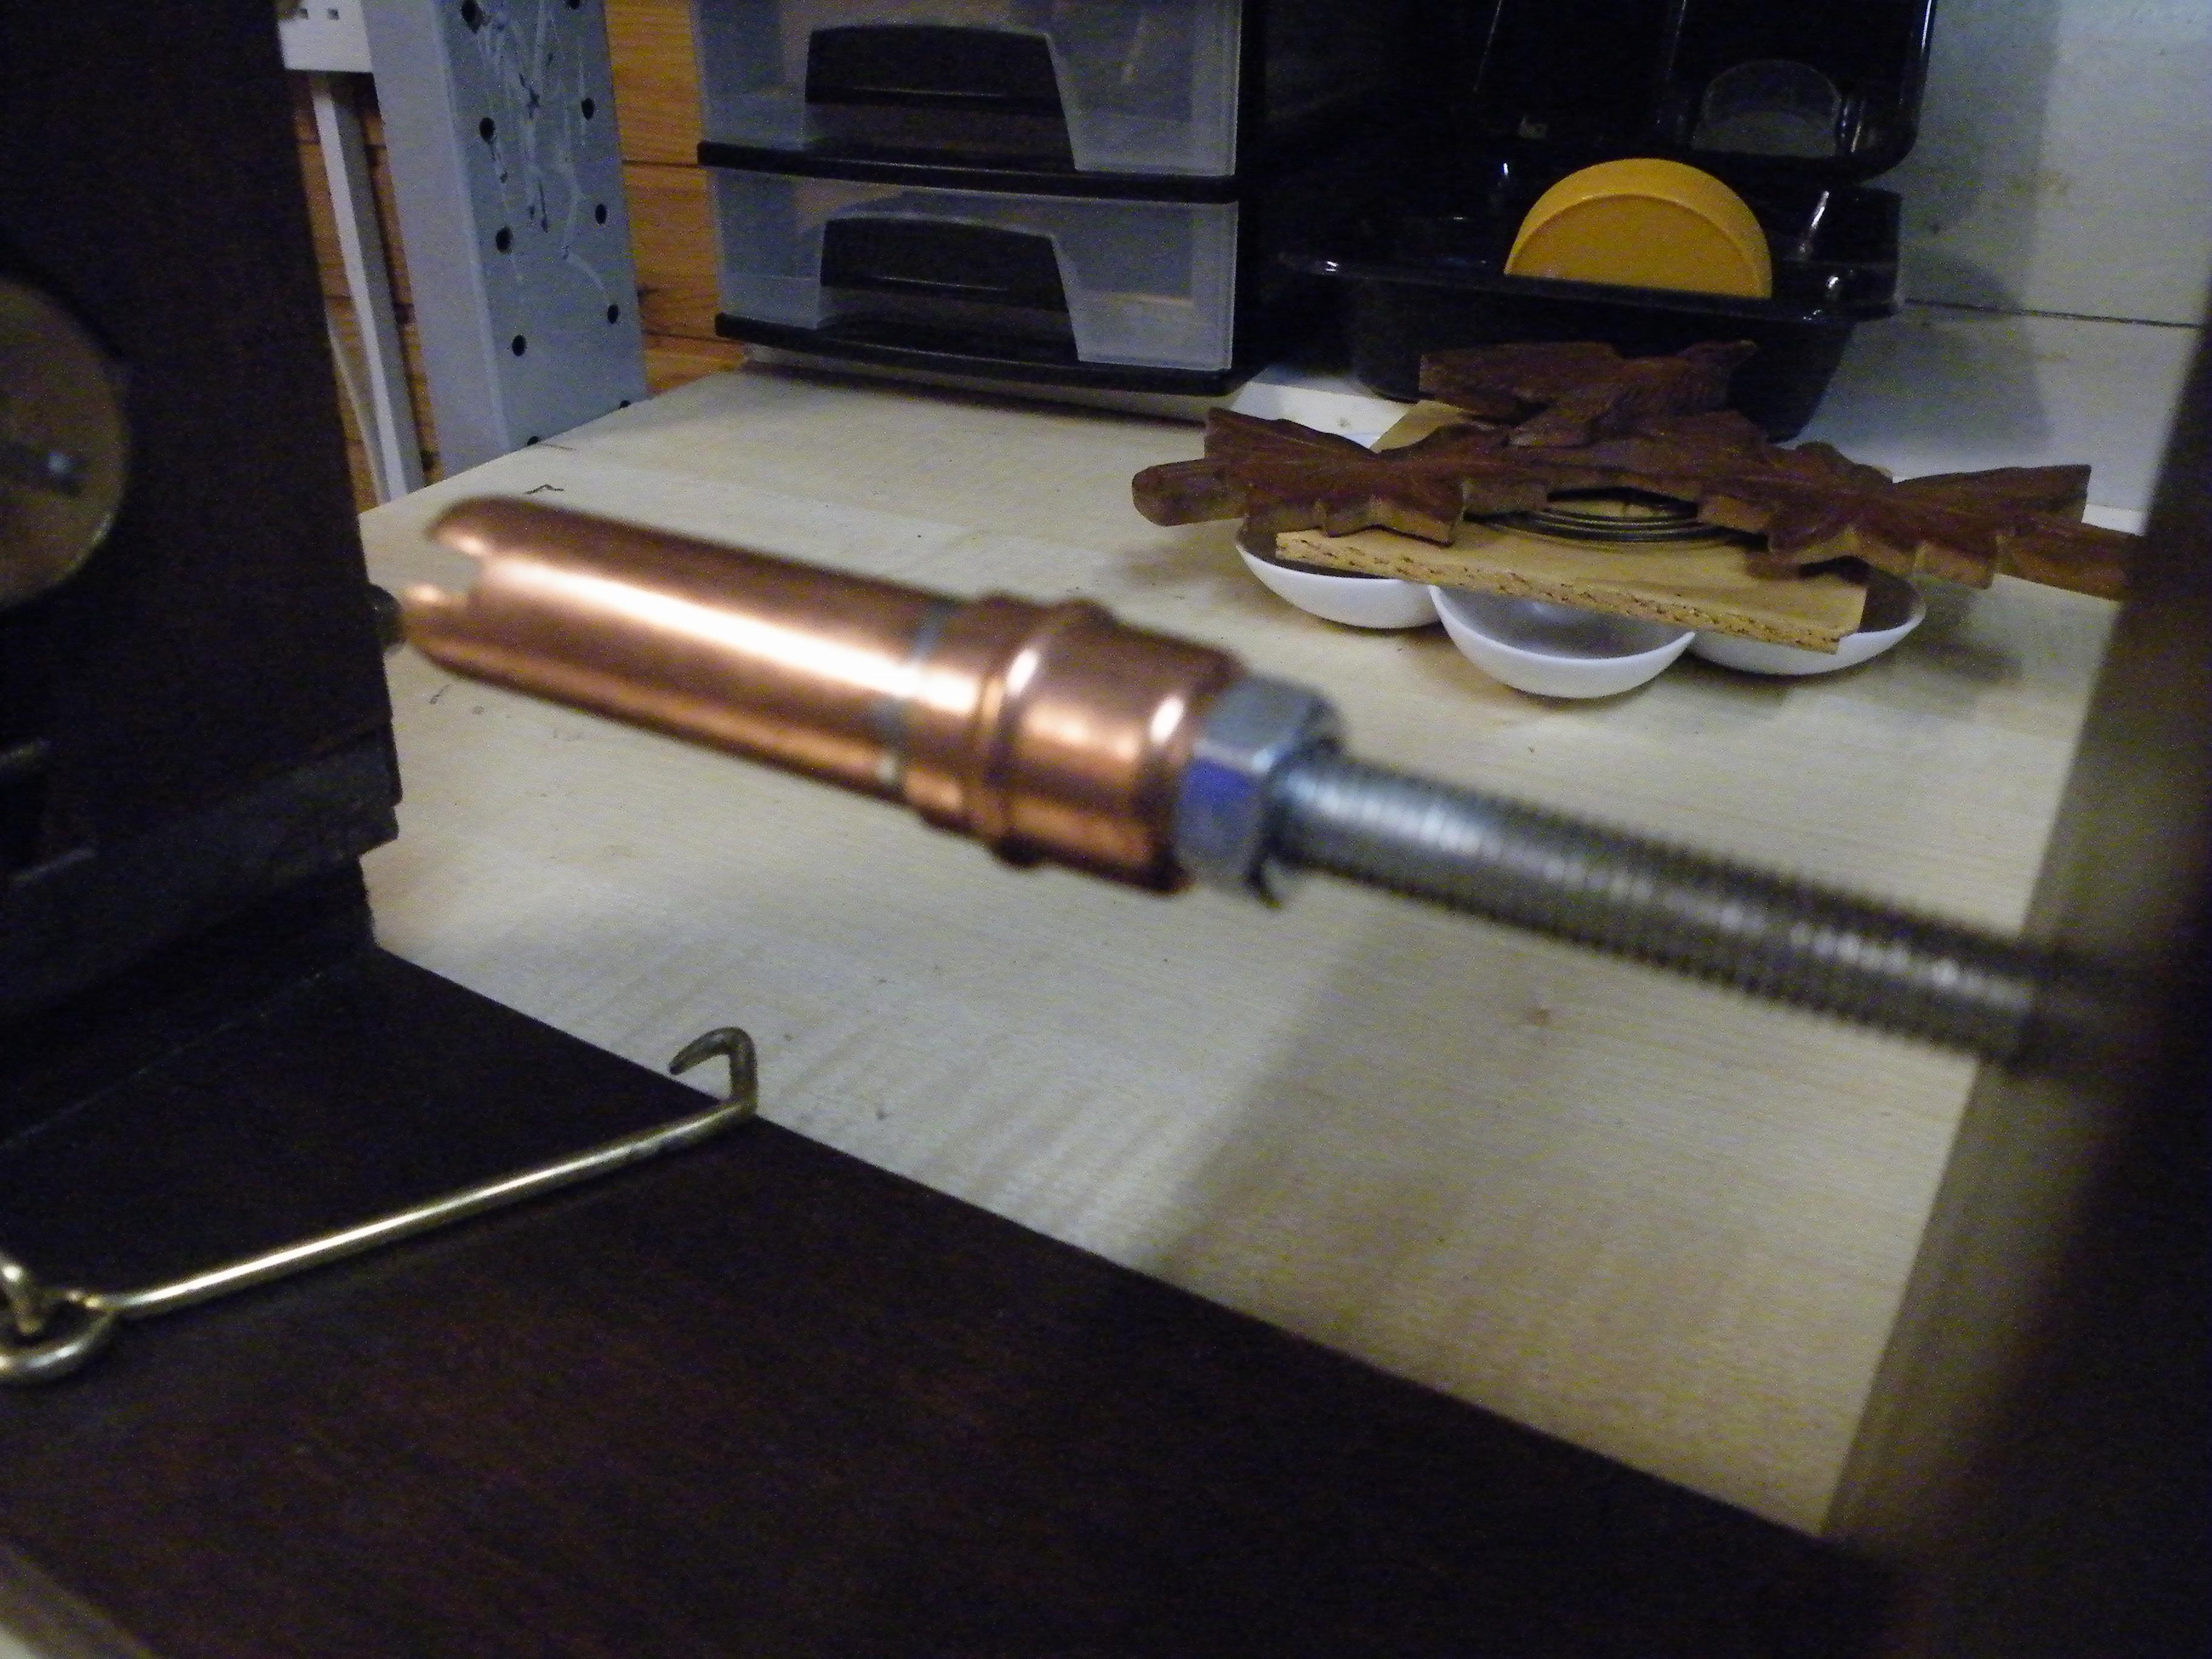
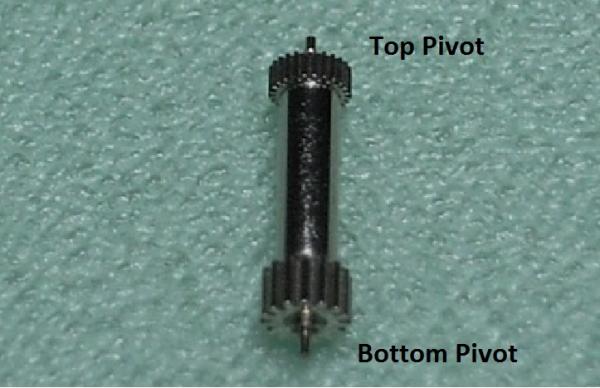
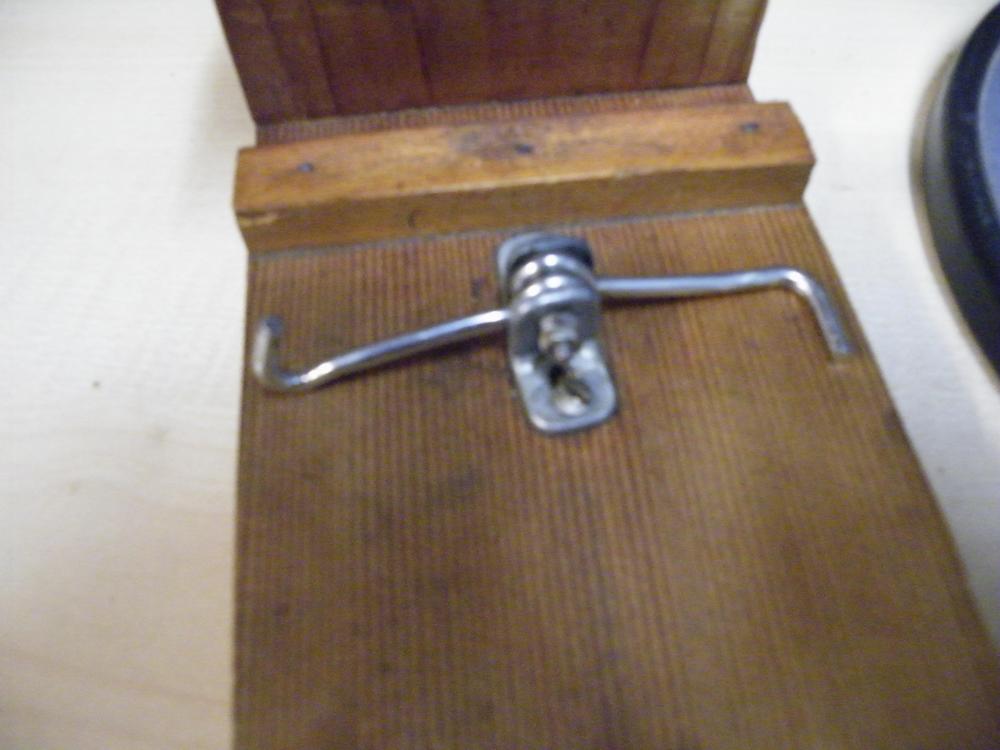
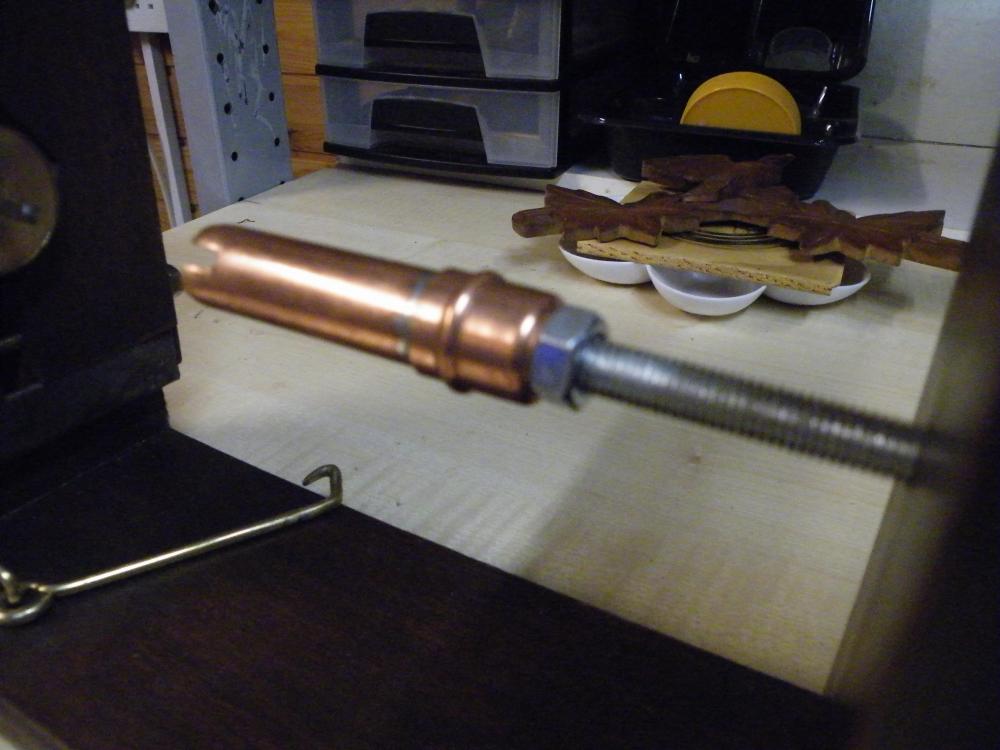
I wanted to post a quick update on my timegrapher. All together I encountered a lot more difficulties then i thought. I screwed up the amplifier assembly kit by using blunt wire cutter and thereby accidentally ripping the conducting layer of the board as i tried to clip the wire of a resistance. I also have the hardest time soldering the brass pin onto the piezo element. I broke several piezos by applying to much heat an bringing the ceramic layer to crack . I'll visit a good friend of mine in January who is a electrical engineer and we'll try to get it done together (using his professional equipment). Until then I wanted to ask @24h if you have any special techniques u used to establish the connection between the pin and the piezo and also if you could elaborate why you used a rubber casting around the pin. I thought it might rather weaken the vibrations and therefore the signal. at least I am making a little progress with my timegrapher stand. Here is a picture of my first built (which is not functional because there is no piezo on the end of the pin):2 points
-
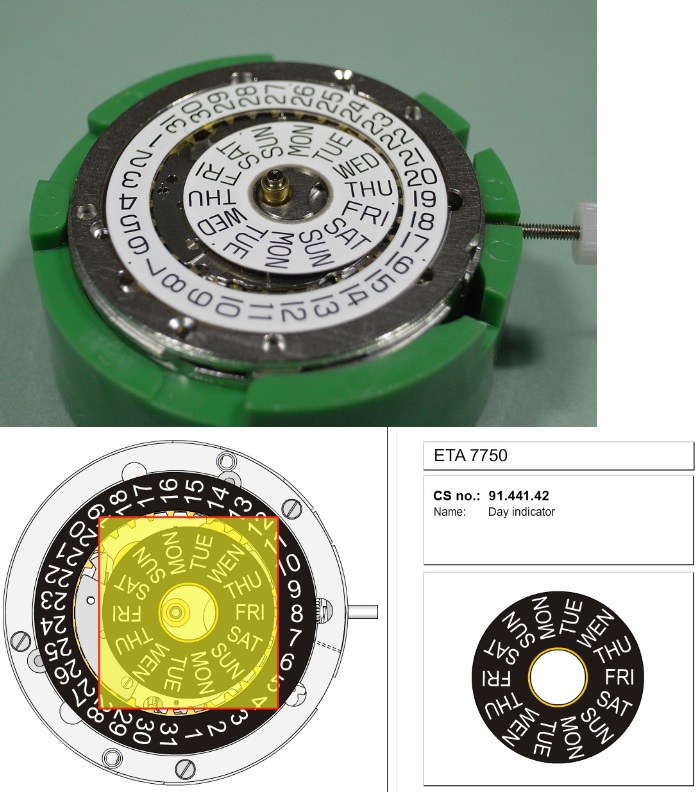
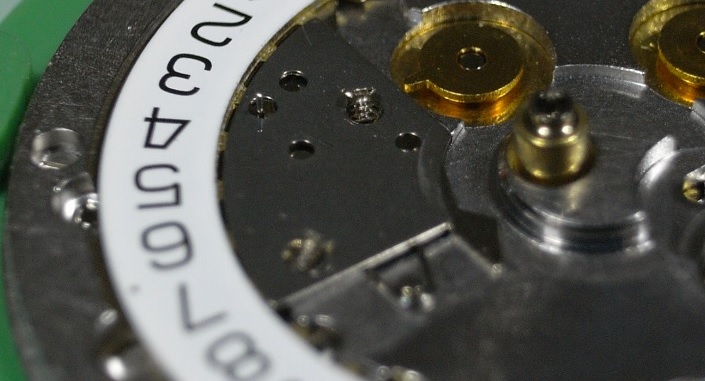
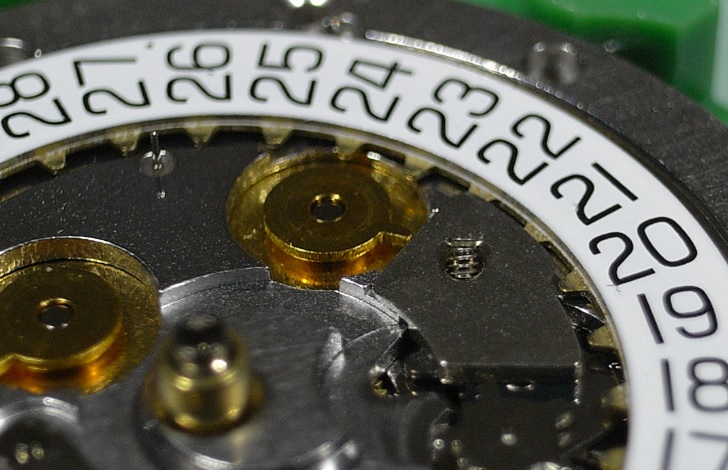
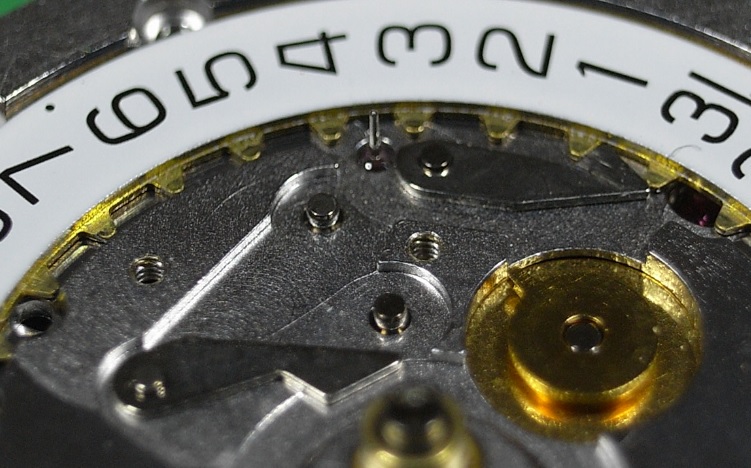
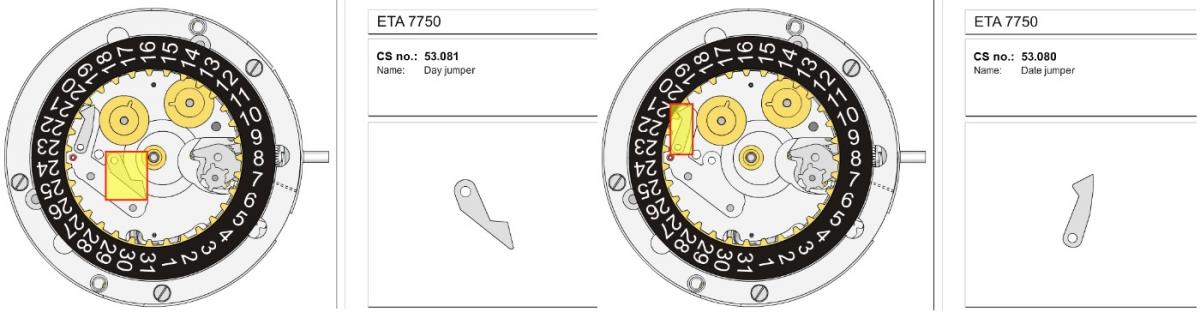
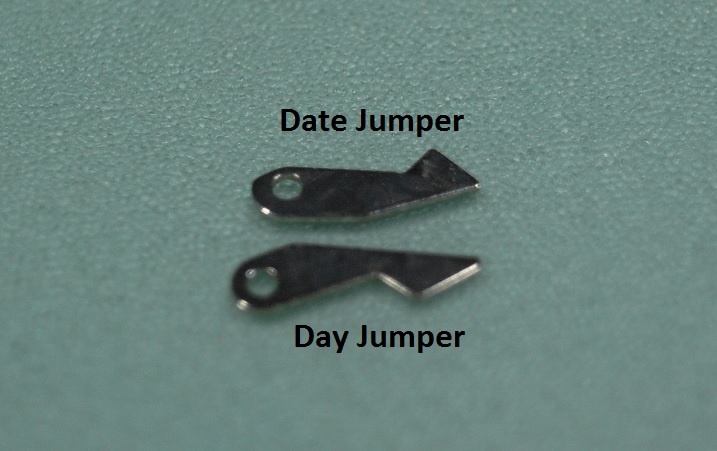
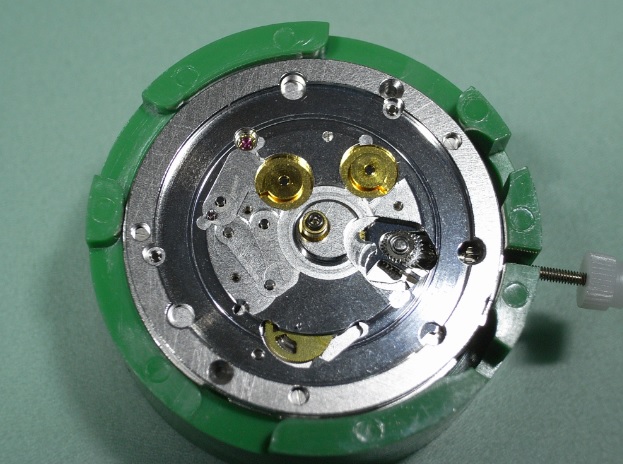
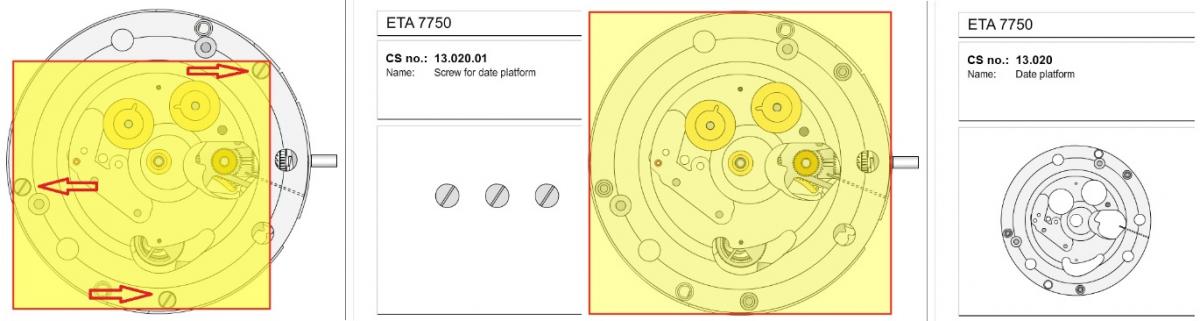
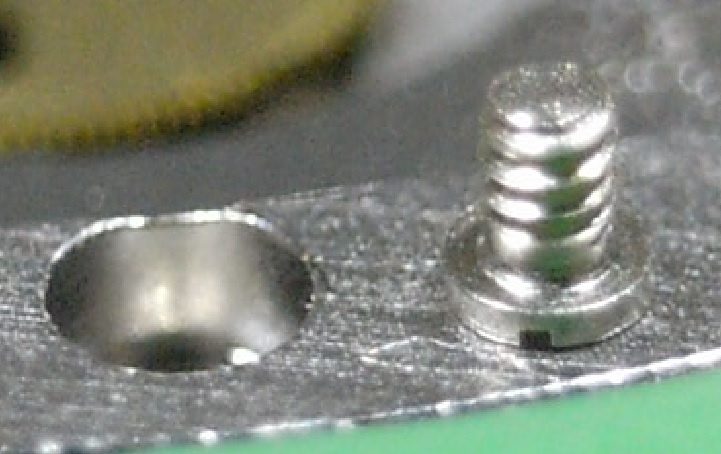
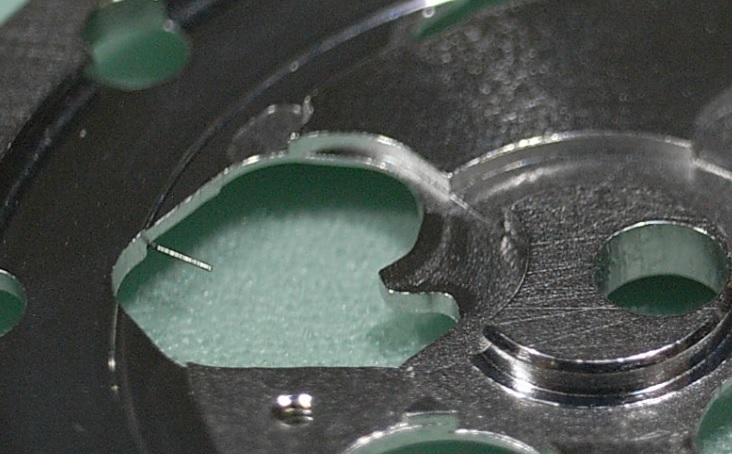
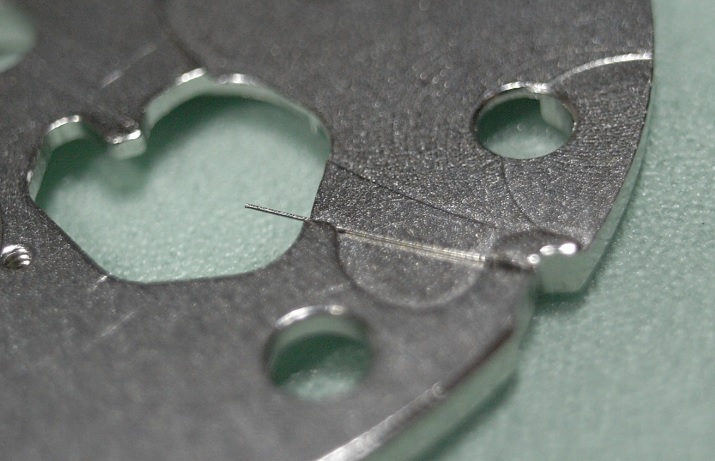
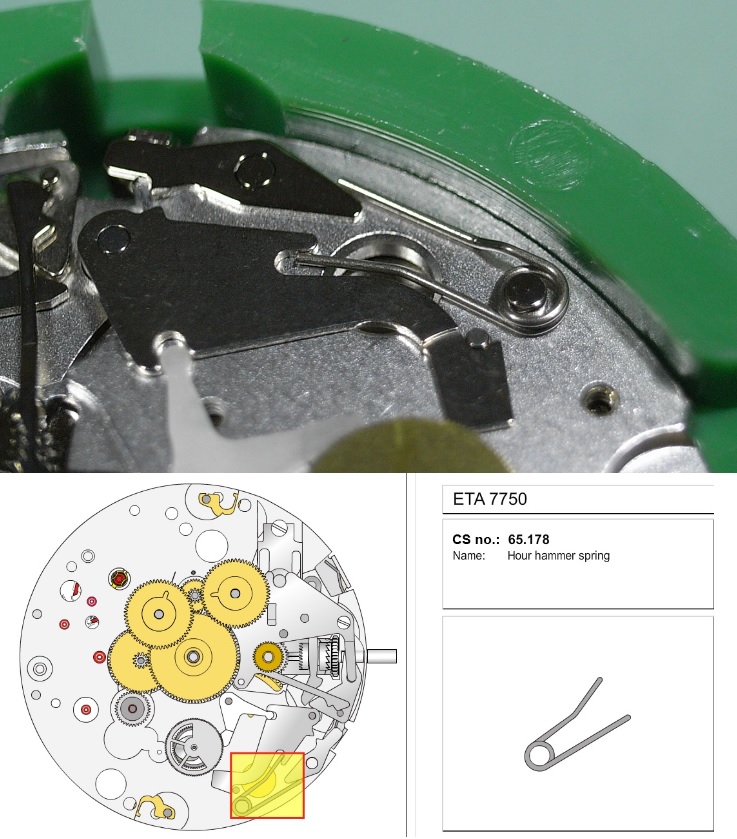
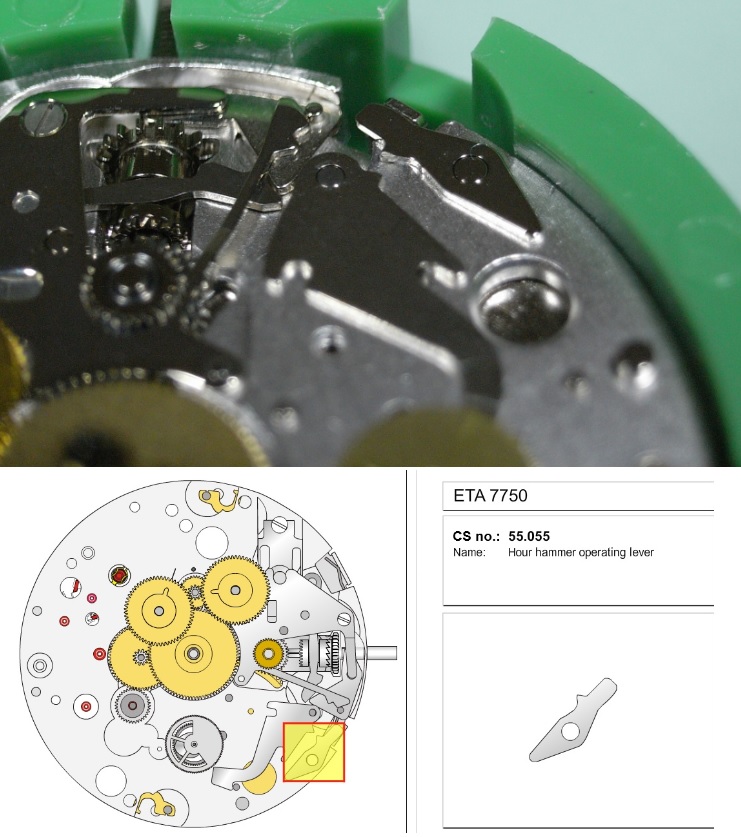
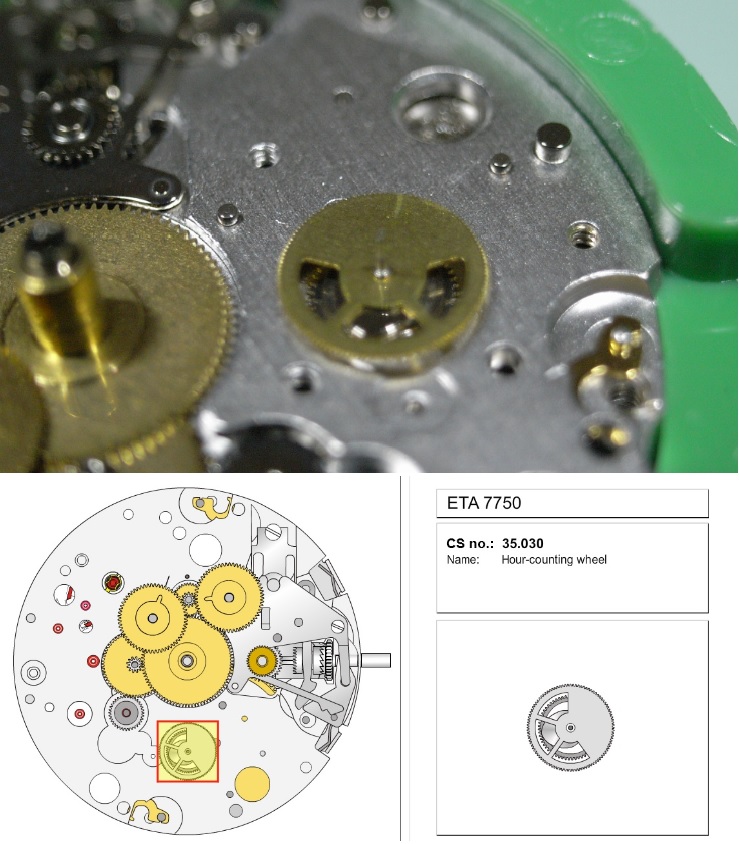
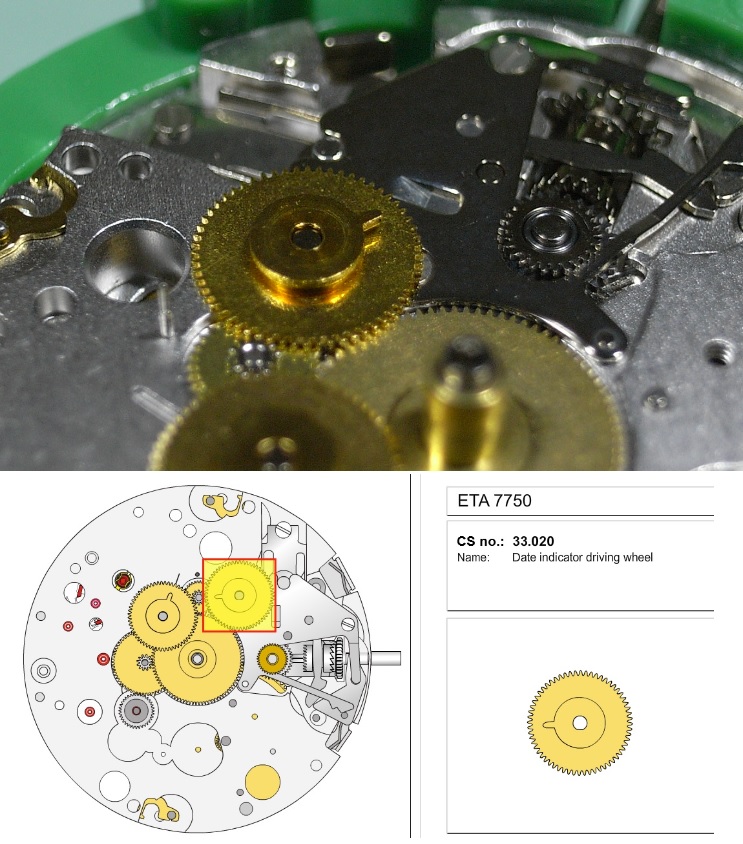
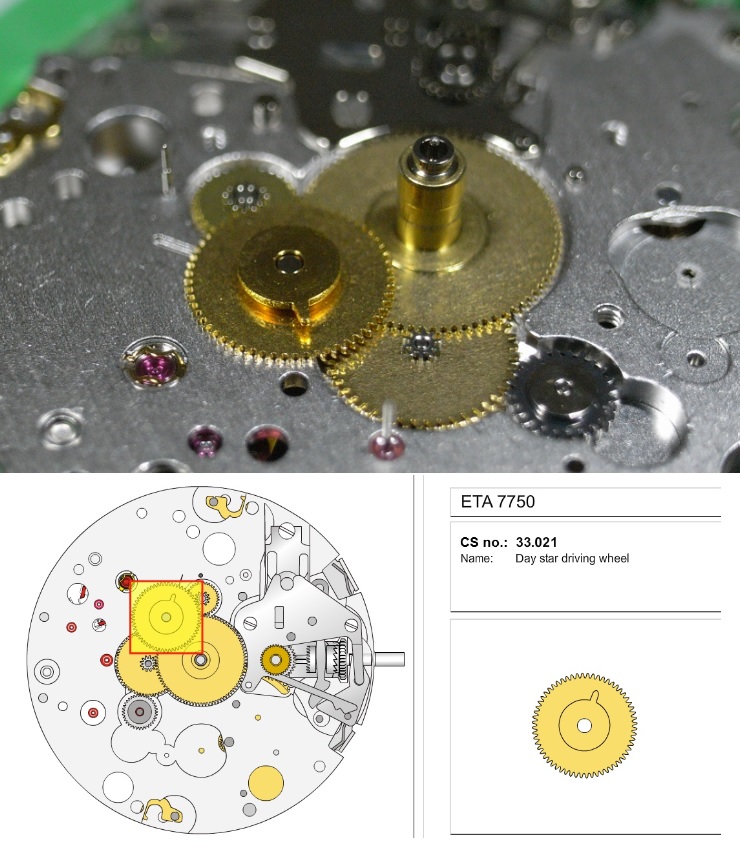
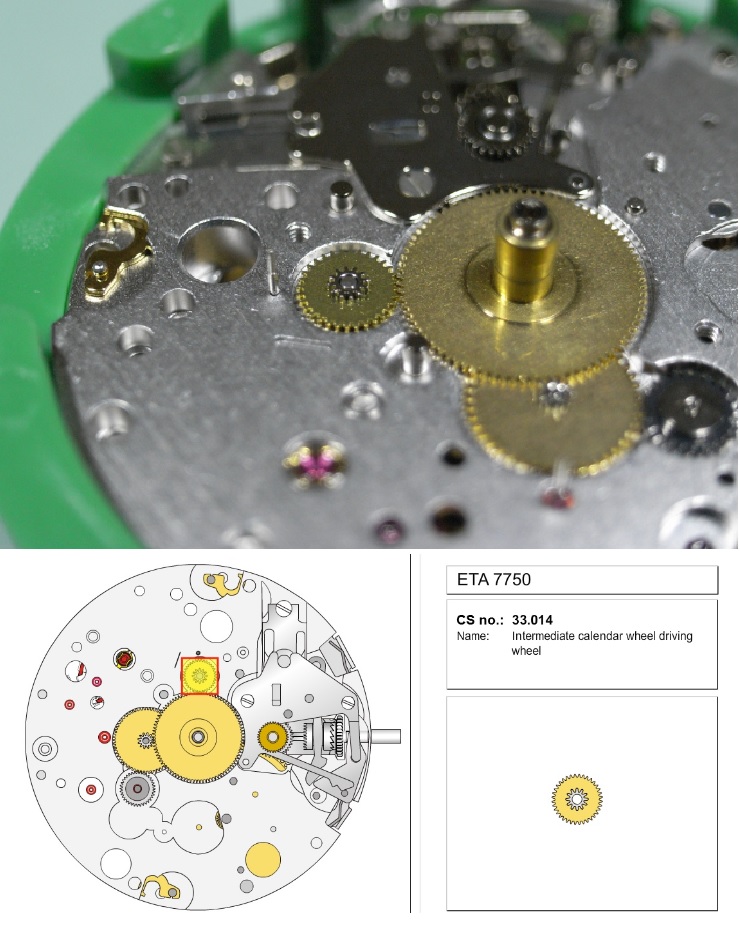
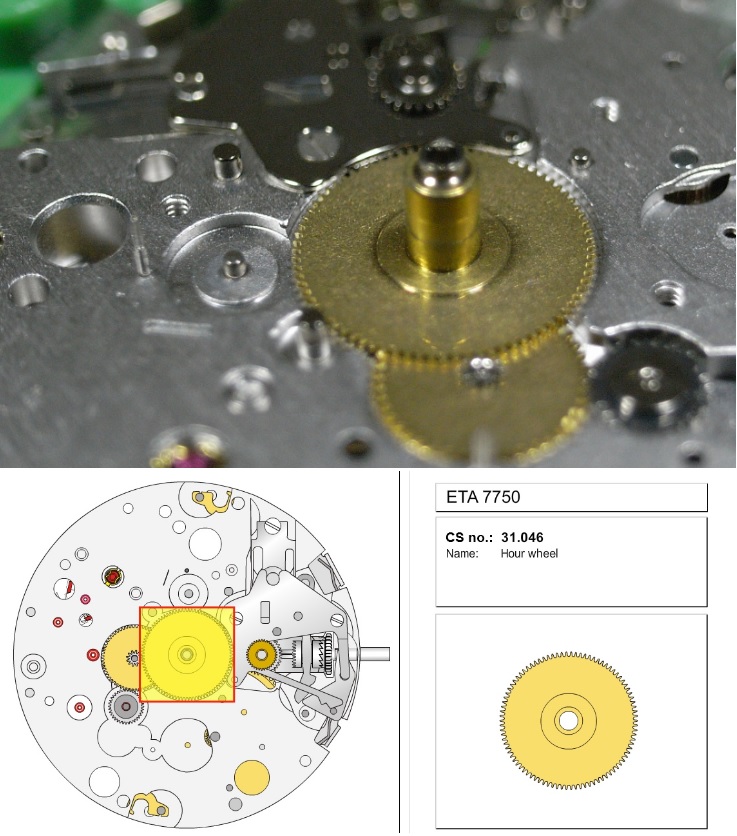
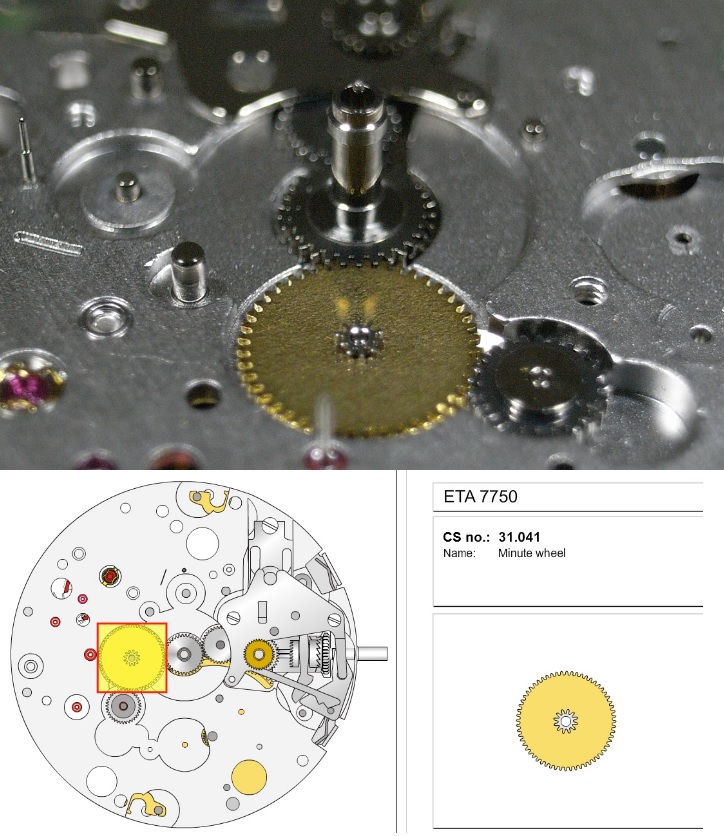
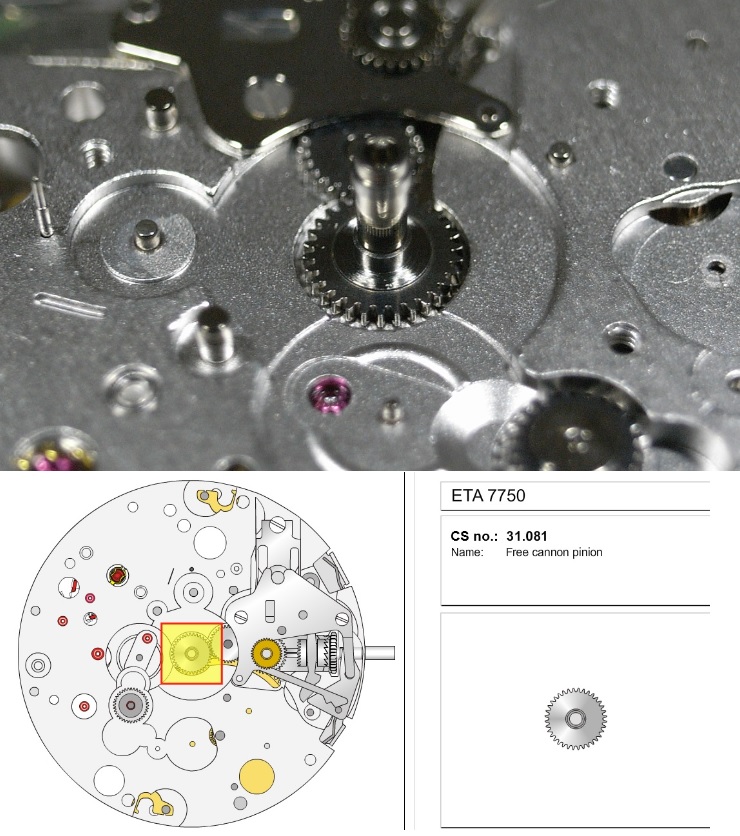
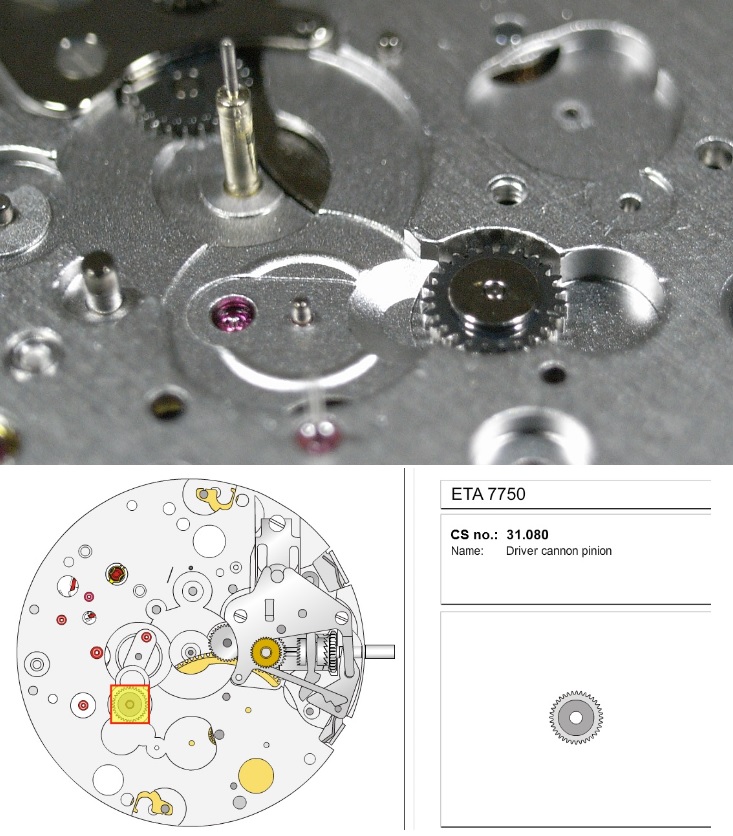
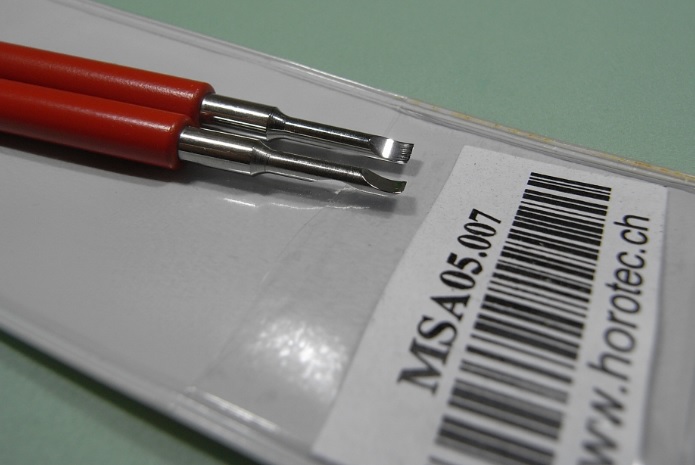
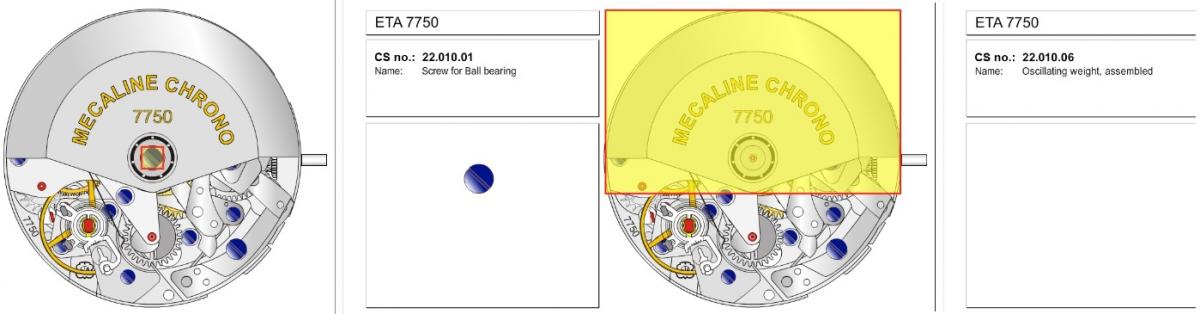
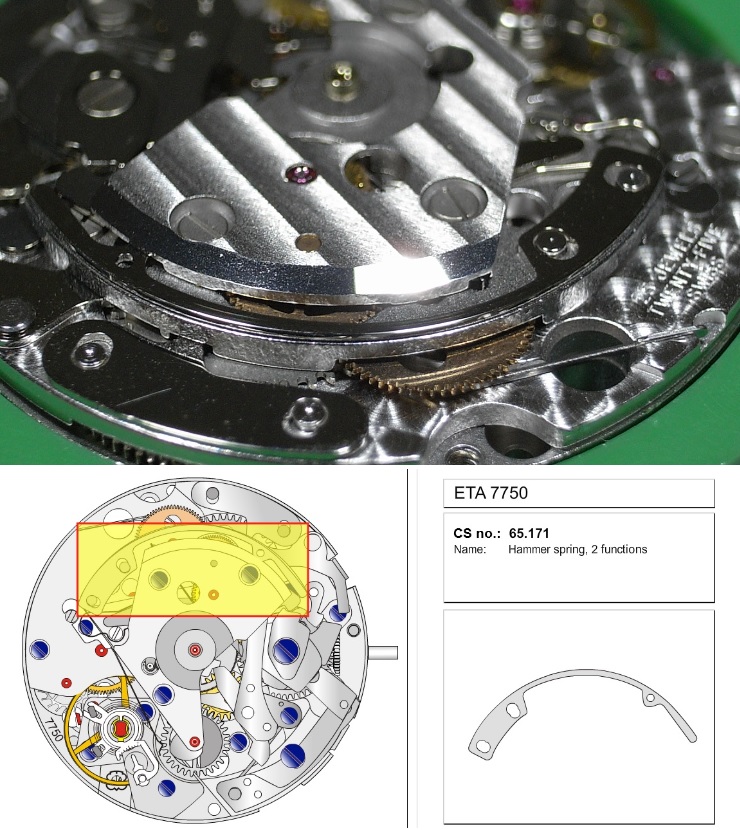
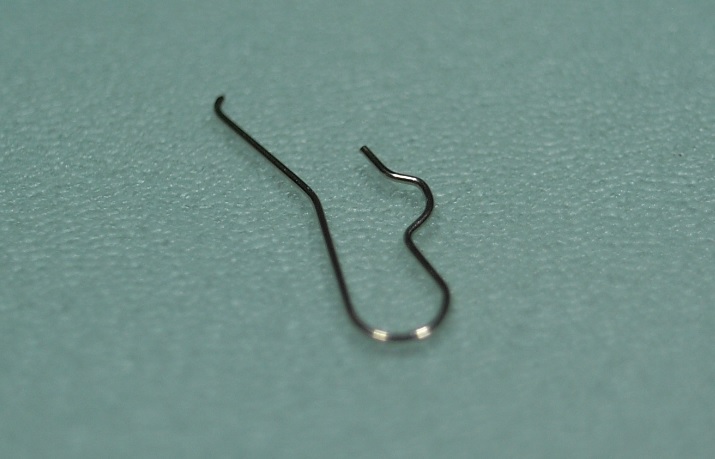
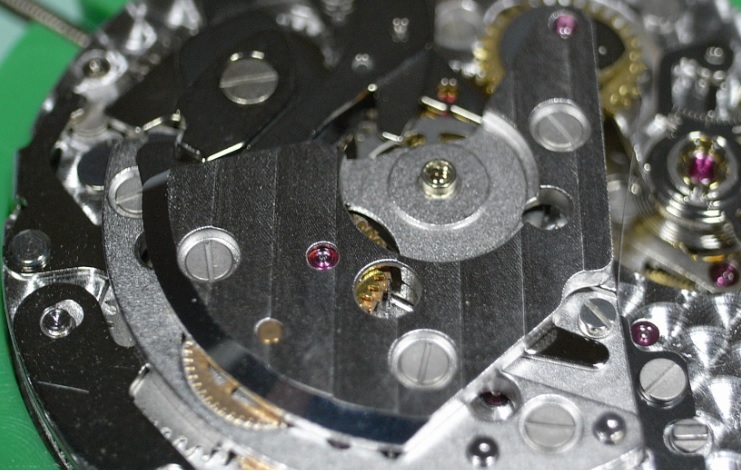
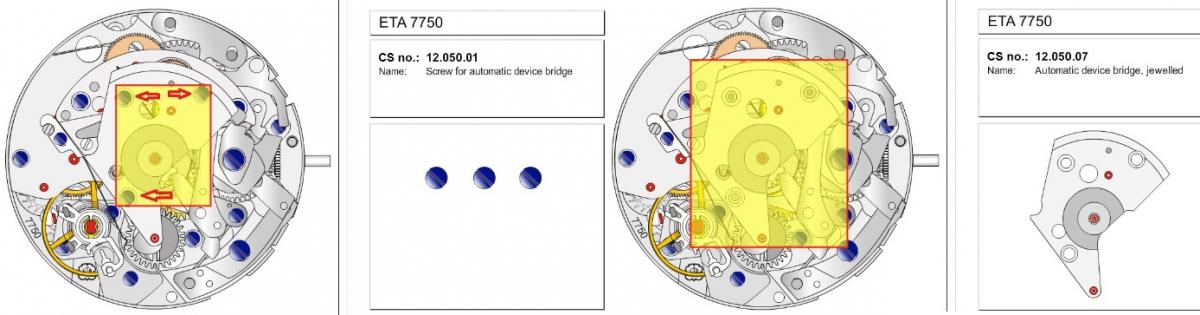
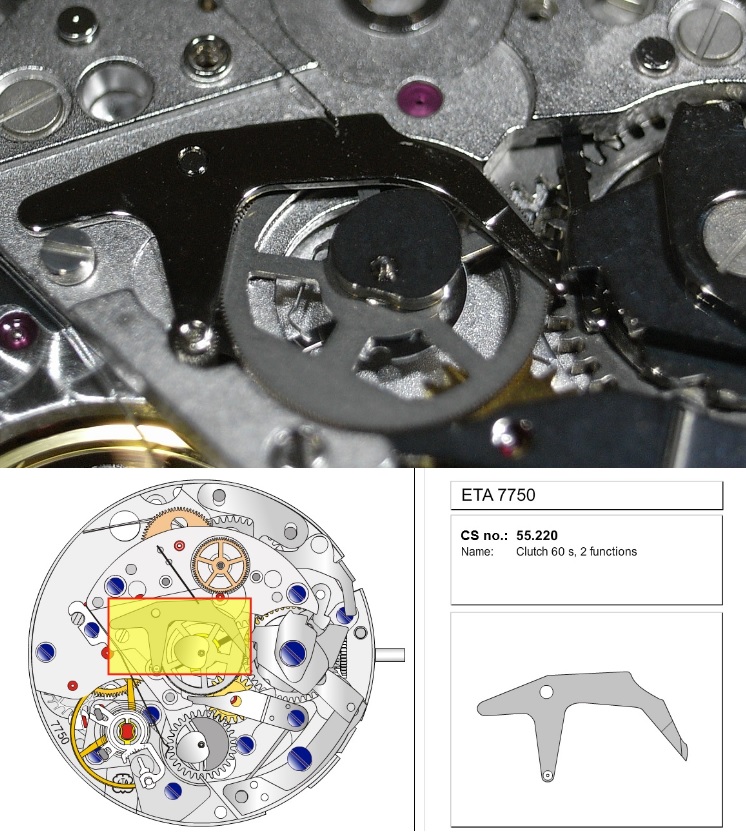
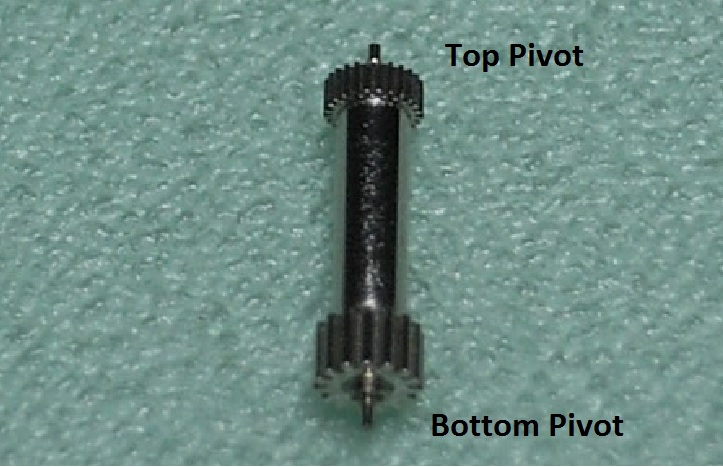
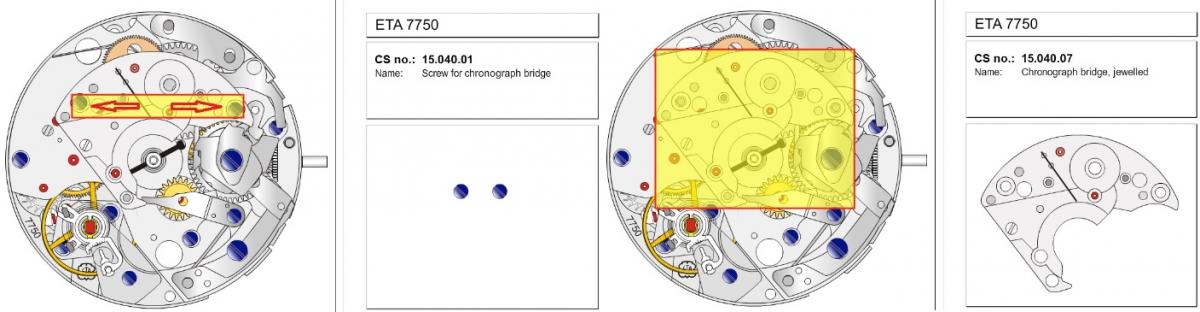
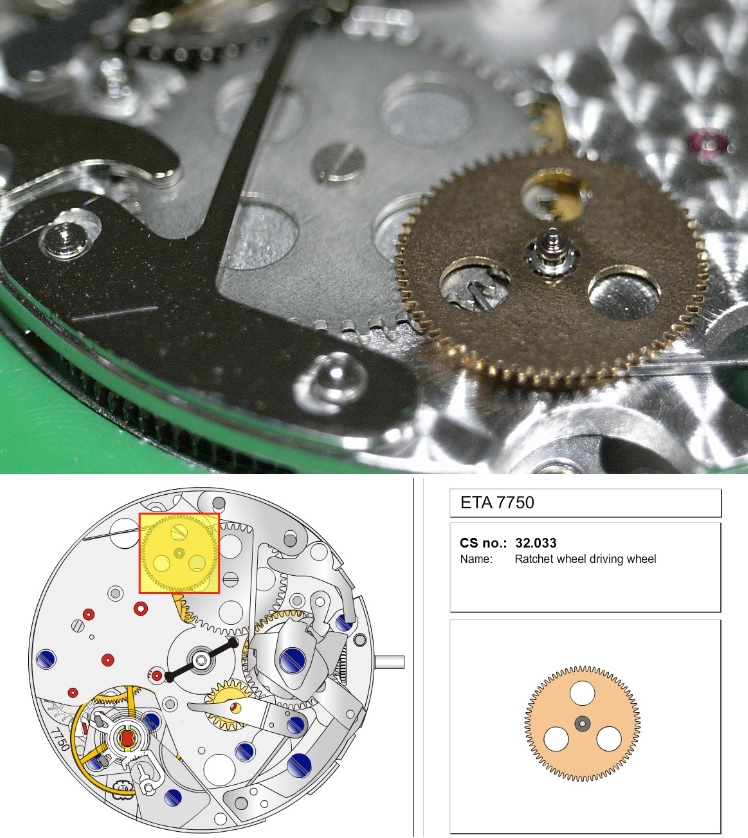
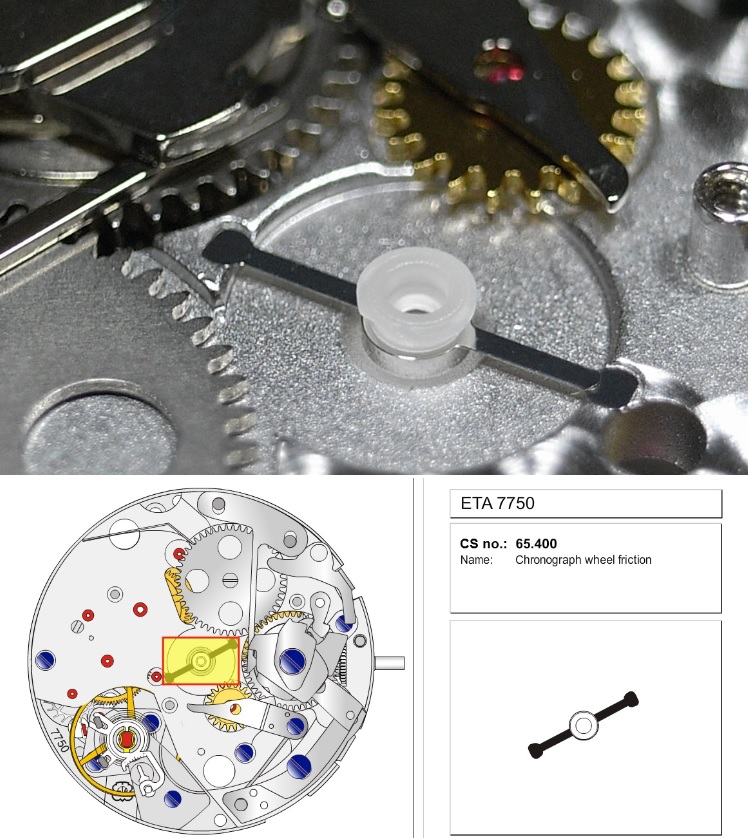
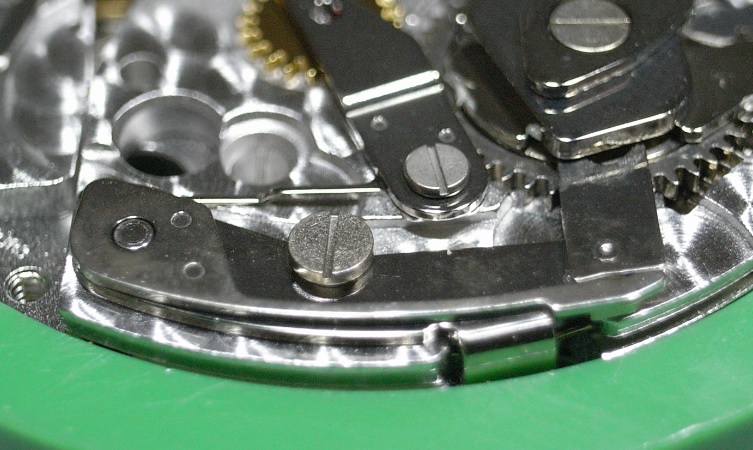
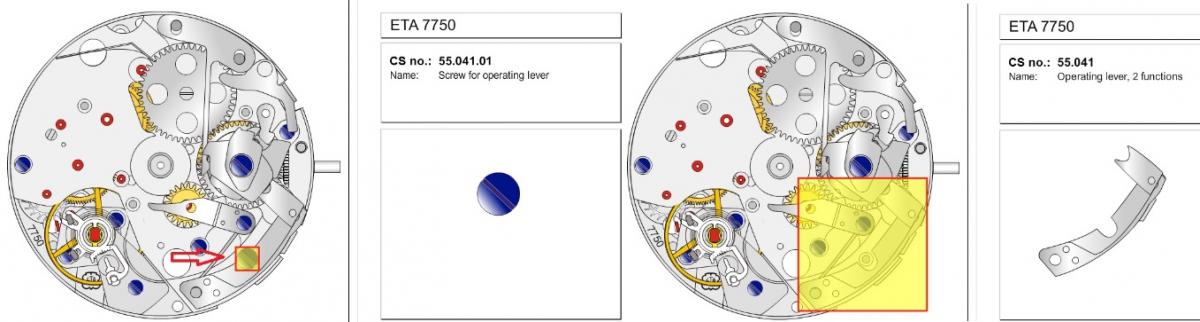
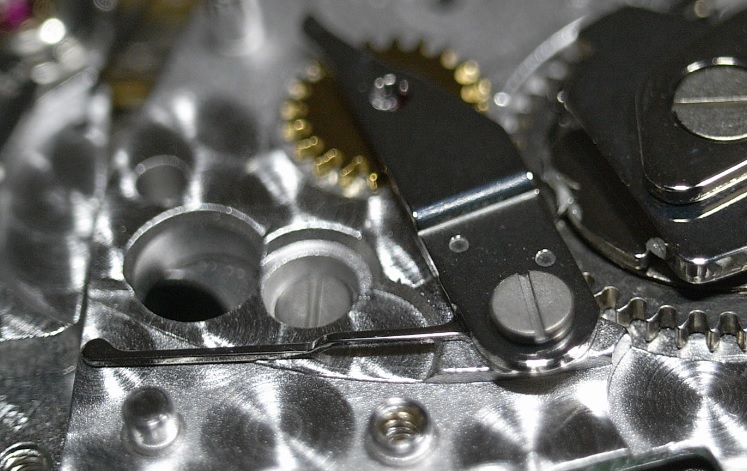
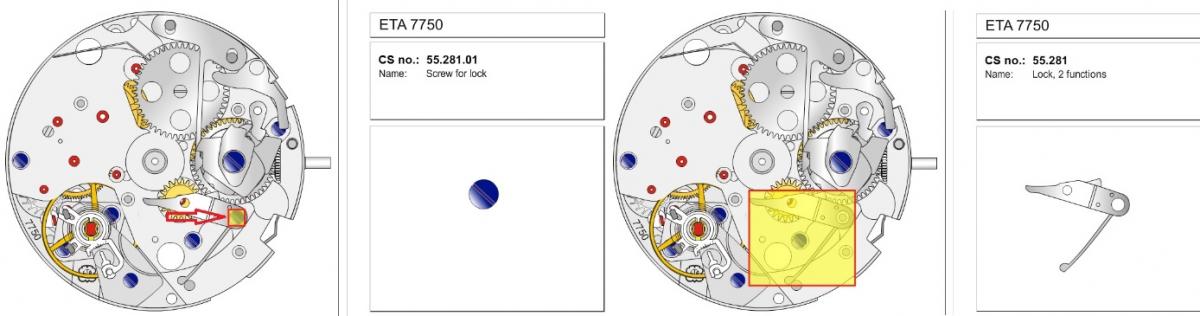
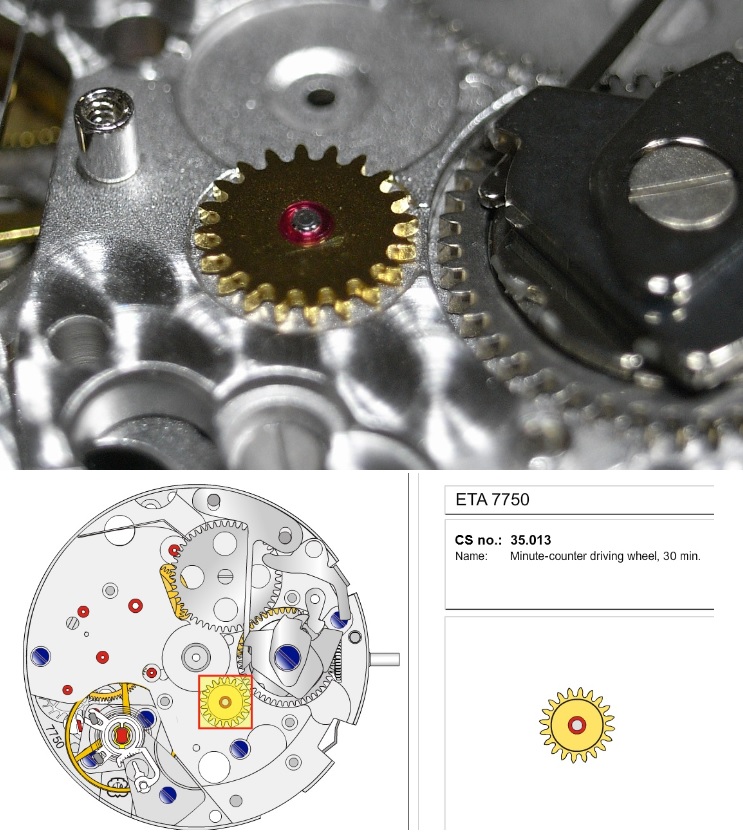
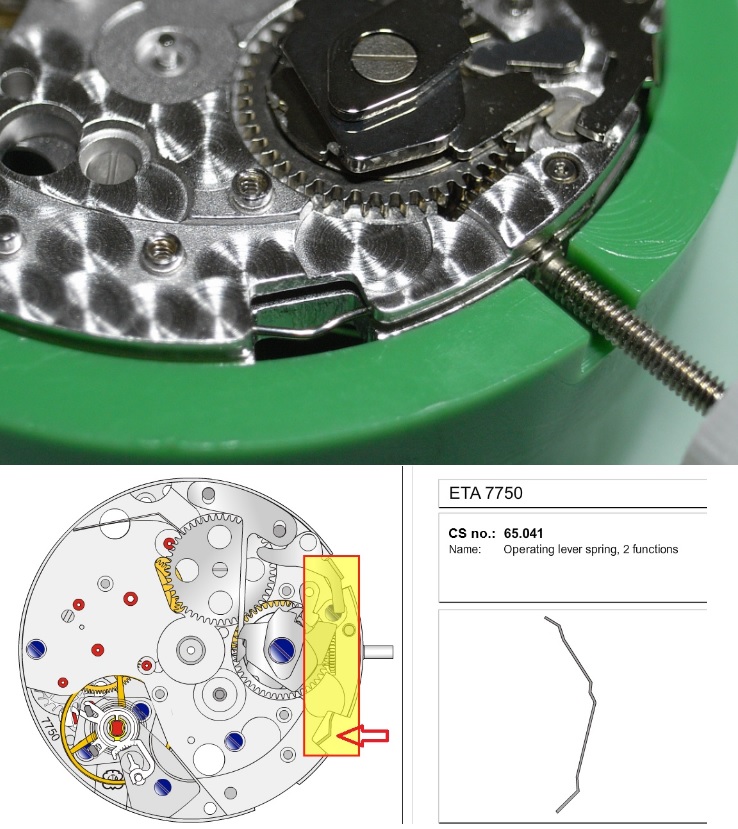
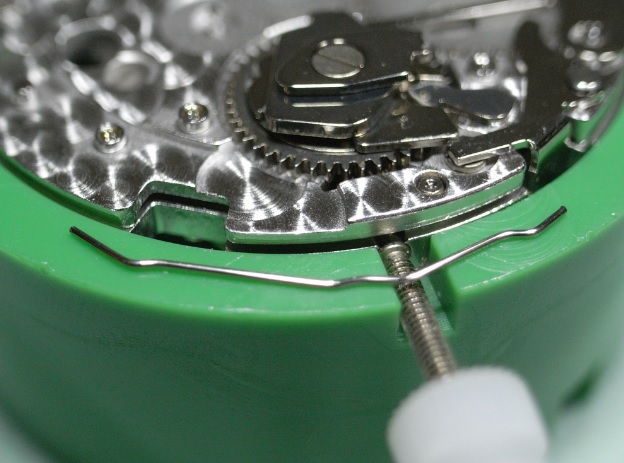
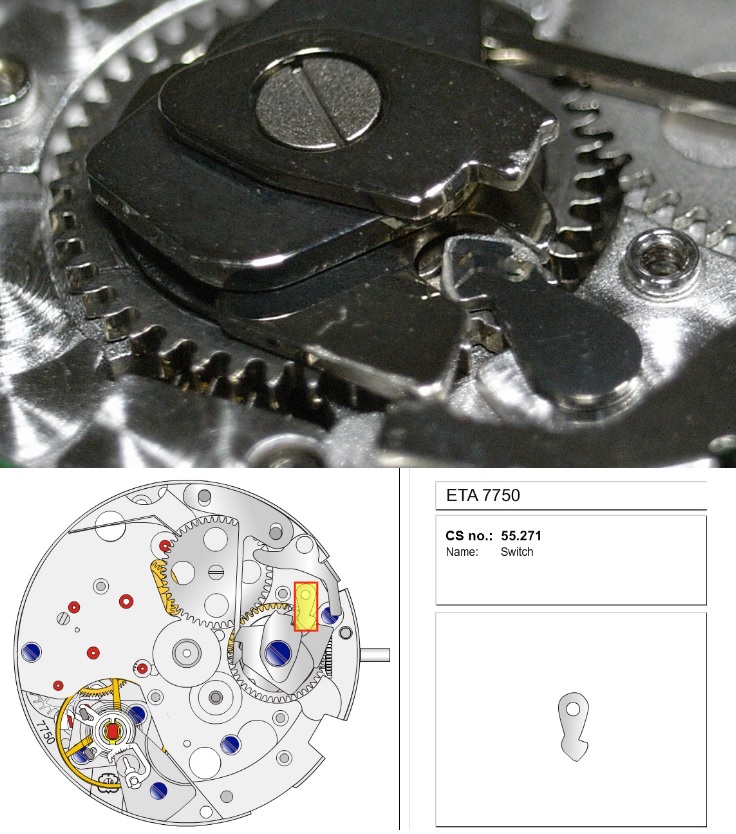
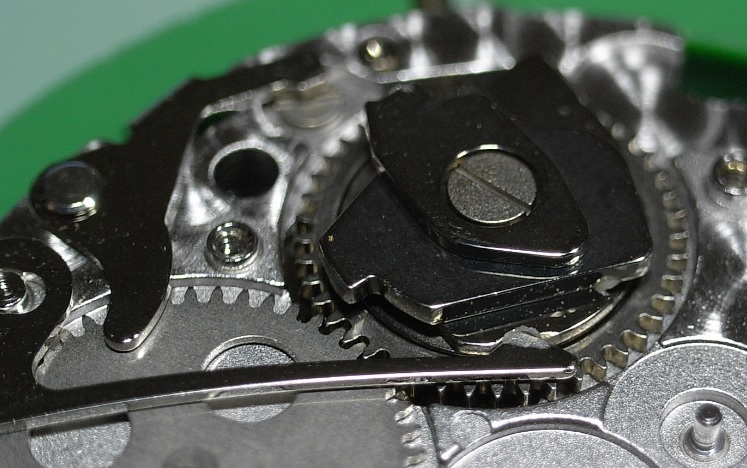
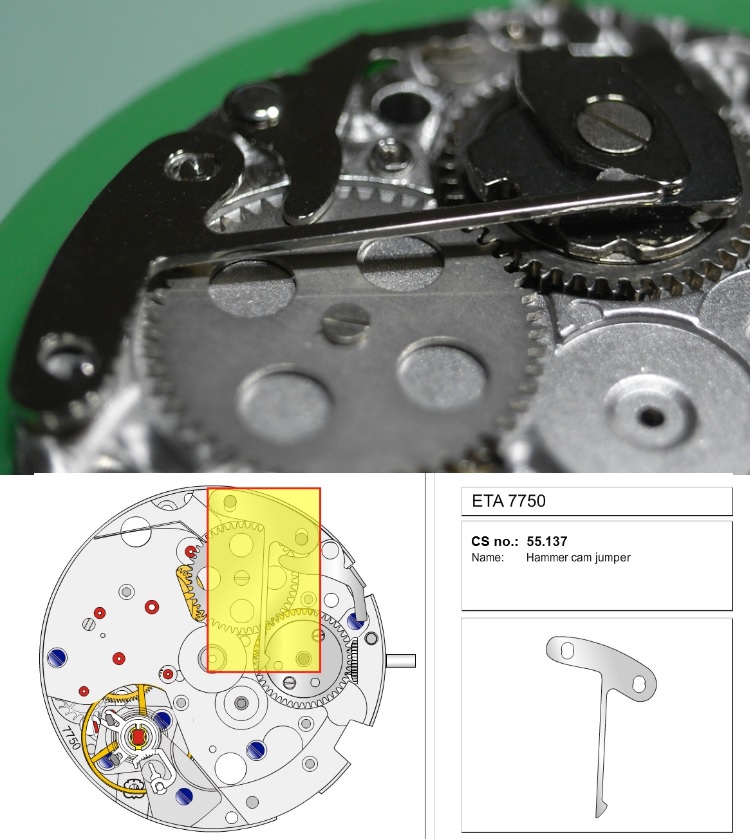
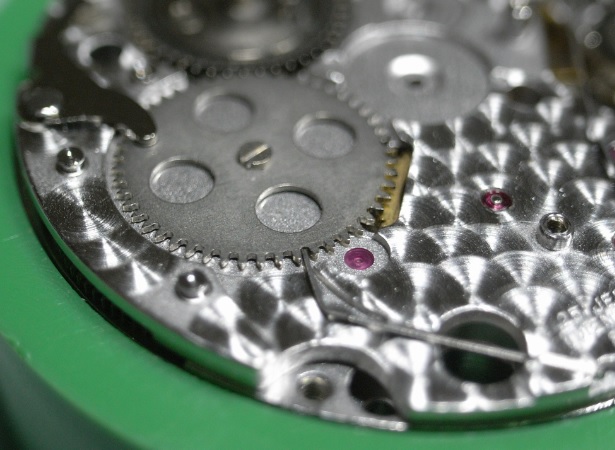
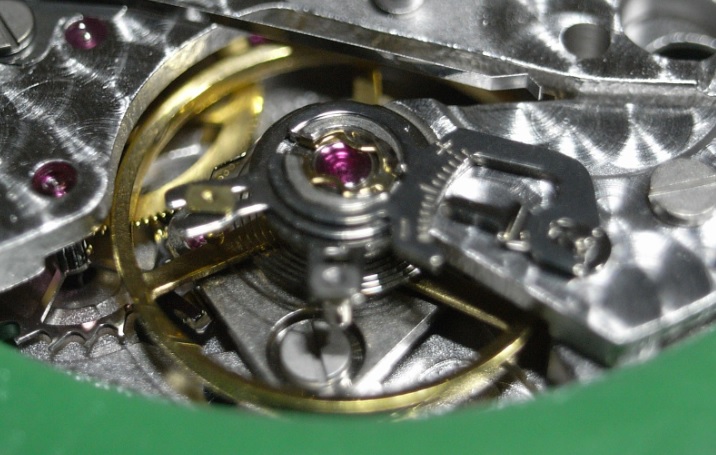
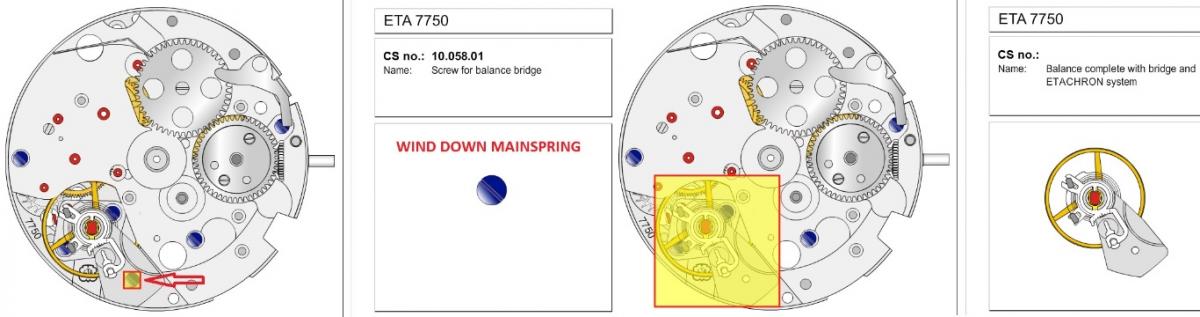
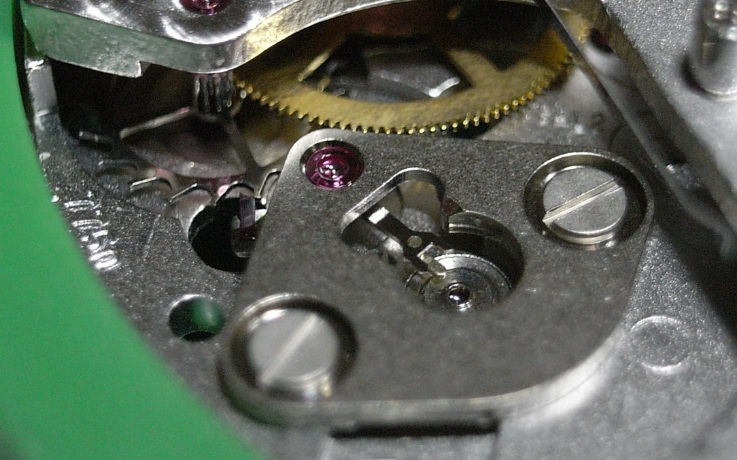
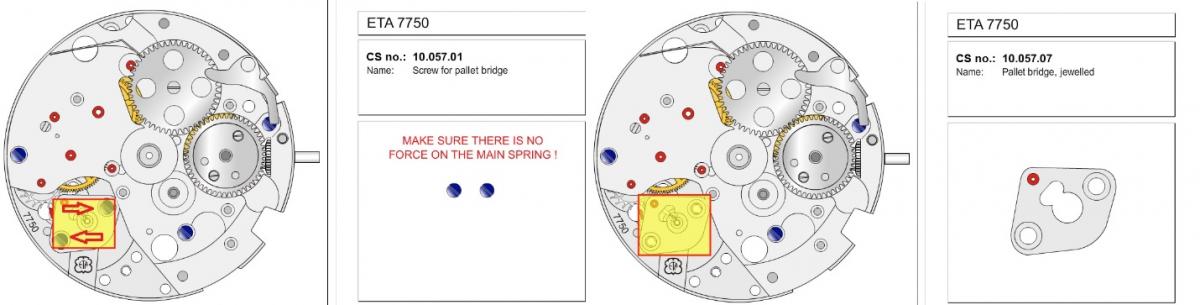
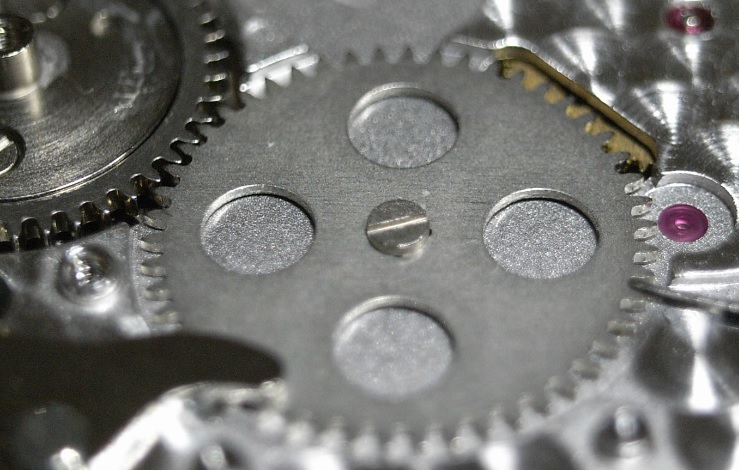
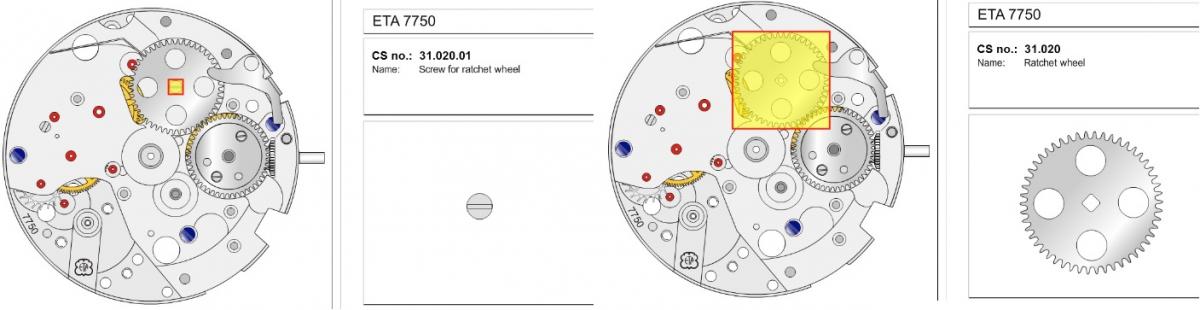
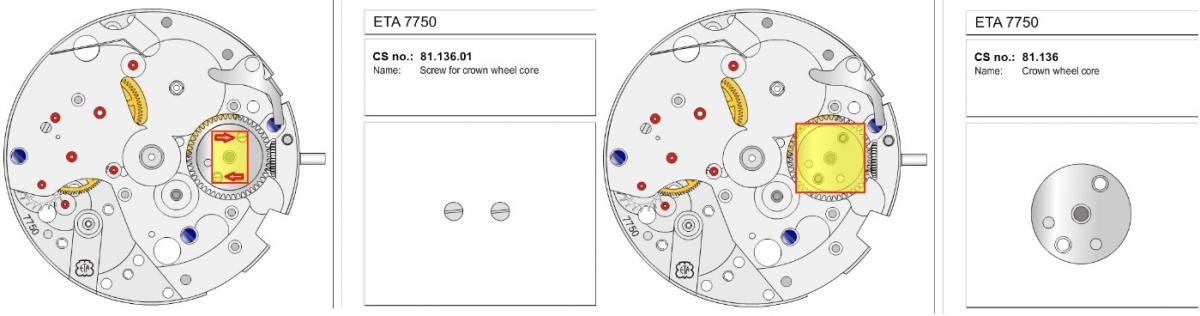
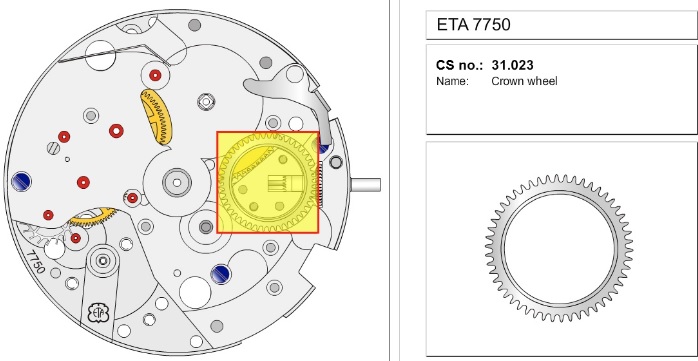
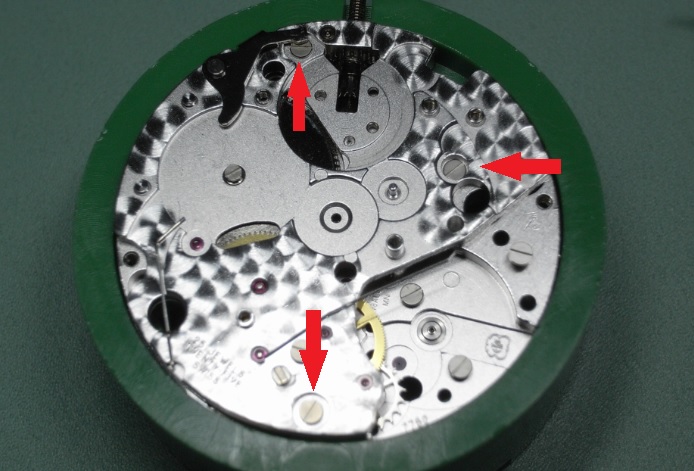
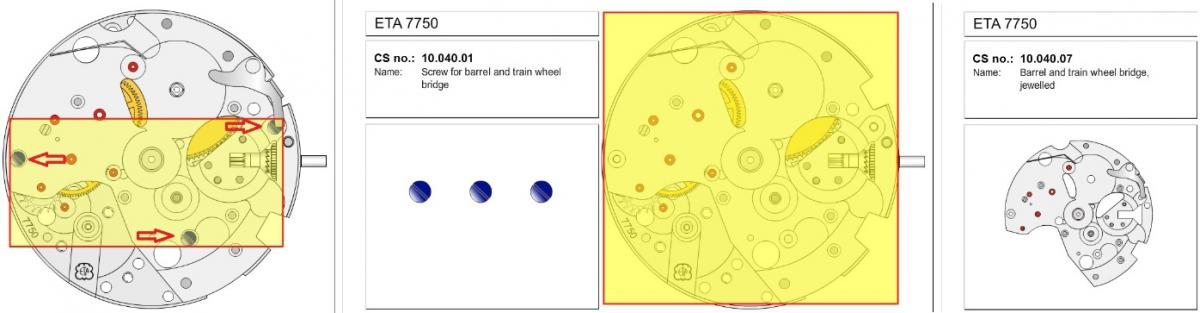
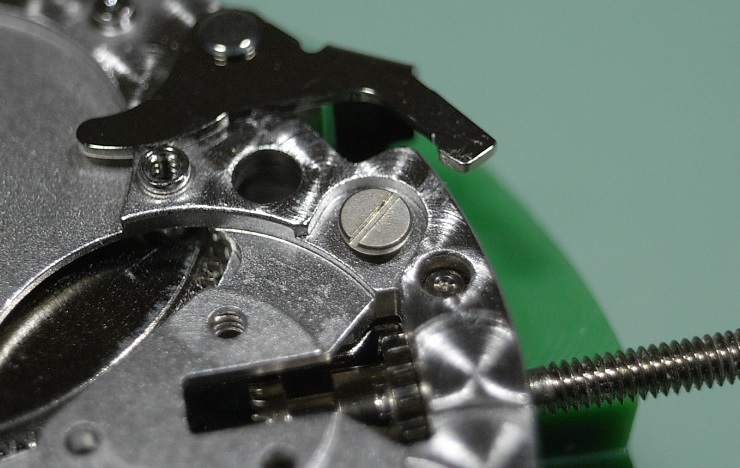
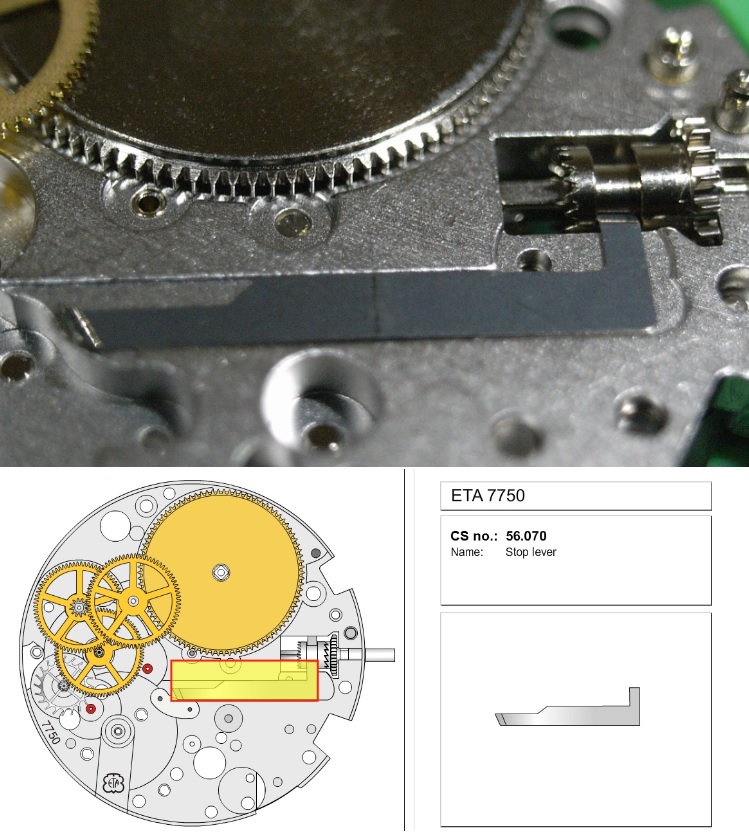
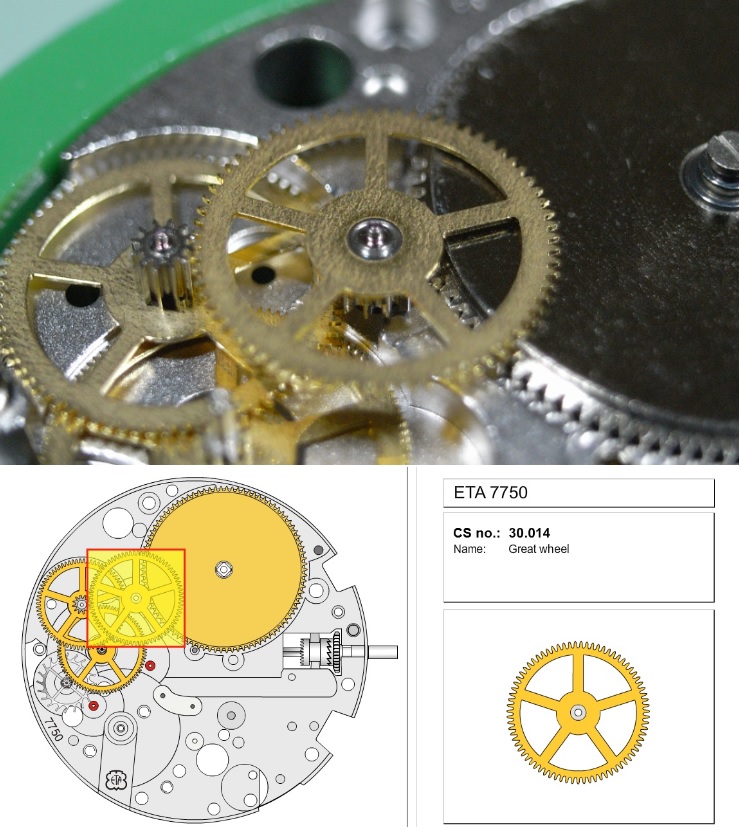
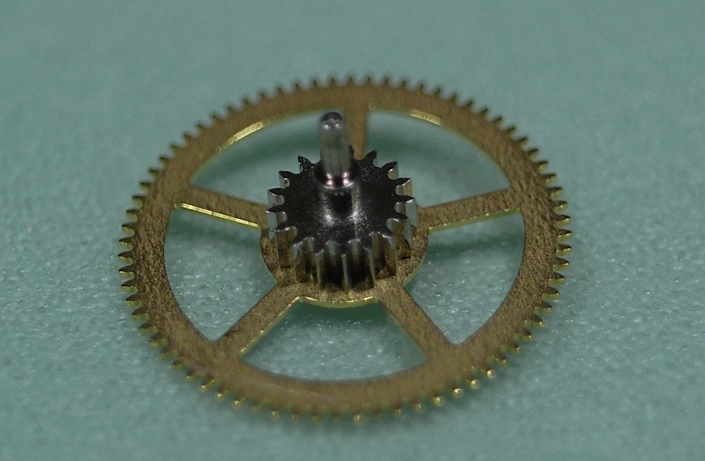
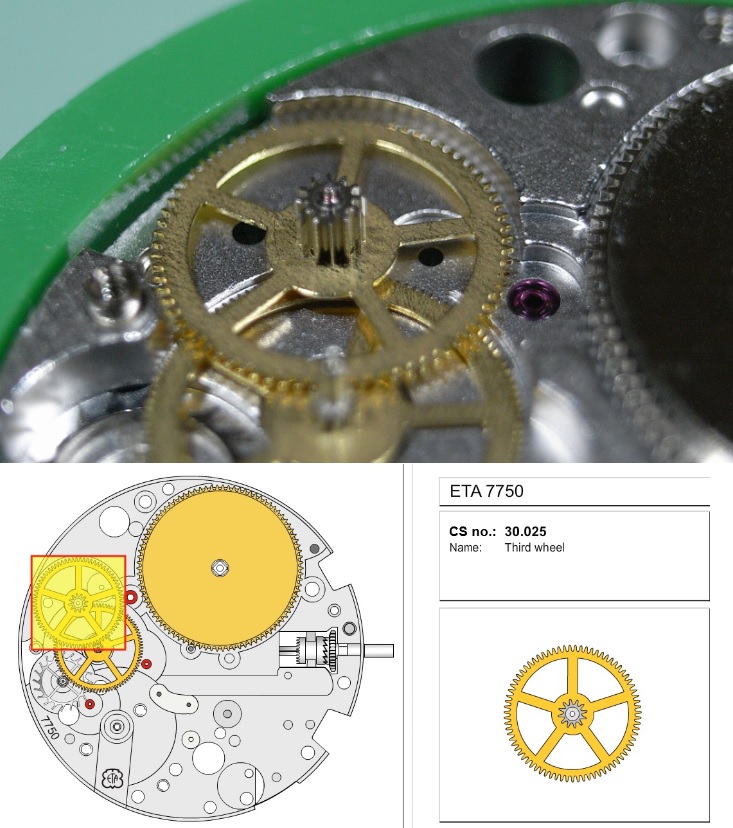
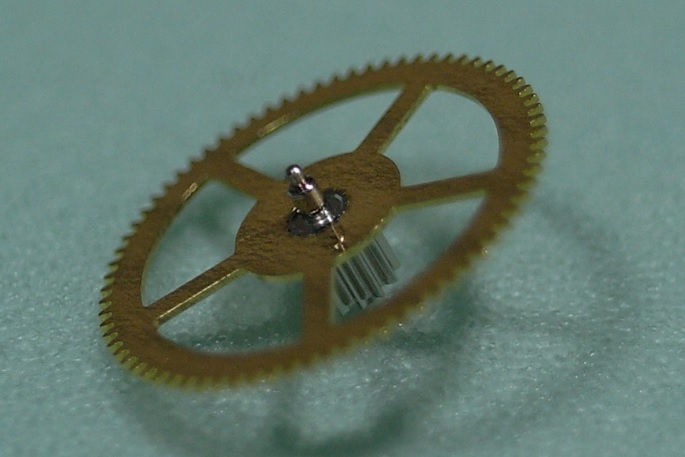
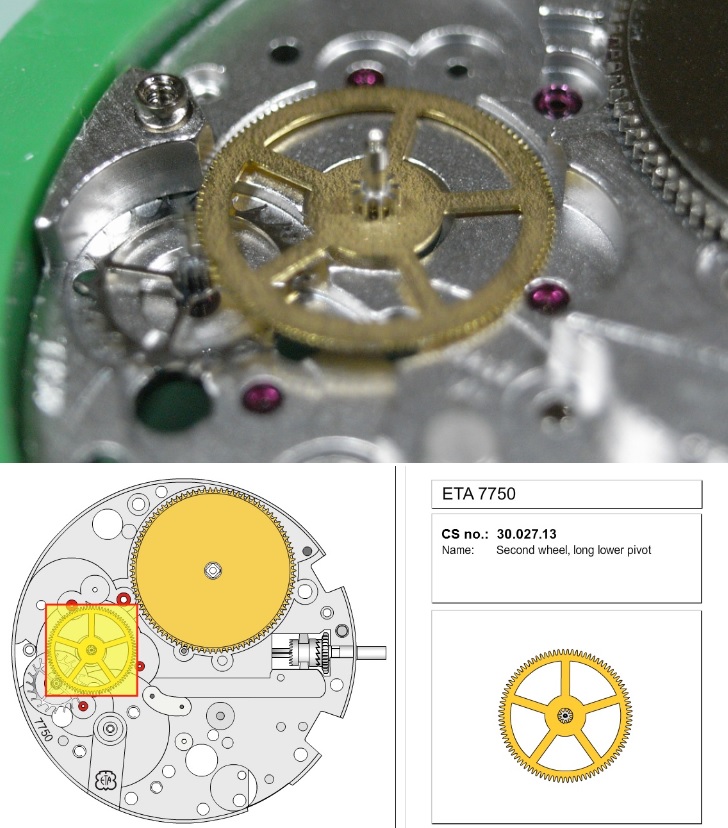
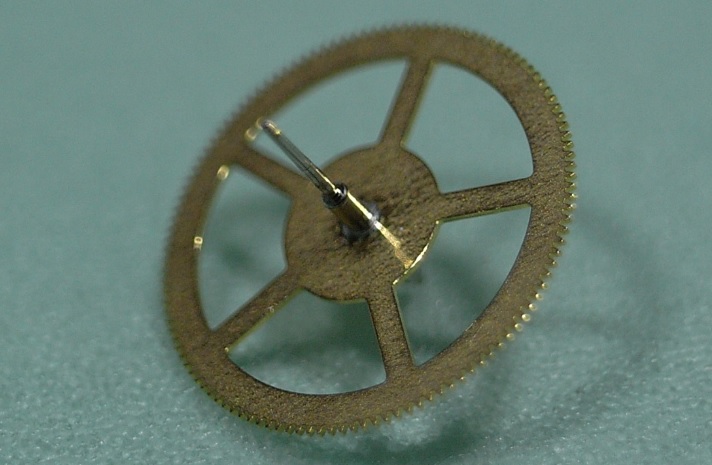
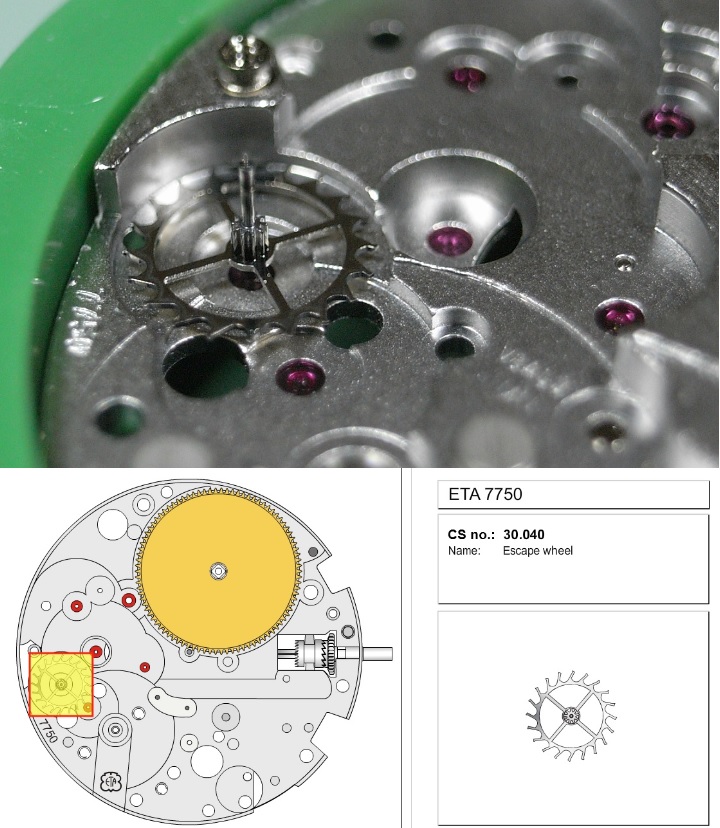
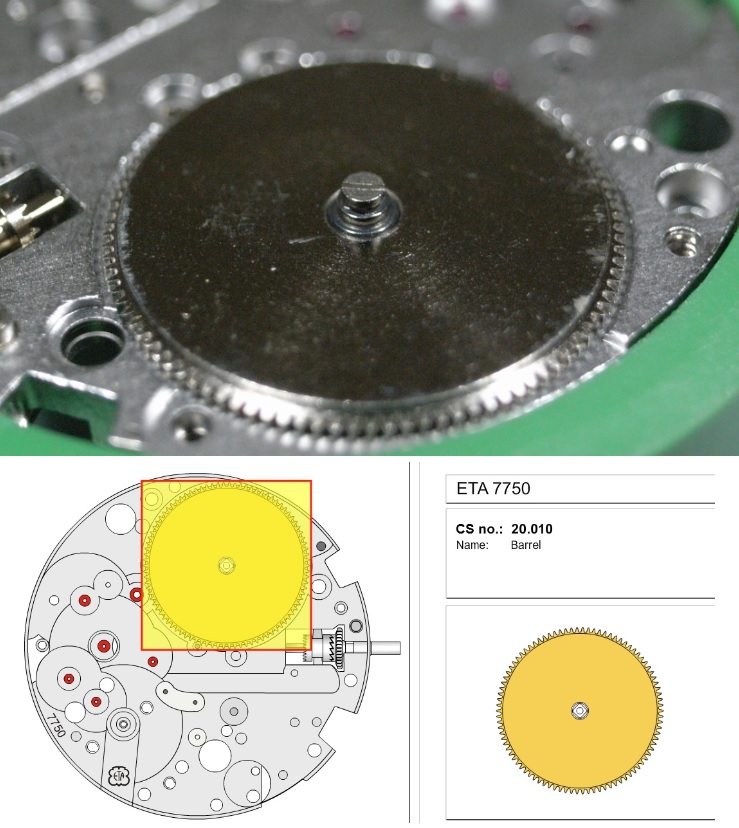
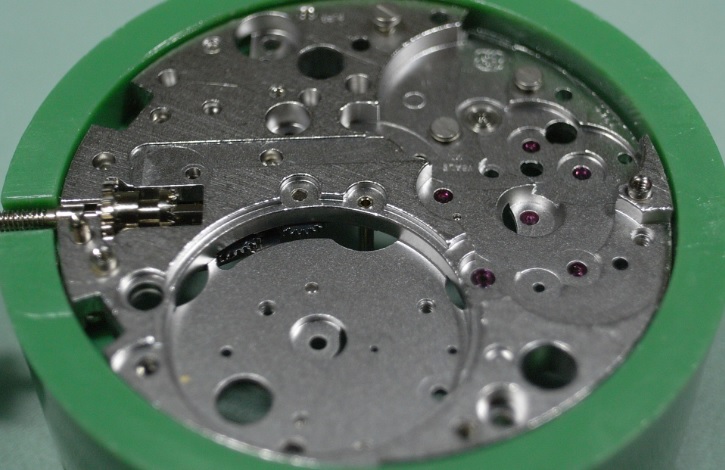
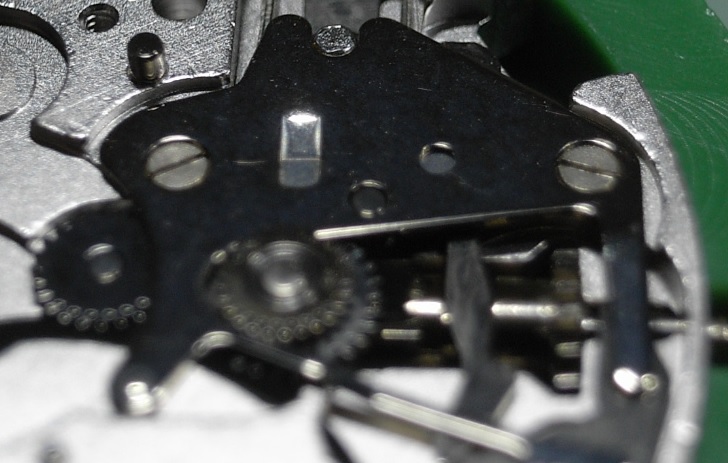
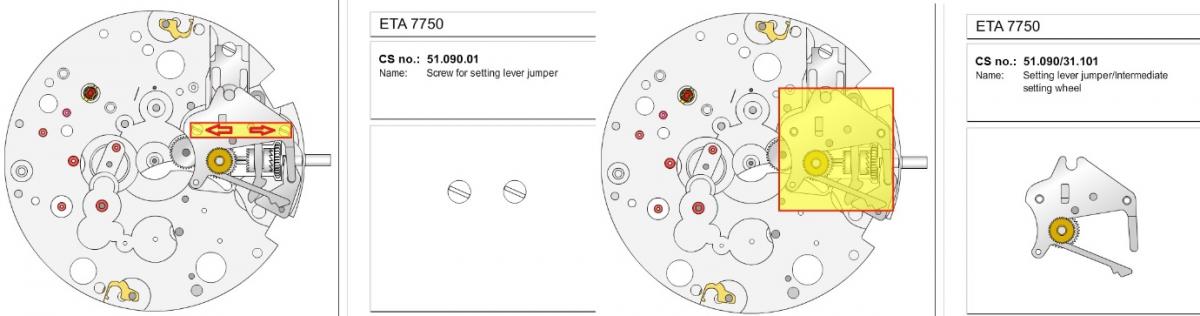
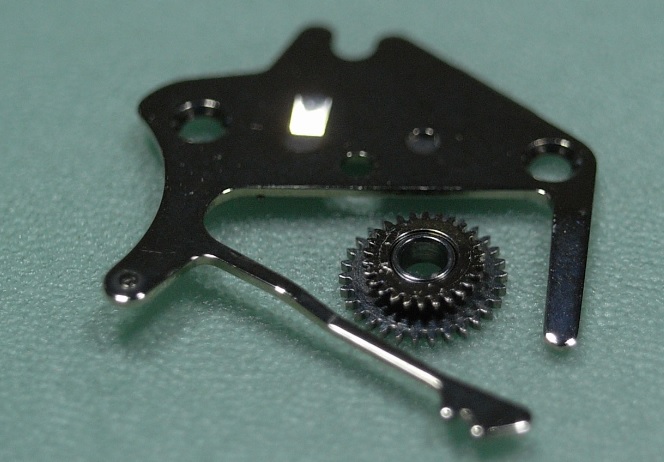
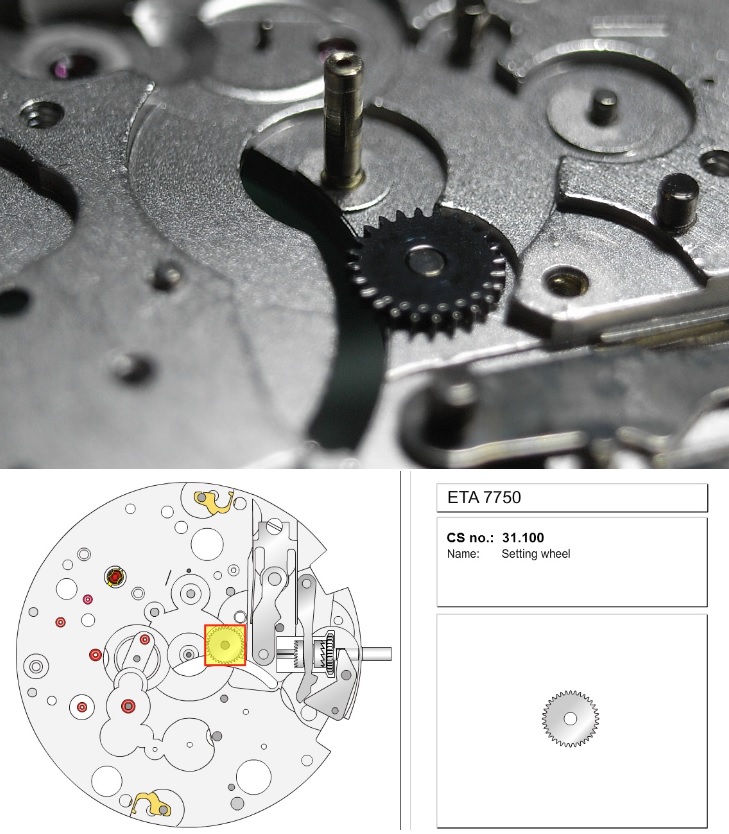
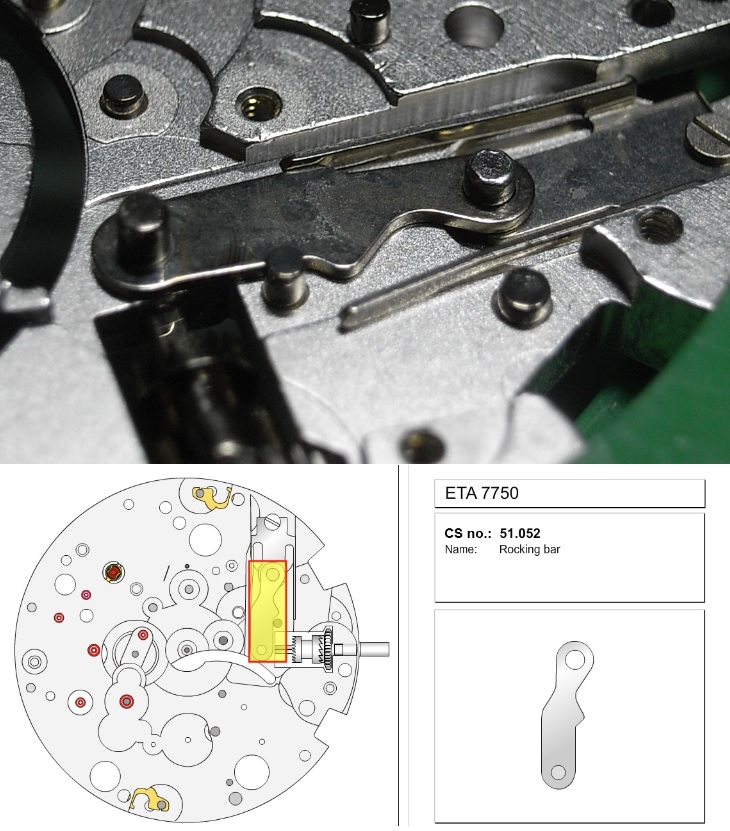
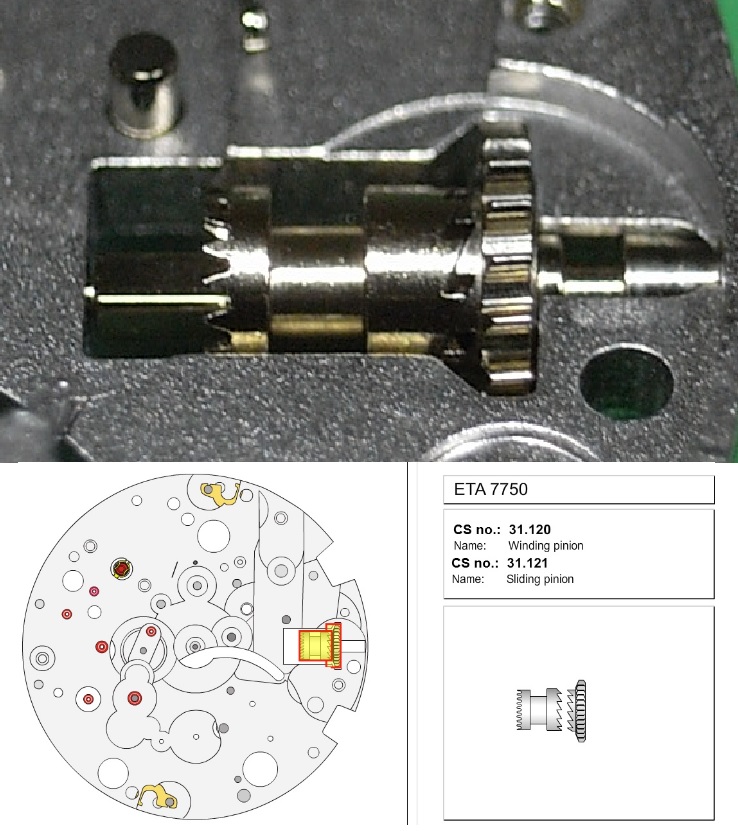
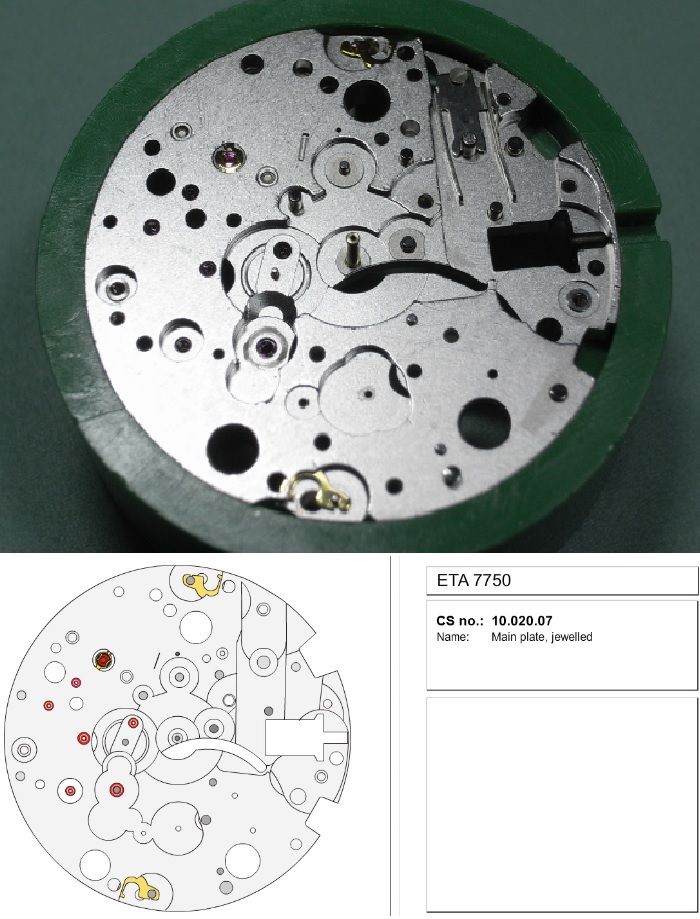
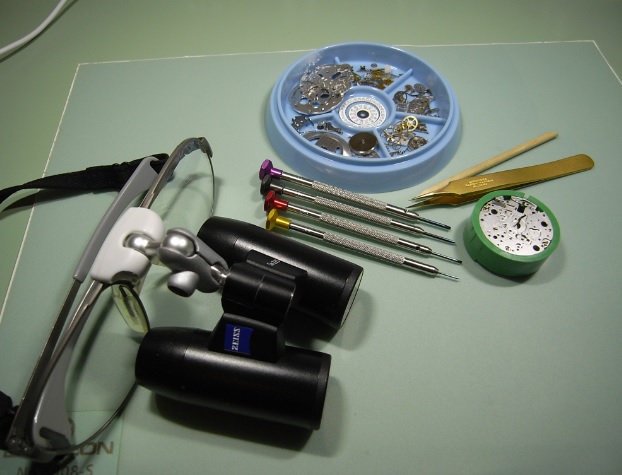
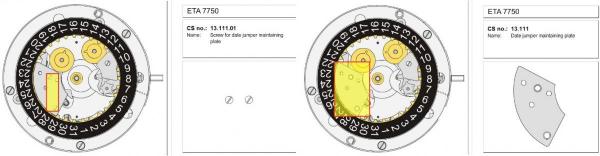
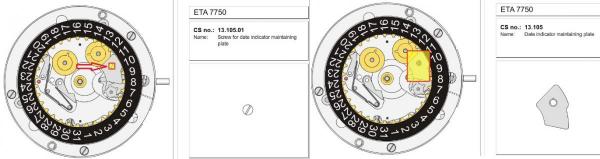
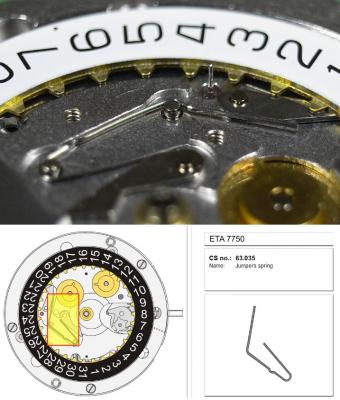
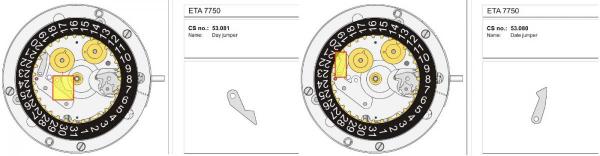
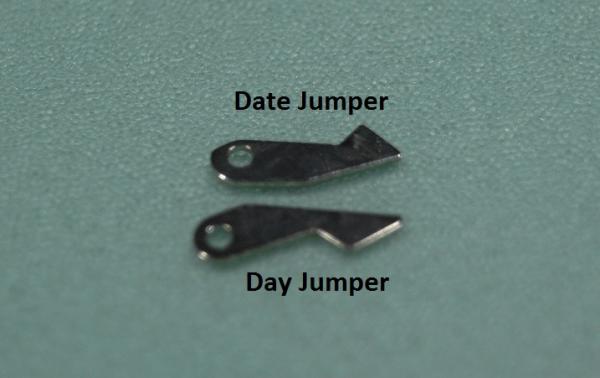
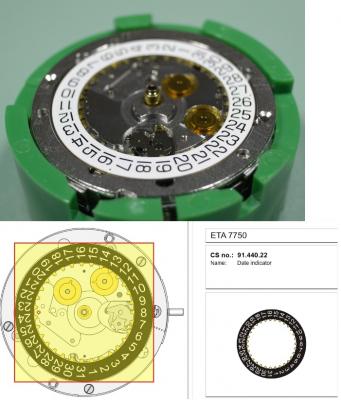
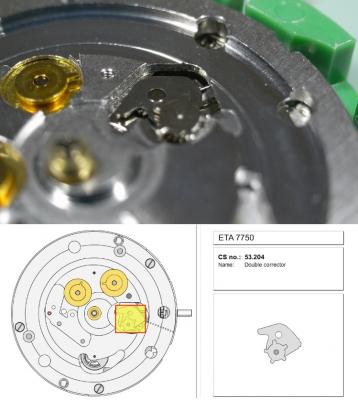
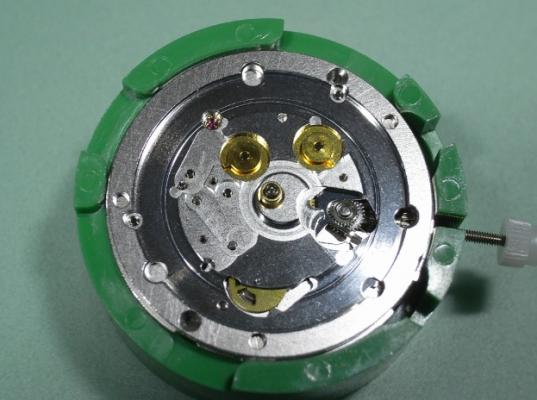
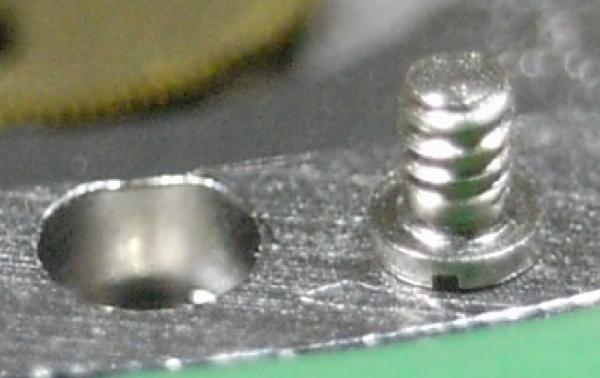
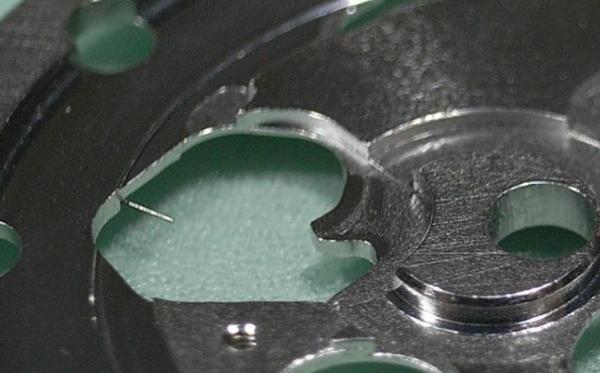
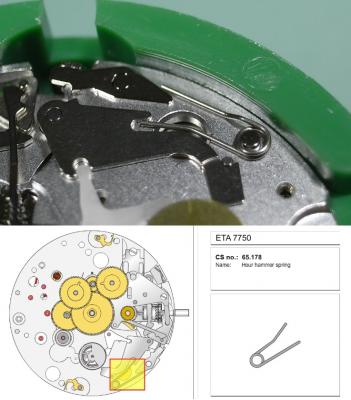
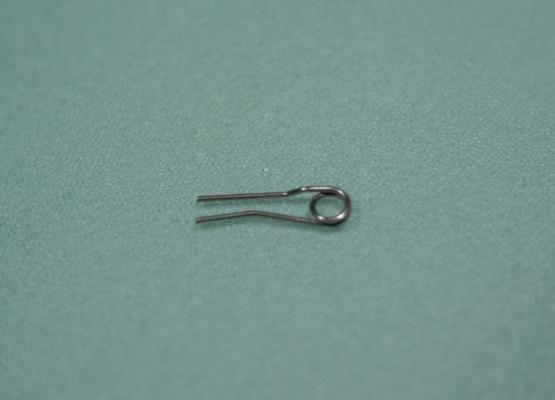
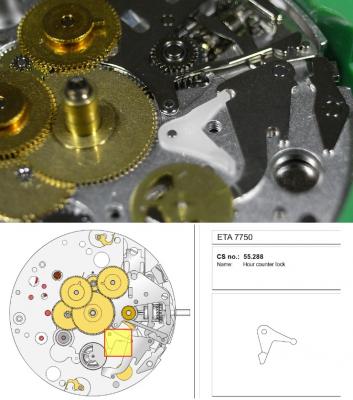
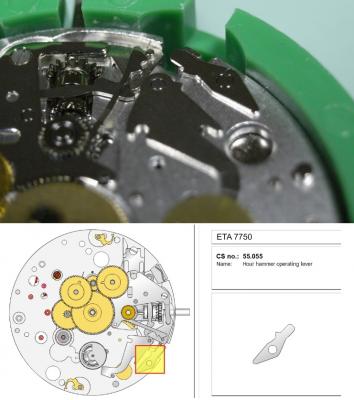
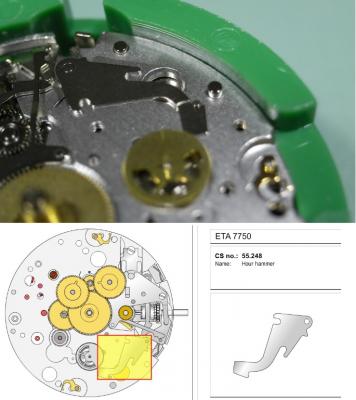
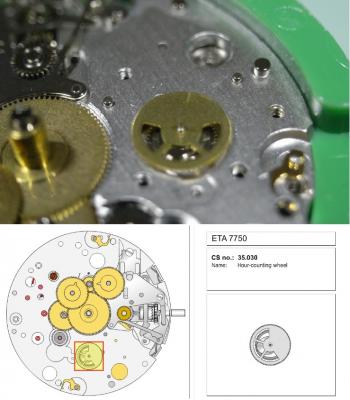
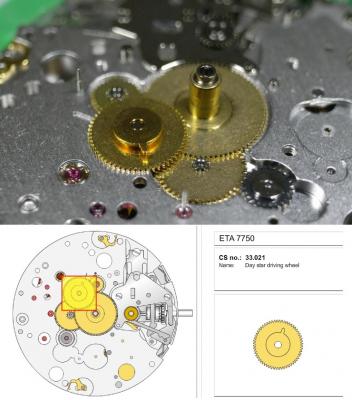
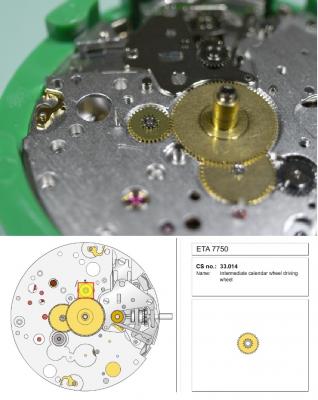
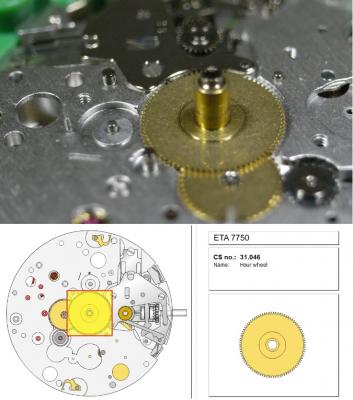
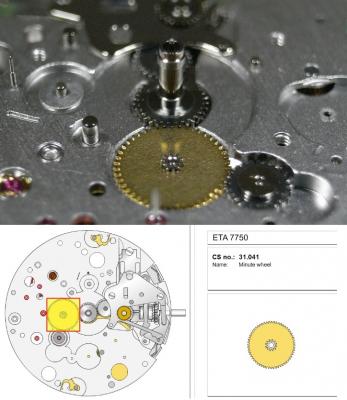
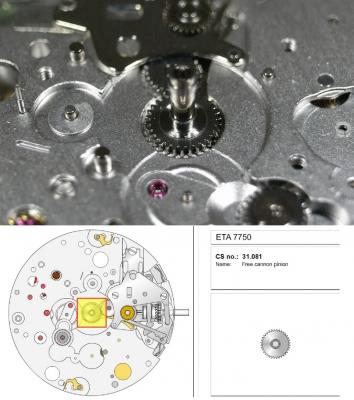
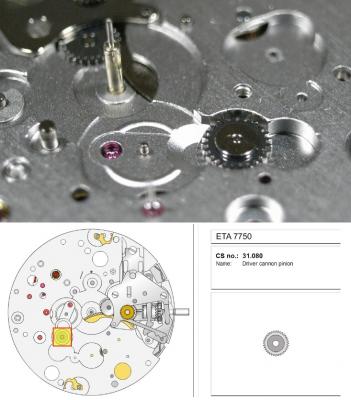
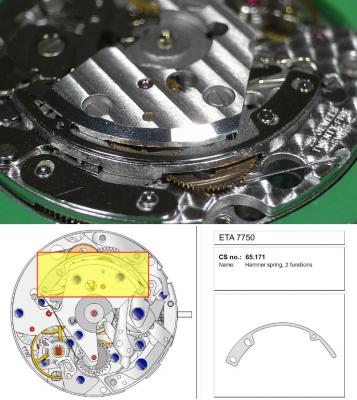
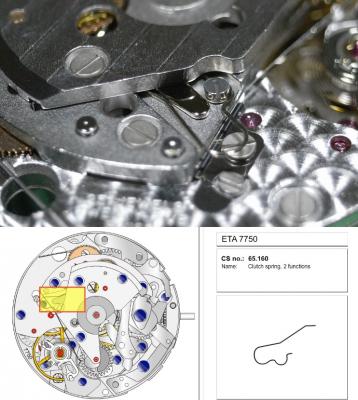
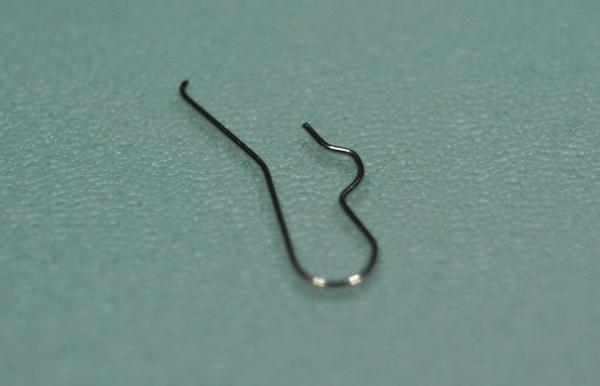
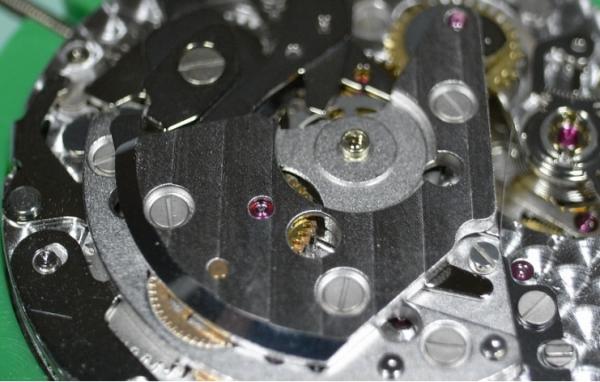
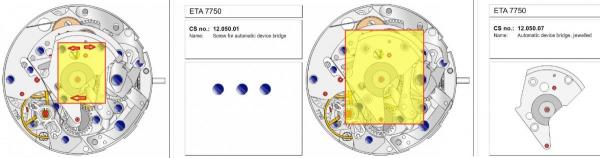
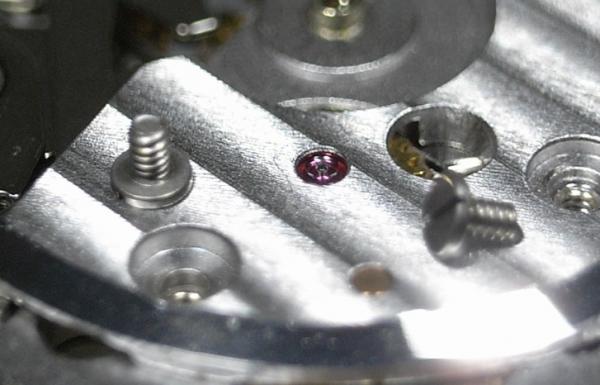
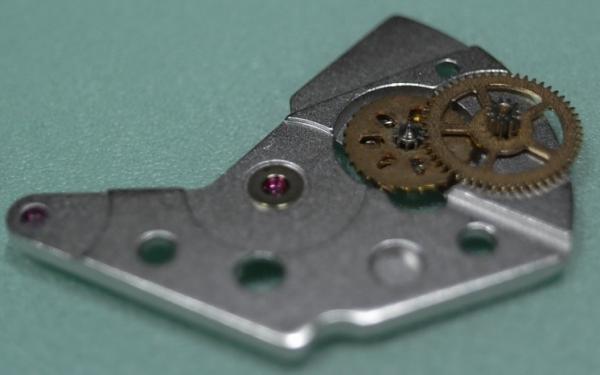
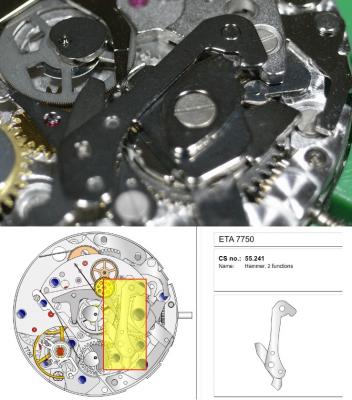
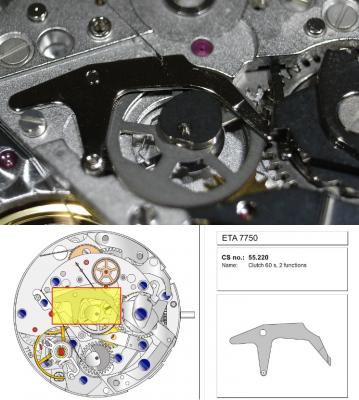
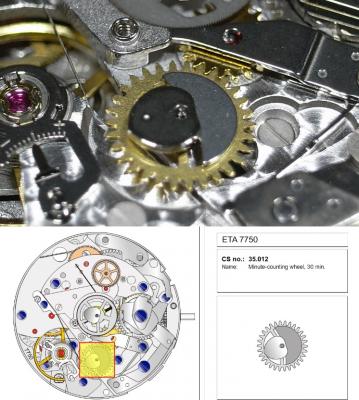
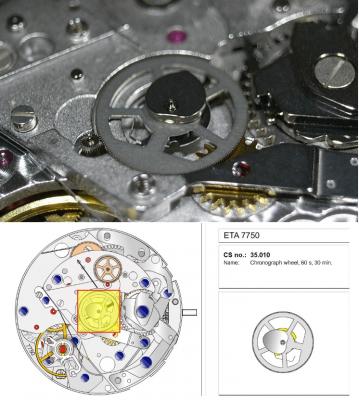
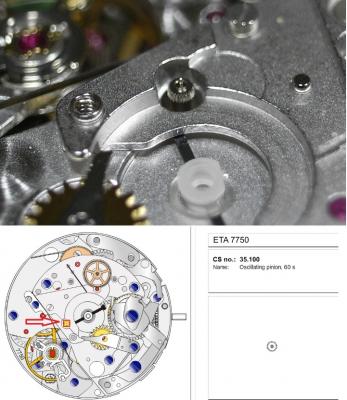
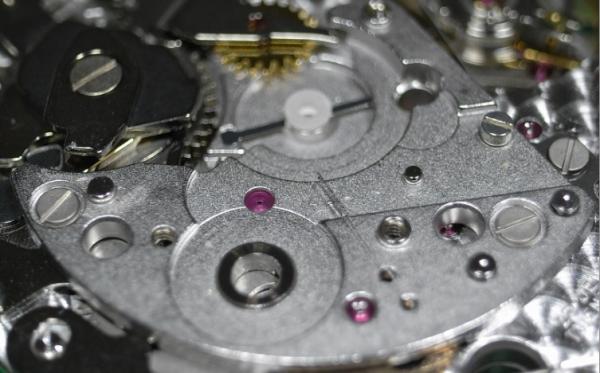
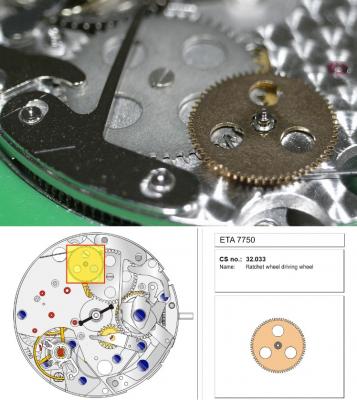
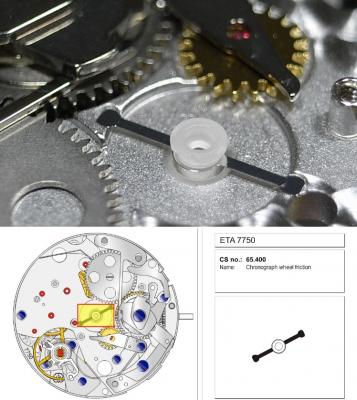
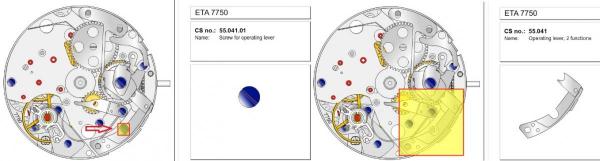
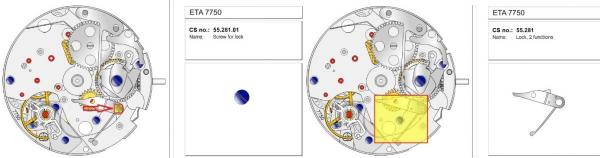
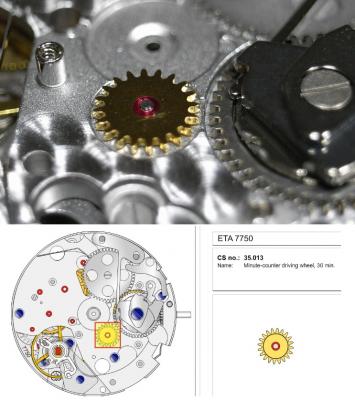
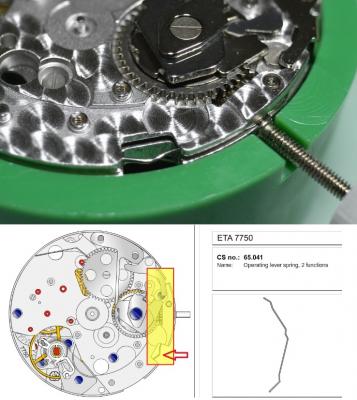
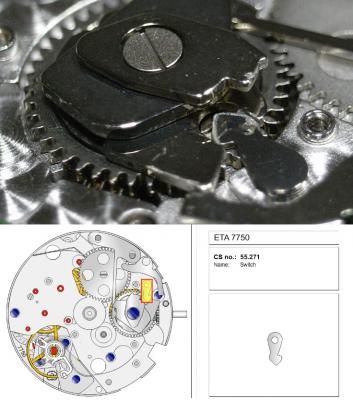
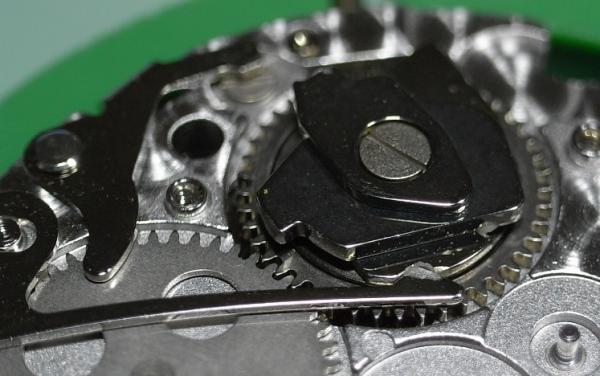
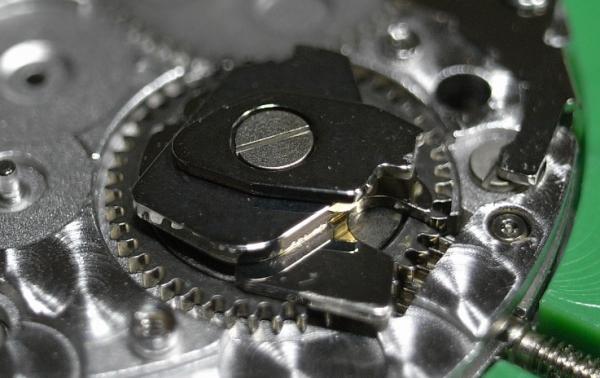
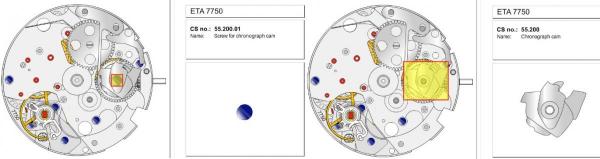
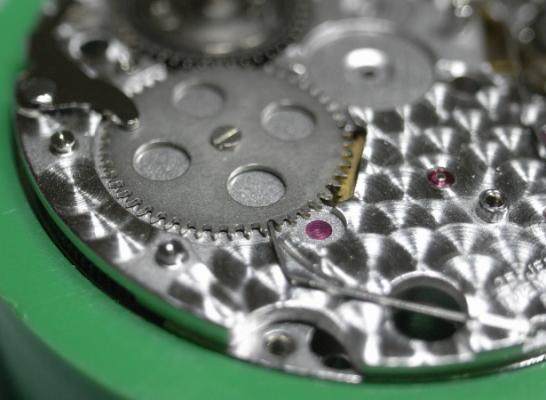
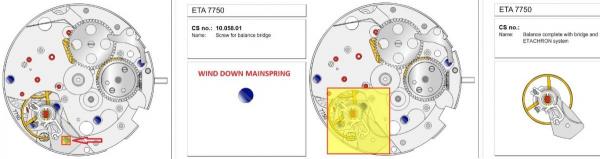
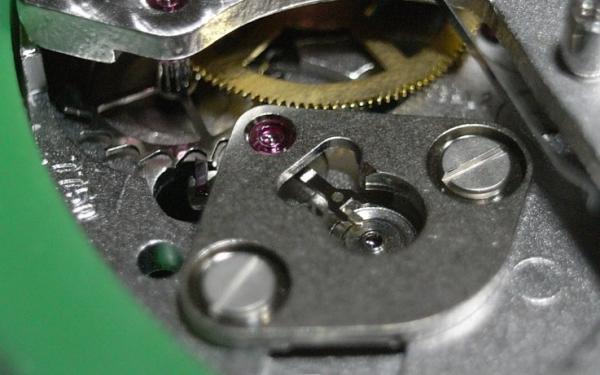
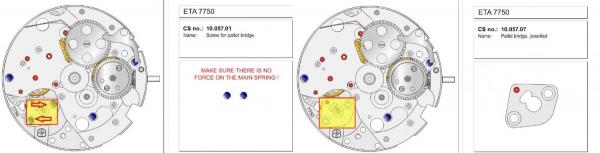
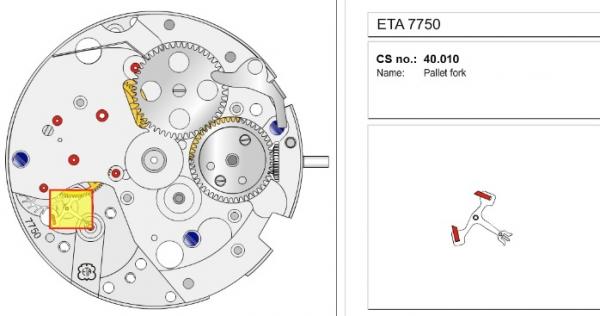
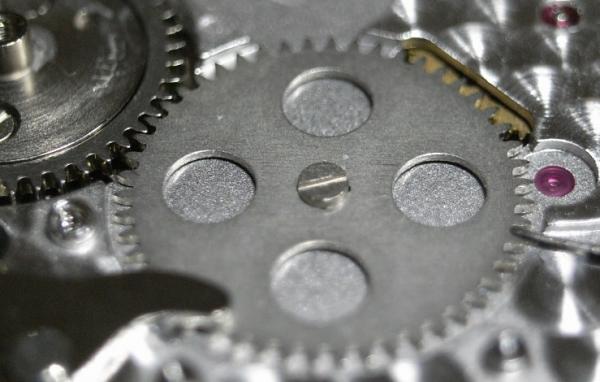
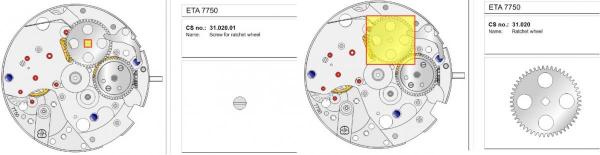
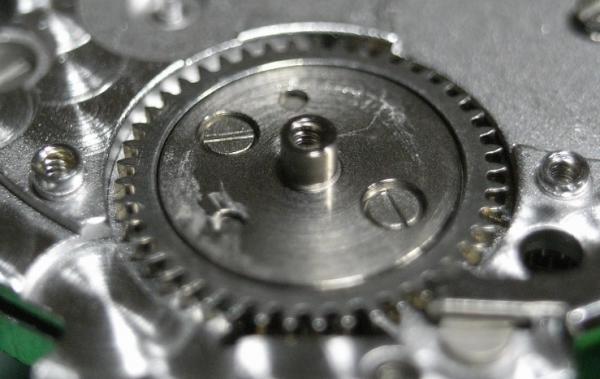
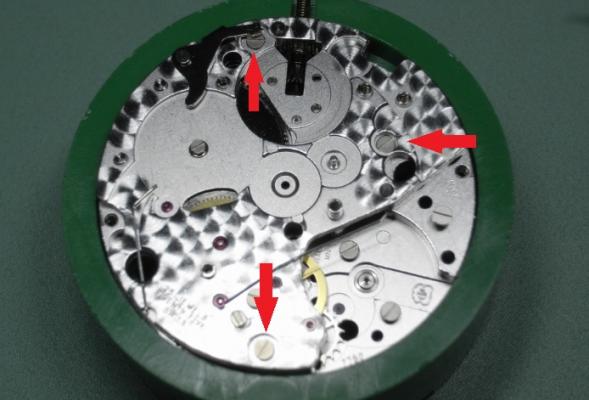
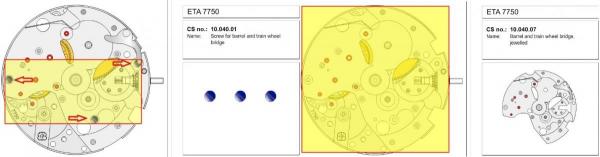
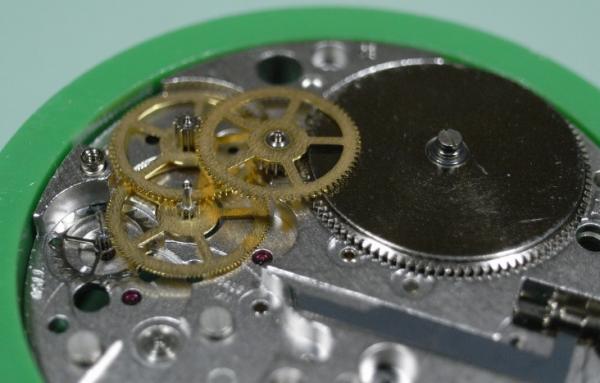
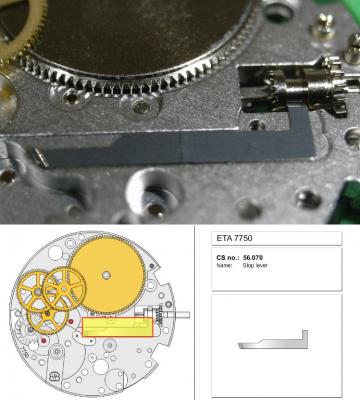
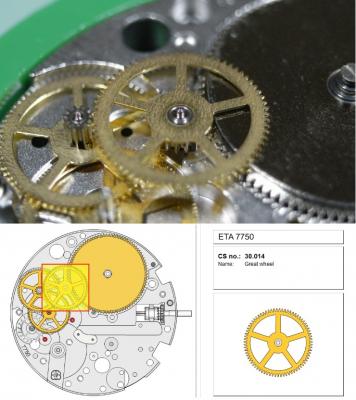
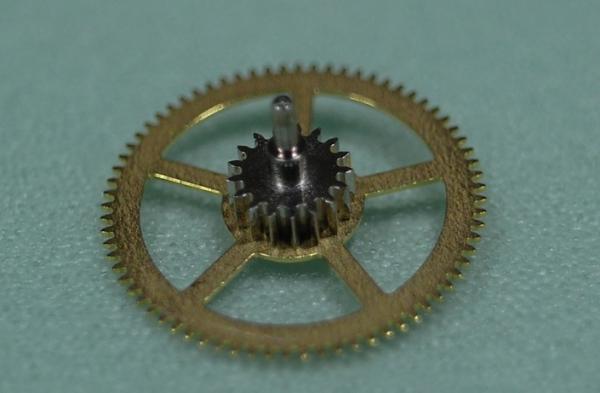
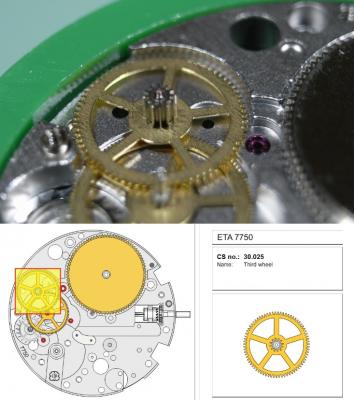
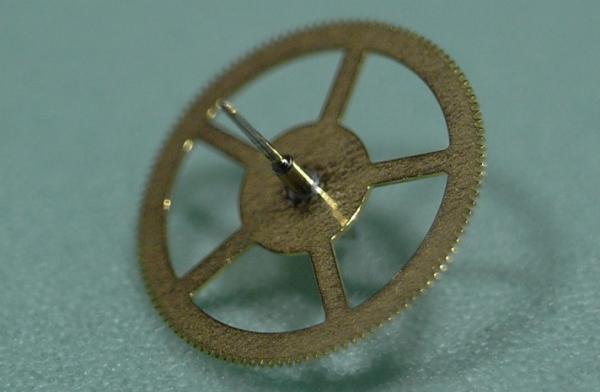
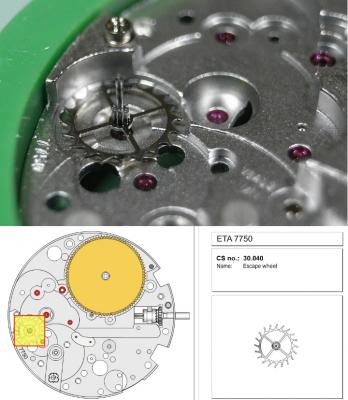
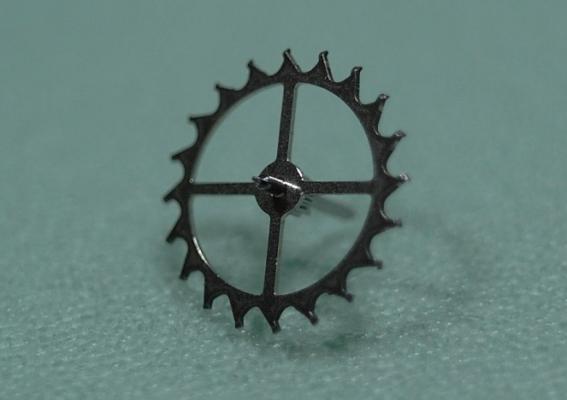
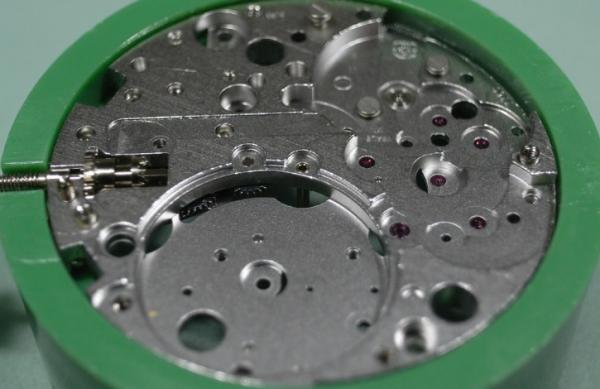
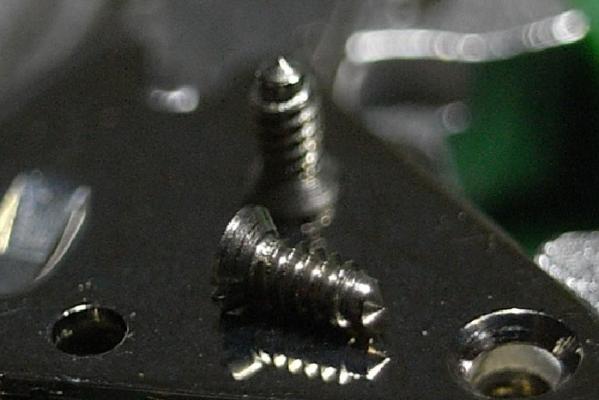
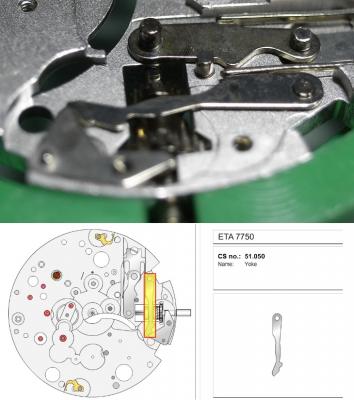
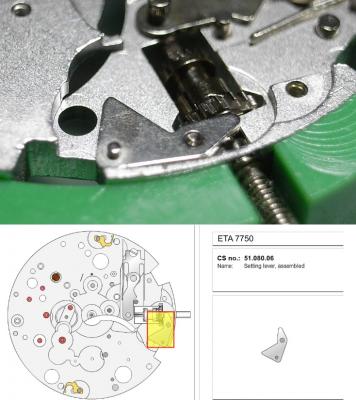
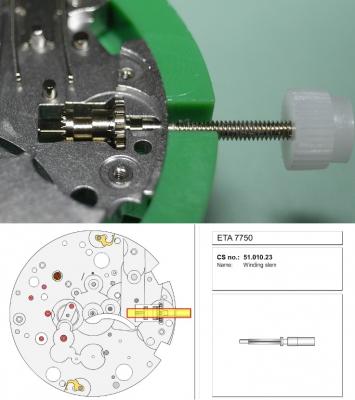
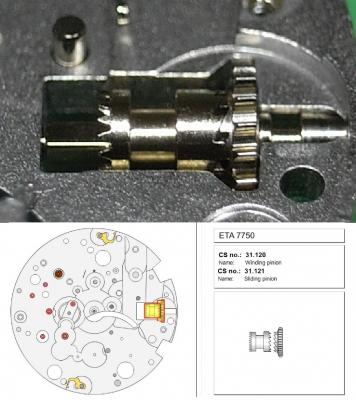
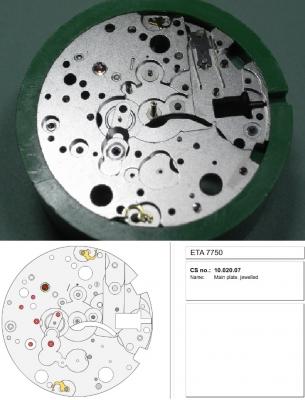
ETA 7750 Service Walkthrough The 7750 was first available in 1974, having been one of the first movements to be designed with the aid of a computer. It's hard to believe that the 7750 is still the industry standard movement for chronographs considering it's history. It was developed over 40 years ago by Valjoux, who was then a legendary movement maker that was part of the giant ASUAG conglomerate. But by the end of 1975 production was stopped due to the onslaught of the Quartz Era, and the 7750, along with many other mechanical calibers, was abandoned. Industry demand for this movement was so low that the stock produced in that 1 year manufacturing lasted until 1982! Such was the devastation of cheap Japanese produced quartz watches to Swiss manufactures. History may have forgotten the 7750 except for the local management at Zenith who ignored the orders by Valjoux to destroy the dies and equipment used to manufacture the 7750, instead hiding the equipment away from corporate eyes. You can find many more fascinating facts about this caliber online, and it's well worth the read. ................................................... This walkthrough will be very detailed, and I hope this will give people the courage to tackle this movement. I've serviced quite a few calibers, and this is one of the most beautiful, with a very logical layout. ETA7750 Tech.PDF If you have built your skills with basic movements, and become proficient in servicing them, I would highly recommend this movement to be your first chronograph to tackle. Lets begin. DEMAGNETIZE THE MOVEMENT BEFORE DISASSEMBLY. Remove the Day Indicator and store it in a safe place where it won't be damaged. Unscrew (0.8 Driver) the Jumper Maintaining Plate and remove it. Do the same for the Date Indicator Maintaining Plate Carefully remove the Jumpers Spring, holding it with a piece of pegwood so it doesn't ping away. Next remove the jumpers for the day and date. The jumpers differ from one another, so here is a reference photo so you can see the difference. Remove the Date Indicator and place it in a safe place where it won't be damaged. The last piece to remove on the Date Platform is the Double Corrector Now unscrew (1.4 Driver) the Date Platform and gentle pry it from the movement. Be careful when removing this plate, as there is a fine spring pressed into the plate that can be easily damaged. Here is a reference photo of the screws that hold the Date Platform. Remove the Hour Hammer Spring, once again using the pegwood to hold the spring while removing the tension. Here is a reference photo of the correct orientation of the spring. Remove the Hour Counter Lock. Remove the Hour Hammer Operating Lever. Next is the Hour Hammer, be careful when removing this item so as not to damage the Hour-Counting Wheel. Now remove the Hour-Counting Wheel. Remove the Date Indicator Driving Wheel Remove the Day Star Driving Wheel Then remove the Intermediate Calendar Driving Wheel Remove the Hour Wheel Then the Minute Wheel Remove the Cannon Pinion, which does not require a puller. The last component to be removed on this side of the Main Plate is the Driver Cannon Pinion. To lift the Driver Cannon Pinion I used what Mark used, a set of hand lifter from Horotec (MSA05.007); but you can also use a Presto Tool (30636-1) which will also work well. The dial side of the movement is now complete disassembled. Flip the movement over and unscrew (1.5 Driver) the Oscillating Weight. To remove the Hammer Spring lift it up gently over the automatic work and move it inwards. This will move the tail of the spring in a clockwise motion to the opening in the slots, which will free the spring. Slide out the Clutch Spring. Here is a reference photo of this spring, and it's orientation. Remove the screws (1.4 Driver) for the Automatic Device Bridge, and gently pry it loose. Here is a reference photo of these screws for the bridge. Once the Automatic Bridge has been removed, the two wheels for the automatic work are able to be removed. Below is a reference photo of how the sit inside the bridge. We now begin to disassemble the chronograph section of this movement. Begin with removing the Hammer, 2 Functions. Next remove the Clutch 60s, 2 Functions. Then remove the Minute-counting Wheel, 30min. Remove the Chronograph Wheel 60s, 30min. Gently lift out the Oscillating Pinion, 60s. Here is a reference photo of the orientation of this pinion. Unscrew (1.4 Driver) the Chronograph Bridge and gently pry it off the Train Wheel Bridge. Remove the Ratchet Driving Wheel. Remove the Chronograph Wheel Fiction. Unscrew (1.4 Driver) the Operating Lever, 2 Functions. Unscrew (1.4 Driver) the Lock, 2 Functions. Next remove the Minute-counter Driving Wheel, 30min. Slide out the Operating Lever Spring, 2 Functions. This spring can be fitting in both directions; but only 1 way is correct. Here is a reference photo of it's correct orientation. Remove the Switch. Here I digress from the order the SwissLab document illustrates the order of removal. They show to remove the Chronograph Cam before removing the Hammer Cam Jumper. This in my opinion is not the best way, as all the force from the jumper is pressing on the cam whilst your trying to remove it, and could lead to damage. Instead I move the Chronograph Cam until it reaches the notch as shown in the photo below. Then lift the Hammer Cam Jumper up to the top of the Chronograph Cam, which will release it's tension. Then, just as you removed the previous hammer, rotate the jumper to the opening in the slots, which will free the spring. Now you can unscrew (1.4 Driver) and remove the Chronograph Cam safely without tension on it. RELEASE THE MAINSPRING TENSION Once the tension has been released, unscrew (1.4 Driver) and remove the Balance Cock. Then unscrew (1.4 Driver) the Pallet Bridge and remove the bridge and Pallets. Unscrew (1.2 Driver) and remove the Ratchet Wheel. Then remove the Crown Wheel. Unscrew (1.4 Driver) the Train Wheel Bridge and gently pry it off the Main Plate. Note that one of the screws is under the Operating Lever. This needs to be moved out of the way to access this screw. The last level of this movement contains the train. Here is a reference photo of the wheel locations. Remove the Stop Lever. Remove the Great Wheel. Here is a reference photo of the underneath of this wheel. Remove the Third Wheel. Here is a reference photo of the underneath of this wheel. Remove the Second Wheel. Here is a reference photo of the underneath of this wheel. Note this has the long lower pivot. Remove the Escape Wheel. Here is a reference photo of the underneath of this wheel. Then remove the Barrel. This completes the removal of the train. Flip the movement over so we can complete the disassembly by removing the keyless work. Firstly, release the tension from the Setting Lever Jumper. Then unscrew (1.2 Driver) and remove the Setting Lever Jumper. These are unique screws with pointed ends, and below is a reference photo of them. This will also remove the Intermediate Setting Wheel. Next remove the Setting Wheel Then remove the Yoke. Remove the Setting Lever. Remove the Rocking Bar. Now pull out the Stem. Once the Stem is removed the Winding and Sliding Pinion should fall out of the movement onto your work mat. Disassembly of the 7750 is now complete If you've come this far, congratulation on completing the disassembly. Make sure you pegwood all the jewels and reinstall the Balance back onto the movement for cleaning. Assembly of the movement will be posted as soon as I complete the write-up.


 1 point
 -
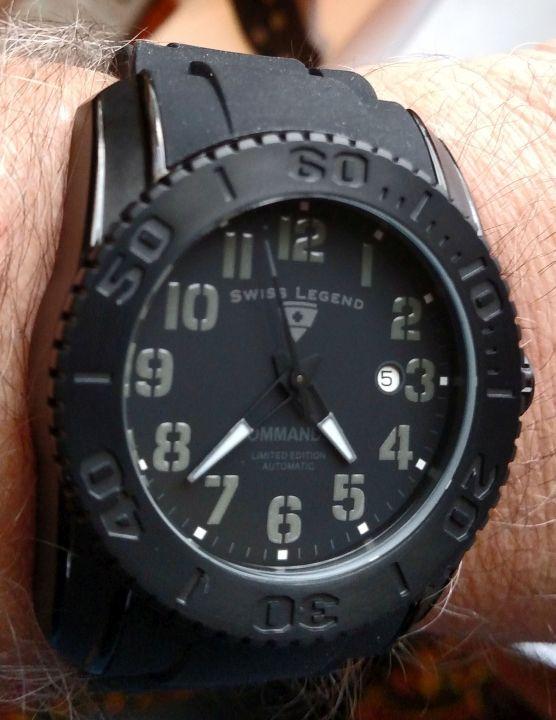
Some year ago, I bought a Swiss Legend watch strictly for the movement. The watch cost less than the movement in it. It was ugly as you might expect! Time passed and I never found anything I really wanted to build up. A period of boredom and lassitude struck and I needed a project while waiting for parts on another project. To EBay and sourced a case, dial, and hands. I should have paid better attention as the dial as it was a touch too large for the case. I turned it down using a dremel and 400 grit sandpaper. Worked very well and did not damage the dial. Put it all together and here it is. The more difficult task turned out to be clearancing the hands so they didn't foul. Cutting the stem was no issue. RMD
 1 point
 -
I'm Heikki Laitinen an enthusiastic watch collector from Sweden. I have been collecting and servicing/repairing watches for some years now. My passion is in watches from the 40's to the 60's but I enjoy working on anything from simple Timex movements to Chronographs. I ended up here after enjoying Marks lessons and videos..1 point
-
Hi Nad There are no plans as such just cobbled together the machine from scrap timber and bits and pieces as I didn't feel like shelling out £350 plus for a shop bought unit, the only major expense were the retaining shells bought from America (timesavers) I have roughed out some drawings for you if you can mail me your address I will post them on to you. have a look on the net for Joe Collins spring winder. It was originly designed for 400 day clocks but by changing the design to suit it will be suitable for all clocks


 1 point
 -
Looks good so far! 1. For the same problem you mentioned, I did not solder the pin onto the piezo. Instead, I used a two part epoxy. I believe it was J-B Weld steel reinforced epoxy. 2. The rubber is to reduce vibrations transferred by the rest of the timing stand to get a cleaner sound. I used a vehicle fuel hose with an inner diameter just big enough for the pin to slide in and out but small enough where there isn't any extra space.1 point
-
nice work...not a turd !1 point
-
Thank you Izzy, Mark replied to the same question and suggested to buy from cousins as a true reliable seagull. If you want to buy in EU you can buy with trust on https://www.alpha-1993.com/en/Watch-parts/Movements/Seagull-ST2130-automatic-movement-clone-ETA-2824-2-SW-200.html?force_sid=cahe8o50rdmf9iilvk7cgib2b6 they send from Latvia [emoji1145]. The aliexpress seller is reliable and has the lowest price but for my experience in Italy I usually wait for postman 1 month and half... [emoji23] Inviato dal mio LG-H930 utilizzando Tapatalk1 point
-
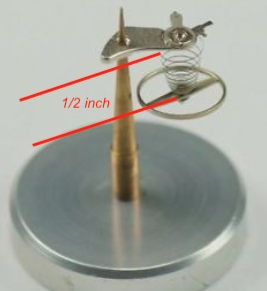
Ok the HS is the most likely culprit it is either too strong our not long enough. If I remember correctly the test for a HS strength is as follows. Put the balance bridge on a tack the HS should then suspend the balance by no more than 1/2 inch. If it is less than this it is too strong if it hangs lower than 1/2 inch it is too weak.
 1 point
 -
I'm not sure, I faced the same problem, how can you know that you buy the real thing (or not an old stock), I didn't look much into it cause I will probably end up ruining mine anyways (by tempering with it). I have decided I will buy from this seller - https://www.aliexpress.com/item/Seagull-ST2130-Automatic-Movement-Clone-Replacement-For-ETA-2824-2-SELLITA-SW200-White-3H-Mechanical-Wristwatch/32916022505.html From his list of products (I think only seagull watches without anything that look shady (like a scum)) and the reviews he have on his store (excellent ones) I tend to believe that the product will be real (maybe you can ask him if it fresh out the factory or an old stock) Some things about Aliexpress - The sellers there are usually fine writing on the boxes that the product cost less than it actually is (not long ago they used to do this even without you asking..) it helps with the custom tax. If you have problem with the item you can 1. contact the seller 2. open a dispute in Aliexpress, they really prefer you to contact them instead of opening a dispute (I don't know what aliexpress do to them..) and usually helpful, the only time I opened a dispute on a 20$ toy that came broken, I got my money back after a day.1 point
-
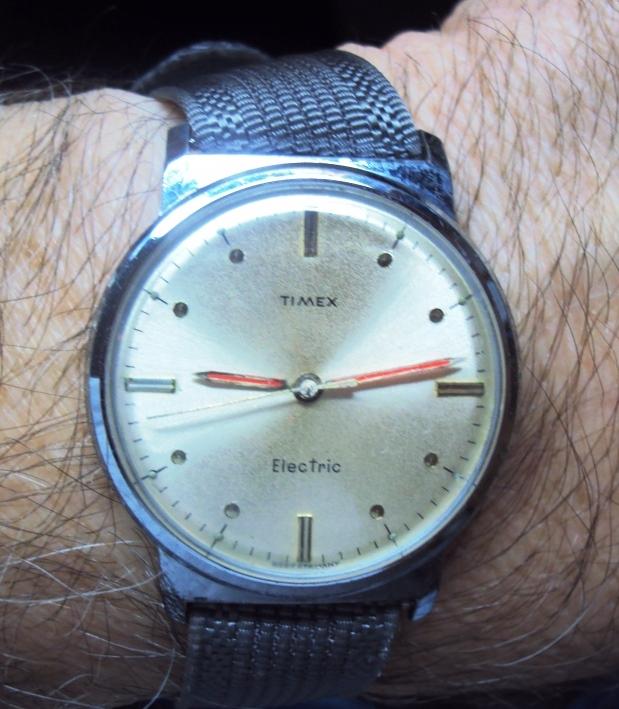
Just off the bench - 1963 Timex Electric - Needed some TLC. Missing battery insulator, crown screw washer, sticky set lever , scratched crystal. Serviced, lubed, buffed and added red nail polish to replaced the cracked and aged lume.
 1 point
 -
A sewing machine motor will be fine. You might like to use it with a foot peddle, you can get very good control.1 point
-
Thanks for the reply. A sewing machine motor sound good. The lathe looks like the one pictured above but has no branding on it.1 point
-
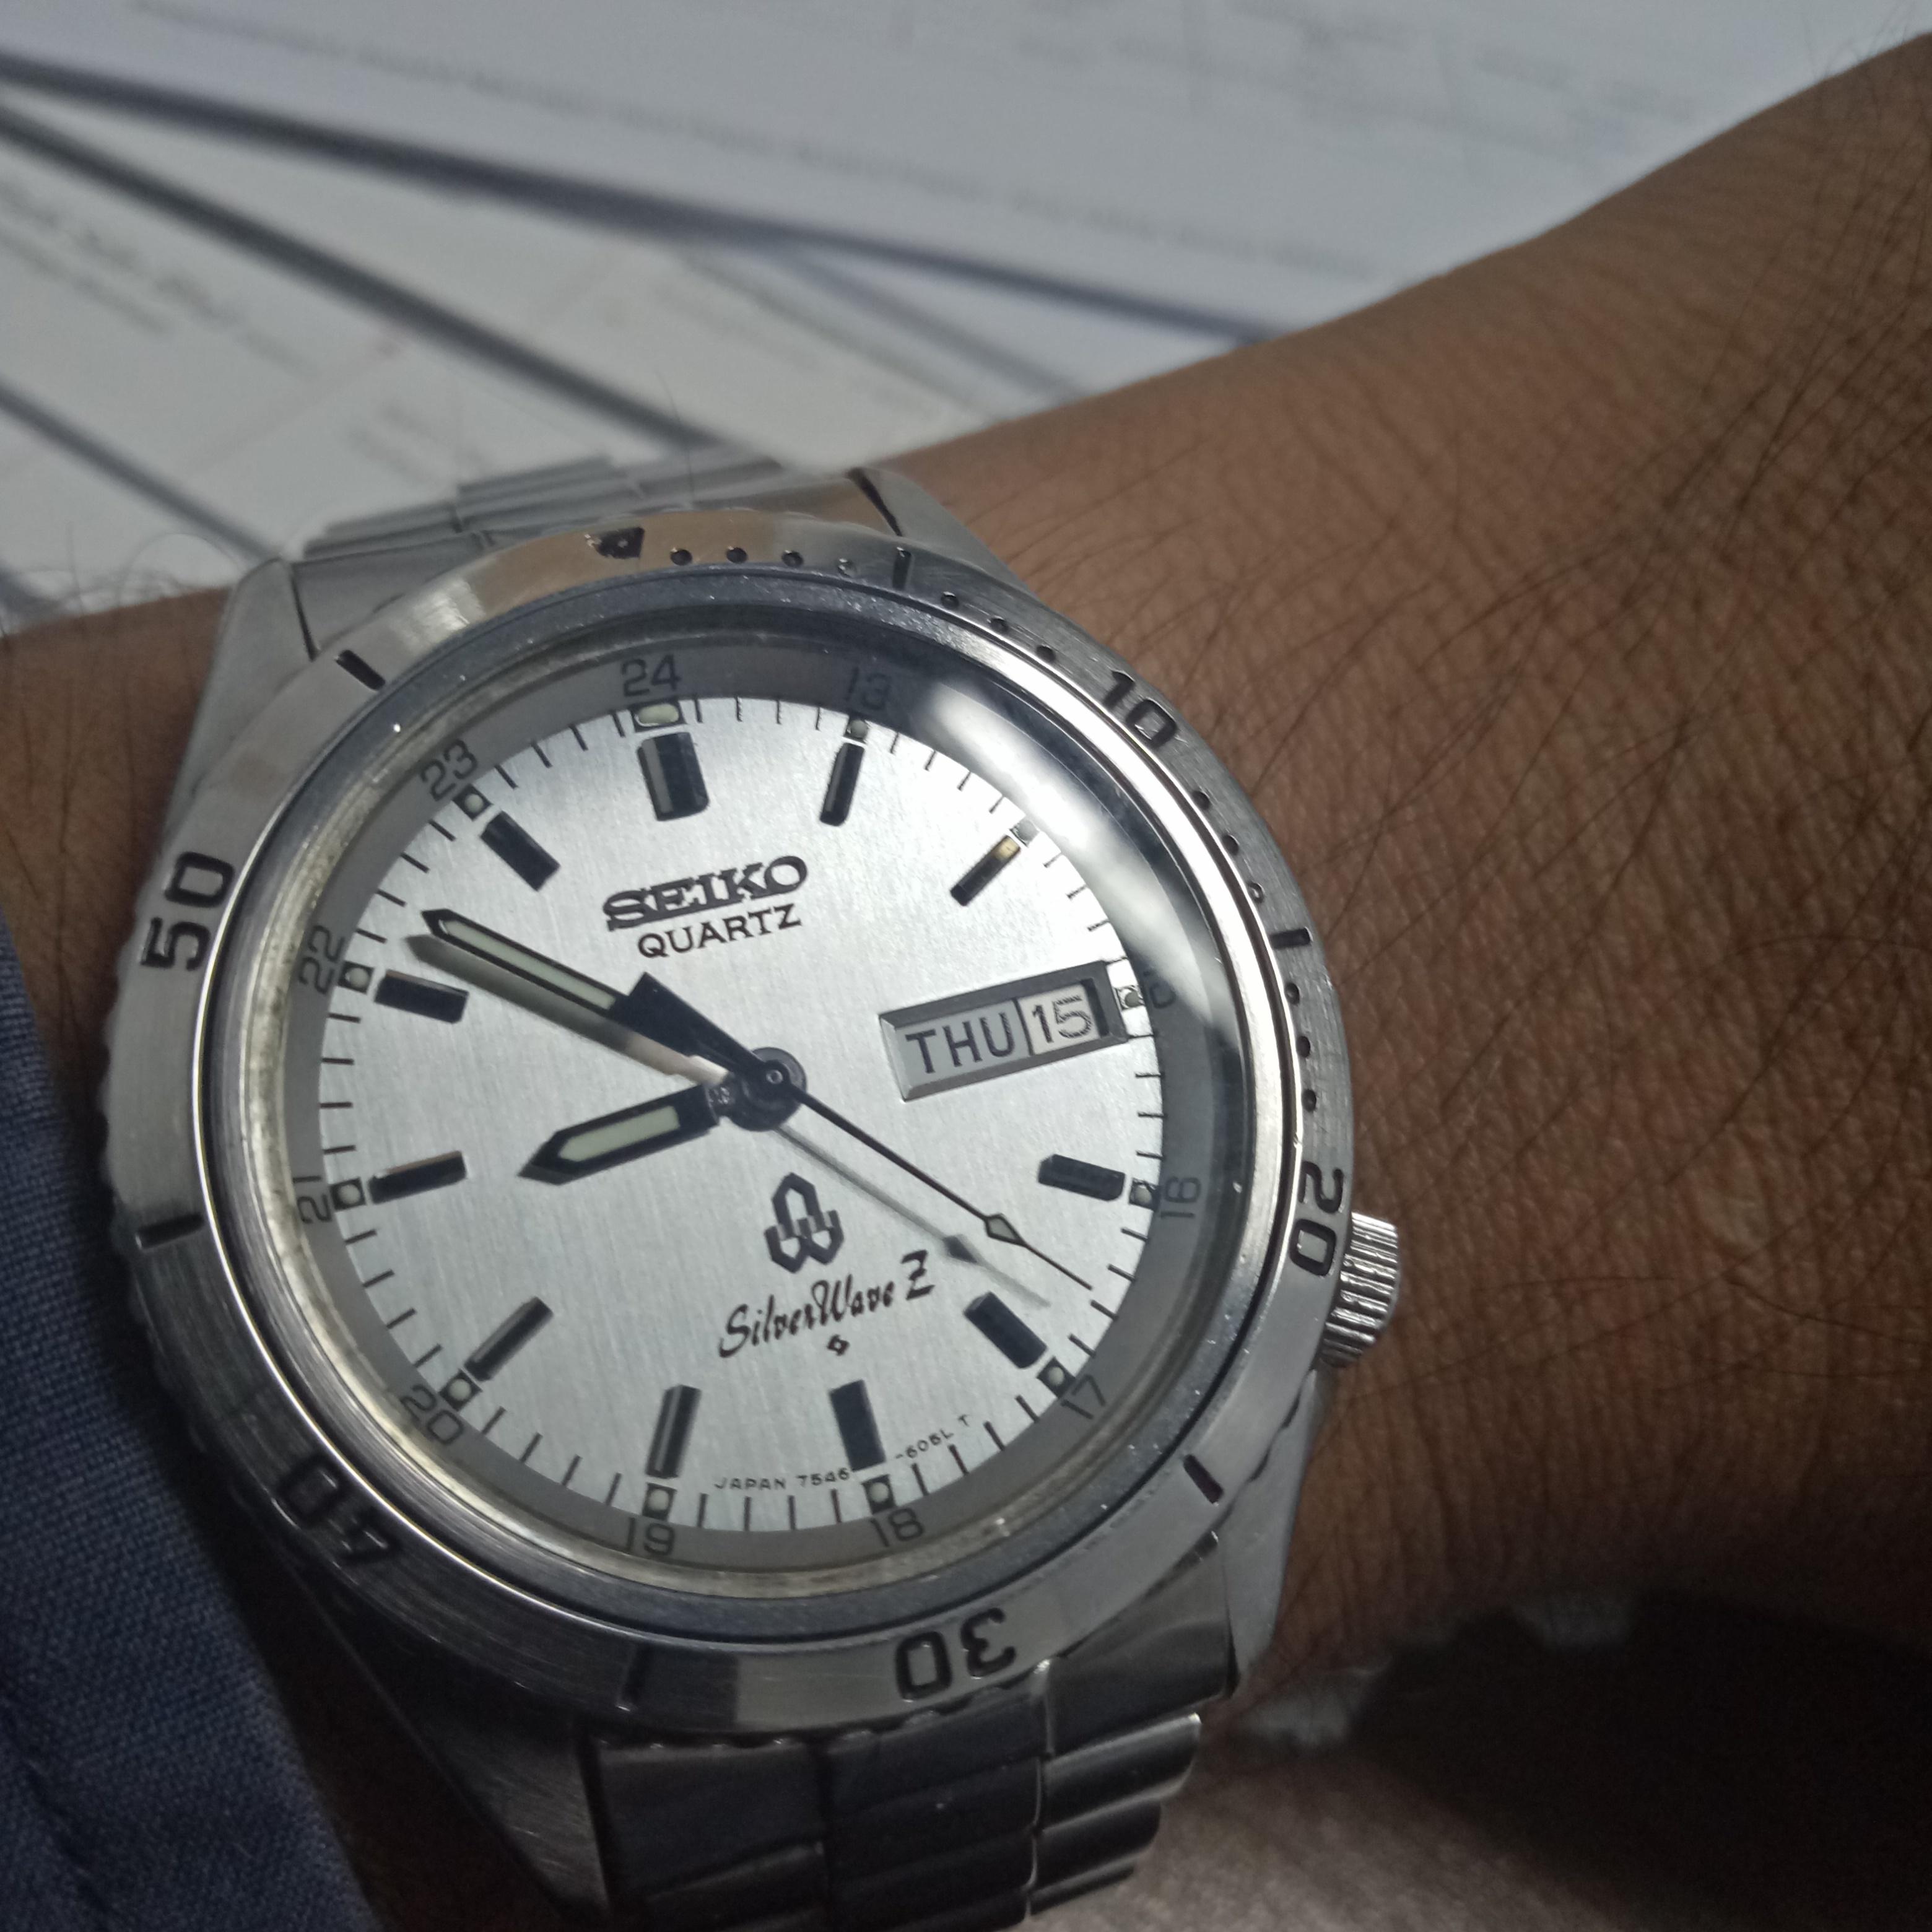
Wearing a Seiko 7546-605A.. It 40 years old but doesn't show it's age. I'm quite familiar with Seiko watches but I figured it was from 1988 until I checked on the web. Pretty accurate like all 75** movements. The dial appears light silver from some angles and a darker shade from another. Water resistance isnt mentioned anywhere but I figure it's 100m like other non screw-down crown watches from Seiko. OK
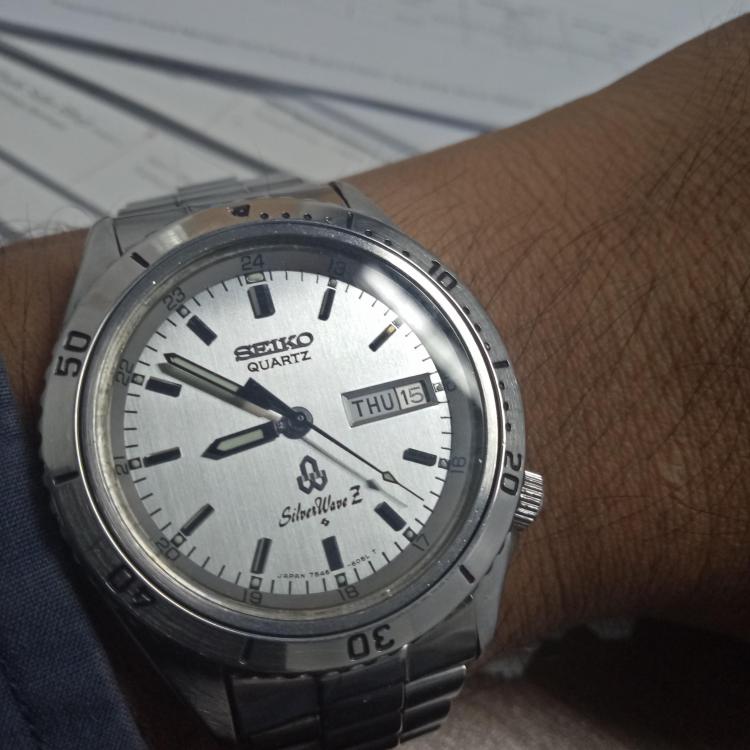
 1 point
 -
Assuming it’s a regular 6mm or 8mm watchmakers lathe then a sewing machine motor should do you fine. You can buy these new or used from eBay. I paid about £50 for a new one.1 point
-
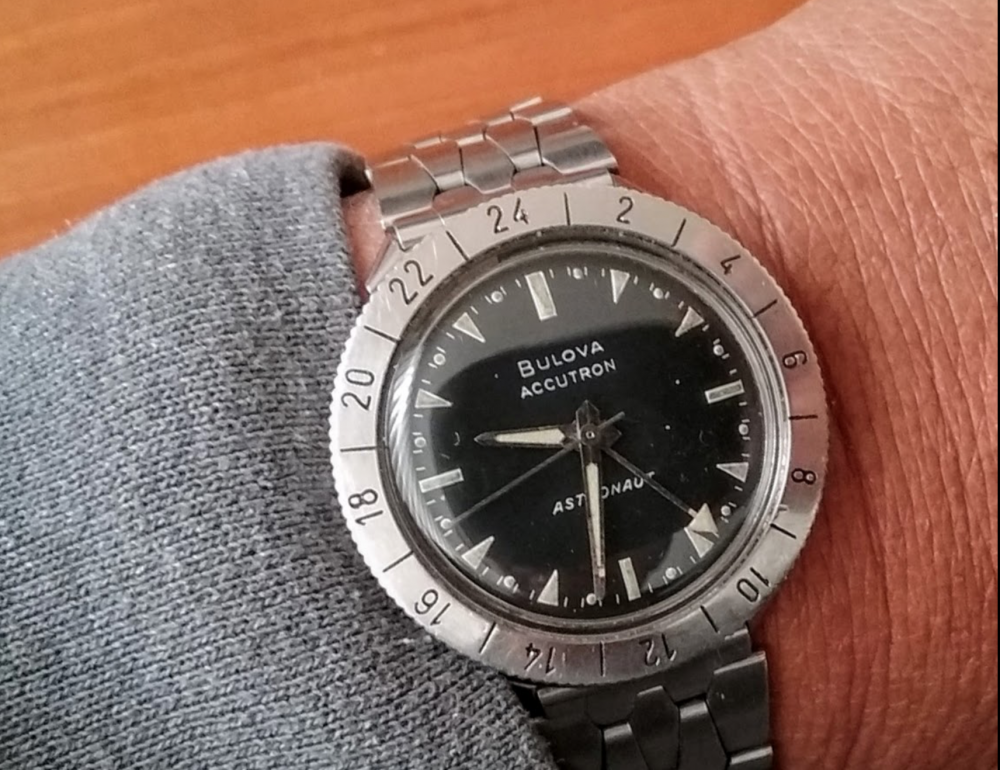
I just got one of those Accutron astronauts as well and I love it. It runs a little fast, but I understand that it just means it needs to be adjusted for the higher voltage off modern batteries. Maybe I'll find someone to do that this spring. This is my current daily though: Sent from my ONEPLUS A5000 using Tapatalk1 point
-
Here's a favorite . I really like this guy......
 1 point
 -
Bright watch for a bright day [emoji16]1 point
-
I have been notified that the links to the PDF's of the 7750 walkthrough have been damaged. I have re-uploaded them to help all those wanting a copy ETA_7750_Service_Walkthrough_-_Assembly.pdf ETA_7750_Service_Walkthrough_-_Disassembly.pdf1 point