
Leaderboard


Popular Content
Showing content with the highest reputation on 04/23/22 in all areas
-
I'VE DONE IT!!!! I'VE DONE IT!!!! I'VE DONE IT!!!! Sorry for the shout. But, I've actually got the pocket watch working. I'm sitting here, looking at the movement, and its ticking. Yes, ticking. Put the Keyless works together. Can wind up, the train wheels move, the motion works are OK. Fitted the balance. Movement, shake, kept going. Still going. It's not perfect, I can see the balance wheel is not square on side elevation. Runs like a wobbly car tyre. But it's ticking when the movement is flat. Way to go!!!!! A well into the future project to make it fully functional. But, I'm on the way. Can you tell I'm excited? Regards and thank you to all Ross3 points
-
We're straying off topic (Lubricants) but I'd just like to mention that, as much as I love these Russian watches (and no, I'm not for the war in Ukraine), one common problem is their QC. Most notably, the jewels seem to be of poor quality. They are often thin, bright, and very, very brittle. In my experience, almost half of all Vostok watches that I have serviced/repaired have had damaged jewels. Sometimes the flaws are obvious, but more often only detectable under a stereo microscope. It's not that these, less than perfect, jewels affect the running of the watch too badly, but I always replace them nevertheless. However, sometimes it can be a bit challenging to find replacement jewels having the right dimensions. Yesterday, for example, I needed to replace the main plate jewel for the ratchet wheel driving wheel of a Vostok 2431. It's dimensions are 80/25, and good luck finding a replacement jewel for such as small jewel with such a large hole. No wonder it easily shatters. The only solution was to get a donor watch. Luckily I had a Vostok 2415 having this jewel still intact. Anyway, in my opinion, the Vostok movements are some of the best value for money in existence.3 points
-
You might have moved the regulator stud or its just the gap, thats if you are sure end curve is OK, Should fix the fault , not correct it by creating another fault.2 points
-
My thought is I like to know what I'm using, so I order steel that is predictable and known, haha. I know that it's not so easy everywhere, but I do recall that it's fairly easy to source "silver steel" in the UK, which would be what you want. I have some old pre- heat treated "blue steel" rods from Bergeon but I consider that OK for making simple pins or other non critical parts; it's not very consistent. Newer blued steel I've bought from other suppliers was far too soft to be really useful for anything critical. If I need to make something important in steel I use something I can heat treat myself. Here it's Sandvik 20AP or equivalent. In the states the go-to for staff or stems (or pinions or whatever) would be O-1 steel, which is essentially what y'all call silver steel. Any place that supplies to model engineers should have small quantities of silver steel. Piano wire might be OK, never tried to turn it. Or a spoke for that matter.2 points
-
If you want to learn lathe work as it pertains to watchmaking, LWS started right. Start with brass, practice getting nice curly chips in the beginning, it takes some time to figure out how to posture the graver, then when you have a feel for it, practice making cylinders. With a micrometer you can see straight away visually with the spindle and anvil if you're cylindrical or tapered. Then practice making nice crisp square shoulders. Then two cylinders, with square shoulders. Then, cylinders to a specific diameter. Then to diameter and length. Then do it with steel. When it's automatic with steel, move on to blue steel. Part of the reason of going through these steps is to develop a feel for the graver and the different materials, and you will become very good at detecting a dull graver and sharpening gravers in the process. In my opinion it's good to start with steel gravers. Get good with them, then you can move on to carbide. Carbide stays sharper longer, especially in blue steel, but it less forgiving as the tip/edge chip far more easily than steel. Chip the tip, and you can't make a square shoulder until you resharpen. Also, carbide really works best if lapped after sharpening, either on a charged copper or cast iron (spinning) lap, or on an ultra fine diamond wheel, like a D7. Steel gravers you just need a medium India stone and a decent Arkansas to get your edge. When your hand graver skills are looking good, then start trying out the slide rest (if you have one).2 points
-
I started with just playing around turning various shapes on brass. Then I needed a screw, so I made a few until I was satisfied. Next, I turned a stem, but a started with a stem of the correct tap. Then I turned the various notches and filed down the square. I think at that point I made a staff...again modifying another. i have spent many many hours with a small amount of success, but I continue to improve. Making screws is the easiest.2 points
-
You should take a break first. I’ve found that things in watchmaking rarely work out well if you spend too long on it and there’s still no improvements. Two hairsprings that I have ruined will agree with me. Anyway, after you have taken a break, here’s a couple of things to consider. Have you given the movement a bit of wind, and the pallet fork snaps cleanly from one side to the other if gently prodded? Before you placed the balance cock, which direction was the pallet fork pointing? I normally have the pallet fork horns pointing in toward the middle of the movement. Next, upon placing the balance cock, have you visually sighted that the lower balance pivot is sitting in the lower pivot jewel? If you have seen that the lower balance pivot is safely in the lower shock block, is the upper balance pivot in the upper shock block? The upper balance pivot is more difficult to visually sight, so I normally have the upper balance jewels removed, but this is not always necessary. If the balance is still not moving freely, I will take off the balance cock, and move the pallet fork to the other position. Finally, if the movement is a hacking movement, do ensure that the winding stem is in the winding position, if not the balance will not be swinging due to the hacking lever.2 points
-
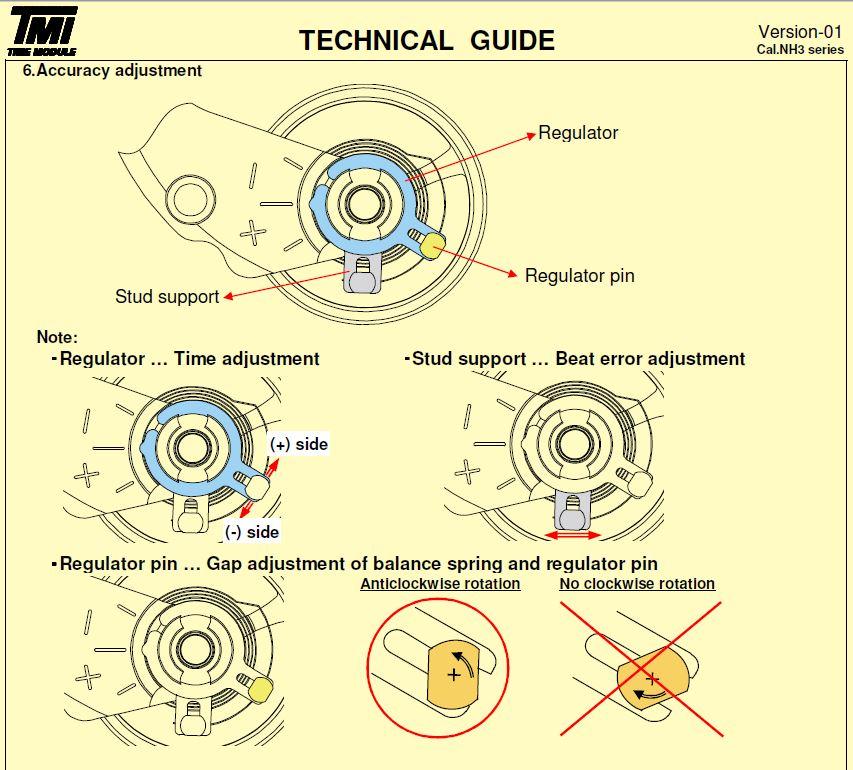
Looks nicely centered, now twist the regulator pin block to close the gap about twice as small and see what you get on the timing machine.2 points
-
I just asked a friend who does work for AP, he's not in the shop and can't remember exactly but around 3 minutes he said. He checks the forks anyway and puts new shellac if/as needed. With my old Greiner machine that distilled, the manual recommends 30 seconds for the balance and fork in freshly distilled (and very warm) alcohol, then the rest of the parts go in and get rinsed for 10-15 seconds in the same alco bath, the bath gets dumped, and once it refills after about 6 minutes, that's it. The only time I ever had an issue with shellac dissolving in the Greiner was if I left the fork in for quite some time. Depends on the age of the shellac too; a fork I had freshly re-shellacced would lose its shellac much more quickly than a lot of older ones, but really old forks might lose it as fast as freshly applied. One thing that simply hasn't been an issue over 25 years of doing this is pallet stones just falling out after the shellac is removed (intentionally or accidentally). In fact, if I really have to dig in to an escapement adjustment the first thing I do is remove all shellac, make my adjustments, including running the watch, then re-apply when I'm happy with it. I understand there are some forks out there that are loose on the stones, but I haven't seen one.2 points
-
I cannot say for certain. If it were me, I would take a chance. Turning a stem is a relatively easy task IMO. I have made a few and I am just an amateur. But you need a good lathe and a filing rest...and some practice.2 points
-
It could be the regulator pin spacing, along with the centering of the spring between them. If the spring isn't fully centered, and is favoring one side over the other, in different vertical positions gravity can cause it to then stay away from one side more and favor the other even more, which will definitely show up in the timing. Get them as close as possible with still a gap that allows you to see the spring bouncing from one to the other, check the centering with power off, see that the spring is centered, then with a slight agitation of the balance that it does bounce from one to the other.2 points
-
I would not attempt a re-bushing or a rejewelling on a piece that has significant value to me. You will need a watchmaker's lathe, and sufficient experience before even thinking of attempting such a repair. To further complicate matters, your movement appears to be a ladies' size movement, which will make things tricky at the best of times. Take a look at the tutorial posted on omegaforums for rebushing: https://omegaforums.net/threads/common-faults-omega-861-movement-barrel-bushing.123076/ Your best option would be to send this off to get someone professional to re-bush, or re-jewel, the mainplate and/or barrel bridge.2 points
-
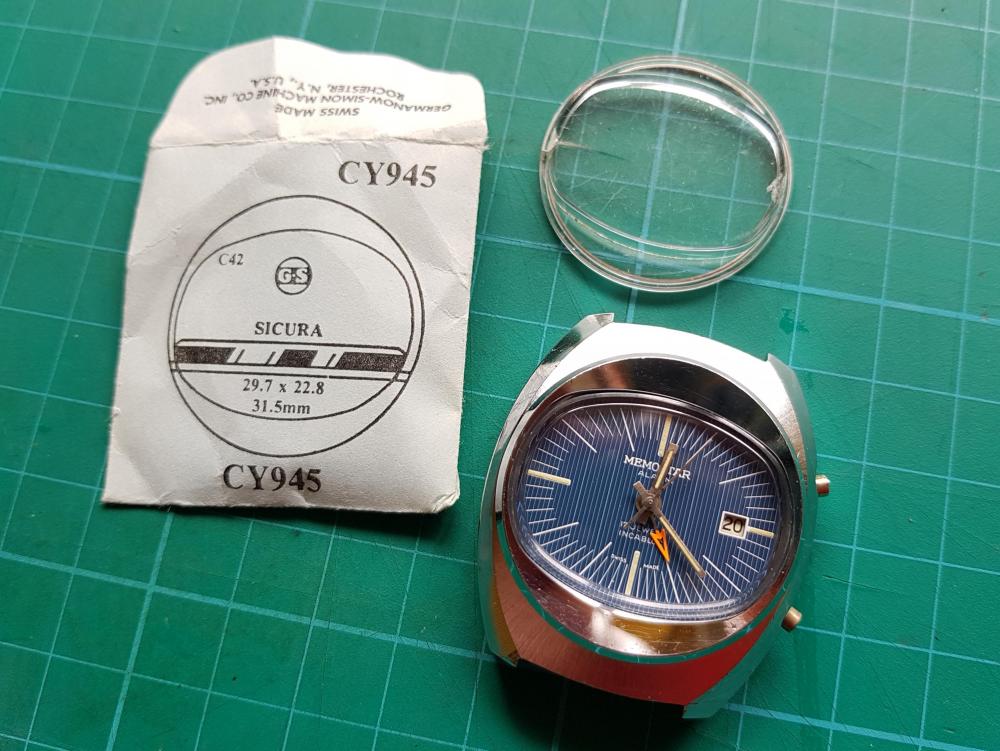
Found one, or at least one that is close enough! Im not sure that the profile is exact - the "corners" do not feel as pronounced and the old crystal has a tension ring whereas the one I found did not. However, it seems to fit well enough. If anyone else is struggling for a replacement crystal this may work for them: GS CY945 29.7 22.8 31.5mm
 1 point
 -
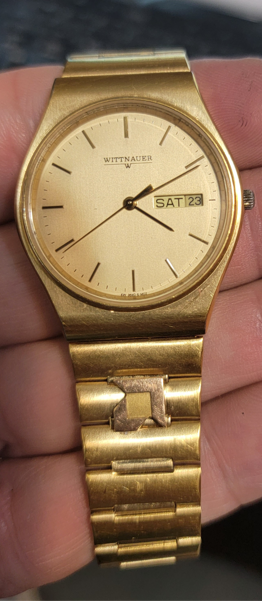
This is a quartz watch I picked up at a garage sale for $1. I thought it was mechanical because it did not say "Quartz." I put the case through the ultrasonic and replaced the crystal. Looks nice. The AMD logo would indicate that it was given to an employee of AMD as a service award or something. The case appears to be gold electroplate or just gold tone while the logo appears to be gold filled or solid gold. Now I pile it up with the other watches...lol
 1 point
 -
I don't have a list of the tools but yes there are a lot of or some special tools you need. Ideally need a holder for the movement itself and there's a variety of other tools. Then in addition to the tools yes you need to know how to use the tools and why the tools even exist. So these are not the kind o'clock you can just rip apart run into the cleaning machine put them back together and you're off and running. Basically the movement itself is like a really big watch and has to be treated as such. They even do things like put epilam on the plates to keep the oil from spreading over time. Then there's things like the pallet fork it has to be poised which ideally means you have a poising tool for the pallet fork. Then you also have to be careful with the running clocks in that if somebody winds up the mainspring manually because the tank is shot I can't quite remember but ill run a long time if that mainspring is welded up. This means you to buy a running clock perceiving that it's running and working fine in several months from now find out that it's not running fine and that can be an issue. They look simple but this is really a very very specialized item1 point
-
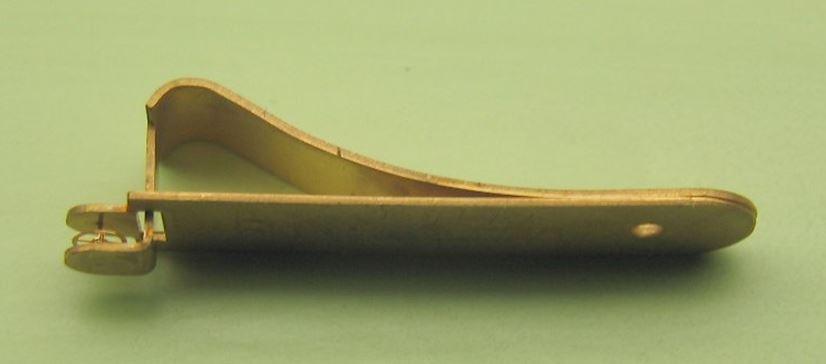
I thought it was a weird paperclip for holding tiny stacks of paper? When you're cleaning a tuning fork watch the index wheel doesn't like to bump into anything. Which means it's really hard to clean it you can't drop it in the cleaning basket for instance and you shouldn't even drop it for that matter. This is why there is a holder it will hold the index wheel securely by its pivots prevent the index wheel from touching anything which is very bad and allow you to clean the thing. Otherwise if you don't have the tool you have to put it back between the plates and run the index wheel that way as it would be no other safe way to do this. I've attached an image of the school in use C can see the index wheel being held
 1 point
 -
Haha, we’re so far into the weeds now it really doesn’t matter to preface a post with OT lol. I hear you on the mainspring barrels. They a total pain to service, but it can be done. In the beginning I bought complete barrels from Cousins, albeit for 7S and newer movements. Now I have a system that works. Mostly. Was a pain to figure out the right combination of winder/arbour for mainspring winder though, mostly because the spring itself is too thin for a typical Bergeon winder tool. I’m busy with a video on it, for those interested. Diafix for train wheels on the top plate was my biggest frustration, because they sit under the autoworks reduction wheel. If you don’t have an auto oiler, you’re going to be swearing. A lot. Almost impossible to remove, clean, lube and fit back the cap jewel without something going wrong. I now have many ‘donor movements’ because of missing/broken/beaten cap springs.1 point
-
That should work. Get a pair with the wheel adjustment.1 point
-
OK, I can imagine what you mean now. That suggests the hairspring wasn't quite centred between the pins in the first place. It's a very tricky process of trial and error getting it perfect. Close the gap slightly by turning the block, then very slightly turn the stud to move the hairspring a fraction away from the pin, so that is not in contact with either of them. Get the gap as small as you can without pinching the spring, then check the timing variations again.1 point
-
I'm glad that you found my ramblings to be of some interest. And yes, delving into the histories of many long-gone original brands, including those you've mentioned, can be rewarding if not really, really frustrating much of the time. Regards.1 point
-
Actually you might do mate lol I see the comparison of hss to carbide, same applies to wood turning . Carbon steel over hss tools. A softer edge over its longevity. I have quite a few stones from being a joiner, I used to be obsessive about sharpening tools ( we all have our fetishes) . I've a really big book somewhere about the subject by James Kingscott, a total master with sharpening. I've a couple of Japanese stones that will be far too soft. A Norton India stone two sides, A washita stone that is really hard and fine, a Welsh slate, a bit soft but creates an amazing edge. Some diamond stones that are ok but little bit rough cut. And my latest acquisition from China, and what an edge, a synthetic Ruby composite, fantastic value , hard as hell and super fine. Appreciate that info Nicklesilver, I'll be ordering some steel shortly. I seen mention of piano wire and racer spokes being used, what are your thoughts on that ?1 point
-
I know what you mean about plastic. I'm the same with plumbing. Yes it works pretty well, but sticking to copper is more traditional, and always works if used properly, where as plastic however well its made can fail more so than copper or brass under certain circumstances. And if you can't get a major part fairly readily why have that stress of tracking it down. It's fun trying but disappointing when it's becoming impossible, I understand exactly where you are coming from there. I had a real problem with a diafix on an 80s oris that kept alluding me and testing my patience, it sounds like the seiko is worse still. I'm starting to think the same as you then. Thank you for the feedback. I may stay away from seiko repair at least for the time being. I have 4 new seikos in my collection. Yes they are very good at dials. I have a cheap seiko 5 snkl 23 and for the price the dial looks bloody good. I'd love to see the Grand seiko snowflake dial, its supposed to be mesmerising. Apparently a creation brought about by staring into the winter snow.1 point
-
I struggled with this at first, but once you get the technique, it's easy. I push the pallet fork towards the centre of movement. Hold the balance cock outside the mainplate at 90 deg to the movement. This ensures that the impulse jewel will be beyond the fork. Move the cock in towards the mainplate and locate the lower pivot in the jewel. Then rotate the cock round to it's final position. See how Mark does it in this video, (16m 45s) https://www.youtube.com/watch?v=7bzU816kO-Q1 point
-
I have some stem blanks, I don't need them all.1 point
-
Yes, it's outside of the horns. Undo the balance cock screw a bit, raise the balace cock a bit and it should go in place almost by itself.1 point
-
Congrats Ross! I remember so well, and will never forget the first watch I got ticking after a service. An unbeatable (ha-ha) feeling and one of the happiest moments of my life.1 point
-
WARNING: 100 % OT! I often look at and marvel at the Seiko watches, especially the dial and hands. If it weren't for the Seiko movements I'd be an ardent fan. Well, there's seems to be nothing wrong with their movements, they seem to work extremely well, and I just love it how springs are integrated into the parts. Anyway, here are three reasons I stay from Seiko (and Orient) movements if I can: 1. Plastic parts. Sure, I know, it's an emotional argument. The plastic is of top quality and will probably last for as long as the metallic parts(?). But still, plastic! In my opinion it just doesn't belong in a mechanical movement. 2. The mainspring barrels. Not designed to be serviceable. Seiko's policy is that the barrel complete should be replaced. OK, that's fine with me, but who can supply Seiko barrel completes to independent repairers? No one is seems!? 3. Diafix springs and cap jewels smaller than a spec of dust for the 3rd wheel and escape wheel to press up the jewel count. They are a PITA to handle, and if you mess up, 99.9 % impossible to recover. Anyway, I spend a lot of time looking at Seiko watches. They're just so very, very pretty!1 point
-
My goodness. You lot are so good. I've done as suggested. I closed the spring centre down then released it a little. Inserted the arbour and hey presto! It winds. Now, using the photographs, I am going to commence the rebuild. Woohoo! I repaired the keyless works. Someone had unscrewed the setting lever and it was miss hitting. Gosh, its great fun learning. Regards Ross1 point
-
How did you start LWS. Its something I really want to learn, that and balance staff turning. 2 things things that usually put me off buying a watch . I'm in the process of deciding what gravers to use.1 point
-
My advice is get a specialist in Atmos clocks to have a look. Most of the time its the mainspring that needs to be looked at because they get gummed up with the old grease.1 point
-
Fully agree with ifibrin mate. You will need at least a couple of years of fairly intensive practise and experience under your belt . By all means experiment, it's my favourite thing to do and one of the best ways to learn imo. But not on something of value, I learnt that in the very beginning. I know and have worked with a lot of people in my industry that think something is an easy job without thinking it through. Only to come unstuck and have created a bigger problem. This is really only learnt I think when the reality of what they are actually capable of hits home and they become aware of what is possible and not possible at their level of experience and skill. But you also need to sometimes push yourself to another level, or will never come. Baby steps mate that's the way forward. The good ones on here will give you an indication of what is doable . Good luck. Keep practicing and keep experimenting.1 point
-
Thanks for the caution and the link. I really appreciate the guidance and the steer I will definitely not touch the movement at present .... and you may well be right that it will remain beyond my skill set - in which case I will try and find someone to help. However, I am definitely going to acquire some bushings and have a go on a suitable thickness of material. That should put things to bed either way. If it goes anything near ok, it might be something to share and ask for advice and input - if not I can quietly bin the evidence and pretend I have more commonsense1 point
-
Twist the stud to center (the adjustment will be very small, unless the spring was bent at the stud when manipulating before), twist the pins to close the gap, like in John's post above. You don't want to squeeze or pinch anything, that's the advantage of the system, both Seiko and ETA. There are tools to fit the shape of the tops of stud/pins, but you can twist them with (well dressed) stout tweezers.1 point
-
Thank you for all that information. You really know your history. I love to repair but I am only a beginner, but enjoy the history behind the brands just as much. I find that knowing the history helps me with my buying, I mostly repair vintage Swiss, i have a thing for Oris . But also history of British makers, the Smiths and Rolex story of Everest was fascinating. Incidentally the design of your BFG 866, with the long sweeping click, and the 3 studded balance cock I've seen used in Smiths Empire, Ingersoll and Services. I found the Ingersol history good as well linking with Smiths for a short time.1 point
-
By the by, I got tired of the disagreements about what will or won't dissolve shellac. So i bought 2oz of "garnet" color de-waxed shellac flakes. The kind woodworkers use, which probably comes from the same bin as what watchmakers use. Oddly herbaceous smell, but no matter. The plan is to wash some US dimes (10 cent pieces) in L&R 111, rinse them properly, melt some shellac onto the faces with my temperature-controlled hot air wand (possibly a measured quantity, I have a milligram scale), immerse them in solvents, and photograph at intervals. Dimes because they will provide good contrast vs. the dark shellac. And i don't have to cut them out of a sheet of something. My guess is that my hardware store "denatured alcohol" that is a mix of ethanol and up to 50% methanol will dissolve it somewhat rapidly, 99% isopropyl maybe not as rapidly but still surely, and that most other solvents won't do anything. If there is demand to know, I can hit up the liquor store for a small bottle of Everclear. But i expect that ethanol and methanol are close enough in properties that it wouldn't differ much from the ethanol-methanol blend. I do have a 5 gallon pail of i think Texaco brand straight methanol in the shed for automotive shenanigans if someone is super curious about that. aside from the industrial alcohols and l&r 111 i have vm&p naphtha, odorless mineral spirit, acetone, d-limonene, chemically dewatered expressed citrus rind oil (which is mostly limonene, but a mix of L and D, and other impurities, and miles from pure d-limonene in properties), and i guess some stuff like windex?1 point
-
From the results you posted so far (verticals at low power) I think I can see a heavy spot at around 11 o'clock. The in-between positions suggested by John should confirm that. If it was mine, I think I would spot-drill the rim very lightly at the heavy spot, and see what difference it makes. Closing the gap in the regulator pins would be my first move though.1 point
-
I got this in a pile of junk watches. I sprayed it contact cleaner and it fired up straight away.1 point
-
You’re welcome. I’m afraid I can’t say whether the “RG” has any significance to Ebosa’s owner or whether it’s purely a coincidence. However, I can say that other makes of pin lever movements also have different combinations of two letters, particularly Louis Newmark’s original Newmark Watch Co (not the resurrected company of the same name) which was based in Croydon. For a while in the 1950s they made their own calibres which, in my experience, all have various two-letter combos, thought to be factory production identifiers for internal reference purposes only. In addition, as you’ll see in the attached image, the BFG 866 in my dreadful Interpol watch also has two letters (GR) stamped on it which similarly seem to bear no discernible relation to either Baumgartner or Ilona Watch Co. I’m not immediately aware of any historical connection between Ebosa and Oberon, the latter company being started by Erwin Rudolf in 1951. However, such is the apparent paucity of documented facts about both companies, it would be somewhat cavalier to dismiss it out of hand. Regards.
 1 point
 -
Your mainspring is far from a tight grip around the barrel arbour, the catch of the arbour does catch the eye on mainspring , but will slip out easy if spring isn't tightly wrapped around the arbour. The spindle seems broke somsomeone rigged it, you need a new spring, as said if you gives us the measurement length, width and thickness a suitable general resort spring can be found to work in your watch.1 point
-
Very cool little watch! Will this be the first one you'll undertake for restoration?1 point
-
You are going to need a few tools to get the movement out of its case. First you need to remove the winding stem, remove the bezel and then the hands, you then need to turn the two screws inside the movement that hold the two dial feet. Be carefull because the hour wheel might just drop off and you do not want to lose that the same goes for the dial washer that might be attached to the hour wheel. Post some nice clear photos of the keyless work that is how a movement can be identified. Tools needed tweezers, selection of watch screwdrivers, hand removers, if carefull you can remove them with tweezers but not advisable and you will need at least one eyeglass depending on your sight. My advice you will need many.1 point
-
Hi Its a trench watch and some of these old ones have no markings and were identidfied via the setting lever parts, there are in the bestfit books. Old Hippy put the links to them on the site and can be down loaded. If using the search function on the home page and search the term "bestfit" and scroll down the results for Old Hippy's post of Dec 30th 2018 where you will find the links. I have checked and they are still operable and take you to the Meadiafire site for down loading.1 point
-
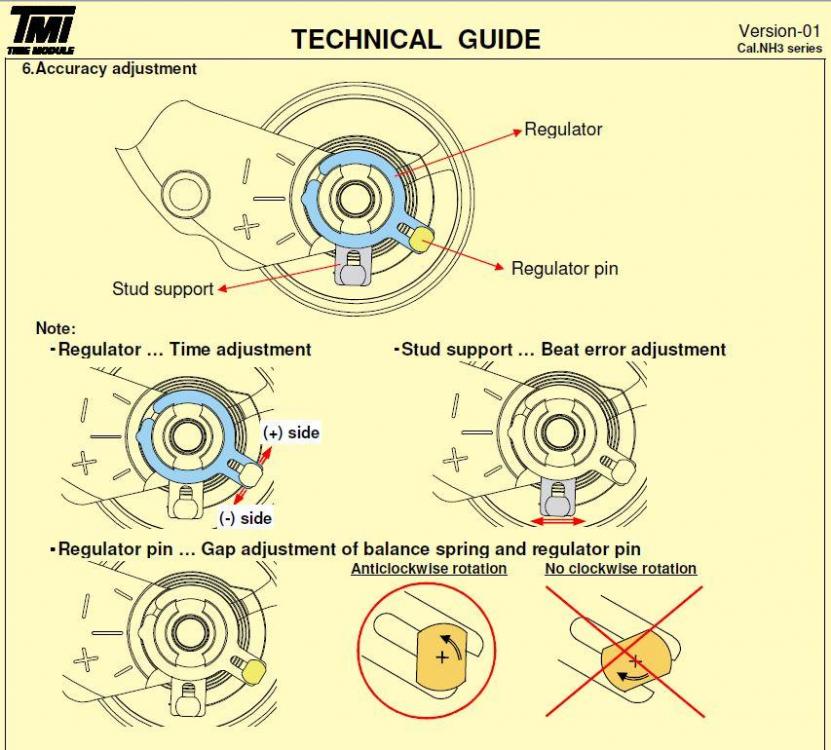
really should be better instructions out there and maybe they are I'm just not finding them. What makes the system interesting is there's lots of various adjustments more than a regular system. The regulator pins can be opened. Then you center with the stud so they hairspring is in the center. Then you close but not super tight need to be closed but not tight the needs to be a little breathing room. So that means you can open up the pins and have horrible isochronism because the pins are too far apart. Then don't worry about letting the power off just wait until watch runs down to around 200° hundred and 80 would be nice about their. Just had to expand the search in the computer found a PDF that will be helpful. seiko etachron.pdf
 1 point
 -
I think I have figured this one out! I went back to the manuals and saw the reference to the "friction pinion," which was confusing at first but they mean the double-pinion setup. I separated these two, lubricated the inner one, and put them back together. Now I'm getting the correct slip that is needed between the two pinions when switching between winding and setting. Also makes sense that this would stop working after cleaning without getting oil back between the stacked pinions.1 point
-
Some of my recent repairs to non-runners that are now happy again. 1963 Mercury - water ingress damaged the dial so I cleaned it up and coated with a Sharpie. 1968 Marlin - found the date detent spring was curved and causing the day of the month not to align in the dial window. 1970 Marlin - this was missing the case back, movement spacer and the hair spring was bent. It was also very dusty inside since the case was exposed. I replaced the balance wheel assembly form a M31 automatic. Have to love the interchange parts Timex used! All were cleaned, polished, movements serviced as outlined in the Timex Service Manual.
.thumb.jpg.5ad3e5e717bc1b79964a37b486ff6973.jpg) 1 point
1 point -
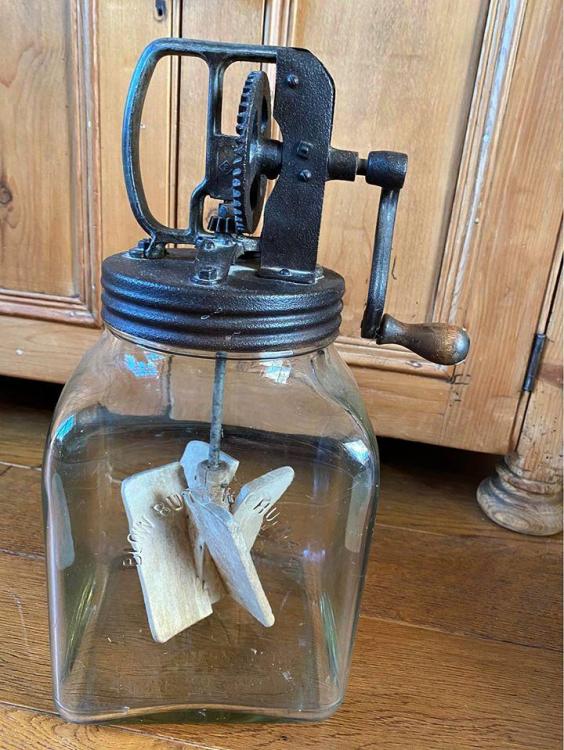
Found another way, vintage butter churn.
 1 point


.jpg.2448c07527cd7e6ff0ae7c37397b7b43.jpg)

