Leaderboard


Popular Content
Showing content with the highest reputation on 02/24/22 in all areas
-
In addition to the million articles, you read the previous 12 pages of this thread, right? What makes you think you will find a concensus here? What specifically is troubling you?2 points
-
Outstanding job and you have way more patience than I do. If I have to scan anything more than about 20 pages it really gets to be stressful and I usually end up missing a page here and there. Looks like we more or less have the same book Looking at my book is 125 Pages but mine is more than likely older mine says it's in 1978 edition.1 point
-
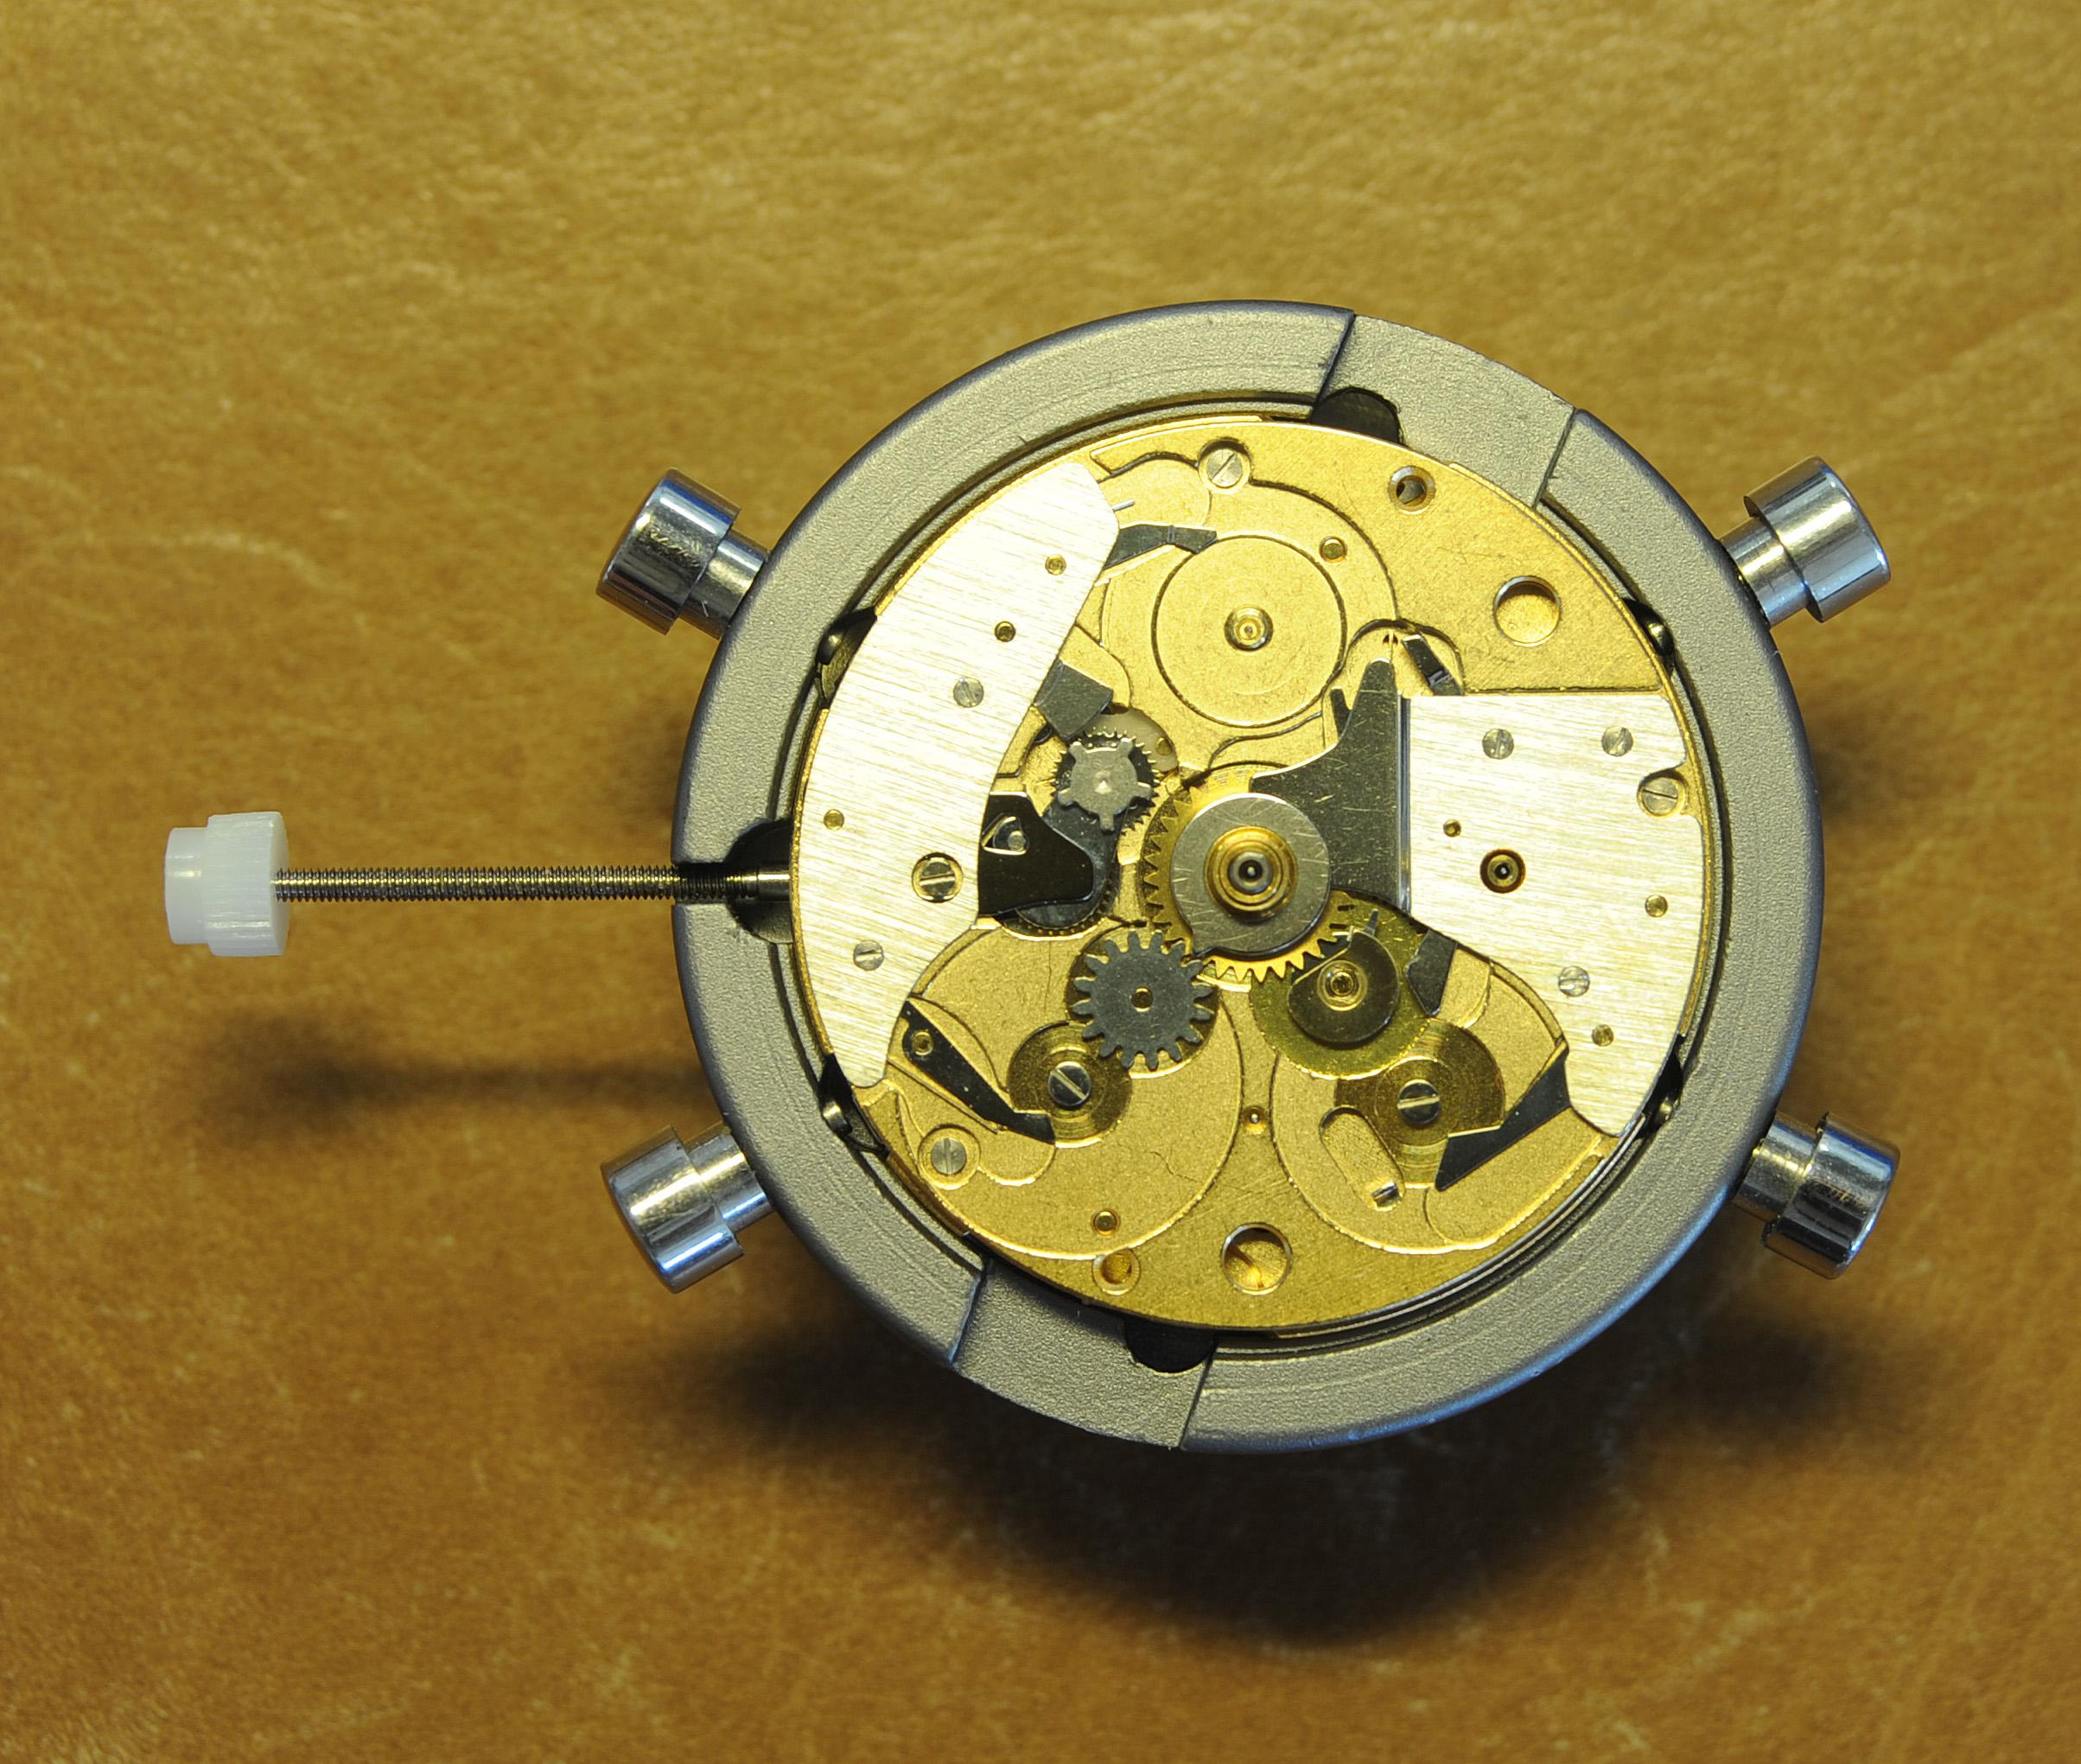
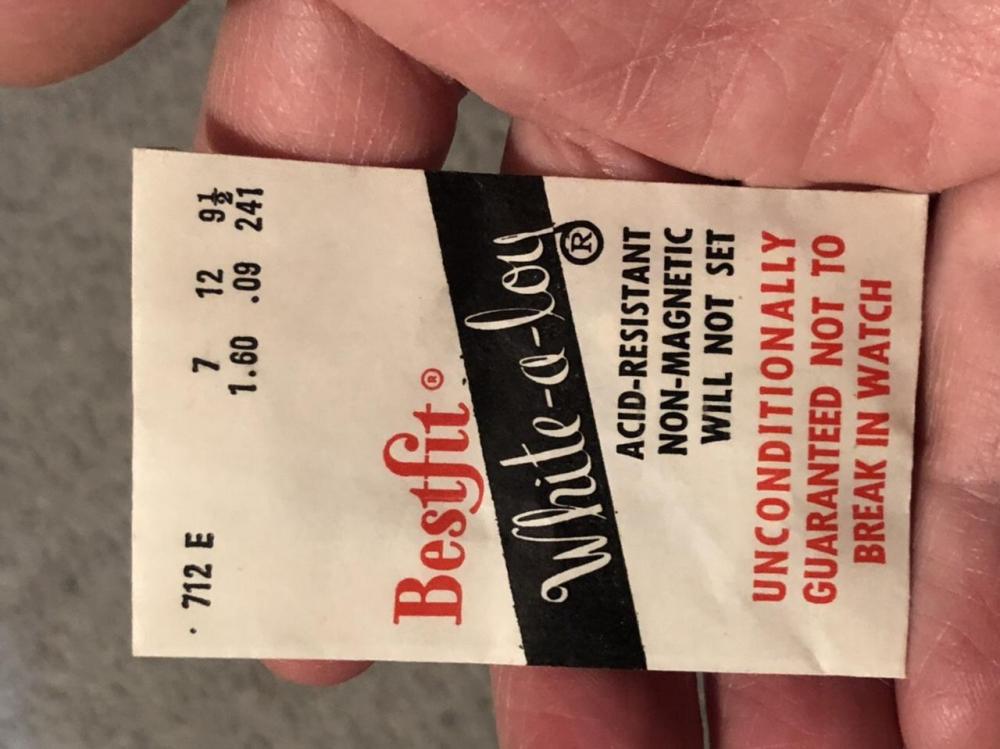
Thanks. I agree it should have some oil added. For this case, still 8200 or, maybe a little HP1300 on the coils? Also, this NOS white alloy mainspring is likely 55-60 years old. And I’m still curious if this one would have been lubricated as made? Or did they expect watchmakers to snap into place and then oil coils as described?
 1 point
 -
The lubrication of clocks and watches is a contencious subject. I should seek out the articals by Mark Lovick or Nicklesilver who are the professionals and do it for a living. As you have found out there are lots of opinions. good luck.1 point
-
@balatonidentified your watch. Here it is on ranfft database. It is the "7" version as ranfft lists it. I see stems on ebay, and Cousins has them in stock, so you should be in good shape. Cousins has the spec sheet for the watch here.1 point
-
hi chaps, quick update, I tried using the iPhone app but even holding my breath in the silence of the night, it still said "to much noise" I even made and printed a nice enclosure that was sealed around the phone but it still did not work reliably. (I see a timegrapher in my future) anyway I really could not see the issue, the teeth all looked good under my limited (X10) magnification, so I swapped out the escape wheel and its working great now (-30 seconds per day , which is good enough for me at the moment) I feel very happy! thanks again for all your help !!!1 point
-
Incidentally, and as you'll doubtless know, the movement is one of the bridge variants of the FEF 190, probably from around 1950, which may help with your search for any bits required. Regards.1 point
-
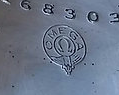
Agreed. There is a slight chance it is Omega, since some importers (important Jewellers for example) would insist on purchasing sterile dial watches. Also dials do get replaced after the fact, so it may be a replacement dial. However there would almost certainly be some makers mark some where on the watch, perhaps behind the dial, maybe behind the balance, or on the edge of the movement. The case is quite nice, but if you buy it for the case only, that obviously should be reflected in the price you are willing to pay. Although the case is Denison, I would kind of expect that too to be stamped with an Omega mark, Something similar to this perhaps.
 1 point
 -
That's a Dennison case with the specially-fitted bow. Really good case. But although Omega has used Dennison cases before, I have to agree with the gentlemen before me: we see no symbol or name on the dial, no symbol or name evident on the movement, no serial number in sight, and no other indications. If I were going to buy it, that seller would need to provide quite a bit of proof on this one if he wanted to convince me it was an Omega. I don't know where they hid the serial on this one (if it has one) but if under-dial photos or under-balance-cock photos were available, I'd ask to see them if the seller were asking Omega-level prices. That said, if the seller is being extremely reasonable, I'd be tempted to buy it just for the case. Those Dennison cases are nice.1 point
-
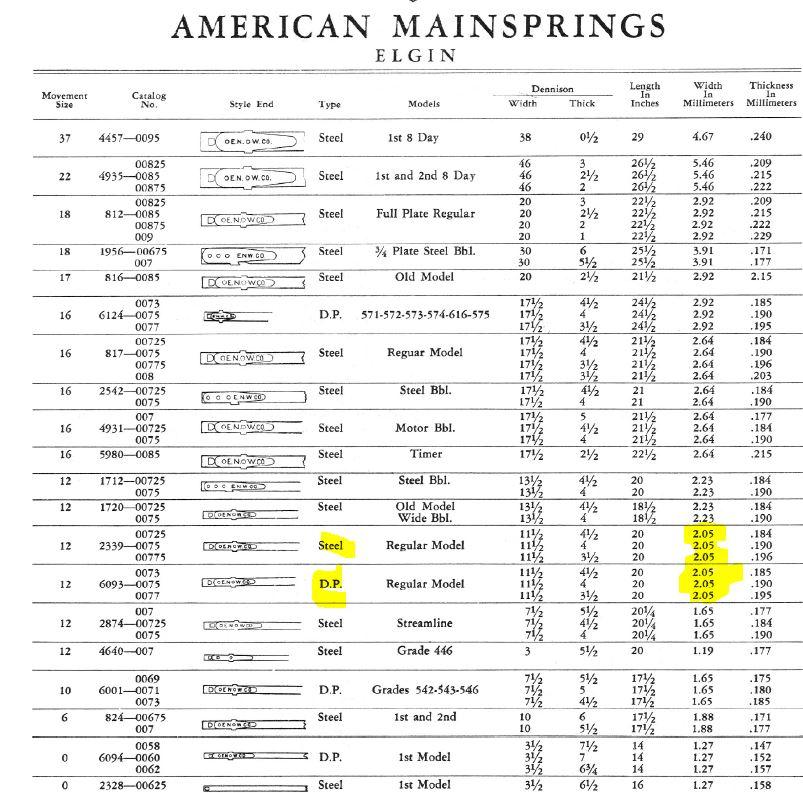
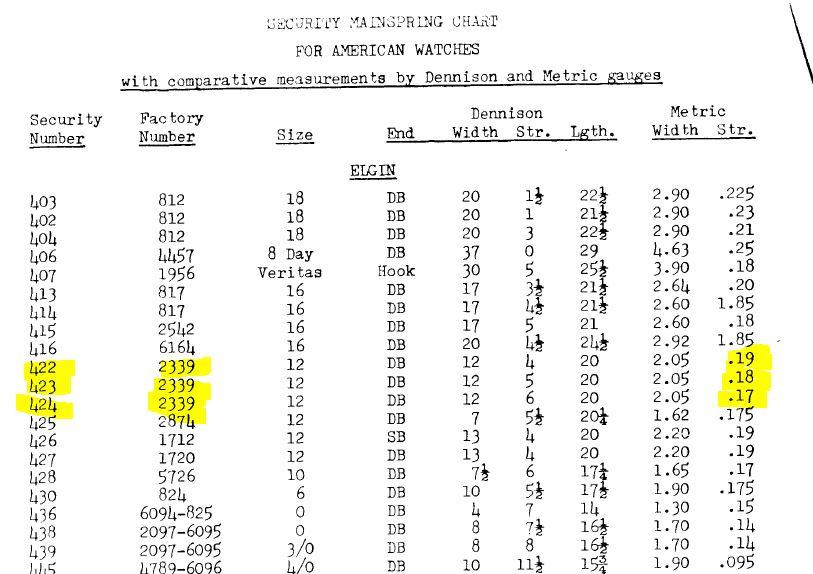
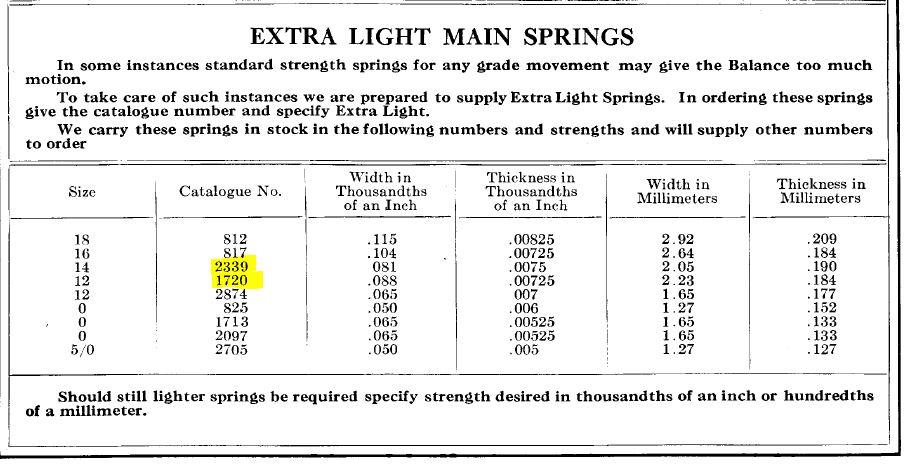
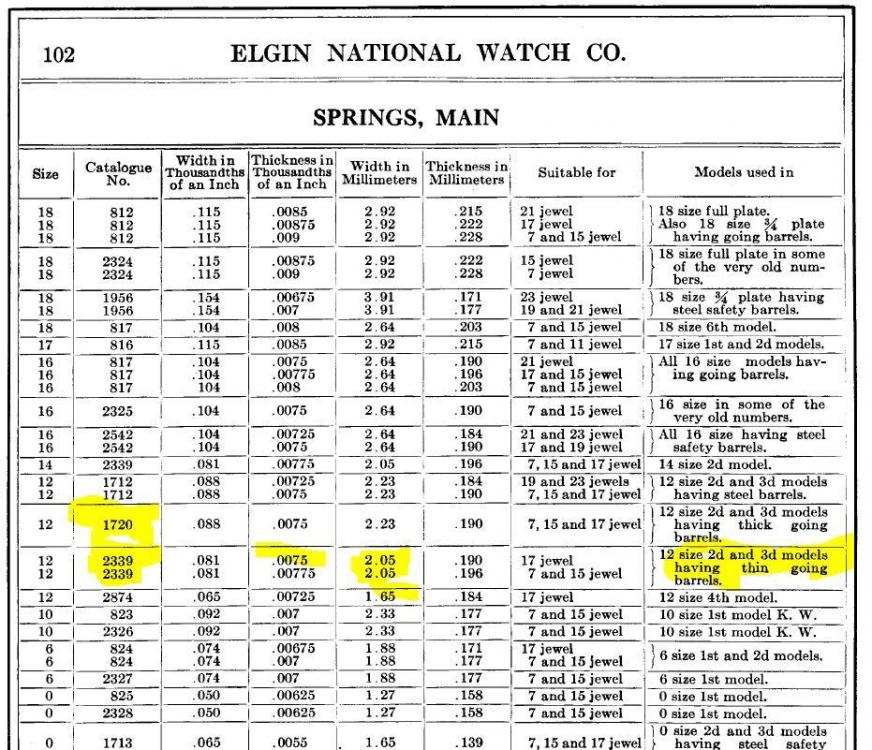
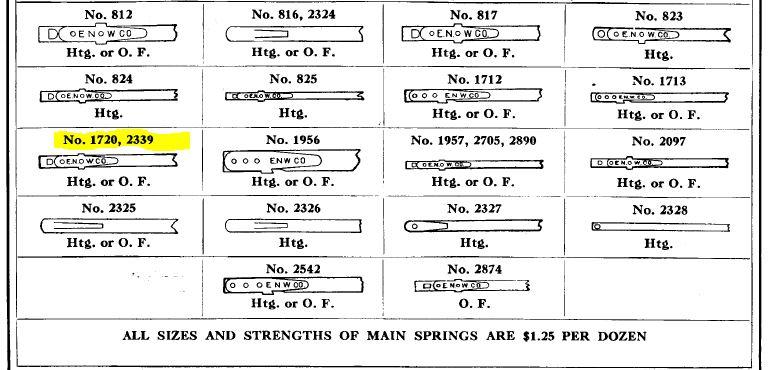
First step you've already done which is measuring the old spring Then typically I would go right to one of the mainspring list I used for ordering the mainsprings but because you're new to all this I'm going to expand upon that considerably. Then typical with American pocket watches getting a spring isn't always a straightforward process. some of the manufacturers will give you a part number and their variations a need to know which thickness you need. Or it could be other variations. One of the nice things about the pocket watch database especially with Elgin is parts listings. Notice on the left-hand side the reference to parts then you go to Springs and I snipped out the image for you. And noticed two separate numbers and one of the Springs gives you the thickness in inches which will need a little bit. Than the Elgin parts catalog 1915. I snipped out the image of what the various ends look like. If you have an early enough Elgin but typically this will be a key wind watch you couldn't have separate Types of ends as they actually change their barrels in the middle of production and you can have either or and the old style is no longer available at all. From the third image we narrow things down really fast. We knew from the image of end styles that they're both the same then you go up to lists to see why there was a difference. It depended upon the type of mainspring barrel you have. The width as you call it how tall it is is supposed to be 2.05 mm but 2 mm is close enough. Then on the pocket watch database is supposed to be a strength of 0.0075 inches so now we know which spring you're supposed to have perhaps? Yes you thought it was that simple. If you have a watch that has too much energy because the spring is too strong Elgin at the factory used to solve the problem by swapping mainspring barrels. When the watch reached quality control or at some point in time there looking at how much amplitude the balance had if it had too much you would go back to the spring department where they would swap for different mainspring barrel that had less energy. If it hadn't lack of amplitude it would go back to the escapement adjusting department. Which becomes a problem for us because we can't do that and you also go the next page the catalog represents the other problem back she had weaker springs. Although for your watch even though they had extralight spring is it looks like your spring is still as light as it came. But I'm still do a show you the image. Then I'm attaching a PDF which is what I usually look at when I'm ordering mainspring is because it seems that corresponds most closely to what is available brand-new. This is where there are no extralight Springs number choices shrink considerably but typically for purchasing new spring is these are usually available. Then to help you out with the confusion of what is it Dennison I'm attaching the cross reference chart. American pocket watch mainsprings use the following measurements possibly all of the same time inches, metric and Dennison. A lot of times the packages will be marked with variations of those to do have to know which numbers you're looking at and how confused you want to be Looking at the PDF mainspring listing we see that the 2339 came in three separate strengths. Then how did you measure the strength or the thickness of the mainspring? Typically veneer calipers may be off by a little bit a micrometer is usually the best. It's now brings up an interesting problem here mainspring if you measured correctly as weaker than any of the other mainsprings available? So basically want to go for the thinnest spring you can find I usually prefer to get original springs even from Elgin a lot of the original springs are still in really good condition really catch is because their steel they can't rust. It's really important to never hold a steel mainspring with your bare hands. Elgin once had a really nice multipage hand out on why mainsprings break and that's because people hold them in their hands and the fingerprints you leave behind and cause rusting or micro fractures and that's why the mainsprings will shatter. Usually will shatter into whole bunch of little pieces but that's not just unique to old mainsprings I've seen it happen to newer springs for a variety of reasons Now the question that you have what does your picture mean? You looked up mainsprings by looking for 12 size Elgin didn't you? But if you look at the Elgin catalog or even the security PDF notice there's a lot of different 12 size mainsprings. Then those numbers where we seen those numbers before? They look like Dennis and numbers. Looking at the security PDF looks like were looking and Dennison for 12 – 6– 20. I think a better way to do this would be go to back the eBay search for Elgin 2339 he don't even need to specify it's a mainspring. Then you get a listing sin brings up another problem? Another problem is there's a new number that indicates it is for the watch in fact the listing is like this Elgin Factory DuraPower Mainspring for 12s No. 6093 / 2339 - Alloy. That's because Elgin had in addition to steel spring as they had their own alloy Springs which should be a better spring but it is a different part numbers that requires snipping out a different book image to show you wanted us. So now you should have all the information you need to go back to eBay do a different search and see if You can find a mainspring. Mainspring - DennisonChart.pdf Mainsprings security American pocket watch.PDF

 1 point
 -
Be very careful. I've seen fake Omegas from India.1 point
-
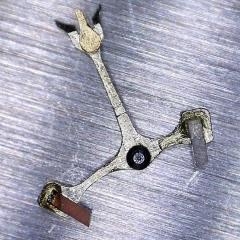
There are maybe half a dozen different "circle with 3 spokes" shock spring types. https://watch-wiki.org/index.php?title=Kategorie:Picture_gallery_archive_shock_absorber Edit: Actually, close to 2 dozen?1 point
-
I could be wrong, but I don't know of any Omega watches that aren't marked Omega, somewhere.1 point
-
Could be a broken escape wheel tooth.1 point
-
The ones with brass jaws - are they the Chinese ones, or Indian? Mine has brass and I wonder now where it was made. It doesn't seem to say. Outside of the jaws being a bit rough at the edges when I got it, the lift works rather well.1 point
-
Seems like a case of "too good to be true"
 1 point
 -
https://www.cousinsuk.com/product/round-glasses-superior I just discovered than Cousins has the replacement coiled spring.1 point
-
I have tested LM-47 grease on an old Vostok 2416B automatic movement. The grease is thick and it really nicely adheres to the barrel wall. Under pressure from the mainspring, grease liquifies and because of that, it probably sticks the bridle to the barrel wall, not letting it slip until the very end. My conclusion is that this grease has good braking properties, and MoS2 should protect the barrel wall from wear. The only question remains how long will it last...1 point
-
Beautful1 point
-
It looks Fantastic ! great job. Matt1 point
-
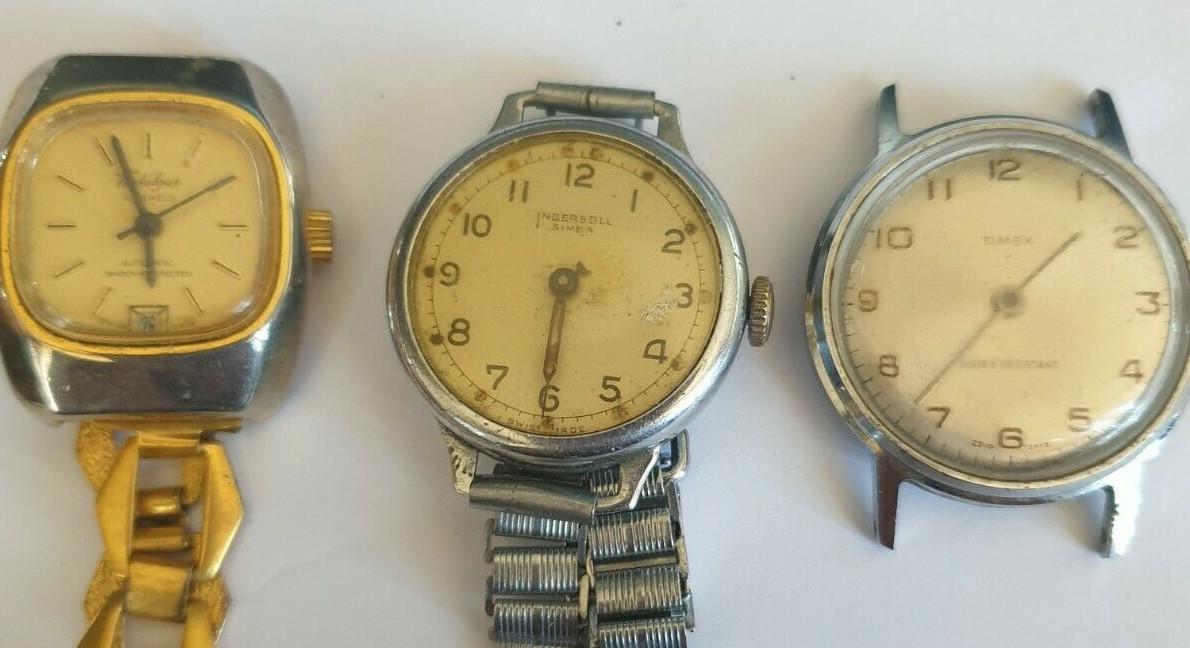
A Trafalgar 25 jewel (almost certainly ladies) automatic, a minor radiological hazard in the form of an Ingersoll "Simba" with a broken hand, and a 1972 Timex Marlin which I suspect is missing its second hand, for a pound sixty six each plus postage. The Marlin is really the one I was bidding for, the other two may be interesting too though. I think I have some hands that might work with the Ingersoll, I almost certainly have a second hand for the Marlin, and I'm intrigued to see what lurks within the Trafalgar. Speaking of hands, I just watched this video from Vintage Watch Services, in which he turns a couple of hands for a Pavel Bure pocket watch (which he also services).
 1 point
 -
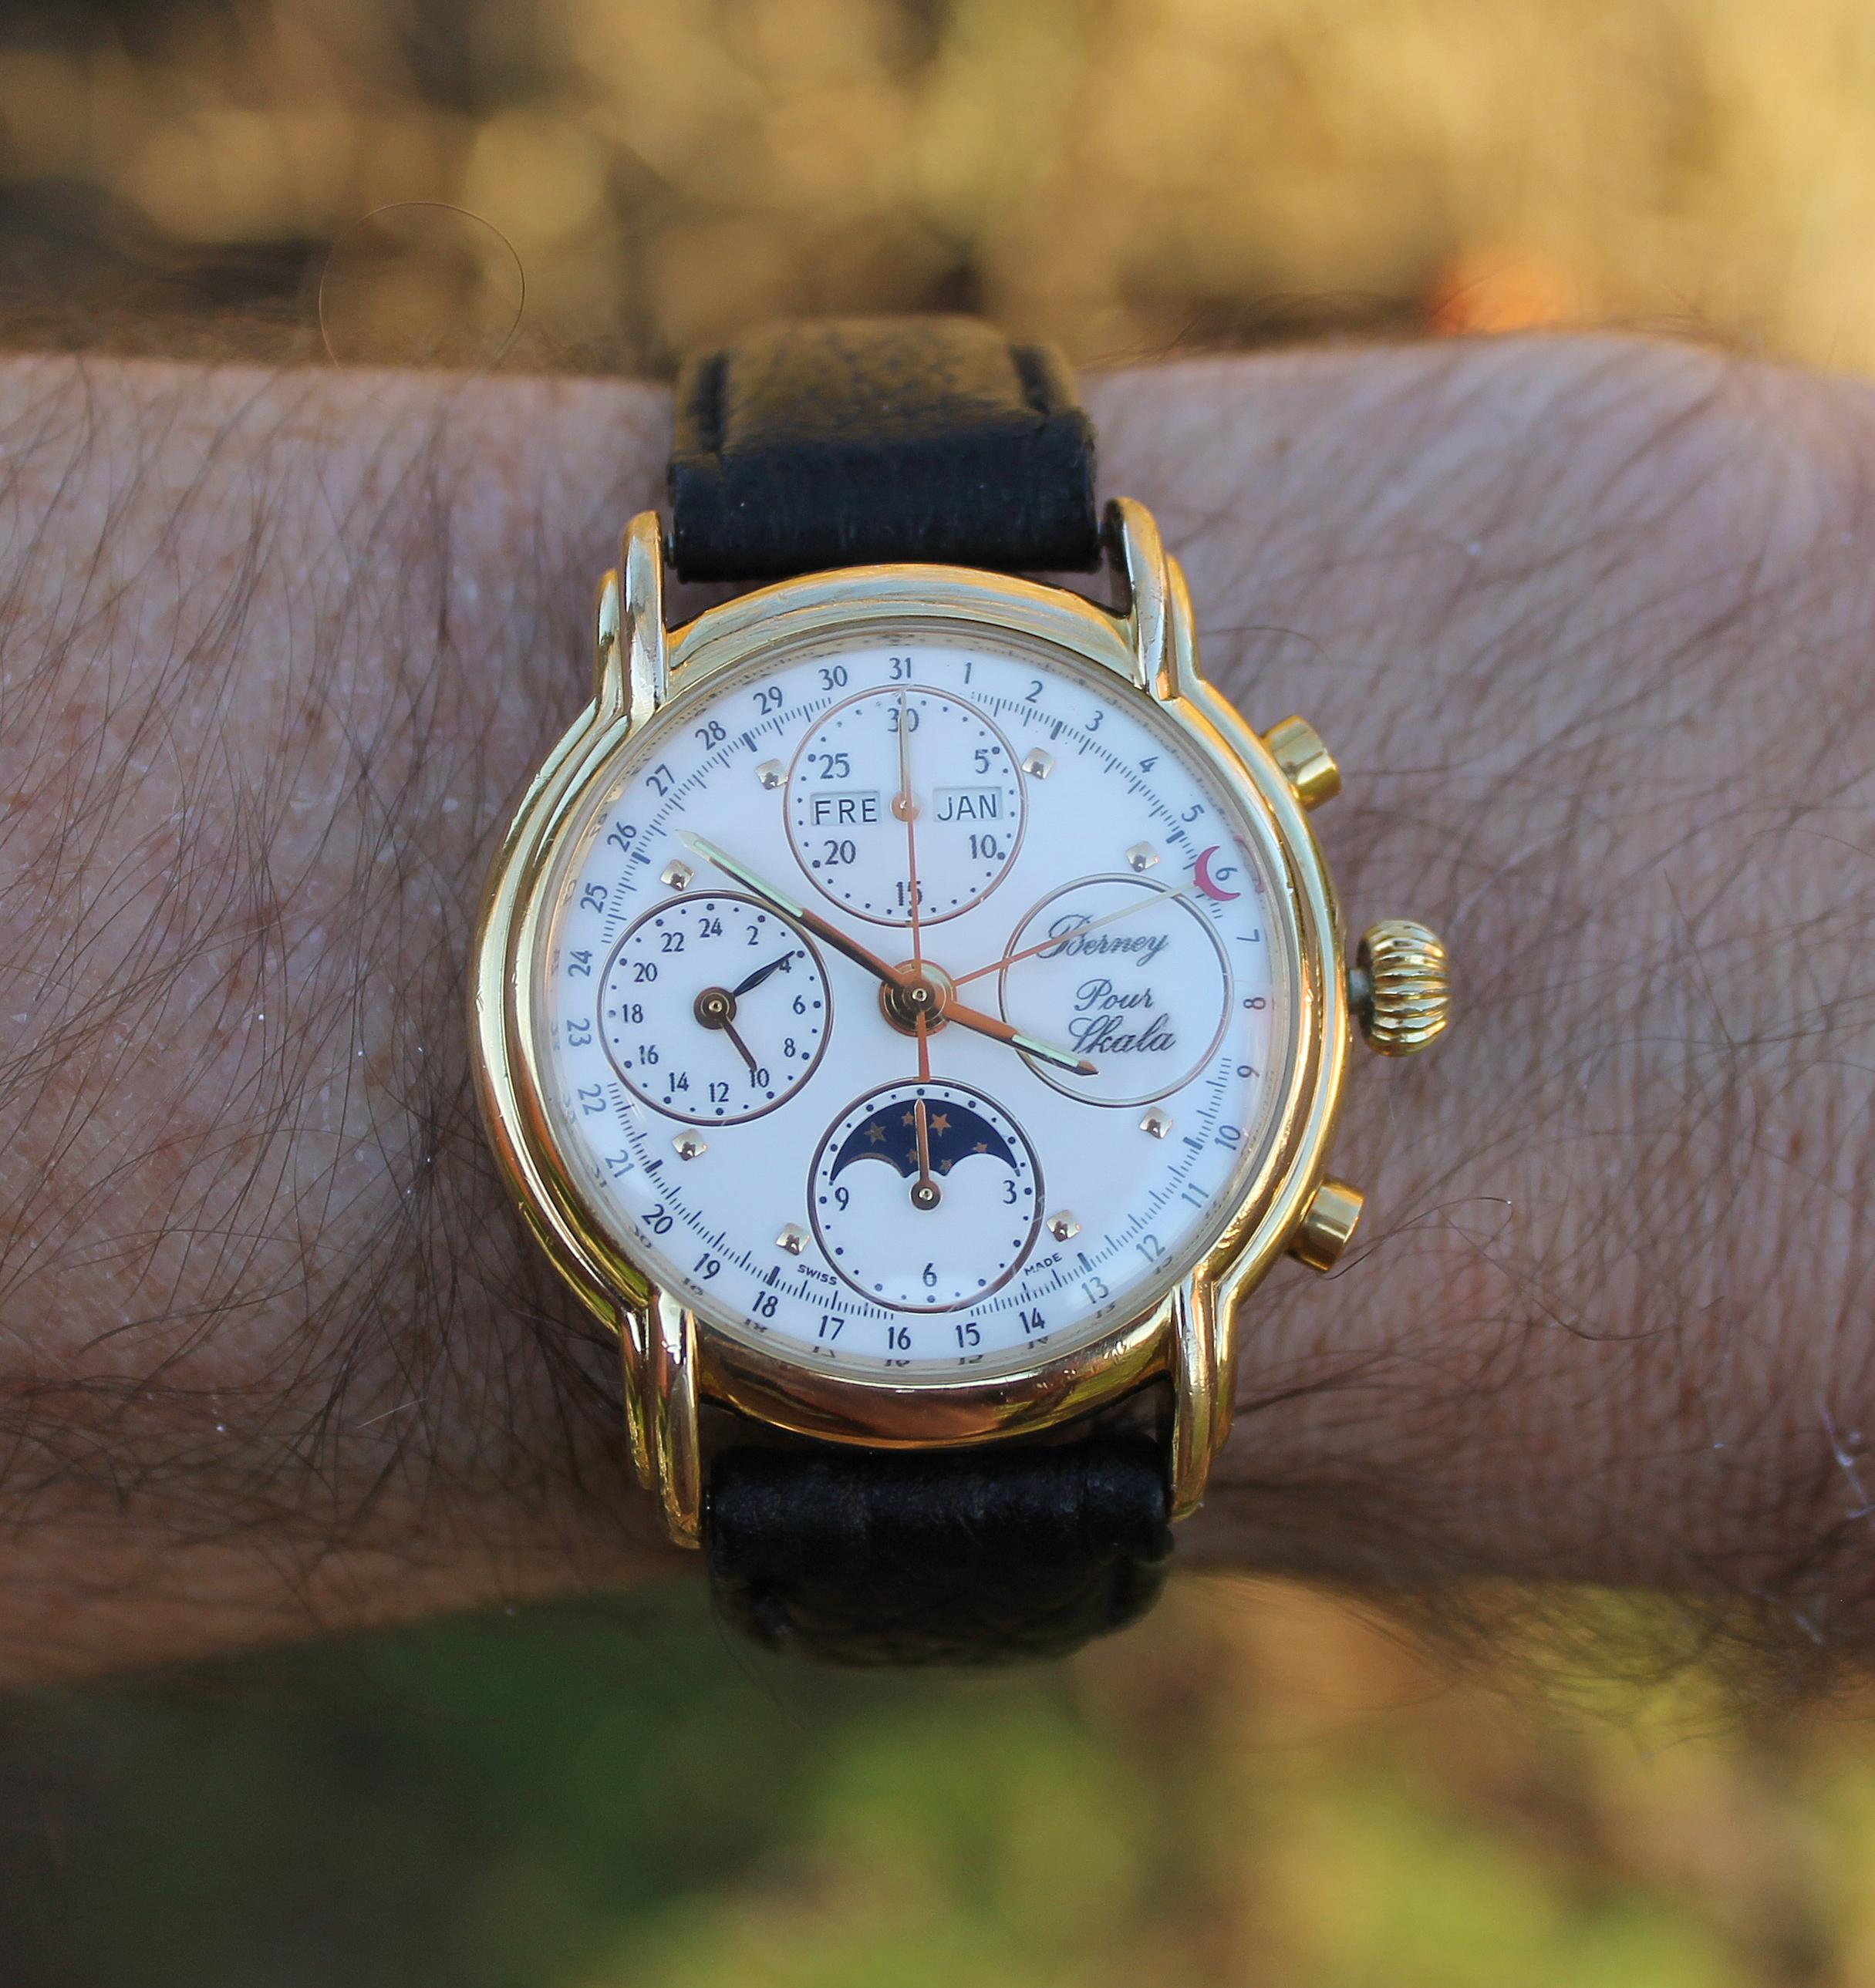
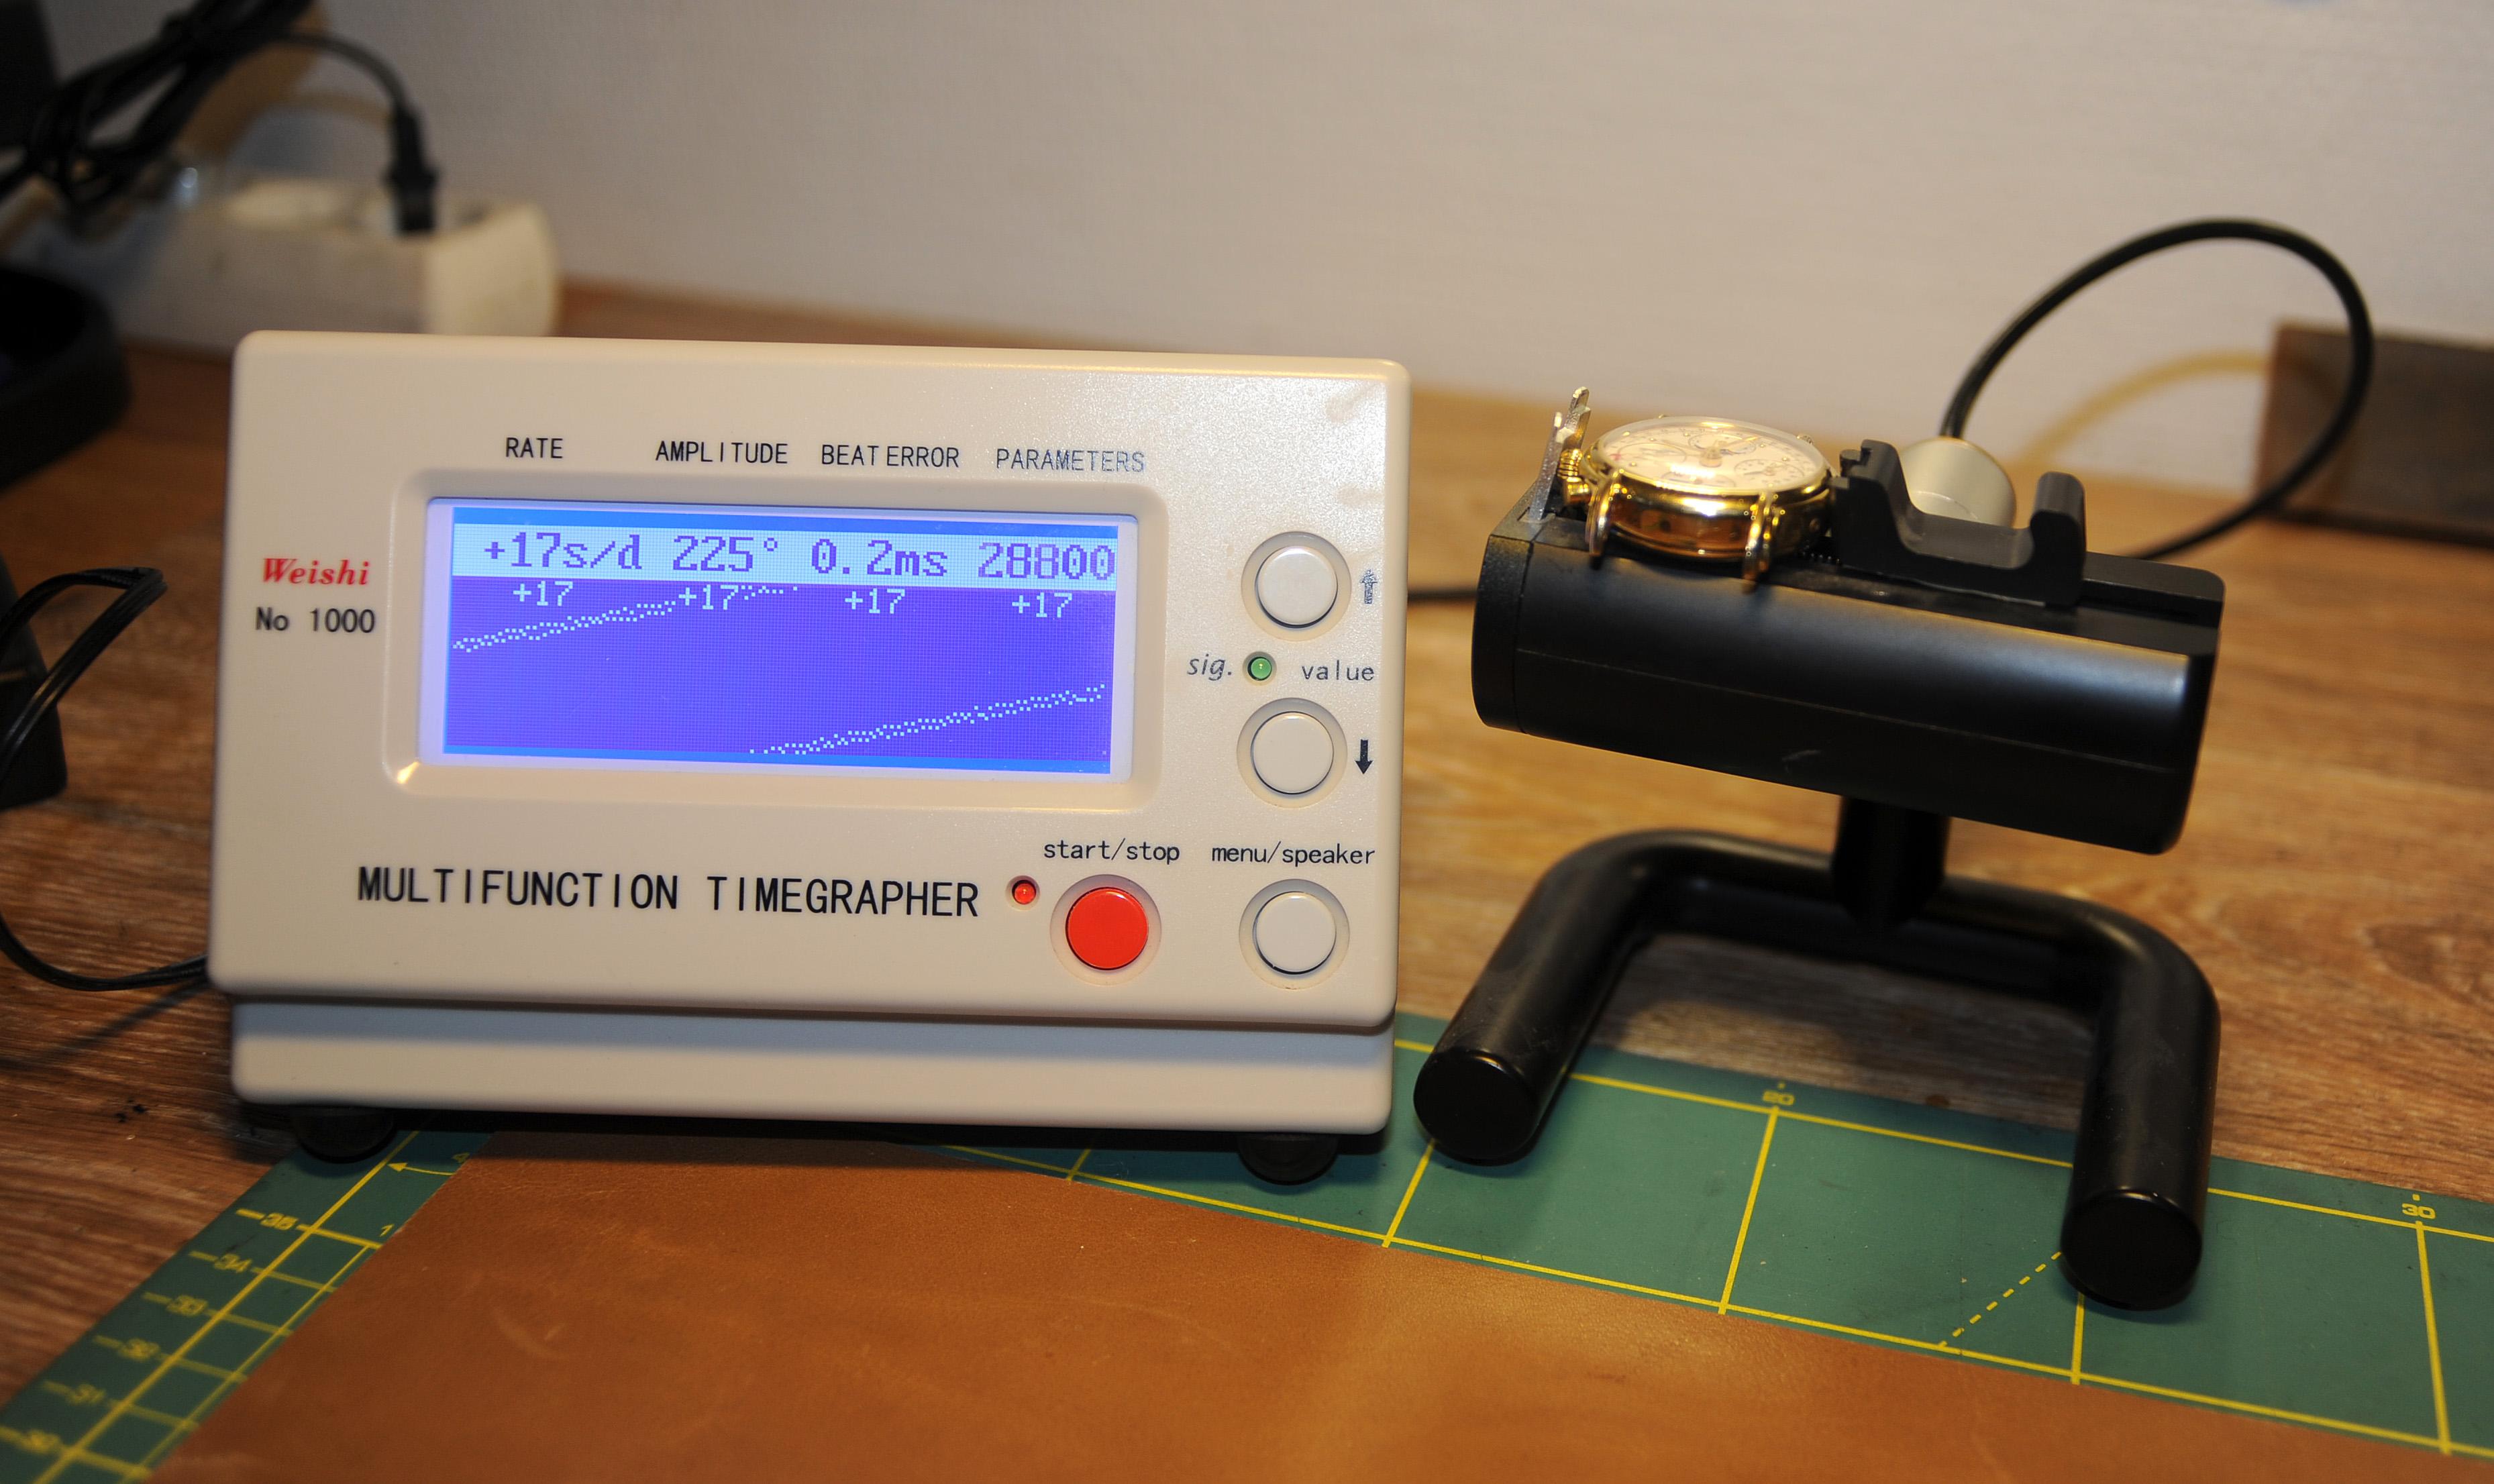
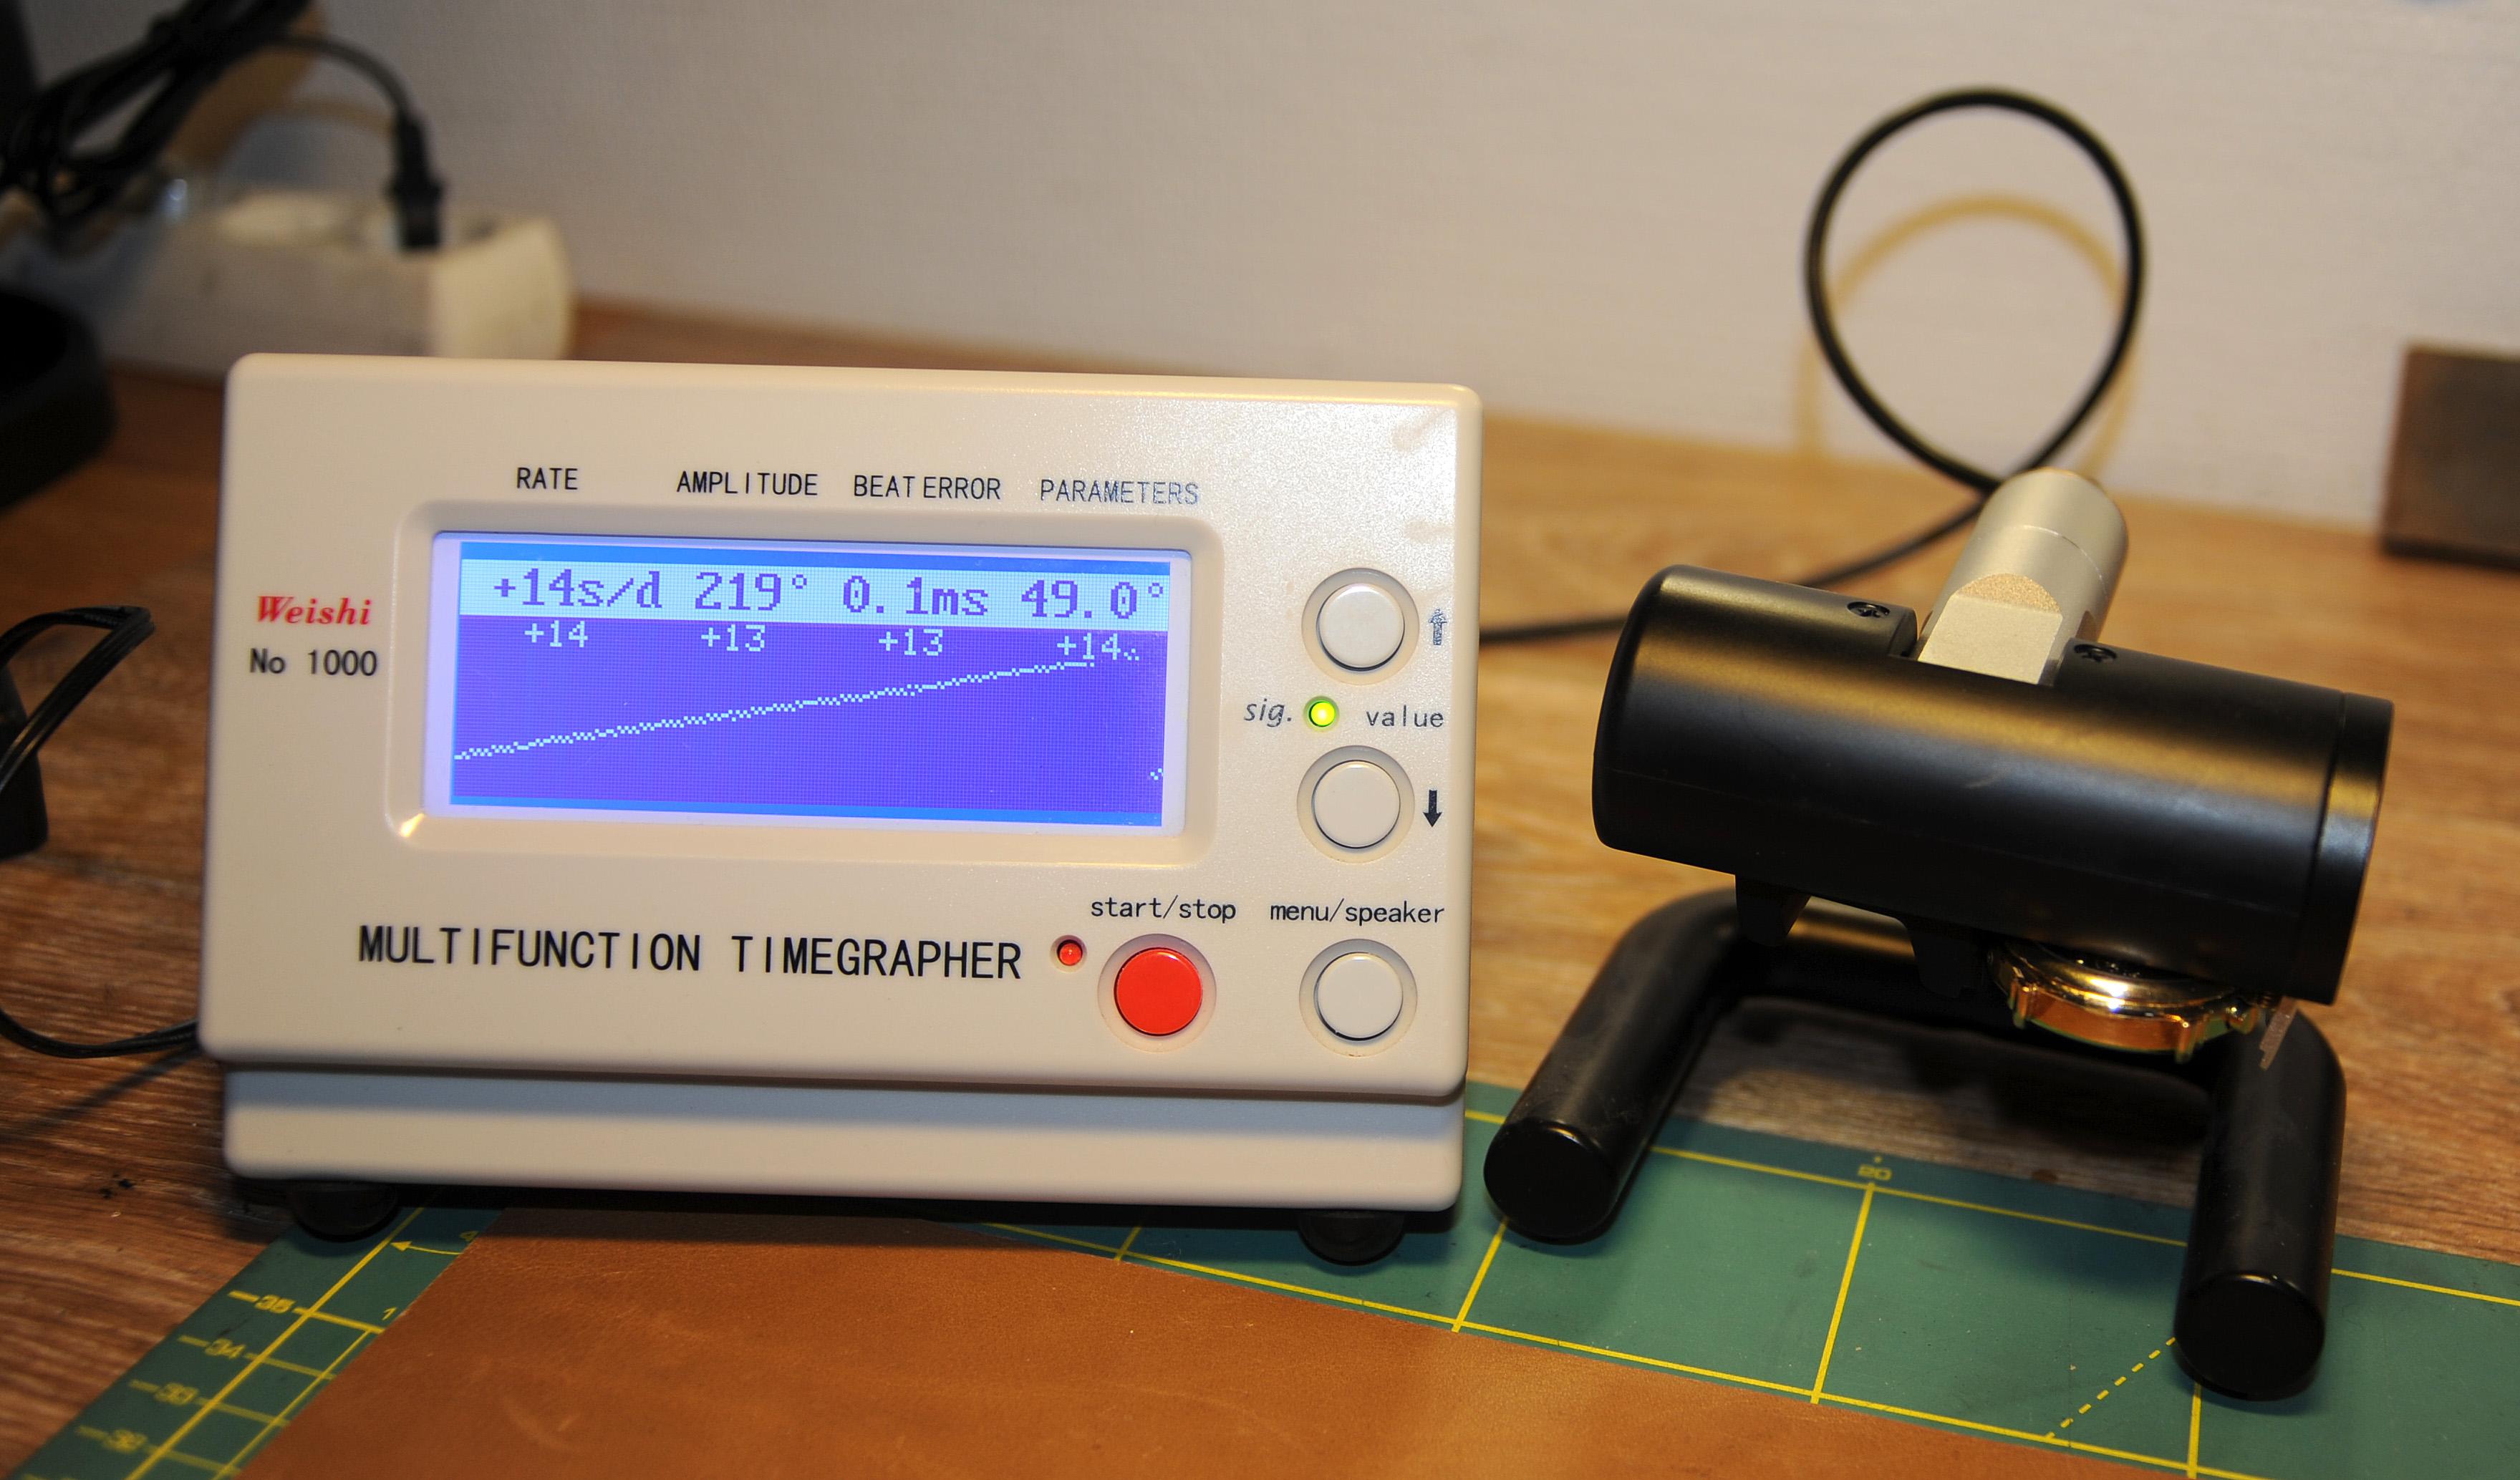
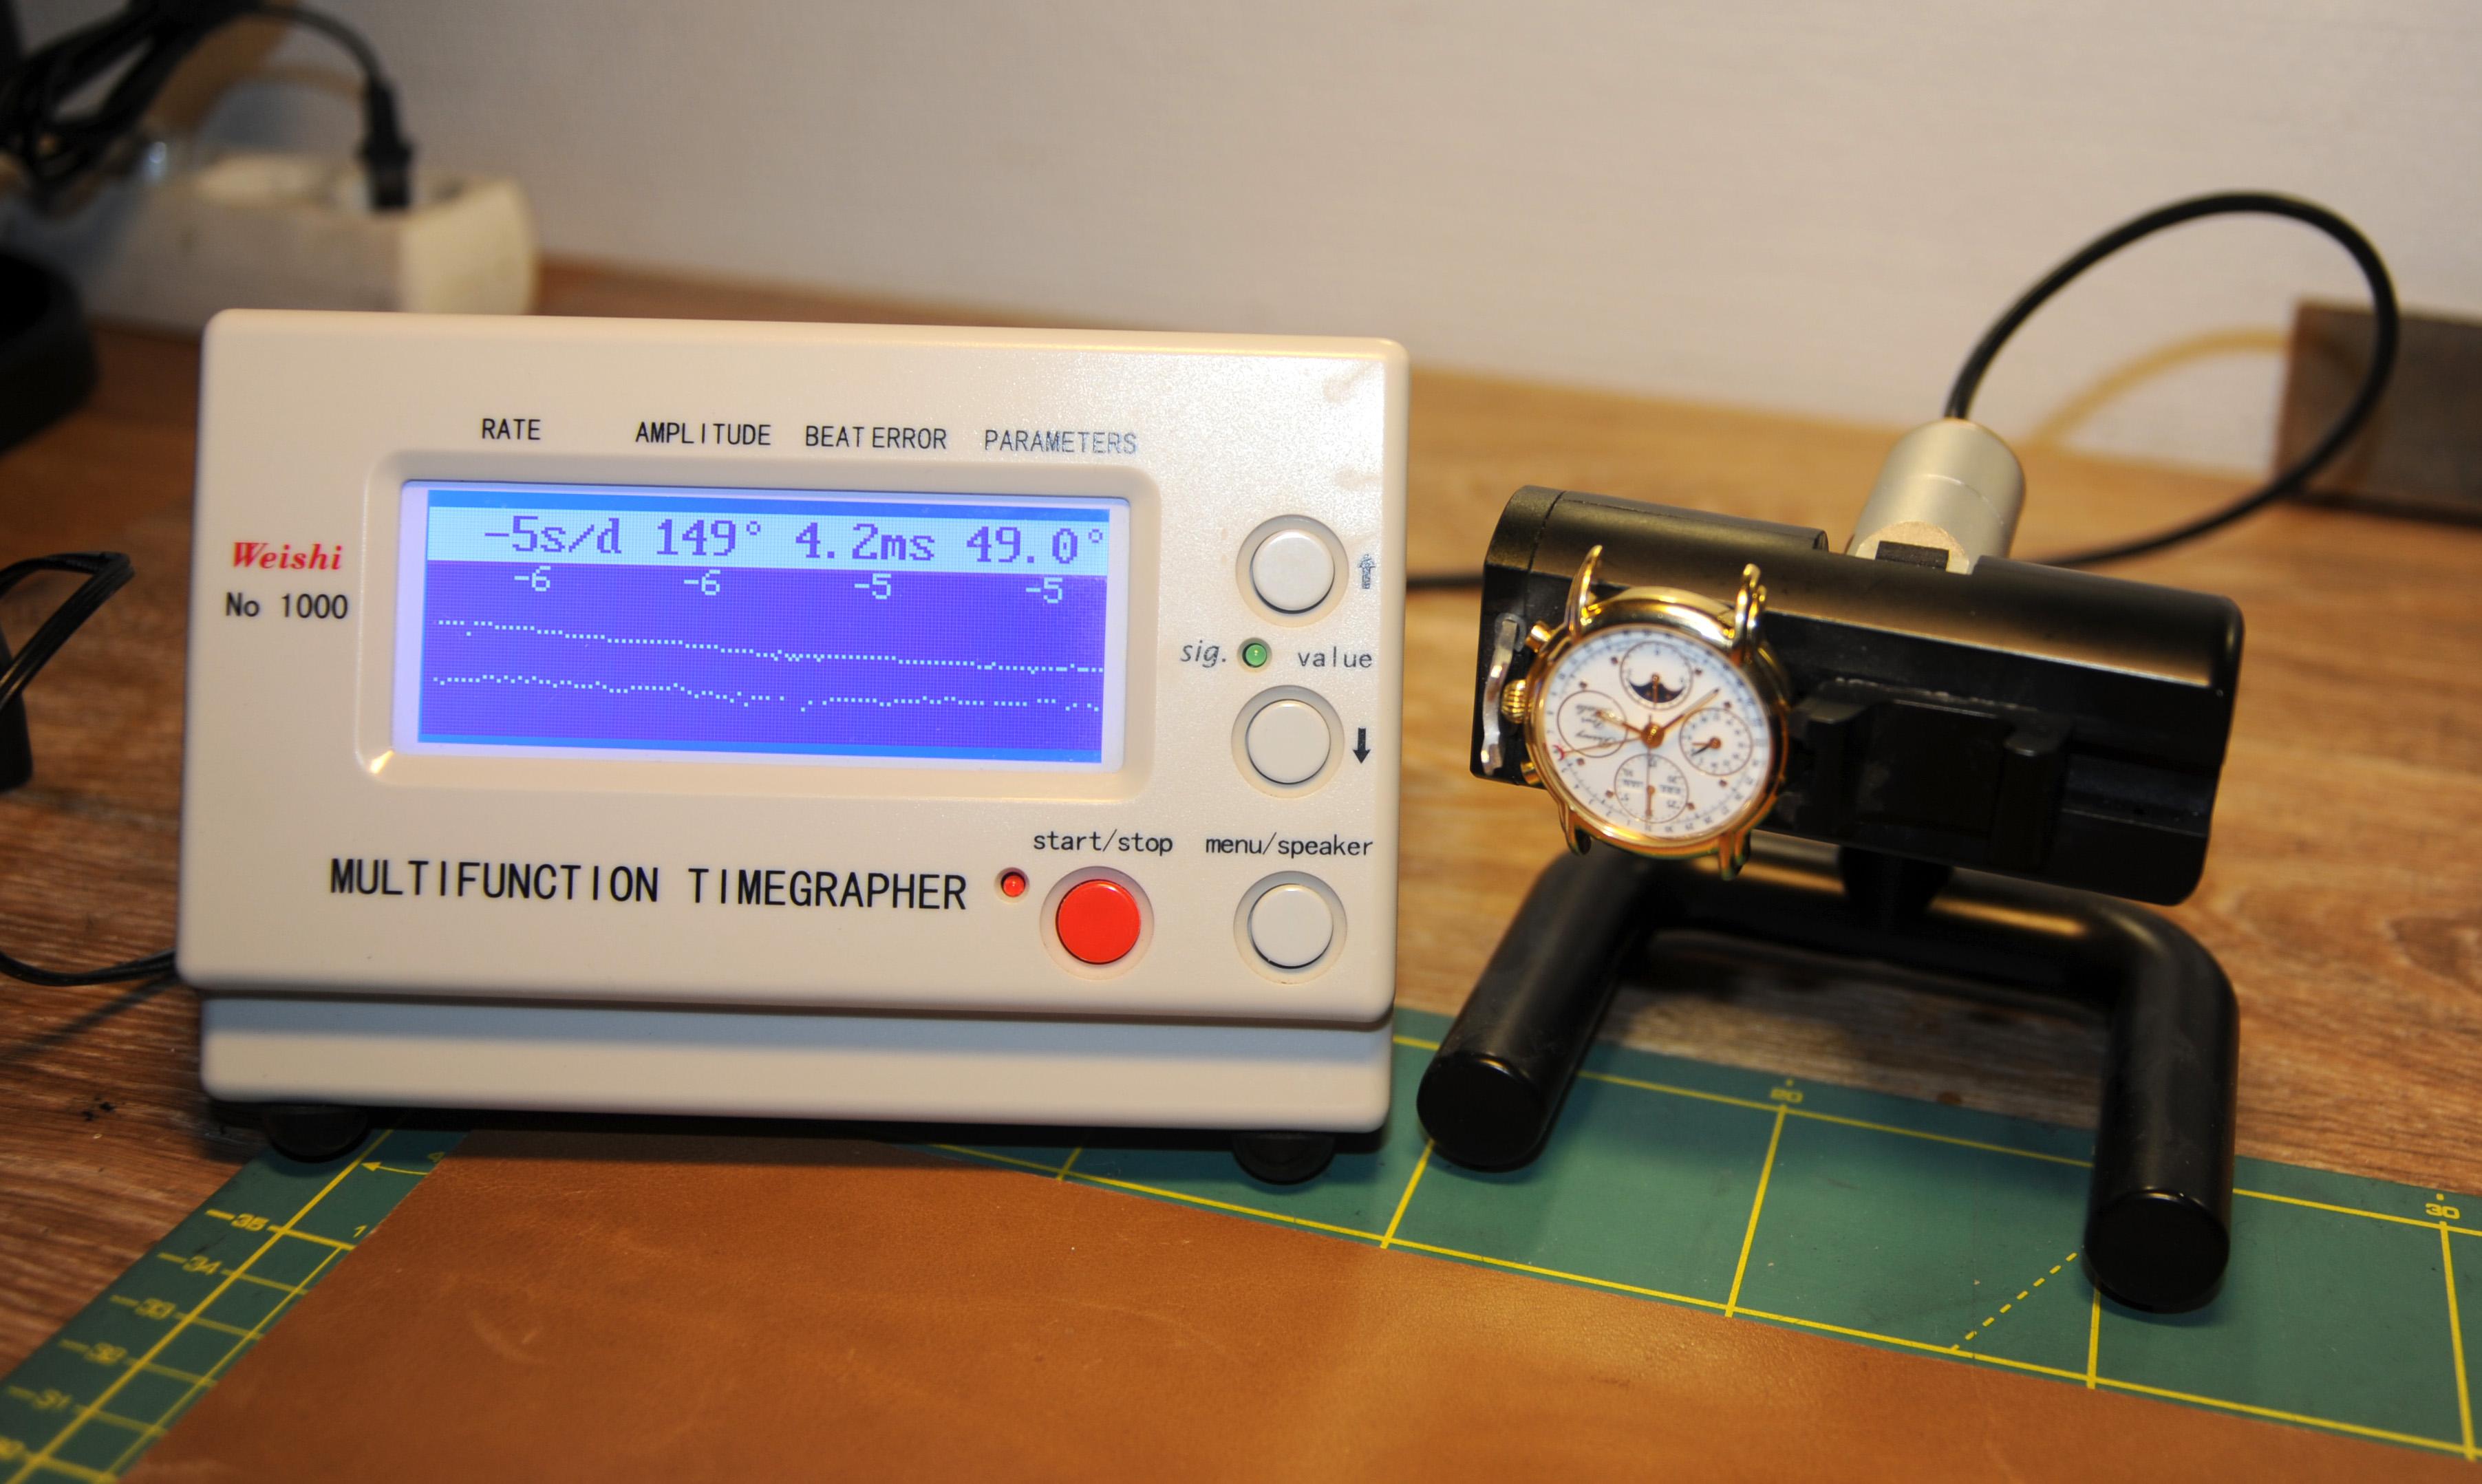
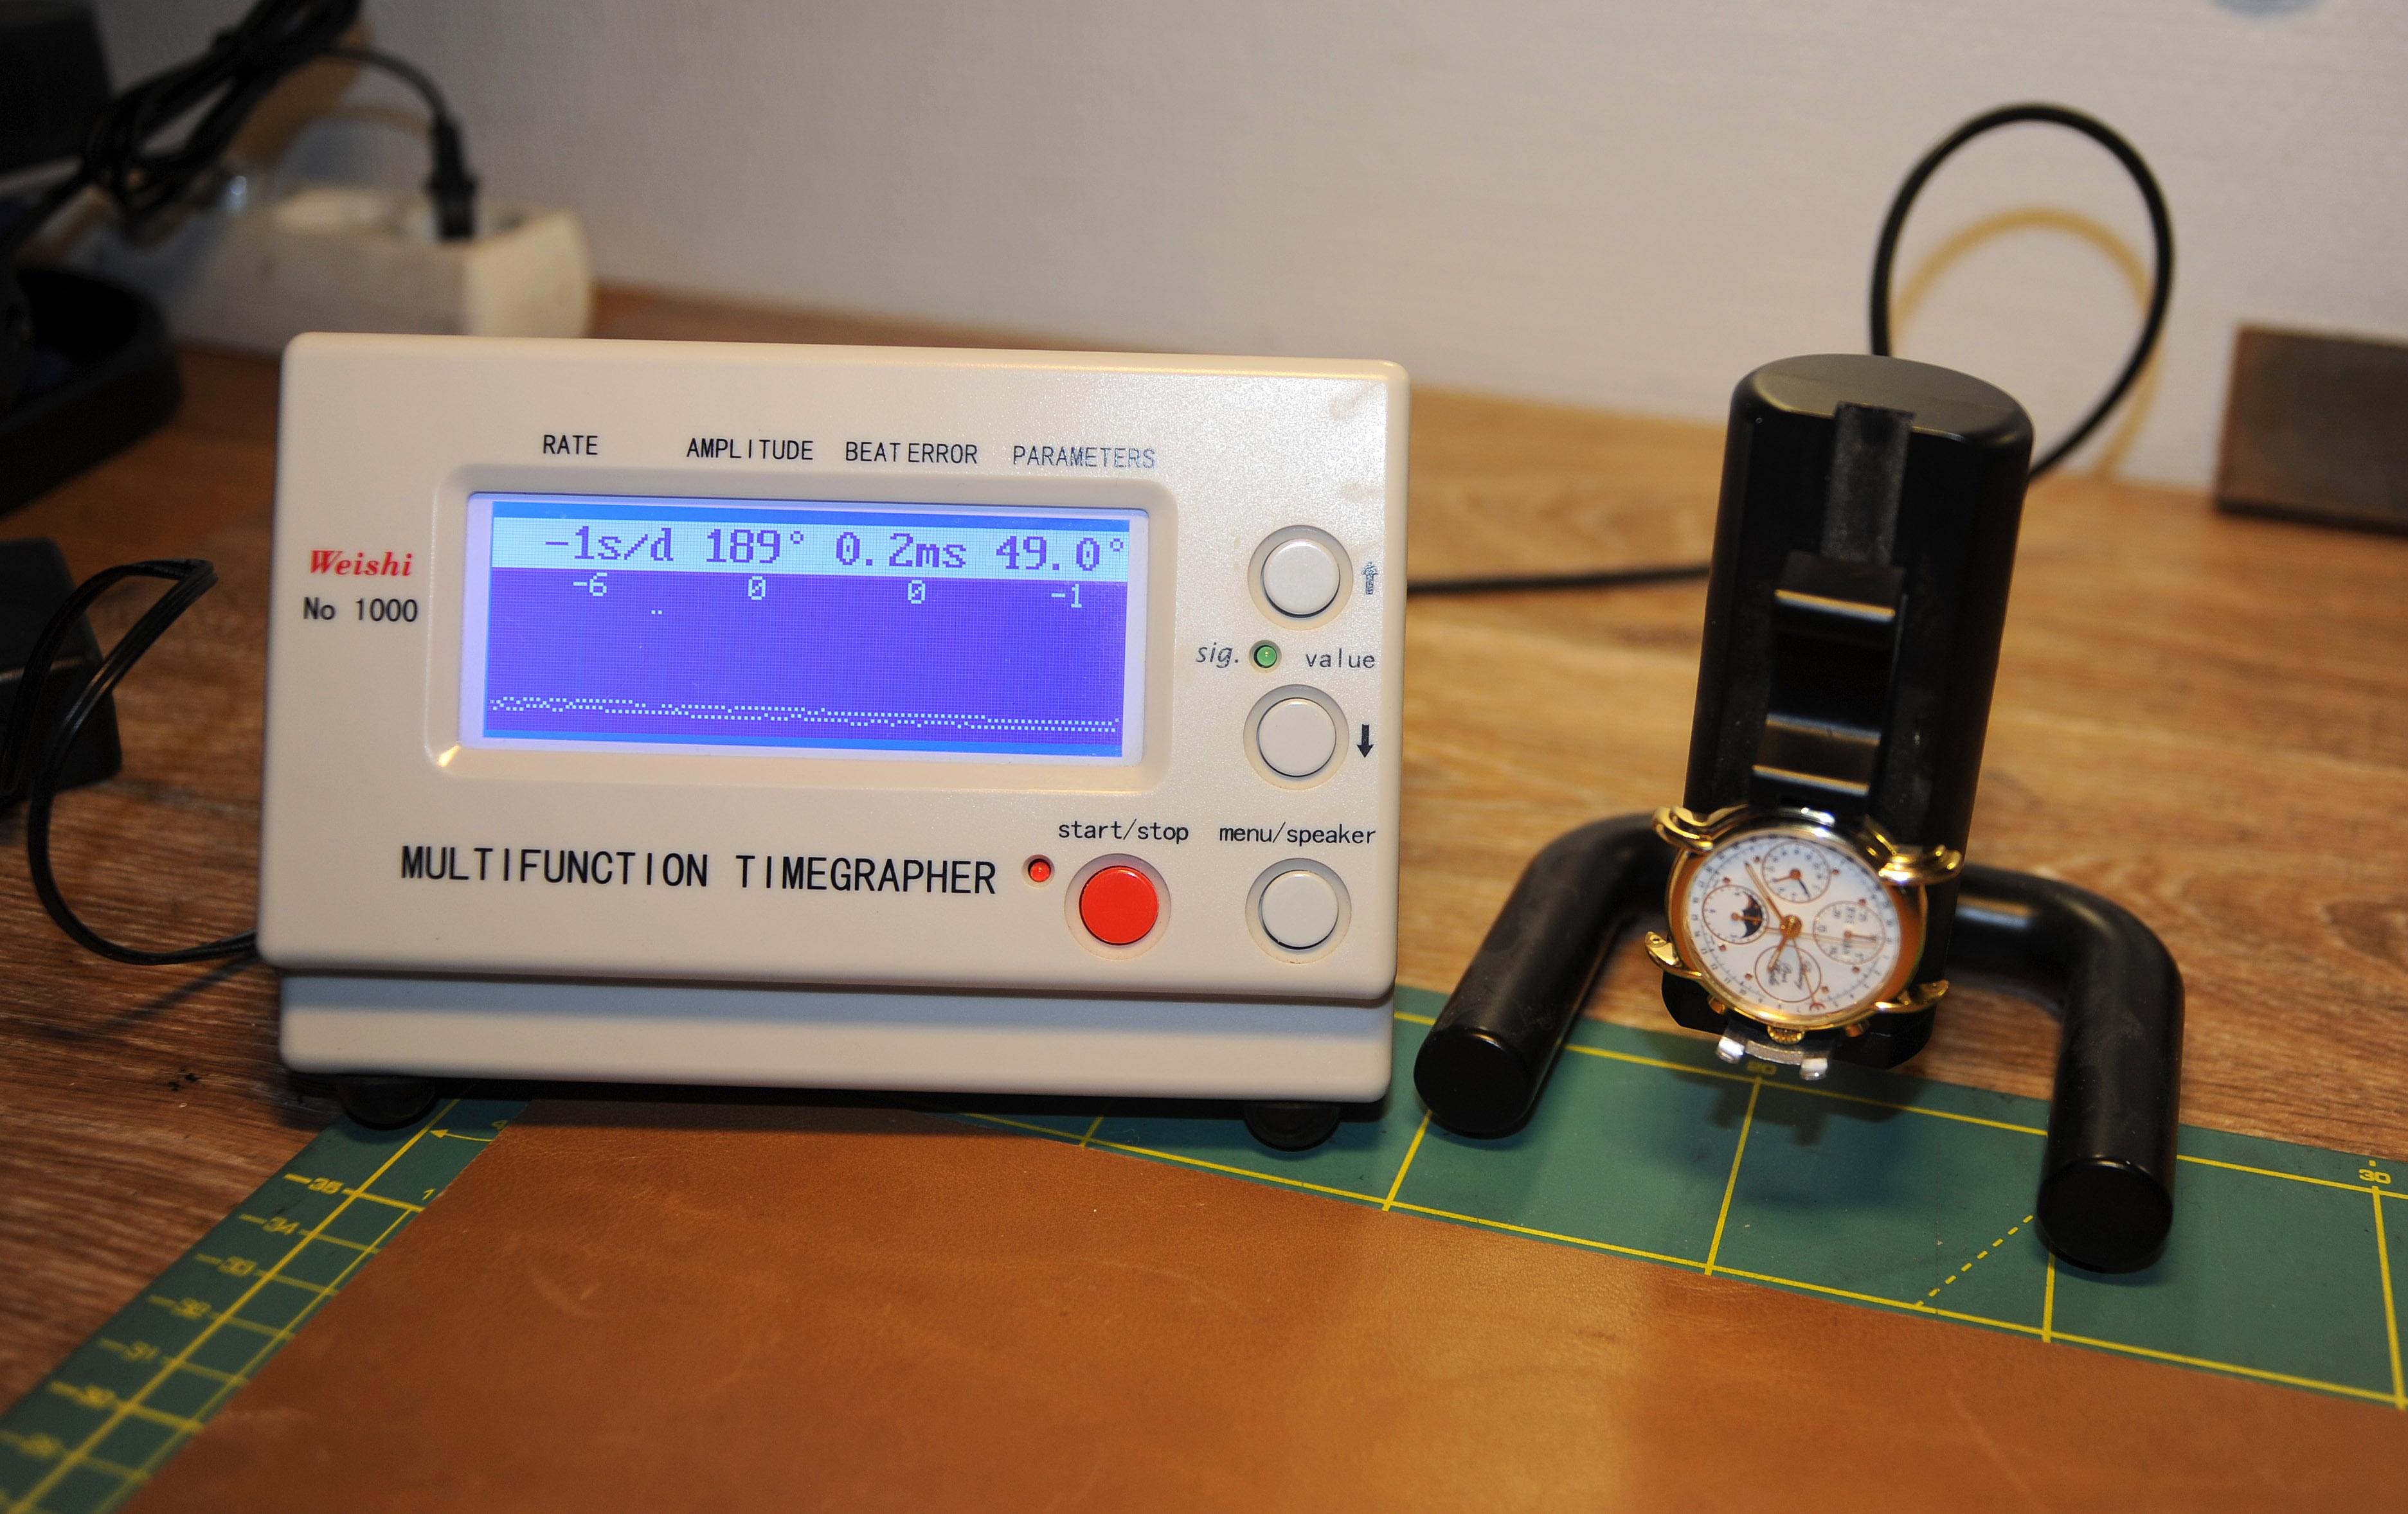
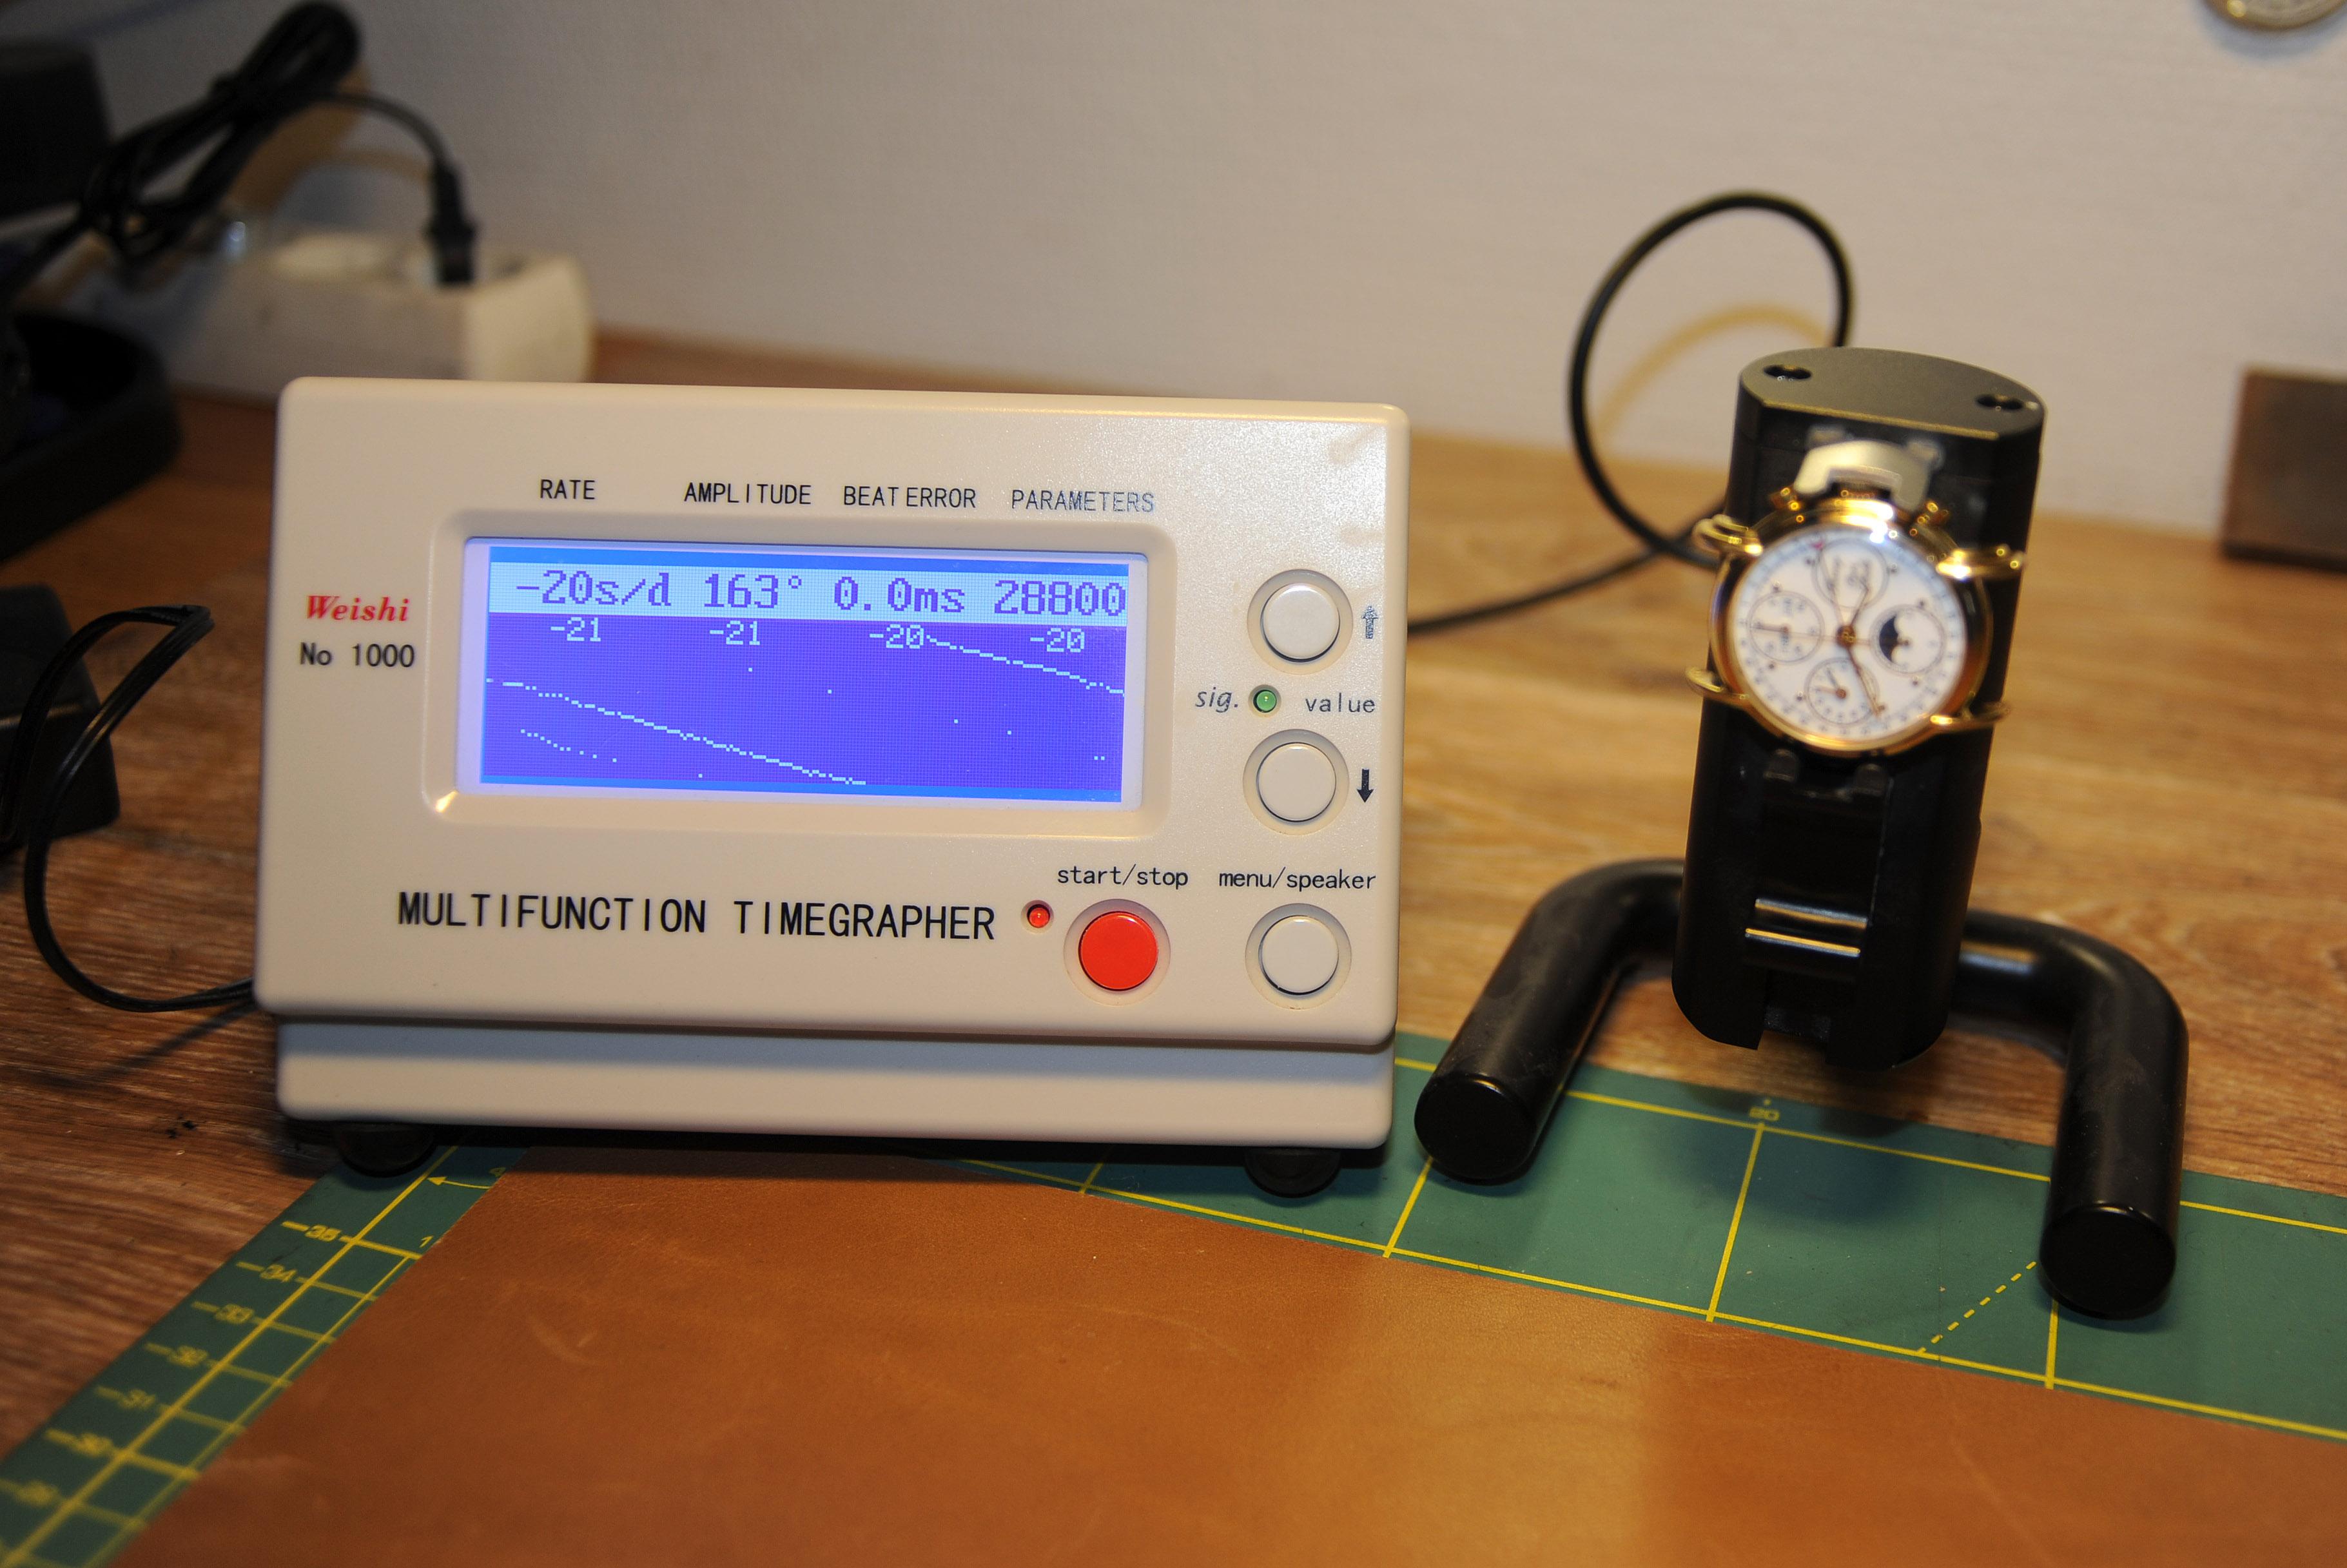
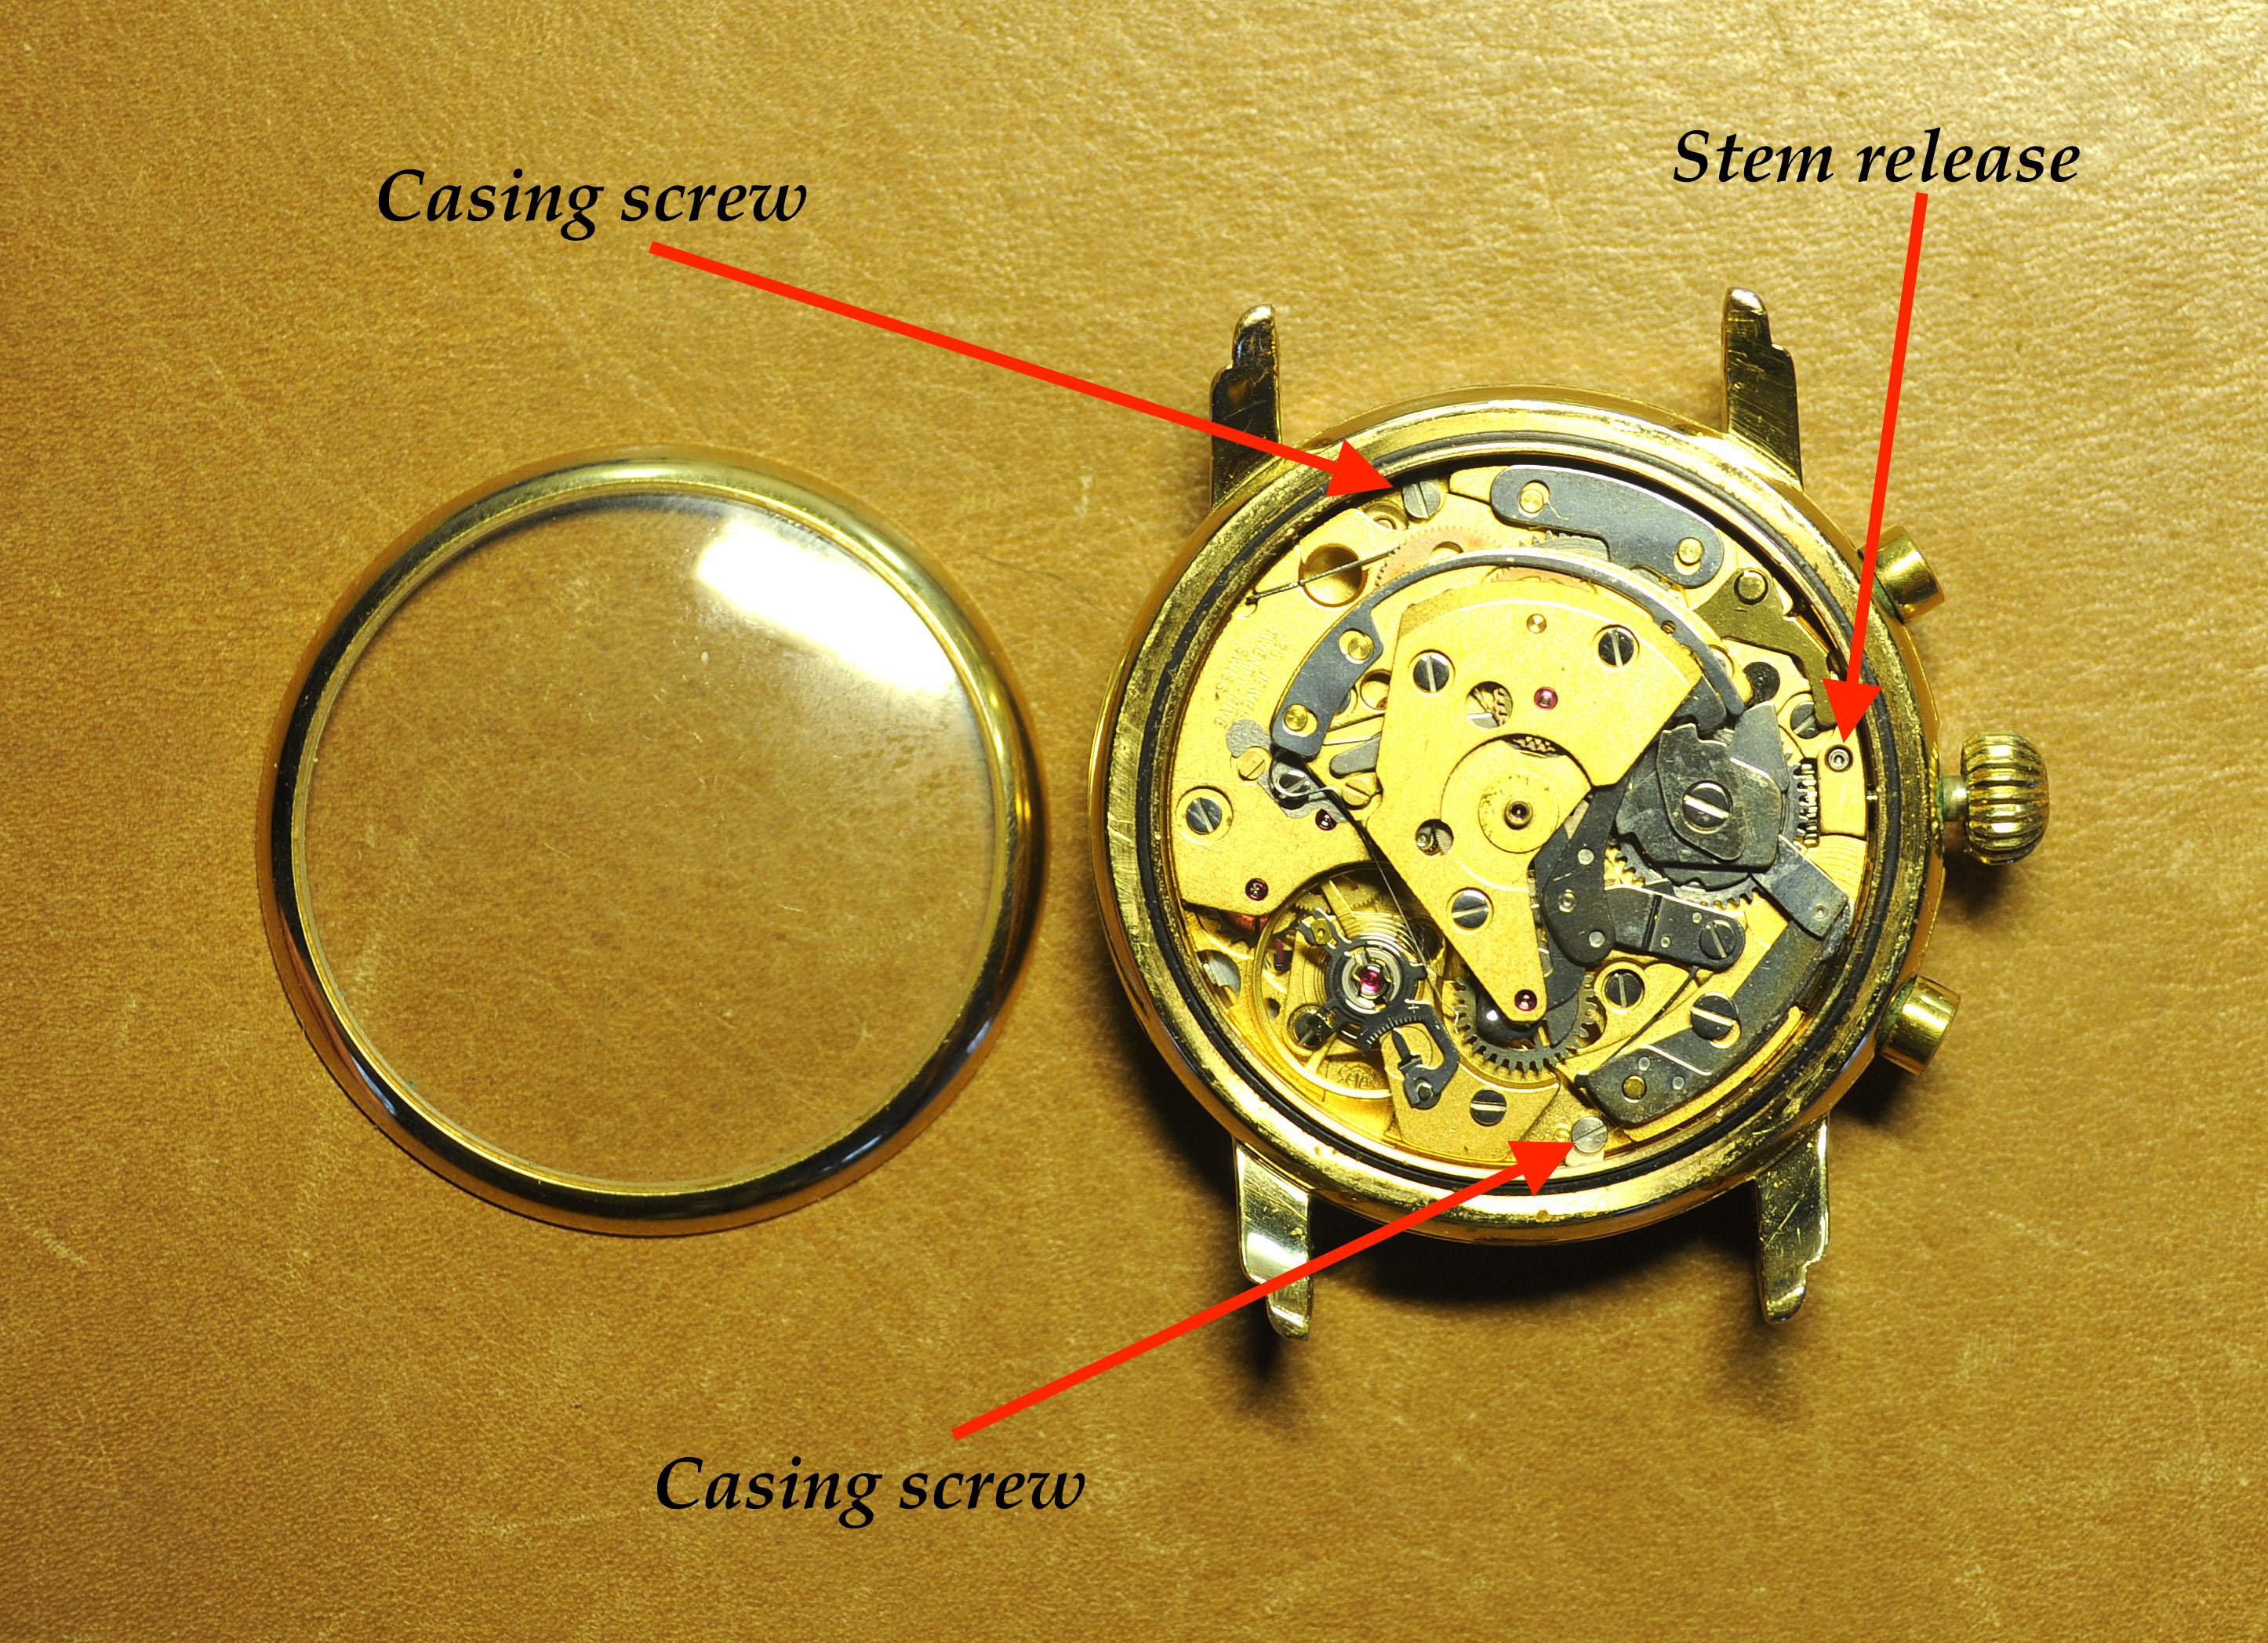
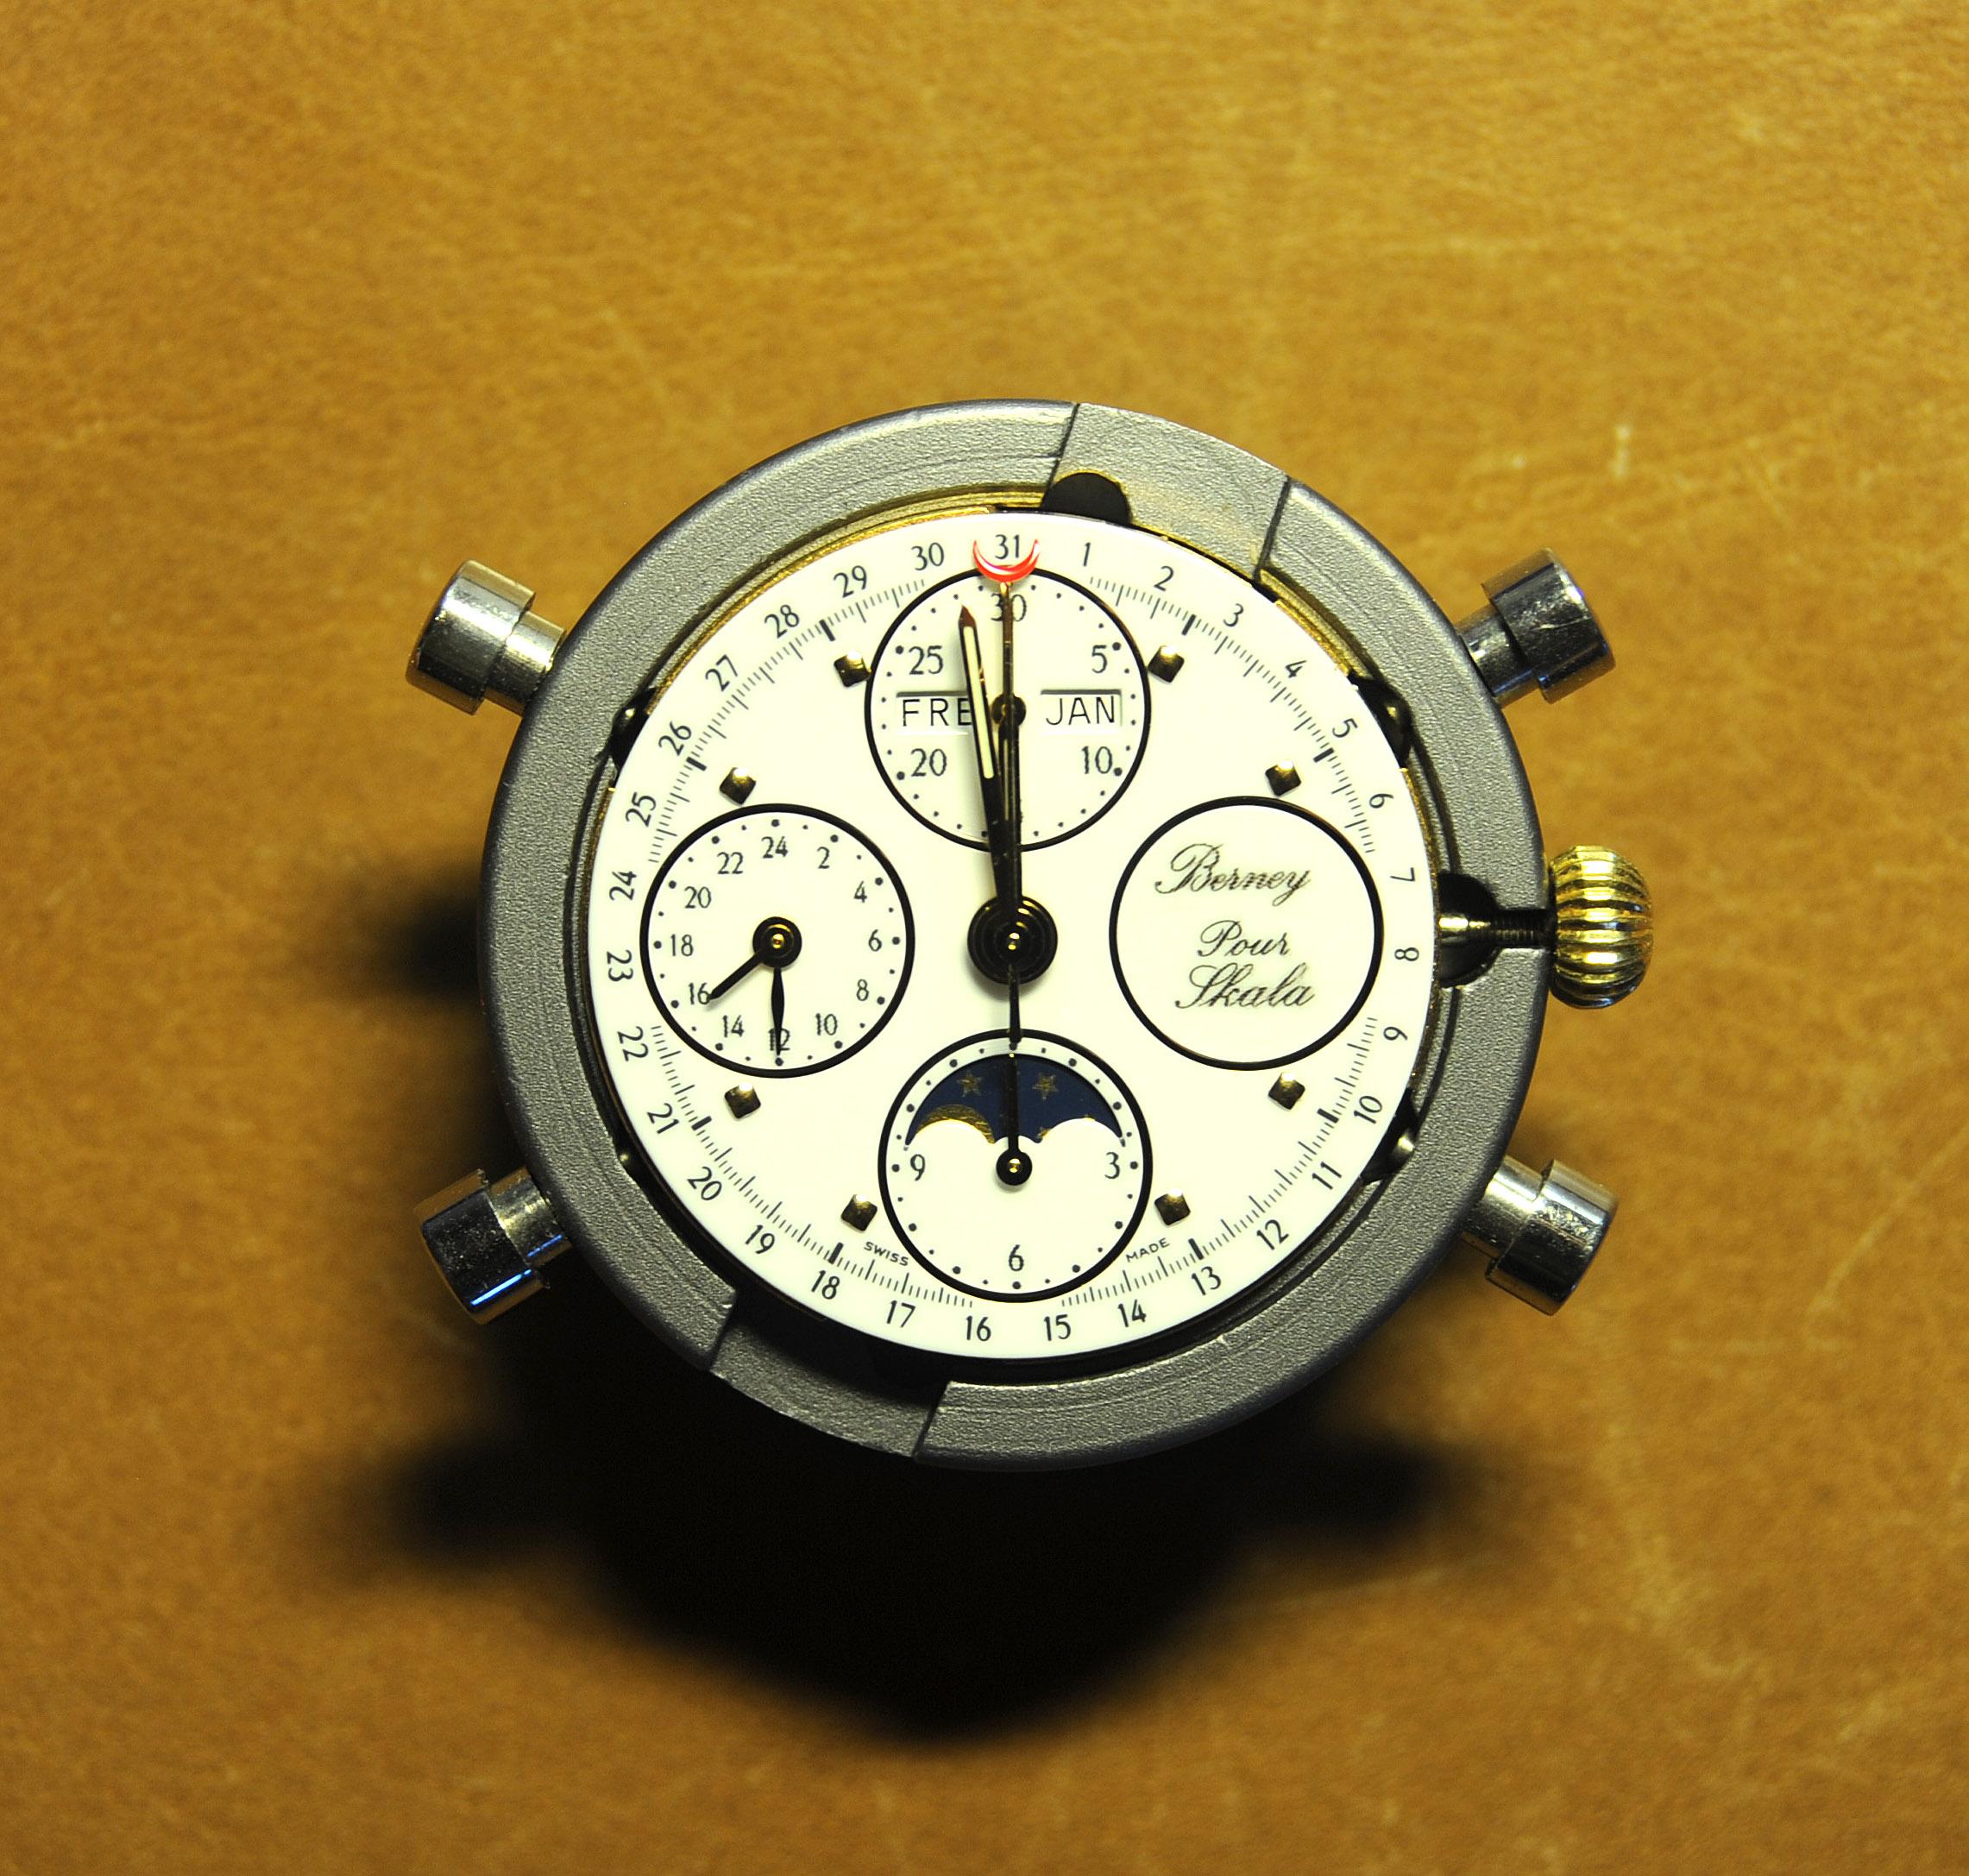
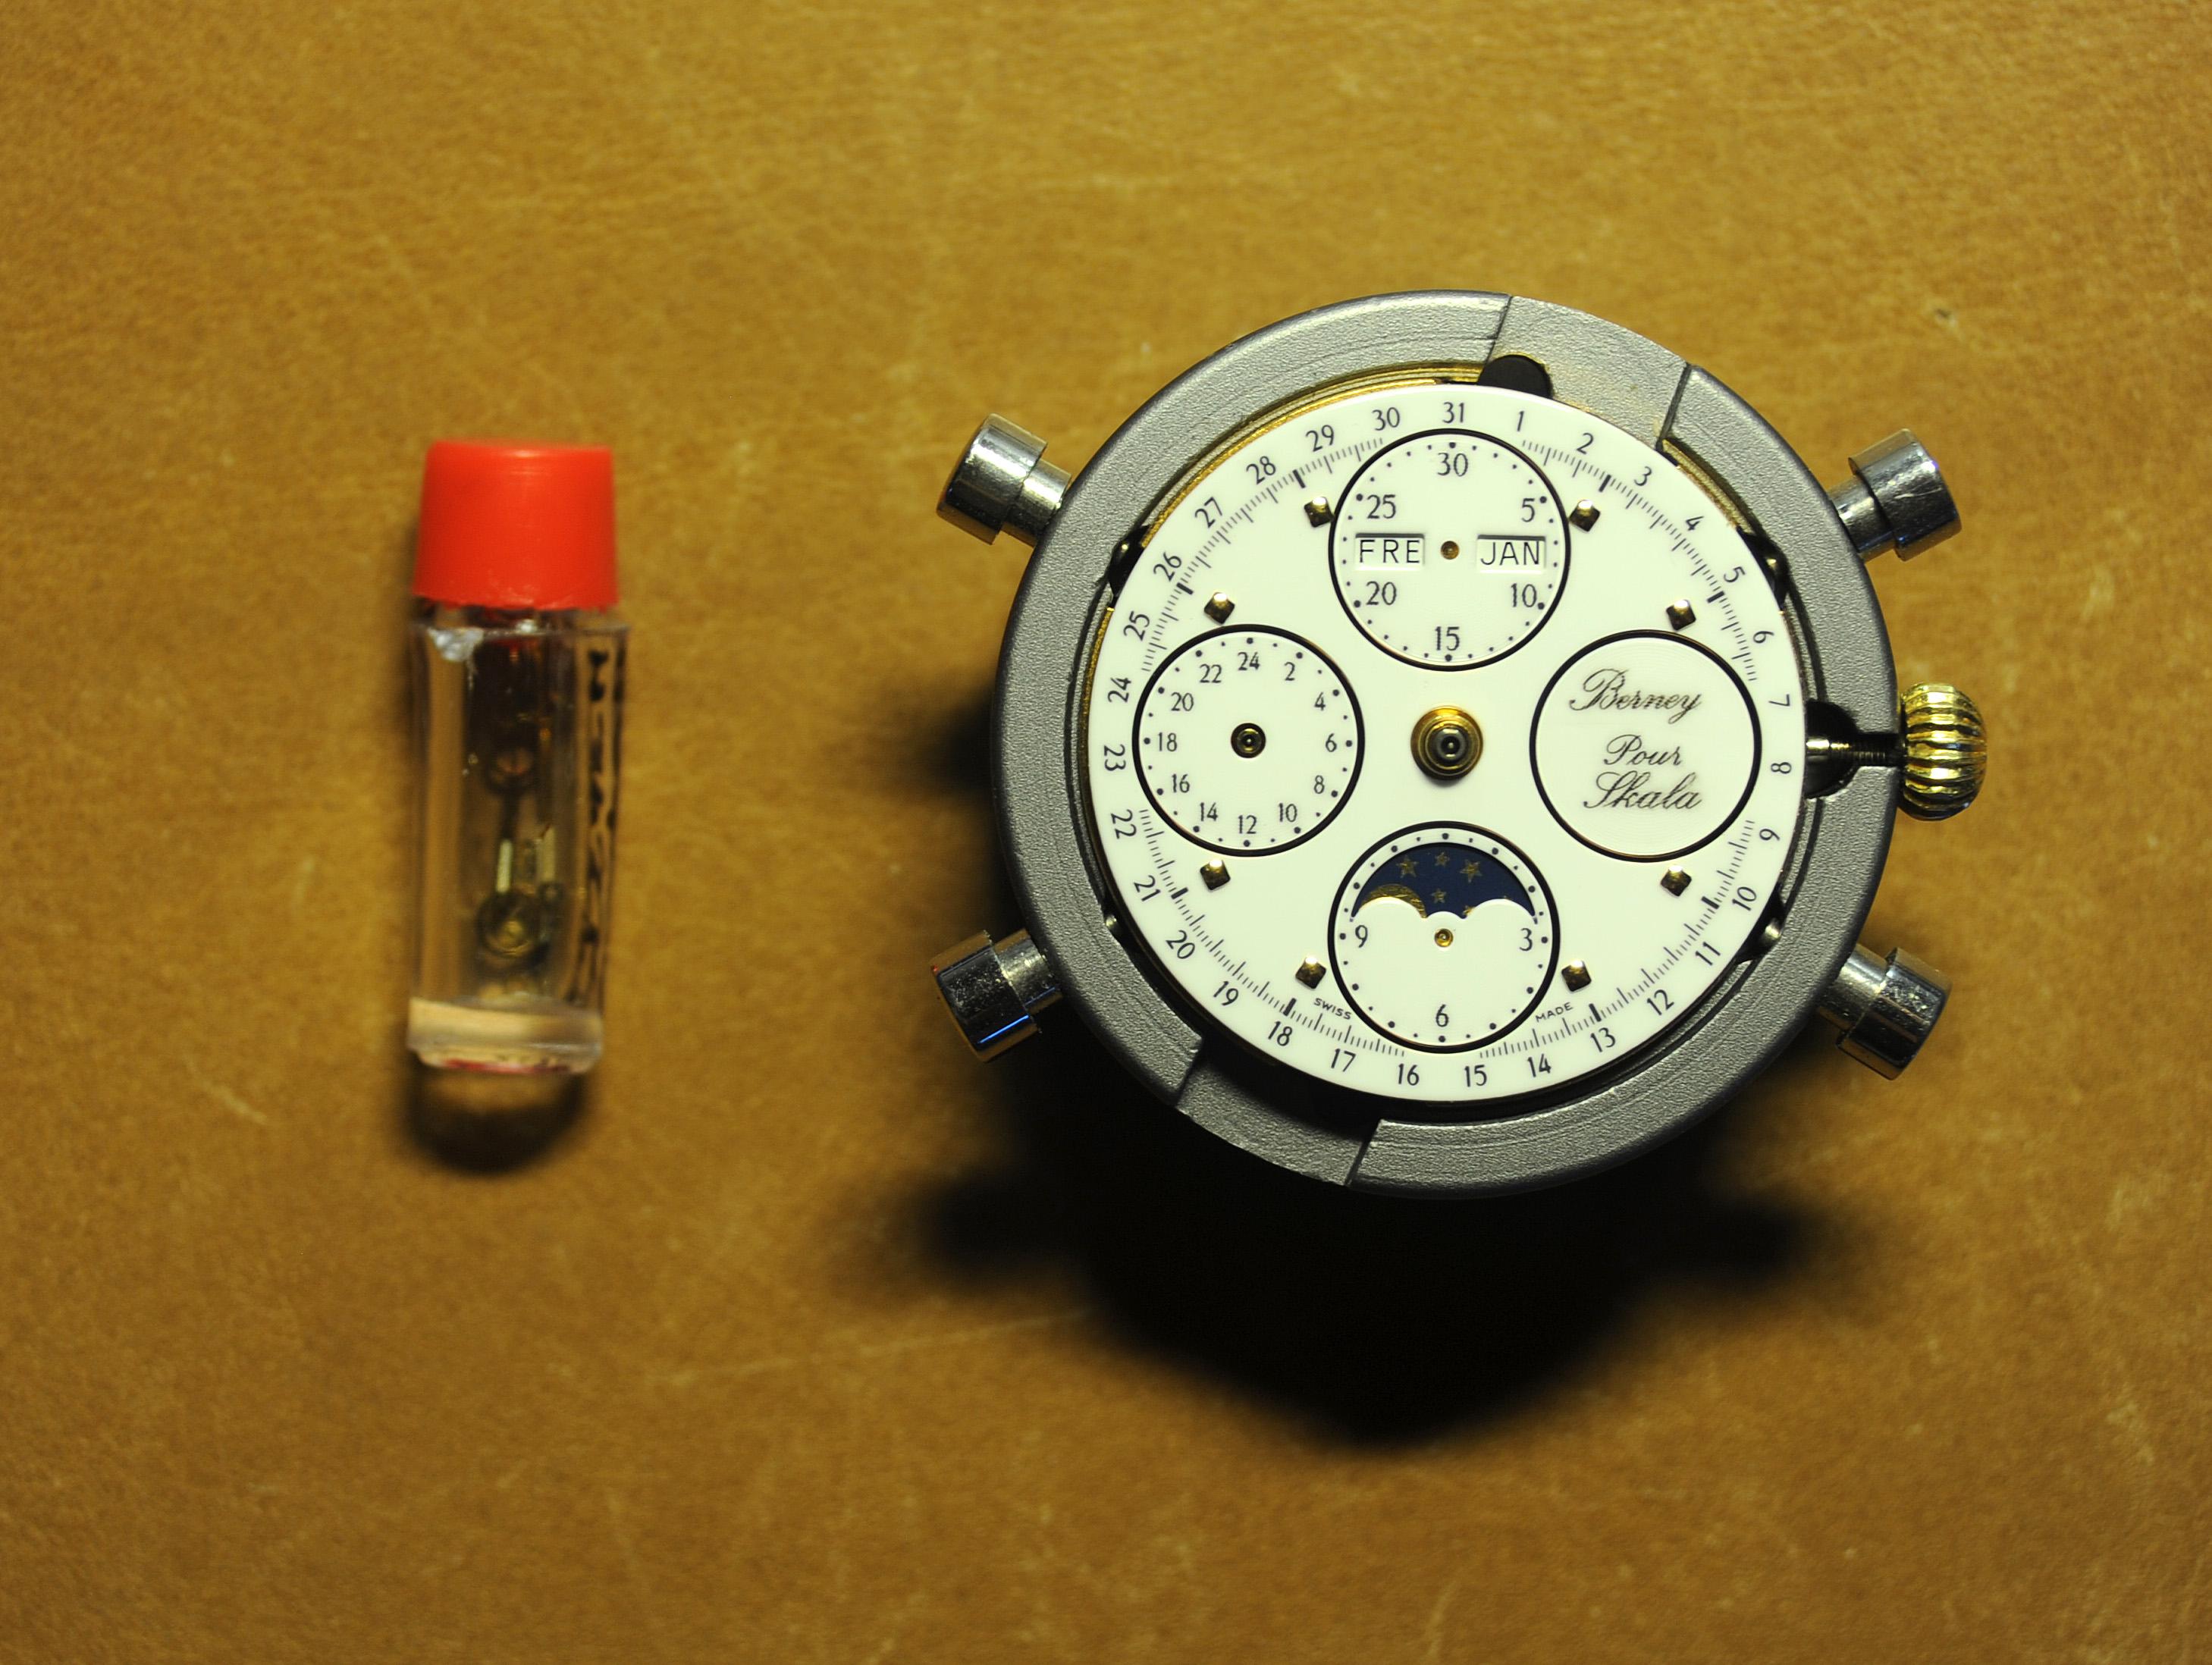
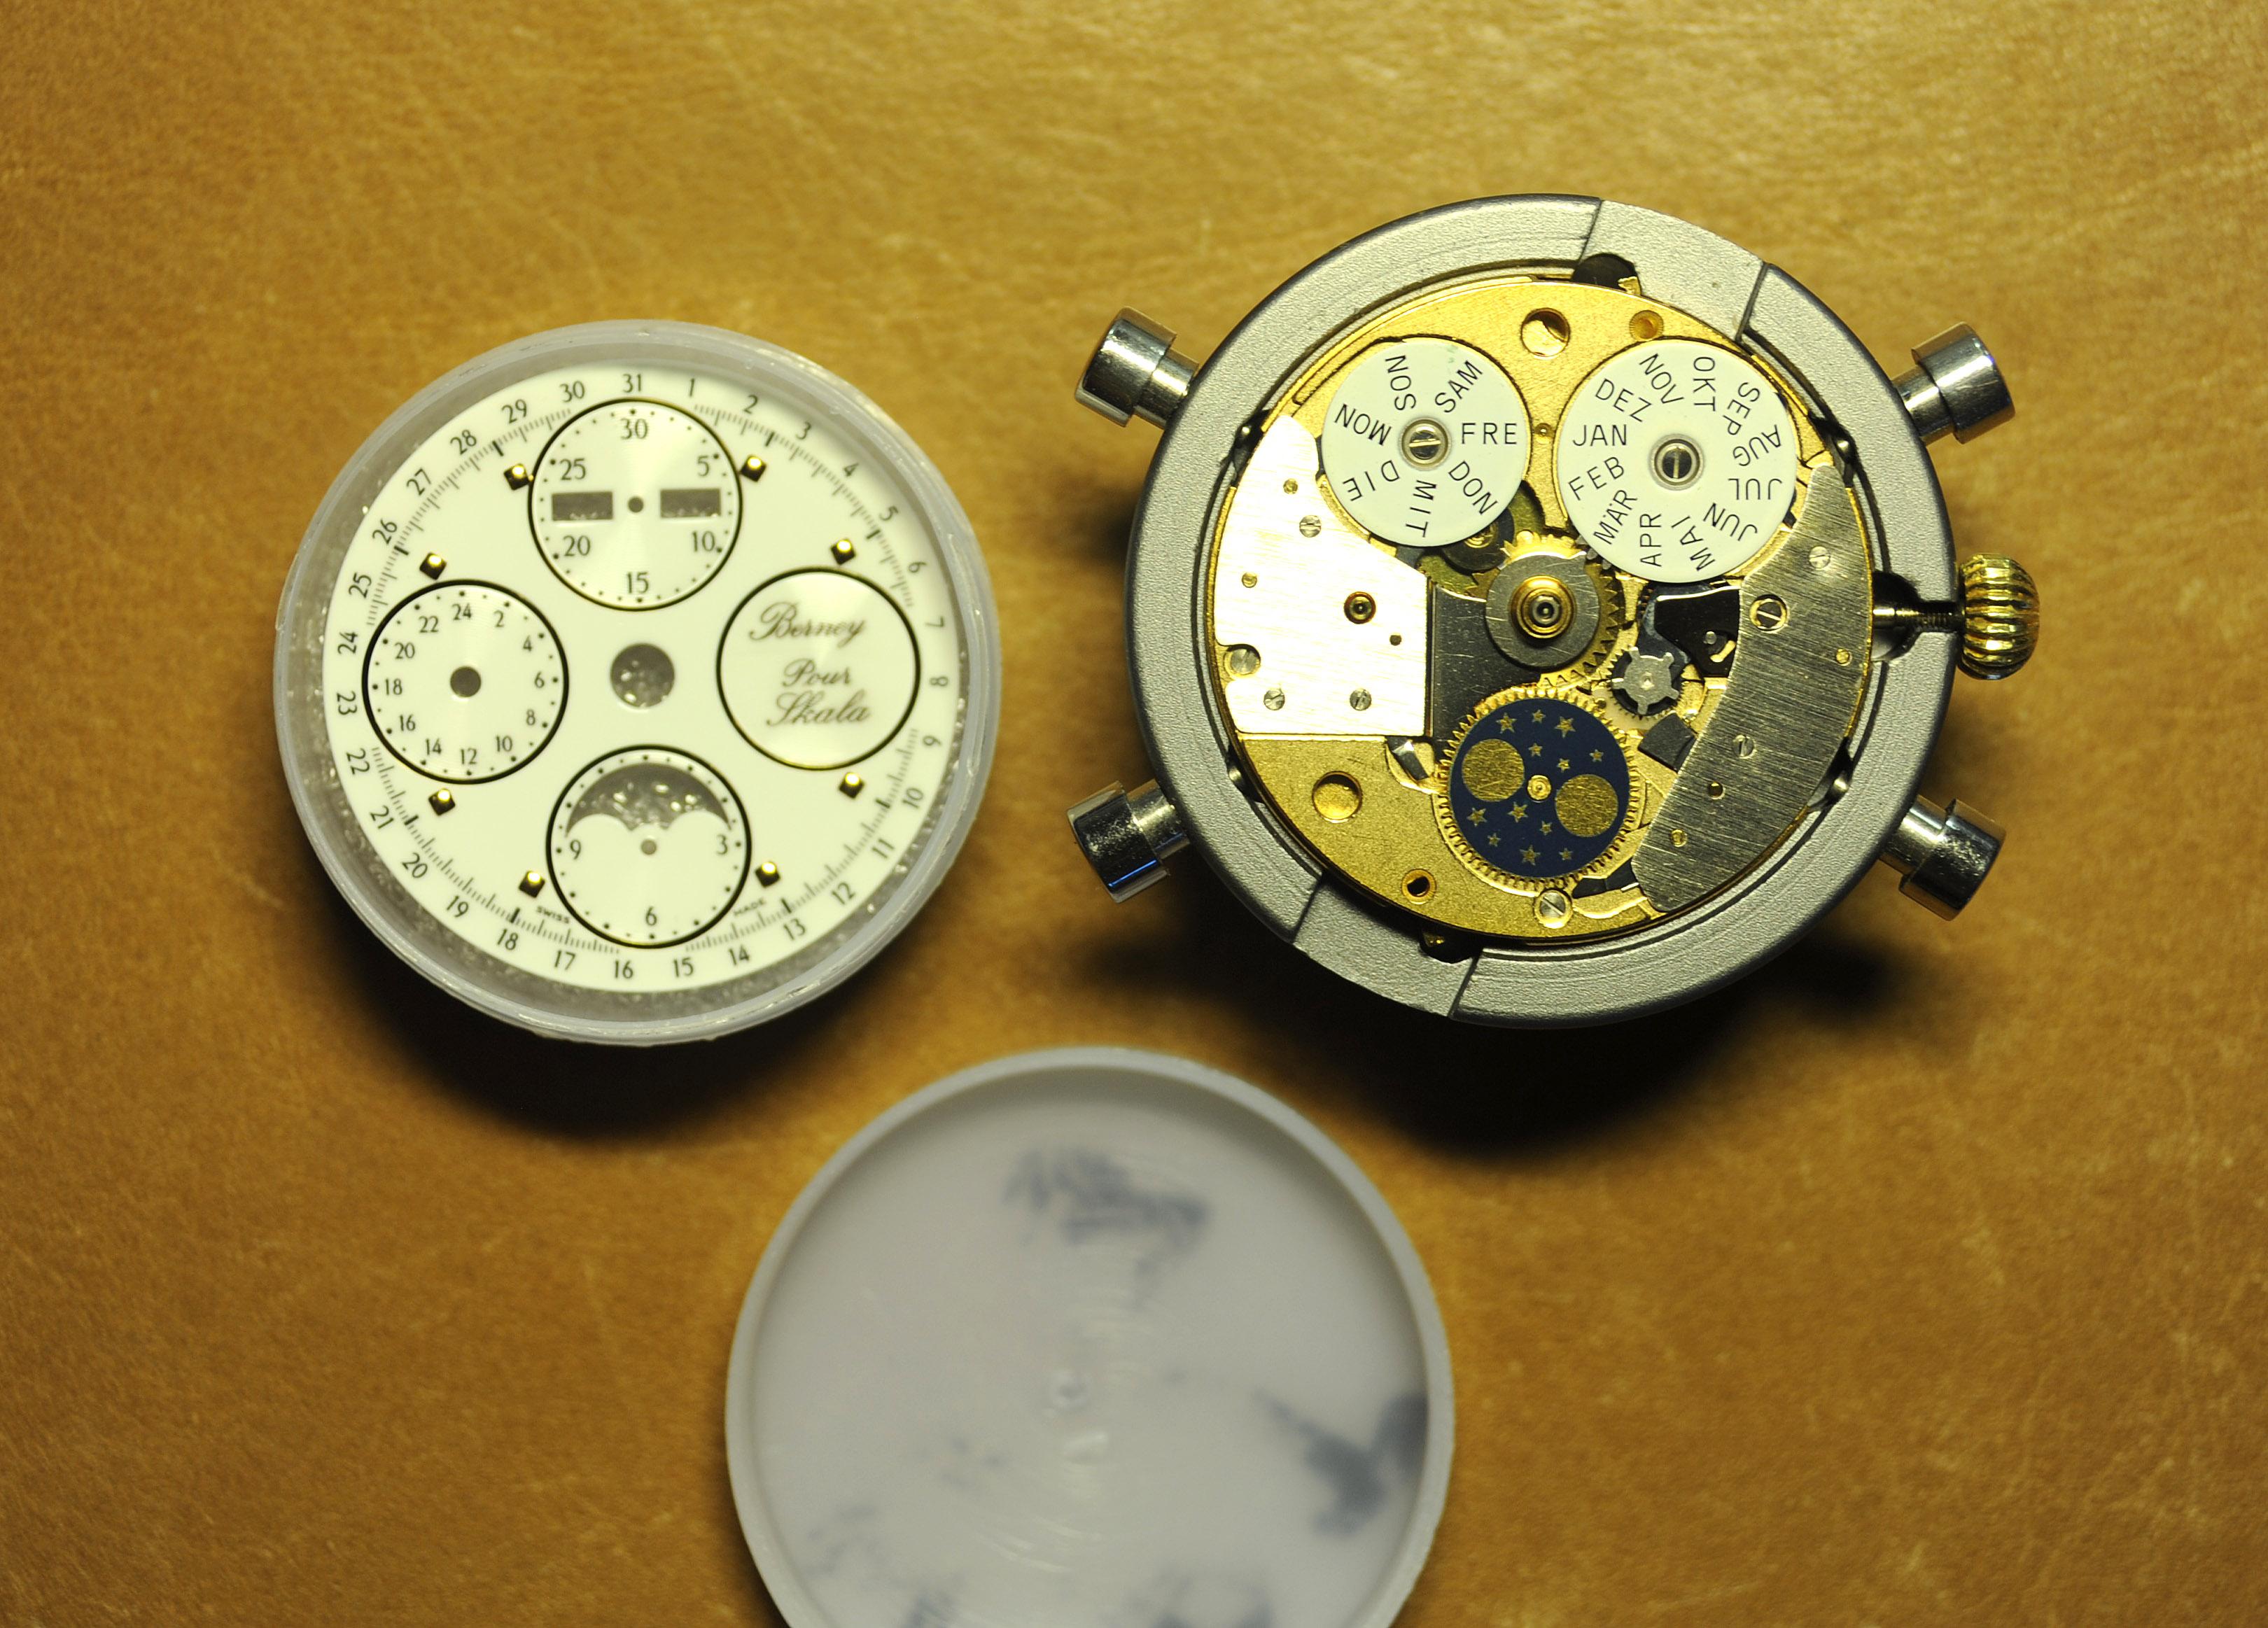
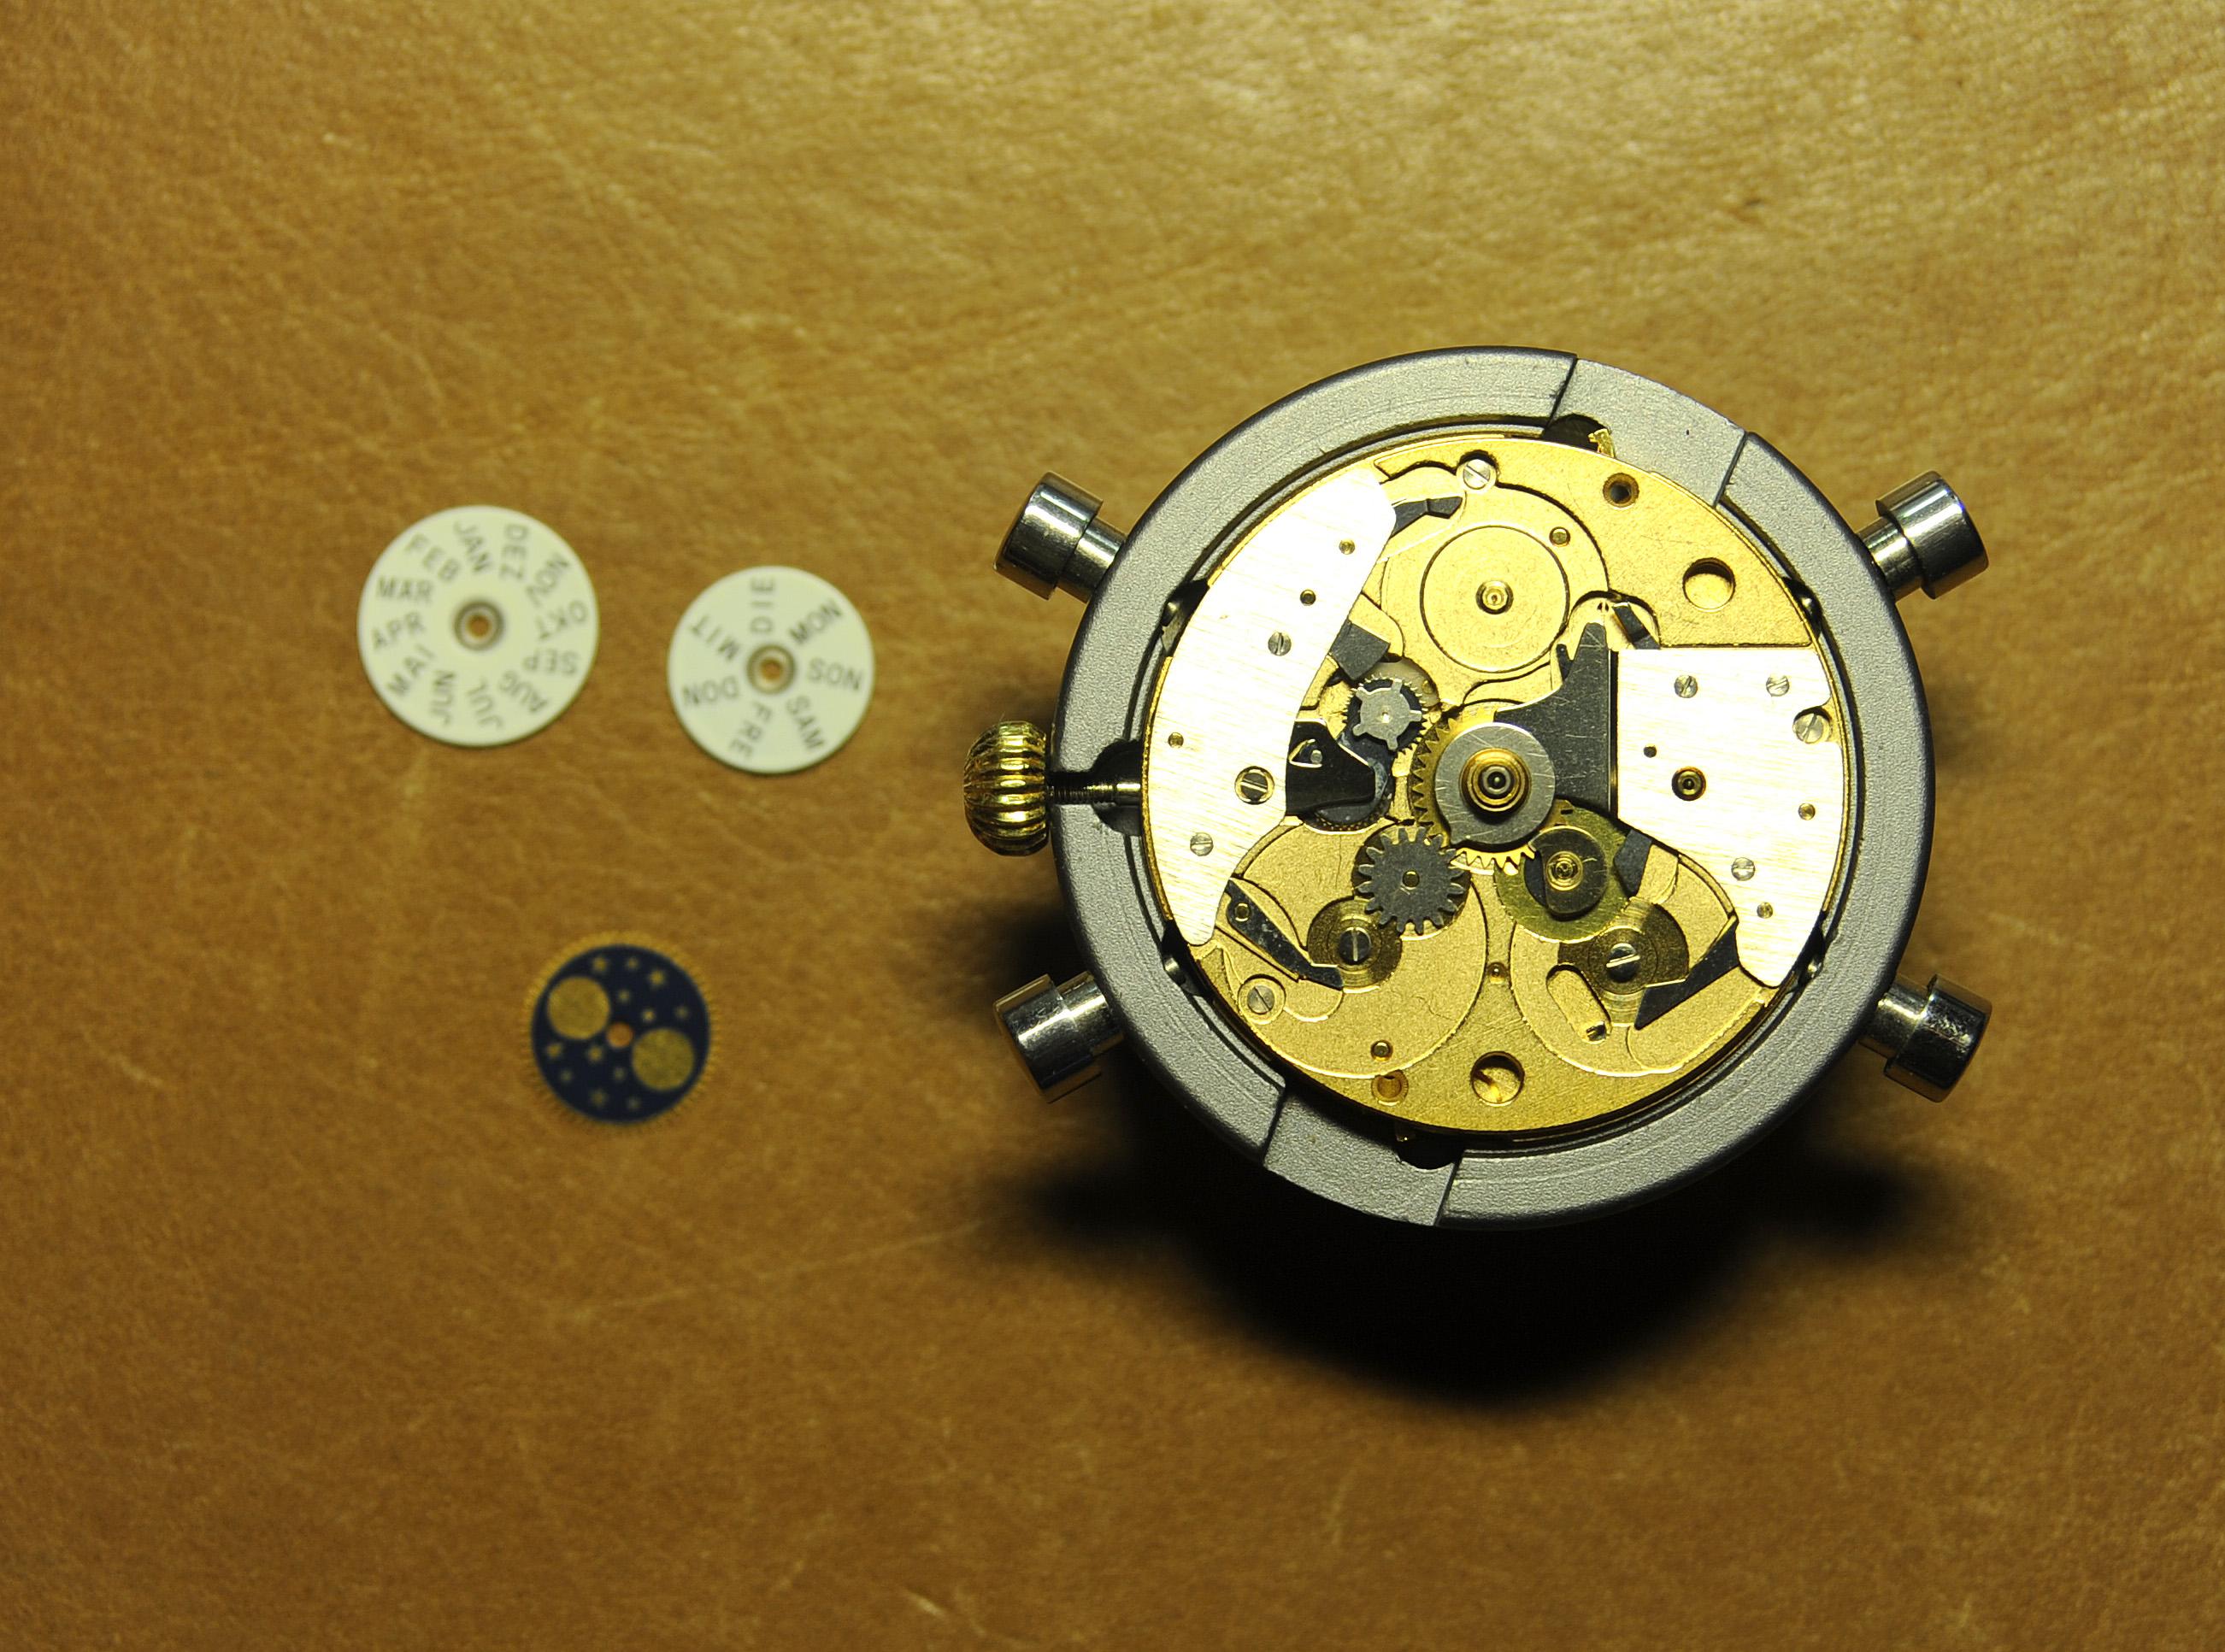
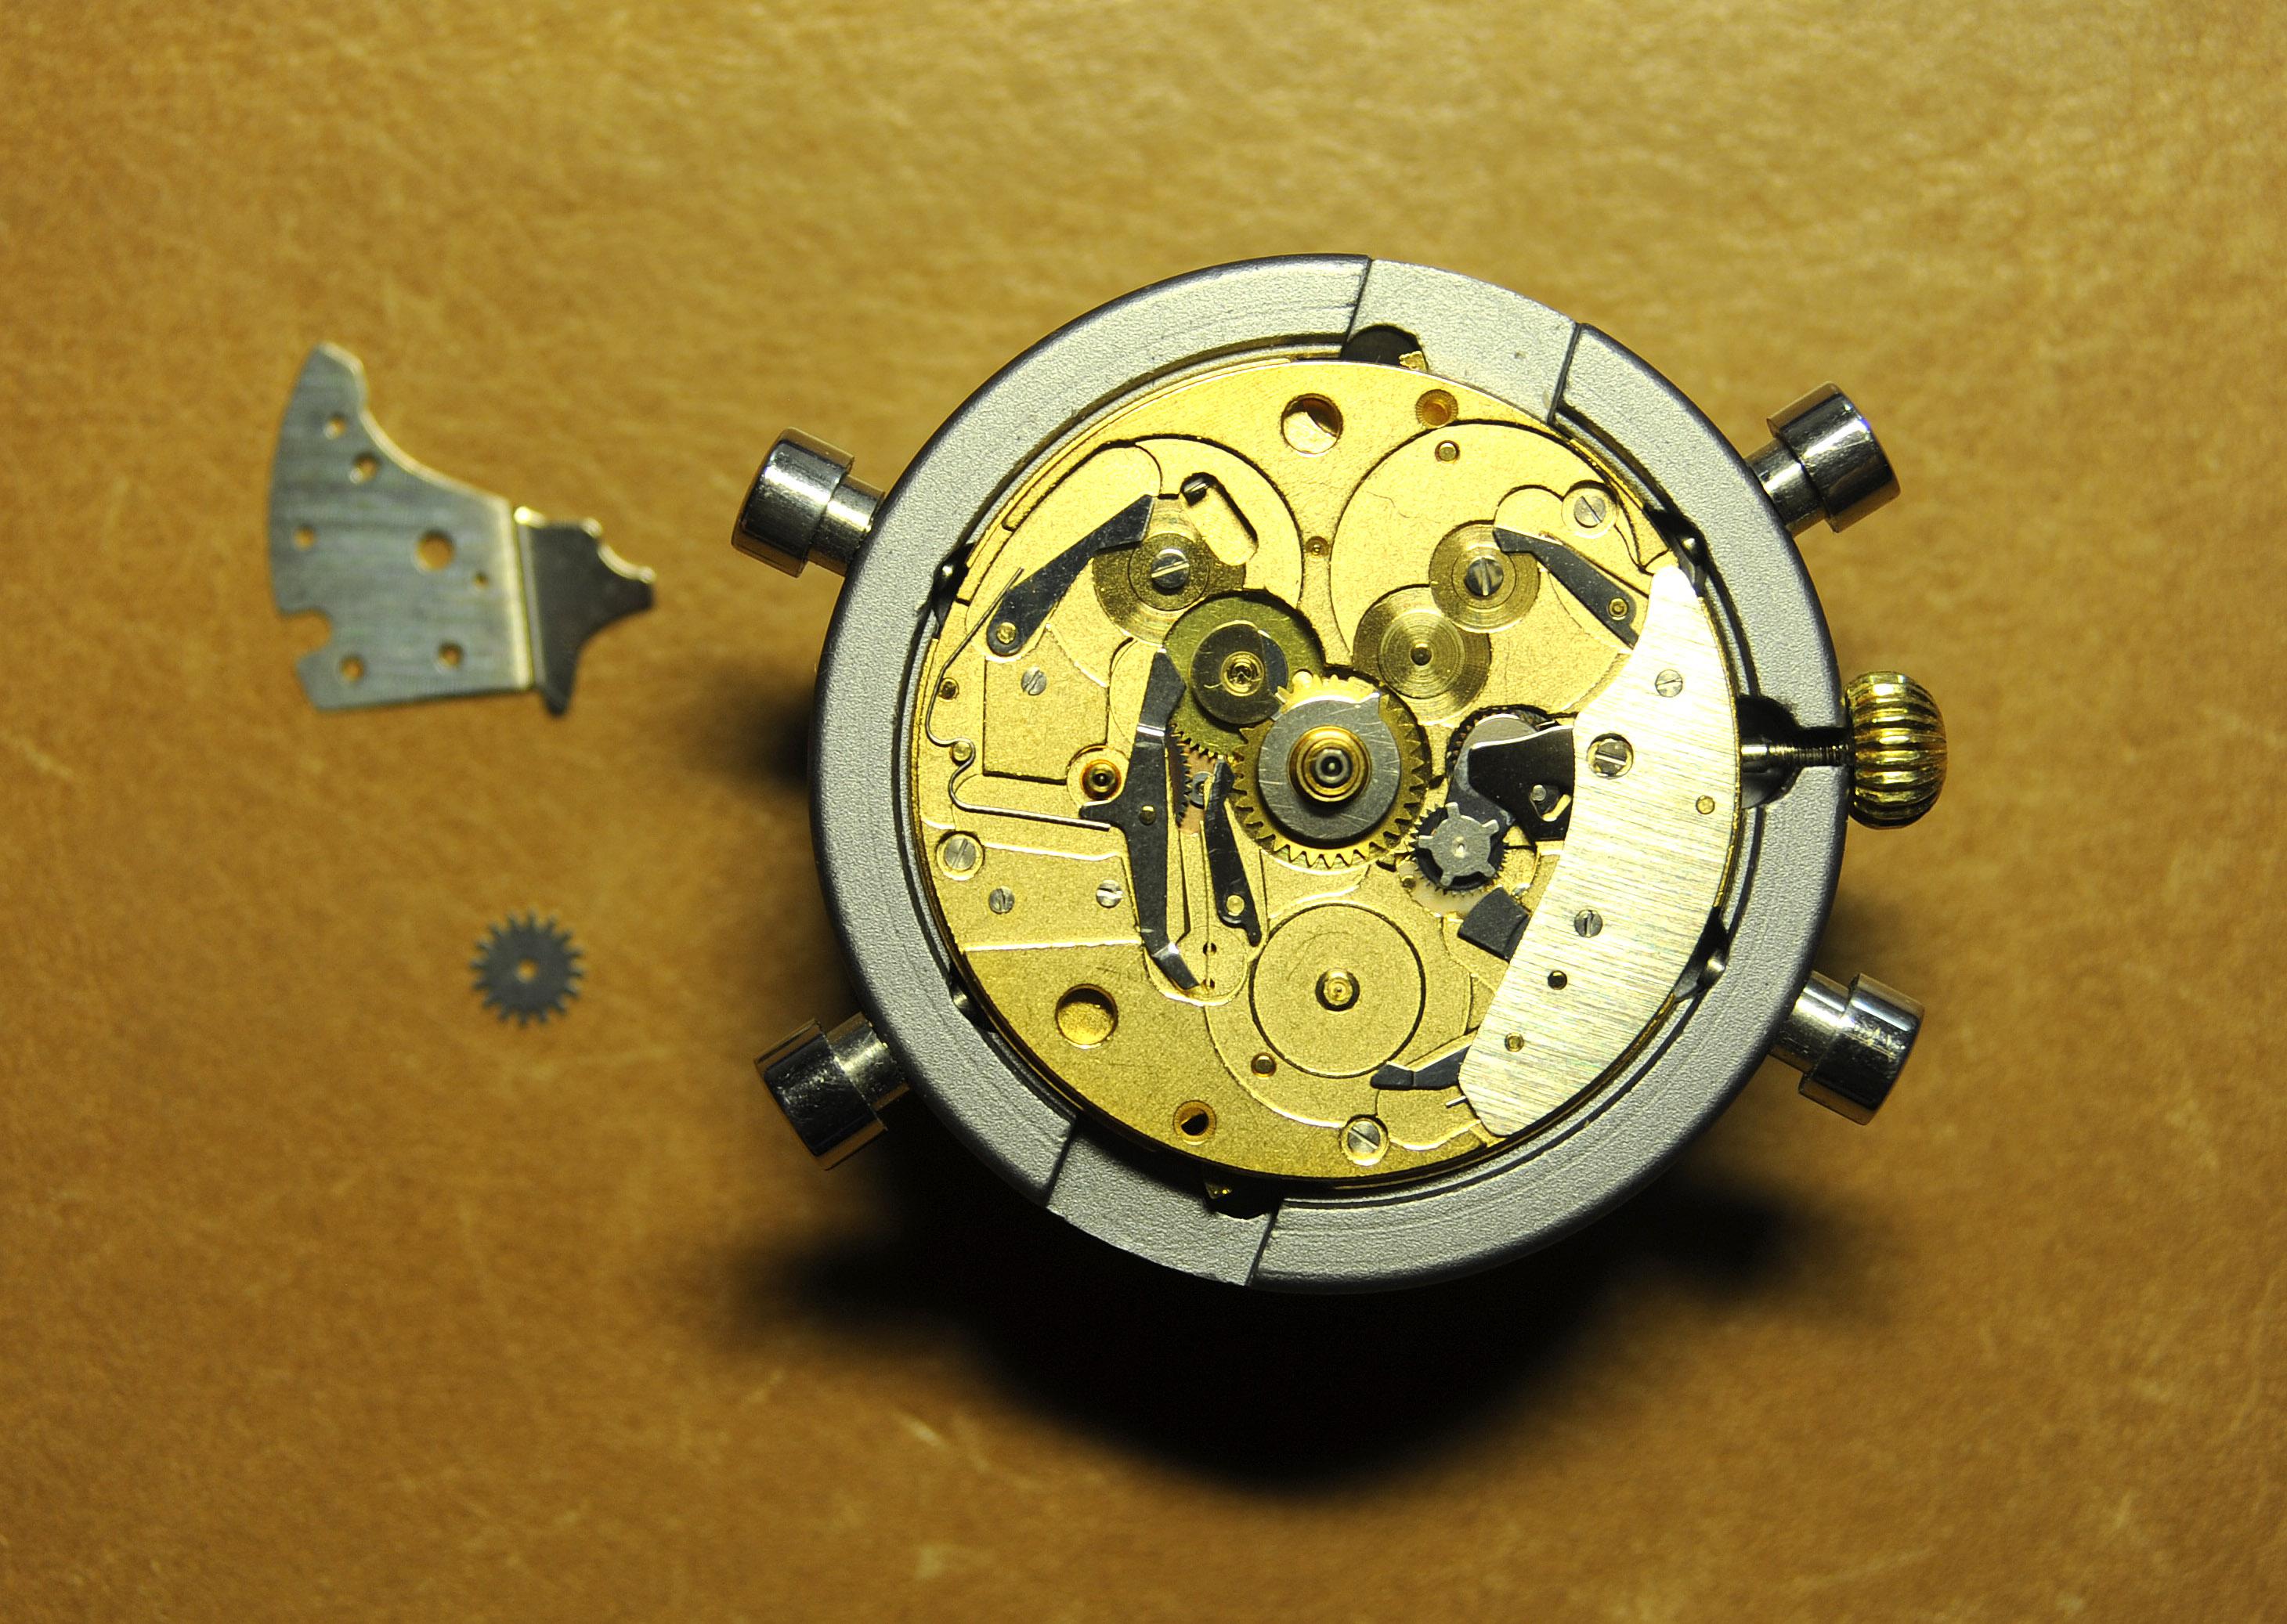
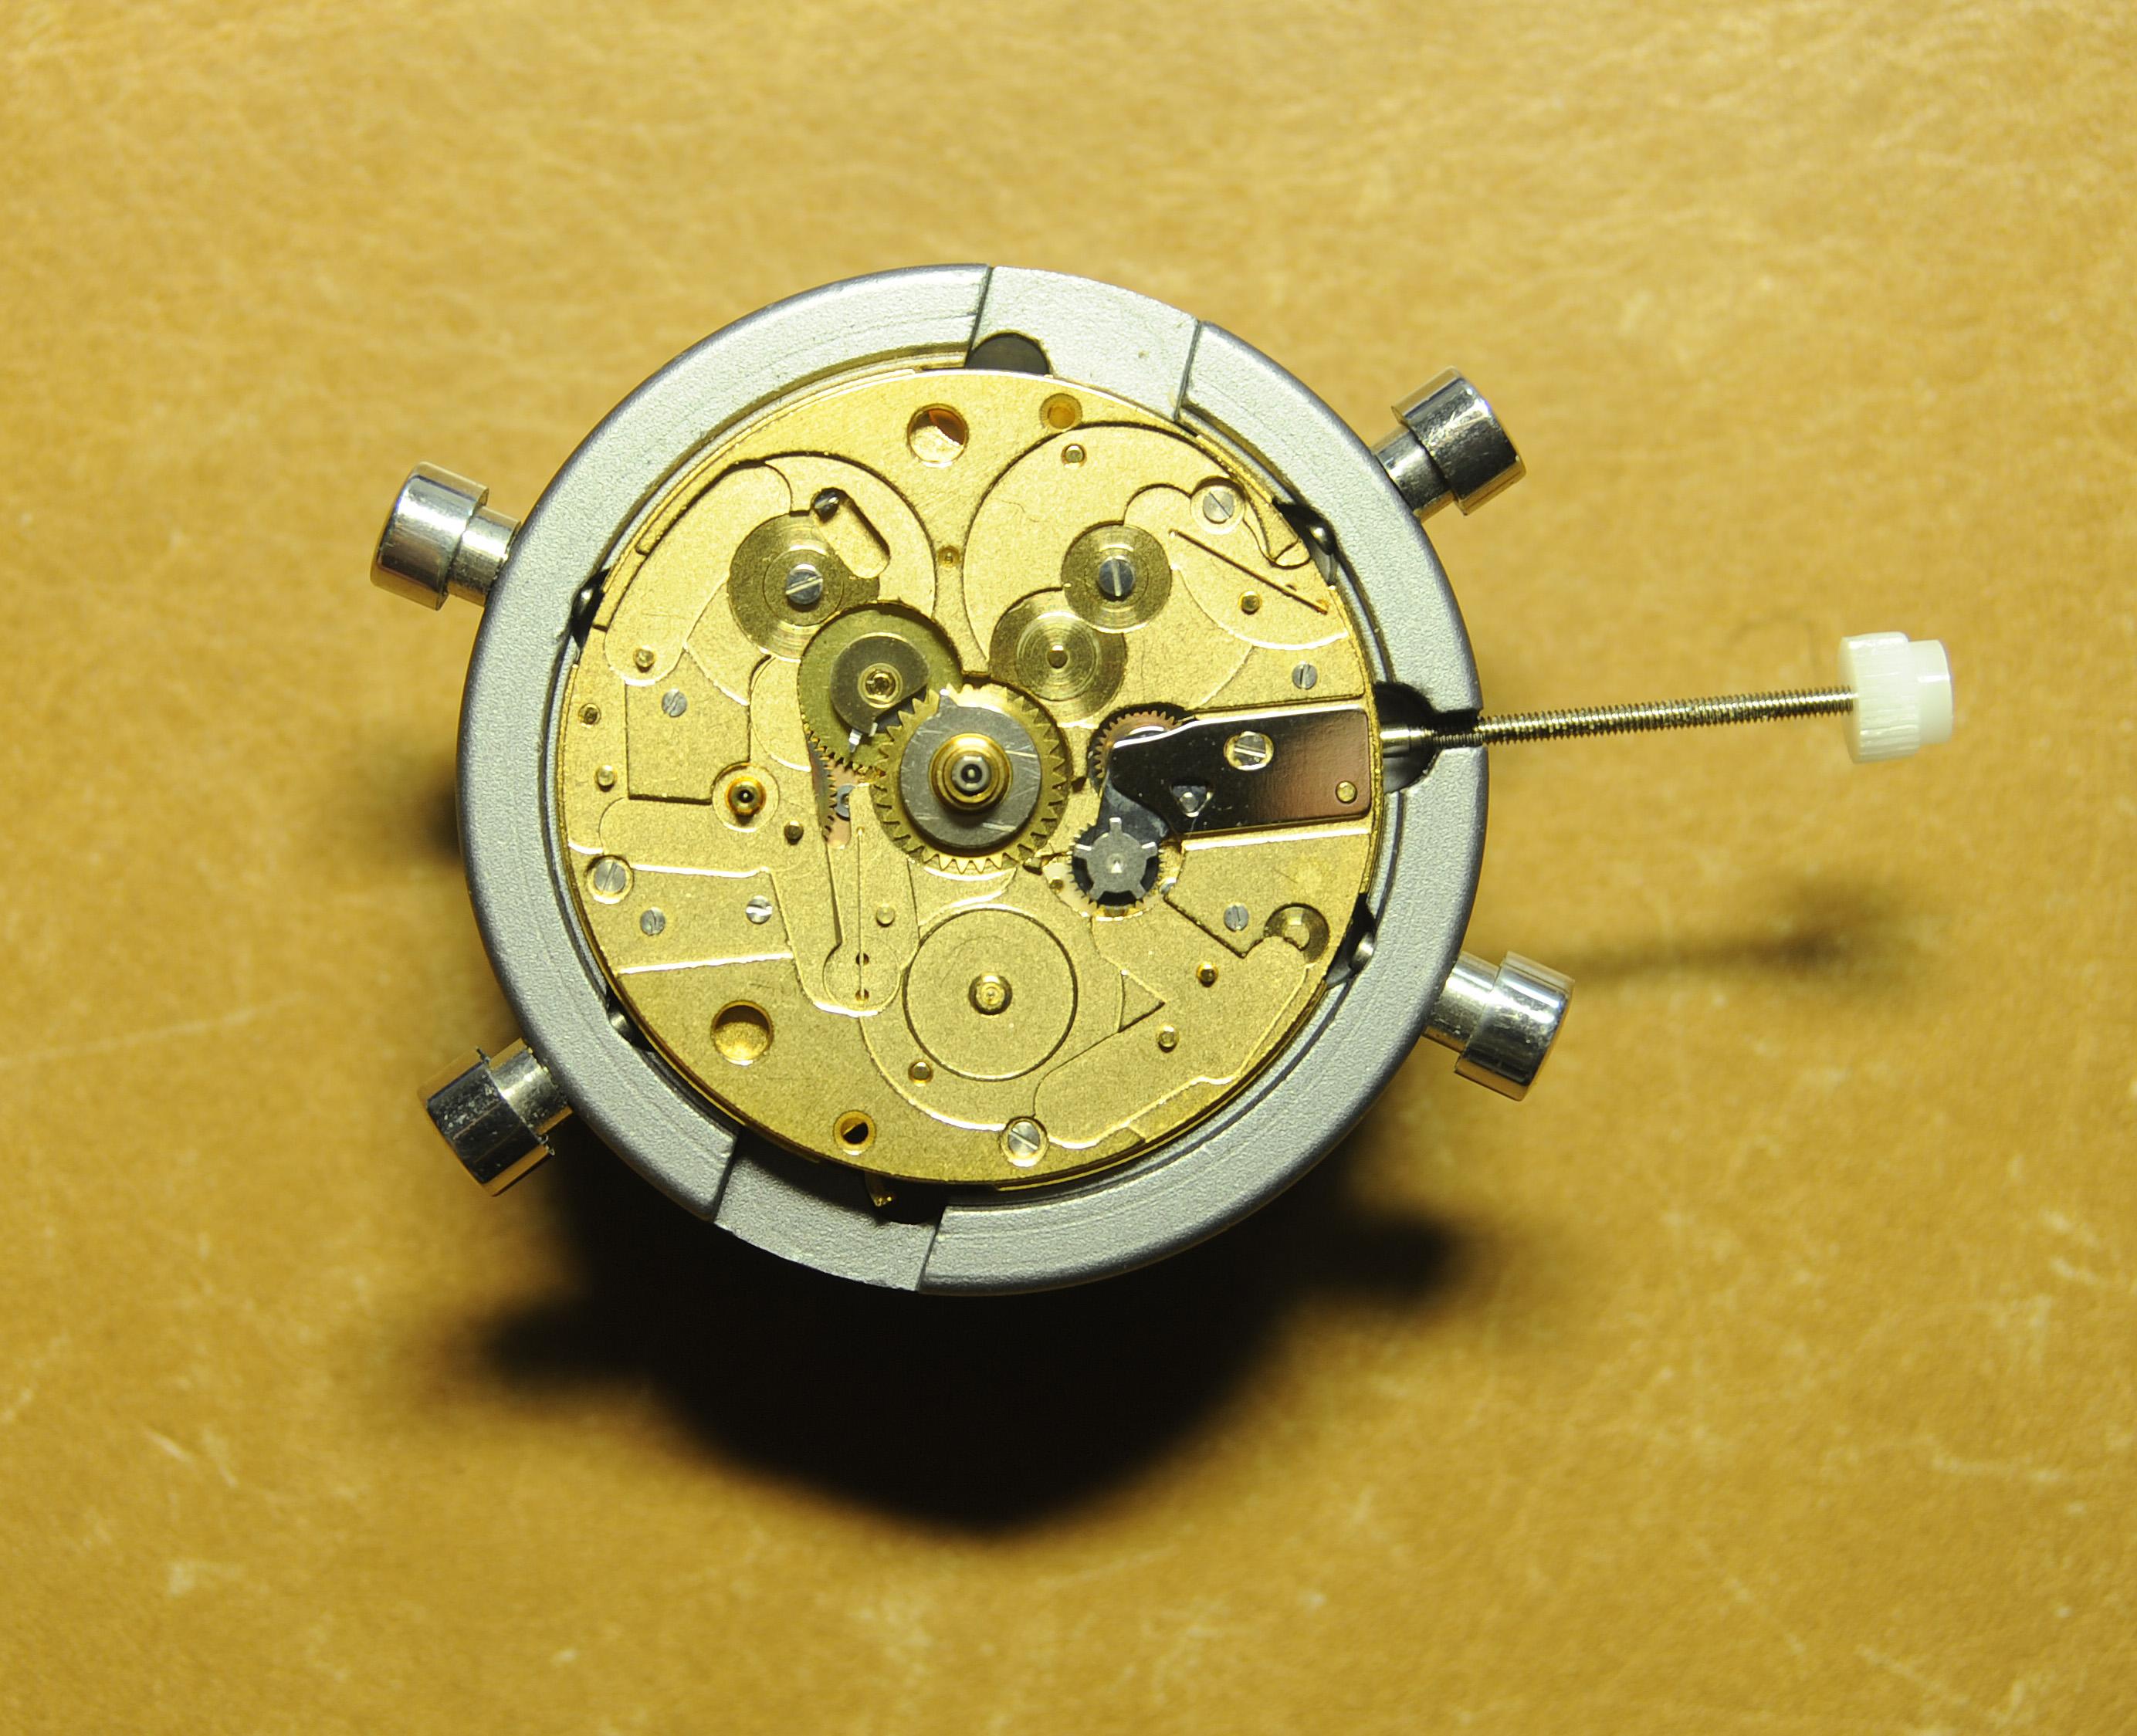
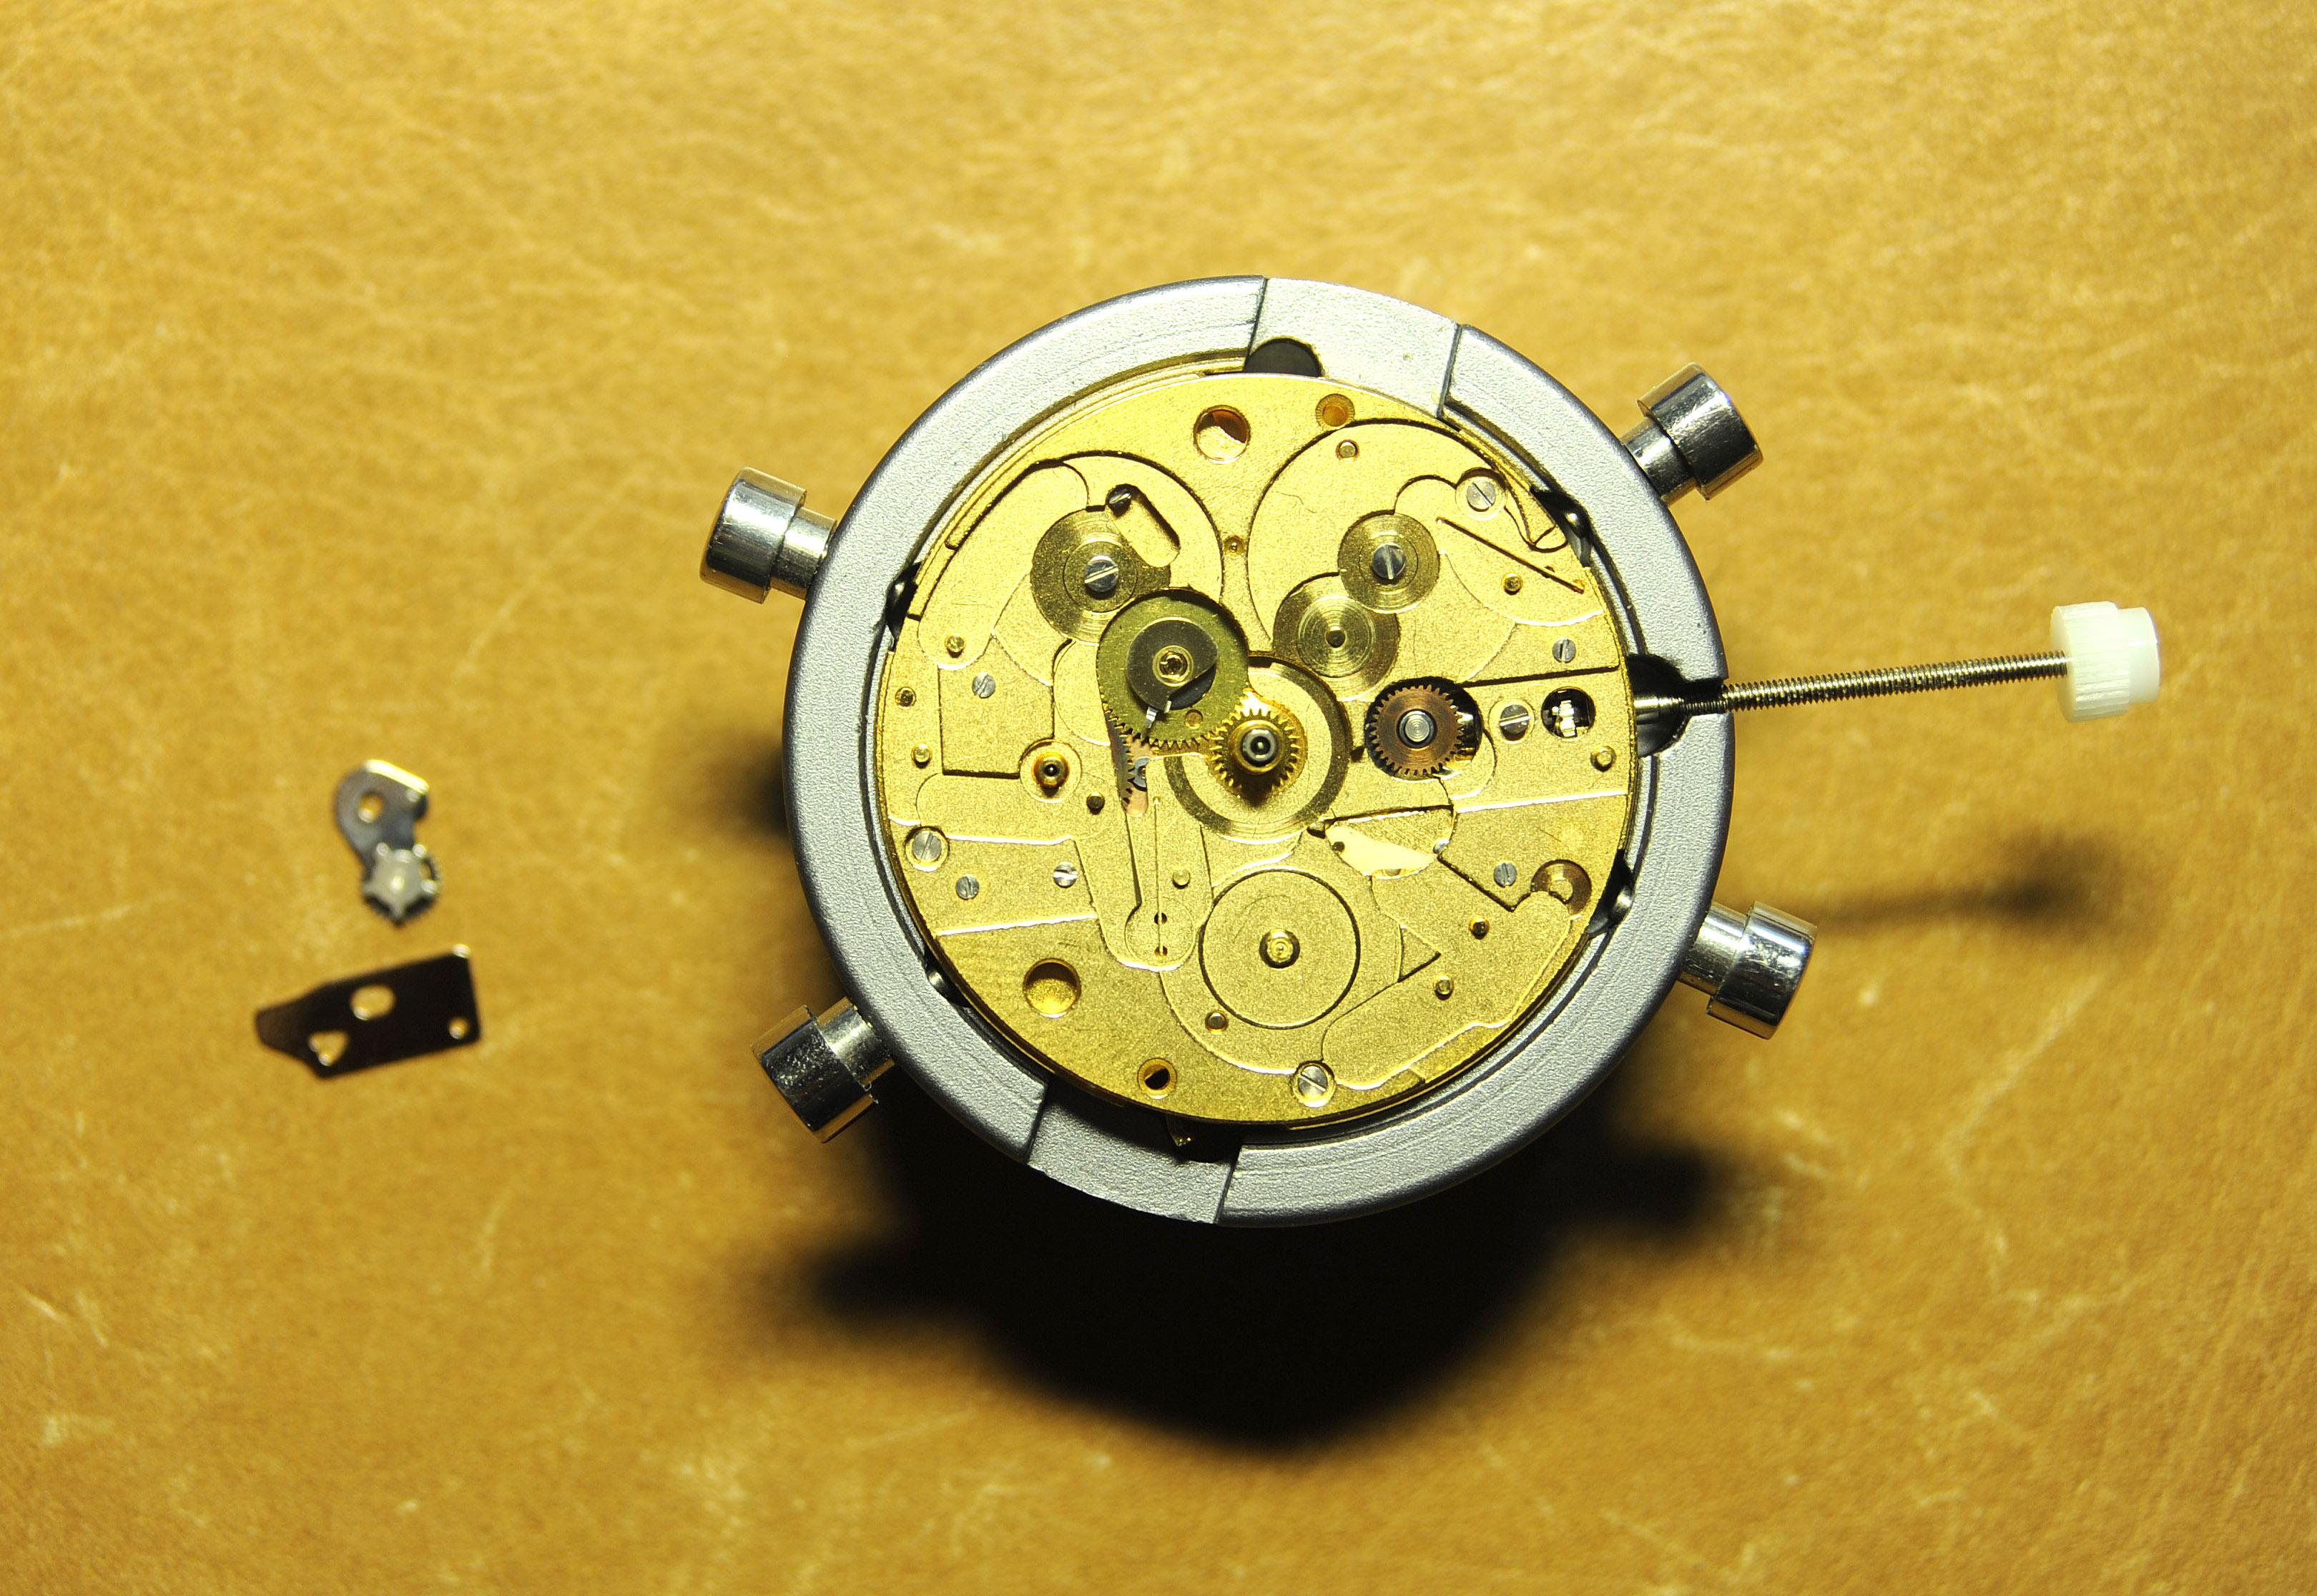
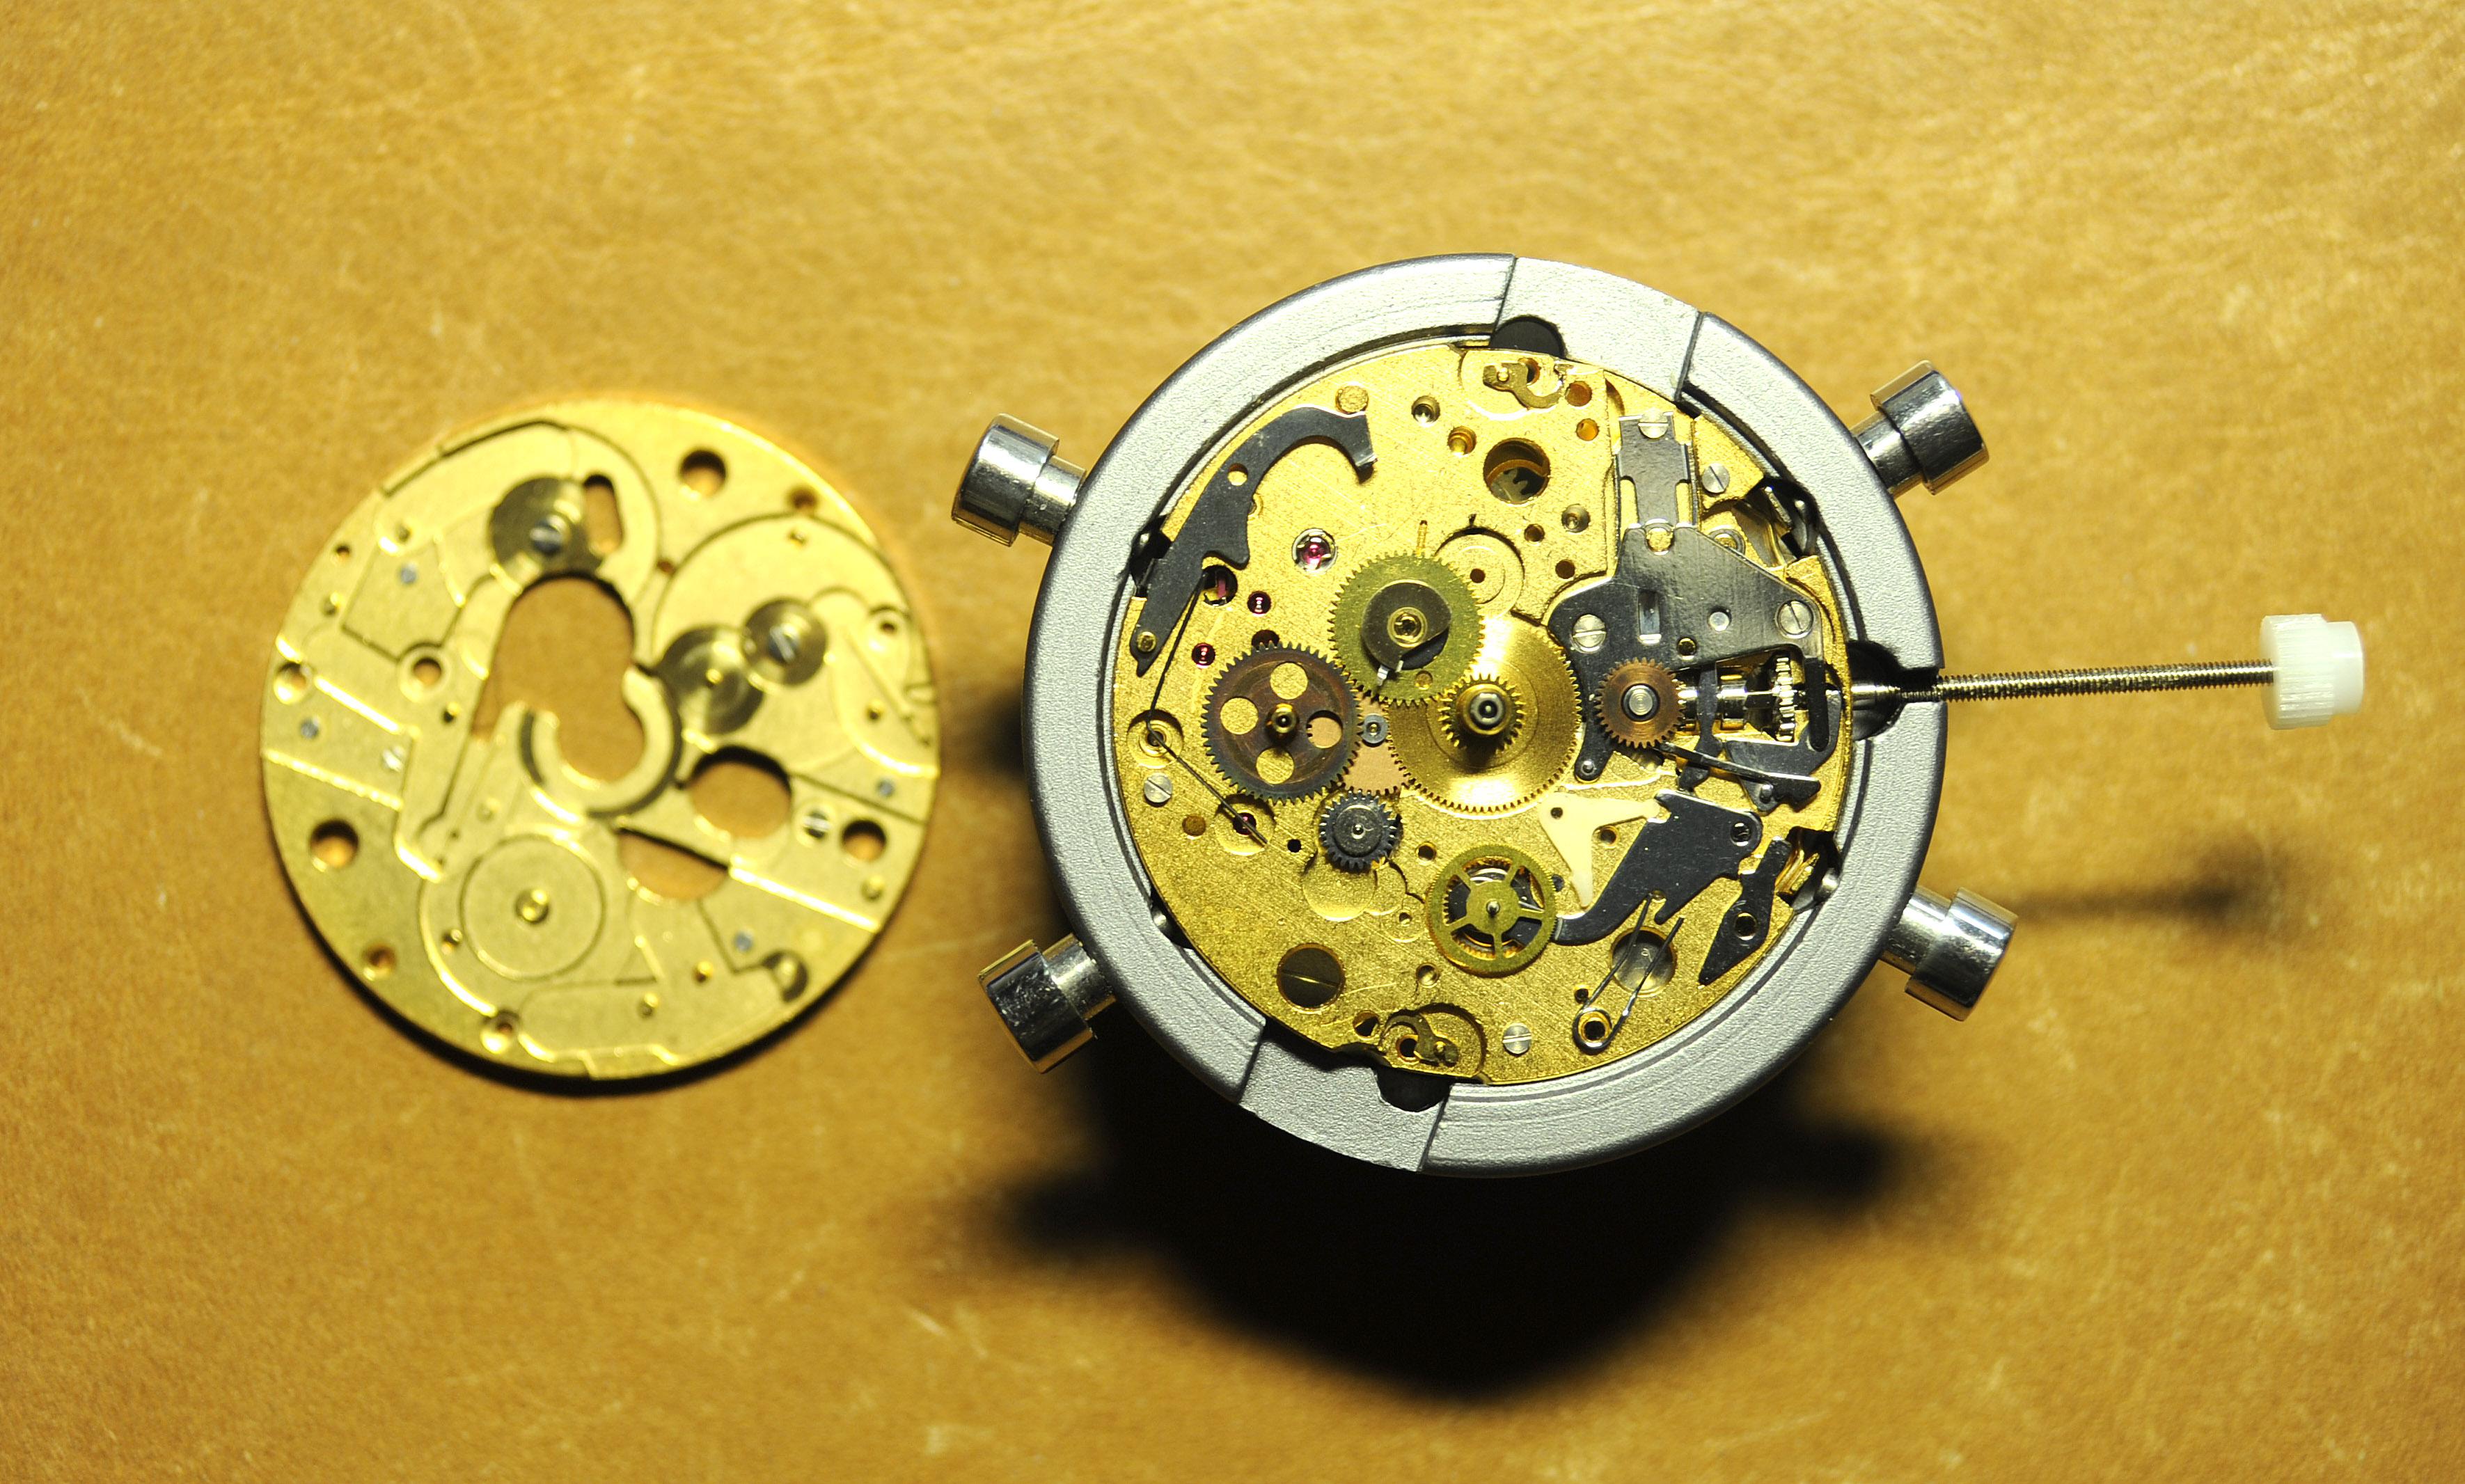
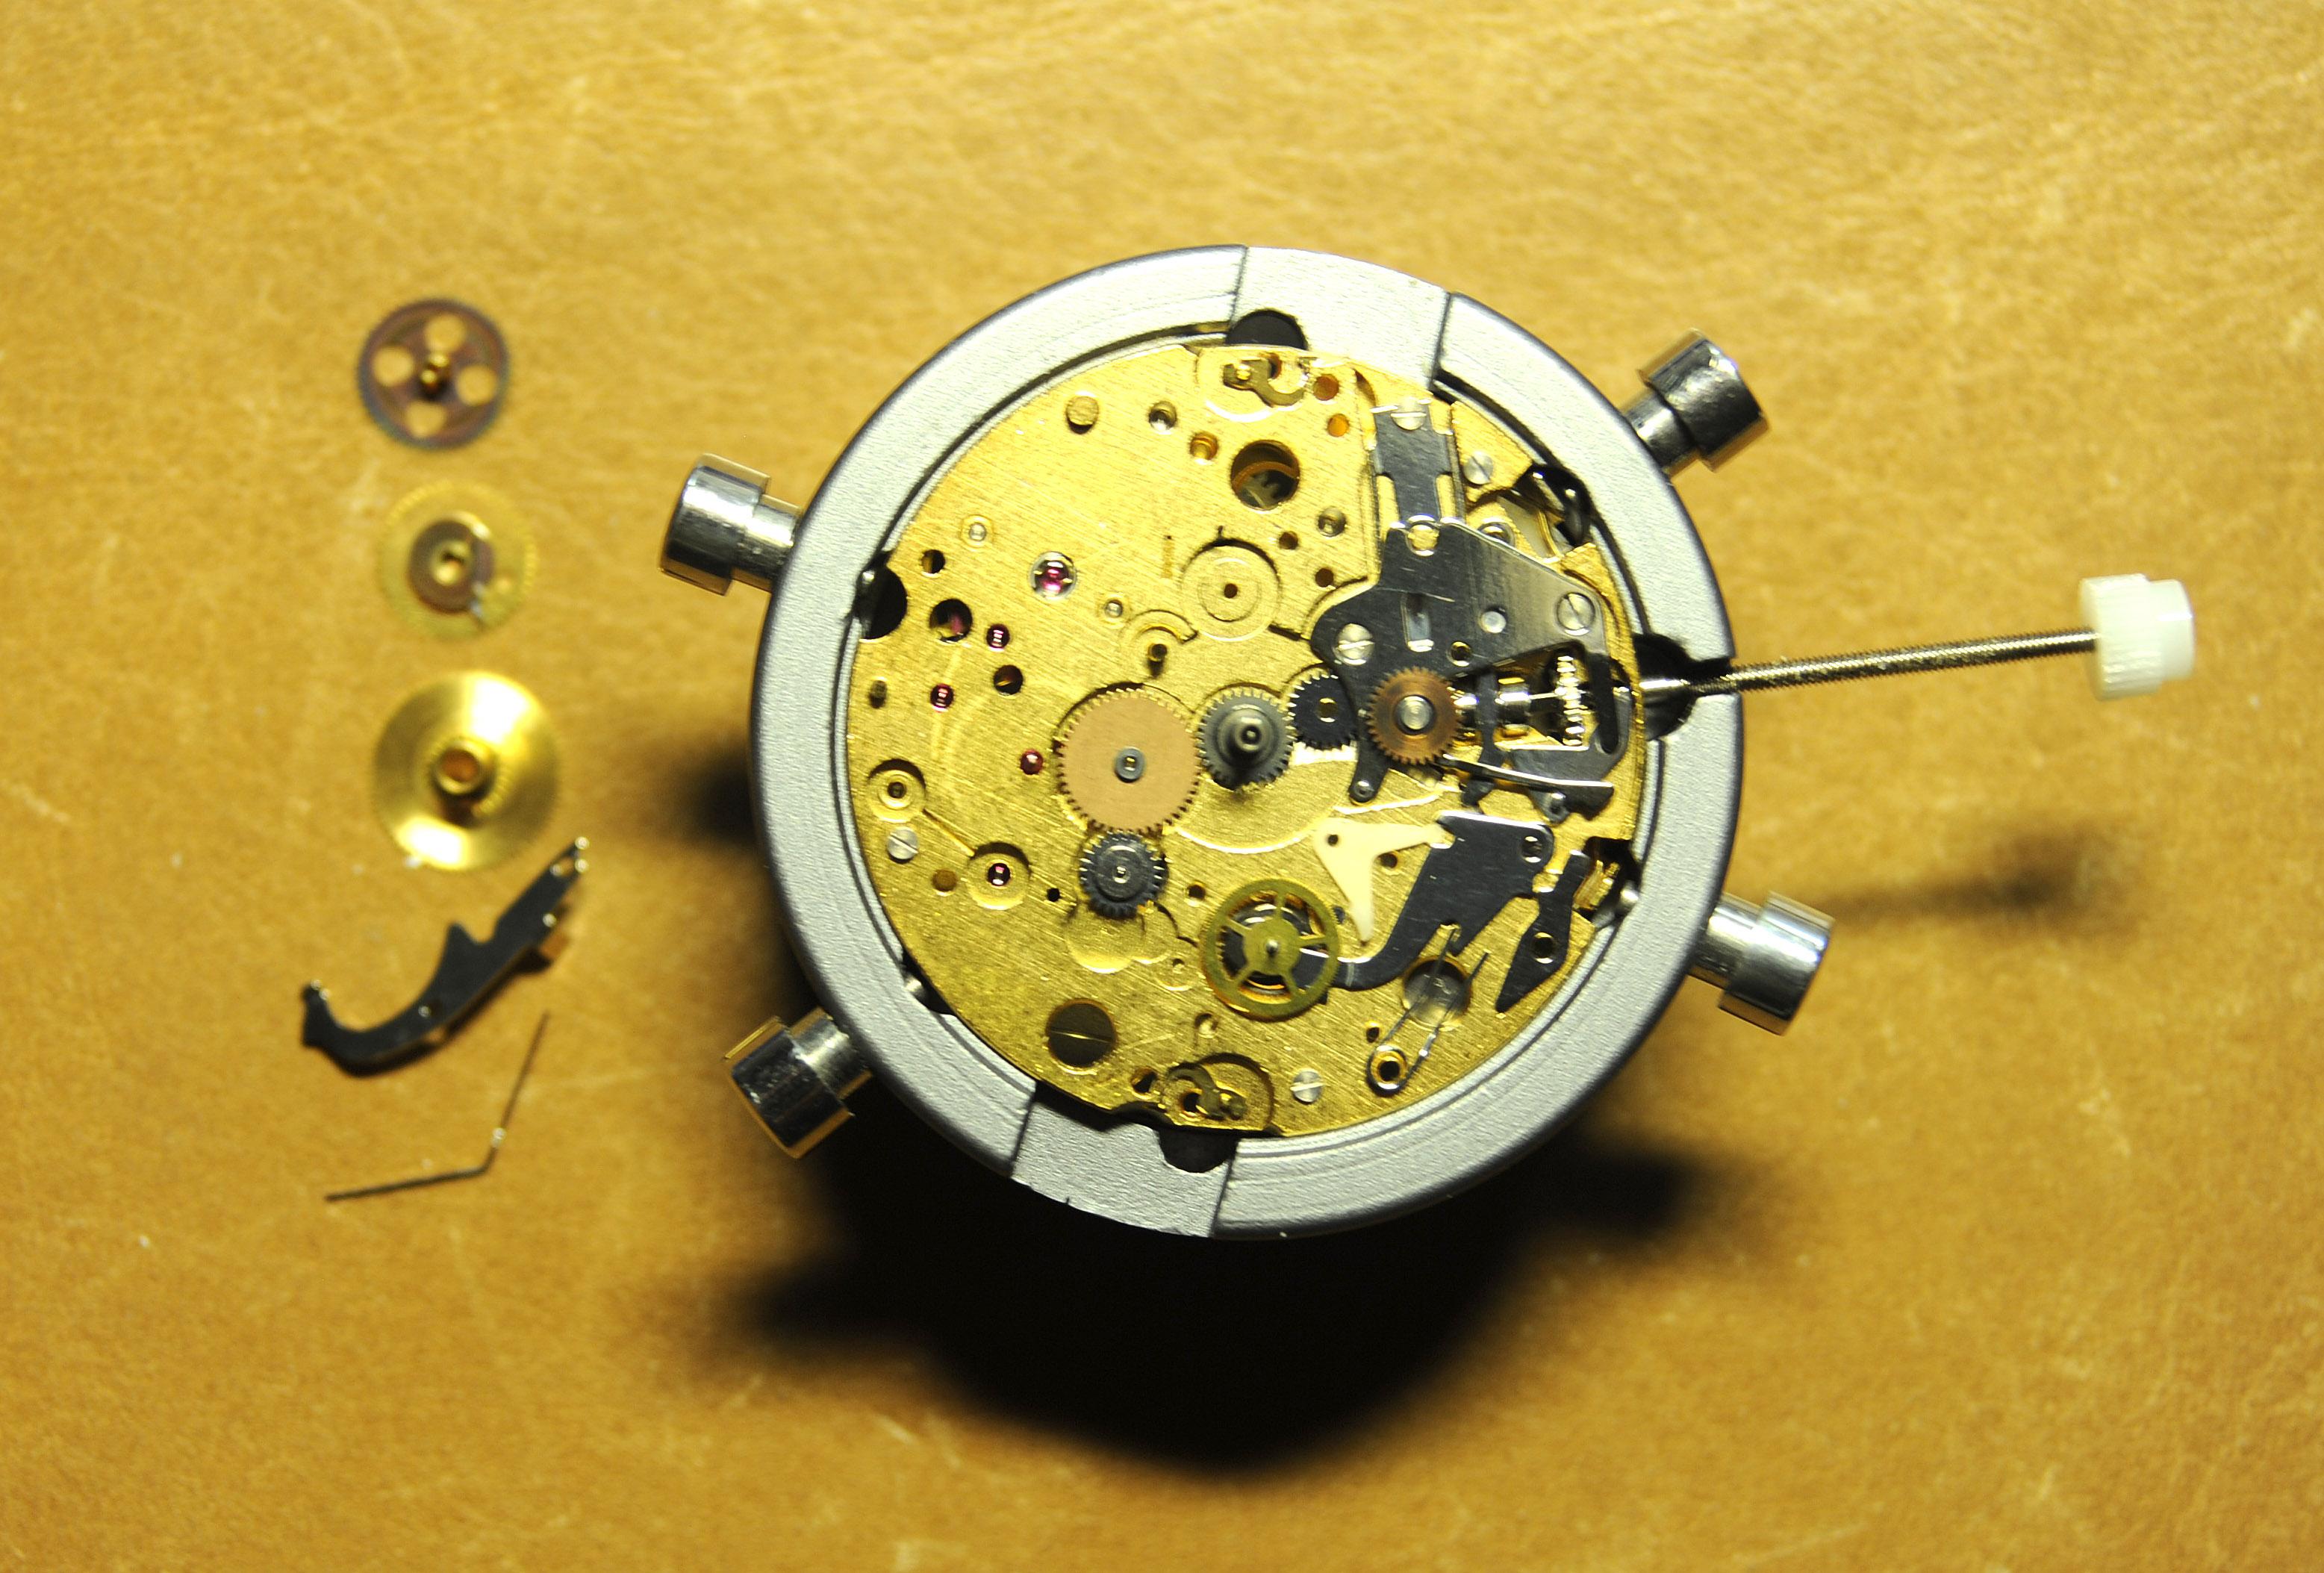
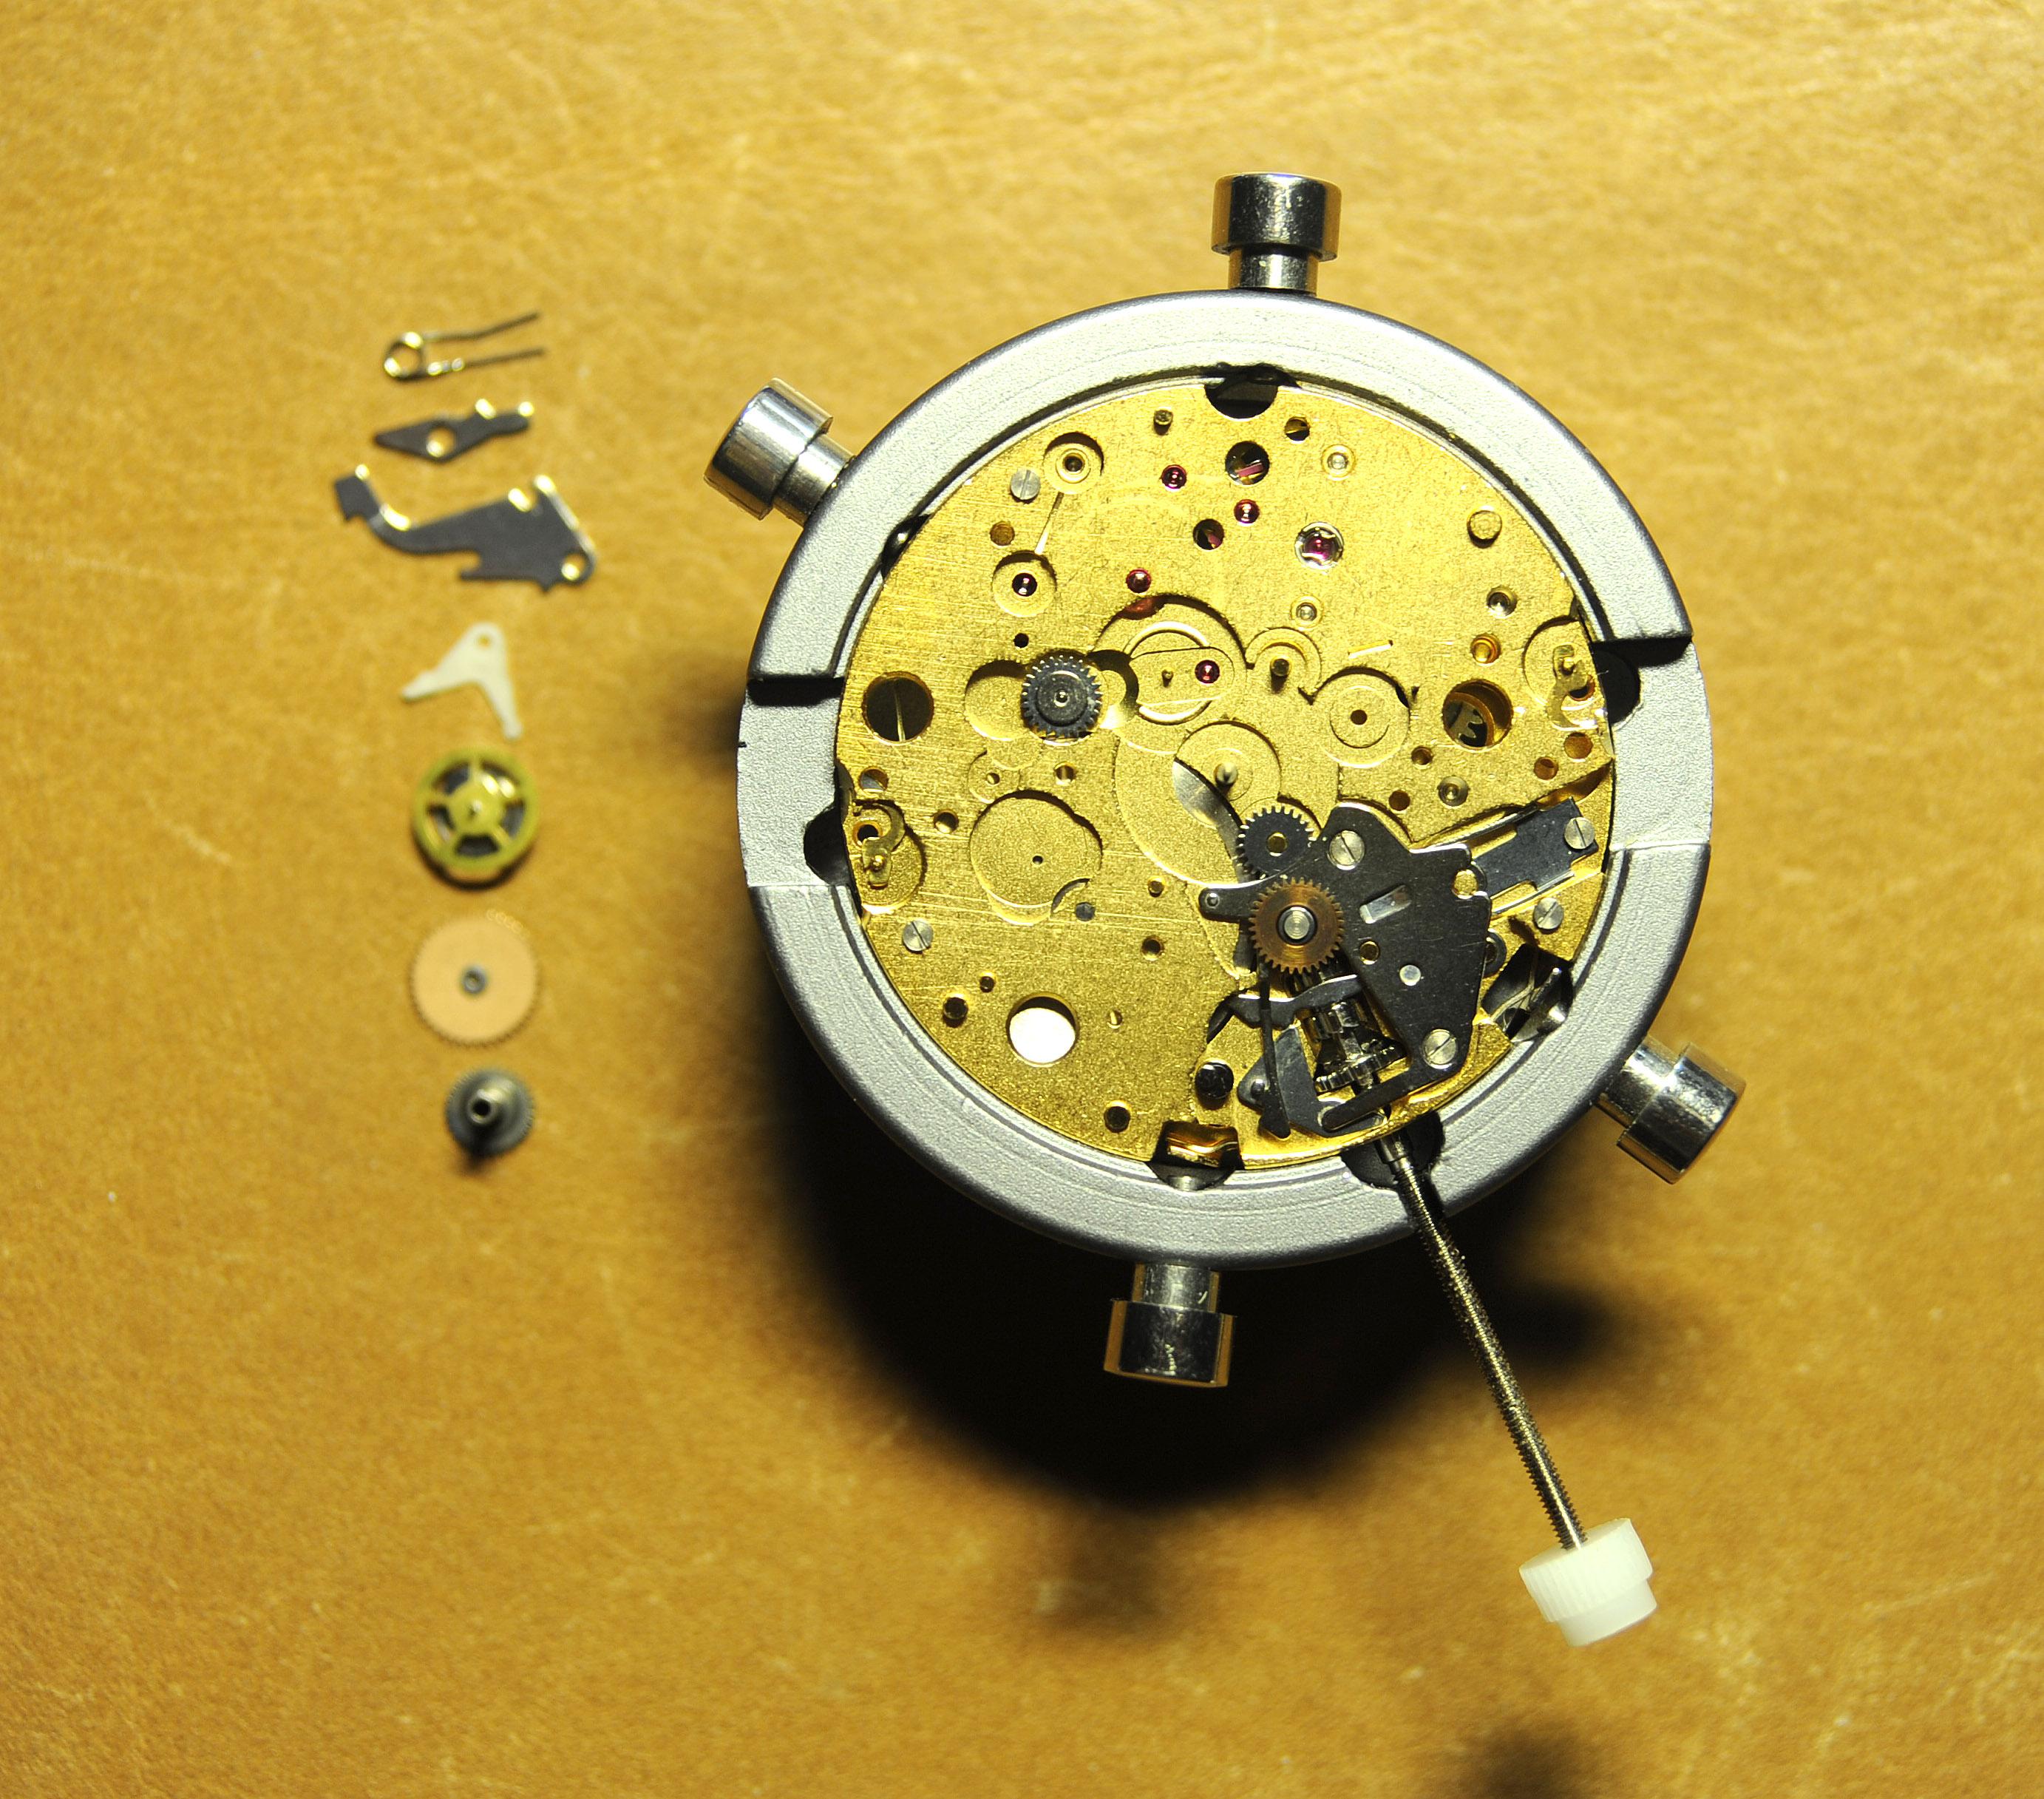
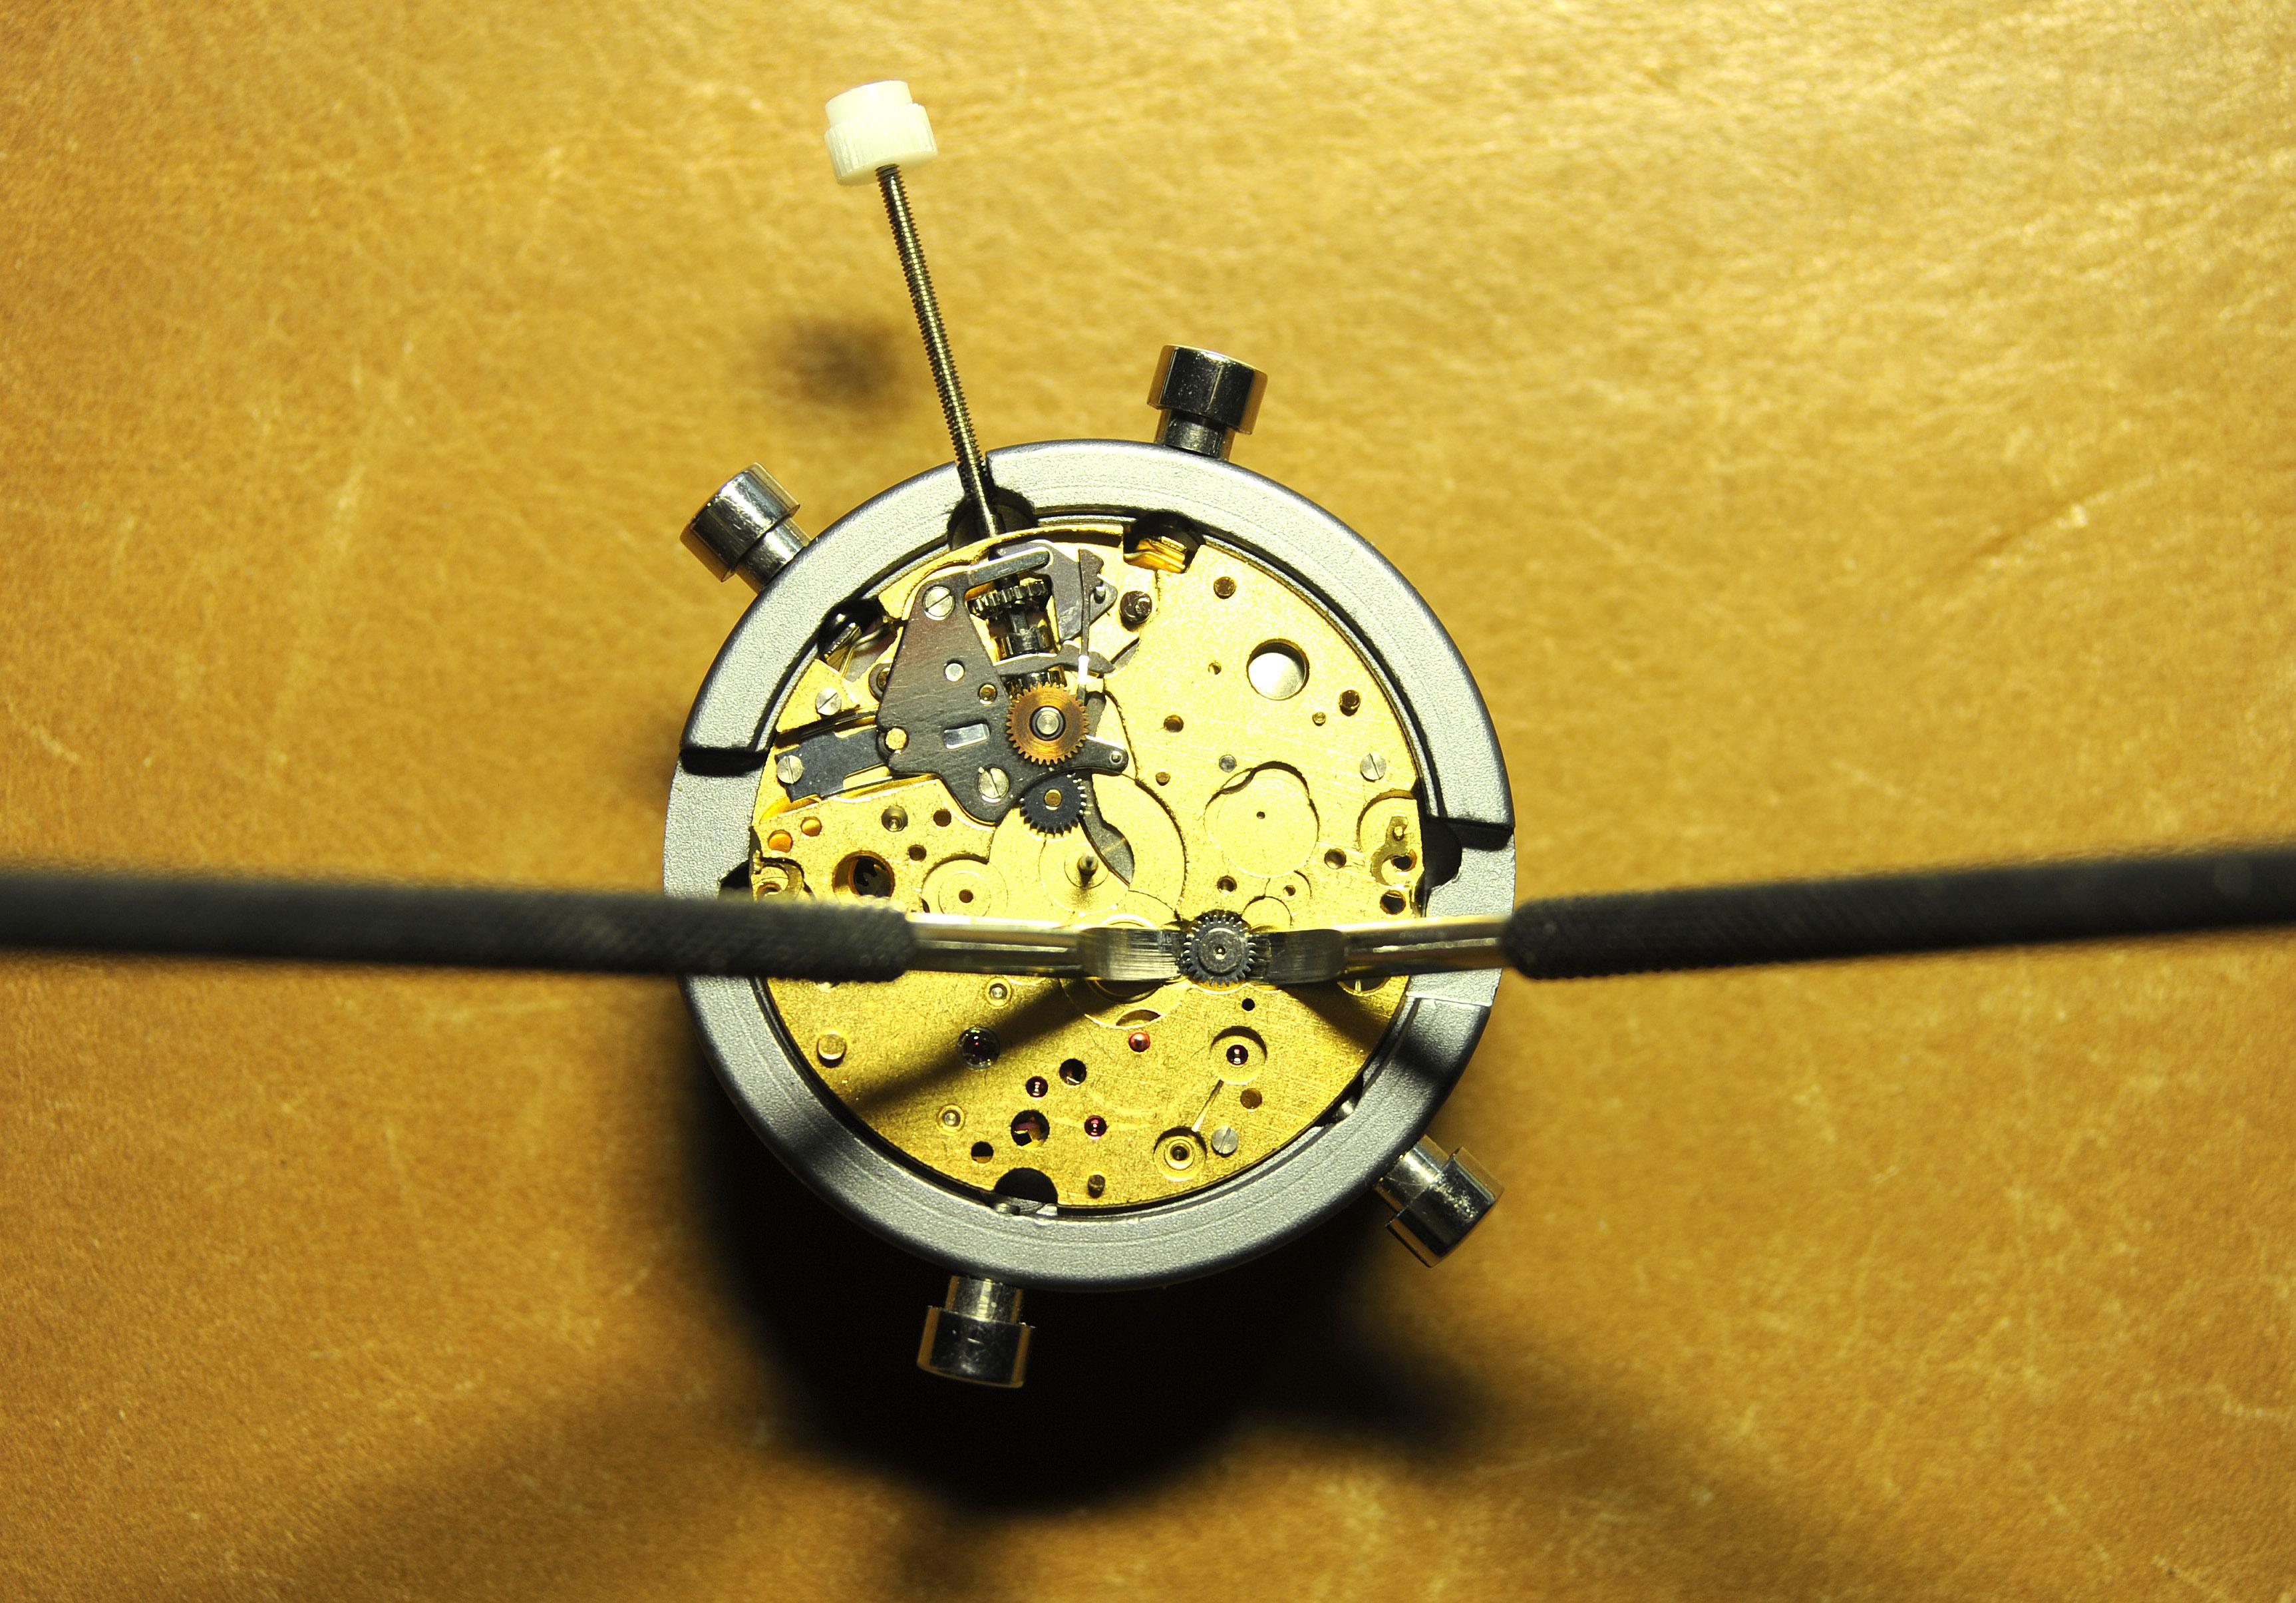
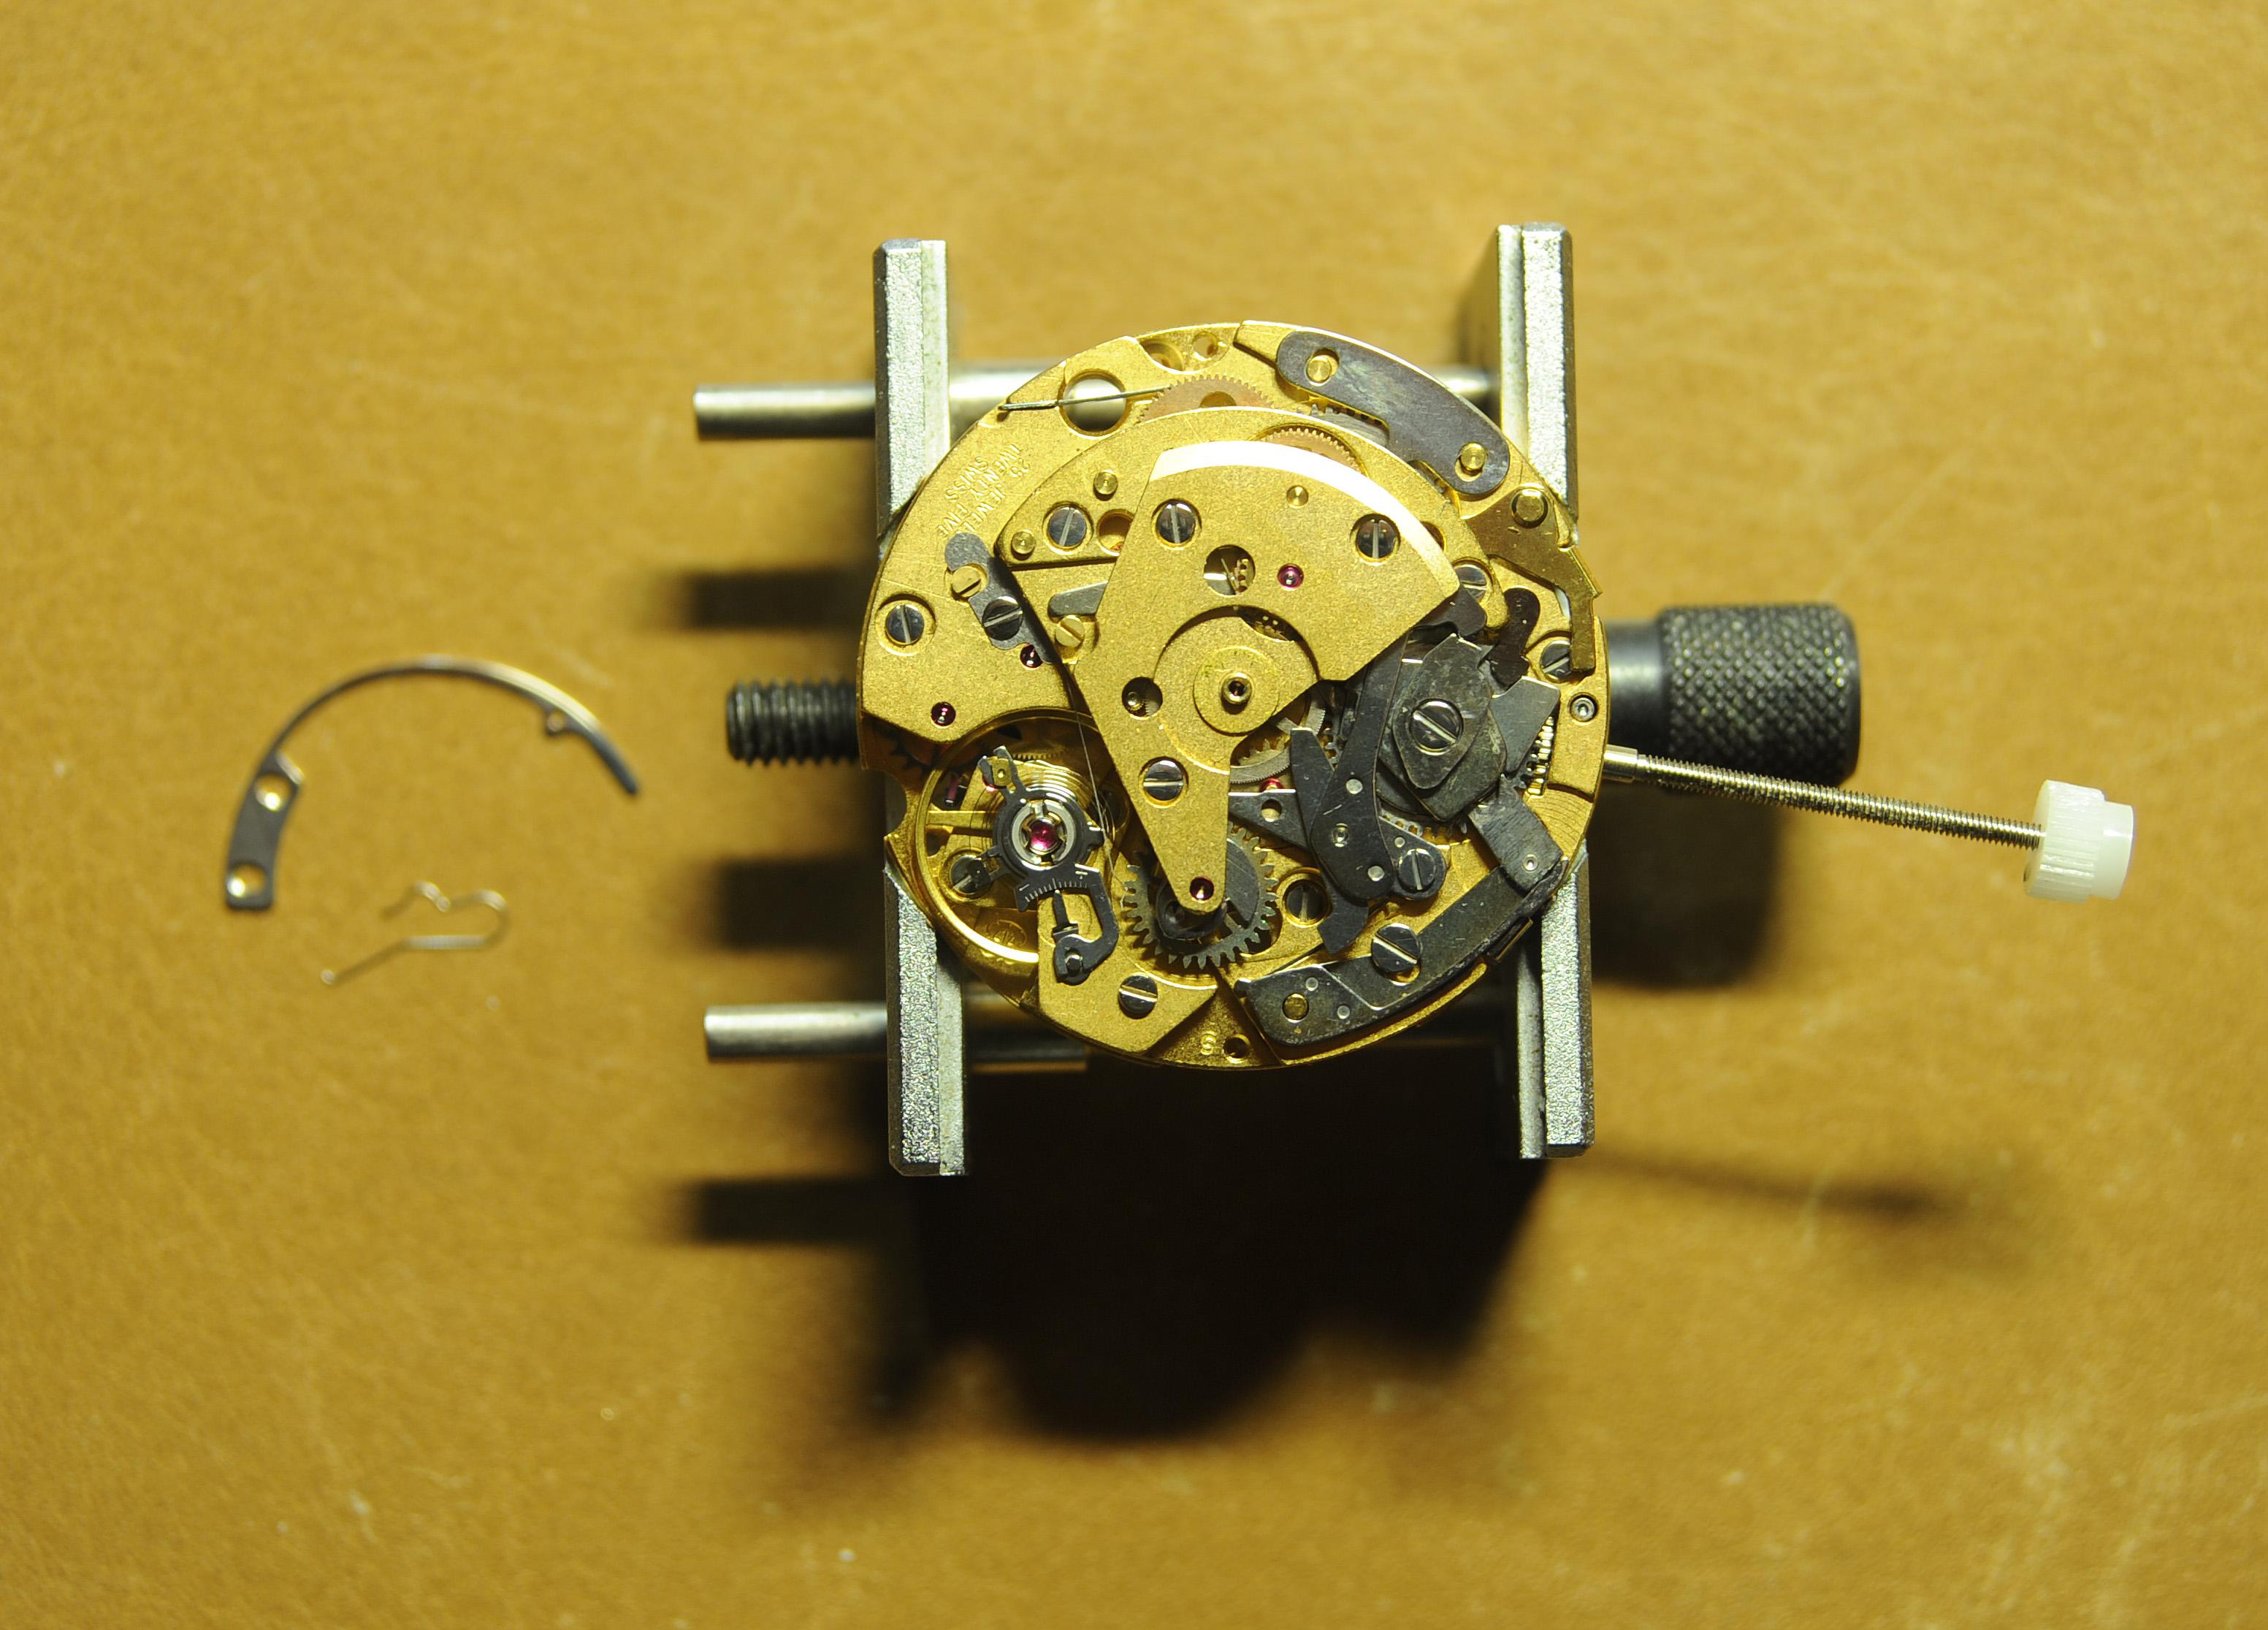
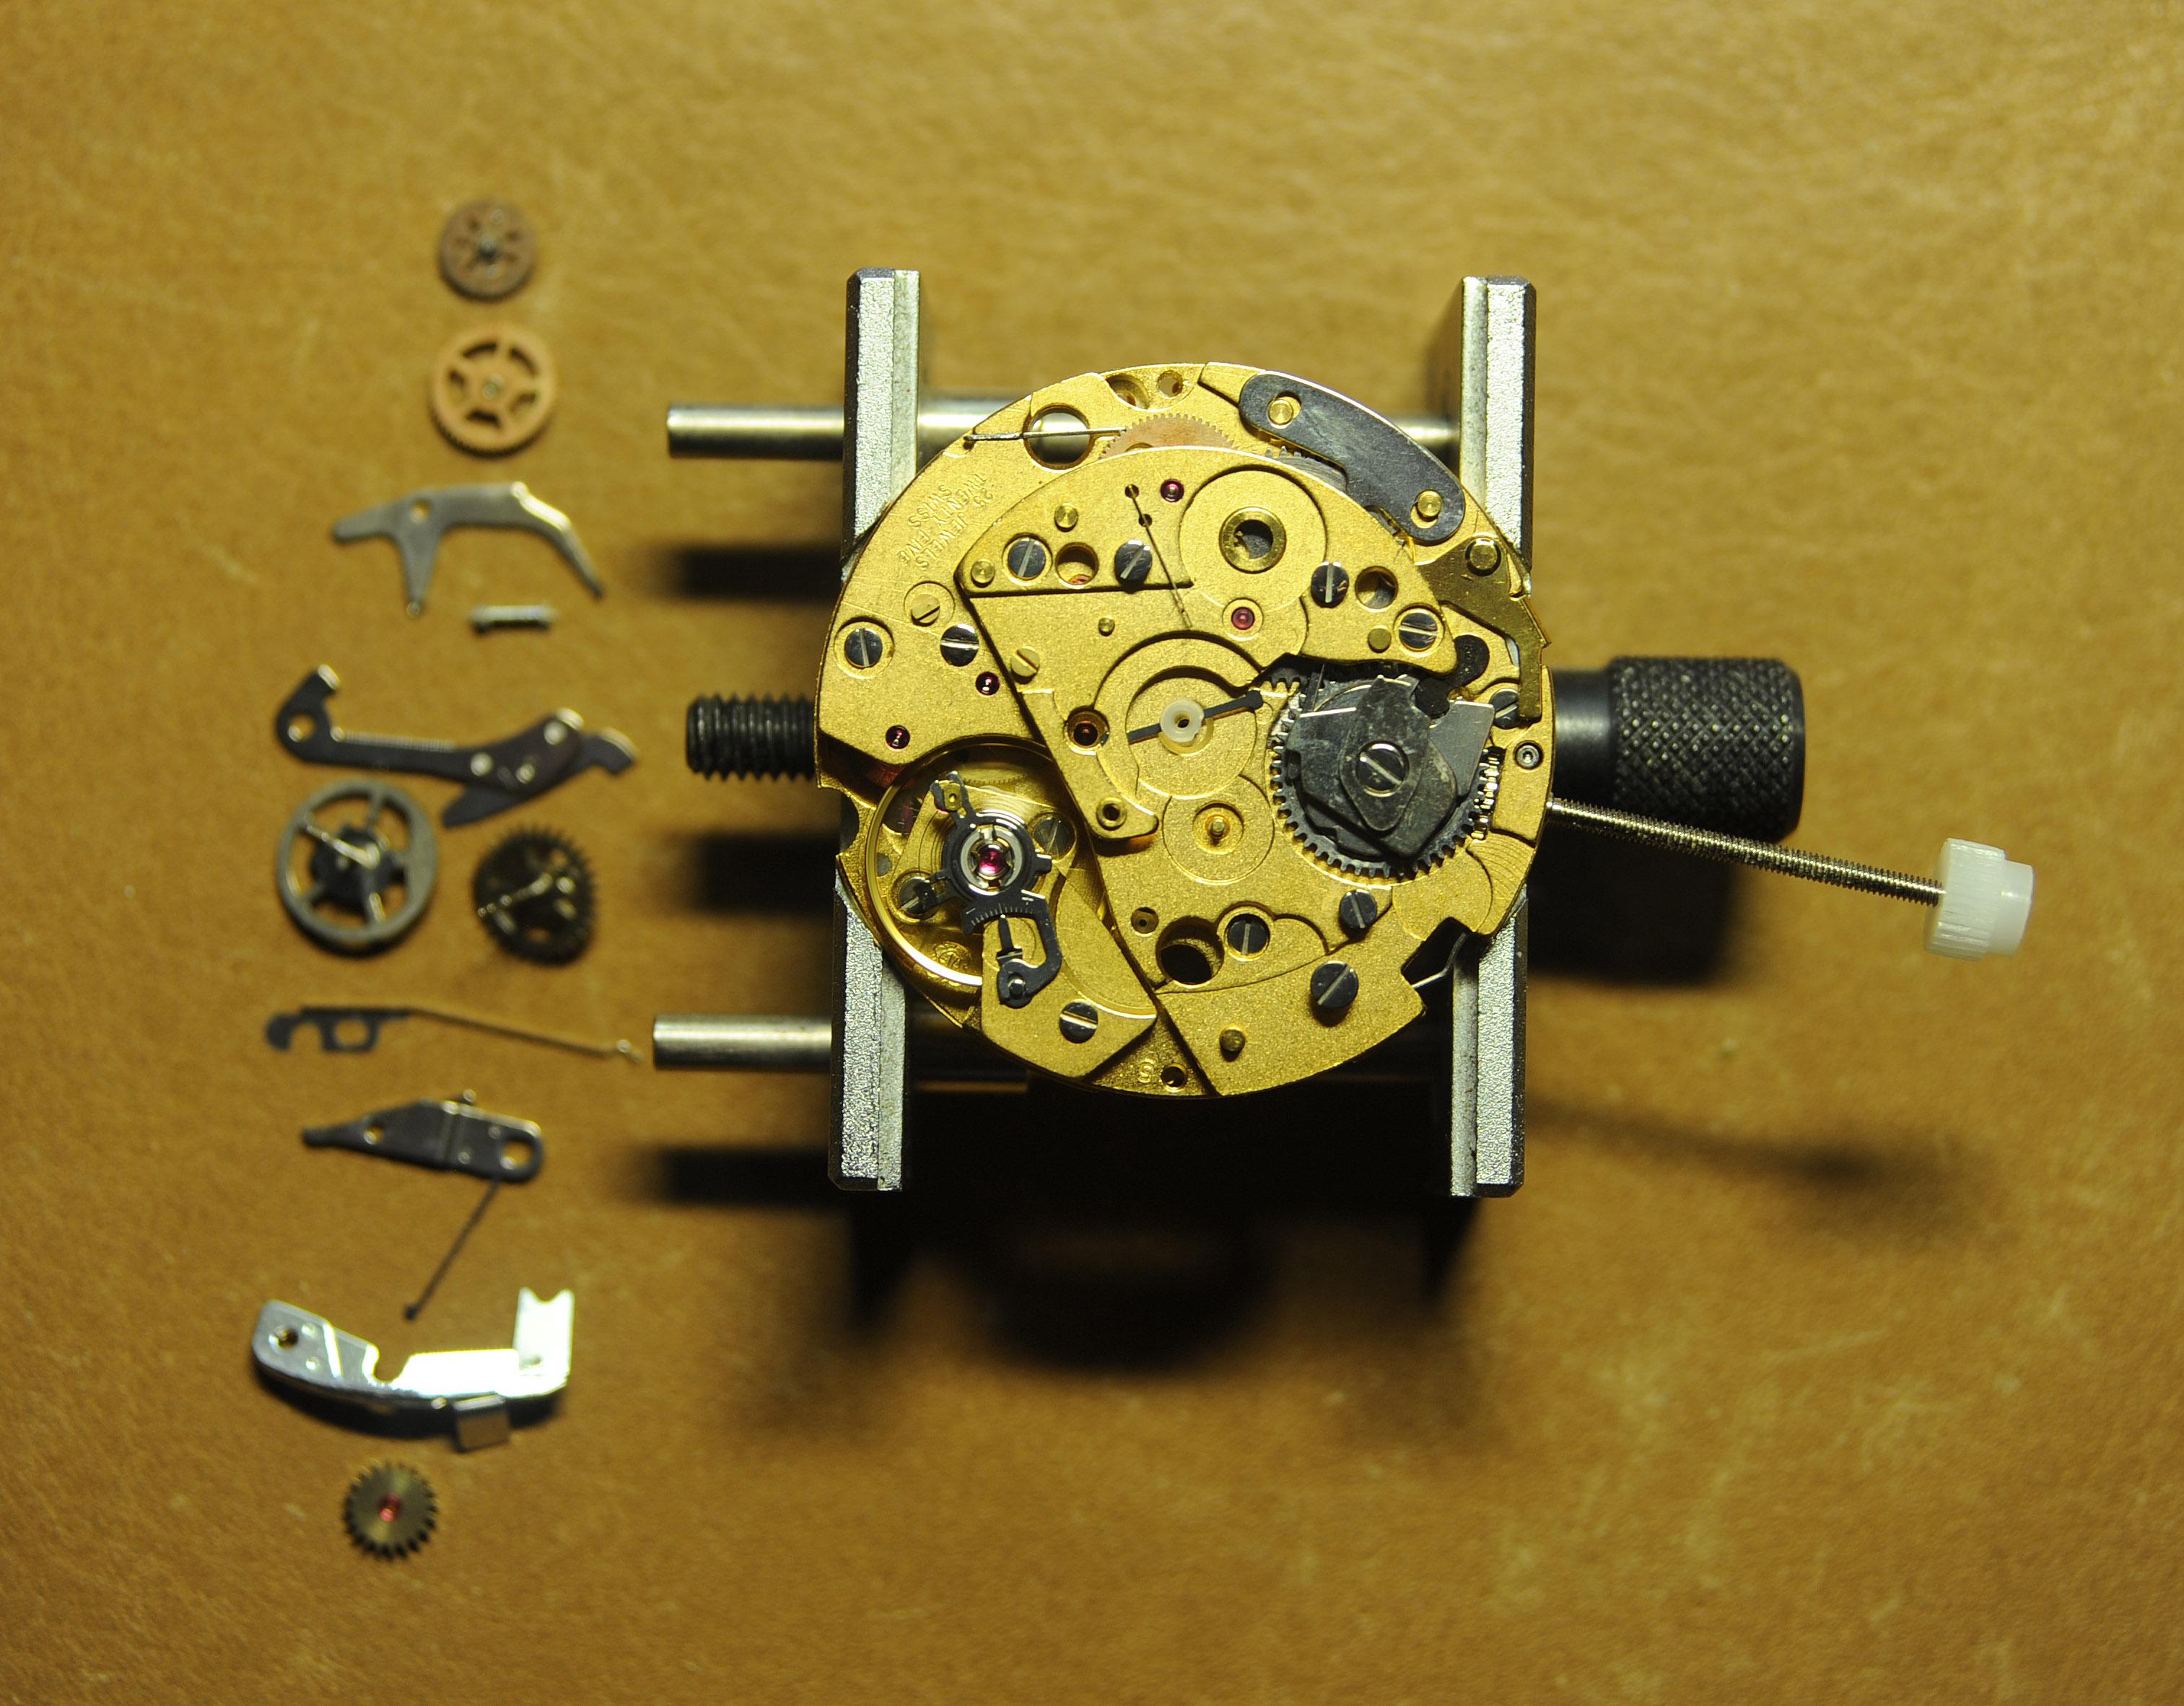
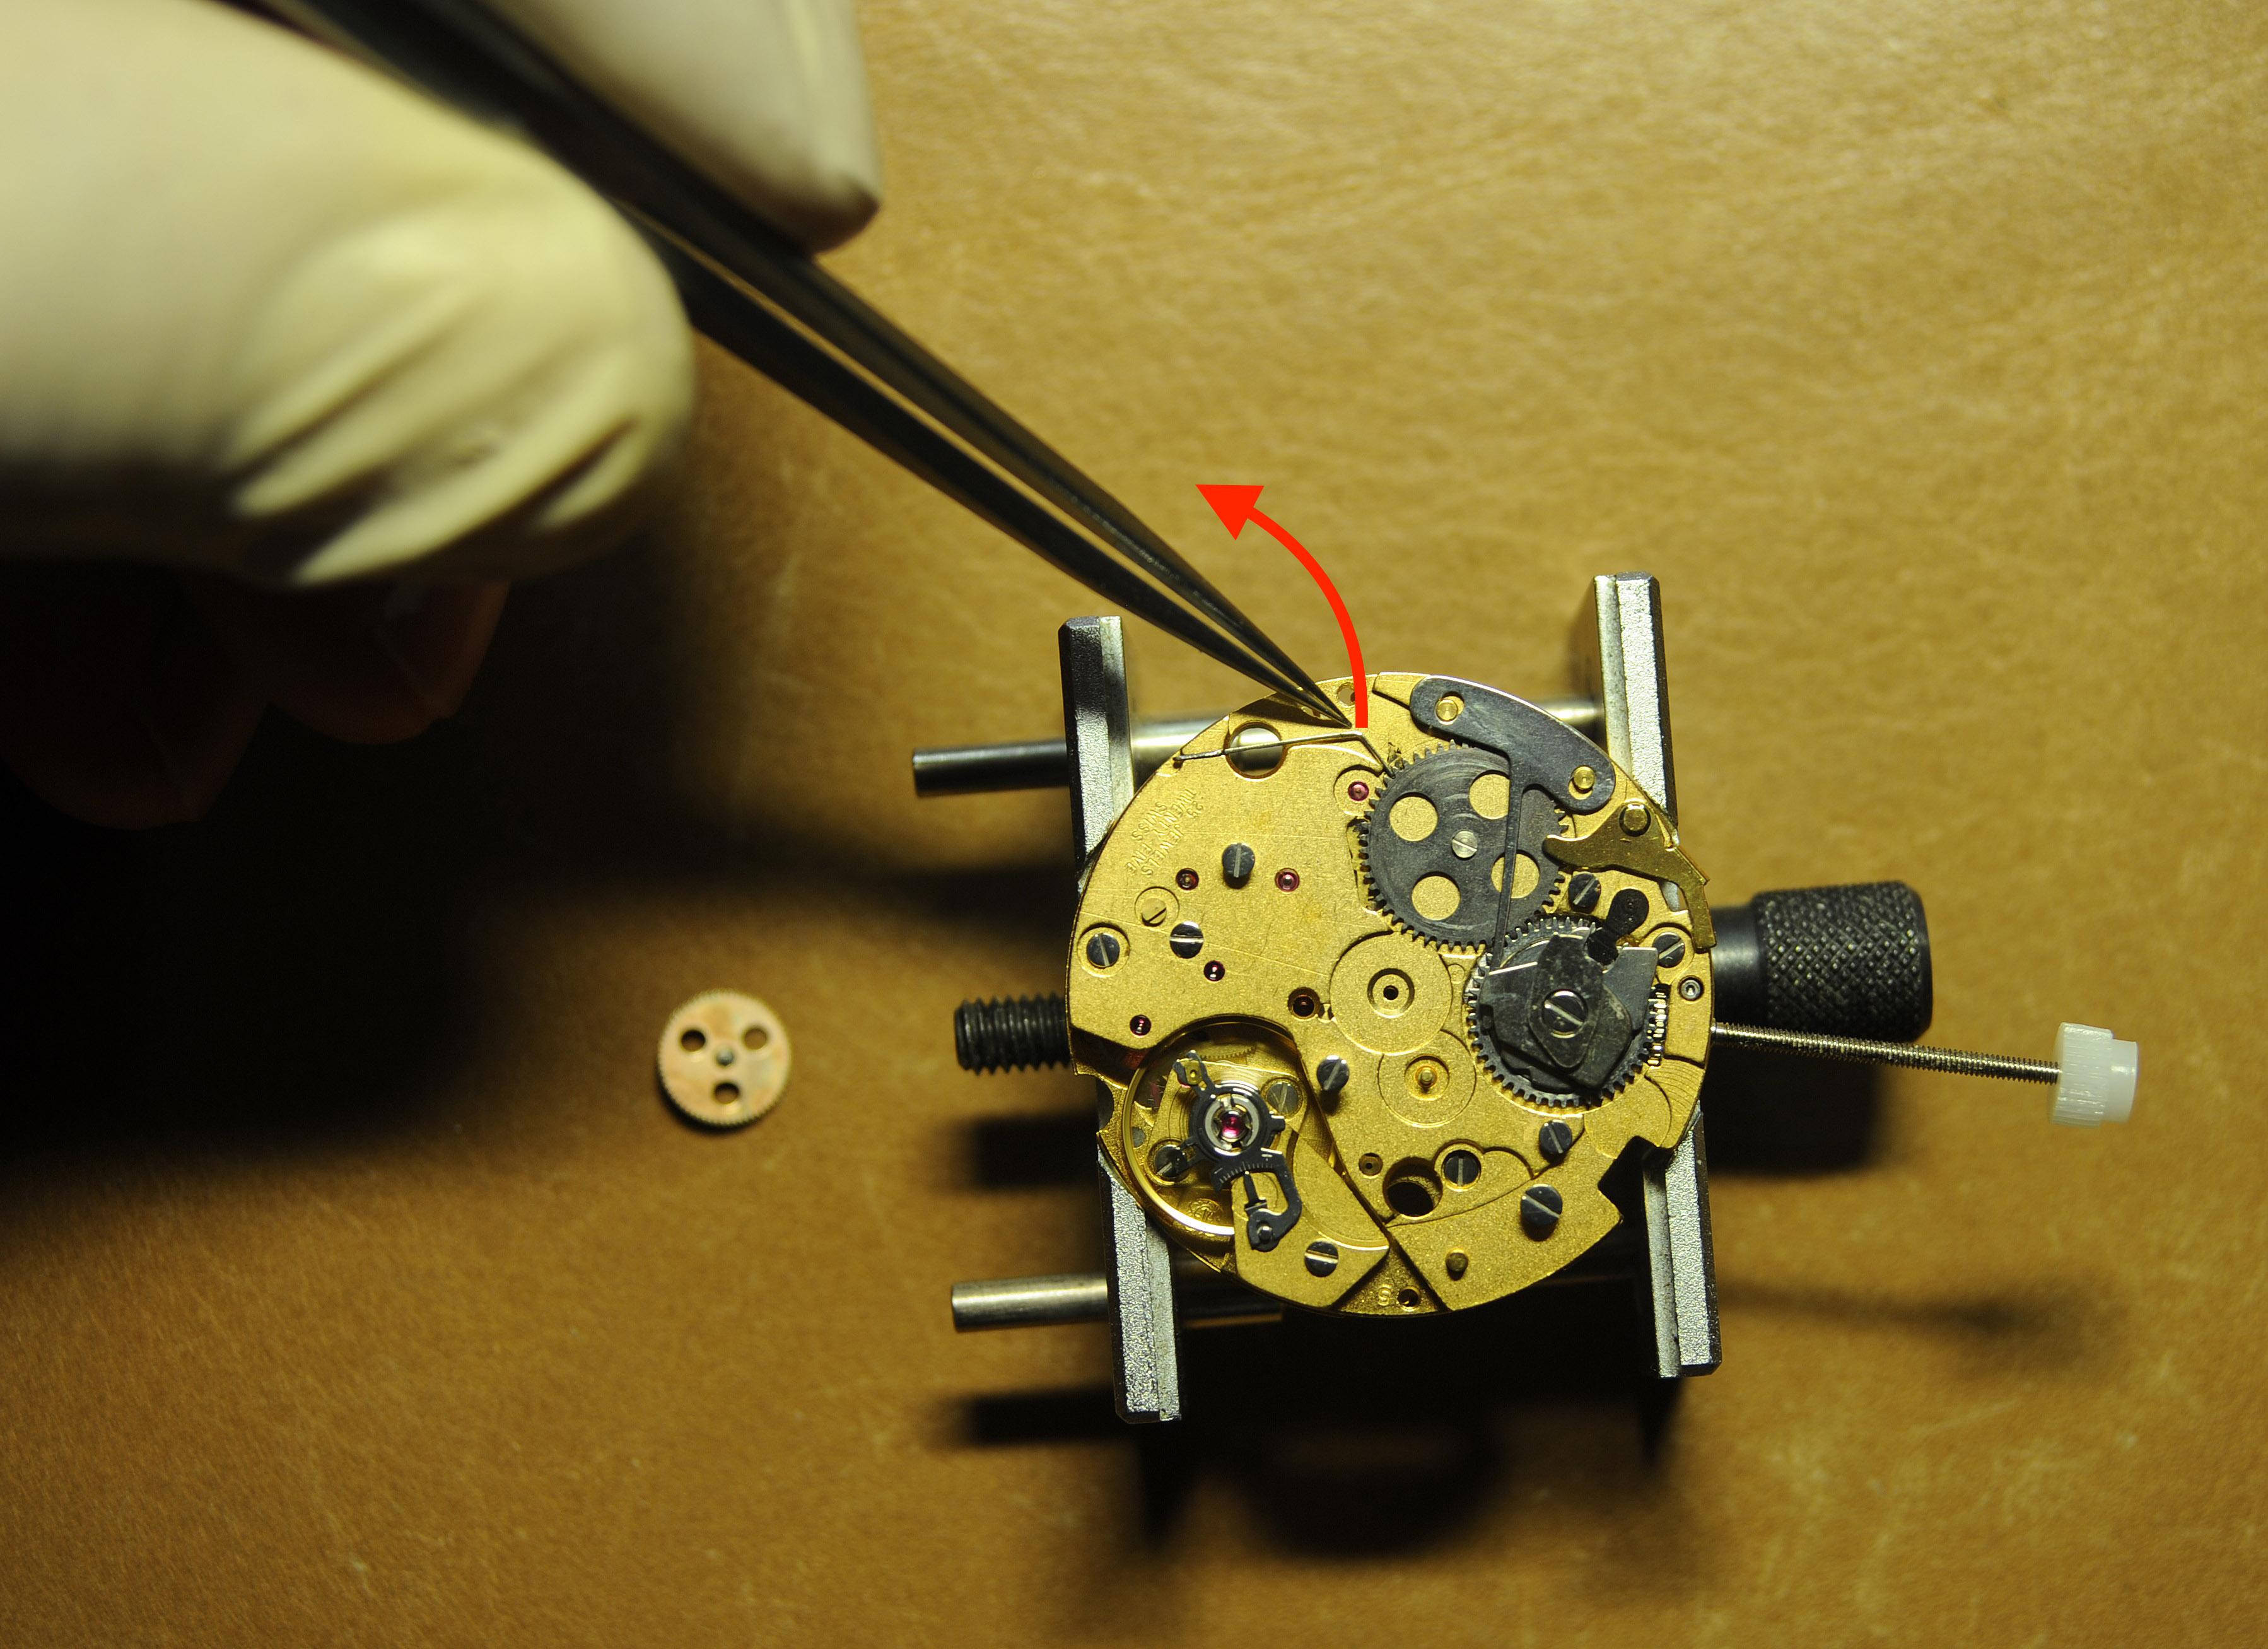
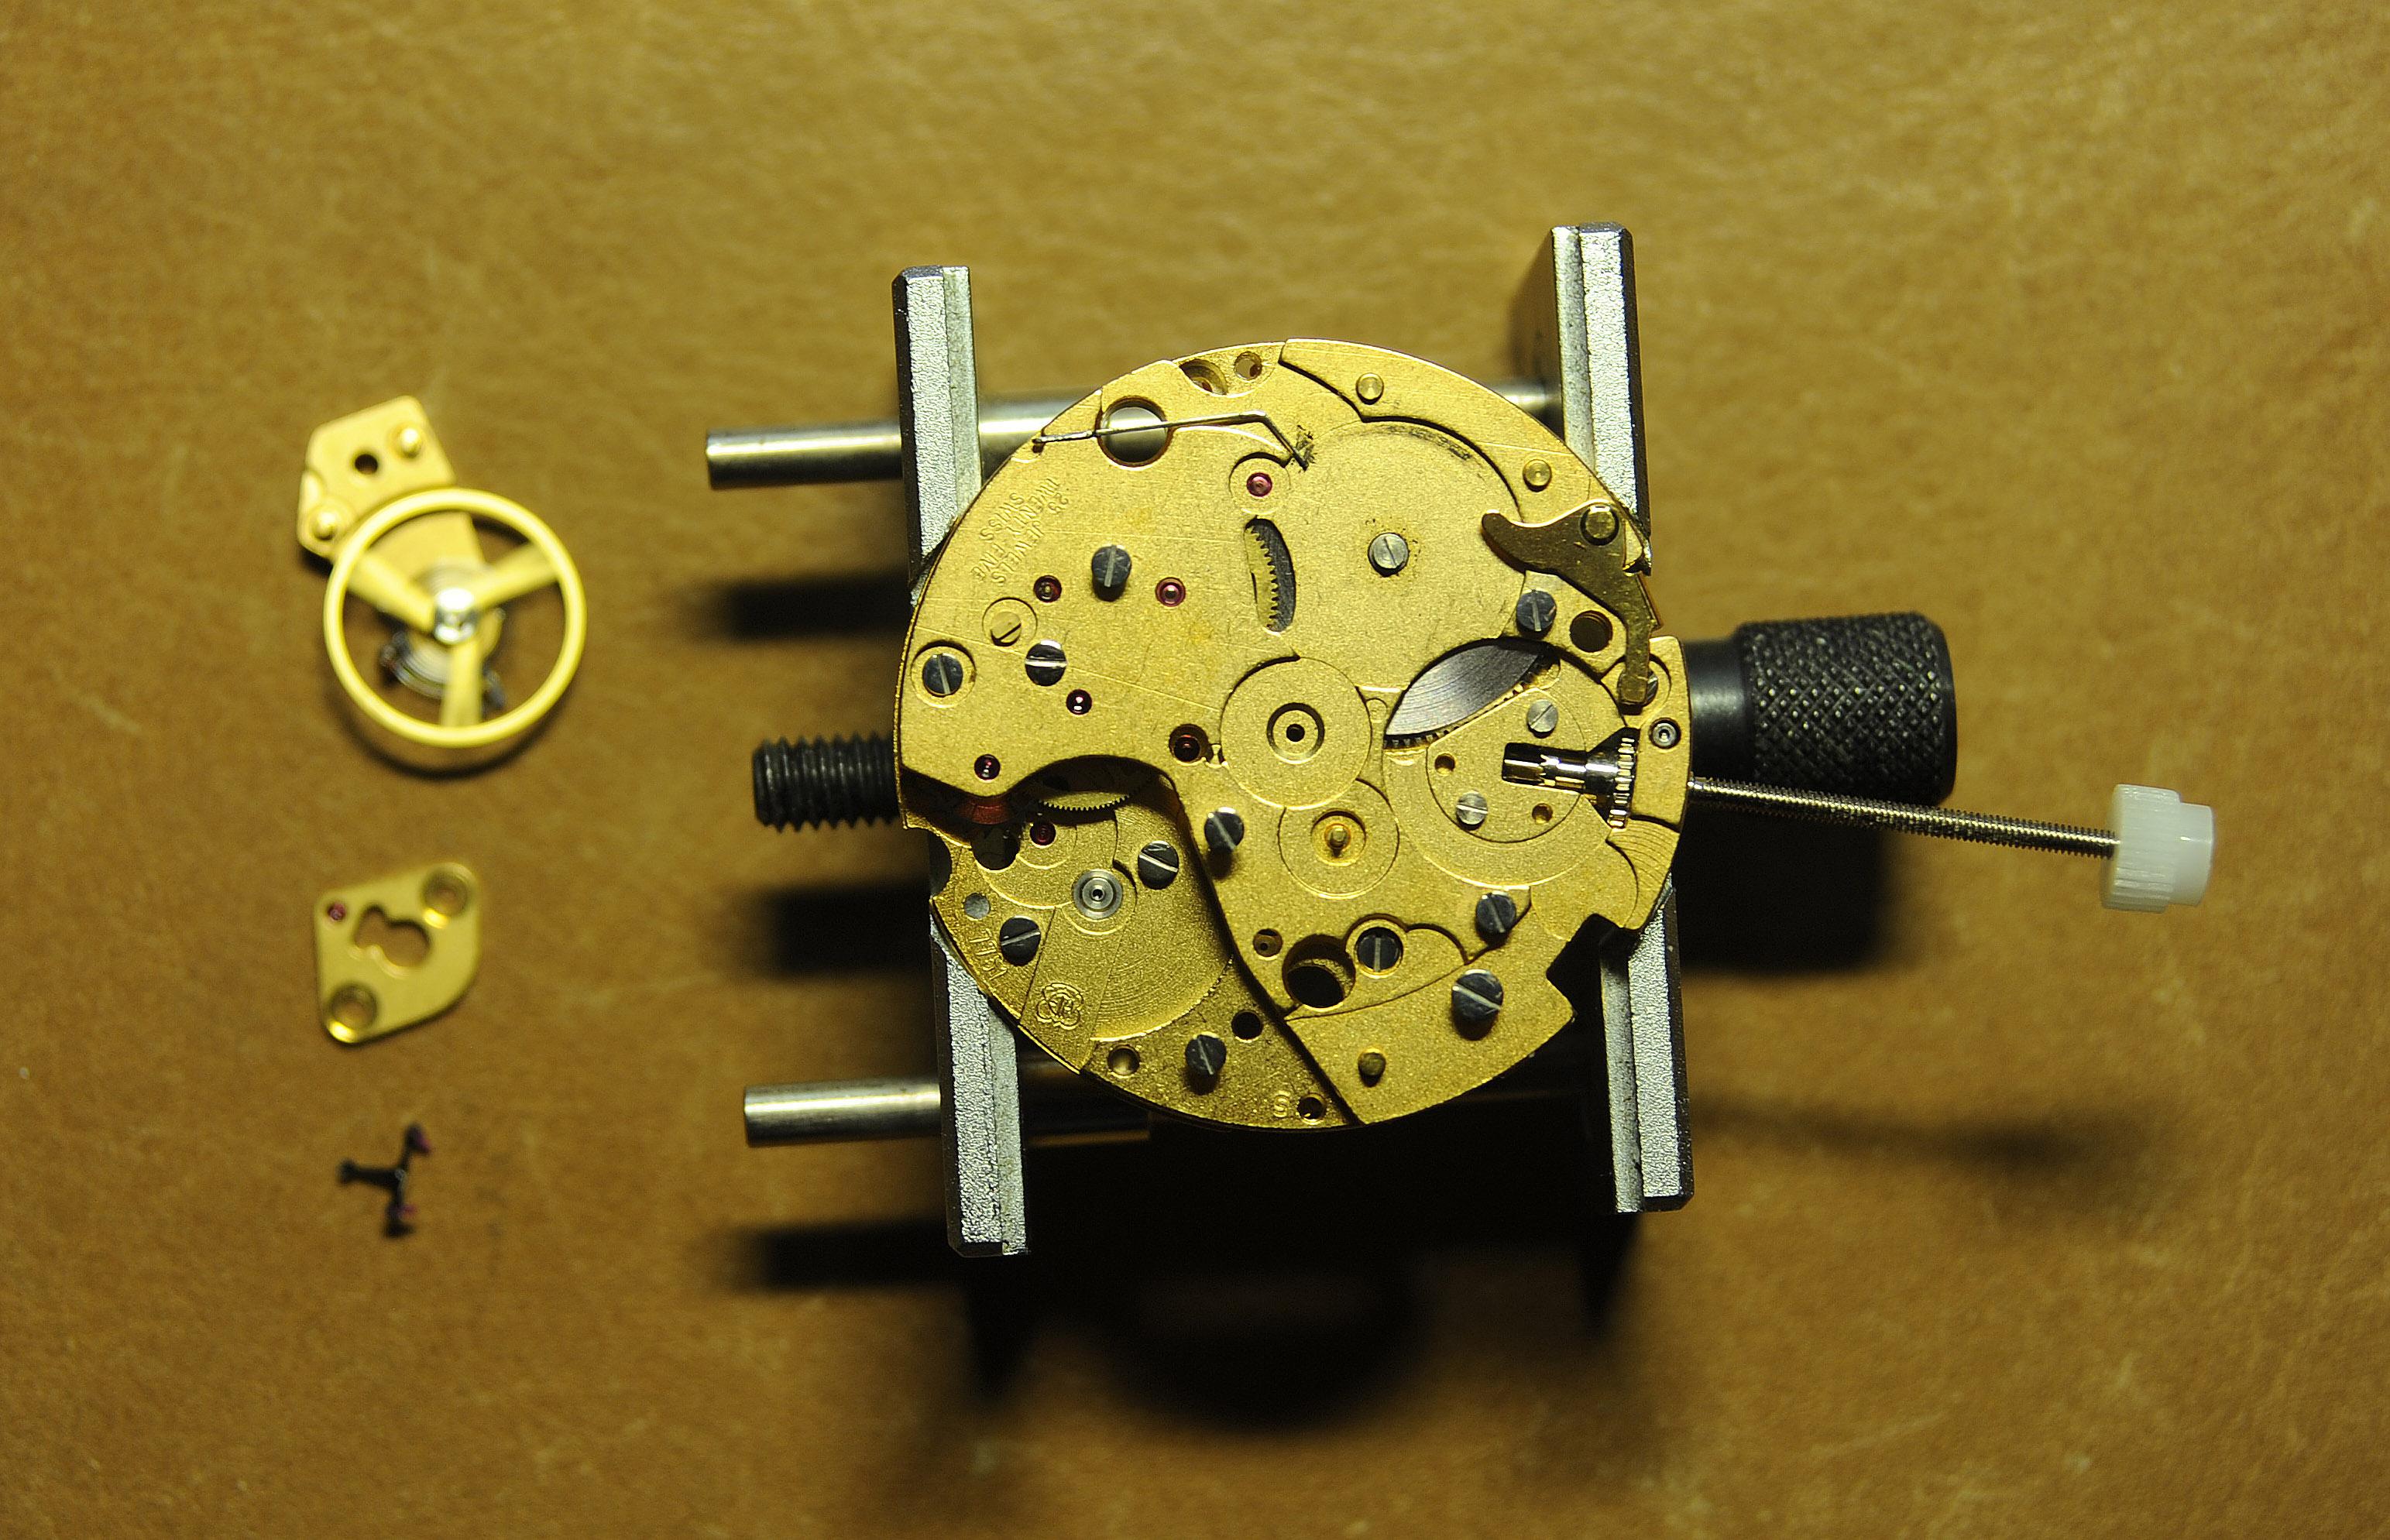
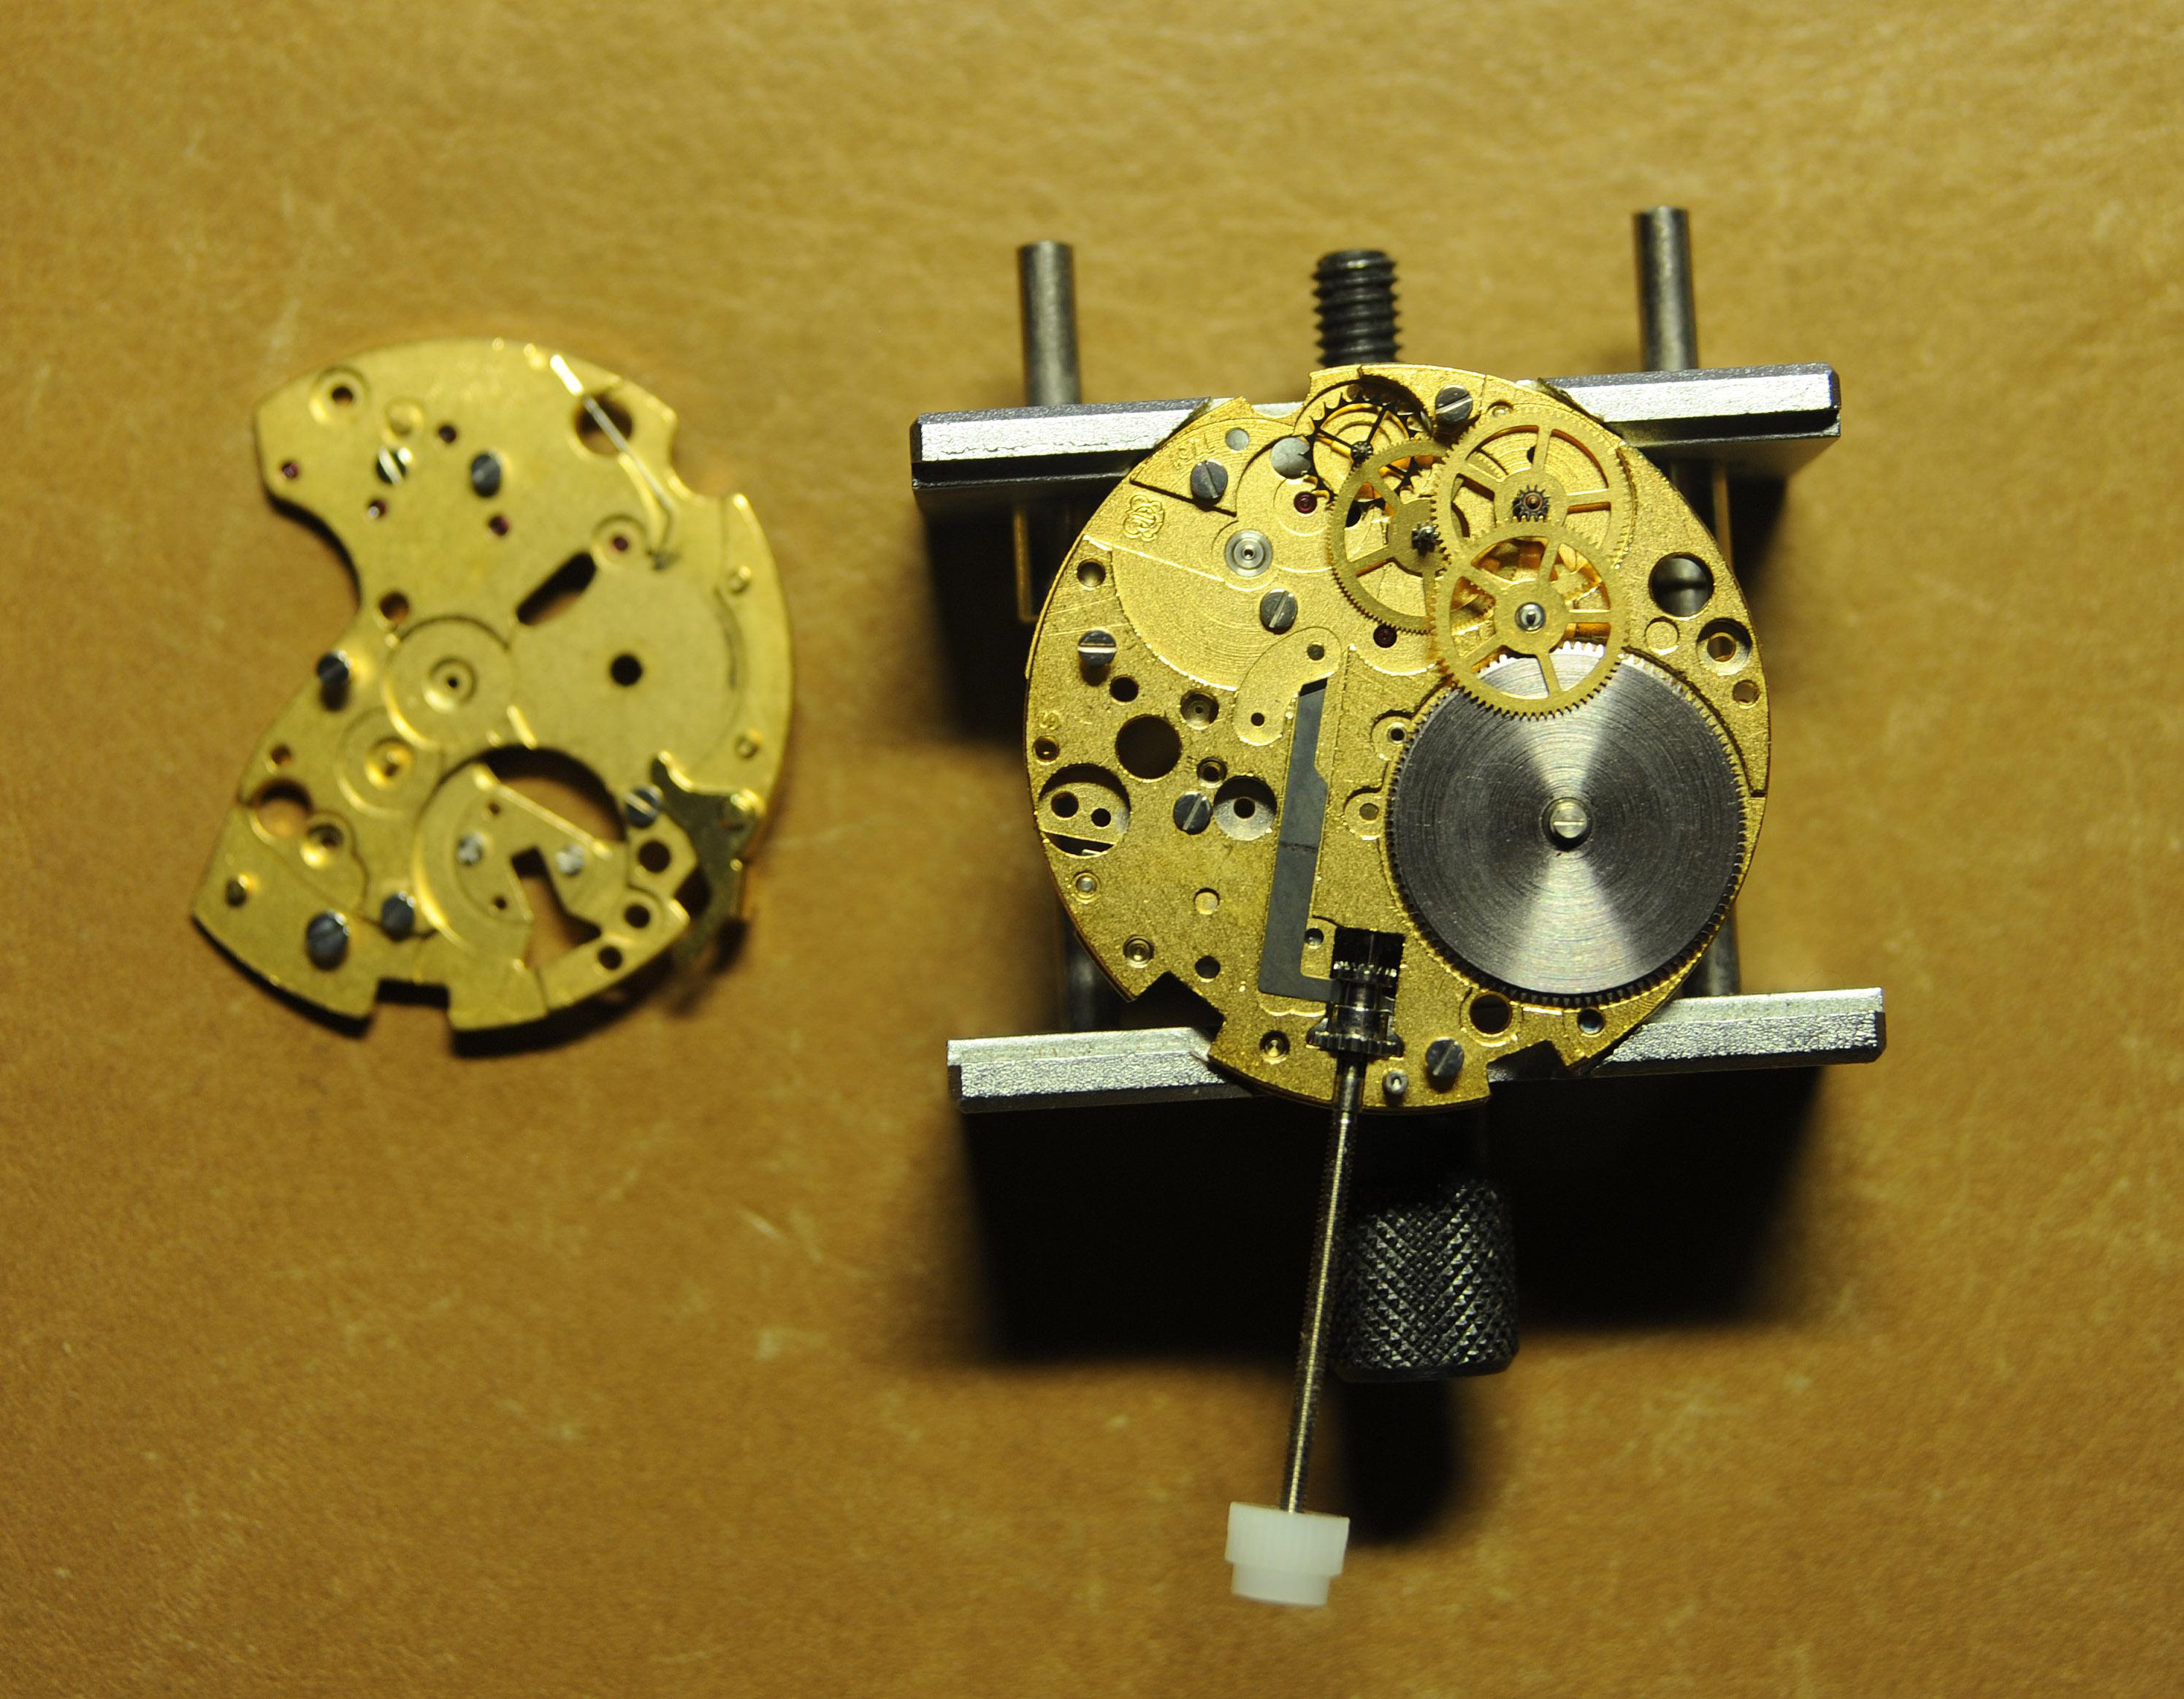
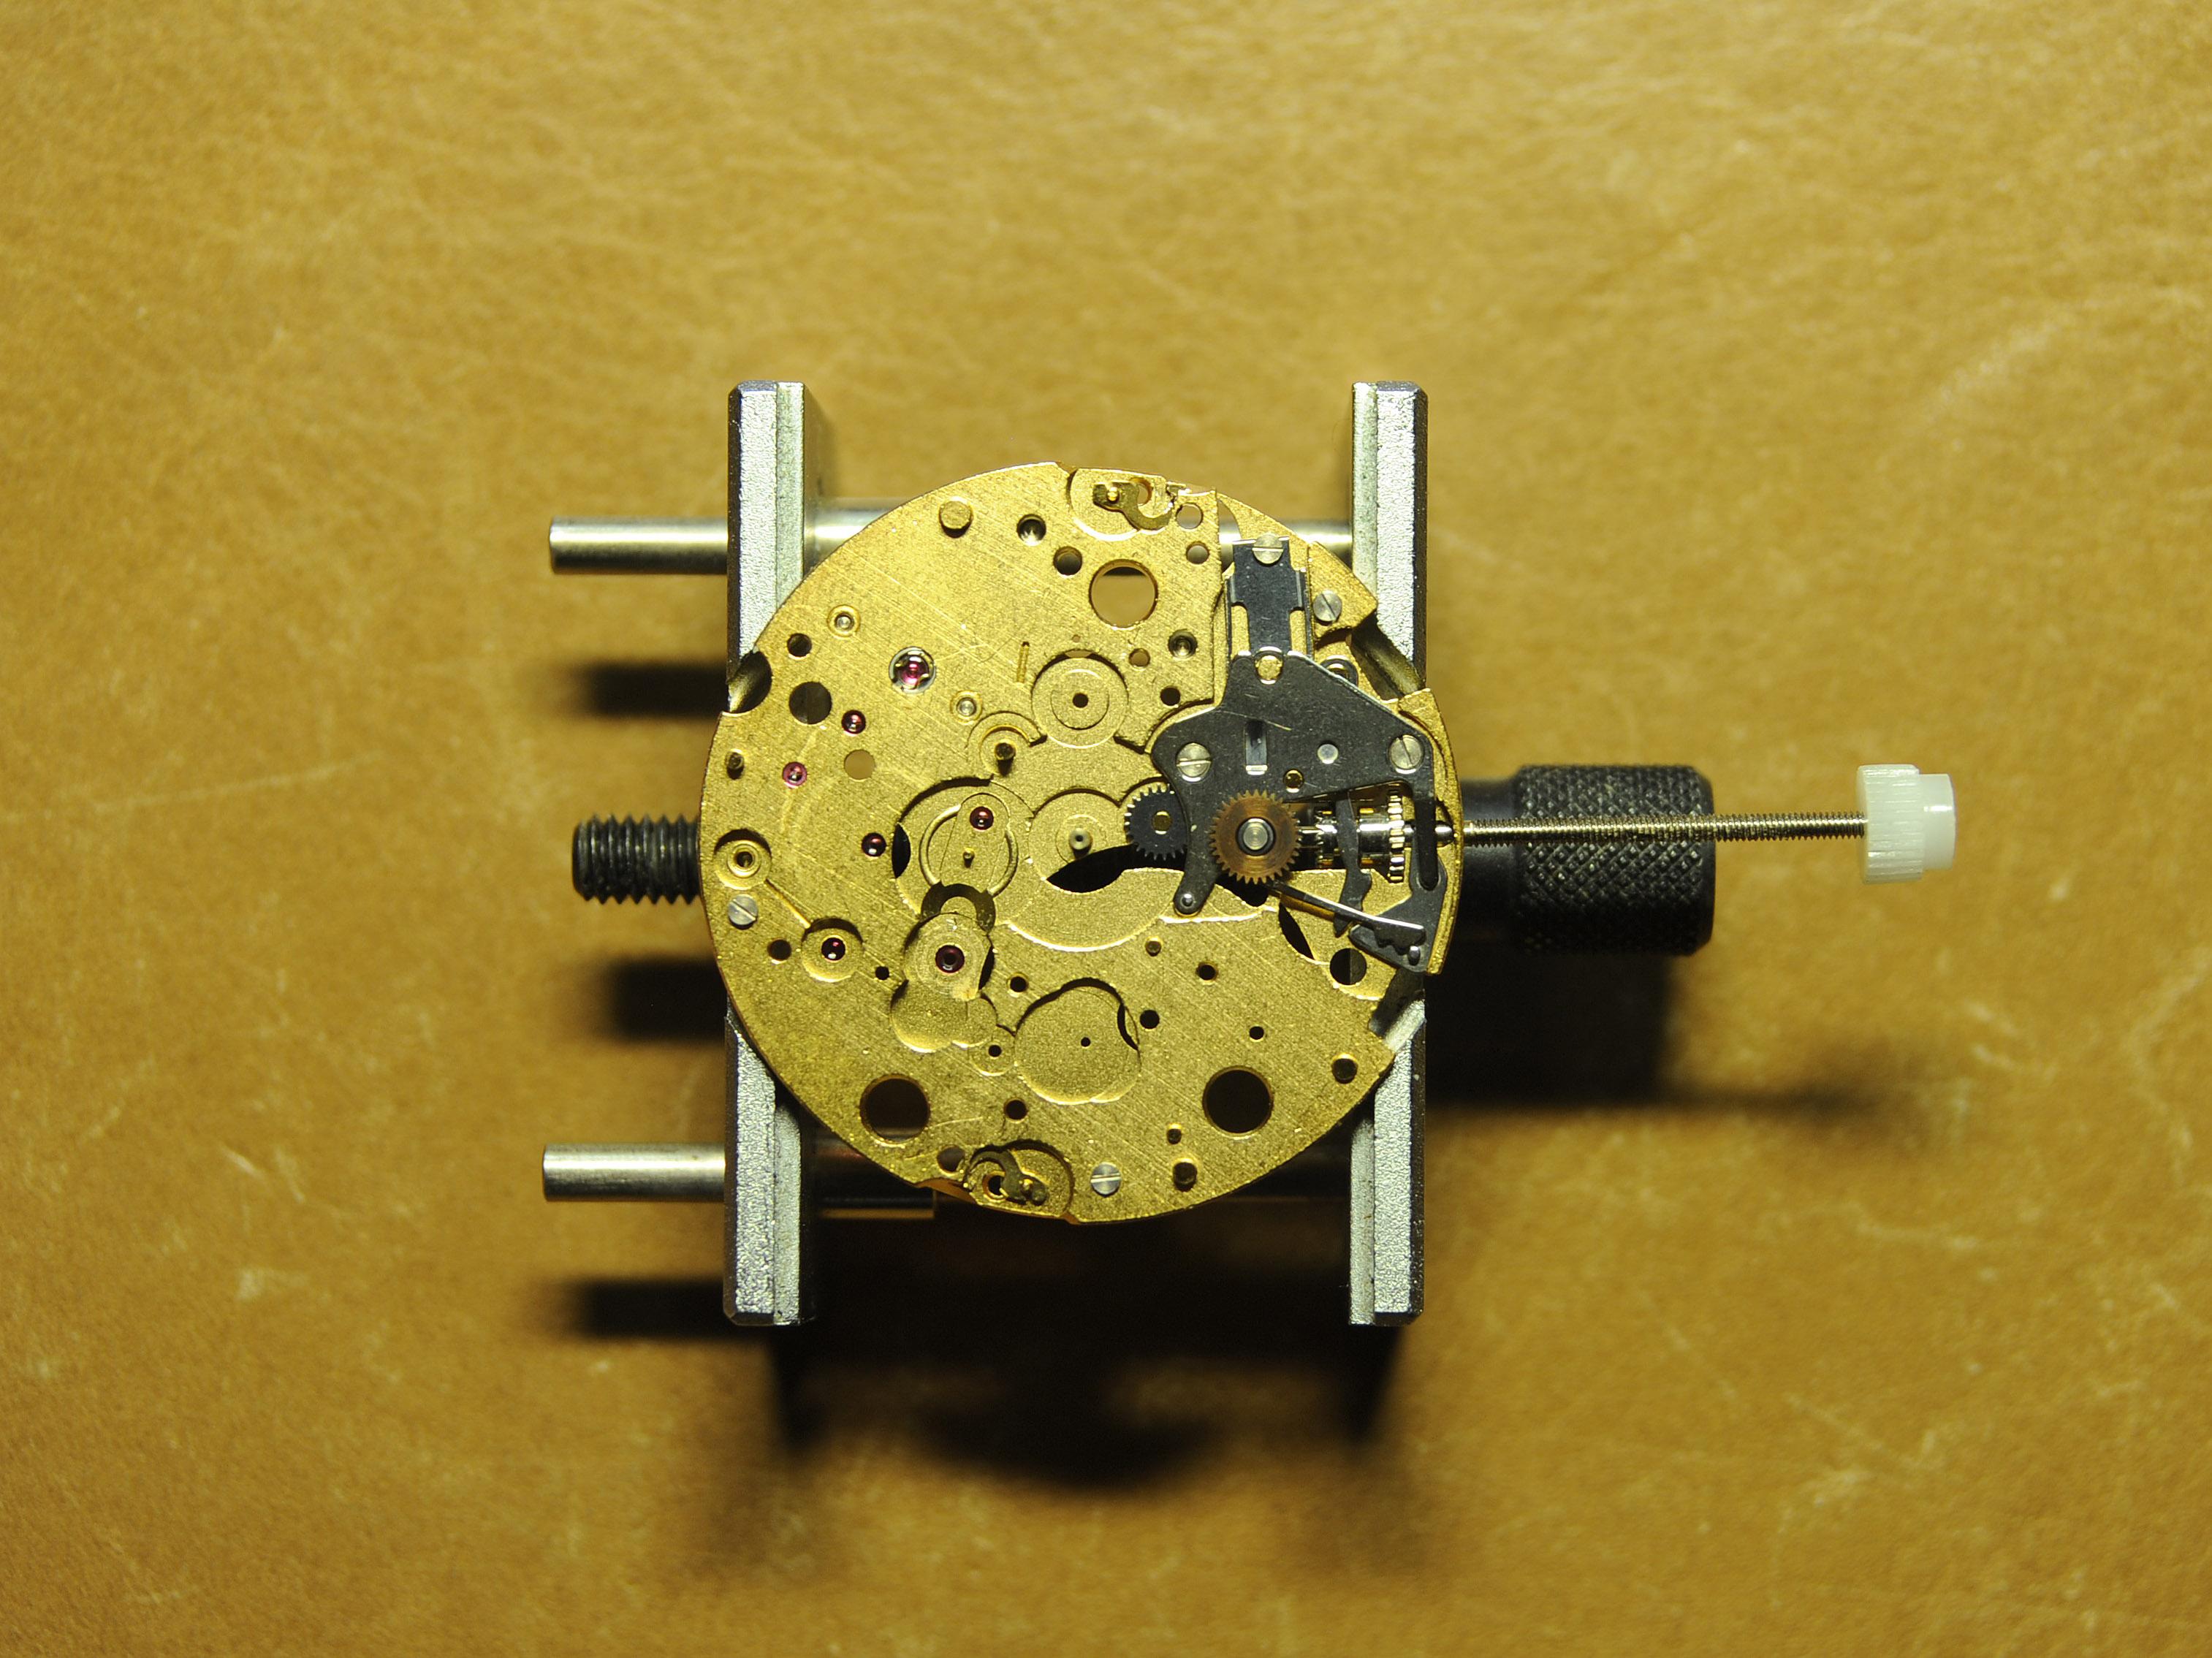
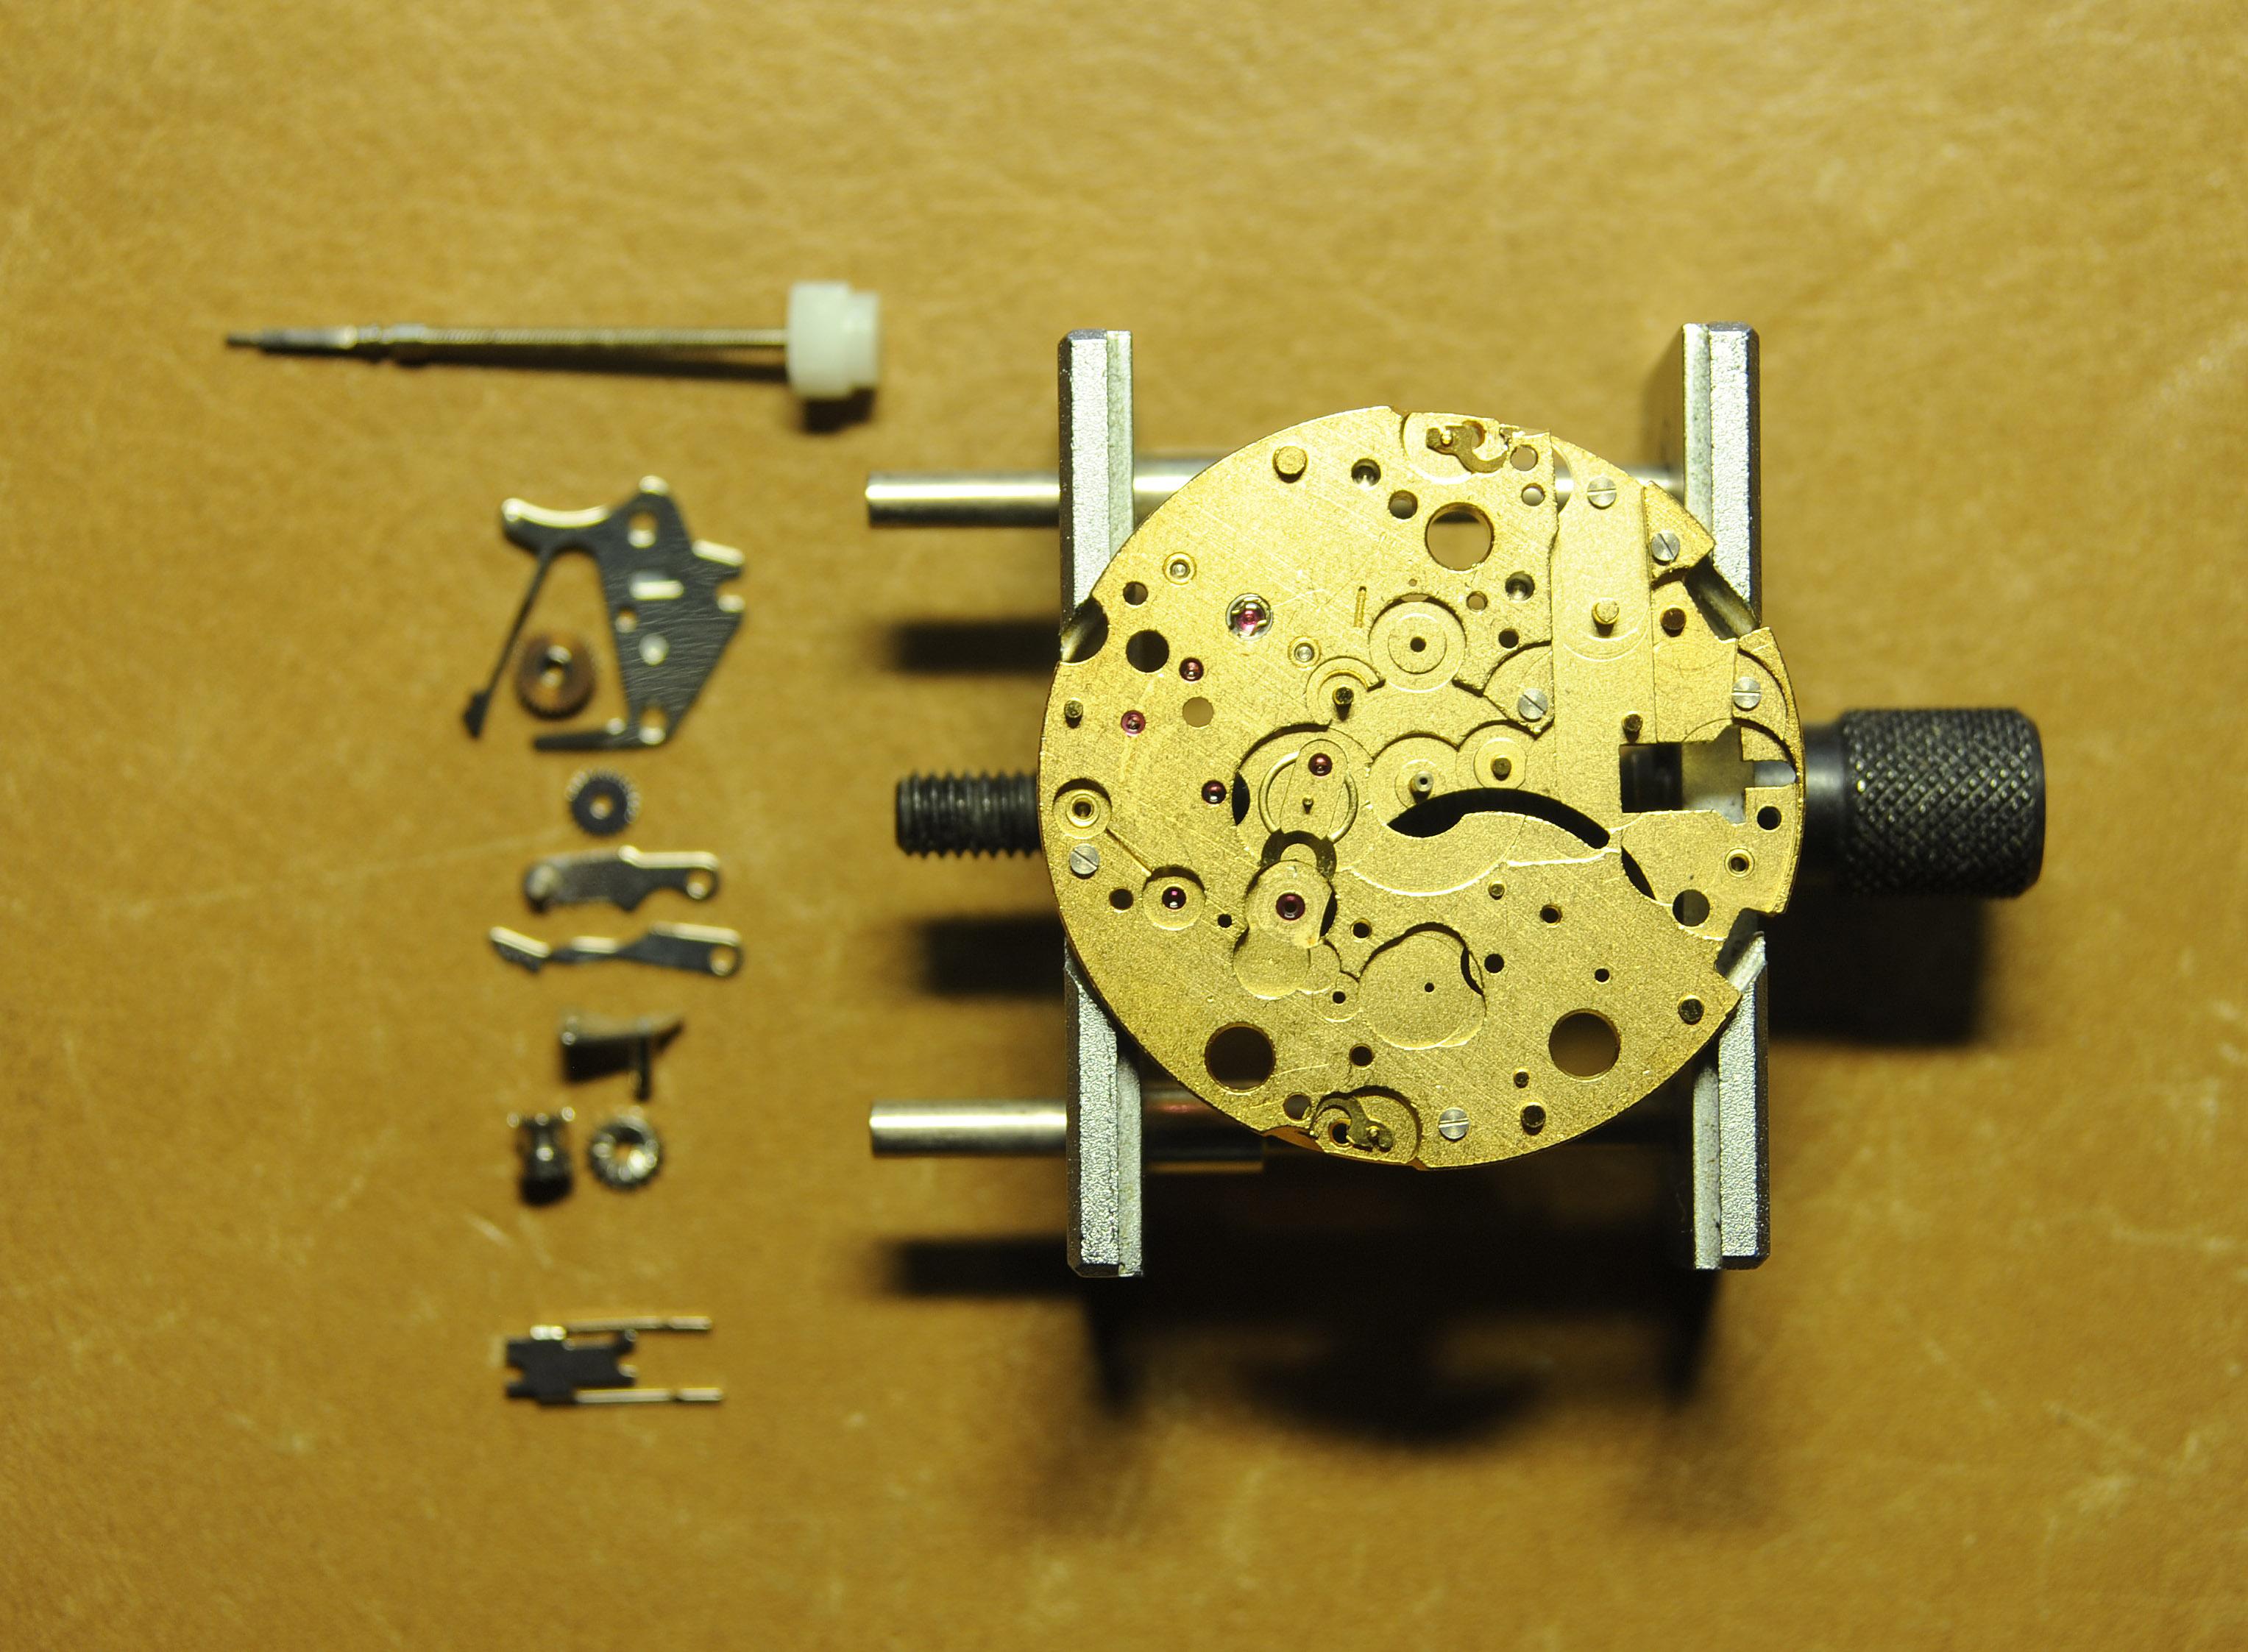
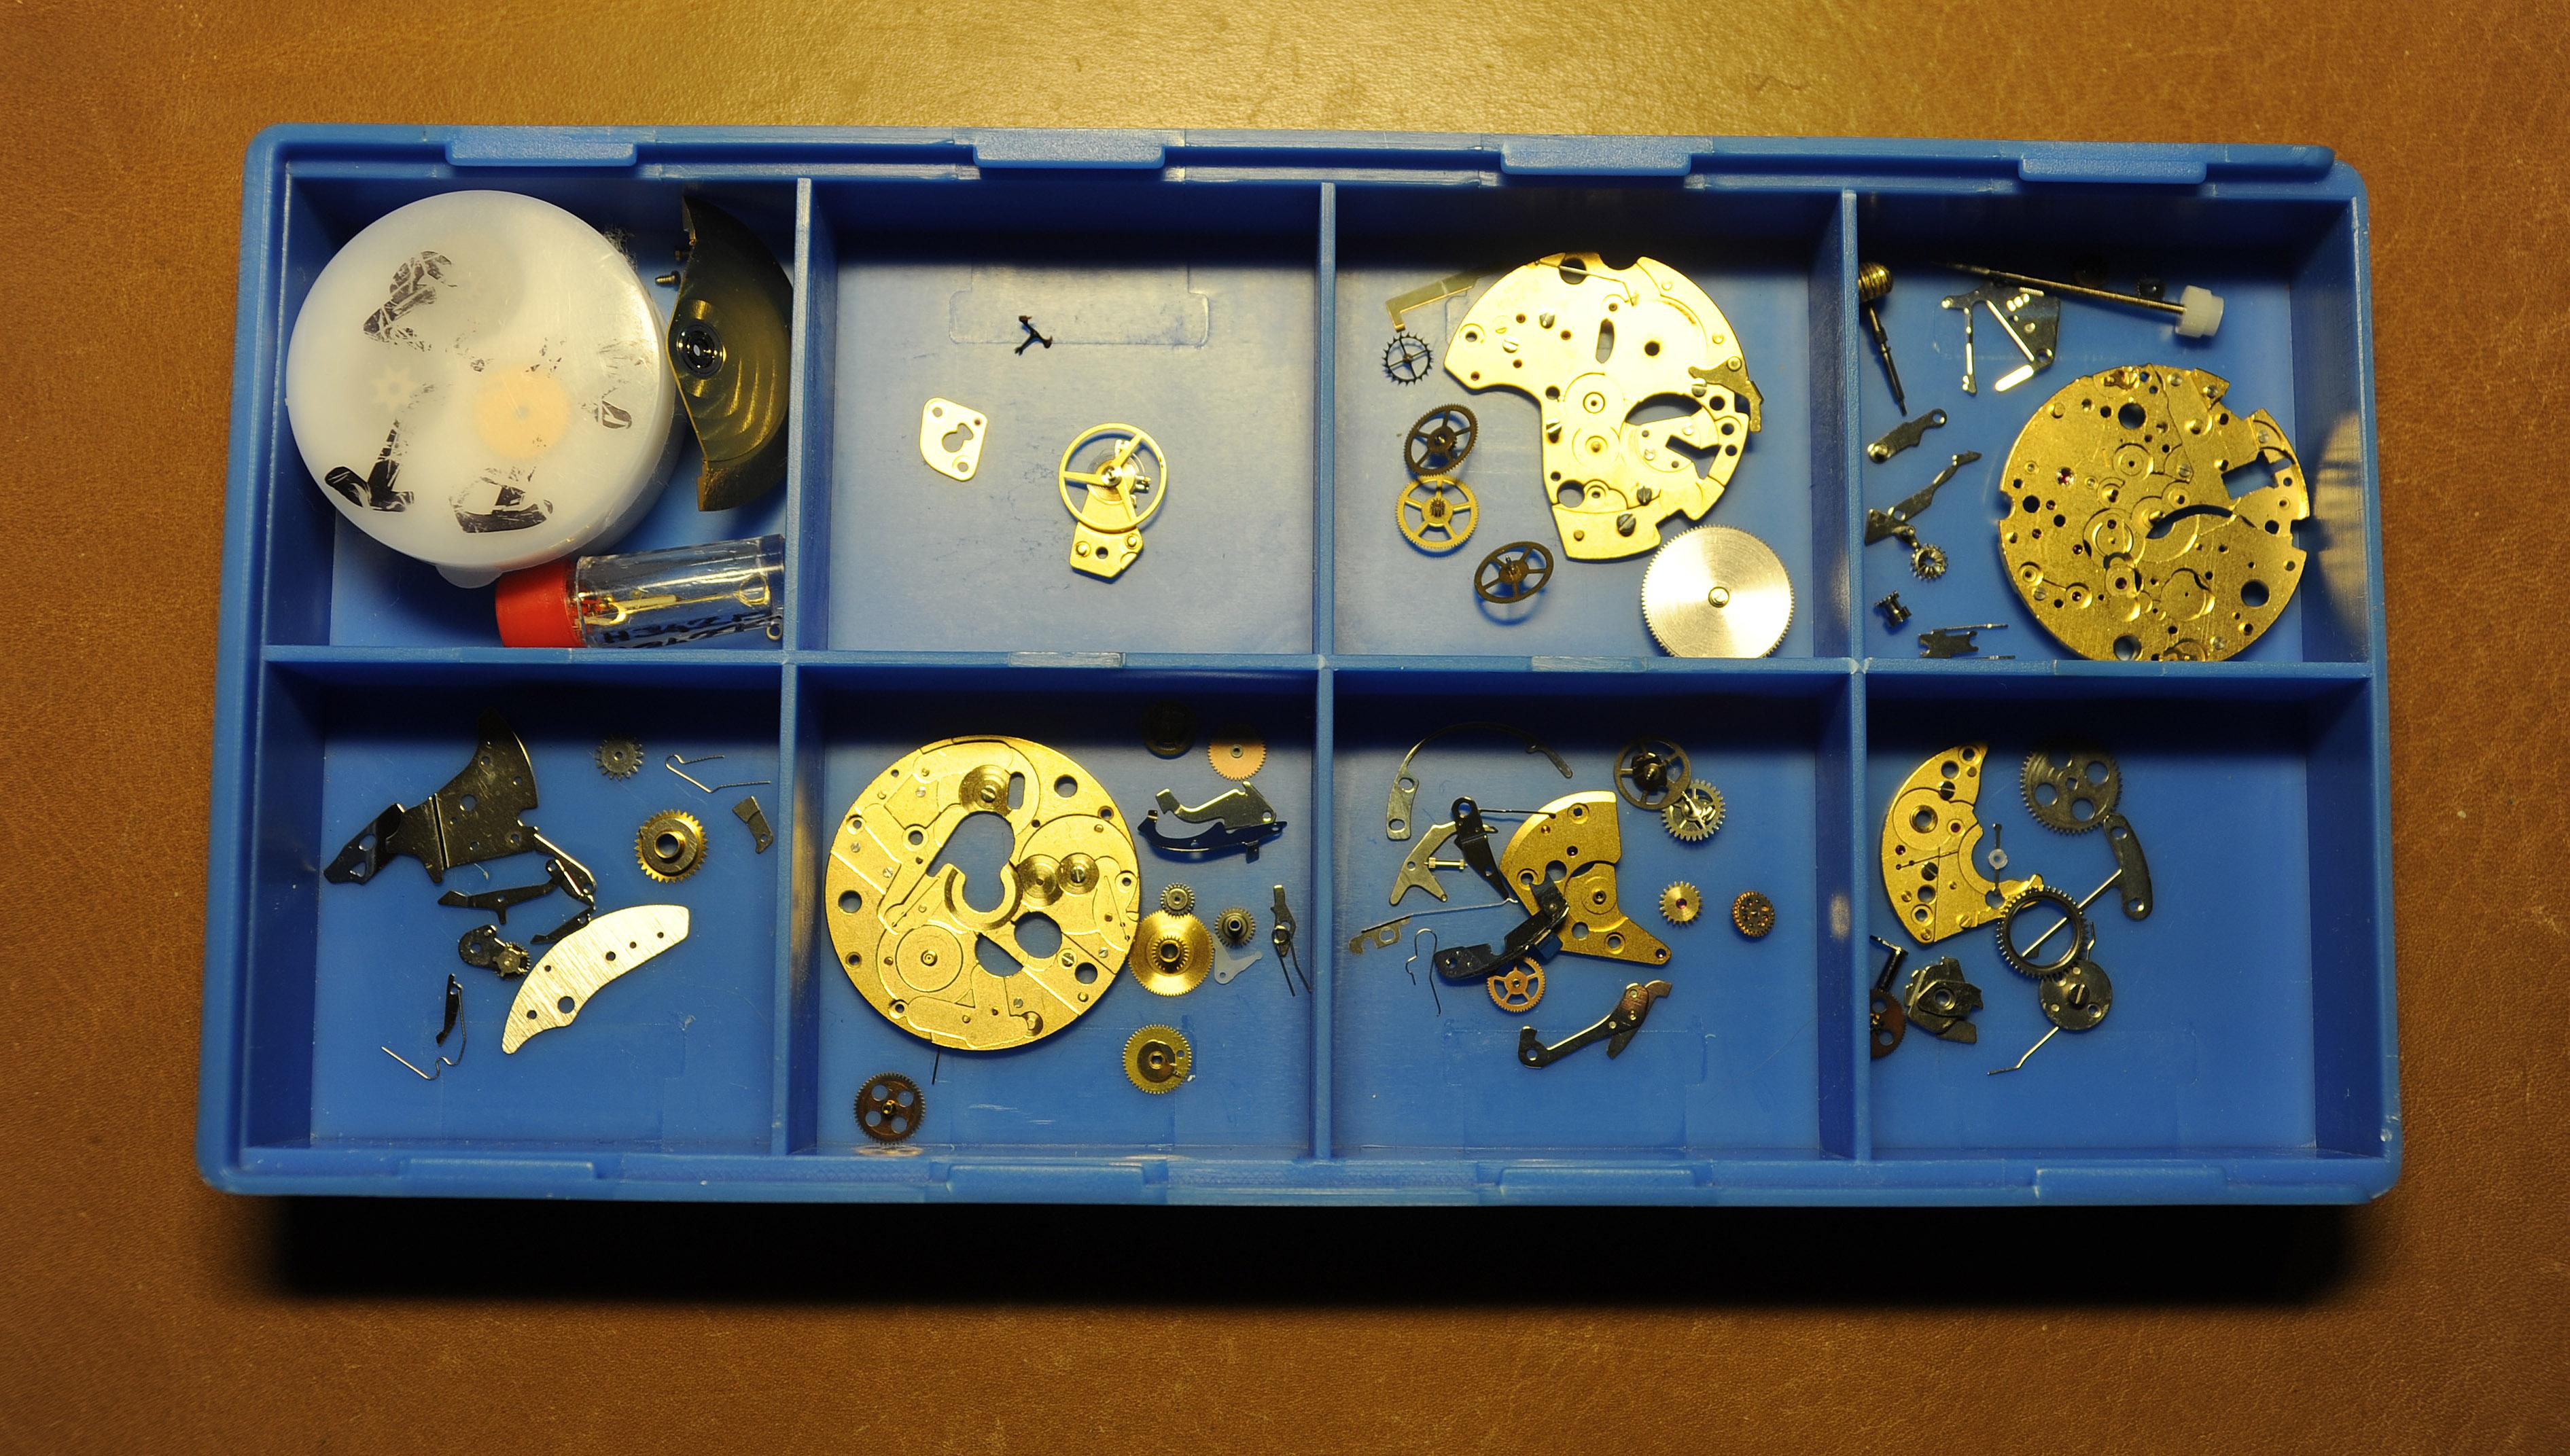
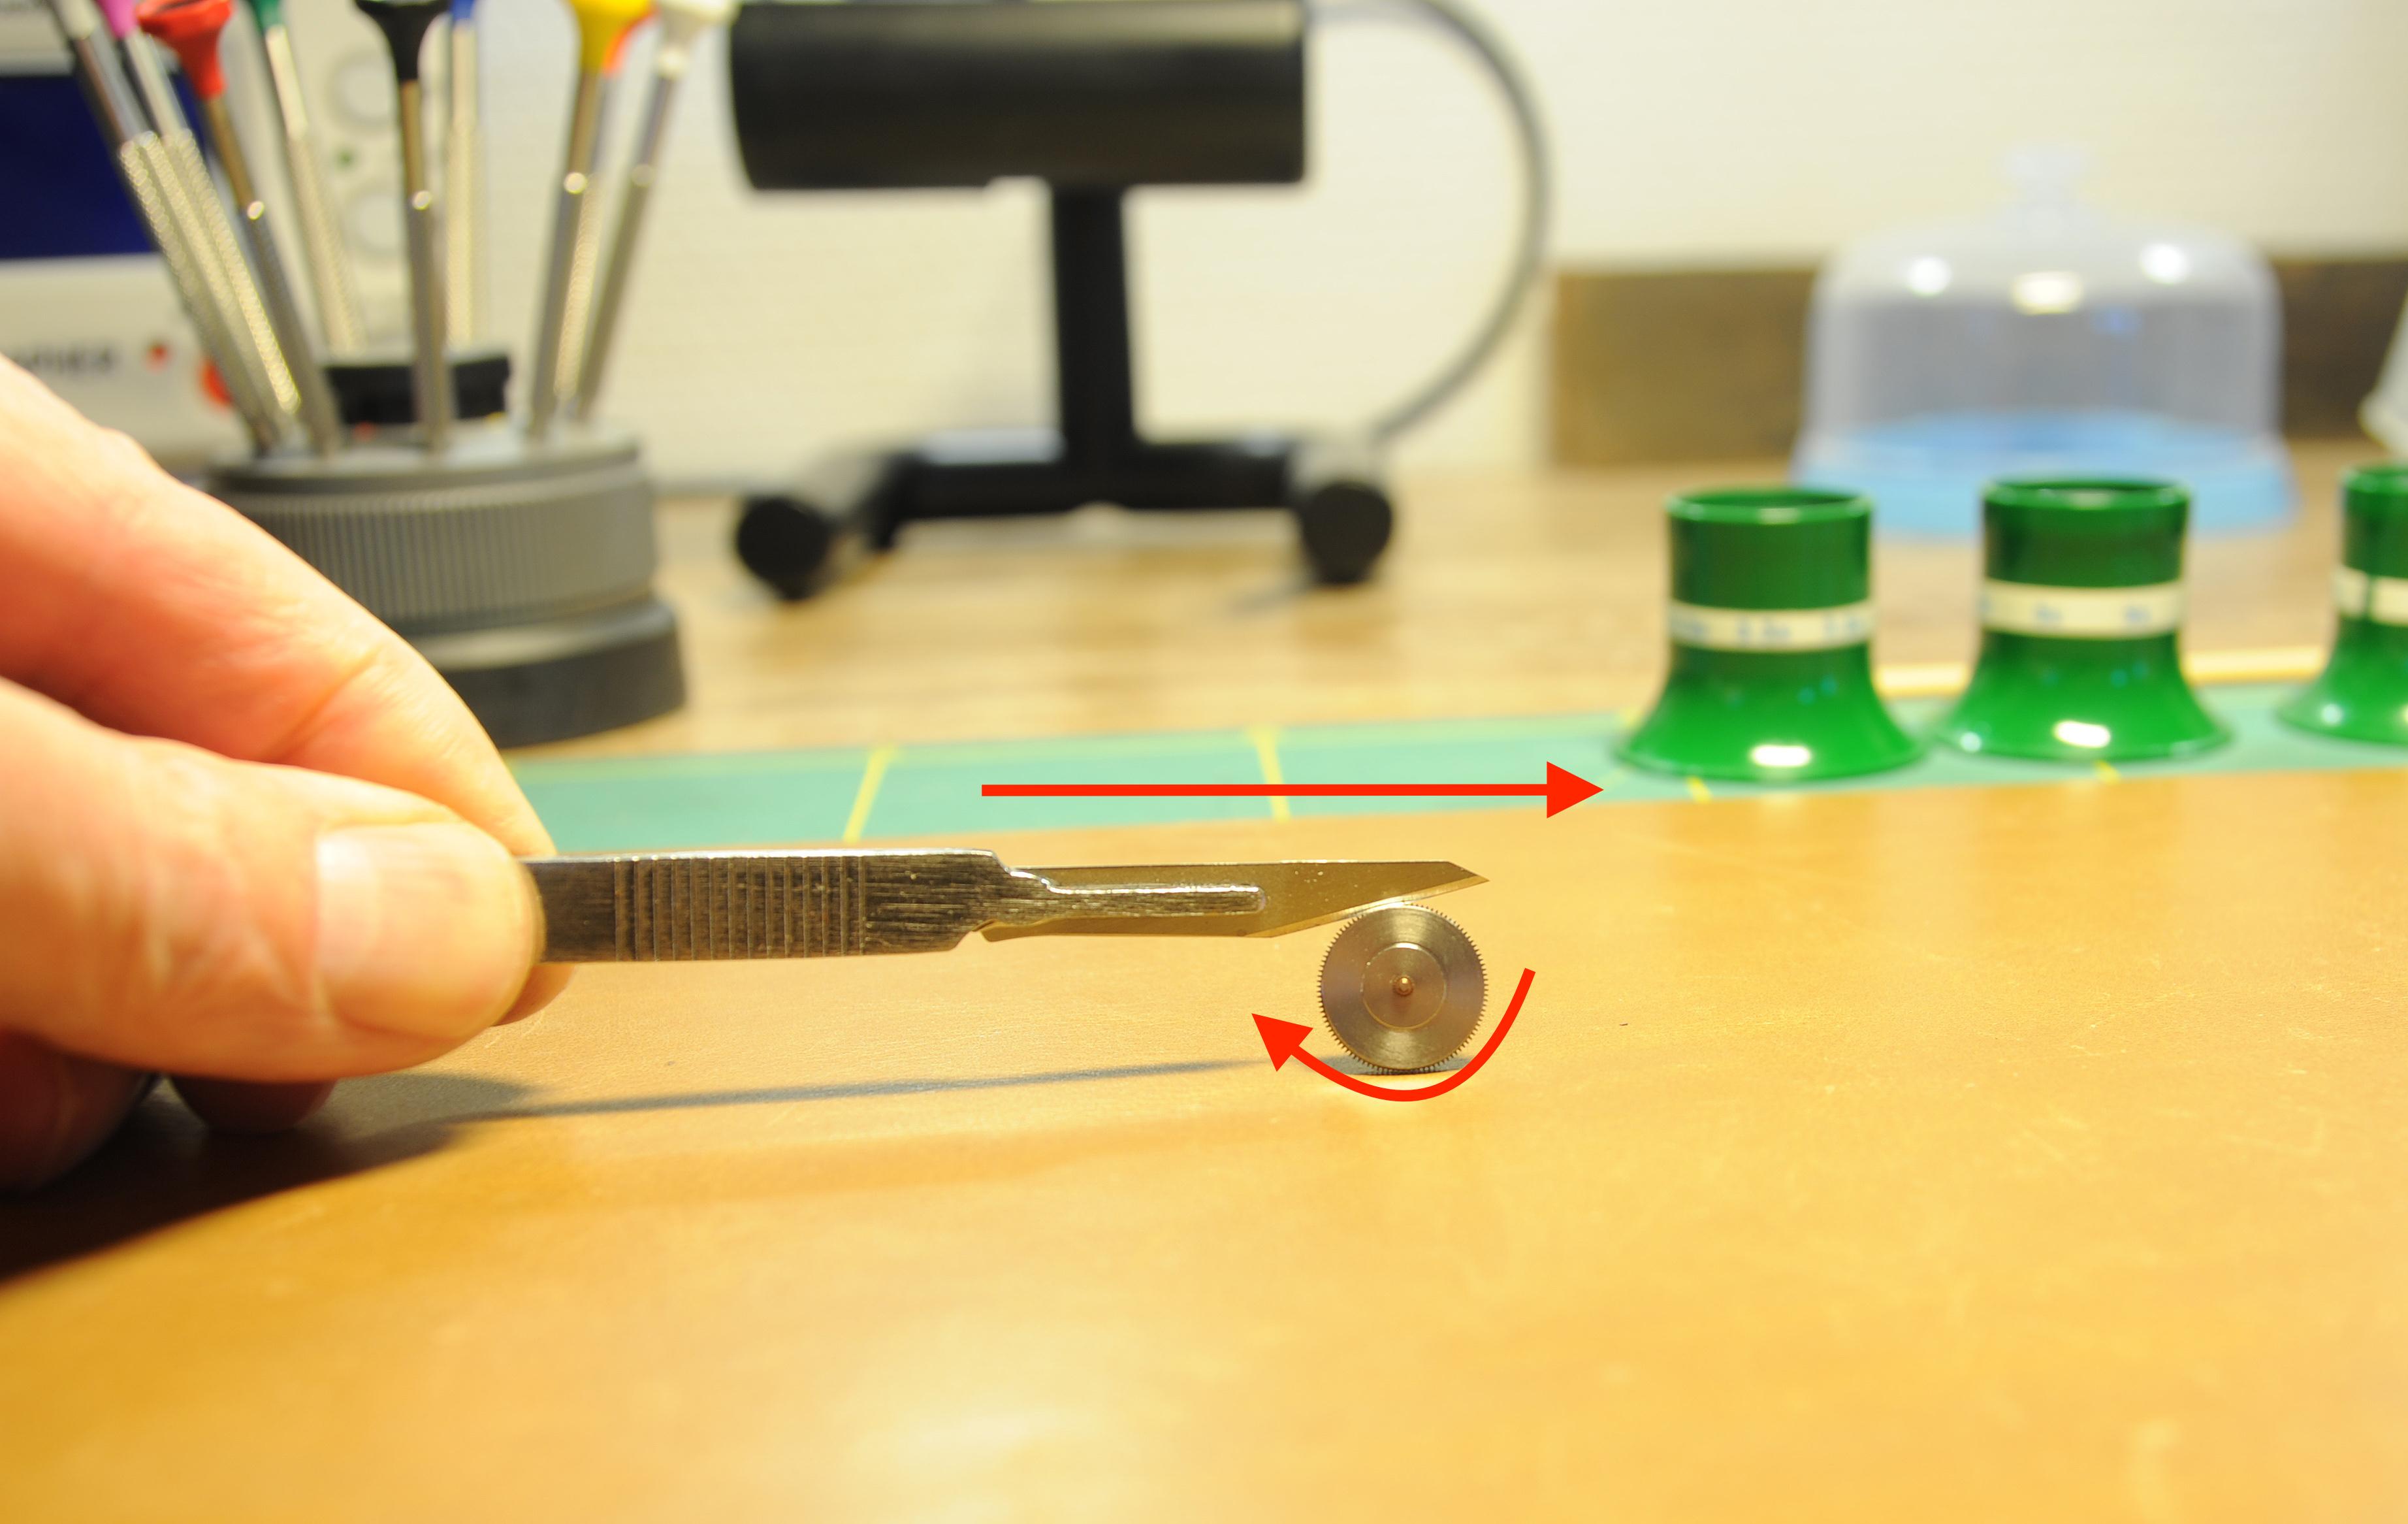
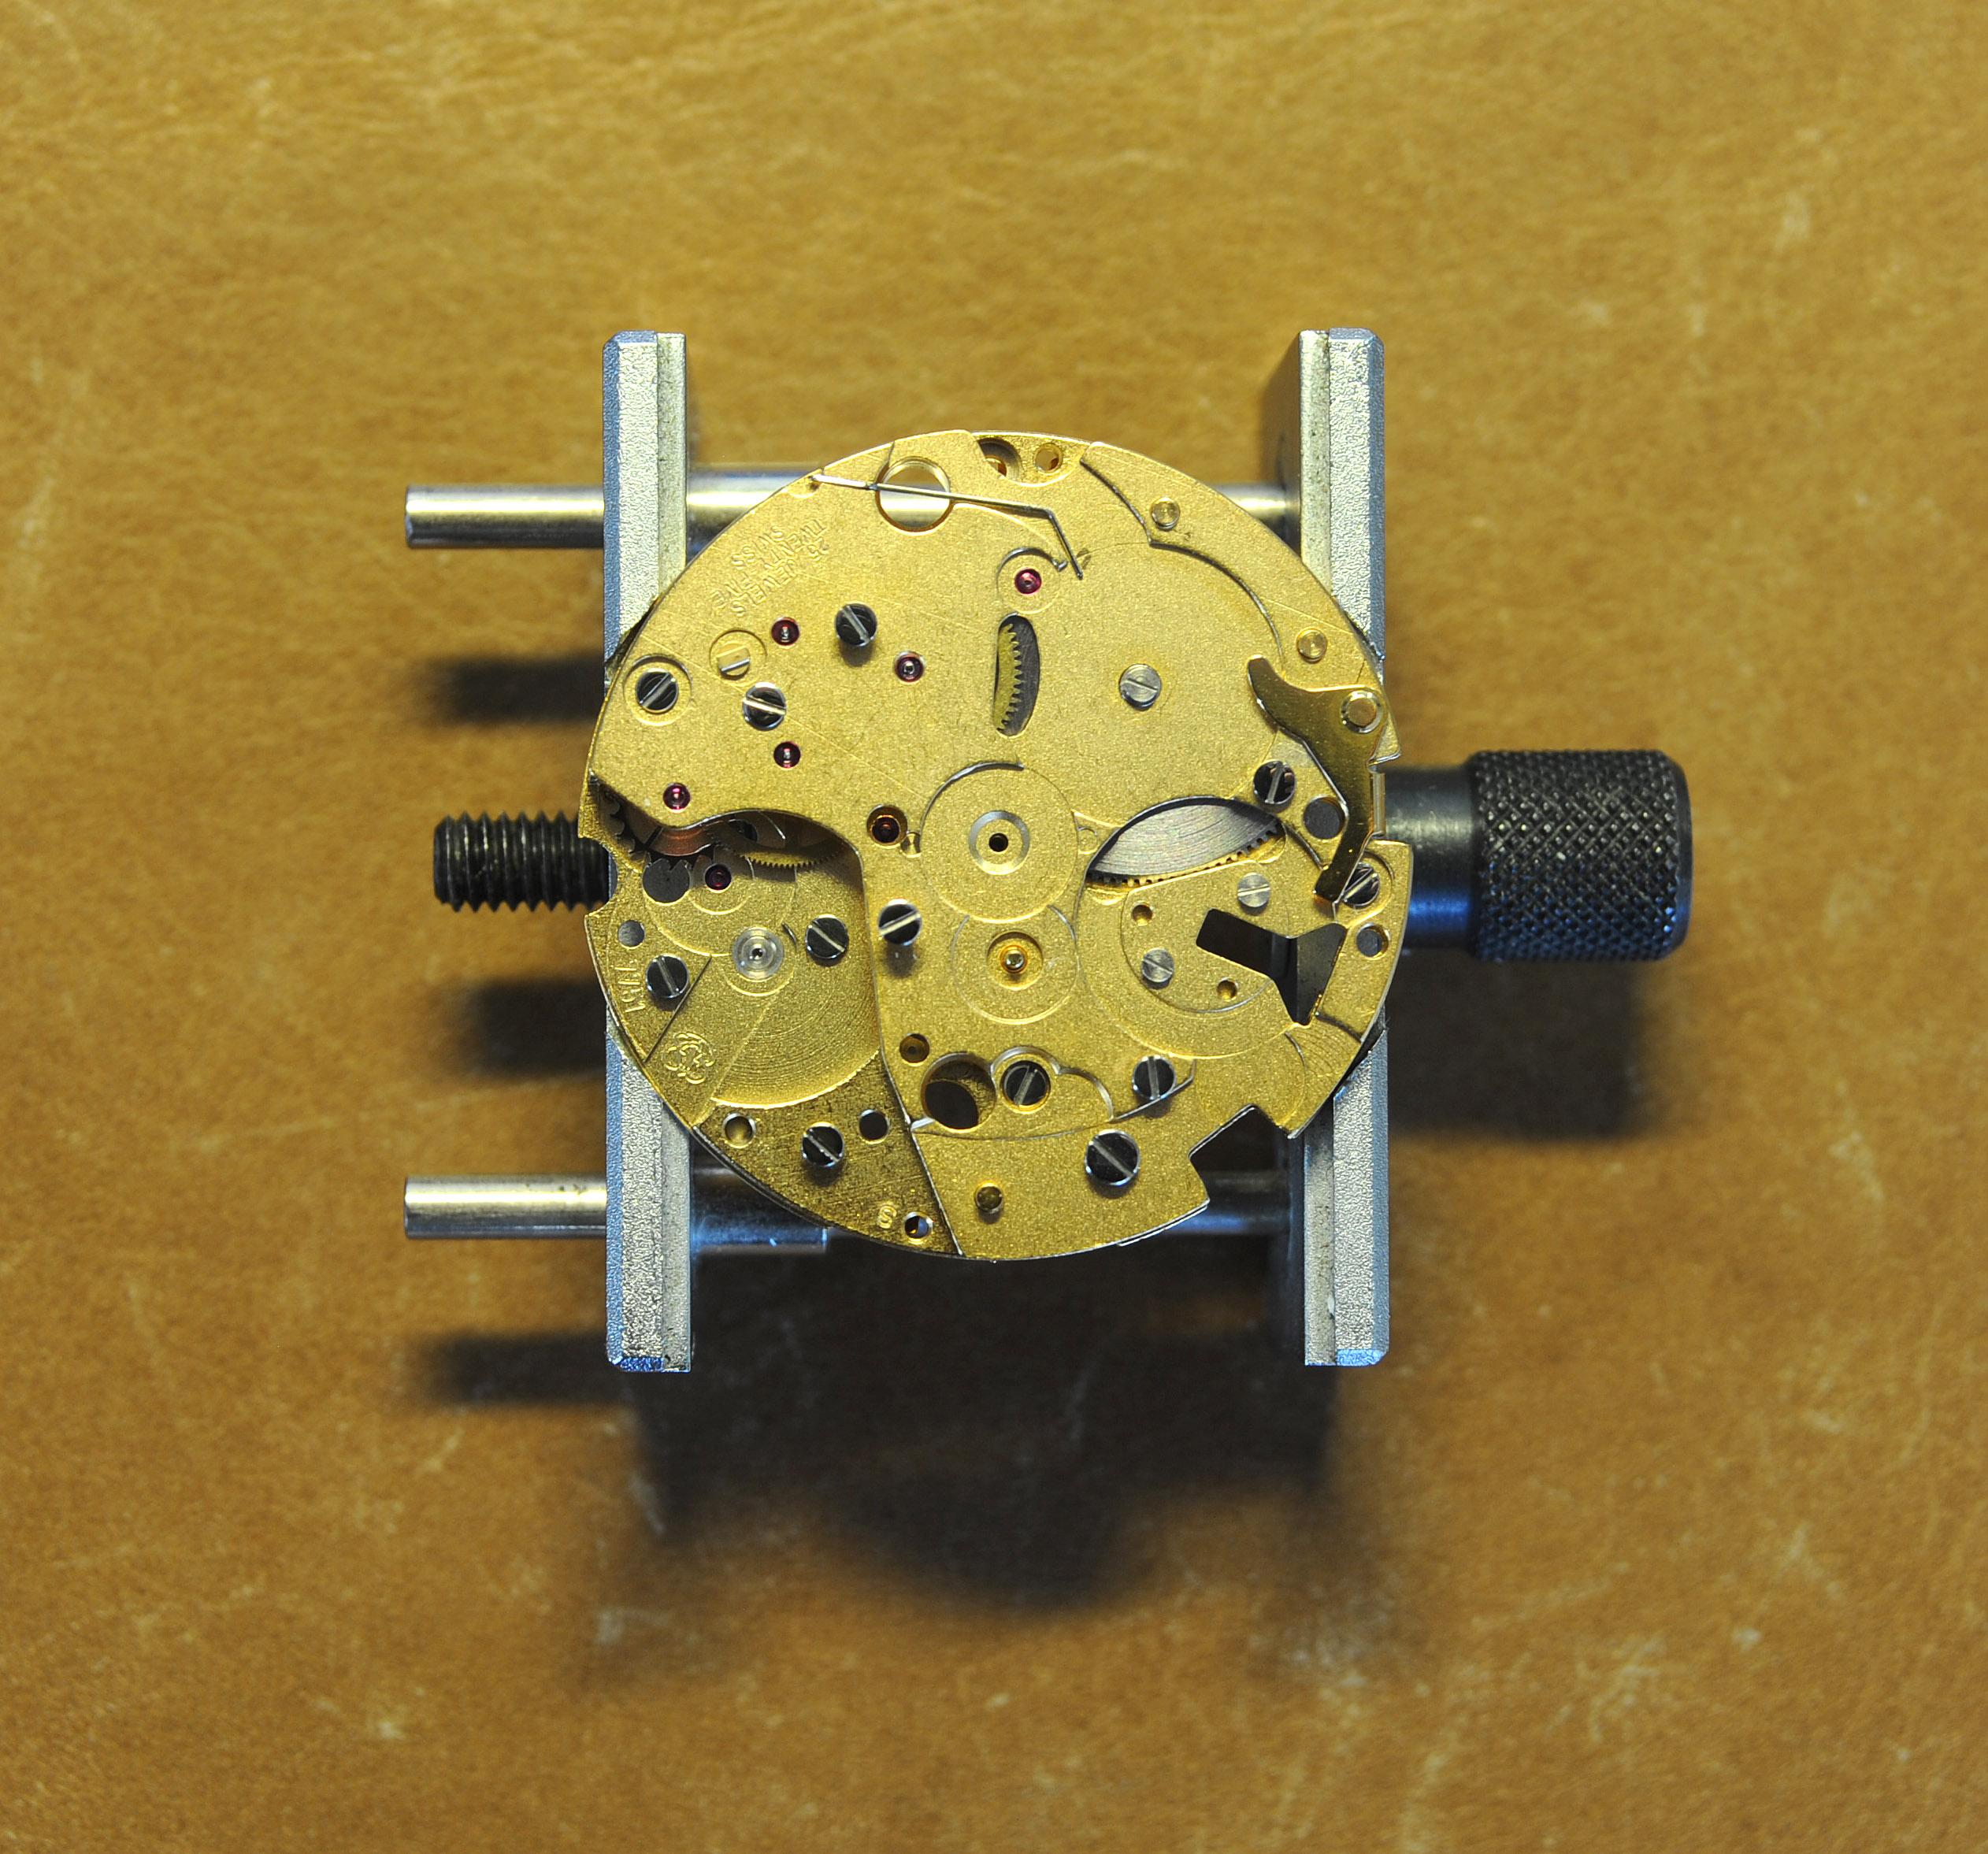
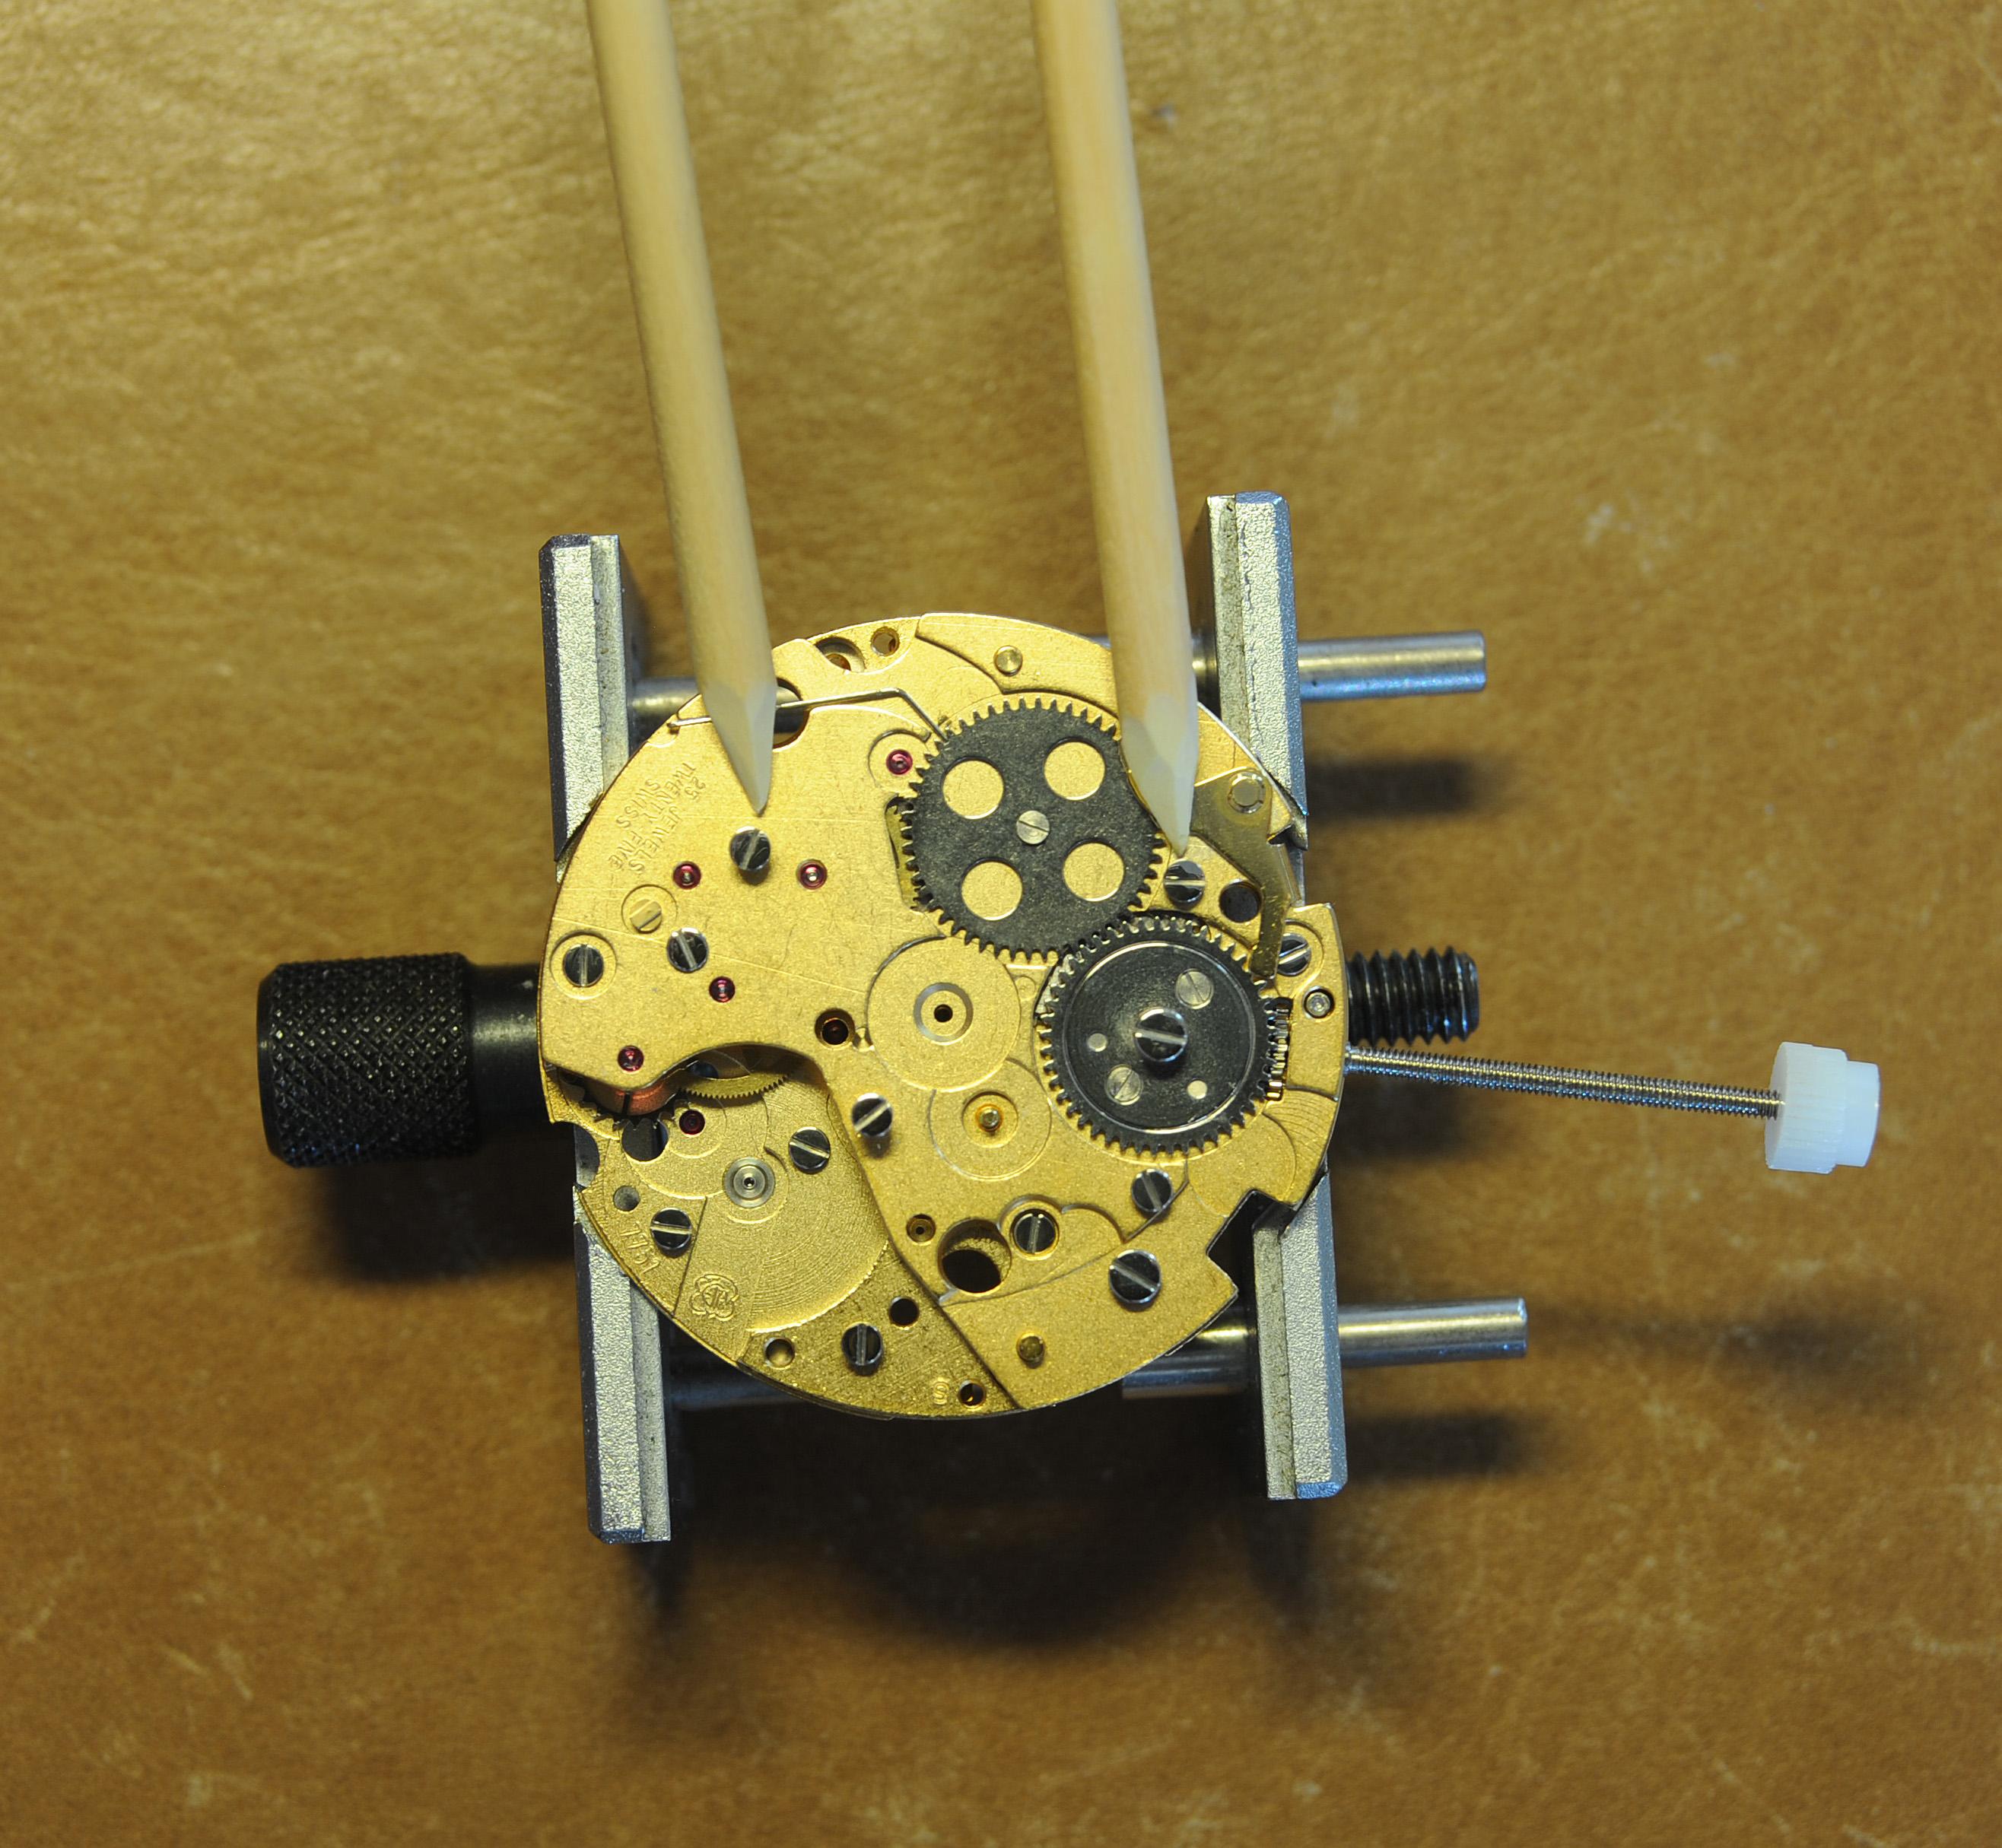
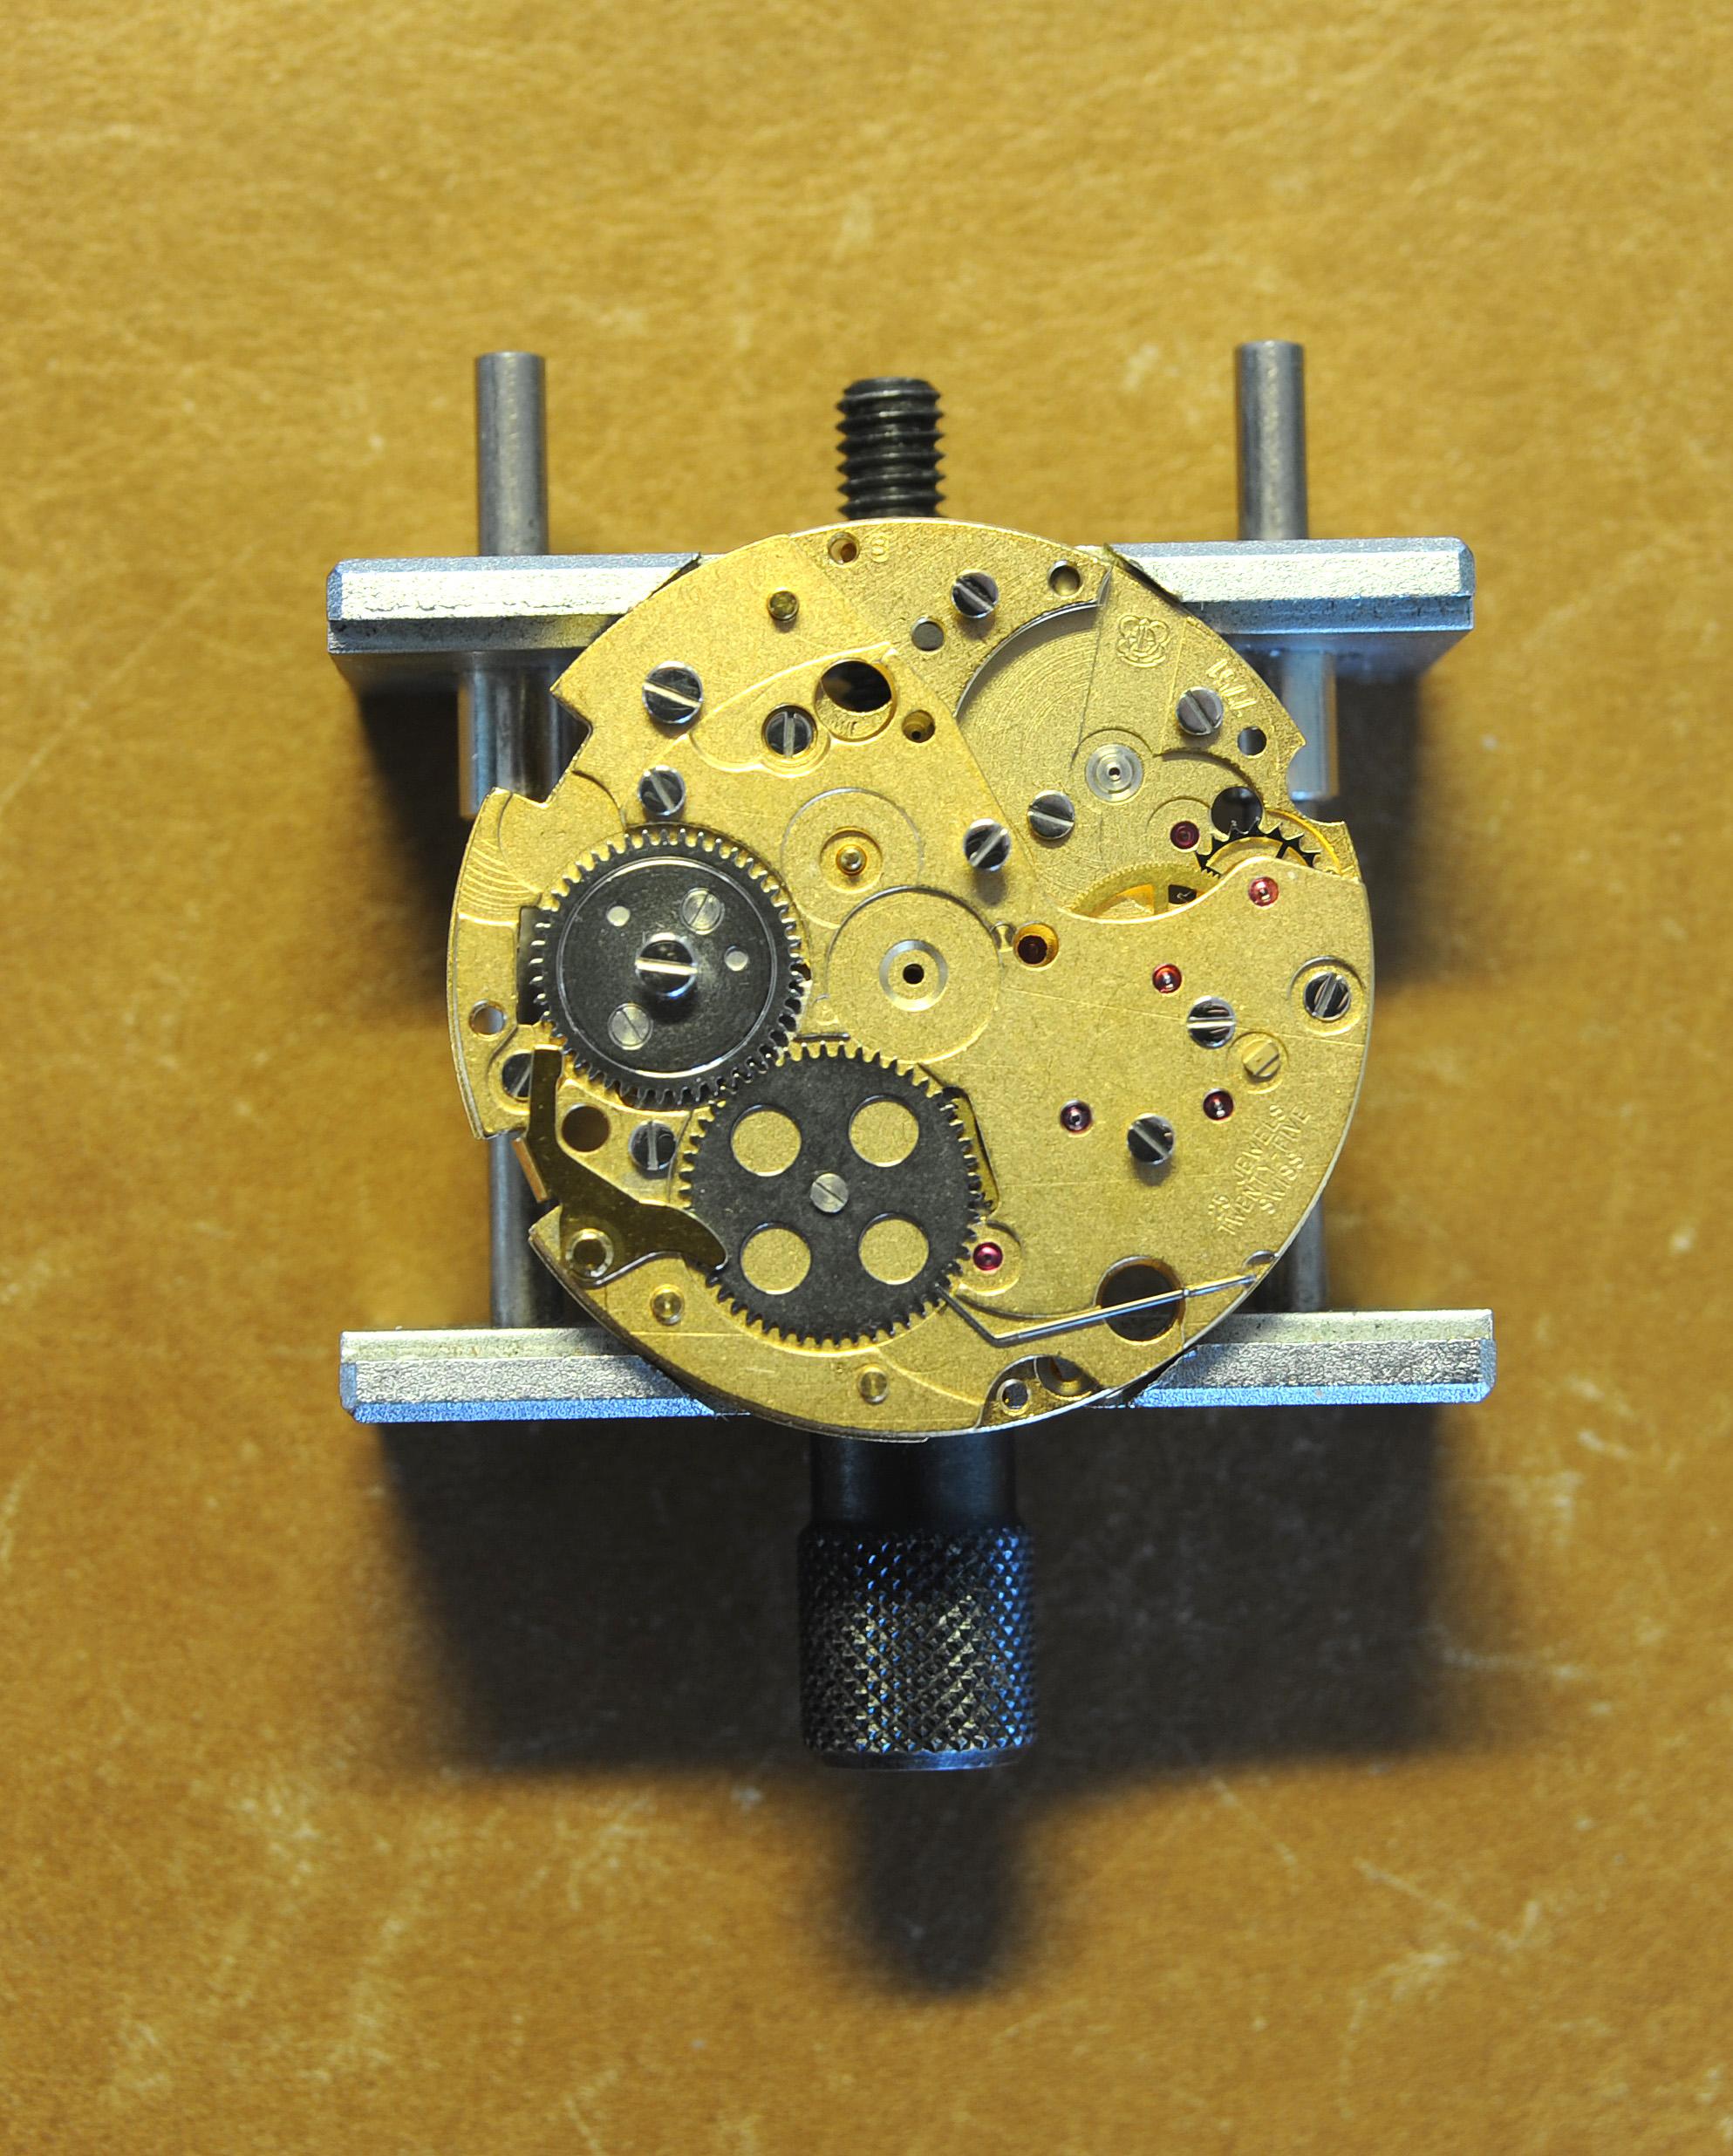
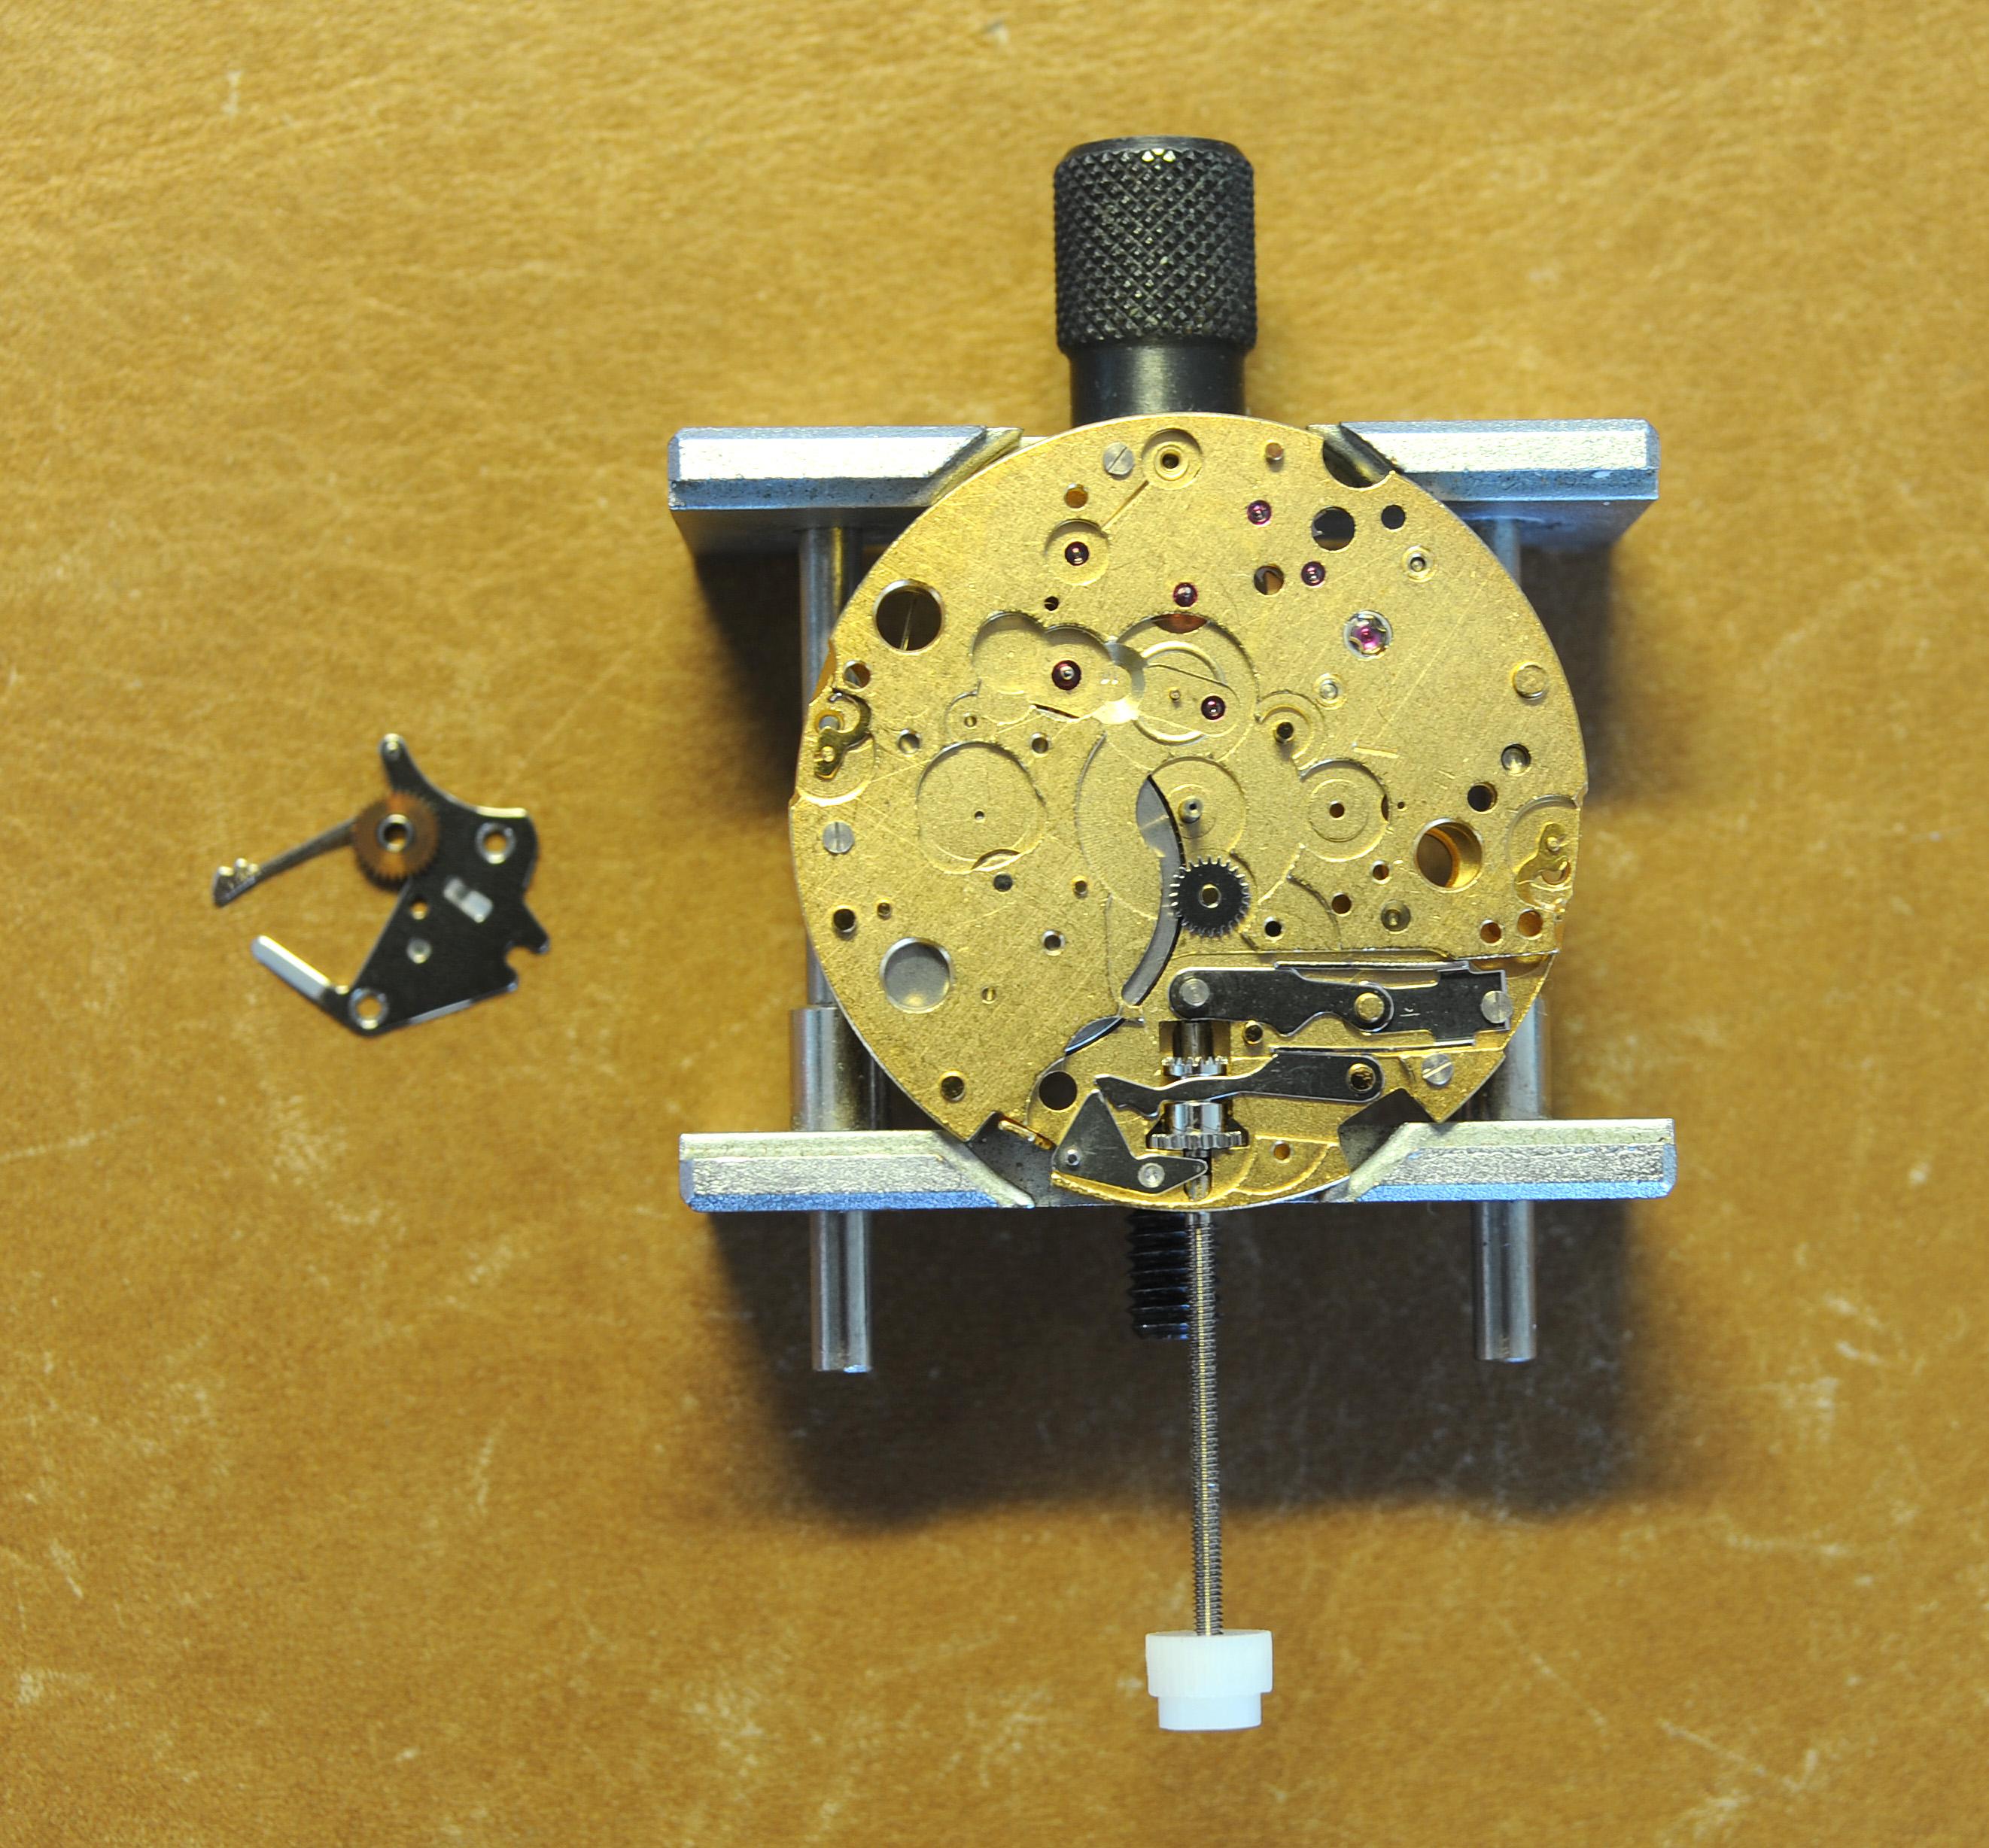
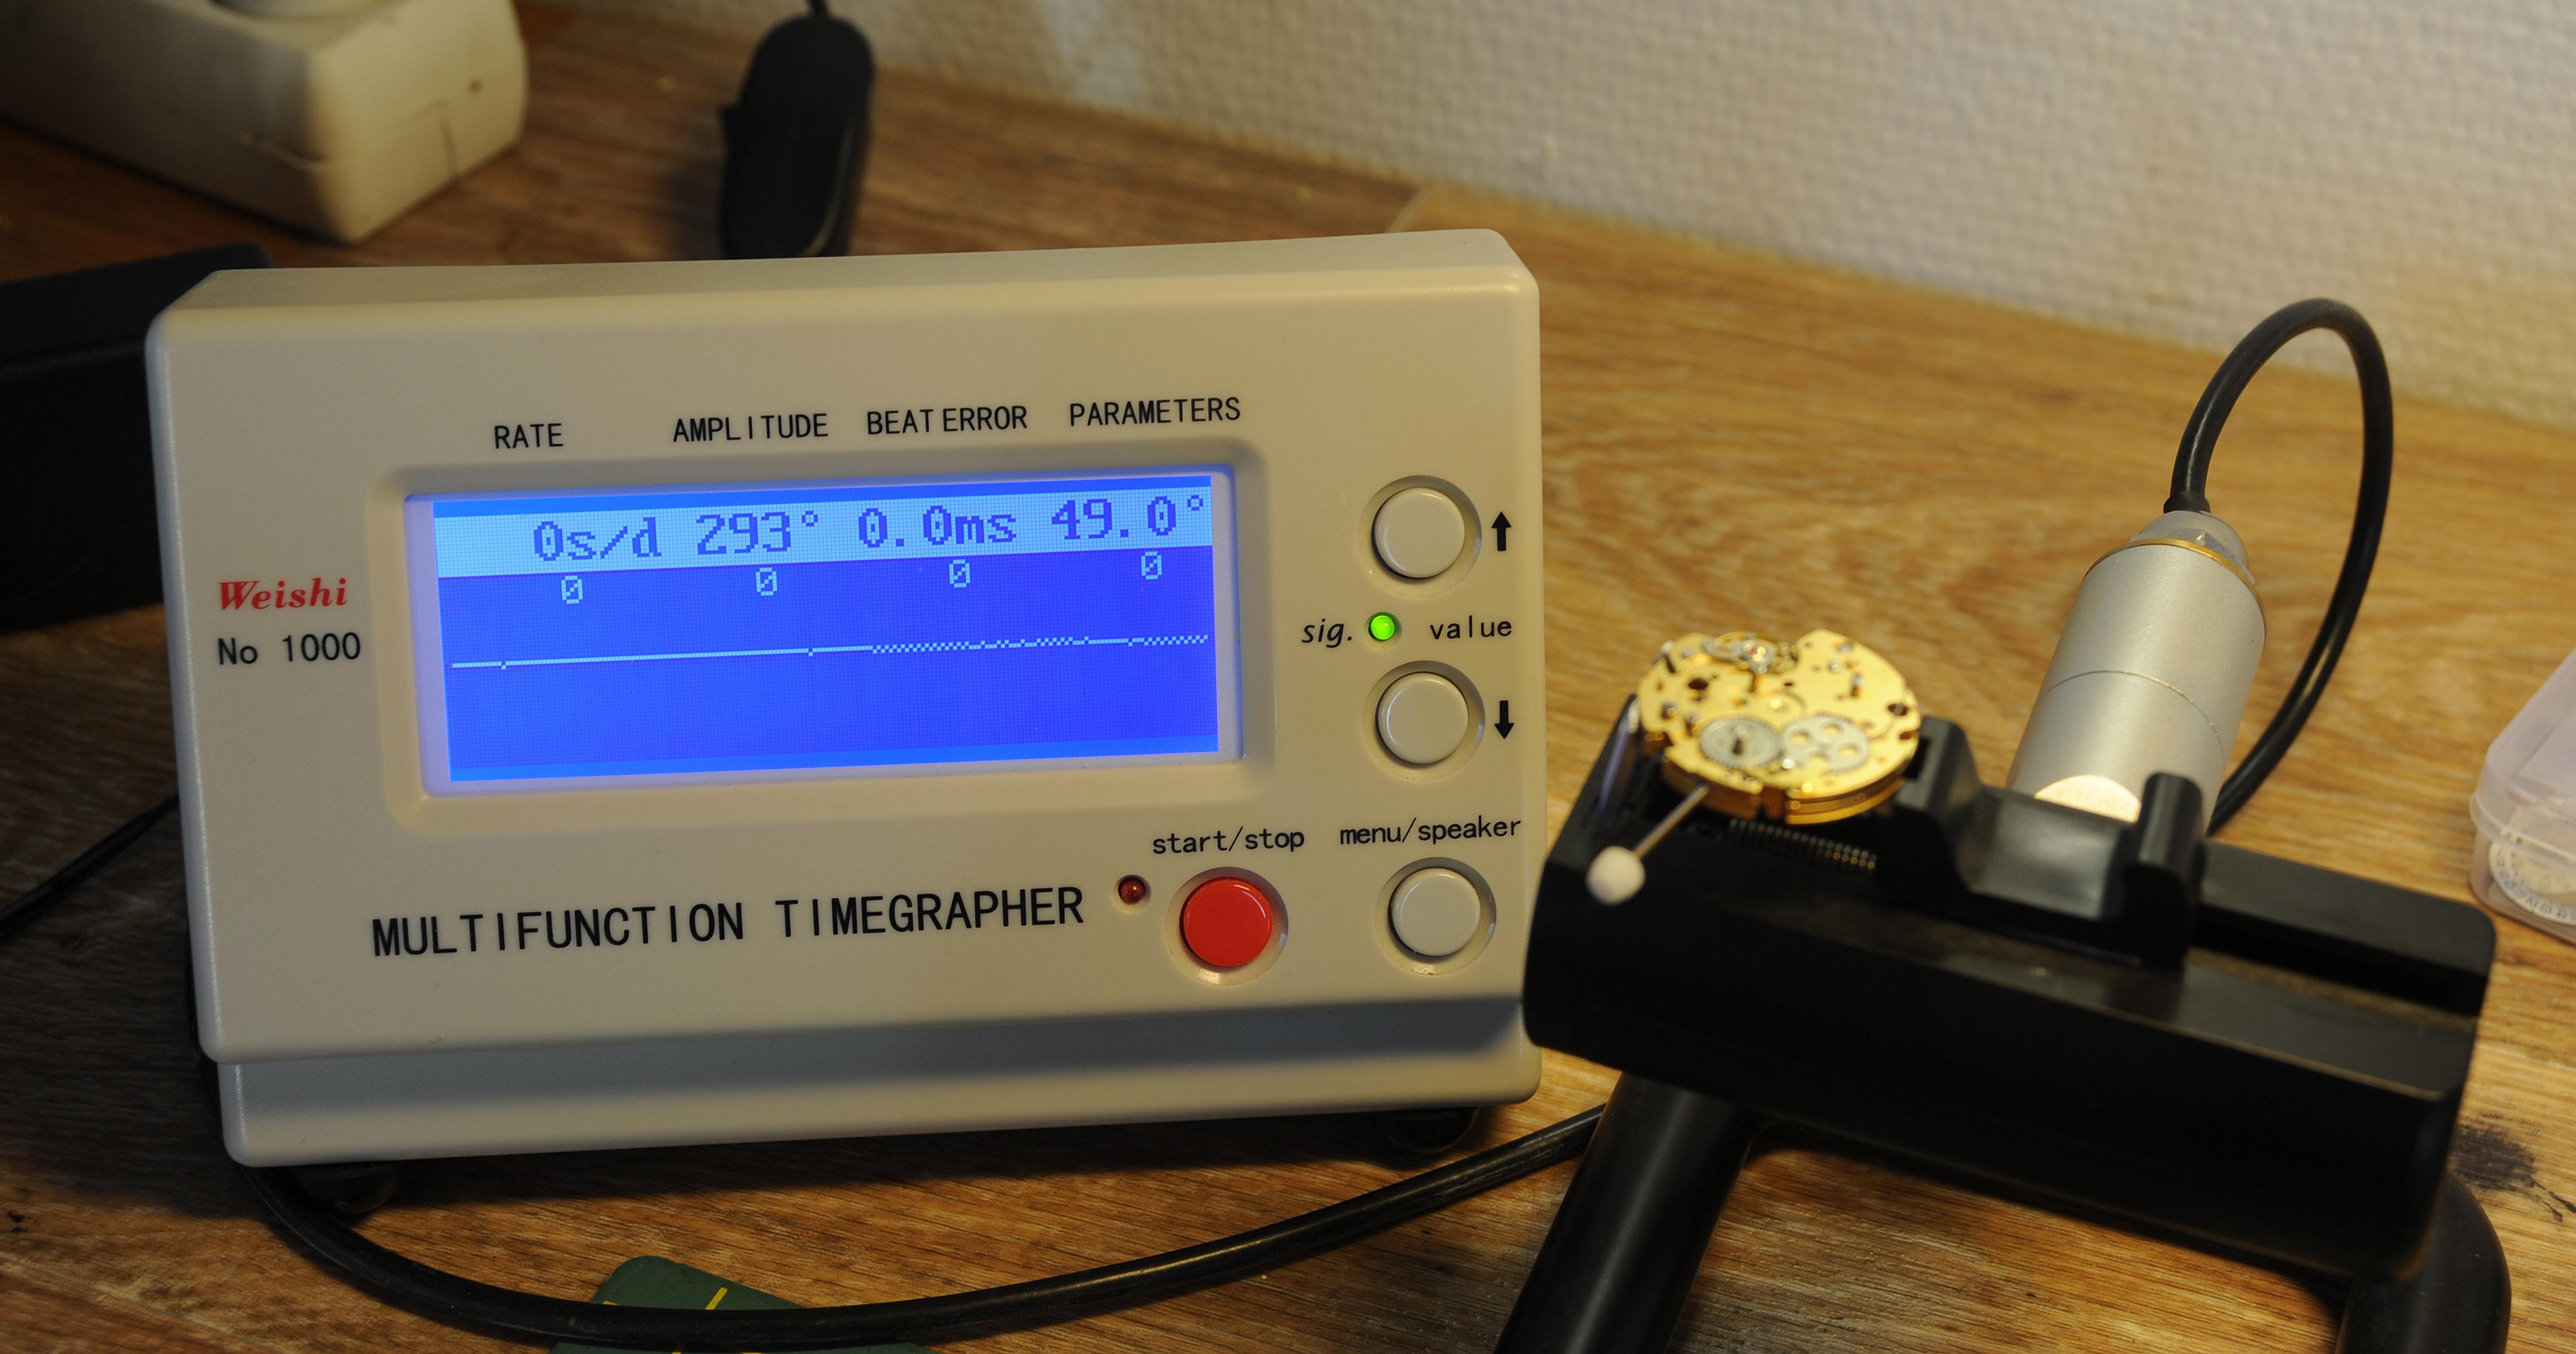
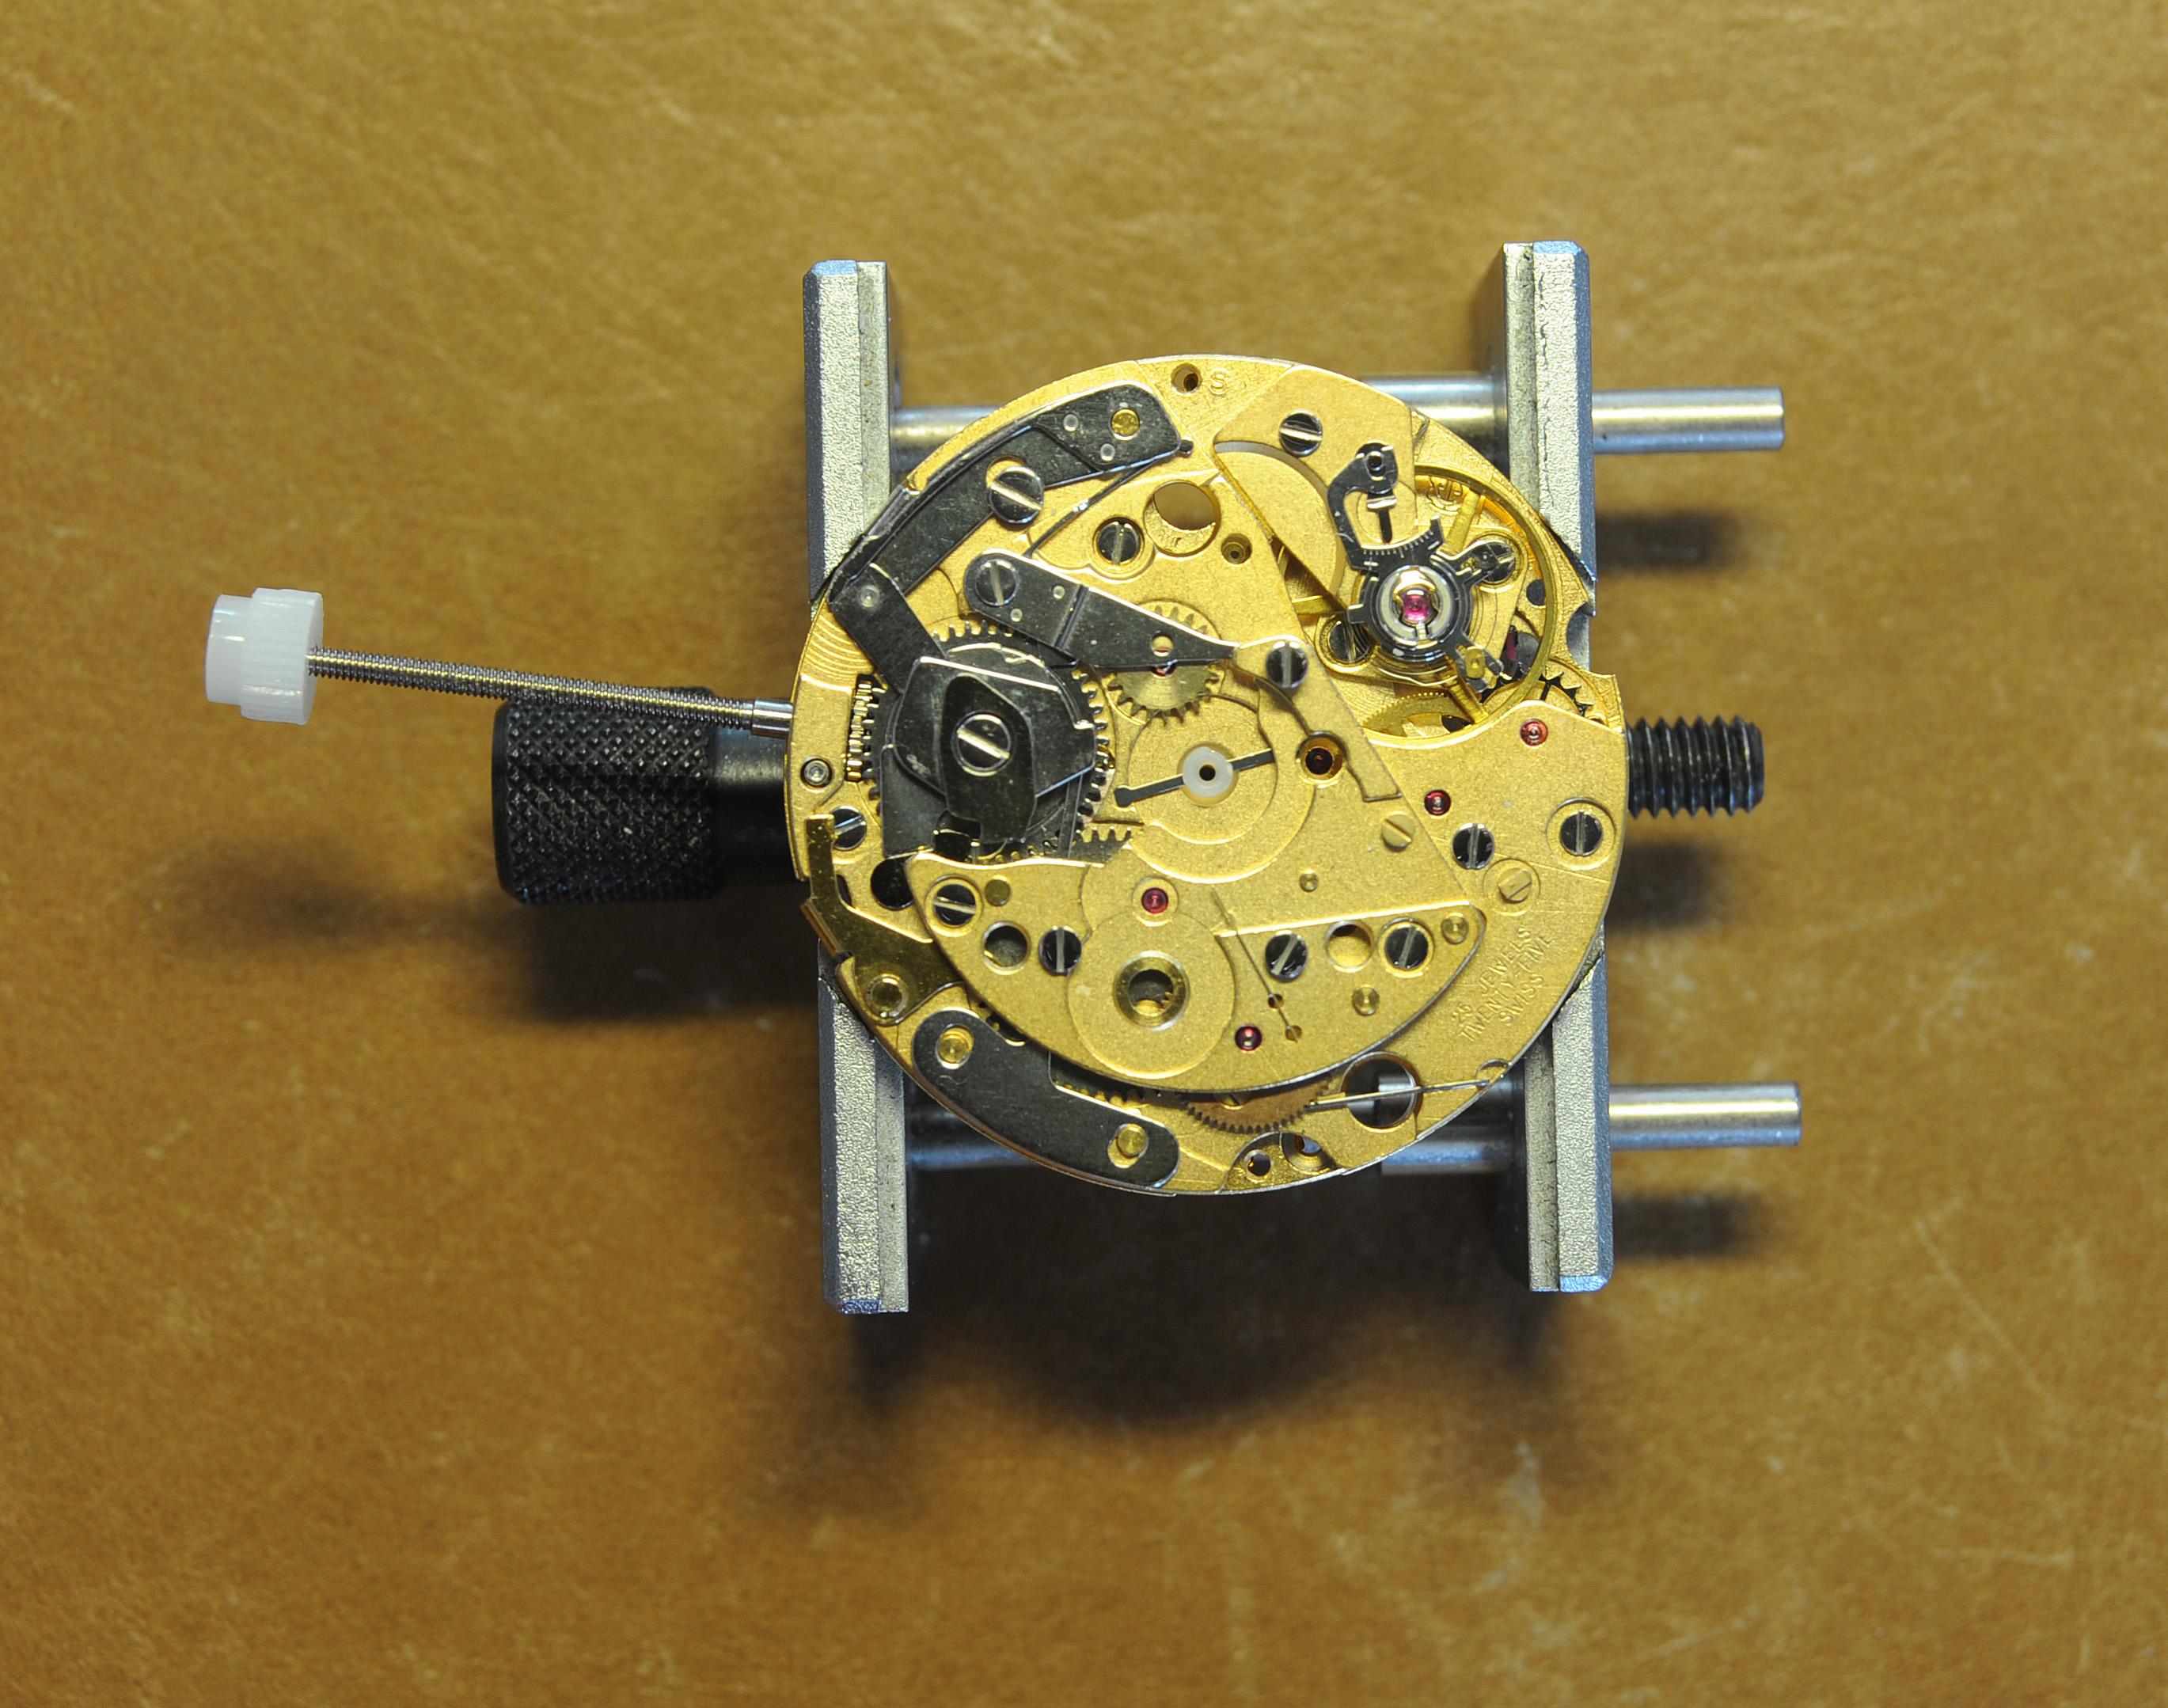
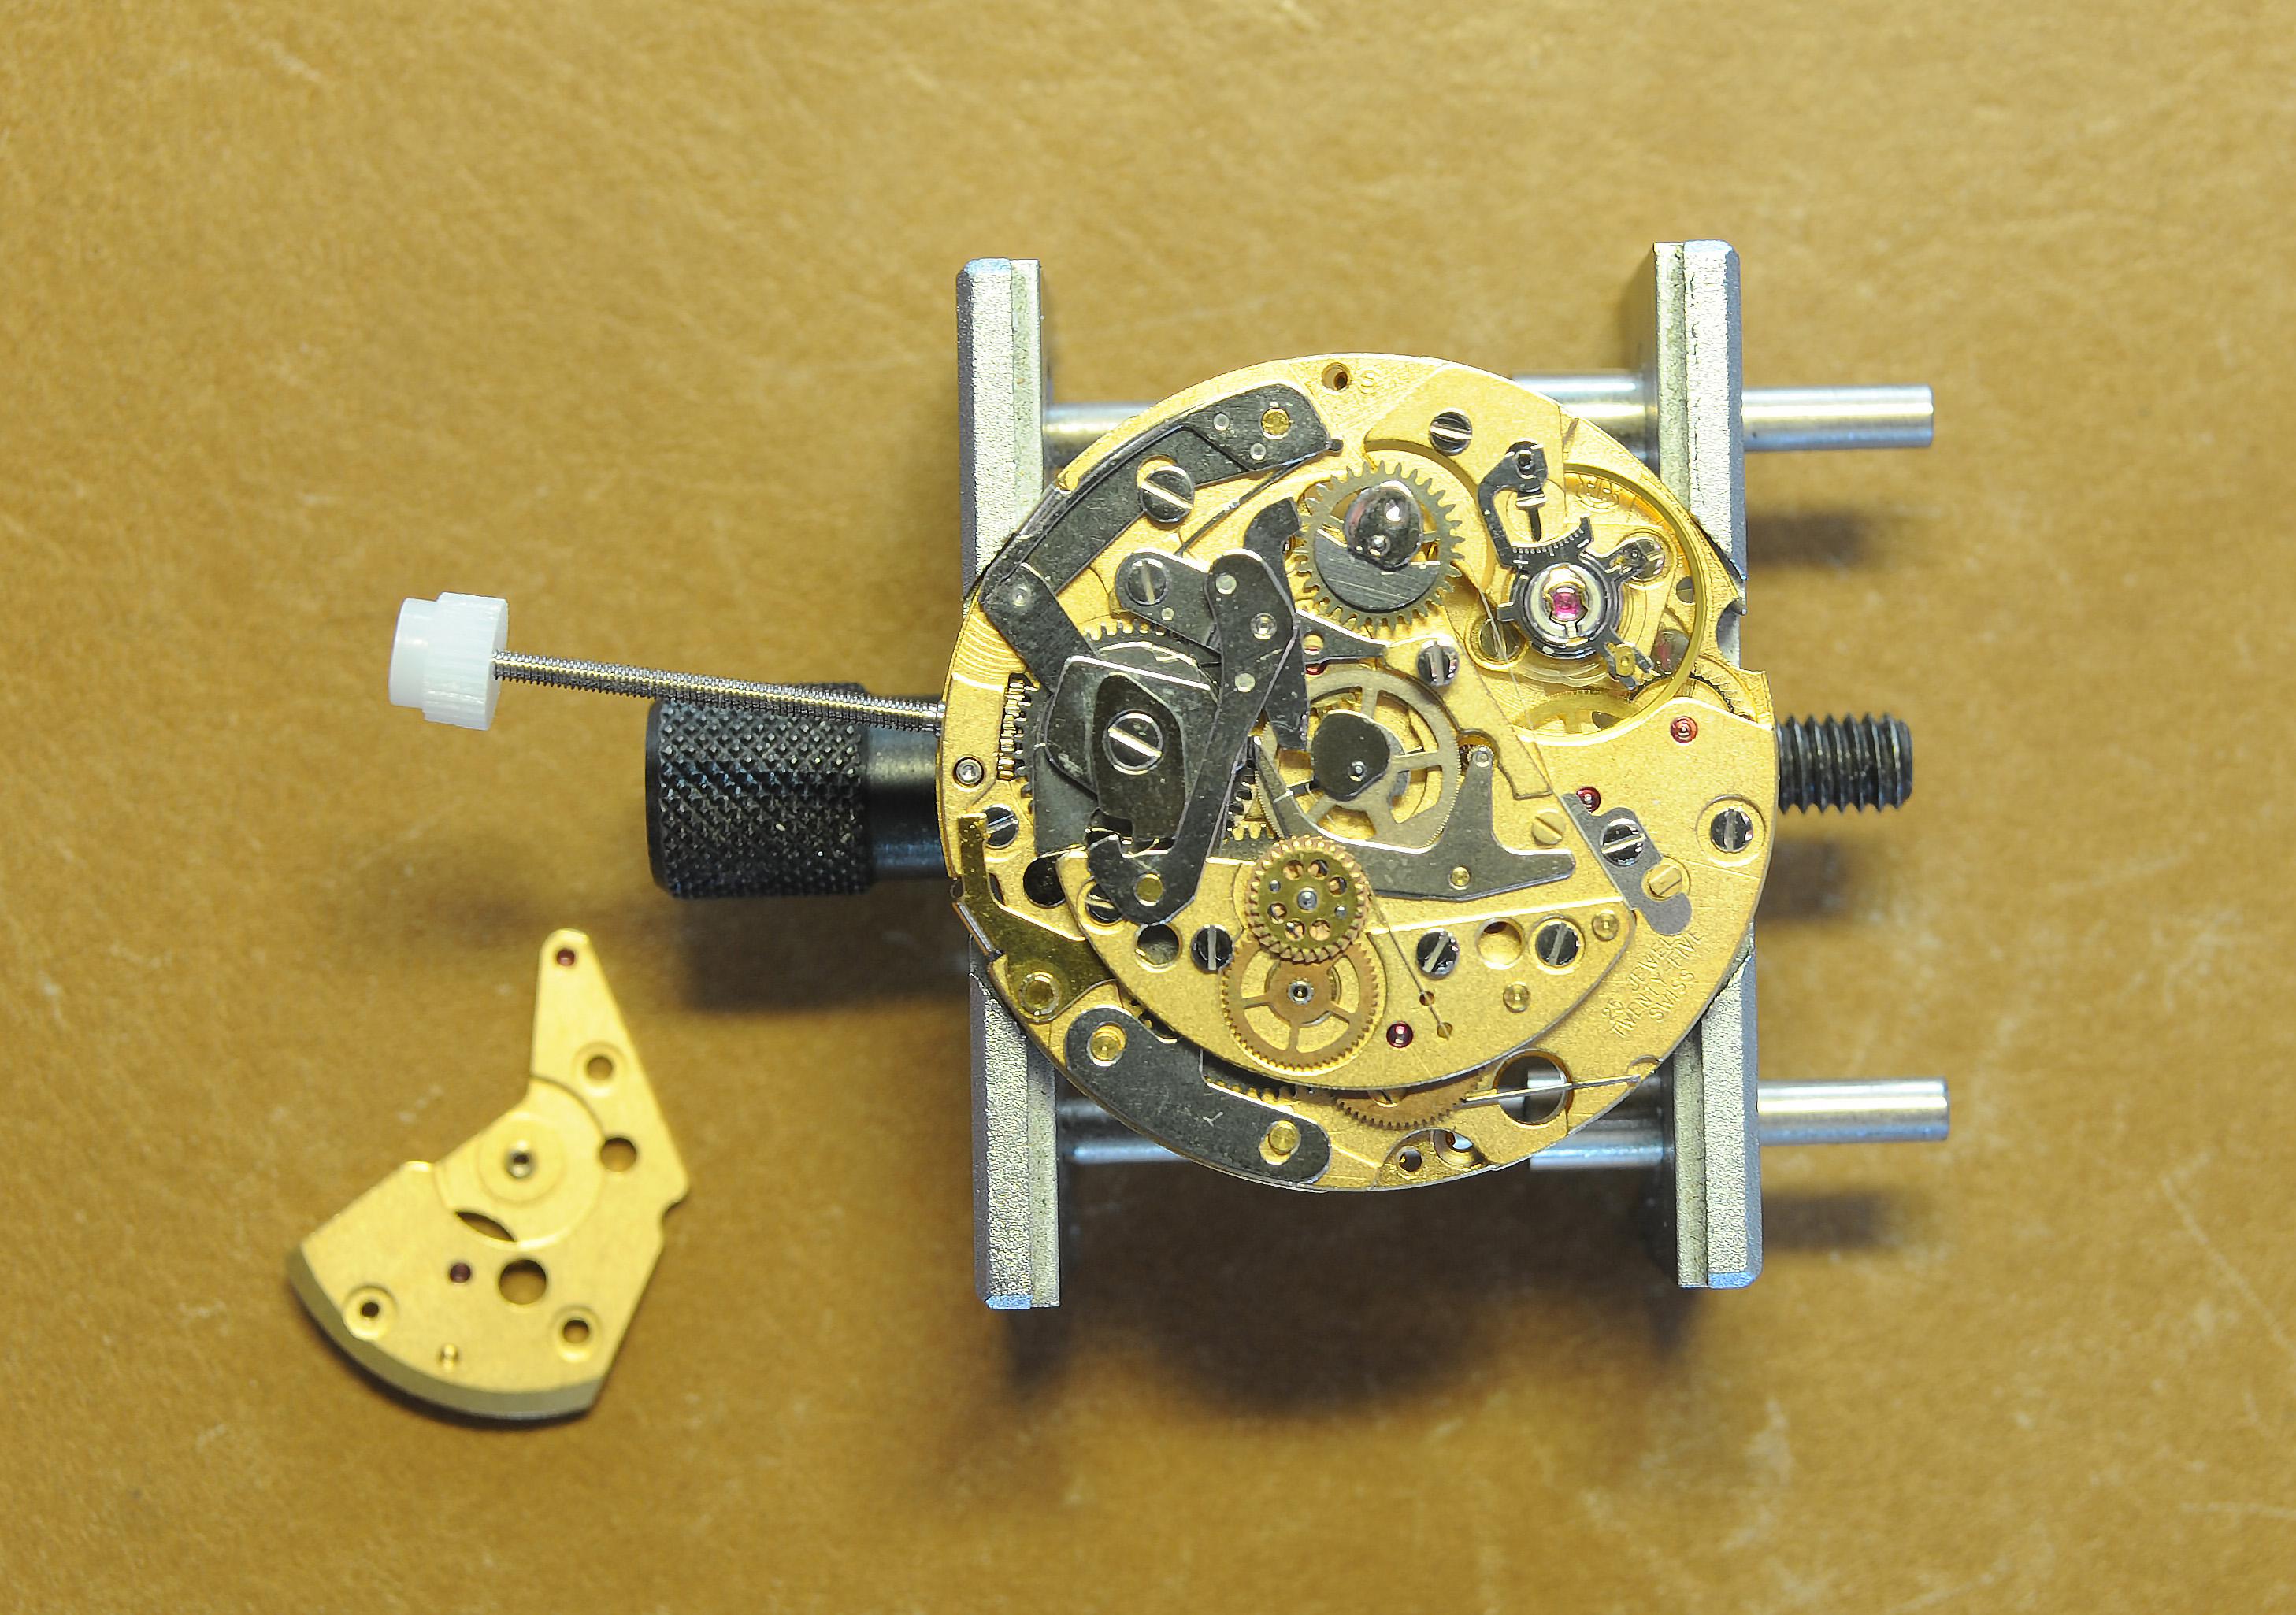
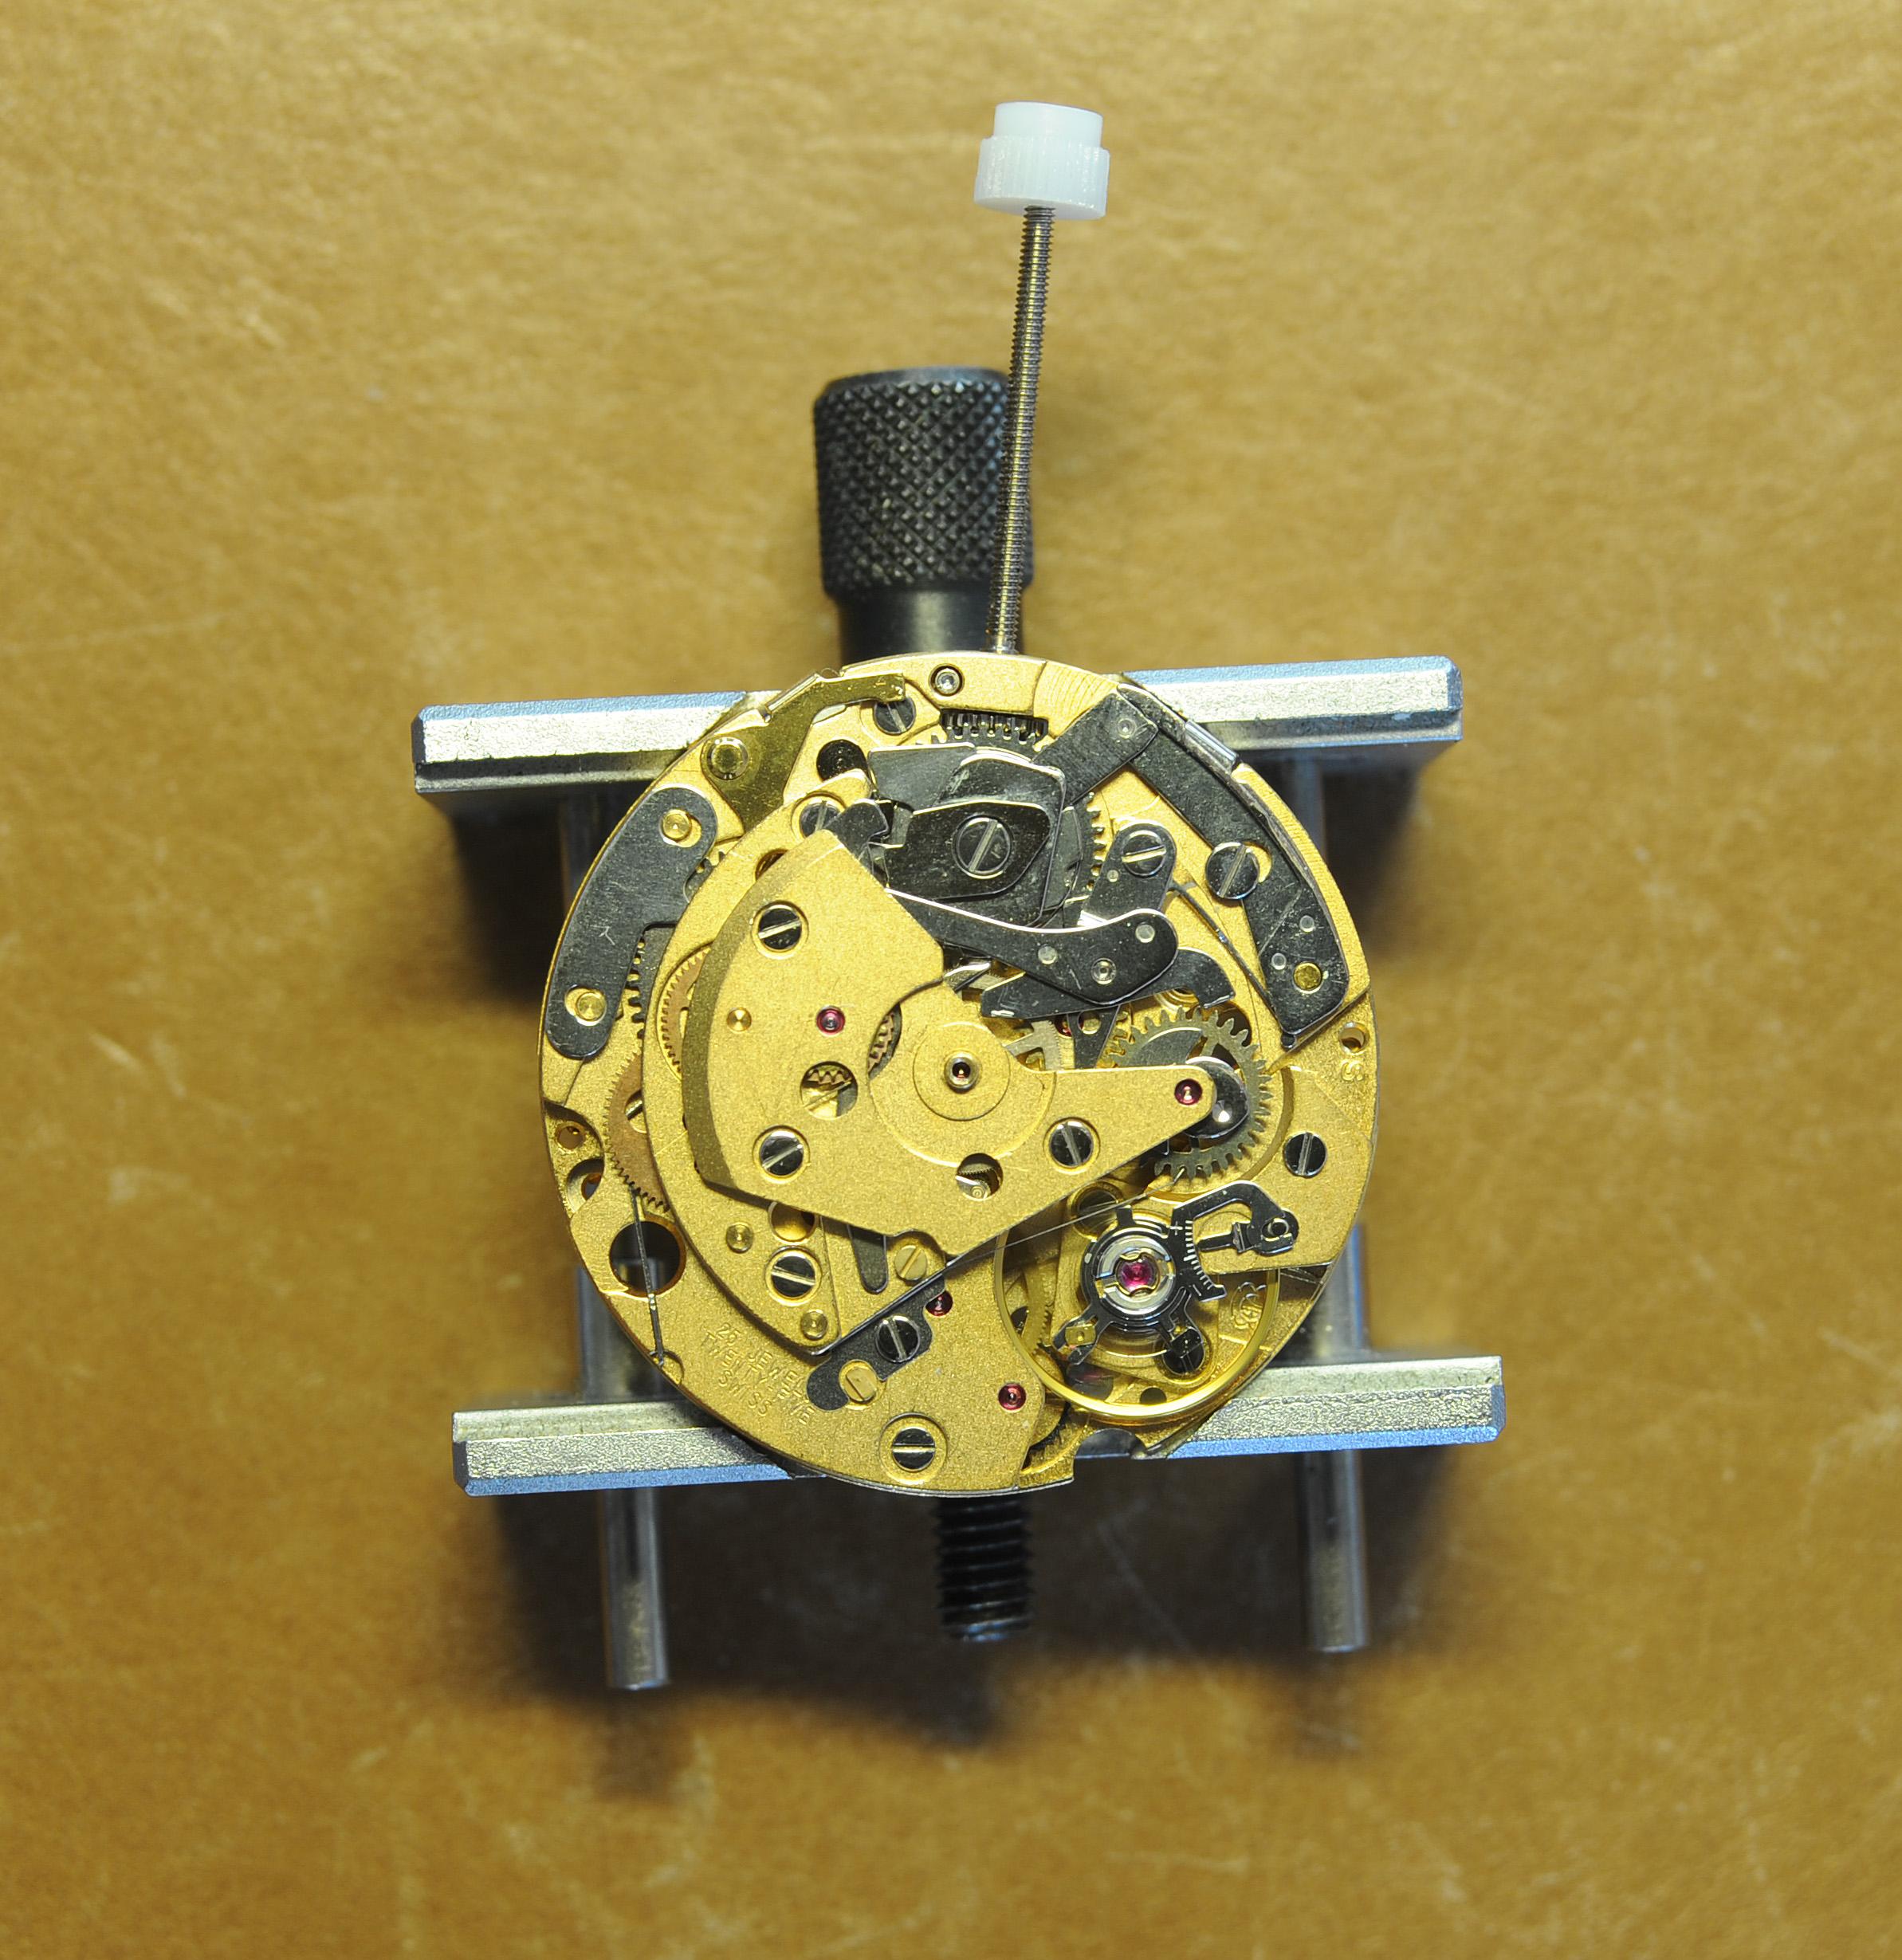
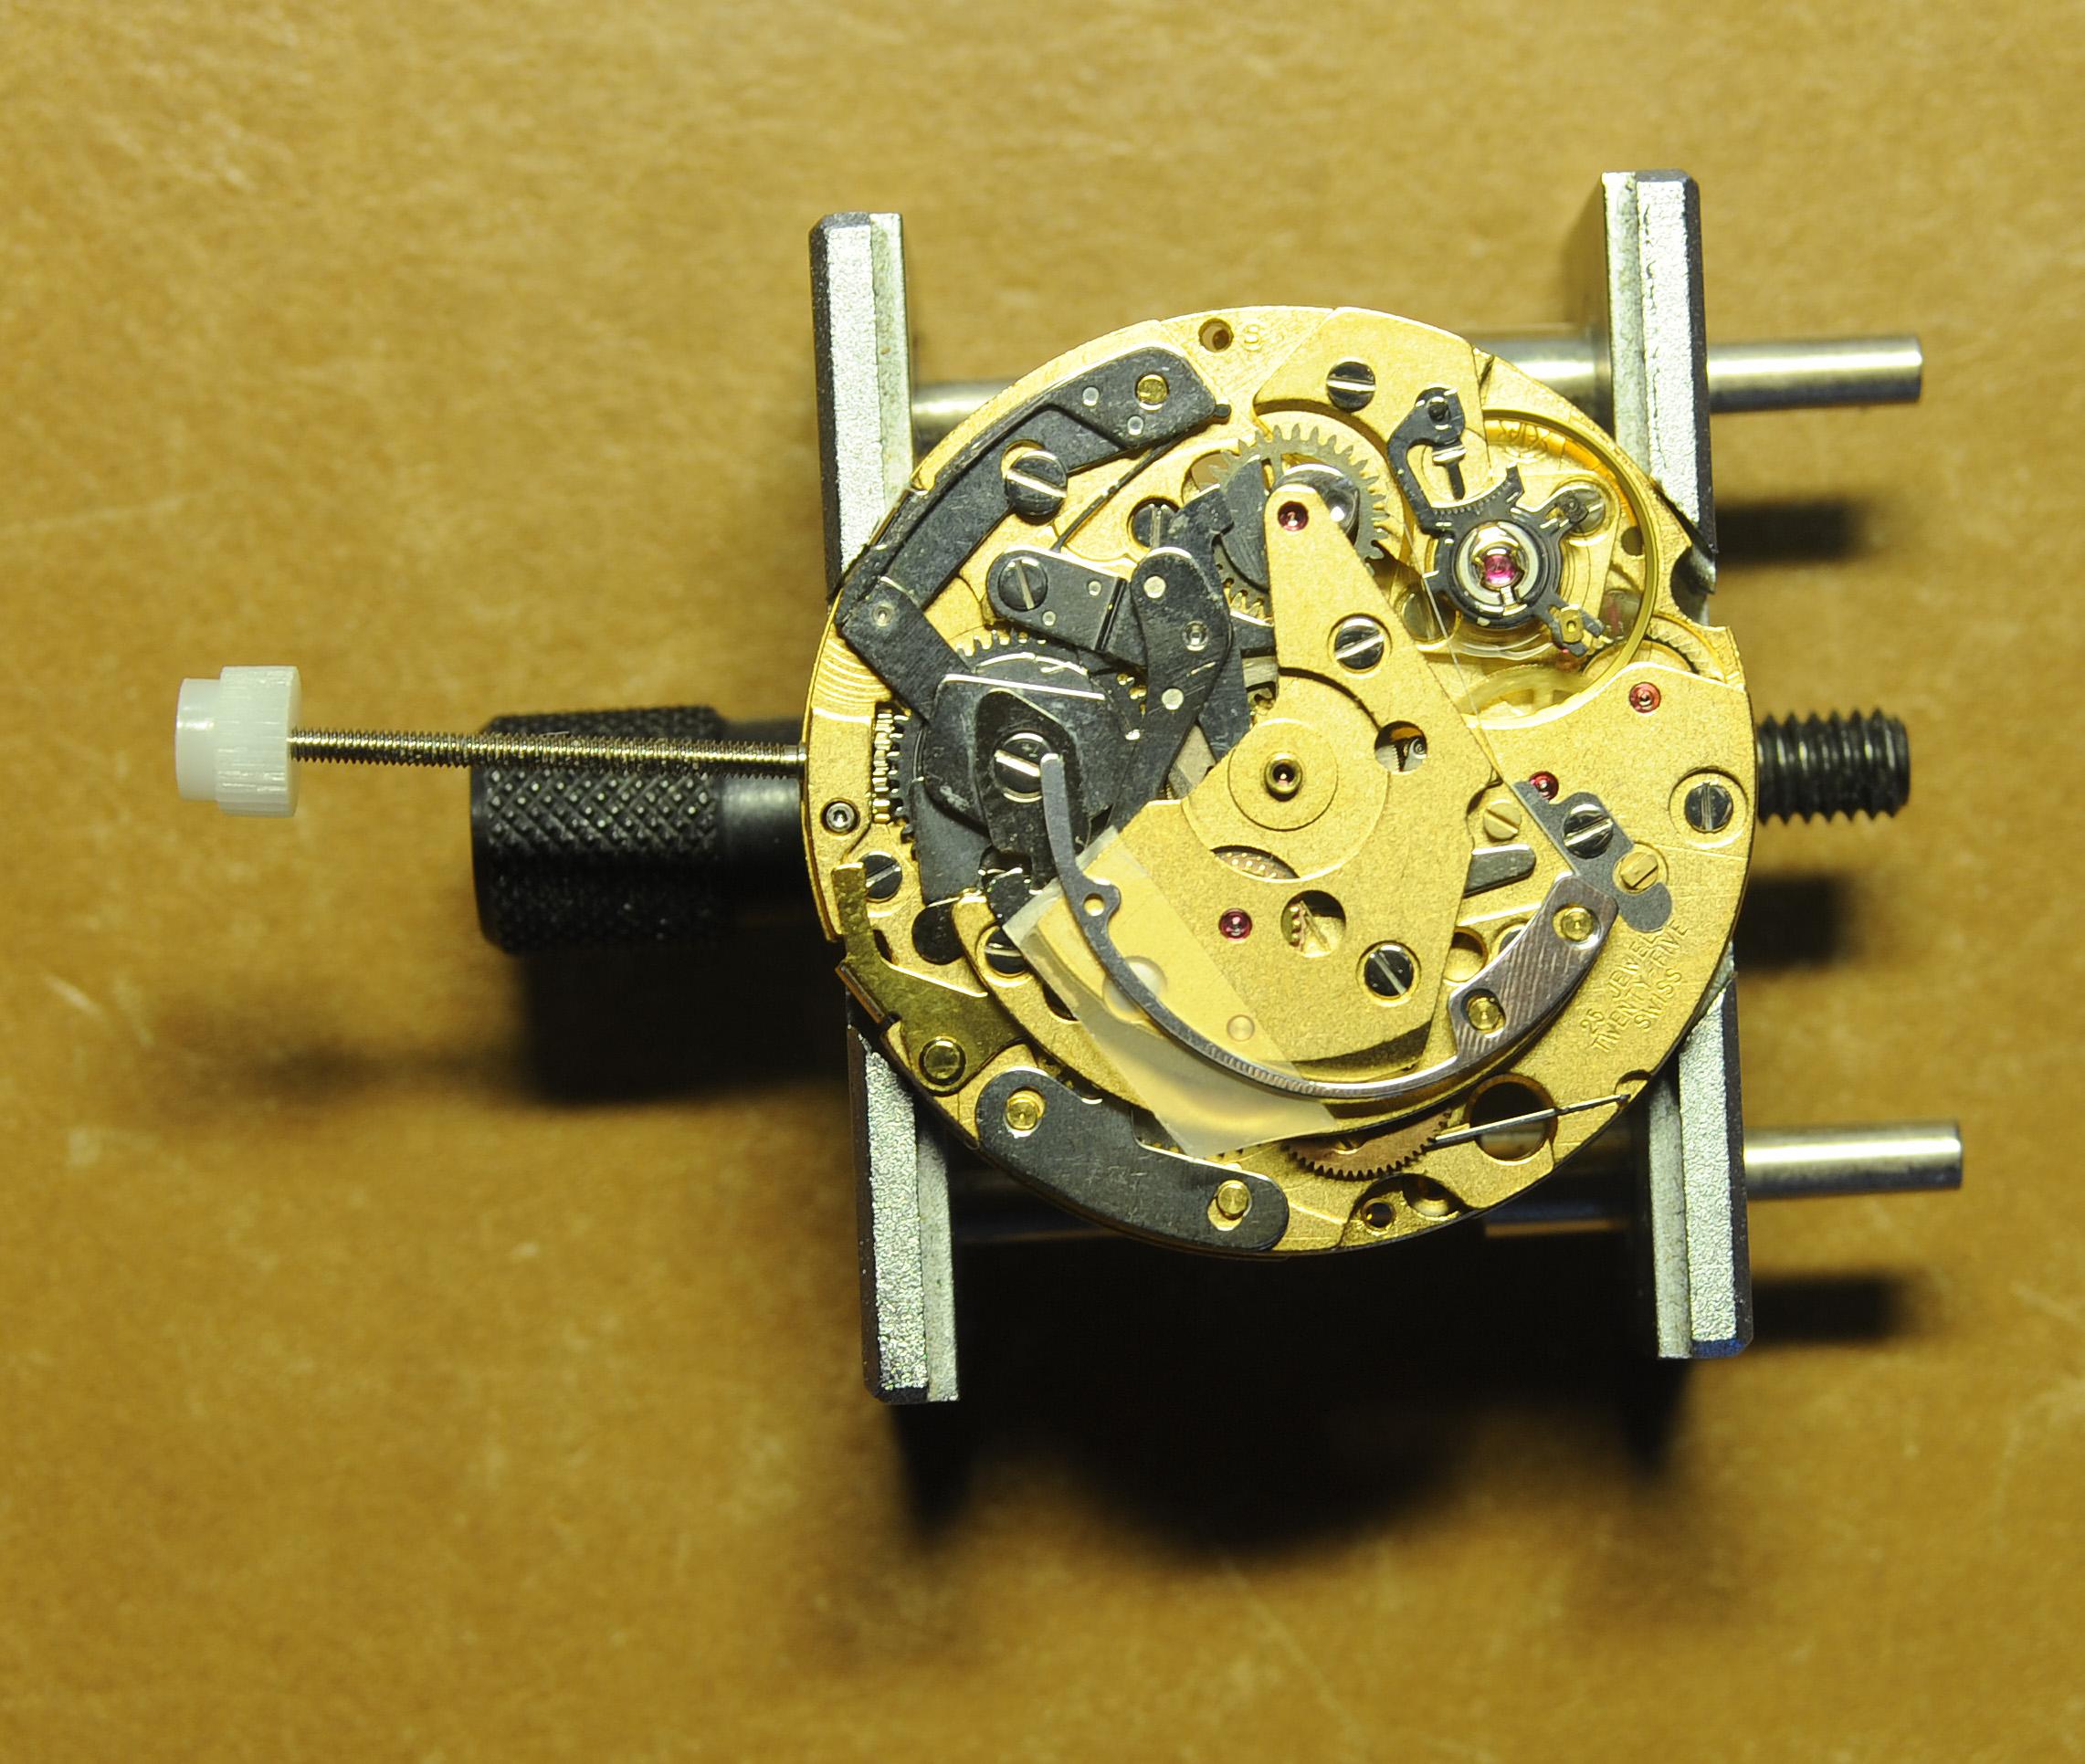
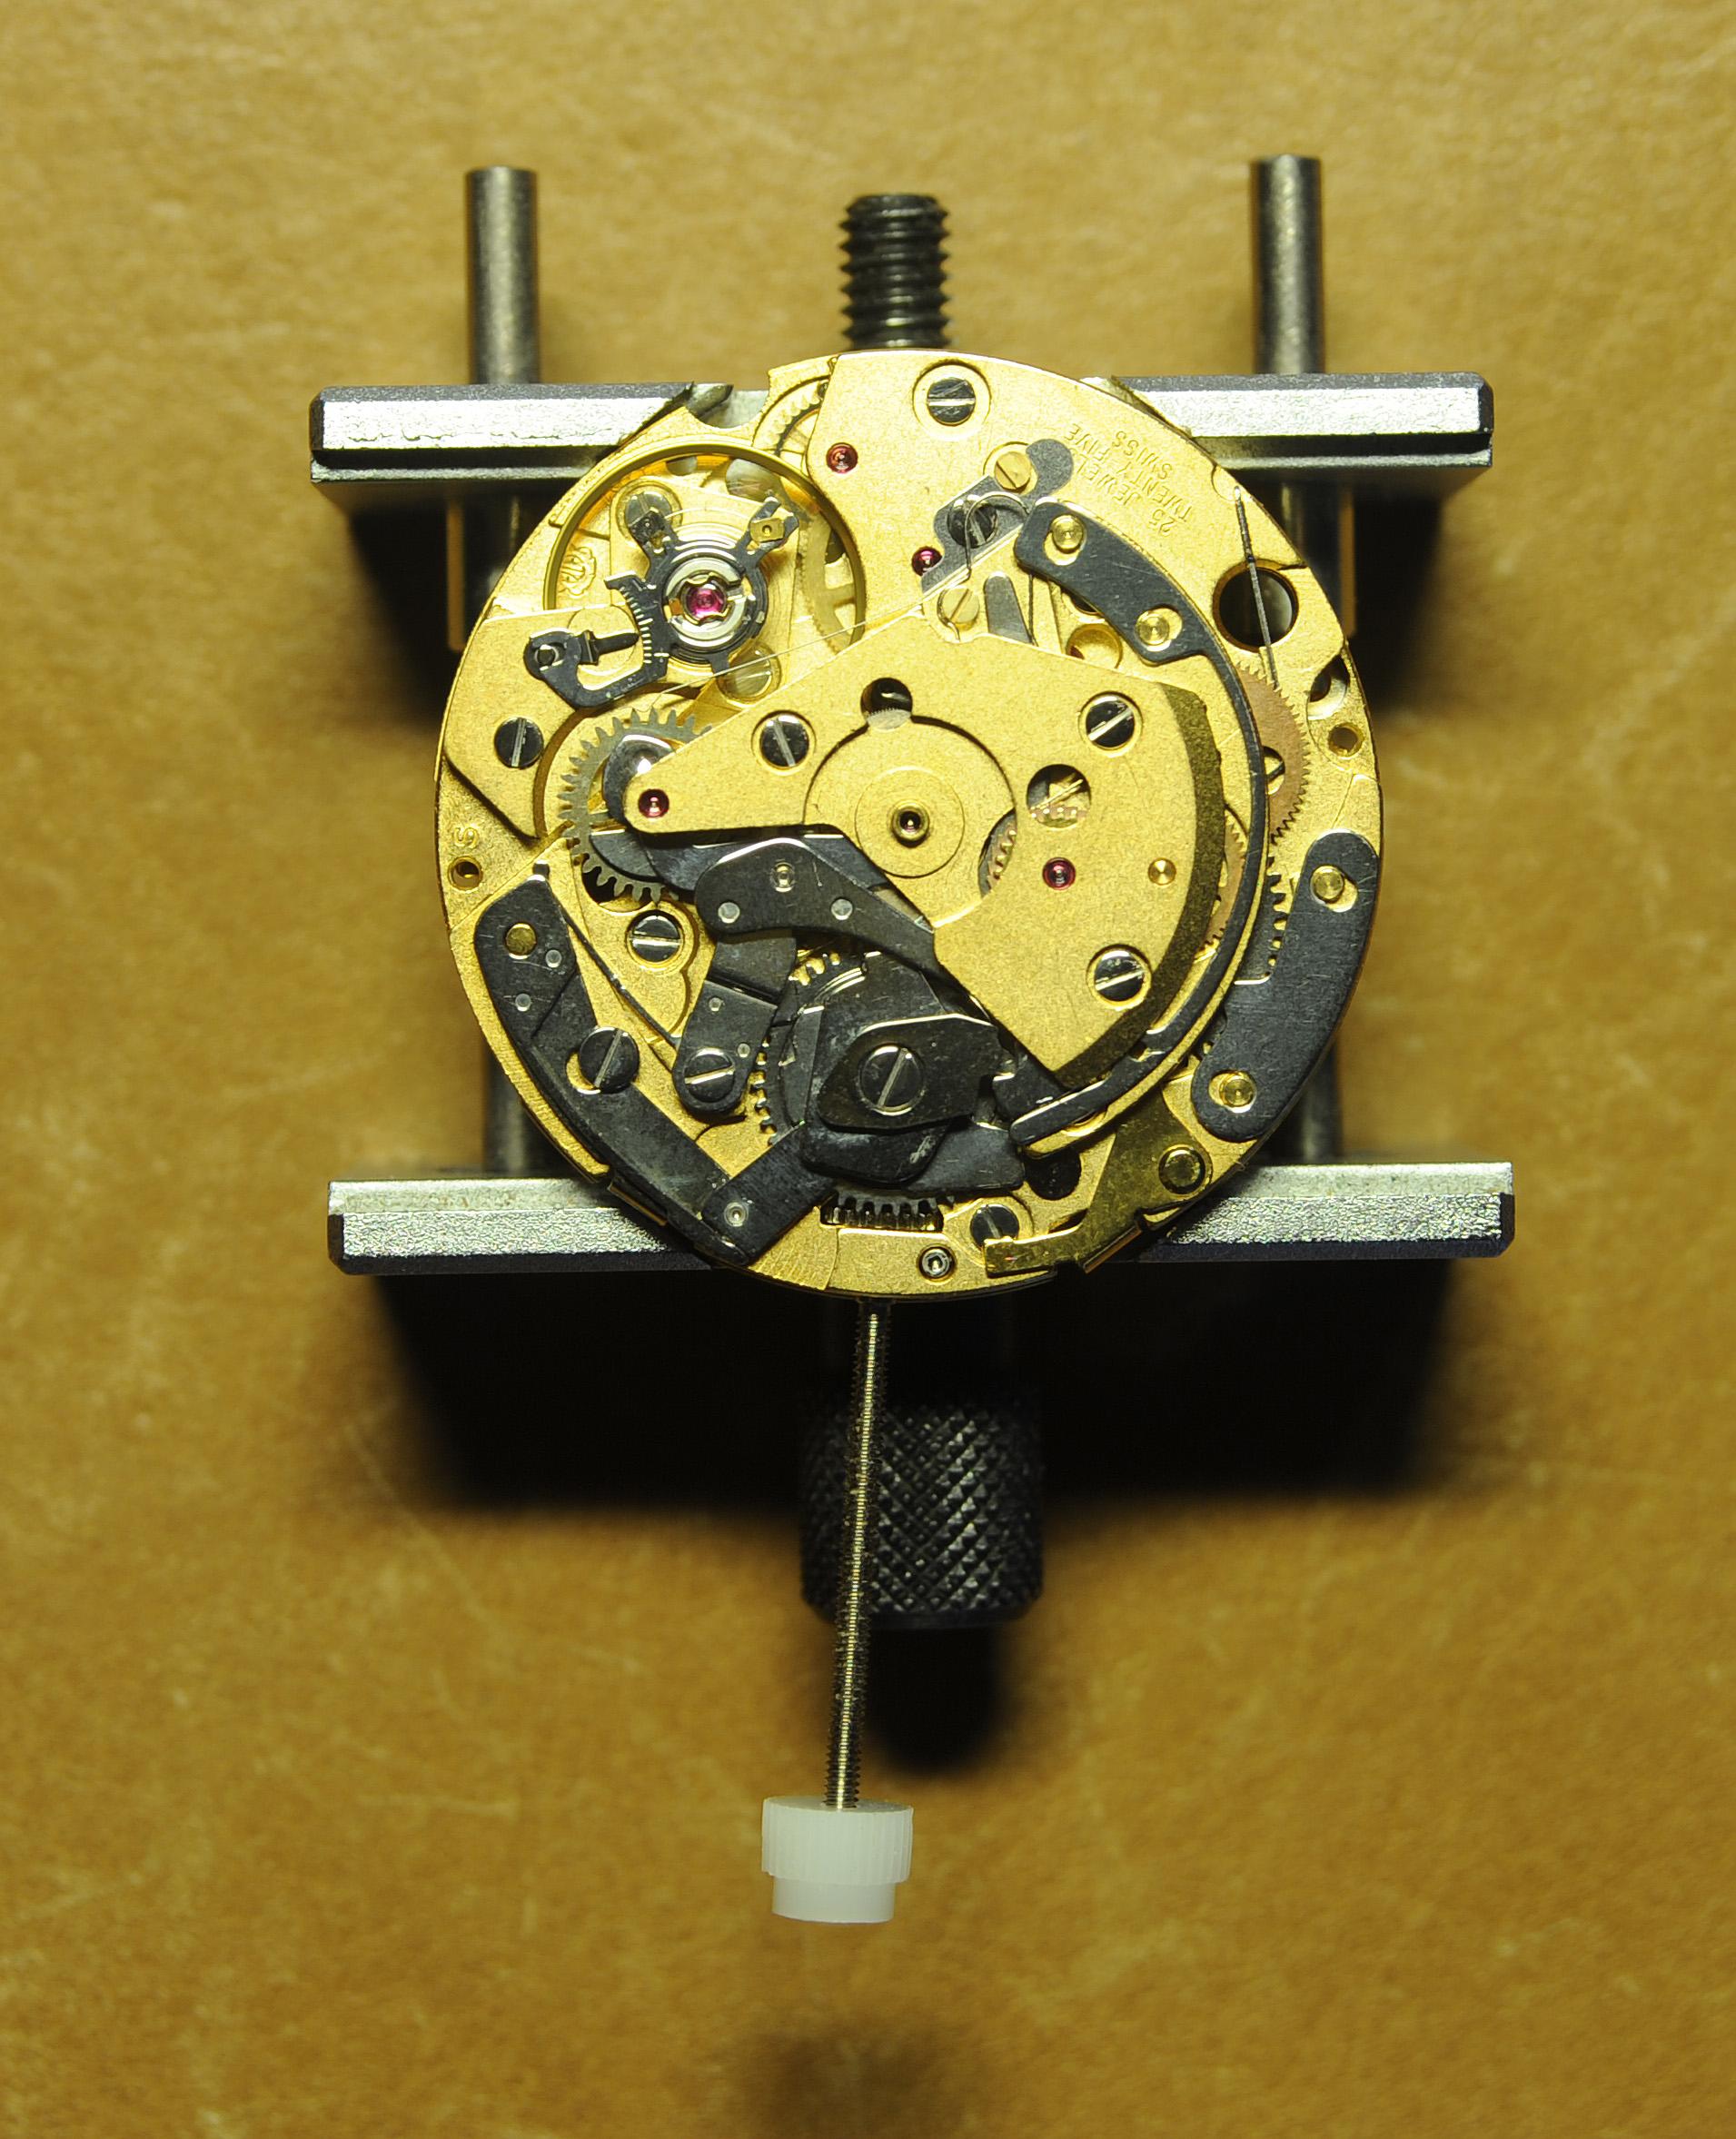
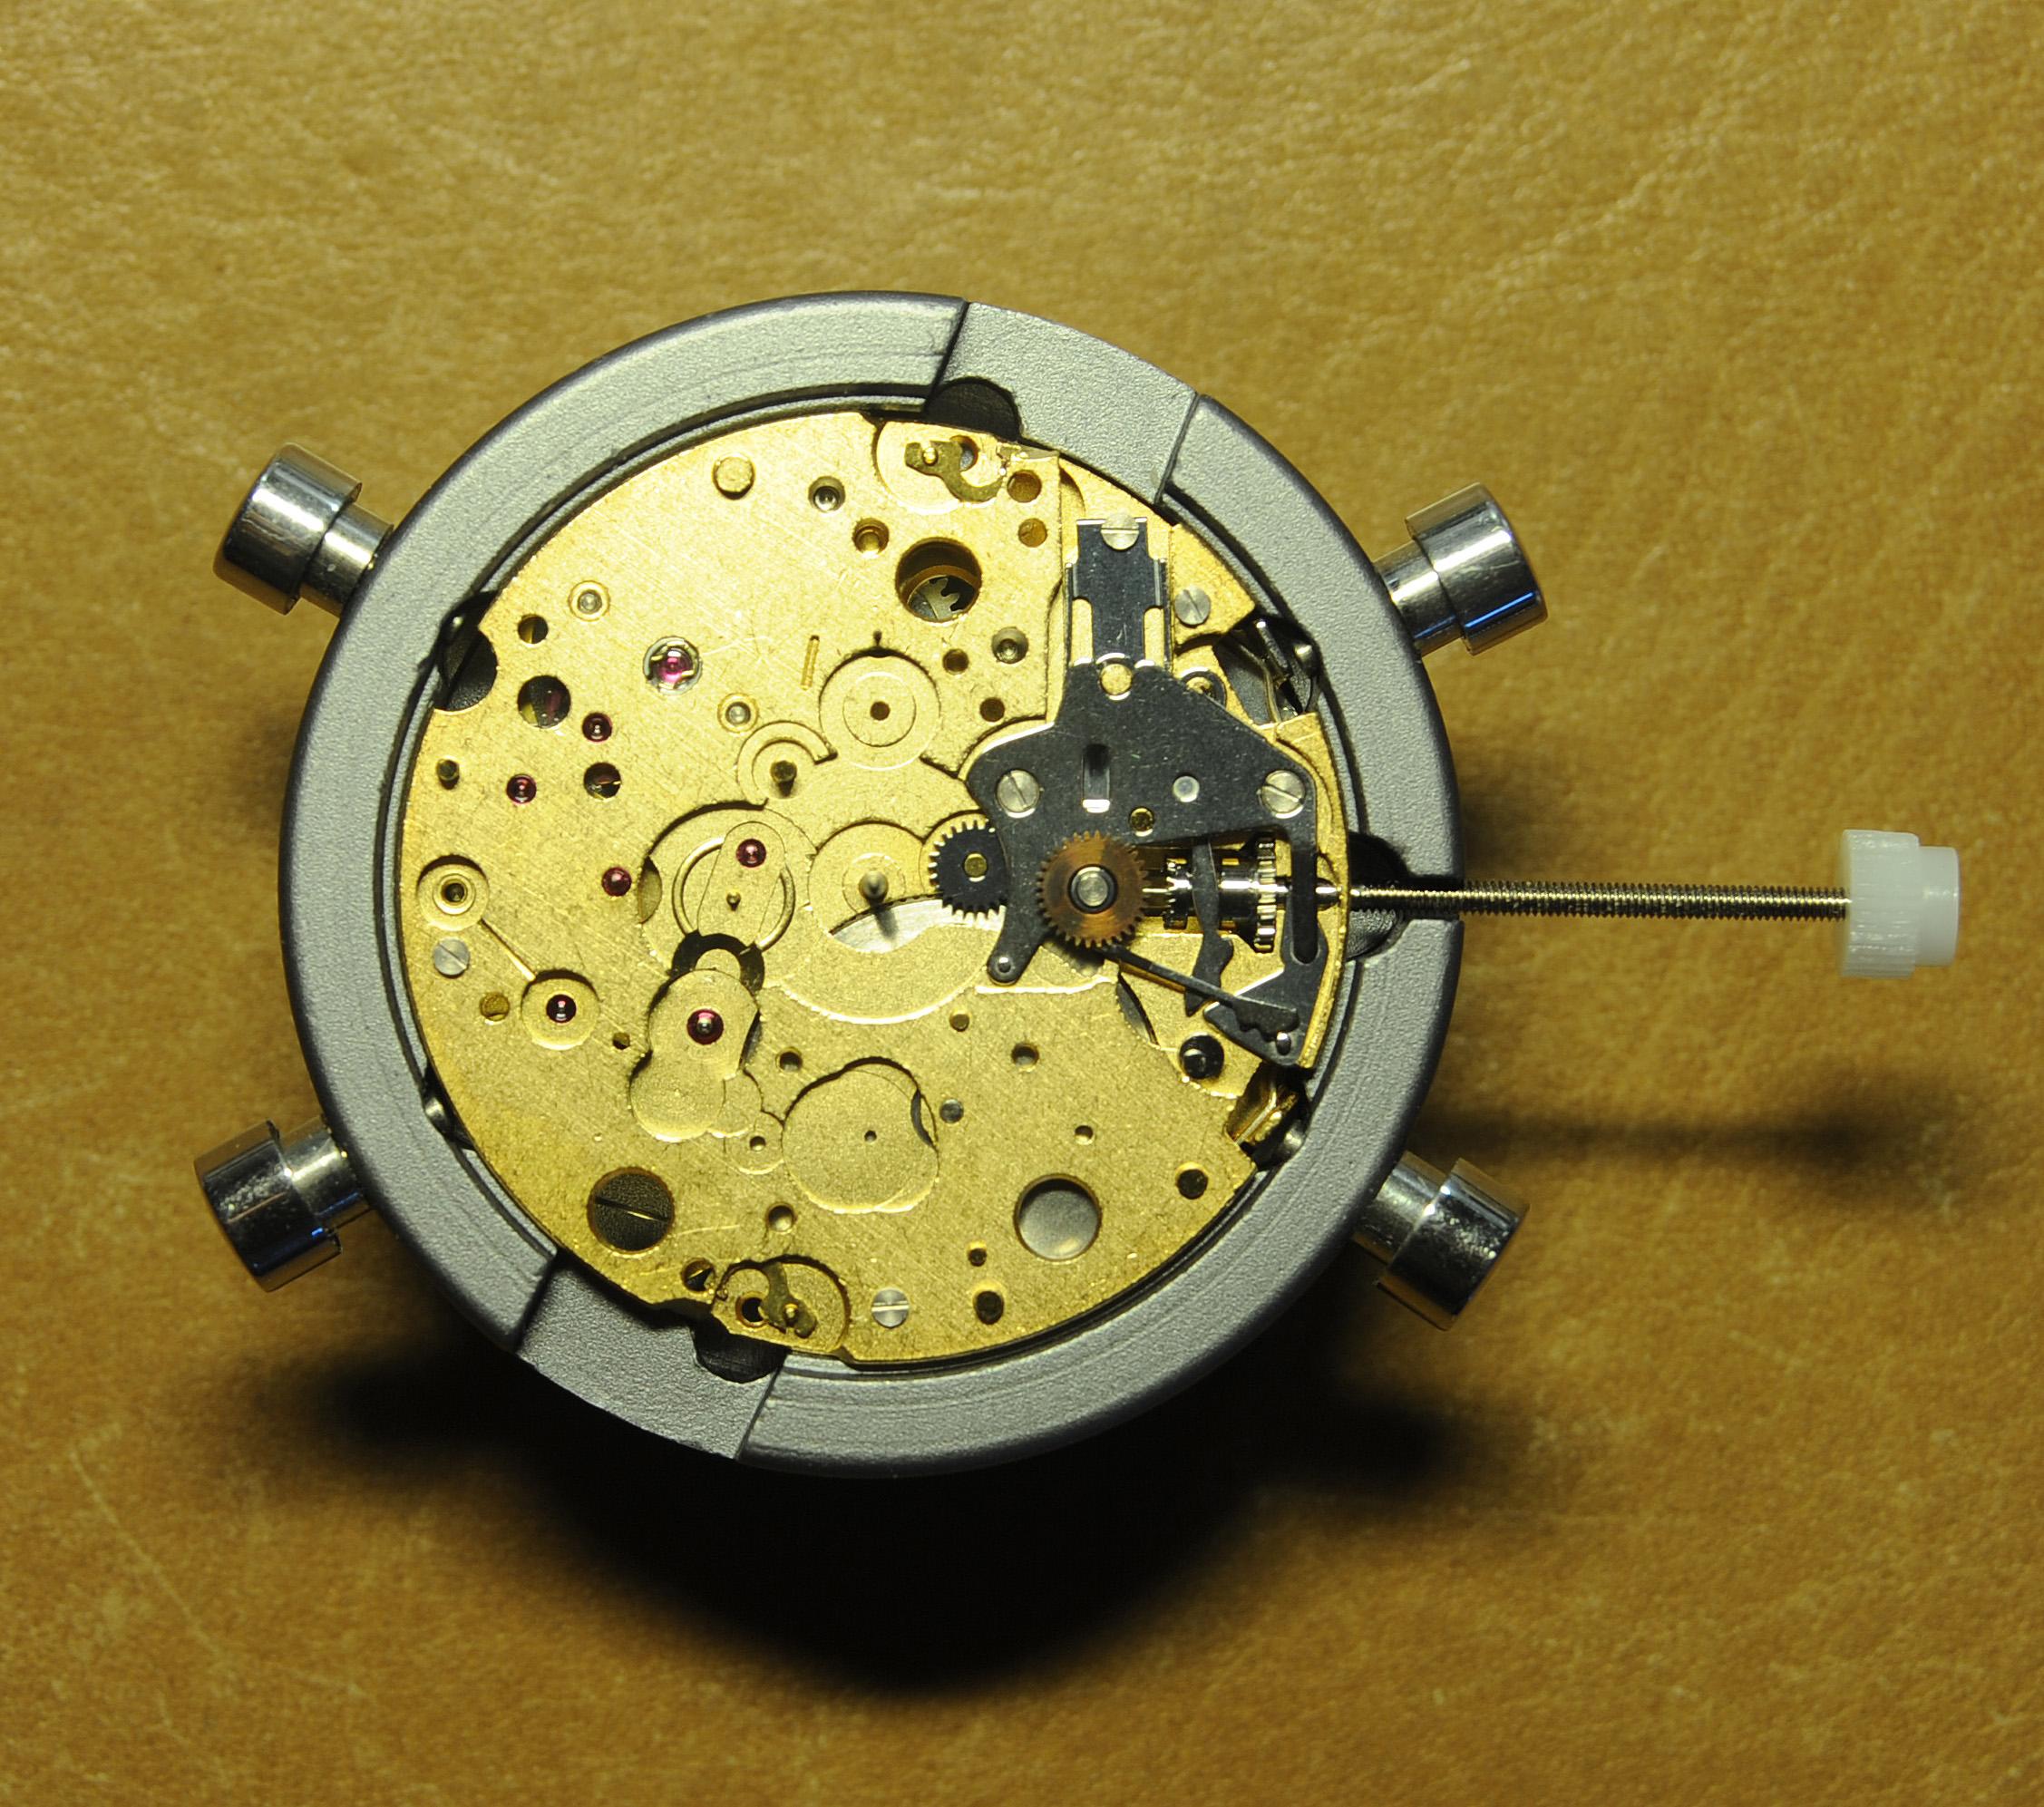
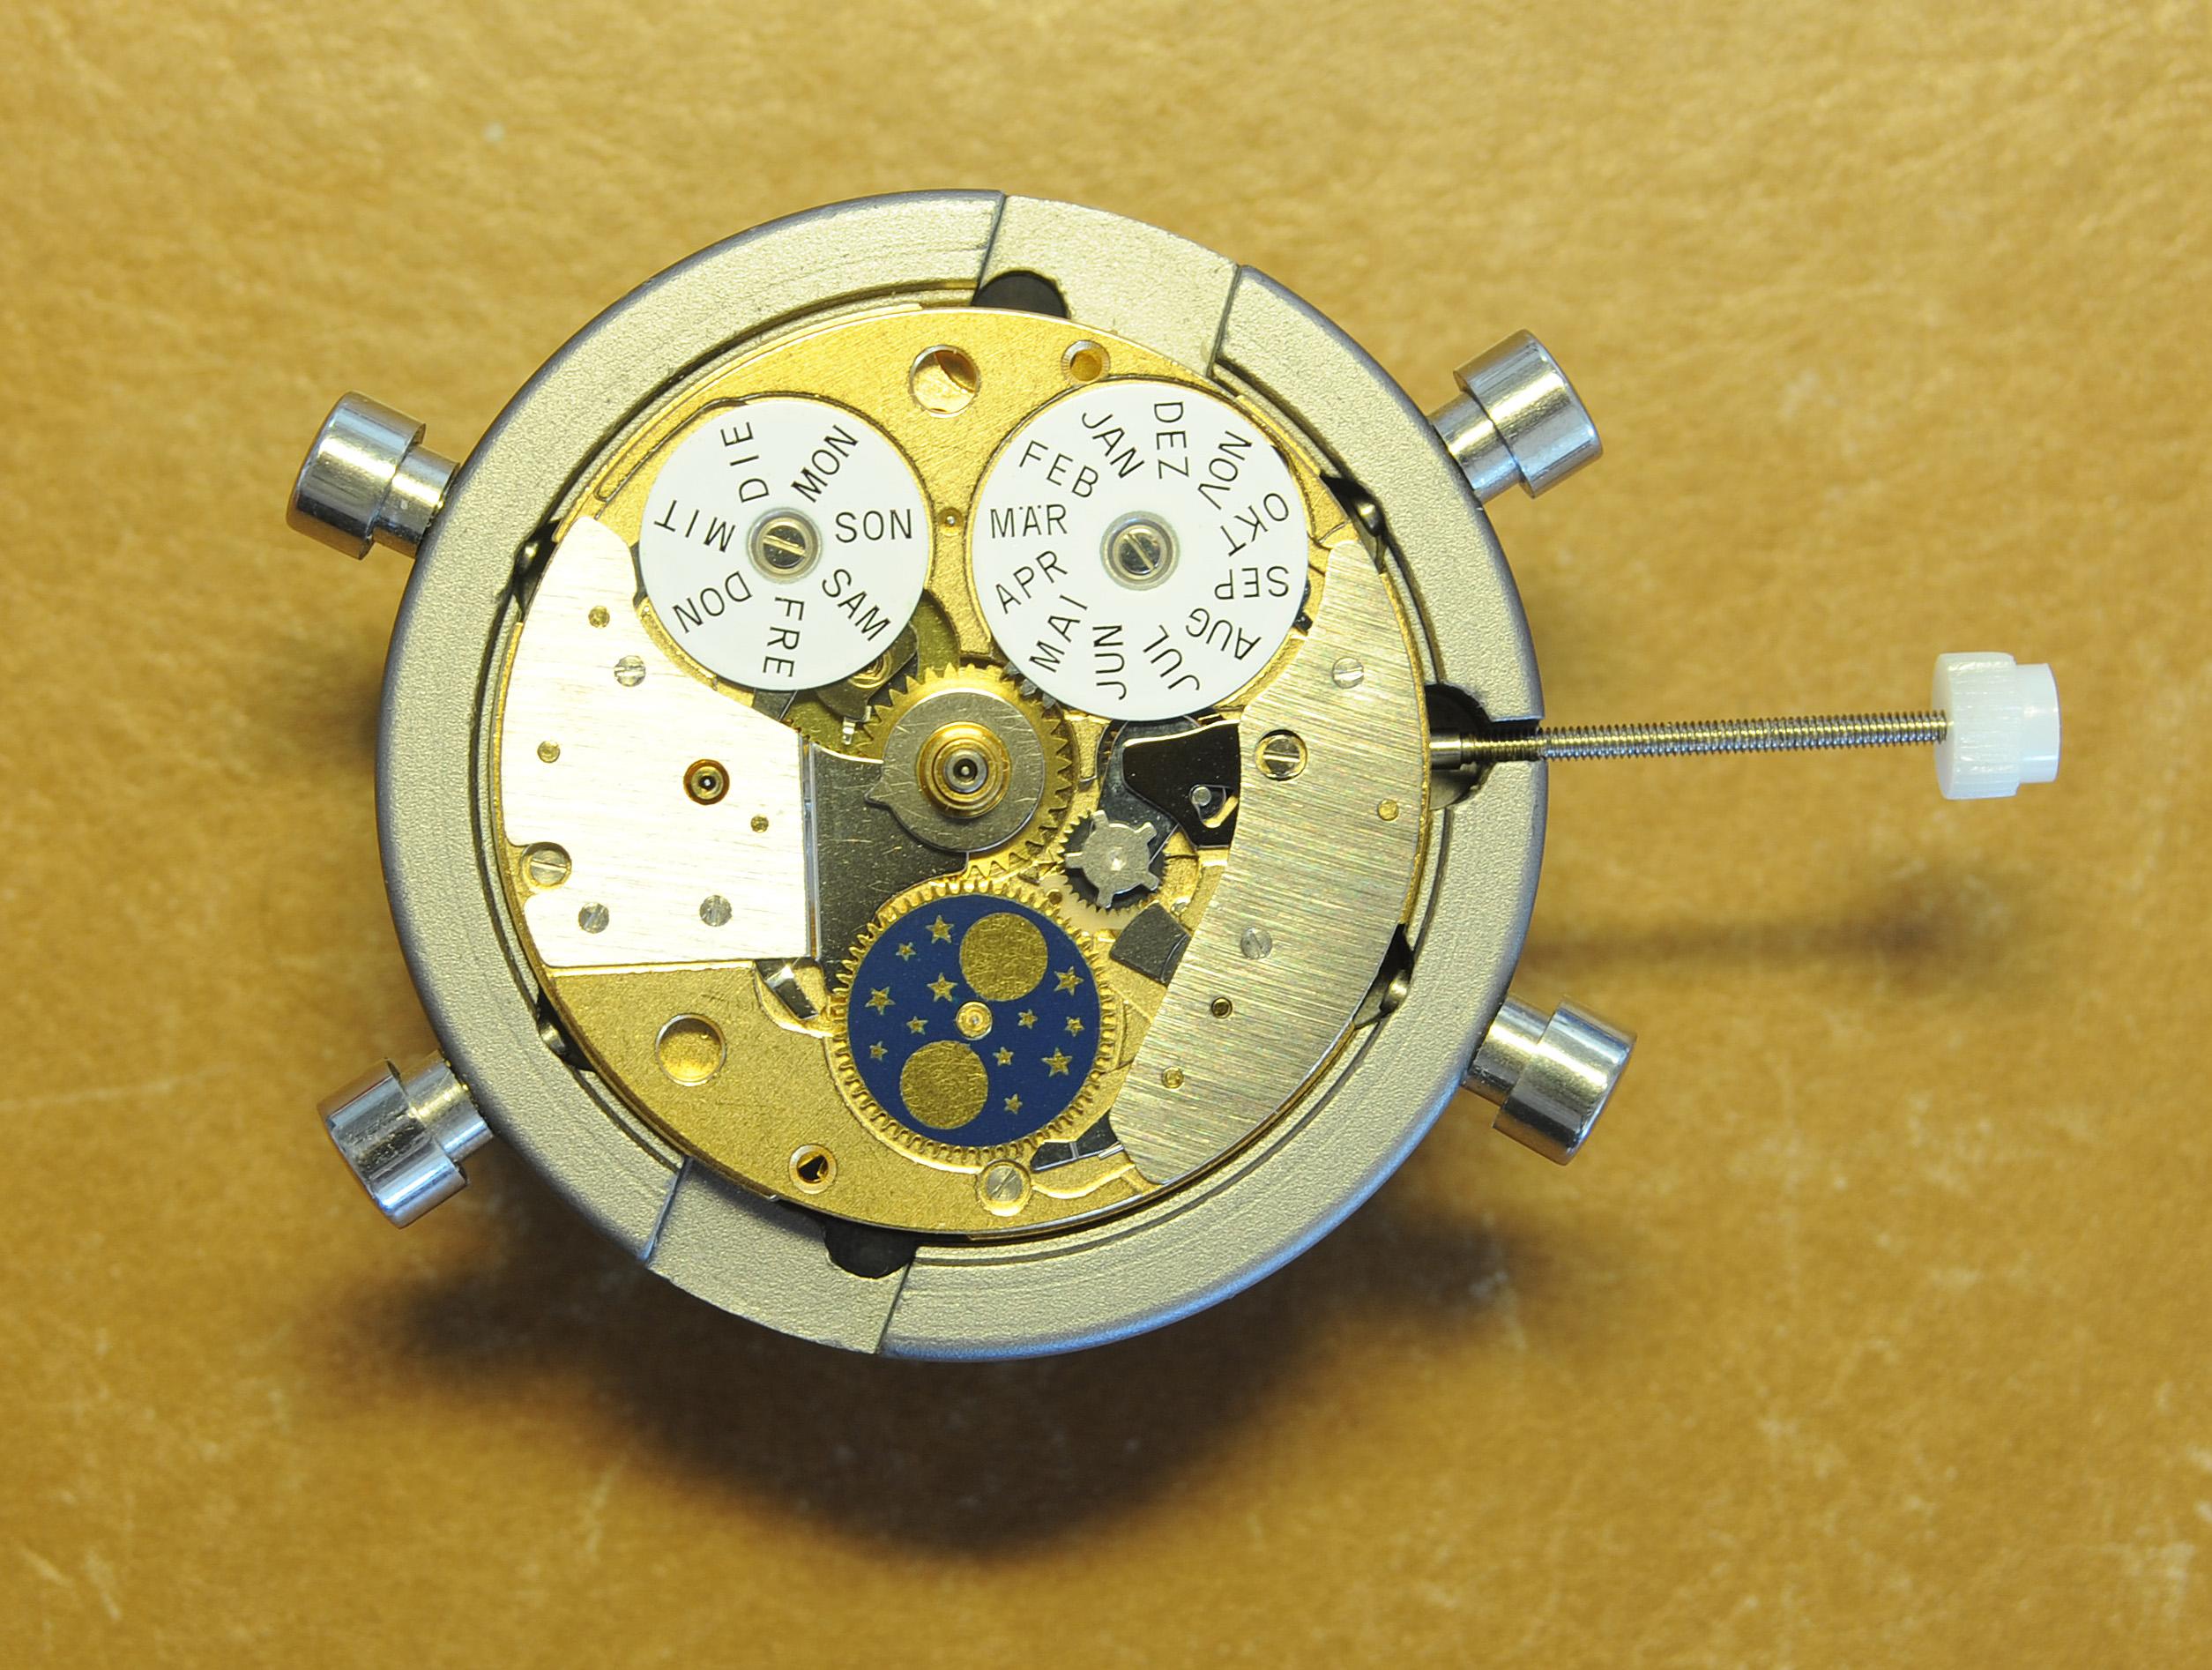
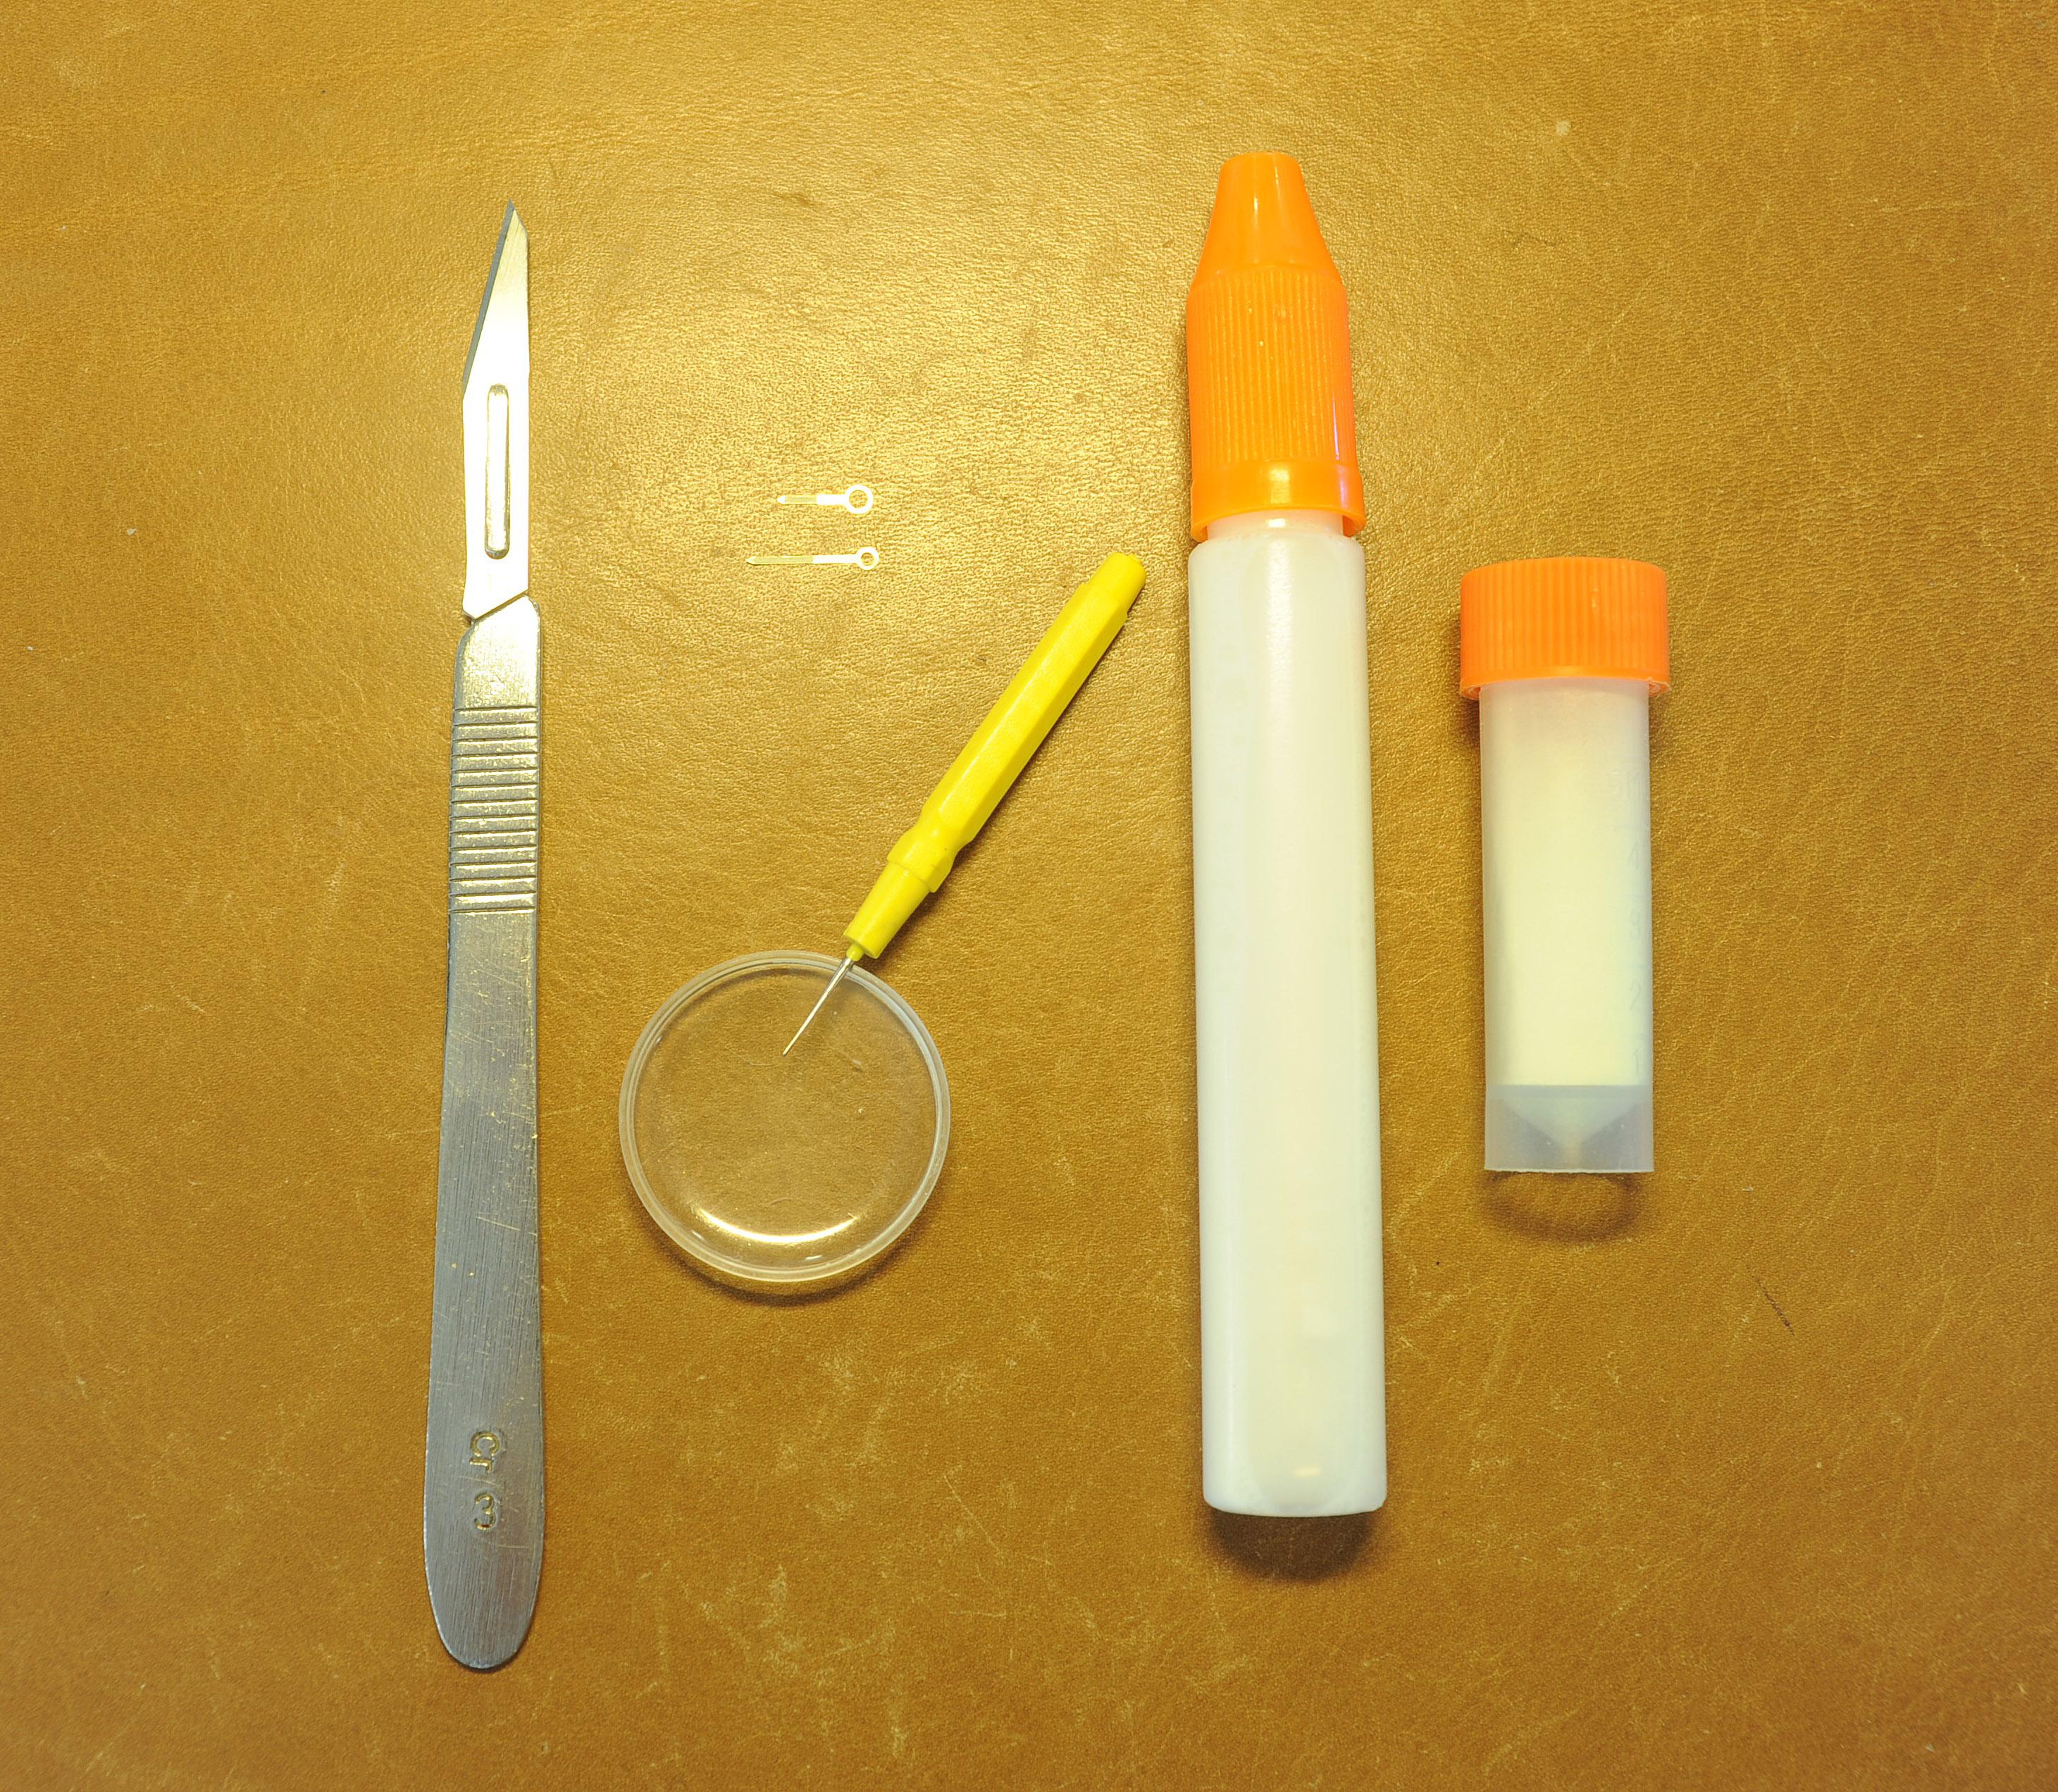
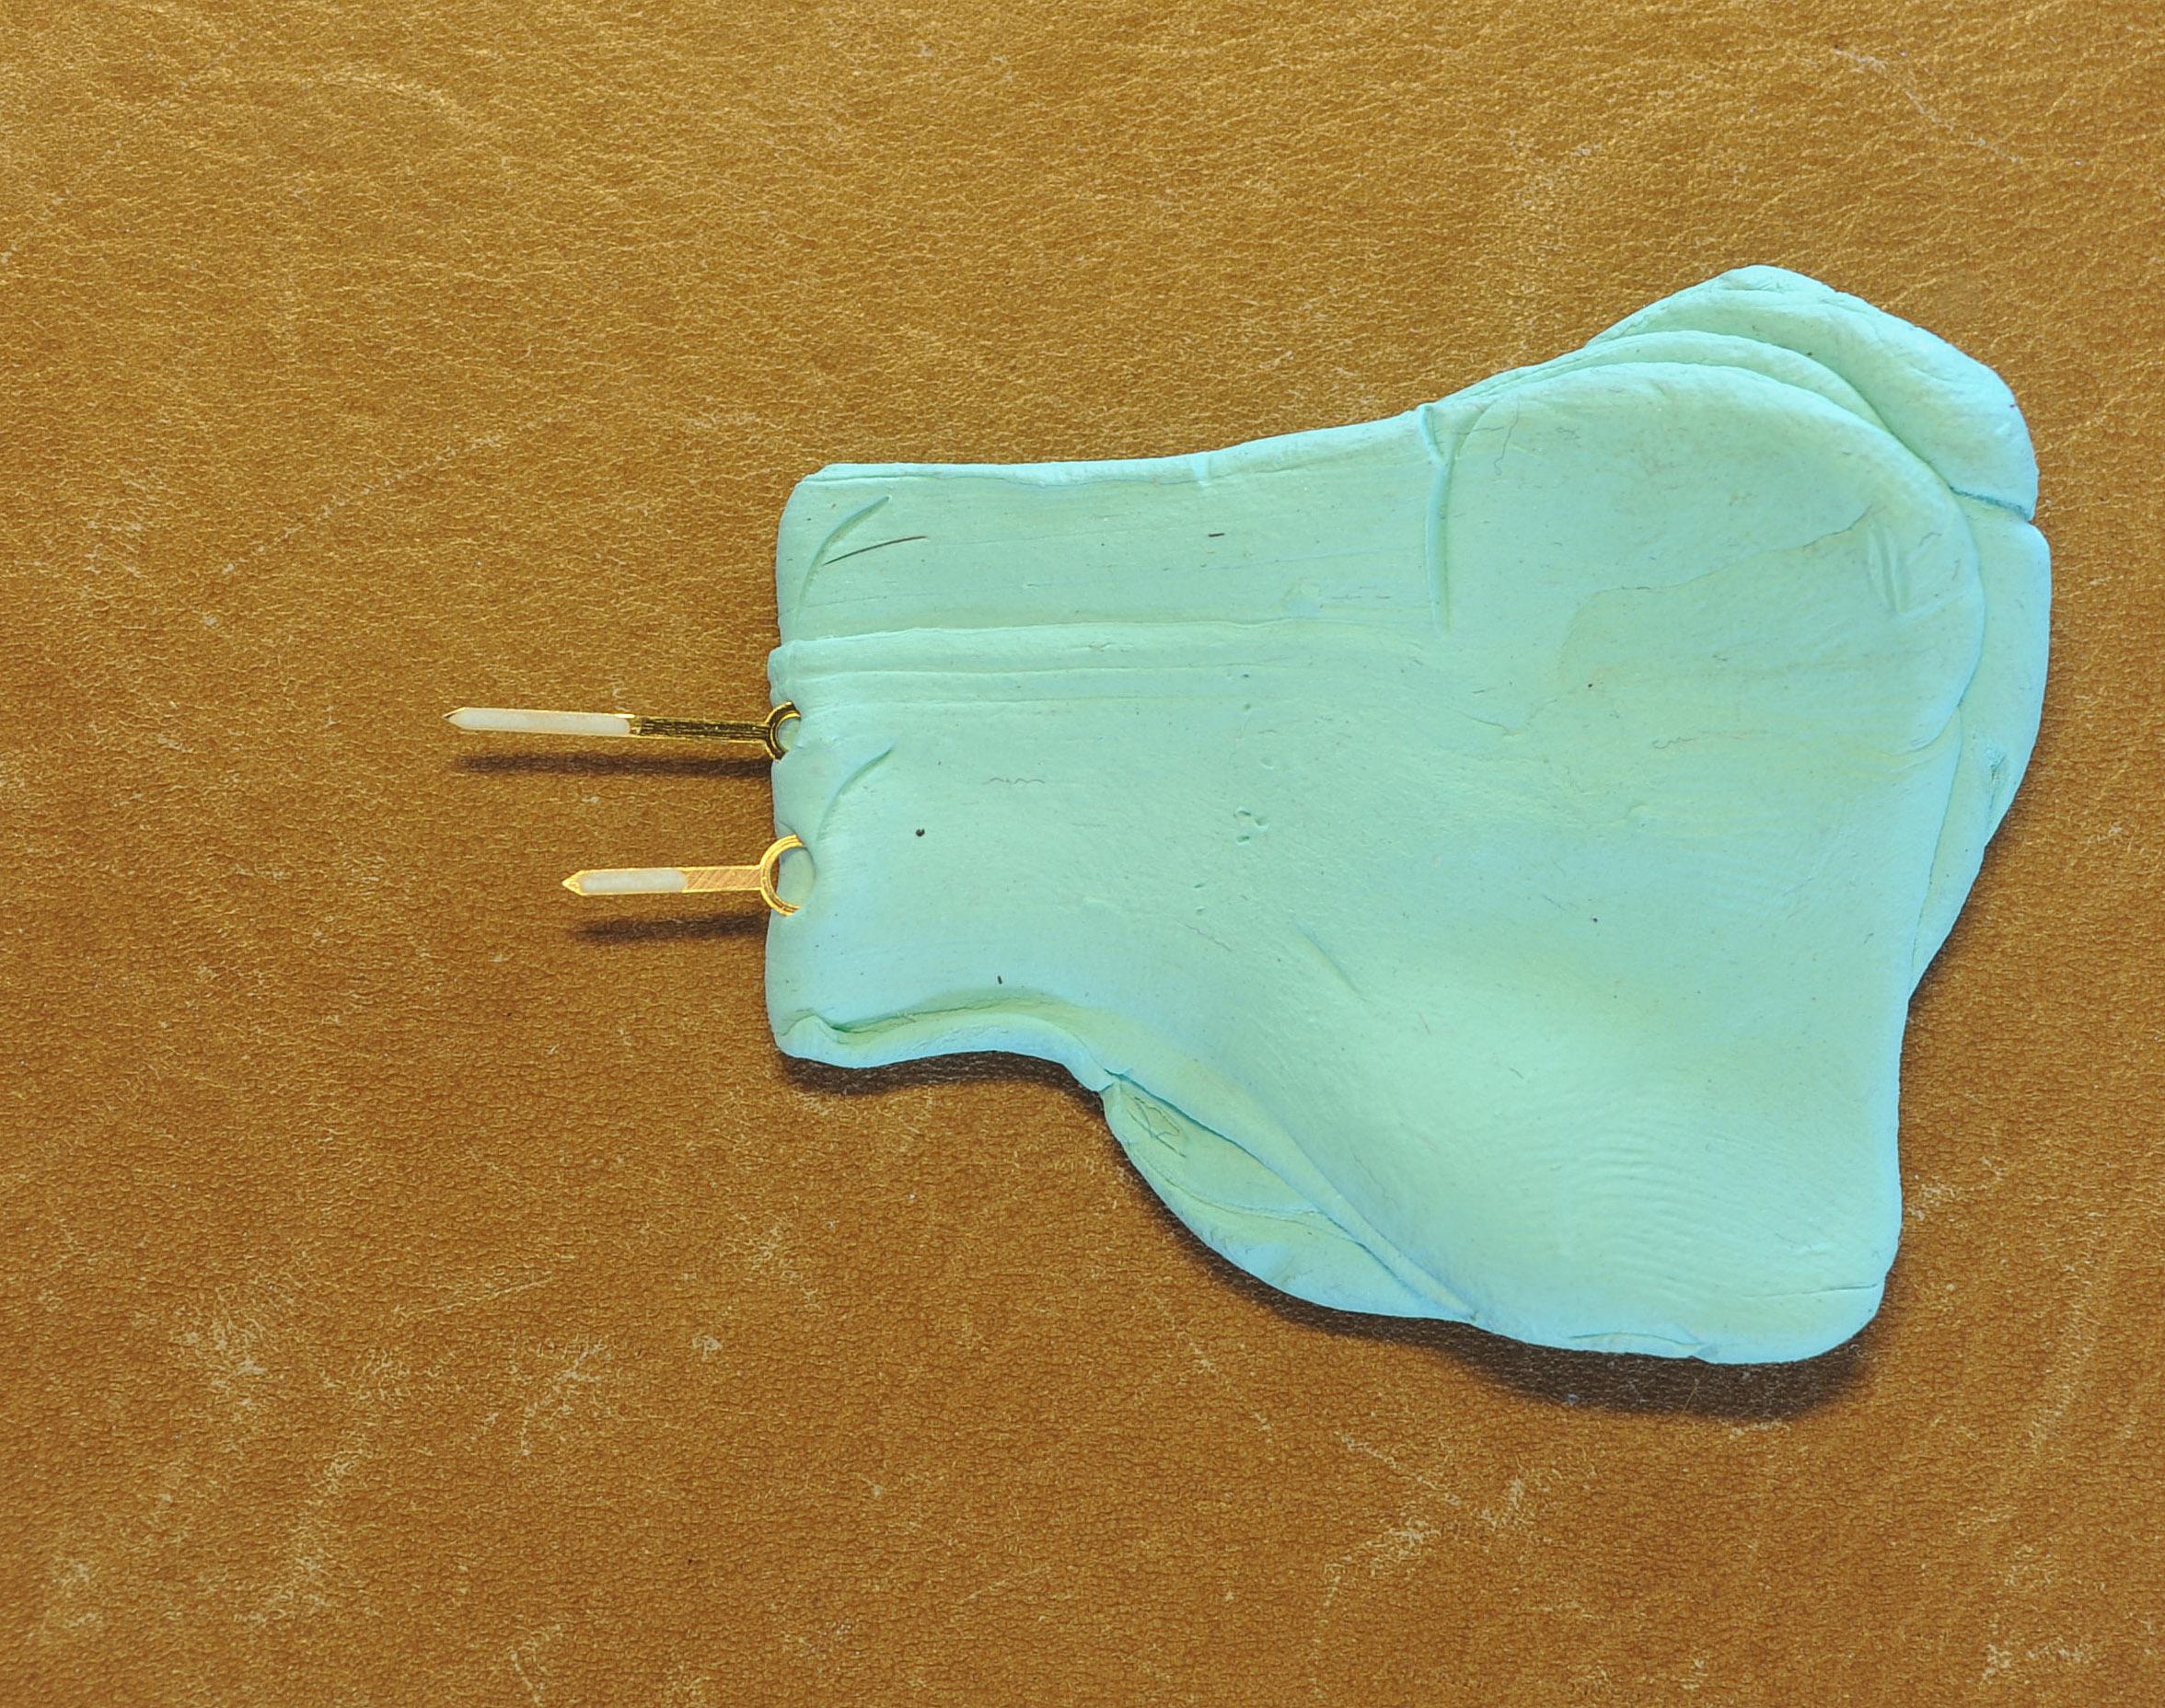
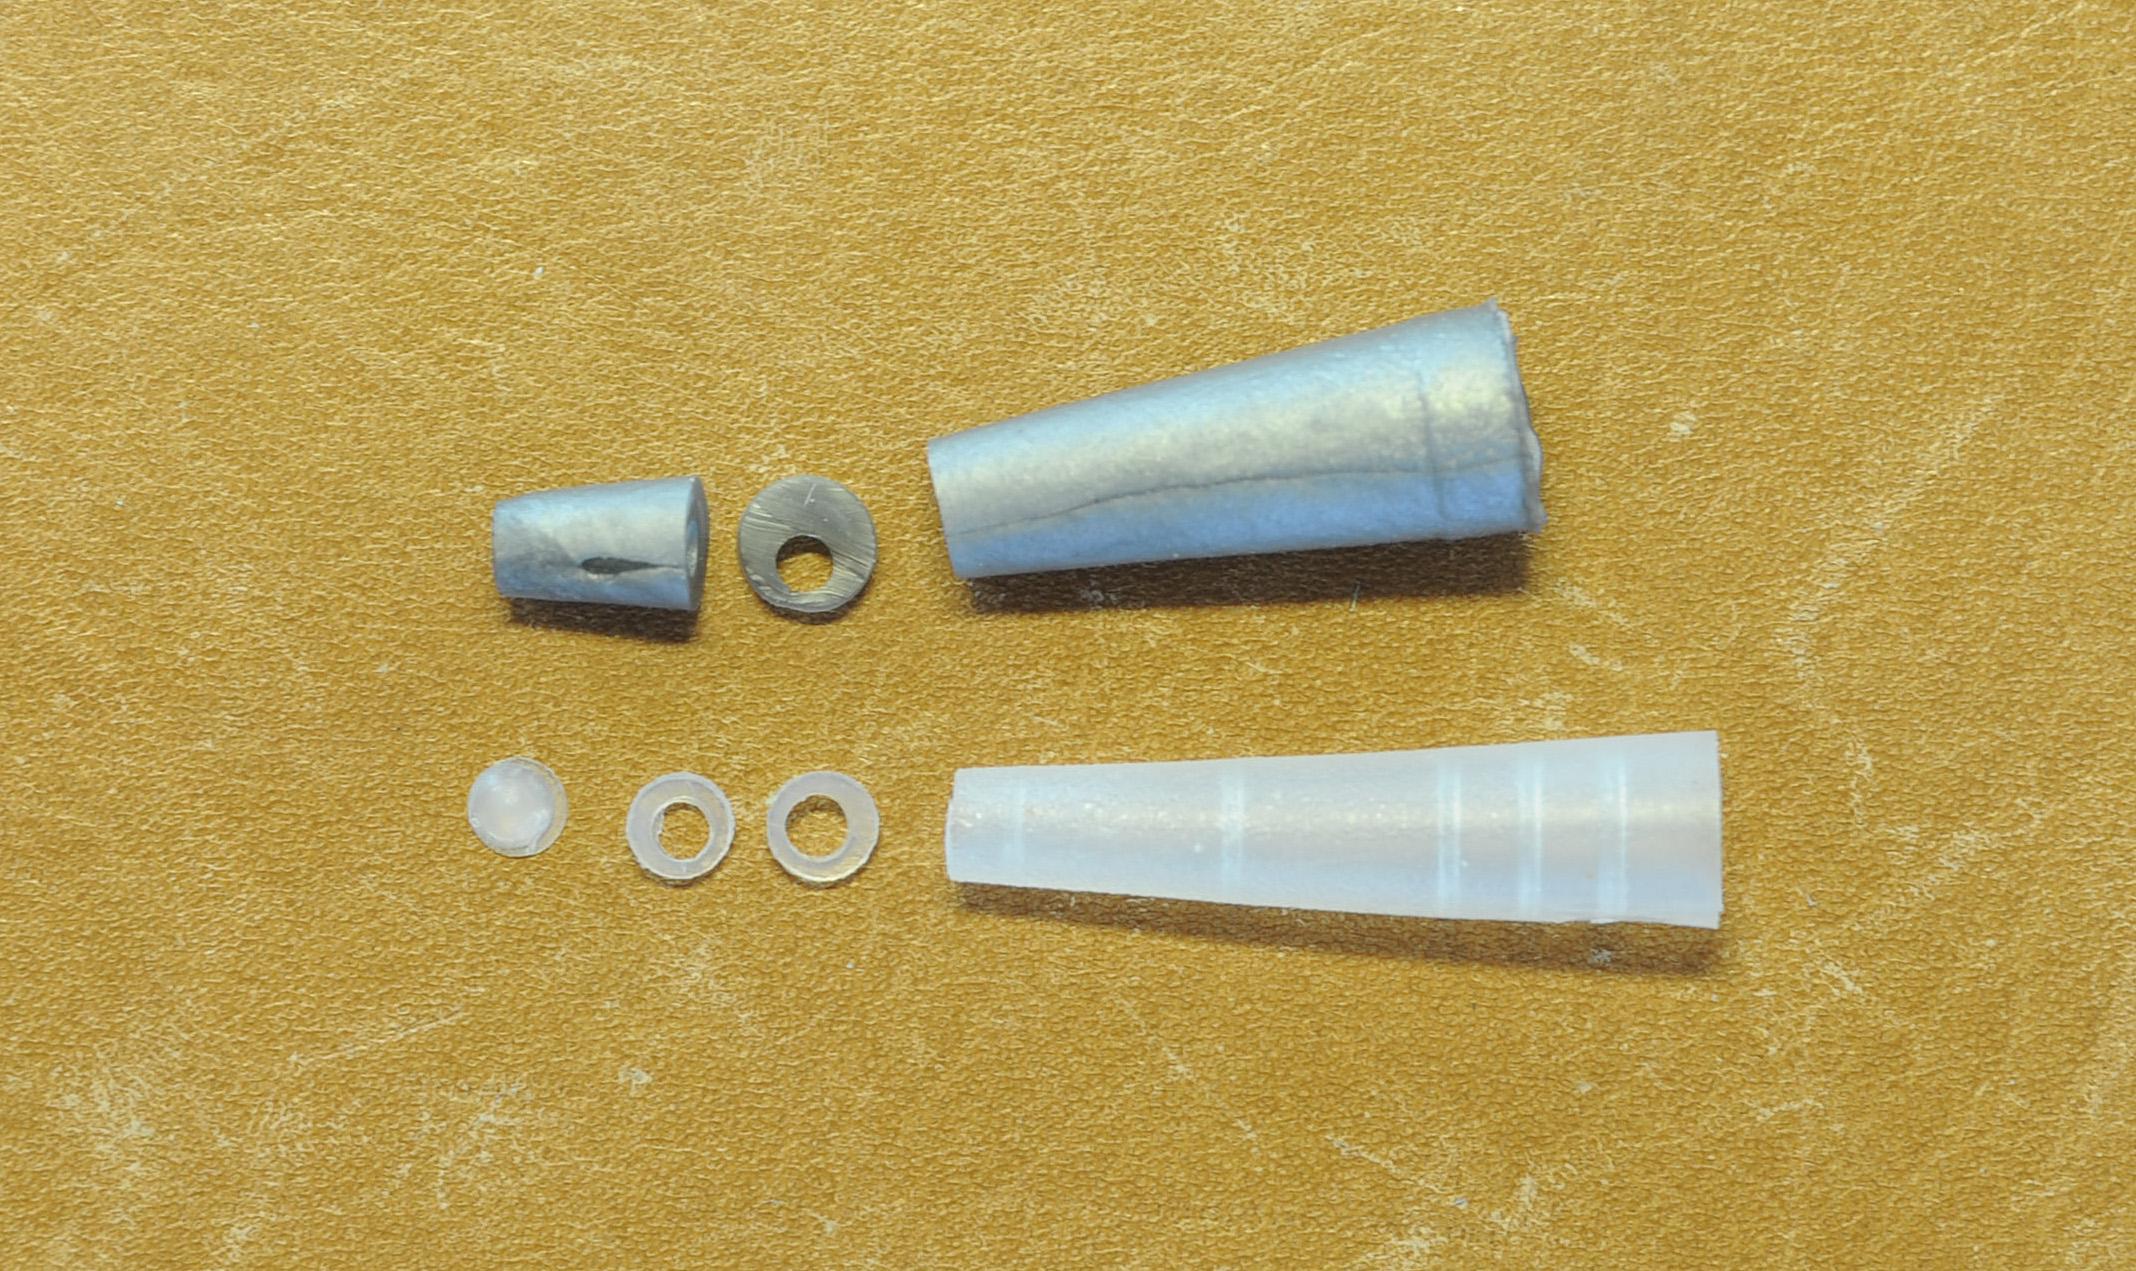
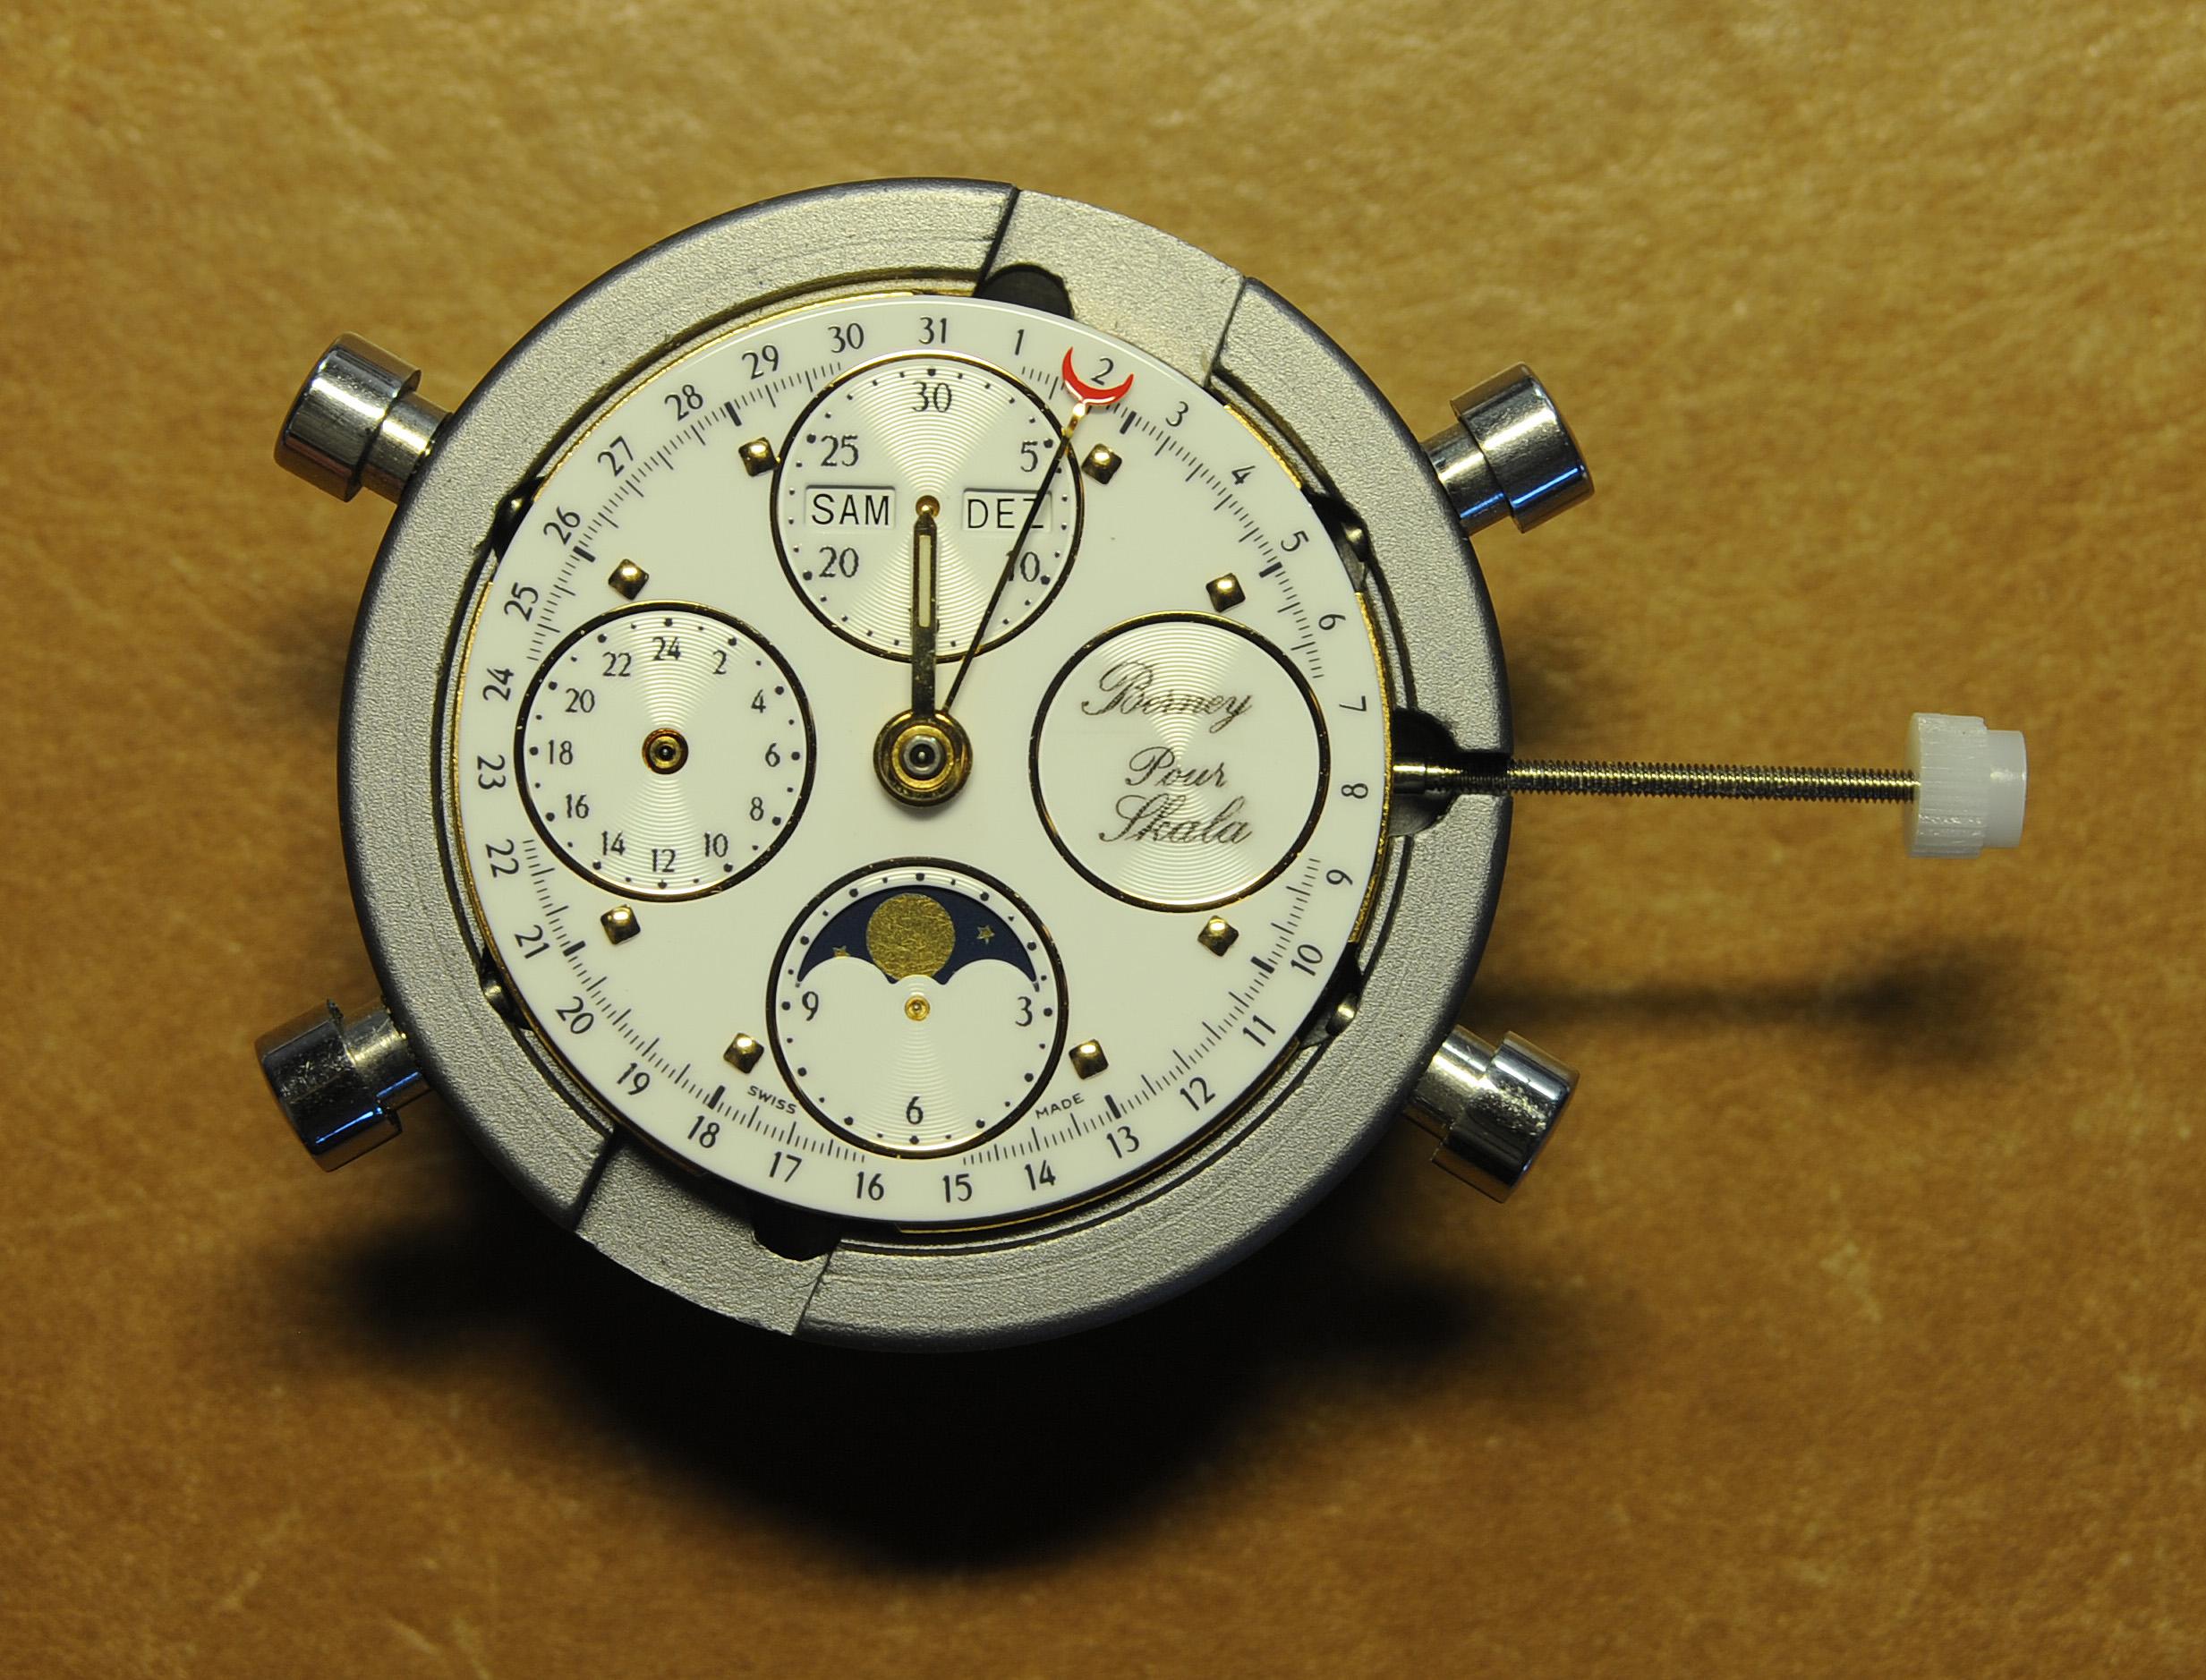
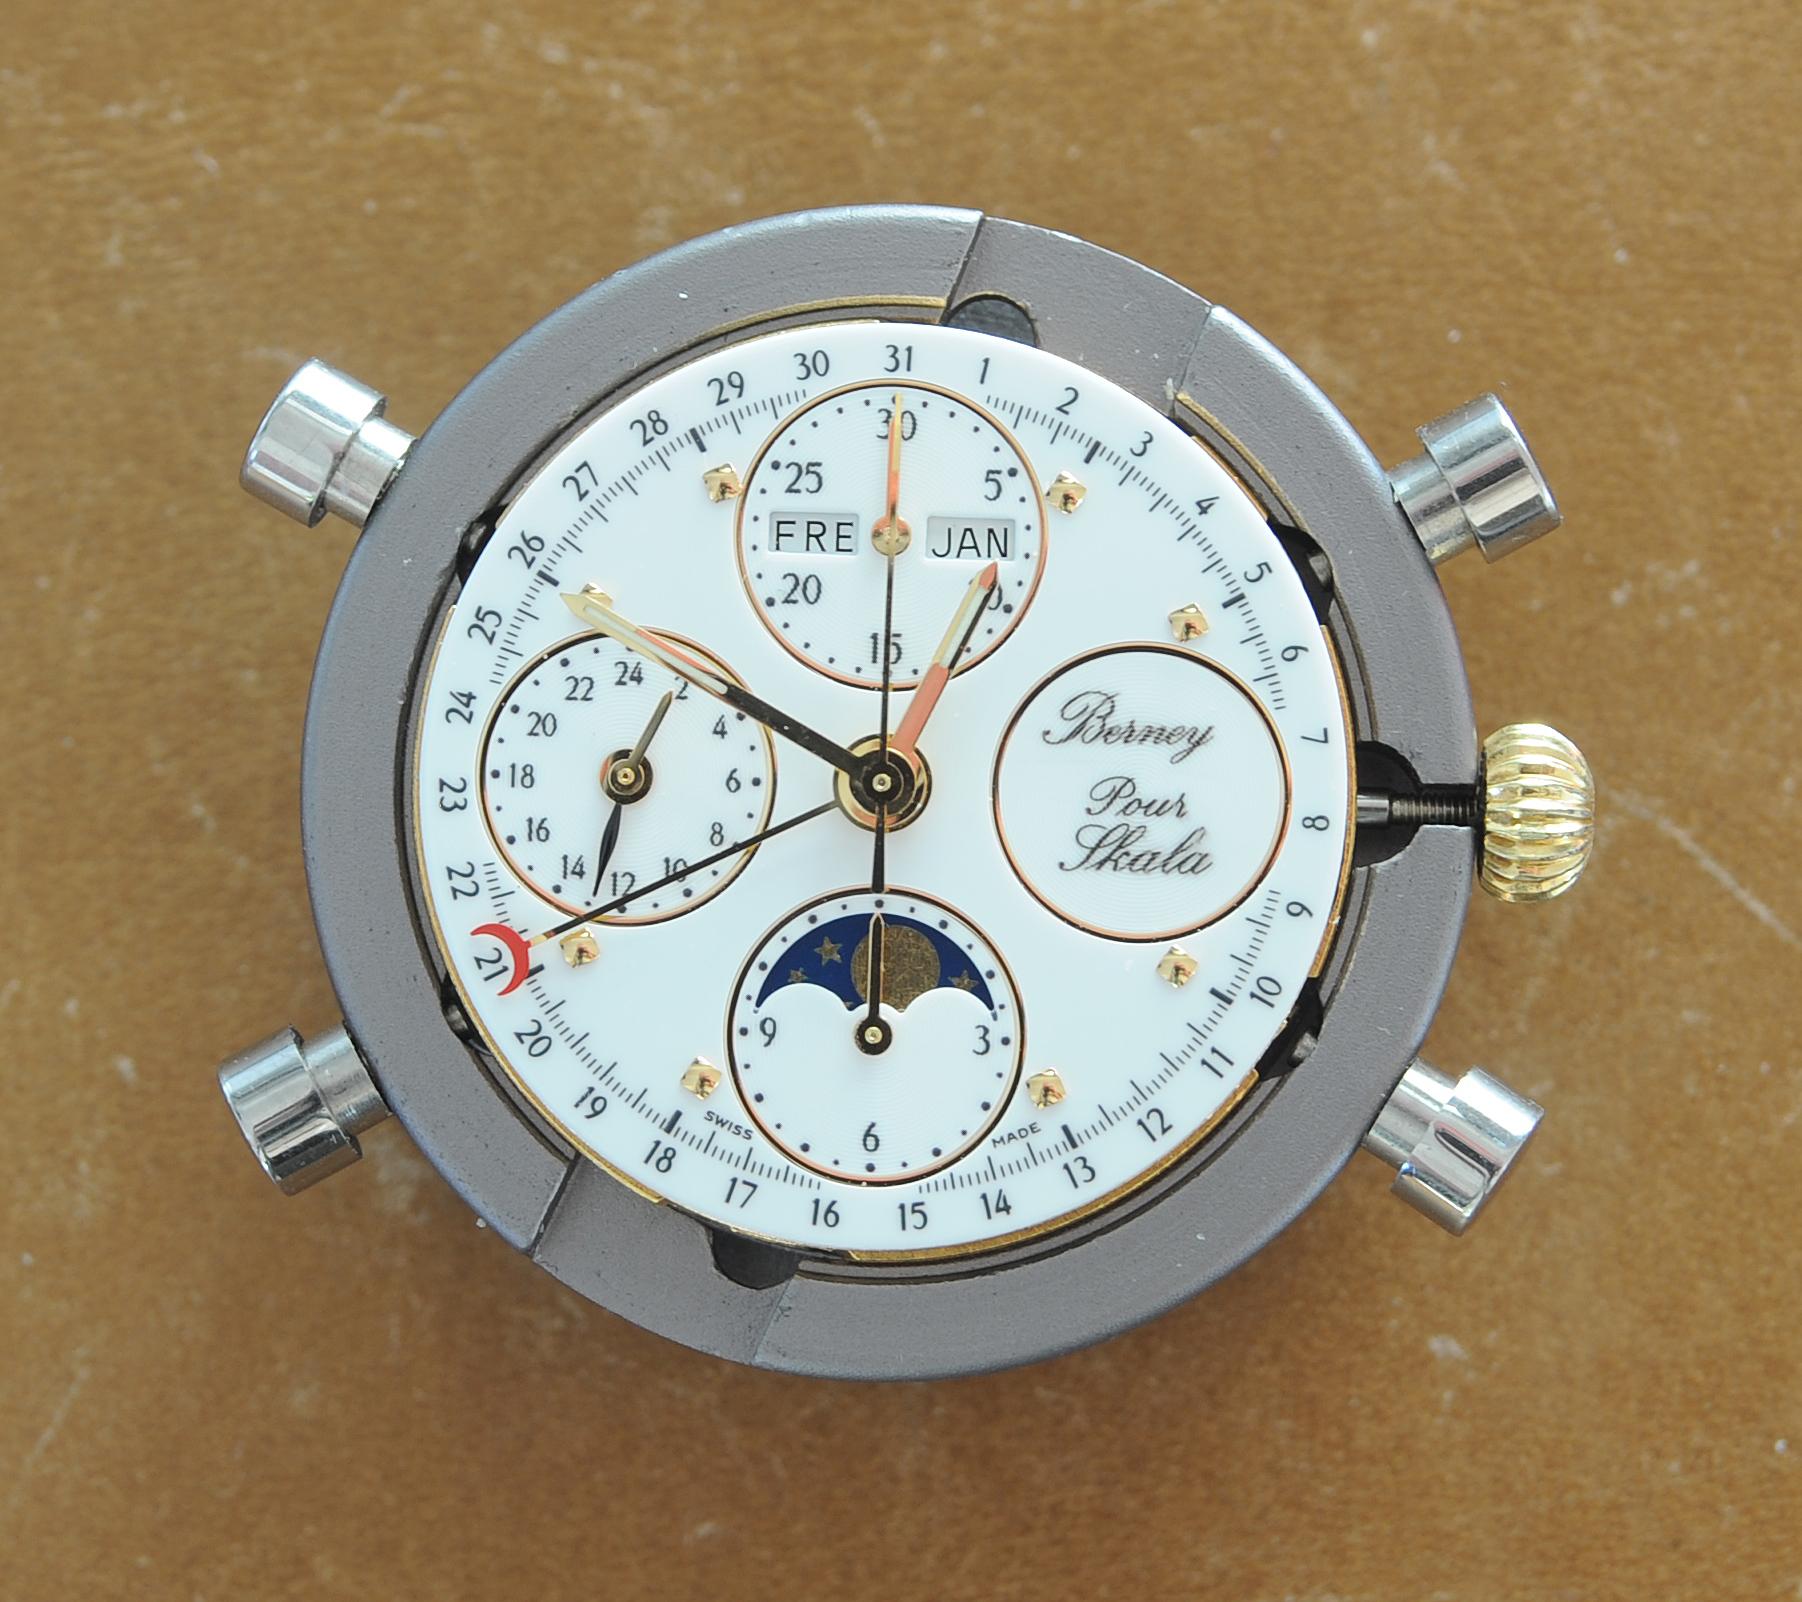
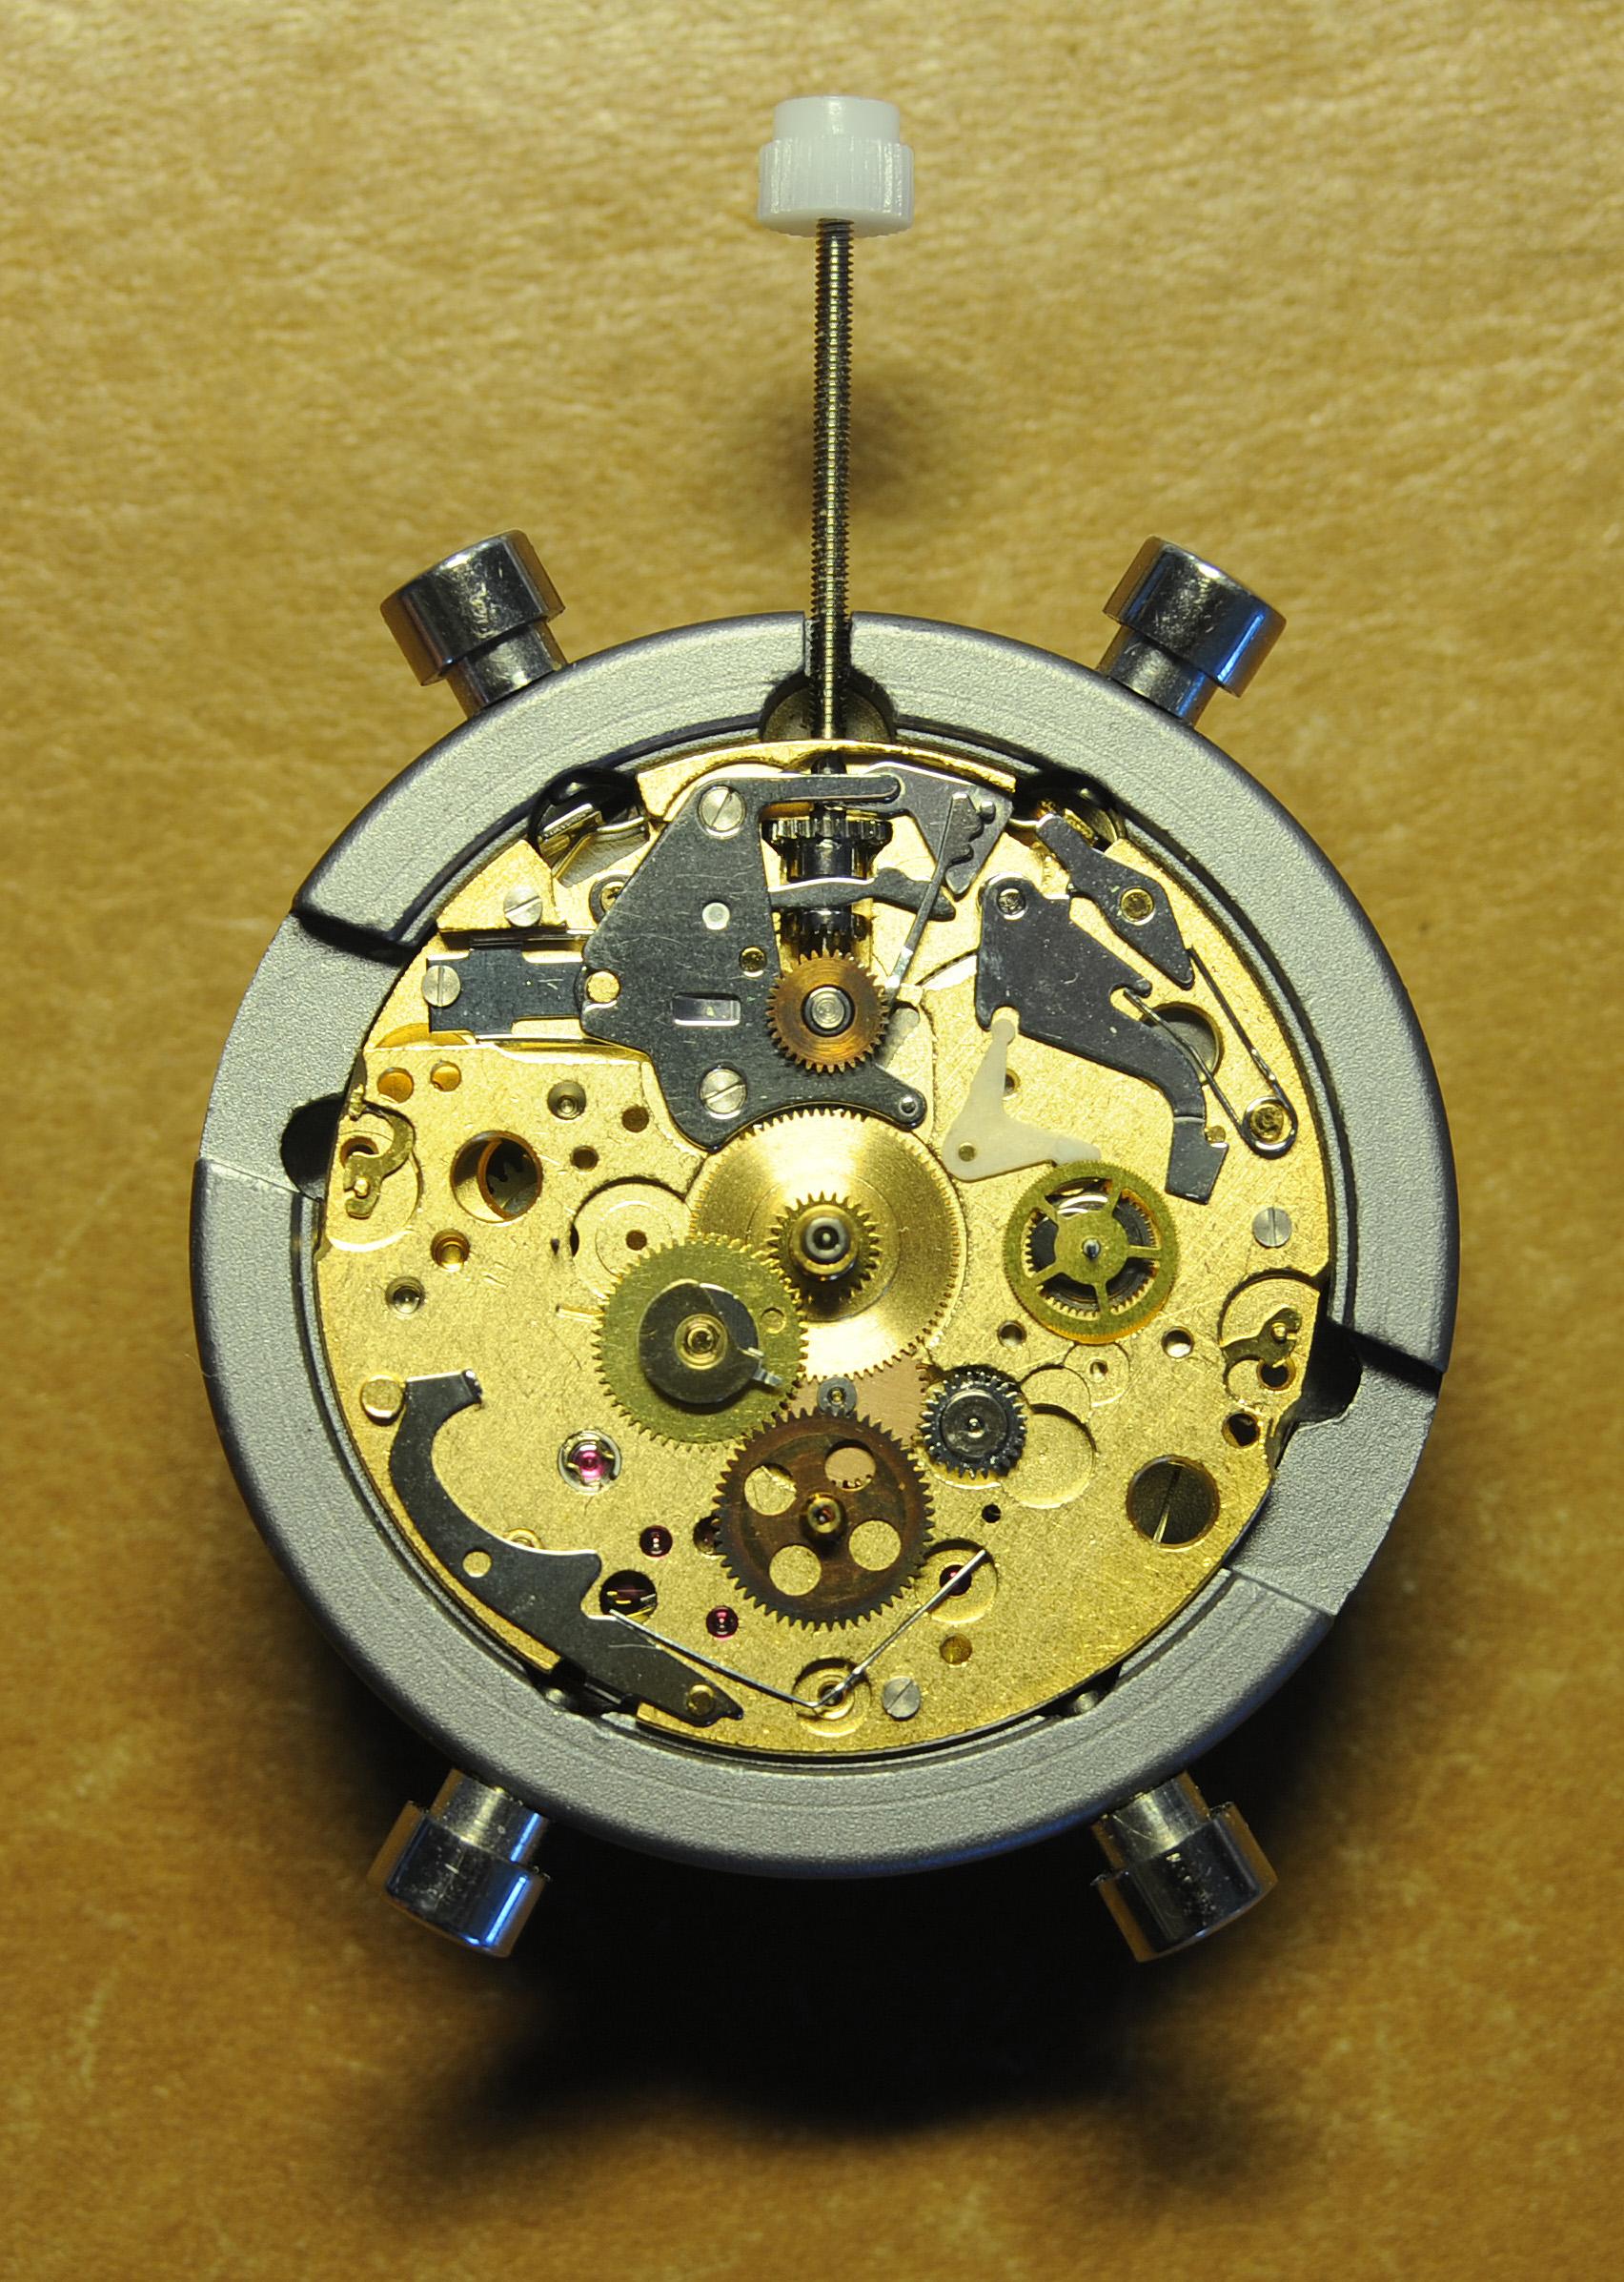
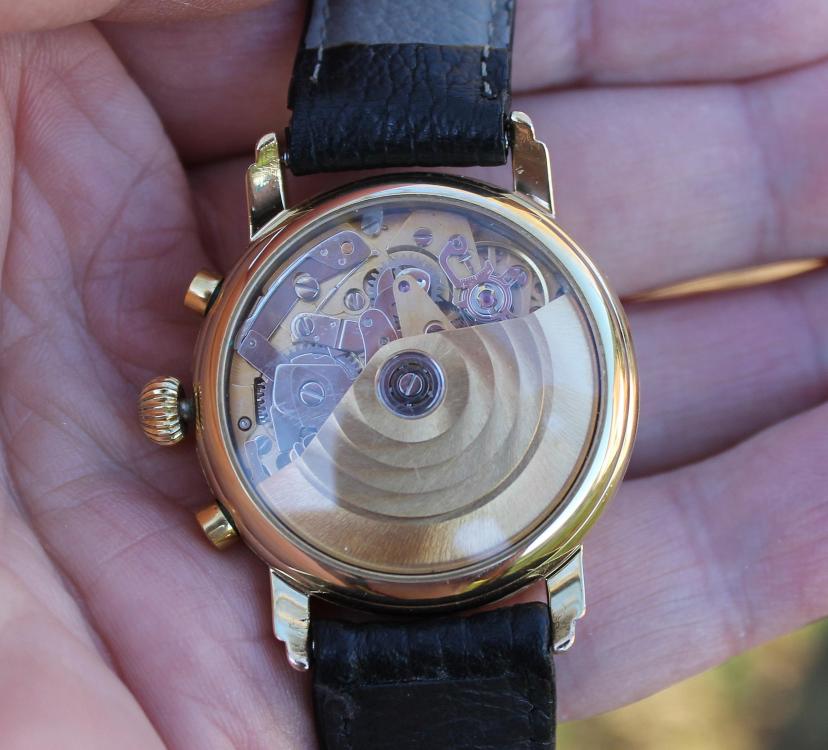
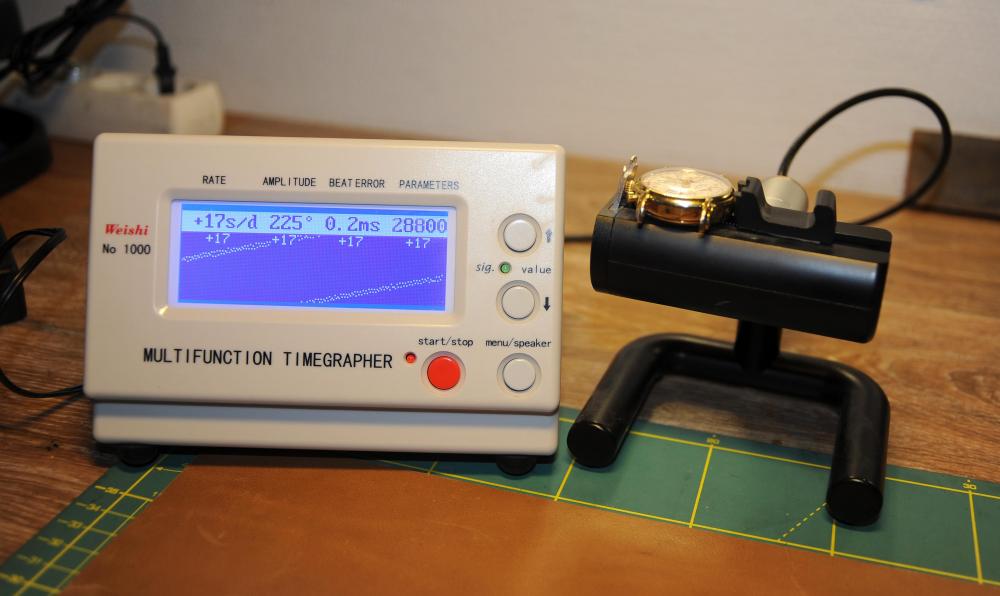
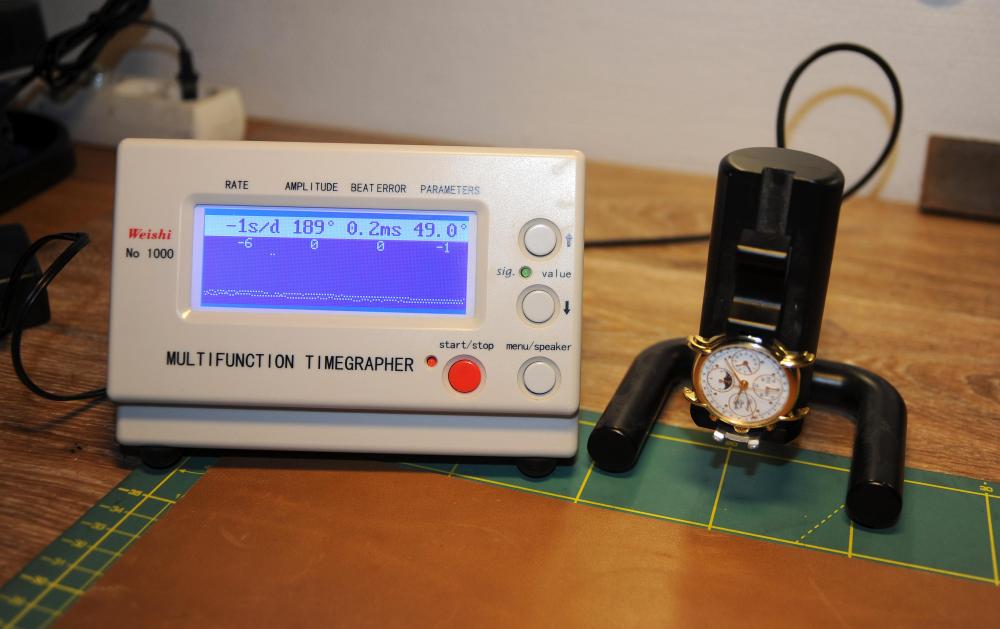
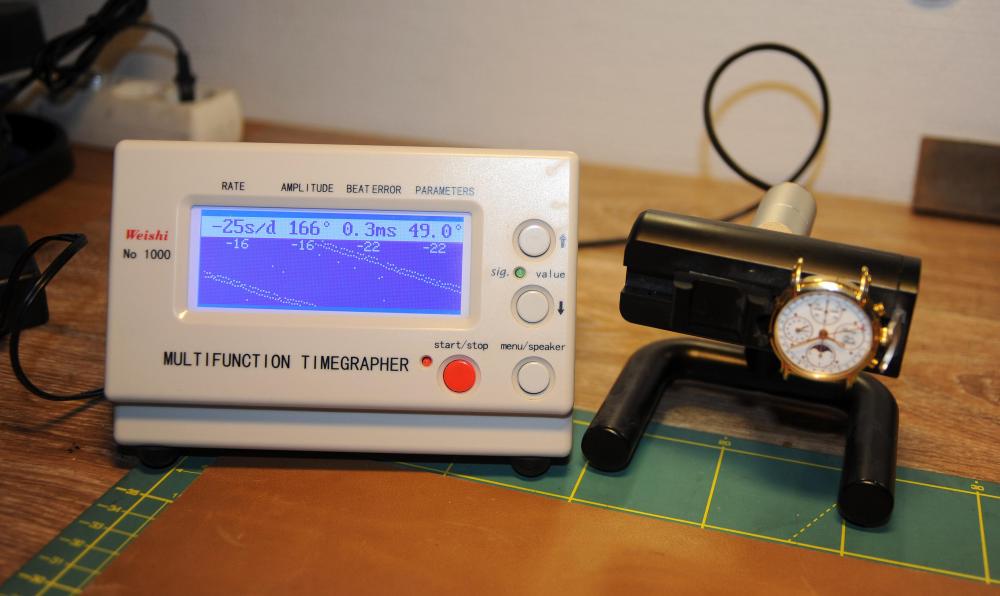
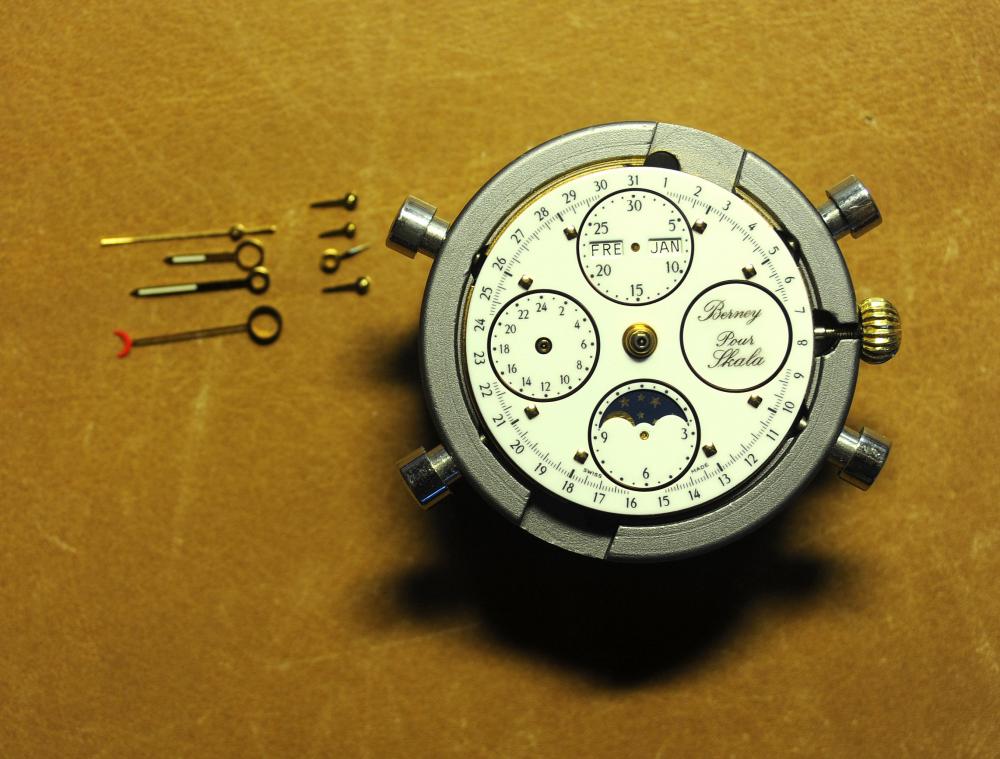
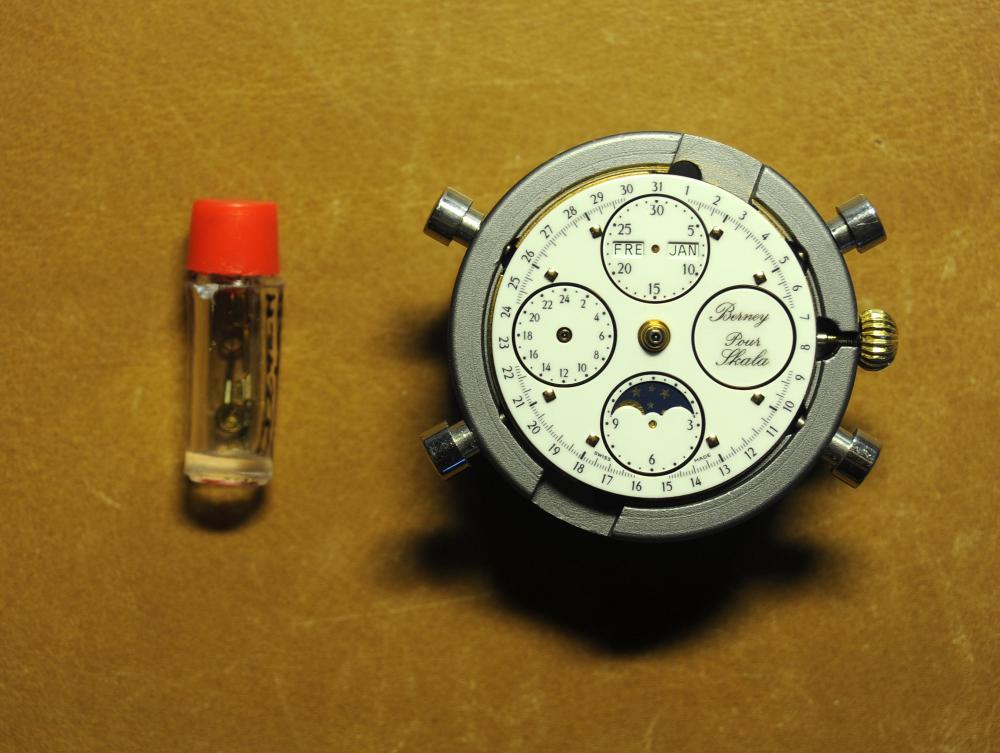
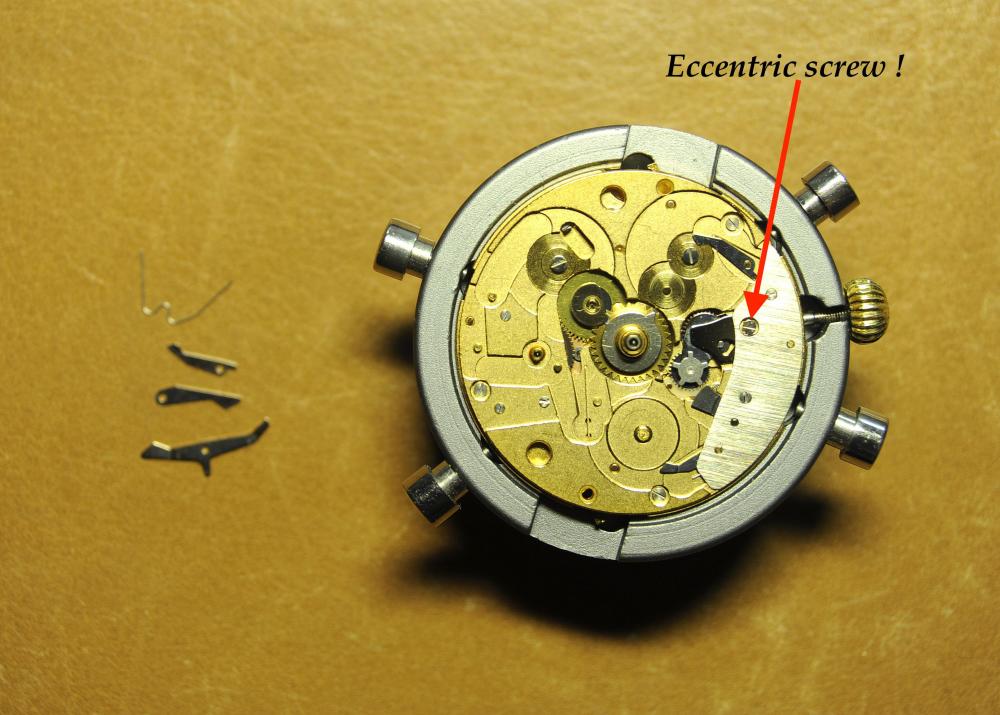
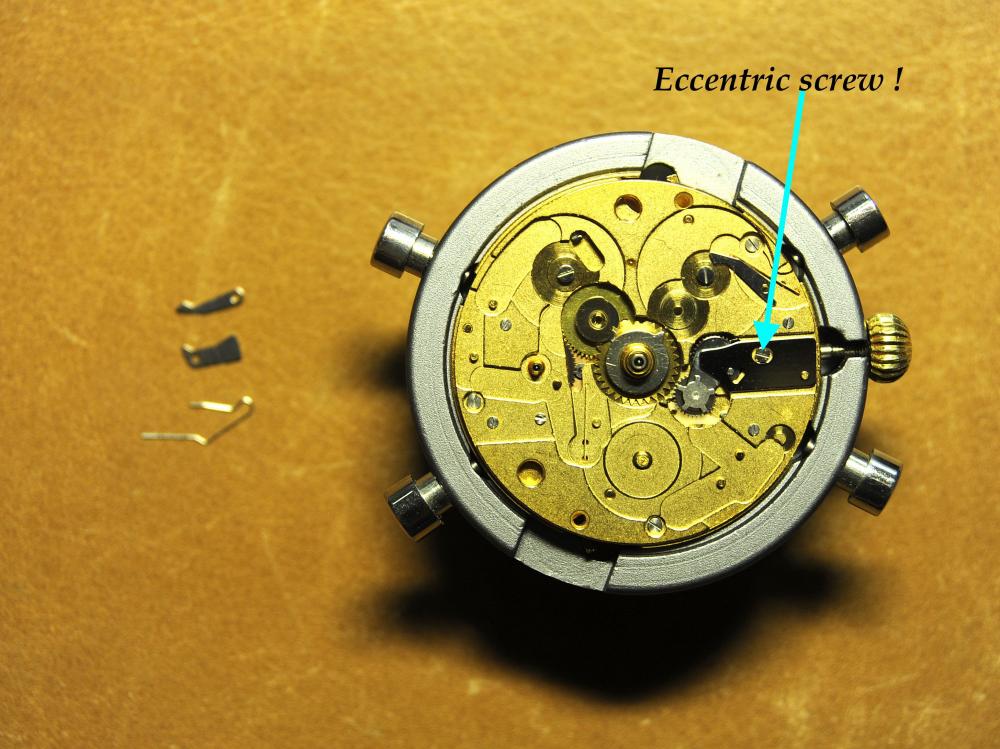
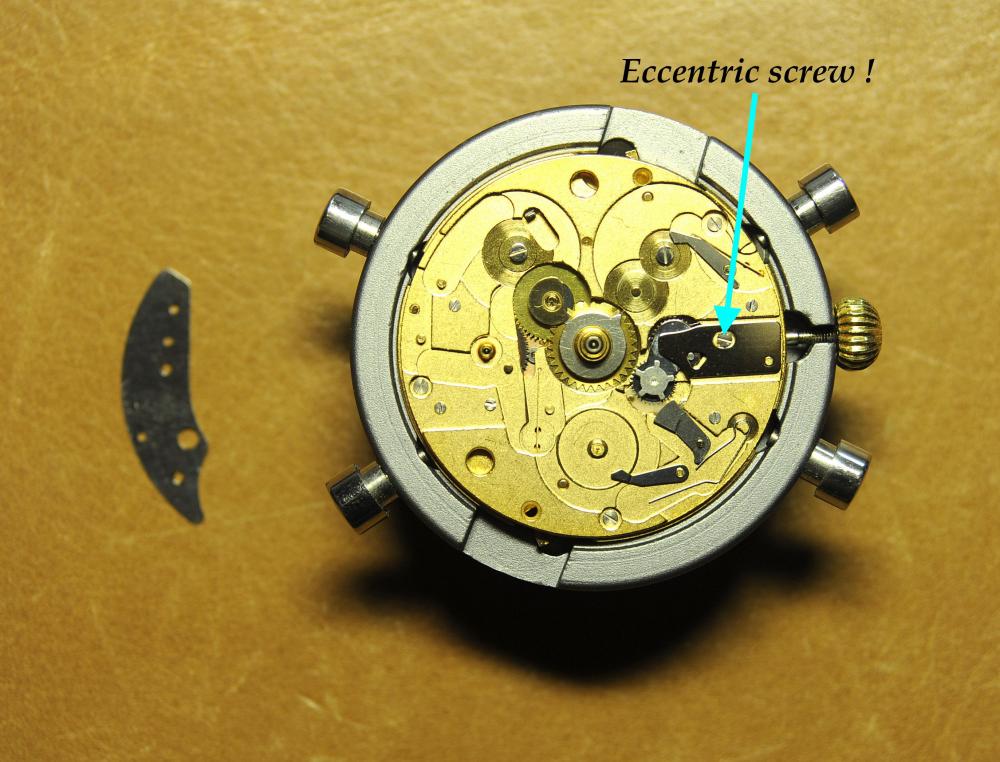
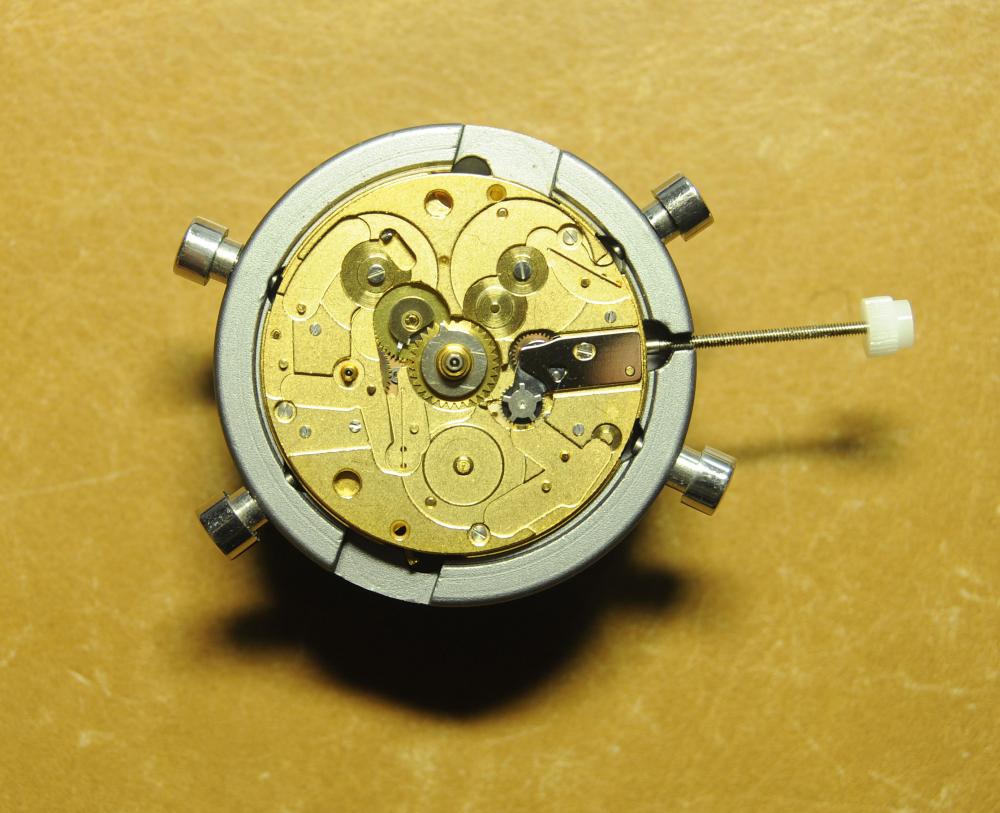
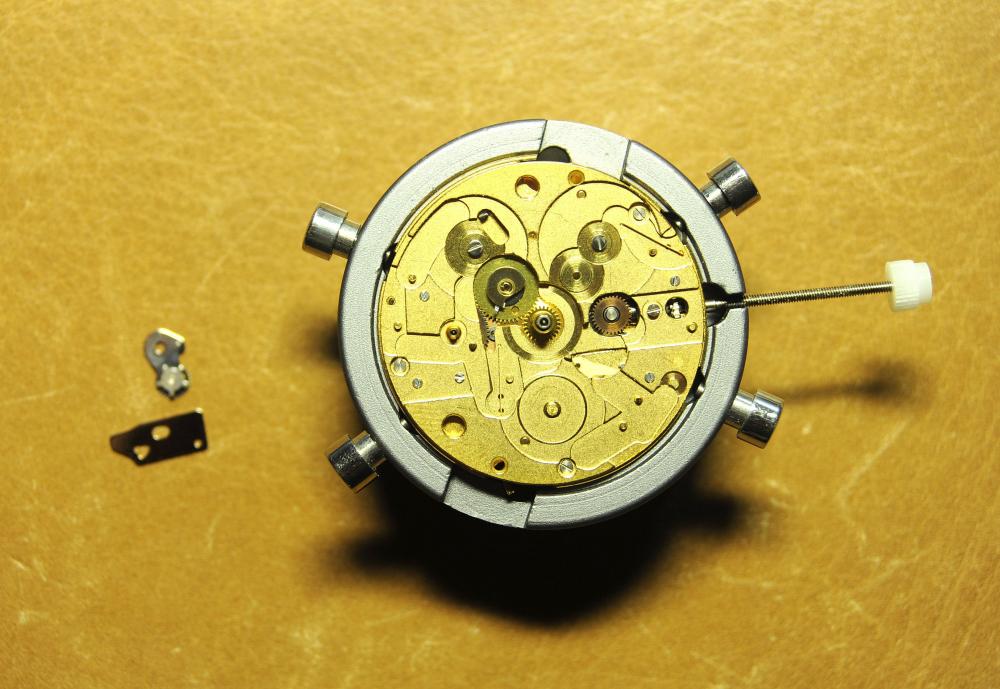
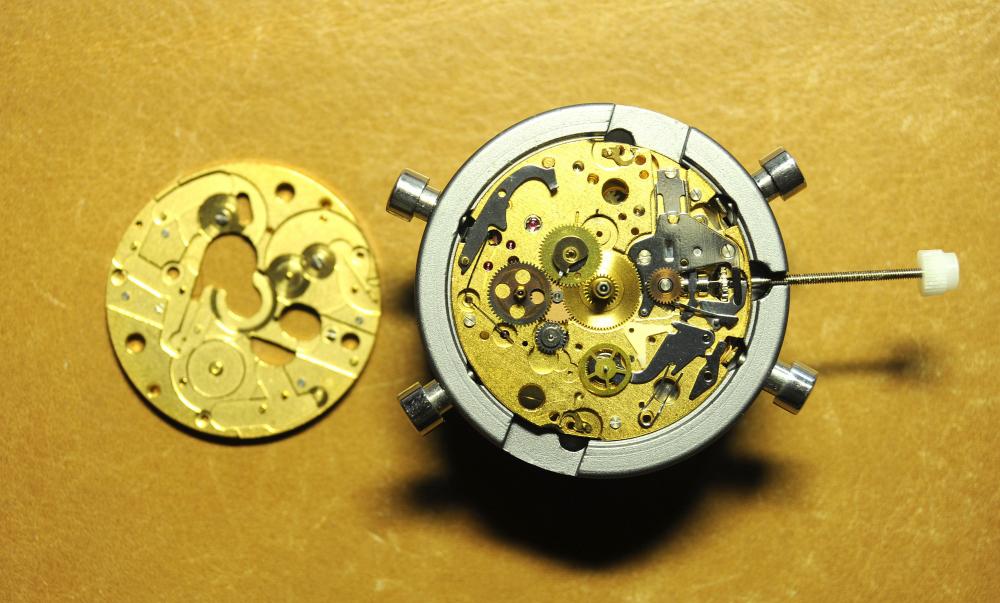
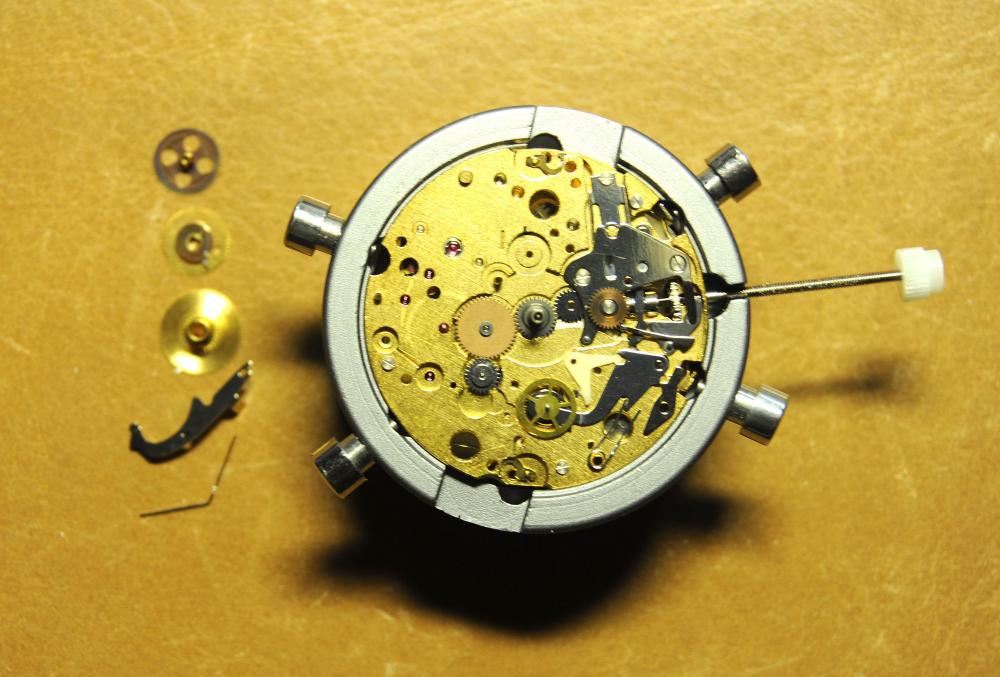
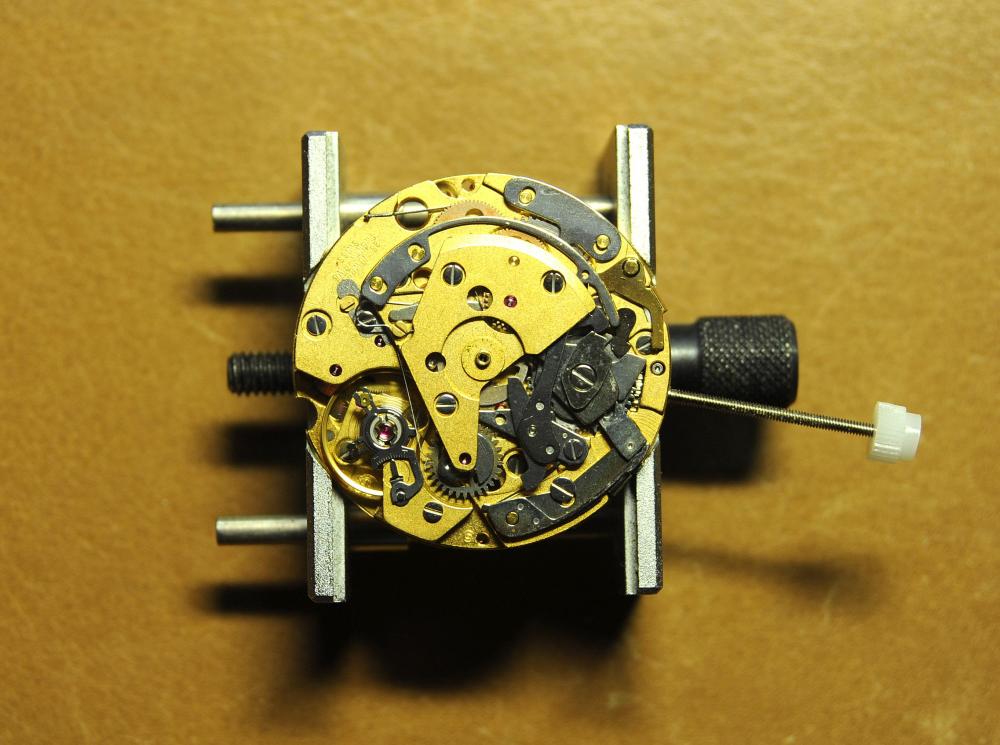
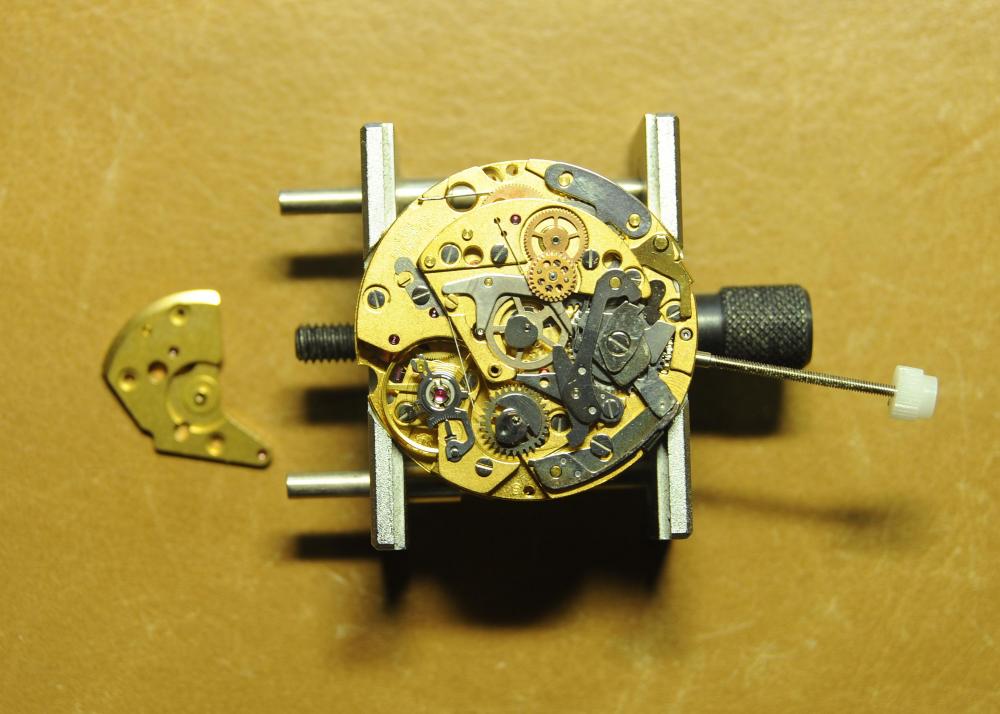
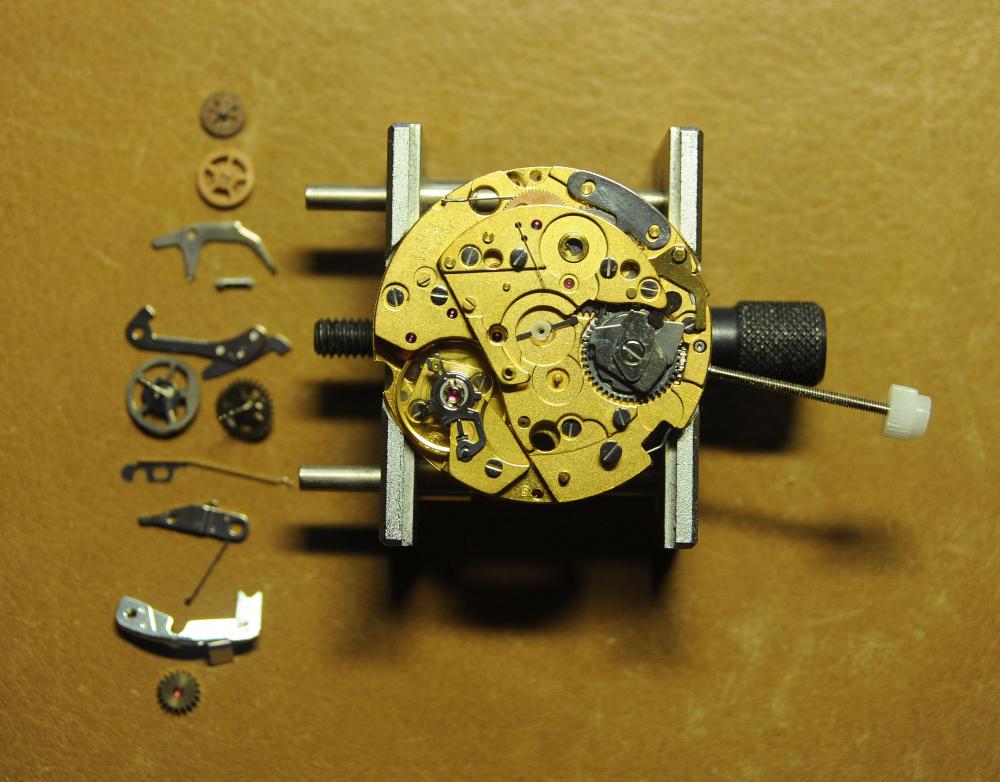
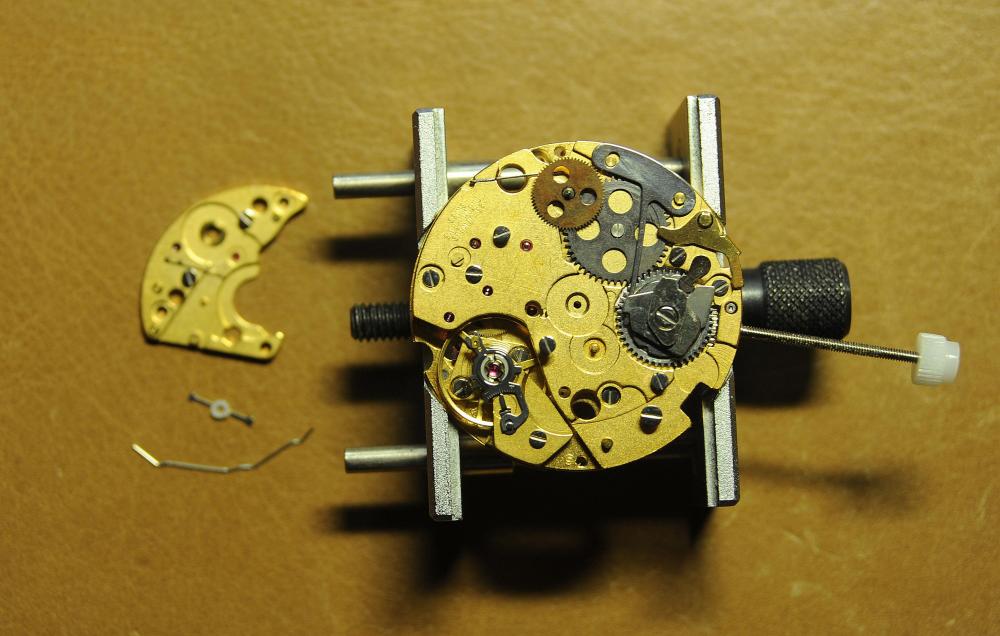
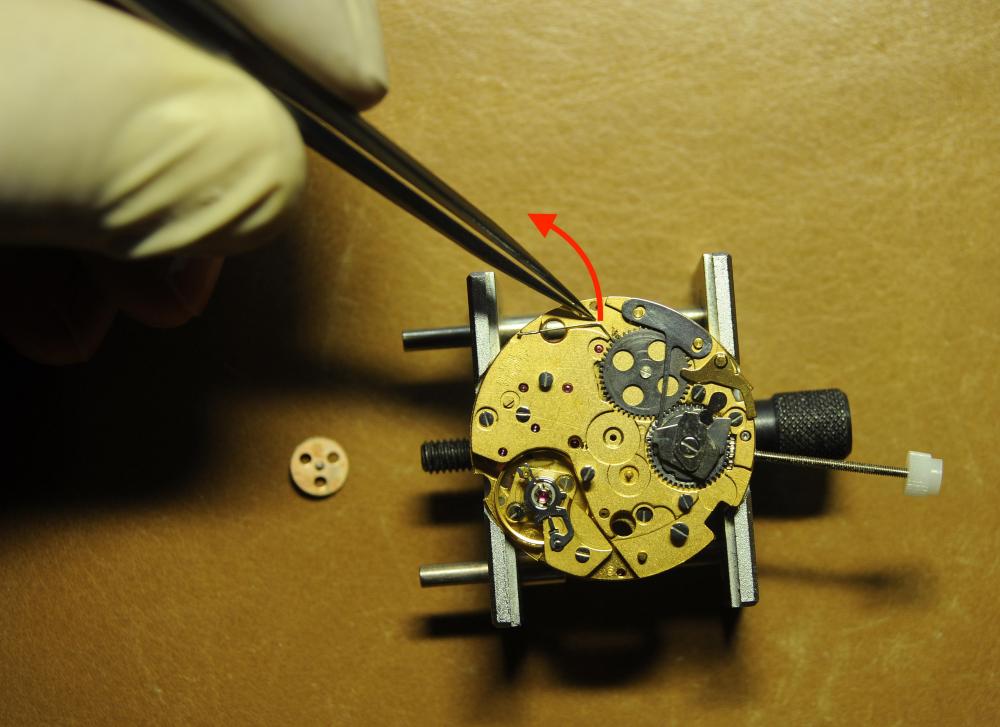
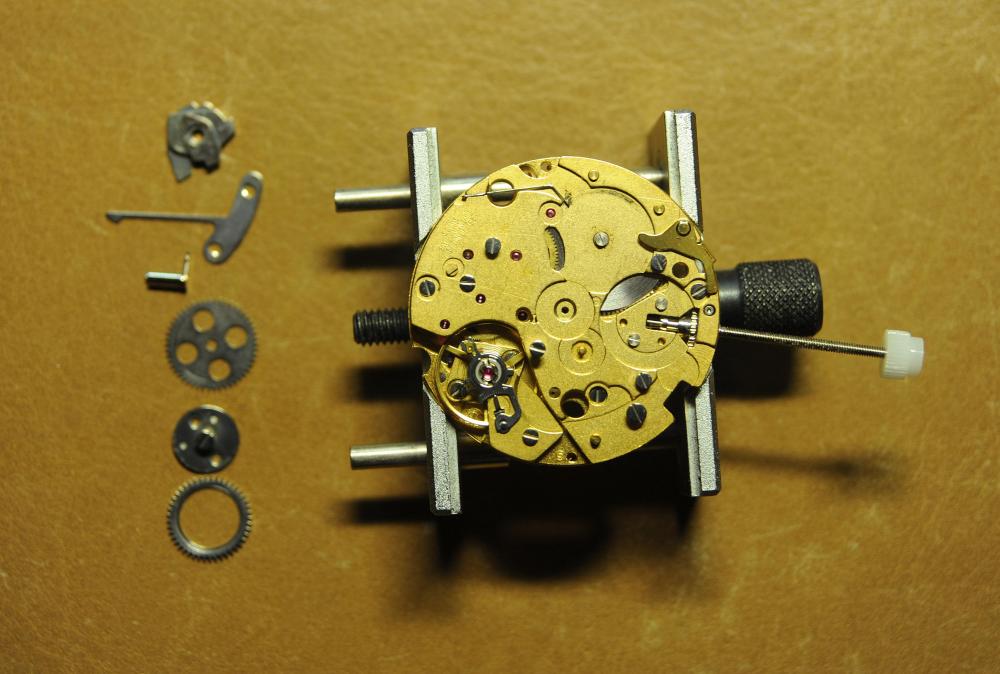
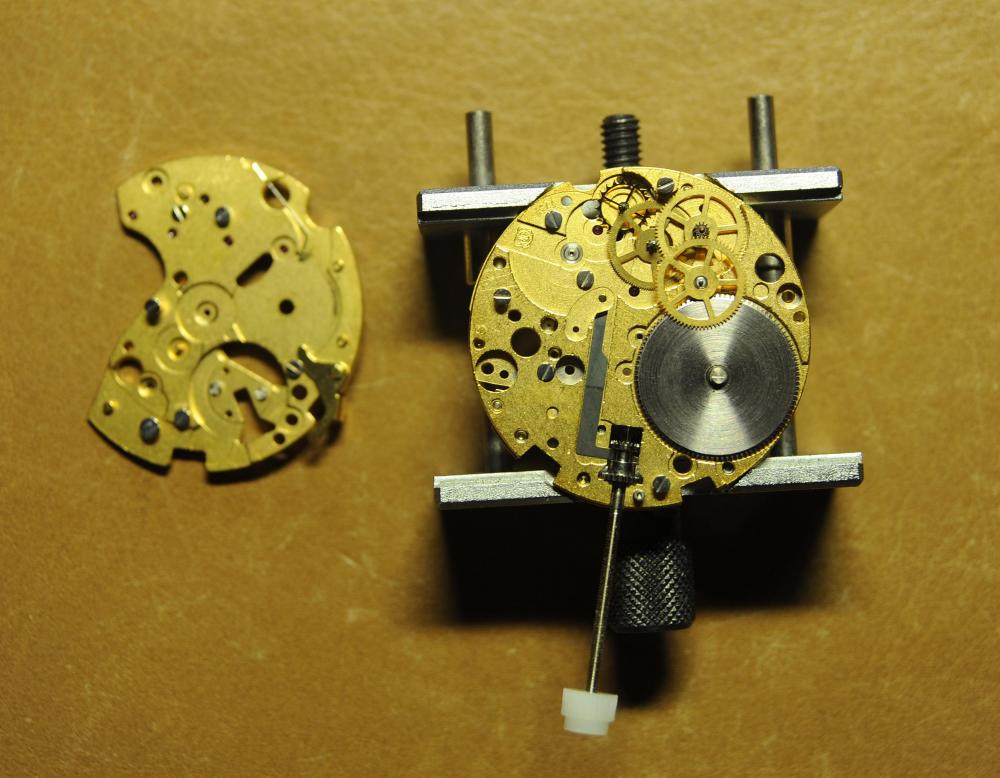
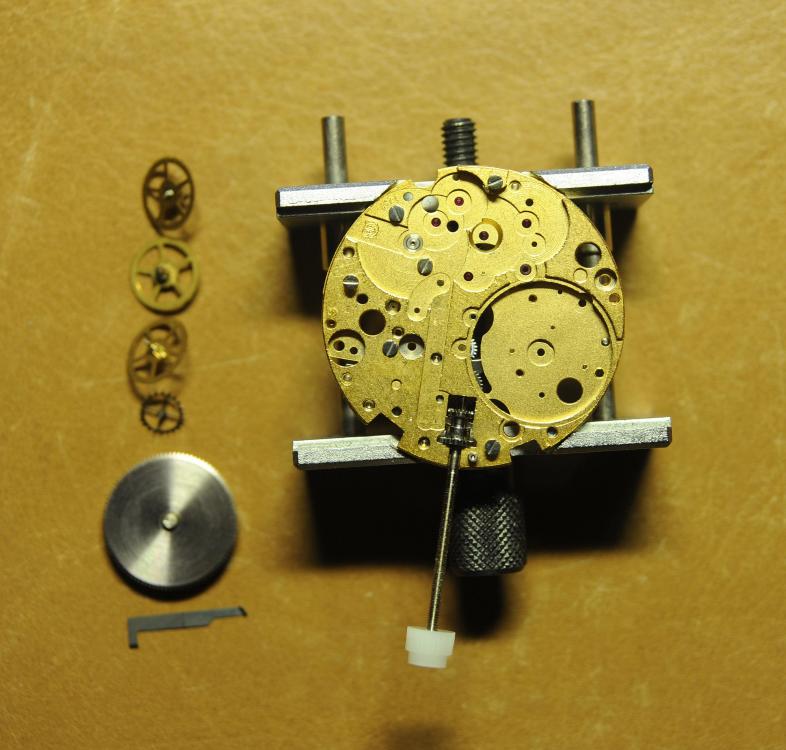
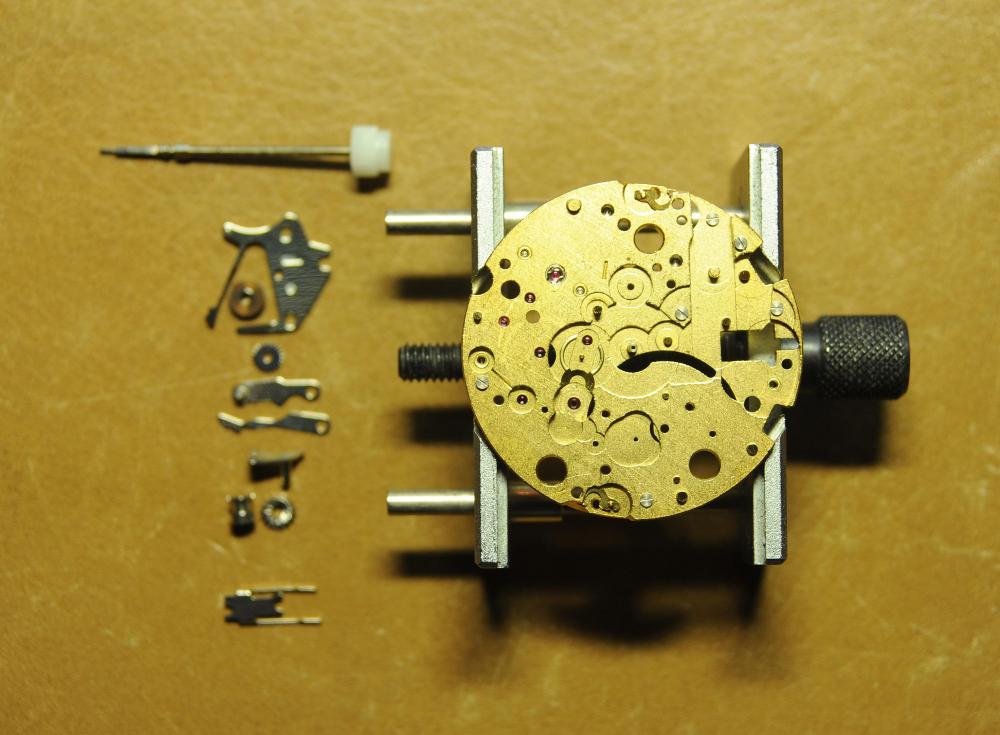
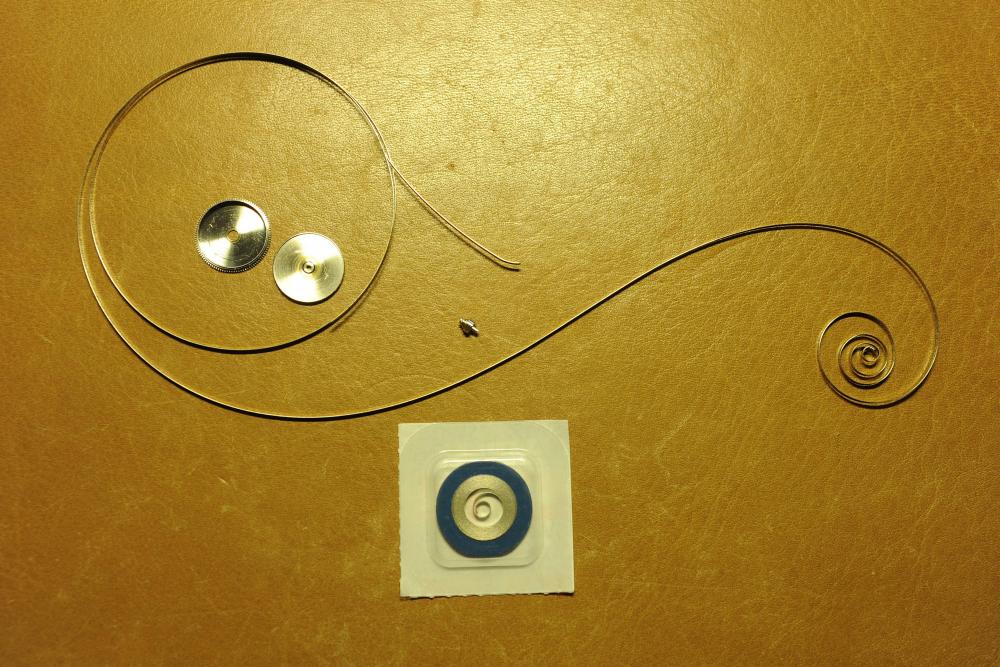
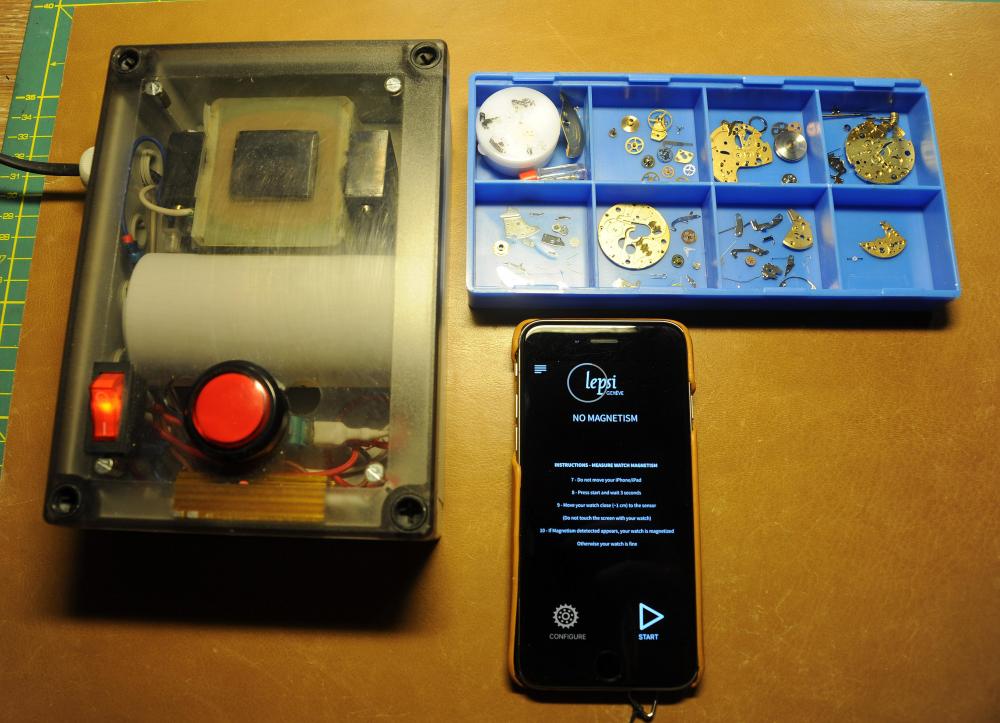
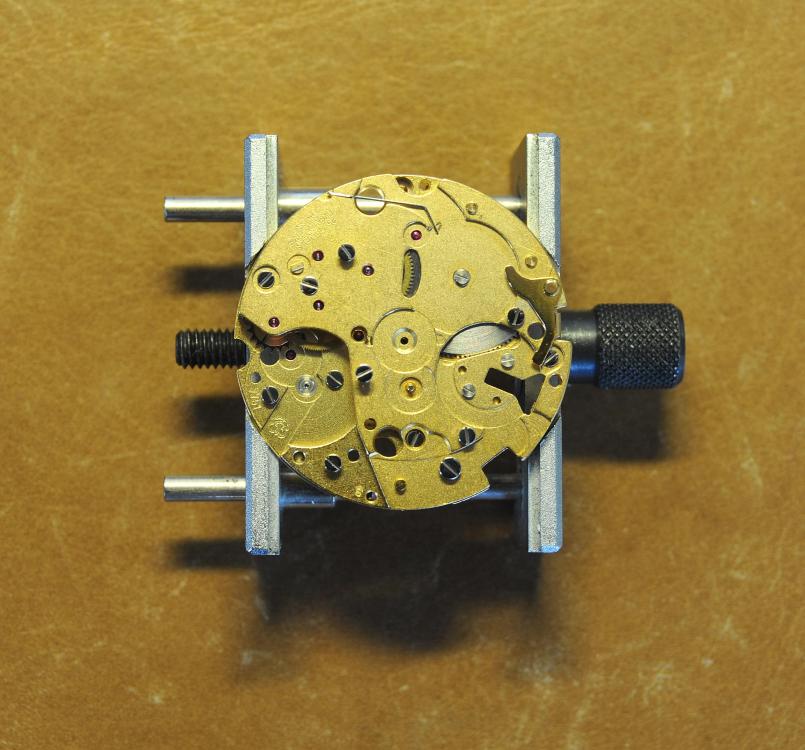
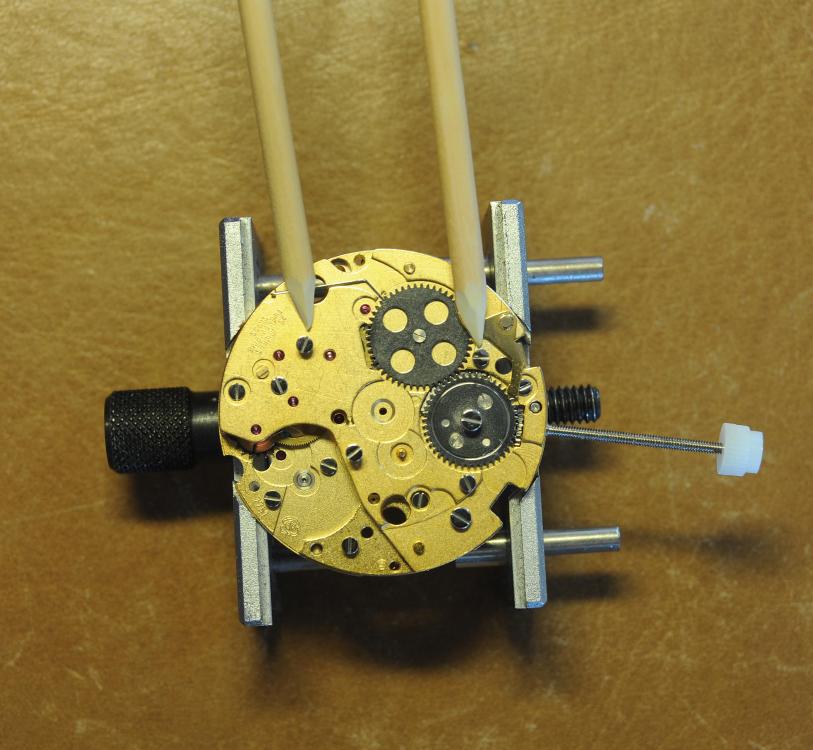
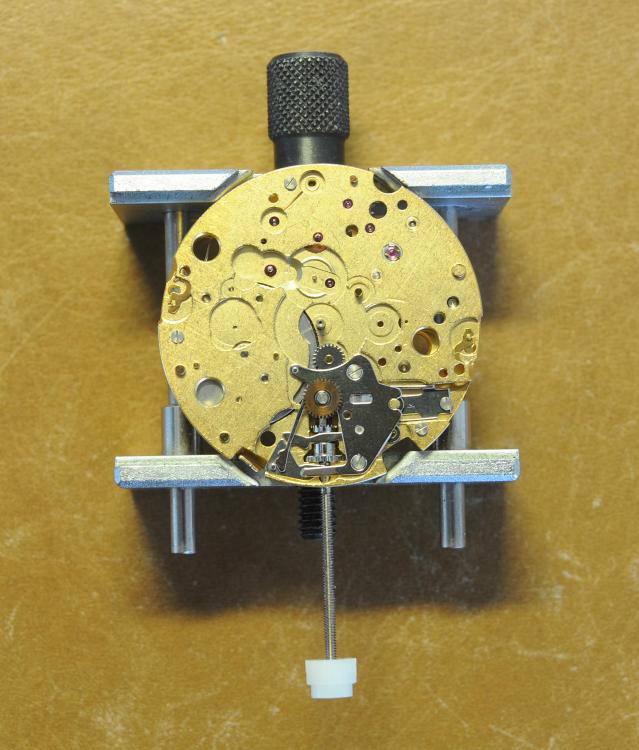
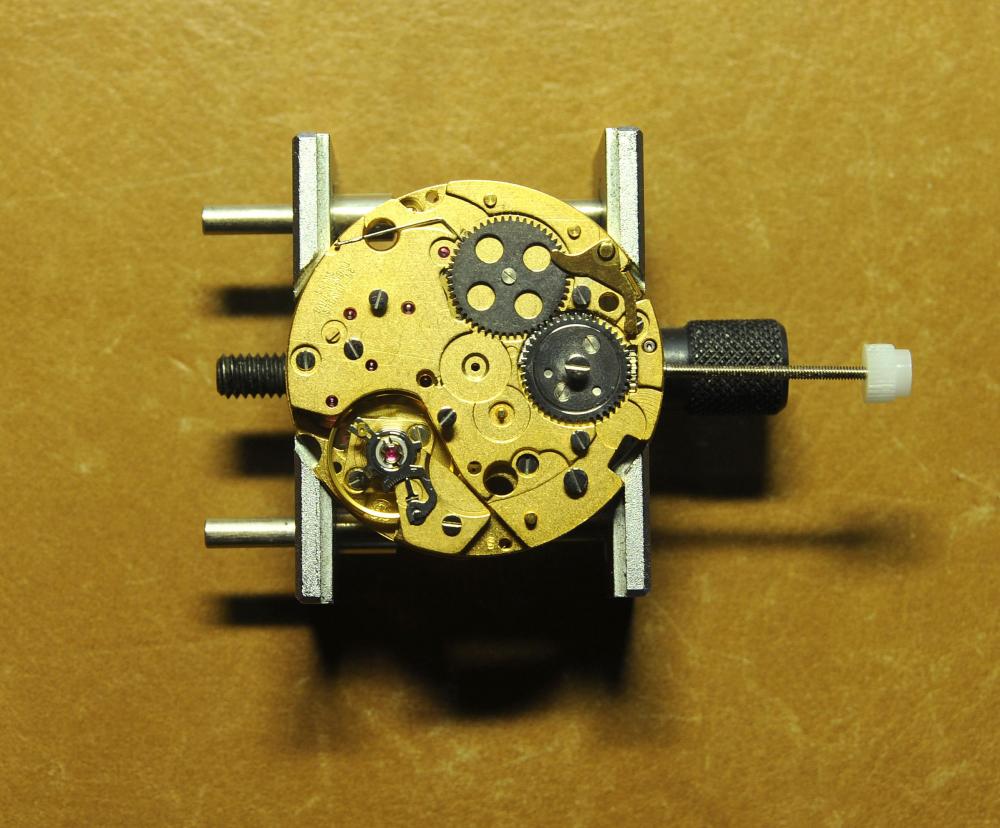
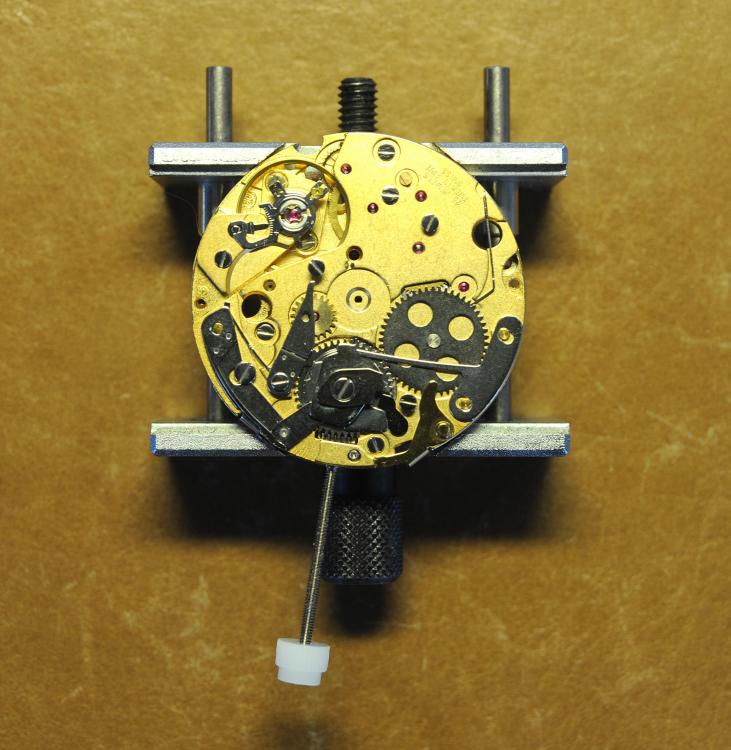
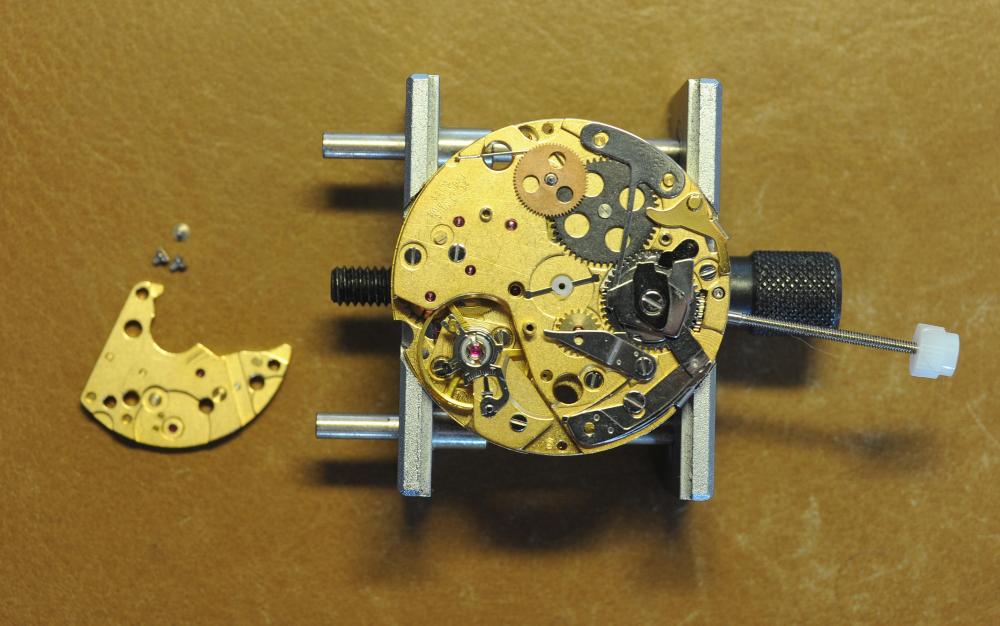
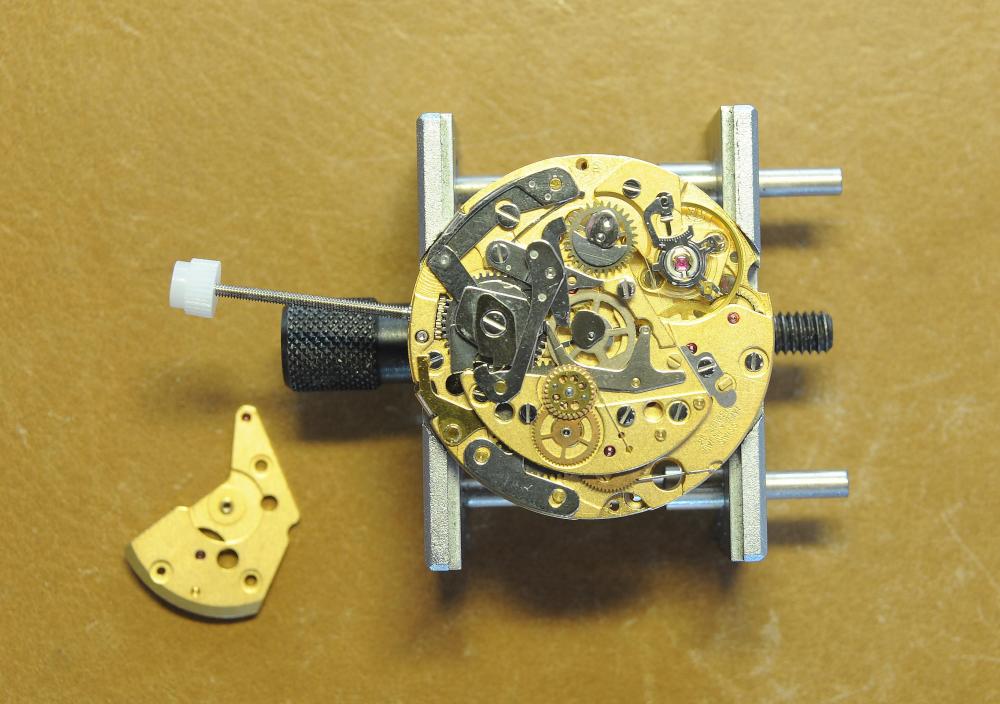
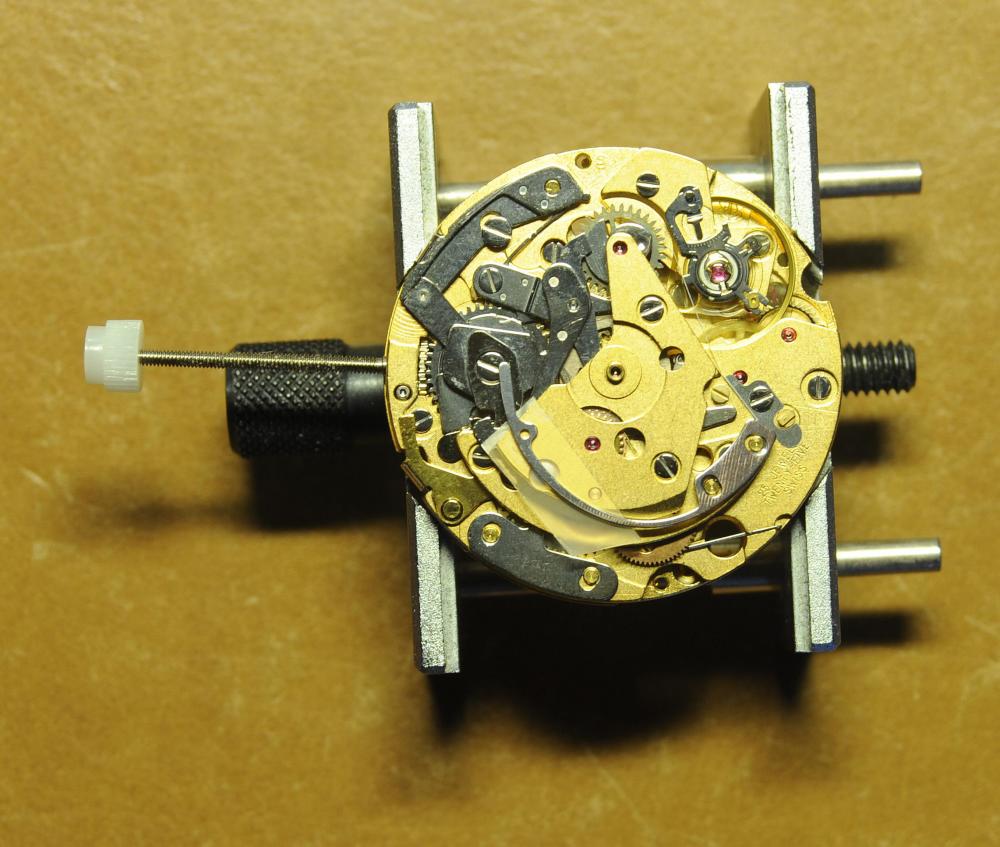
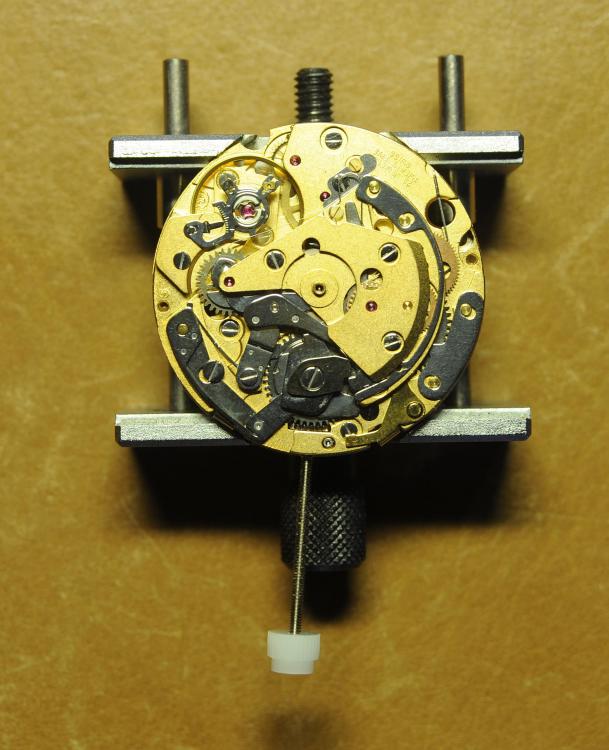
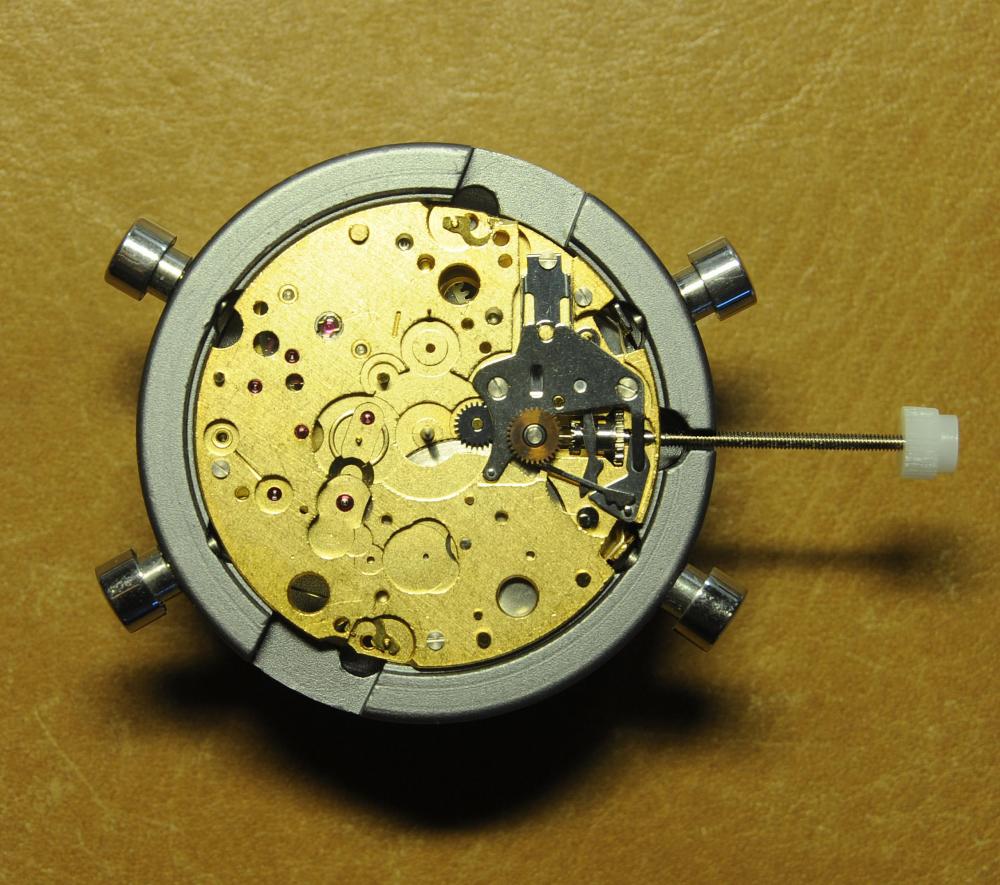
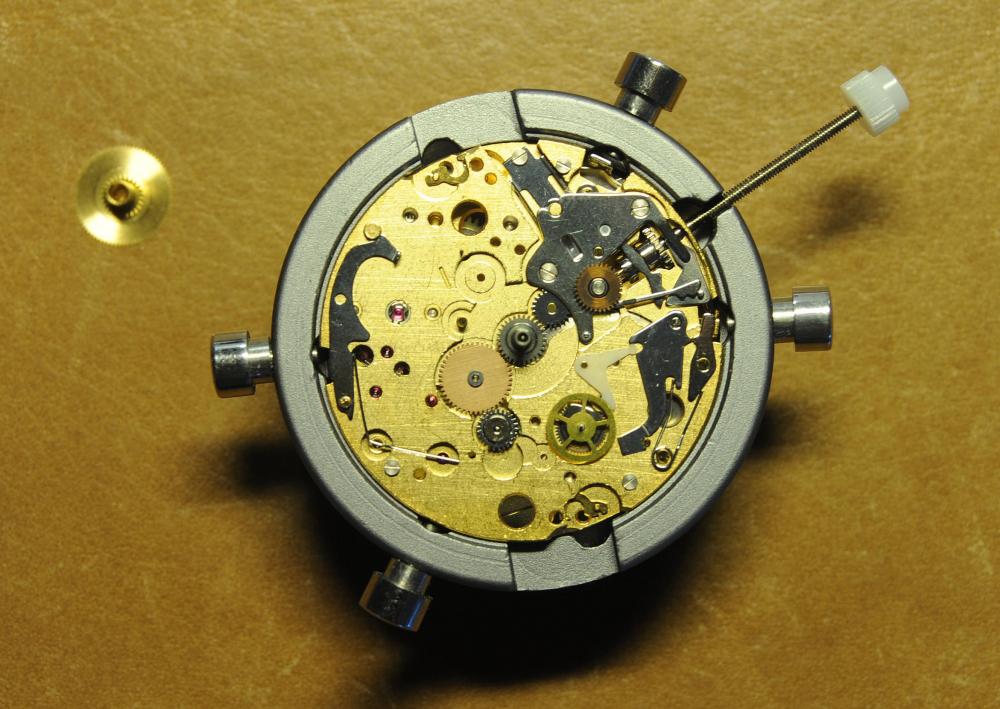
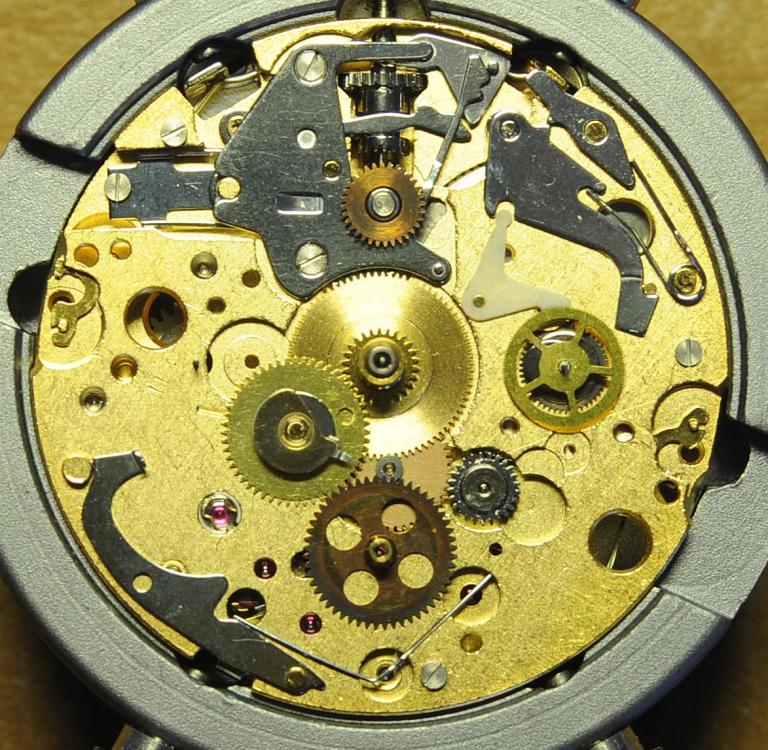
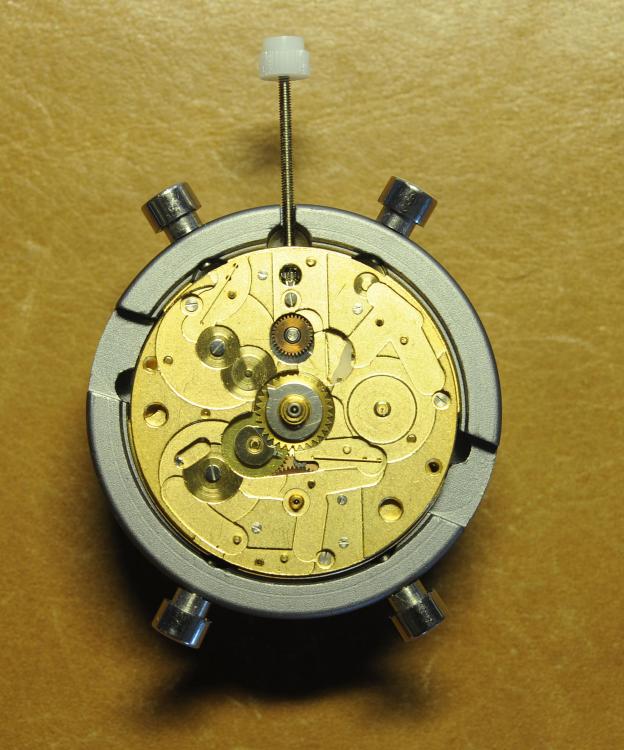
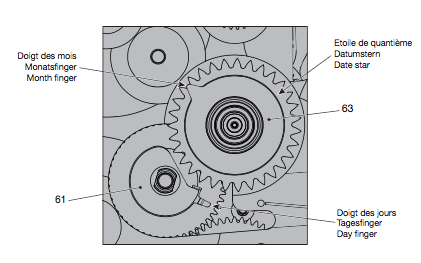
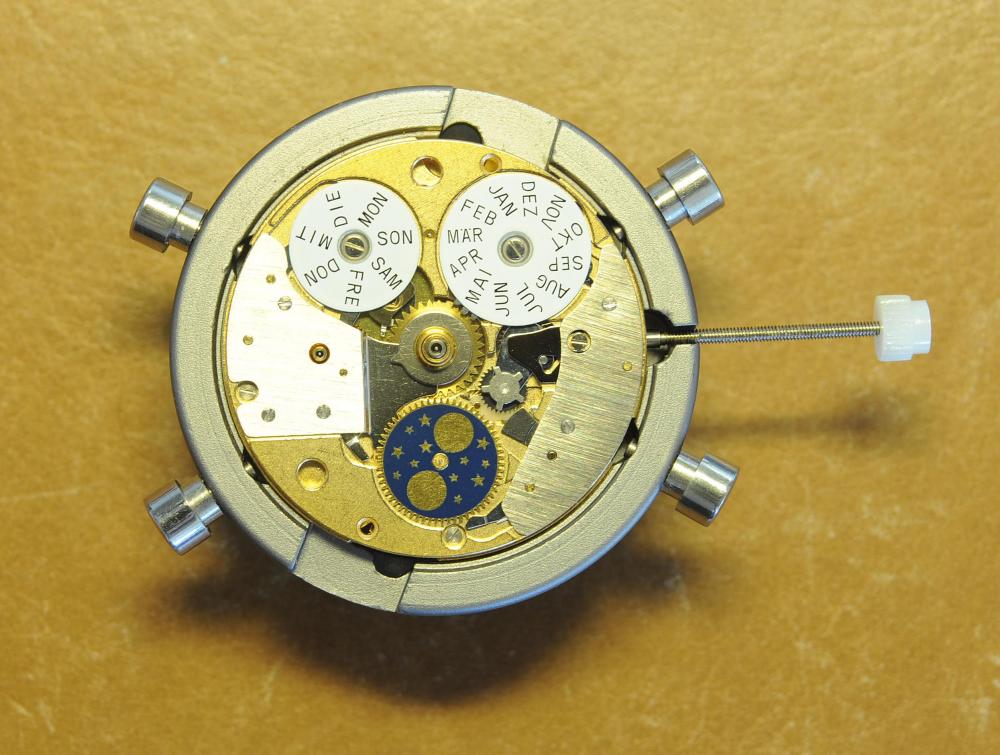
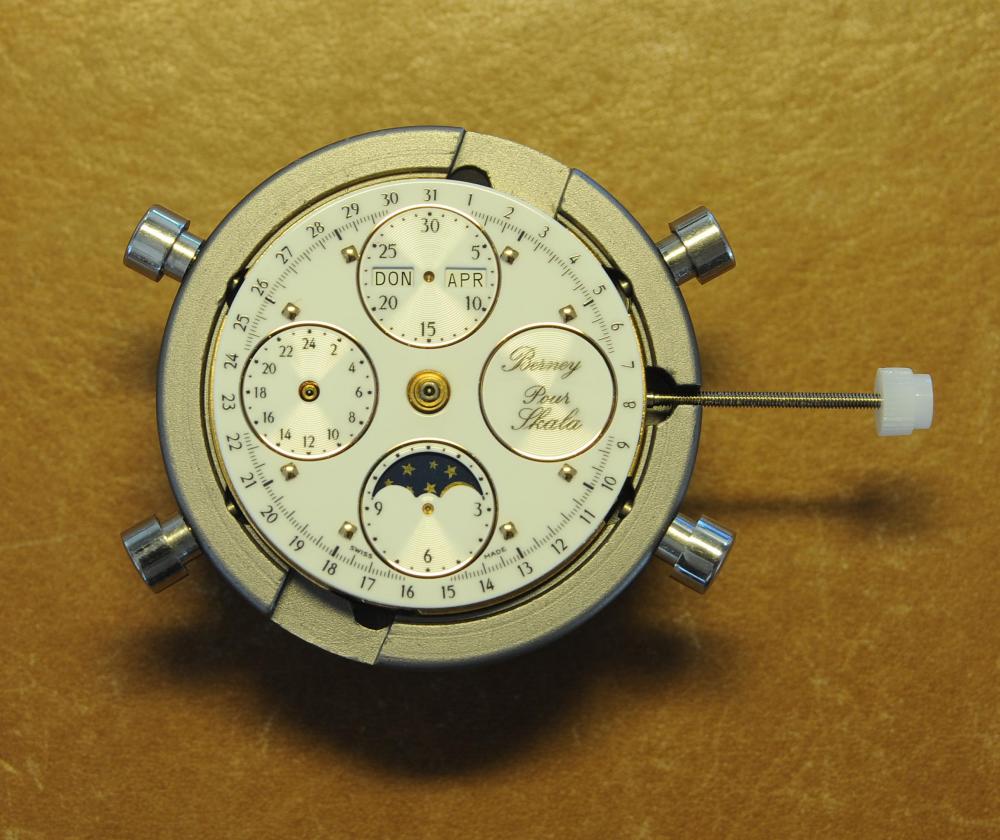
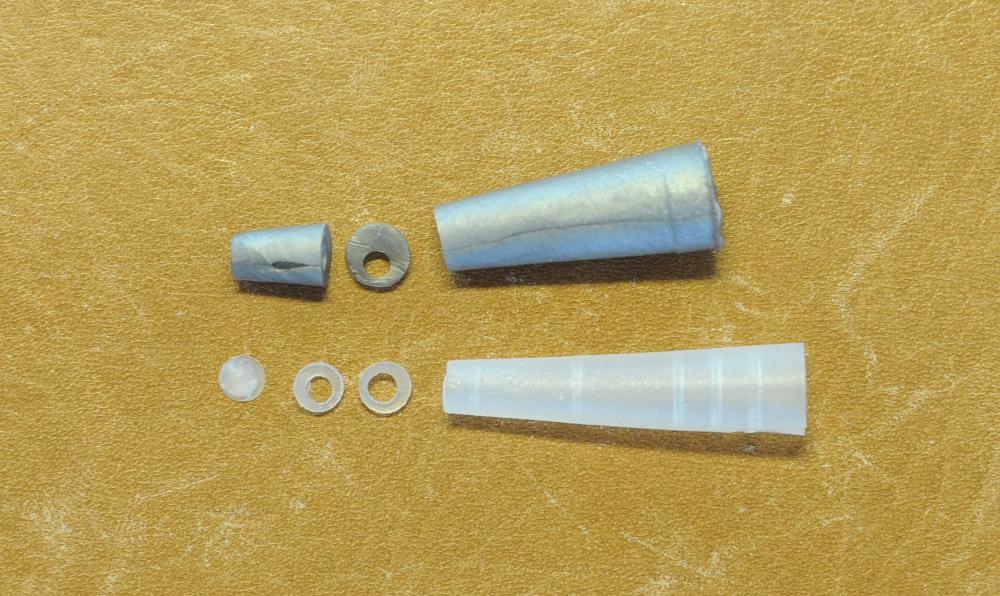
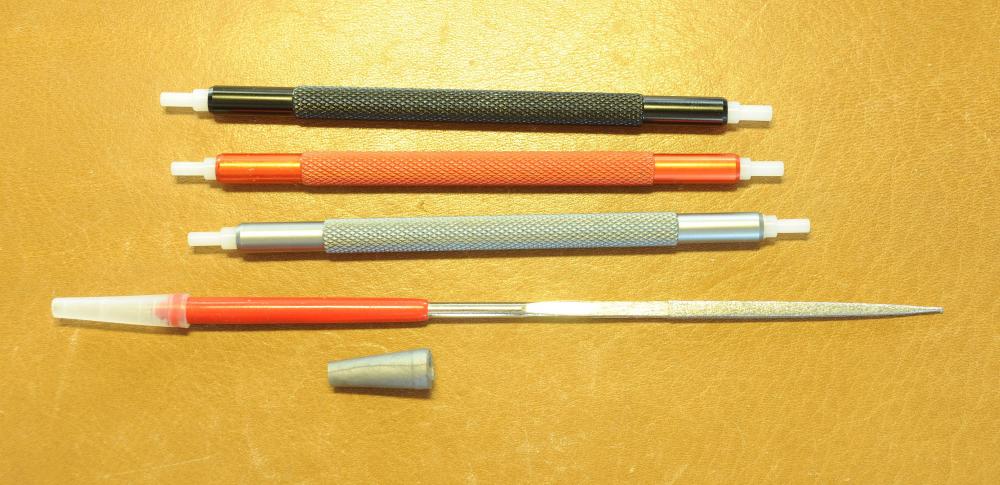
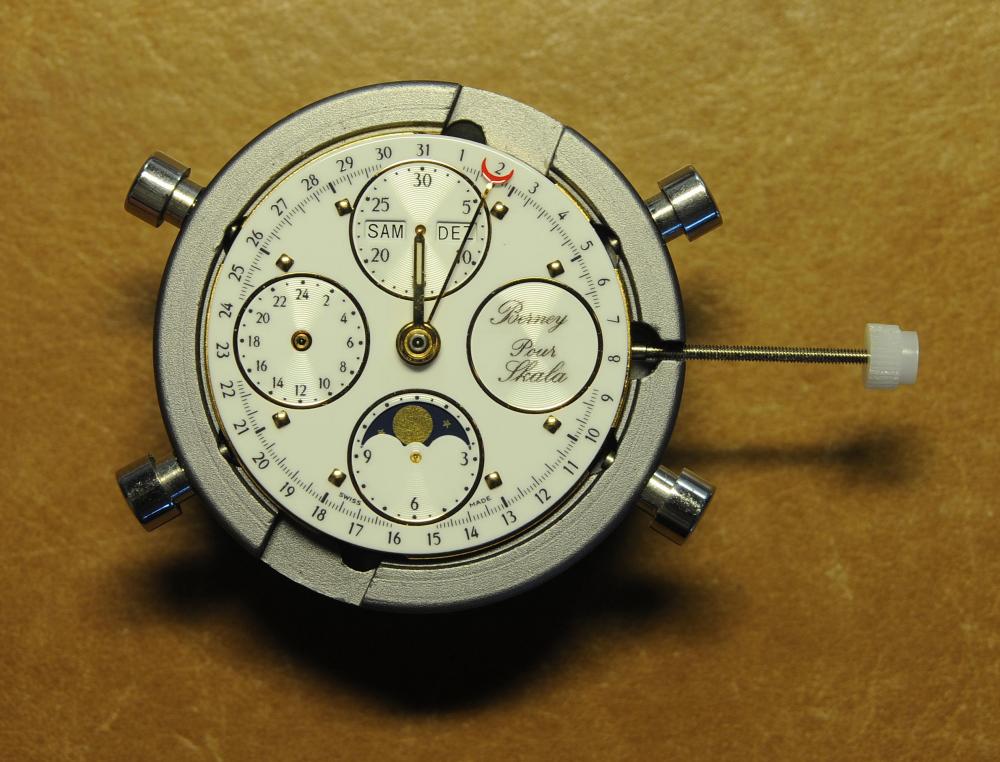
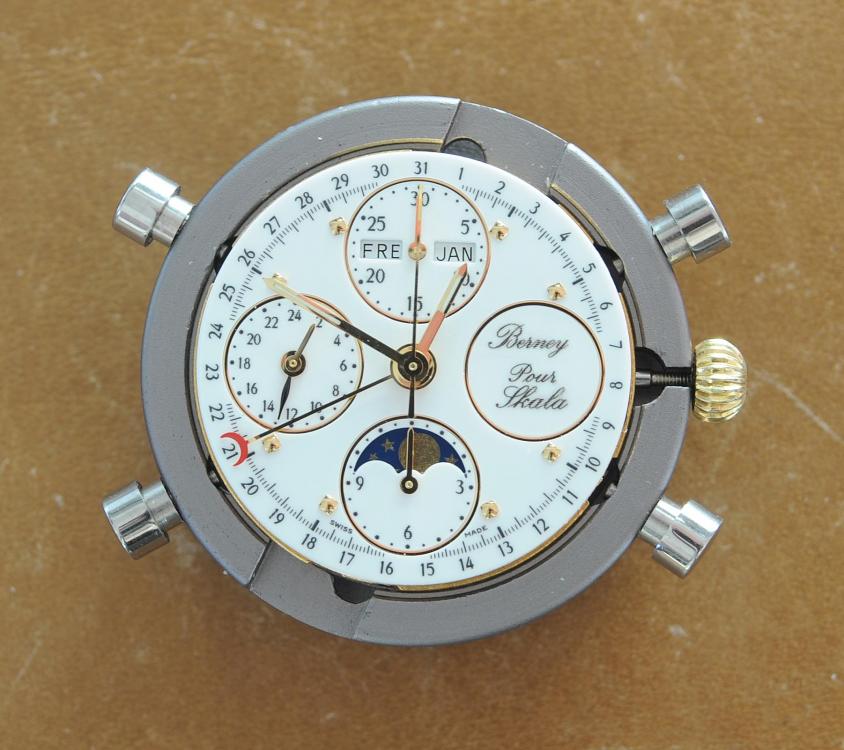
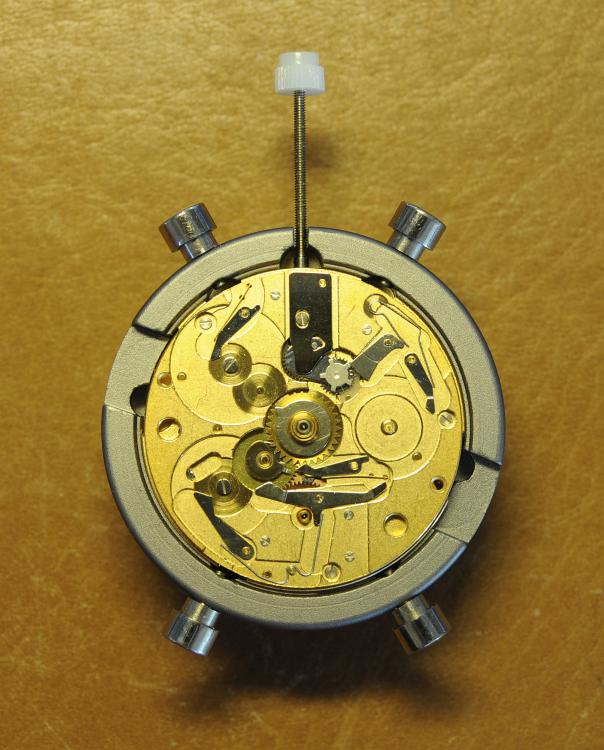
Valjoux / ETA 7751 Triple calendar moon-phase; This gold-plated Berney-Blondeau S.A. with an ETA 7751 belonged to a German gentleman who received it new on his 60th birthday in 1995. Through the years he kept the original box, the warranty card as well as the 1995 price-list and the dealer’s business card. He has worn the watch only on social accessions and the watch spent most of its time stored in a "Panzerschrank". According to the original price-list, the 1995 purchase price was 1450 CHF. As you can see, the watch held up pretty well, only a few small scratches in the front- and rear mineral-glass crystal and on the top of the lugs some of the gold-plating has worn through. The watch ran, all function did work. It had never been serviced nor opened Disclaimer; This walk-through is written in the way I do it. That's not to say it's the most correct way of doing things but as they say: there are many ways to Rome, all leading to the same result. Neither do I, as a hobbyist, have fancy horological equipment such as a cleaning machine or a "sterile" & "dust-free" room and therefor the end result will not be "Rolex"-standards. All I can say is that I'm always give it my best shot and I will mention problems encountered or were I went wrong, so you don't have to Without any further ado, let's dig into this beautiful & complicated watch ...... First make sure that you downloaded the latest ETA 7751 "Technical Communication". Throughout this walk-through I'll use the same parts reference numbers as used in the "Technical Communication". Below the currently latest September 2021 version; 7751 manual.pdf Before having done anything to the watch, I tested all the functions for proper working and took the timegrapher readings to see if there was anything which needed special attention. These readings can later be compared with the readings after the service. Dial-Up; Dial-Down; Crown-Right; Crown-Down; Crown-Left; Crown-Up; From the readings, it's clear to see that the watch needed a proper service. The back-lid, just like the front-crystals found on pocket-watches, required a knife-type case-opener. Checked out the oscillating weight ball-bearing, it had next to no play and therefor good for another round. Removed the oscillating weight (48). Removed the two casing-screws and clamps, pulled the stem and flipped the case over onto a soft pillow. With the watch-case removed, the winding stem re-inserted and the movement was placed in a proper 7750 (or family) movement-holder. To me, working on these movements a proper movement-holder is paramount. During the disassembly of the movement I encountered some problems and without this holder I most likely would have made scratches or worse..... Pulling the 8x hands; they all came off without any problems. All the hands safely nicely stored in a small plastic container. The same counts for the dial, after the removal directly stored in a plastic container with on both sides of the dial a soft lining. Removal of the Day & Month indicator disk (78) and the Moon phase indicator (79) The keen observer may have noticed that there are no screws next to the movement holder, for example the two screws holding the Day & Month indicator respectively. When working on complicated movements or movements which I'm not familiar with, I took on the habit, when possible, to replace the screws in the same hole as they came from. For sure, it's more work, but some movements do have multiple types/sizes screws and it will become a big puzzle if you store them in the same container / basket. Replacing the screws works (most of the time) very well for me, but in some cases the replaced screws shoulder-out deeper than as they would have done when holding the part above. The protruding screw may touch parts below or when replacing bridges, prevent the bridge from not seating fully "level". To me, replacing the screws thoughtfully is far simpler than facing a huge sorting puzzle later. Removal of the combined maintaining plate (76) and the Month star driving wheel (77). The three tiny screws holding the maintaining plate (76) were extremely tight. I couldn't loosen them with my standard (new) screwdriver bits so I had to grind the screwdriver bit to match the exact the same shape as the screw-grooves. Only then, with "force", they came loose and I was glad for having a proper movement-support! One slip of the screwdriver, with the force that was required, could / would have easily made a deep score in the plate or worse ........ Removal of the Day jumper spring (71), Day & Month jumper (70), Day jumper (72) and the Moon phase yoke (73) plus an early warning ! With those parts out of the way, the Moon phase platform (75) had to come off. Assuming that the with the arrow highlighted screw was one of the screws holding the platform down, I turned the screw only to discover that it was the moon-phase corrector eccentric ....... Oops !! The setting of the eccentric has to be checked at the end anyway, but now I know for sure that it's set wrongly. Removal of the Moon phase jumper (69), Corrector maintaining small plate (66) and the Moon phase jumper spring (67). Still in the picture the Date & Month jumper (74) which should have been removed before this picture was taken. The original stem was replaced by a longer stem to adjust the Calendar driving wheel (61) which was holding the Date-star (63) down. Removal of the Date-star (63, shown in the previous picture) together with the Date-corrector (65) and the corrector maintaining small plate (66). Removal of the calendar platform (62). Slowly back to familiar ground; a standard ETA 7750 starts to appear ... Removal of the Hour wheel 24hrs H1 (59), the Calendar driving wheel (61), the Hour-wheel (60), the Day corrector (58) and the Day corrector spring (57). The removal of the Hammer-spring (56), Set hour-hammer operating lever (53 & 54), Hour counter lock (55), Hour counting wheel (52), Minute-wheel (51) and the free Cannon pinion (50). Pulling of the Driving pinion (49) has to be done carefully; either with a pair of hand-levers or two small screw-drivers. The upwards force on either side of the pinion has to the equal or you may break the pinion of the great wheel (16) (a previous experience has taught me so !! ) Flip the movement over and from here on I'm using a Bergeon 4040 movement holder. First the removal of the Hammer-spring (45). When removing this spring I had up till now difficulties avoiding making a small mark in the Automatic device bridge (44). It was our WRT-member "Nickelsilver" who tipped me off using a piece of Scott tape over the edge of the bridge. This worked very well and for the first time I was able to remove the hammer without leaving a mark! Thanks Nickelsilver! The hammer-spring (45) and the Clutch-spring (47) removed. Remove the Auto device bridge (44). Removal of the Reversing wheel; (43), Reduction wheel (41), the Clutch (40), Oscillating pinion (39), the Hammer (42), Chronograph wheel (37), Minute-counting wheel (38), Minute-counting jumper (46), the Lock (33), the Operating-lever (36) and the Minute counting driving wheel (19). Removal of the Chronograph bridge (34), the Friction spring (32) and the Operating lever spring (35). After the removal of the Ratchet wheel driving wheel (33) it's time to release any residual power in the main-spring. This can be done by holding the crown, lift the Click-spring (20) and slowly release the tension by letting the crown slip through your fingers. Removal of the Chronograph cam (29), Cam jumper (28), Detent (30), Ratchet wheel (23), Crown wheel core (22) and Crown wheel (21). Removal of the Balance Assembly (26+27), Pallet bridge (25) and Pallet fork (24). Removal of the Barrel bridge (18). Removal of the power-train; the Great wheel (16), Third wheel (15), Second wheel (14), Escape wheel (13), the Movement barrel (12) and the Stop lever (17). Flip the movement over for disassembling the keyless works. Removal of the Setting lever jumper (11) together with the Intermediate setting wheel (10), the Time setting gear (9), Rocking bar (8), Yoke (6), Setting lever (5), Winding stem (4), Winding pinion (2), Sliding pinion (3) and the Yoke spring (7). All the parts safely stored in a compartmentalized box with lid, ready for cleaning & demagnetizing. Regarding the "wear & tear" of all the watch-parts; it was clear to see that the watch hadn't seen a lot of use. The Oscillating weight ball-bearing (48) was good, reversing wheel (43) looked good etc. However, I decided to change out the main-spring. This type of barrel has a lid which cannot be "pushed" open. To open the lid, I place a sharp knife in the groove between the barrel and the lid and while pressing down on the knife roll the barrel, in my case on a "soft" leather underground to avoid doing any damage. This widens the groove into a small gap and with the smallest screwdriver one can pry, going around the barrel, the lid off. When done carefully you won't leave any marks. Barrel & Arbor cleaned, braking-grease applied ready for the new spring. Apart from a few (see "technical communication" !) the parts were soaked for 24hrs in Zippo lighter fluid and pegged; all the sprockets, pivots and jewels. Thereafter all the parts were checked for magnetism. Instead of using the unreliable compass method, I'm using an App called "Lepsi" on my iPhone. This App doesn't tell you how much magnetism there is, it only indicates whether there is any. The distance of the object above the screen, by which magnetism is detected, gives you some indication of the strength of the magnetic field, but nothing more. For me, when magnetism is detected, that's enough reason to "Zap" that part on my no-nonsense self-build demagnetizer. Of course, in reality the demagnetizer is not placed anywhere near my iPhone or the other watch-parts / metal-objects like here on the photo. Also, it may be a good idea to take your watch off during the "zapping” operations! Quite a few parts, particularly in the calendar works, were magnetized. With the main-plate anti-shock Chaton cleaned, pegged, cap-stone oiled and re-installed in the main-plate (1), the assembly of the 7751 can begin. Escape wheel (13), Second-wheel (14), Third-wheel (15), Main-spring barrel (12), Great-wheel (16) and Stop-lever (17). Installation of the barrel-bridge (18) (by a 7750 the wheel-train the and barrel-bridge are combined in one bridge). Make sure that all the wheels turn fine before tightening the screws; check, check and double check. Again, if you using the re-installed screws method, some screws may protrude the bridge. (I took the "warning picture" below a little later, so don't look at any additional installed parts) All the Lubrications as per the ETA 7751 "Technical Communication". These two re-installed screws do protrude the Barrel bridge (18). The one on the left will touch the Great-wheel (16) and the one to the right may just touch the main-spring barrel (12). Back them out far enough so they don't cause any trouble. The installation of the Crown-wheel (21), Crown-wheel core (22) and the Ratchet-wheel (23). With the movement turned over, installation of the keyless works; Sliding-pinion (3), Winding pinion (2), Winding-stem (4), Setting-lever (5), Yoke-spring (7), Rocking-bar (8), Yoke (6) and placing of the Time setting gear (9) before placing the Intermediate setting wheel (10) and Setting lever jumper (11) as a "combination". Keyless work completed. Check for proper working! Installed the pallet-fork (24) and the complete balance assembly (26 & 27). Cleaned, pegged the balance Chaton and oiled the cap-stone. Before going any further with the assembling, I tested the power-train and escapement for any irregularities. On the timegrapher the readings were looking a whole lot better than initially. Instead of picturing each position, here are the readings; DU & DD both 292-294 degrees, 0 ms and 0 s/d. CU: 244, 0.1, -14 s/d CR: 249, 0.2, -16 s/d CD: 252, 0.1, -6s/d CL: 262, 0.0, -5 s/d Even though I adjusted the Etachron as good as I could, that's to say centring the hairspring between the two regulator pins and thereafter reducing the regulator pins gap to the point that the hairspring could still, but just "breath", the positional deviation with max. 16 seconds is slightly higher than I was hoping for. Then again, it's not a chronometer grade and each position produced straight lines, so I think that with some daily-rate adjustments the watch will run just fine. Once satisfied with the running of the power-train and the escapement, the assembly of the chronograph can start. Cam jumper (28), Chronograph cam (29), Detent (30), Minute counter driving wheel 30 minutes (19), Lock (33), Operating lever spring (35) and the Operating lever (36). As said; lubrication as per "Technical Communication" and test the proper function of the start/stop and reset levers. Placement of the Ratchet wheel driving wheel (31) and the Friction spring chronograph wheel (32). Install the chronograph bridge (34); don't forget the lubricate the Reversing wheel jewel on the bottom of the chronograph bridge before placement. Also pay attention to the reset-lever, it has to be pushed in so the bridge can sit level & flush. Check the working of the Ratchet driving wheel (31) and the reset lever before tightening the bridge screws. The placement of a well lubricated Reduction wheel (41), Minute counter jumper (46), Oscillation pinion (39, biggest sprocket down), seconds recording Chronograph wheel (37), Minute counting wheel (38), the Clutch (40), make sure that the oscillation pinion pivot is engaged), Reversing wheel (43) and finally the Hammer (42) before the Automatic device bridge (44). Before installing the Automatic device bridge (44), lubricate the jewel for the seconds recording Chronograph wheel underneath the bridge. The installation of the Automatic device bridge can be very tricky. It's very easy to touch the Clutch (40) and the pivot of the Oscillation pinion comes out. Before inserting or tightening the bridge screws, double-check the placing and working of every component!! Once the bridge is installed and with the relevant lubrication done, before mounting the hammer-spring (45) and the Clutch-spring (47), all the functions of the chronograph can be checked & tested; the engagement of the oscillation pinion, the smooth running of the seconds recording chronograph wheel, the advancing of the minute counting wheel, the start/stop- and reset-levers etc. Next is the installment of the Hammer-spring (45) and Clutch-spring (47). To prevent scratches on the Automatic device bridge (44), as per brilliant idea of WRT member "Nickelsilver", a piece of Scotts tape was taped over the edge of the bridge. With the installment of those two springs, the assembly of the chronograph is completed Movement flipped over and placed in the 775x movement holder. Installment of a well lubricated Driving pinion (49), The Cannon-pinion (50), the Minute wheel (51), Hour counting wheel (52), Set hour operating lever (53+54), Hour counter lock (55) the Hammer spring (56), the Day corrector spring (57) and the Day corrector (58). The build-up, up till the Day corrector spring (57) and the Day corrector (58), was identical as to a standard 7750. The Hour wheel 24hrs (59) drops over the Second wheel (14) pivot. Attention: Sadly, no picture but when installing the Hour wheel (60) over the Cannon pinion, one has to lift the Minute wheel (51) slightly and to make sure that the hour wheel teeth do engage in the small minute wheel sprocket. Once they engage, both wheels can be lowered in place. Finally, before installing the Calendar platform (62) the Calendar driving wheel (61) with the "day finger" pointing as shown. From here on I pulled the winding stem to stop the running of the movement and thereby avoiding the advancement / altering of the positions of the wheels. The installation of the Calendar platform (62) can be a bit tricky. It's all too easy to dislodge the hour lever (53) and the Hammer spring (56). Make sure that the platform sits flush with the Main plate (1) before tightening the 3x screws. Place the Day star (63) as shown in both above pictures. Placing of Date + Month jumper (70), the Day + Month jumper (74) (Both jumpers are identical), Day jumper (72), Moon phase yoke (73), Day jumper spring (71), Date corrector (65), Corrector maintaining small plate (66), Moon phase corrector (68), Moon phase jumper (69) and Moon phase jumper spring (67). Installation of the Moon phase platform (75), the Combined maintaining plate (76) (Be aware that the top of the Combined maintaining plate slides in the gap of the Day Star) and the placing of the Month star driving wheel (77). Placing the Month & Day indicator disk (78) and the Moon phase indicator (79). Adjusting the Phase corrector eccentric (64) wasn't that hard as I feared. By adjusting the eccentric one determines the "depth" of the Date corrector (65), shown by the blue arrows. Set too high and the top-sprocket of the Date corrector (65) won't even touch the Moon phase corrector (68). Set too deep the top-sprocket of the Date corrector will jam the Moon phase corrector (68) into the Moon phase indicator. The "depth" has to set such that the sprocket of the Date corrector (65) pushes the Moon phase corrector (68) just far enough so that it will just advance the Moon phase indicator by one click before the top Date corrector (65) sprocket releases the Moon phase corrector (68). There is clear information about the Moon phase corrector "depth" setting in the ETA 7751 "Technical Communication". With all parts installed and tested as far as possible, the dial goes back on. Before re-installing the hands, I re-lumed the minute & hour hand with new high-class LumiNova. Both hands now re-lumed and drying before the installation. Placing the long Date indicator hand required a bigger size hand-pusher which I didn't have. The idea was born to cut a tweezer protector-cap from the top until the required size was obtained. Stuck to protector cap onto the handle of a diamond file for more stability / pushing-power. It worked like a treat Turn the date quick-set until the month indicator disk changes month, that will be the first (1) day of the new month. The rest of the hands (8! in total) to be set at 24:00 midnight when the day indicator disk changes. Detailed instructions about the "shift tolerances" are described in the ETA 7751 "Technical Communication". All the hands installed and correctly set on the month / day / date and moon phase. The 18th of January 2022 had a full moon. The German gentleman received the watch when he turned 60 in 1995, now I'll continue with his watch as from my (65th ) birthday in January 2022 I'm still awaiting new crystals and once the case has been restored, I'll add the final picture of the fully restored/serviced watch. I really enjoyed working on this watch and even though I sometimes feel that contributing to this current WRT-forum has sadly become a bit of wasted time, I do hope that my write-up, perhaps found via Google or some other search machine, will be of some use to somebody, at some point in time Endeavor, Denmark


 1 point
 -
This is the intro, the book is 135 pages long and my scanner's very slow so it's going to take a bit longer than I thought... a Sunday job. KIF Spare Material Catalogue P1-17.pdf1 point
-
Take small pliers in one hand, mainspring in the other, make an outward 3° bend about 3mm from the end. That is enough for a manual winding mainspring to positively engage its stop groove in the barrel.1 point