Leaderboard


Popular Content
Showing content with the highest reputation on 01/21/22 in all areas
-
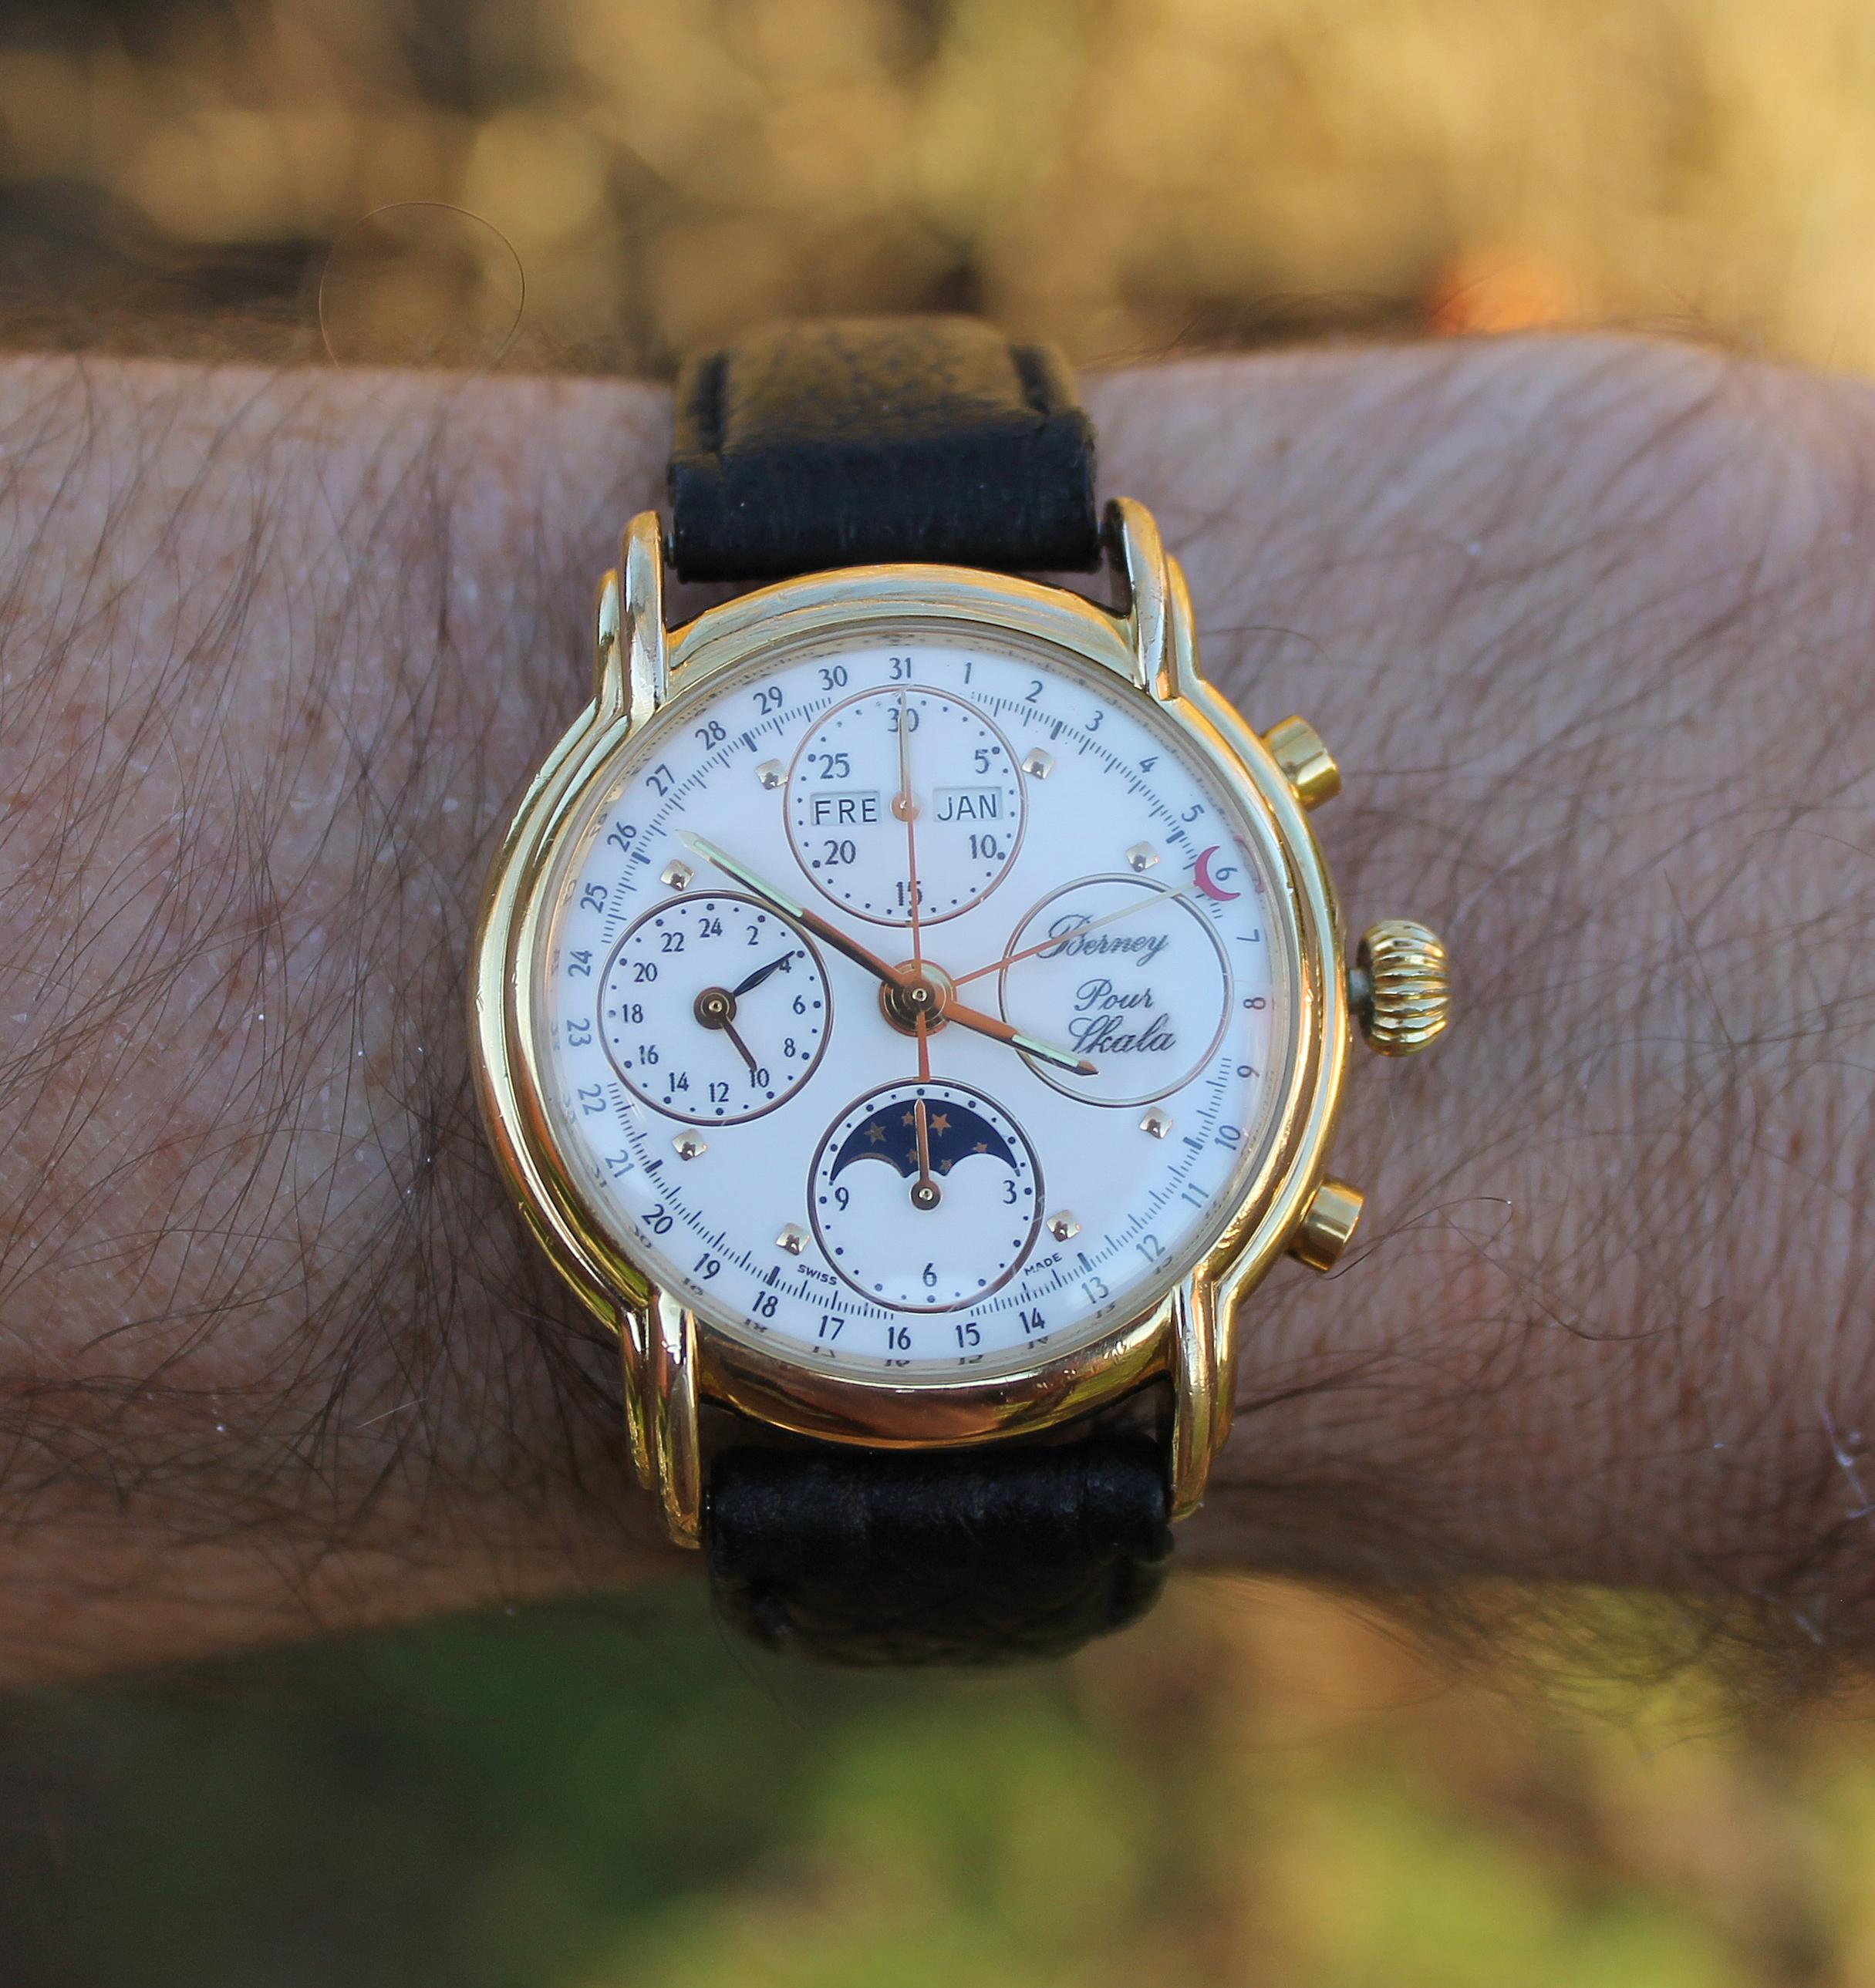
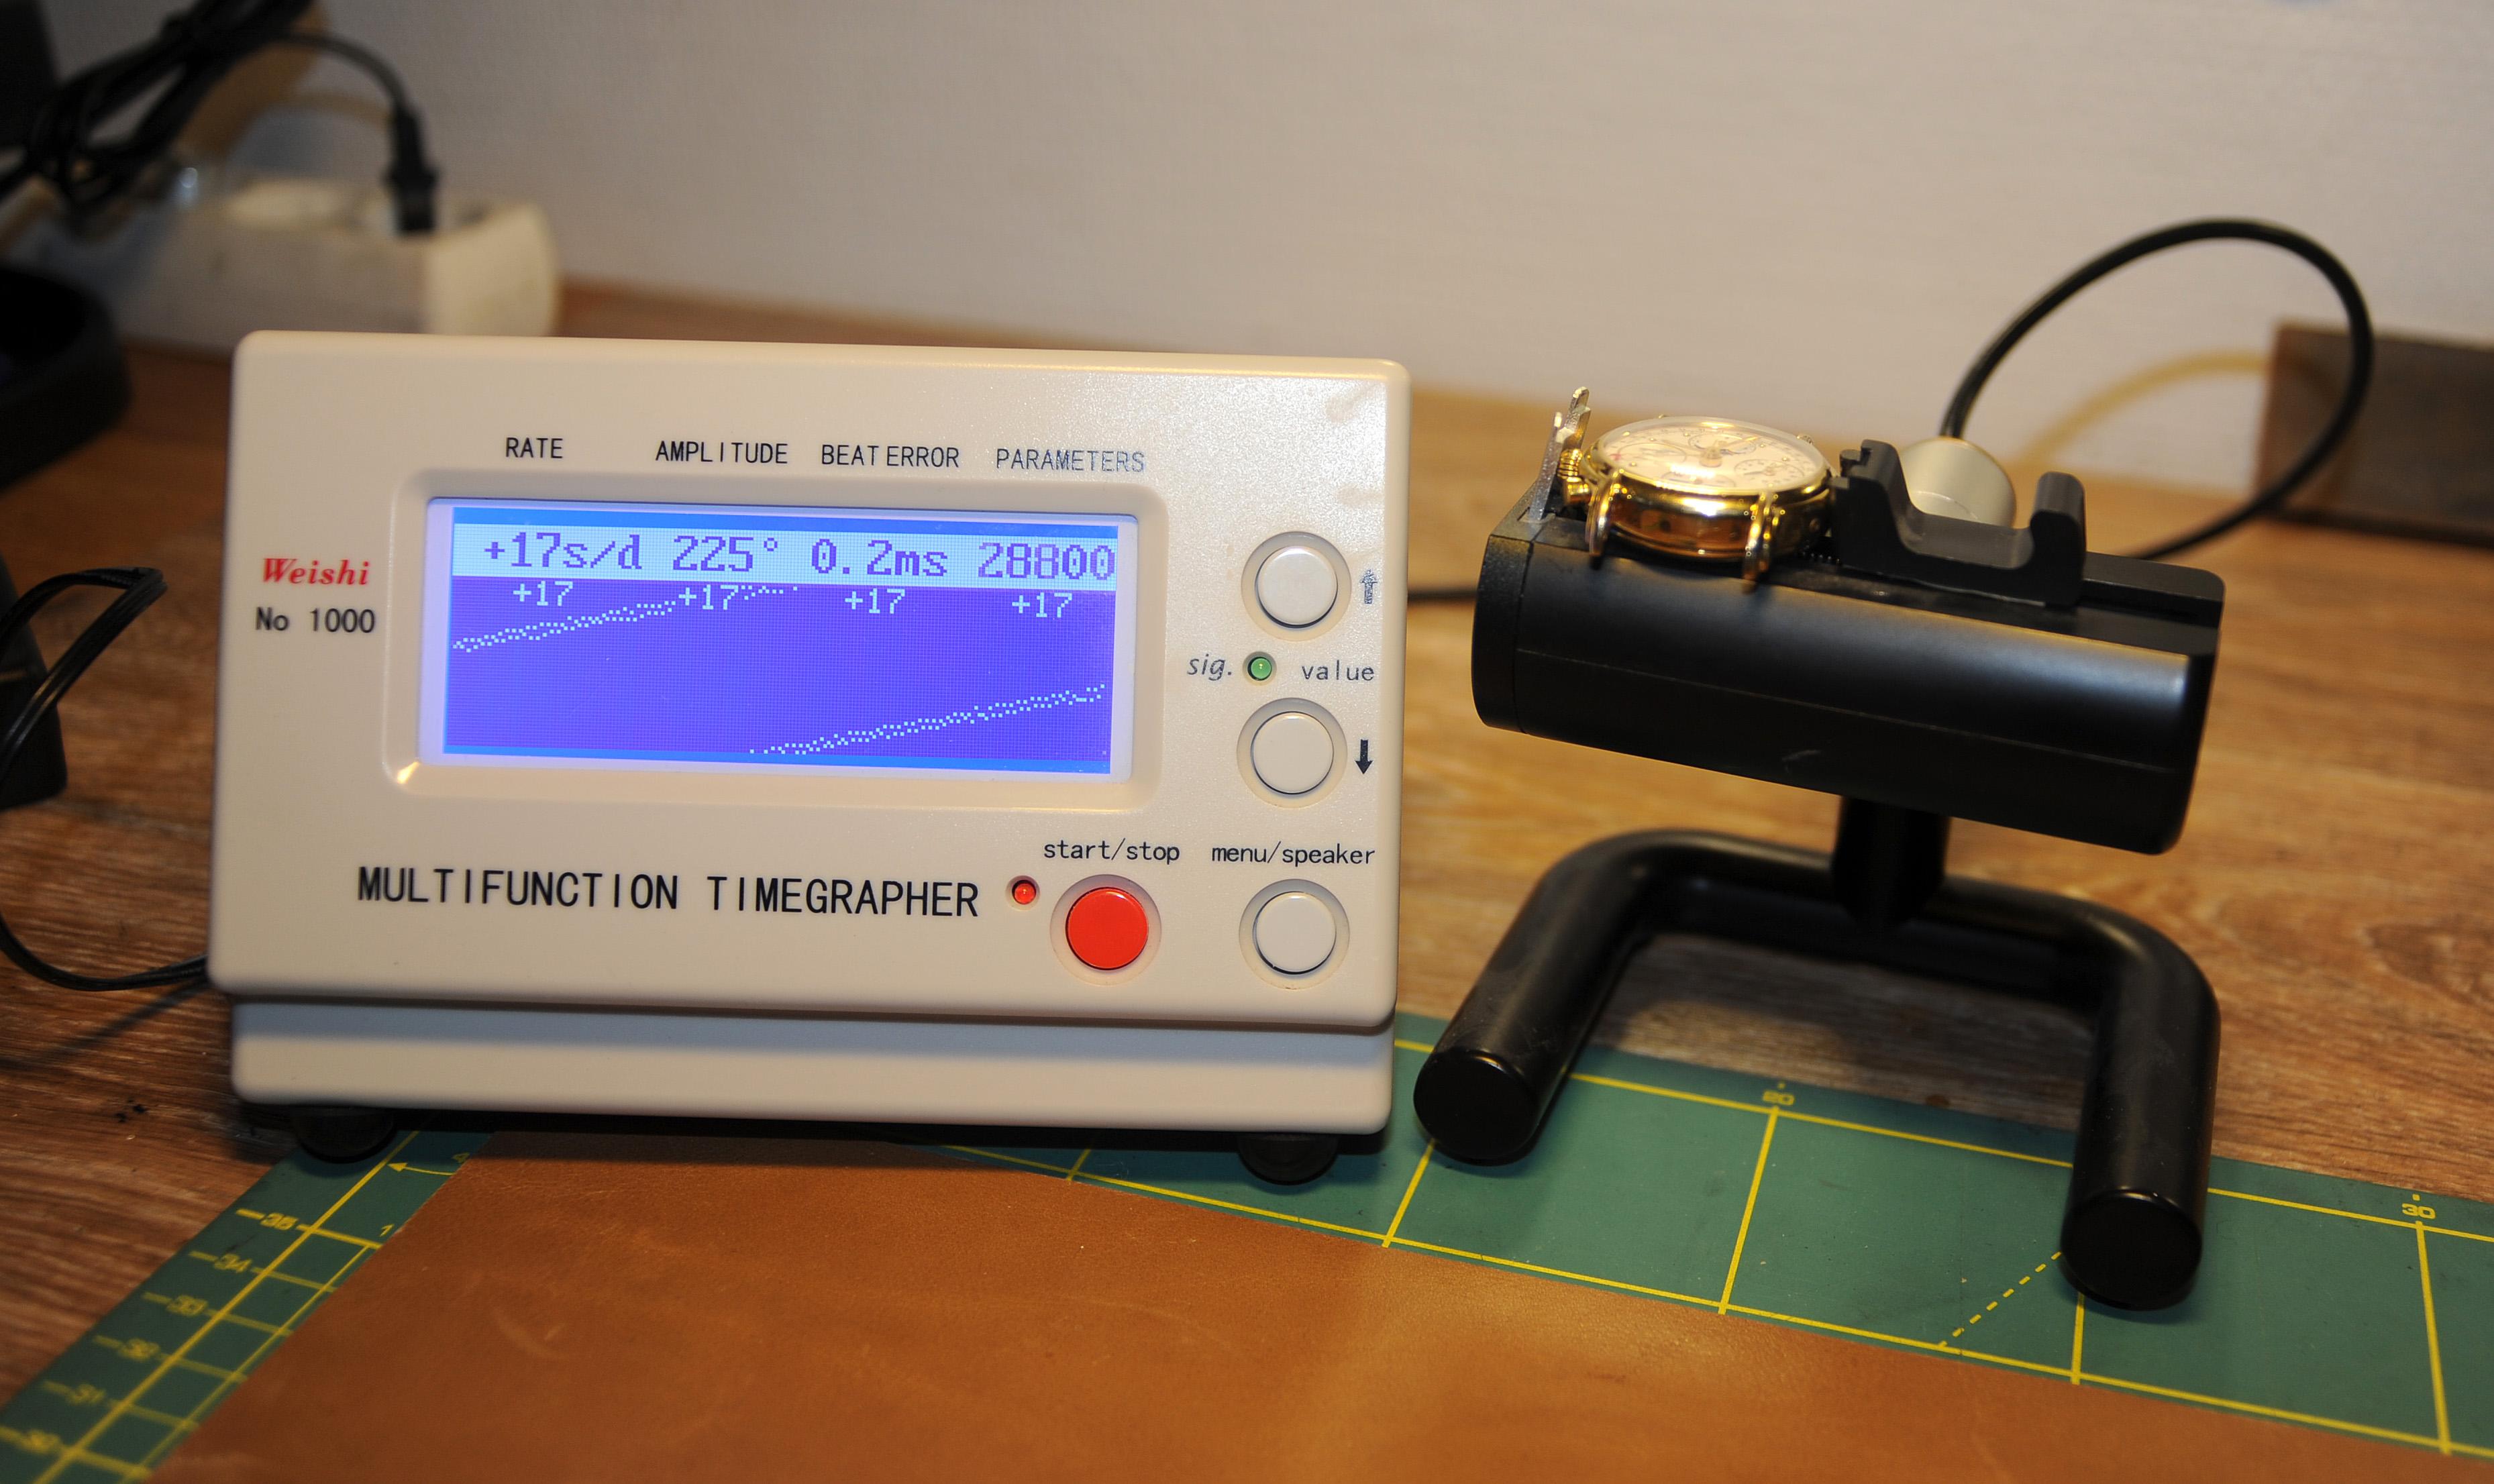
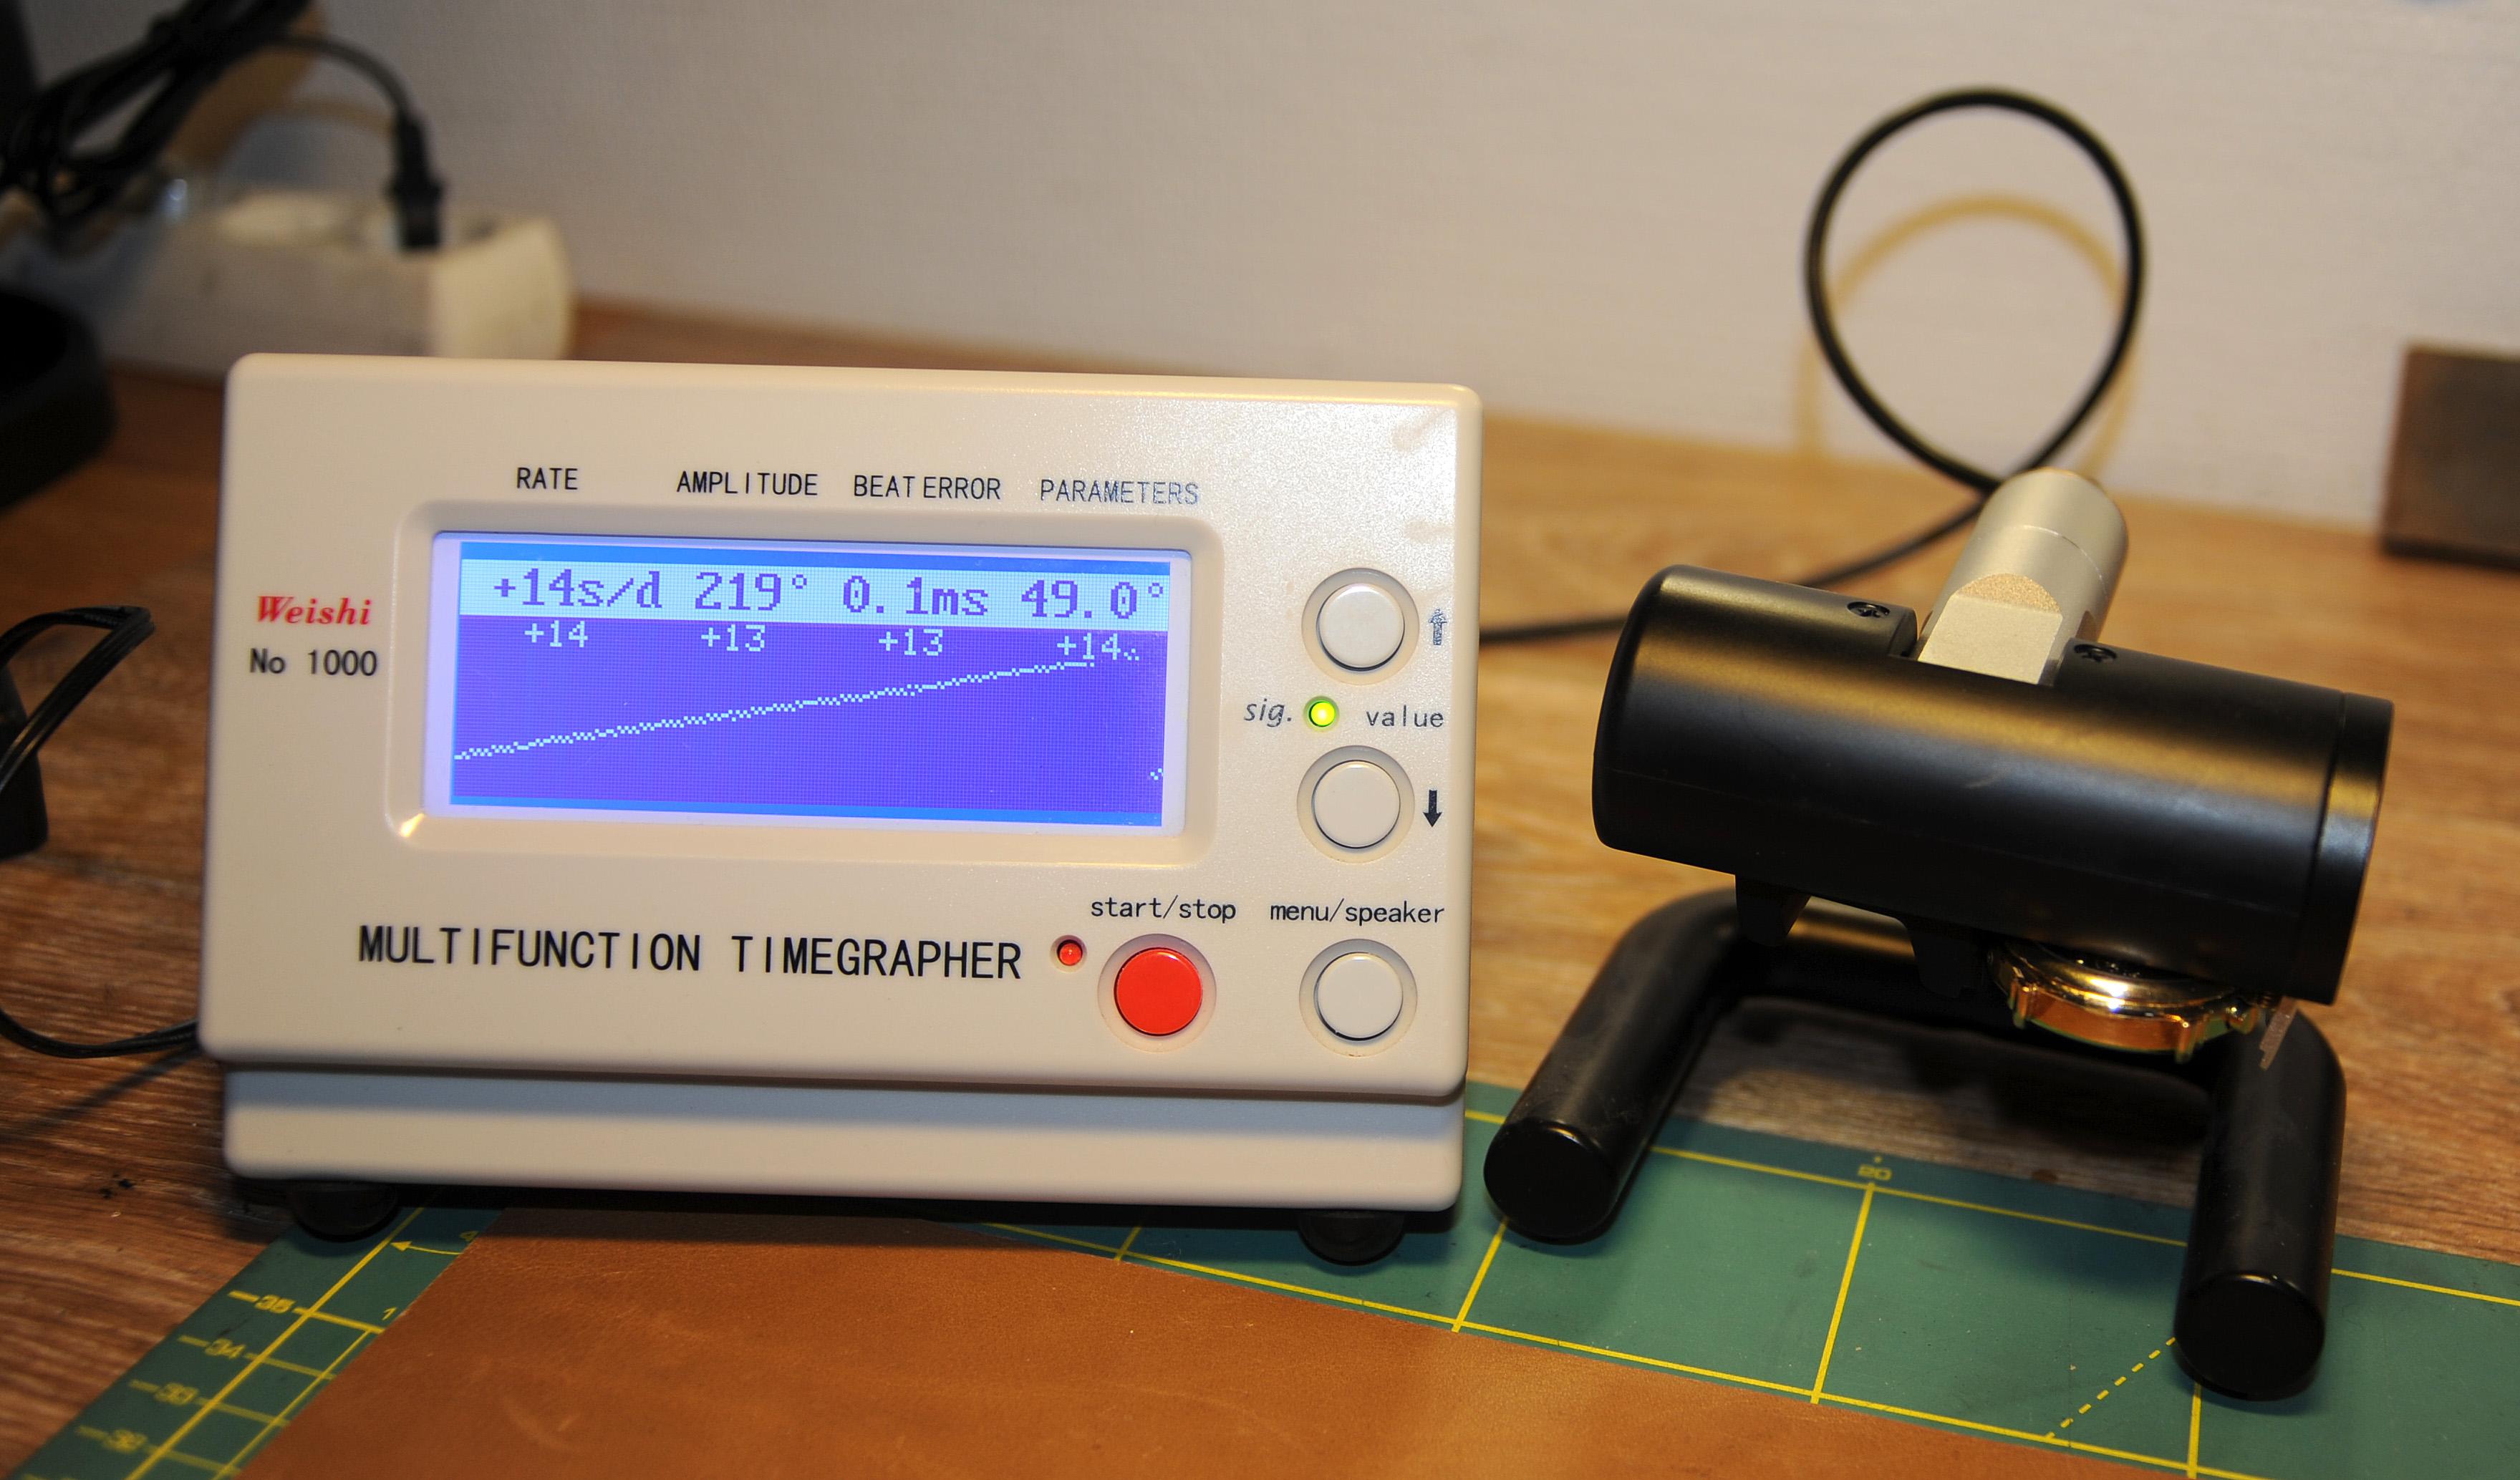
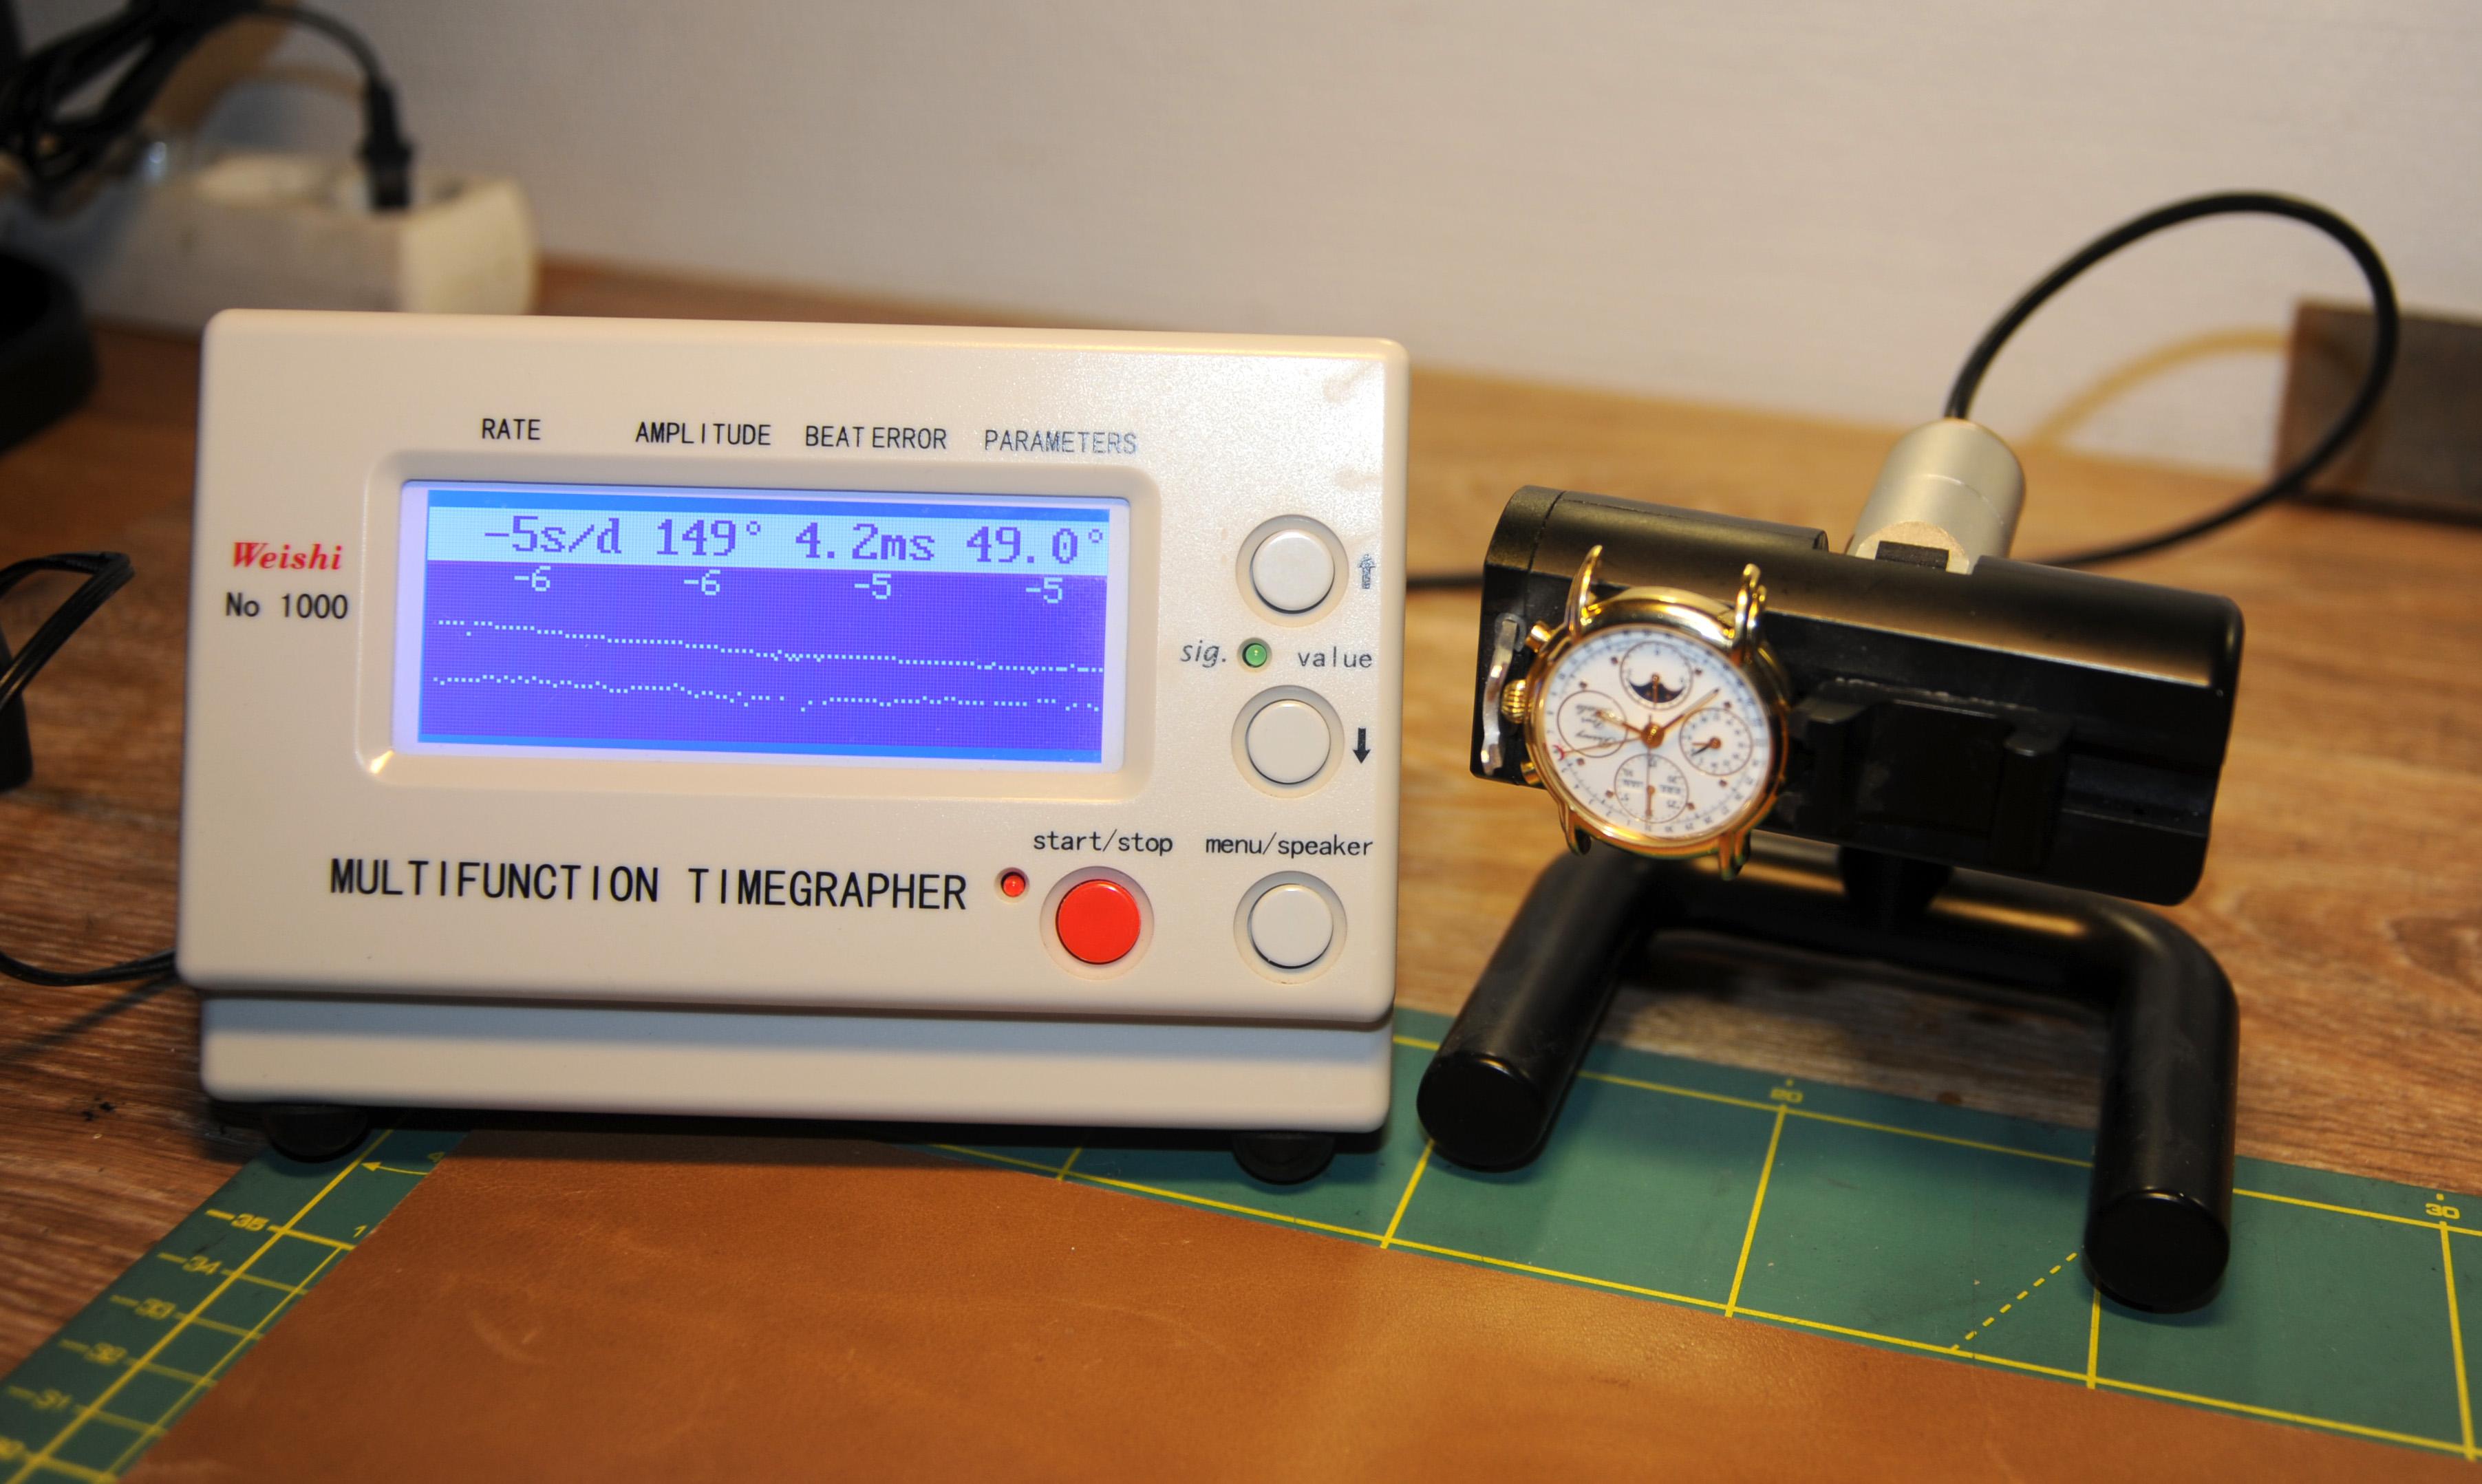
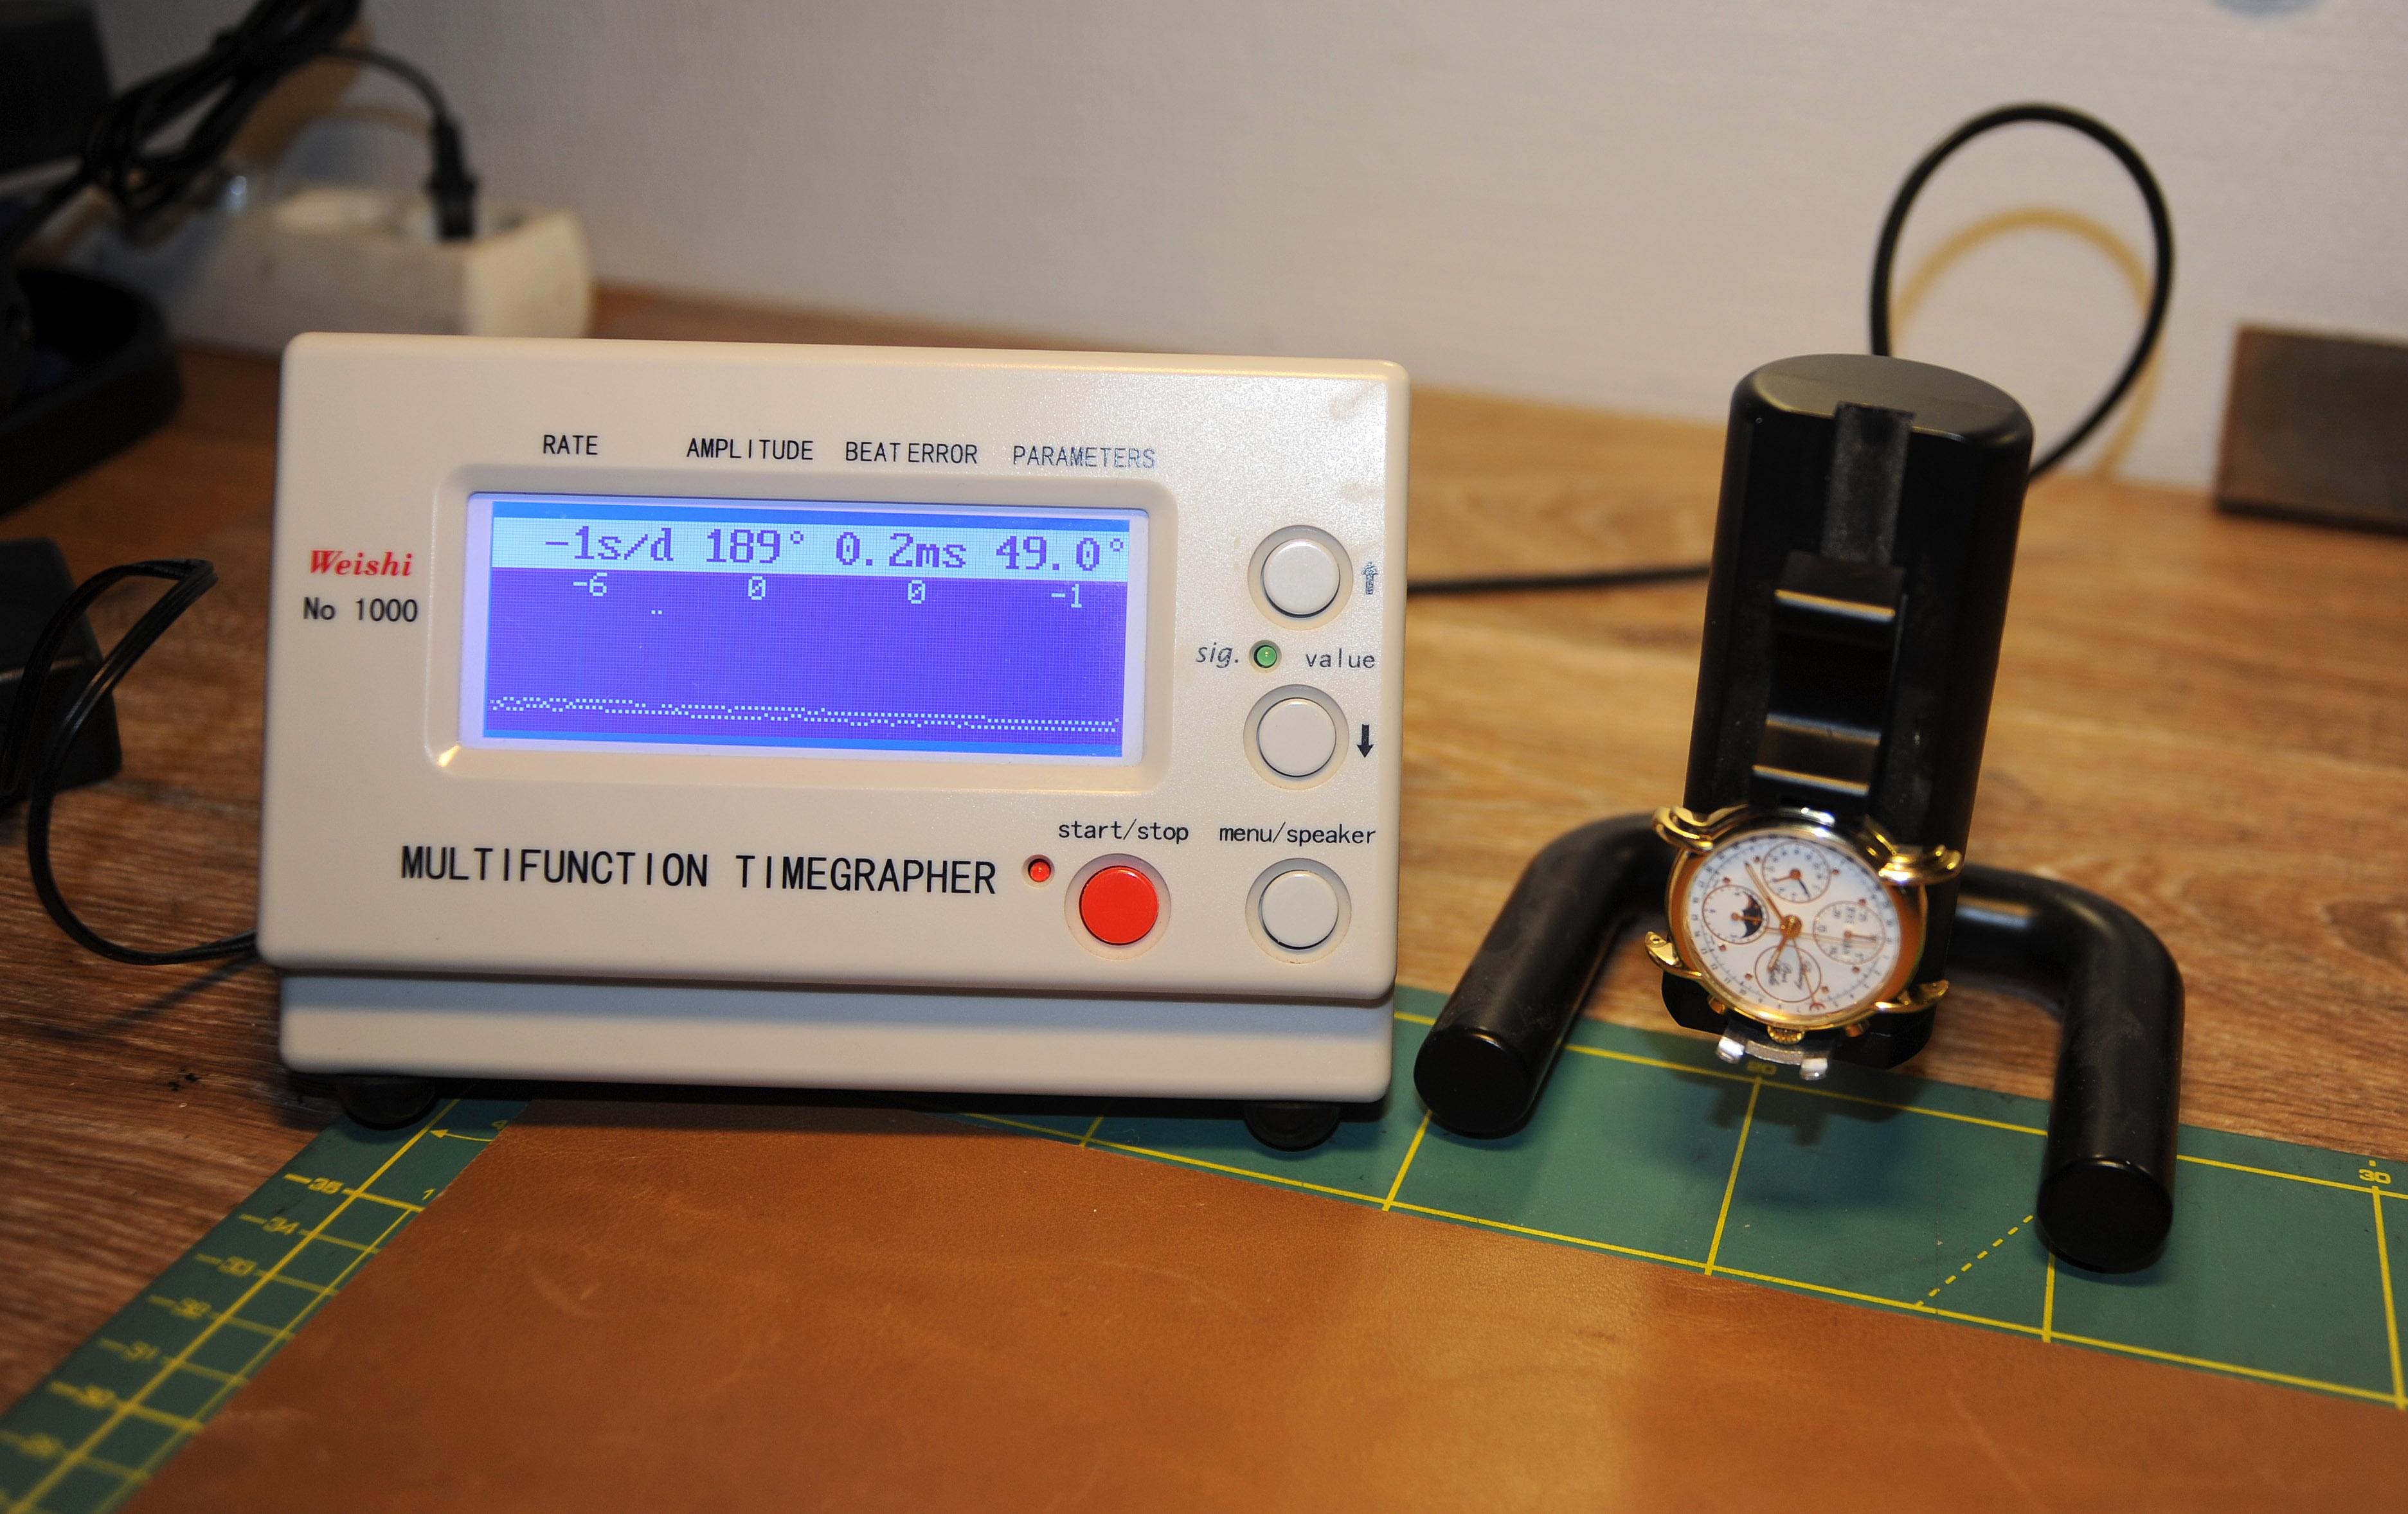
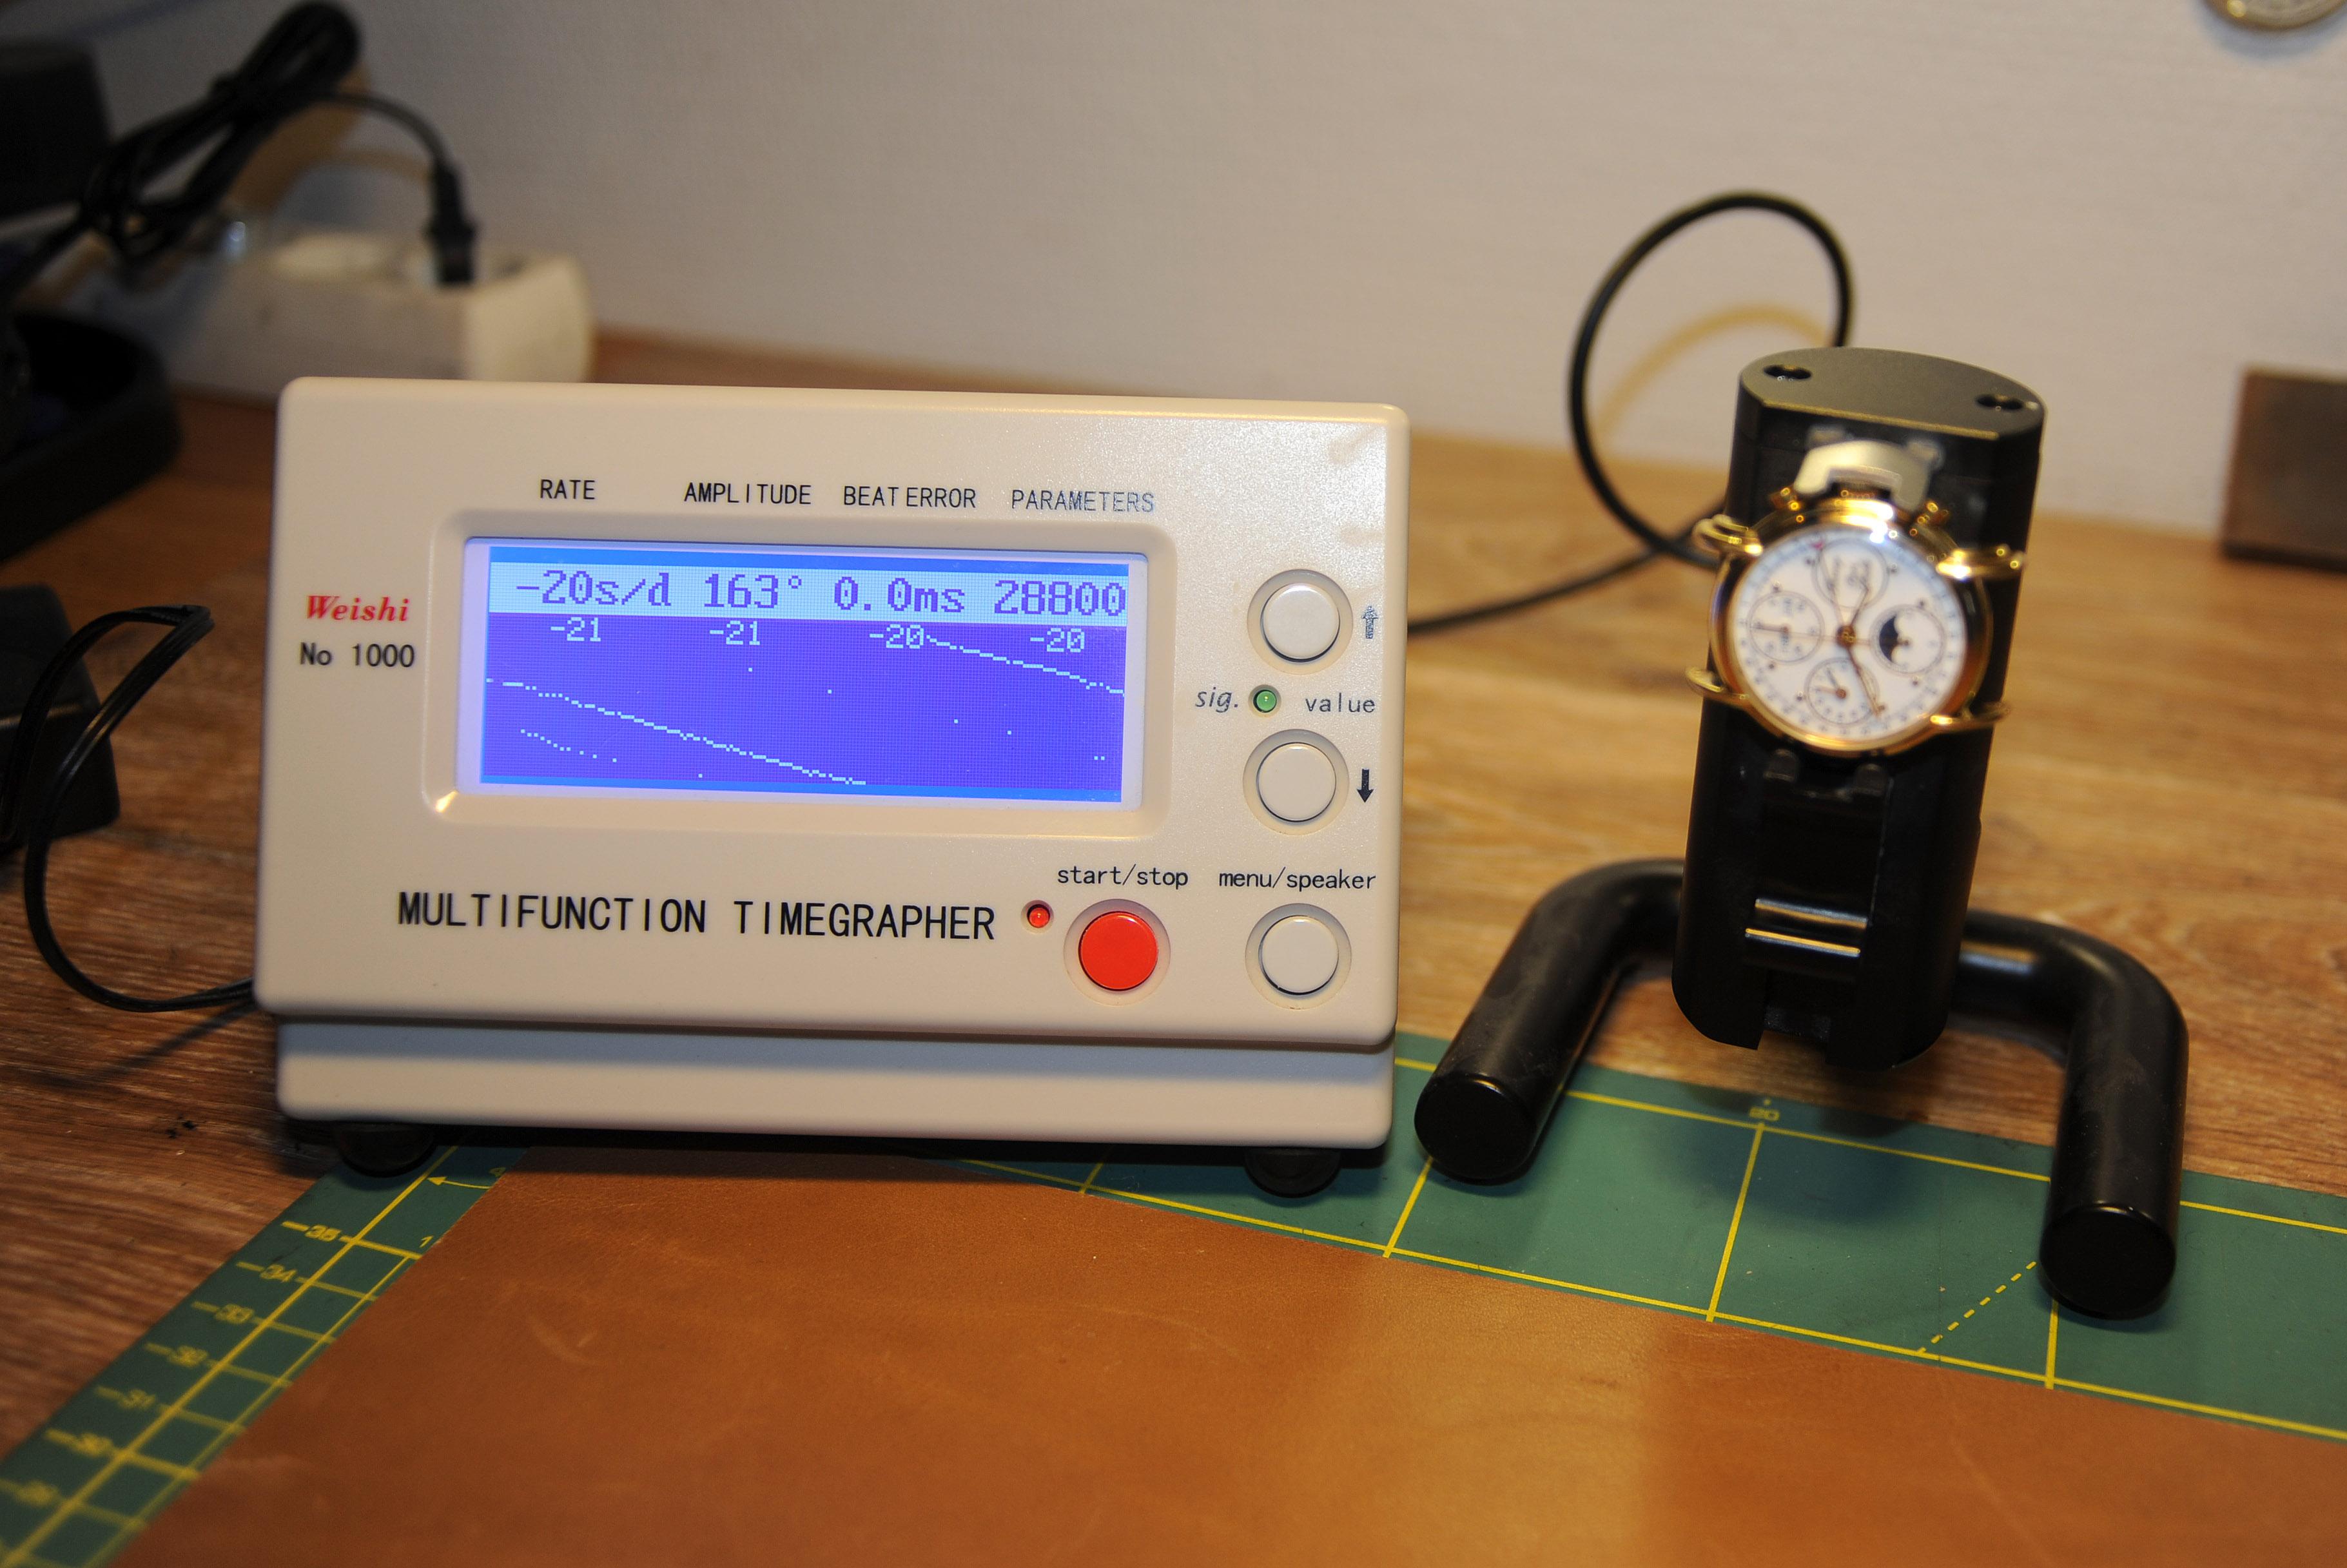
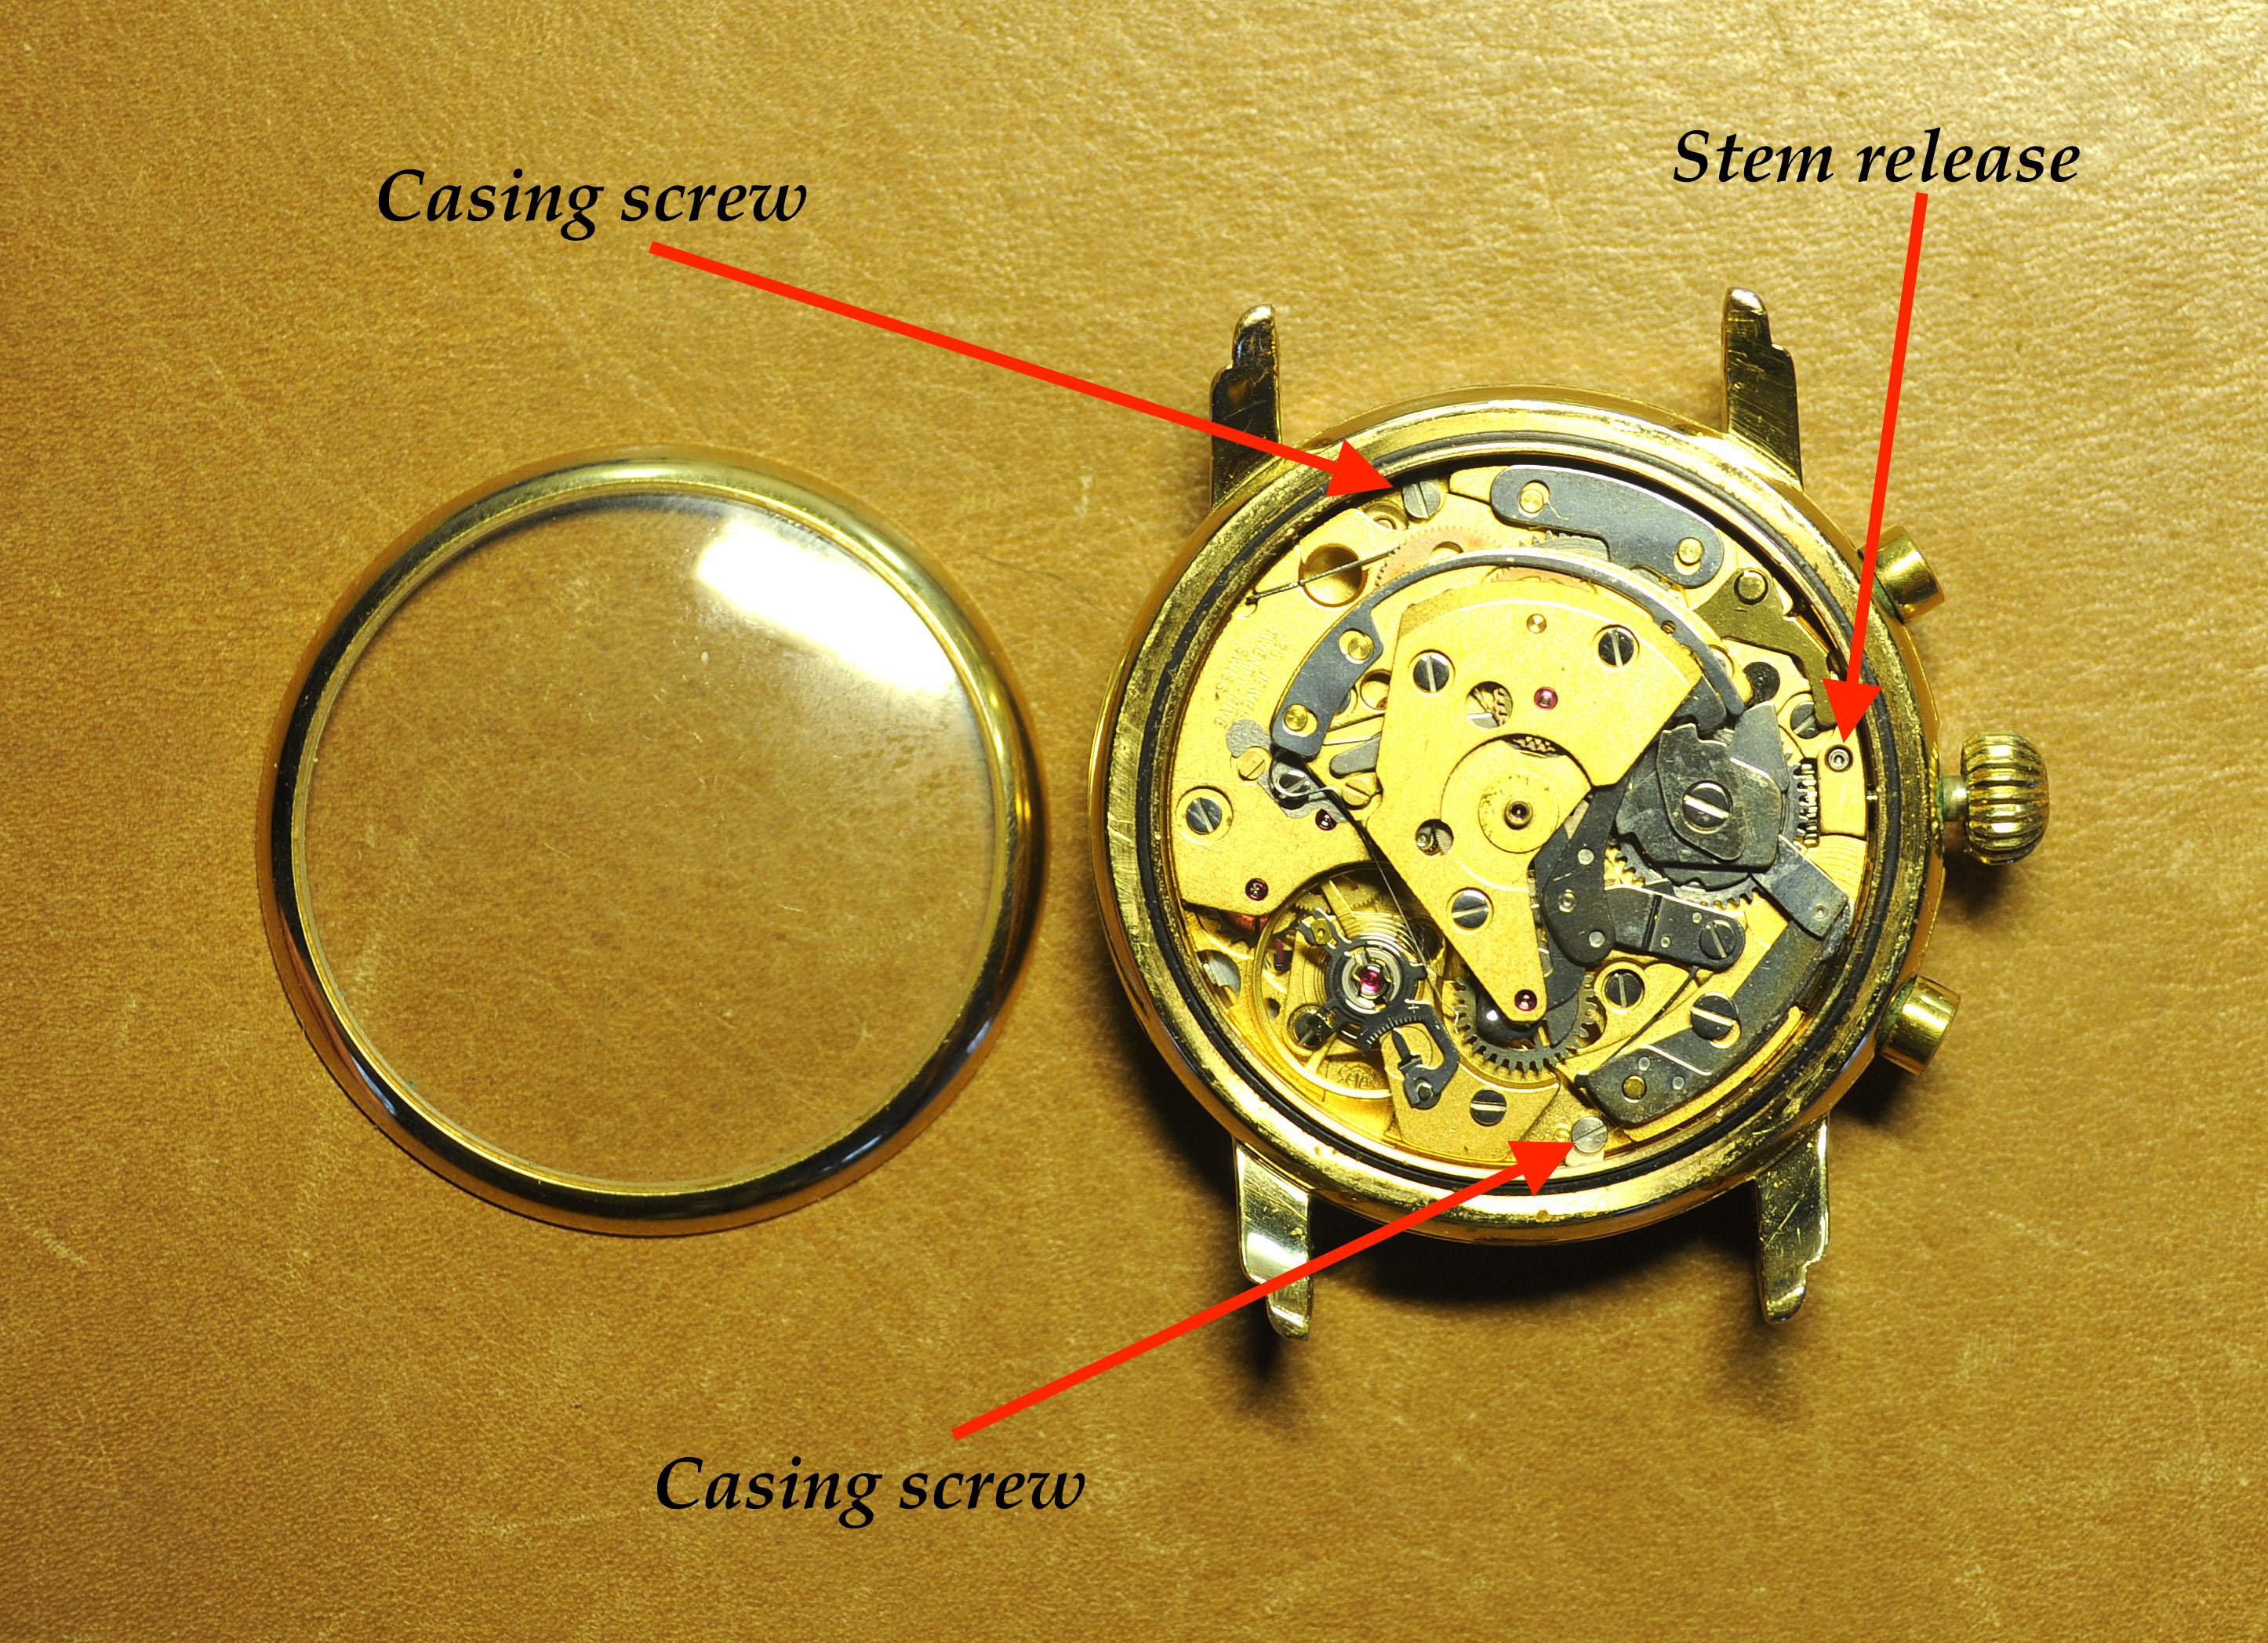
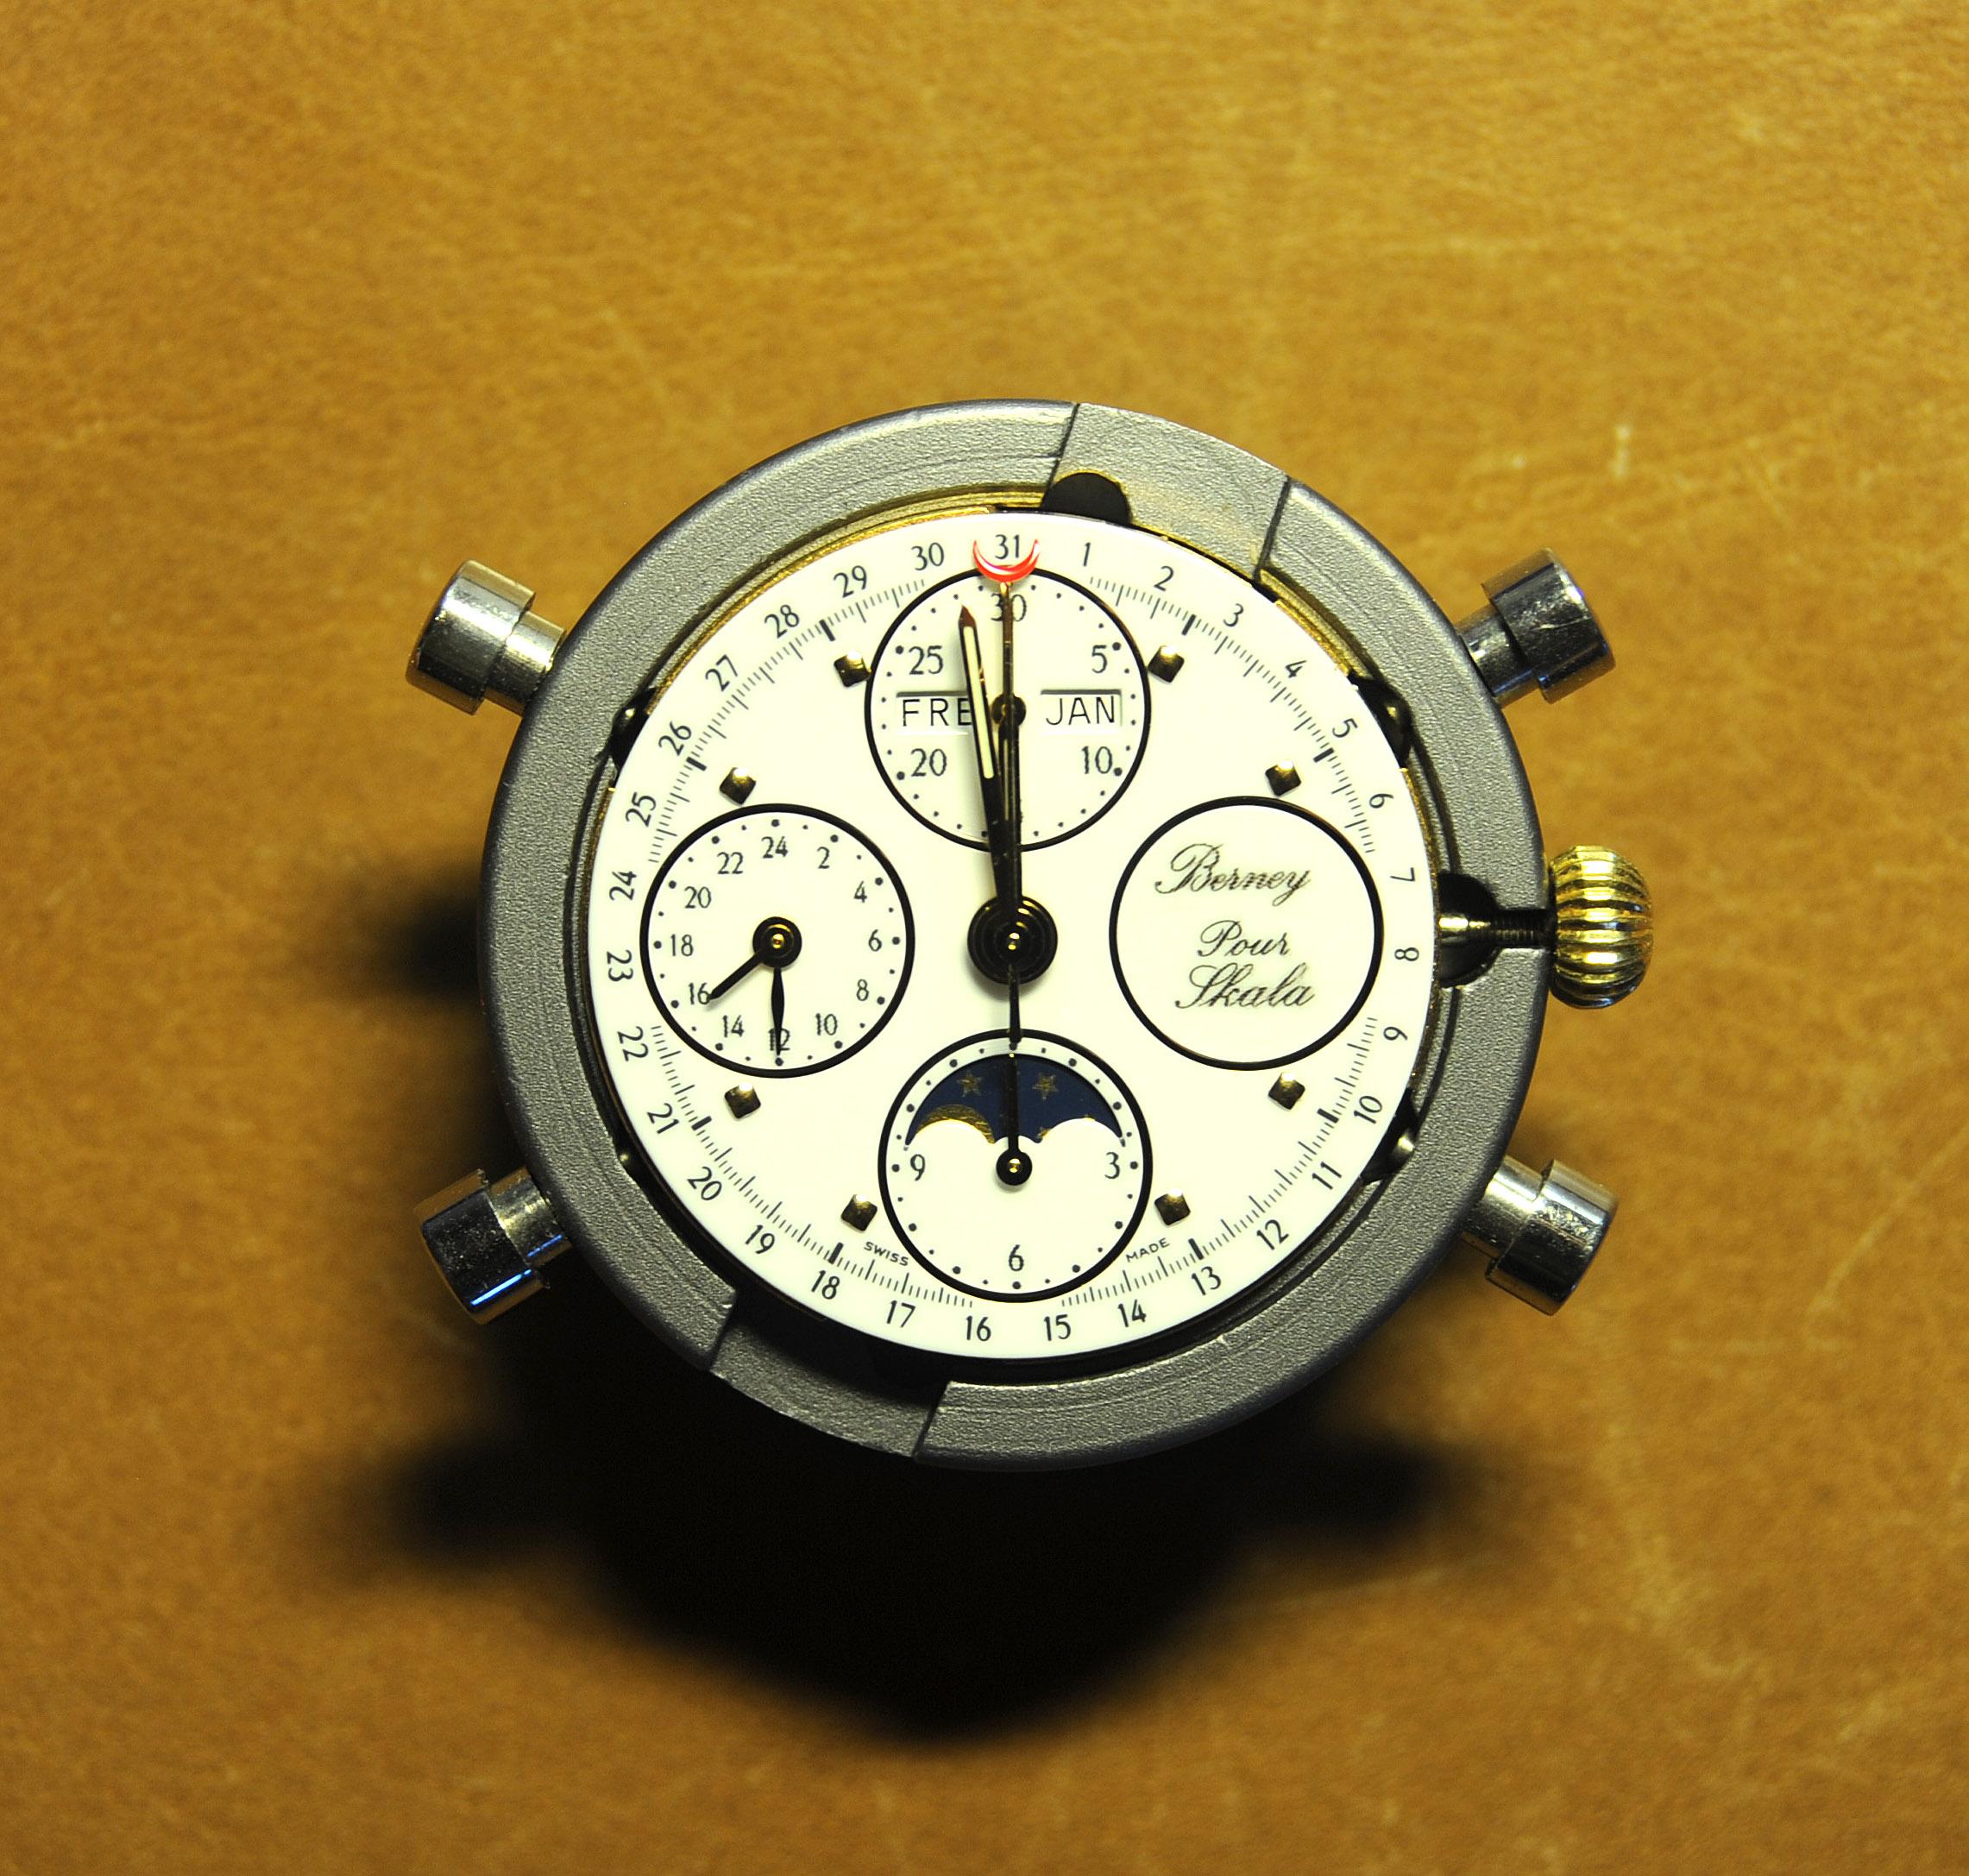
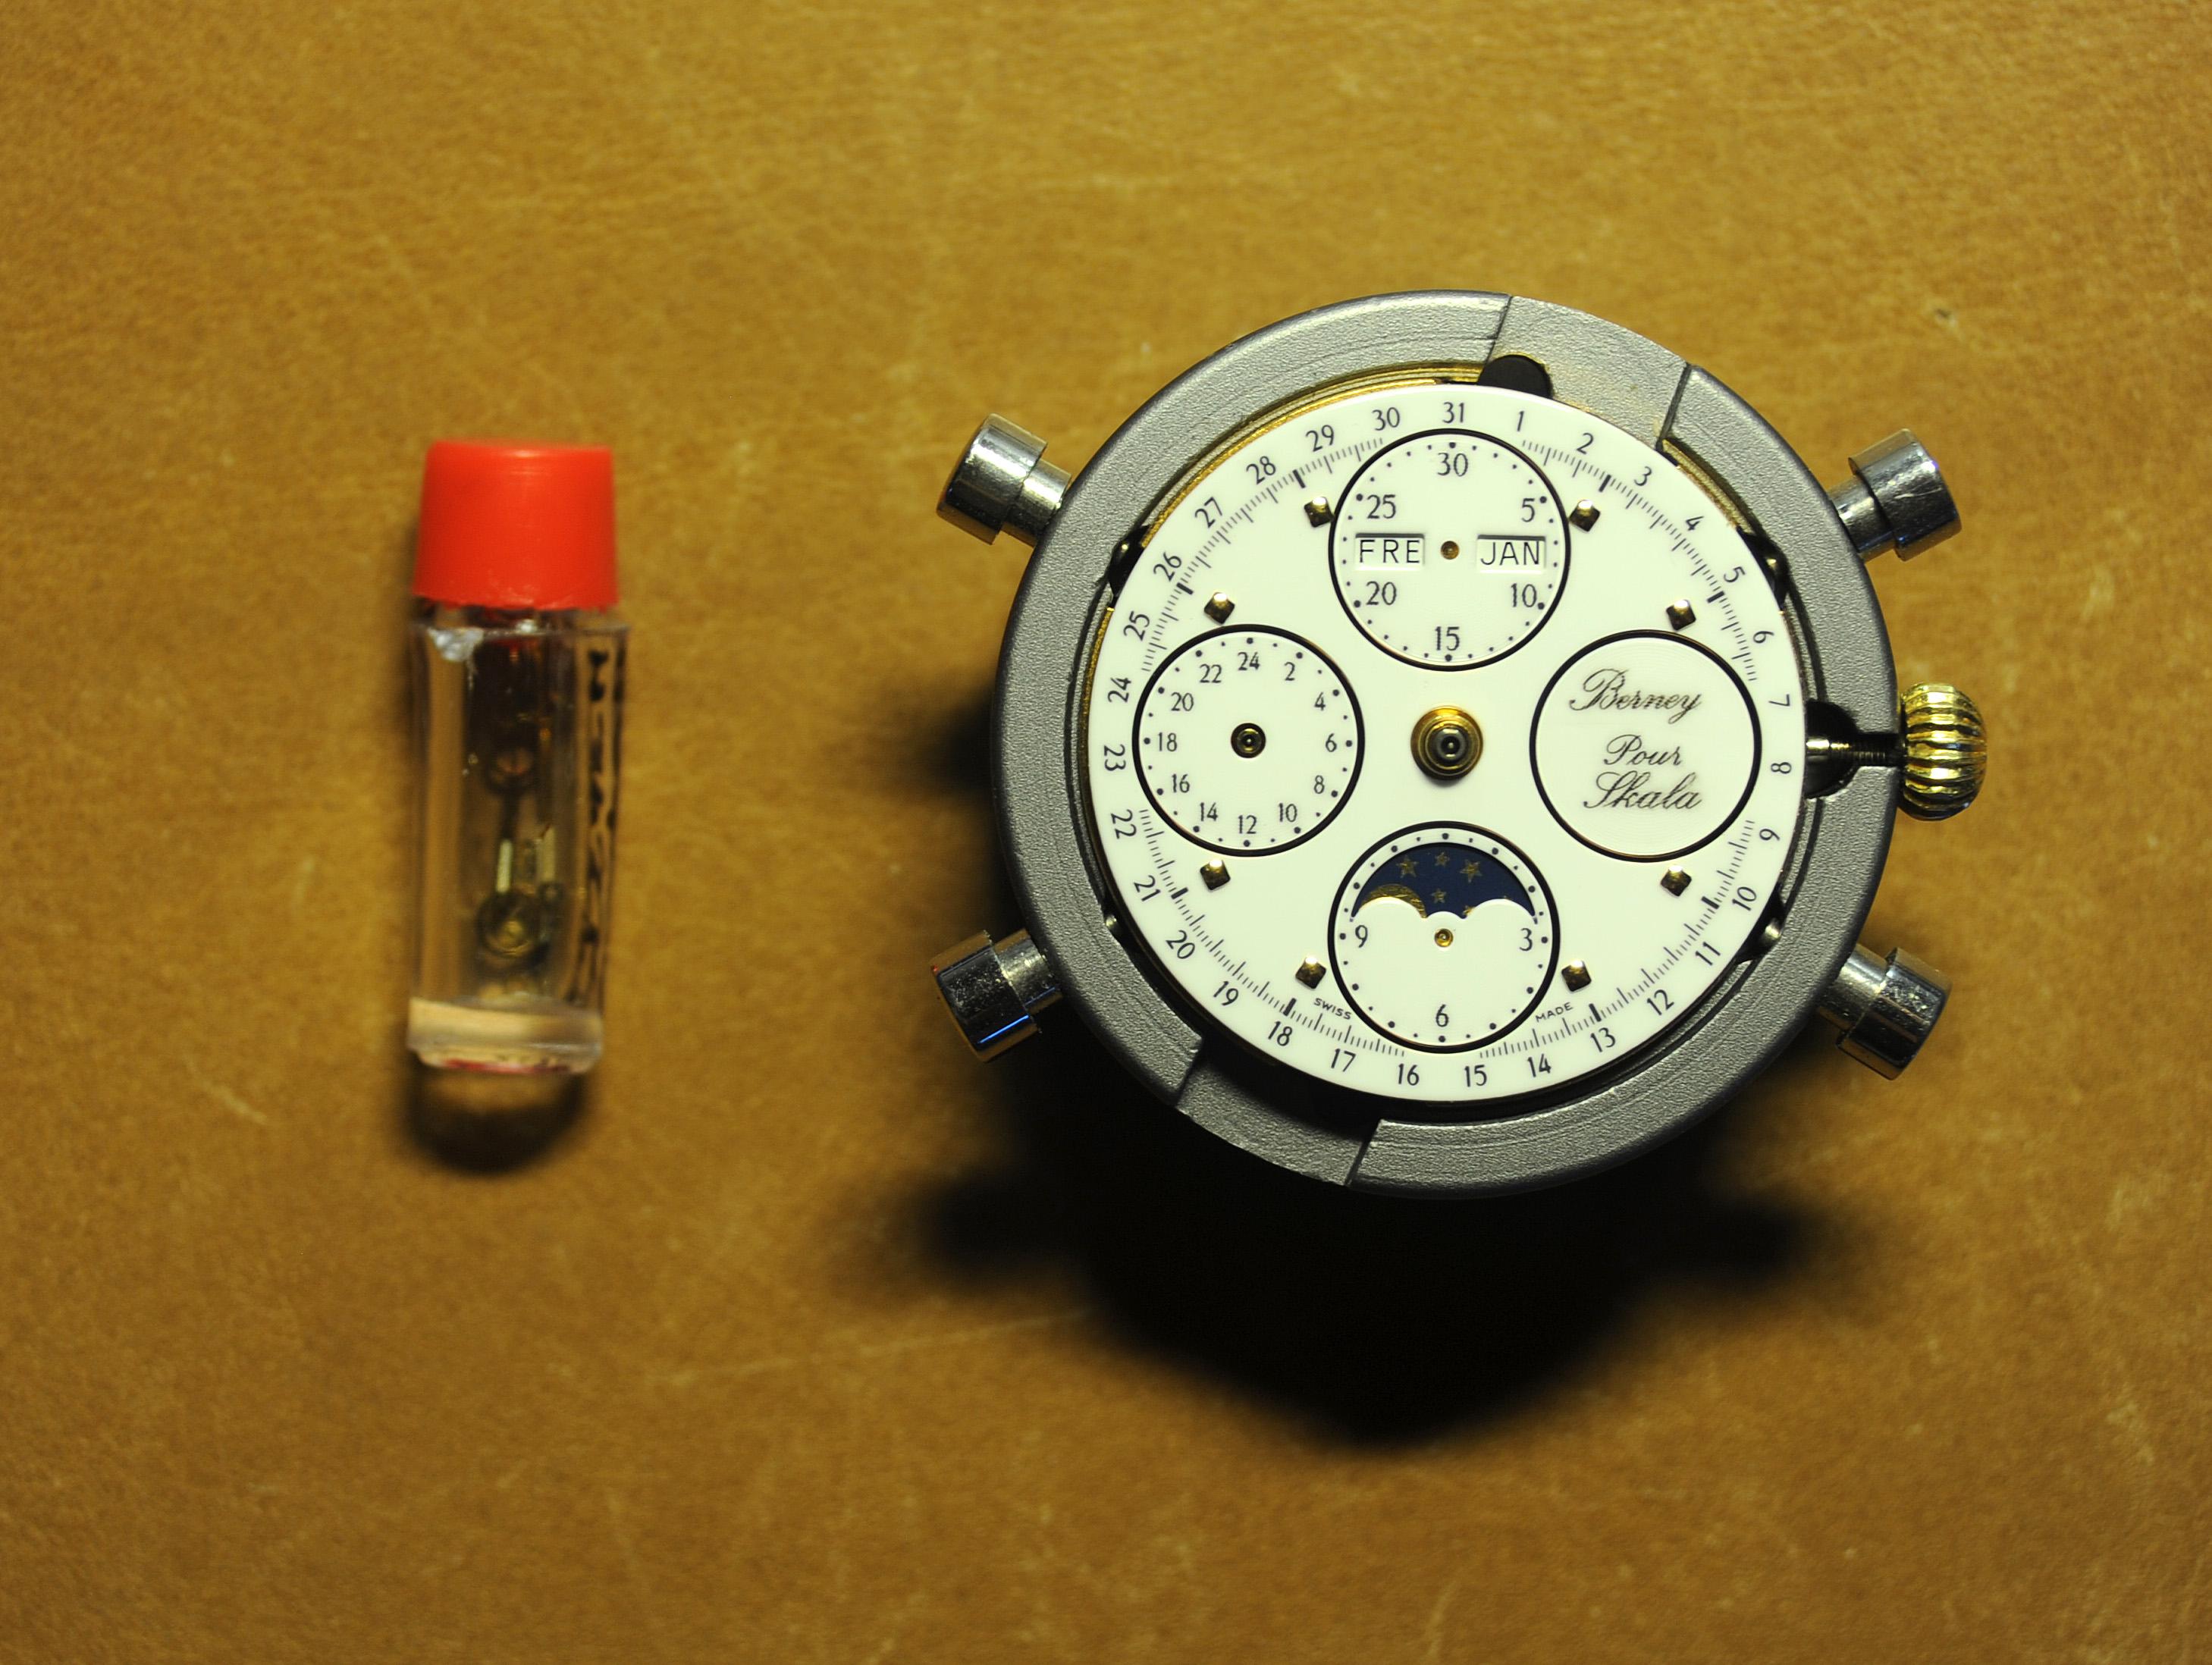
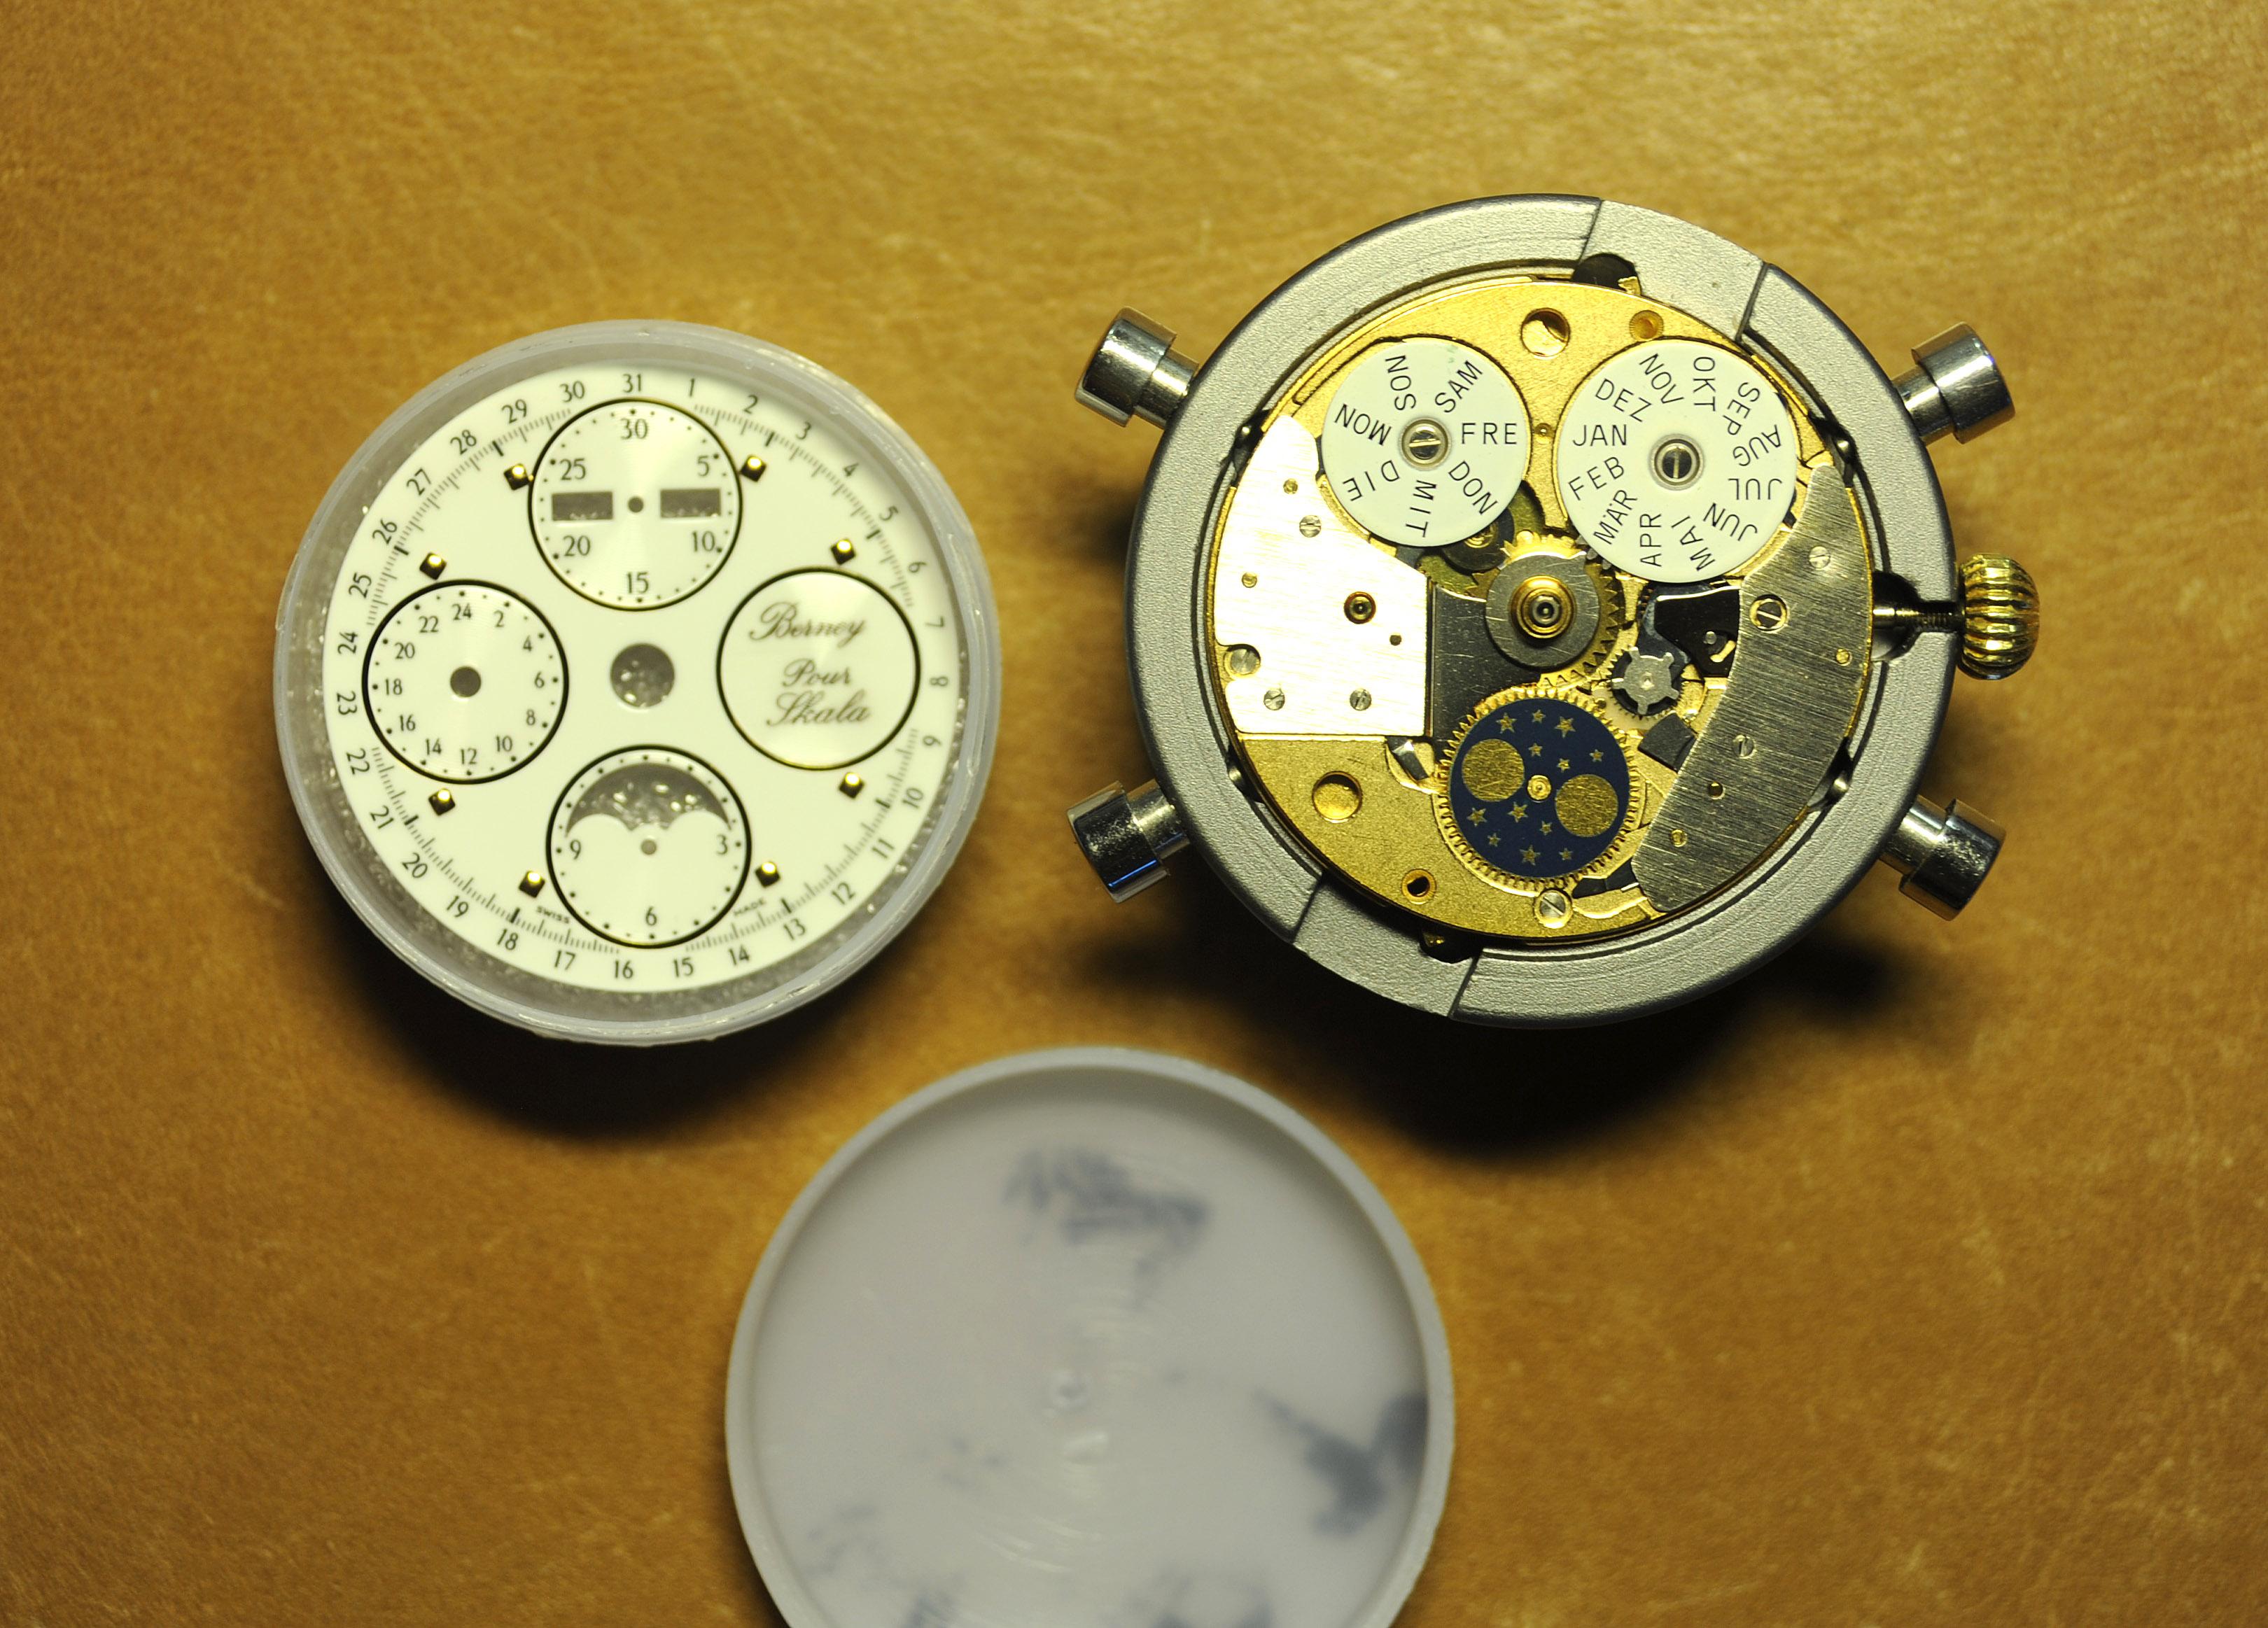
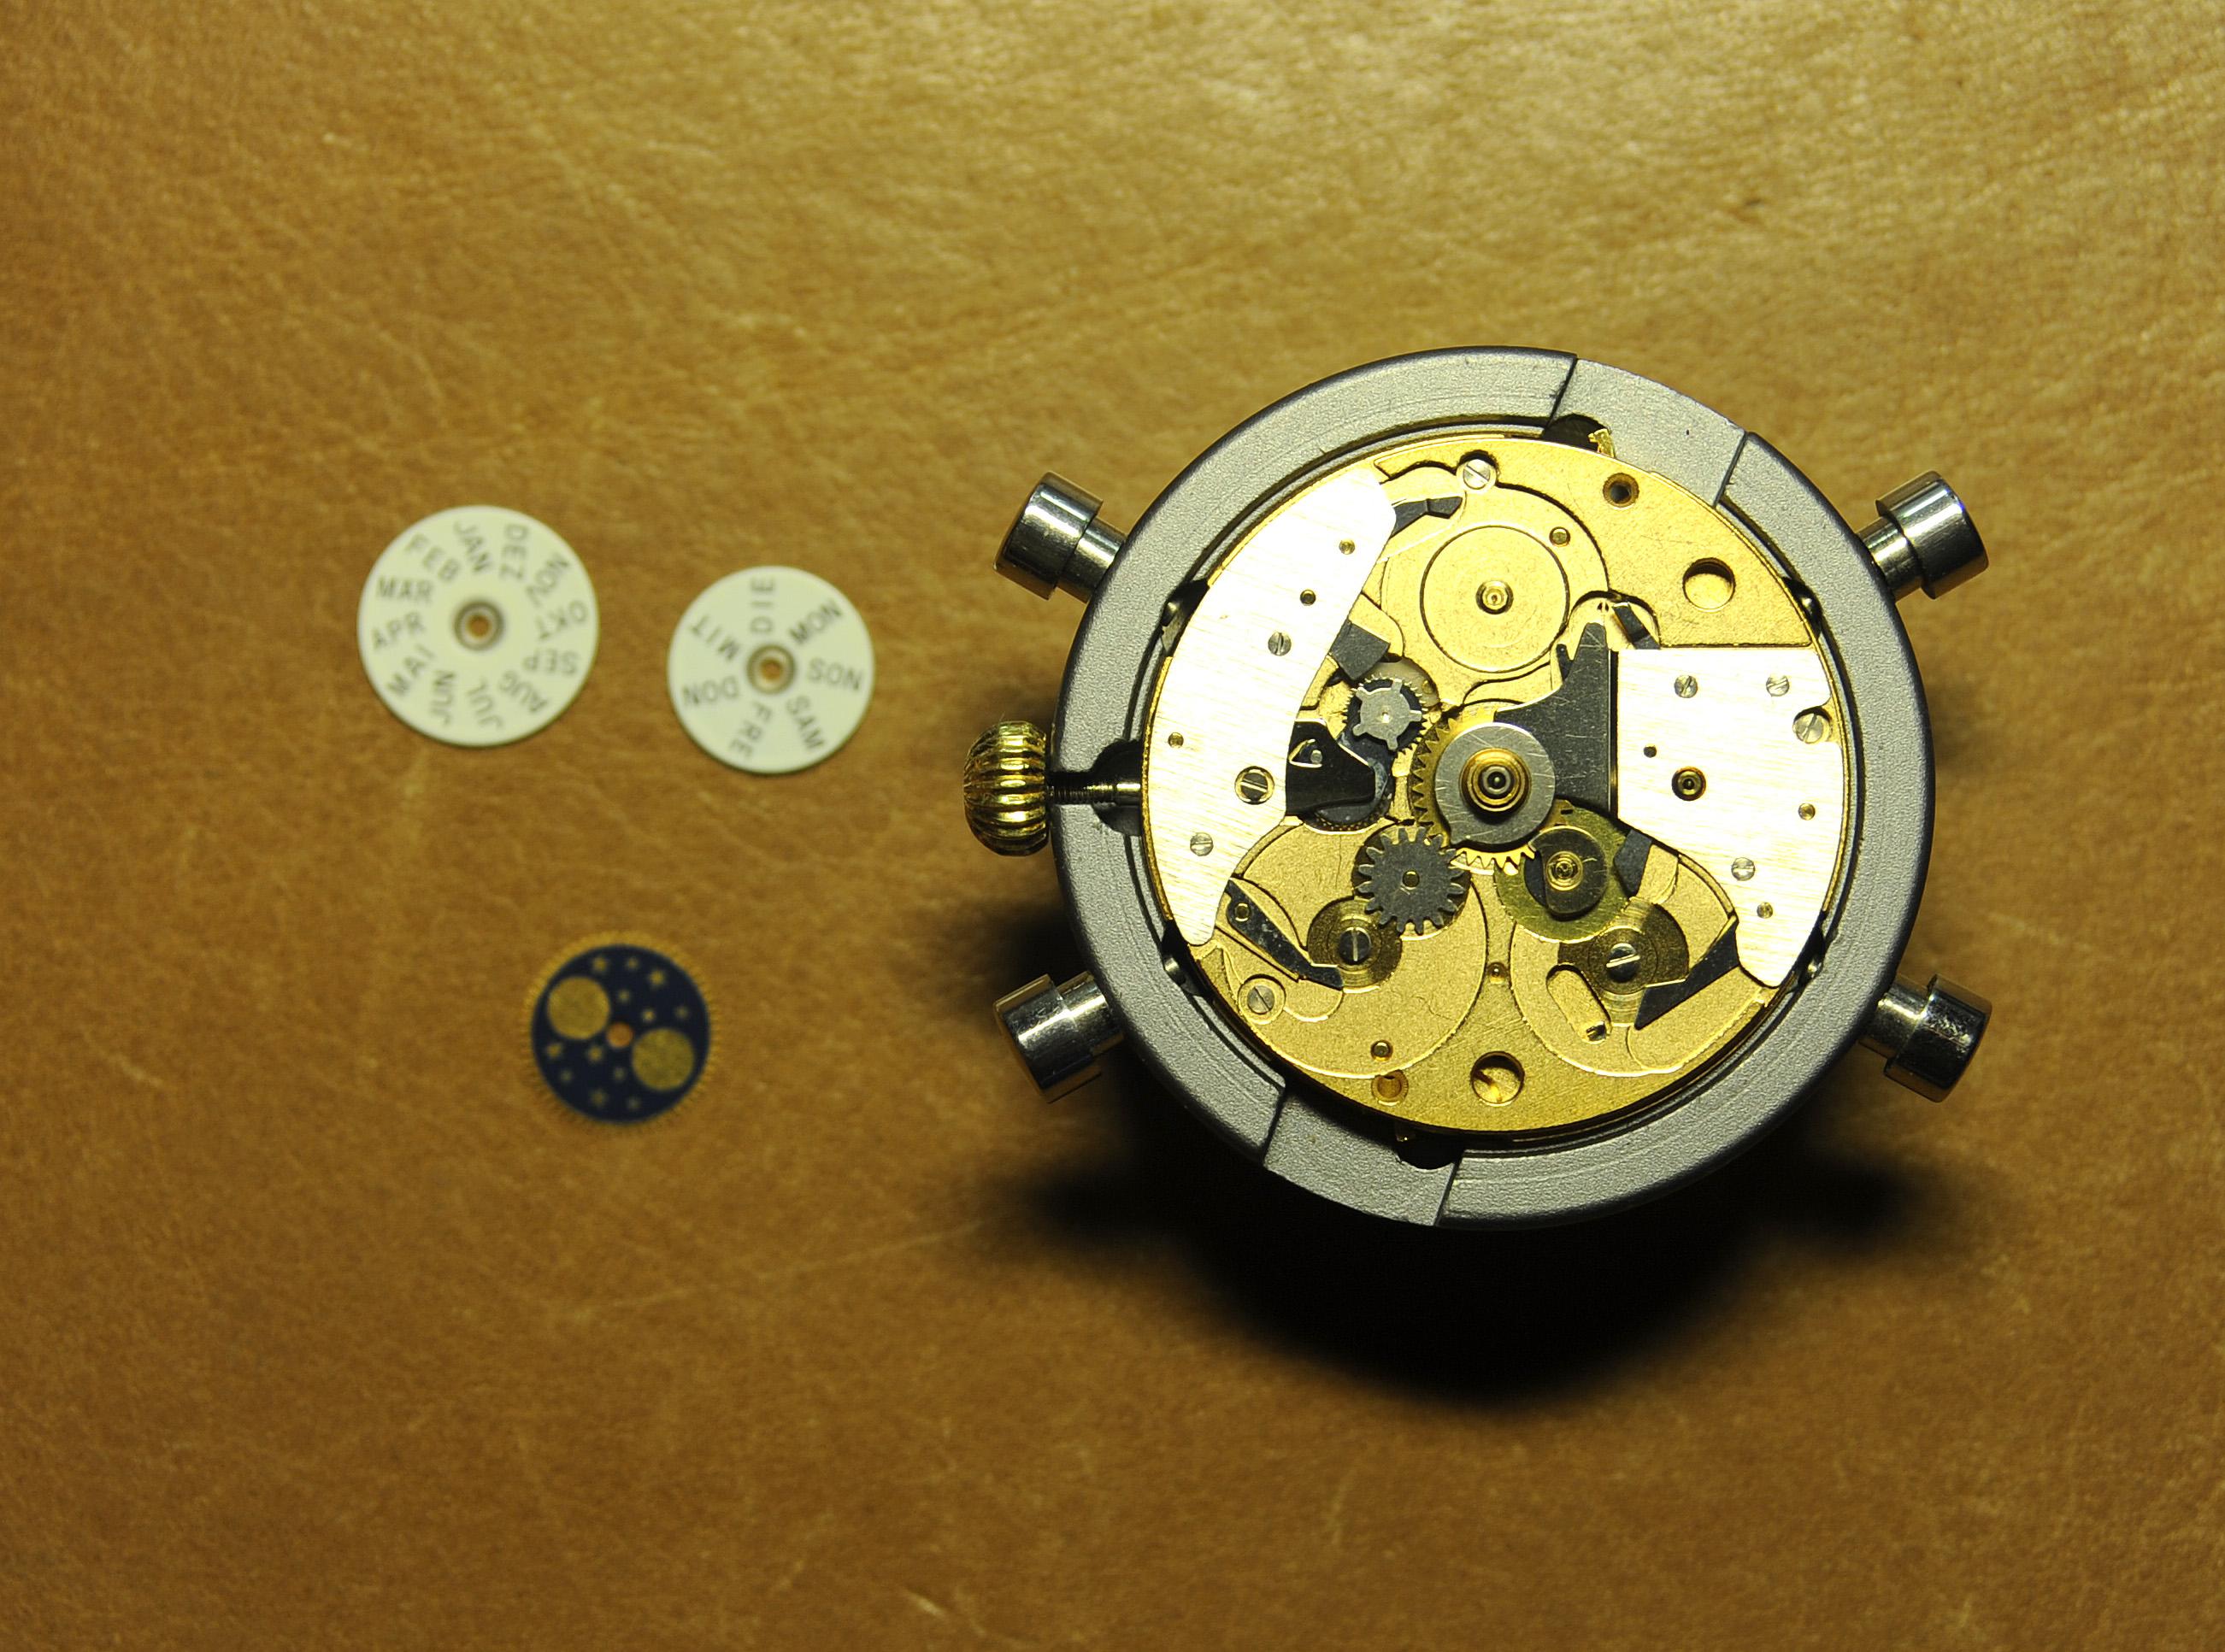
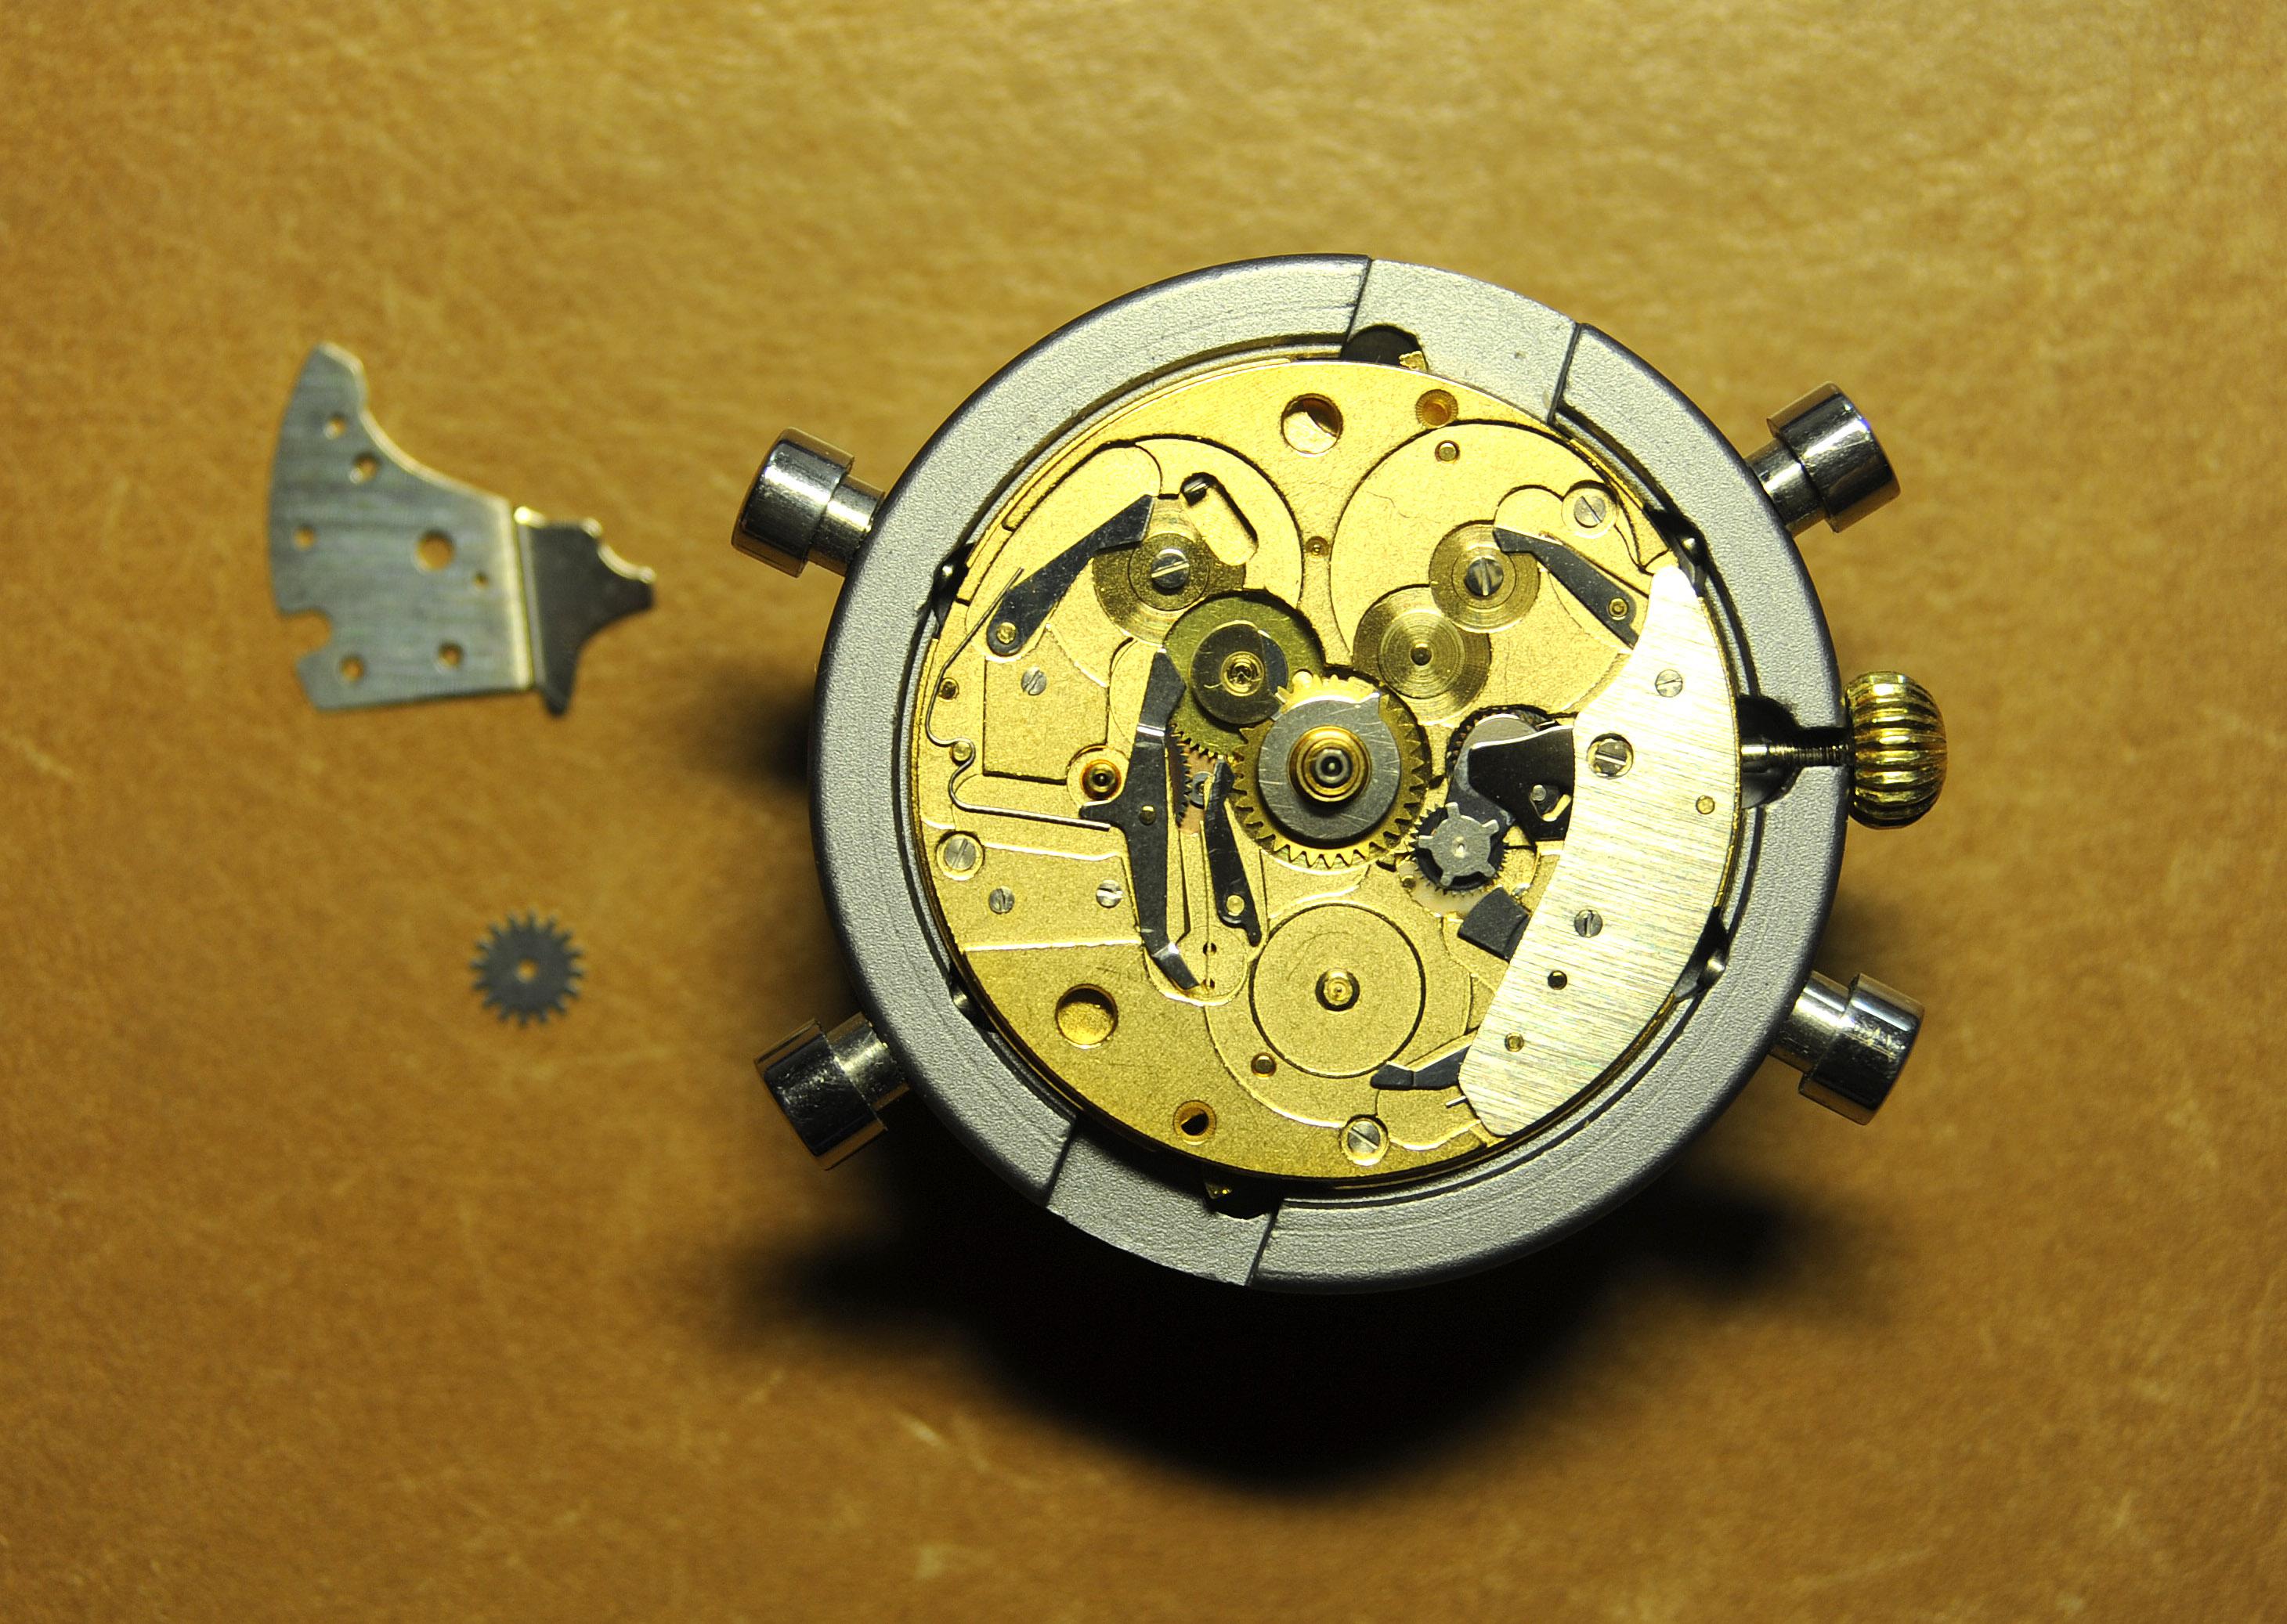
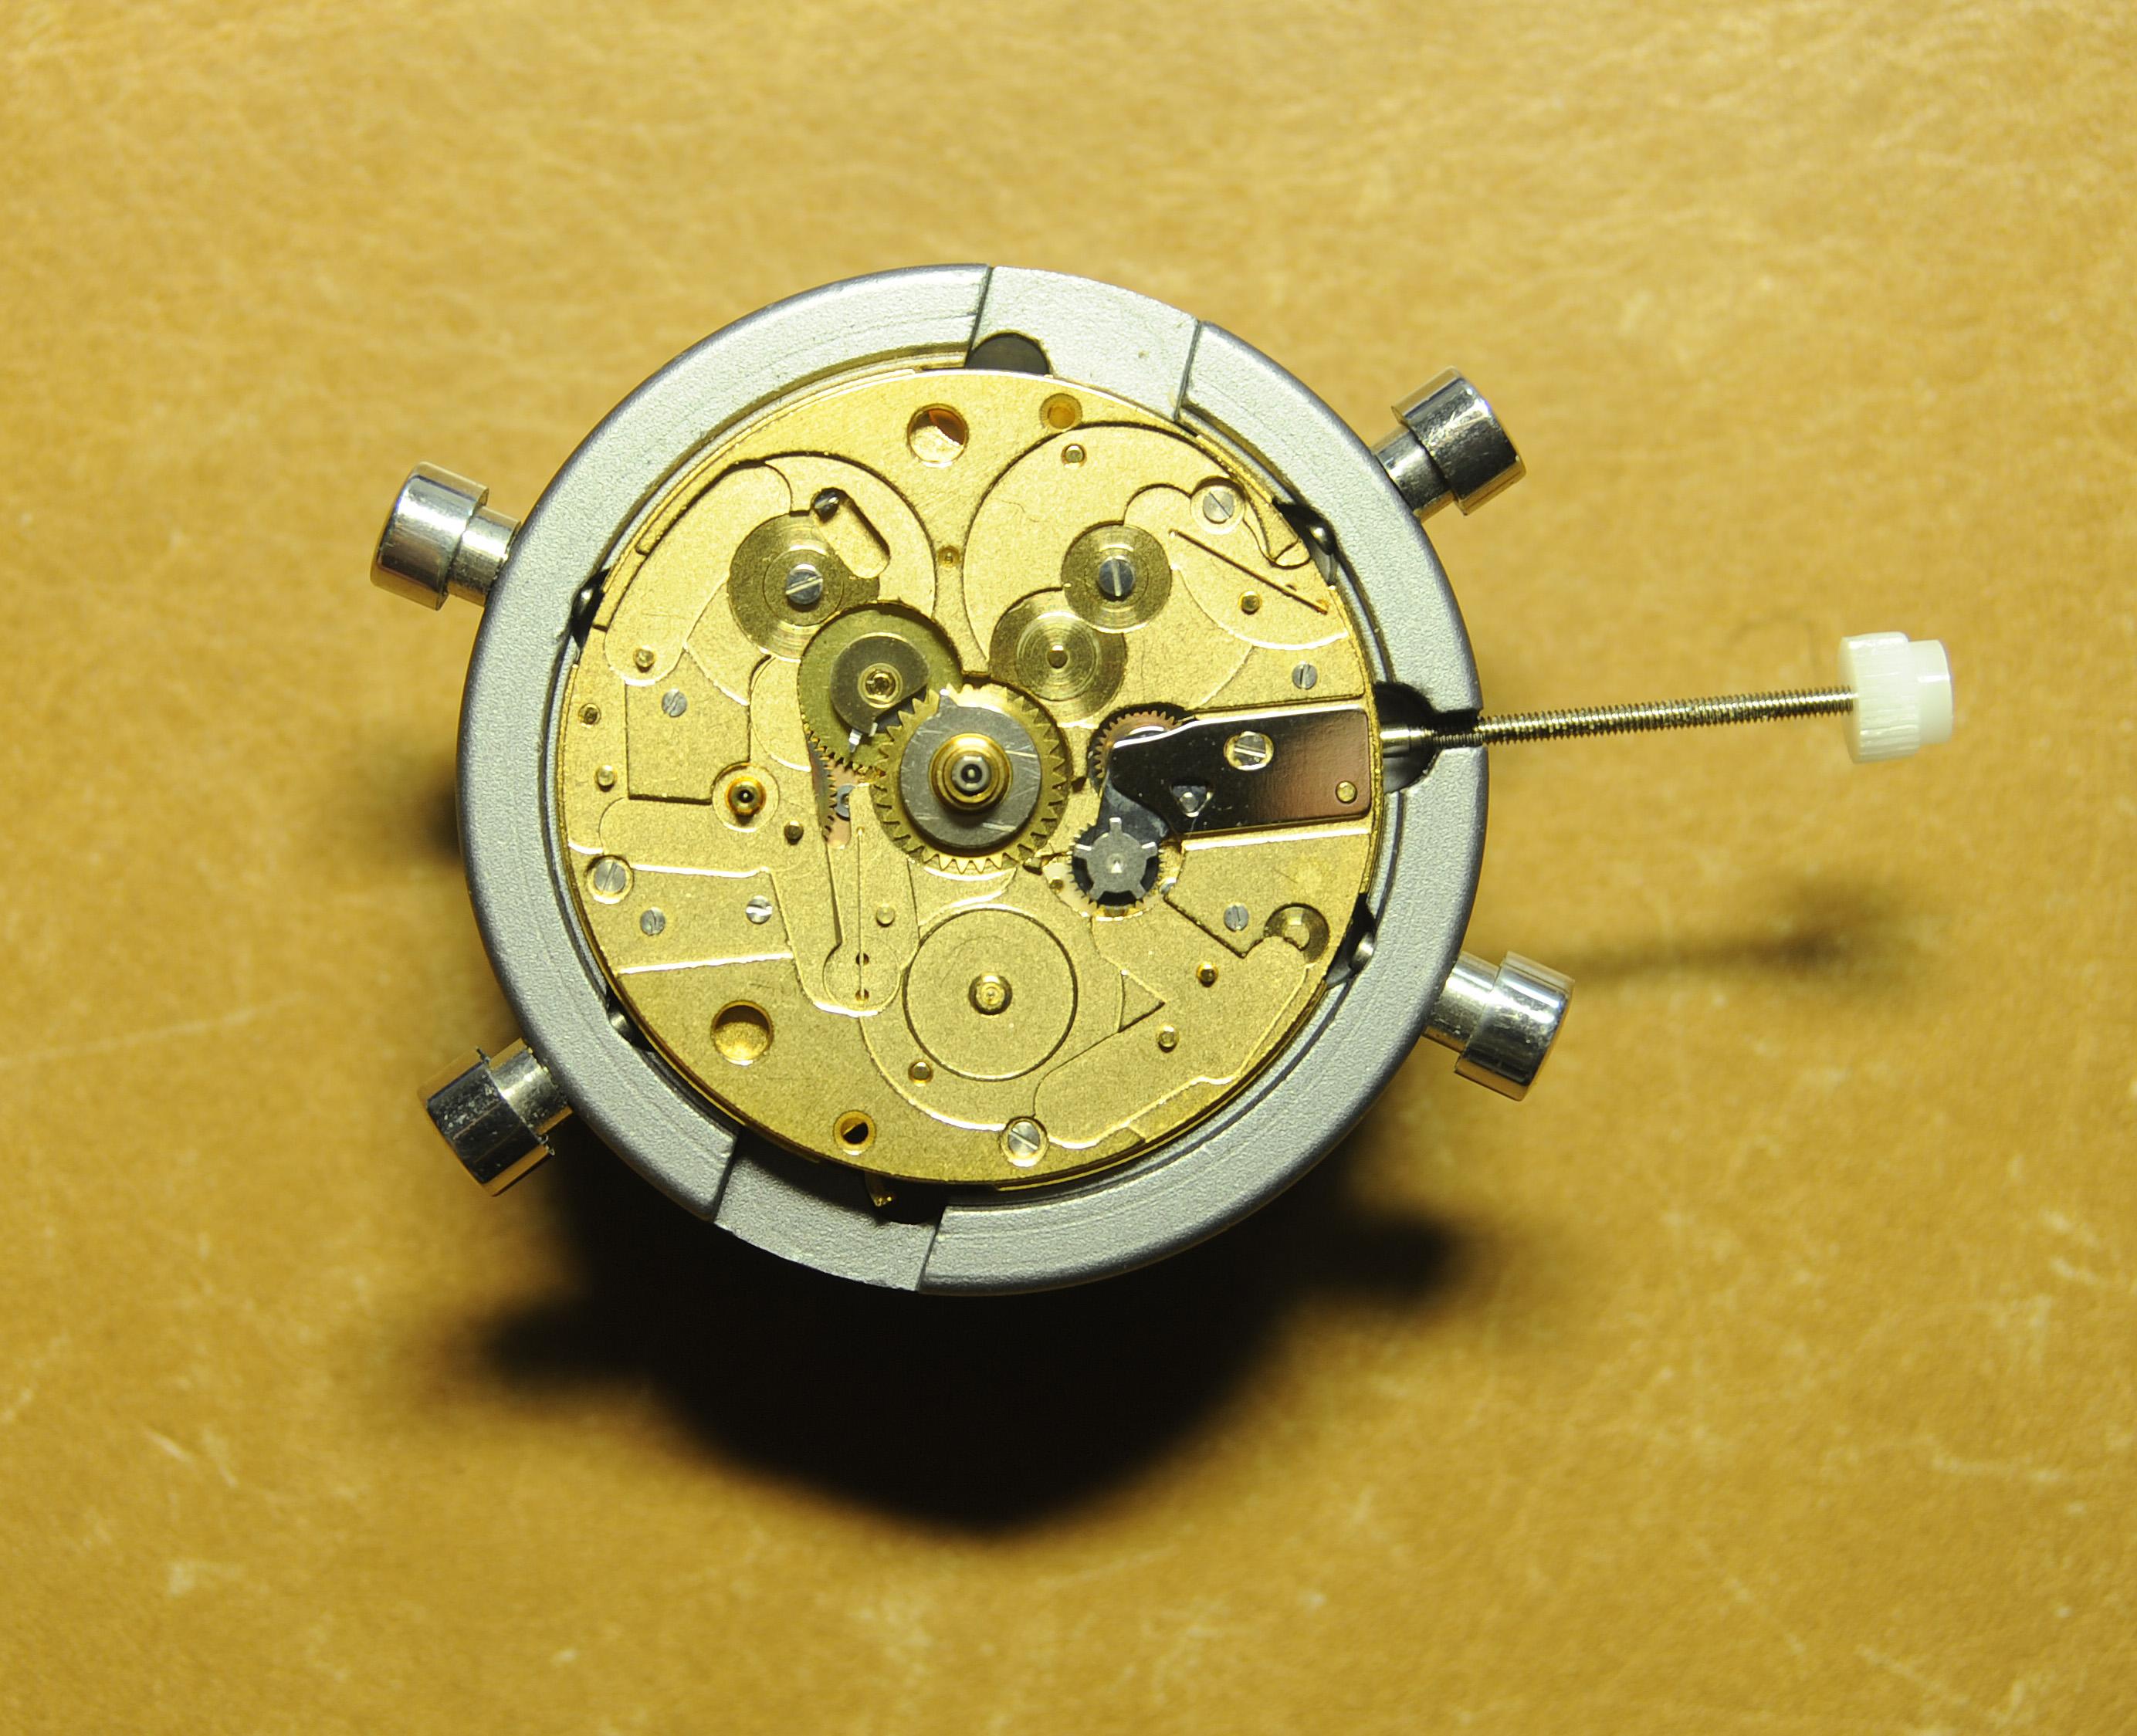
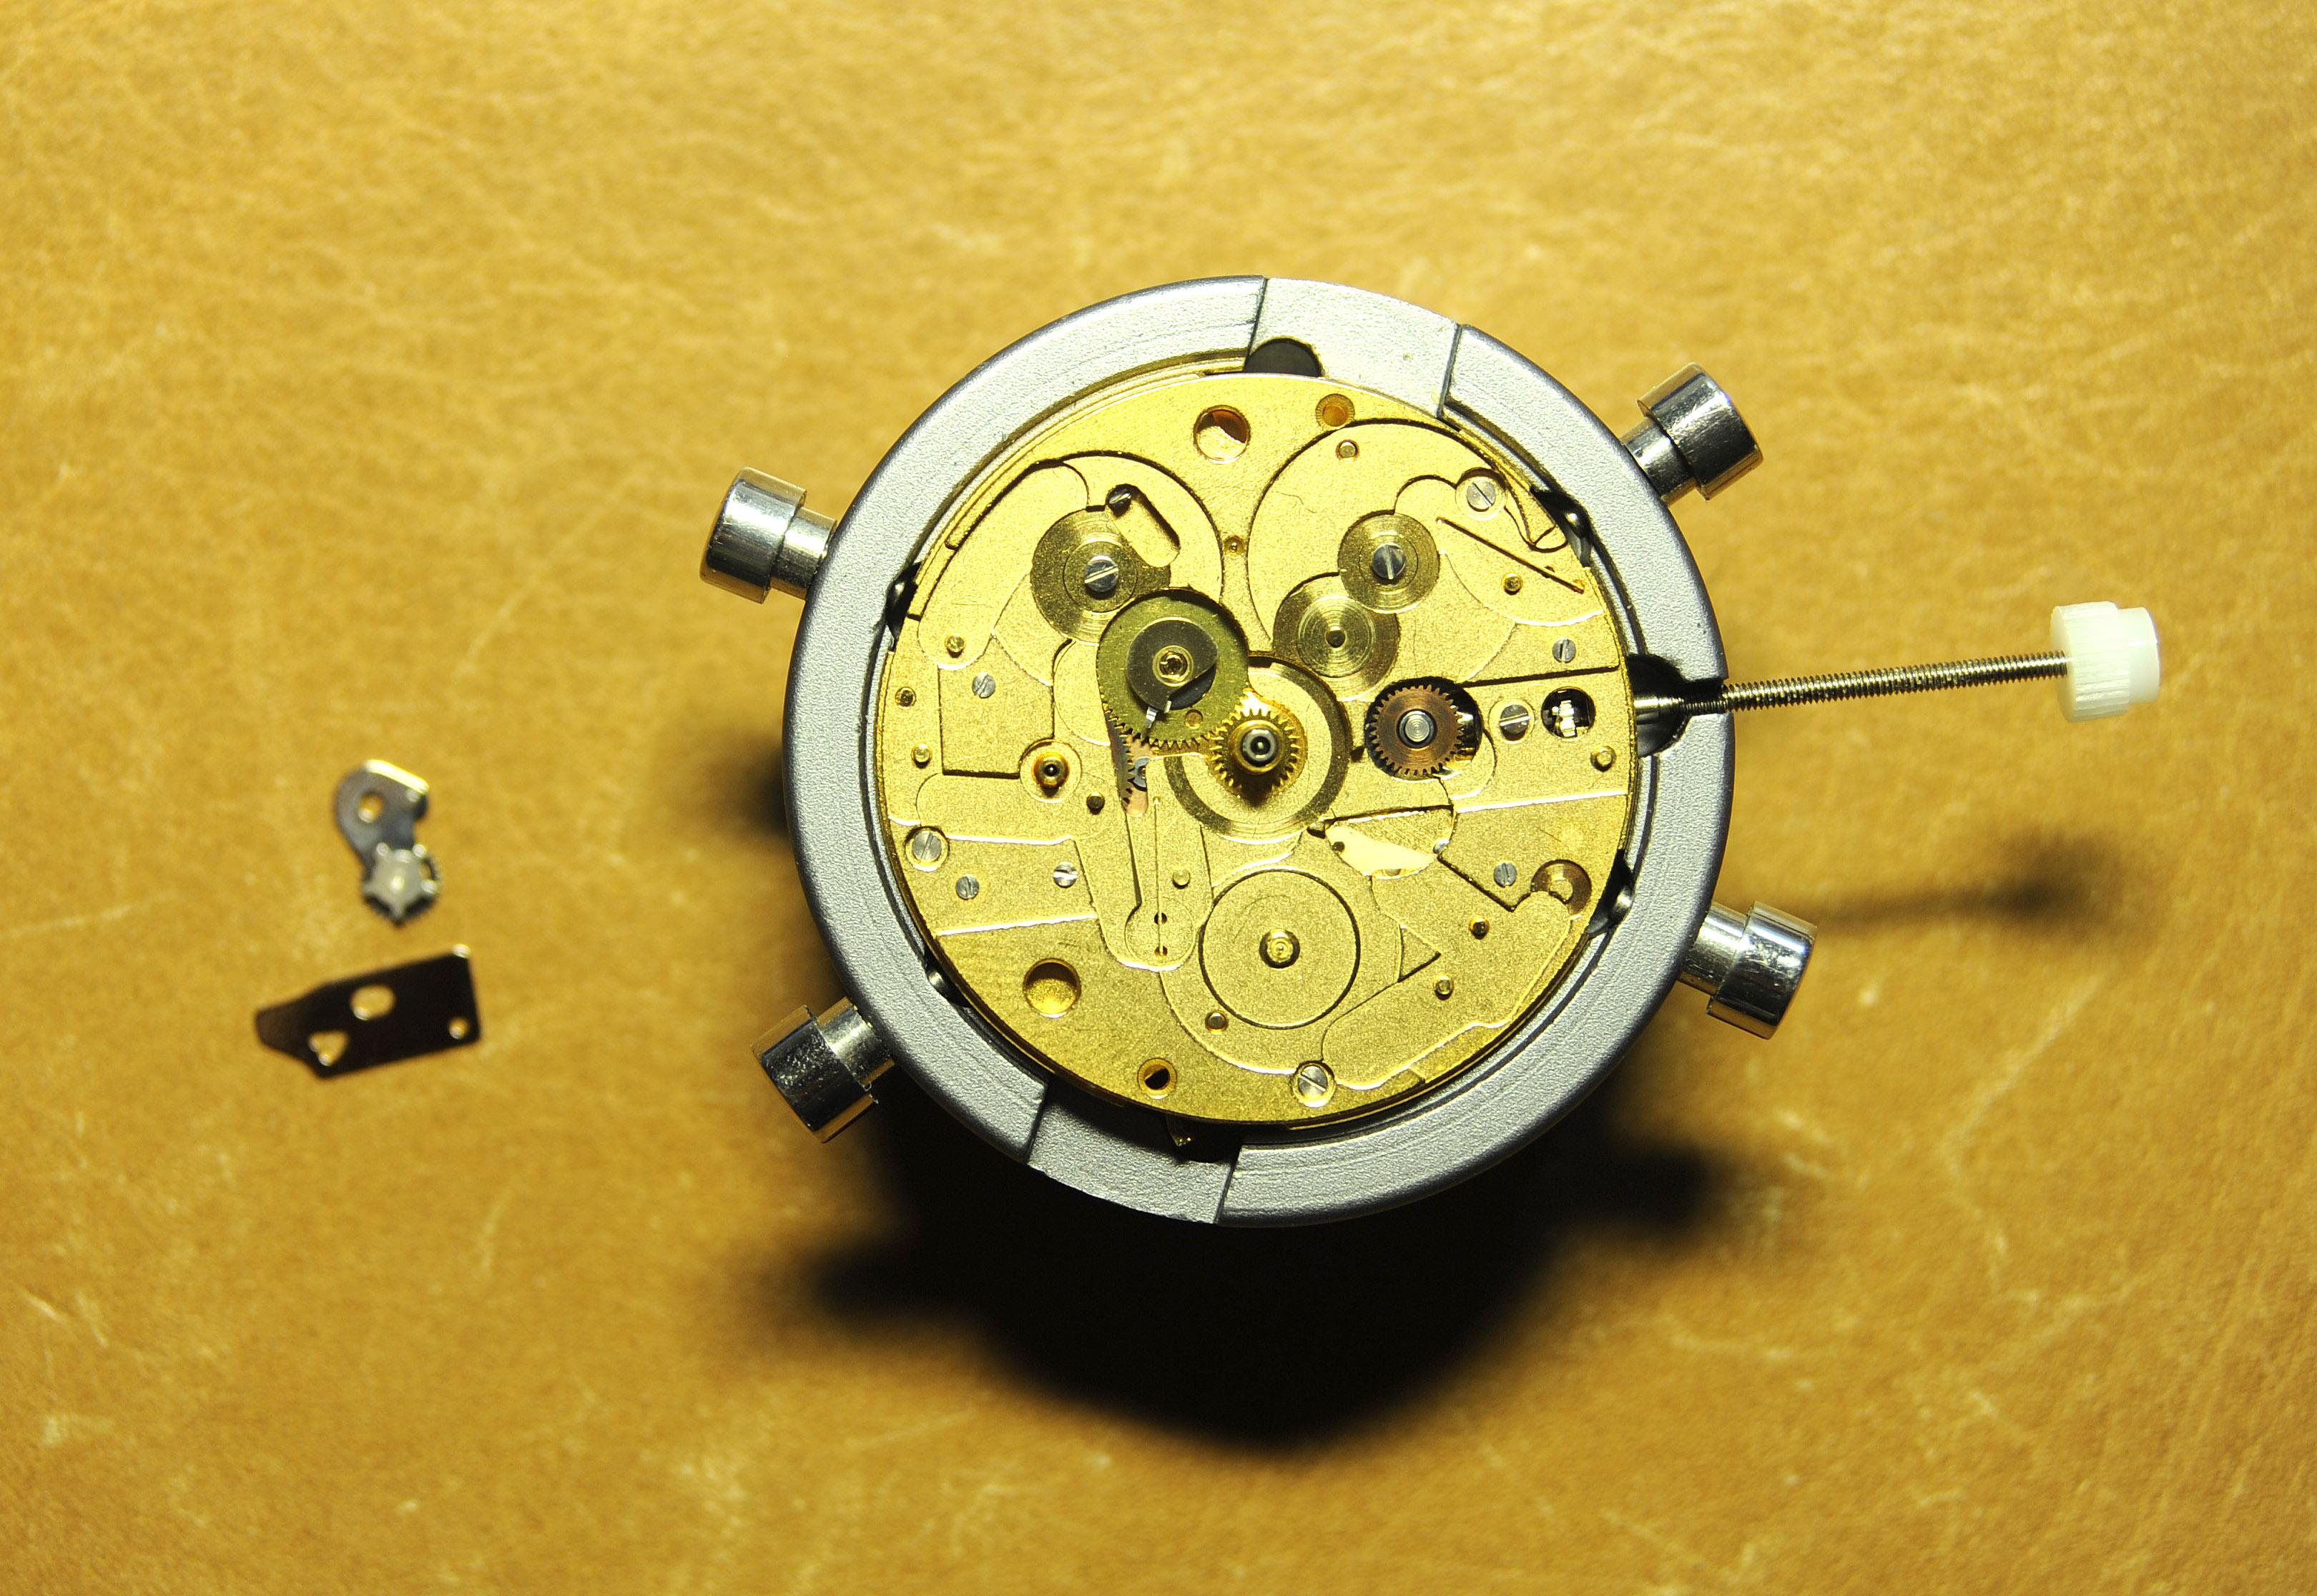
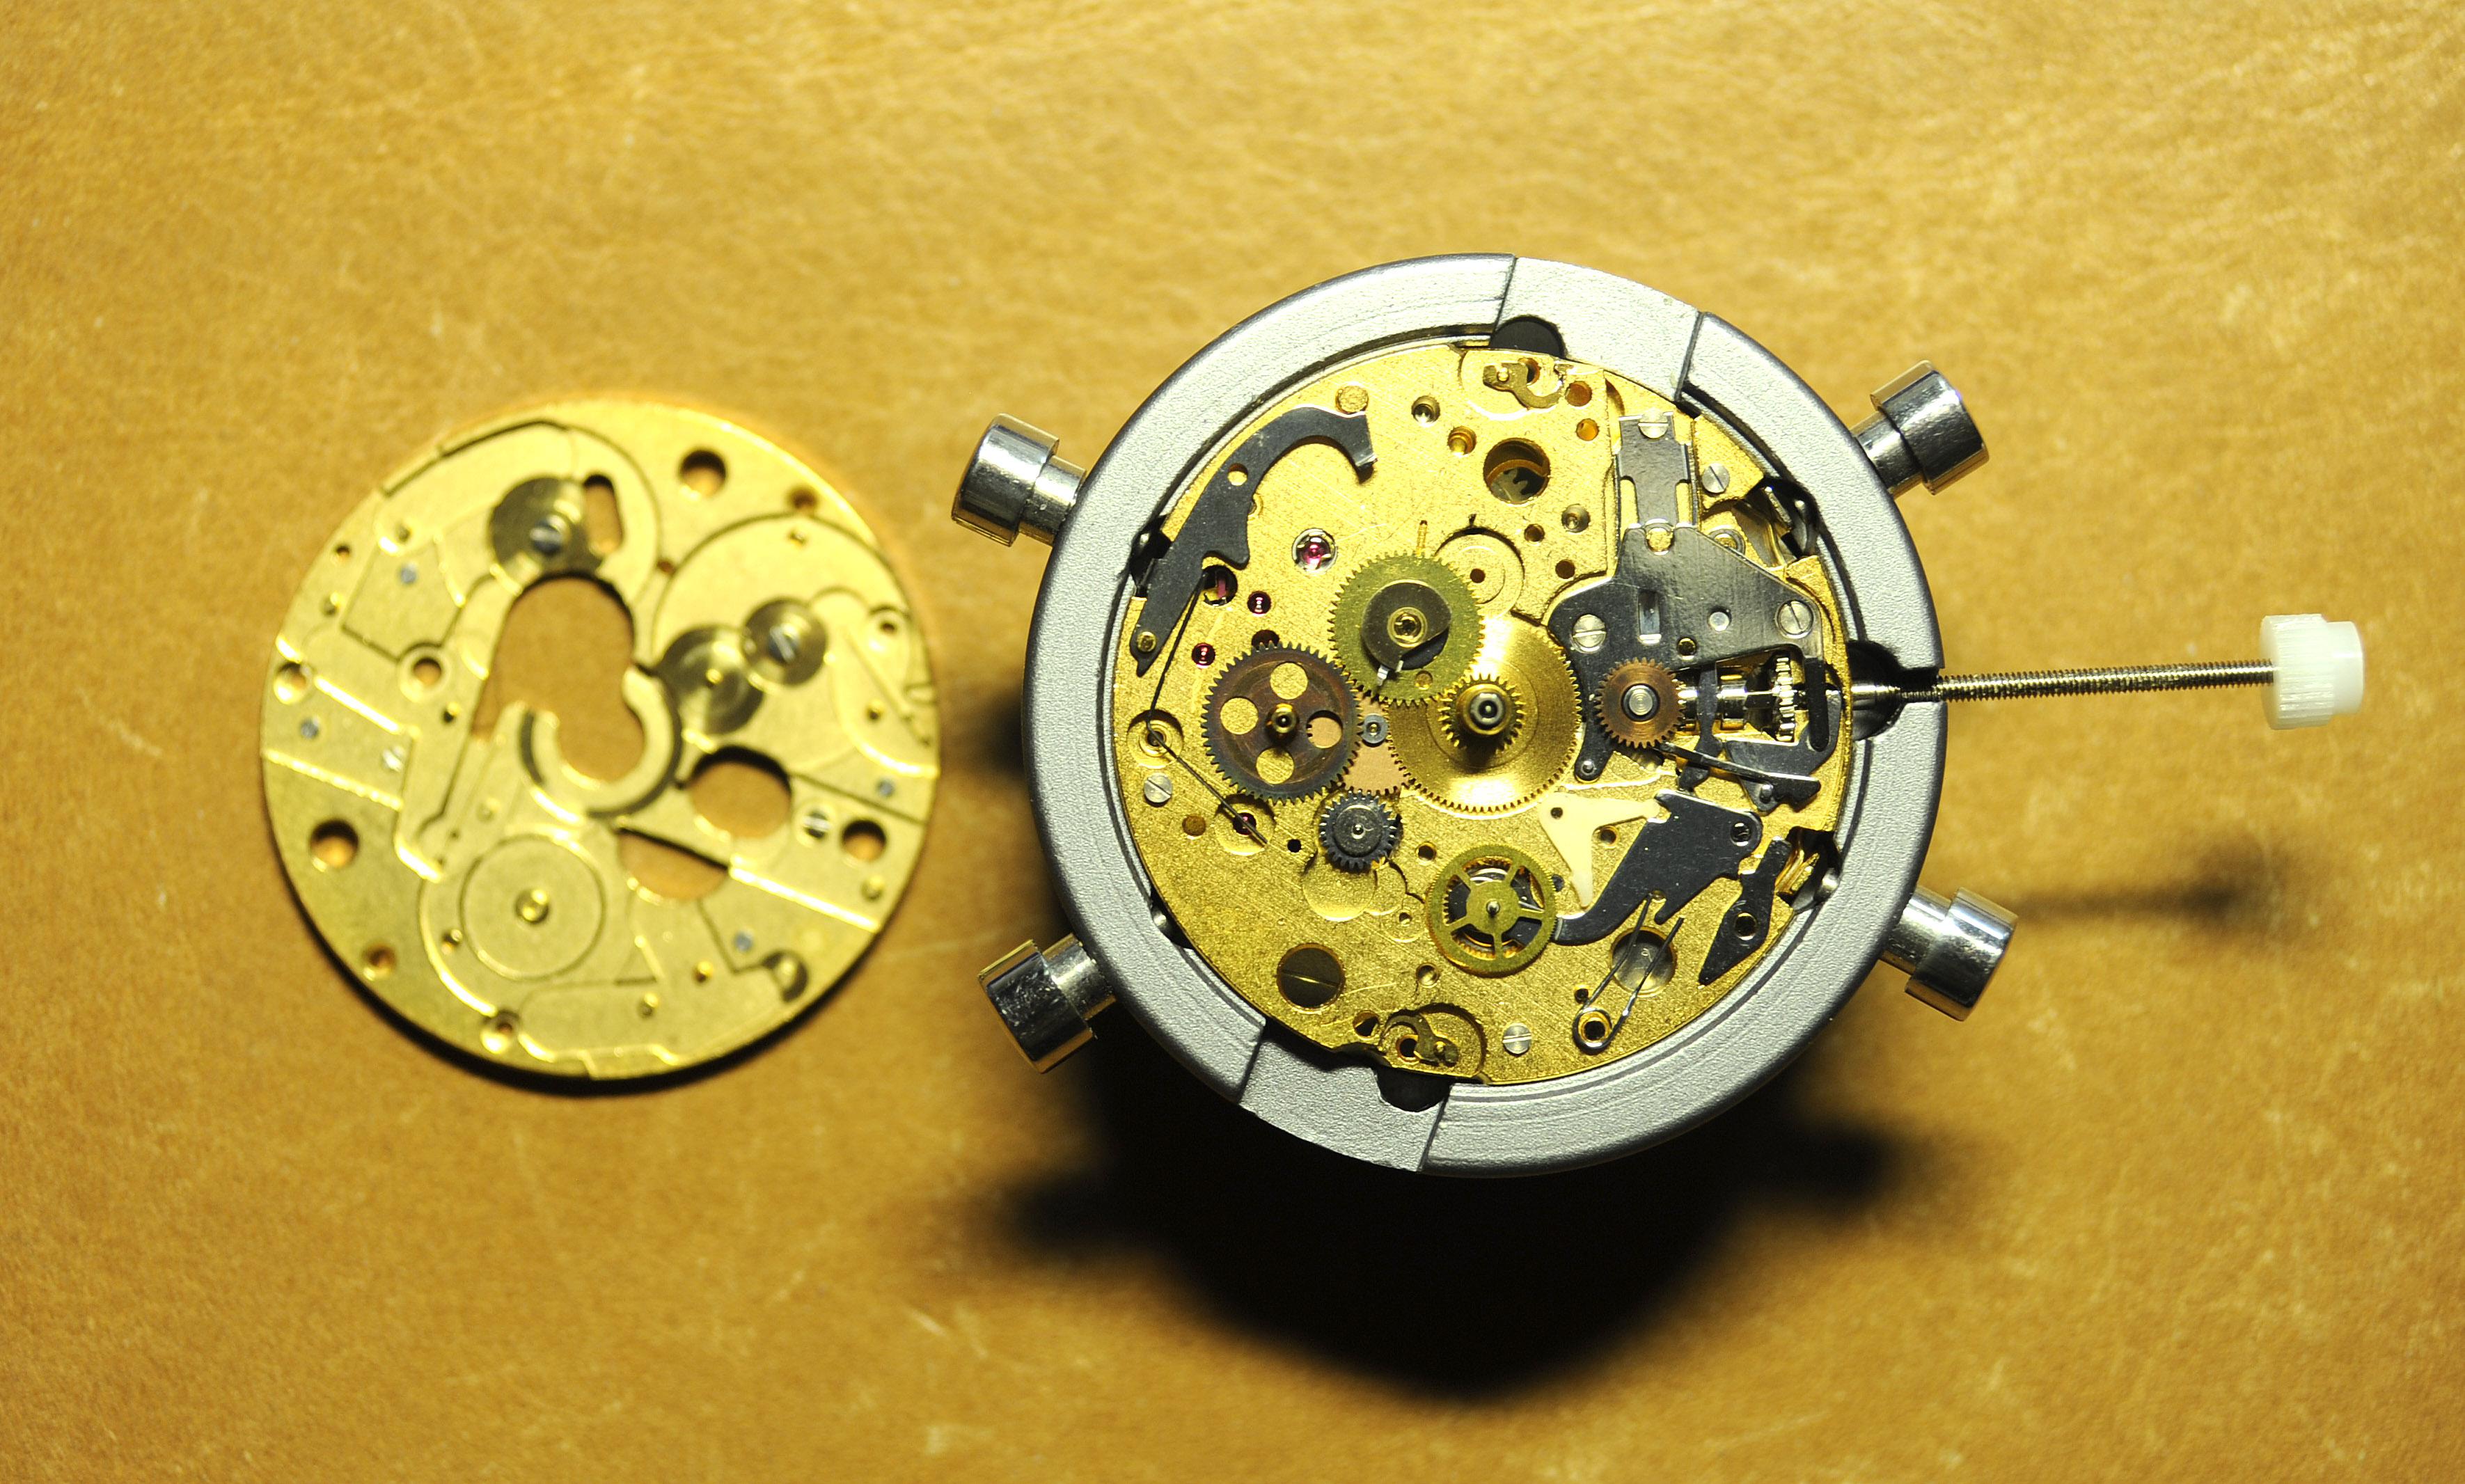
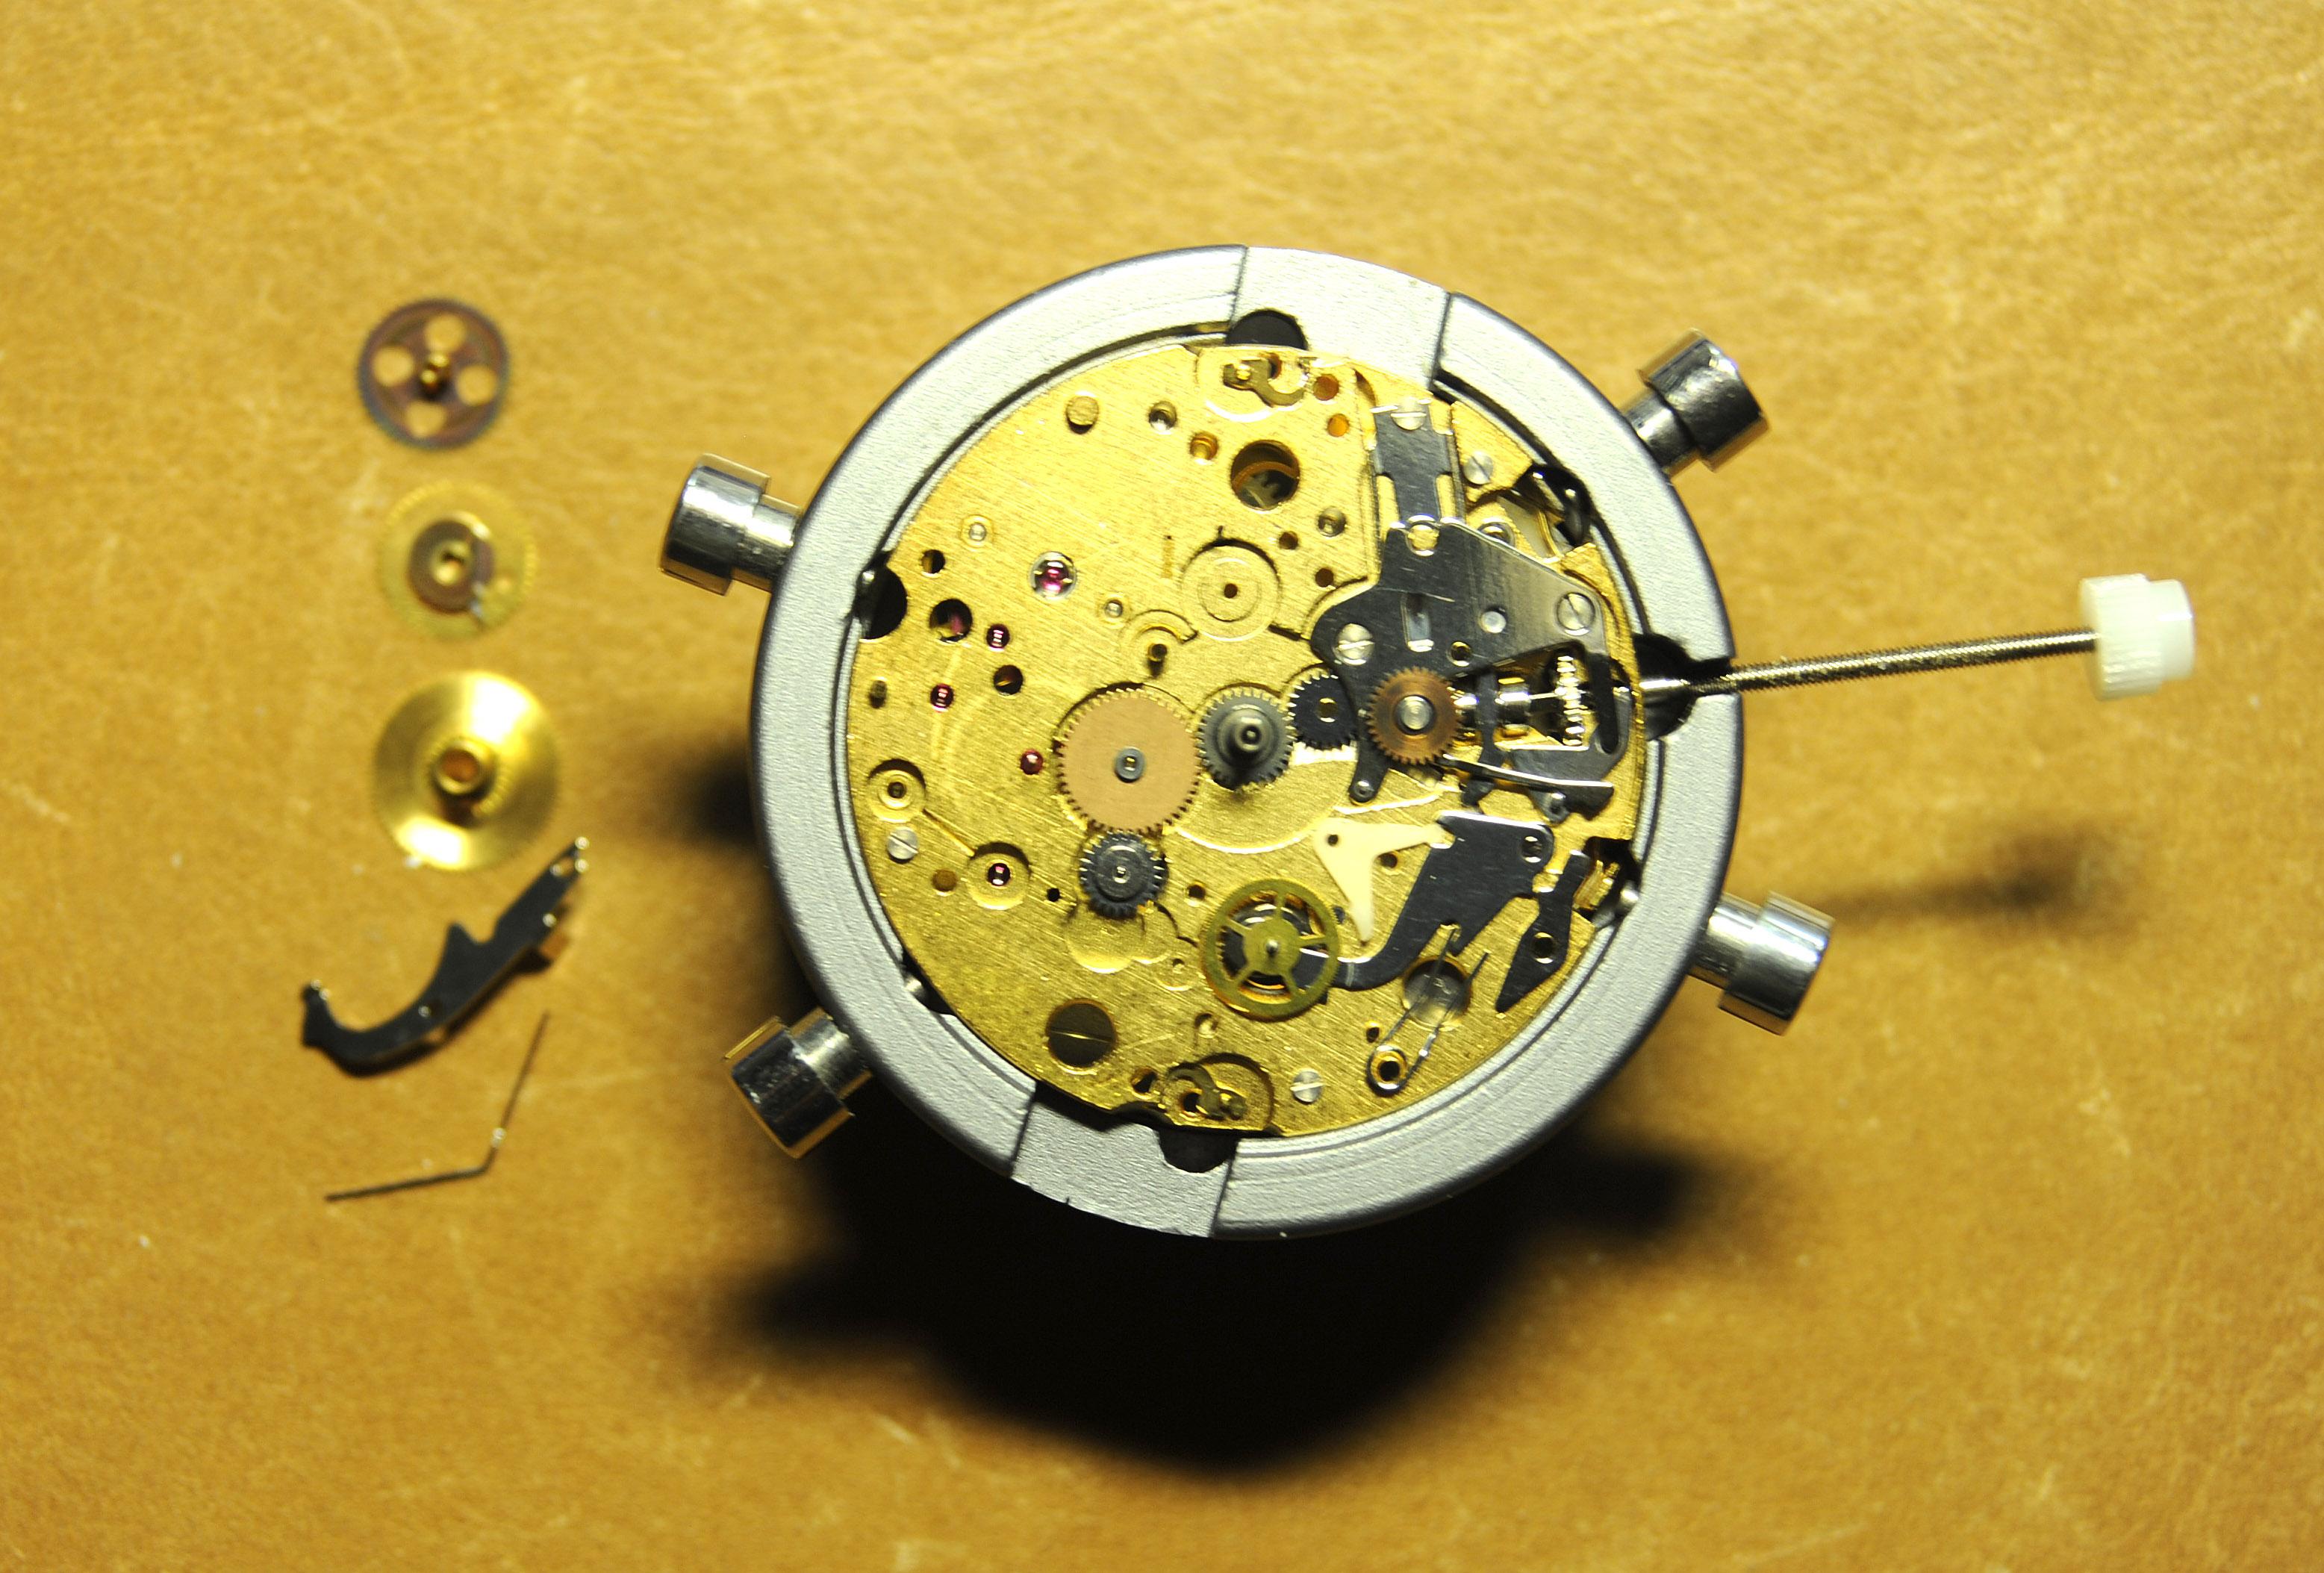
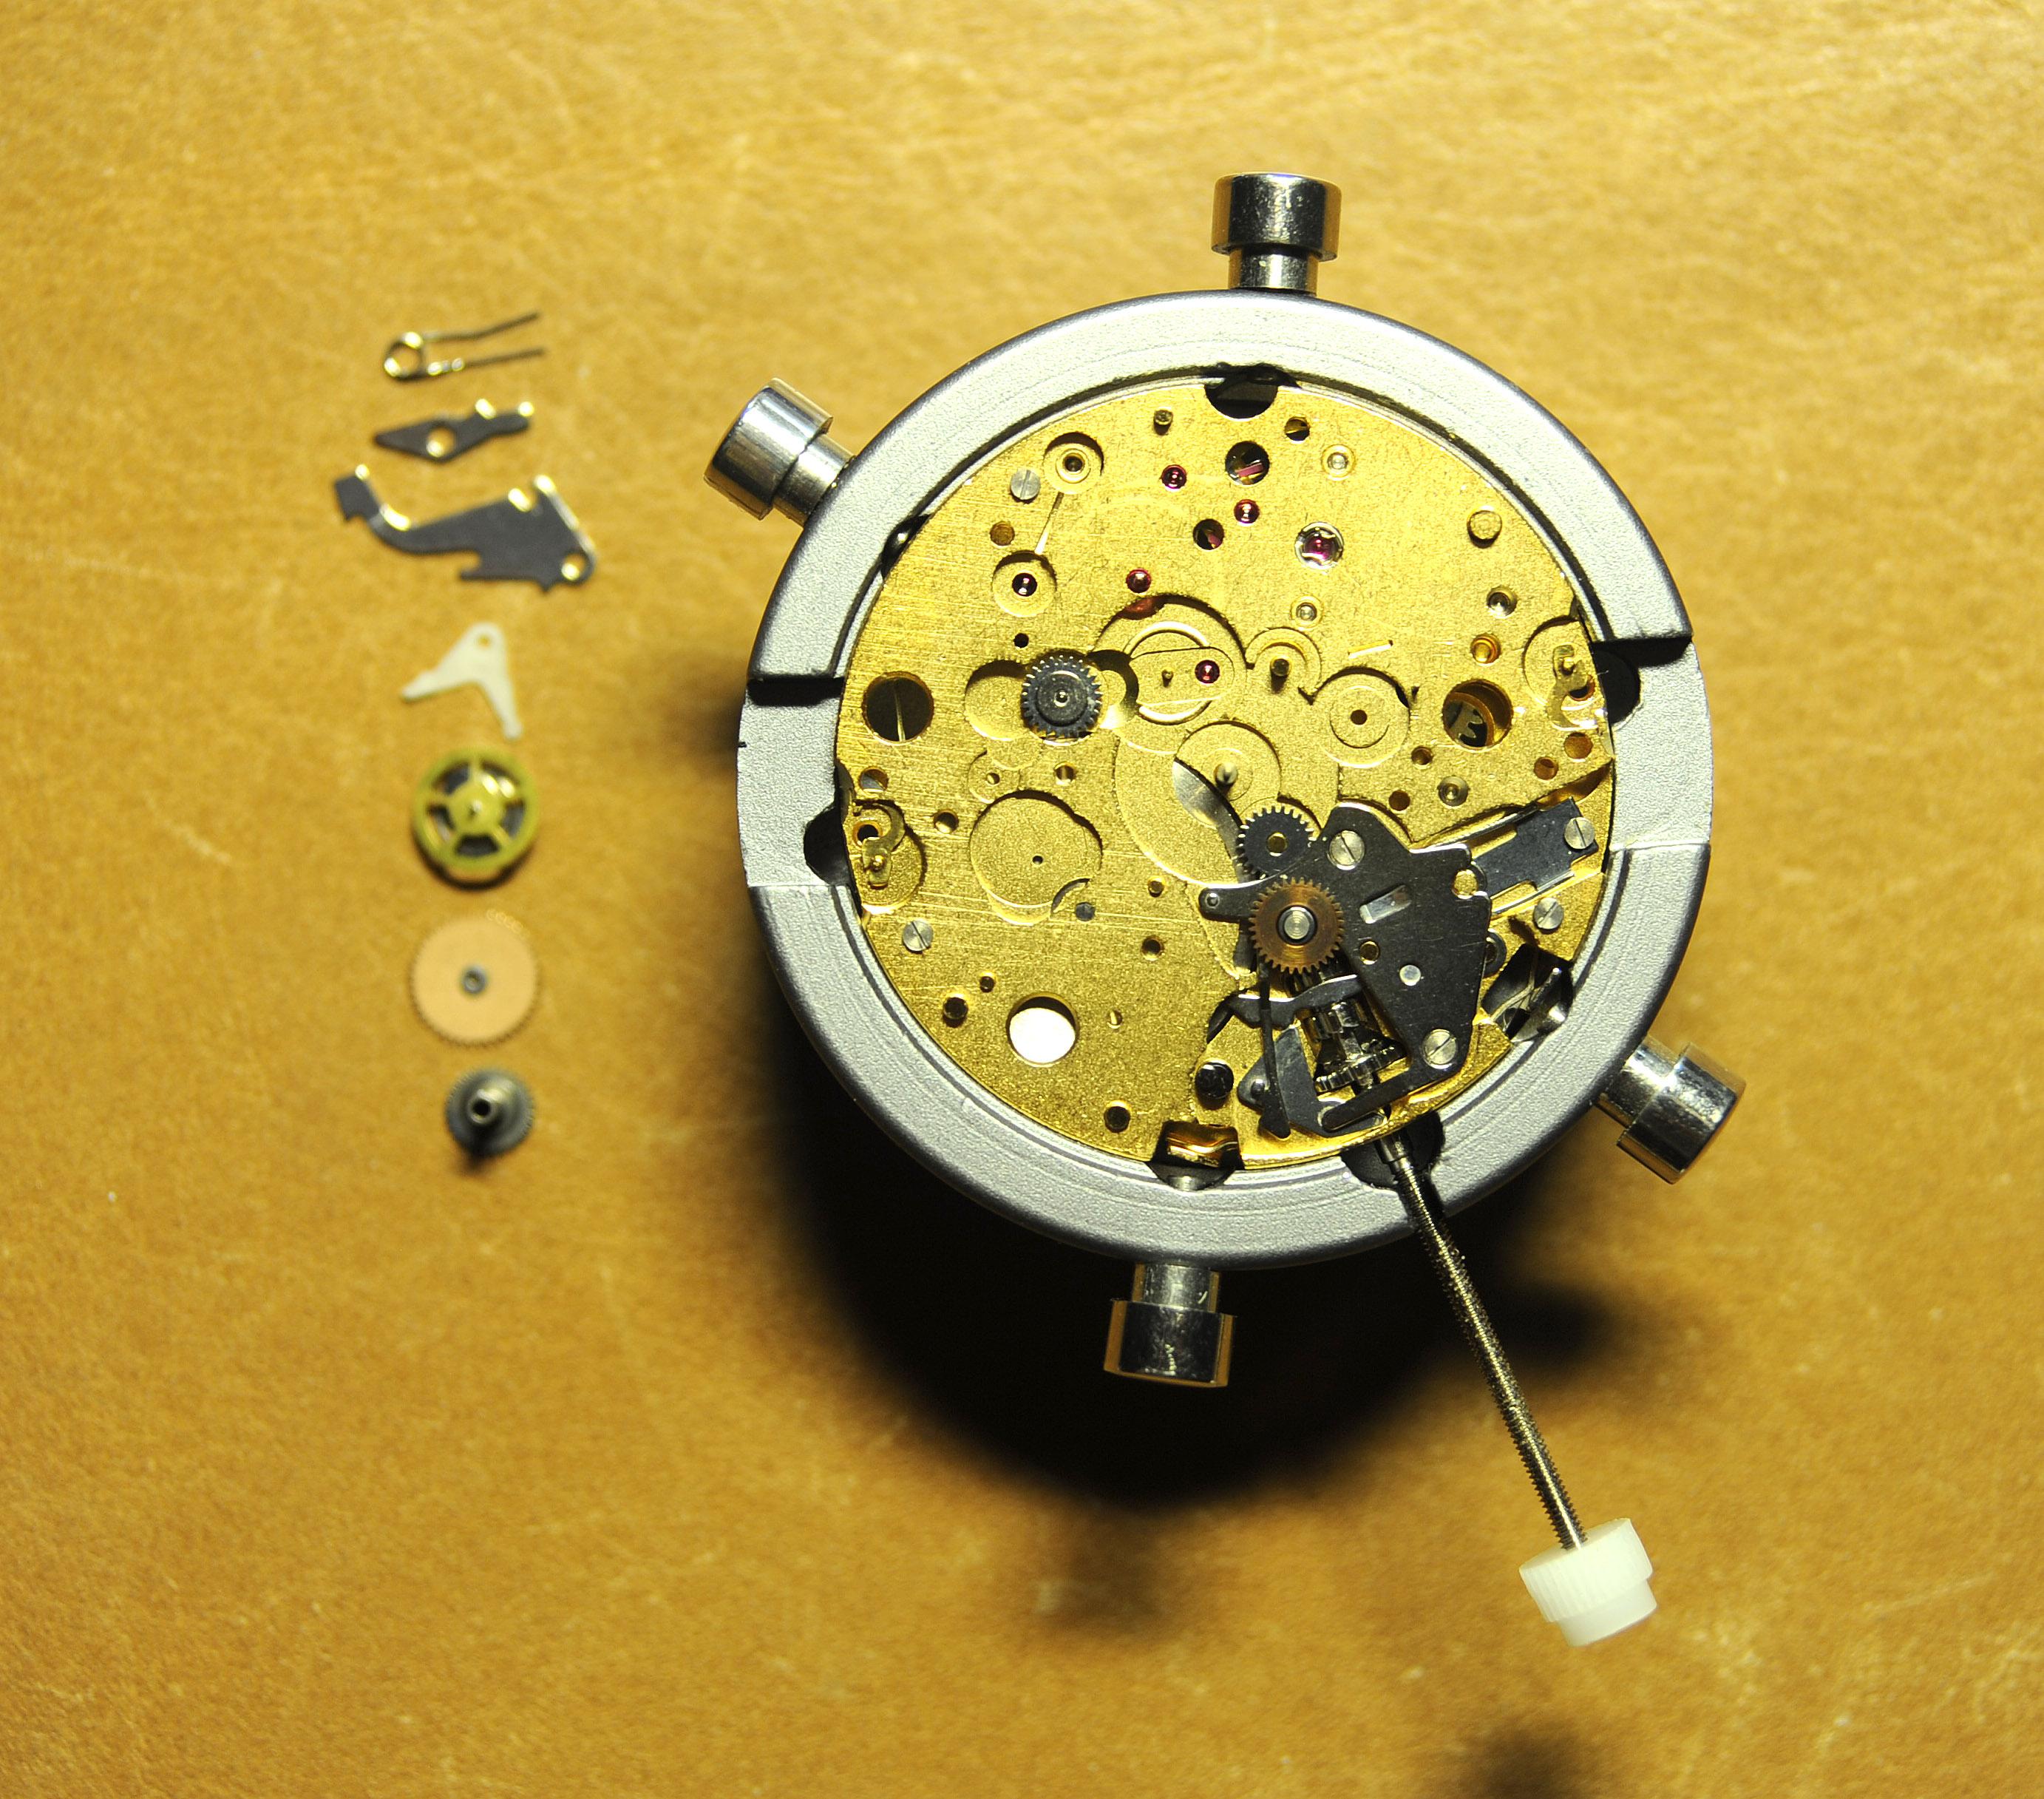
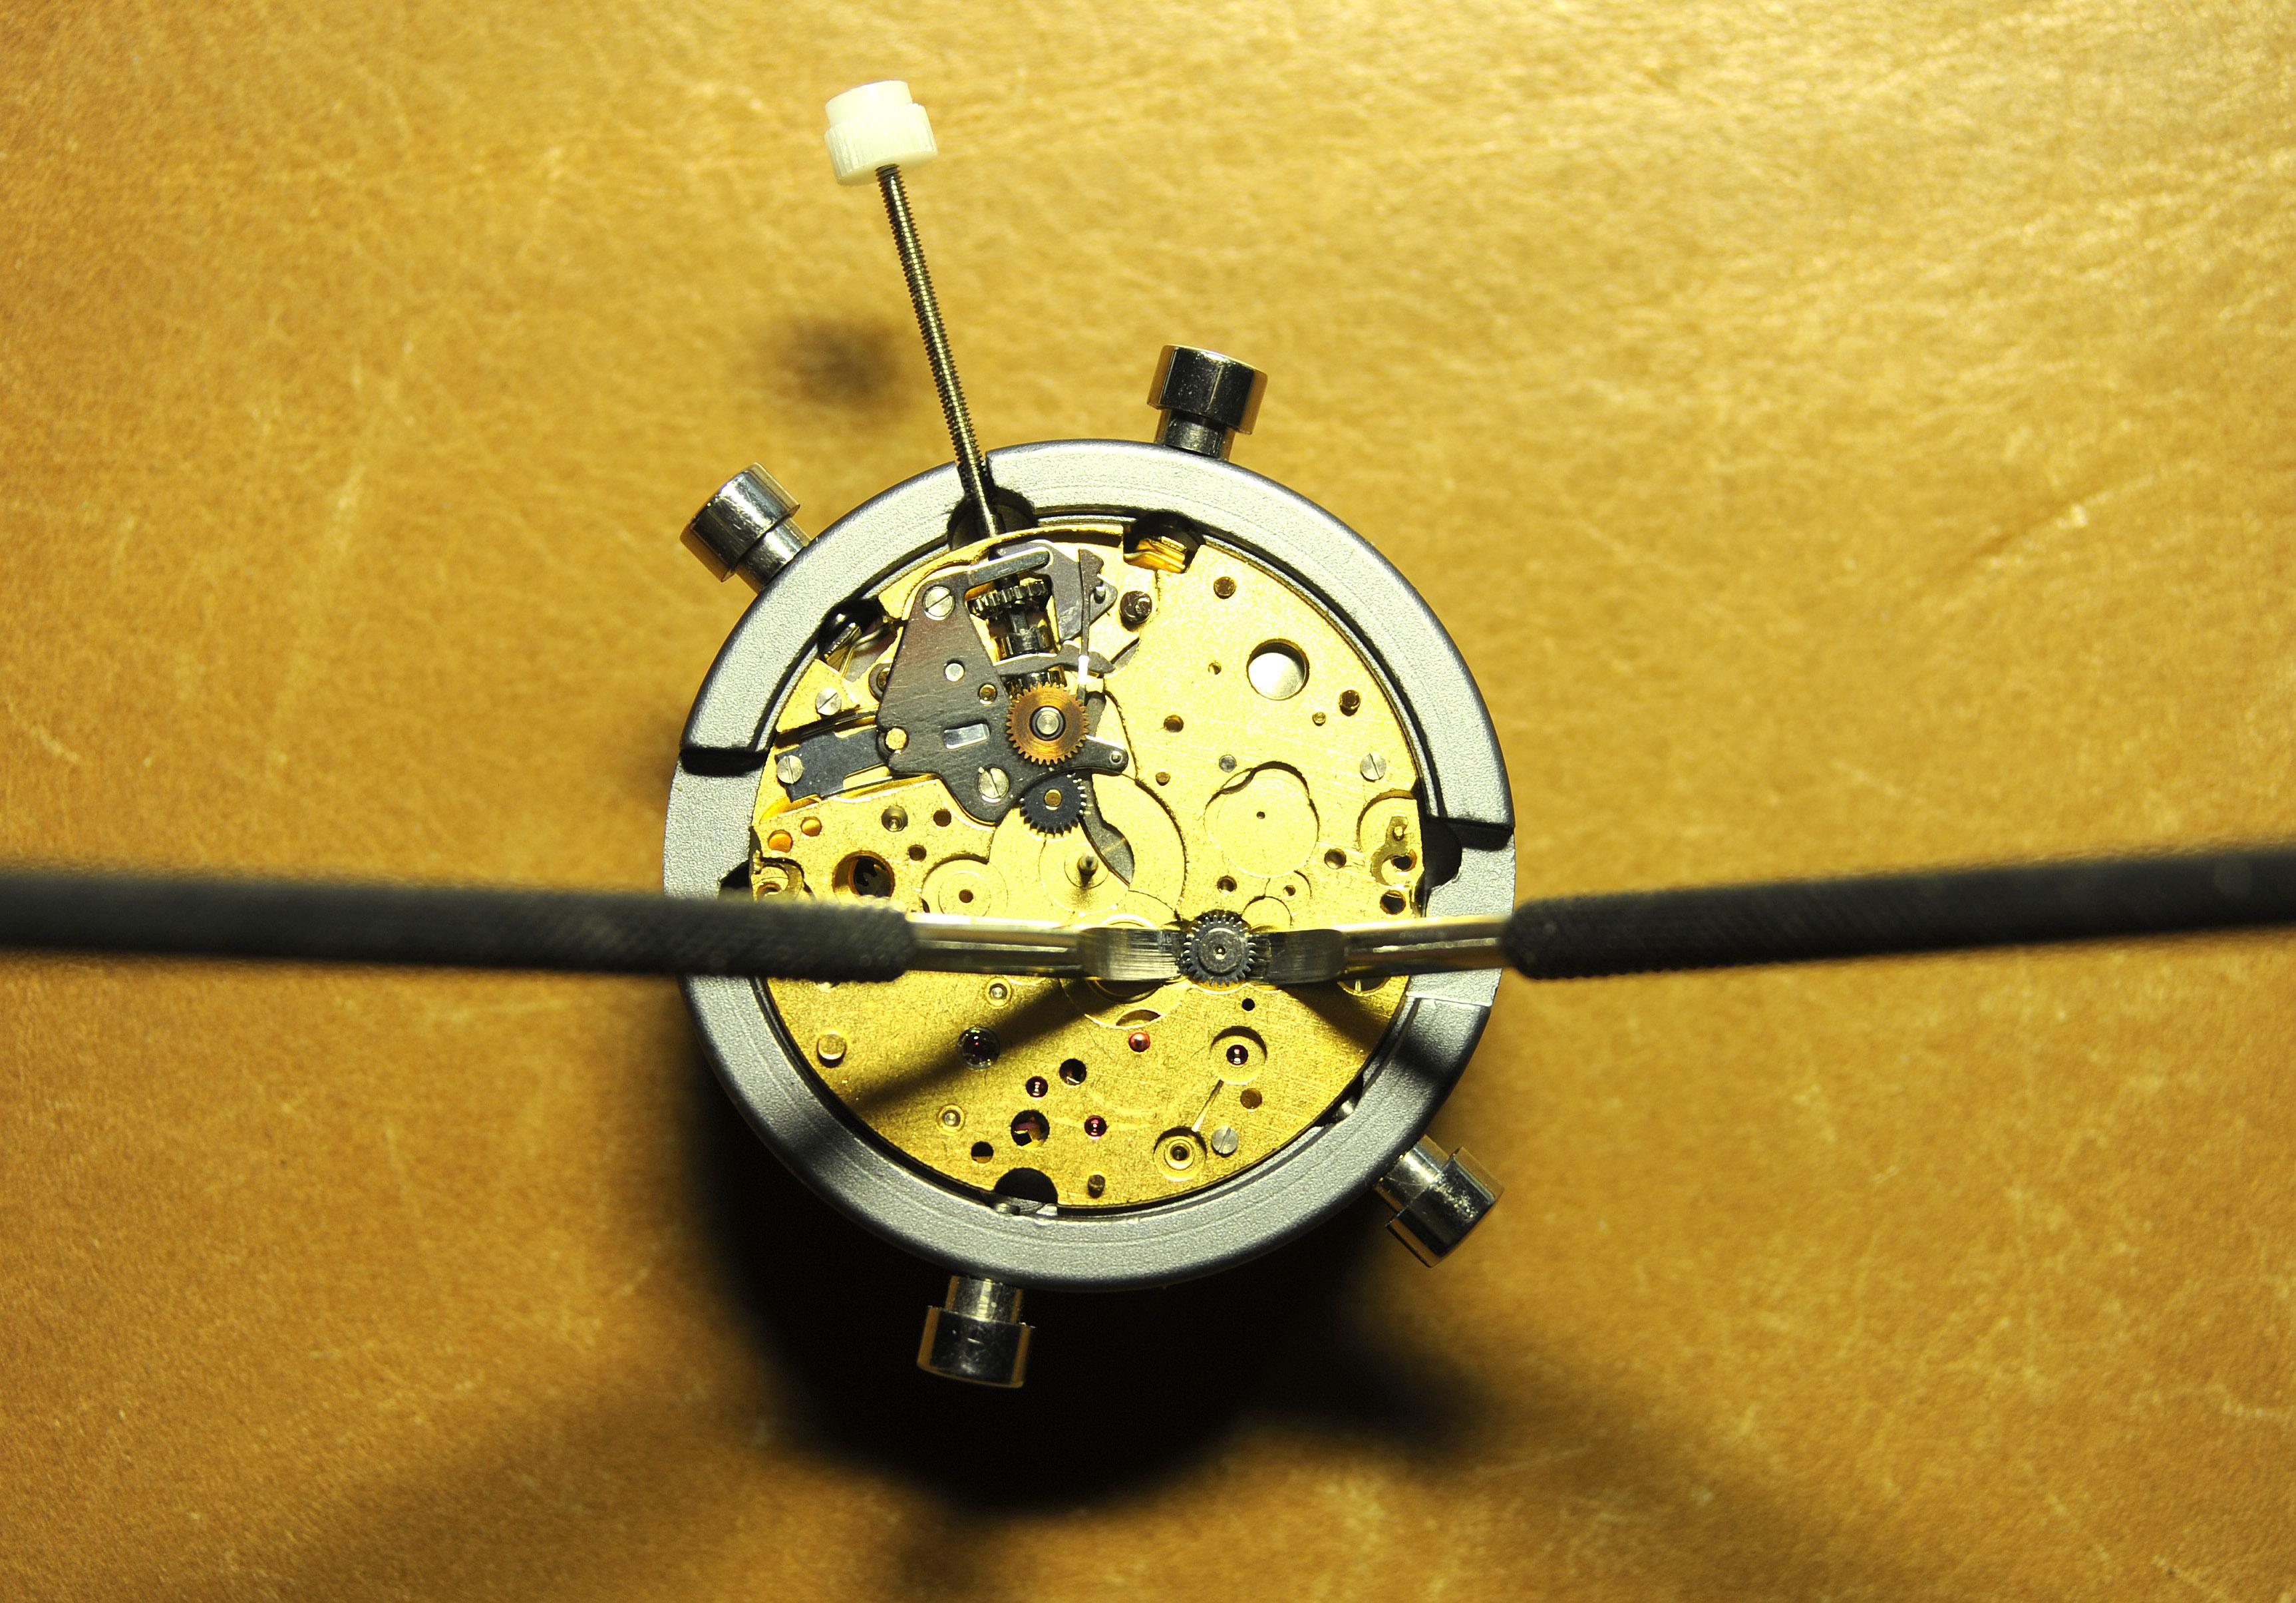
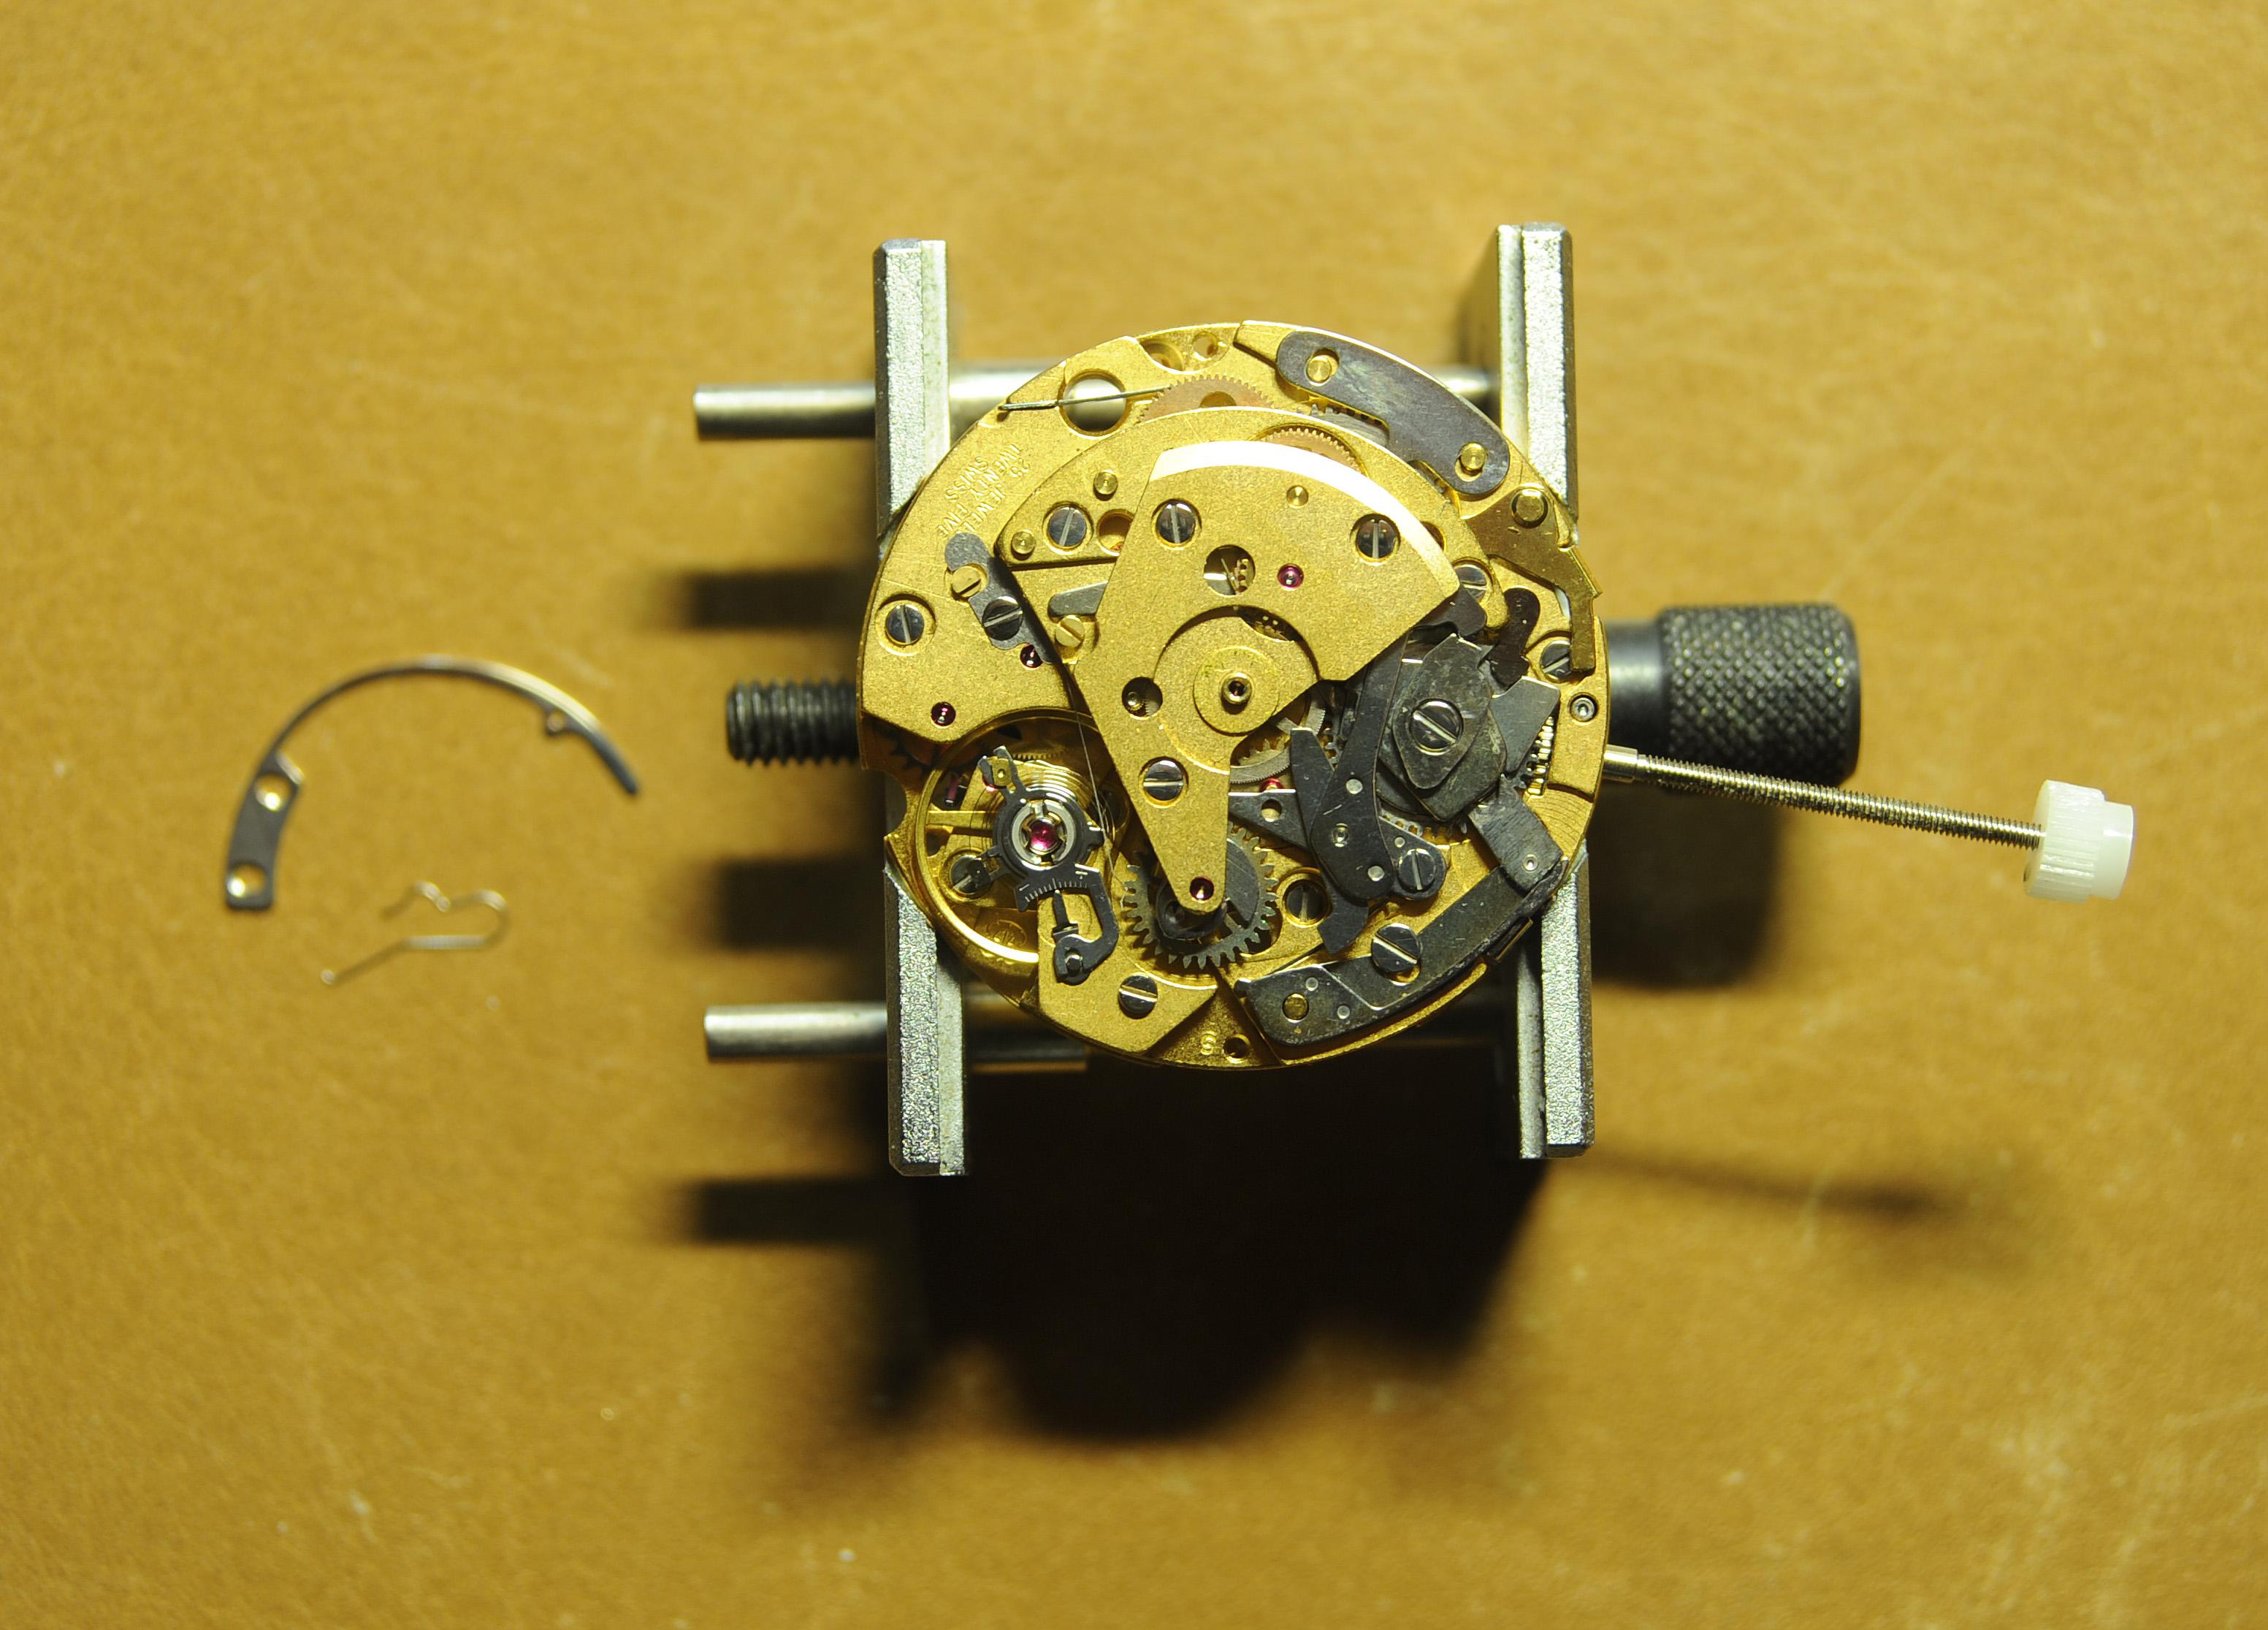
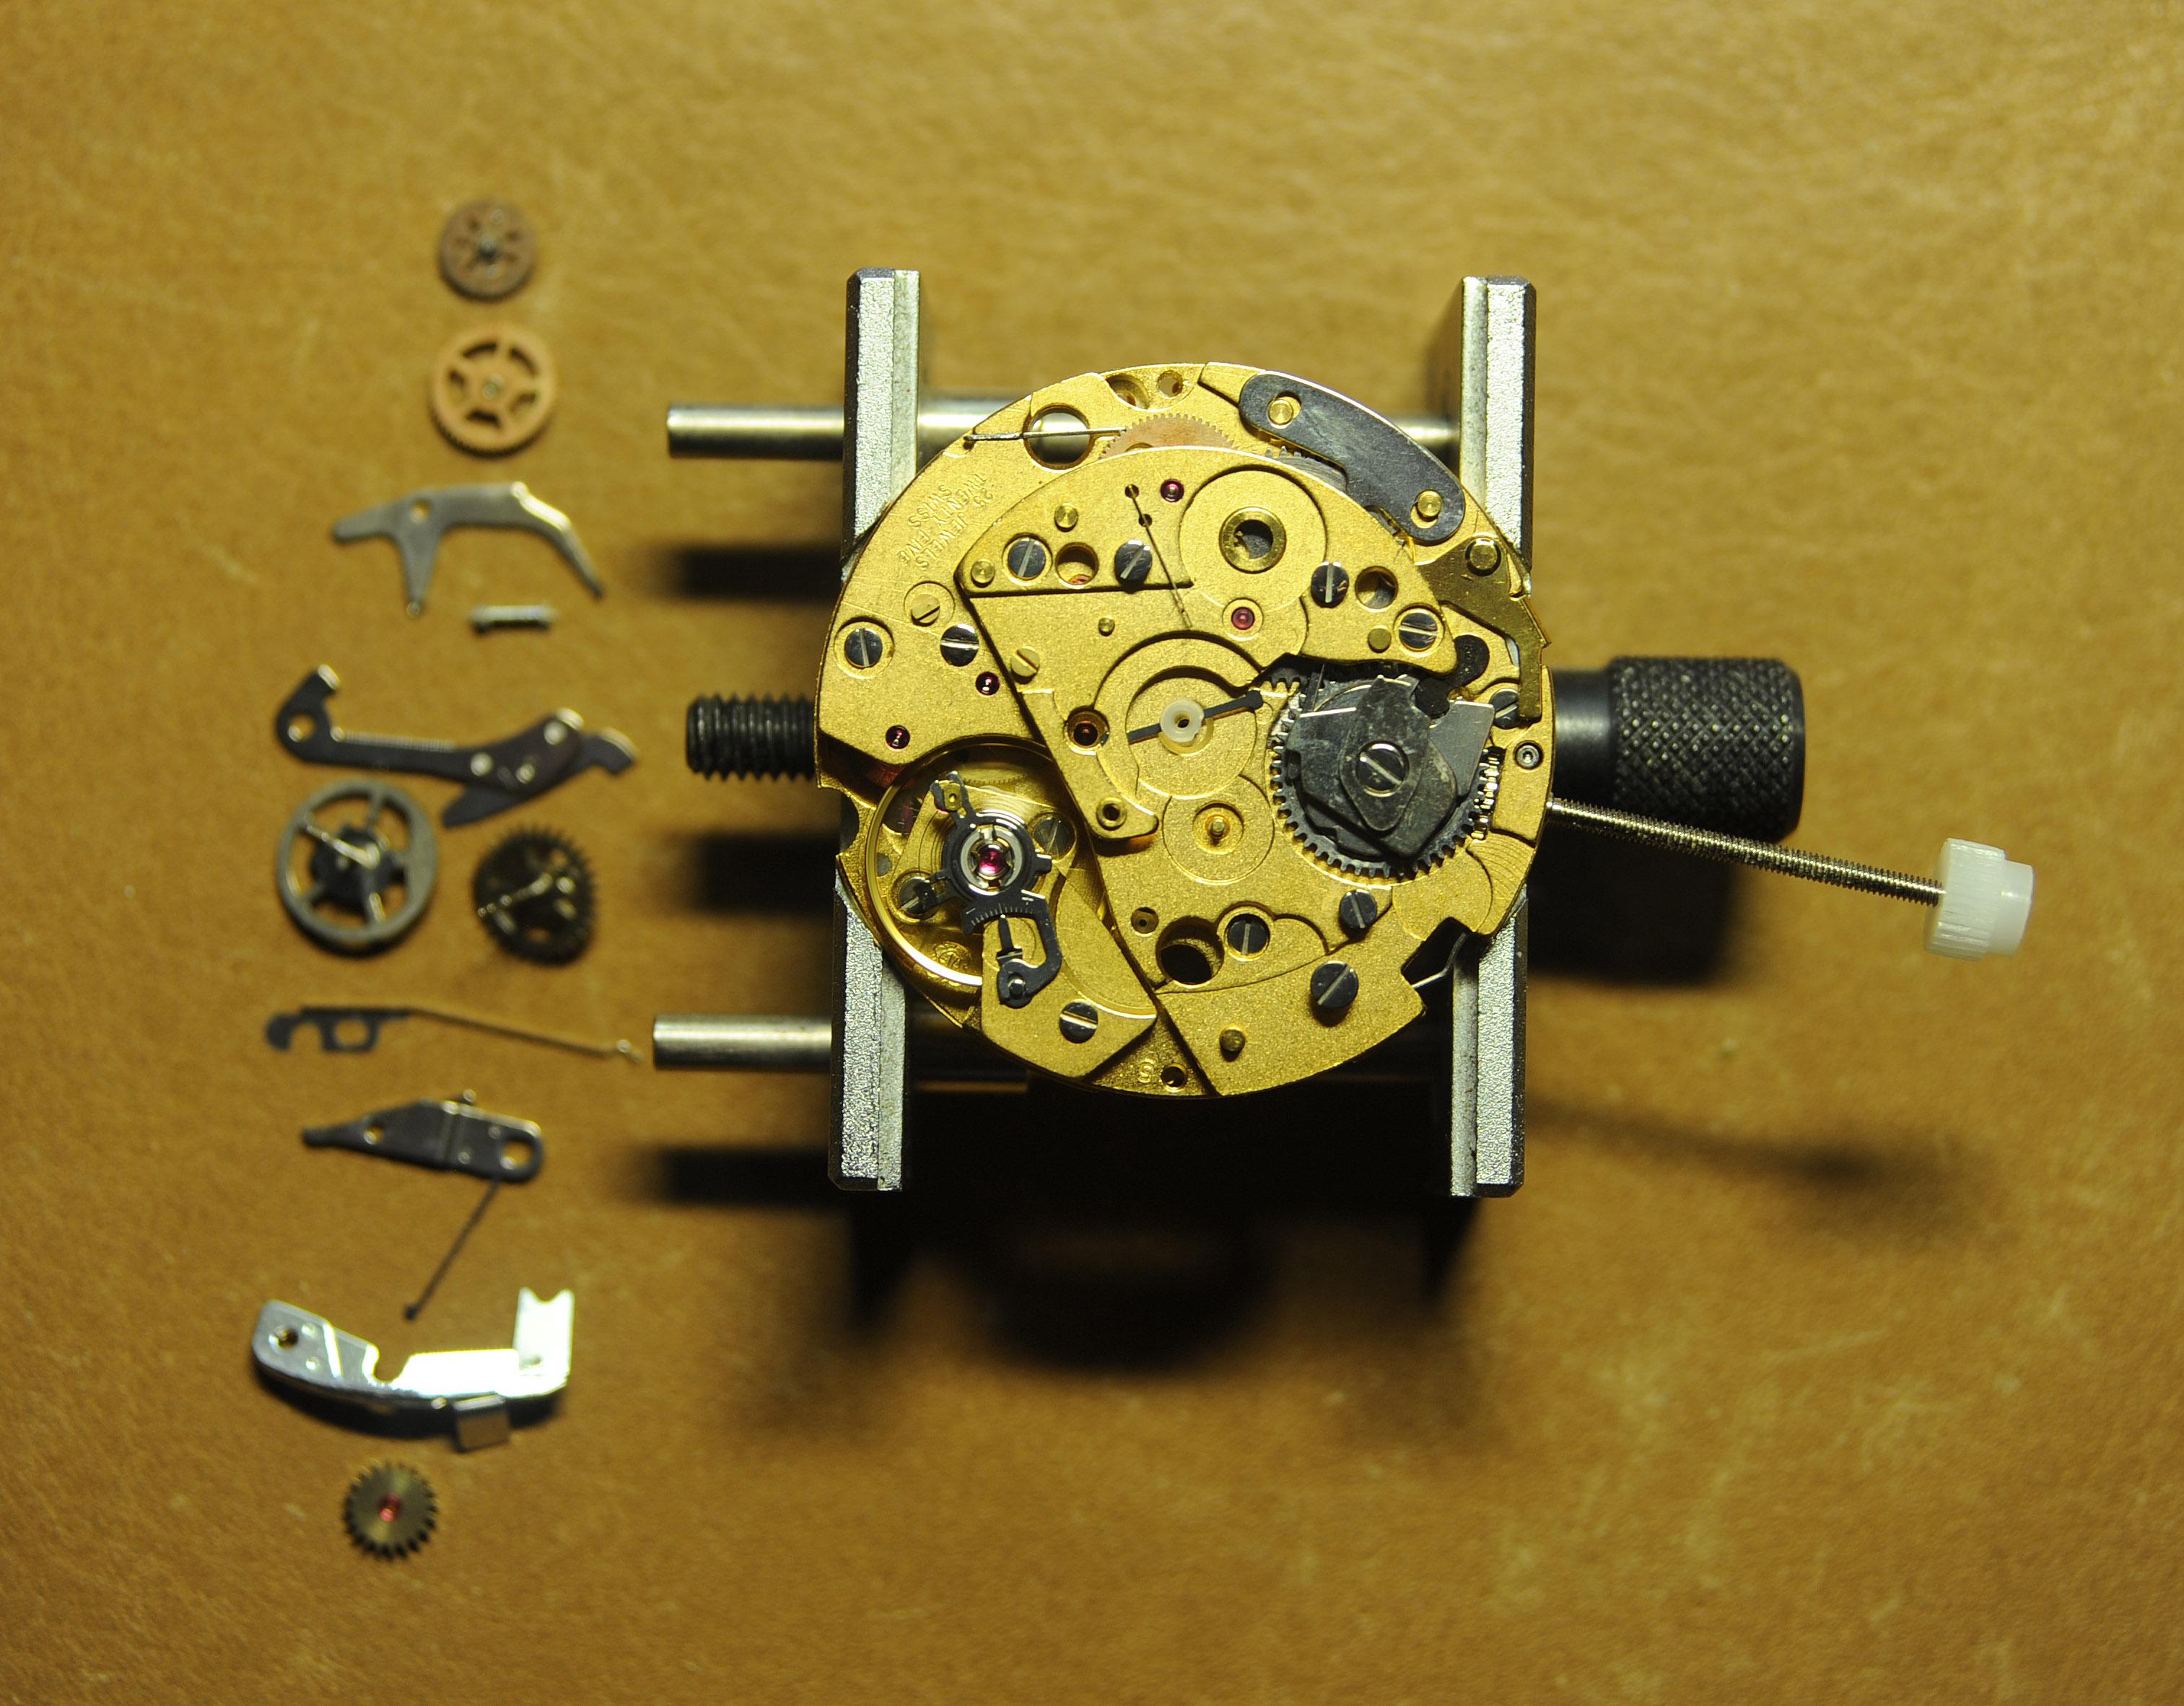
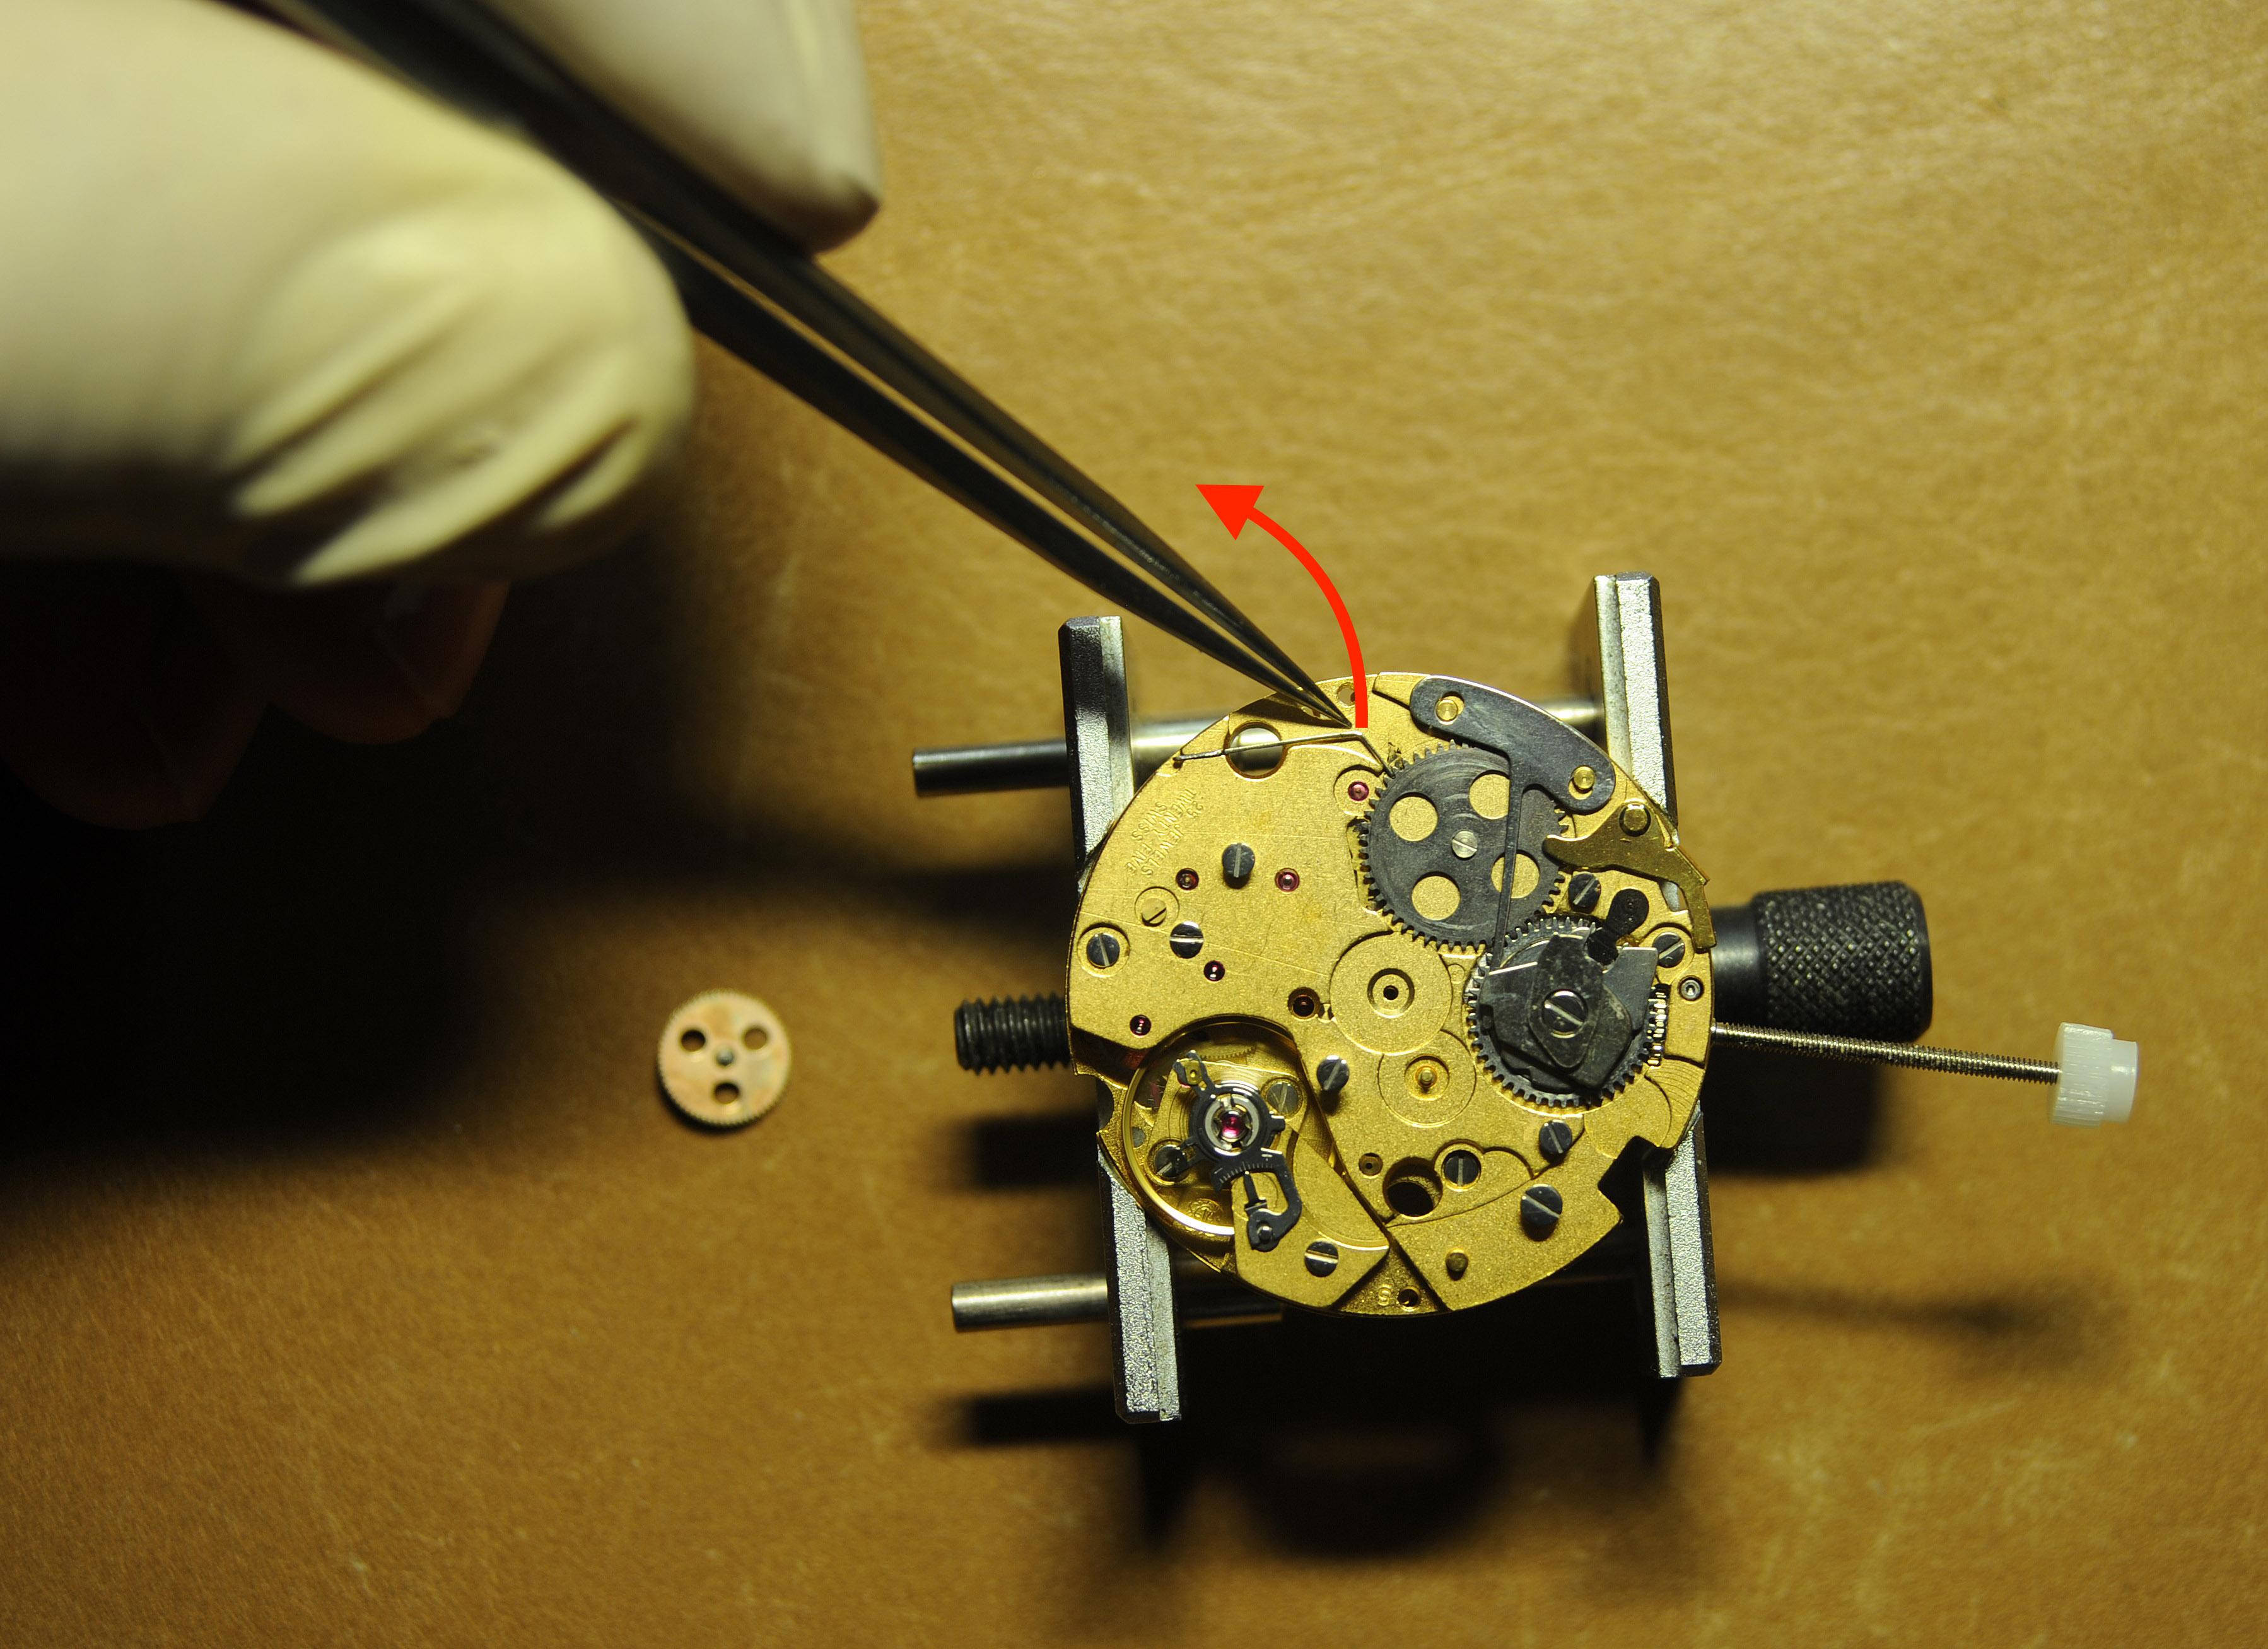
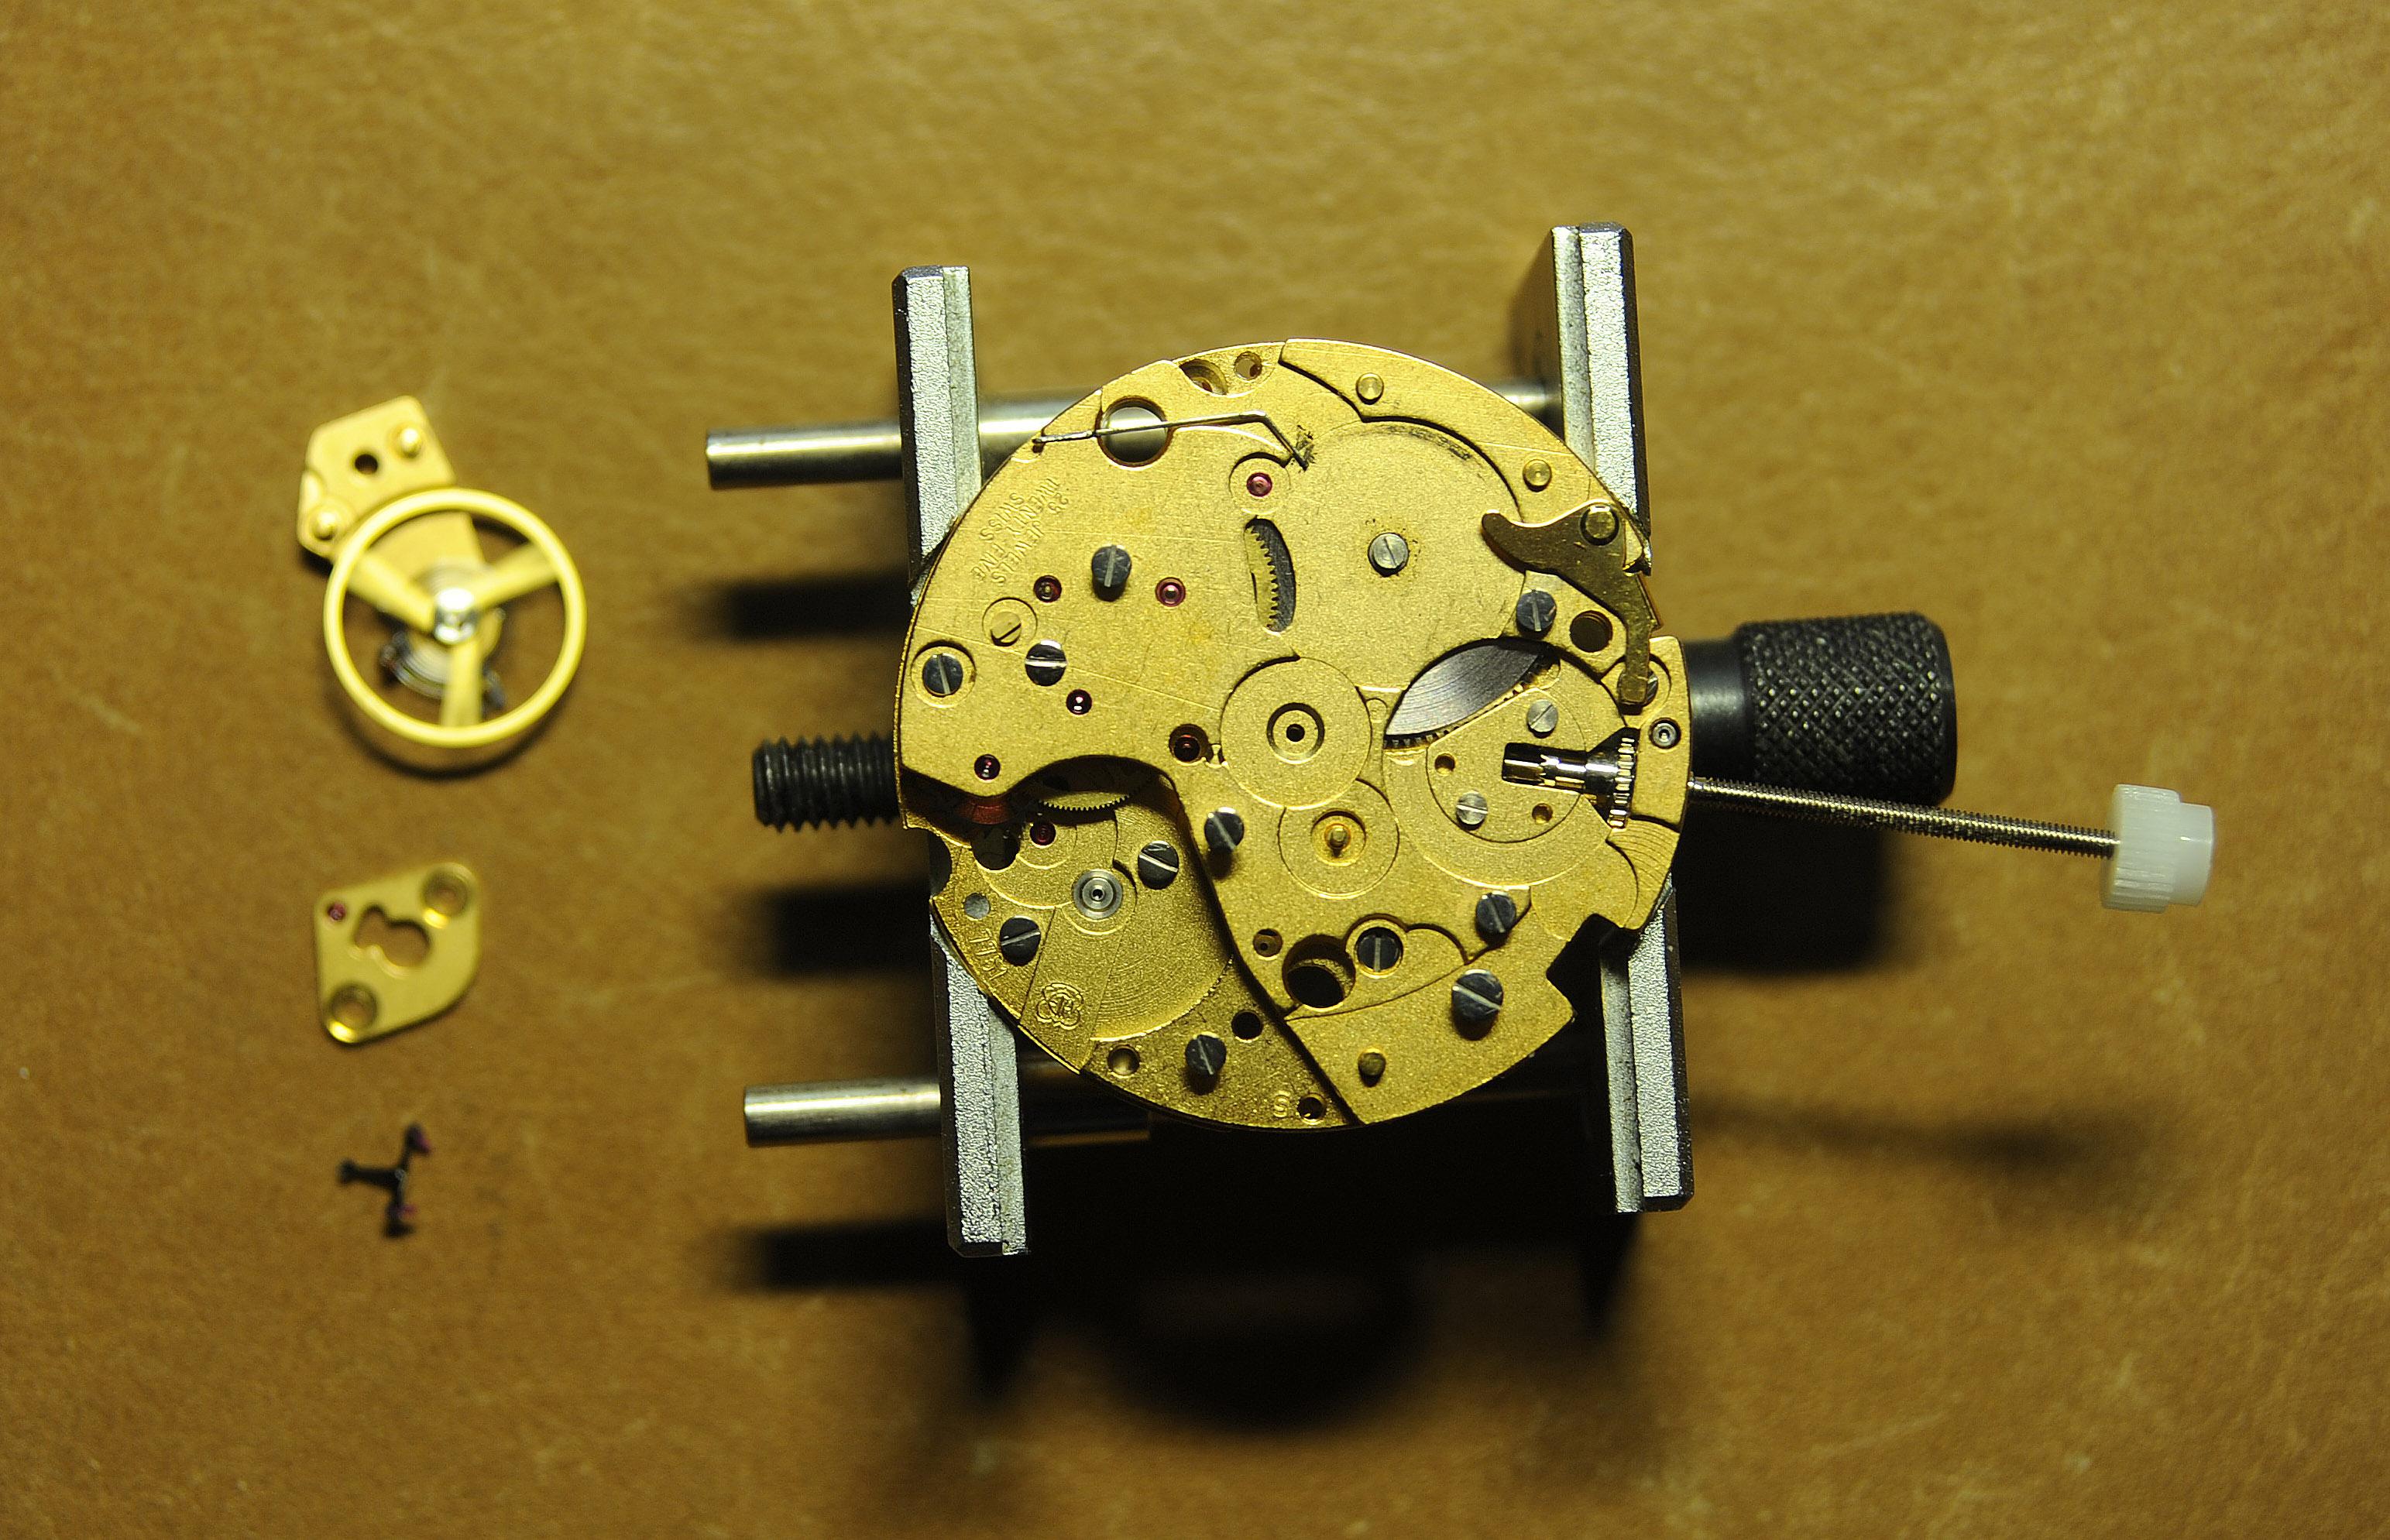
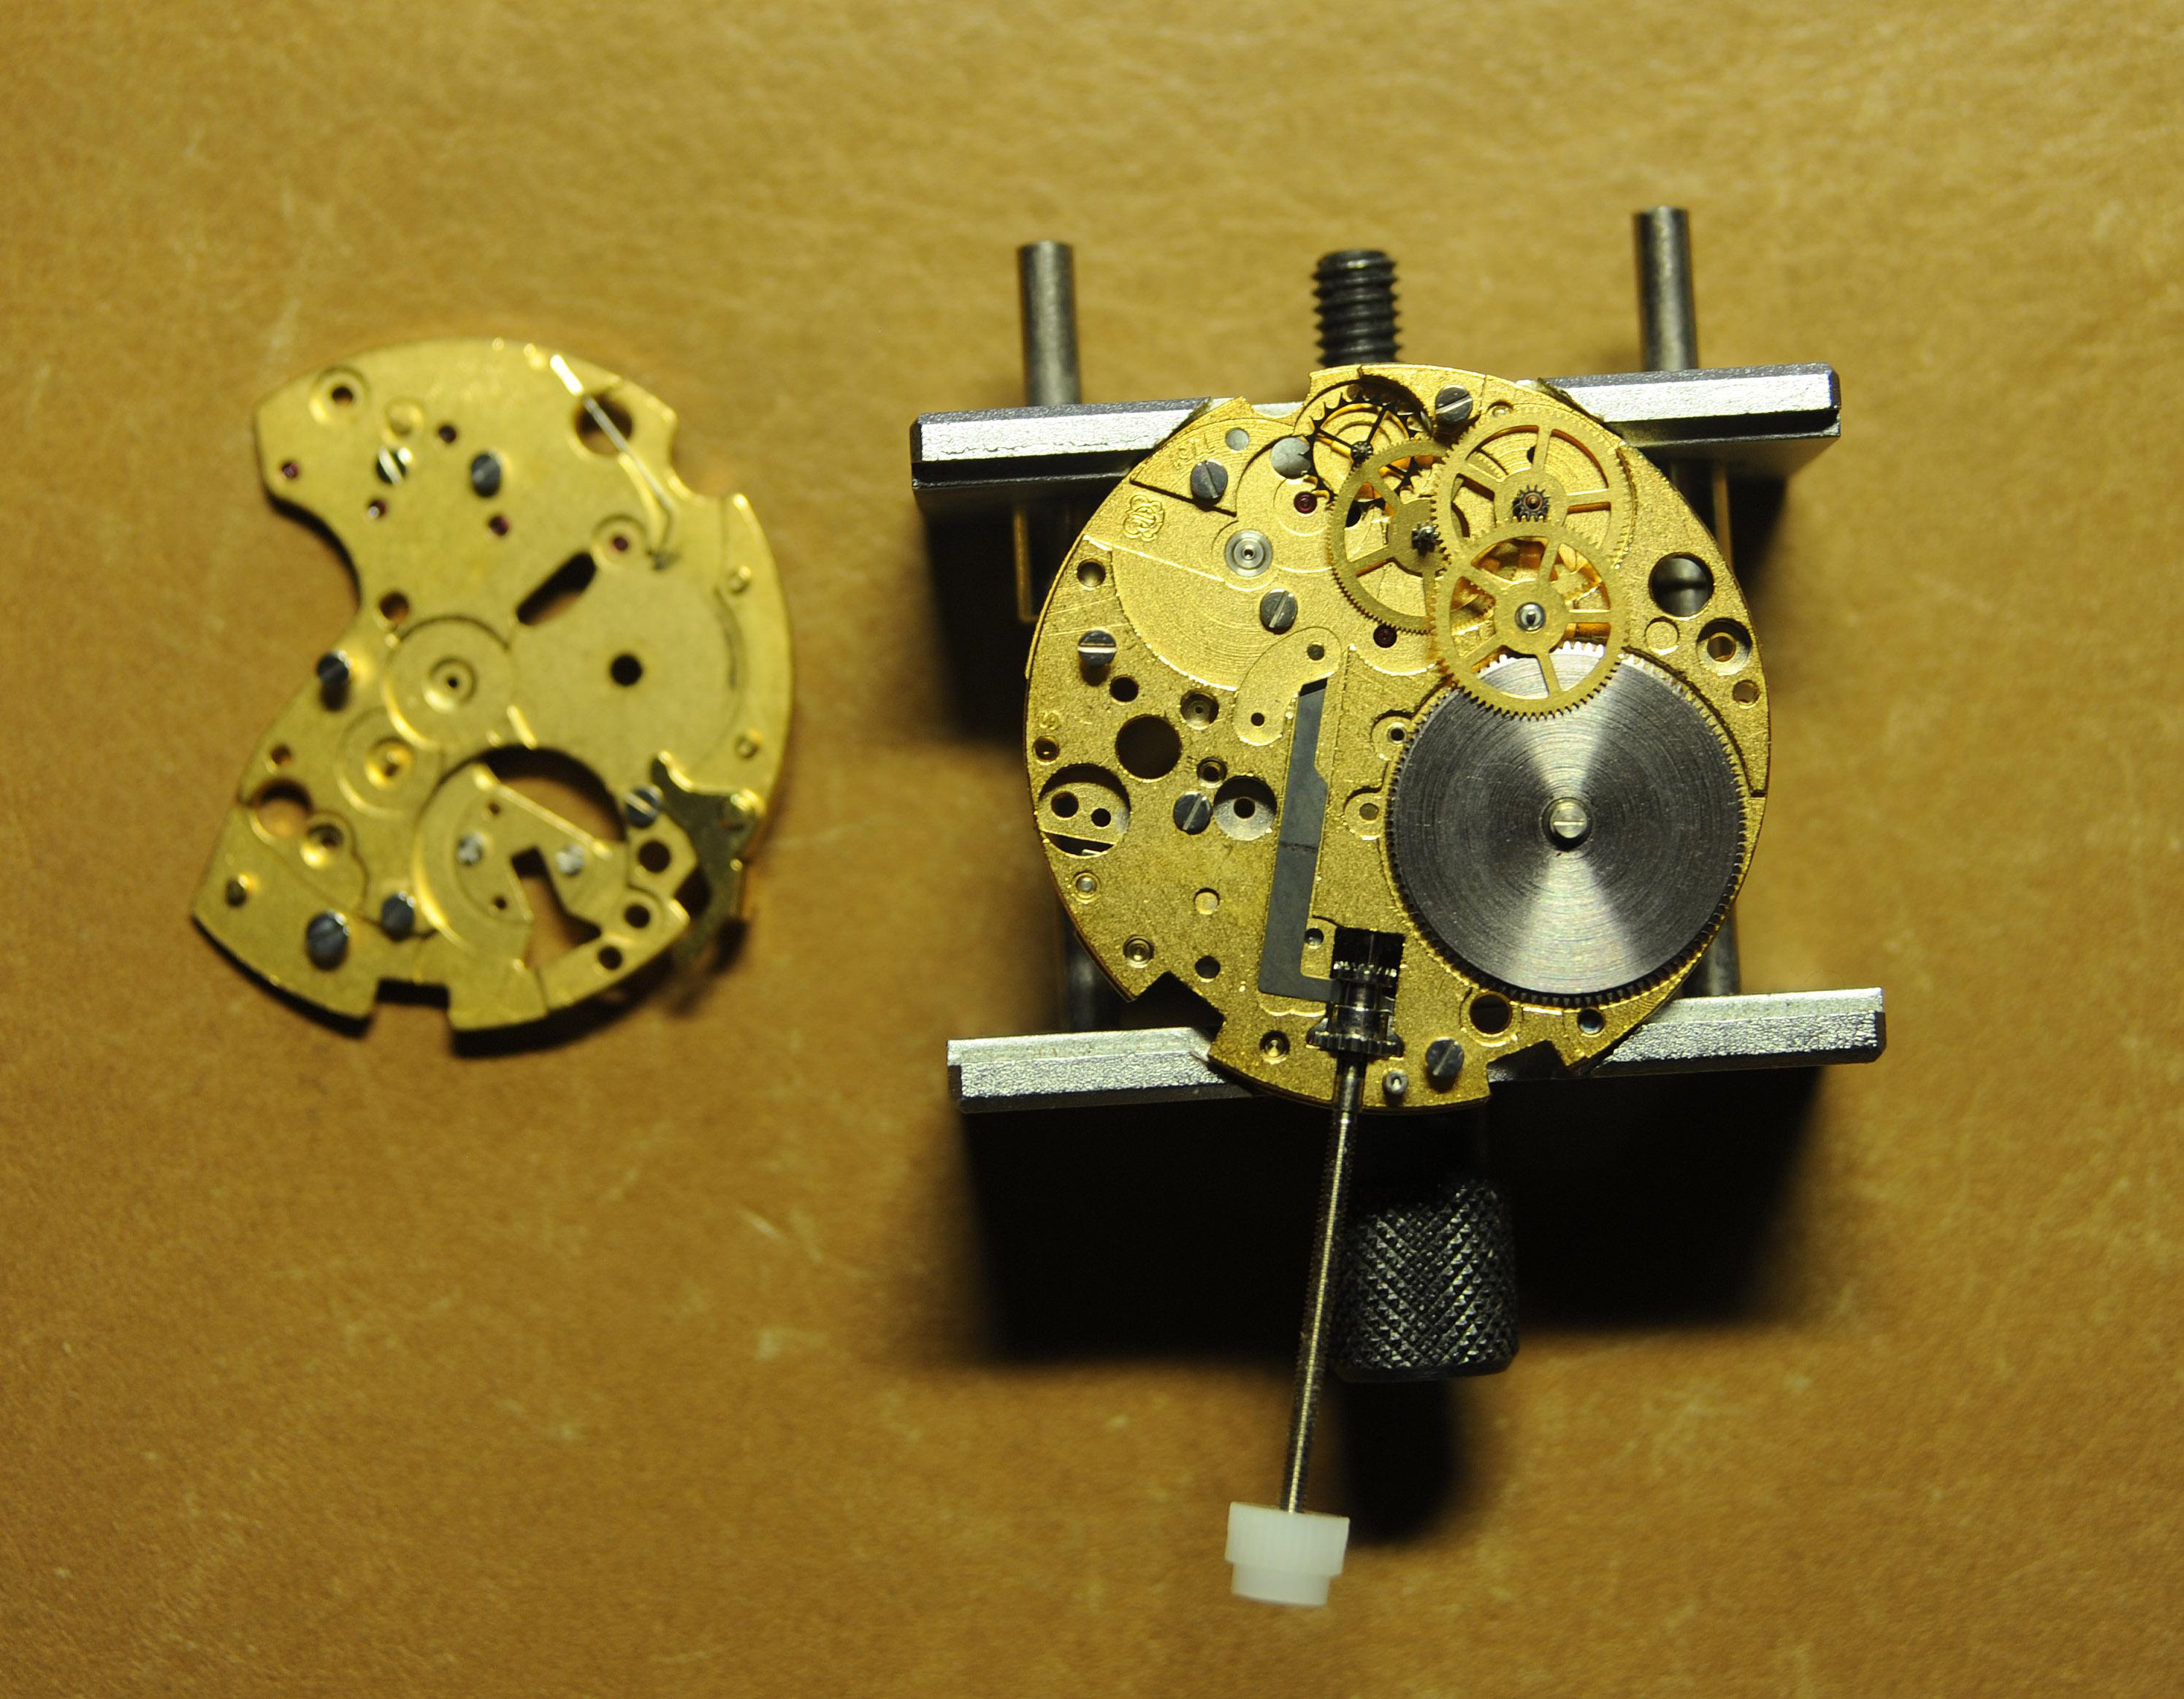
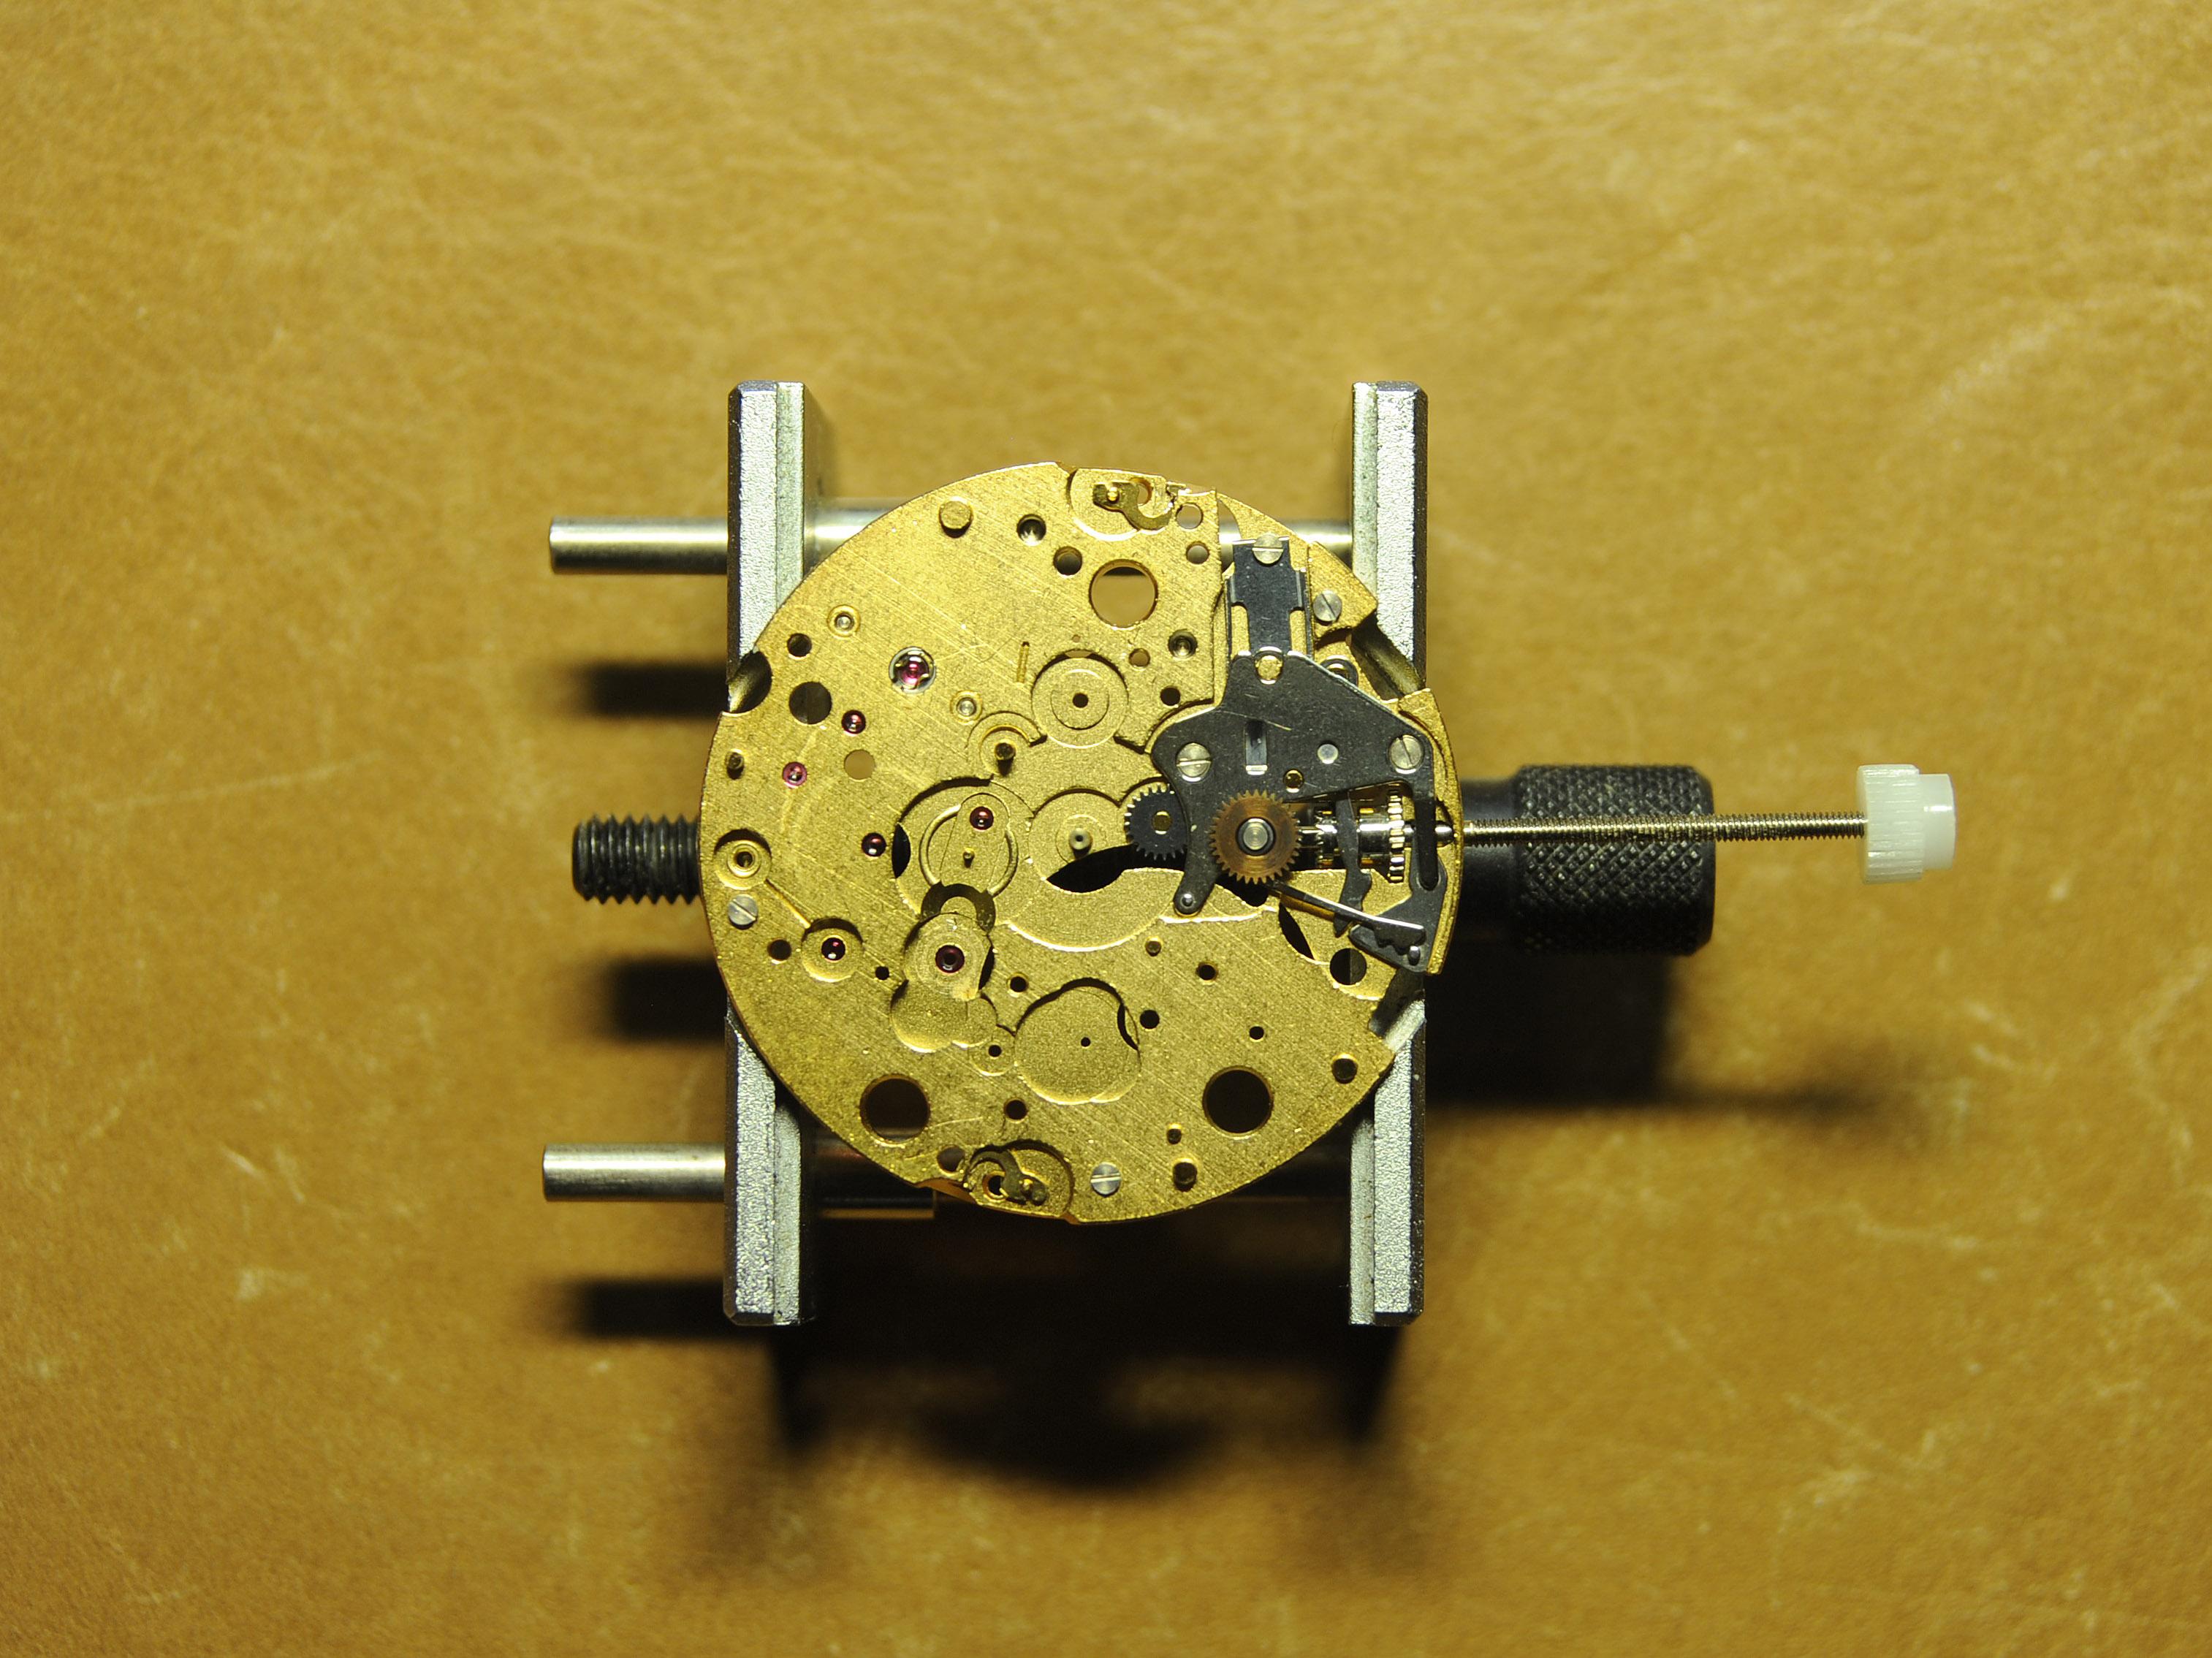
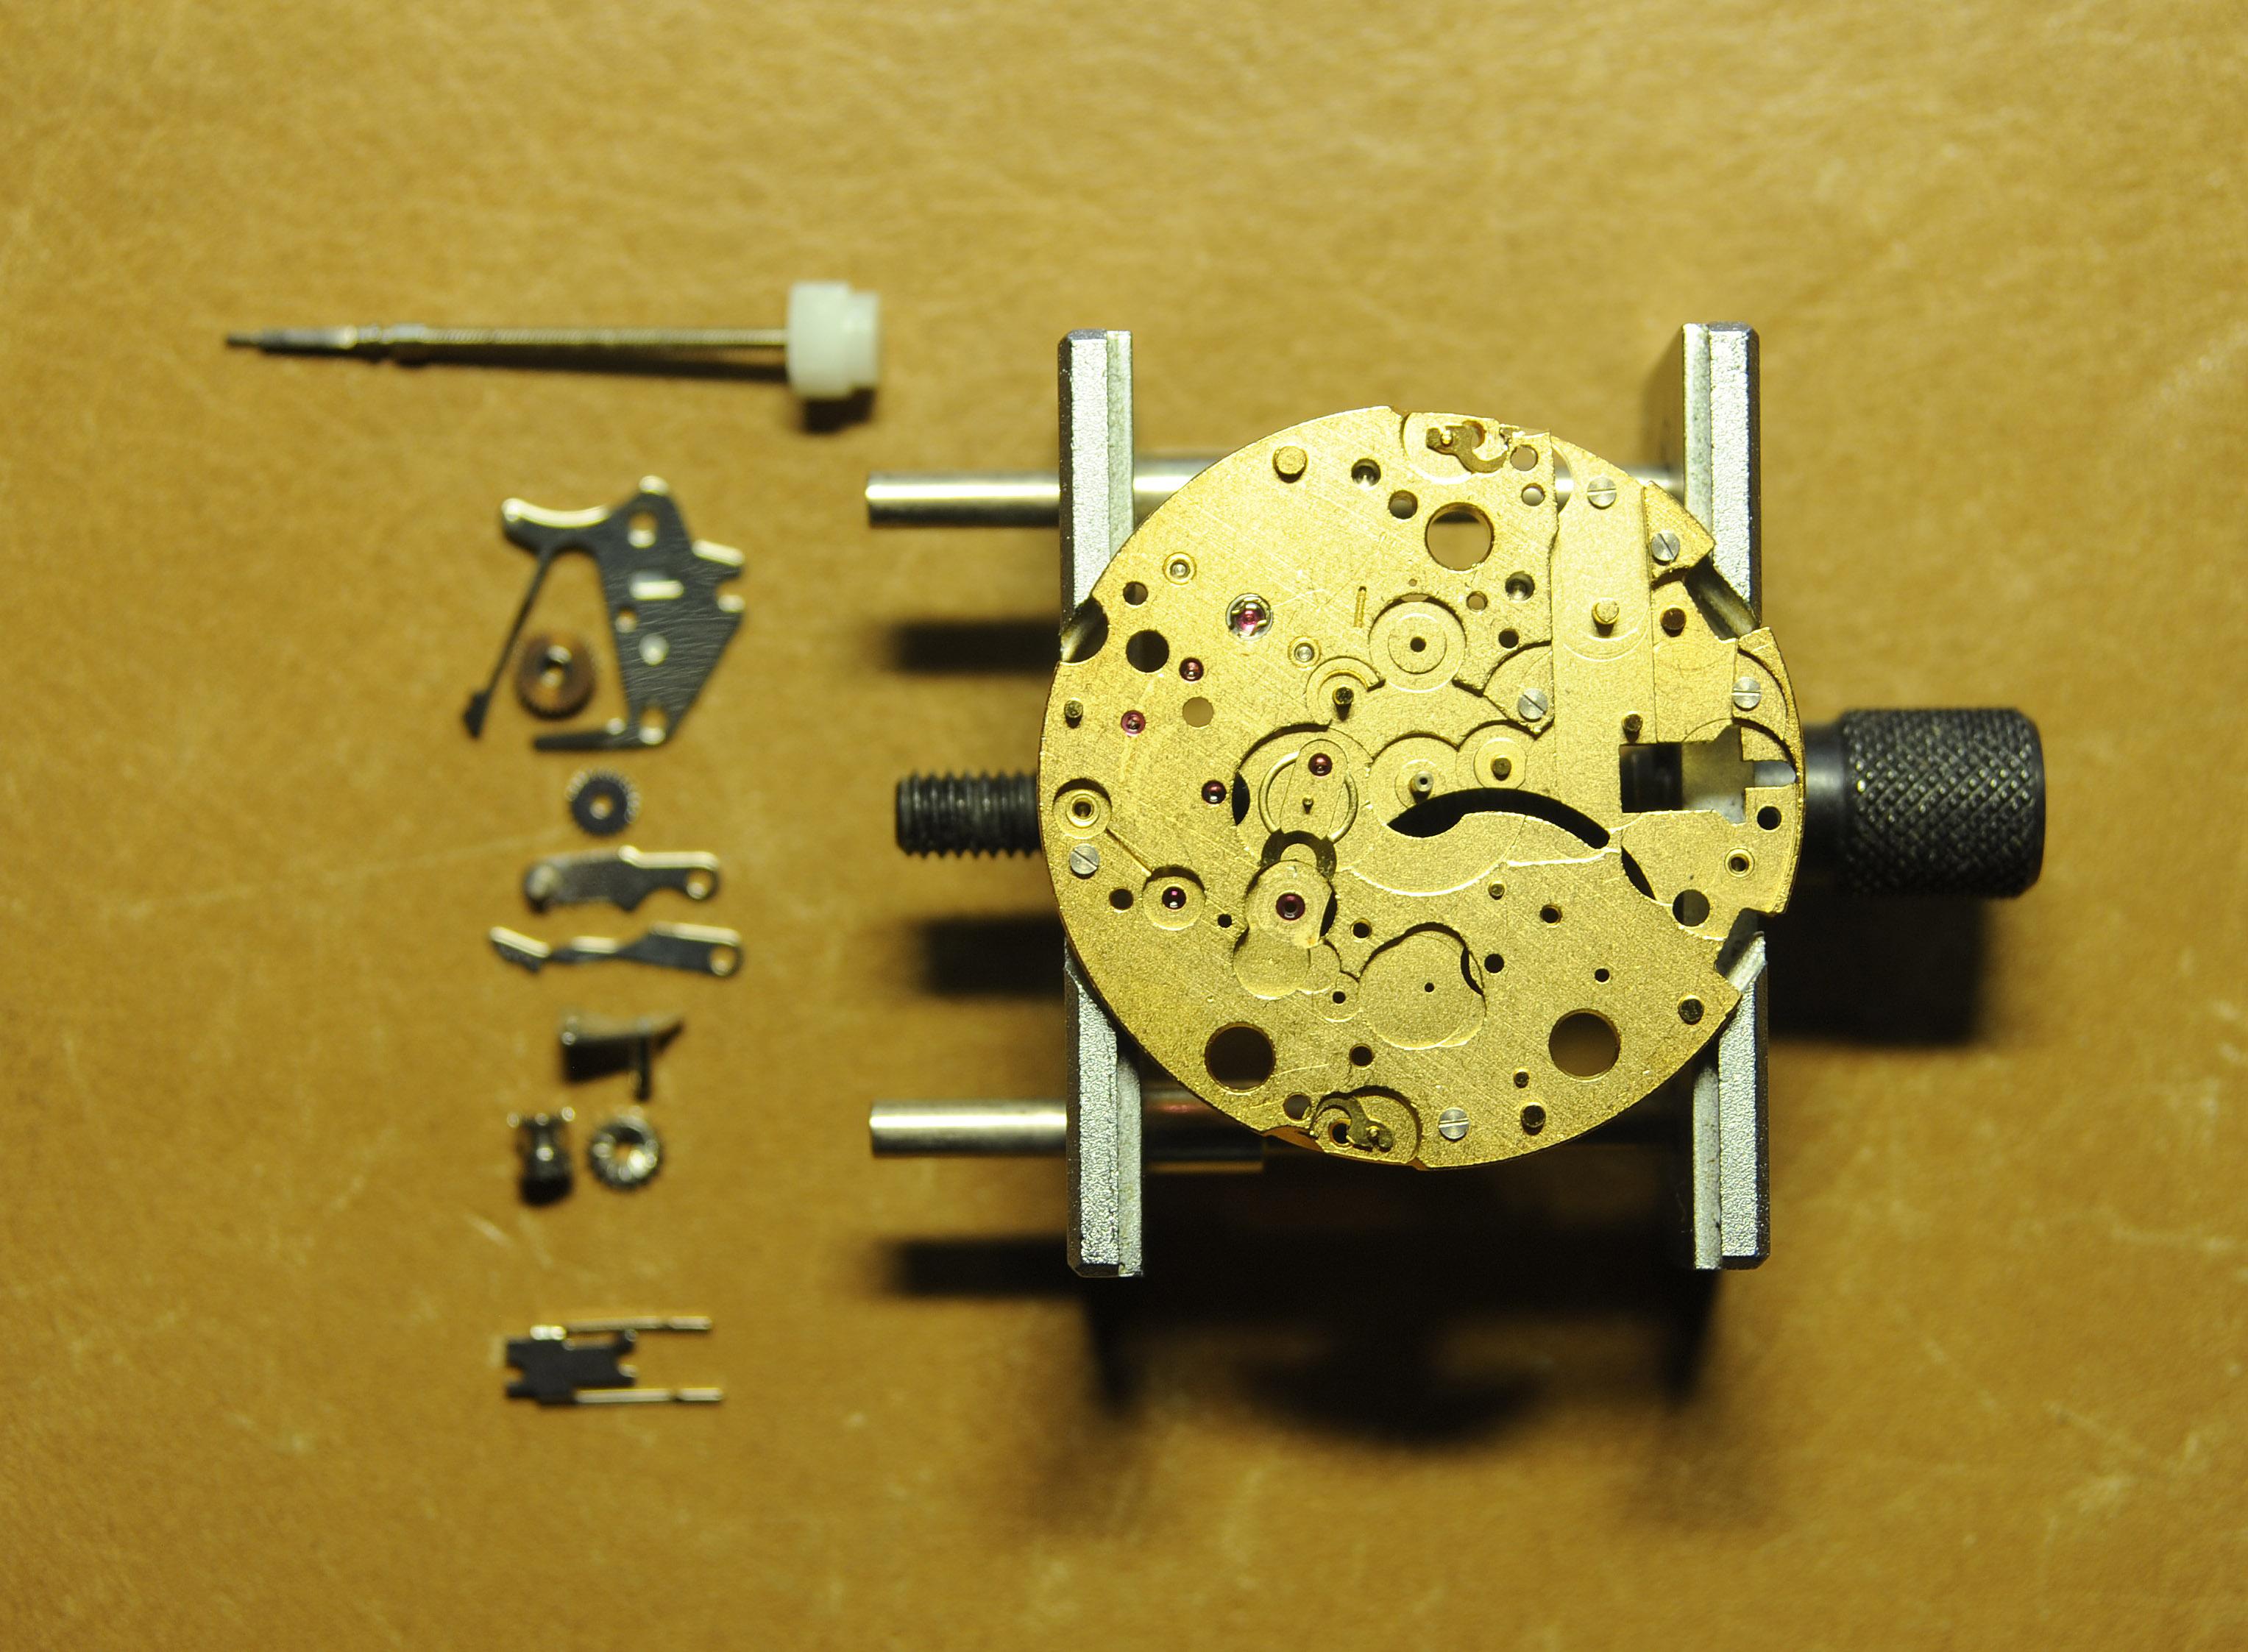
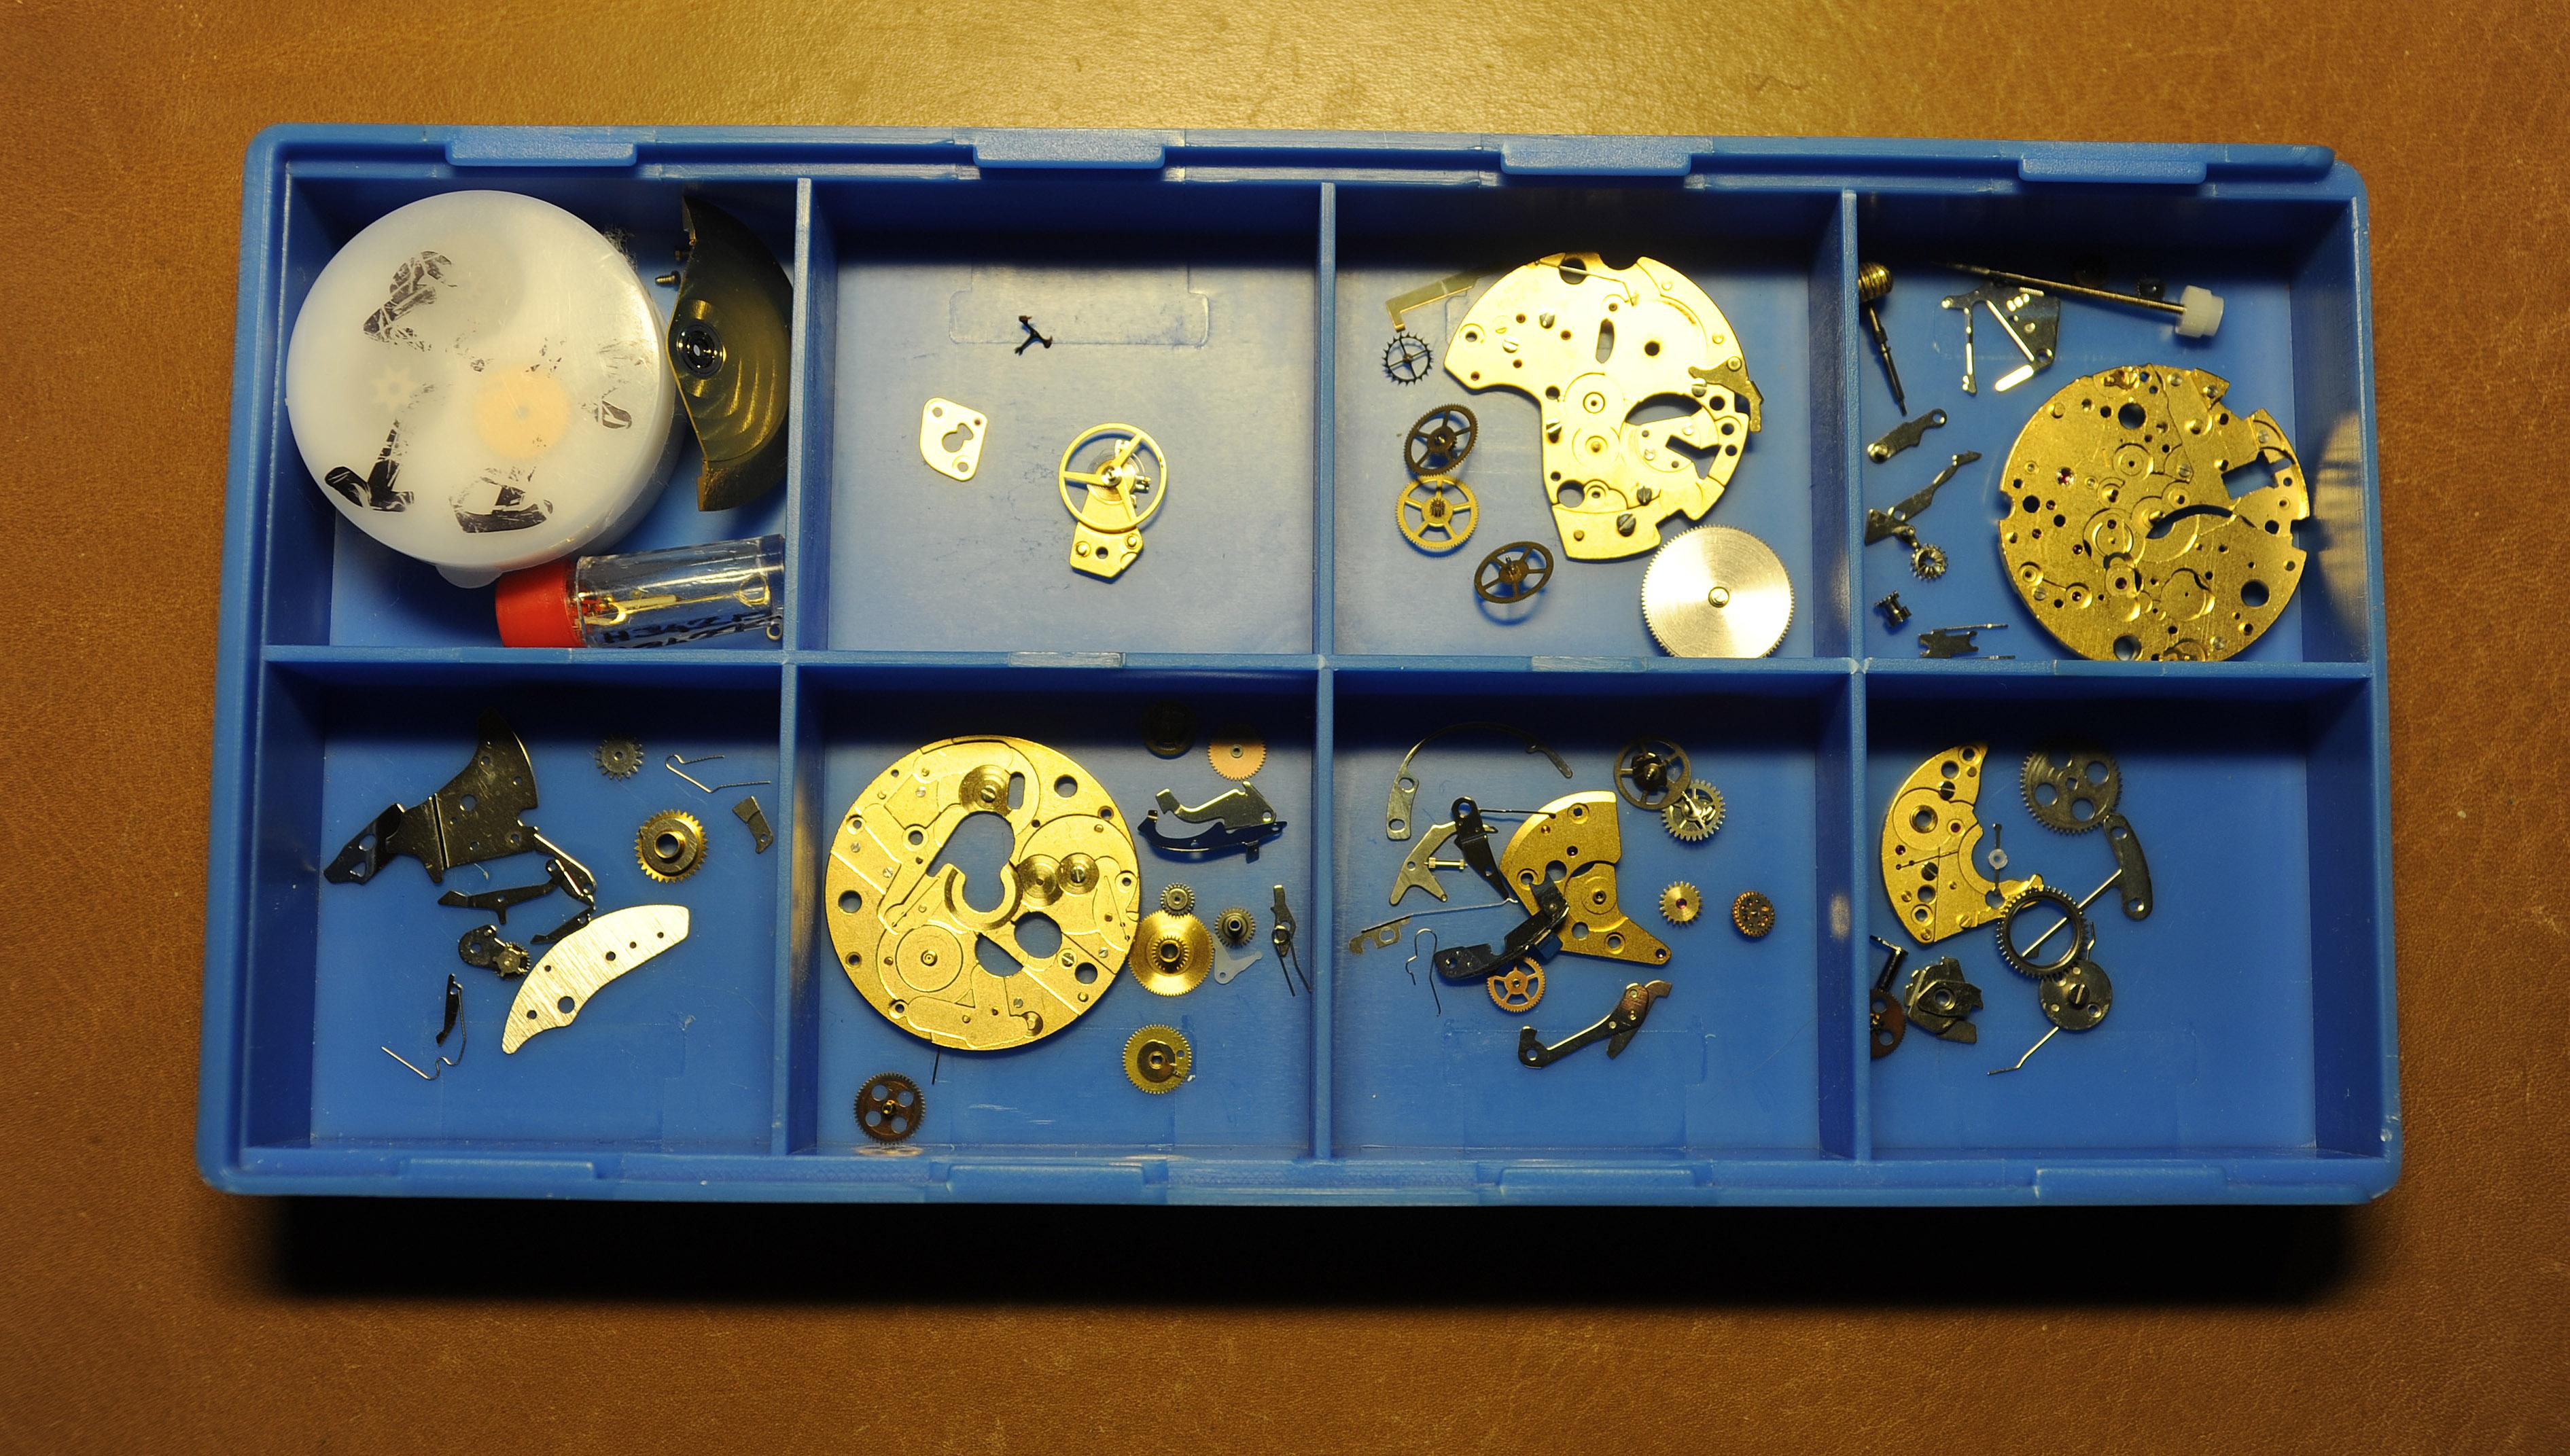
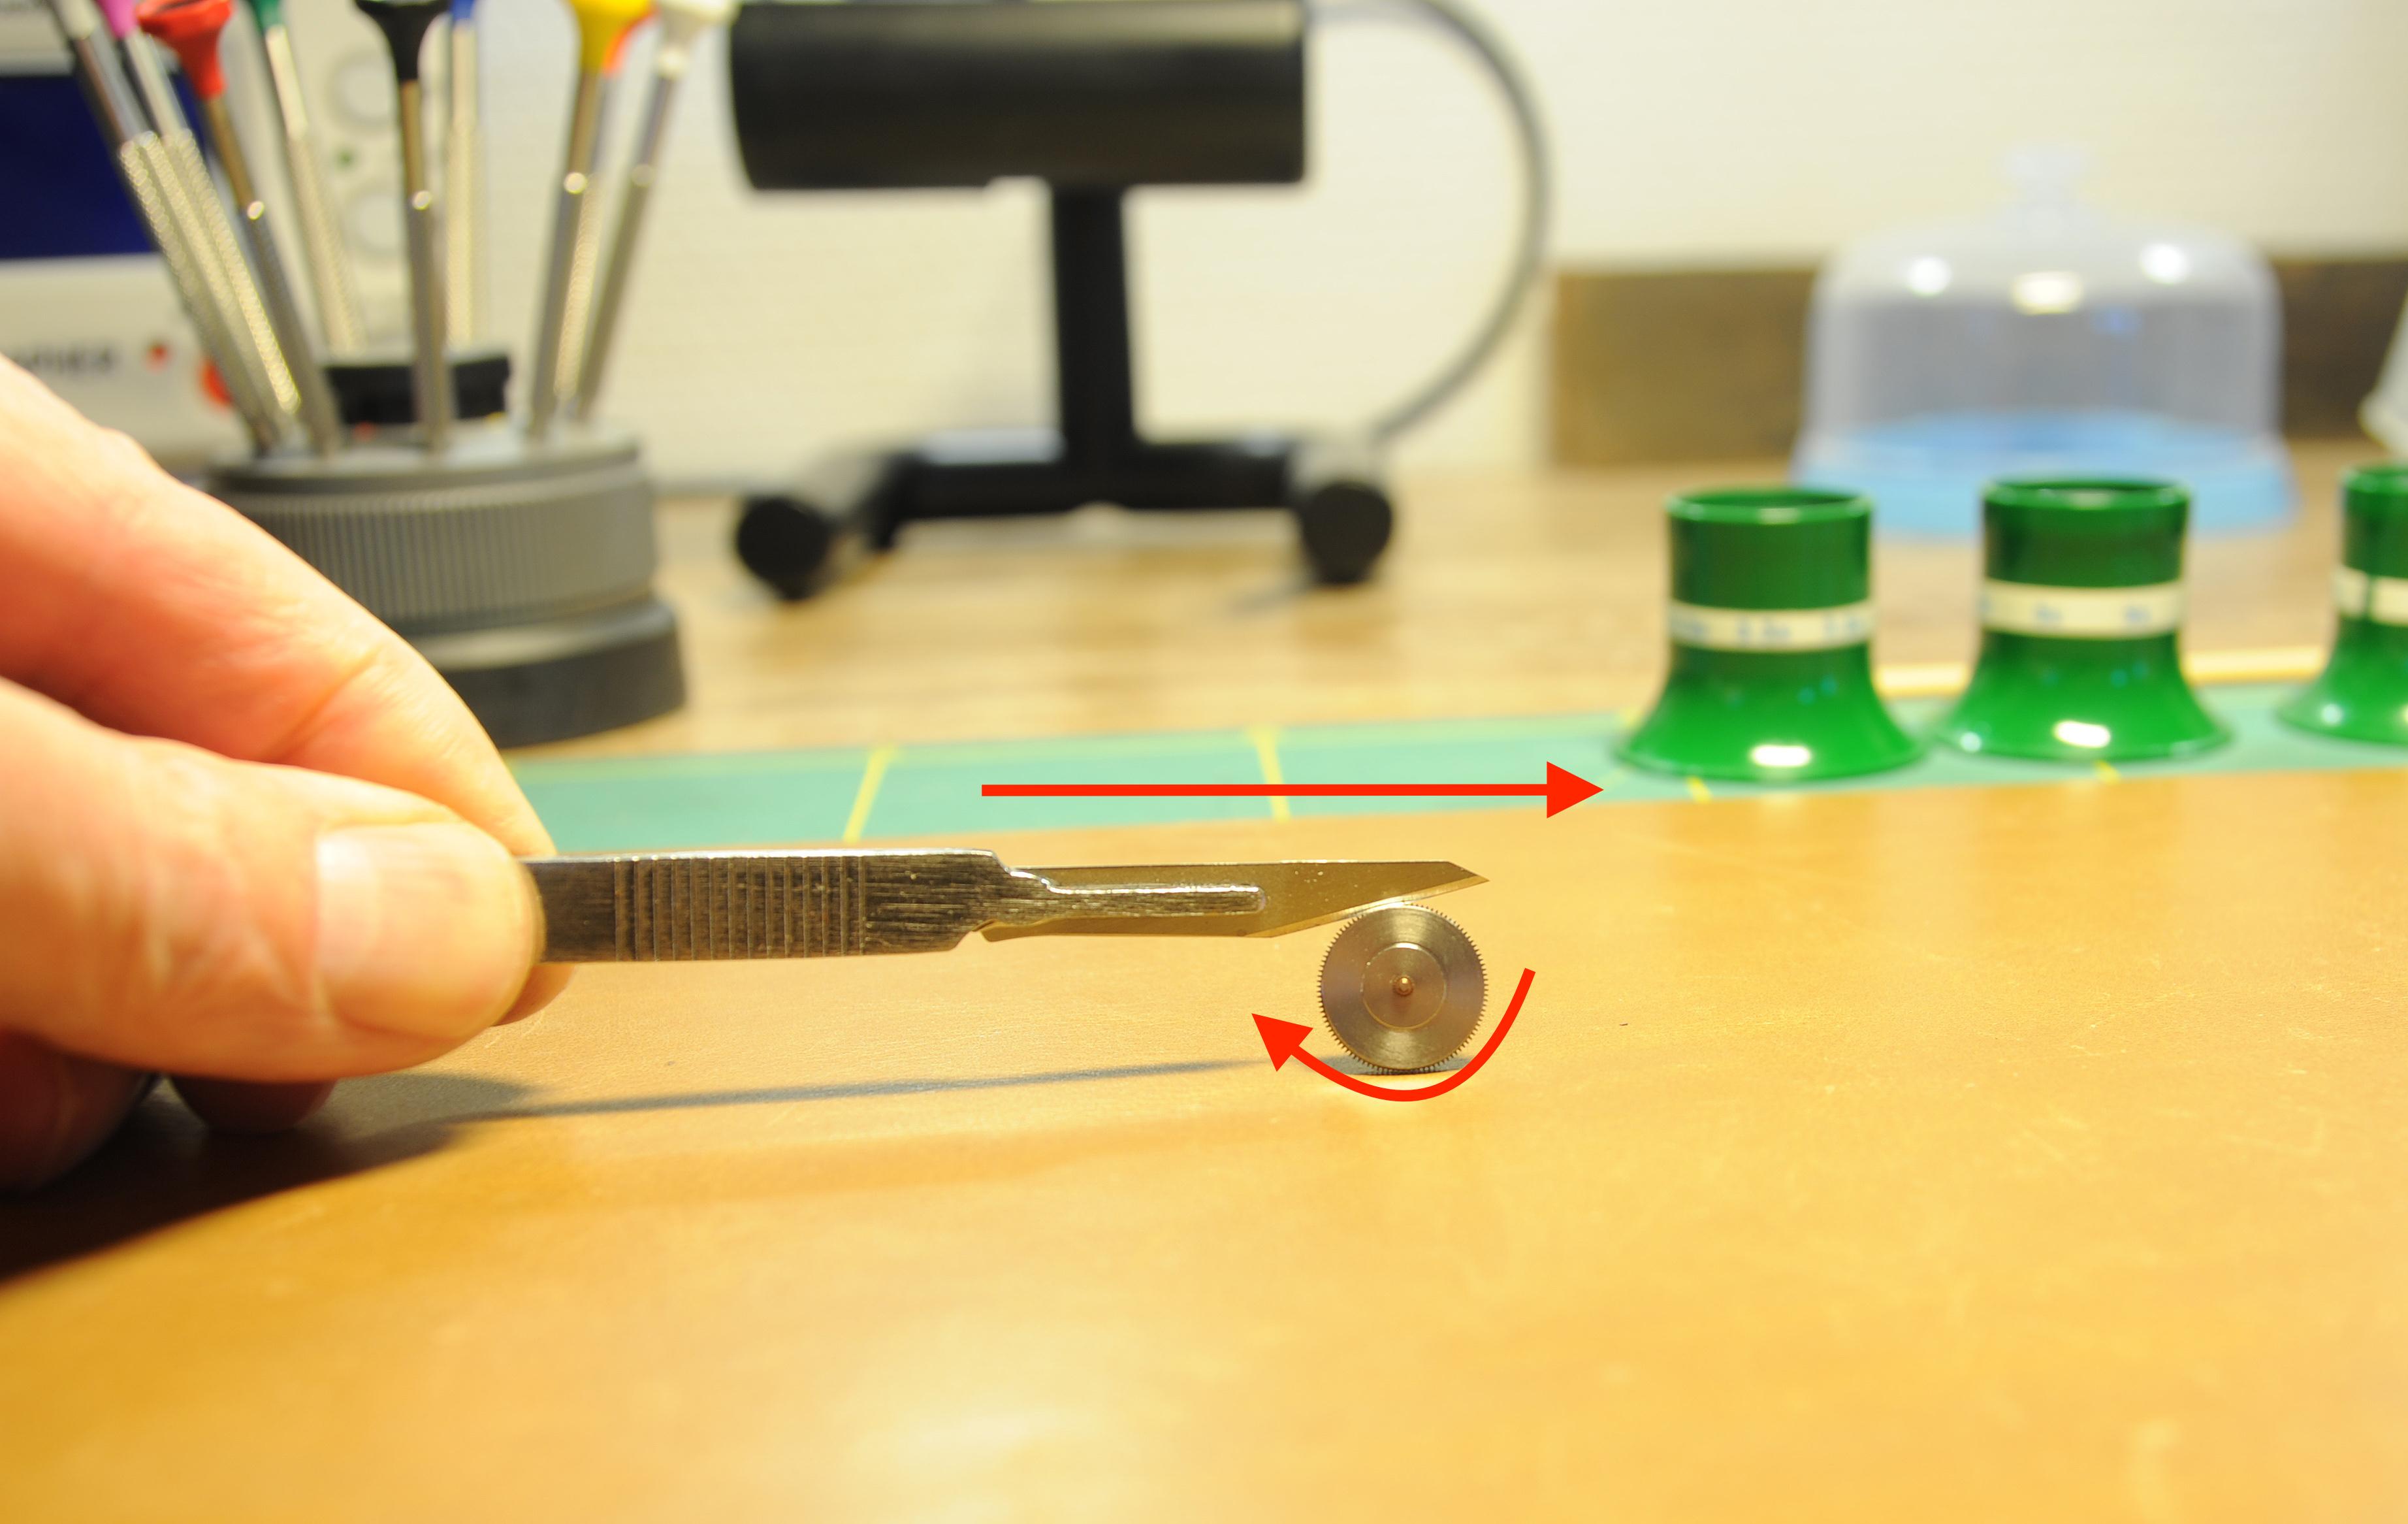
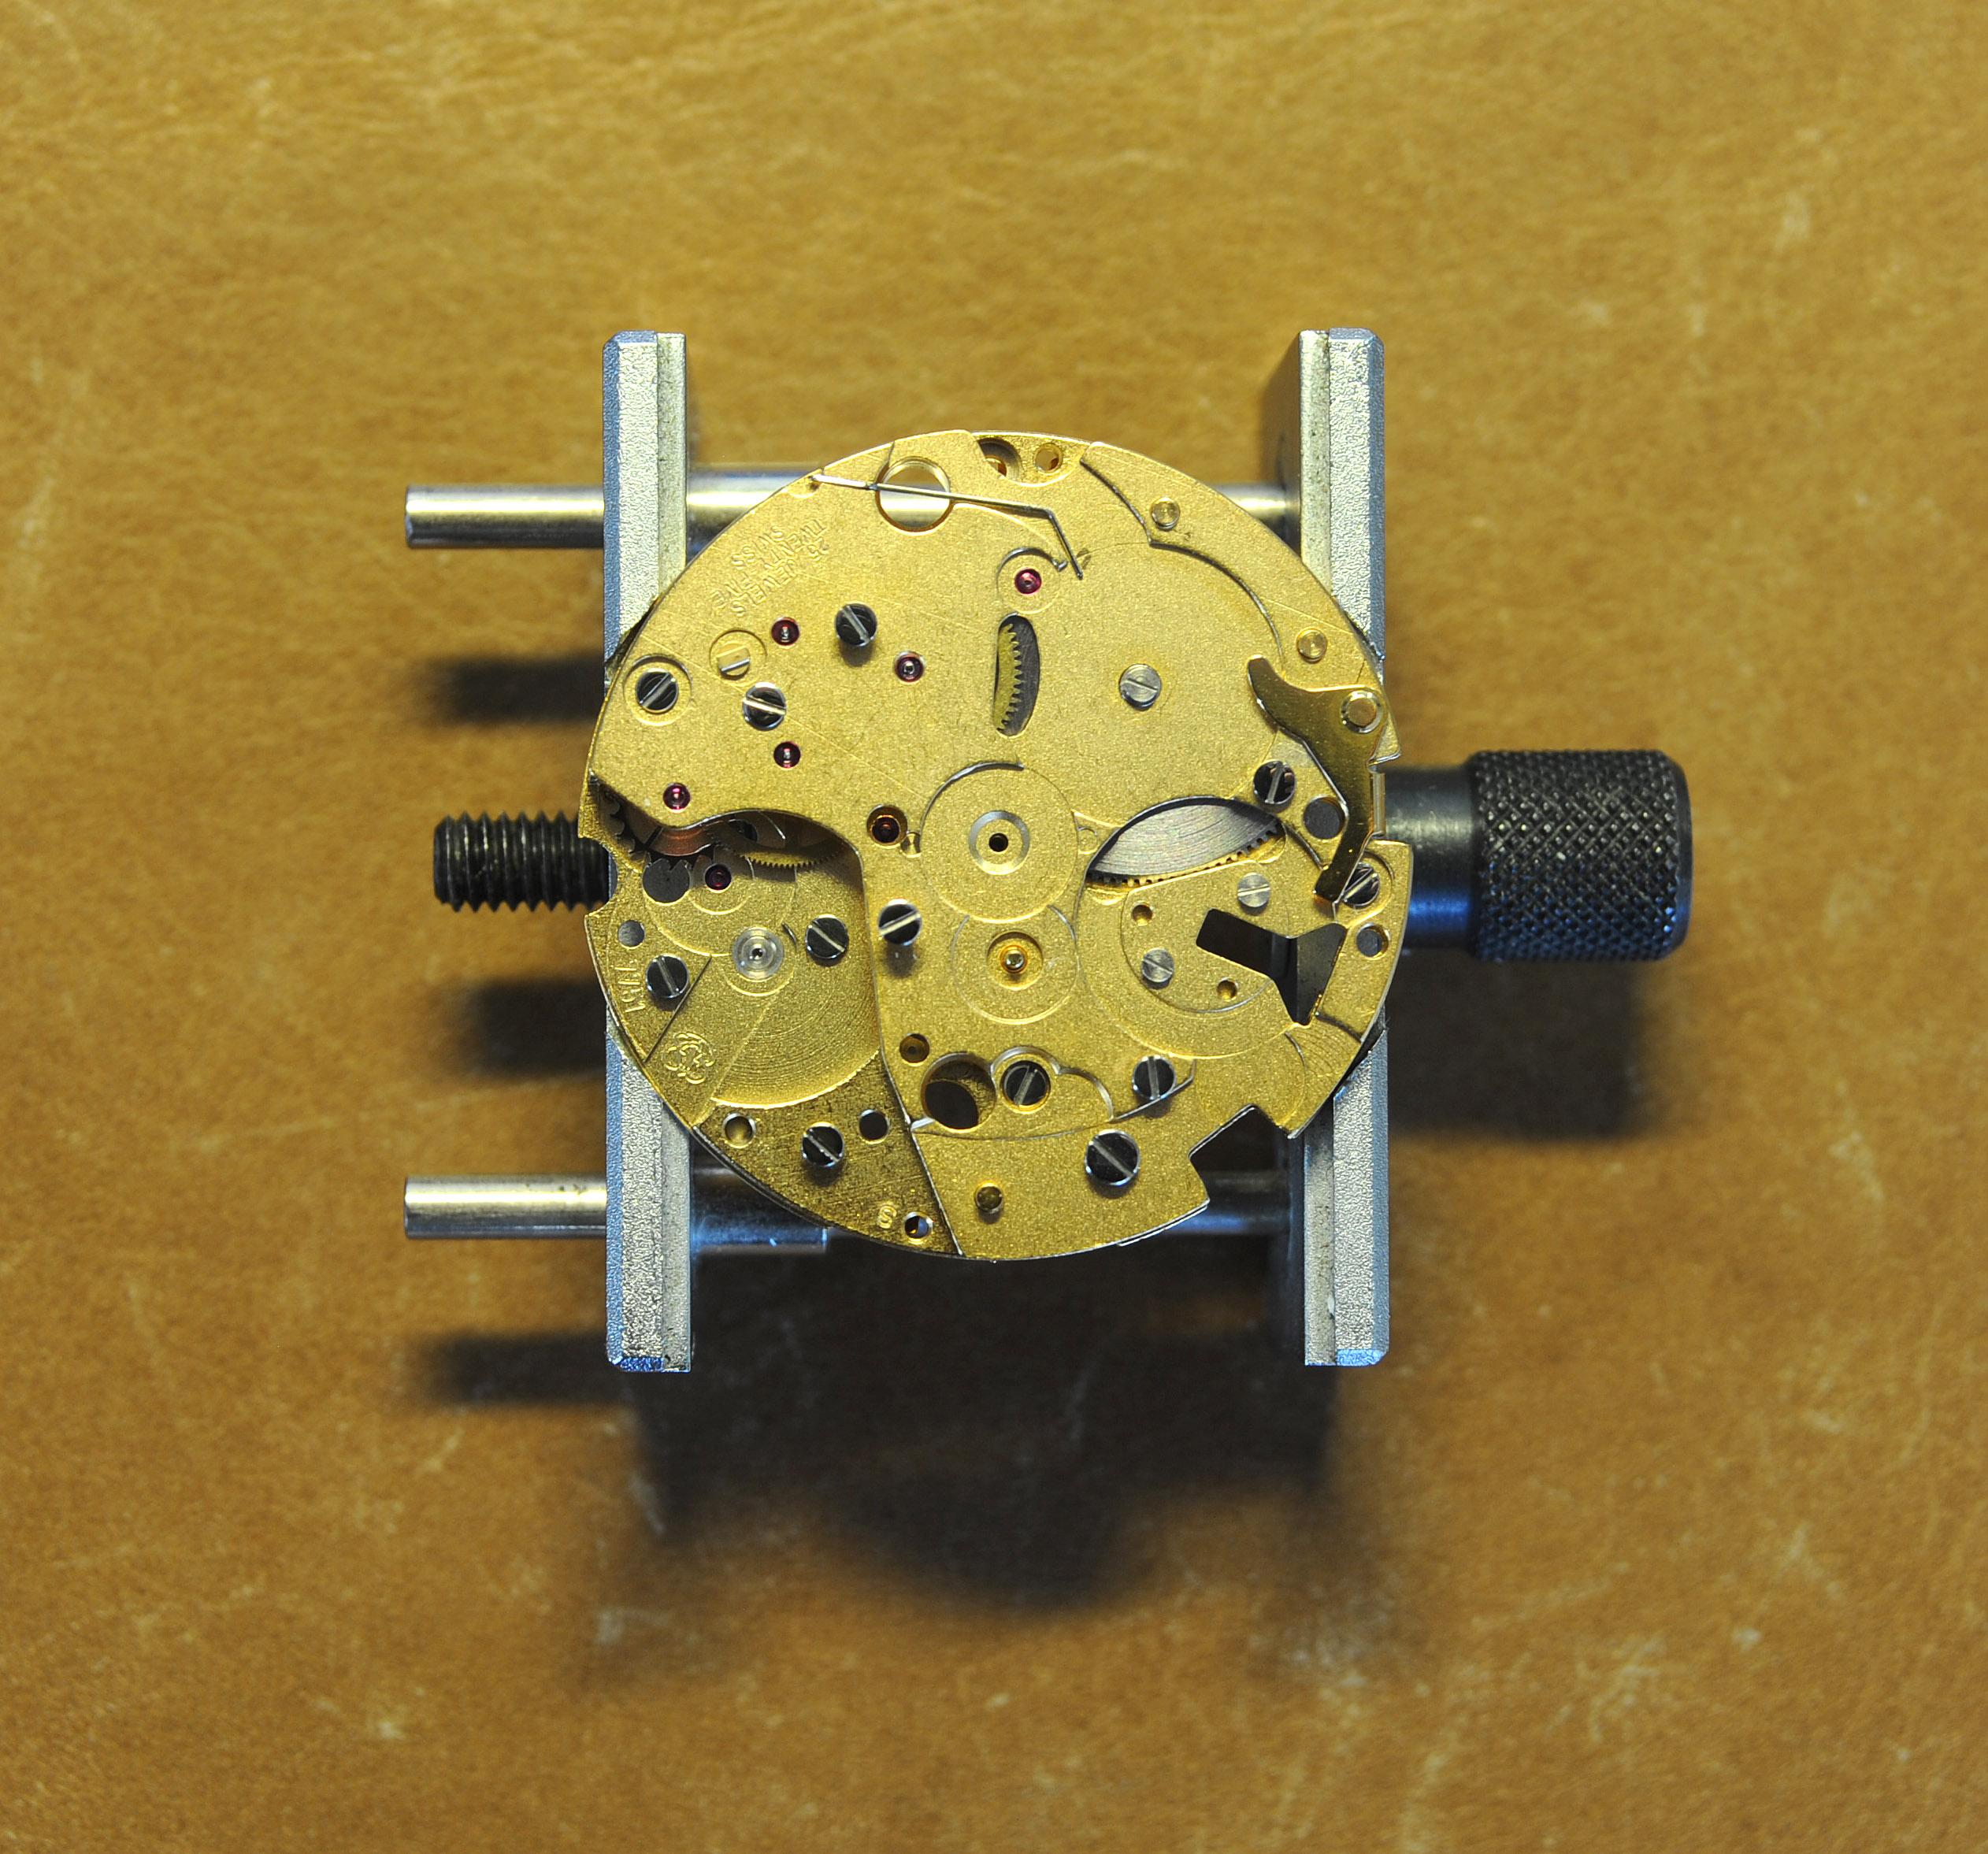
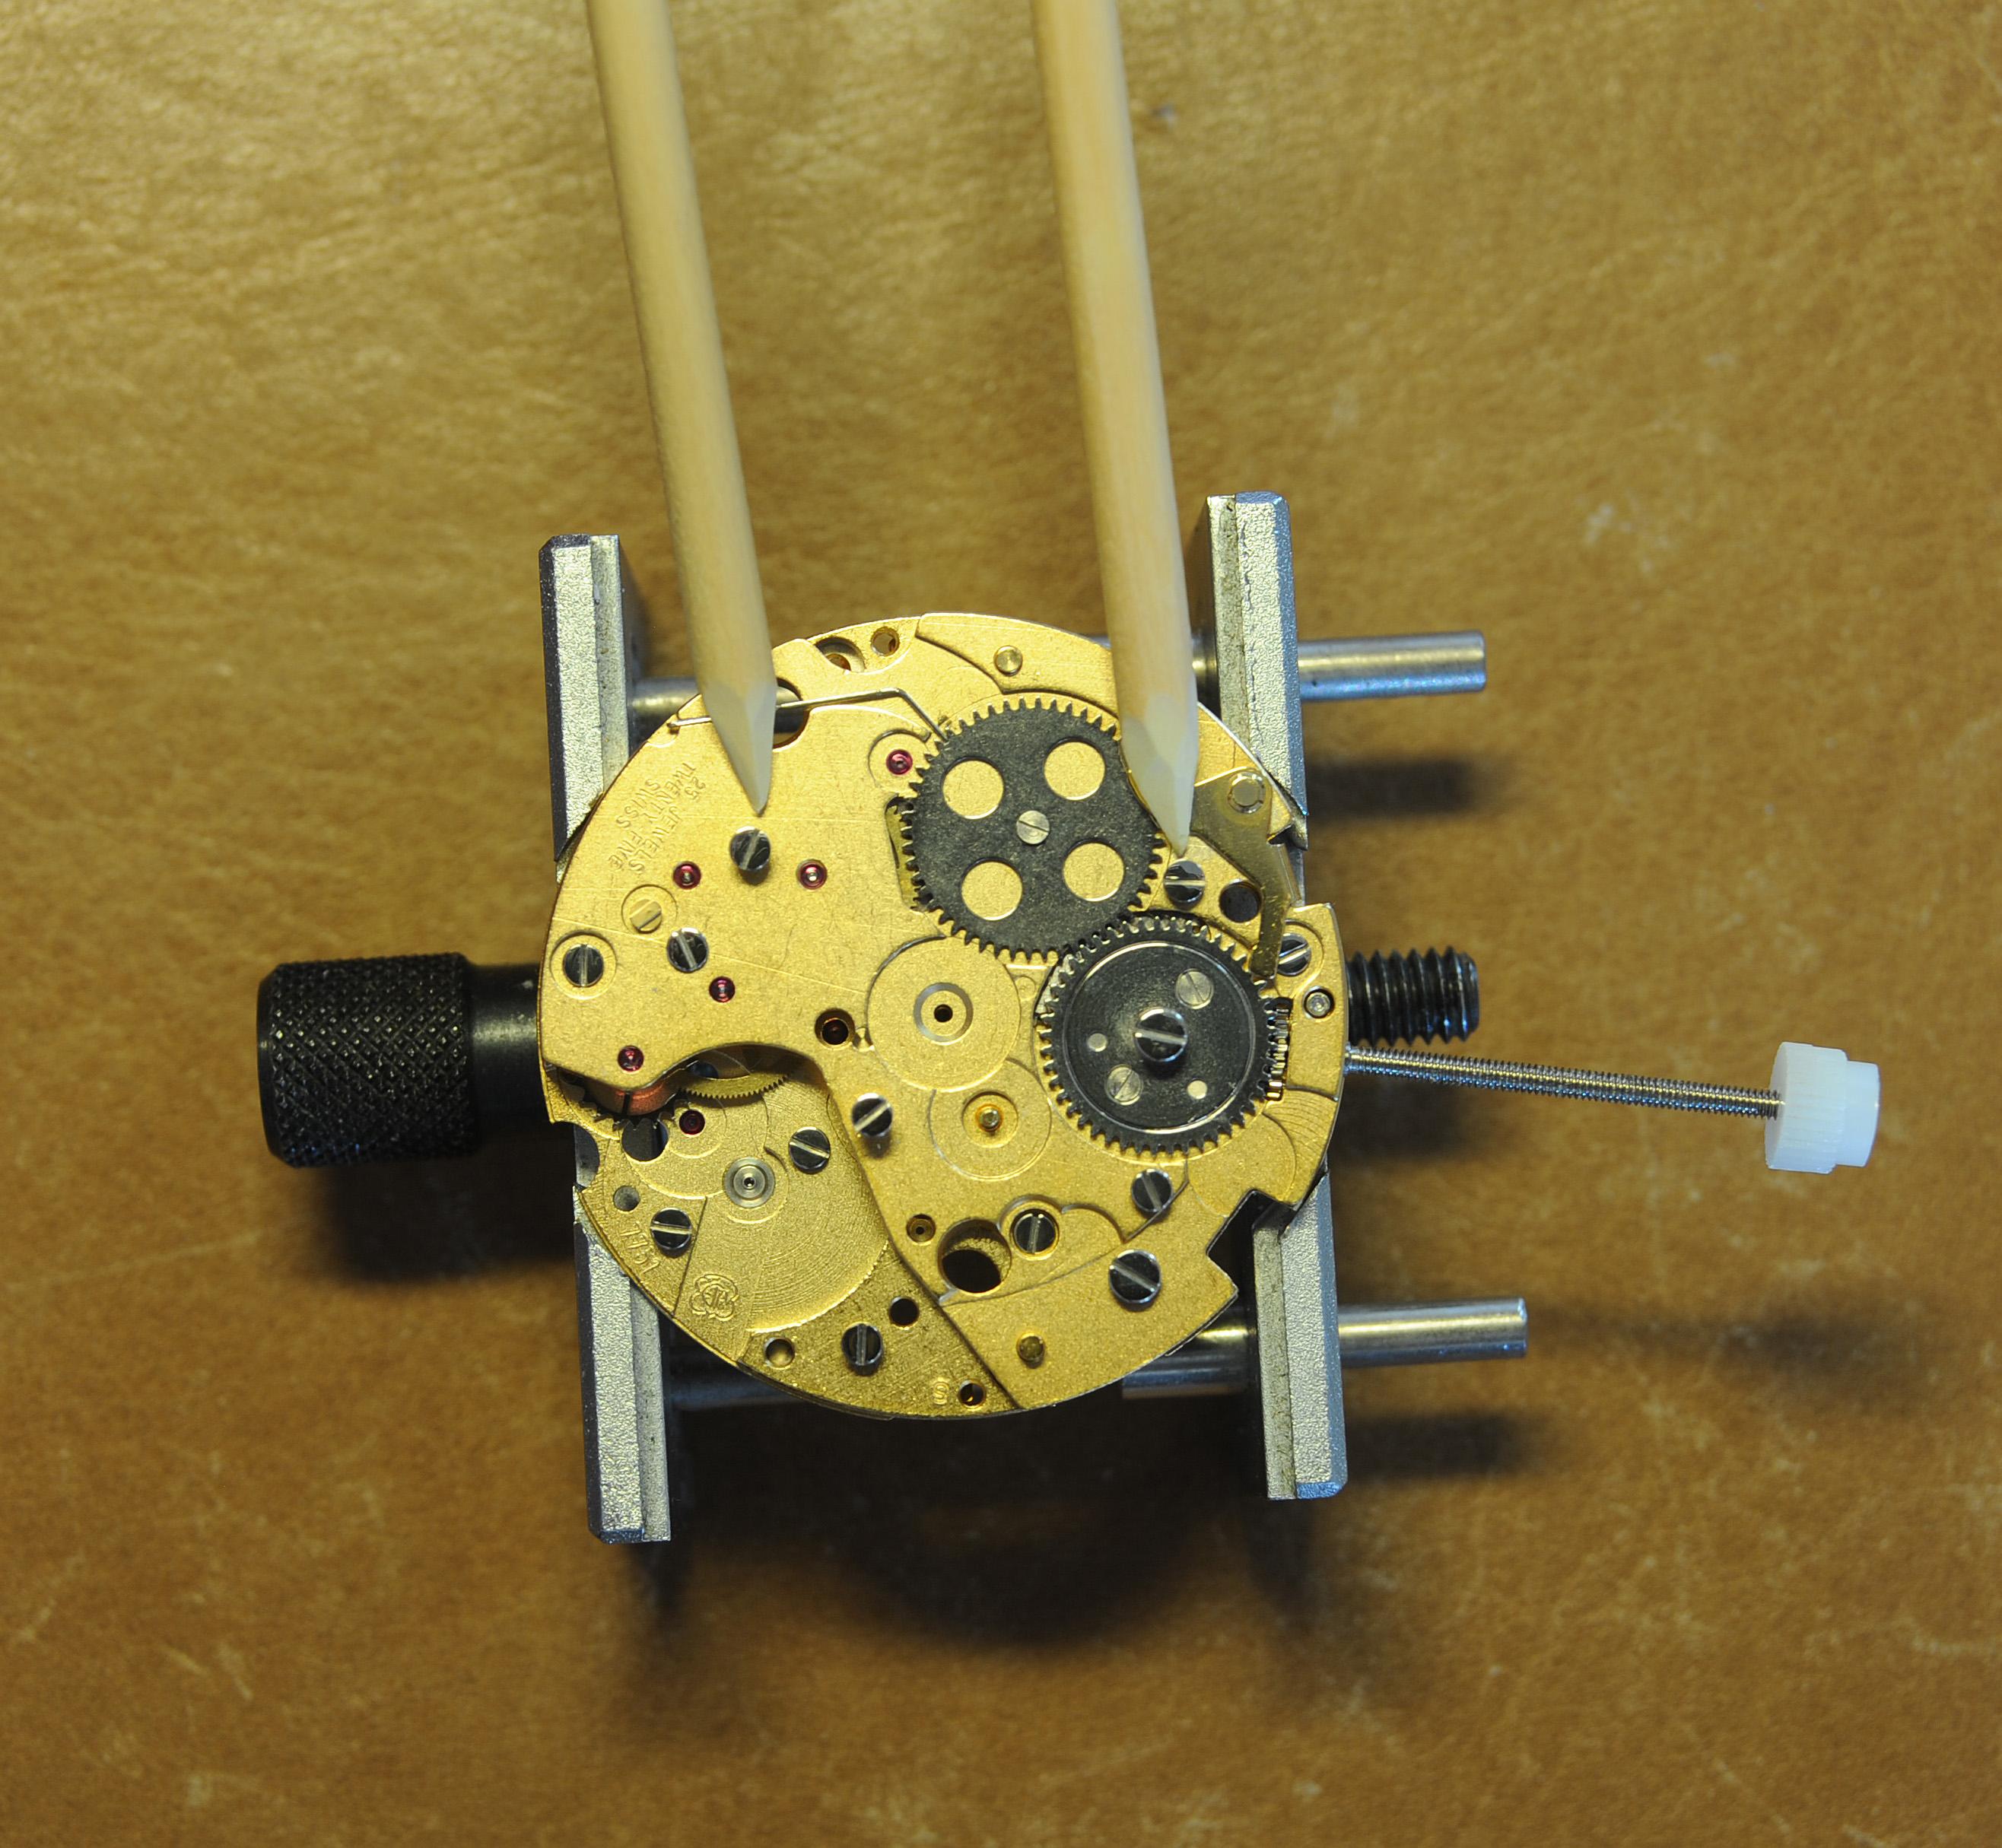
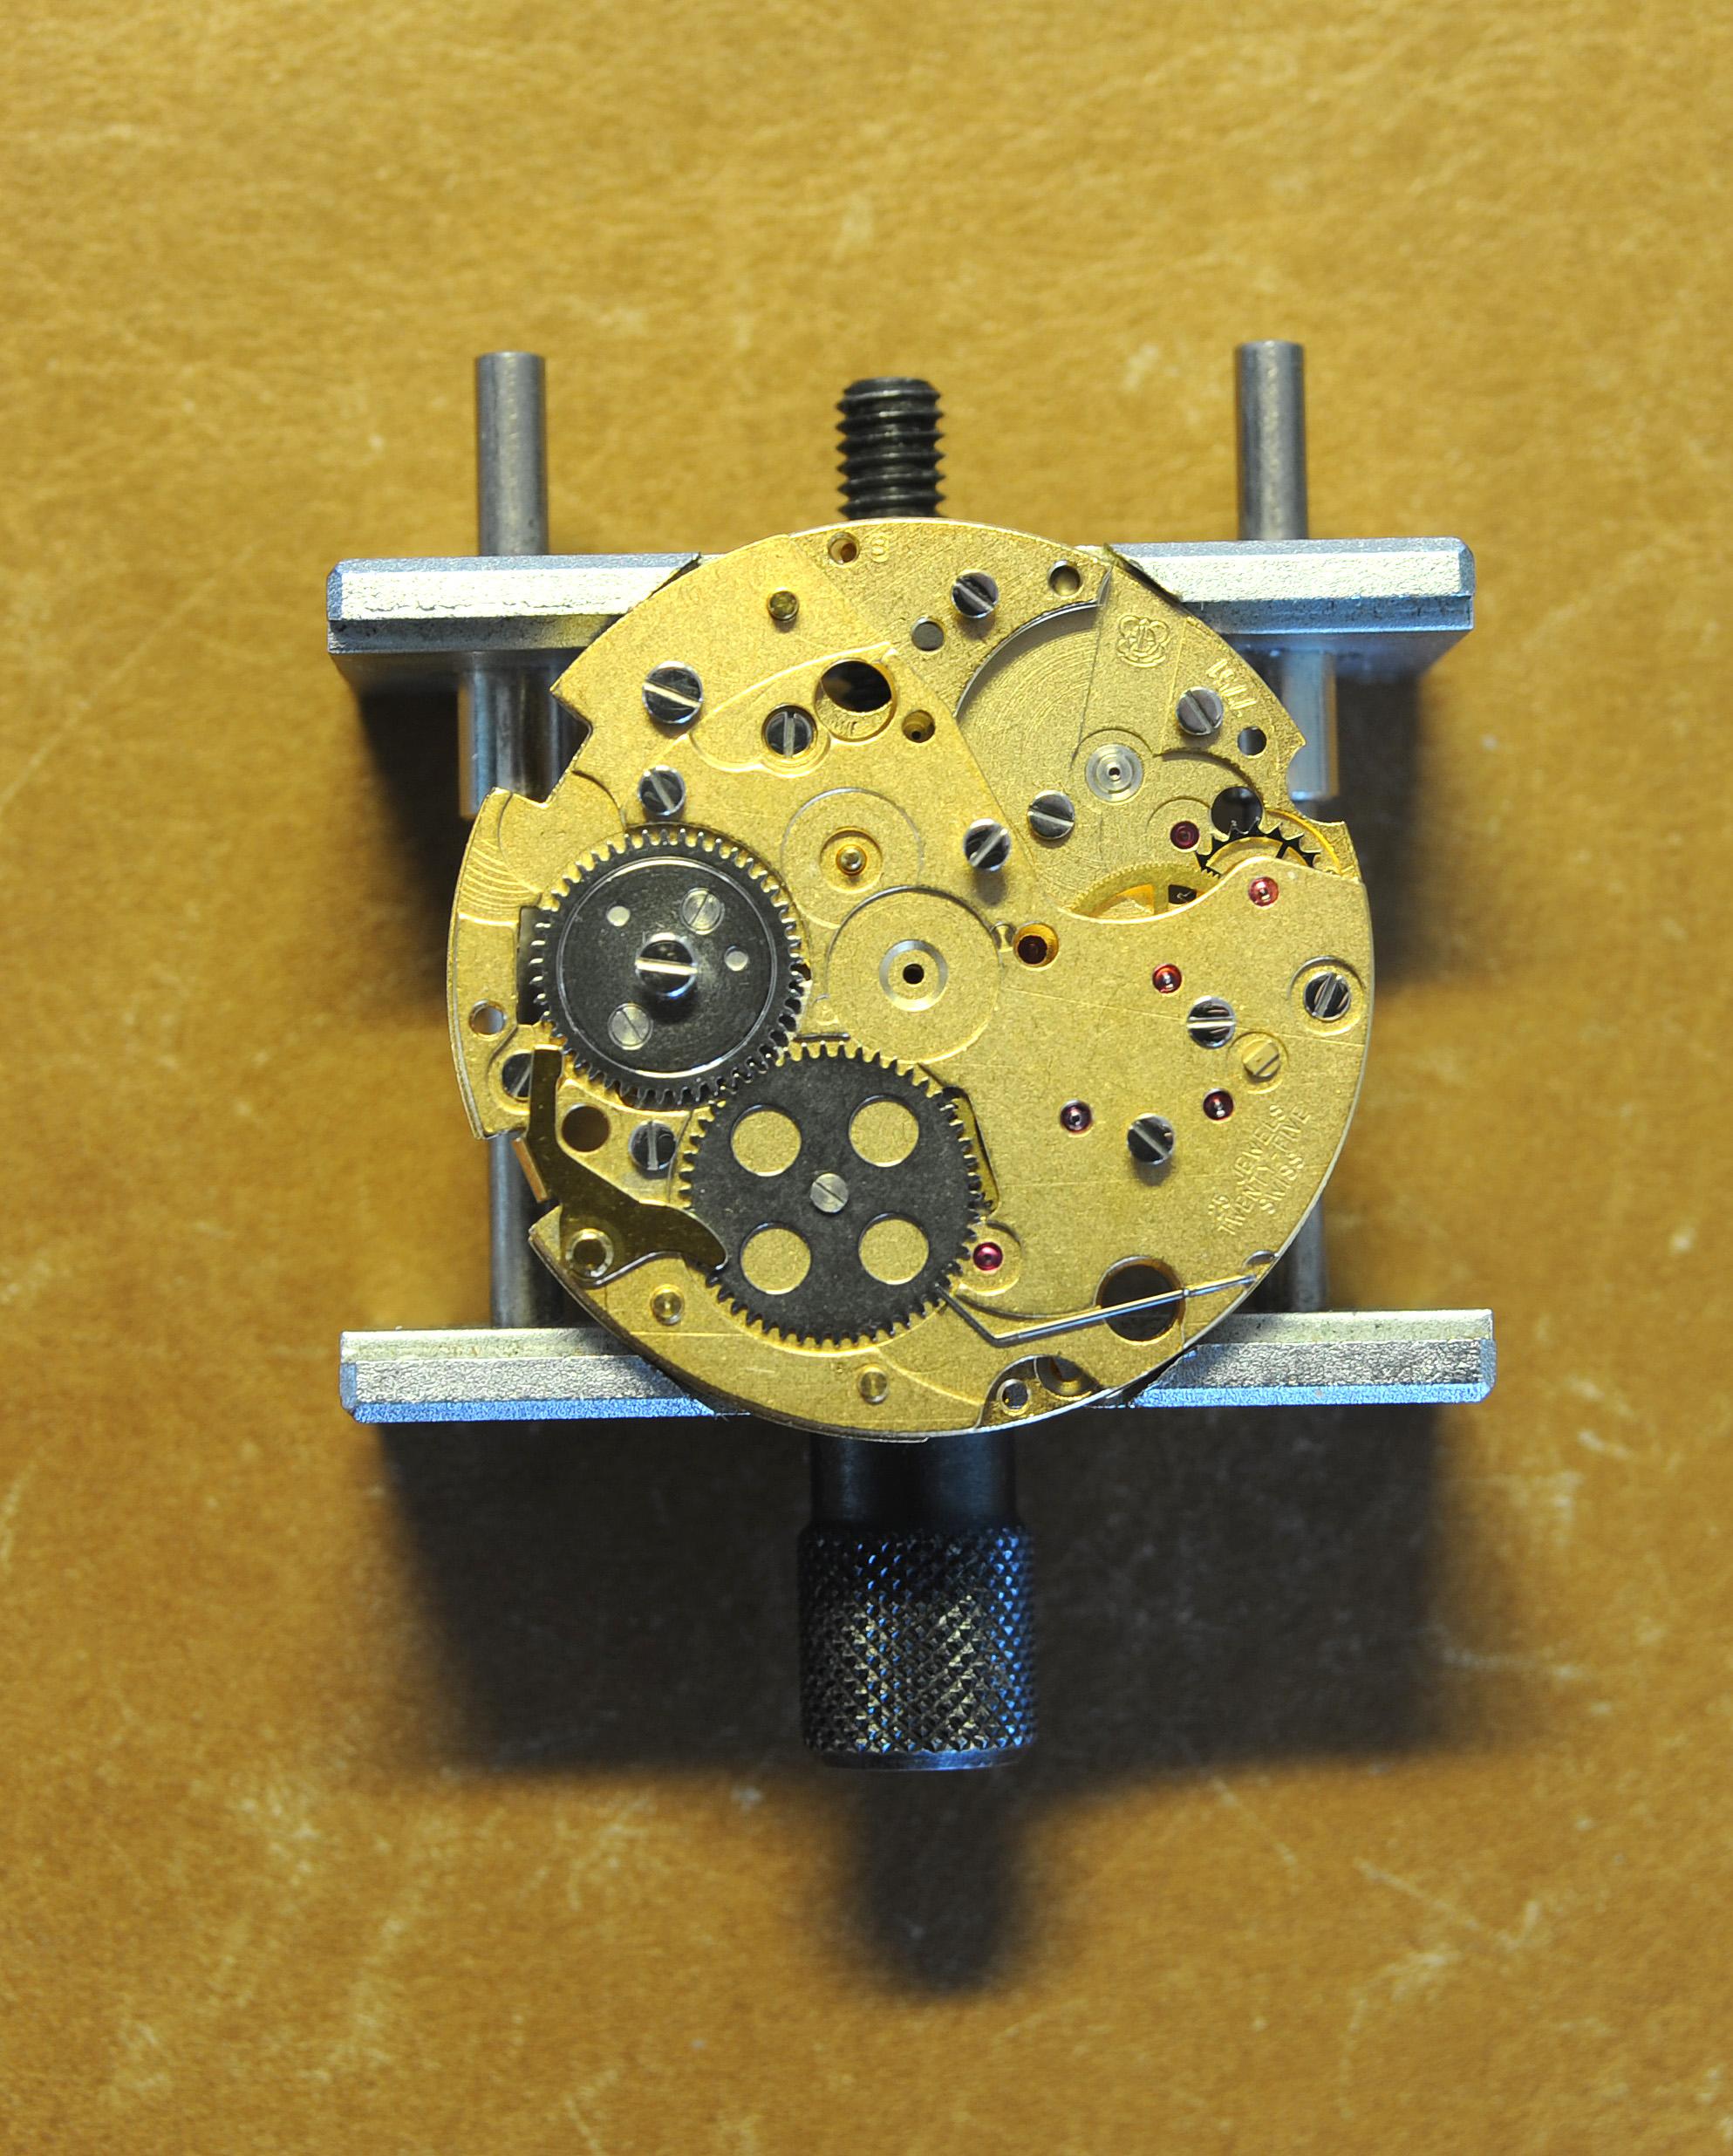
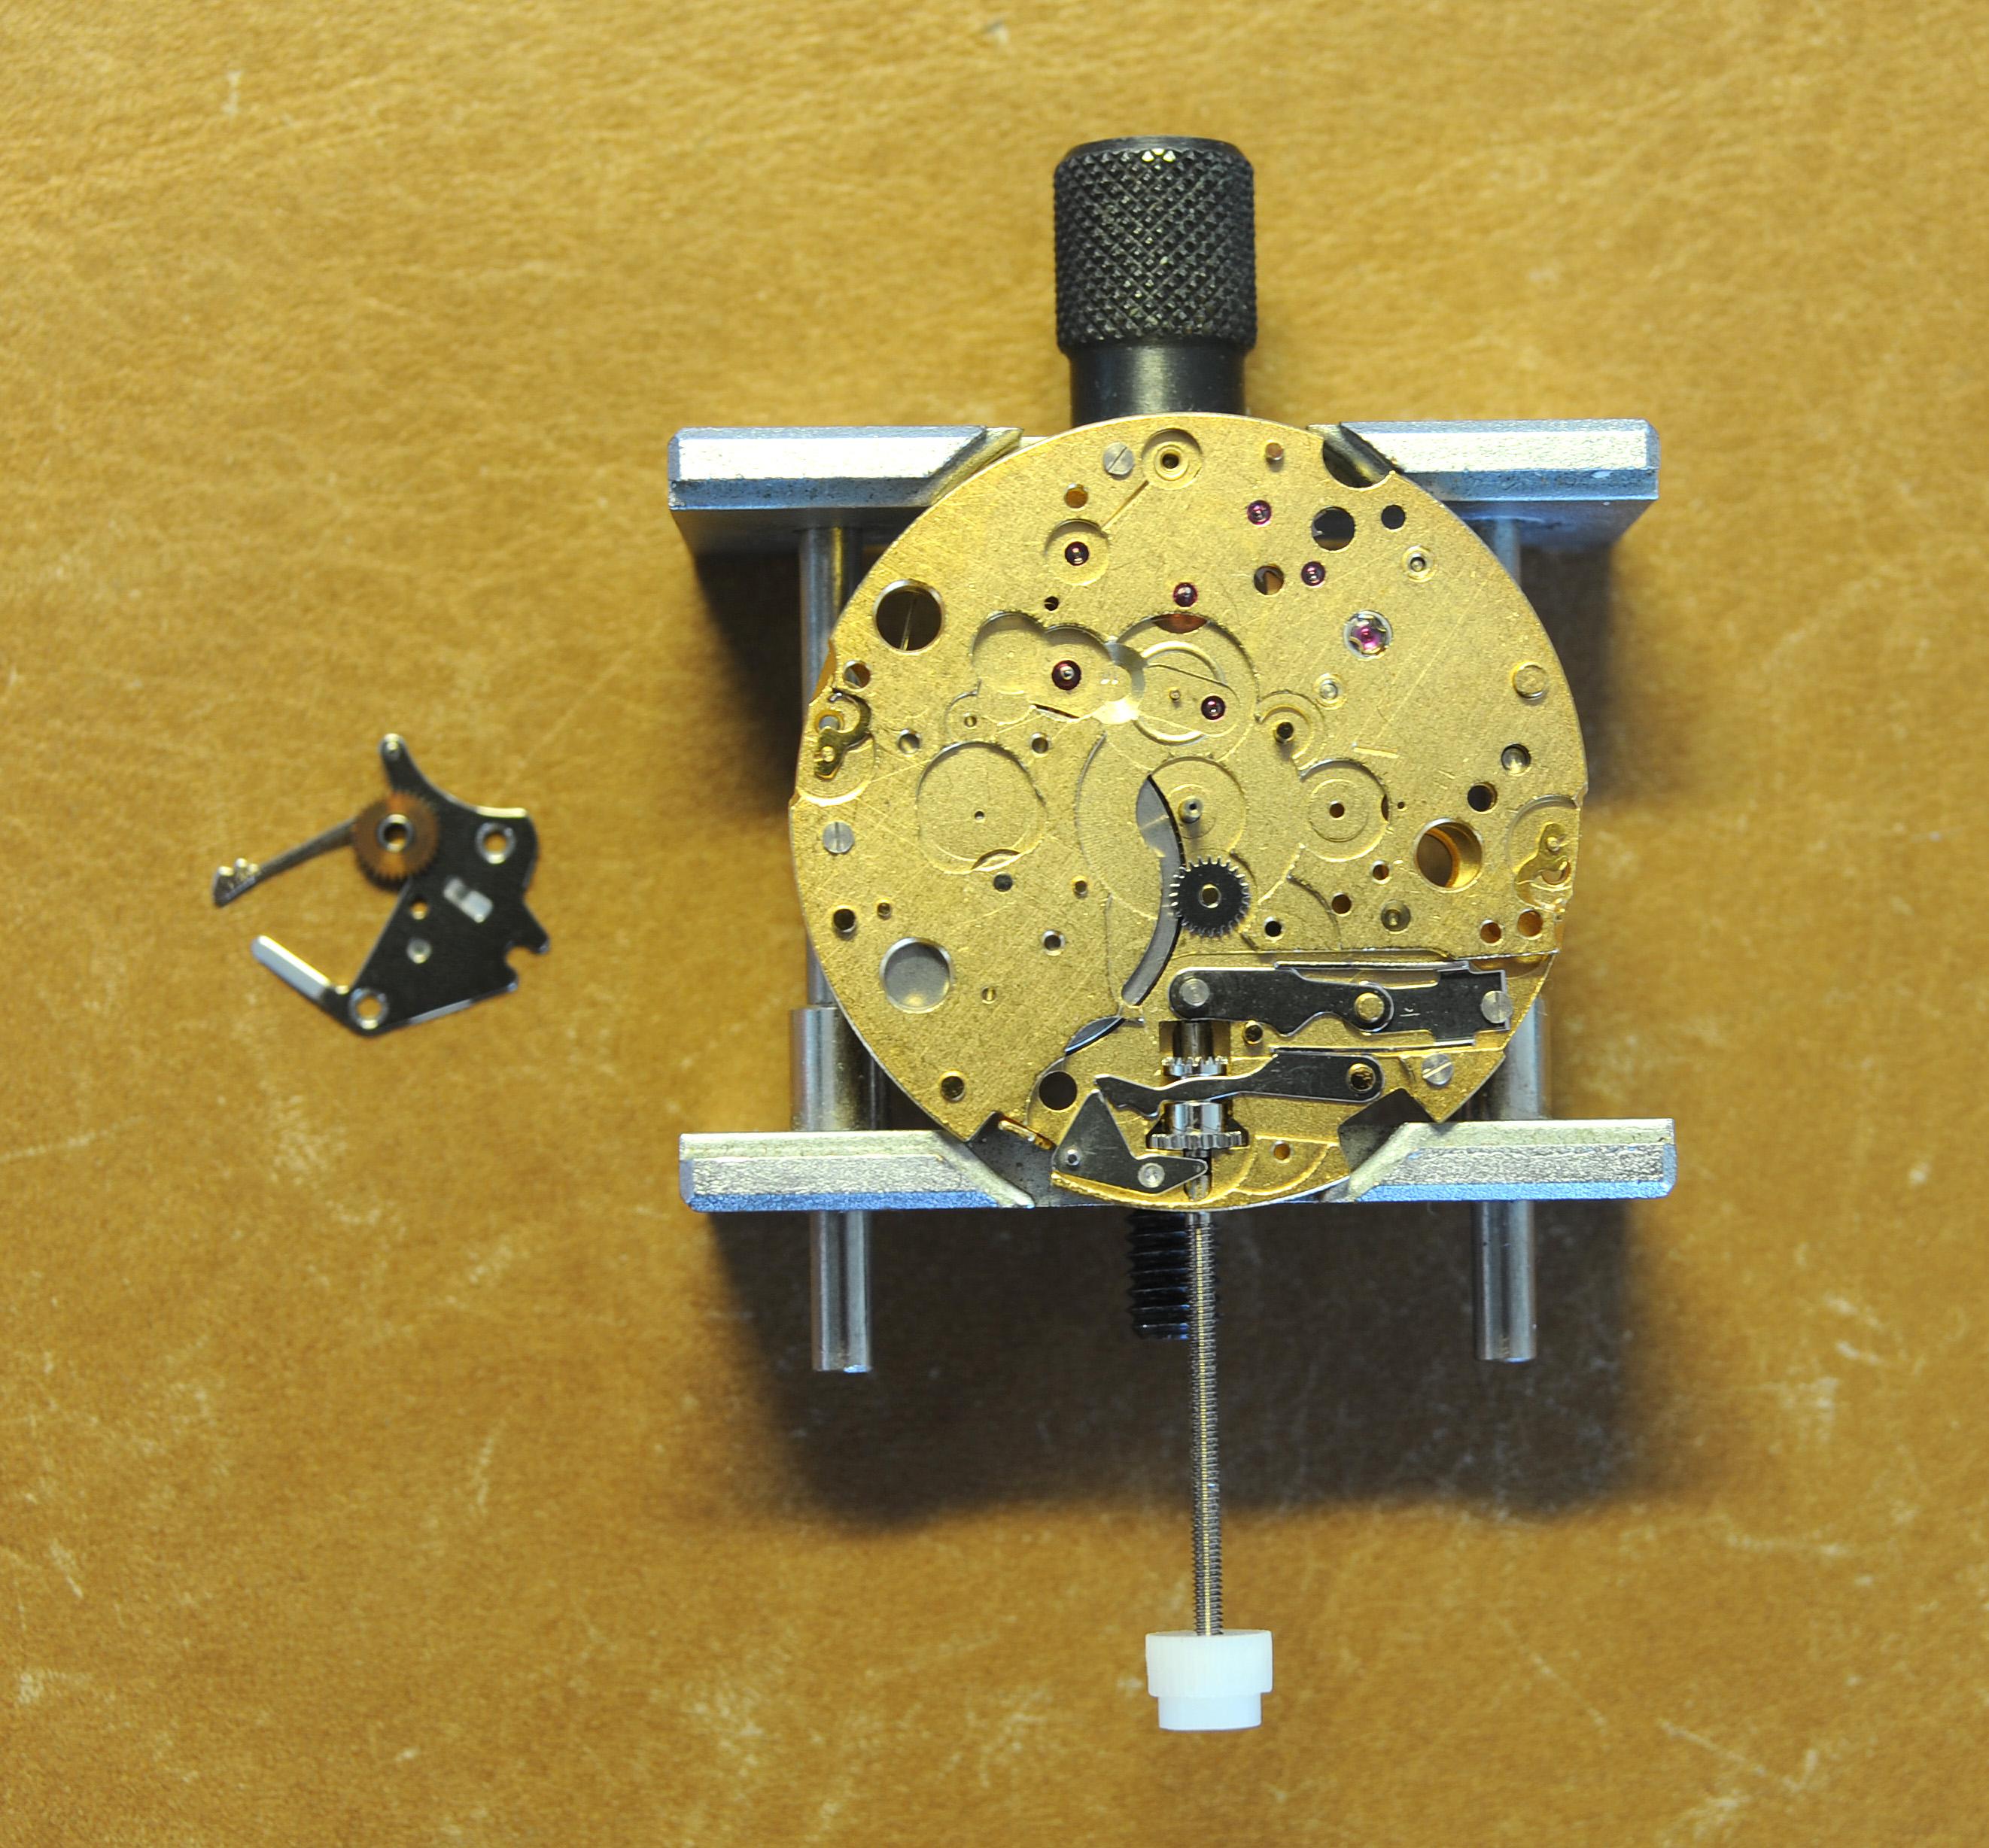
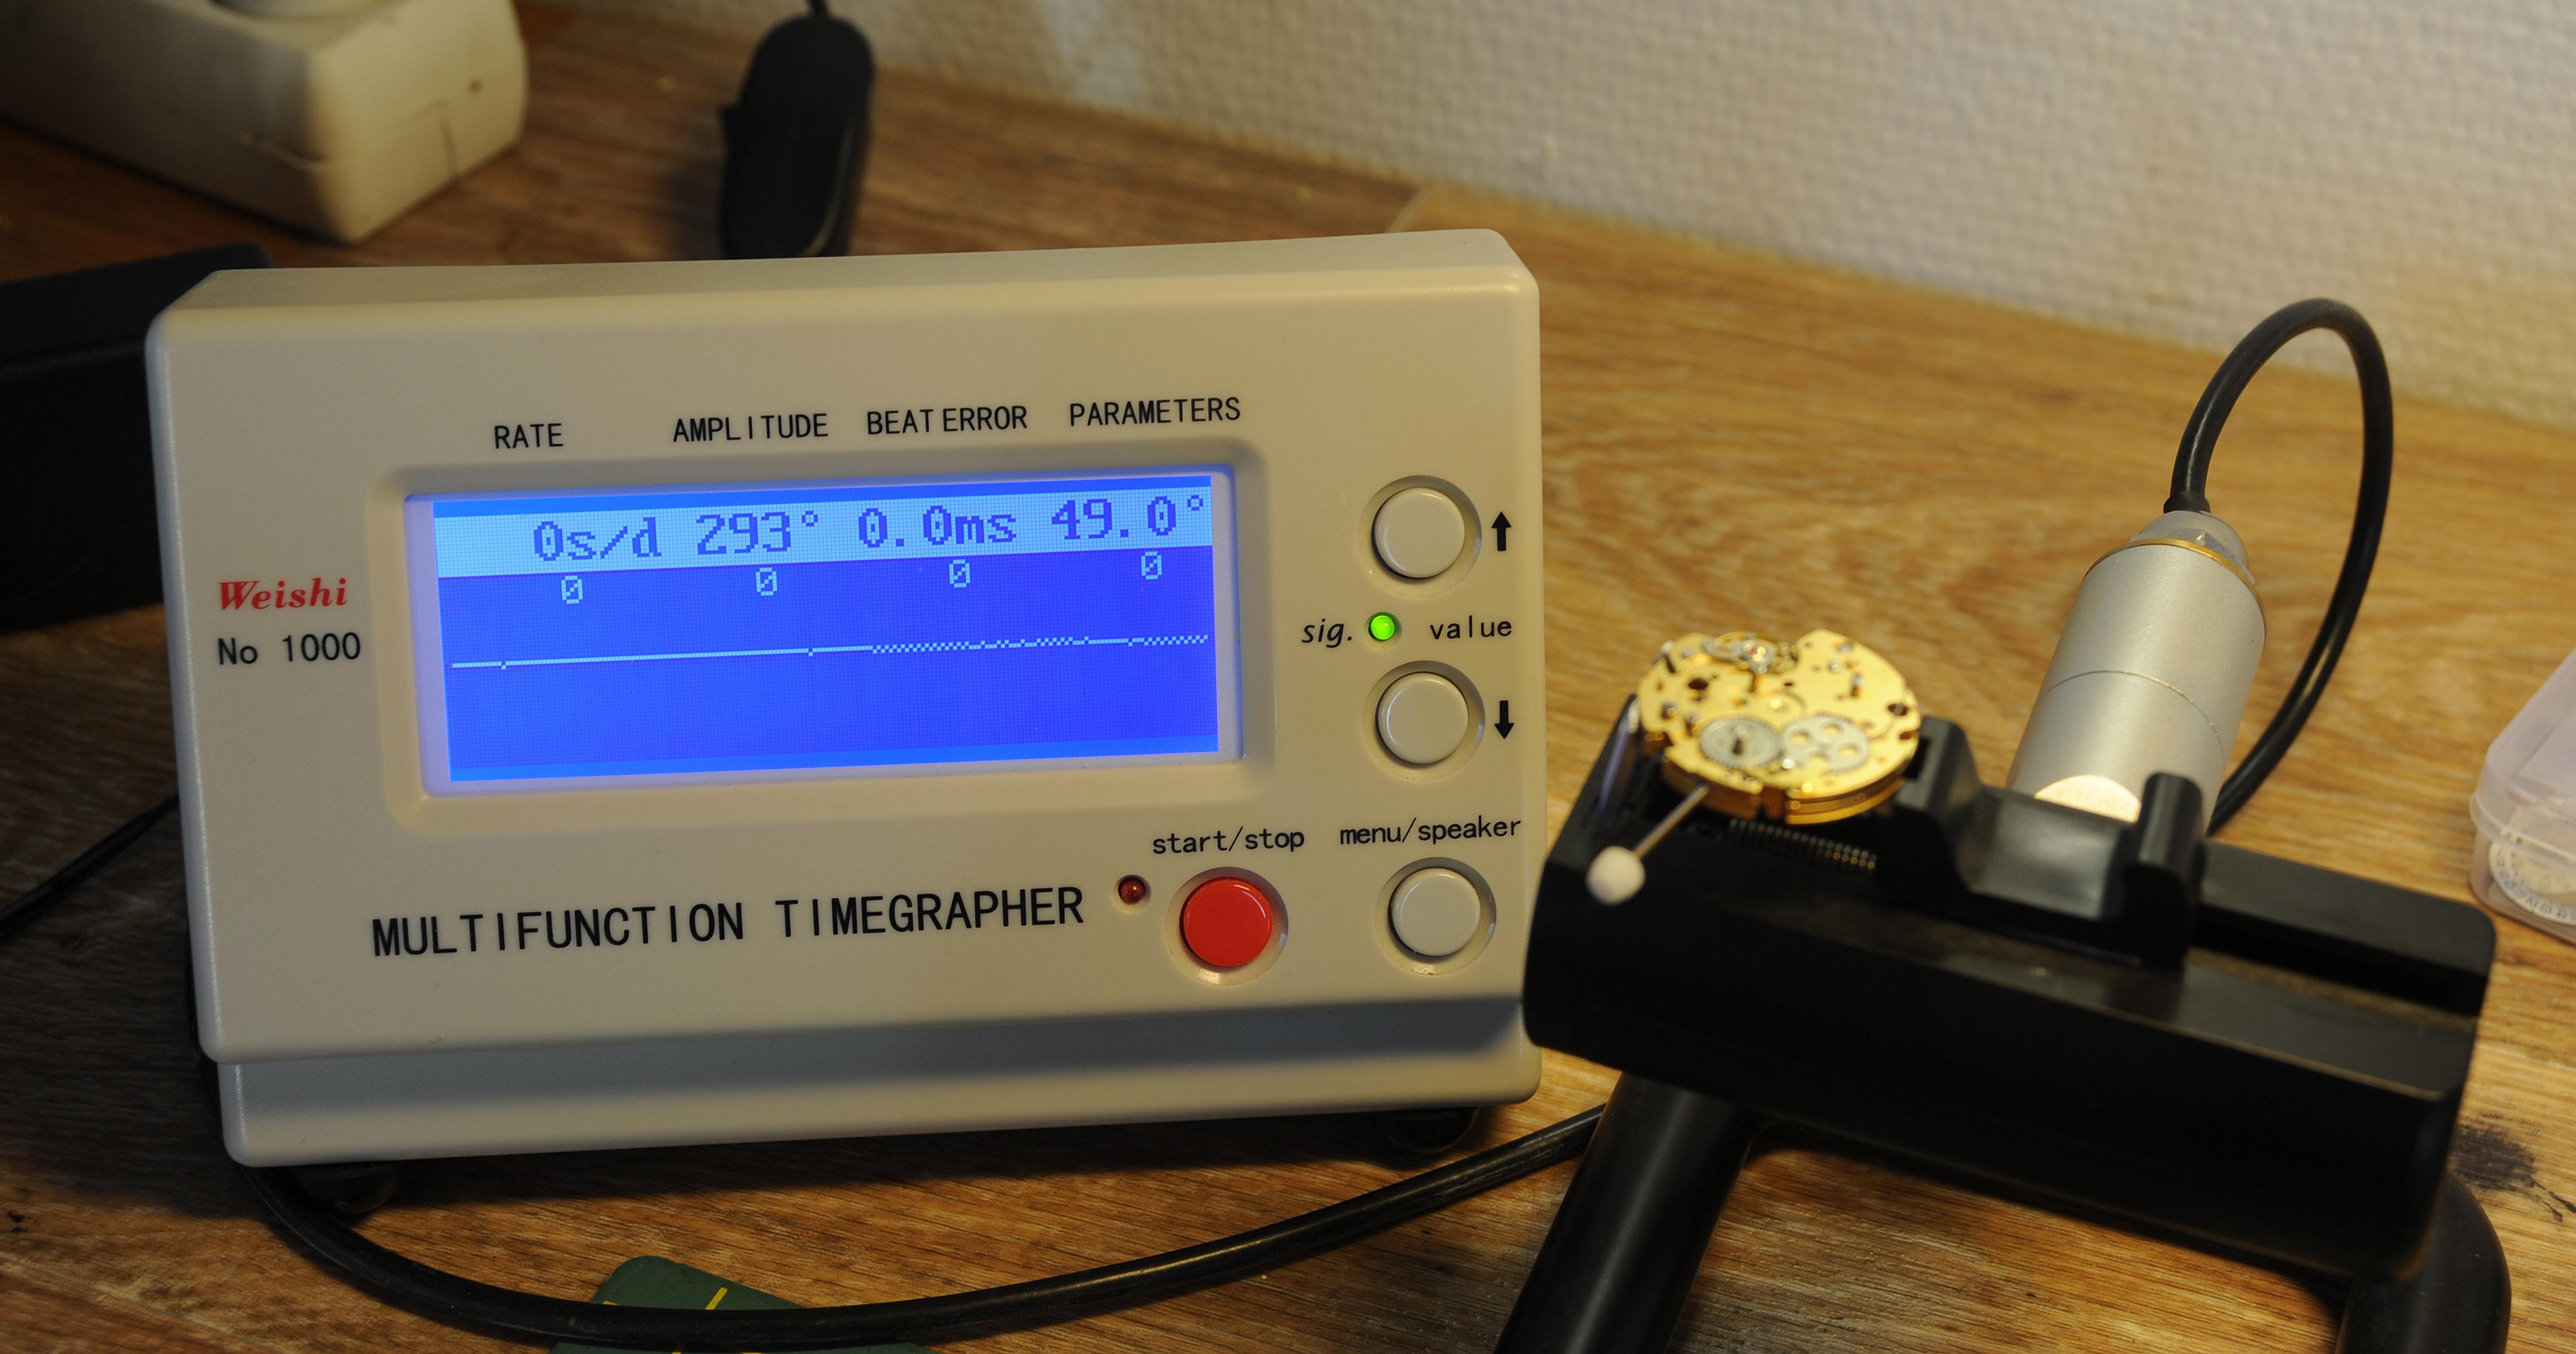
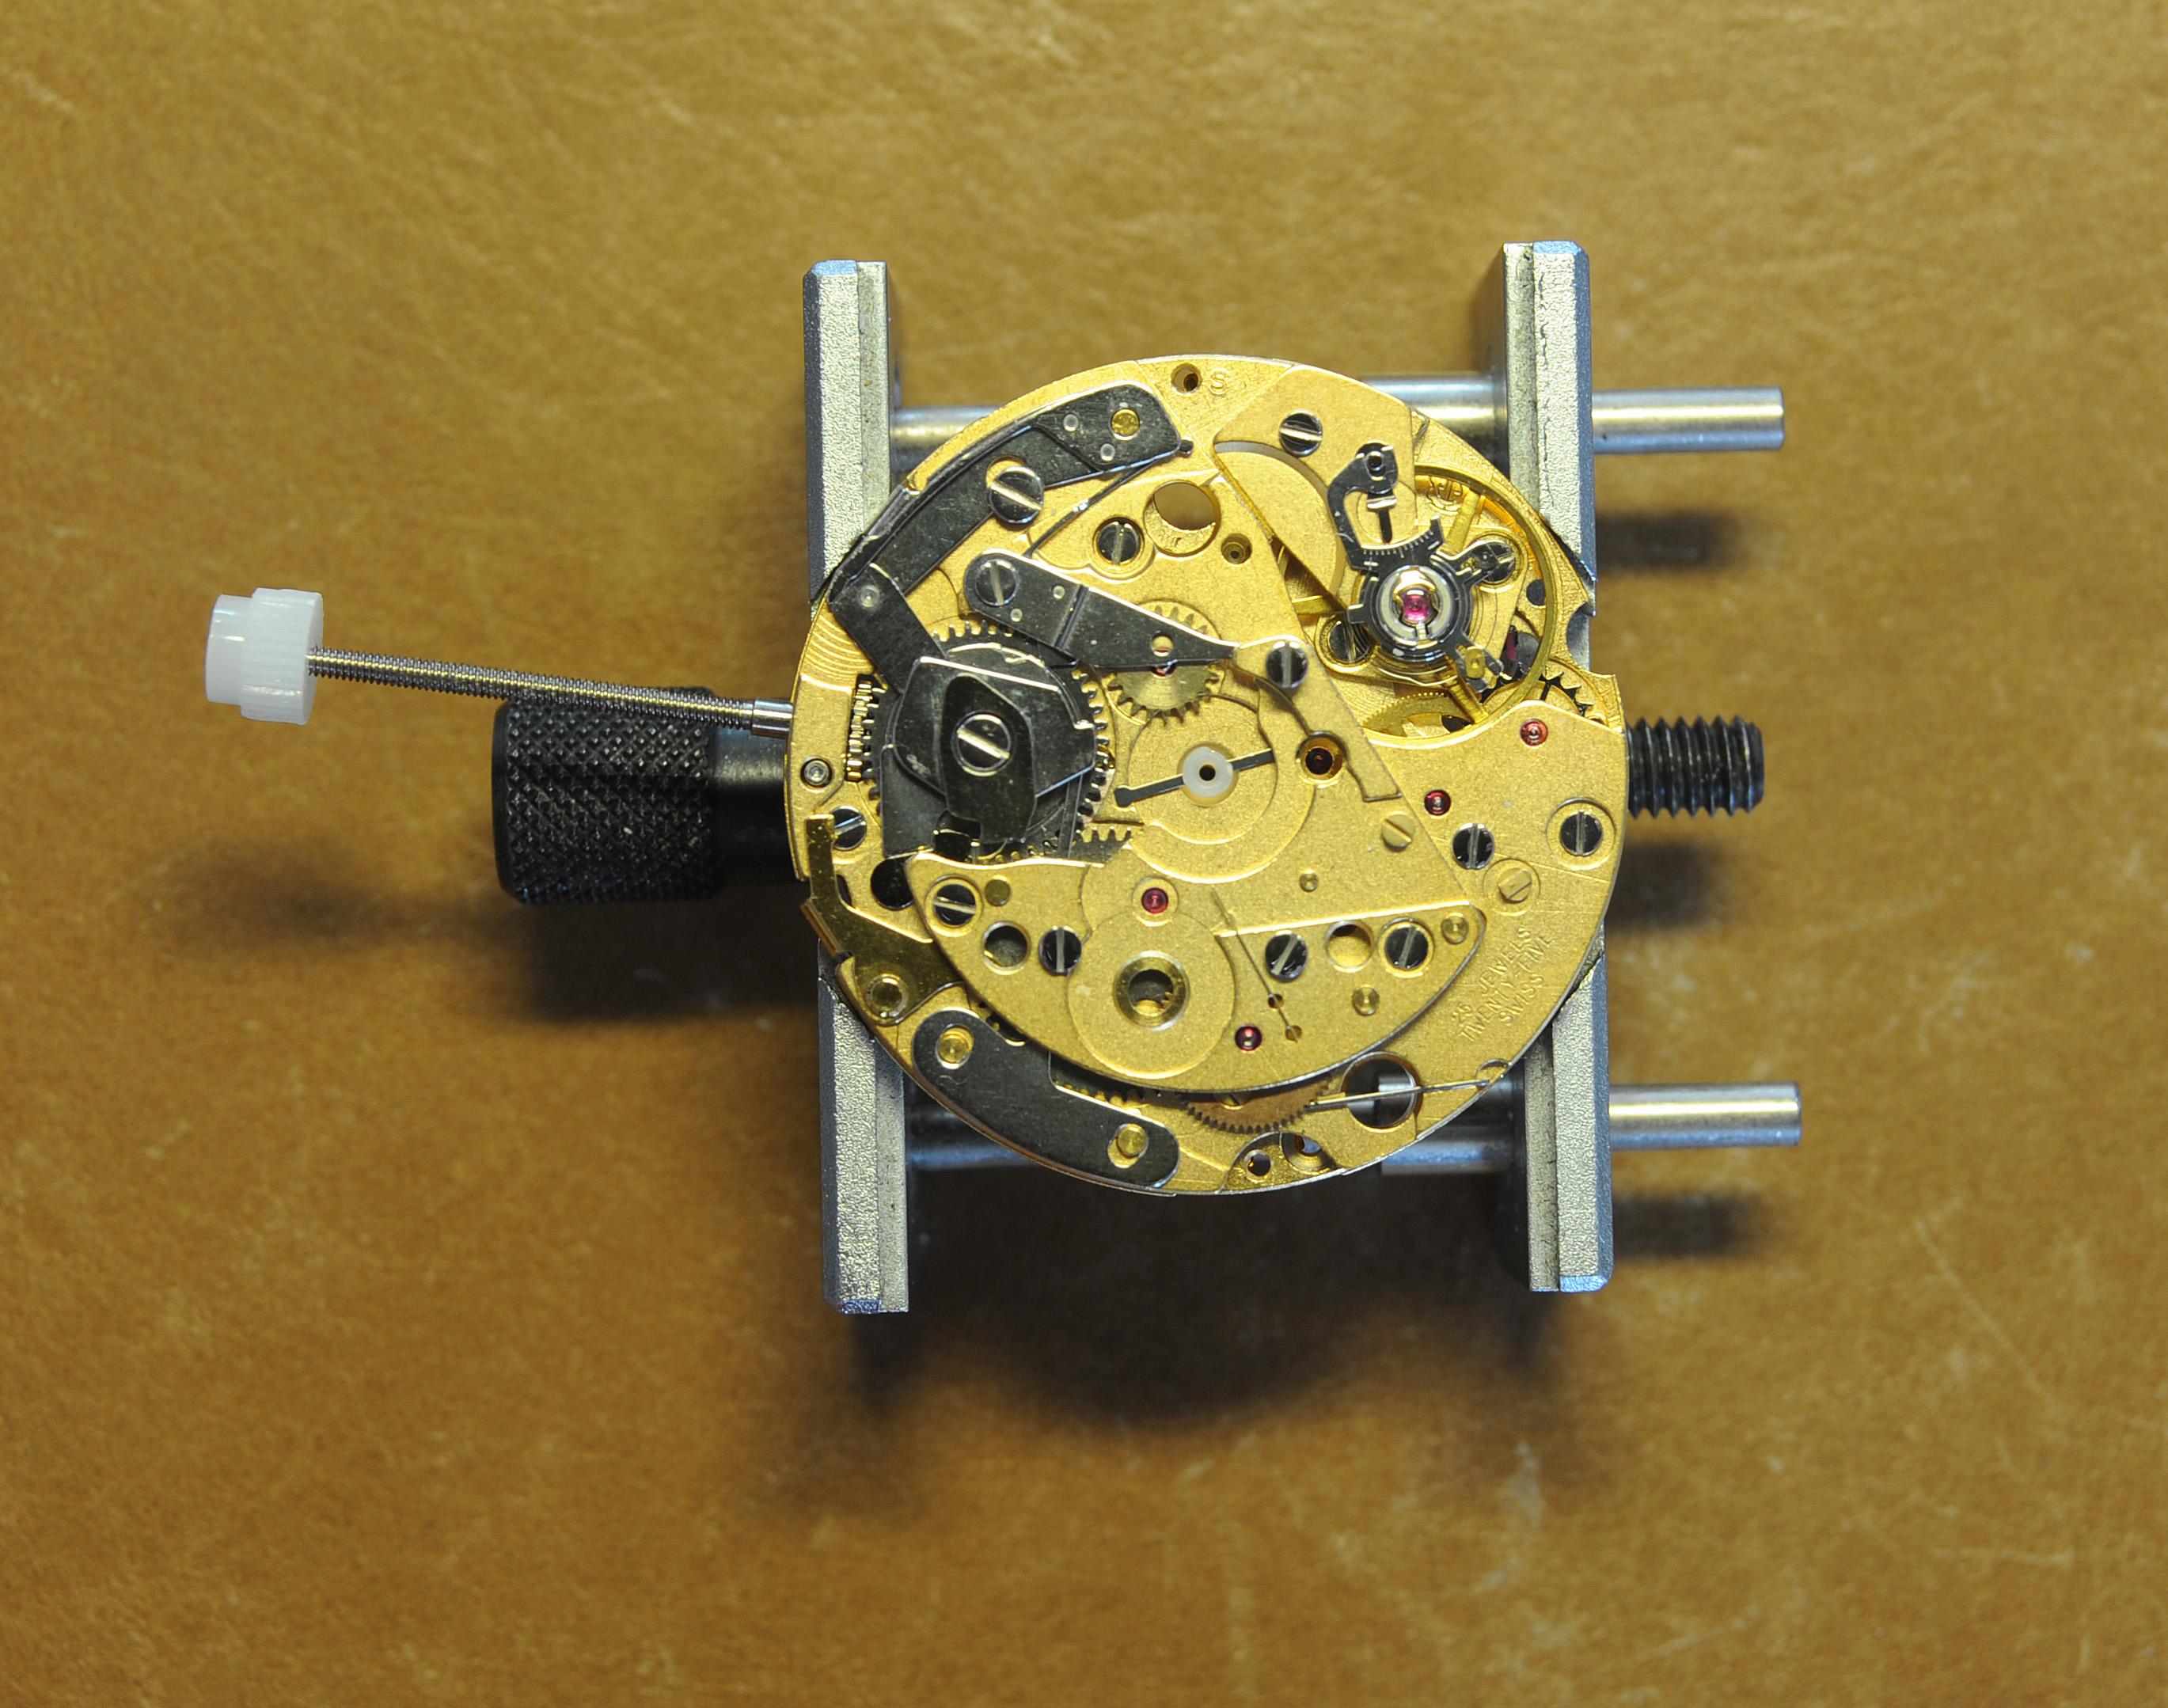
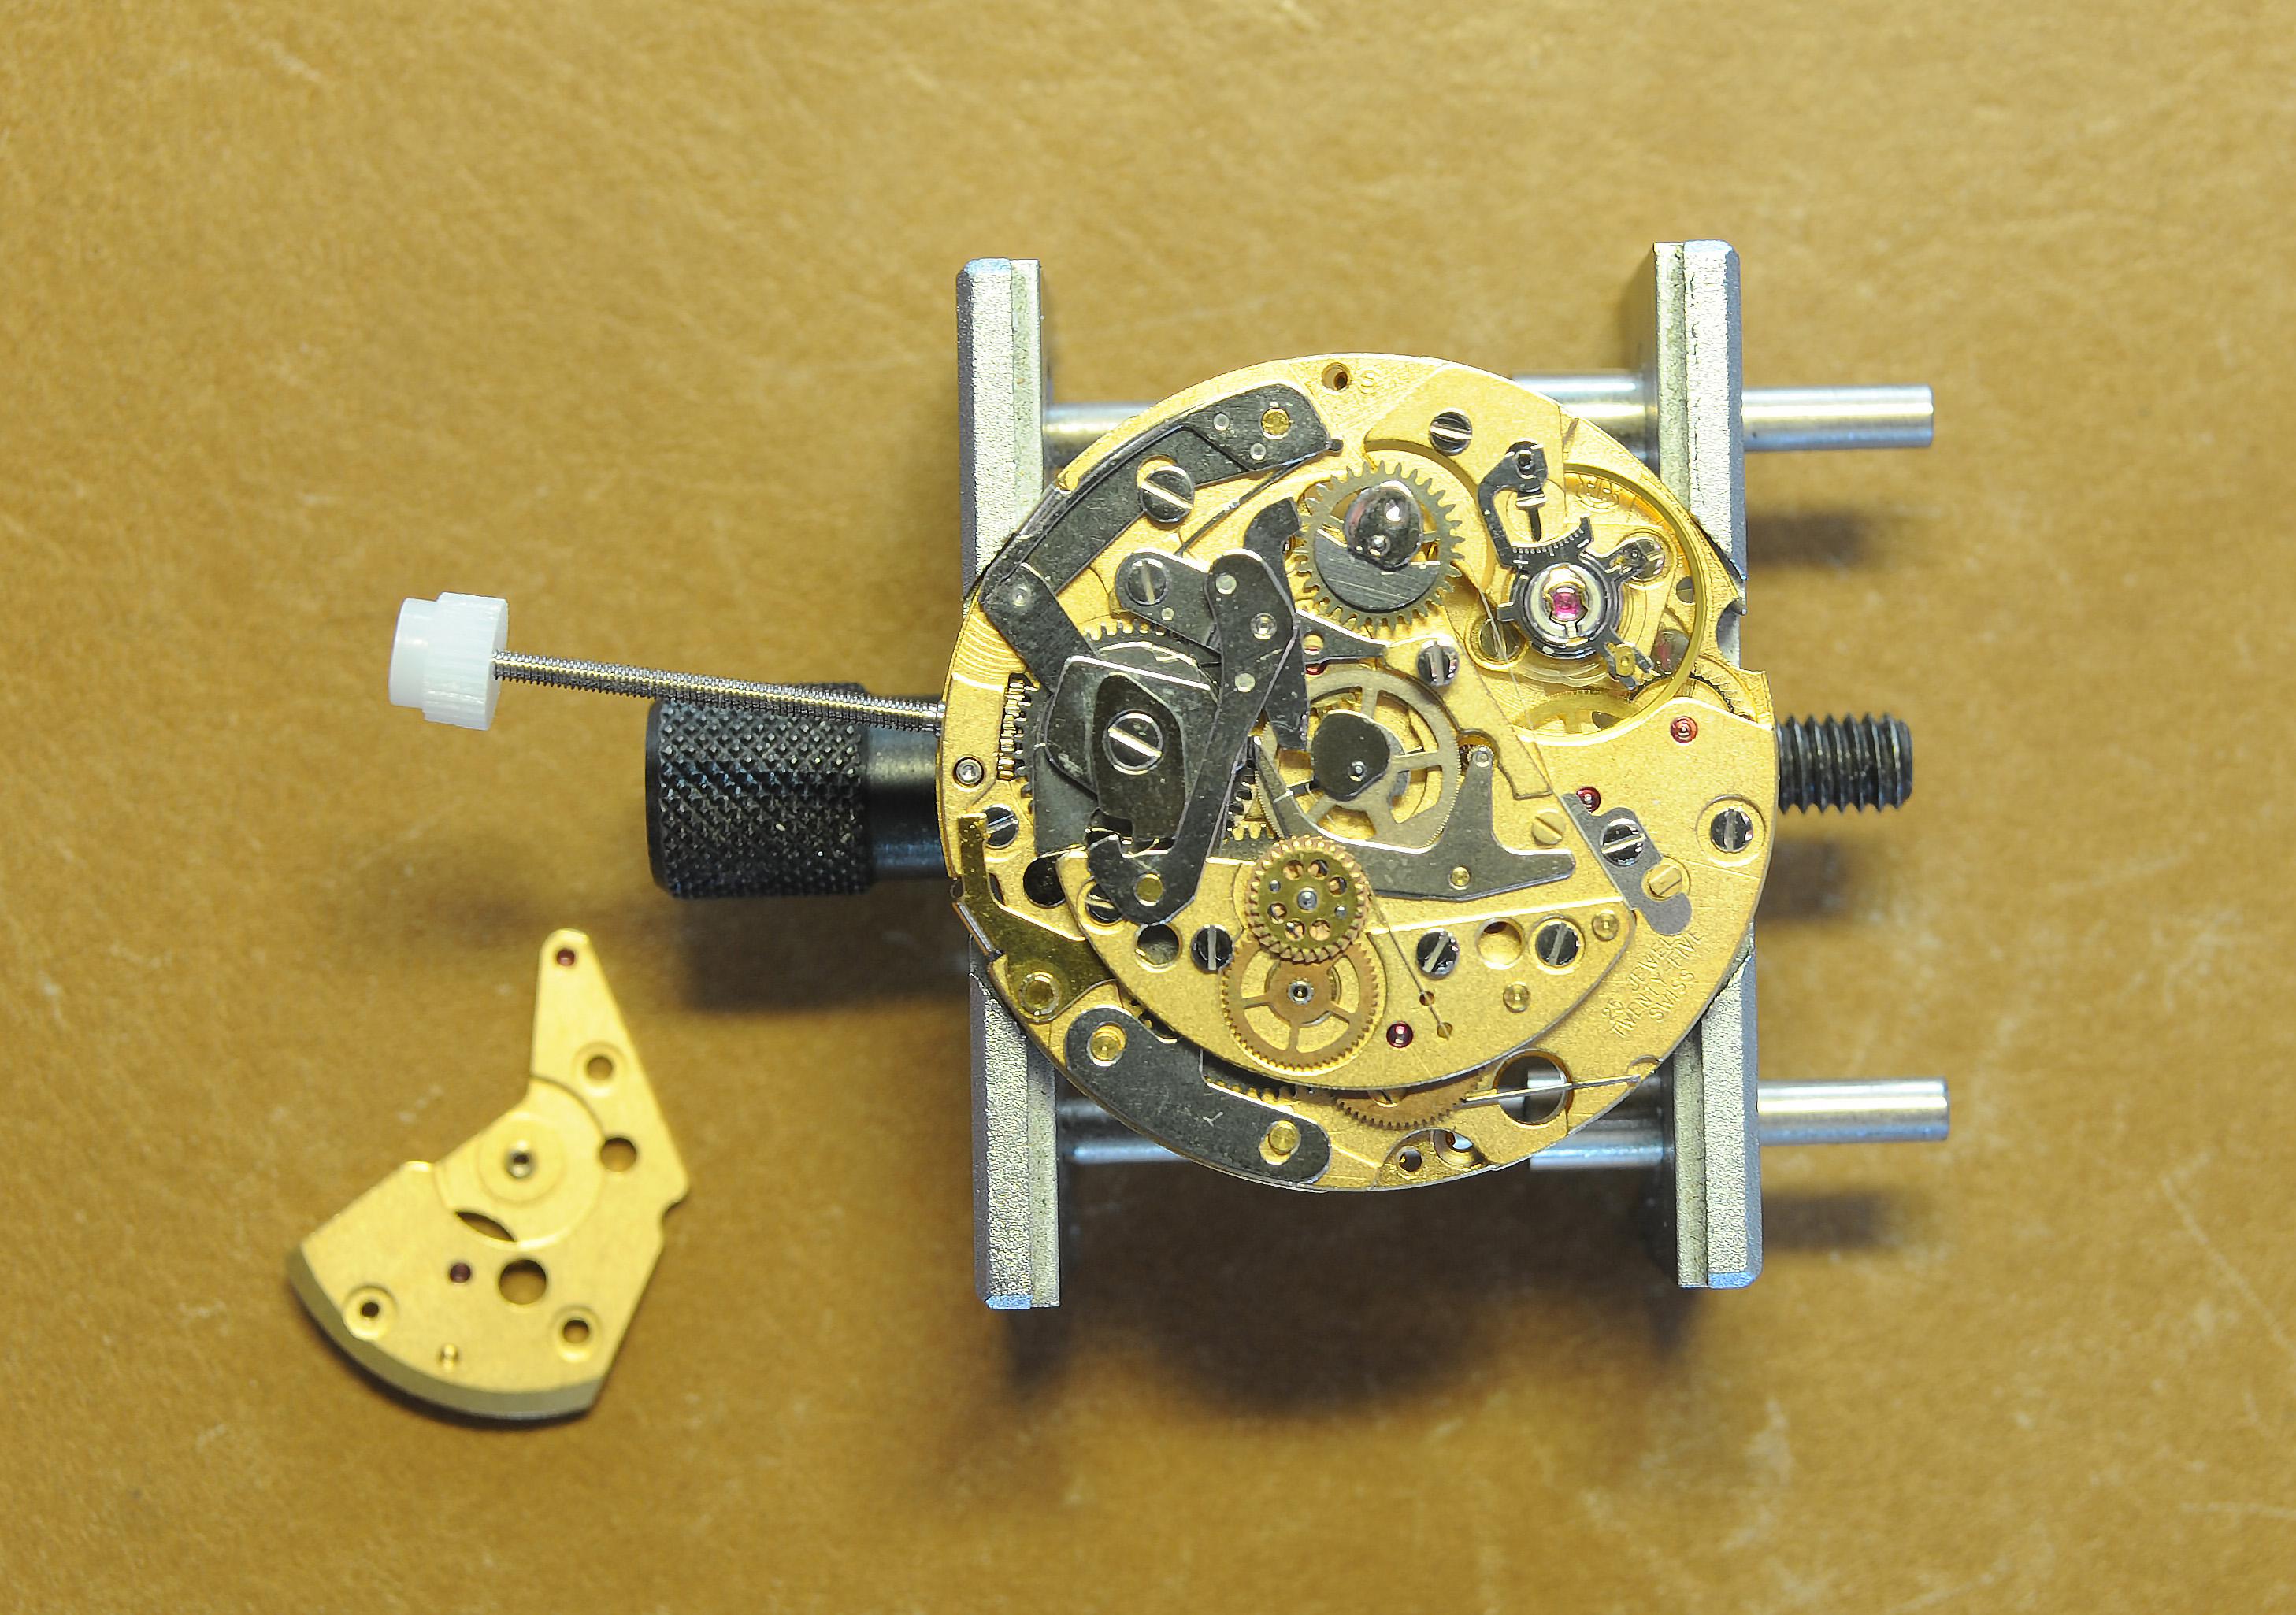
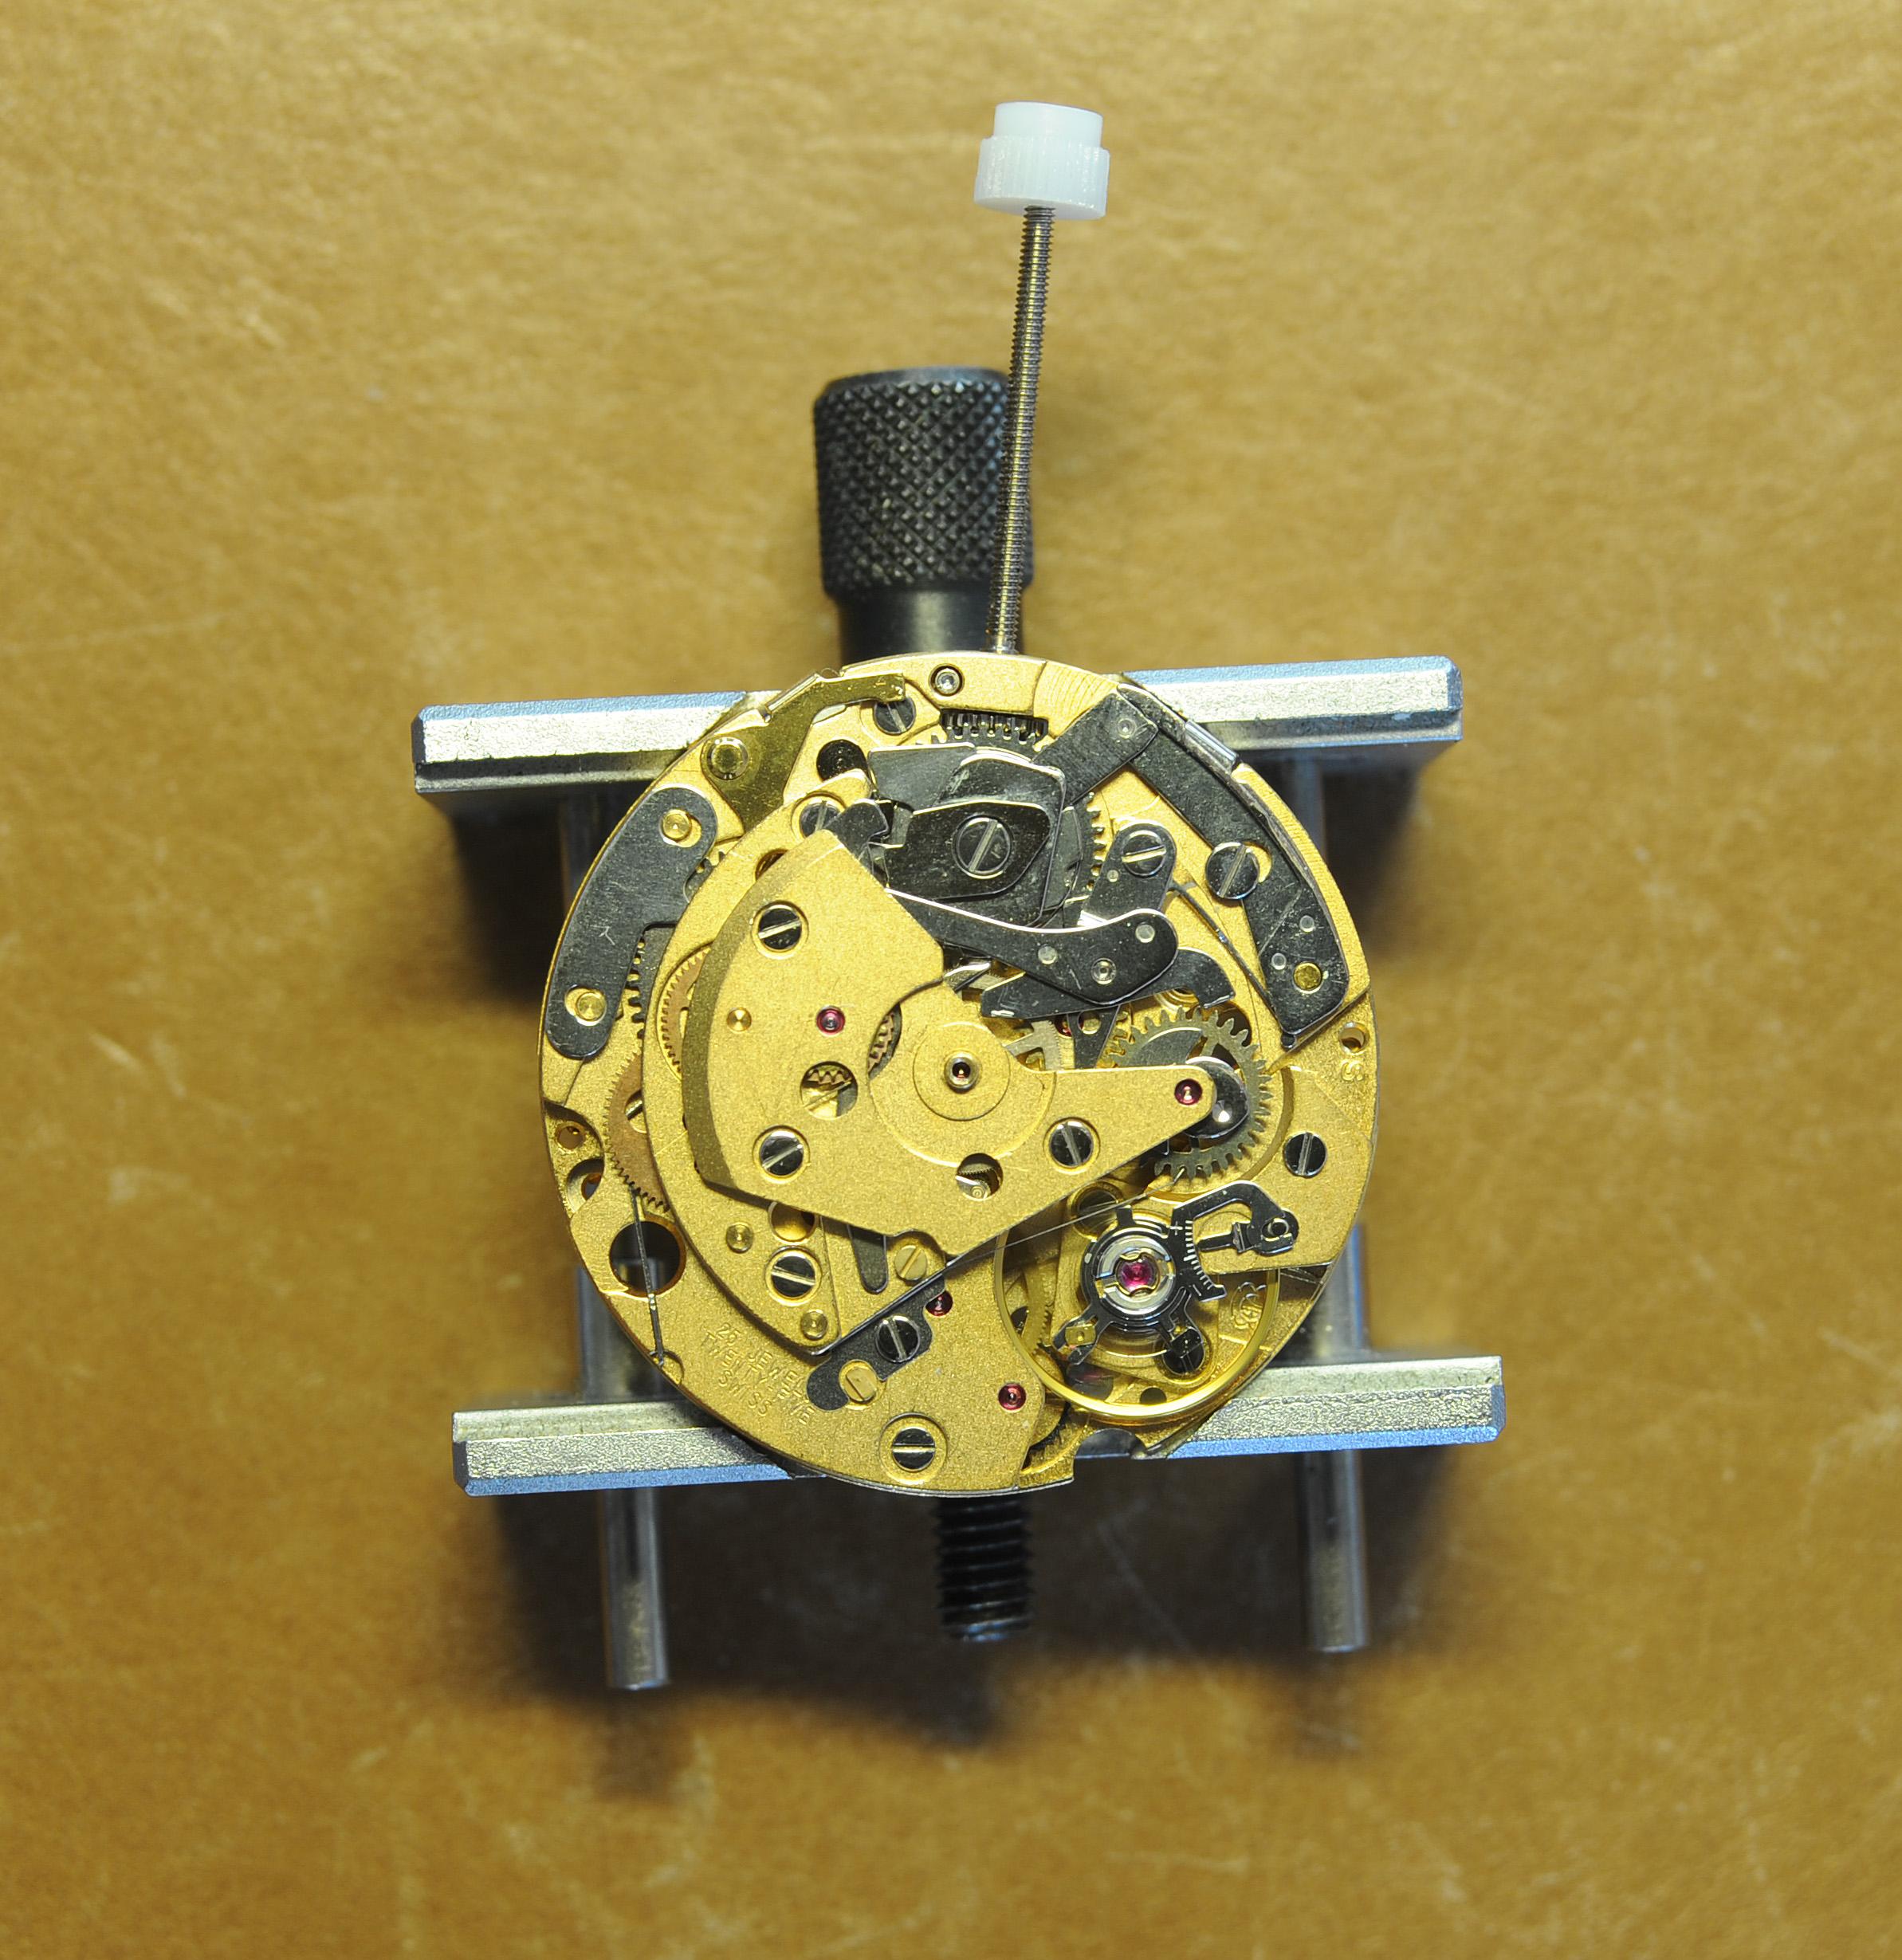
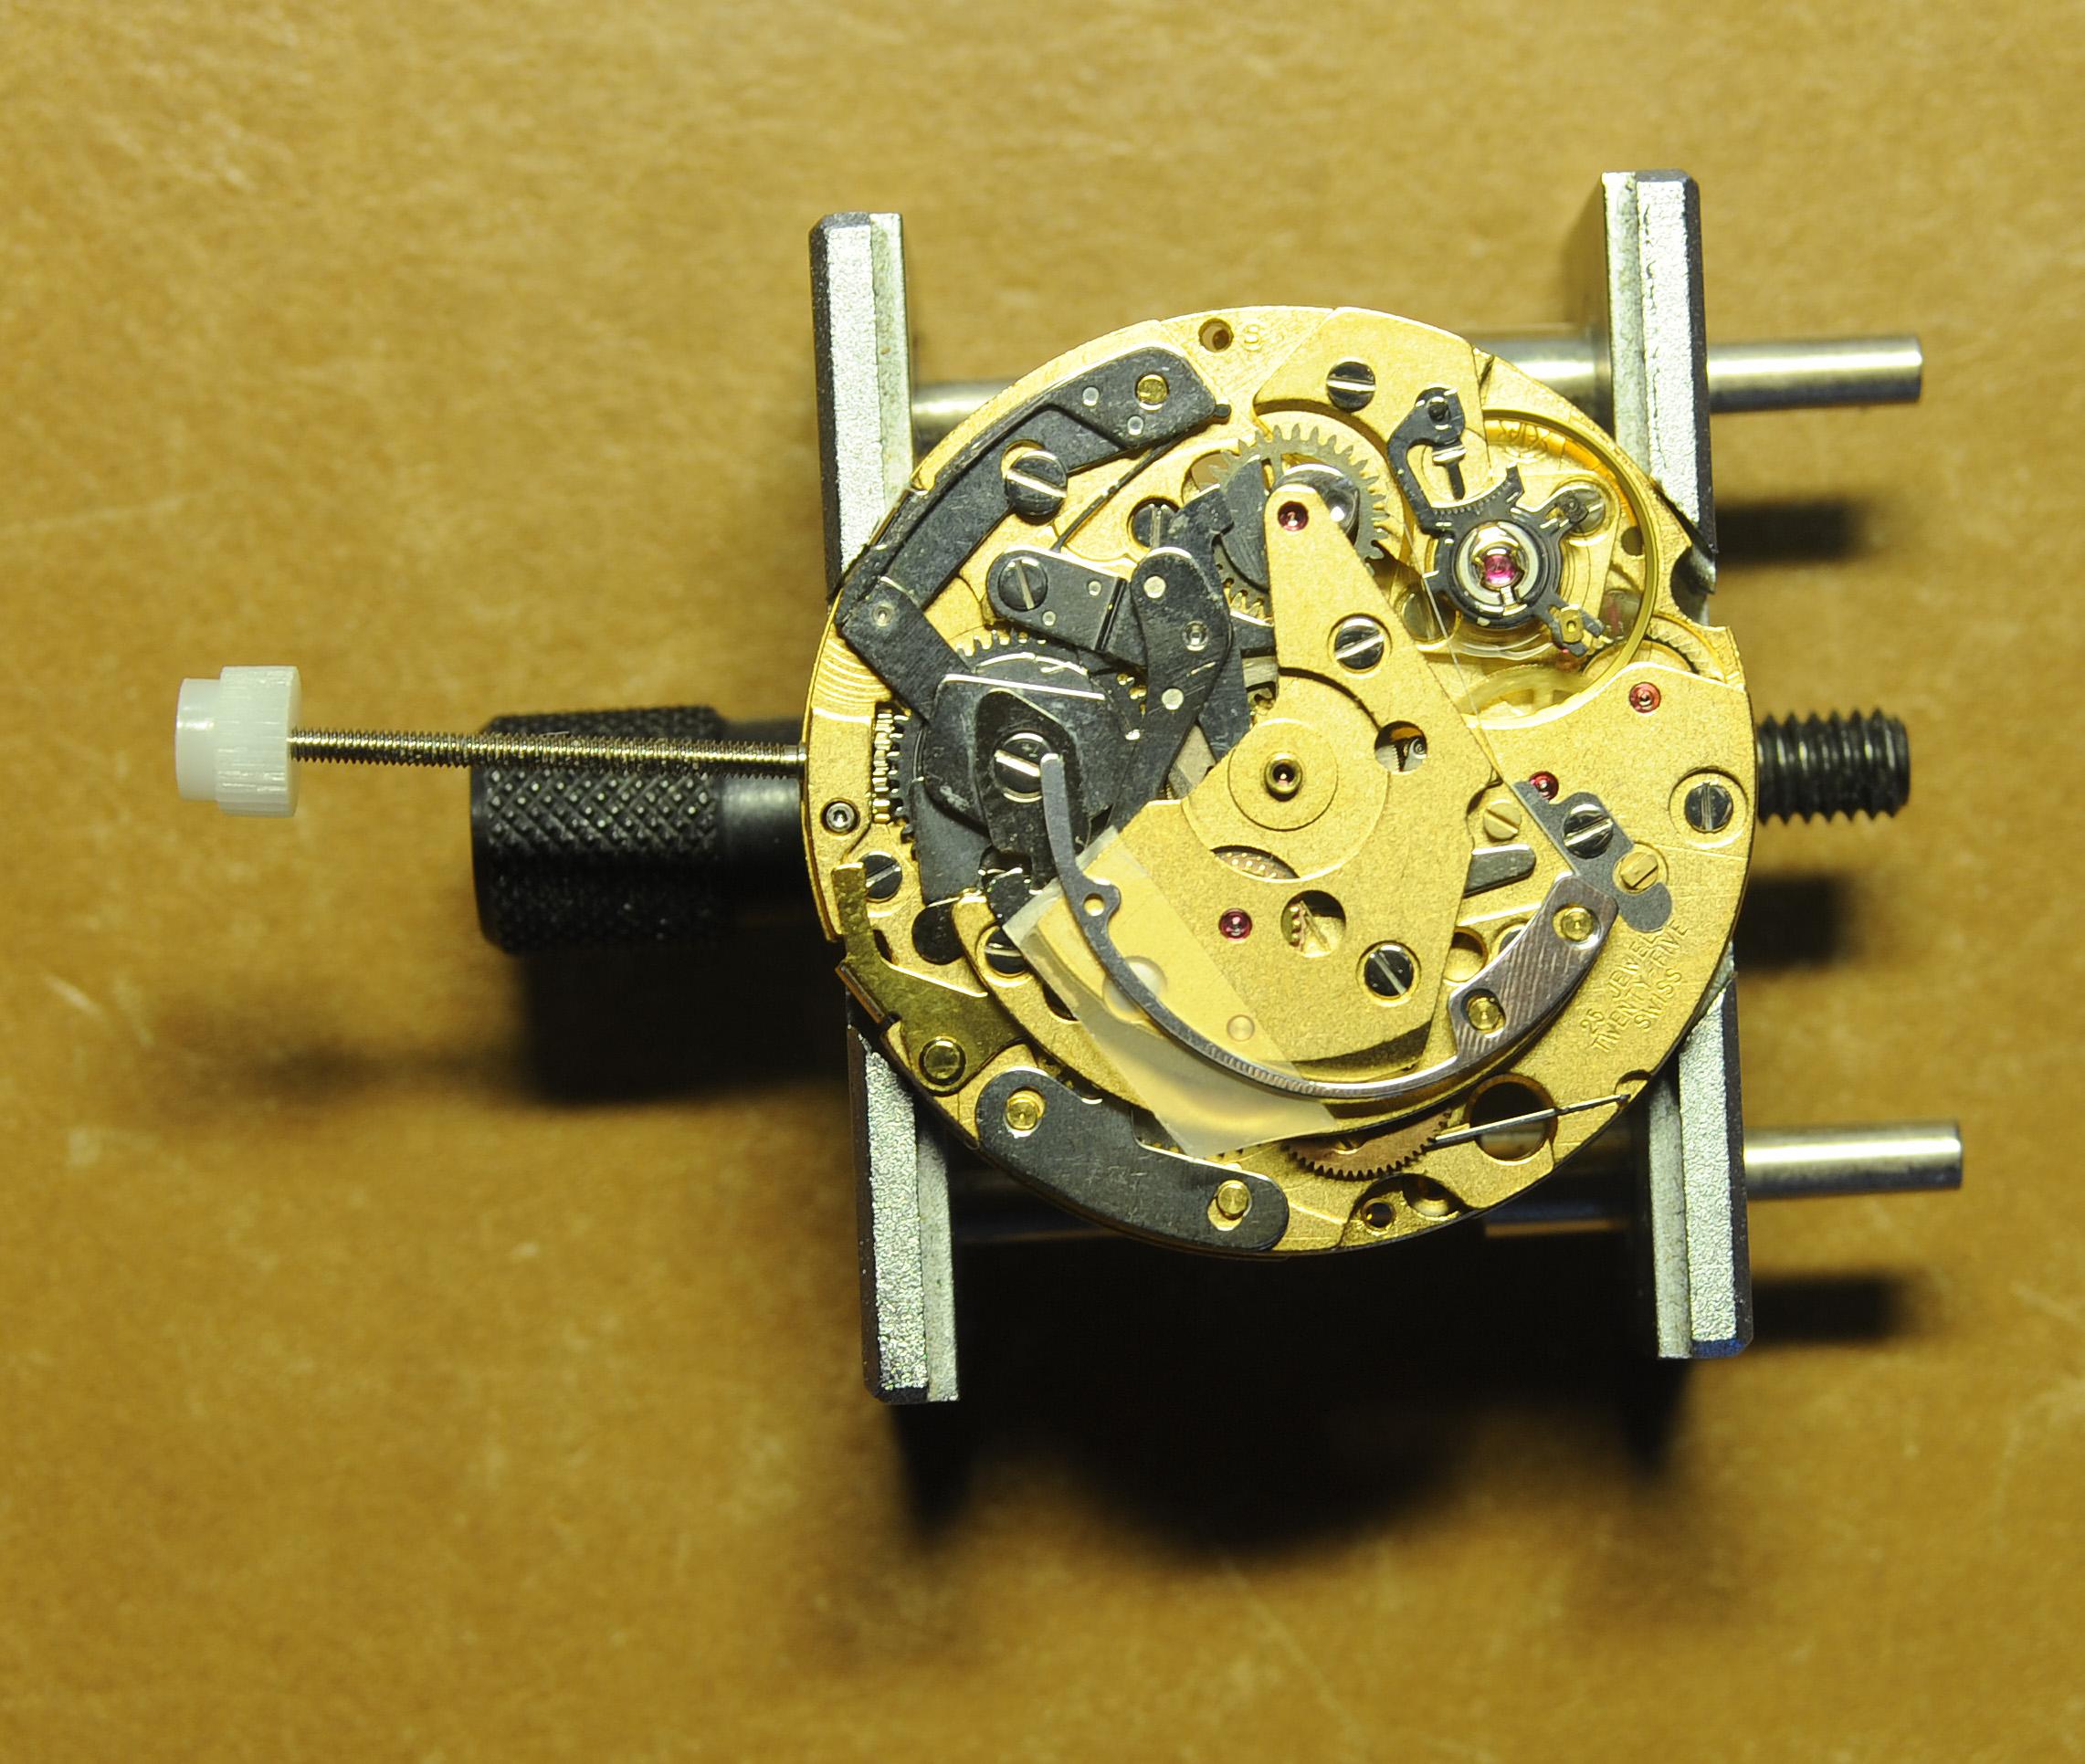
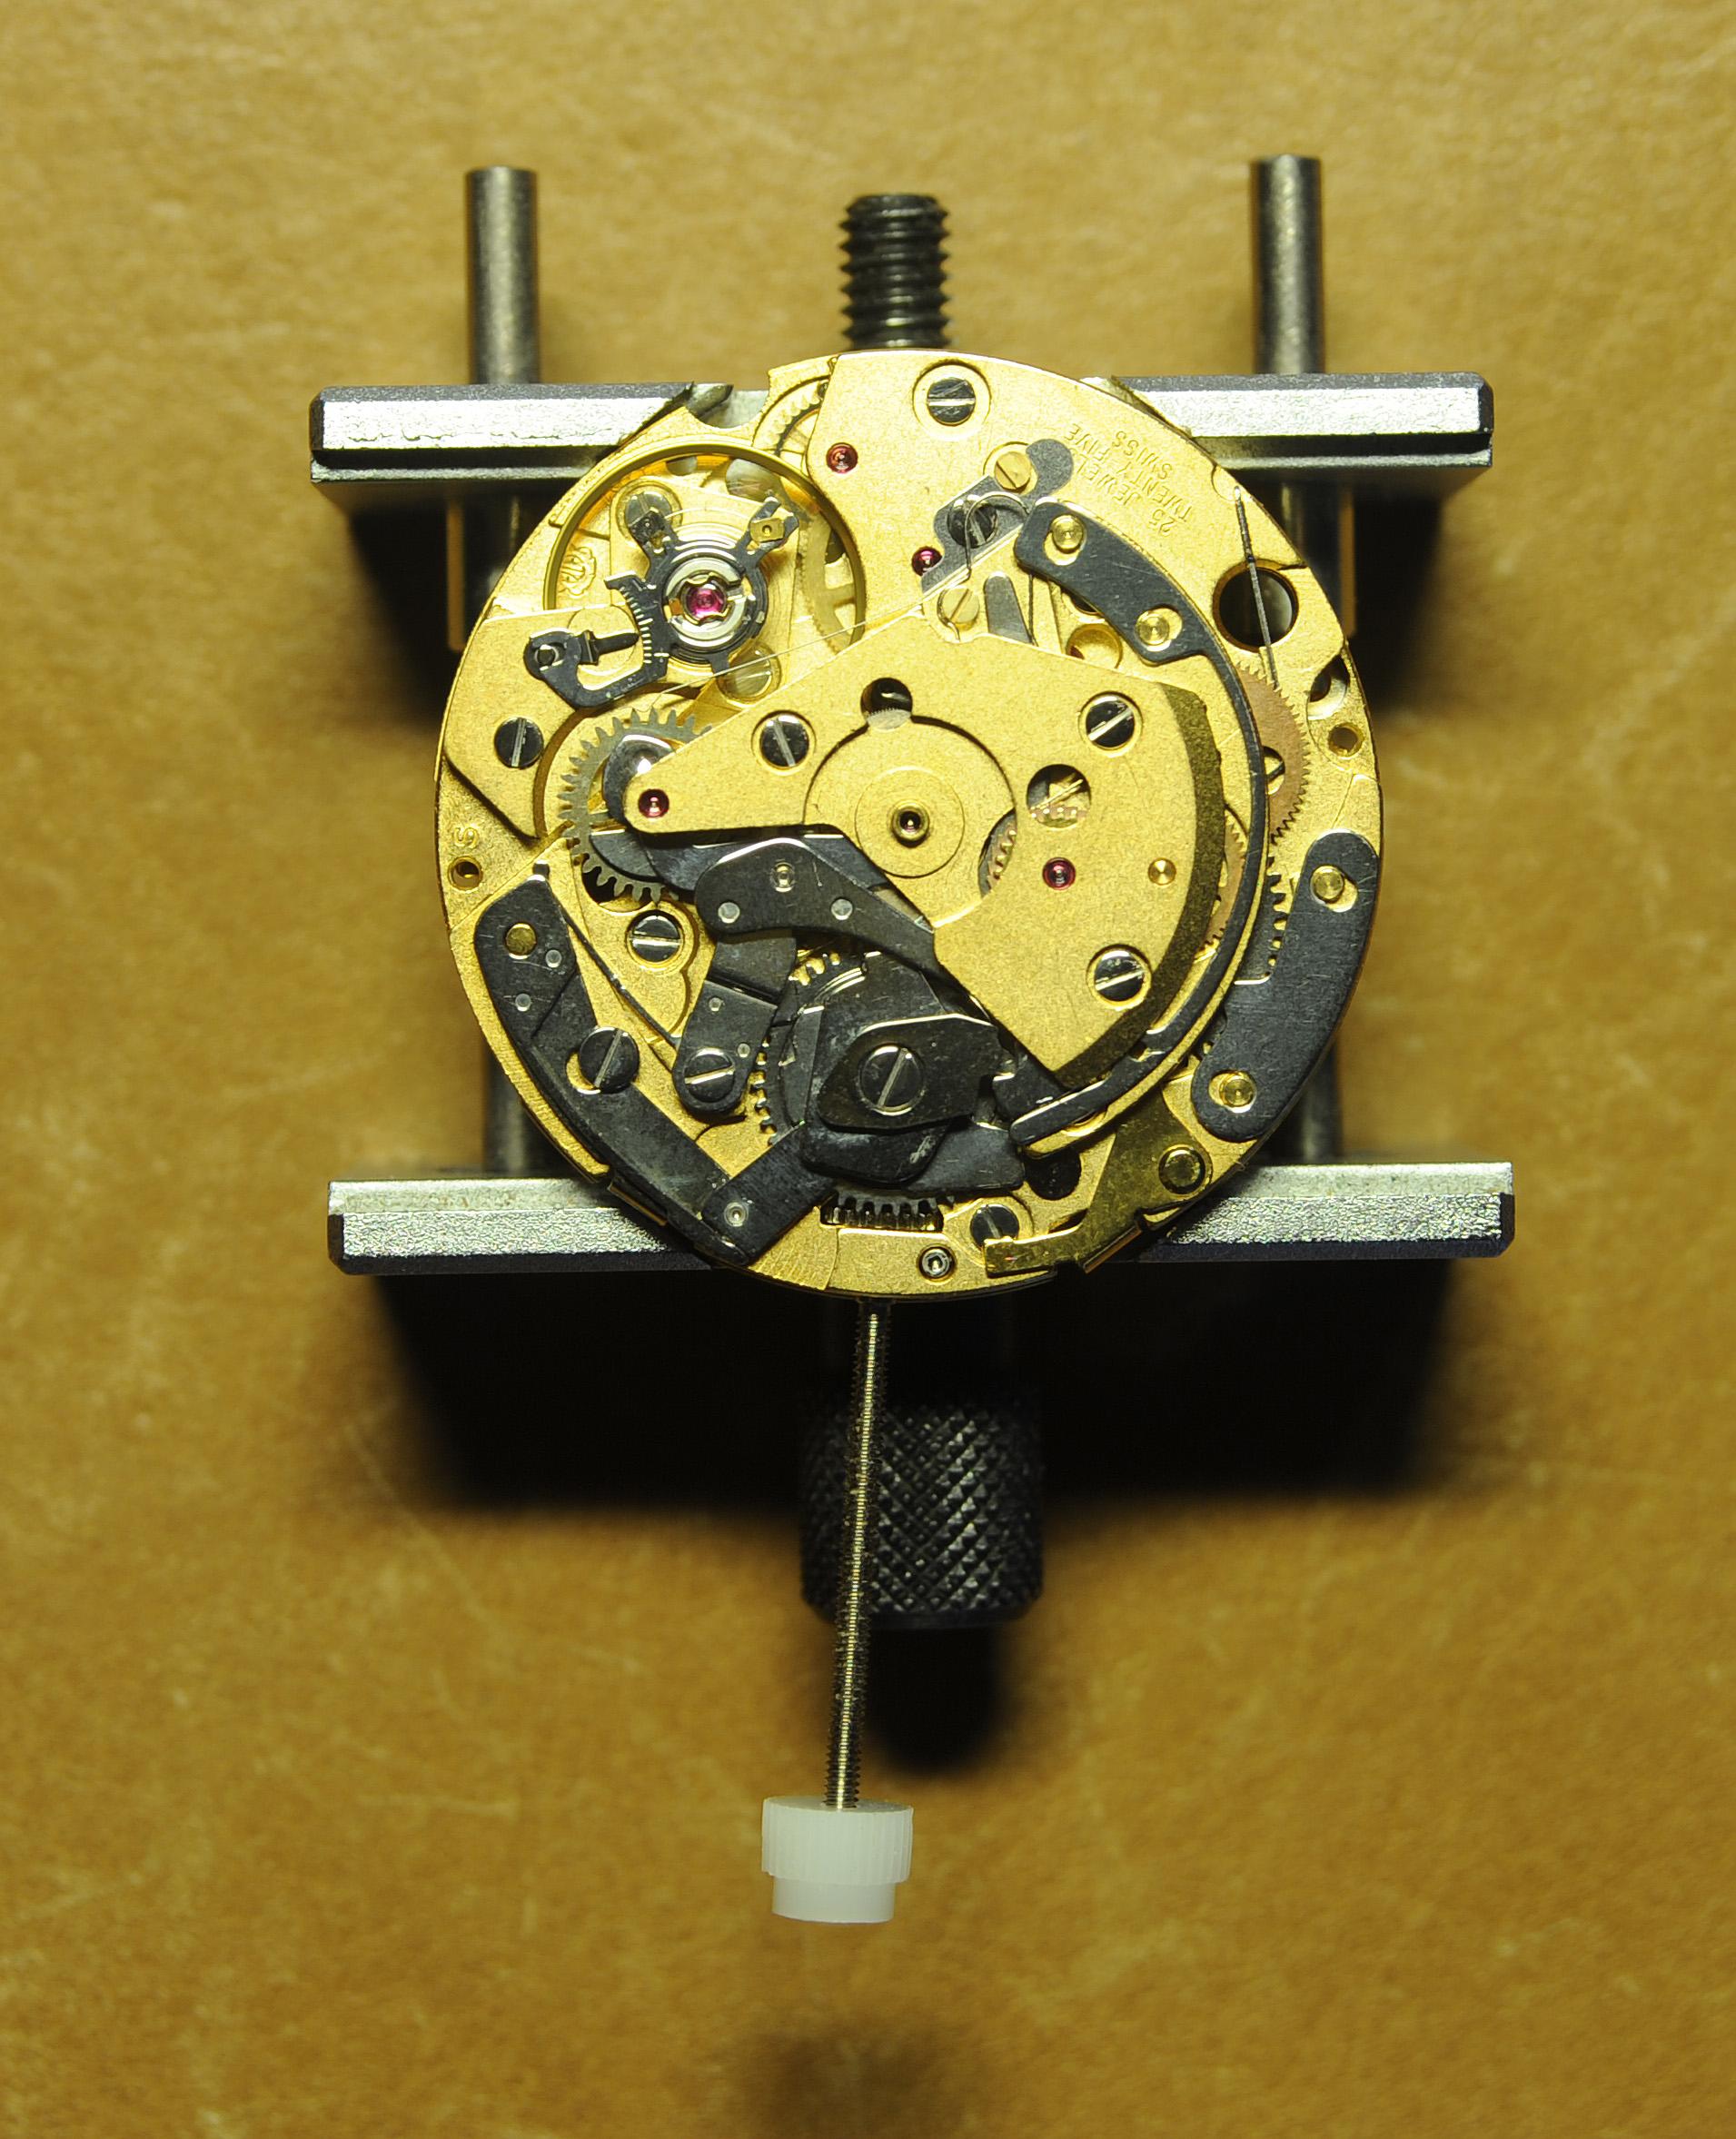
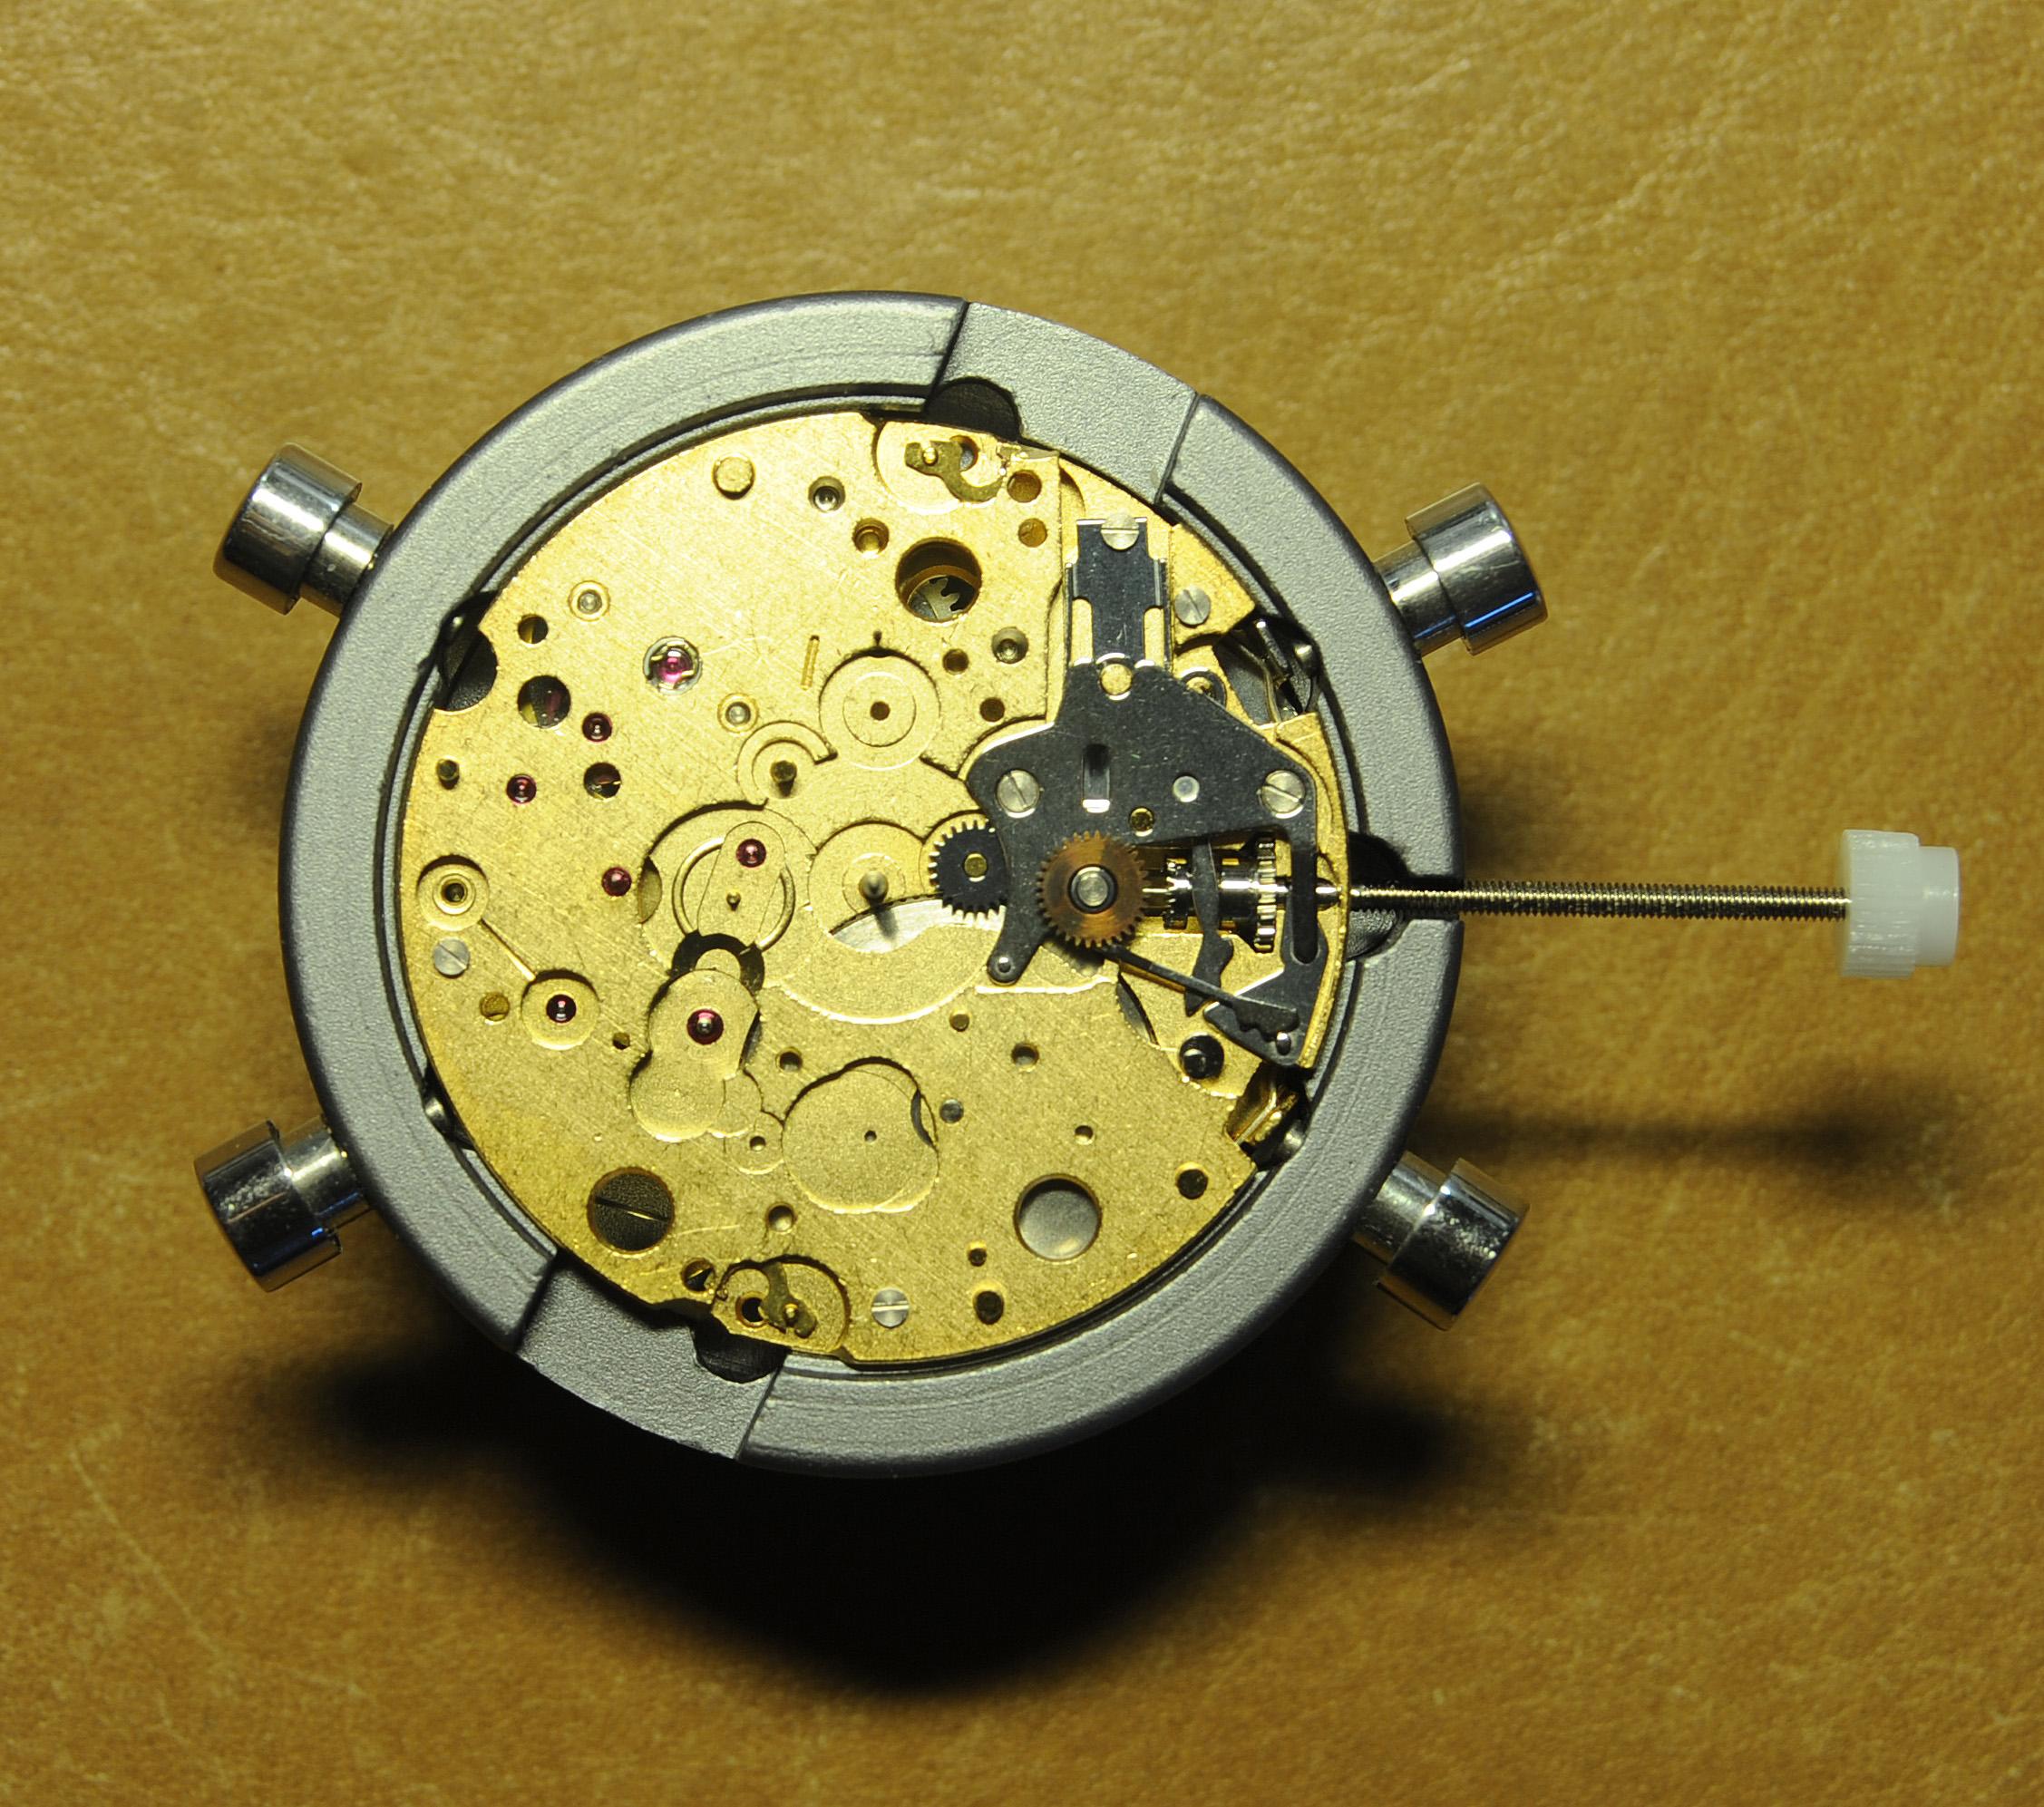
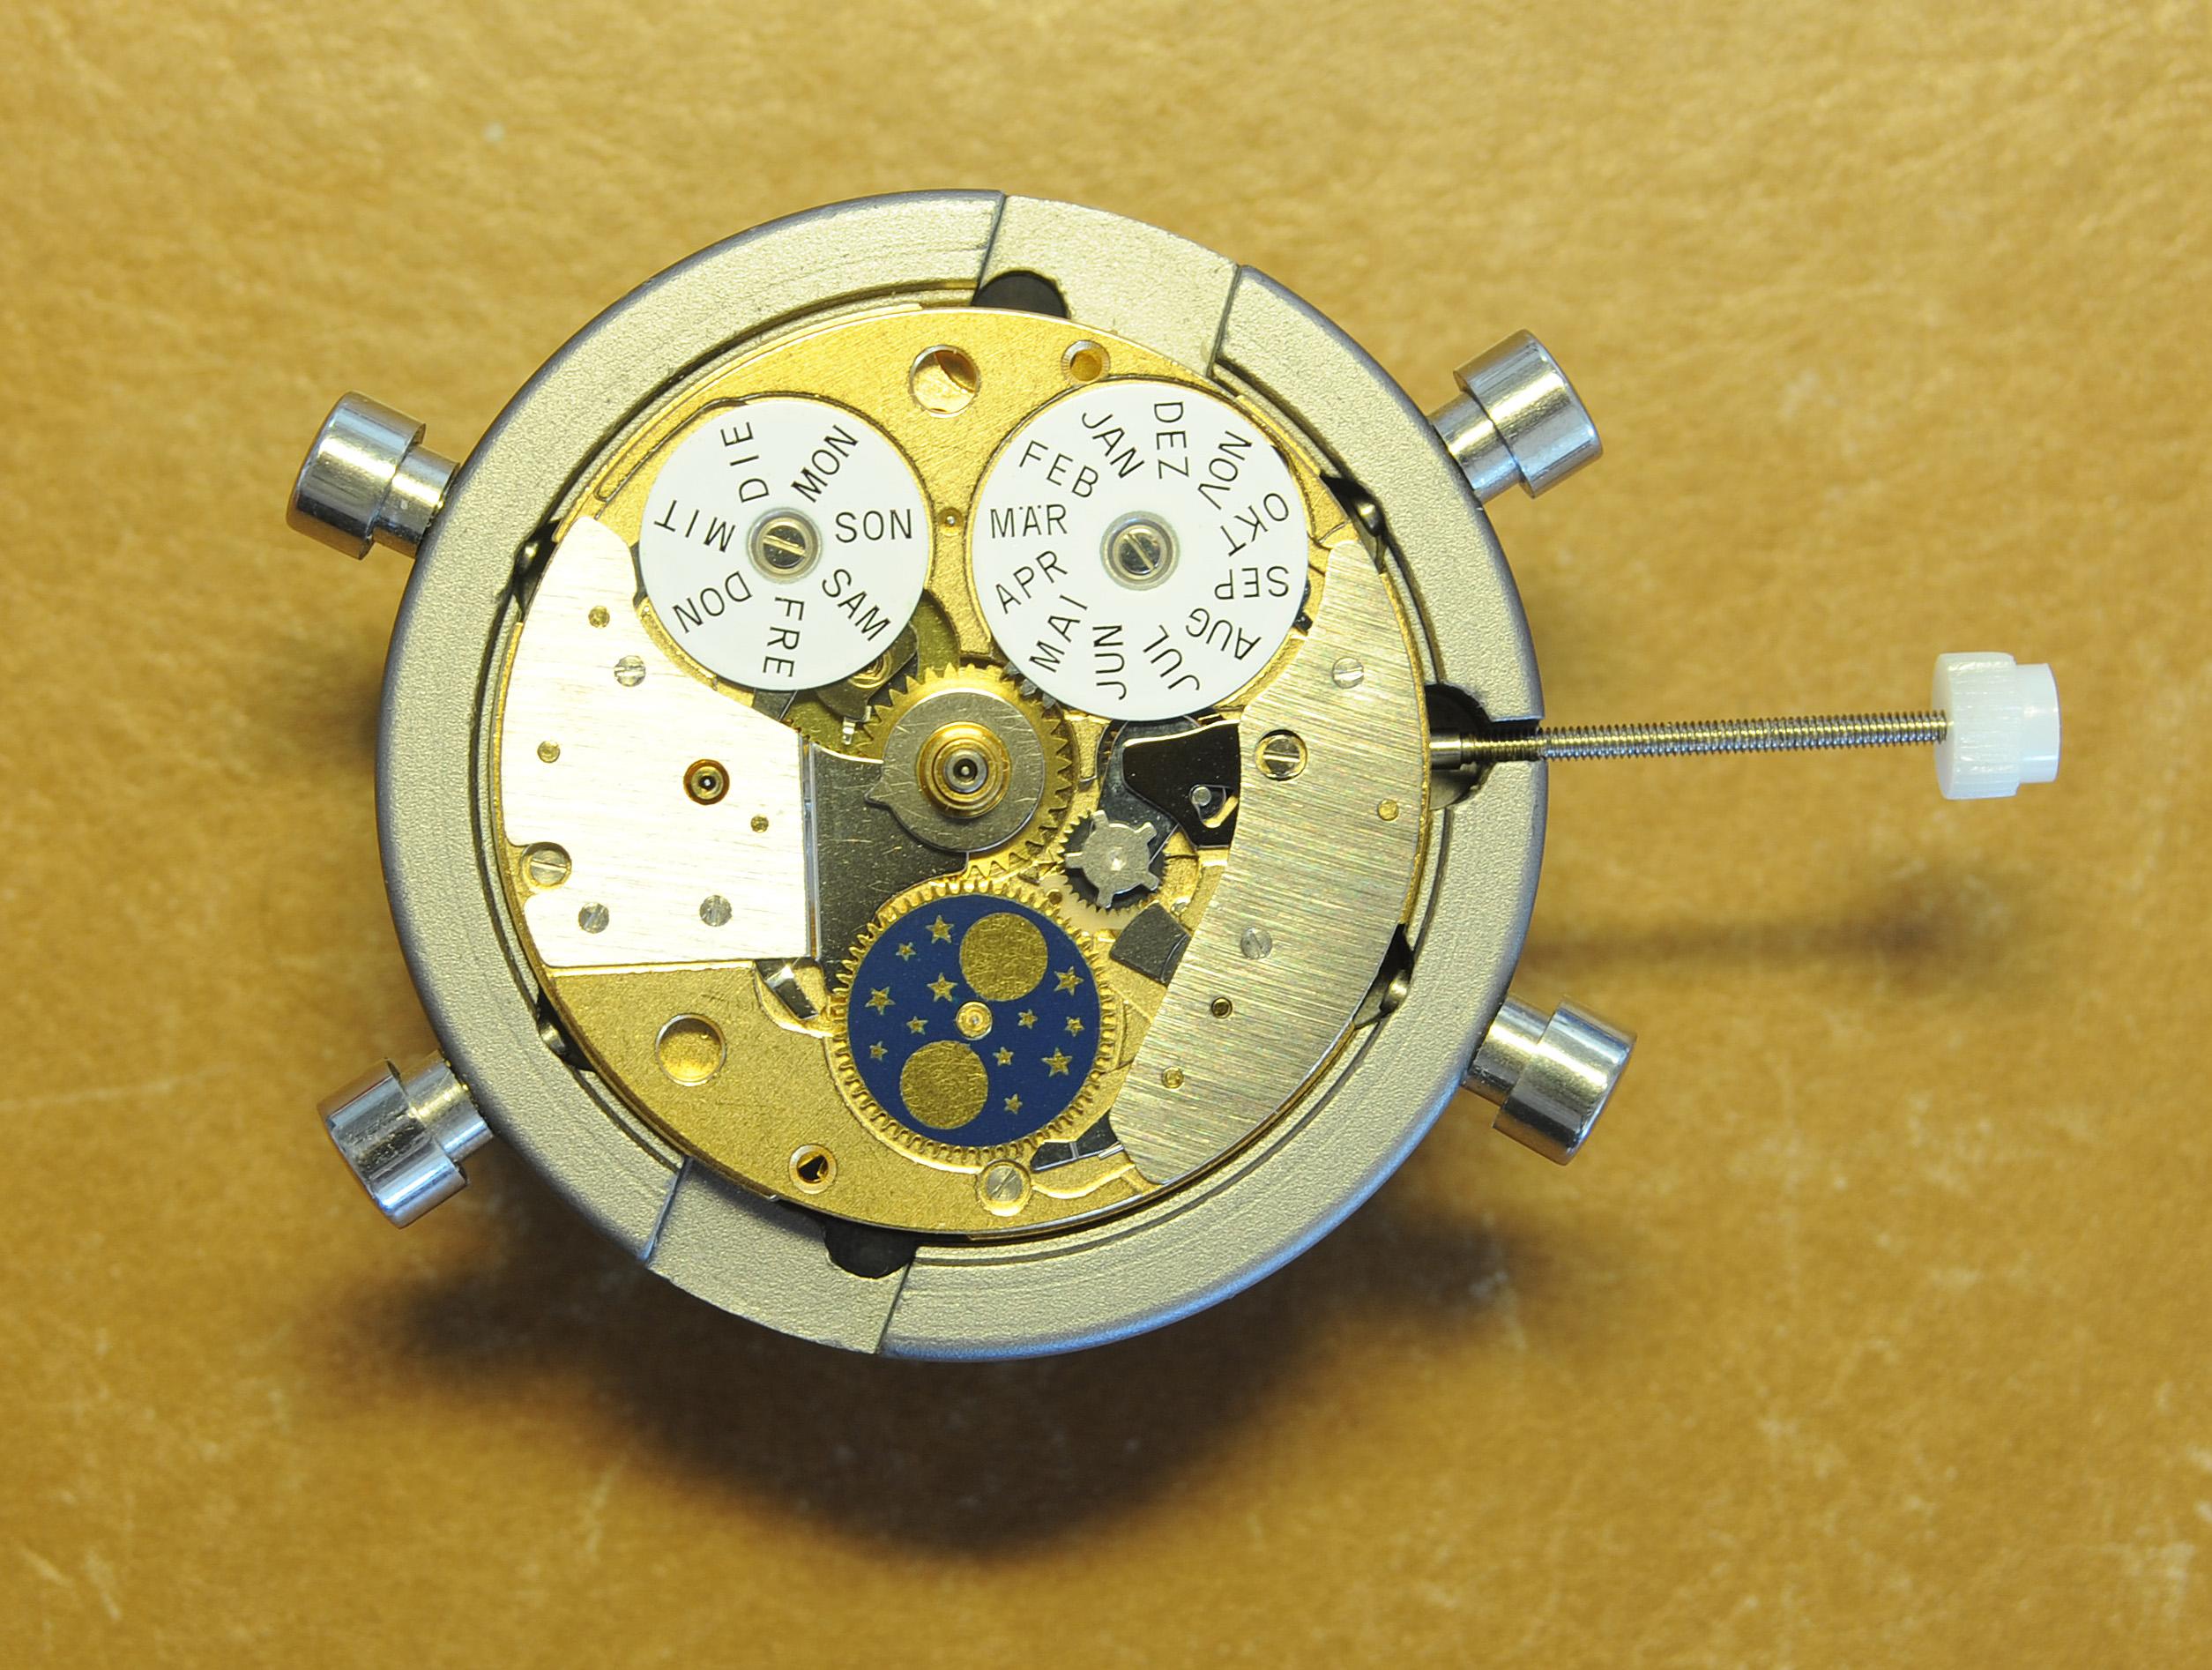
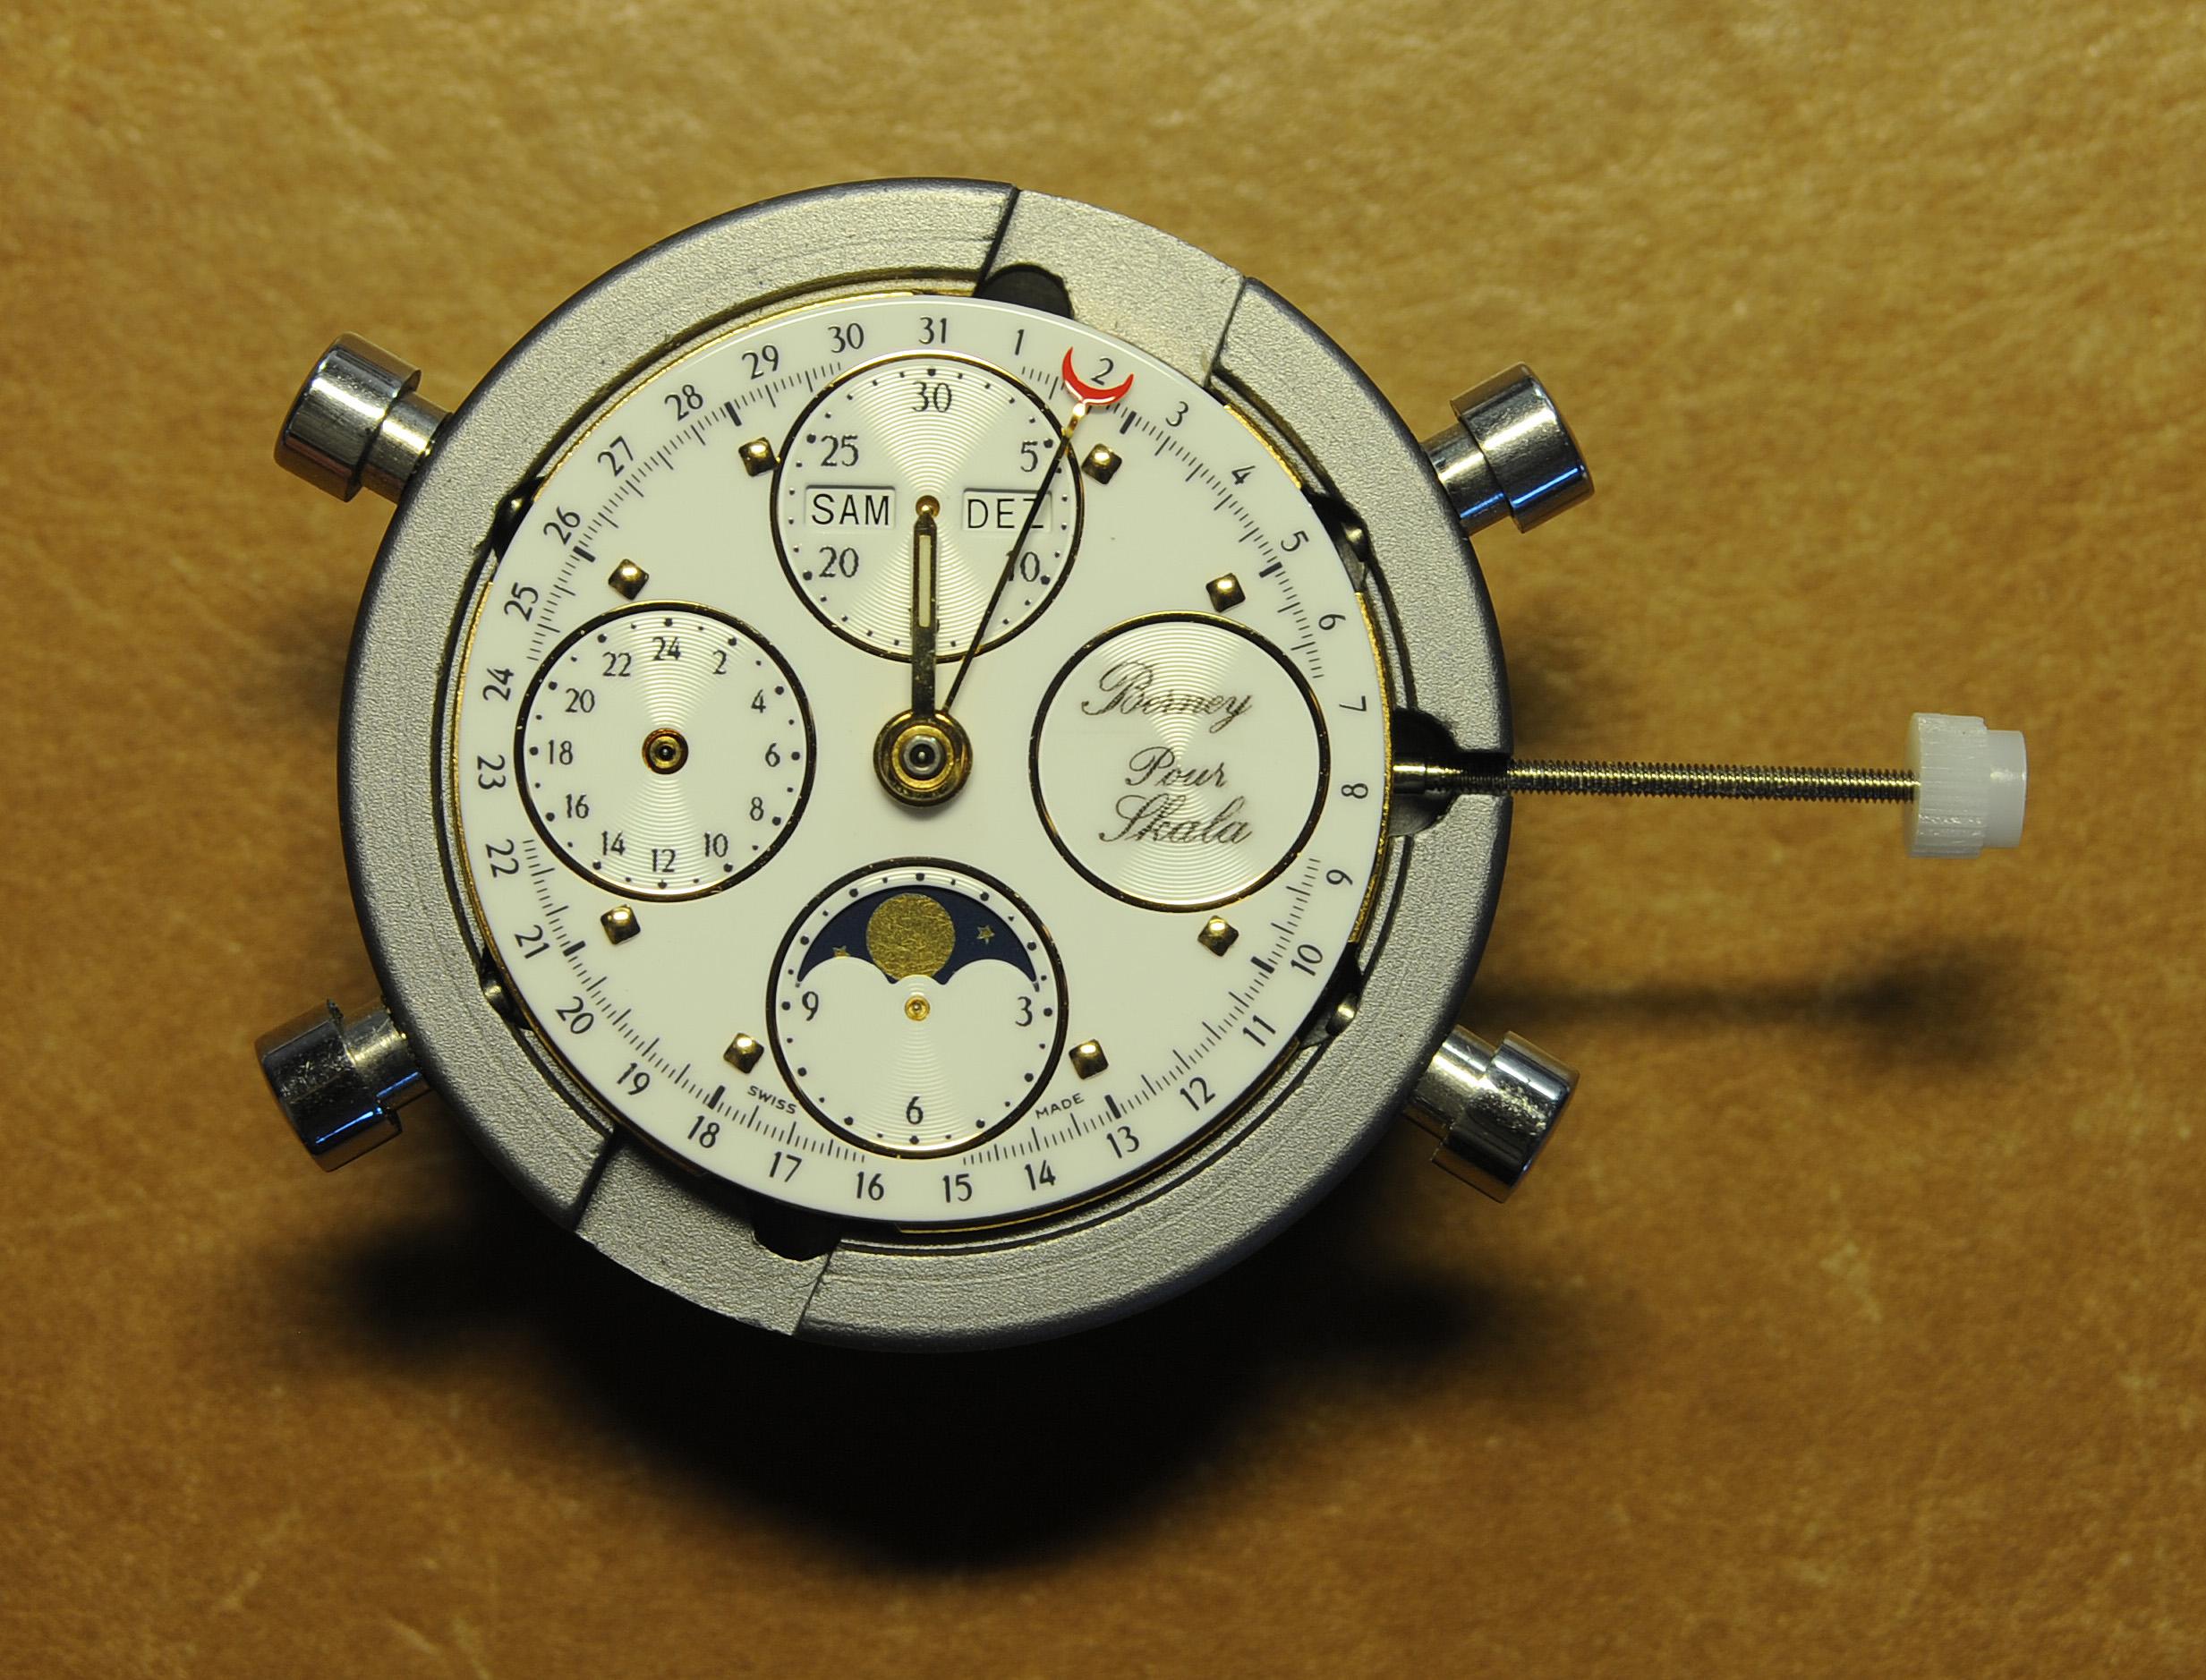
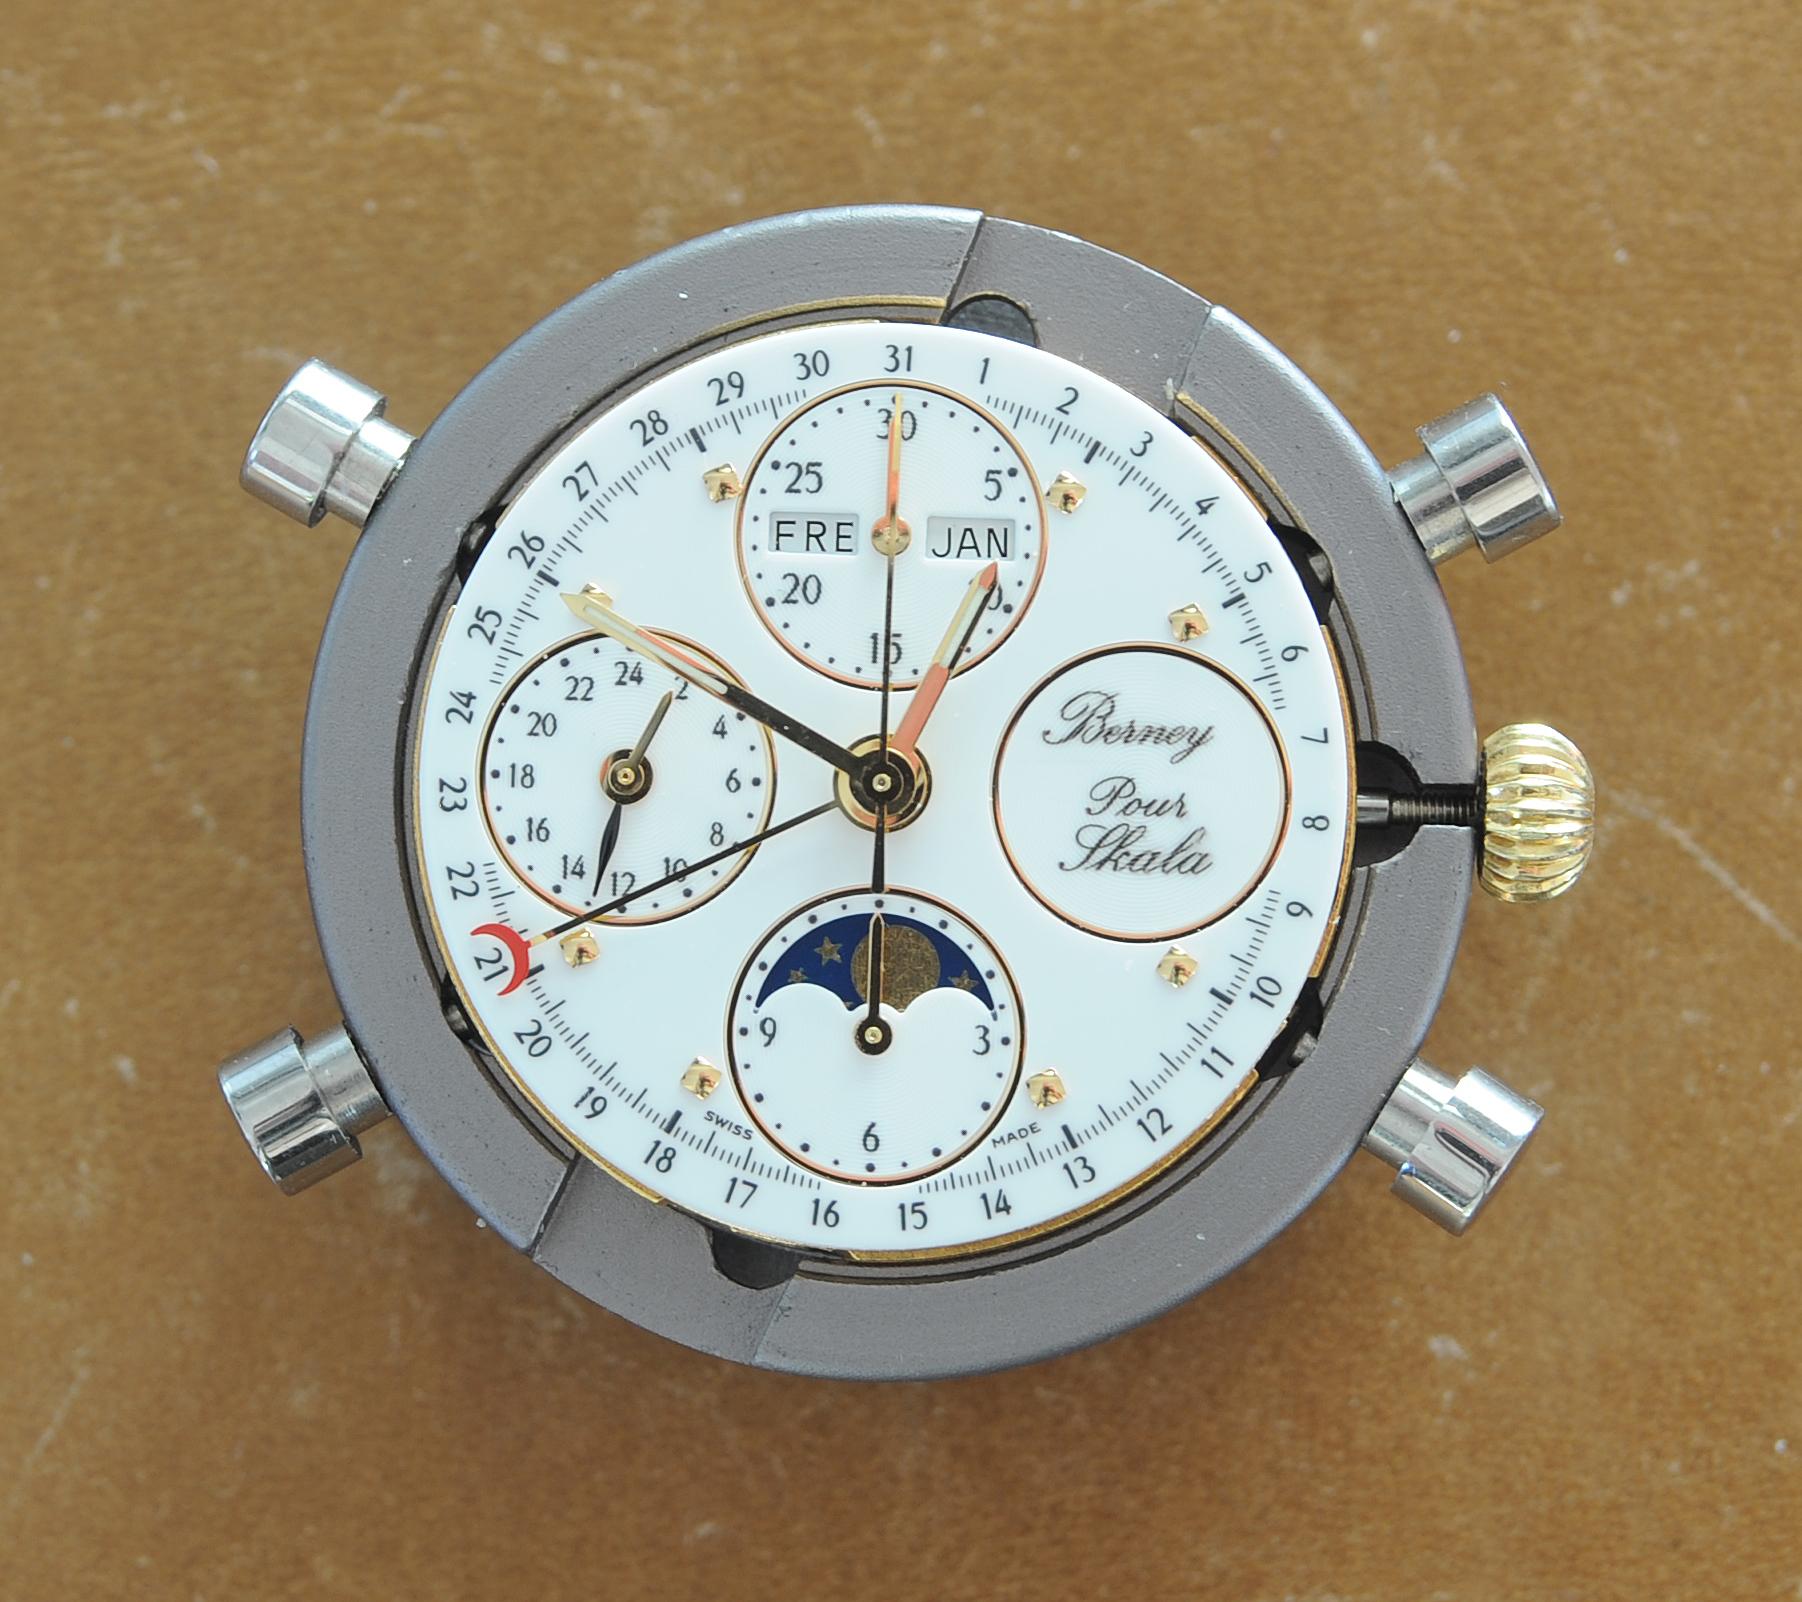
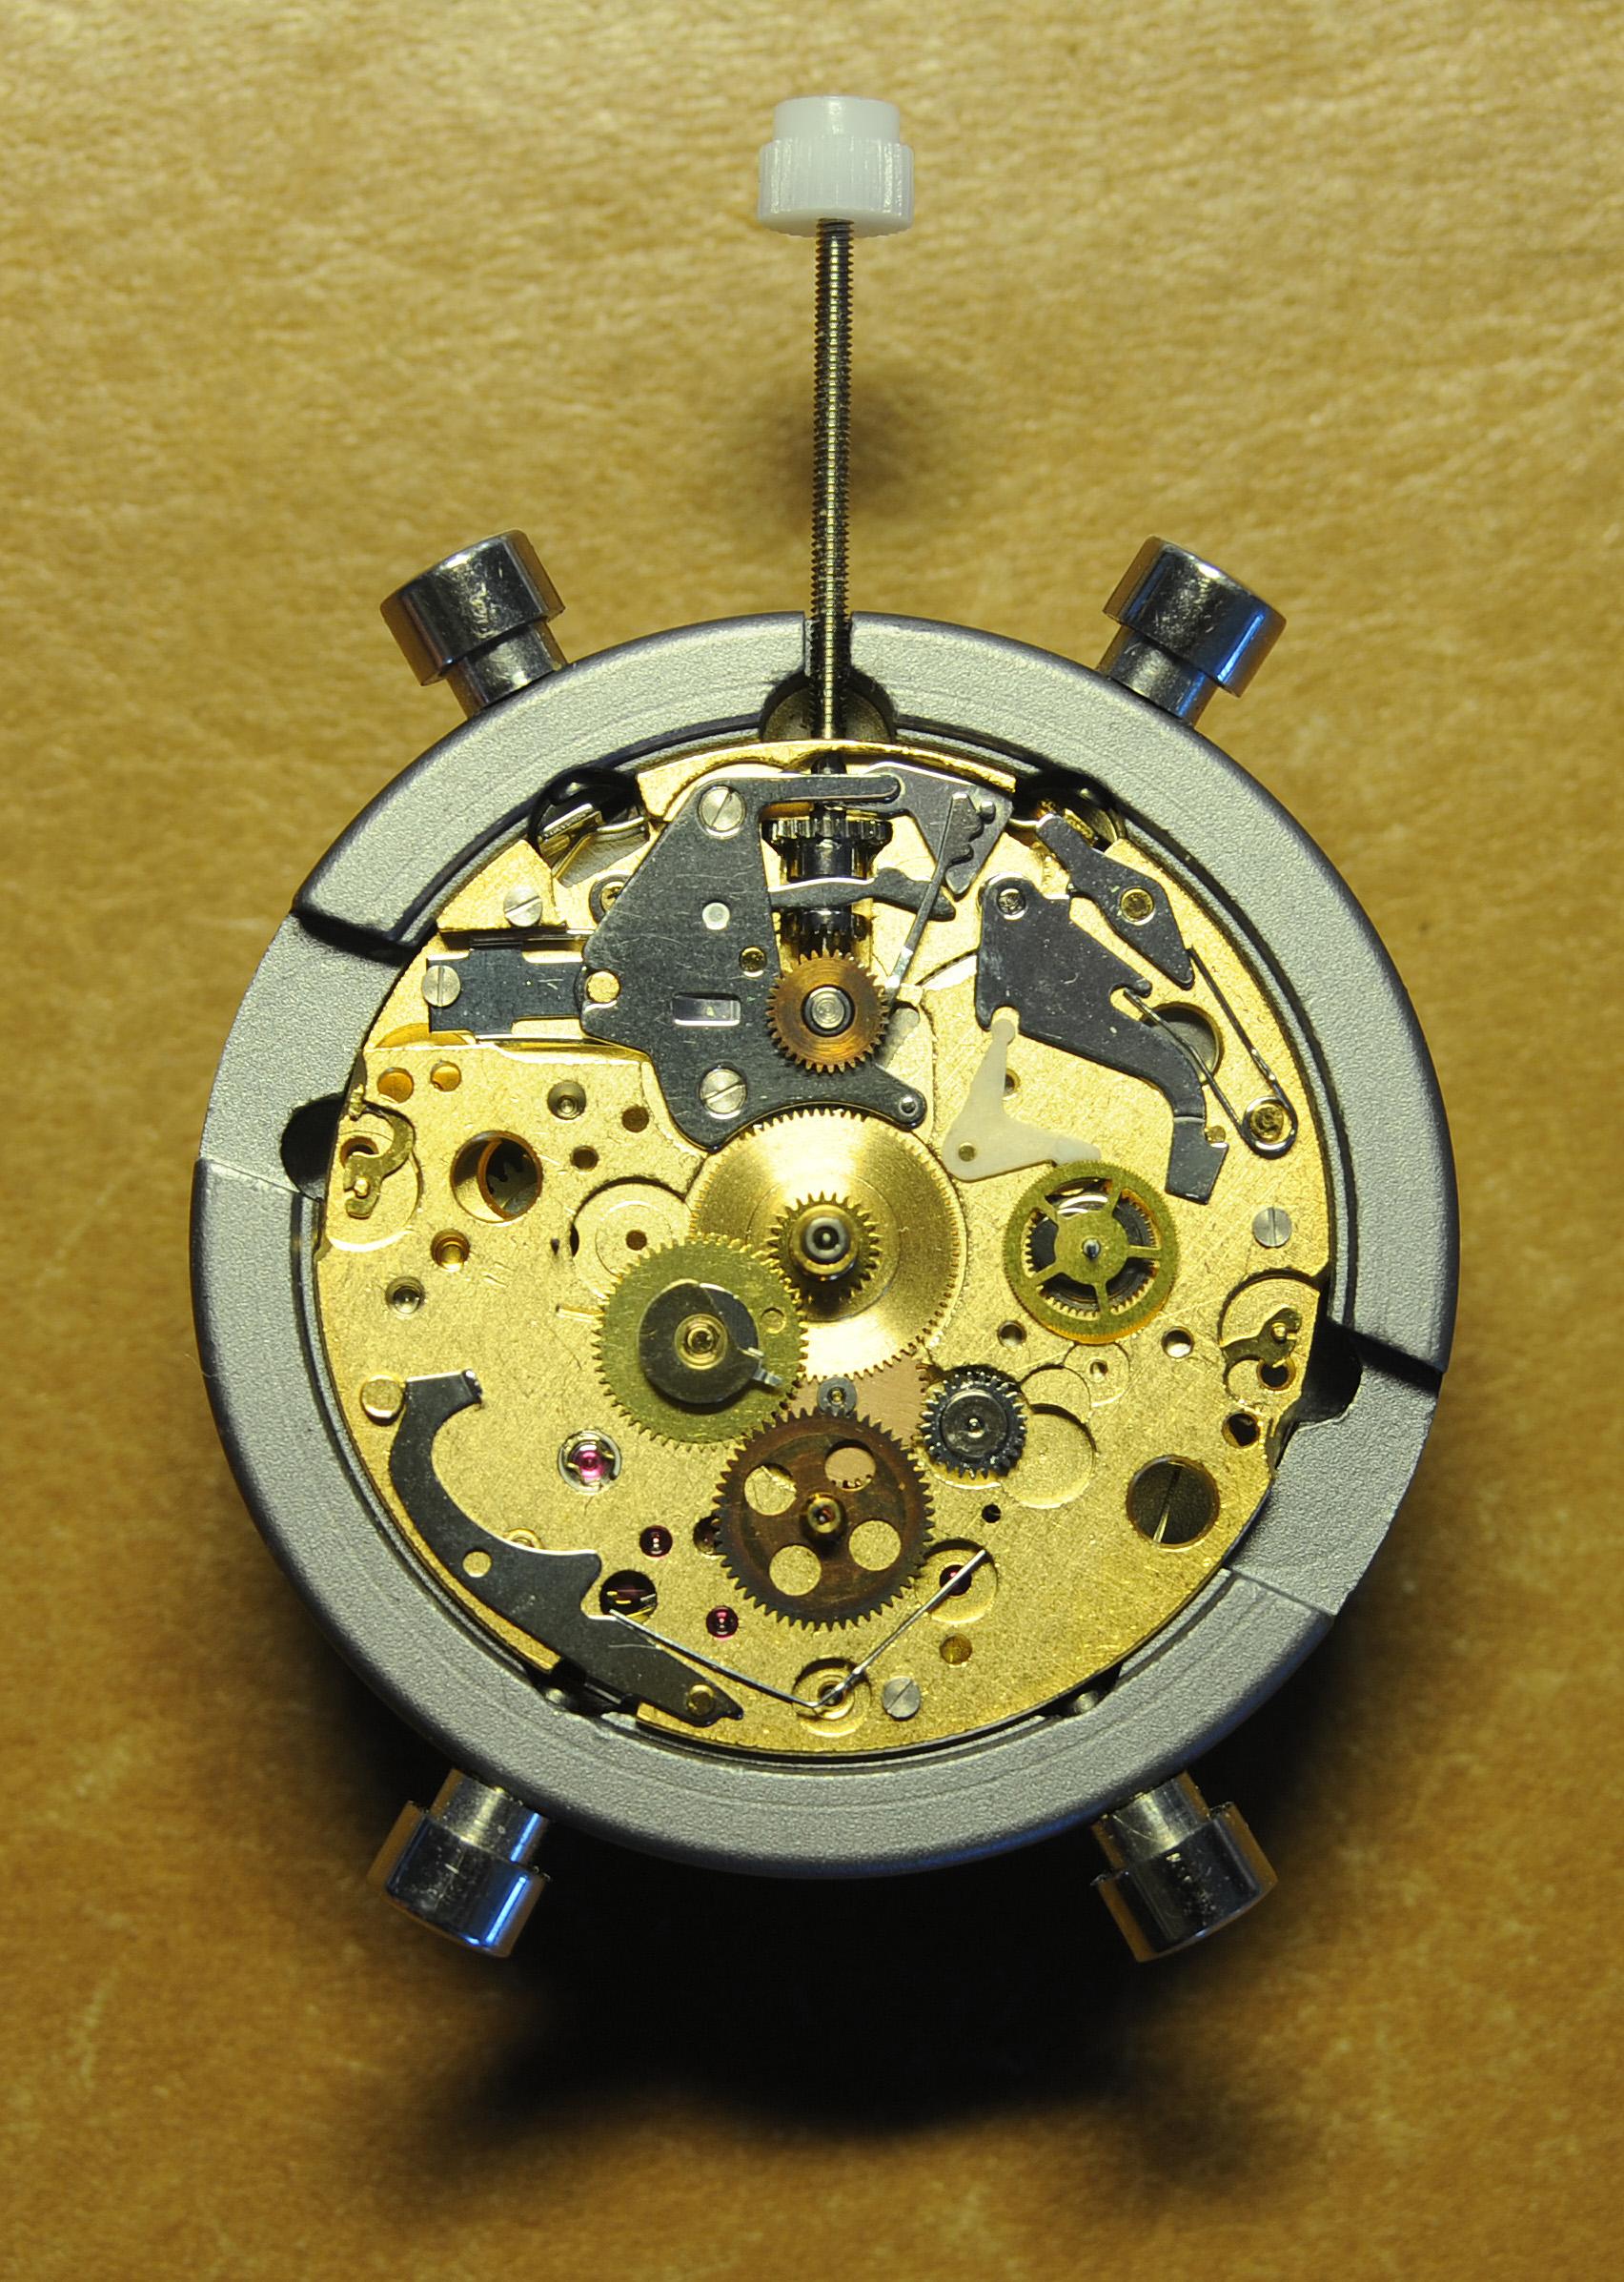
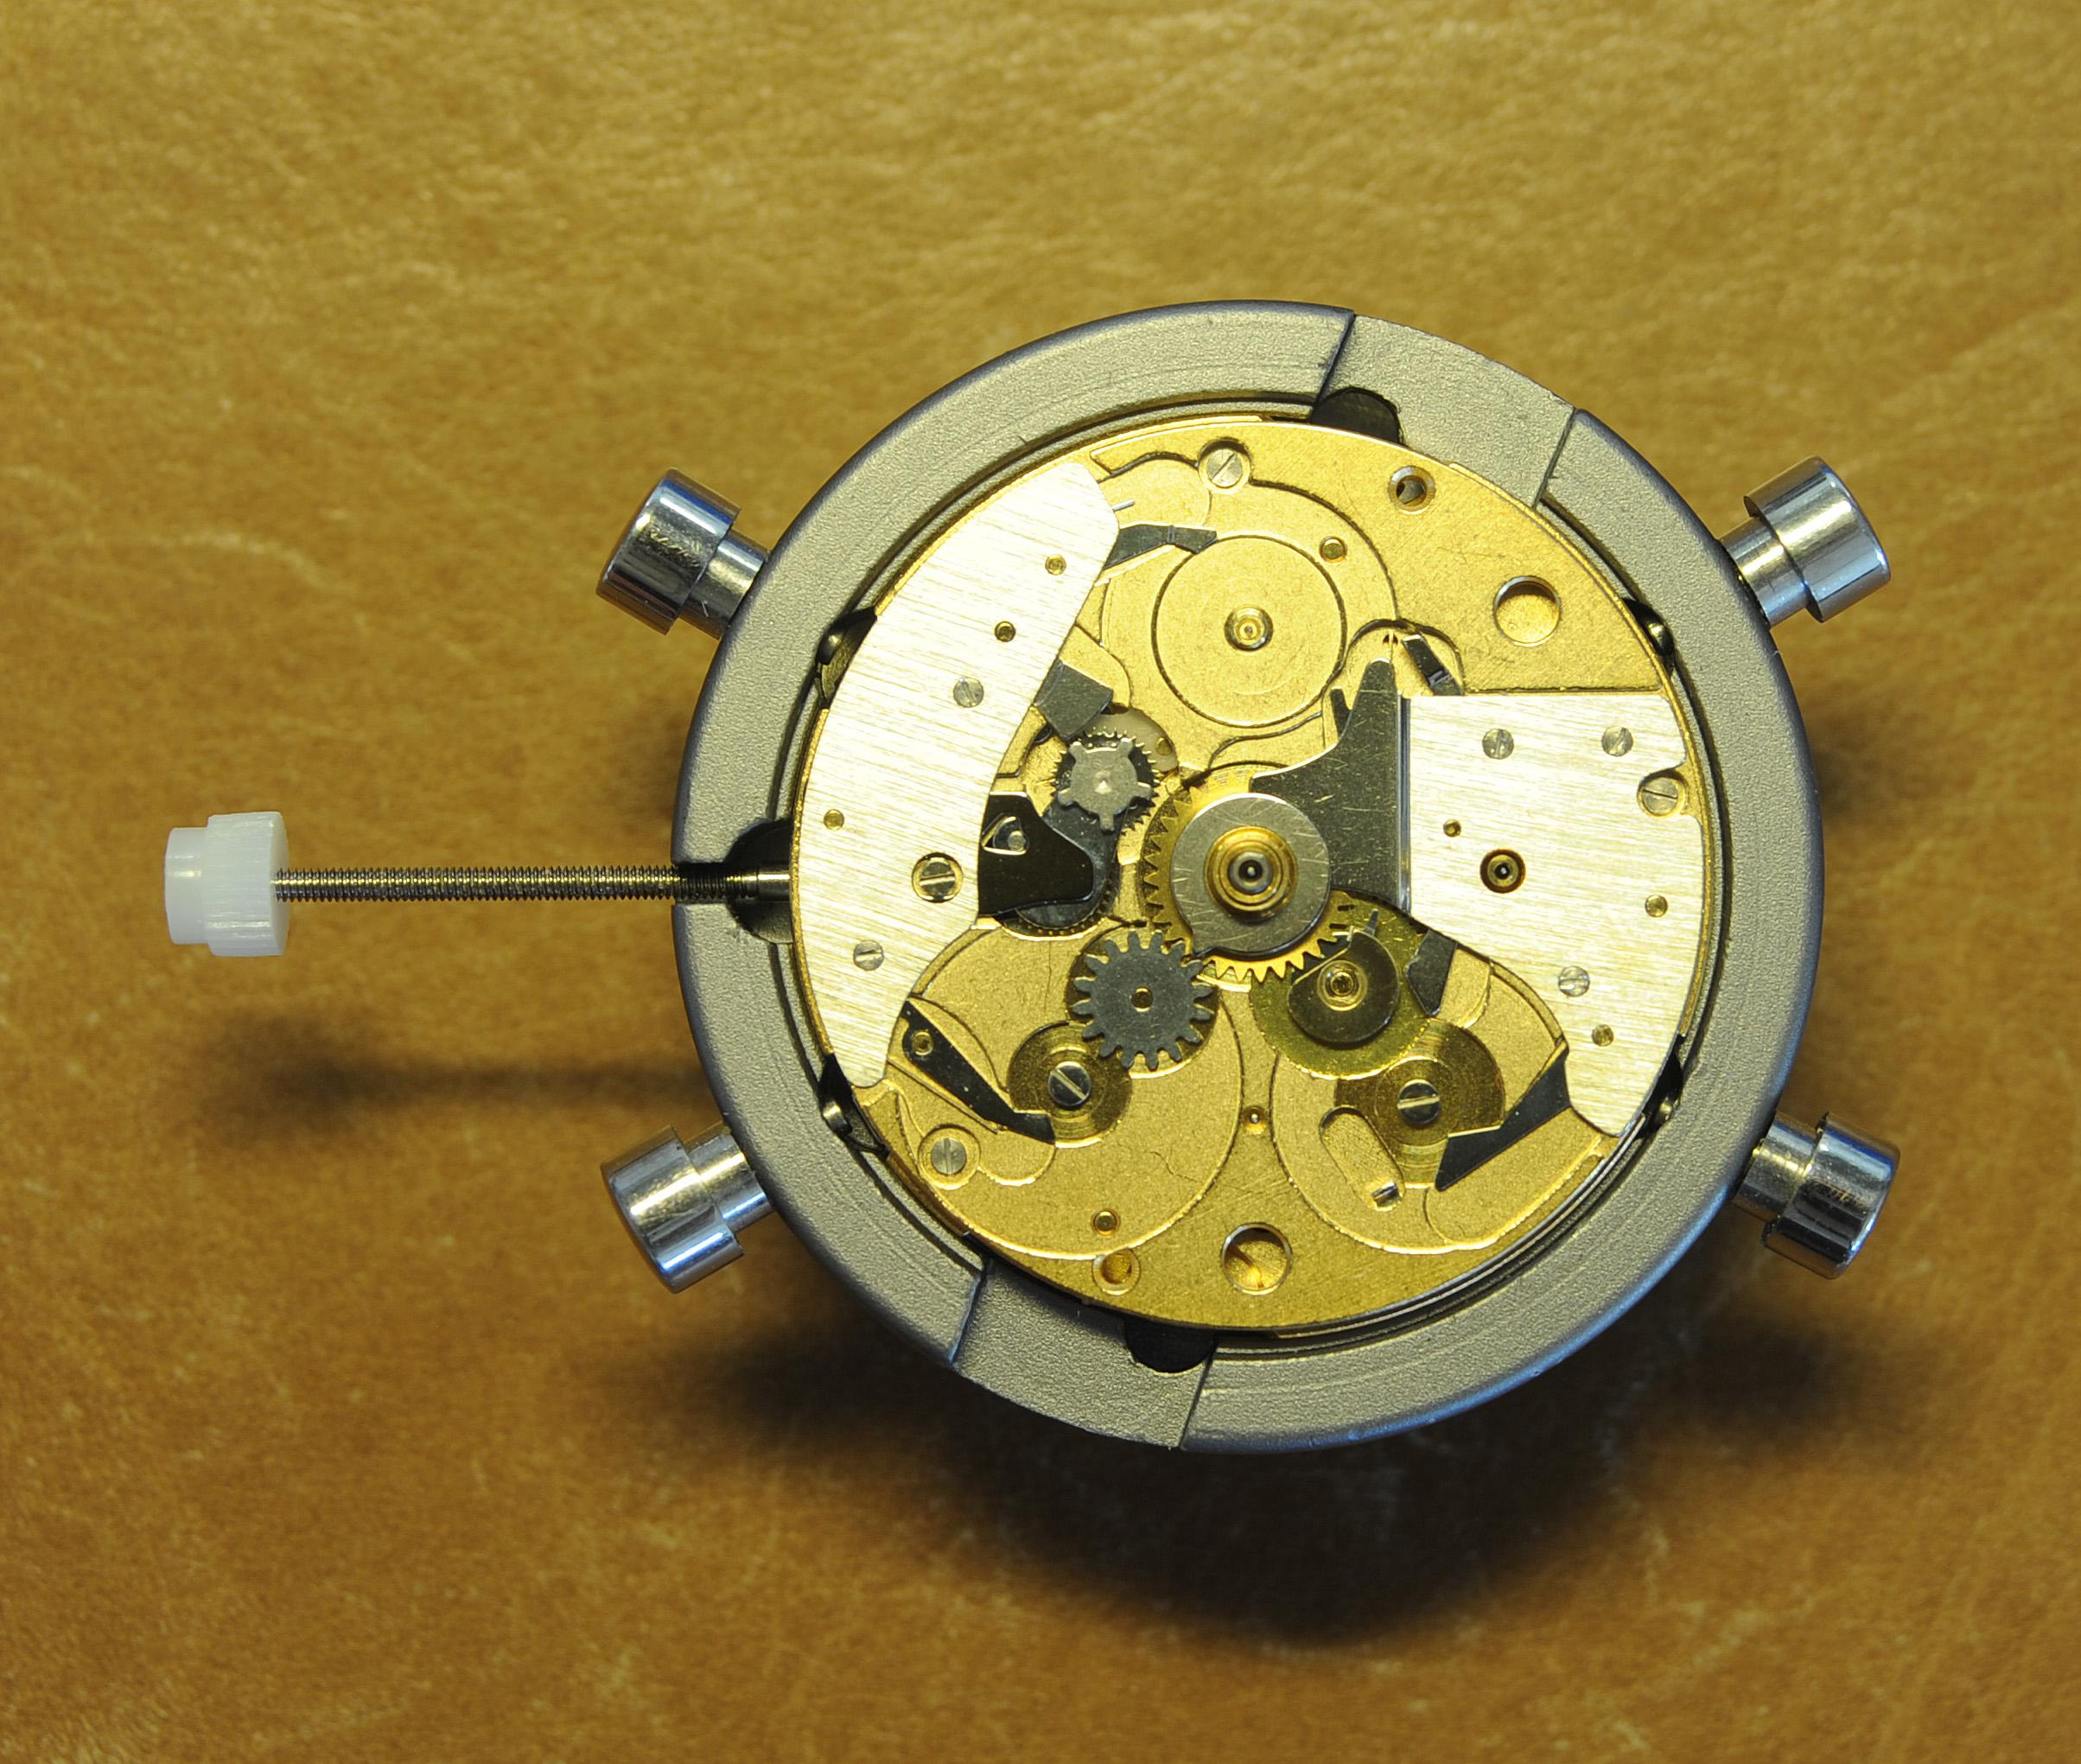
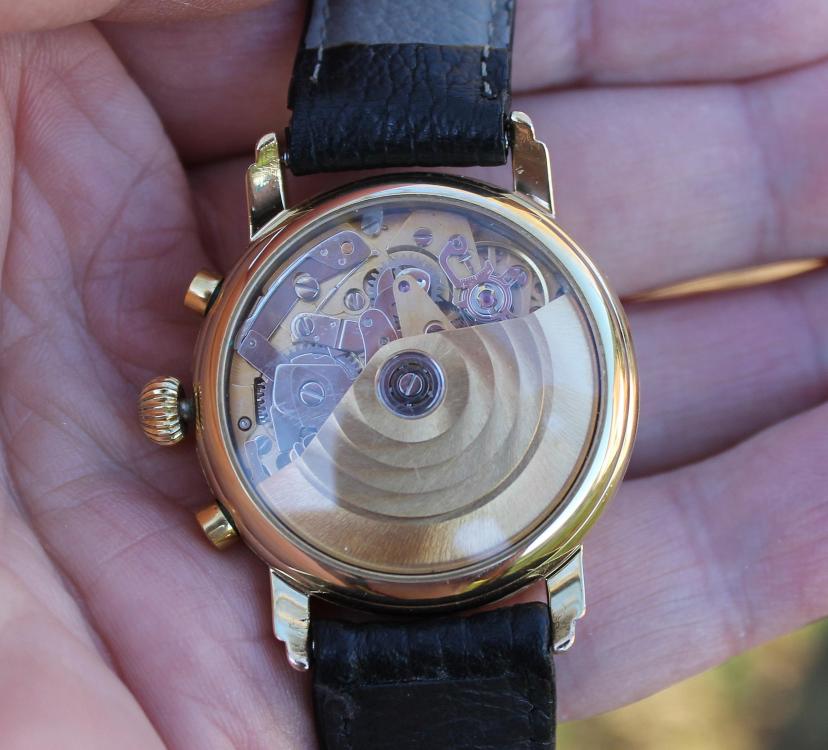
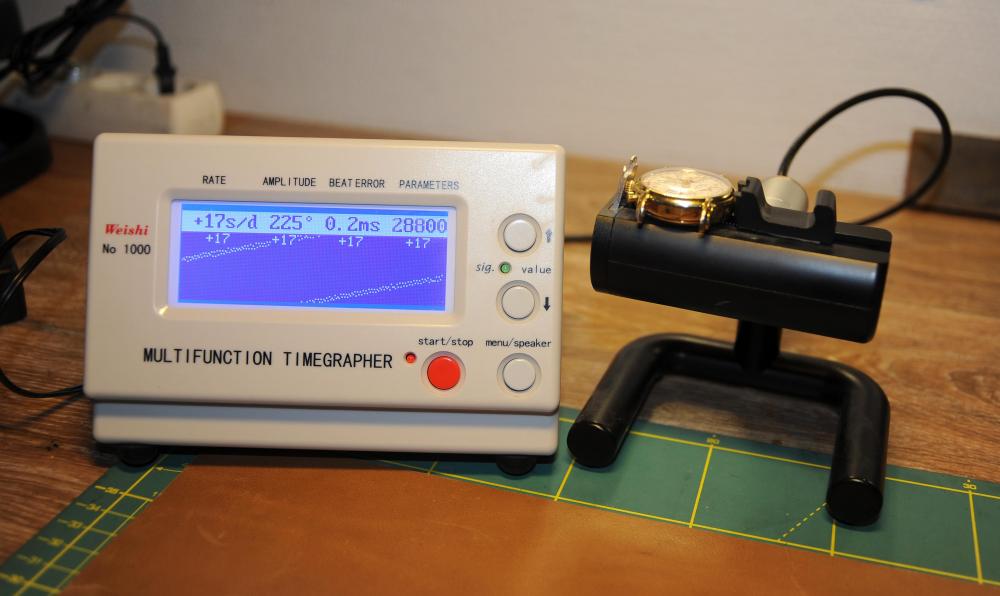
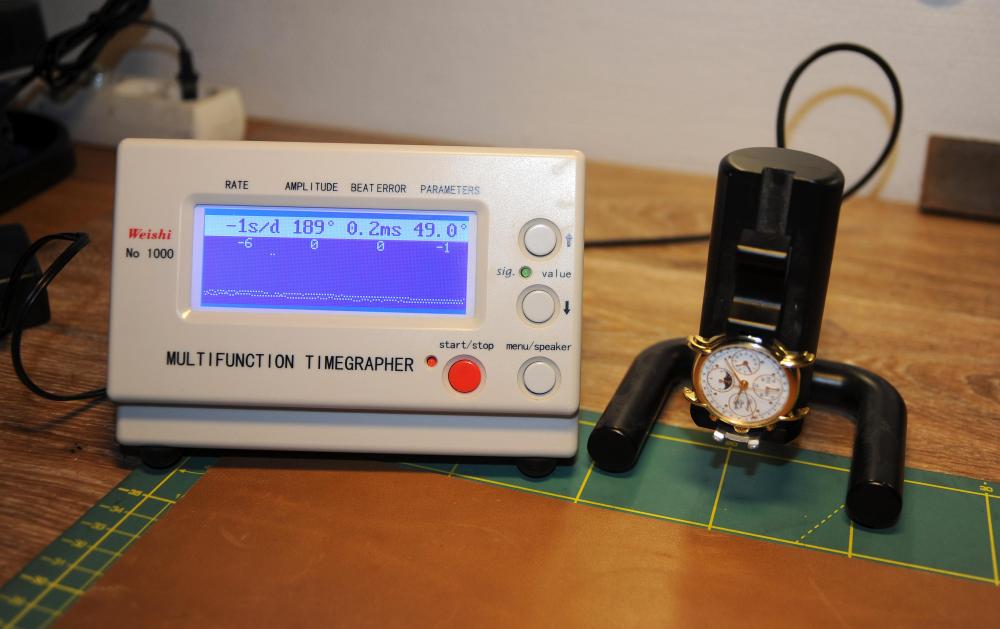
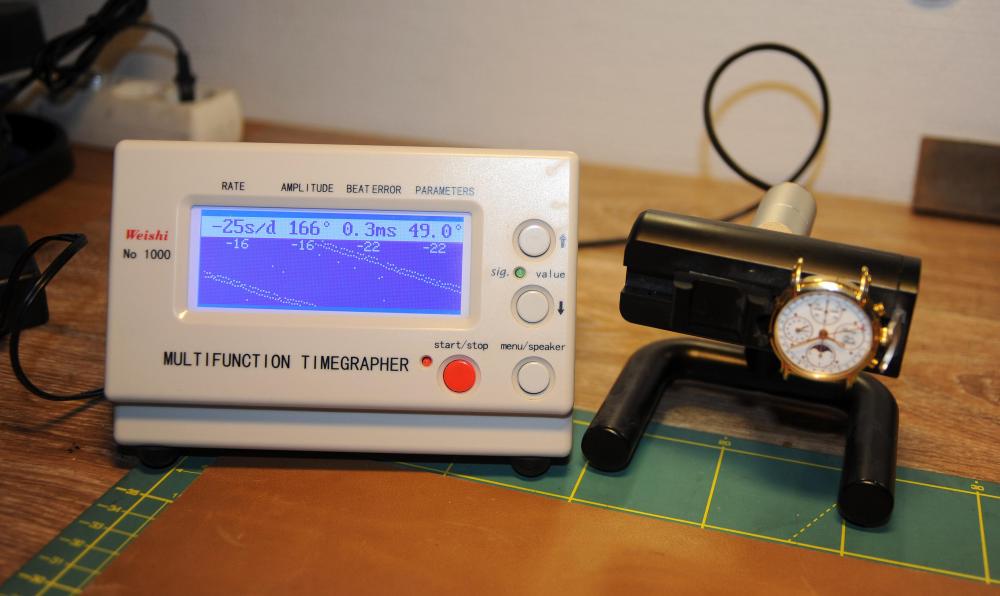
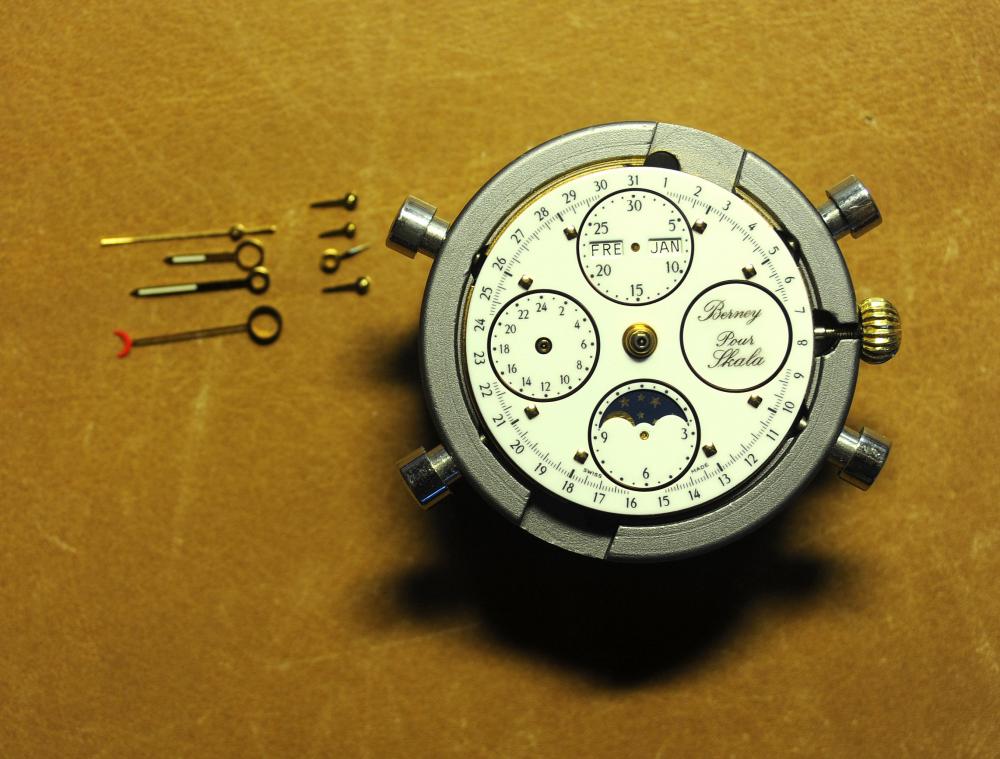
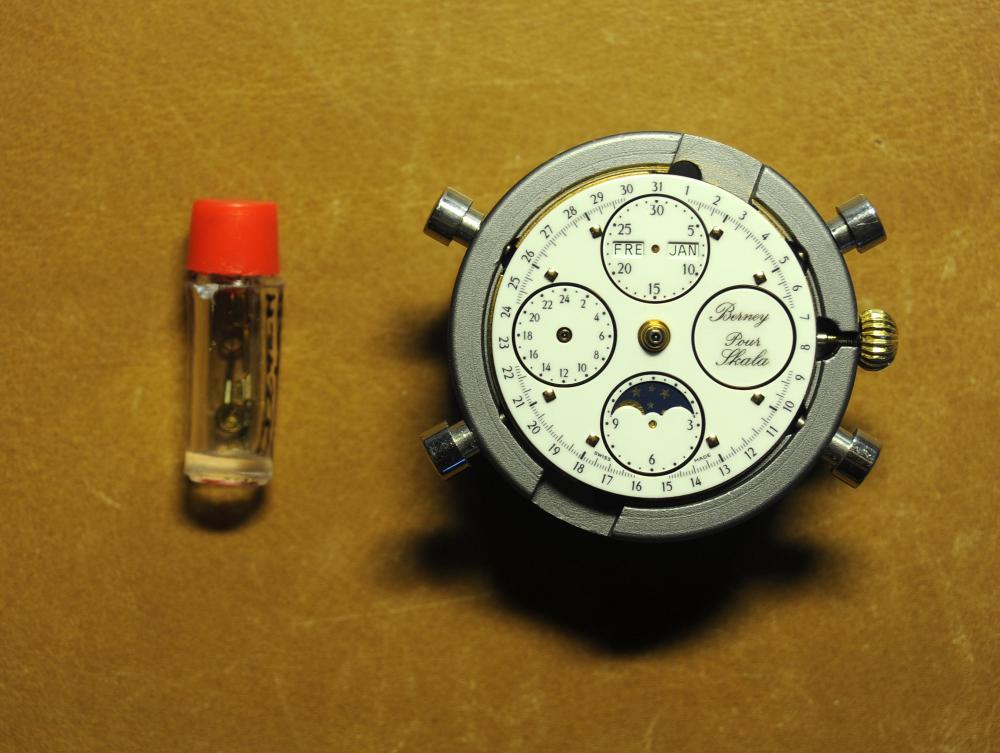
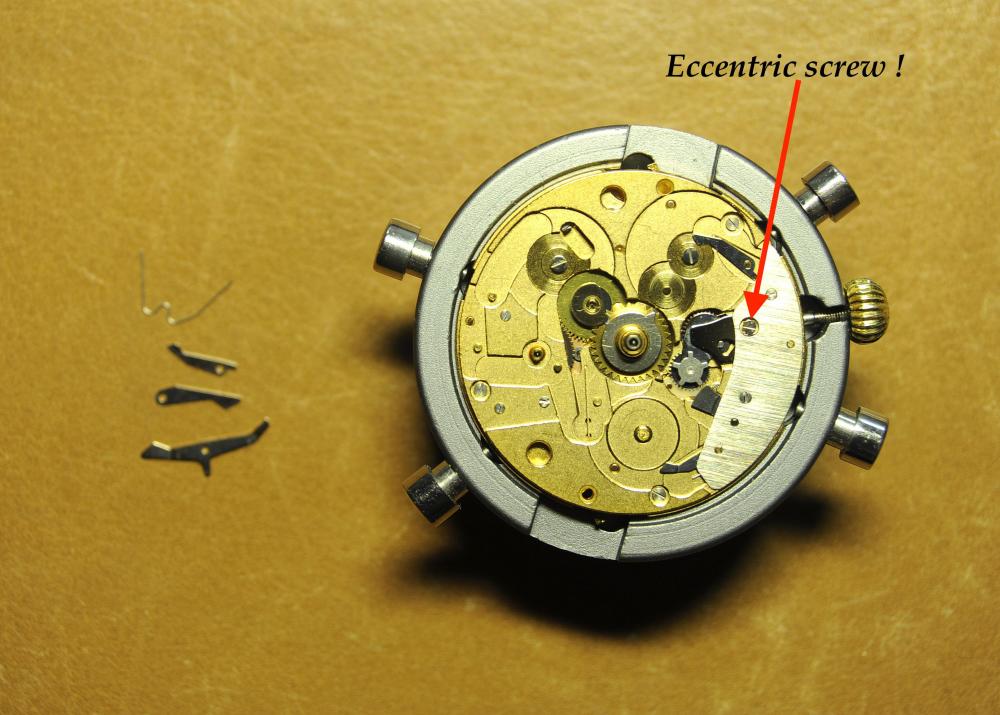
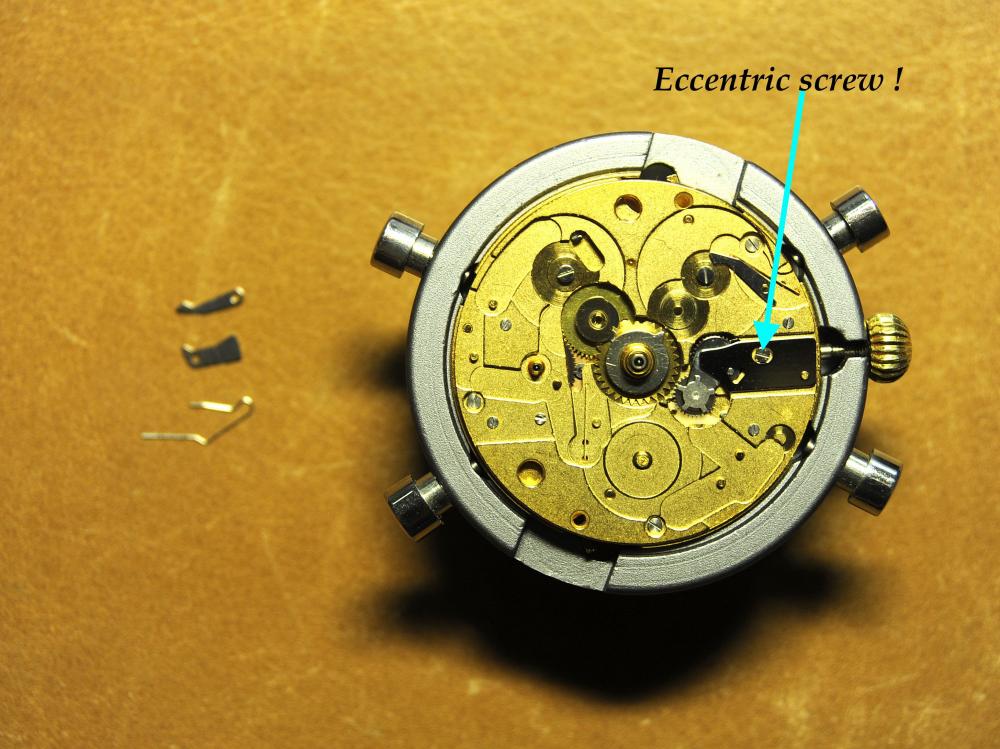
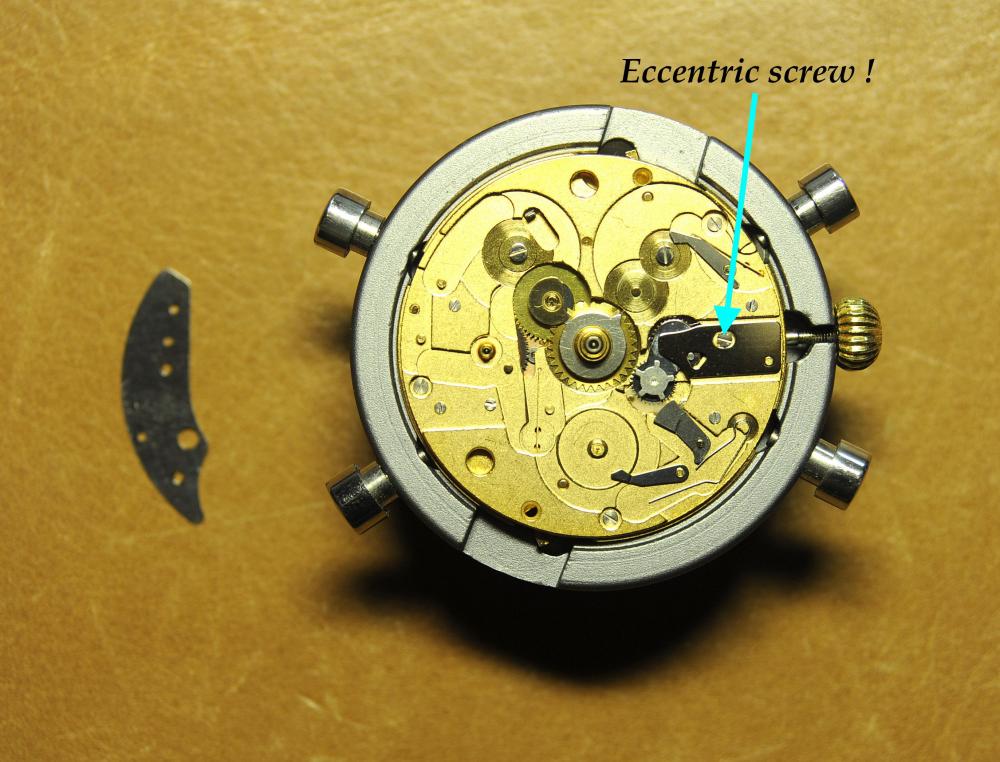
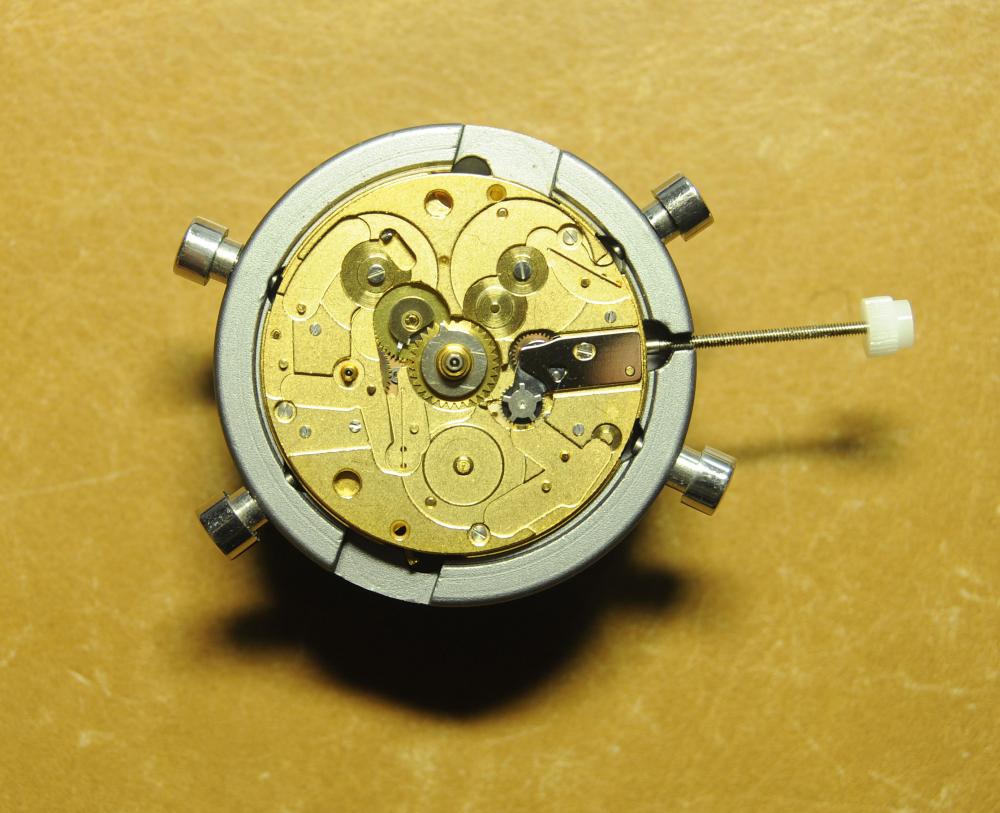
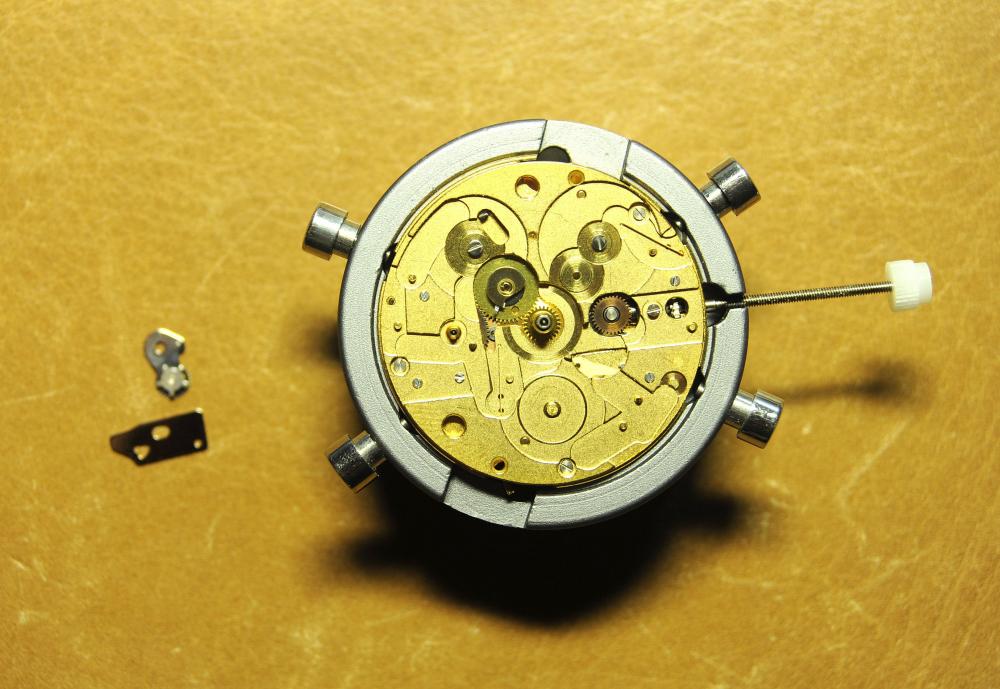
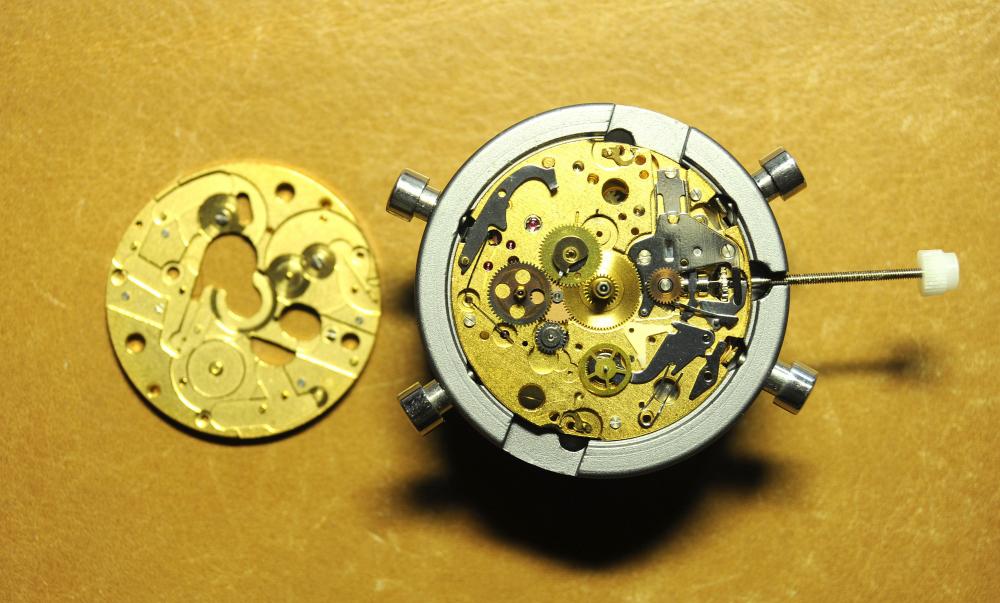
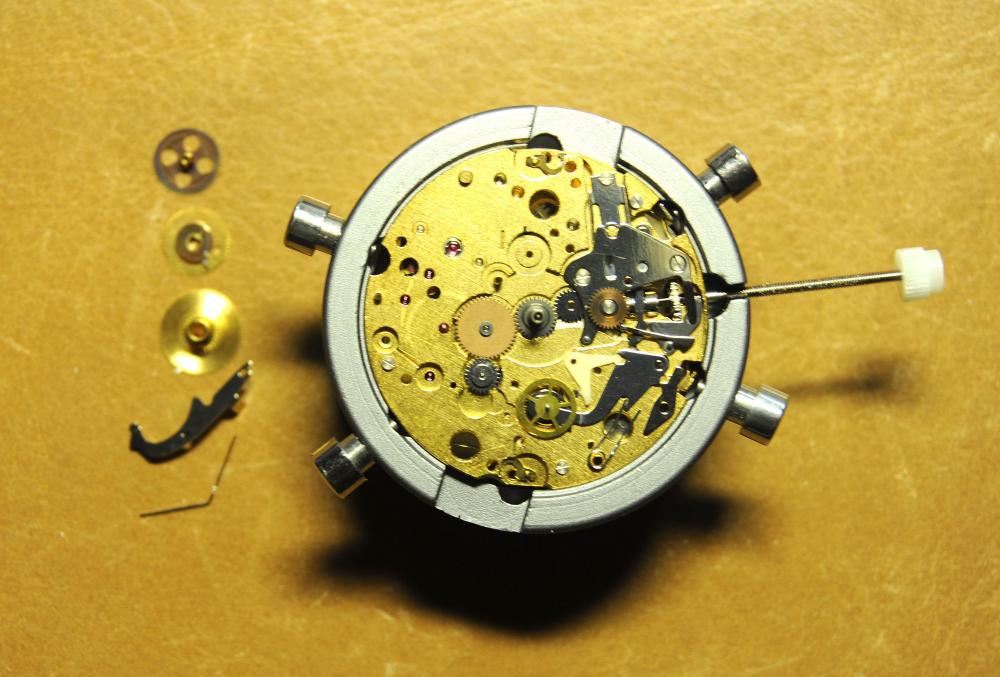
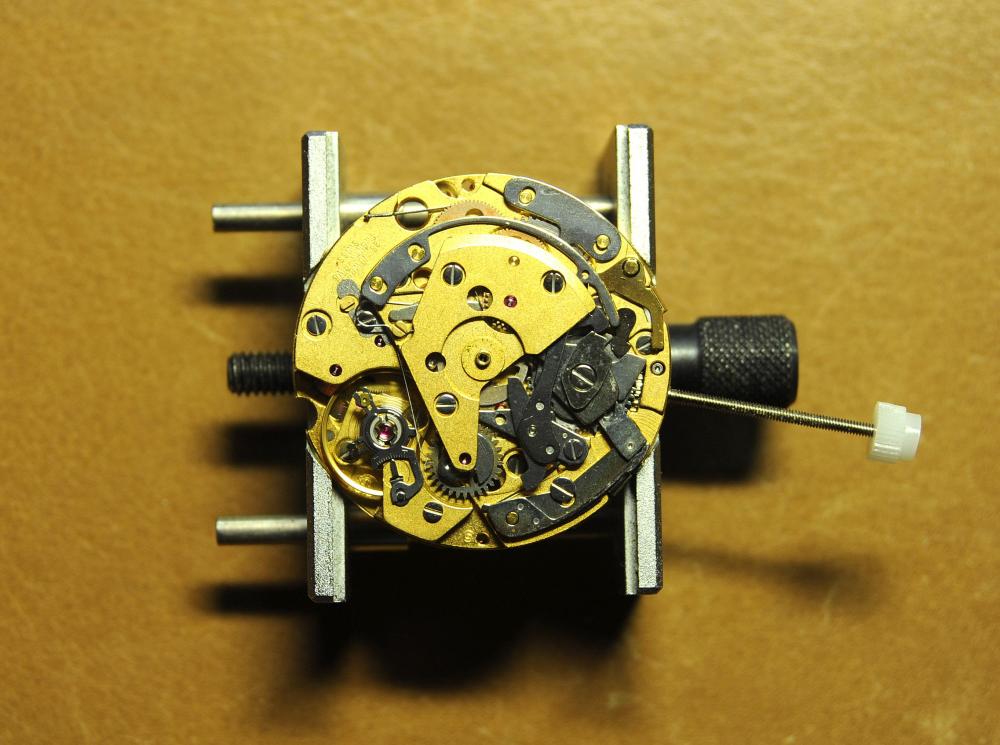
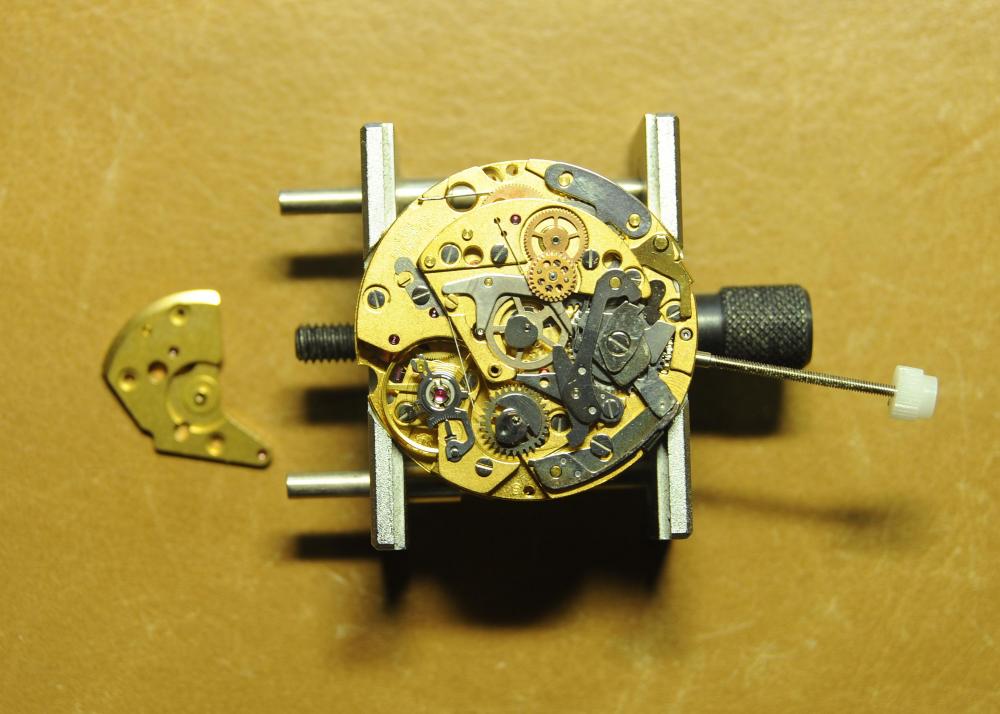
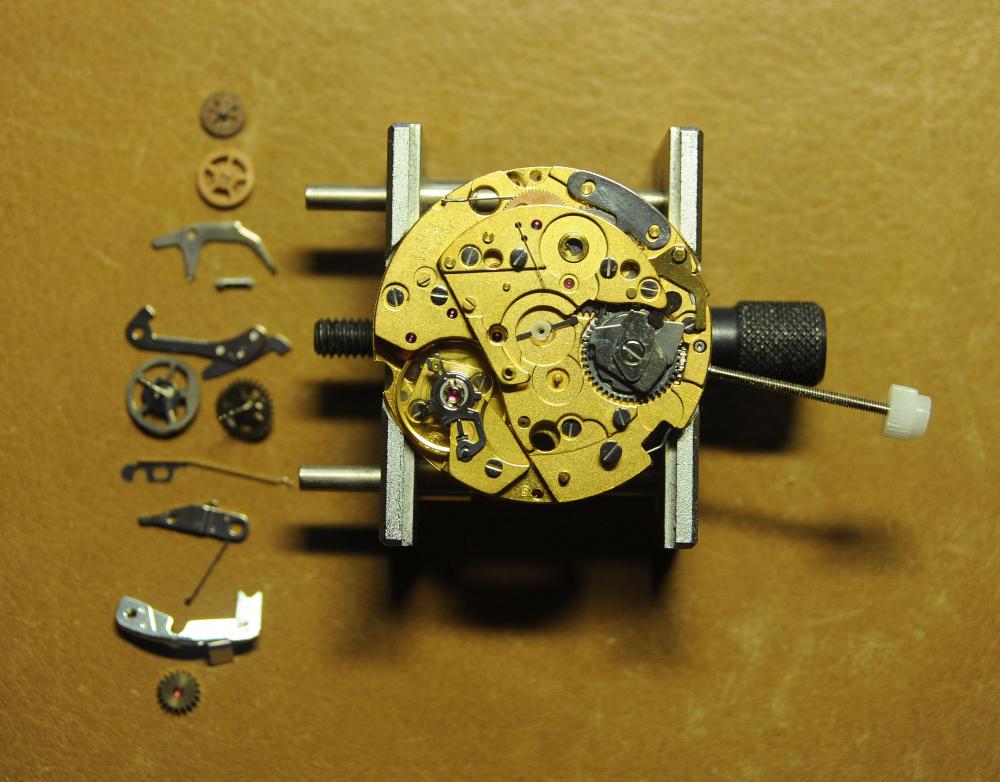
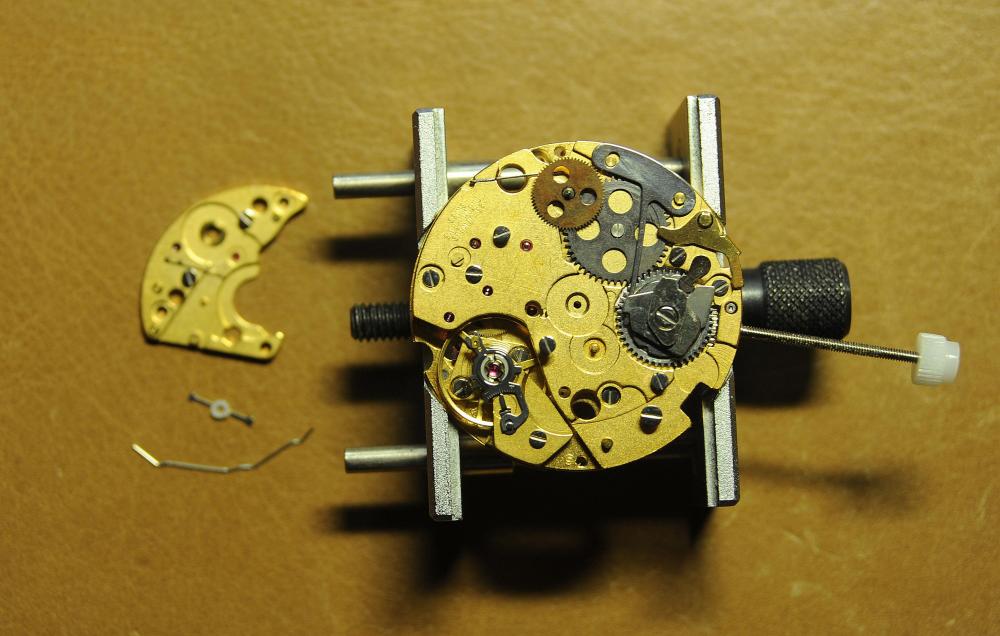
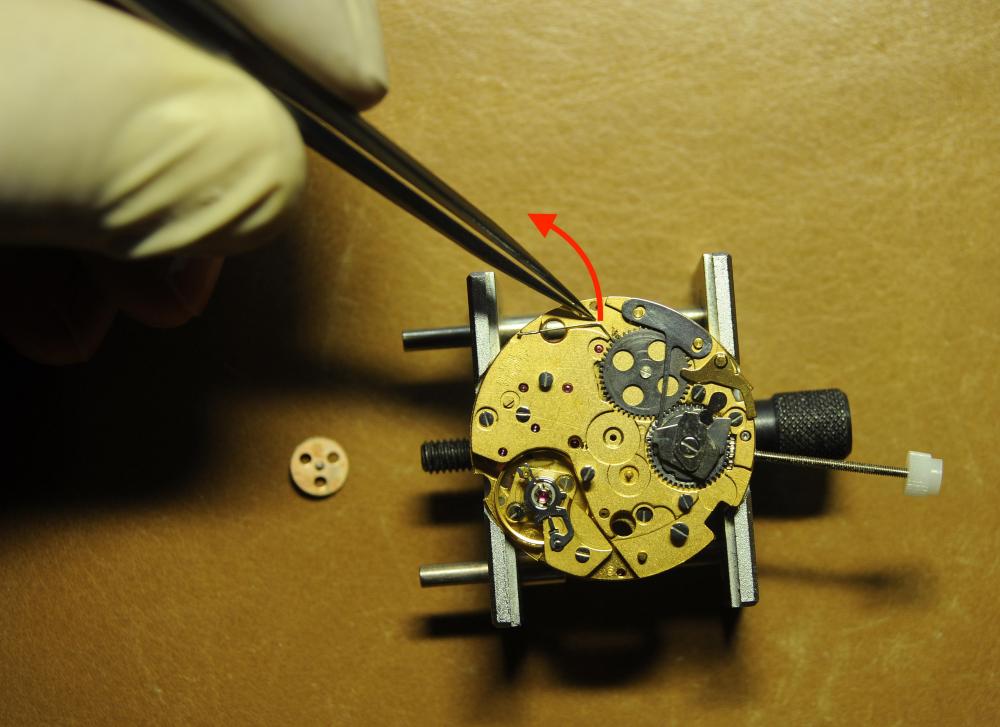
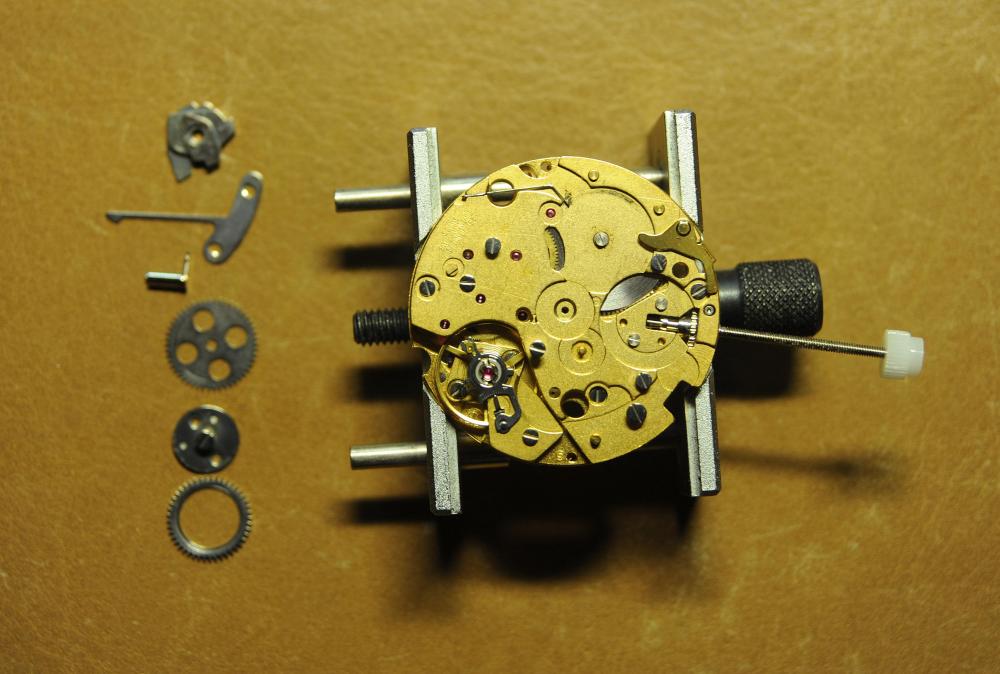
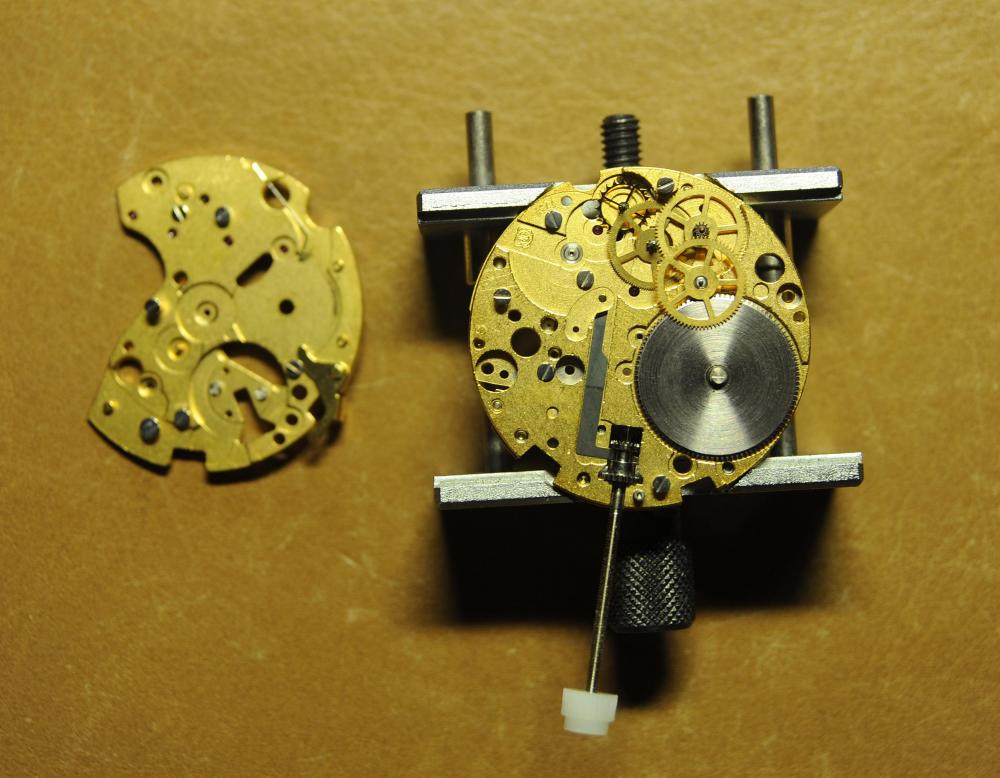
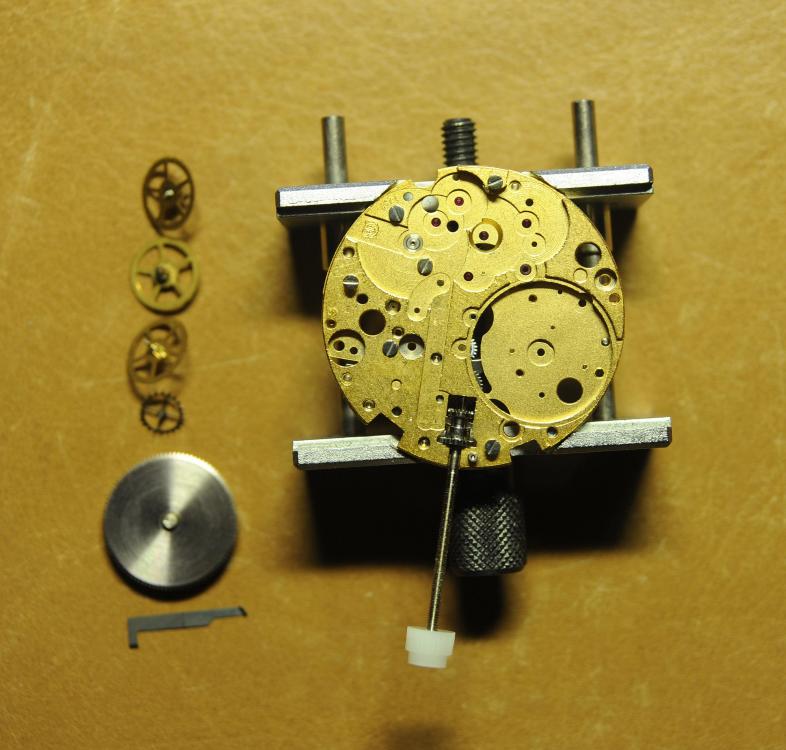
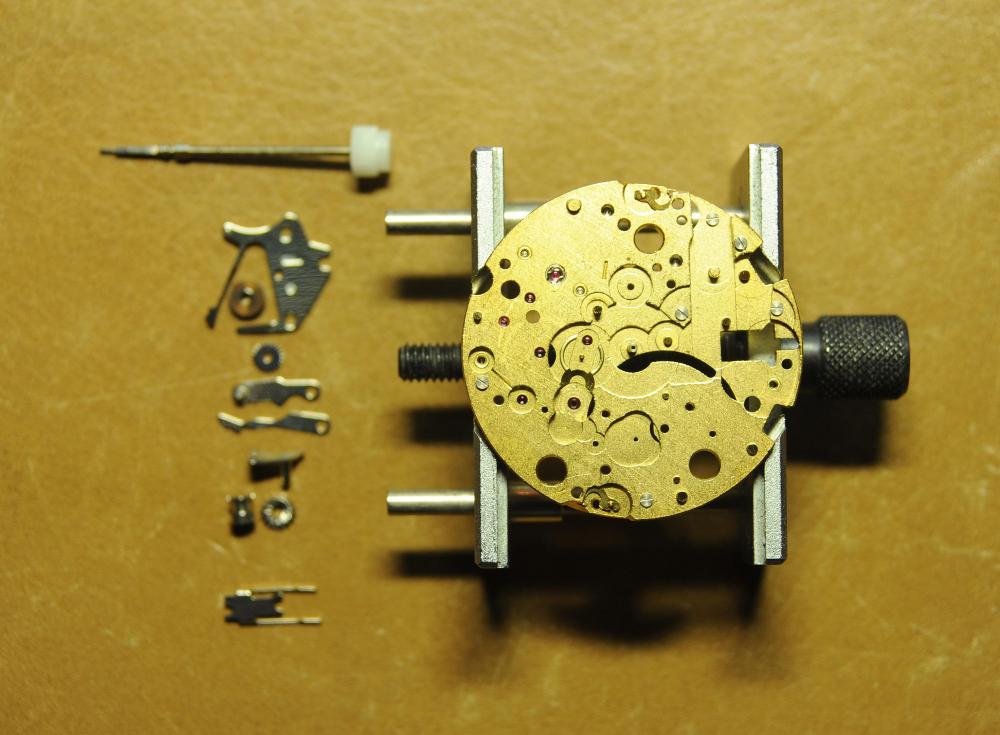
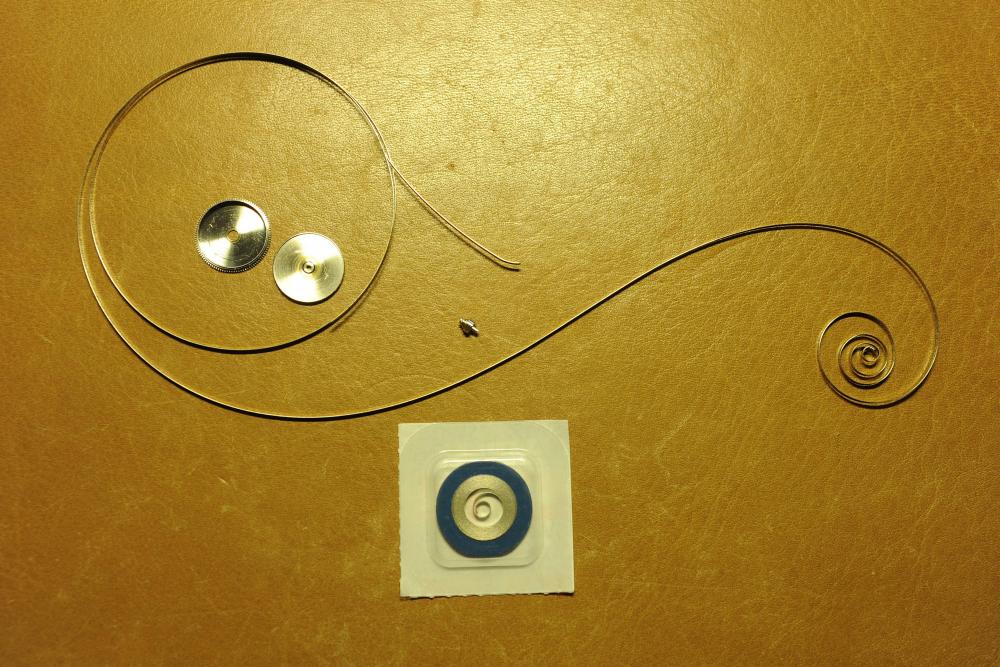
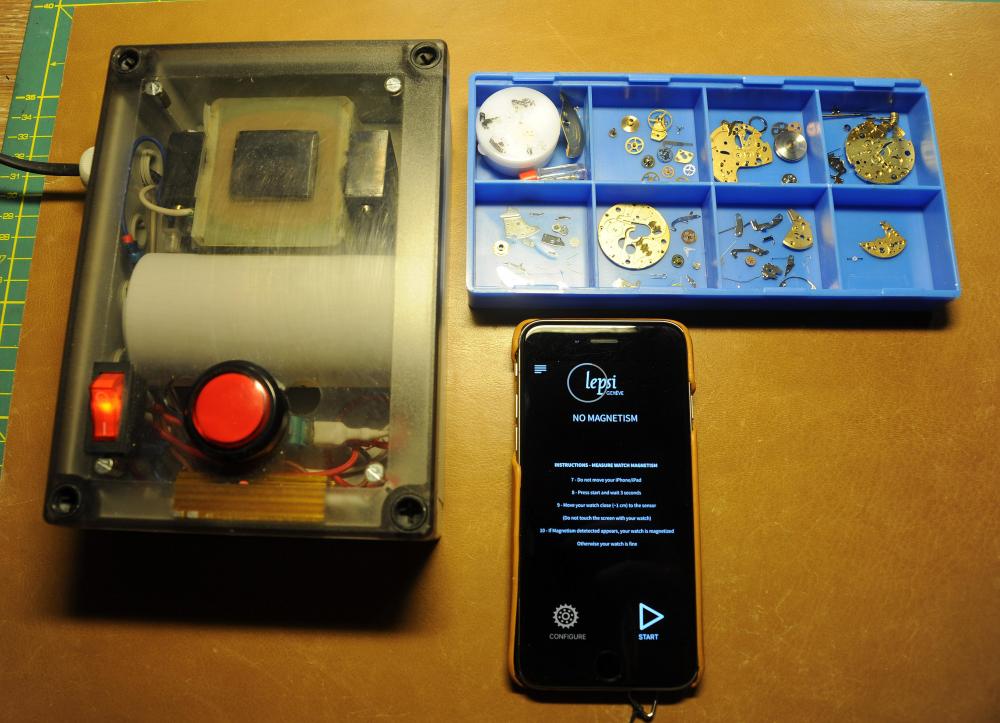
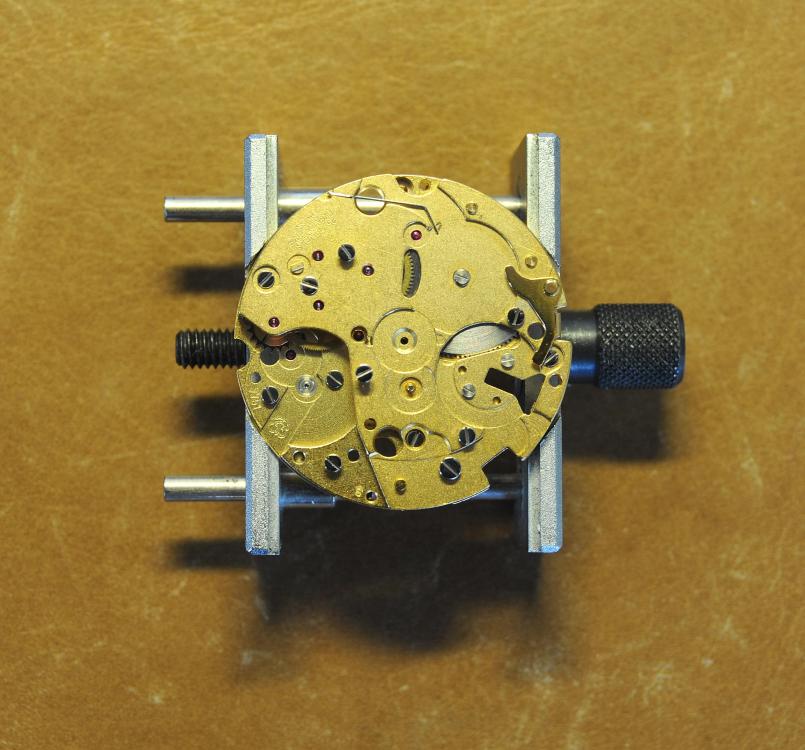
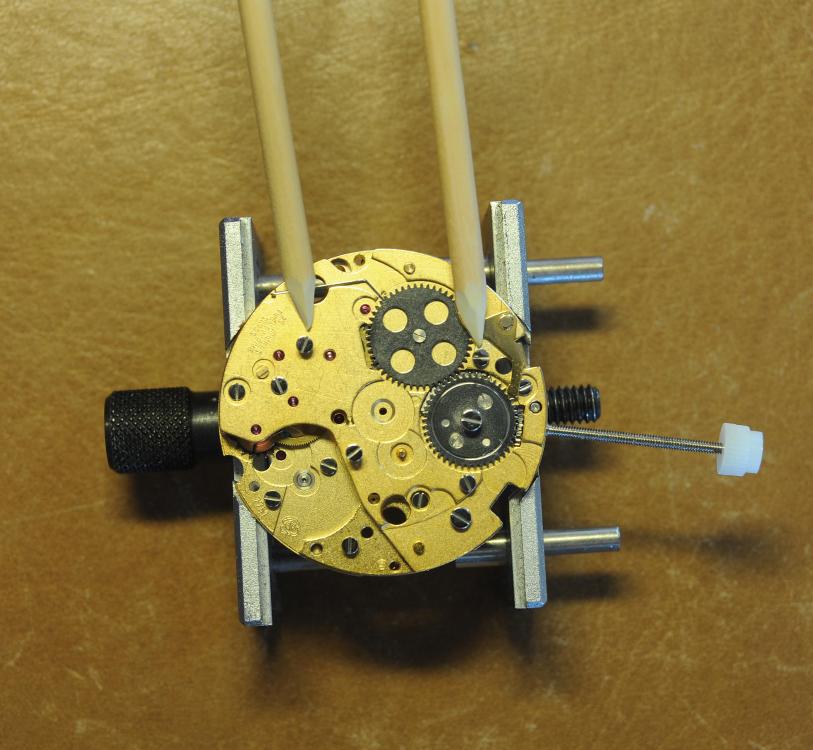
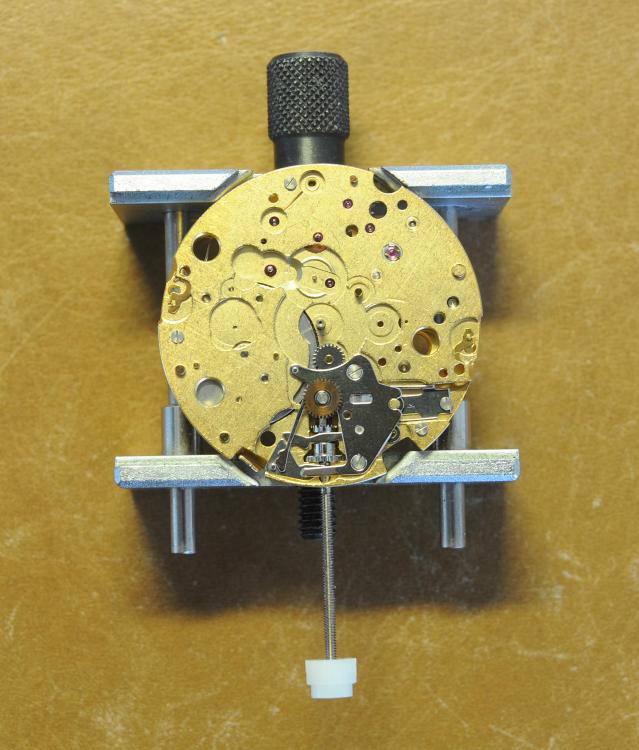
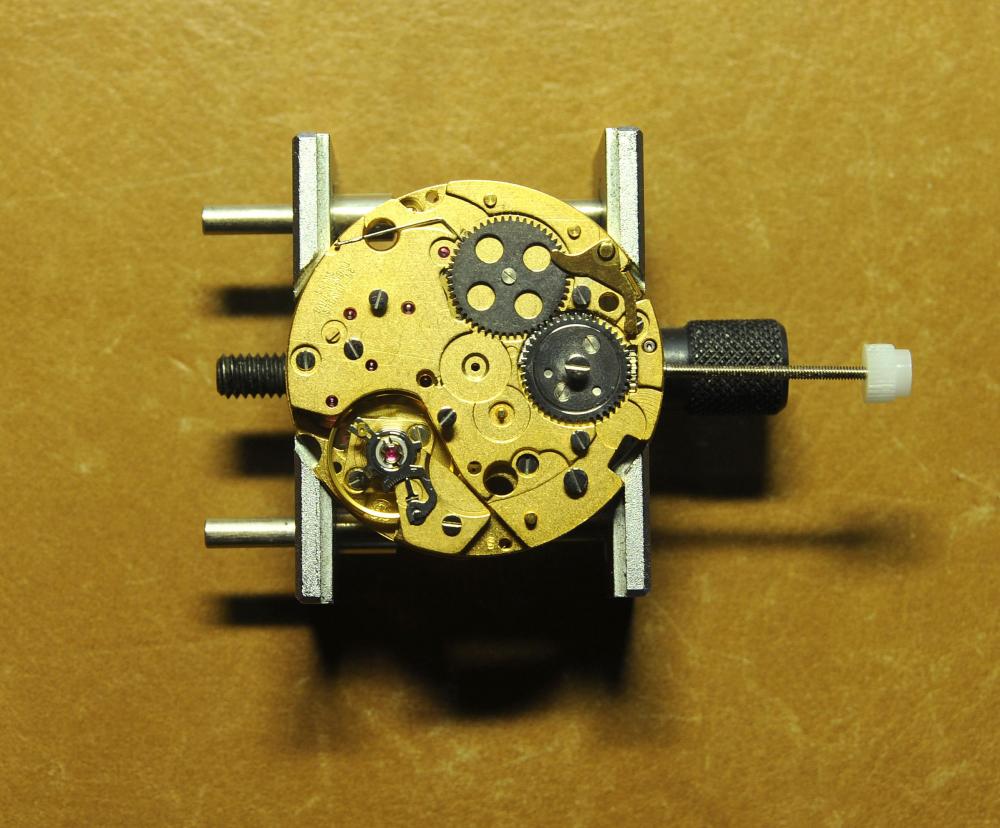
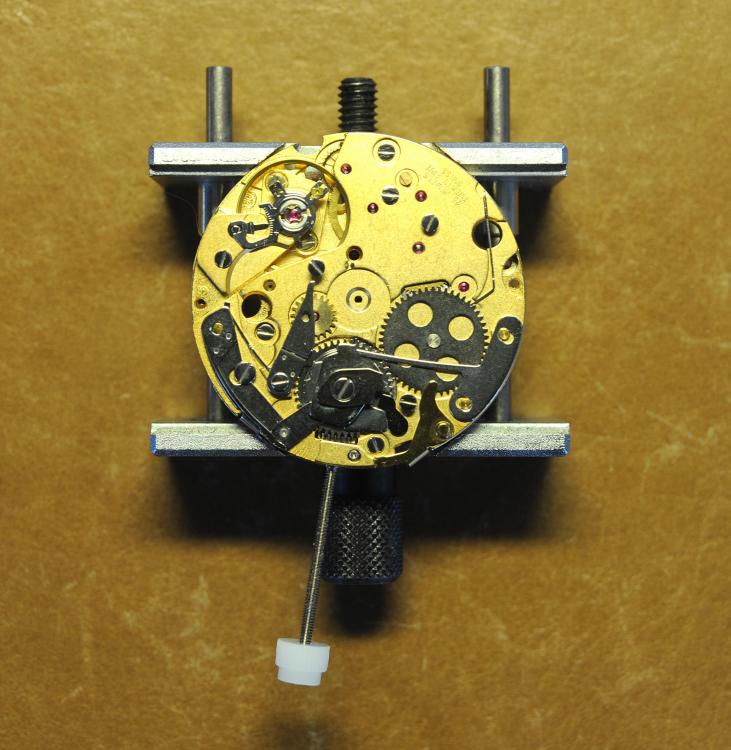
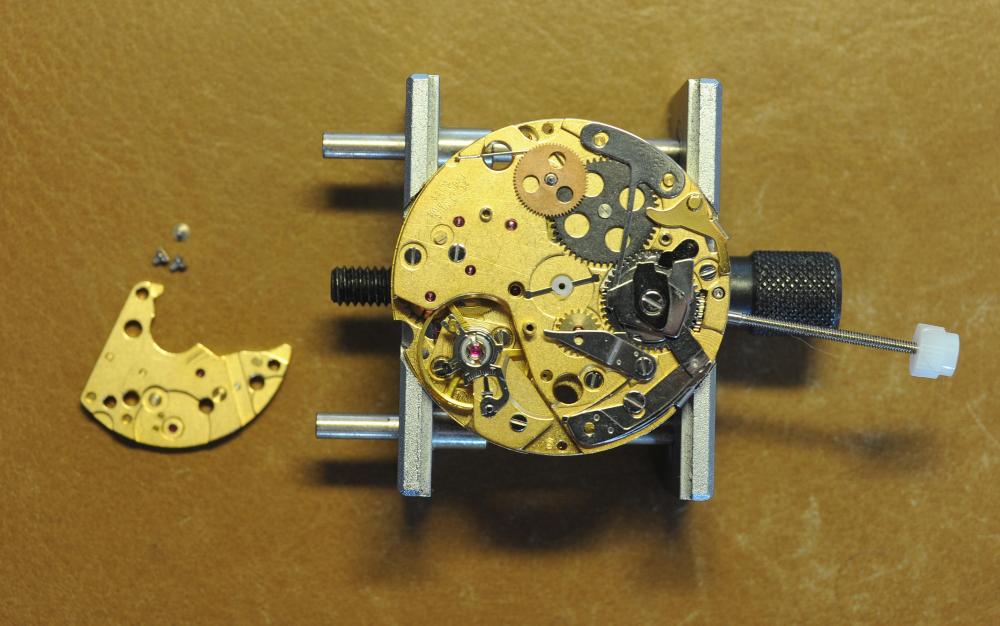
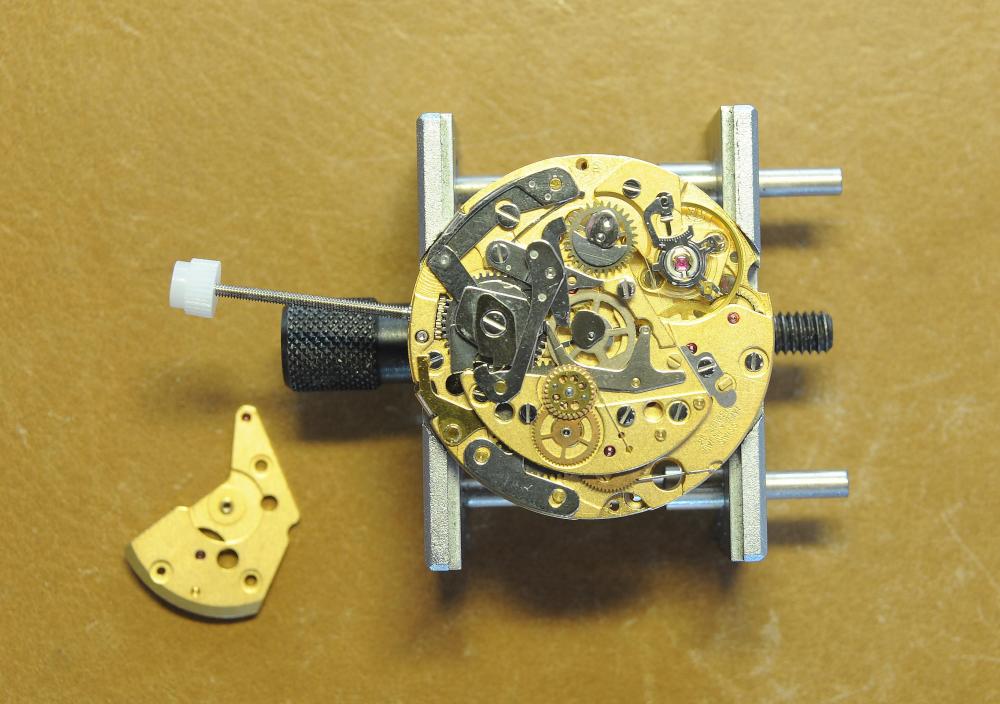
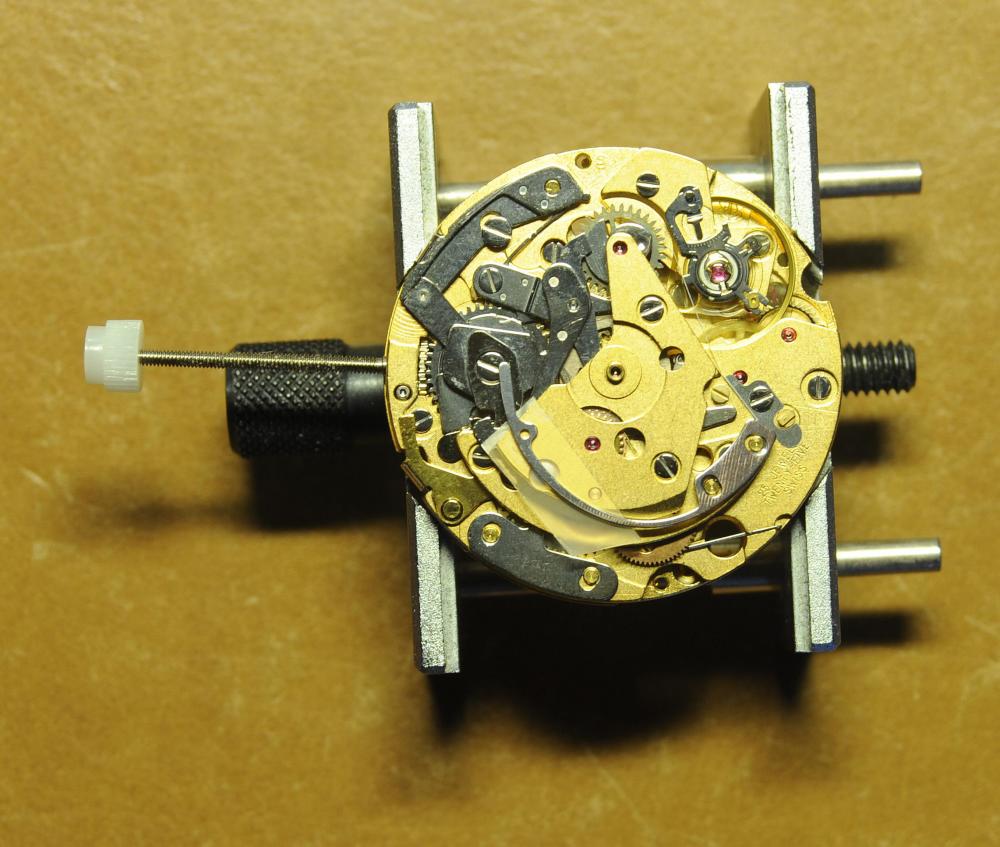
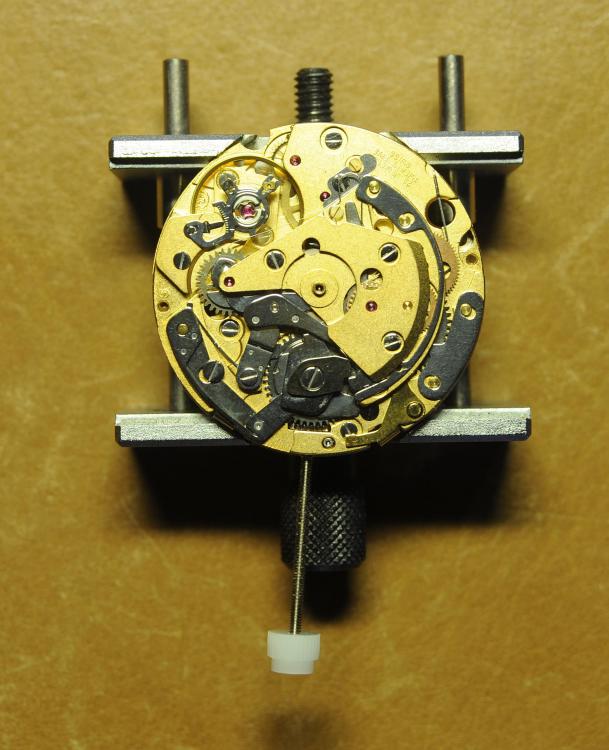
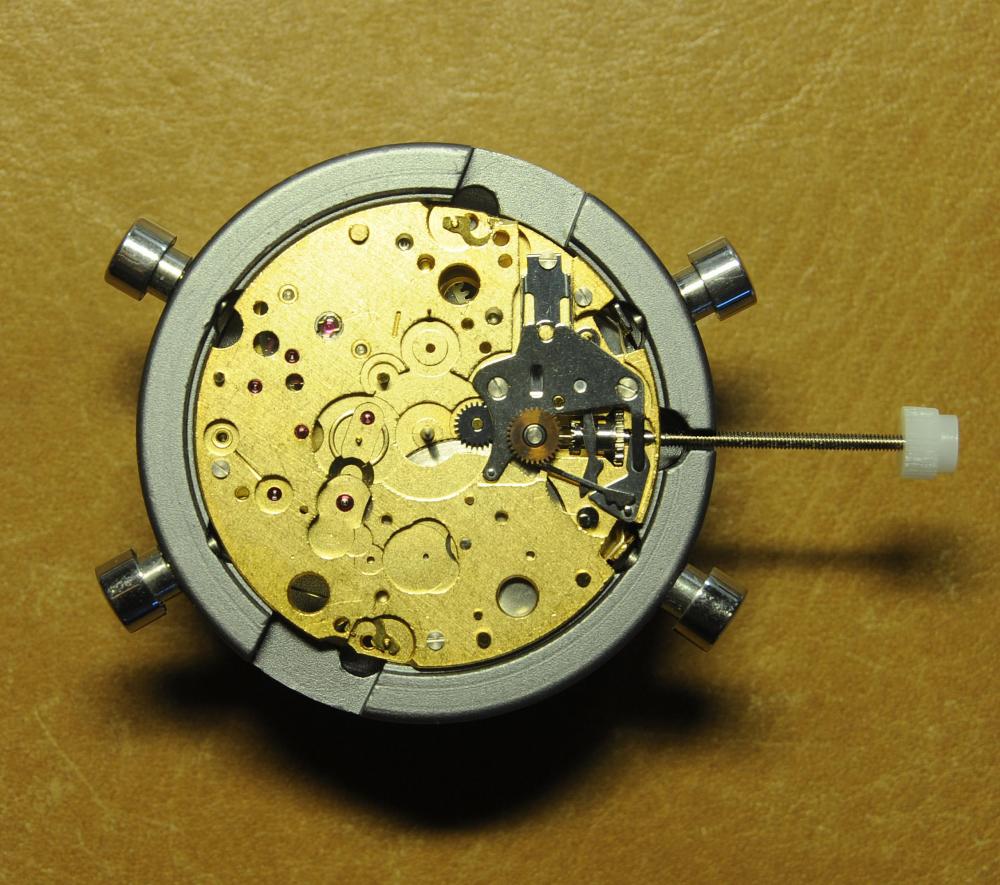
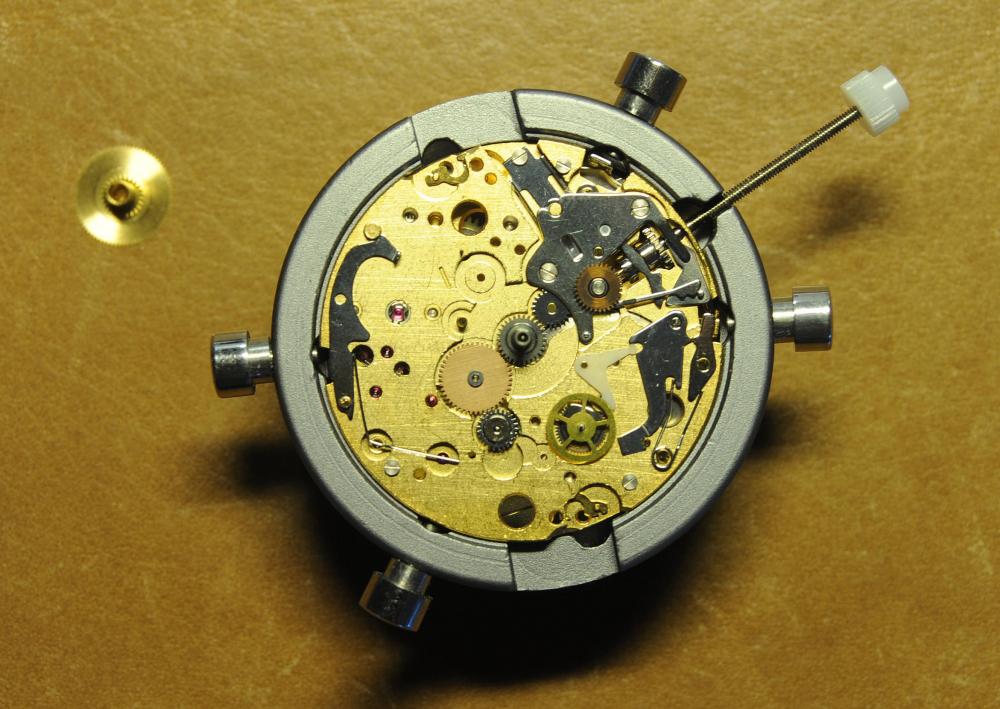
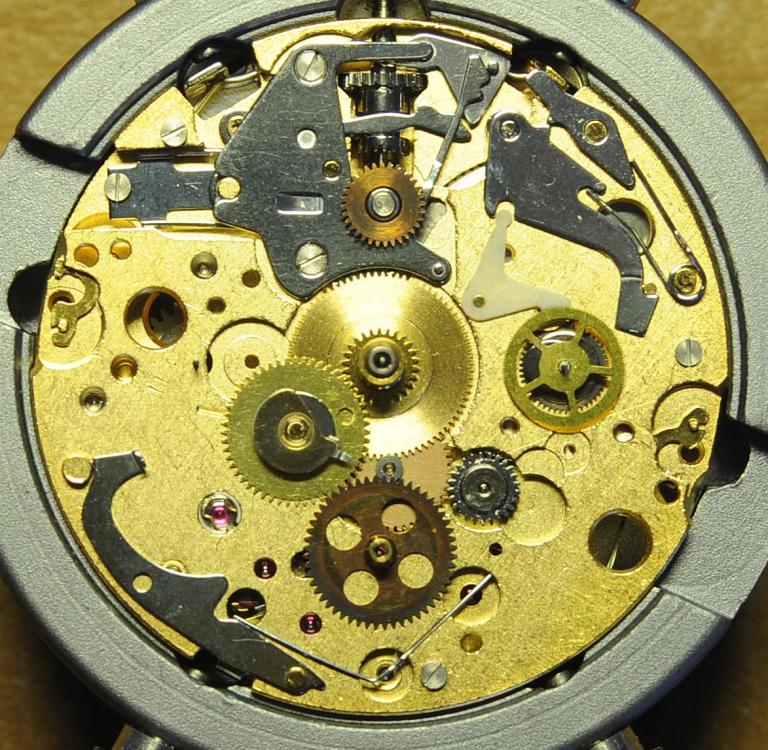
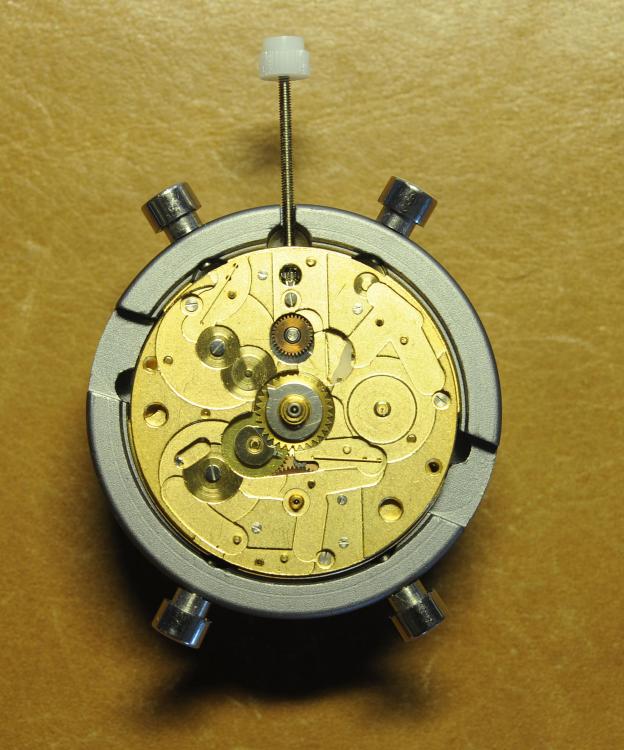
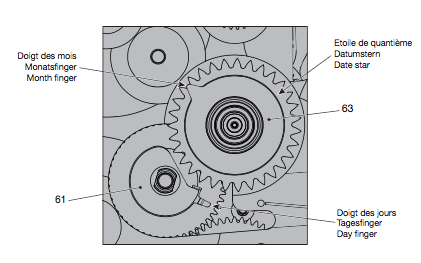
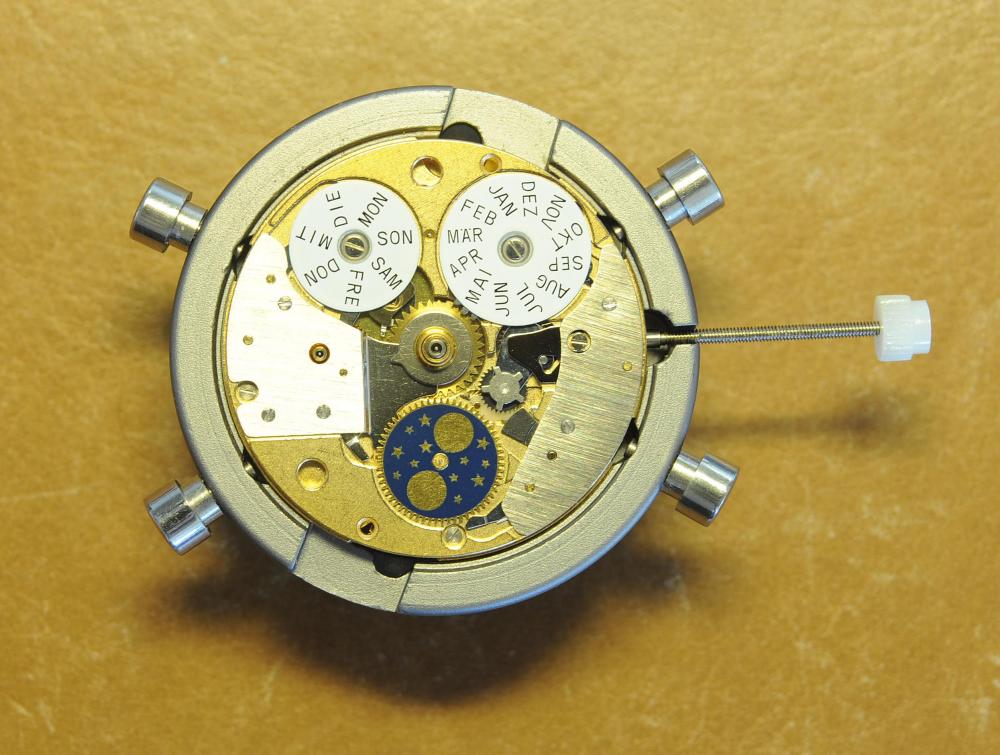
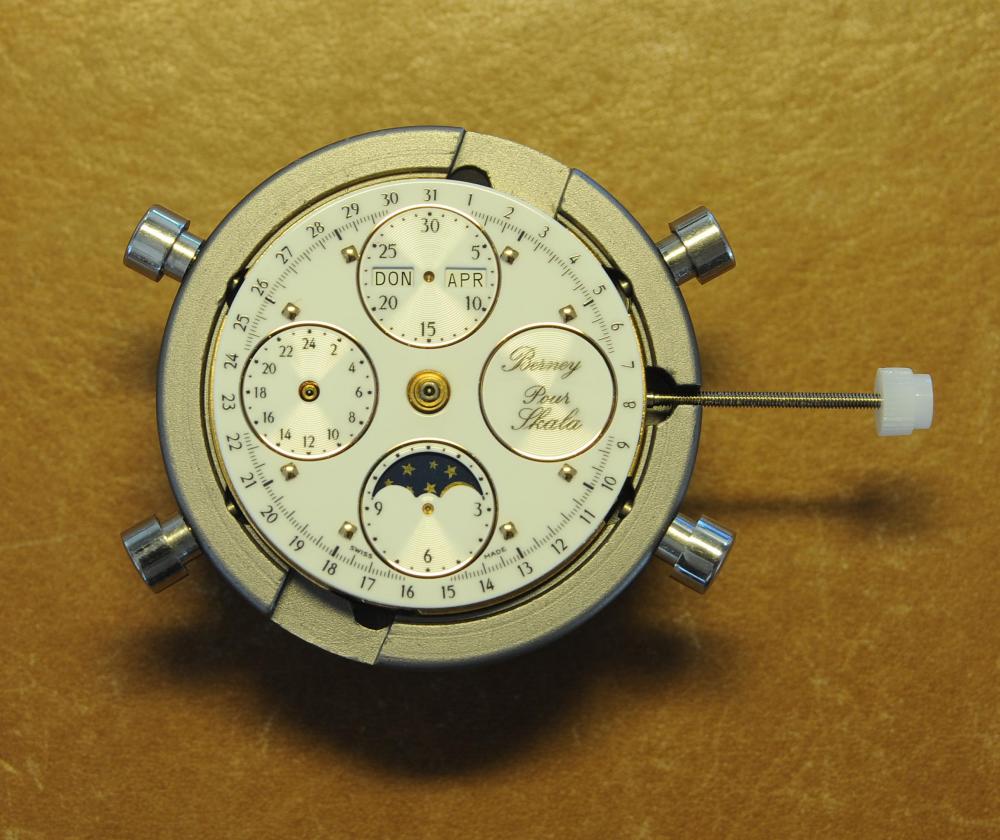
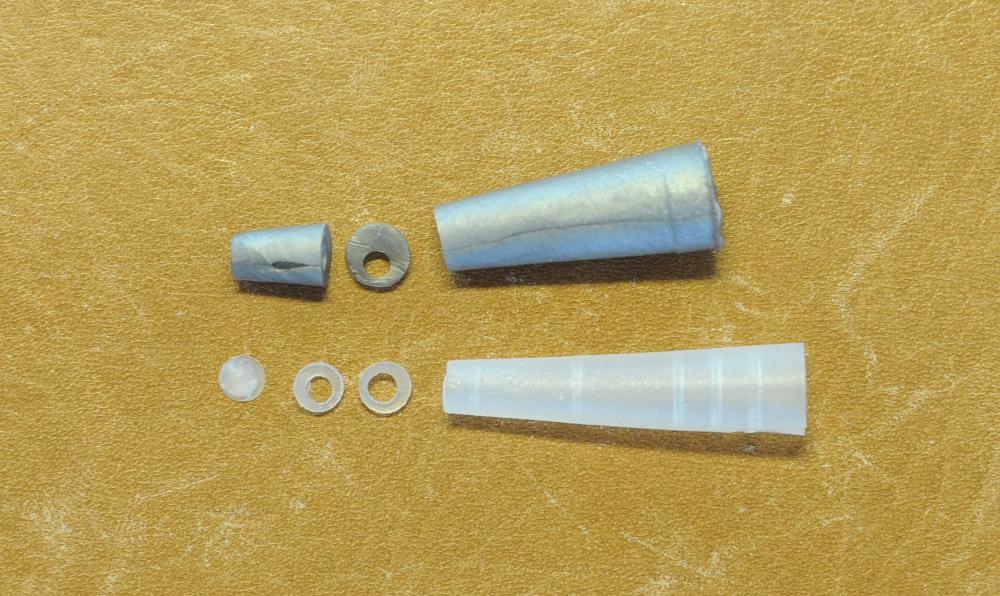
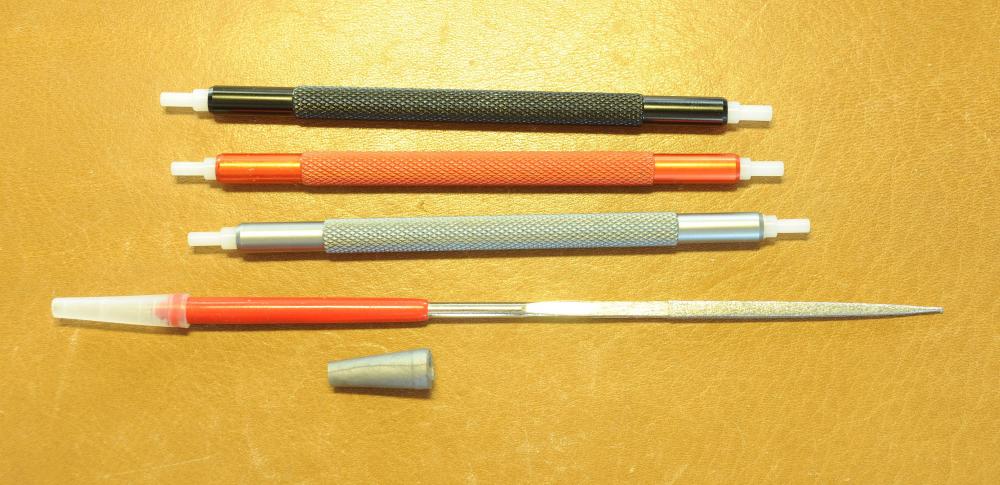
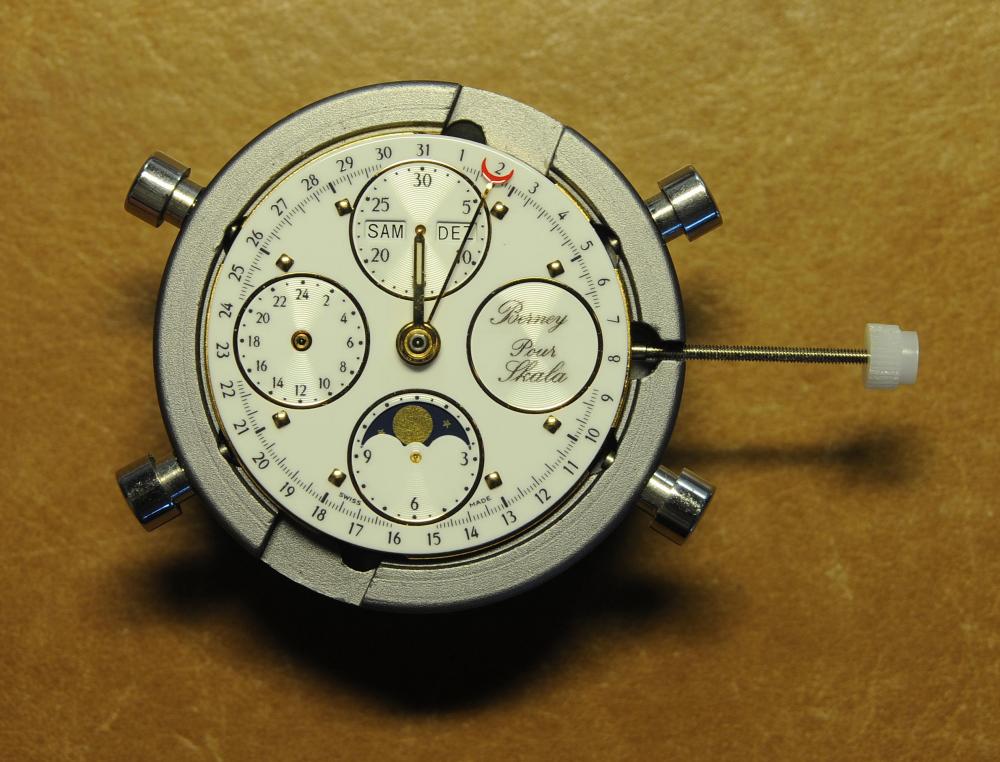
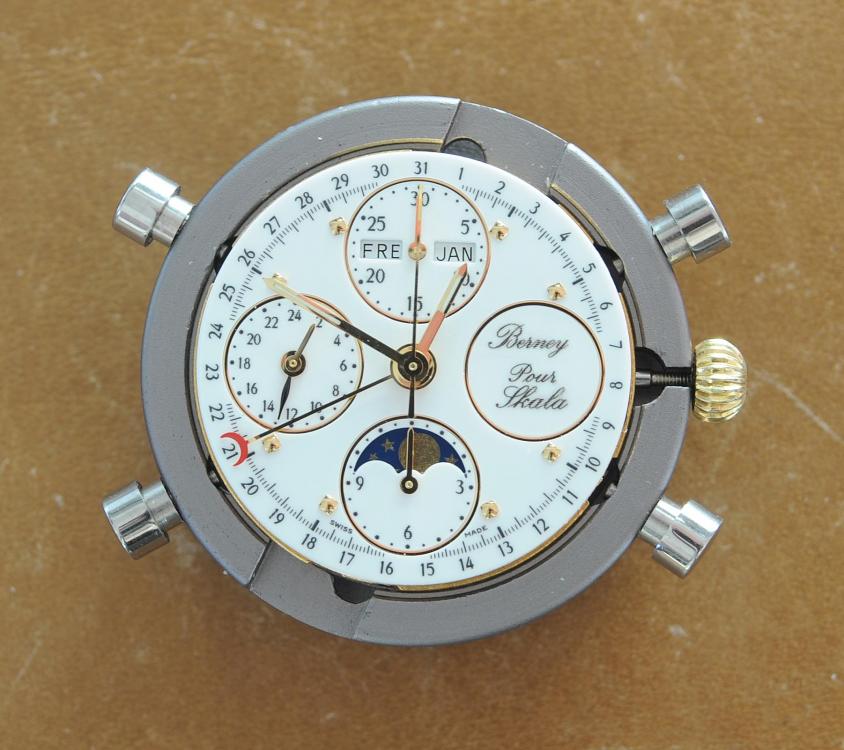
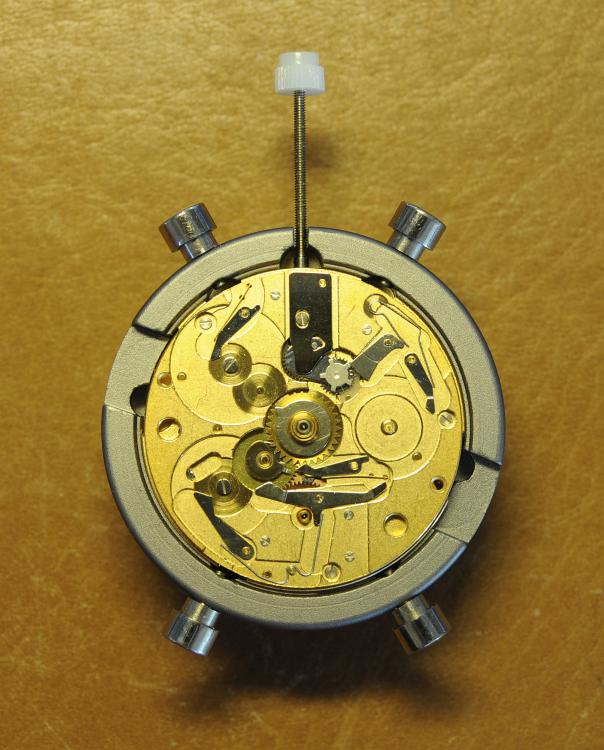
Valjoux / ETA 7751 Triple calendar moon-phase; This gold-plated Berney-Blondeau S.A. with an ETA 7751 belonged to a German gentleman who received it new on his 60th birthday in 1995. Through the years he kept the original box, the warranty card as well as the 1995 price-list and the dealer’s business card. He has worn the watch only on social accessions and the watch spent most of its time stored in a "Panzerschrank". According to the original price-list, the 1995 purchase price was 1450 CHF. As you can see, the watch held up pretty well, only a few small scratches in the front- and rear mineral-glass crystal and on the top of the lugs some of the gold-plating has worn through. The watch ran, all function did work. It had never been serviced nor opened Disclaimer; This walk-through is written in the way I do it. That's not to say it's the most correct way of doing things but as they say: there are many ways to Rome, all leading to the same result. Neither do I, as a hobbyist, have fancy horological equipment such as a cleaning machine or a "sterile" & "dust-free" room and therefor the end result will not be "Rolex"-standards. All I can say is that I'm always give it my best shot and I will mention problems encountered or were I went wrong, so you don't have to Without any further ado, let's dig into this beautiful & complicated watch ...... First make sure that you downloaded the latest ETA 7751 "Technical Communication". Throughout this walk-through I'll use the same parts reference numbers as used in the "Technical Communication". Below the currently latest September 2021 version; 7751 manual.pdf Before having done anything to the watch, I tested all the functions for proper working and took the timegrapher readings to see if there was anything which needed special attention. These readings can later be compared with the readings after the service. Dial-Up; Dial-Down; Crown-Right; Crown-Down; Crown-Left; Crown-Up; From the readings, it's clear to see that the watch needed a proper service. The back-lid, just like the front-crystals found on pocket-watches, required a knife-type case-opener. Checked out the oscillating weight ball-bearing, it had next to no play and therefor good for another round. Removed the oscillating weight (48). Removed the two casing-screws and clamps, pulled the stem and flipped the case over onto a soft pillow. With the watch-case removed, the winding stem re-inserted and the movement was placed in a proper 7750 (or family) movement-holder. To me, working on these movements a proper movement-holder is paramount. During the disassembly of the movement I encountered some problems and without this holder I most likely would have made scratches or worse..... Pulling the 8x hands; they all came off without any problems. All the hands safely nicely stored in a small plastic container. The same counts for the dial, after the removal directly stored in a plastic container with on both sides of the dial a soft lining. Removal of the Day & Month indicator disk (78) and the Moon phase indicator (79) The keen observer may have noticed that there are no screws next to the movement holder, for example the two screws holding the Day & Month indicator respectively. When working on complicated movements or movements which I'm not familiar with, I took on the habit, when possible, to replace the screws in the same hole as they came from. For sure, it's more work, but some movements do have multiple types/sizes screws and it will become a big puzzle if you store them in the same container / basket. Replacing the screws works (most of the time) very well for me, but in some cases the replaced screws shoulder-out deeper than as they would have done when holding the part above. The protruding screw may touch parts below or when replacing bridges, prevent the bridge from not seating fully "level". To me, replacing the screws thoughtfully is far simpler than facing a huge sorting puzzle later. Removal of the combined maintaining plate (76) and the Month star driving wheel (77). The three tiny screws holding the maintaining plate (76) were extremely tight. I couldn't loosen them with my standard (new) screwdriver bits so I had to grind the screwdriver bit to match the exact the same shape as the screw-grooves. Only then, with "force", they came loose and I was glad for having a proper movement-support! One slip of the screwdriver, with the force that was required, could / would have easily made a deep score in the plate or worse ........ Removal of the Day jumper spring (71), Day & Month jumper (70), Day jumper (72) and the Moon phase yoke (73) plus an early warning ! With those parts out of the way, the Moon phase platform (75) had to come off. Assuming that the with the arrow highlighted screw was one of the screws holding the platform down, I turned the screw only to discover that it was the moon-phase corrector eccentric ....... Oops !! The setting of the eccentric has to be checked at the end anyway, but now I know for sure that it's set wrongly. Removal of the Moon phase jumper (69), Corrector maintaining small plate (66) and the Moon phase jumper spring (67). Still in the picture the Date & Month jumper (74) which should have been removed before this picture was taken. The original stem was replaced by a longer stem to adjust the Calendar driving wheel (61) which was holding the Date-star (63) down. Removal of the Date-star (63, shown in the previous picture) together with the Date-corrector (65) and the corrector maintaining small plate (66). Removal of the calendar platform (62). Slowly back to familiar ground; a standard ETA 7750 starts to appear ... Removal of the Hour wheel 24hrs H1 (59), the Calendar driving wheel (61), the Hour-wheel (60), the Day corrector (58) and the Day corrector spring (57). The removal of the Hammer-spring (56), Set hour-hammer operating lever (53 & 54), Hour counter lock (55), Hour counting wheel (52), Minute-wheel (51) and the free Cannon pinion (50). Pulling of the Driving pinion (49) has to be done carefully; either with a pair of hand-levers or two small screw-drivers. The upwards force on either side of the pinion has to the equal or you may break the pinion of the great wheel (16) (a previous experience has taught me so !! ) Flip the movement over and from here on I'm using a Bergeon 4040 movement holder. First the removal of the Hammer-spring (45). When removing this spring I had up till now difficulties avoiding making a small mark in the Automatic device bridge (44). It was our WRT-member "Nickelsilver" who tipped me off using a piece of Scott tape over the edge of the bridge. This worked very well and for the first time I was able to remove the hammer without leaving a mark! Thanks Nickelsilver! The hammer-spring (45) and the Clutch-spring (47) removed. Remove the Auto device bridge (44). Removal of the Reversing wheel; (43), Reduction wheel (41), the Clutch (40), Oscillating pinion (39), the Hammer (42), Chronograph wheel (37), Minute-counting wheel (38), Minute-counting jumper (46), the Lock (33), the Operating-lever (36) and the Minute counting driving wheel (19). Removal of the Chronograph bridge (34), the Friction spring (32) and the Operating lever spring (35). After the removal of the Ratchet wheel driving wheel (33) it's time to release any residual power in the main-spring. This can be done by holding the crown, lift the Click-spring (20) and slowly release the tension by letting the crown slip through your fingers. Removal of the Chronograph cam (29), Cam jumper (28), Detent (30), Ratchet wheel (23), Crown wheel core (22) and Crown wheel (21). Removal of the Balance Assembly (26+27), Pallet bridge (25) and Pallet fork (24). Removal of the Barrel bridge (18). Removal of the power-train; the Great wheel (16), Third wheel (15), Second wheel (14), Escape wheel (13), the Movement barrel (12) and the Stop lever (17). Flip the movement over for disassembling the keyless works. Removal of the Setting lever jumper (11) together with the Intermediate setting wheel (10), the Time setting gear (9), Rocking bar (8), Yoke (6), Setting lever (5), Winding stem (4), Winding pinion (2), Sliding pinion (3) and the Yoke spring (7). All the parts safely stored in a compartmentalized box with lid, ready for cleaning & demagnetizing. Regarding the "wear & tear" of all the watch-parts; it was clear to see that the watch hadn't seen a lot of use. The Oscillating weight ball-bearing (48) was good, reversing wheel (43) looked good etc. However, I decided to change out the main-spring. This type of barrel has a lid which cannot be "pushed" open. To open the lid, I place a sharp knife in the groove between the barrel and the lid and while pressing down on the knife roll the barrel, in my case on a "soft" leather underground to avoid doing any damage. This widens the groove into a small gap and with the smallest screwdriver one can pry, going around the barrel, the lid off. When done carefully you won't leave any marks. Barrel & Arbor cleaned, braking-grease applied ready for the new spring. Apart from a few (see "technical communication" !) the parts were soaked for 24hrs in Zippo lighter fluid and pegged; all the sprockets, pivots and jewels. Thereafter all the parts were checked for magnetism. Instead of using the unreliable compass method, I'm using an App called "Lepsi" on my iPhone. This App doesn't tell you how much magnetism there is, it only indicates whether there is any. The distance of the object above the screen, by which magnetism is detected, gives you some indication of the strength of the magnetic field, but nothing more. For me, when magnetism is detected, that's enough reason to "Zap" that part on my no-nonsense self-build demagnetizer. Of course, in reality the demagnetizer is not placed anywhere near my iPhone or the other watch-parts / metal-objects like here on the photo. Also, it may be a good idea to take your watch off during the "zapping” operations! Quite a few parts, particularly in the calendar works, were magnetized. With the main-plate anti-shock Chaton cleaned, pegged, cap-stone oiled and re-installed in the main-plate (1), the assembly of the 7751 can begin. Escape wheel (13), Second-wheel (14), Third-wheel (15), Main-spring barrel (12), Great-wheel (16) and Stop-lever (17). Installation of the barrel-bridge (18) (by a 7750 the wheel-train the and barrel-bridge are combined in one bridge). Make sure that all the wheels turn fine before tightening the screws; check, check and double check. Again, if you using the re-installed screws method, some screws may protrude the bridge. (I took the "warning picture" below a little later, so don't look at any additional installed parts) All the Lubrications as per the ETA 7751 "Technical Communication". These two re-installed screws do protrude the Barrel bridge (18). The one on the left will touch the Great-wheel (16) and the one to the right may just touch the main-spring barrel (12). Back them out far enough so they don't cause any trouble. The installation of the Crown-wheel (21), Crown-wheel core (22) and the Ratchet-wheel (23). With the movement turned over, installation of the keyless works; Sliding-pinion (3), Winding pinion (2), Winding-stem (4), Setting-lever (5), Yoke-spring (7), Rocking-bar (8), Yoke (6) and placing of the Time setting gear (9) before placing the Intermediate setting wheel (10) and Setting lever jumper (11) as a "combination". Keyless work completed. Check for proper working! Installed the pallet-fork (24) and the complete balance assembly (26 & 27). Cleaned, pegged the balance Chaton and oiled the cap-stone. Before going any further with the assembling, I tested the power-train and escapement for any irregularities. On the timegrapher the readings were looking a whole lot better than initially. Instead of picturing each position, here are the readings; DU & DD both 292-294 degrees, 0 ms and 0 s/d. CU: 244, 0.1, -14 s/d CR: 249, 0.2, -16 s/d CD: 252, 0.1, -6s/d CL: 262, 0.0, -5 s/d Even though I adjusted the Etachron as good as I could, that's to say centring the hairspring between the two regulator pins and thereafter reducing the regulator pins gap to the point that the hairspring could still, but just "breath", the positional deviation with max. 16 seconds is slightly higher than I was hoping for. Then again, it's not a chronometer grade and each position produced straight lines, so I think that with some daily-rate adjustments the watch will run just fine. Once satisfied with the running of the power-train and the escapement, the assembly of the chronograph can start. Cam jumper (28), Chronograph cam (29), Detent (30), Minute counter driving wheel 30 minutes (19), Lock (33), Operating lever spring (35) and the Operating lever (36). As said; lubrication as per "Technical Communication" and test the proper function of the start/stop and reset levers. Placement of the Ratchet wheel driving wheel (31) and the Friction spring chronograph wheel (32). Install the chronograph bridge (34); don't forget the lubricate the Reversing wheel jewel on the bottom of the chronograph bridge before placement. Also pay attention to the reset-lever, it has to be pushed in so the bridge can sit level & flush. Check the working of the Ratchet driving wheel (31) and the reset lever before tightening the bridge screws. The placement of a well lubricated Reduction wheel (41), Minute counter jumper (46), Oscillation pinion (39, biggest sprocket down), seconds recording Chronograph wheel (37), Minute counting wheel (38), the Clutch (40), make sure that the oscillation pinion pivot is engaged), Reversing wheel (43) and finally the Hammer (42) before the Automatic device bridge (44). Before installing the Automatic device bridge (44), lubricate the jewel for the seconds recording Chronograph wheel underneath the bridge. The installation of the Automatic device bridge can be very tricky. It's very easy to touch the Clutch (40) and the pivot of the Oscillation pinion comes out. Before inserting or tightening the bridge screws, double-check the placing and working of every component!! Once the bridge is installed and with the relevant lubrication done, before mounting the hammer-spring (45) and the Clutch-spring (47), all the functions of the chronograph can be checked & tested; the engagement of the oscillation pinion, the smooth running of the seconds recording chronograph wheel, the advancing of the minute counting wheel, the start/stop- and reset-levers etc. Next is the installment of the Hammer-spring (45) and Clutch-spring (47). To prevent scratches on the Automatic device bridge (44), as per brilliant idea of WRT member "Nickelsilver", a piece of Scotts tape was taped over the edge of the bridge. With the installment of those two springs, the assembly of the chronograph is completed Movement flipped over and placed in the 775x movement holder. Installment of a well lubricated Driving pinion (49), The Cannon-pinion (50), the Minute wheel (51), Hour counting wheel (52), Set hour operating lever (53+54), Hour counter lock (55) the Hammer spring (56), the Day corrector spring (57) and the Day corrector (58). The build-up, up till the Day corrector spring (57) and the Day corrector (58), was identical as to a standard 7750. The Hour wheel 24hrs (59) drops over the Second wheel (14) pivot. Attention: Sadly, no picture but when installing the Hour wheel (60) over the Cannon pinion, one has to lift the Minute wheel (51) slightly and to make sure that the hour wheel teeth do engage in the small minute wheel sprocket. Once they engage, both wheels can be lowered in place. Finally, before installing the Calendar platform (62) the Calendar driving wheel (61) with the "day finger" pointing as shown. From here on I pulled the winding stem to stop the running of the movement and thereby avoiding the advancement / altering of the positions of the wheels. The installation of the Calendar platform (62) can be a bit tricky. It's all too easy to dislodge the hour lever (53) and the Hammer spring (56). Make sure that the platform sits flush with the Main plate (1) before tightening the 3x screws. Place the Day star (63) as shown in both above pictures. Placing of Date + Month jumper (70), the Day + Month jumper (74) (Both jumpers are identical), Day jumper (72), Moon phase yoke (73), Day jumper spring (71), Date corrector (65), Corrector maintaining small plate (66), Moon phase corrector (68), Moon phase jumper (69) and Moon phase jumper spring (67). Installation of the Moon phase platform (75), the Combined maintaining plate (76) (Be aware that the top of the Combined maintaining plate slides in the gap of the Day Star) and the placing of the Month star driving wheel (77). Placing the Month & Day indicator disk (78) and the Moon phase indicator (79). Adjusting the Phase corrector eccentric (64) wasn't that hard as I feared. By adjusting the eccentric one determines the "depth" of the Date corrector (65), shown by the blue arrows. Set too high and the top-sprocket of the Date corrector (65) won't even touch the Moon phase corrector (68). Set too deep the top-sprocket of the Date corrector will jam the Moon phase corrector (68) into the Moon phase indicator. The "depth" has to set such that the sprocket of the Date corrector (65) pushes the Moon phase corrector (68) just far enough so that it will just advance the Moon phase indicator by one click before the top Date corrector (65) sprocket releases the Moon phase corrector (68). There is clear information about the Moon phase corrector "depth" setting in the ETA 7751 "Technical Communication". With all parts installed and tested as far as possible, the dial goes back on. Before re-installing the hands, I re-lumed the minute & hour hand with new high-class LumiNova. Both hands now re-lumed and drying before the installation. Placing the long Date indicator hand required a bigger size hand-pusher which I didn't have. The idea was born to cut a tweezer protector-cap from the top until the required size was obtained. Stuck to protector cap onto the handle of a diamond file for more stability / pushing-power. It worked like a treat Turn the date quick-set until the month indicator disk changes month, that will be the first (1) day of the new month. The rest of the hands (8! in total) to be set at 24:00 midnight when the day indicator disk changes. Detailed instructions about the "shift tolerances" are described in the ETA 7751 "Technical Communication". All the hands installed and correctly set on the month / day / date and moon phase. The 18th of January 2022 had a full moon. The German gentleman received the watch when he turned 60 in 1995, now I'll continue with his watch as from my (65th ) birthday in January 2022 I'm still awaiting new crystals and once the case has been restored, I'll add the final picture of the fully restored/serviced watch. I really enjoyed working on this watch and even though I sometimes feel that contributing to this current WRT-forum has sadly become a bit of wasted time, I do hope that my write-up, perhaps found via Google or some other search machine, will be of some use to somebody, at some point in time Endeavor, Denmark


 8 points
 -
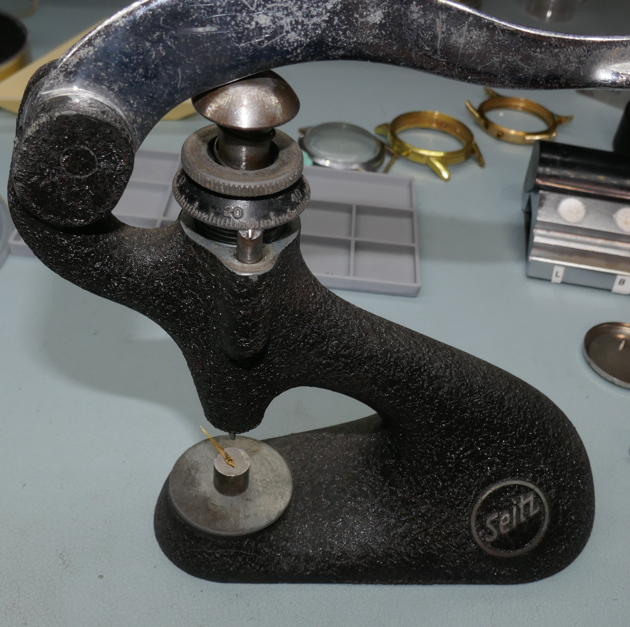
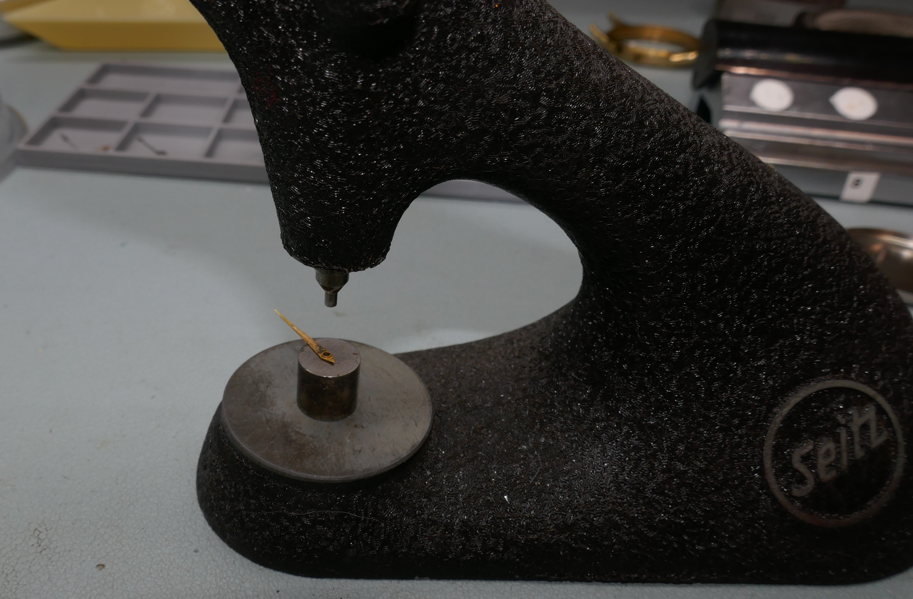
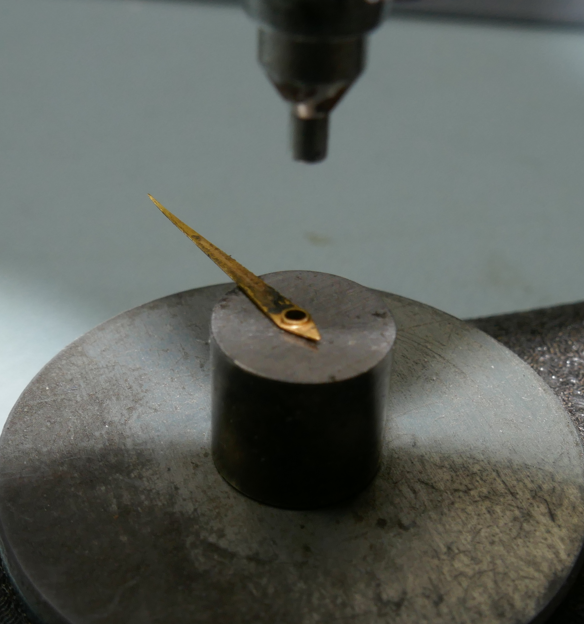
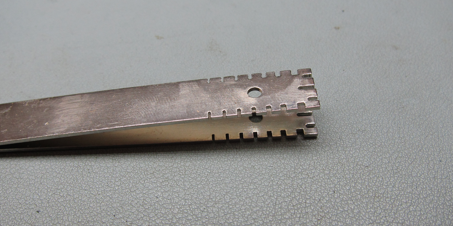
Been working on another Vulcain Cricket. This is a rebuild from a rusty start and a donor watch (also a rusty watch). The hand was floppy on the cannon pinion. Not sure how that happened--was not my fault--the watch came to me in pieces (the last guy gave up I guess). In one of my watchmaking books, there was a mention of using a jeweling tool to close the hand tube, so that is what I did. Of course...as delicate as I was, I overshot and ended up having to use a staking tool to open it back up slightly. Got it now. I have two of these Seitz tools. One has a base hole of 3mm and the other 4mm. I only had one solid stump and it was a 3mm one. I prefer the 4mm tool, so I just let the stump "float" for this exercise.
 3 points
 -
Hi I believe from other posts that tapping it out is the correct way. I would be inclined to make a sliding punch. Hollow brass rod that fits snugly over the canon pinion and another brass punch that fits in the hollow rod/guide. Being brass it wont damage the pinion surface and the guide rod will ensure a srtaght impact so no chance of bending the pinion either.2 points
-
It depends? If the watch seems to run in other words the hairspring and balance wheel are compatible enough that the watch can actually run then we just need some timing adjustments to the balance wheel. In other words may be some tiny balance screws would work. I wouldn't say the balance is destined to definitely go away until a proper evaluation can be done. Basically we just need someone to a proper evaluation that has access to the proper timing machine that can time things that are grossly out of frequency. Plus may be evaluated multiple of positions just to make sure there aren't any other problems.2 points
-
I like my tweezers to have a very light touch, (soft and mushy). This gives me better tactile feedback and better control of small objects like balance jewels and small screws. I don't own a single Dumont or Bergeon. All my tweezers are cheap tweezers but modified and tweaked to my preference. The jaw opening and closing force can be tailored to an individual's preference by grinding down the thickness of the metal at the back end of the tweezer and bending the spread of the jaws. The important thing is that the jaws of the tweezers must be well dressed and aligned. Poorly maintained tips is the main cause of parts pinging away.2 points
-
Hi Sometimes you can straighten the teeth, but you have three/four there, probably damaged when the other barrel broke. the only problem with straightening is getting the profile right and then polishing the teeth, be very careful and inspect for cracks once done. I have straighted them before and been ok. the other barrel probaby best to replace. If you get stuck for a barrel let me know and I see what I have. Keep clocking ebay good luck1 point
-
Hi some time or other some one repaired the barrel teeth (badly). The french clock springs are quite strong and if left I can see that repair failing and causing more damage. So best either repair it properly and it will be ok or replace rhe barrel. Its a nice clock and The mougin movement is a sound and they clean up a treat. Well worth the effort. French clocks and parts appear on ebay quite often. I have a little collecyion of bits myself.1 point
-
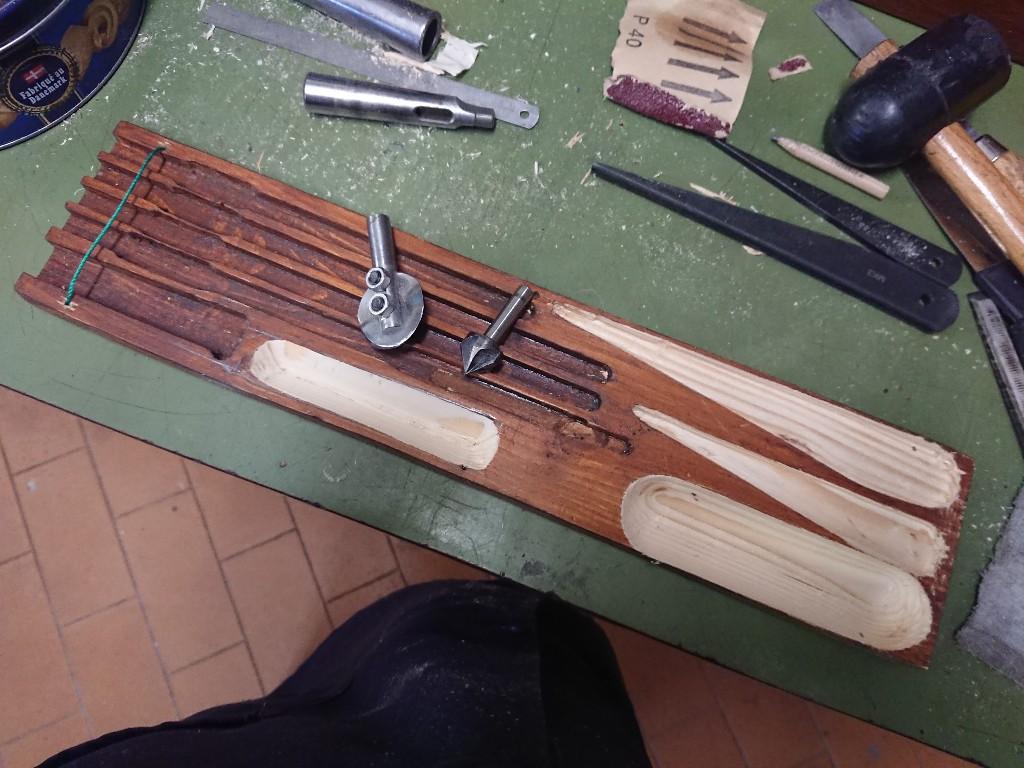
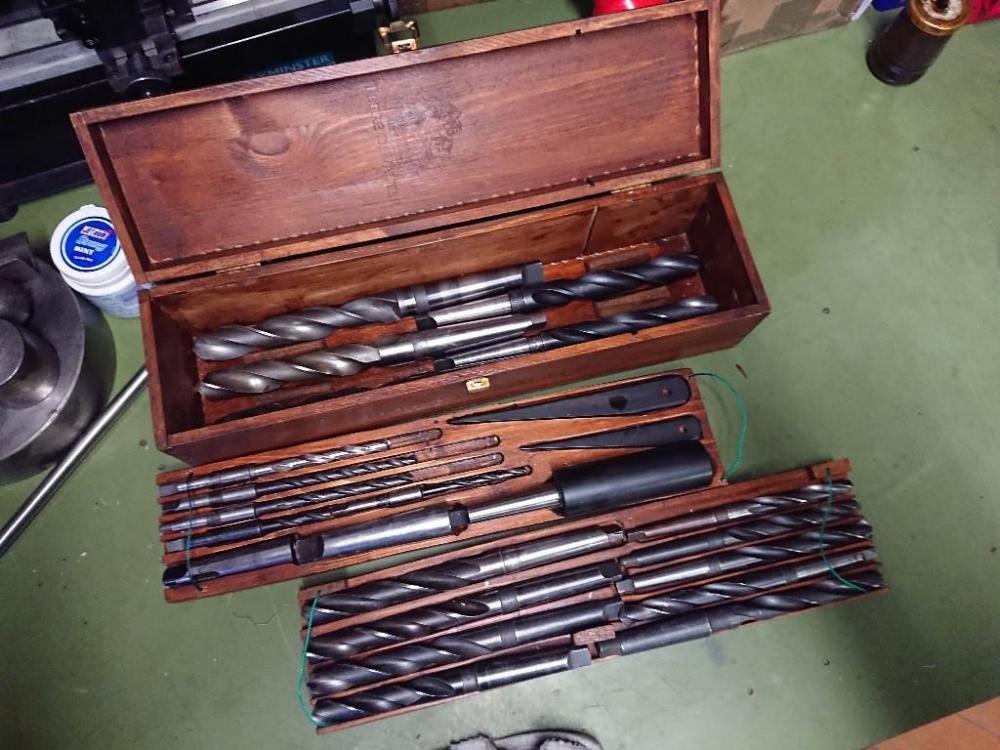
A bit of woodworking The case (was a 1.5L wine bottle box) for the big drill bits which I got as part of a "lots more stuff" is finished. These have Morse taper shanks, so need to accommodate adapting sleeves, drifts and a chunky MT3 to 2 extension. For the latter I made a sort of round nose cutter to work the top tray, all slotting was done by eye on the milling machine. Then two hands of wood stain conceal most mistakes and make everything look vintage good.
 1 point
 -
Could you please also measure the max diameter you can fit into the picture? Can you for example take a picture of a whole pocket watch? I understand that a microscope is not made for this, but if it can then its a good bonus. My camera mounted on my amscope can only take pics just half of the averaged sized mens wristwatches.1 point
-
Have you lurked on replicawatches forum? Your sure to do a 180 real quick anyway, but answers to such questions are there.1 point
-
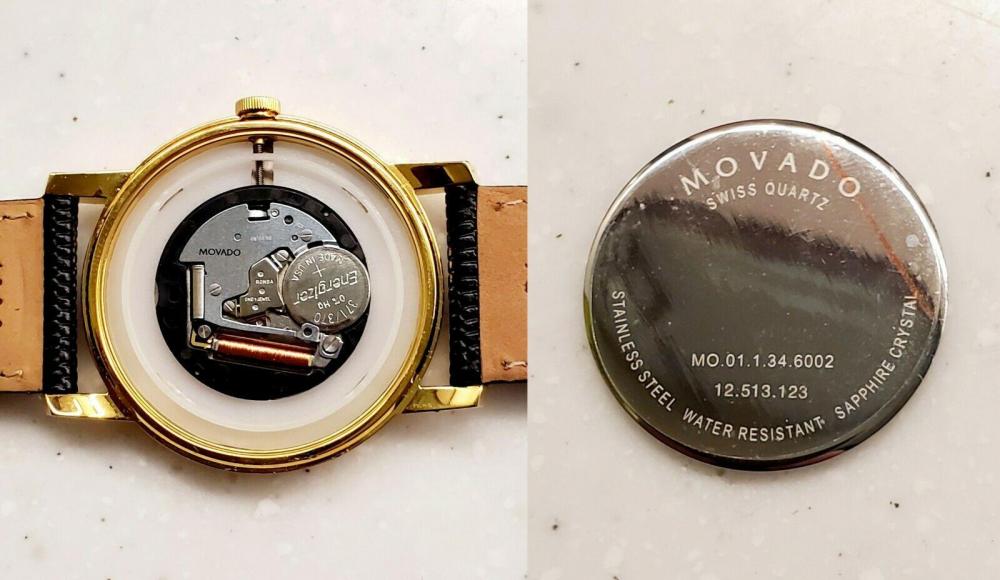
I 100% agree with you, my understanding from your earlier post was that it was an example of a fake, I may have misunderstood. I would urge any potential buyer to do the level of research that they feel is appropriate to the purchase prior to parting with their money. If I was presented with the example that you posted earlier I would have to come to one of two possible conclusions; either it's a fake, or if it is genuine then it is so over priced as to be laughable and I would move on. If the contents of the case had proven a bit more credible though then I may still have wanted to do some some more investigation in order to satisfy myself that it was the real deal. This could be as simple as a close inspection with a loupe, or a more in depth check with the manufacturer and the dealer regarding authenticity, which ever provided me with the level of confidence that I was happy with, and that's a highly subjective judgement that is unique to each of us. The point that I was making earlier though was that I think that we should be a bit more careful about categorically declaring something a fake without sufficient evidence to back up our assertions. I can't tell from the submitted photos in the OP's post whether it's fake or genuine which is why I asked @Nucejoe to elaborate on how he came to his conclusion, afterall if there is some clue that I have missed then I would be glad of the education. Your own explanation regarding the possibility of a genuine item from a budget range from Movado (therefore cheap but not fake) made sense and provided a possible alternative interpretation of the case back text, demonstrating the potential pitfalls of jumping to one side or other of the argument without sufficient data. Like I said I would need more information regarding both the content of the watch case in question, and what should be in there, before I could even begin to have any confidence in my conclusion.1 point
-
Old pinion has 8 leaves, new one has 9! How can that work? Before you do anything: count the teeth number of both wheels and compare! Diameter, too. Frank1 point
-
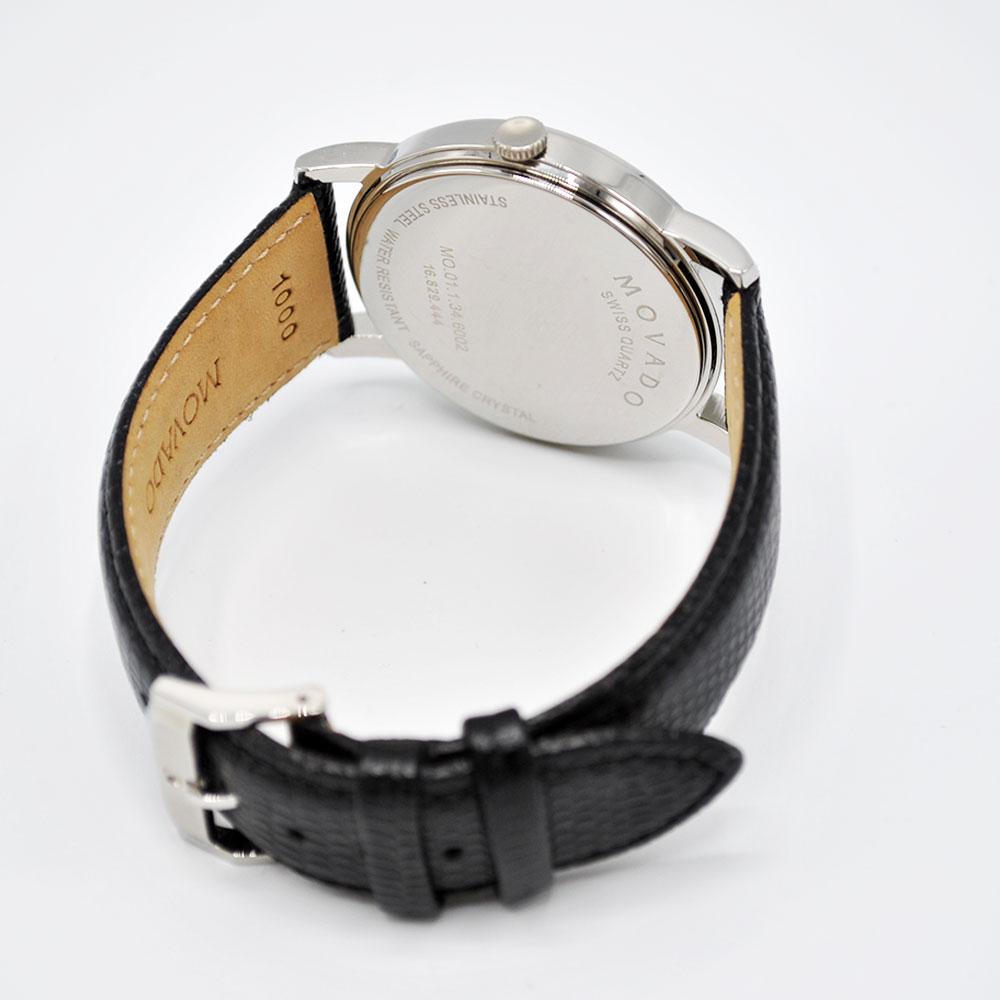
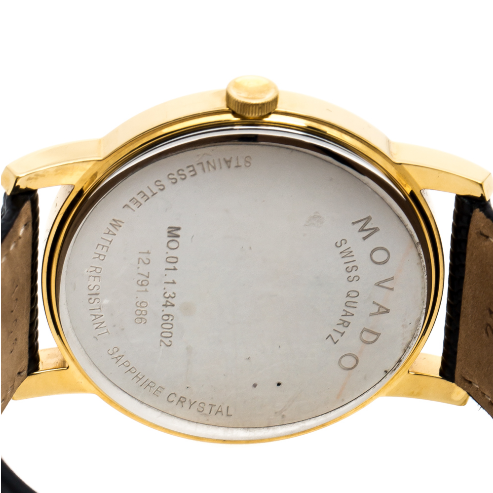
If we are to go purely by the case back markings then there would certainly appear to be plenty of "fakes" out there, and in the hands of some perfectly reputable dealers.... .....these from just a couple of minutes of googlefoo. Personally I would need to see what is underneath the case back before I could confidently declare something genuine or counterfeit, and even then only after verifying what the real deal should have under the hood so to speak. In response to the OP's query I would say that the pics don't really provide enough information to come to a qualified conclusion, although the wording on the buckle is somewhat suspect and would warrant further investigation (open the watch up and have a proper look), preferably in the presence of the vendor.

 1 point
 -
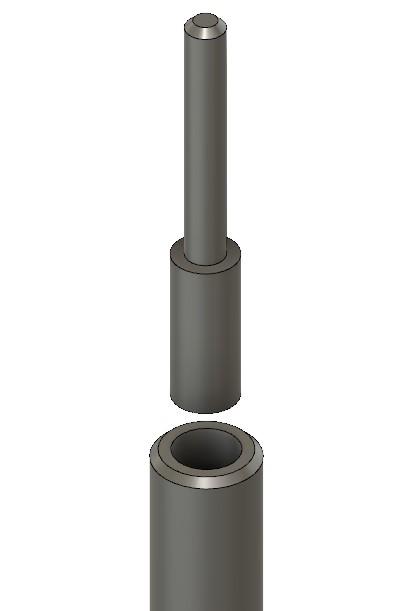
As JDM said, those marks are a remnant from cutting the pinion leaves. As that surface is nonfunctional, it's just a cosmetic issue. As for repivoting a 4th wheel, it's a common job. It's best to make a stepped plug, so that there is a bit of a shoulder at the pivot/pinion interface so that the pivot doesn't pull out when removing the seconds hand. Just a quick sketch below to illustrate. In practice, I'll drill oversize, fit the oversize plug, then turn down the pivot and burnish to finish. When all done the repair is invisible.
 1 point
 -
What I'm trying to explain is, it's correct that says that, because it's supposedly a Movado from their economy range, made in China with Swiss parts - namely the Ronda the mov.t. There are probably more fakes than genuine of these around, and all could be coming out of the same factory.. Check listing: https://www.ebay.com/p/1323810638
 1 point
 -
That is because to cut correctly the leaves of the pinion to the given depth the cutter removes also a bit of material in there. Then it's polished so the resulting edges don't interfere with the jewel. So it is, as the OP had mentioned. I never heard of a seconds hand pivot being refitted to a pinion, and I'm a bit skeptical about it's practical feasibility.1 point
-
While looking for a rust removal product on ebay, I got a lot of hits from the usual suspects from China. One contained this rather alarming product endorsement. I'm not sure this is the effect I'm after.
 1 point
 -
When I have a problem like this, the first thing I do is find a picture of the movement and look at the position of the regulator levers for timing and beat. If the hair spring is not fouled in some way. I would bet that someone broke and reattached it or just put one on it that looked right. I would look for a parts movement. Even one with a broken staff will have a good hair spring and would provide you with needed practice for this type of repair.1 point
-
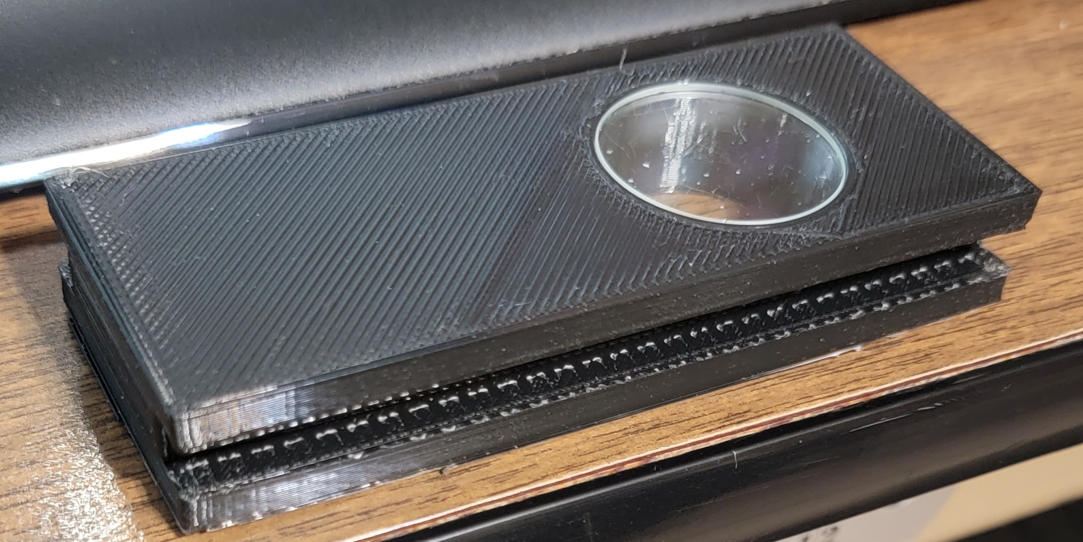
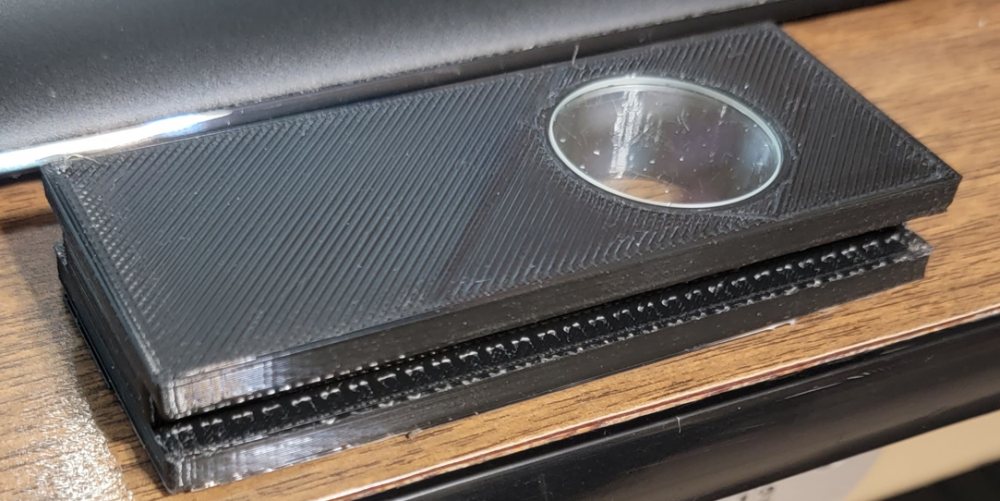
I designed and printed the base. Used a mineral crystal that I had taken off another watch when replaced. Will order a new one...without scratches.
 1 point
 -
We were taught in school to use the Jacot. I have a Jacot permanently set up, and it would be a rare week I don't use it once, more likely daily. It's really the best tool for the job; Swiss schools used to spend 3-6 months on its practice. But the "knack" can be had in about an hour of practice, get some 'steampunk' or whatever assortments of wheels and a Bergeon carbide burnisher and go to town.1 point
-
The iron oxide plating really sets off the rest of the movement. Bravo on your new purchase!1 point
-
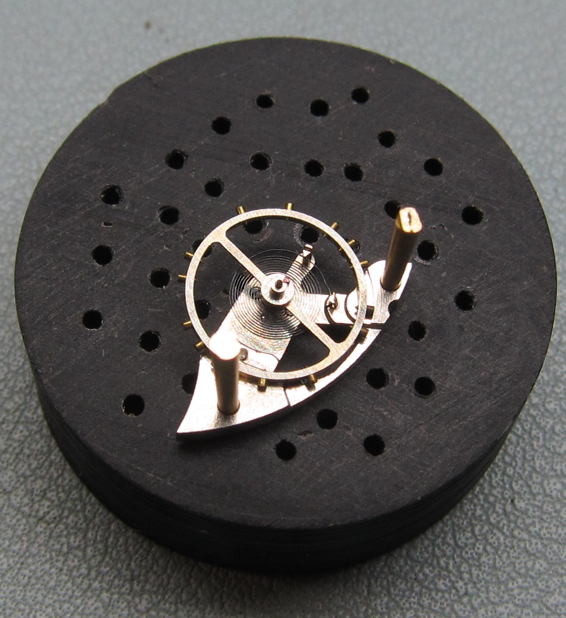
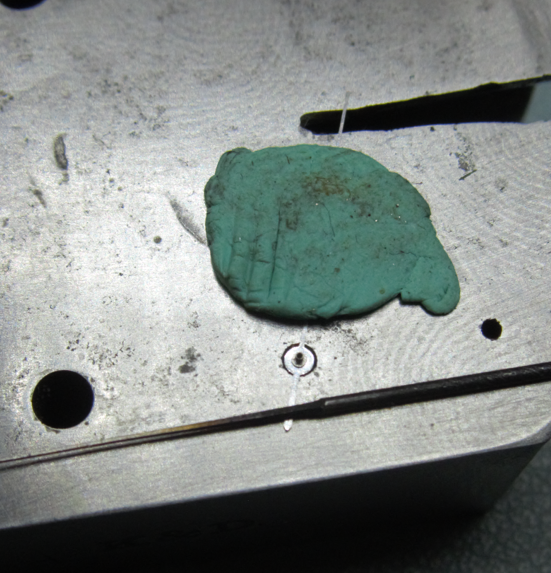
Stabilizing the balance cock while removing the balance and hairspring (removing stud, and turning the shoe) is always challenging for me because of stabilization. I think I have solved this today. I printed this multi-hole base to mount the balance cock and using brass tapered pins I do the stabilization. My example here is probably the optimal case because the cock has two holes (balance for a Vulcain Cricket 120). I will report back on success with single-hole cocks.
 1 point
 -
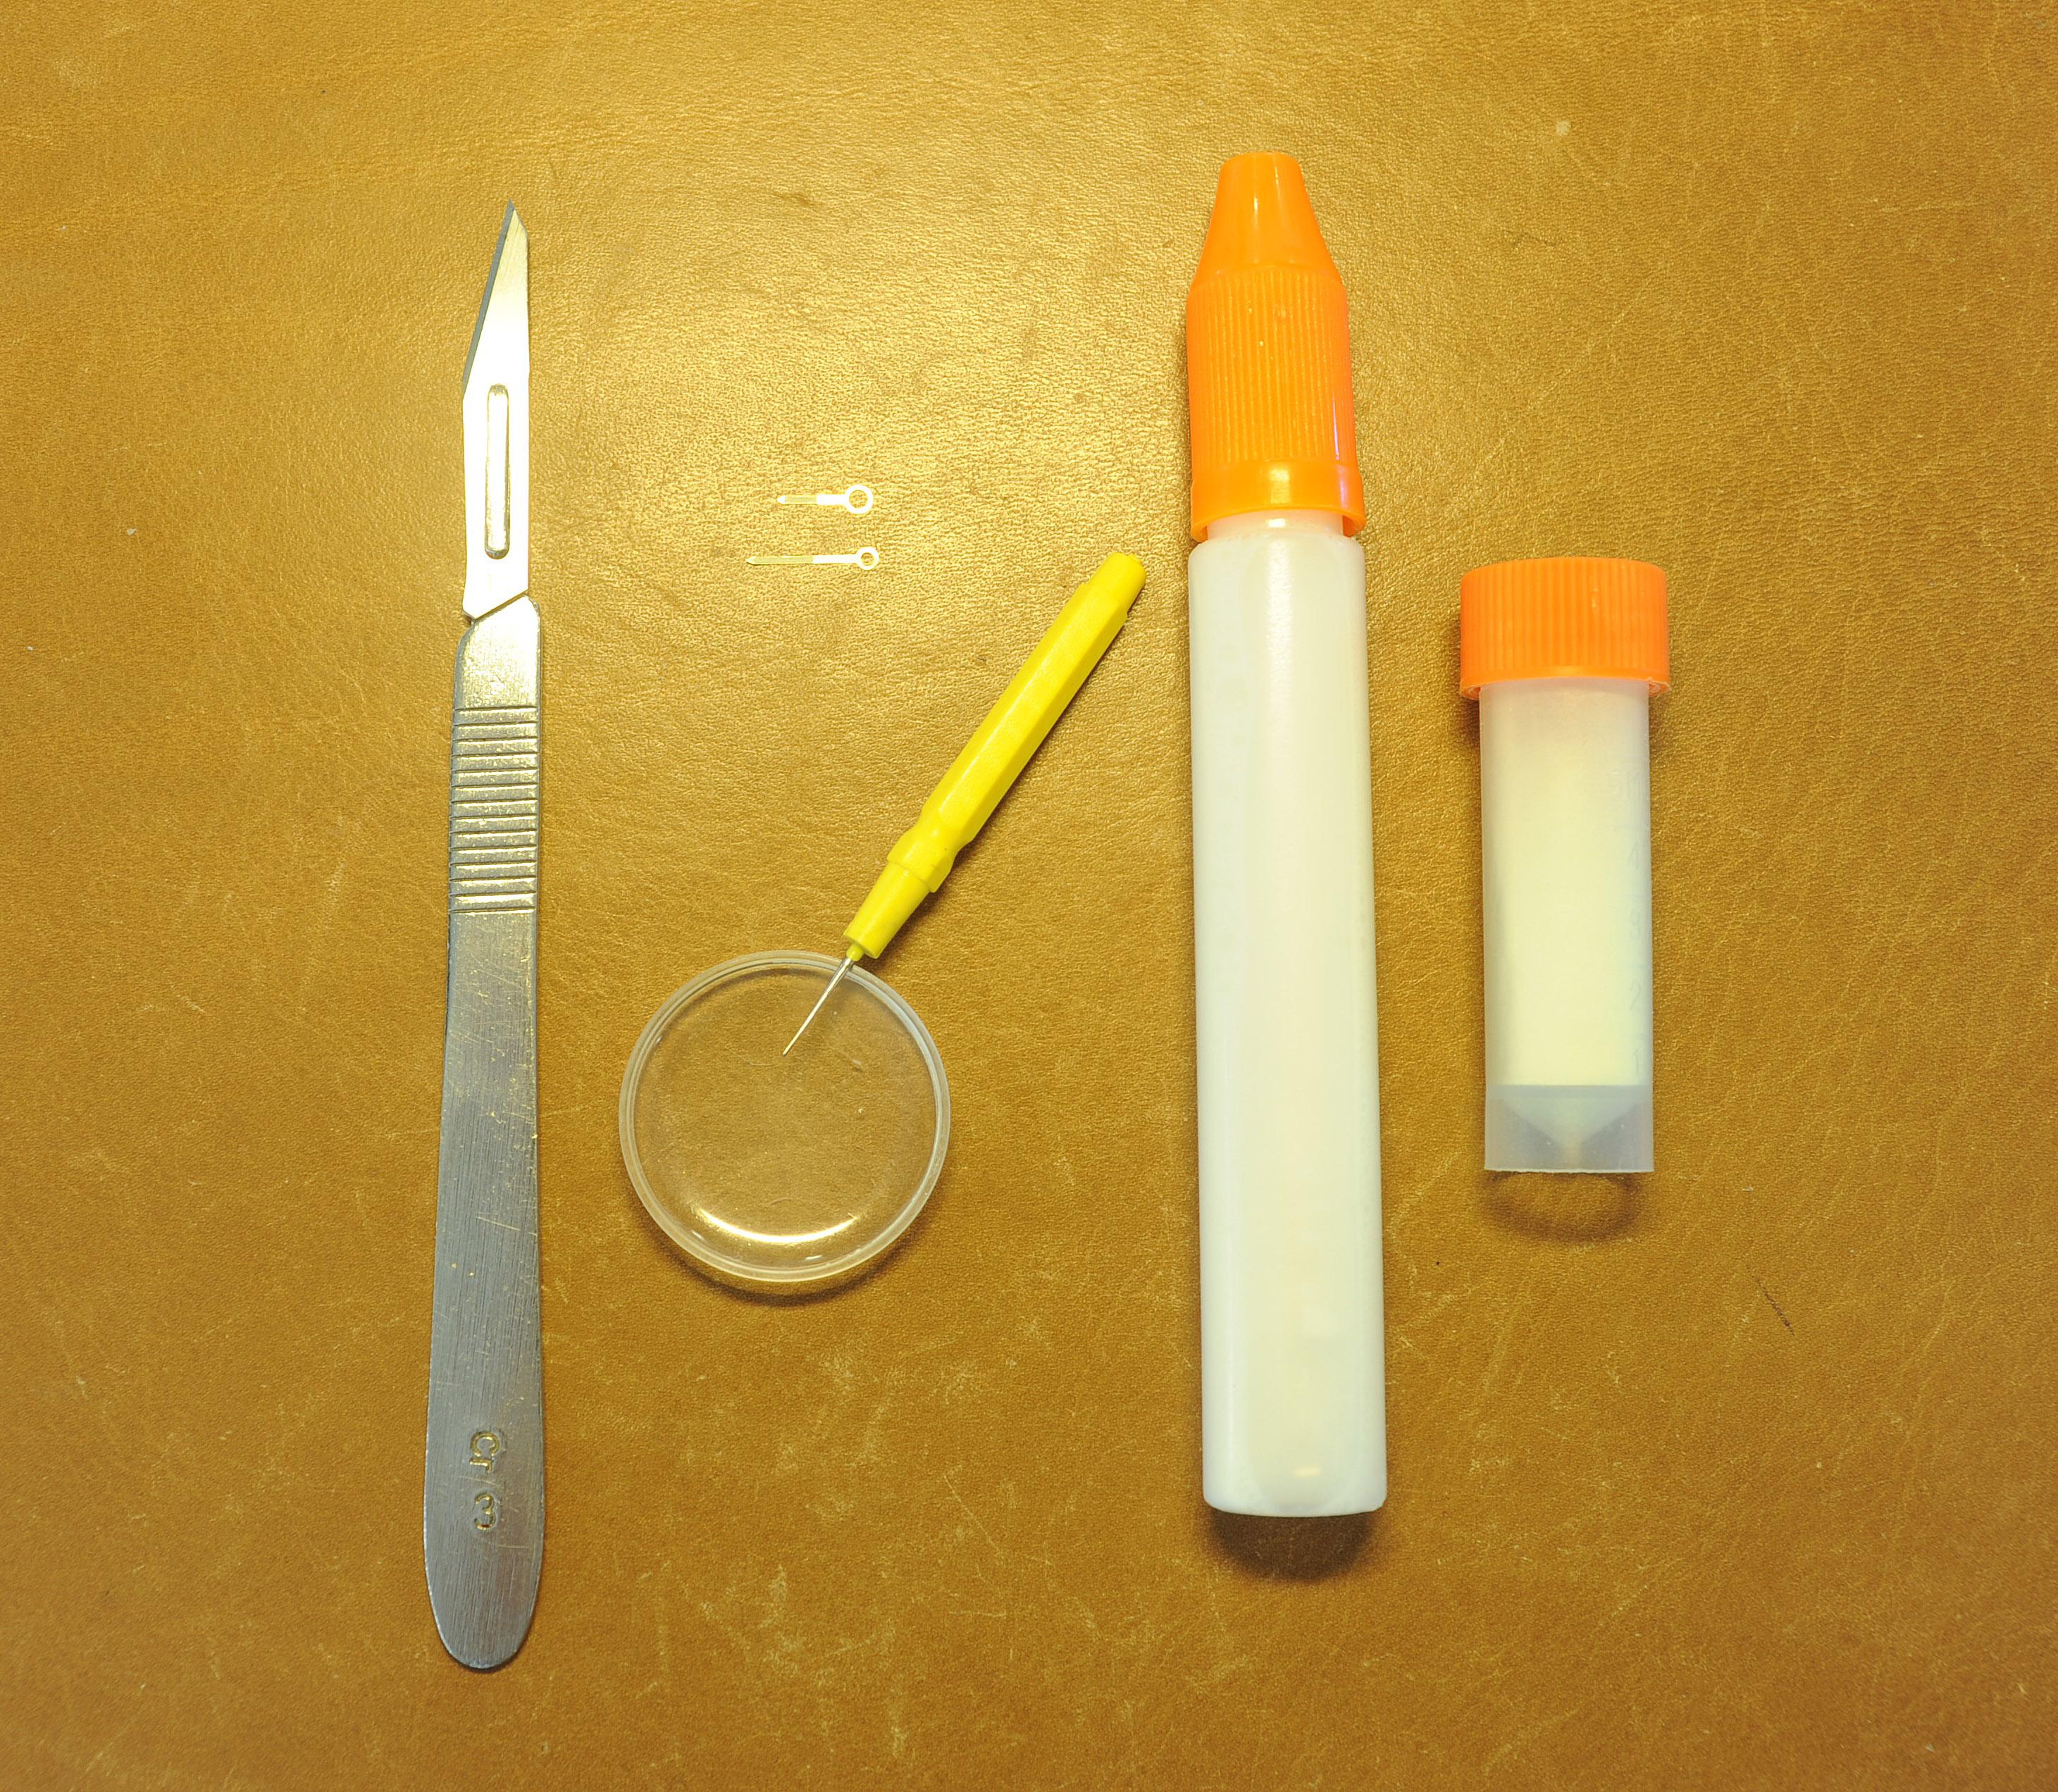
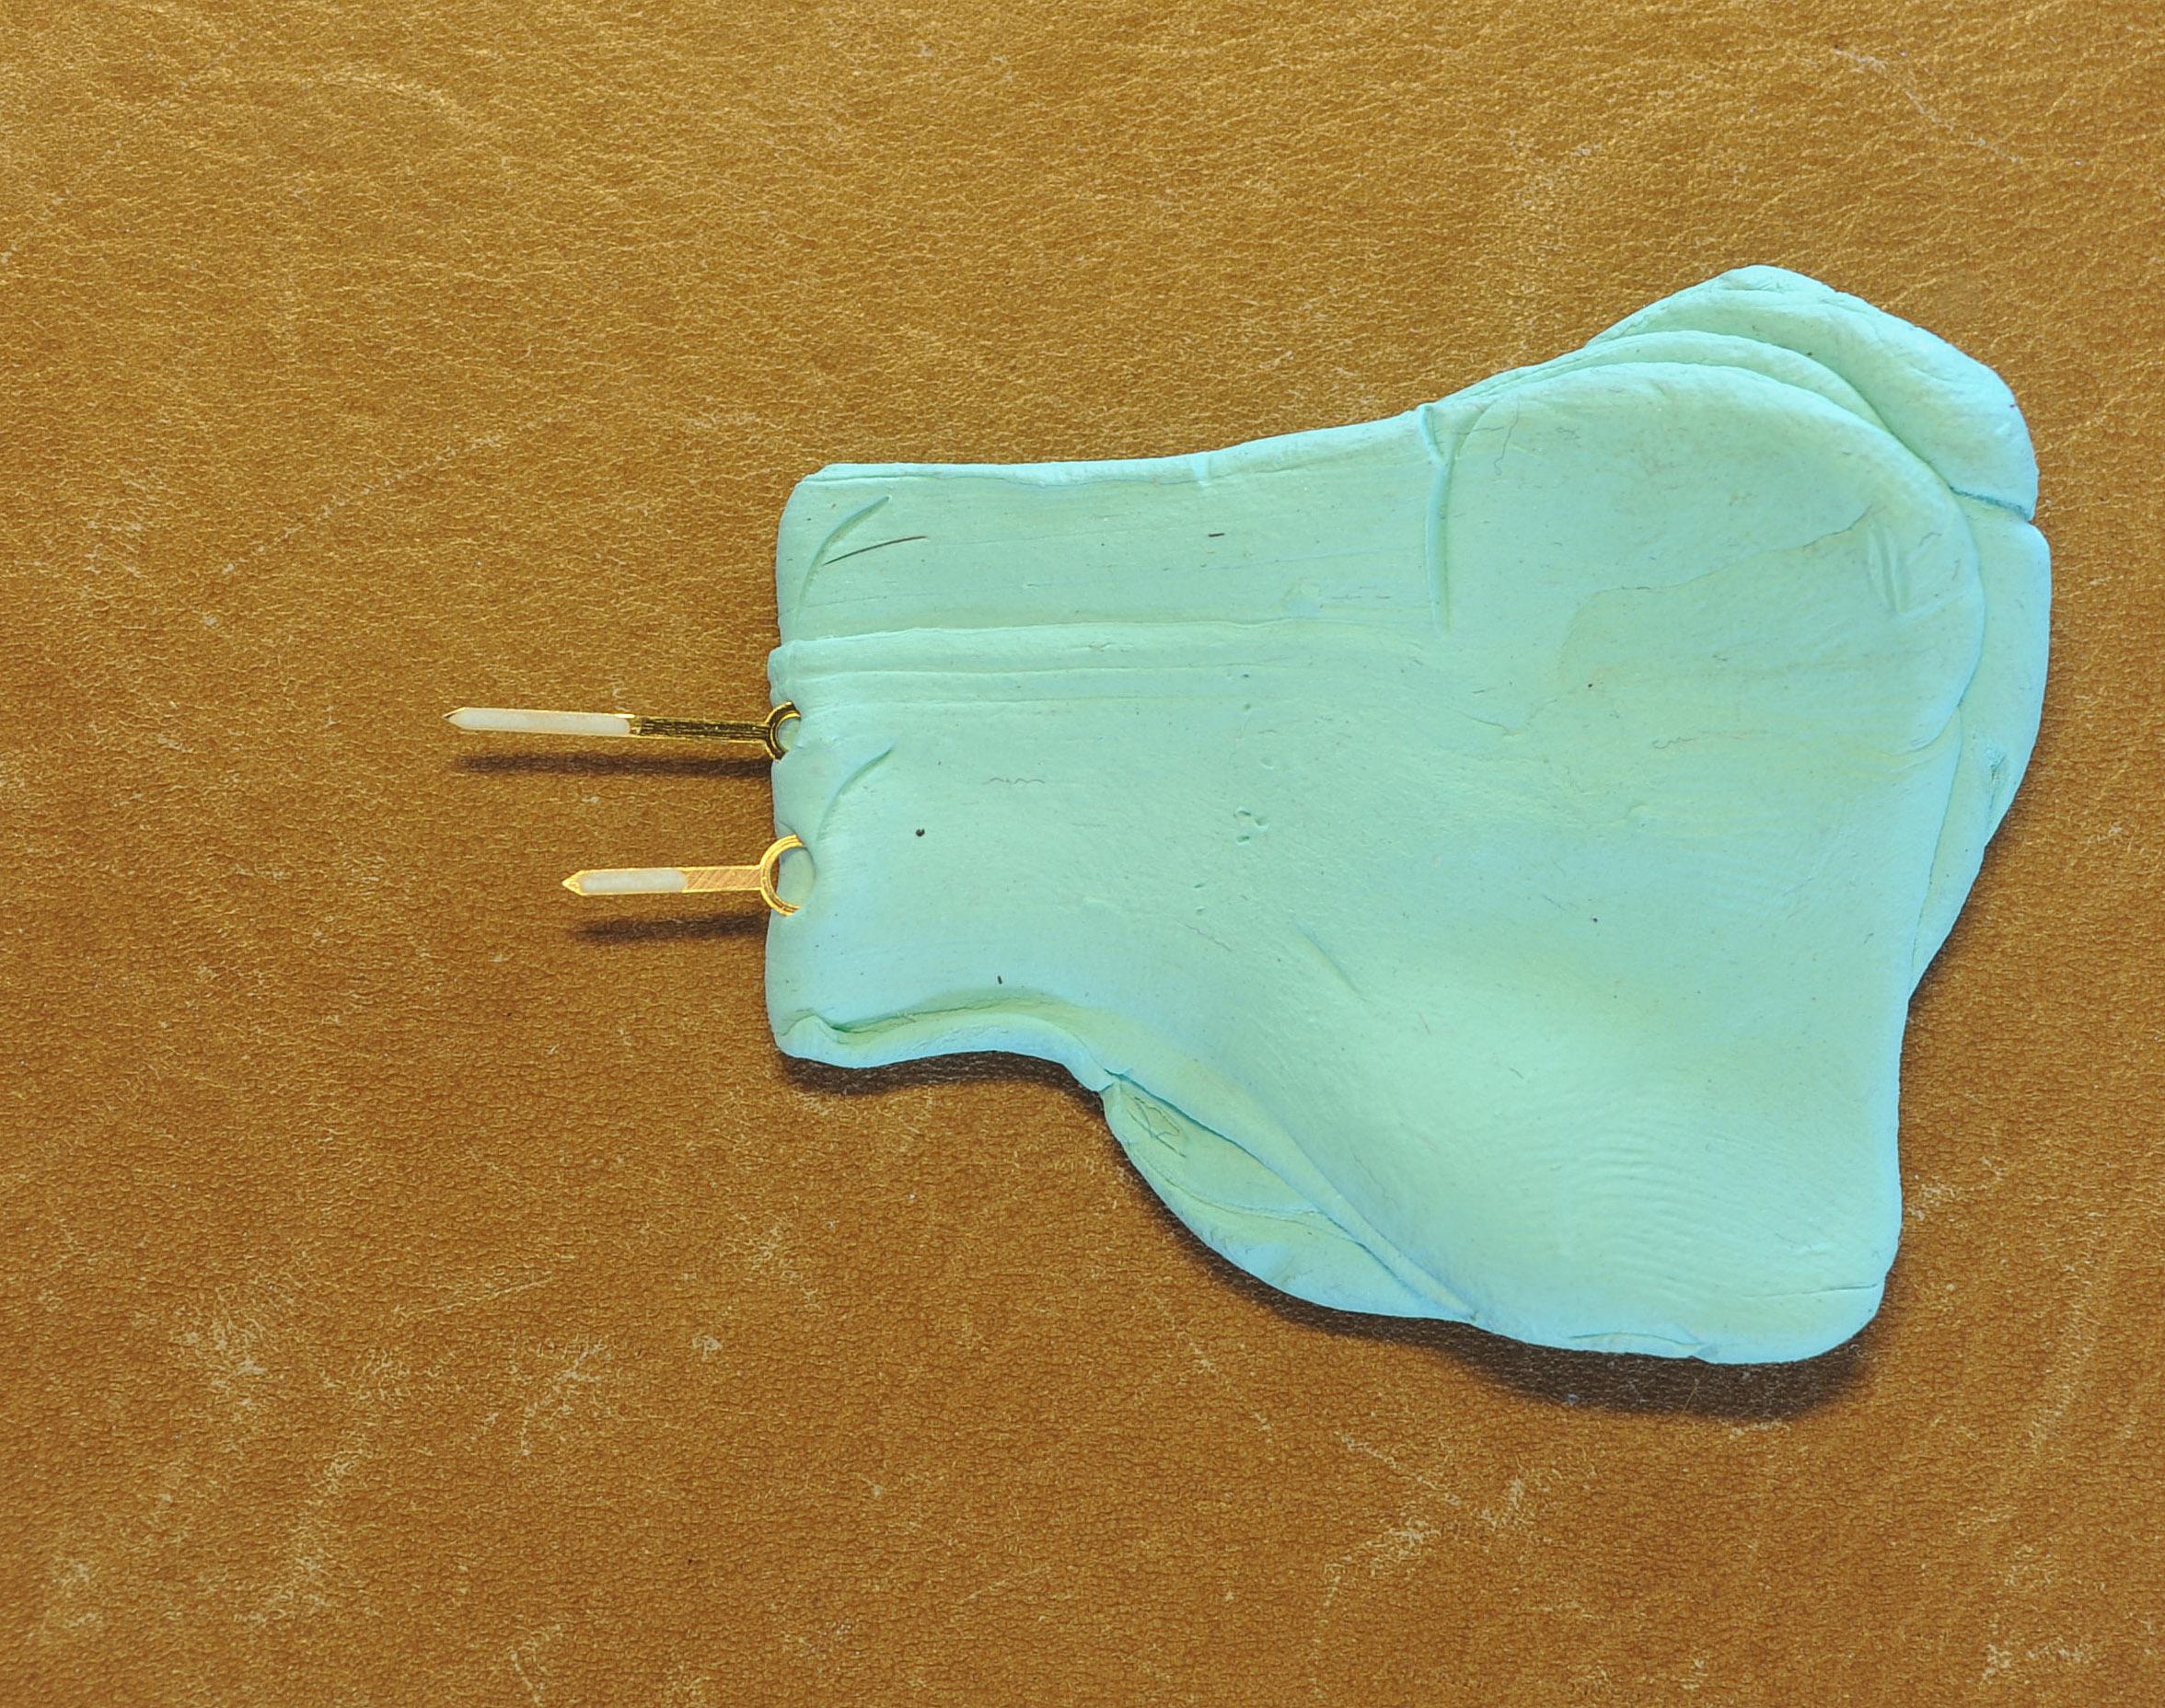
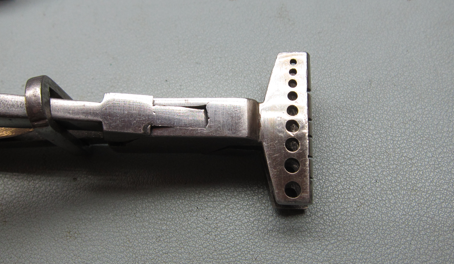
Today, I had to broach a second hand I bought from Esslinger. I am showing all of the tools I have for this job. Then I show the setup I finally used. It gave me the most control with less fear of breaking the hand. Also gave more visibility than the round clamp gives. I put the hand on a bench block and stabilized it with Rodico. Holding the base of the hand pressed toward the bench block with tweezers, I inserted the broach and did its job.
 1 point
 -
Interesting that this website exists? I have their tweezers I rather like them fortunately I think the ones I have will last forever so I may never need any more tweezers ever again. But when the discussion of good tweezers would come up if I looked for them the only thing the website acknowledged was that they existed. It barely had contact information so I find it interesting that they have a store. Even more interesting they had a bonus dial and timing washers? We may be arriving late to the party again? Several years ago and one of the BHI journals they had an article on hairsprings. Specifically they no longer existed and blue packets for the watchmakers to use. They were arriving late to the party also as they had been discontinued for quite some time was just that nobody noticed. The simplistic answer is the Swiss no longer need to manufacture generic parts. They does manufacturer for demand so generic hairsprings are gone. In order for a material house to have an assortment a timing washers they have to have an access to timing washers. If nobody's manufacturing timing washers we can't have an assortment. Then there's the other much much bigger problem. Everybody dig out the timing washers tell me who made them? One of the boxes that I can't conveniently find was made by the company was a US company and when I was in school the instructor said those were the best because they were actually true to the timing per weight versus the Swiss in other words the Swiss for American pocket watches her approximation. One of my assortment says justright Then the initials GICs Switzerland on the bottom no idea who they are. The other assortment Newall I think they still exist. The third assortment best fit and they still have a presence. Because unless the material houses were really big or exist a long time ago where they had access like in America to the watch companies to buy their surplus they're not going to probably make up assortments they would have to buy from one of the wholesale material houses which are all going away because that's what they seem to be doing. Unfortunately I suspect that there's a lot of stuff that is disappearing that would be nice to have but there isn't a big enough demand to justify them worst-case on the timing washers I have a book that shows how to make the punch if I remember where it is I'll see if I can post an image. Then on the website above does anyone know who the company is esSer Is never heard of it it's on all the boxes on the website above doesn't even say Switzerland but I'm going to assume that's where they're located it's not the same name as the company of the tweezers so it must be another company? That might give us a clue as to whether we can buy additional timing pictures new but I'm suspecting the answer is no Oh and if you go back in time they used to have himI suppose somebody has checked all the online material houses to see if they exist anywhere? Well and thinking about it there is the other problem? http://www.julesborel.com/s.nl/it.A/id.247778/.f?sc=31&category=9906721 point
-
I would put a pair of timing washers on, opposing screws, this is exactly what they are made for.1 point