Leaderboard


Popular Content
Showing content with the highest reputation on 03/31/17 in all areas
-
Hong Kong airport Sent from my iPhone using Tapatalk3 points
-
took the boss out today, second time in a year, trying to keep the original enamel, well, original! You hardly see this Elgin Direct Reading from 1957 with the crest not buffed off the face and you might see one with the red enamel maybe once a year but still having the blue enamel is a rare event!3 points
-
3 points
-
When fitting new stems to watches I use these tools :- Digital calipers, Fine grade diamond lap Wire cutter Pin vice Now for fitting. (1) Hold the stem in the pin vice and screw on the crown tightly by hand. (2) With the movement fitted correctly in the case, insert the stem until it locks in place. Now measure the gap between the case and the underside of the stem. In this case it is 2.16mm. (3) Subtract 0.2mm from this size and this will give the amount to remove from the stem. In this case it will be 1.96mm which will give 0.2mm clearance below the crown when fitted to the watch. (4) Now remove the crown from the stem and hold the stem very tightly in the pin vice, then place the pin vice and stem between the jaws of the digital calipers then zero the calipers. (5) Remove the calipers and without touching the zero button set them to minus 1.96mm. THEN RE-ZERO THE CALIPERS AT THIS LENGTH The wire cutters are now used cut off the excess thread leaving a small amount to be filed to the exact length. (6) All that is required now is to dress the stem with the diamond lap a little at a time until the calipers read zero. (7) Finally screw the crown on tightly and it should be ready to fit to the watch without further adjustment. I find that this method cuts down on trial and error. FOR SCREW DOWN CROWNS. A) Screw down the crown tightly onto the case without the stem and measure the distance nbetween the bottom of the crown and the case. B ) Screw the new stem tightly into the crown, then insert into the watch until it engages and locks into the movement. C) Press the crown down firmly as far as it will go and hold it there. D) Using the vernier callipers, measure the distance between the bottom of the crown and the case. E) Subtract the size determined in (D) from the size measured in (A) then subtract a further 0.15mm from this size. This is the amount to shorten the stem by. This should allow the crown to screw full home without compressing the stem too tightly between the movement and the inside of the crown. F) Cut the stem leaving it slightly longer than the size determined in (E), and dress down to size using the diamond lap and vernier callipers as described in the original post. G) Screw the crown onto the shortened stem and check fit and function, before using a tiny spot of Loctite 221 to secure. Click here to view the article1 point
-
After talking to a rep at a material/tools supplier I have managed to get hold of a ring rack that sits across the top of my ultrasonic tank, this will be used to sit 30m watch's on to clean bracelets so the head of the watch sits above the water without having to remove the bracelet. The rack is made from cheap mild steel and is plastic coated, after manipulating it to do the job I want it to do the plastic coating has split where I have bent it. Over time it will rust, stain the water and will come away at the welds. Any ideas on what I could use to either recoat the split bits on the bends or recoat the full thing. This tank is a biggish one and is on all day every day with heat, it's being used in a commercial environment so whatever I coat the rack with needs to be hard wearing and heat resistant as well as obviously withstand the ultrasonic itself. I only ever use water with washing up liquid in the tank. Any ideas would be greatly appreciated.1 point
-
The vinegar and cola didn't do much good, but I bought some of the stuff you recommended and I'm impressed how well it cleaned up the plates.1 point
-
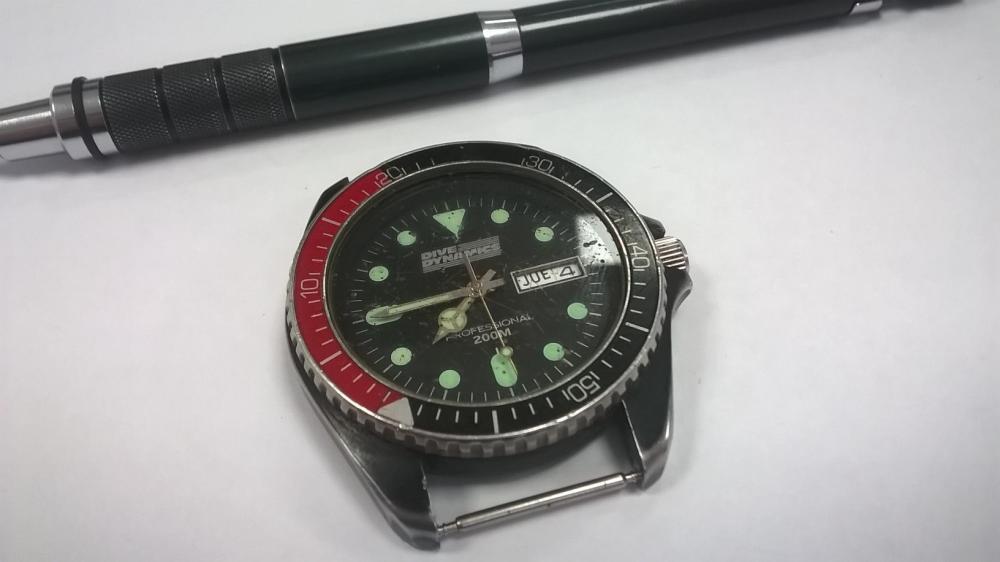
Just bought another 'generic' diver. Very similar to the Veteka branded one I posted above. This is the slightly more common Dive Dynamics branded dial. But there are some similarities and differences. Firstly, this has the black PVD body, although a lot has worn off this one. The dial, hands, bezel and insert all look the same between the two watches. The Veteka has an ETA 955 movement. This Dive Dynamics has a Seiko (?) VX43. The dial also has this marked at the bottom. Yet when I did a bit of googling on these budget dive watches, most of what I read suggested that the Dive Dynamics ones also have the ETA movement. I would have assumed this had a replacement / downgrade to the VX43, but the fact the dial states it suggests there were several levels of watch sold. Also most Dive Dynamics pictures online show a polished body. And it looks like there were some others branded as Barracuda. Perhaps some more? So quite an interesting little collection of watches out there. I love the look of them and am interested in seeing or getting more, so if anyone happens across one, please let me know. The fact they are so affordable and have been used as working dive watches appeals to me. But on to this new one. It is in a right state. Apart from the worn off coating, the bezel insert has some wear. The glass is terrible, totally covered in little craters and pock marks. I doubt it'll polish out, so new glass to go in at some point. Bezel just about turns, but will need a clean at the very least. Inside is grubby. No battery tried yet. The crown does tighten, but doesn't move to it's setting positions very well. I think some of the visible gunk inside has made its way into the movement. I will try and give it a blow out. But the cost of the VX43 movements suggests I will just put in a new one. Or perhaps get another ETA 955 and put that in. Dial and hands look OK as far as I can tell through the glass. The (smelly) strap went in the bin! So for the price of a cheap night out, I have acquired a little project do-err upper.
 1 point
 -
Thanks for introducing me to plasti dip guys. I've not come across it before, but boy do I have some uses for it!1 point
-
Plastidip, as suggested. Or try truck bed liner spray like Line-X or Rhino. Readily available in auto supply stores.1 point
-
Thank you very much for the information you share. I can rate the signal coming to your computer as excellent. The noise that is created I think can be eliminated if you do the same in the equalizer with the controls that you have lowered. Lowering them all to the left the very low frequencies. There is no useful information for the program Particularly do it with the network. If in your country the network is 50 hz. Give special attention to that band. Even at least in my country sometimes the network is not accurate 60 Hz. Is 59 0 61. You can in the "Peace", change the value of the band by an exact one to remove all the hum of the network.1 point
-
Plastidip It's what it was invented for Sent from my Honor 5c1 point
-
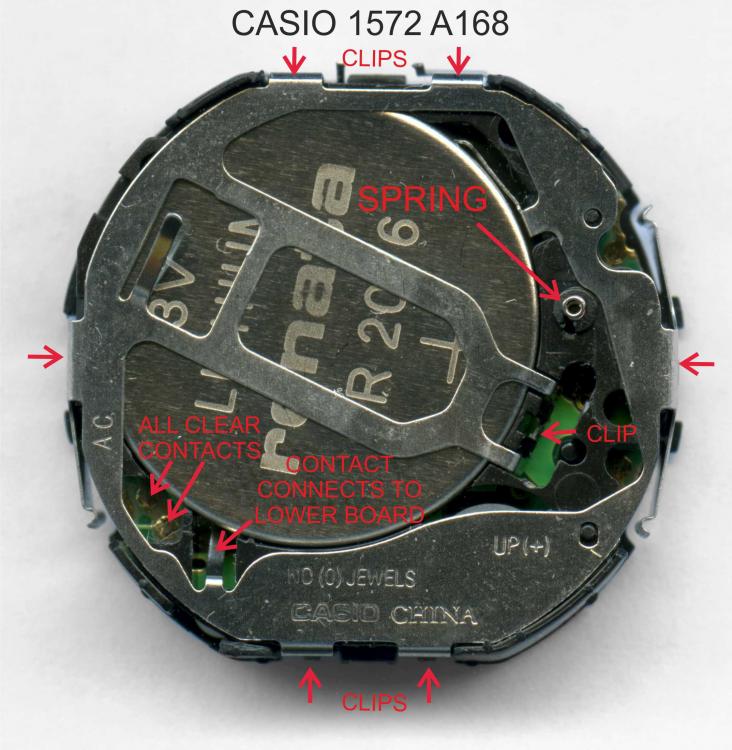
I am not a professional but after several attempts I succeeded in replacing the battery on my Casio 1572 A168. I decided to post a picture in case anyone searching needs one. Here is the procedure I used*. 1- Undo the 4 screws to remove the back cover. Note the correct orientation for reassembly by observing the writing. 2- Gently pry out the mechanism. 3- Undo the 6 clips round the circumference of the mechanism with a pin or watchmakers screwdriver. The top half should come loose. There is also a 7th clip which can be more easily unclipped from underneath. Replace the battery. 4- Note the correct position of the small spring. This spring is necessary to make the watch speaker work. 5- Note from the picture the correct position of the special contact which connects with the lower board. If this does not connect properly then the display will disappear. 6- With the battery in place, the watch display should work properly. If there is a problem try connecting the two all clear contacts with a screwdriver, paper clip or small piece of wire to reset the watch. 7- Reassemble the watch and make sure the rubber seal is in place. The seal on my watch was slightly deformed so I used a very small amount of silicone sealant on the tip of a screwdriver to tack it down properly. 8- Put on the back cover being careful not to overtighten the 4 screws and damage the threads. The cover needs to be positioned correctly and not 180 degrees in reverse so the spring will connect with the correct place. When you look at the front and back of the watch the writing should be the same way round. I hope this information will be useful to someone. As I mentioned I am not a professional, so if anyone has some additional advice it is welcome. Kind regards Chris *Looking at the picture it might also be possible to replace the battery by removing just the one clip that is closer to the spring. However I found that that clip is more easily undone from underneath, so I preferred to do a more complete dismantling. This also gives more freedom to reposition the battery.
 1 point
 -
the perfect summary1 point
-
Oh sure it's worth it. Isn't that what we do? Start with a watch that needs to be brought back to life, buy a parts watch to accomplish that, look at the parts watch and say "gee, that would make a very nice watch if it was complete", but another parts watch, and - repeat ad infinitum.1 point
-
I had another look at the movement incase I missed something. Can't see any identification. Have posted pics incase it can be recognised. Tried to take rotor off assuming it was centre screw but it didn't want to shift even with gentle prising. Don't think the 2 side screws will lift the rotor out, more like the bearing will fall off inside the movement! Think it's a matter of taking the bridge off and see what's going on. The watch has puzzled me, particularly the Timegrapher. Thought that first reading was more relevant to a loose stone or possibly the pallet stone was going too deep into the escapement wheel? Or something was touching. Can't see the relevance to magnetism? Believe@Jdm explanation as a superfluous marketing gimmick to sell more is correct. Can't see it working, looks awful with 2 second hands in my view. I couldn't work out any functional reasons for 2 hands. Not expecting any surprises. The manufacturer has probably extended the pivot on the 3rd wheel to allow for a sub second. The movement, to me, looks cheap Chinese and Forsining (Who ever they are) have adapted a dial to the movement. Sent from my SM-G920F using Tapatalk1 point
-
I think first you have to disassemble the fly-back-lever and the operating lever while the movement is still in the case. Then you can take out the pushers.1 point
-
Sorry everybody. I'm a rookie - the movie file in my previous post is huge. Please forgive me. Here's the same movie compressed: IMG_0418.MOV1 point
-
Hello Andrew, you will find this a very friendly forum. There's loads of info on here for you. I see you also like clocks which is my thing. I hope you will be able to contribute to that section as well as the watches.1 point
-
The latest advice is to look for an ETA 6497 or 6498 movement, either Swiss or one of the Chinese clones. Even though those movements are found in watches, they are really pocket watch movements. Large, and relatively easy to work on. These are also the movements used in Marc's Watch Repair Lessons, and there are lots of resources available for a beginner. Have Fun!1 point
-
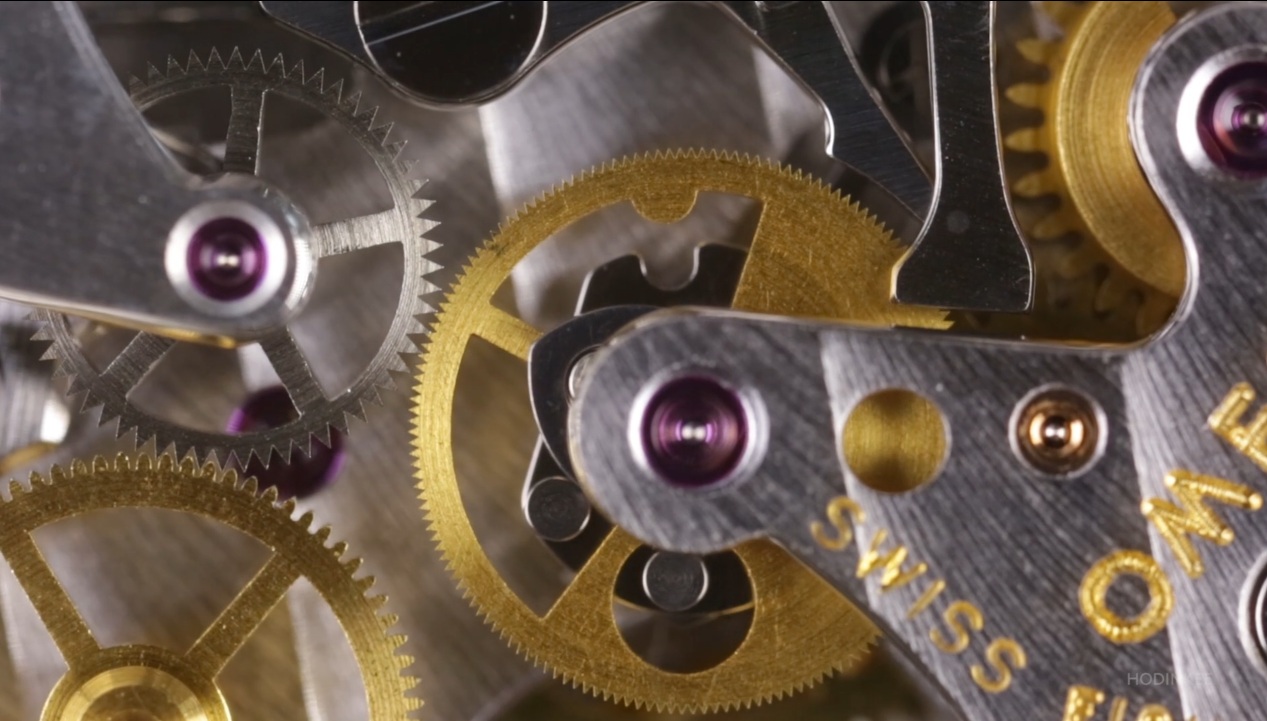
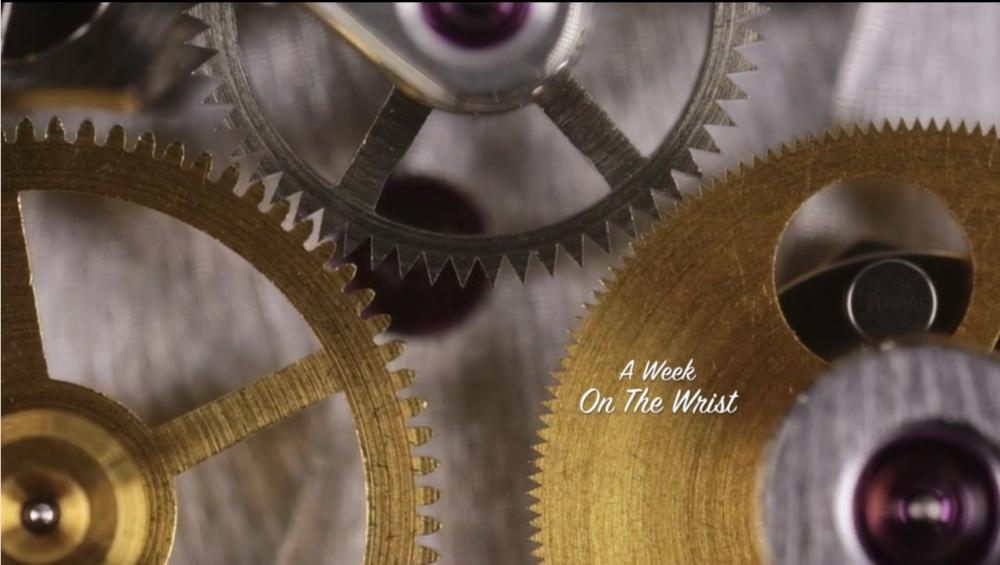
I was watching the video on the Speedmaster FOIS (First Omega In Space) from Hodinkee, and since I liked it so much, I took a couple of screenshots of a particular closeup of the movement. I will use one of them probably as desktop wallpaper... I just love how the gears interact...

 1 point
 -
Before you remove the hair spring you should make a note of where the stud sits in relation to the impulse jewel as this is essentially what governs whether or not the balance is in beat. Either make a sketch or what I do is to make a tiny dot on the rim of the balance with a fine OHP dry pen where the stud is (dry pen is great as it just wipes off when you're done). When you reassemble just make sure that the stud sits exactly where it did before, that way, assuming that the balance was in beat before you started it should still be in beat when you're done. The same applies when it comes to adjusting beat error at the collet (if the hair spring stud location is fixed an not adjustable). With all main spring tension removed and the balance at rest, sight from the pallet fork pivot to the balance pivot and see where the impulse pin sits. It should be exactly on the line between the two pivots. If not then dot the rim of the balance (dry pen) at the point where a line projected from the balance pivot through the impulse pin would intersect the rim (in other words the point on the rim which would also be on the line between the two pivots if the balance was in beat). At the same time you also need to dot the rim where the pivot line actually crosses it. Now when you remove the balance to adjust the orientation of the hair spring at the collet you have a fairly good indication of how far and in which direction the stud needs to move. I hope that makes sense (I should have drawn a picture, video is beyond me). I actually do all of that with only the balance on the main plate before removing the pivot jewels prior to cleaning. That way I get a much clearer line of sight with everything else out of the way, and any residue from the dry pen that doesn't get wiped off is washed away in the cleaner.1 point