Jump to content

Just Moved In, Looking For Ideas For A New Watch Repairing Bench


jnash

Recommended Posts

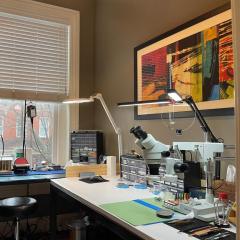
This is my bench at the moment (found a use for the unpacked boxes)

eff2513b55451f6becccf906122562e8.jpg

Now I need to find a new bench, I have looked at the IKEA hack version which is the strongest contender at the moment , but I was thinking about maybe getting a old writing bureau and lifting it a bit. If anyone knows of any other ideas it would be appreciated, preferably with storage.

Thanks in advance

Sent from my Nexus 5 using Tapatalk

Link to comment
Share on other sites

Alot of the most functional setups are those devised by yourself.  Key thing is a large working service that is at your 'perfect' height.

'standing' desks are becoming popular and you could possibly modify one for watchrepair.


Alot of folks get caught up in needing a desk that's branded for watch repair. 


Nice wood floors, btw. Very sweet.

Edited by perpetual92
Link to comment
Share on other sites

Thanks, I have the storage sorted, just in need of the desk, I may go for the clever IKEA one but put an edge around it to stop flying parts , thanks Jonathan

Sent from my Nexus 5 using Tapatalk

Link to comment
Share on other sites

Hello from me,


I am currently using a computer desk that had been in bits in my loft for at least 10 years.  I was sharing the craft room with my lovely lady but it was not working out as I needed more space.  The height and shelving were adjustable and it is tailored to my vast bulk.  

I have not presented it in a very good light because it is crammed full of "precious" and indispensable (not) stuff.  Ok I am not the tidiest of workers and a sensible person would be more organised but I am not about to change the habits of a lifetime. 

An option may be to shop around the computer supplies type shops like Staples etc.you may find something reasonable and functional.  I often look in at auction houses for watches and some of the desks - genuine furniture etc. that sells for a song could be utilised if you want something more attractive, though height may be a factor there.


post-197-0-76645500-1445769494_thumb.jpg


Cheers Vic

Link to comment
Share on other sites

Sides ? Edges ? - do you not mean springboards :cool:

Being on my hands and knees swearing and using various obscenities is the only exercise I get these days, wish i could use a massive magnet but it would knack the pacemaker :startle: :nurse: 

Good luck in the quest Jonathan


Cheers,


Vic

Link to comment
Share on other sites

Well i love ikea furniture , in case the photo didn't give it away ;)


The Galant table on the left of the photo makes for a great repair table, adjustable height which is very handy and back saving. Currently it is used for my lathe but id gladly buy another in place of the main table.

But if you do manage to unpack your time machine then at those prices you can grab a bargain :O ha ha


DSC02862_zpsafyzsoim.jpg

  • Like 1
Link to comment
Share on other sites

So possibly this isn't exactly what you're looking for but still interesting. So the first image of the first link you can see something made to raise up the work area. Then at the very bottom of this page you can see the rest of the bench. Design looks quite simple flat work surface simple frame and a raised center area for working on. Then ideally you should look into the work not down on it. Then whatever you're working on should be on the bench not held in your hand.


Then in the second link you can see what Roger Smith is working on has a look of being homemade.


Then both links demonstrate how not to keep your bench clean obviously these people never lose any parts because if they did they would never find it in the clutter


http://www.network54.com/Forum/125316/thread/1031252004/Benches


http://www.network54.com/Forum/125316/message/1122507877/Benches+-+Part+2


  • Like 3
Link to comment
Share on other sites

So possibly this isn't exactly what you're looking for but still interesting. So the first image of the first link you can see something made to raise up the work area. Then at the very bottom of this page you can see the rest of the bench. Design looks quite simple flat work surface simple frame and a raised center area for working on. Then ideally you should look into the work not down on it. Then whatever you're working on should be on the bench not held in your hand.


Then in the second link you can see what Roger Smith is working on has a look of being homemade.


Then both links demonstrate how not to keep your bench clean obviously these people never lose any parts because if they did they would never find it in the clutter


http://www.network54.com/Forum/125316/thread/1031252004/Benches


http://www.network54.com/Forum/125316/message/1122507877/Benches+-+Part+2


Great Post, i have been spending ages trying to find where i saw these pictures.. spot on!

Link to comment
Share on other sites

My workspace is in the living room. My wife was kind enough to buy my a nice old hutch for my birthday. I actually work in the drawer on the plastic lid of my parts case. Also, I always work over a paper coffee filter (see picture 2). I find it makes a great bowl, and parts catcher, and I can wrap up the watch in it to tuck it away and not risk losing parts. 


post-1540-0-72562700-1446042910_thumb.jp


post-1540-0-85787800-1446042914_thumb.jp


post-1540-0-21517600-1446042920_thumb.jp

Link to comment
Share on other sites

  • 2 weeks later...

Few pics of what I ended up with! -/very happy, just saving up for the led lamp at cousins that you guys have verified is good. Back at the bench, very happy. Thanks all for your help!

post-275-14469244360235.jpg

post-275-14469244514478.jpg

Cleaning all goes in inside the cupboard, as long as I keep the door open I'm not worried about fumes or heat

post-275-14469244672349.jpg

Put in some LEDs too!

post-275-14469245017778.jpg

Sent from my Nexus 5 using Tapatalk

Edited by jnash
  • Like 6
Link to comment
Share on other sites

Here's my setup . I was doing some work in a residential area one day and some people in a nearby house were moving out of state and getting rid of things . They gave me their daughters craft table . Laminated wood , adjustable leg height , wheels on the back legs , and a tilt table top if used for drawing . Also a  crome storage rack with colored plastic drawers  that I pulled out of the trash bin ........Waste not , want not ,.....  That's my stereo Microscope under the plastic cover...telescoping double boom....it's big


post-808-0-71035200-1446970261_thumb.jpg


post-808-0-34924900-1446970277_thumb.jpg


post-808-0-14343700-1446970298_thumb.jpg

  • Like 1
Link to comment
Share on other sites

  • 4 weeks later...


  • Recently Browsing

    • No registered users viewing this page.
  • Topics

  • Posts

    • You could also use a very fine artist's brush to brush between the coils.  If you get a size 00 or even 000 that should be small enough for convenience, and with bristles so fine that they are incapable of damaging the hairspring.  Get a good one though, like Windsor-Newton or similar.  I have never had a Windsor-Newton brush shed on my art or other work.  You want a soft brush that will not shed.
    • Sounds interesting but how do you push the button if you’re holding both ends? the large current draw overheats after 3-5 seconds and the thermister triggers. A great tool for magnetizing things but I’ve not be able to ever demag anything with it because the emf is so strong it pulls the item off center (down or up).   I paid $89 bucks for it from  CAS-KER, if someone on the board wants it I’d gladly sell it for $25 plus shipping (probably US only otherwise postal costs are prohibitive). Just sent me a note offline.
    • Hi. First thing to do is measure your oil movement as the vx32E and the 43 look very similar but one is a couple of mill smaller the vx32E.  Also the canon pinion heights differ attached tech sheets for 7N22. And  VX43, check details on the sheets. 7N22A_29A_33A_42A_43A.pdf VX43.pdf Hattori VX32E - Specification.pdf Hattori VX32E - Disassemble.pdf
    • Thank you for your introduction and welcome to this friendly forum. We all look forward to your contributions and continued involvement. 
    • I was spitting out flowers and leaves for 10 minutes,  fortunately 3  people saw it and promptly whipped out their phones to film the quick " nothing to see here " recovery  🤣🤣
×
×
  • Create New...