Leaderboard


Popular Content
Showing content with the highest reputation on 04/07/24 in all areas
-
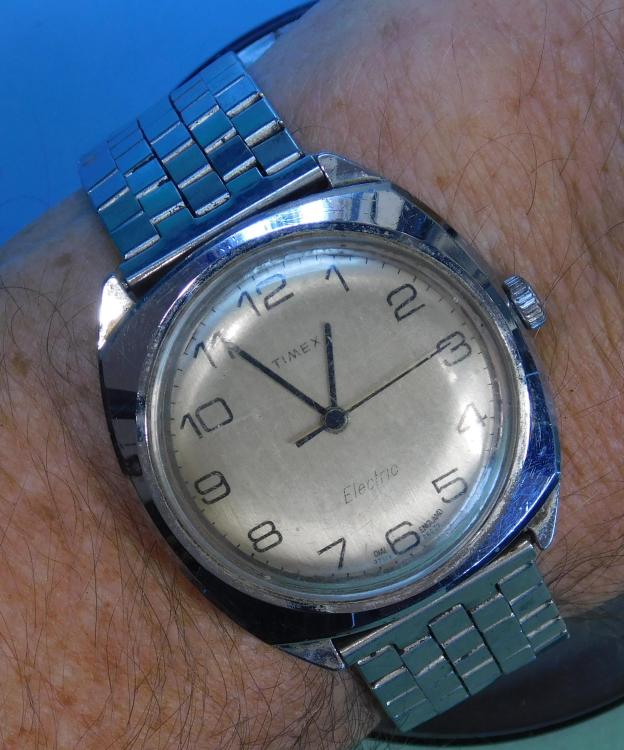
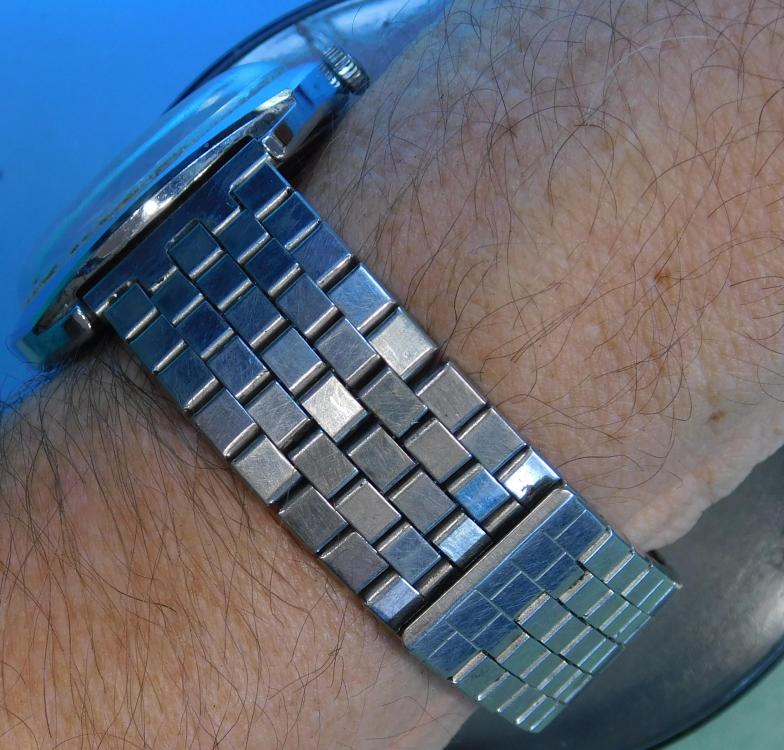
I just picked this up a couple of hours ago for $2US. Put in a new battery, pegged it just a bit and took these pics. I think 30-40 minutes in an ultrasonic bath and a little polywatch on the crystal and we have a beautiful nostalgic trip down memory lane for 1979. Maybe listen to Pink Floyd's The Wall and it doesn't get much better than that for a Sunday afternoon. Electric! This bracelet is just so comfortable on the wrist as well.
 2 points
 -
Serious collectors of rare watches may very well want untouched lume original dials.2 points
-
Good idea for small items. Alex uses the stump for larger objects. Same principle with shellac though.2 points
-
And don't "give-it-a-go" after you had those two glasses of beer; failure assured !2 points
-
I know way too little about this specific watch/movement to have an objective opinion, but if by "worth repairing" you mean repair and then sell to make a handsome profit I would guess the answer to be no. However, if it has personal value to you and you want to wear it and keep it my answer is a resounding yes! As far as I know, CYMA made excellent quality watches. With a bit of luck, a service is all that is required to make it tick. However, most of the time there's always some little gremlin hidden inside these old watches so don't count on it.2 points
-
By some brands, the world is awash with different bezels / inserts. But it seems that you like to keep the brand and further details of the watch a secret, so who knows .......2 points
-
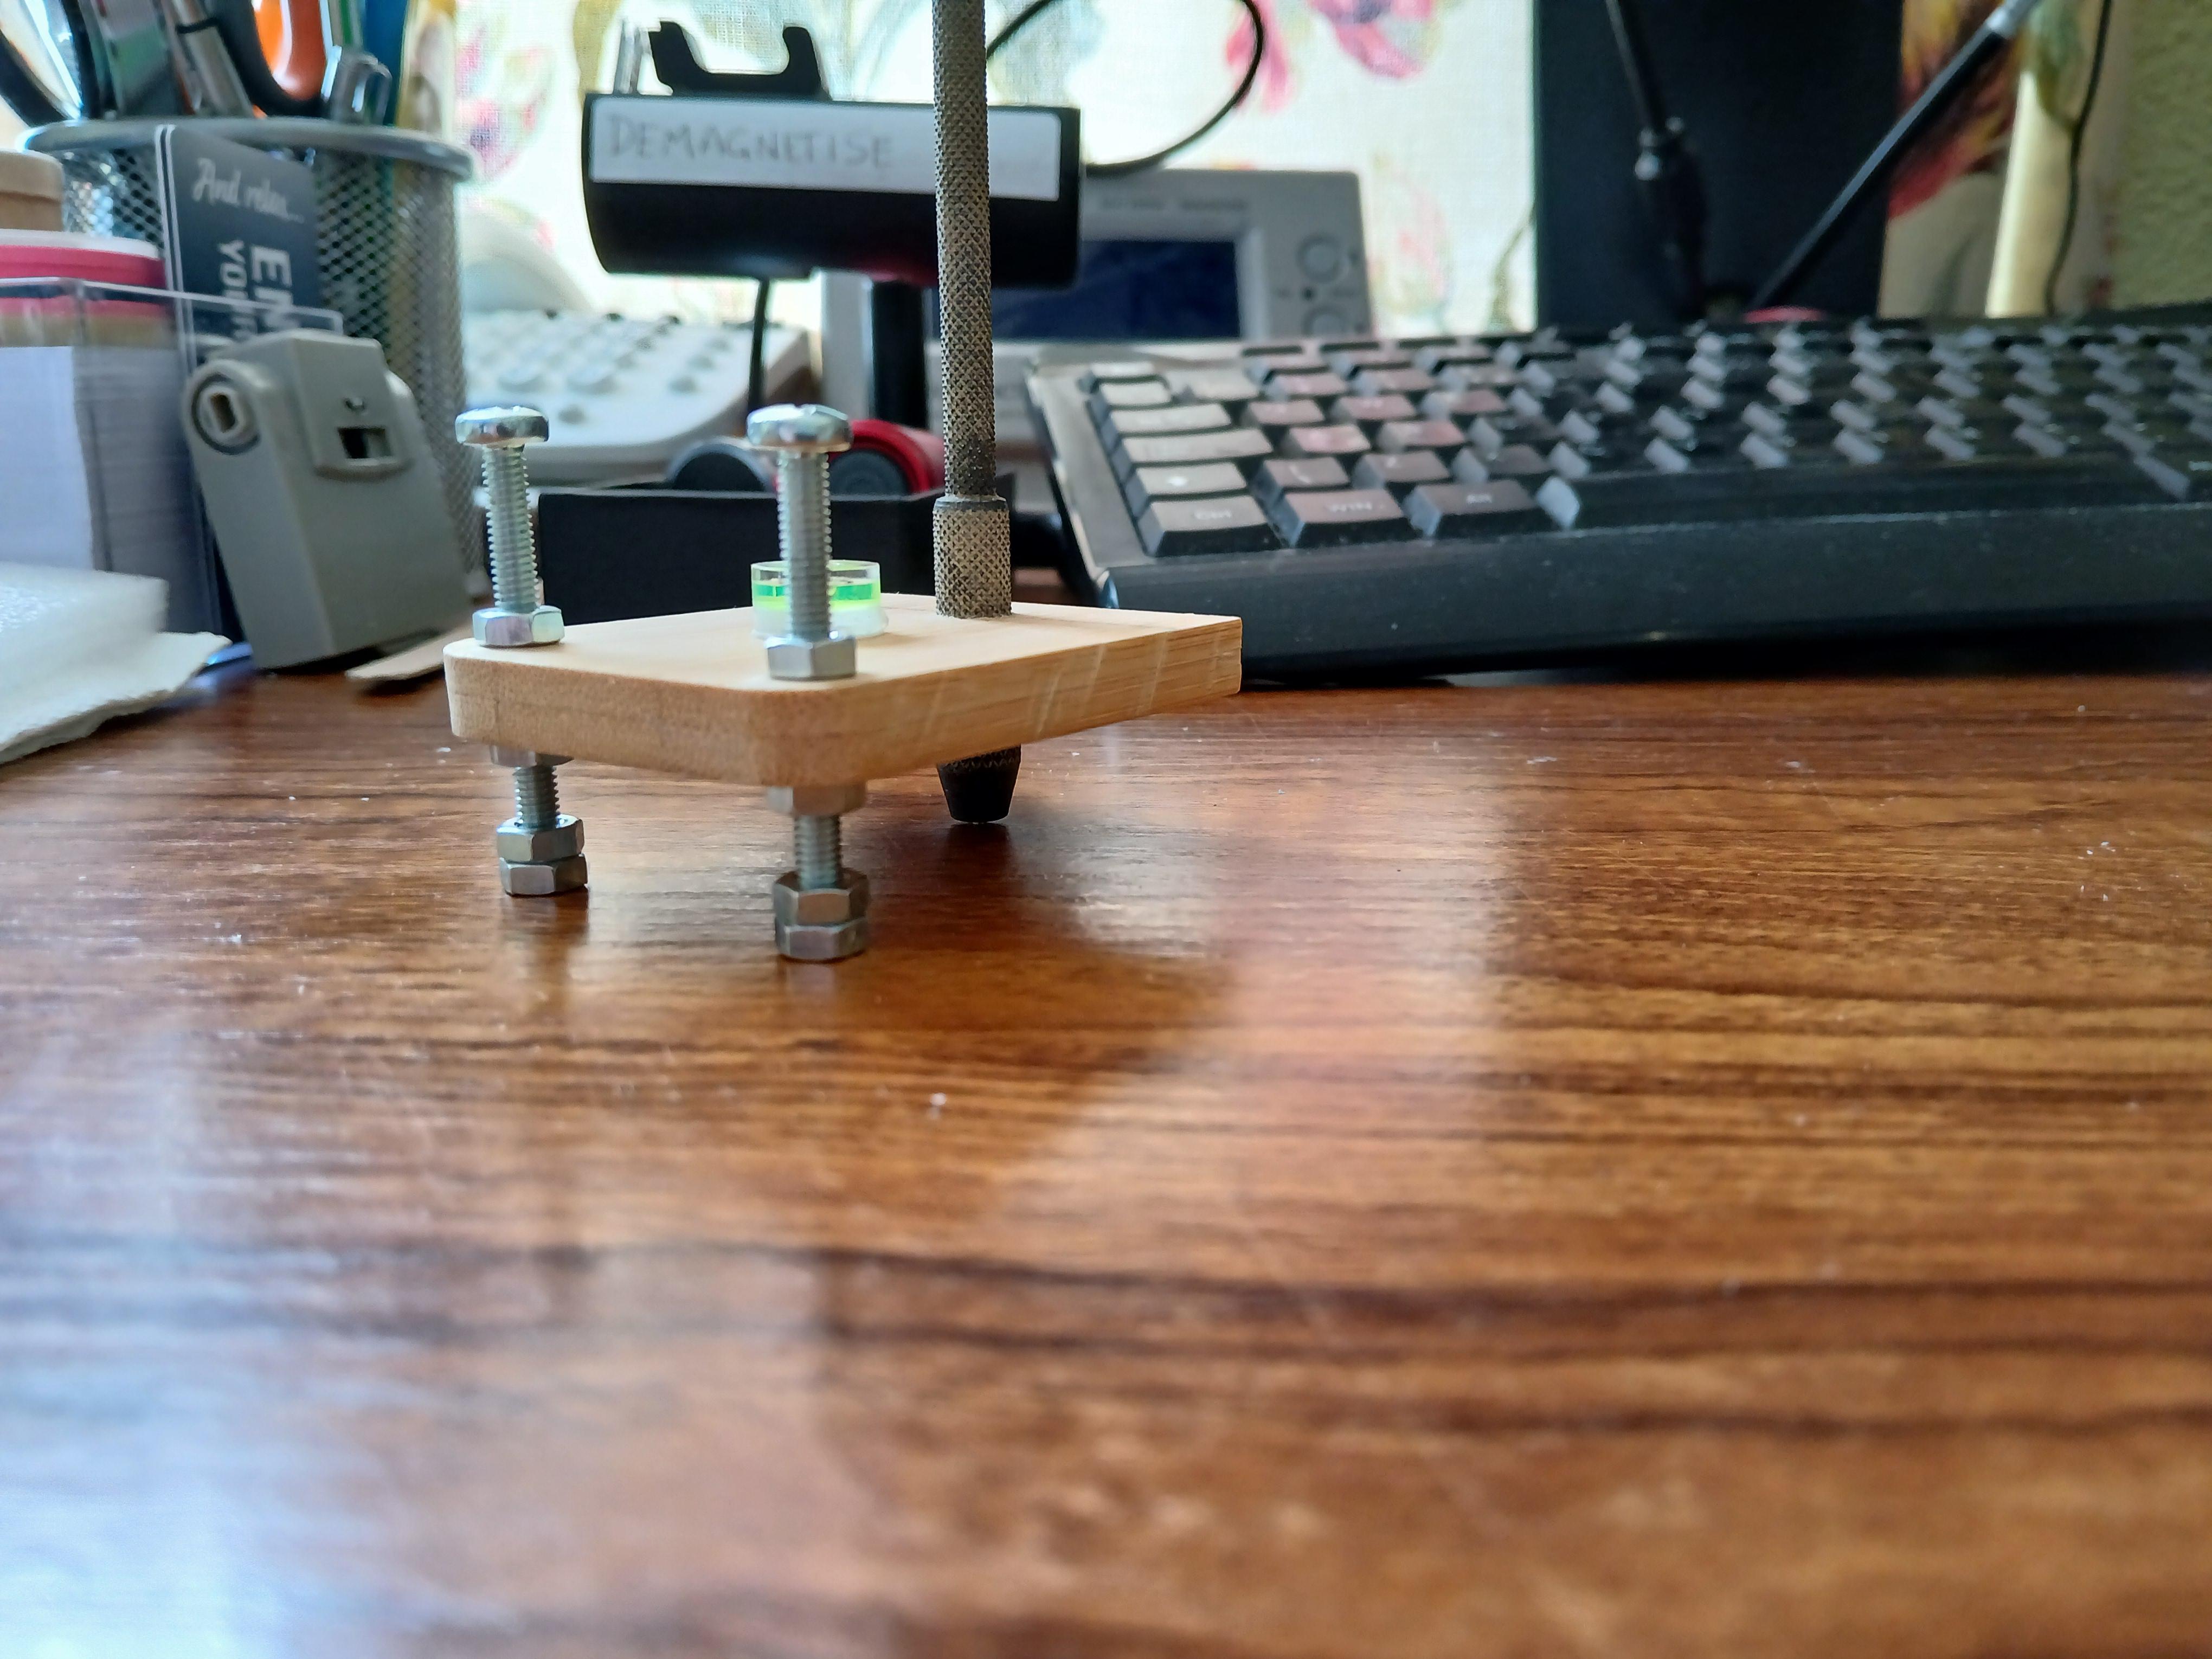
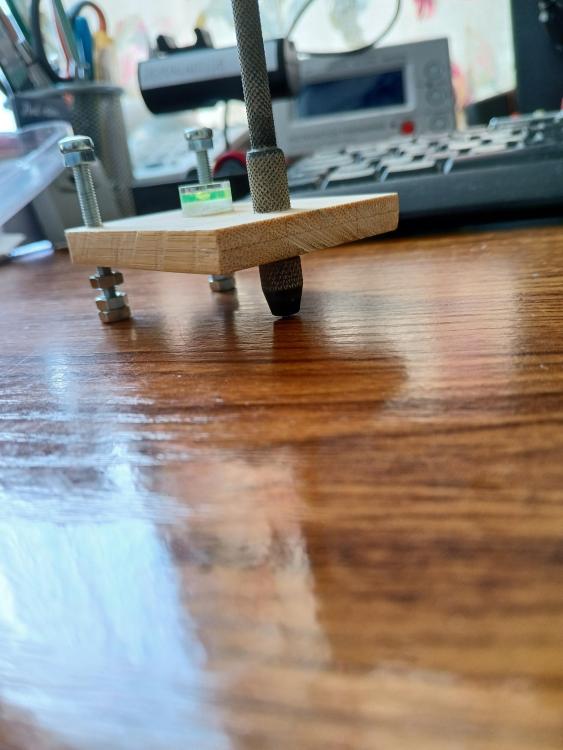
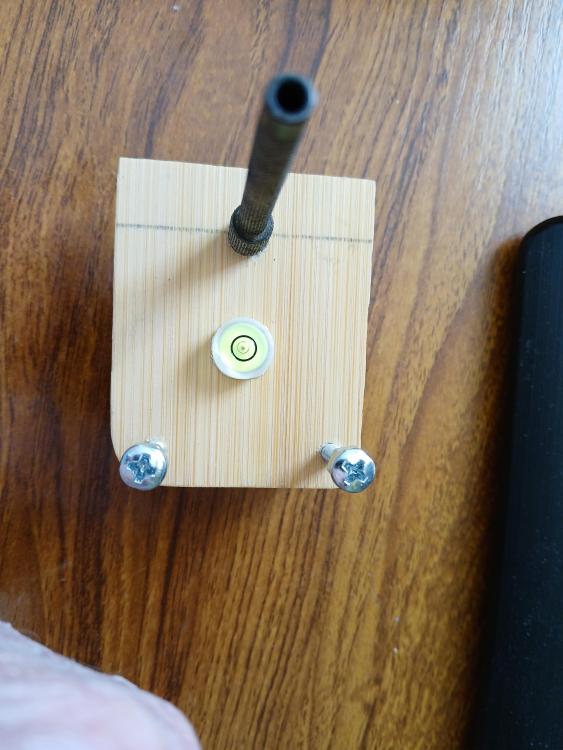
DIY Screw polisher. Inspired by Alex Hamilton, I have made my own screw head polisher. Less than £4 in parts. I hour to make. Chuffed. Additional photograph information Bottom nuts are tightened to make a solid base. Nuts below and above wood are to make the level set when using the polishing base. I will get a small picture frame with glass to insert the polishing paper. The screws can be altered to accommodate. I can now polish to 1 micron. I piece of wood 2" x 2 1/4". 2 x M4-30mm bolts. 6 nuts. 1 pin vice from set of 4.

 1 point
 -
I suspect that may be a friction drive between the movement and the hands / motion works, to allow for time setting? Something broadly equivalent to the cannon pinion friction drive in many watches.1 point
-
Looking at the second video, as they check the date change 11 to 12 - it appears they wind the time back again, and the date ring kicks slightly but stays on 12? Is the "quickset" done just by setting back and forward near midnight, to repeatedly trigger the date advance? Other than that, it looks like the keyless works only has two positions, for winding and time.1 point
-
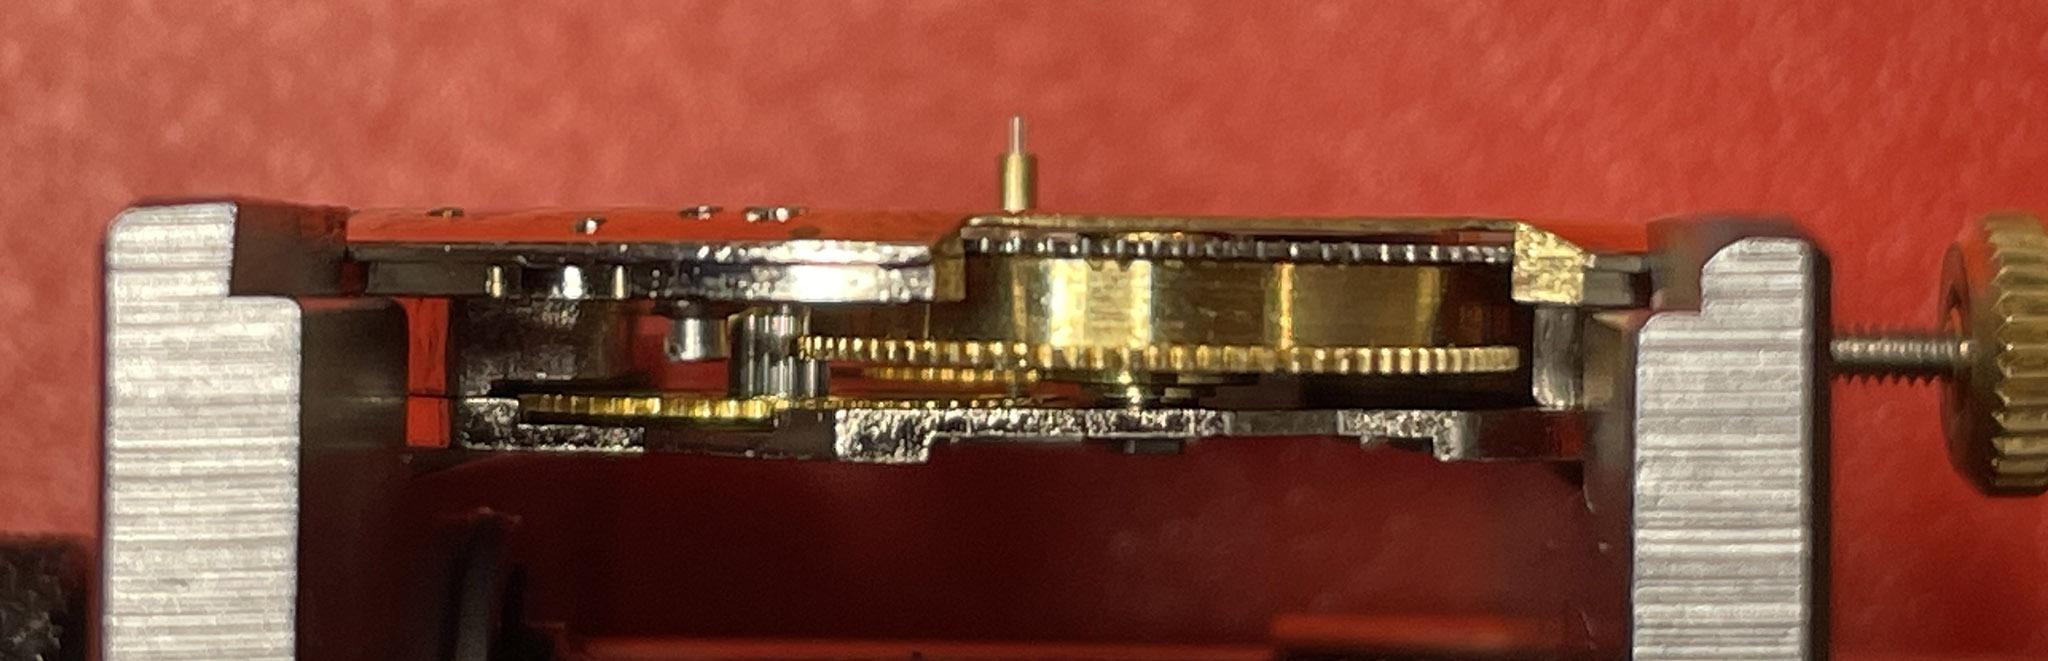
OK, thanks, that makes me feel better about not having chance to renovate it! The movements for both the Borea and the Gruen Precision I posted in another thread are now assembled and running nicely. The Borea has a very unusual (to me, at least) motion works - no canon pinion, but a free spinning brass pinion of similar dimensions running on a fixed sleeve, driven by a second (steel) wheel that's part of the barrel. That is mounted on its back (dial side) with some form of friction drive? The keyless works switch between driving the crown wheel for winding, or the steel wheel side of the barrel for time setting. This is part assembled, without the ratchet wheel etc. And the dial side, without the pinion in place:

 1 point
 -
I had once a few heirloom cylinder Pocket watches. They kinda ran but were either pretty worn, in desperate need of a service or both. I explained the owner the risk involved and, because of the high sentimental value, he decided to keep them in he condition as they were. Rather poor running than taking the risk having them broken. In your case it is not so black & white. The 7t32 is still plenty full around, but most likely the replacement, due to its age, needs a service as well. While you are searching for help, take the battery out and store it dry. It's to hope that the poor mechanical functioning is not caused by water ingress. It would be nice if you could keep the original movement, but if needed, identical replacement movement are still around and a swap is easy for somebody who knows. In the not too far future I'll try to service / resuscitate a partially-working 7t32 movement. If I manage to get it serviced and 100% working, we'll talk again ....... if still needed ......1 point
-
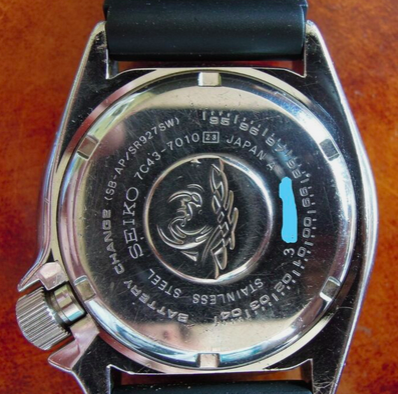
Sometimes there is a reference number on the back of the watch case. If so, you can compare that number with the one you original pictured and, I presume, got the bezel insert sizes from. Searching Chronosport, all the hits I'm getting are in the US. Perhaps that's where Chronosport is/was mostly sold? For example Seiko has lots of bezel inserts, referred to by the case-number. So if you have a case number, you may get a hit when searching for a complete bezel or a bezel insert? Here an example from a Seiko; The 7C43 is the reference number for the movement and 7010 is the housing reference. Perhaps you get a hit when searching for the reference numbers, if your watch has any ..... ?
 1 point
 -
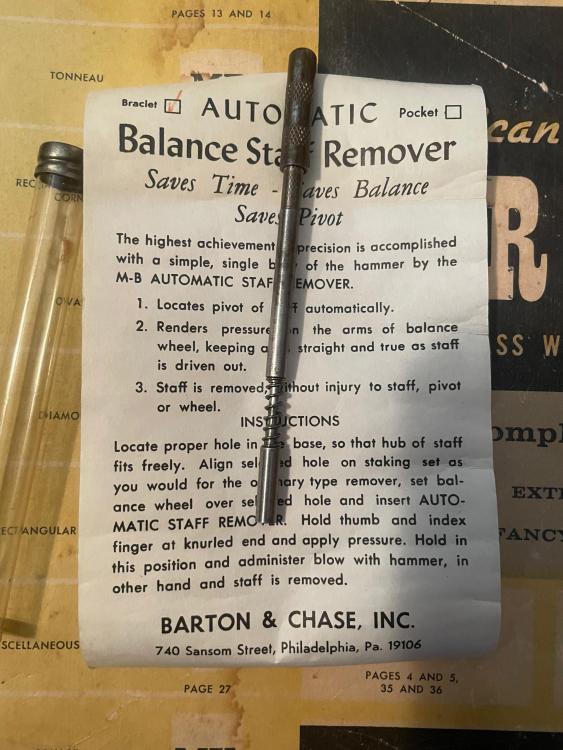
I thought I would show this K&D punch for staff removal, this one is for Bracelet staffs, there is one for Pockets also....
 1 point
 -
The Borea is cleaned and ready for re-assembly, but after mentioning the radium lume on the Cyma to the owner, he's decided he wants to sell is as it is, so I'm not doing anything to that one. It would have been interesting, but also probably pushing my skill level.1 point
-
Besides the good quality 50's Cyma movement ( I'm not sure what the part is on top of the rate adjuster, usually parts like this are for fine rate adjustment ?) J W Benson were famous watchmakers and Jewellers . Value, not quite sure, the movement is good quality and the Benson name may give it a little value, some other movement brands such as Smiths that were made for J W Benson can be quite valuable. But as in all cases condition makes a big difference, and the condition of this dial and case can be considered as below average. But to repair and restore it, i certainly would, the dial could be improved with some very careful cleaning.1 point
-
Hi. A nice old watch that has lived, nice patina on the dial. The problem seems like it’s stuck up either dirt or dried oil. A complete service would be in order.1 point
-
https://calibercorner.com/cyma-caliber-r-458/ Read the above. Might just want a service, it's the first step anyway.1 point
-
Welcome to the forum, enjoy. At a guess I would say it just needs servicing. When was it last serviced. Replacing the complete movement with another used movement could also be problematic.1 point
-
Thanks! I’ll try some Molykote when I get back home on Monday. I’ll report back with an update.1 point
-
The Cyma is rare and collectable, though its complicarions are not complex, you still should be careful to put each spriing in the jumper mechs back where it came from. Take plenty of pictures as you disassemble, I be surprise if a schematic diagram for complications or spare parts to it can be found. Seems like the dial can be cleaned a bit. The lume isn't a big deal just saok the hand in water to remove the lume.. Good luck1 point
-
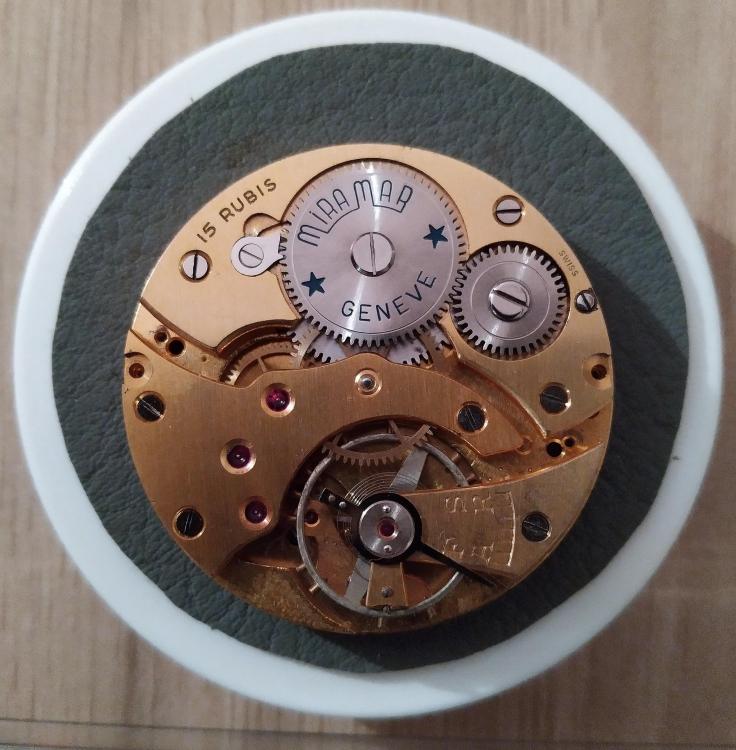
Likely be an st96. The maker and calibre are under the balance?1 point
-
Thank you for your introduction and welcome to this friendly forum. We all look forward to your contributions and continued involvement. Norway how lucky you are to live their. You might find this helpful. 704789946_TZIllustratedGlossary(2).pdf1 point
-
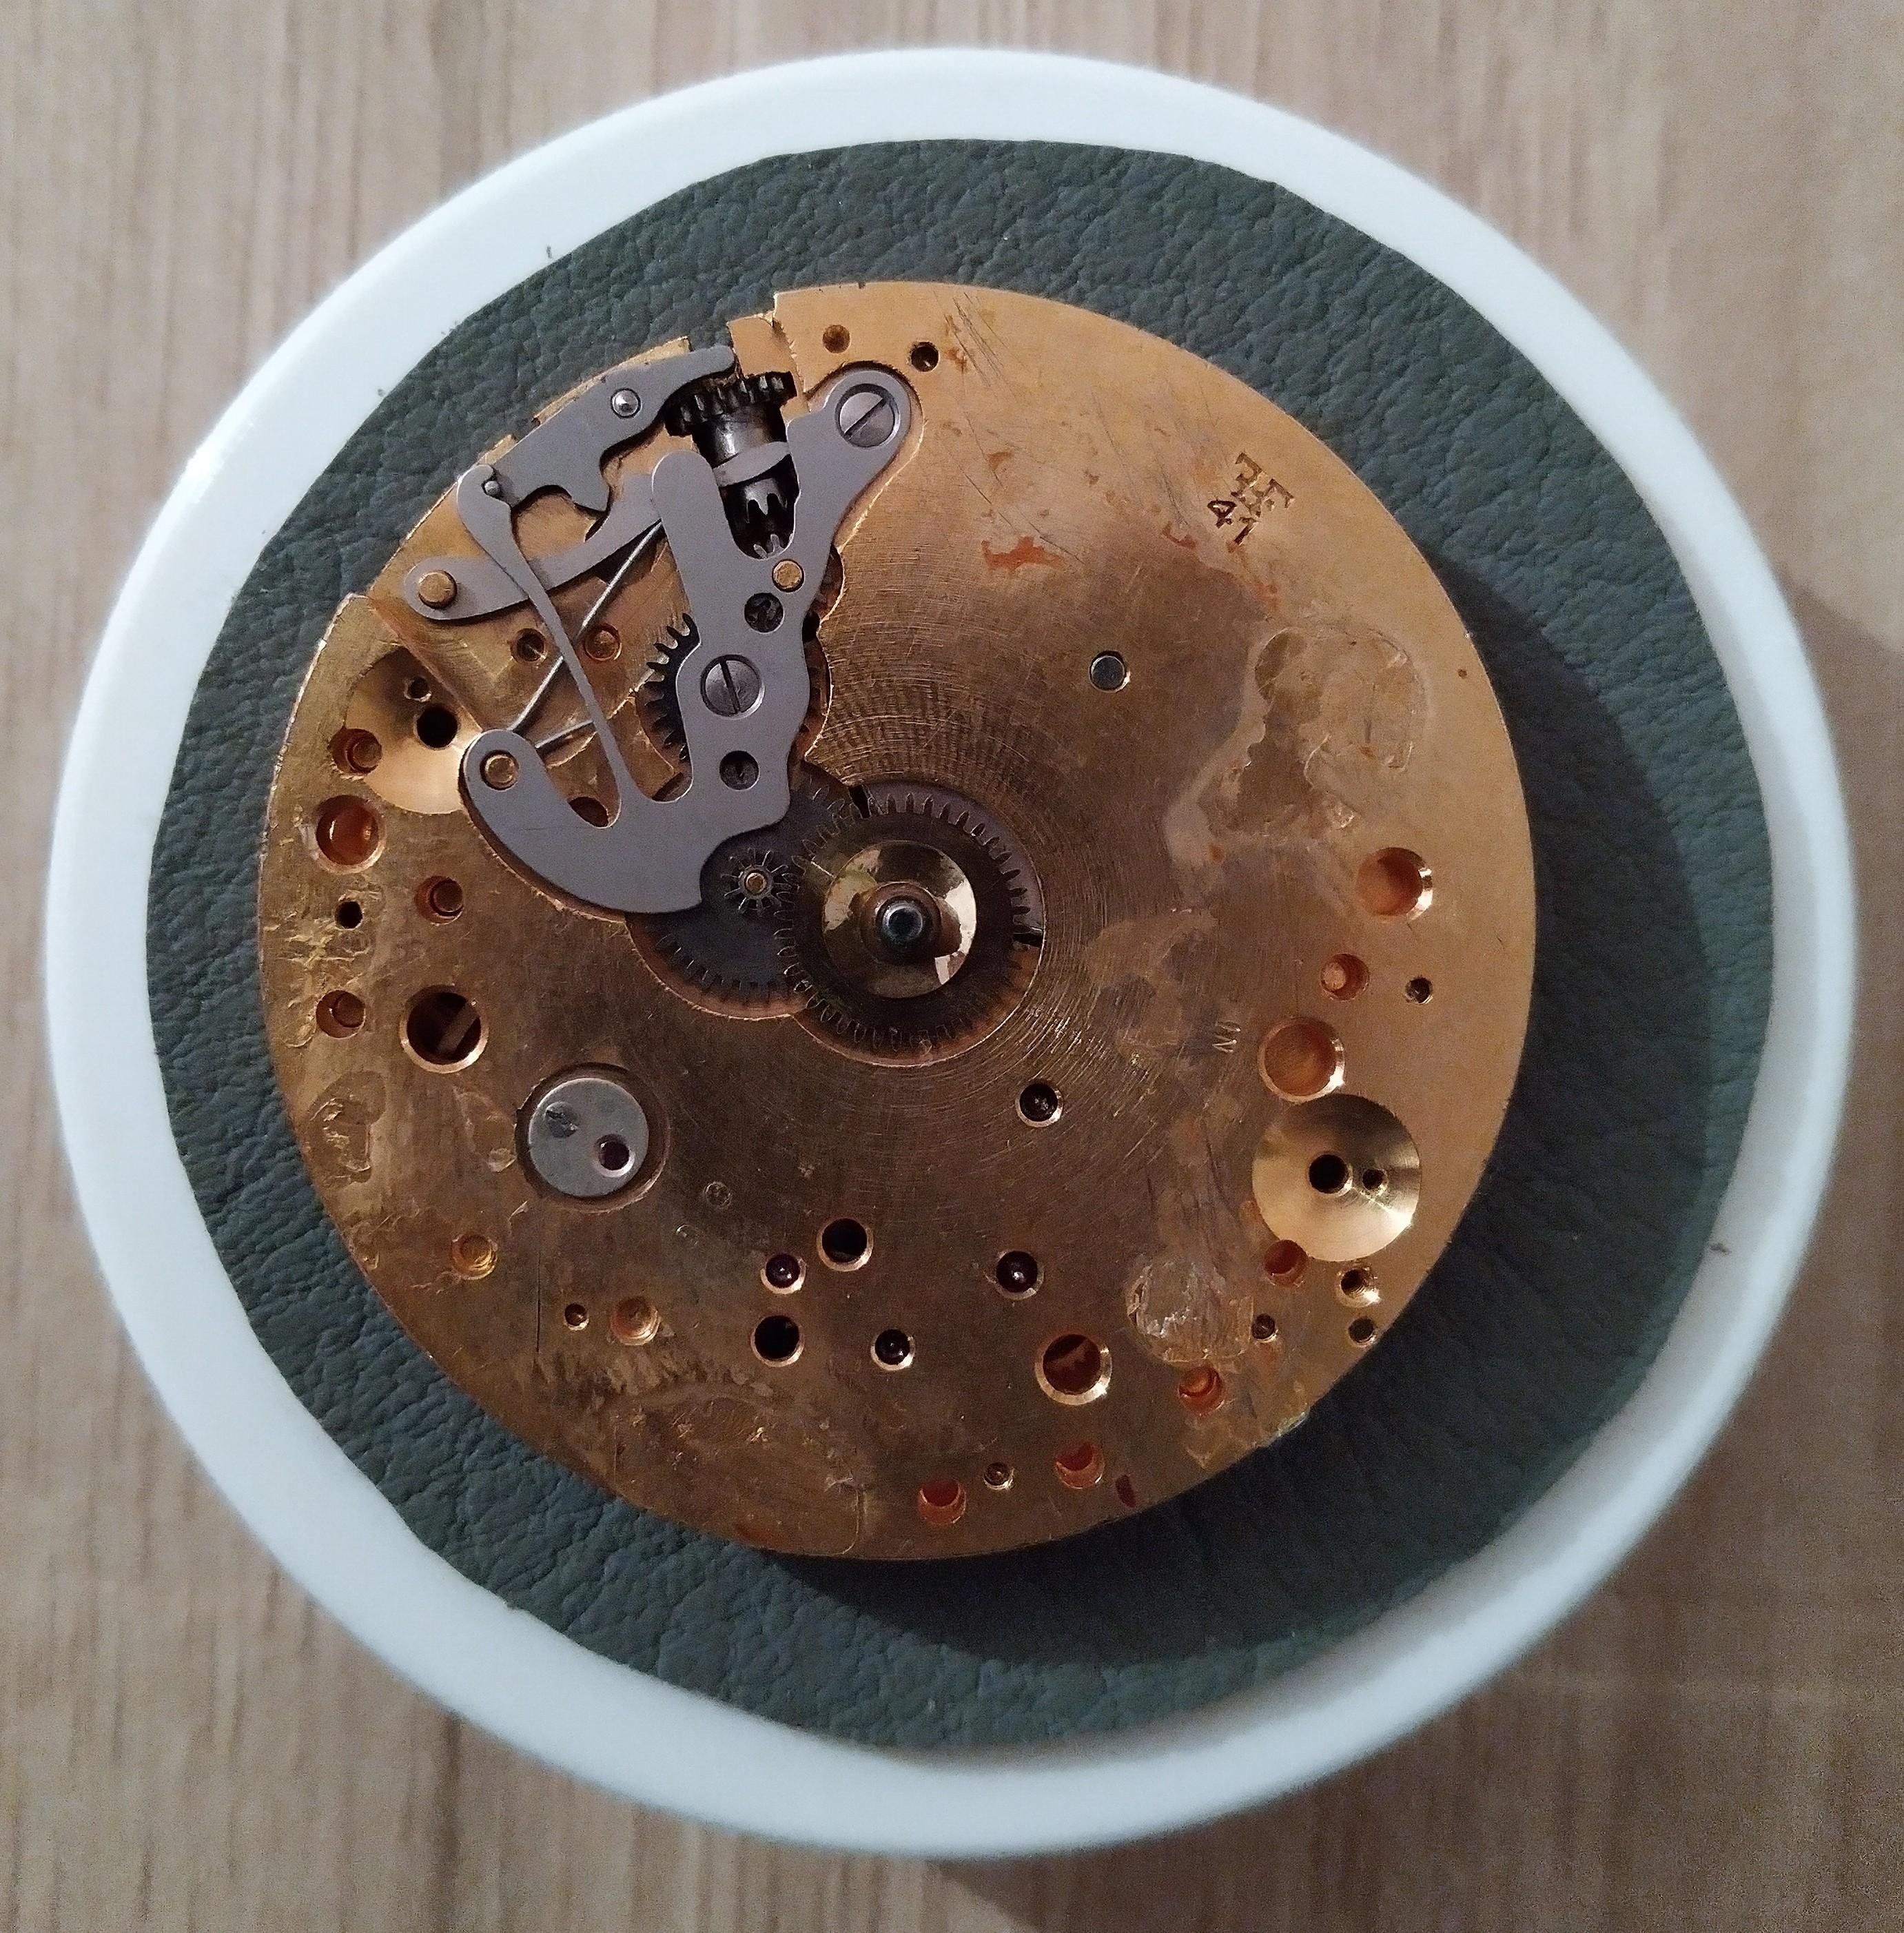
I received the watch today and, as you noticed, the dial feet are missing. More than that, the pivot of the balance wheel is broken. I'm really unlucky with pivots . Here are pictures of the movement. I couldn't identify the manufacturer though I noticed the engraving FF41.
 1 point
 -
unless you enjoy surprises always best to measure the new and the old staff to see if there any differences.1 point
-
Hi. There is definitly an undercut on the hub for the wheel to be riveted in as normal. Must admit some do look flat but it needs careful looking at1 point
-
I don't know myself. But what you could do is temporarily put the hand on right in the middle between red and blue, the wind the watch only a few turns, and see which way the hand moves. It'll move toward "0" power.1 point
-
Well, 02 in 3602 means 'no shock protection, small seconds hand'. For sure there is only one balance staff for 3602, so no way to order wrong one, but spare parts from the last years of the production are wid bad quality. I would advice to true the balance and check how it behaves in the movement without the roller first. To see if the endshake is normal and the balance position against the lever bridge, because in Molnia the distance between the balance and the lever bridge is verry small and if not trued, the balance may rubb.1 point
-
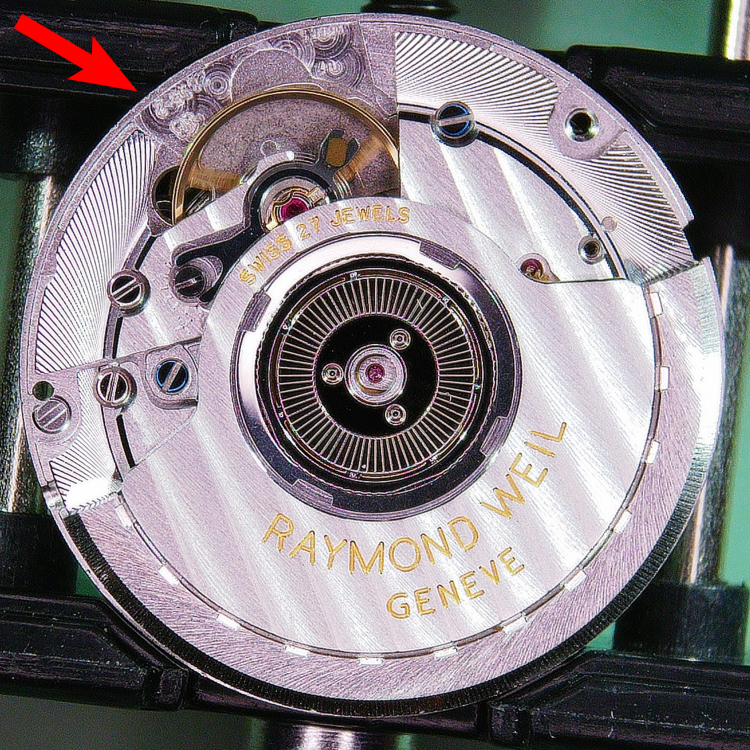
Actually it looks like a 2895. You can find the model number stamped into the plate right under the balance. And, no, on this movement there is no center screw holding the oscillating weight onto the winding works. It's held by three small screws from the underside. I can think of three scenarios where the weight on the rotor would be "sloppy". First, the three screws holding the weight to the rotor were loose. Second, the movement encountered an impact that dislodged or damaged one of the bearings in the rotor. Third The entire automatic works wasn't screwed down properly. Those would be the three blued screws you see as you spin the rotor around. Did RW indicate what was repaired during the warranty service?
 1 point
 -
The company was set up in the 1950s, once you receive it, it may have markings, if not we probably need to see the keyless works. The name on the dial isn't the movement manufacturer.
 1 point
 -
You have to put the parts in place, some force may be needed to fit the spring back. Then You should try to rivet it in staking set.1 point
-
Yep, it was not having the cap jewel in place All sorted now.1 point
-
…check the bench for the missing cap jewels . Seriously but not seriously I’m nominating you for best cinematography…1 point
-
Place the movement dial-down in a movement holder.1 point
-
Well I have around 30 years experience restoring clocks and watches. I have serviced many floating balance movements and always added a tiny drop of oil to the floating balance,not only Hermle but Smiths it improves the rotation of the balance and I have never had any come backs.1 point
-
On watchguy.uk you can find this document about Heuer Cal. 11 complete. On page 34 the tool for opening the famous Heuer Monaco is mentioned. https://watchguy.co.uk/cgi-bin/files?showfile=Heuer/Heuer 11 complete.pdf&filename=Heuer 11 complete.pdf&dir=Technical Manuals&action=documents1 point
-
They are a good tool for removing a balance staff. Better than using just a stake, as the balance arms are held firmly in place at the same time the spring loaded part does its job1 point
-
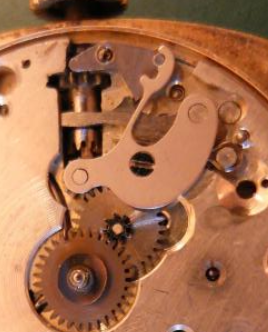
It looks like a Record 022 or 022k movement by the shape of the setting cover. I found a link to a photo for the 022k - https://www.buzzufy.com/blog/2017/02/03/record-caliber-022k-movement-specifications-and-photo/ From the 1930's. The link says 17 jewels. It looks close. Also link to this site with a similar watch -
 1 point
 -
In school we were shown the punching out method, using a K&D tool that presses down on the balance arms to keep things flat (as the Platax tool does), but were told the proper technique was cutting away the hub. They showed us the punch method simply because many professional watchmakers only ever do it that way. On a Glucydur balance, which is heat treated beryllium copper and very hard, there is less risk of enlarging the hole; likewise with steel balance arms. But not all bimetallic balances are heat treated, and many monometallic balances are made of nickel, and these will almost certainly see their holes enlarged from punching. I don't do much Rolex work, but I understand that on the modern pieces they instruct to press the staff out with a Horia tool. As I heard the staff is designed in a way that the rivet breaks away during this process. I wouldn't try it on anything else!1 point
-
I think there maybe a perception issue around Marks video for @nevenbekriev , Mark targets videos towards us who are trying to learn about it all and would find the idea never mind the expense of one a lathe for best current practice to be out of reach. To this end I suspect that the staking set method of driving out the balance staff is actually a well accepted practice for professional watchmakers , although perhaps not the best. Having spent a lot of my life teaching people how to do my job and creating best practice on a per customer basis I maybe understand more how this misunderstanding could come about. I truly believe both nev and Mark have our best interests at heart and only want us to improve as we go and become the best watchfiddlers we can be. my tuppence Tom1 point
-
Couple of things to look at arron. How big was the hole in the balance wheel to start with. A sloppy fit of the staff and the rivet may not have enough of the wheel to grip hold of, more important it could end up being off center. And the domed punch is to flare out the rivet in order for it to be flattened down onto the wheell by a flat punch afterwards. Two punches are involved in the process of riveting.1 point
-
My english is not good enough to understand the meaning of Yes I know all the worsd, but I can't still get the meaning. I suspect You do not what is needed, and what is needed is to use a punch wit hole in which will go the hairspring seat (with minimal free play), but the rivet will not go. So, the punch should never touch the balance spoke with the hole, but just the 'rivet' of the staff. And, I don't see on the picture signs of riveting on the staff, nider i see signs of punch on the balance spoke, so I wonder if You understanding of 'moderately harder taps' is close to mine. Then, please watch this video. It shows one of the correct ways of old balance staff removing from the balance in a manner that will not enlarge and distort the hole. Simply punching out the staff is wrong as the hole gets larger and every next riveting of new staff will need more and more harder hammering, and this leads to loosing of balance center and roundness. If You watch just the end of this video, You will see the awfull result this guy proudly shows instead of being ashamed of what He has done... So, when the balance hole has get larger, this means that normal staff wil not fit, but one will need to make custom staff to fit the hole.1 point
-
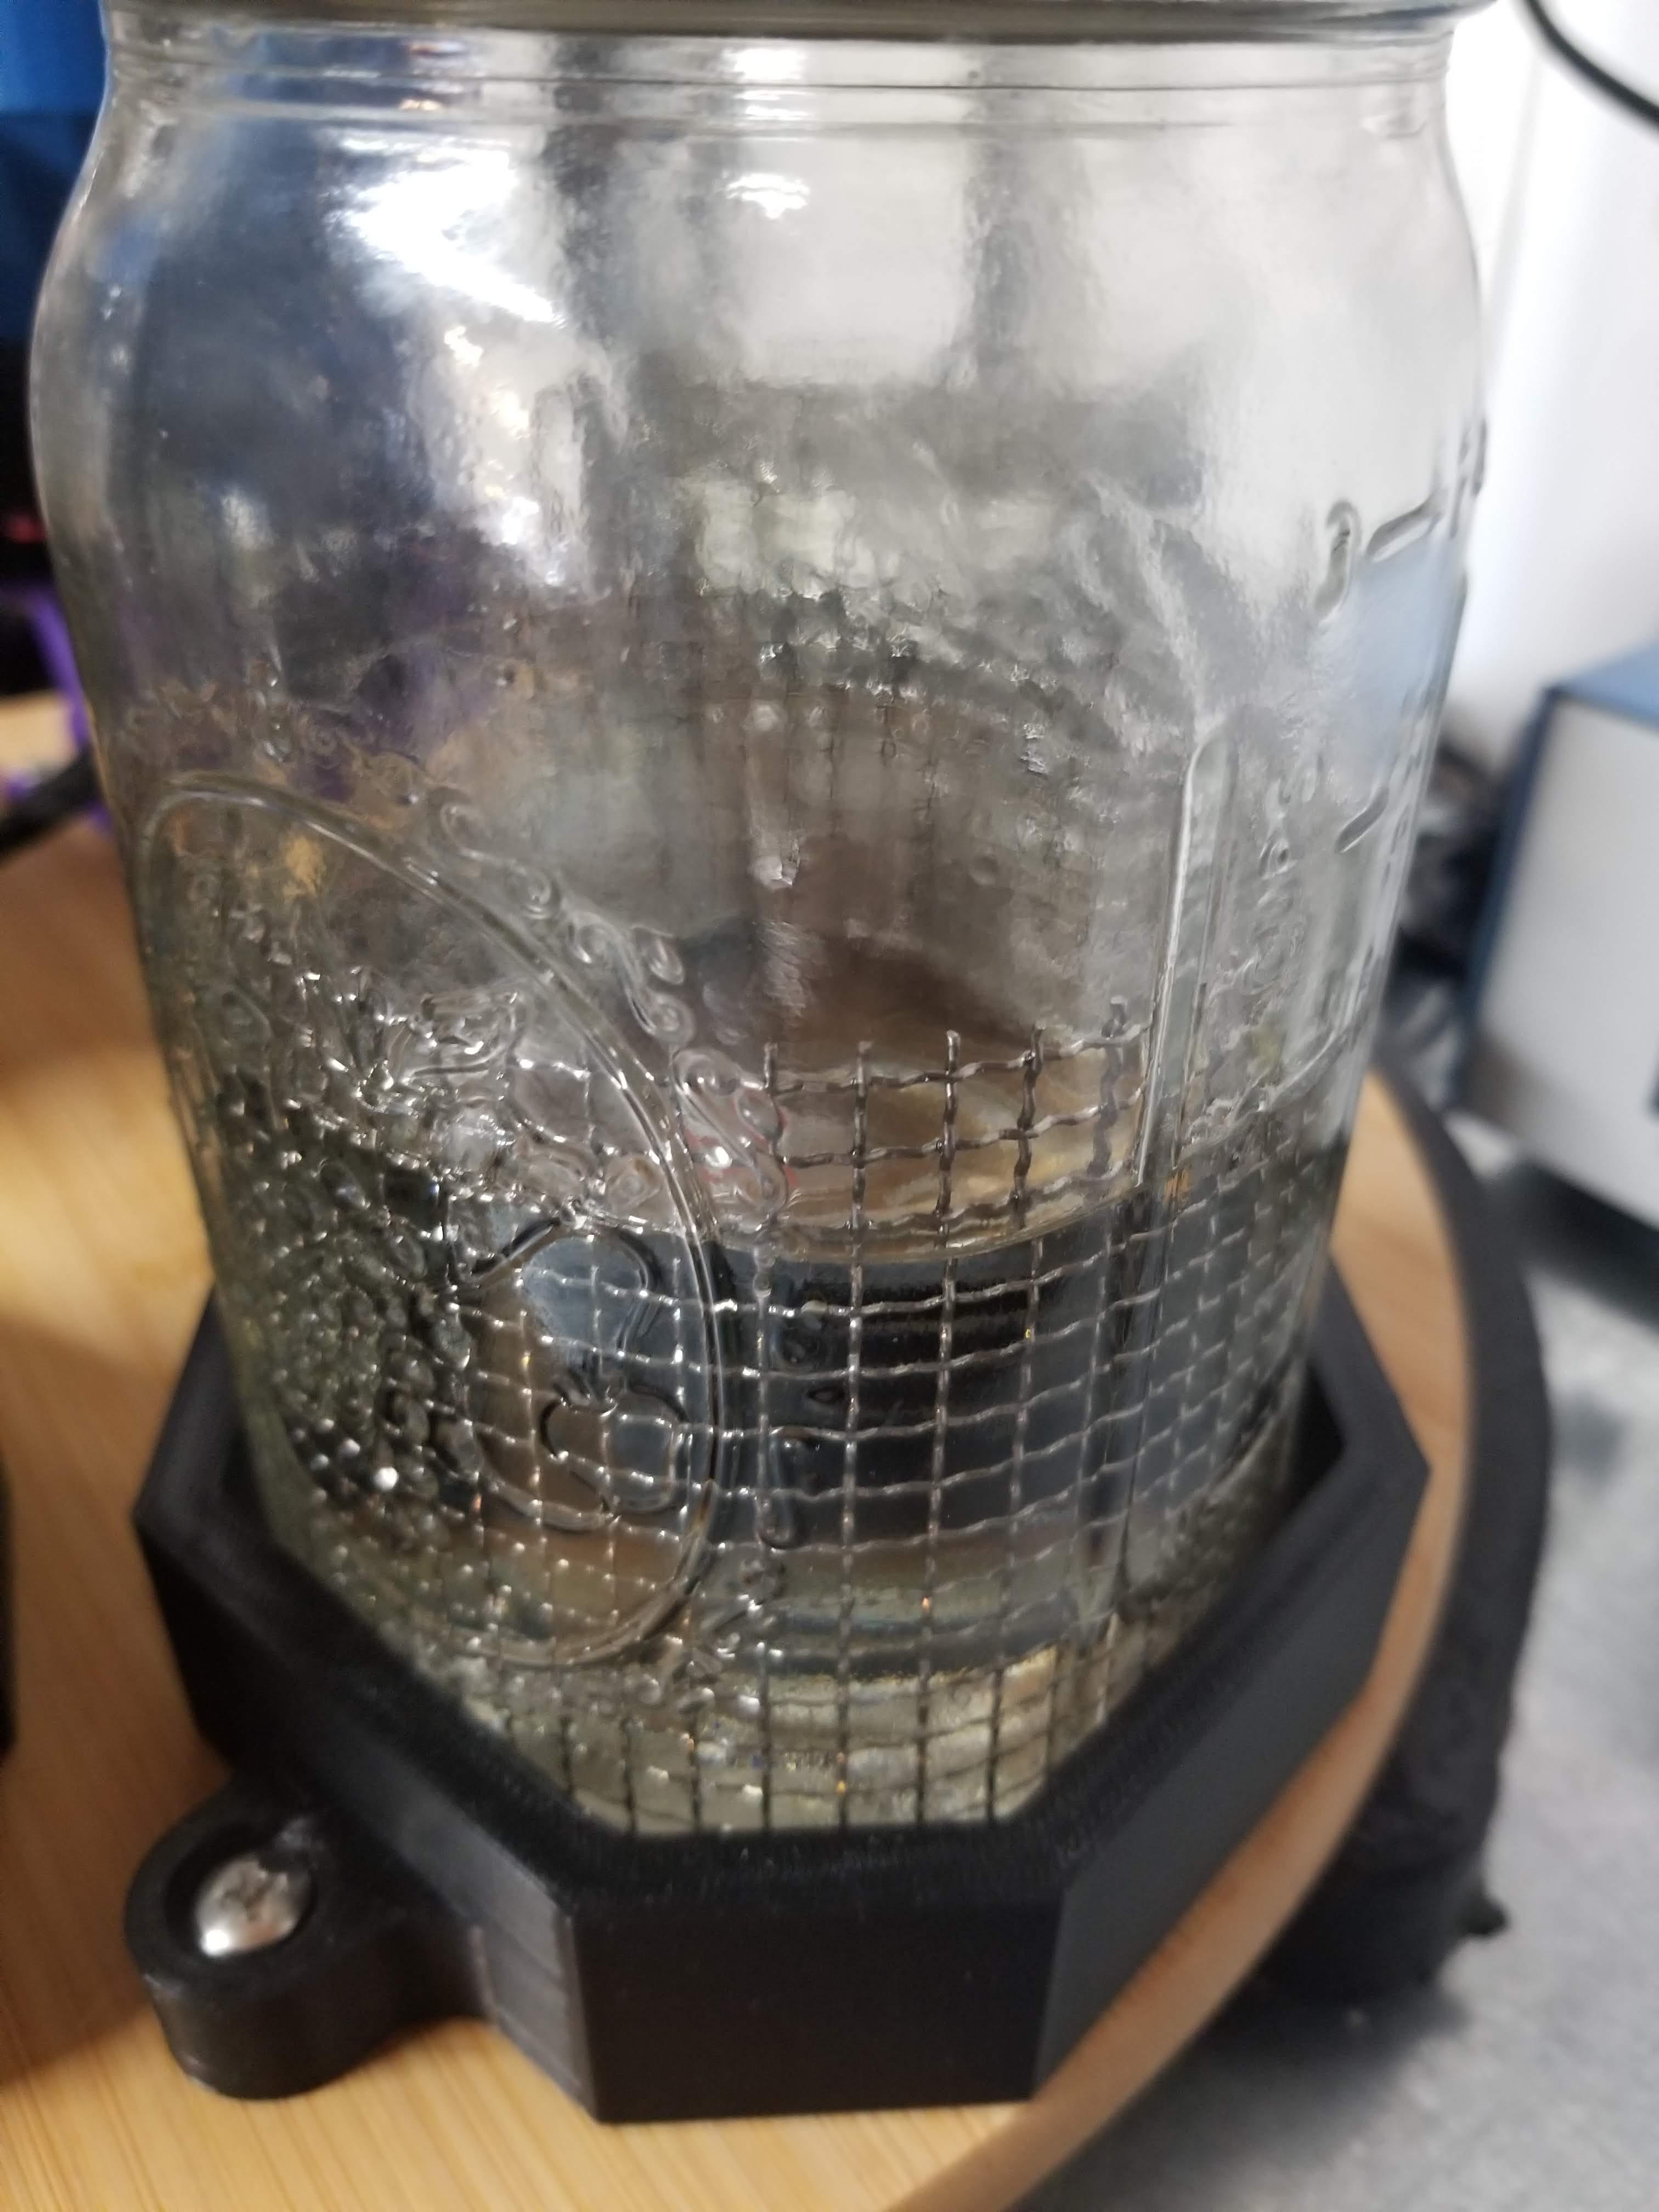
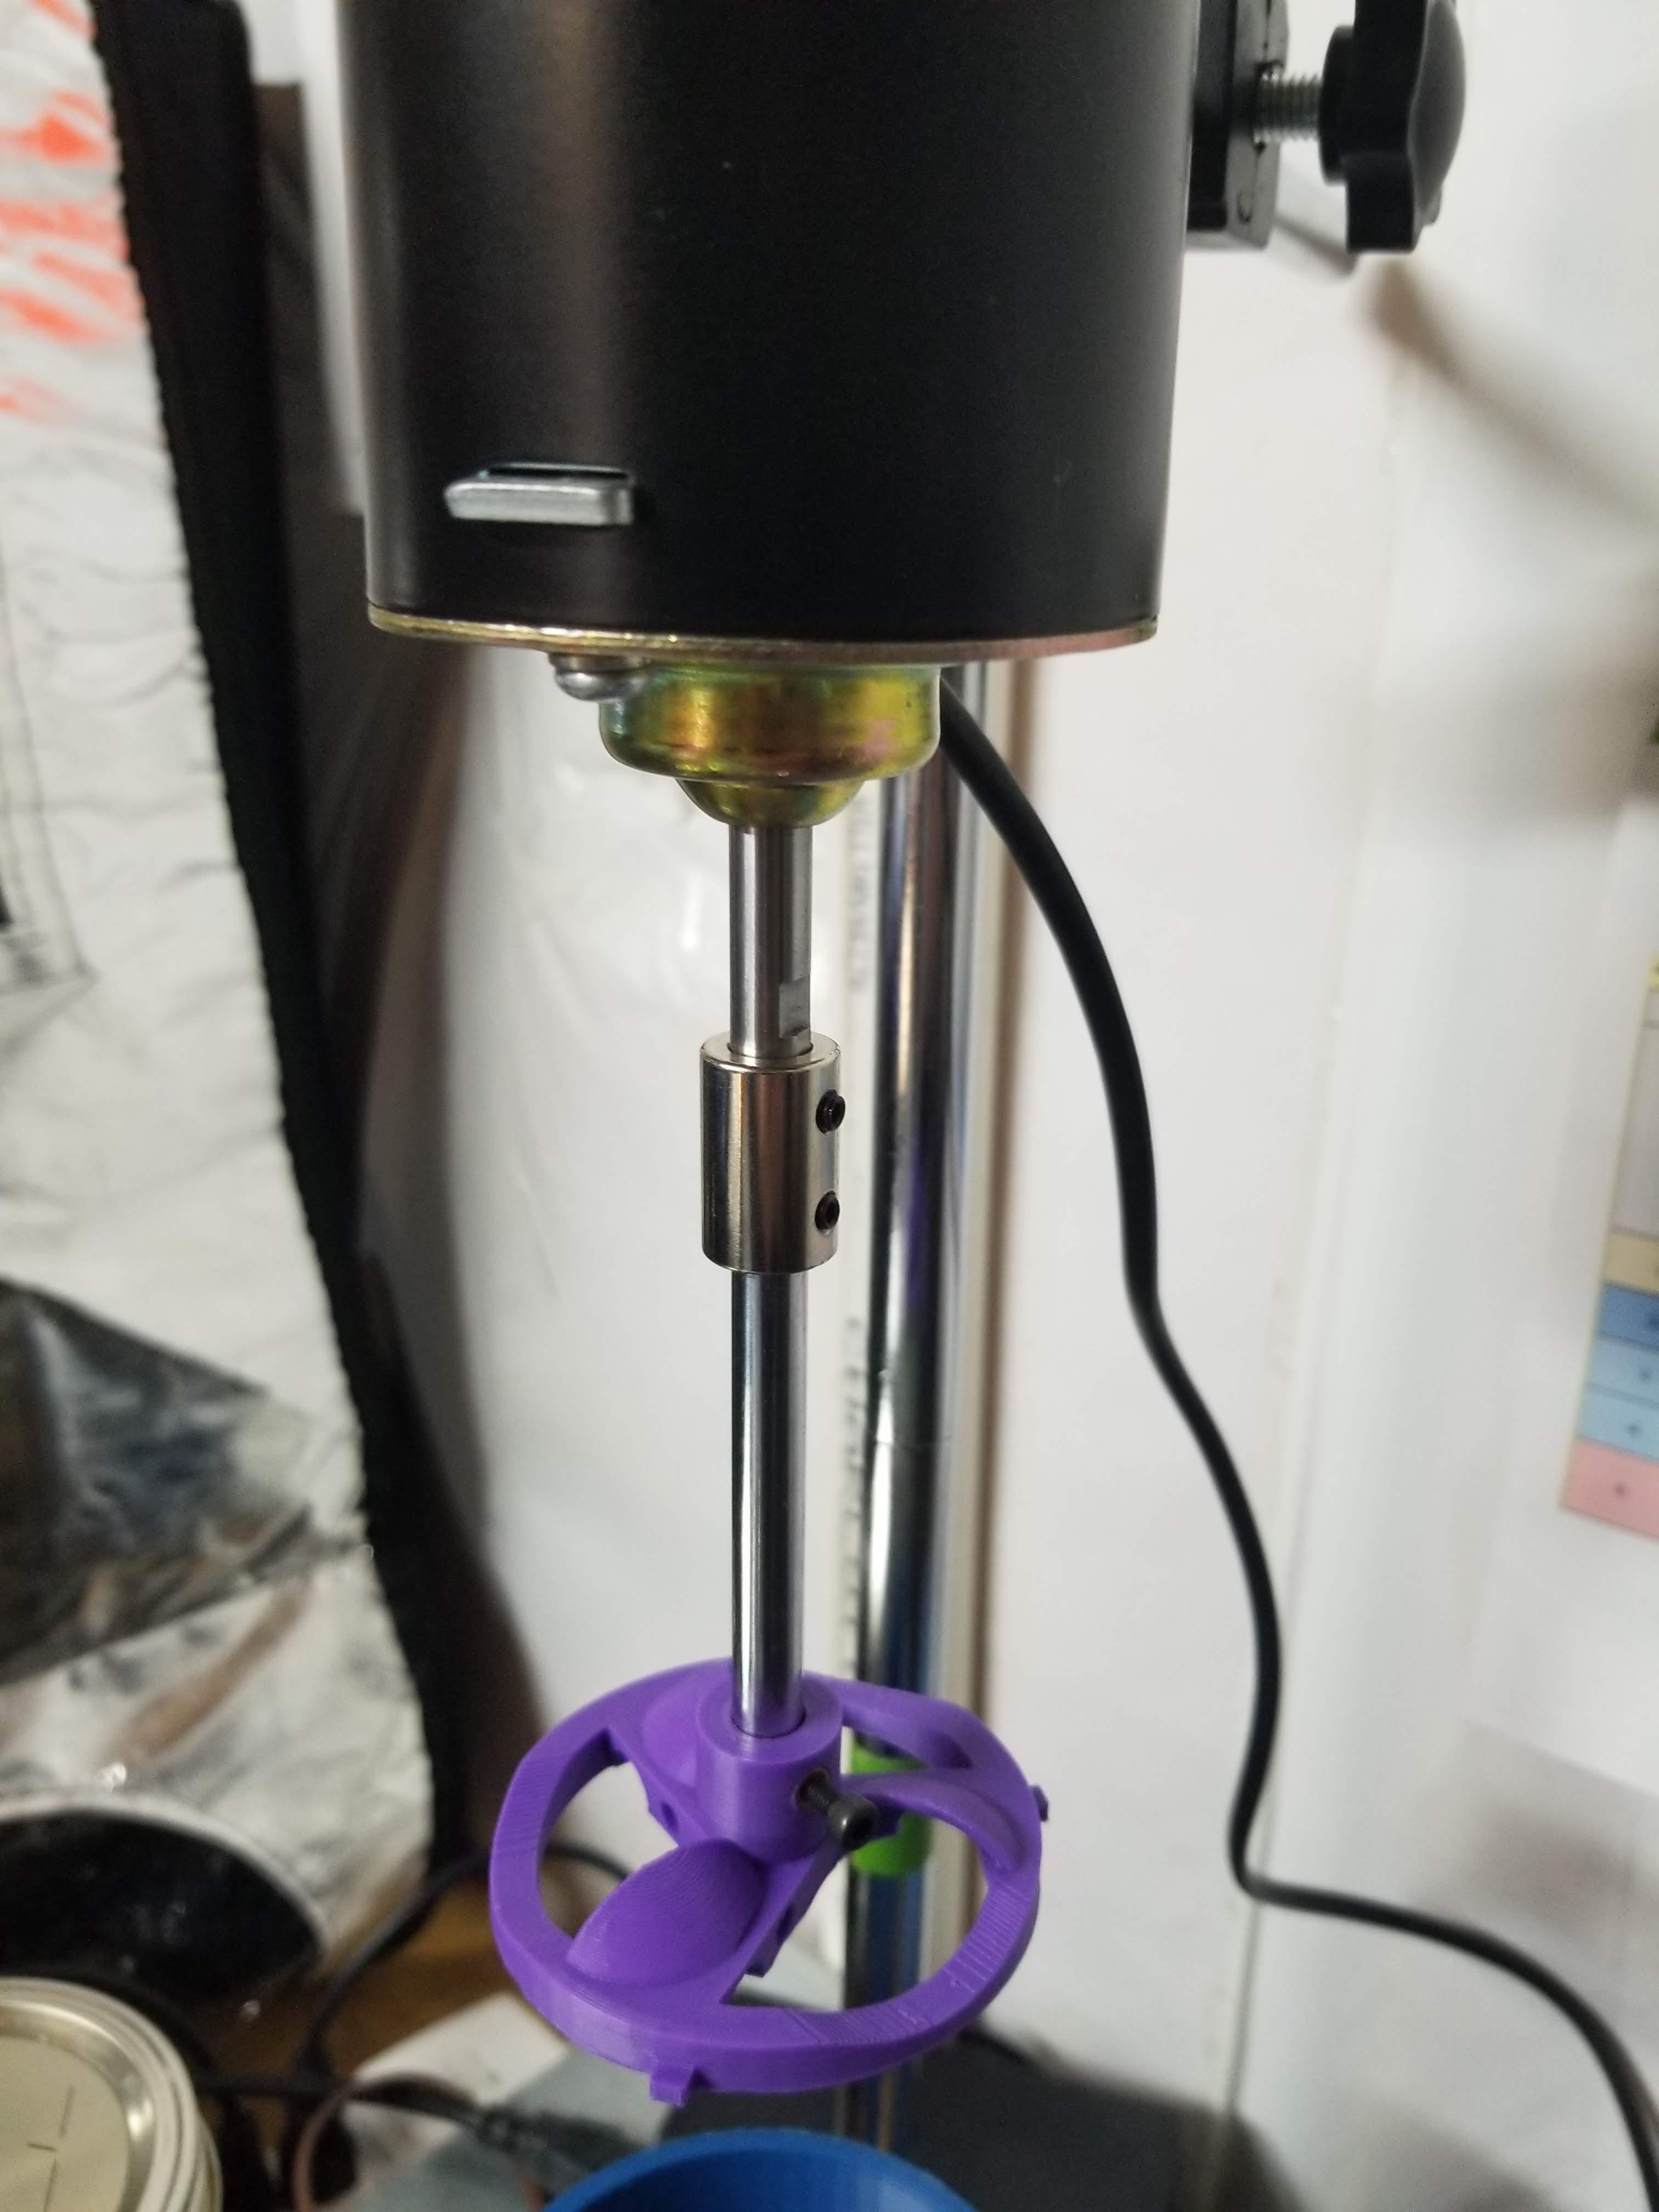
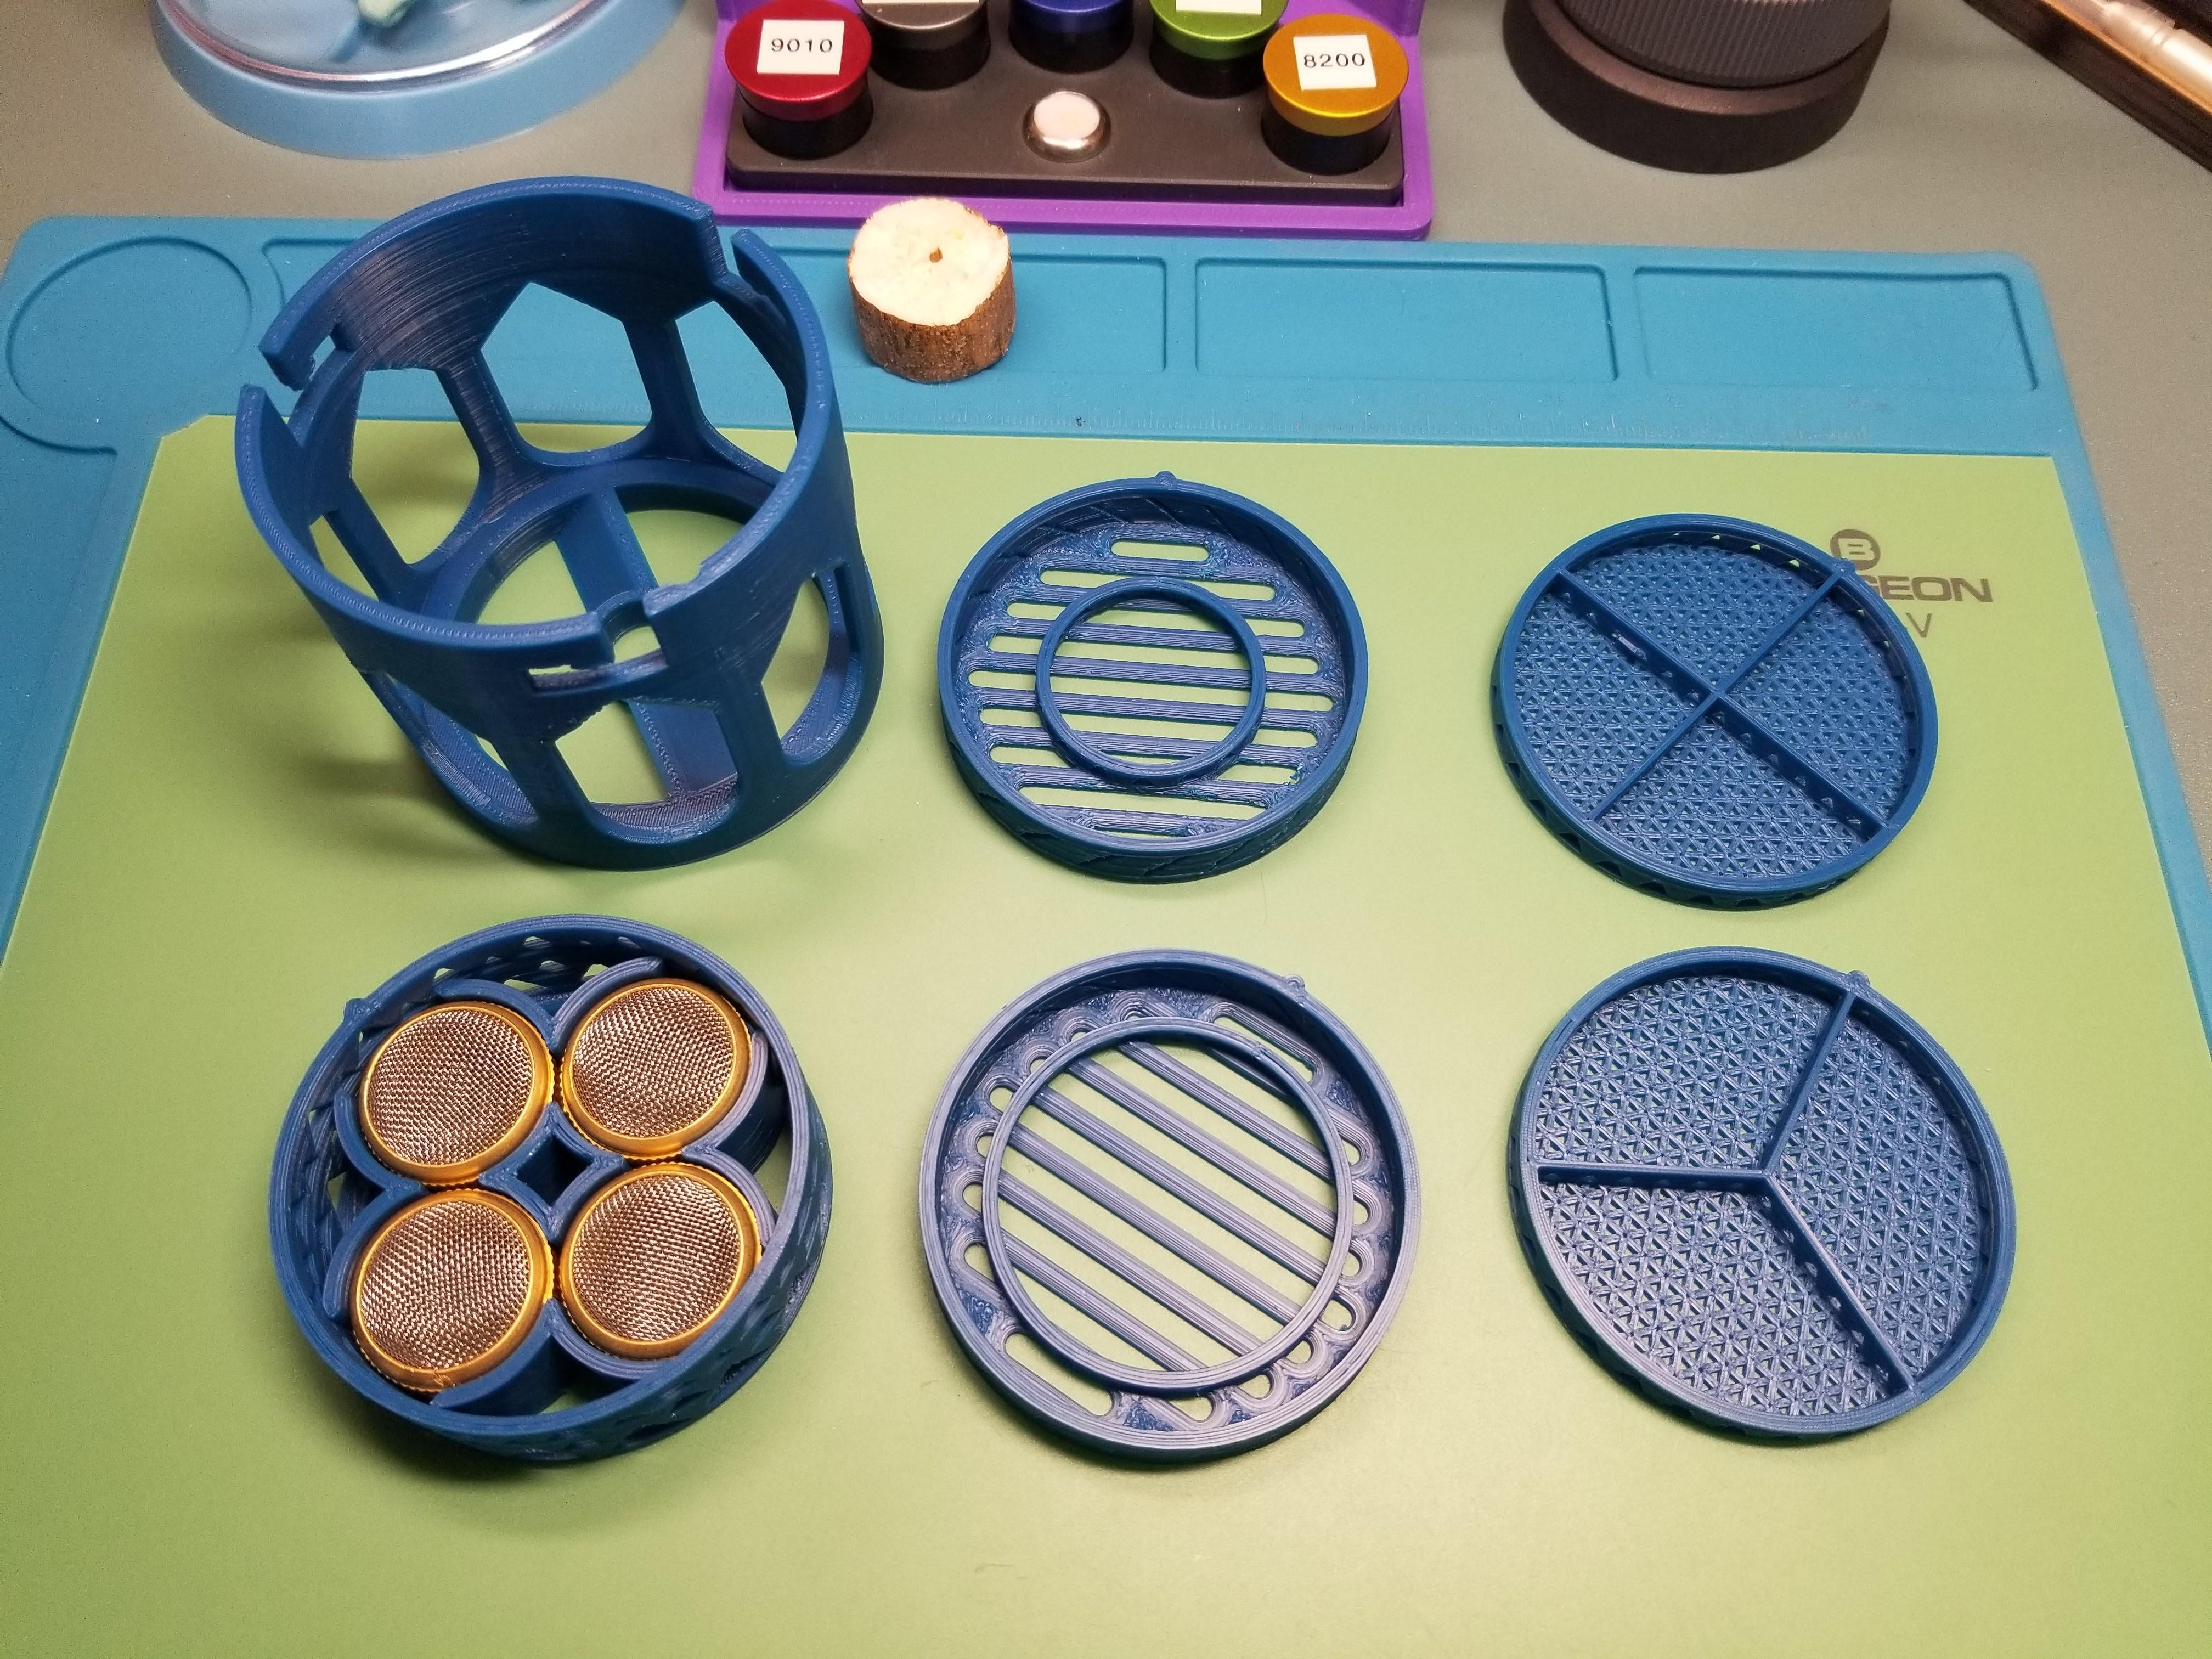
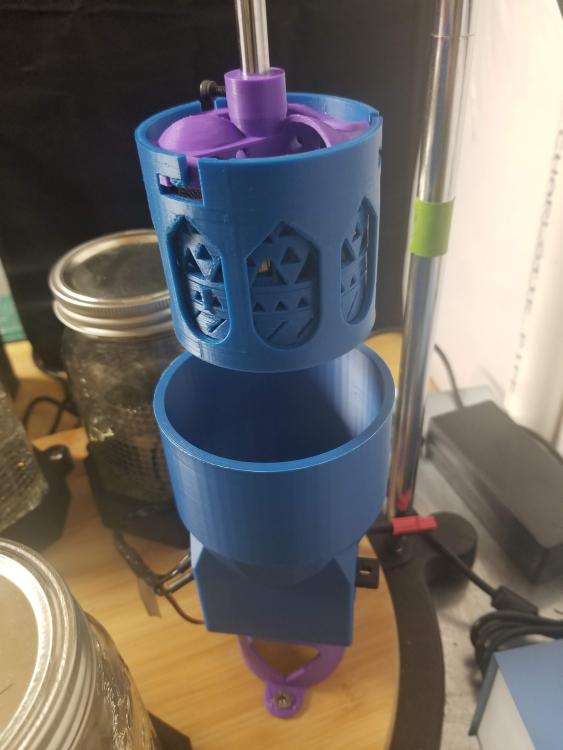
I have made some changes to my DIY machine over time and thought that I should do an update of this thread. Outer wash basket has been redesigned with larger openings. Prints a bit faster and uses less filament. Also added a bottom impeller to encourage fluid flow through the basket layers. Added a basket layer that holds 4 of the mini mesh baskets. I still have one for holding 3 of those baskets. Drying shroud was made a bit larger. Less chance of the basket rubbing against the sides. Bottom jar baffles replaced with stainless steel mesh along the sides of the jars. The bottom baffles looked to be reacting with the wash and rinse chemicals. The stainless steel mesh has not had that issue. Testing with and without the baffles does show some reduction in the swirling of the fluid. https://www.amazon.com/gp/product/B0BMTY6KH4/ I extended the stirring rod for the basket. My 3D printed extension ended up breaking. I used a coupler and a length of stainless steel rod instead. I did grind some flats on the ends for the basket and the coupler to tighten to. https://www.amazon.com/gp/product/B07P5YZKY5/ The STL files have been updated for the 3D printed items. https://www.thingiverse.com/thing:5905166


 1 point
 -
Found videos of the movement service. Covers the autowinder and locations of the fittings. https://www.youtube.com/watch?v=-OtbF-5pxRM&t=18s https://www.youtube.com/watch?v=oINE26WcLU4&t=951s Should anyone need them1 point
-
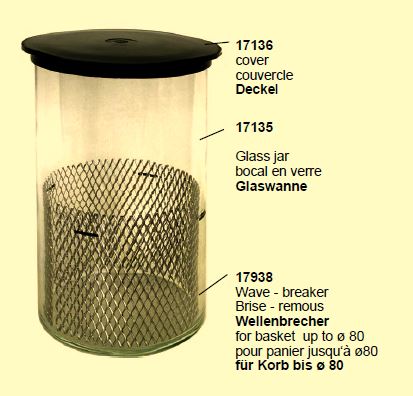
So we can have a better idea of what the wave breaker is supposed to look like I inserted it in the one of the jars which I found is rather difficult to get it perfect which may explain why they're not in the jars. Then I have an image out of a PDF of a modern machine they use something a little difference but same terminology. The purpose of these things are to break up the spinning wave that forms when the basket is spinning in the solution. Otherwise the solution will spin with the basket and not clean as effective if you could somehow stop them. It's why a lot of machines will stop spinning and in go back the other direction.
 1 point
 -
As good as our imagination can be it would be nice to have a picture. But without the picture I can go with the title of L&R Wave breakers. In a cleaning machine it with a round jar when the baskets spinning the fluid has a habit of spinning with the basket which is undesirable. So the star shaped part goes in the bottom of the jar and the stick like thing as you referred to it sticking up would go along the edge of the jar to try to keep the fluid from spinning and it also deflects some of the fluid in towards the middle. But others probably haven't seen what it looks like it be nice to have a picture1 point
-
There is an old thread here that shows a YouTube vid of how to remove the EtaChron stud from the stud support, which I think is a bad idea, as there is too much downwards pressure on the stud support when using tweezers. It can be done that way, but isn't ideal, especially when working on a clone movement where the stud support isn't as strong as an ETA movement. I put a lesson together for my class at https://efhc.org.uk/wordpress/index.php/centre-facilities/ to show how to do it without risking damage to the stud support and how to save over £60 making your own tools to perform this task (That's another lesson on hardening & tempering, if anyone is interested) Here's the PowerPoint presentation. The video's within the presentation are marked in the top left hand corner of the slide 'Video' Enjoy... Lesson 7. EtaChron adjustment & regulation.pptx1 point