Leaderboard


Popular Content
Showing content with the highest reputation on 12/08/17 in all areas
-
It is good practise always closely examine every part. Try to remember this with every repair, it will soon come naturally.2 points
-
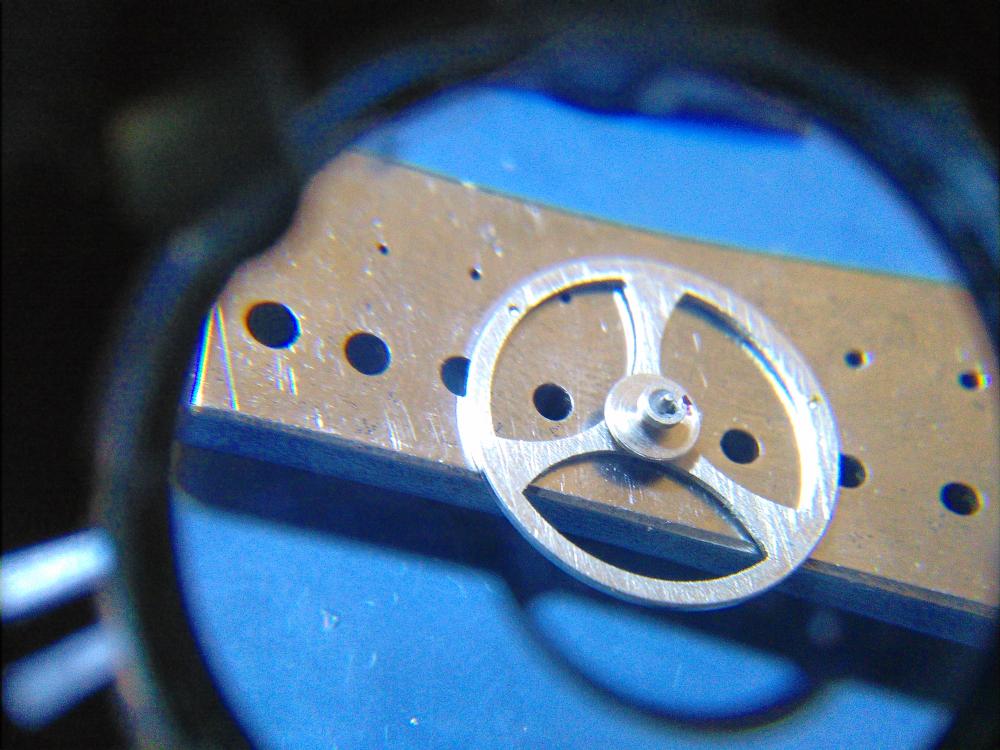
Measured or known size 29.3 or thereabout, order 29.3. That's all really.2 points
-
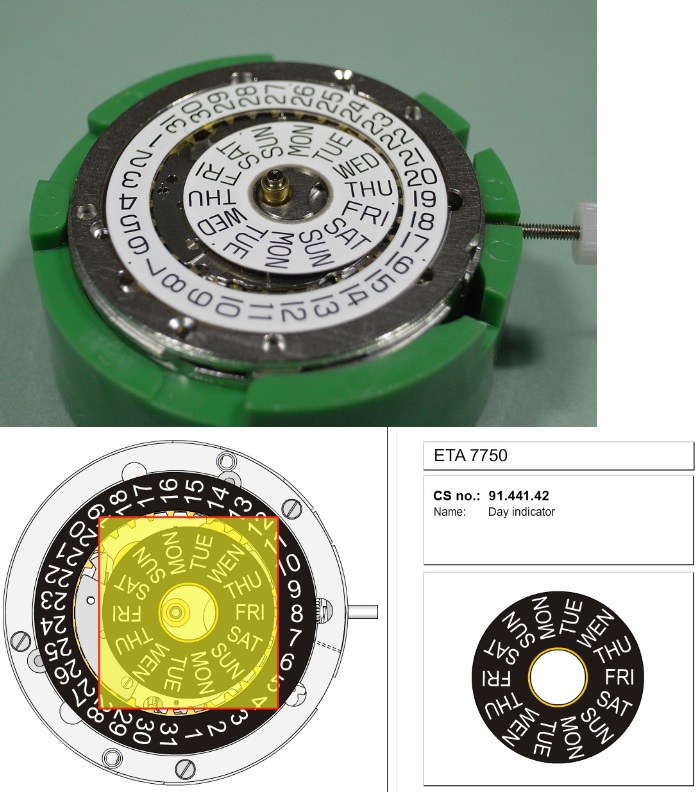
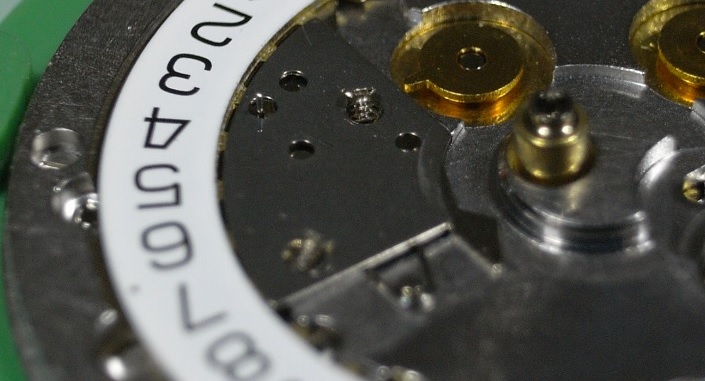
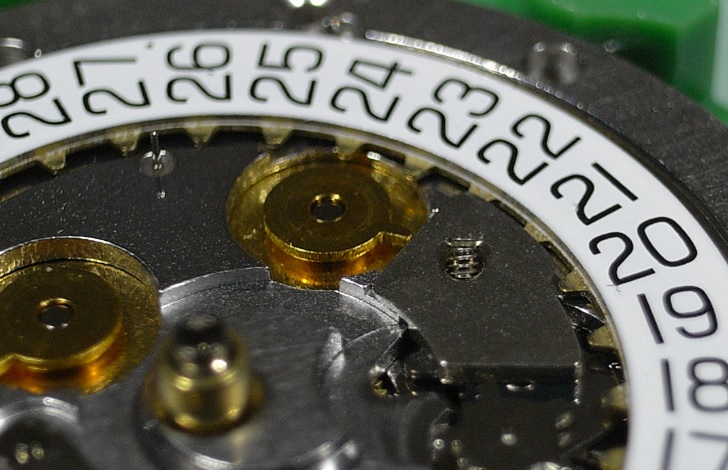
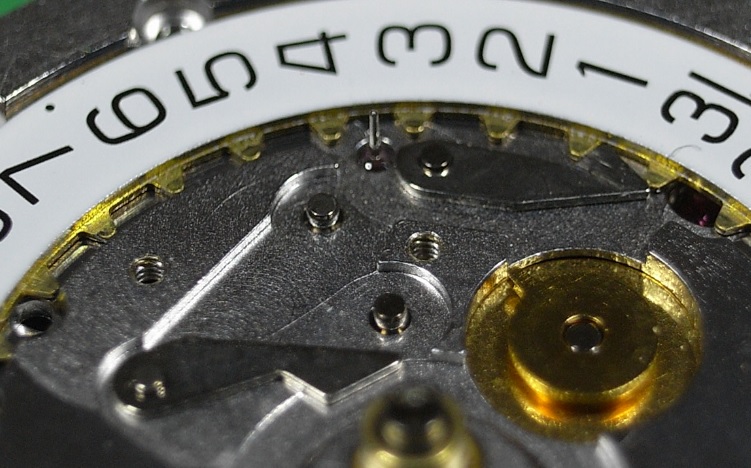
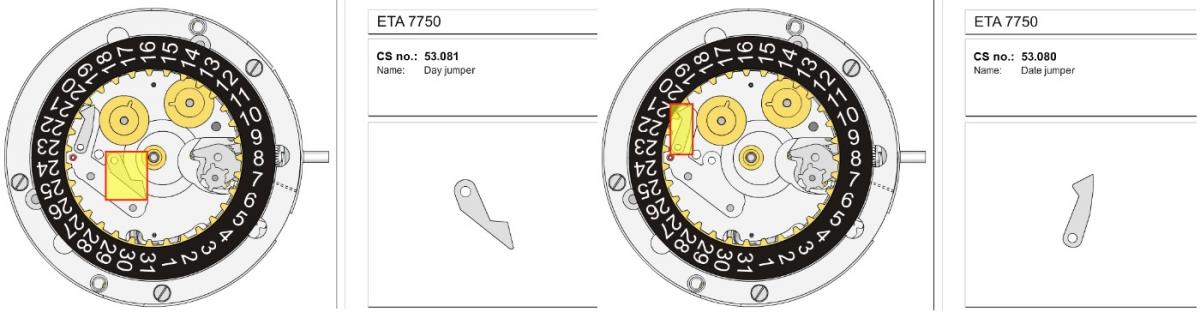
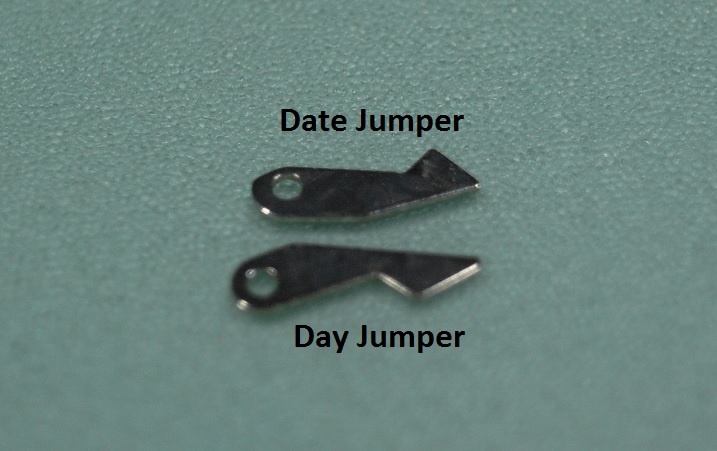
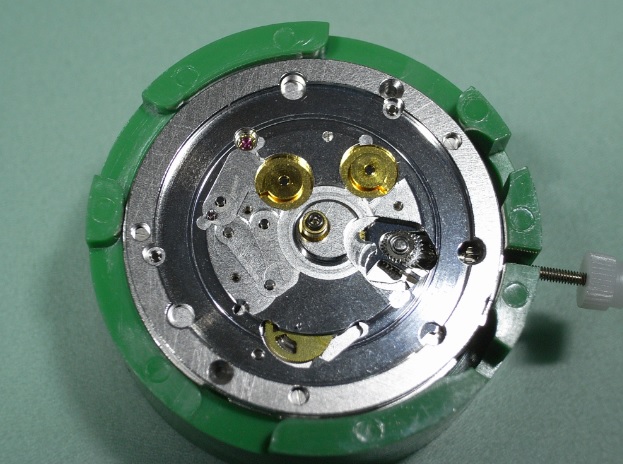
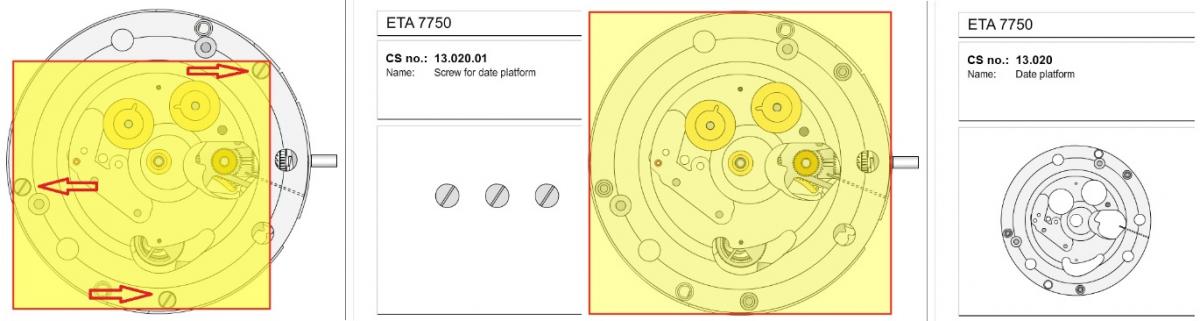
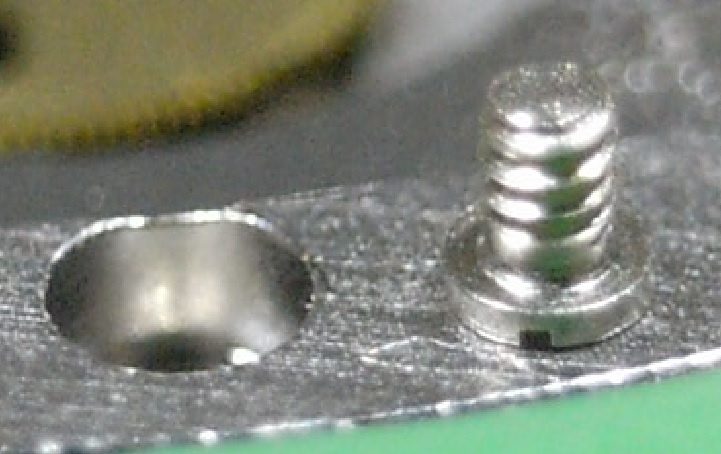
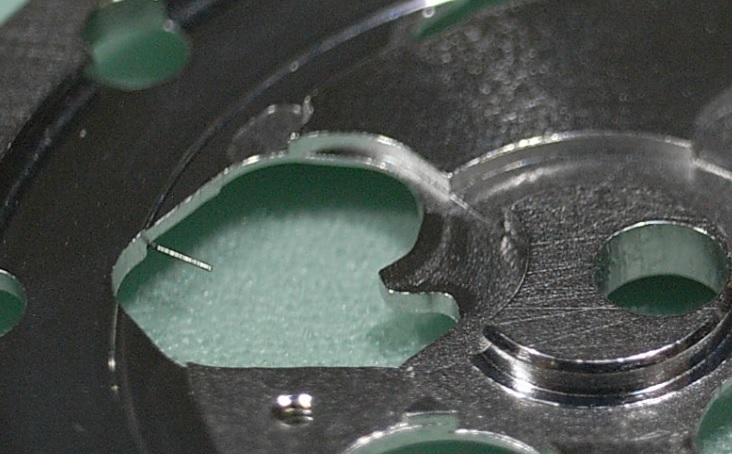
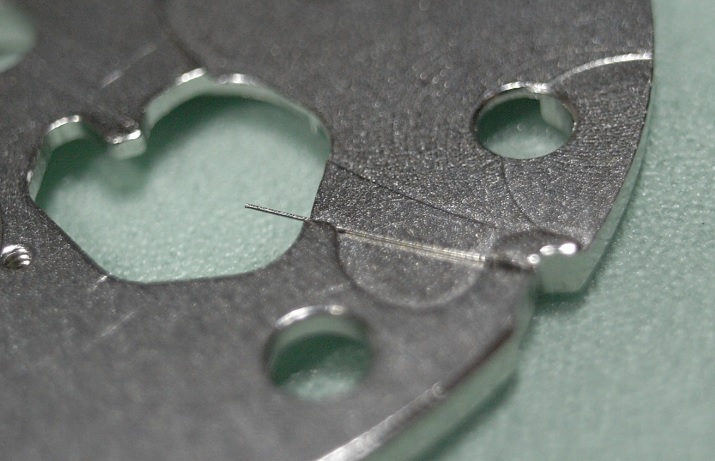
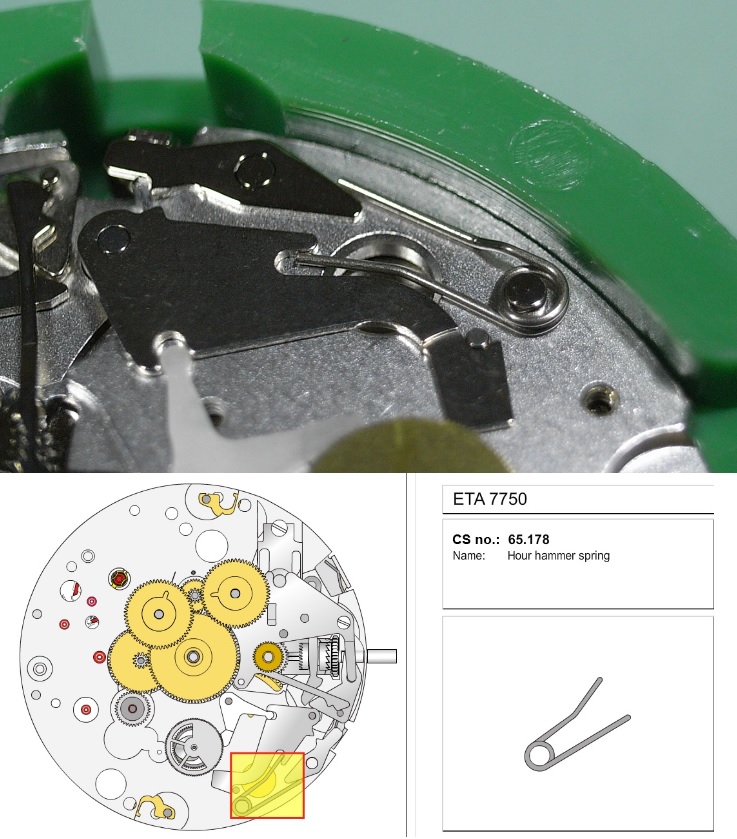
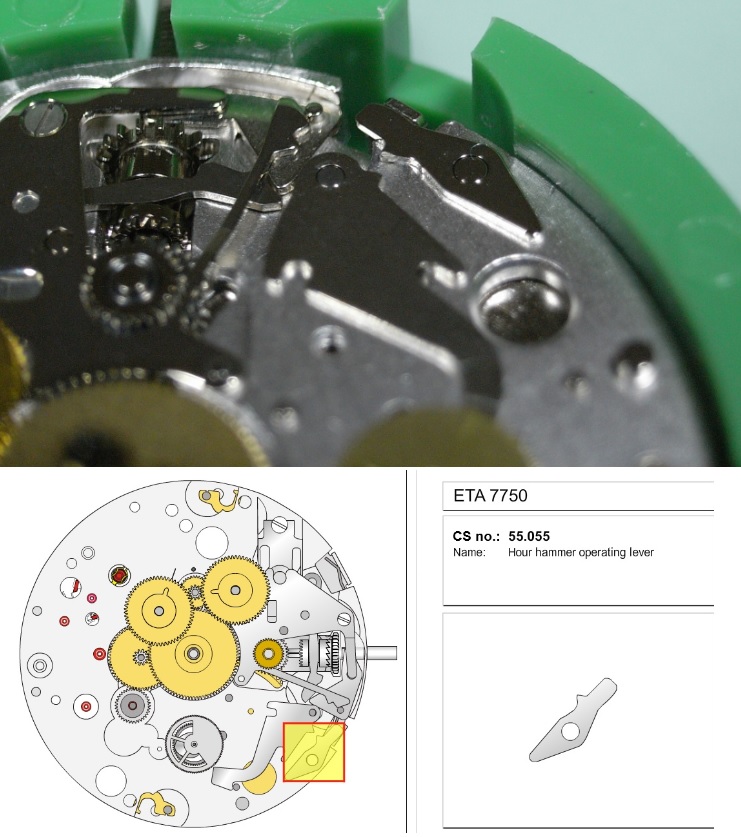
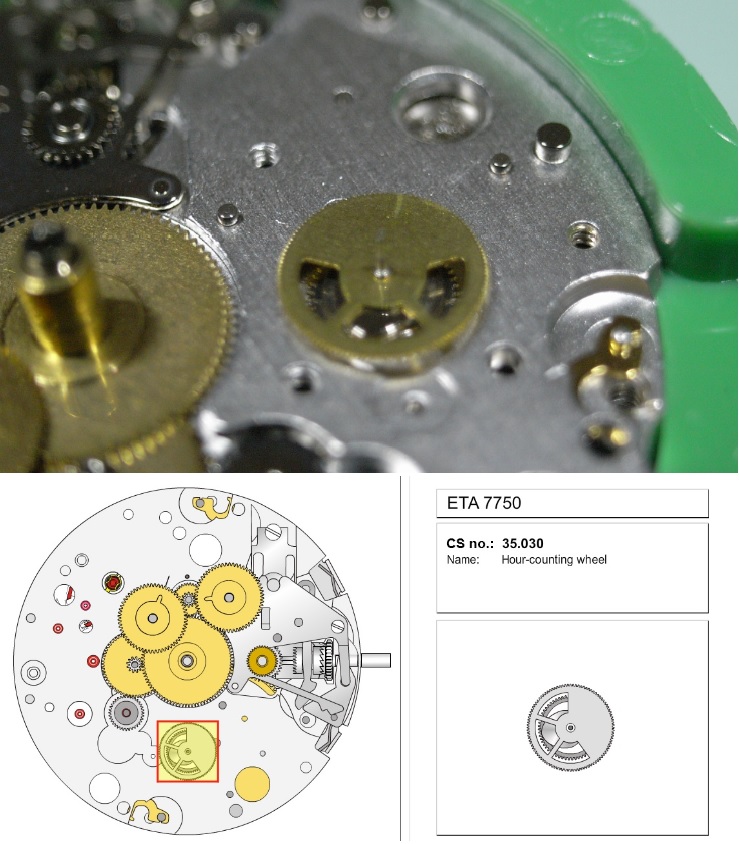
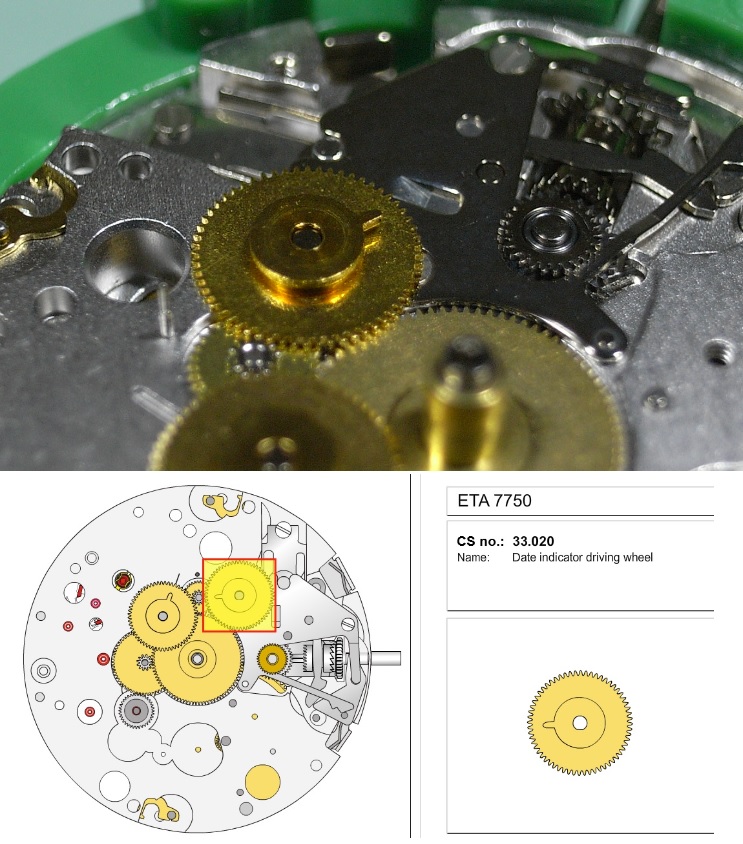
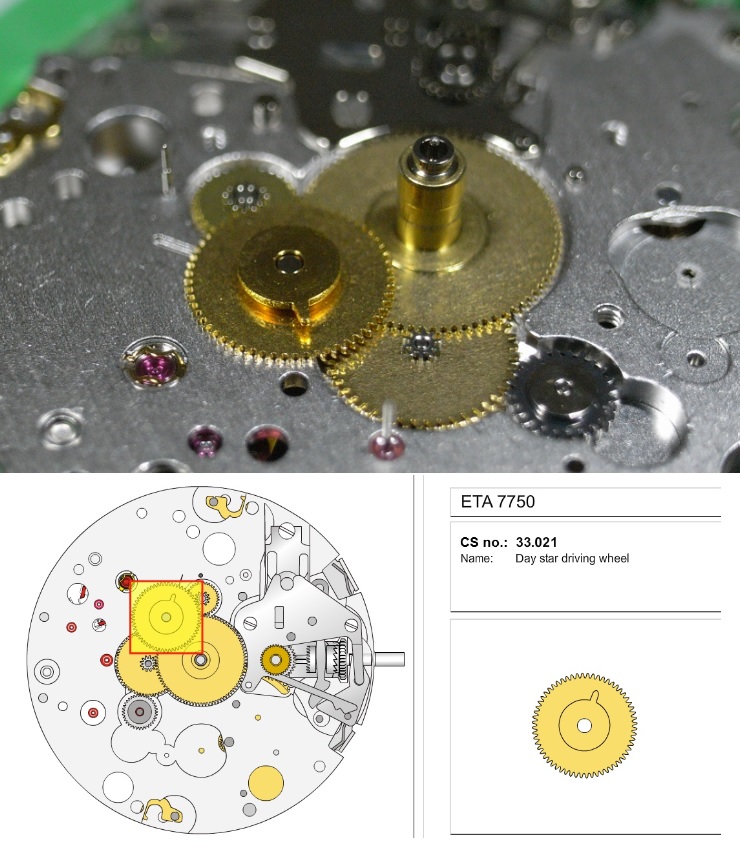
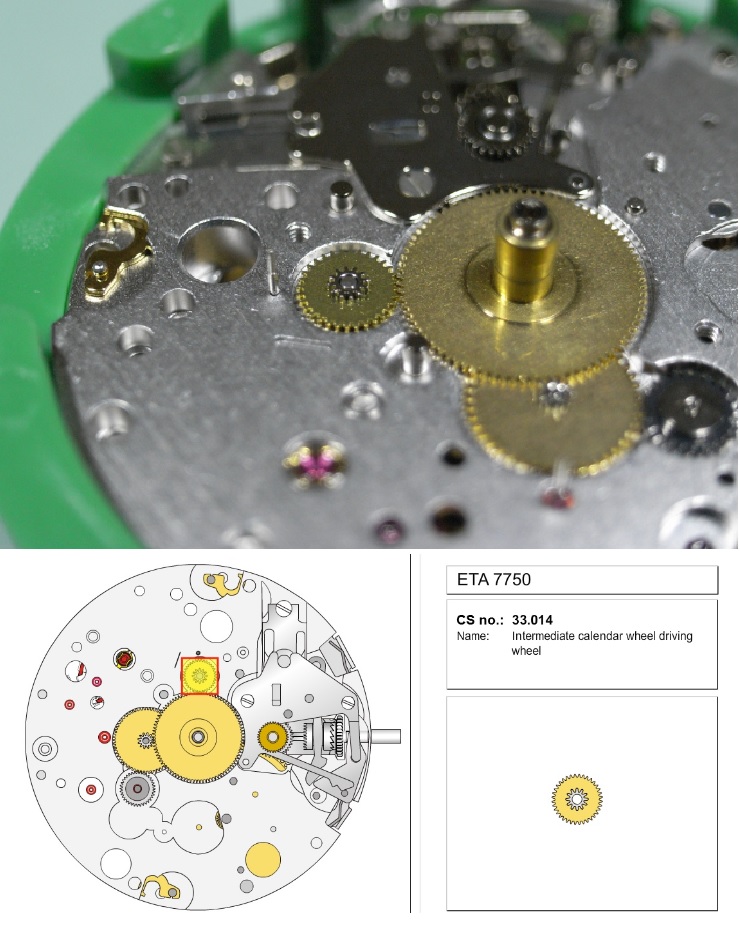
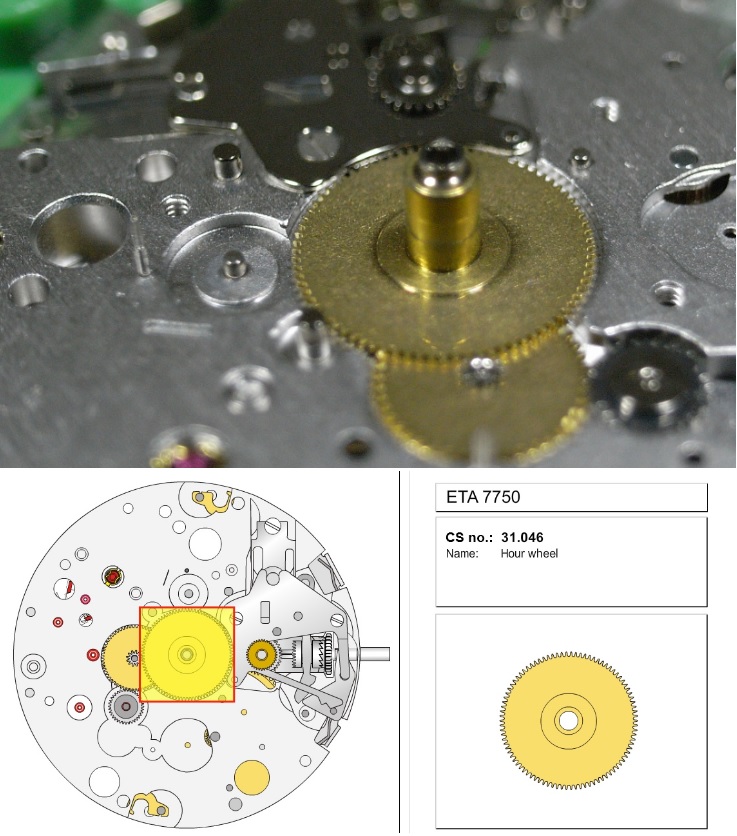
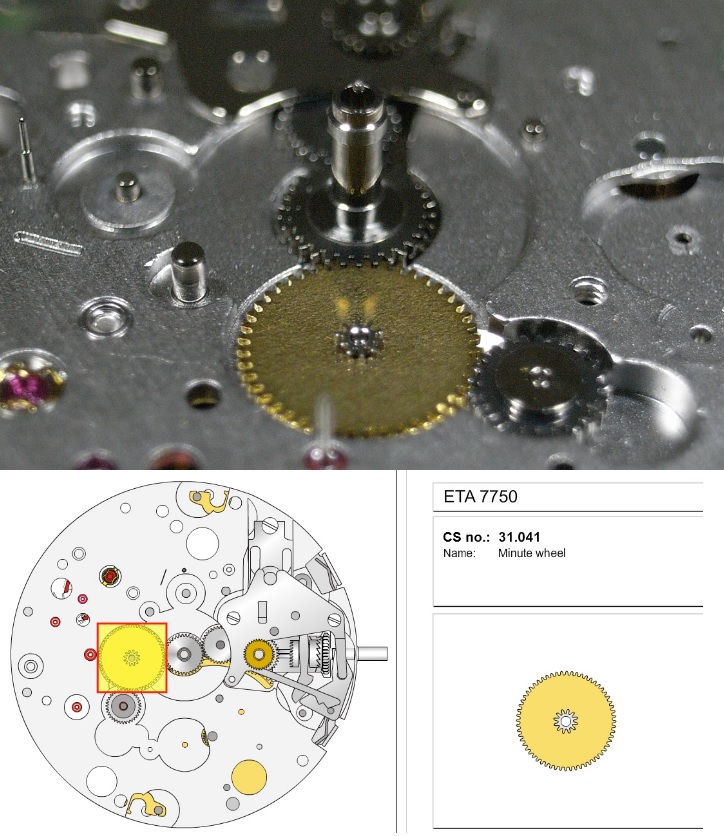
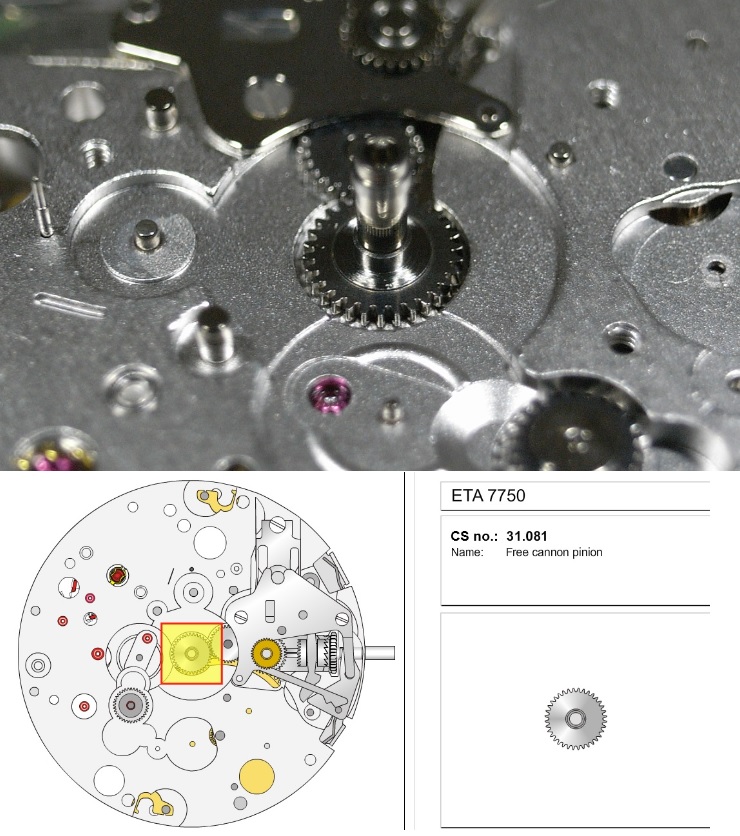
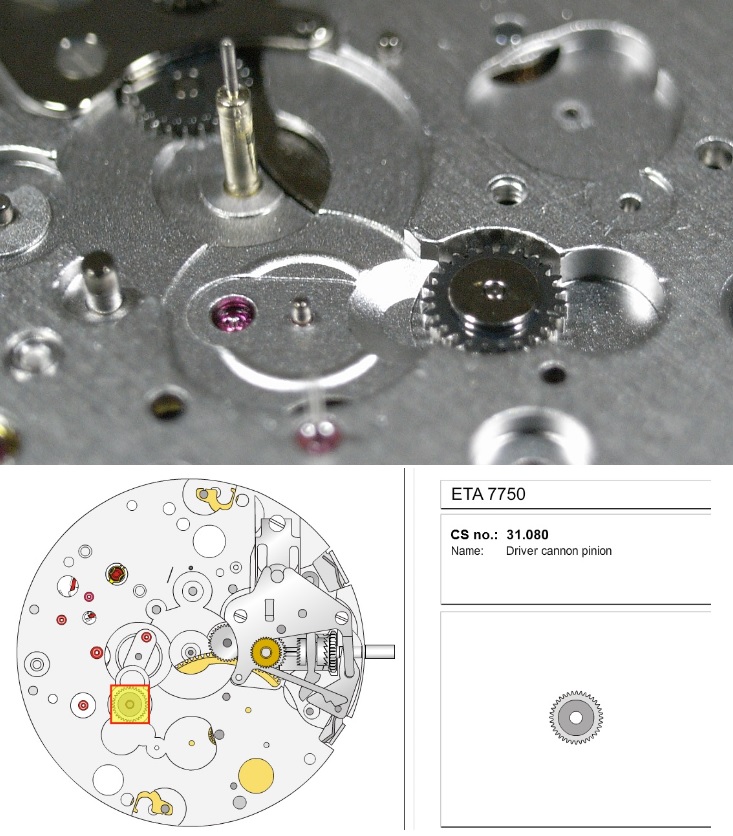
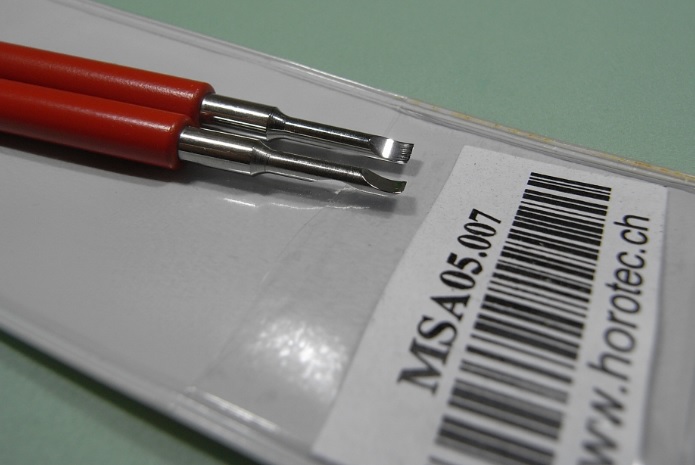
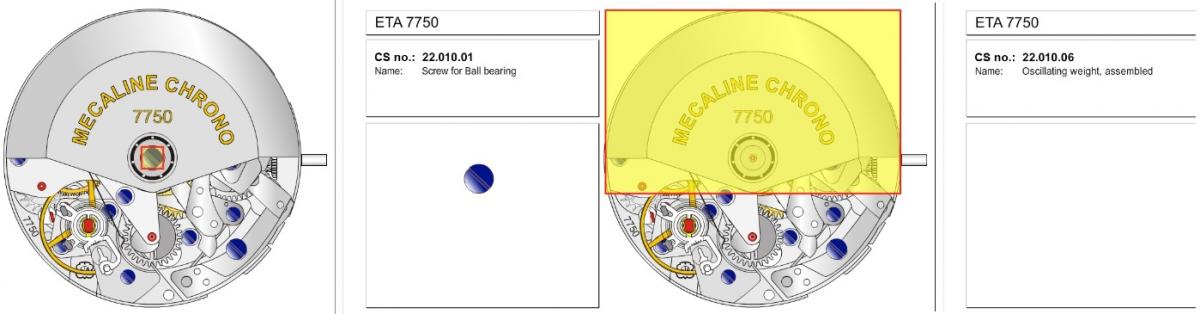
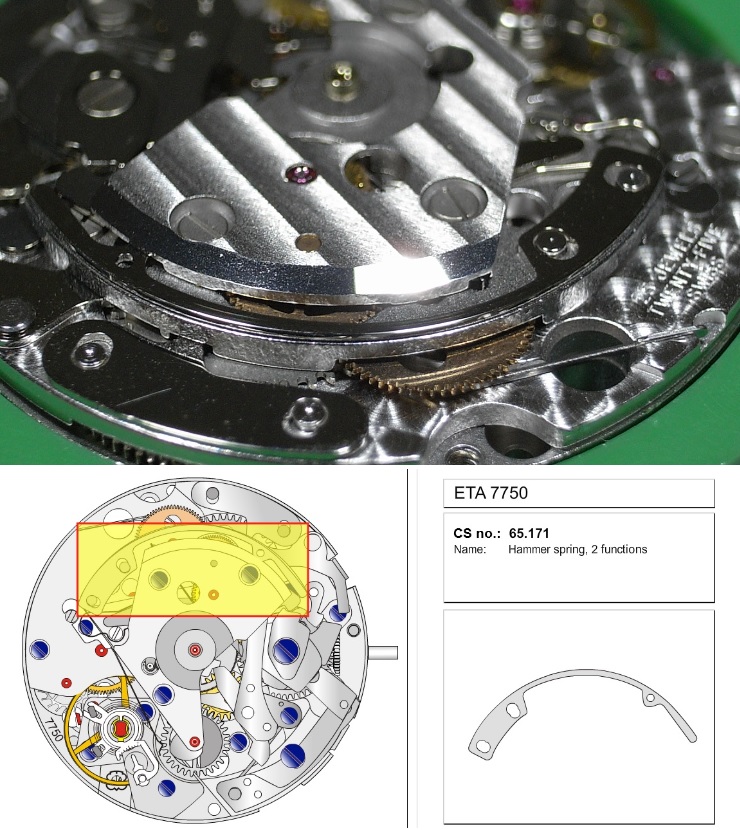
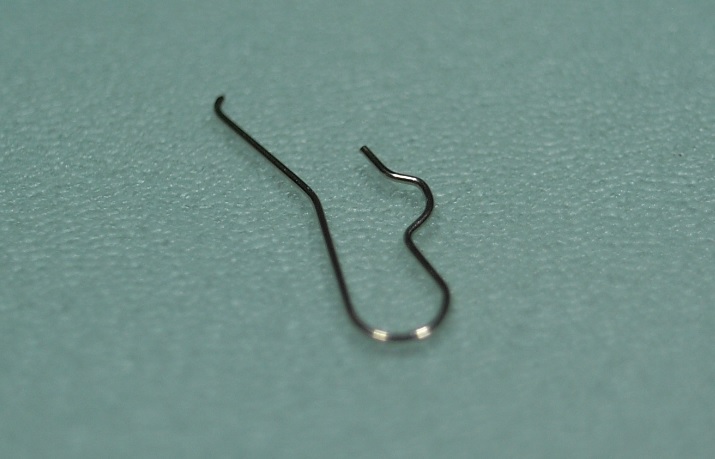
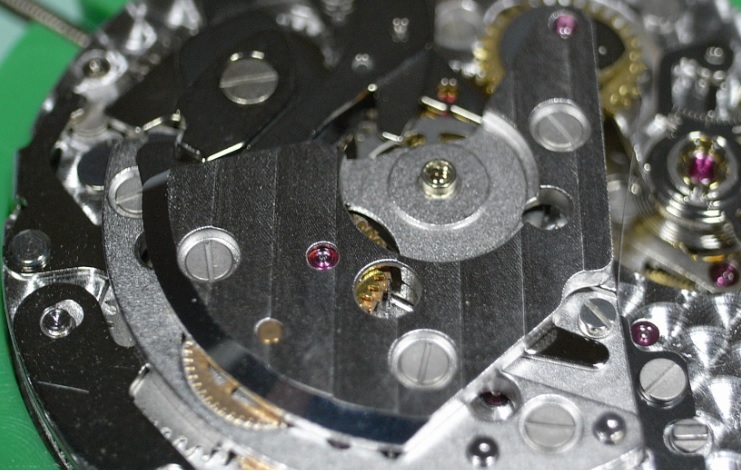
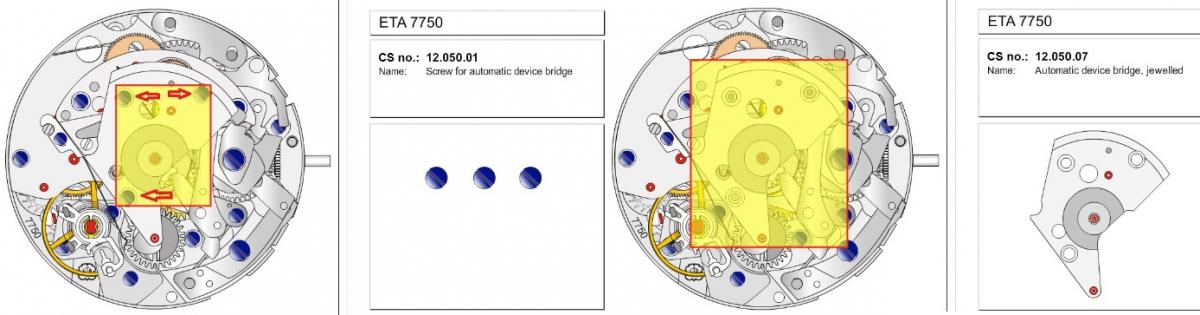
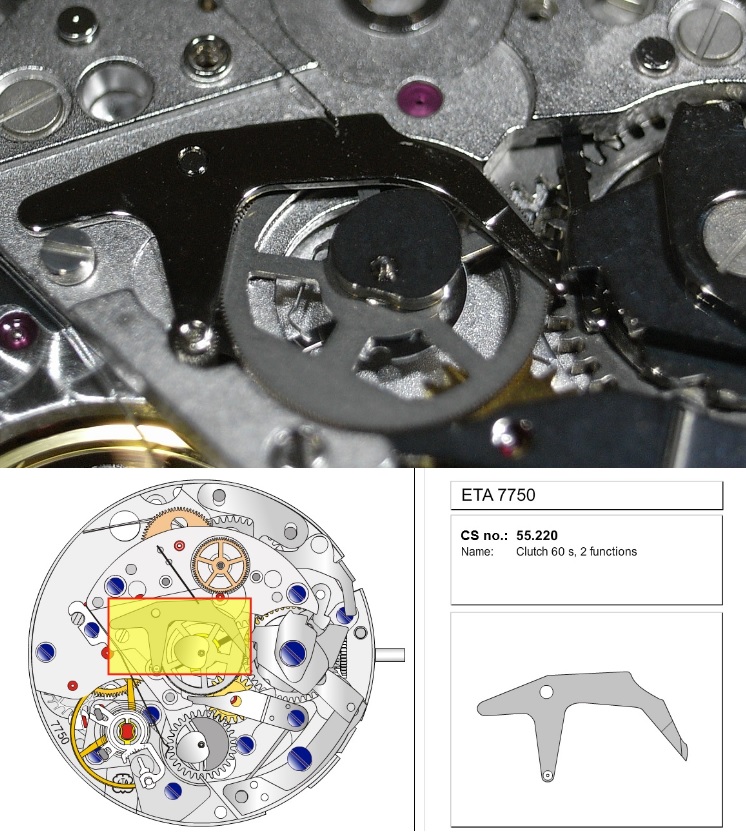
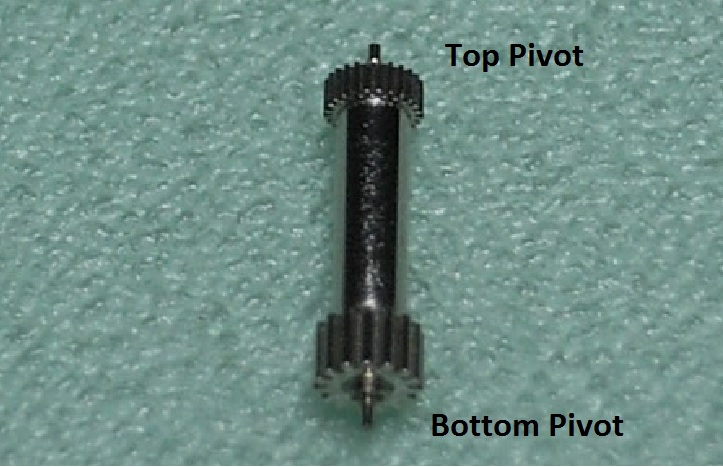
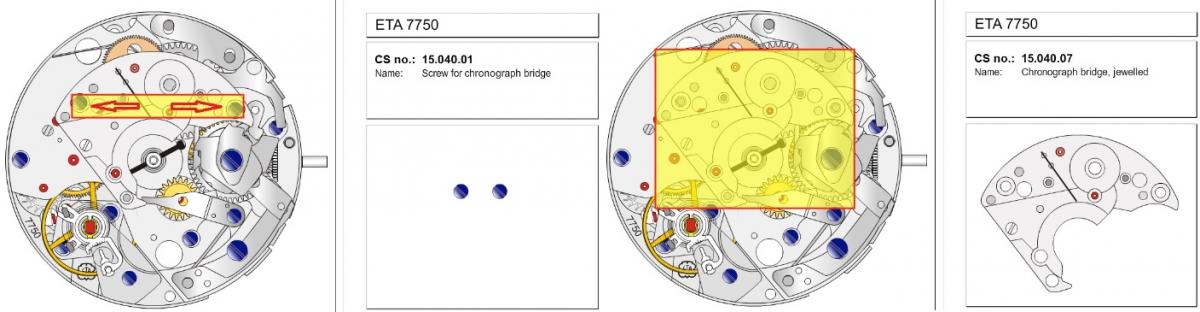
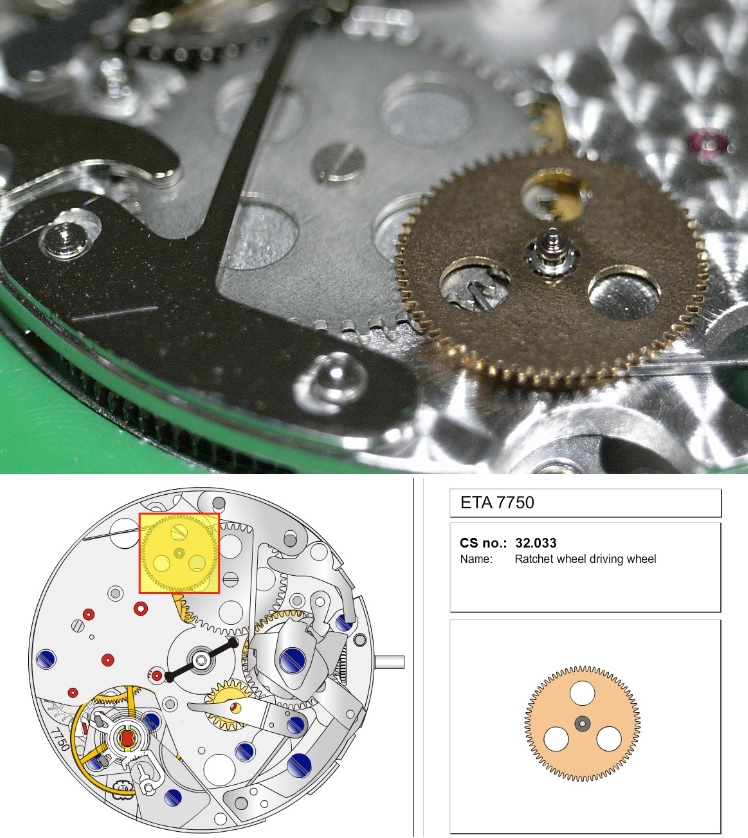
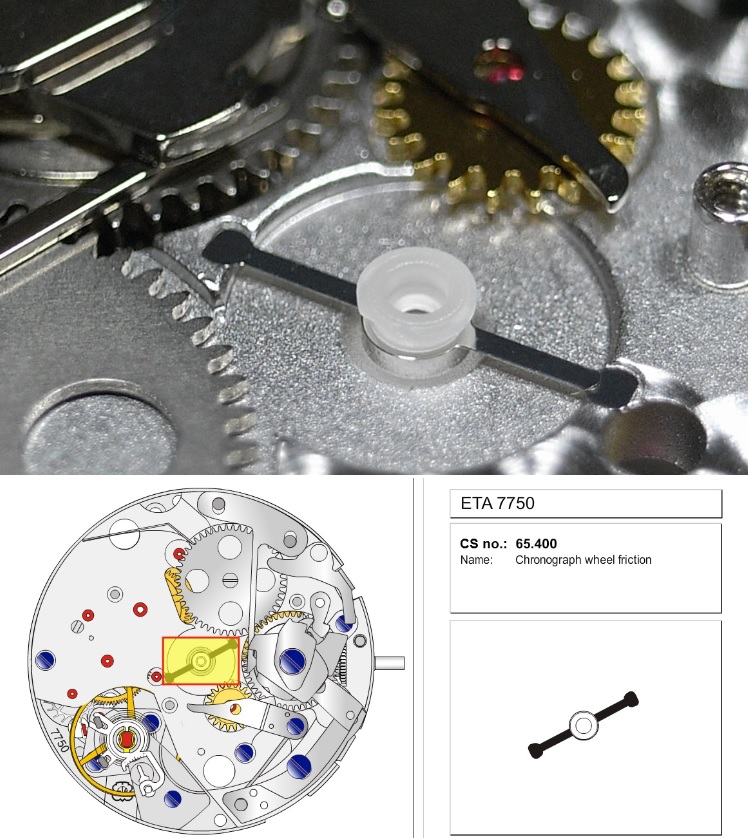
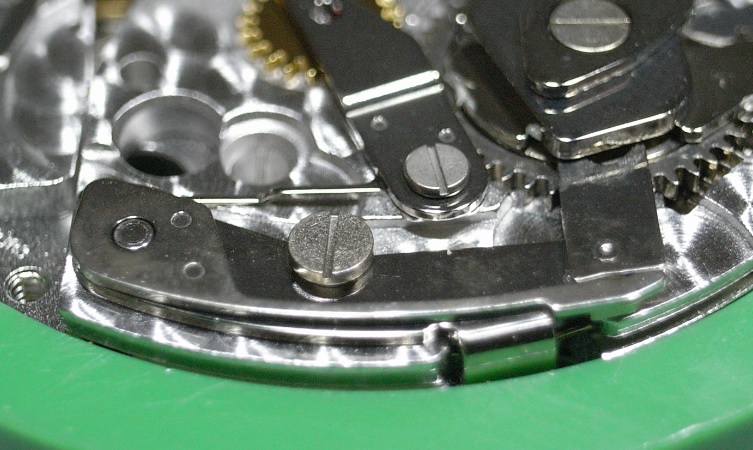
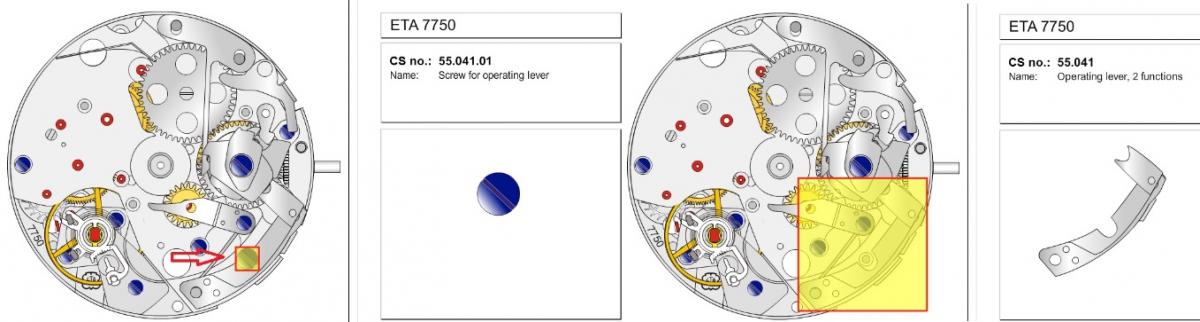
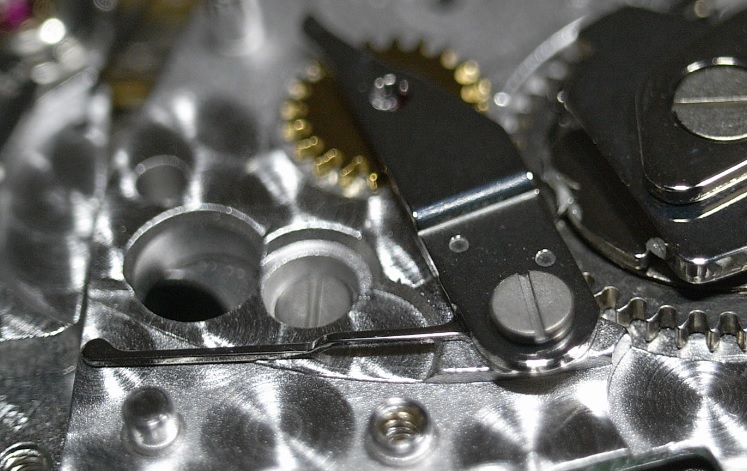
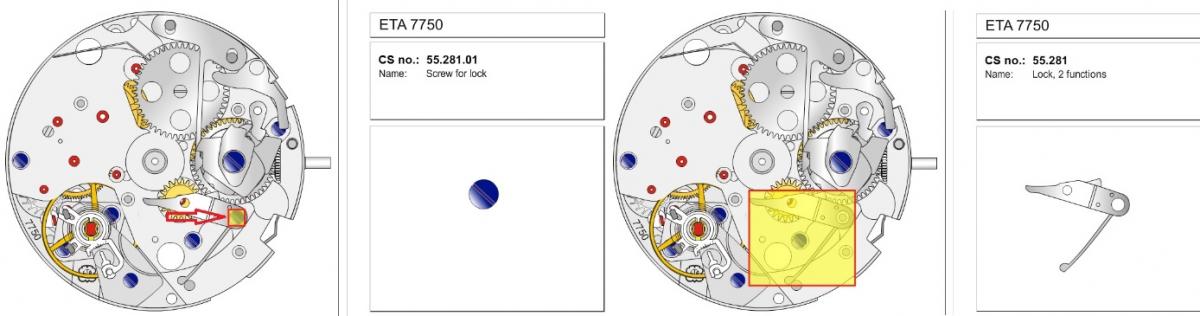
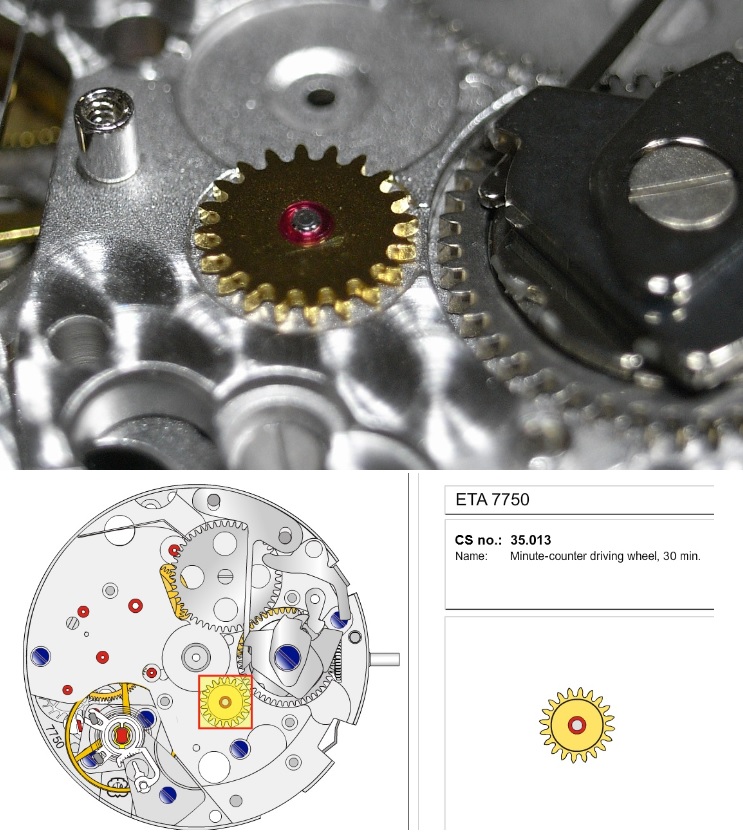
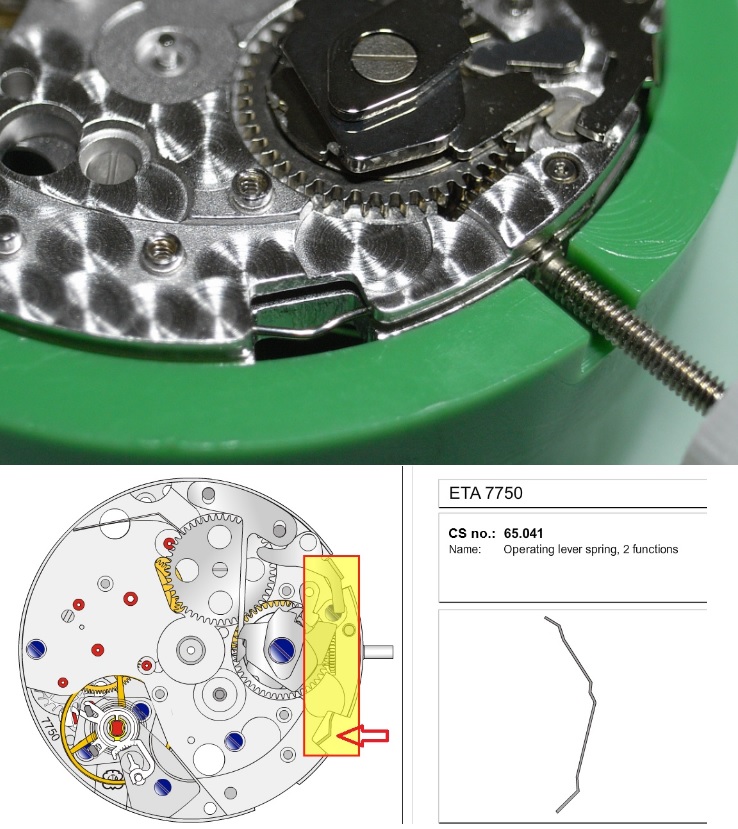
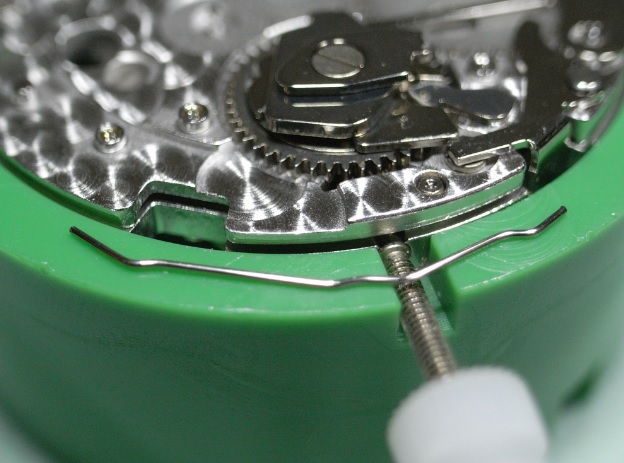
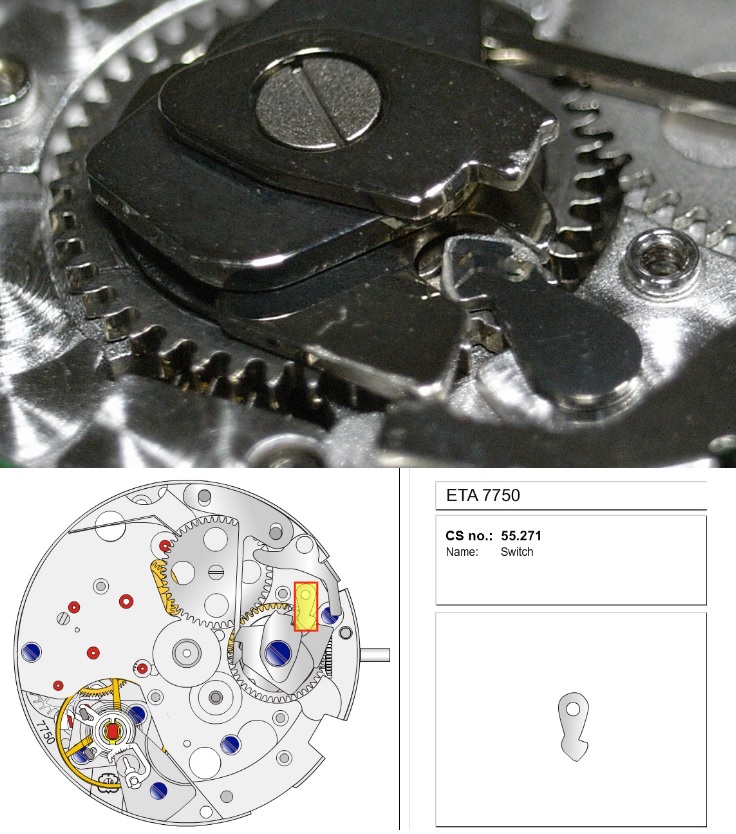
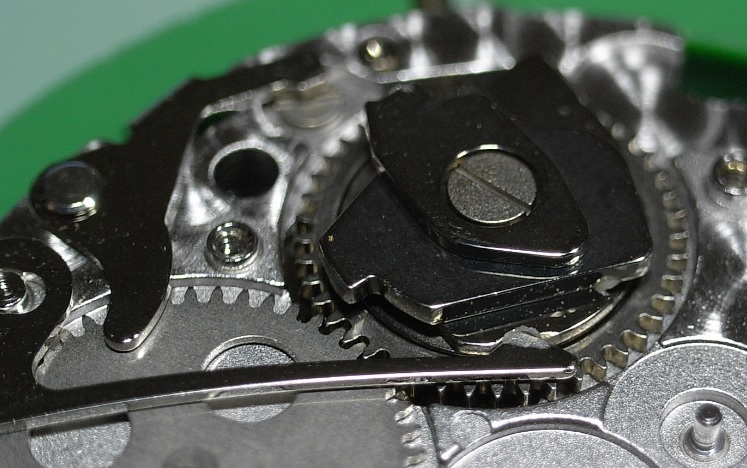
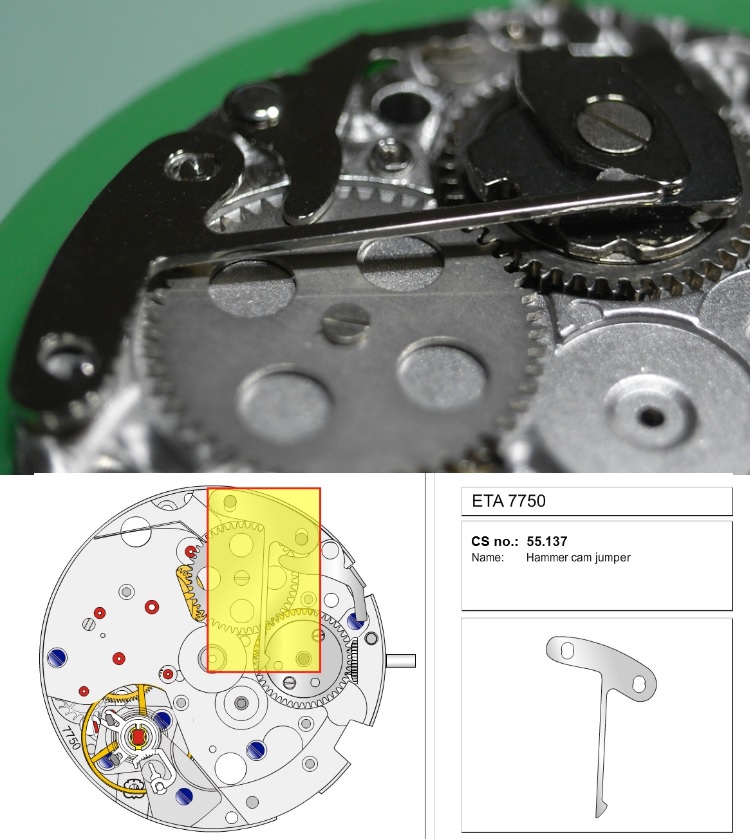
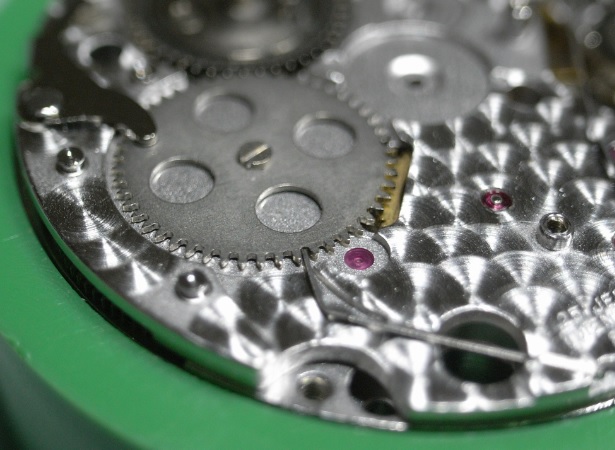
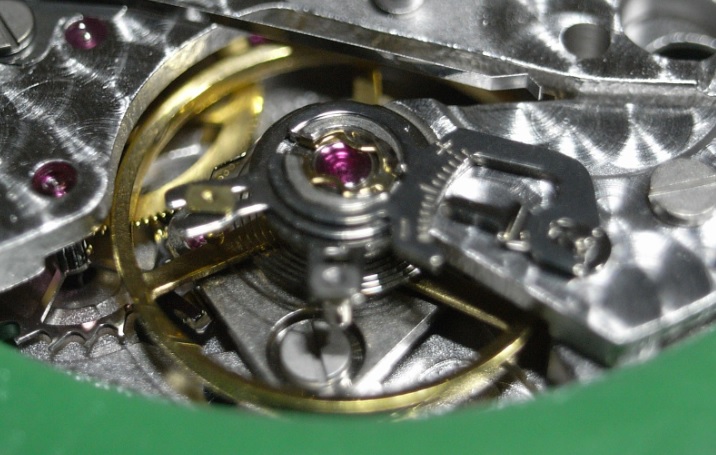
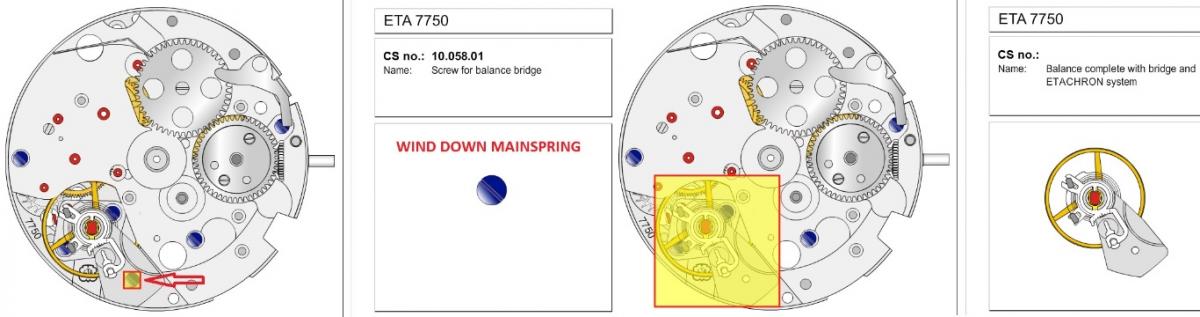
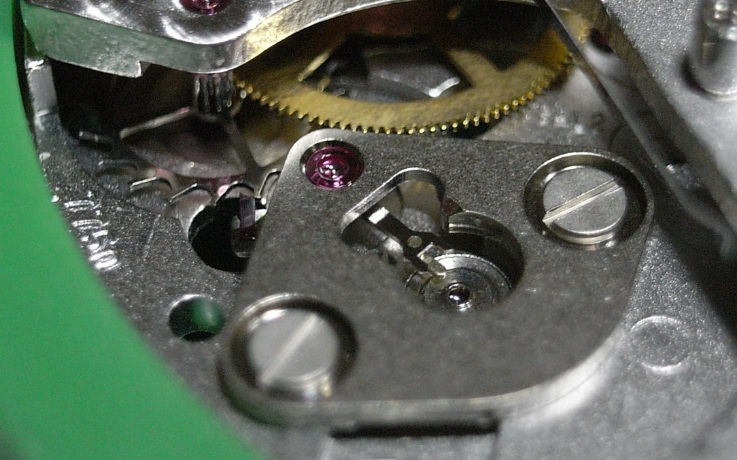
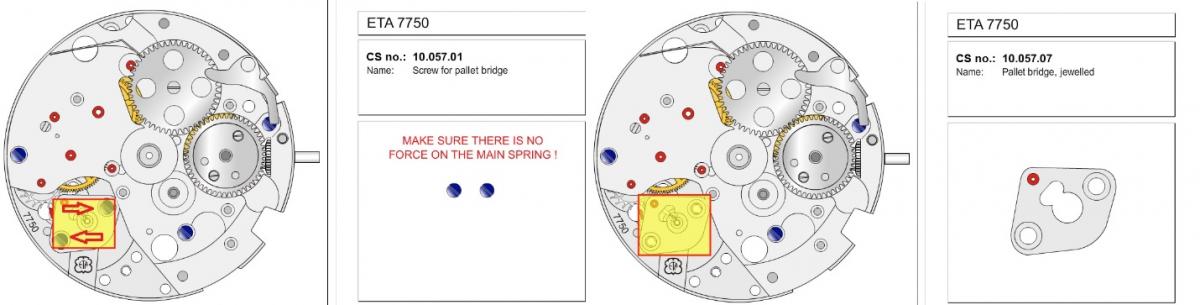
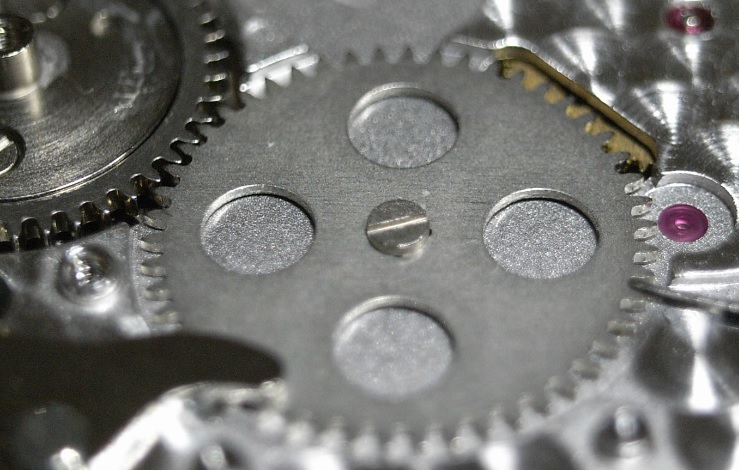
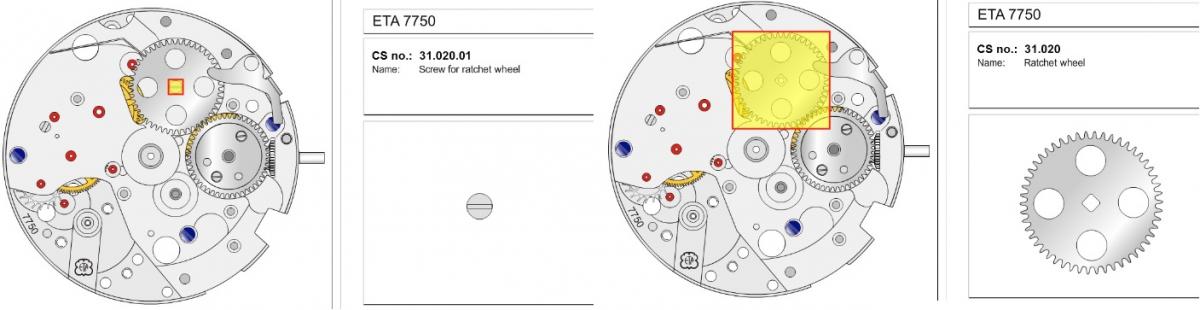
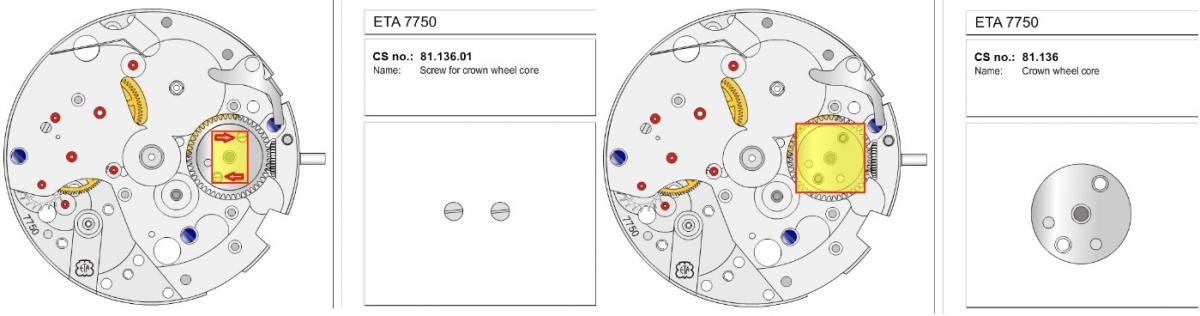
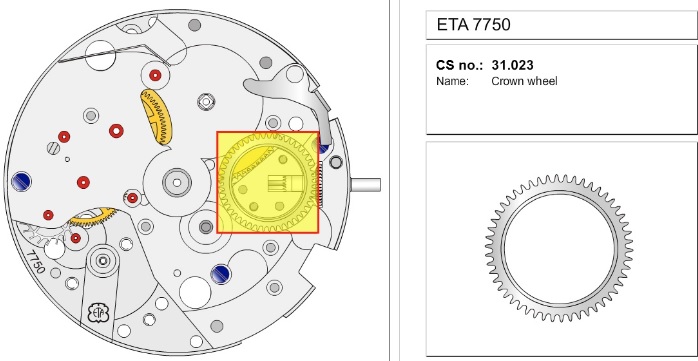
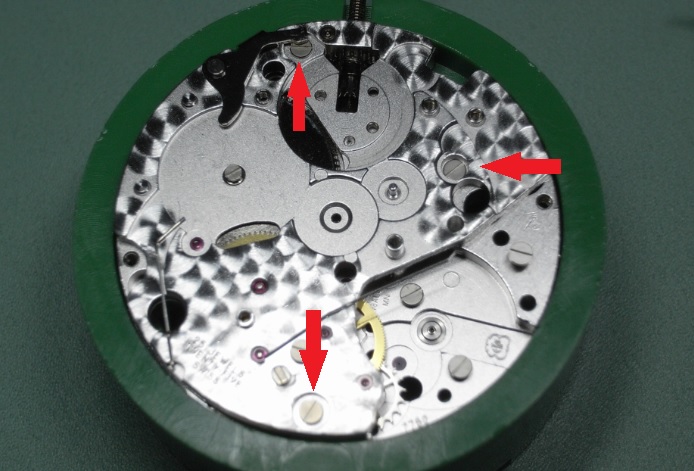
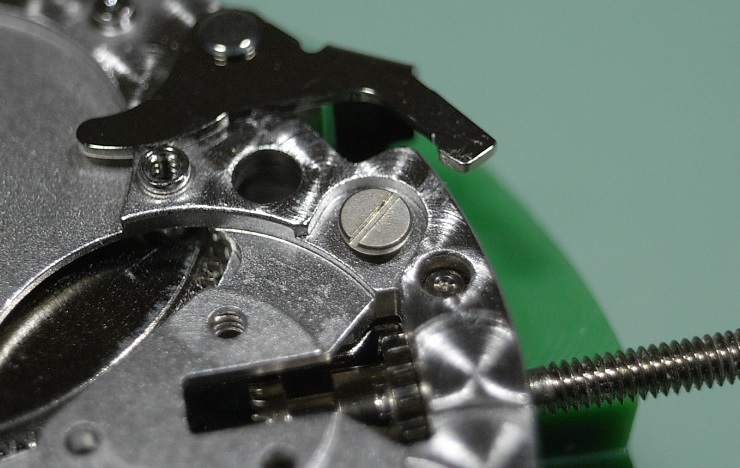
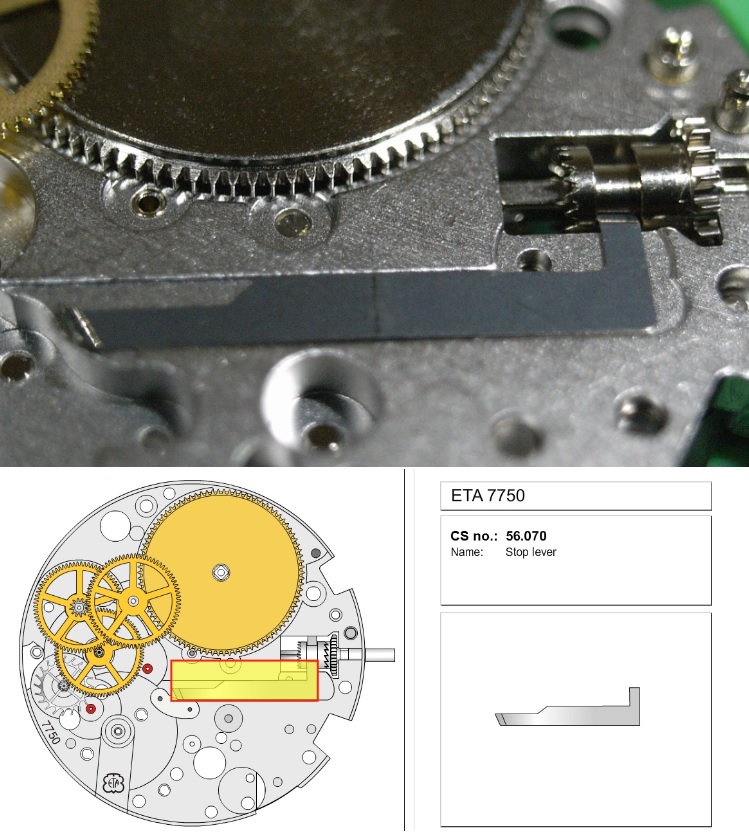
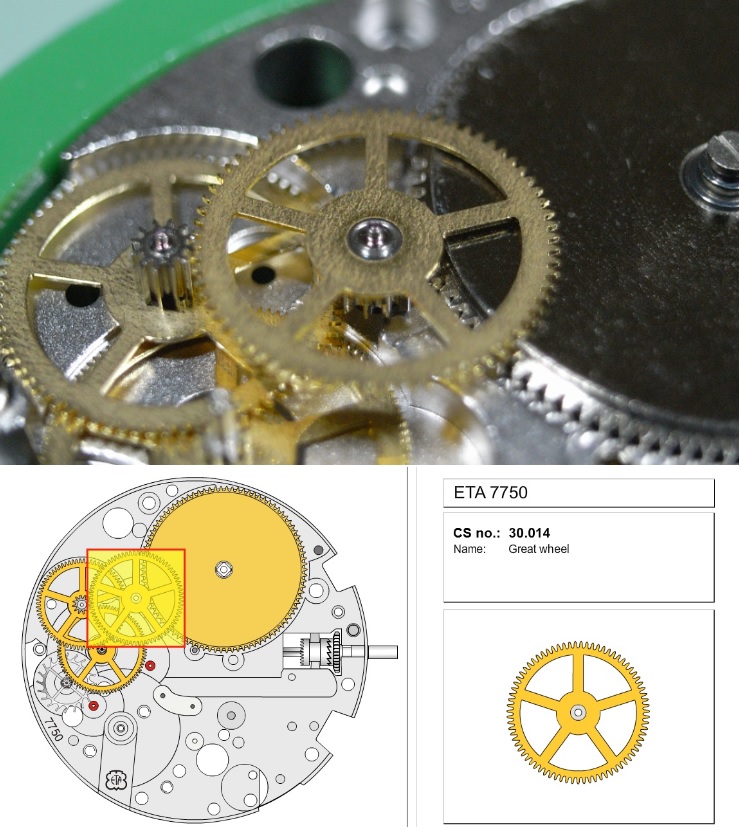
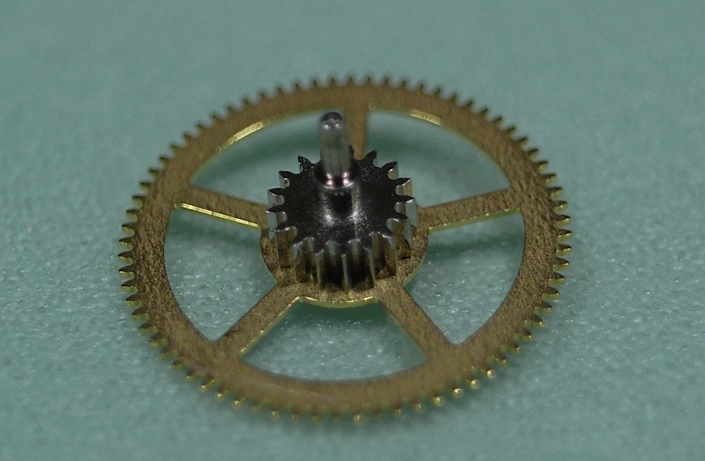
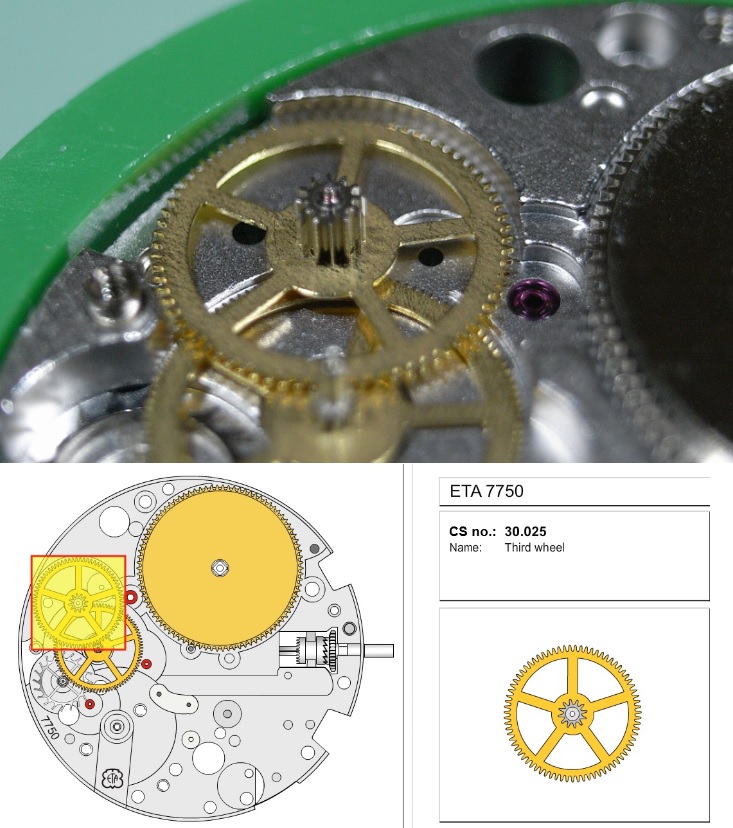
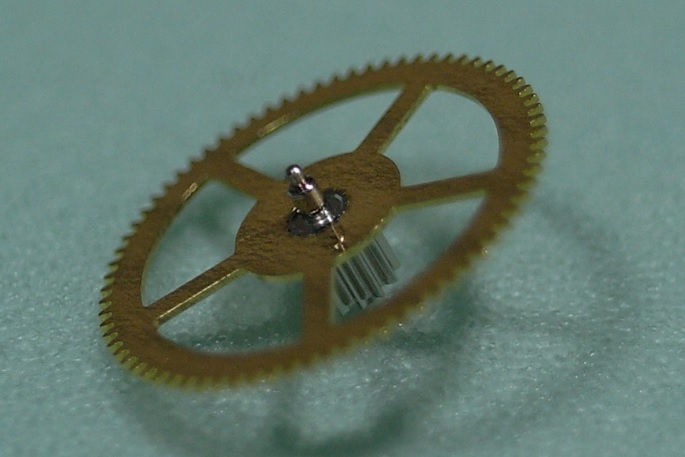
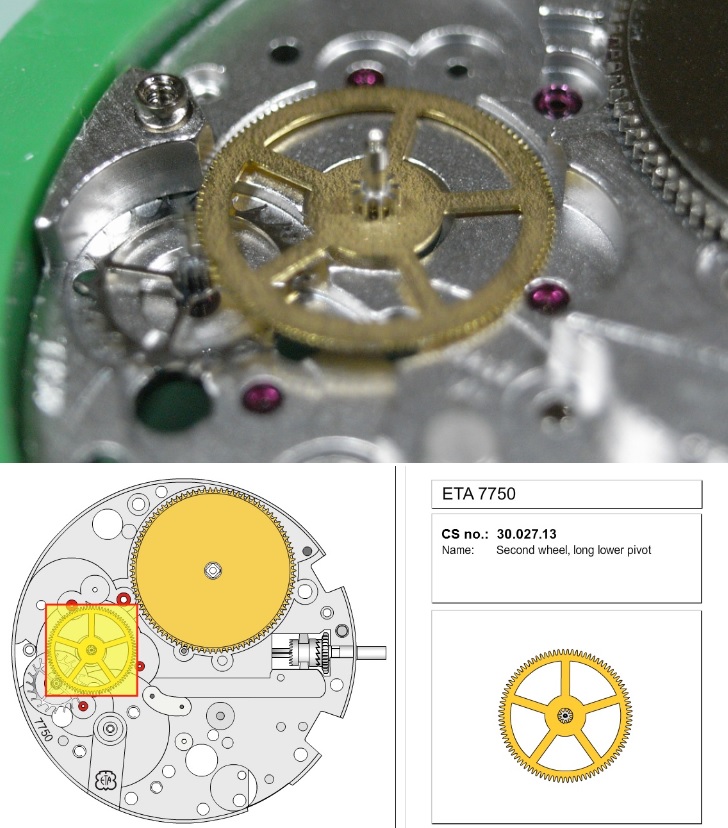
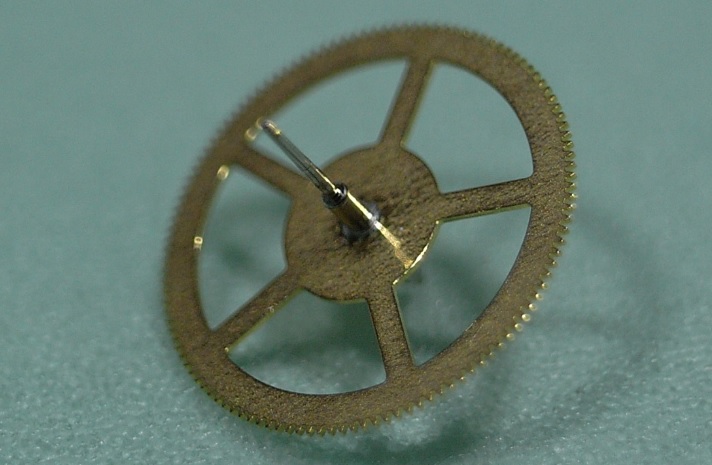
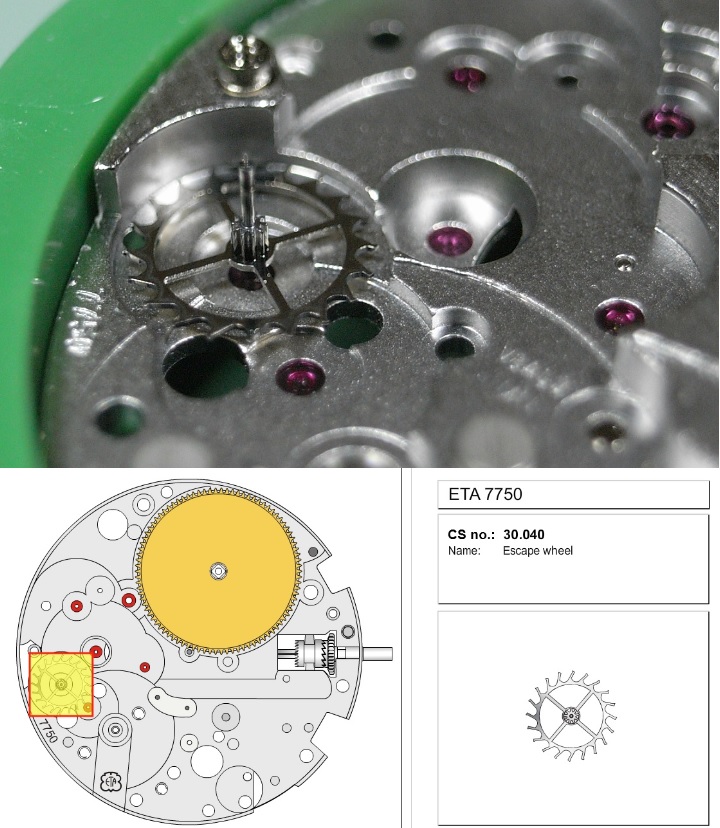
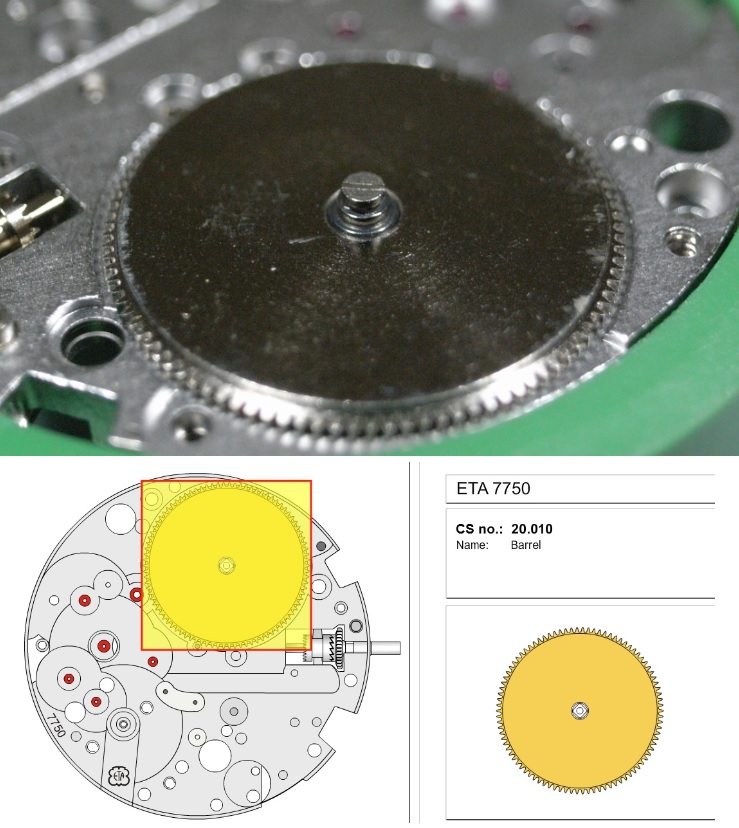
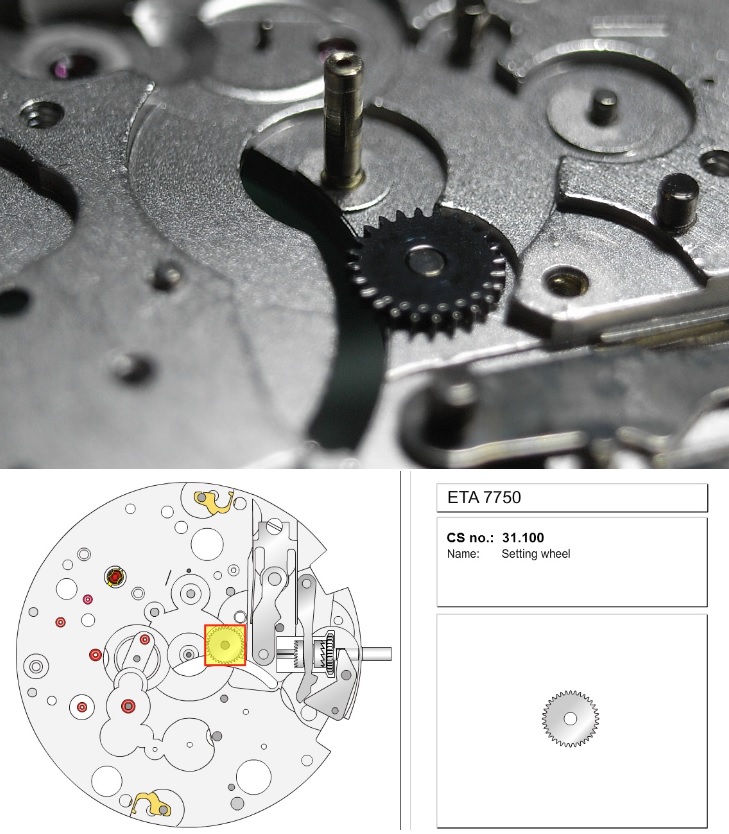
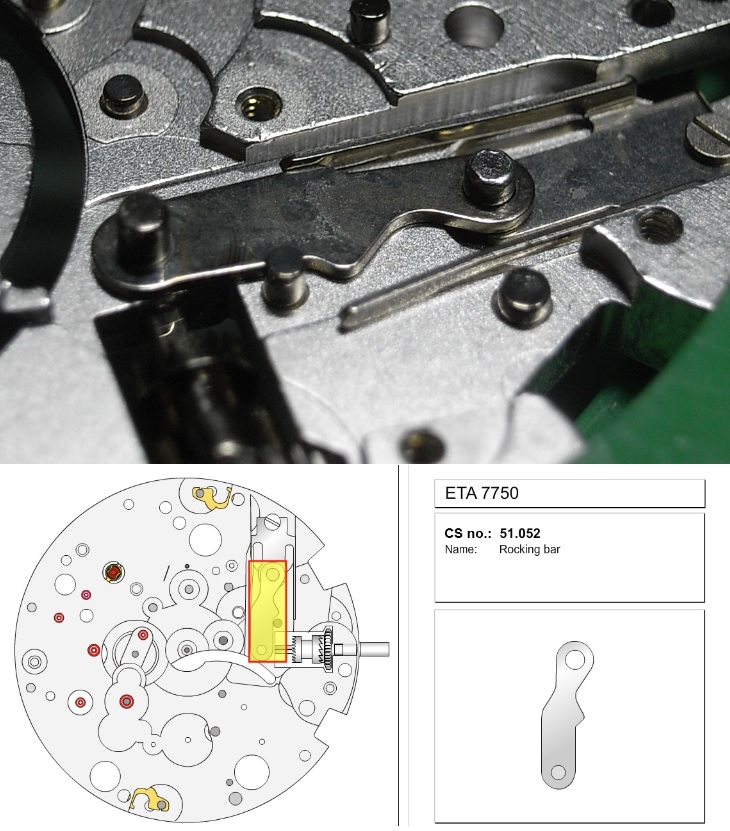
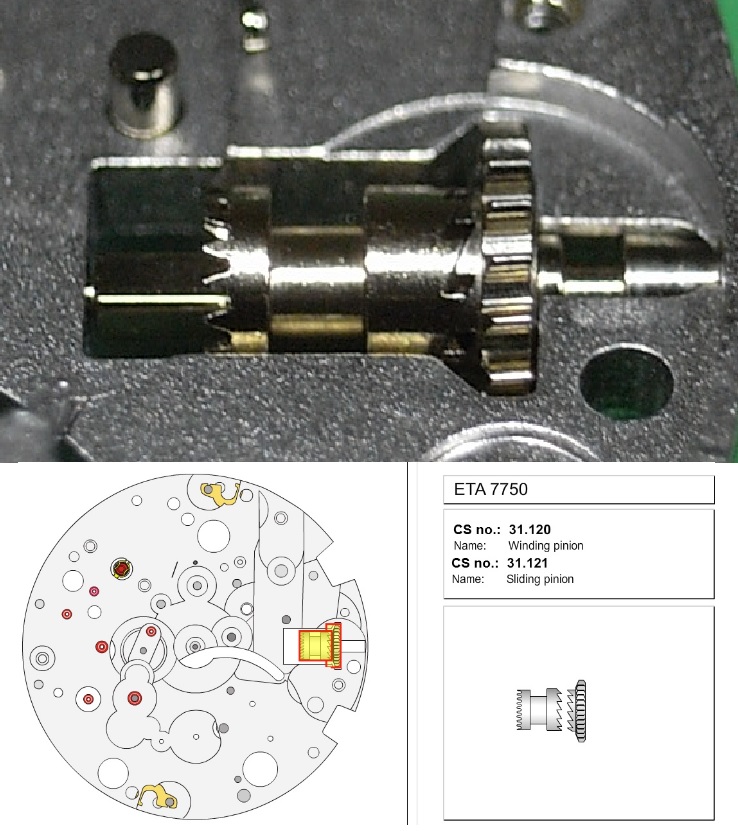
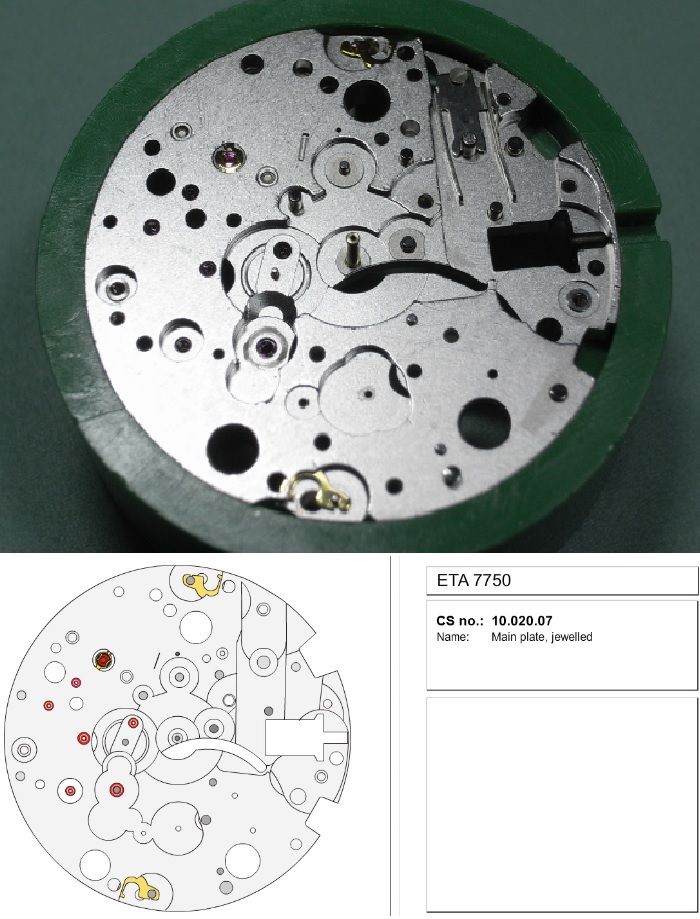
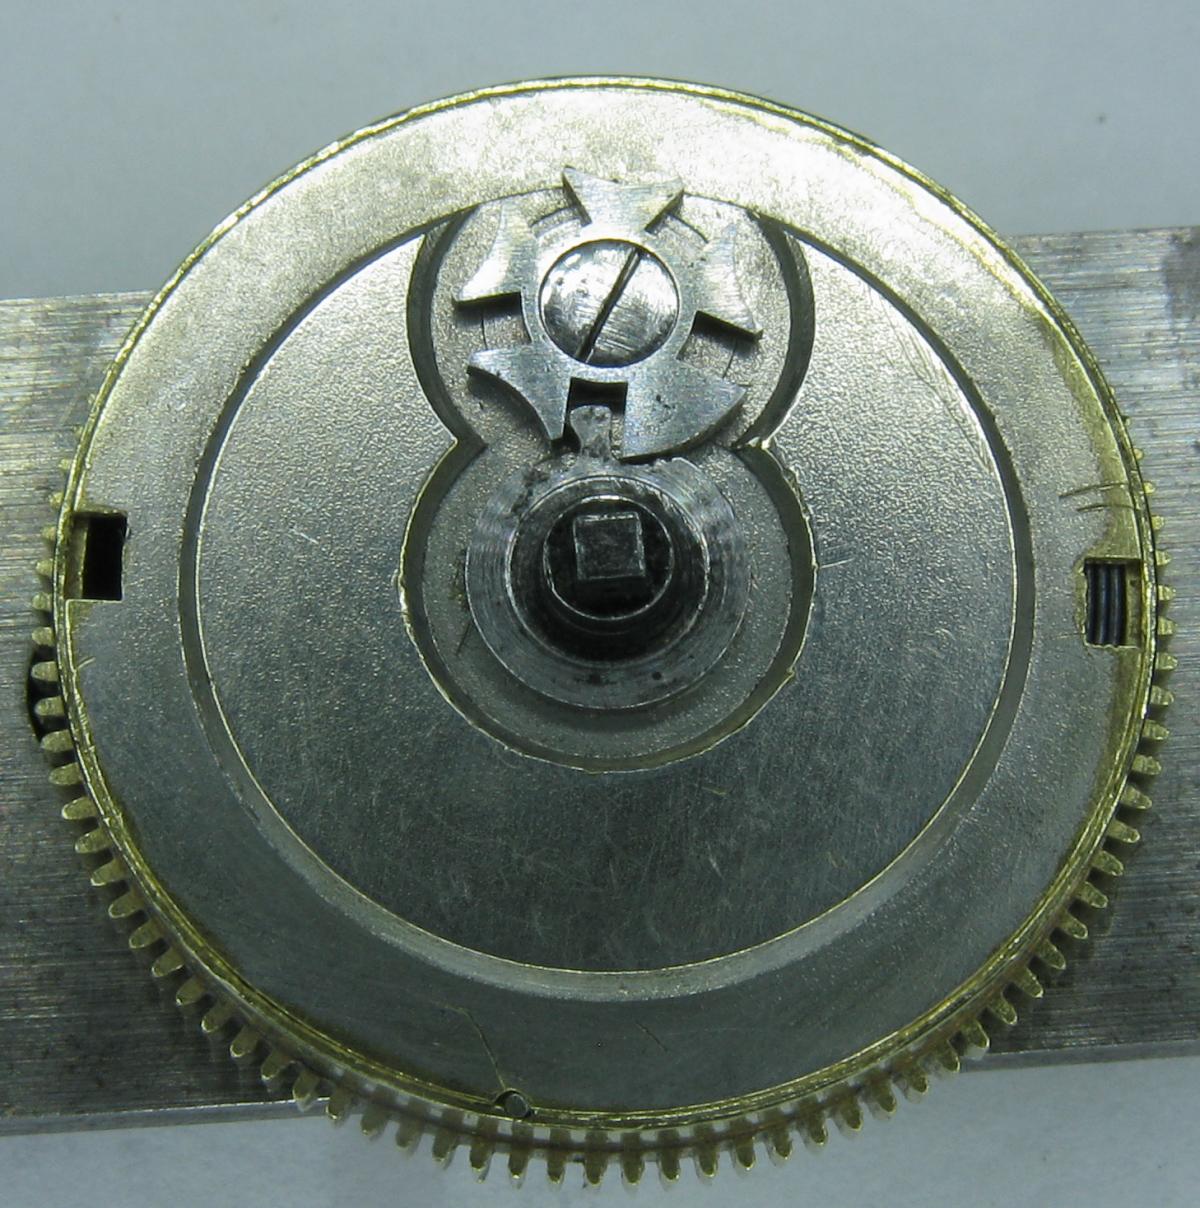
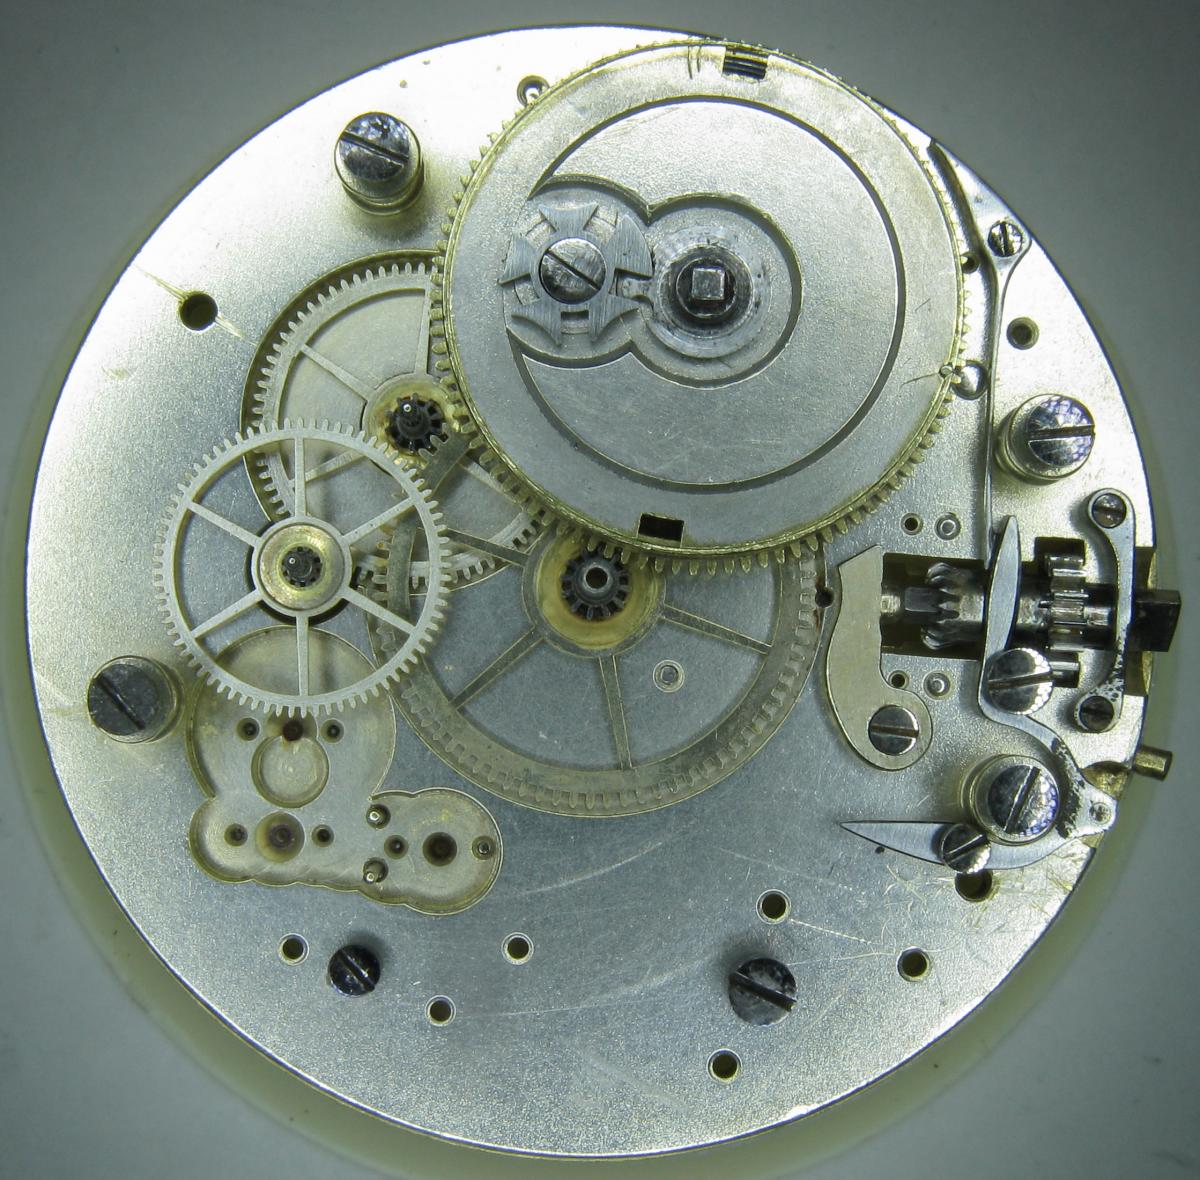
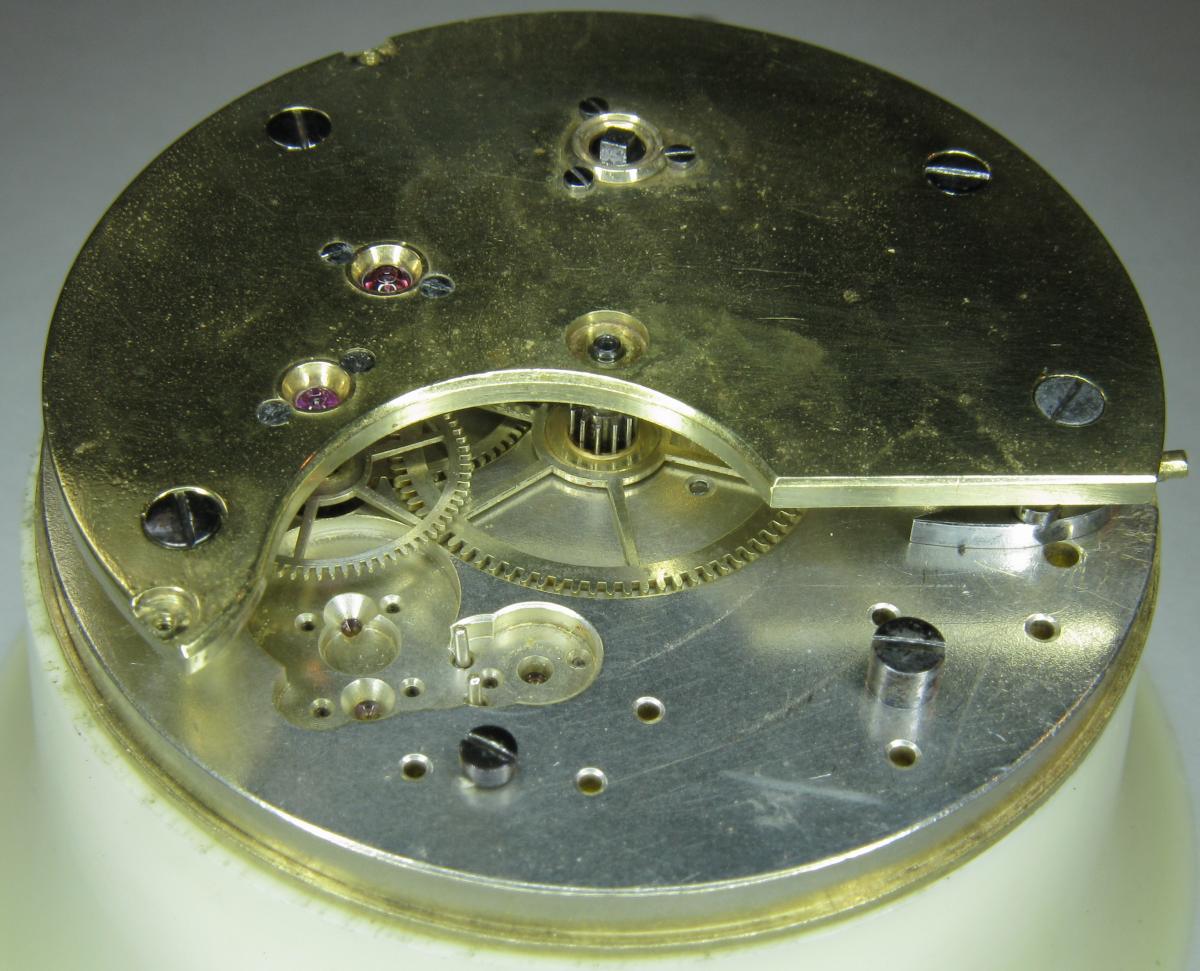
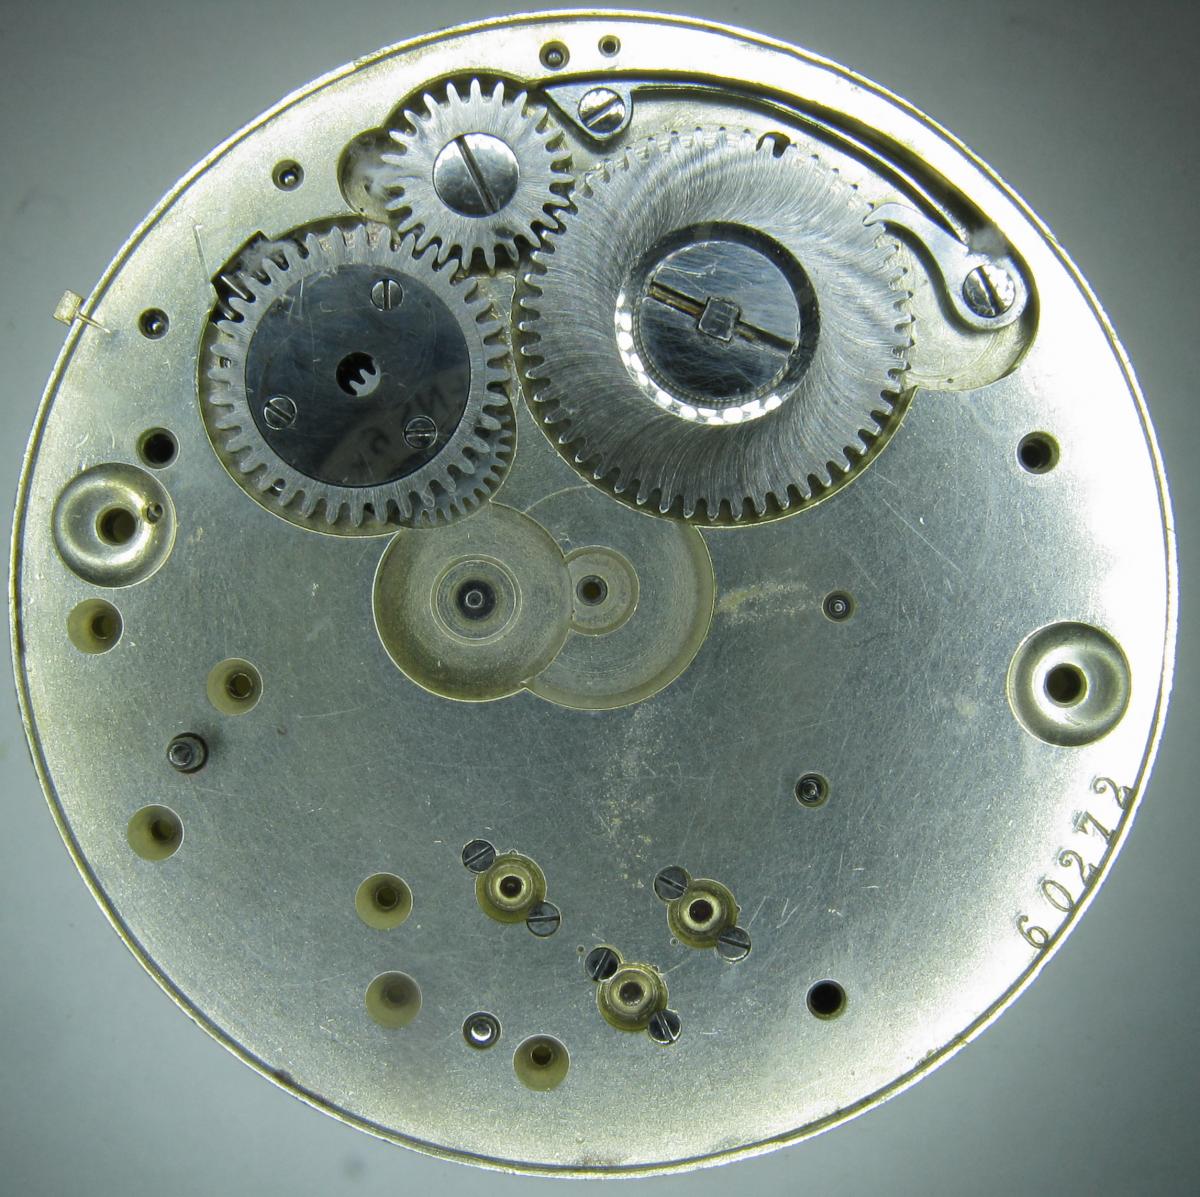
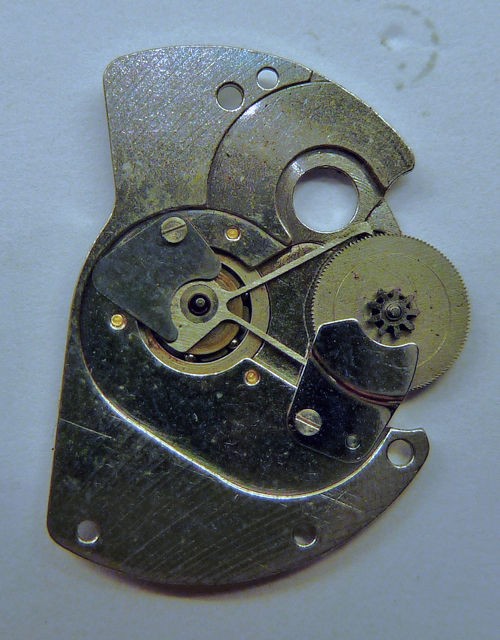
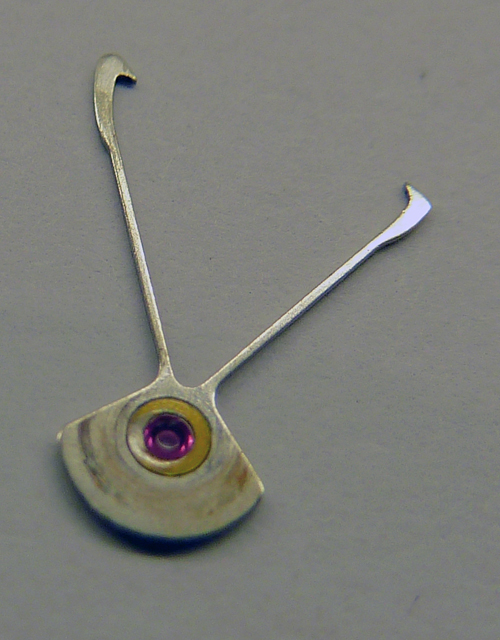
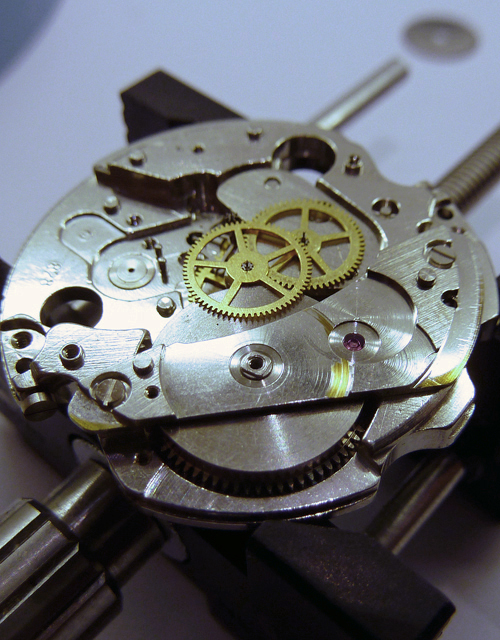
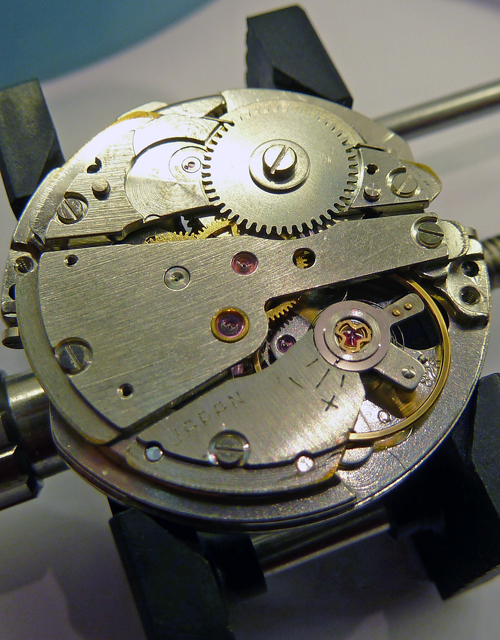
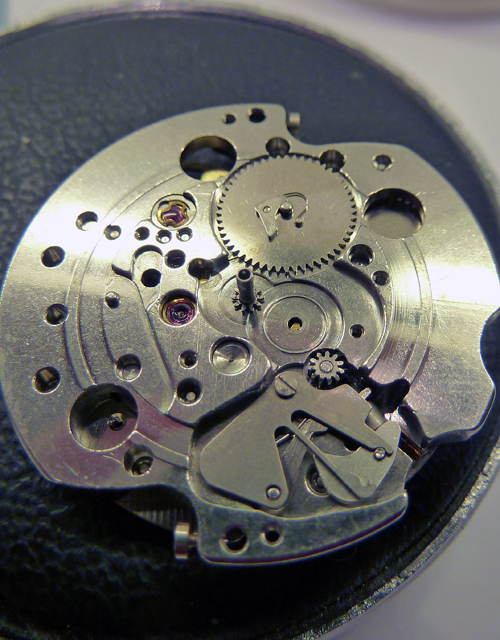
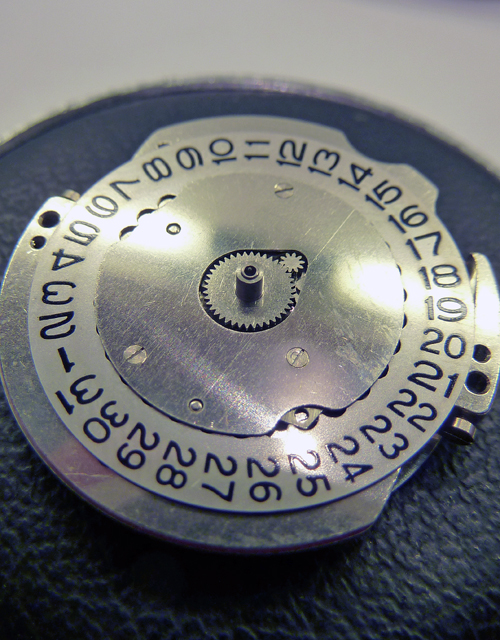
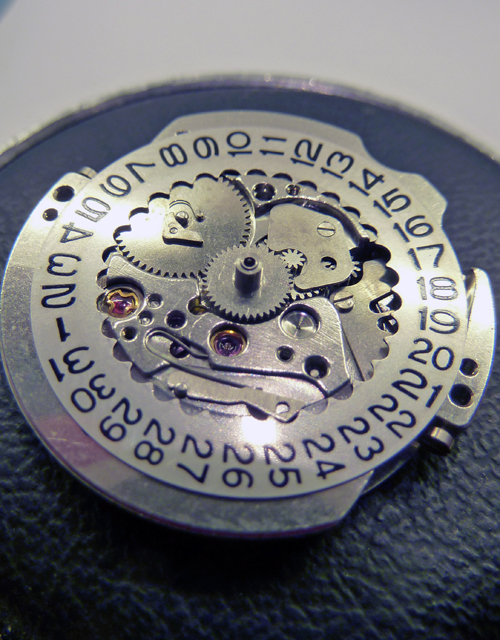
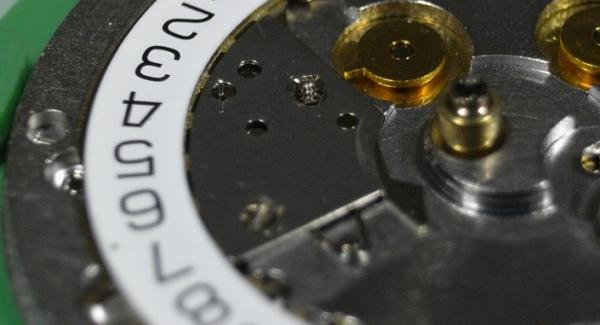
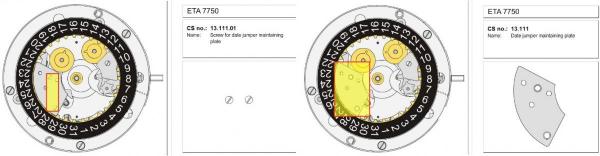
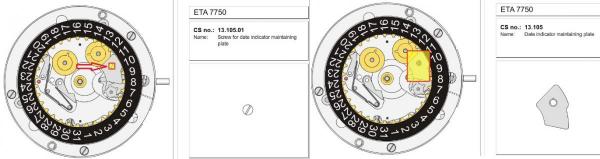
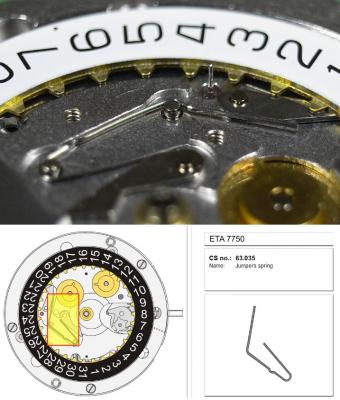
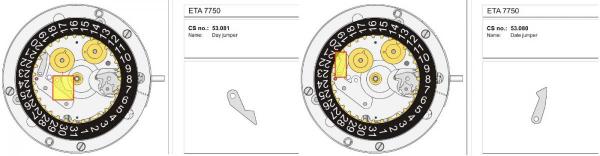
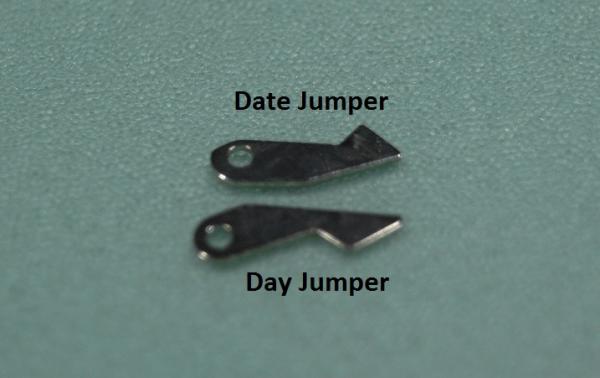
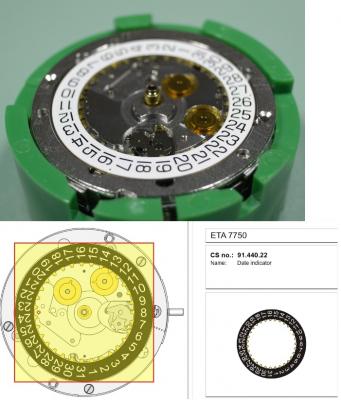
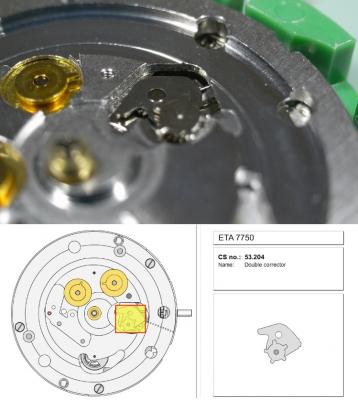
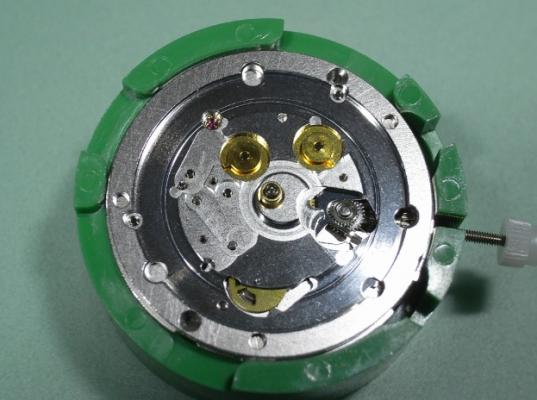
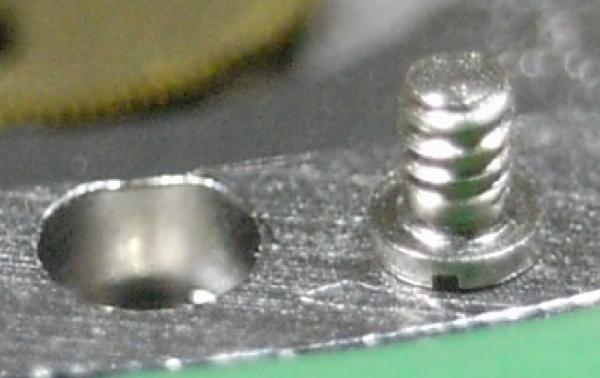
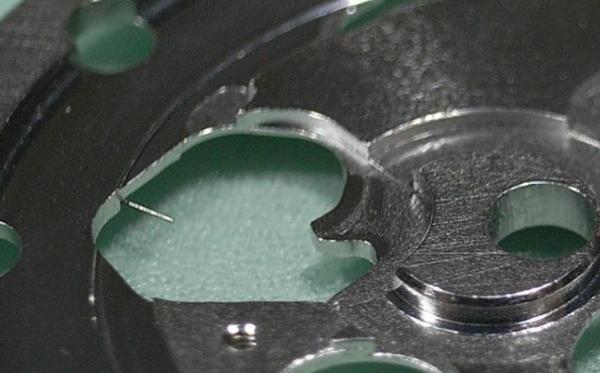
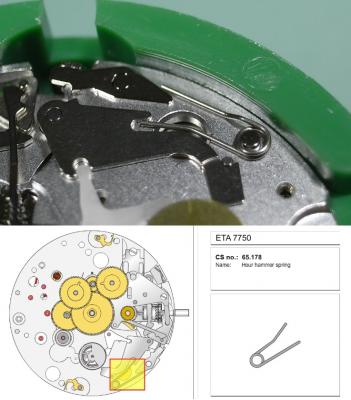
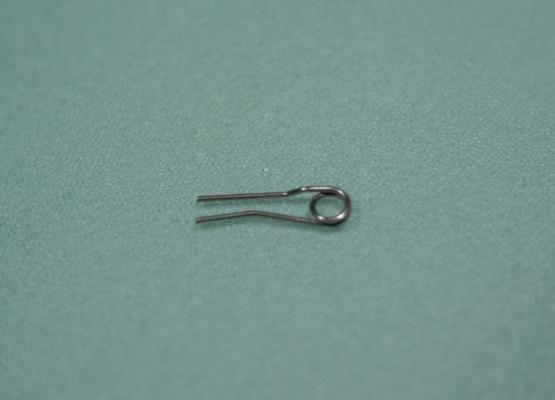
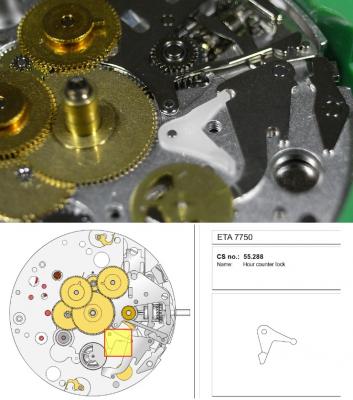
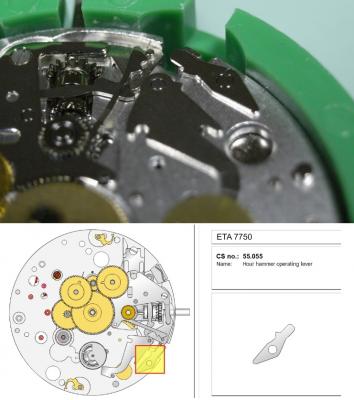
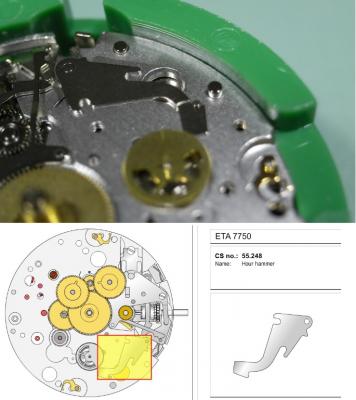
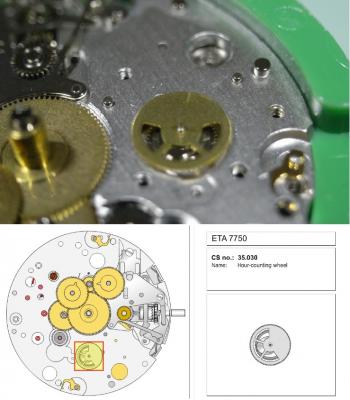
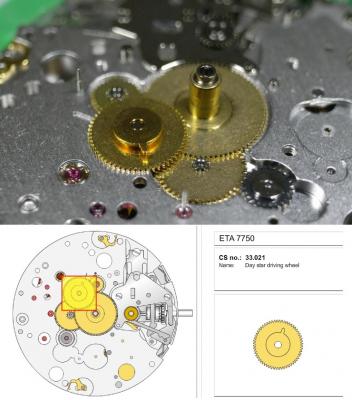
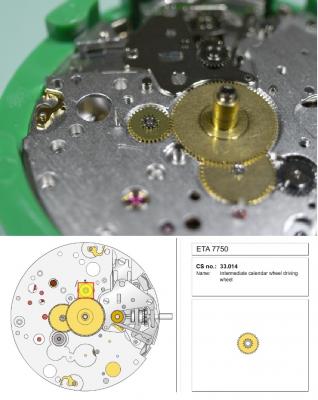
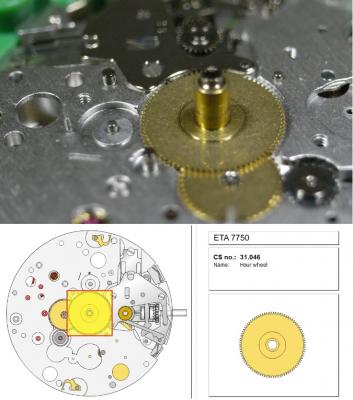
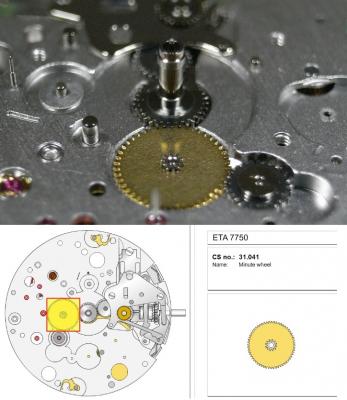
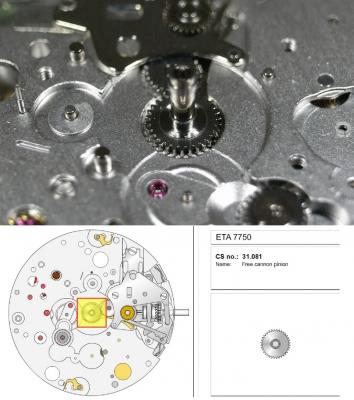
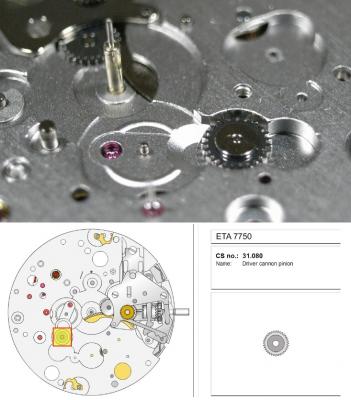
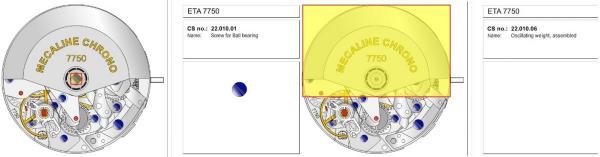
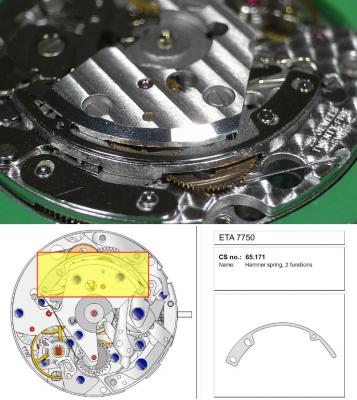
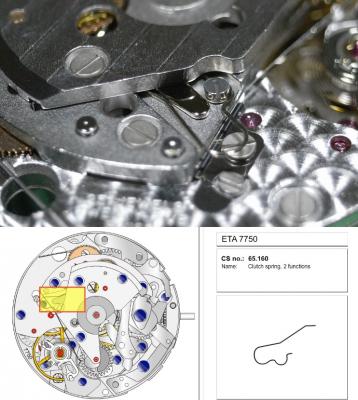
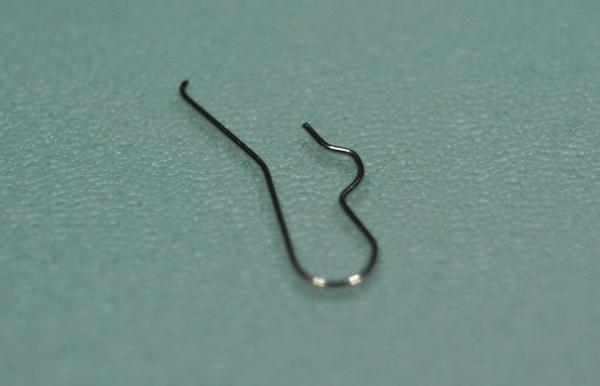
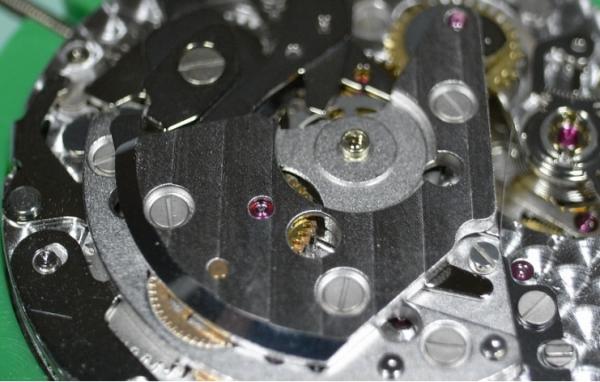
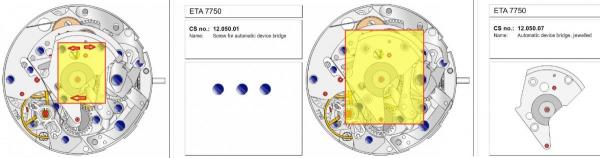
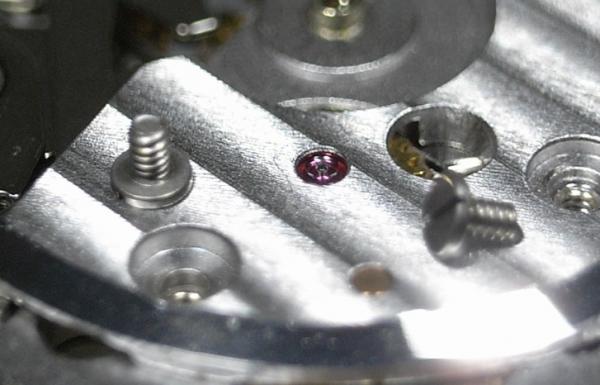
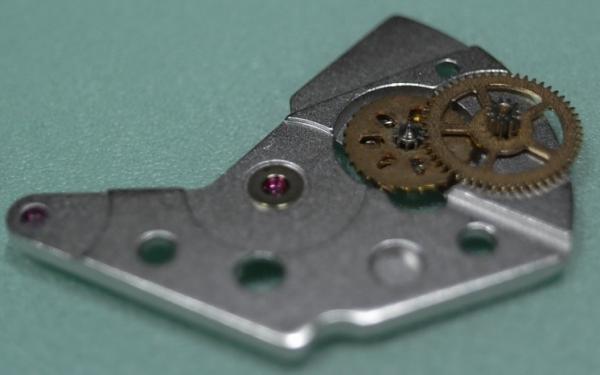
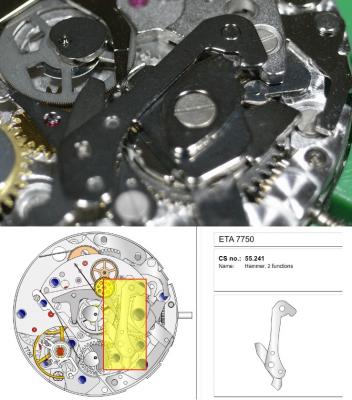
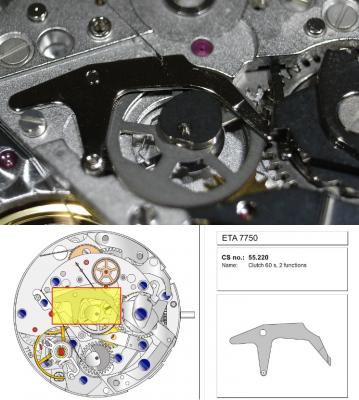
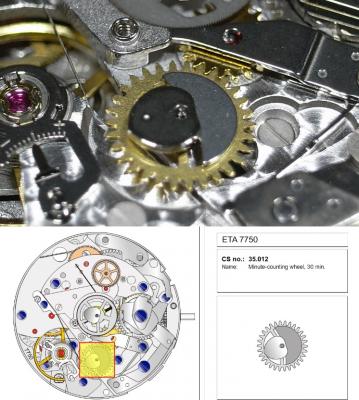
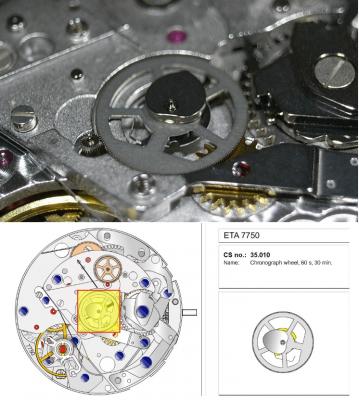
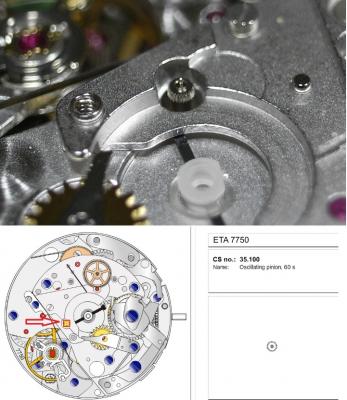
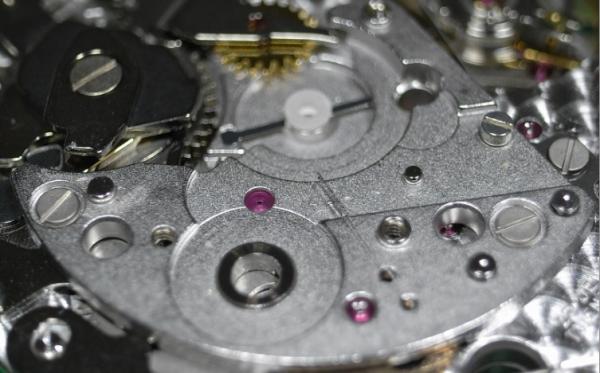
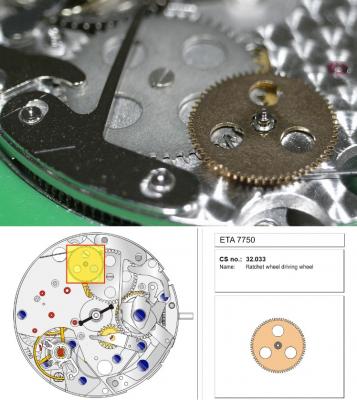
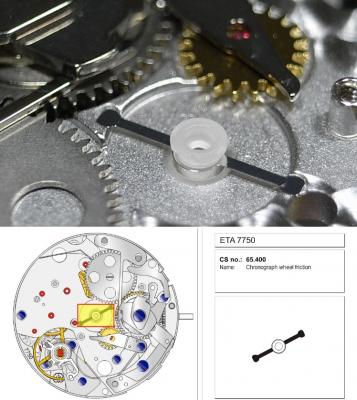
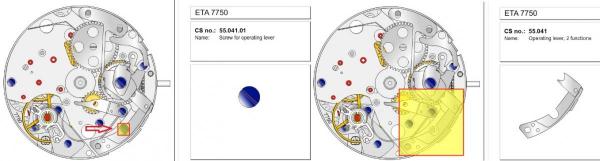
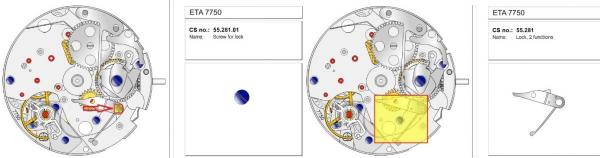
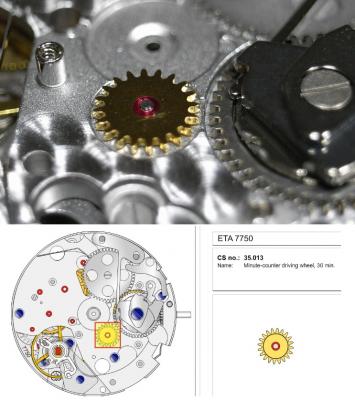
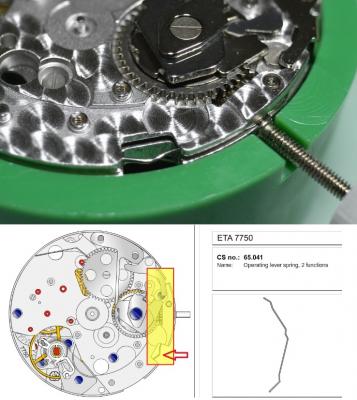
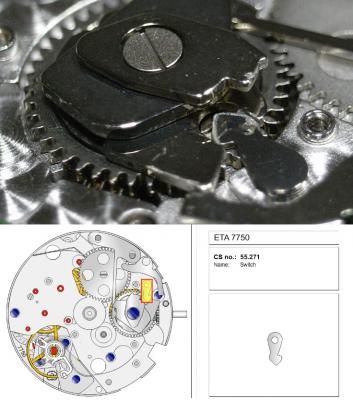
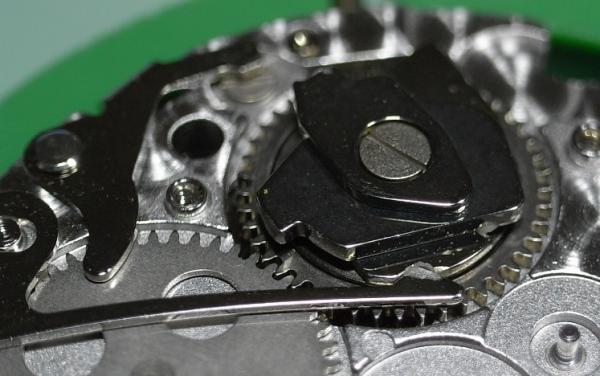
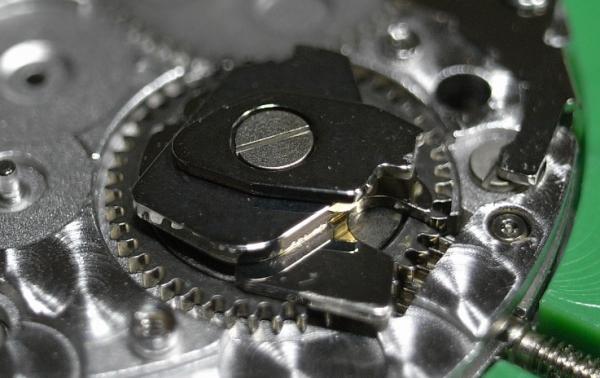
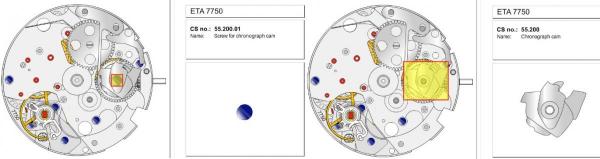
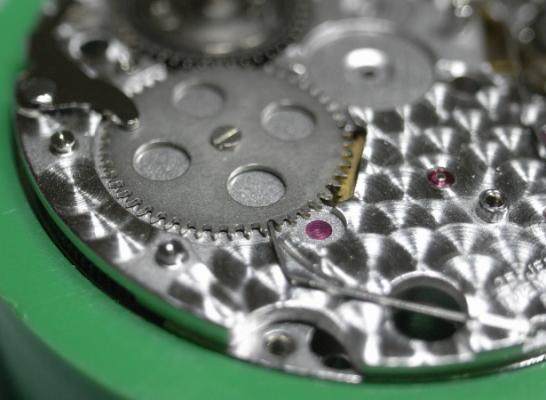
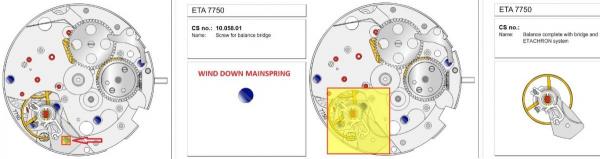
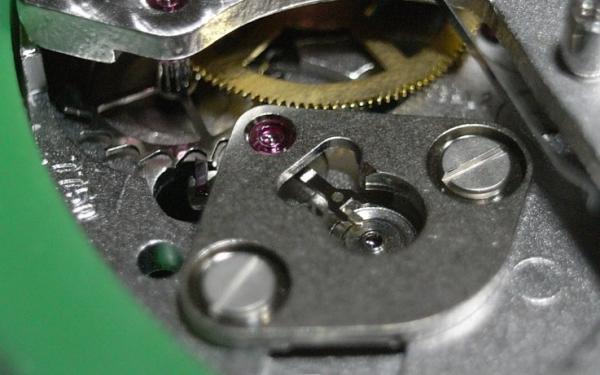
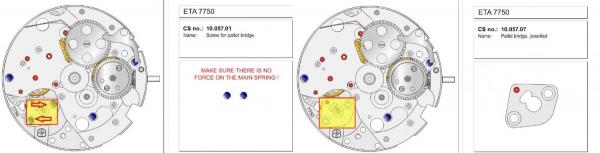
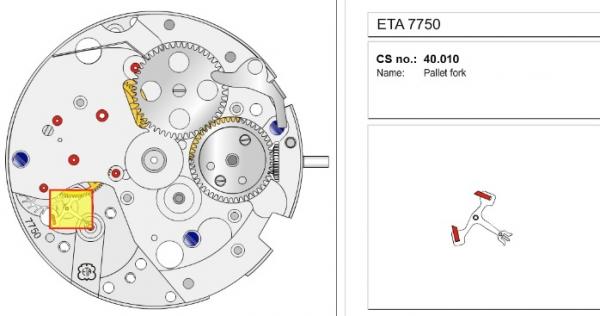
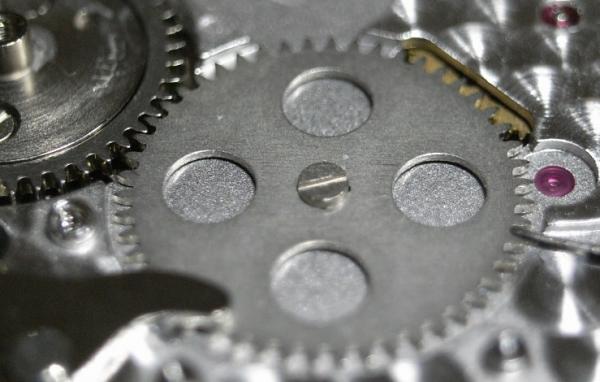
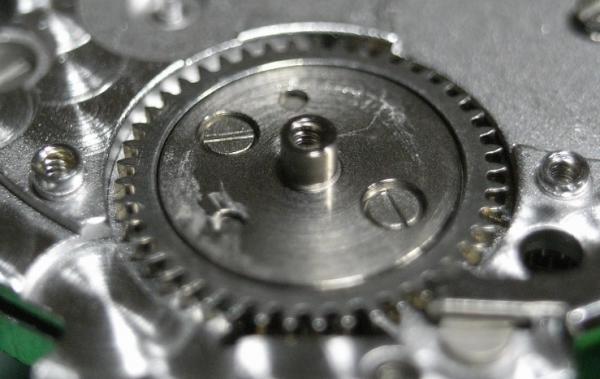
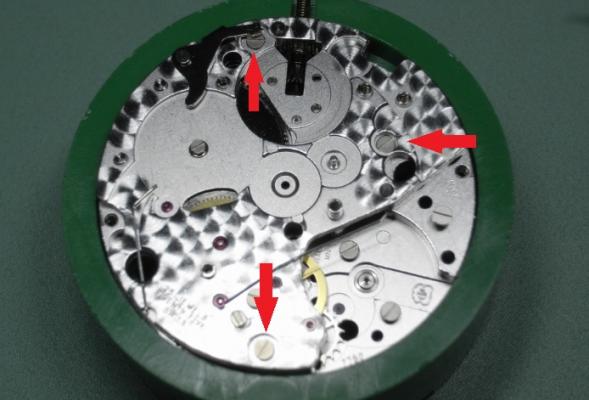
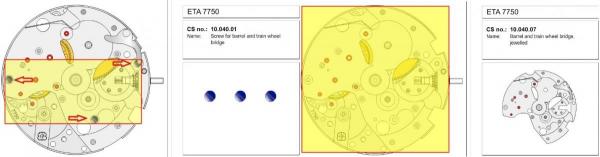
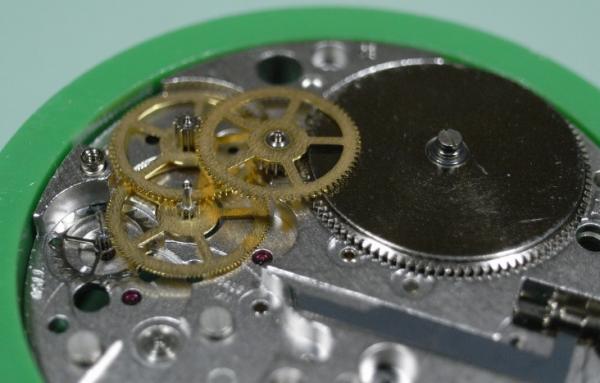
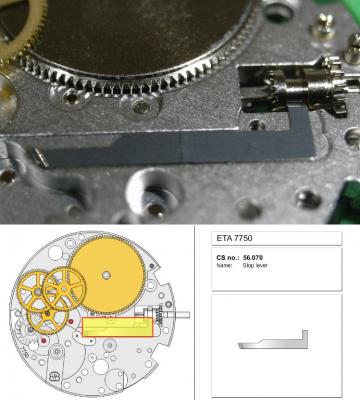
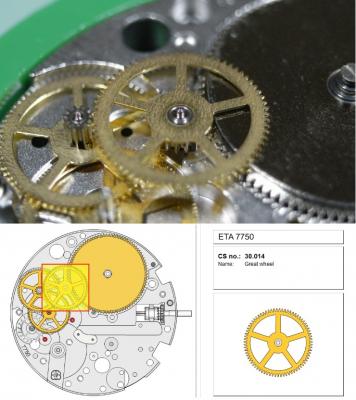
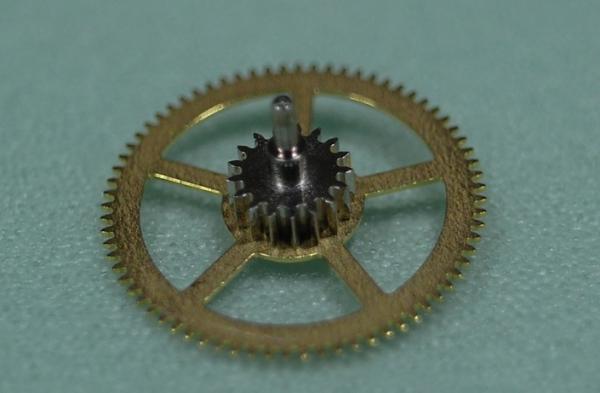
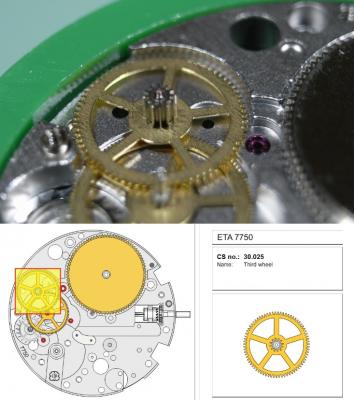
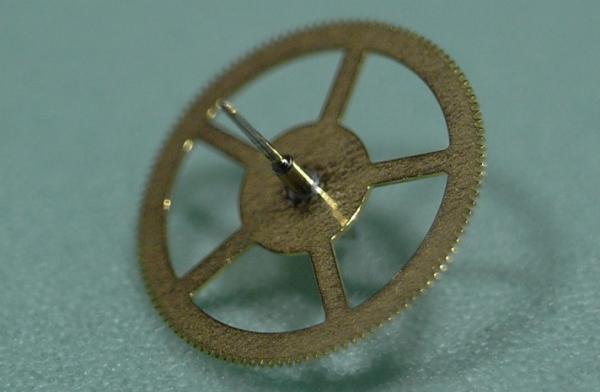
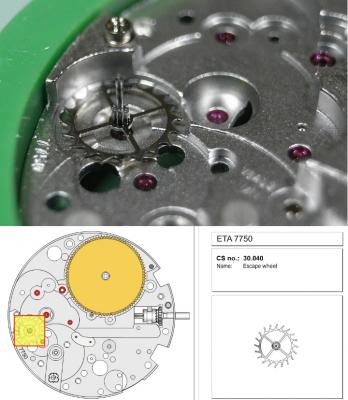
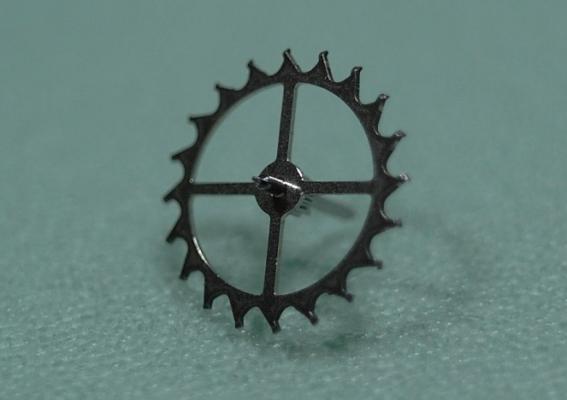
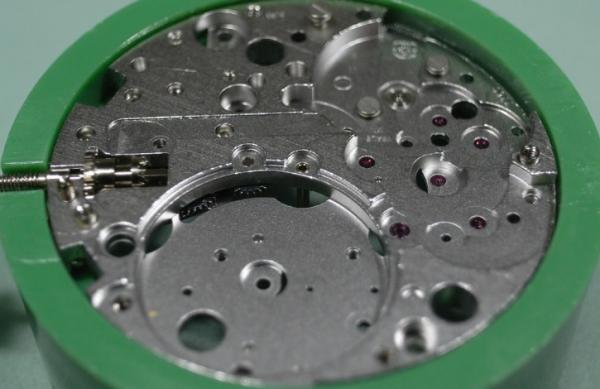
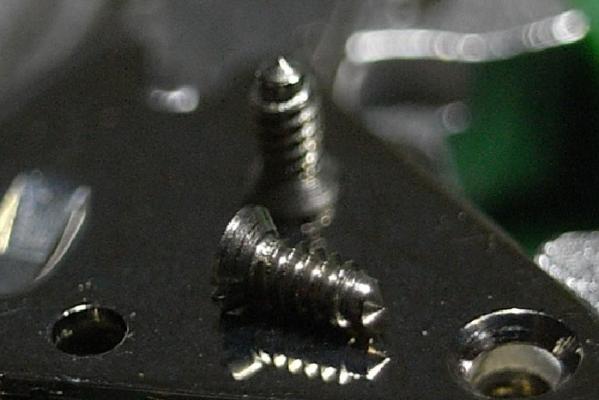
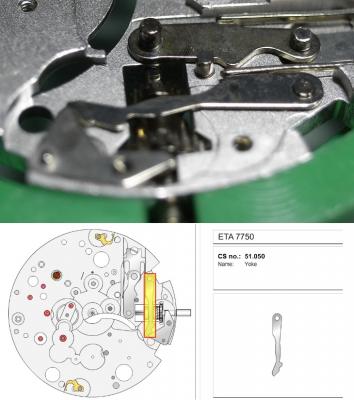
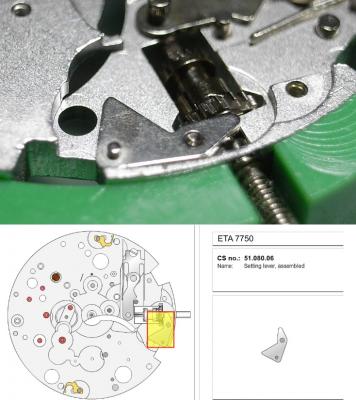
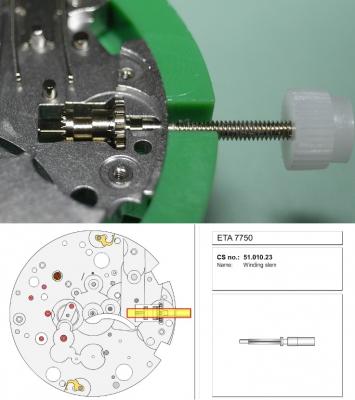
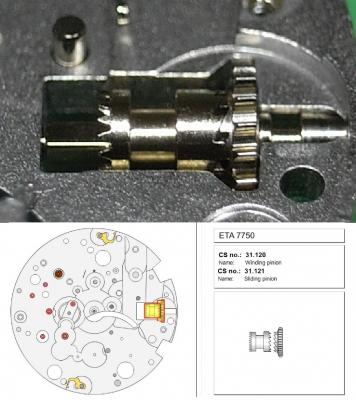
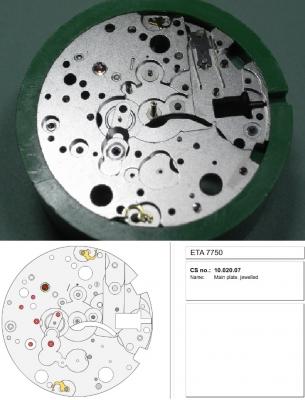
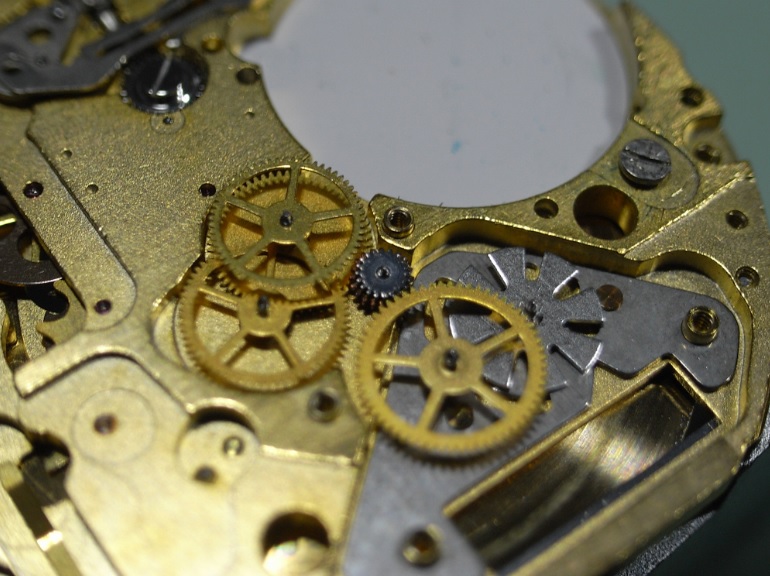
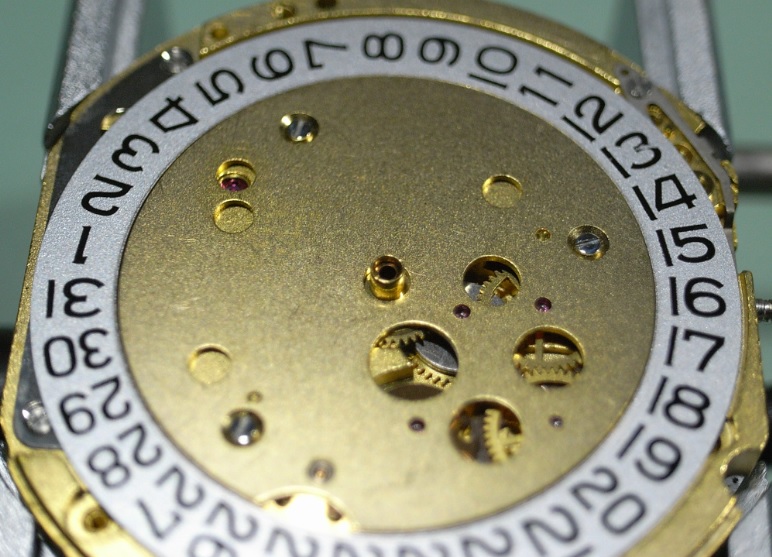
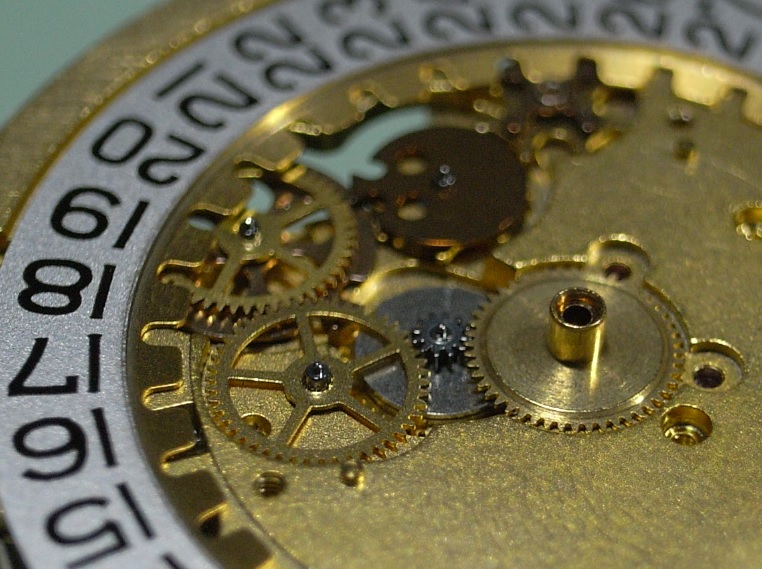
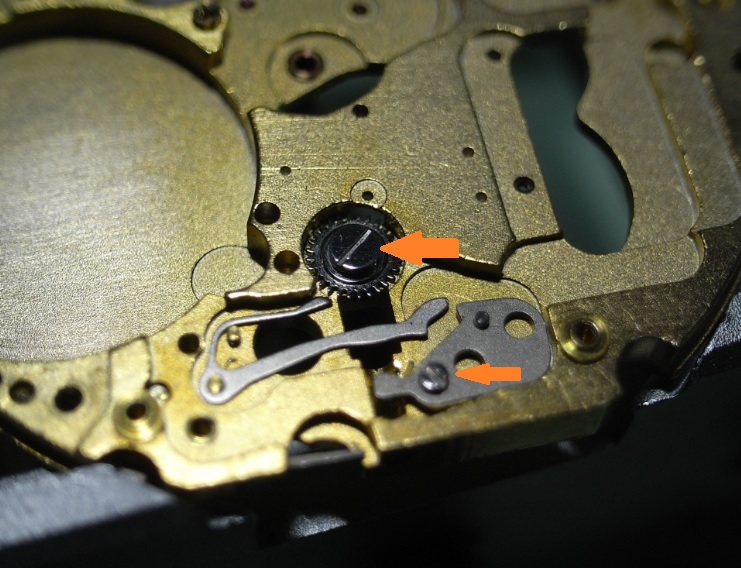
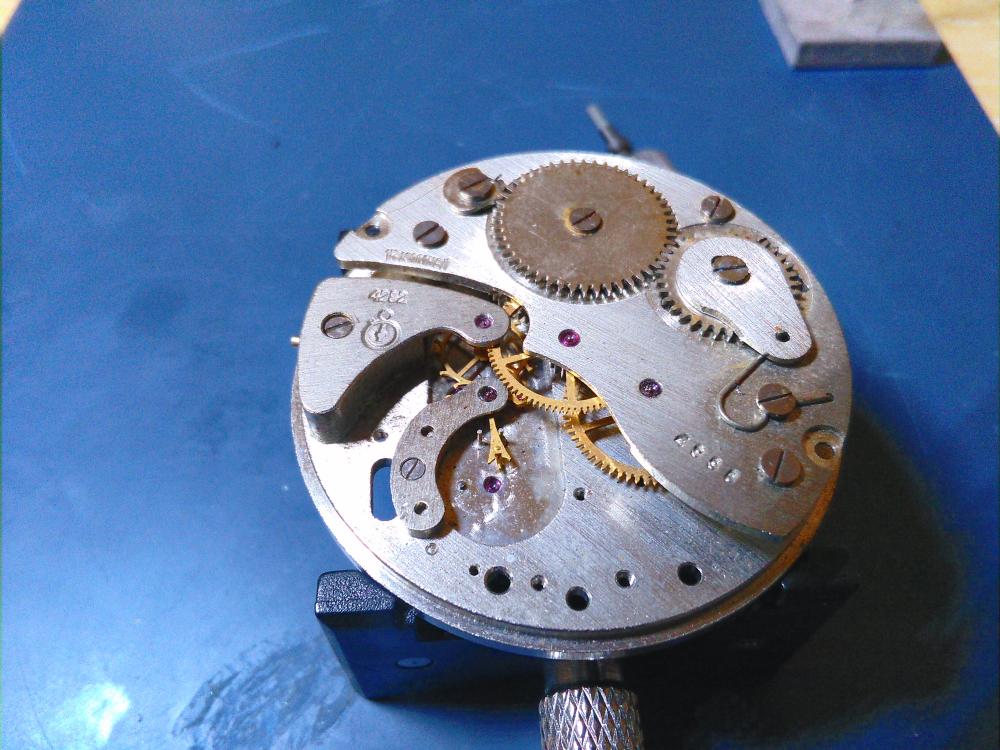
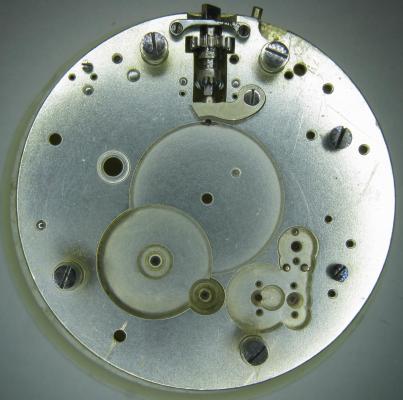
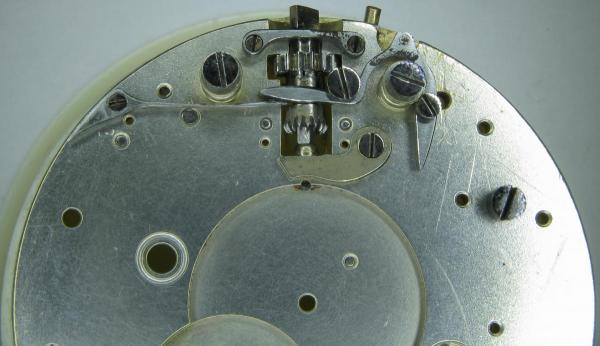
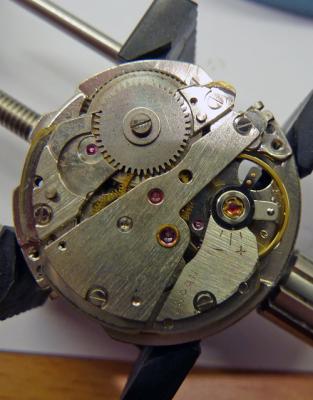
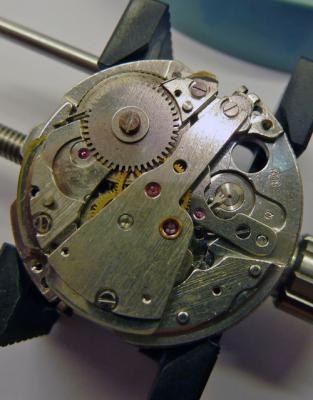
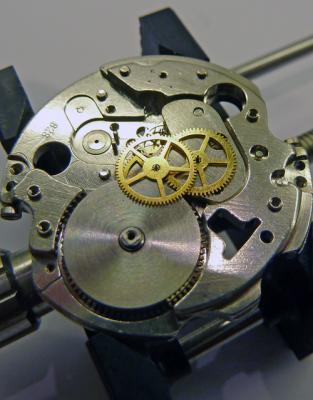
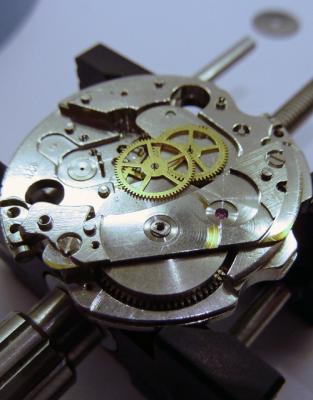
ETA 7750 Service Walkthrough The 7750 was first available in 1974, having been one of the first movements to be designed with the aid of a computer. It's hard to believe that the 7750 is still the industry standard movement for chronographs considering it's history. It was developed over 40 years ago by Valjoux, who was then a legendary movement maker that was part of the giant ASUAG conglomerate. But by the end of 1975 production was stopped due to the onslaught of the Quartz Era, and the 7750, along with many other mechanical calibers, was abandoned. Industry demand for this movement was so low that the stock produced in that 1 year manufacturing lasted until 1982! Such was the devastation of cheap Japanese produced quartz watches to Swiss manufactures. History may have forgotten the 7750 except for the local management at Zenith who ignored the orders by Valjoux to destroy the dies and equipment used to manufacture the 7750, instead hiding the equipment away from corporate eyes. You can find many more fascinating facts about this caliber online, and it's well worth the read. ................................................... This walkthrough will be very detailed, and I hope this will give people the courage to tackle this movement. I've serviced quite a few calibers, and this is one of the most beautiful, with a very logical layout. ETA7750 Tech.PDF If you have built your skills with basic movements, and become proficient in servicing them, I would highly recommend this movement to be your first chronograph to tackle. Lets begin. DEMAGNETIZE THE MOVEMENT BEFORE DISASSEMBLY. Remove the Day Indicator and store it in a safe place where it won't be damaged. Unscrew (0.8 Driver) the Jumper Maintaining Plate and remove it. Do the same for the Date Indicator Maintaining Plate Carefully remove the Jumpers Spring, holding it with a piece of pegwood so it doesn't ping away. Next remove the jumpers for the day and date. The jumpers differ from one another, so here is a reference photo so you can see the difference. Remove the Date Indicator and place it in a safe place where it won't be damaged. The last piece to remove on the Date Platform is the Double Corrector Now unscrew (1.4 Driver) the Date Platform and gentle pry it from the movement. Be careful when removing this plate, as there is a fine spring pressed into the plate that can be easily damaged. Here is a reference photo of the screws that hold the Date Platform. Remove the Hour Hammer Spring, once again using the pegwood to hold the spring while removing the tension. Here is a reference photo of the correct orientation of the spring. Remove the Hour Counter Lock. Remove the Hour Hammer Operating Lever. Next is the Hour Hammer, be careful when removing this item so as not to damage the Hour-Counting Wheel. Now remove the Hour-Counting Wheel. Remove the Date Indicator Driving Wheel Remove the Day Star Driving Wheel Then remove the Intermediate Calendar Driving Wheel Remove the Hour Wheel Then the Minute Wheel Remove the Cannon Pinion, which does not require a puller. The last component to be removed on this side of the Main Plate is the Driver Cannon Pinion. To lift the Driver Cannon Pinion I used what Mark used, a set of hand lifter from Horotec (MSA05.007); but you can also use a Presto Tool (30636-1) which will also work well. The dial side of the movement is now complete disassembled. Flip the movement over and unscrew (1.5 Driver) the Oscillating Weight. To remove the Hammer Spring lift it up gently over the automatic work and move it inwards. This will move the tail of the spring in a clockwise motion to the opening in the slots, which will free the spring. Slide out the Clutch Spring. Here is a reference photo of this spring, and it's orientation. Remove the screws (1.4 Driver) for the Automatic Device Bridge, and gently pry it loose. Here is a reference photo of these screws for the bridge. Once the Automatic Bridge has been removed, the two wheels for the automatic work are able to be removed. Below is a reference photo of how the sit inside the bridge. We now begin to disassemble the chronograph section of this movement. Begin with removing the Hammer, 2 Functions. Next remove the Clutch 60s, 2 Functions. Then remove the Minute-counting Wheel, 30min. Remove the Chronograph Wheel 60s, 30min. Gently lift out the Oscillating Pinion, 60s. Here is a reference photo of the orientation of this pinion. Unscrew (1.4 Driver) the Chronograph Bridge and gently pry it off the Train Wheel Bridge. Remove the Ratchet Driving Wheel. Remove the Chronograph Wheel Fiction. Unscrew (1.4 Driver) the Operating Lever, 2 Functions. Unscrew (1.4 Driver) the Lock, 2 Functions. Next remove the Minute-counter Driving Wheel, 30min. Slide out the Operating Lever Spring, 2 Functions. This spring can be fitting in both directions; but only 1 way is correct. Here is a reference photo of it's correct orientation. Remove the Switch. Here I digress from the order the SwissLab document illustrates the order of removal. They show to remove the Chronograph Cam before removing the Hammer Cam Jumper. This in my opinion is not the best way, as all the force from the jumper is pressing on the cam whilst your trying to remove it, and could lead to damage. Instead I move the Chronograph Cam until it reaches the notch as shown in the photo below. Then lift the Hammer Cam Jumper up to the top of the Chronograph Cam, which will release it's tension. Then, just as you removed the previous hammer, rotate the jumper to the opening in the slots, which will free the spring. Now you can unscrew (1.4 Driver) and remove the Chronograph Cam safely without tension on it. RELEASE THE MAINSPRING TENSION Once the tension has been released, unscrew (1.4 Driver) and remove the Balance Cock. Then unscrew (1.4 Driver) the Pallet Bridge and remove the bridge and Pallets. Unscrew (1.2 Driver) and remove the Ratchet Wheel. Then remove the Crown Wheel. Unscrew (1.4 Driver) the Train Wheel Bridge and gently pry it off the Main Plate. Note that one of the screws is under the Operating Lever. This needs to be moved out of the way to access this screw. The last level of this movement contains the train. Here is a reference photo of the wheel locations. Remove the Stop Lever. Remove the Great Wheel. Here is a reference photo of the underneath of this wheel. Remove the Third Wheel. Here is a reference photo of the underneath of this wheel. Remove the Second Wheel. Here is a reference photo of the underneath of this wheel. Note this has the long lower pivot. Remove the Escape Wheel. Here is a reference photo of the underneath of this wheel. Then remove the Barrel. This completes the removal of the train. Flip the movement over so we can complete the disassembly by removing the keyless work. Firstly, release the tension from the Setting Lever Jumper. Then unscrew (1.2 Driver) and remove the Setting Lever Jumper. These are unique screws with pointed ends, and below is a reference photo of them. This will also remove the Intermediate Setting Wheel. Next remove the Setting Wheel Then remove the Yoke. Remove the Setting Lever. Remove the Rocking Bar. Now pull out the Stem. Once the Stem is removed the Winding and Sliding Pinion should fall out of the movement onto your work mat. Disassembly of the 7750 is now complete If you've come this far, congratulation on completing the disassembly. Make sure you pegwood all the jewels and reinstall the Balance back onto the movement for cleaning. Assembly of the movement will be posted as soon as I complete the write-up.


 1 point
 -
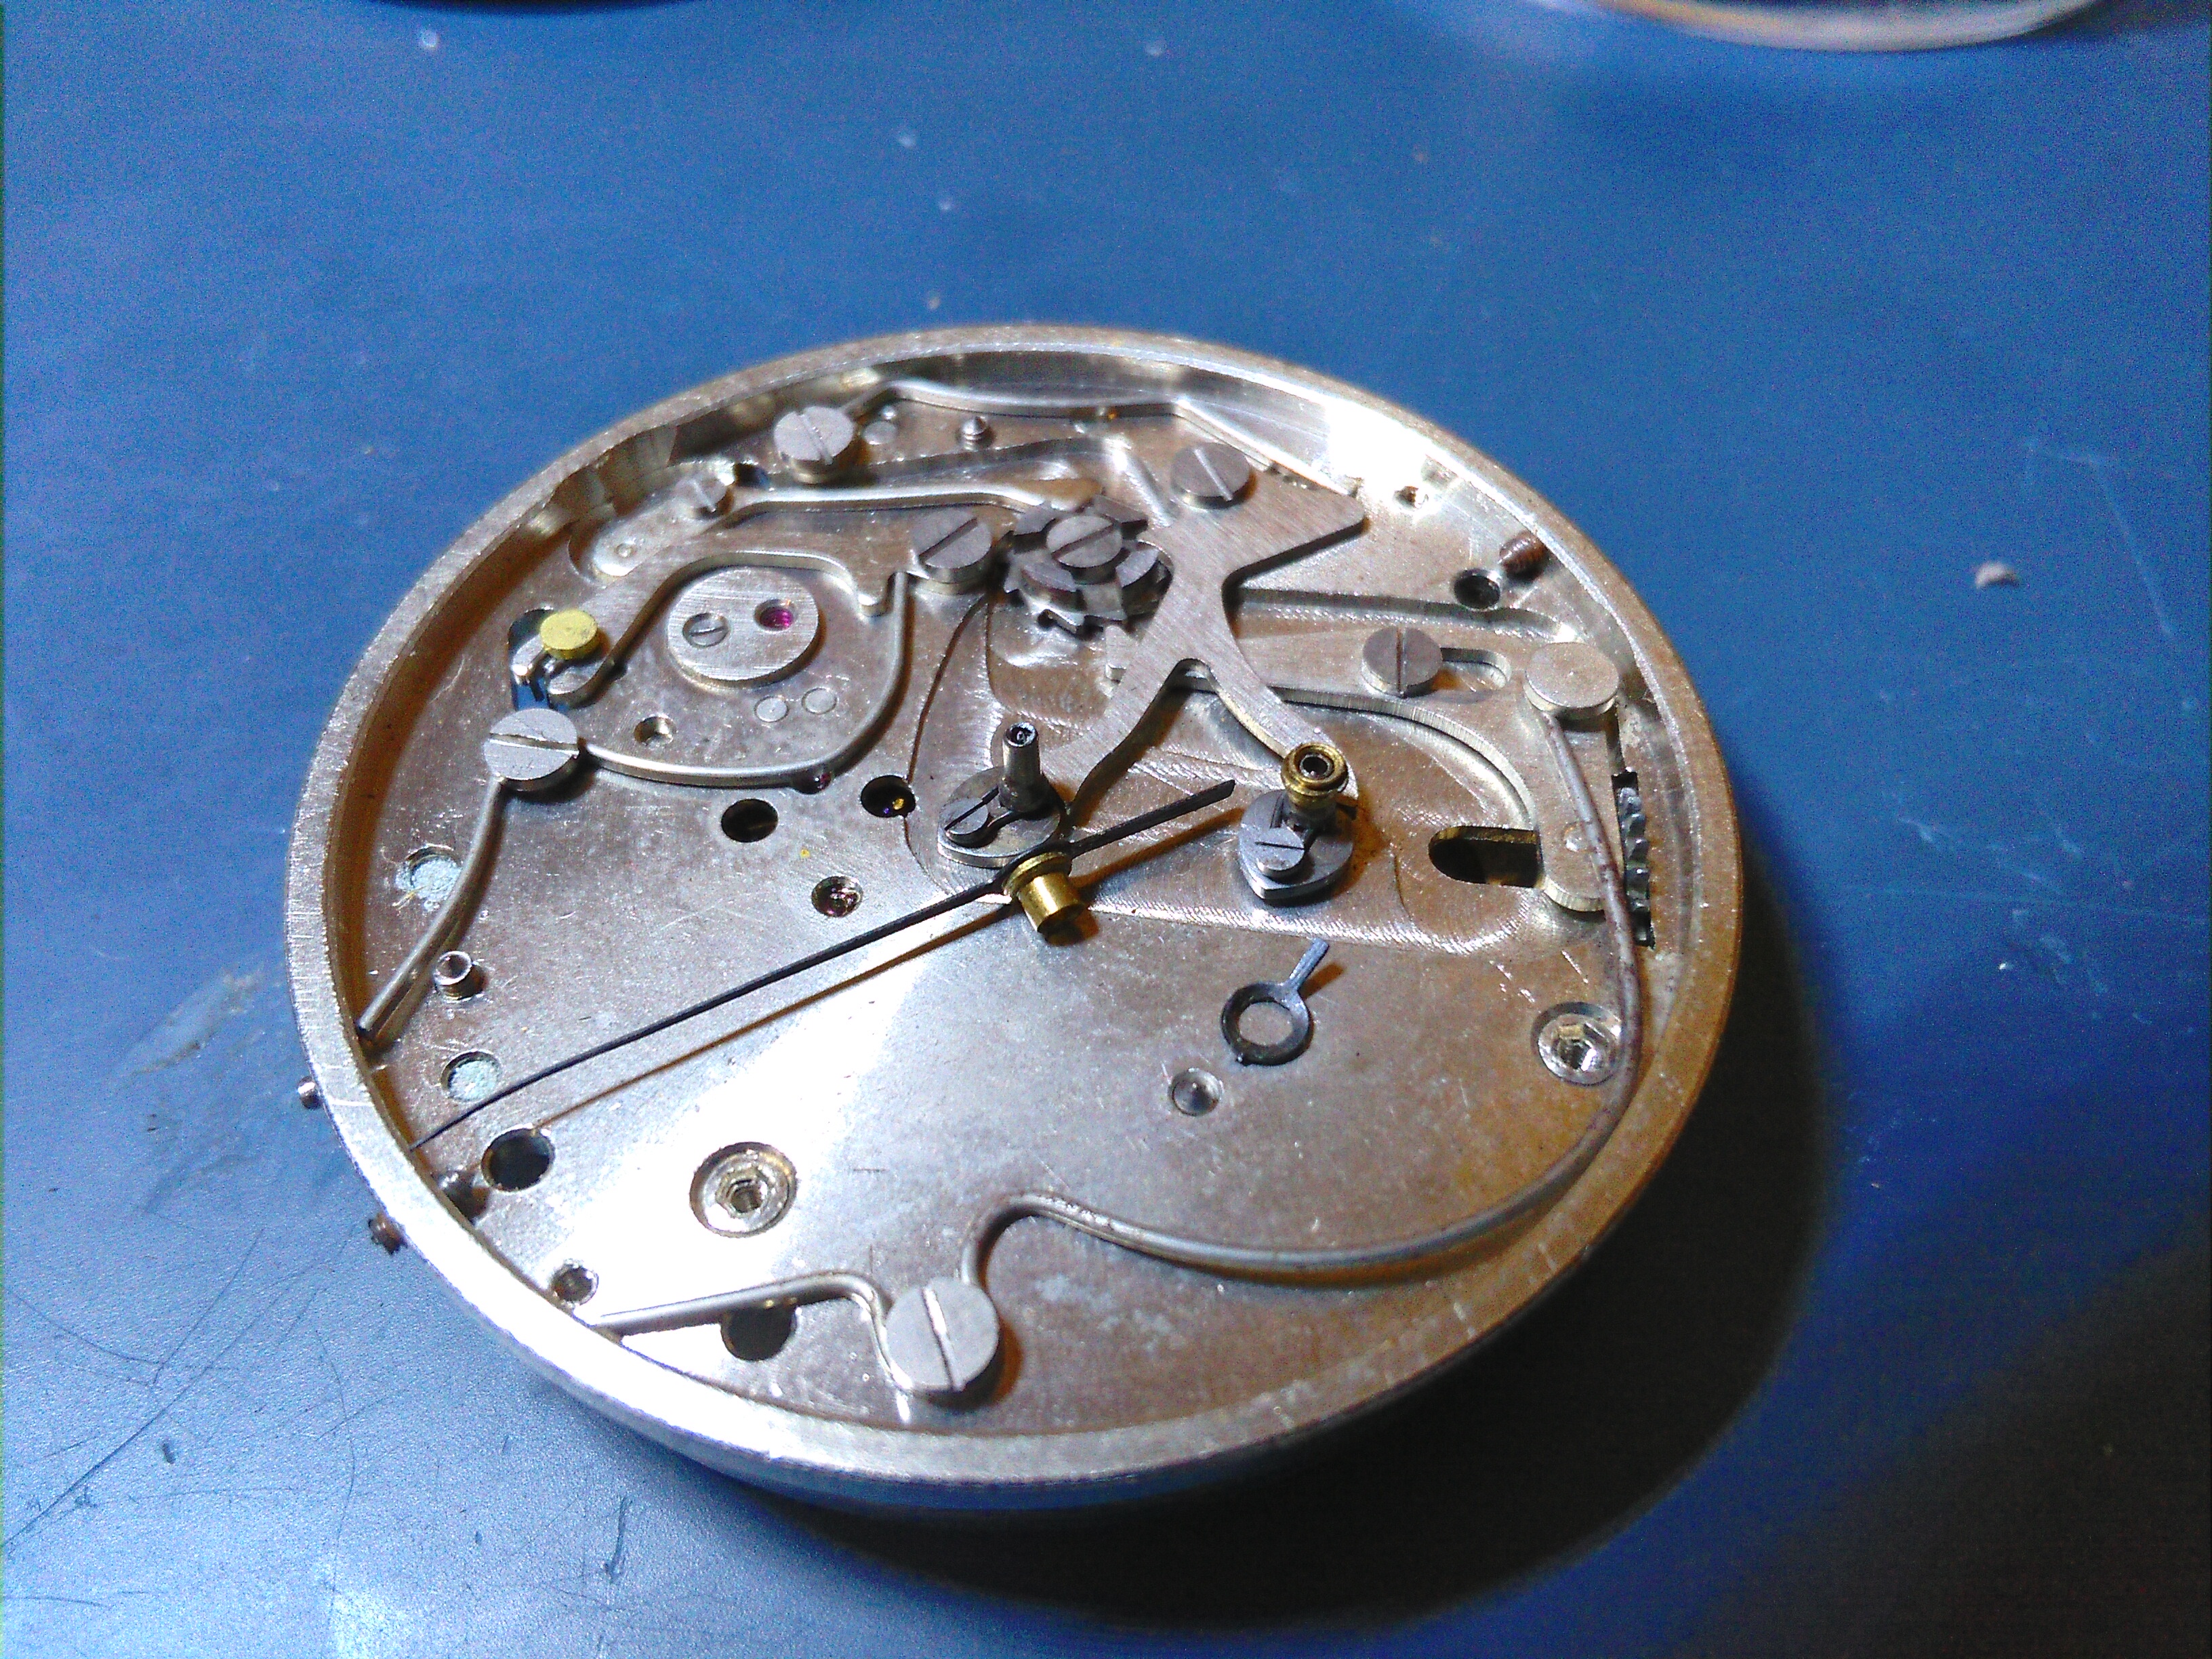
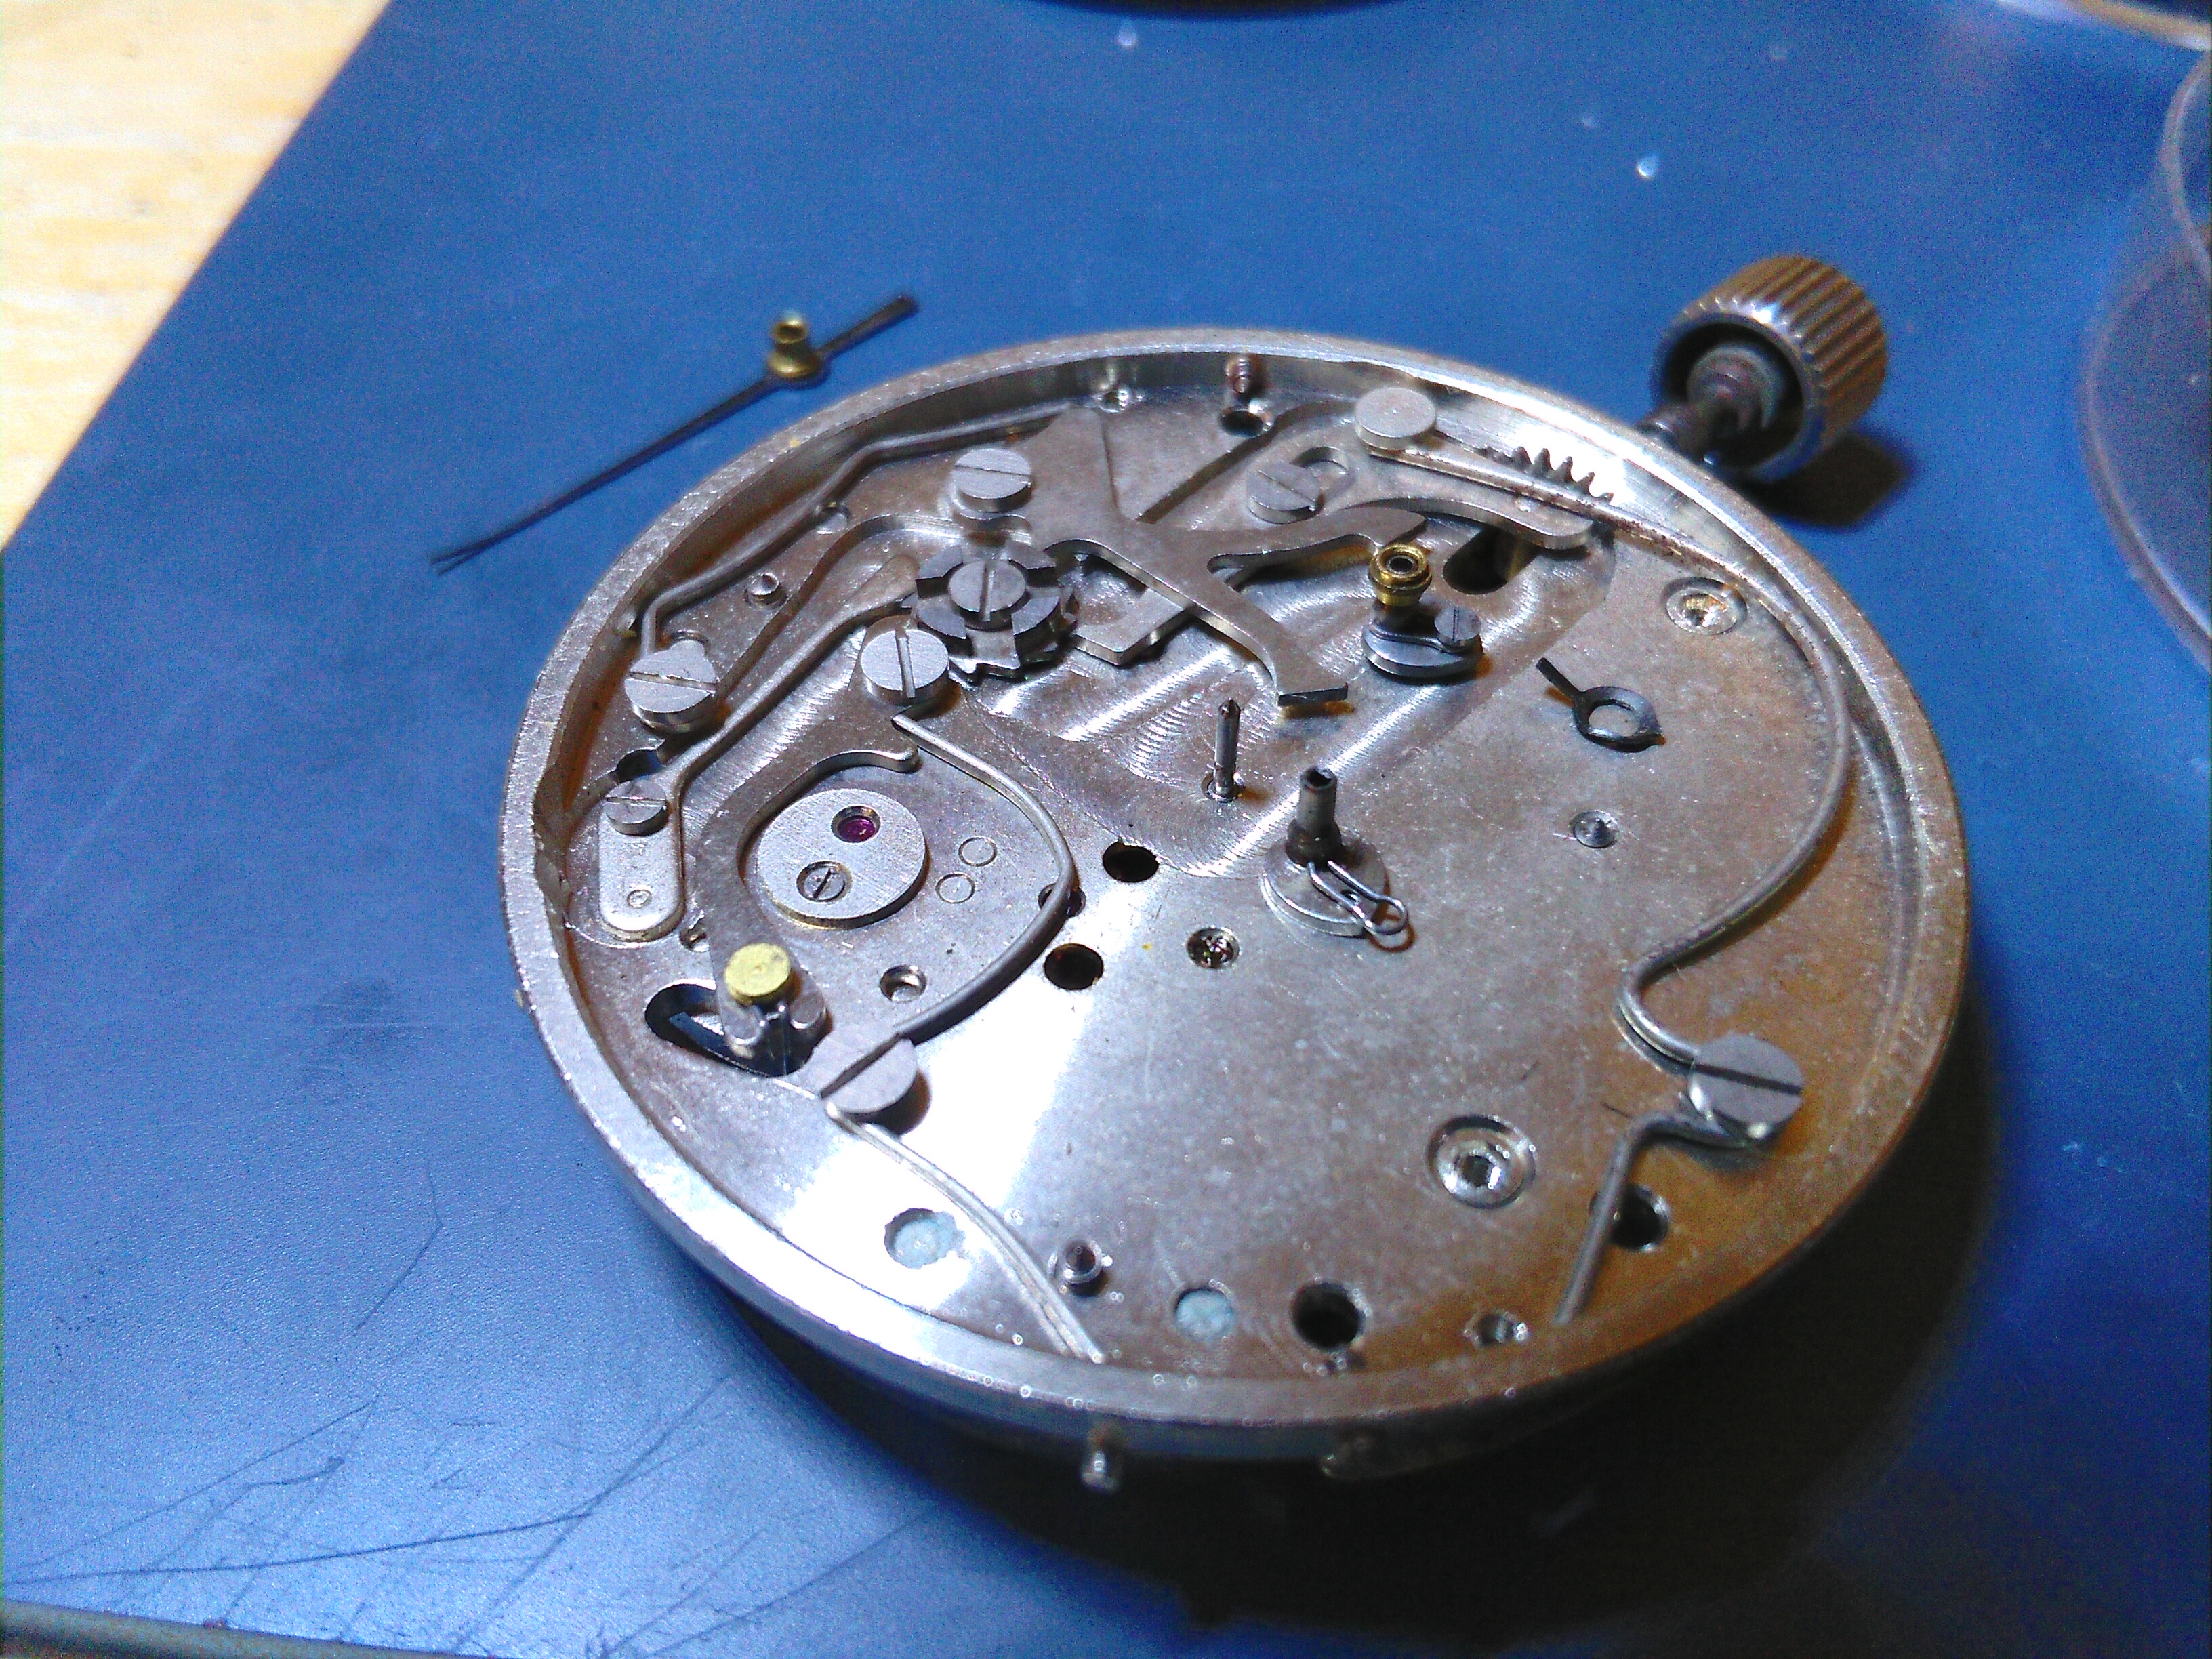
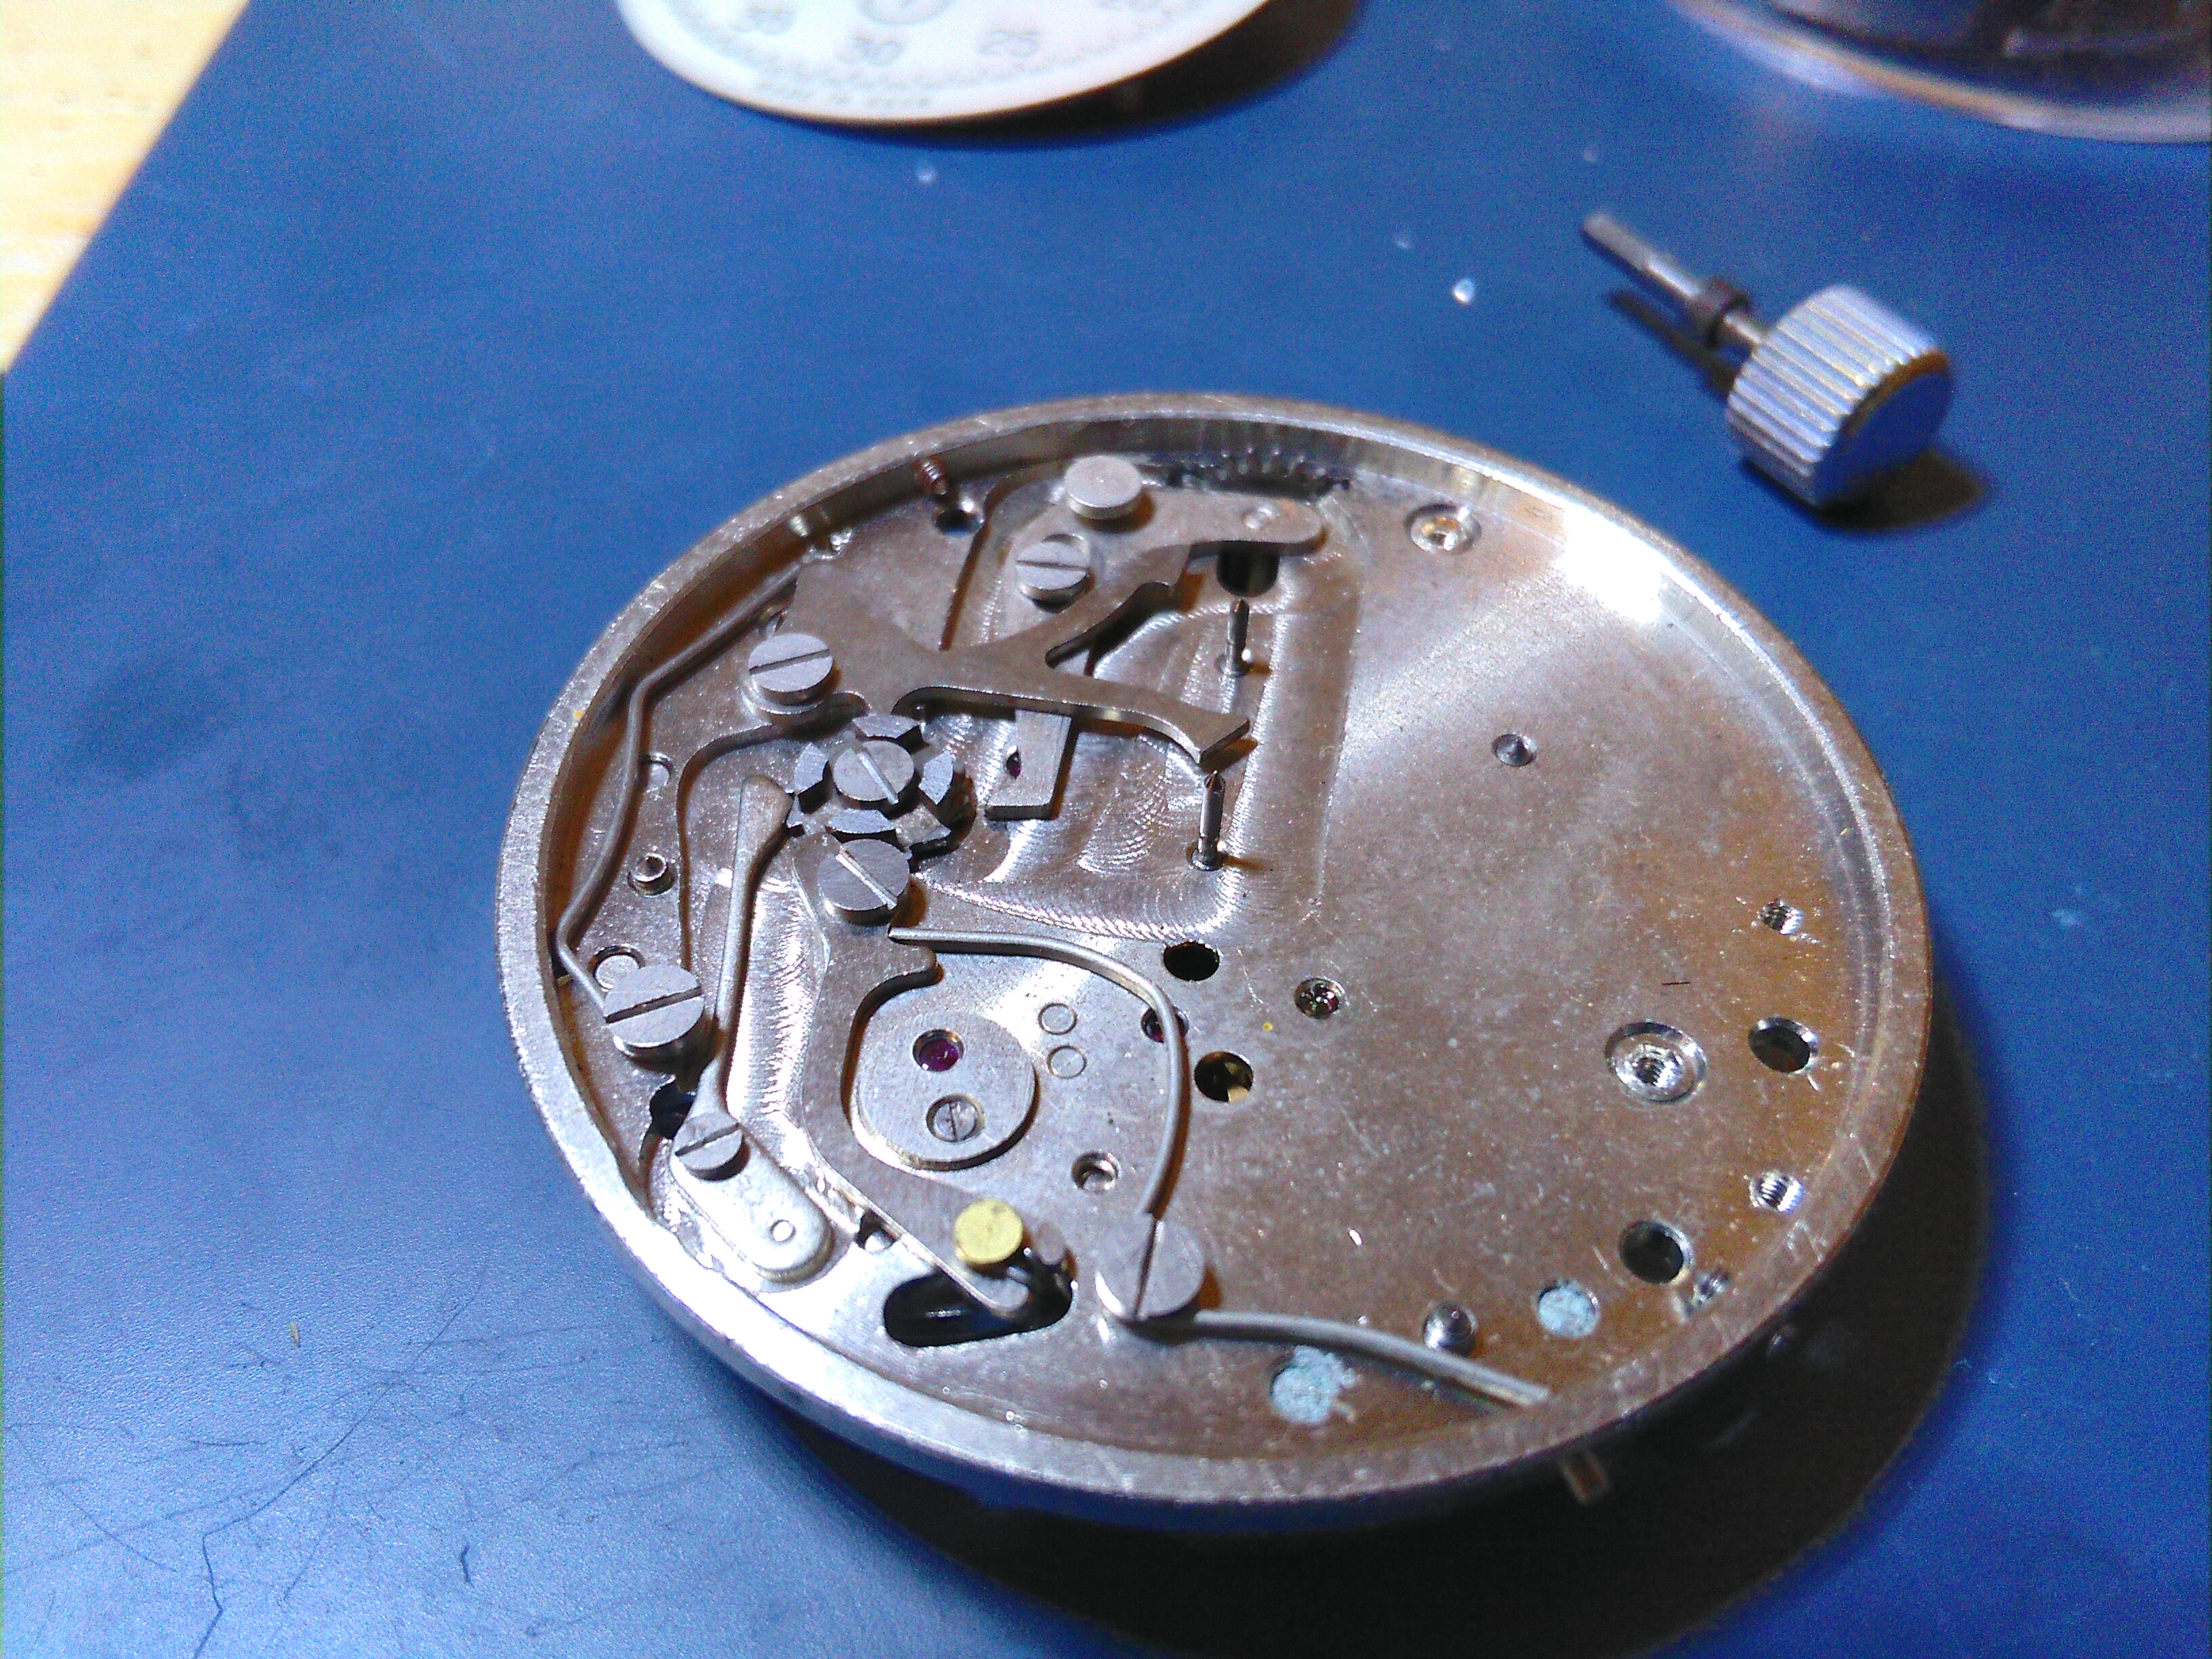
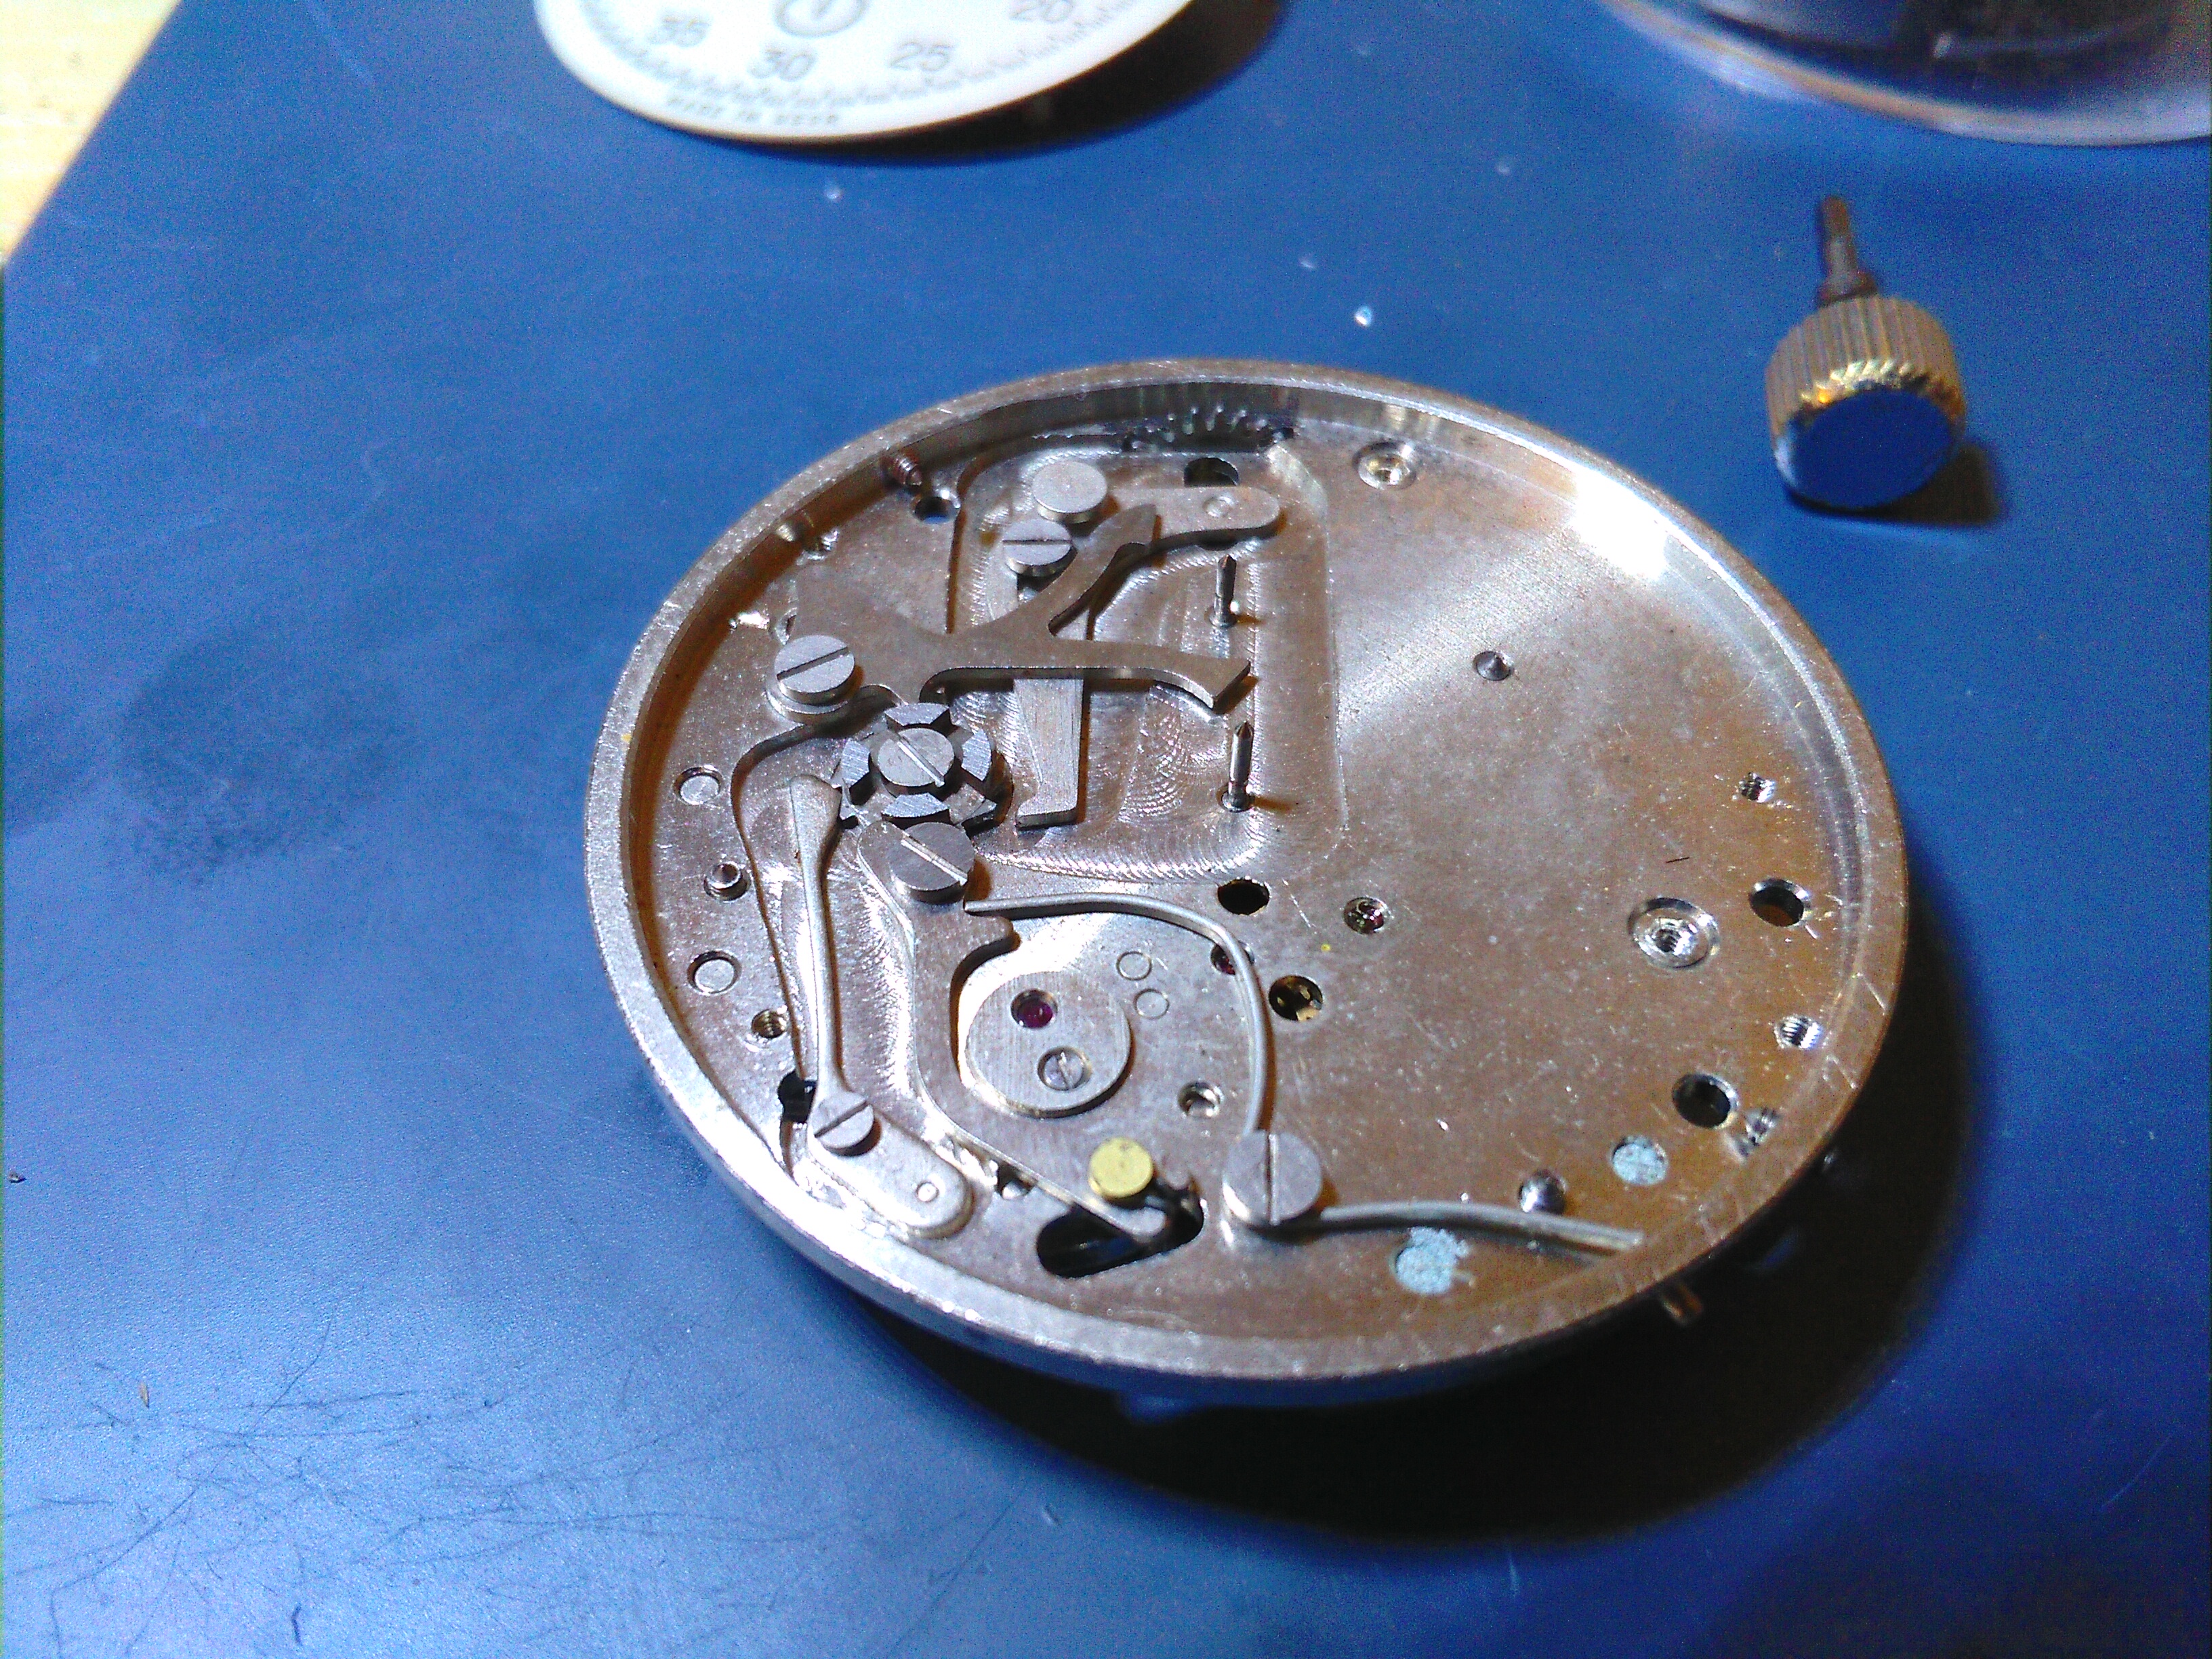
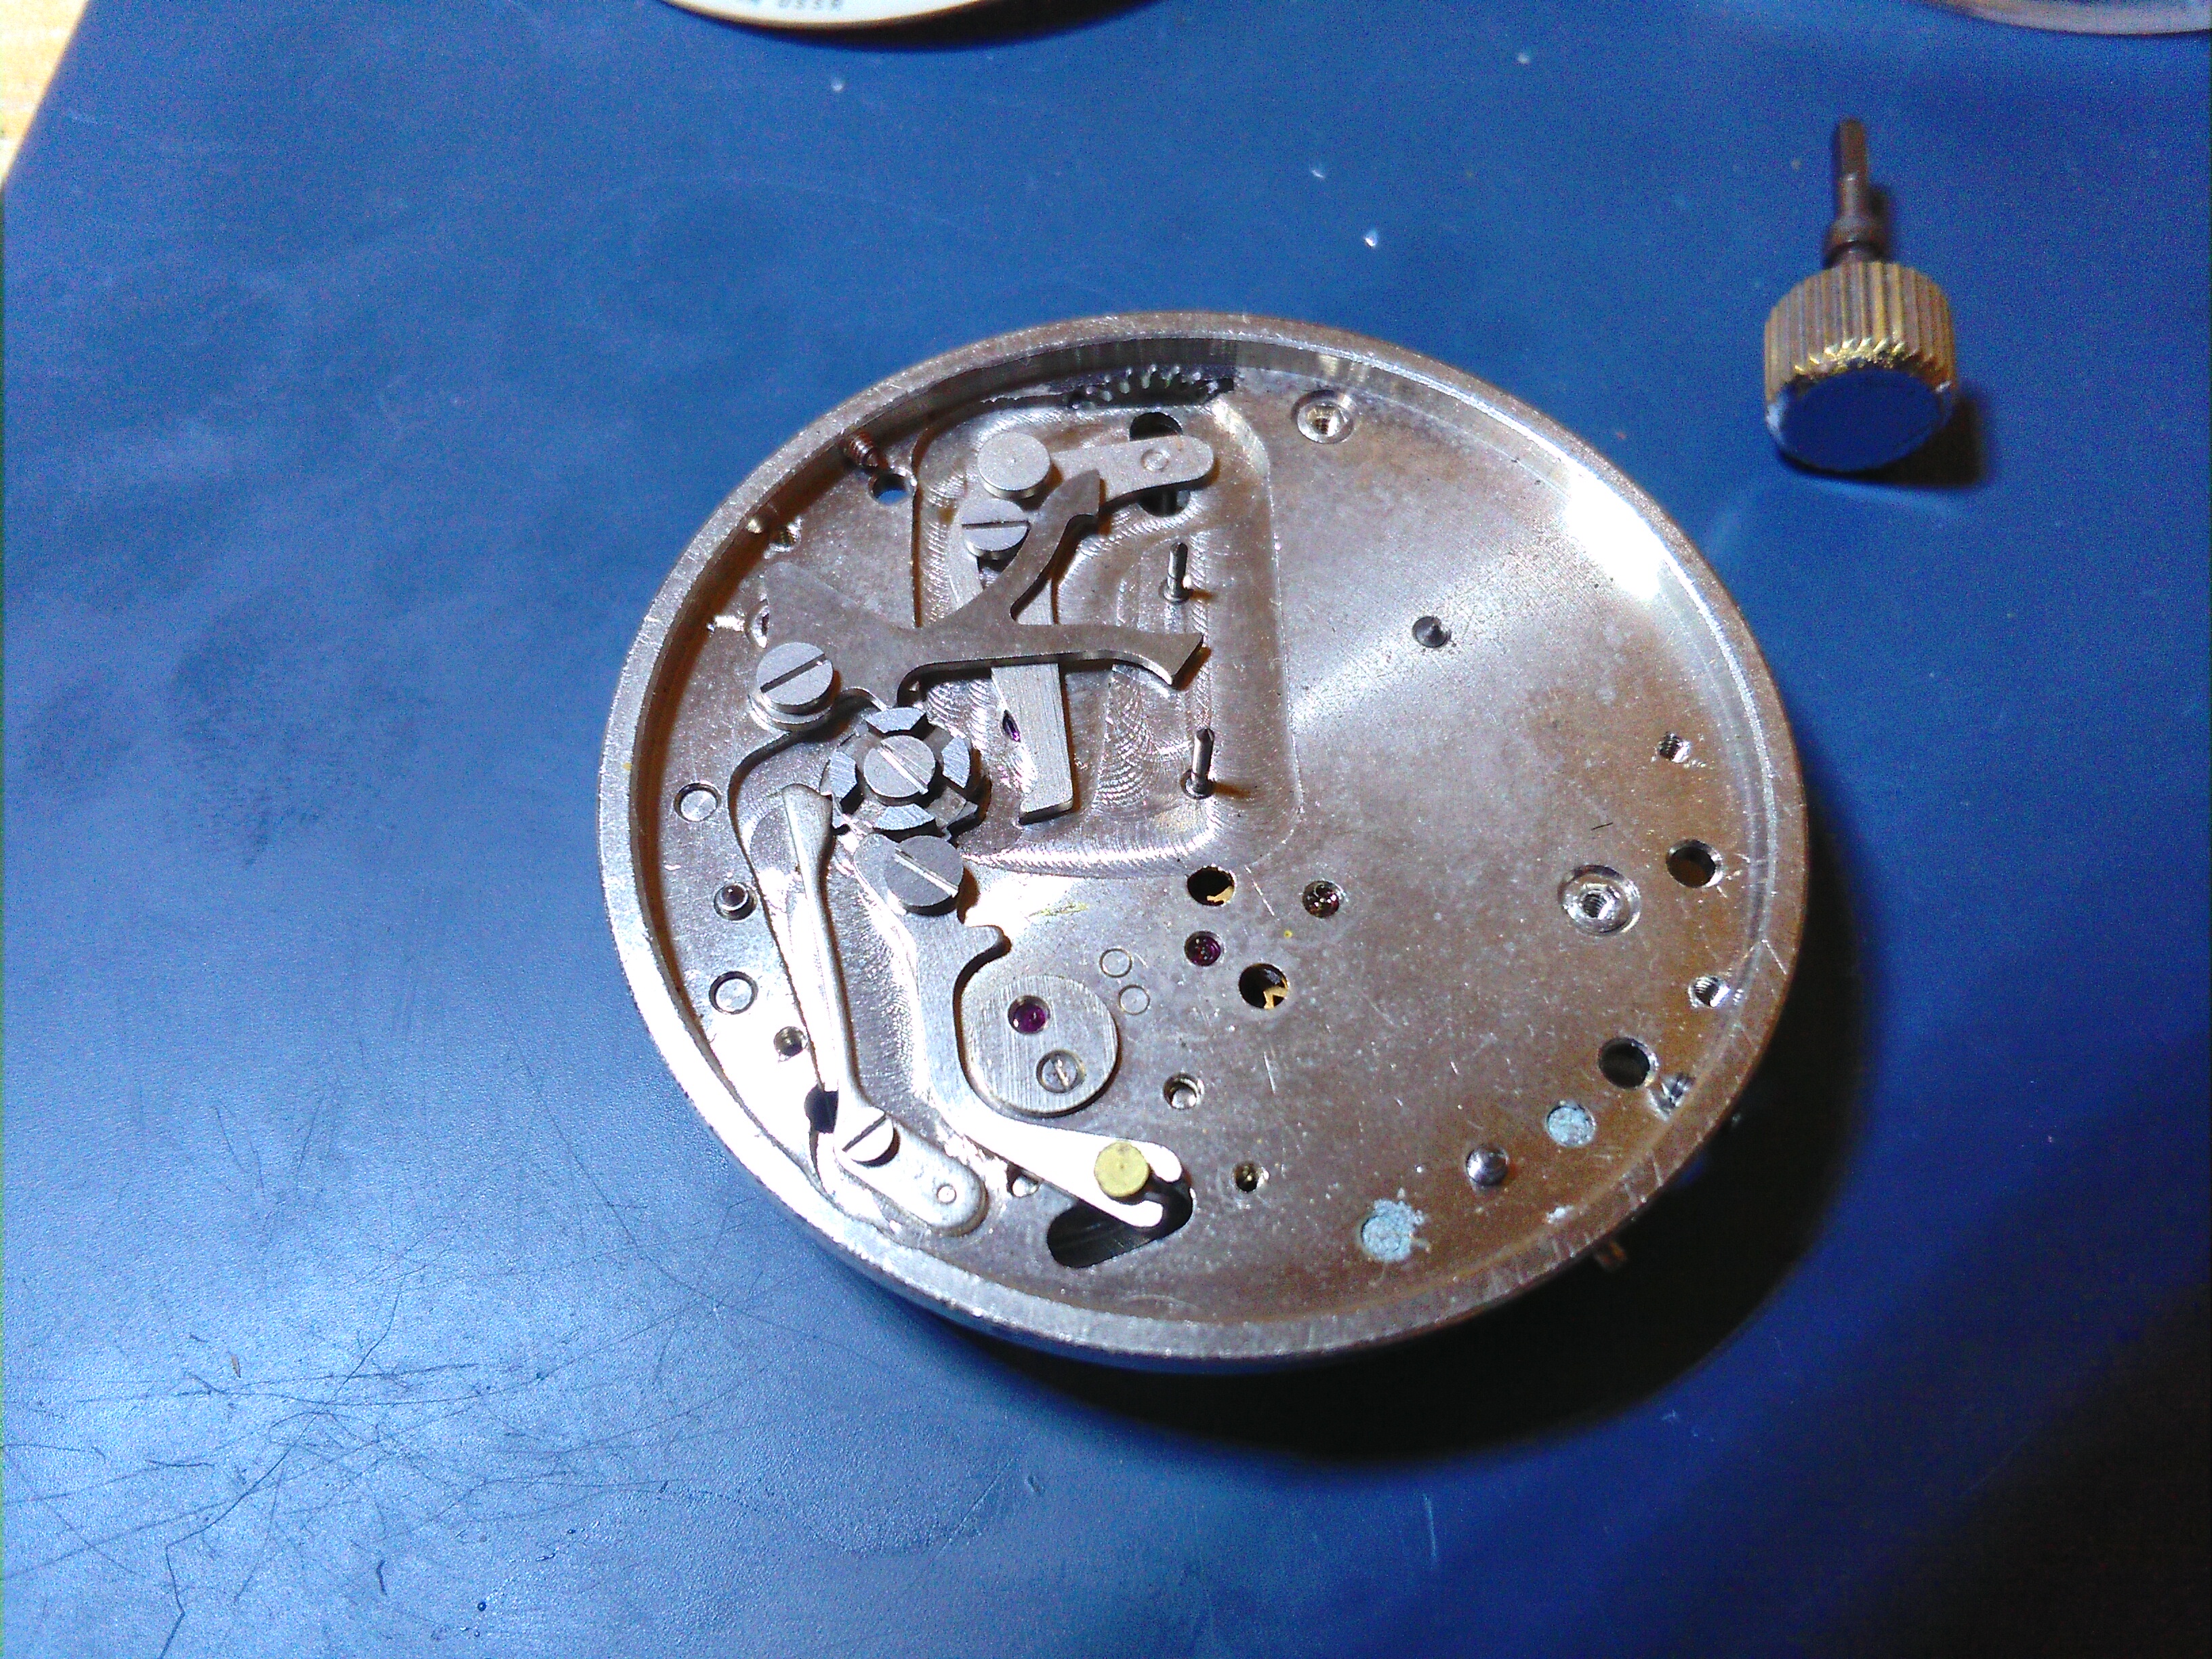
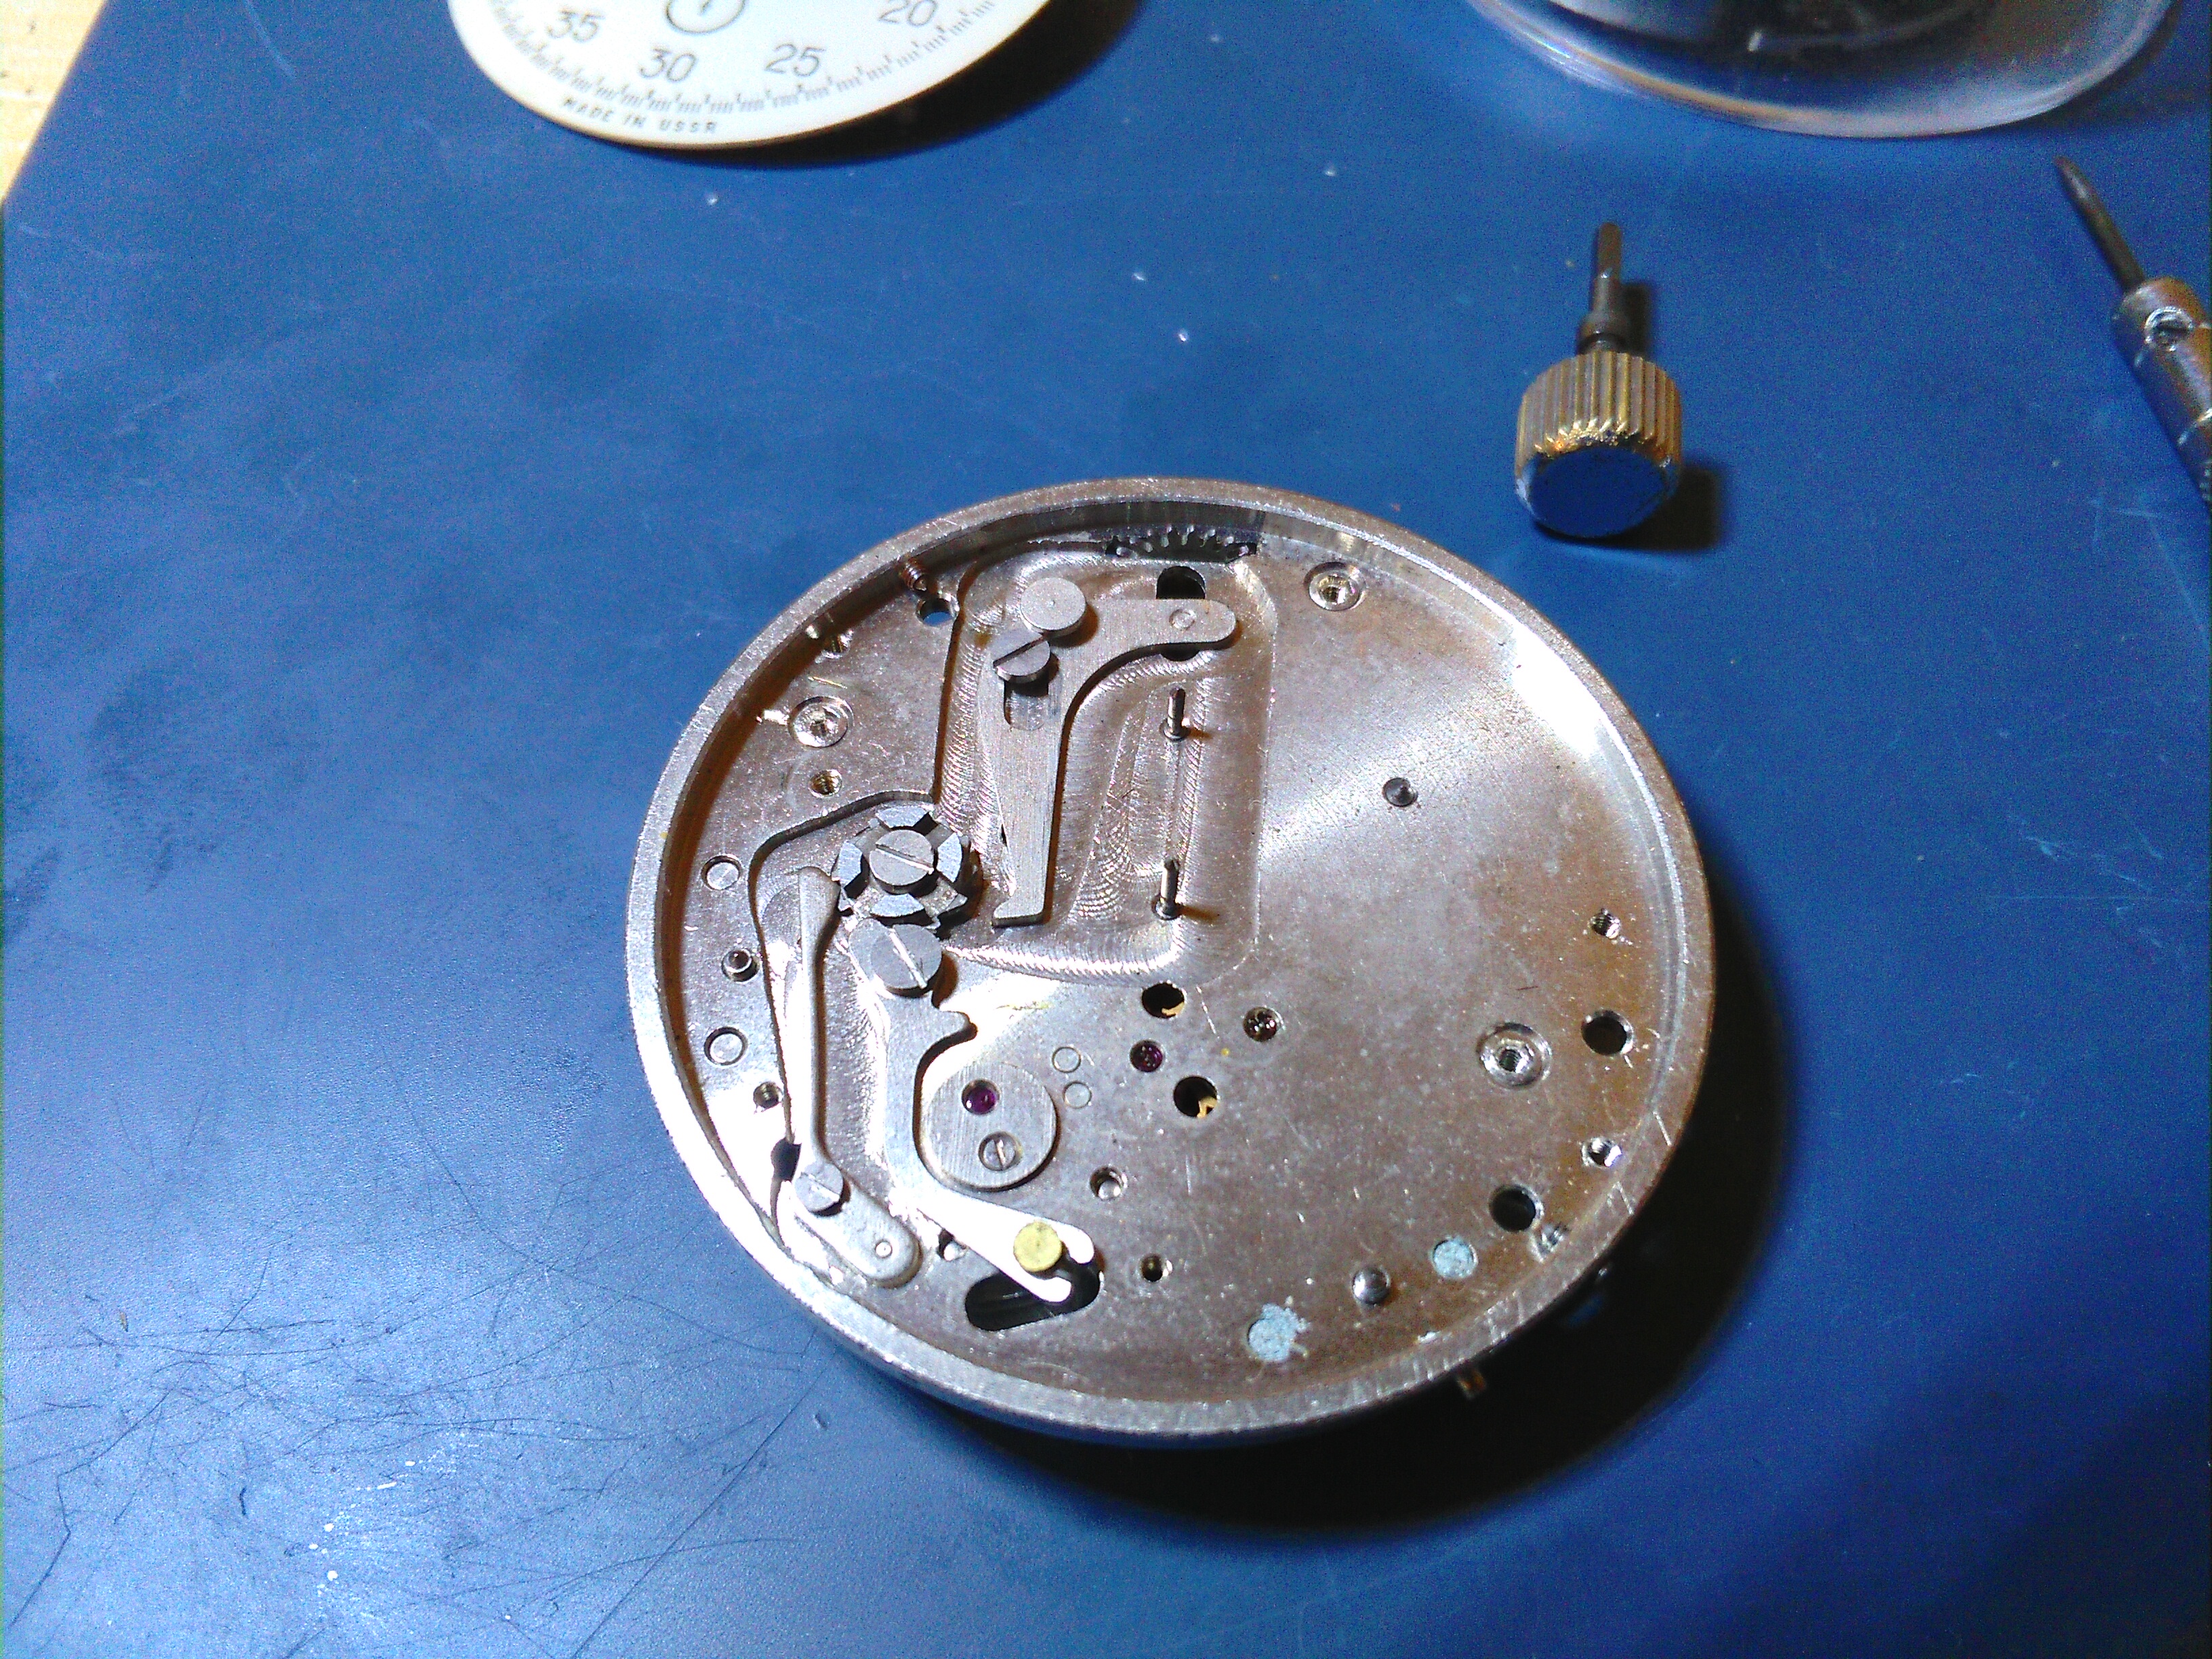
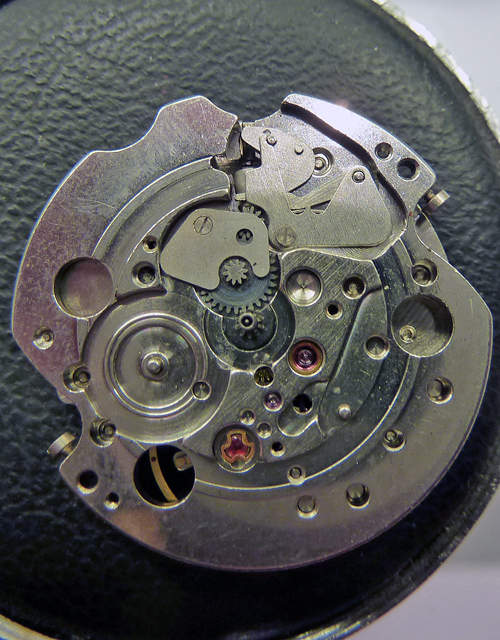
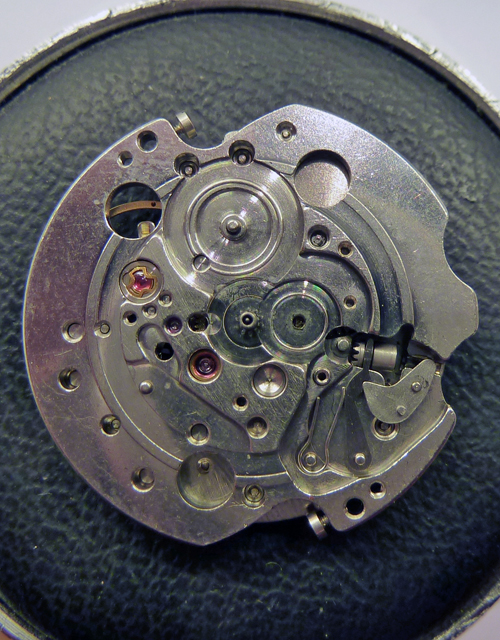
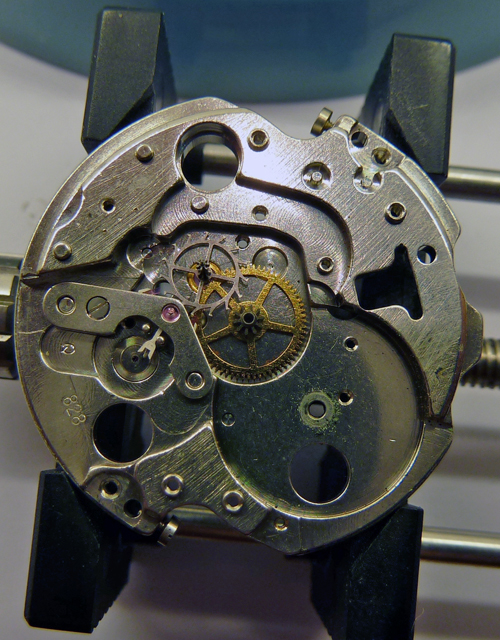
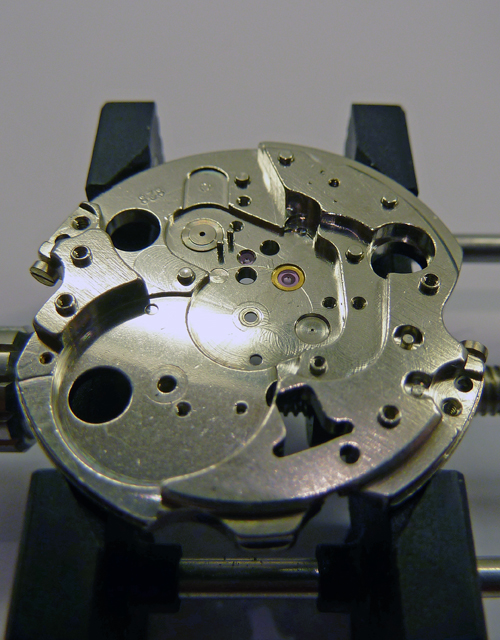
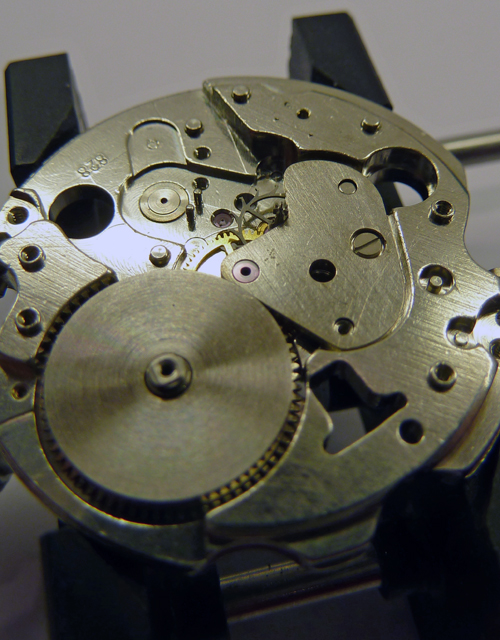
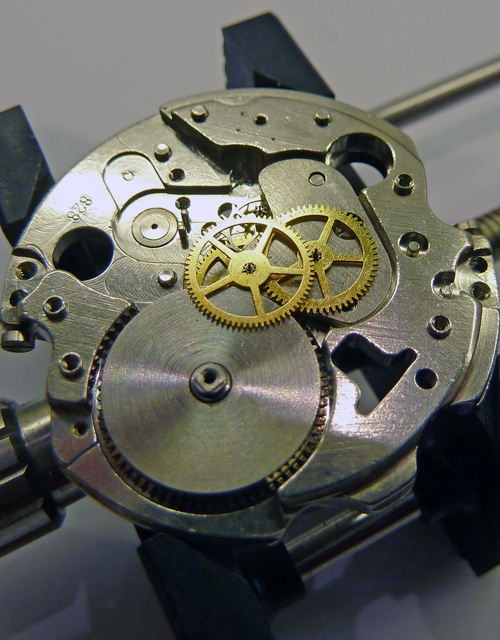
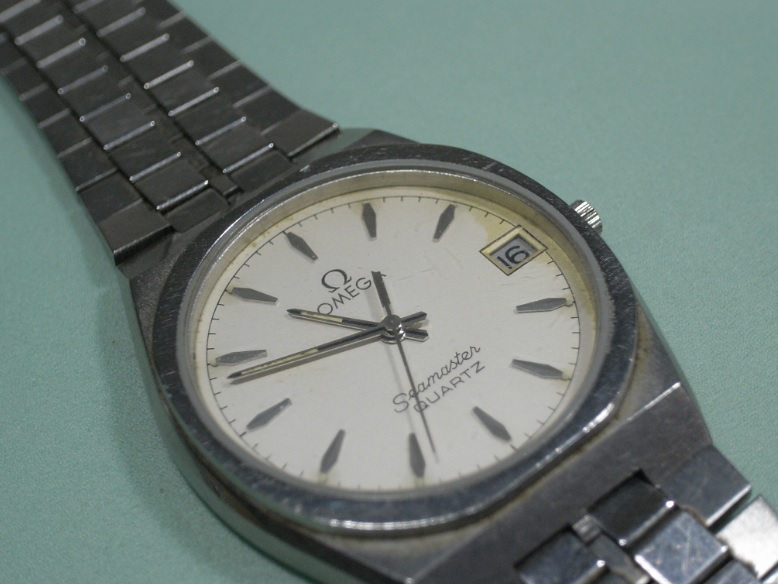
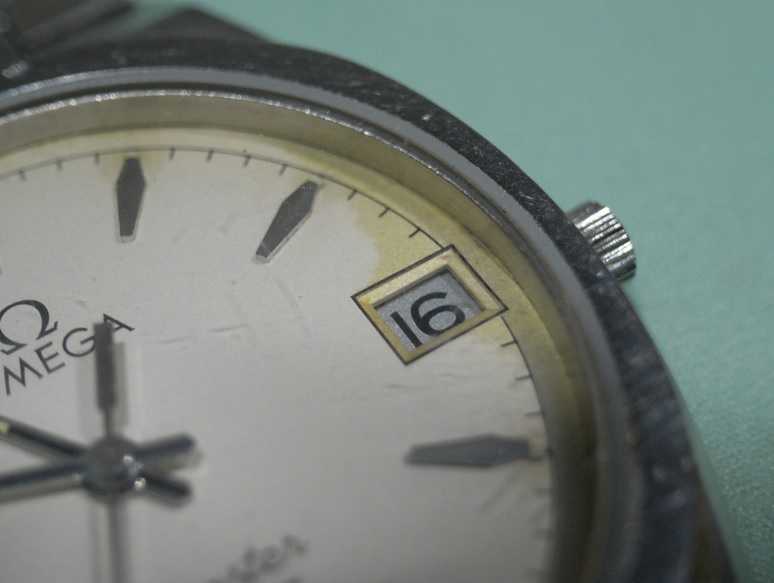
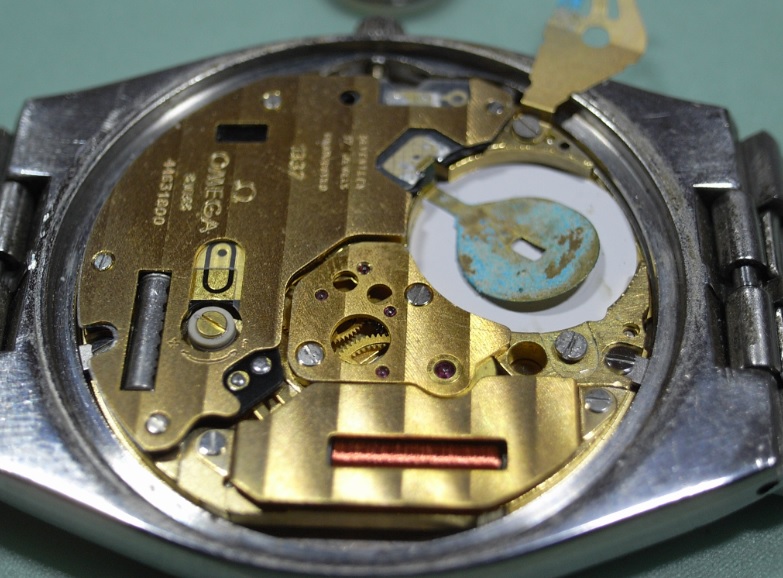
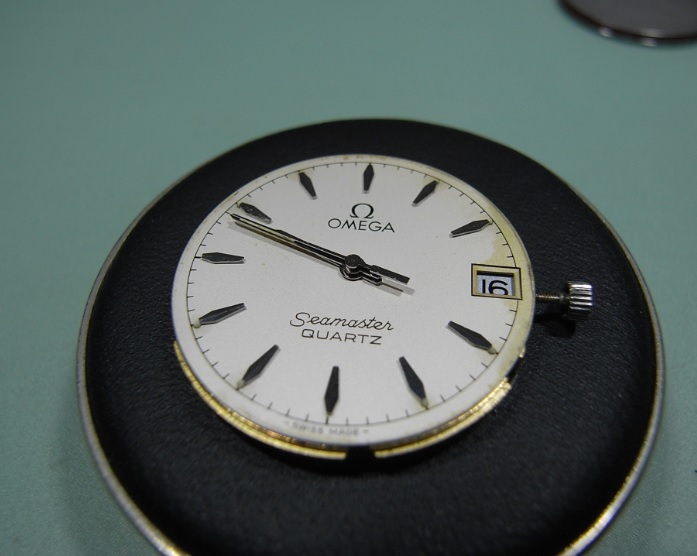
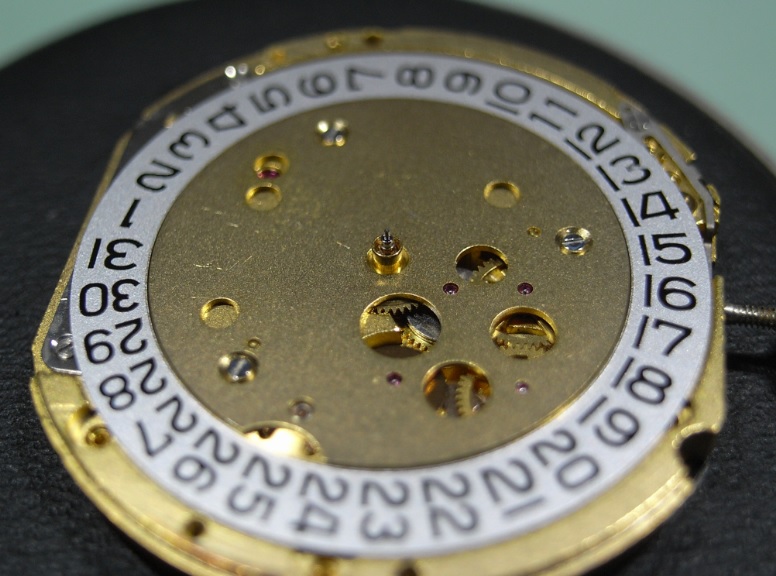
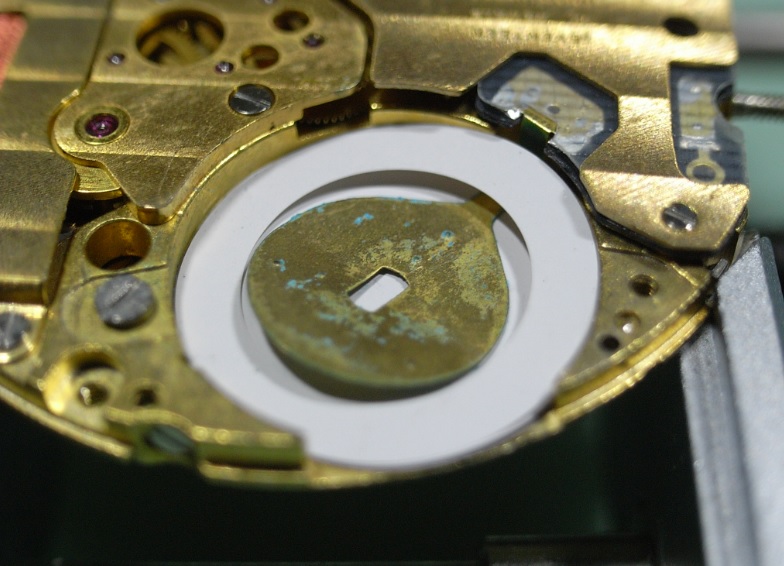
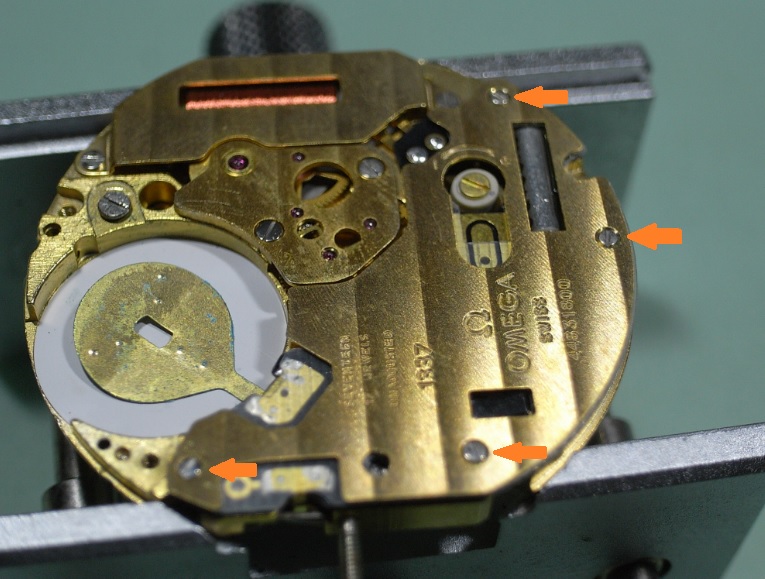
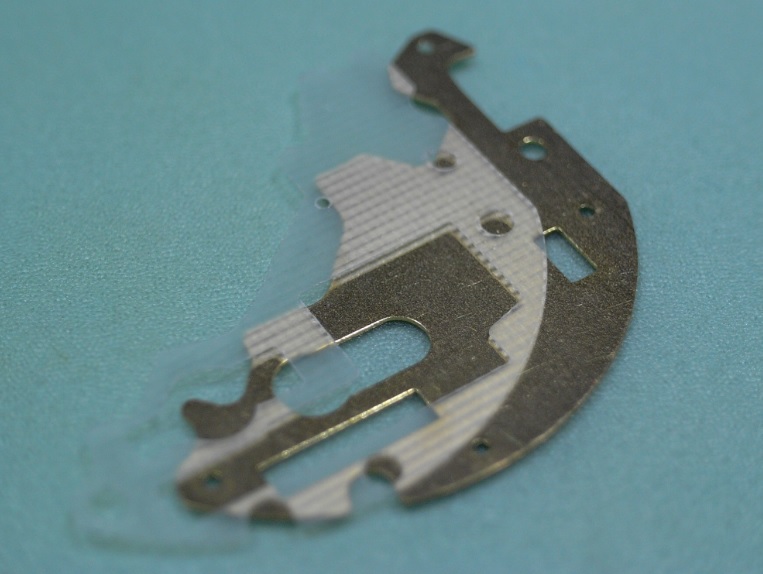
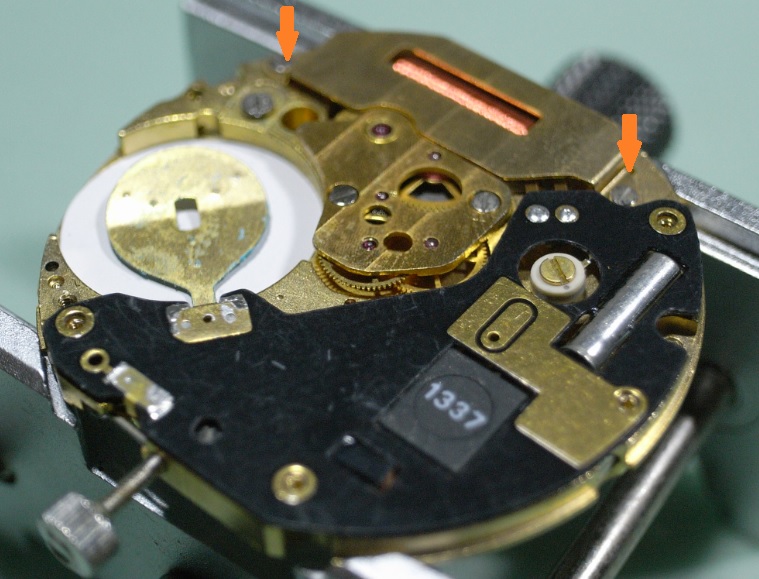
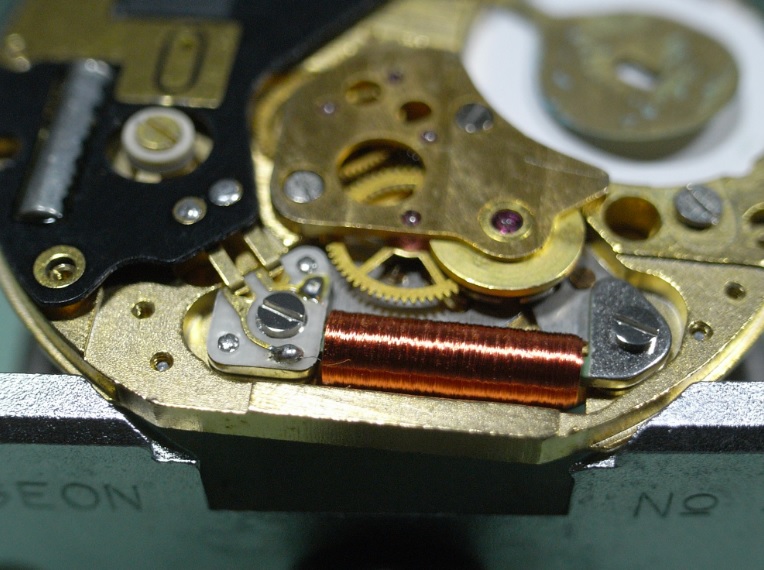
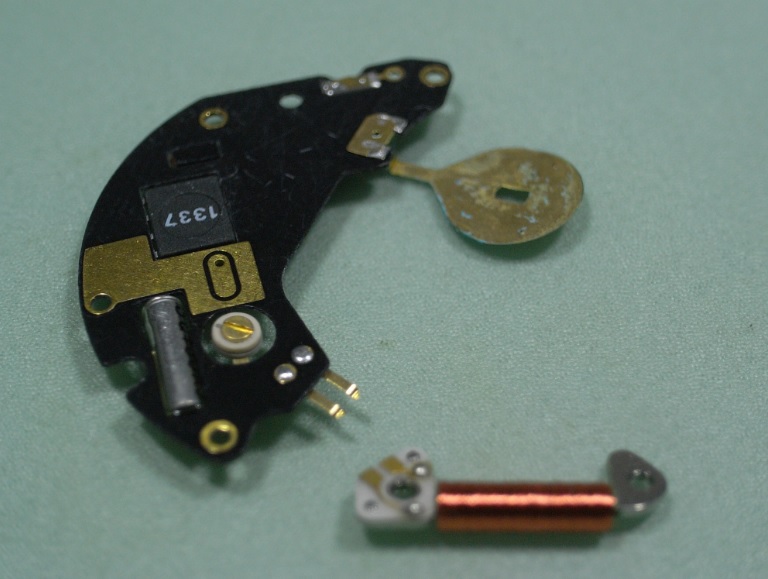
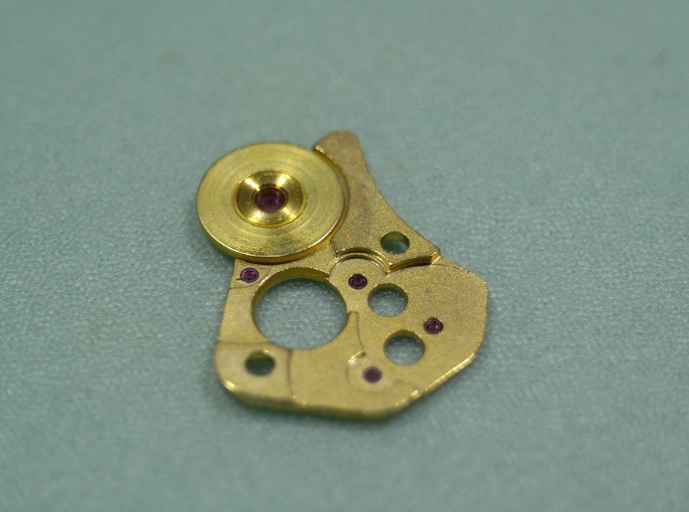
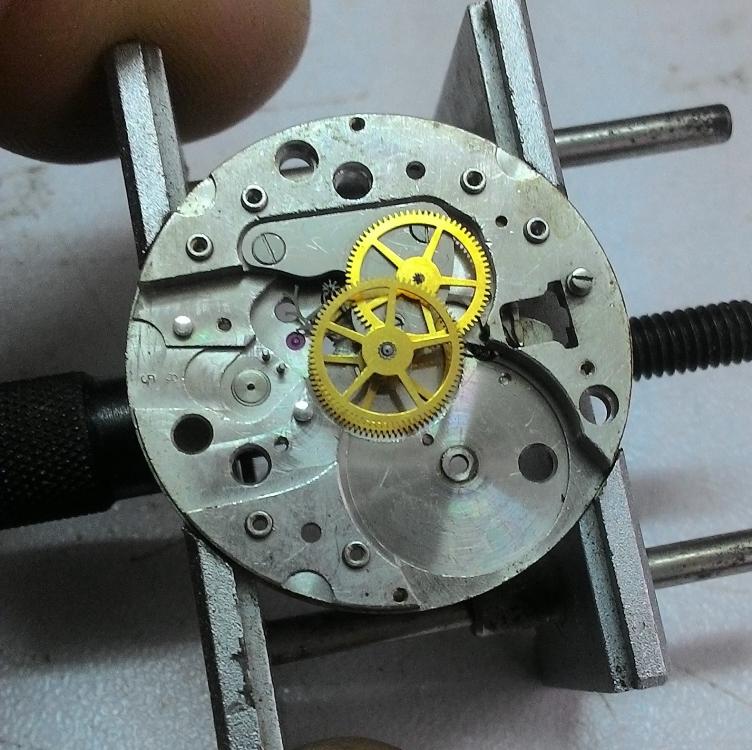
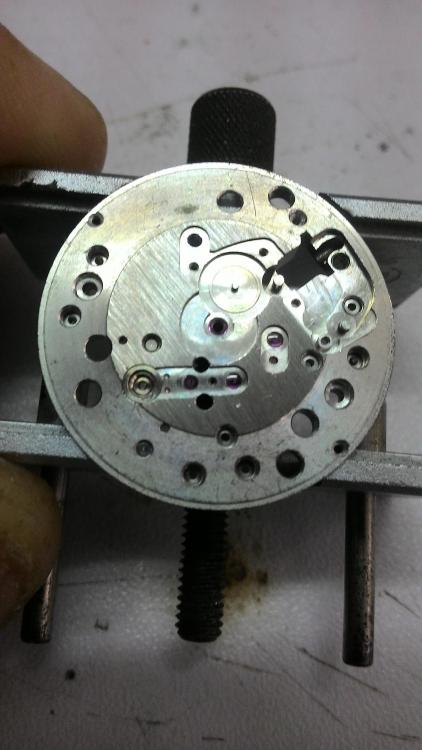
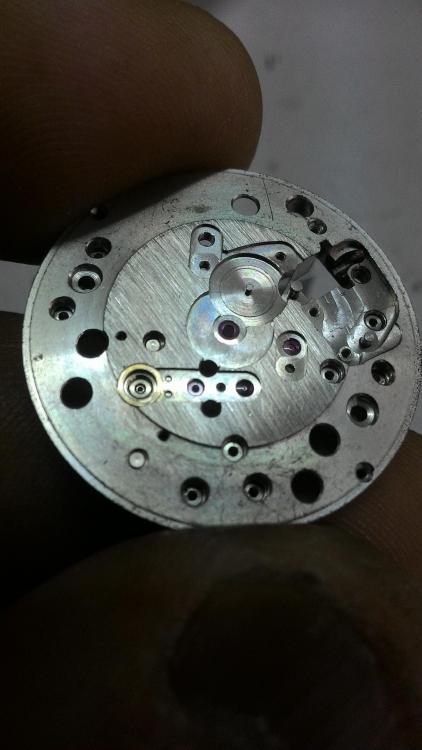
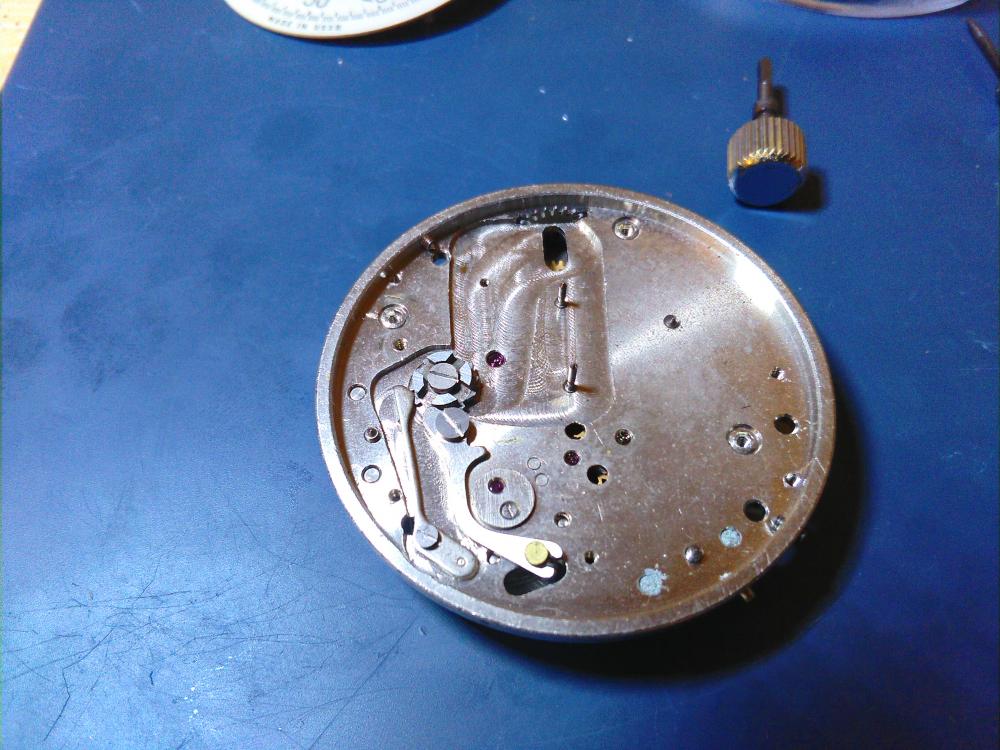
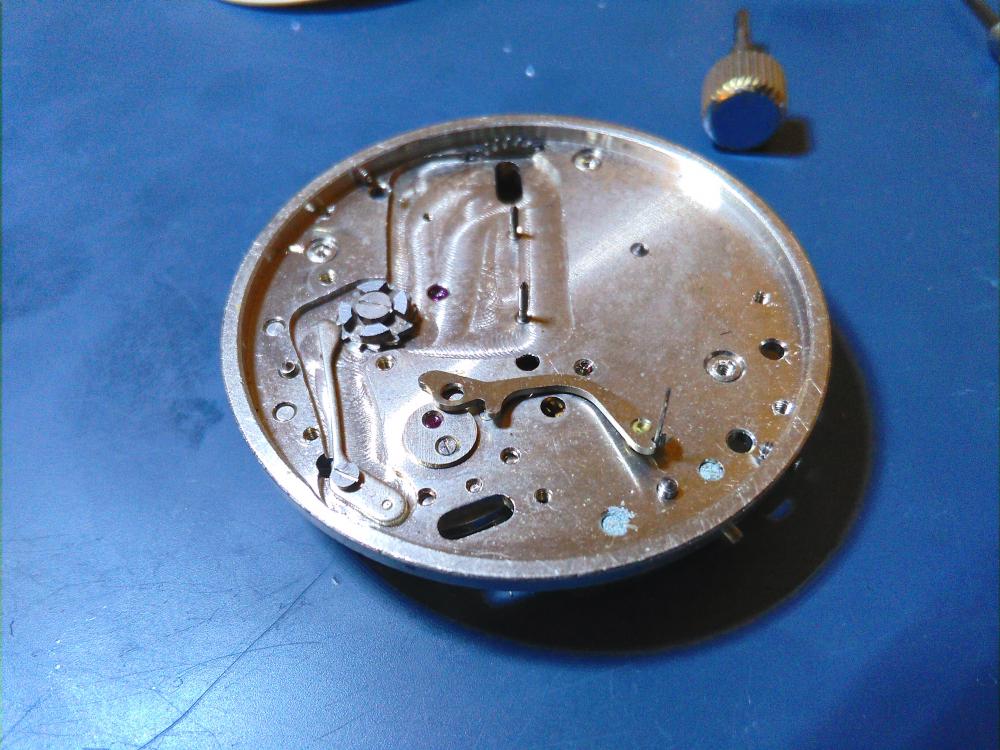
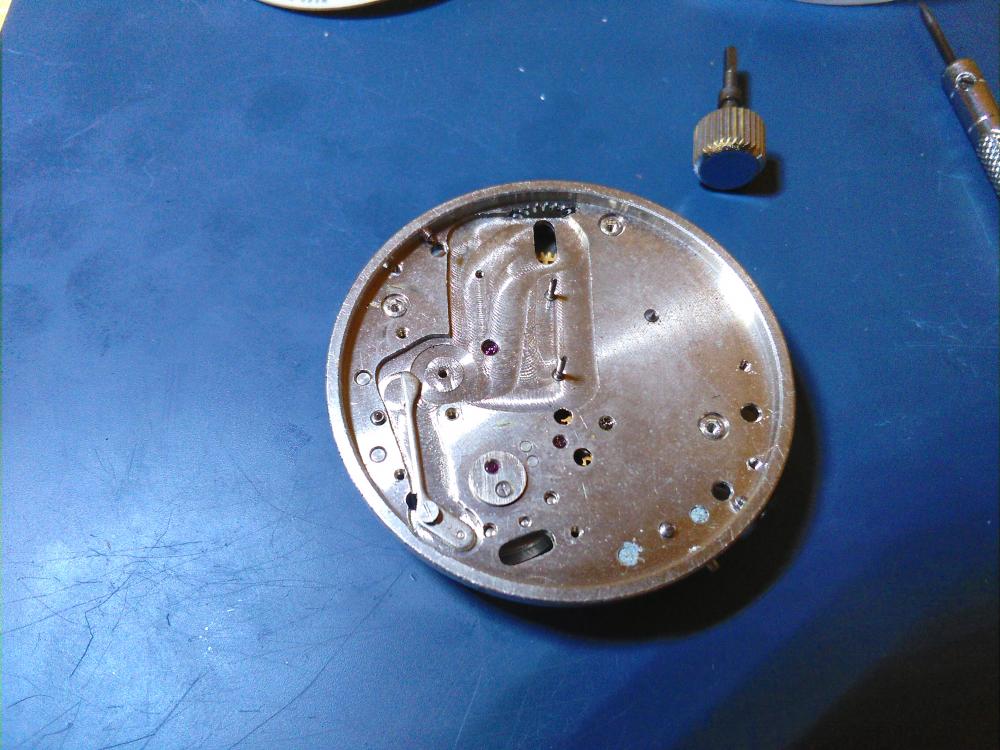
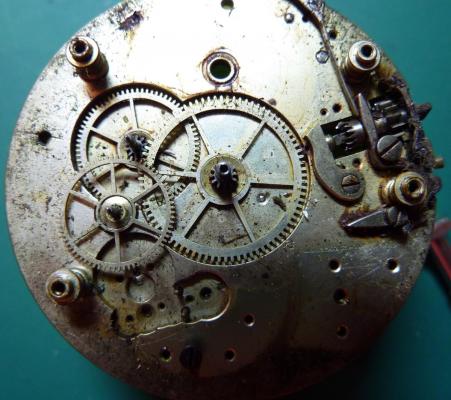
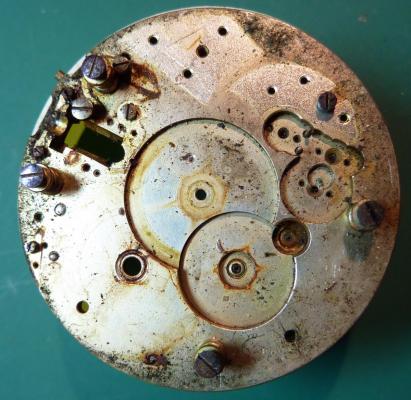
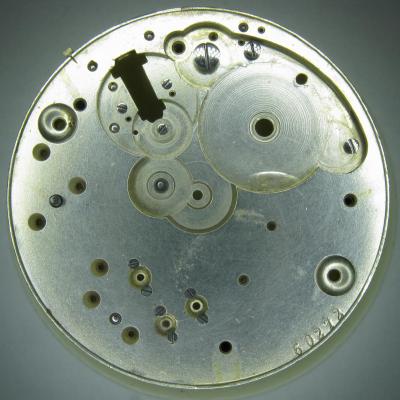
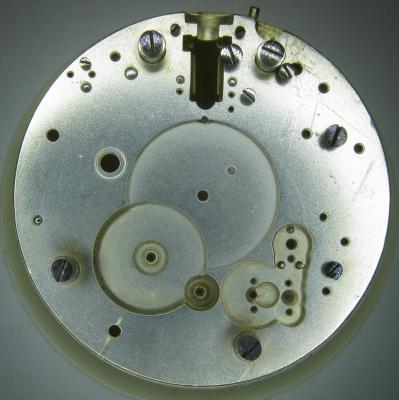
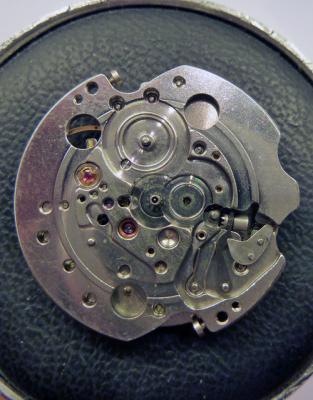
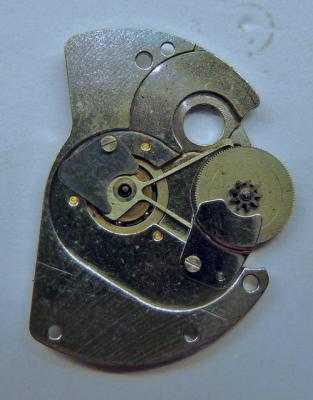
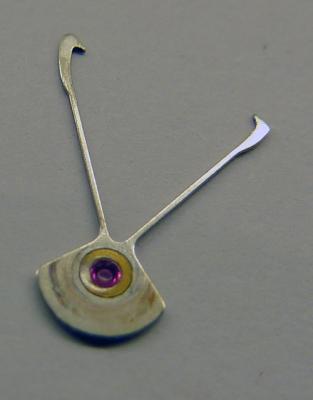
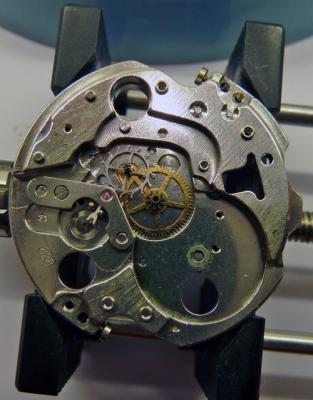
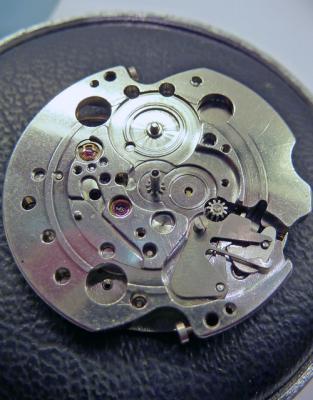
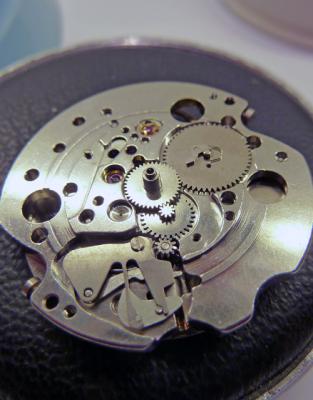
Hello fellow watch freaks. It's been a while since I've posted a service walkthrough, but I had an accident that destroyed my left shoulder and needed surgery. It's been a rough 6 months for me, with a LOT of soul searching throughout my recovery period. But I'm back on the bench ... at least at home anyway; work is a different matter, and my close friends on this forum know about that ... nuff said. This watch is owned by one of my older brother's friends. My older brother is one of the most selfless people I know, and has always been there for me. So when he asked me to do this for him it became TOP priority. It was the first item his friend purchased after he left school and began work: so there's a lot of good memories tied to this watch. As you can see it's an older quartz Seamaster with an 1337 Movement. On first inspection you can see water damage to the Dial @ 3 o'clock. So I wasn't expecting to see a happy movement inside. But when I got the Caseback off things didn't look too bad at all. Just a bit of corrosion from a cheap nasty Chinese battery. The movement still looked nice and shiny and the Stem only had a touch of rust up near the Crown. So this watch looks like one we can save :) Disassembly OK, lets begin. Fist remove the Hands and Dial from the movement. Again, absolutely no moisture damage under the Dial ... this made me VERY happy indeed. So on to the Movement Holder it goes. Remove the Battery Clamp and Insulator Ring. Then remove the 4 screws that hold the Circuit Cover. Note that there is an insulator under the cover. It is very delicate, so great care should be taken when handling it. Once the cover is removed the circuit is exposed; but before removing it, unscrew the 2 screws holding the Coil Protector and remove it. Then unscrew the Coil, and remove the Circuit and Coil. Place both the Circuit and Coil in a safe place to avoid damage, as this parts are obsolete, and if damaged you'll have to scour the internet for a donor movement ... good luck with that!! Next remove the Train Bridge Here is a reference photo of the train. As you can see, the Rotor is a very different looking animal to the modern ETA rotors. Carefully remove all the wheels, and store the Rotor in a safe place AWAY from the rest of the parts to be cleaned ... as this has to be hand cleaned due to it being magnetic. Please Note: There is a very small washer that fits between the minute wheel and the extended pivot of the Second Wheel. Be sure to identify it, and make sure it's put in the small parts container for cleaning. Here's the complete train removed from the movement for reference. Flip the movement over in the holder and remove the 3 screws of the cover that holds the Calendar Ring. As you can see that Motion Work and Calendar Work are fairly complex on this movement. Make sure you take good reference photos and study them carefully so they are not confused with wheels of the train. Remove the Calendar Ring. Remove the Motion Work and Calendar Work. Here's the complete Motion Work and Calendar Work removed from the movement for reference. The Crown and Clutch should now be able to be removed. Flip the movement over once again to tackle the Keyless Work Unscrew and remove the Setting Lever Spring. Lastly unscrew and remove the Setting Lever, Intermediate Wheel and Yoke. The Omega 1337 Movement is now completely disassembled and ready for cleaning. I will post the assembly soon.


 1 point
 -
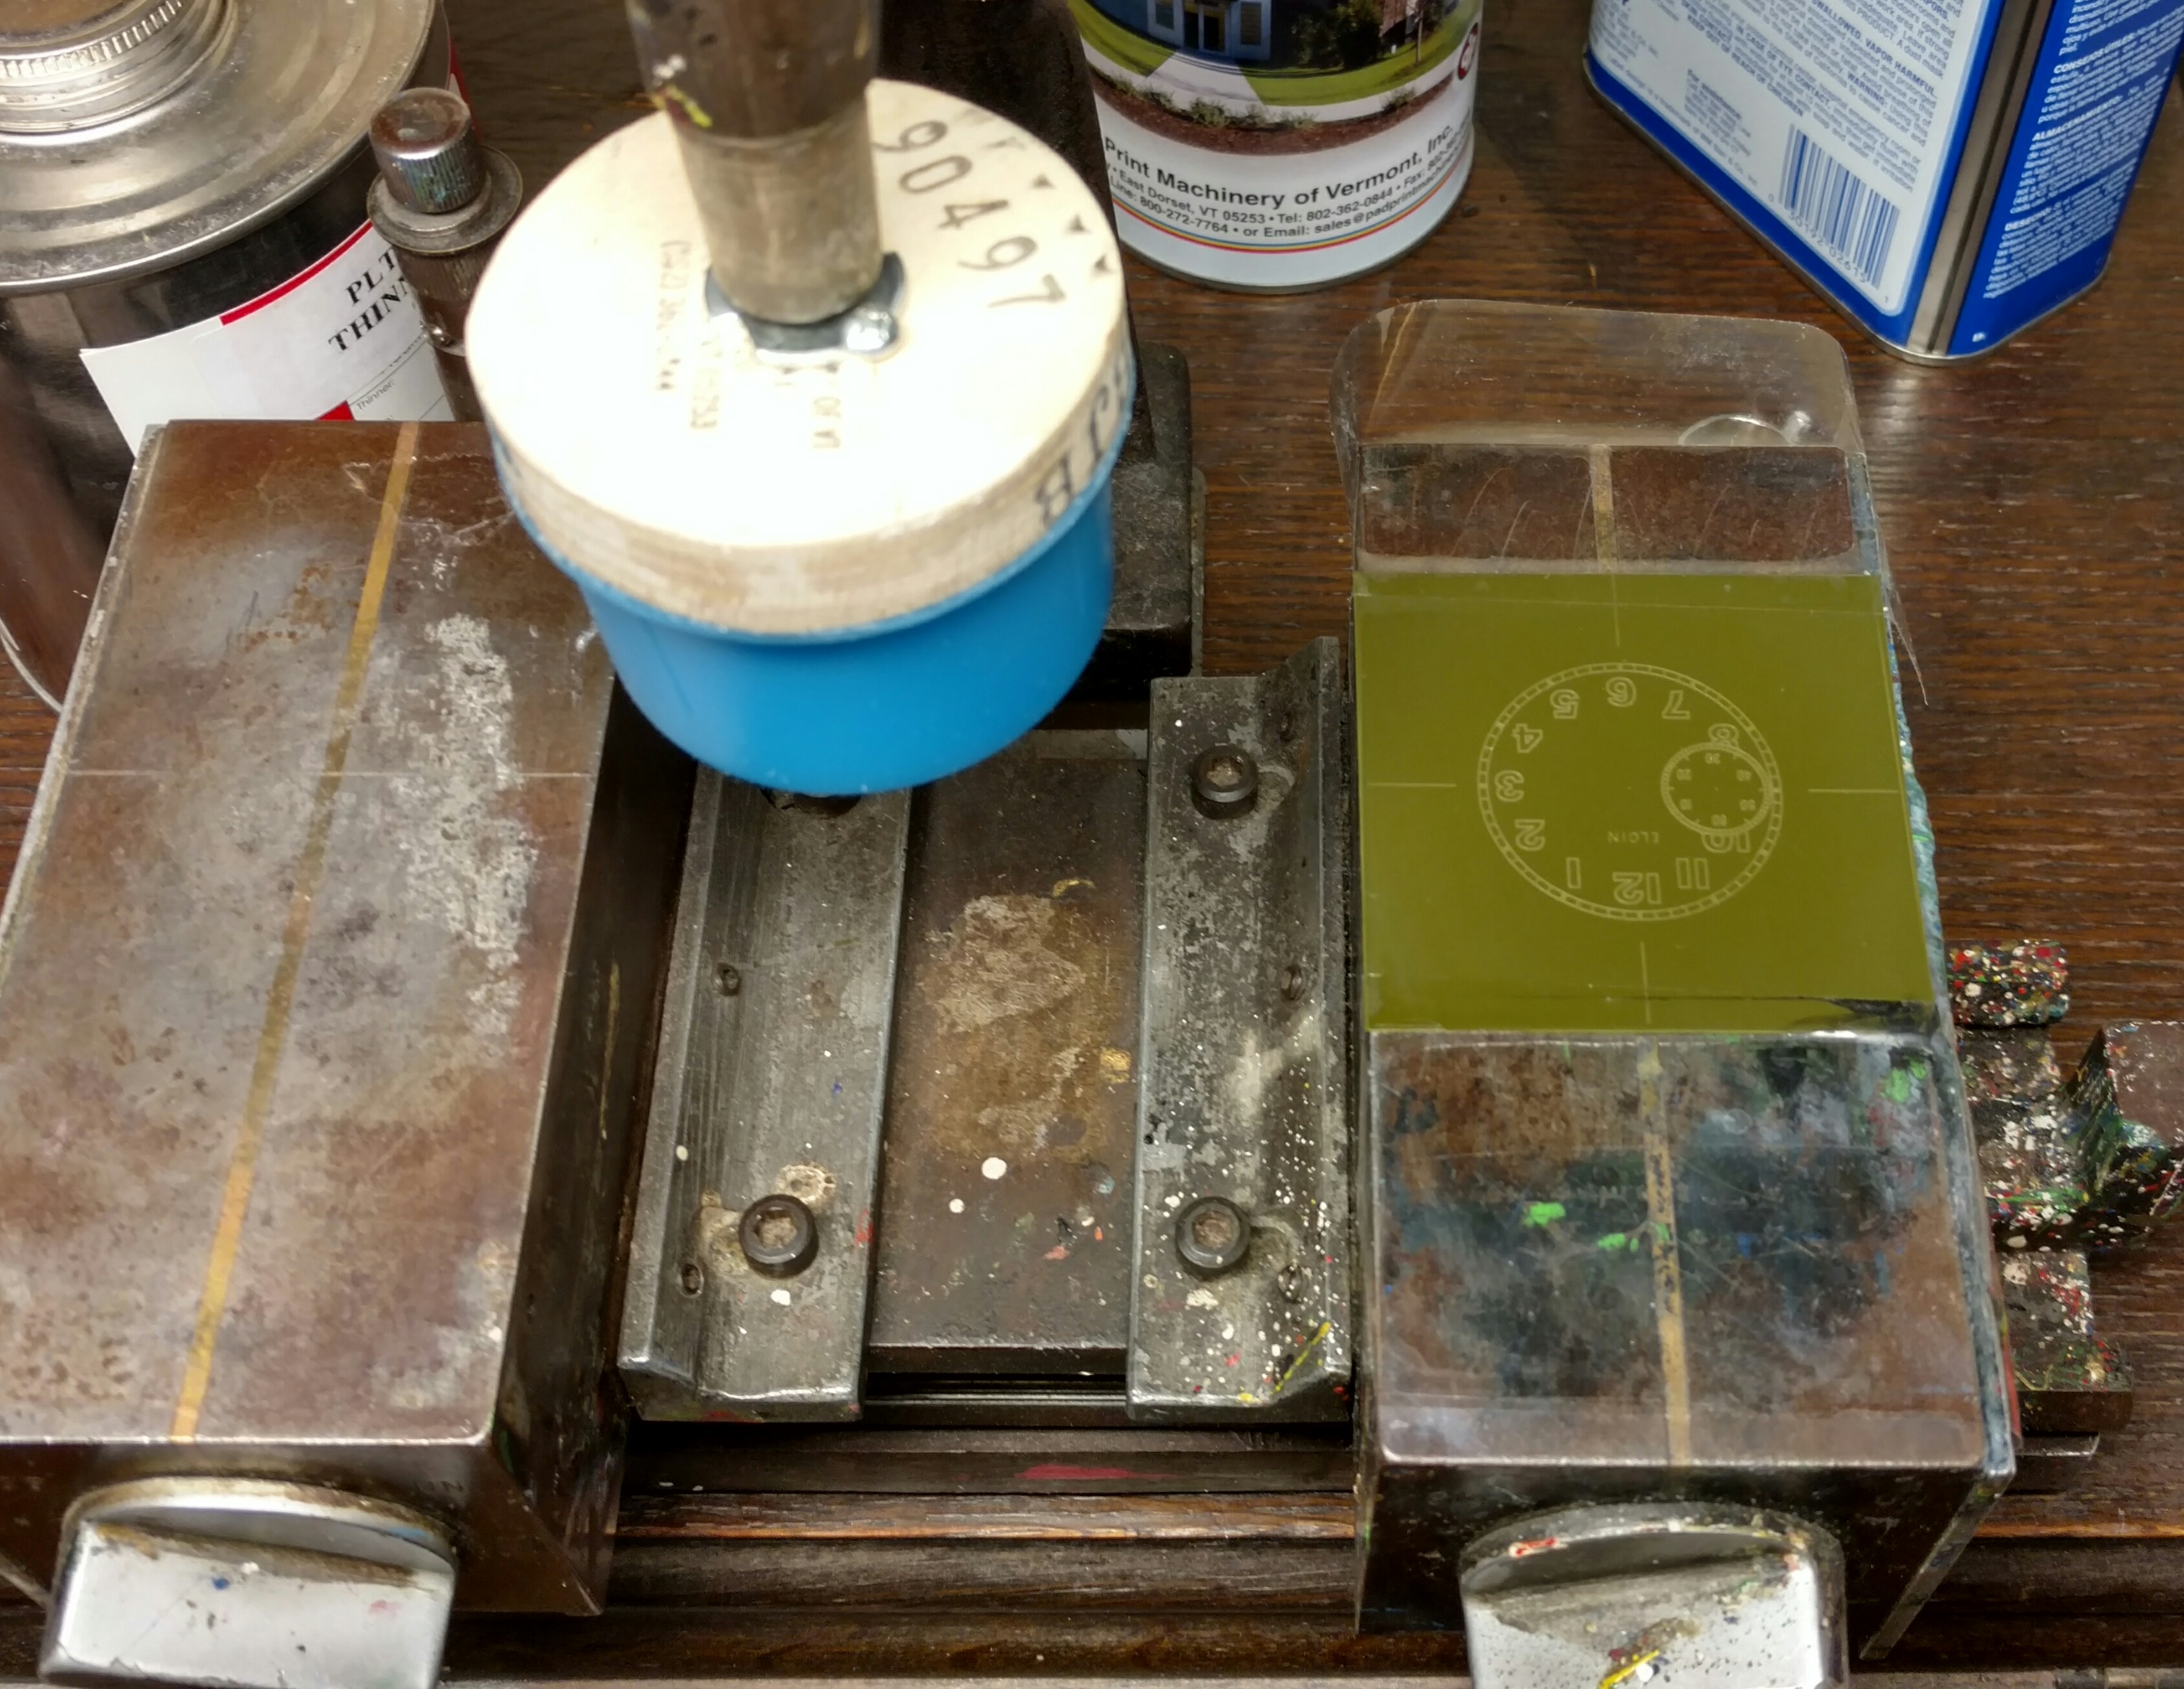
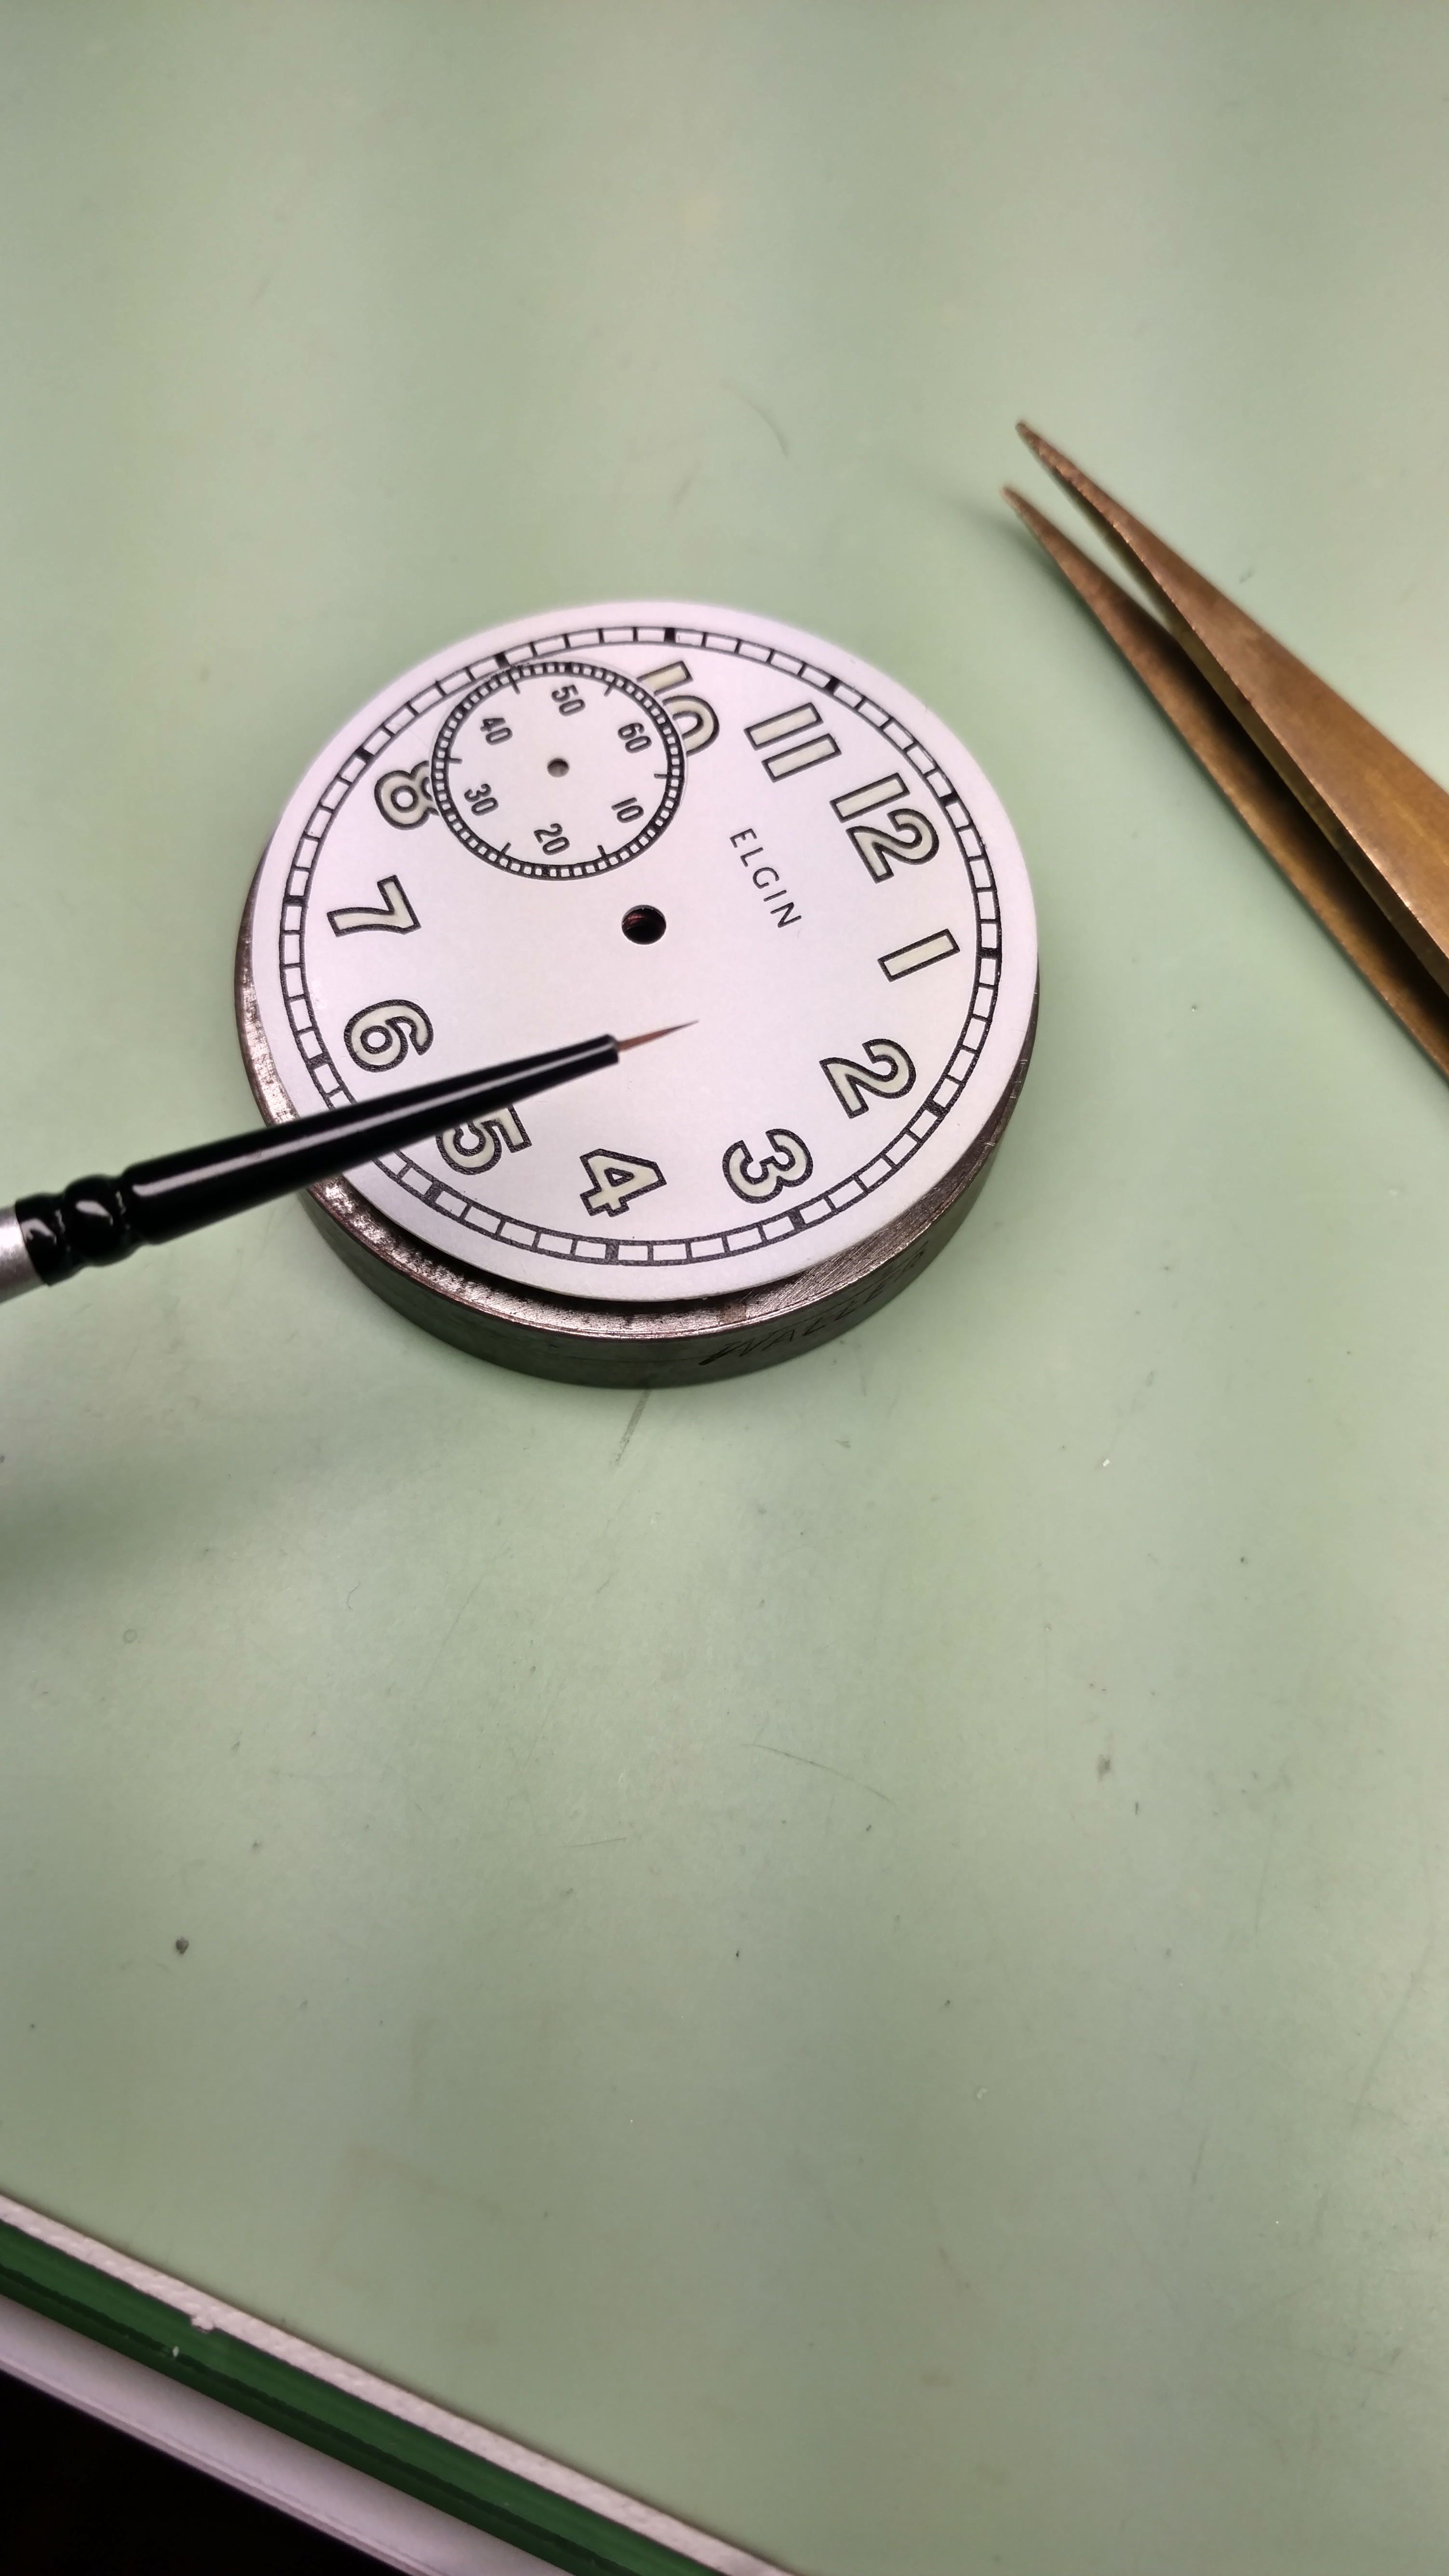
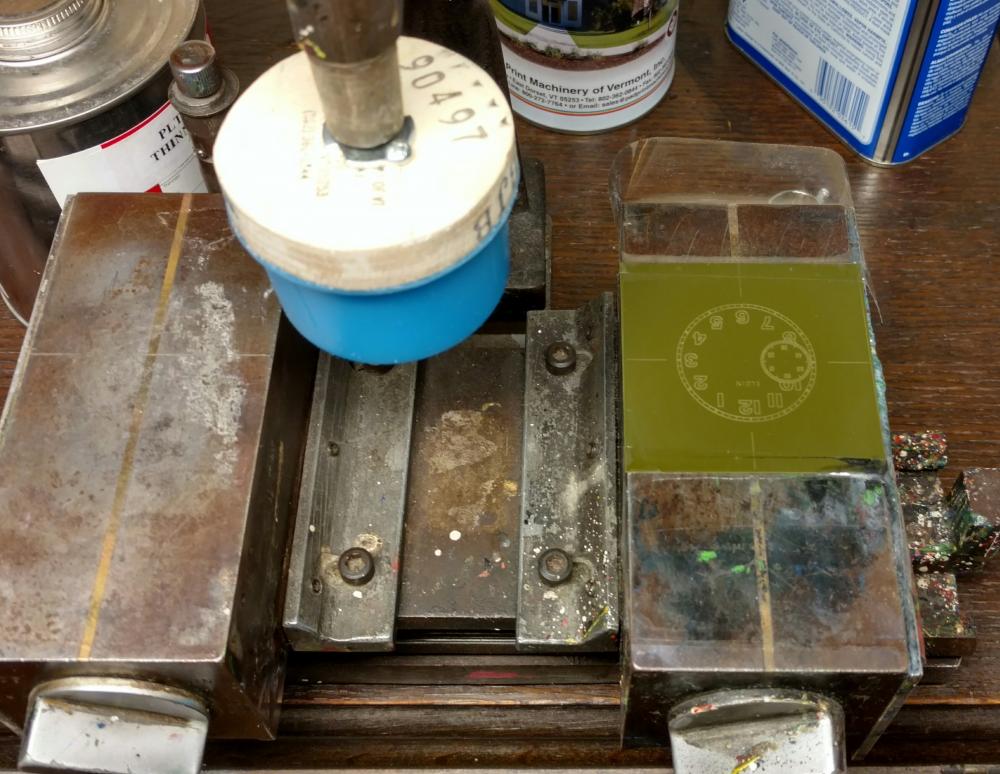
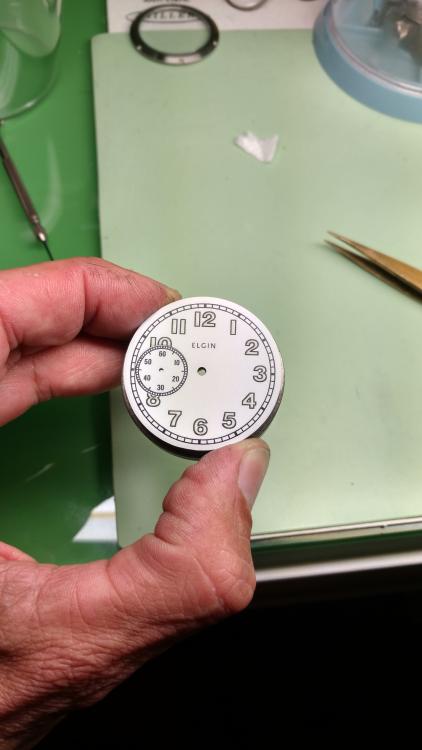
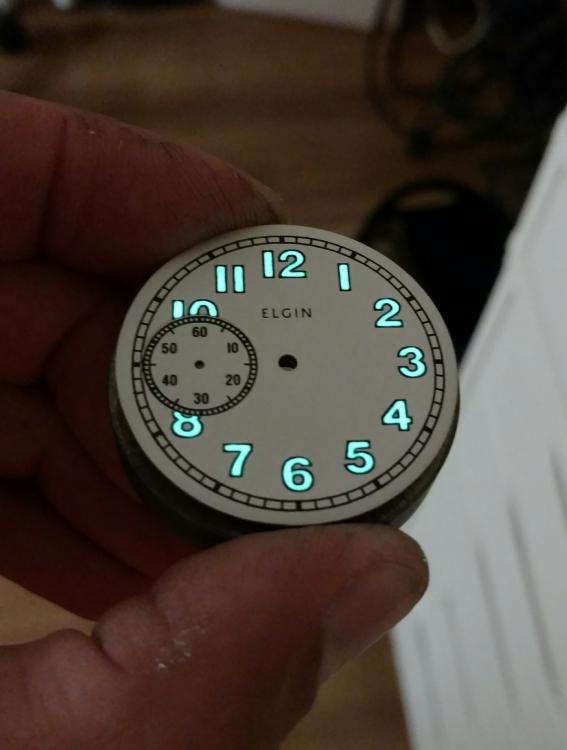
I'm very satisfied with how this dial turned out. I'm building and Elgin pocket watch conversion into wristwatch and wanted a vintage military dial look. I had recently purchased a lume kit but hadn't had the chance to use it yet. I design the dial with bold outlined numerals for the purpose of filling with lume. It really turned out better than I ever hoped! The first dial I did turned out very acceptable, except that I had another issue with it and had to start over. I learned quite a bit just from doing that one dial. Once I had the printing plate made I repainted the original Elgin dial to a flat white. I then Inked the plate and printed the new dial. Once everything was dry I then slowly added the lume using a 100 - 0 paintbrush which is about the size of a watch Oiler. I went around the dial 4 times adding a layer little by little. I'm very surprised just how much Lume this process adds. The markers have a nice three-dimensional heft to them...

 1 point
 -
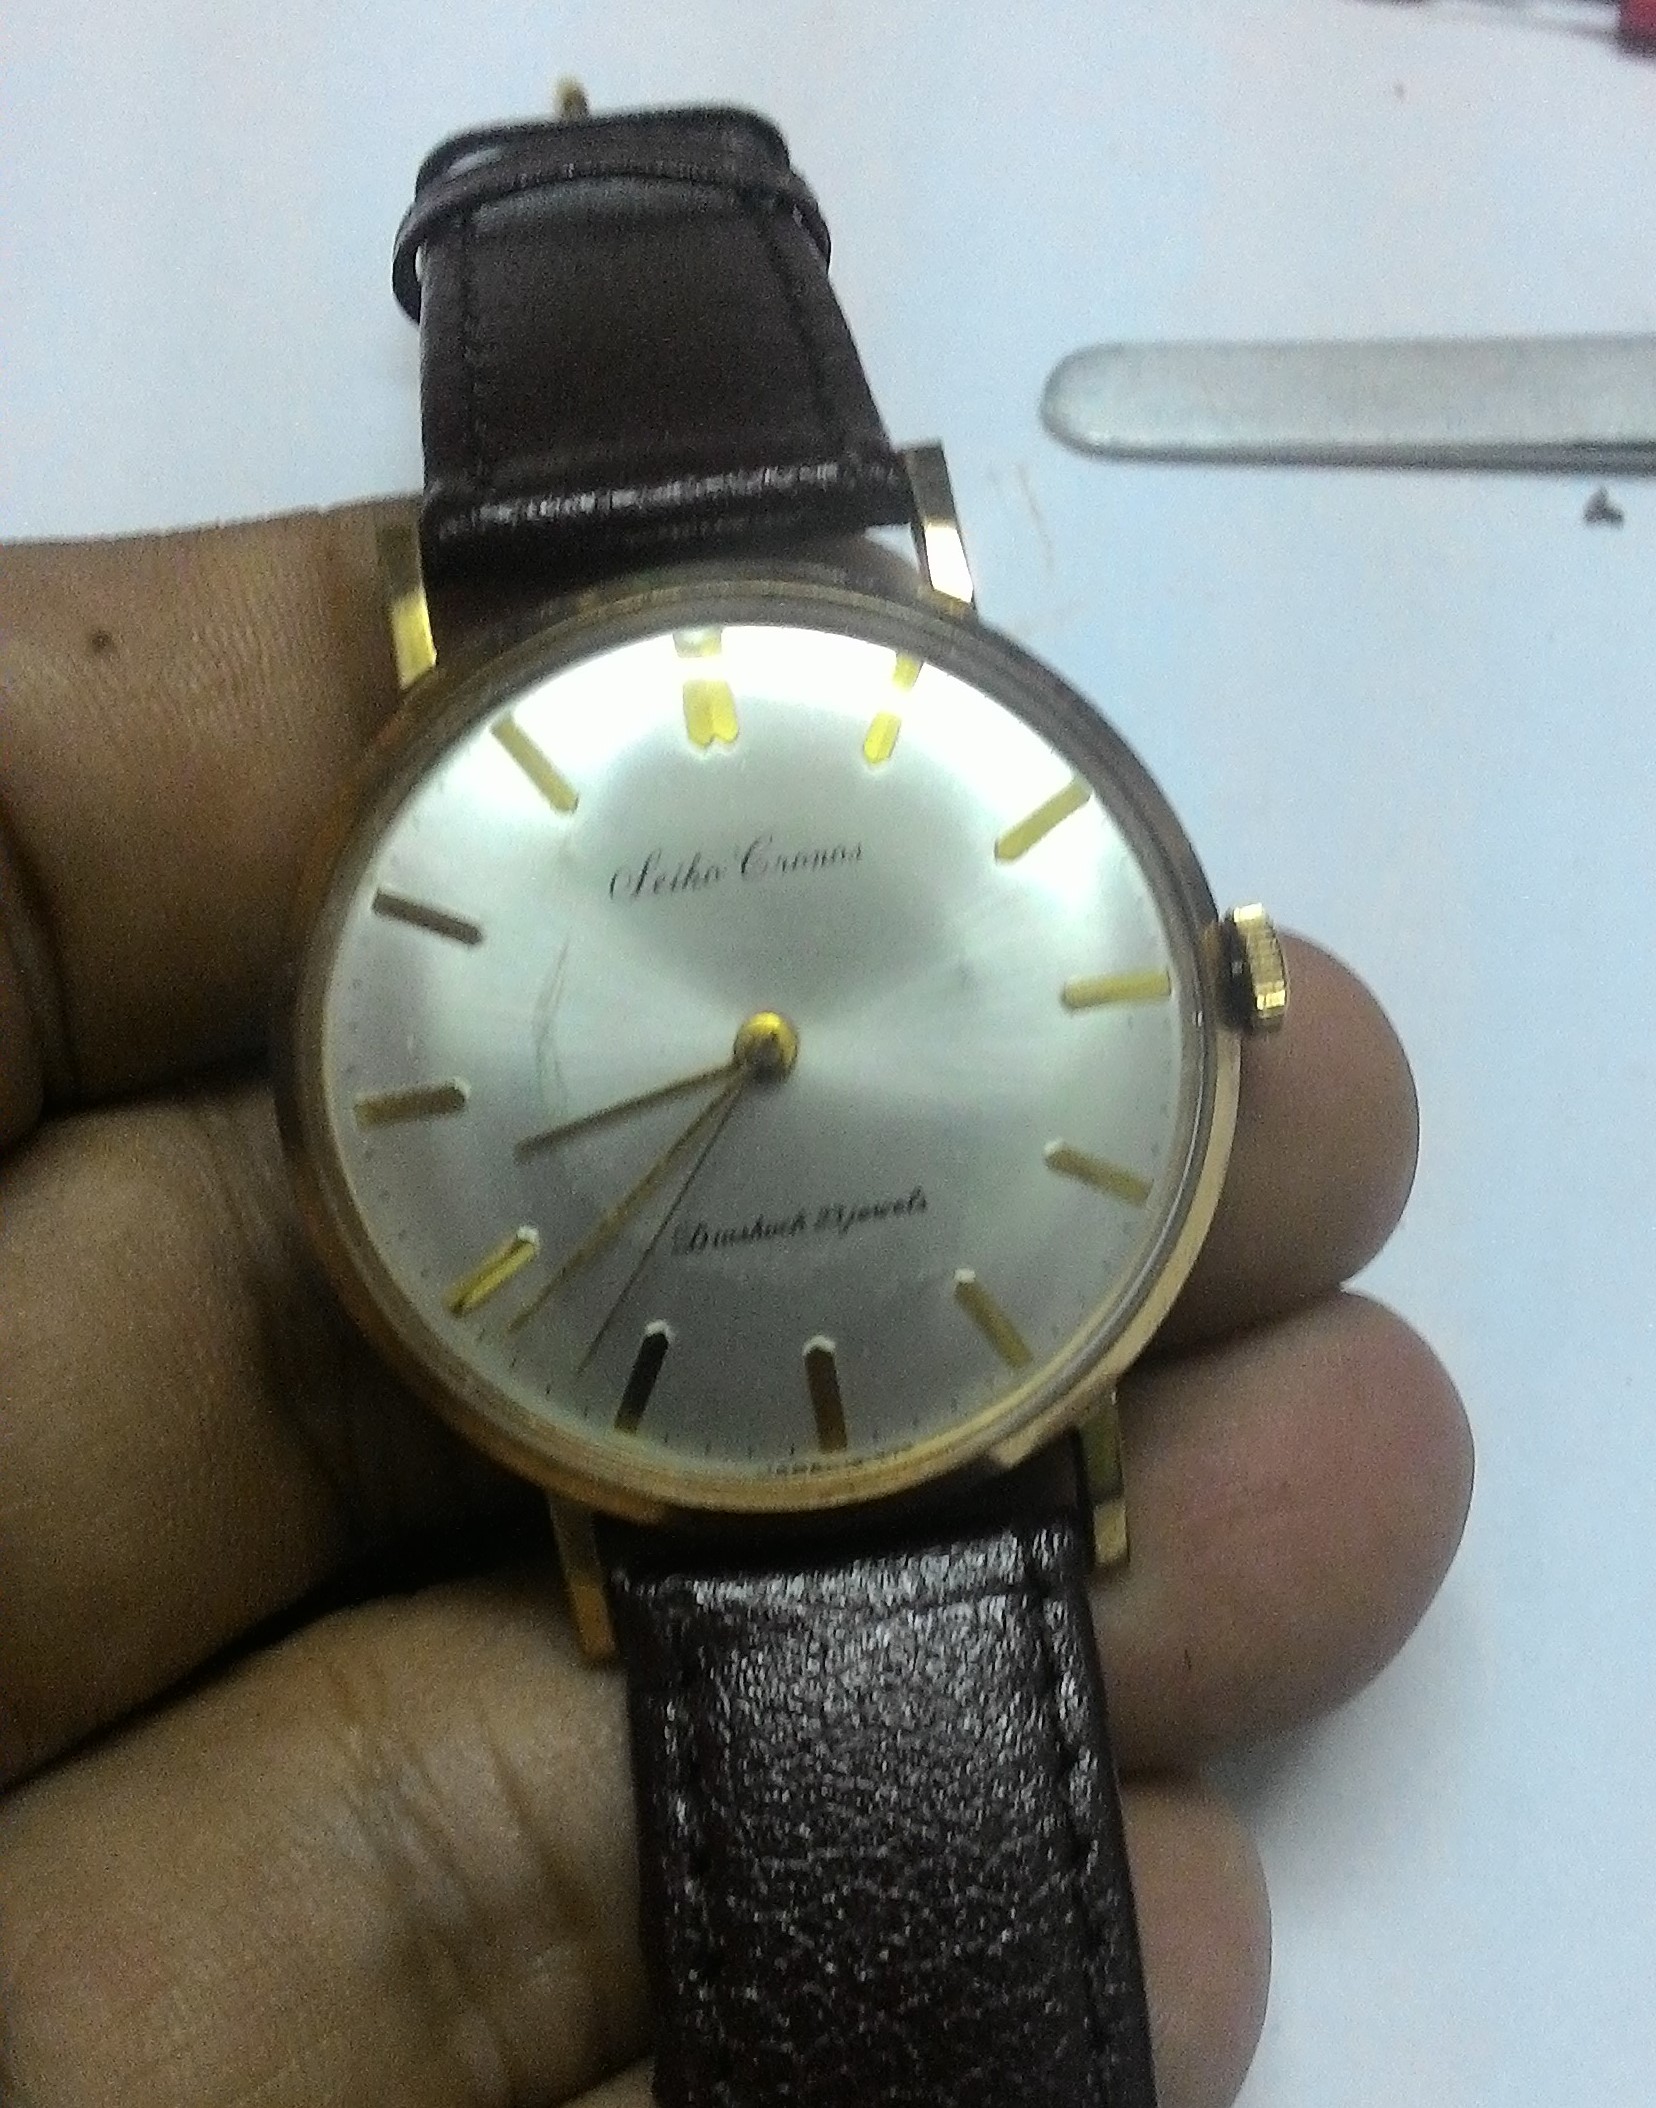
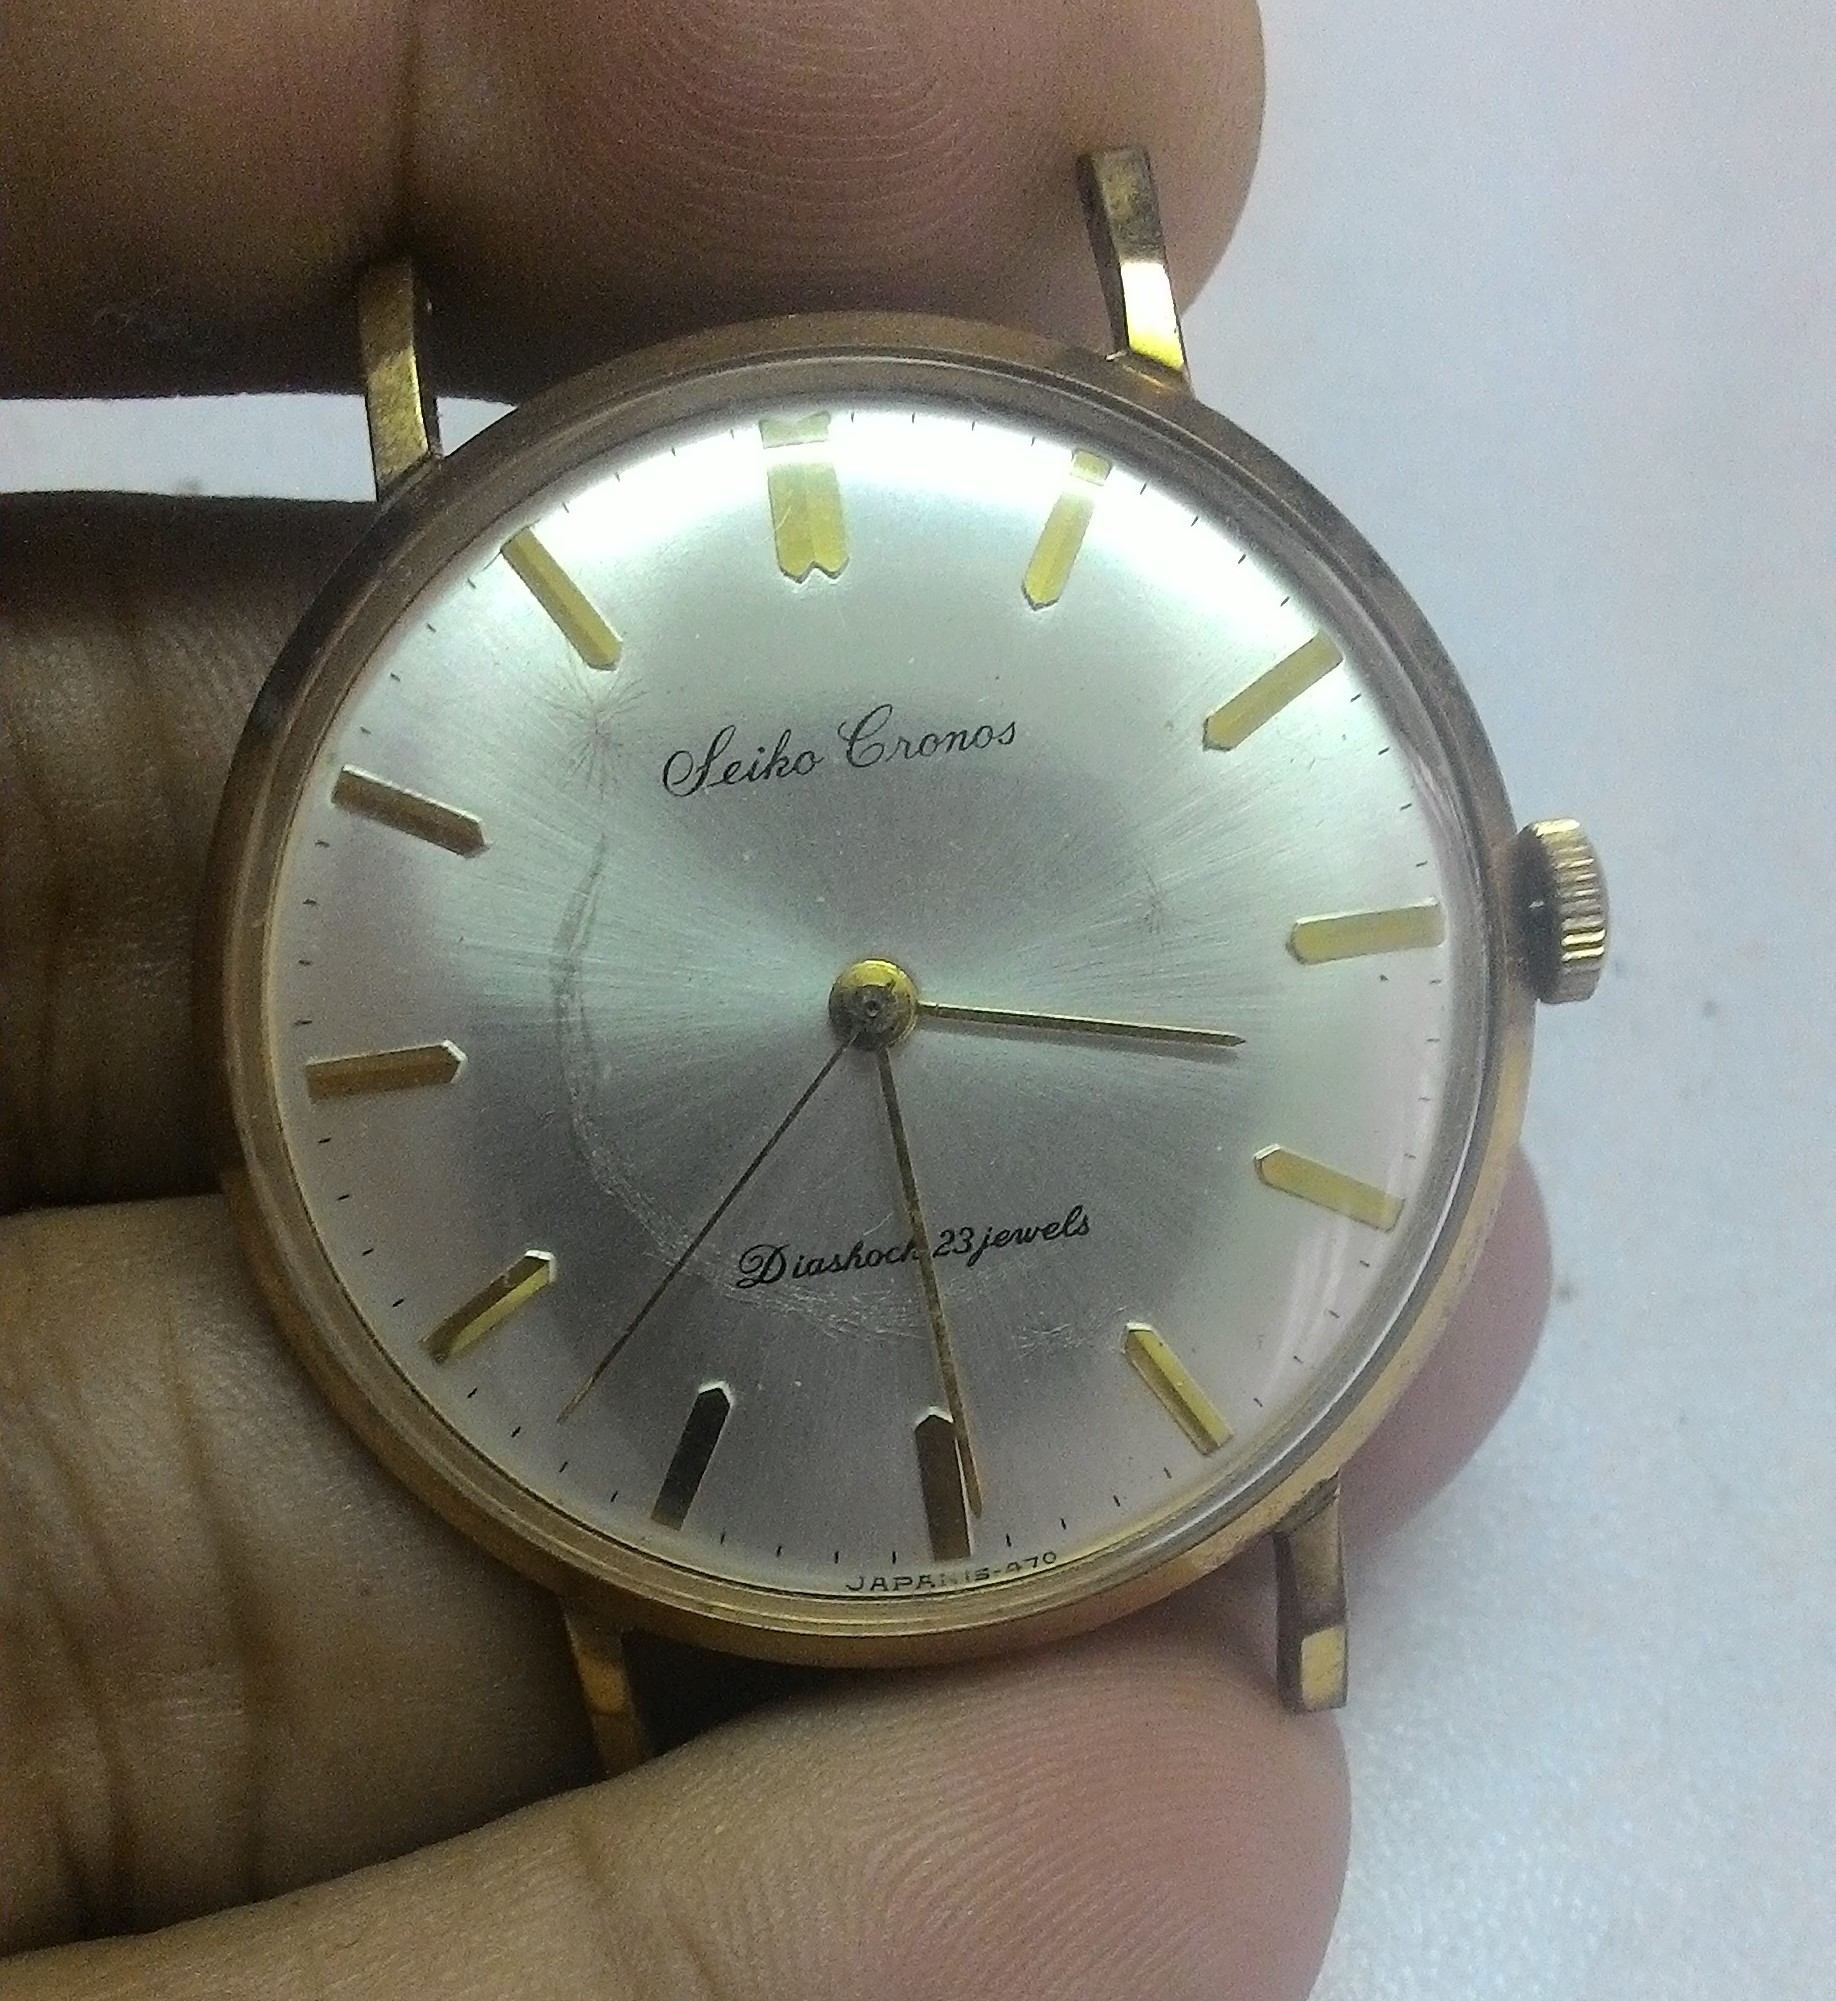
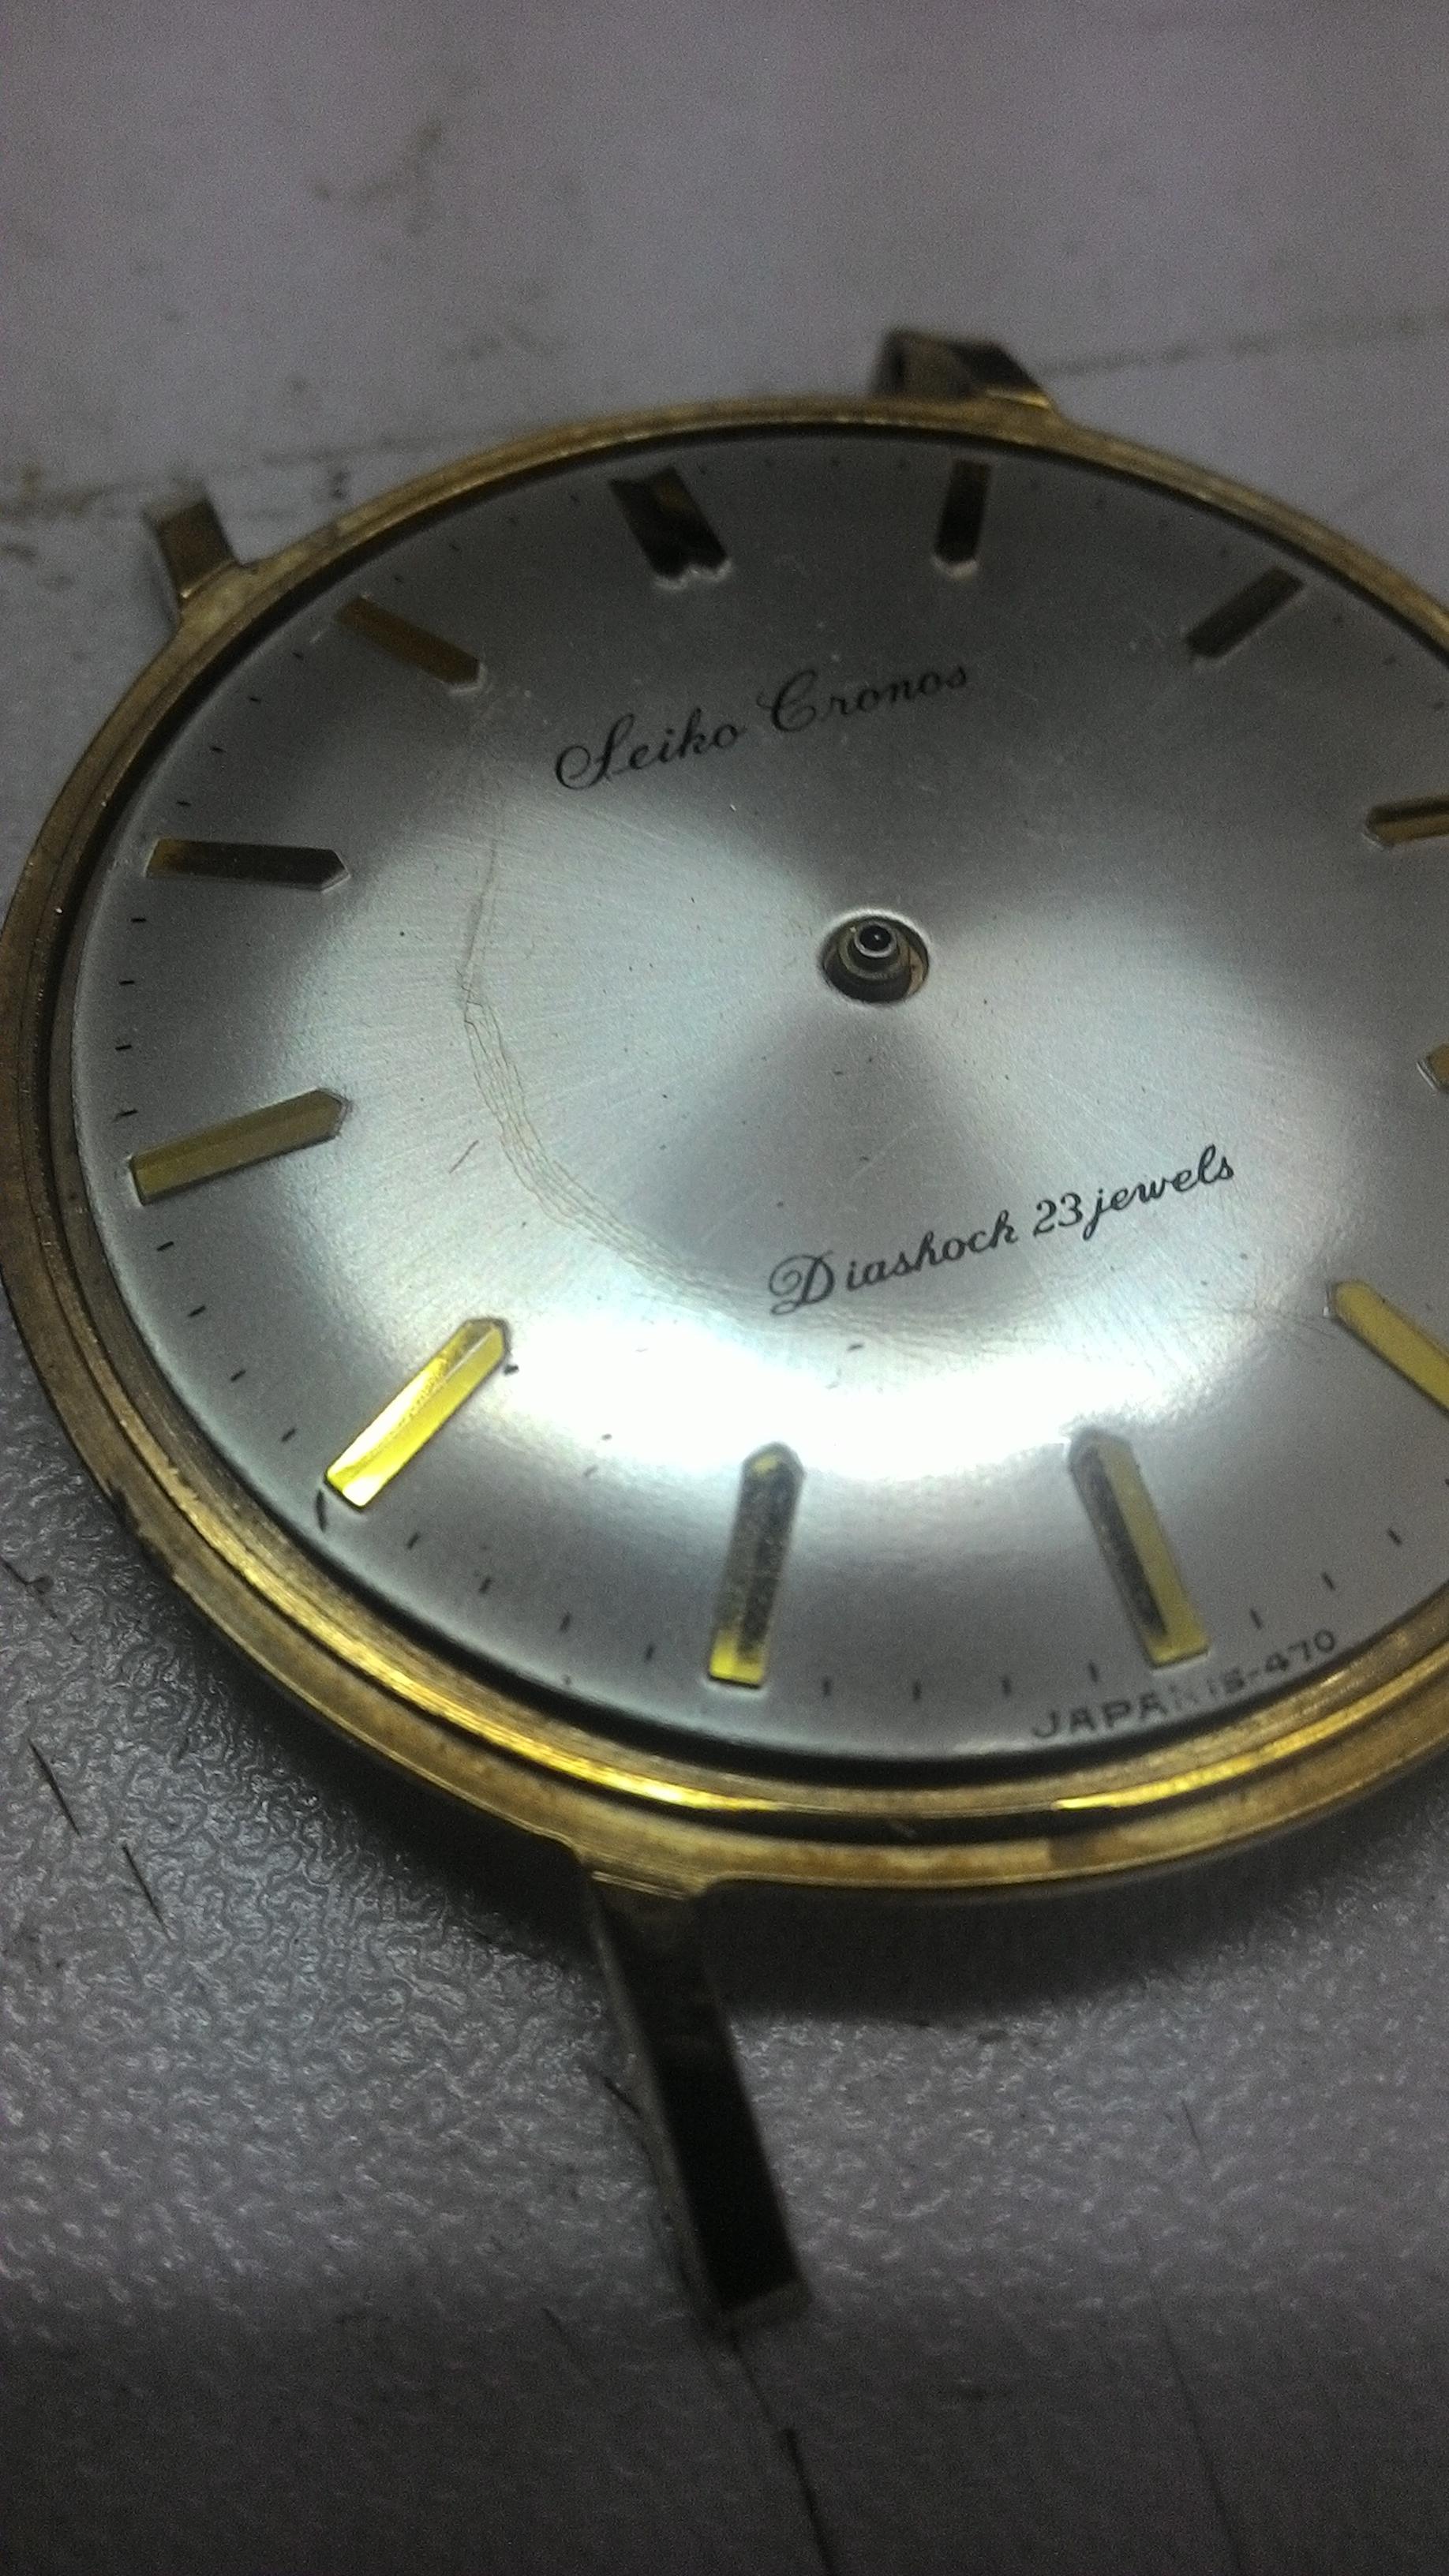
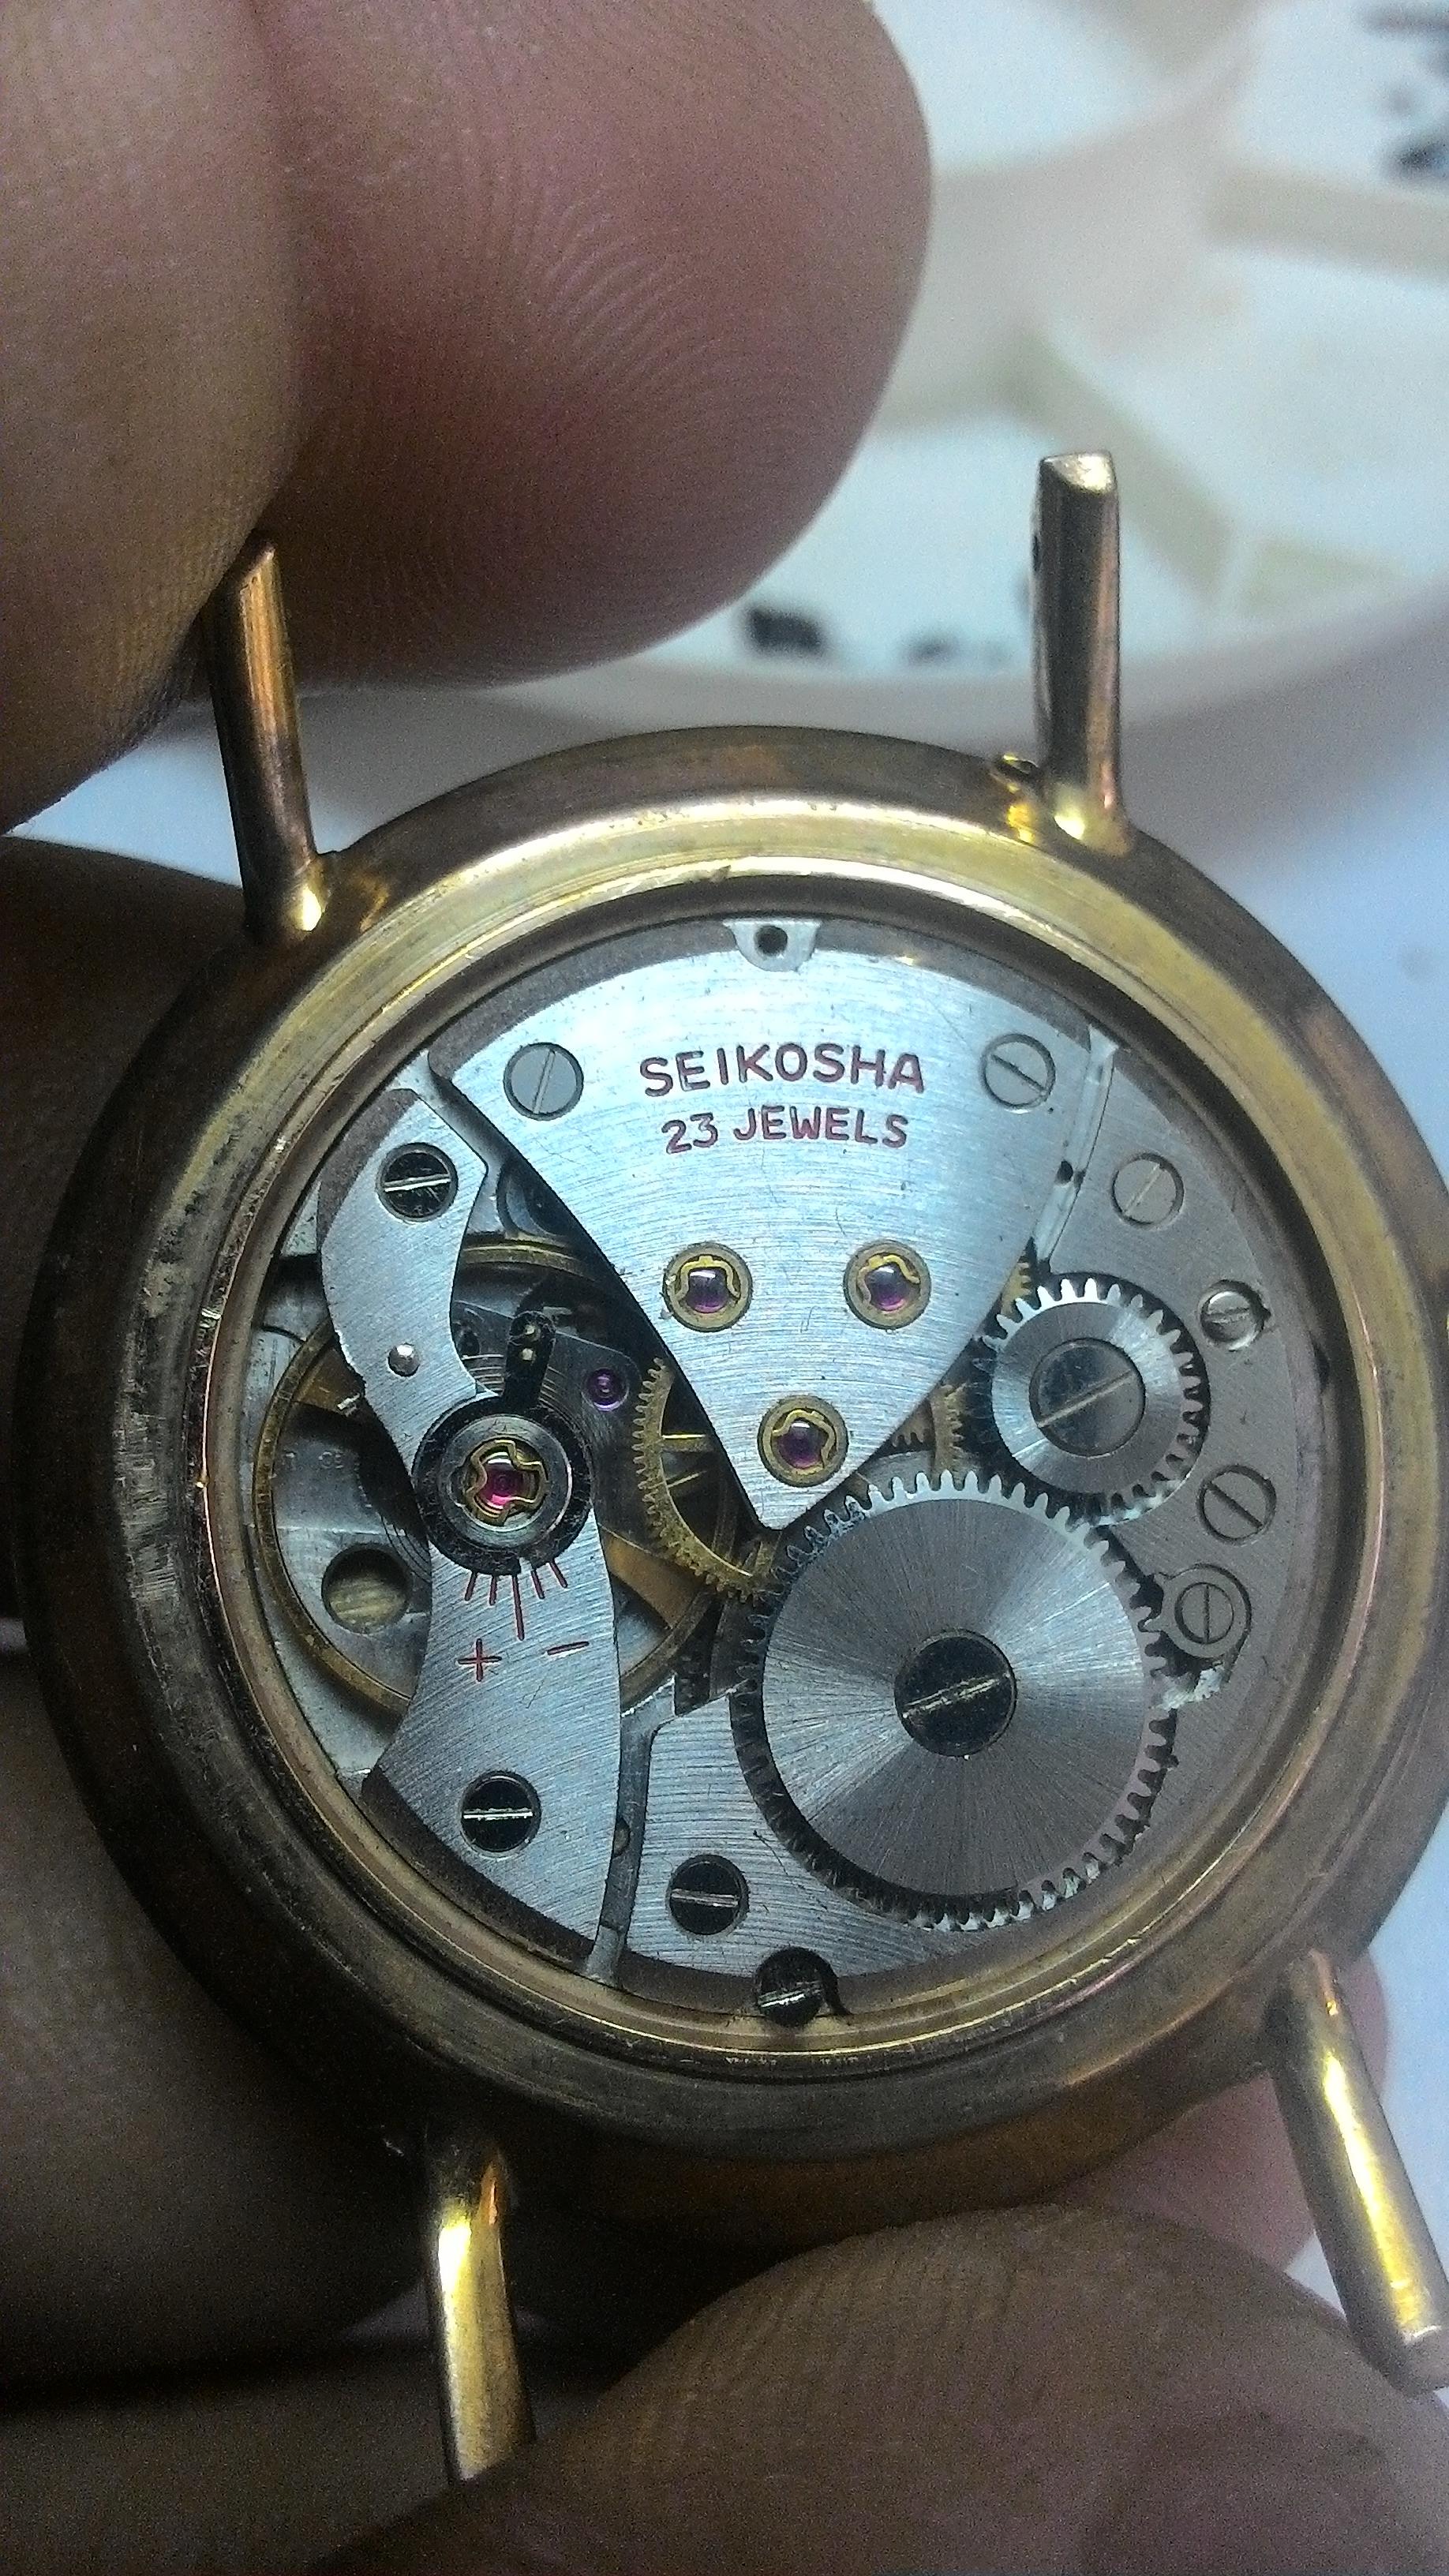
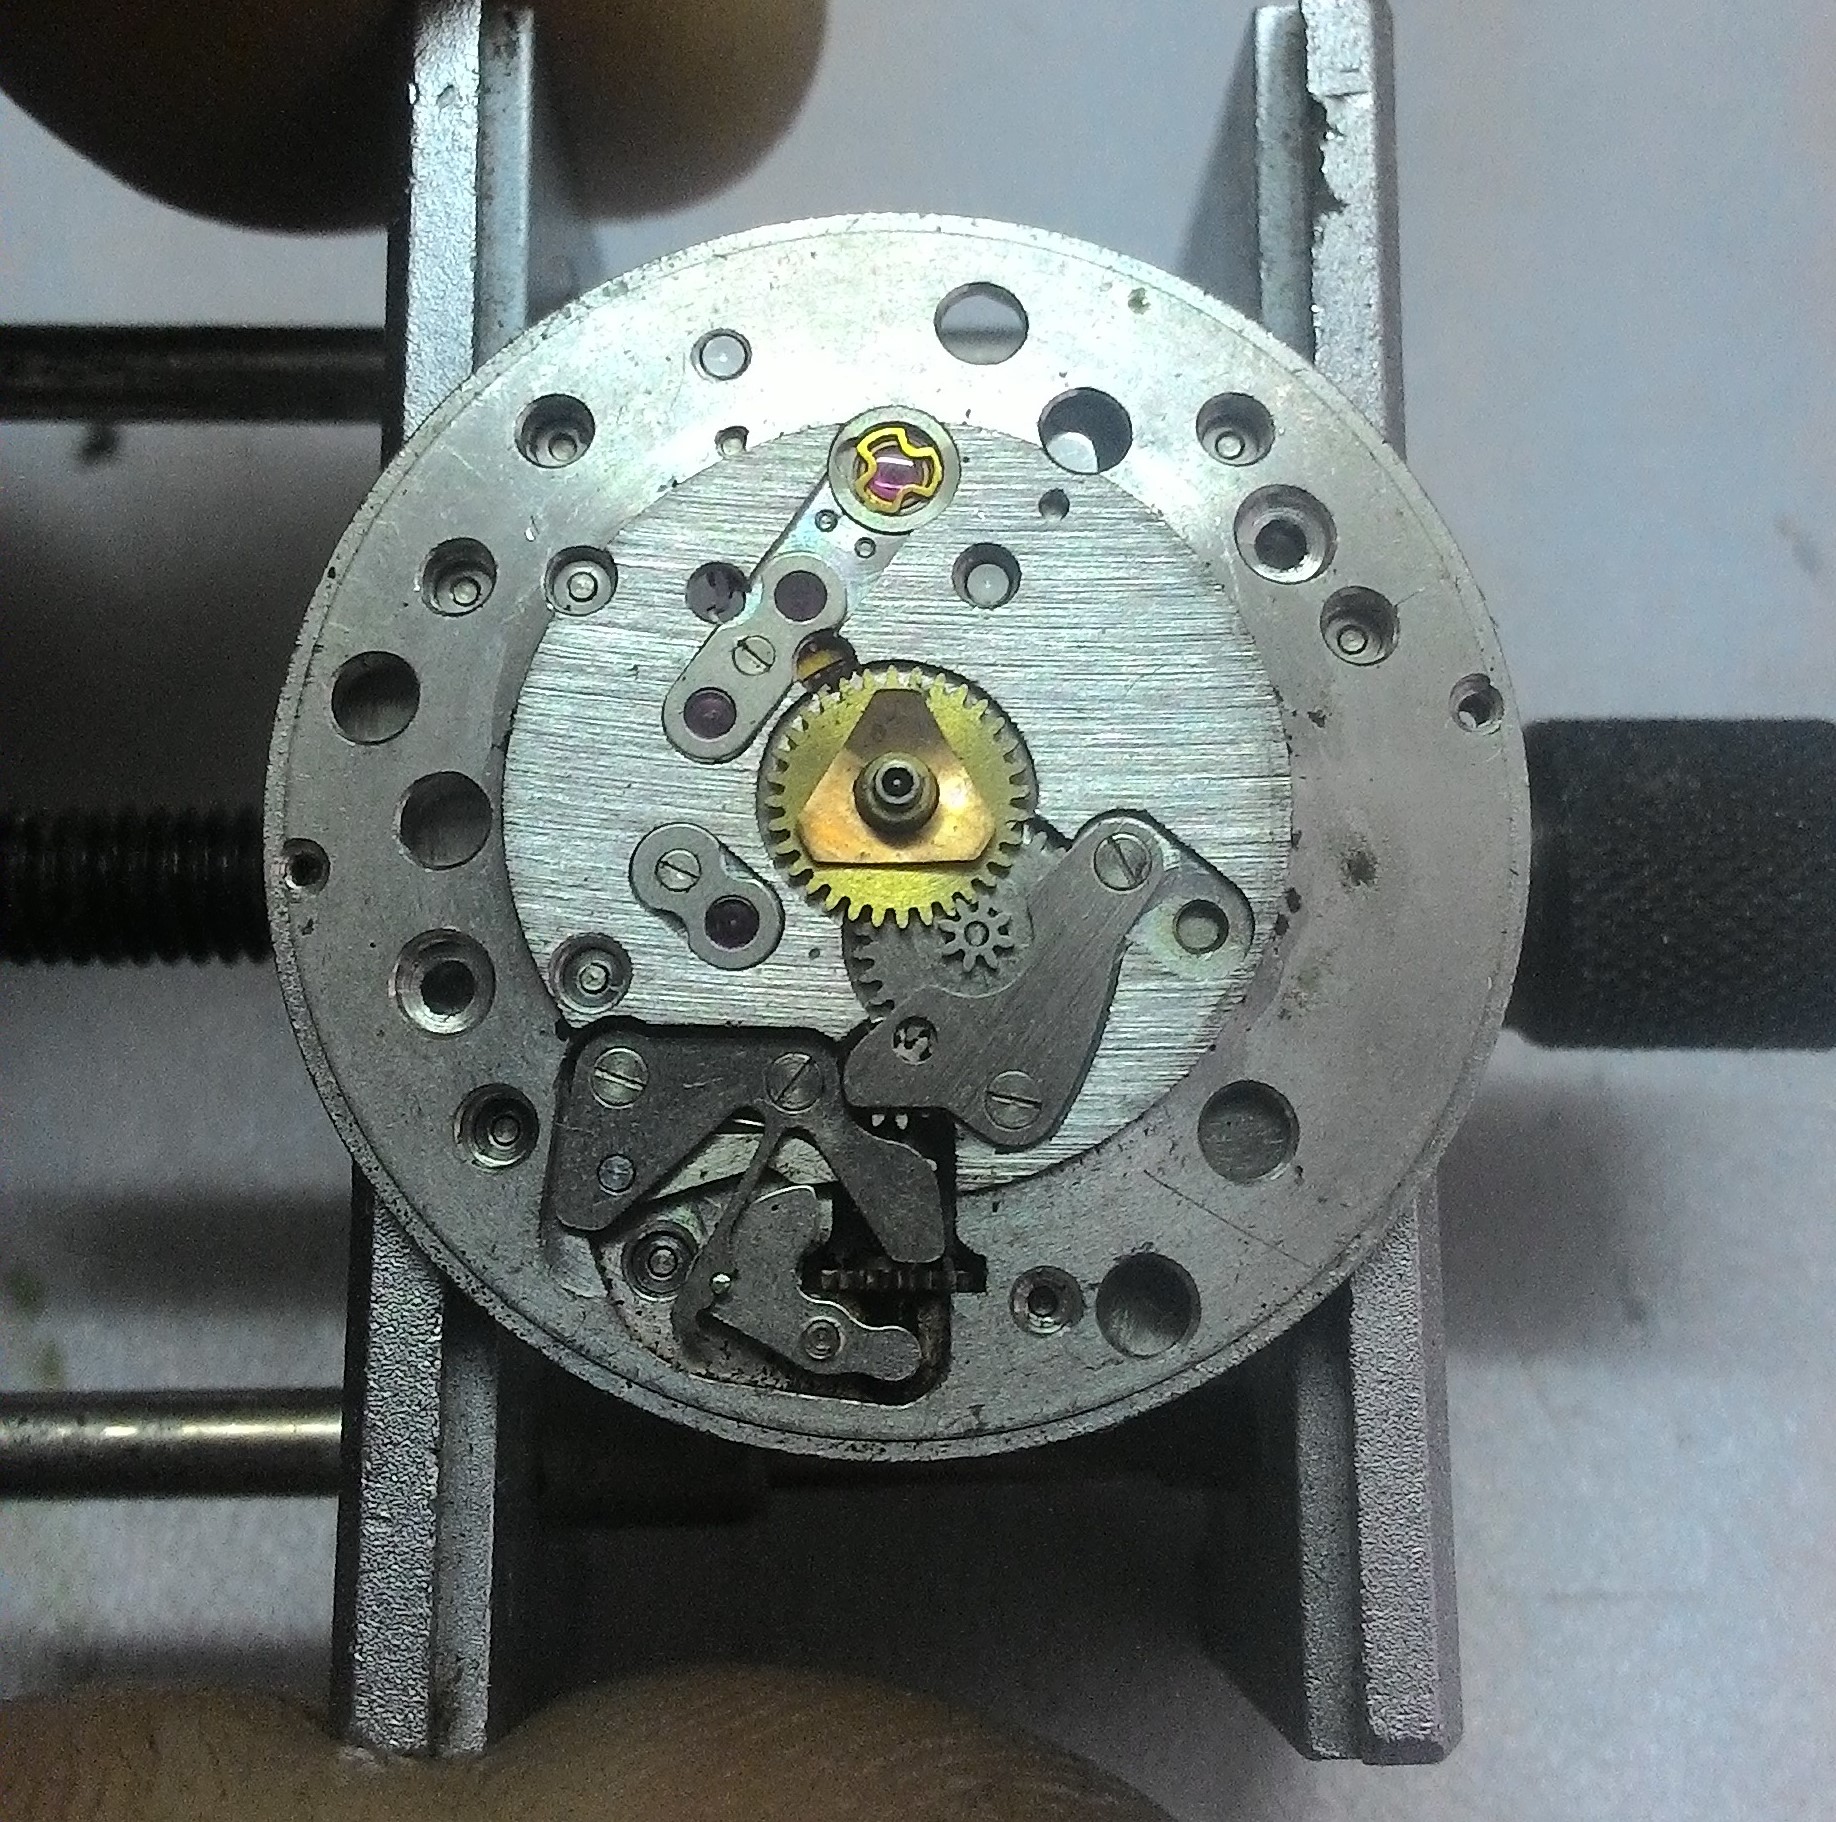
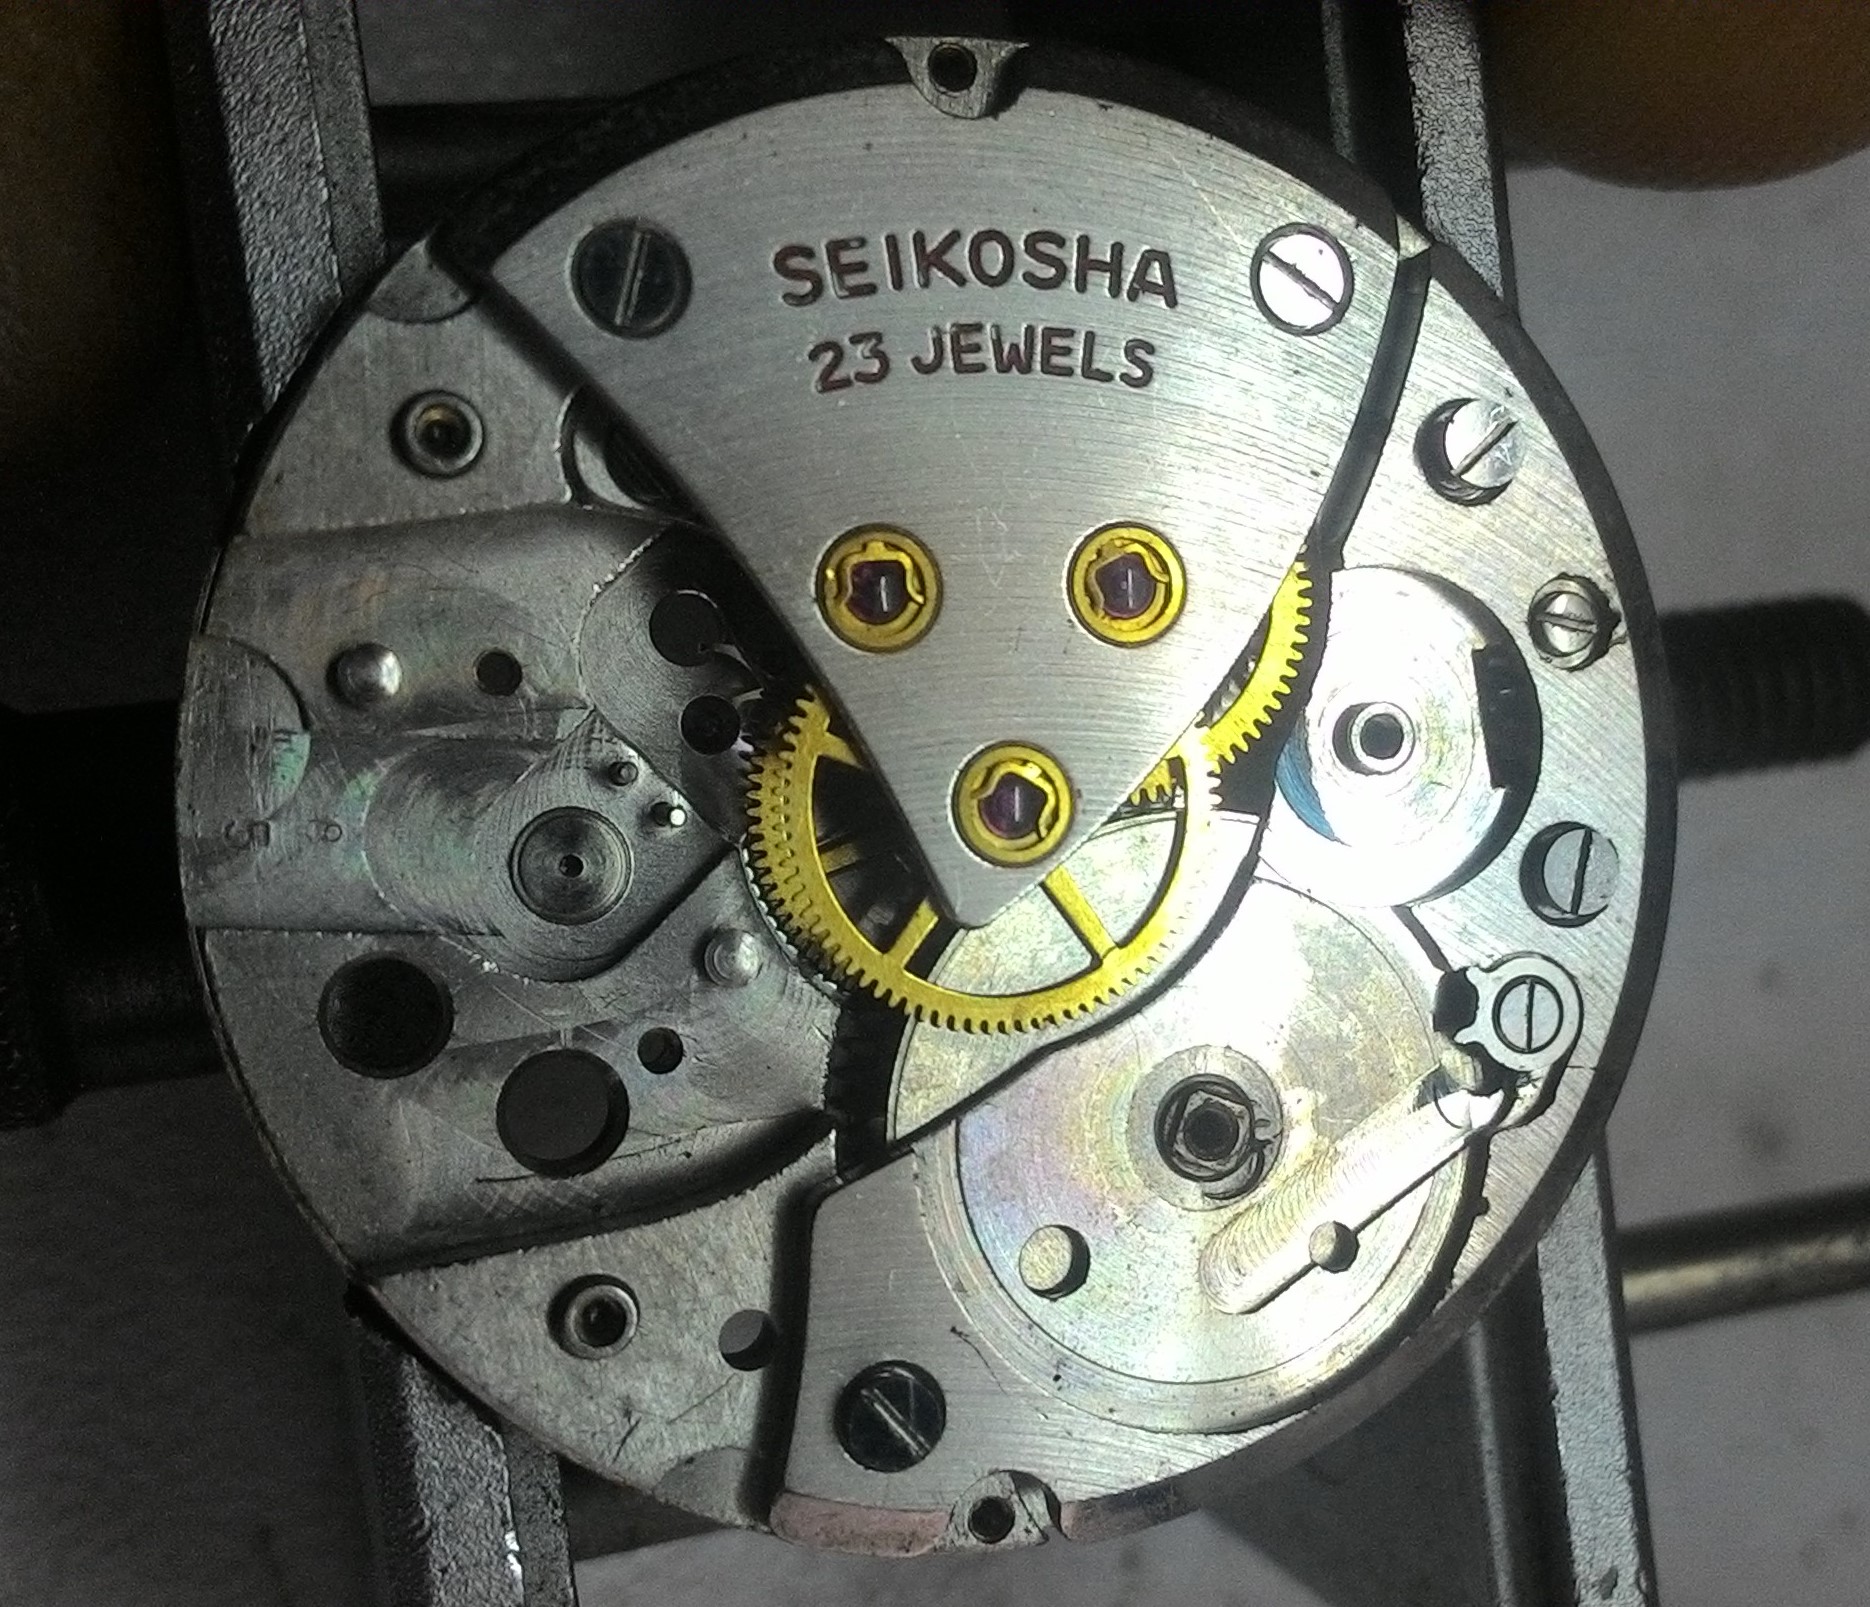
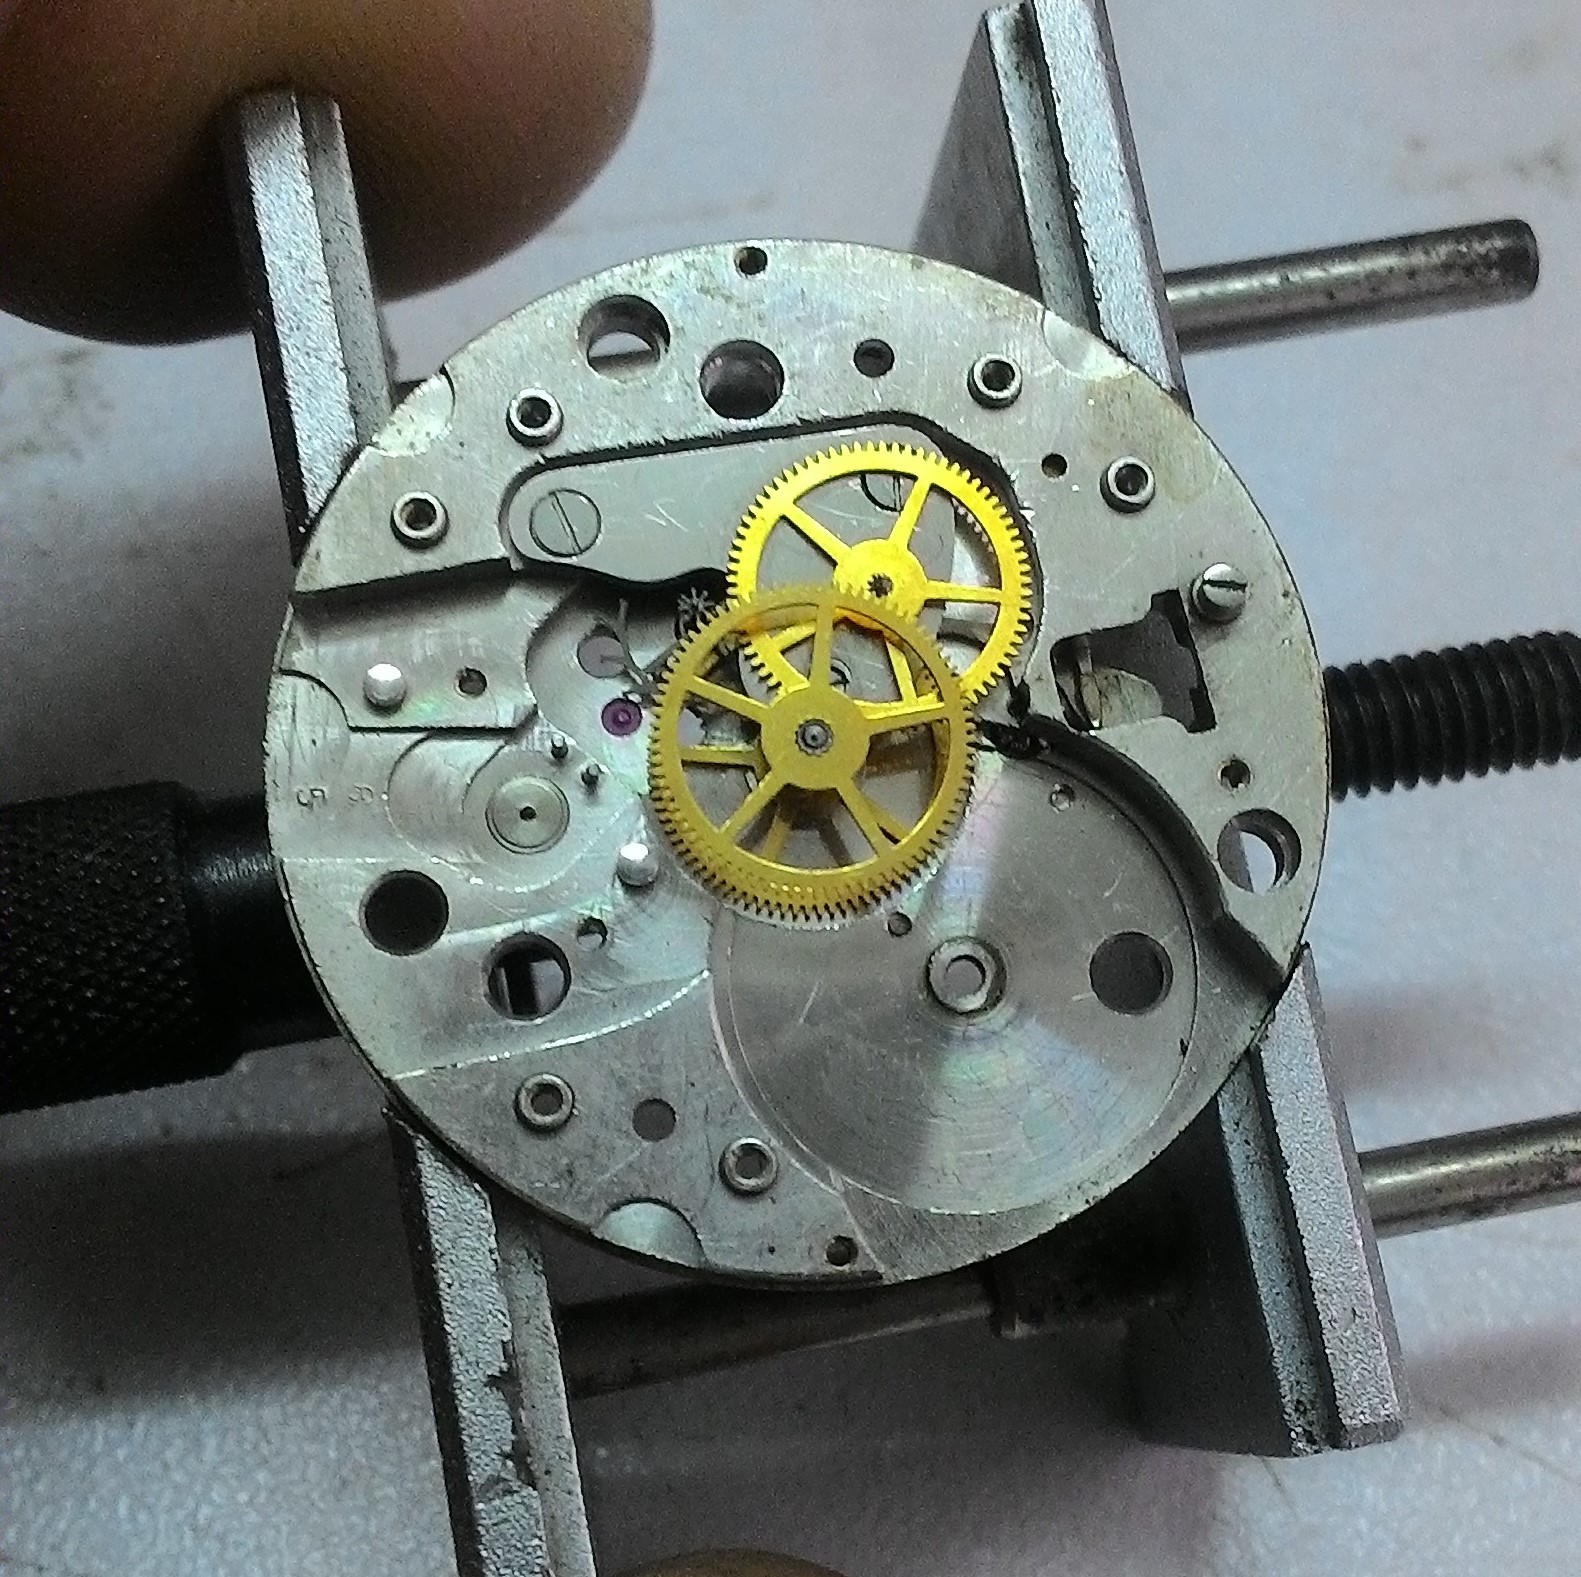
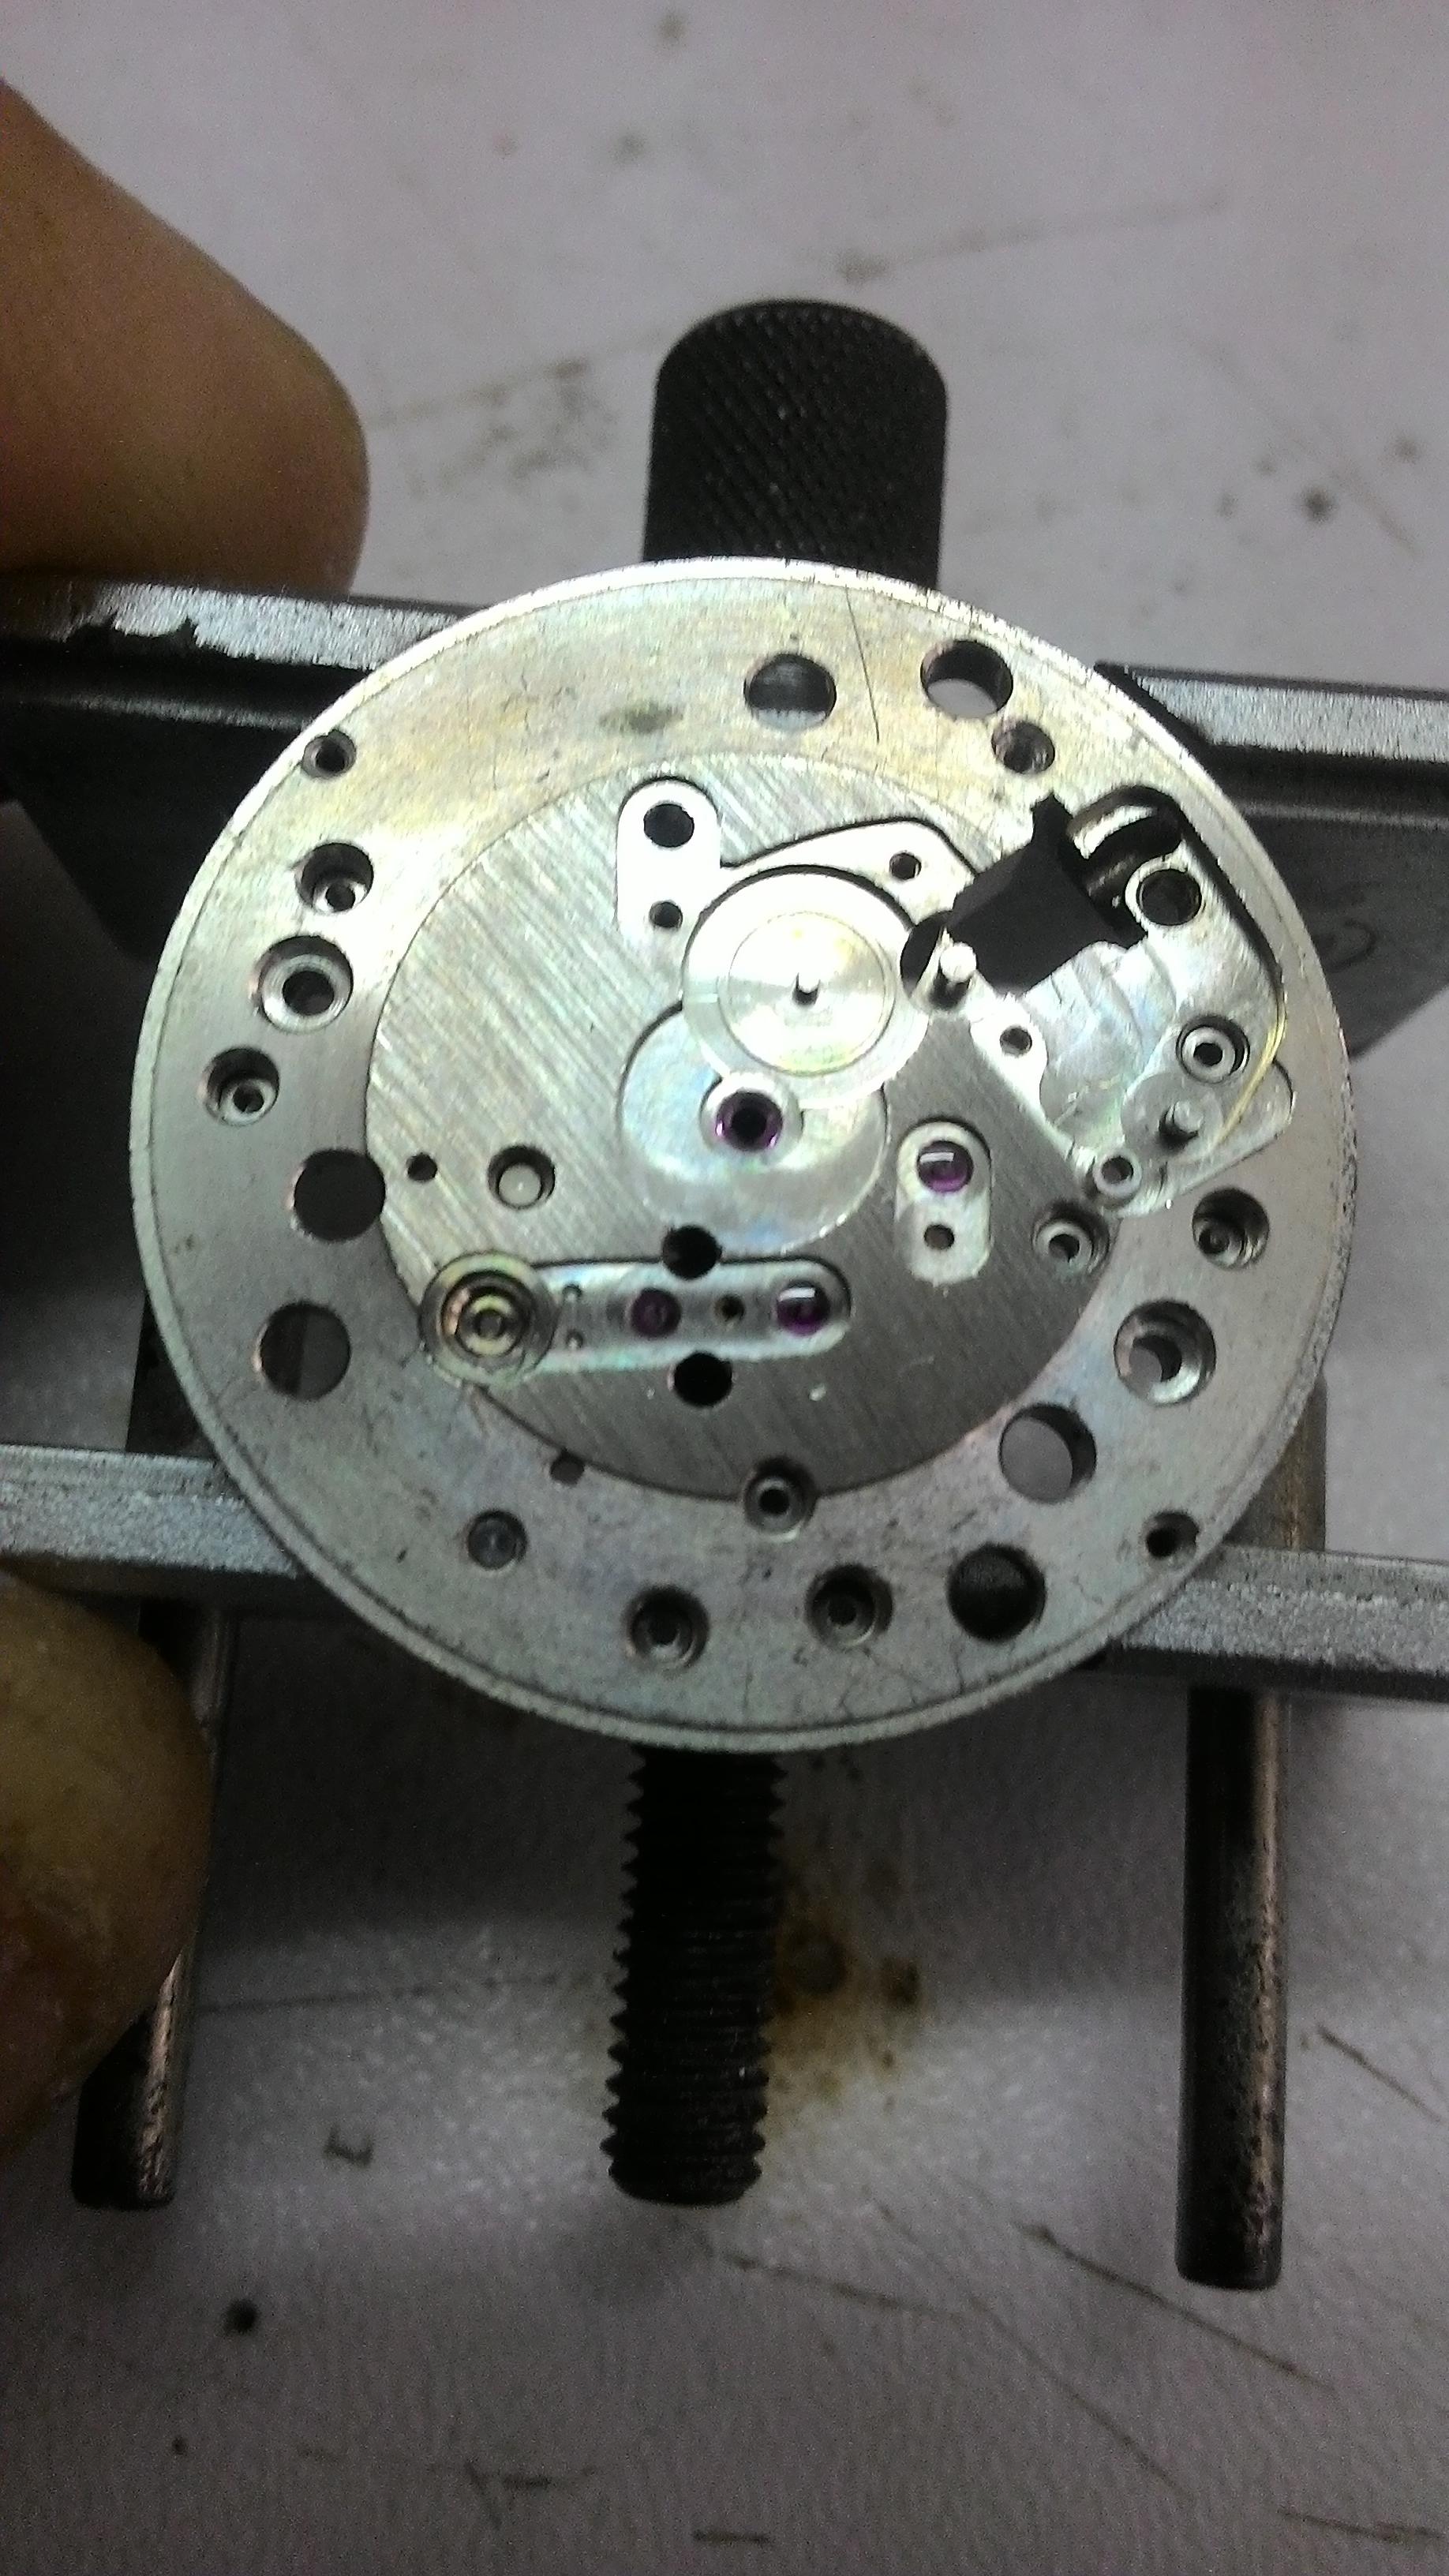
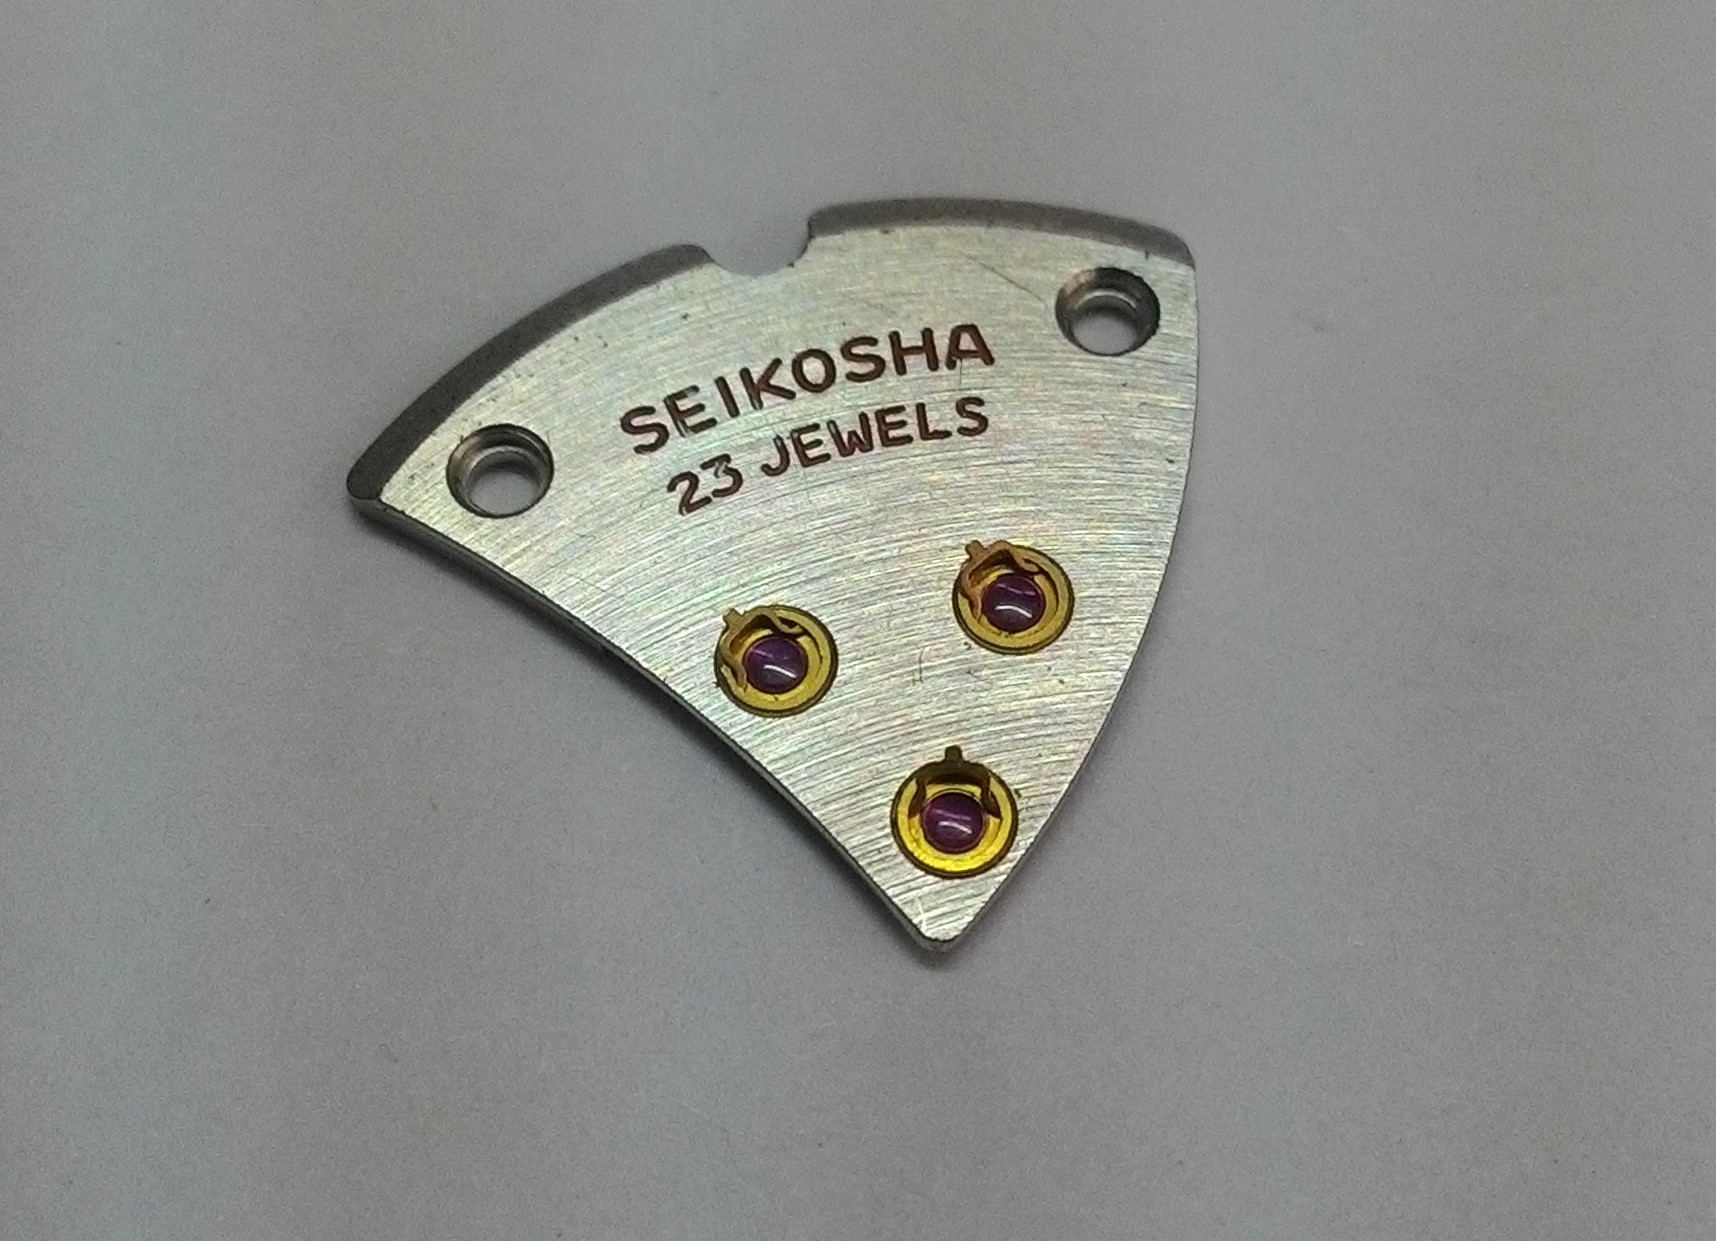
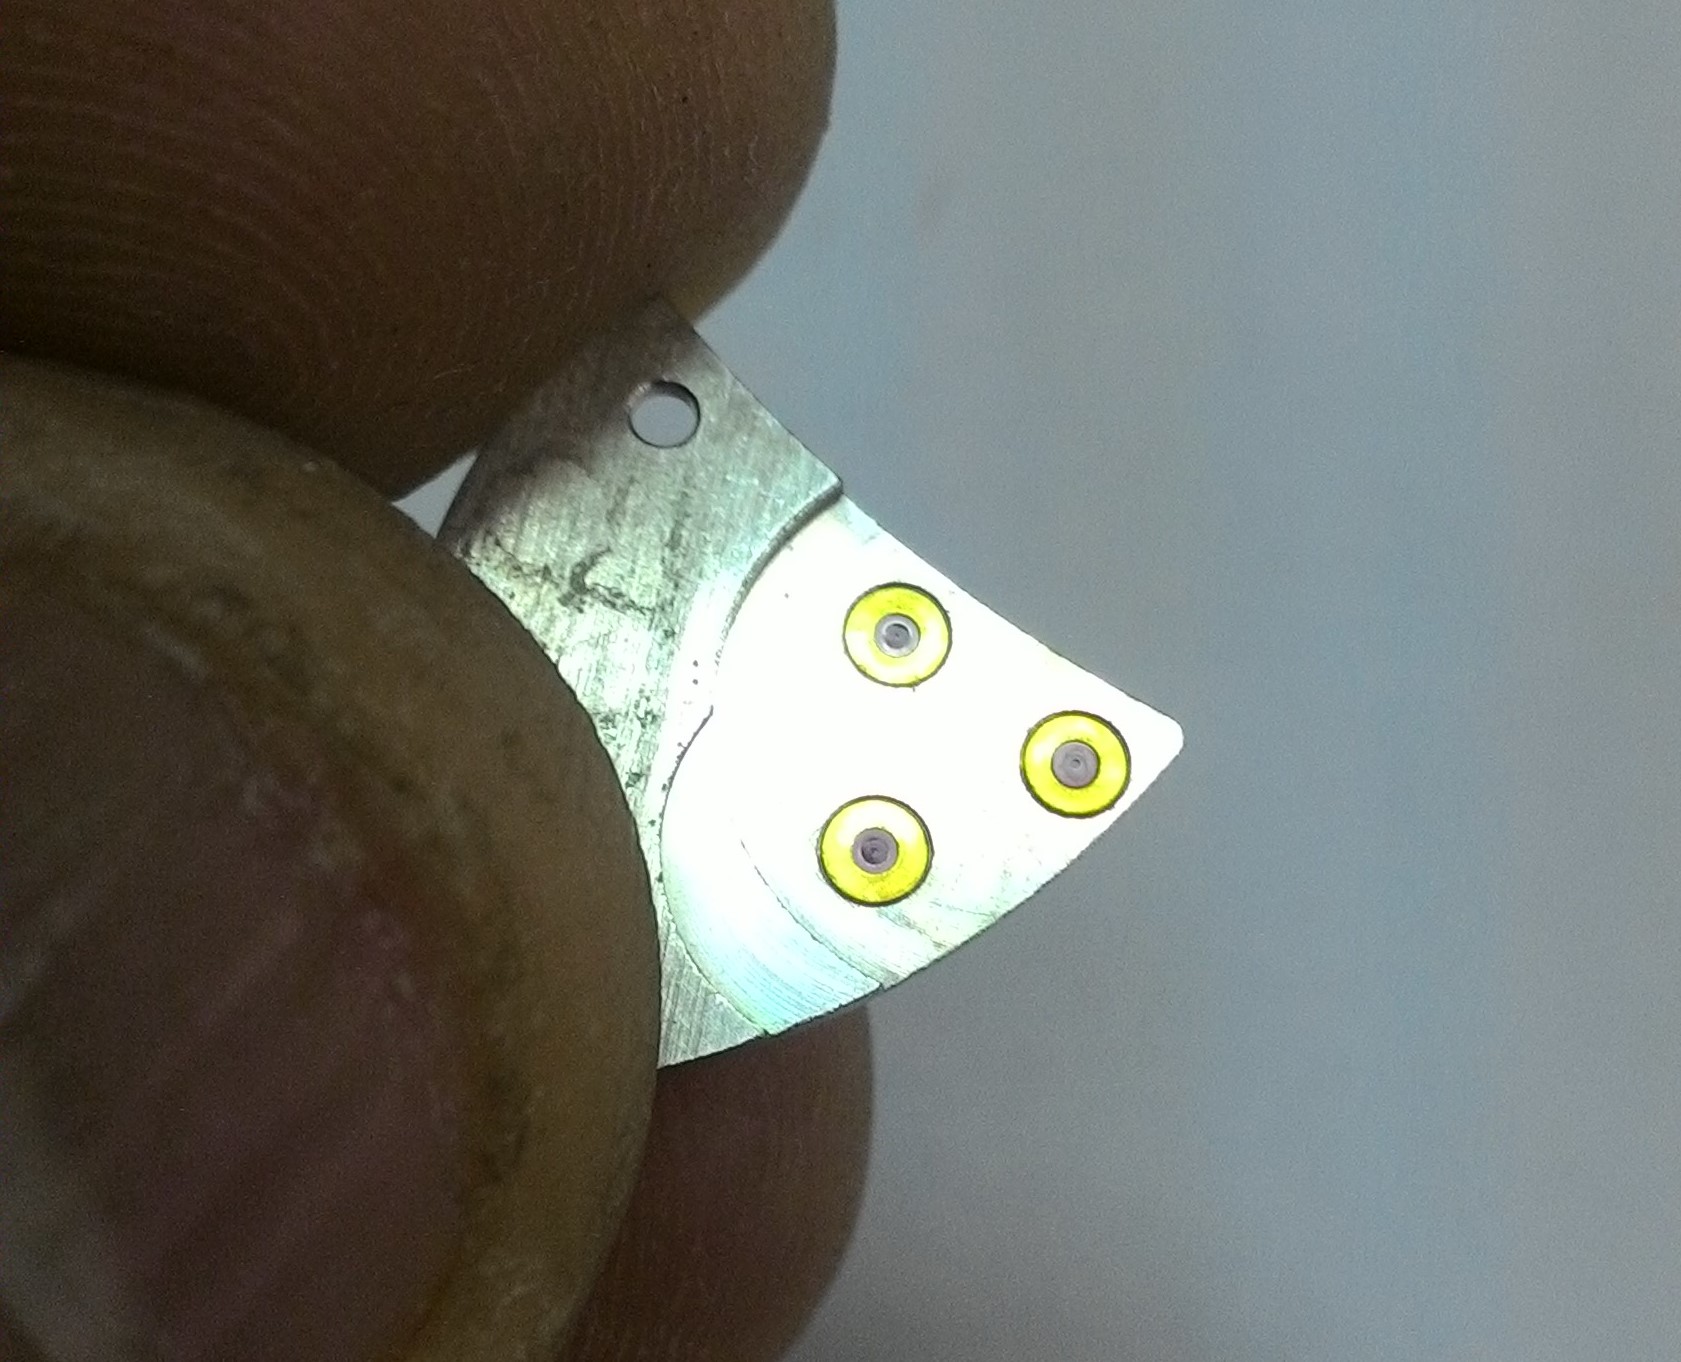
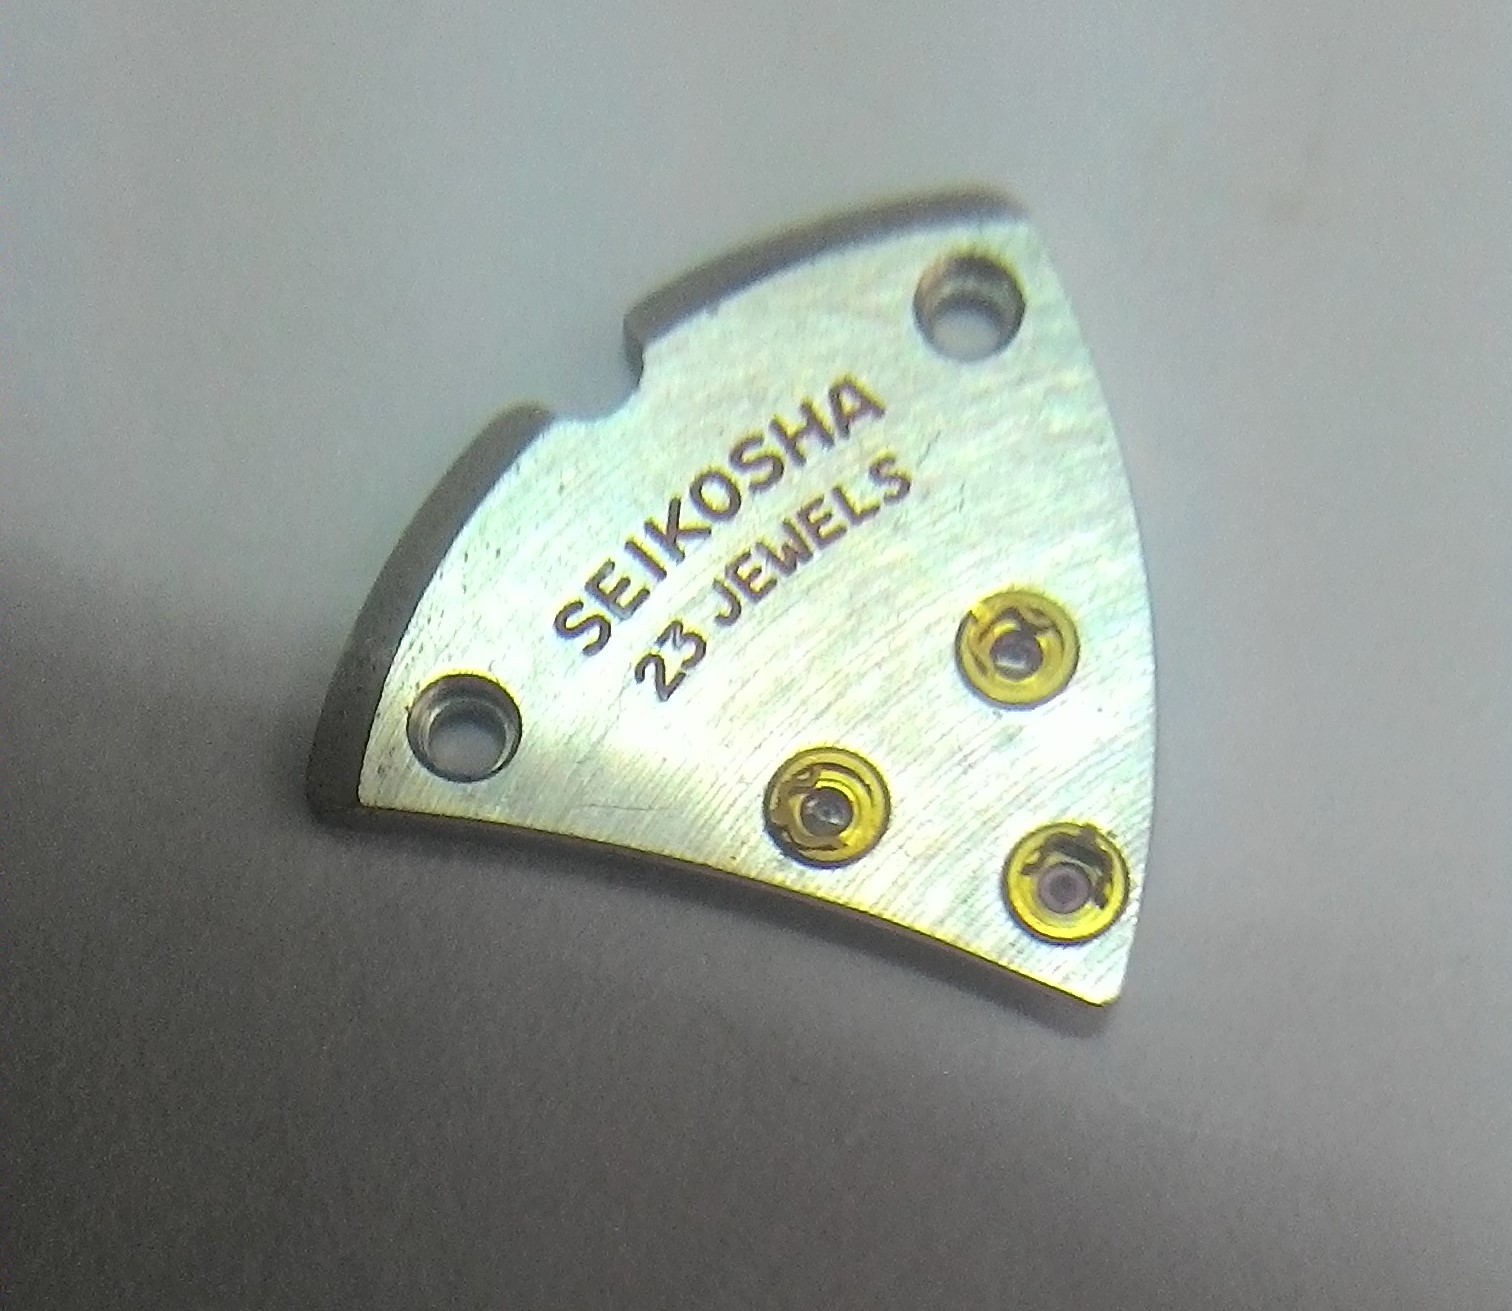
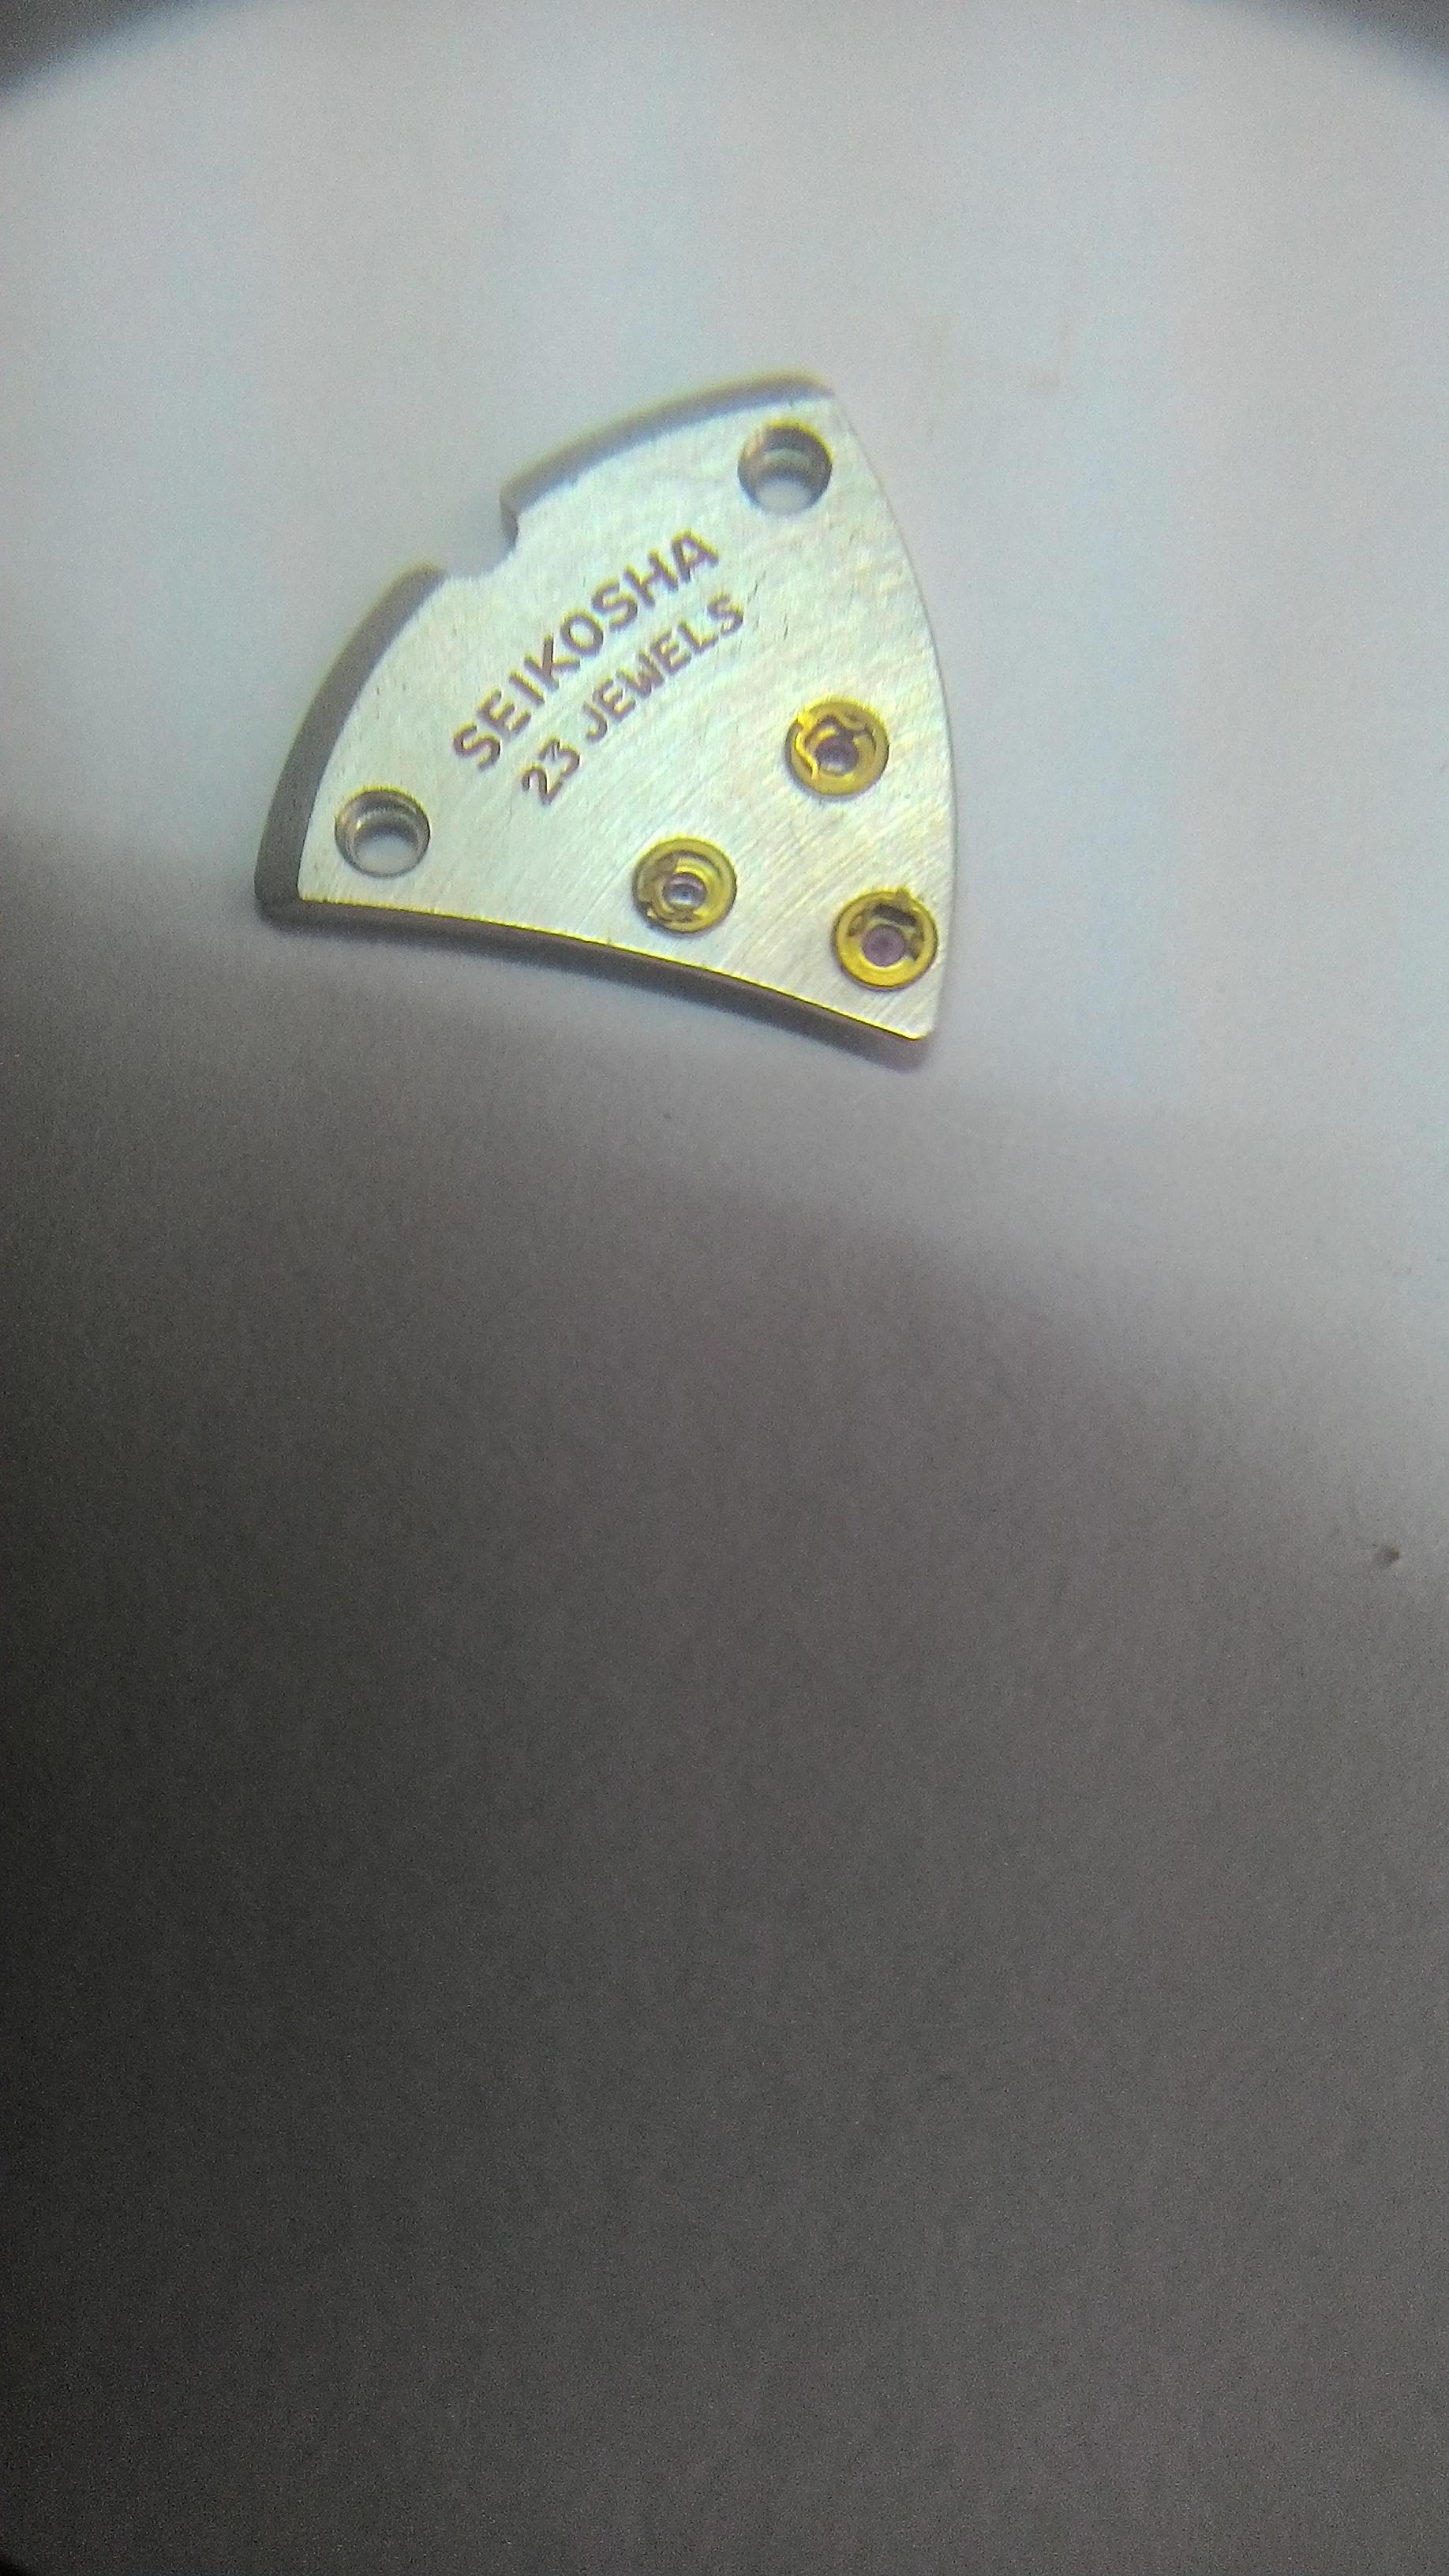
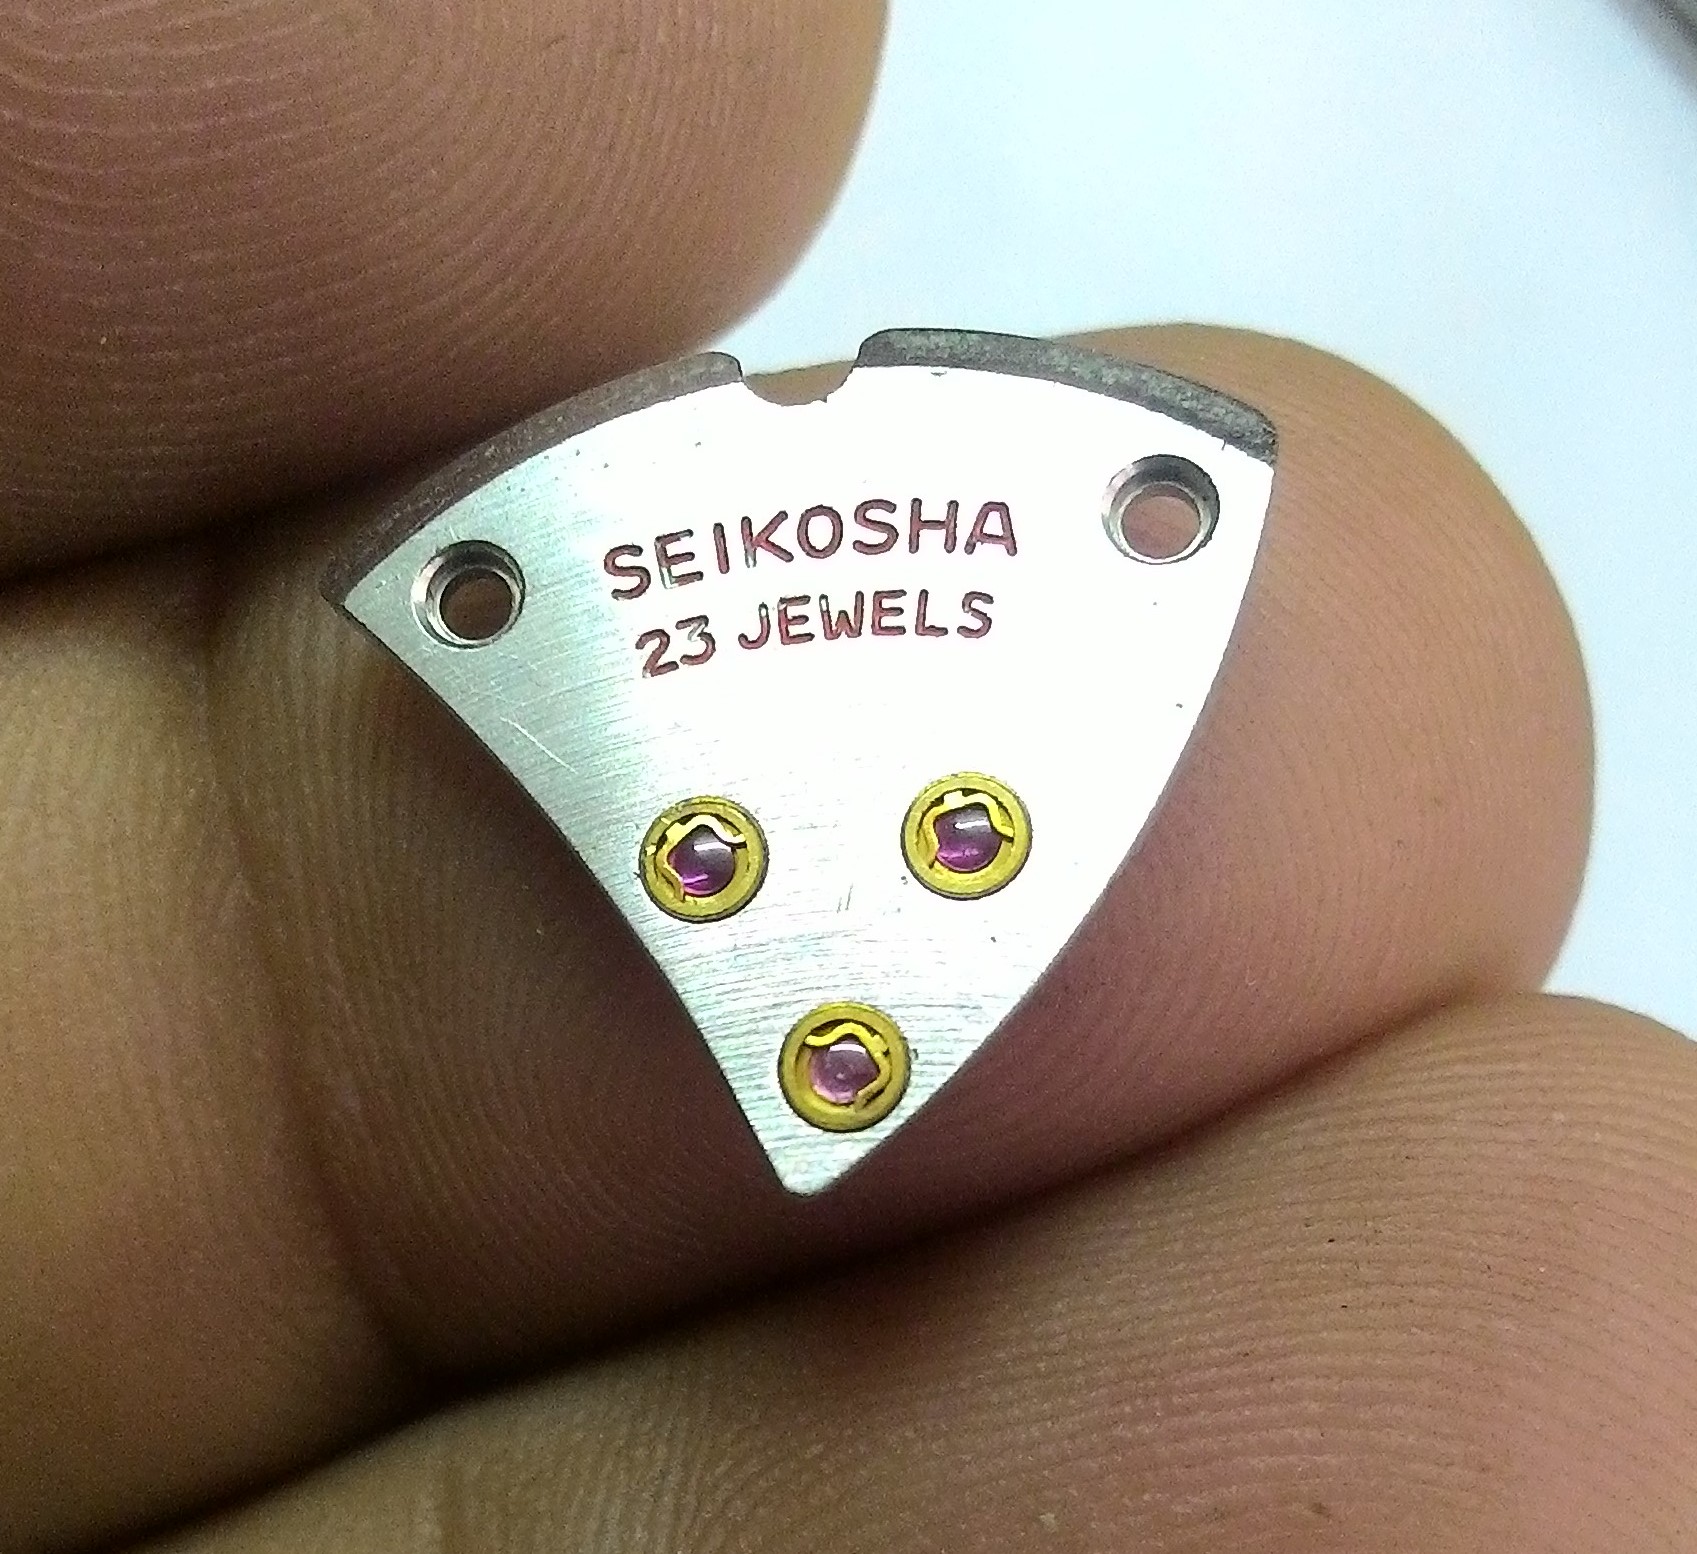
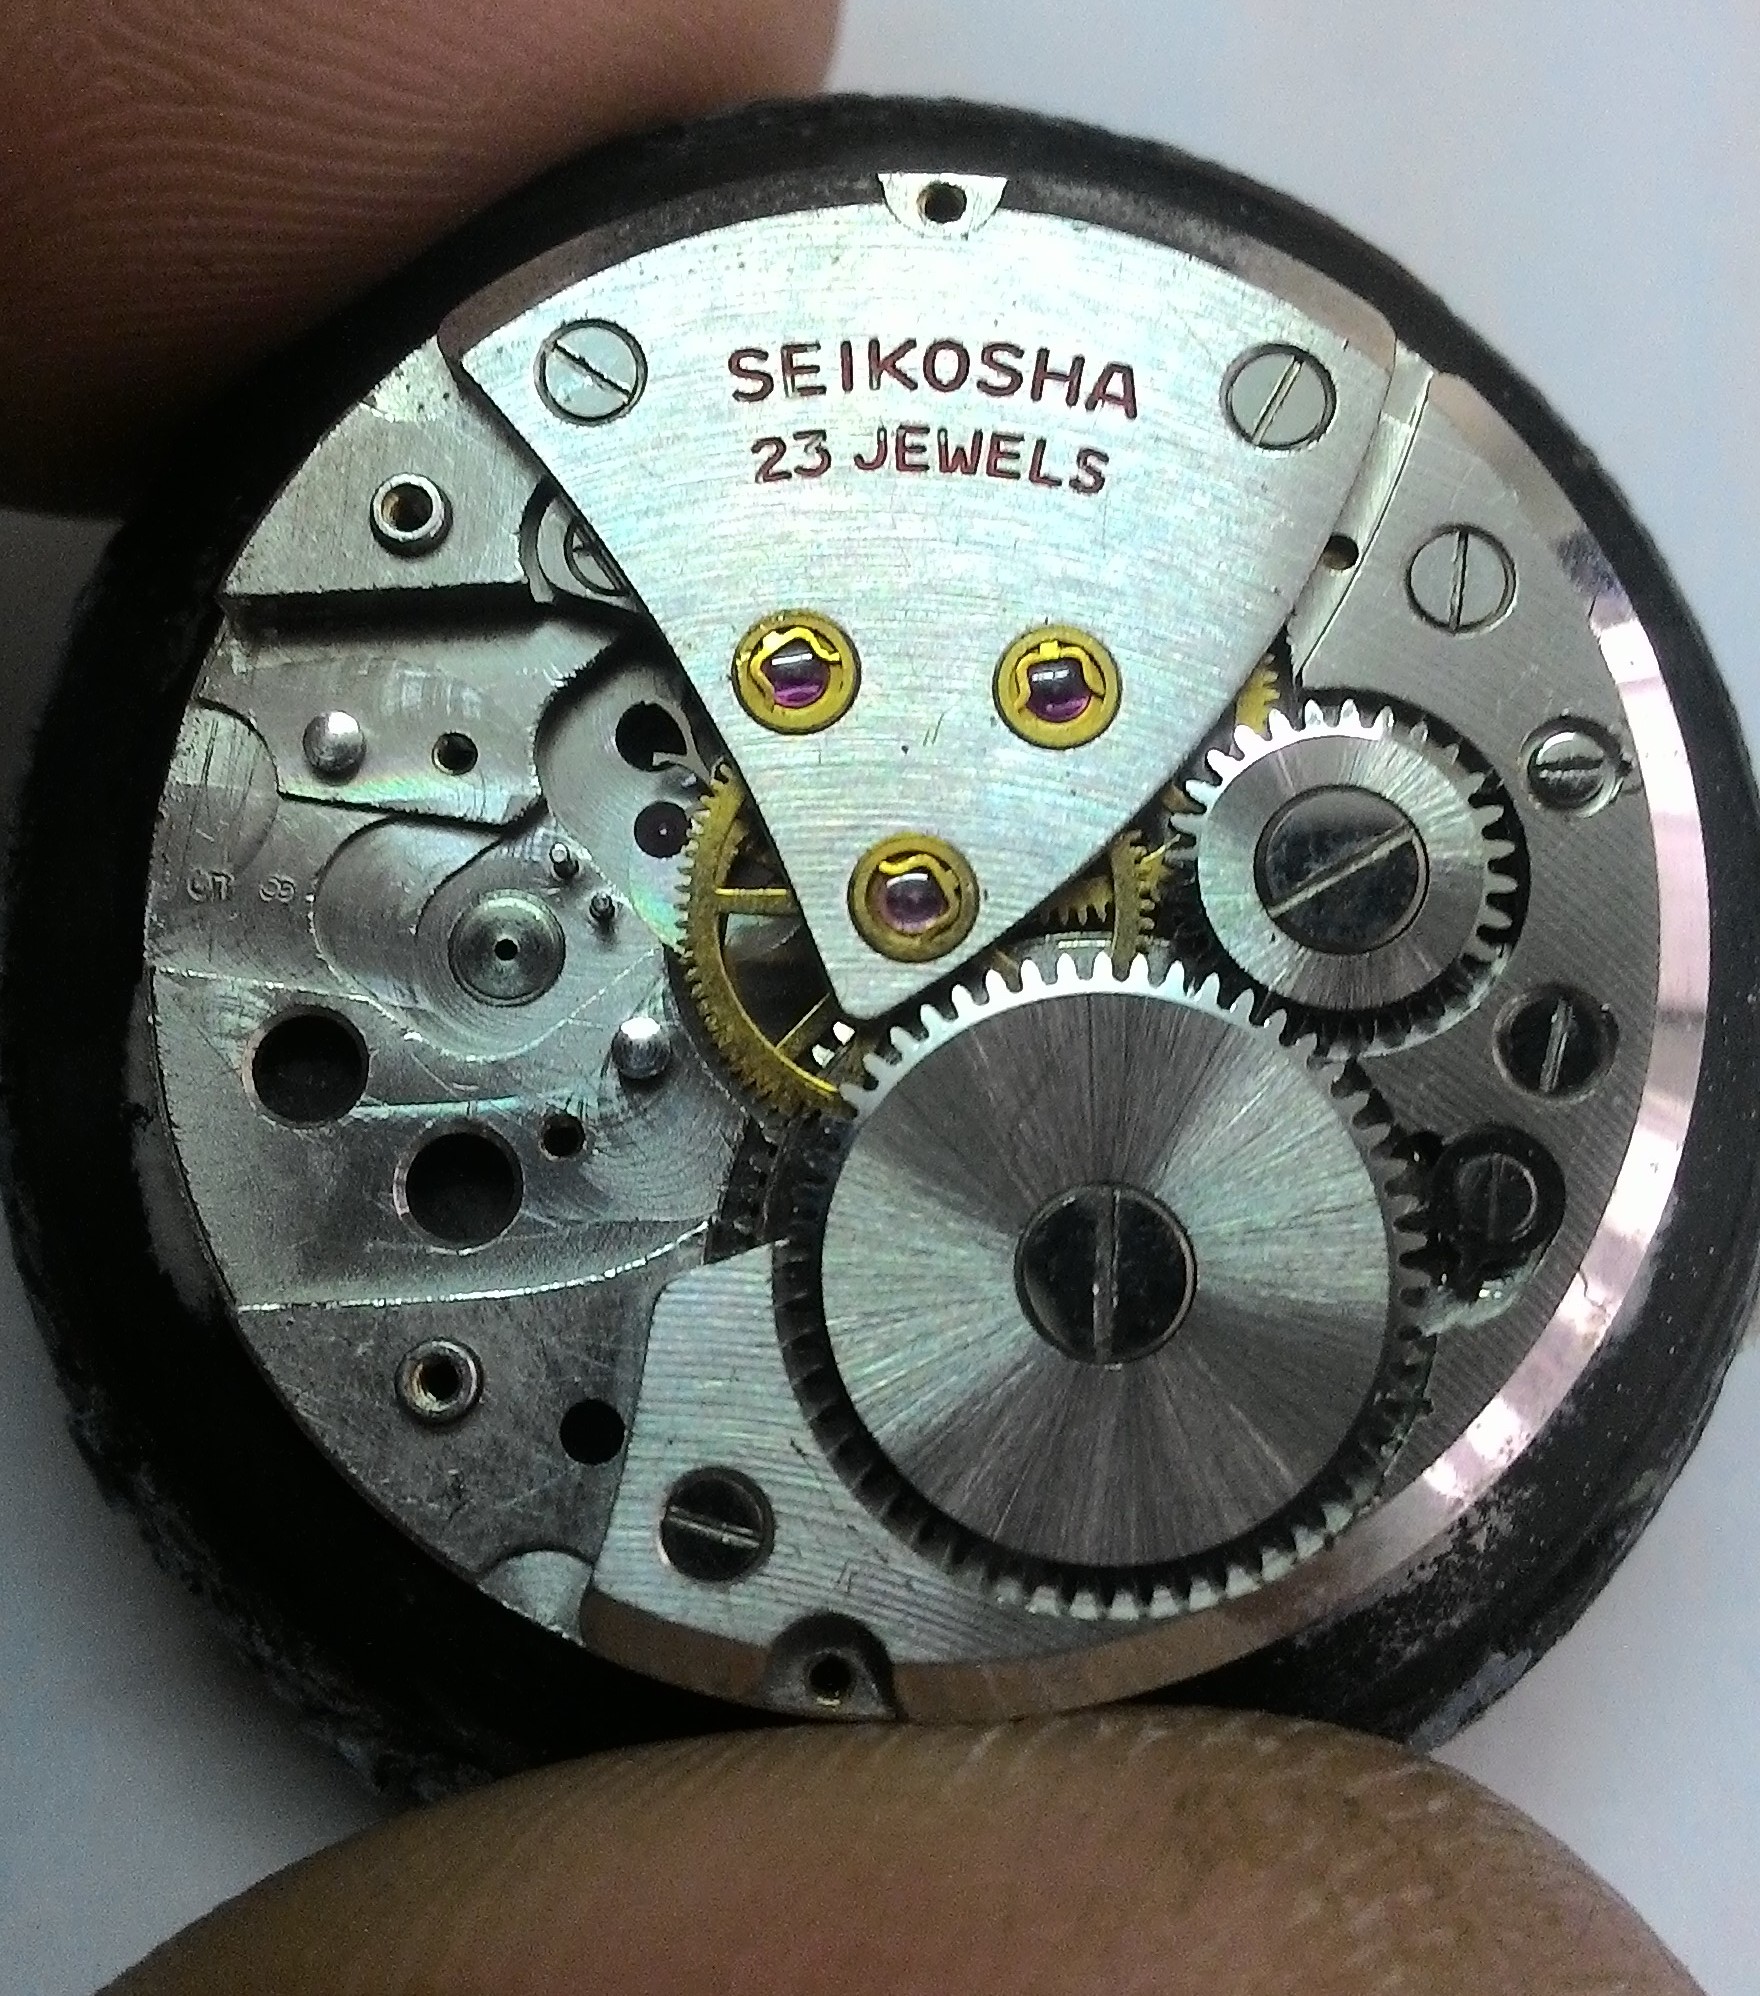
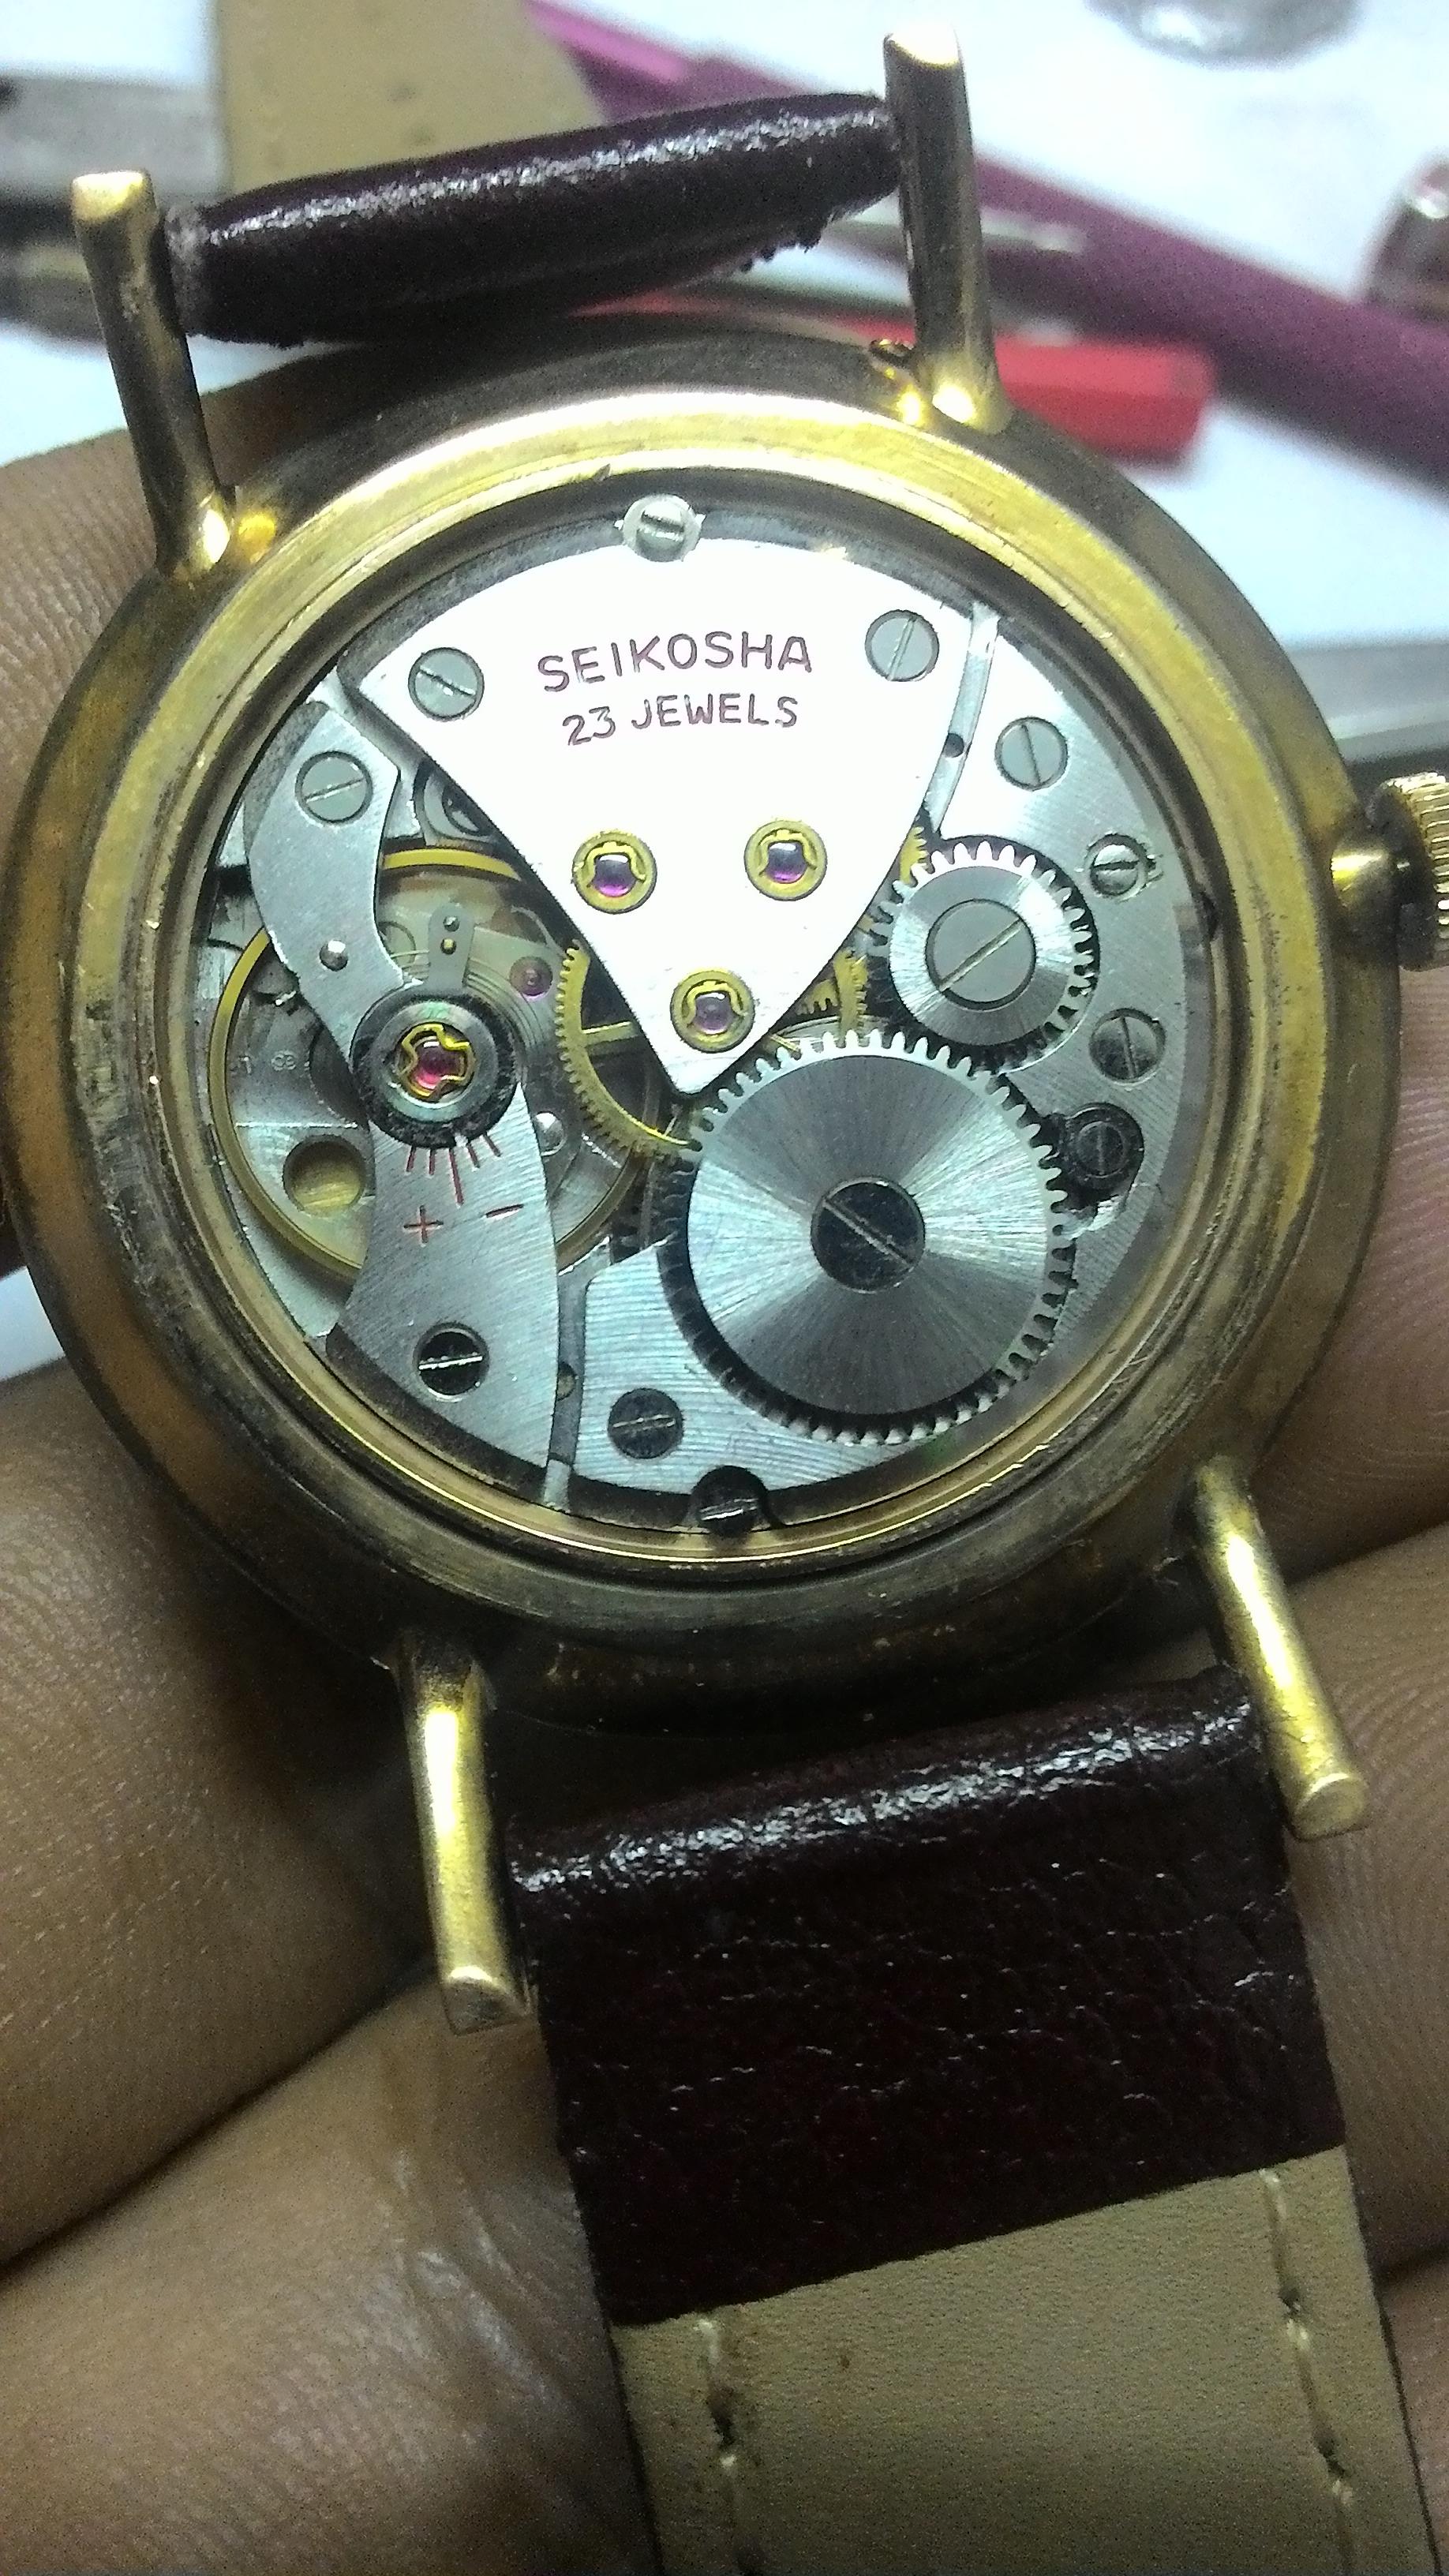
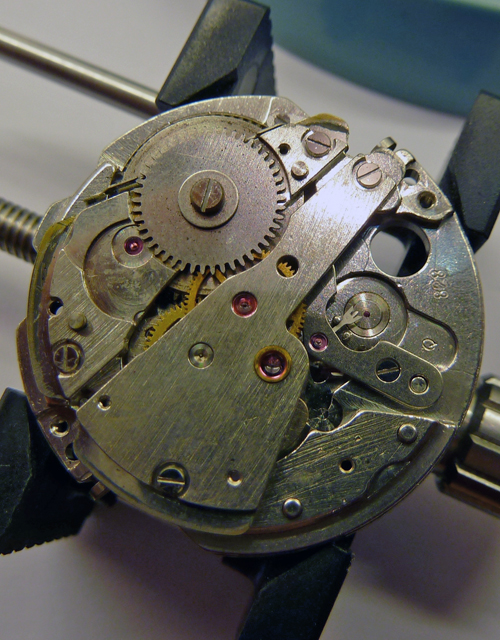
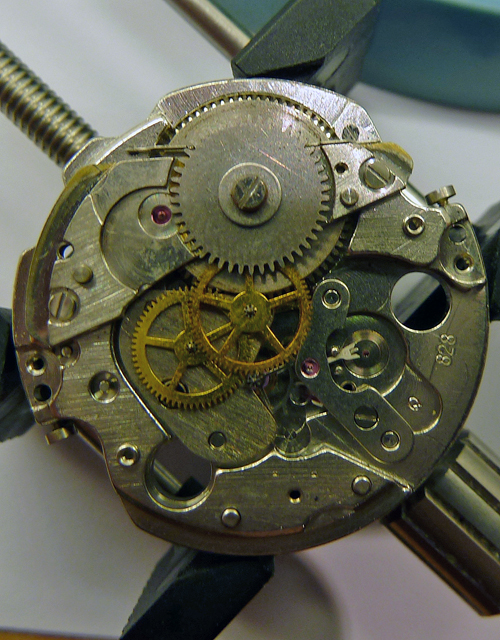
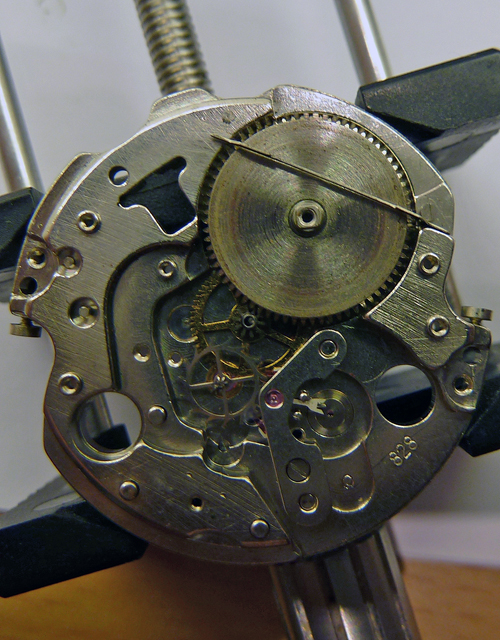
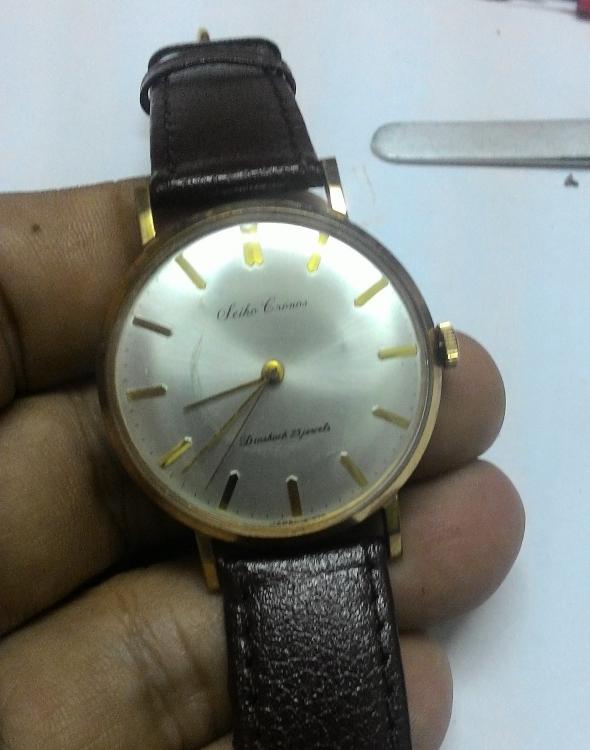
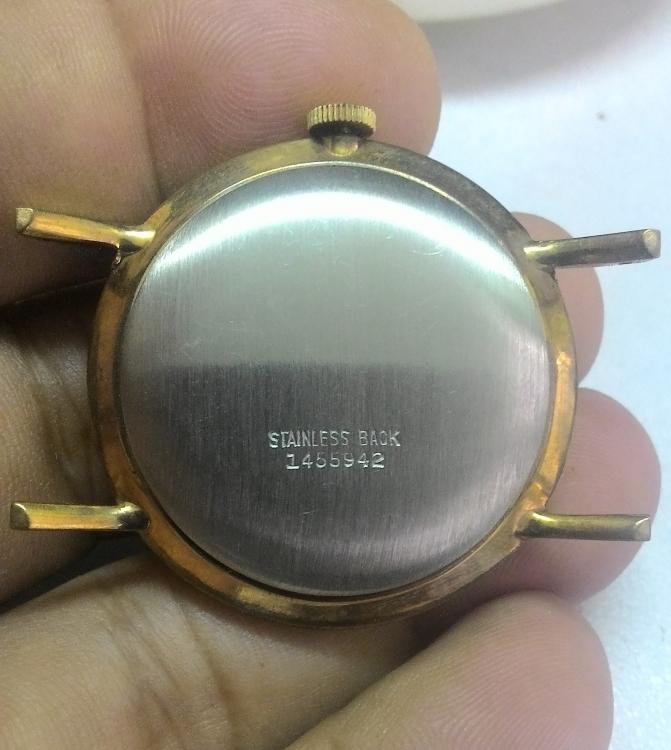
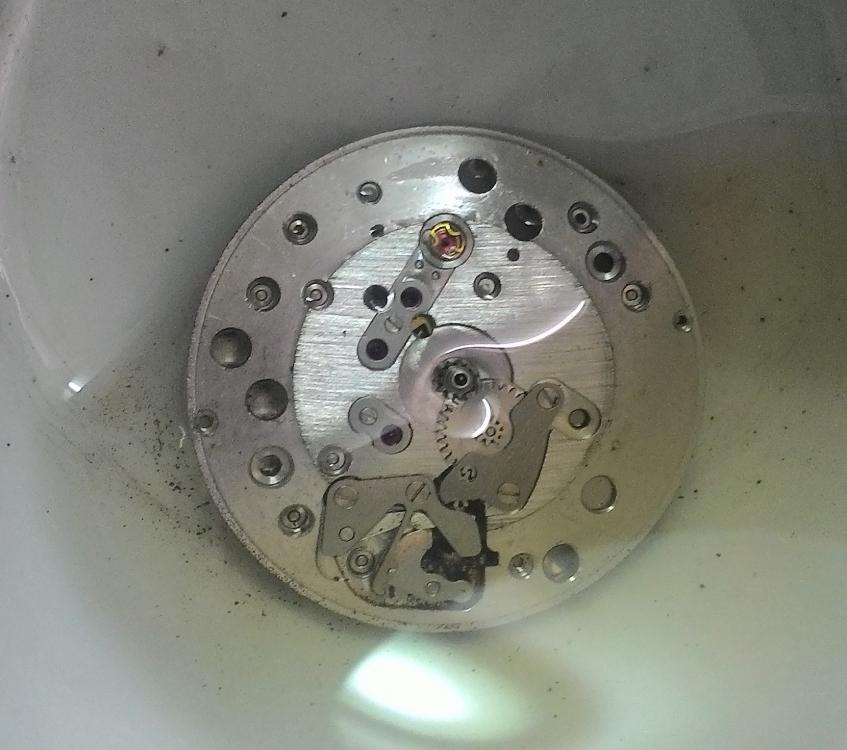
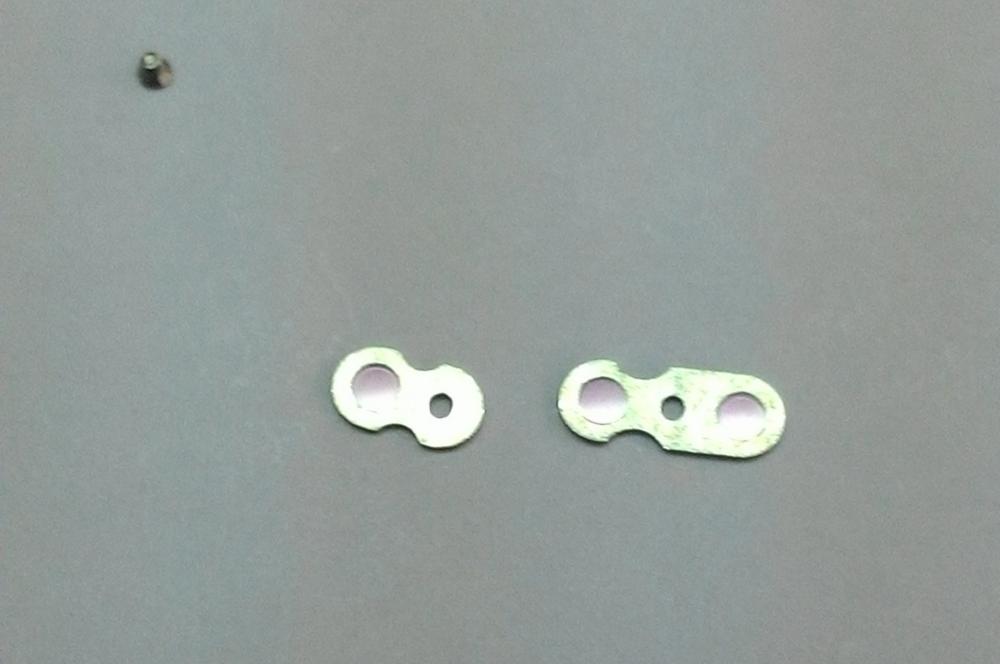
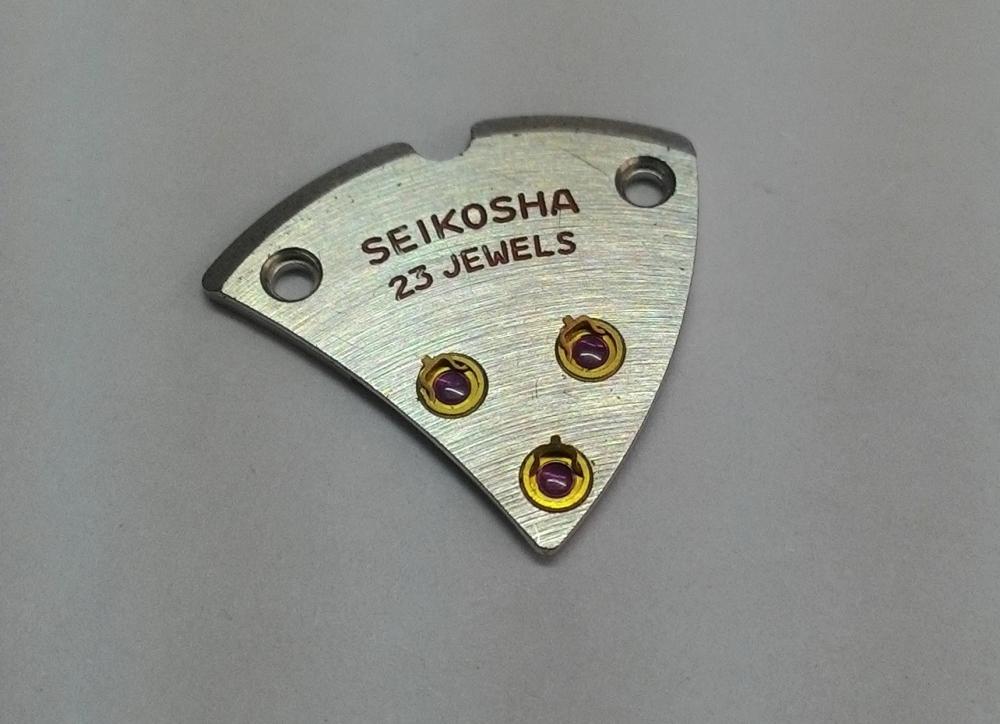
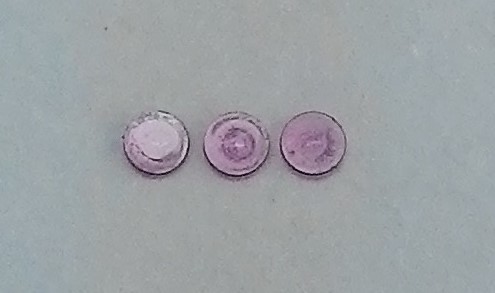
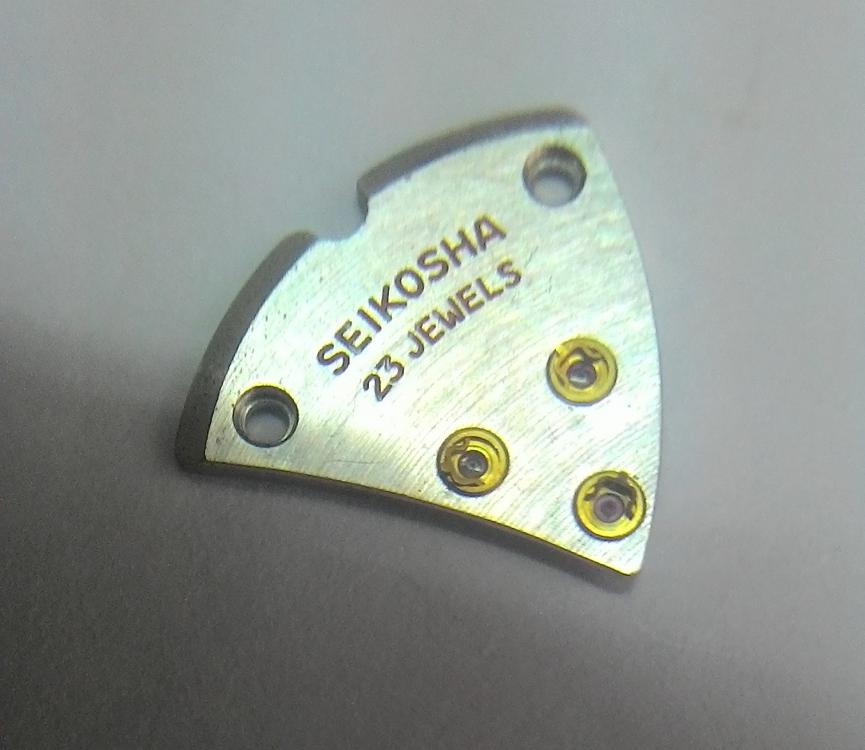
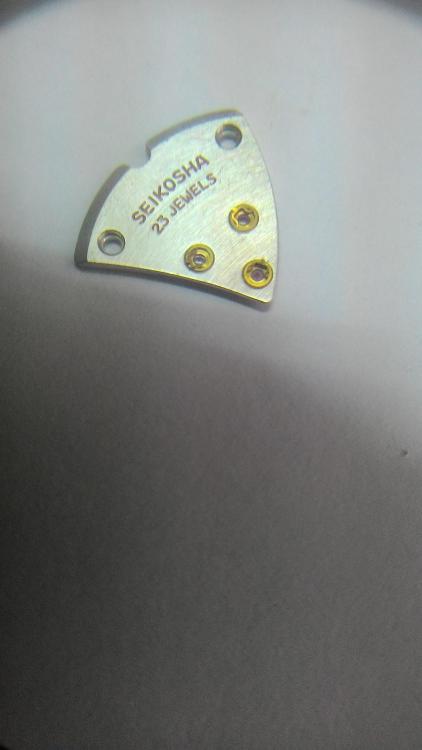
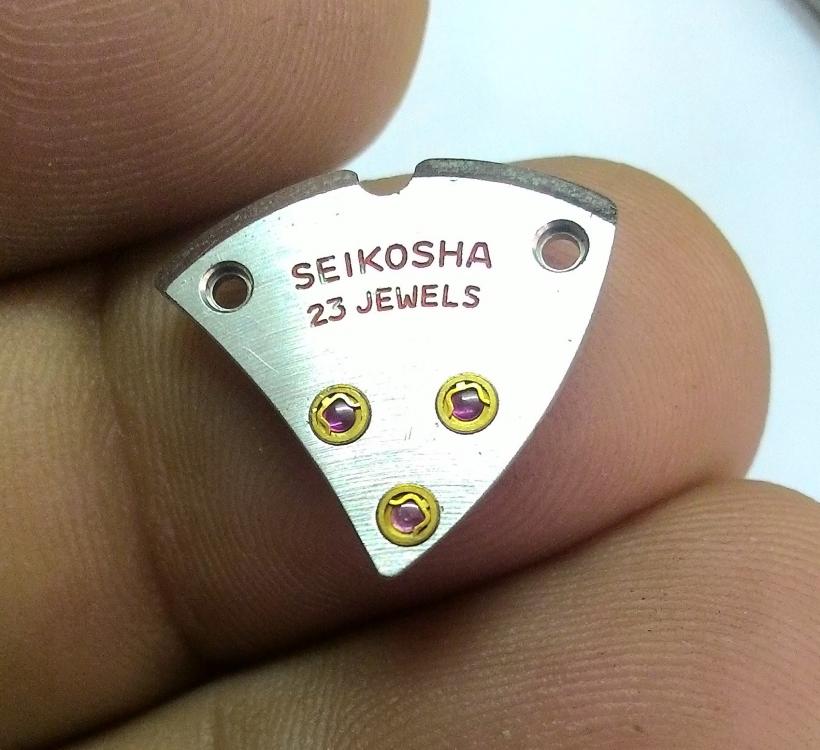
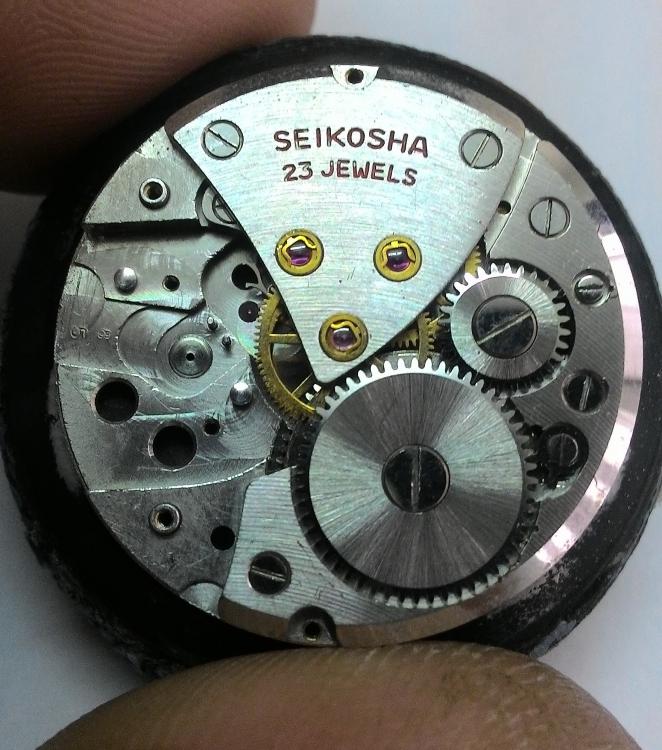
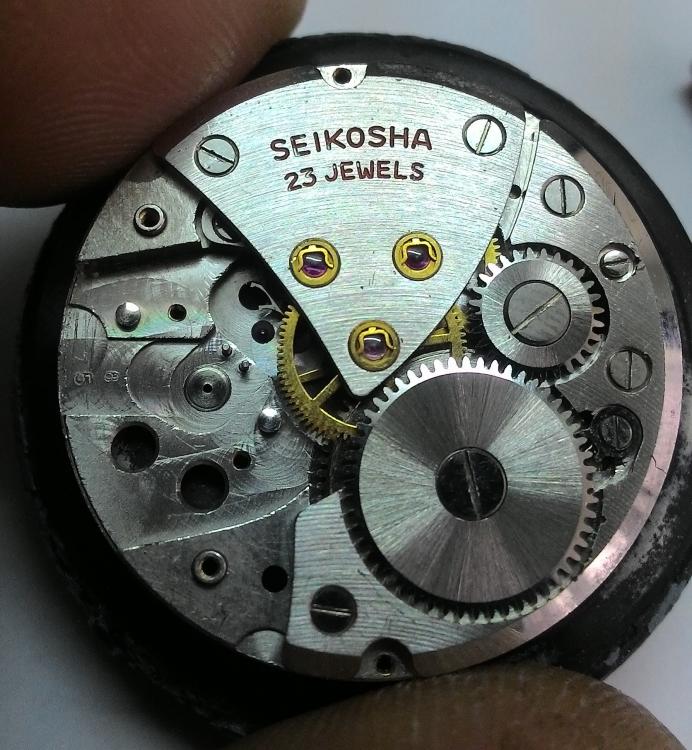
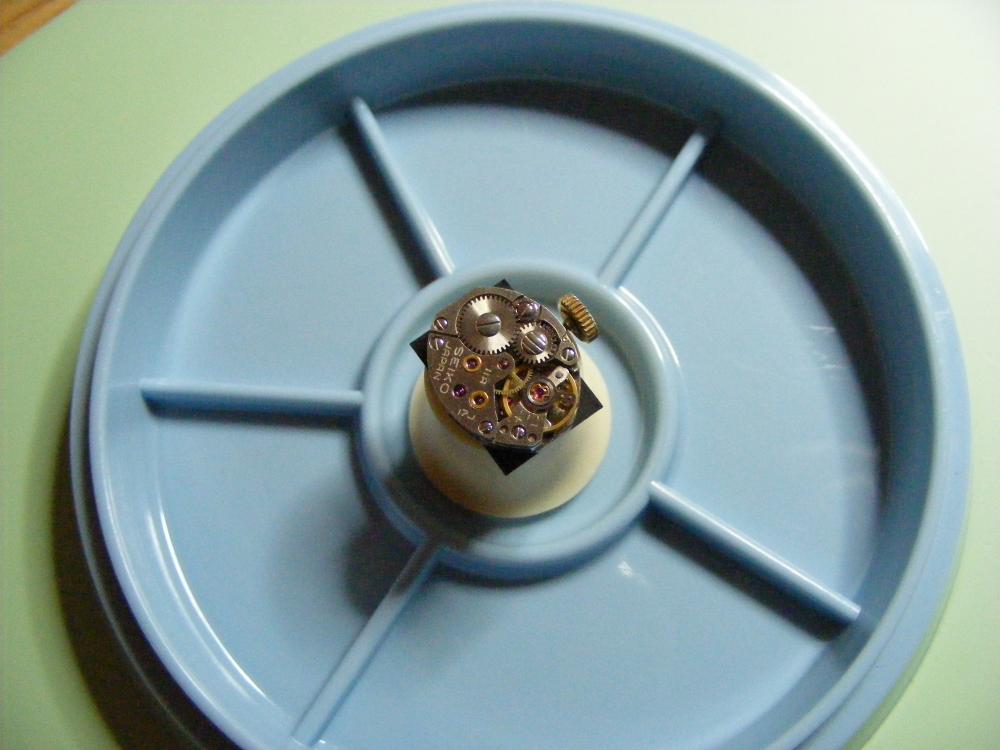
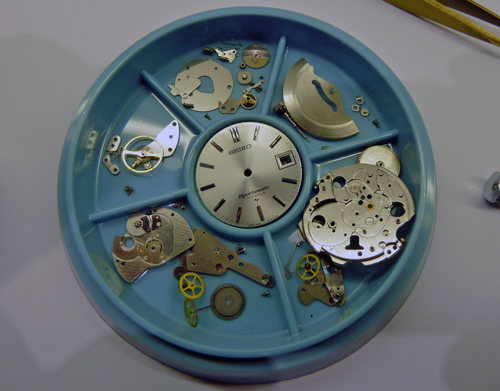
Seiko watches have been a personal favorite of mine because of the quality of the materials used and also the quality of the design. I recently purchased a hand-wind Seiko Cronos which was advertised as non-running and I thought I'd share my experience with it. As received, the watch was in decent cosmetic condition but not running. Caseback is in decent shape and the case itself seems to be pretty much unworn. Its Gold-plated but no indication of the thickness. Serial is the 7 digit type used in the 60s so this would be April '61? I popped the front bezel off as the movement comes out the front, you can see some damage to the dial where the hands have grazed the dial. Another pic of the damaged area. Its a shame as the dial is in good condition otherwise. The Seiko calibre 54. These came in 54A, 54B and 54C.. not to sure which one this is as there's not much info about these movements. Decent looking and 23 jewels for a handwind is pretty awesome. A full bridge for the balance-wheel no less...just like Rolex! One of the case screws is missing. The dial side of the movement with the dial removed... not as pretty as the other side, cap jewels present but in a simpler design. With the ratchet-wheel, balance-wheel and pallet-fork removed.. here we see the first sign of a problem. The barrel arbor hole has been 'massaged' to reduce barrel endshake. The underside of the barrel-bridge.. negligible end-shake on the barrel so it will go back in as it is. Some wheels...pretty similar to a lot of other Seiko movements. Dial-side dismantled.. It is at this point I realised that Seiko was not above playing the 'jewel' game. In the picture below, you can see that the jewel for the pallet fork has an oil 'sink' . In these jewels the endshake is controlled by the inner flat surface, rather than cap jewel which makes the cap jewel superflous. Compare this to the escape wheel jewel where the jewel is domed on the outside and the oil sits in the gap between the curved jewel and the cap jewel. Here the cap jewel serves to ensure minimal friction as the point of the pivot rides on the cap-jewel whereas in normal uncapped settings the pivot's 'shoulder' hits the flat inner surface of the jewel. I'm not sure if Seiko did this to raise the jewel count, pallet-fork pivots are not usually oiled so it could be that having cap jewels here MAY reduce friction in this case as endshake is more controlled. Below we see the other side of these jewels, the escape wheel jewel is the one with a flat side. Mainspring looks good. Ditto the barrel The cap jewels have been cleaned, The double jewelled one goes back in one position only as the cutouts match the holes in the dial where you check the pallet/escape-wheel engagement. Diafix settings with the spring in the open position and cap-jewels about to be removed... Dirty jewels.. And here we see the bottom of the train bridge. again we see another jewel which does not require a 'cap'. The fourth-wheel (seconds) jewel is flat on this side and has the oil-sink on the other. This wheel needs to be oiled and hence the cap-jewel is just a 'dustcap'. view of the oil-sink and 'proper' capped jewels for the escape and third wheel. All cleaned up and oiled. Fitting the diafix jewels went smoothly enough.. sometimes they cause problems but not today! Train bridge installed and checked for smooth runnig.. all good but......... The diafix springs were all over the place so I adjusted how they were aligned.. I think it looks a bit better now! (the upper left spring looks like it has one leg out of the groove but its actually OK). Everything running smoothly. Overall it was a nice movement to work on but the most difficult part about working on these watches is getting the clearance of the hands correct. I had to remove the bezel twice before it ran without hands snagging on each other and I believe that it wouldn't take much to get them out of alignment. This movement was used as the basis for some early Grand Seiko watches and while I haven't timed it, it has been running well for the last few days. I really think that the 2 cap jewels I mentioned above are unnecessary and it would have been better to jewel the barrel arbor but even with 21 functional jewels it still is a nice running watch! Hope you enjoyed reading about this as much as I enjoyed working on it! Anilv Ps.. while outwardly clean, the initial rinse in lighter fluid showed how much of dirt was in the movement. Here the balance and pallet fork was removed, the mainspring given a few turns and it was left to unwind in the fluid. I find that this helps clean the pivots but you have to prevent the wheels from turning (I used a sliver of pegwood) until the movement is submerged in the lighter fluid otherwise the wheels spin too fast and could wear the pivots unnecessarily.


 1 point
 -
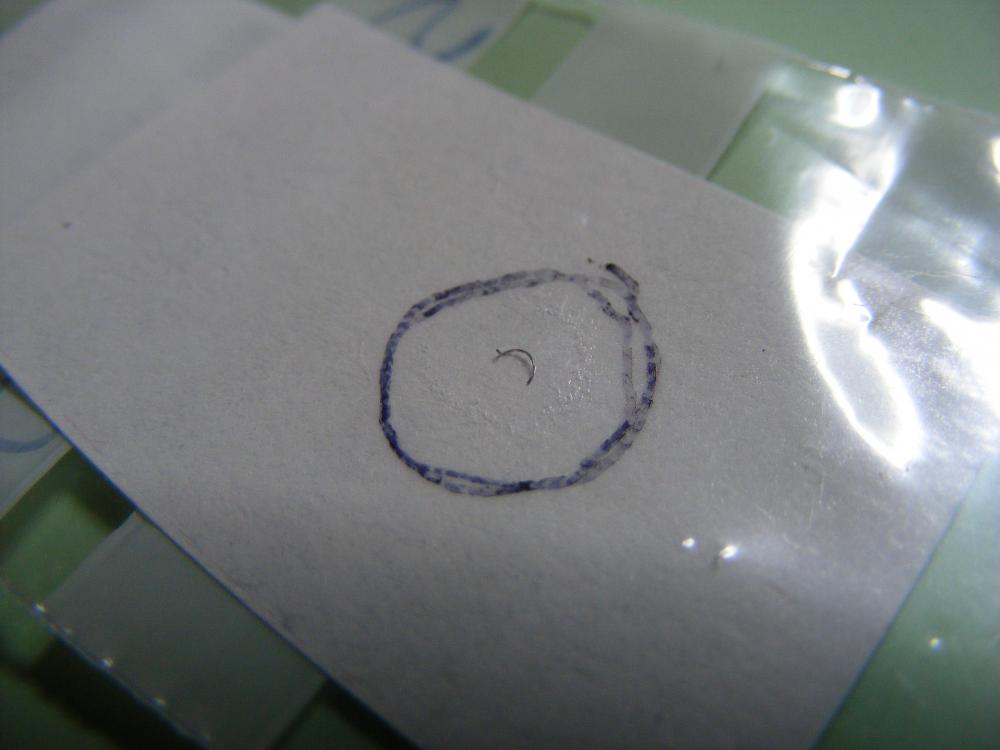
One of my neighbours recently gave me his wife's watch to look at, he just said ''it's not working do you think you could do anything with it ?''. It's a tiny Seiko ladies watch, I took out the movement and found a broken click spring, nothing remarkable about that except it must be the smallest click spring I've ever seen ! barely visible with the naked eye , Cousins even had one ! ( £1.50 ) Watch now working Just thought I'd post it.

 1 point
 -
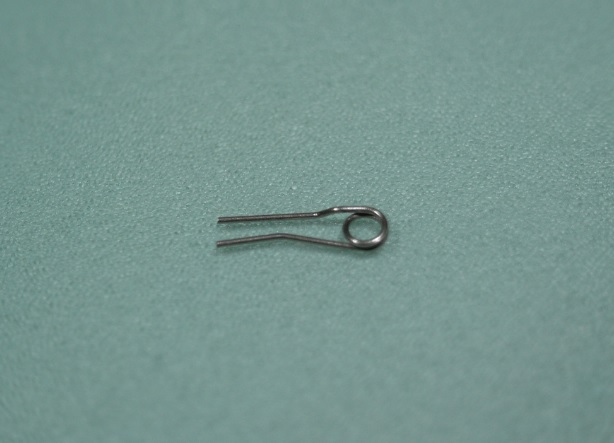
Lift lever and pull out.1 point
-
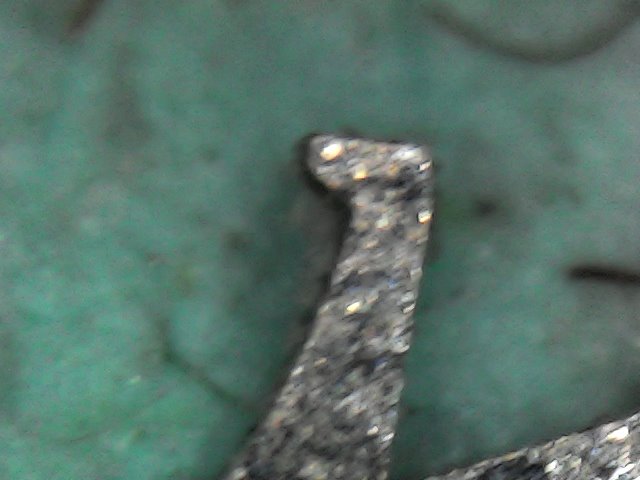
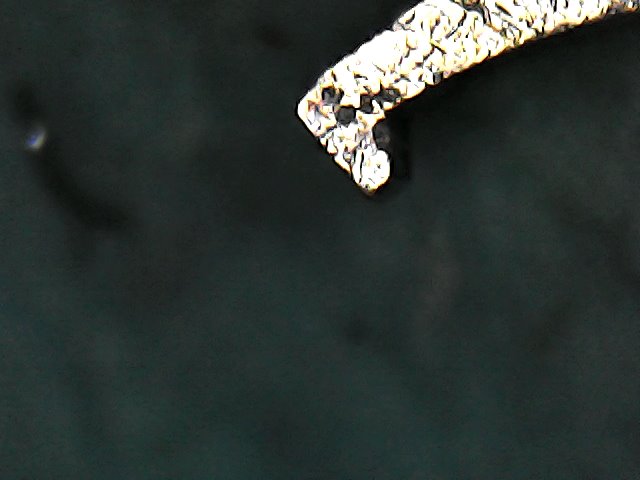
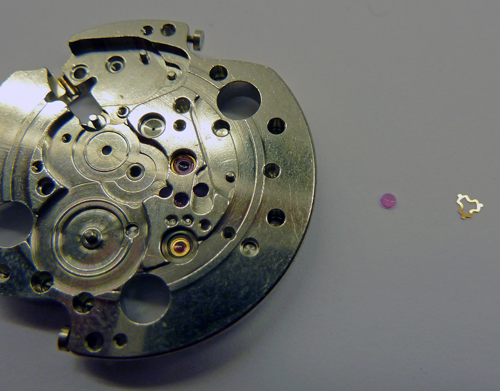
Hello guys I've been renovating quite a few 1960s Seikos recently and a couple have shown very scattered traces on the timegrapher and generally ratty running after cleaning. All three responded to a new escape wheel very well. Being unable to see the wear using normal magnification I decided to try one of the £15 USB microscopes available on fleabay. They are too light, the software is hit and miss but glue it onto a heavy base and they will do the job. The difference between a good and bad wheel became obvious. The square corners get rounded off by the fork pallet jewels and precision is lost. The first two shots are from a worn 6602B and a 7625A Auto. Note the rough finish but 50 years ain't bad - neither watch back showed any servicing marks and were bone dry. The third shot is also a 6602 but it's a good performer - note square edges. The last is from my new baby - King Seiko 4402. Very different quality. Three lessons. 1. These devices are fine for simple close examination. 2. Don't neglect oiling the escape pallets - it's tricky but worth the effort 3. Once you've handled a part with your fingers it needs cleaning again - it's horrifying how many skin particles appear.
 1 point
 -
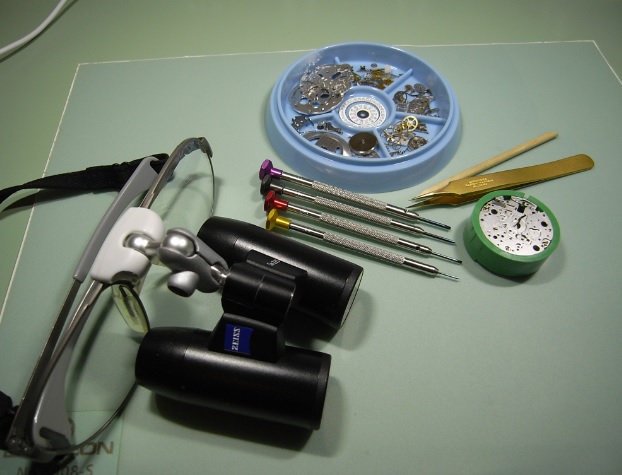
For more detailed pictures just place the eyeglass on camera or phone lens. Works very good.1 point
-
Sounds like 29,3 to me as well.1 point
-
Moving to help section - this is not a walkthrough1 point
-
I certainly will and yes, It is I, Robbie [emoji4]1 point
-
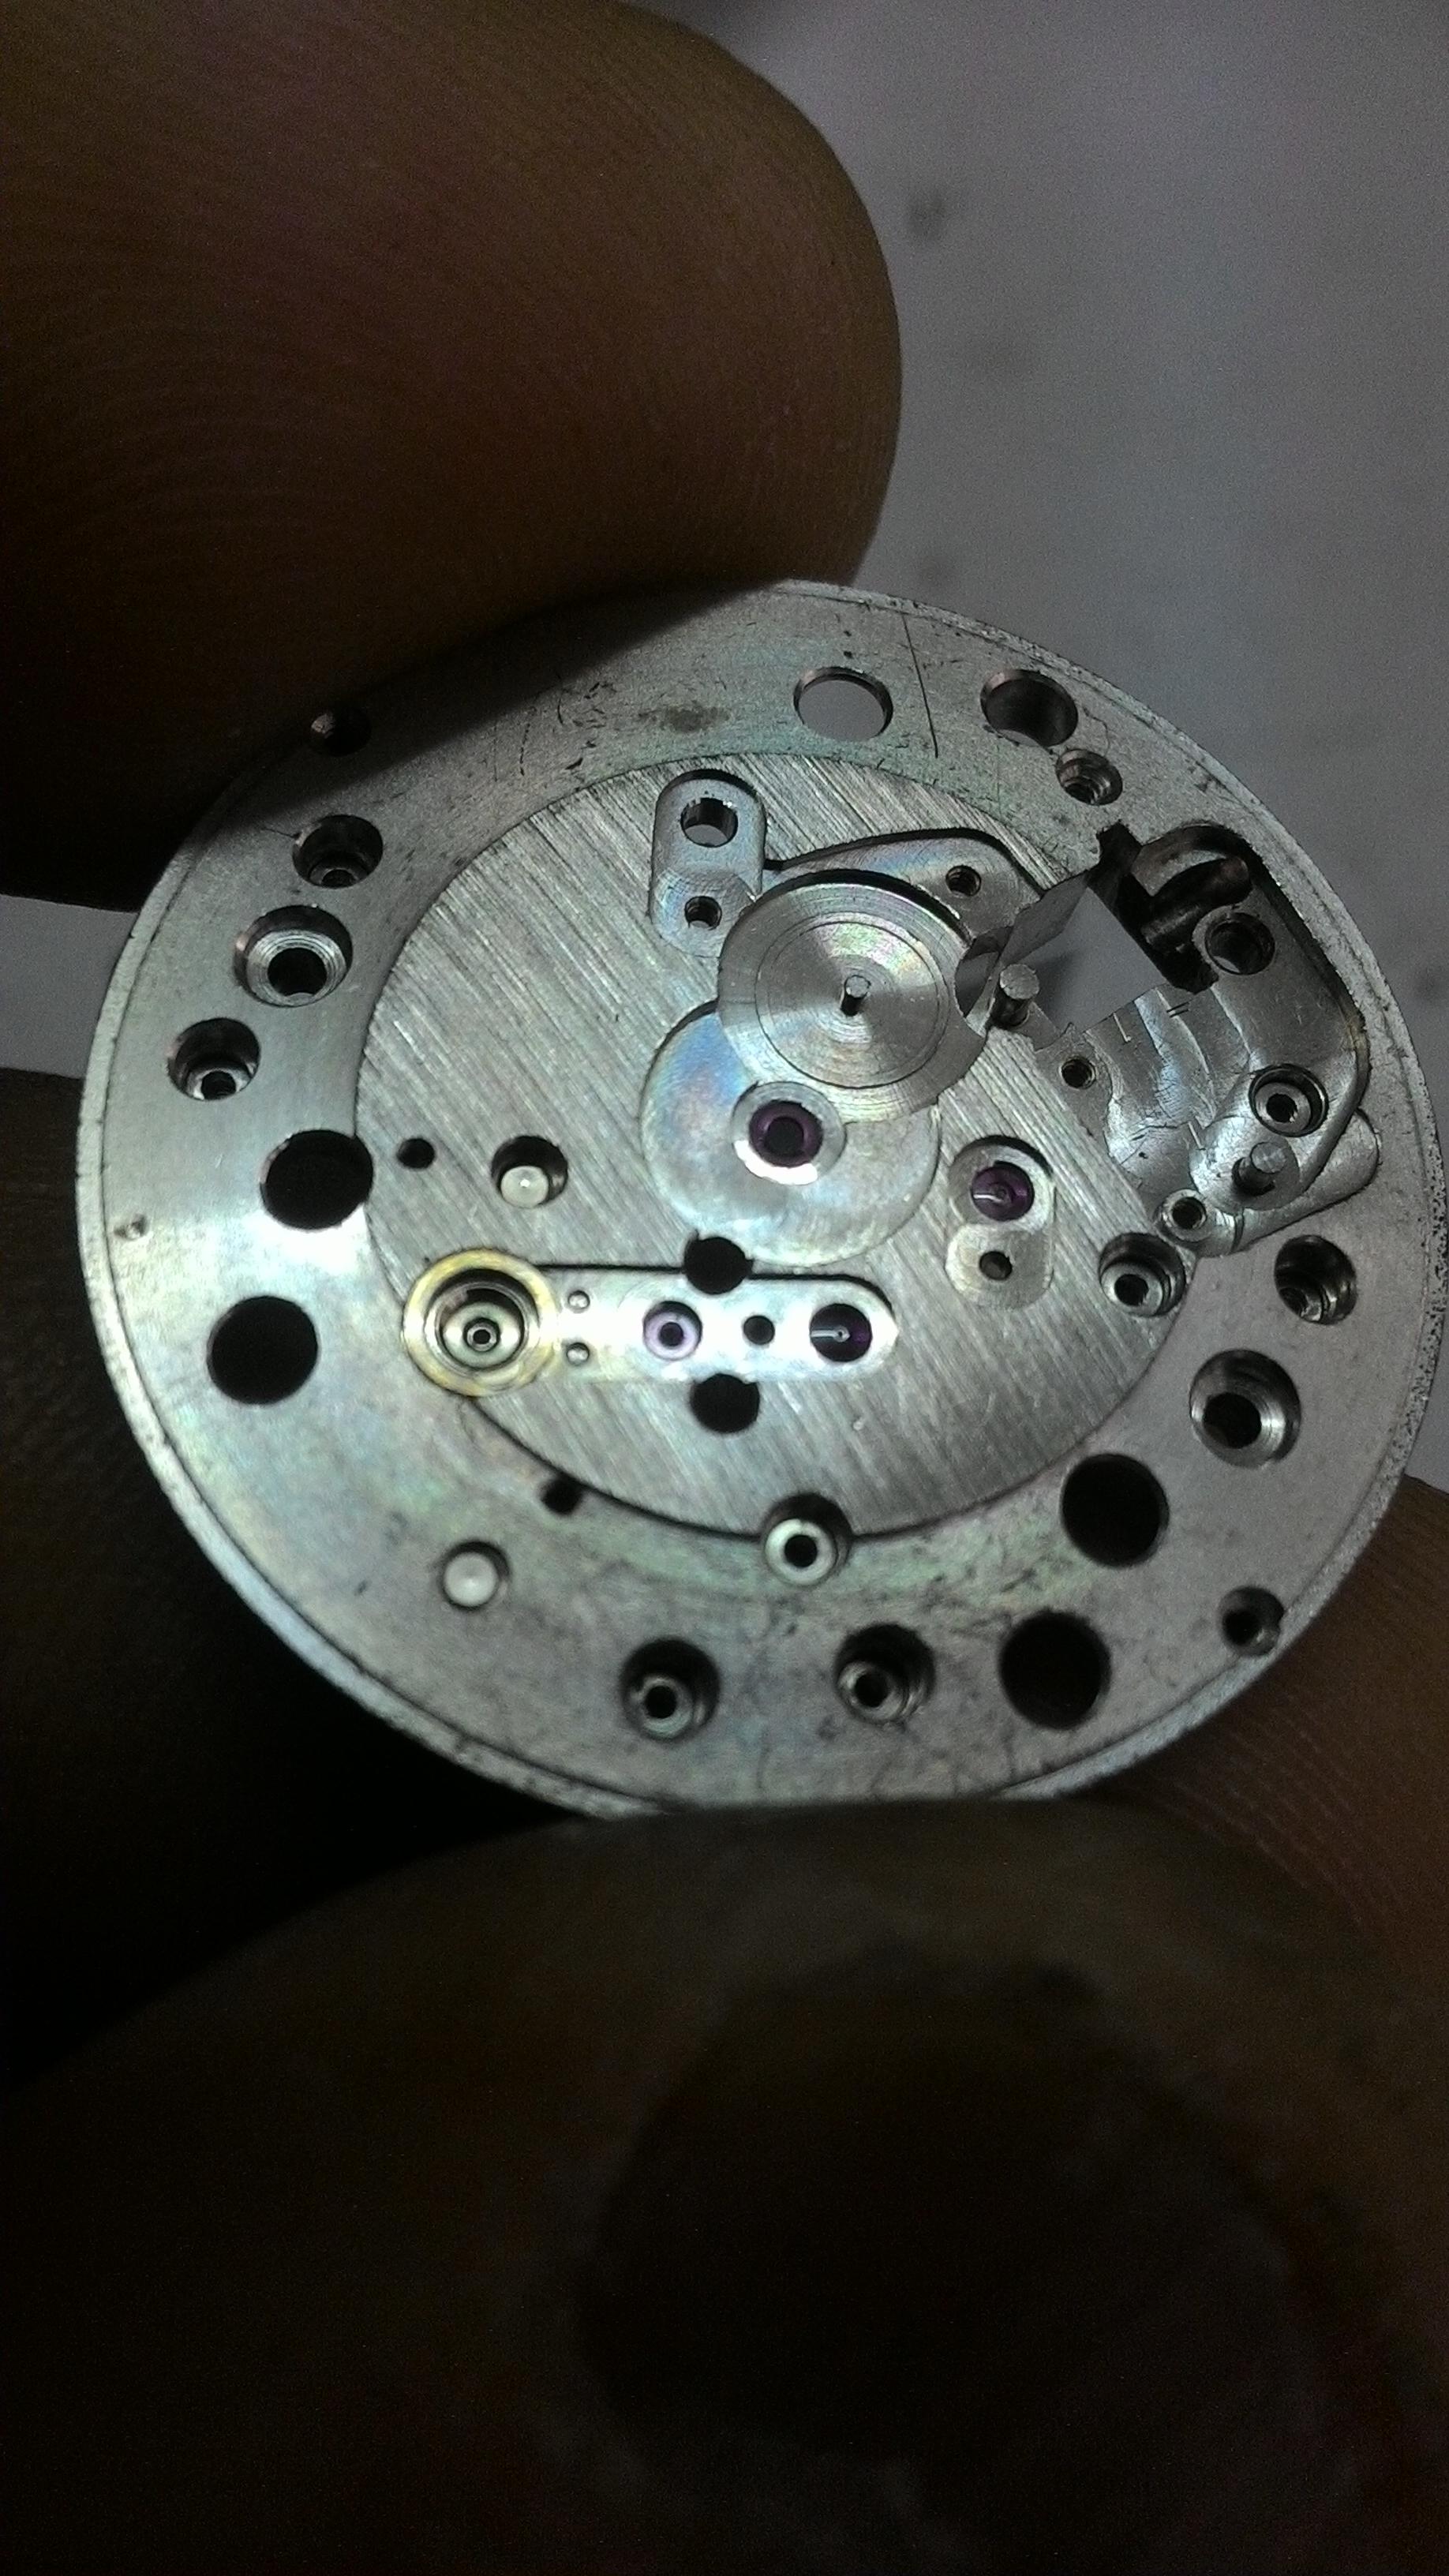
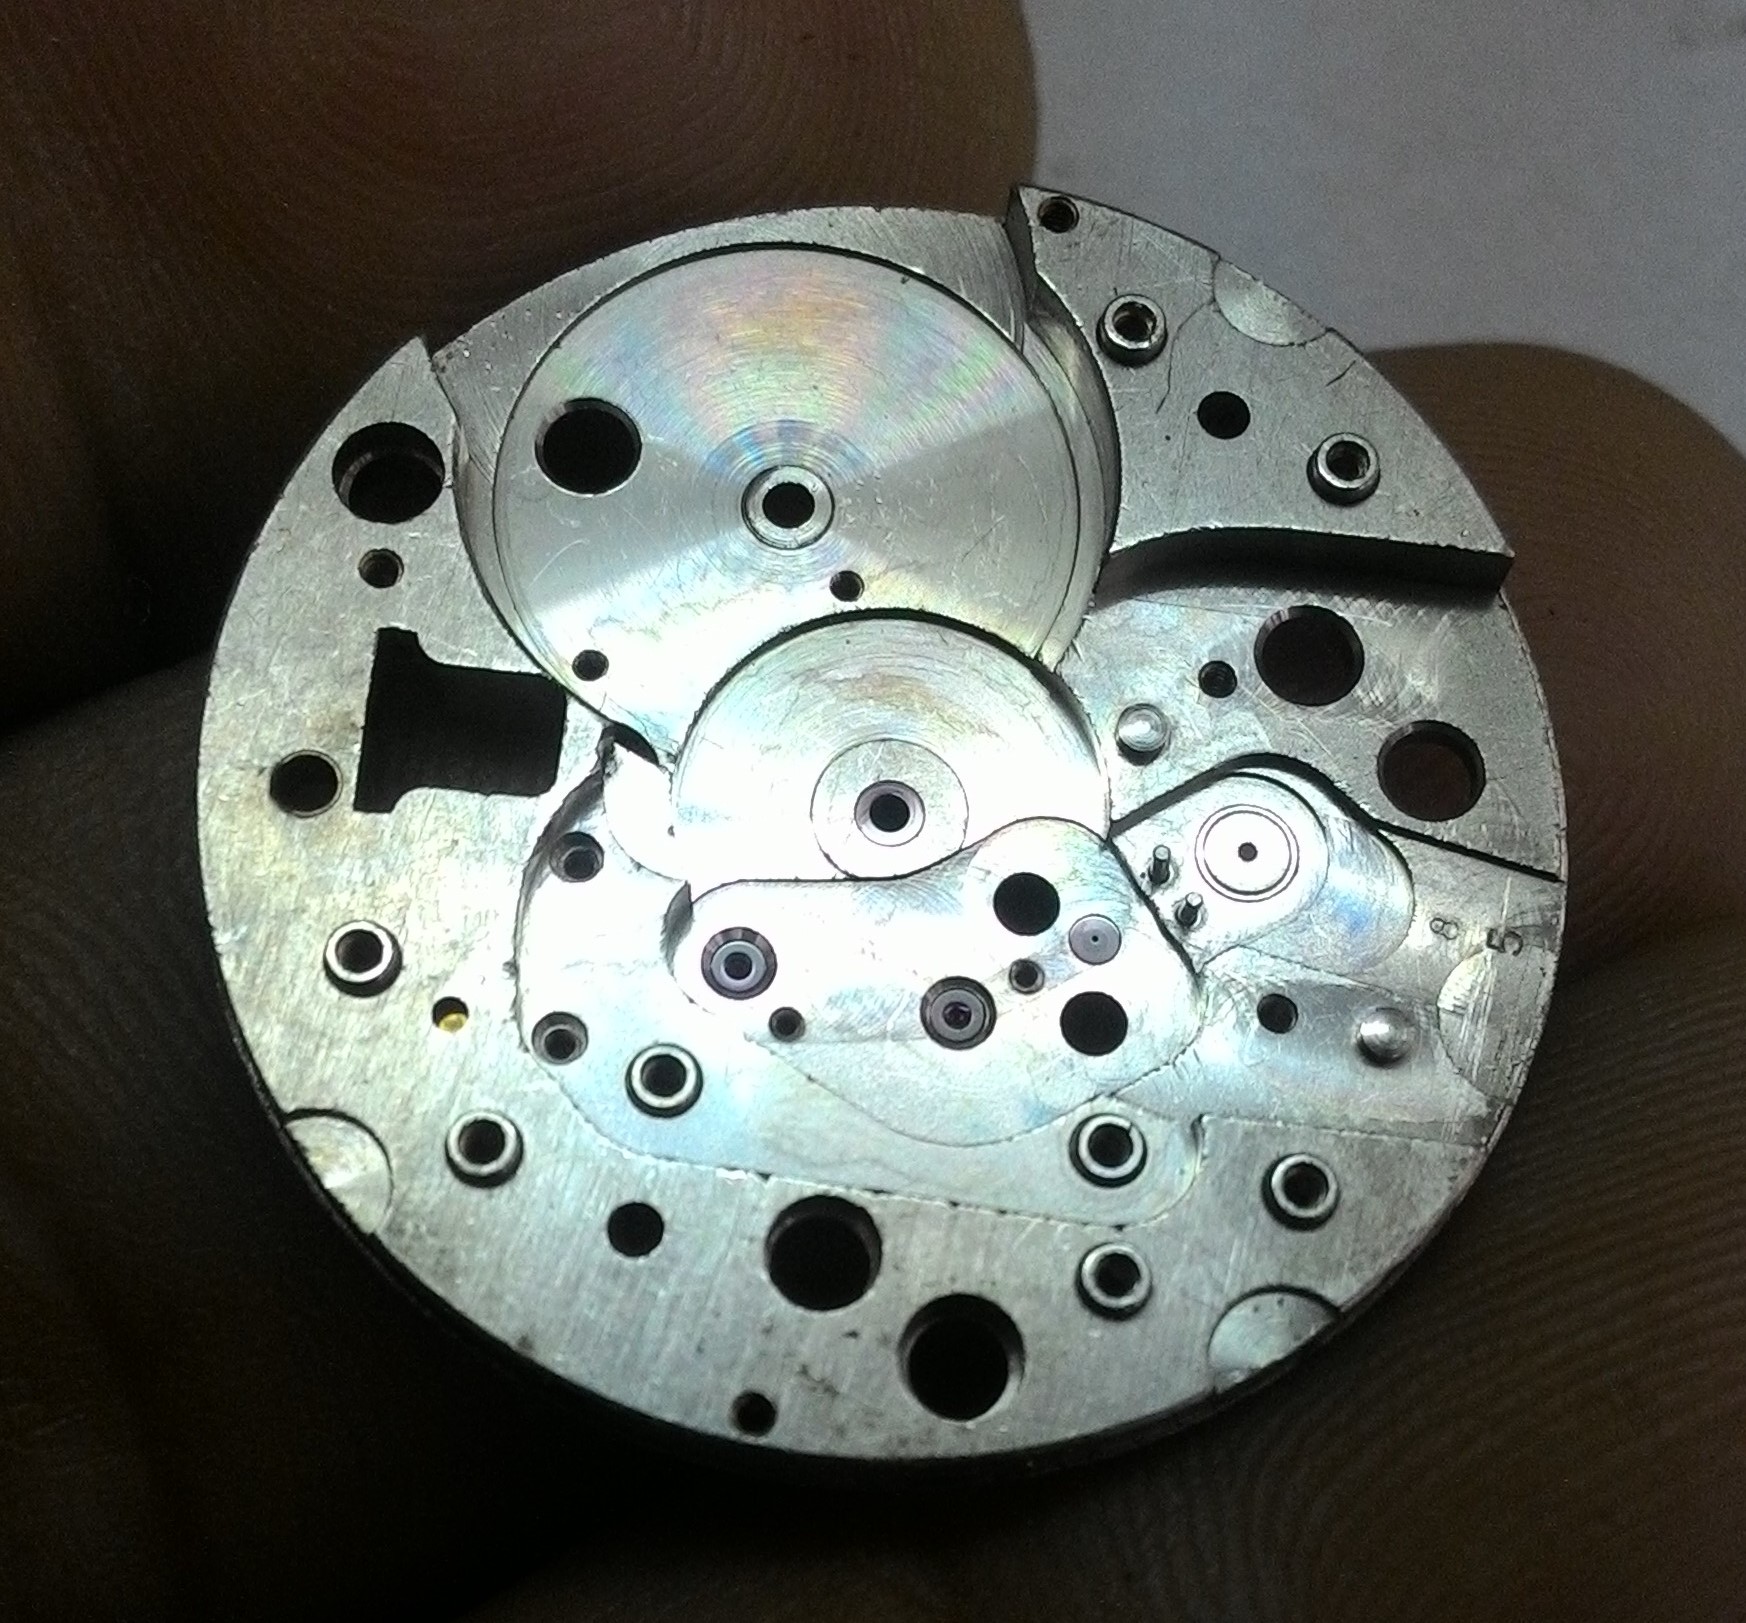
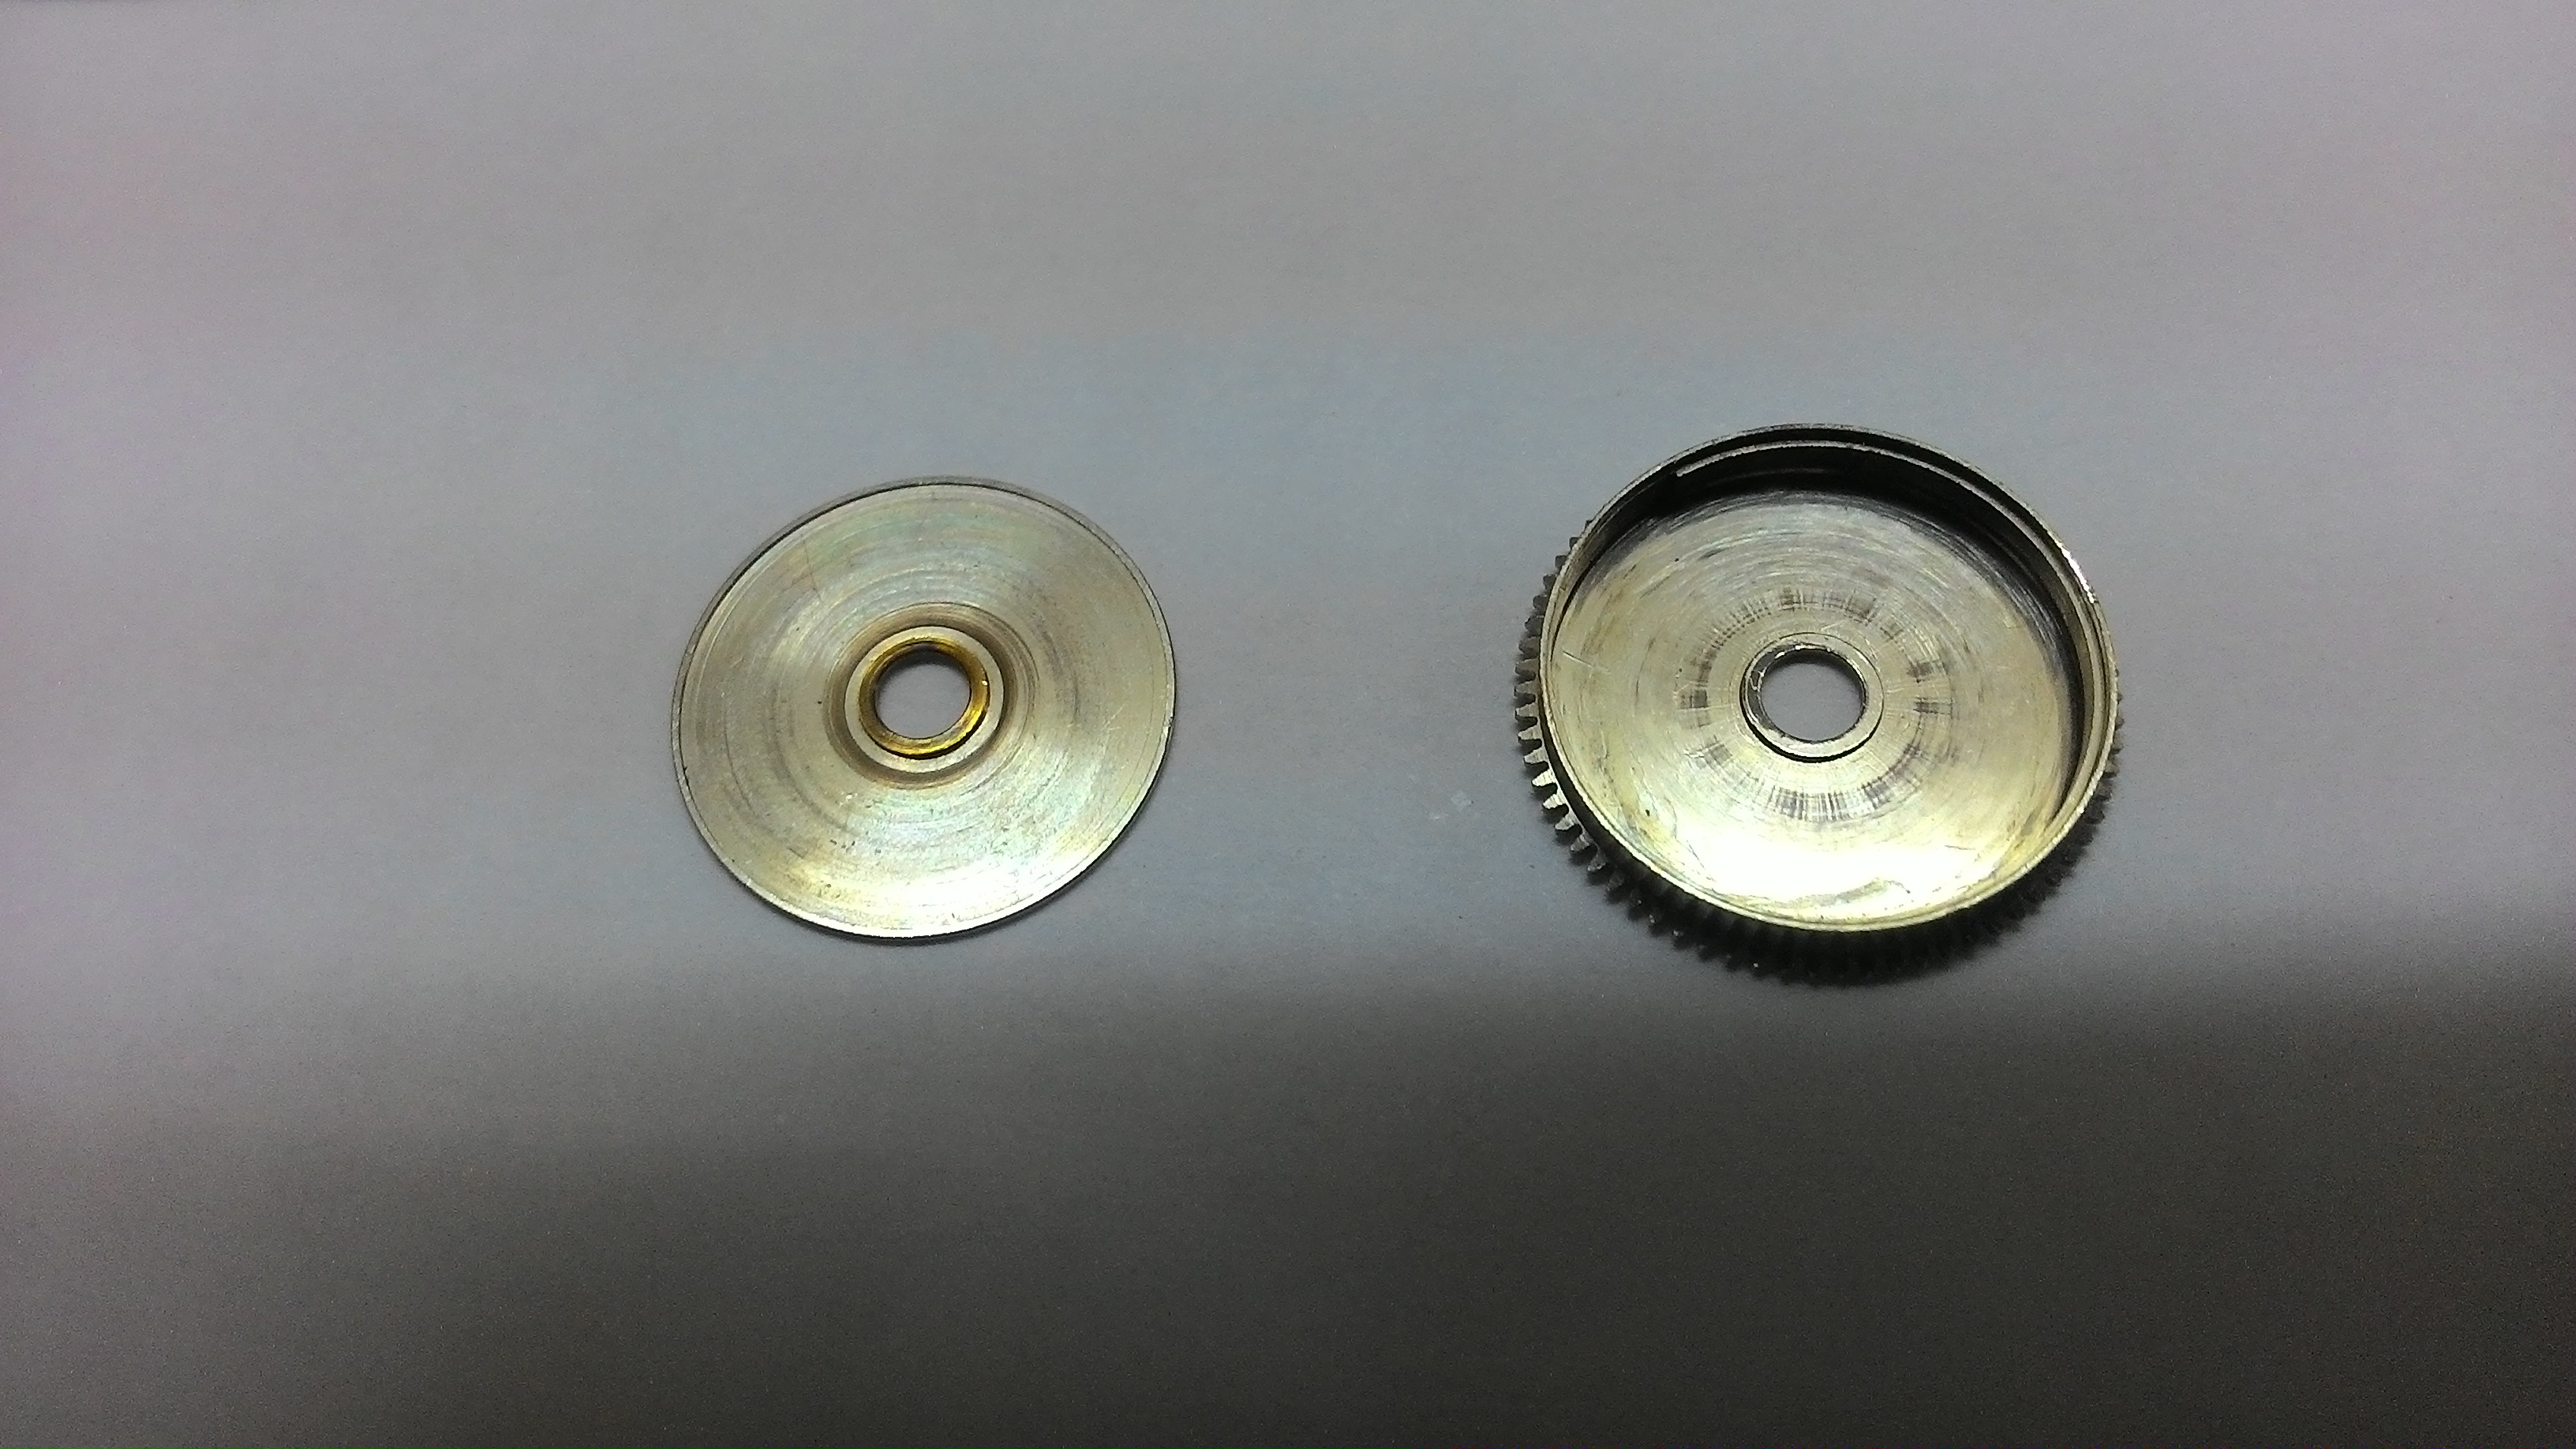
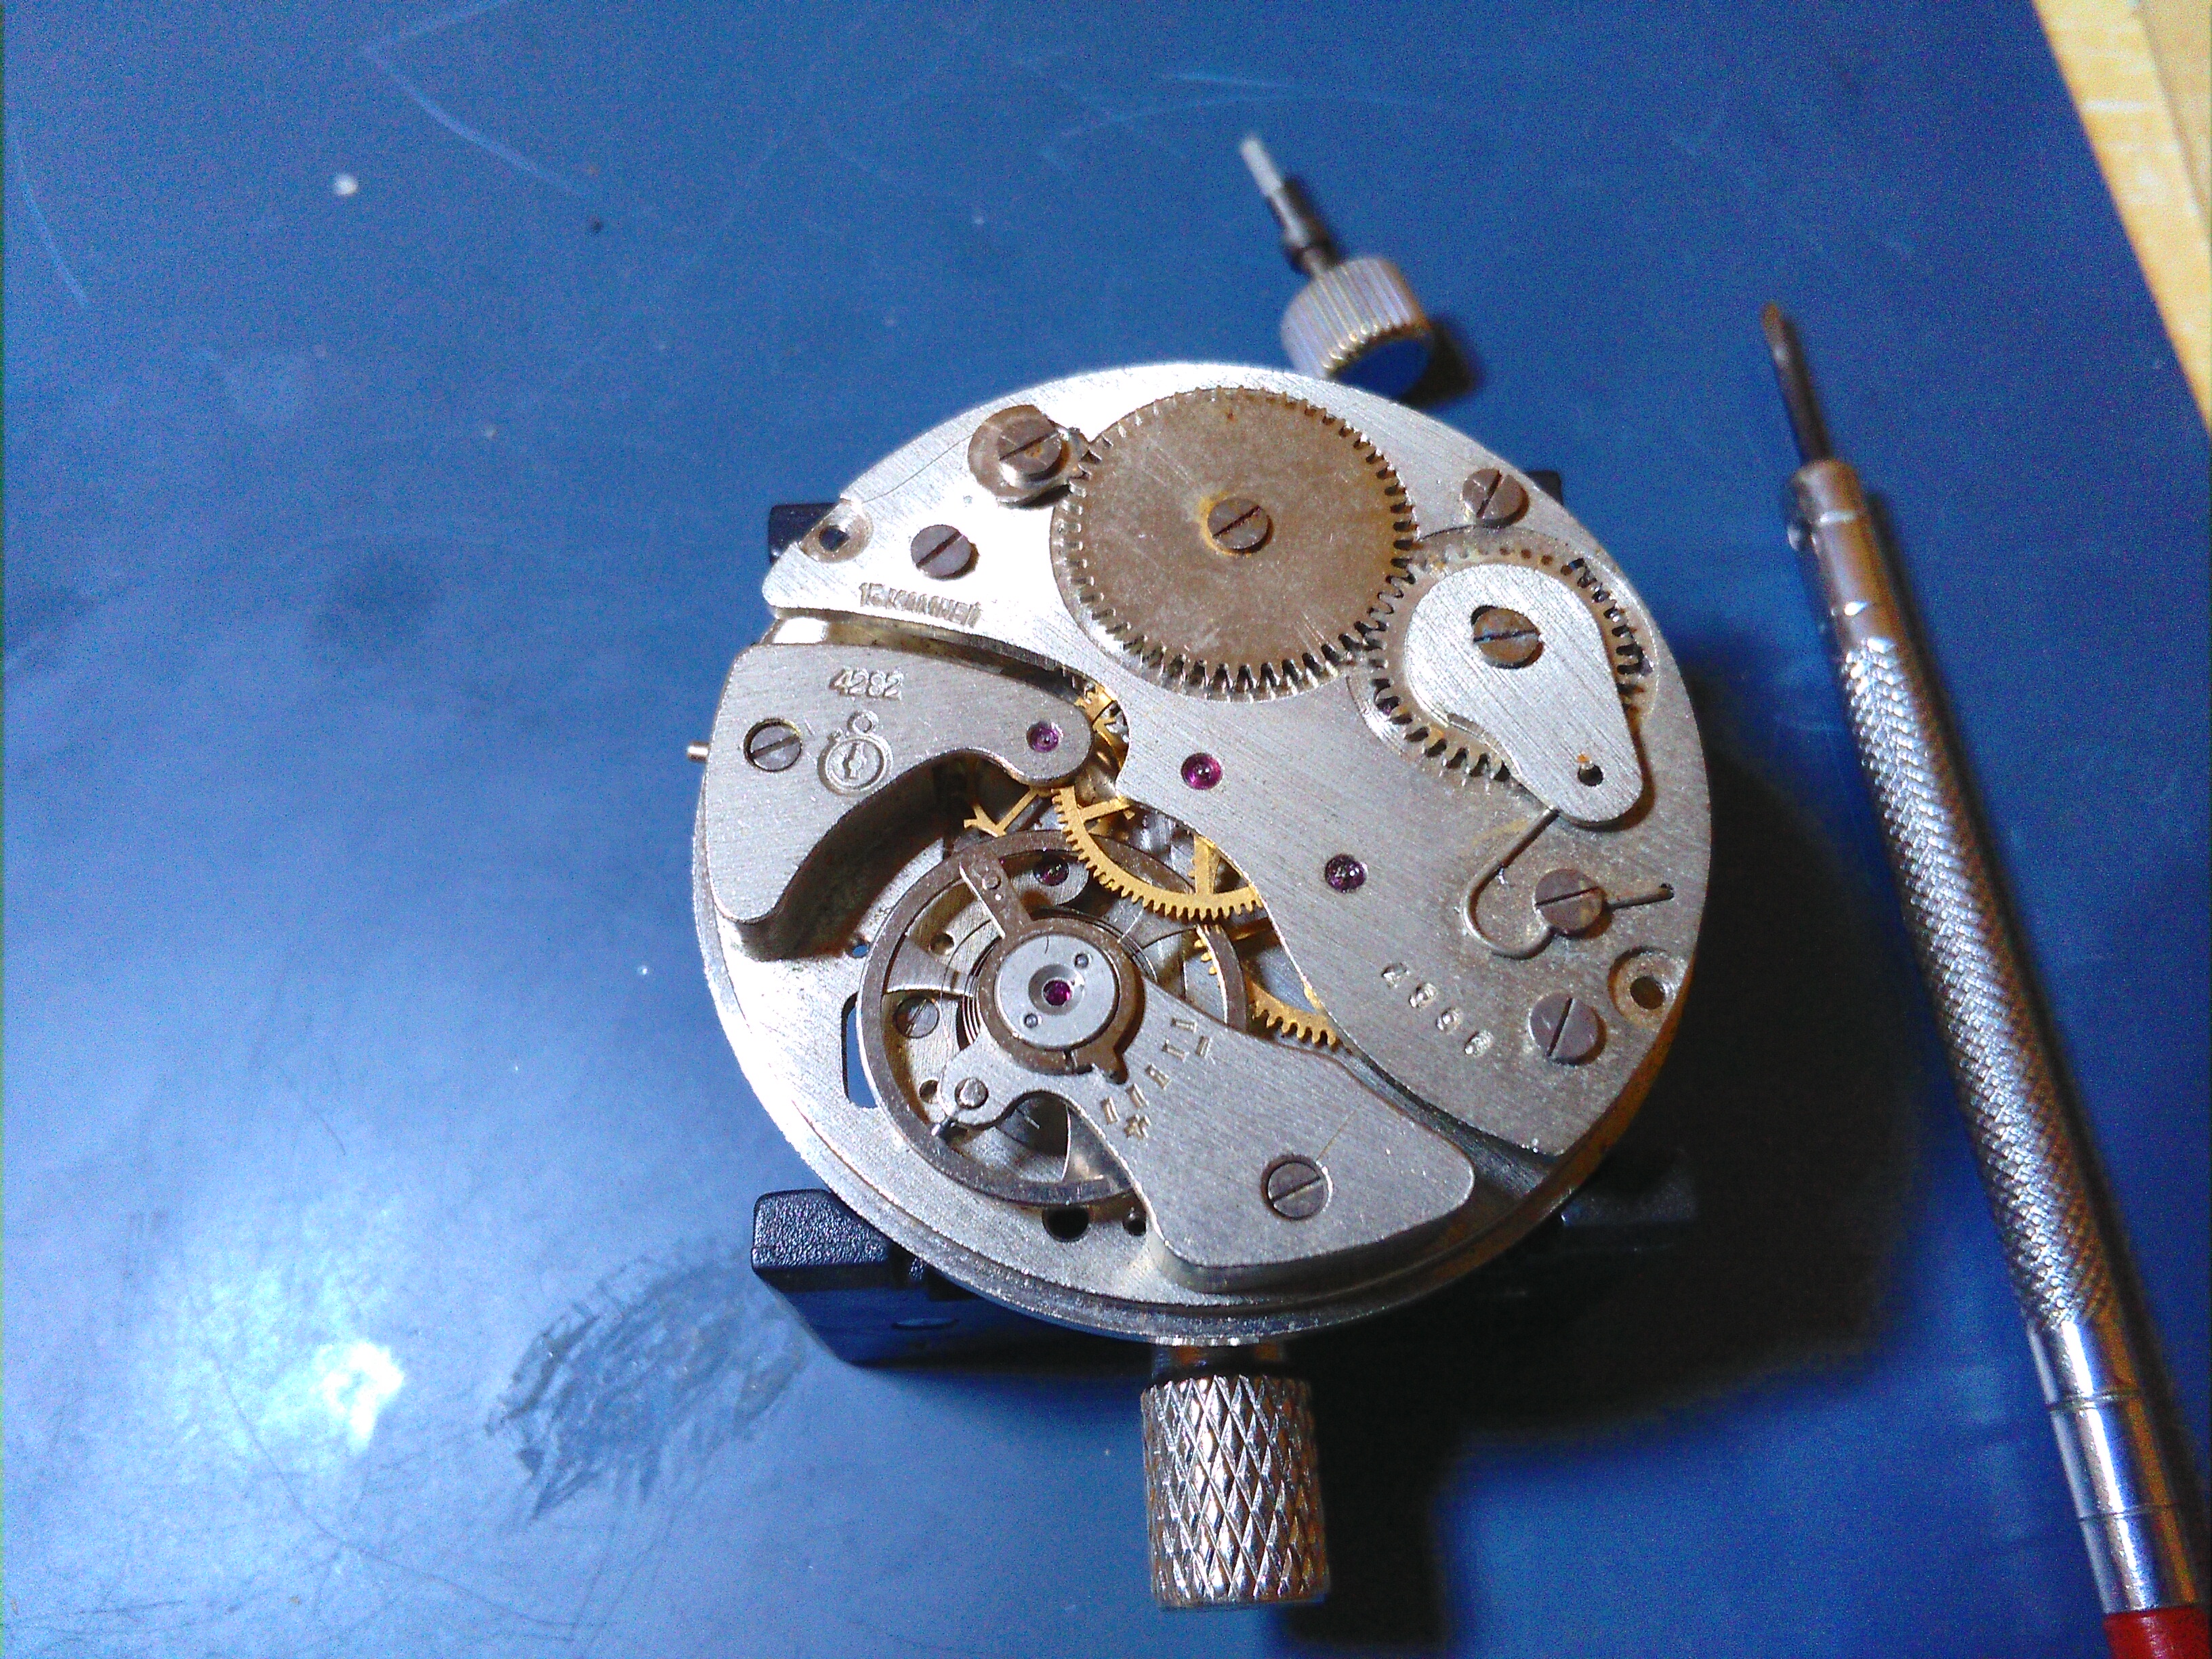
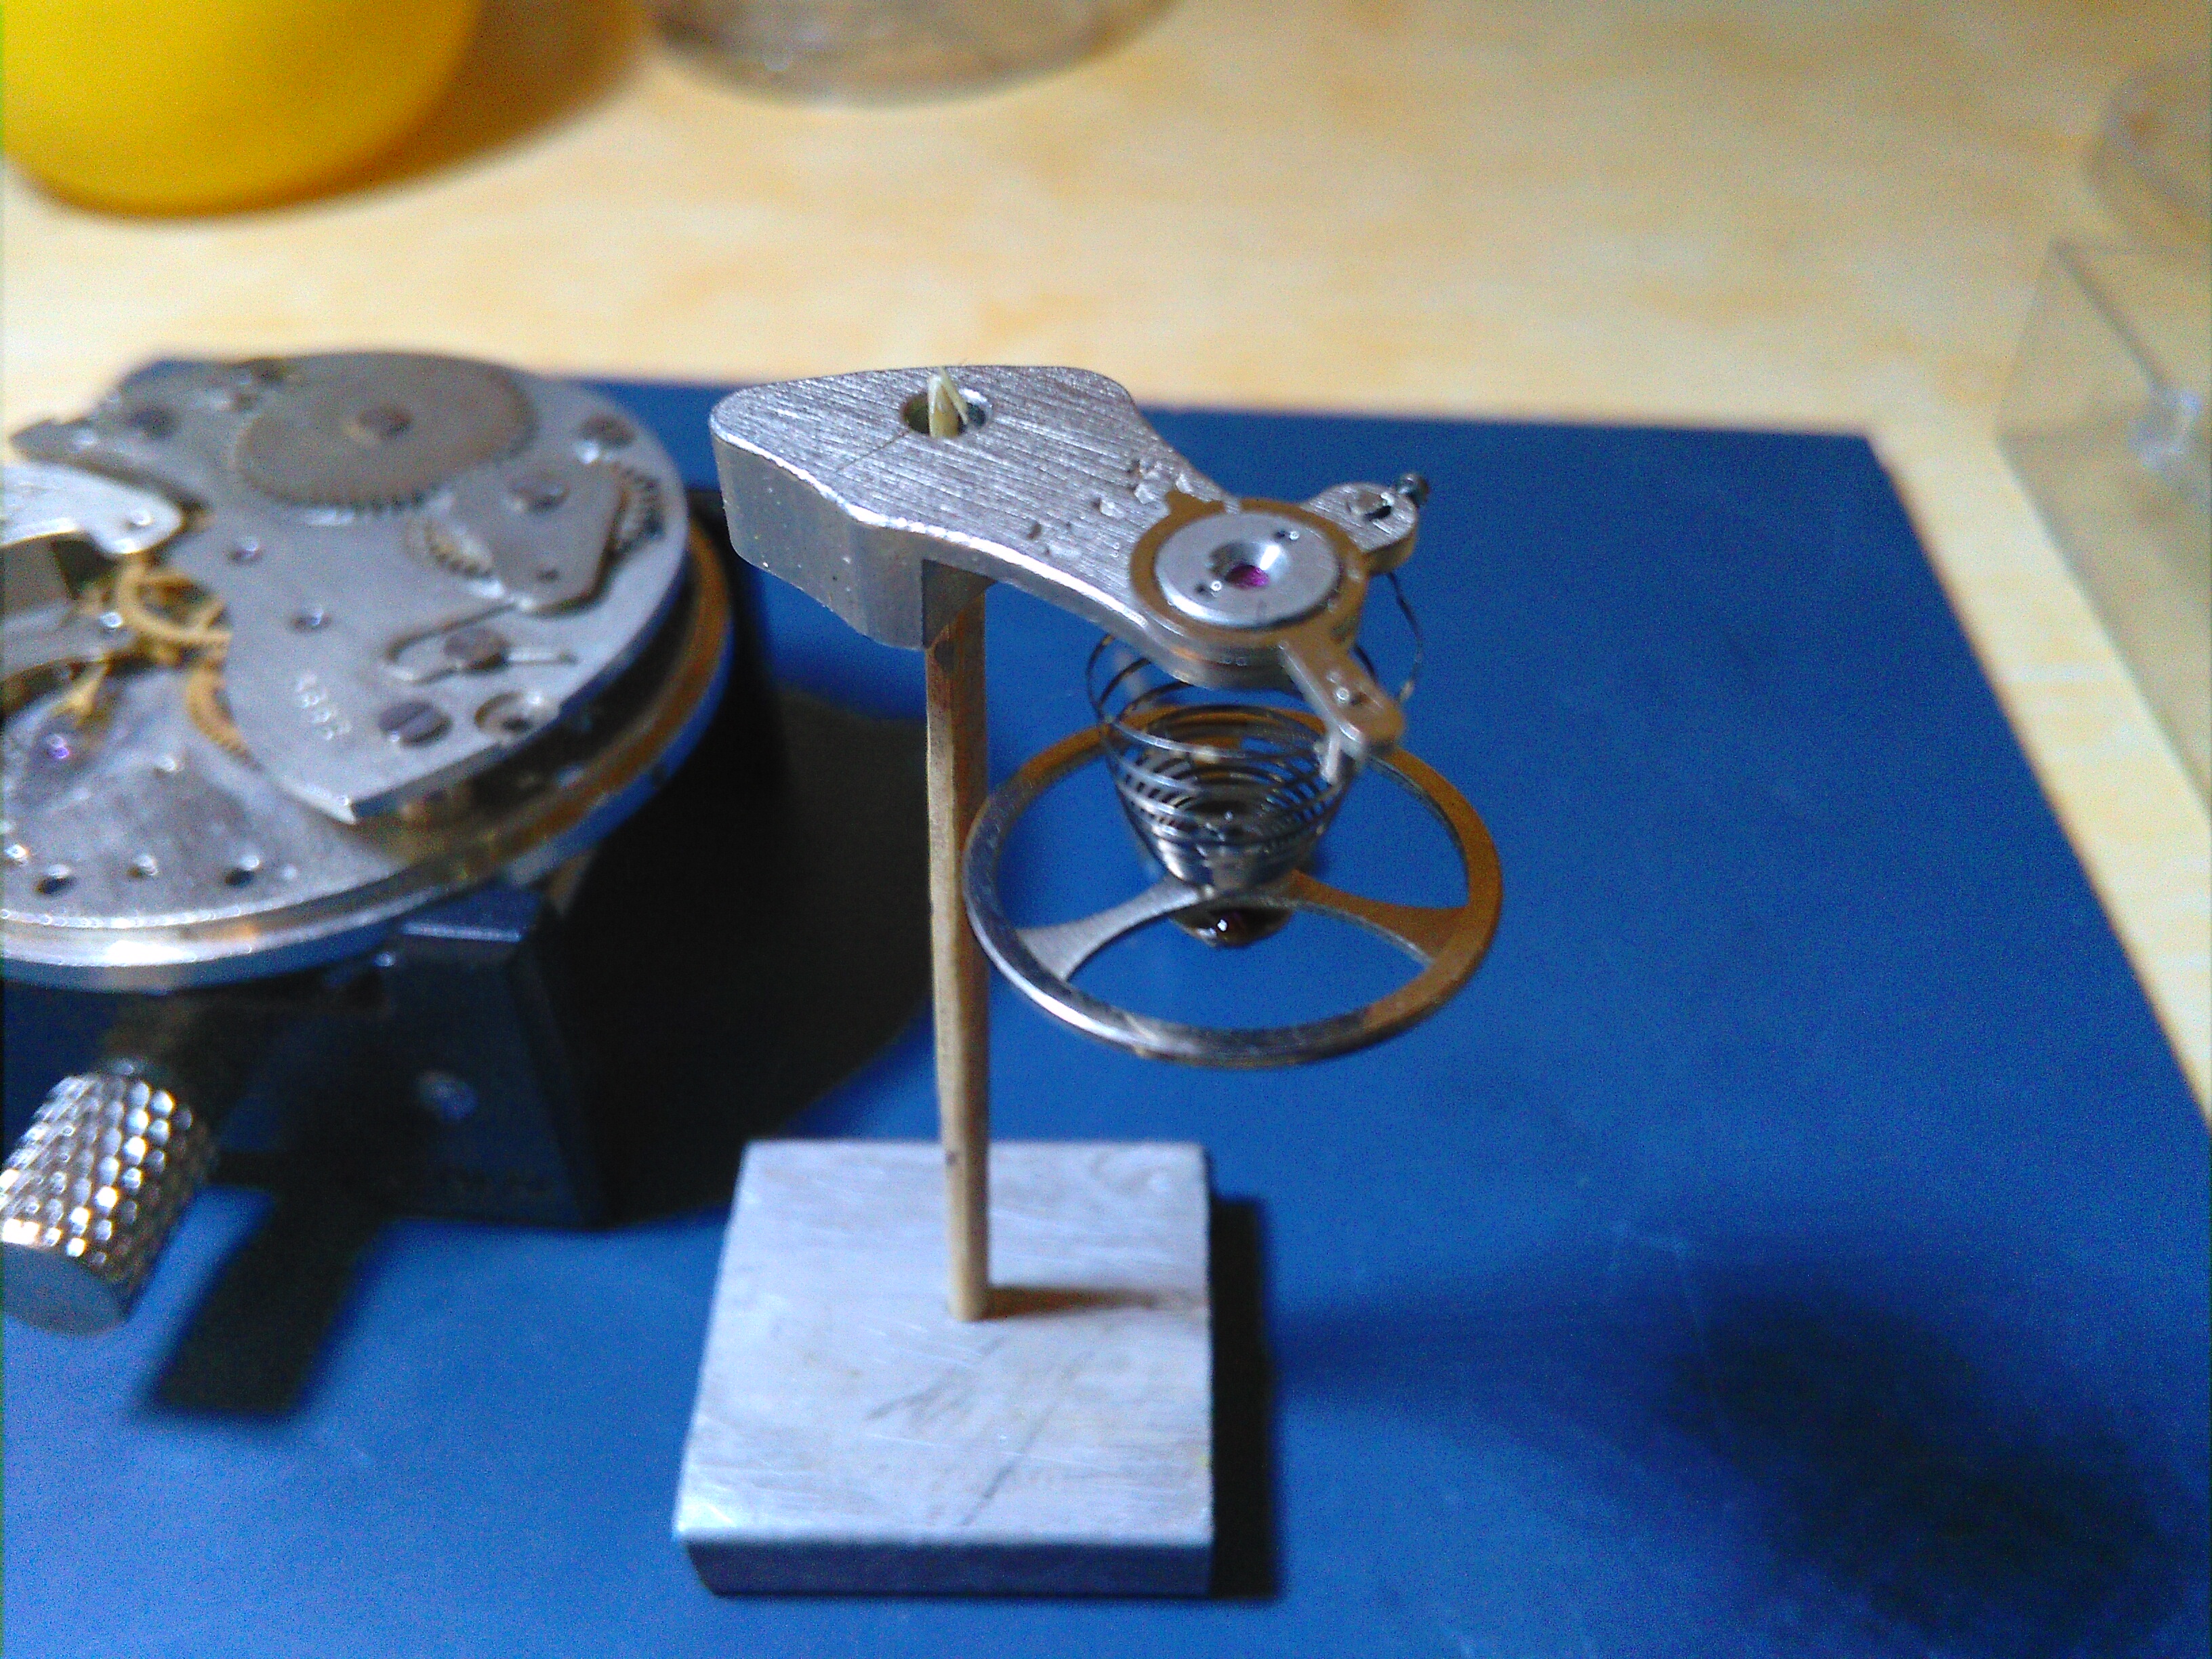
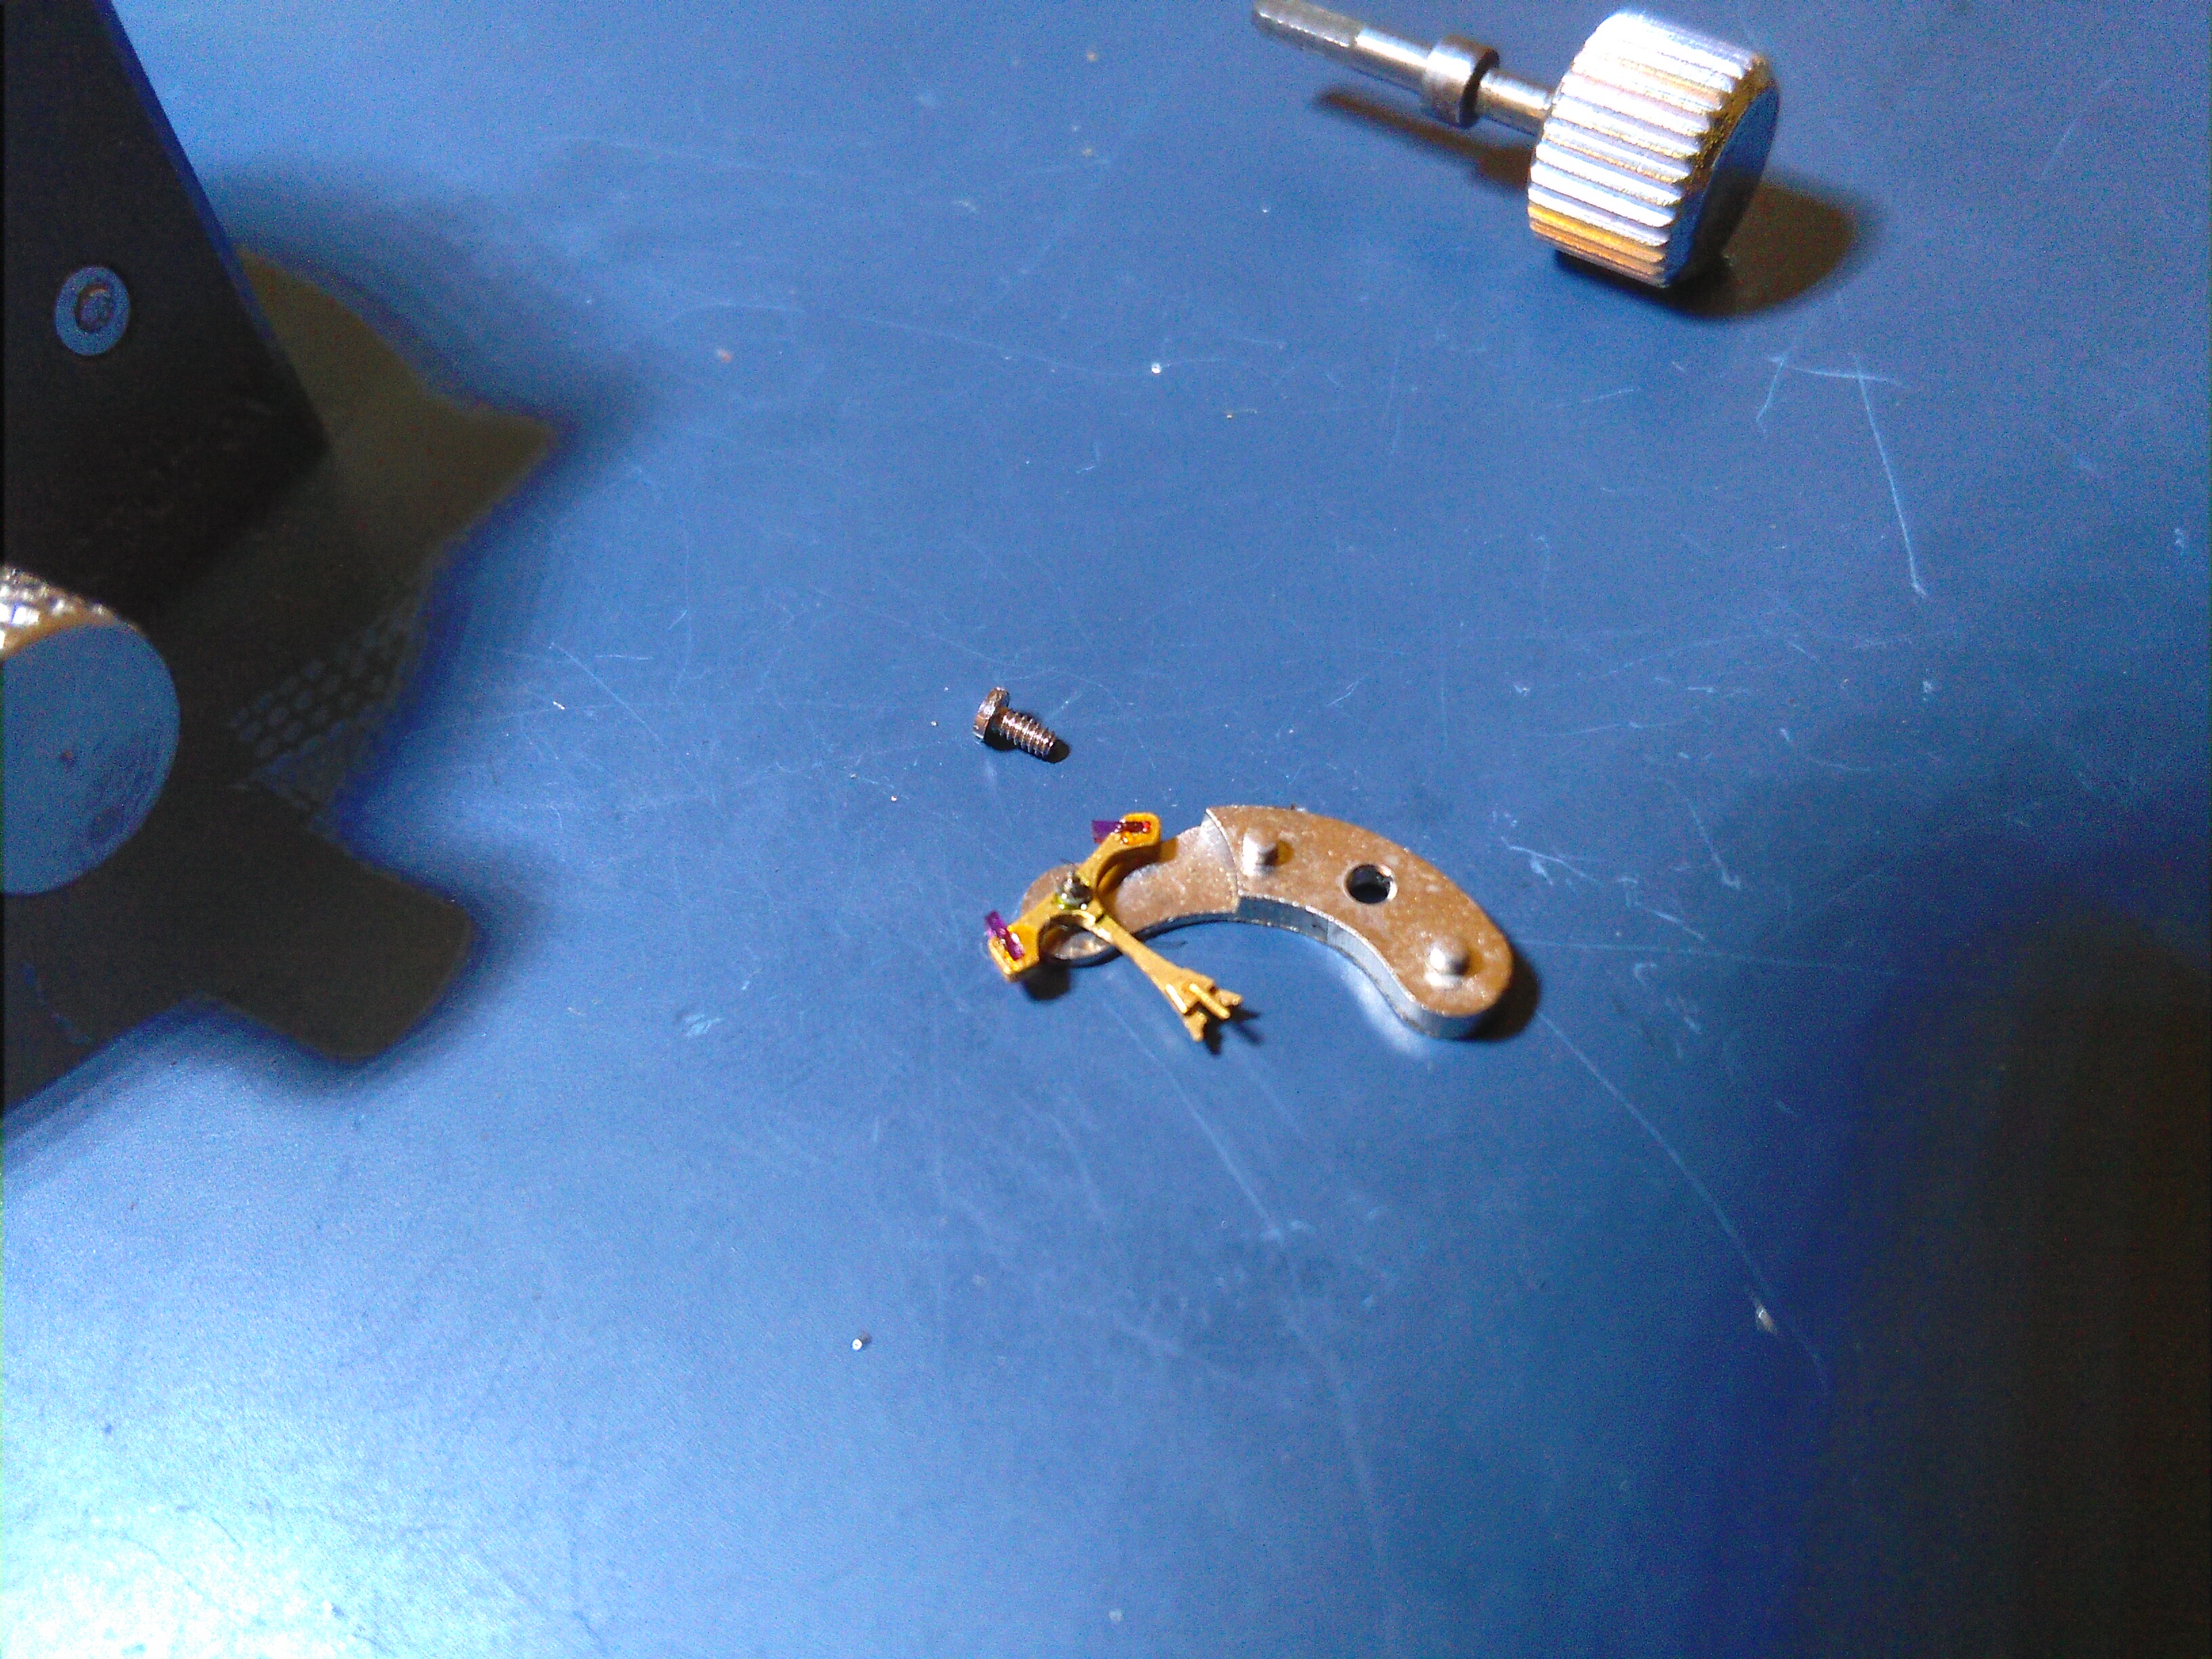
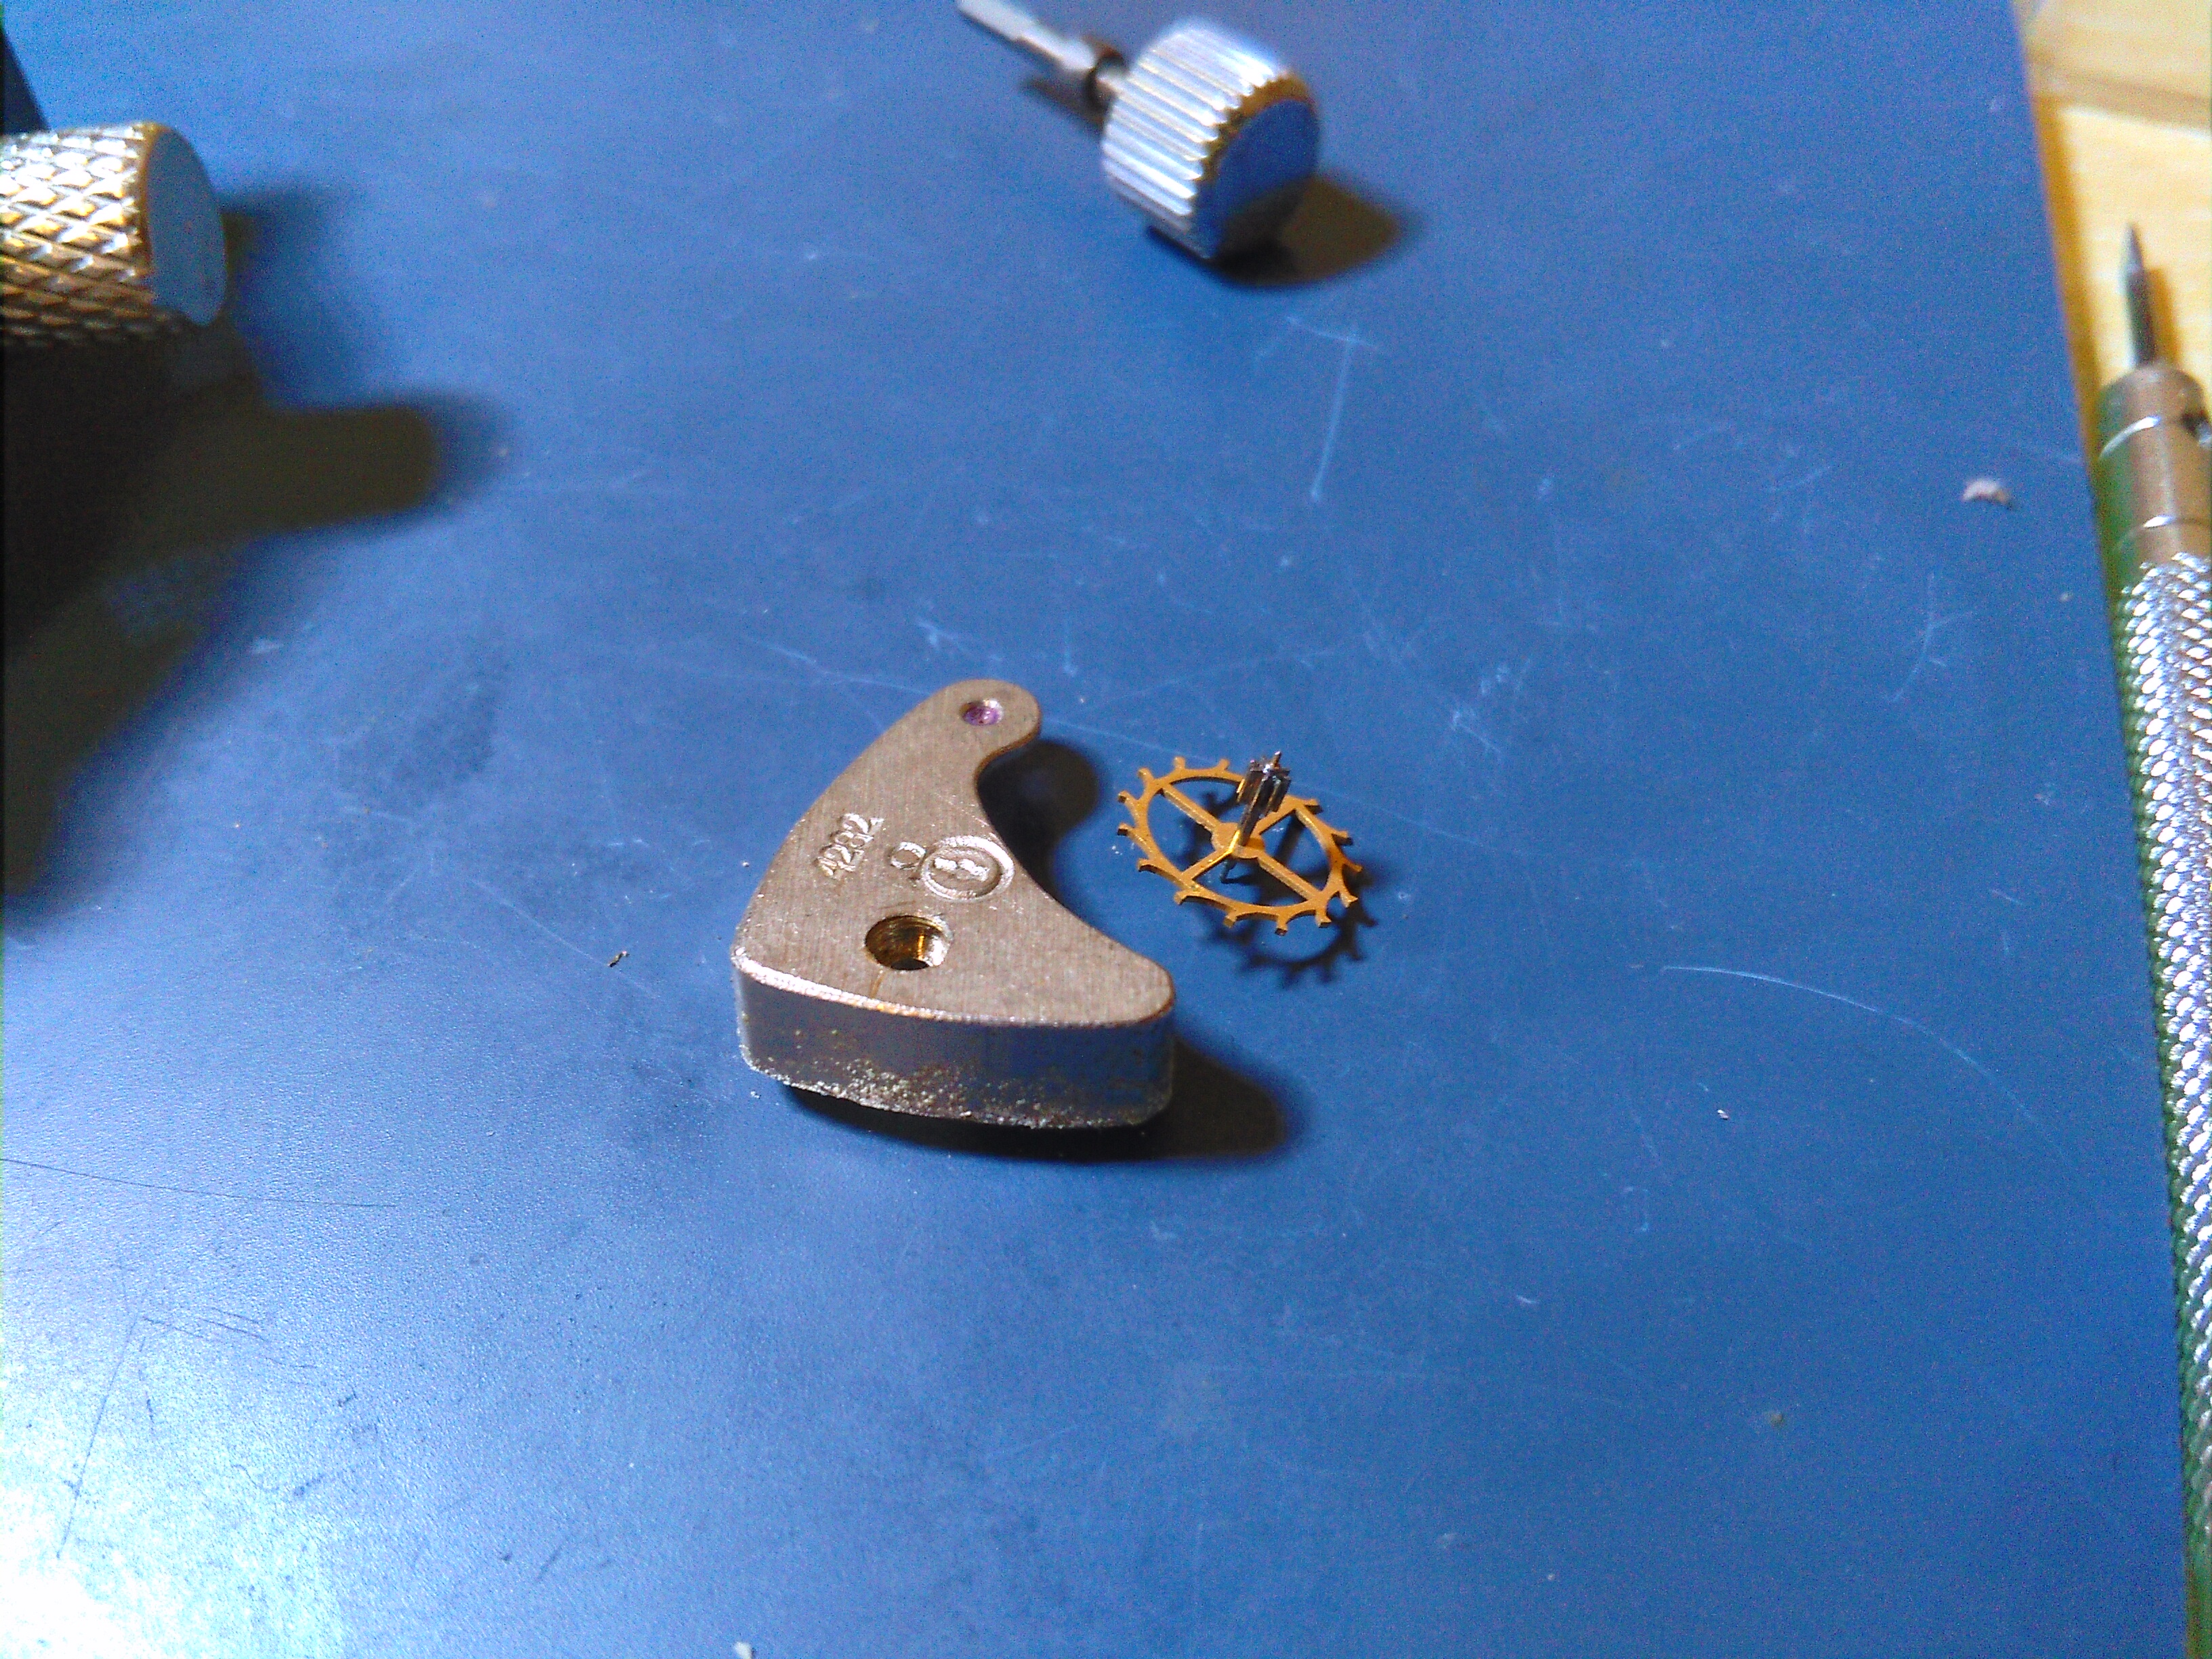
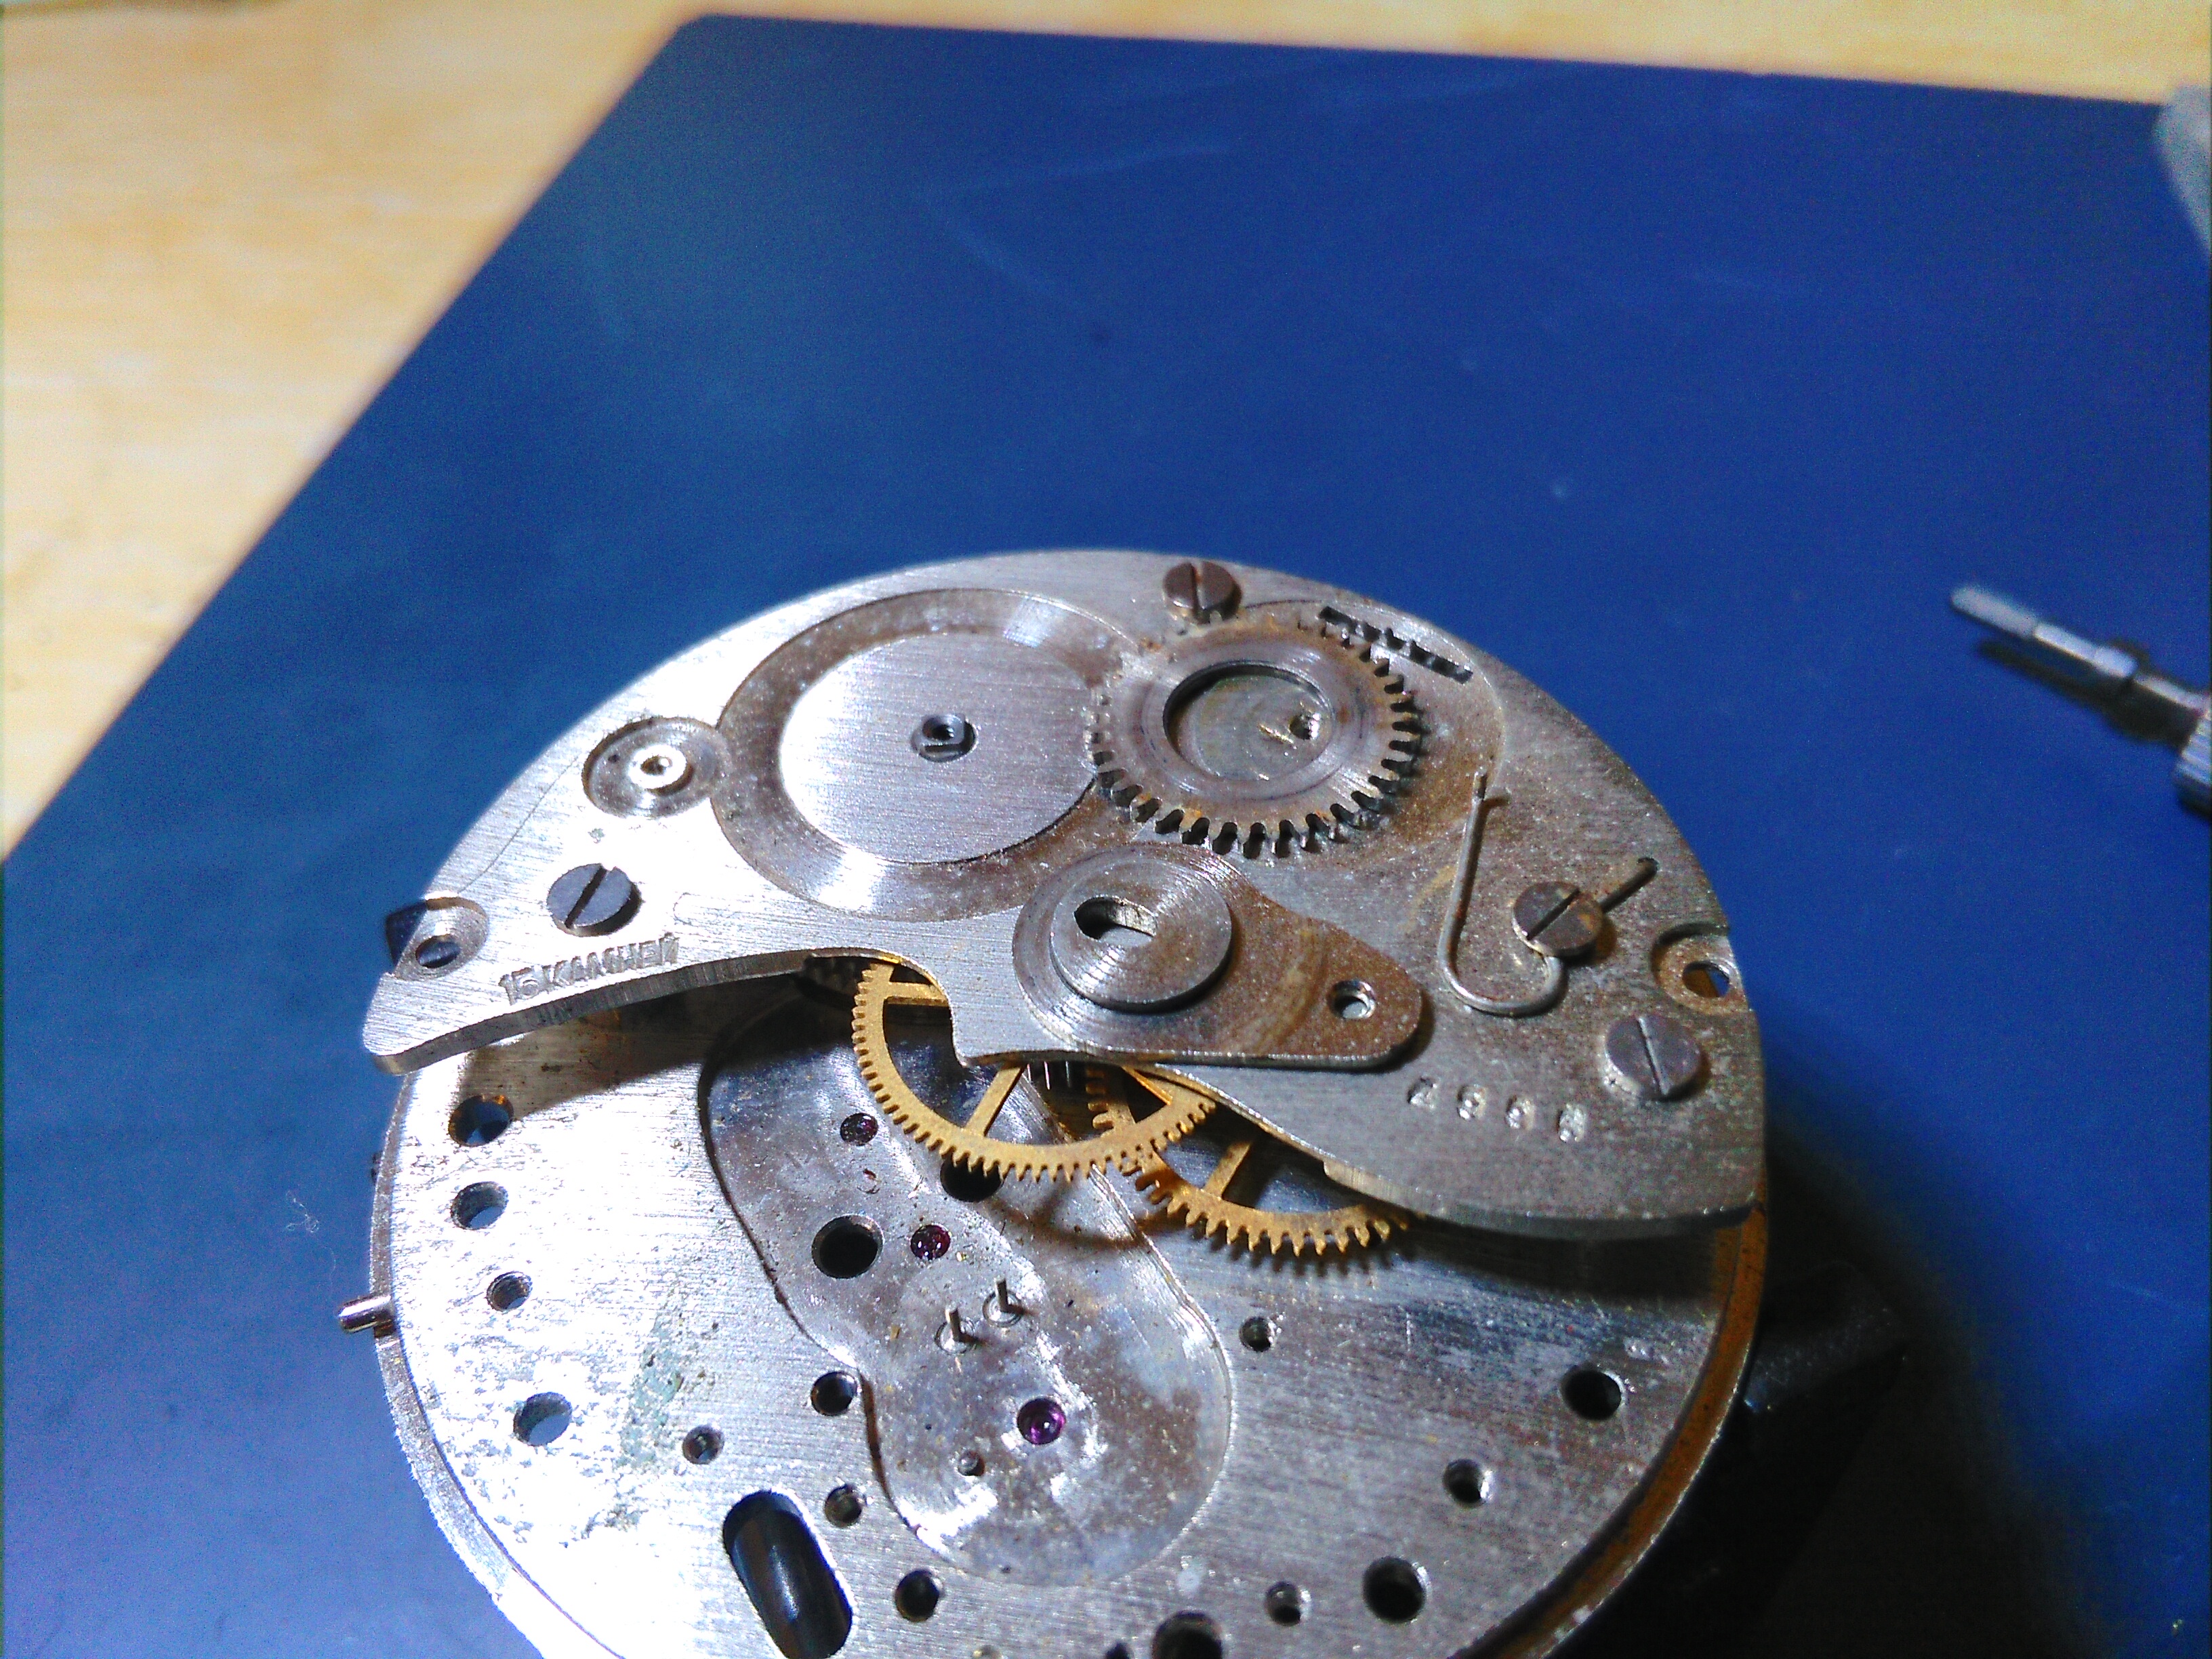
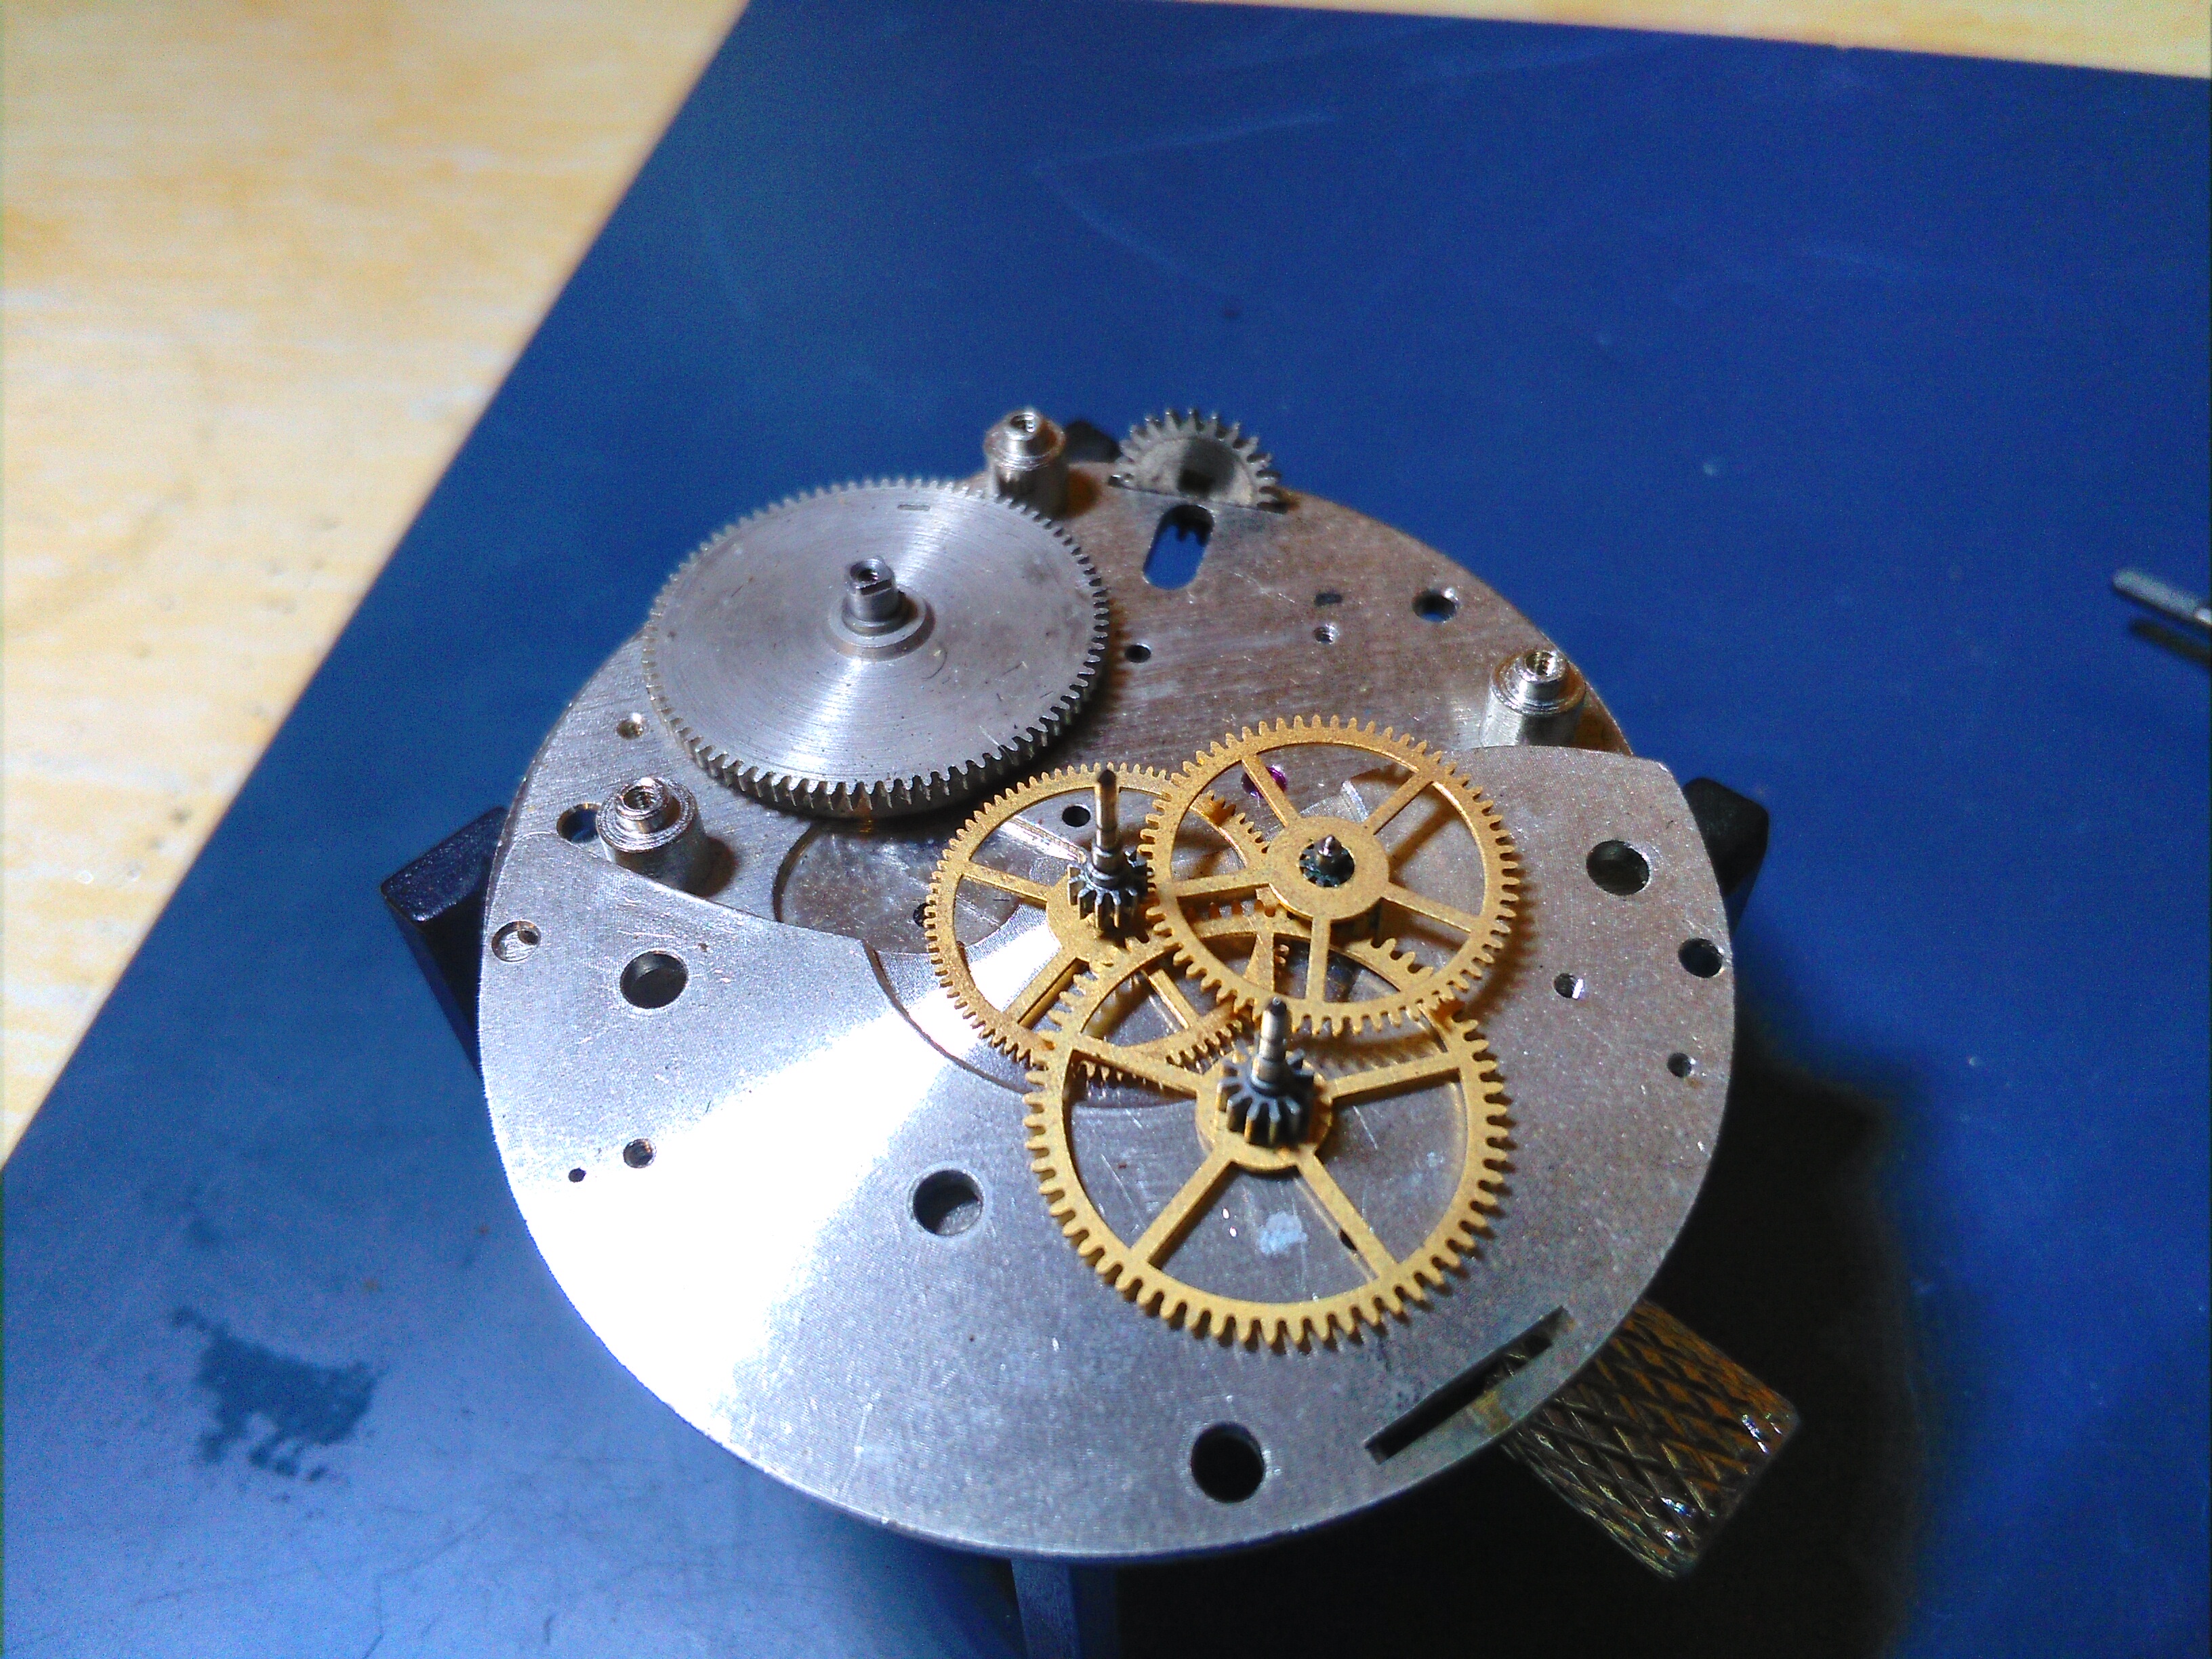
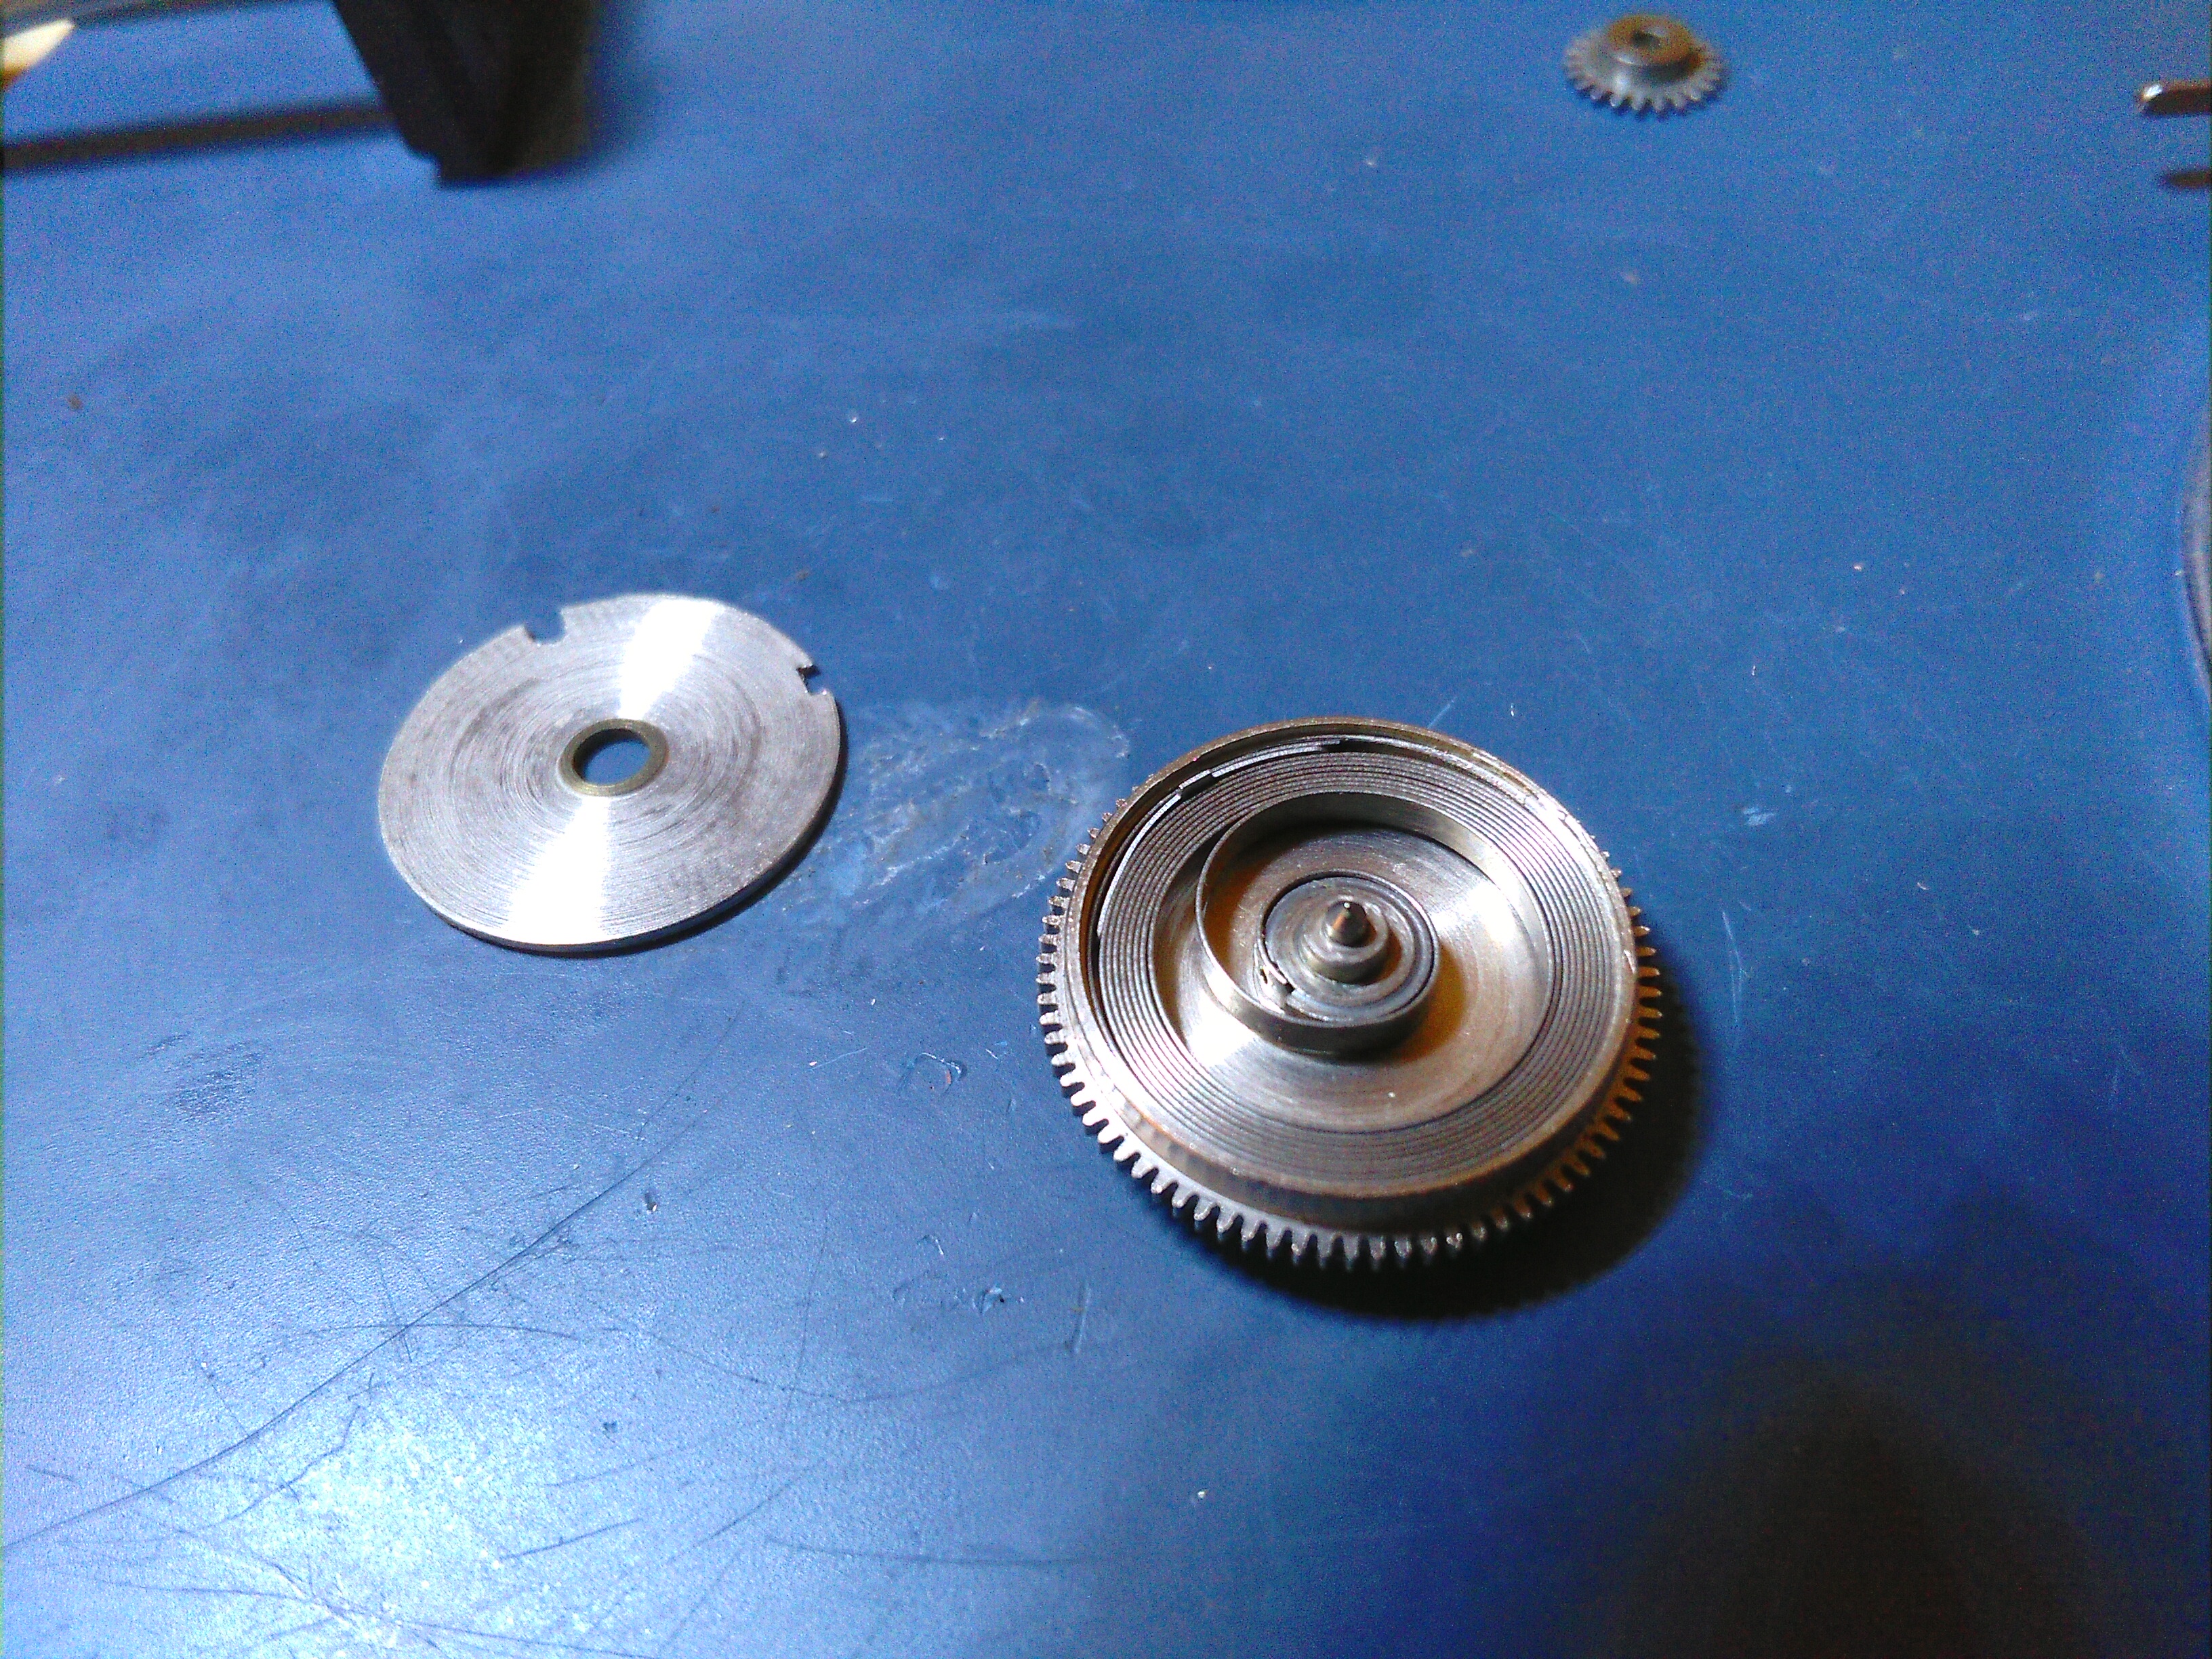
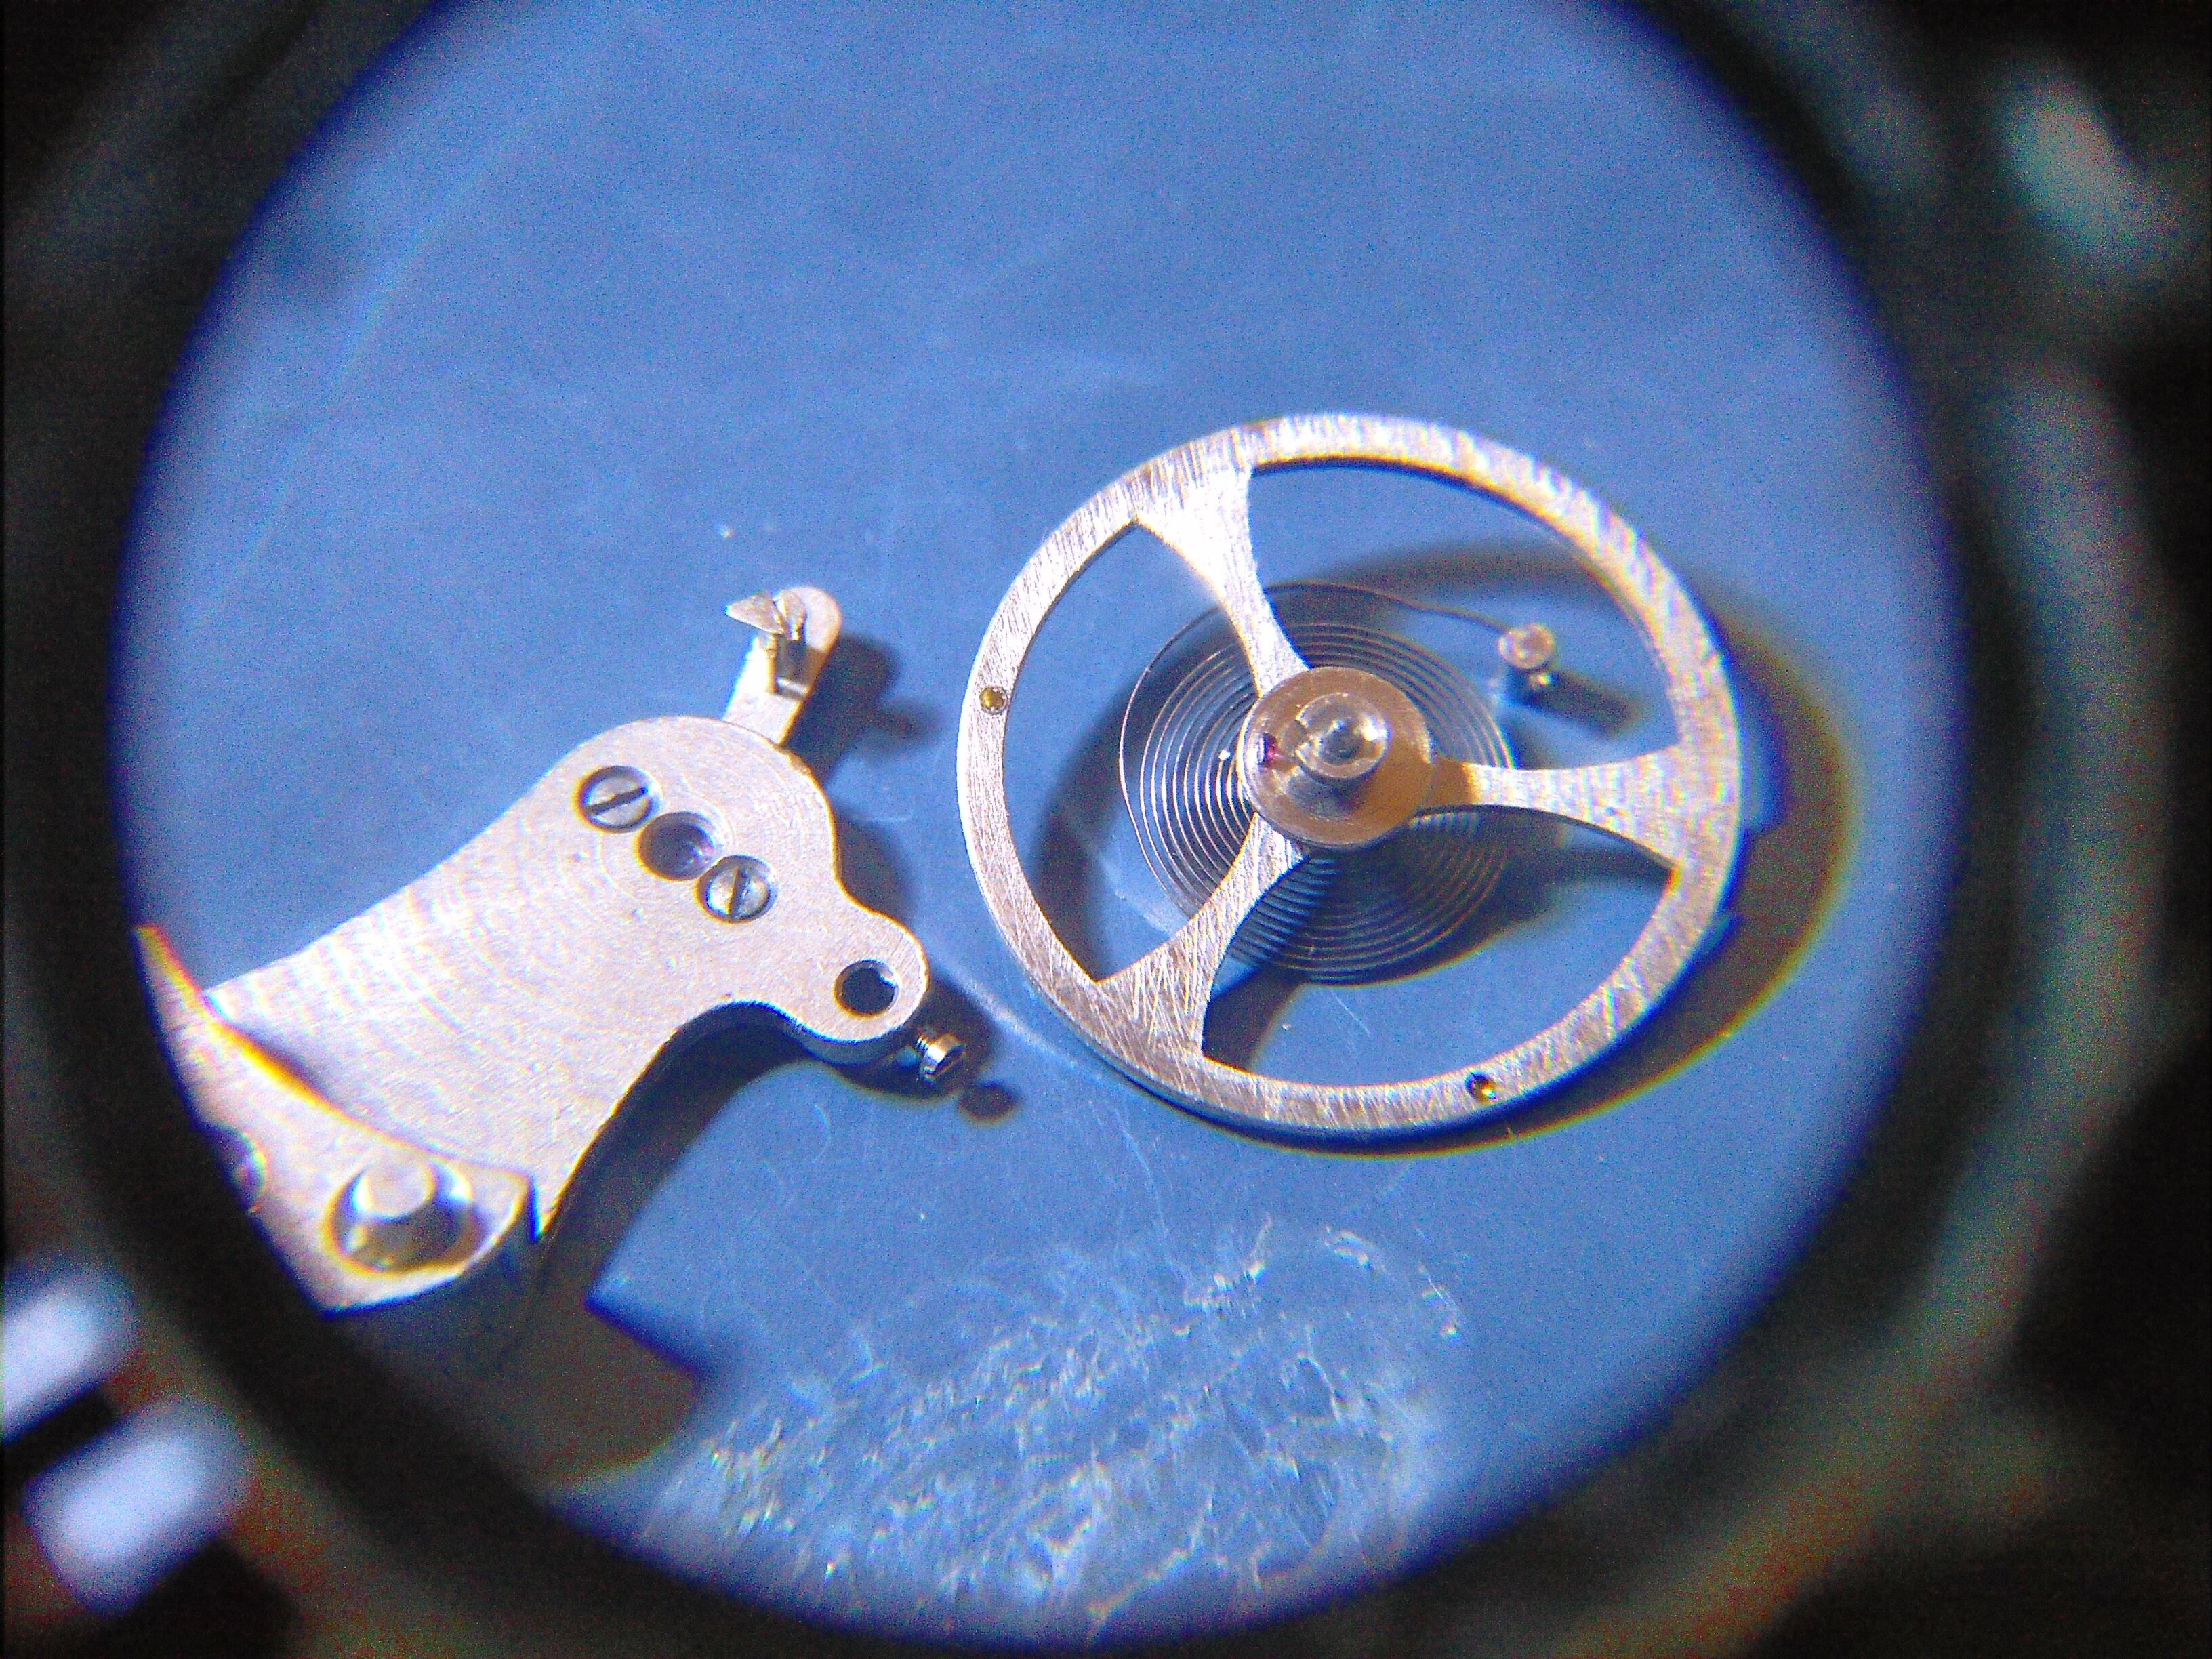
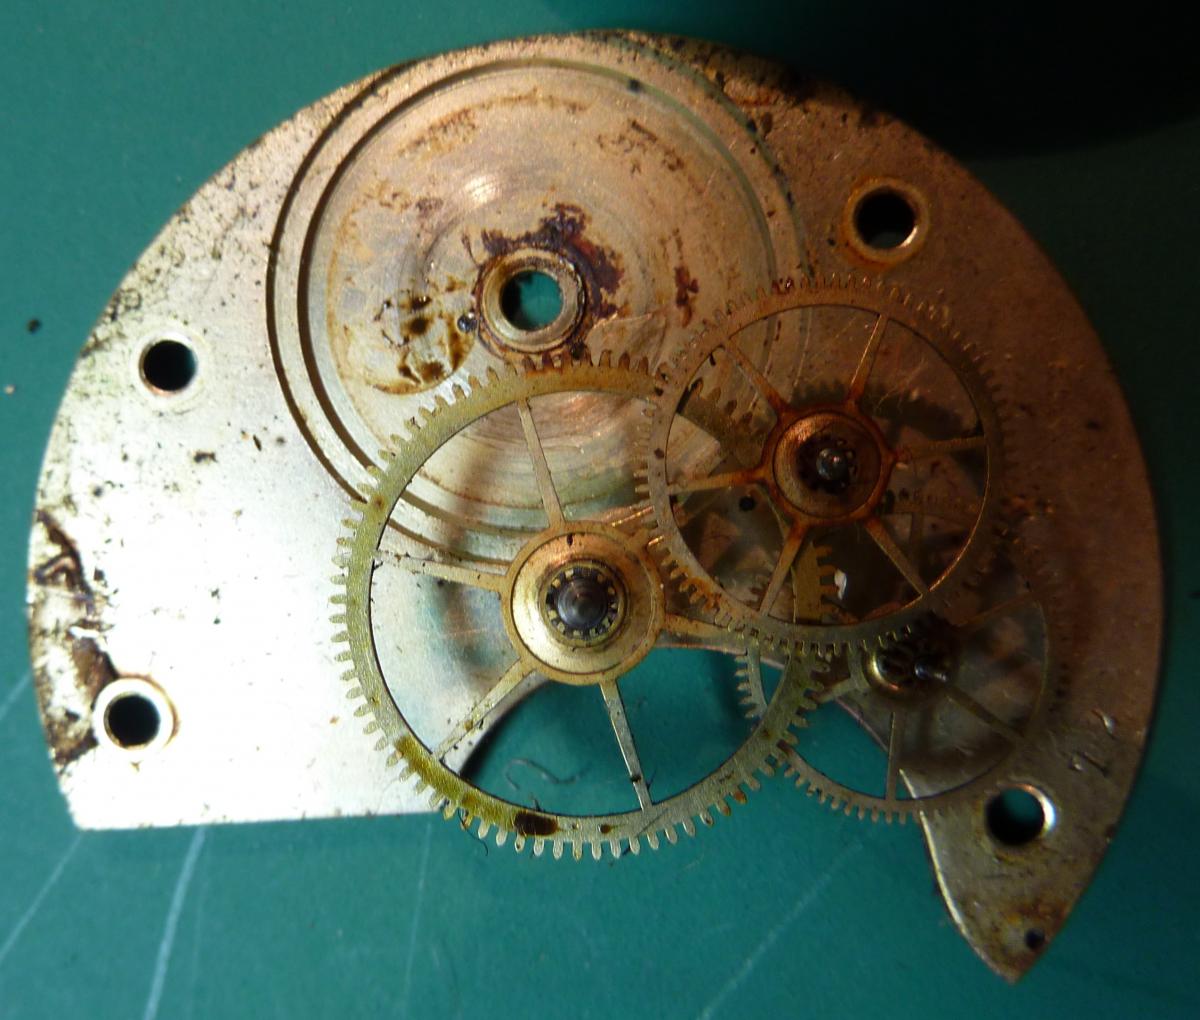
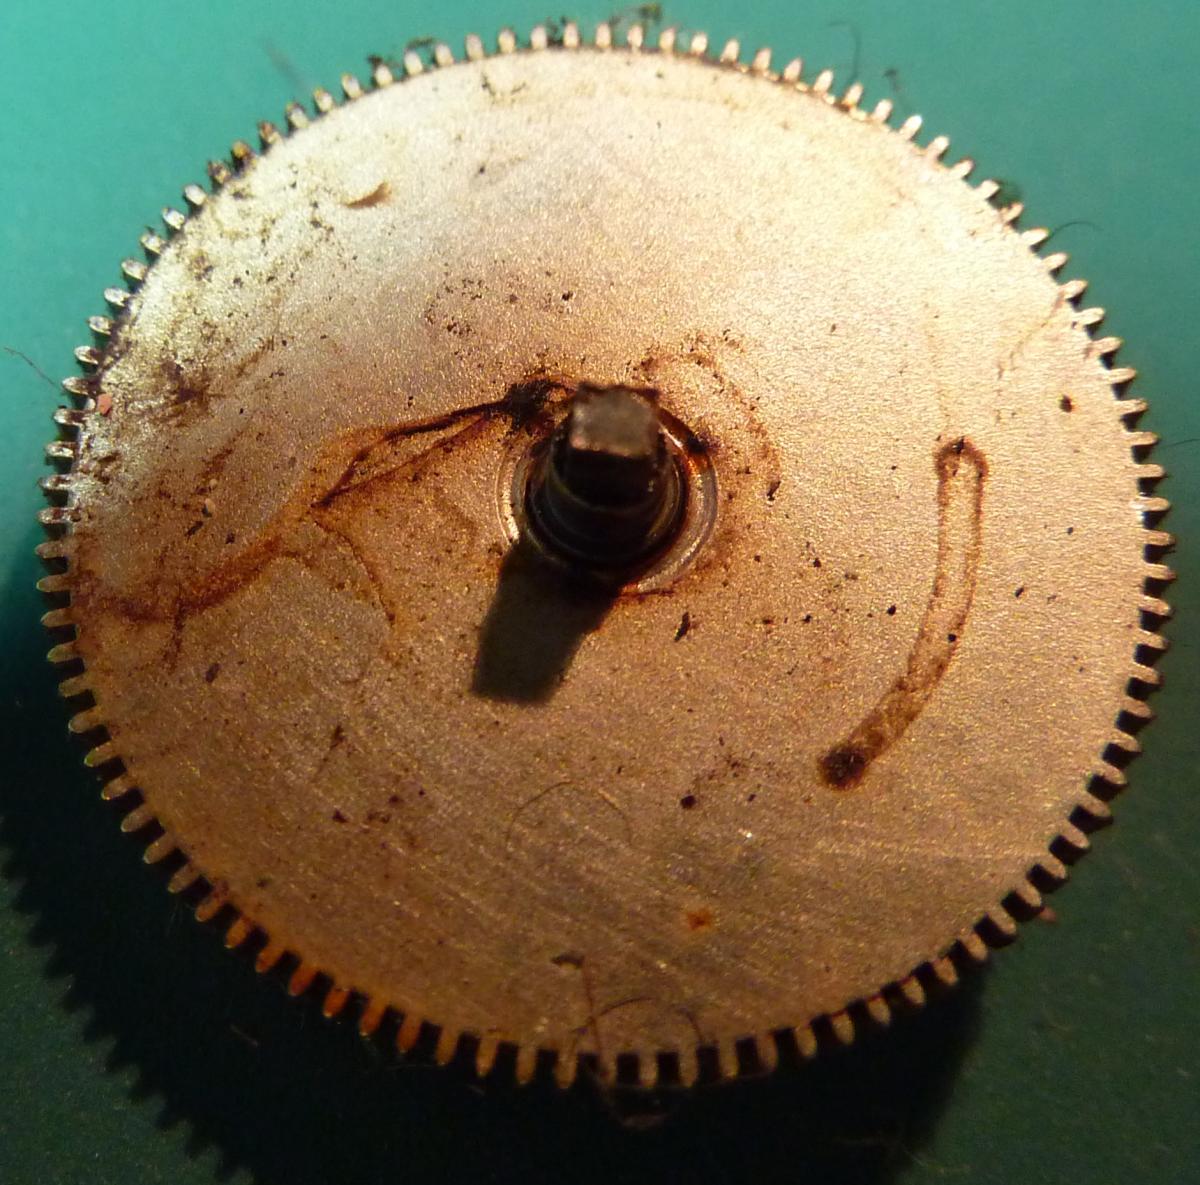
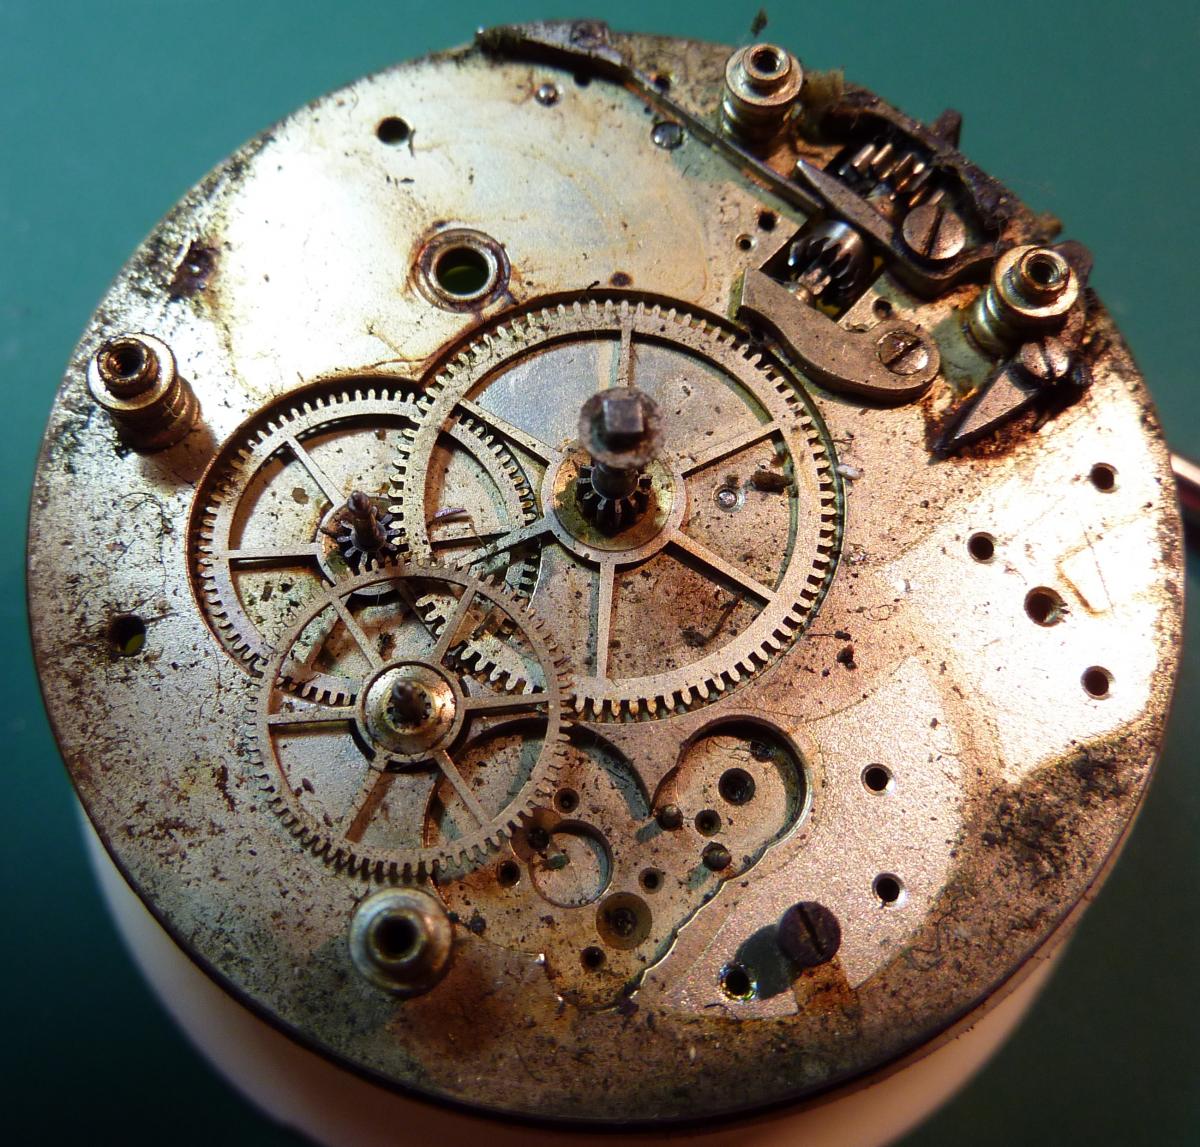
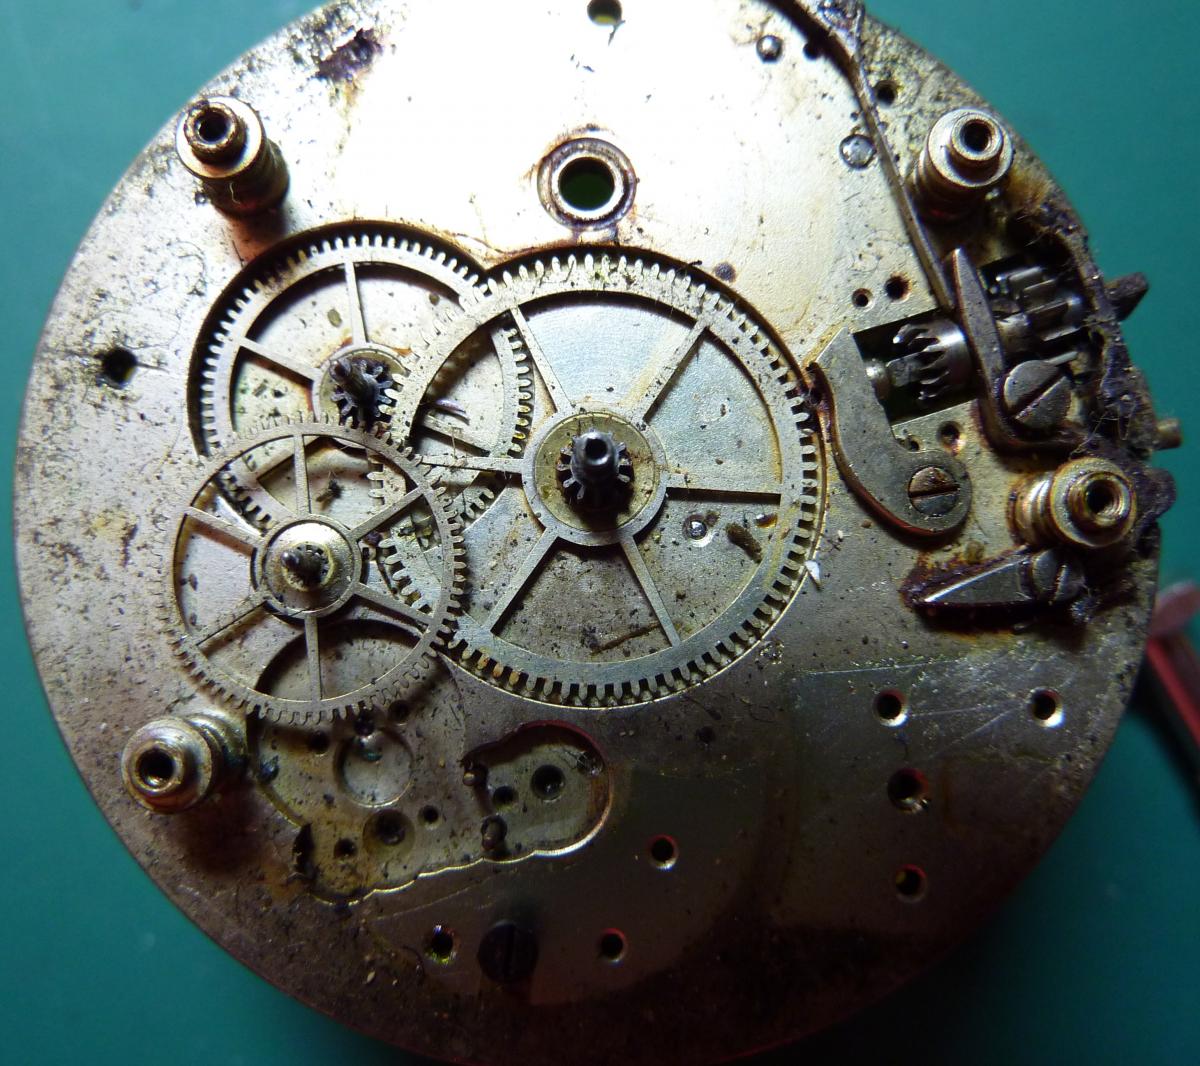
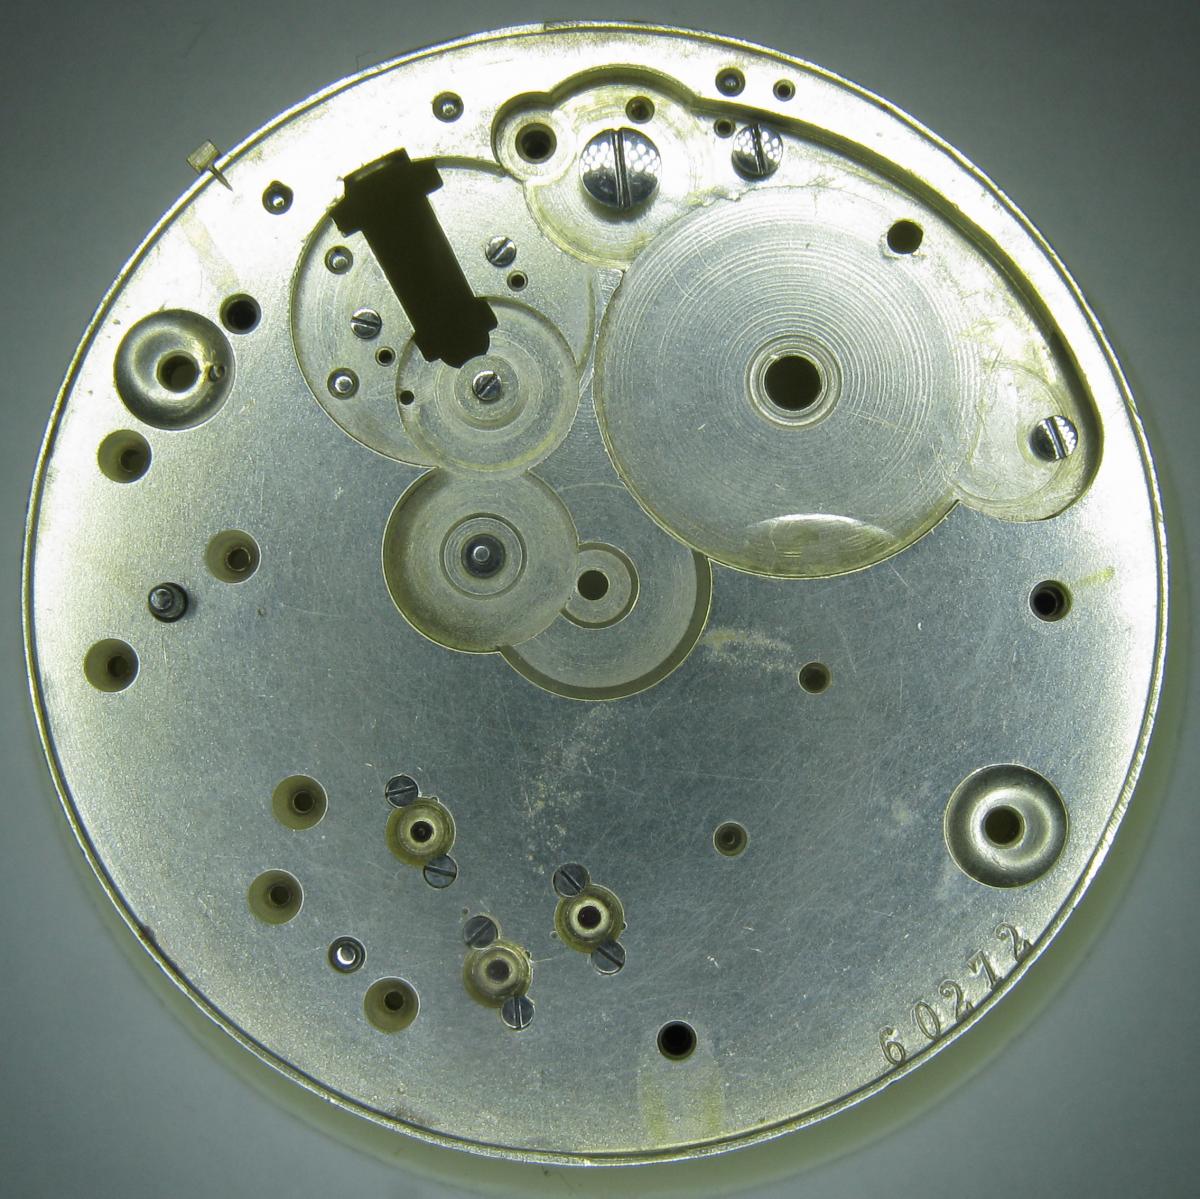
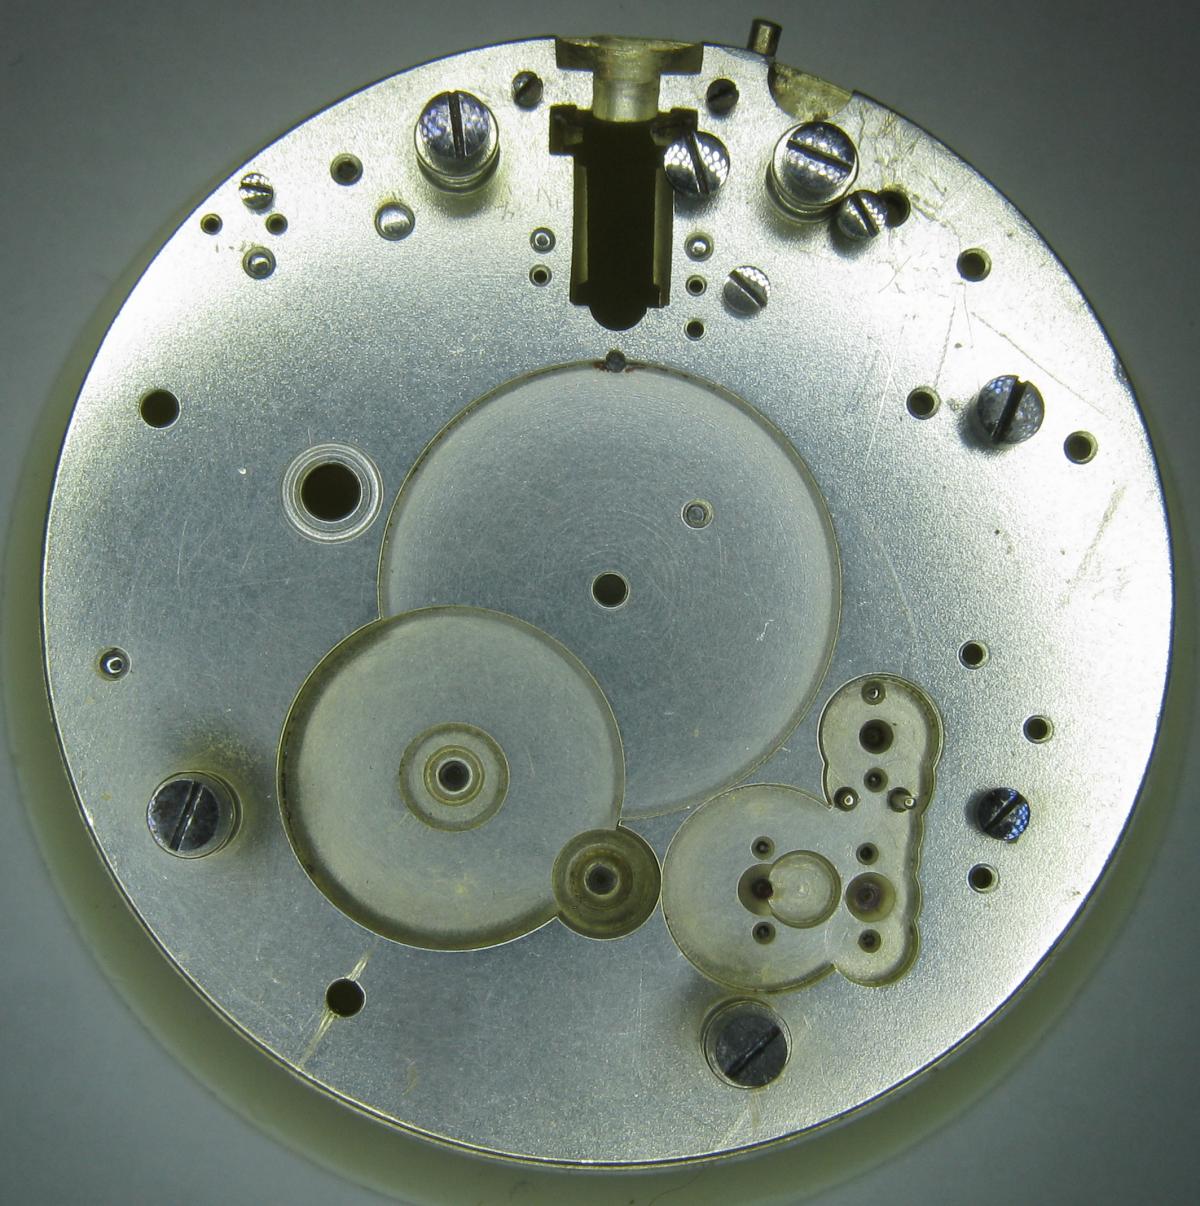
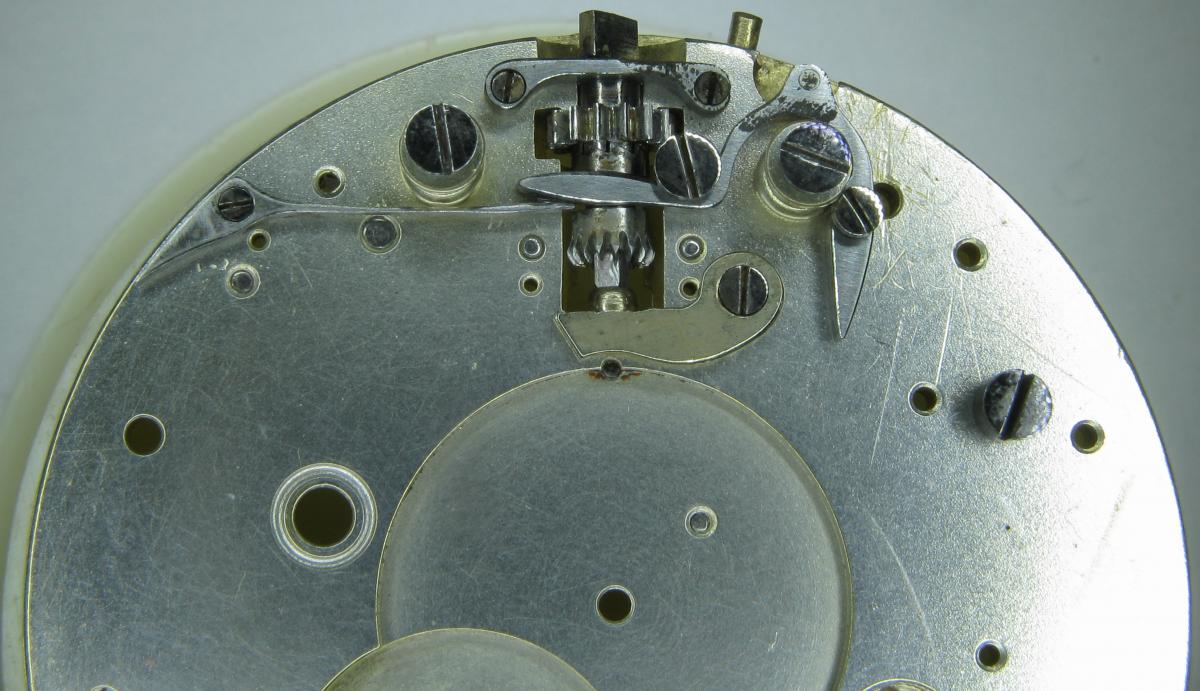
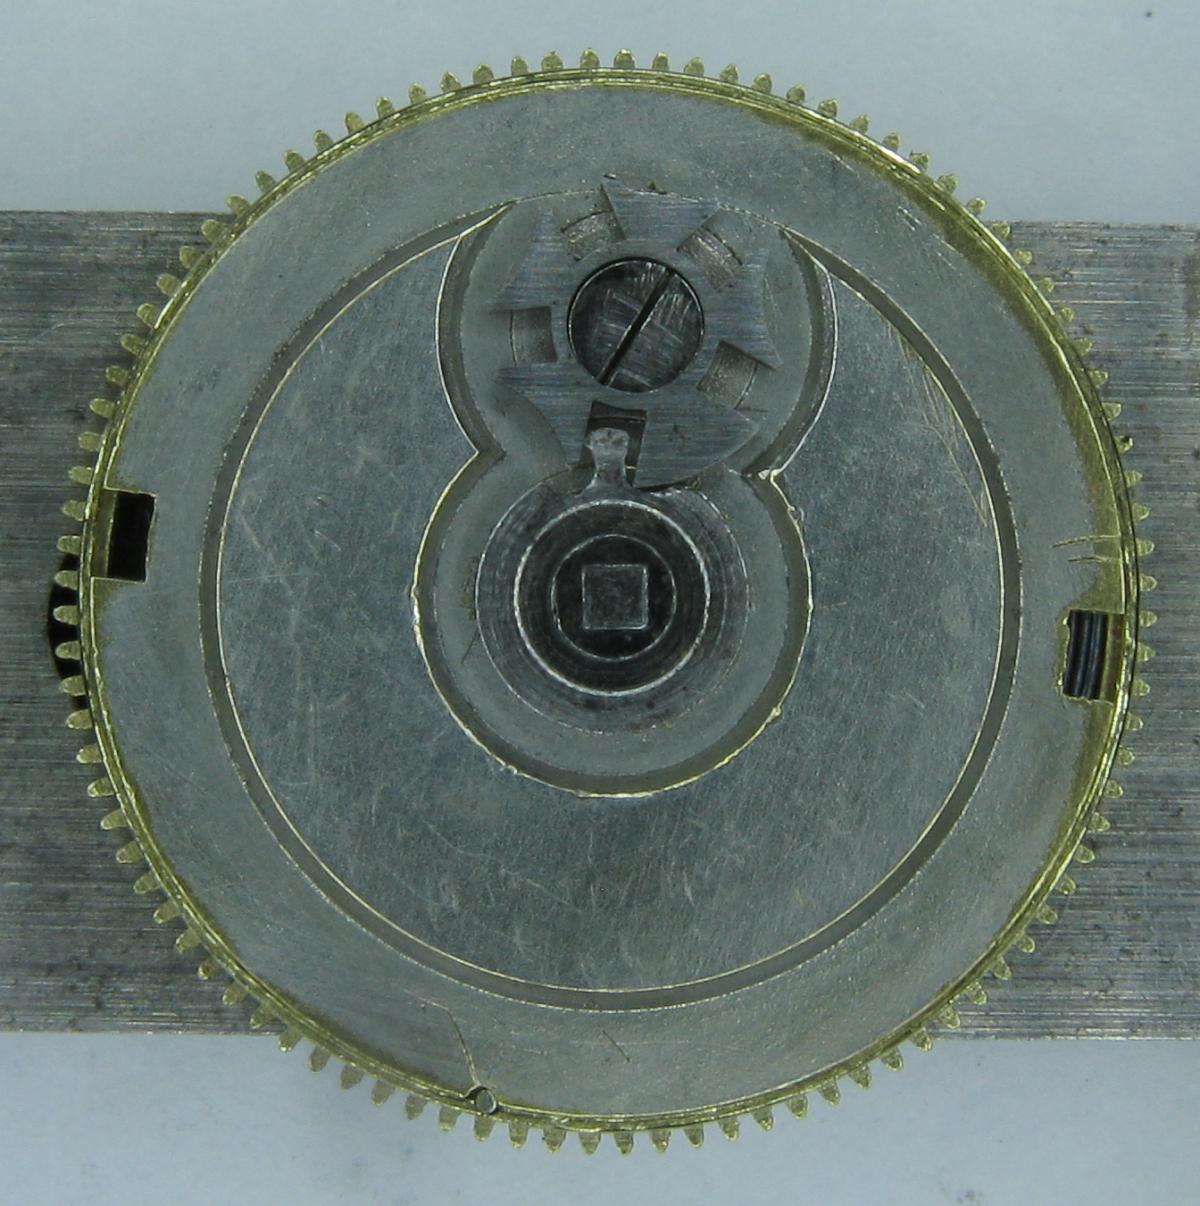
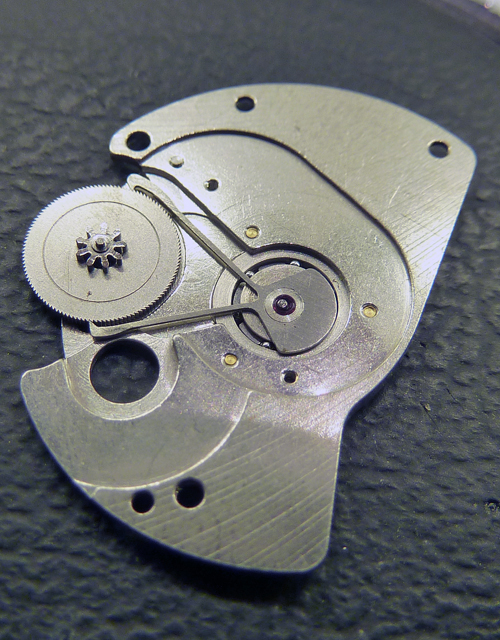
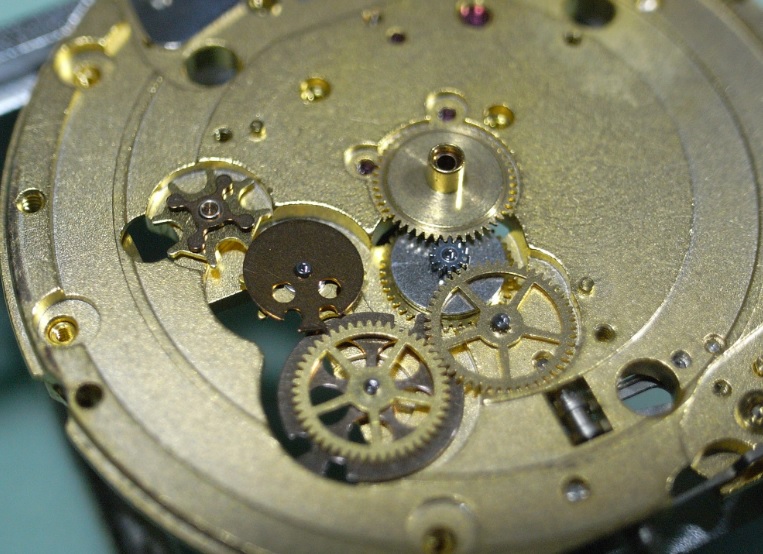
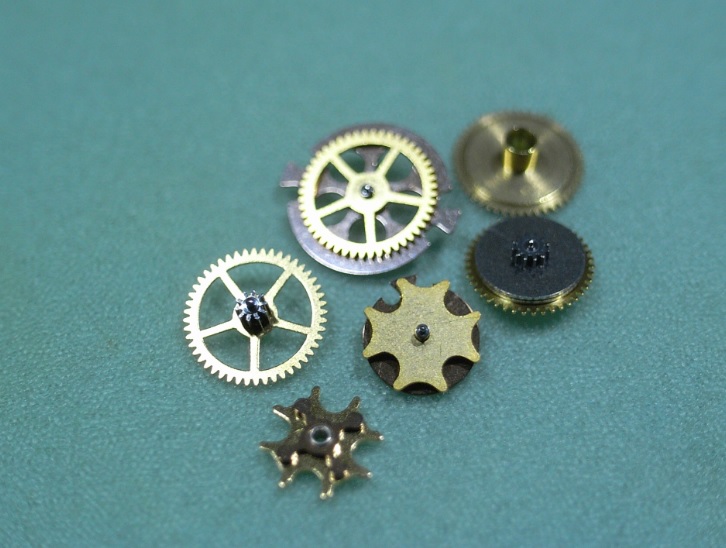
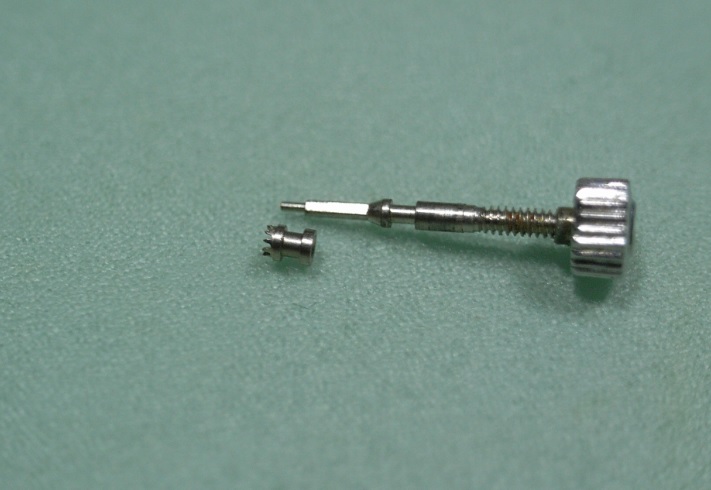
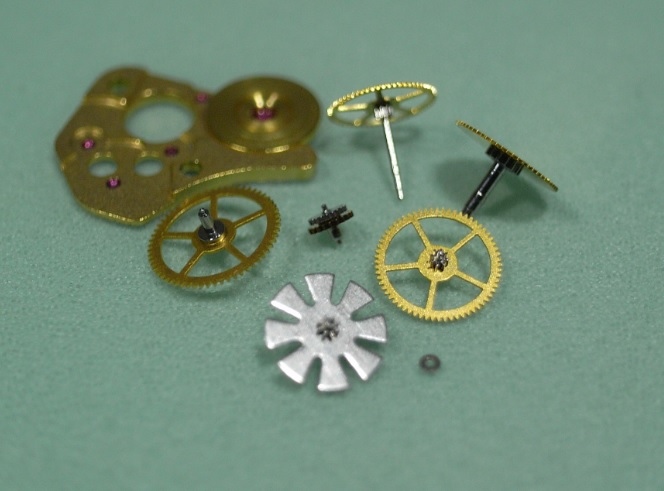
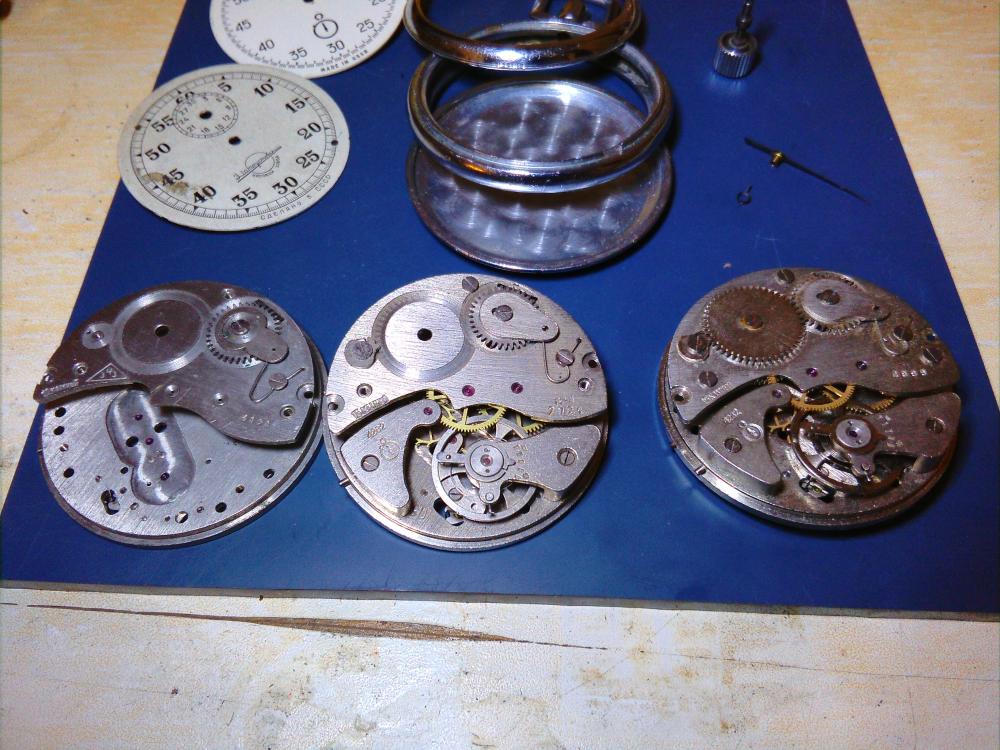
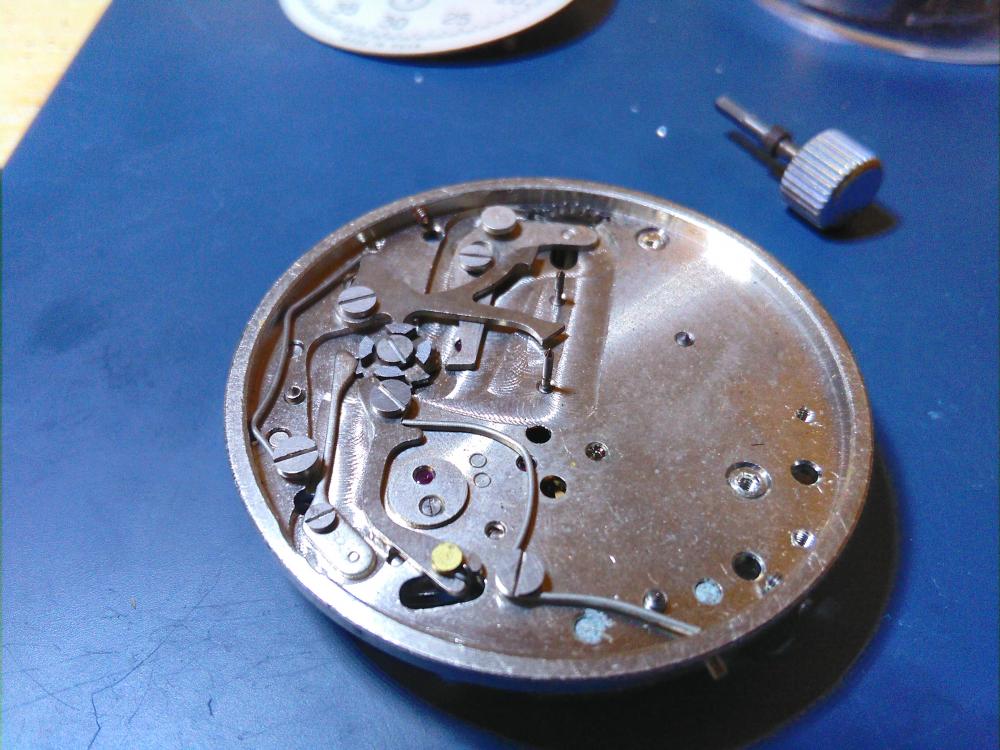
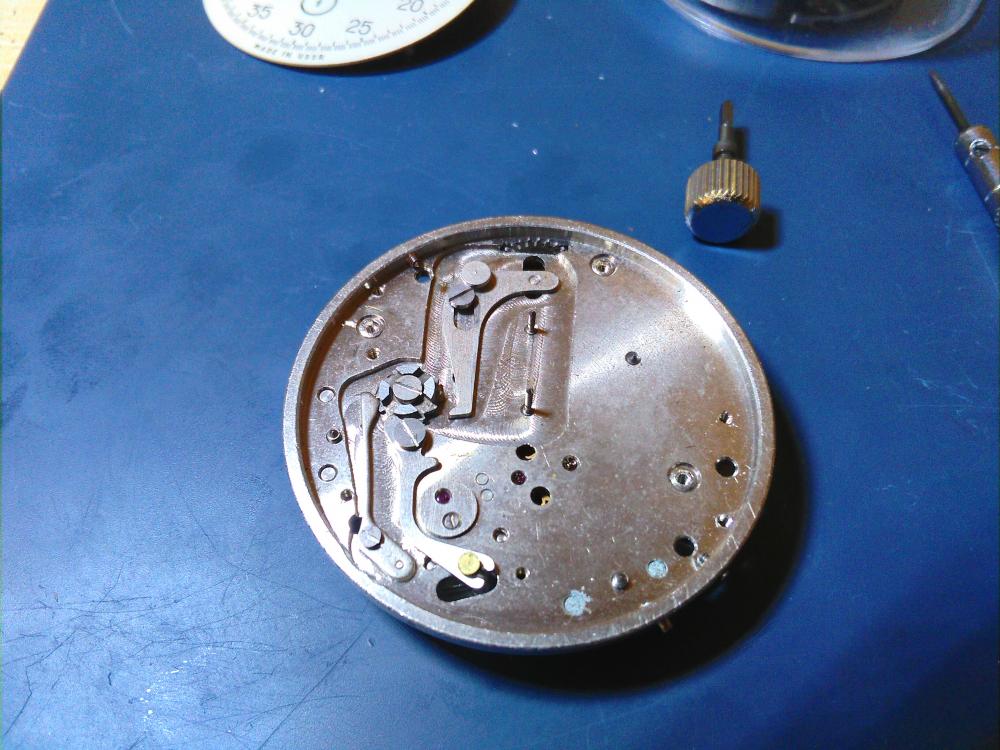
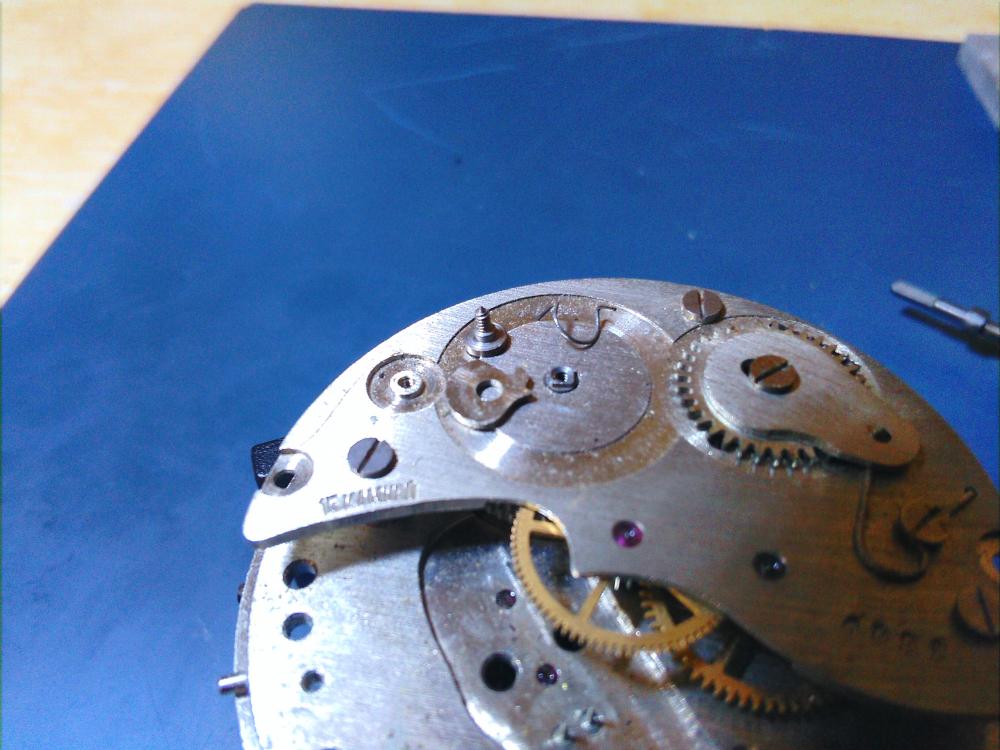
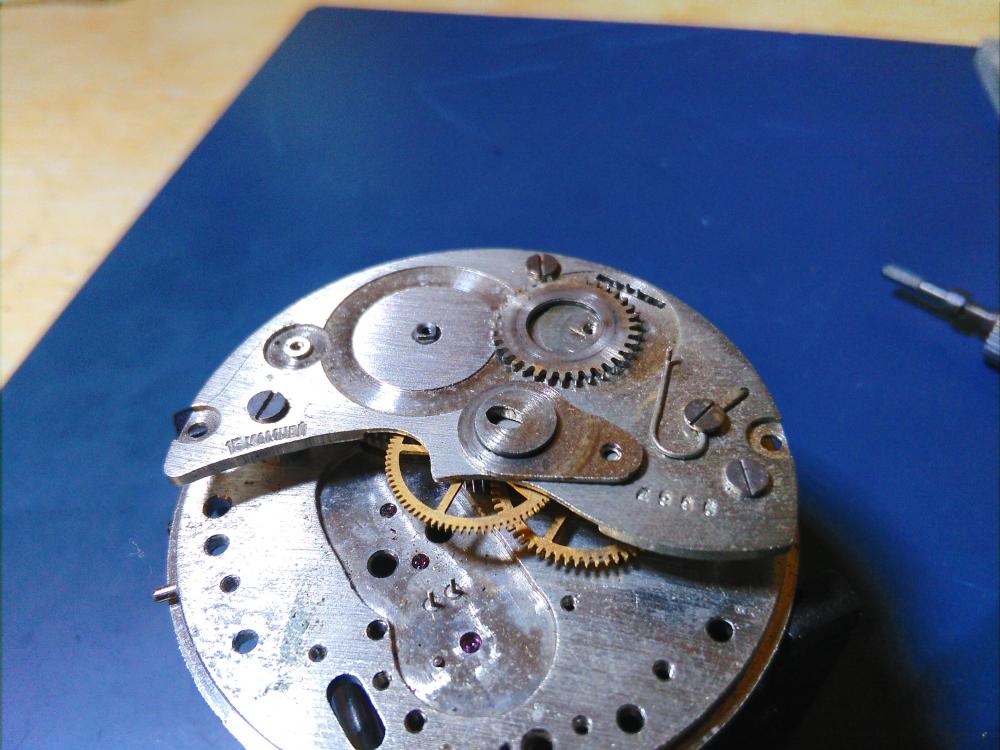
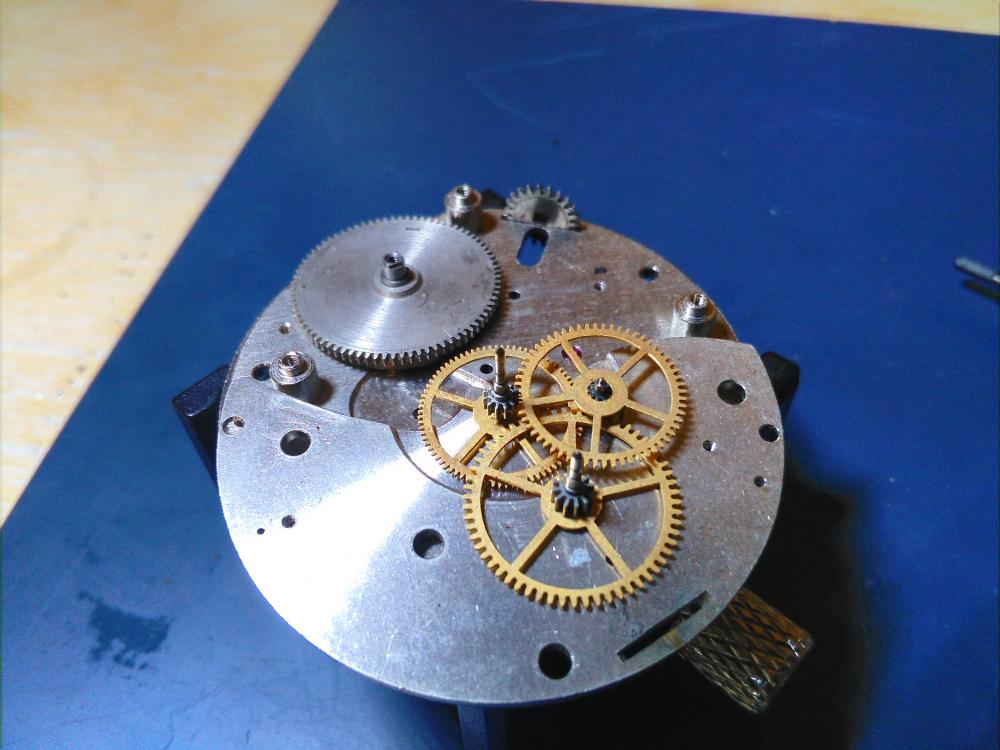
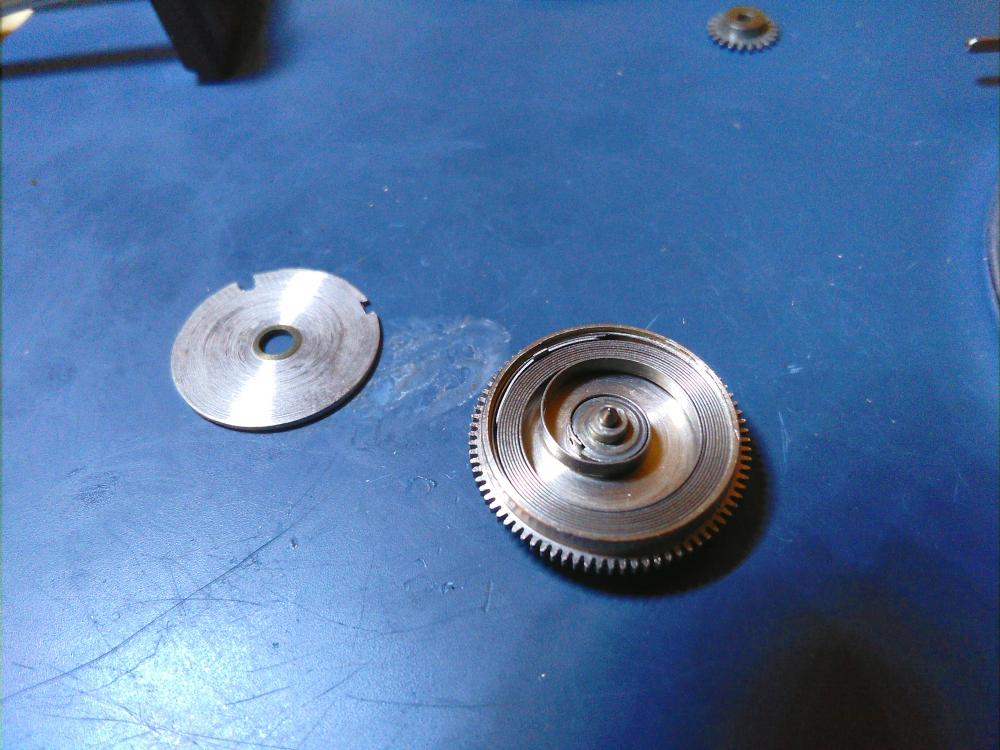
Receíved two stopwatch movements recently (the two on the right). One was a full movement, the other one had the barrel missing. Also had a case with a Zlatoust dial and a movement containing only the mainplates and the dial side complications. So i decided to make one working stopwatch with the older dial (lookng better in my opinion). DONT TRY TO REMOVE THE HANDS!!! The dial is fixed by two grub-screws found at the movement side. DONT EVEN TRY TO REMOVE THE HANDS!!! Pull upp the dial, the hands will be also lifted. You can see two hearth-shaped steel plates with a steel tube in the next picture taken from the dial side. The steel tube has a brass tube pressed on it, which actually holding the hand. The hand is riveted on the brass piece. Secured position of the hands on the hearth-shaped plate ensures that they always jups to 0 at reset. The hearth-shaped plates are spring-mounted on the wheel pinions, so if one lifting the dial the springs will let off the pinion. I wanted to change the dial so tried to remove the hands. The result is one bent second hand (the big one) and a broken minute hand. It seems that it will be a pain mounting the hands back in the proper position. At first the movement seemed to be a complicated one, but the disassembly is pretty straightforward. Release the tension of the springs first by unhooking them. All of them are mounted with screws so they wont fly away. Then just remove the levers one by one. The next lever has a pin for stopping the balance wheel. And finally the column wheel. The last lever spring didnt wanted to come off so i just left it there. There is nothing unusual on the movement side. First take off the balance assembly. (Last chance to let down the mainspring tension!) Then the pallet fork. Ratchet wheel, click, and clickspring dismounted. The crown wheel is mounted with a spring loaded slipping plate. This is so russian... simpe and easy. And finally take down the three screws holding the main plate. I would like to mention it here, that the whole thing is so ... russisan All parts are rough and "has material in it". Pinions are thick.... I could see oil residues on the pallet staff pinion, which was cogged (where it is ususally not needed) and on one of the gear pinions. No sign of oil in the barrel. I could evel let it down lamely. Nothing special at disassembly, just push down and the cover will pop off. No cleaning needed here, i will just add oil. Balance disassembly, pretty streightfoward. Yes, both end of the balance is broken. It has some "russian amount" of shellac on the impulse jewel. And ready for repivoting.


 1 point
 -
Mumbay Oiler Sent from my SM-T585 using Tapatalk1 point
-
If you watch some of his other videos you can see that he is highly skilled and seems to have years of experience. I would find it hard to be judgemental toward his approach as I do not know his situation. Many people in the eastern block countries live under extreme poverty as well as having to deal with political and infrastructure problems. It can be difficult to afford food let alone a bottle of Loctite or a tourch. I feel that he did well with what he had to work with. david1 point
-
I feel your pain.. I currently have a ladies Eterna 1441 on my desk and the **BLEEP** clickspring is giving me grief. Picture from http://www.ranfft.de/cgi-bin/bidfun-db.cgi?10&ranfft&0&2uswk&Eterna_1441U Anilv
 1 point
 -
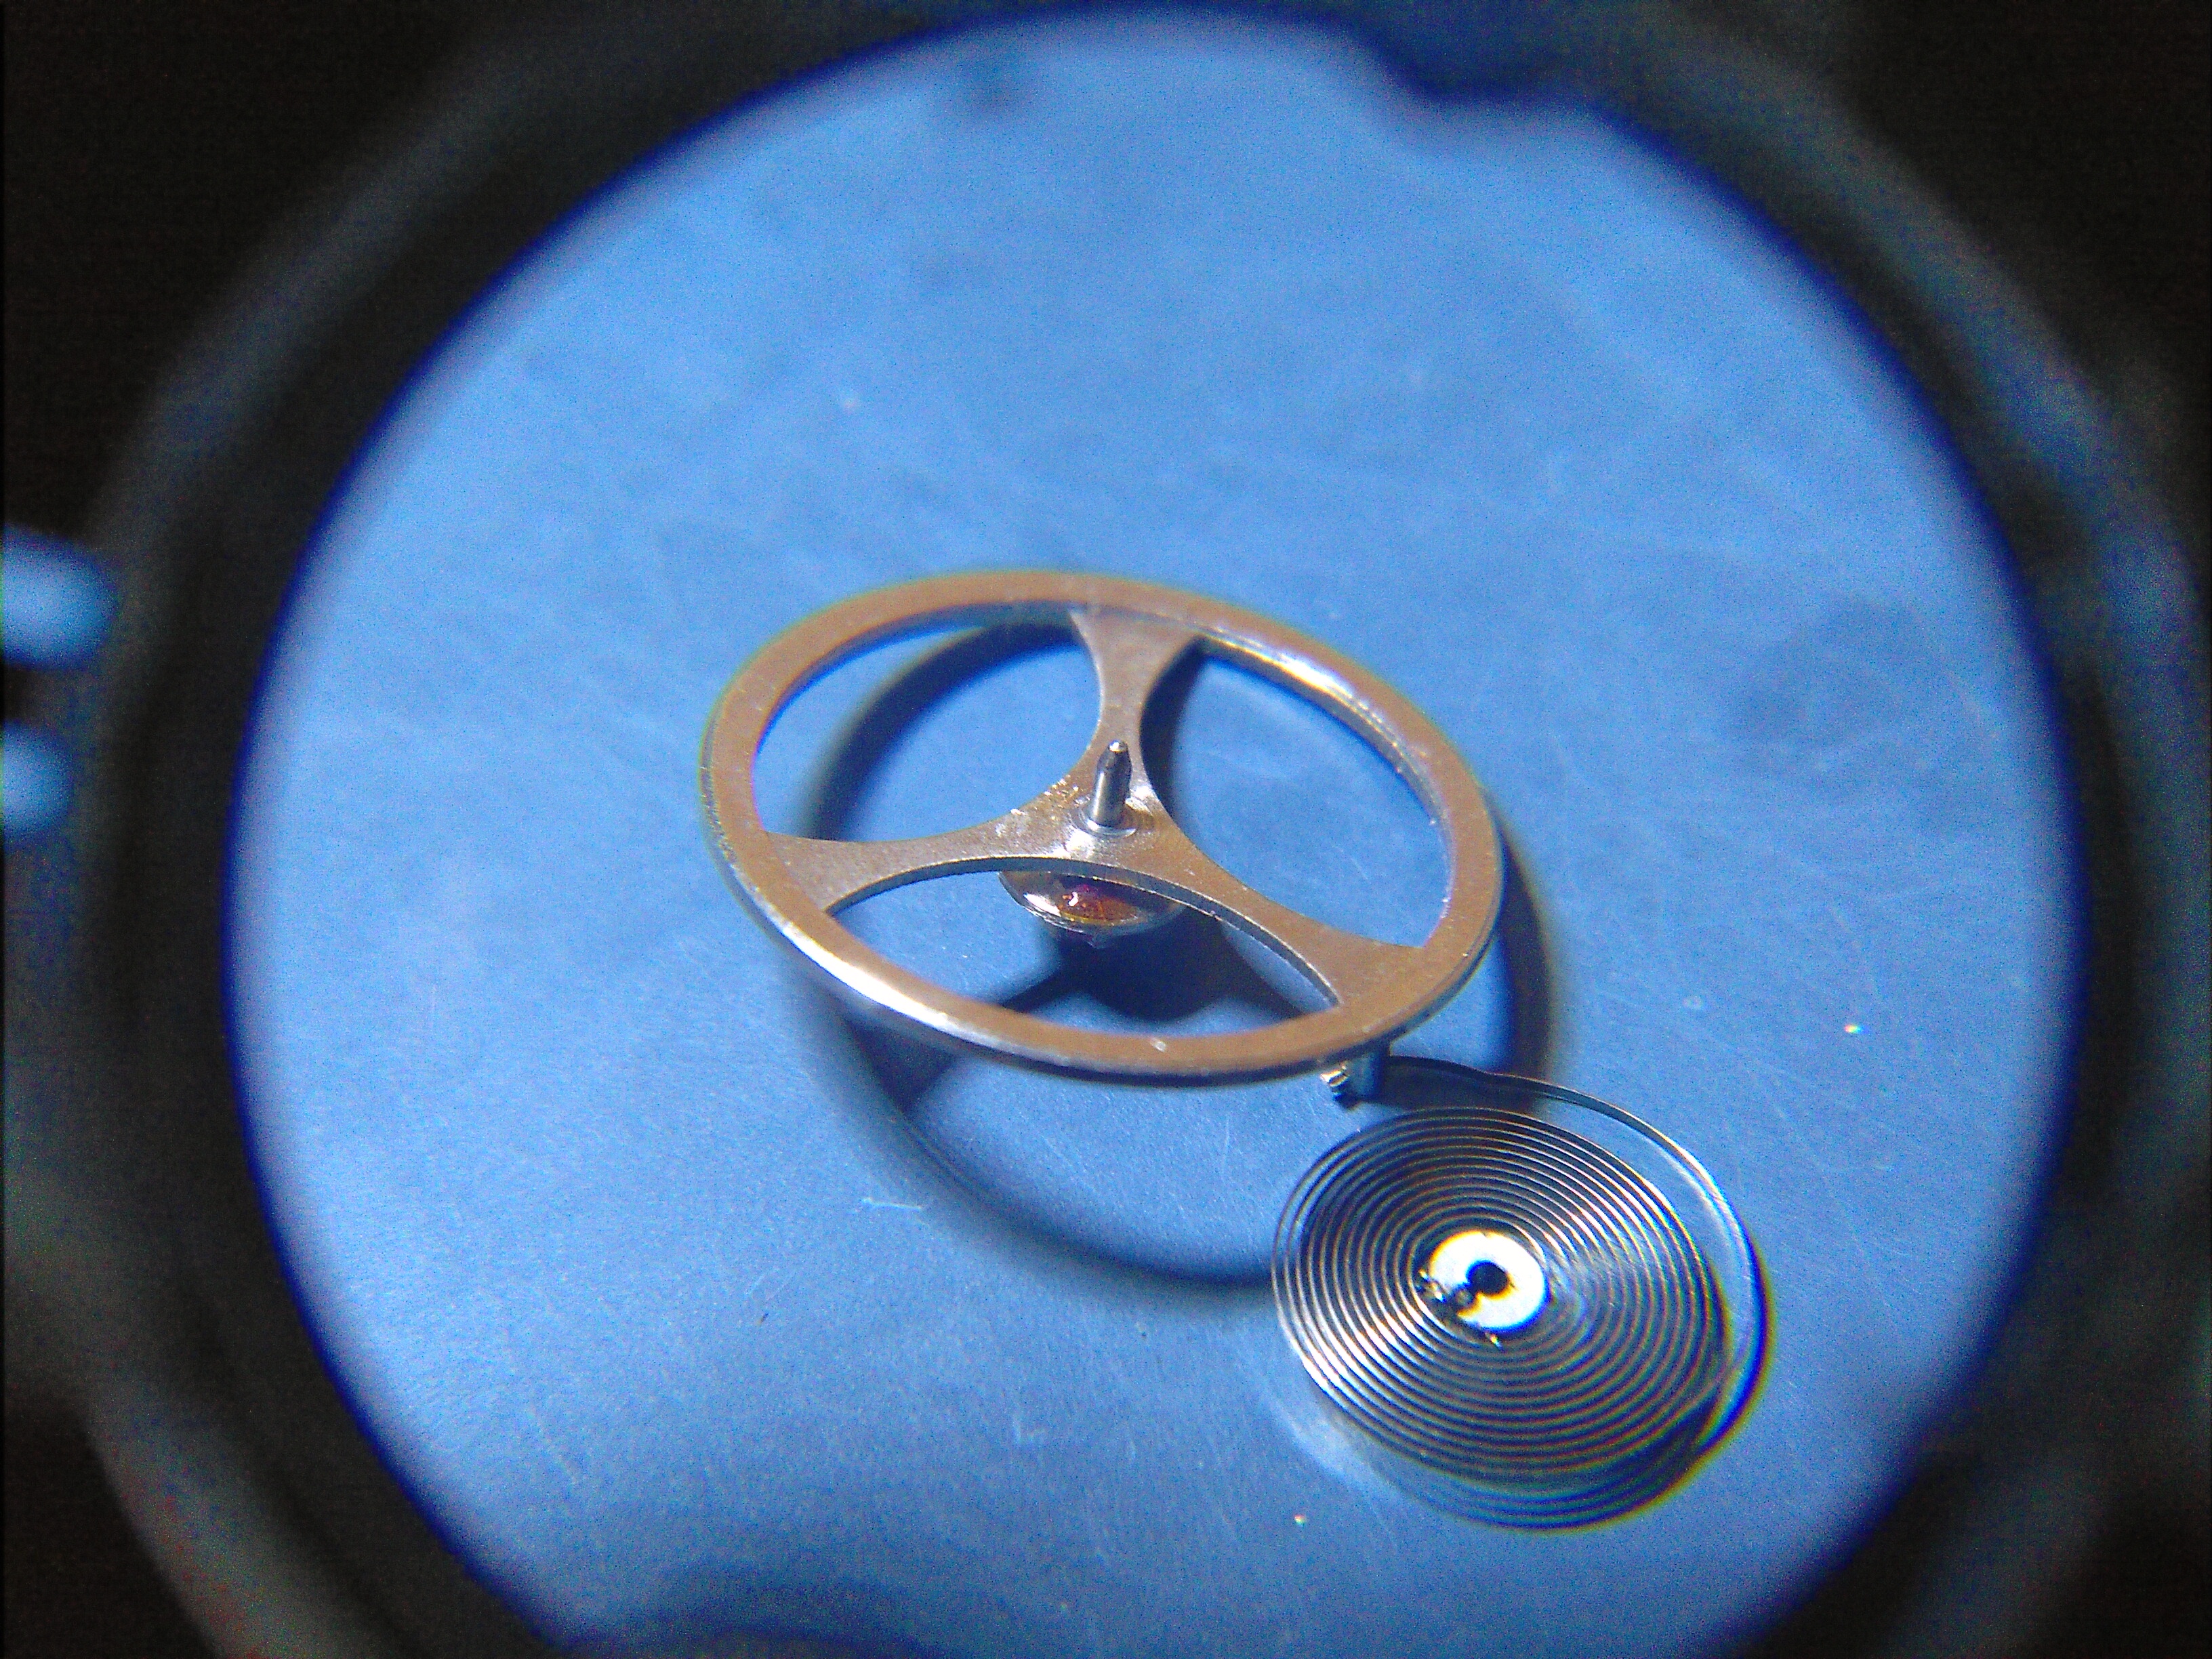
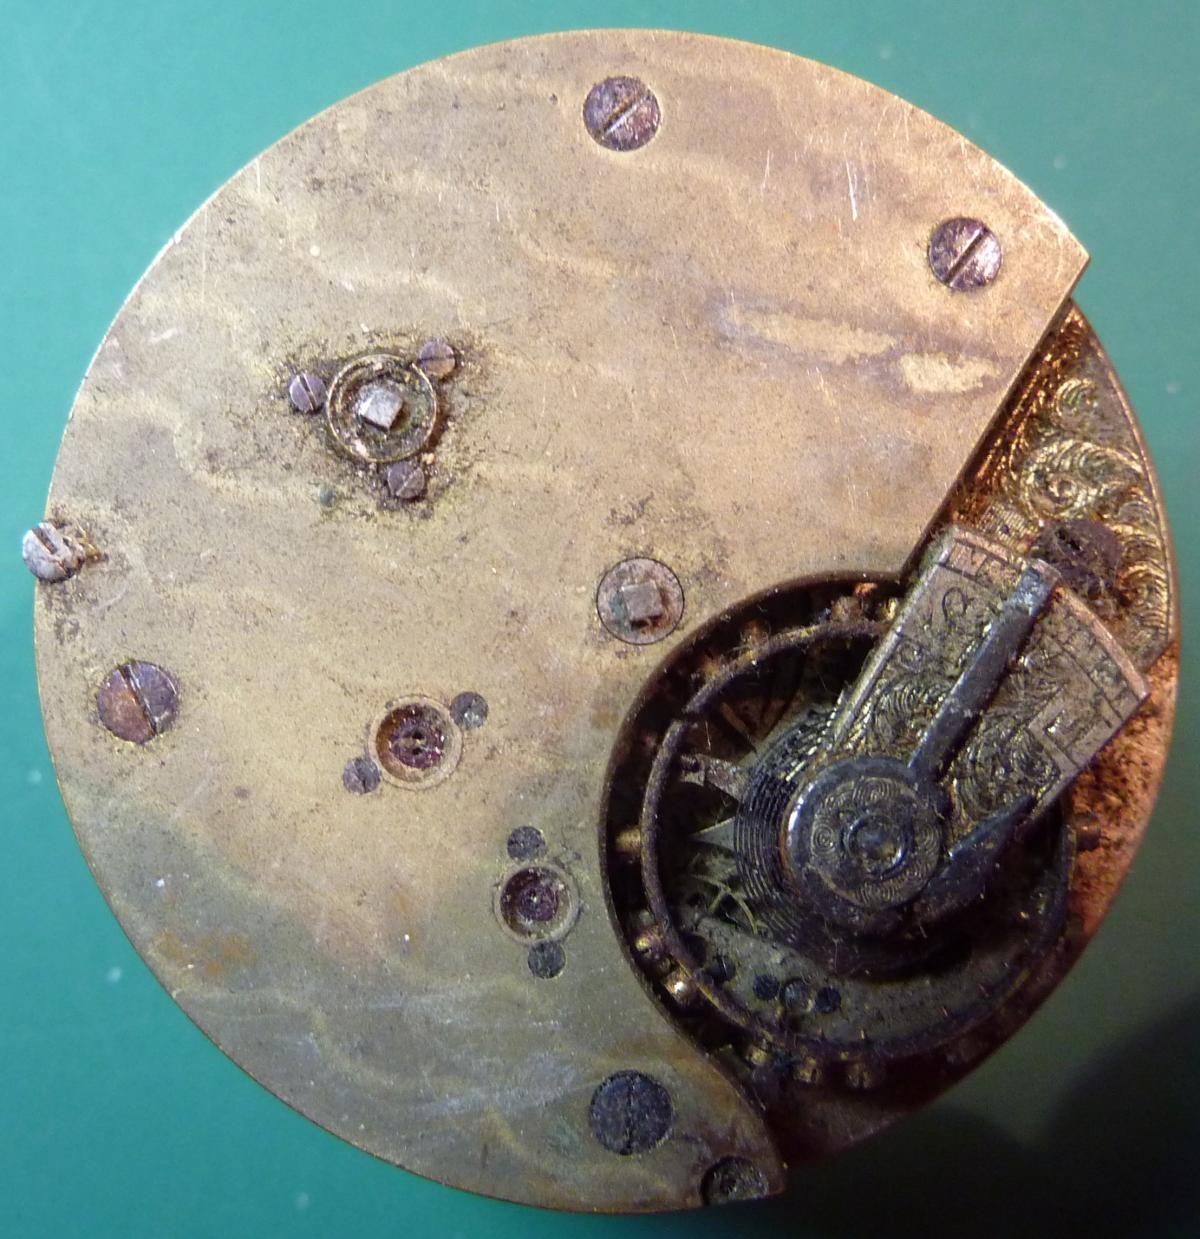
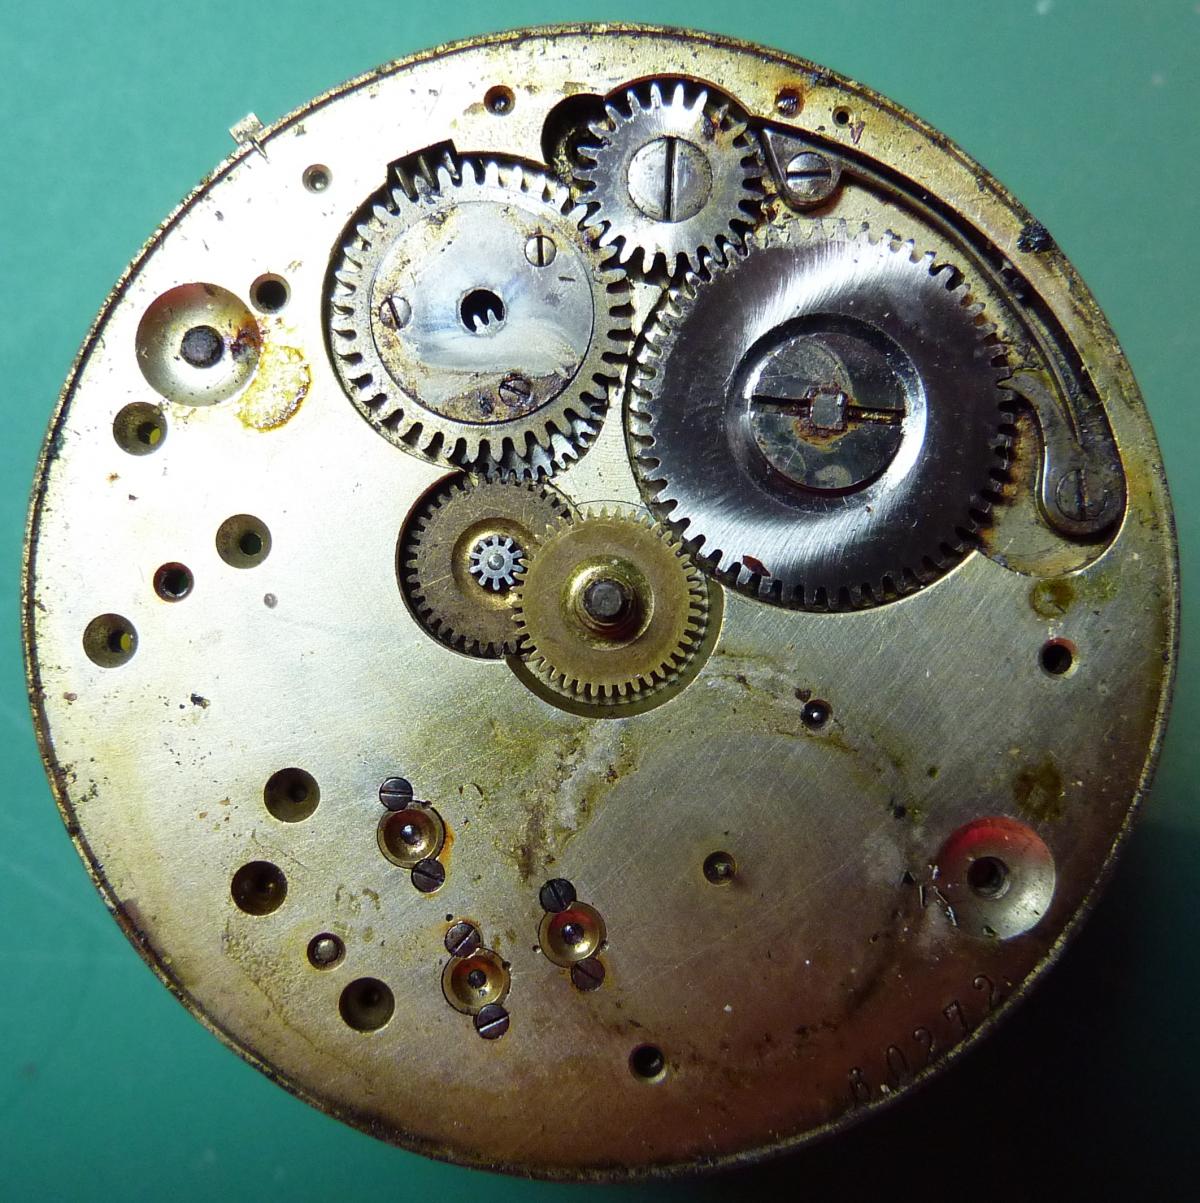
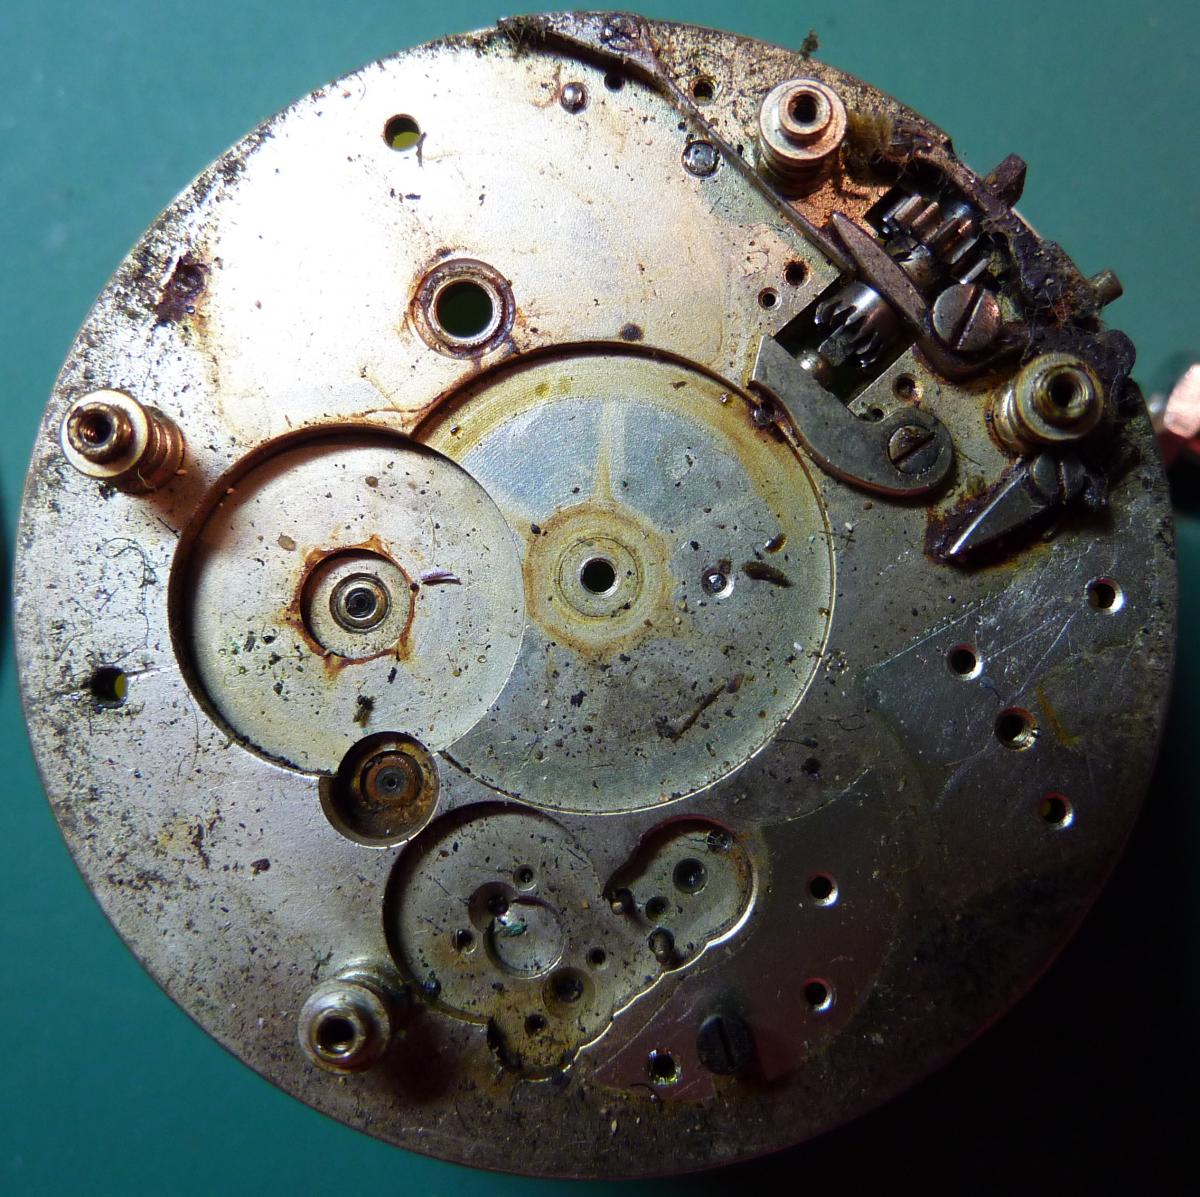
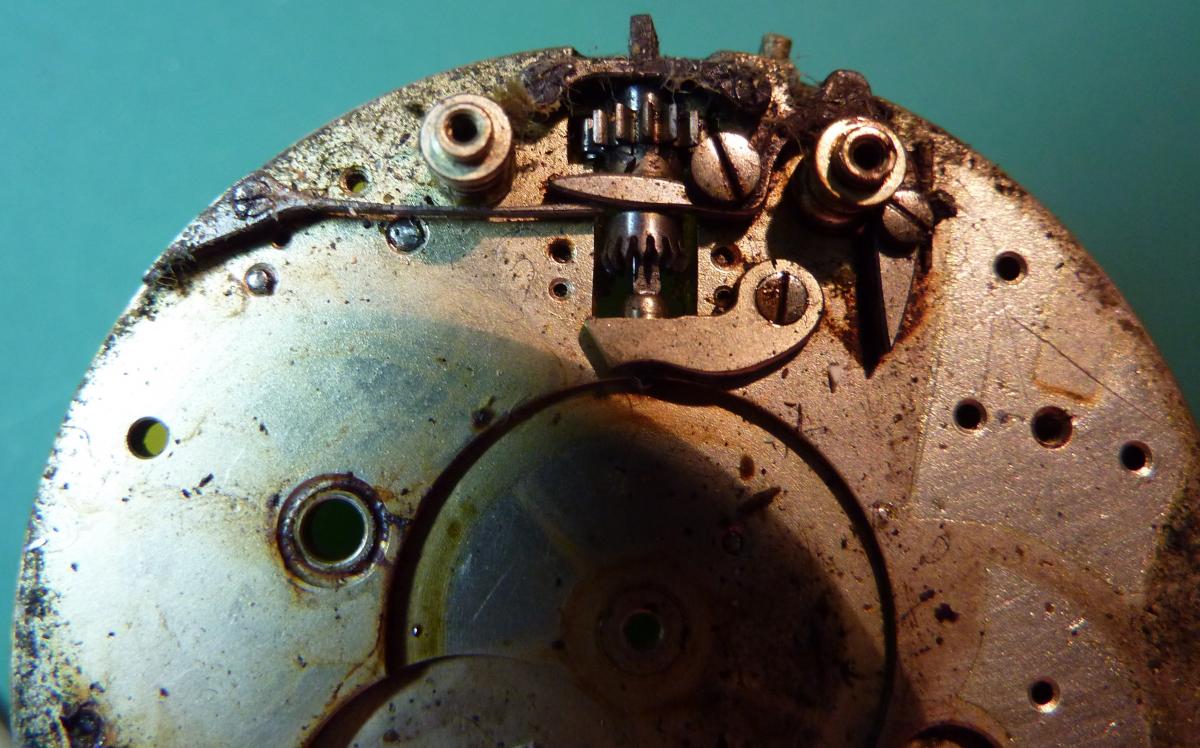
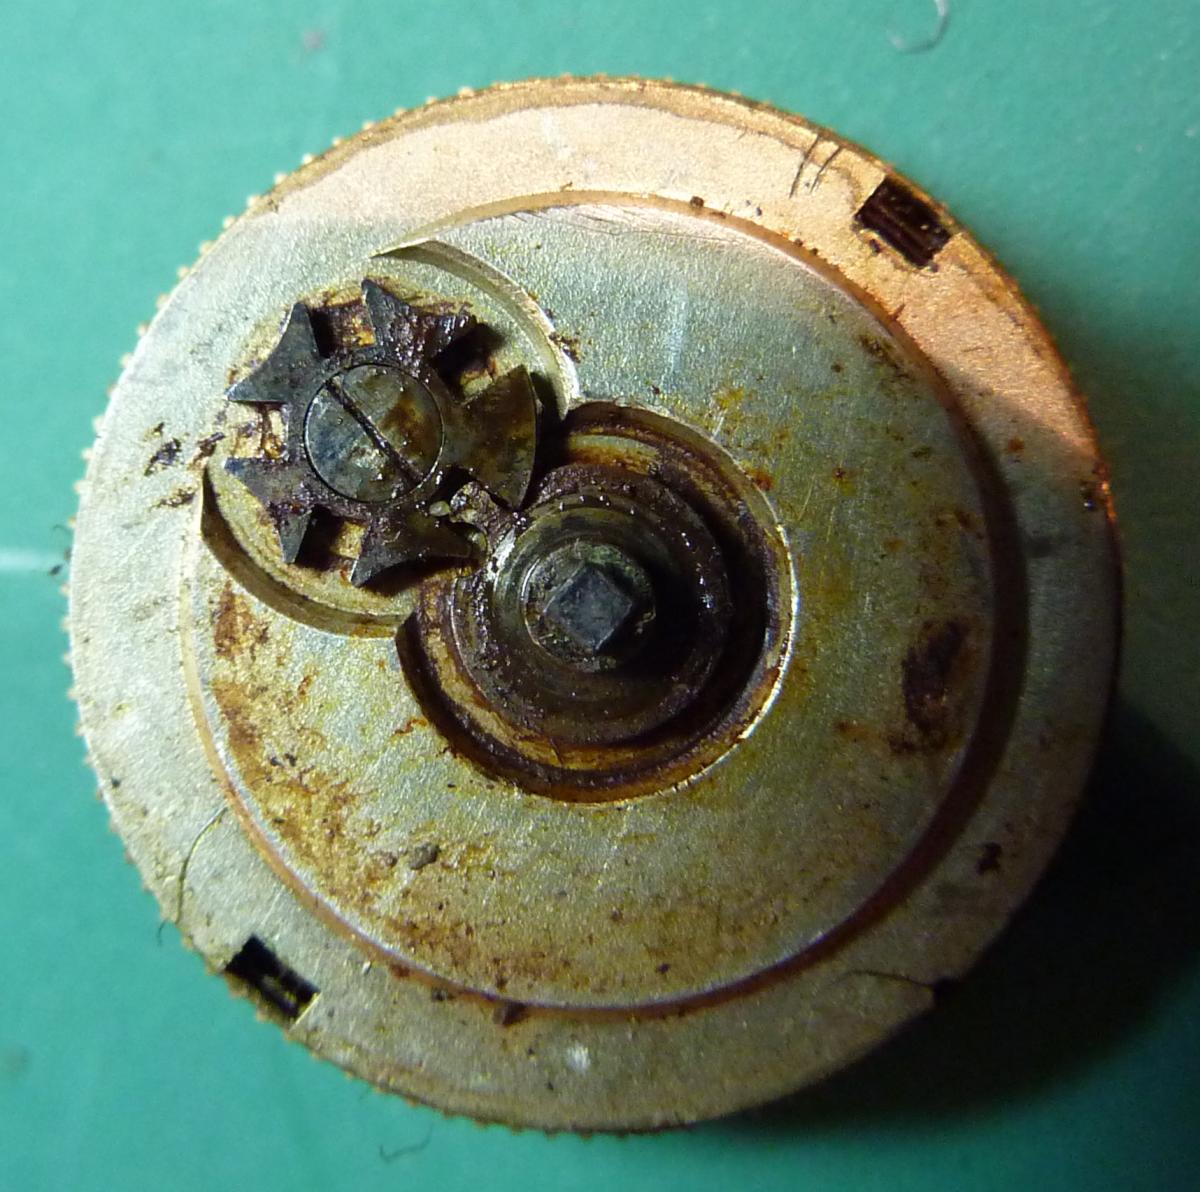
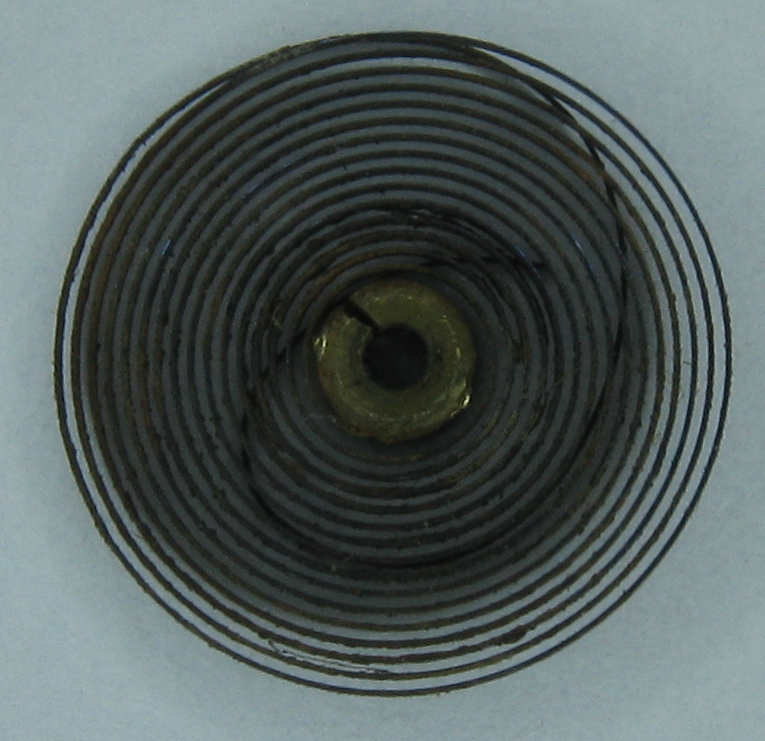
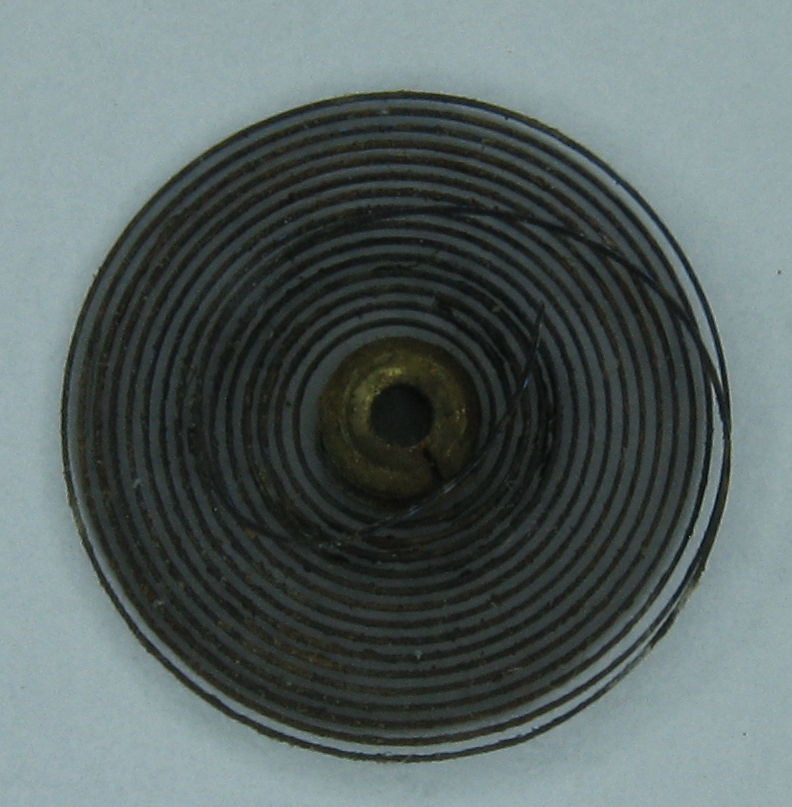
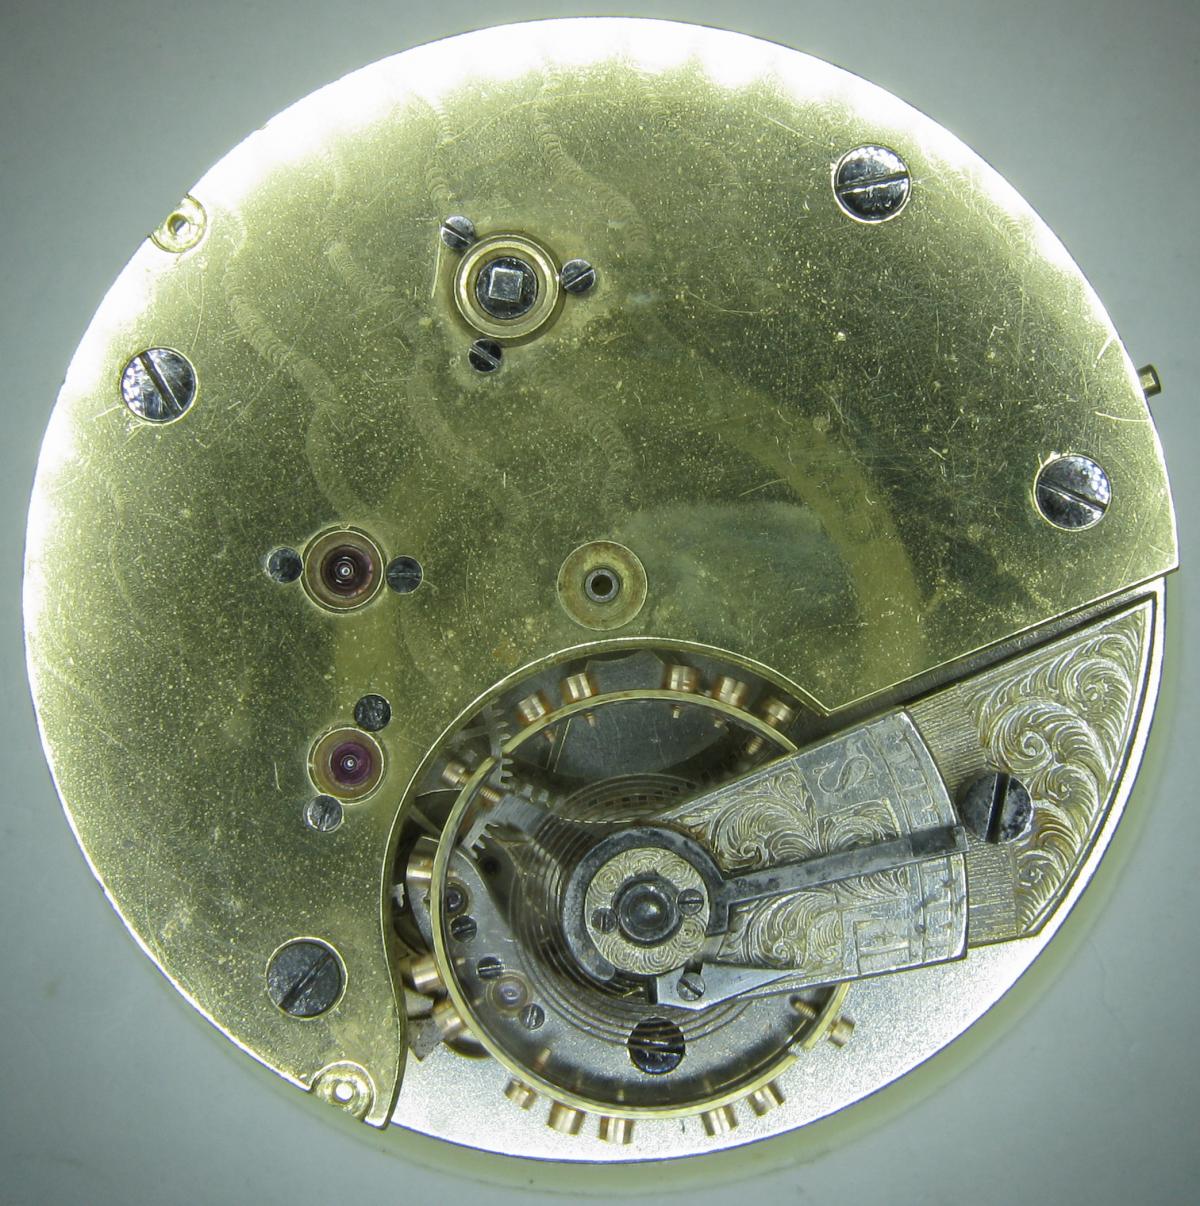
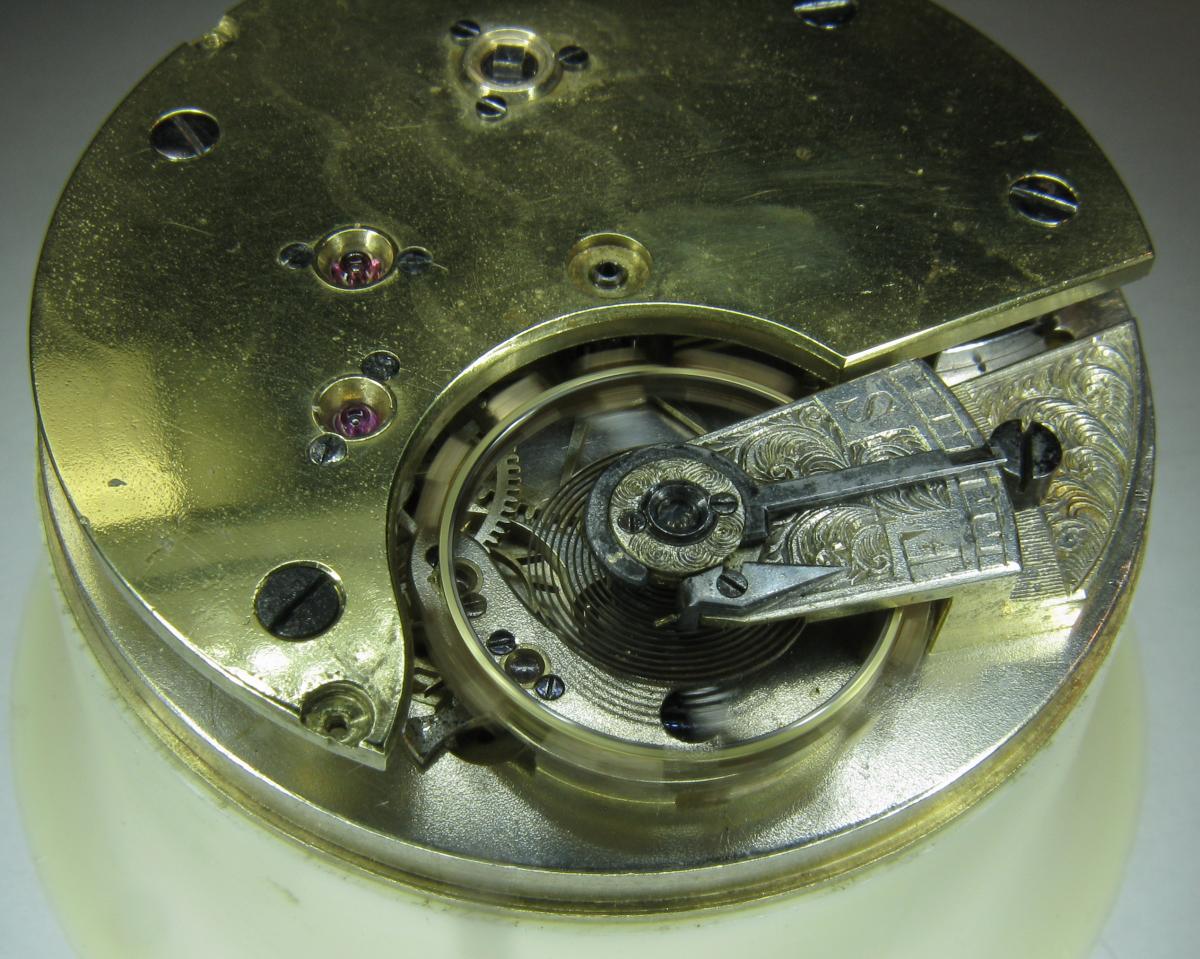
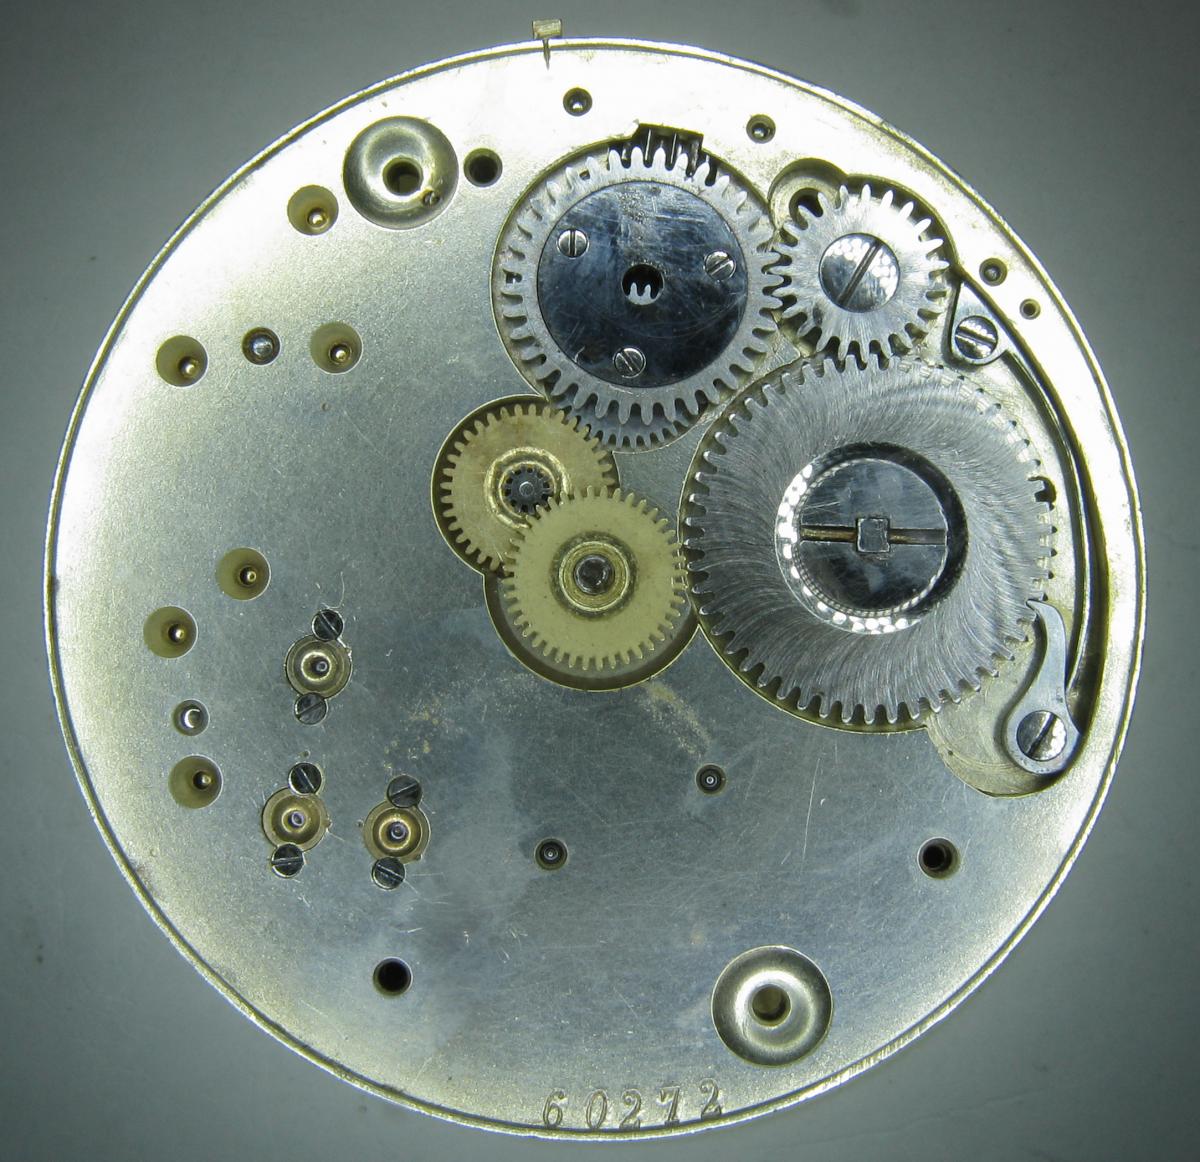
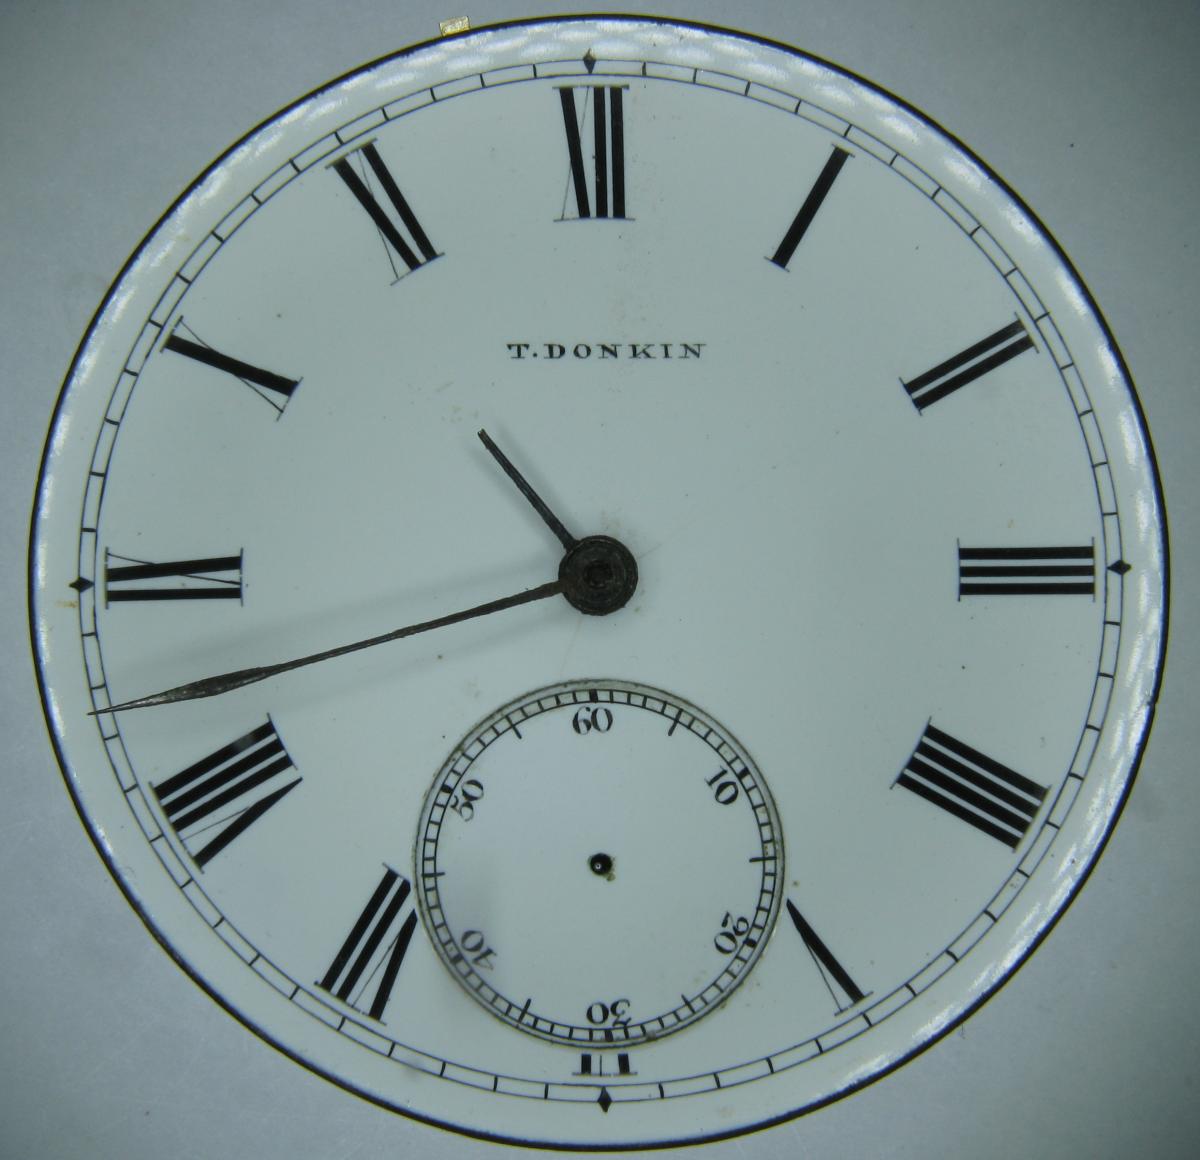
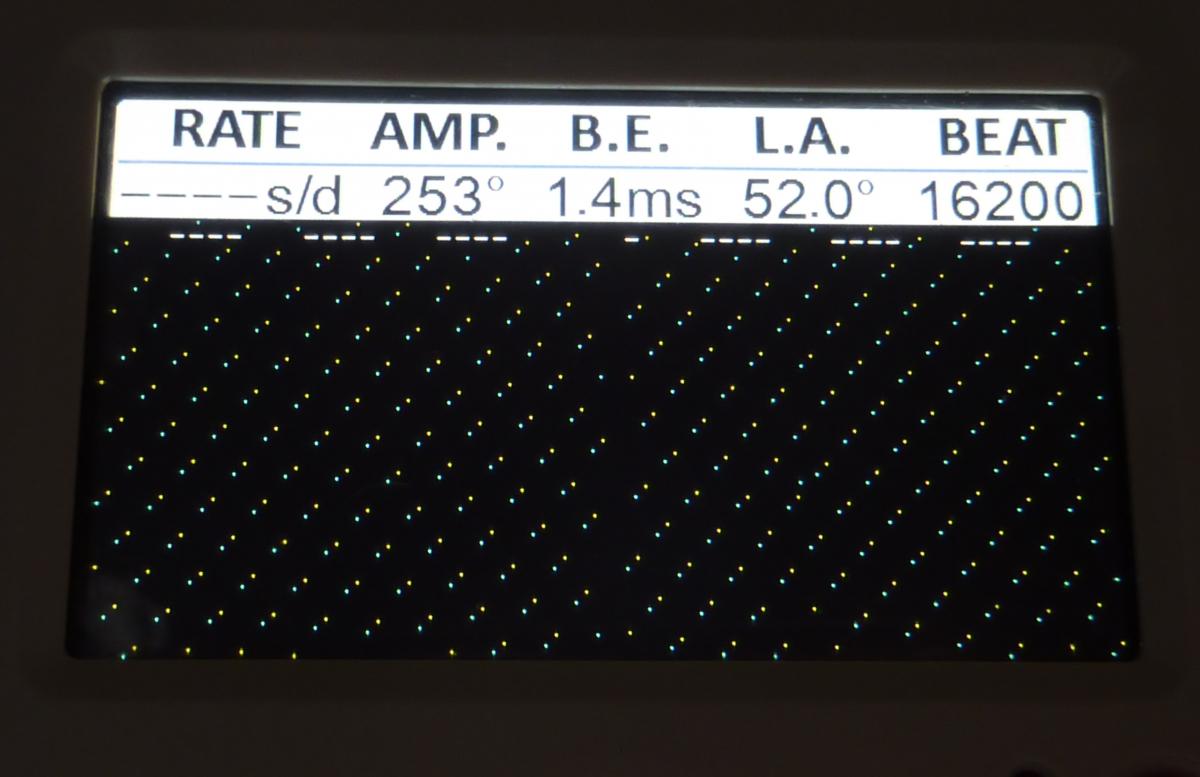
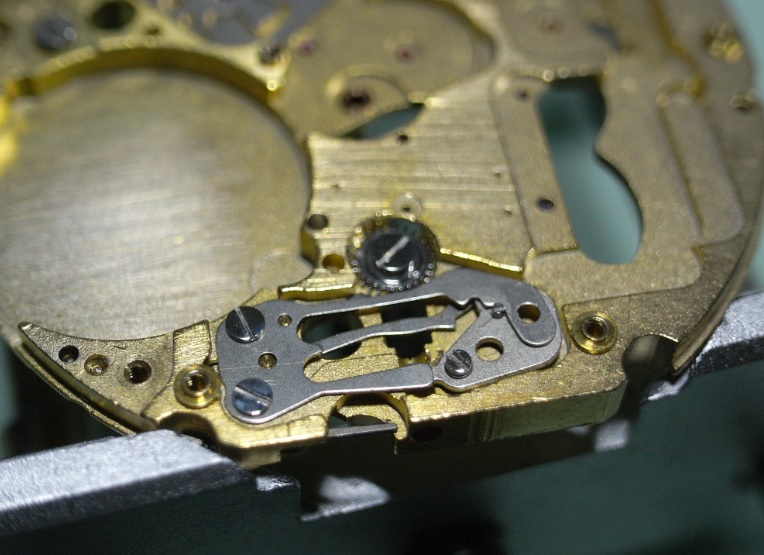
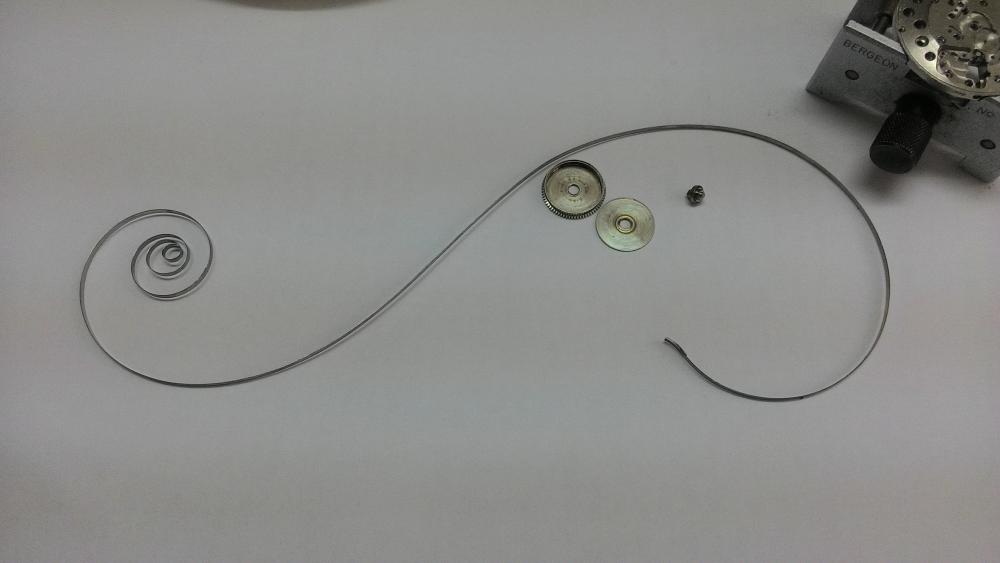
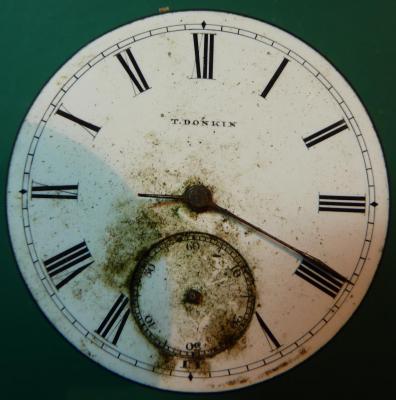
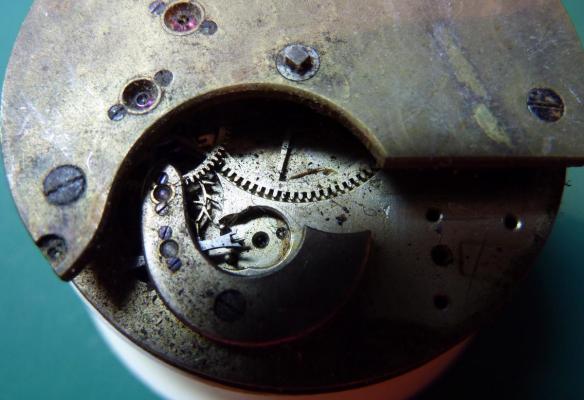
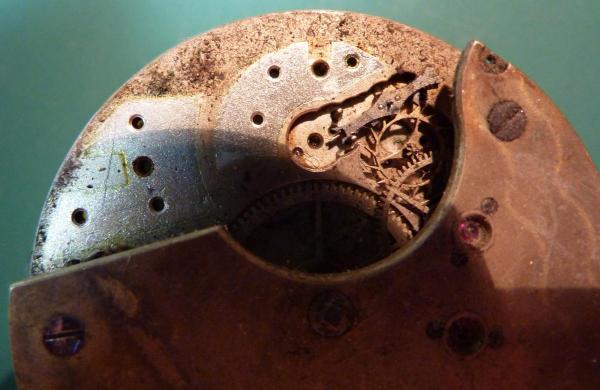
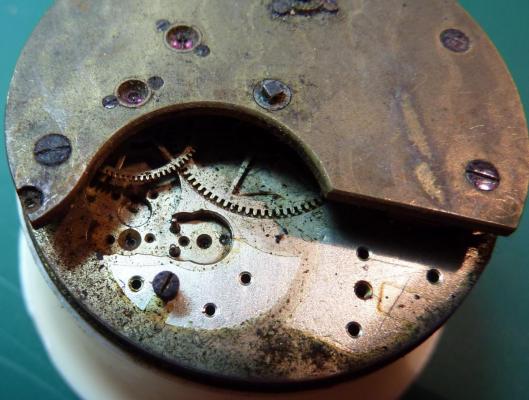
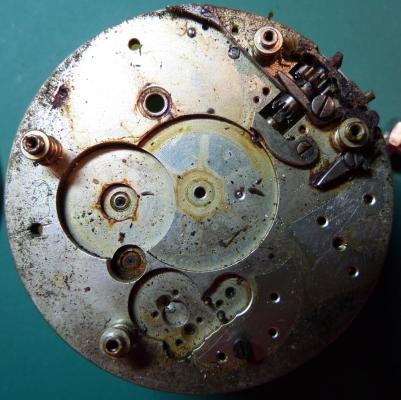
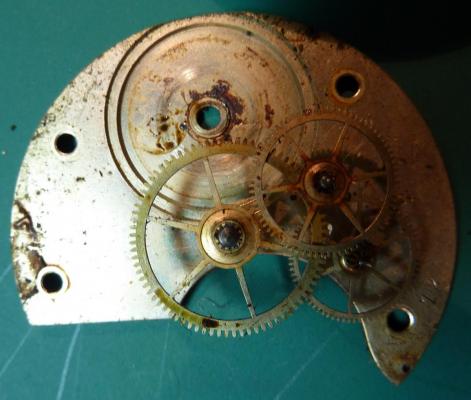
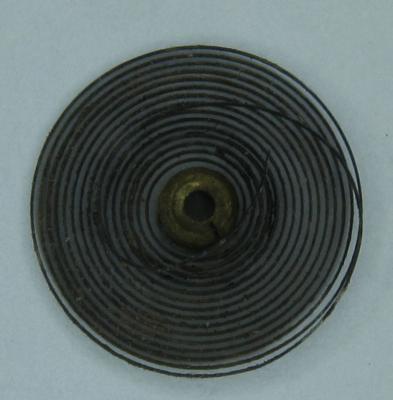
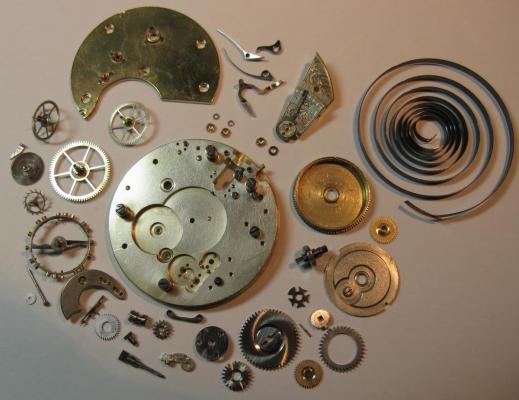
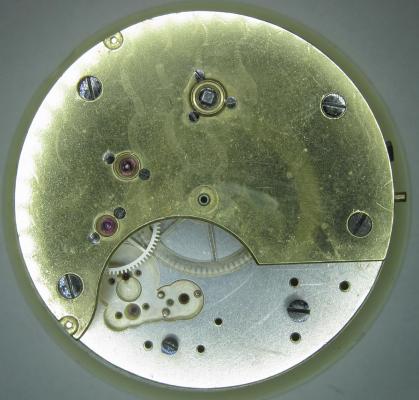
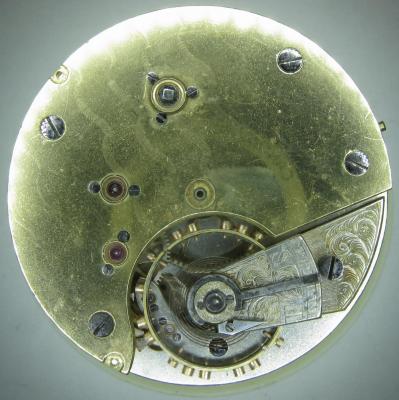
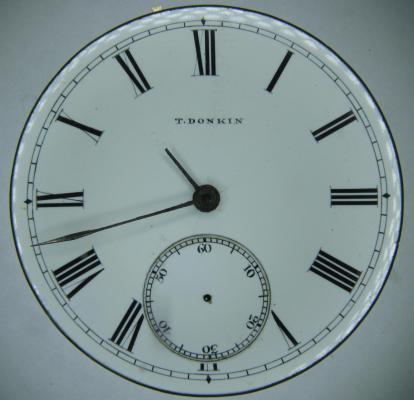
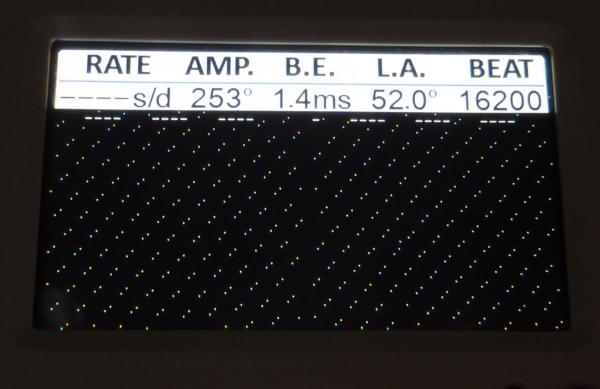
OK, so me and Mrs H did Christmas day with the family, and then we did Boxing day with the family, and then we were granted a day off so got to relax, and for me that meant I had the chance to tackle a little project that I had acquired as part of a job lot from a long retired watchmaker that had been sitting around in a shed for about 35 years (the job lot, not the watchmaker). Pocket watches are not usually my thing although I do own and use a couple. Orphaned pocket watch movements are even less my thing; but this little baby was in such a state that I couldn't resist the challenge. I don't think I have ever attempted to resurrect anything in quite such a sorry state as this before but it wasn't all bad. The balance was free and with sufficiently little end shake to hint that the pivots were not broken. However, the accumulation of dirt and dried grease obscured just about everything else. The inner coils of the hair spring also looked to be completely filled in with rust/gunk. With the balance cock and balance removed things got a little more interesting. Underneath the grime is a rather nice English Lever escapement with cap jewels on both the pallet and escape wheel pivots. A good sign, but I need to let down any power in the mainspring before I go any further, which means flipping it over and removing the dial as the keyless works are dial side. Not quite so bad under here as the dial has kept the worst of the dirt away. You can see too that both ends of the pallet and escape wheel pivots are capped, and the click spring is a proper cut steel affair, not wire. There is worrying evidence of rust on the steel work though. With the power let down the pallet and escape wheel cock is removed and you can now see the English Lever escapement in all its (rather grubby) glory. What a mess, but through the gunge there are just little hints of quality watchmaking peeping through; the thickness of the 3/4 top plate, and the cut and form of the teeth on the wheels. The top plate comes off taking the entire train and barrel with it as the pivots are seized in their bearings. The main plate is a mess. The under side of the top plate with the train still in place. The barrel has vacated its bearing revealing rust. Not a good sign but it could be worse. The train now removed from the top plate and dropped back into the main plate for a reference shot. The set lever and stem retaining bridge do not look healthy. Again though the set lever spring is cut steel, not wire. Oh yuk!!! The main plate now stripped. The barrel lid, with another nice touch; Geneva stop work, designed to only allow the central portion of the springs torque curve to be utilised thus reducing isochronism. Main plate, top plate, and escapement cock ready for cleaning. Ok, so whilst I was stripping all of this down, the hair spring, removed from the balance has been sitting in some Cola. The result is that the rust has softened and with a little careful tweezer work with a pair of Dumont #5's, most of it has been dislodged. The terminal curve of the Breguet over coil is badly out of shape due to a mishap when trying to unpin it from the rusted steel stud. I'll sort that out later. For now it's back into the pop to see if I can get those coils a little cleaner. Everything cleaned and ready for reassembly. I have a couple of spare jars for my cleaning machine and when I renew the cleaning solutions, the old stuff is kept in the spare jars. Any really heavily soiled movements get a "pre-wash" in the old chemistry so as to prolong the life of the new. With this watch everything was washed in the old gear and then very carefully gone over with peg wood, a G/F scratch brush, and tooth paste on a cotton bud in order to remove all of the staining that the bath didn't touch. All the jewels, bearings, and pinion leaves were also pegged out. Then it all went for another cycle through the old stuff before going through a normal cycle through the fresh chemistry. Main plate dial side prior to reassembly. And train side. Scrubbed up quite well I think. Stem, winding pinion, clutch, and stem retaining bridge reinstalled. Set lever and spring back in place. I haven't removed all of the rust pitting from the stem bridge and the set lever as it was too deep and to take it out would alter the shape too much, but it has been stabilised. The reassembled barrel and Geneva Stop work. I have reused the old main spring for now but made a note of its dimensions in case I choose to replace it. Another (gratuitous) shot of the Stop work as I just love it :-) Barrel and train back in place and things are starting to look fairly healthy. The top plate goes on. Quite a difference compared to the strip down shot from the same angle. The keyless works back in place dial side. And the balance, with reshaped and re-pinned hair spring goes back into place. After about half a dozen attempts to adjust the beat, removing the balance from the cock and turning the hair spring collet each time, and she comes to life!! Everything back in place dial side. And the cleaned up dial goes back on, complete with (broken) hands. And if you ignore the rate error for now (I need to re-pin the hair spring a little shorter), it's actually not a bad performance. As I said at the outset this was a challenge for challenge sake. I really enjoyed doing it and have learned a little bit about quality English watchmaking from the days when we were really rather good at it. I have absolutely no idea what to do with it now though although I want to try and find a bit more about it. Here is what I know; The name on the dial is T Donkin. There was a T Donkin watchmaker in Scarborough but I have no dates (yet) I'm guessing somewhere between about 1890 and 1910. It is a 19 ligne, 19 jewel English Lever escapement movement with capped balance, pallet, and escape wheel pivots (diamond on at least the balance top pivot). It has a screwed, split bi-metalic compensating balance, Breguet over coil hair spring, and Geneva Stop work on the barrel, and a 16200 train. A technical spec that suggests that it was of a reasonably high grade for its day. I still have a couple of issues to address though, the most problematic of which is that it has a slightly bent balance staff pivot. I decided not to tackle this on this occasion as the risk of breaking it whilst trying to straighten it was too great and I desperately wanted to see it running, but I may have a go in the future. I will re-pin the hair spring at the same time to get the rate up to where I can regulate it properly; it is currently about 25 minutes a day slow which is way beyond the range of the regulator. I also need to re-attach one of the dial feet and source some new hands. Then of course there is the question of recasing it. If you have made it this far then thank you for indulging me :-) I hope you have enjoyed it. If anyone can shed any more light on this little old lady I would be very grateful.


 1 point
 -
There was no walkthrough in the thread, I moved it to the collection section. When the walkthrough is ready you can of course post it in the walkthrough section - please don't be offended, i'm just trying to keep posts in their relevant sections @toptime810, What is the point of this?? Kindly do not make pointless posts in threads.1 point
-
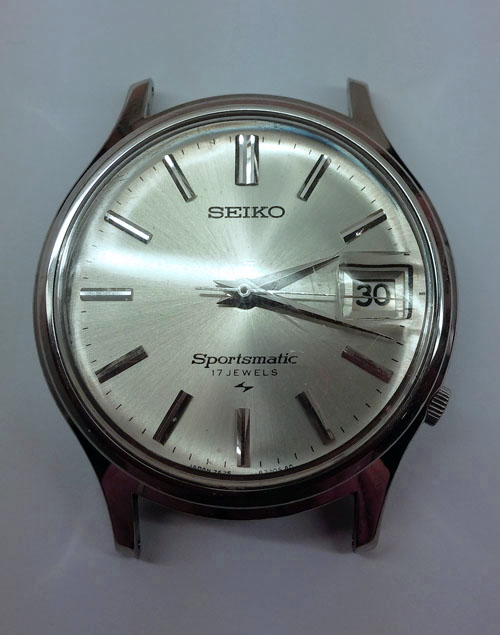
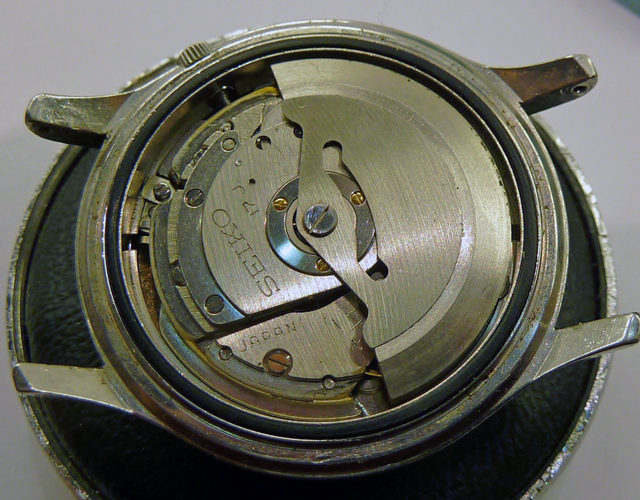
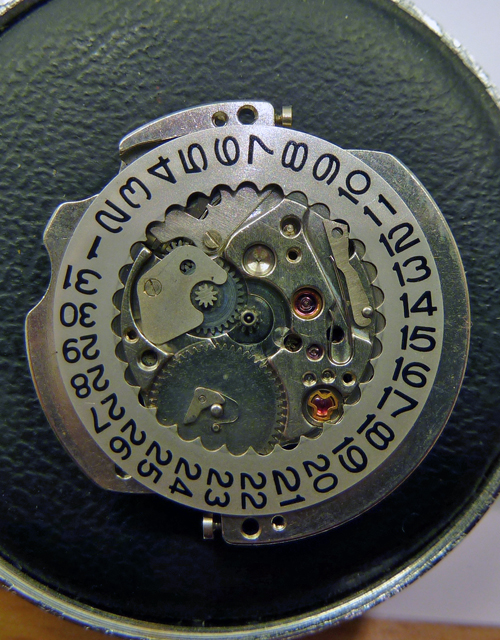
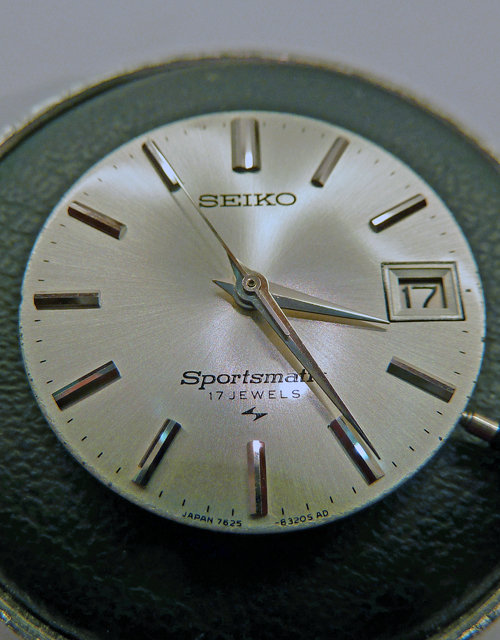
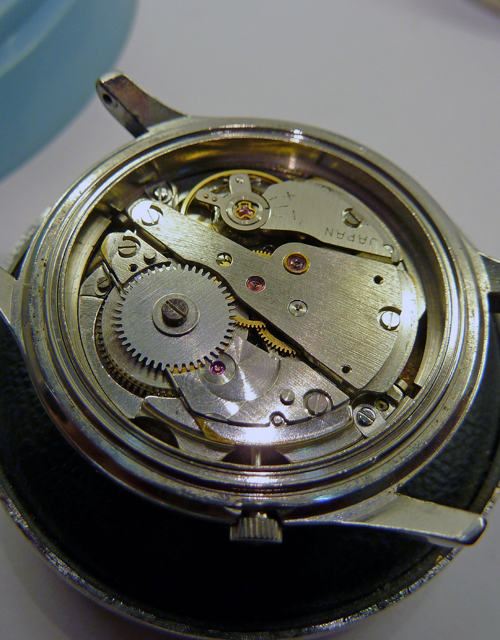
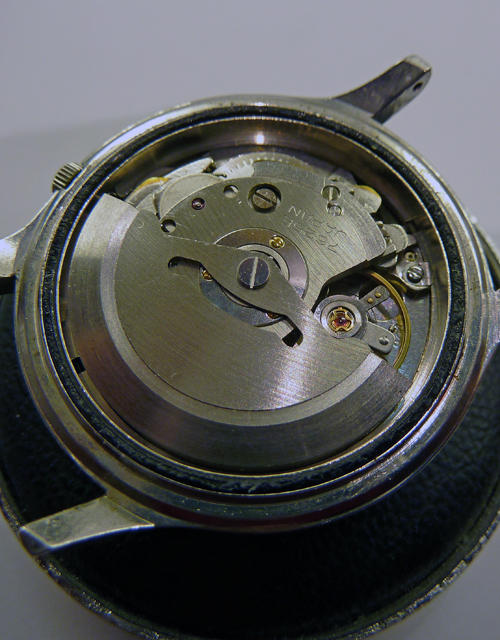
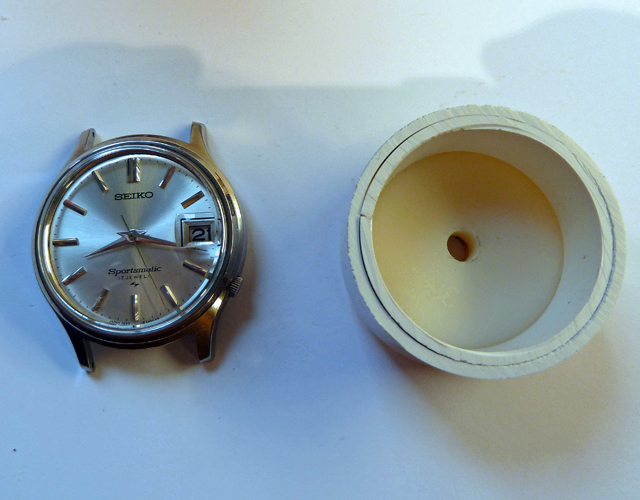
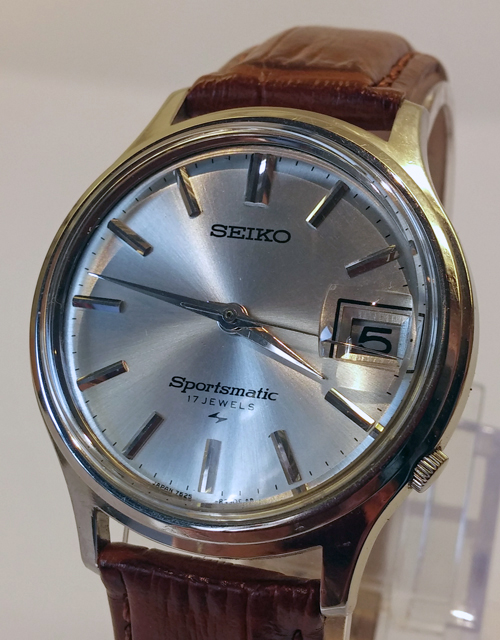
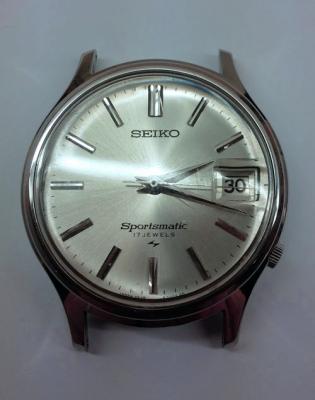
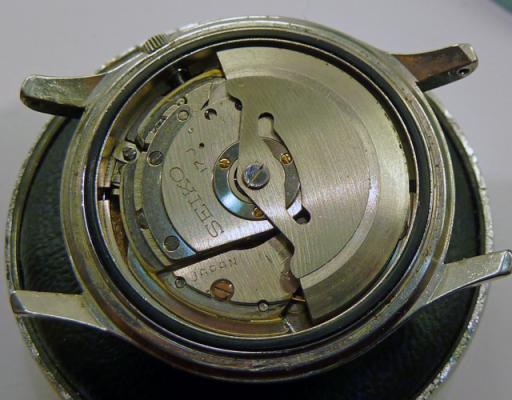
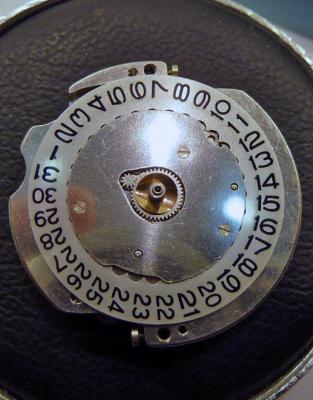
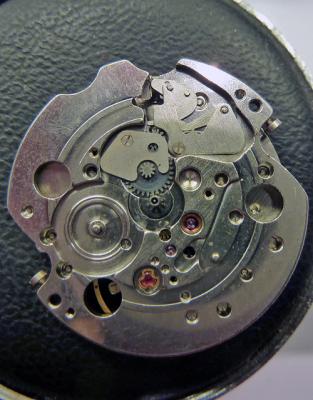
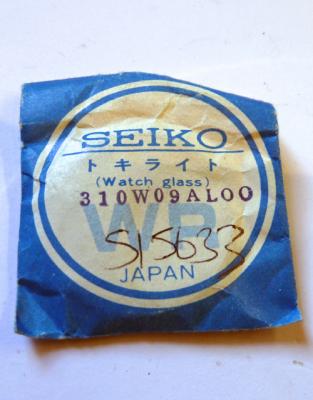
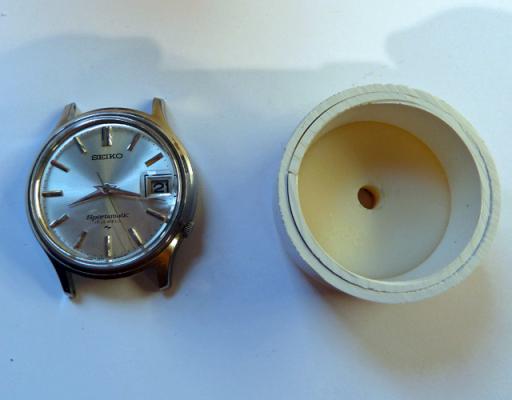
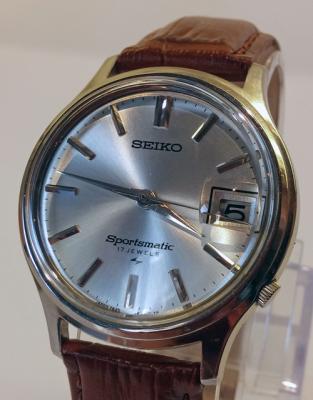
Picked this up recently for a snip from an excellent fleabayer in Japan: A fairly clean item from August 1968 with a good dial. Being a bit of a fan of Sportsmatics, I haven't come across this particular model before & wrongly thought at first that it had a cyclops crystal retro fitted. Further research showed this to be the original configuration, however the crystal was in fairly poor nick & appeared to have been polished a few times in the past. After some more detective work the part number was obtained & amazingly Cousins had one in stock: So far so good, although the rotor sounds a little rough (not uncommon on these). Lets see whats inside: Bit grubby with a scraping rotor, but the bearings seem OK, so the rotor gets bent upwards slightly - don't frown, it's what Seiko recommends! Out of the case, dial & hands off, strip down the dial side. Note the broken setting lever spring, I have a donor movement from a previous project and will replace this: Turn over & rotor off: Remove the winding gear: Strip down the above, a bit of wear on the magic lever but appears to work fine, clean lube & reassemble: Onto the main stripdown: All in bits & cleaned: Lower Diashock dismantled, cleaned then reassembled: Then it all goes back together: On to the dial side, setting lever spring replaced: Into the case, reattach winding gear, rotor & caseback on: The original crystal was used before the previous step to protect the hands, this is now removed the dial is given a final clean before putting the new crystal in place, which pushes on under finger pressure. The crystal is held firm by the bezel, which is a problem to fit as all of my dies are shallow & bevelled, unable to push the bezel down, so 2 pieces of 40mm waste water pipe are cut to suitable length, one piece is then fitted onto a stepped flat die, the other has a section removed and placed inside the first: Works a treat. Finally, with a new tan alligator strap fitted: It looks like the crown has been replaced with the wrong one in the dim & distant. Hopefully this will be rectified in due course.


 1 point