Leaderboard


Popular Content
Showing content with the highest reputation on 08/01/22 in Posts
-
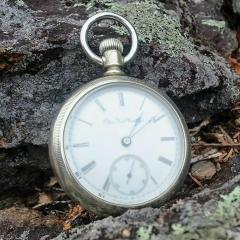
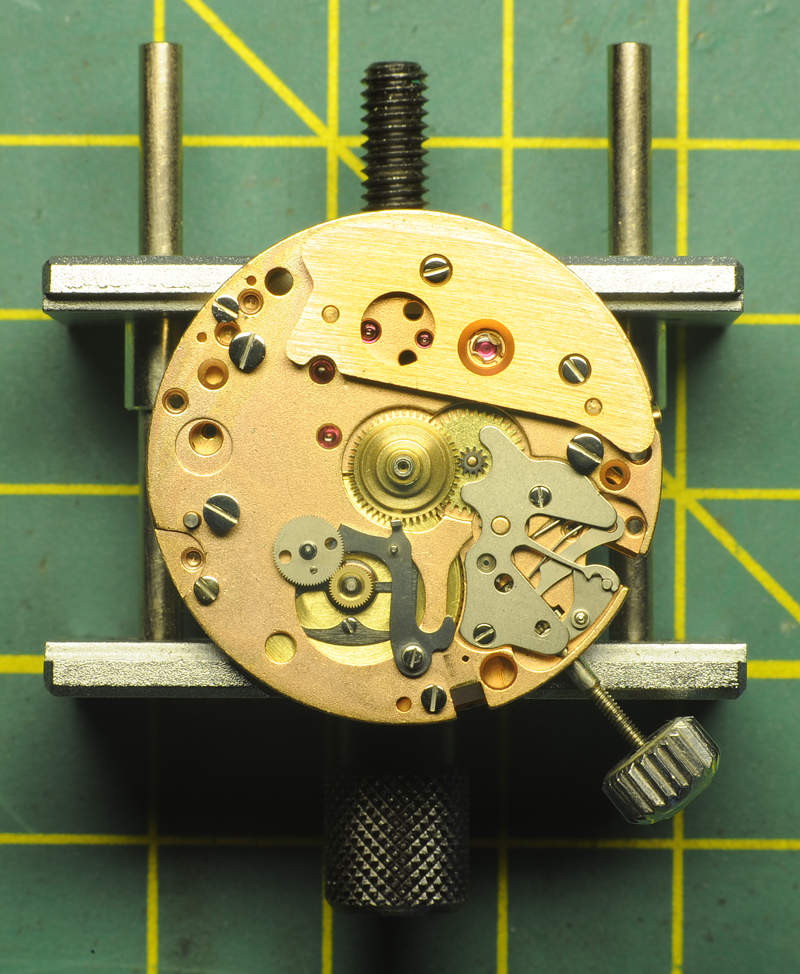
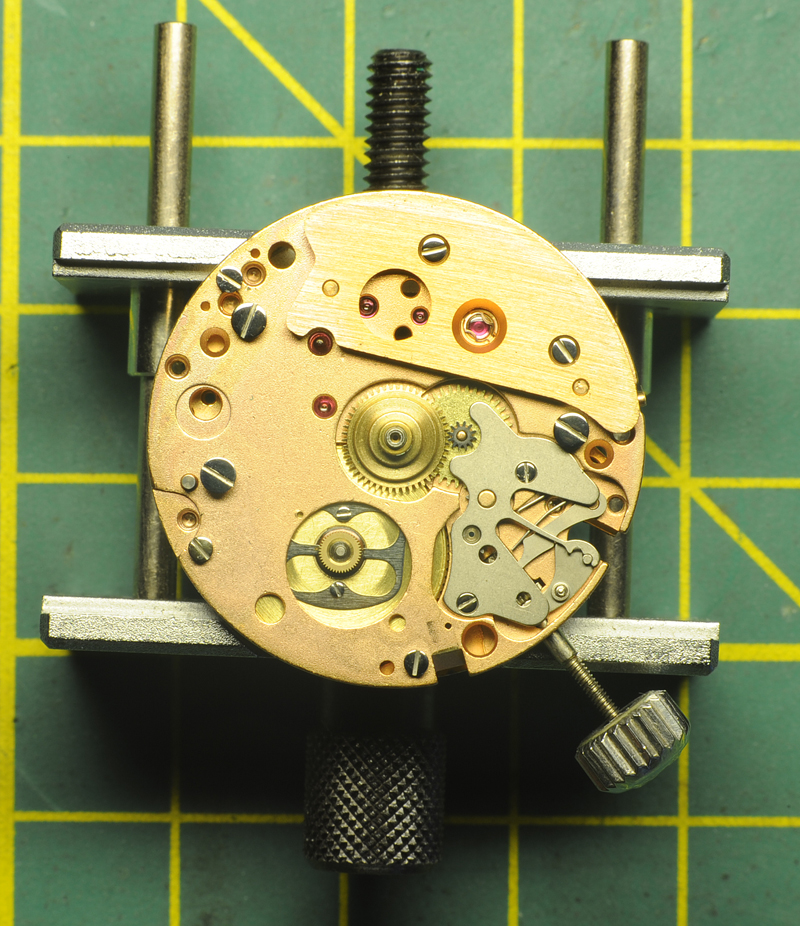
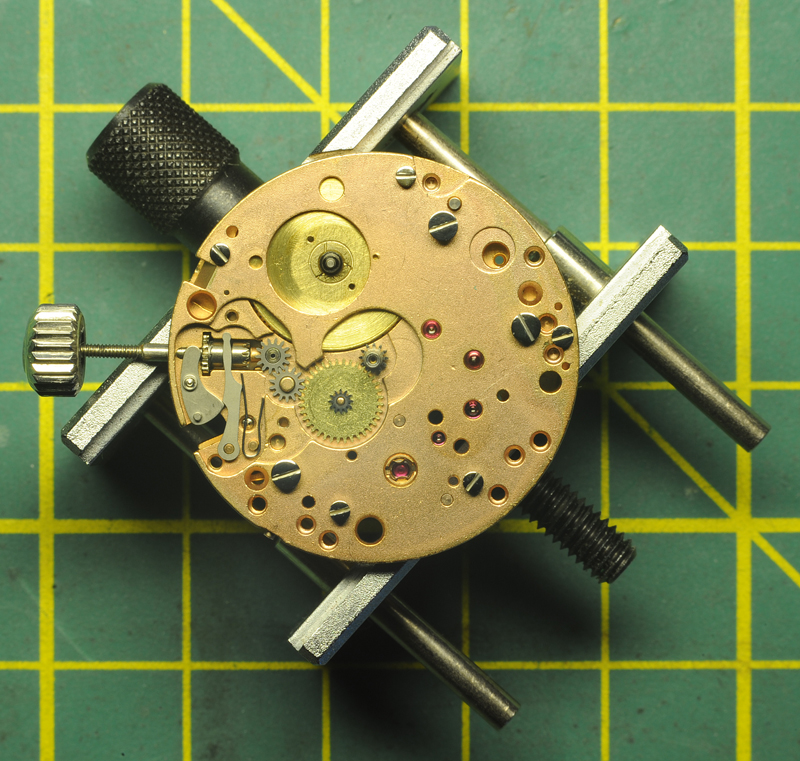
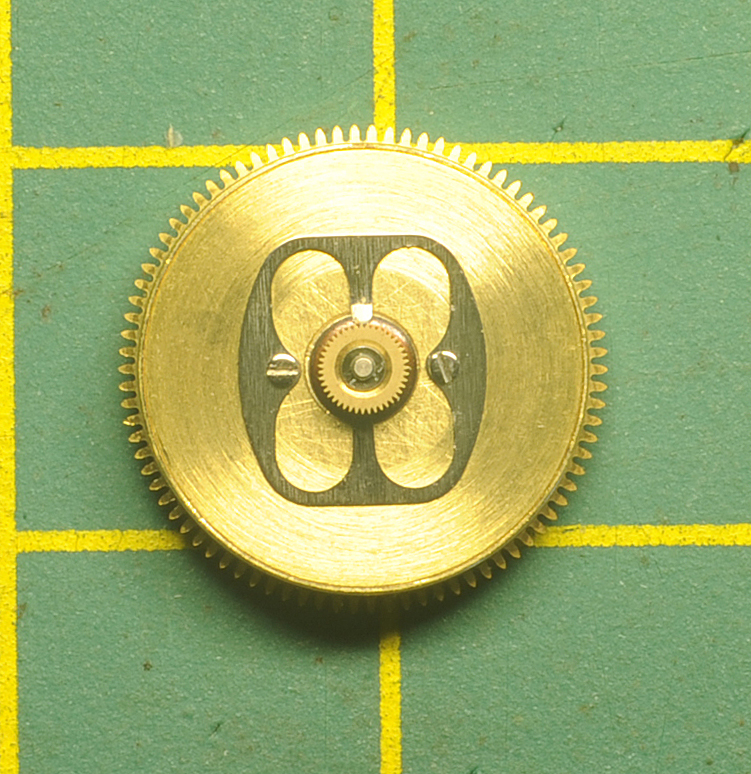
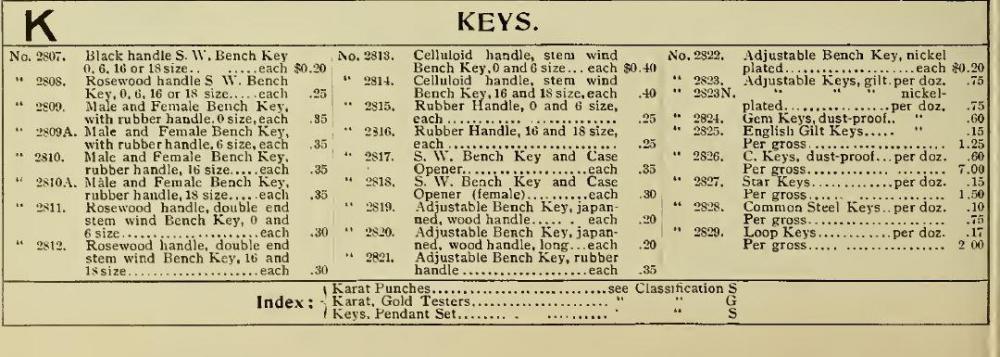
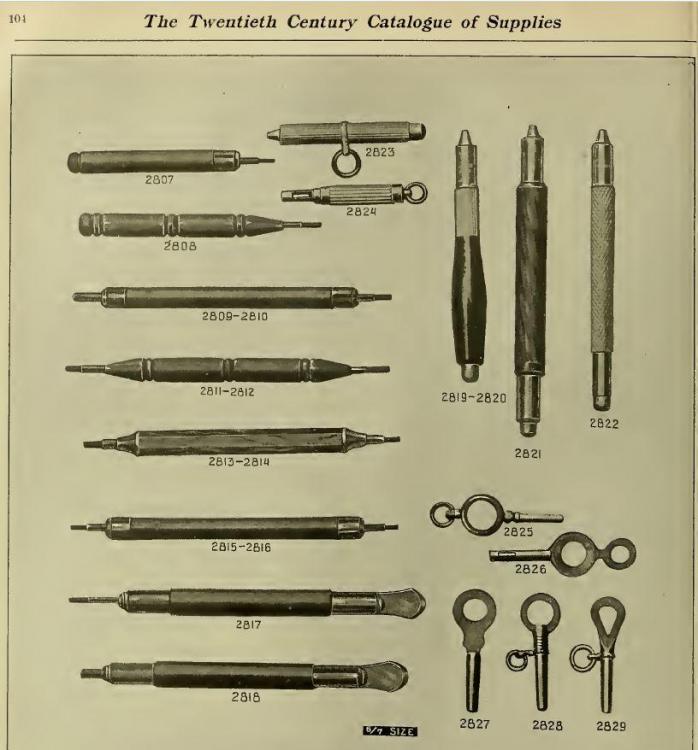
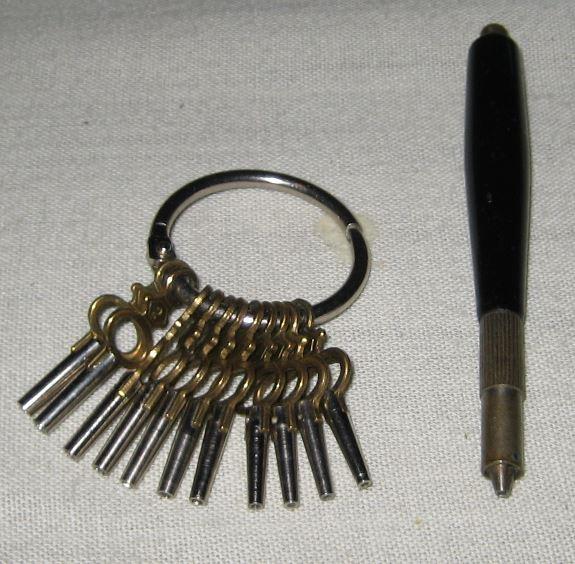
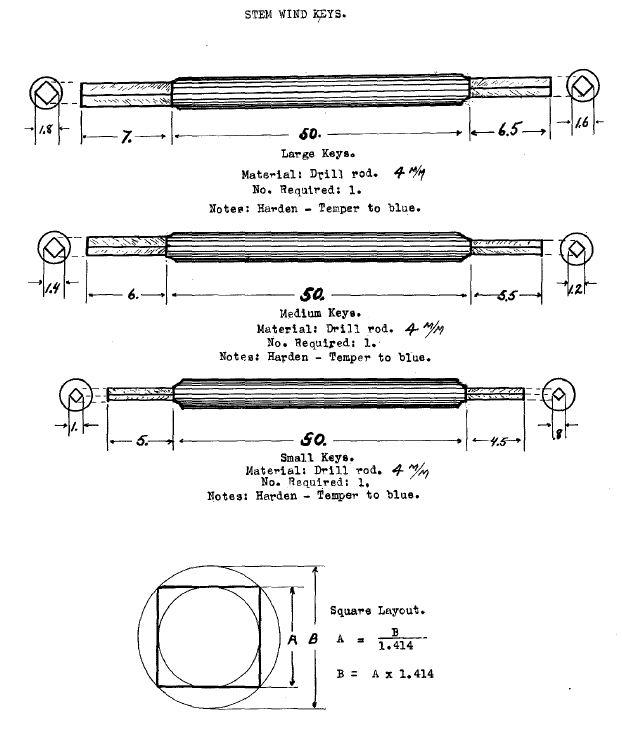
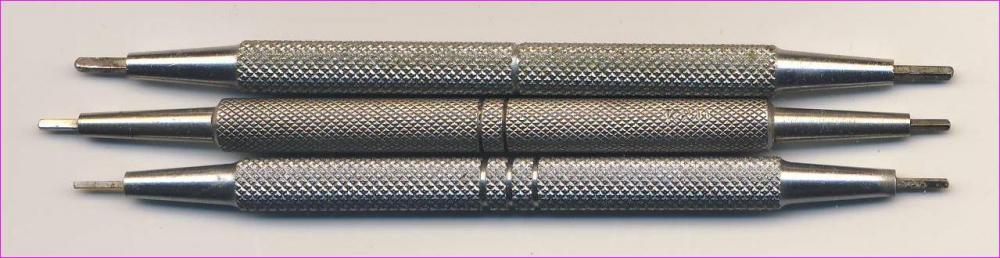
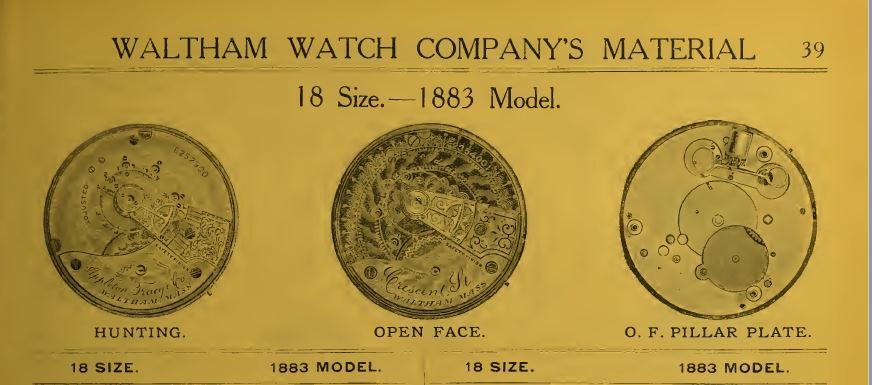
That is standard for most American pocket watches the stem and crown Are part of the case and the movement is a separate item.. Then as others have mentioned you definitely need the let down keys to both wind the watch and let the power off. The problem is the American pocket watch cases have lots of variables. For instance the setscrew variety is typically found on lever set watches because there is no need to pull the crown into setting. If the crown pulls into a setting position you have a sleeve and I would really try not to mess with that if it's working as if you break it there won't be a replacement typically. As others have mentioned you need bench keys standard for working on American pocket watches. I've attached some pictures of bench key is and a few keys for key wind watches. Worst-case grab a piece amenable in a file and just make a key. Do not try to use your screwdriver as others have it doesn't always end well and getting replacement components can be a challenge. Although you could file a screwdriver down to be Square to fit in if you can find one the right size that would give you handle the hold onto. Even notice in the images there's plans for bench key is as at one time this is a standard project for students taking watch repair. Then I have a image of what the watch looks like from the parts catalog. The problem is it is a model number but it had lots and lots of variations. You definitely want to get pictures when you disassemble or otherwise putting it back together might be interesting. Then of course this is a full plate there are certain challenges with full plates. Also if you have your serial number you can look up the watch at the link below. https://pocketwatchdatabase.com/
 4 points
 -
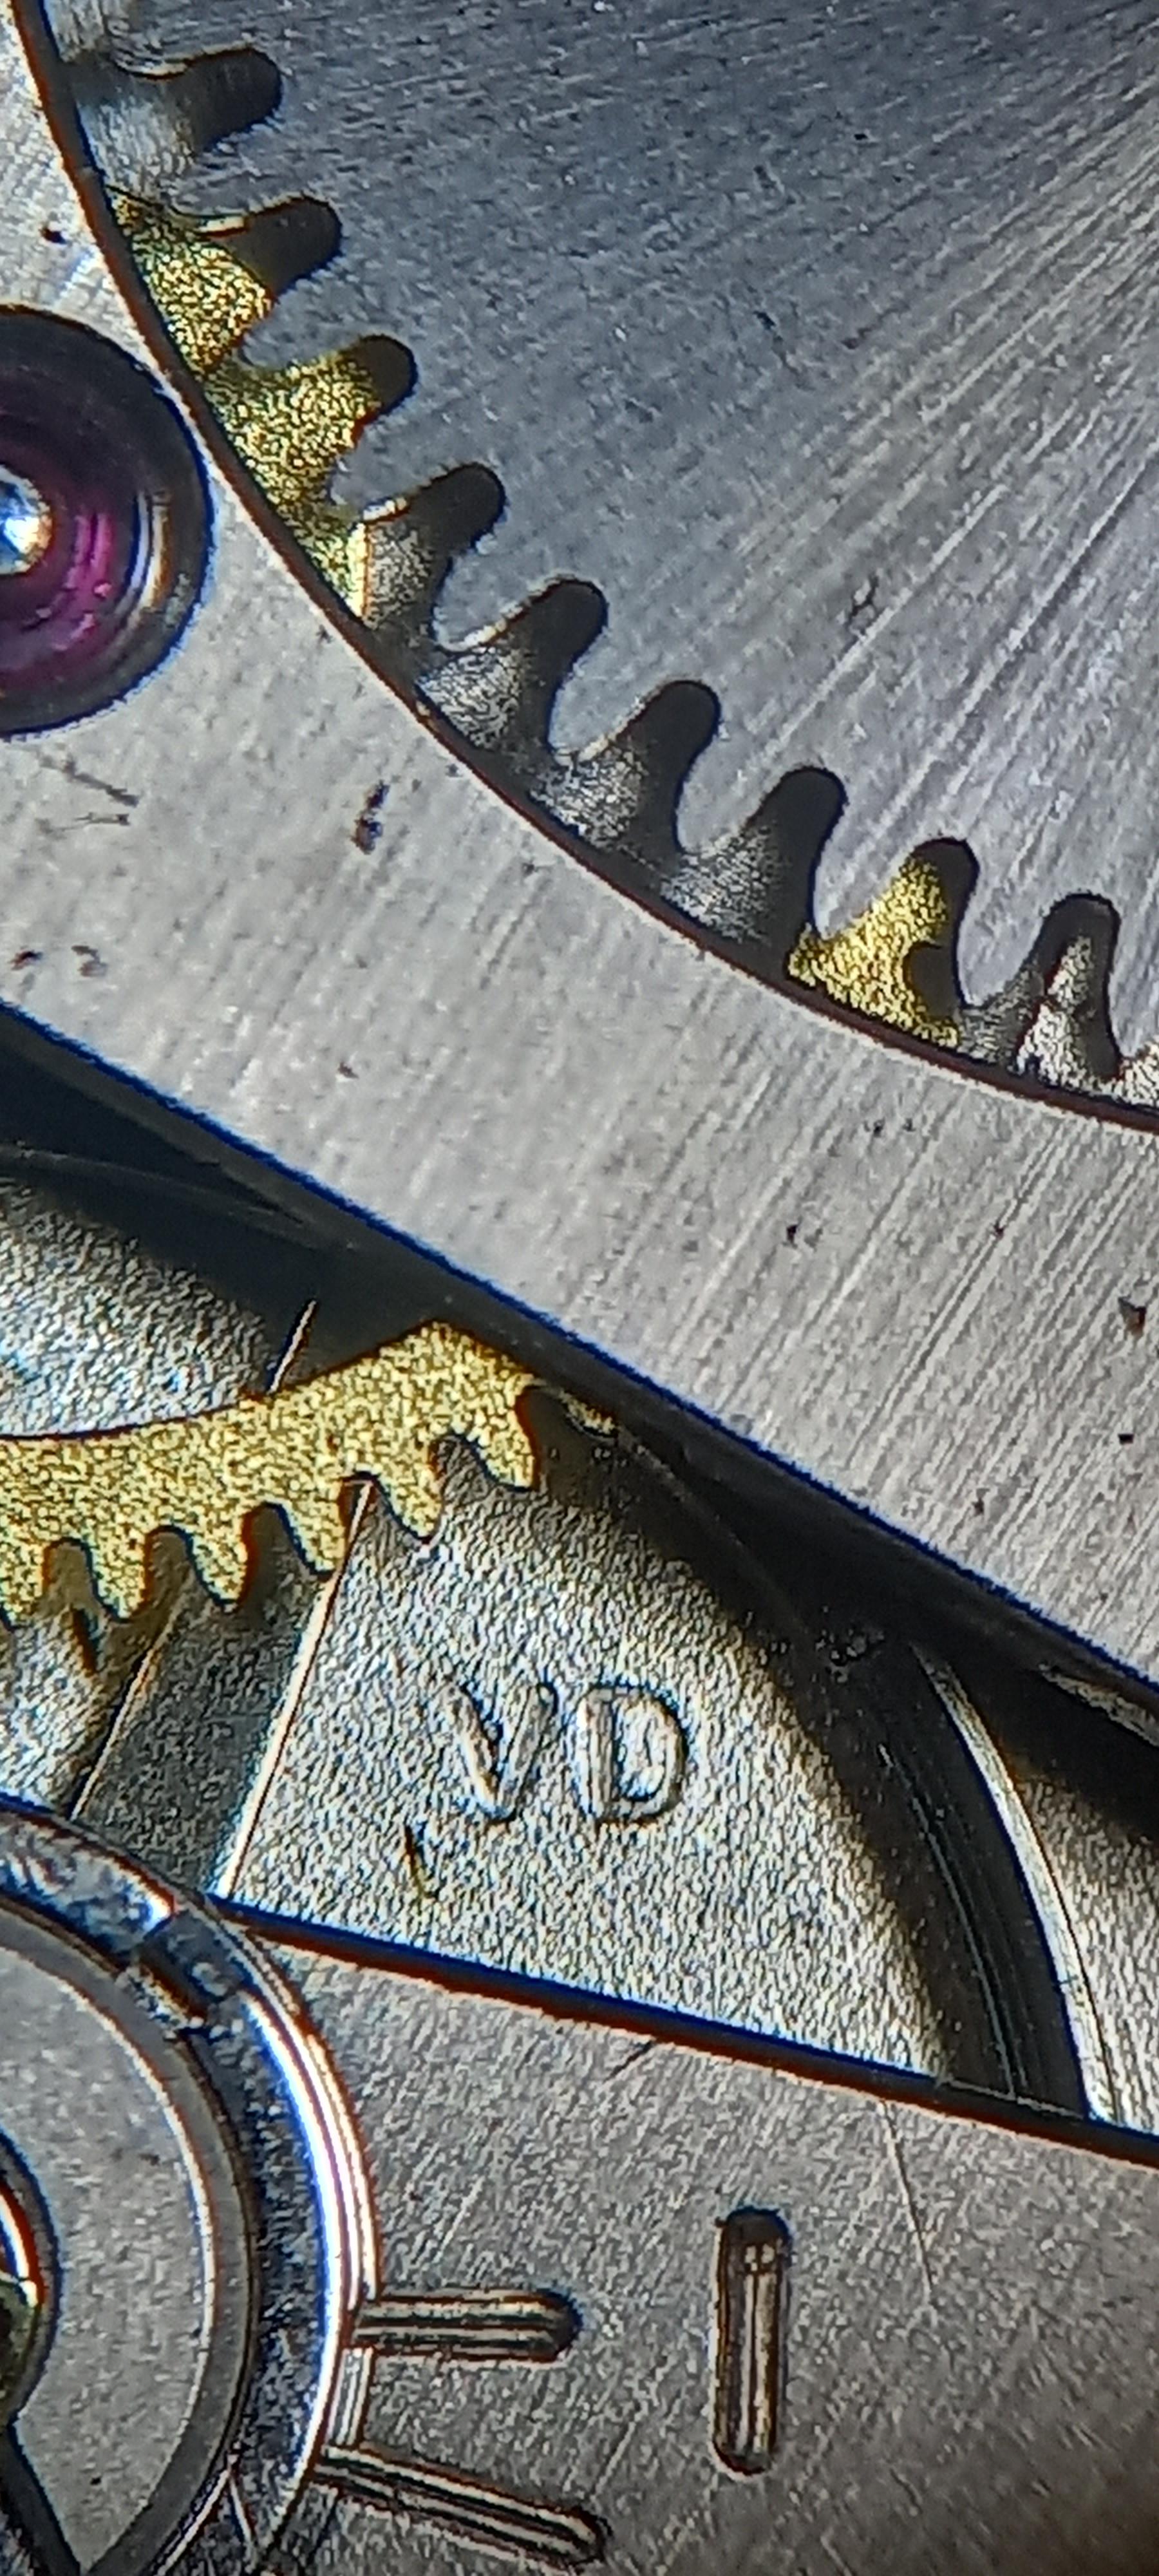
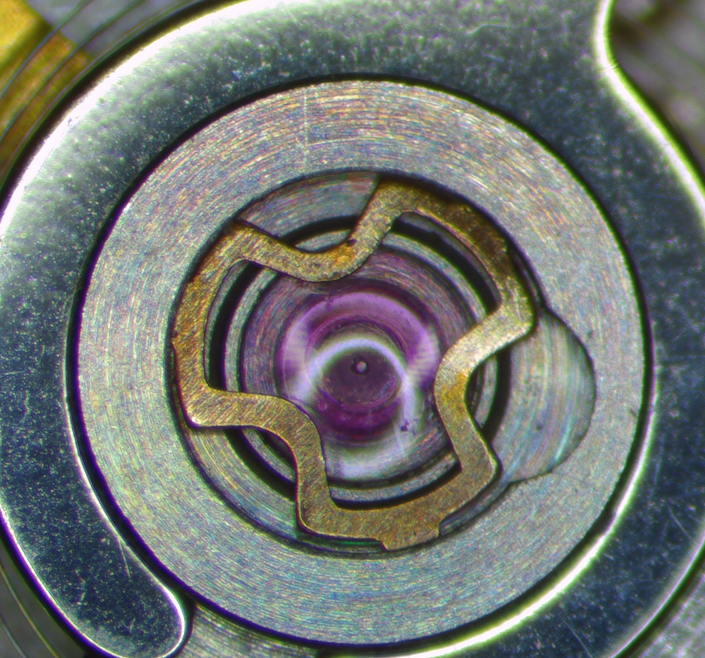
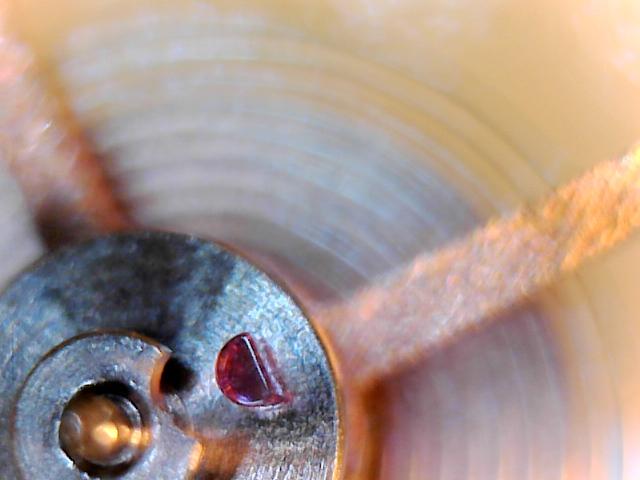
I am pleased to report that the C to CS adapter ring did the trick and spaced the microscope camera out enough to allow it to focus throughout the zoom range. The pic is pre-cleaning of course!
 4 points
 -
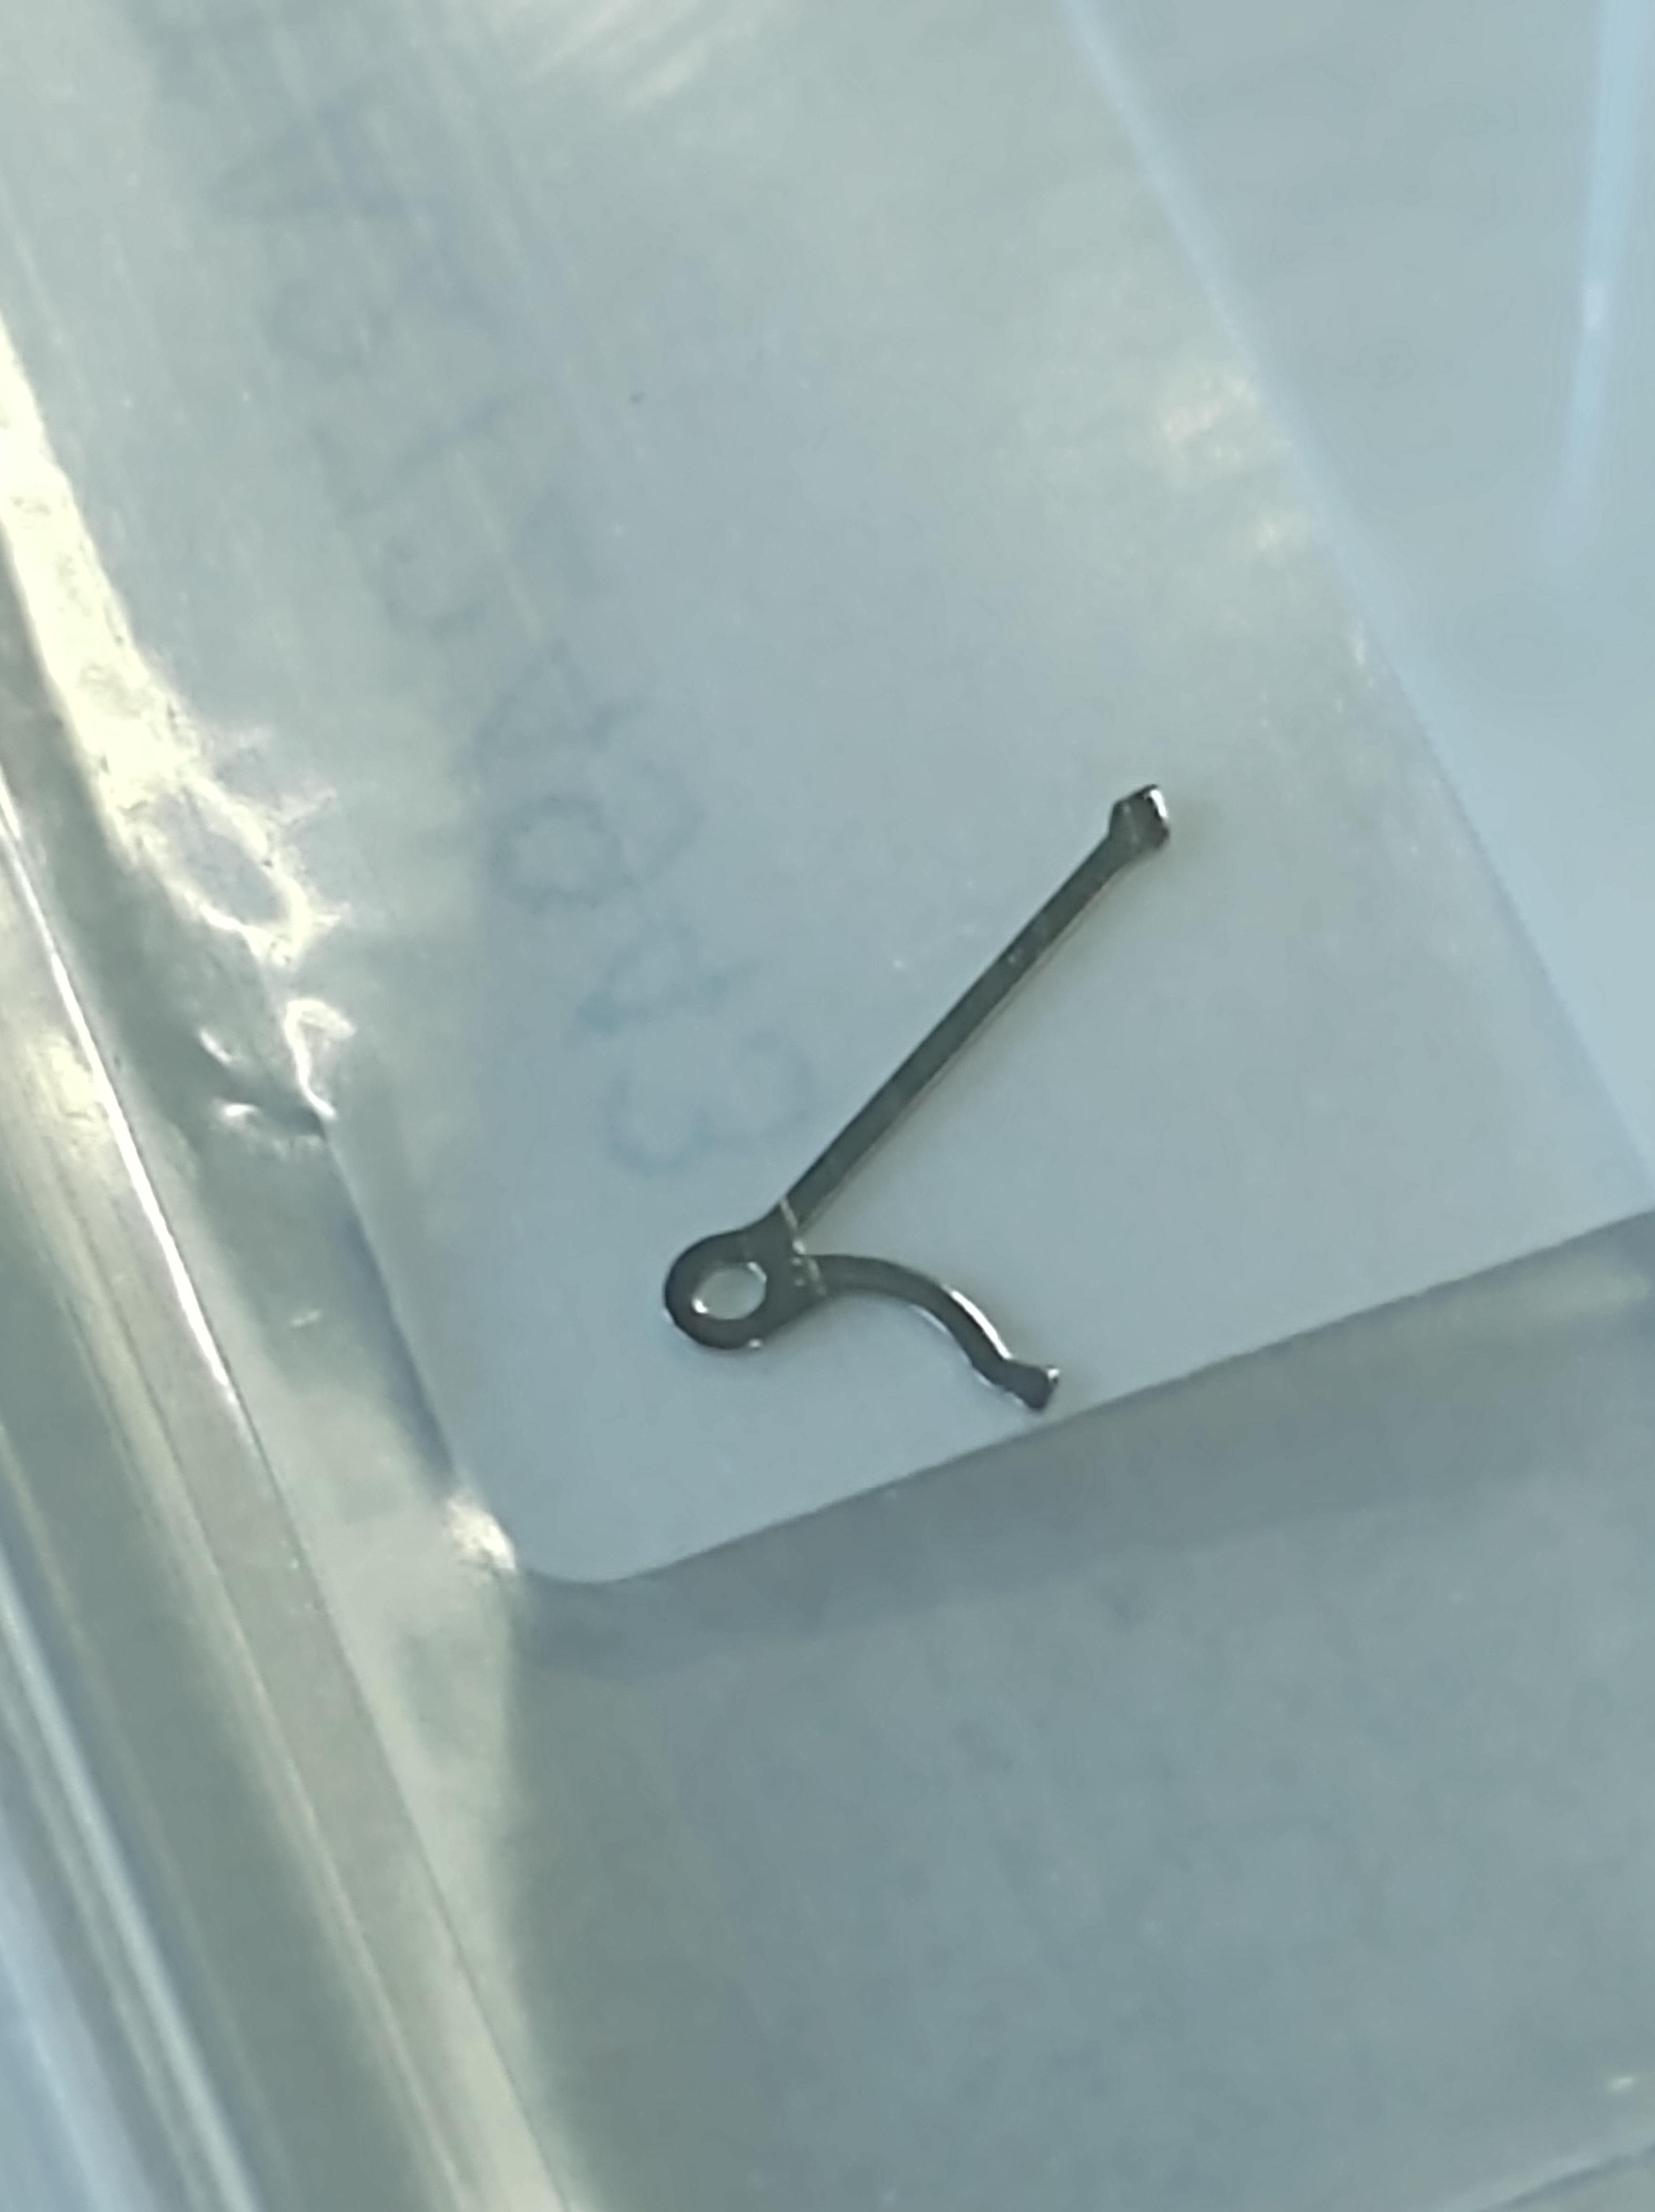
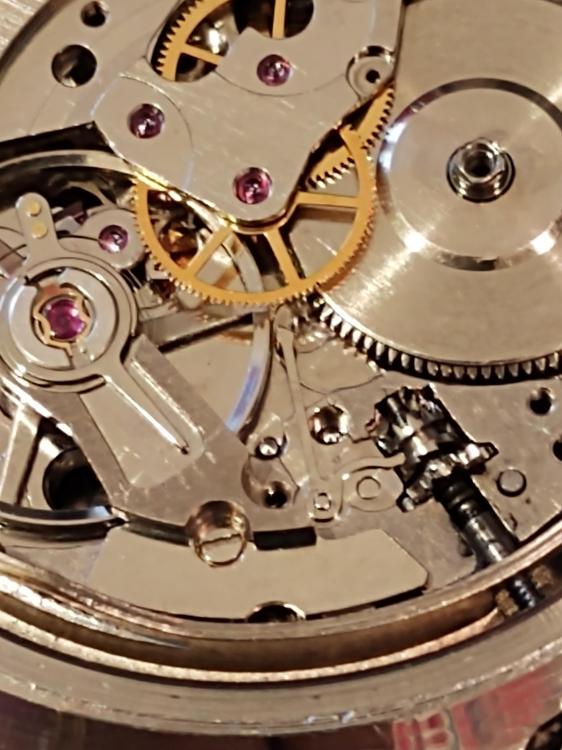
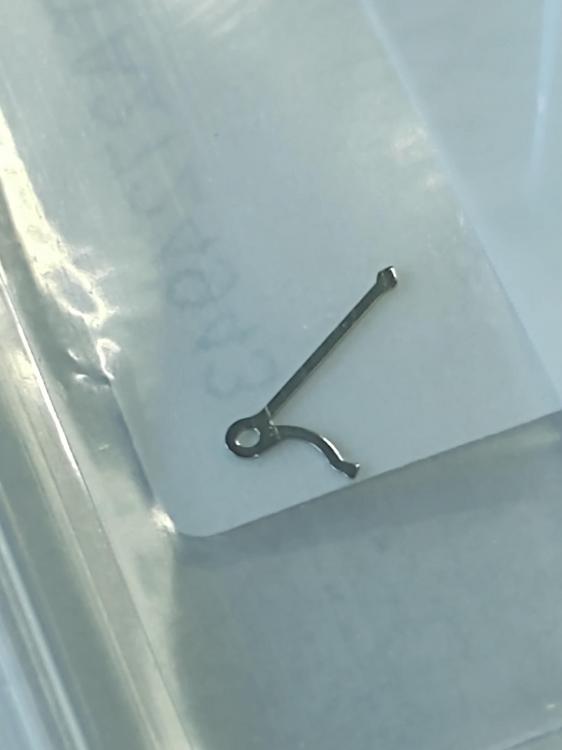
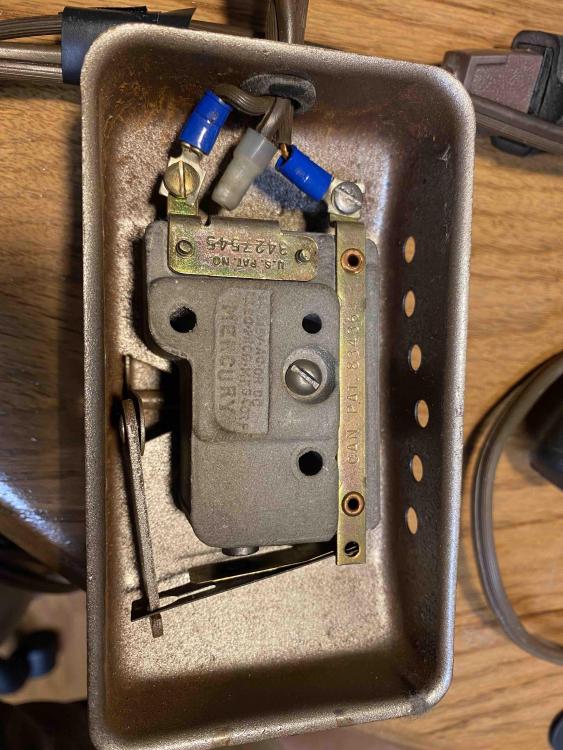
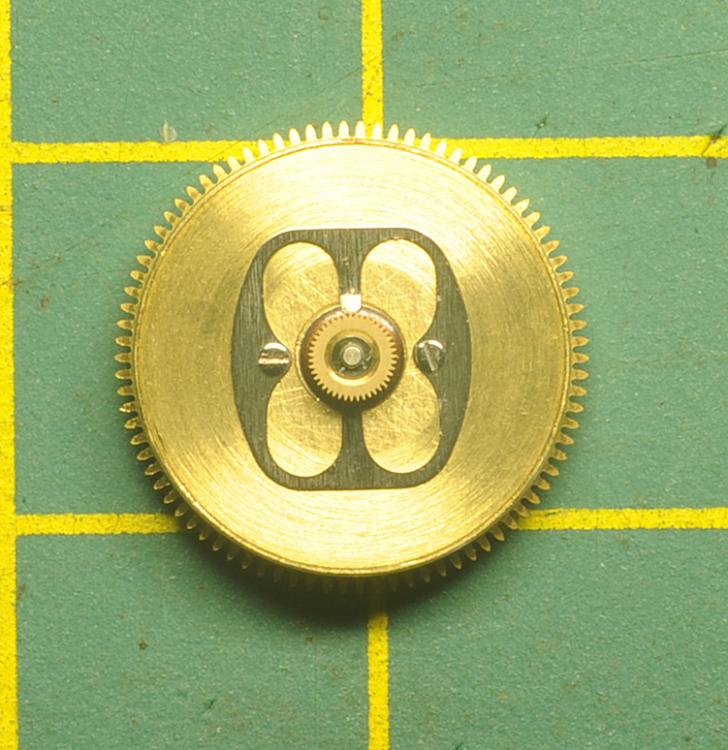
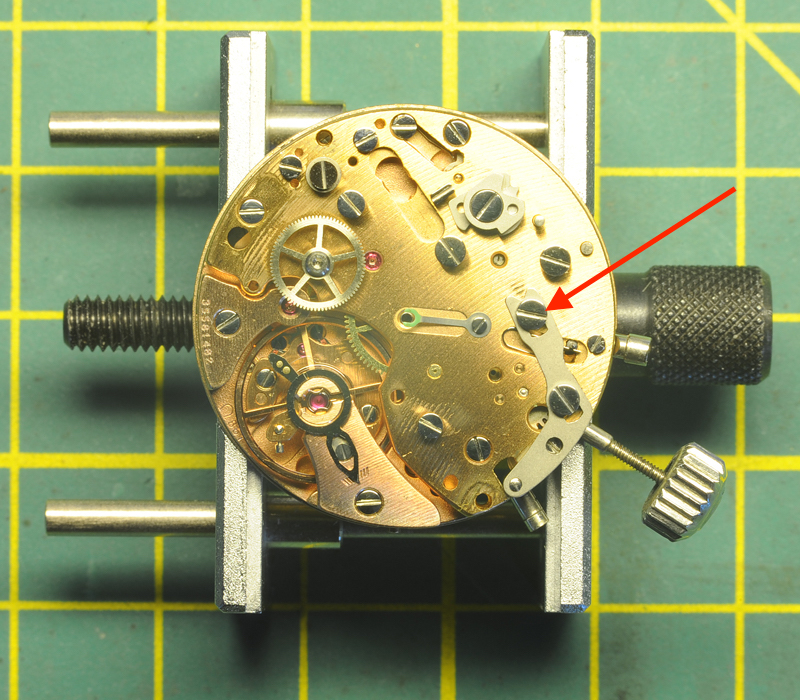
Hi All, just wanted to share that I added a hacking lever to an ETA 2789 movement. I used the same lever as specified for ETA 2824-2. All worked fine except the watch hacked on the date set position of the crown. I had to put a very slight bend in the lever so that there was a small gap between the lever and the balance rim in that position (as shown in photo). It was a fine adjustment as too much bend caused the lever to touch the barrel teeth in the crown pushed in position. All very doable without too much pain. Well worth it for £1.68 from Cousins. Steve.
 3 points
 -
The Appleton Tracy & Co. grade is one of the highest grades of '83 model. It was close between it and the Crescent St. '83. Some of the ones with nickel plates are gorgeous to look at. Even the gilt models are fabulous. The dials are usually the right amount of fancy for my tastes. And the stock hands are often a cut above as well. If the only thing the watch needs is a clean and oil, you're fortunate. Just be sure that you're very careful when you disassemble the movement. Full-plate movements like the '83 Waltham have what is called a potance that hangs down under the top plate and accepts the lower balance pivot. The trouble comes because the fingers of the pallet fork extend into the potance, with the fork side on the lower plate. Many a full-plate movement has broken pallet pivots because people took them apart without making sure the lower pivot is free of it's jewel before lifting. This is critical. In addition, when you put it back together, it's generally best to assemble the watch upper plate down. I believe that I have used a 16s movement holder to hold the 18s upper plate while upside down. I know I posted about it on the NAWCC MB a year or two back. Good luck. Cheers.3 points
-
Yep, bench keys are your friends here. The web site - Dave's Watch Parts - should have a few, and at good prices. If Ebay fails you, check Dave's also.3 points
-
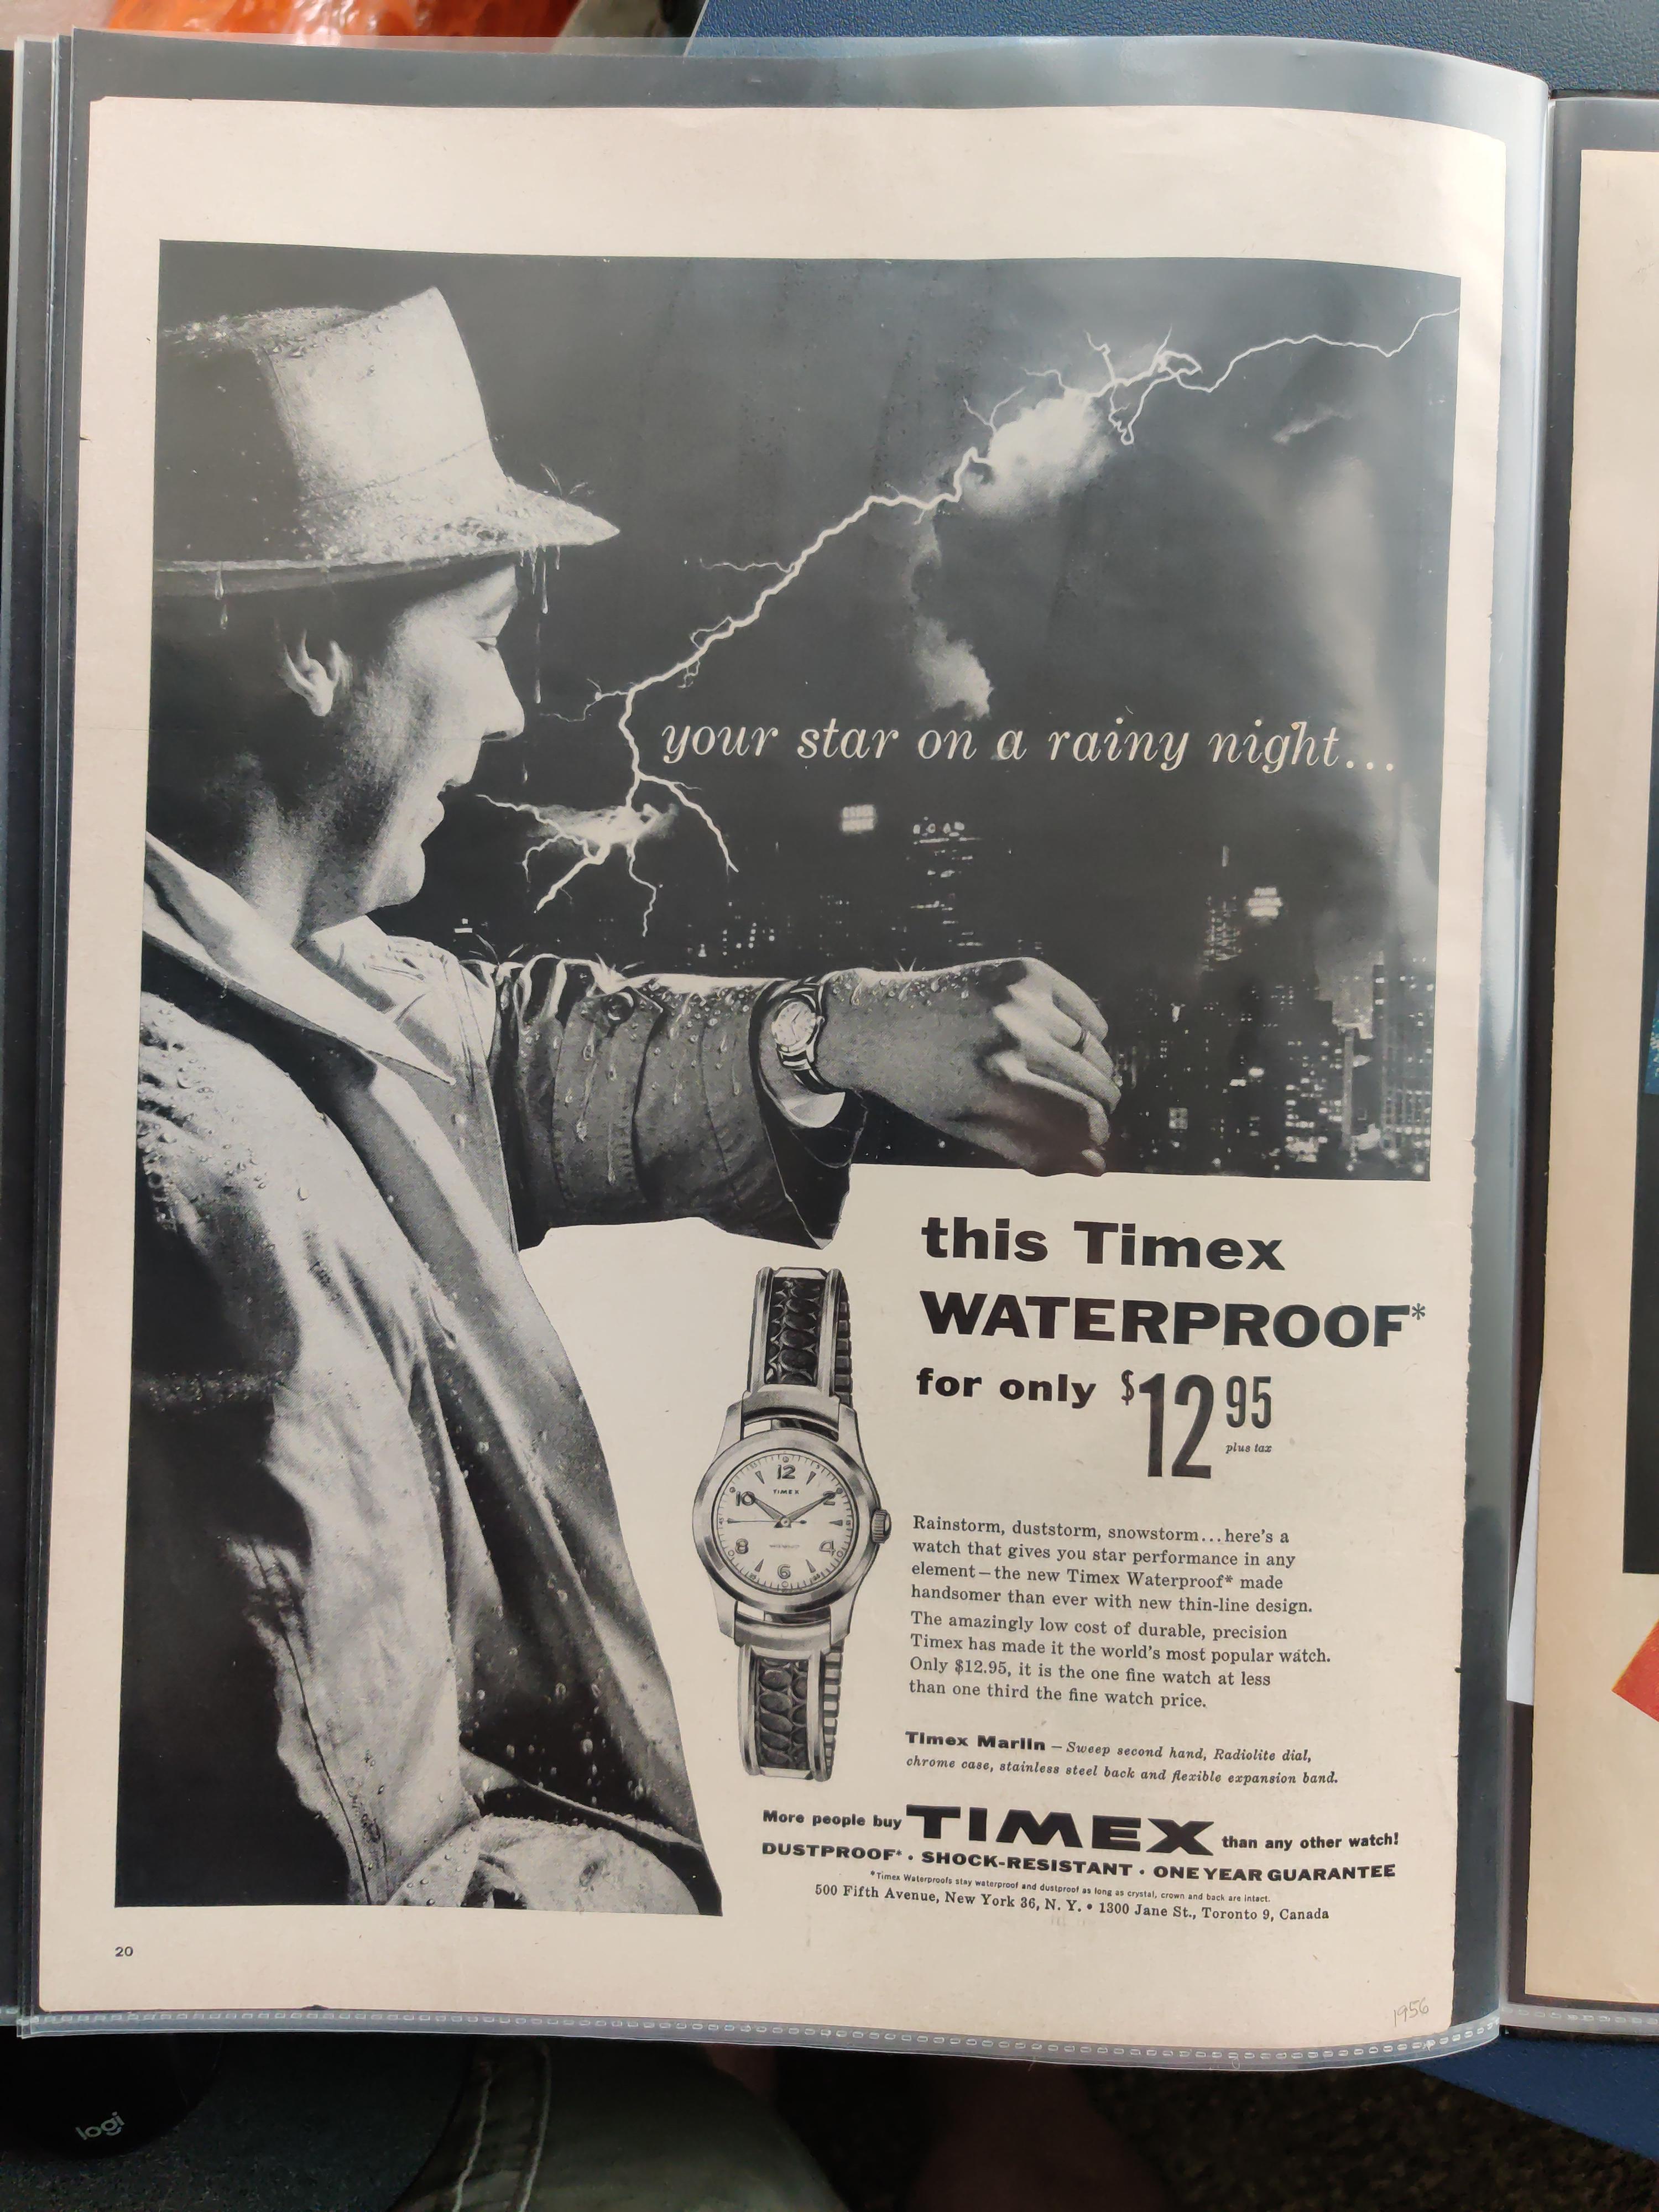
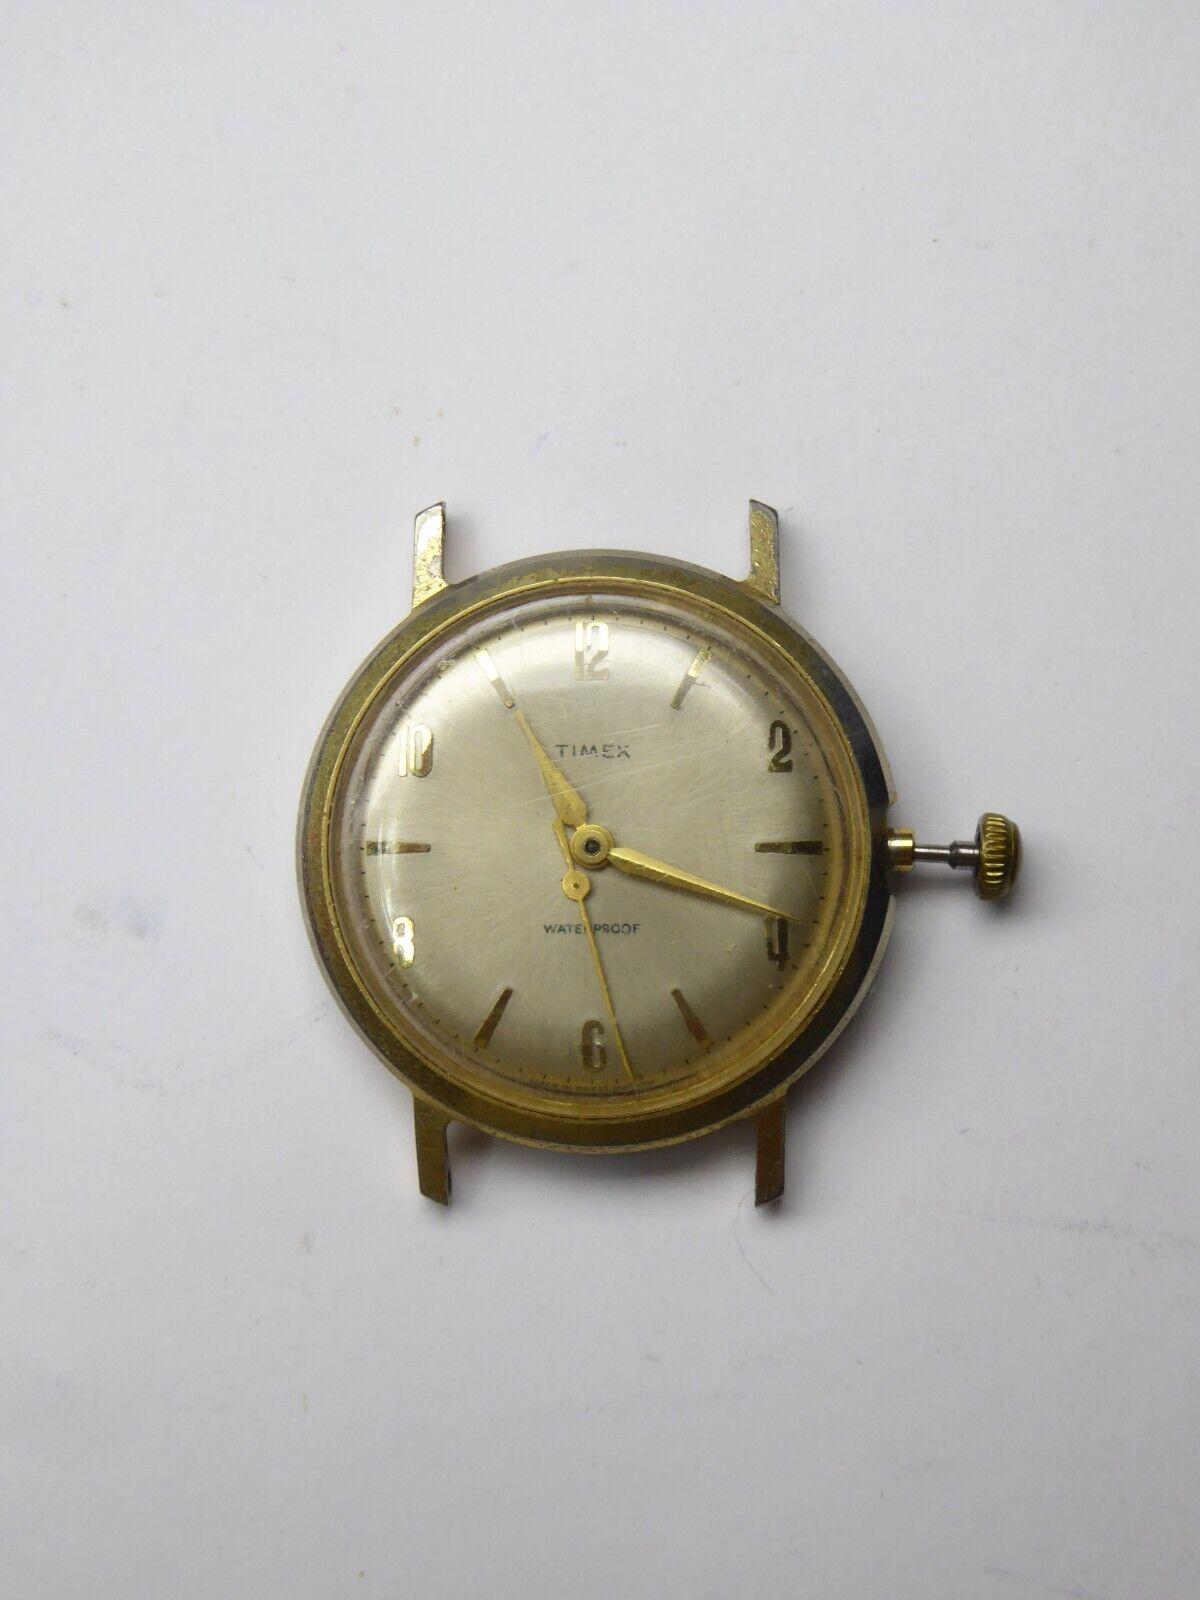
Timex "Marlin" watches were a range of watches introduced by Timex in the 1950s. Large numbers of these very popular watches were produced in the UK, assembly taking place at the large Dundee Timex factory. Sadly Timex closed their Dundee factory, so Timex production is now mainly in the far east. If you look on the dial of most Timex mechanicals from 1963 through to the 1990s the dial usually has a code on it to indicate the line of watches it is from. They break down (roughly) as follows. (1XXX = Mercury/Sprite) (2XXX = Marlin) (25XX = Sportster) (3XXX = Fun Timer) (4XXX = Viscount) (5XXX = Super Thin) (6XXX = 17 Jewel) (9XXX = Electric) Be aware that ebay sellers tend to call *everything* with a Timex dial, a Marlin, because they are popular with collectors. Check the dial code if you are unsure. The last two digits tell you the year. The year is also sometimes stamped inside the case back with an ink stamper, but this often gets cleaned off, so it isn't a reliable method of dating the watch. The one I posted above has "Made in Great Britain" stamped on the dial, and no dial code, so this puts it pre 1963. Timex revamped the Marlin range in recent years, with modern movements, but with the same design aesthetics to the originals. Take a look here if you want to see their modern offerings. https://www.timex.co.uk/browse/collections/marlin/shop-all/ The early Timex mechanicals are a bit "marmite" in terms of watch repair. Some people love them, some... not so much. I've fixed quite a few and have the process down pat, but they can be tedious to work on, and the build quality is a little "agricultural", but then again that was the point. They were mass produced to a price, and while they are designed to be serviced, most service centres back in the day, would have considered them disposable and not worth the trouble of fixing. I think the "Marlin" reference may be down to the "waterproof" nature of some of these watches. Personally I wouldn't trust the waterproofing even when they were new.3 points
-
I've cleaned many watches without shock protection and never broken a pivot before. Maybe I was getting complacent ! The hairspring had been manipulated a lot and the terminal curve was all out of shape. I got it looking OK, but those blue springs only take so much before they break. One way I could have done it, is put the cock+balance on the mainplate inverted, then flip it, so the spring doesn't have to dangle too far. I'll try that next time. At least balance staffs are cheap, and it's good practice as I don't fit many.2 points
-
Yes, this name was introduced along with the features needed to keep water out of the case. "Waterproof" was a little ambitious, but compared to the wide open cases of the time it was an improvement. The most obvious difference is seen in the crowns. If you are interested, I've been keeping a stash of Timex documentation available here - https://drive.google.com/drive/folders/0B-IKHN7WFKiwY3JMMDJnMld2SE0?resourcekey=0-7myGNNAUiShb5ihA-o6PnA&usp=sharing Most of this was from a now defunct Timex forum. I've attached an advert from the late 50's that shows how Timex originally marketed the Marlin. Someday I'll scan a few more of these magazine ads, I get a real kick out of them. Have fun!
 2 points
 -
Hi Before chasing up a crystal check what its made from If its acrylic you may be able to polish out the scratches with something like Polywatch or auto chrome cleaner Sovolautosol and save you a few quid. If its crystal you will need to remove it and measure its size and the case rim. Check to see if it has a gasket as well. you will need a crystal press and or a crystal lift tool depending on the material and also whether its got a tension ring on the glass.2 points
-
Thank you all so much. I need the straight letdown key like JohnR725 posted in his top picture. I didn't know they existed. Thanks again to all who took time to read my post and answer. Forgot to say (guess this would have been helpful in my original post - sorry - new to this... - Here is my specific watch (looked up by serial number). My movement is serial number 8513419 and has Appleton Tracy and Co. (a.k.a A T & Co.) stamped on the movement.2 points
-
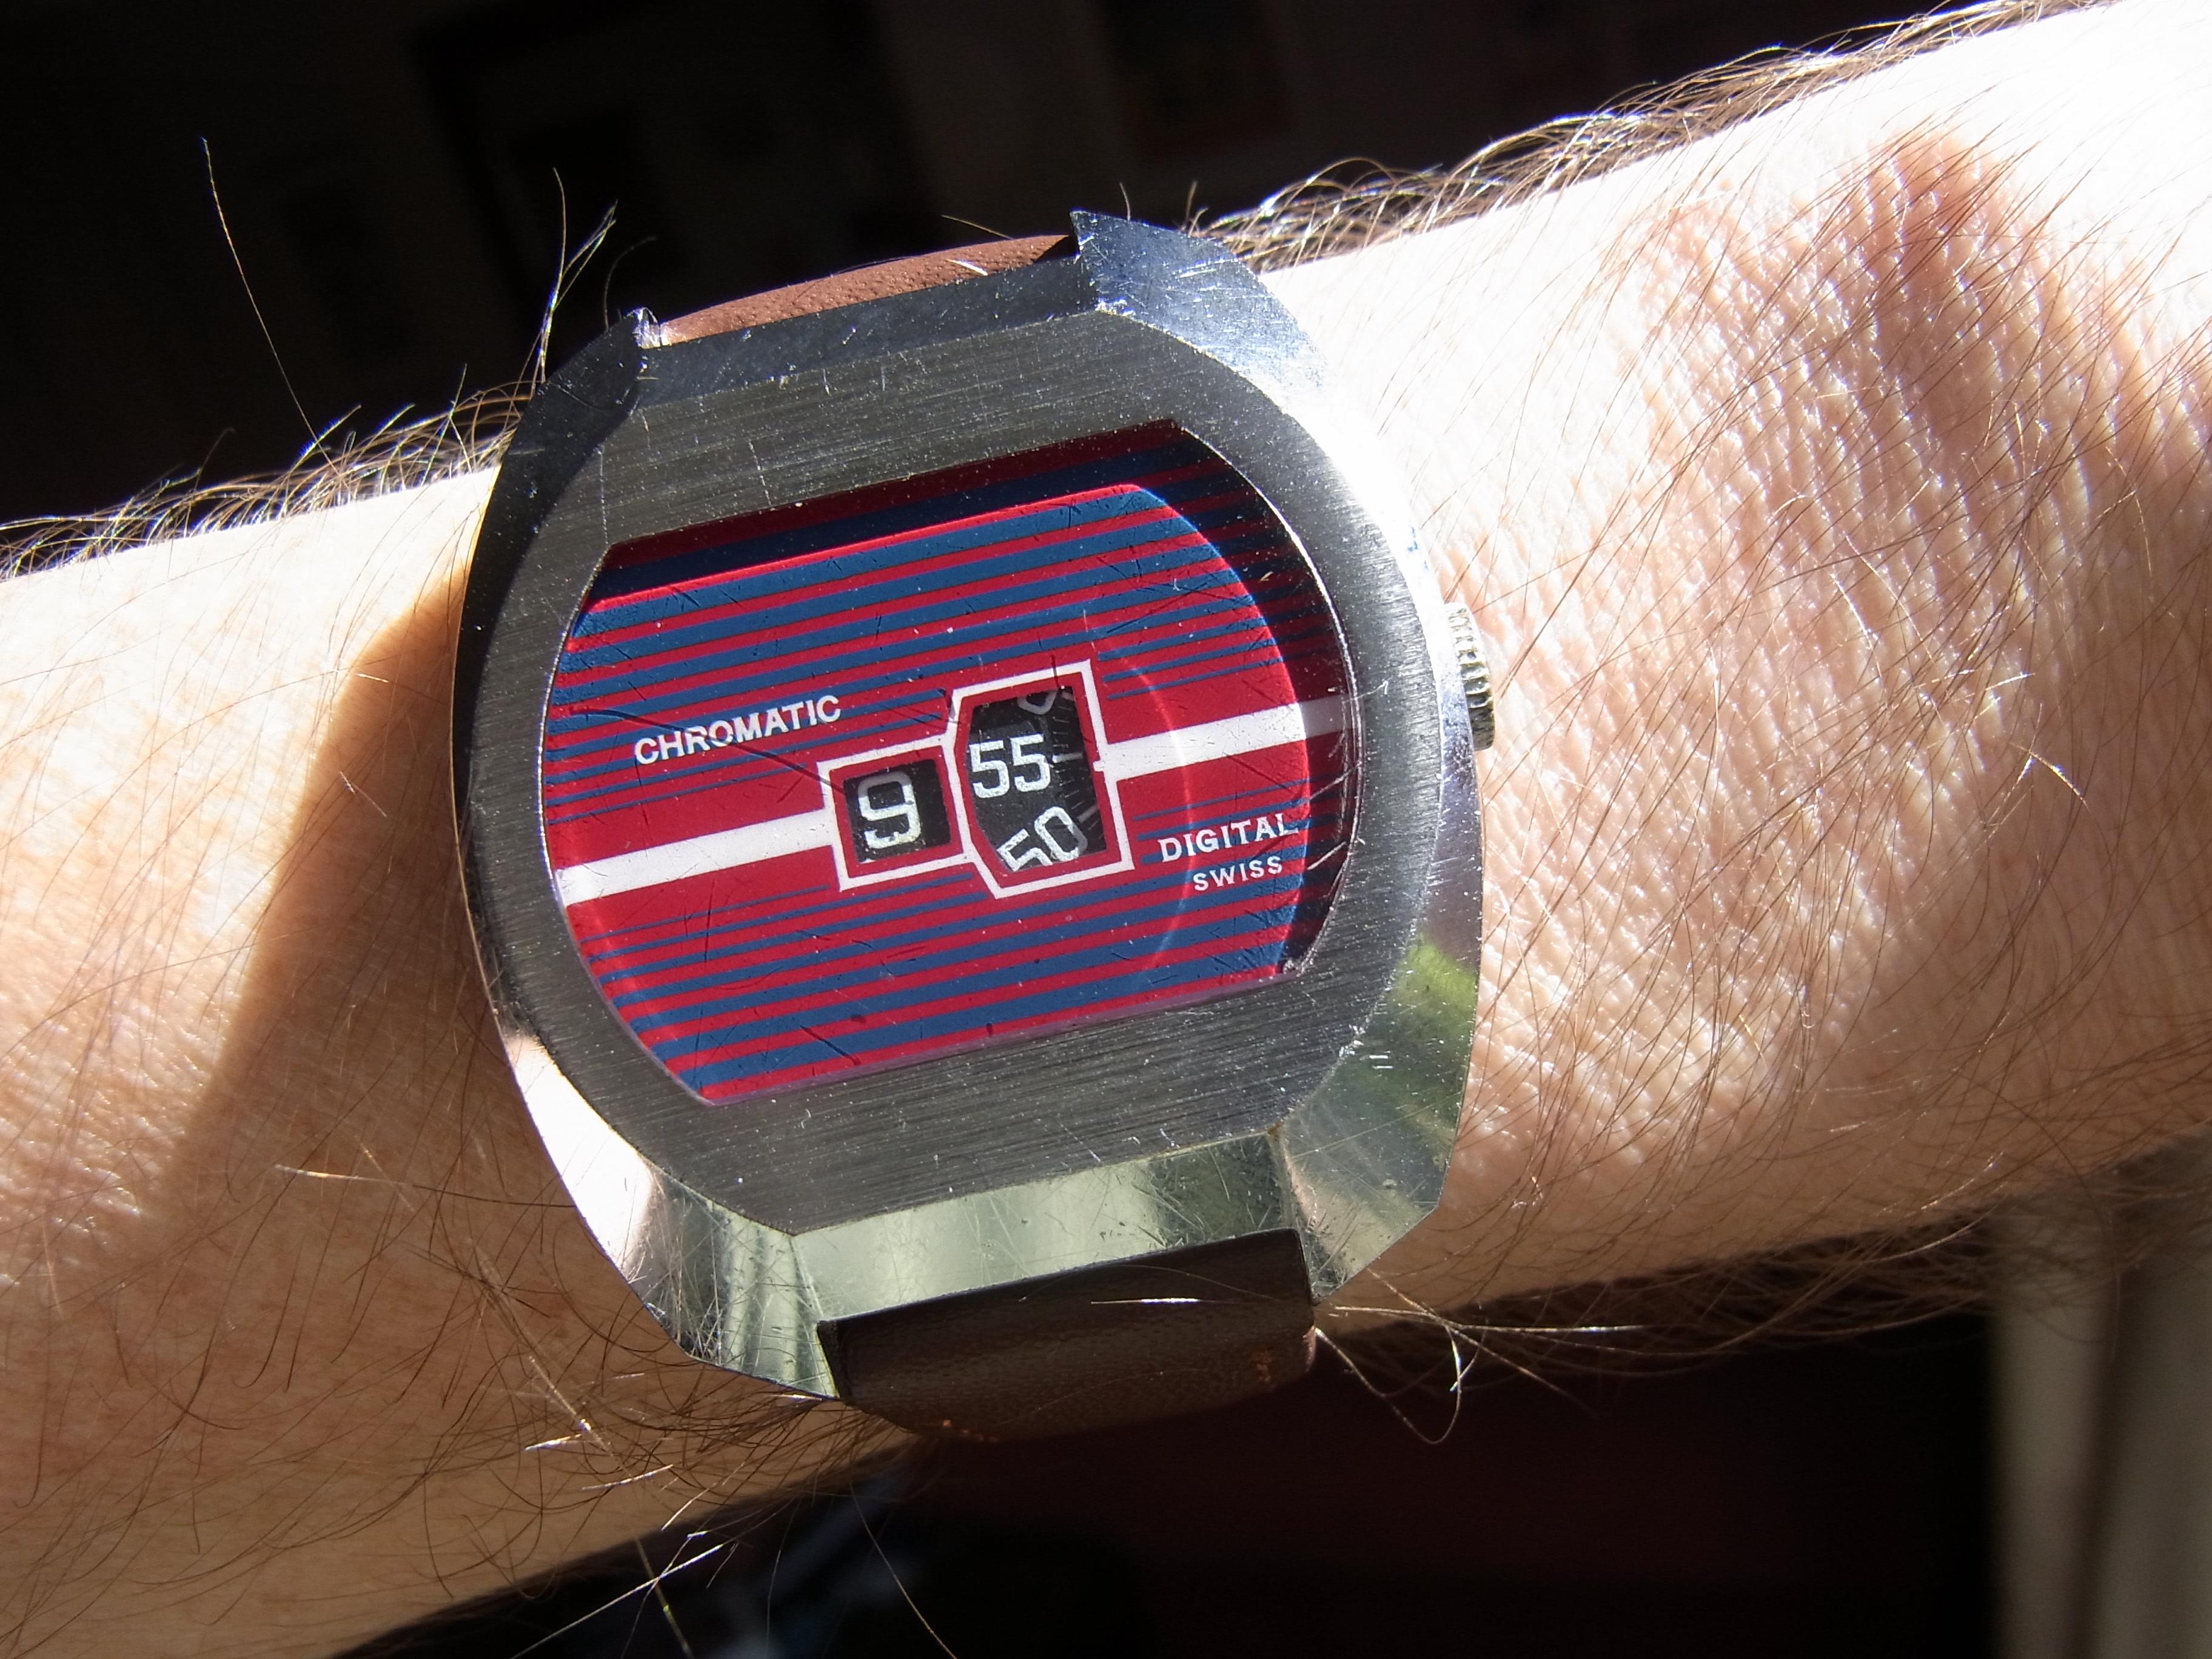
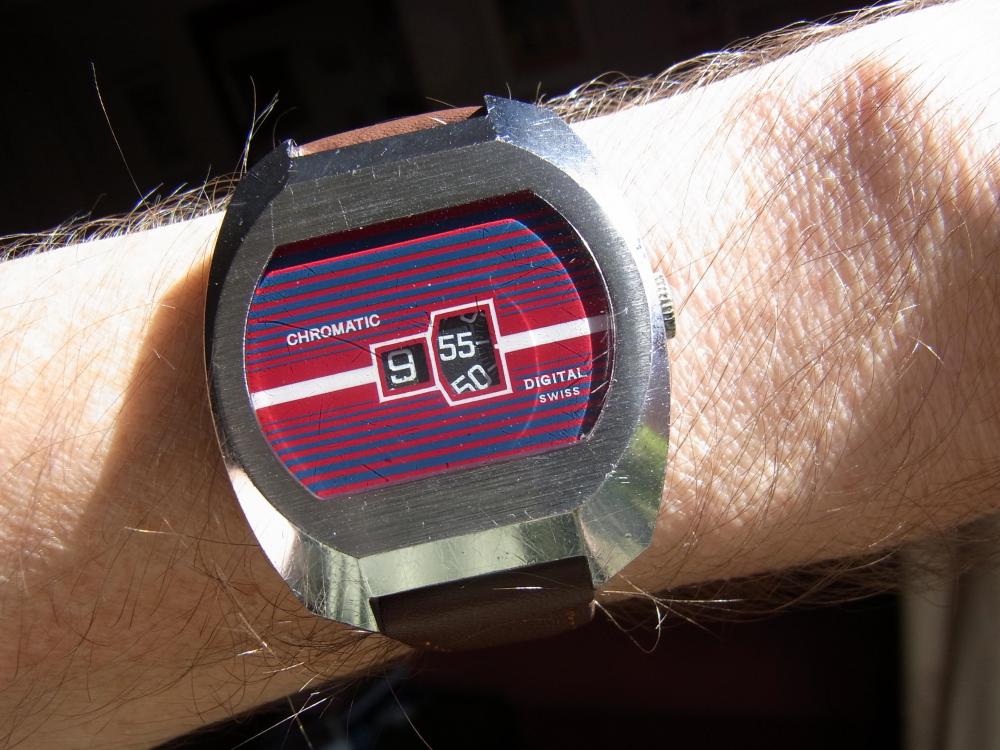
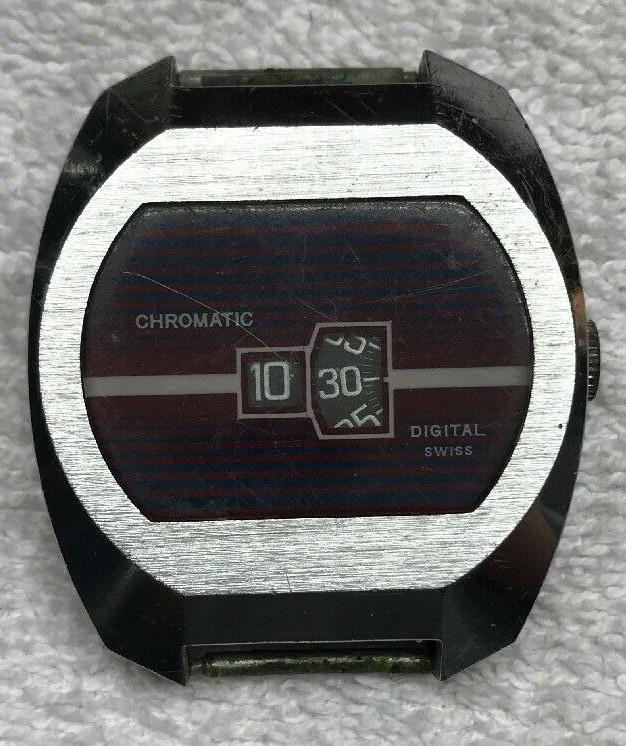
Today I decided to give my EB8800 based "Chromatic" "Digital Swiss" an airing.
 2 points
 -
There are bench keys for most old pocket watches. When you remove the stem from the case and have the movement, there is a stem in the movement with a square socket in the keyless. The bench key for the Elgin I was working on looks like this (between the tweezers and the steel rule - it has different square sizes on each end). I got this one from https://www.daveswatchparts.com/ He was easy to deal with and helped me to get the correct size tool. I suspect that buying the tool for a single job would be silly if you are at all handy. You could measure the size socket, buy some square stock (or file some to size) and use in a pin vise. You might also get away with using a screw driver with a width equal to the corner to corner width of the socket - but using square stock would be better (less likely to bugger up the socket).
 2 points
 -
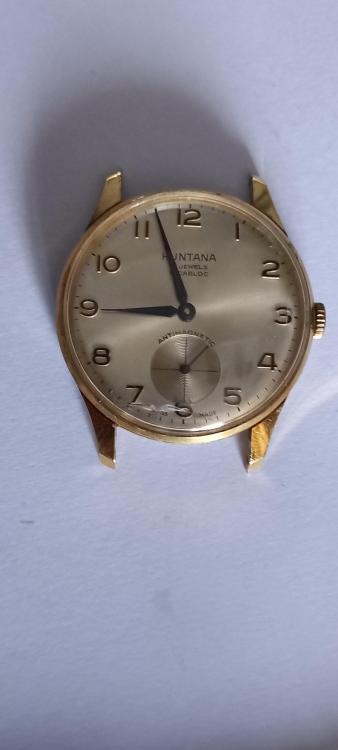
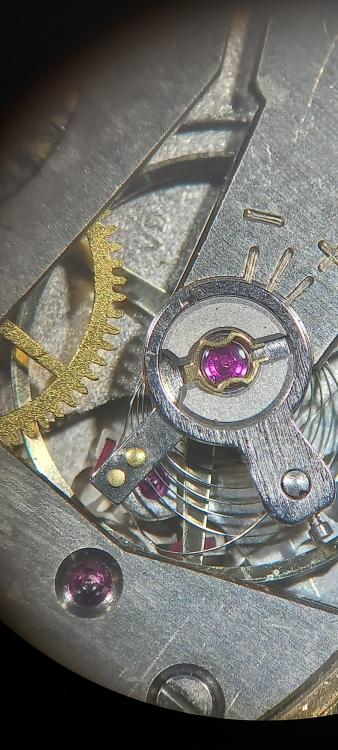
Morning UK, and hello to the rest of the world. I hope you are all well. Today i have a nice swiss piece, er watch that is . This is a Huntana ( cool name ) not running as yet but will probably be my next project. Inside is a Unitas 6325, as you will notice from the photos it has a hairspring issue ( just a bit lol ) but hopefully my superhuman skills can straighten this out. Besides this the watch has more to worry about than a dodgy mangled hairspring as you will see in the last photo lol. This is a bit beyond me and more in line with a visit to the doctor and a course of antibiotics. As a precaution during its repair i will be keeping my mouth firmly closed ( yeah yeah hard to believe " Whaatevvaaa " ). And I will not be wearing my usual # going commando # style of attire. Yes Gert and Richard you know what I'm talking about. And no Richard i wont be using 20x mag on my scope, bigboy needs wide-angle lens just to fit it all in
 2 points
 -
Abenaqui scouring paste (I'm sure there is something similar in your location) uses feldspar which has a Mohs Hardness of 6 and works quite well on glass (if you are patient) and plastic crystals. Glass has a Mohs Hardness number from 5.5 to 7, depending on the glass. Cerium oxide was listed on the chart I found at 7, which will work faster but is more expensive and less available were I am. I have used the piece of wood trick before but not on crystals (should still work). The abrasive gets embedded into the wood and continues to cut rather than getting lost somewhere in the cloth. Just make sure you average all of your polishing out across the crystal, otherwise you will see waviness through the glass. Good luck. Shane2 points
-
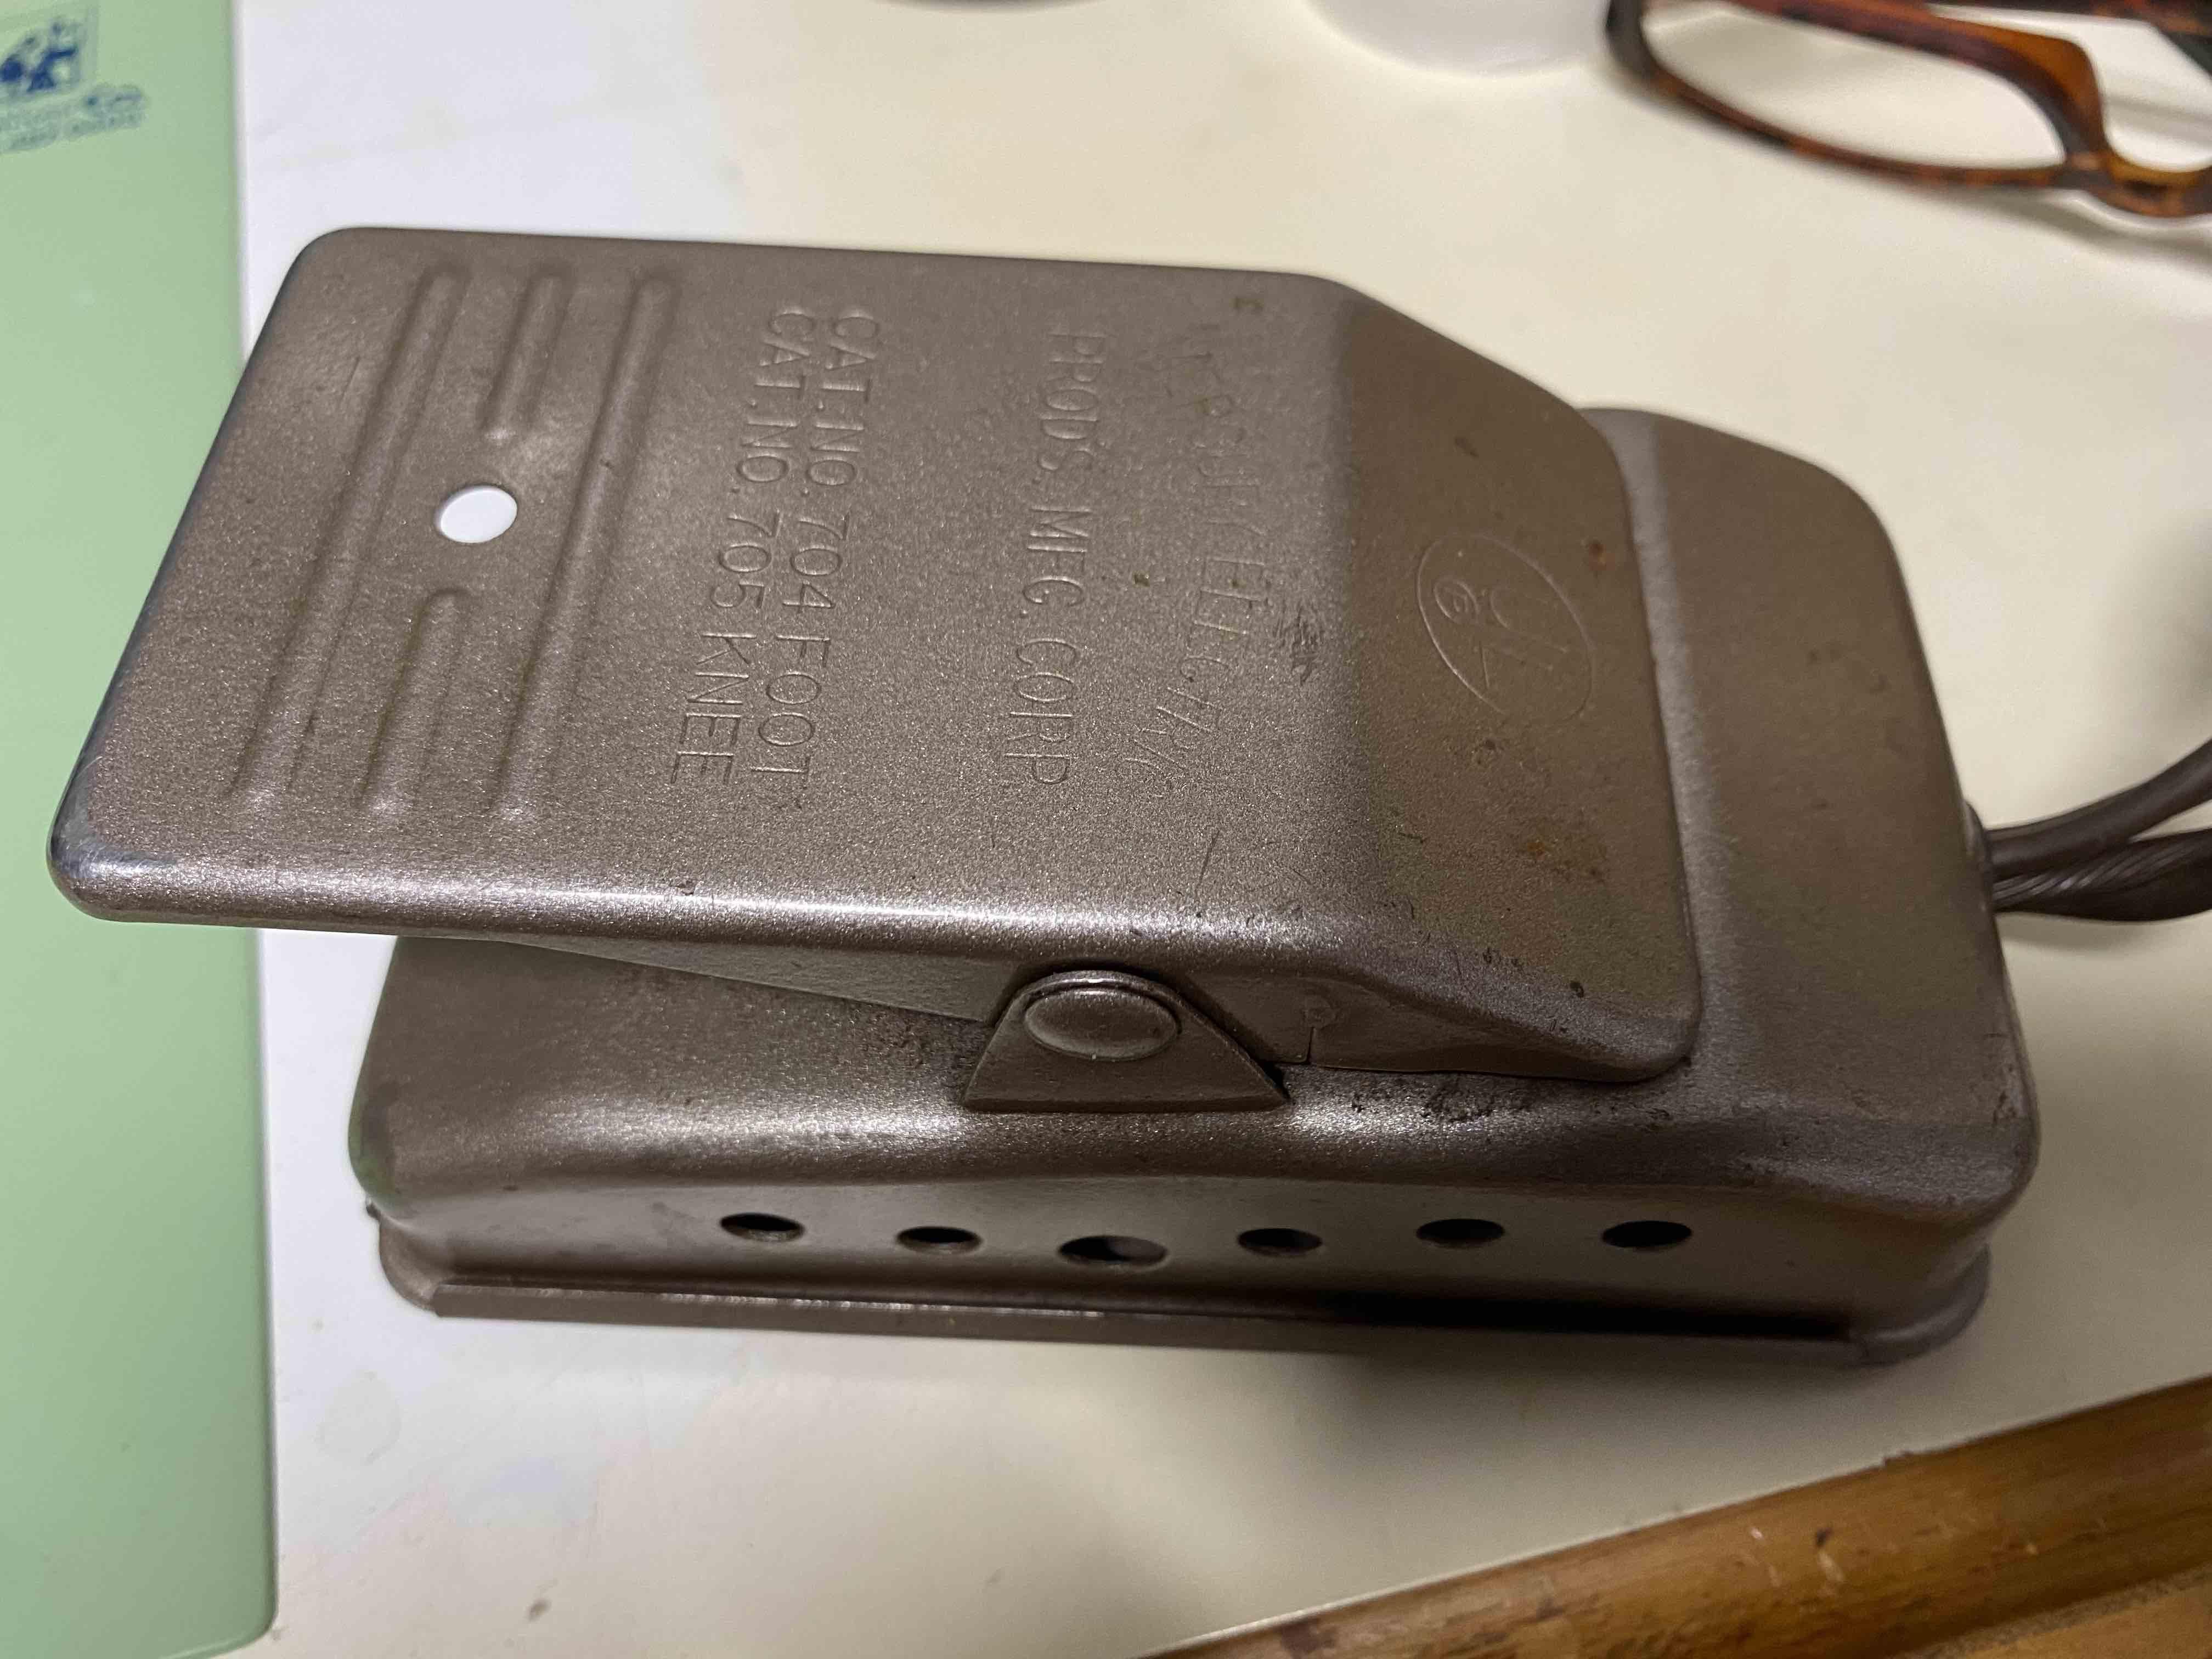
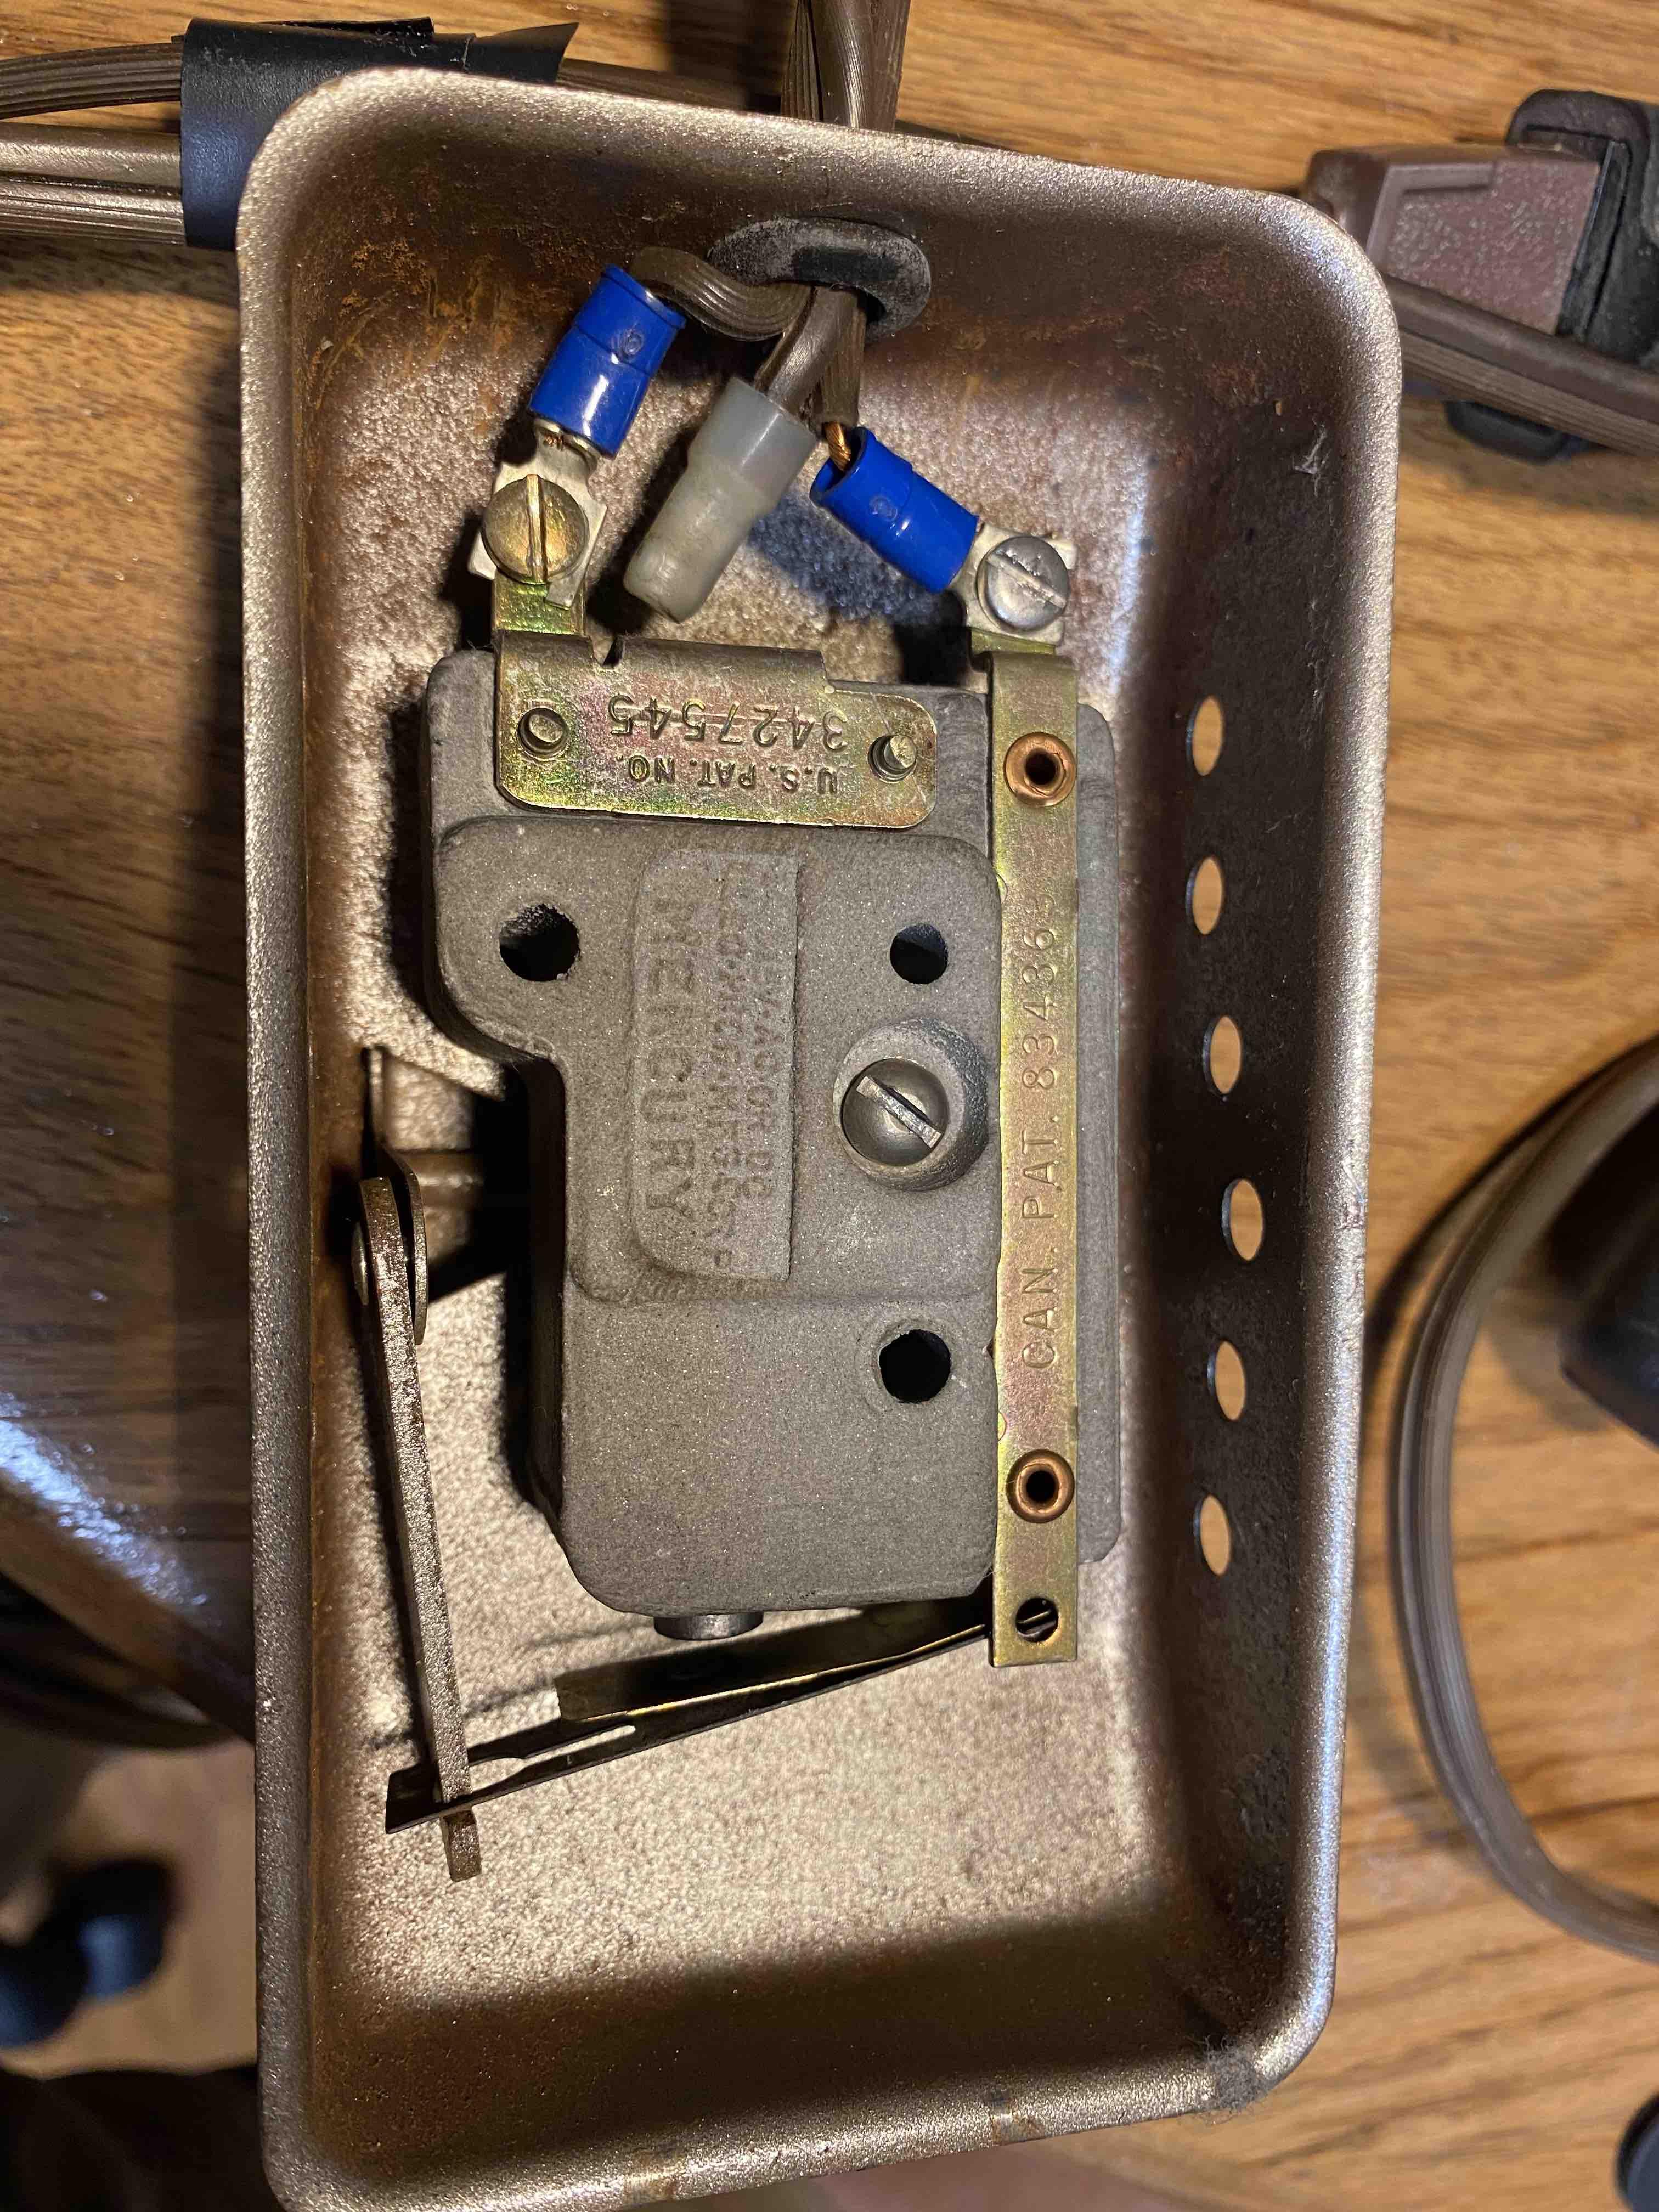
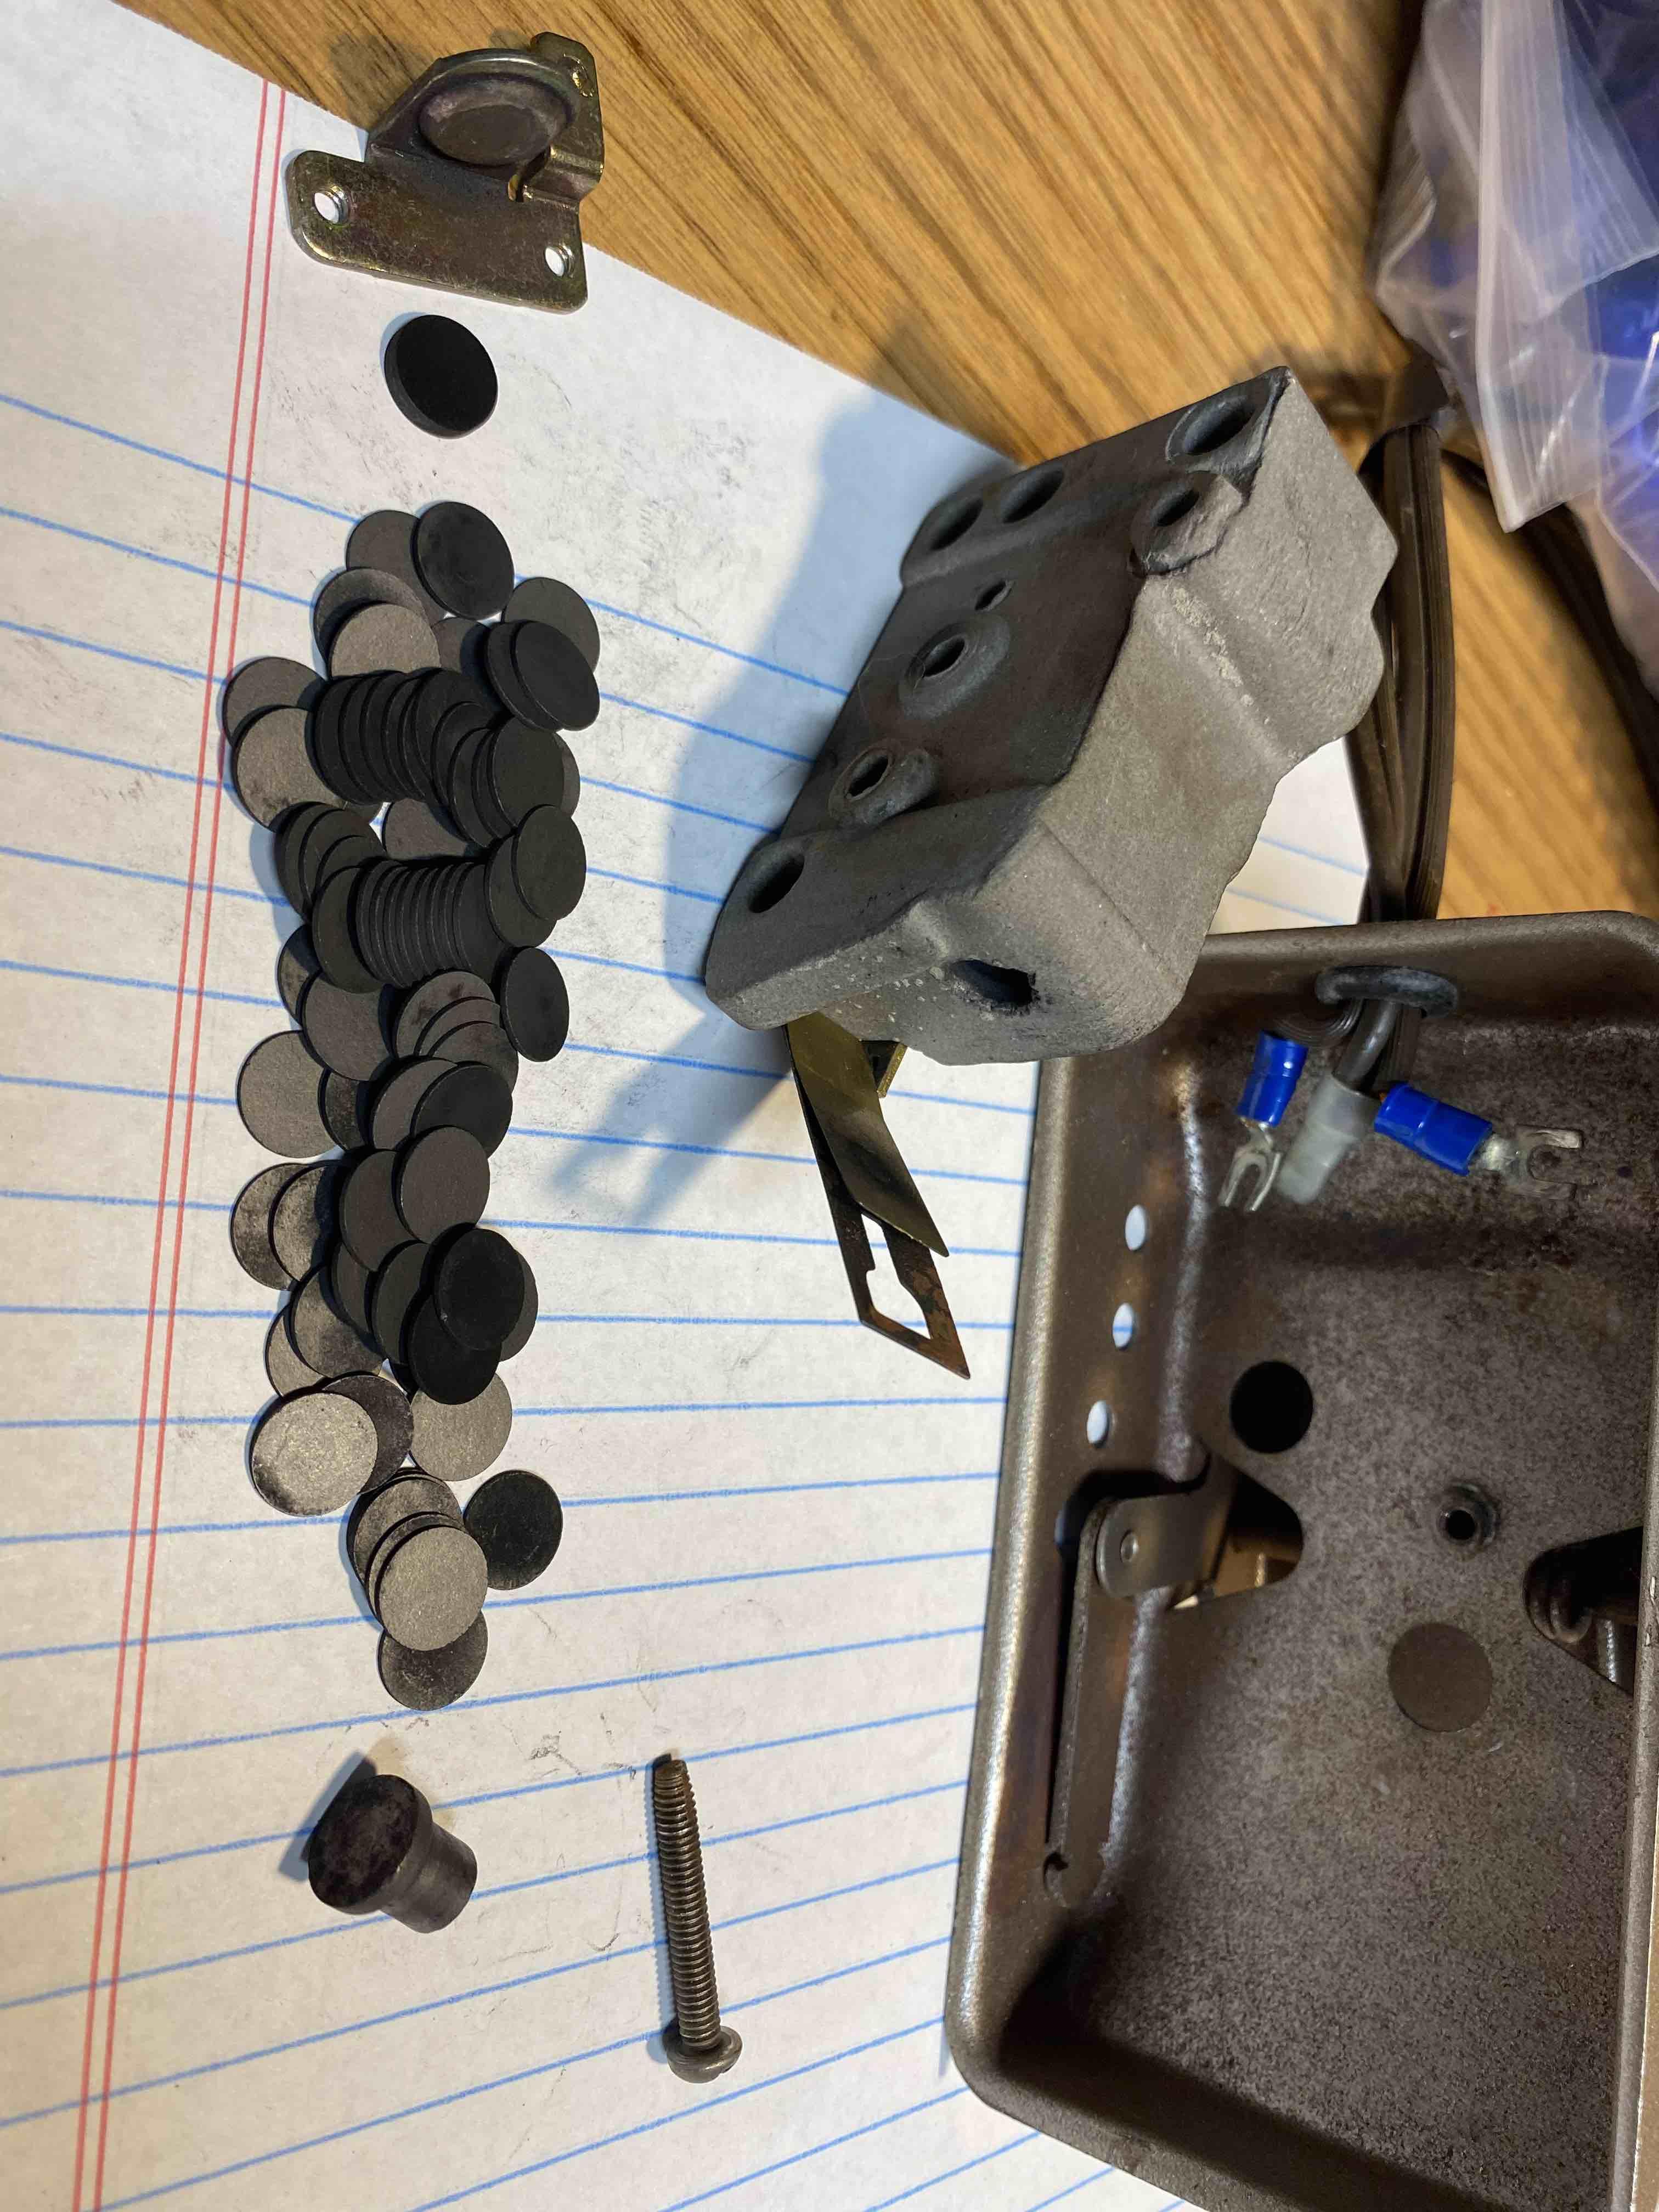
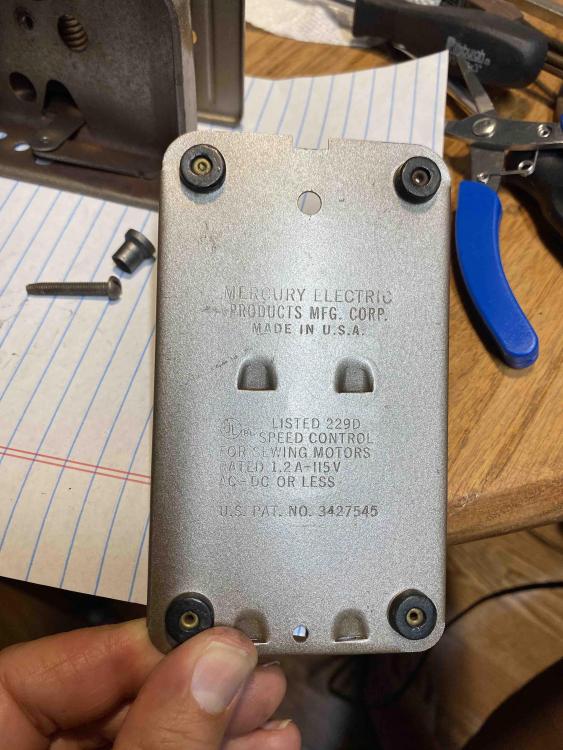
Just a quick post on another lathe maintenance item. I have a Boley 8mm watch makers lathe which has a foot pedal control to adjust the speed of the lathe. As I pressed the pedal down the speed was not consistently increasing. I had just serviced the lathe motor and lathe body, so the only thing left to look at was the pedal. Cleaning the pedal switch improved the quality of the speed control, but it was surprising to see the switch construction. Outside is pretty boring, but functional. Back plate took a bit of convincing to slide it off. There are grooves either side of it and you have to sort of pry the end of the plate over the edge of the pedal body to get past the two indented stops. The switch is much larger than expected, held in place by one screw in the middle. When you press down on the body, it causes the lever to draw in the pair of thin metal pieces which gradually make firmer contact with the contact at the bottom. It gradually squeezes the end and in so doing somehow decreases resistance causing more more current to flow. Needed to unhook the thin metal blade from the lever arm. And the surprise for me was when I took the top end of the off, all these very thin carbon wafers spilled out, along with the end piece at the bottom of the picture. The resistance went down because more pressure caused better surface contact across all of these wafers! You can see they are varying shades going from gray to black. The blacker they are the more carbon build up from current. The carbon build up reduced the flow of current. So the solution was to clean both sides of all these wafers with Electrical Contact cleaner very carefully. Too much pressure on a slightly uneven surface would cause the wafers to snap into pieces. I broke two wafers in the cleaning process so did pretty good. But in order to keep the same overall thickness of the switch I had to replace the broken wafers with a couple of washers that were the same diameter. I sanded the end contacts and the thin metal strip that touches the contact at the bottom. I dropped the bottom contact down the hole first, then carefully coaxed the wafers in after it until I filled up the gap to the other contact assembly and attached the two screws. After assembly the speed control was smooth again.

 1 point
 -
Oh then there's the other thing? The service manual should be the absolute resource but what if it's not? You bring this up because in the video he removed something and in my 214 manual that has been crossed out with a note not to remove something. It's basically the center jewel assembly for the sweep second pinion. It's because assembling it can be easier if it's in place sometimes. But there's other things in May a letter been crossed out and that was based on taking a class given by Bulova. So there is the contradiction of what the manual has versus what Bulova's instructors were teaching then of course you can see that even with the detailed manuals why the watch companies for their electric watches had to give classes to the watchmaker. As I said Bulova had a 2 1/2 day training class with asked that you had the pass at a certain percentage to get your certificates and not everyone pass the test. So yes there are skill sets you have to learn and you have to be very very careful they're not as forgiving as a mechanical watch where you can do a lot of bad things and it will still be okay and it will still run.1 point
-
Any chance you can get hexane? I’ve recently switched over to this as a rinsing agent and completely stopped using IPA. As Rich mentioned, this creates a riot on the forum, but I’ve had a bad experience with IPA and shellac (once was enough). Hexane evaporates even faster than IPA and does a better job to be honest.1 point
-
If you flip the cock with a controlled sidewards movement letting the wheel be supported by your bench the wheel will follow without too much stress for the hairspring. I‘ve seen this in videos too.1 point
-
I have one and it is not a screw back it is a front loader the 107 tool is to remove the crystal. The ring on the back just holds the special band on. I have a Tissot that is the same.1 point
-
I didn't want to comment to soon just in case. Looks all is well so congratulations from me.1 point
-
Welcome to the forum.1 point
-
Sounds a fair idea dad. I had similar thoughts but then changed my approach for removing the balance cock. Instead of tugging on the cock ( hahaha, very sorry these words just appear of their own accord lol ) i use a sharpened oiler to fit between the cock and mainplate. In fact not an oiler any more, i use acupuncture needles that i flatten and sharpen. Ease the sharpened implement in the gap and carefully twist working your way around the cock ( again the words just come out like this ). I think we all do Mike, usually when we've had a good run of repair. Your unfortunate accident just illustrates that all methods and approaches have their upsides and downsides. And that sometimes there is no right way and no wrong way that works or does not work the same in every case. For some reason this past two weeks i must have said a dozen times that all beginners need to find their own way and what works best for them and not somebody else. I think this quote came from Kalle at Chronoglide, but how true it is.1 point
-
Great info as always Andy1 point
-
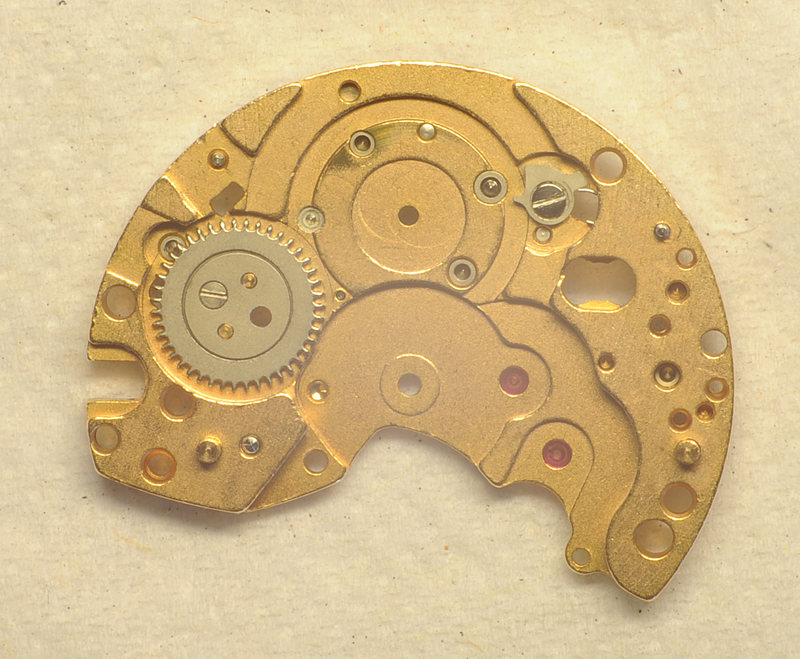
That particular jump hour is based on the EB8800, which comes in a whole bunch of different versions. Strictly speaking mine is an EB 8807. More details about that family of calibers here. http://www.ranfft.de/cgi-bin/bidfun-db.cgi?10&ranfft&&2uswk&EB_8800 There are a couple of EB 8800 teardowns on WRT. One here for example (this is an 8815 - jewelled - date version, but the basic mechanicals are the same). The EB8800 is reasonably easy to work on, though the single bridge construction is a bit fiddly. Spare parts or rather spare mechanisms are easy to find on ebay, generally cheap as chips, and most of the parts are interchangeable between versions. There are jewelled and un-jewelled versions, but all are simple pin lever mechanisms. The EB8800 does have some common failure points. For example the spring "bridge" that holds the mainspring barrel in place and the barrel itself tend to wear, resulting in a mechanism that will partially wind, then explosively unwind. Swapping out the barrel and the bridge and anything else that has been damaged in the process will probably result in a working mechanism. There are a number of other Jump Hour mechanisms. Search for jump hour or digital on -> http://www.ranfft.de/cgi-bin/bidfun-db.cgi?10&ranfft&&2uswk The use of digital displays goes way back in the history of watch making, but they became very popular around the time that the first LED, and later LCD digital watches arrived on the scene. James Bond's LED Pulsar from Live and Let Die in 1973 has a lot to answer for in that regard. This is what it looked like when I bought it in Feb 2020. Not great shape, non runner, and a bit scratched up. With a little bit of effort, a service and a clean and polish it came back to life nicely. The crystals are custom, so if that is damaged, it would be pretty difficult to replace or repair, but other than that there is nothing particularly difficult about working on them.
 1 point
 -
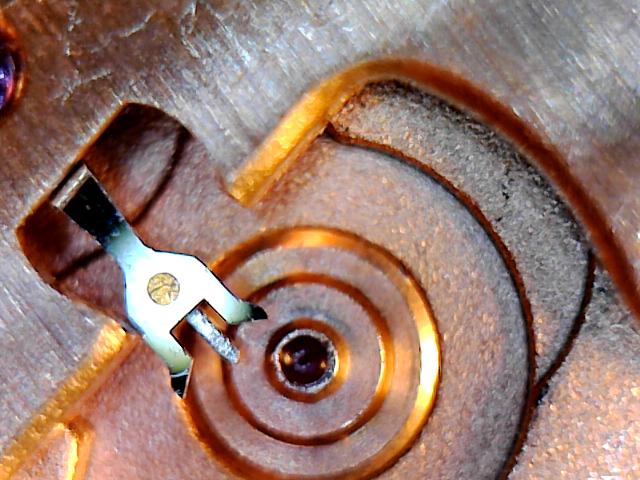
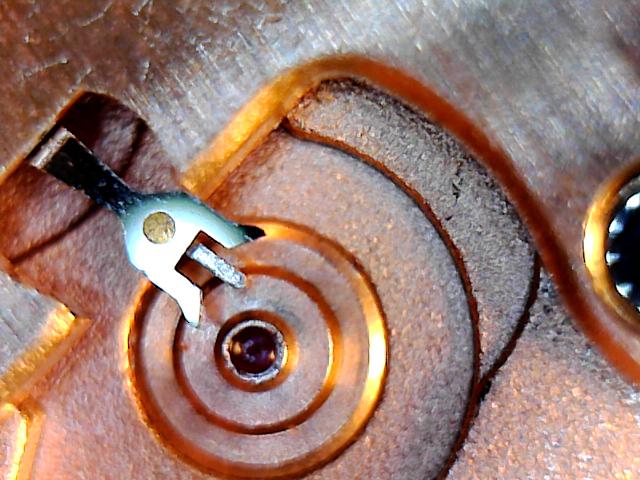
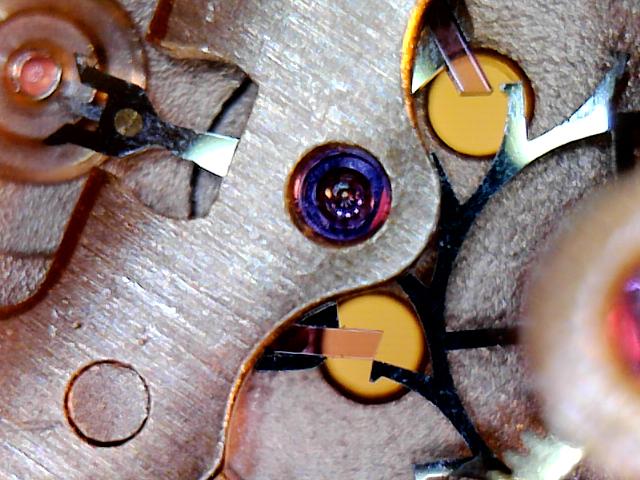
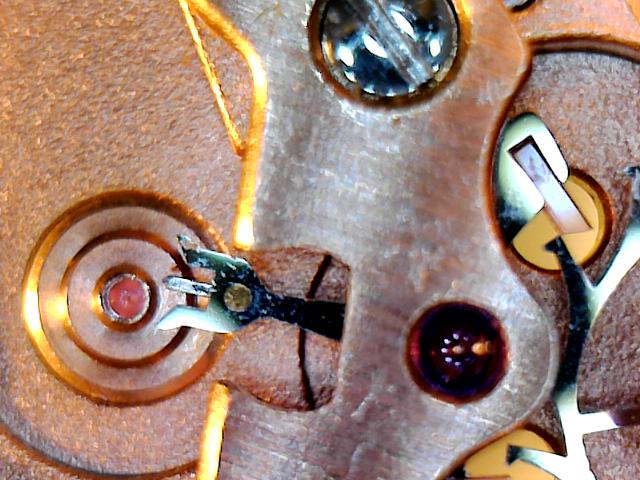
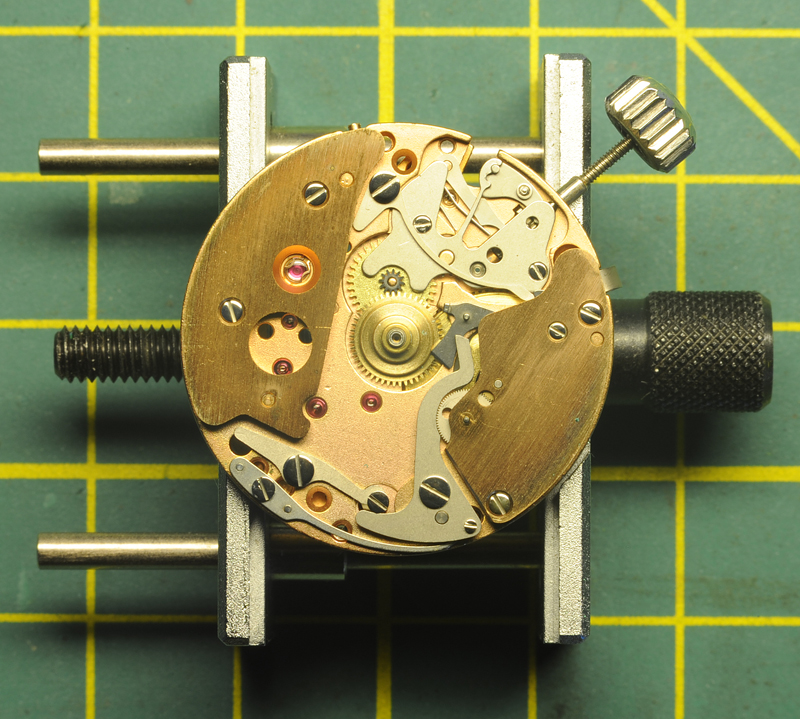
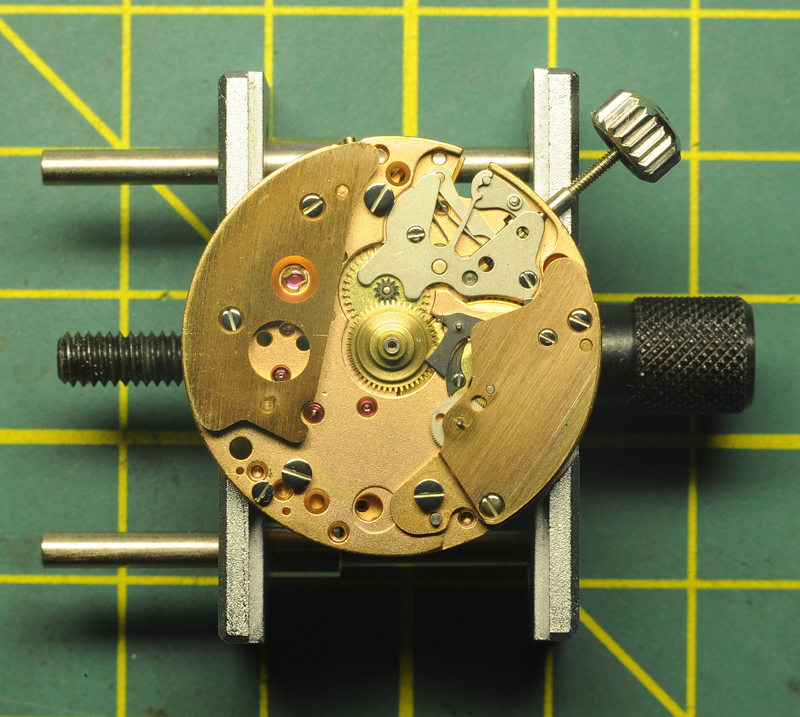
Troubleshooting by elimination; Thinking out load and even if it was for my own sake, I like to have the items I've checked documented. Also documenting my thoughts enables others to look over my shoulders to see if or where I perhaps go wrong. Next, a bonus would be if this way of troubleshooting has some educational value? The imput so far has been phenominal and I'm slowly (trying to) work down the list of "items to check" Nickelsilver and JohnR725 have given me. By the Omega 861 the banking is an integral part of the pallet-bridge (1005). First check is to see if in the past somebody has altered the banking. From what I can determine is that there are no signs that this has happened. Here the banking-surfaces, both look fine and don't have any specific marks apart from a slight shiny spot on either side where the pallet-fork is resting. With some tension on the mainspring, the pallet-fork does rest firmly against either banking sides. Referring to a document of the The Chicago School of Watchmaking ( Working Swiss Escapement.pdf) I've made some assumptions; 1) I do assume that Omega placed (designed) the center of the balance anti-shock, the pallet-fork jewel and the escape-wheel jewel in one fixed "center-line". 2) I also do assume that either banking, since being an integral part of the pallet-bridge and the banking surfaces being untouched, are situated 100% at the same distance from the center-line. This would implicate, with the pallet-fork looking in perfect shape, that the pallet fork, looking from the center-line, swings exactly the same amount to the left as to the right. 3) Assuming that the fork travels as much to the left as to the right, I therefor also do assume that the total travel (up & down) of both pallet-jewels are the same (?). If all the above assumptions are correct, in my mind both pallet jewels (if correctly placed) should have the same locking-depth measured from the top of the relevant escape-wheel teeth (?) This is clearly not the case with this movement, the pallet entry jewel sits (much) deeper than the exit-jewel. 4) Assuming that Omega made 100% sure that all parts fulfill the required dimensions, with the pallet-fork horns & the banking surfaces looking normal and the fork banking out fully agaist the banking surfaces, with the roller-table rotating around the center-line the roller-jewel should enter the horns under the (clockwise and anti-clockwise) exact the same angle and hit the respective horns at the same respective CW / ACW center-line angle. (I checked that the roller-jewel sits firmly in the table). With, as far as I can judge, the banking, horns & table-jewels checking out fine I make the assumption that (apart from the guard-pin which I haven't figured out how to check) the interaction of the roller-table jewel and the pallet-fork horns is as it should be or at least as "designed" (?) As for what I perceive the "corner clearance" (?), I managed to take some pictures (with some slight tension on the main-spring) showing the fork-angle and fork-distance from the banking surface just before the unlock. Here just before the unlock of the entry-jewel, the guard-pin already getting close to the center-line. Next picture just before the unlock of the exit-jewel. Clearly the distance from the fork to the banking is less than the distance of the fork to the banking just before the unlocking of the entry jewel. With everything else checking out so far, this shouldn't come as a surprise (?) I still have to get my head around the fact that if one jewel-depth gets changed, it effects the other ...... but that's the next step Any comments so far ....... Hope to hear ...... !! Oh, a picture of the roller-jewel .... seems fine to me (?)
 1 point
 -
It happens Mike, the enevitable happens sorry for your loss. I think Kalanag and me rest our case. I use tweezers to lift the cock and something else to make sure the staff and roller release from the movement. If the hs is looking weak and tired then a small plastic spatula under the staff to take the weight off. Two tweezers? I'm thinking risky for beginners though that dont have really good control. Moving two hands keeping the same distance at the same time. . I guess you mean one pair to hold the cock the other pair handle to support .1 point
-
I follow the procedures recommended for watch cleaning machines. The first jar is the cleaning solution, in your case Naphtha. The second and third jars contain rinsing solution, in your case Alcohol. Some machines and some recommendations are for *four* jars, but I've never felt the need to do that. Good Luck!1 point
-
The reference is inside the caseback. Replacing this crystal isn't difficult still some specific tools and knowledge are necessary, so if you have a reputable repair show I would recommend to give them the work. You can still buy the replacement crystal yourself.1 point
-
Hi Luigi and welcome to the forum, checkout Cousins UK they supply parts and assortments you may get lucky, cheers1 point
-
Hi LWS sounds like you cracked it , well done1 point
-
Feeling very stupid at the moment Heed the above warning from @Kalanag . With Incabloc I've never had problems holding the baIance+cock together. But .... I just fitted a new balance staff to an AS 984 which does not have shock protection. The blue hairspring is VERY soft, so I gently held the balance and cock together with tweezers to re-fit. No gently enough, as I broke the top pivot. I think two pairs of tweezers is the way to go, one to hold the cock and the other underneath the balance for support.1 point
-
Early Timex Marlin. Possibly late 1950s or more likely early 1960s. According to the seller "Mens Timex Watch Second hand is loose, winder is loose ? For parts." Colour me pedantic, but that looks more like "second hand has fallen off and the winder is no longer attached". Hopefully both should be easy to remedy. As to the "For parts." comment. I think I probably have plenty of parts. I'm hoping to wear this one. If not I guess it will be 0.99p worth of parts.
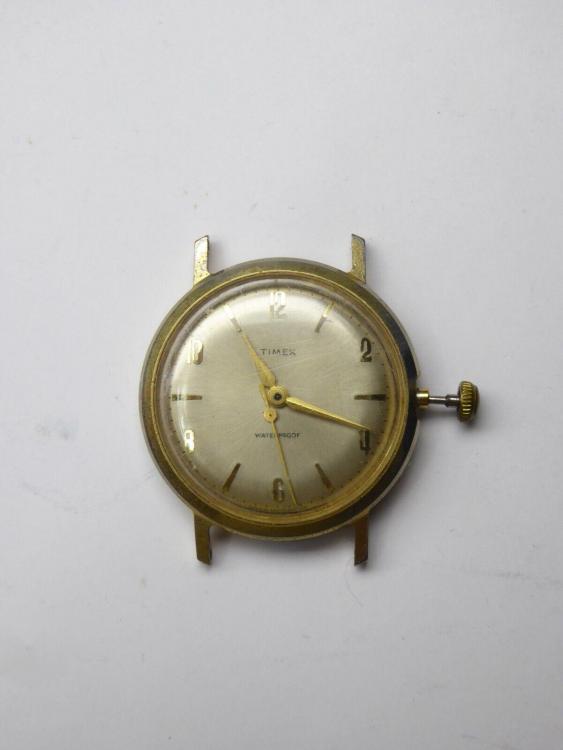 1 point
 -
Hiya Colin. Dadistic is just meaning 2 sets of rinses. The 1st rinse gets contaminated from the cleaned part with residue, the second rinse improves the overall clean. Not everyone goes for the two, but eventually the 1st rinse jar will become too contaminated to be effective hence two rinse jars. At that point the 2nd rinse jar becomes the 1st rinse jar and a new 2nd rinse jar is started. Then some filter the 1st rinse jar and so on and so forth.1 point
-
I don't think I'll let that bother me. I'm enjoying my retirement and have been for many years.1 point
-
You can get nickel and zinc electrodes from AliExpress. SG$ 6.33 90%OFF | Pure Nickel 99.99% Plate Electrode 0.8mm X 25mm X 150mm Sacrificial Anode Plating Sheet https://a.aliexpress.com/_mqEn9Si SG$ 4.53 40%OFF | 1mm 2mm 3mm thick width 10mm length 100mm 5pcs/lot Zinc Sheet Plate Pure Metal Zinc Plate Foil for Science Lab Accessories https://a.aliexpress.com/_mrJB0kw1 point
-
Yes, you're pretty much going to need a let-down key to do the job safely. I suppose you could pull the sleeve and stem from the case pendant and use the crown/stem combo, but it's a bit tricky and you might end up springing the sleeve that threads into the pendant. And you'd be messing with the important depth of it as well. Forget I mentioned it. If you look on da Bay, you might find a K&D let-down key that has one bar on the handle, which is the largest one. That will be the size you'd need for an 18s Waltham like an 1883 model, regardless of the grade. BTW, a serial number would be helpful to establish the likely grade. Images work as well. Good luck.1 point
-
Please post good pictures of all aspects of the problem to help others help you. That is necessary with most repair questions.1 point
-
The finger adjustment tools can be made with sewing needles. I think there is a video on YouTube where there is a mention sbout making these tools. I find that it's easier to adjust the fingers nearer to the fixed end. It requires good lighting, a microscope, steady hands and nerves of steel.1 point
-
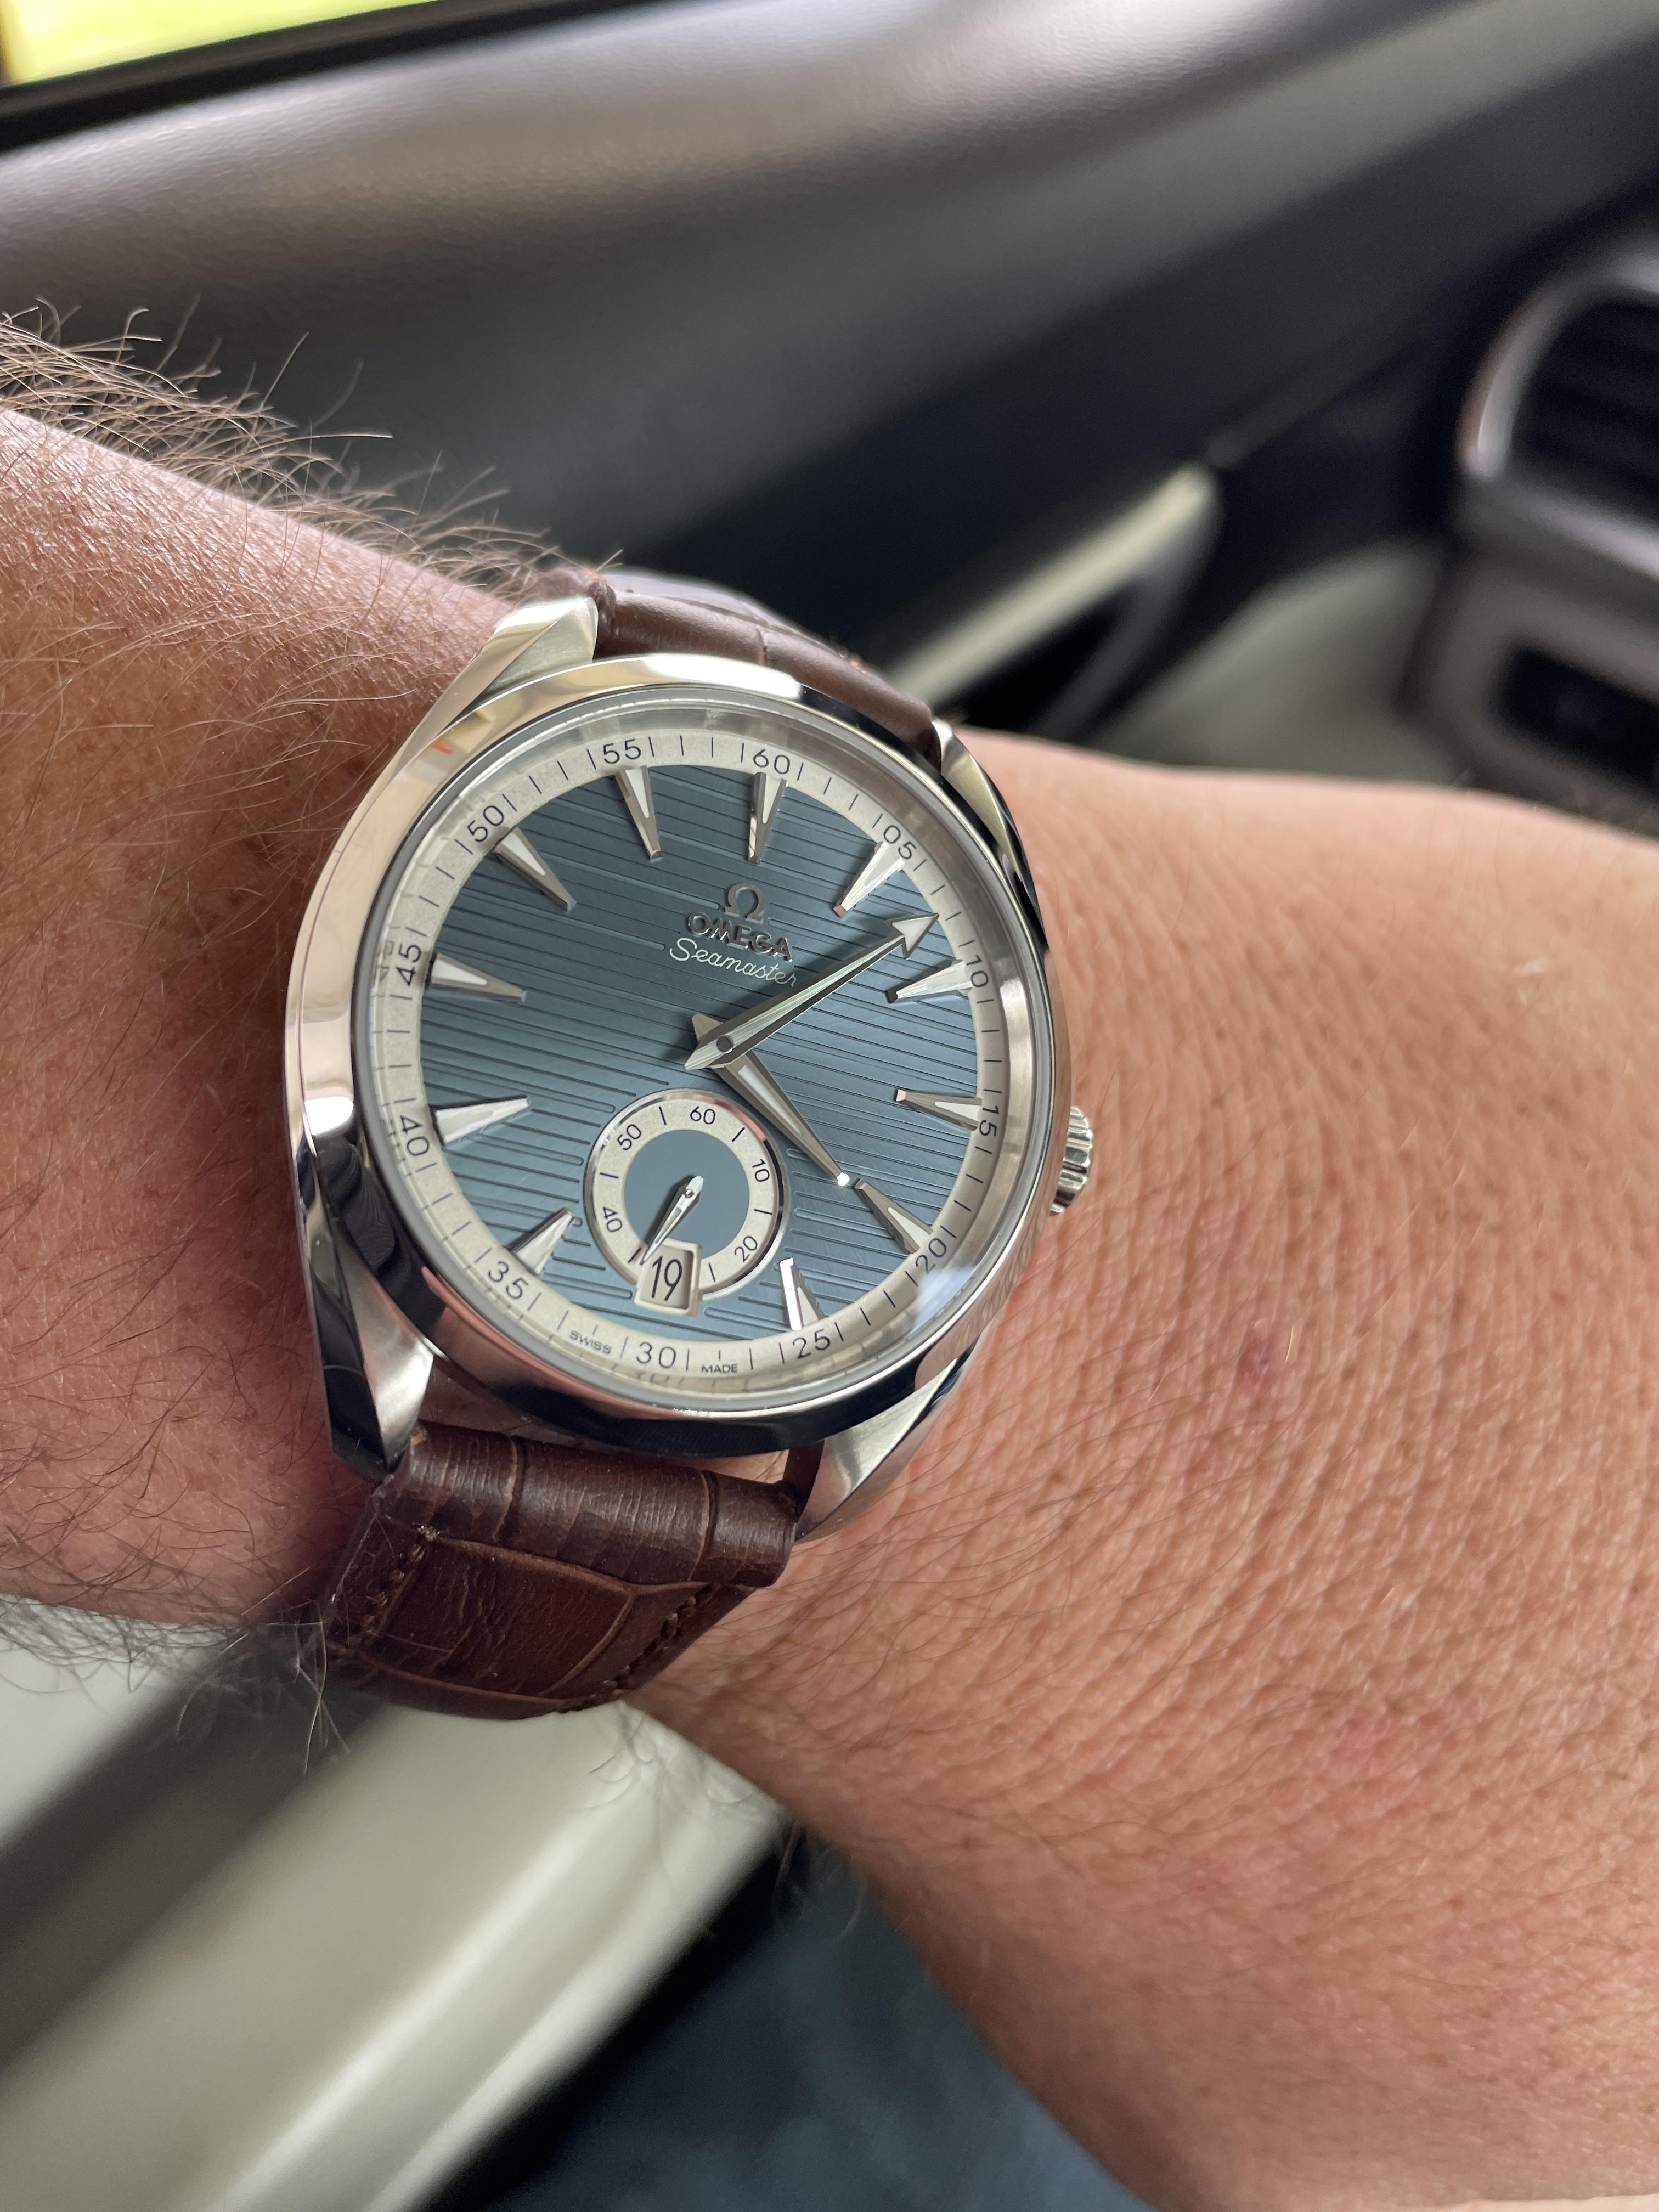
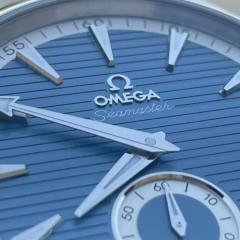
Wearing my Aqua Terra. It hasn't been getting much attention as of late so I decided let it see some sunshine today. The pic is older, but it is the watch I'm wearing today. Every time I try to take a new photo on my phone it shuts the app off, so I'm forced to use an older picture.
 1 point
 -
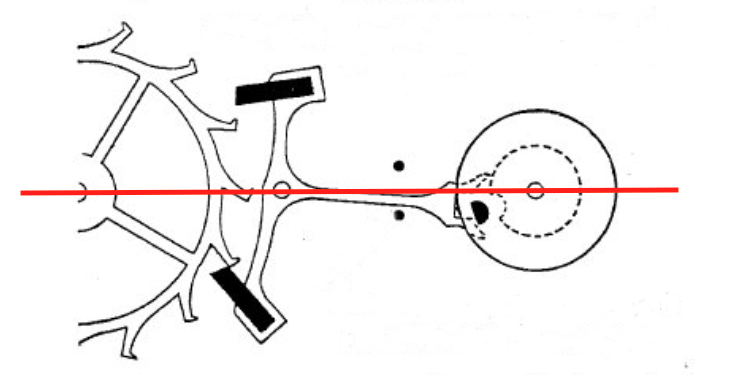
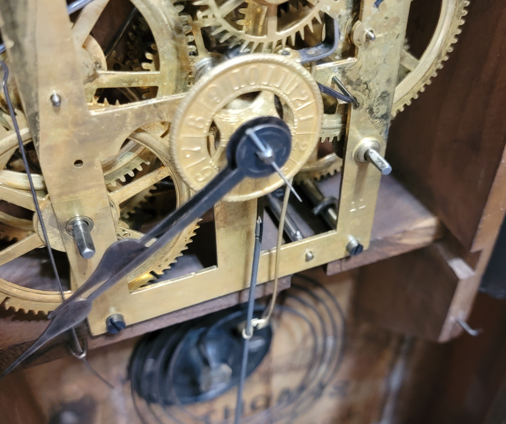
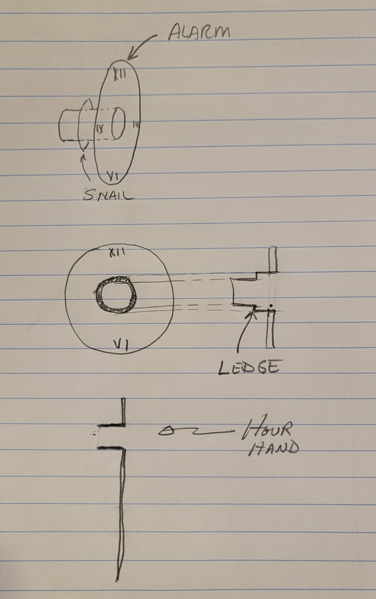
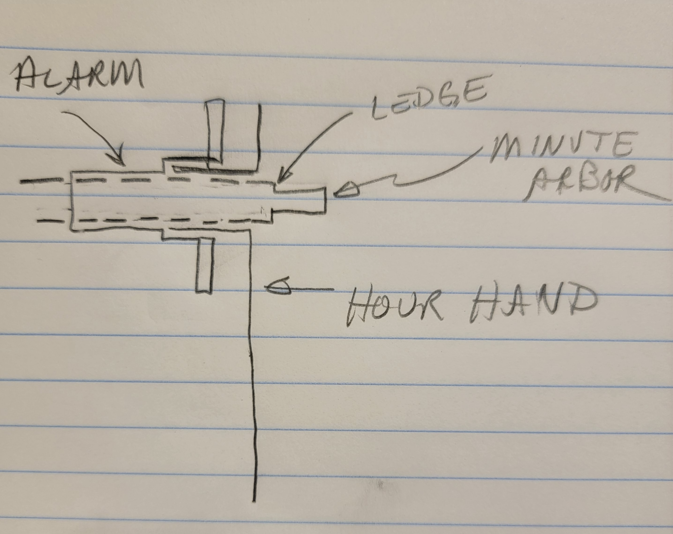
Very interesting problem with this clock. It was running without dial and hands and then when I installed the hands, it quit. I took them off and it ran...put them on and it quit. I removed the movement and inspected everything very carefully. Some play in the great wheel, but nothing serious IMHO. I think I have figured it out. The alarm snail sits on the hour arbor and presses up to the plate. The hour wheel also attaches to the same arbor, but the alarm snail blocks the hand so that it can only push on so far. This leaves almost no distance between the plane of the hour hand and the ledge of the minute arbor, so when the hand is mounted with a washer, the pressure from the washer against the minute hand rubs against the hour hand and that is the friction that is stopping the clock. The solution that seems to be working is I put the washer on BEFORE I put the minute hand on. The washer is concave away from the hour hand and is enough to avoid any contact...thus no friction. These drawings are intended to support the language above.
 1 point
 -
I also use autosol. It was mentioned in a de carle book. I Have tried other things as well, bicarbonate powder not as effective and also eucryl toothpowder which does actually work ok. But the Autosol is by far the best and is very comparable to polywatch, in fact i couldnt tell the difference. I start with 600 grade wet and dry depending on how deep the scratches then 200 grit increments up to 2000 and then finish with Autosol. A crystal generally takes about 20 mins to half an hour depending how bad the scratches.1 point
-
If that is a glass crystal, then the crystal is probably "etched". A sticker or or something else that was slightly acidic was sitting against it for a long time, perhaps? The way to get rid of that on a glass crystal is to polish with cerium oxide, I've seen a suggestion of using a piece of dowel rod to hold the cerium oxide paste (at the end). Supposedly makes it easier to handle than using a cloth.1 point
-
I use Abenaqui scouring paste (for kitchen cleaning) on a papertowel. If it's a deep imperfection, a bit of very fine wet or dry paper speeds it all up. Shane1 point
-
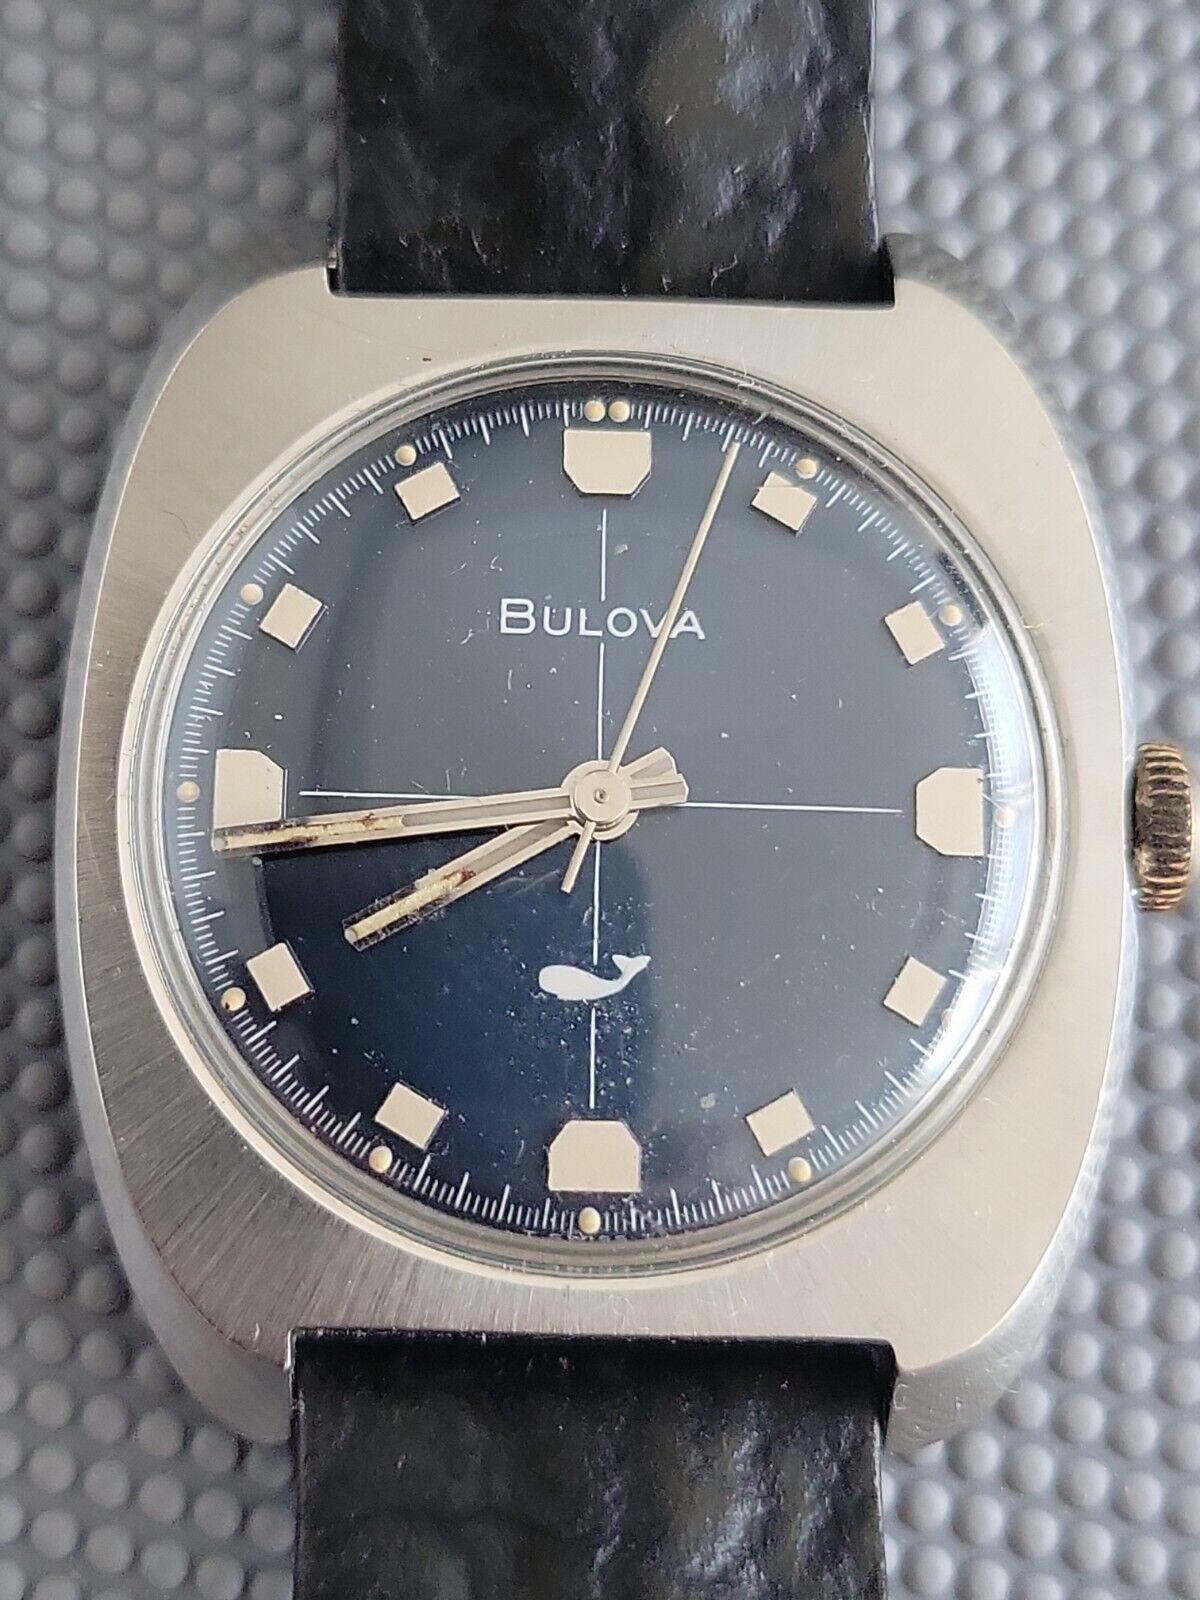
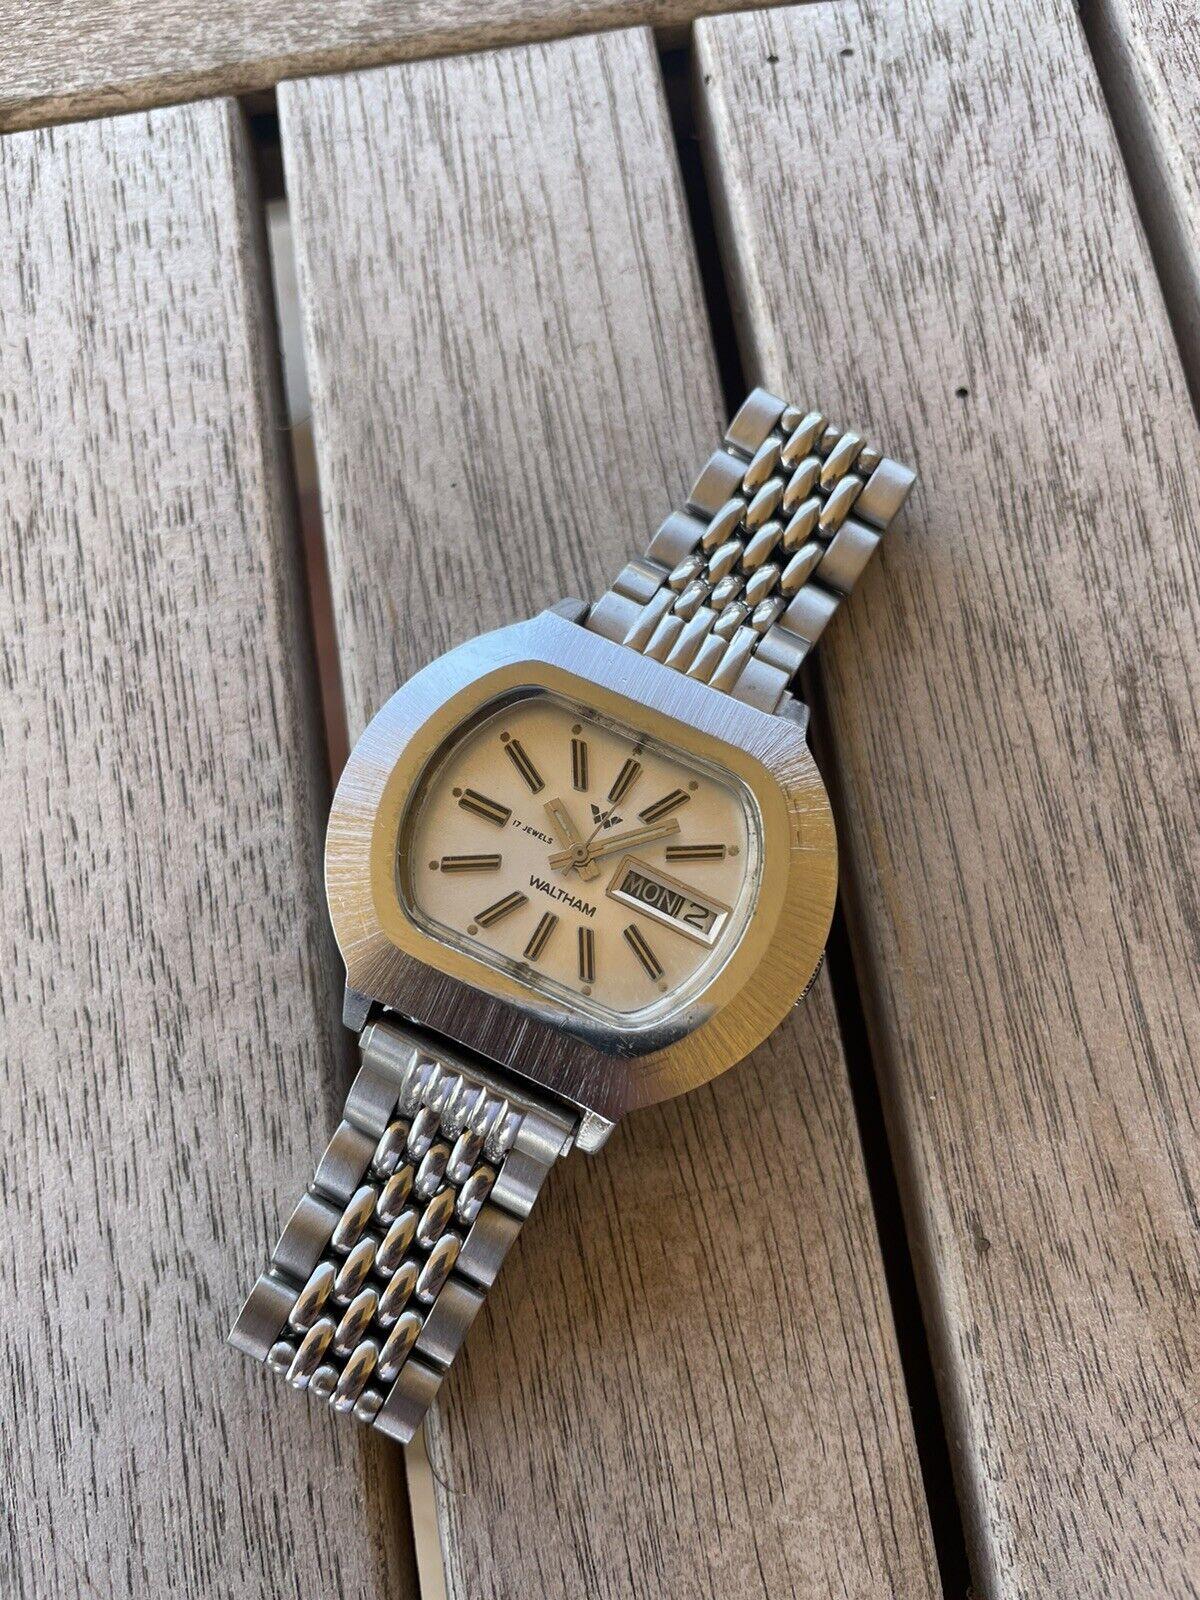
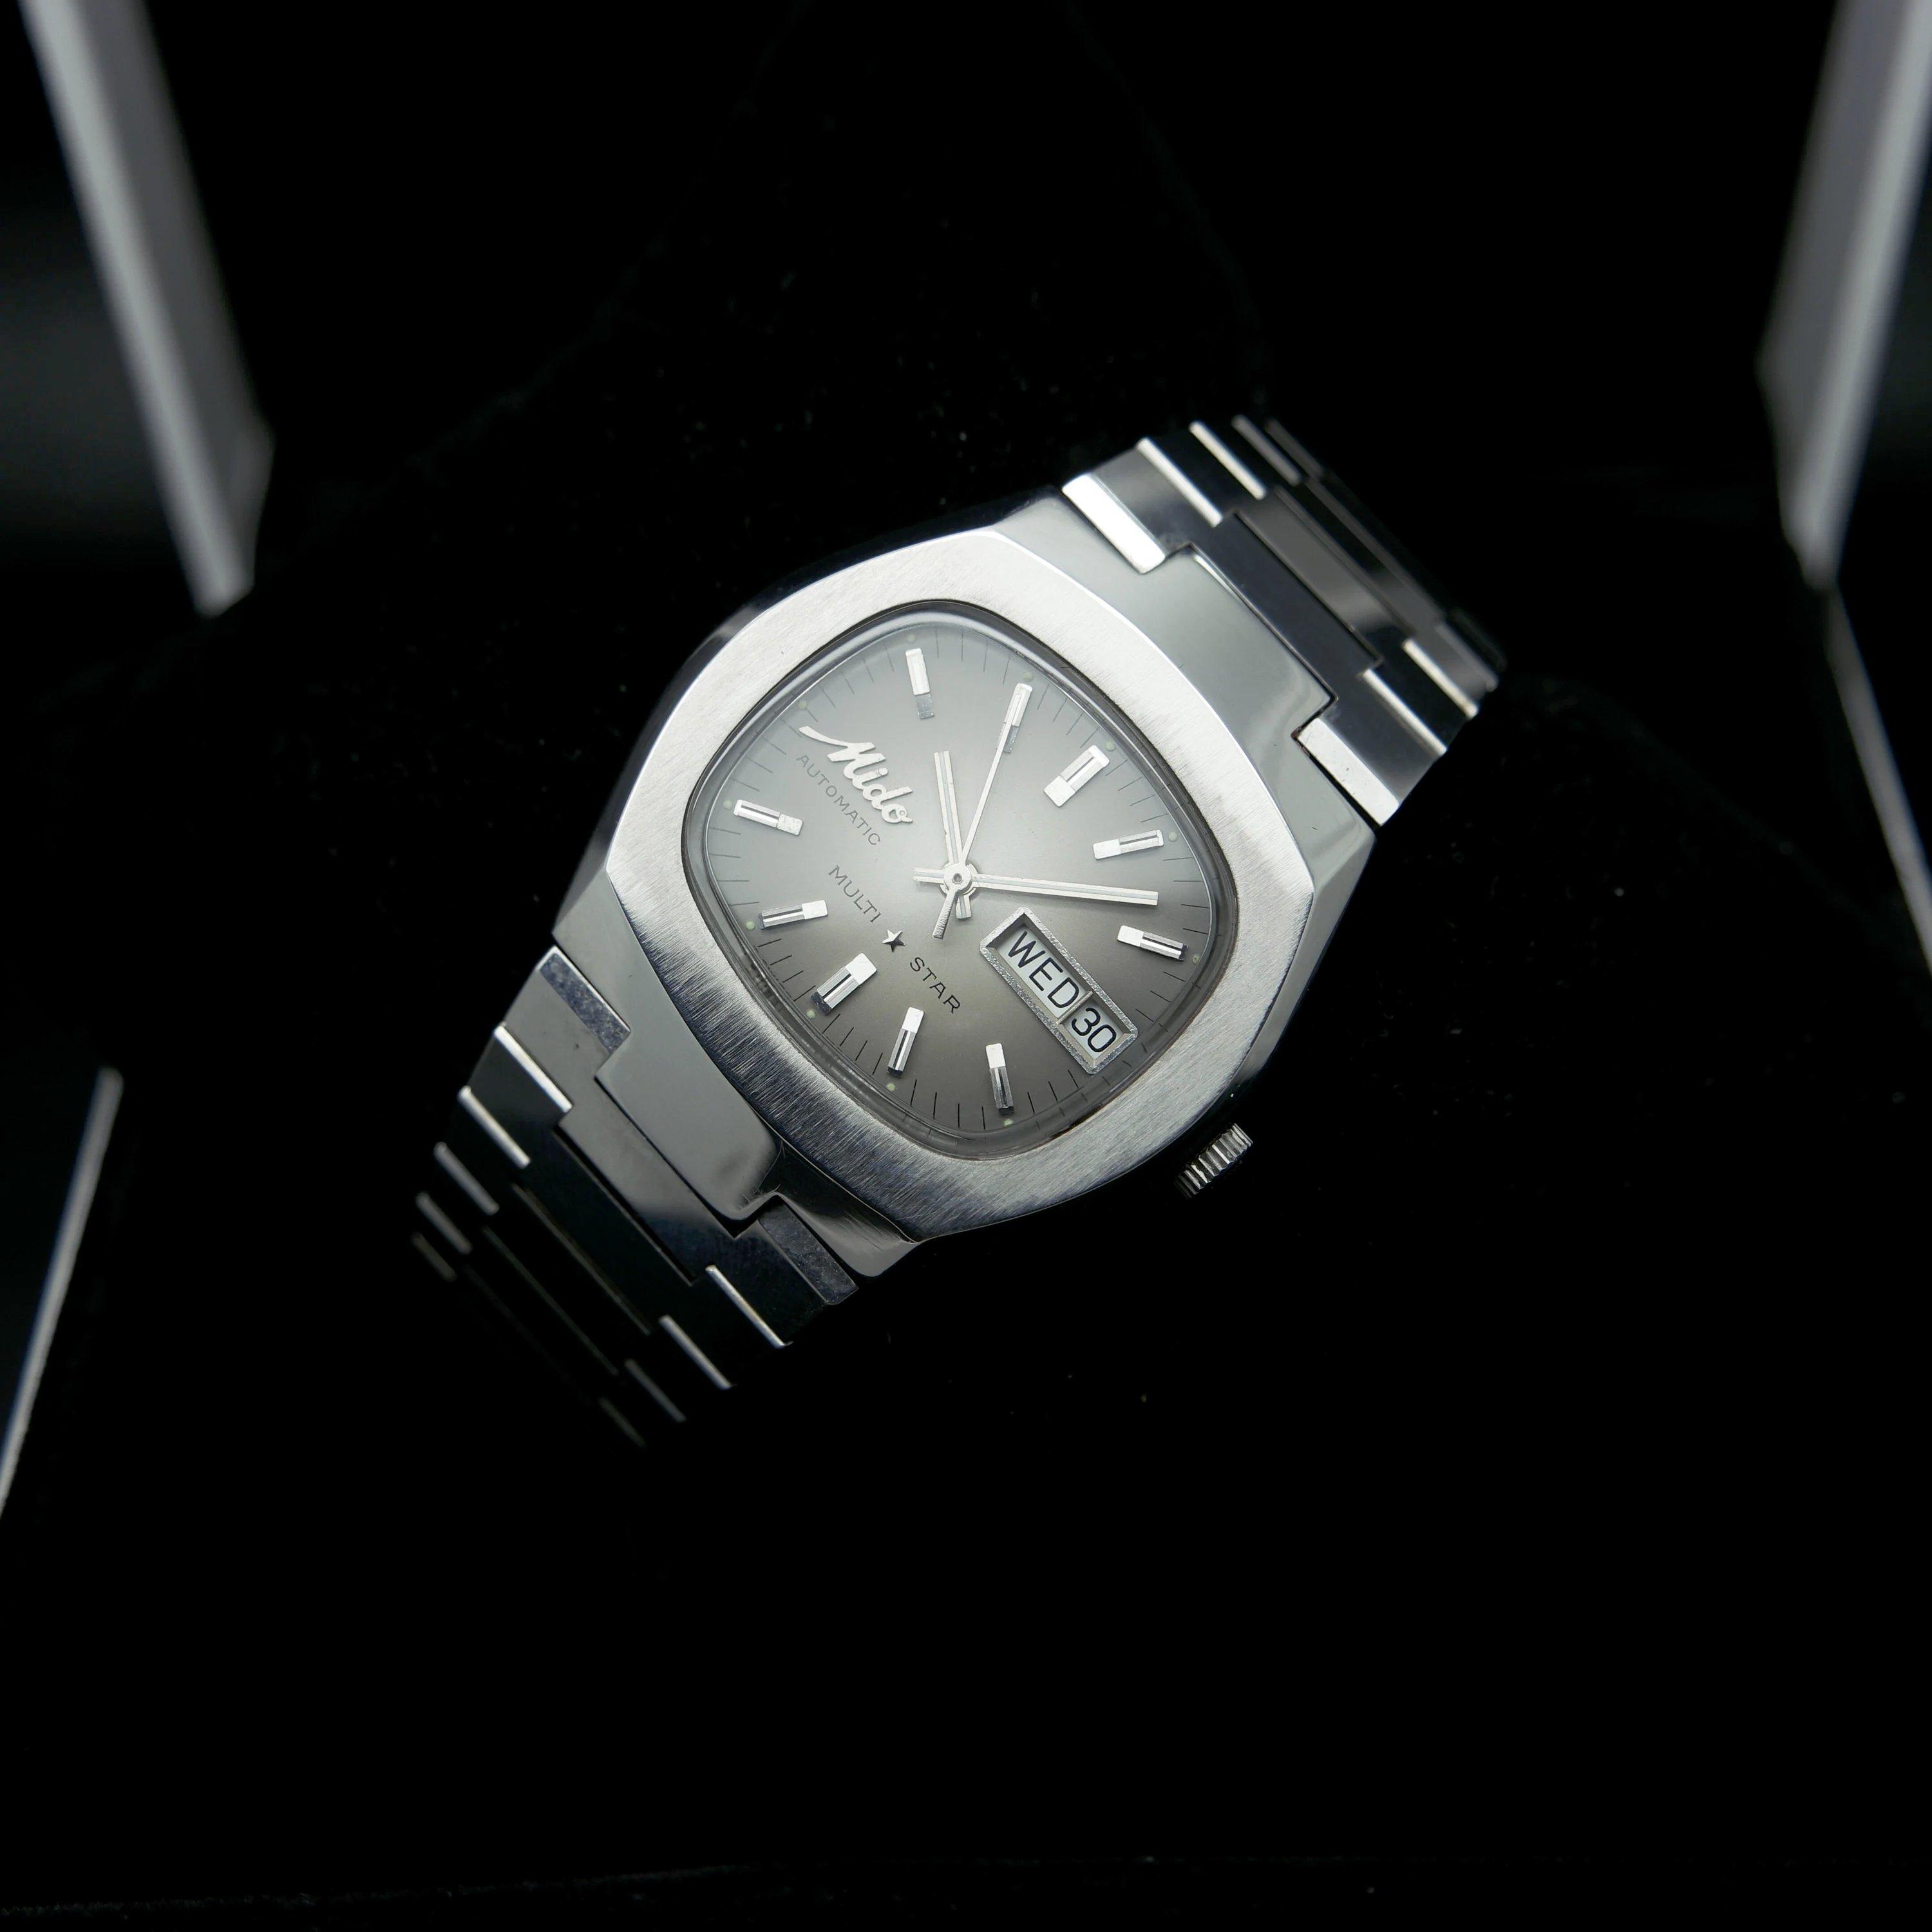
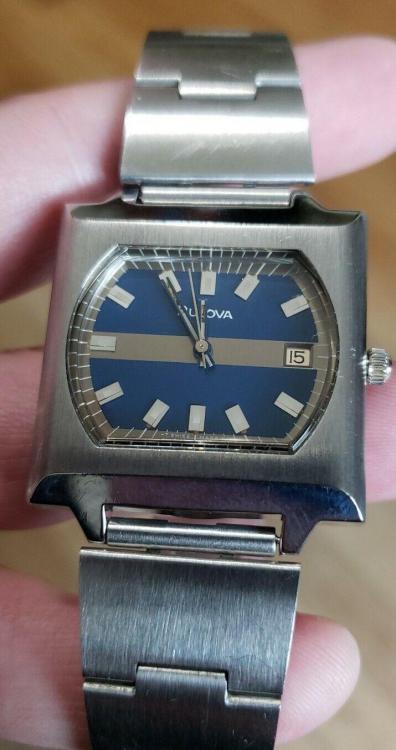
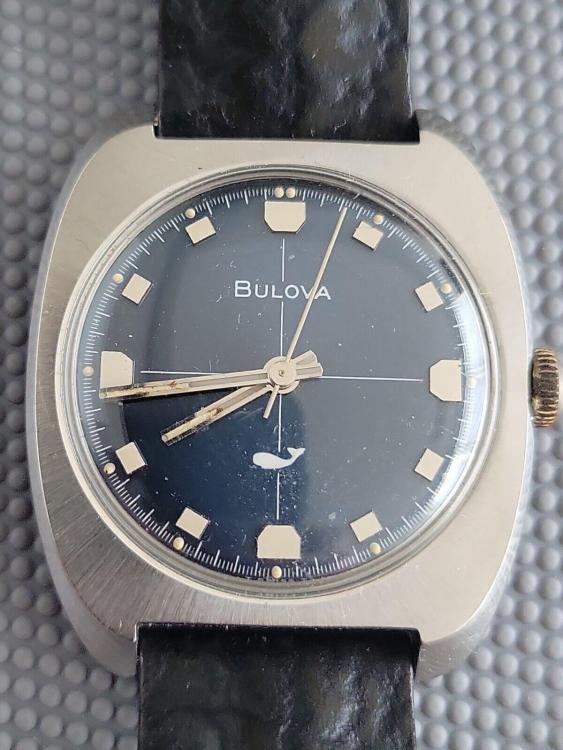
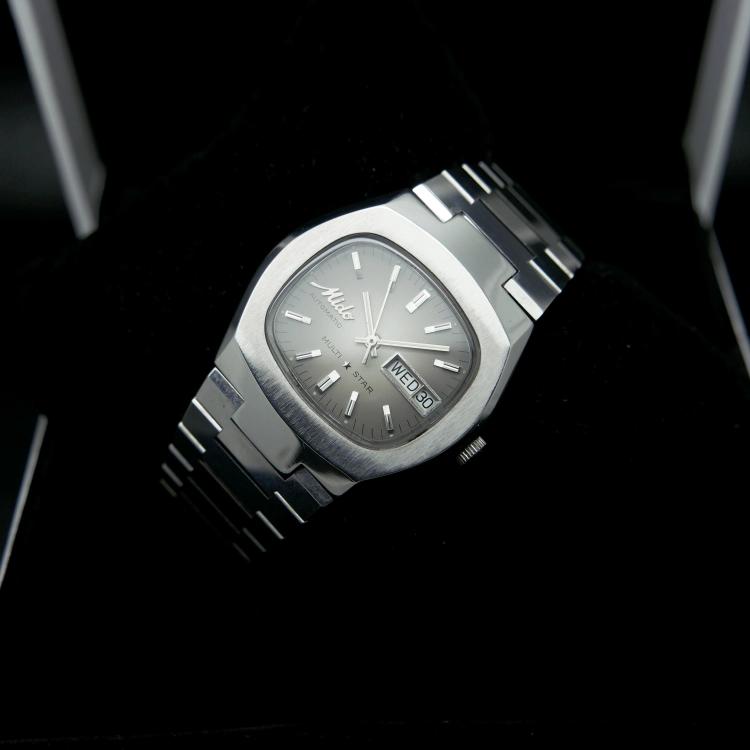
Too many in the latest haul! Sometimes the stars just align that way at the expense of the wallet. Got these 4 coming, and I have a NOS dial/hands for the 2nd watch, a Bulova Sea King 'FL', which it looks like it will need. That first Bulvoa with original band is straight out of the 1970's, chunky and bold, something I could see either Starsky or Hutch wearing :). I have a soft spot for Mido's and this one looks NOS, can't wait to give it wear on the wrist. The Waltham was so clean looking and fairly inexpensive that I couldn't pass it up:

 1 point
 -
Hi Have a look here on Ranfft http://www.ranfft.de/cgi-bin/bidfun-db.cgi?10&ranfft&&2uswk&Venus_188 it notes that it change to the Valjoux 7730 so with that in mind I have attached some information for you and a bit extra on the 7733.34.etc which may be of help. cheers Venus 188.pdf Valjoux 7730.pdf Valjoux 7733, 7734, 7736 Pages 6-10.pdf Valjoux 7733, 7734, 7736 Pages 1-5.pdf Valjoux 7733, 7734, 7736 Pages 11-15.pdf1 point
-
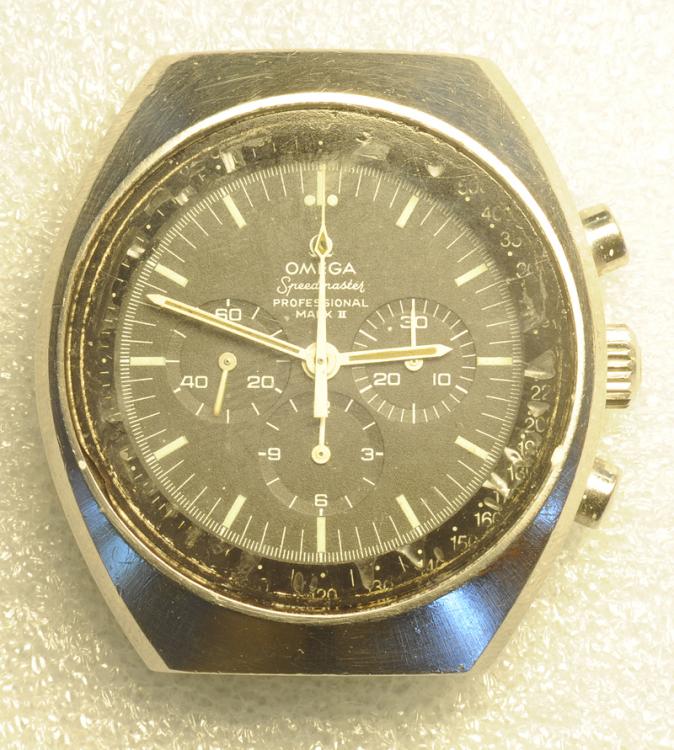
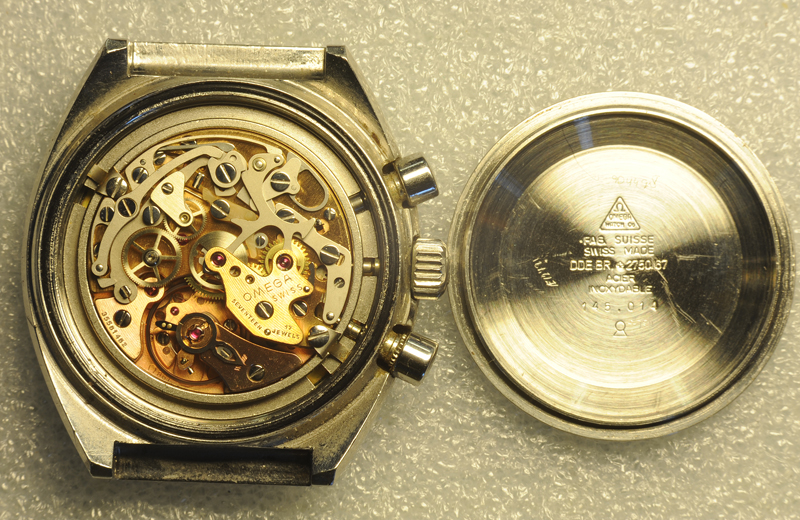
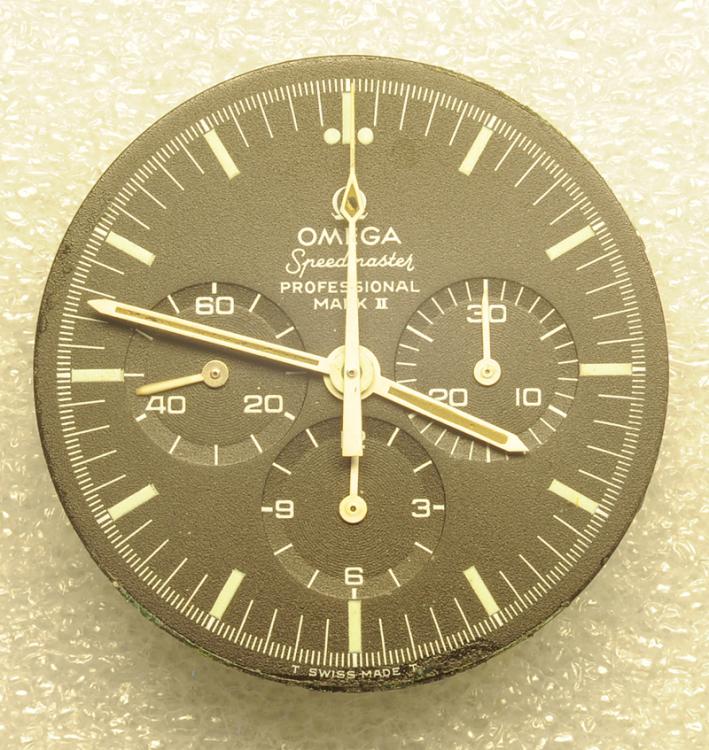
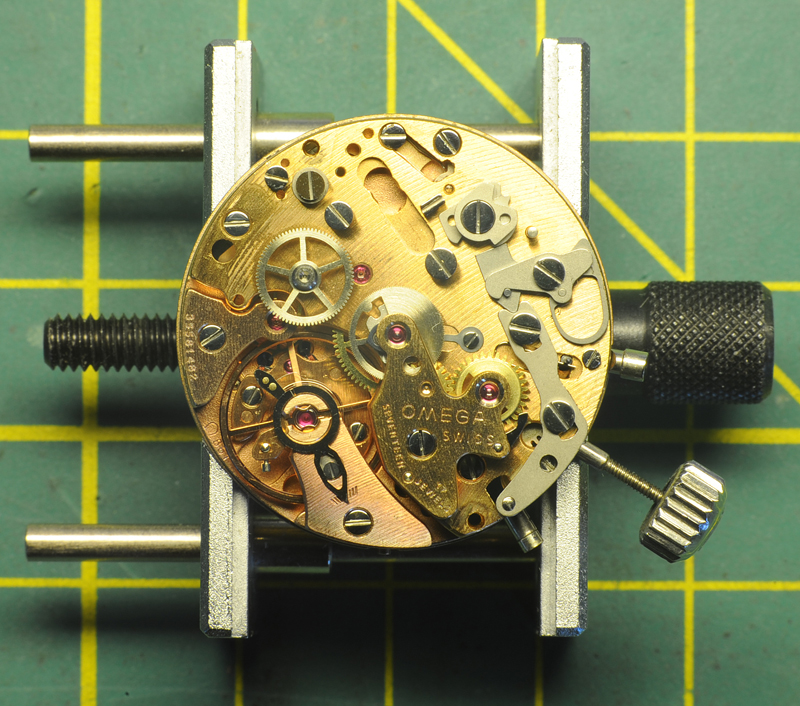
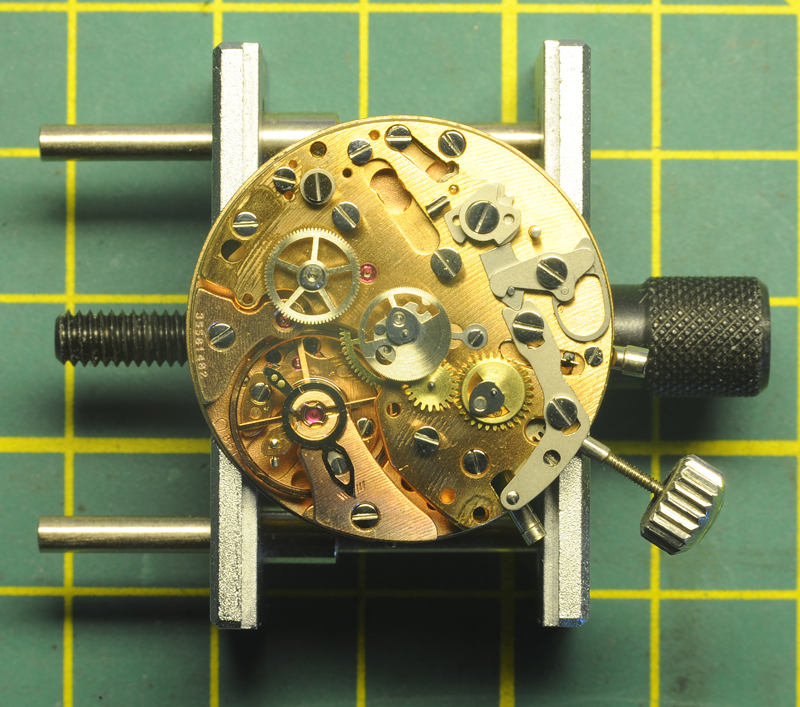
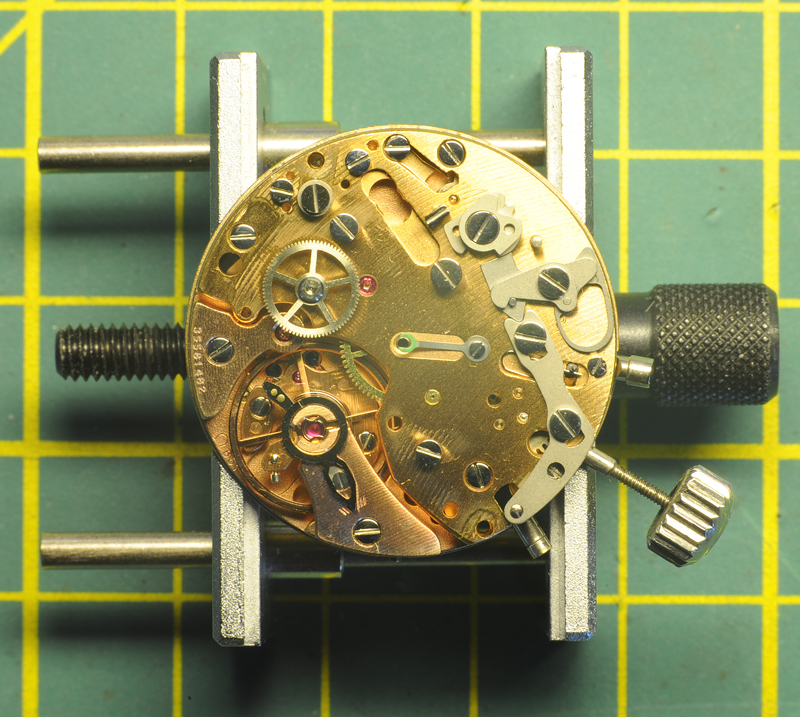
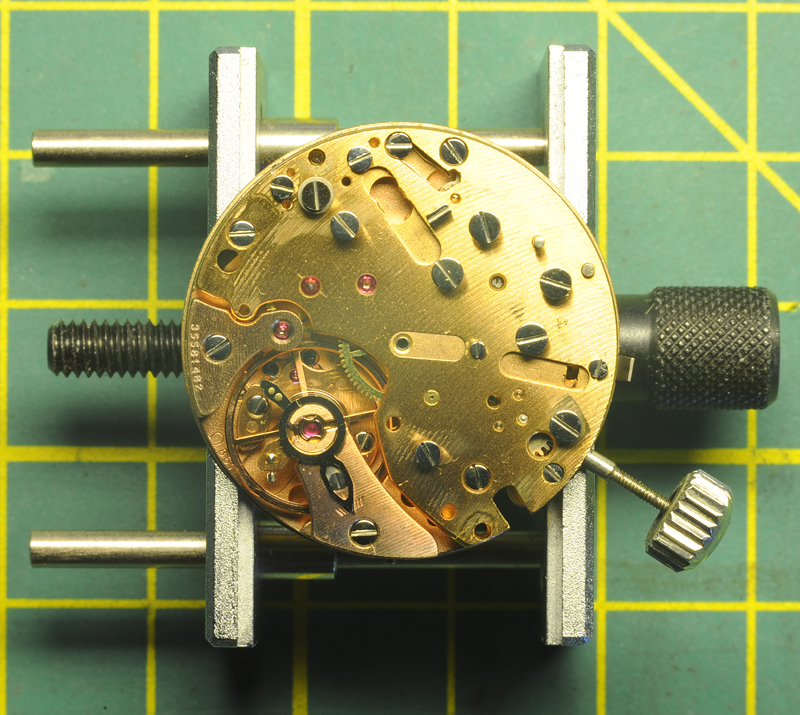
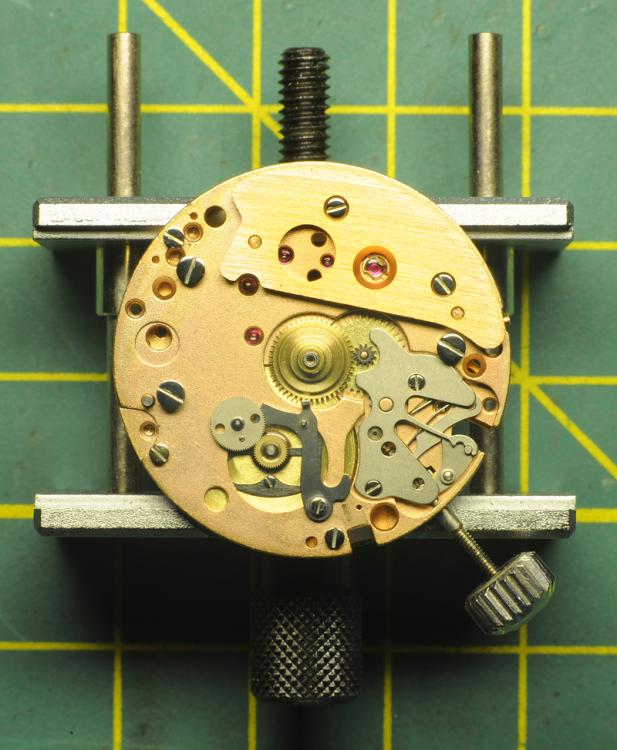
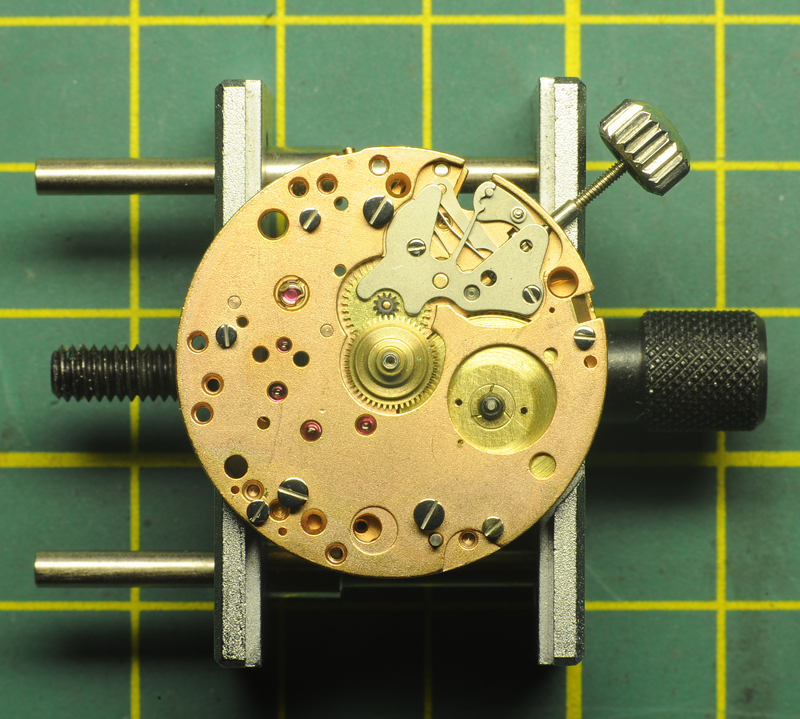
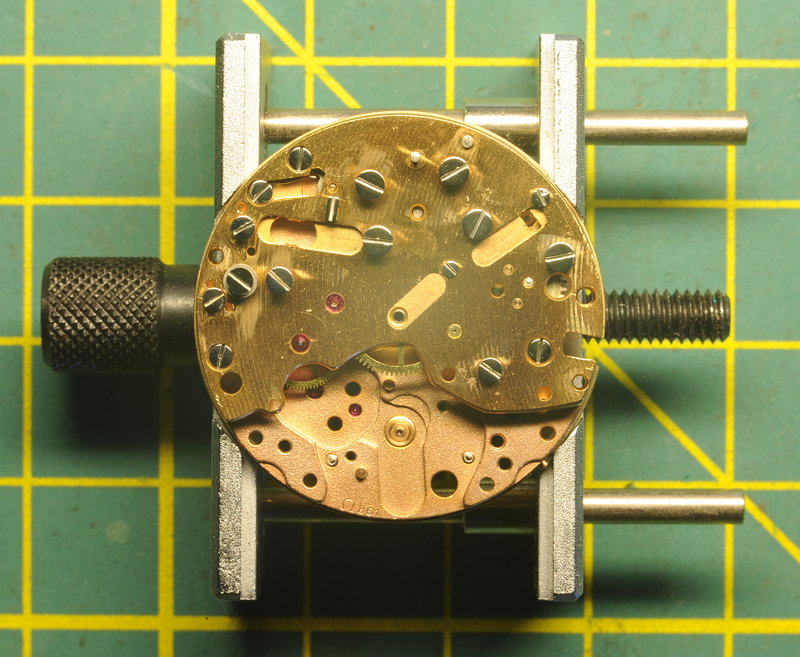
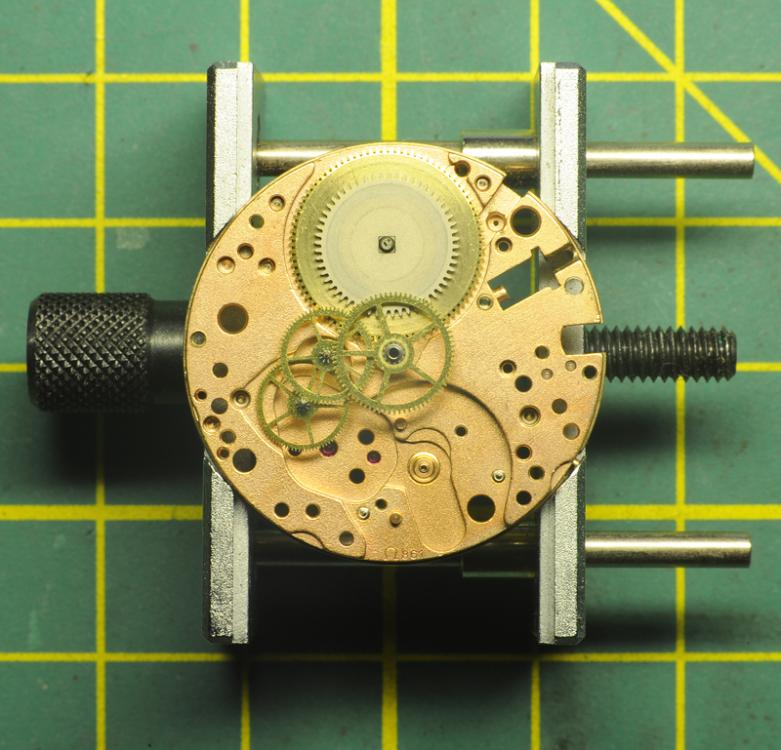
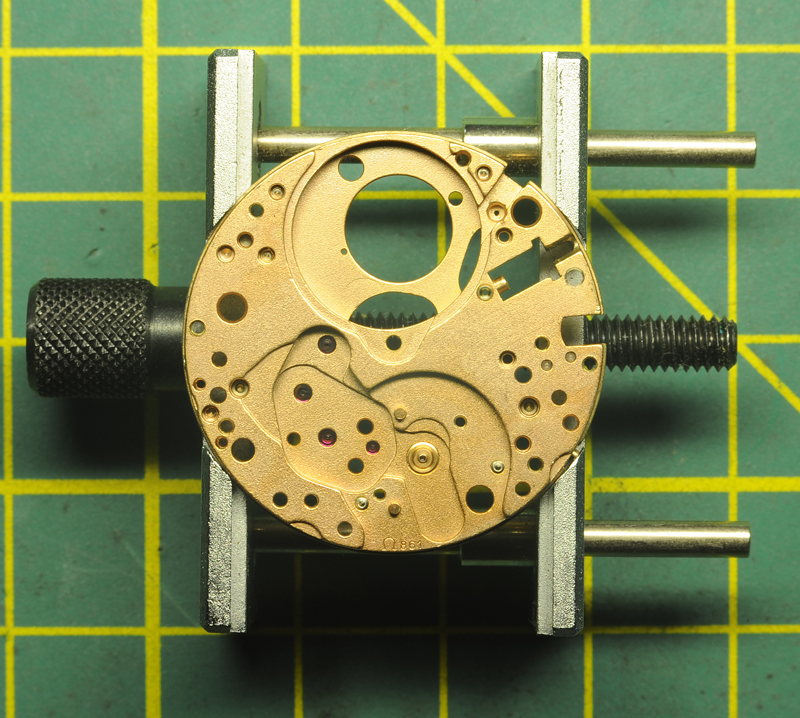
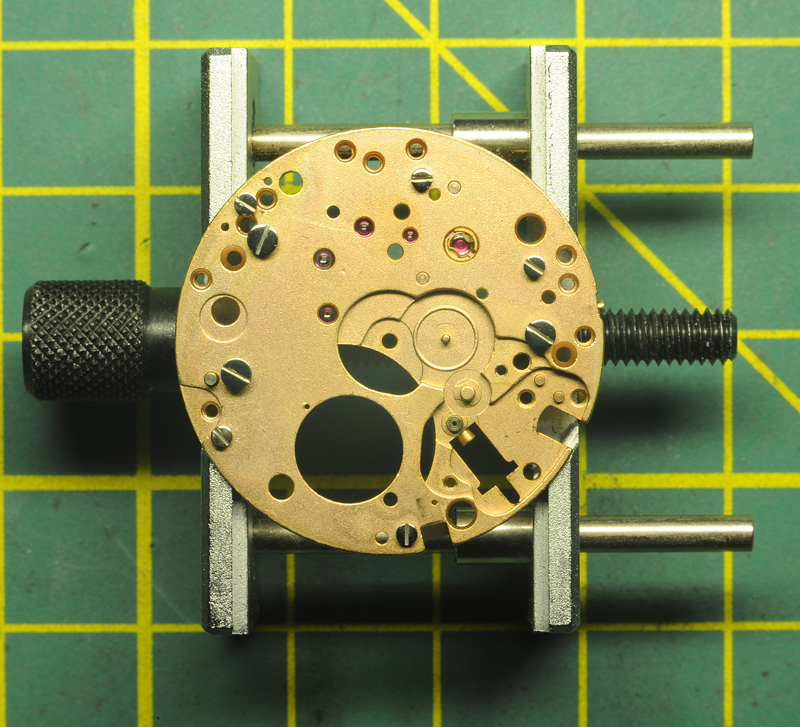
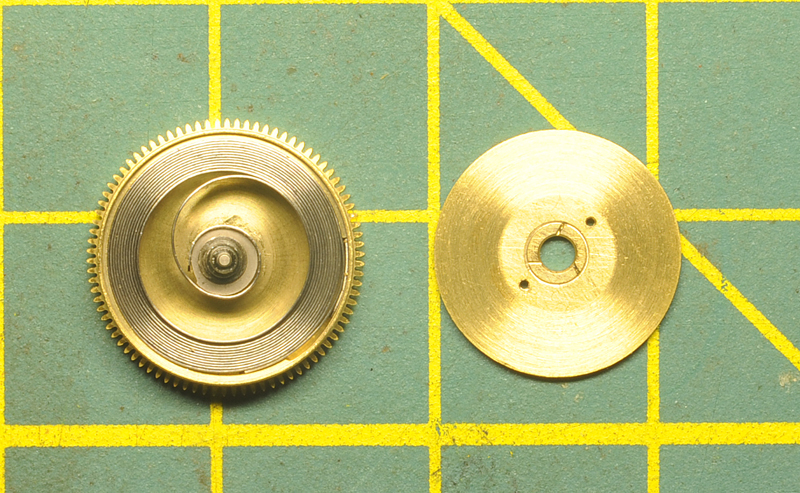
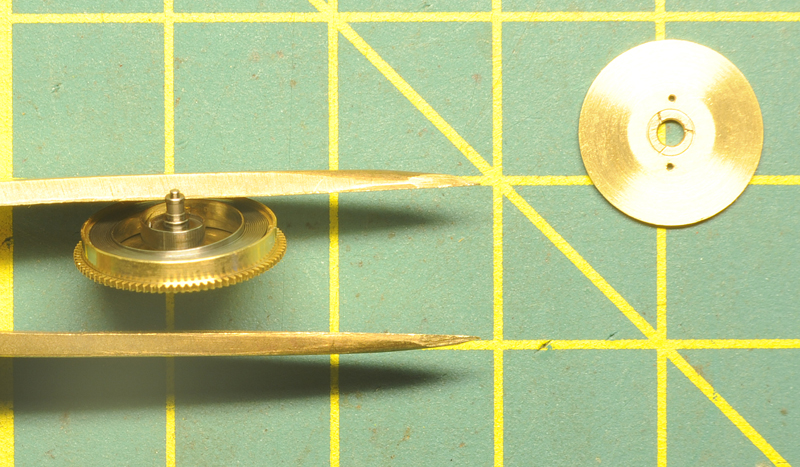
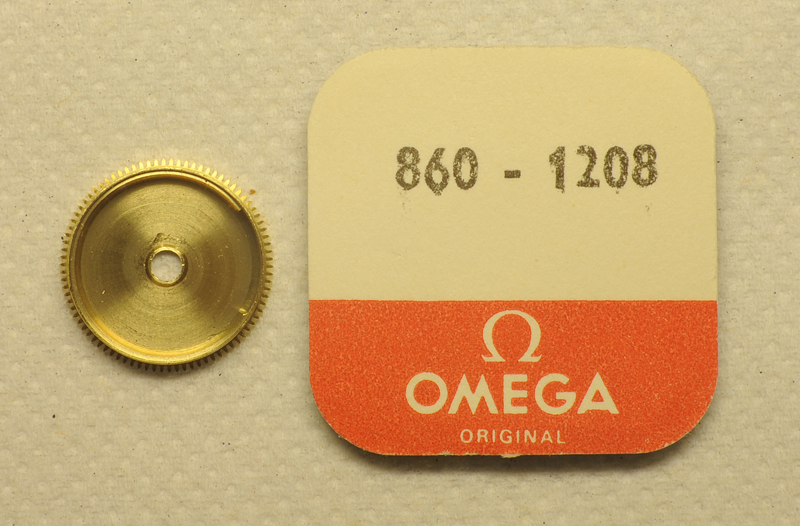
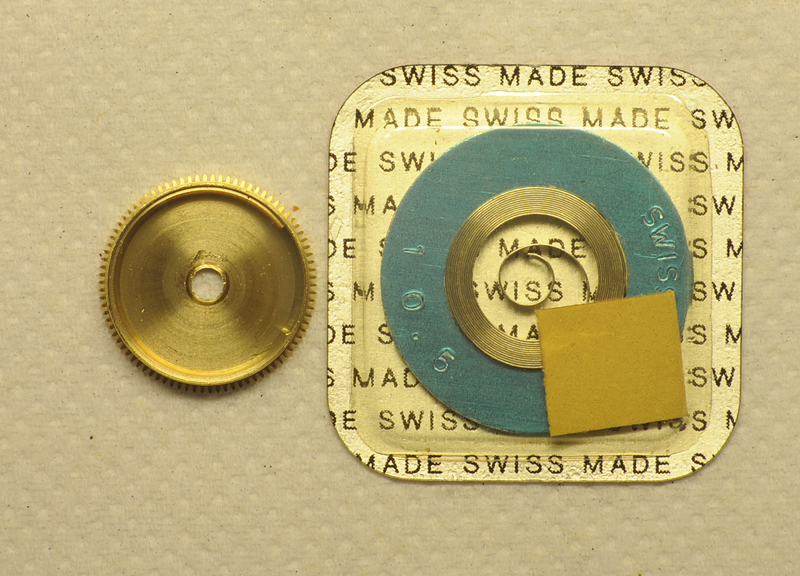
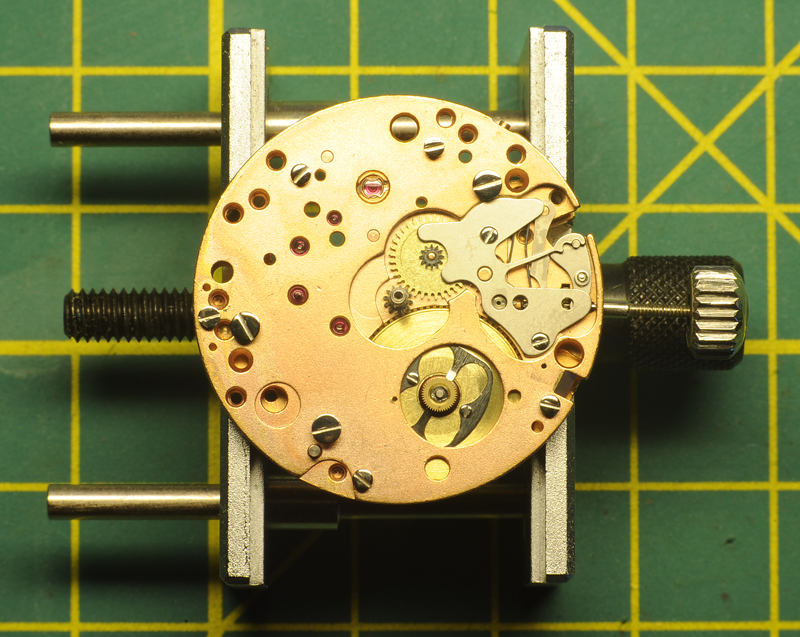
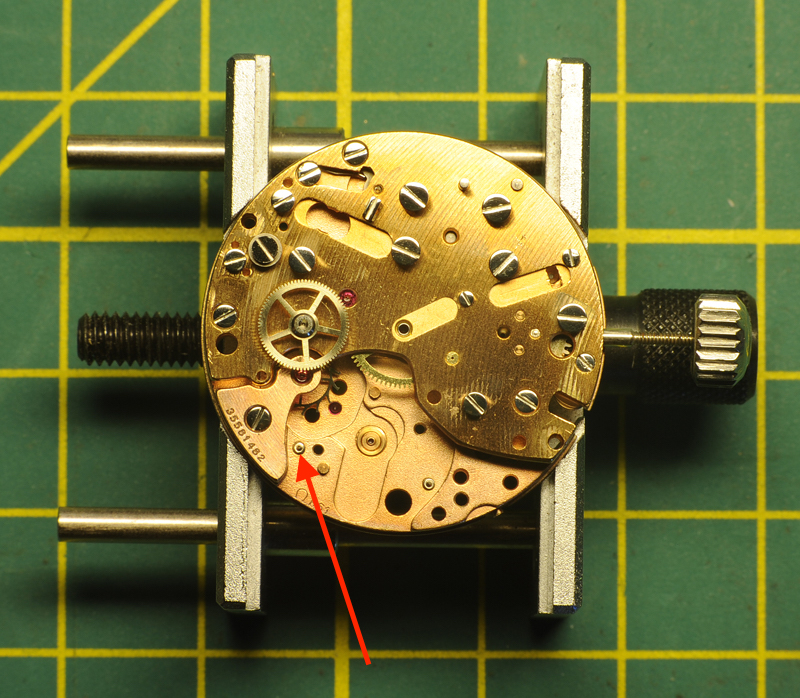
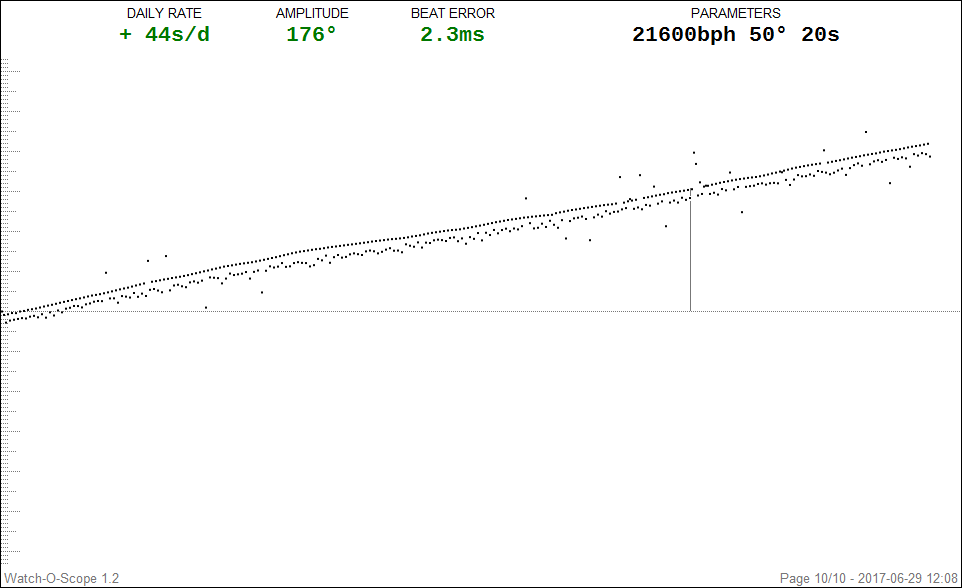
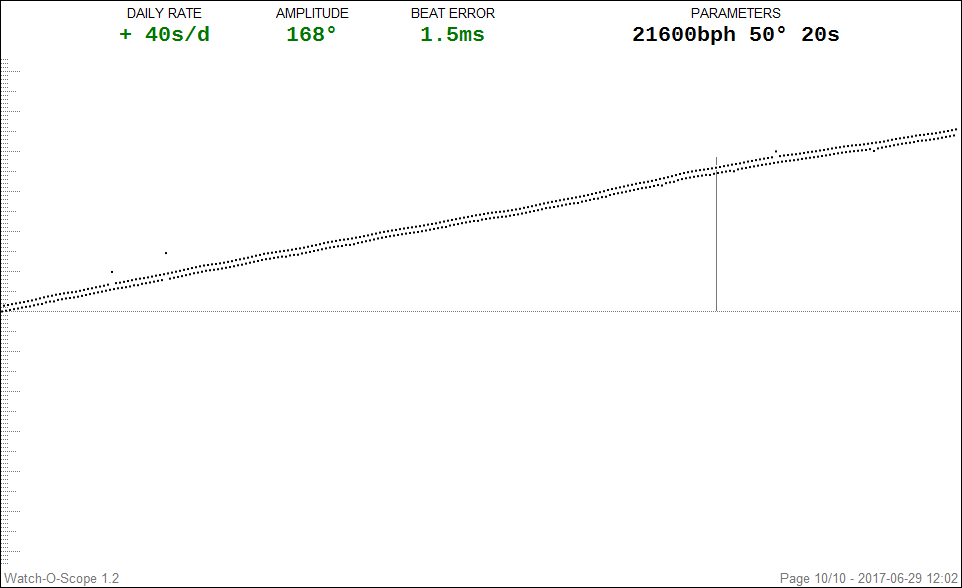
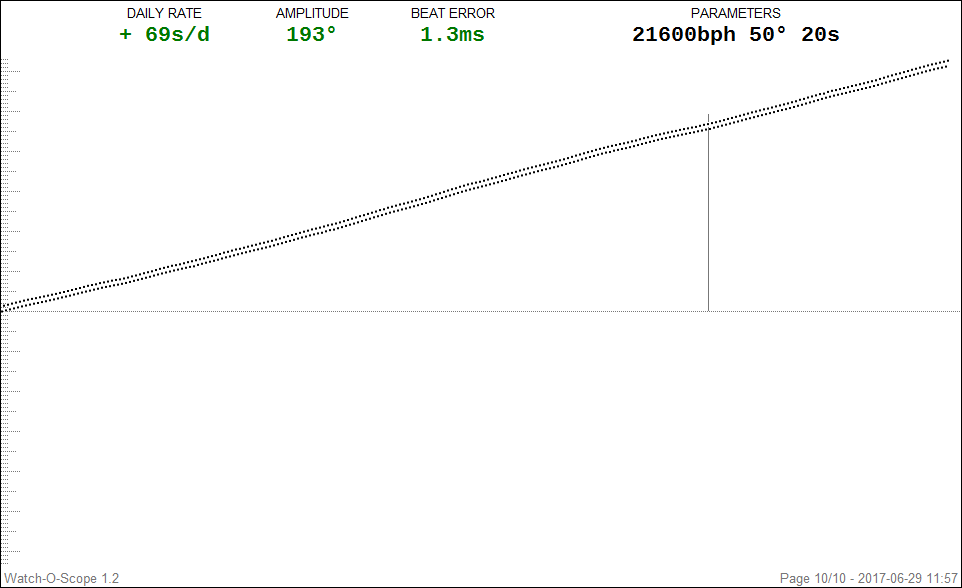
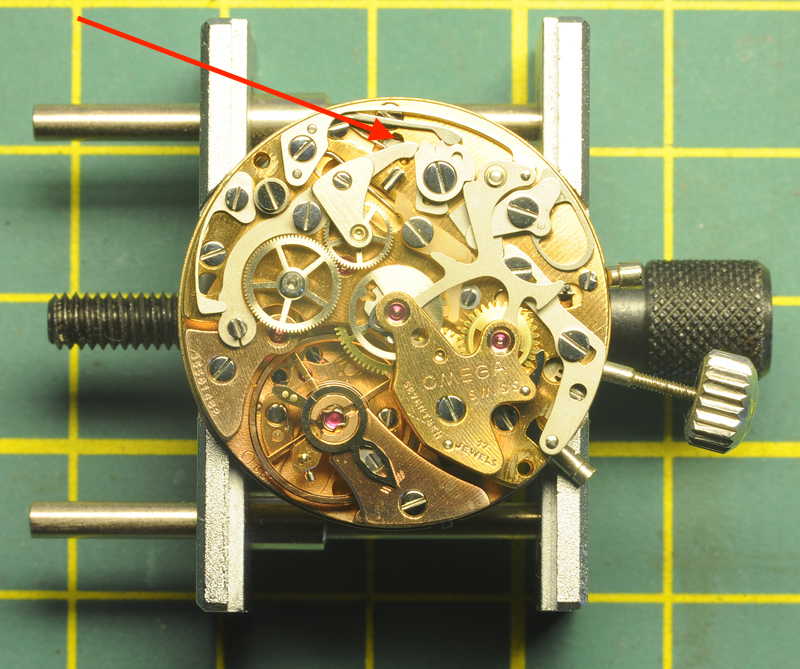
Hello All; On my desk landed a 1975 Omega Speedmaster professional Mark II. It was in a sorry state and water ingress was suspected. The last services were quite a few years ago, mid '80's towards the '90's. Those services were performed by a watchmaker working for a local highly reputable jeweler with a glossy facade. Instead of using the proper tools (a guide-ring) to replace the glass, for ease or necessity the official seal-ring was taken out and the glass was placed using a black sealing-kit. The back-cover received the same treatment, instead of the correct O-ring, the O-ring groove was filled with the same black sealing kit and the cover was thereafter closed. By a stroke of luck, the Omega was replaced by another watch and has for 20+ years been stored in a drawer; until recently. The owners current watch was sent away for a service and the Omega had to fill the gap. Unfortunately the Omega came in contact with water. The owner suspected water ingress and as soon as his current watch was back from servicing, the Omega was sent to me. Though time, the black sealing kit has eaten away the printed Tachograph-ring and made its way onto the edge of the dial. The task on hand; a full service of the movement, installation of a new mineral glass and replacing all seals. Perhaps some new luster to the watch-case........ Whether I show the full restoration of the watch-case needs to be seen, but I like to start off with a walk-through of the 861 movement. Two Omega 861 manuals were of enormous help; Omega 861 service manual.pdf Omega 861.pdf I printed them out and best is to read and cross reference both manuals before starting. Each manual contains important information, not necessarily mentioned in the other manual ! Once the information is combined, then there is enough information to do a proper service. For chronographs like this one, I replace each screw after the component has been removed. This avoids screw mix-ups, but can cause some problems too ...... read installing the pallet-fork bridge. Without any further ado; Here is the watch as I received it; Luckily the inside looked pretty okay and no visual signs of water. BTW, the black sealing kit on the back was already replace by a proper O-ring. Took some Watch-O-Scope shots (lift angle 50 degrees) Dial up: Dial down; Crown Up; Crown down, this one was harder to get due to a weak signal; All in all, not too bad.......... at least not "devastating" differences in the four positions. The movement is attached to the case with two clamps and a spacer ring. Remove those plus the winding stem and the movement can be taken out. Clearly visible is the black sealing-kit around the dial edges, starting from 5 till 10-o-clock. Pay special attention when removing the little hands, these have different tube sizes. I stored them separately, each in their own container; Left, Bottom and Right. Taking ample pictures was a great help to me as well. I had to consult them a few times during the assembly. Another remark I like to make is that the movement doesn't sit comfortable in an universal movement-holder. The movement-holder I used was a Bergeon 4040 and with great care it can be done, but later I've spotted on eBay Omega 861 movement holders for reasonable prices ..... On the picture below, the Joke 1774 has been removed. This exposes and give access to the click (see arrow). The main-spring can now be disarmed. Next is the hammer-spring 1734; it sits on two center-pins and has to be lifted at its heel. The hammer 1728 sits on a post and can be lifted straight off. Remove coupling spring 1731 and coupling yoke 1724. Be aware of the eccentric screw, it clearly has a different shape. I left the unit (wheel bridge 1716 and coupling wheel 1712) in one piece. Later I dismantled the unit and attention has to be paid which way around the coupling wheel is mounted. Removed the plastic blocking lever 1726 and blocking lever spring 1733: in the manuals different names and number are used for seemingly the same item. One end of the spring has a "hook". This "hook" has to face upwards against the blocking lever. Next to remove is the cam-jumper 1845. Next is the chronograph bridge 1037. The manuals are not very clear if one does this for the first time. Underneath and fixed to the bridge is a thin spring for the minute recording jumper. This spring will come together with the chronograph bridge. The spring pushes against the minute recording jumper 1767, which is attached to a post underneath the bridge. While lifting the chronograph bridge, the jumper 1767 may, or may not come as well. I my case, all lifted in one piece. By turning the bridge around, it all becomes clear .... Das "Aha Erlebnis" ;-) Remove chronograph runner 1705, minute recording runner 1708 and intermediate wheel for minute recording runner (1714); note which way around of the wheel ! Remove operating lever 1841, operating lever-spring 1842 and connecting lever 1840. Attention: The operating lever 1841 sits under tension. After I removed the screw and attempted to lift the lever 1841, the connecting lever 1840 had its personal launch ...... luckily not that far ...... Remove operating lever 1720. In my case, the "Glossy Facade Watchmaker" left a surprise; the top screw was sheared off right under the screw-head and screwed in by literally one thread (red arrow, picture above). I later attempted the remove the remaining stud, but no success. After consulting the owner and this being the second, more a guiding screw, the decision was taken to repeat the GFW-trick. The screw held for many years, so hopes are it will do it again. Remove (and note position) upper cam for hammer 1844, remove lower cam for coupling clutch 1843, remove stem for "Zero pusher" by undoing the screw, remove bolt-spring 1752 and bolt 1759. Carefully, use Rodeco, remove fragile friction spring for chronograph runner 1735. Carefully remove the driving wheel 1710; I managed to lift it using two hand-levers. I then removed the balance & bridge, the pallet fork-bridge & pallet and the escape wheel bridge & escape wheel. Flip the movement over; Remove bracket for operating lever 1784 (note position), remove hour hammer spring 1794 (not described in both manuals, note how it engages) and remove hour recorder stop lever 1750. Be aware: as soon as lever 1750 is lifted, spring for stop lever 1793 will jump free !! Remove spring for stop lever 1793, remove switch mounted 1779. Watch out !! Little screw at tail end is an eccentric (see arrow above) ...... do not touch !! Remove hour recorder bridge 1775; Remove hour hammer 1783, hour recorder runner 1788. Next is, according to the manual, removal of the friction spring for driving pinion 1792 and driving pinion 1791. I did this according to the manual, but found out that the removal of the friction spring 1792 and driving pinion 1791 can be done (much easier) later when the main-spring barrel is removed. Remove support bridge for dial 1776. Remove hour wheel and keyless works, note the two intermediate wheels. Remove canon-pinion. Flip movement over; Remove barrel bridge. Note crown wheel and click are underneath barrel bridge. Also note that ratchet wheel lays on top of the barrel. Remove wheel train; Open barrel and note spring position; Note arbor position; Install new spring; Install arbor, grease/oil and close barrel. Mount driving pinion for hour recorder 1791 and friction spring 1792. Grease as per manual. Service crown wheel and click. In my case the little screw of the crown wheel center was too tight and deemed not worth the risk. Applied some oil in the wheel groove. Now as for replacing the screws after each removed component; During the assembling I encountered a problem placing the pallet fork bridge and good pivot engagement of the pallet fork. After quite a few nerve-wrecking attempts, I noticed that a replaced screw on the other side of the main-plate stood proud of the main-plate and prevented the pallet bridge to seat. Once corrected, all fell in place ....... Assembling of the chronograph is the reverse of the above. Greasing / oiling is done as per attached manuals. Below; the movement is back together, running and all functions work ..... Tomorrow adjustment of the daily rate & bear error. As said, I may or may not follow up on the case restoration. Cleaning the dial is another challenge ....... Hope this walk through is to somebody of any use ....... ;-) Roland.


 1 point