Leaderboard


Popular Content
Showing content with the highest reputation on 10/03/18 in all areas
-
How are you cleaning them initially? If it takes off with solvent on the jewels then you have a lubrication issue, either gumming up or not existent. If the jewels aren't properly clean before oiling you will have problems. Worn pivot holes will generally be slightly oval, and in the direction of wear there is actually more contact with the pivot, increasing friction. In a watch like this you can probably get by with closing the hole slightly with a staking set and then broaching back to size. Pivots are best refinished with a Jacot tool.2 points
-
We are thinking of moving as I am unable to sleep at night due to the constant ticking….It turns out it is the neighbourhood watch!1 point
-
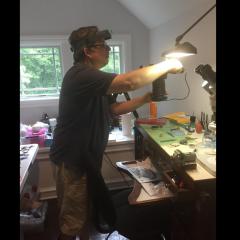
Hello everyone! My name is Alex Gatz and I’m a 27 year old traveling registered nurse who works all over the United States in different Emergency Departments. I just found this website through random YouTube binge watching. Recently I have been obsessing over watches, and after coming from having an “extreme hobby” background in electronics (arduino/raspberry pi creations/coding, web development, programming for 12 years, pc building, drone building, 3D printing, phone repair/customization) I thought watch repair and perhaps watchmaking would be interesting and fun to start doing. I’m absolutely fascinated with the detail and intricacies of the engineering involved. Things like: good lighting; handling tiny components; using all sorts of tweezers; good lighting and magnification are some strong similarities between these two hobbies that I have an excess of experience in so that’s a plus. Now I’m just trying to find a good and cheap place to really sample watchmaking. I have read that starting with a new ETA 6497/8 is a good starting ground, or perhaps an ETA 2824? (Probably replicas or copies, links would be great) I’m also looking for a good book as I love a great reference/guide to be at my side (plus I love books :D). Watchmaking by George Daniels is well over my head, however, it is very interesting. Beginner Watchmaking by Tim Swike sounds interesting but perhaps to basic? At this time my GOAL is to trial working with a movement at the minimum entry level possible. So first I need a movement and second a movement holder Most other tools I do have already.. except levers to pull the watch hands. Anyway, any recommendations or direction.. even perhaps links to direct sites or eBay offering would save me a significant amount of time and I would greatly appreciate anything Also, don’t forget, “Be nice to Nurses, we choose the needle size” :P1 point
-
If you do not have a cleaning machine you will need to 'peg out' all the pivots holes. Get yourself some peg wood, if you don't want to buy it from watch suppliers I've been told people use bamboo skewers sucseddfully, although I've never used them. Then sharpen to a point eitehr with a knife or a pencil sharpener. Gently place the tip in the pivot or jewel hole and rotate. Check the point if it is dirty resharpen it and repeat until it comes out clean. You need to check you dont leave behind any dust from the pegwood too. Once you have finished rinse again in lighter fuel. You need to oil all the pivots once in place too, except the pivot on the anchor, do not oil these.1 point
-
isopropinal (alcohol), you can get it at the drug store. vin1 point
-
Hollow ground screwdrivers are really only of use if you work on the same model of watch all the time. The reason is if your flat ground screwdriver is too thin you just stone a tiny bit off the end to make it fatter. On a hollow ground screwdriver you need to remove a lot more material to make it fatter, and then hollow grind it again to suit the screw you want to undo, so its harder to swap between brands of watches that you need to adjust your screwdrivers for. If you worked as an 'in house' watch repairer of an expensive brand of watches, and always did the same movements then hollow ground is the best, but for most of us that works on what ever watch comes our way the flat ground is best being a compromise between time taken to reshape screwedrivers and the risk to 'chewing' screws.1 point
-
Here's another thing to think about. The issue you are experiencing happened to me on one of the first movements I cleaned. If you are only soaking the parts as you state, there is a very good chance that there are still tiny bits of age hardened oil in some of the jewels. When assembled for the first time the watch will more often or not run OK. But after a few days or weeks, the small pieces of old hard oil starts to soften and expand because the fresh oil slowly seeps into it. This then grips the pivots and the watch will either run slow or stop. I suggest you purchase an inexpensive ultrasonic cleaner as the vibrations will blast away the old oil that has turned to varnish. I have been safely using an ultrasonic bath for years with great effect. One thing though, NEVER use it to clean dials. Wishing you good success.1 point
-
Hi @chrisdt - understood. It's a nice watch and only a minor issue you could always look to correct in the future if you wanted to. http://roamer-watches.info/foreign.shtml gives a list of MST movements to ETA (or other maker's) movements that Roamer used. I believed your watch was an MST 478 / ETA 2638 whilst with your research you think it is an MST 482 / ETA 2630. I am unsure on the subtle differences between the two since the ETA references often come up together. If there are subtle differences then almost certainly this wouldn't be for the day change mech where parts would have remained the same. I only mention this now should you want to look at things in the future and find the 478/2638 combo easier to find references to than the 482/2630!1 point
-
If you do not have a watch cleaning machine. The best and safest way of cleaning the balance and pivot holes is to use Ronsonol lighter fluid. It is shellac friendly. You will need a sealable small jar as it evaporates quickly. A fibreglass brush is very good at cleaning away old dry oil. After cleaning you put the parts on some tissue paper and then use your bench blower to remove the access.1 point
-
Cleaning screws and blueing. I cleaned clock screws up using a lathe, but you can also use a screw head polisher. Take the rough edges or burr off by using your needle files or small bench file. Then use various emery sticks finishing with the finest to produce a very fine finish. You then need to burnish the complete screw head. You then need to clean the screws; I used an old watch cleaning machine with old cleaner and rinse. I used to blue the screws using an old copper penny in a hand vice which was over a spirt lamp (you don’t want a long wick) the hand held was then held in a bench vice. The trick is to blue all the screws to the same colour blue. If you fail, then clean the blue off and start again. As soon as the screw has turned to the required blue quench the screw in oil, this makes the screw shine. Clean the screws again in the cleaning machine, dry and cool. If you are successful, all the screws will be an even colour blue. It takes a little practise. There are a few ways of bluing screws. My master taught this way me.1 point
-
Welcome to this friendly forum.1 point
-
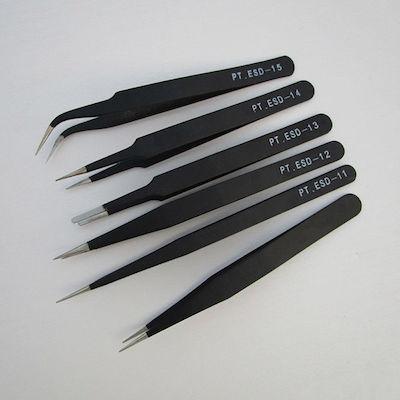
Hello Alex; Well, you are in luck with all your previous hobbies. Not all of it, but it surely helps. There are many ways to get into watch-repair. You can see watch-repair as the only goal, but you can also make it a kind of journey with D-tours. Enjoying it as much as you can together with your already acquired skills and previous hobbies. One of the tools which is really handy to have is a Timegrapher. A device which picks up the watch audio and converts that, via software, into information how the watch is running / doing. Of course you can buy such a machine, but I think (with your background) it's much more fun to make one yourself. Feel free to go all the way, but that requires a total understanding how a movement / escapement works. An in between solution is the Watch-o-Scope and it's great fun to build. Op-amps, capacitors, you can get your oscilloscope out, drooling from excitement & joy while building it ....... Perhaps you can even improve it ?? Here a link to the W.O.S: http://www.watchoscope.com/ There is also a (very) long thread on this forum: https://www.watchrepairtalk.com/topic/3002-d-i-y-watch-timing-machine/?tab=comments#comment-4156 As for which movement to start on; that is very individual, depending on your skills, your self confidence, how far you want to push yourself etc. Most people start on bigger movements, my first movements were two 17mm ladies movements (ETA 2541) because I had a big challenge ahead. Very individually indeed. My advice is go for a good working movement. You know that it worked well before you started on it and if it doesn't after you are done, well you know who is the culprit. If possible, buy two identical movements, so if you ruin a part, you have back up spares. Learn yourself to perform "ghost" repairs; that's to say, don't leave any marks, so nobody can see you have been there. Best of course are two new, or new old stock (N.O.S) movements. After you are done, any scratch and you know who did it As for movement holders ...... you can buy the Chinese, but I've been there and to avoid agony I would advice you to go directly for the Bergeon 4040 and the Bergeon 4039. They will go you a long way. Same advice counts for screwdrivers; get yourself a decent set. Doesn't have to be top of the range, but a good mid-range ..... I'm sure there is plenty of advice on this forum. Tweezers; Up to you and what works for you; I have some cheap Stainless steel (non-magnetic) and a brass from China and they work great for me ....... Again, plenty tweezers discussions on this forum, how to maintain them etc etc etc. Anyway, enjoy your new endeavor and if it goes south, there is plenty of help .........
 1 point
 -
Welcome Gatz, Enjoy the forum.1 point
-
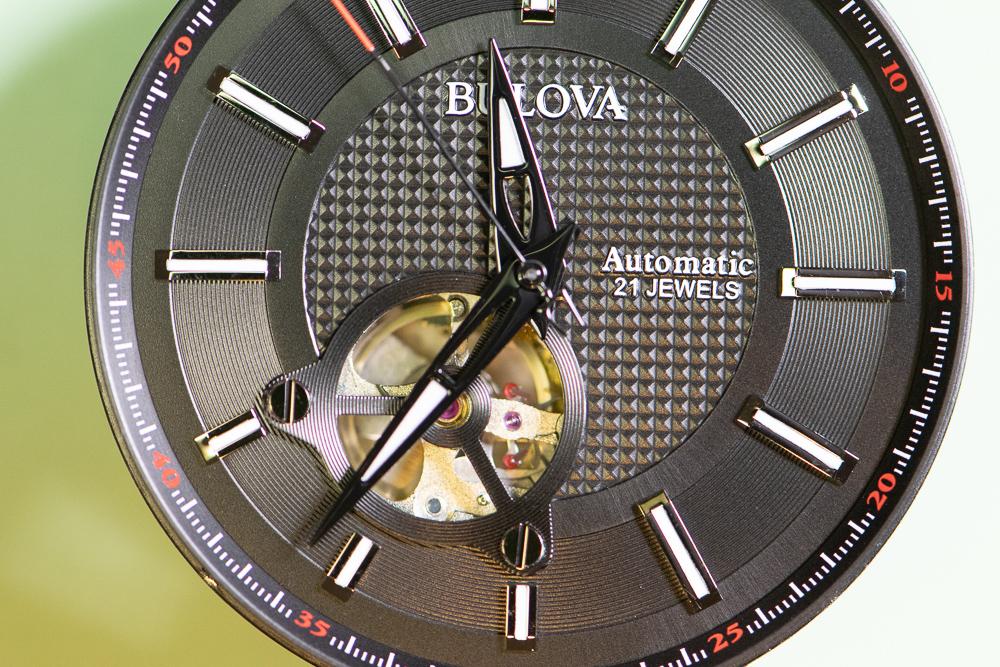
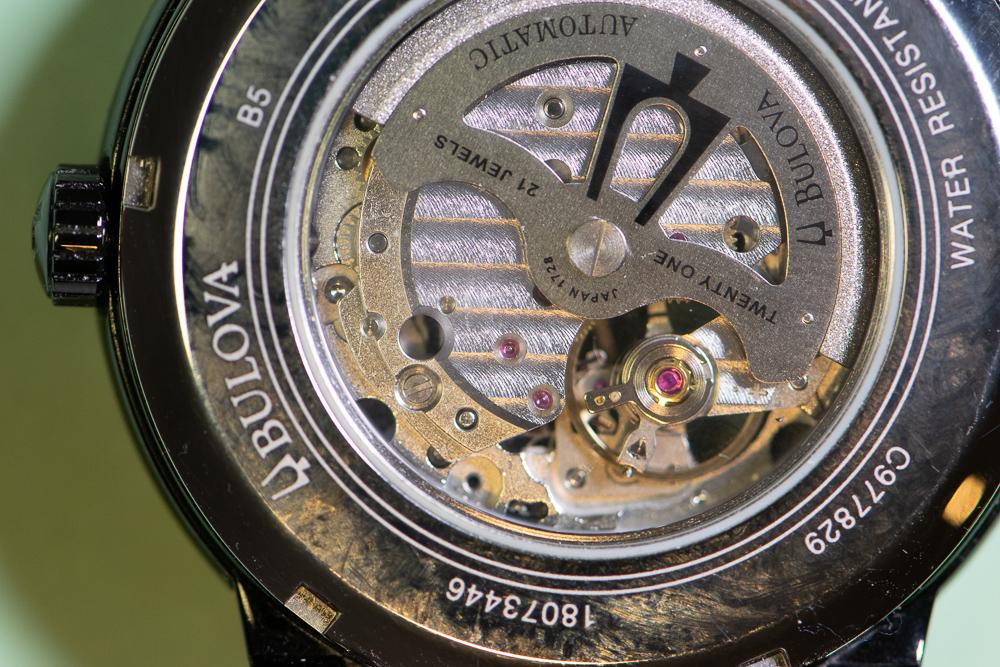
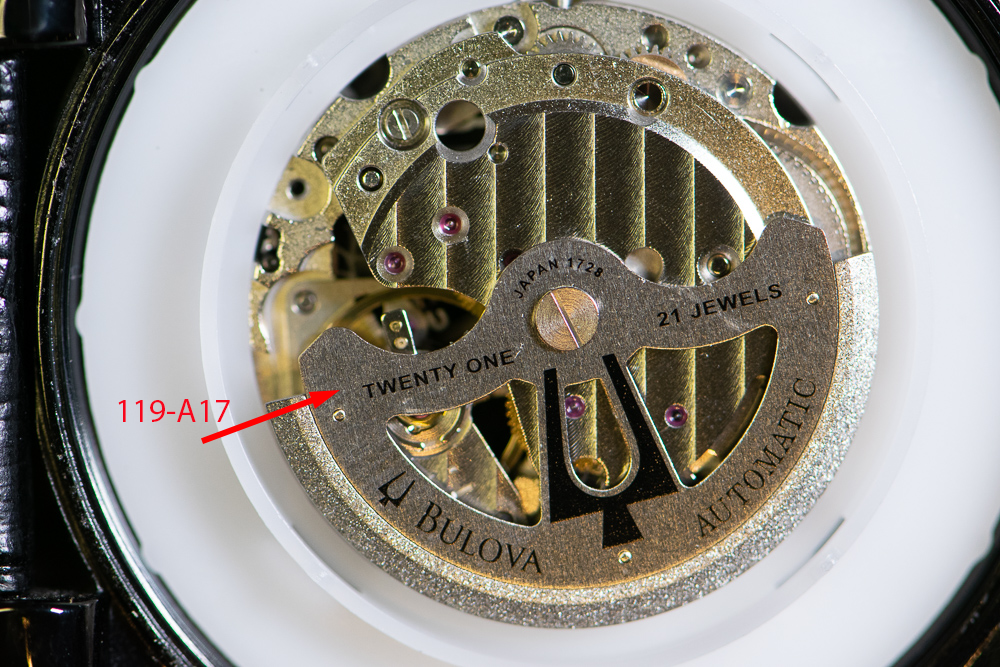
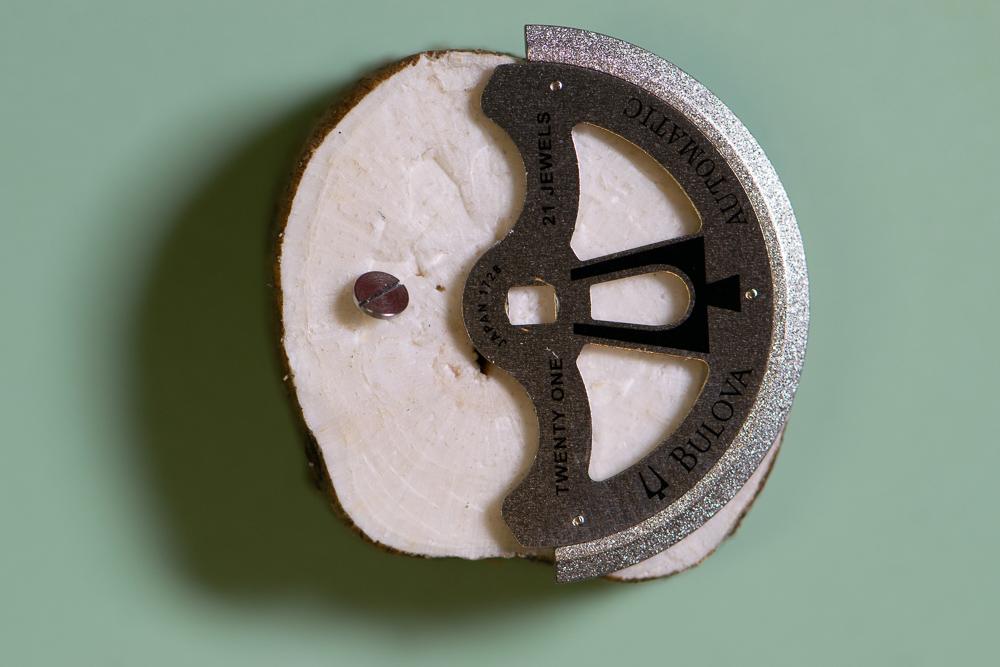
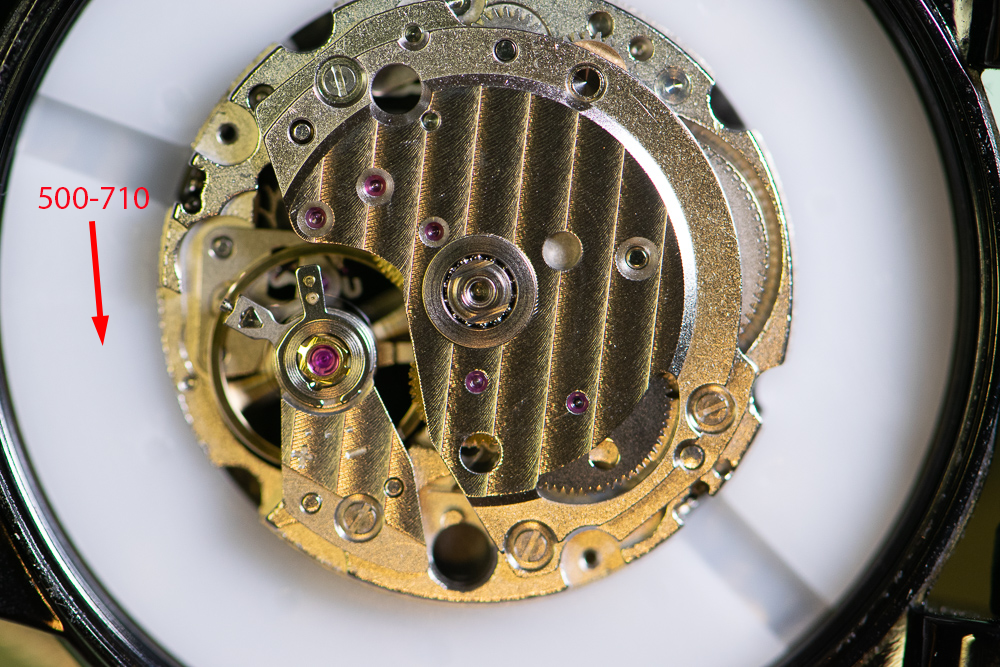
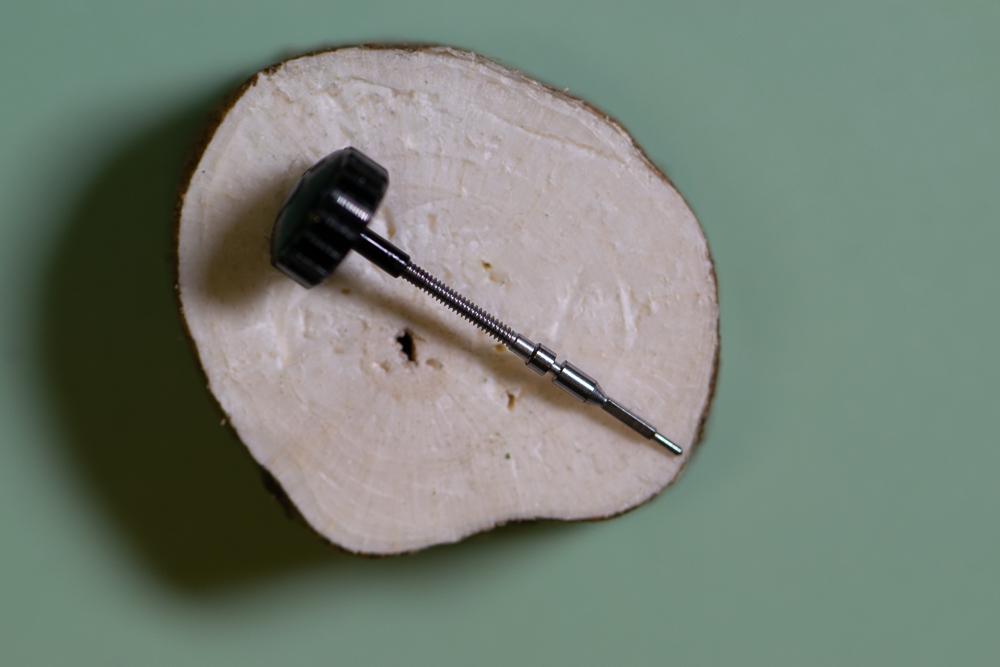
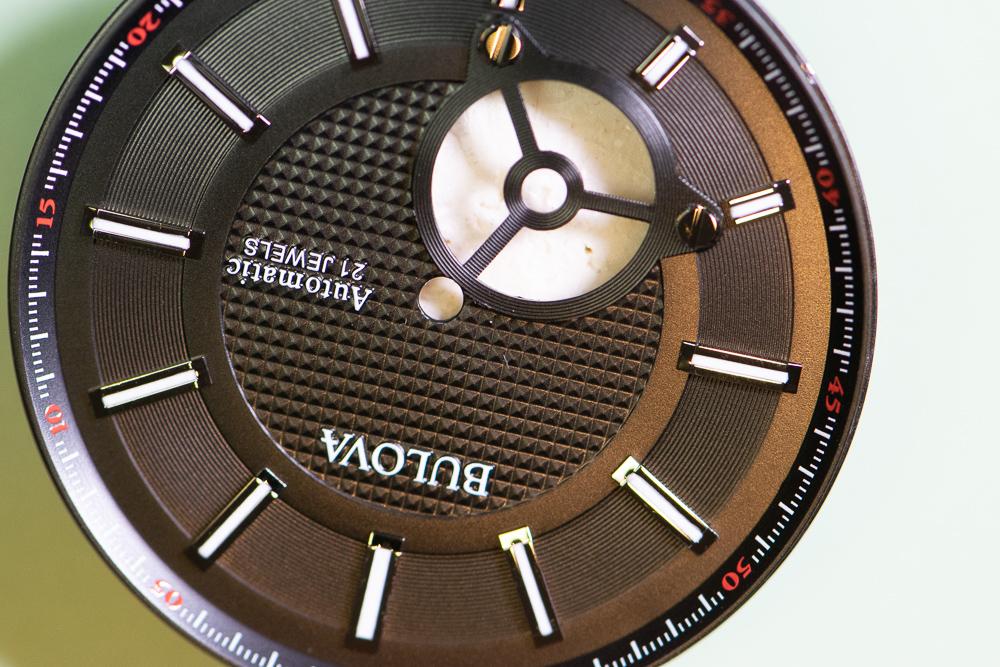
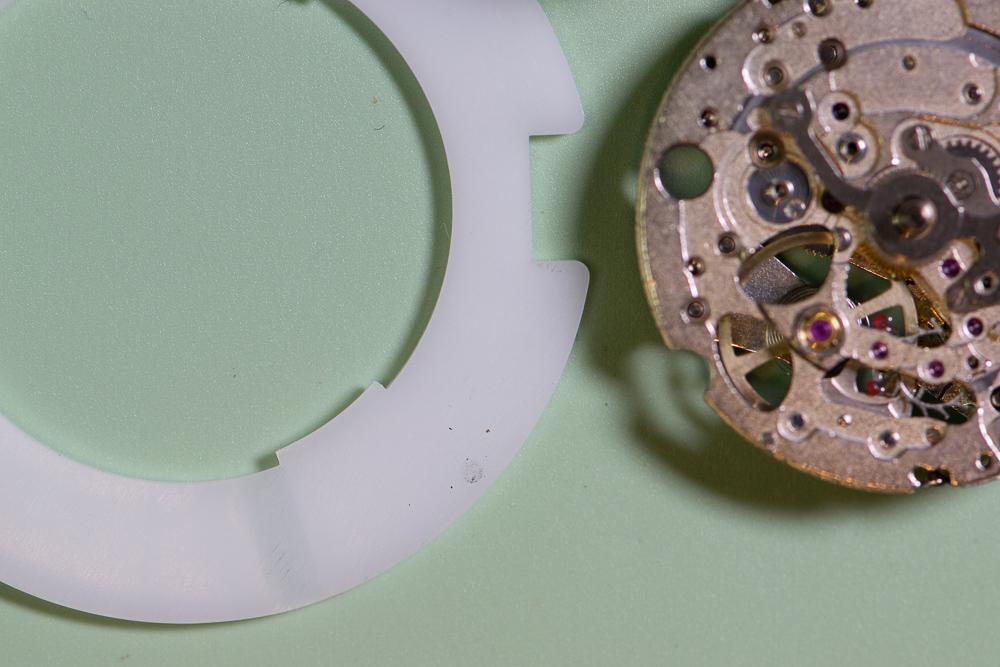
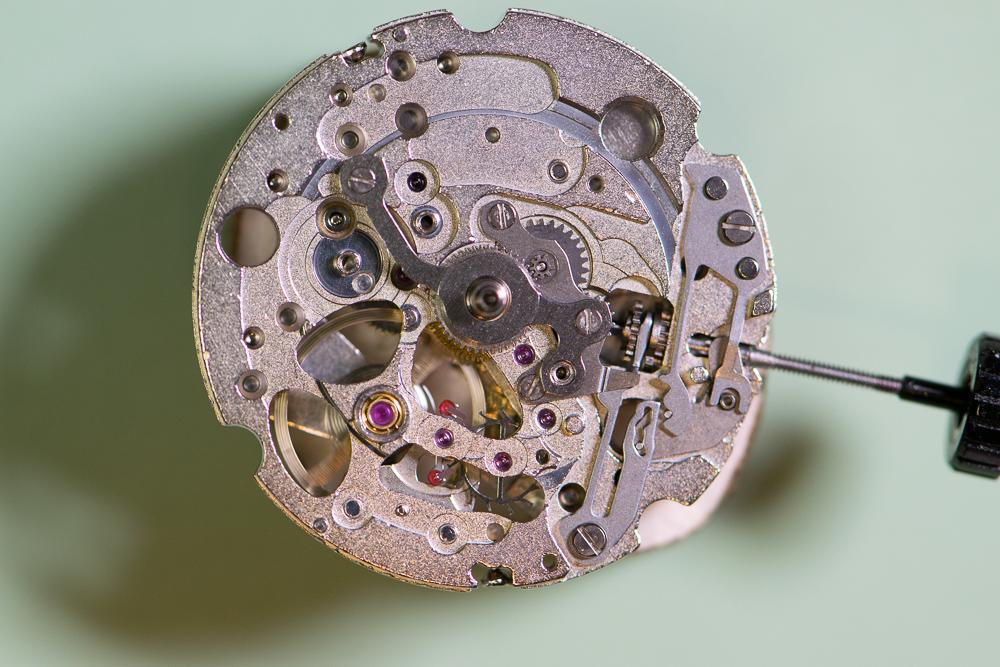
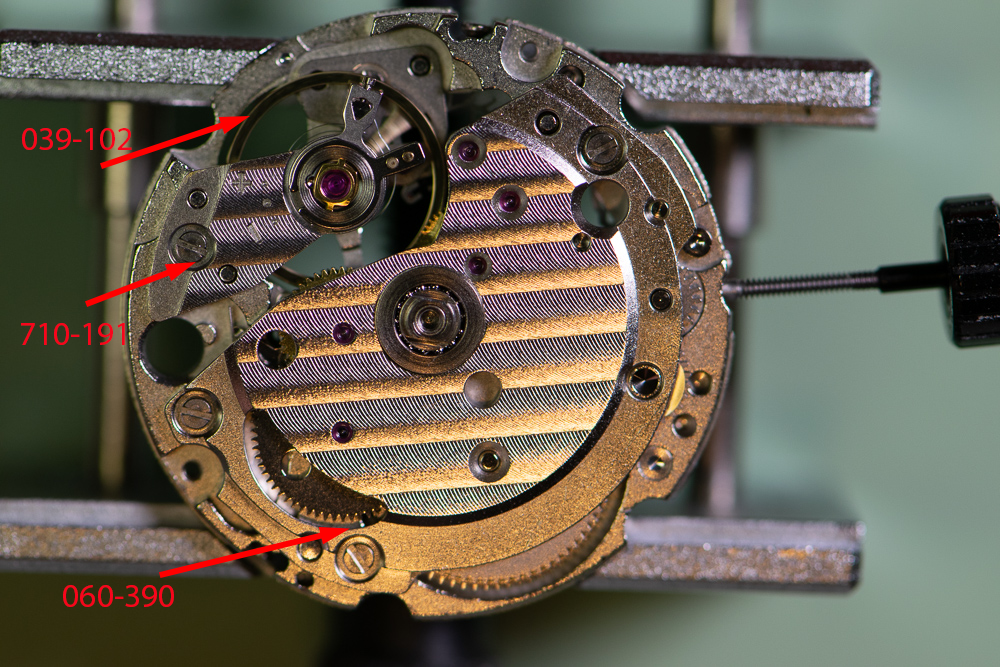
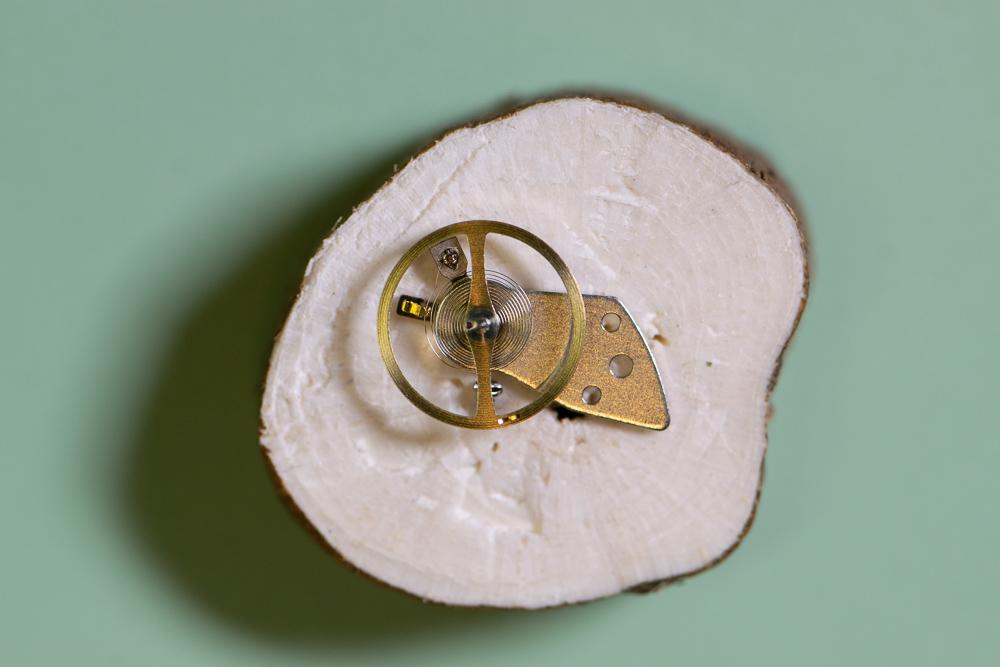
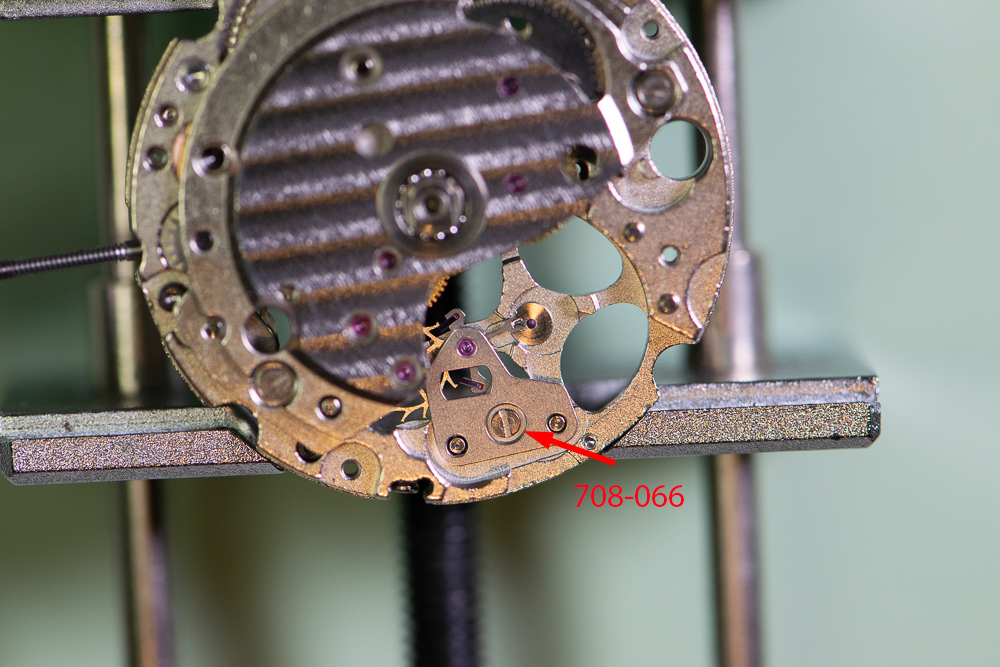
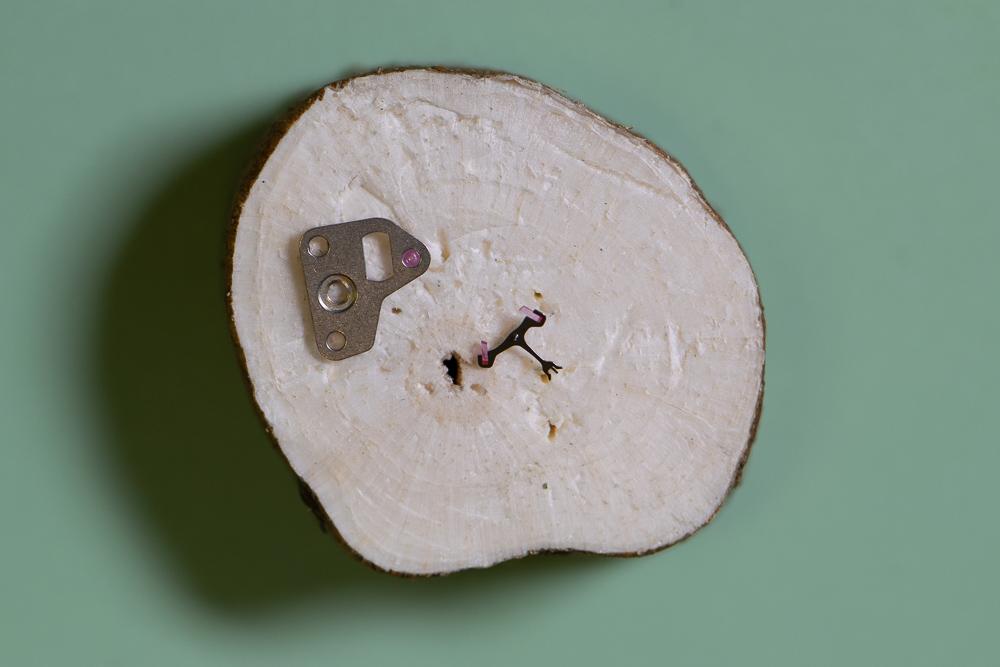
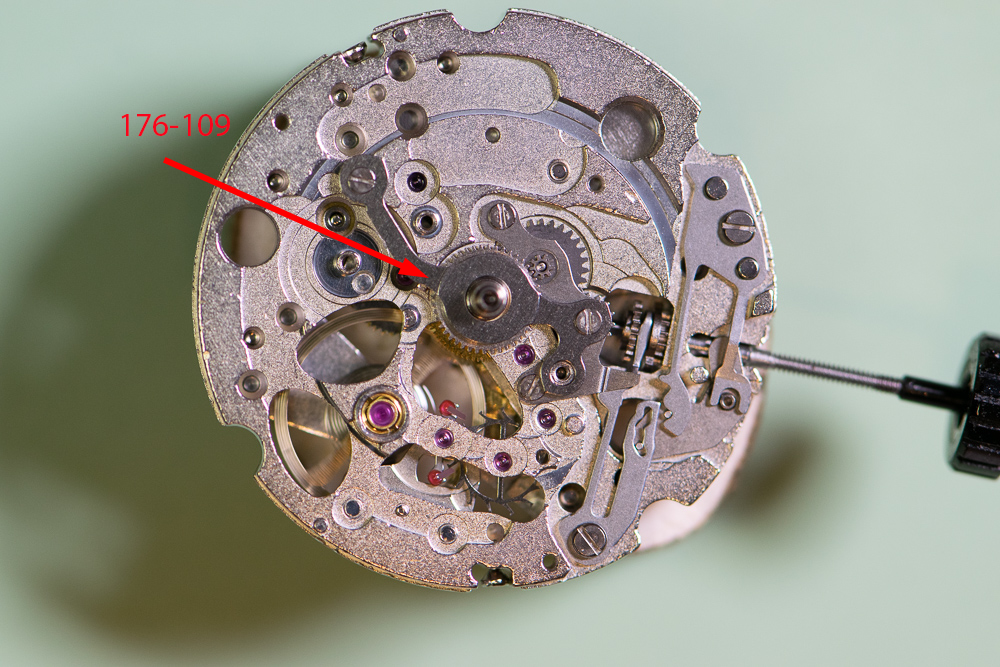
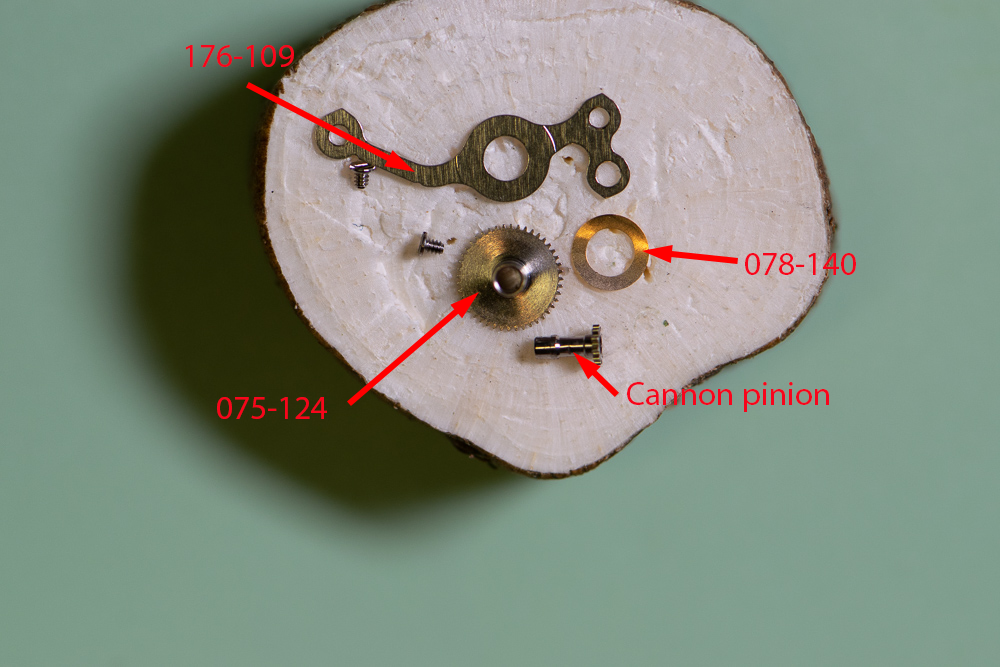
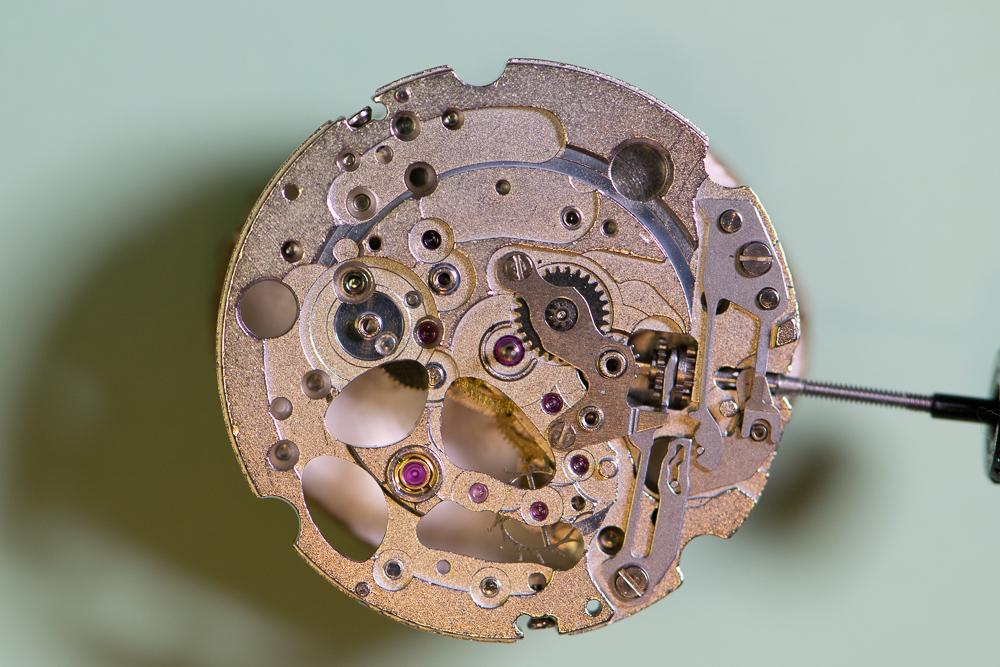
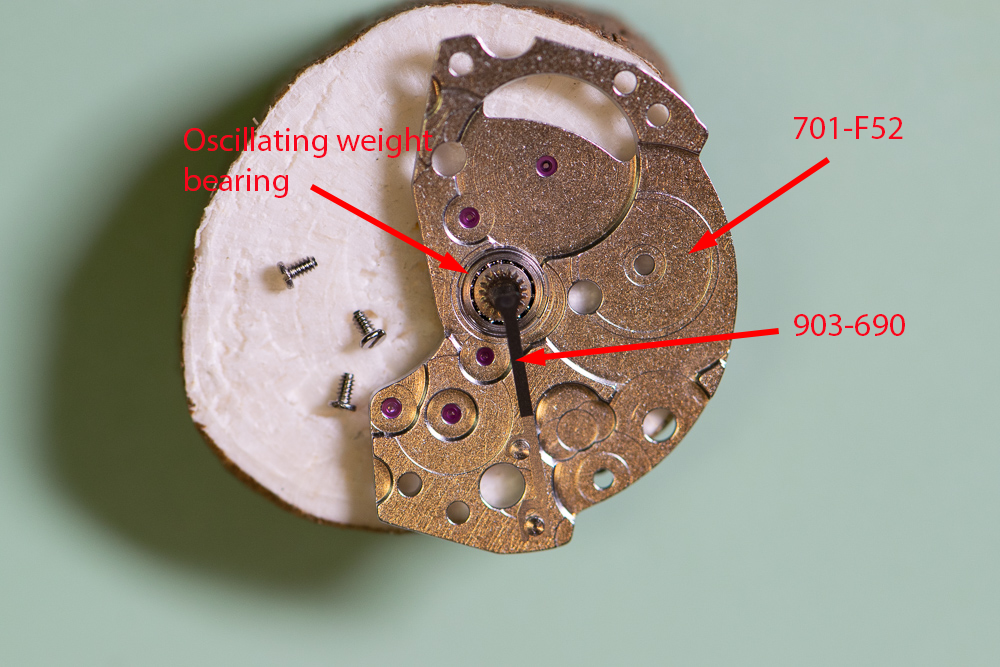
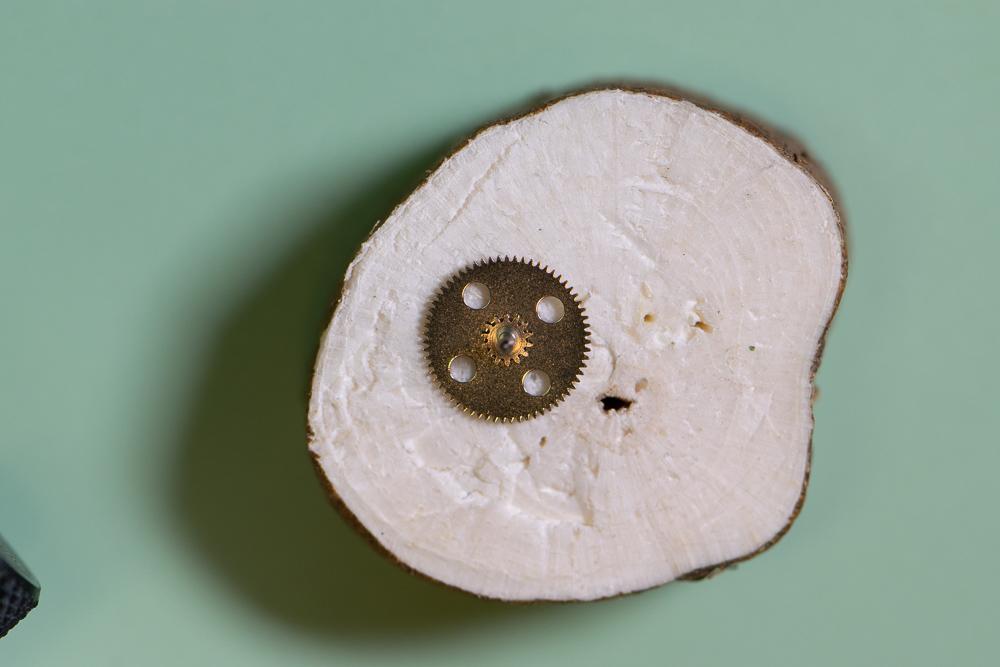
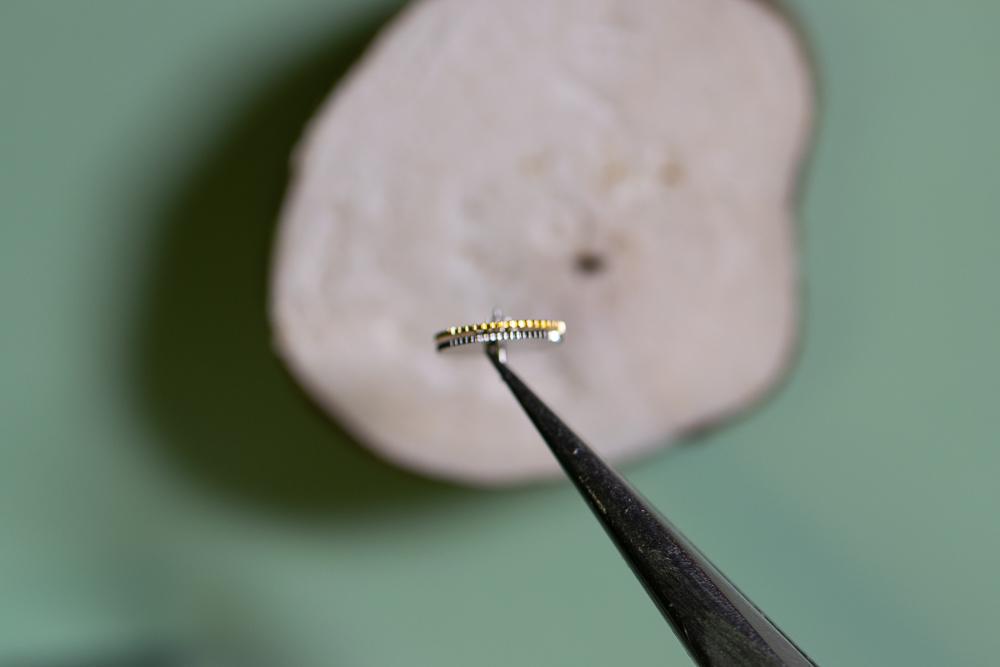
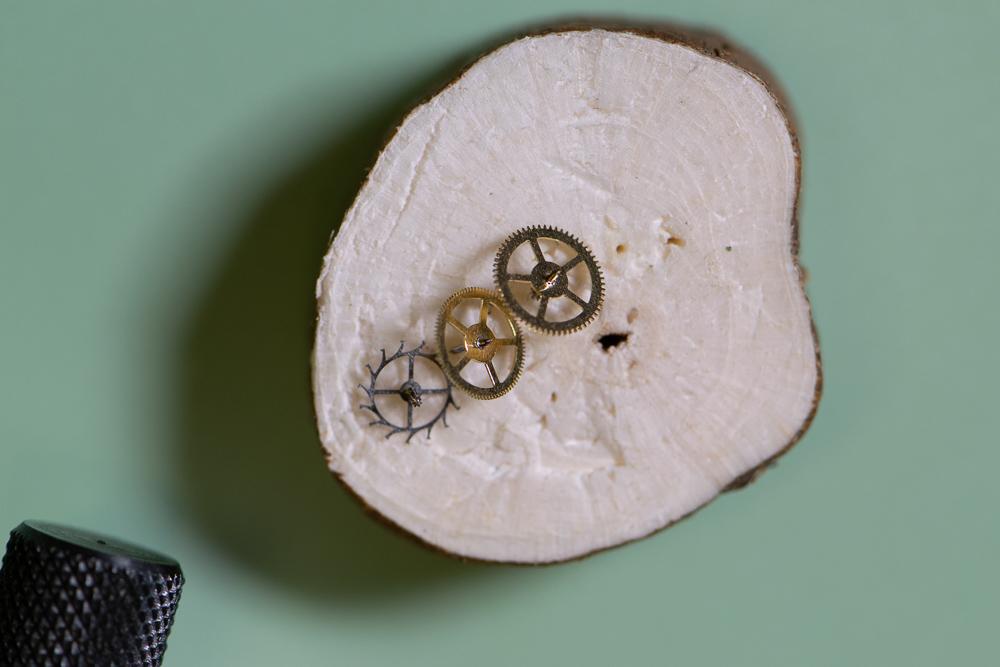
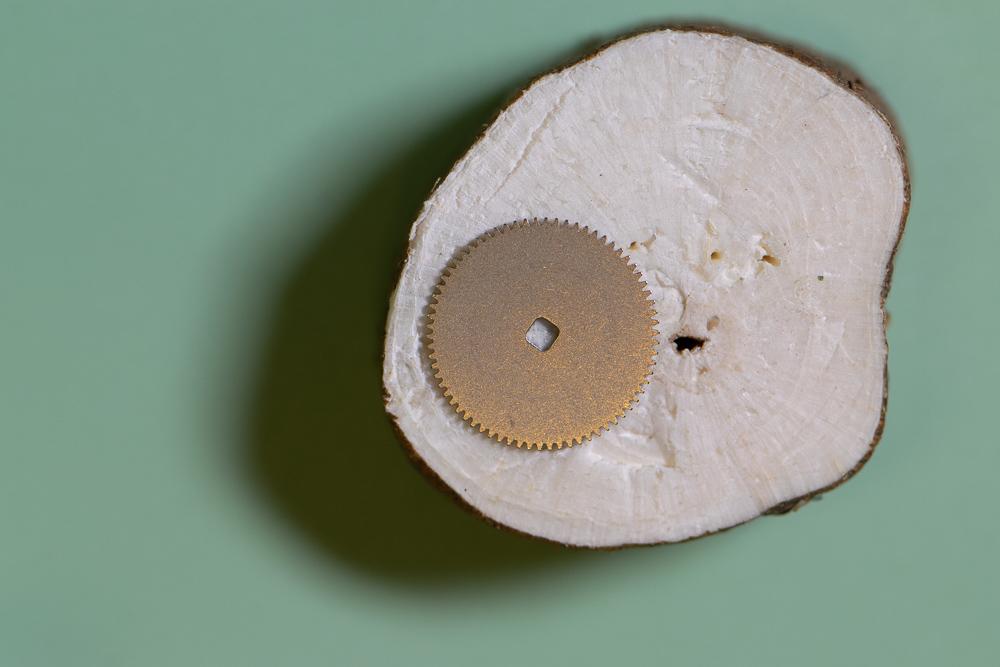
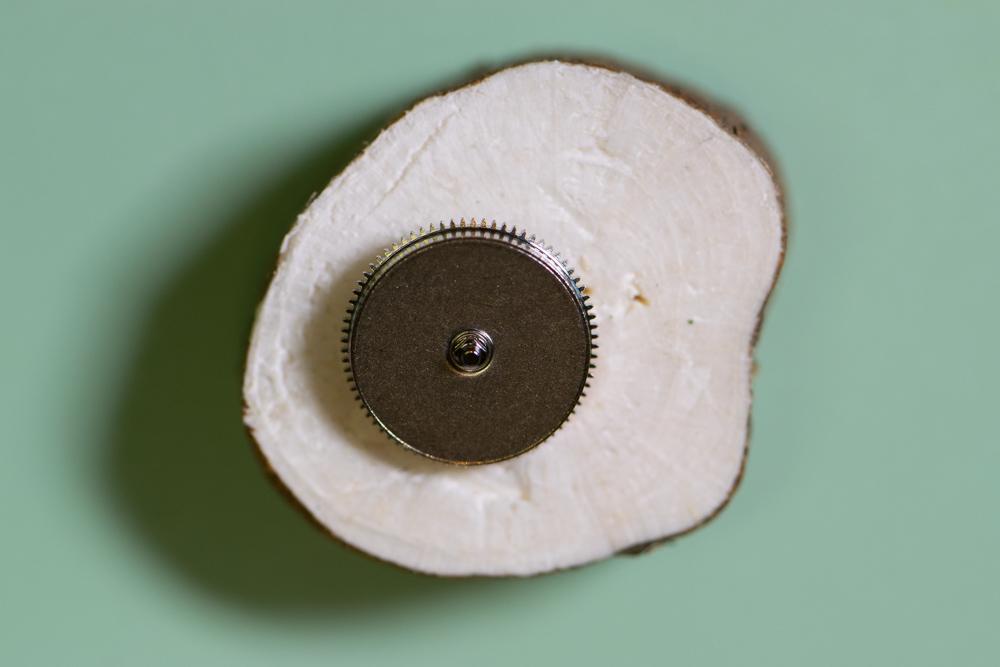
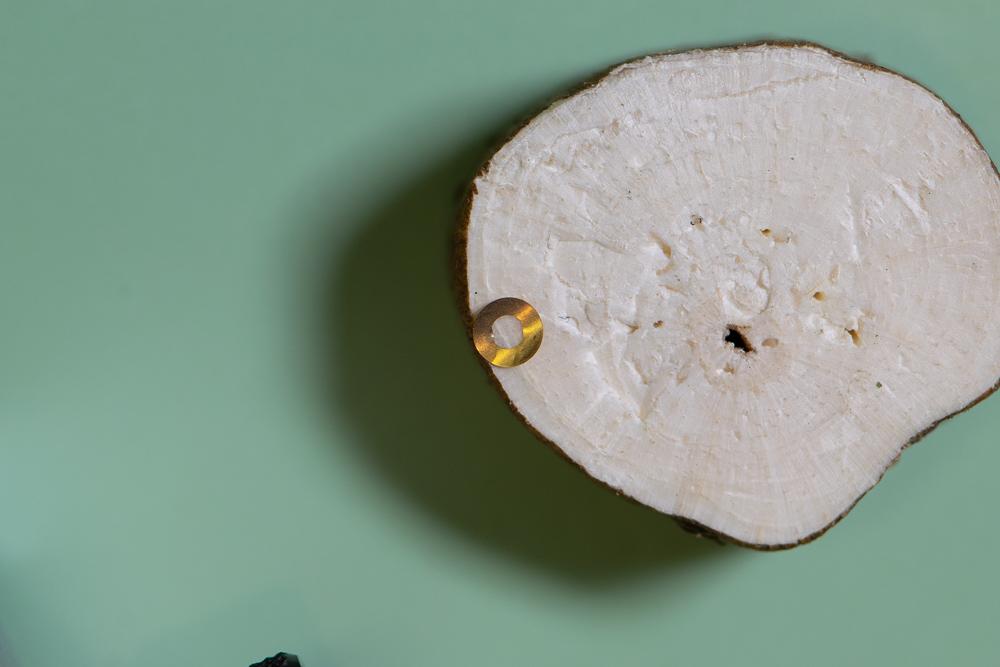
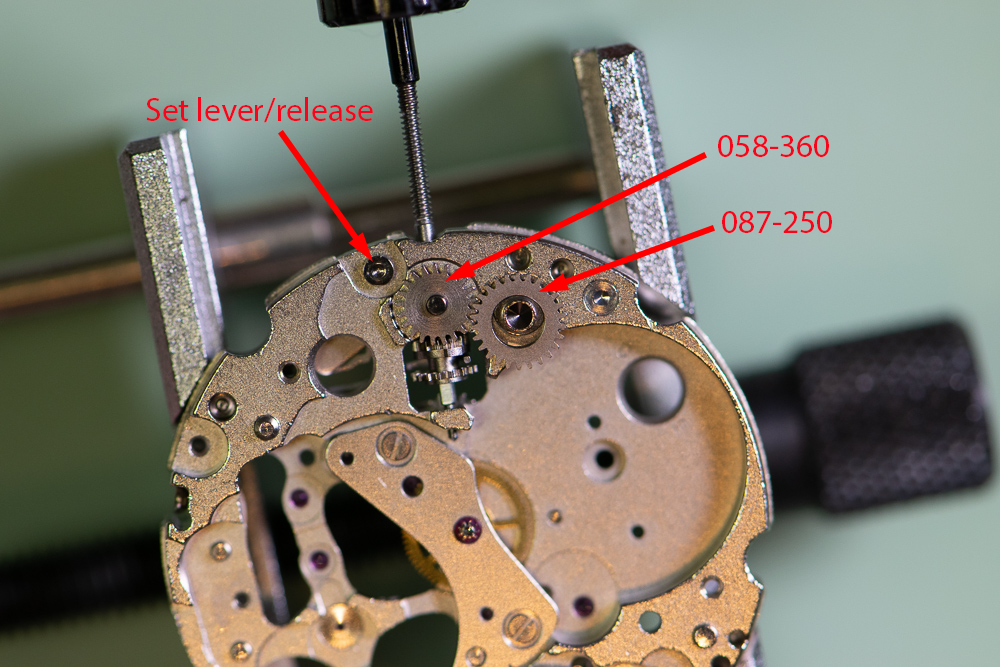
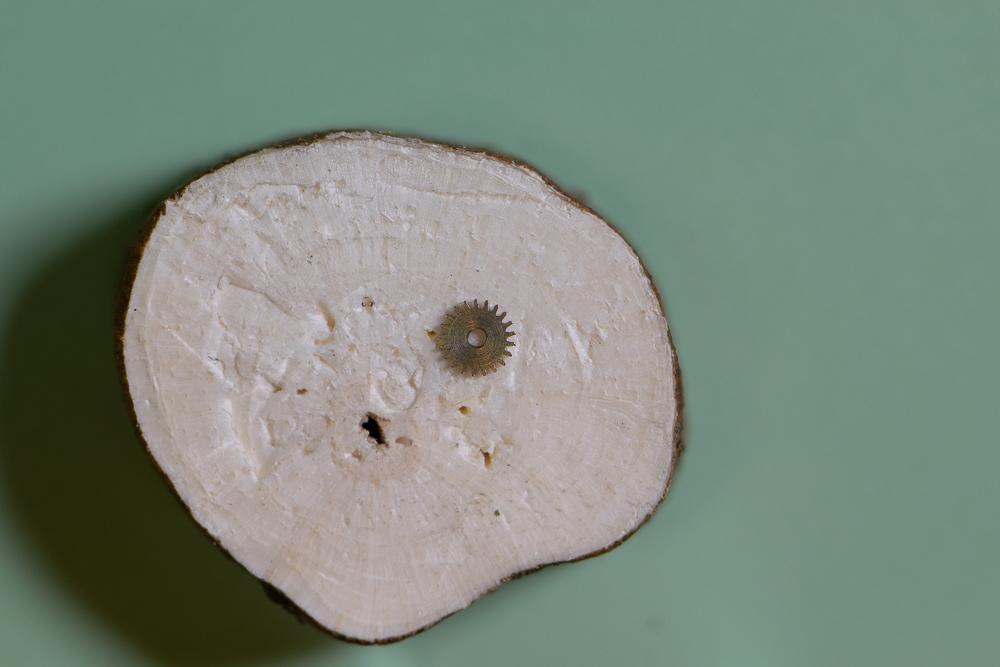
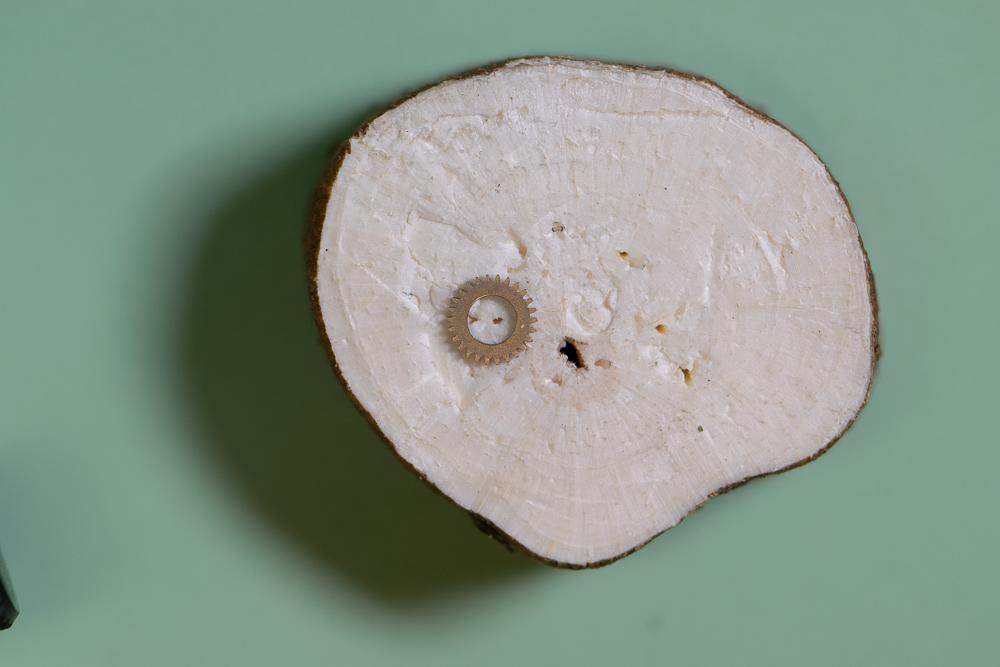
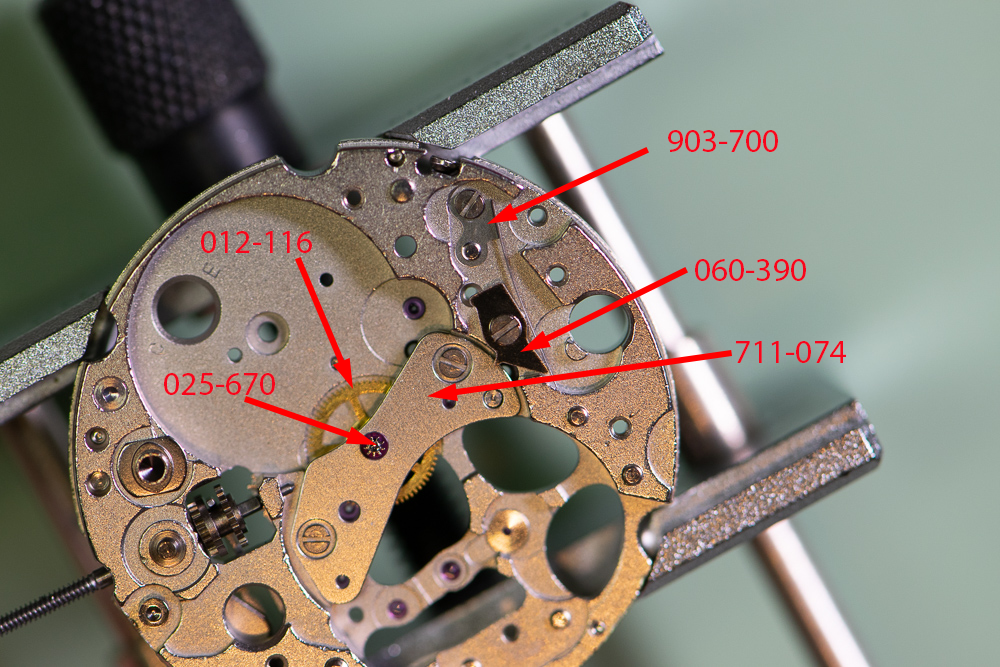
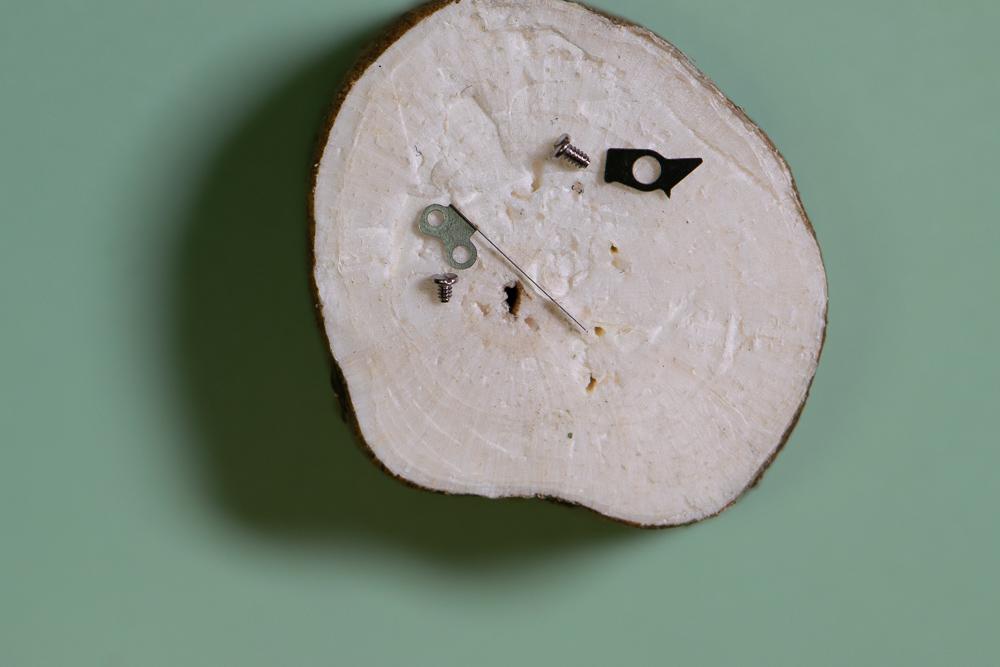
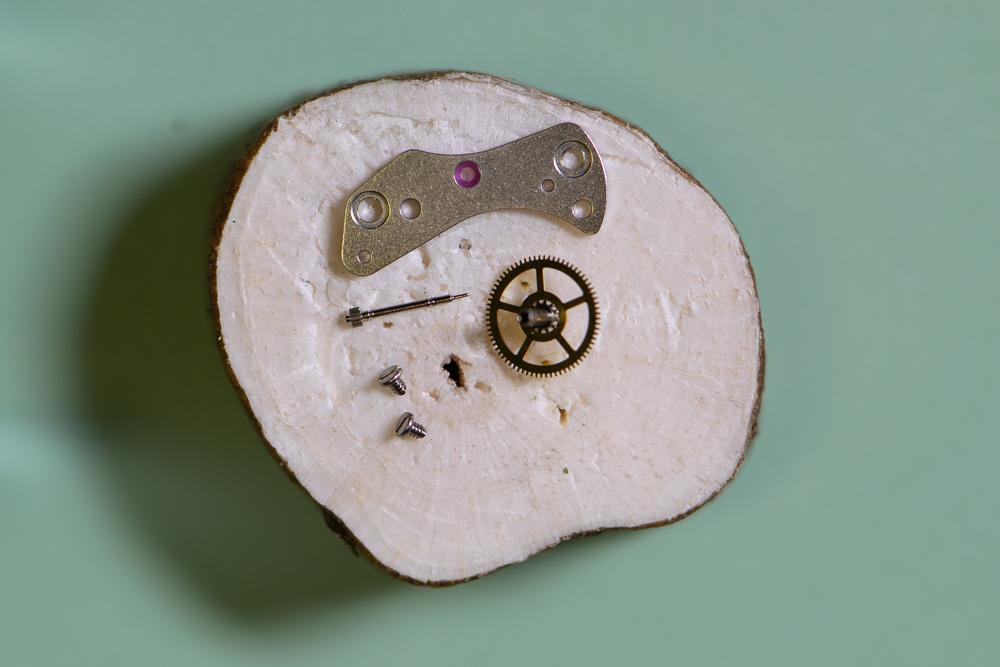
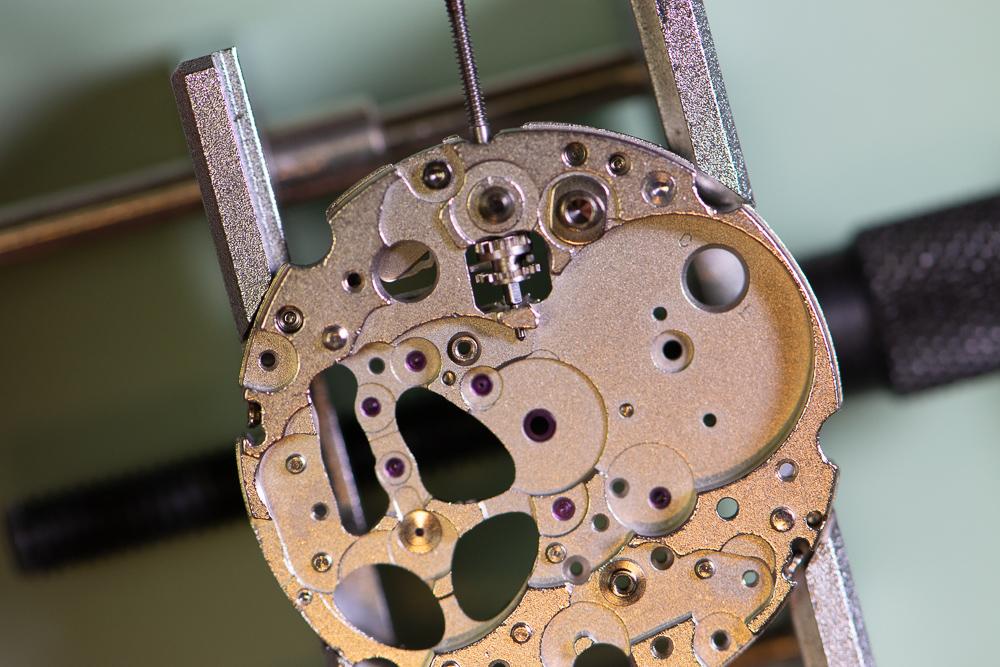
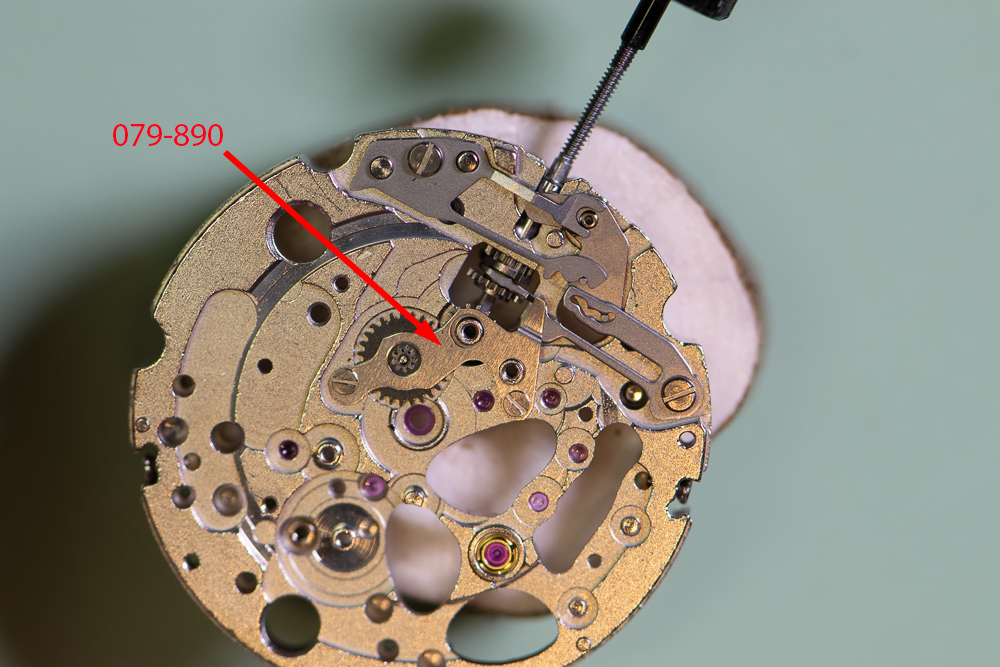
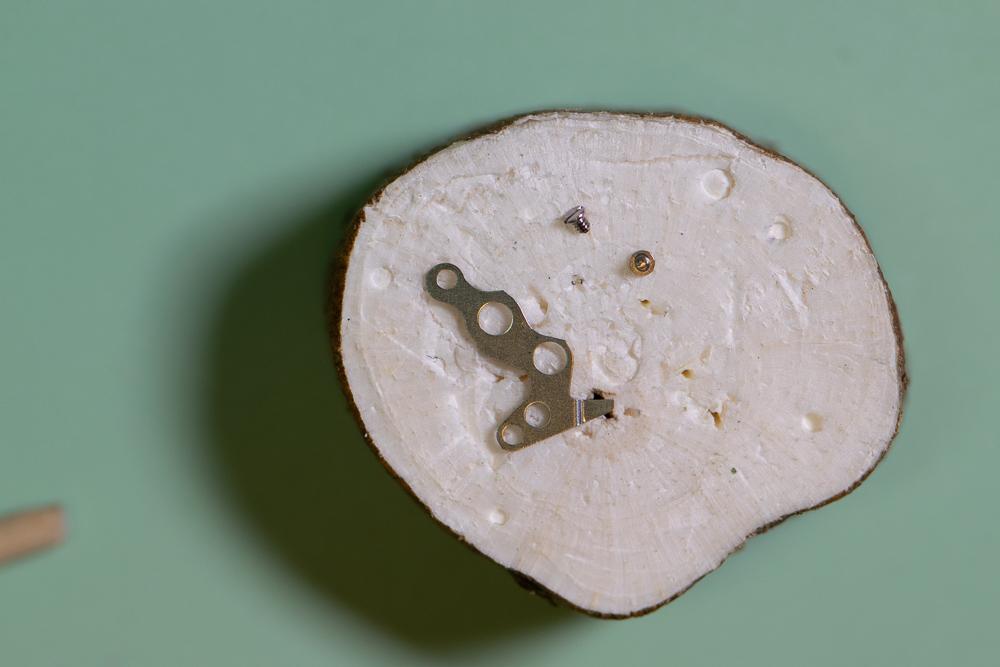
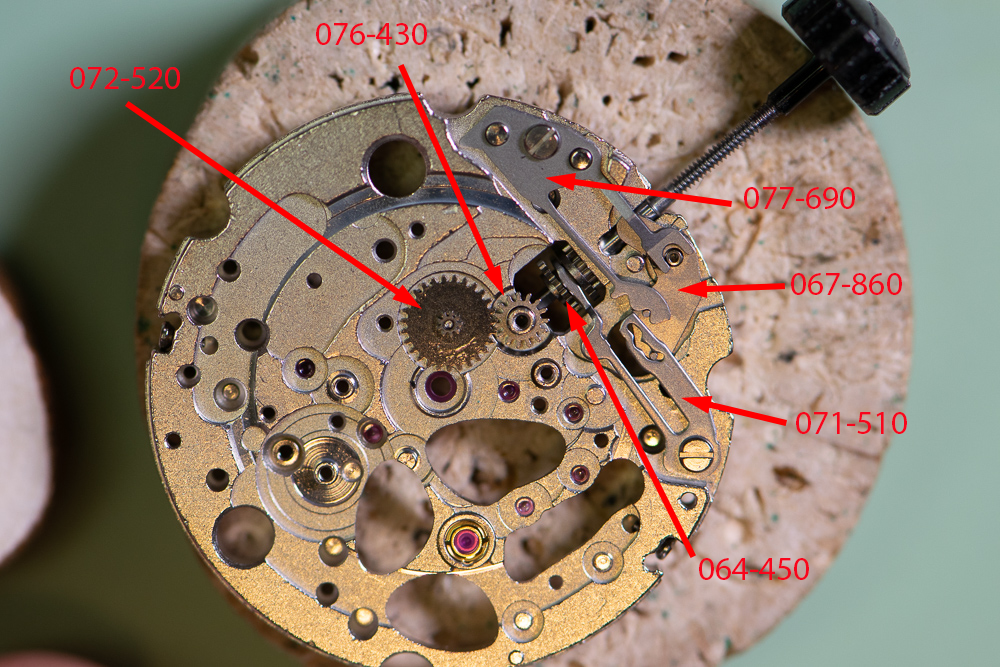
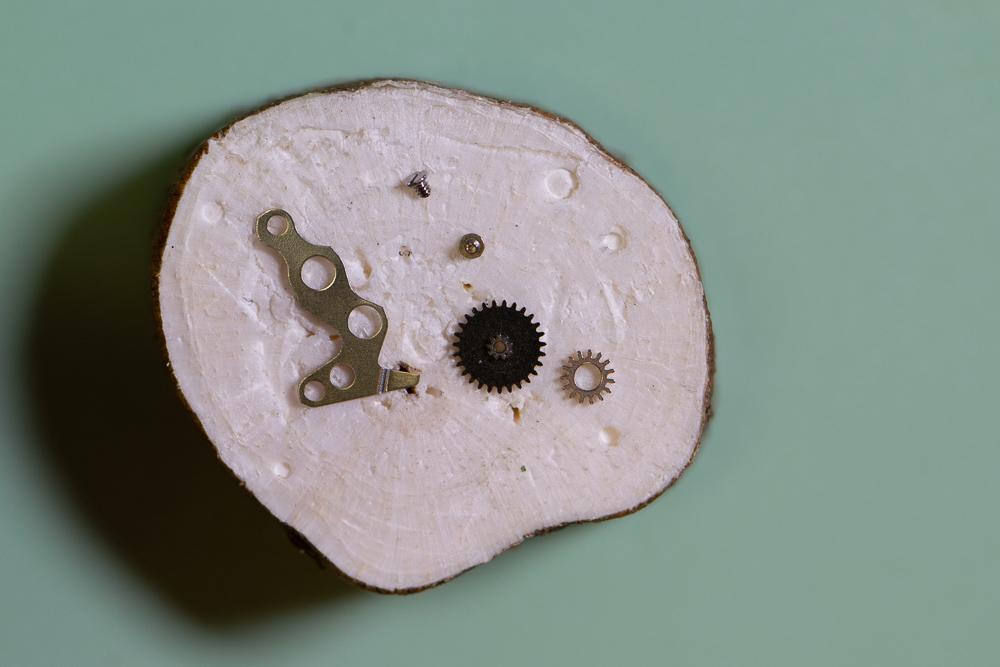
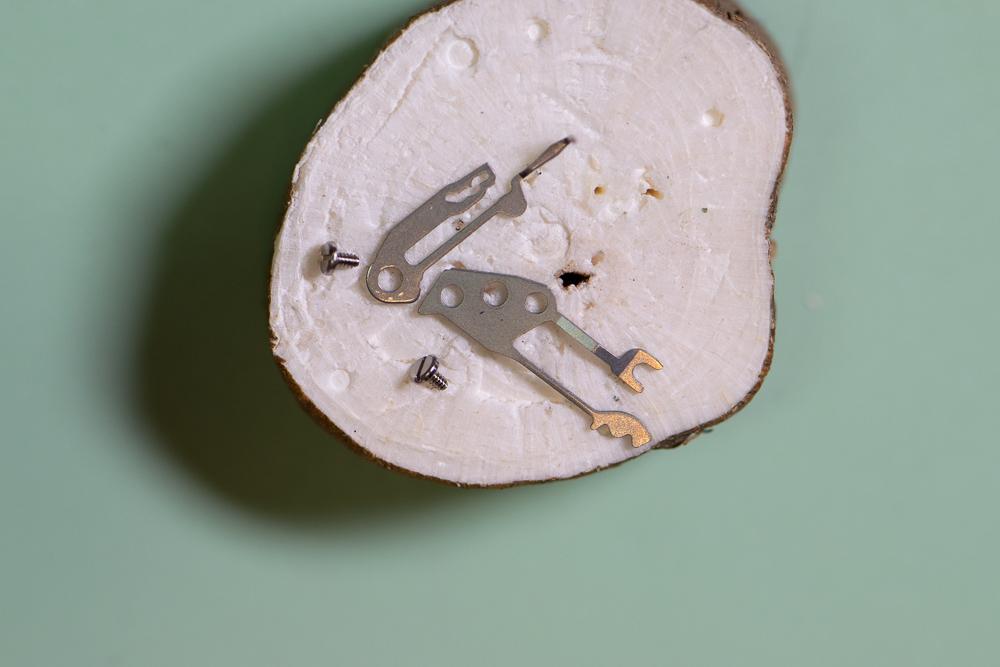
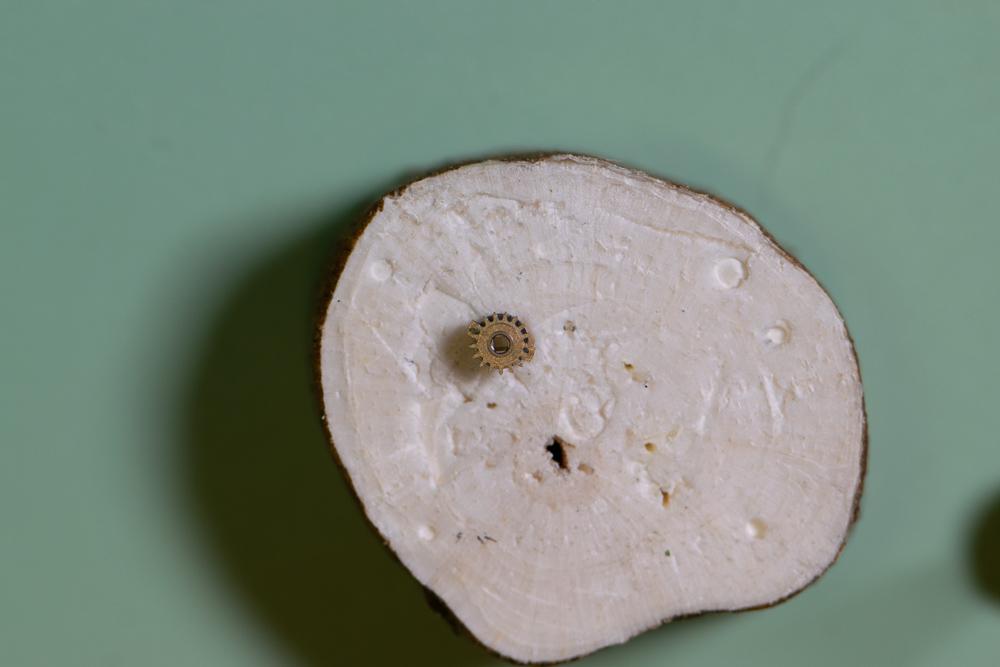
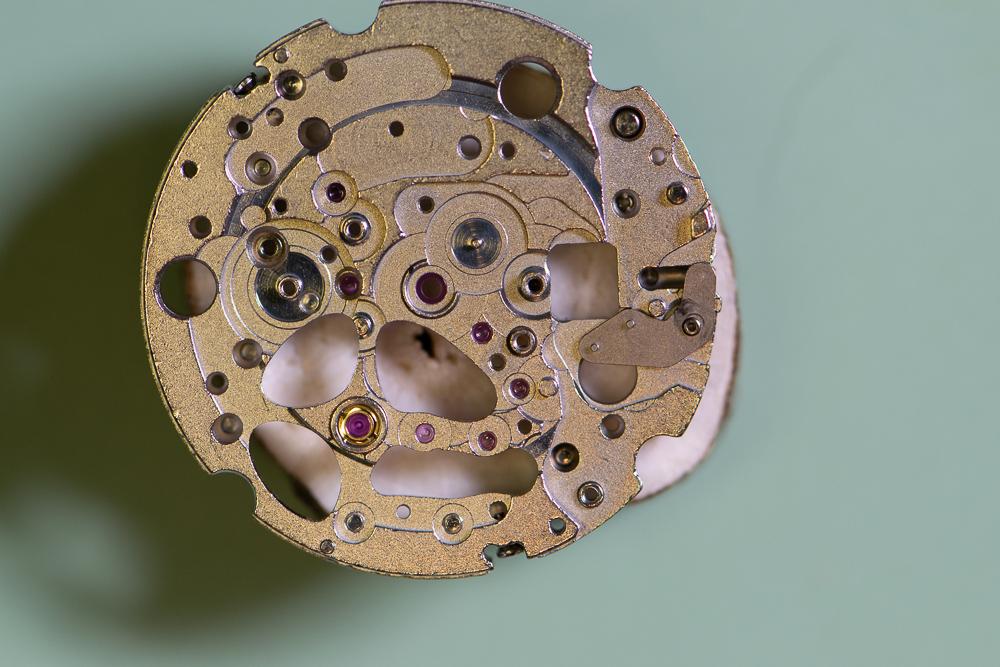
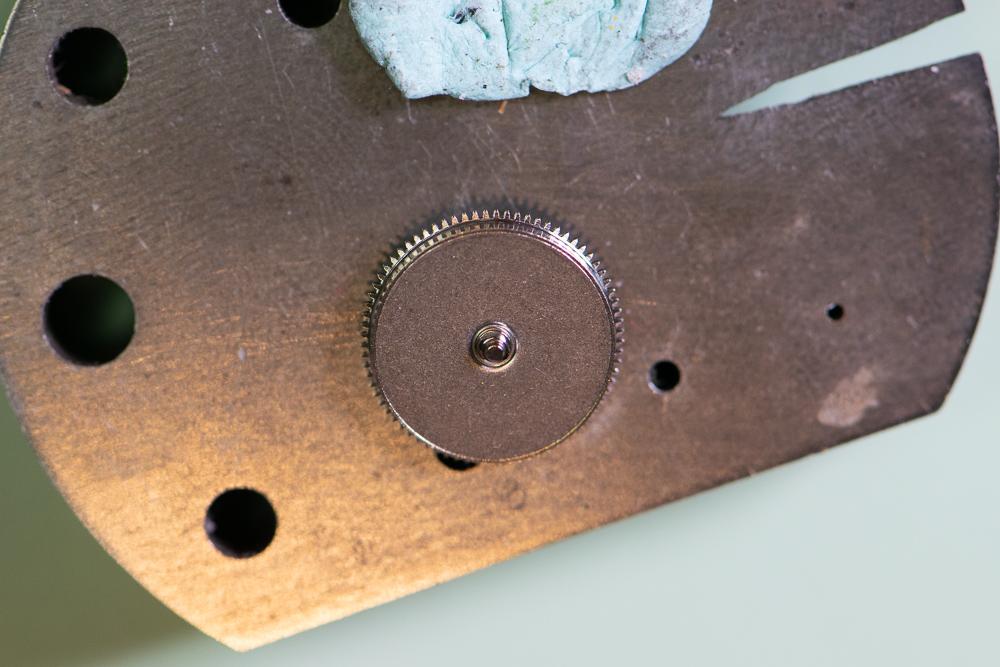
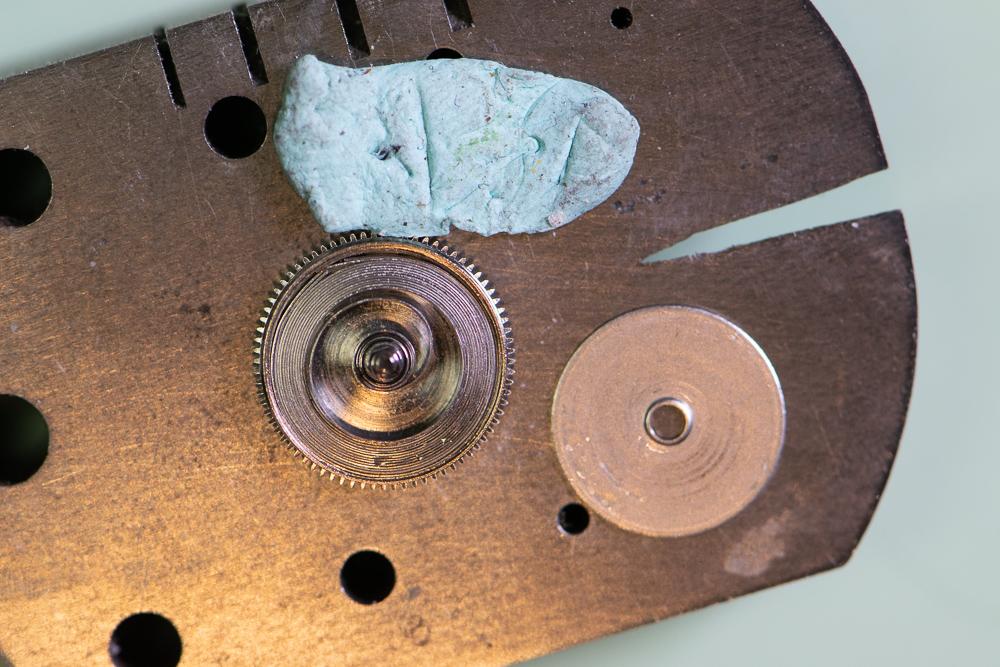
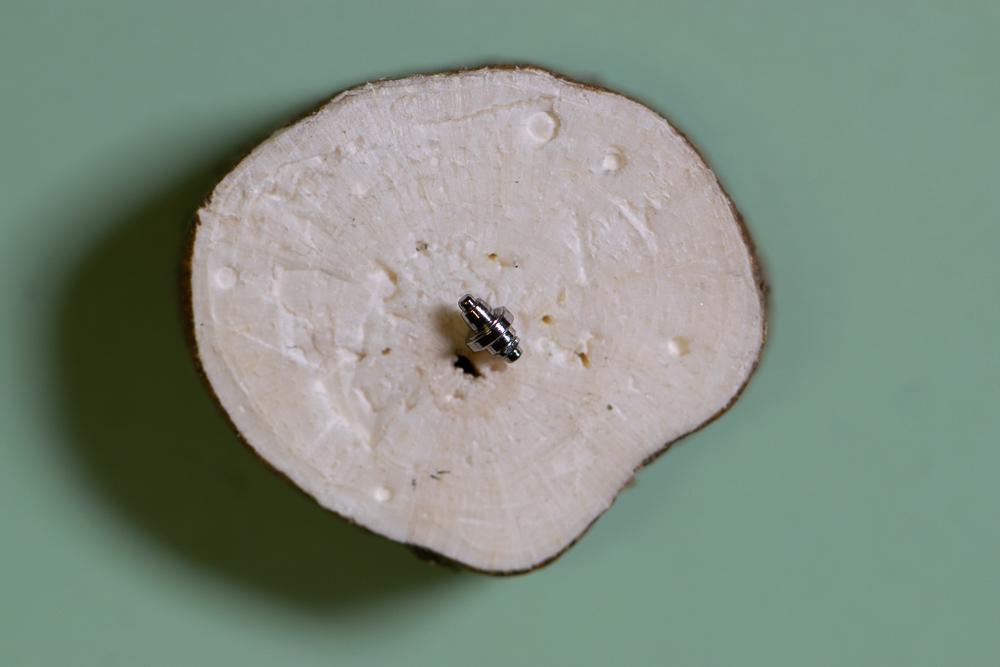
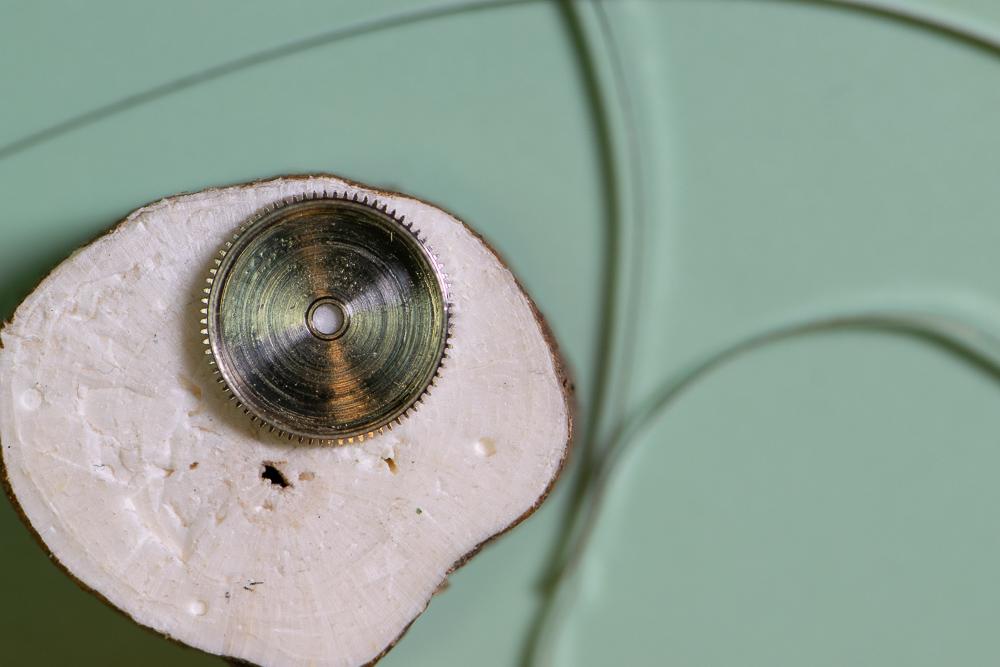
This is a more detailed version of my previous picture-only post for this watch. This Bulova 21-jewel automatic was given to me by a colleague for repair. It was running extremely fast – gaining about 15 minutes per hour. The movement is a Citizen/Miyota 82S0 skeleton. Looking through the clear back it was obvious that the balance amplitude was extremely low. First step was to simply demagnetize the watch to see if that did the trick as it sometimes does. No dice. I then removed the balance and pallets and put a small amount of wind onto the mainspring. The train spun up but as power wore off the escape wheel stopped, then started again several times. It was a very sloppy action. Nothing obvious in terms of loose or cracked jewels or excessive side or end shake that I could see. I decided to disassemble the movement and give it a full servicing. Here is how I disassembled the movement. Where I can I will list the Miyota part number for reference. You can find the parts list here: http://miyotamovement.com/parts_search.php?open=82S0 Figure 1 shows the face of the watch after removing from the case. Note the exposed balance at the 7 o’clock position. Figure 1 – Face Figure 2 shows the clear case back prior to removing the movement. Figure 2 – Case back The first step in disassembly is to remove the Oscillating weight (119-A17. Note that the weight is secured to a bearing that is pressed into the main plate. Unlike many Swiss movements, the screw securing the weight rotates with the weight itself. I used a peg wood stick to prevent the weight from rotating while unscrewing the fastener. Figure 3 shows the weight prior to removal. Figure 4 shows the oscillating weight after removal. Figure 3 – Preparing to remove the oscillating weight Figure 4 – Oscillating weight Figure 5 shows the movement after removing the oscillating weight. The plastic movement holder (500-710) is also visible. This will be removed after dealing with the hands and dial. I also removed the winding stem (figure 6) by pressing in on the setting lever and gently pulling the stem. The location for pressing on the setting lever was clipped from the pic, but it’s a standard setup. Figure 5 – Plastic movement holder Figure 6 – Winding stem After removing the stem, the movement was removed from the case. The stem was then reinstalled to facilitate power let-down, etc. With the oscillating weight removed, it’s a simple matter to lay the movement down dial-up on a piece of pith wood and remove the hands (Figure 7). The dial retaining screws on the side of the movement are loosened (not removed) and the dial is gently coaxed away from the movement by inserting a thin screwdriver blade. Figure 8 shows the dial after removal. Figure 7 – Hands Figure 8 – The Dial The movement holder shown in figure 5 is now lifted off. It is shown in figure 9 next to the movement. Figure 9 – Movement holder ring Figure 10 shows the dial side of the movement. Figure 10 – Dial side The movement is then flipped dial down and loaded into a movement holder for disassembly. The balance (039-102) is removed along with the balance bridge (710-191) as shown in figure 11. Figure 11 – Preparing to remove balance The balance complete is shown after removal in figure 12. Figure 12 – The balance complete Important: Before removing the pallets I need to remove all the power from the mainspring. I do this in the standard way – by applying a bit of winding pressure on the crown while pulling the click (060-390 in figure 11) out of the way with a bit of peg wood and allowing the stem to unwind in a slow/controlled manner. Figure 13 – About to remove pallets With the power let down I can now remove the pallet bridge (708-066) and pallets. Figure 13 shows the bridge prior to removal. The pallets and bridge are shown in figure 14. Figure 14 – Pallets and pallet bridge I probably should have removed the motion work prior to starting in on the balance – not sure why I didn’t. Regardless, we need to flip the movement back so I can remove the motion work from the dial side. The hour wheel is held in place by the hour wheel spring (176-109). Remove the 2 retaining screws and then lift off the spring. The spring is shown prior to removal in figure 15. Figure 15 – Hour wheel spring prior to removal Once the hour wheel spring is out of the way I can remove the dial washer (078-140), the hour wheel (075-124) and finally the cannon pinion (using your favorite cannon pinion removal tool). These parts are shown after removal in figure 16. Figure 16 – Hour wheel spring, hour wheel, dial washer and cannon pinion Figure 17 shows the movement after removal of the motion work. It’s now time to flip the movement back over and start in on the gear train. Figure 17 – After removing the motion work I remove the three screws securing the barrel and train wheel bridge (701-F52) and carefully remove it. Figure 18 shows the underside of the bridge. Note that the seconds pinion friction spring (903-690) was left in place. I didn’t see the point in removing it. You can also see the oscillating weight bearing that is press fit into the bridge. I didn’t mess with this either! Figure 18 – Barrel and train wheel bridge and seconds pinion friction spring Figure 19 shows the detail after removing the barrel and train wheel bridge. First, I remove the reduction gear (088-120) and reversing wheel (141-190). These components are part of the automatic winding mechanism. They are shown in figures 20 and 21 after removal. I make note that the reversing wheel should be installed with the brass side up. Figure 19 – After removing barrel and train wheel bridge Figure 20 – Reduction gear Figure 21 – Reversing wheel Next, remove the third wheel (017-760), fourth wheel (023-940) and escape wheel (032-106). These are shown in figure 22. Figure 22 – From left to right – escape wheel, fourth wheel and third wheel Next, I remove the ratchet wheel (059-560) and the barrel complete (001-870), which sits directly underneath the ratchet wheel. Th.ese components are shown in figures 23 and 24. Figure 23 – Ratchet wheel Figure 24 – Barrel complete Looking back at figure 19, you can see a spring, very similar to a dial washer. This part is called the ratchet sliding wheel spring (078-150). Simply lift it off (figure 25). Figure 25 – Ratchet sliding wheel spring With the spring out of the way I can now see the ratchet sliding wheel (087-250). I remove this part along with the crown wheel (058-360). Figure 26 shows these parts. Ah – finally a picture that shows the setting lever release button I mentioned earlier! Pressing here allows the stem to be removed. I will leave the stem in place for now. Will get to it shortly. Figures 27 and 28 show the parts just removed. Figure 26 – Crown wheel and ratchet sliding wheel Figure 27 – Crown wheel Figure 28 – Ratchet sliding wheel Figure 29 shows the click (060-390) and click spring (903-700), the center wheel cock (711-074), center wheel (012-116) and center seconds pinion (025-670). Technically I believe the center wheel cock should be named the center wheel bridge since it’s secured by more than one screw, but I’ll leave that open for debate. Tension on the center seconds pinion is provided by the friction spring we saw back in figure 18. Figure 29 – Click and spring, center wheel and cock, center seconds pinion Figure 30 depicts the click and click spring after removal. Figure 30 – Click and click spring Figure 31 shows the center wheel in place after the center wheel cock has been removed. Figure 31 – After removal of the center wheel cock Figure 32 depicts these parts after removal. Figure 32 – Center wheel cock, center wheel and center seconds pinion The train side of the movement is now fully stripped. This is shown nicely in figure 33. Time to flip it over and finish off the dial side. Figure 33 – Finished with the train side Figure 34 shows the current state of the dial side of the movement. To get started I remove the minute train cover (079-890). Figure 35 shows this component after removal. Figure 34 – Dial side Figure 35 – Minute train cover I can now remove the keyless work. The components are shown in figure 36. The minute wheel (072-520) and setting wheel (076-430) are removed first. These components are shown in figure 37 along with the minute train cover. Figure 36 – Keyless work components Figure 37 – Minute and setting wheel Referring back to figure 36, the next components to remove are the yoke (071-510) and setting lever spring (077-690). The stem can now be removed and then the clutch (064-450) is free to remove. The setting lever (067-860) was not removed as it’s press button is staked (spread). No sense disturbing this. Figure 38 shows the yoke and setting lever spring after removal. The clutch is shown in figure 39. Figure 38 – Yoke (left) and setting lever spring Figure 39 - Clutch Finally, the main plate is fully stripped. The dial side is shown in figure 40. Figure 40 – Main plate – dial side We can now deal with the barrel assembly (figure 41). Figure 41 – Mainspring barrel complete Using the steel anvil for support, gently press down on the gear teeth to pop the barrel cover off (figure 42). Figure 42 – Barrel cover removed Carefully remove the barrel arbor (figure 43). Figure 43 – Barrel arbor Unwind the mainspring from the barrel (figure 44). Figure 44 – Barrel with spring removed This completes the disassembly of the movement. My next step will be to clean it in the ultrasonic. Will post the reassembly as a new thread.


 1 point
 -
Most of the Oris movements are pin-levers with not much jewelling. They wear at the pivots and also the pin-lever. They also need new mainsprings but these will usually run for a few hours before stopping. Anilv1 point
-
The best way to adjust drivers is with an abrasive stone. You can use a holder but it is also possibly to do it by hand. I prefer a Norton India stone, I have tried diamond stones and those work as well.1 point