Leaderboard


Popular Content
Showing content with the highest reputation on 02/19/18 in all areas
-
Hi everyone. My interest in horology started over a decade ago and my fist exposure to the watch repair began with attending TimeZone online courses (Level 1 and 2). In order to complete these courses, I had to purchase some minimum tool set. From that time, I have been continuously adding tools to my workshop and slowly improving my knowledge. Then at some point in the last couple of years I have also discovered Marks channel and, as most of you, developed high admiration for his skills and experience. I consider myself a beginner but over the time I did get my hands dirty working on certain number of affordable movements ranging from vintage to newer Japanese, Russian, and entry Swiss movements. Mainly I service my own collection (mostly three hands, affordable watches) but sometimes, I also get to repair my friends and collogues watches. In most of the cases I was able to complete the work successfully. I don’t recall causing a major damage (selective memory, lol) but there were, for sure, some close calls. To wrap up, thank you for reading my introduction. I am looking forward to further learn and share on this forum.2 points
-
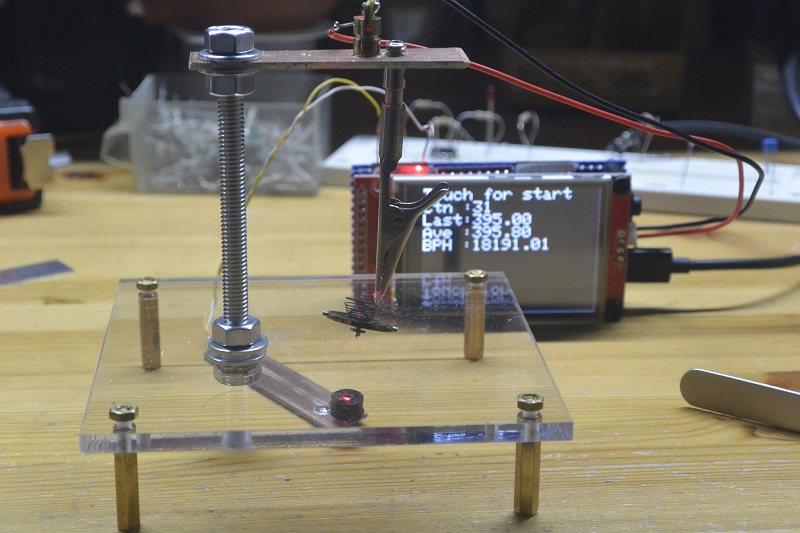
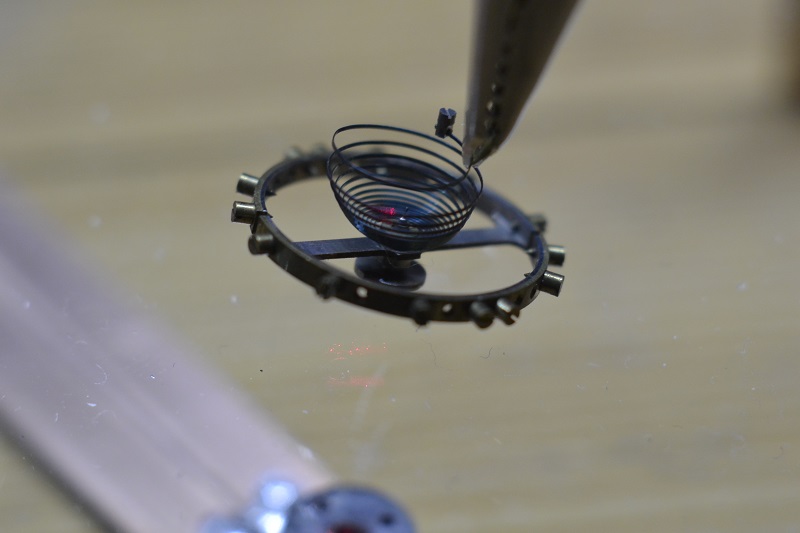
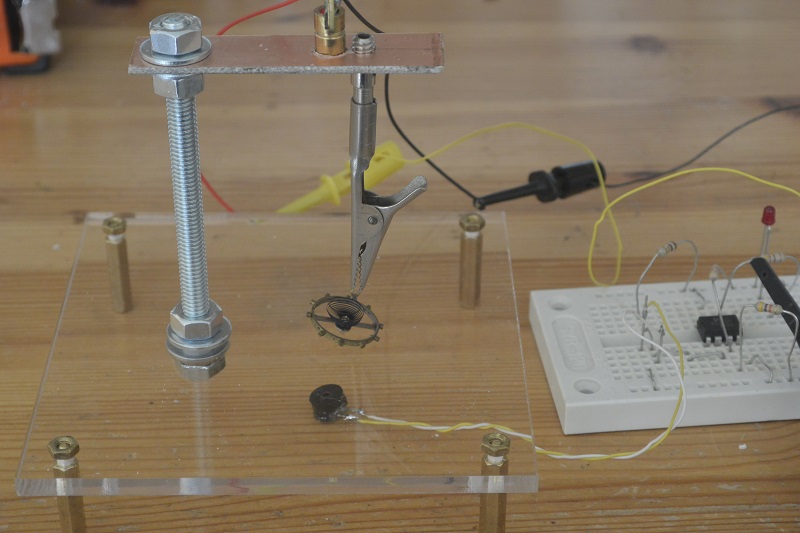
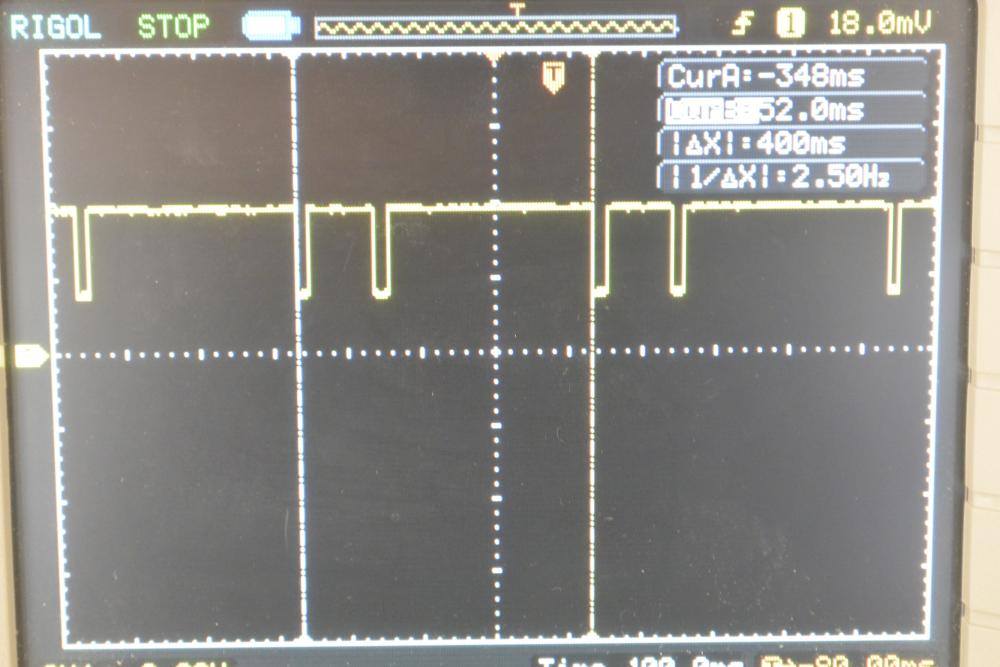
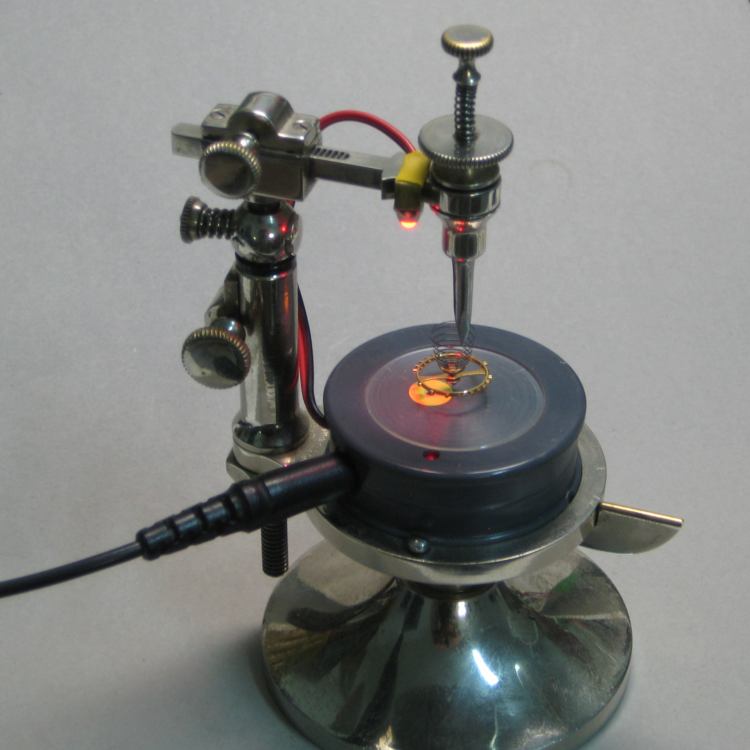
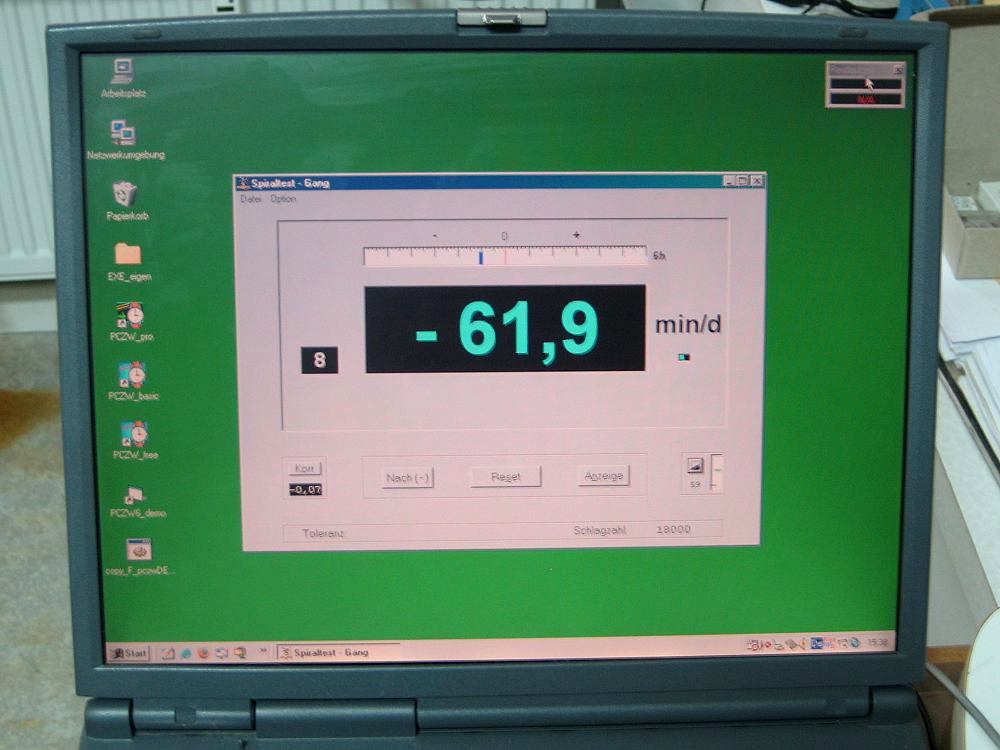
Hello guys, An attempt to make a low cost hairspring vibrating tool : Prove of concept : The hairspring (here it's a 18s balance) is clamp in a crocodile clip which has been grinded to be as fine as possible, a laser beam is set so that the beam is cut by the balance arm. The photo diode (from an old pc mouse ) is en-capsuled in a little housing to avoid parasite light (from what i thing to be an old TO3 transistor spacer found in my spare screws box). The IC is just a simple op amp acting as a comparator, the led on the output is used to visualize the that the laser beam is on the detector. First measure on scope : Doing some simple math show that an error of 0.1 ms on the measured value (which is 400 ms for 18000 bph) correspond to an error of 21.5 seconds / day. At that time base setting my scope has a resolution of 4 ms ! I switched to an Arduino based measuring system : I used an existing Arduino module based on a cheap stm32 and add a led (indispensable to adjust the beam) and the power output for the laser. The comparator is no more required as the stm32 has schmitt trigger inputs. The soft is triggered by the touch screen and accumulate a couple of measures in a circular buffer to compute an average value. This permits to eliminate aberrant measures that you can have when the balance starts to swing. Detail of the crocodile clip : In conclusion this is little tool (cost me only the plexyglass sheet, around $1.5) could be useful to match a new hairspring on an existing balance. The measures are relatively simple to do with a good consistency and surprisingly the croco clip do the job and you can get the balance swing for tens of second on the plexy. You need a resolution of 0.05 ms to be at 10 s/d and probably calibrate your measuring device. The main difficulty was to adjust the position of the laser beam. Hope this can give you some ideas. Regards

 1 point
 -
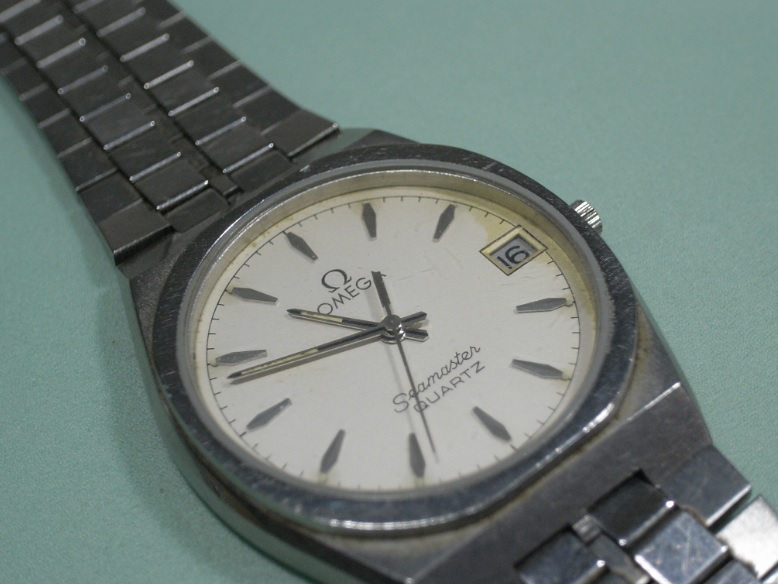
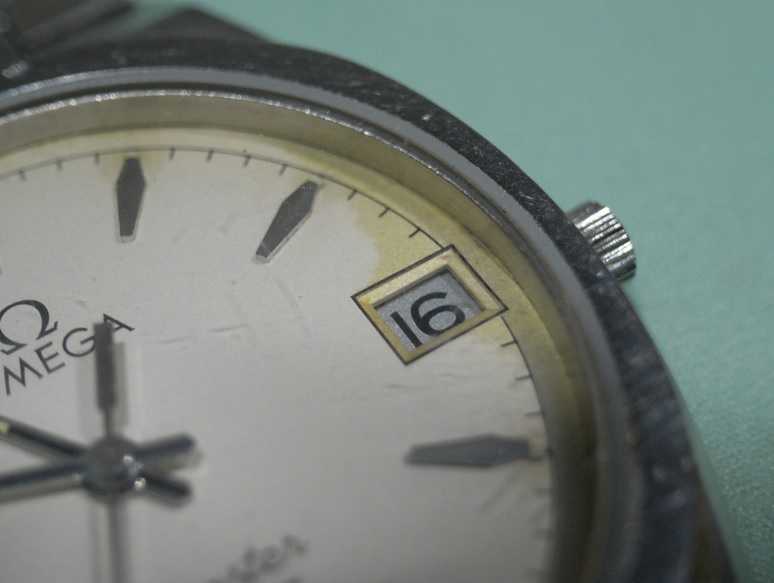
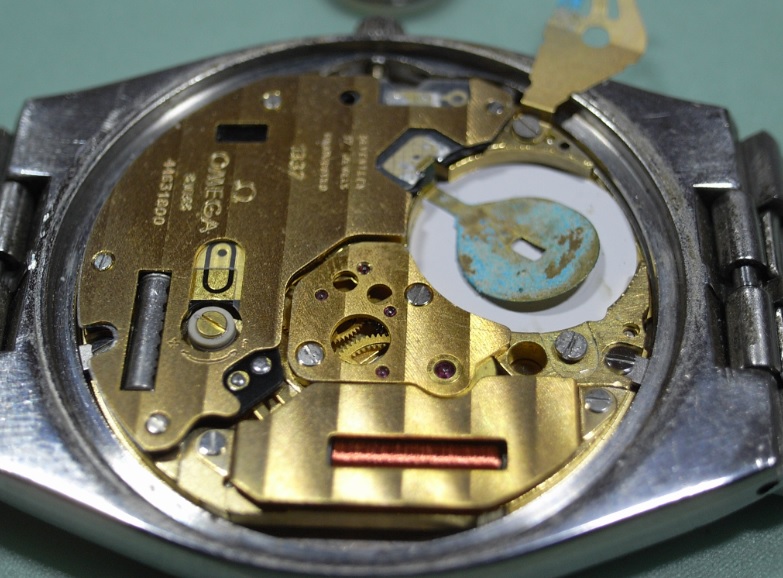
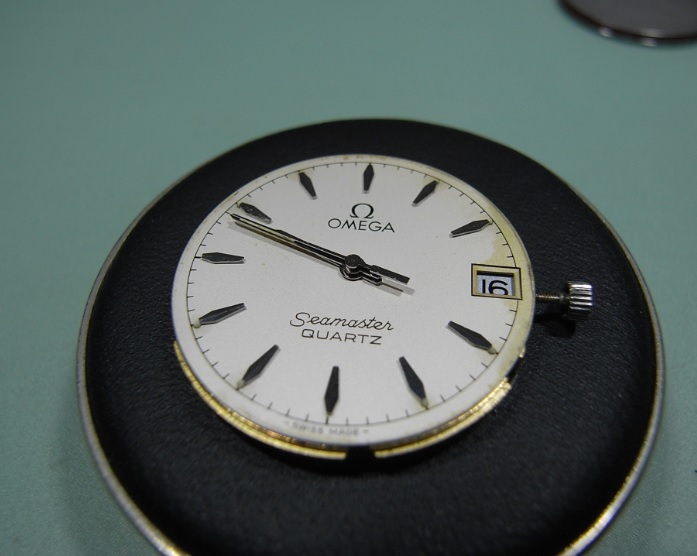
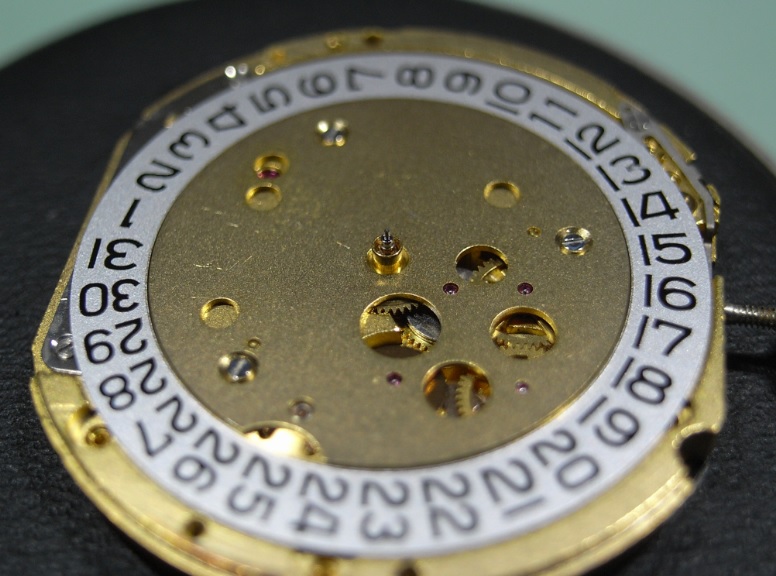
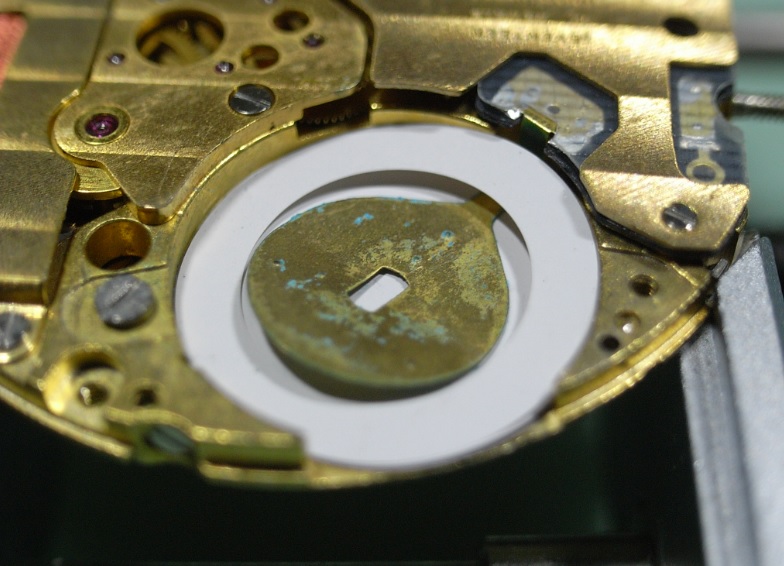
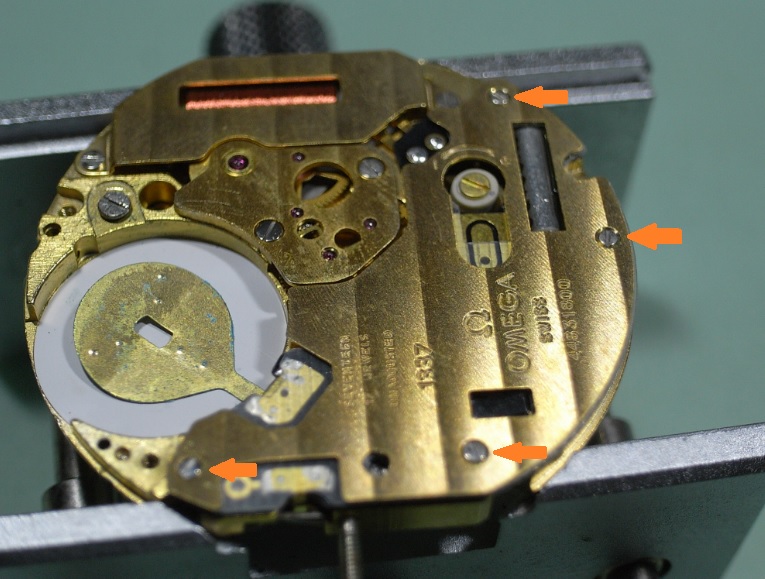
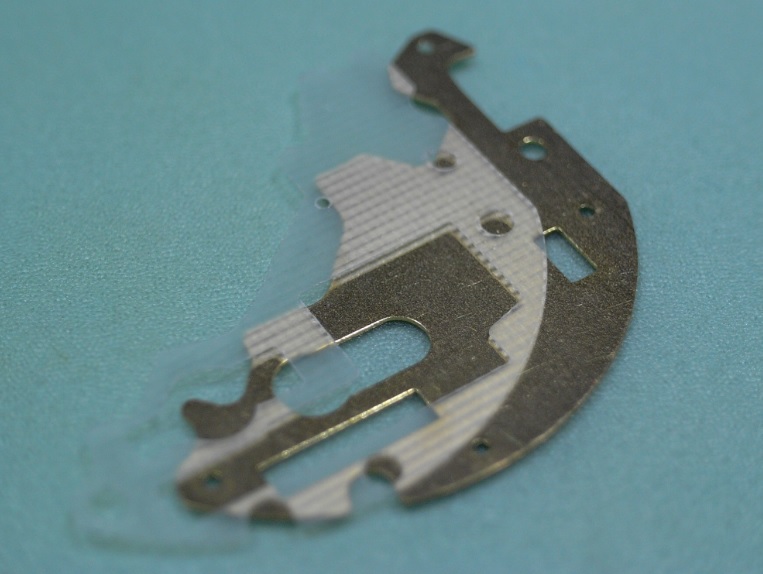
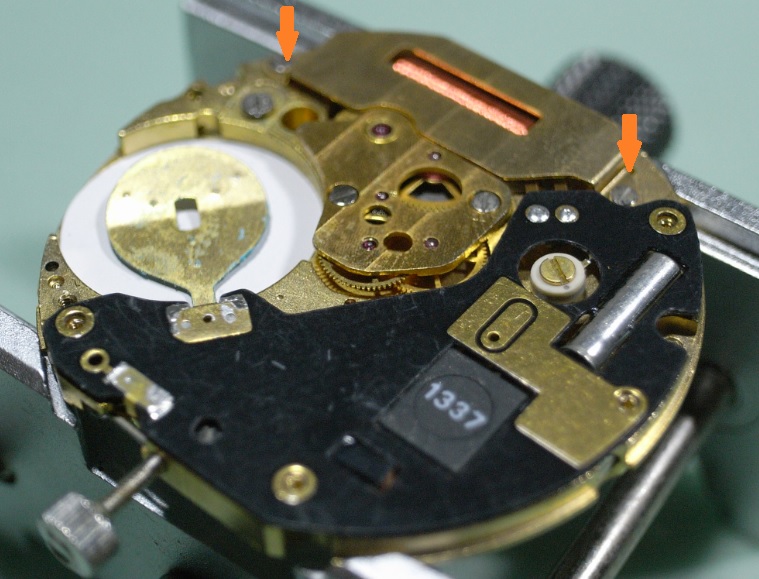
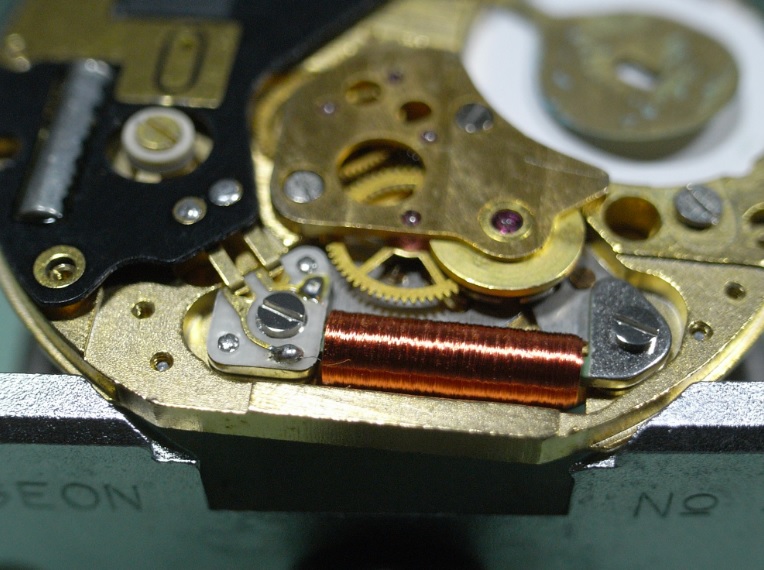
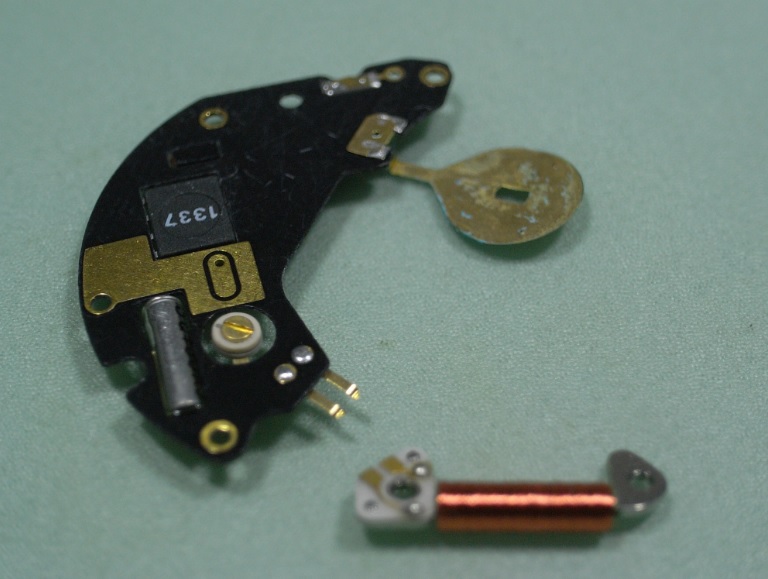
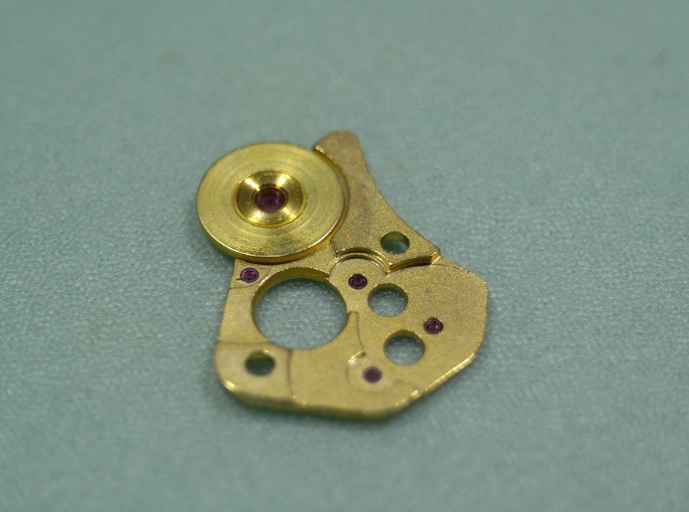
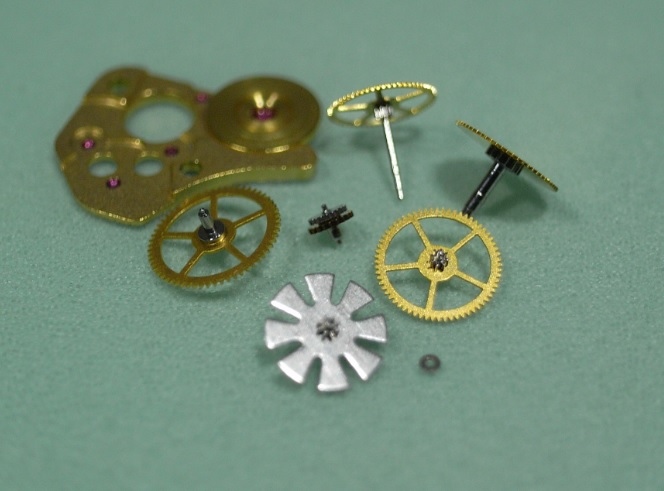
Hello fellow watch freaks. It's been a while since I've posted a service walkthrough, but I had an accident that destroyed my left shoulder and needed surgery. It's been a rough 6 months for me, with a LOT of soul searching throughout my recovery period. But I'm back on the bench ... at least at home anyway; work is a different matter, and my close friends on this forum know about that ... nuff said. This watch is owned by one of my older brother's friends. My older brother is one of the most selfless people I know, and has always been there for me. So when he asked me to do this for him it became TOP priority. It was the first item his friend purchased after he left school and began work: so there's a lot of good memories tied to this watch. As you can see it's an older quartz Seamaster with an 1337 Movement. On first inspection you can see water damage to the Dial @ 3 o'clock. So I wasn't expecting to see a happy movement inside. But when I got the Caseback off things didn't look too bad at all. Just a bit of corrosion from a cheap nasty Chinese battery. The movement still looked nice and shiny and the Stem only had a touch of rust up near the Crown. So this watch looks like one we can save :) Disassembly OK, lets begin. Fist remove the Hands and Dial from the movement. Again, absolutely no moisture damage under the Dial ... this made me VERY happy indeed. So on to the Movement Holder it goes. Remove the Battery Clamp and Insulator Ring. Then remove the 4 screws that hold the Circuit Cover. Note that there is an insulator under the cover. It is very delicate, so great care should be taken when handling it. Once the cover is removed the circuit is exposed; but before removing it, unscrew the 2 screws holding the Coil Protector and remove it. Then unscrew the Coil, and remove the Circuit and Coil. Place both the Circuit and Coil in a safe place to avoid damage, as this parts are obsolete, and if damaged you'll have to scour the internet for a donor movement ... good luck with that!! Next remove the Train Bridge Here is a reference photo of the train. As you can see, the Rotor is a very different looking animal to the modern ETA rotors. Carefully remove all the wheels, and store the Rotor in a safe place AWAY from the rest of the parts to be cleaned ... as this has to be hand cleaned due to it being magnetic. Please Note: There is a very small washer that fits between the minute wheel and the extended pivot of the Second Wheel. Be sure to identify it, and make sure it's put in the small parts container for cleaning. Here's the complete train removed from the movement for reference. Flip the movement over in the holder and remove the 3 screws of the cover that holds the Calendar Ring. As you can see that Motion Work and Calendar Work are fairly complex on this movement. Make sure you take good reference photos and study them carefully so they are not confused with wheels of the train. Remove the Calendar Ring. Remove the Motion Work and Calendar Work. Here's the complete Motion Work and Calendar Work removed from the movement for reference. The Crown and Clutch should now be able to be removed. Flip the movement over once again to tackle the Keyless Work Unscrew and remove the Setting Lever Spring. Lastly unscrew and remove the Setting Lever, Intermediate Wheel and Yoke. The Omega 1337 Movement is now completely disassembled and ready for cleaning. I will post the assembly soon.


 1 point
 -
YouTube video talking about the Sherline 3 Jaw Chuck and adapted Sent from my iPhone using Tapatalk Pro1 point
-
Getting the DU and DD positions to run close to each other is the most difficult part in adjusting, IMO, because there are so many different things that can cause differences. If you've got them both at +30 a day then that's bang on. Remember, adjusting and regulating are two entirely different things. You adjust to get positions within an acceptable range of difference (say, +/- 10sec/day from each other).....then you Regulate to get the average daily rate as close to 0 as possible, emphasis on the average. There's an excellent blog that describes adjusting and regulating vintage pocket watches, aptly named: adjustingvintagewatches.com sounds like you're well on your way!!1 point
-
W I was going to say that bit of advice aswell mate, I think you told me that trick on my first elgin full plate, I have another that requires a new 4th wheel if I remember correctly.1 point
-
A platax tool is basically a fancy staking set, they come up on eBay every now and then, and cost a fortune! I have both tools you have pictured, and they work like a charm. Pretty cheap investment if you do staffing frequently.
 1 point
 -
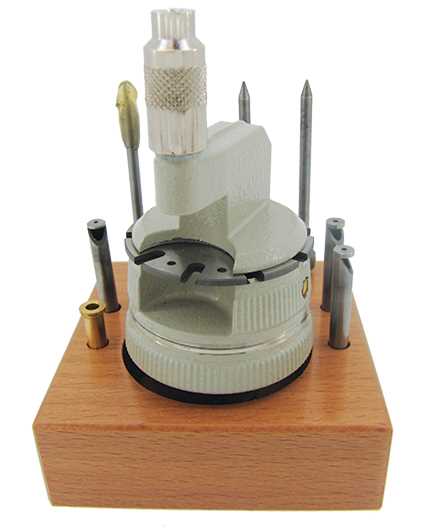
This is the best tool for safely removing the roller table. Mines by C.E. Marshall. Which quality wise I rate as good as Kendrick & Davis. With the hairspring removed, you place the jaws over the split balance arms. The jaw ends fit onto the back of the roller table. As seen, the jaw shafts are threaded and rotated in the chuck (want of a better word) The jaw diameter is reduced to give a better fit. A stake is placed over the lower pivot onto the staff and given a light hammer until the roller table loosens. Anyone interested in old pocket watches should keep an eye out for this type of tool. They do come up on auction sites Sent from my SM-T585 using Tapatalk1 point
-
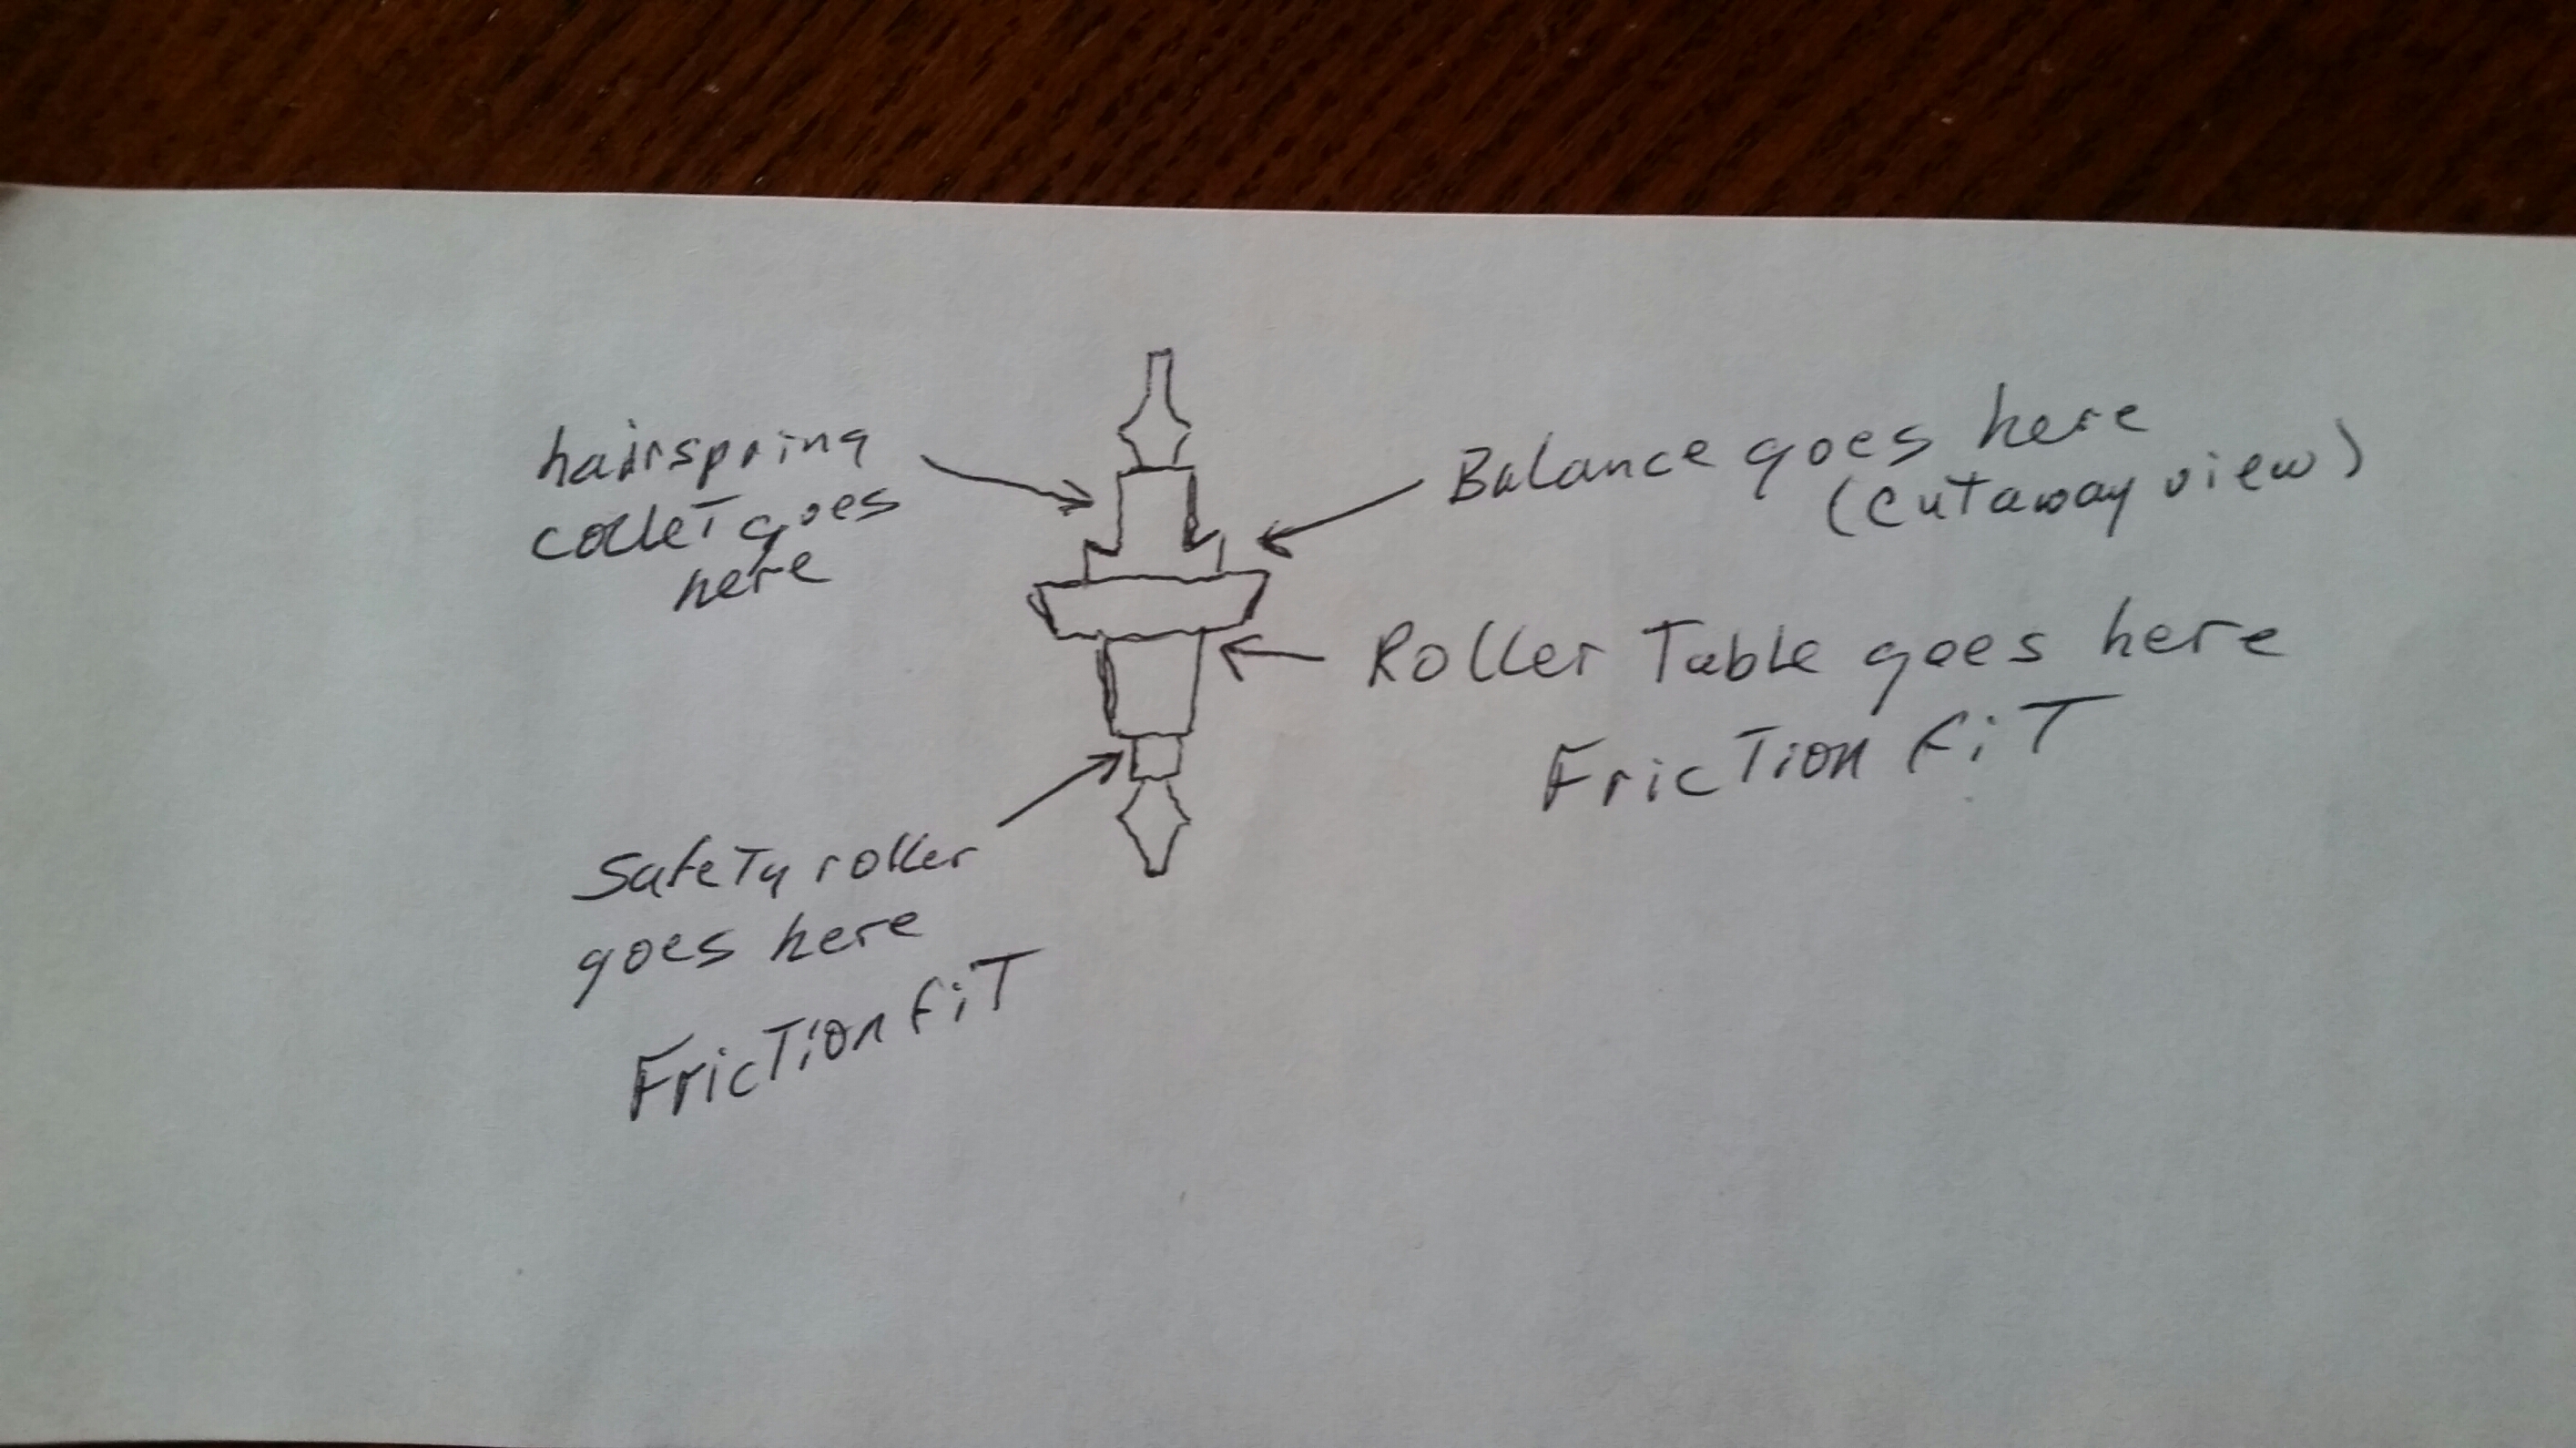
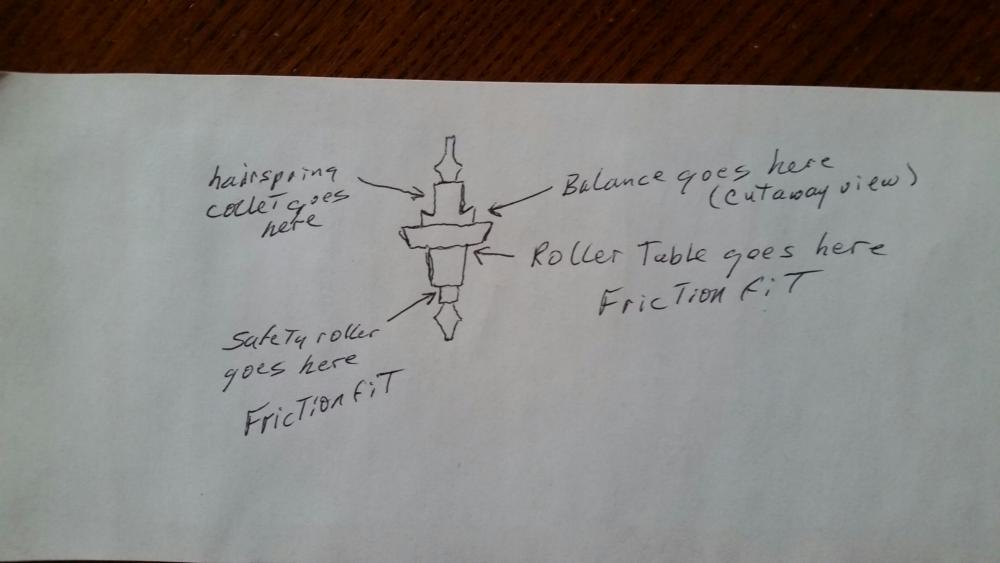
Here is a crude drawing of a balance staff and where everything goes. This is for a double roller, a single just doesn't have the second step at the bottom. The roller table and safety roller are both friction fit on a taper. The cutaway view of the balance rivet shows the undercutting required for riveting.
 1 point
 -
Has been going good so far now. Still running very smooth. Taking it apart. I lifted the plates ever so slightly using Rosinol lighter fluid, to clean the pivot holes and a toothpick to clear out the dry varnished oil and kept slightly working it until the top plate came off and lifting it slightly sideways so the pallet fork didn't catch on the bottom balance jewel cock for there is a cutaway so it doesnt catch. Serviced the watch relubed it reassembled and it's been running good for over a few weeks now ( after winding it a few times). It actually keeps decent time.1 point
-
Thanks to all! The problem is solved! The washer goes between the pinion and the center wheel (Elgin safety pinion). I don't remember taking it apart. I did have one come apart on a previous movement which explains the second one I found. Someone just helped me with this problem, you think I would remember.1 point
-
That is watchmakers anvil. Used for many different things.1 point
-
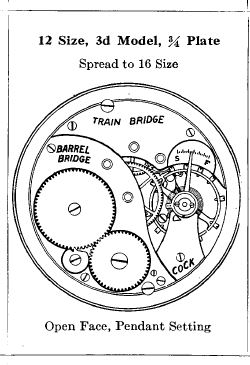
It usually works best for me to reread the original question and I noticed you said the last three Elgin watches? So are all three washers identical from all three watches? Then background history? Where they running before did they come from eBay different sources for all three? One clue of why I am asking is you don't know how many parts are original that definitely suggests a problem. What's interesting with American pocket watches are there mass-produced. If you look at the parts catalog you'll see that the parts will interchange except the reality is there usually hand fit. At least a lot of the parts some parts do interchange. There are some YouTube videos showing assembly of American pocket watches and you can see that as the parts go in somebody is adjusting to fit. So the more parts that are swapped and interchanged in American pocket watch the less likely you are to get it to run right without a lot of work. Then I'm attaching 3 separate PDFs. The Swigart American Watch Movements Is almost a must have if you're working on American pocket watches. Doesn't list every watch but shows the parts for the various sizes of watches. And as a bunch of reference material like all different mainsprings found in pocket watches. Then PDF Elgin parts catalog from 1915 which unfortunately lists the parts alphabetically. Then what's interesting that the various parts catalogs are how the watches are described. For instance 12 size Illinois has a whole bunch of variations but really comes down to about five different models that all the parts supposedly interchange over the entire manufacturing history which they do not. So for Elgin yours is listed as a 12 size 3d model class 114 That I have a PDF of that page so you can see that. Then before we go looking for washers in the parts catalog we need to discuss terminology? Terminology in horology is interesting because it changes with location and time. Or simplistically some parts will go by whole variety of names depending upon when the publication was done and where. Then it be nice to get a better picture of your washer and the side view click doesn't exactly look flat to me it just doesn't look right at all before we start looking at washers. So the first washer found on page 110 you would normally never see. So we see that this is a center staff washer and what the heck is a center staff? So universally we think of staff and balance wheel but the terminology paragraph will tell us that there other parts that can go by the name staff found in the watch. So not always labeled is safety pinion? When the main spring break six release a lot of bad energy which will break things so the safety pinion unscrews itself from the center wheel staff. Sometimes found underneath is a flat steel washer.. So part number 1555 would be yours it would be flat shiny steel. Then on page 111 winding wheel and ratchet wheel washers. Winding wheel in our terminology is crown wheel. Some watches will have a washer under the screw holding the part in place. Then this is usually a machined washer is a recess for the screw and as you can see comes a variety of decorative finishes. Then as mentioned above under the crown wheel/winding wheel sometimes is found a steel washer but Elgin doesn't Seem to have it so it's probably called something else. Maybe crown wheel spacer or something and that's not always universal and yours doesn't have that based on the link below. Link below someone is disassembled the model 315 and any of the washers mentioned above other than the safety opinion washer which of course we can't see none of the rest are visible. http://www.rdrop.com/~jsexton/watches/museum/elgin28563994.html Swigart American Watch Movements 12 size.pdf 1915 Elgin Catalog ( All Illustrations ) washers.pdf 1915 Elgin Catalog ( All Illustrations )315 .pdf
 1 point
 -
This one needs some work, love the dial, clean minimal text. Some dials its like they are writing a novel.
 1 point
 -
One of the few movements that can be identified from the bridges due to the distinct barrel bridge, an incredibly long production run in various versions from 1935 to the mid 70's, shock resistance introduced to the movement in the 1940's. I dont know in that time how the movement developed and if different versions have different mainsprings but the movement you have is a early one so I should imagine the mainspring will be the same as listed on Ranfft but you are going to have to take it apart to fit it so you may as well check.If you remove the dial it will probably have the calibre number stamped on the plate. Cousins list the GR4870 1.70x.095x9x320 which differs only slightly in length when compared to Ranfft1 point
-
7t42-7a2a on a new non Seiko padded black leather strap.1 point
-
Hi syfre, I like your prototypes and your spirit of research. Who ever had to make a flat or a Breguet hairspring (happens now and then in my shop), knows why you need such a device. Years ago I made my own device as I did not like the traditional boxes that can test one beat rate only and are ridiculous expensive, very similar to your setup: Advantage: box has a built-in 3 V battery that lasts for years (or one month if running permanently). Frank
 1 point
 -
I thought I would post this vid. It is a vid promoting Seiko but it is also excellent in showing how a mechanical watch works. Well worth watching.1 point