Leaderboard


Popular Content
Showing content with the highest reputation on 02/26/24 in all areas
-
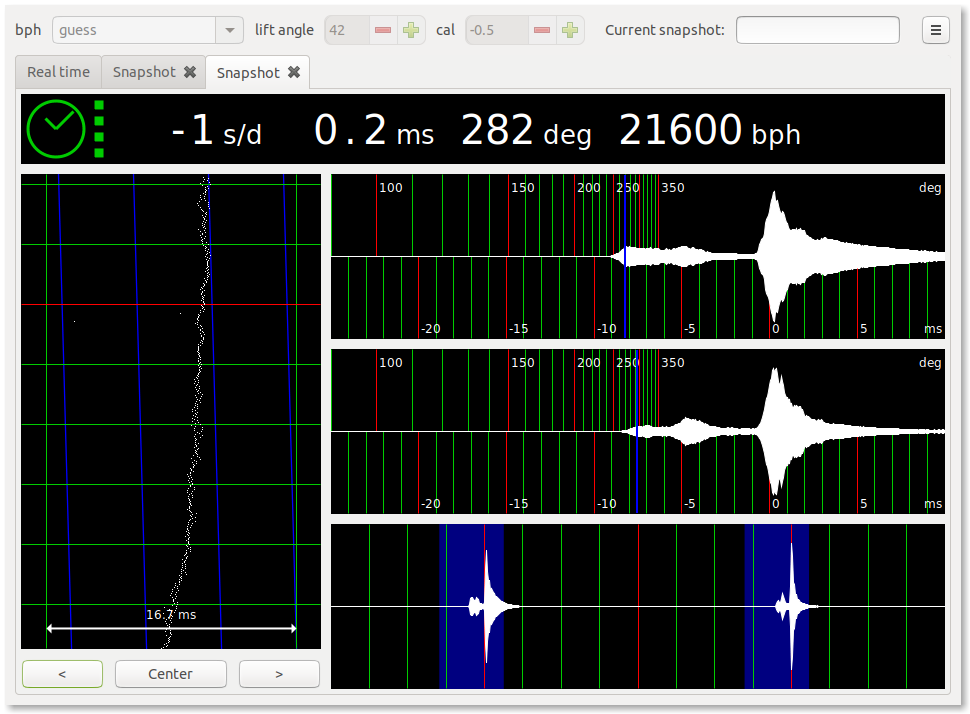
Update. And I know it is nice to read about an update and not wonder at the outcome. Before I commence to tell. I would like to send special thanks to members, both in the post and those who contacted me via private messages. Many sensed that I was becoming stressed and being concerned for me, contacted with help and messages of well intention. As you may have realised, I was very close. Despondent. I took the advice of many and set myself down and read the messages a number of times. Do you know how good you are? Friendship is not a big enough word. Where am I now? Back is where. Thank you. And possible end of my woes. I put into practice what many said. Look at what you do. As you have all said, in some form. I needed to look at all aspects of my system of installation. Well, this I have done. I looked at:- Disassembly. Did I pull, twist , damage any item in removal, especially the balance and pallet. I checked a number of watches that I had serviced and it looked ok. Checked all items on the microscope. Showed how careful I was. No damage seen. Cleaning. As before. Pegwood. All items in lighter fluid (Naptha) then Ultrasonic. Pallet fork and balance cleaning in fluid but not Ultrasonic. All items in Isopropyl and Ultrasonic. Pallet fork and balance cleaning dipped in fluid and then blow dried (no ultrasonic for these). Everything checked again with microscope. No damage to pallet or balance. I now needed to reassemble, so plenty of more practice now. Each item installed, following many members videos. Took my time. always check train of wheels ease of free movement. Barrel and spring always cleaned and lubricated. End shake checked. Dial side, motion works and keyless works always check and lubricated. Pallet installed. Exit stone oiled and rotated. Jewels removed and installed, correct way up folks. Oiled as per directions. And now. The balance. And the problem amplitude. After a number of tests it would appear the culprit it is me. I am careful with screw installation of all parts. I never overtighten. I close down, check item and then tighten gently. Using Alex Hamilton's guidance of down, check and then tighten only the width of the screw head gap, if that. Never had a problem. It would appear that as the balance is always on a heavy bridge I always secured it tight. I inadvertently closed the end shake, increasing resistance and decreasing the Amplitude. This is the only screw on which I ever put a 'full' pressure turn. It would appear that little amount of extra pressure always gave enough to close down the end shake. Less is more it would seem. I have tested this with a few watches now. Removed the balance. Cleaned, jewels also, and replaced. Installed to the bind, but this time watching the groove, tighten to possibly half the distance. Amplitude is increasing to a tolerable rate. Certainly in the 200 degree area, an increase of 30% all round. Whilst it is not the bee all and end all to my problems, at least it has given me a way forward. Have I overcome my problem? Could it have been so simple? In reality, I don't think so, still some way to go. But sitting back, going over system and totally applying what members say is the way. The outcome? Watchmaking, ongoing. I feel able to begin to partake in discussions again. So, thank you. Ross5 points
-
Should be standard equipment in a beginners kit
 5 points
 -
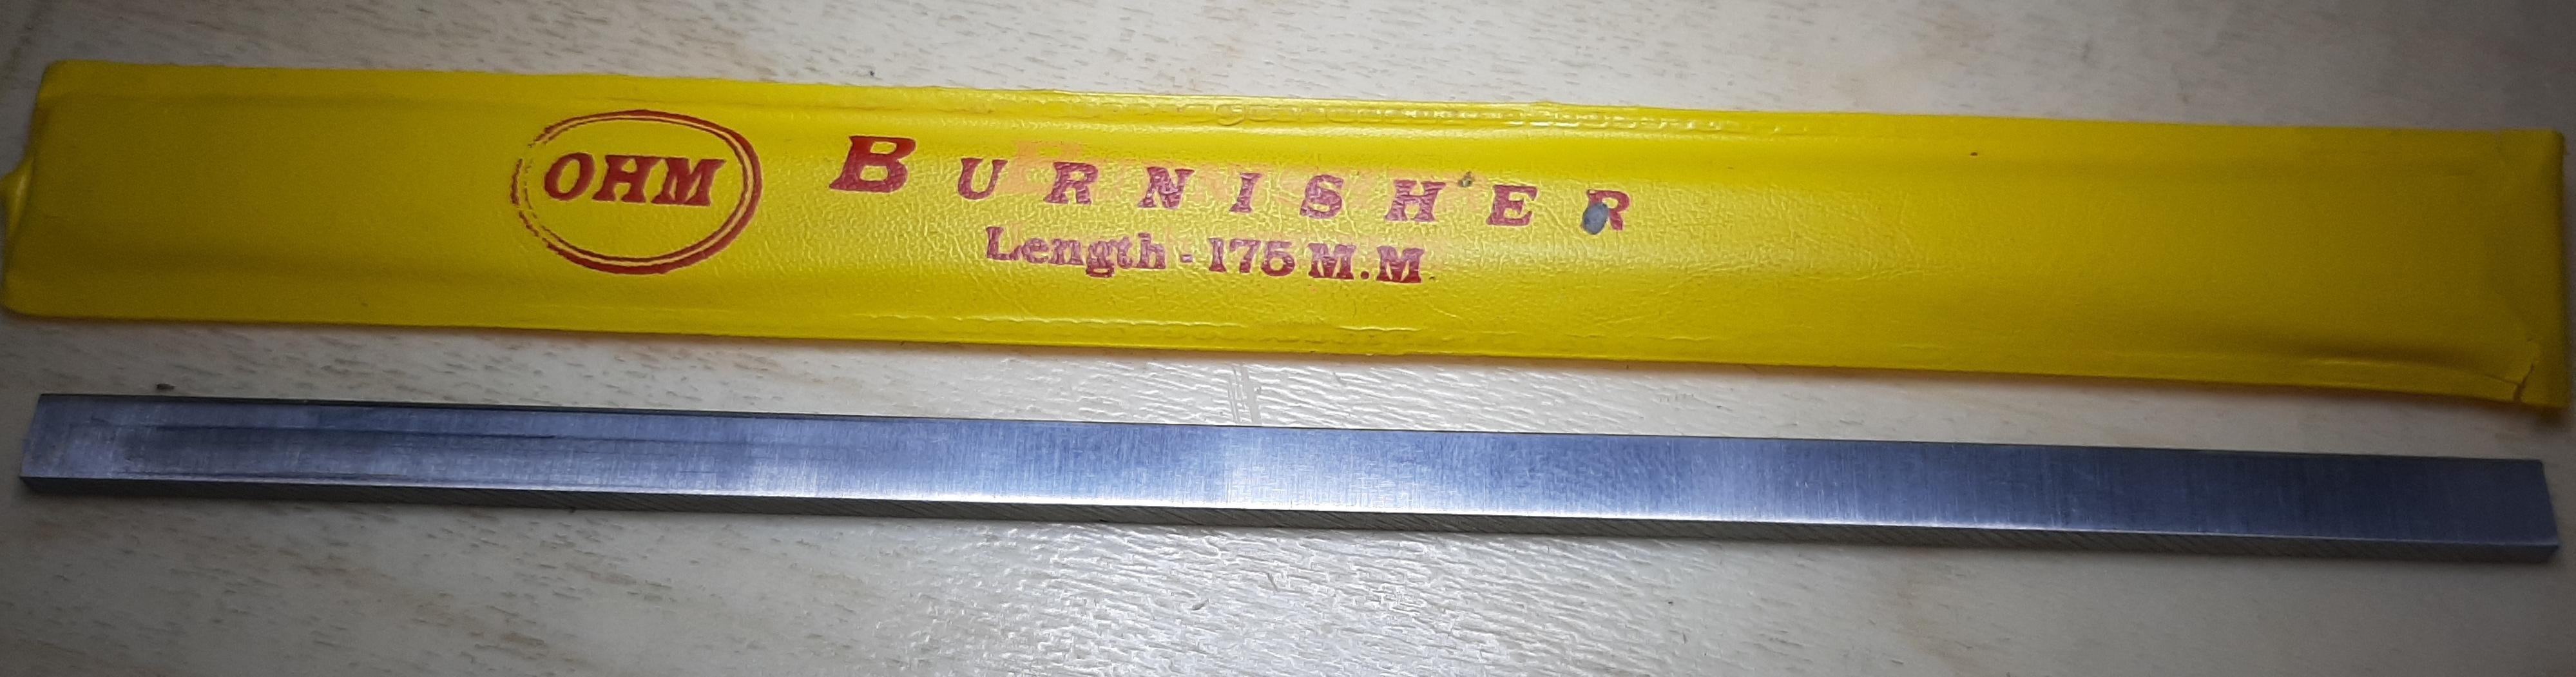
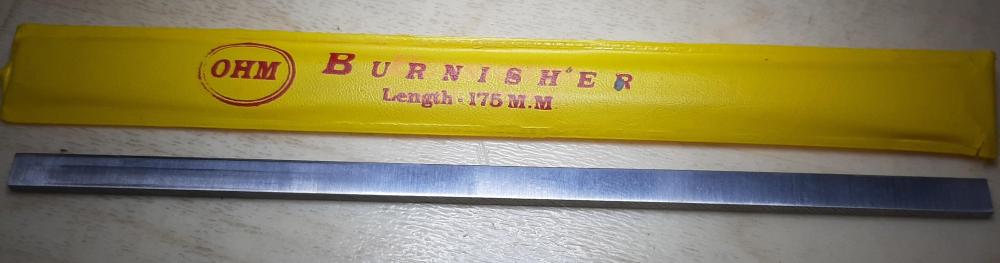
So, being a frugal Yorkshireman, I bought a cheap Indian burnisher for about £12 There is no handle, so it functions both right and left handed. The metal does seem hard enough, and I have refinished the surface on some oiled wet and dry. It does seem to do the job. I haven't used a 'proper' burnisher, so I don't know how it would compare. So the question is, what would spending and extra £130 on a flat piece of metal gain me ? What would a £££ burnisher do that this one is not able to ?
 4 points
 -
which theory would you like to hear my favorite is alien abduction. In real life people learning watch repair tend to be very destructive. I like to relate watch repair is similar to learning to be a doctor except? Doctors usually study and practice on nonliving patients before they get the work on the real thing living. Where as here people like the learner as they go practice on living watches and it's probably good that doctors don't learn the same the same way otherwise their malpractice insurance would be even higher. So yes people learning watch repair are very destructive. I have an amusing video. In the video he has a Swiss watch versus your clone where they didn't quite follow the same manufacturing steps. So in the real setting the spring will typically hinge back exactly as shown in the video. Although it would be preferred not to do this when the watches running. Makes it a lot easier if it's not running. So on a Chinese clone and watch typically when you hinge back the spring likes the fallout.4 points
-
These days I seldom ping parts (knock on wood!), and when I do I have a wonderful wife who helps me find them having the eyes of a hawk (bless her!). To me personally, it comes down to being relaxed, physically and mentally, and being patient, taking my time, which I can afford as an enthusiast. I constantly try to monitor my physical state of mind and body. When I become too tense, frustrated, or impatient I try to force myself to take a break, which, in itself can be frustrating at first. This, just like handling tools, takes practice.3 points
-
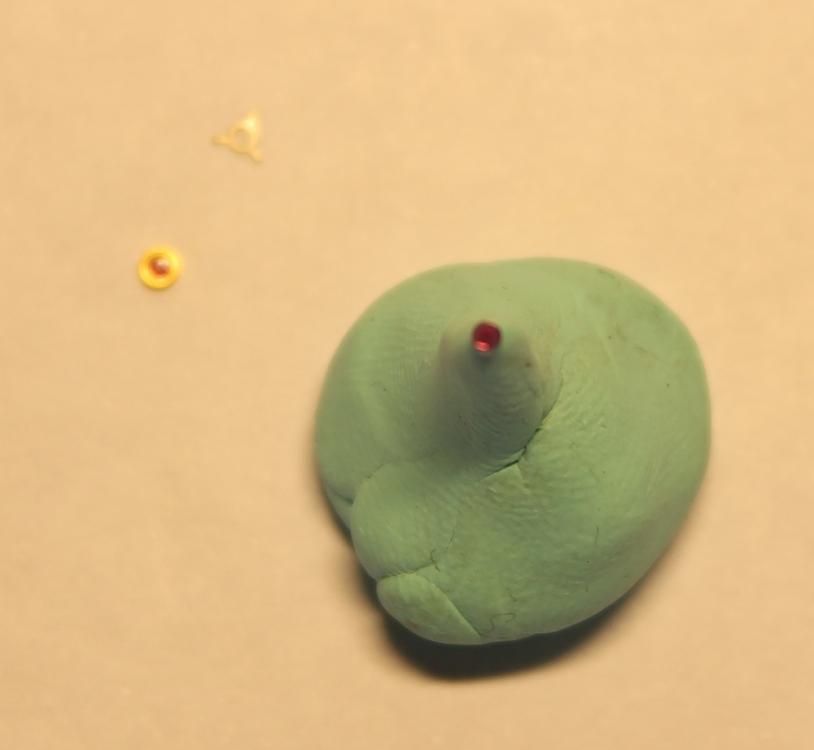
In the beginning I had problems with handling the cap-stones as well. I discovered a method which suites me much better and I never had a "ping" ever since. This is an old picture in which I used a huge piece of Rodico. Nowadays I use a much smaller piece of Rodico for better handling. Once the cap-stone is clean, put the flat side of the cap-stone down (you've now learned how to differentiate between the two sides) and with a small pointed piece of Rodico you pick up the cap-stone on the domed side, like in the picture; You can now lift and manipulate the cap-stone. You can hold it under the light to see if the flat surface is 100% clean. You can hold it while oiling. Once the oil is on, turn the Rodico, with cap-tone, upside down and place the cap-stone in the waiting Chaton. Hold with your tweezers the top of the cap-stone down and separate the Rodico from the cap-stone/Chaton. The "pointier" you have the Rodico, the easier that seperation goes. Having the Rodico too "pointy" doesn't work very well either, you have to find the happy point ....... if you get my point Job, under great control, done Here some interesting information about Anti-shock; https://www.great-british-watch.co.uk/watch-anti-shock-settings/?sfw=pass1614921835#
 3 points
 -
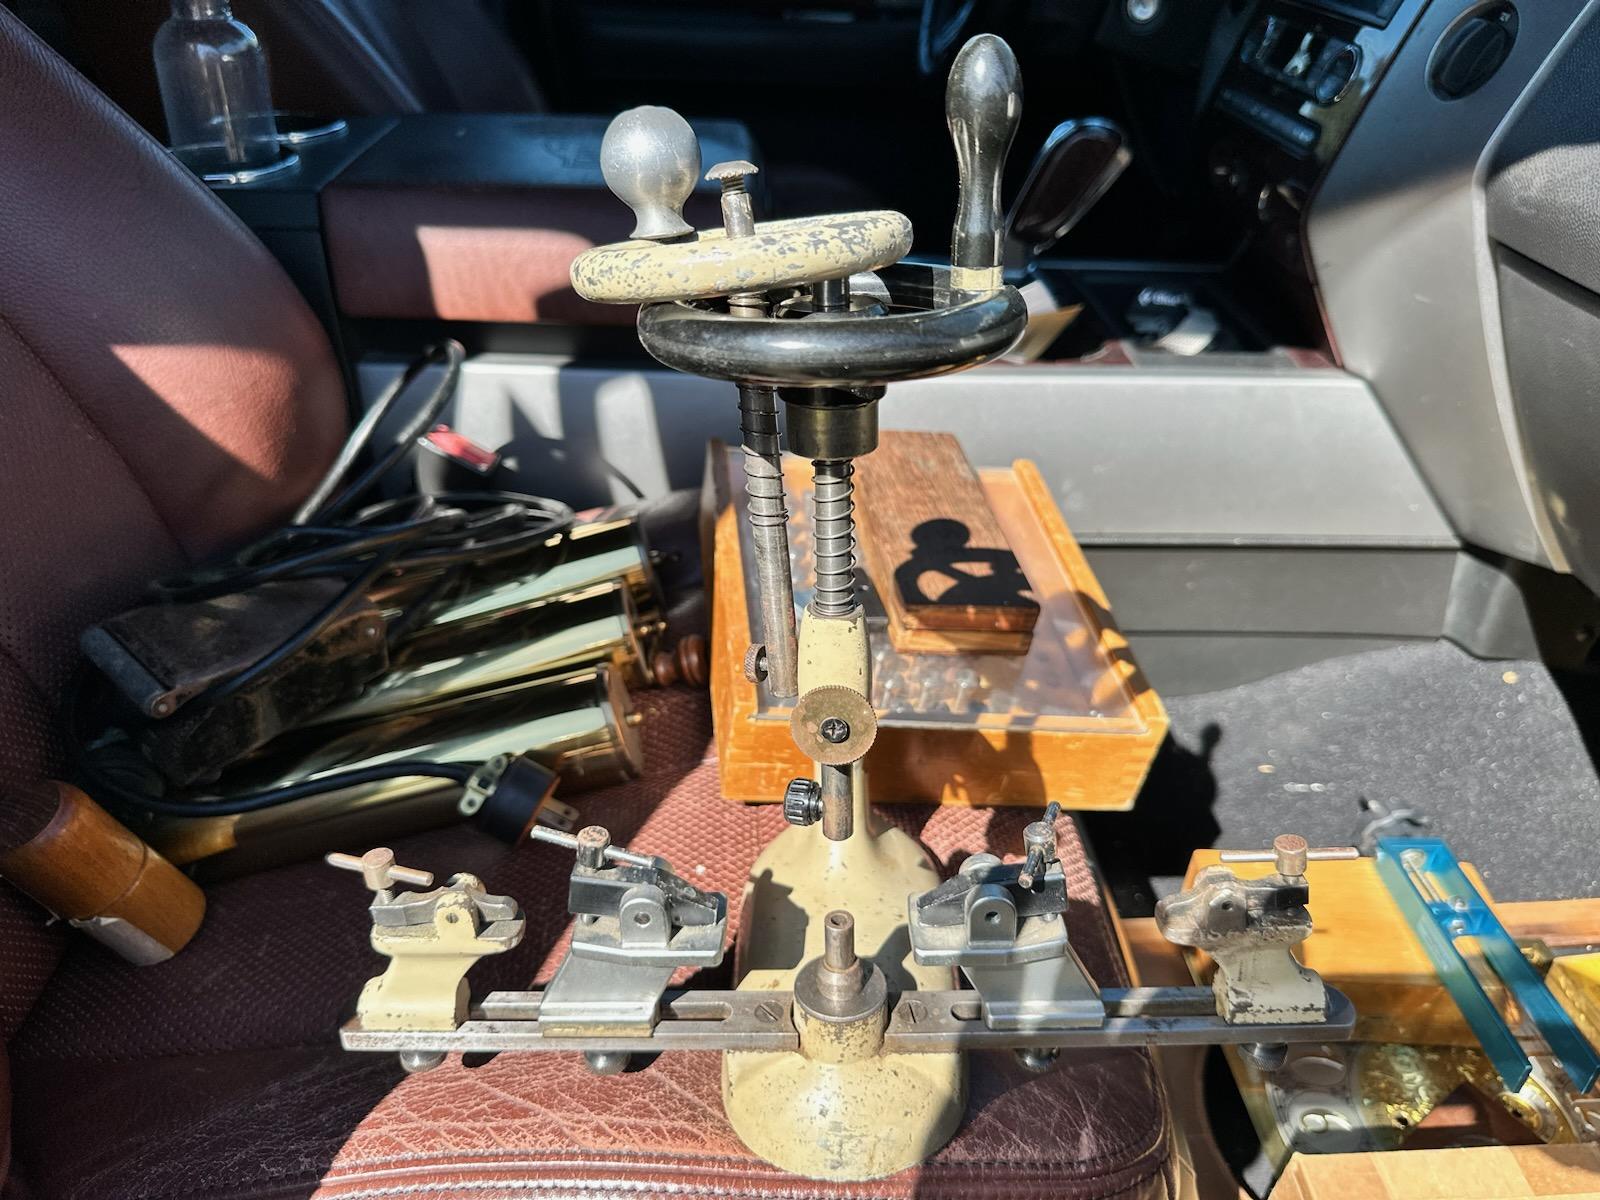
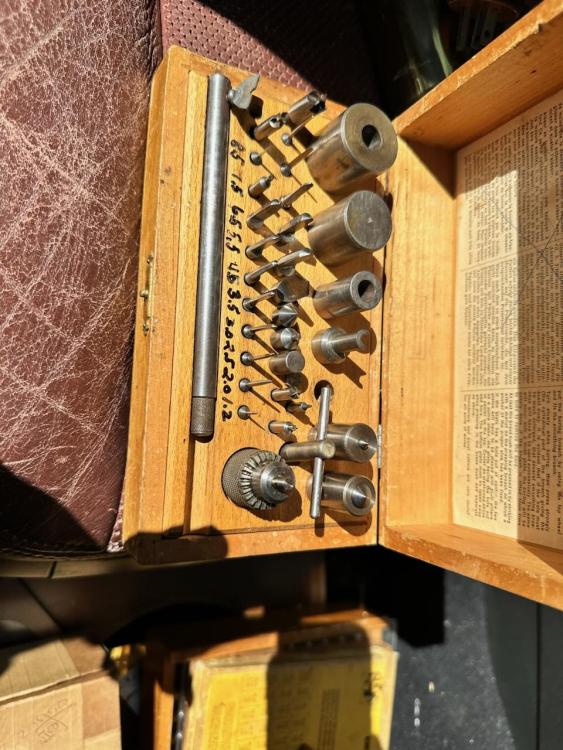
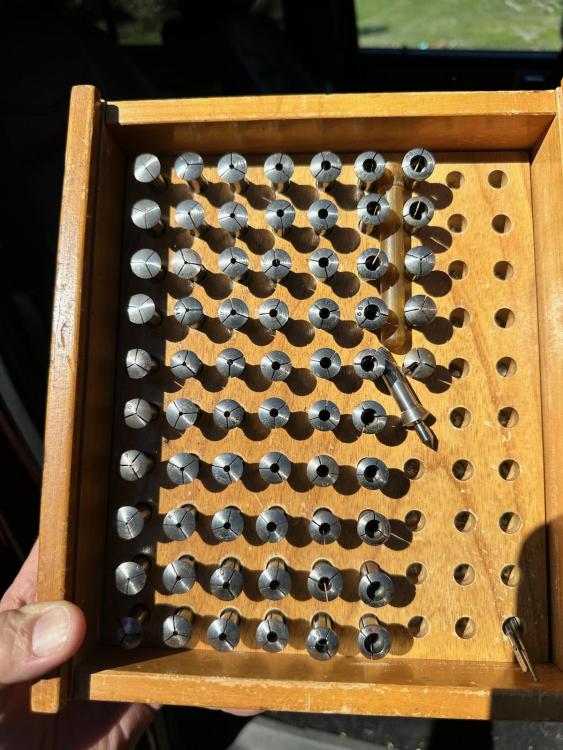
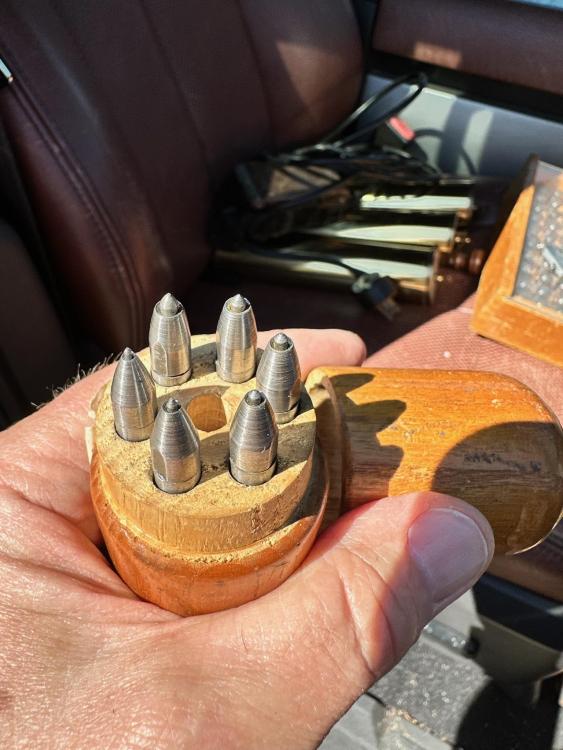
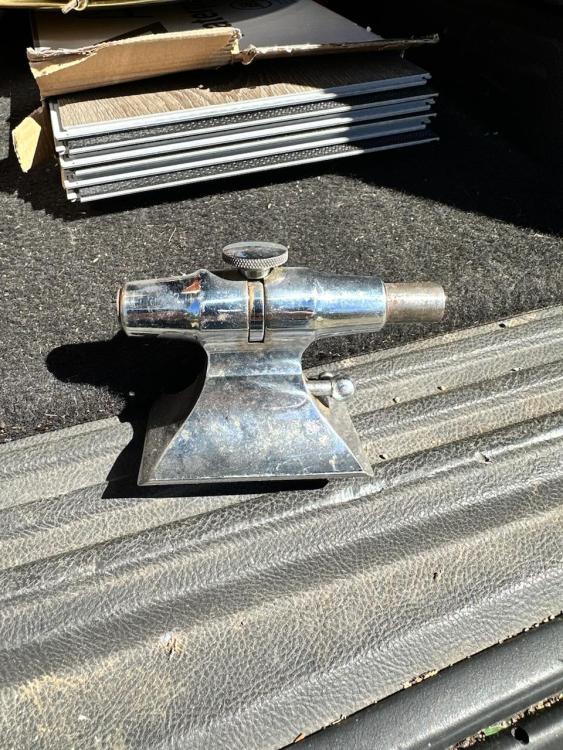
Showed up on FB marketplace. The guy acquired a storage facility and this stuff was in there. He just wanted it gone. Vintage Bergeon. Bushing tool I am bushed!


 2 points
 -
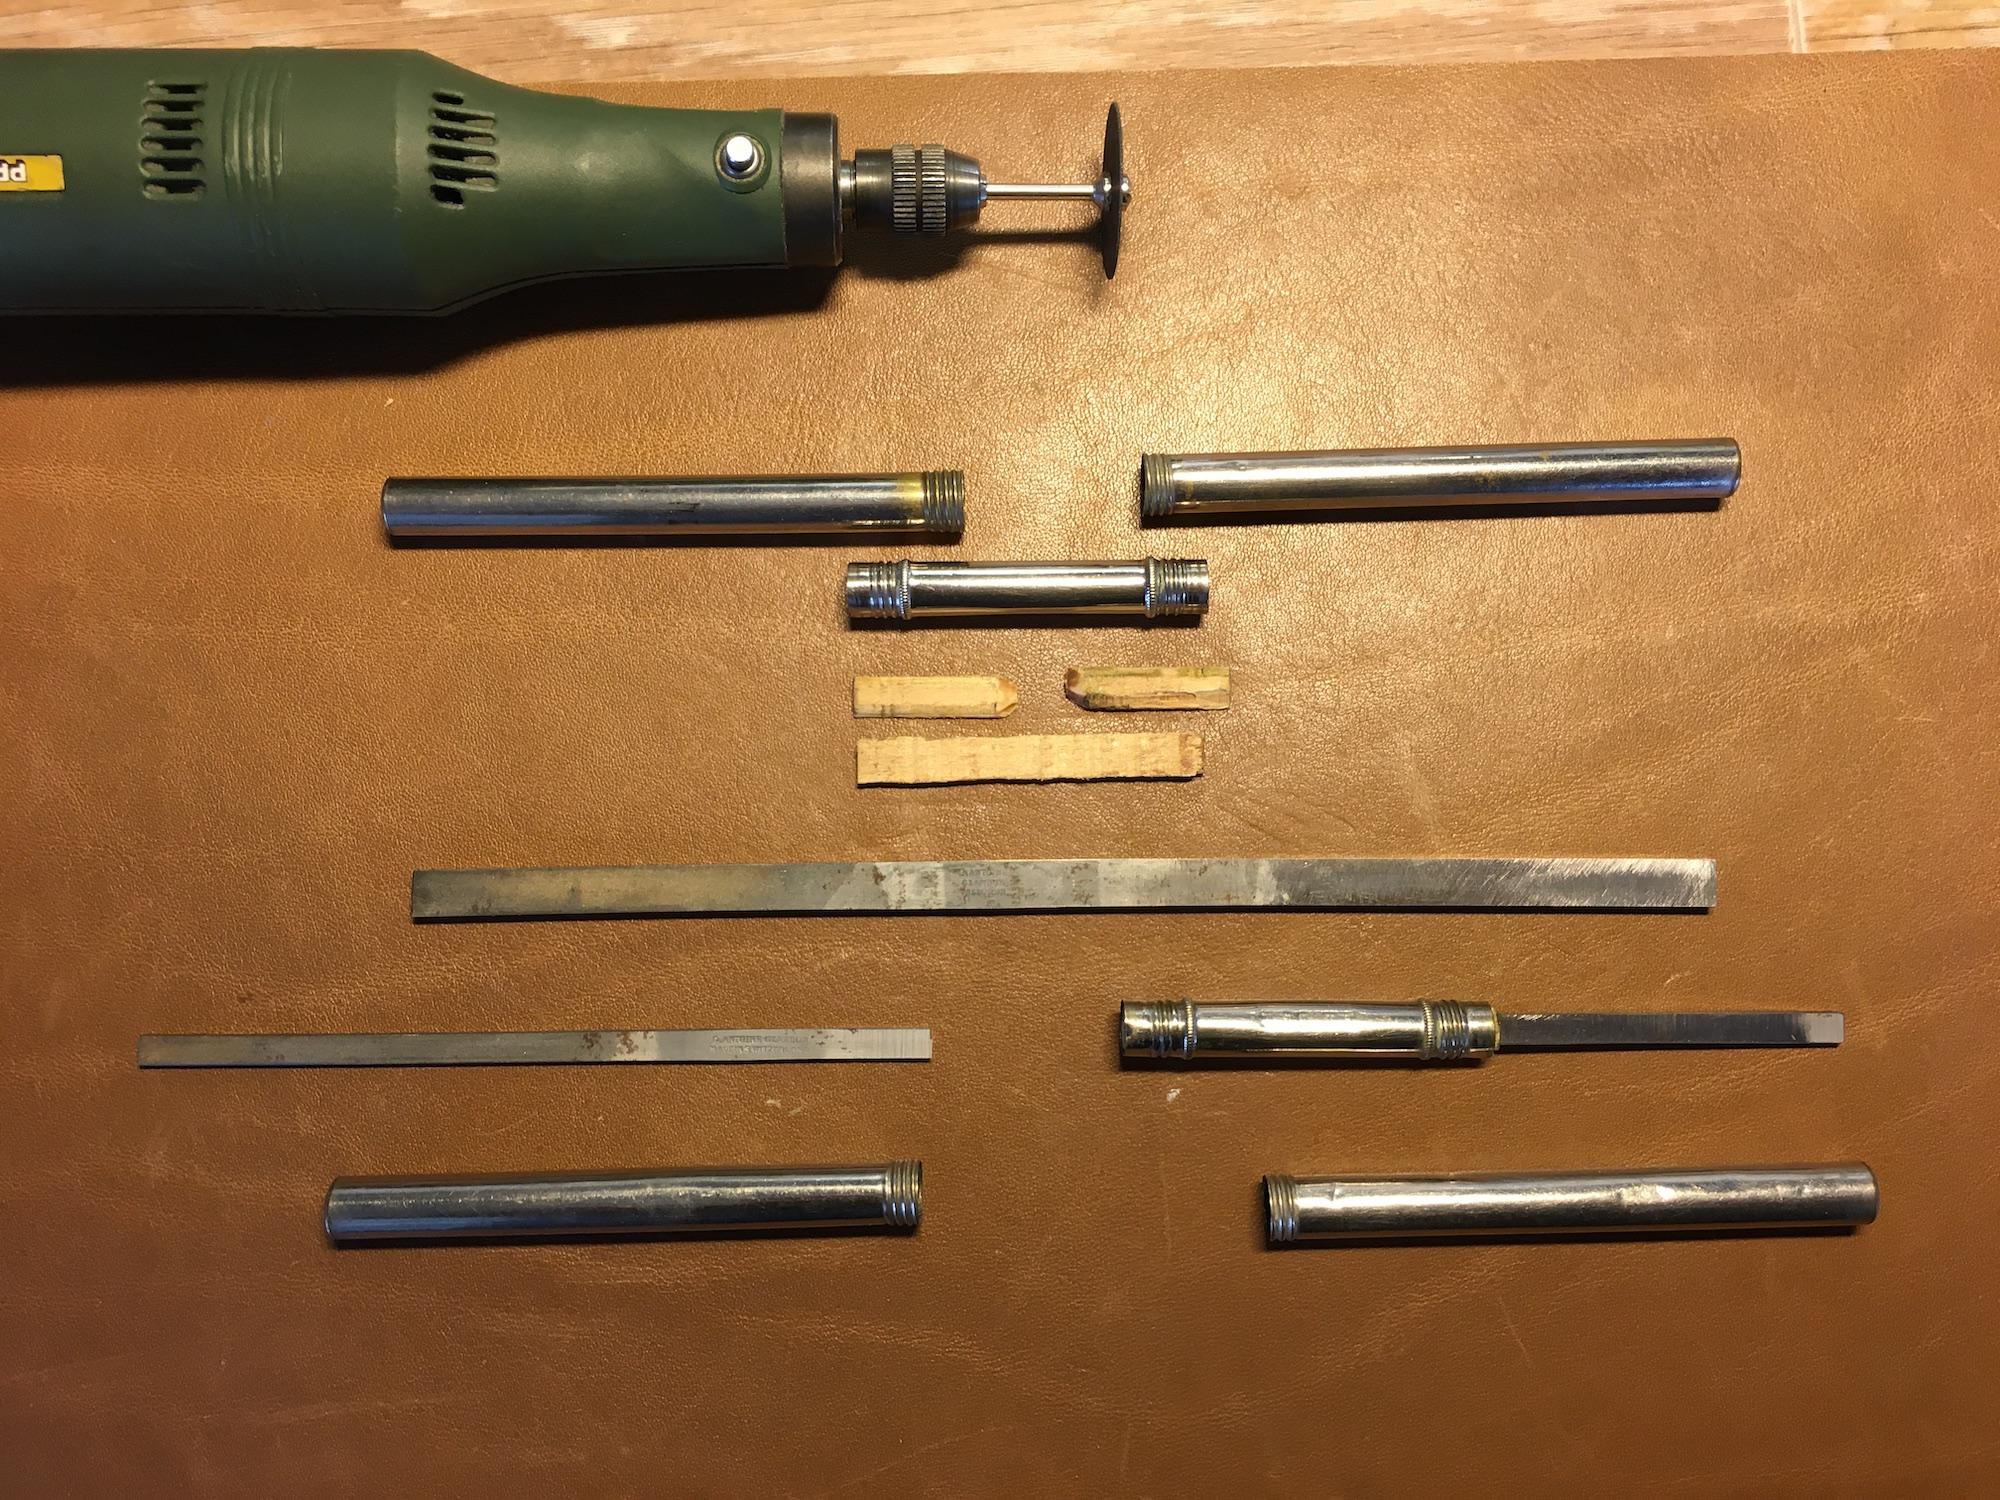
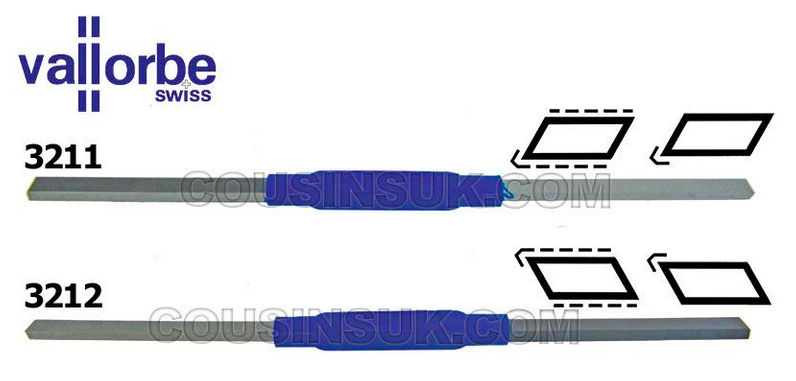
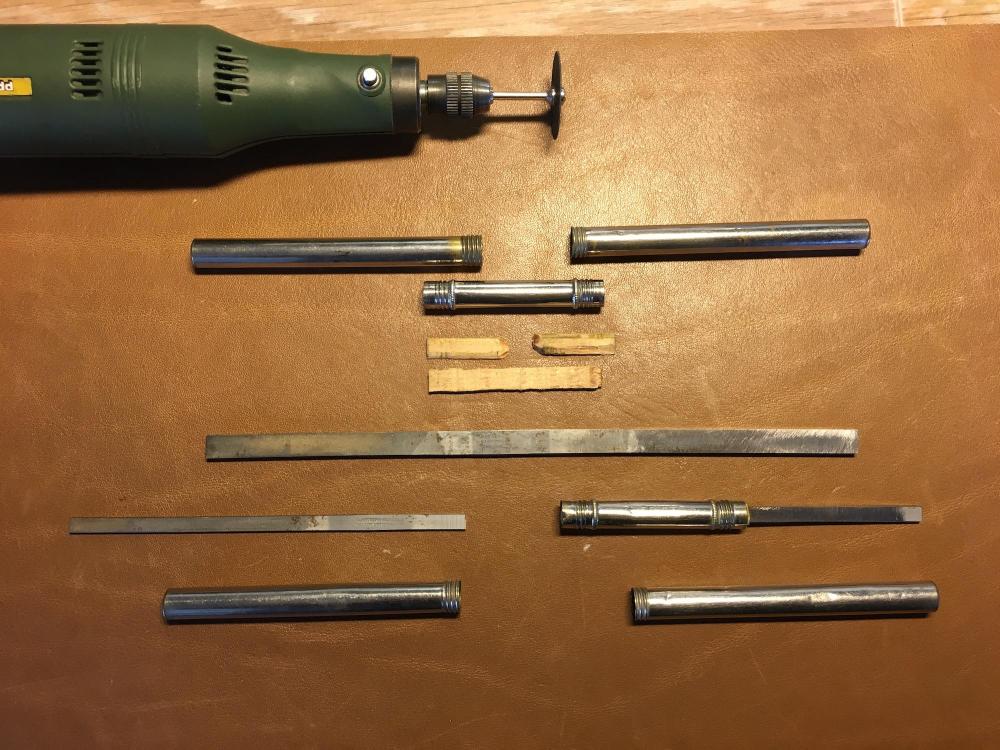
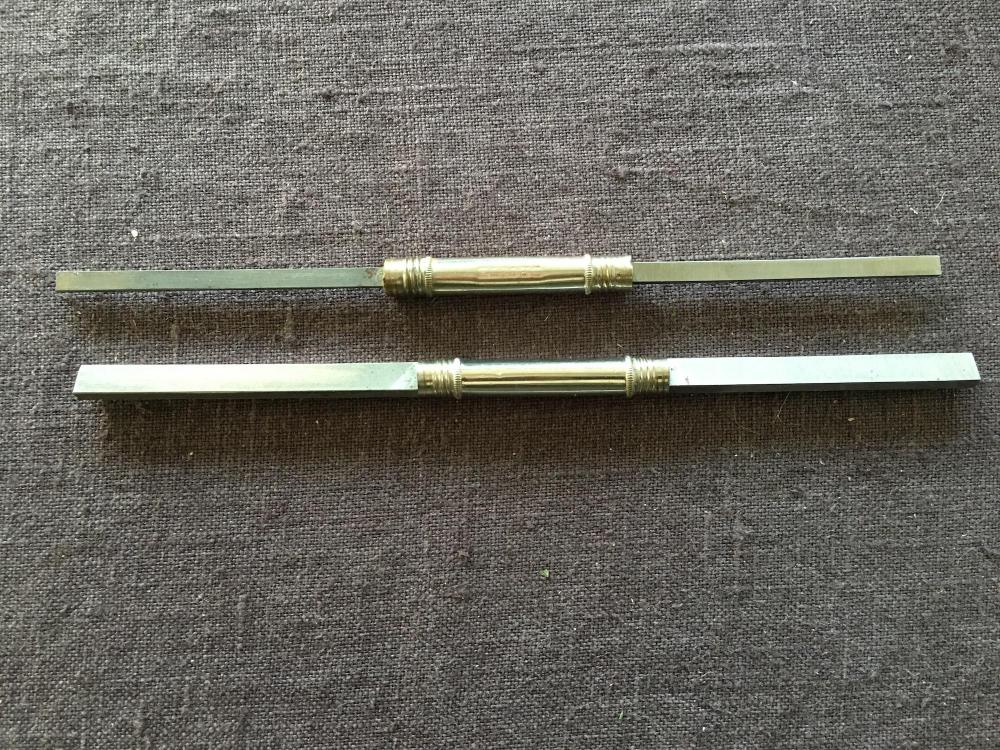
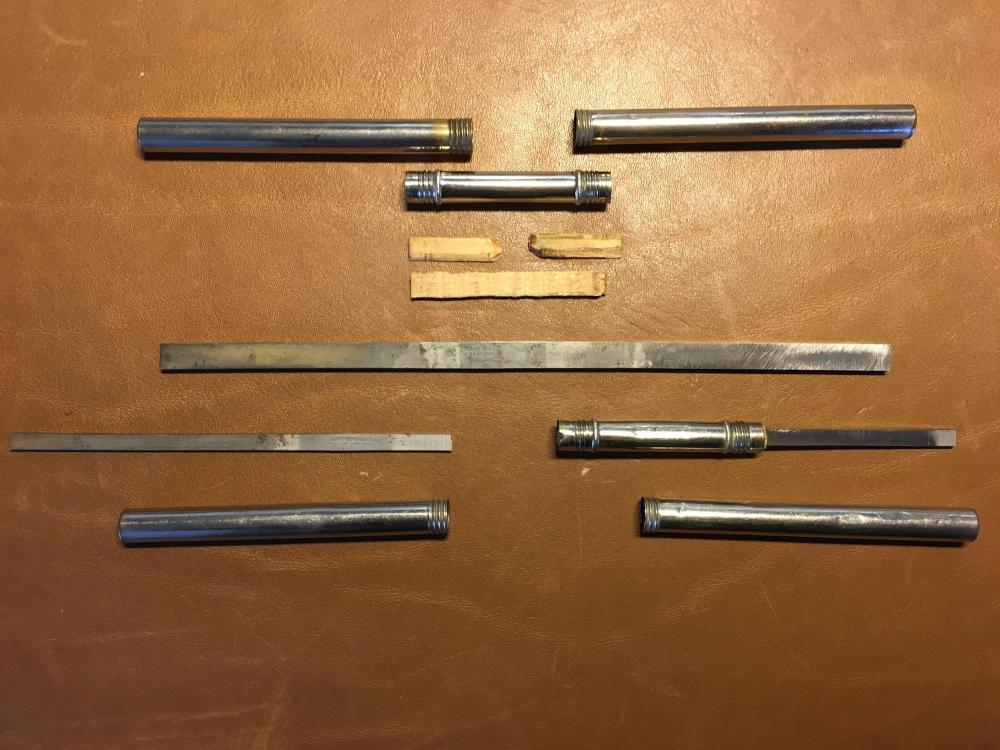
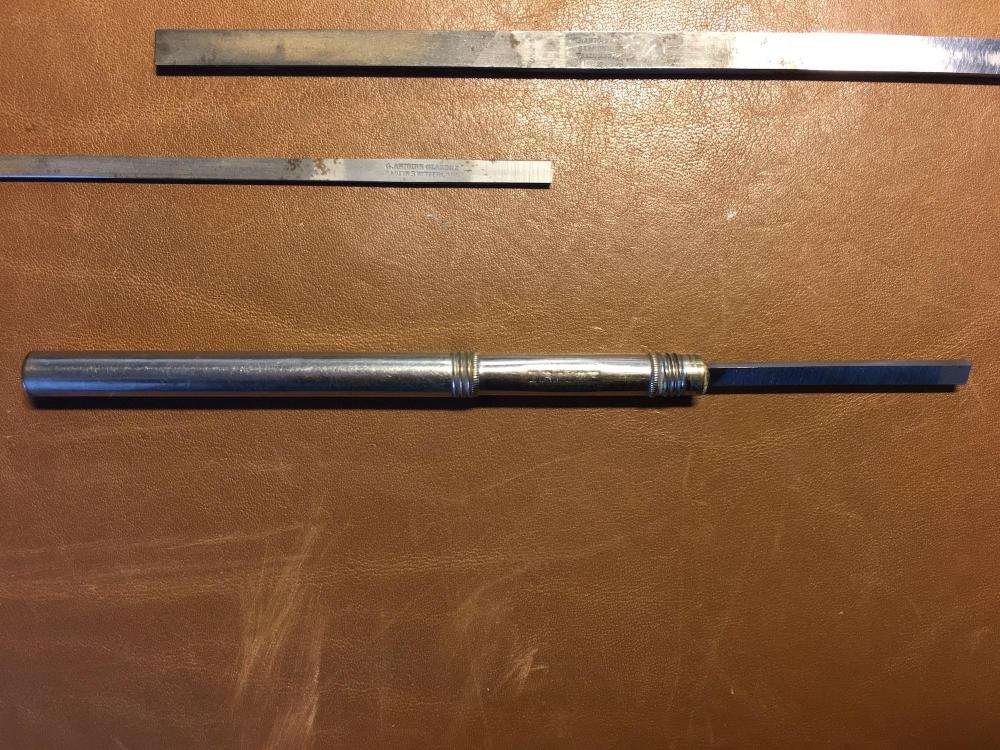
As far as I"m aware there are two types of Pivot-files and Burnishers; a Left-hand tilted and Right-hand tilted. F Most people are right-handed and work with their burnisher on the Jacot tool from right to left, they need LH burnisher 3212. These burnishers are also the most common on the 2nd hand markets. People like me, left-handed, working on the Jacot-tool from left to right, need a RH burnisher model 3211. So what to do with a 2nd hand set of LH 3212 burnishers Burnishers in general don't come cheap, a new burnisher (3212 or 3211) at CousinsUK cost a whopping £136 exclusive VAT. If we ignore the rounded edge, the difference in shape between model 3212 and 3211 is how you hold it. Which side of the stick burnisher you are holding ...... If you hold LH model 3212 by its handle, it's a 3212. If you hold model 3212 at the end, at its tip, it become a RH model 3211 The old LH 3212 burnishers I have (one side is a file, the other side is a burnisher), the handle in the middle is slid over the file / burnisher and hold in place by wooden wedges. The picture below, the first 4 rows from the top shows a complete stripped file/burnisher. Top row the two end-caps, below the handle, the wooden wedges and the 4th row the file/burnisher. So if one cuts the burnisher off, like what I've done with a burnisher in the 5th row, and stick what used to be the tip of the burnisher in the handle, you created a RH model 3211 burnisher. To minimize the cutting heat generated, I used a very thin grinding disk to cut, in stages and with cool-down pauses in between, the hardened file / burnisher. If the created burnisher is a bit too short for your liking, you can screw the end-cap on the handle as an extension; A new rounded edge I created on a whetstone. It's all a matter how you look at it

 2 points
 -
Jewels correct. Demagnetised every time. Love Maple syrup. Tried what you said. 9010 tastes horrible.2 points
-
one of the interesting problems in life is seeing things? Also microscopes do not necessarily help for seeing things conceivably they will make things worse. Seeing involves visually observing something sending it to your brain and your brain has to interpret what you see which is the problem. If your brain is unable to figure out what it's seeing or just doesn't grasp well that's why the microscope doesn't help at all making something bigger if you still don't grasp what it is you're looking at or why you're looking at it the outcome will still be the same you just not going to see or grasp the problem at all. then on the very top line of the quote I would agree the problem is you because you're the only one working on the watch. Then I was thinking where do you live? The reason I bring this up is United Kingdom is a relatively small place compared to other parts of the planet and I do happen to know they have transportation like trains unlike other parts of the world. Because the UK is relatively small one of the ways to improve your eyesight issue would be to find somebody else on the group and get together compare notes. Often times somebody else will see something that you cannot. I'm actually quite amazed that since so many people are in the UK that you haven't already formed a support group? then the second problem of the quote is the biggest of all the total failure to grasp what screws are used for in a watch. Screws do not have a double purpose of controlling end shake they must be screwed down tight otherwise the watch will fall apart. The definition of tight can be a bit of a challenge. For instance trying to disassemble watch were somebody had a much heavier hand than they should have and the screws don't want to come out that is too tight. But gently tightening them down hoping your watch will run is totally wrong and using them to adjust the end shake is extremely wrong and you still have a problem here. But I guess the good news is we've narrowed the problem down to the balance bridge providing all the rest of the screws are down tight. in my first school as far as I know no watch went into the sawdust. but in the second school that we attended there was the danger of that and other things you had to be extremely careful about wasting the instructors time. On the other hand I don't recall anyone that ever did have a watch glint of the sawdust maybe it was just the threat that was there the intimidating presence of the instructor.2 points
-
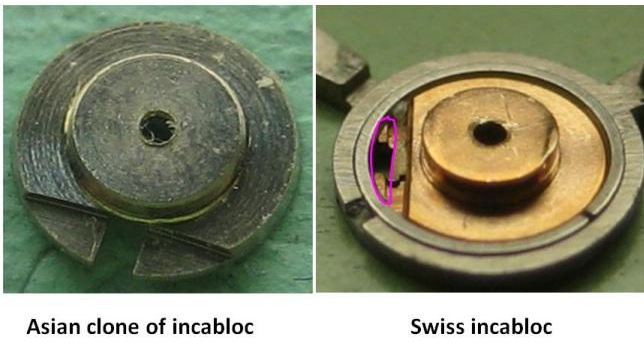
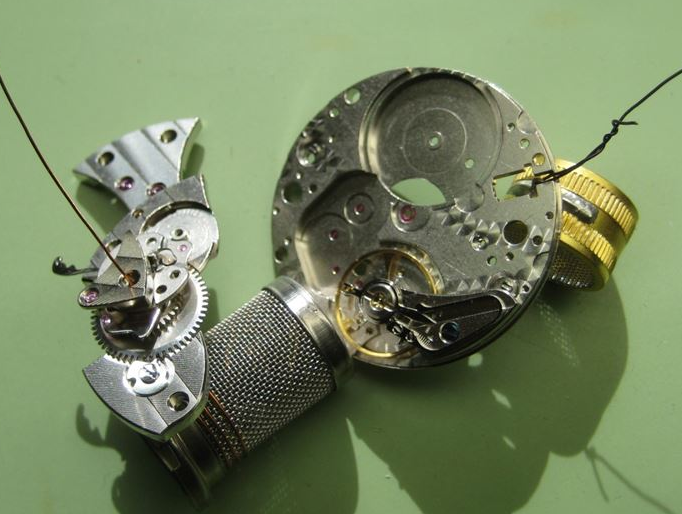
the video is not perfect but it shows the concept. I did make a comment that it's much better to do this when it's not running. As when it's running it makes things much more challenging besides there is the other little problem. which is typically would never have a situation like the video shows? one of the problems with cleaning a watch is what to do with the balance wheel to keep it from getting damaged. Plus if you have things like the modern watches with the etachron system removing the balance wheel from the bridge is a pain. So if you have removable jewels like this you don't actually have to remove the balance from the bridge. The watch is disassembled the balance bridge is put back in held in place by its screw. Then the jewels are removed the spring is put back in place unless it's the Chinese and it falls out. If it is the Chinese just put it someplace safe you'll need it later on. If it's the Swiss hinge it back in place and lock it down it will be just fine. then a reminder here regarding the jewel settings you do want to keep them separate because they may not be the same size. A lot of times the dial side will be physically smaller because you don't see that. Or even if they are the same size typically on the balance bridge because of the regulator the end stone will be thicker. So just works best if you can keep them separate. so basically this is good way of allowing the balance wheel would be safely protected. The pivots are exposed the cleaning fluid so they will clean fine and this is why you'd never have the situation in the video where he's removing jewels from a running watch and only cleaning the jewels and not cleaning his balance pivots. Then the picture below shows that yes you can really clean watches without a fancy cleaning machine. You put all the parts in the thimble baskets making sure the jewels go in a suitable basket that they can't escape from. then why does your spring fallout well it's supposed of fallout it's unfortunately been designed that way to fallout? then yes we've discussed this before the problem with the message board is finding where we've discussed it before multiple times can be a challenge as people titled the discussion interesting ways so I will just repeat the whole thing. So are looking at the bottom of the setting removed from the plate or balance bridge in this particular case. On the right is a setting out of an Omega watch which is why it's that color Omega watches typically have a copper color to them. So this is a Swiss setting original and notice I circled something? When the thing was machined they left some metal behind. You can actually see the spring is still in the setting when it's released it can't go back because it runs into that little bit of metal. Just a warning a key additionally usually on the dial side where things are thinner the spring might actually come out and on the Swiss version it's a pain to get it back in because it wasn't supposed to fall. But typically on the regulator side the spring will almost never come out because it has that machining and the metal to keep it in place. Now on the left-hand side notice that the Chinese took the easy route and failed to machine it correctly. There is nothing to hold the spring in place which is why it falls out. It's the problem of the Chinese cloning watches they don't exactly follow all the steps.
 2 points
 -
One for each day of the week. What more could one want? $502?2 points
-
Back in the day you would always dry parts in sawdust; it soaks off the solvent (benzine, maybe alcohol) and avoids condensation. There were little boxes with a layer of sawdust at every bench. The "dust" part is misleading- more like dust-free micro wood chips. This was still common, at least in the restoration end of things, when I was in school. If you brought something to the teacher to check that was clearly wrong, you might get away with it once, but after that your movement went in the sawdust. Meaning you got to take it all apart and reclean and oil it... so you got good at bringing things up that were worth the teacher's time, haha!. I still use sawdust sometimes, but I didn't drop student's movements in it when I was teaching, and don't do it to the new guys at the workshop- though I have been pretty tempted.2 points
-
Between you and JD that's like 20 that are off the market and everyone wonders why they keep getting more expensive . I have had one watchmaker lathe for the last 24 or so years- but it has literally about 10k hours of use on it in that time, haha. Well, I recently found another identical one for a song so I had to get it, good to have backups.2 points
-
I am a hoarder. Now I have seven lathes.2 points
-
The balance cock screw is a fair size so you can crank down on it to a point, bearing in mind that you are using small screwdrivers with only a 5 or 6mm shaft between your fingers tips and not a driver handle in your palm. The screw should be fastened down completely, looks like you've discovered some consistent lack of endshake but a fully tightened balance cock should not be the real cause of that . This is one good reason for just focusing on getting the balance running correctly and forget everything else for now considering you've probably pinpointed your main issue. You did previously identify that issue with a free oscillation test of lasting only 15 seconds, well under what you should be getting. Keep at it Ross you are getting warmer.2 points
-
Hmmmm- Glad things are working better, but you should be able to tighten the balance cock "fully" and still have endshake. If you get the cap jewels in upside-down (convex side toward pivot) you will remove endshake. Otherwise, over several watches, it would be strange for the endshake to disappear from properly tightening the balance cock screw. In school, if your screws aren't tight, like you think they might snap, you get your movement tossed in the sawdust box!2 points
-
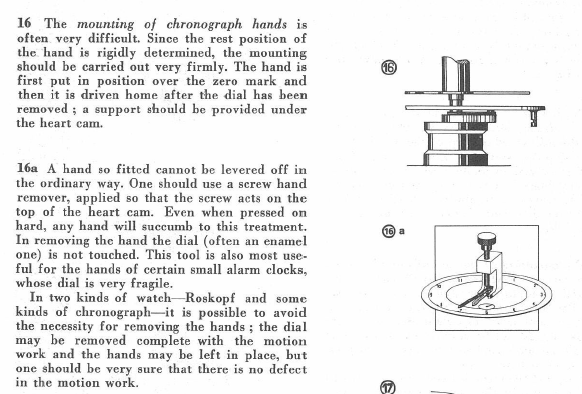
I wonder if I could just copy and paste the answer from the other group? It would save time for me writing it again. Then I did find your picture I need to post a picture of the other discussion. Then just a reminder some people don't use the same identity everywhere the other group they tend to use real names sometimes. Now even though the discussion uses the word chronograph it really applies to stopwatches. The heart-shaped cam is attached to the hands with the extreme force. So when you're removing the dial the hands and the heart-shaped cams go with the dial there held on with a little spring onto the driveshaft. The reason they go on with considerable force is in the case of a stopwatch the hands are really big and long and have a lot of mass and when they come to a rapid stop on reset if their word on super title start moving around. This unfortunately also means that removing them can be a bit of a challenge. The picture isn't exactly what I remembered I remembered something a little different but you get the idea. Similar to conventional hand removers something goes underneath but a center pin pushes the heart-shaped cam out of the hand. Probably makes more sense to look at the picture than my description.
 2 points
 -
The things are different in reality. And everyone finds his own way in making things to suit his own filling of 'good'. I will recommend to drill with what drill bit You have. Of course, it must be at least 0.15, as the hole of the bearing is this size. Then, 0.2 will be good, but 0.3 will be problematic to drill in 0.5 and press a pivot in, as the material can easyly crack. Then, when the hole is drilled, You will choose the pivot wire that will be correct for the hole. This usually means that the wire wil not go in, and reducing the diameter (slghtly tapered) will be needed to make it go in tightly.Then I will recommend to use Henkel Loctite 638 'just in case', and wait 1 day or heat the wheel to let loctite harden. In the end, the new pivot should be reduced in diam. to fit the hole and in the same time - to make it centric if the hole was no complitelly centered. The main problem here is drilling the hole. Usually when drilled to some depth, the drill bit begins to stuck in the hole and rotates harder and harder, then the tip of it breaks and thus ruins all the pinion making it useless. The decision I found is to sharpen the drill bit not symetrically - the 2 cutting edges on the tip to be not equal. Thus the hole is drilled a little bigger than the drill bit diam. The depth of the hole is not needed to be more than 3X hole diam. As You see, I don't use exact sizes of hole or pivot wire and I don't care of it, and don't even have what to measure with... Now, put this repeater aside for 2-3 years and practice on another movements. You will break probably at least 50 drill bits before get learned how to drill and repivot. Practice is needed... Till then You will learn how to assemble without breaking pivots too.2 points
-
Hello, started a couple of months ago watching videos on watch repair and got hooked on the hobby. Now i have a corner of my apartment setup for watchmaking and slowly learning.1 point
-
I have in fact been fine with using the no. 1’s all the time, though I sometimes wonder if I should be using the 3’s for certain tasks and if so, which ones?1 point
-
I wouldn't call it madness, using the right tool for the job applies to watch repair just as much as any other trade. In saying that you dont want to be swapping your tweezers every 30 seconds either so finding a pair that feels right and has a few applications can save you a lot of time. A lot is based upon the size of what you are picking up. The bigger and heavier the part the more of it's surface area you want to be holding , without the surface area coverage more pressure is needed. You should have noticed by now picking up a big bridge or a mainplate with fine tweezers, parts can spin and slip on you, risking a drop. Tweezer material has an effect, brass grips better and scratches less than steel but also wears much quicker. I find titanium a good compromise, its doesn't scratch like brass doesn't but is quite a bit tougher than brass. A lot of folk like bronze tweezers which are much tougher than brass. No matter what you choose to use now you will change later, it could take a year or so chopping and changing until you develop a feel of what you like and can work best with.1 point
-
On pancakes maybe, but waffles? So we've narrowed it down to aliens, evil spirits or the ancient Celtic burial ground your shop is over. Silliness aside, have you considered sending a problematic watch to someone on WRT to evaluate? Or if someone is close to you invite them over for a shop review and a cold one? At this point I think it might be time for a second set of eyes on the issue.1 point
-
The substance is 'hot glue' which is used in 'hot glue gun' and comes in long sticks 8 or 10mm in diam. But it is needed only to heat the studd and put hte end of the spring in the gap with the melted glue. Use soldering iron with sharp point to do the job. Don't touch the glue with the iron, but heat the stud from the other side of it. But... You spring is deformed - it is not in plane. It is streched as a funnel. I guess You have detouched it from the balance and tryed to stretch it in the reverse direction in order to restore it, and You have 'overdone' it. Now it is stretched again but in the oposite direction, which is as bad as it was in the beginning. The spring MUST be in ONE PLANE so no coil touches anything and no other coil.1 point
-
Both are hardened steel ......... and as said, the HSS seems to do a very nice job. Of course, I'm not a "burnish specialist" ...1 point
-
Welcome aboard the S.S. Rabbithole. If you don't think you have too many tools, then you don't have enough tools.1 point
-
I'll give you $501 for it.1 point
-
I see this a lot with the Chinese movements too and have lost springs in the past. I usually hinge the spring back onto a tiny ball of rodico to hold it. I don't see this problem on the Swiss movements I have worked on. I don't know how they do it with the balance spinning. I have enough trouble when things are stationary.1 point
-
Incorrect metric. If you spend all your time looking for lost parts, you'll get much better at that and not improve your part handling skills. My method is pretty close to what others have stated with a few variations -- similar to the differences between the way the NY Philharmonic and the Vienna Symphony play Tchaikovsky's Orchestral Suite #4. Two complicated arrangements, same results. Remove the cap jewel and the chaton with a little bit of rodico on the end of pegwood. I then drop them both in a 1ml vial of one-dip (or whatever highly volatile and toxic solvent you have on hand). The tiny vial makes them easy to find/retrieve and saves on the use (and exposure to) the one-dip. I then drop the cap stone onto a sheet of watchpaper, tear off a corner of the watchpaper, put it over the cap stone and rub it around until it's clean on both sides. At that point it's pretty clear which is the flat and which is the domed side. Of course you'll need good magnification to see it. I then pick up the stone by the domed side with my little rodico-on-a-stick and roll it over to show flat side up. You don't want to jam the stone in the rodico, just enough contact to lift it is ideal. Oil it, and then place the chaton on top. Here's the trick -- don't lift the chaton up, but slide it horizontally to get the rodico to let go without pulling the stone out of the chaton. Now you just have to place it back in the setting and close the spring. Easy as computing Pi to the last digit. As for placing the cap stone domed side down, there is a tendency for oil to migrate to the outer edge instead of staying in the middle where it belongs.1 point
-
Have you noticed any problems with using no.1 all of the time ? Could it be like using a pair of needle nose pliers to take all the parts of a car engine ?1 point
-
Hold the end stone down in chaton with your tweezers to remove the rodico. Once shock spring is locked in the setting, you can whipe / clean any residue off the setting. Swiss setting holds the spring in place but the spring in chinese setting fall out. To remove the srping from Swiss setting , you got to remove the setting or at least raise it .1 point
-
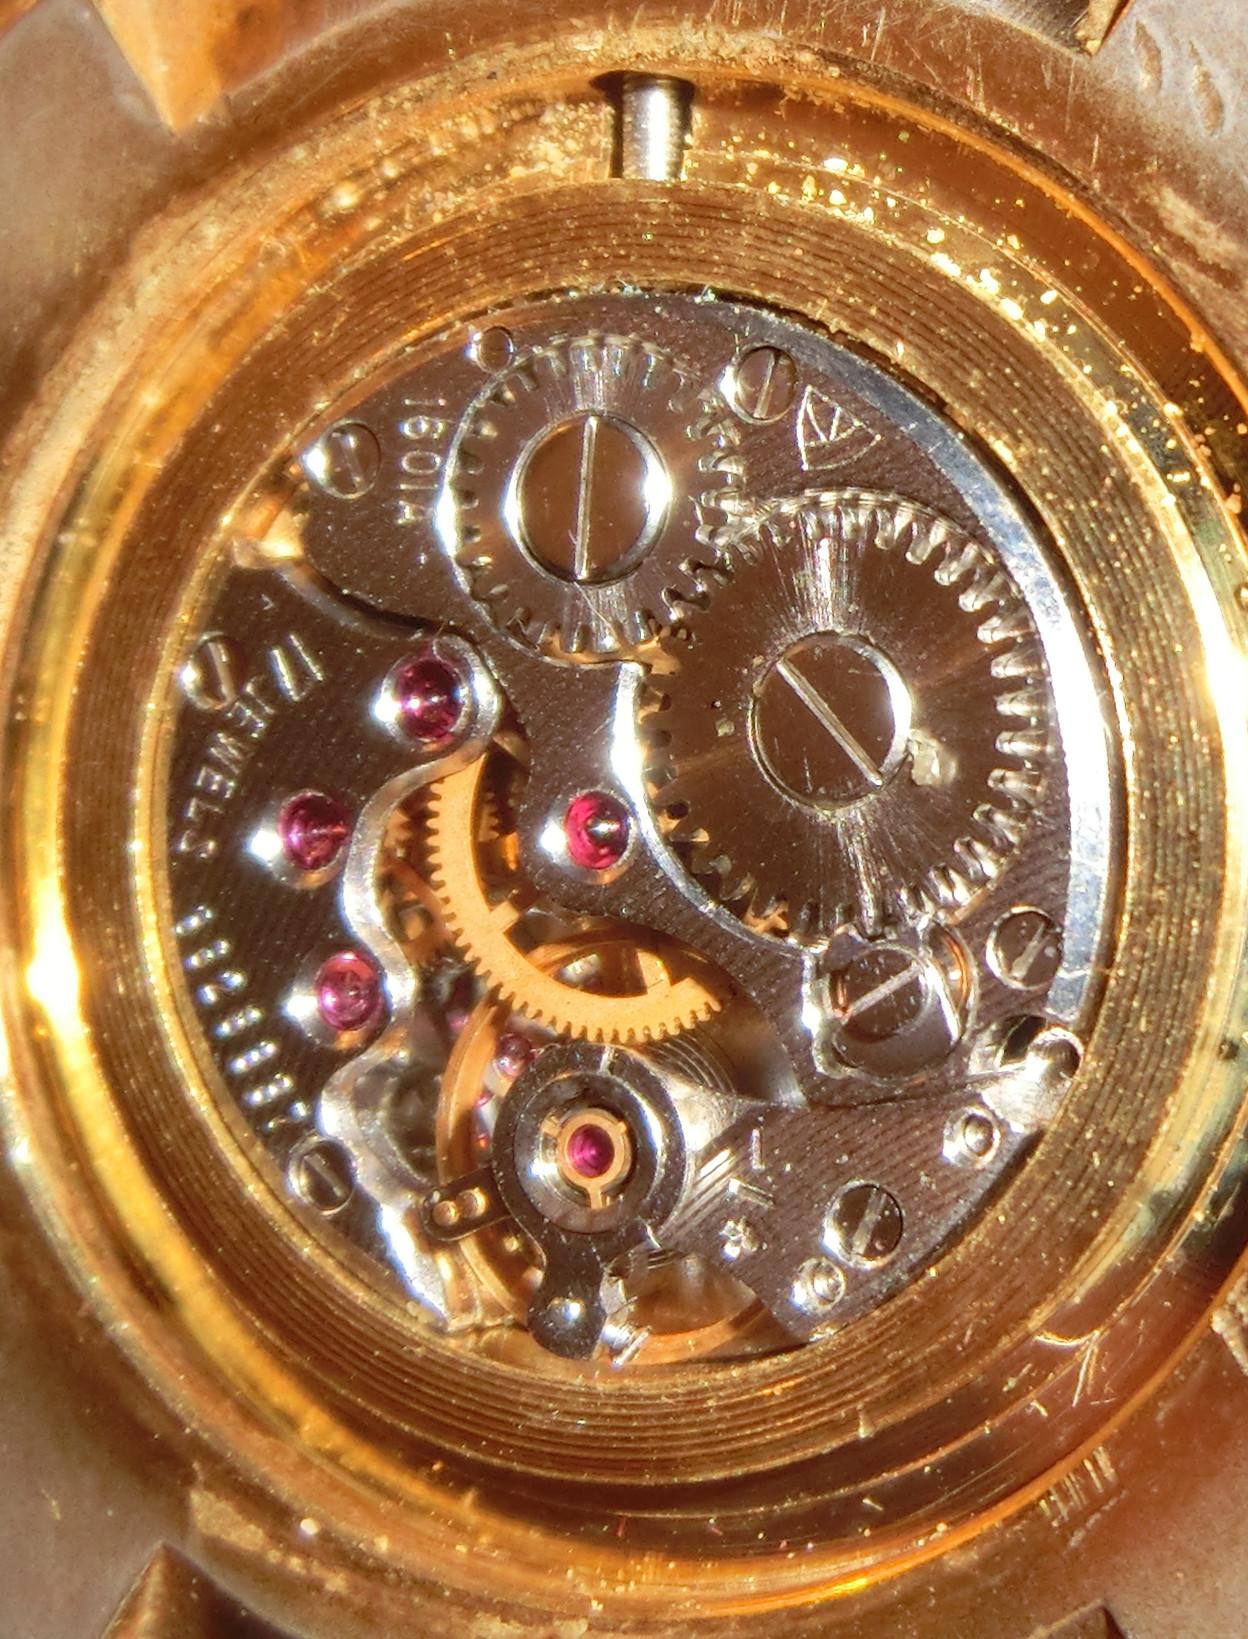
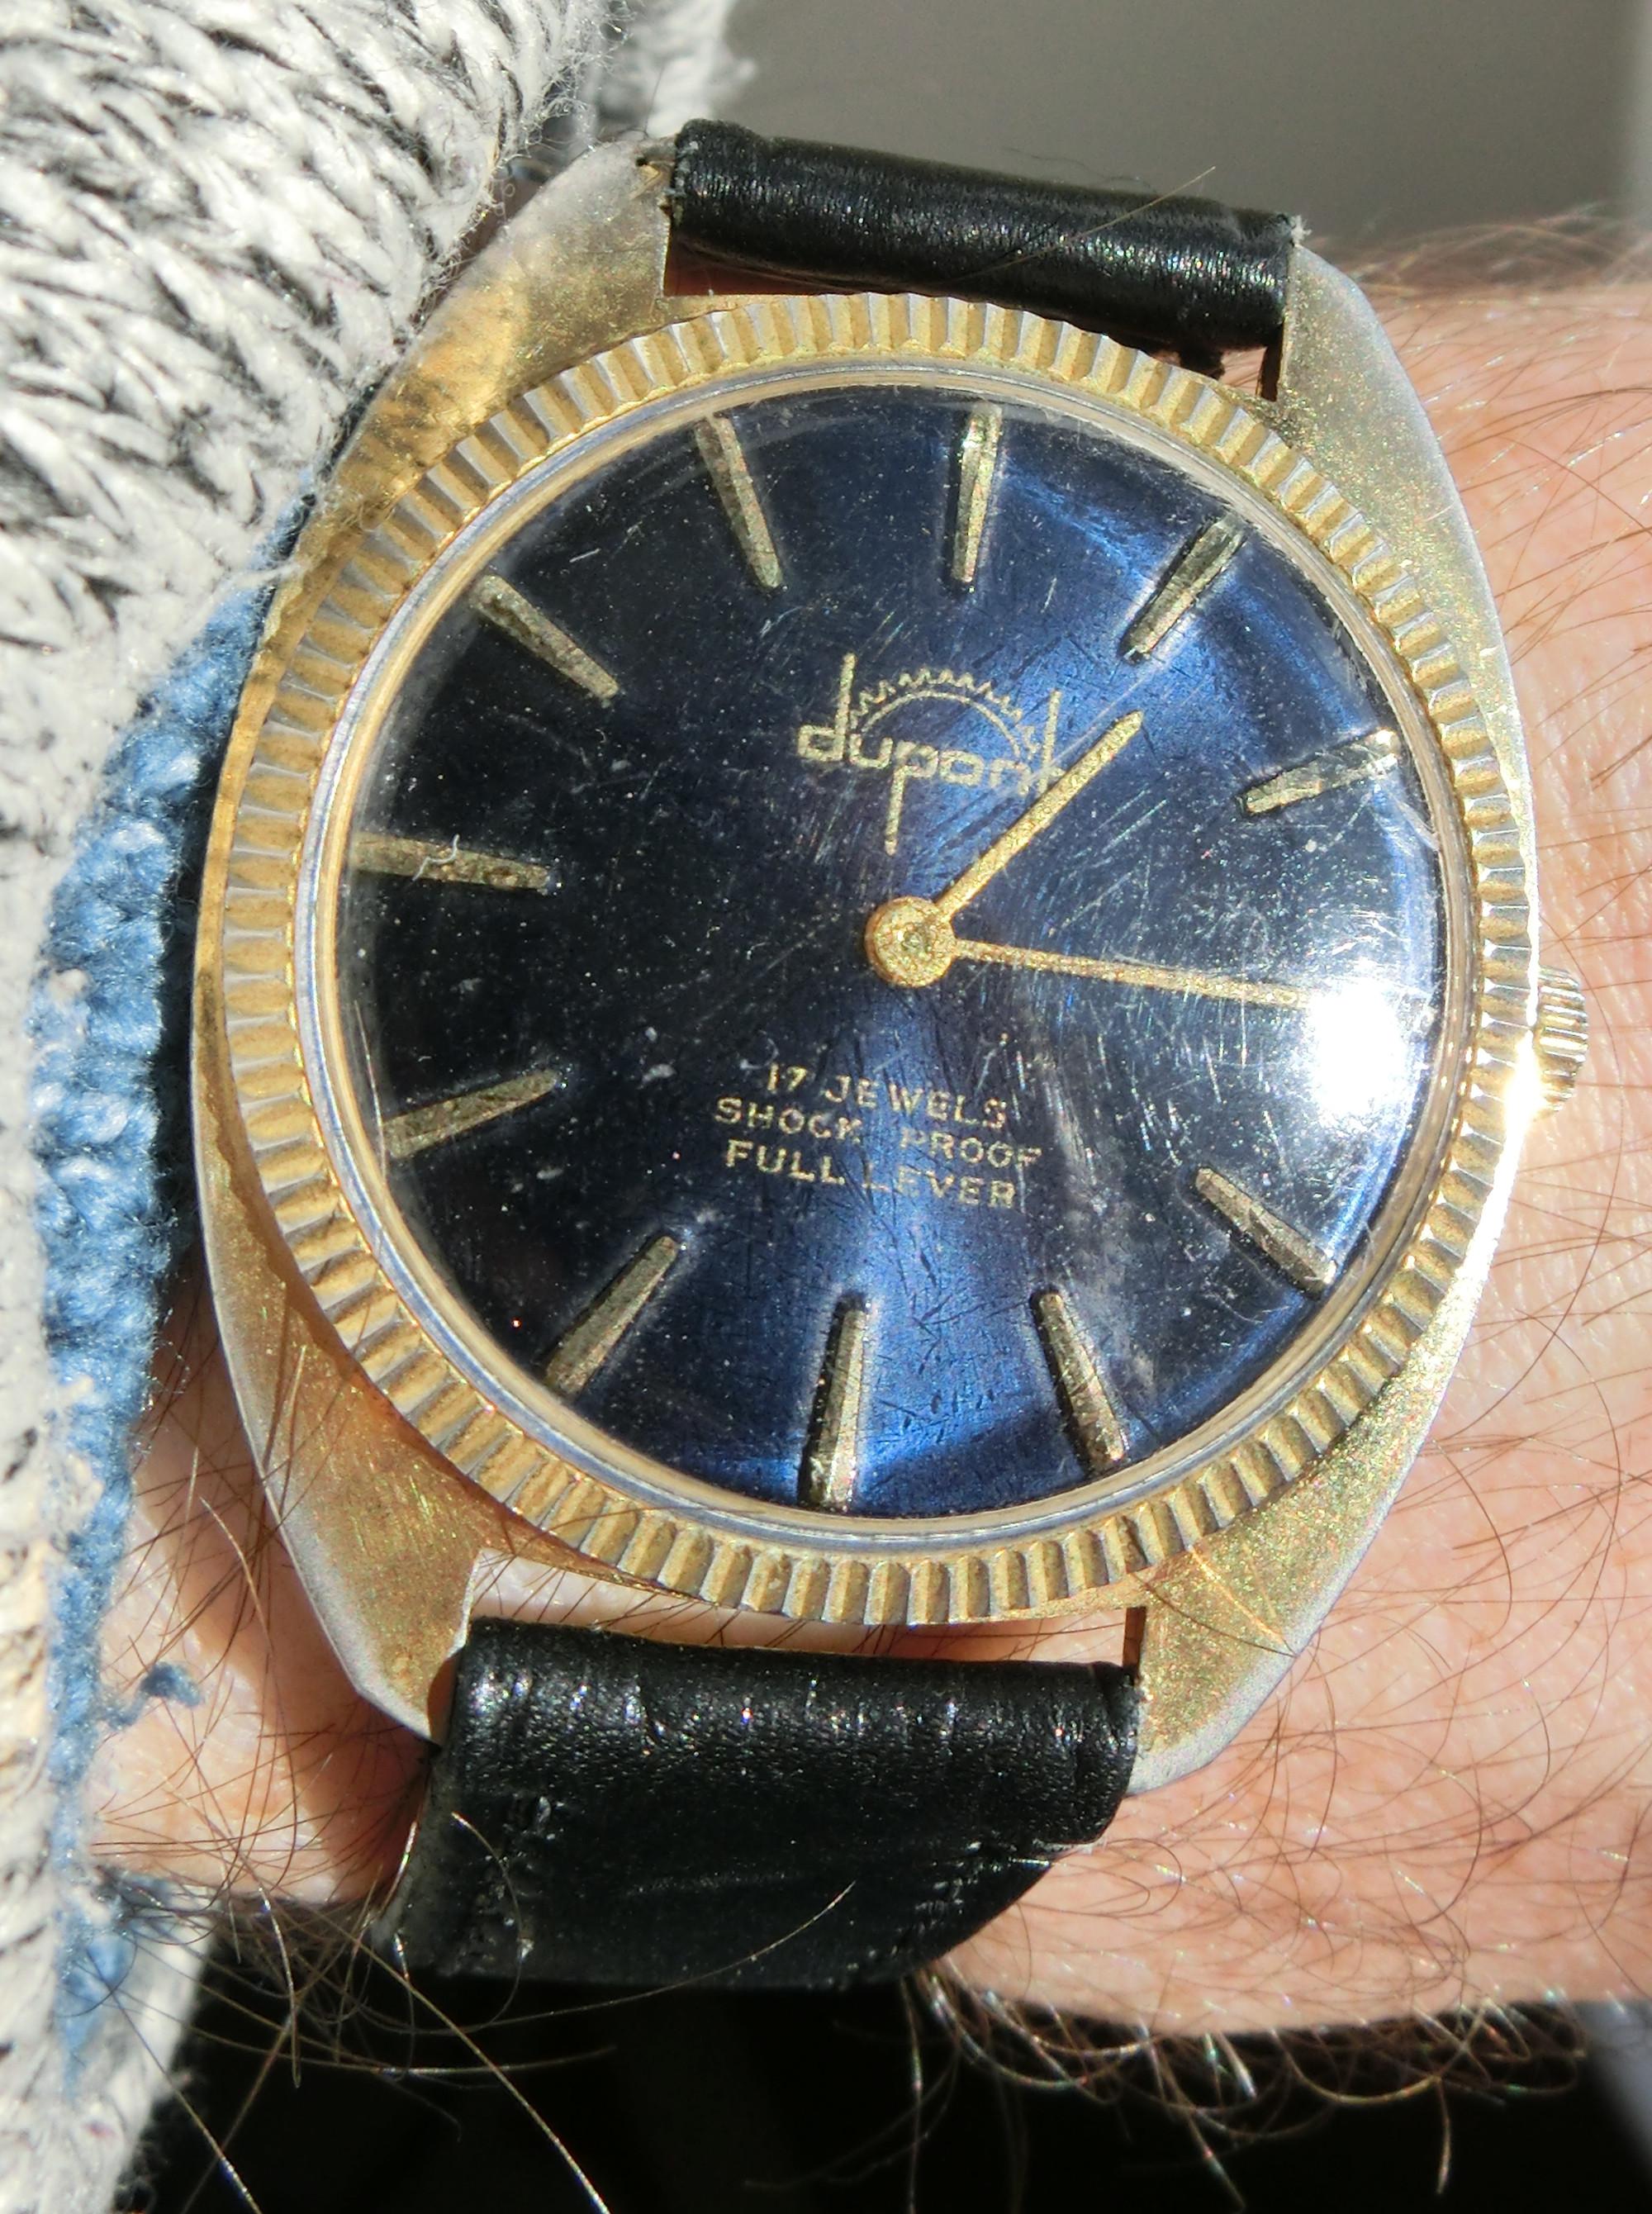
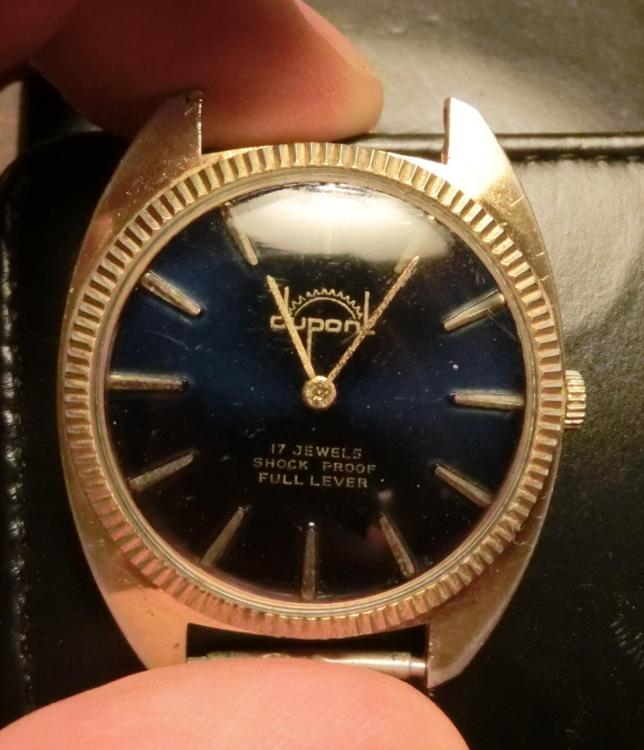
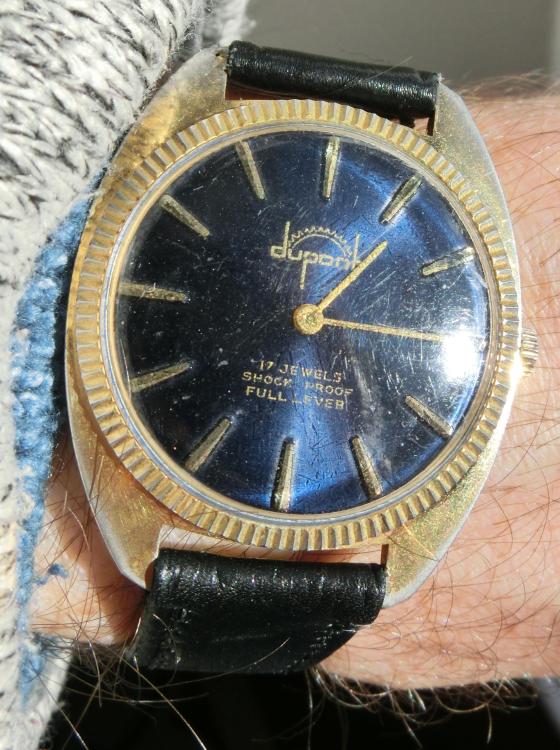
A Chaika 1601A based "Dupont" USSR era with a deep blue dial joins the 404 club. It needs a new crystal, which I probably have in my stash, but other than that, it needed nothing other than a clean and a new strap. The Chaika 1601A turns up regularly in Sekonda ladies watches from around the late seventies till the late eighties, although there seems to be some debate about when the Chaika 1601A went in to production, with some sites suggesting as late as 1985. It seems to me to be a much older design, with more in common with 1950s calibers than ones from the mid eighties. It has slightly odd dimensions, for a gents watch, which I presume it is. With the two hander dial, 17mm lugs and a case size that would not look out of place on a 1950s watch, and a touch of the beer bottle cap design of the Rolex Oyster, it is somewhat unique. Its origins are a little unclear. Mikrolisk has a couple of suggestions. Despite its diminutive size, the relatively large 1601A balance makes for a reasonably accurate little watch. It isn't likely to make COSC standars, but it runs pretty well for what it is. As you can see the dial changes colour quite markedly depending on the light. Quite attractive, and well worth the four quid it cost. ... and of course we have to have the "money shot" too. It may be possible to date this more accurately if anybody knows how to decode the serial number.

 1 point
 -
Three of my lathes are setup for dedicated use. 1) primary turning (Levin), 2) graver sharpener (Peerless), 2) remote office general purpose (Peerless). I started with the two Peerless that my dad left me. Kept searching for better precision and then discovered Levin and searched for that. My Levin with cross slide and 4-jaw chuck, collet tailstock, also came from FB for $300...another good deal.1 point
-
Thanks Neven. It’s not the repeater. I would not dare. It is a movement I’ve had in a drawer. The repeater is resting. I will buy plenty of extra bits. Thanks Neverenough.1 point
-
The bushes alone in Aus could well be worth the price you paid and then you got a lathe, collets, a bushing tool plus all sorts of other bits and pieces. Colour me jealous.1 point
-
The collets look to be mostly Levin- that set is worth 3x what you paid easily. The bushing tool and accessories probably 2x. Nice find! The lathe looks to be Peerless (perhaps marked Marshall-Peerless), not the best but it does have the collet holding tailstock with it great.1 point
-
It is a fascinating channel Andy, really impressive achievements. Tom1 point
-
More clickspring magic to enjoy with your morning brew.1 point
-
Okay, the new pallet fork came in yesterday and I installed it today and it seems to be correct now. The exit stone is on the proper side of the escape wheel tooth and the lever arm seems to click when you give it a little push. On to the next problem, LOL.1 point
-
Hi Harry and welcome to the forum. A quick google on hallmarks and stamping on gold and silver, British hallmarks will produce a few sheets giving dates,gold/silver content, manufacturer. In such a case as yours this is the first step.1 point
-
I can't provide any info, however it's a beautiful piece and I'll be following!1 point
-
So long as a leaking battery hasn't eaten anything important, there is a good chance it might just work.1 point
-
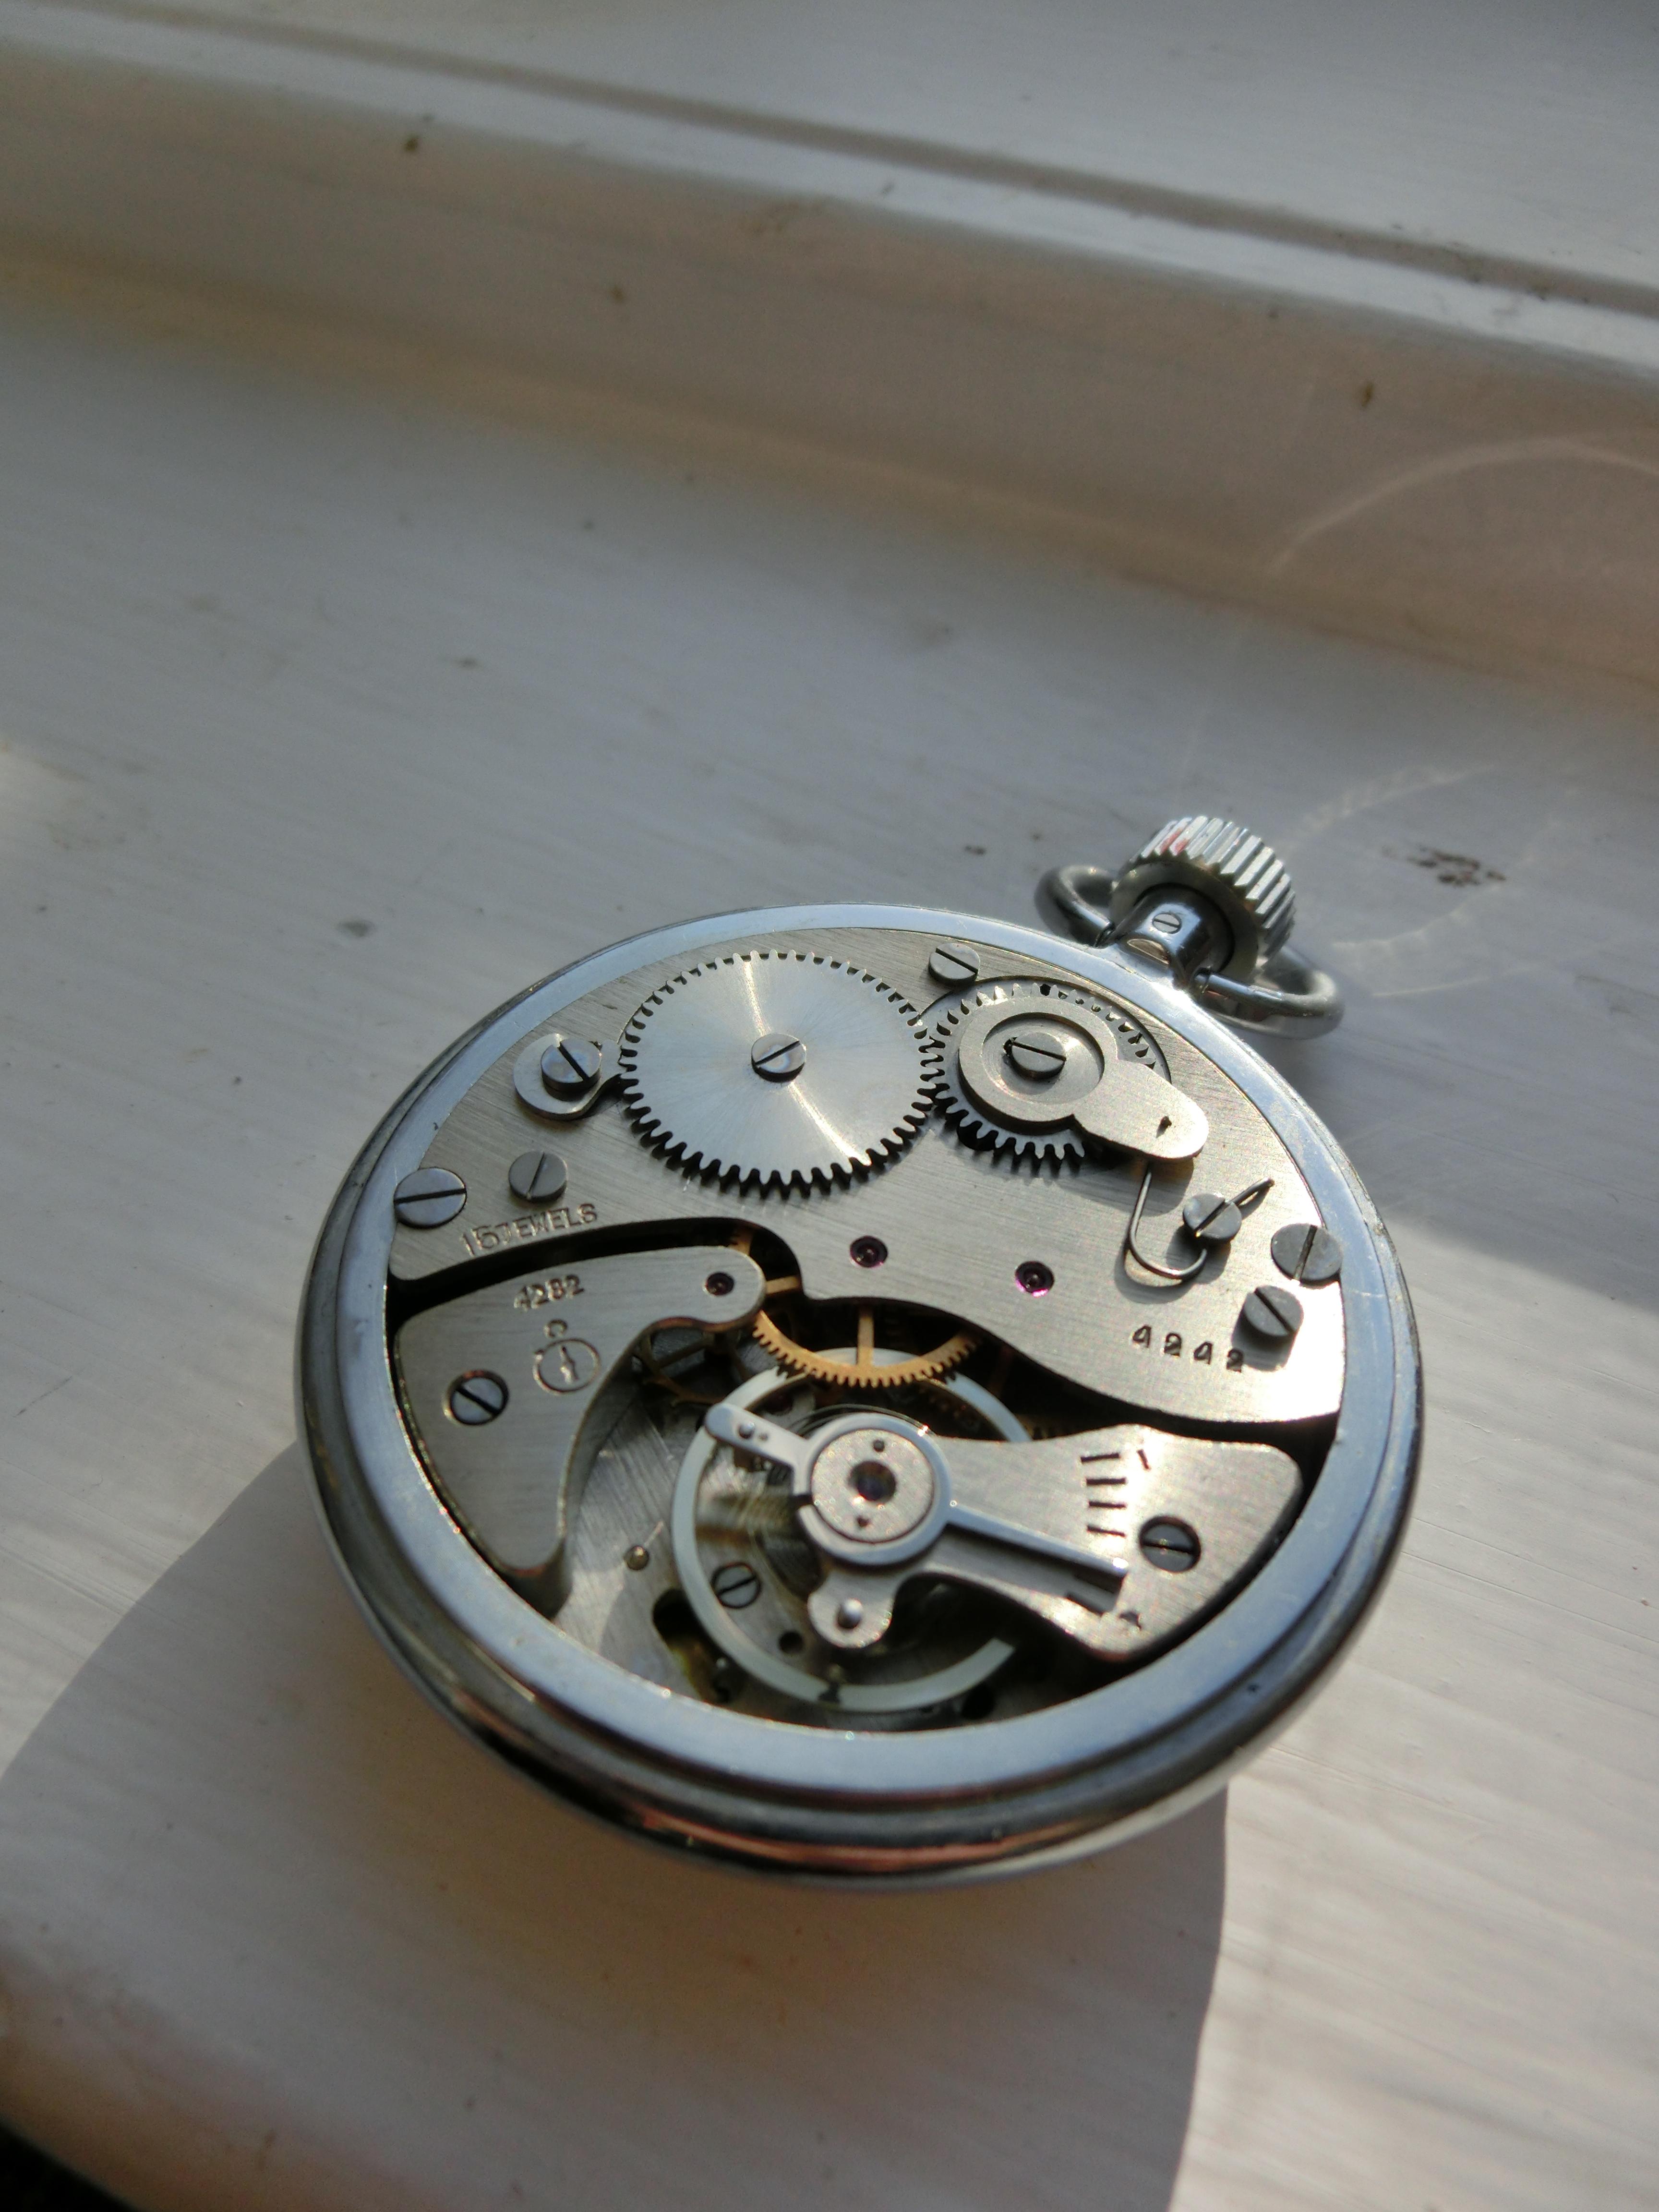
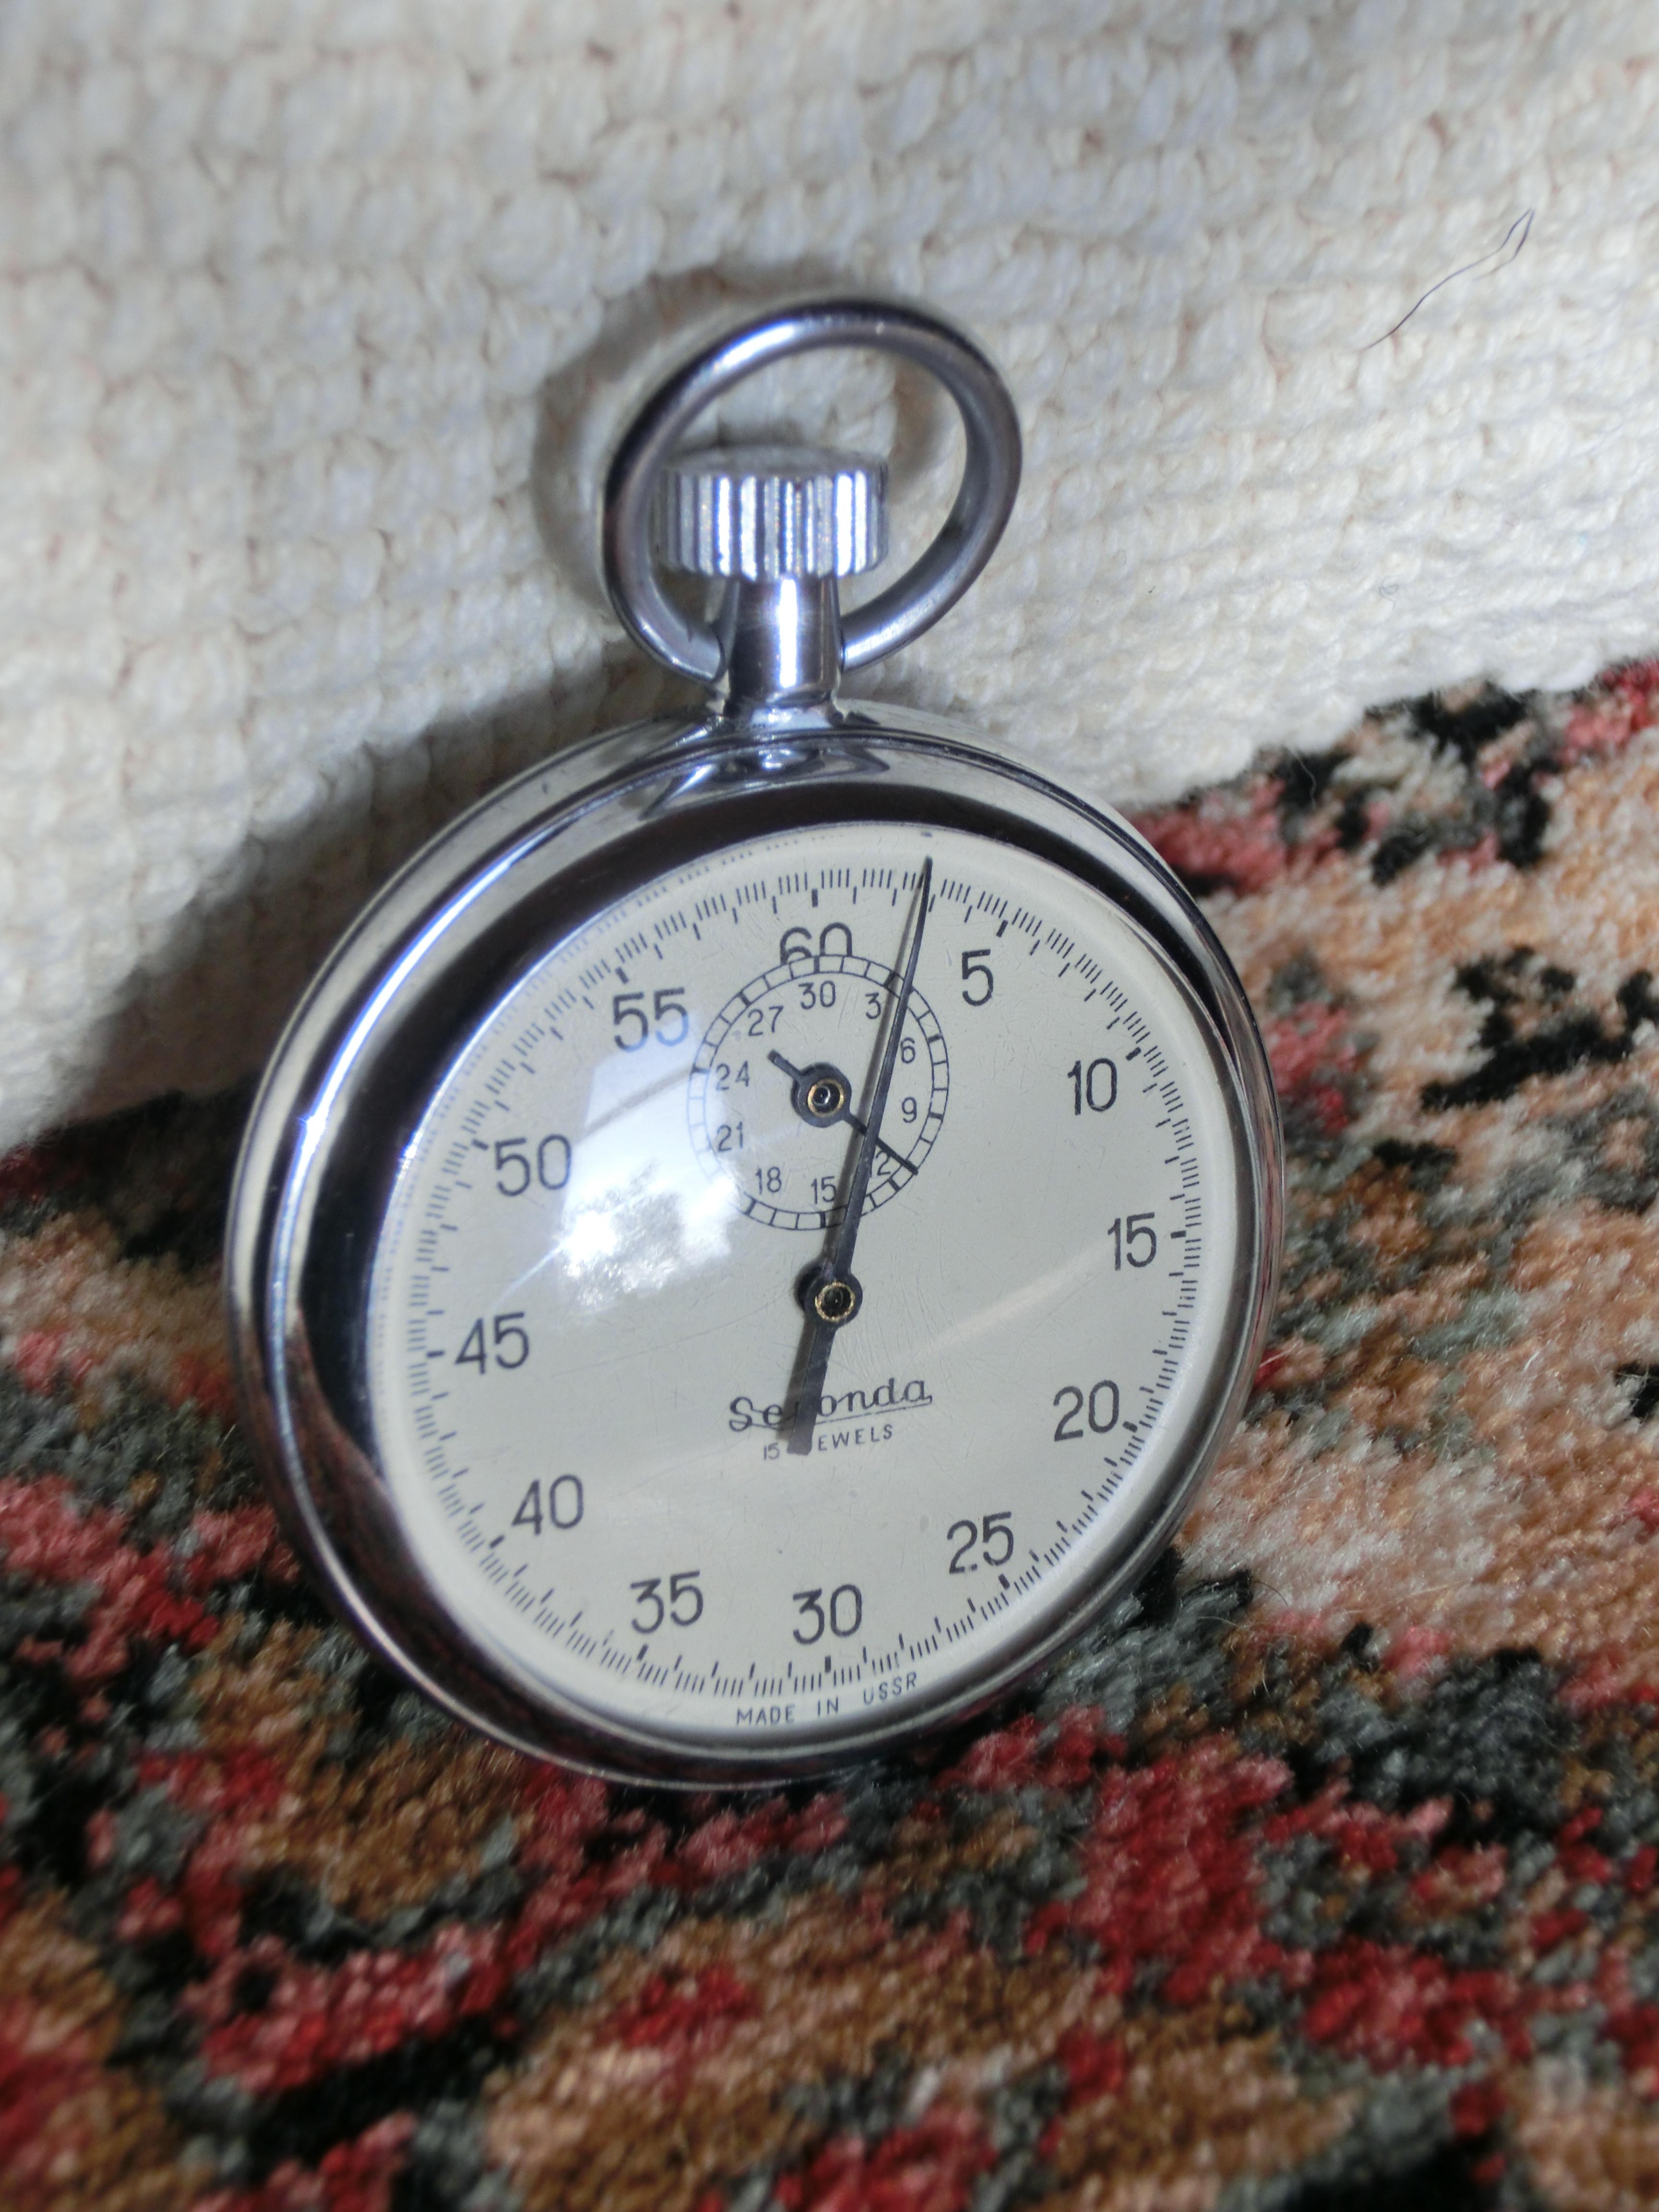
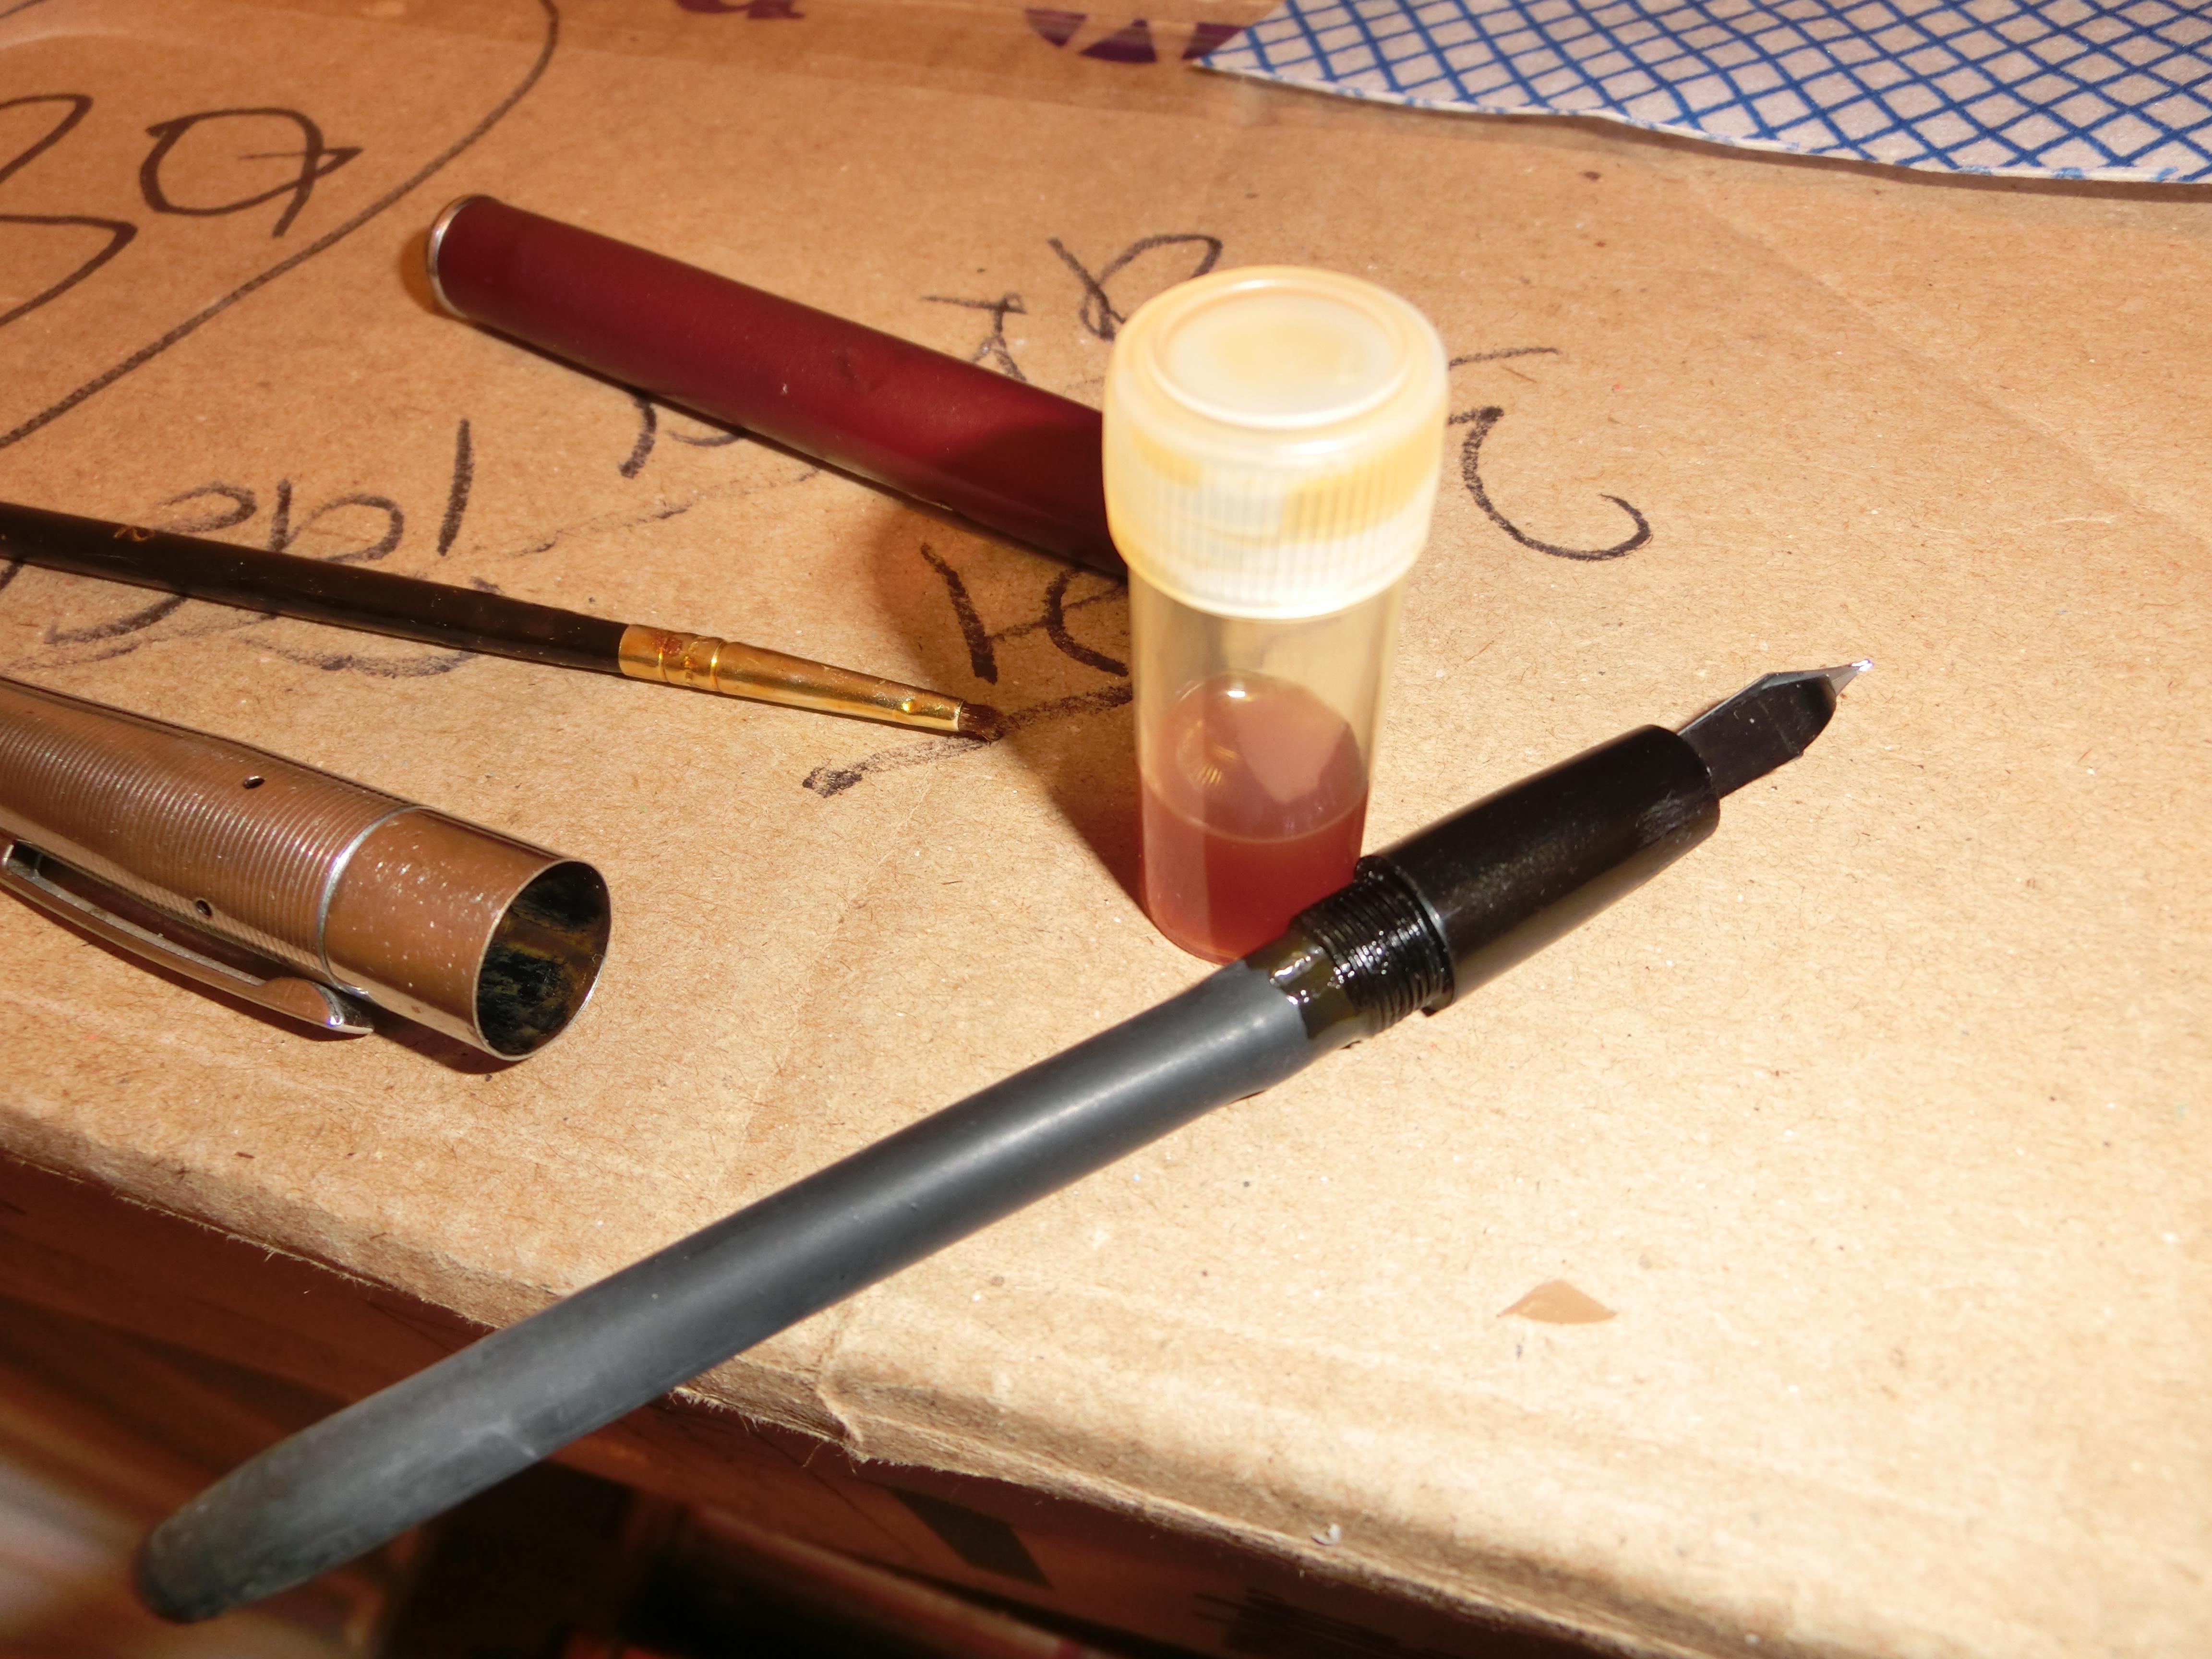
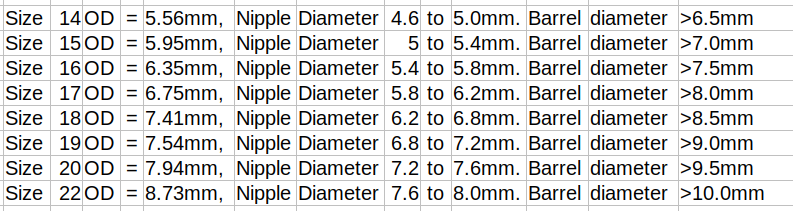
I've gone off on a bit of a tangent recently, but back to watches for this next post. To be exact, an Agat/Zlatoust 4282/4242 single button USSR era 15 Jewel, 1/5th second stopwatch, or to use its modern Agat designation, the СОПпр-2а-3-000 This is one of the few mechanical time pieces that is still produced to this day. I suspect this particular example is from around 1980, but it looks to have been little used. A quick clean and oil and it looks, and runs as well as it did the day it left the factory. @szbalogh did a full teardown of a very similar Agat 2482 here -> If you fancy browsing the Agat factory website, follow the link below. https://www.agatfactory.de/products/mechanical-stopwatch/soppr-2а-3-000-2 A little bonus content. Replacing the "bladder" on one my Platignum fountain pens. This is a pretty simple process. Pick a suitable size, based on the following chart. Nipple refers to the end of the section, where the bladder is fitted. Barrel diameter is the inside diameter of the barrel. These are best measured with calipers. Search ebay for something like "Latex Ink Sac Bladders for Fountain Pen". You will need something else that most of us have. Shellac dissolved in alcohol, to use as the glue to seal the bladder to the "section". You may need to cut the bladder to length. Once you are happy with the length, clean off any old shellac and rubber from the "nipple" with isopropanol or methylated spirits (don't use acetone, as it will damage the section). Ensure the nipple end is un-cracked, dry and clean (this also applies to cows). Paint a thin coating of shellac on to the "nipple" end of the section. Slide the open end of the bladder on to this coating of shellac. This should be a fairly tight fit. Paint around the "collar" on the section to seal the latex to the plastic, and leave to dry for 24hrs. Take great care to avoid getting shellac in the thread, or you may end up gluing the pen shut by mistake. Once dry, re-fit the section to the pen. You may need to dust the latex with talc, or coat with a thin coating of silicone oil to get it to slide in smoothly, without kinking or twisting. A little silicone oil or silicone grease on the section thread will make life a lot easier when it comes to removing the section in the future, as it should stop it gumming up with ink. Refill with your favourite ink and you are done.


 1 point
 -
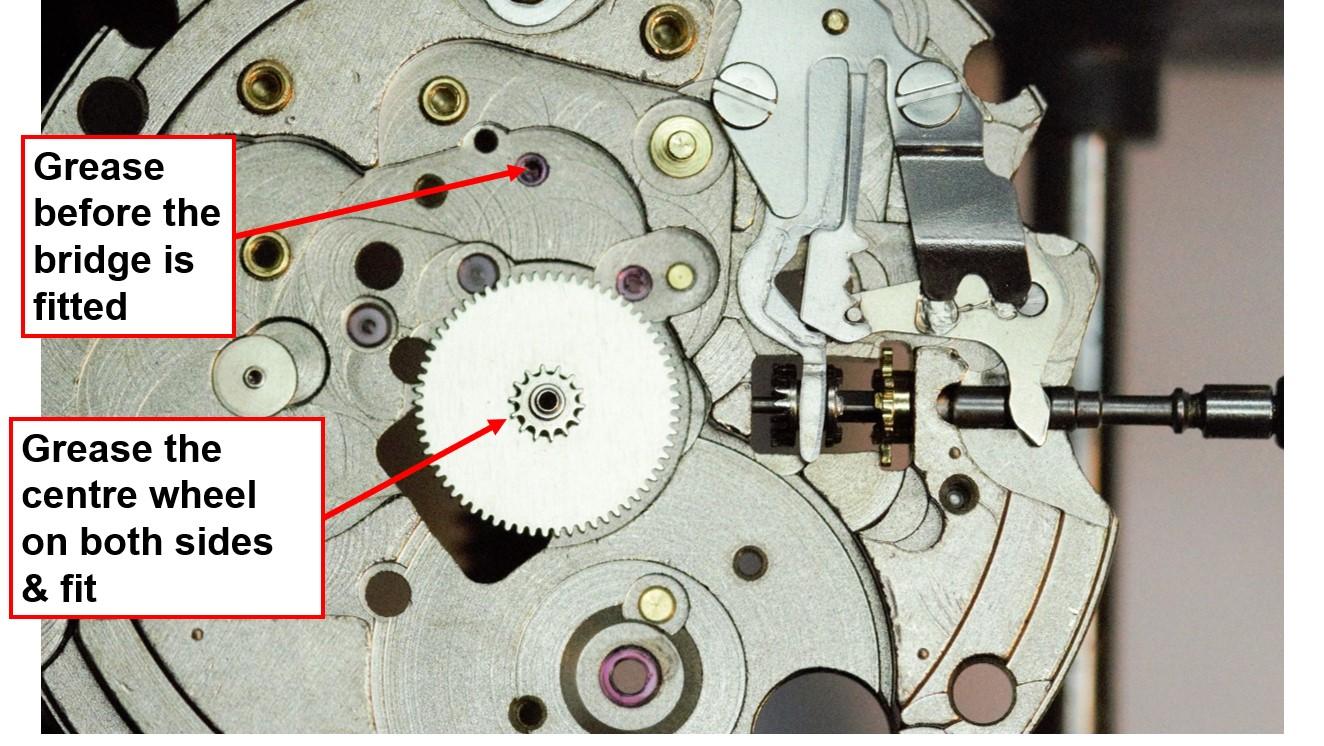
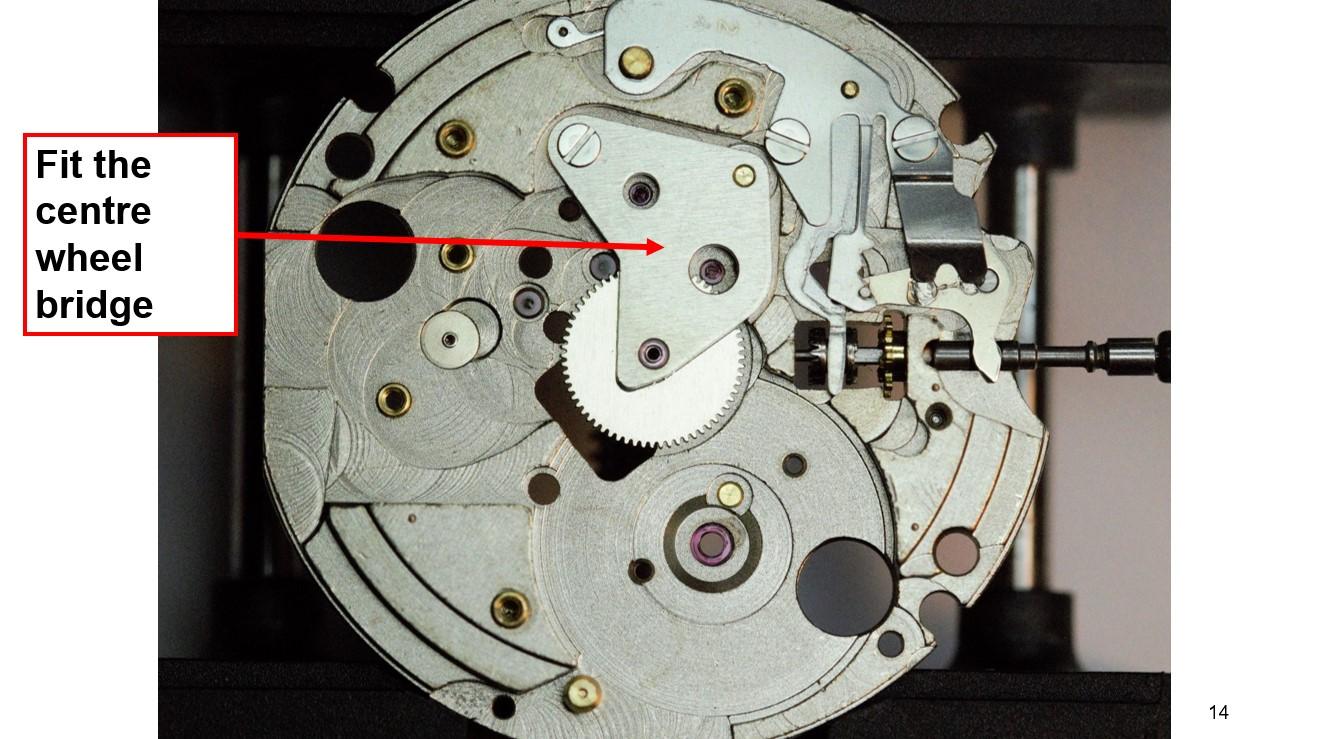
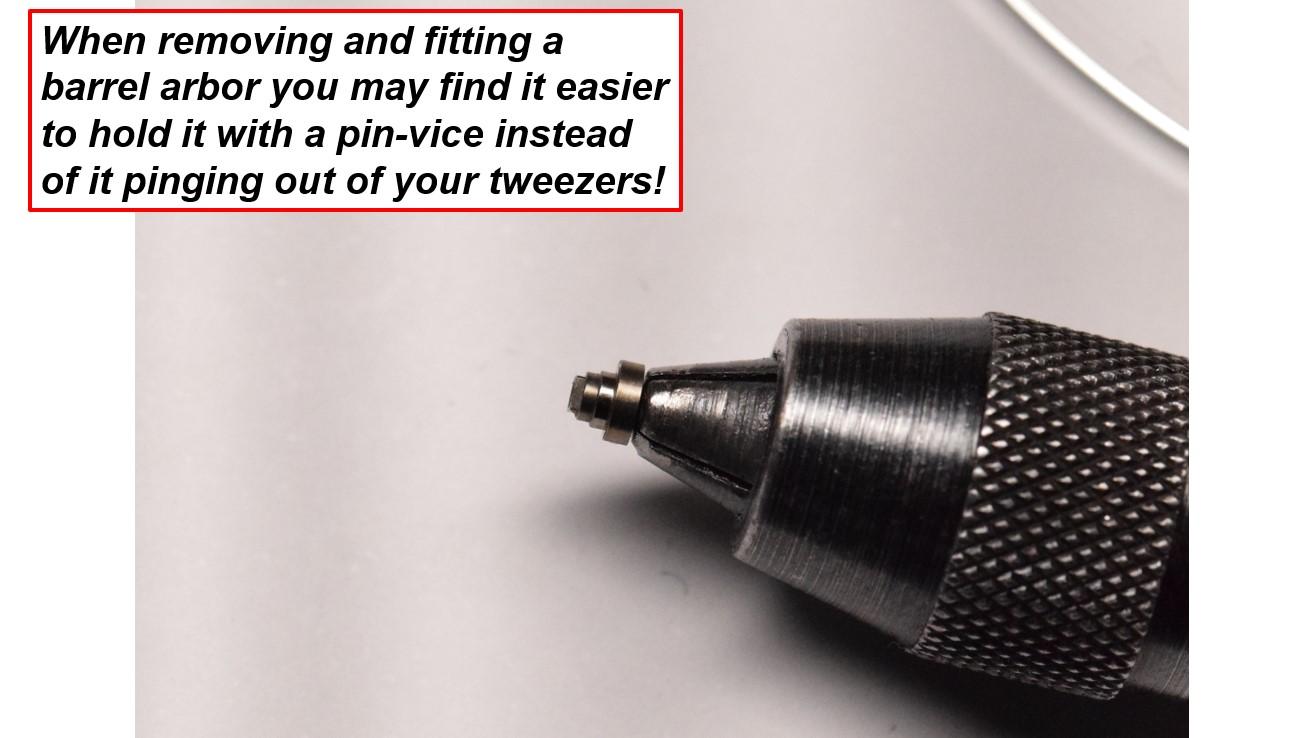
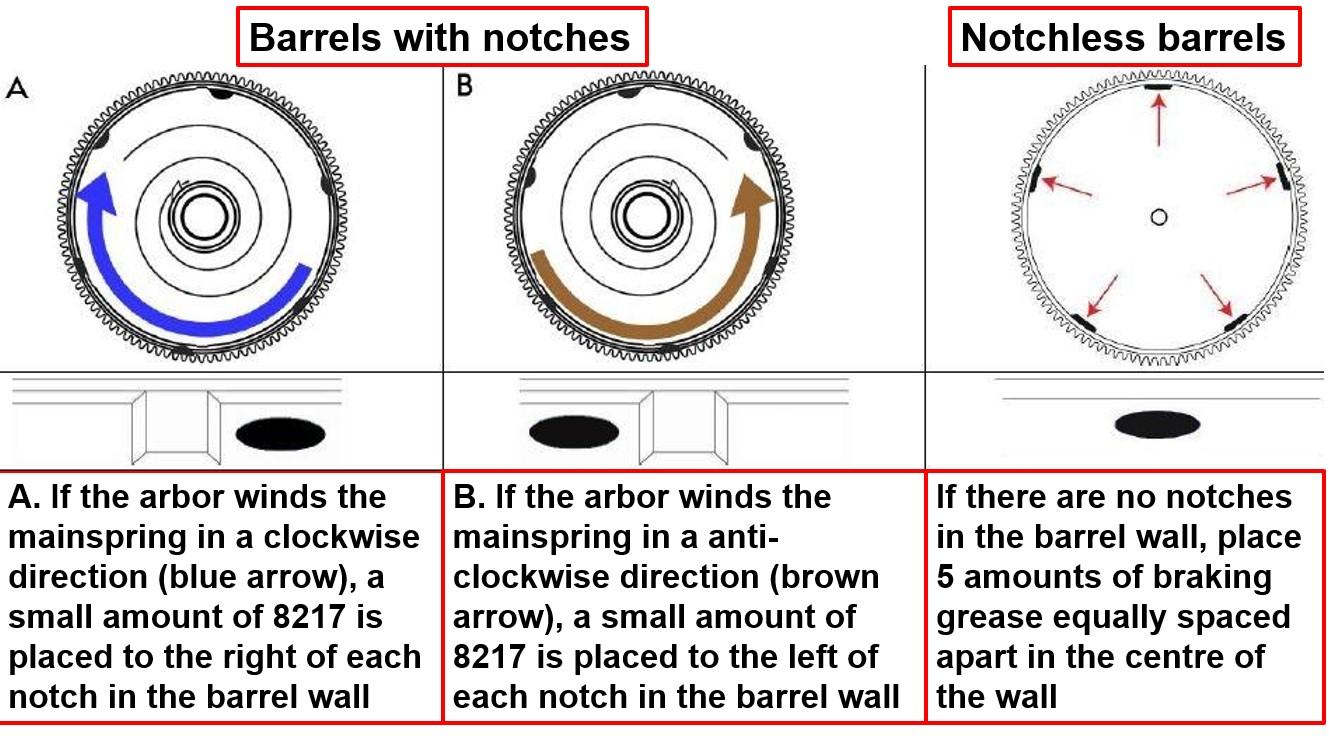
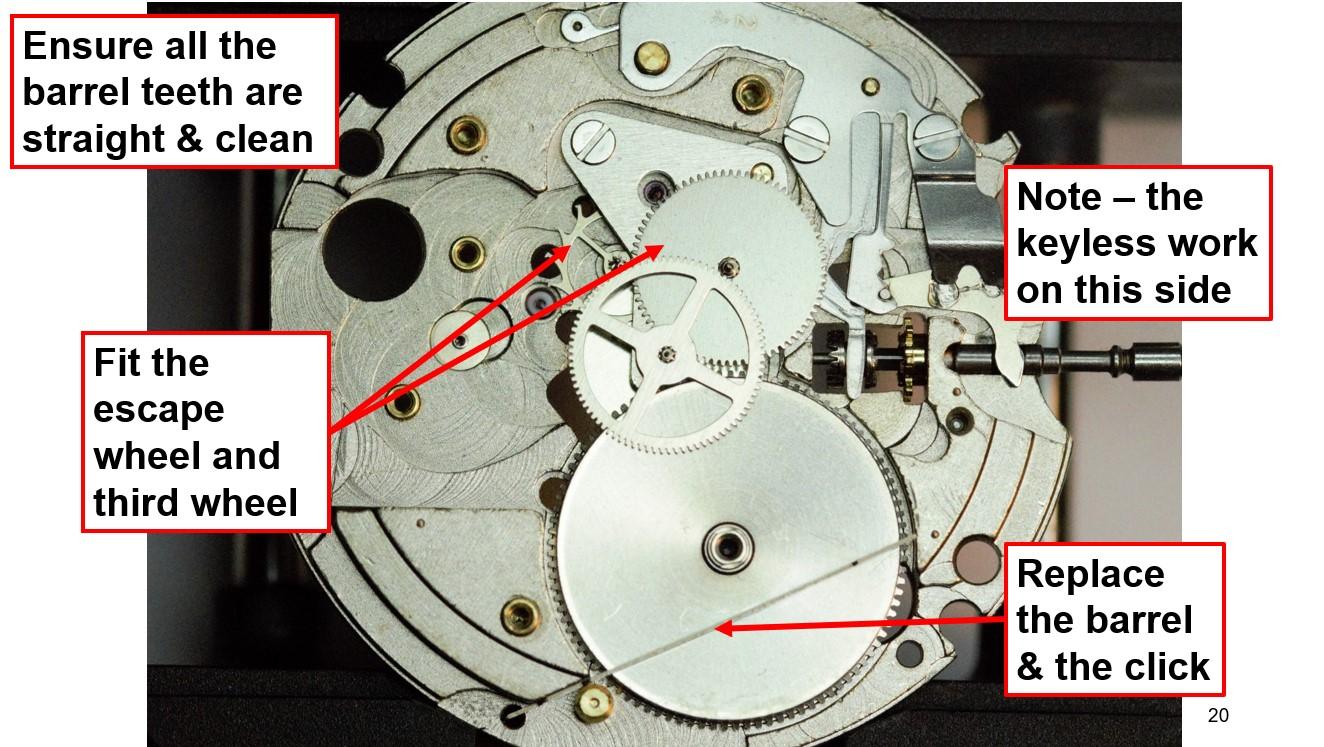
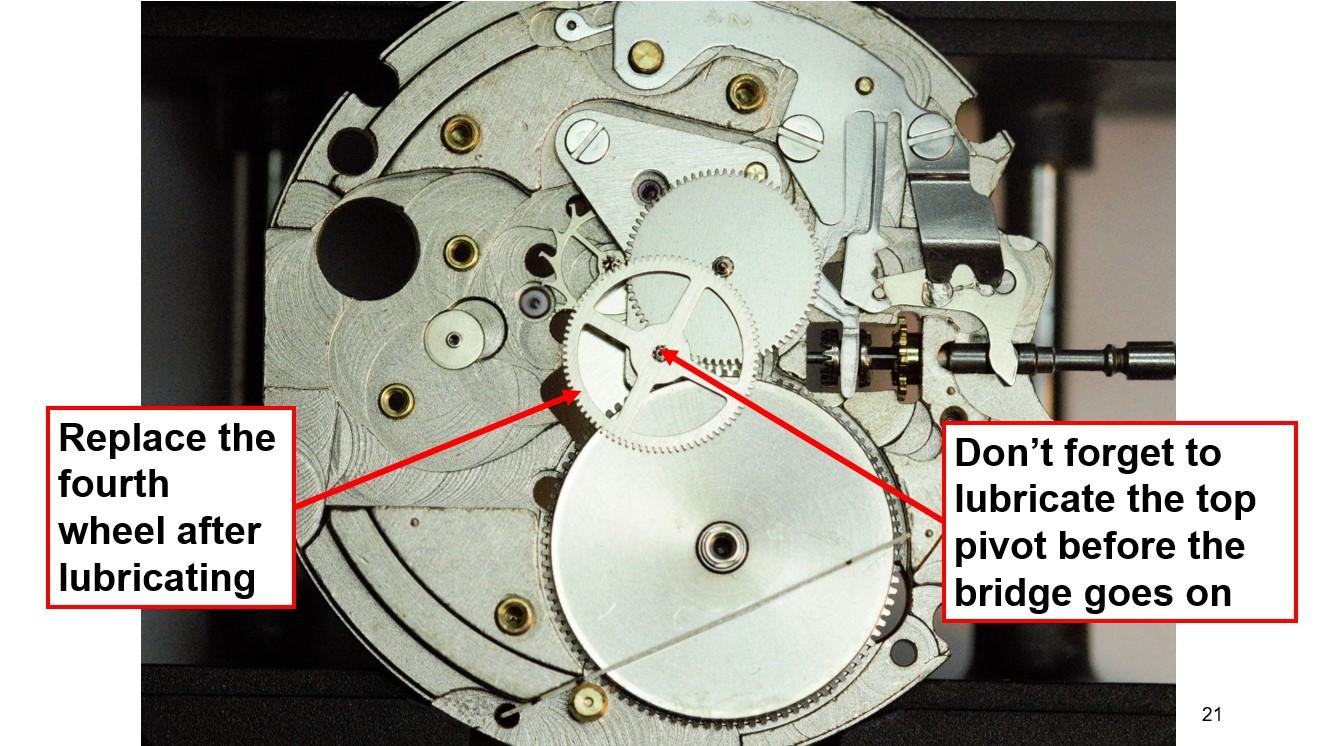
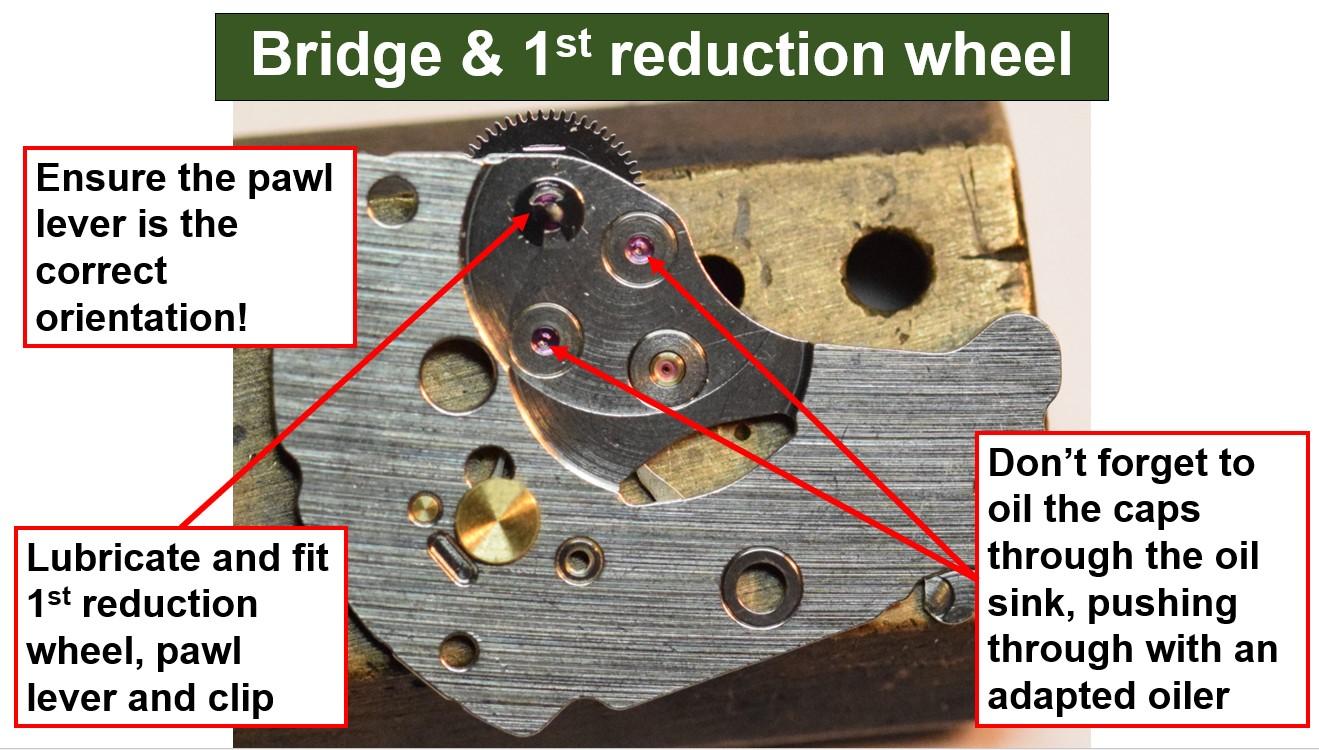
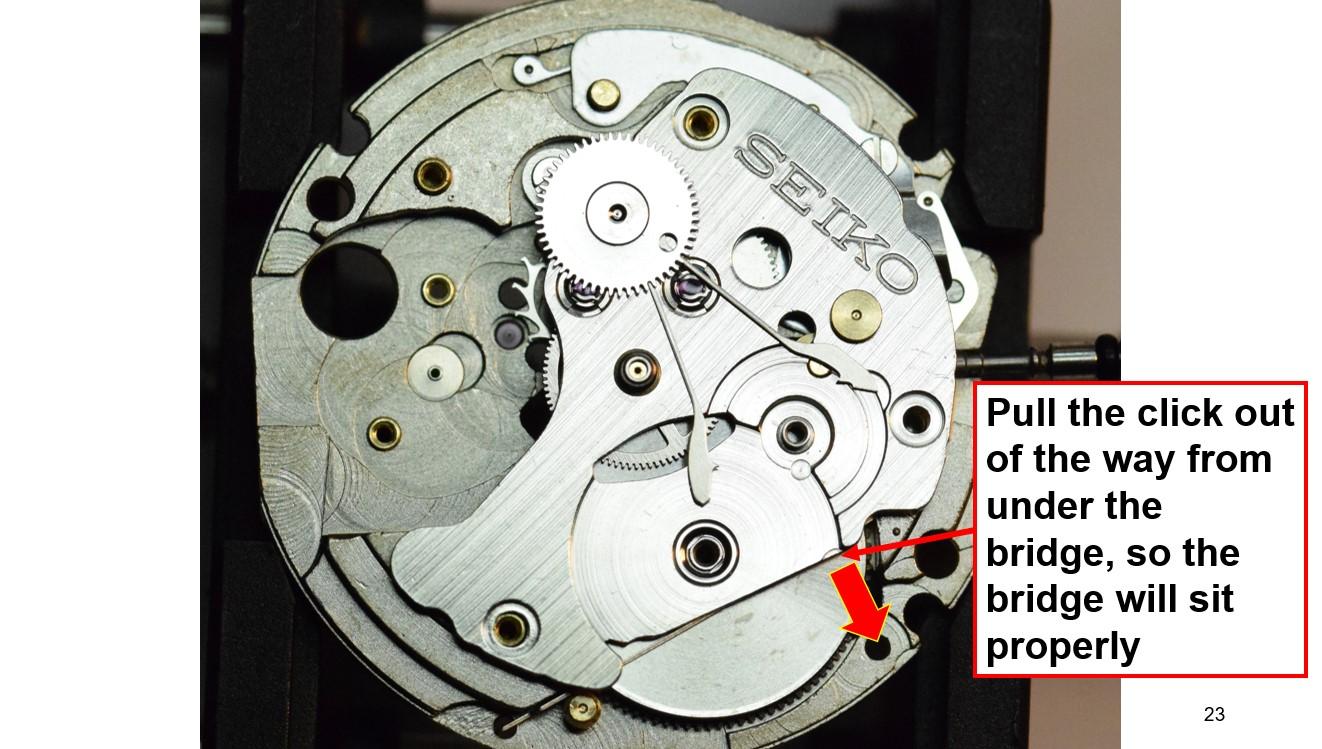
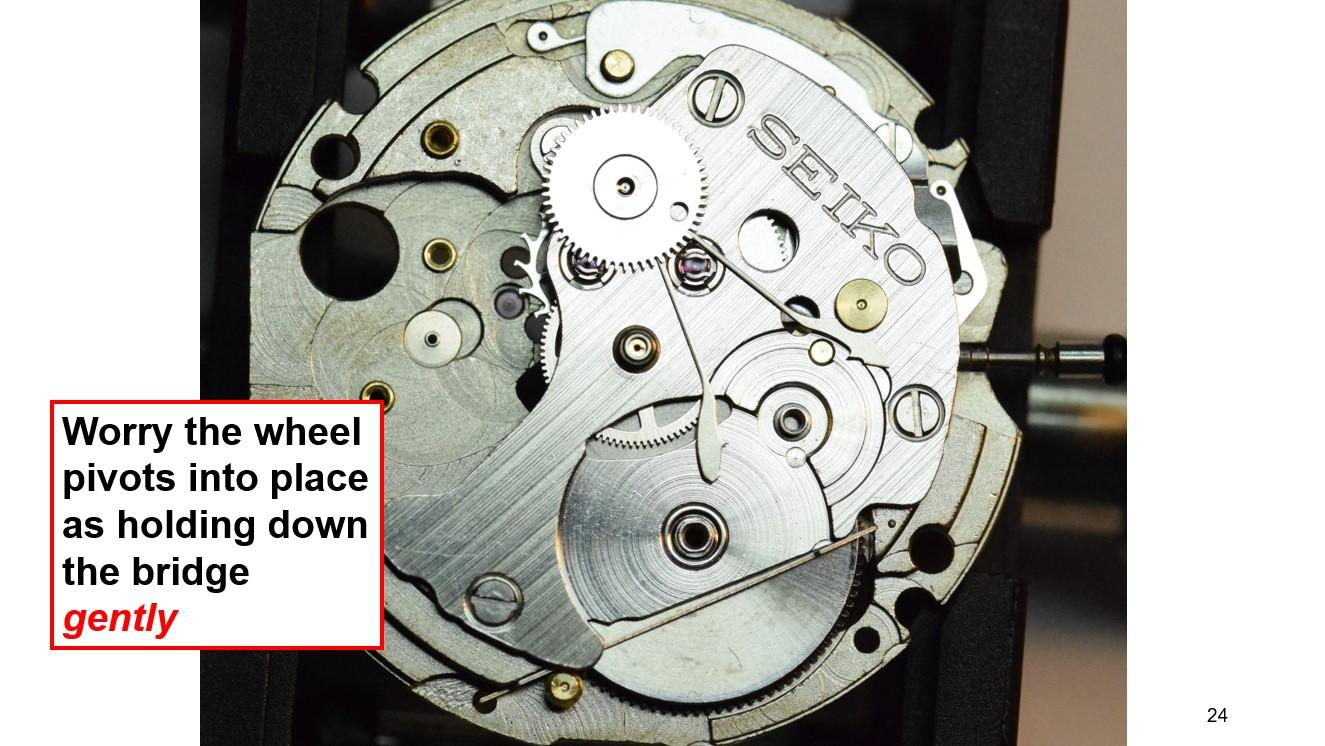
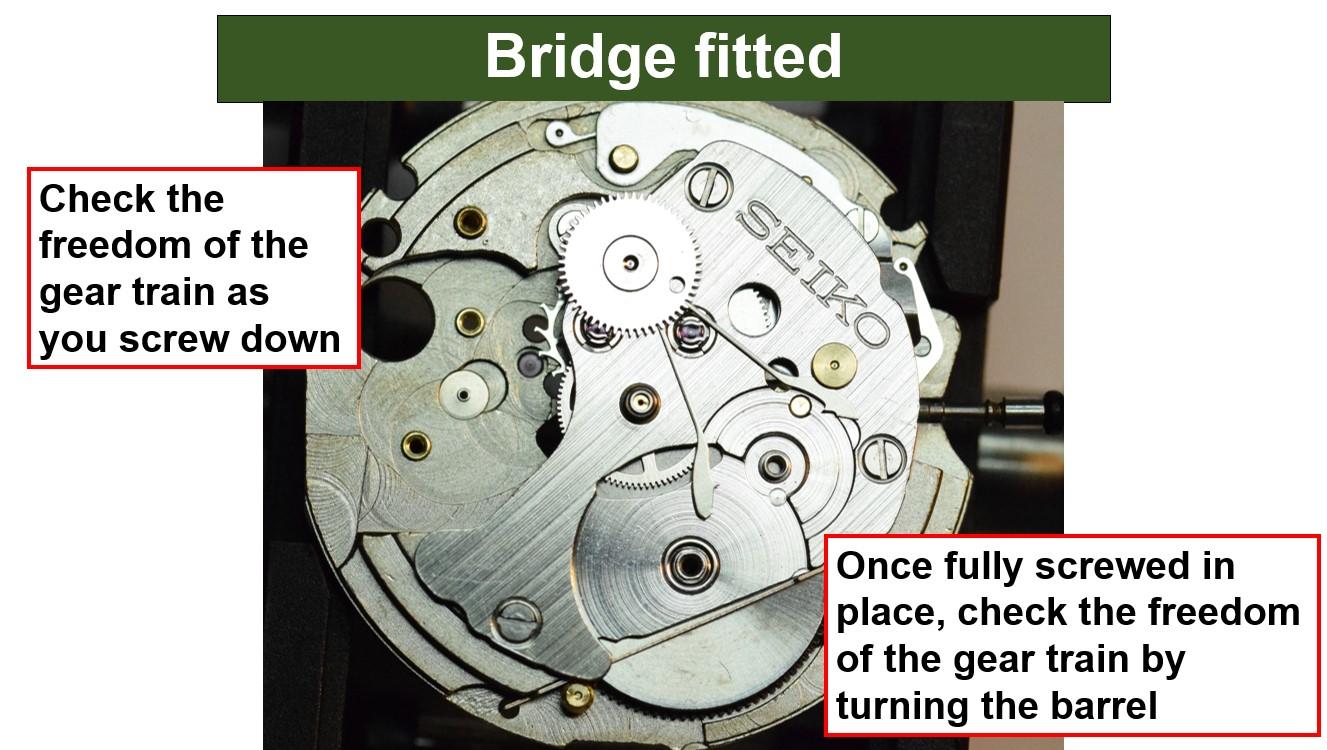
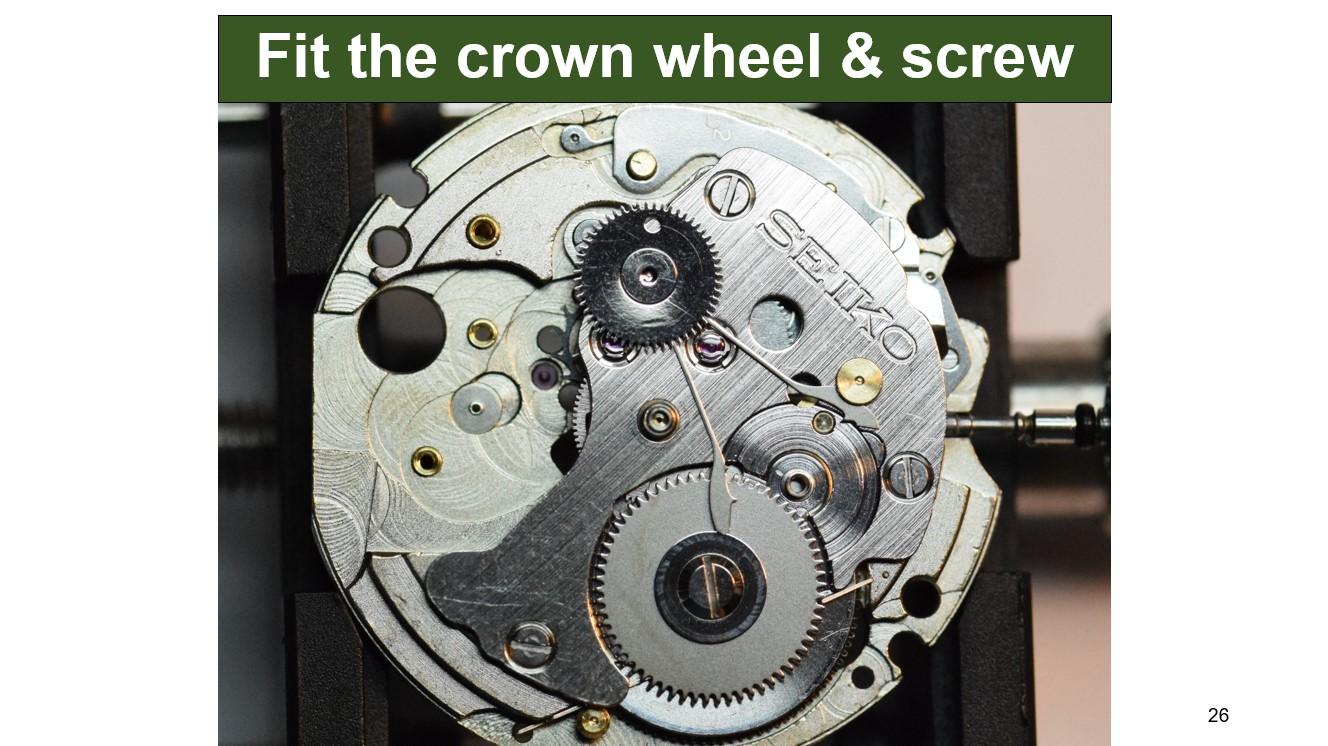
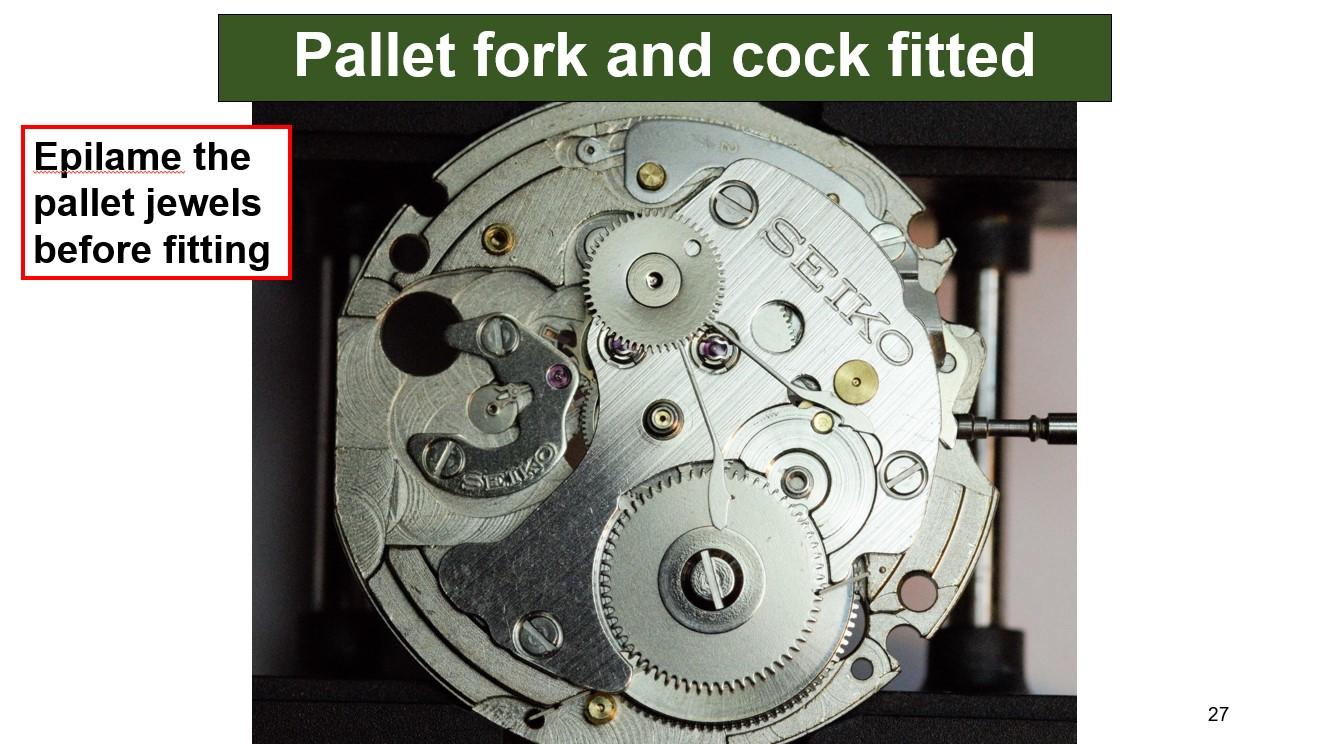
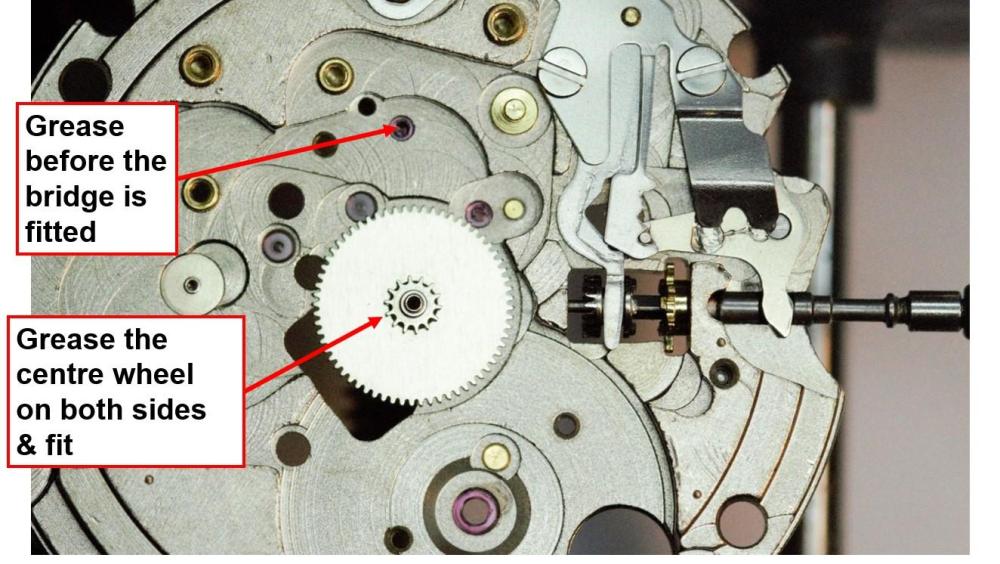
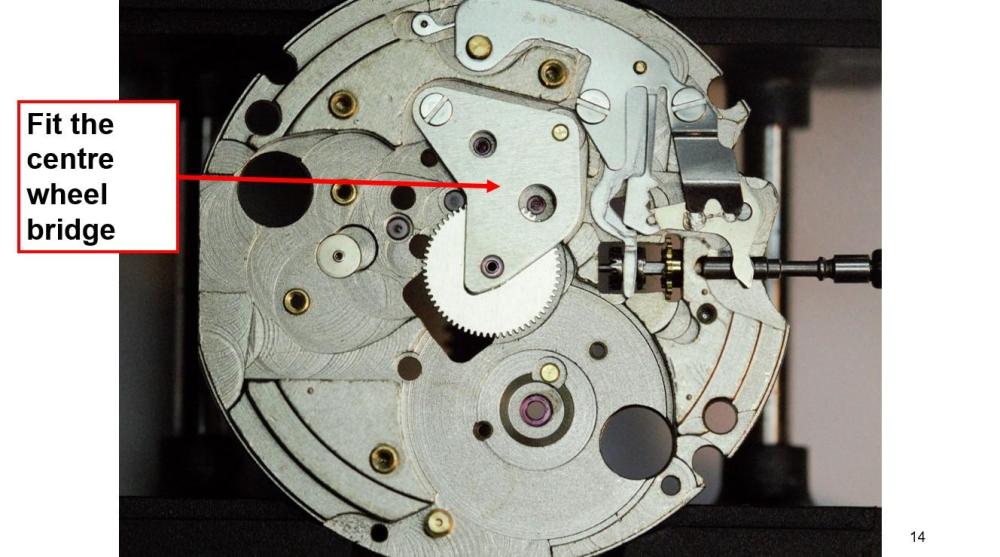
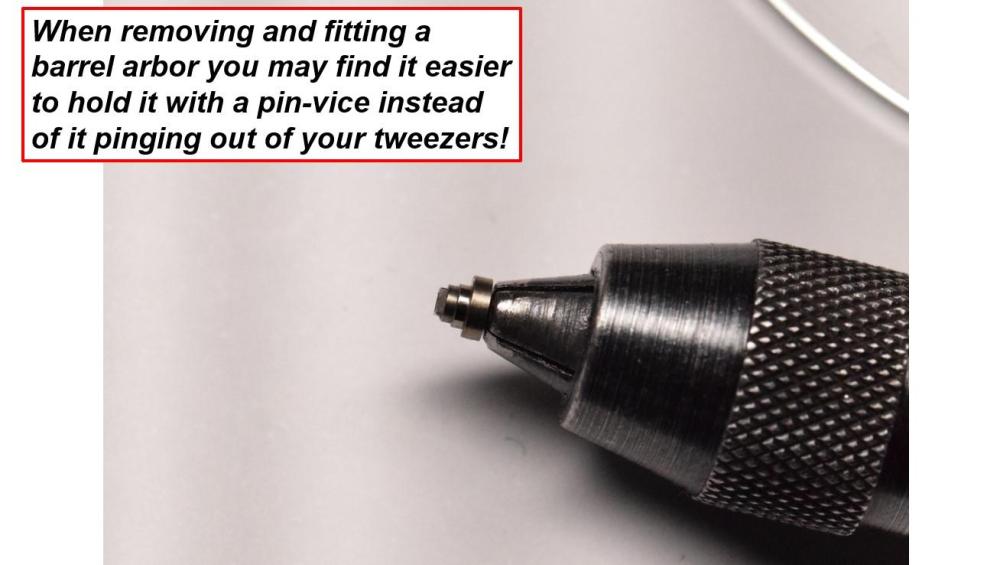
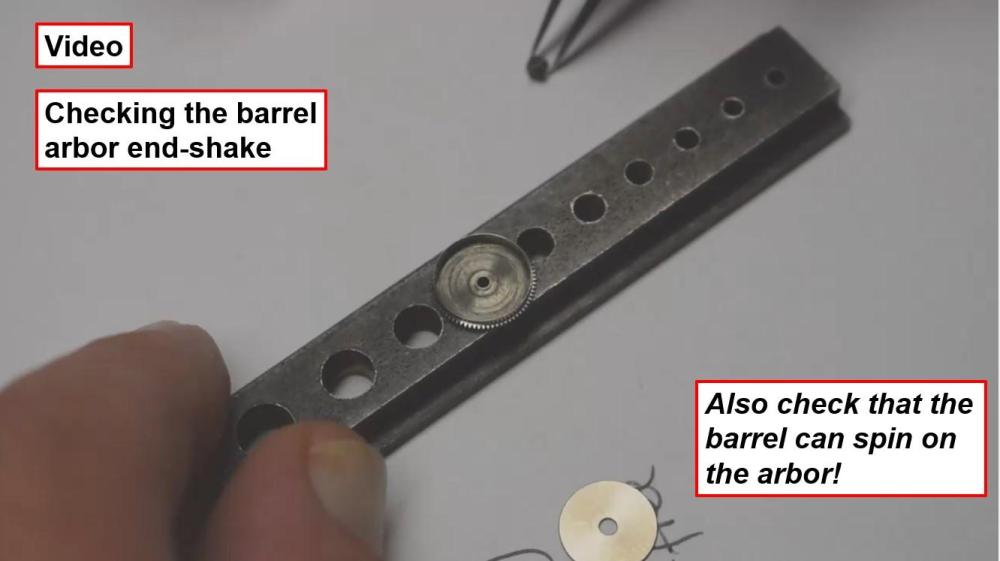
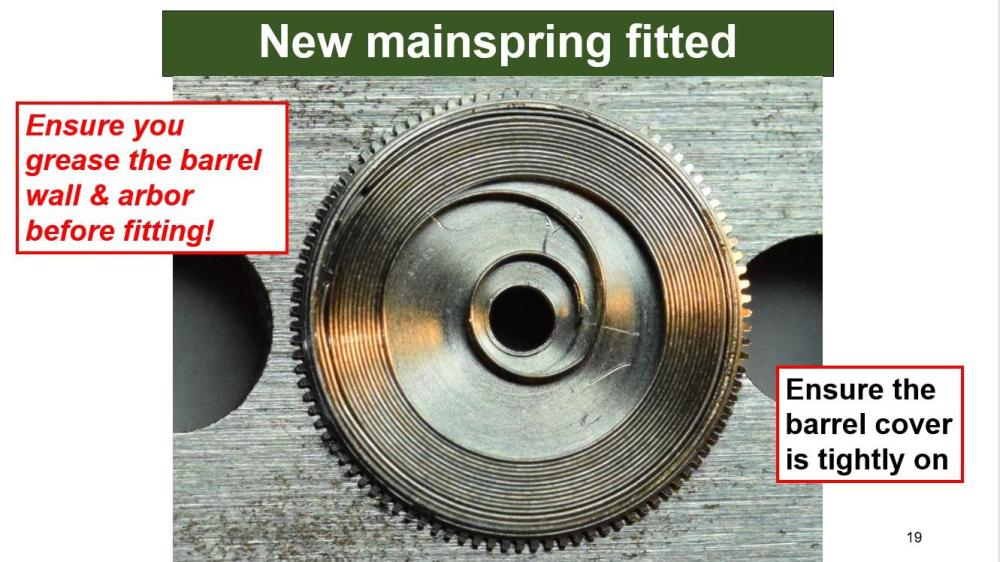
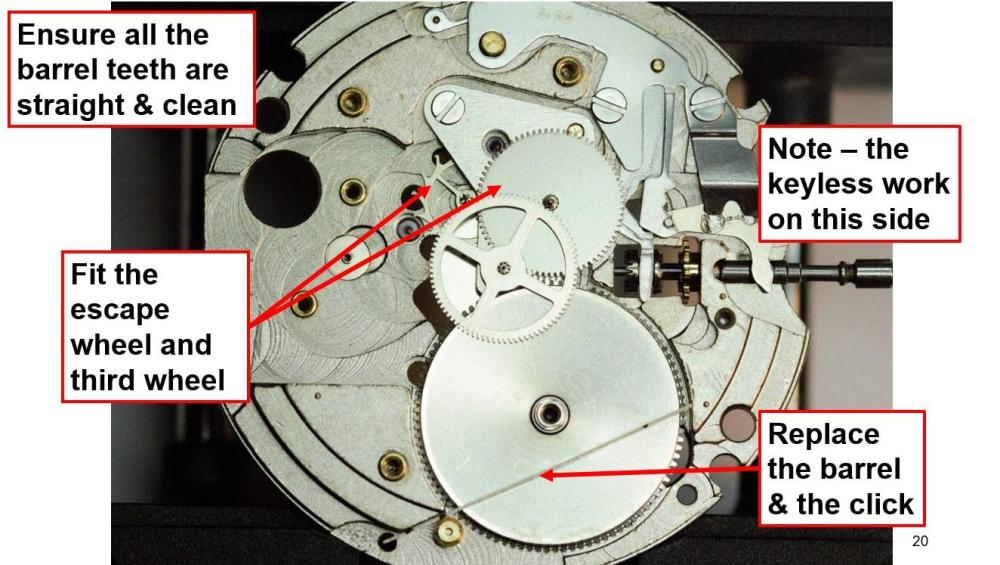
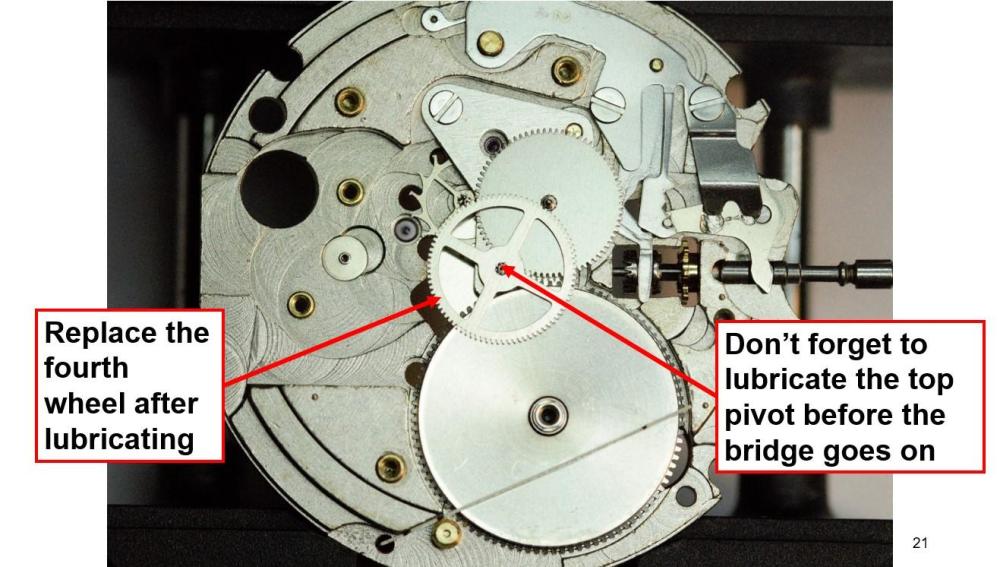
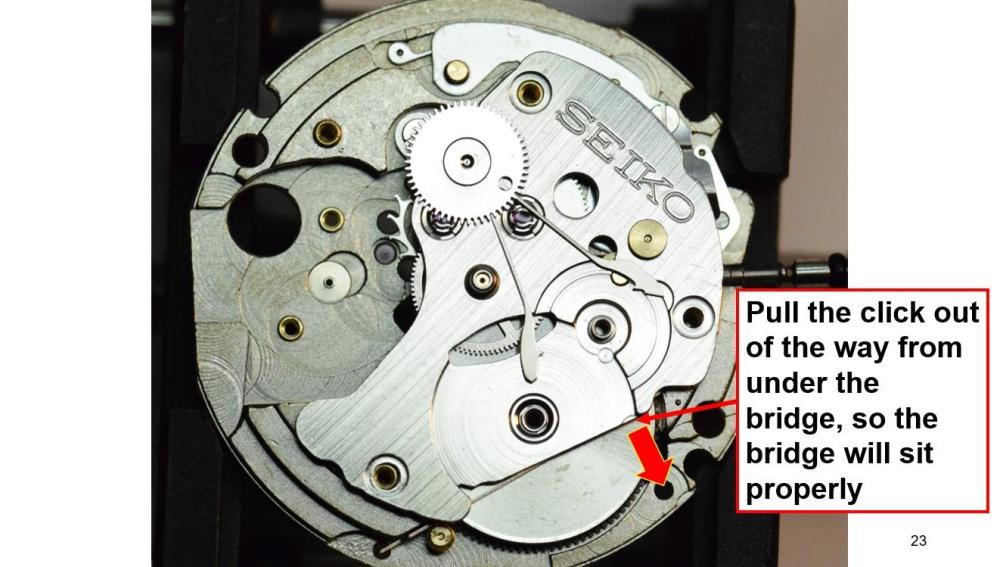
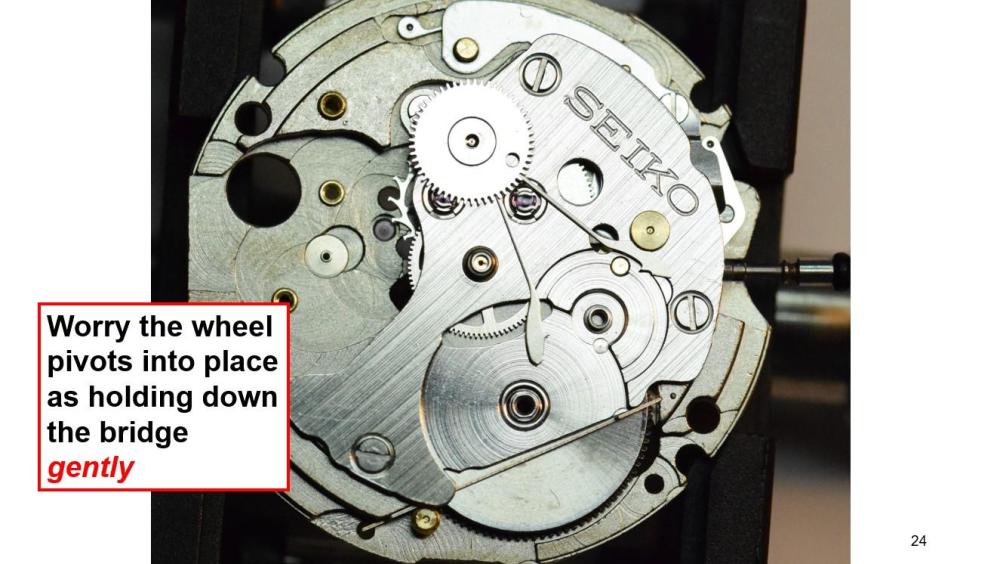
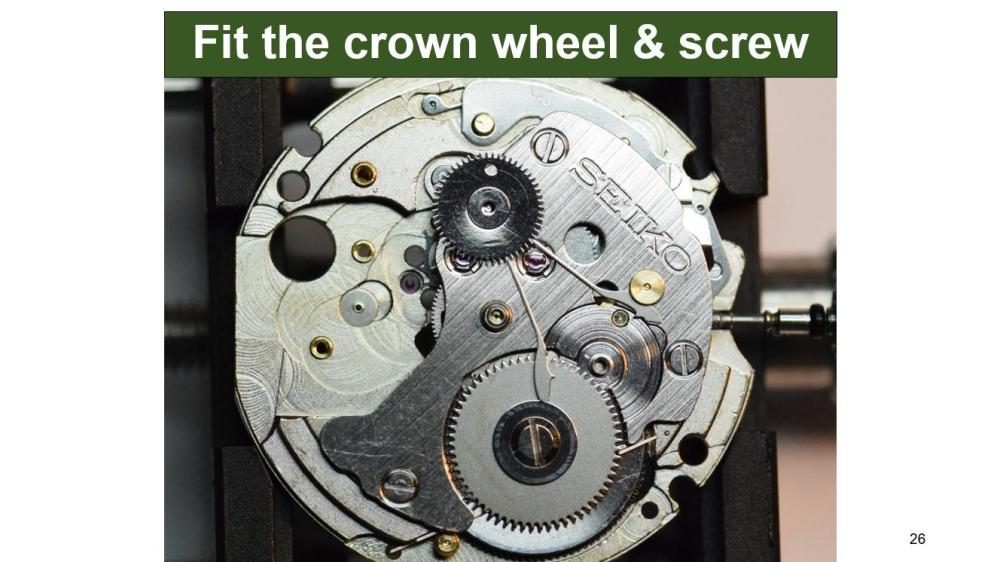
I wrote a set of lessons for the 7S26C some time ago, so you might find these slides helpful. Unfortunately slide 4 regarding the barrel is a video which can't play on this forum, so I copied it as a static slide, so apologies for that.


 1 point
 -
Hi. As you have already been advised you are going to have to gain access to the pivot pins by removing the infill, boy either drilling carefully. Probably best left to a jeweler who is likely to have the right tools.1 point
-
you will have to drive out or drill the pin out or if gold the pin could be soldered so a jeweler might have to do it unless you are familiar with that process....1 point