Leaderboard


Popular Content
Showing content with the highest reputation on 02/11/24 in all areas
-
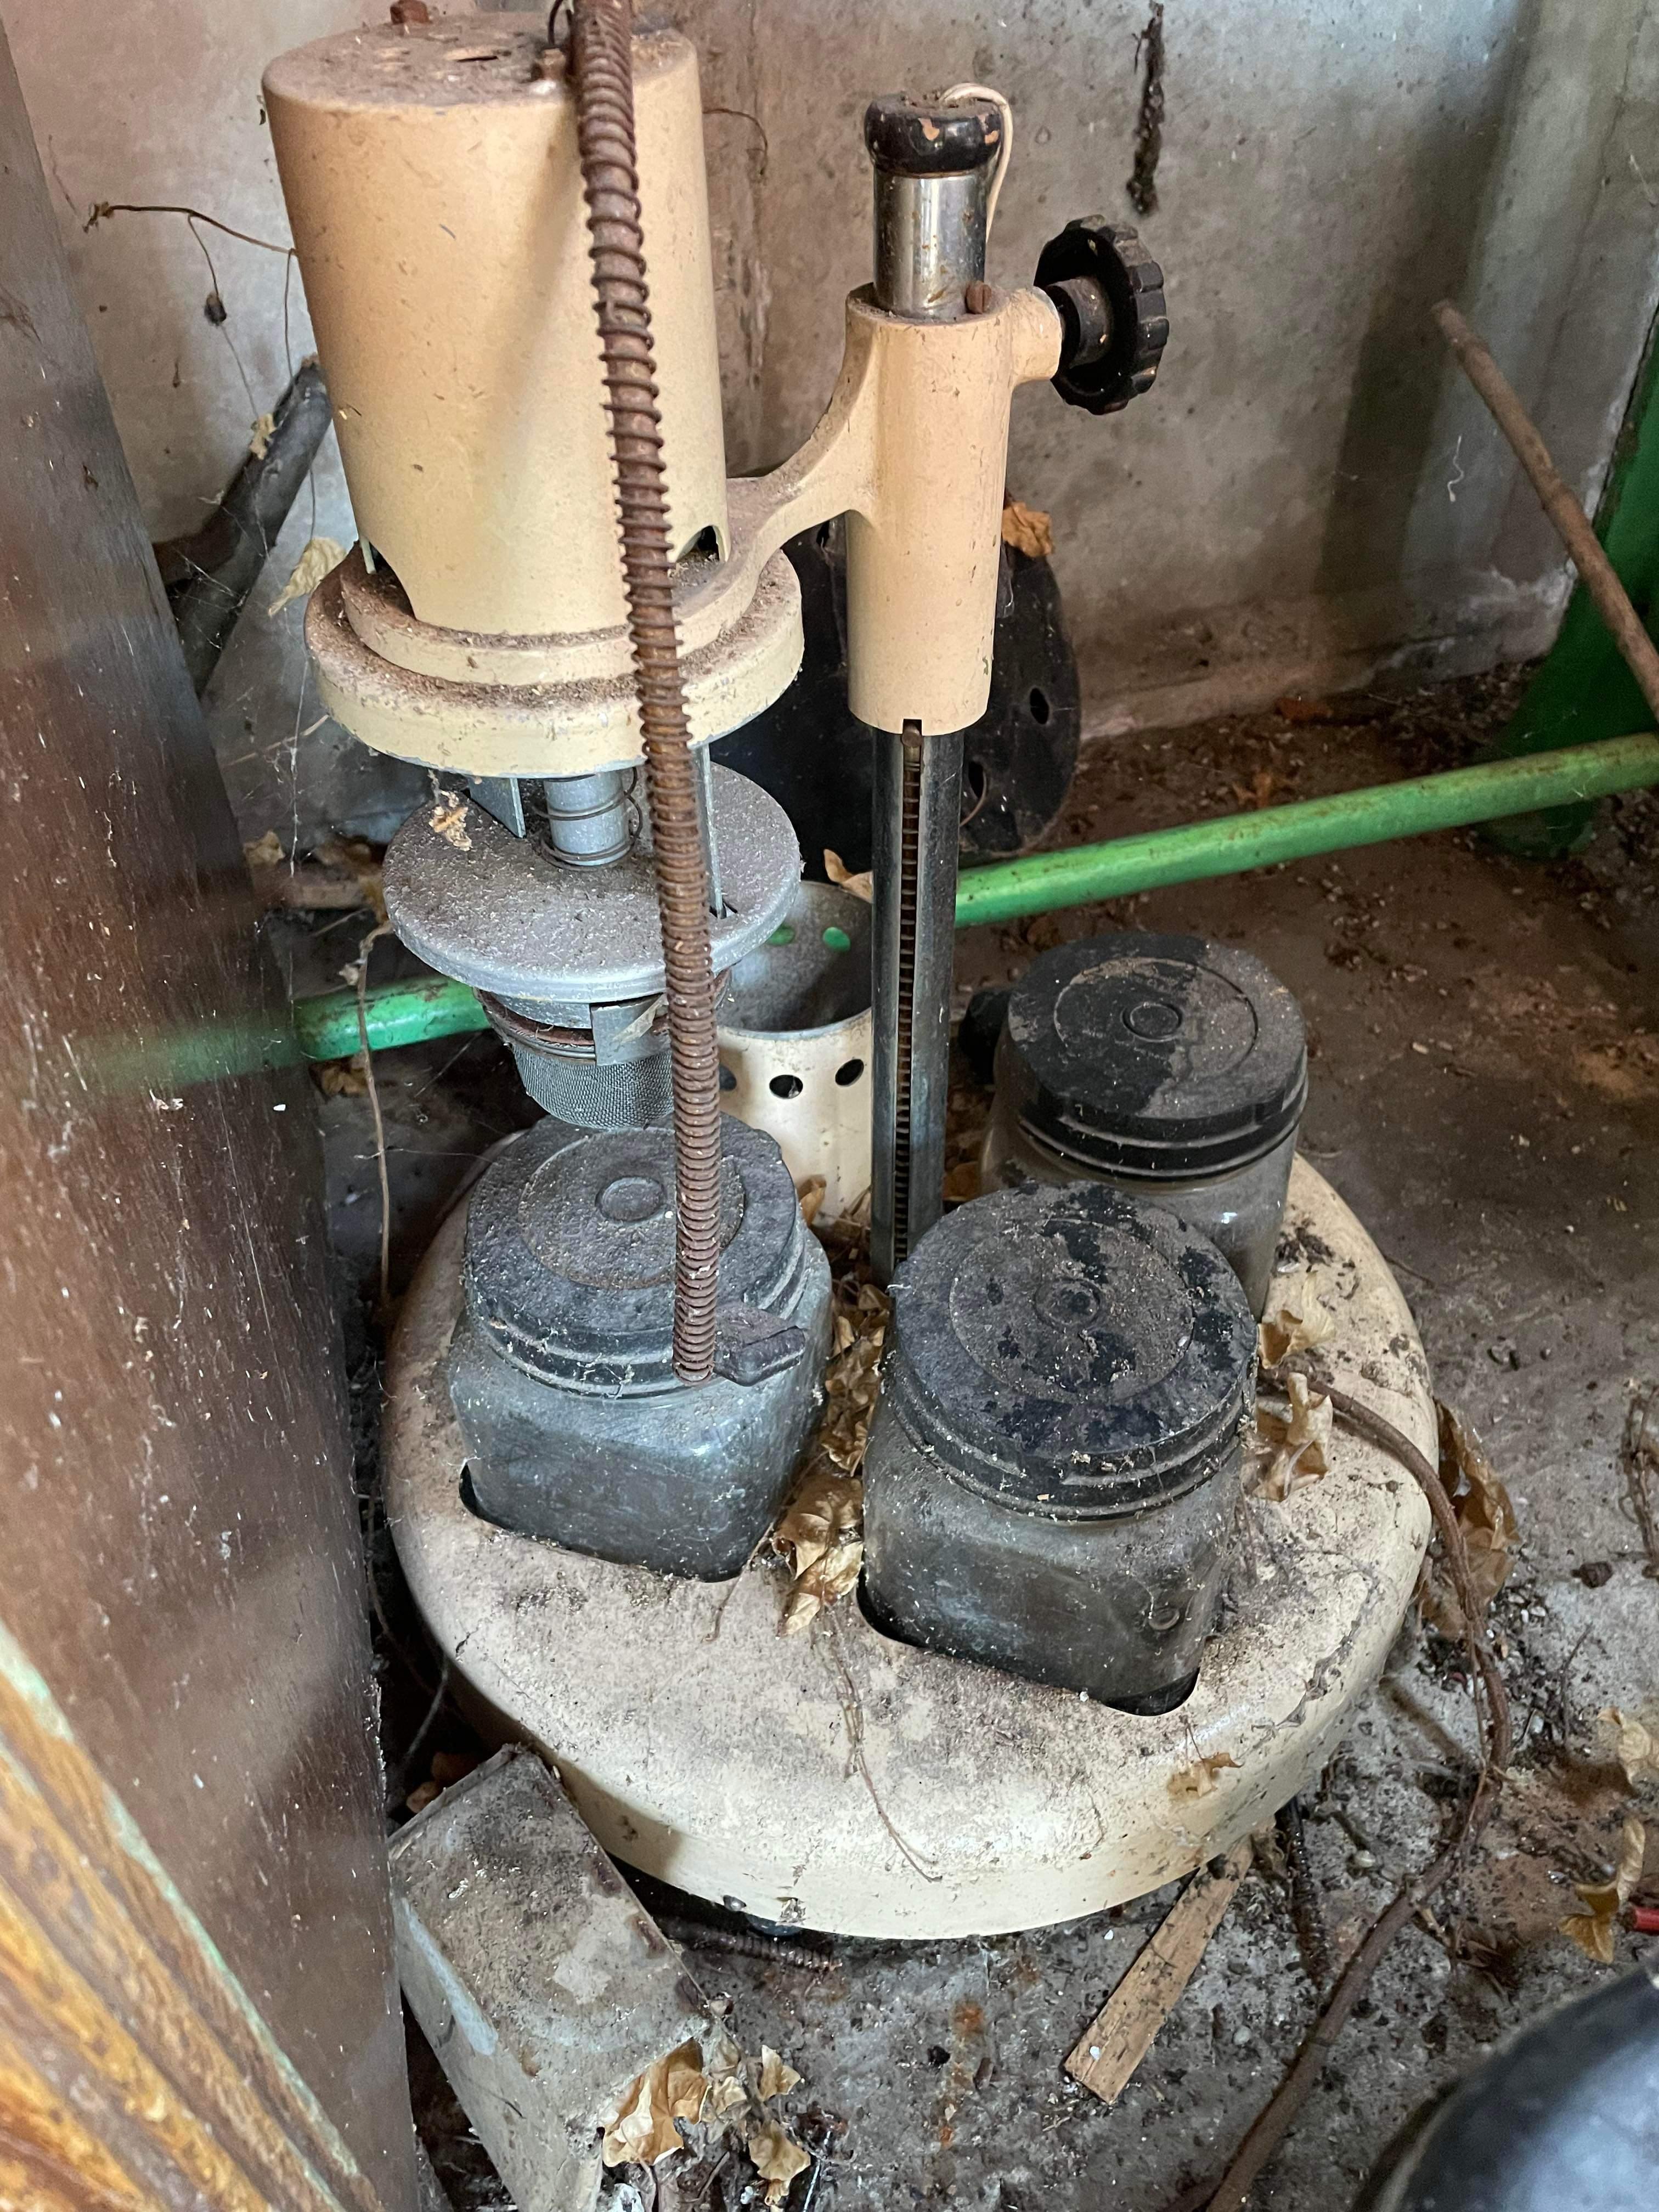
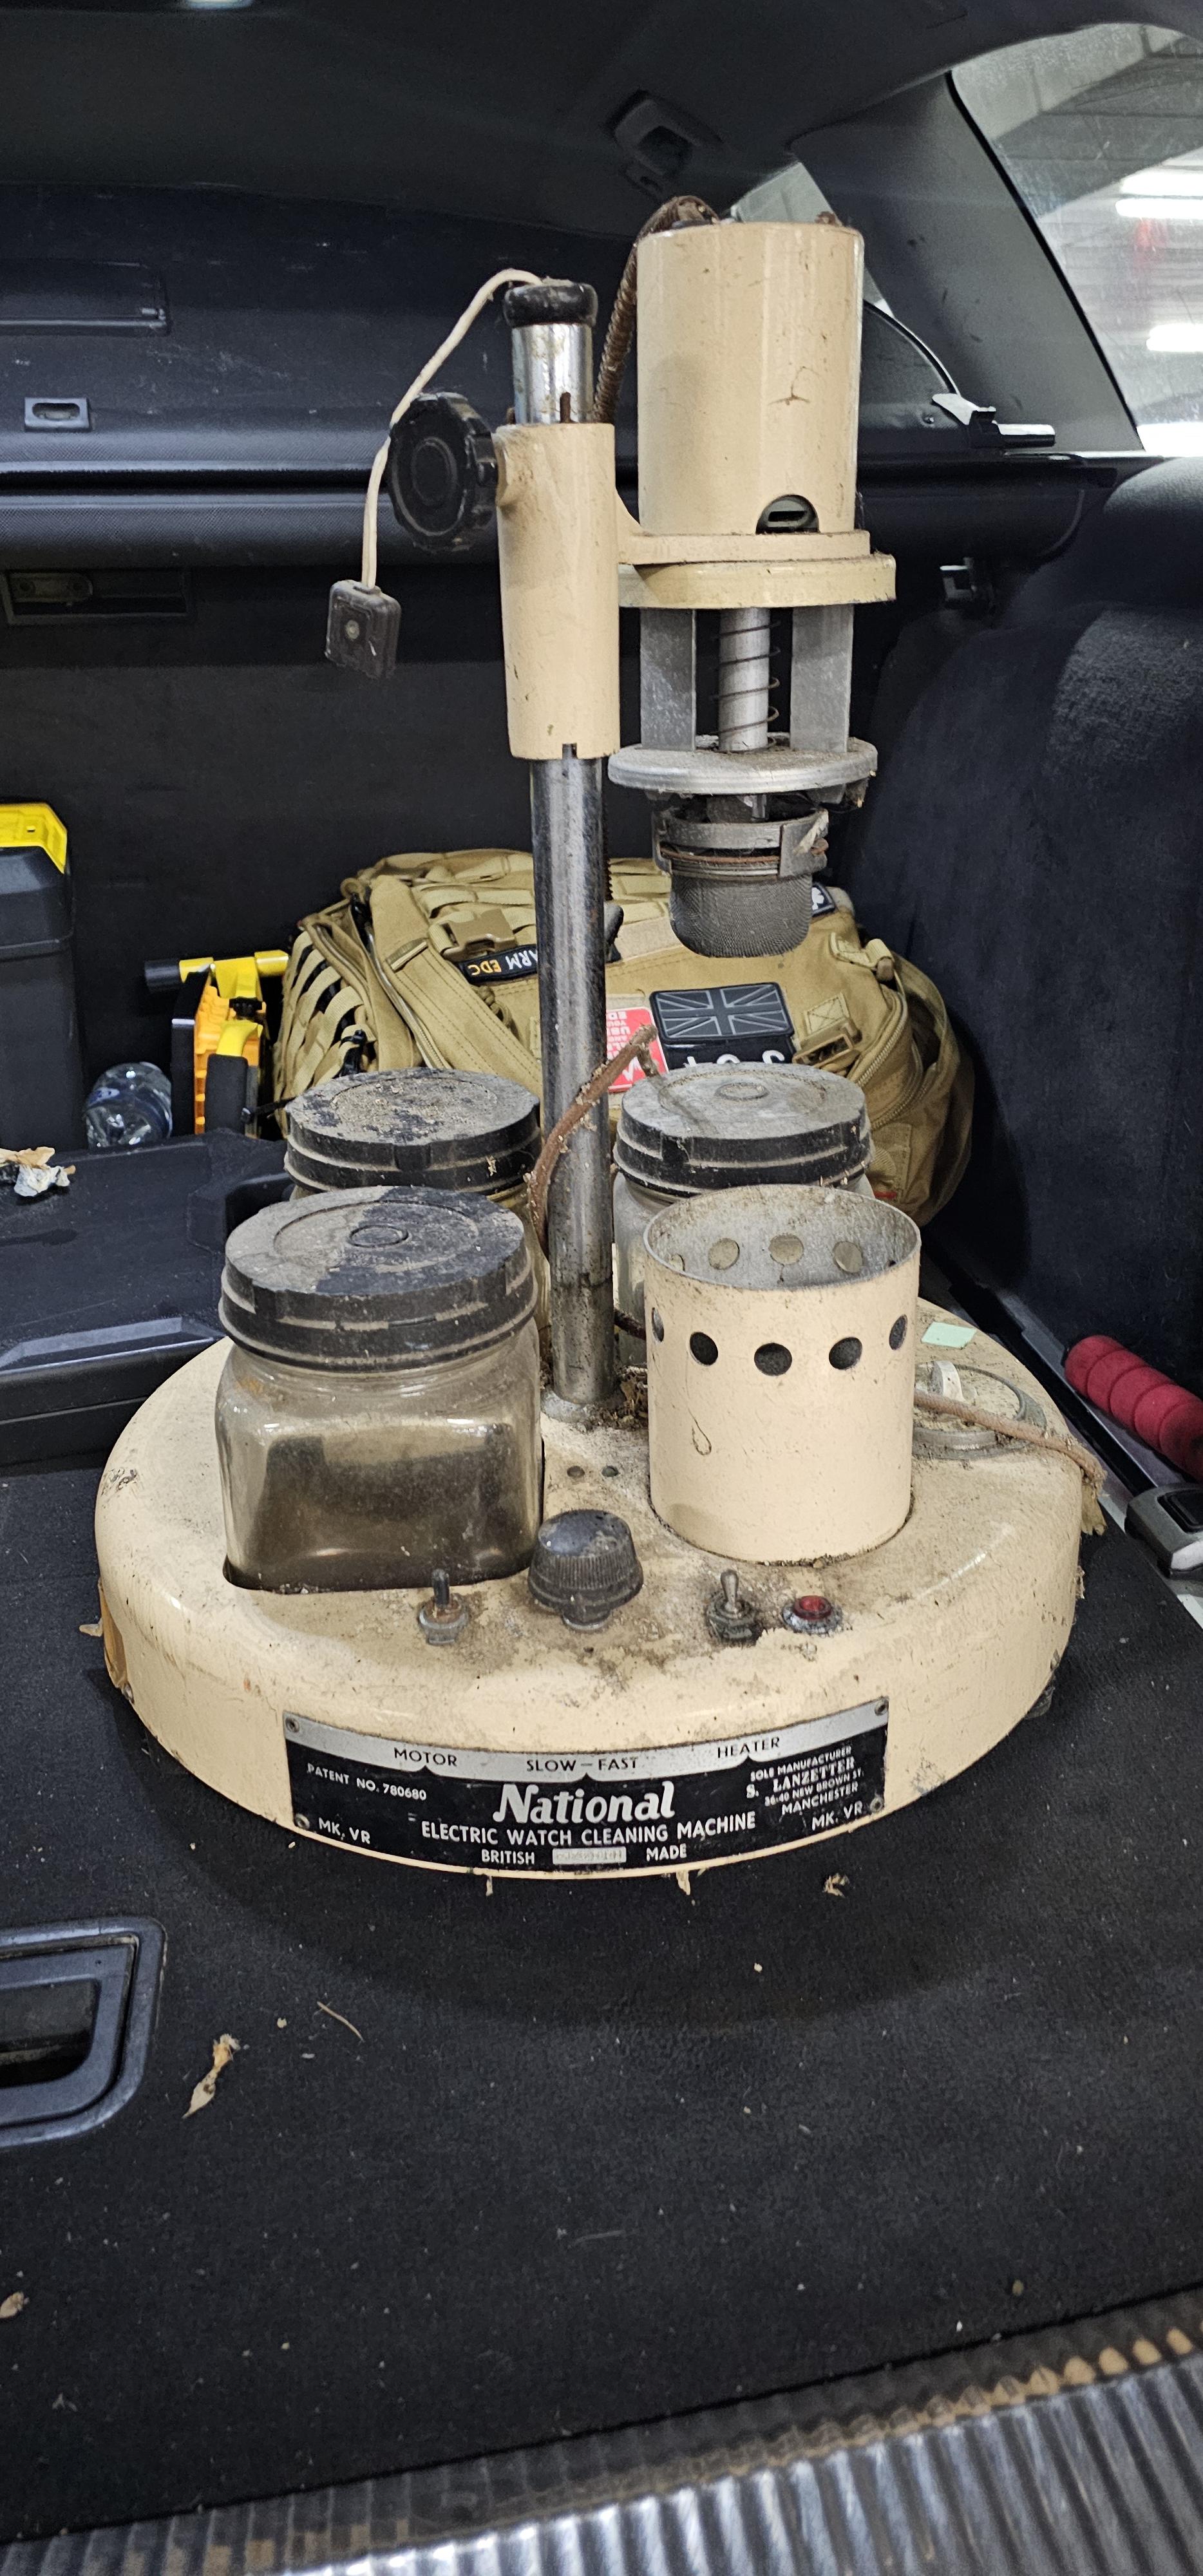
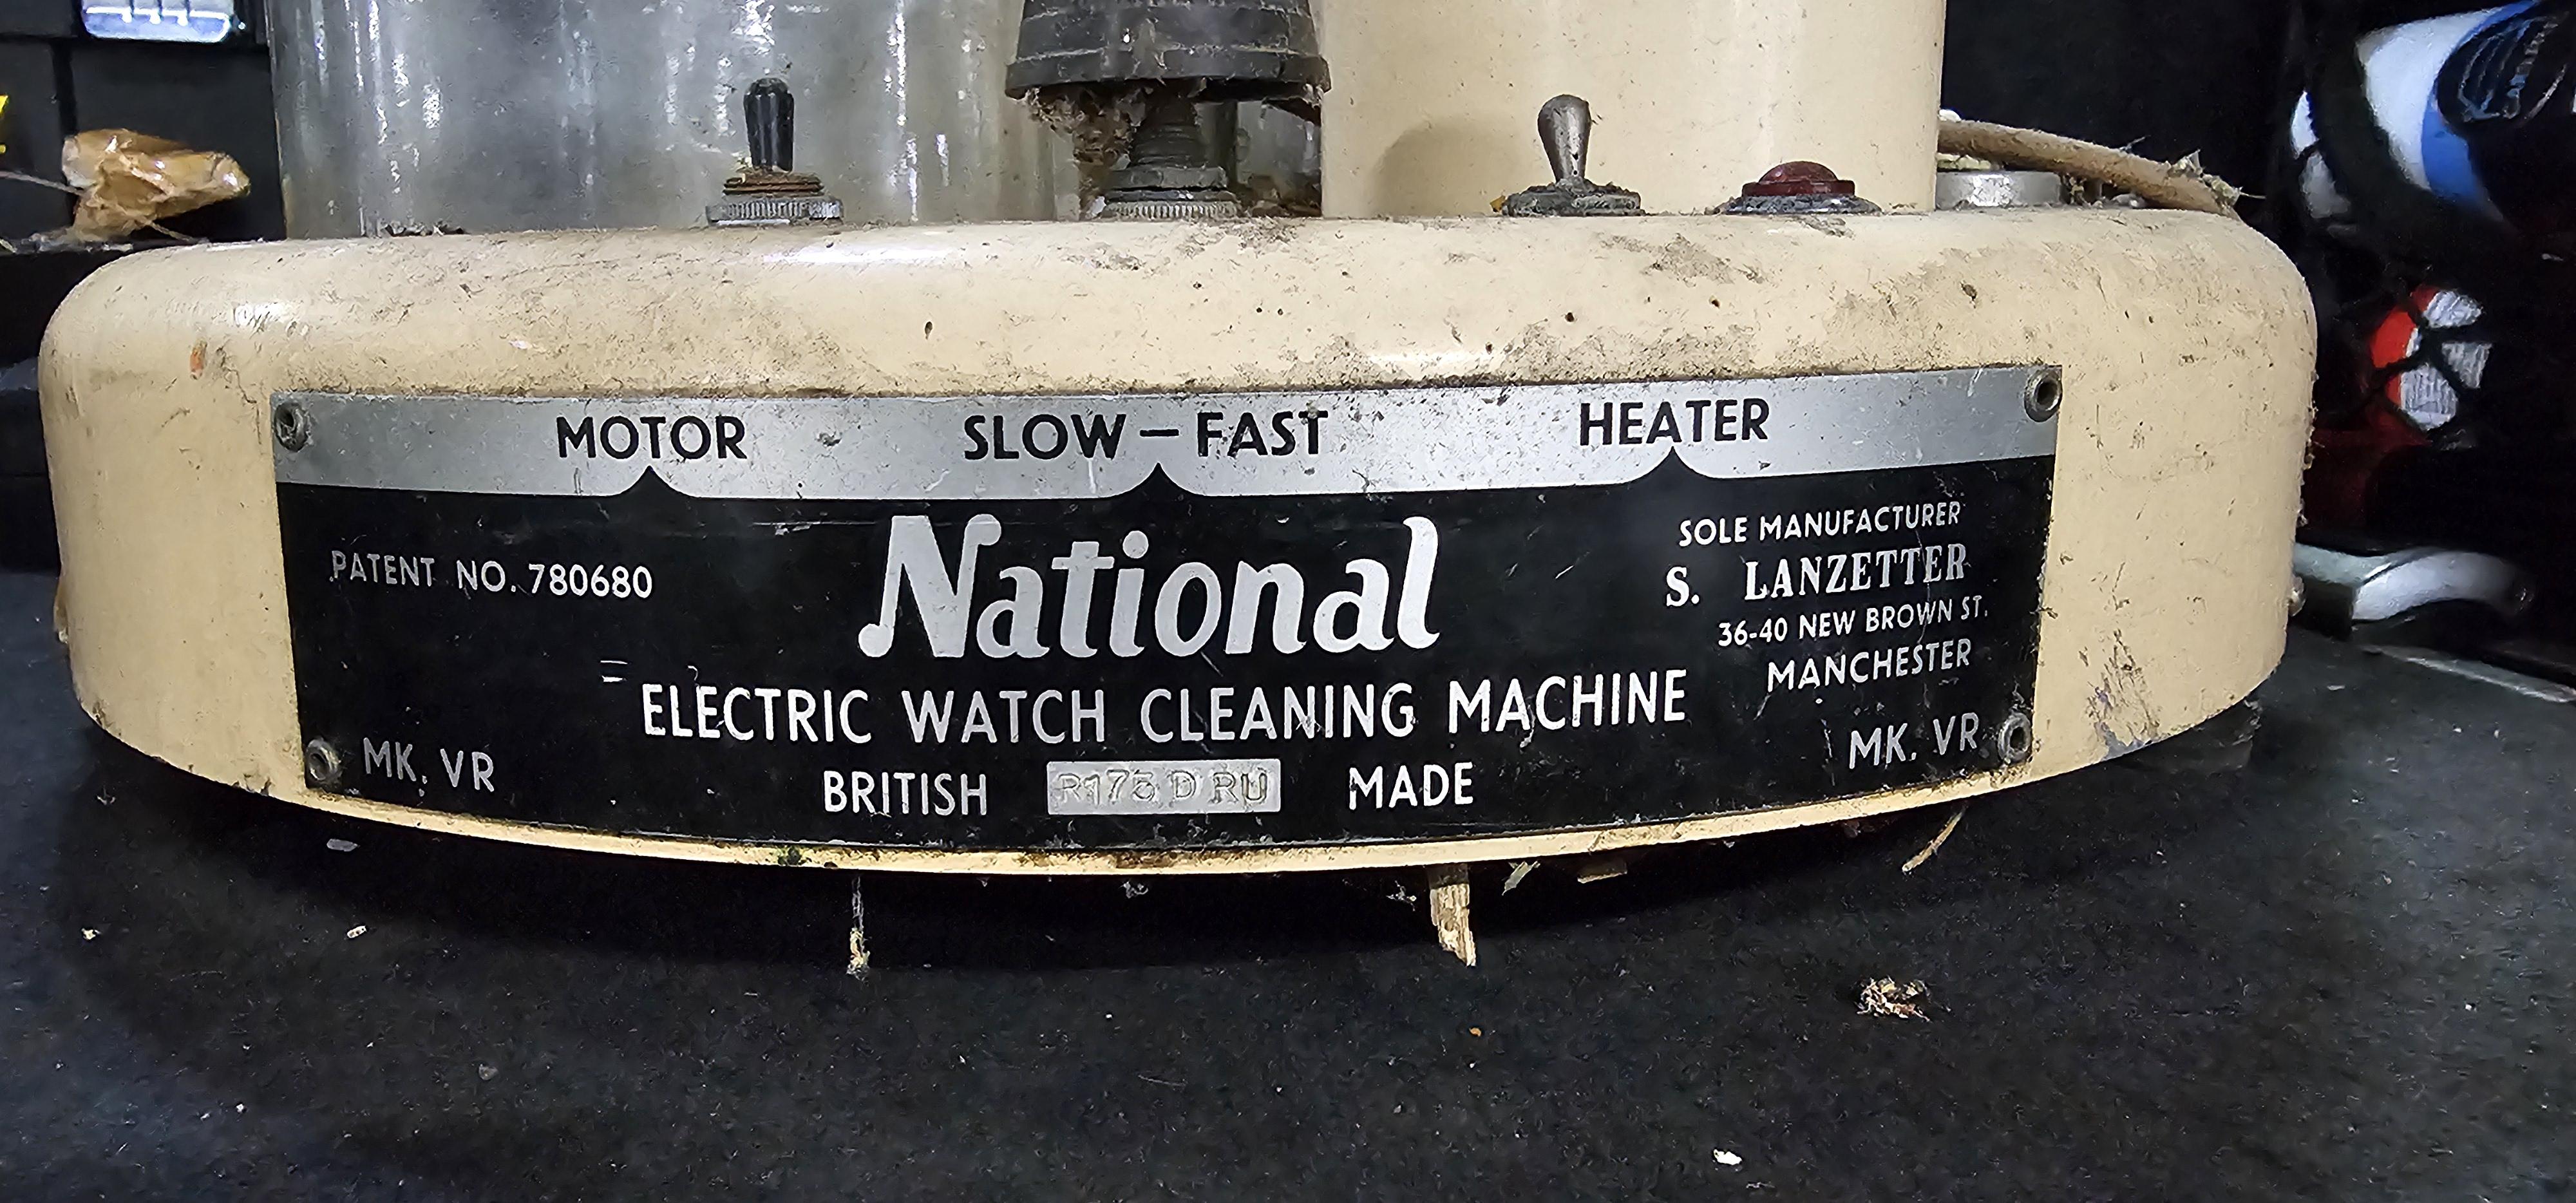
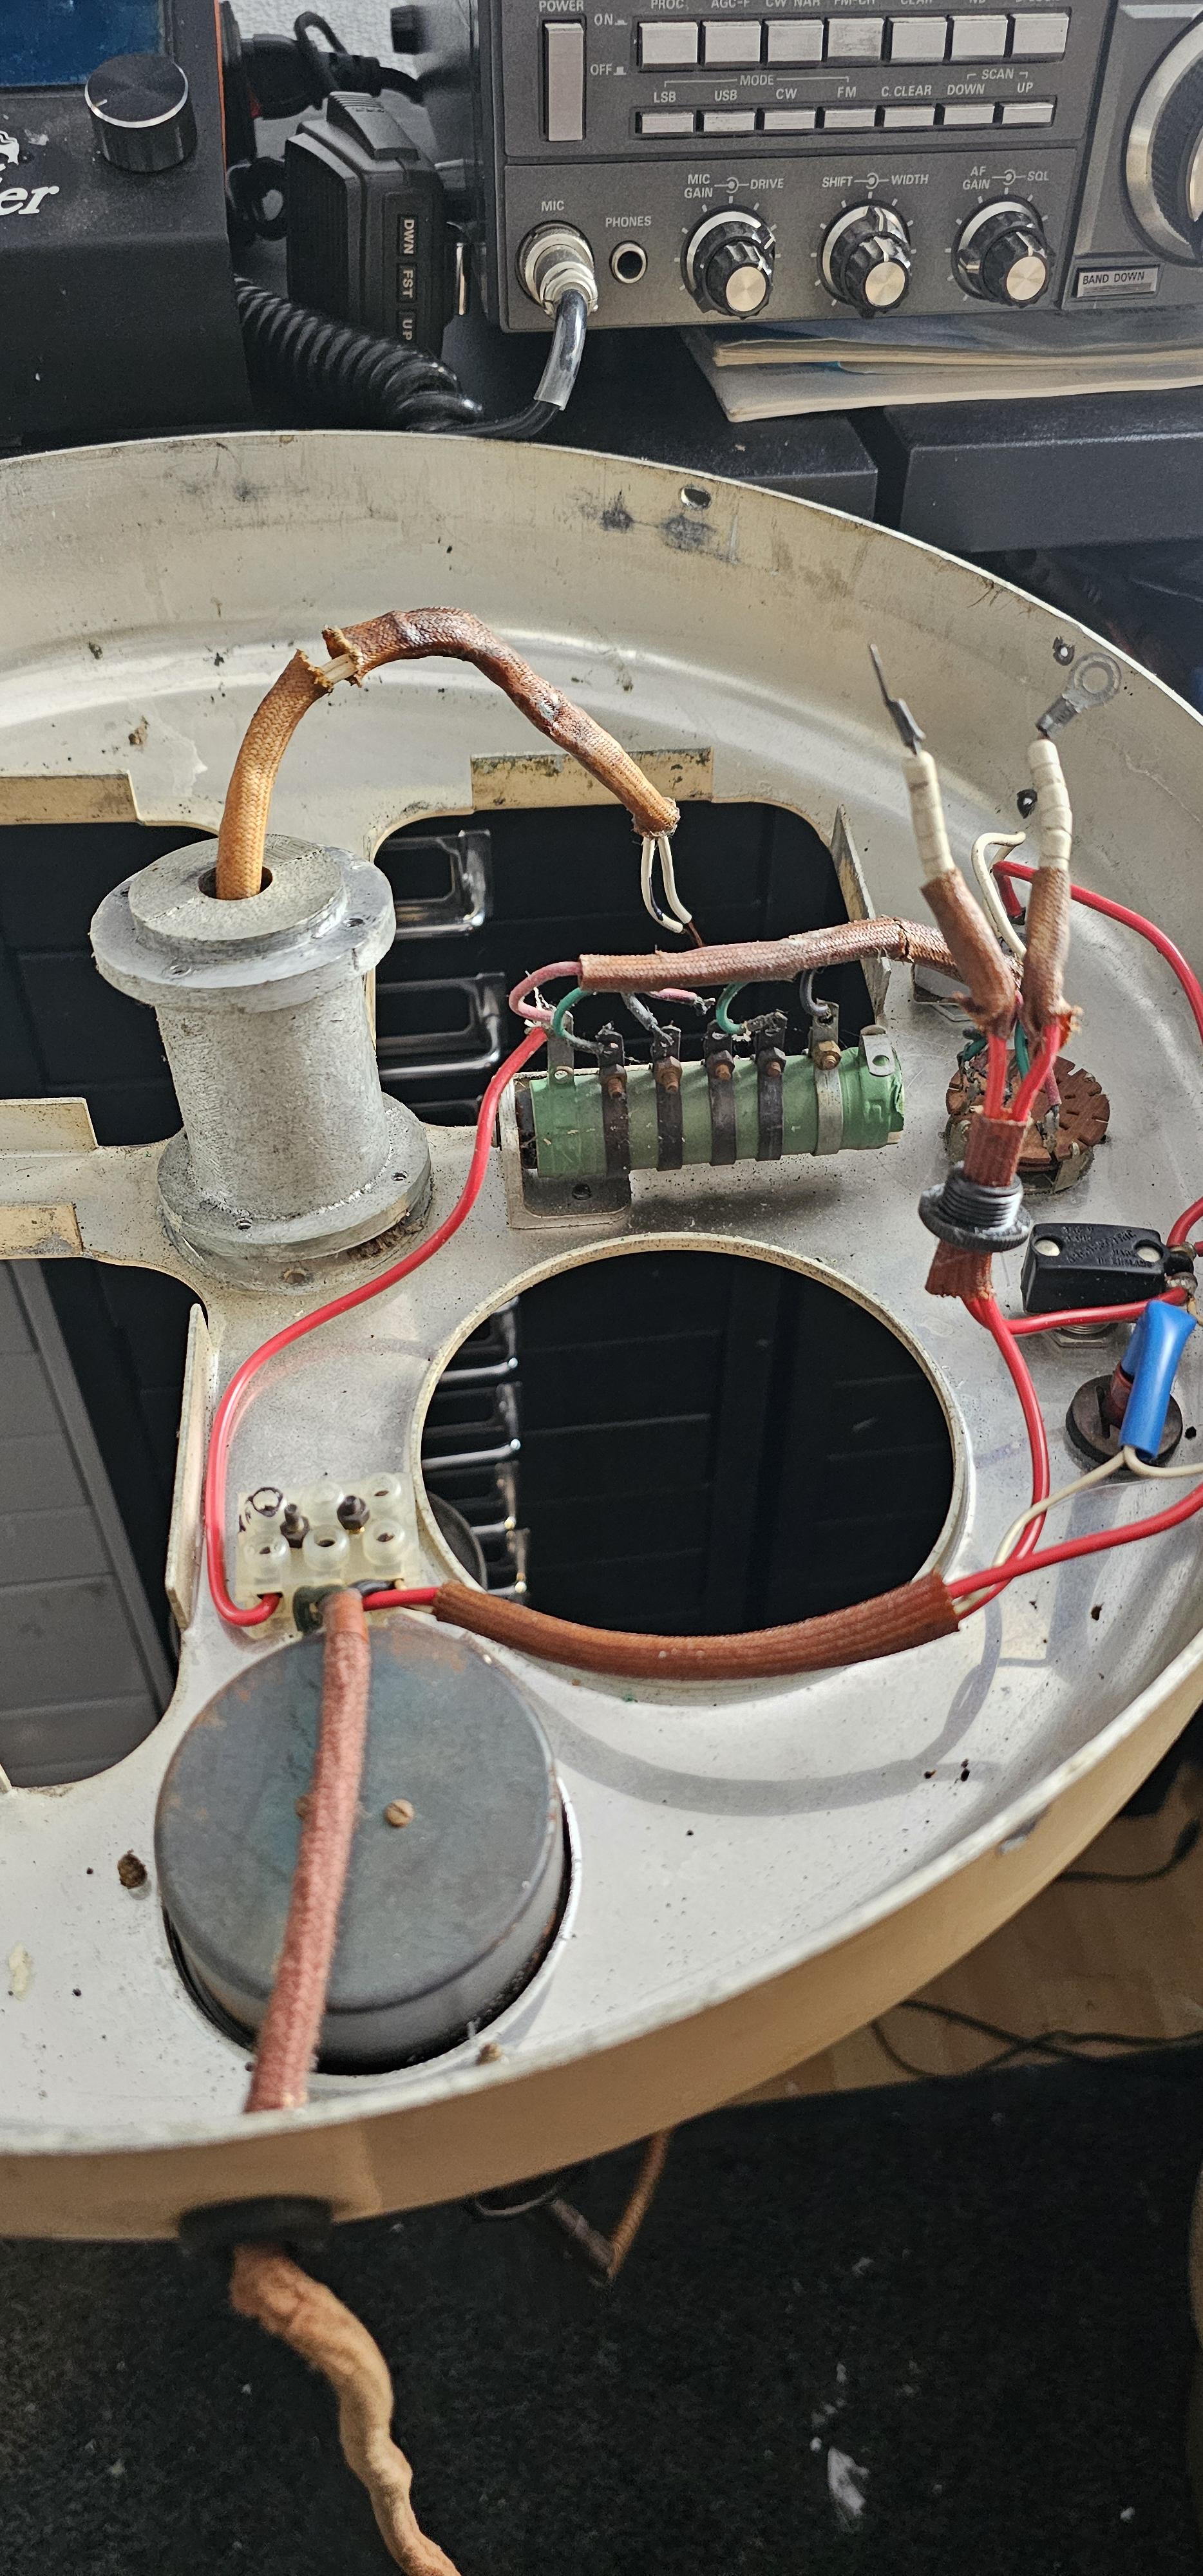
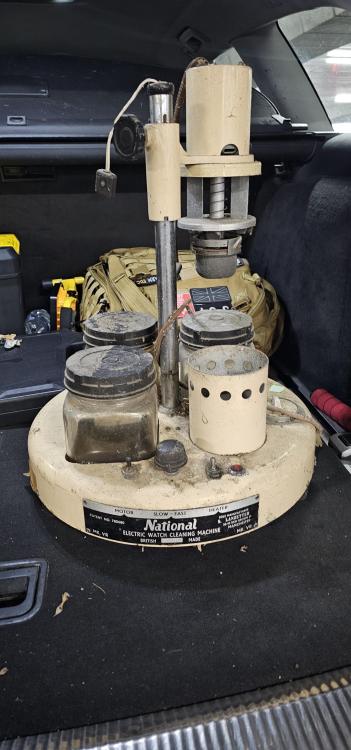
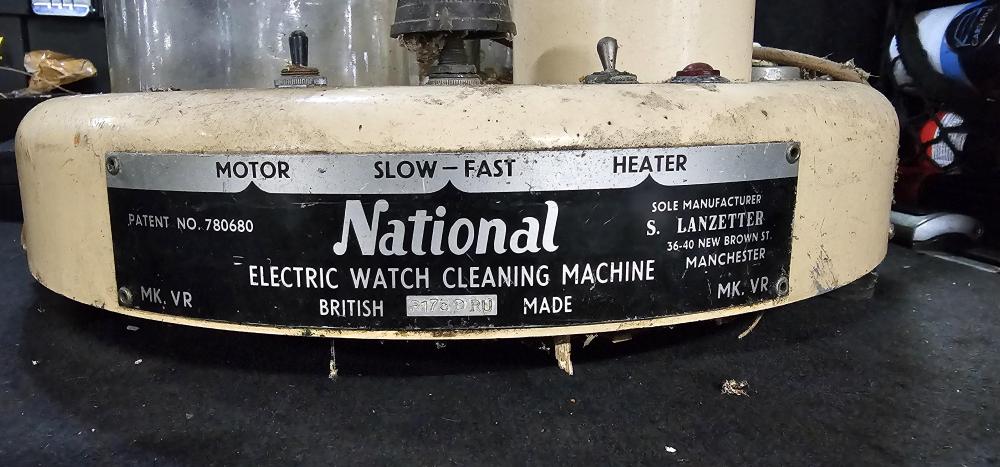
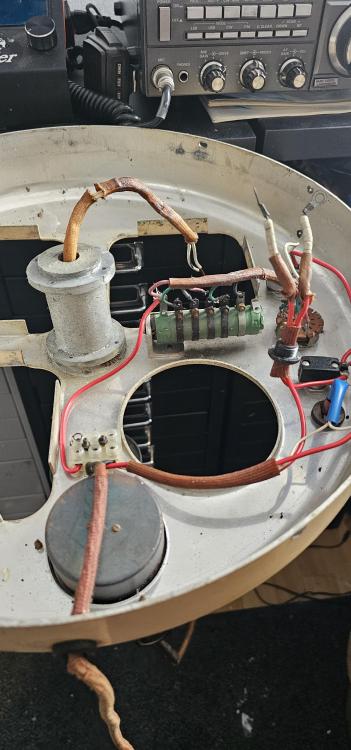
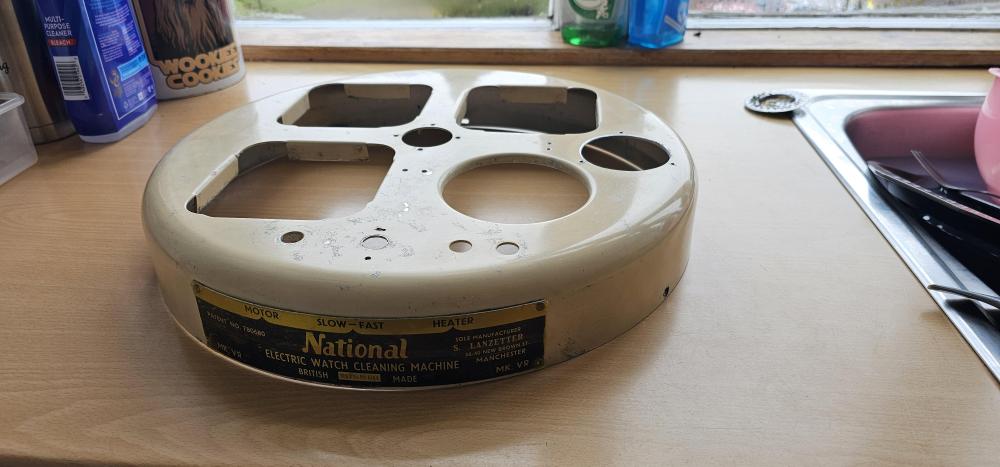
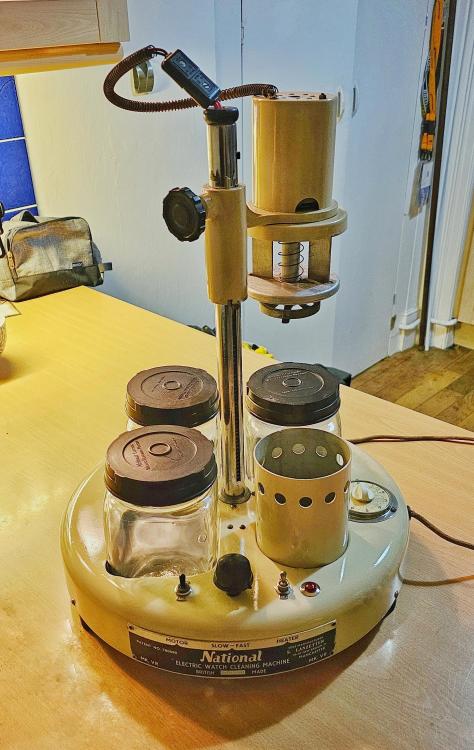
Sorry to resurrect an old thread but I've been using this thread to restore my own national electric watch cleaning machine and would like to thank everyone in this thread for all you knowledge


 5 points
 -
I don't know why I find things like this so funny.
 3 points
 -
In my younger days tinkering with cars i had plenty of belts from petrol engine ignition systems running at tens of thousands of volts.2 points
-
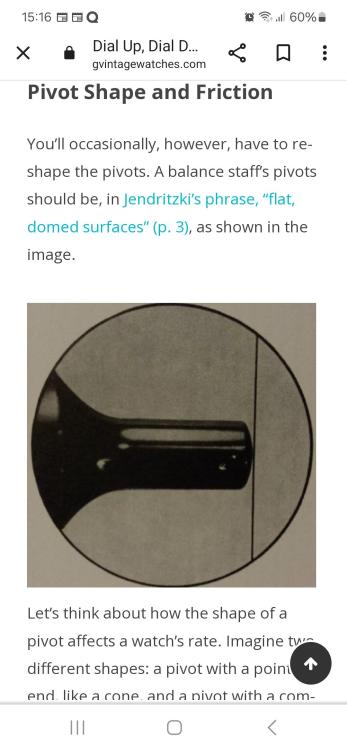
Exactly how round do the pivots get ? Yes it looks nice and flat. But it be nice if you had a slightly different picture Like at an angle at the end of the pivots so we could see how it looks. Specifically not straight down a slight angle so we can see and look for why it is flat perhaps. And watch companies are rather interesting they don't always publish their technical but some companies do like eta it's a separate Guide labeled manufacturing information it has all the really nifty technical stuff like the image I snipped out down below. Notice what it says about the balance staff? Now I'm sure it doesn't actually mean flat like yours it means It has a slight radius to it. Remember their trying to equalize the amplitude in all positions and by the way what does your amplitudes look like in other positions than resting on the flat ends of the pivots. Then this websites really not helpful. Conveniently I haven't memorized every single watch in the universe and I was looking for a picture of the movement but I do get a little bit of the history. History brings up a problem typically the older the watch but not always the more likely people have played with it and that means cleaning does not necessarily fix all problems. Like how does your escapement Look? https://longines30l.com/wordpress/longines-the-movement
 2 points
 -
Gauge.2 points
-
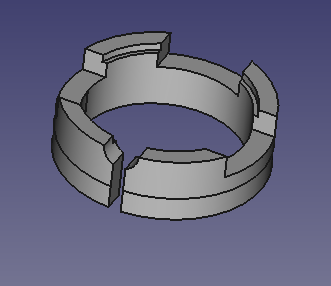
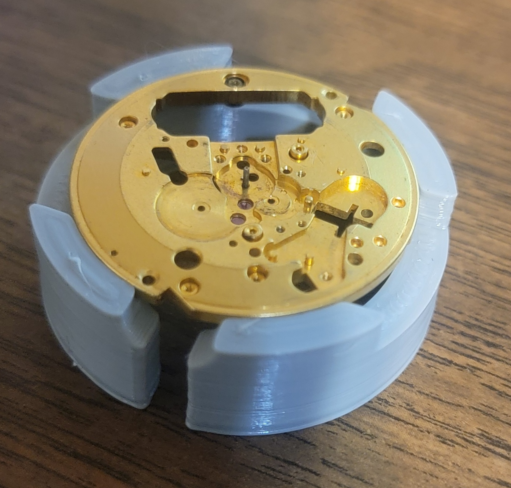
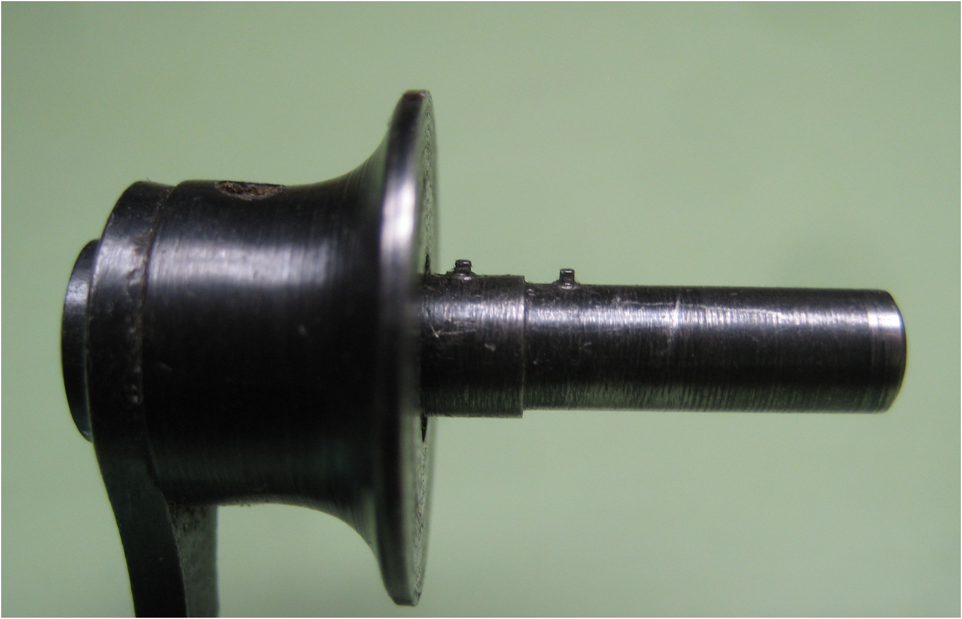
As noted in many other posts, I am running an Accutron repair assembly line!! I have the official movement holder that connects to the test set, but I needed others to hold accutrons that are under test and waiting to be cased. Thus I designed a similar holder to the official one.
 2 points
 -
Hi well done always satisfying when it starts to tick.2 points
-
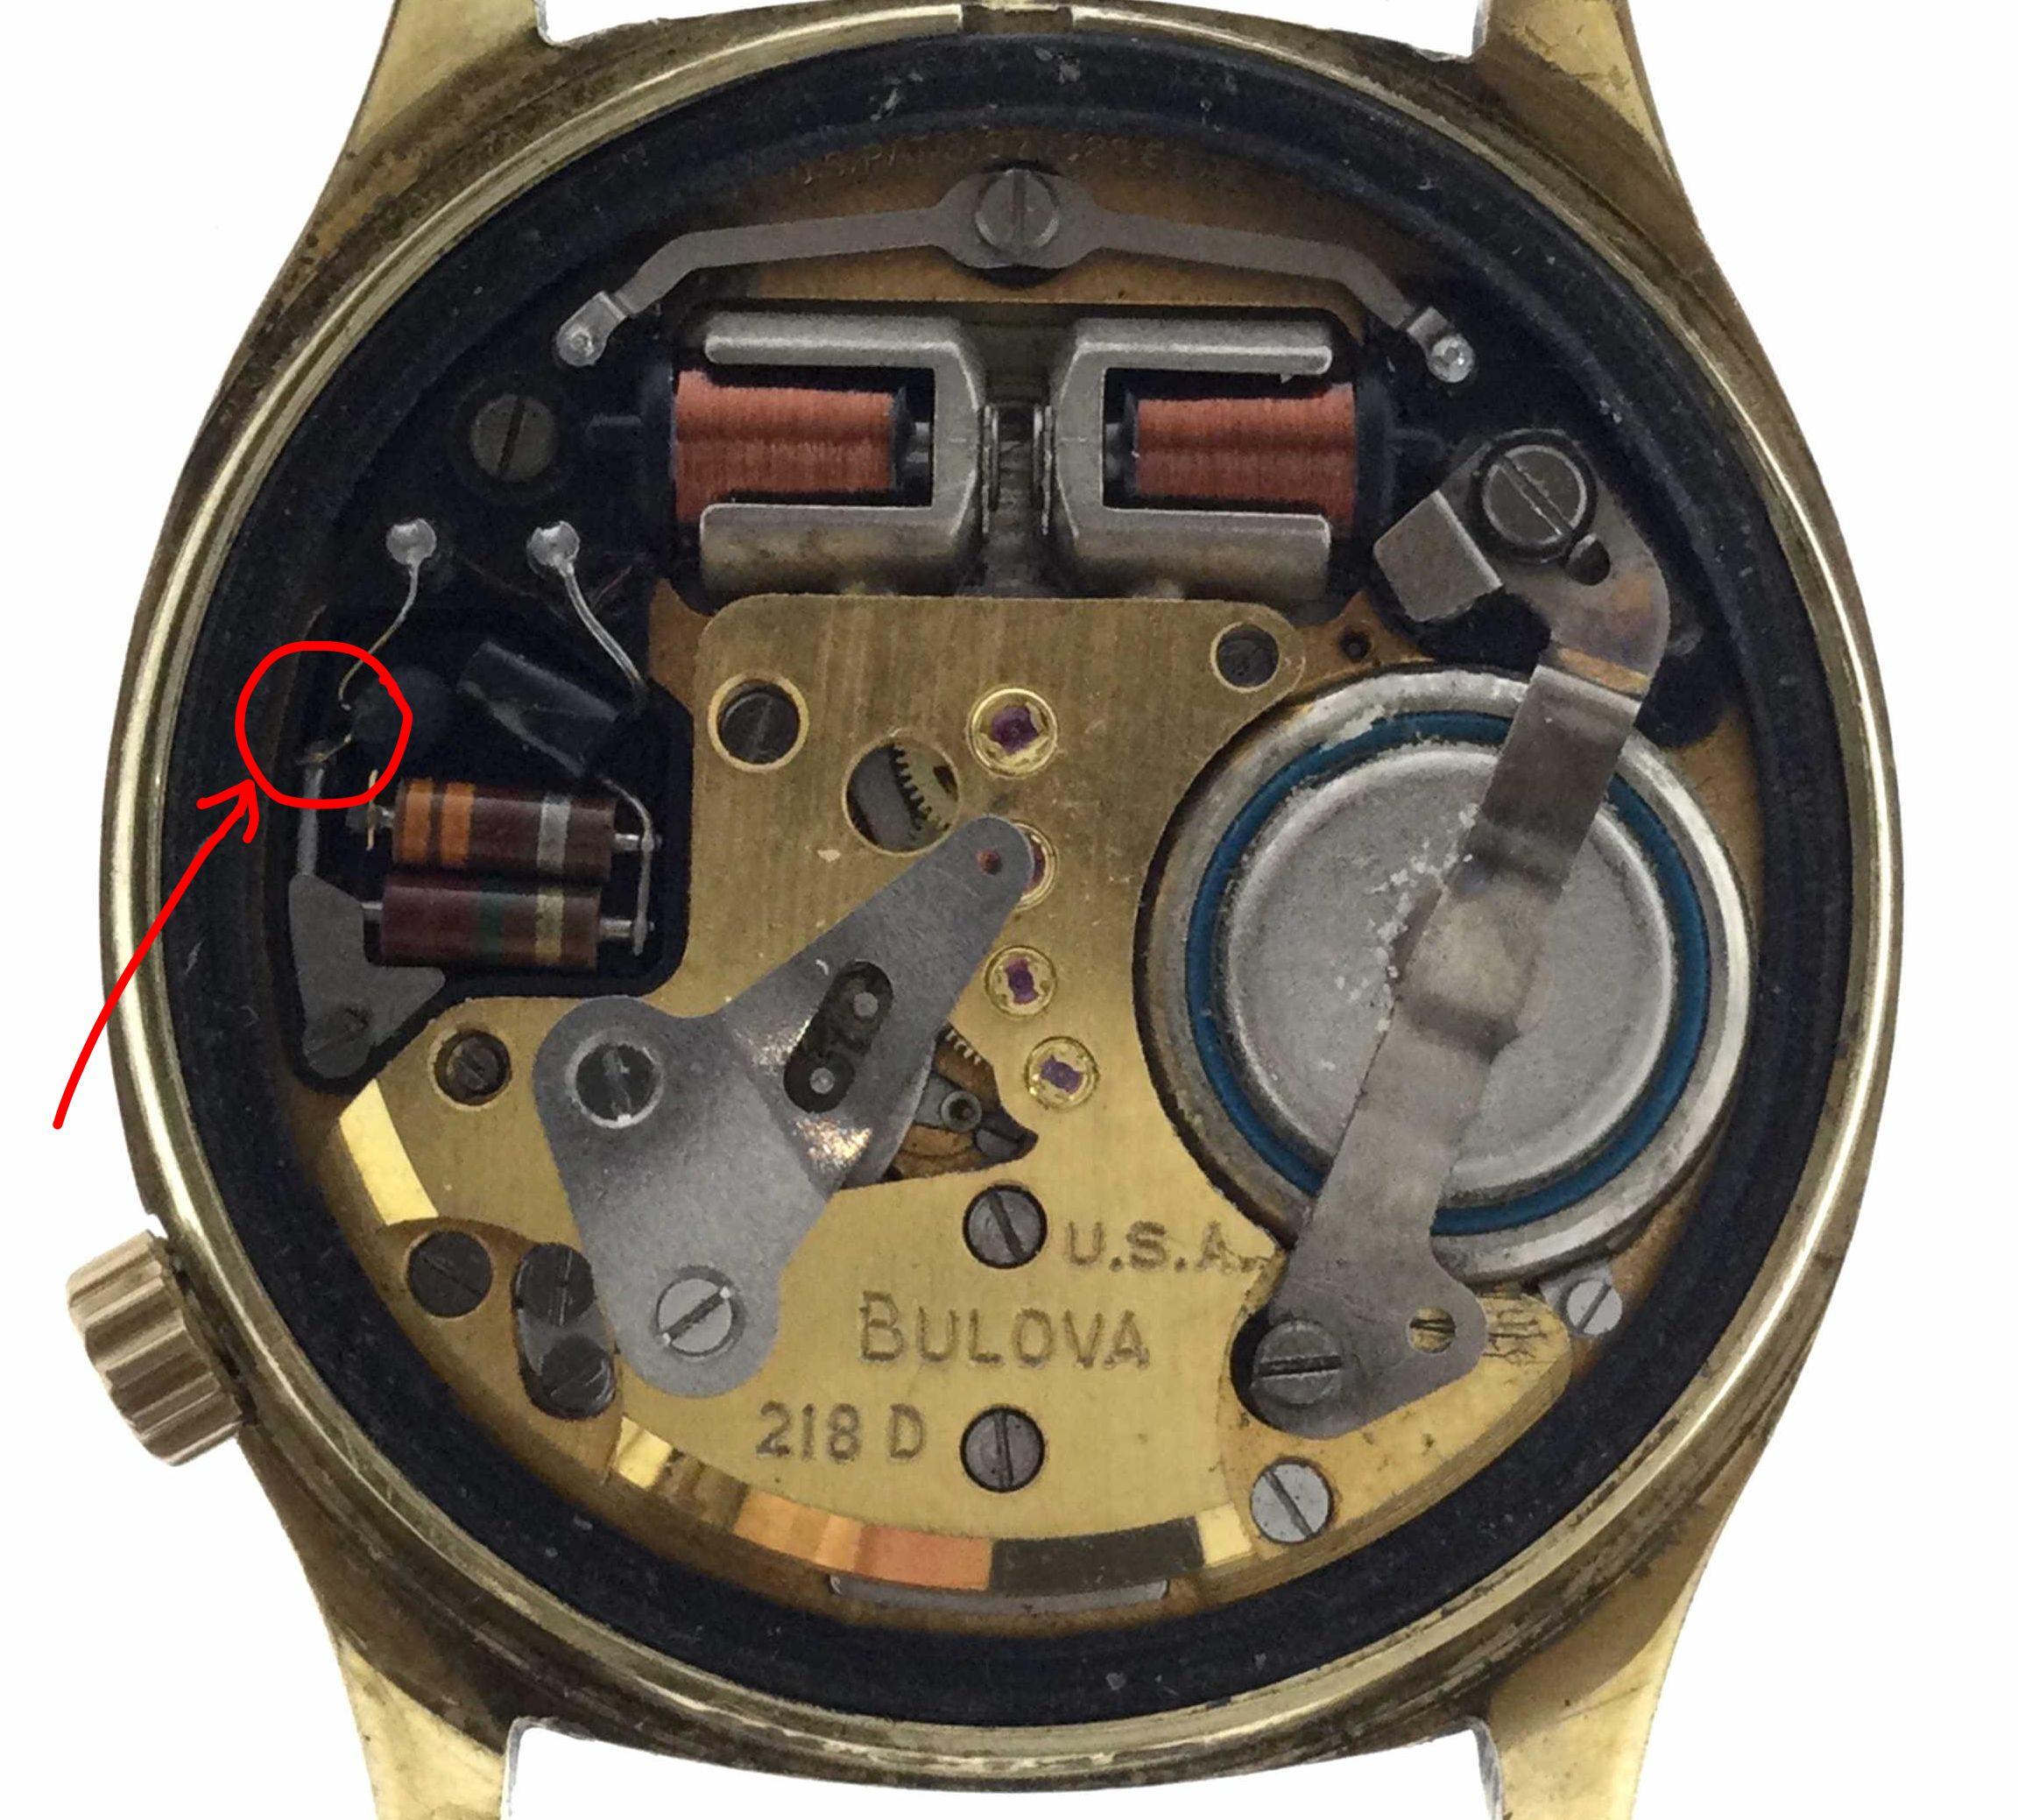
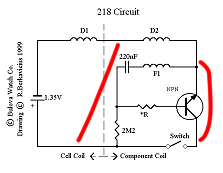
The reason I ask is because it is possible to short the battery +ve terminal and complete the circuit (see red lines in the diagram below, sorry for the low resolution). So if a multimeter probe touches two pins simultaneously, you can complete the circuit. The NPN switch pins are very close to each other, only a single probe or tweezer is needed for this. There doesn't seem to be any protection diodes to prevent this. Your equipment is probably just fine . The old stuff is better than most of the new stuff we can buy nowadays, they were built to last.
 1 point
 -
TASER's are high voltage, low current, if they weren't, they would kill you.1 point
-
OK, almost all old and modern ADC based multimeters are not able to output more than 2.5V on the probes, and the voltage that will destroy the coil is far far beyond. The old system multimeters also will not output more than they are supplied with, and it is usually 1.5 0r 3 volts. Only megaohmmeters will output more than 30 V, but no reason one to use such device1 point
-
Actually Found a website called tiptopcrystals.com has a wide variety of vintage crystals and odd shapes1 point
-
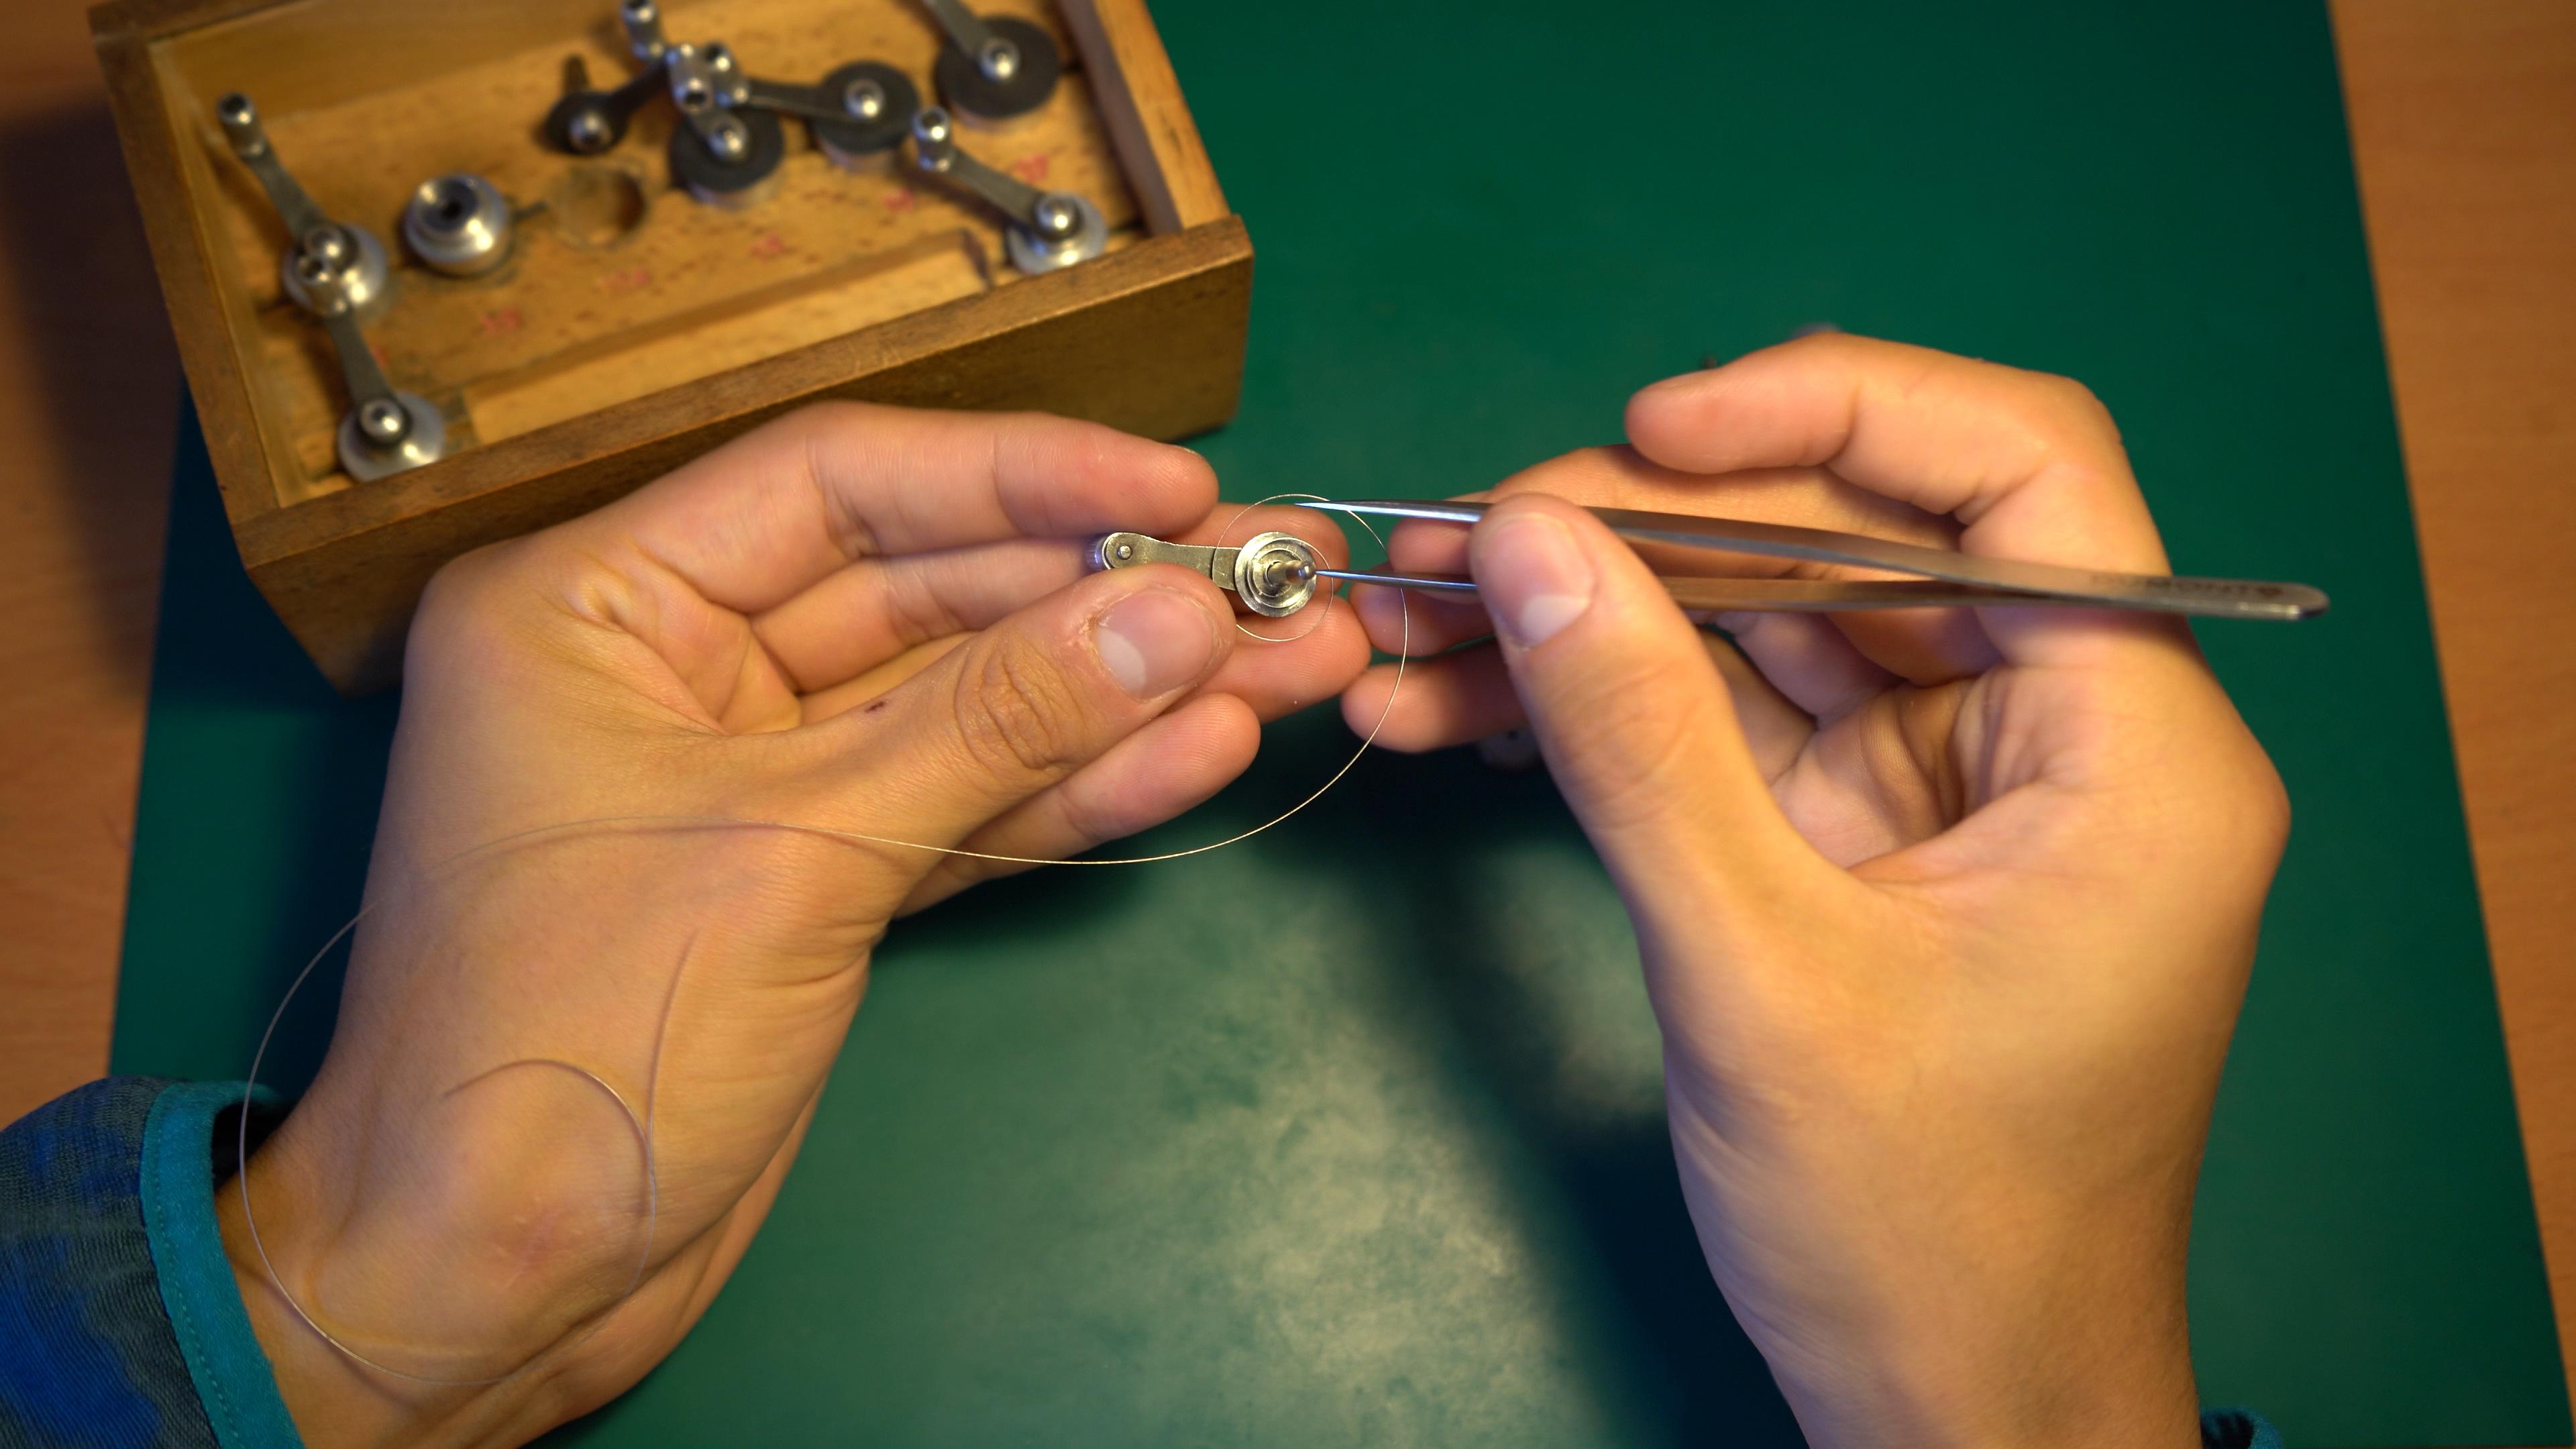
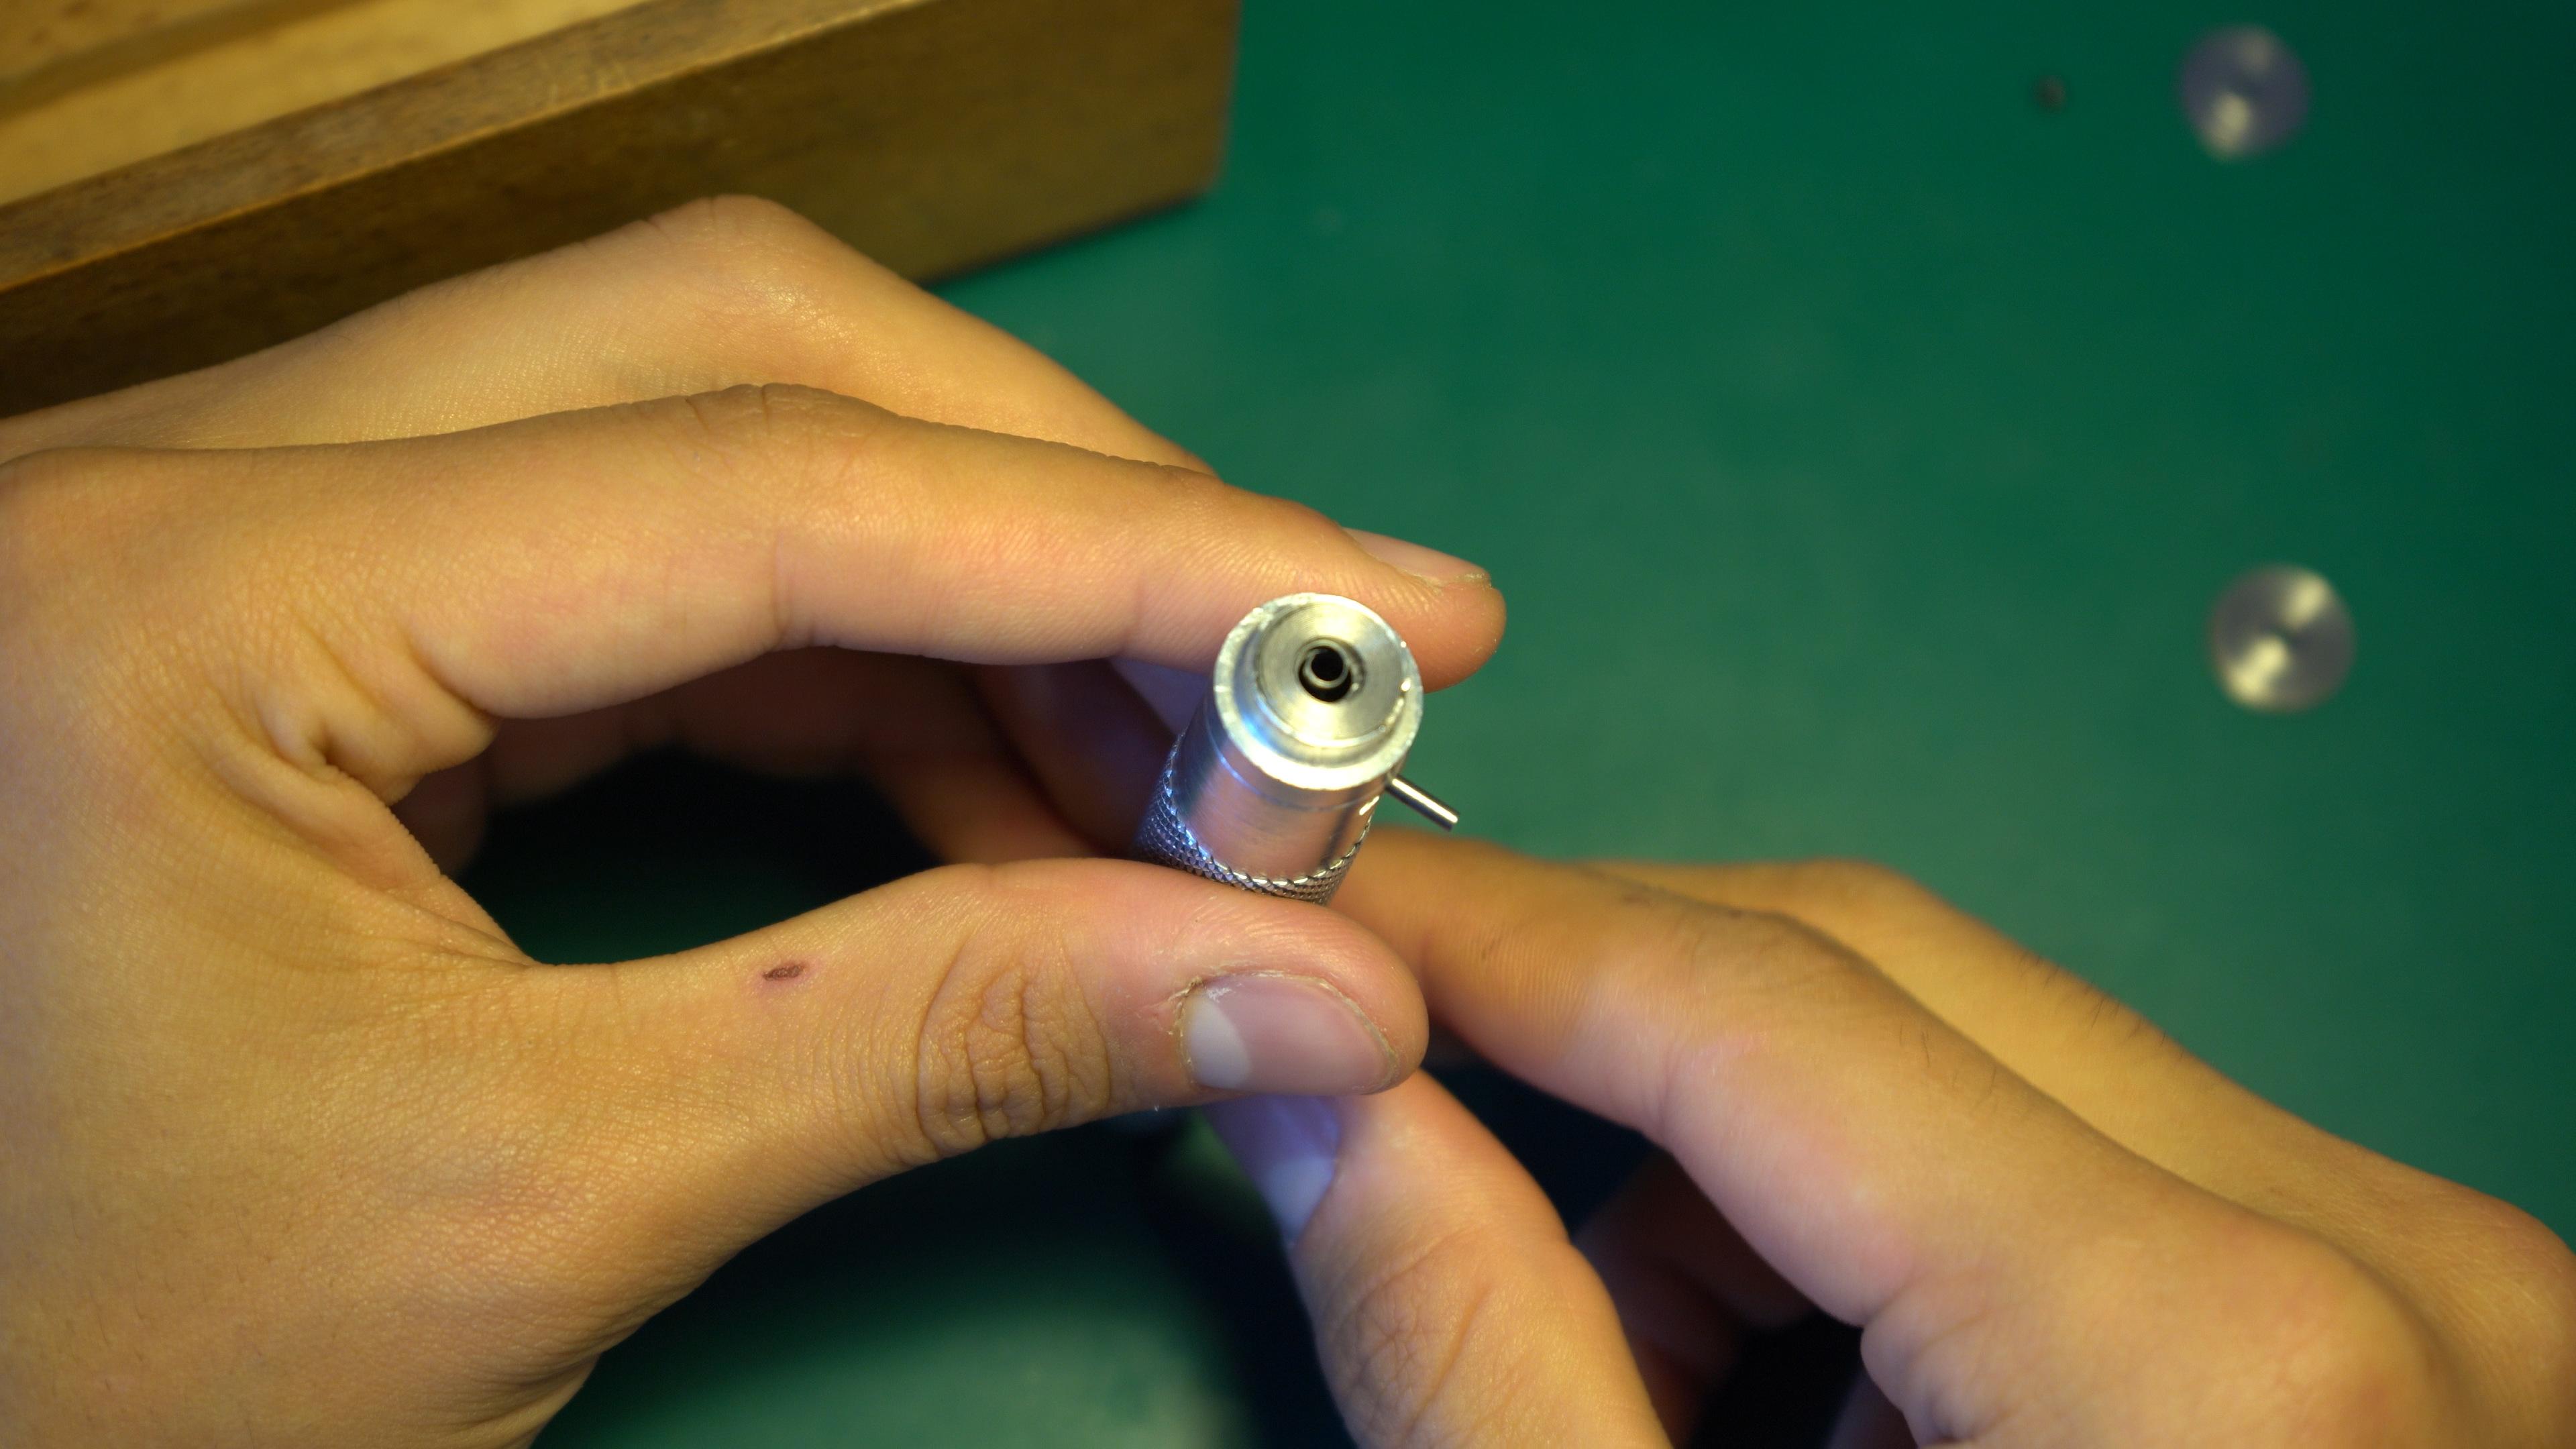
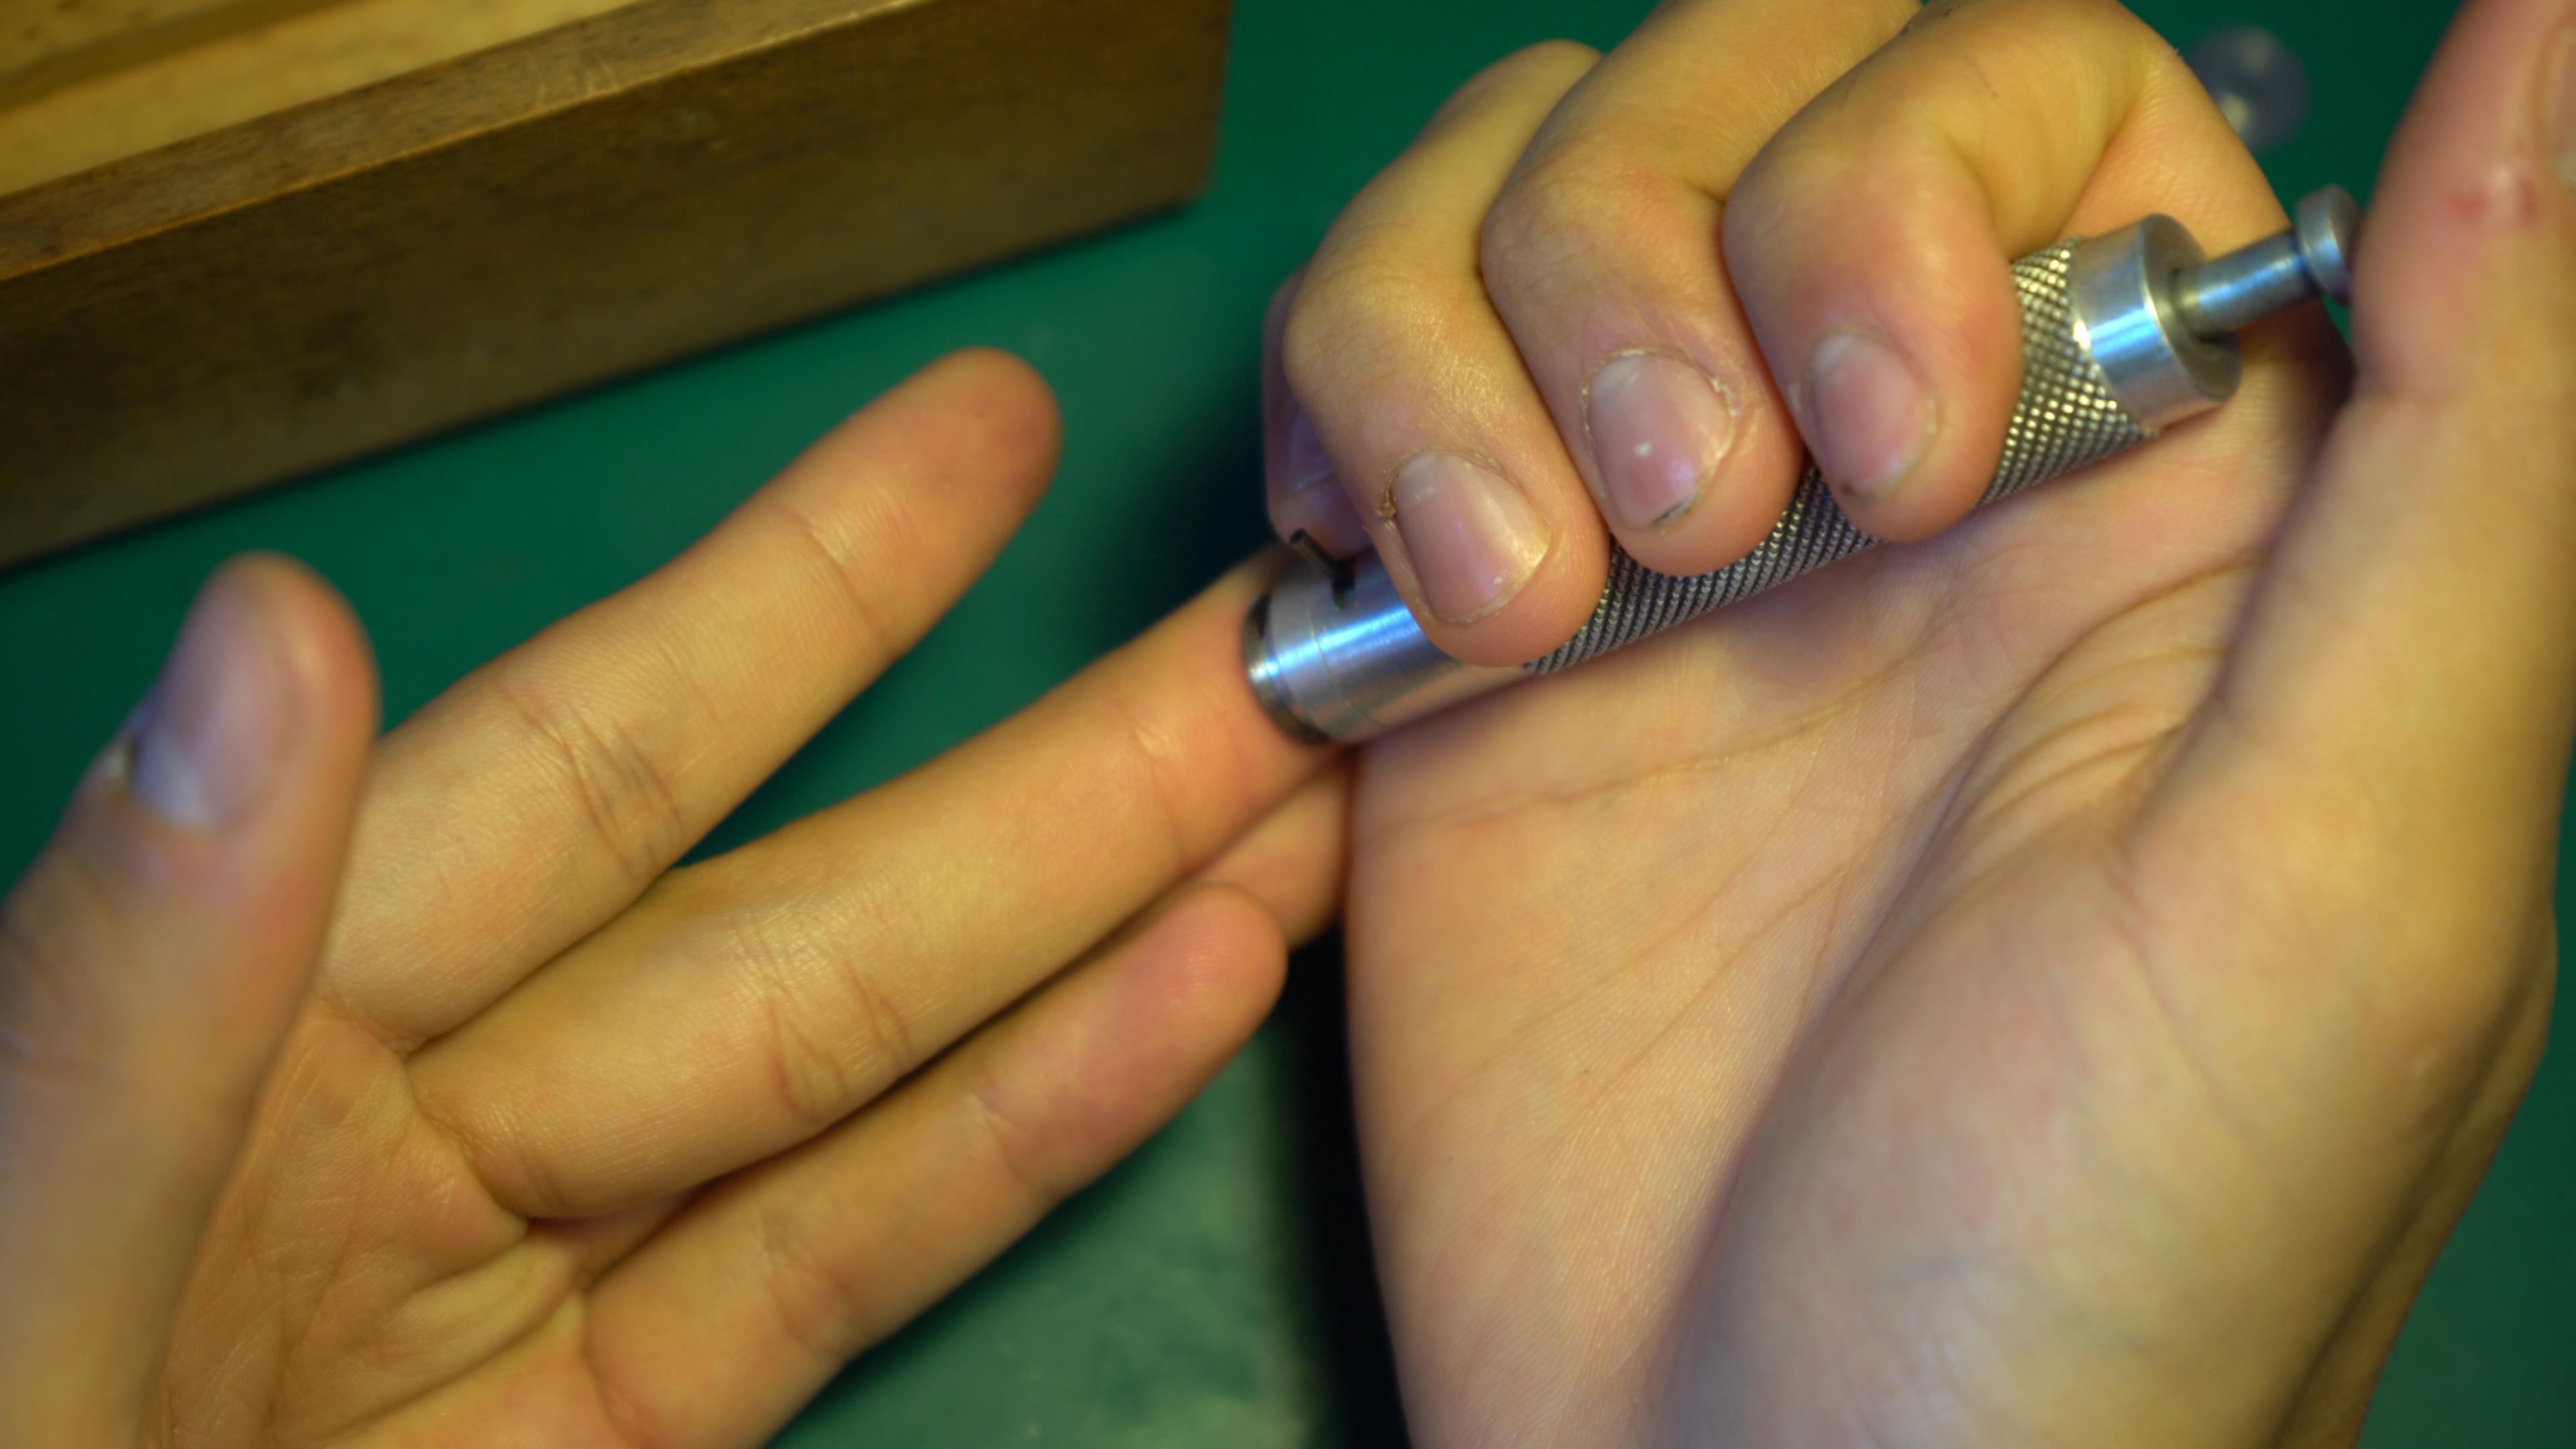
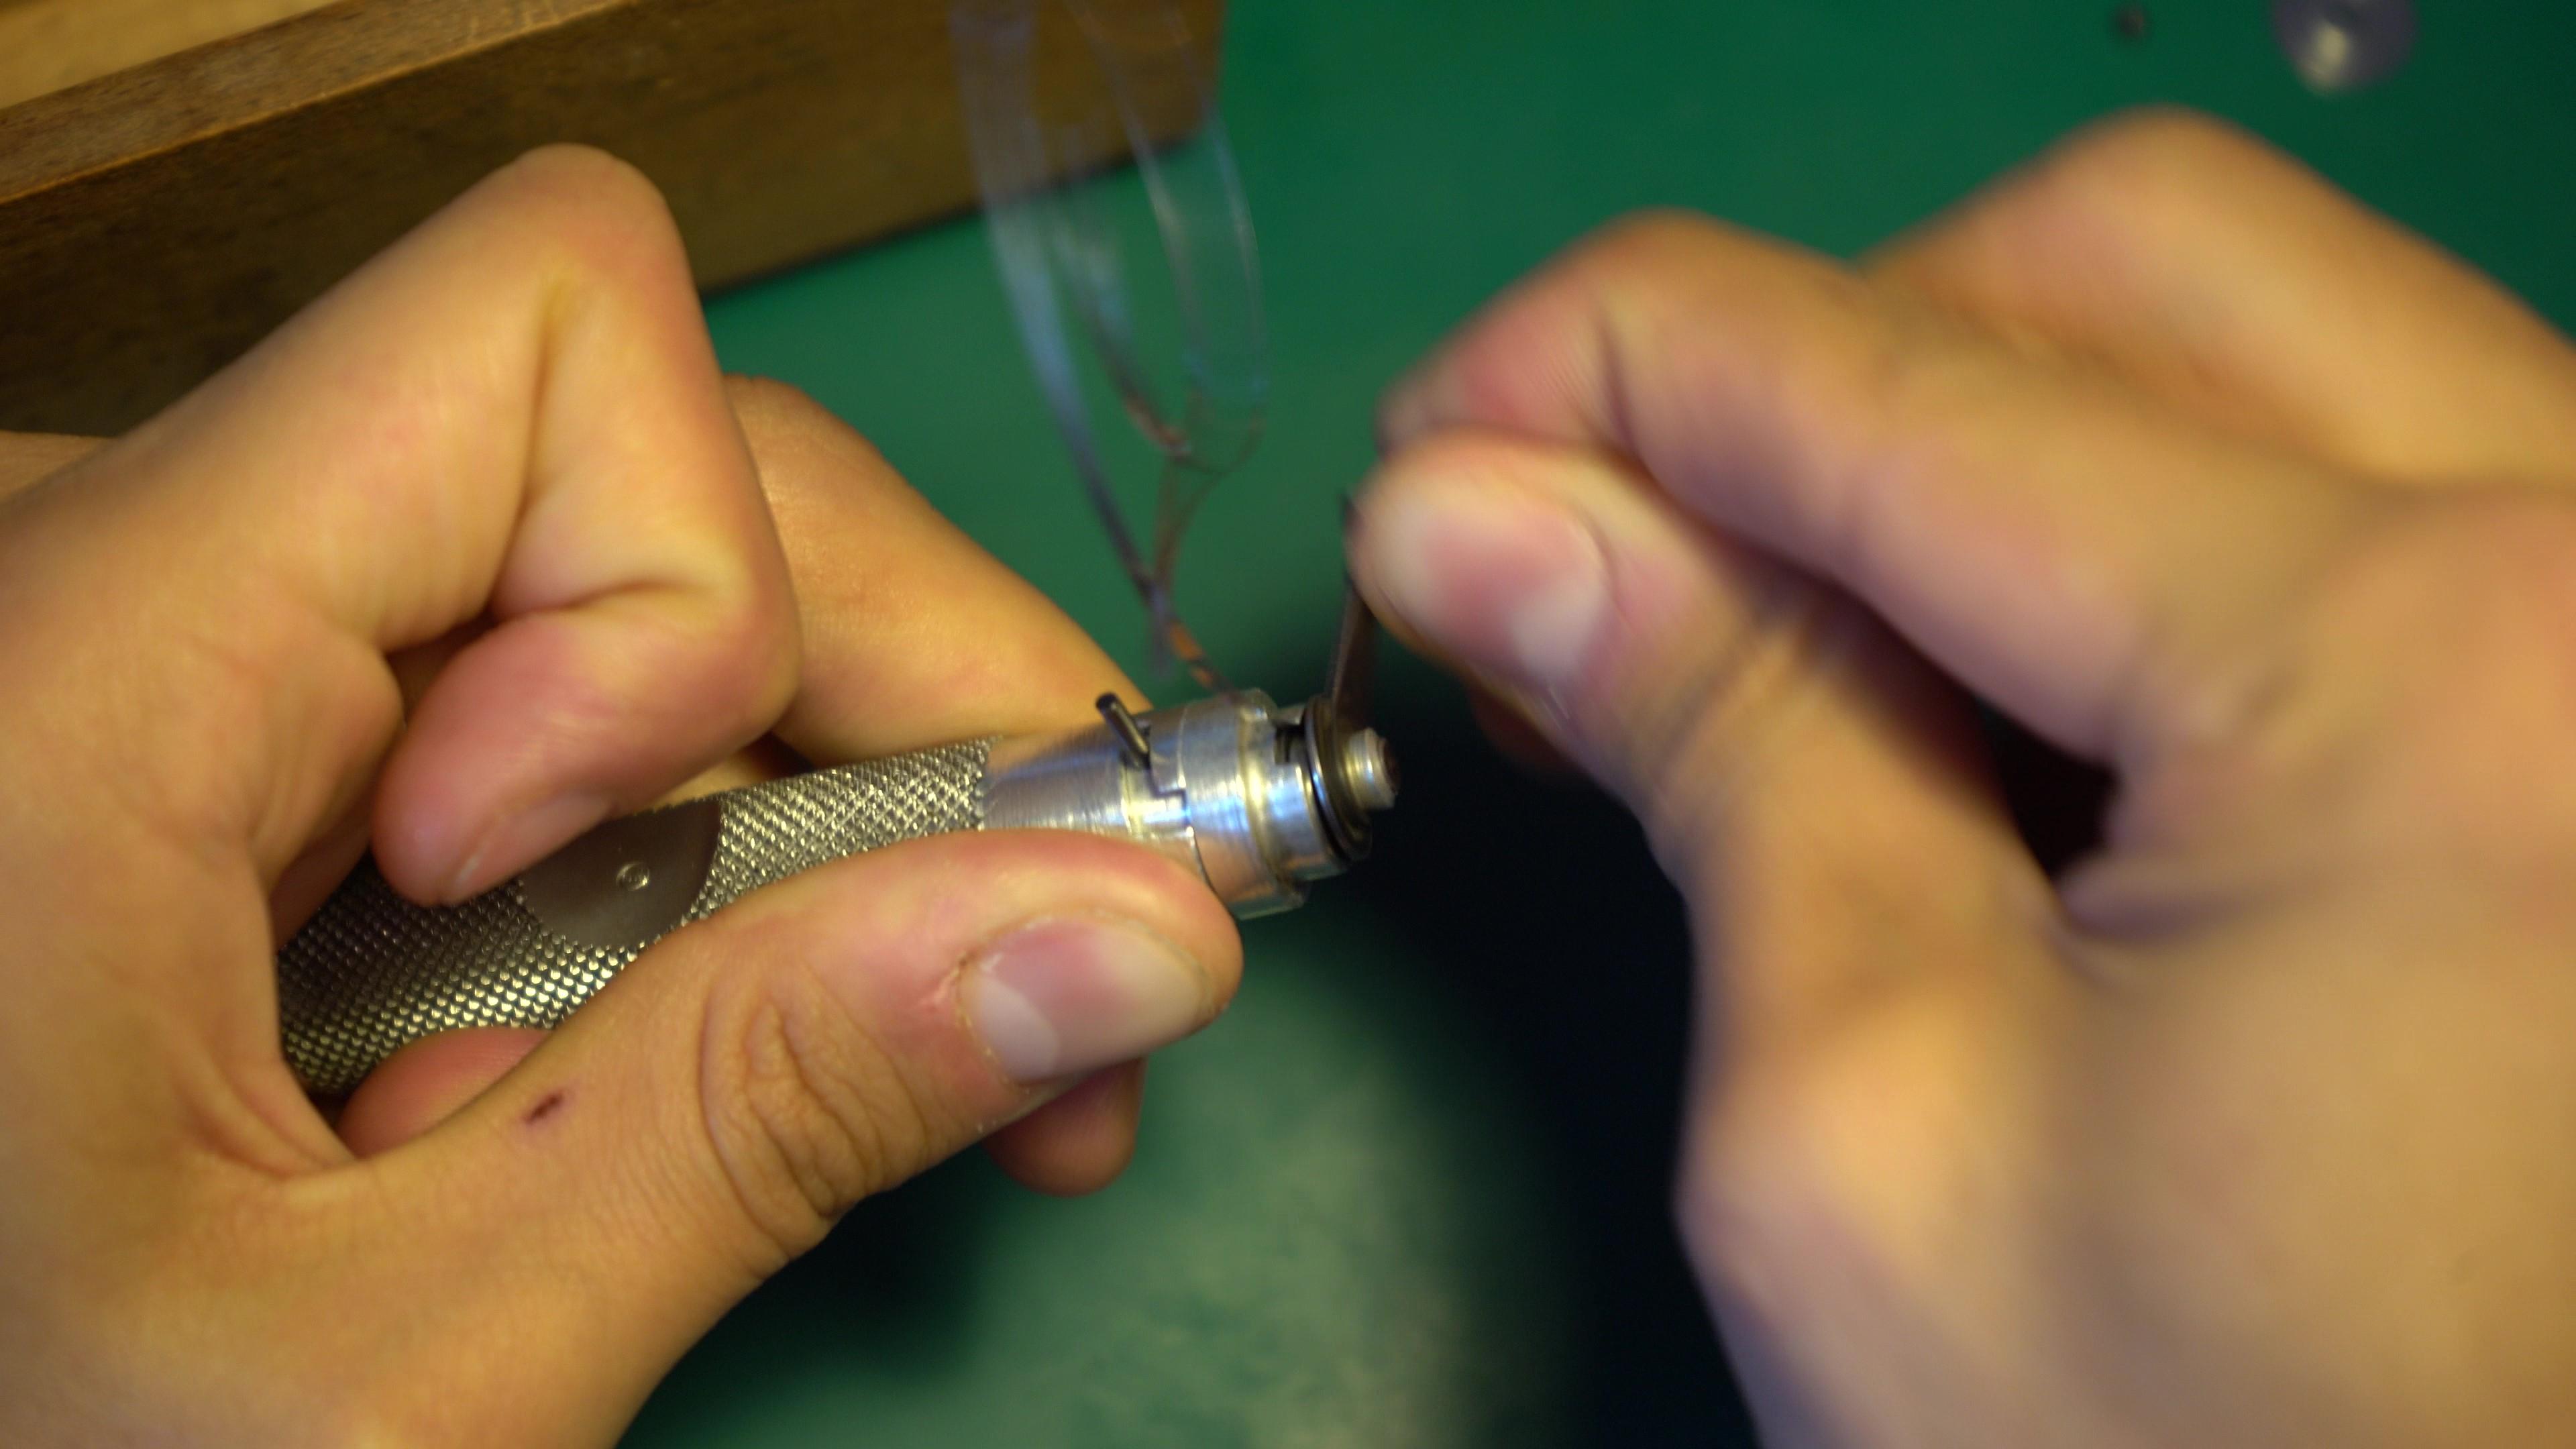
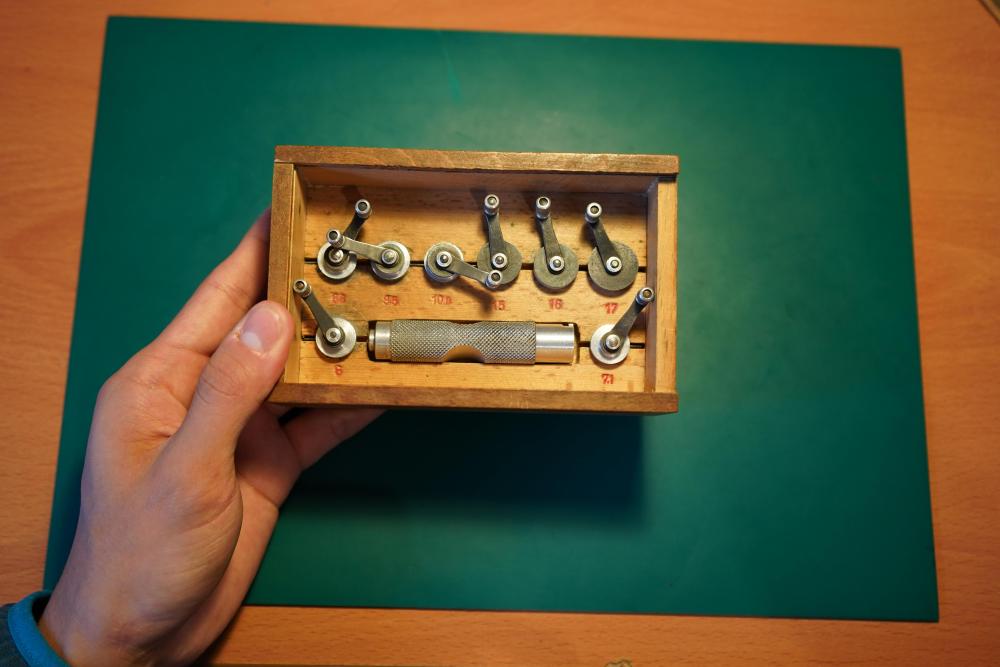
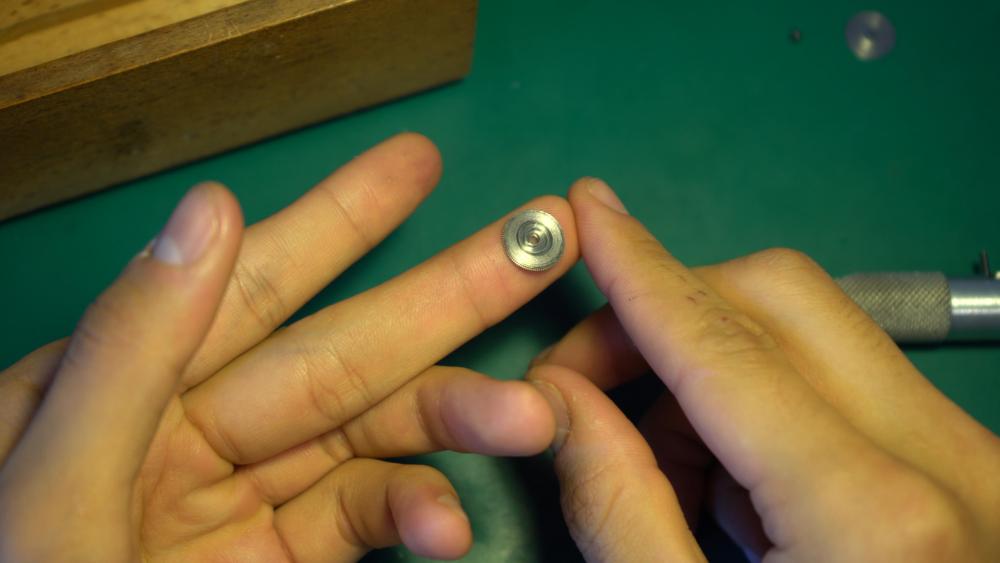
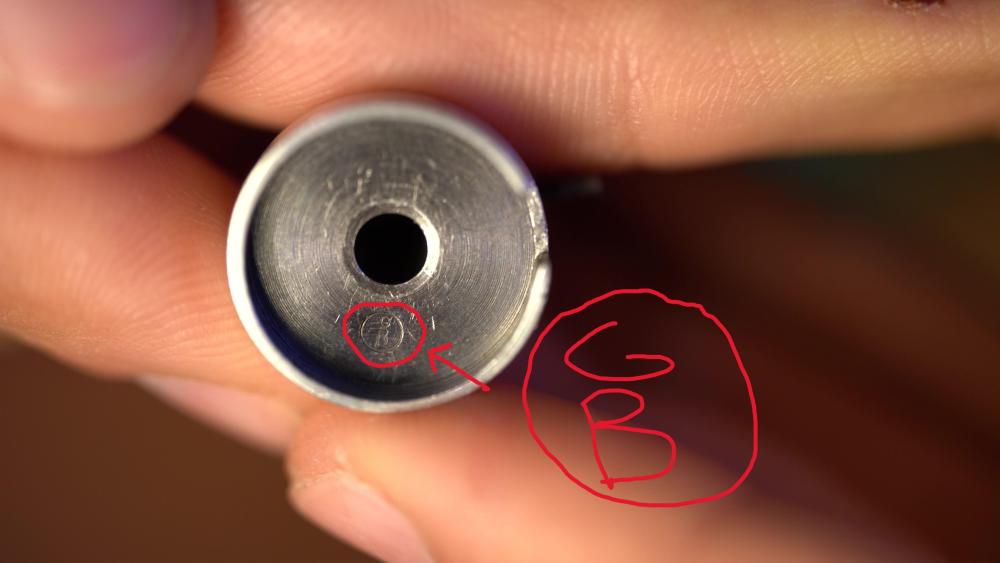
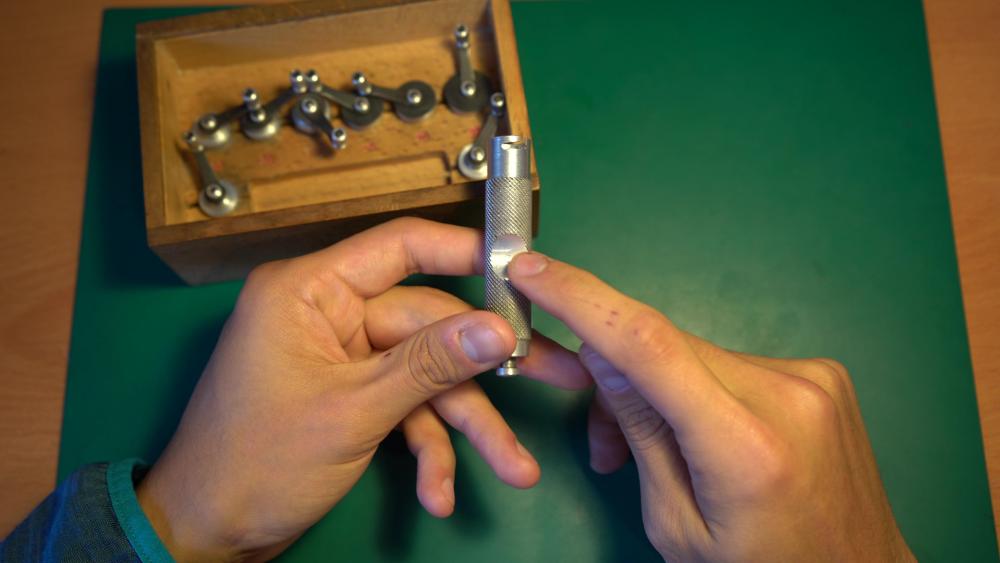
Hello Watchbangers! Today I return with another small post introducing my vintage mainspring winders! For those who prefer watching something rather than reading through the whole post, here is all the contents in form of a video: https://youtu.be/-63Do2Dkikk Now to the written part! While I first started winding mainsprings by hand ( and recommend this method for hobbyists who don't want to break their wallets) it was clear that I couldn't continue this practise due to the wear and damage it left on the mainspring and barrel! Thus I set out on the search for a pair of vintage Winders as the modern alternatives are not financially possible for a student. I was first eying american K&D winders or Watchcraft sets but coincidentally found a unbranded box of winders on Ebay for around 100 Euros: After inspecting and cleaning the set I was delighted to find that they were produced by Boley as they were stamped gB ( Gebrüder Boley) meaning Brothers Boley: The set came with 8 sized drums, their cranks and a holder! While I'm pretty sure that the hooks only point in one direction, I have tried winding left and right turning mainsprings with success, not sure what is going on there haha. Now the process of using these mainspring winders is the same as any other really! 1. You start by pressing the innermost coil of the spring down onto the arbor, making sure that the hook catches the mainspring latch. Be sure that you are attaching the mainspring the right direction/ way otherwise you will wind it wrong! 2. Then you slide the arbor into the drum and start turning the crank to wind the spring! Be careful on manual-wind springs when approaching the part of the spring which hooks into the barrel! If you go too fast these can catch the edge of the drum opening and break off! Just go slow and optionally help out with a tweezer for example! 3. Then carefully lift off the arbor, making sure that the innermost coil of the spring unlatches itself from the arbor hook again. This will make sure that the spring won't be pulled out as you remove the crank. I like using a pair of tweezers here! 4. Finally you just press down on the pusher, pressing the spring out of the winder into the cleaned and lubricated barrel drum underneath. While I am fully satisfied with the performance of my older set, I must say that it is a bit fidgety to use! The spring power often turns the barrel out of the holder slot leaving me no option other than to press against it firmly. Secondly, the lids of the cranks are also a bit bent. Occasionally, when the spring is almost fully wound in, the strong power allows the left over spring to slip between lid and barrel lip, scratching it around for one turn before I can press down firmly on the lid so the spring is wound into where it should be! I hope you guys are also as lucky in finding an affordable set of mainspring winders and if you have any other questions or comments, please put them down below!


 1 point
 -
Joe at the Nekkid Watchmaker often does this. Here's one of his :1 point
-
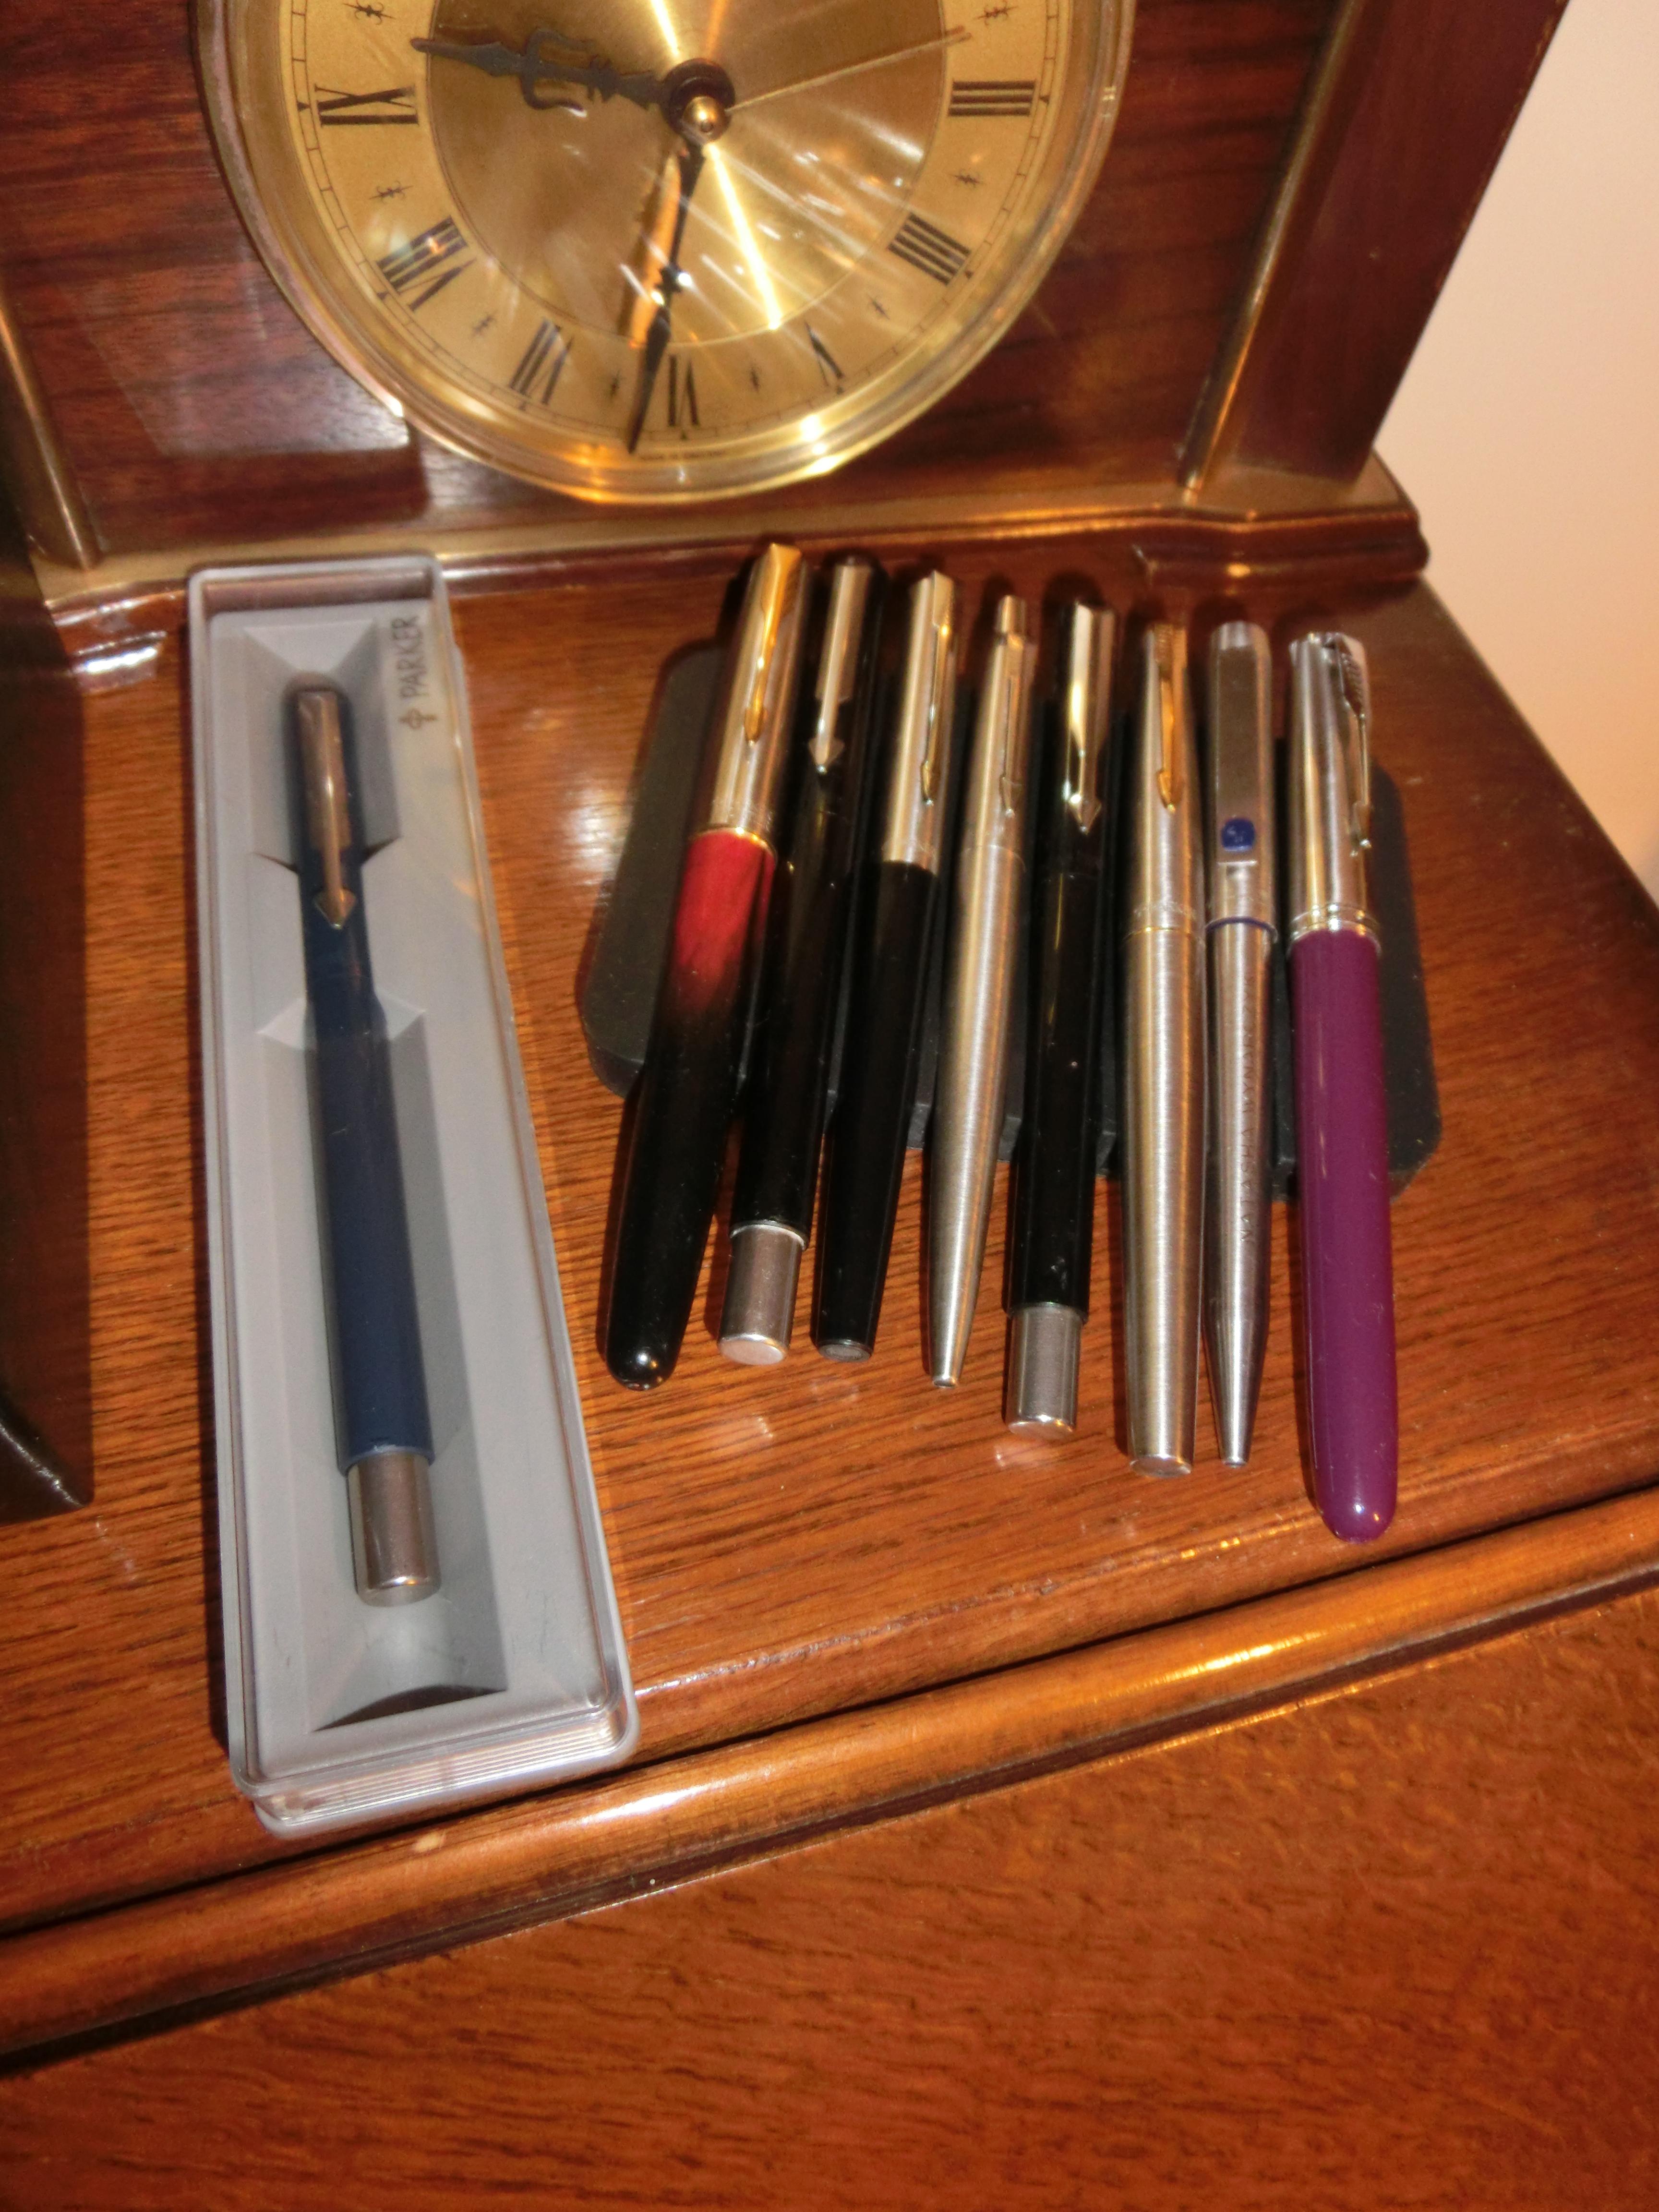
I didn't think I had a Parker problem, then I looked through the stash of fountain pens. Does eleven Parker pens count as a problem? Even if a couple of them are Rollerballs, and one of them is a Jin Hao? If you add in the vintage Platignums, and random odds and sods, the Apollos, the Wing Sungs, the Jin Hao and assorted Lamys and such like, the Jin Haos that look like Parkers, the Pai Lis, the Heros ... OK maybe I do have a *little* bit of a problem.
 1 point
 -
there are so many stiles of pins, screws, rivet, pressure and spring bars for watches, the one in the buckle is a springbar for sure, buckle springbars have a shorter end so as not to protrude out from the buckle itself and fit flush, but the the fold over part of yours looks to have been cut with only a smaller center piece holding the springbar or it has been flipped around and goes between the other part of the fold-over, if Cousins does not show assortments of the parts mentioned then look on eBay or other material houses, like Jules Borel, Cas-Ker, Esslinger etc. for ideas, the fold over pins are probably correct for the band links, the band to case could be different like the center tube notch and pin type...1 point
-
Very nice work on the machine!1 point
-
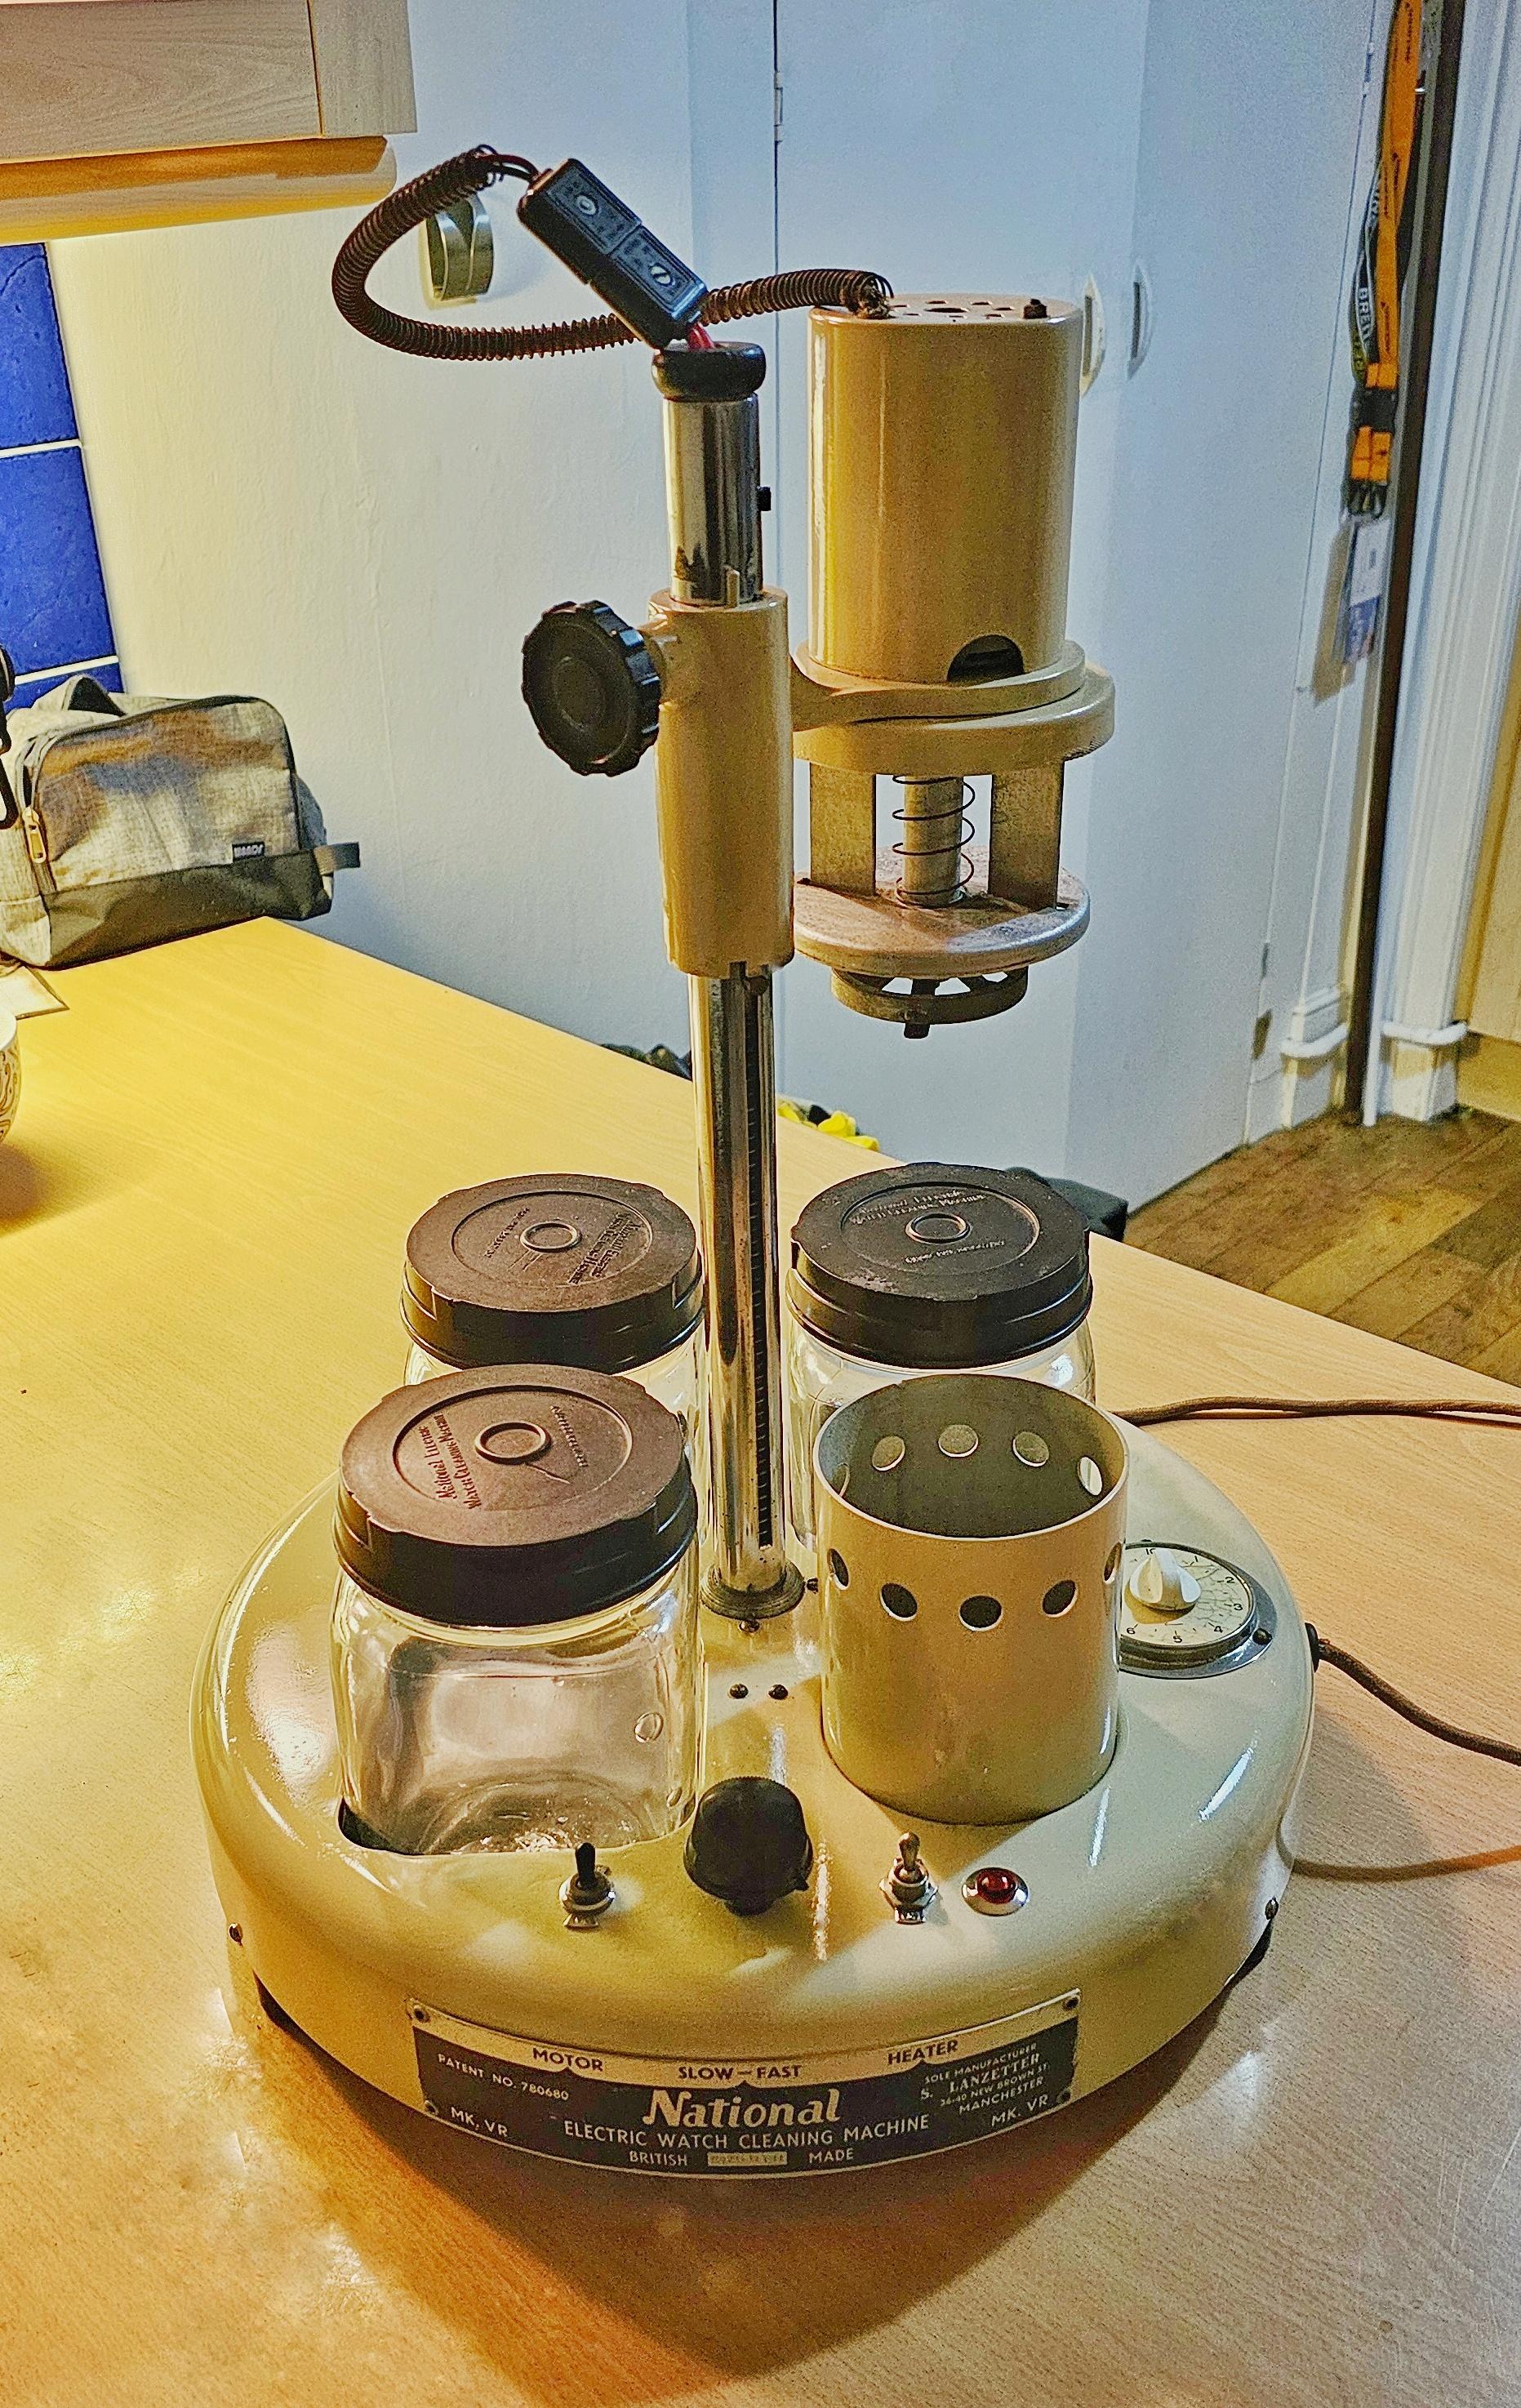
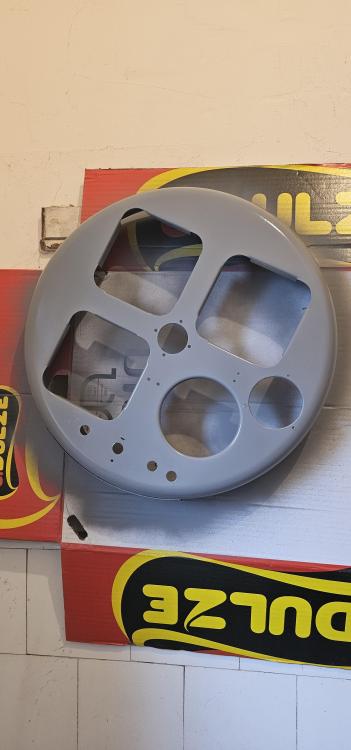
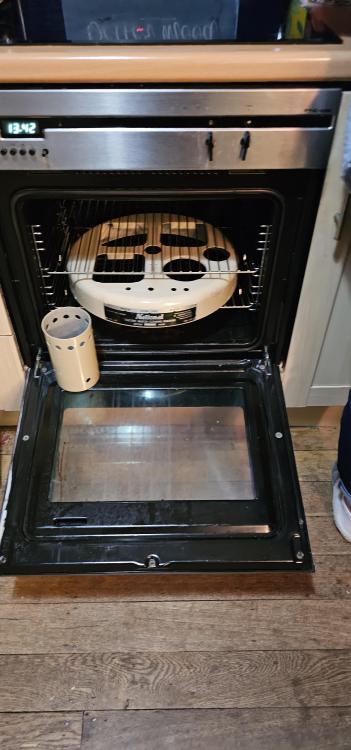
Hi look nice cleaned up. And will provide some years of service. I have a big National which has an ultrasonic generator, very heavy unfortunately the transducers are cracked but it works as normal . Maybe find some one day.1 point
-
As a temporary repair I used a 28mm o-ring and a 30mm. genetic crystal. That seams to work.1 point
-
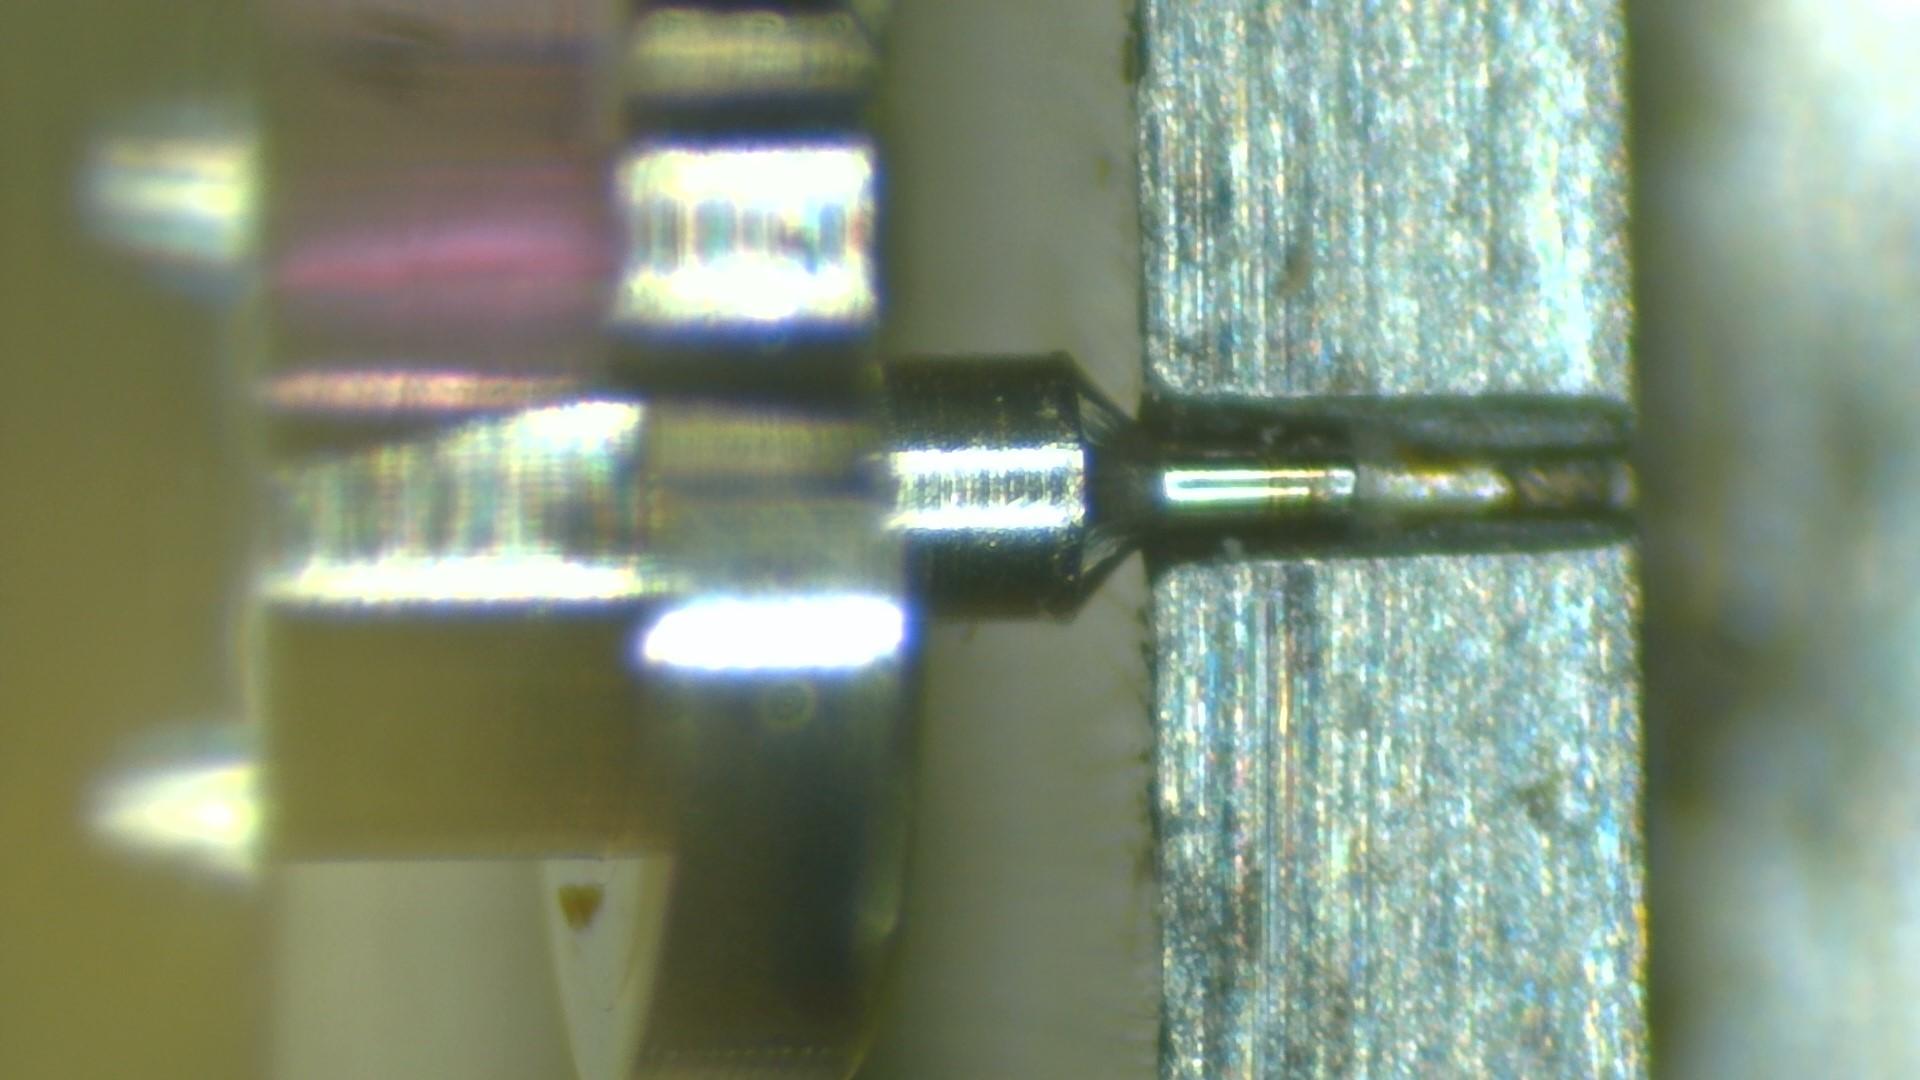
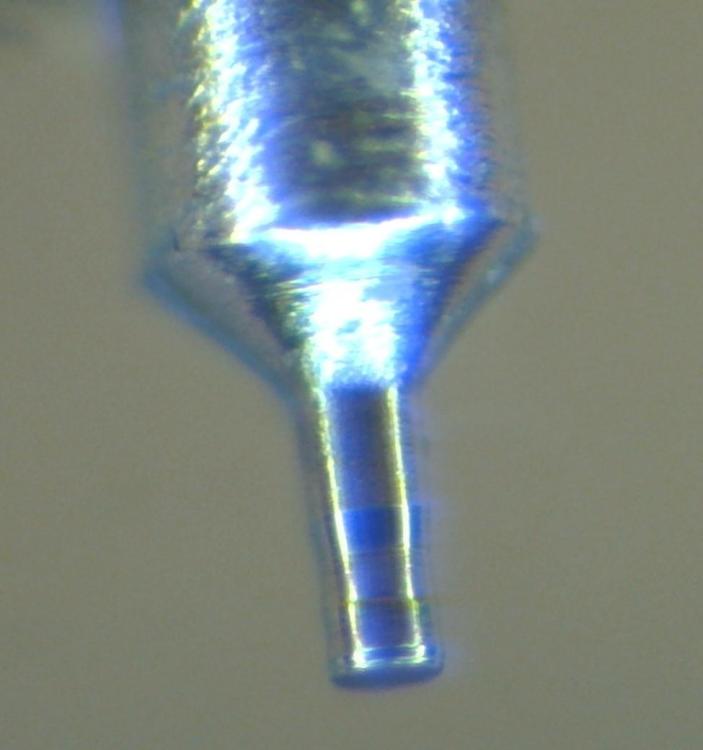
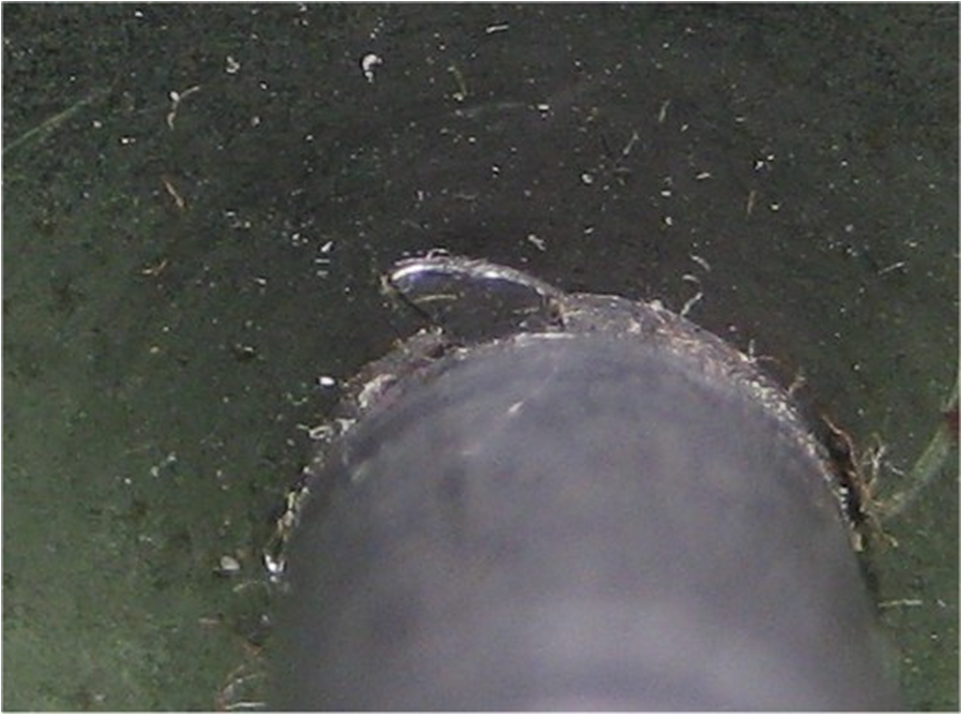
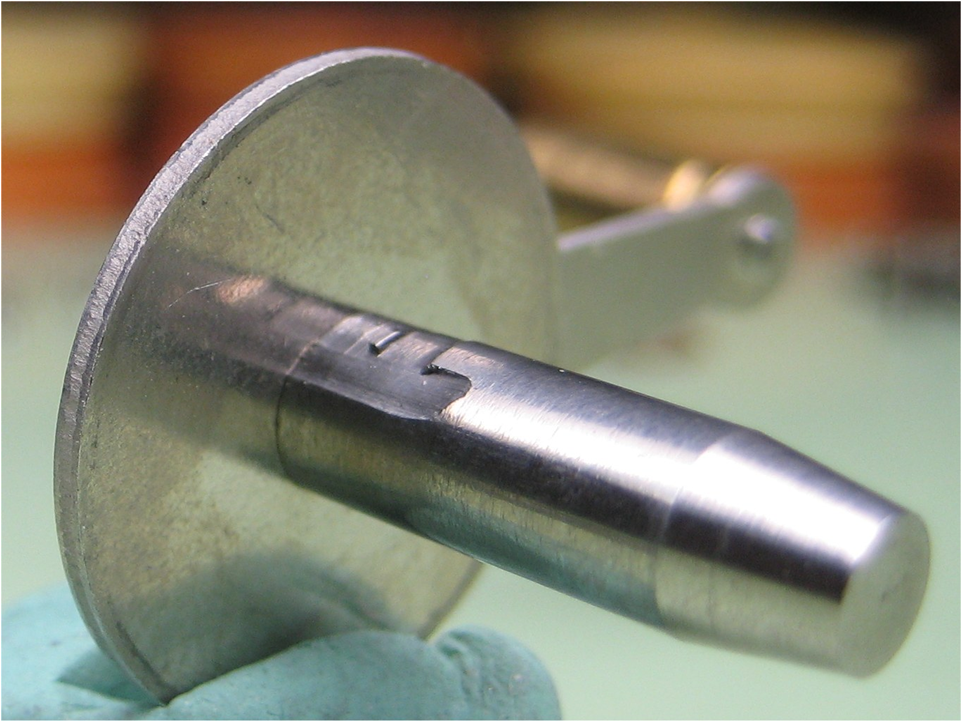
Just for you @JohnR725, I broke out the 2x Barlow lens - wow it's hard to get a steady picture with the microscope head on a long arm, attached to my desk, on a wooden floor. The ends are very slightly rounded, but you can also see grooves where the pivots have worn away against the jewel holes (look at the reflected light lines). The pic is the bottom pivot, the top was more worn. I was thinking that a new staff would be best, when it was decided - adding a bit more pressure on the burnisher, the balance jumped out of the Jacot and broke the top pivot . (Not the first time I've screwed up on the Jacot tool). Idiot. I want this watch to run well, so it's probably a good thing to get a new balance staff. I'll change the jewels too. I don't know if jewel holes actually wear? But if it's worn away the pivots, then a paste of hardened steel has been rubbing on the jewel for a long time, so probably. The cap jewels have slight dimples in from wear, and they are clear, not red. They're a nightmare to find in a liquid.
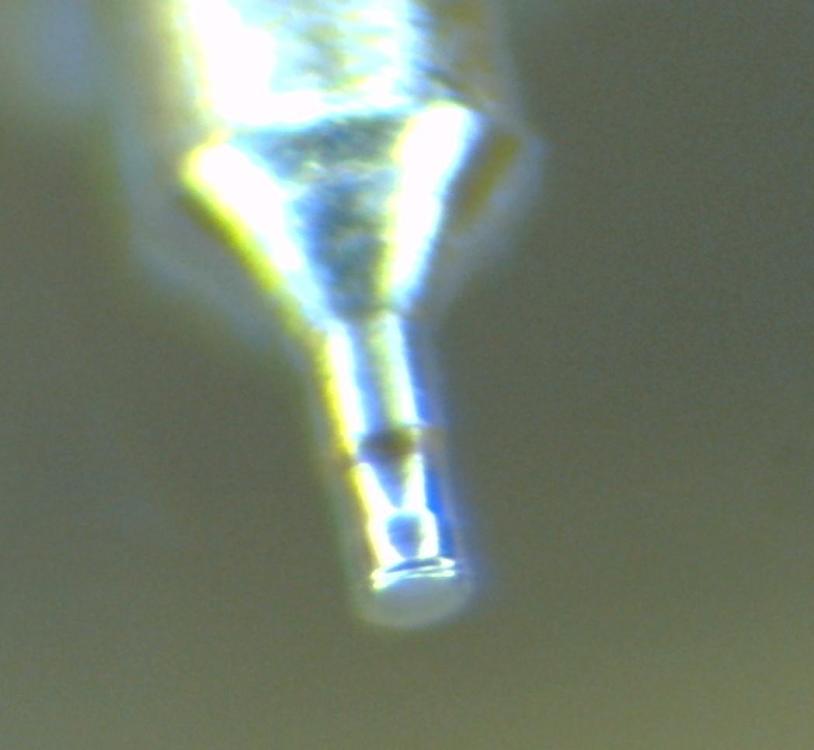 1 point
 -
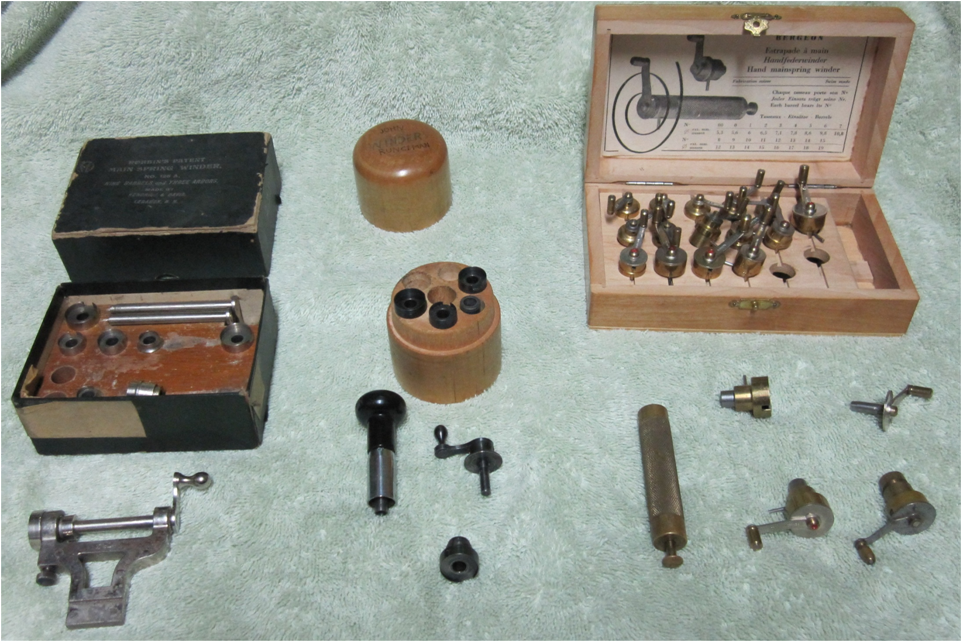
Out of curiosity where you going to order these mainspring winders from? What about the other issue if you purchase modern mainspring winders they may or may not work at least as the handles will have issues. Specifically modern handles are designed for modern Springs and vintage watches seem to have a lot of variations unfortunately it's not that simple usually end up on some occasions you end up having to use multiple sets of handles and/or winders to find something that fits. Then I would probably have to sit down and measure as to whether there actually is sort of a? This post is a compromise to the question you have I have a picture below. The mainspring winder on the very left-hand salad does exist and I'm not a big fan. The center winder is the standard one that I use 90% of the time so I could get to the diameters of those and that would cover almost everything. At least as far as the diameters go. Then the set on the right-hand side would work if you can afford it because it tends to be pricey unless you're just lucky purchasing it like I was and then there is the handle issue which I brought up the a get you some pictures of that. For the center set this is what the handle looks like it's interesting in that it actually has two separate books because the center part can move in and out so when it's all the way out like it is now would be for a bigger mainspring and you can push it in for smaller diameter Springs. No notice is just a protruding in all and that's the other little problem a lot of the mainsprings of pocket watches could be left-handed Springs like typically 18 size full plate watches could be left-handed and there are few others it could be. So this is why this set is so nice to go in either direction Then in the modern set is we will call it on the right-hand side the handles themselves common three configurations basically the image below is the vintage handle this is for all the blued steel Springs or for Springs that are diameters that your handle may not fit as I said this seems you a lot of diameter differences of the center part of the spring and you may not actually have a handle of the modern type which will show what a moment that's going to fit and for blued steel or older Springs this is the Handle which by the way I don't think they sell anymore. It's what the older sets used to have Then this is what the newer handles look like because of the design of the mainspring and how tight it goes on the arbor and its sizing the book is ground into the metal and doesn't actually protrude out which is why it's a problem on vintage or odd size Springs.
 1 point
 -
Sad you weren't paying attention at all were you. Somebody who is paying attention. Isn't it interesting that Rolex has two separate mainsprings for the watch if it always runs super high amplitude then why do they have a standard mainspring why not just offer the weaker mainspring? Then this morning I had a meeting of our watch group a group of hobbyists and professionals that meet on Saturday every other month. We had a really nice lecture on the history of the lever escapement. Then I was talking to Jeff retired head watchmaker of a service center that service a heck of a lot of Rolex watches. Not just the service center he was responsible for training all the watchmakers in all the stores and probably some other lectures to the salespeople on Rolexes etc. So if anyone should know what this magical high amplitude that we should all strive for it would be Jeff and what was the answer I got? They don't care there is no target magic high amplitude it's exactly what the tech sheet says what is the minimum amplitude at one half winding. Remember the Rolex will run 48 hours so basically it 24 hours one half of its power it should do a minimum amplitude in a certain position that's all they cared about and of course timekeeping. Oh and yes the watch on the printout is a problem watch. It still have to come apart and get a new mainspring you have to go to the weaker spring although apparently it's only a problem when it's on the auto blinders so how much problem will be on somebody's wrist what's the likelihood that they will wind it up all the way and have timing issues? The unfortunate problem with a mechanical watch is its mechanical. That means he will be variations as why Rolex has two different mainsprings because there's obviously variations. It's why we don't have that magical the watch should do 273.99° amplitude when fully wound up while standing on your head because there is no magical target amplitude. Your efficiency test is whether you have the minimum amplitude at 24 hours. Then of course there's the silly other problem of the idiot customers who want their watches to keep time. After all that's one of the reasons I bought a Rolex watch they expected to keep time. Very few customers have timing machines to measure their amplitude and get excited about it. Oh and as far as worrying about wear and tear because your watch is not running at its peak efficiency with your phantom specifications what about the proper lubrication of the keyless works? You can't see if you're having issues there or if the Crown gasket goes bad moisture gets in the rust gets in you could grind the heck out of your watch winding it up and that won't show up on the timing machine at all. So if you want to have something to worry about that something to add your list to worry about. Another reason why watches should be serviced occasionally to replace the gaskets before the watch fills up with water and then you have a new problem.1 point
-
Wow what a difference. Looks like you are good to go.1 point
-
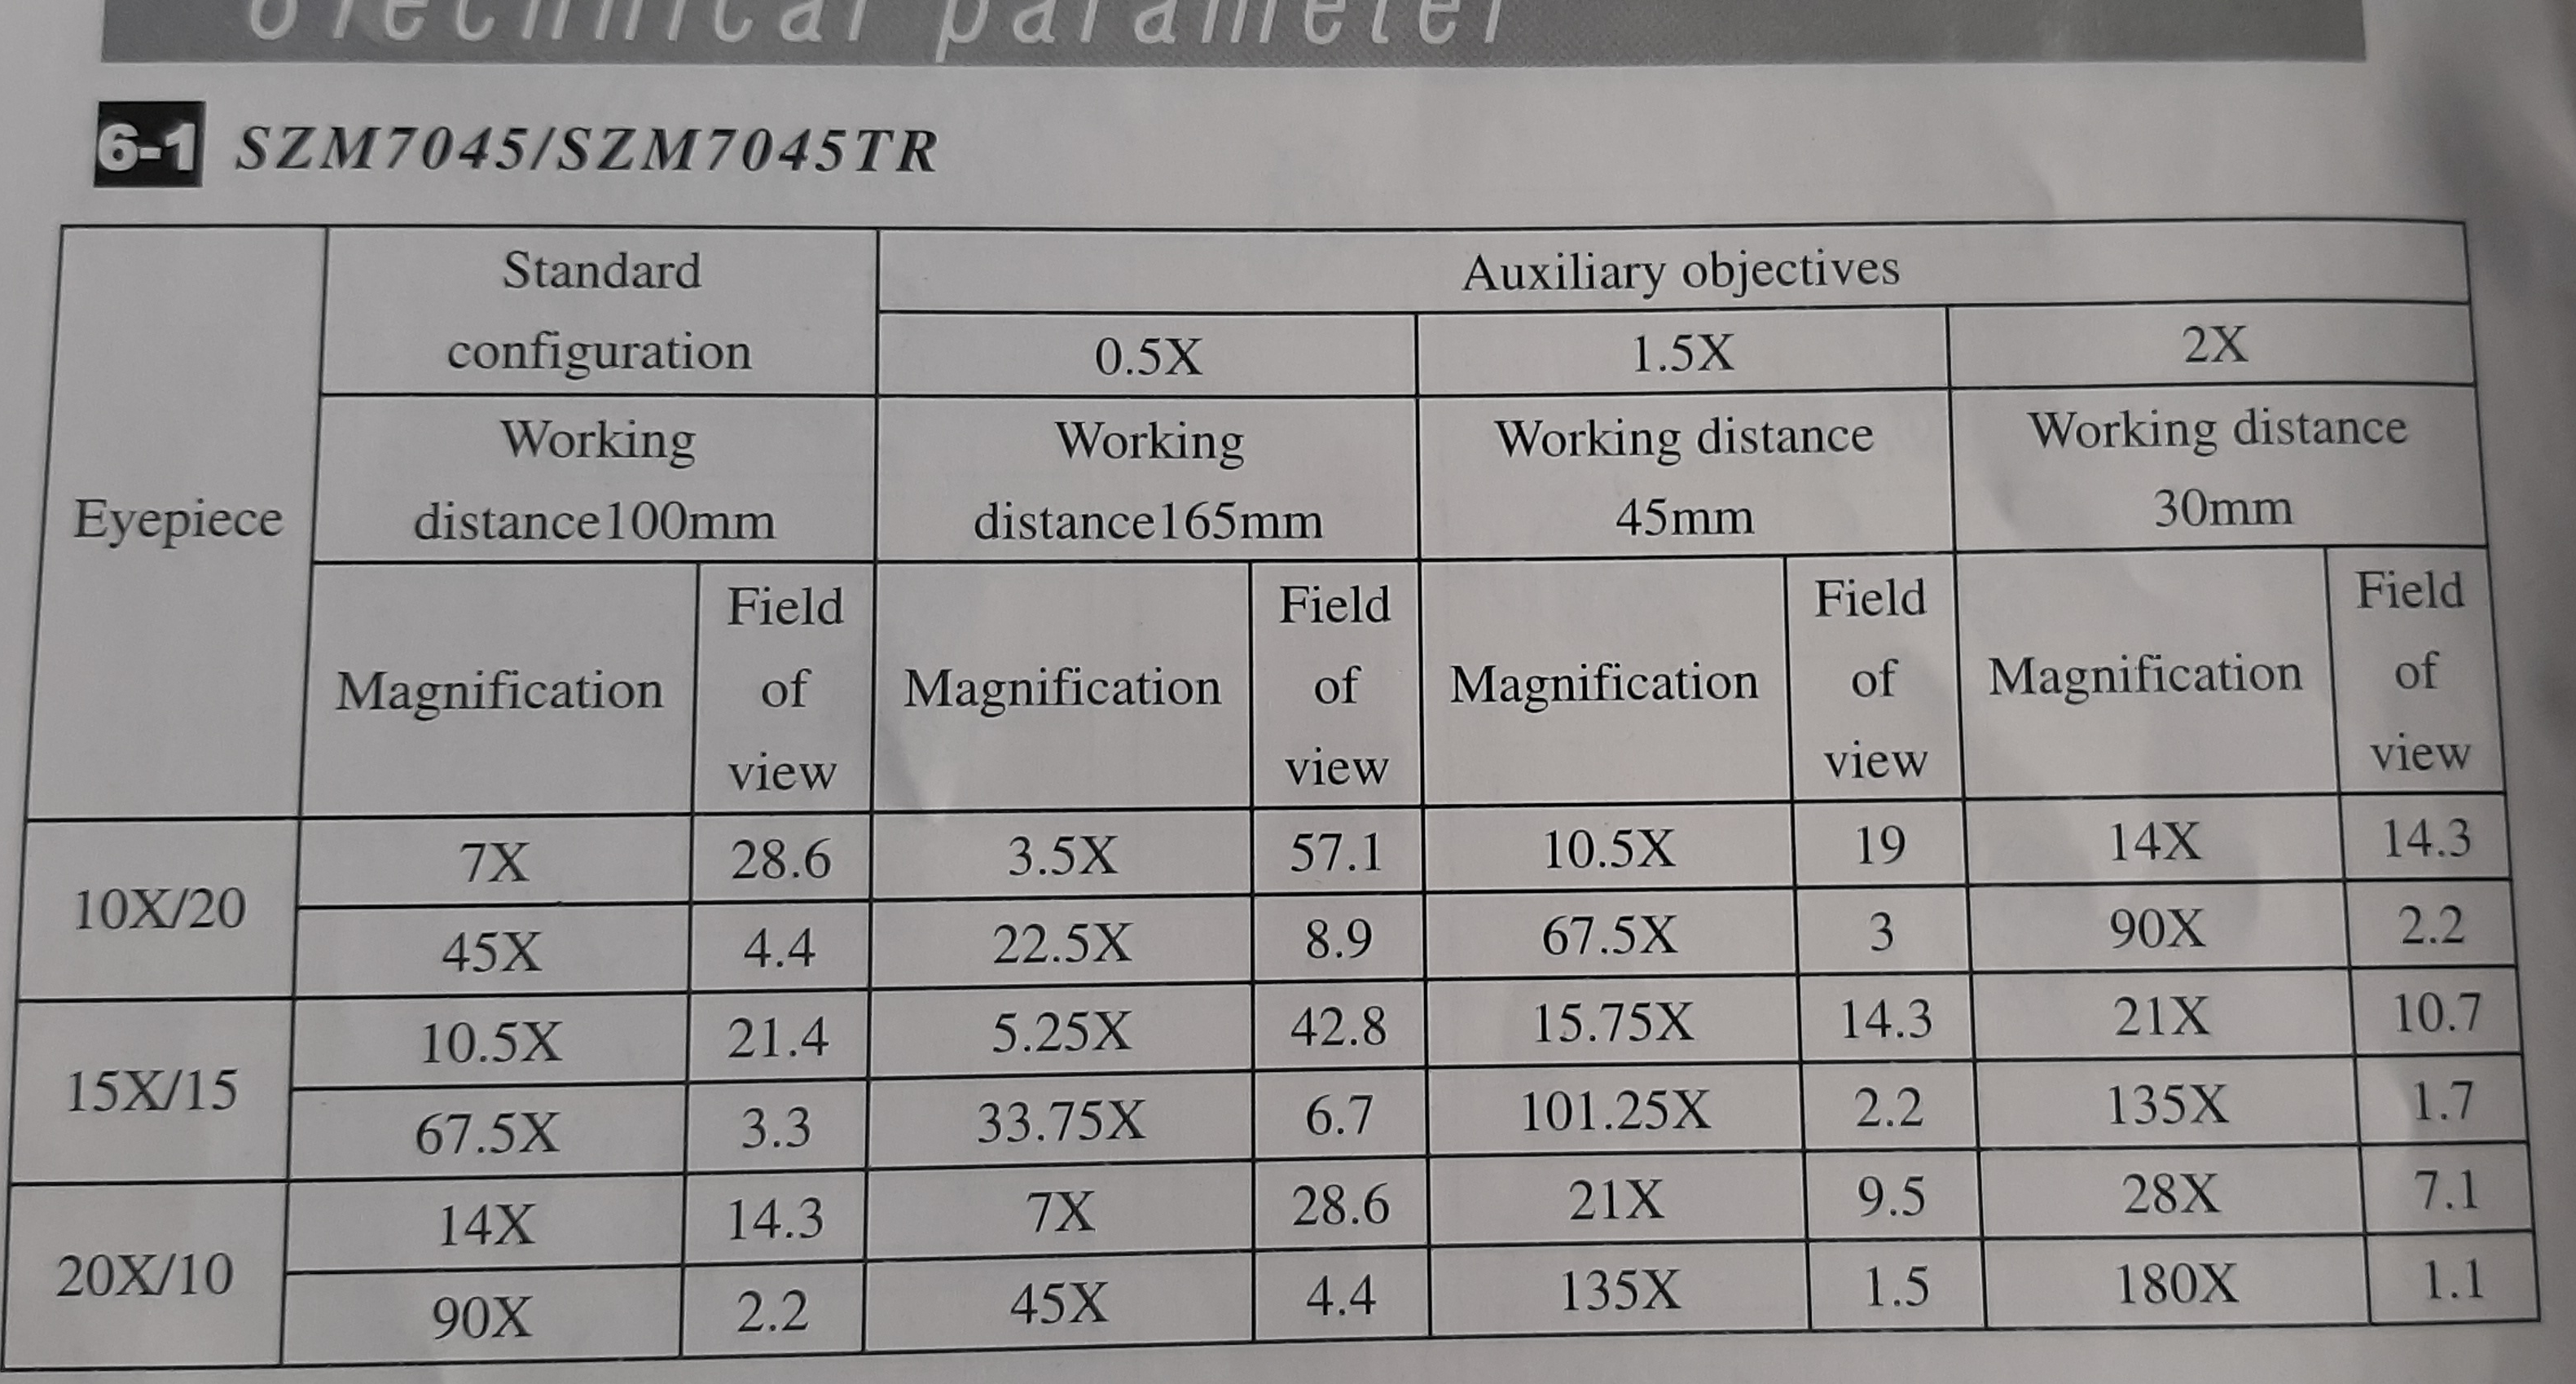
Playing with the microscope to find a configuration that gives me enough magnification and working depth to shape the pivots on the Jacot tool. I have the 'standard' Amscope stereo microscope with zoom. I usually use the standard 10X eyepieces with a 0.5X Barlow lens. Which gives a 165mm working distance, and 3.5X to 22.5X magnification. (see table below) I removed the Barlow lens, and put in 20X eyepieces. This gives a working distance of 100mm (about 75mm from the ring light), and max magnification of 90X. It seems a good compromise. See pic.

 1 point
 -
DD/DU amplitude too high.1 point
-
The balance is wet of oil... It shouldn't be there, so wash it out in benzine. Search and read about watch lubrication.1 point
-
Please provide more information like the make of the watch, the typevof glass, etc. Photos would help greatly.1 point
-
I hate rounding pivots in the Jacot- I always do them on the lathe. But there is a tool for rounding them, the Bergeon 5482, and it actually works and does a good job!1 point
-
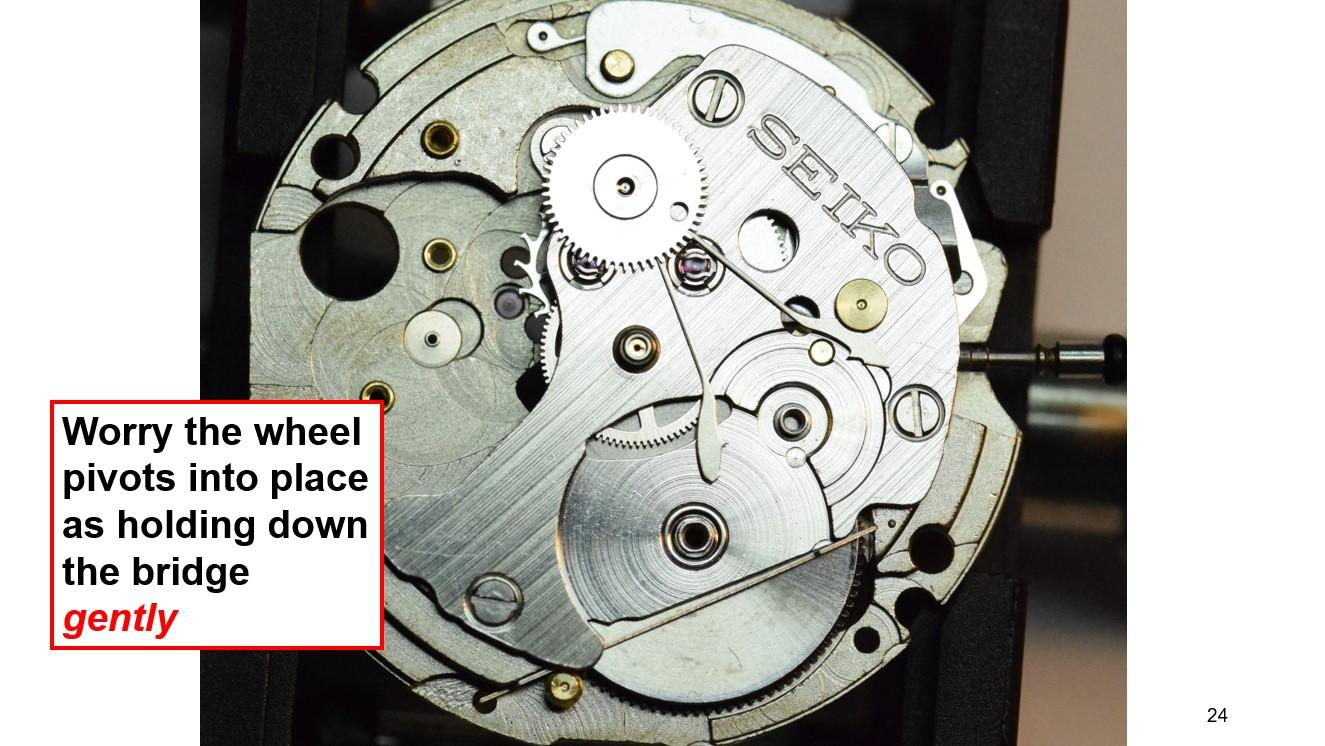
It should look like this.
 1 point
 -
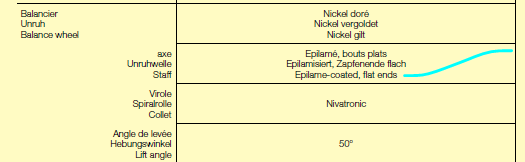
How did the jewels look when you got it apart? The upper pivot looks a little worn, and almost like it has formed a bit of a burr around the tip. This could happen if they were super dry and it ran for quite some time in that condition. If it were mine I would give them a lick in the Jacot tool and round the ends slightly. It is possible though that they were made flat. Some watches have flat pivots to help have closer amplitudes between flat and vertical, but rare to see on mid 20th century Swiss stuff.1 point
-
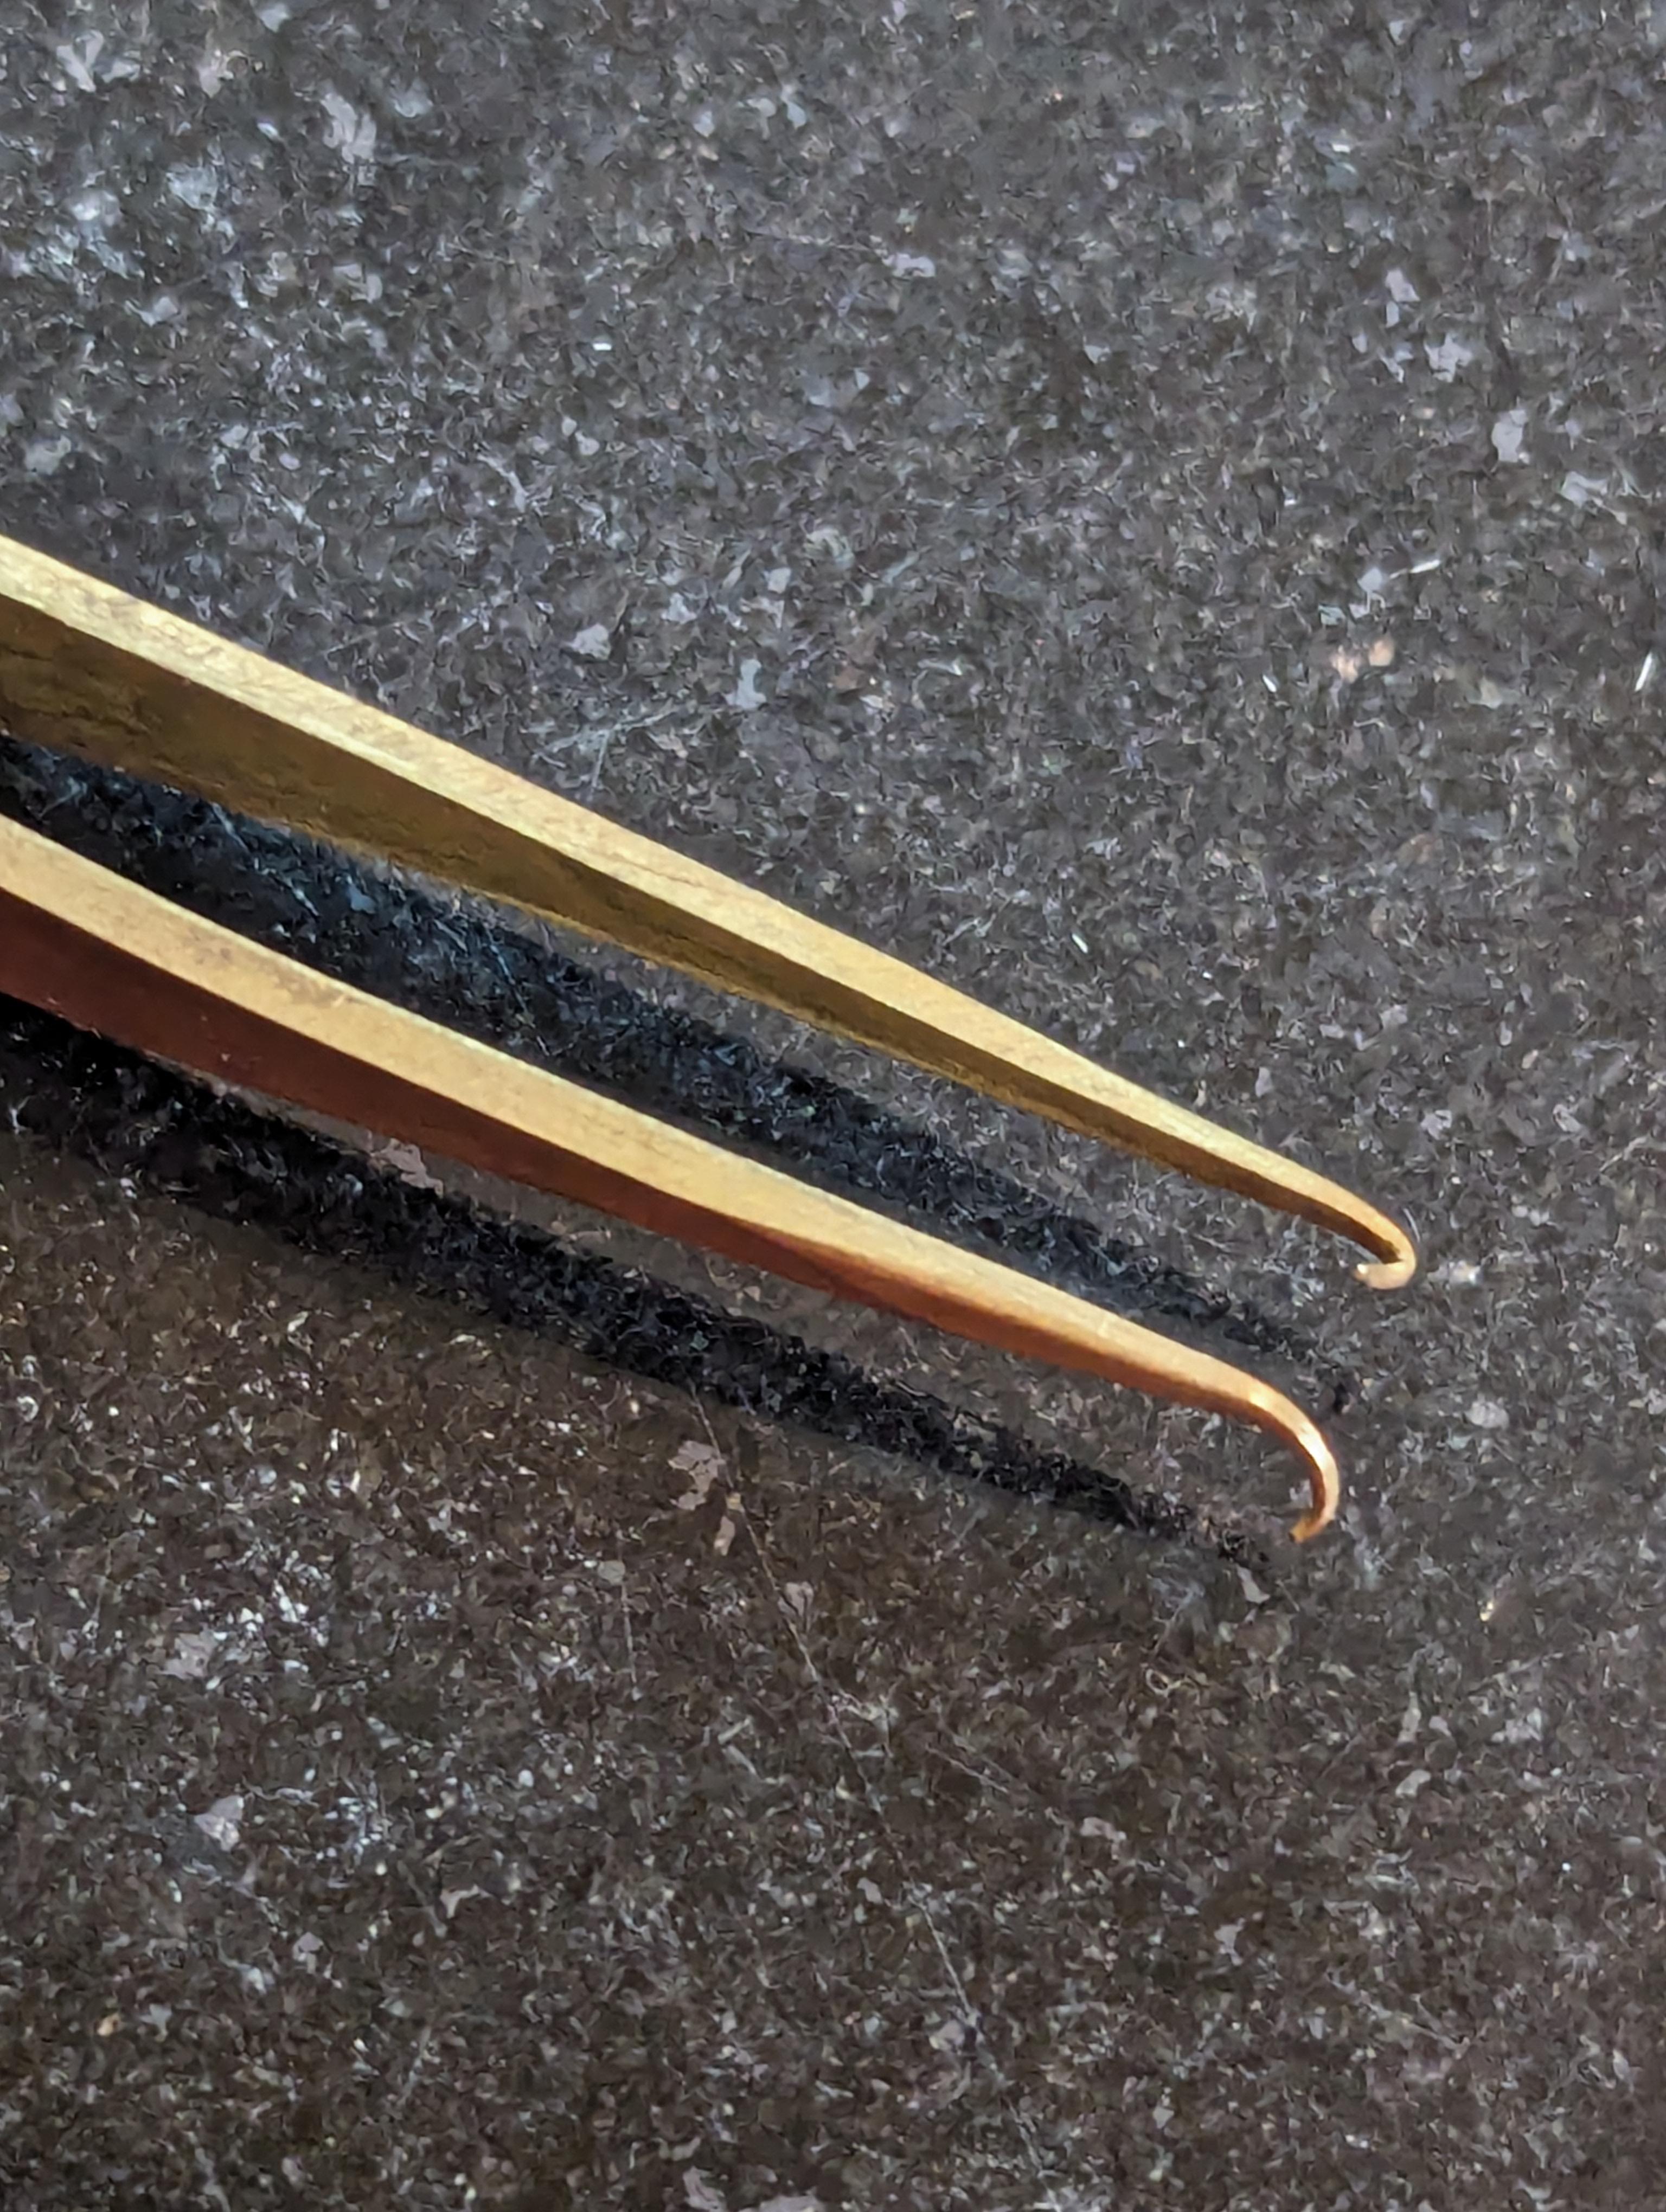
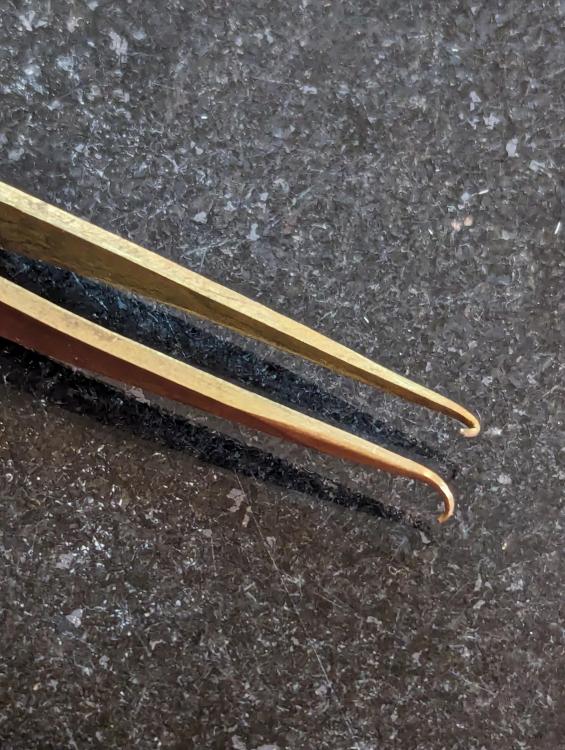
And they wonder why I say no... When I got home from work: "I borrowed your tweezers...why do you always look like that?!?! don't worry they are fine..." Just figured out what they remind me of:
 1 point
 -
Hi There! I recently fell into the deep hole that is watch repair, and have been learning as I go. Recently started taking apart and reassembling Raketa movements as practice, as well as an NH36. I have a Seiko 4205-0155 on my bench that I am currently restoring, (challenging with the 17mm movement!), and have assembled two Seiko based watches with new movements. I have a selection of oils arriving shortly, and will dig into that, and I am saving up for a trinocular microscope to help these older eyes manage. Looking forward to learning more! Yani3651 point
-
Here's a post that explains how to spin the collet to reduce beat error. These lessons were designed for those that were complete beginners, so I had them remove the balance and hairspring from the cock to do this task, but if one feels confident, the collet can be turned whilst in situ. You just need a balance tack the has a table for the balance to sit on and with an oiler going between the hairspring coils the collet is turned that way. If really confident, just a normal balance tack can be used. Also I roughly worked out how much to turn the collet depending on how much beat error there is. If a watch movement has a 300 degrees amplitude and it is an 18000 bph movement, that equates to the balance moving 1500 degrees in total in 1 second, which is 1.5 degrees of movement for every millisecond. An 18000 bph watch ticks five times per second, which is 5 times 300 = 1500 degrees. So, if your movement has a beat error of 5 milliseconds the collet needs to turn approximately 7.5 degrees. This is a rough estimate.1 point
-
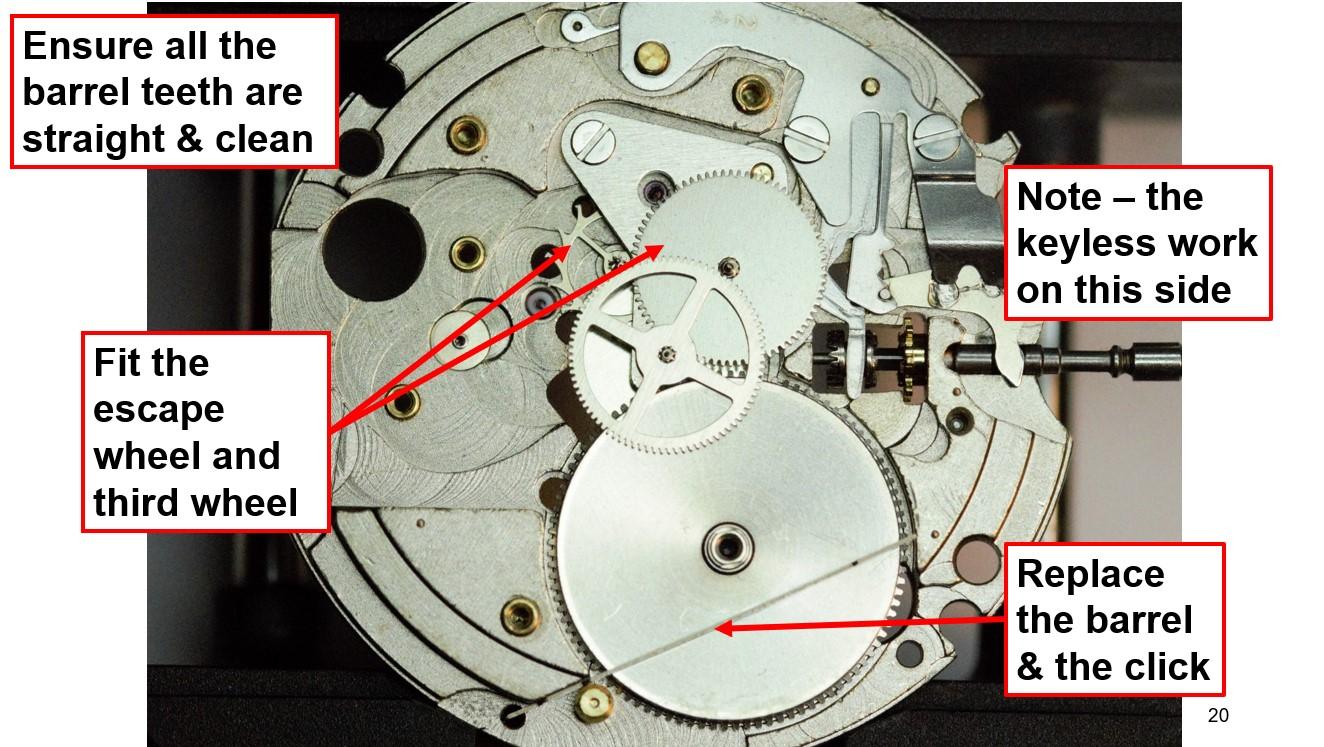
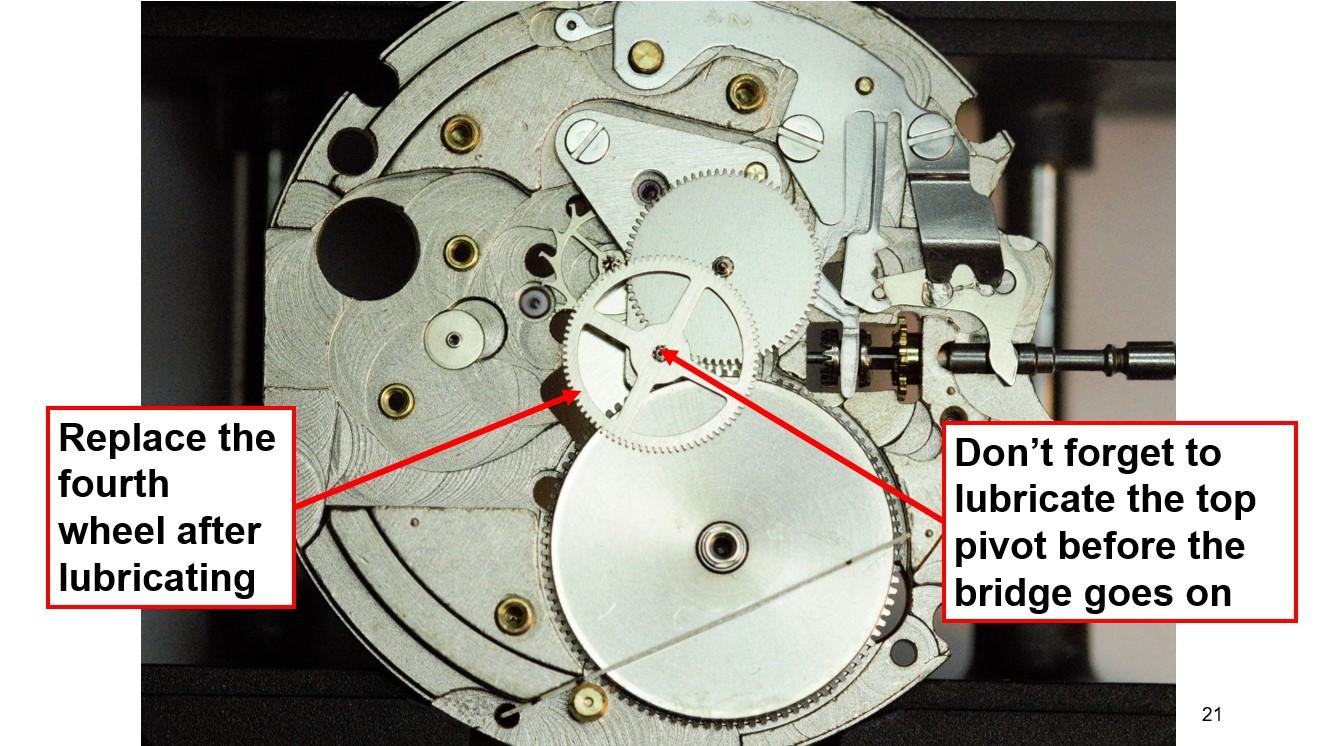
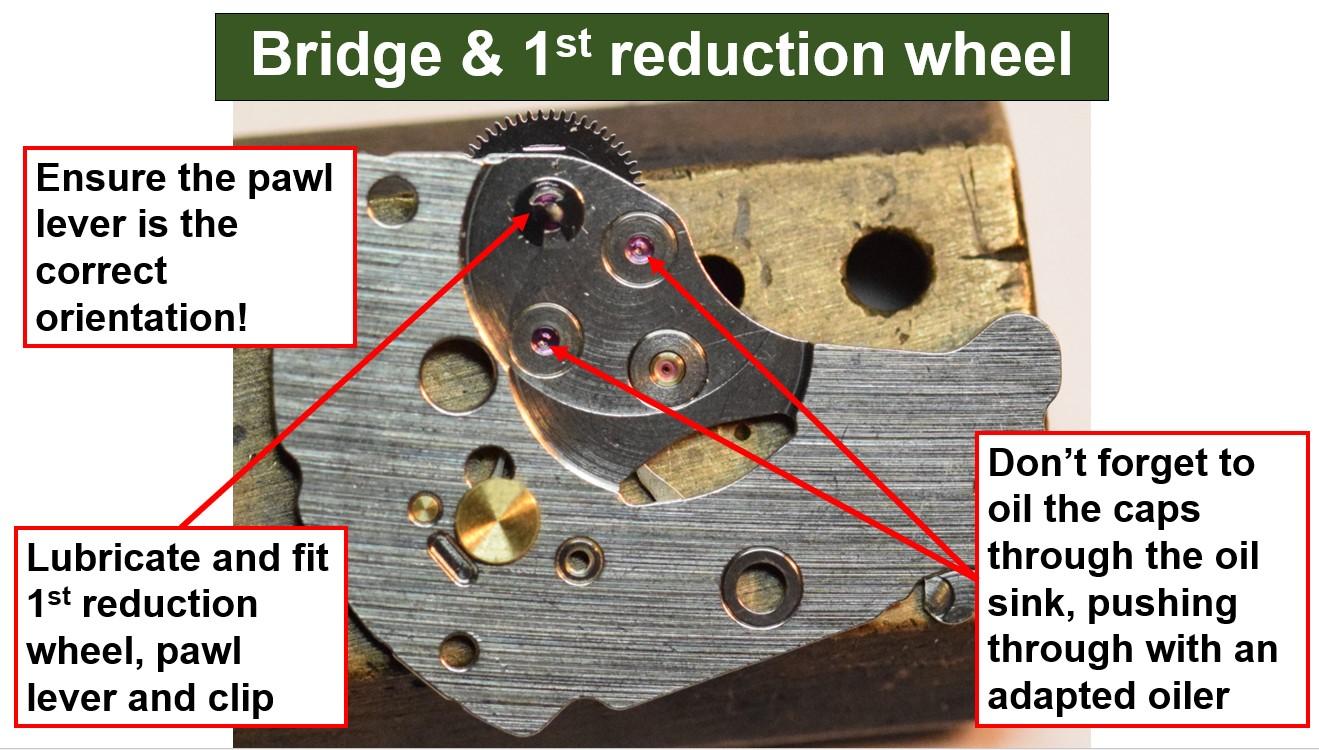
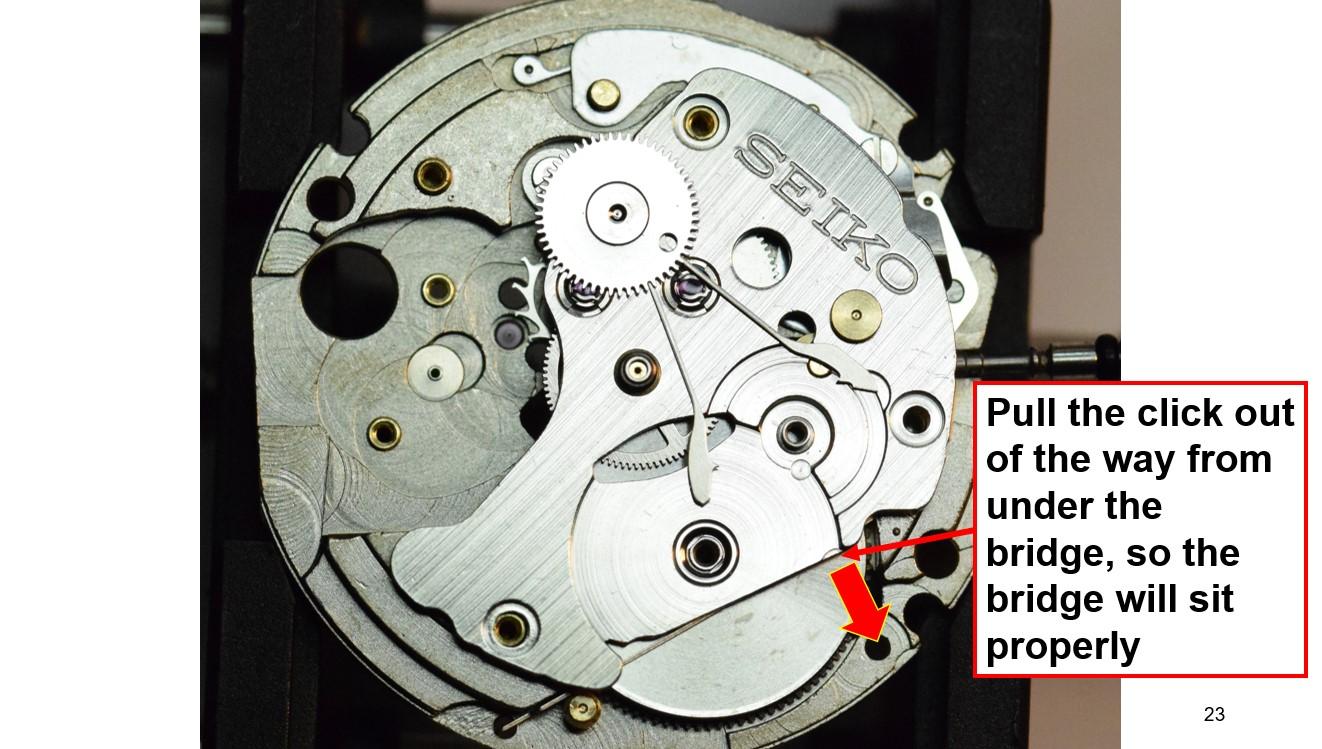
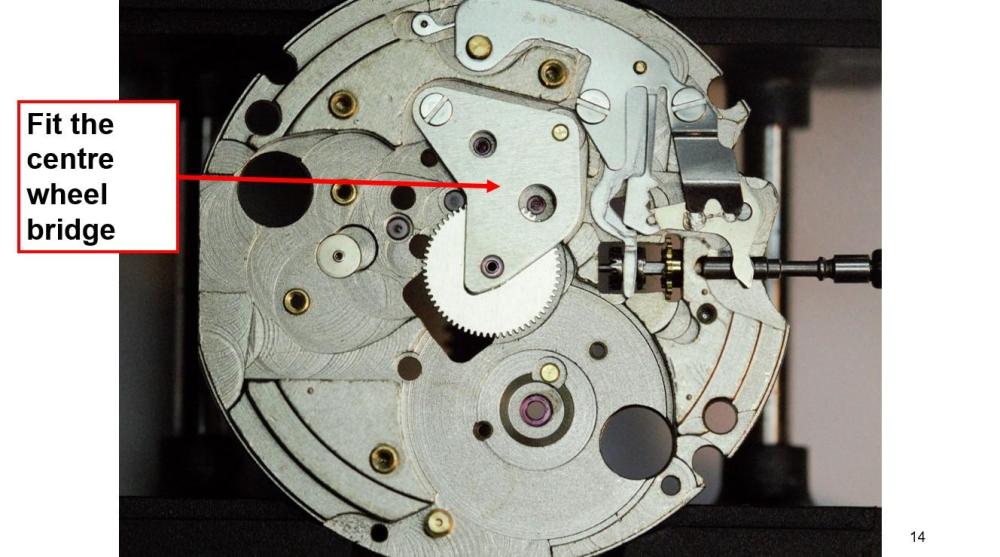
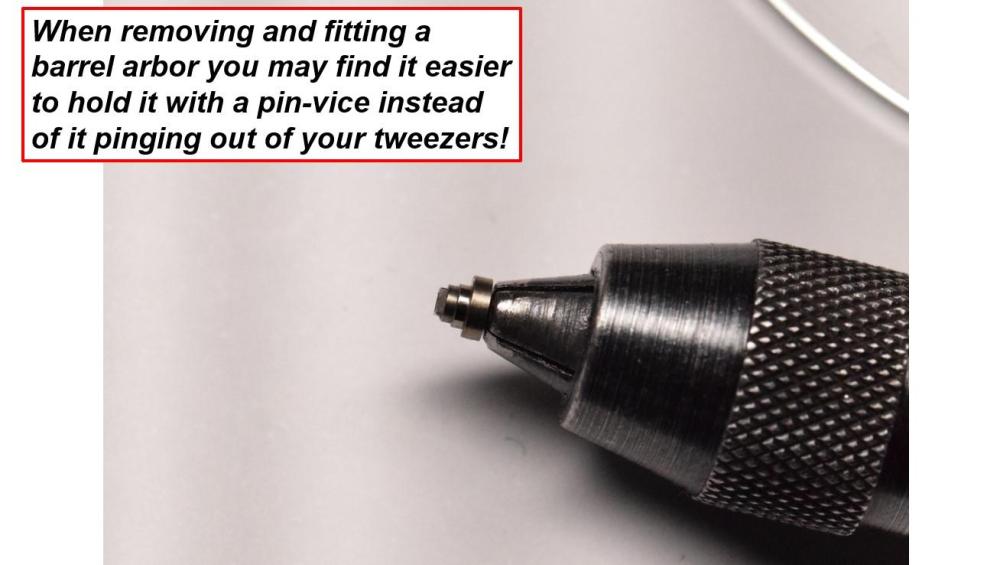
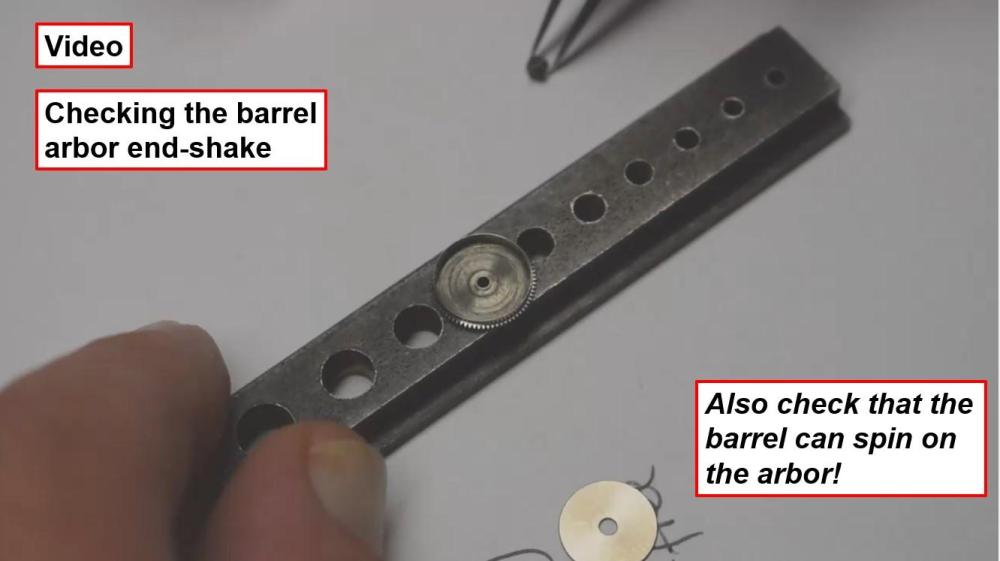
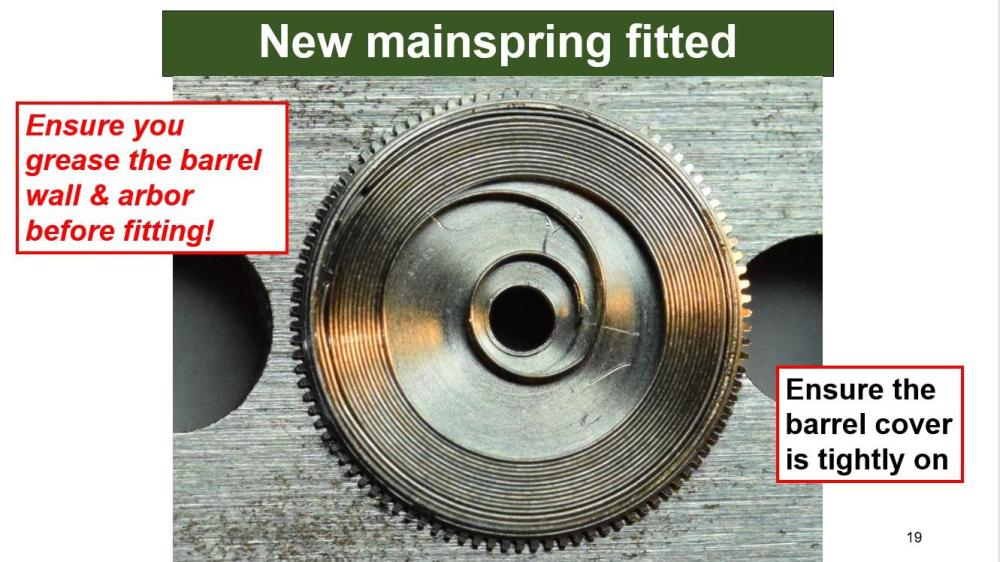
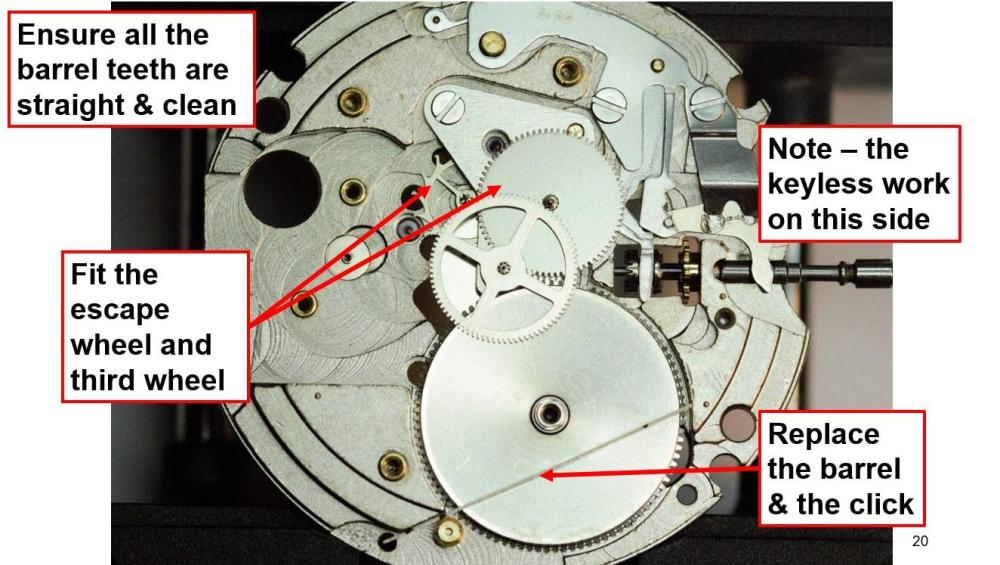
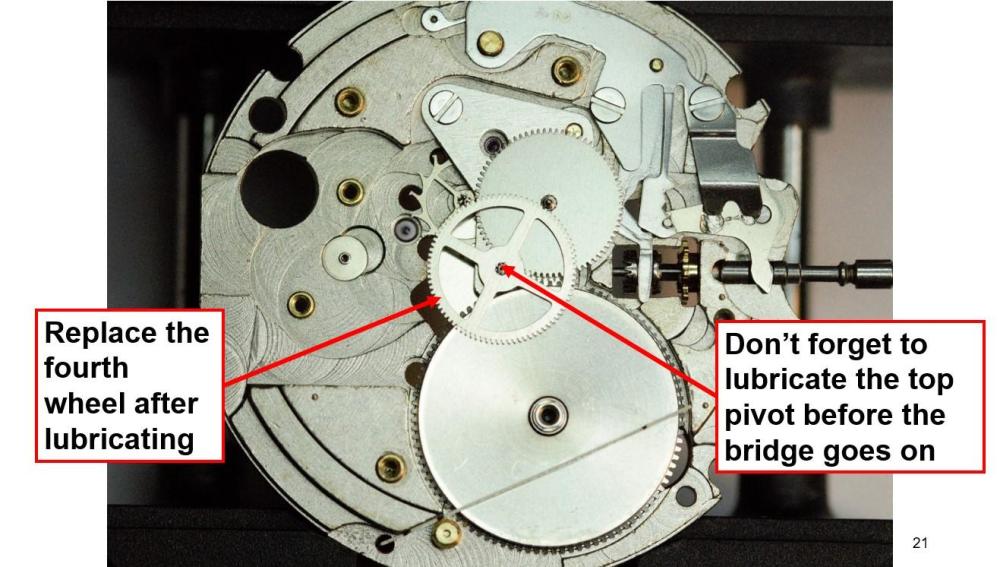
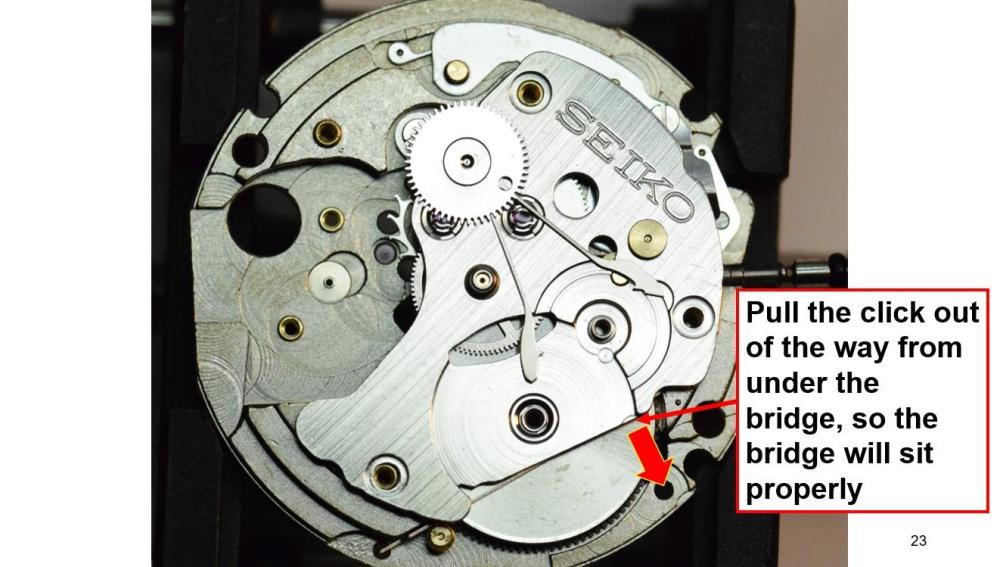
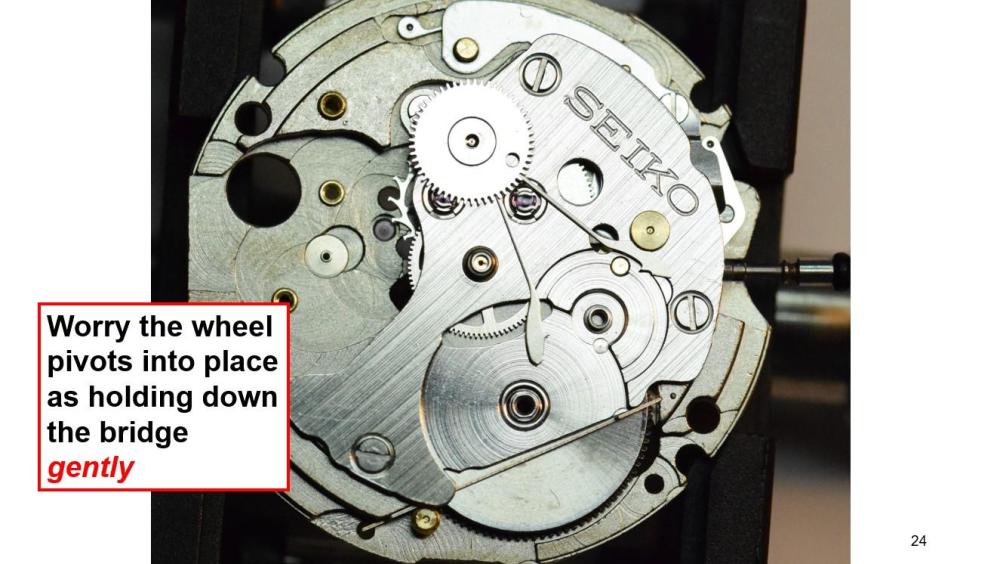
I wrote a set of lessons for the 7S26C some time ago, so you might find these slides helpful. Unfortunately slide 4 regarding the barrel is a video which can't play on this forum, so I copied it as a static slide, so apologies for that.


 1 point
 -
Yep, I've got the Farer Maze GMT v1 which was a present to myself for my birthday a few years back. I also bought the steel bracelet for it at the same time. I think it's great, definitely has a good wrist presence and looks and feels premium with combinations of brushed/polished sections, amazing dial, good bezel action. I also really love the tiny bit of bronze in the crown that has slowly developed a patina. I've had no issues with it either (except what I mentioned below). I did have an issue when it arrived after being shipped to the other side of the world. The GMT hand was out of sync and the movement magnetised (probably happened at some point in transit). Rather than shipping it back at a large cost and time I talked to Farer and then took it to a local watchmaker who sorted it out for me and Farer then reimbursed me. They were extremely quick to respond to me and very friendly and easy to deal with so I have a great impression of their customer service too! Hope that helps a bit!1 point
-
Well, such clicks are usually soft. Soft - not like anealed steel, but like a carbon steel that has been hardened and then tempered to grey color, e.g. to 500 degr. celsius. Or, You can use as a material some bolt or something of the sort, that is made from construction steel, wuthout termal treatment.1 point
-
If the bezel is friction fit turning it shouldn't damage anything but if it is screwed then trying to pry it will damage the threads or lock it tighter.1 point
-
One thing to check is if the click is wedged under the bridge. It should be outside the edge. When I first started, I had it caught under the bridge and took me a while to find it.
 1 point
 -
If you do a search for "bracelet pin" in Cousins website, you'll find all the various designs available.1 point
-
When I run up against this kind of situation, I use a razor blade and gently pry up to see if there is any movement. If not, I assume it is screwed on. I realize this may not help you, but when I have something like this that is hard to unscrew, I will often design a tool and print it in PLA on my 3D printer. PLA will not damage the watch. You may also consider the superglue/nut technique. Glue the nut on the glass and see if you can unscrew it. These situations are always tricky...and sometimes scary.1 point
-
I would say it comes off with a case knife.1 point
-
I have cheap ebay tweezers from my first set. I do two things often. Demagnetise and keep them 'dressed', sharpened. The demagnetiser cost me £10. A honing stone cost me £3. that's it. Press the red button on the magnetiser, Demagnetise the tweezers by lifting them off the base ad going up. Release the red button. Repeat twice. Dressing. Using my magnifying glasses to confirm what I think I see. Shape and form the points. Dress all four edges and then gently removes burs. Job done. I use a pair of curved brass tweezers when working on an expensive watch that might show scratches. These were a massive £3 also. And, I do keep them dressed. Would I like high end tools. Of course, but to what end would it make my work better and this stage of my learning curve I ask myself? My standards are getting better by practice, not by high end tools. This is a great hobby1 point
-
Put the movement dial up on a watch cushion, place the case over the movement and then turn the cushion over.1 point
-
I believe most lever escapement watches have a safety roller. But the definition here is a separate safety roller. It depends upon the tools you are using to remove them. I usually find I start with the roller table itself and as it's coming off it will take the safety roller with it. Well eventually it will not right away and just be careful when you put them all back together that there in alignment sometimes it's a pain to get the safety roller where it's supposed to be. Plus you also want to pay attention often times the safety roller has a side one side is a little different than the other so this pay attention that you might be lucky in that might just have a straight hole but sometimes there's an indent and know I can't remember which ways which I just remember to pay attention when taking them apart1 point
-
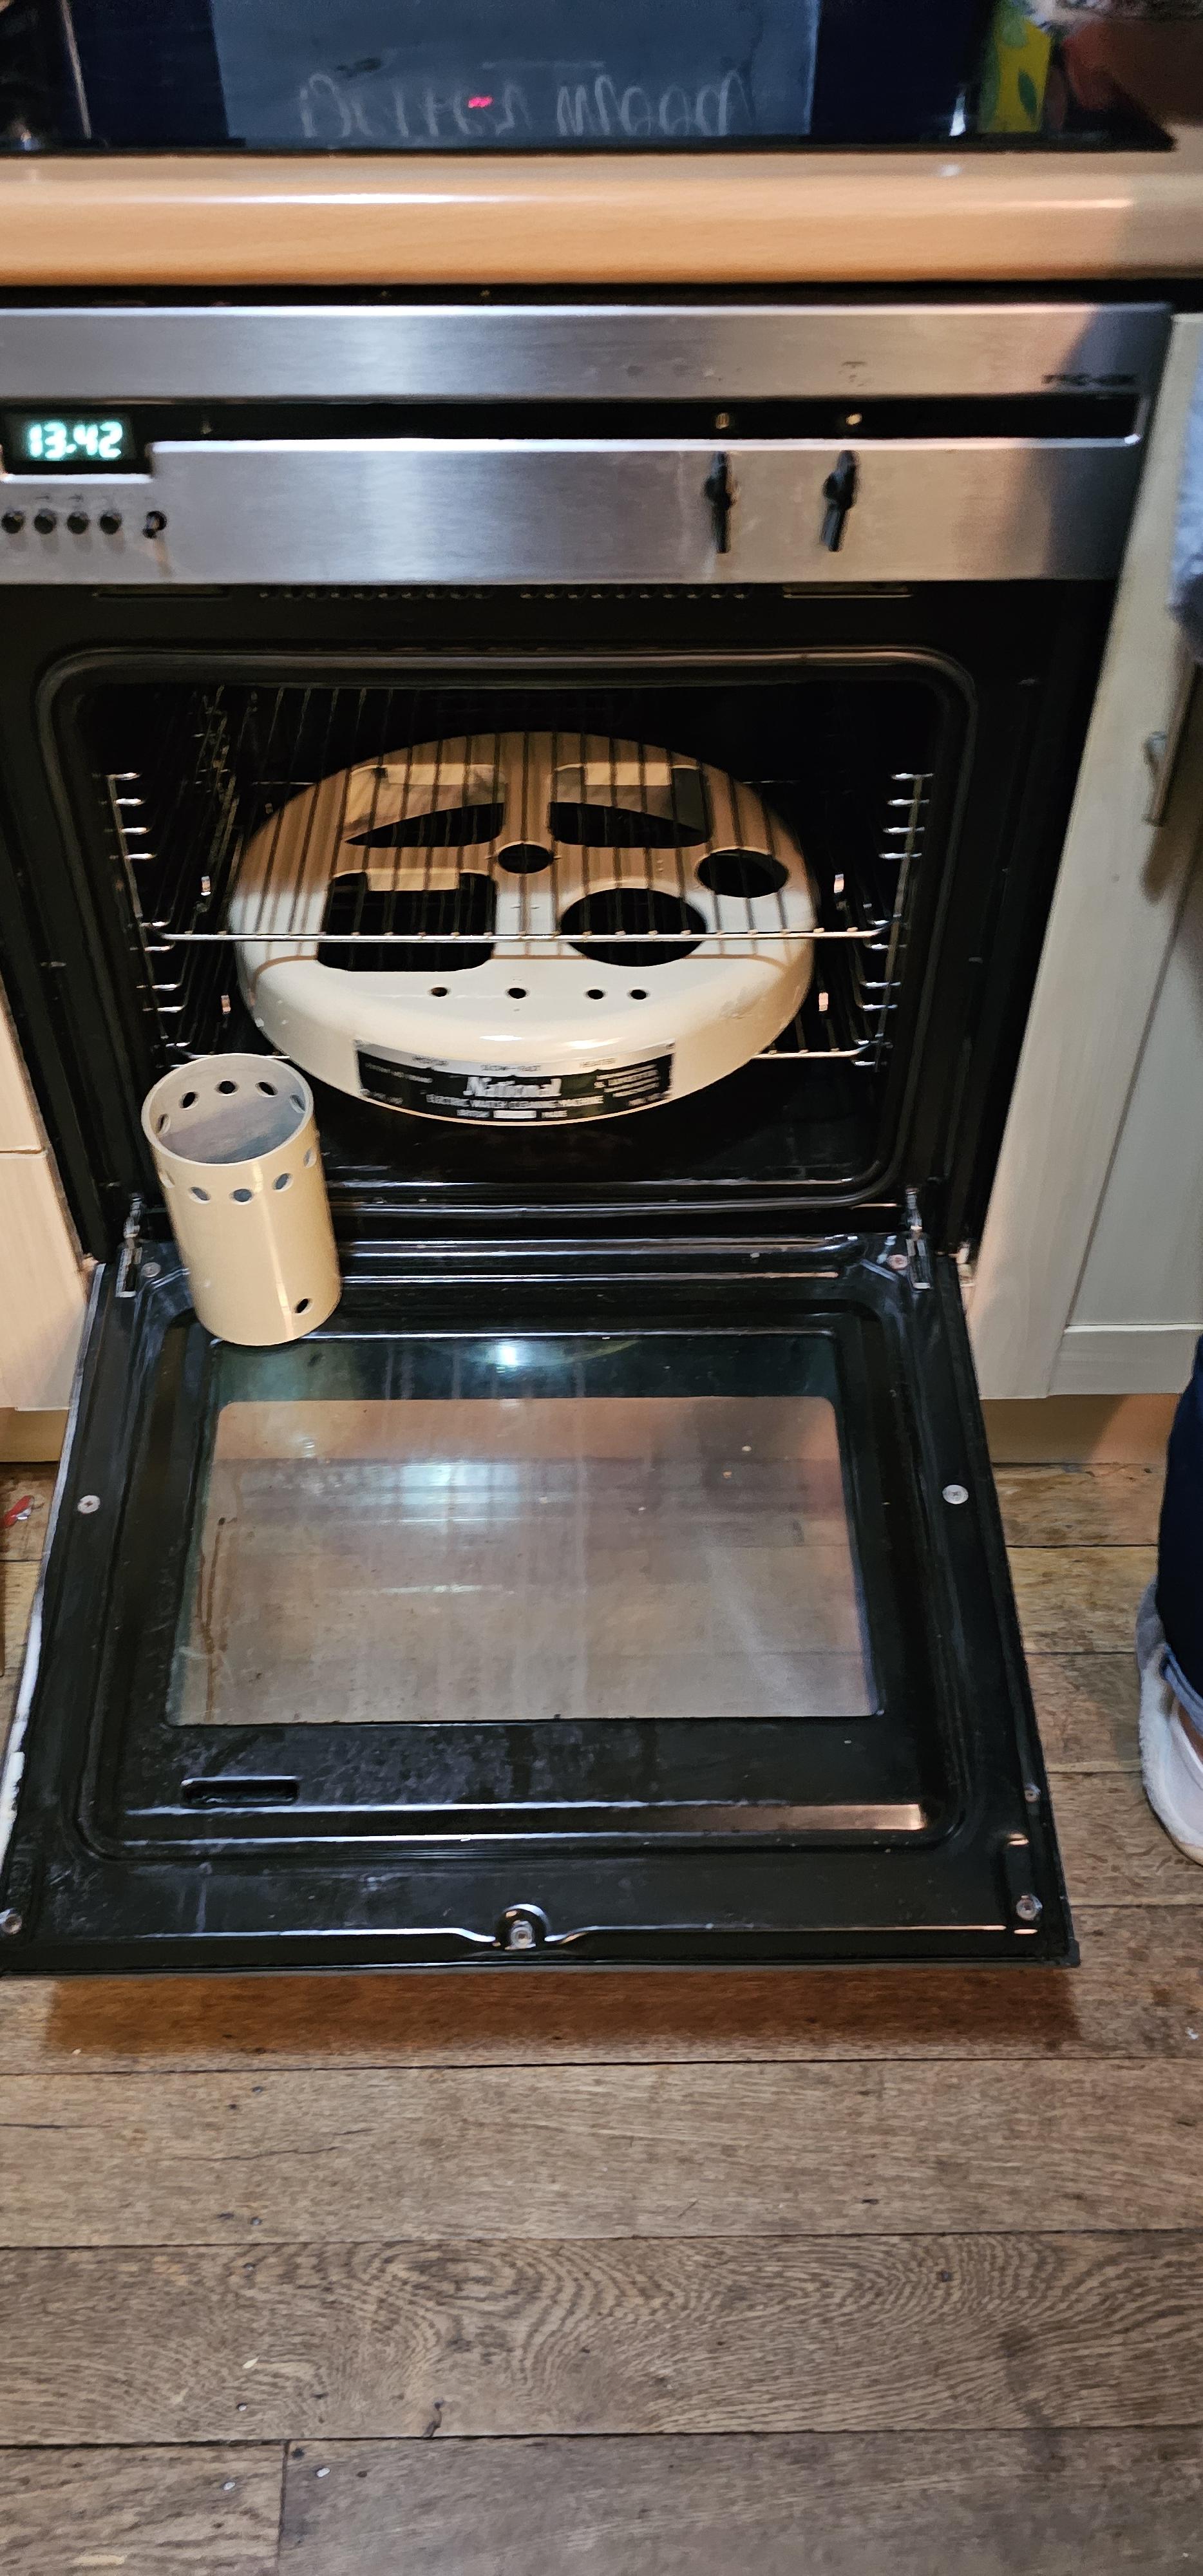
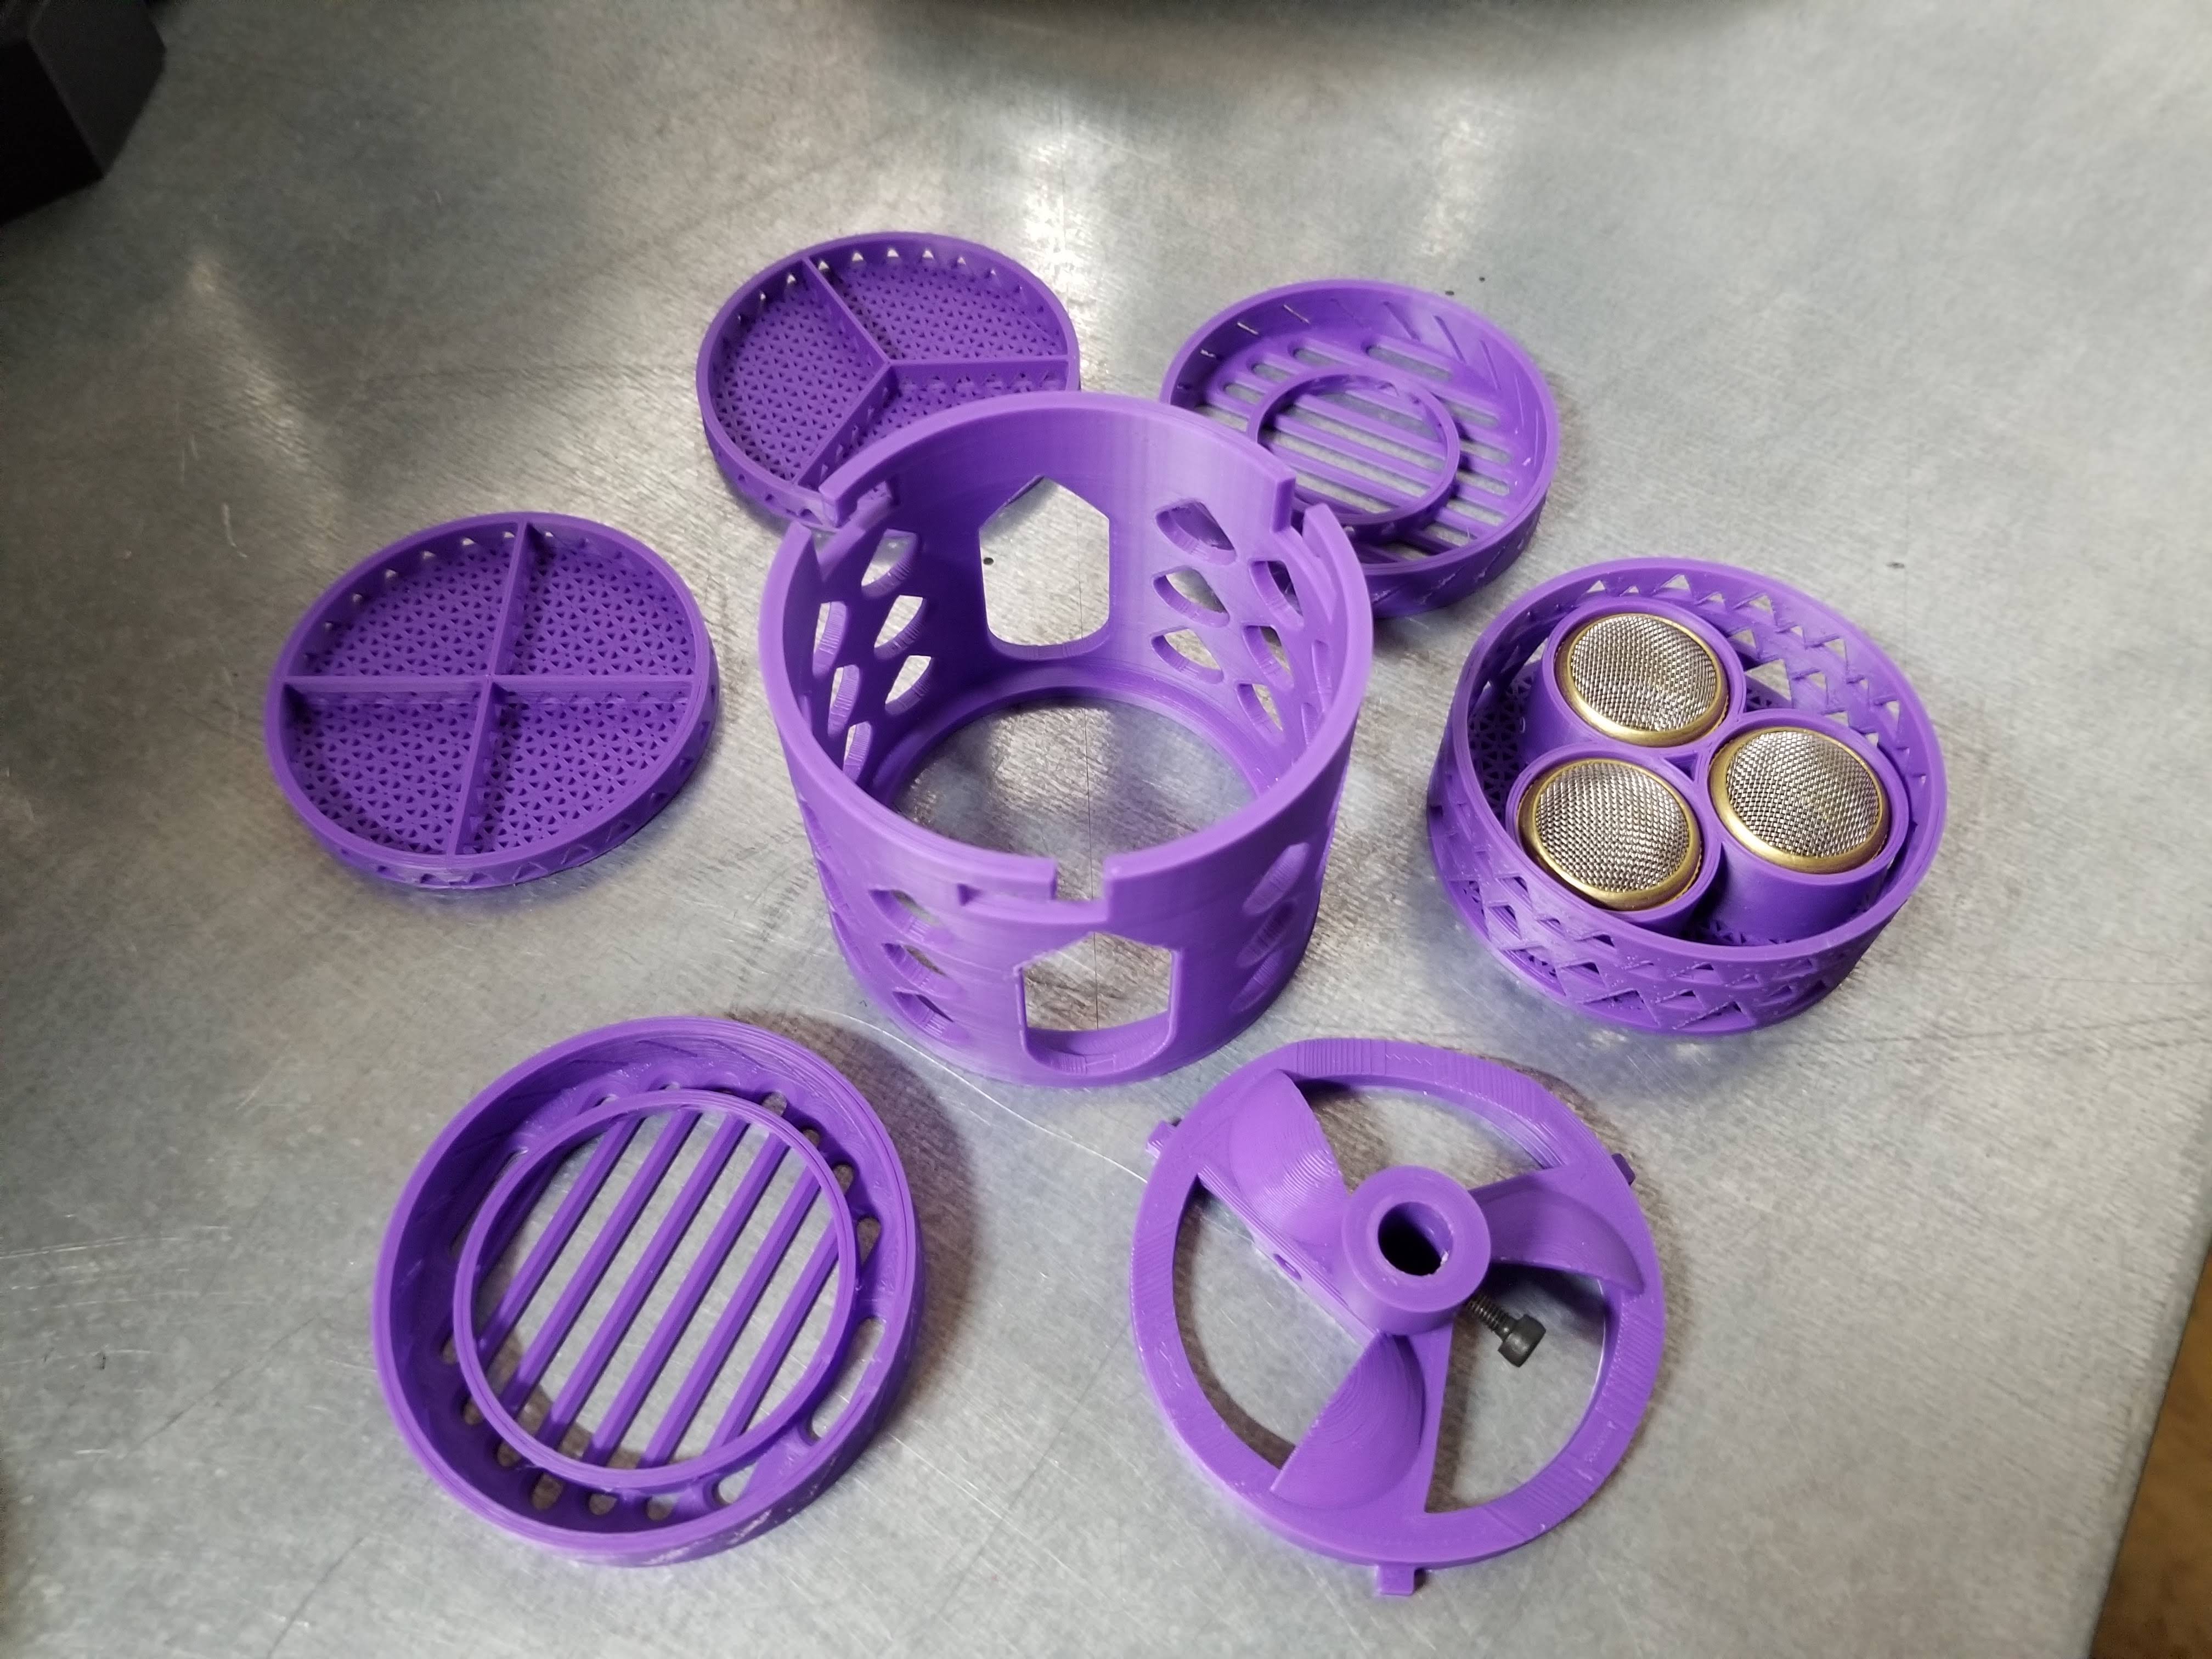
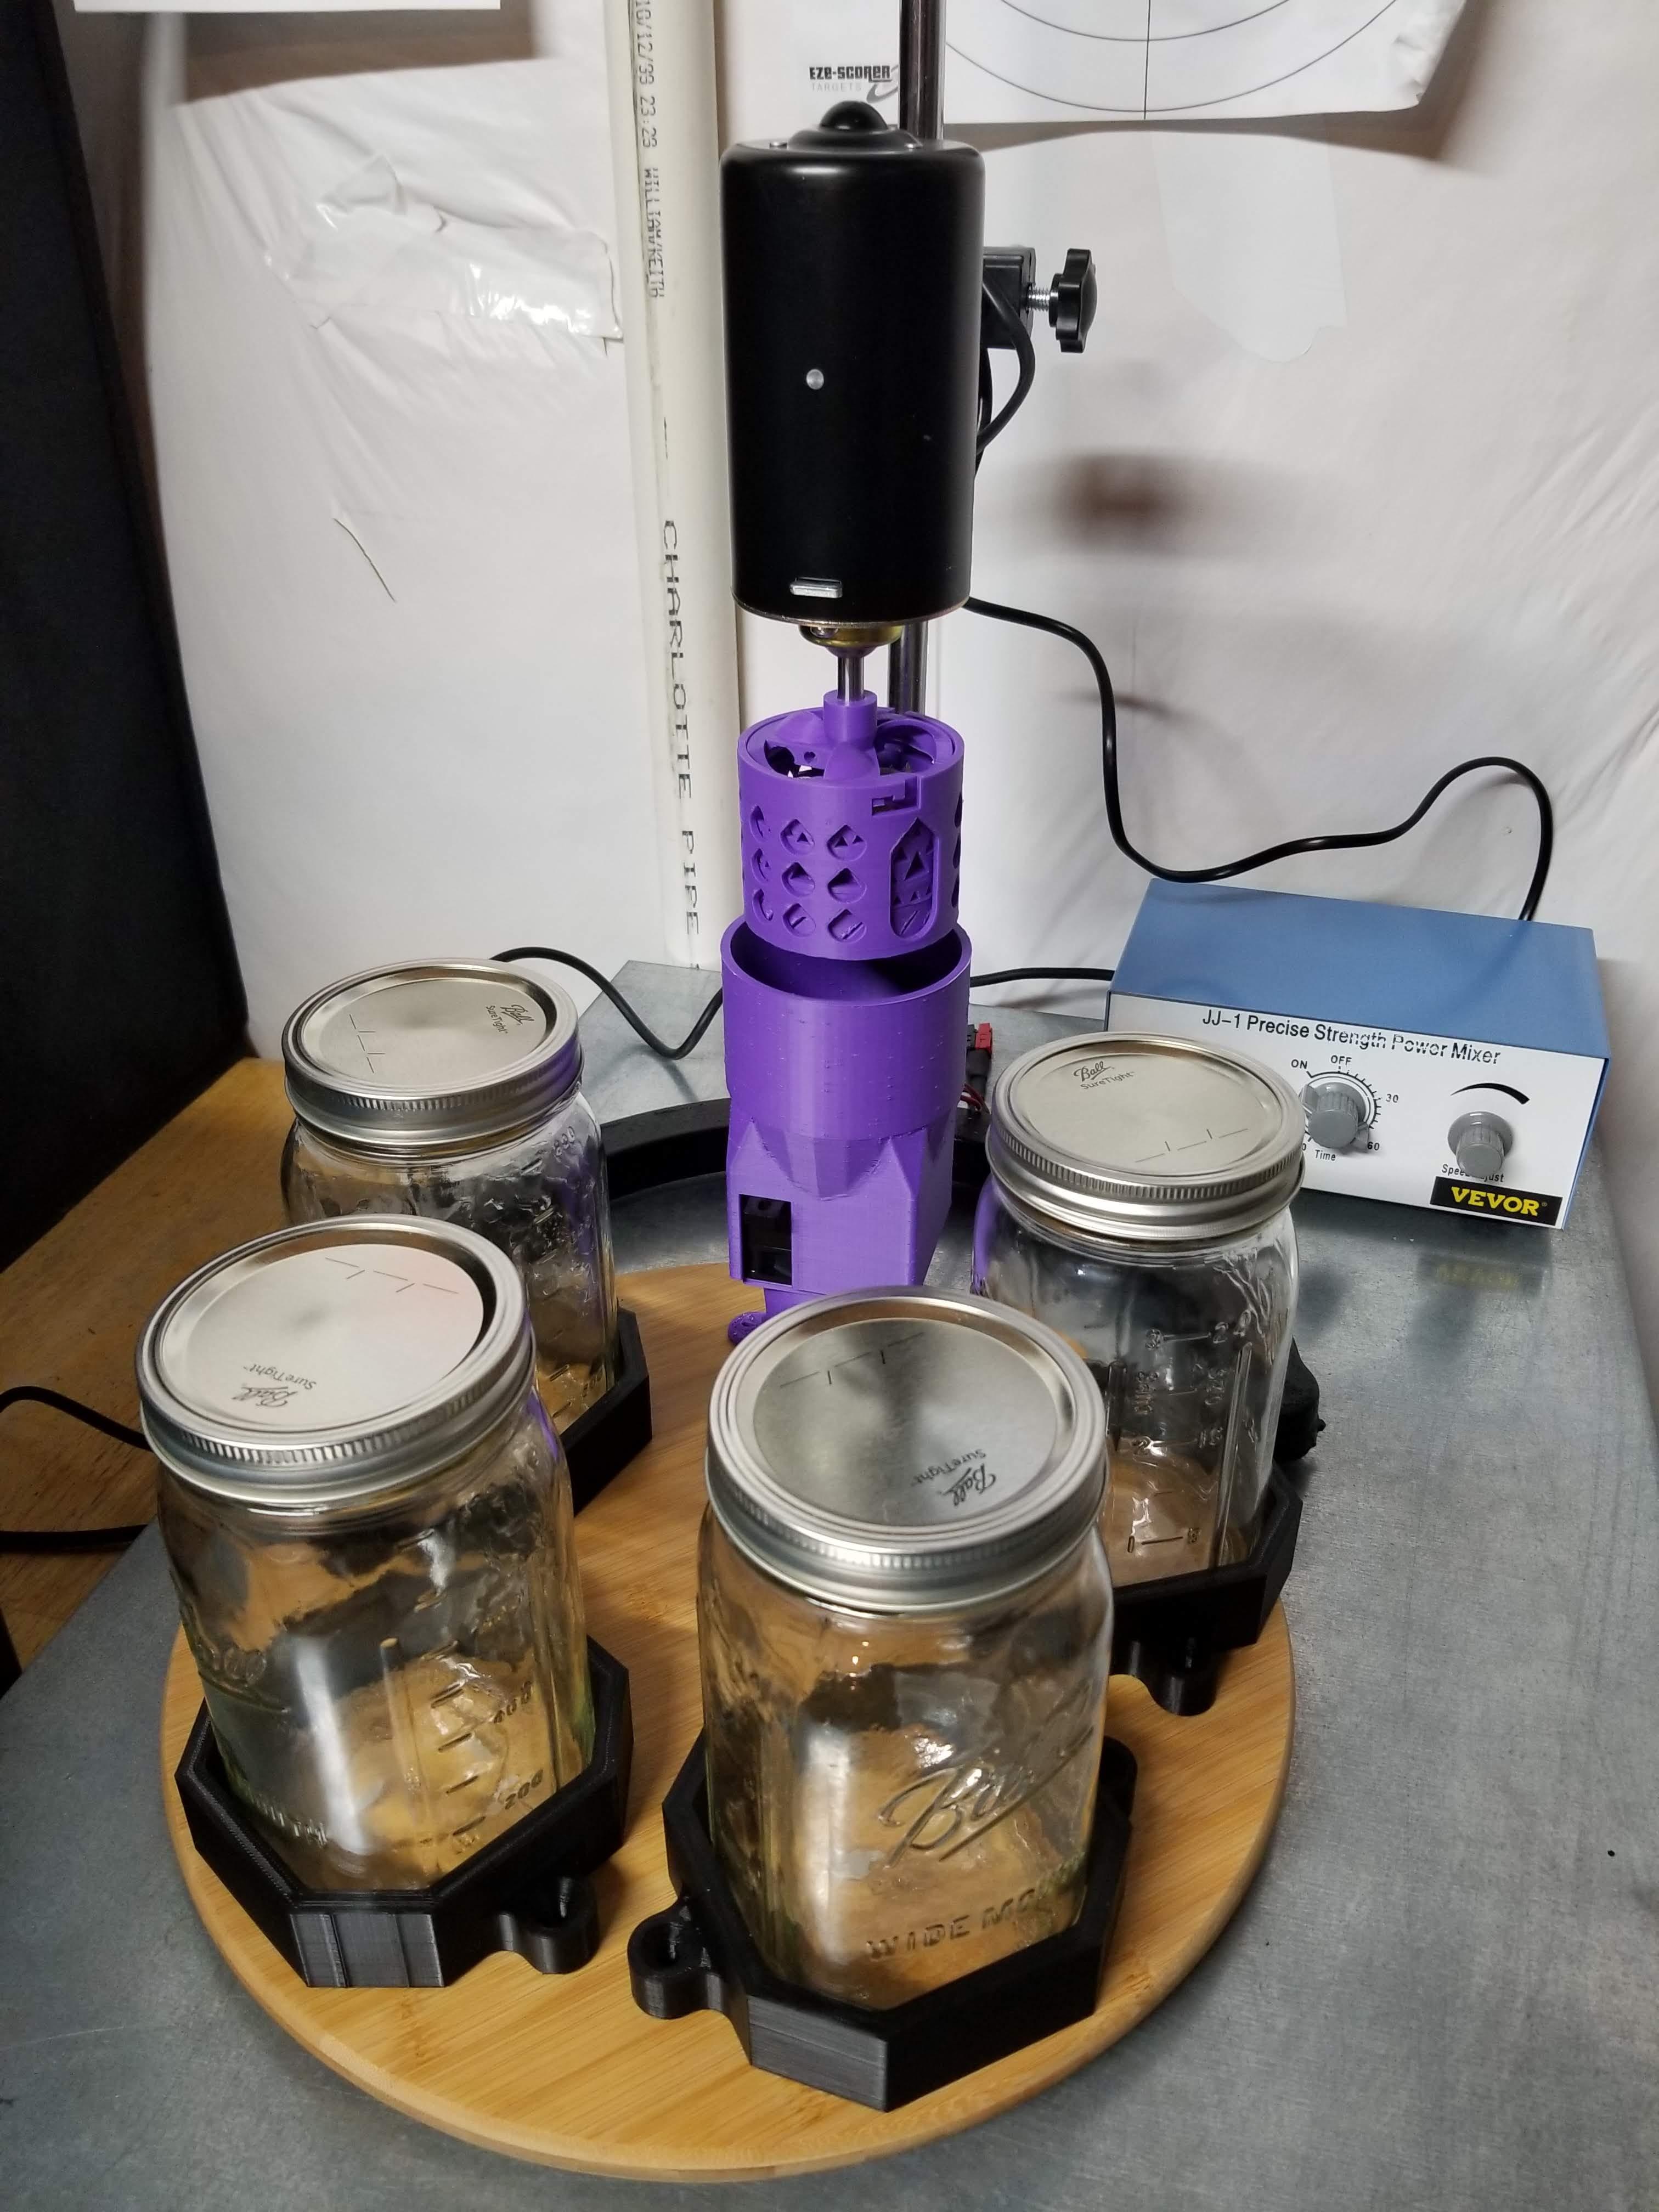
I've been working on a DIY cleaning machine. Ran my first movement through it tonight and it did a good job. Parts came out clean and toasty dry. Though, it was a new movement as my starting project, so the parts were pretty clean to begin with. I'll next be running a vintage movement through it as a better cleaning test. Here's a quick video of it in action, https://youtu.be/KrhK5E3GqVU See photos below. This is based on a lab stirring motor and controller unit. Not perfect, but workable. I used the timer on my phone instead of the one on the controller. It is rated up to 3000 rpm. I was trying to run at about 200-300 rpm, which is the speed knob barely on. I would pull the basket up out of the liquid, but still in the jar, and spin at a faster rate to get out as much fluid before moving to the next station. 3D printed basket setup is originally from @muddtt with some minor tweaks that I made. The jar brackets and dryer intake and exhaust parts were ones that I designed. I used ABS plastic as it has good chemical and heat resistance. STL files are available at https://www.thingiverse.com/thing:5905166. The drying station is based on a 12V PTC car heater fan. The brass mini baskets came out very toasty after about a 10 minute spin dry. The plastic baskets showed no negative affect from the heat. The 12V power supply does get pretty warm. Fortunately, the dry cycle doesn't need to be long. I only plug in the heater when that station needs to be used and then unplug (easier to rotate the turntable that way). I got a small 12" x 12" sheet of aluminum from Home Depot and cut 3/4" wide strips to make baffles for the bottom of the jars. The square-ish mason jars were helpful to keep those baffles from spinning, as long as you splay the fins out. Hopefully, these are getting the water to circulate better through the basket layers. I am a bit disappointed in the turntable. At 14" in diameter, it is large enough to have a wash and 3 rinse stations. The problem is the rotating base is such a small diameter that it is tipsy if not loaded evenly. I'm looking at getting a bigger rotating base for just a few bucks. You could go with a smaller turntable if you just want 2 rinse stations. I have just under $200 into this setup. Of course, you don't have to use a turntable (just manually swap out jars), or dryer station (use a hair dryer) to go even more budget. If you don't have a 3D printer, you could mount a stainless mesh basket to the metal spindle that comes with the stirring motor (not used in my setup). Overhead Stirrer, $70 - https://www.amazon.com/dp/B06XXFLVBS Turntable, $17 - https://www.amazon.com/dp/B07PP44DQ4 32 oz Mason Jars, $3 each - https://www.walmart.com/ip/Ball-Glass-Mason-Jar-with-Lid-Band-Wide-Mouth-32-oz-Single-Jar/24653886 12V PTC Car Heater Fan, $25 - https://www.amazon.com/dp/B07MDN81C3 12V Power Supply, $21 - https://www.amazon.com/dp/B07PWZQ33N Mini Parts Baskets, $9 per pair - https://www.ebay.com/itm/194215040365 Aluminum for Jar Baffles, $11.50 - https://www.homedepot.com/p/M-D-Building-Products-12-in-x-12-in-Plain-Aluminum-Sheet-in-Silver-56040/100293264 ABS Filament, $16 kg spool - Local Microcenter At some point, I would like to try an automated design. Maybe repurpose a 3D printer. For giggles, I was able to easily fit 3 mason jars and my drying station on my Ender 3's bed. Mount a stirring motor to the X-Z axis gantry. Maybe repurpose the hotend heater, thermocouple and fan to make a drying station. 3D printed brackets to hold the jars and drying station in place on the bed. Arduino or Raspberry Pi to control it all. Not sure if anyone is interested in collaborating on such a project.


 1 point
 -
Just to update, I managed to broach out the old pendant tube to the threads and then managed to clean out the threads well enough with a tap and then screw the new pendant tube in without any issues. A bit scary but it certainly works and it looks really nice(:1 point
-
I think the best option is a soldered bridge piece across the break then cleaned up. A thin brass piece held in place with cross over tweezers a dab of flux and thin electronic solder wire. A little heat. Job done.1 point
-
without any way of testing whether your watch is water resistant or not you're basically guessing but the safe guess is you didn't properly seal the watch. I assume you mean counterfeit? The problem with counterfeit is there not make the same standards as the original and how well things seal could be an issue. Ideally if you want your watch to stay water resistant you should change all of the gaskets. Then of course there is the environmental factors. water resistant is an interesting thing doesn't always mean what you think. For instance take your waterproof watch in the shower and it gets hot. The gaskets and seals were not designed to keep the hot air inside the watch inside and that air will expand and a tiny bit will leak out. Then when the watch cools down in the air contracts it will pull back its missing air and with time depending on how good your gaskets are it will pull water with its. o typically any time someone says so watch exposed to hot in the form of shower hot water anything involving heat and water and sooner or later the watch will fill with water or a heck of a lot of humidity. Also typically on a real Rolex watch don't know about your counterfeit they have screwdown crown's and if the crown is out that's another way to get moisture into your watch really fast.1 point
-
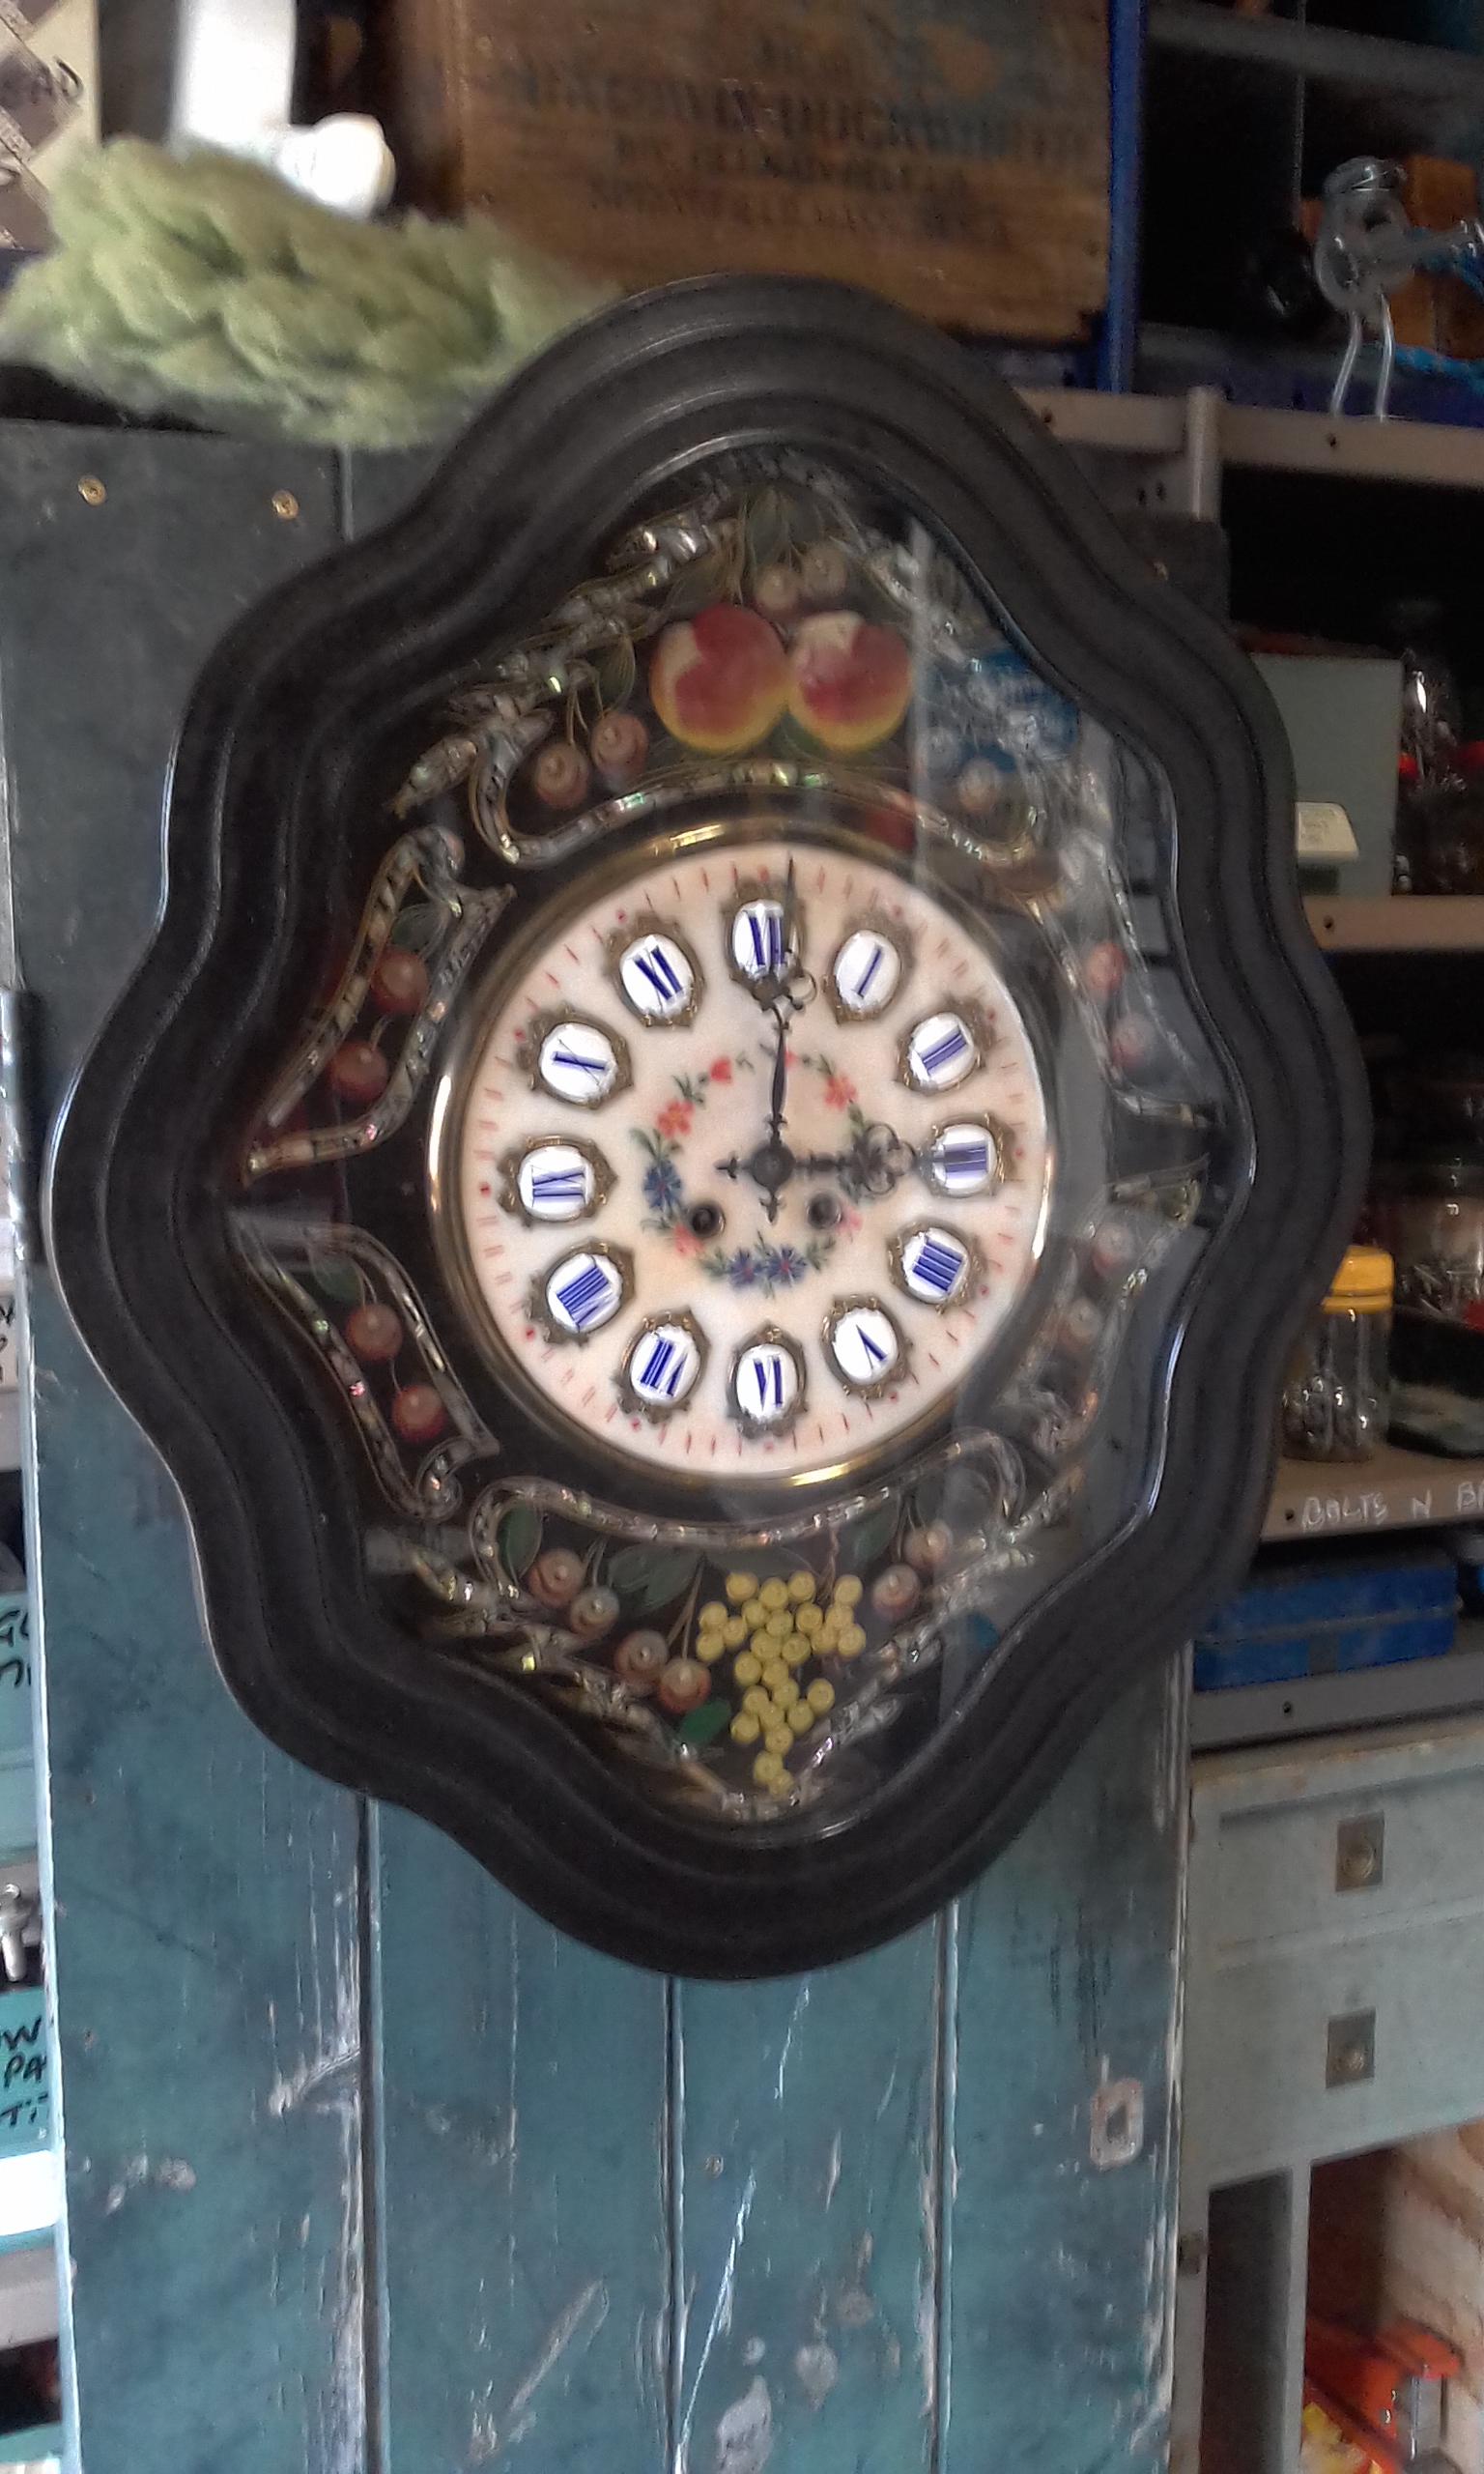
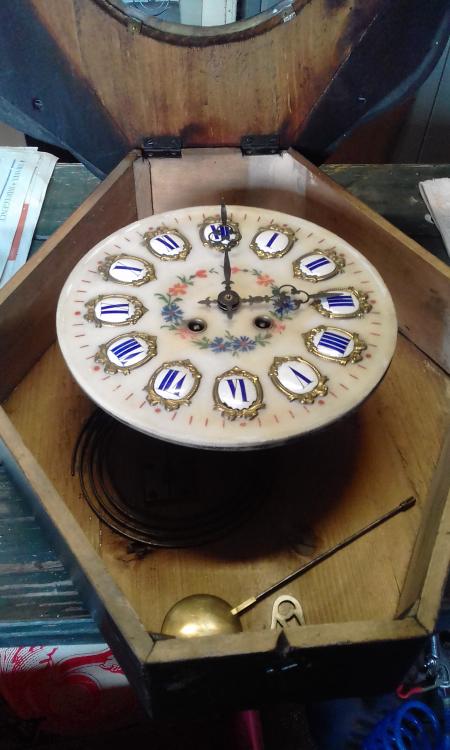
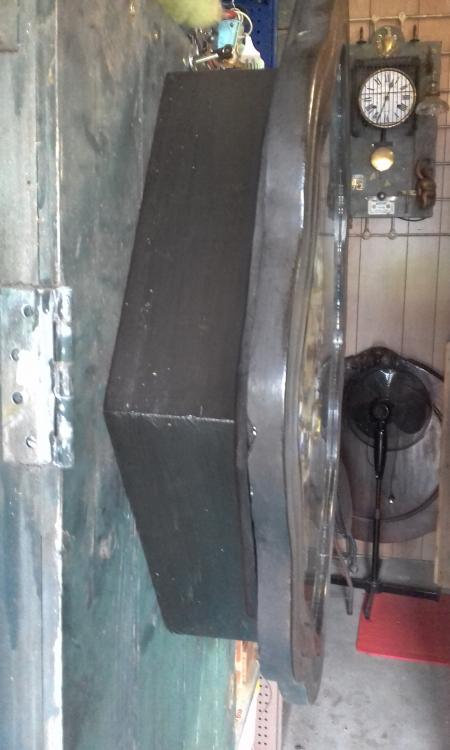
have finished the restoration ... the case is a fairly standard construction .. no fancy dovetail joints in this one , all butt jointed with nails inserted on a hit n miss basis BUT it's held up well and required minimal attention ... further research seems to support Wls1971 that it is a German movement 1 million series 22 .. I believe ... I can't help feeling that the case is French made , it's right up their alley but I'm not sure and not bothered either .. have attached a couple of pictures including a side elevation showing the coffin like shape ... Thanks to everyone for their help and research , much appreciated ..

 1 point
 -
Hello and welcome to the forum. It would be helpful if you could post a picture of the mark in question as it will greatly help members in their advise. thank you1 point
-
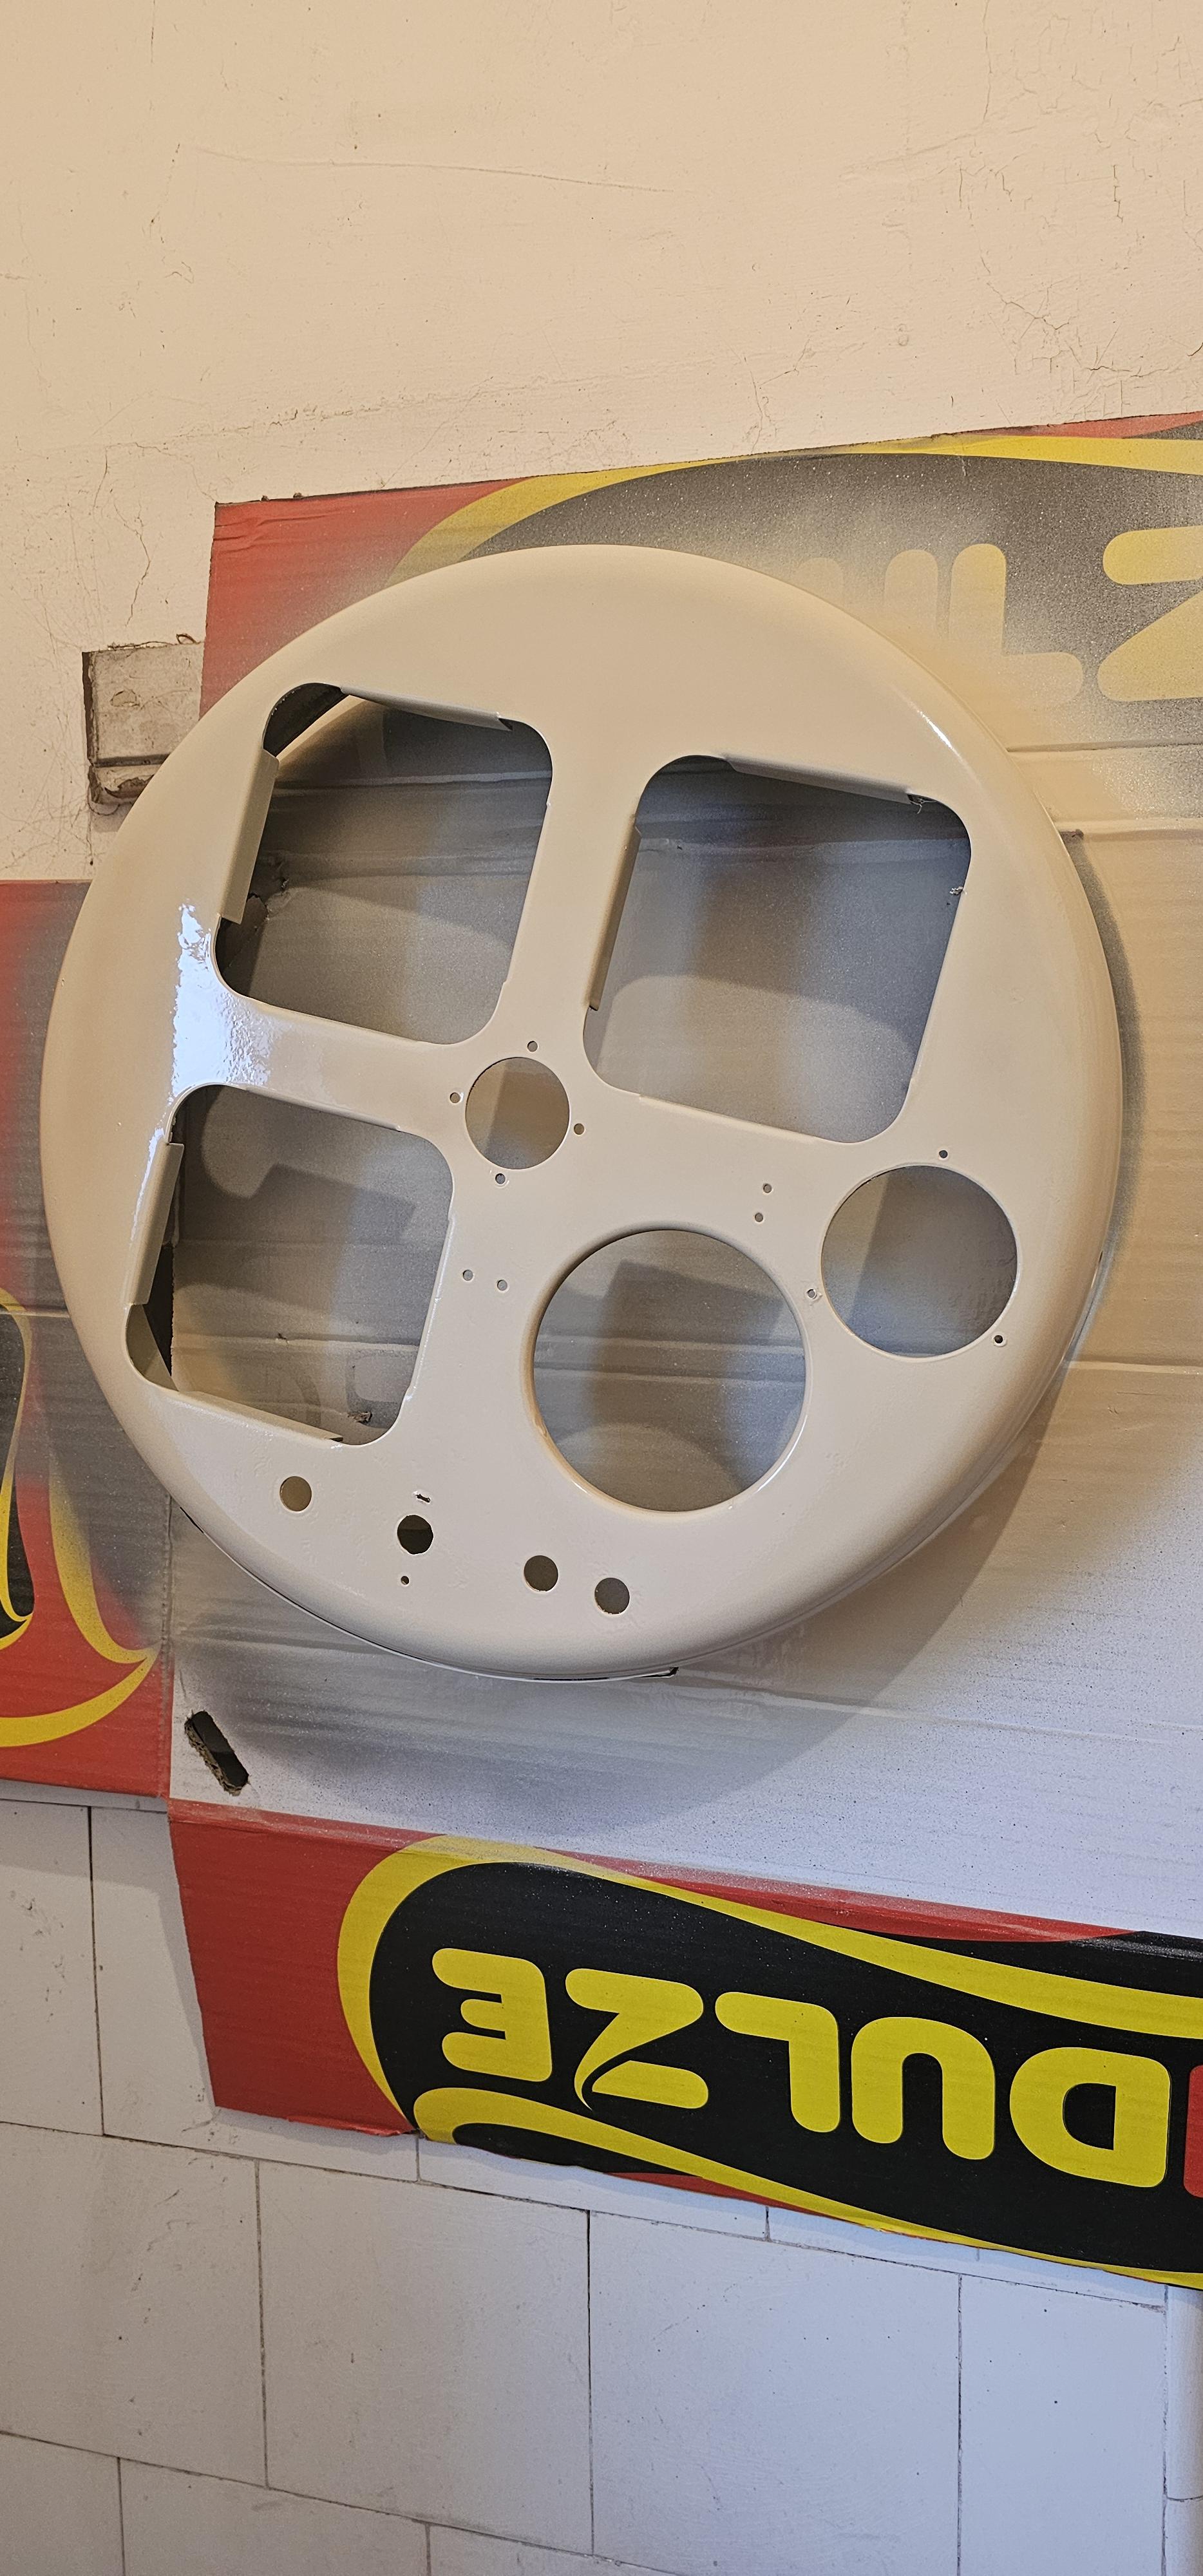
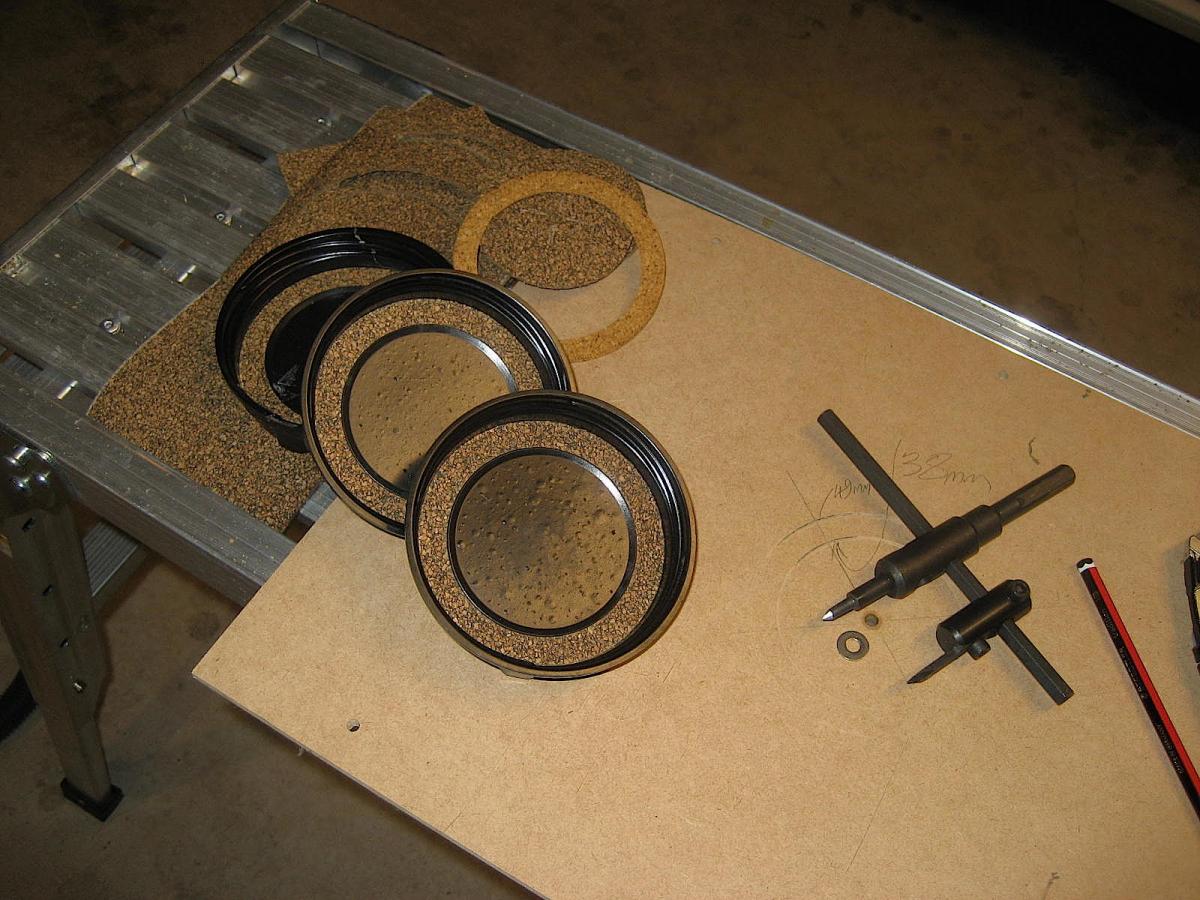
Now that the jars are filled with the right stuff, I turned my attention to the jar seals. When I got them there were one and some bits cork gaskets, and as they help prevent evaporation of liquid more expensive than petrol, I decided to make some new ones. I got a sheet of nitrile bonded cork gasket material from the car parts place, measured everything up and started. Not having a CNC controlled laser machine, I used an old cutter left over from installing some downlights. The blade was sharpened, set to the correct radius and off we went. The results are rather pleasing and now all three jars will prevent the angels getting their share of my cleaning fluids.
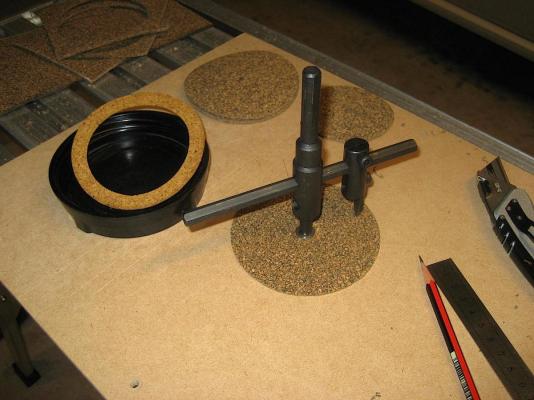
 1 point