Leaderboard


Popular Content
Showing content with the highest reputation on 01/20/24 in all areas
-
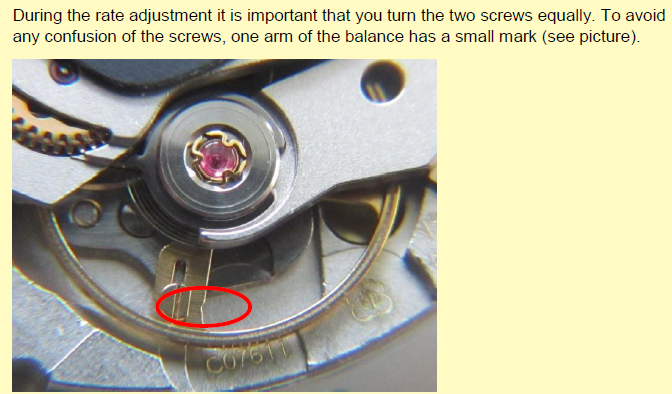
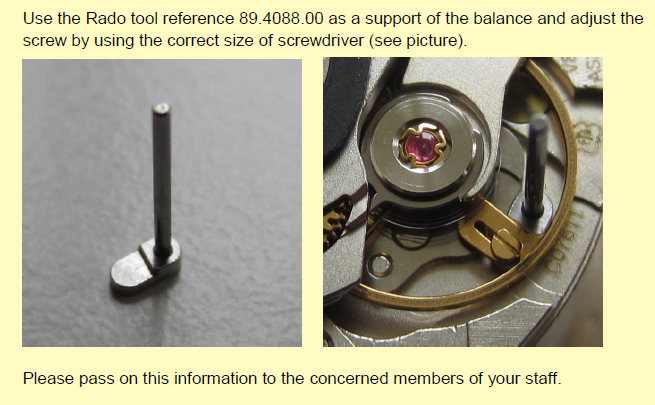
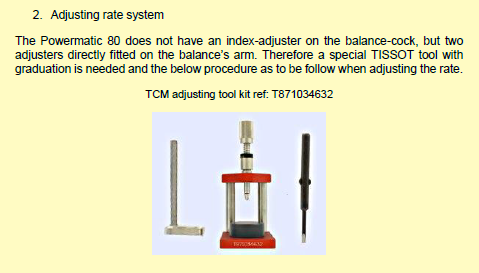
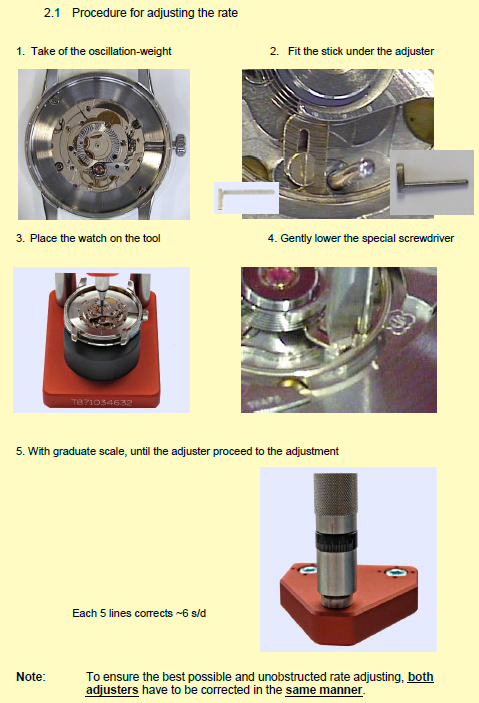
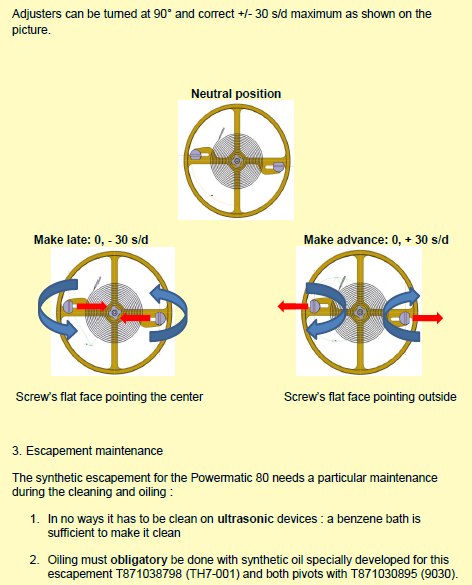
to a certain degree the title isn't that important if someone at the top you actually have the correct model number. Having the correct model numbers important if someone's trying to help them figure out what you have. Also it's important in case anyone ever does a search for this caliber they might find the information of help. I find often times people will discuss things without having proper referencing and an ever finding the discussion again is impossible. I would be curious as to where that came from as that is false. This is what happens when people do not have the proper documentation. then I don't suppose you have a link to the video I might find it either interesting or amusing or possibly both. then so I don't have to repeat myself we've covered at least setting up the timing machine in another discussion we didn't cover the final details of the actual regulation. So your homework assignment is to read the information at the link below and then I'll add in the last little bits you need to know to how to regulate the watch although you're not going to have the special tools but you can probably work out something once you understand what the special tools purpose is. now that you've done your homework by looking at the above discussion and you understand how to set up your timing machine we can look at the actual regulation one of the amusements with documentation is sometimes minor technical conflicts like the lift angle of 50° specified up above but also specified in other technical documents as 47° . Then and one of the rating sheets of the various calibers that actually list both of them. Doesn't really matter though your close enough. here's something nice that they did for anyone that's ever played with their mean time screws or did dynamic poising its sometimes gets confusing as to exactly where you are which is why sometimes all use of felt pen to temporally marked the balance wheel to keep track of things yes you can pay attention to the roller jewel but sometimes it's nice to actually have a marketing like this then from one of the other brands a slightly different well a much nicer fancier tool with a scale see you can precisely see what you're doing. For those people really obsessed with precision timekeeping probably not an issue with the synthetic escapement. basically the exact same procedure with a fancy tool with a graduated scale so you can do it very nicely. then you will note at the bottom references to synthetic escapement and how to clean and how to lubricate. Which would become extremely important because you're not going to get a replacement. Unless of course 3-D printers improve themselves considerably and we can start printing our own.

 4 points
 -
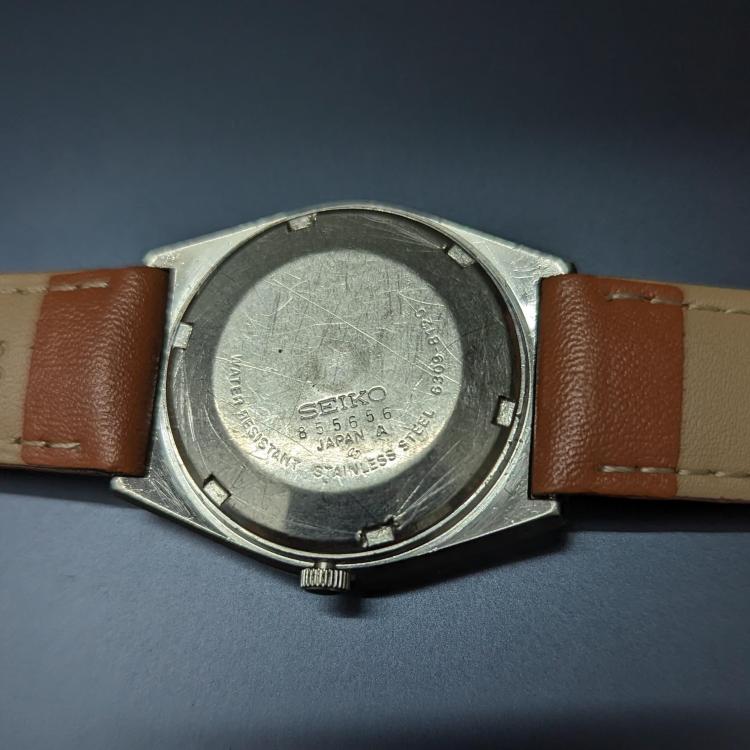
Managed to rescue this Seiko 7009A (August 1978), it needed a new crystal and date change return spring (the huge banana shaped one), the bracelet needed some TLC on the bufing machine and re-shape some of the bent links, and the rest is original. I had to do a lot of gluing on the dial to replace all those markers, fortunately they were all still there , then re-lumed the hands, Before, lots of : After: 250 degrees amplitude and 0.0 beat error + 5 seconds/day face up and -5 seconds/day face down so very respectable for this old timer.
 3 points
 -
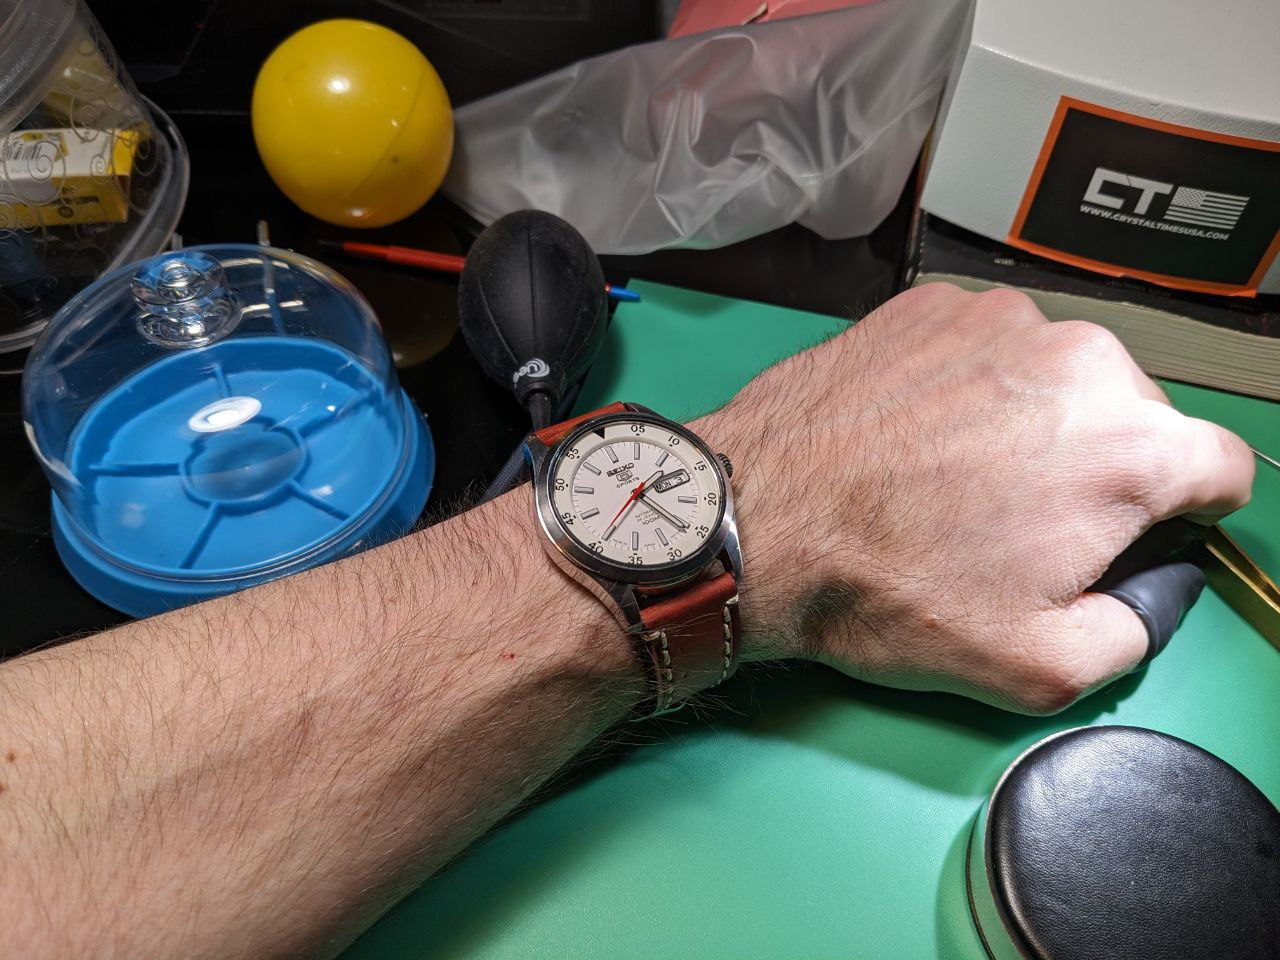
I feel like this is pretty damn good for this movement? I got a delta of 6 on this same 7s36b before it took a dive on concrete and broke. Reshaped the hairspring and reserviced it and this is what I got now. I've only done two hairspring jobs but this one was utterly trashed from the fall and i got it i think about as close to perfect as i could. I'm curious because I have a couple people from watchuseek basically begging me to service and adjust their 7s26's and offering me decent money to do it because they can't find a competent watchmaker. I"m just a hobbyist but i'm thinking of taking them up on it as i get results at the very least far better than the factory after my services on this movement. The rebuilt hairspring in case there's any room for improvement and the watch in question because we all like watches.
 2 points
 -
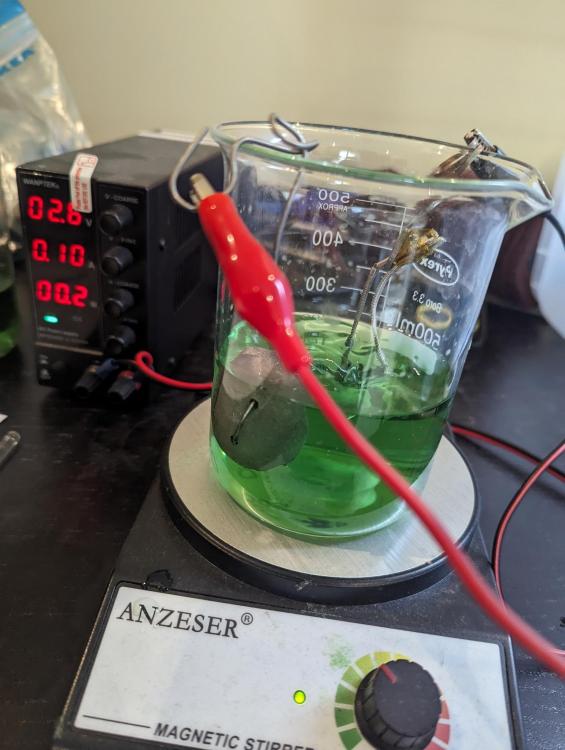
I got it running! https://youtube.com/shorts/qXy5Cp8ZLEg?si=cw1FR3x88LsI0C2i2 points
-
These 200 are the minimum you should charge. For full service of an automatic watch a professional wants to see 300 at least (plus spare parts) afaik.2 points
-
I figured it out. FYI if you want to insert a users name you type "@" followed by the first letter of their moniker and a list of possible users pop up for you to choose from. I'll probably ask the question again in 6 months when I forget. Socks to get old. ha.2 points
-
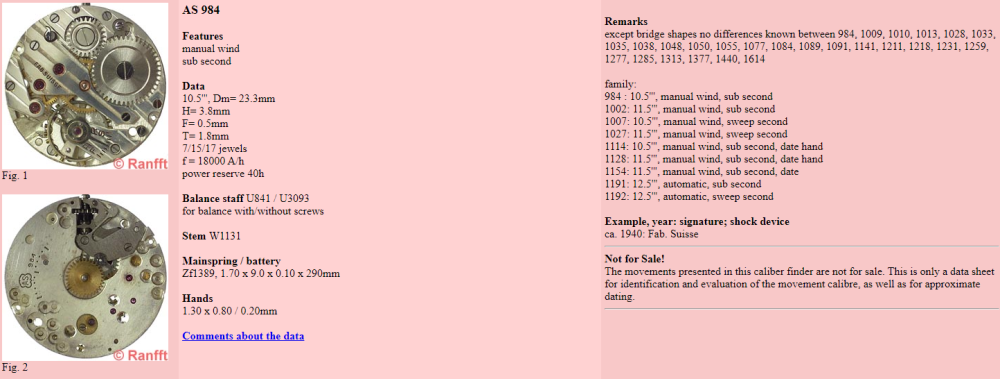
They are from the same family, so many parts will be common. To check which are, use the Jules Borel database http://cgi.julesborel.com/cgi-bin/matcgi2?begin=AS_&end=AS_&label=Calibres_Manufactured_by_A SHIELD
 2 points
 -
Very well for the first time! It is important to understand what You did wrong and how to avoid it later, and what are the principles of hairspring adjustment. @ Nickelsilver gave You the best advices, but I will try to explain a little bit more. There are two hairspring adjustments – one about the collet and one about the stud. The collet, as You learned, has to be in the middle of the spring and in the plain of the spring. As You don’t supposed to have balance calipers or smoothing broaches, then a regular sewing needle that is with proper diam. for the collet can be used. By turning the needle, one can see if the hairspring is ‘in plane’ and ‘centered’. To see the ‘flat’, hold the needle horizontally, as the mass of the stud will change spring position other vice. To see the ‘centering’, hold the needle vertically. Imagine that the spring is a vinyl record. When a vinyl record is well centered on the platter, the arm moves gradually from periphery to the center. When not centered, it moves in-out with every revolution too. The same is with the hairspring – observe the internal coils when rotating the needle – they must move not in-out, but only in or only out. The stud must hold the hairspring in the plain of the bridge/balance and in a manner that the collet will stay exactly above the jewel of the bridge, when the stud is in the carrier (hairspring is out of the balance). The outer coil must be exact arch that goes thru pins of regulator and moving of the regulator must not change the position of the spring, the spring must be not pressed to some of the pins. Now, I must say that all needed could be done in the beginning without taking the hairspring from the balance and even with the stud in place in the carrier. Just some skills and experience are needed to know where and how to manipulate the spring that must be gathered… One must know that even bent out of flat, not concentric and so on hairspring, no mater, still may work with perfect amplitude, the only condition is no coil not to touch or rub anywhere. What we say here about the ‘flat’ and ‘concentric’ only is that the above condition is this way easier fulfilled… and looks better! And, the hairspring position adjustment has certain impact on the position errors and isochronism, but this is for another topic…2 points
-
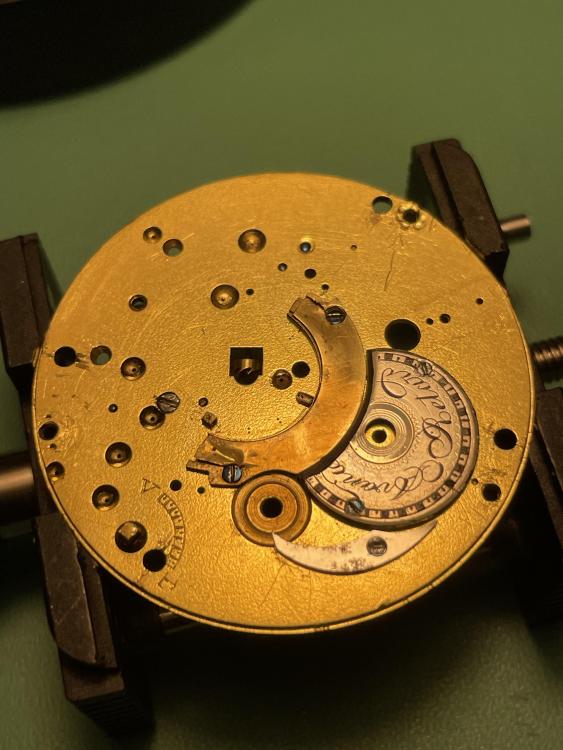
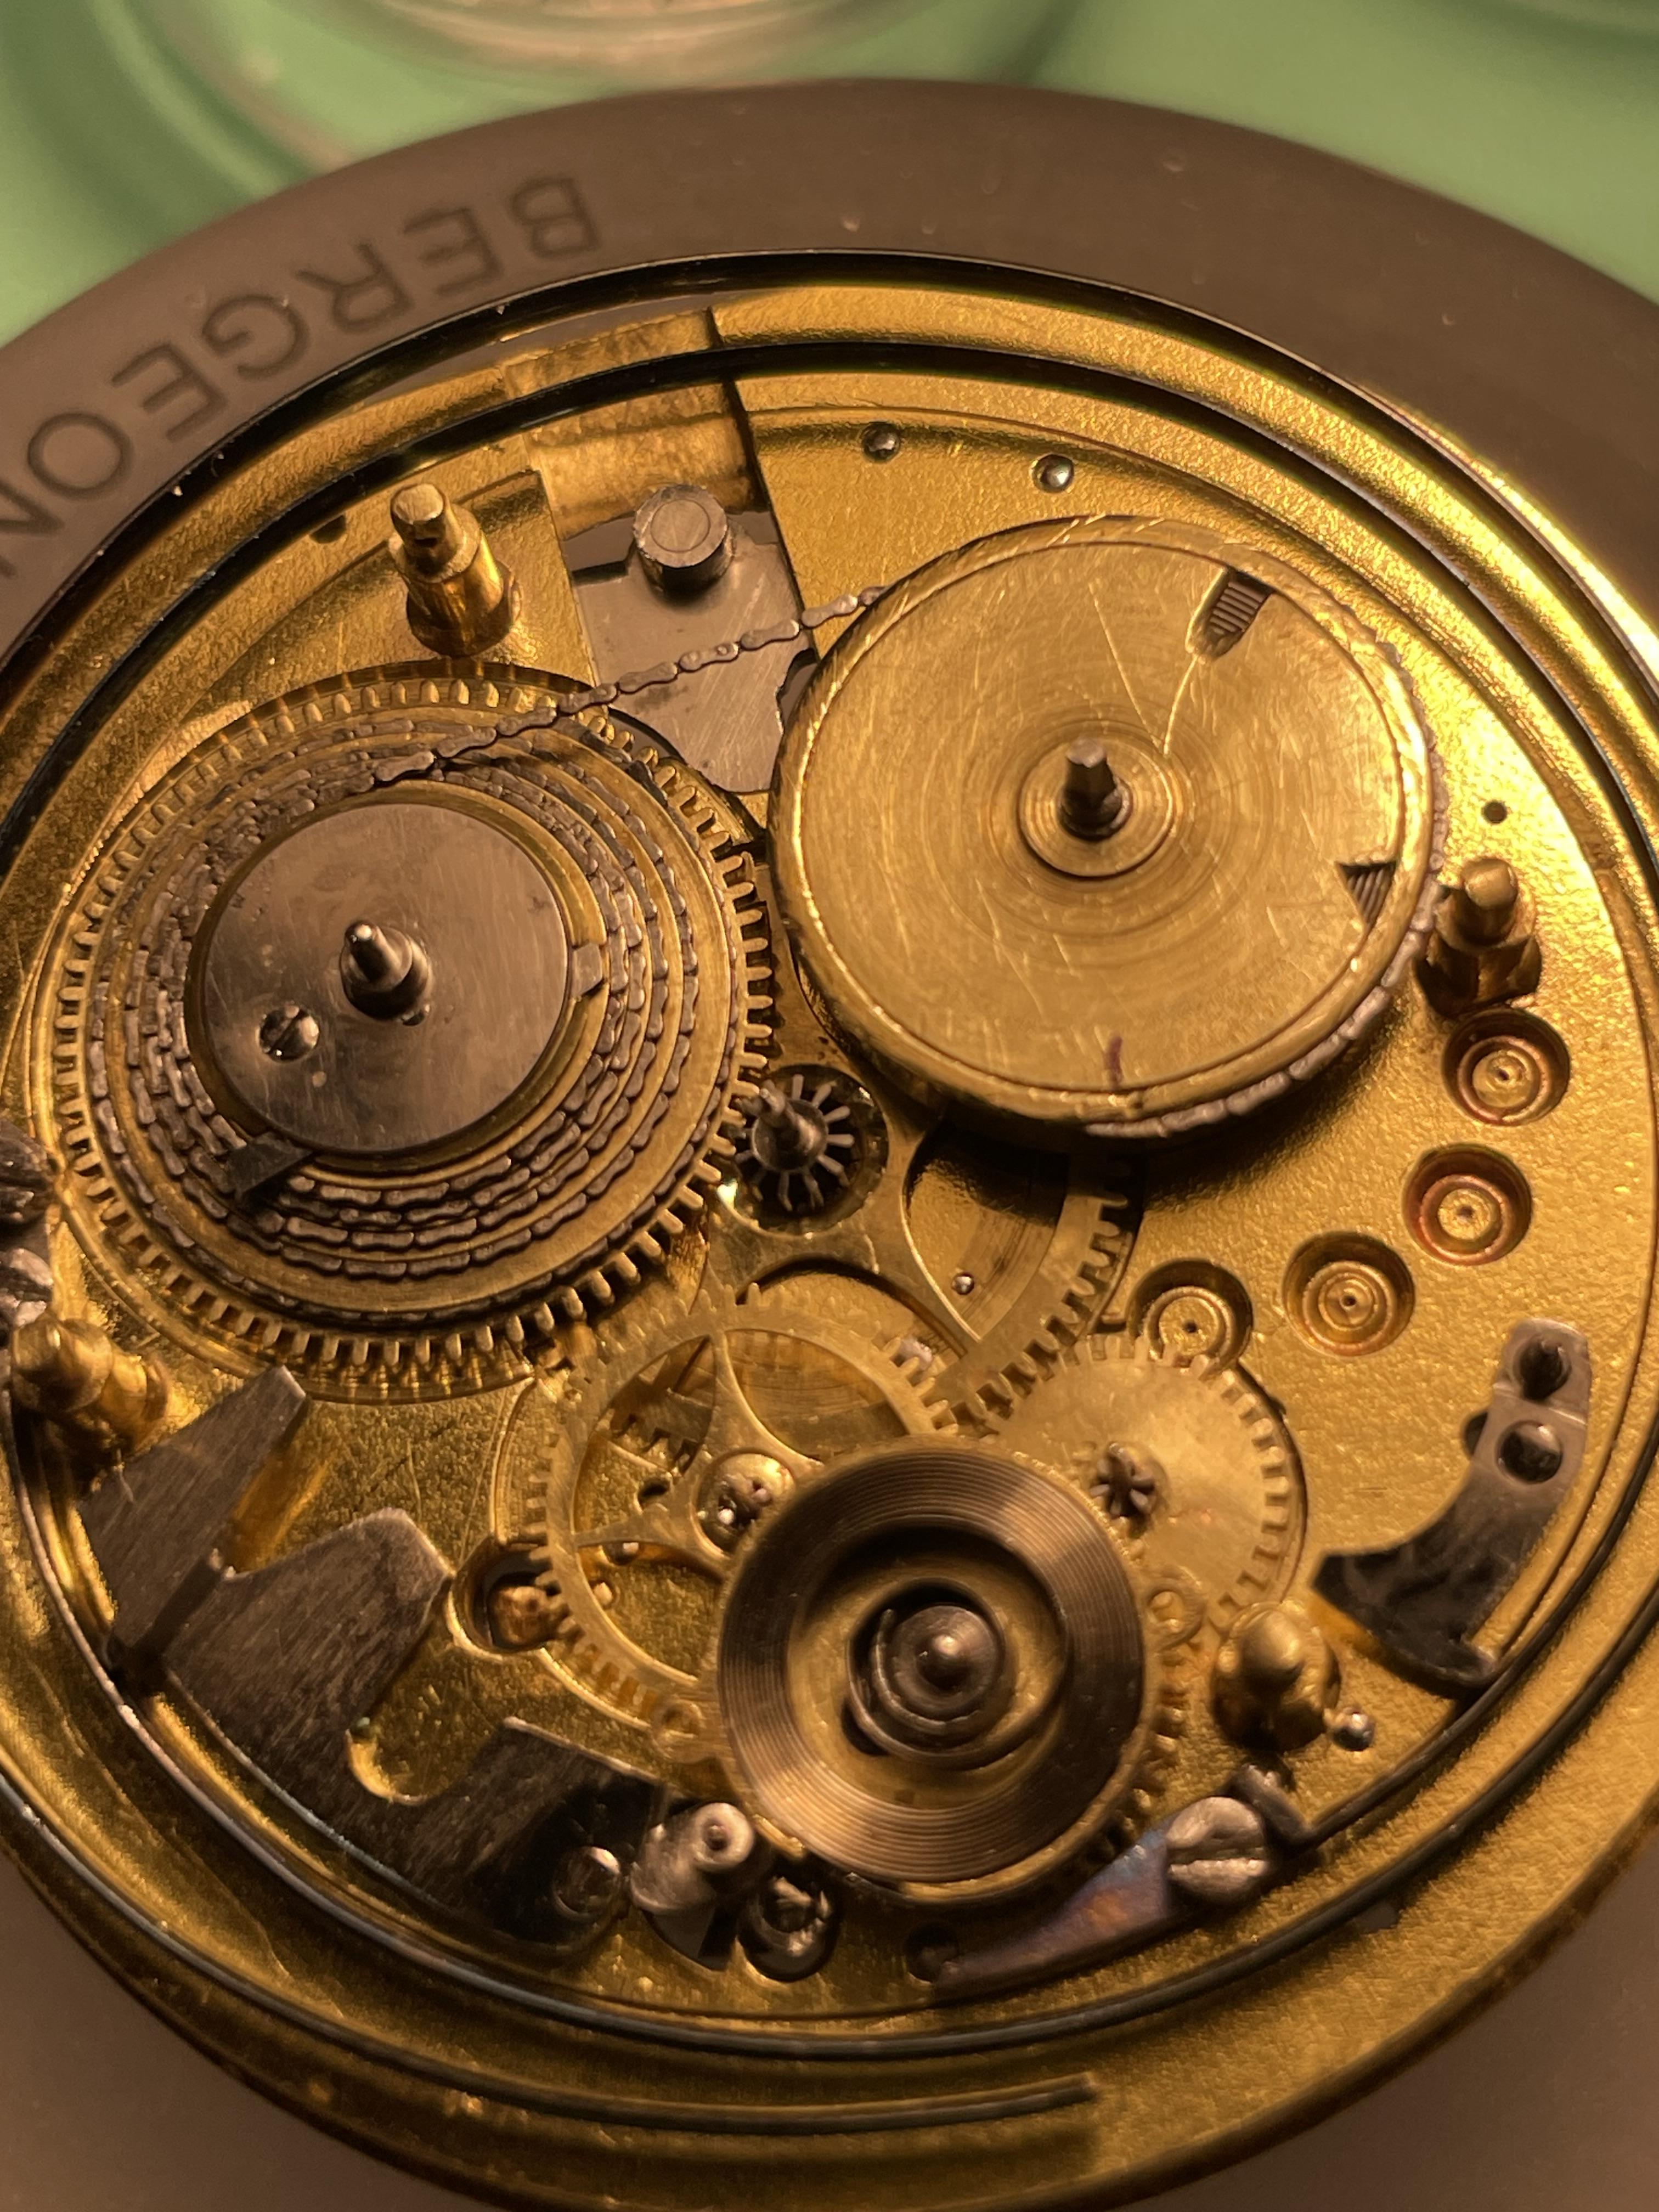
I have just basically finished cleaning and fixing a Fusee movement in a pocket watch, it also has a chime that I have never heard. Been assembling and now am at the point where I need to put the bridge back on. In this case as you can see in the pics the bridge is a complete disk covering the entire movement. The problem is aligning the pivots to the bridge. There are 6 pivots plus other stems to align and because it covers the entire movement I cant really see much. In the pic I have taken out the wheels but you can see the holes Is there any advice out there on aligning bridges in a case like this. Also note the train wheels come out of their holes so easily it is frustrating. There are no jewels in this watch, Any thoughts are appreciated. Thanks bob
 1 point
 -
I would like to share a check list made up by a master watchmaker. I take no credit for it, only think it would be helpful for us hobbyists. Here it is! CHECK LIST I decided to write up what is called a 16 point check that is meant to be a guide to steps required to service a watch this is slightly bias towards a wrist watch but very relevant to pocket watches also: This is a guide and not the definitive answer after going through it a few times add you own additional tests and observations. This is of course for a basic time only non-automatic or any with additional features, I also leave out things like demagnetizing, actual cleaning procedures, a good chunk of common sense needs to be applied also as I say its meant as a good starting point to a correct disciplined procedure, This is version 1 may add or edit/delete later. Check number 1 a Check the winding to see if the mainspring is broken. b Check to see if the setting bridge or sleeve is broken by pulling the stem out and testing the proper snap of stem. A broken setting bridge/sleeve is easily detected c. The balance wheel should be oscillated to see that it is true and the balance pivots should be checked by looking through the upper jewel to see that there is not a flash on the pivot. d. The hairspring should be checked to see that it is not damaged. e Check setting of hands f. The watch should be looked over in every respect, paying particular attention to any rust spots that may appear on any part of the movement. When rust is evident around the stem or setting mechanism, it is most important to remove the dial and hands in order to check this mechanism to see if the rust is very extensive. Check Number 2 a. Examine each part as it is being removed from the movement. b. Check for rust on every part. c. Check every pivot to see that it is not damaged or bent. d. Check the jewels in the watch, to see that there are no cracked jewels. e. Check pallet stones to see that they are not chipped or damaged. f. When removing barrel cap, make sure that it snaps off only after sufficient pressure has been applied to it. g. In the examination of each part, a close check is not made at this time as many of the parts will not be clean enough for that purpose. a much closer check will be made on the parts as each part is handled in the assembly of the watch Check Number 3 a. Upon completion of cleaning and parts removed from the basket into the assembly tray, each part should be checked over with the use of a watchmaker’s loupe special attention should be paid to the jewels, because if there is gum oil still remaining on the jewels, the cleaning job was not done satisfactory . It is also worthwhile at this time to examine the pivots. If the jewels are clean, and the pinion leaves are clean, it is almost certain that the cleaning operation was performed effectively. Check Number 4 a. Examine the condition of the mainspring. b. Check the width, strength and length of the mainspring. c.. If correct, replace mainspring using correct mainspring winding tool, not by hand d. Check the lubrication of the mainspring if required e. Check the fit of the mainspring around barrel arbor. f. check the mainspring end for proper shape to catch in barrel. g. Check the snap of the cap on barrel and replace in correct position h. Check the end shake and side shake of barrel arbor is it also sometime recommended to do this without mainspring fitted to test for free run and end shake i. Check the cleanliness of the barrel and barrel teeth. j. Check the oiling of the barrel arbor after the cap is on. k. Check the condition of the barrel teeth to see if they are bent or worn. Check Number 5 a. Jewel holes must be cleaned with peg wood if necessary. b. Jewels must be checked for chips or cracks. c. Check the train wheel pivots for rust, polish, cuts and straightness. d. Check the pinions for rust’, pits and polish. e. Check the pivots for pitting check that clean pith wood is being used. f. Check plates for tarnish, fingerprints, and polish jewel settings. g. Assemble time train and check end shake and side shake. h. Check wheels for trueness arid upright. i. Lift each wheel with tweezers to check for end shake and to see if each wheel is free enough to fall back to its original position. j. Spin train to see that is spins freely, in dial up, dial down and a vertical position. Check Number 6 a. Replace barrel and barrel bridge and check the oiling of the barrel arbor upper and lower bearing. b. Check oiling of crown wheel. c. Replace ratchet wheel. d. Note: do not oil remainder of movement until after kick-back is checked or cap jewels are present oil those now e. Wind watch slightly to check kick-back and recoil. This check should be made in dial up and dial down positions. If the watch does not have kick¬back, this indicates that the train is not as free as it should be. First, however, before checking into the train itself to determine if there is some frictional error, it would be worthwhile to examine the mainspring around the barrel arbor. Many times the loose fit of the mainspring around the arbor will prevent kick-back from occurring within the train. In such instances, the arbor is simply slipped in the mainspring instead of the train receiving the reversal torque, that normally occurs. If the barrel is found to be satisfactory, then the train. should be checked to see if the trouble can be located. first, the train should be examined carefully to see if each wheel is free, and if no trouble can be found, then it is advisable to remove the train wheels from the watch and replace each wheel in the watch individually and to check the spin of each wheel. If each wheel spins freely, this indicates that the pivots and the jewels are in good condition and that one need not look further for defects or faults in those areas. Next, place two wheels at a time in the watch and check the spin of the wheels. Thus, any error of improper depthing or a badly formed tooth on a wheel or pinion will be detected. It is simply a process of elimination in order to locate the particular trouble, and of course, proper corrective measures must be taken to correct an error when one is found. Check Number 7 a. Oil all the train jewels in the watch, and at this point it is advisable to oil also the balance jewels. b. Check to see that there is a ring of oil around each train pivot and that the jewels are not over-oiled or under-oiled. c. Check the jewels that have caps to see that the globule of oil has been formed properly between the flat cap and curved hole jewel and no keyhole shape if so remove re clean jewels and check seating the re oil and repeat check for perfect ring. Check Number 8 a. Oil stem properly. b. Oil friction parts of setting. c. Oil wolf teeth of clutch wheel and winding pinion. d. Oil clutch wheel groove. e. Oil points on setting lever that contact the setting bridge or the clutch lever. f. Never oil dial train. Note: ‘dial train means all wheels following center wheel staff. g. Seek expert advice on some types of intermediate wheels connecting clutch at setting positions that require oil. Check Number 9 a. Check condition of pallet arbor pivots. b. Check for chipped or loose stones, shellac or gummed oil on pallet stones. c. Check guard pin for straightness and proper shape. d. Check polish of pallet arbor, pivots and fork slot. e. Check end shake of pallet fork. f. Check height of pallet stones in conjunction with escape wheel teeth. g. Check matching stones. h Check drop lock i. Inside and outside drop. j. Draw. k. Hang-up of stones on escape wheel teeth. Check Number 10 a. Check tightness of roller jewel in roller table - uprightness of roller jewel. b. Check the height of the balance wheel in conjunction with the fork bridge and the center wheel. c. Check the clearances. d. Check the height of the guard pin in relation to safety roller. e. Check the proper length of roller jewel and fit of roller jewel to fork slot. f. Check the guard clearance. g. Check the corner clearance. h. Check the jewel pin shake. i. Check the guard test, j. Check the corner test. Check Number 11. a. Check the hairspring in-the-flat. b. Check the hairspring in-the-round. c. Check the quadrant of the hairspring to see that it is formed properly between the regulator pins and stud d. Check for beat of the watch by equalizing the force to receiving and discharge pallets. e. Check for the collet wobble. f. Check for trueness of the balance wheel, and for the flash of the balance pivots g. Check for trueness of roller table. Check Number 12 a. Place the watch on the timing machine and take a rate in the dial down position, then turn the movement over to dial up position and take a rate. There are three things that should be observed from the rate that was taken: 1. Dial up should indicate the same time as dial down. 2. Observe the closeness of the lines to determine if the watch is in perfect beat. 3. Observe how the watch is running in reference to the time error over a 24-hour period. b. Adjust the mean time rate of the watch so that the dial up and dial down positions will record on time. Do not move the regulator more than one degree in adjusting the mean time rate. Any other alteration must be made by adjusting mean time screws or by adding or removing weight from the balance wheel in such a manner as not to affect poise, static or dynamic,. c. If the rates in dial up arid dial down are found to be different from one another, then this indicates a mechanical error in the watch which must be traced out before proceeding. d. If the watch is found to be out-of-beat, then of course, it should be put r in proper beat at this time. We might emphasize that if the watch was put in proper beat in accordance with the proper procedure at the bench, then an out-of-beat condition or minimal amount would not be indicated on the timing machine. e. When the above conditions have been satisfied, the next step would be to take a rate in positions and errors corrected. If everything has proved to be satisfactory, the watch should be tested for isochronal test be made on the timing machine, which consists of re-testing at different winding levels and rate in the dial up position. Check Number 13 a. Check for proper lubrication of cannon pinion on center post. b. When replacing the cannon pinion, be sure that the leaves of the cannon pinion do not come down on top of the minute wheel teeth so as to bend the teeth of the minute wheel. c. Check tightness of. cannon pinion d. Check to see that cannon pinion does not ride up when watch is being set. and smooth consistent operation. Check Number 14 a Make sure that the hands are fitted securely to the parts to which they are attached b. Make sure that the hands are adjusted so that there is equal space between the hands and the hands are set as close to the dial as possible. c. Check to be sure that the hands are shaped to the contour of the dial. d. Check to see that\ the hands are positioned so that they are synchronized with one another. Check Number 15 a. If there is no case for the movement, simply disregard this check and proceed with the next check, number 16. b. Check for proper snap/screw back of the case. c. Check for the clearance of the hands under the crystal. d. Check the crystal to see that it is securely fitted into the case. e. Check to see that the crown is next to the stem and reasonably close to the case. f. Check for tightness of movement in case. g. Check the spring bars to see that proper spring bars are used for the particular type of case so that the band is held securely to the case. h. Check the lug holes to see that they have not been worn badly by the spring bars to a point where the hole may break through and allow the spring bar to come out of place. Check Number 16 a. Set the watch on time with a master clock. b. Let the watch run for a period of 24 hours and check the error in the time repeat in several positions. c. Allow the watch to run until it completely runs down and check the length of run. The watch should run a minimum of 30 hours, preferably 40 hours, if it is in “A. I have no answers to any of the steps since I didn't make this up. Maybe Mark might.1 point
-
I'm slowly getting into doing more and more things on my watches and I thought I'd come here to pick up some knowledge. I made a list of things I've done so far: 1) Adjusting bracelet length 2) Replacing spring pins 3) Removing/replacing case back 4) Polishing scratches from crystal 5) Removing movement 6) Removing movement ring 7) Removing crown and stem 8. Removing/reinstalling hands 9) Removing dial 10) Removing day wheel 11) Removing date wheel 12) Inspecting/replacing plastic gears involved in day/date change 13) Removing cannon pinion 14) Removing rotor 15) Replacing mainspring barrel (haven't reinstalled yet, waiting for part) 16) Simple regulating I've had some casualties! In particular I mangled a mainspring while doing some of the above.1 point
-
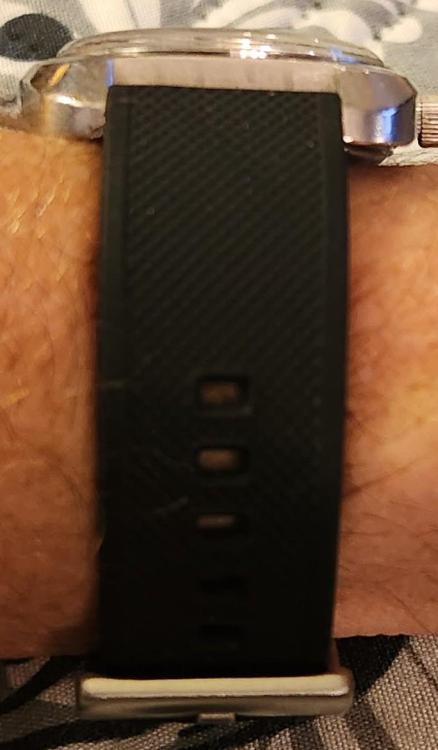
I have success with these for fixing similar clasps https://www.cousinsuk.com/product/0120mm-non-swiss-big-heads there are other sizes as appropriate. Tom1 point
-
Updates: @Nucejoe Coca Cola soak worked! Got the screw loose. Thank you! @mikepilk You were right. The ratchet wheel screw and crown screw are both lef handed threads. Also, upon further disassembly of the donor, which i couldn't do until i got the ratchet wheel screw loose, i found a marking on the donor that says AS 1002. It wasn't in the same place as the original, but it was still there.1 point
-
Just use pliers with long flat jaws. Squeeze in such manner that one tip will rest on the rivet, and the other - on the bottom of the pin1 point
-
Believe me, the watch is old, and has nothing to do with Phillip Haas. The key word is not 'fusee', but 'fusee verge repeater', and the syle and the layout of the movement. The pivots dont break because they are old, but when somebody doesn't work carefuly enough. So, please be careful. No parts will be replaced, unles somebody is able to make such parts. That's why the restoring of such watches is not simple task - the watchmaker must be able to make by himself every part needed. The stone on the balance bridge is real diamond (thow not so valuable) and is fully functional cap stone. The pieces of spring/steel under it is because it was broken or because the verge was repaired and got shorter, so the axial free play had to be normalized this way. Yes, I will try to guide You thru what is needed to do in order to make all work. Please, show pictures of the other side of the plates, we need to se the condition of the crown wheel teeth, also of the repeater parts and levers, the chain...1 point
-
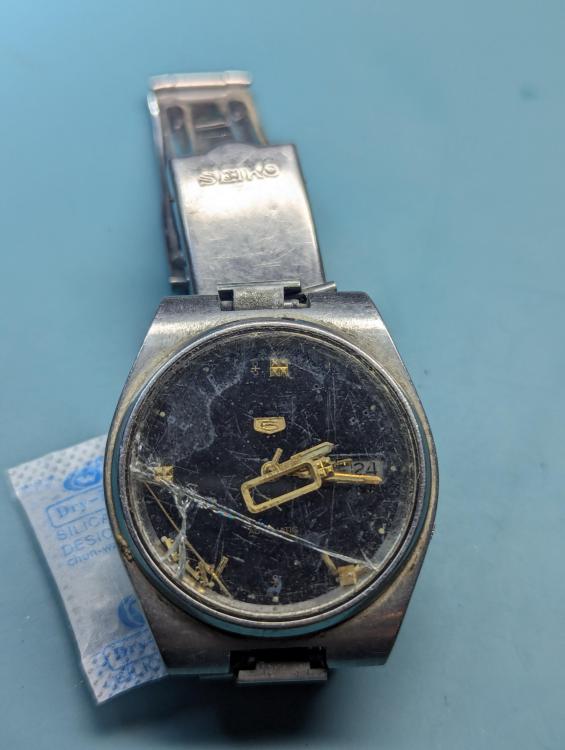
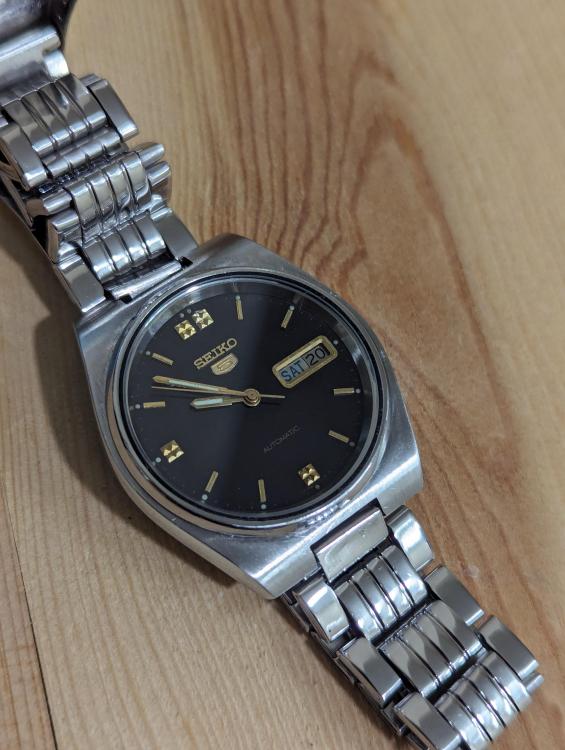
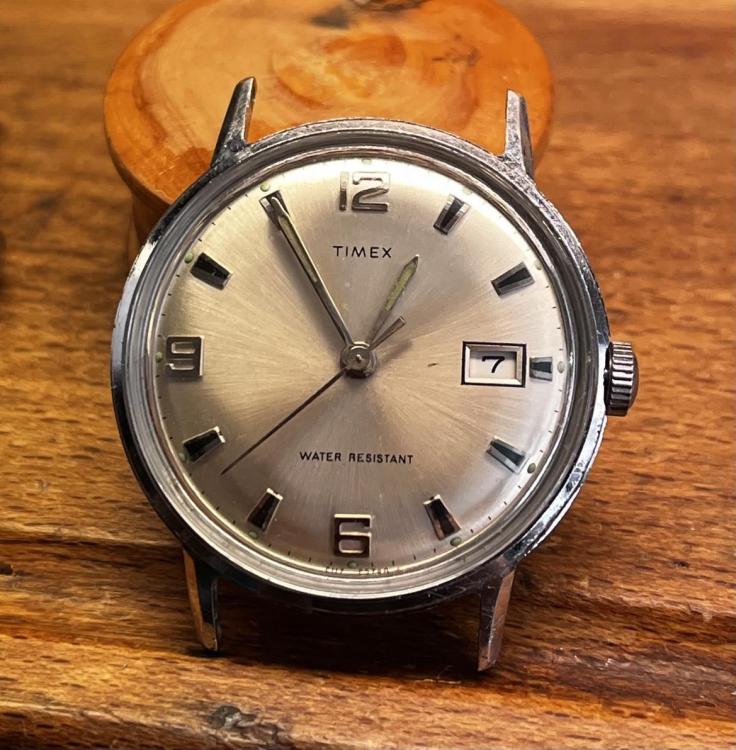
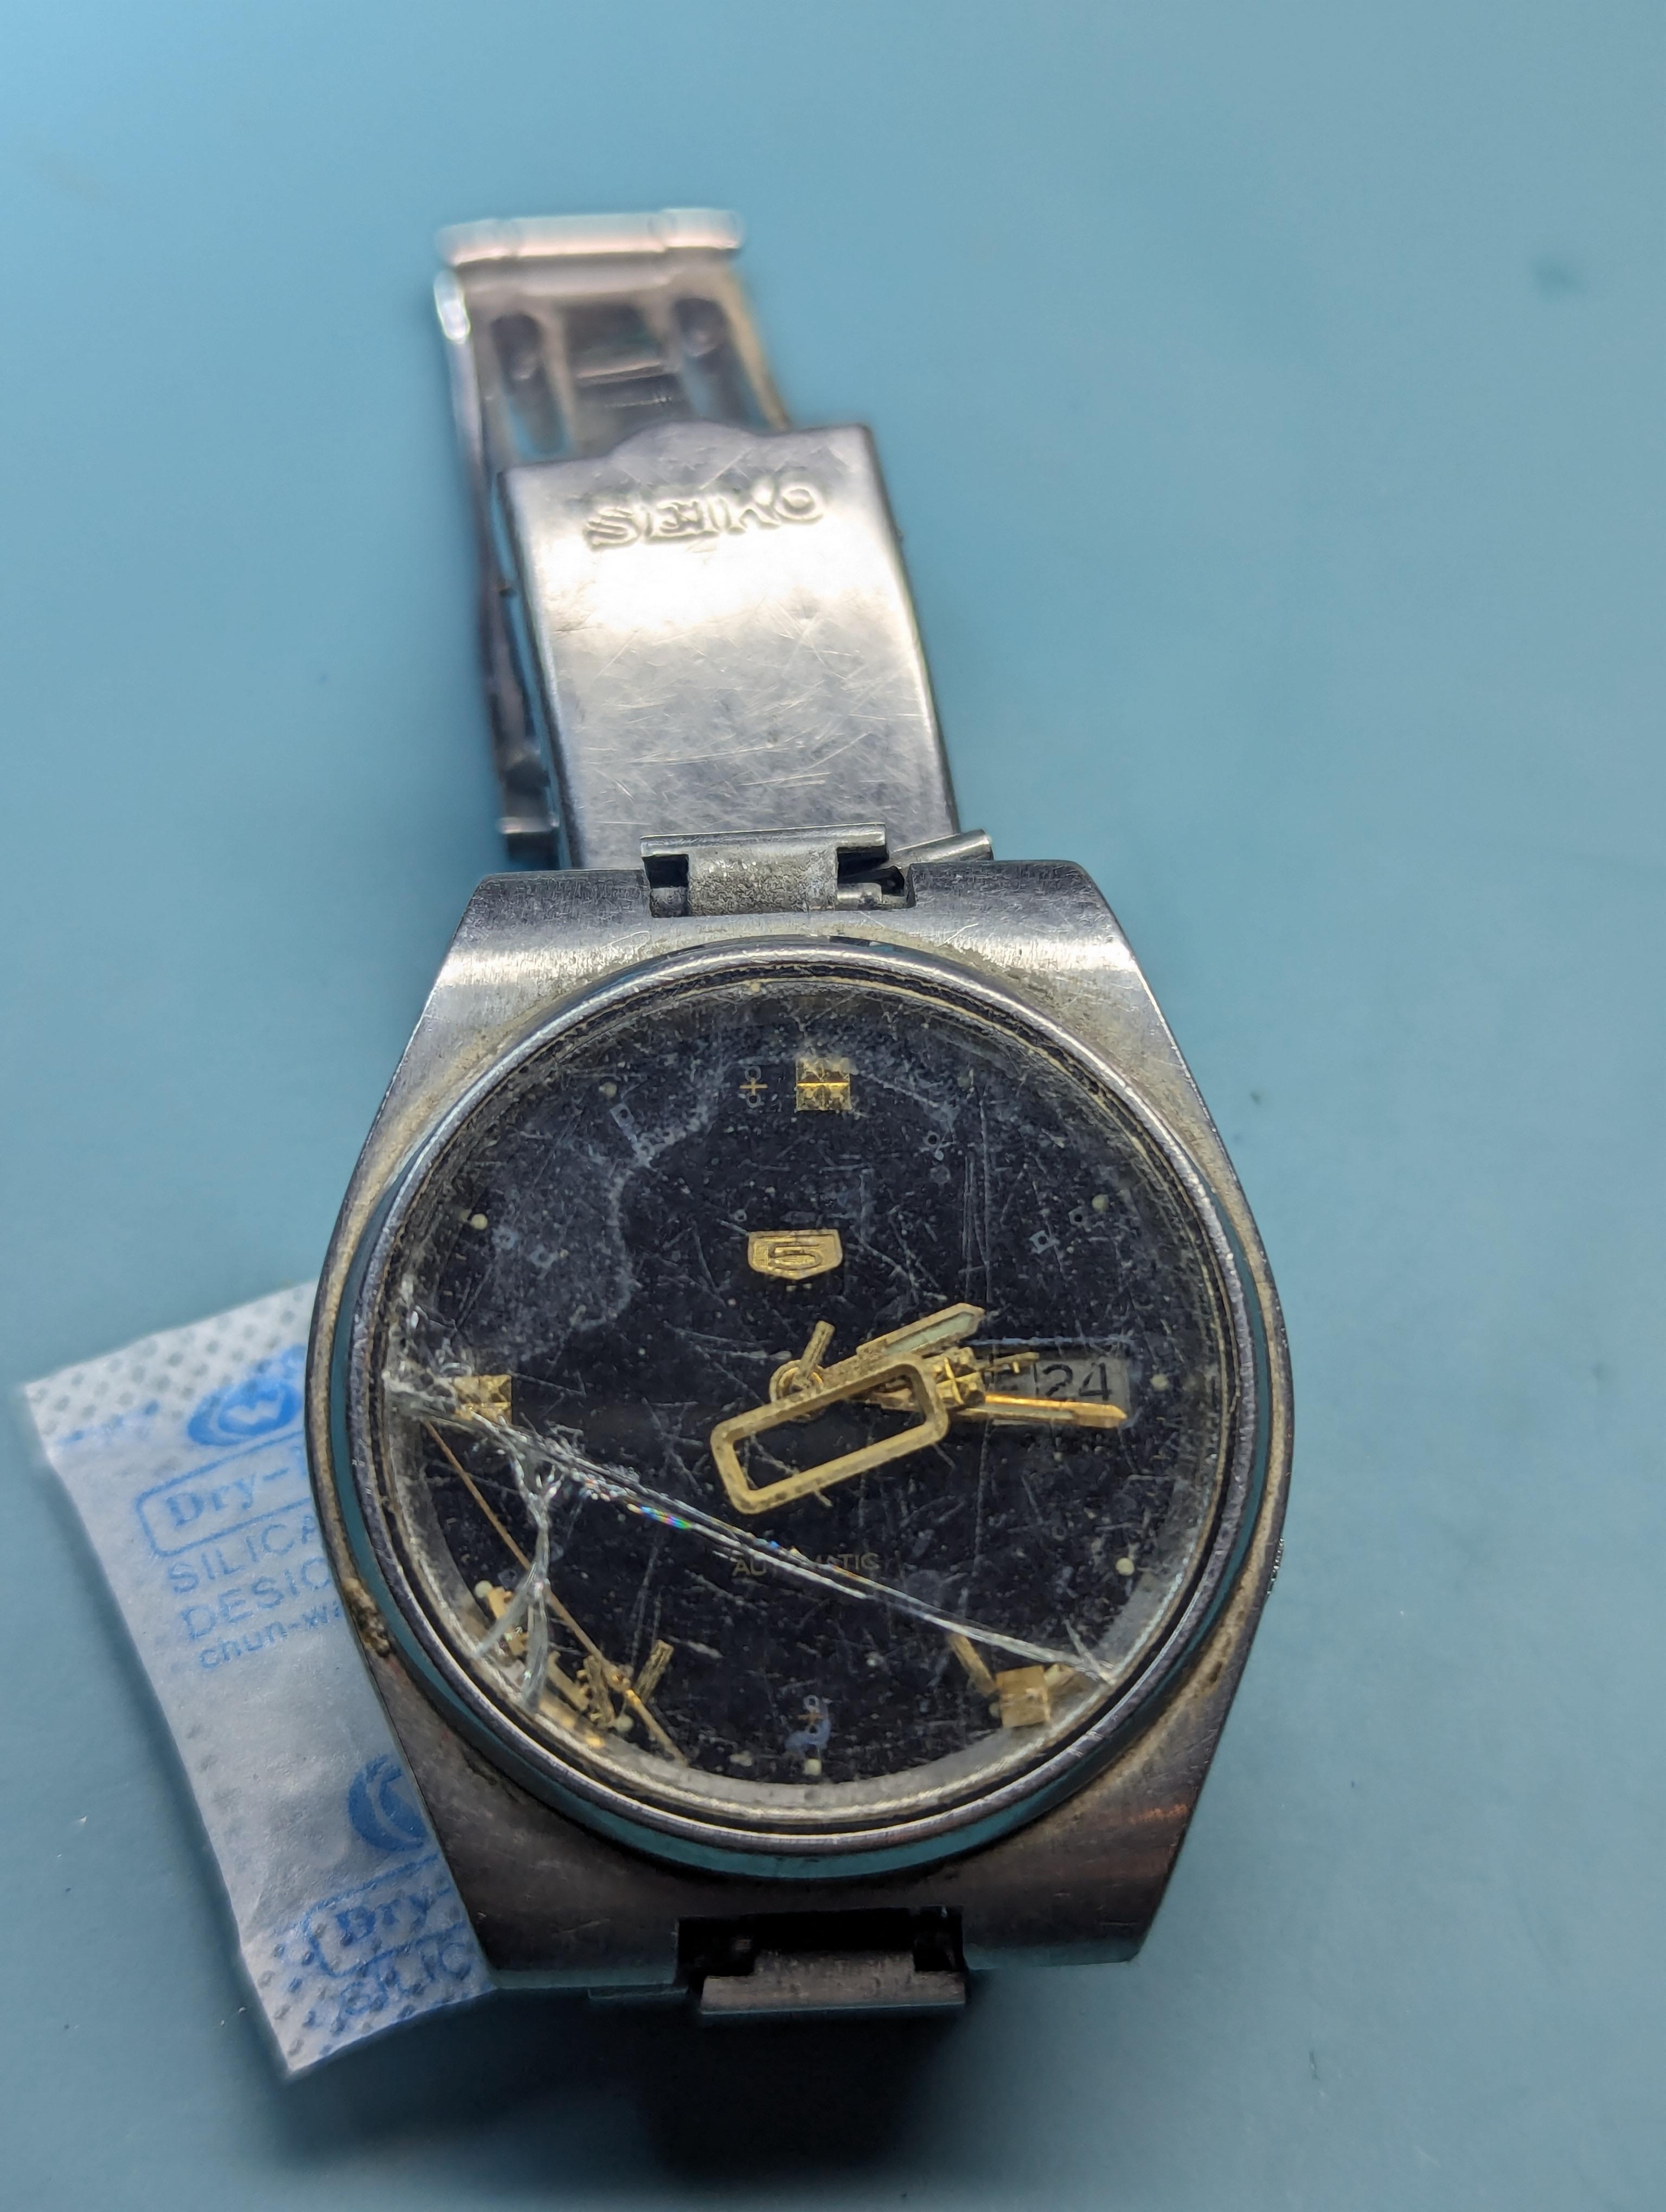
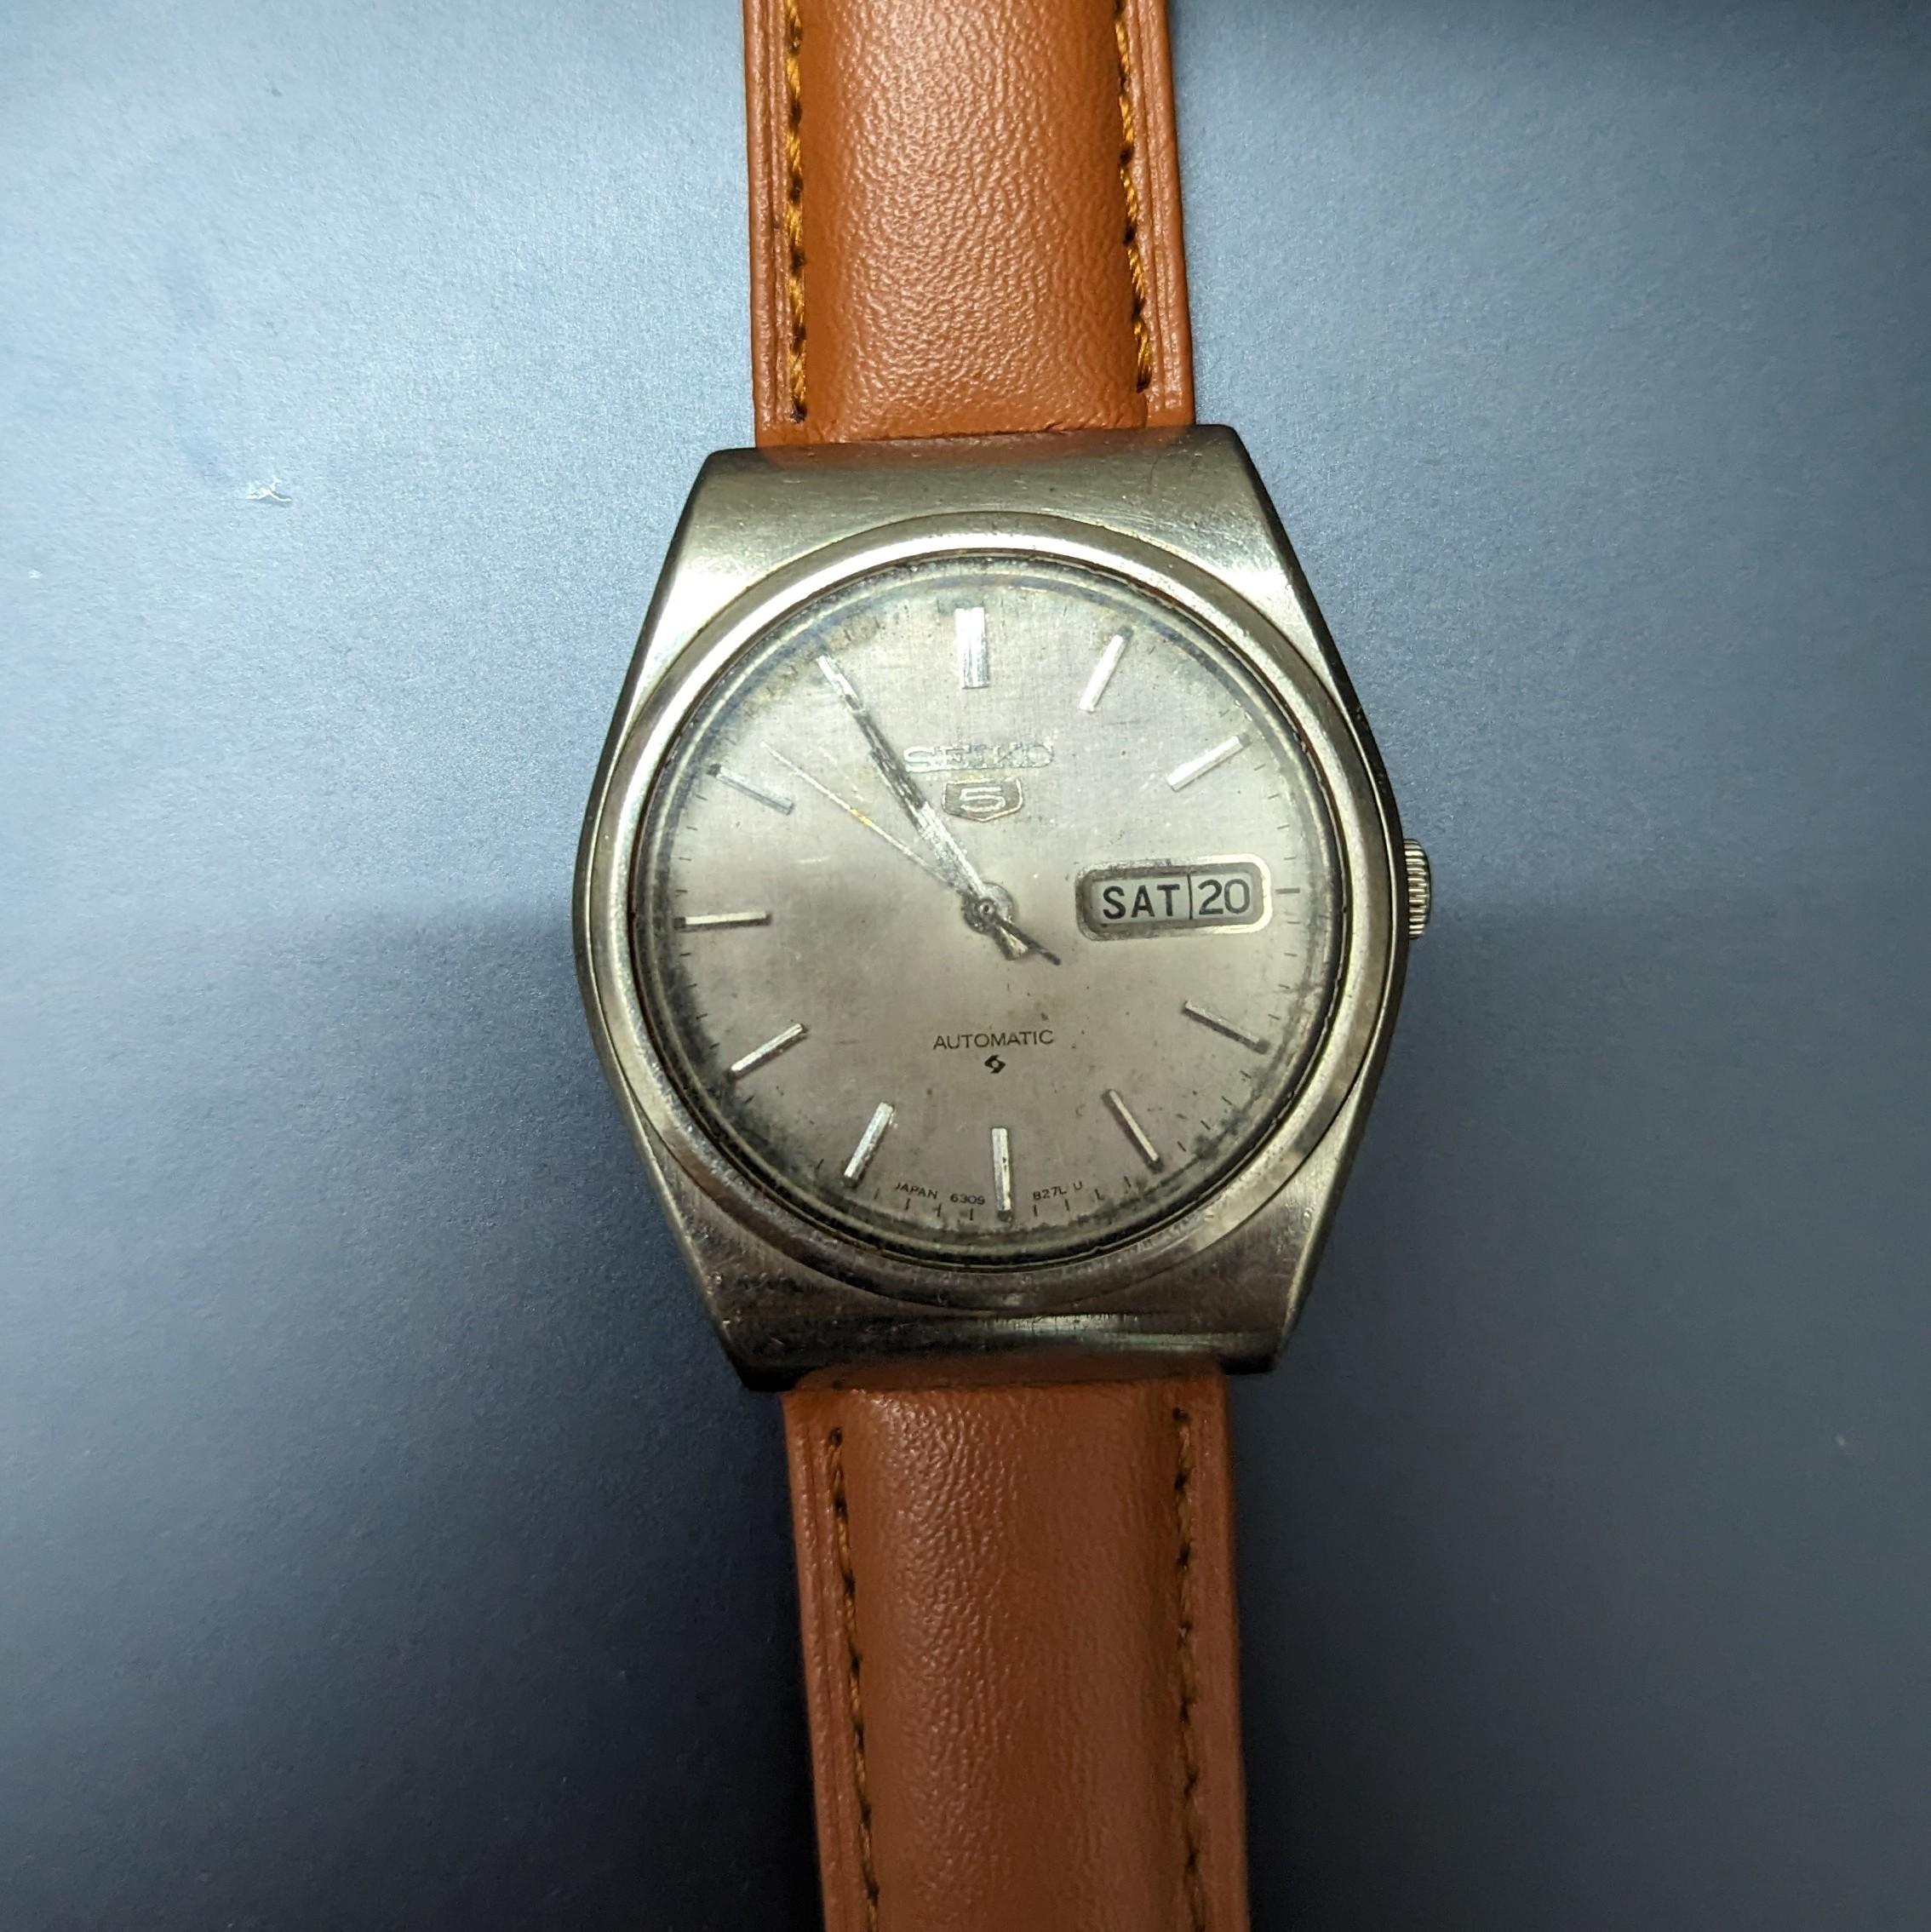
I think the pallet fork finally sat in place randomly and got power. Well, the watch is running. I really appreciate everyone's help! Is the watch from 1978 according to the serial 855656? Again thanks to everyone, this forum is very helpful for someone new like me. (And excuse the mold on the dial. The person who sold this to me said it didn't run for many years)

 1 point
 -
…this has been my observation as well. The ‘crap’ part often is referring to lack of finish or economical fasteners and shortcuts. I’ve had many that adjust well in positions, like yours…1 point
-
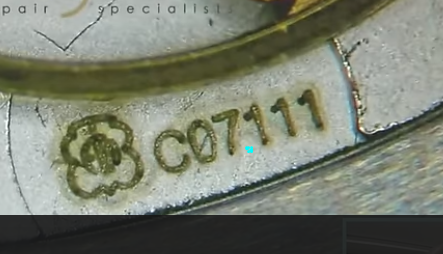
You are right, as usual John. Mistake on my part. The number is C07.1xx I cannot edit the topic heading There are videos showing how to adjust the screws. So it can be done, but it looks fiddly.1 point
-
I heard that these balance „screws“ can only be regulated once during the production prozess. https://watchbase.com/eta/caliber/c07-111
 1 point
 -
Omega I casing numbers are interesting in that they're not an exact thing. Then you usually have to modify the number if you want to find your apart because the decimal point is not really a decimal point. In other words you have three digits with something that looks like a decimal point but is not. So for instance your number really becomes 166.0033 like at the link below. Then if find out you get a whole bunch of different references because those are all the different materials the cases are made from then as far as the inside ring goes you could take the ring out of your old crystals it still usable. To certain degree it be much better if you did that because the original rings have a step and the after markets may or may not have the proper step. https://www.cousinsuk.com/document/search?SearchString=166.0033 then for stainless steel case I have attached the PDF off the cousins website. Couldn't remember if the hands were included with the casing information are not and apparently not. if there showing the hands as restricted are they giving you part numbers for the hands? Because if it would give you part numbers you can look on eBay or other sources otherwise finding hands becomes a bit more of a challenge for instance here's a website that says they have Omega hands but they might not have the style are looking for https://www.ofrei.com/page764.html 8258_Omega 166.0033 ST Case.pdf1 point
-
Are you kidding? Most of us have seen results provided by so called „professionals“. You are more than competitive!1 point
-
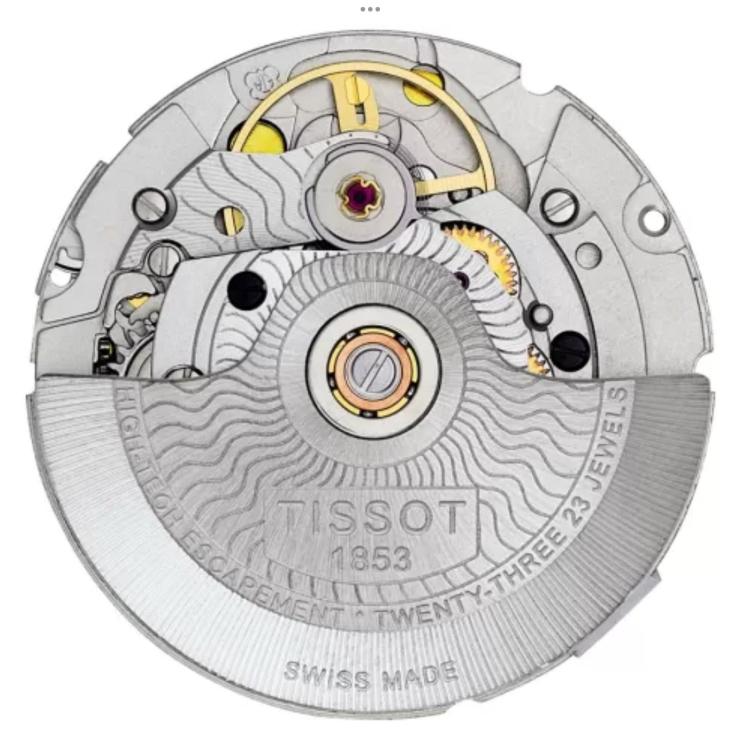
that is an interesting number seems to conflict with the number in the video? it appears to be probably one of those things I would do a deluxe six thing of swapping your numbers around. you haven't been paying attention we've seen this before like what escapement does the watch below have? The chronograph that has all sorts of bits and pieces of plastic it has to be more expensive than the watch you started with this discussion with his at the chronograph and what is escapement made out of now? Oh I remember engineered materials yes that is one of the things I call plastic and they definitely do not call plastic cheap if it's engineered materials. https://www.watchrepairtalk.com/topic/28175-tissot-prc-200-one-weird-chronograph/ oh and this particular series of movements is found in several Swatch group brand so this isn't the only one using engineered material escapement's it's not just watches like this look at all these other watches being sold out there couple hundred dollars expressive as a quartz movement that probably cost five dollars inside. Oh and then there is the other amusements would something like this ever be collectible who in their right mind would want to collect the plastic escapement watch? Here's an interesting video and what kind of escapement does this watch have?
 1 point
 -
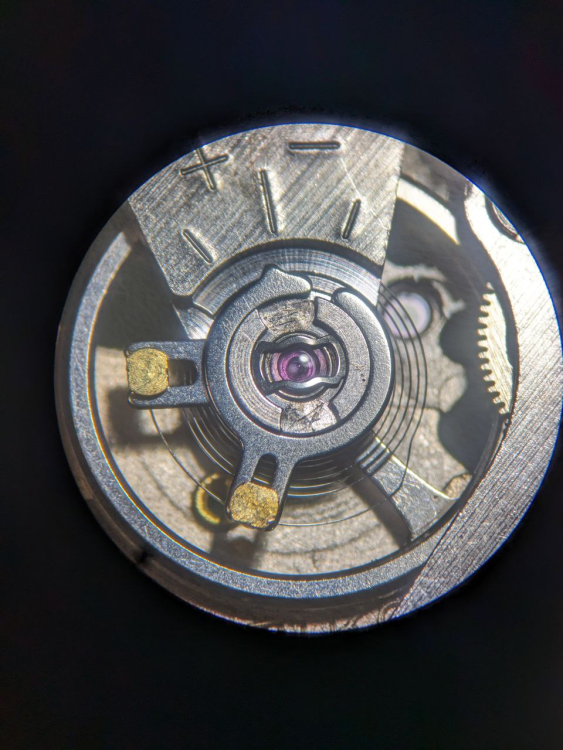
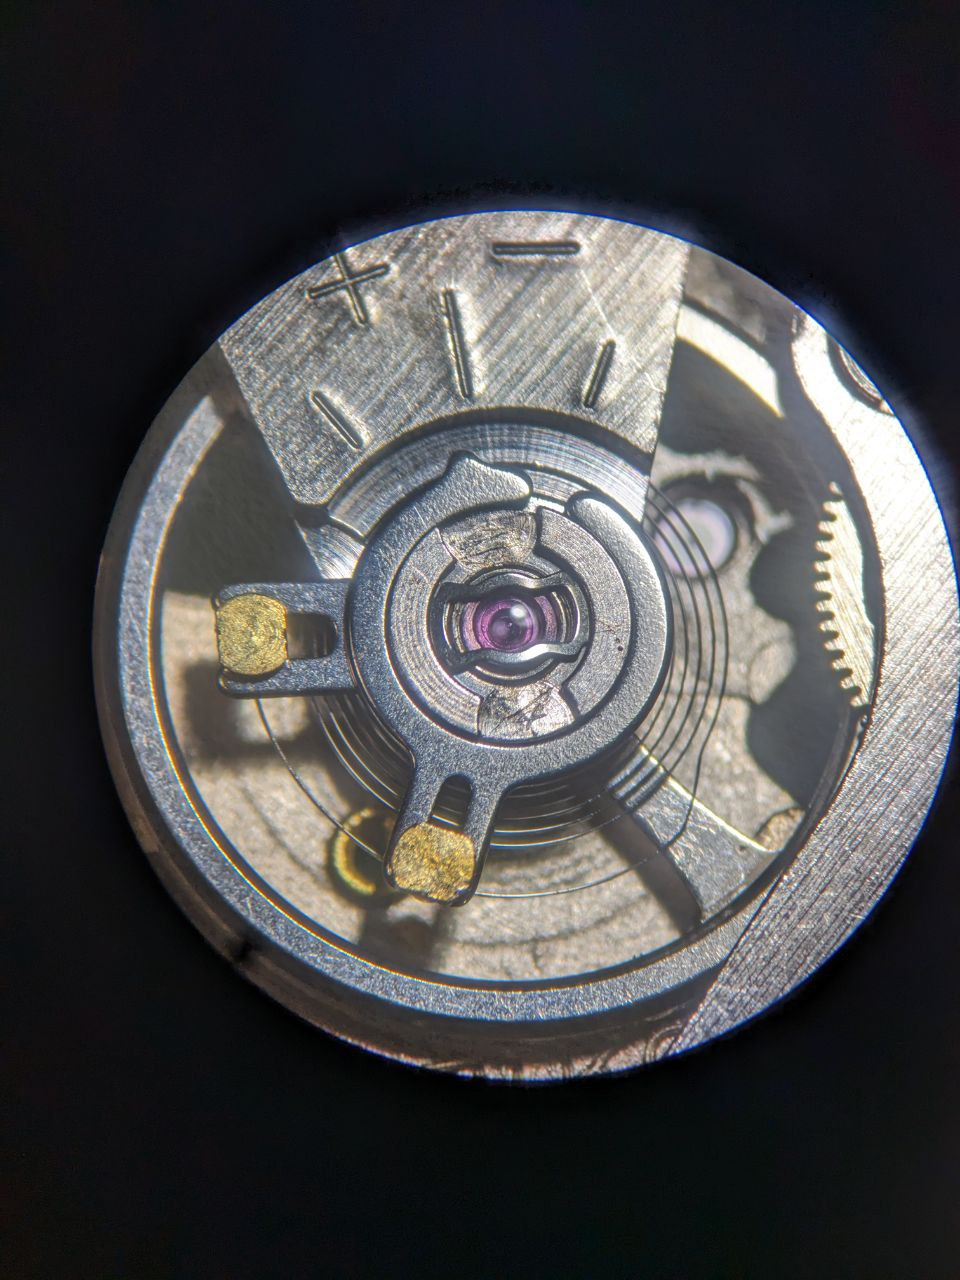
The photos are a bit blurry. The pallet jewels ok. But I think the upper pivot looks a little bent. Could you get a sharper photo? Check the pallet fork jewel holes too.1 point
-
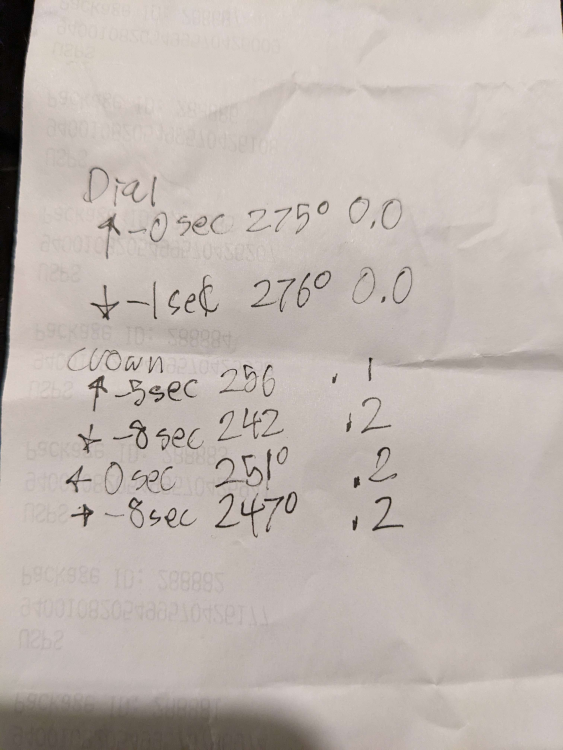
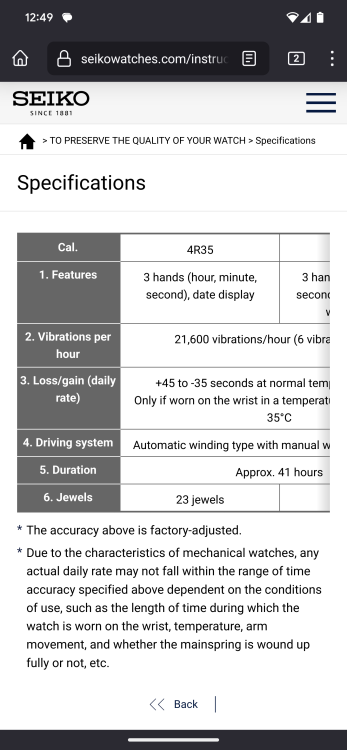
All looks good, just to give you a yard stick and put things into perspective I think the rate on a new Seiko is like 20 seconds/day (someone correct me if I'm wrong), so you are better than factory spec in all orientations. Like the finish too, all edges are still crisp and not over rounded/ over polished. Especially like the red seconds hand. 10/10 with a gold star The bit I always struggle with is pricing... How will you decide what to charge? See below from Seiko website:
 1 point
 -
Swatch group at its finest, they don’t want watches that can be handed down generations but that should be replaced several times per generation. Tom1 point
-
I was on a tight time crunch for this due to an out of town visit. I did end up flushing out pivots with naphtha, removing a lot of gunk, pegging a lot of detritus out of pinion leaves, reoiling with a generic light clock oil I had on hand. It has been running on time for 48 hours cased now and tomorrow I have to send it back home with the out of town guest who brought it to me. When its owners receive it, they'll have a timekeeping, correctly chiming clock that answers their question "can this clock still run?". It will need a more complete strip down and service by someone more qualified than me within a couple of years. I can't evaluate whether it needs any new bushes. Thanks for everyone who offered advice.1 point
-
Hi Bob, I am pritty sure You don't know what it is... This is about 200 years old verge quarter repeater. And, in hands of a newbie (sorry for that), guess it has little chance. Is this a complete watch (with case and dial)? If so, it will be pretty expencive, especially if in working condition. Watches like this usually come to me to restore, as I am the one in my country that is able to do this. Usually they come with 2-3 broken pivots or which is worse - with missing wheels and other parts. So - if happens to break a pivot - please don't let the wheel get lost, but return it back to it's place, as it is much much easier to repivot the vheel than calculating and determining the sizes and parameters of the missing wheel. There are no spare parts for such watches, as everyone of them has been made individually. Now, don't try to assemble the movement before being sure that everything is OK with it and will be able to work. I mean, first leave tghe repeater parts aside and concentrate on the time part. The escapement itself has 3 inependent adjustments, and they has to be done and checked before assembling the movement. Then, only time part should be put in place and movement assembled without repeater part to check how the time part works, final fine adjustments to be done and reliability of the work confirmed for several days. Only then, the repeater train is to be put in place and repearer function adjusted and 'alived'. So, now I am waiting to see video of the working movement as a normal verge watch. Ask questions before doeing something that You are nor confident how it should be done!1 point
-
Here's one: why bother with the fake $h!t, when you can get the Real Poo right here - https://www.ebay.com/itm/364687541987?mkpid=0&emsid=e11021.m43.l1120&ch=osgood&euid=3cae395826ce4ba1bd75307b02bbba42&bu=45336855555&ut=RU&osub=-1~1&crd=20240119054242&segname=110211 point
-
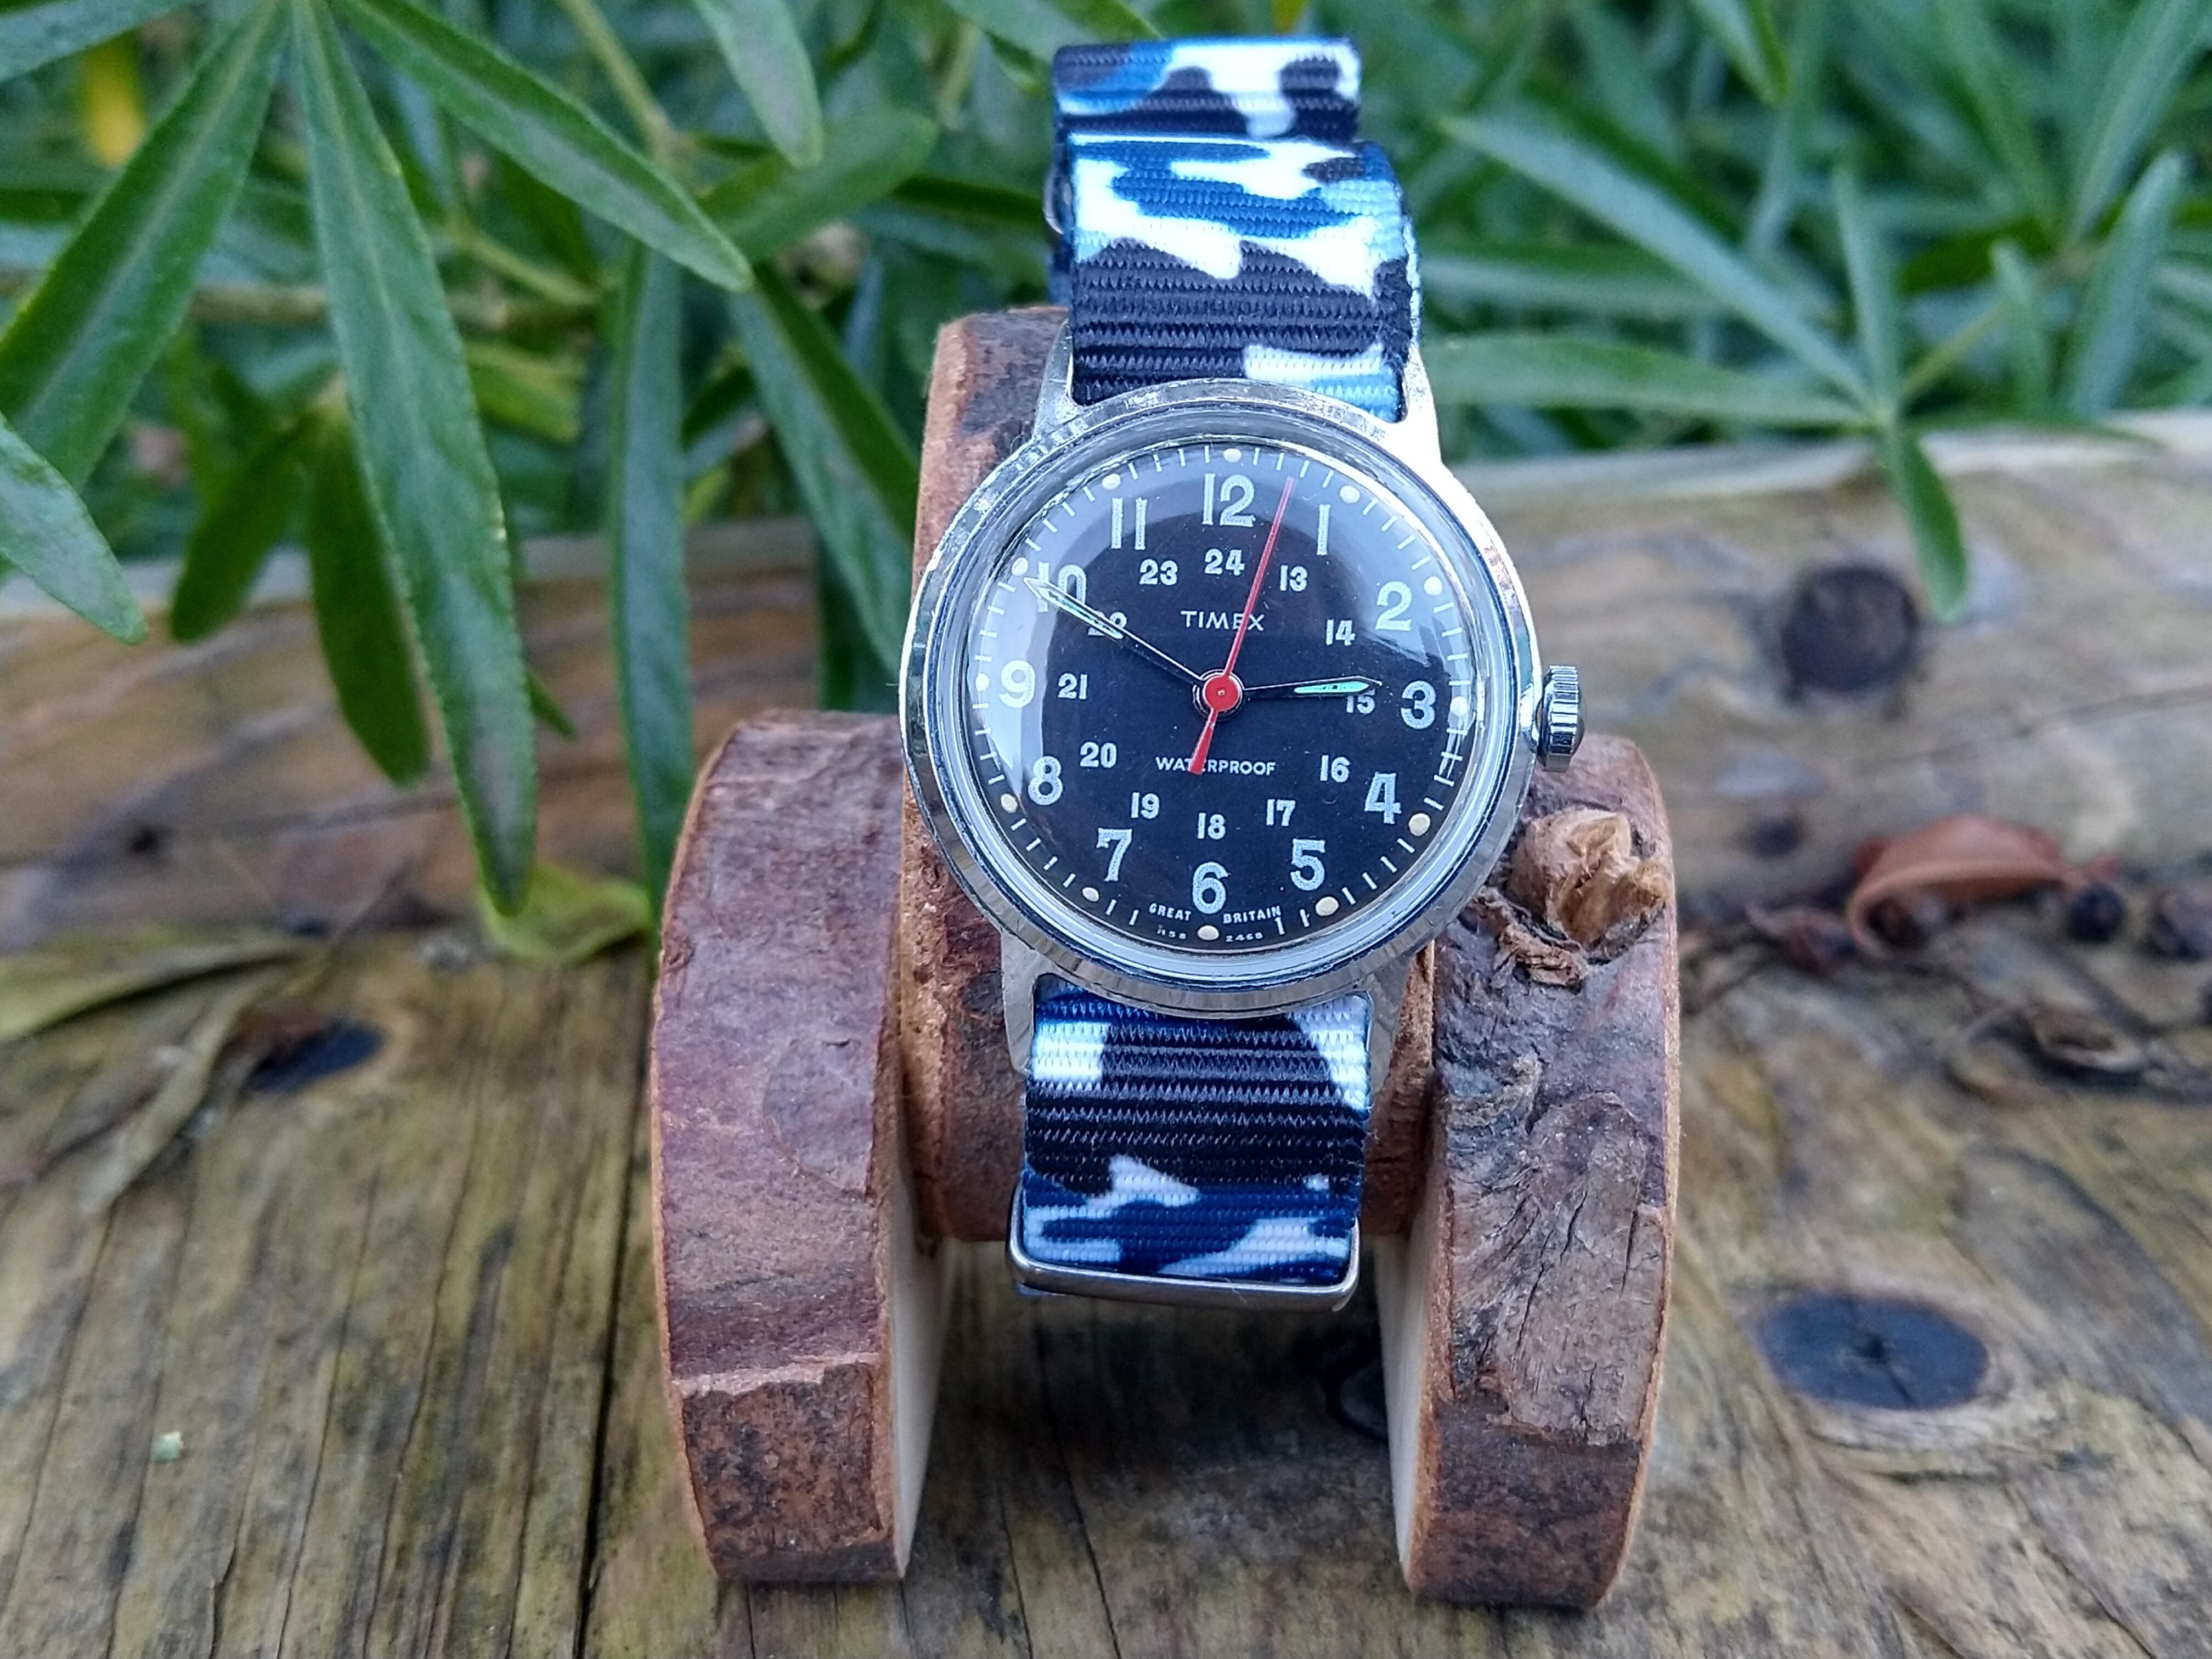
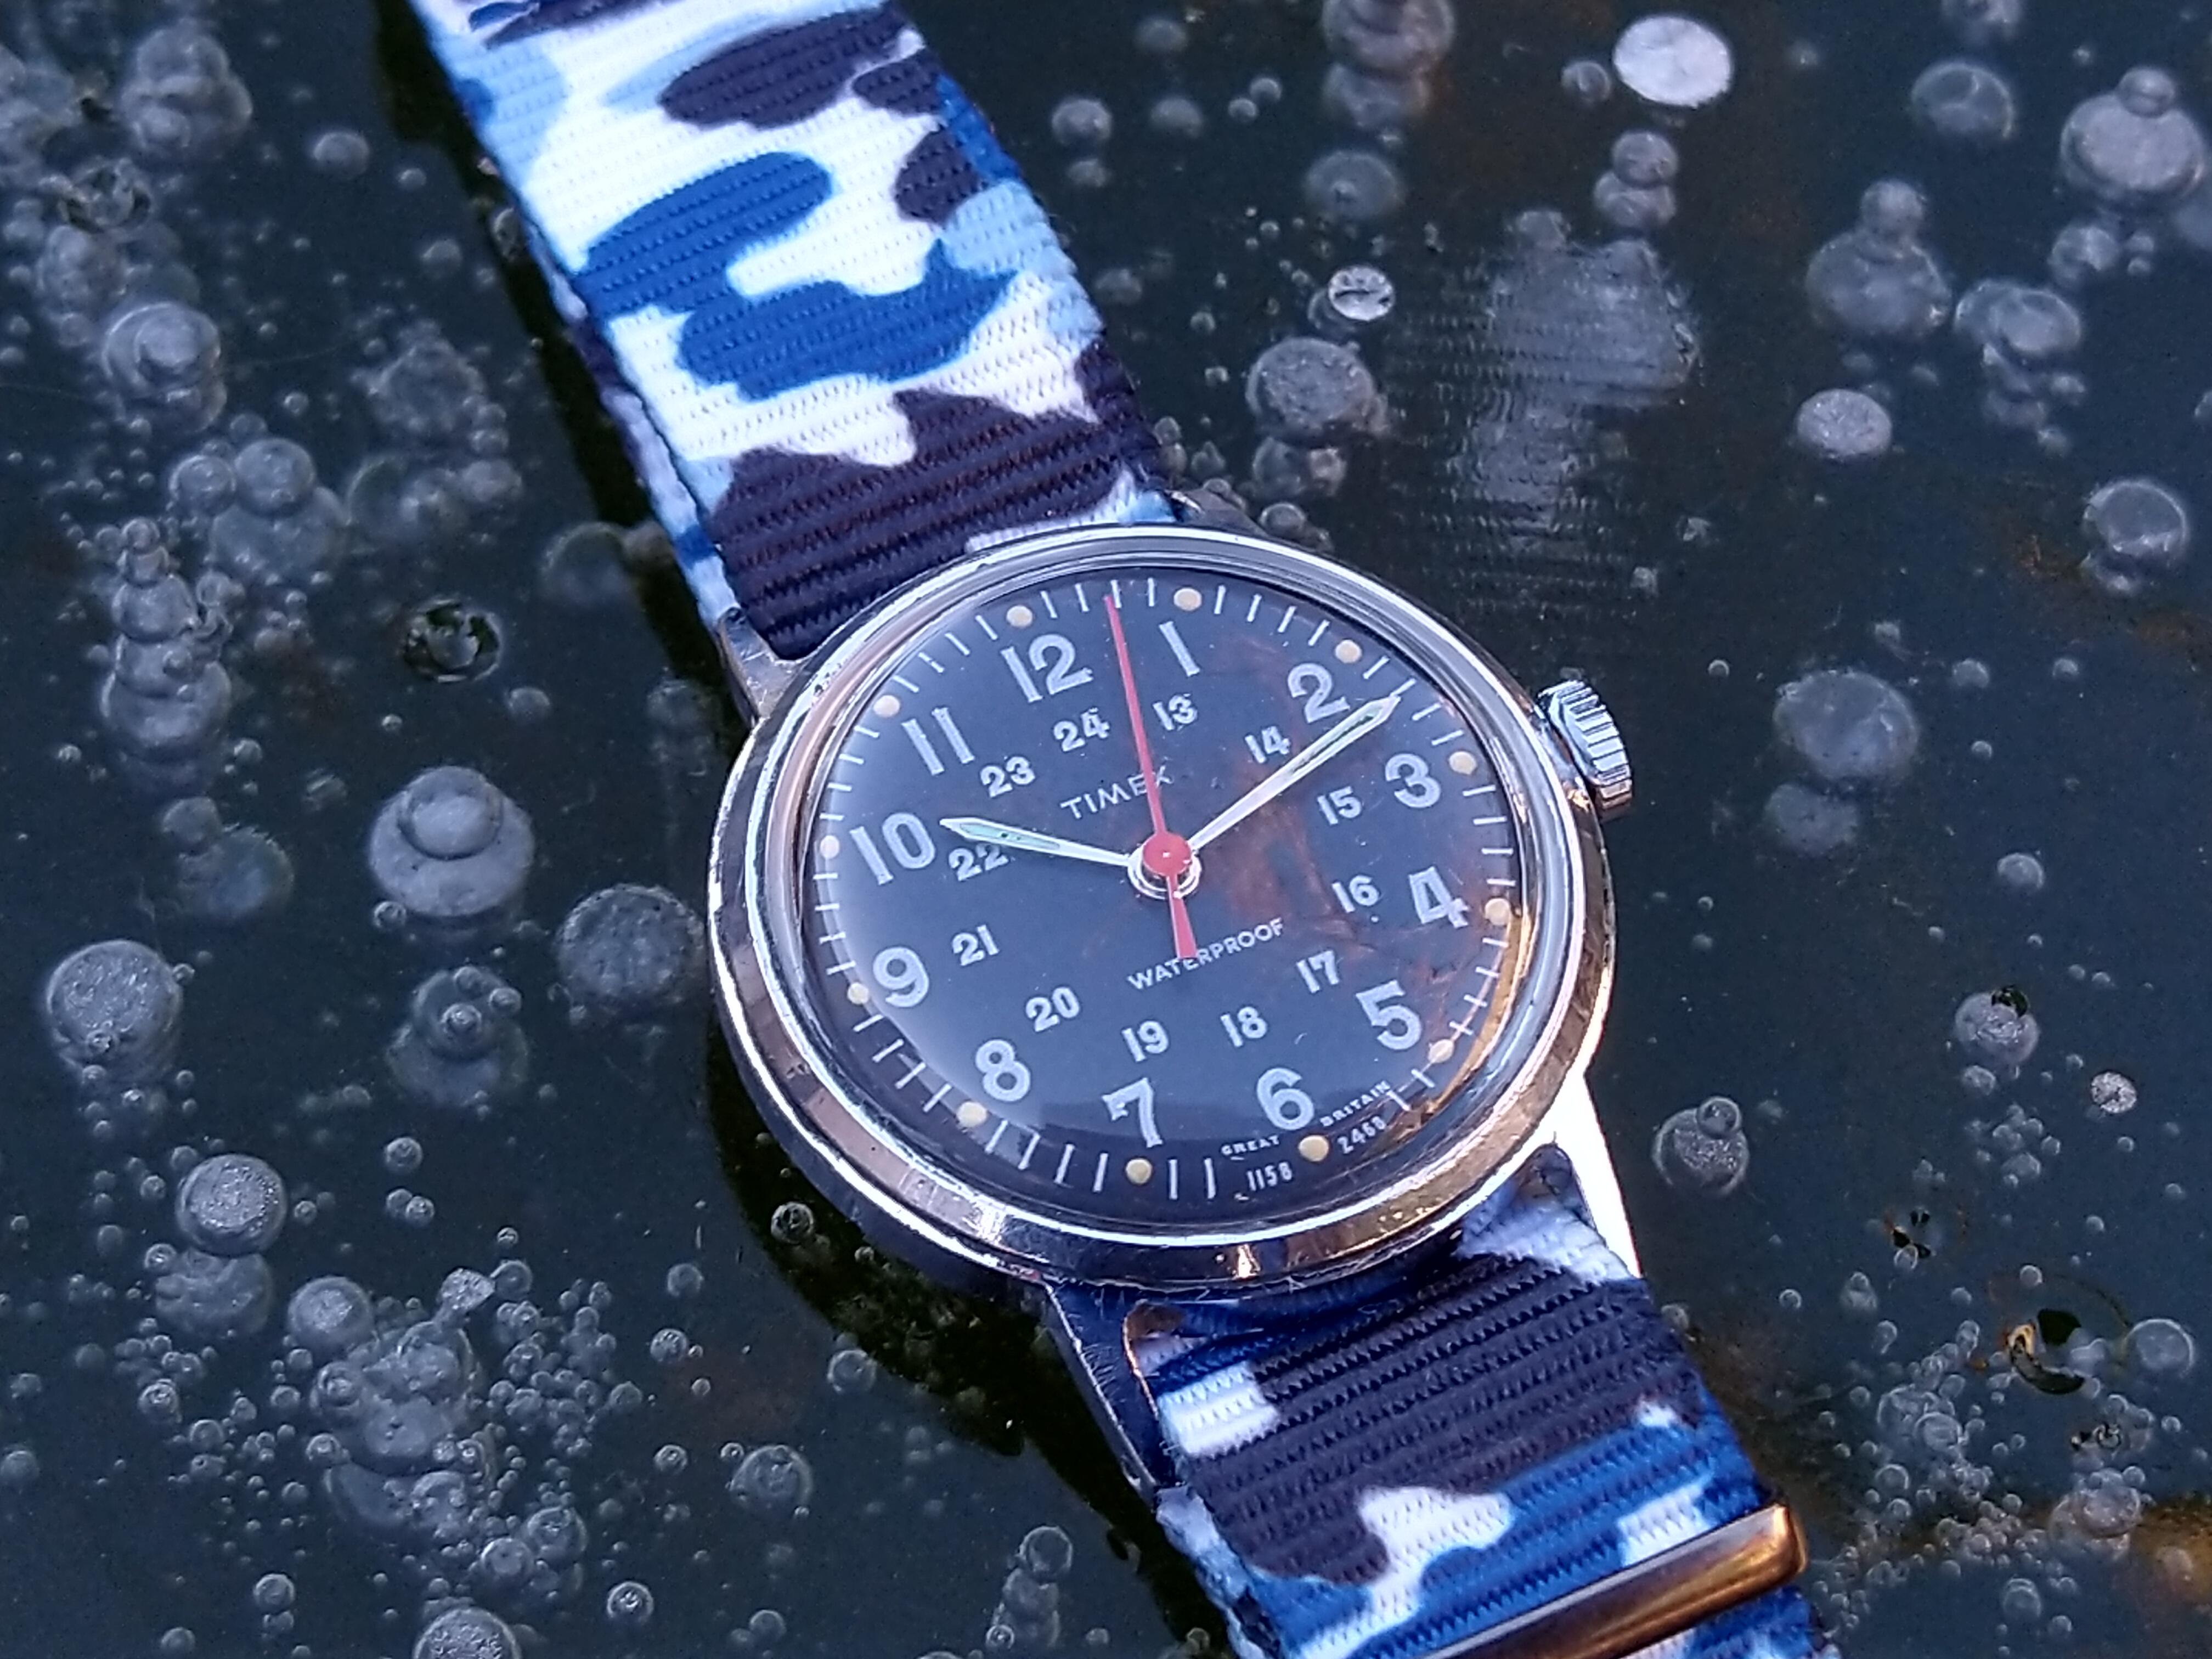
1158 2468


.thumb.jpg.d3a7e26be0a4d9a1ca2e6e176ca26bdf.jpg) 1 point
1 point -
It needs to be straight and in perfect condition, if shellac is holding it there is no reason why a little heat wont do the trick.1 point
-
Starting with the ST36 is still a good idea, there are plenty of case, dial and hand options available on eBay/Aliexpress to build your very own custom watch once you have moved on from this movement in your studies. Tom1 point
-
That is what I always recommend start with pocket watches but not the fusse type they are so different. The next stage a gents watch with a basic movement, then gents with date, then day and date, you can progress up to a basic auto then the same with date and so on. Next ladies watches in the same way. When you have reached that you go to the high end movements. The last is chronograph/split timers. Reading through you should see how it works. With high end movements make sure you have the correct case opening tools. When all this has been achieved in being able to clean all these types of movements which includes replacing mainsprings, buttons and stems, you can start replacing balance staffs.1 point
-
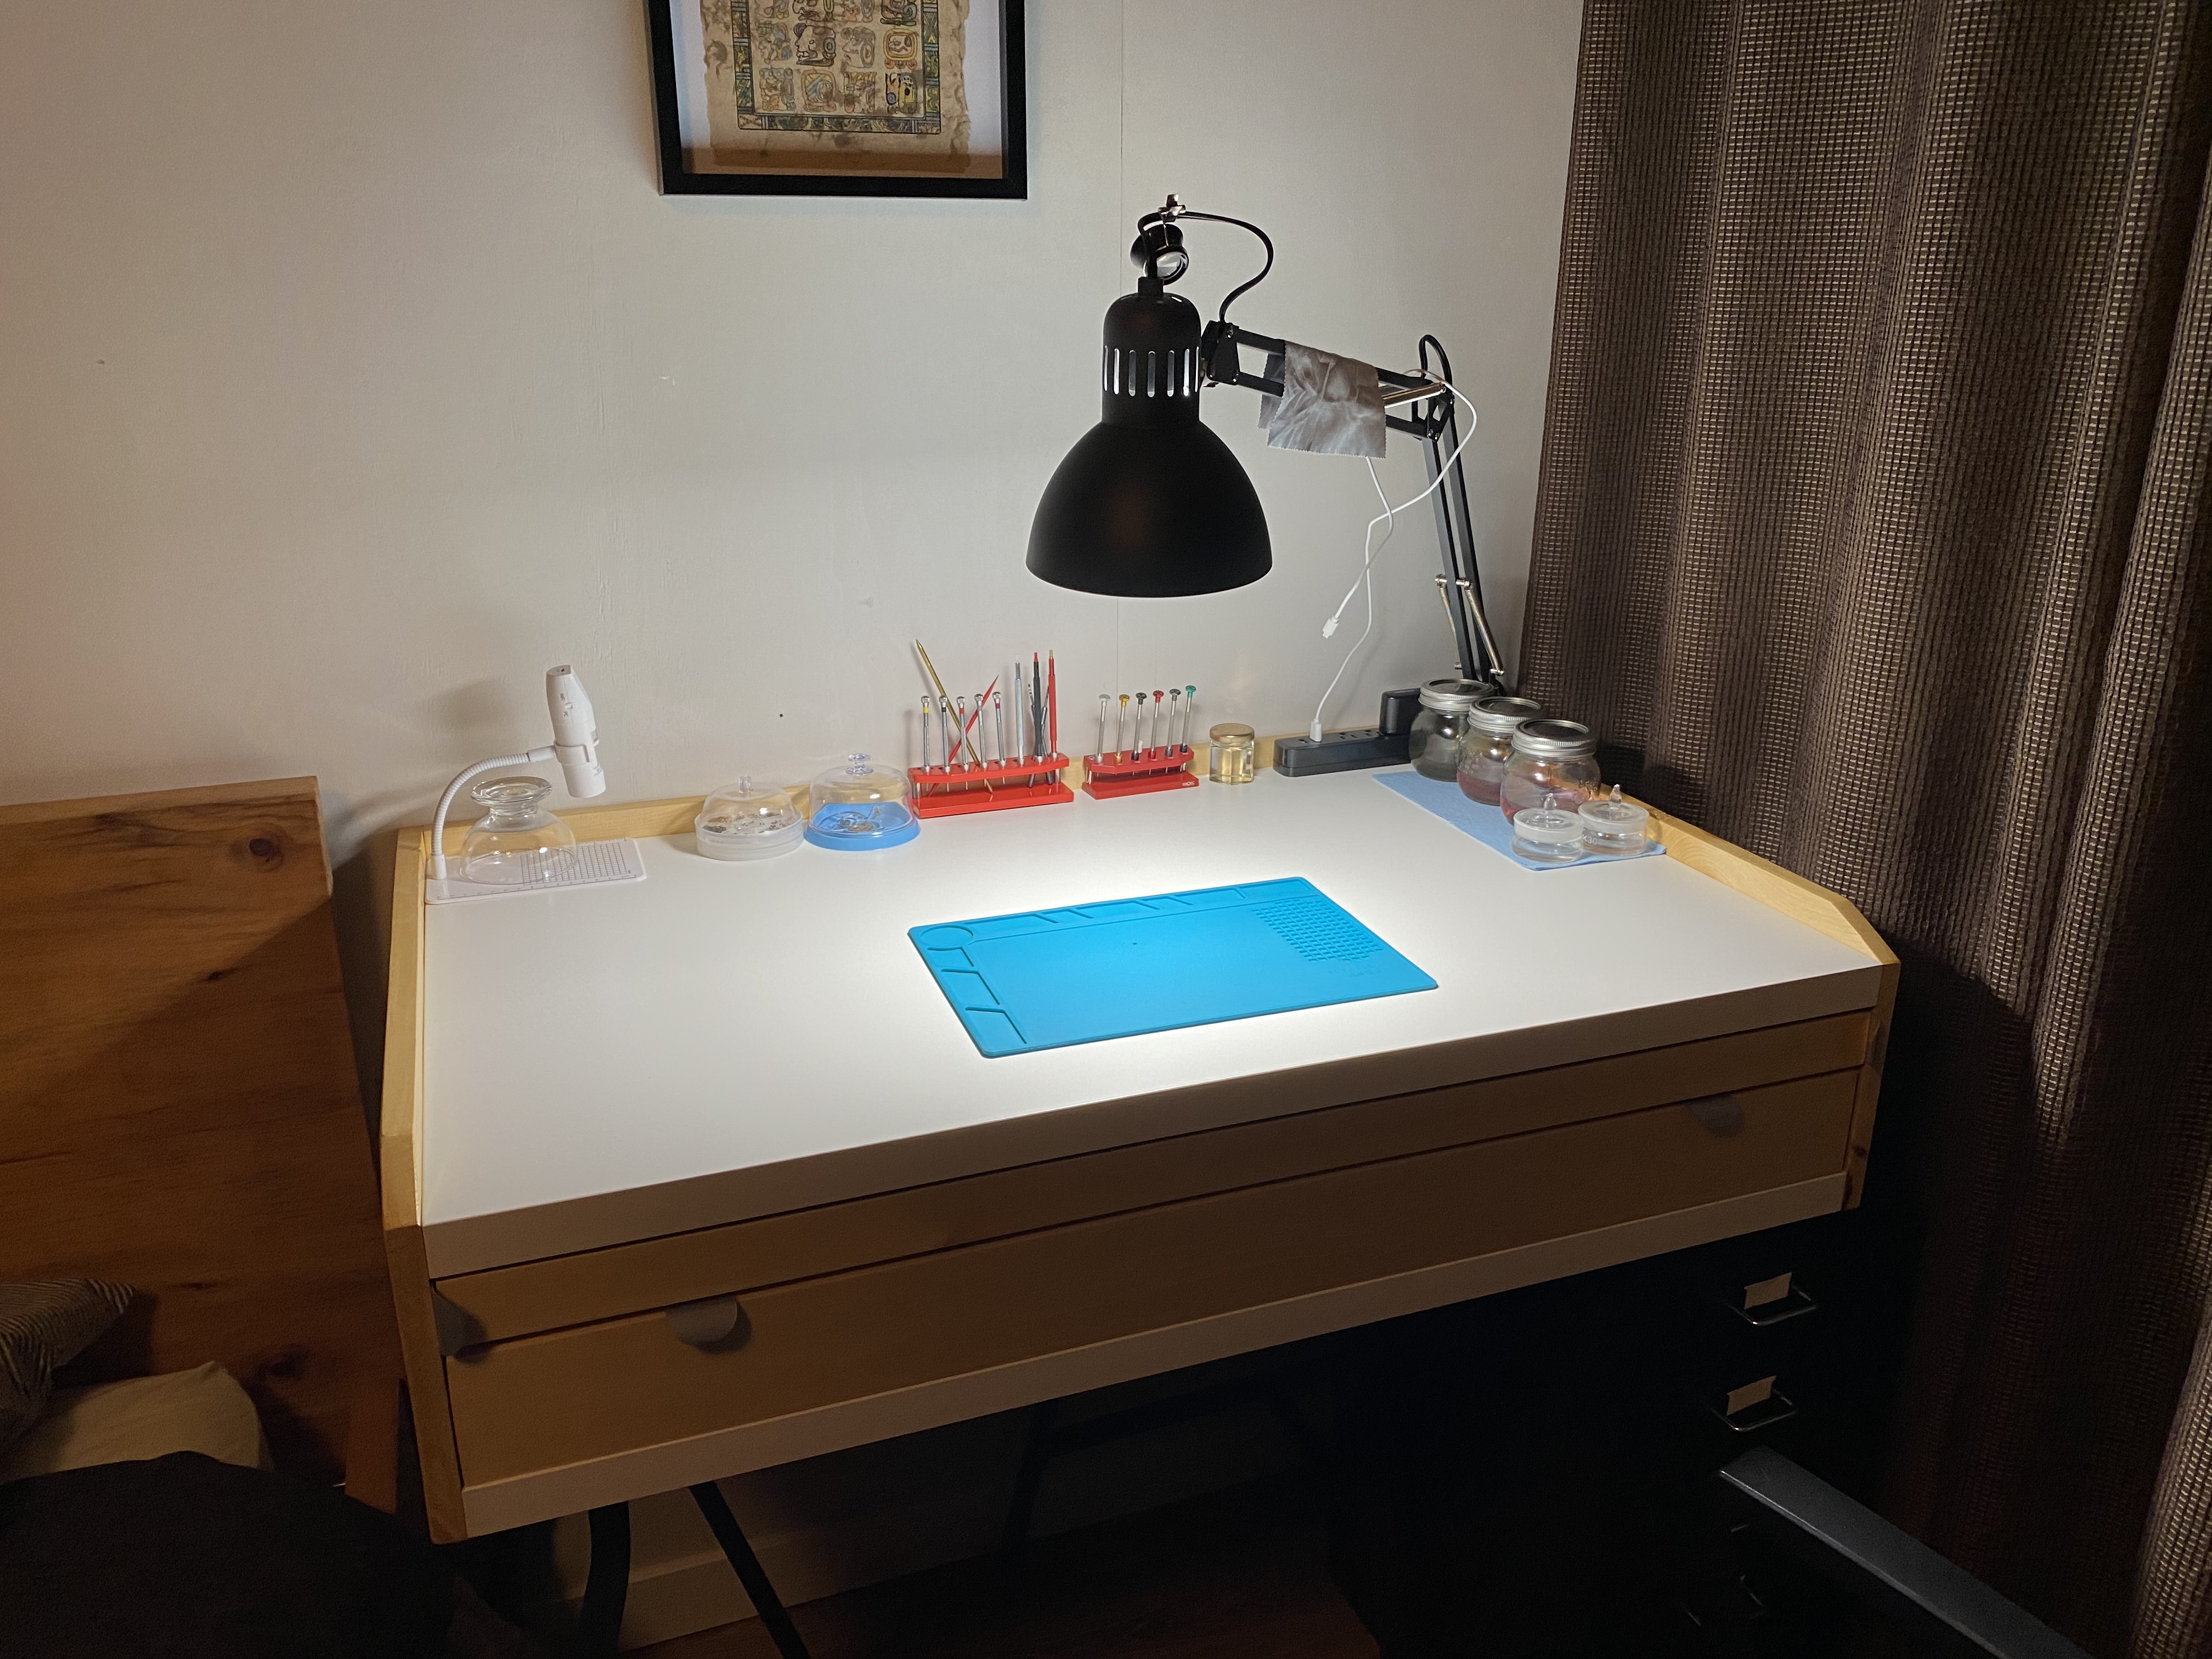
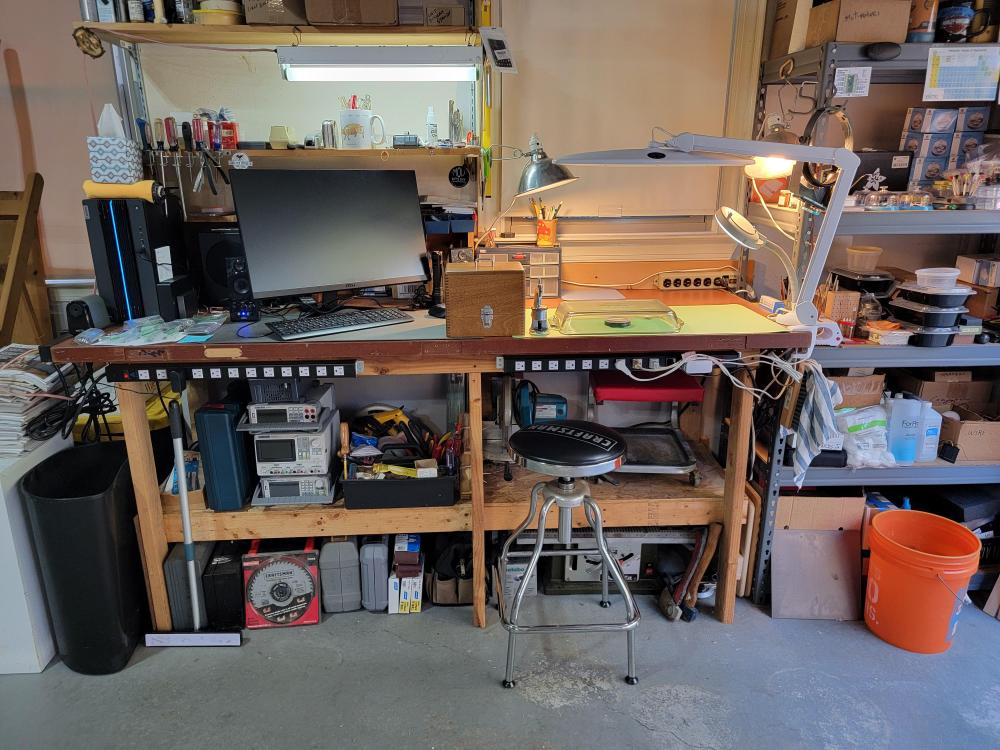
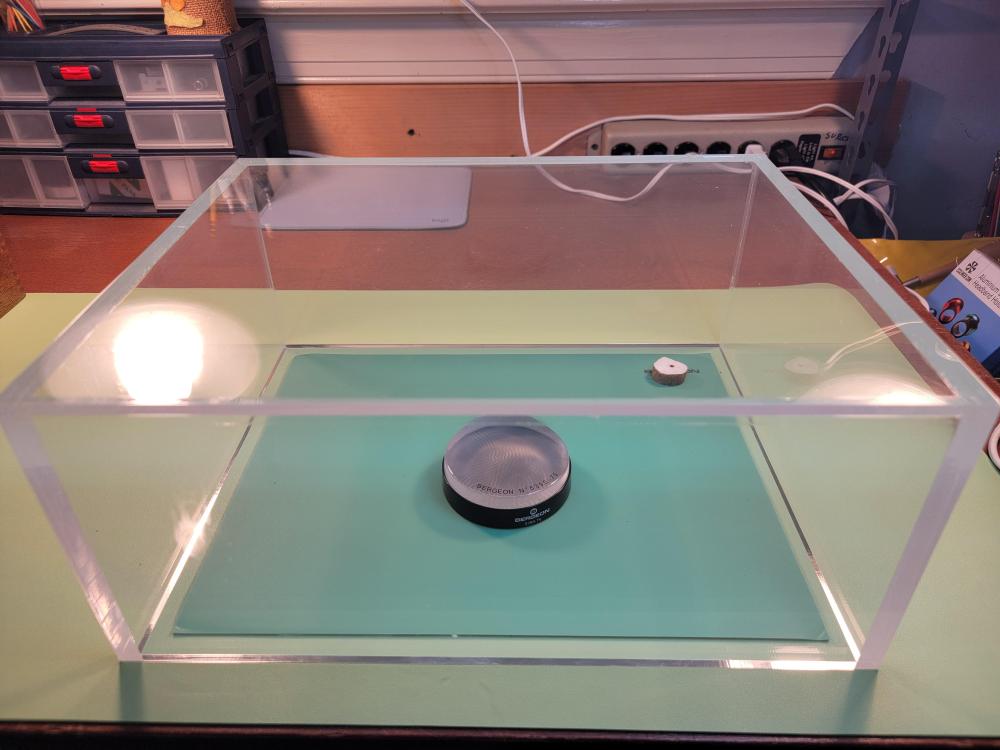
I've had one of those circular magnifier lights but was disappointed in it, so I went to a couple of the artists clamp-on lights that I put 100 W equivalent LED bulbs in. That gave me good light but I still needed more direct light right over my work pad so I bought a nice LED desk lamp similar to the one shown above from Cousins. It clamps to the edge of the work bench and is tall enough to where the vertical arm doesn't get in the way. Also, as you can see, my bench is in the garage and my biggest challenge is dust, hence the glass baking pan upside down of the work pad. Since that picture, after looking for better non-glass alternative I ordered a custom plex display case and just received it. I probably could have made it 3" high rather than 6", but being a rookie I still lay things out on the pad as I disassemble because and leave them there overnight.
 1 point
 -
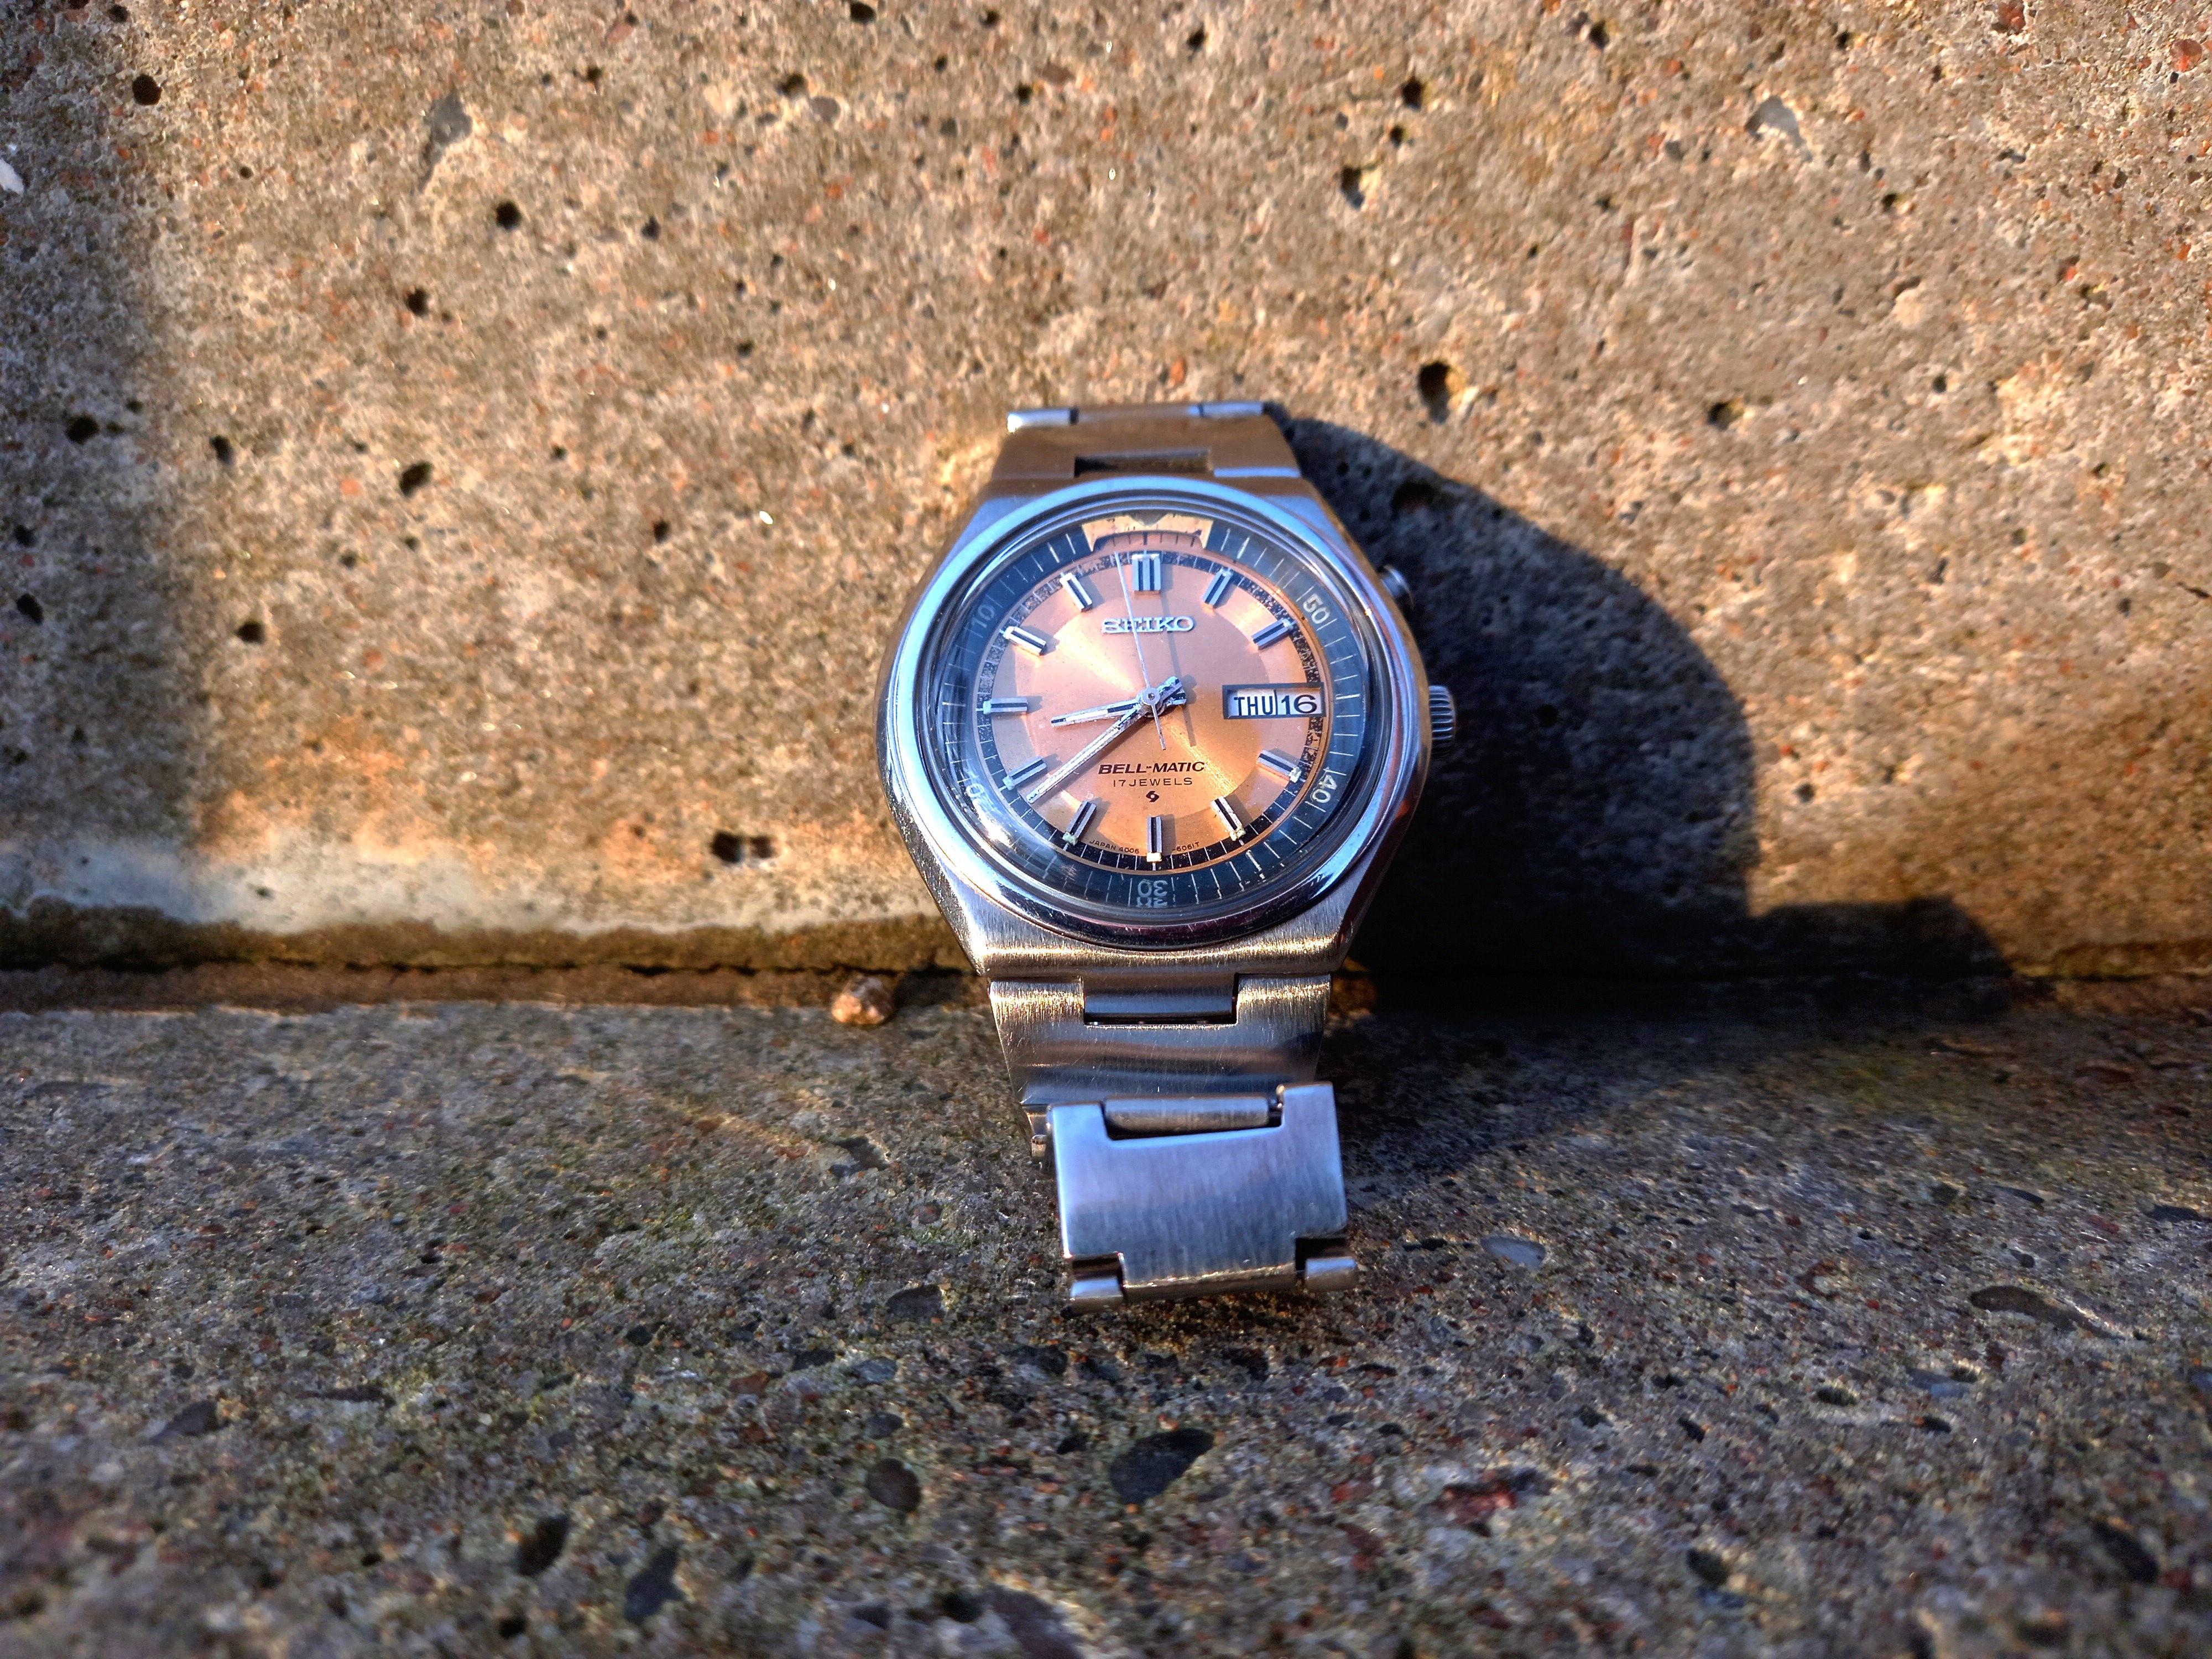
Finally! Wearing it for a few days to confirm my standards. Bellmatic 4006a

 1 point
 -
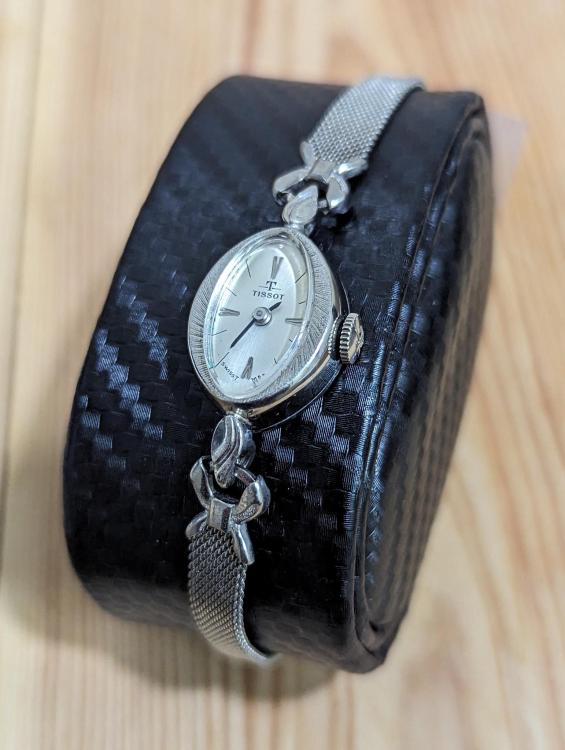
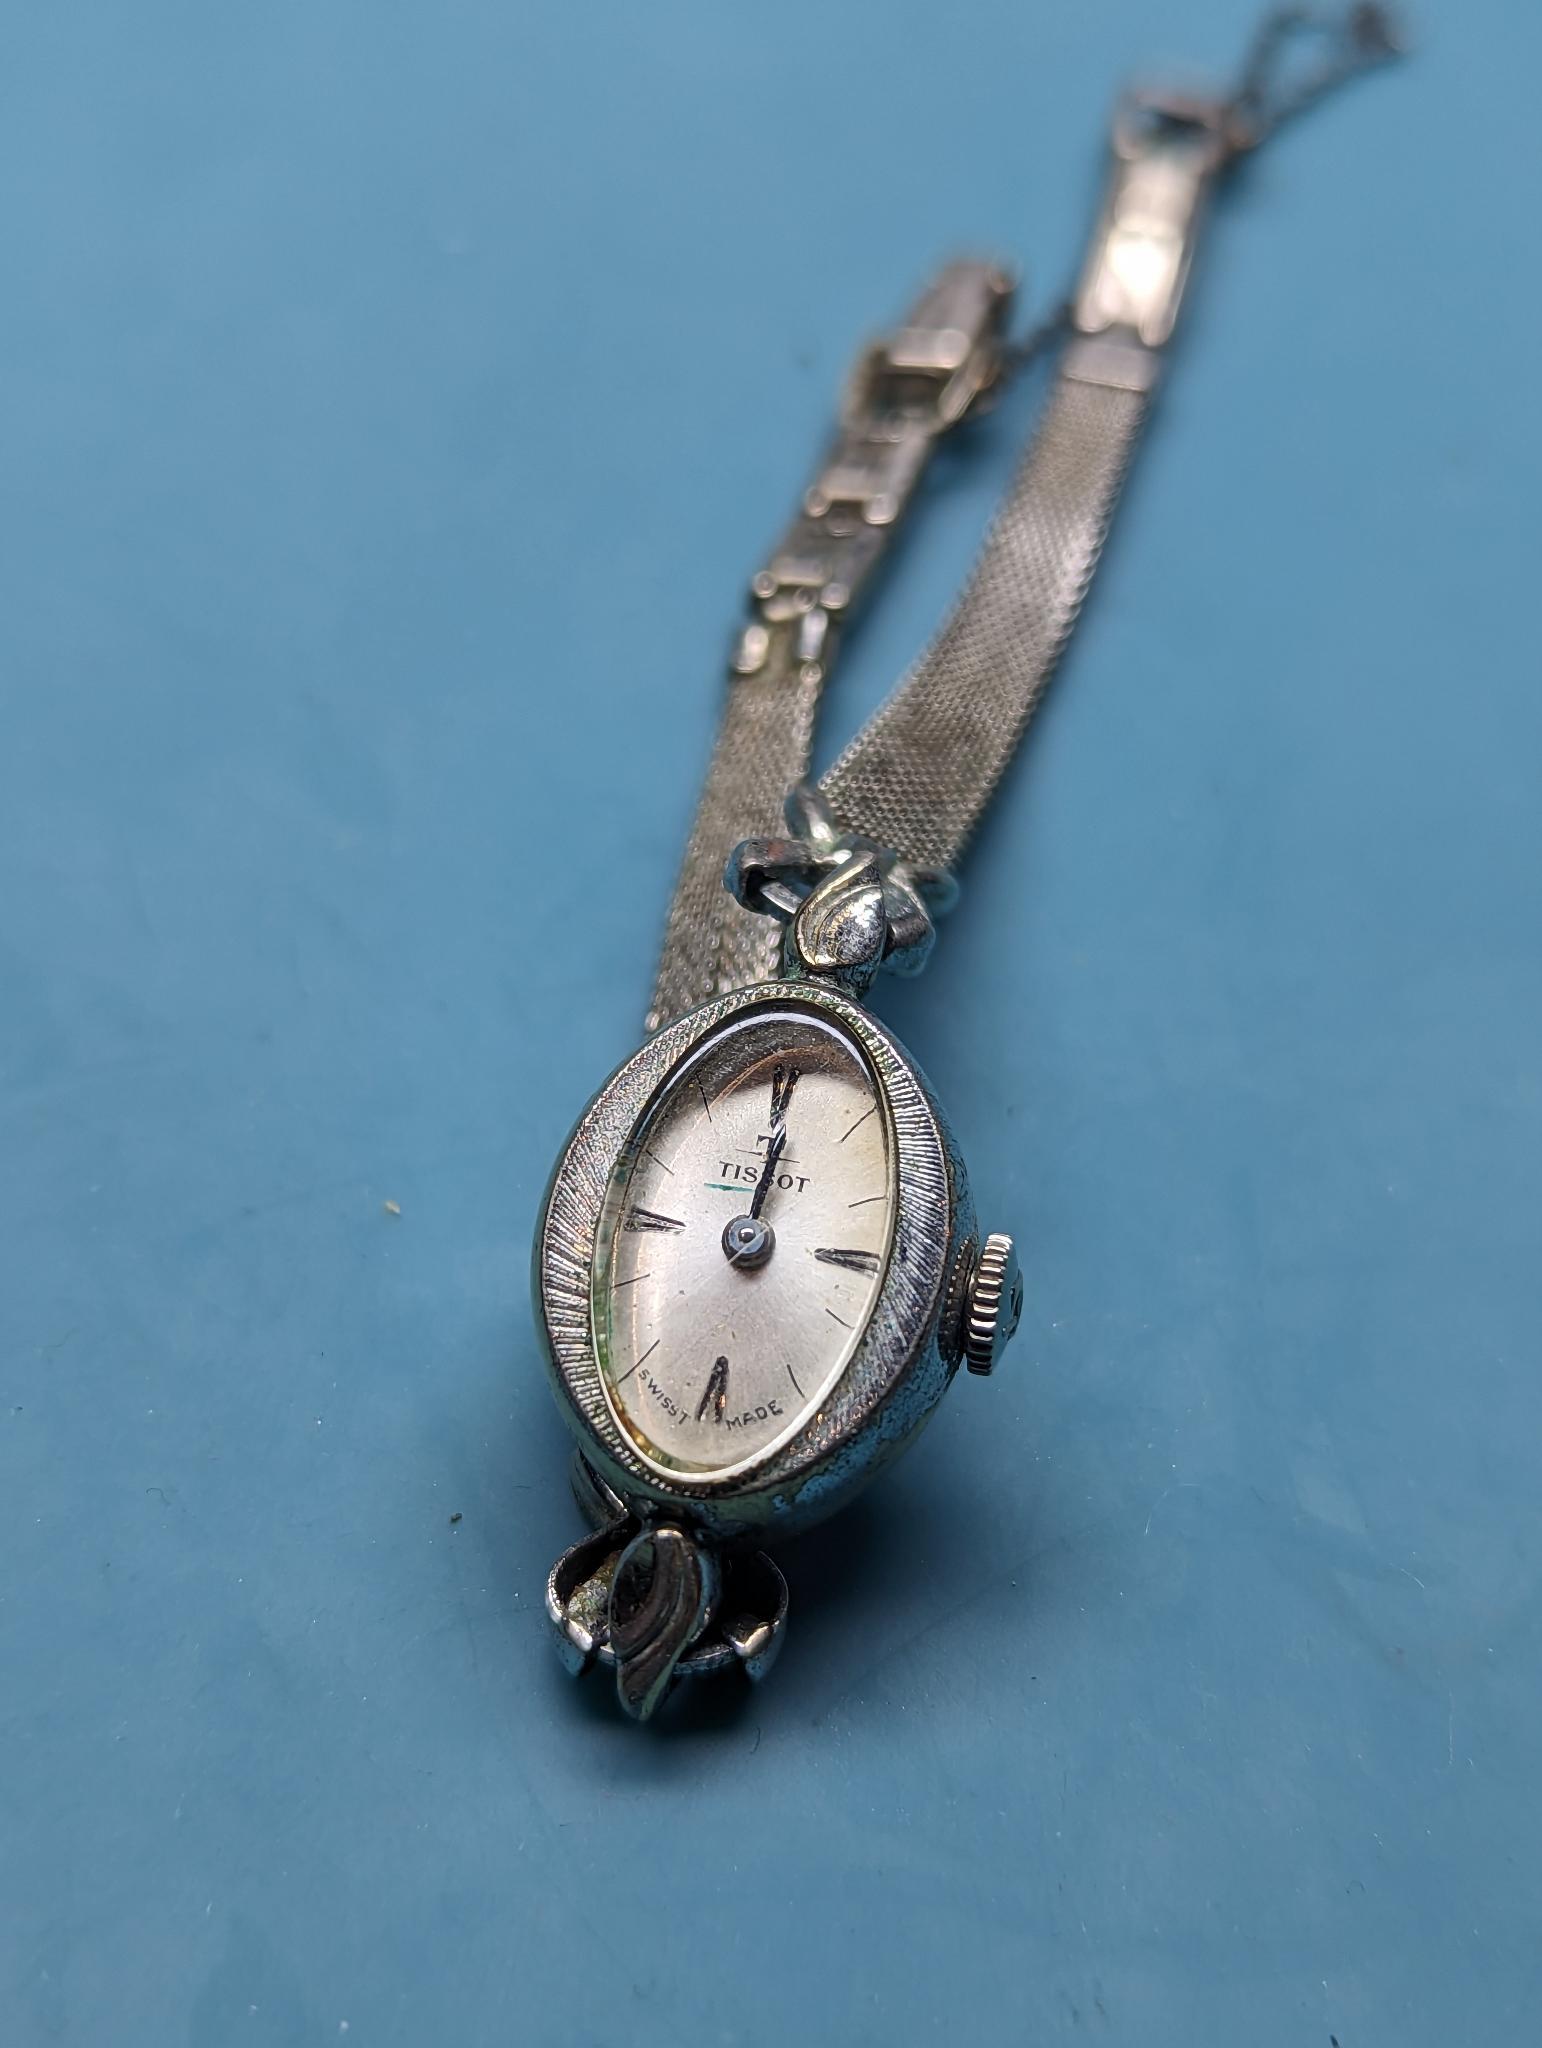
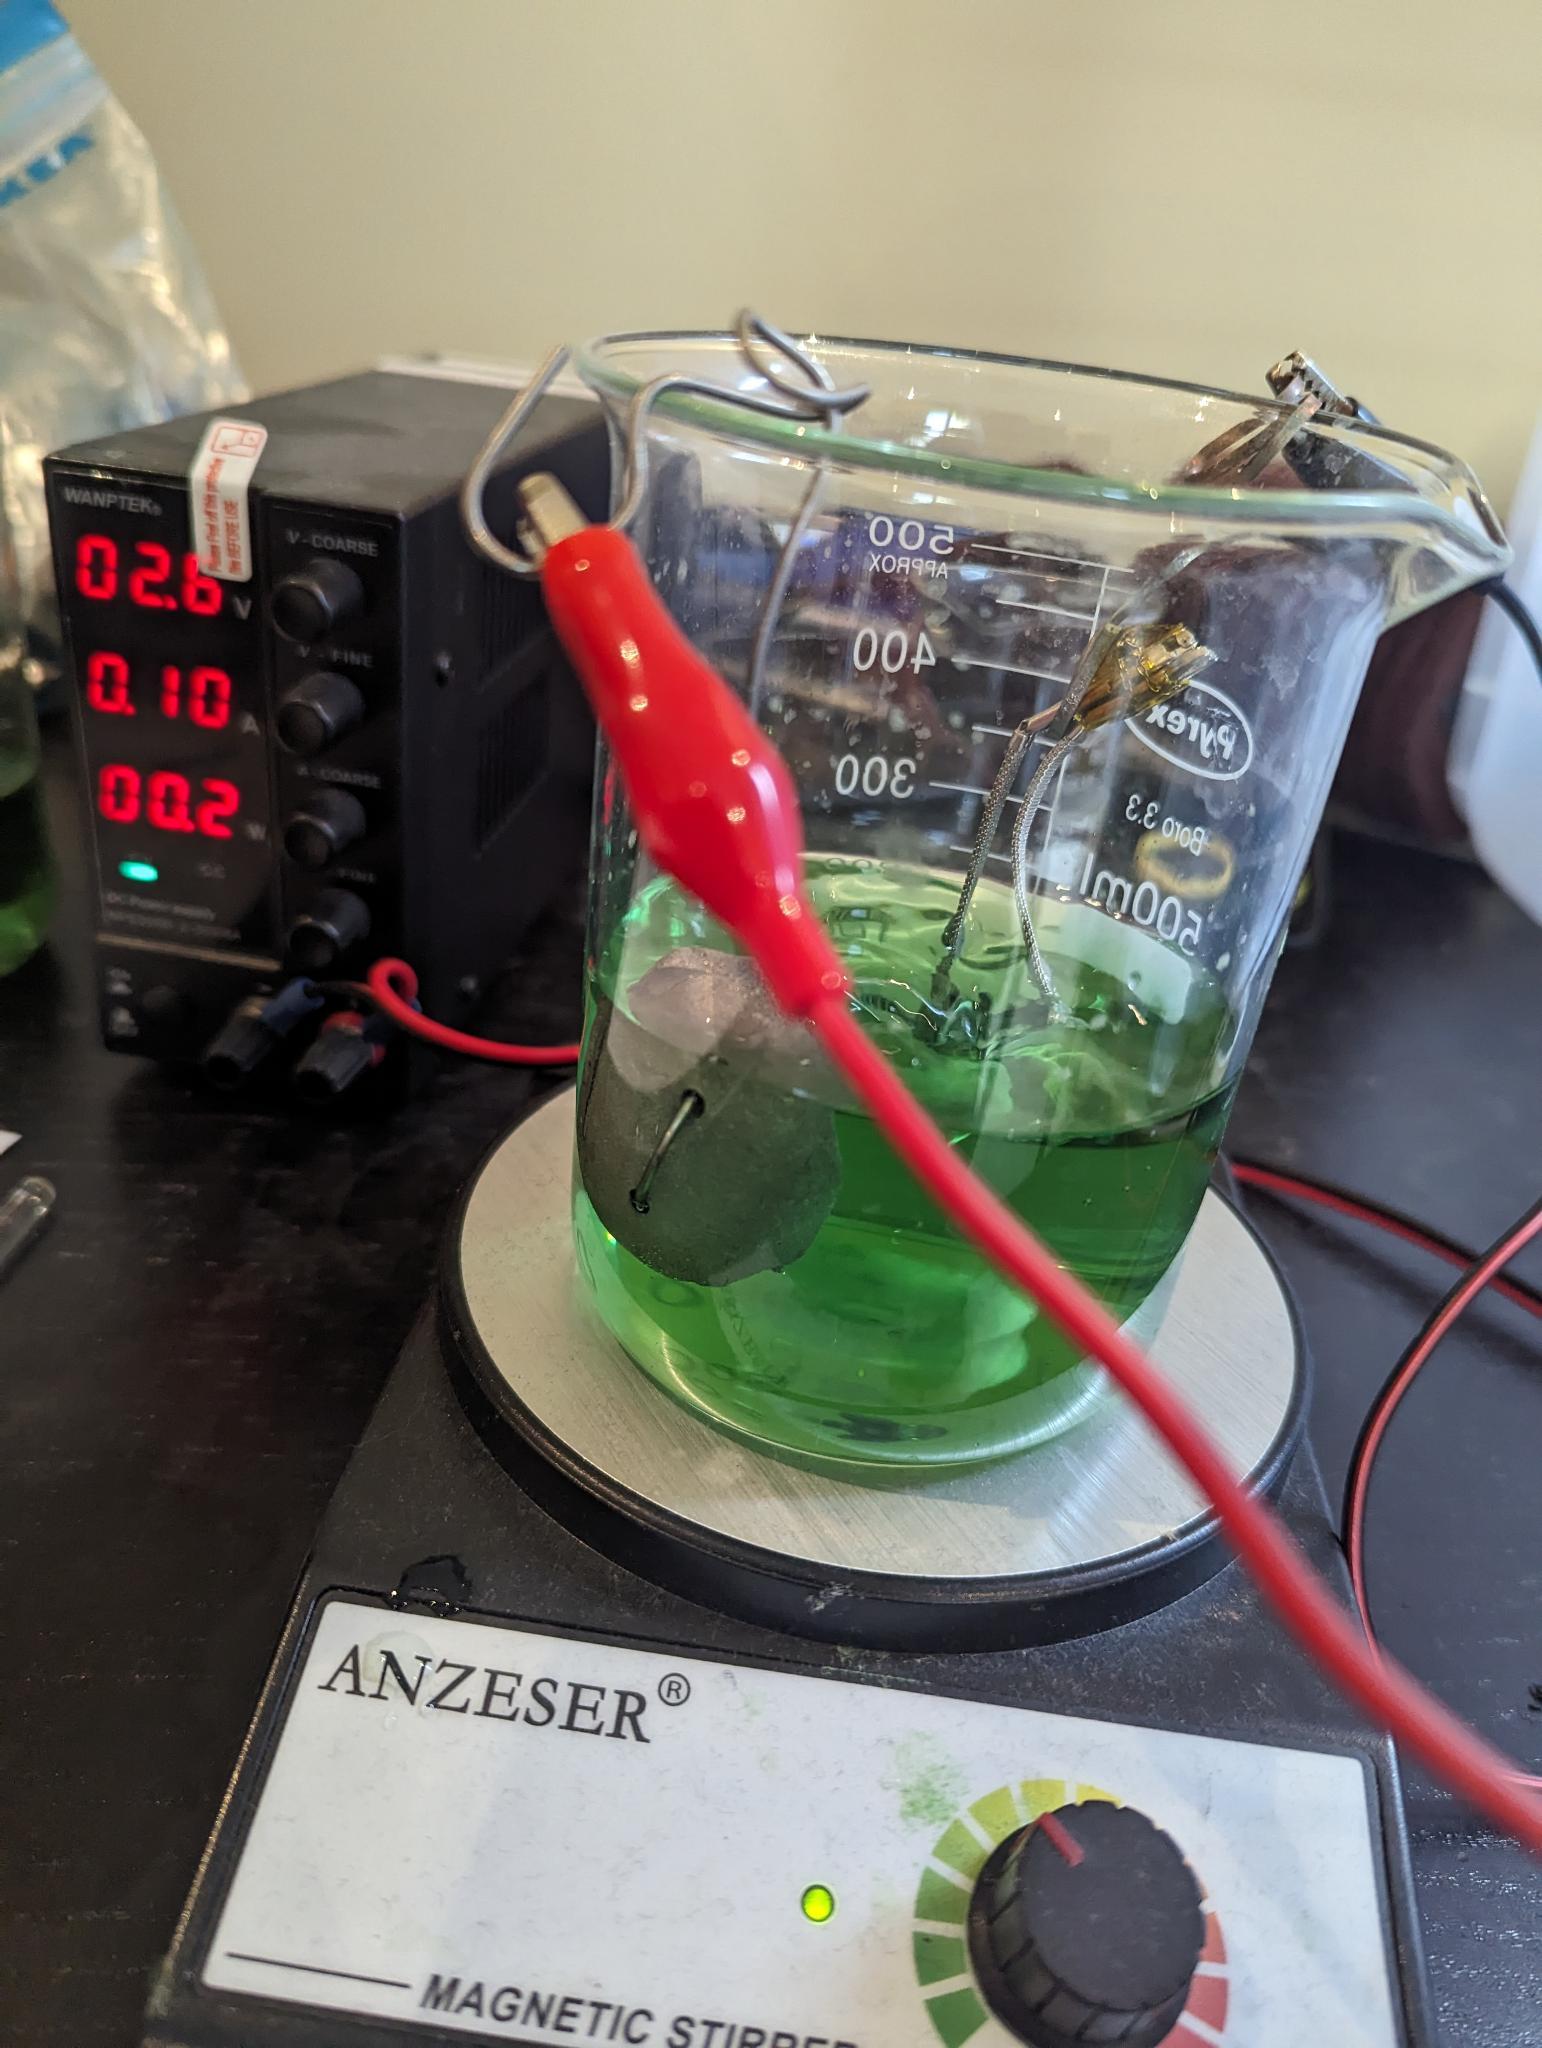
Also done a few ladies watches, here is an absolutely tiny Tissot that I had to replate: Before: Plating process: And here is the finished watch:

 1 point
 -
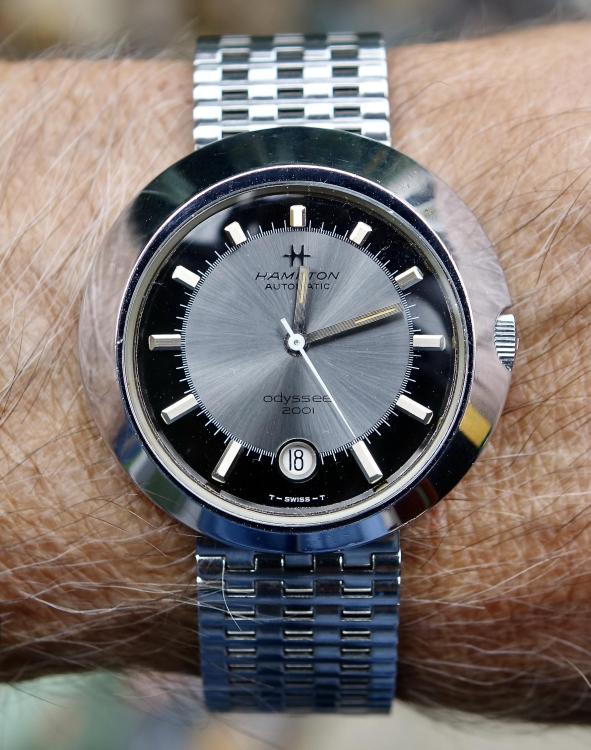
2001 Odyssee
 1 point
 -
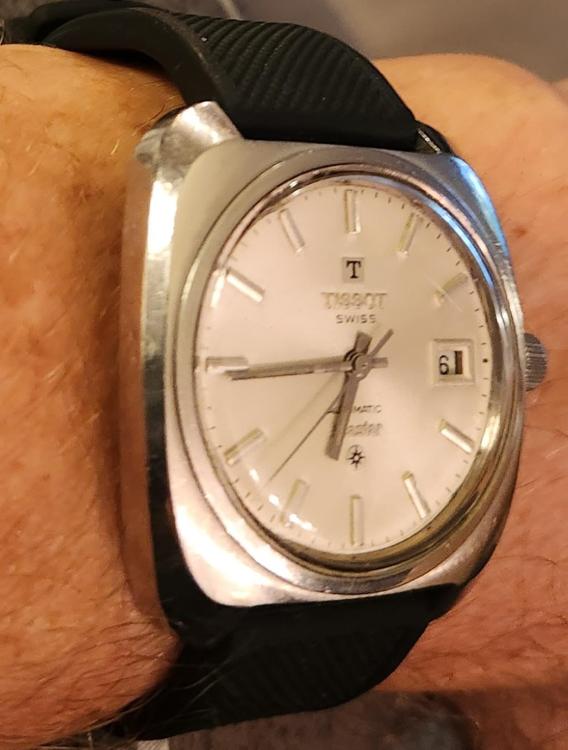
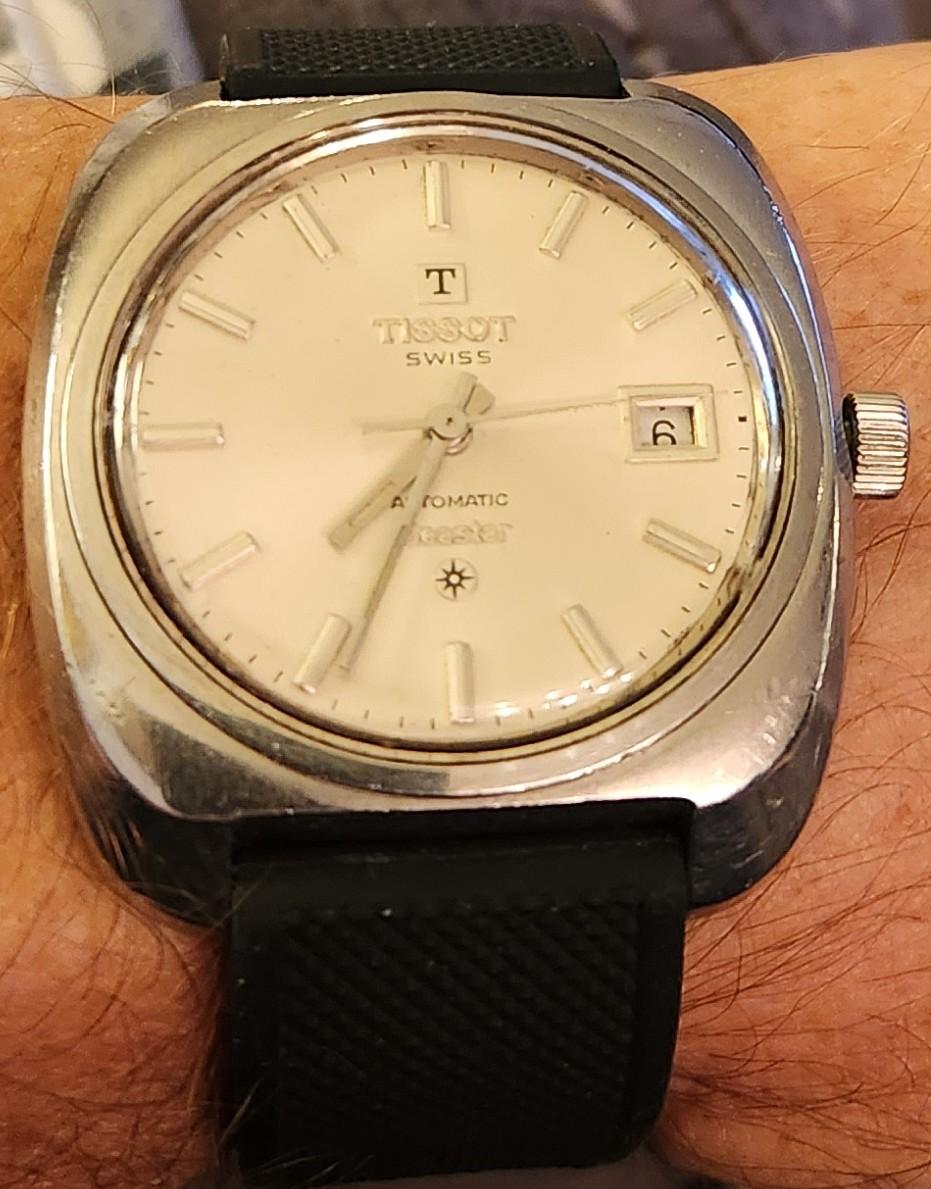
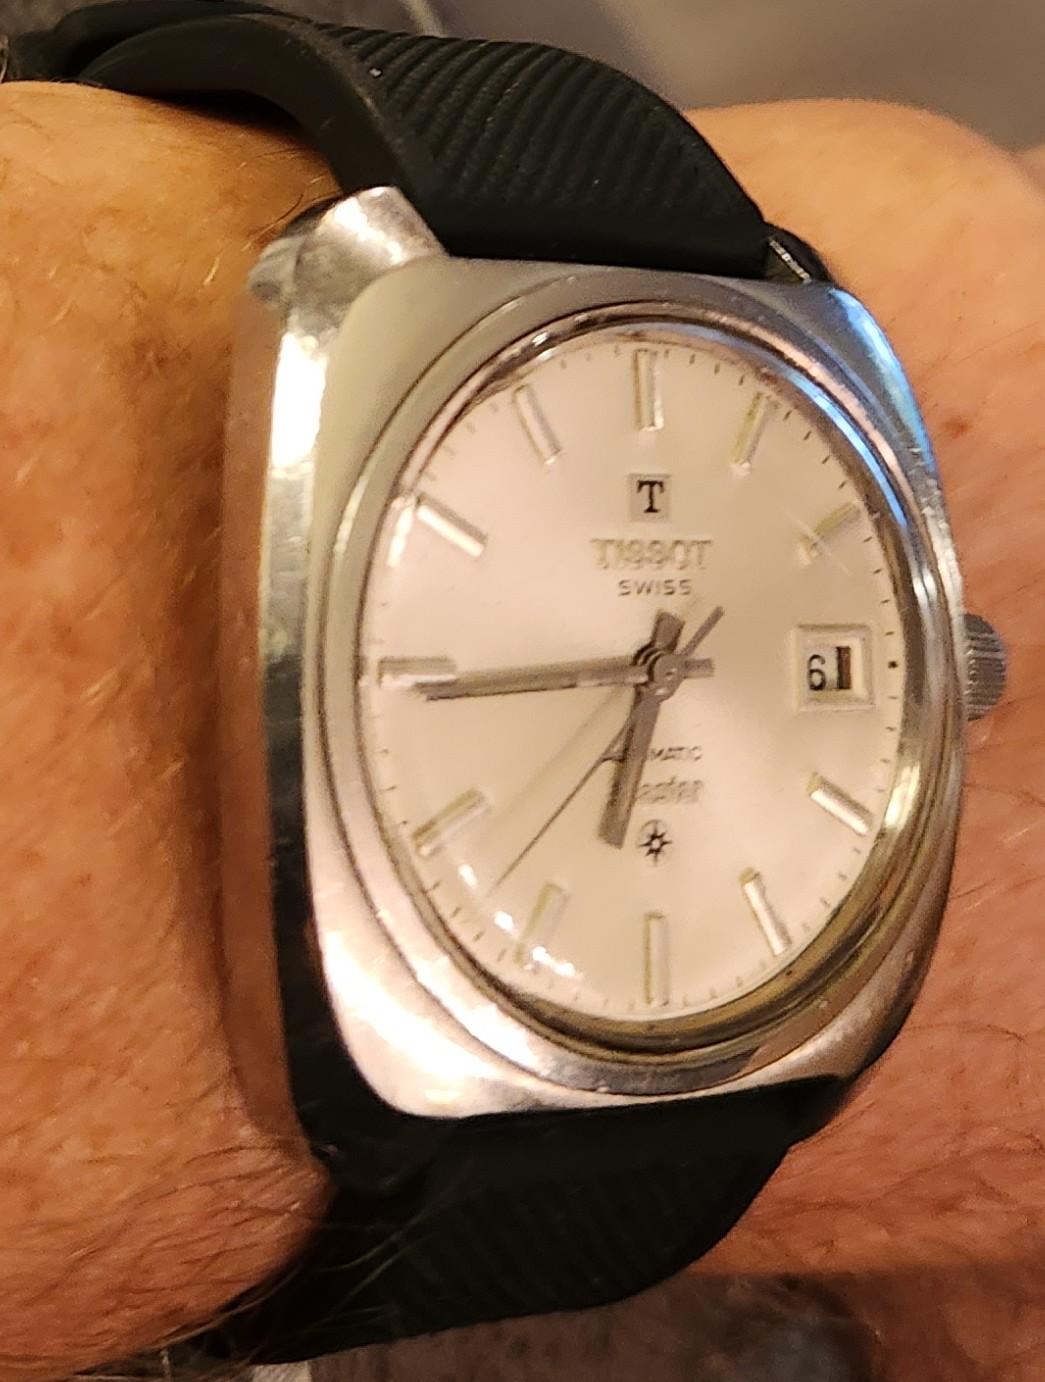
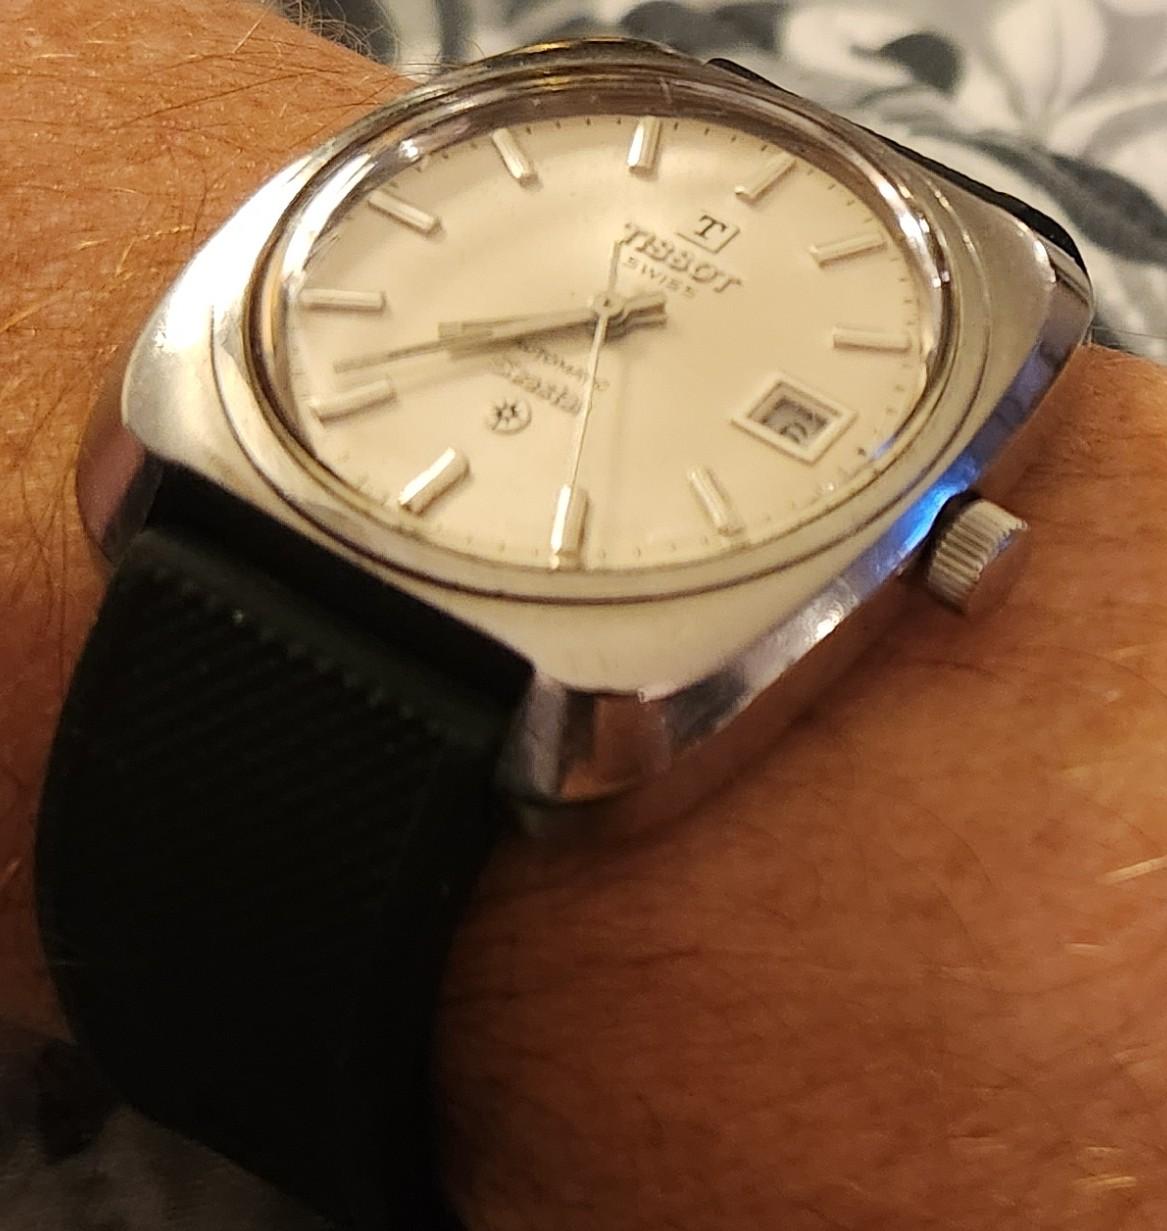
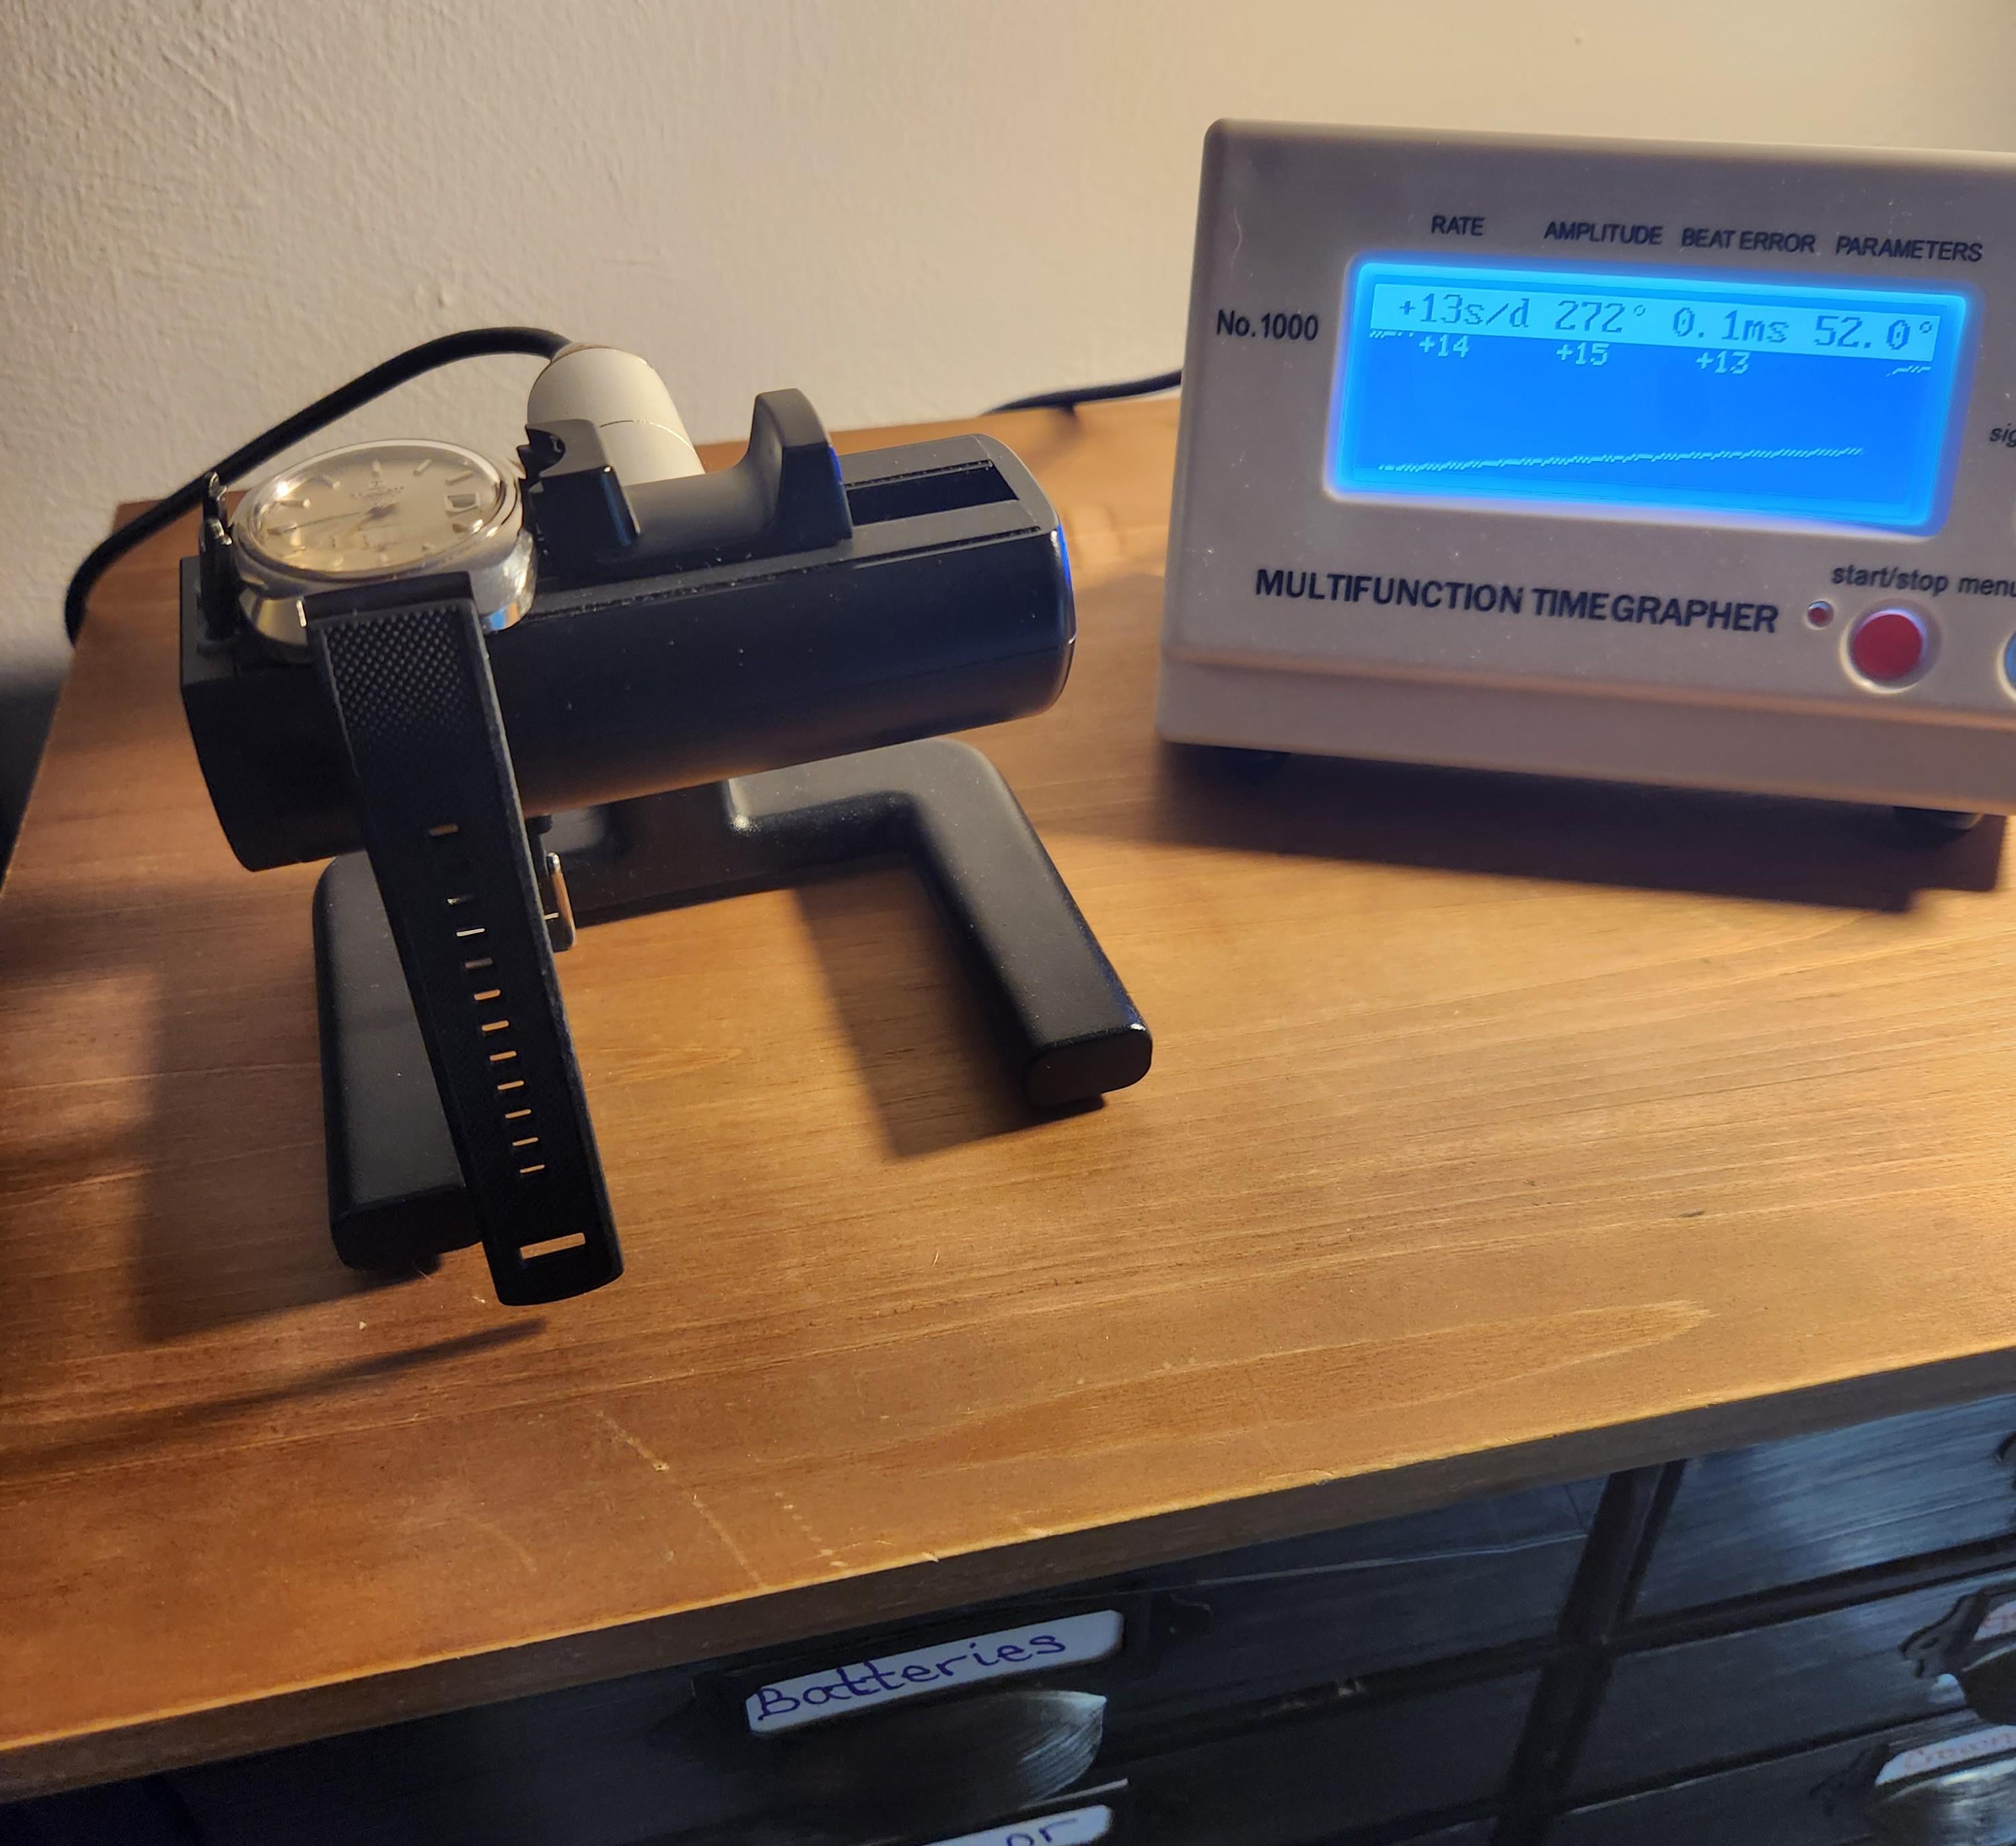
Just arrived today. Tissot Seastar automatic with a 2481. I really like the cushion case and this may be my daily wearer for quite a while. Some very minor adjustments only. Added a Barton silicone band that is extremely comfortable on the wrist. I need to look up the serial number but must be early to mid 70s.


 1 point
 -
Somewhere along the way the insider bits of a 68 marlin were cased into mercury. So I decided to right this wrong. With the help of an NOS 1970 dial, the correct case, and even the date stamp. This now is a period correct 1970 Marlin. full service of the M25 movement, crystal buffed and polished, etc.
.thumb.jpg.dc9a4120bc428412a335b91599cfd9b9.jpg)
 1 point
 -
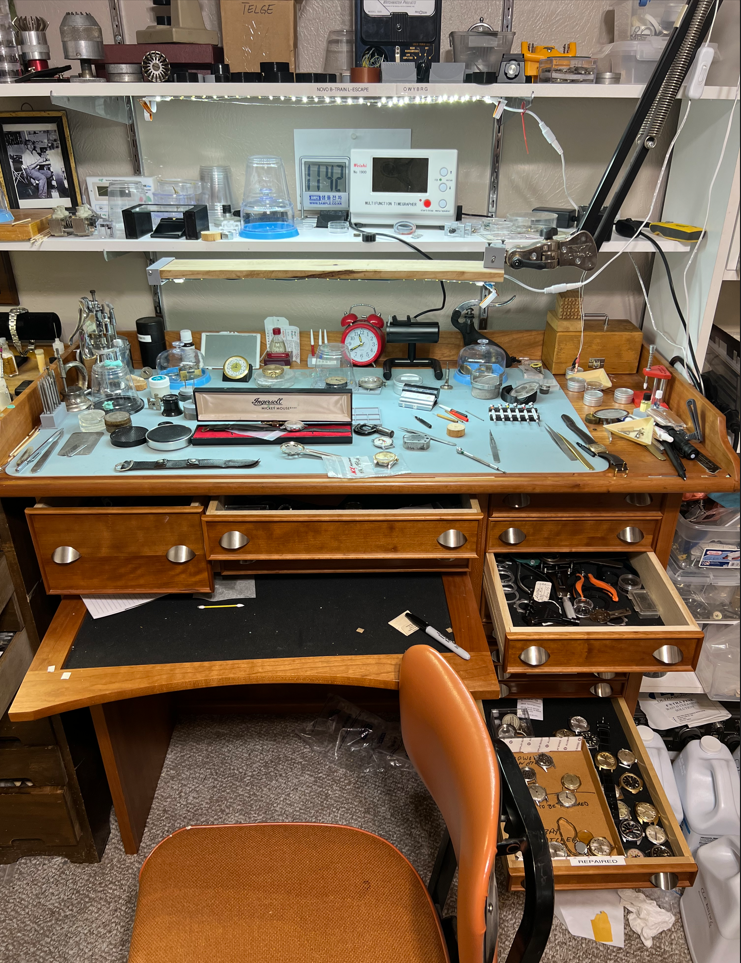
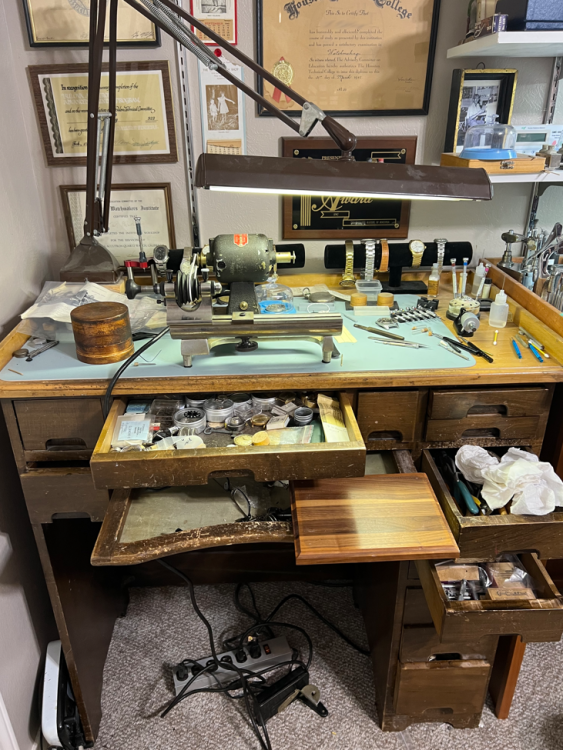
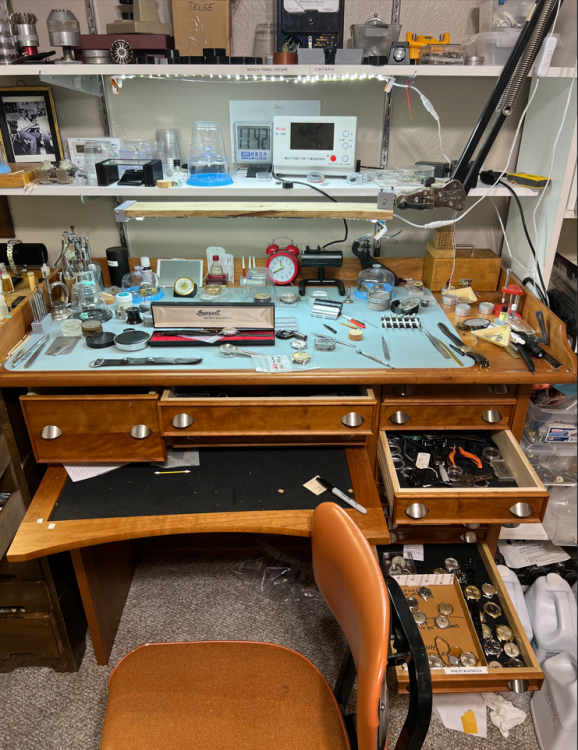
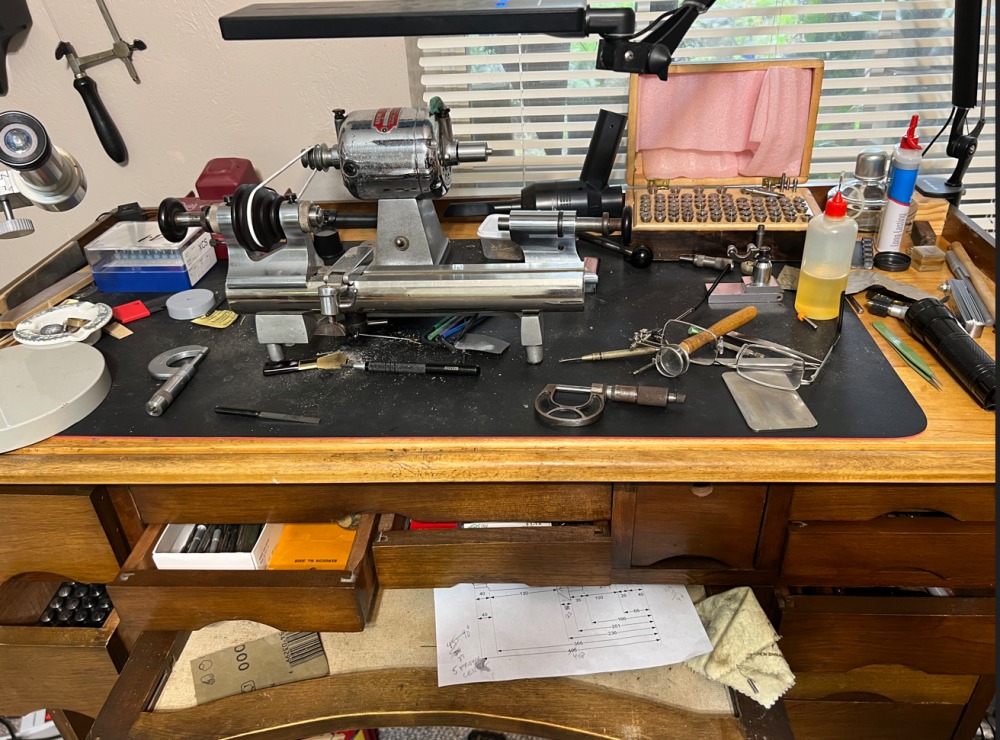
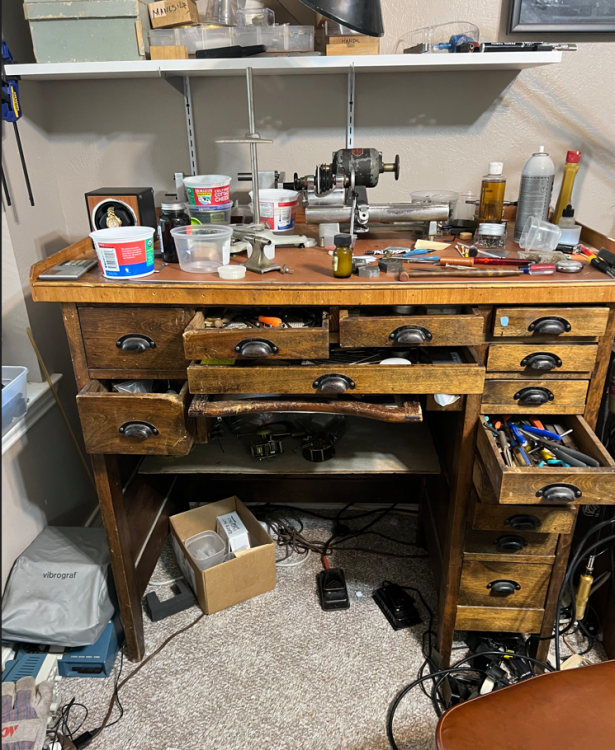
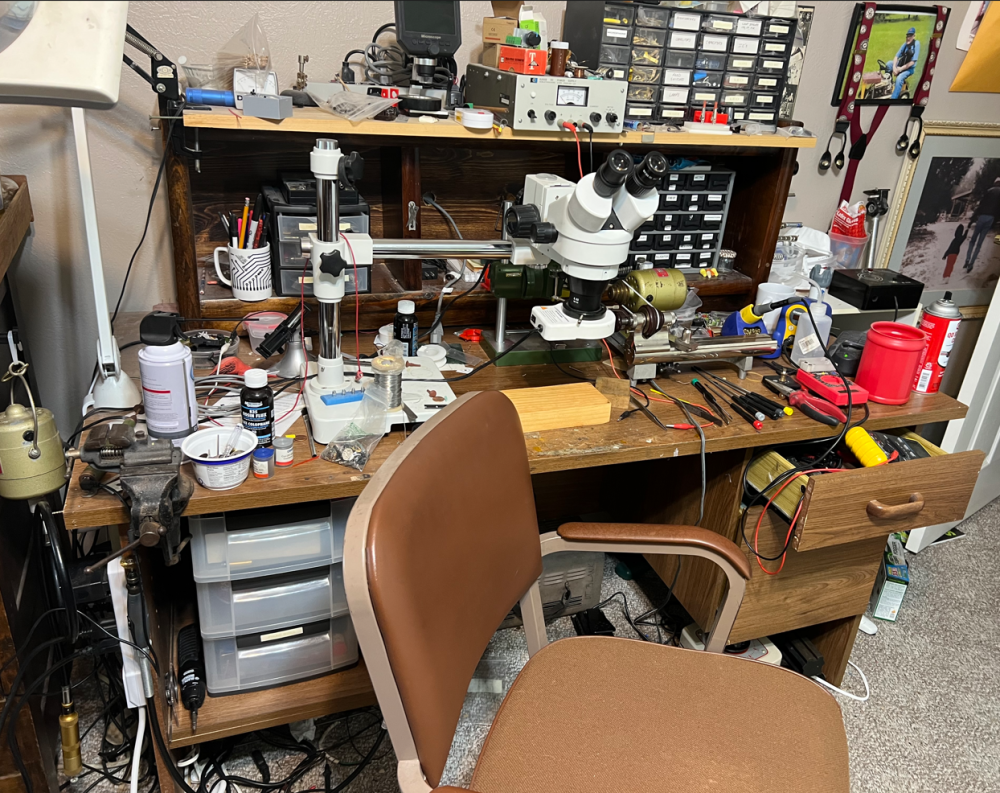
My wife took these pictures today. Not sure if there is a message that I am supposed to get The first bench is the one from my Dad. The second is the one I bought from Maine. The third I bought from someone in Wyoming. The last watch bench came from Dallas. The other bench is just a converted office desk. The last picture captures a portion of the room. This was not staged...and I am a little embarrassed about how it looks. That's me and Cromwell.
 1 point
 -
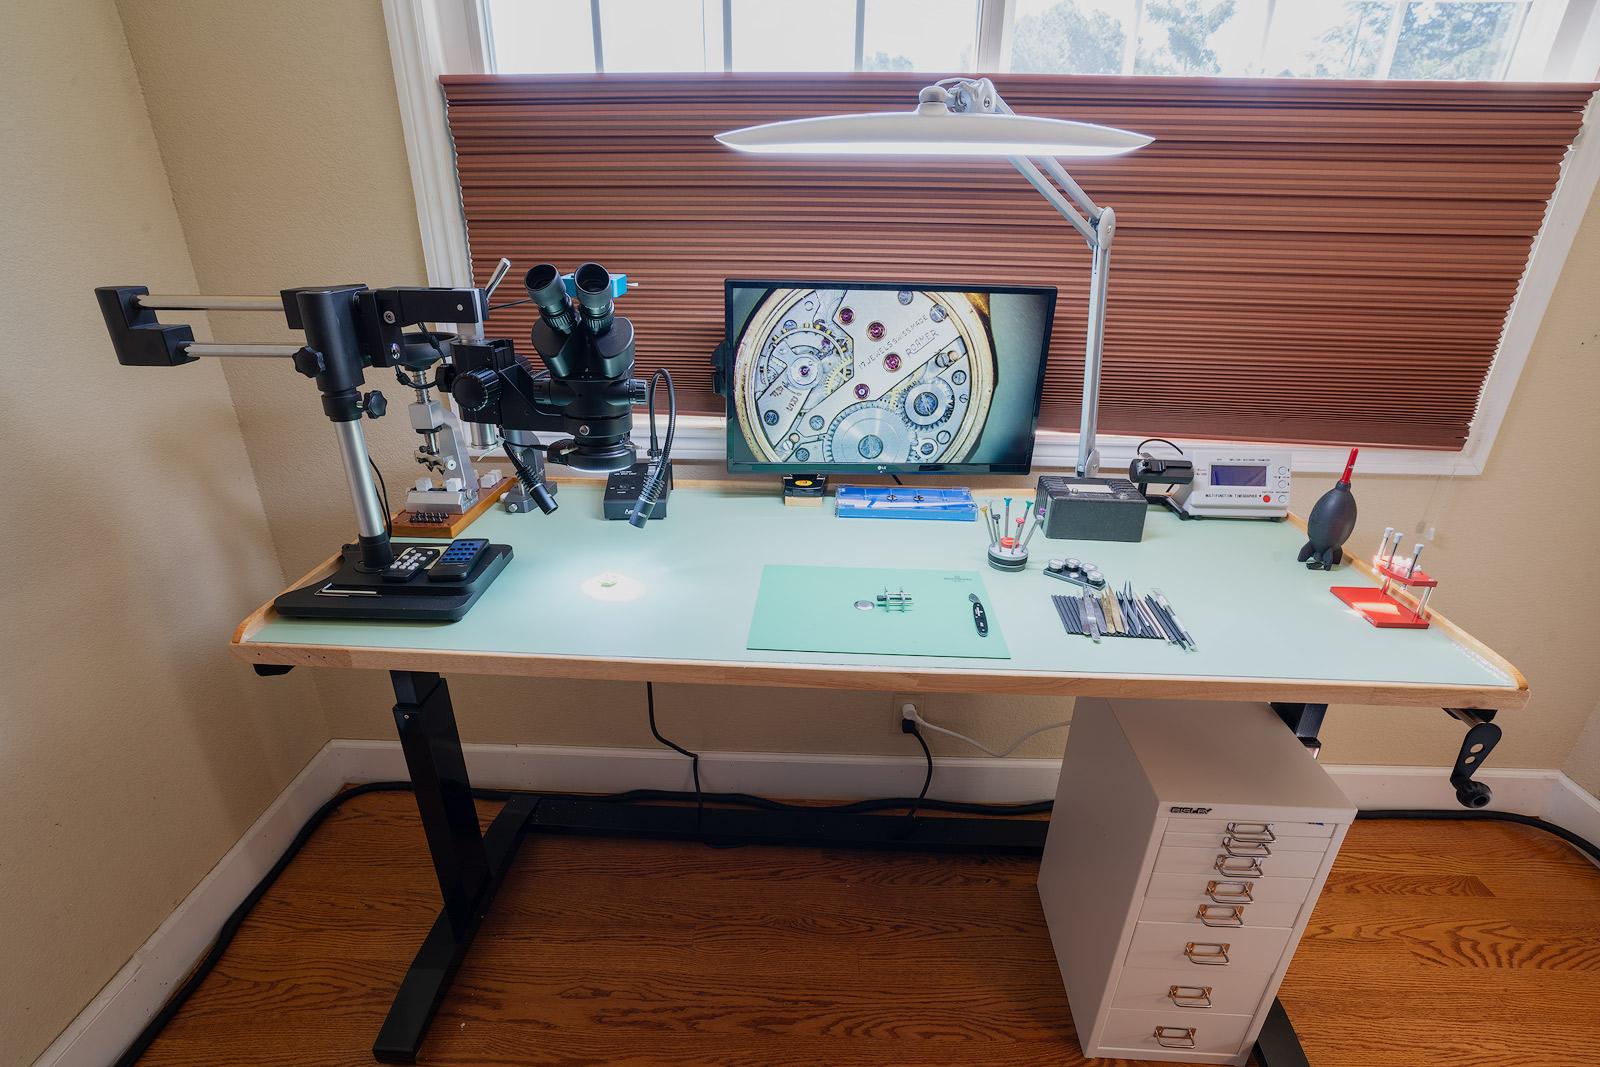
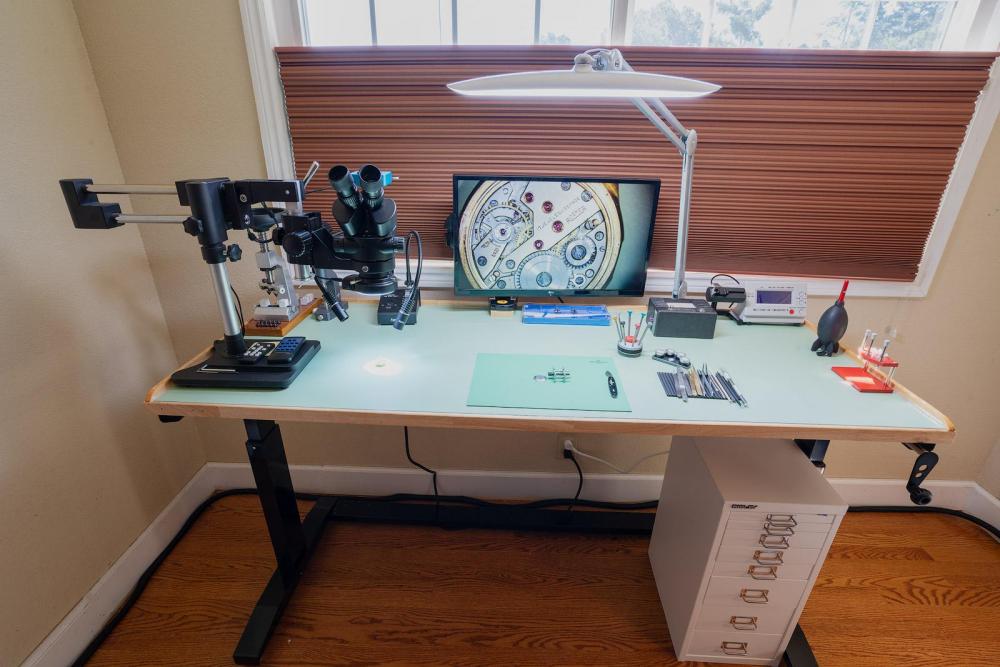
I was inspired by a post on the Watch Repair Lessons Facebook group showing a DIY watch bench. It's using a 62" Husky adjustable height desk with some added rails along the back and sides and a Vyco table mat on the desktop. My old setup was so cramped and jumbled together and now after getting rid of my old office desk, I have a lot more room to work and I can adjust the height of the desk to ideal. I'll eventually be adding some more drawers/tables along the sides for storage. It was (somewhat) cost effective with the desk costing $199 (on sale), the Vyco mat $75 (free shipping), and the rails just some pine from my local lumber yard for $14.
 1 point
 -
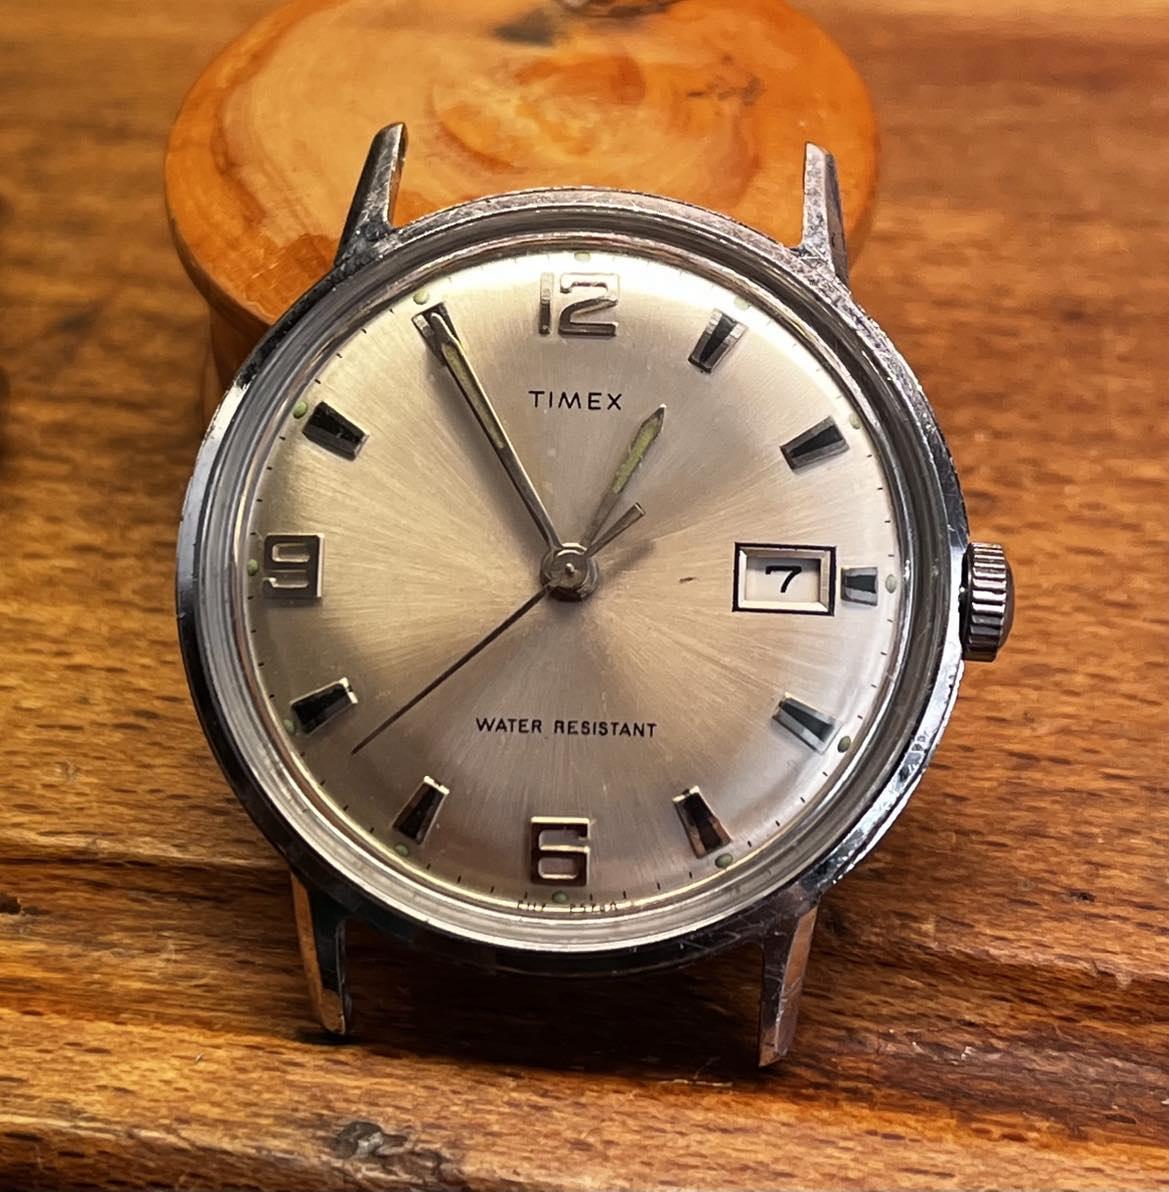
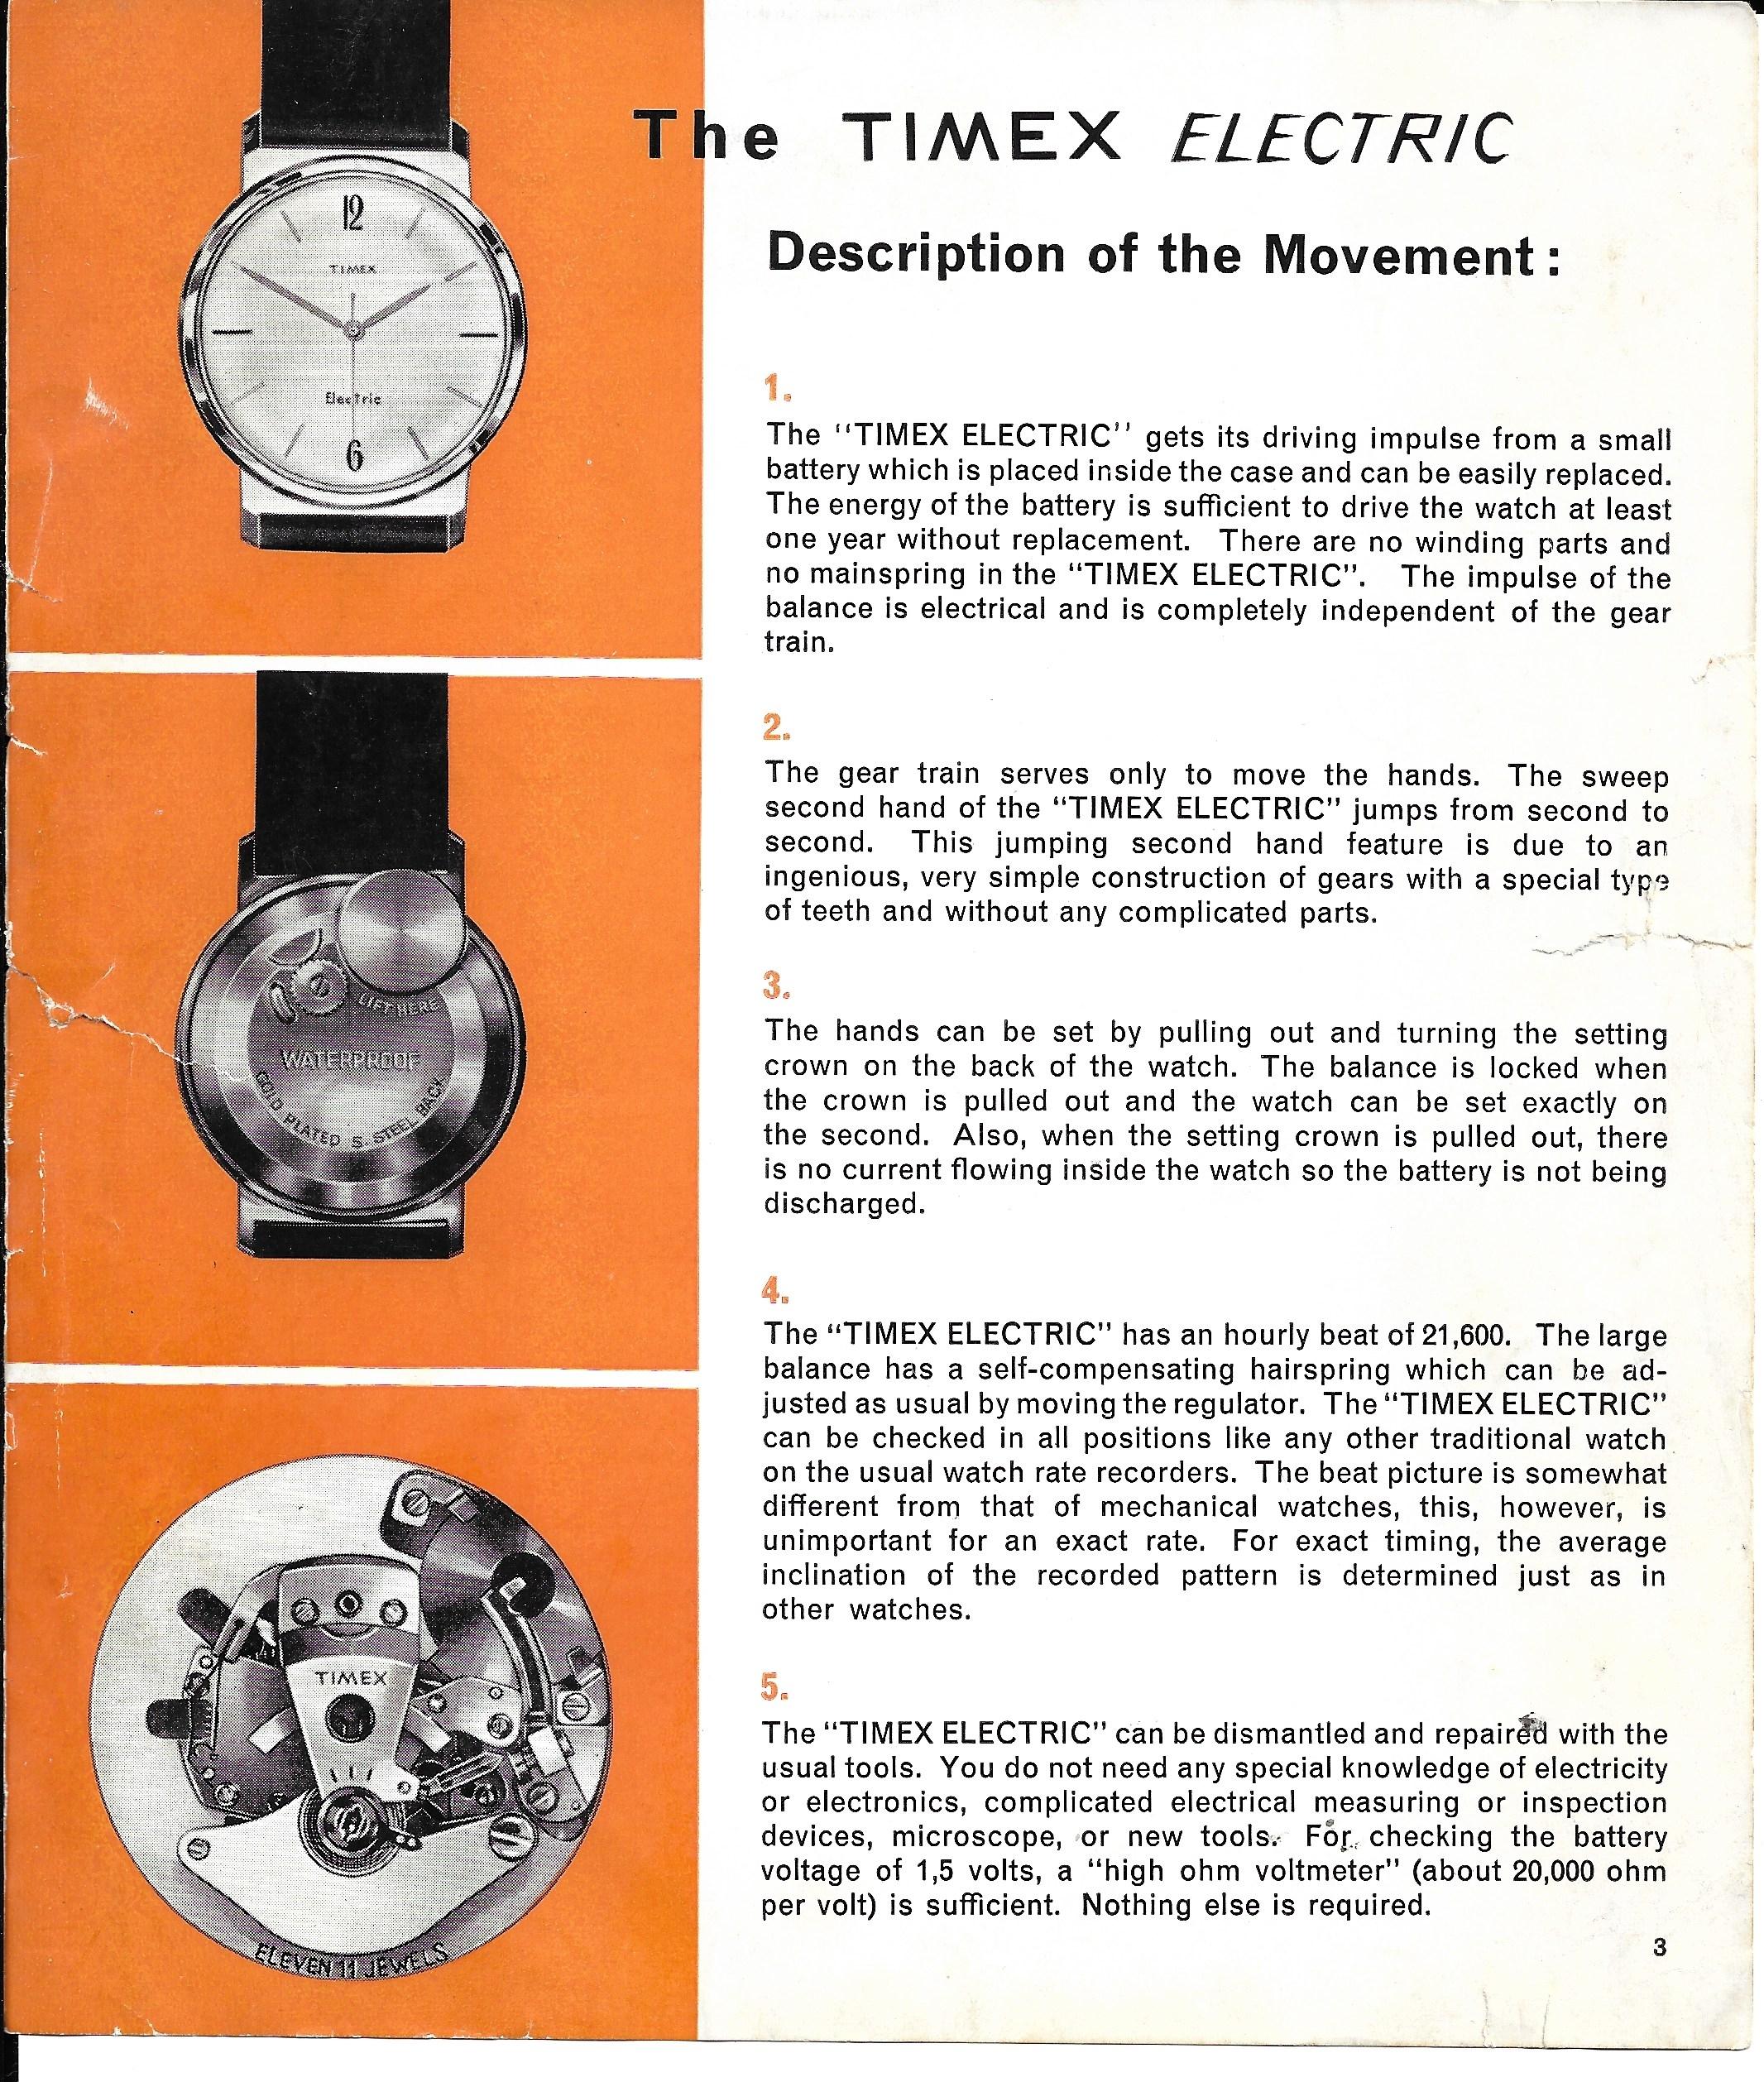
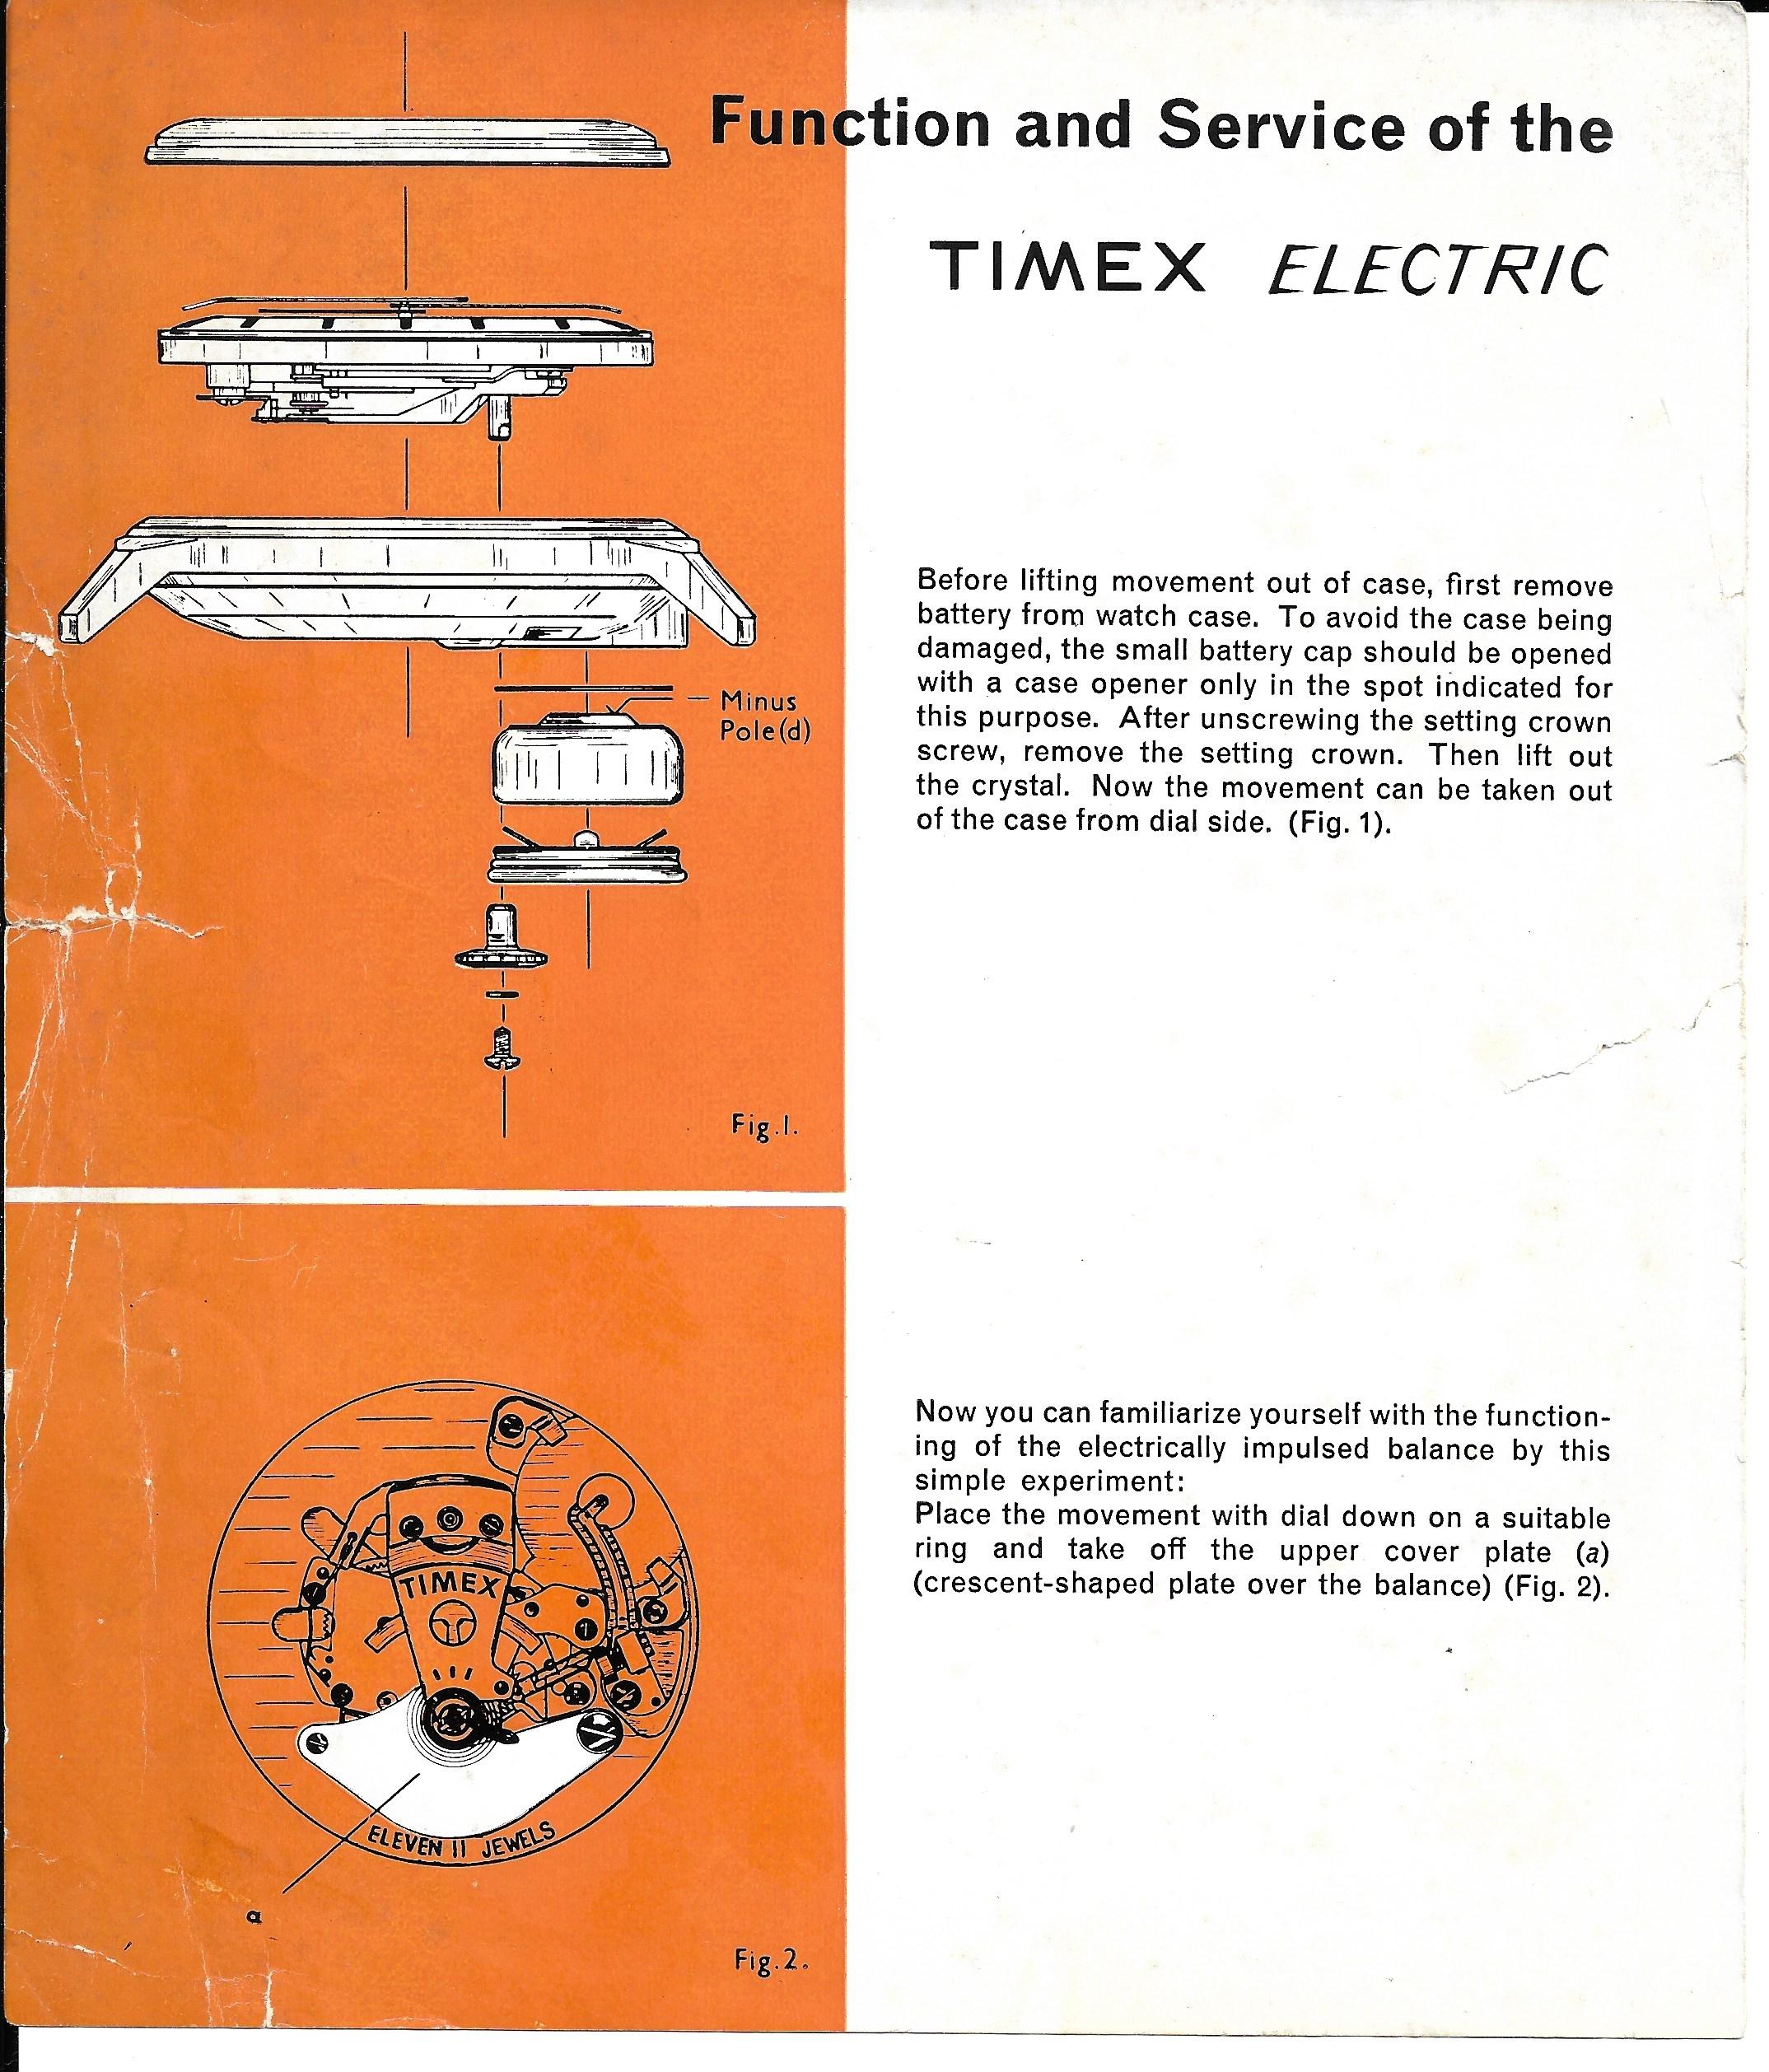
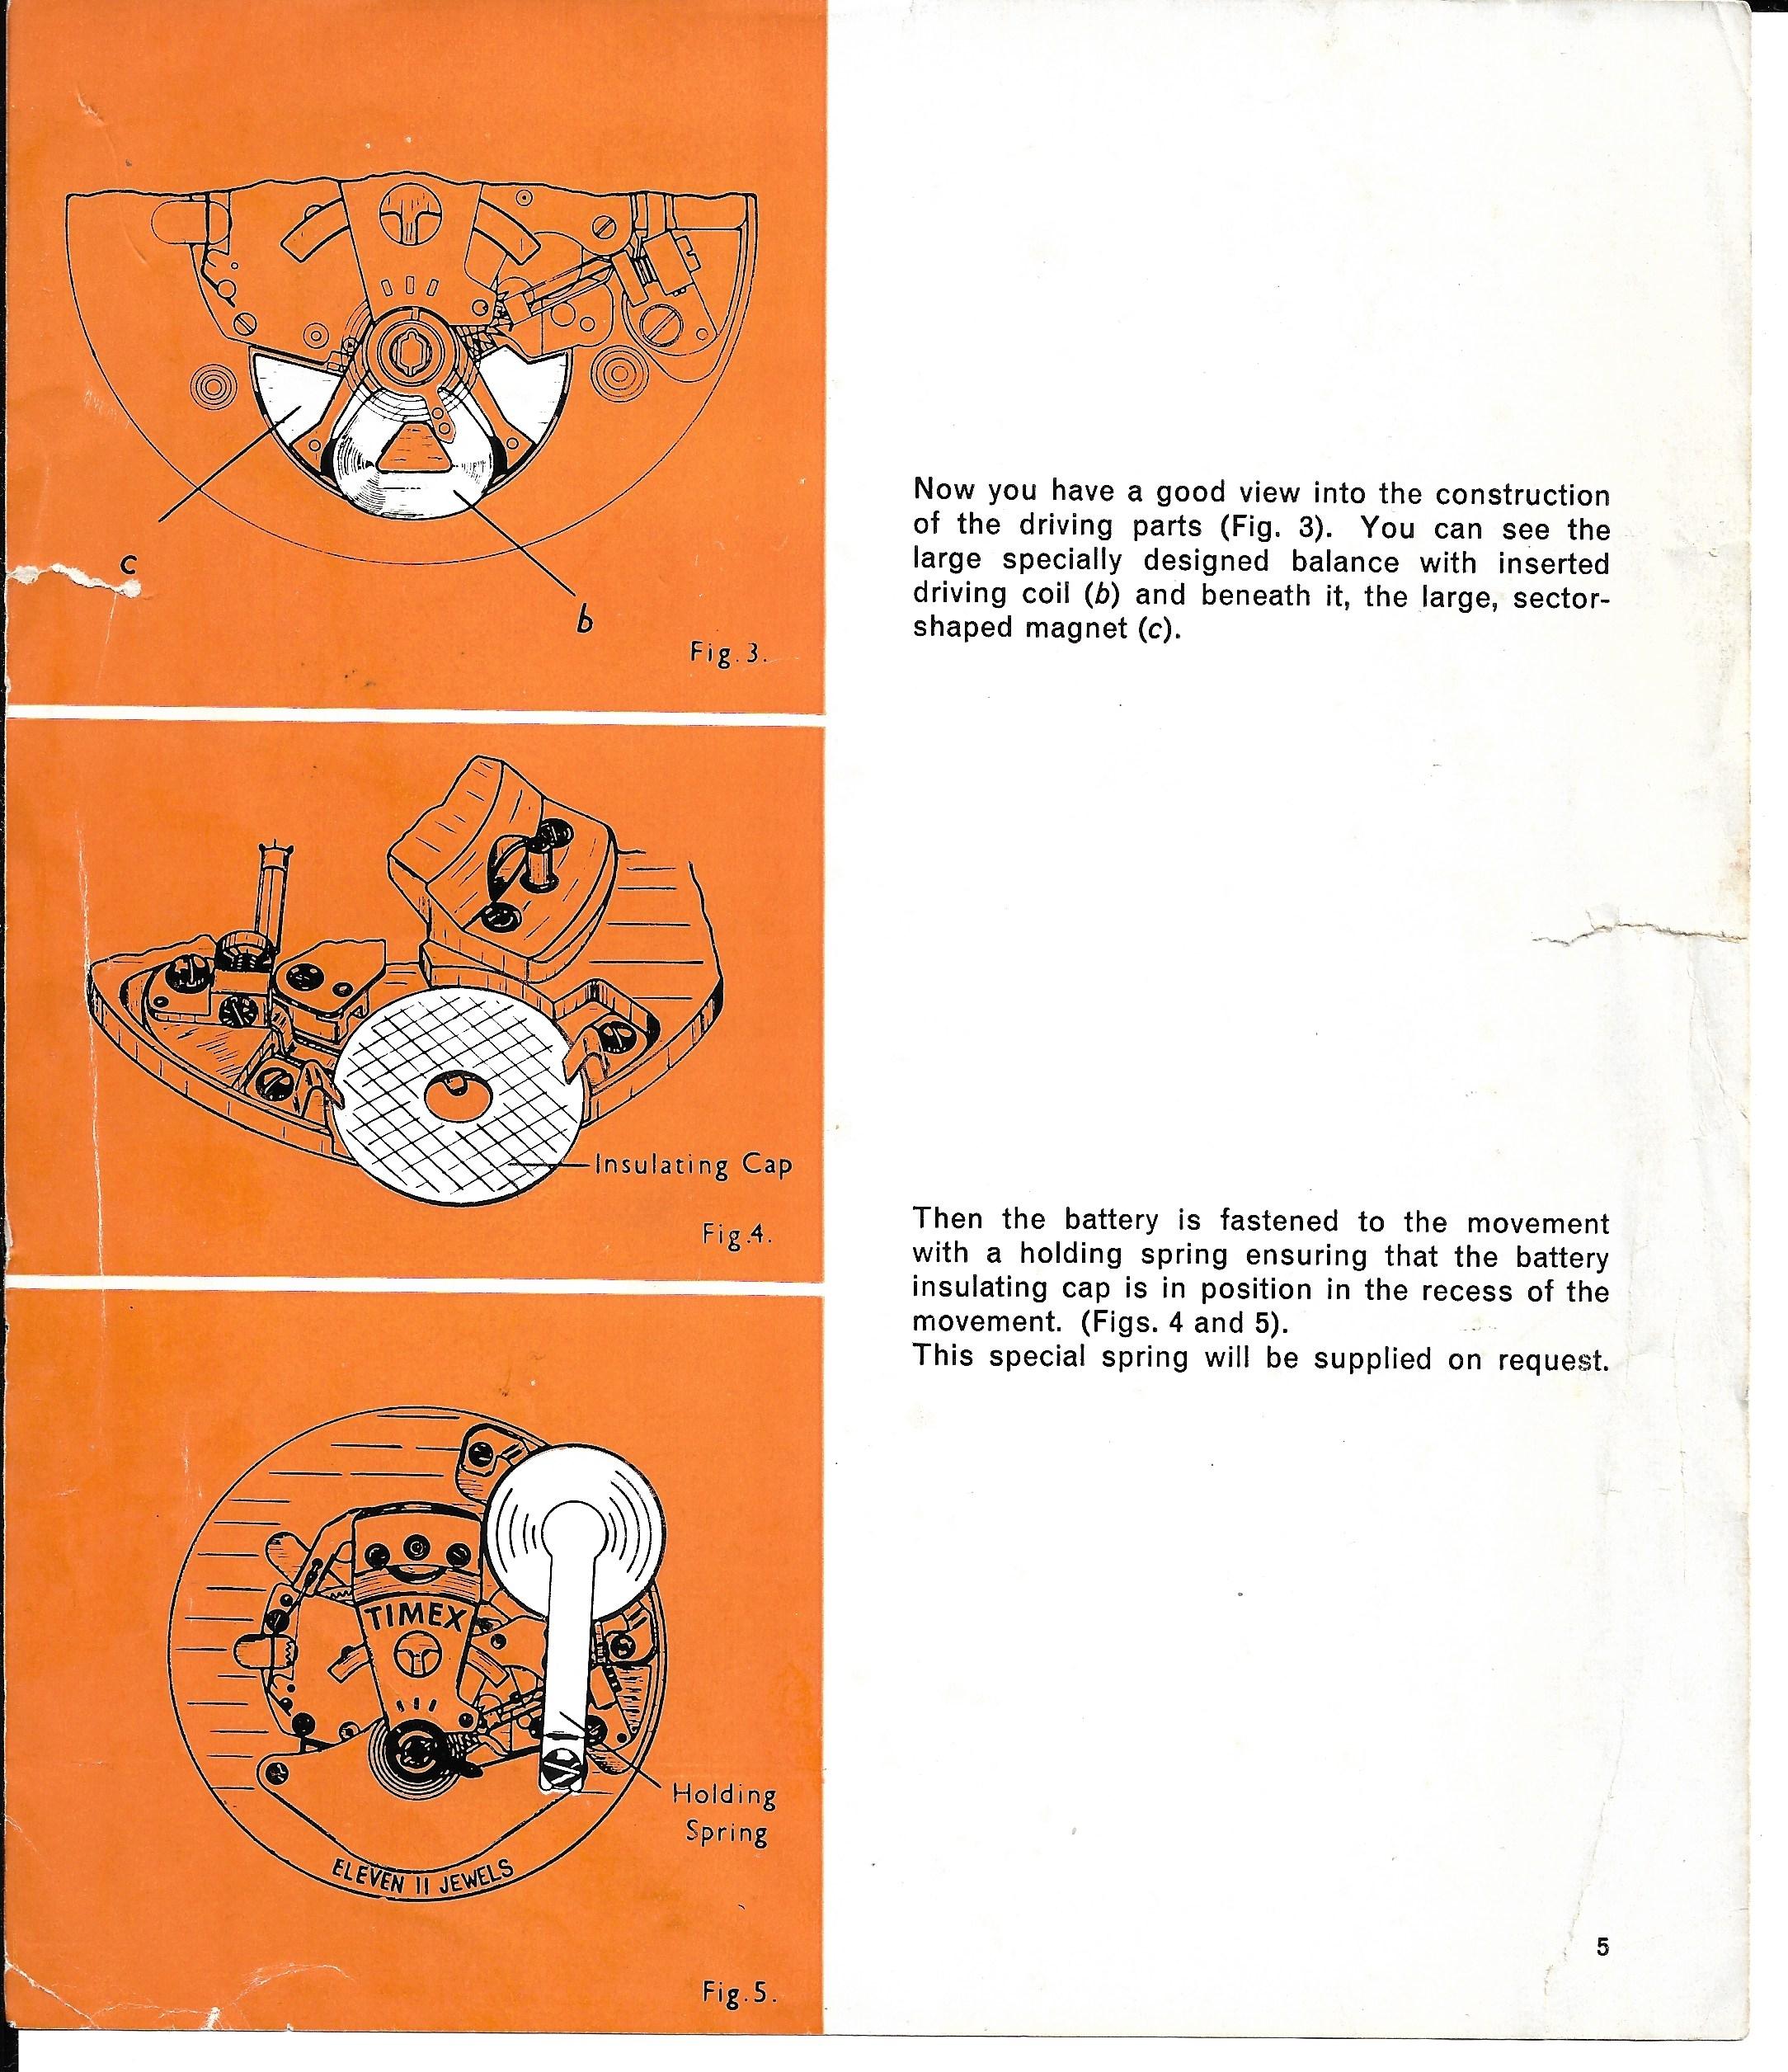
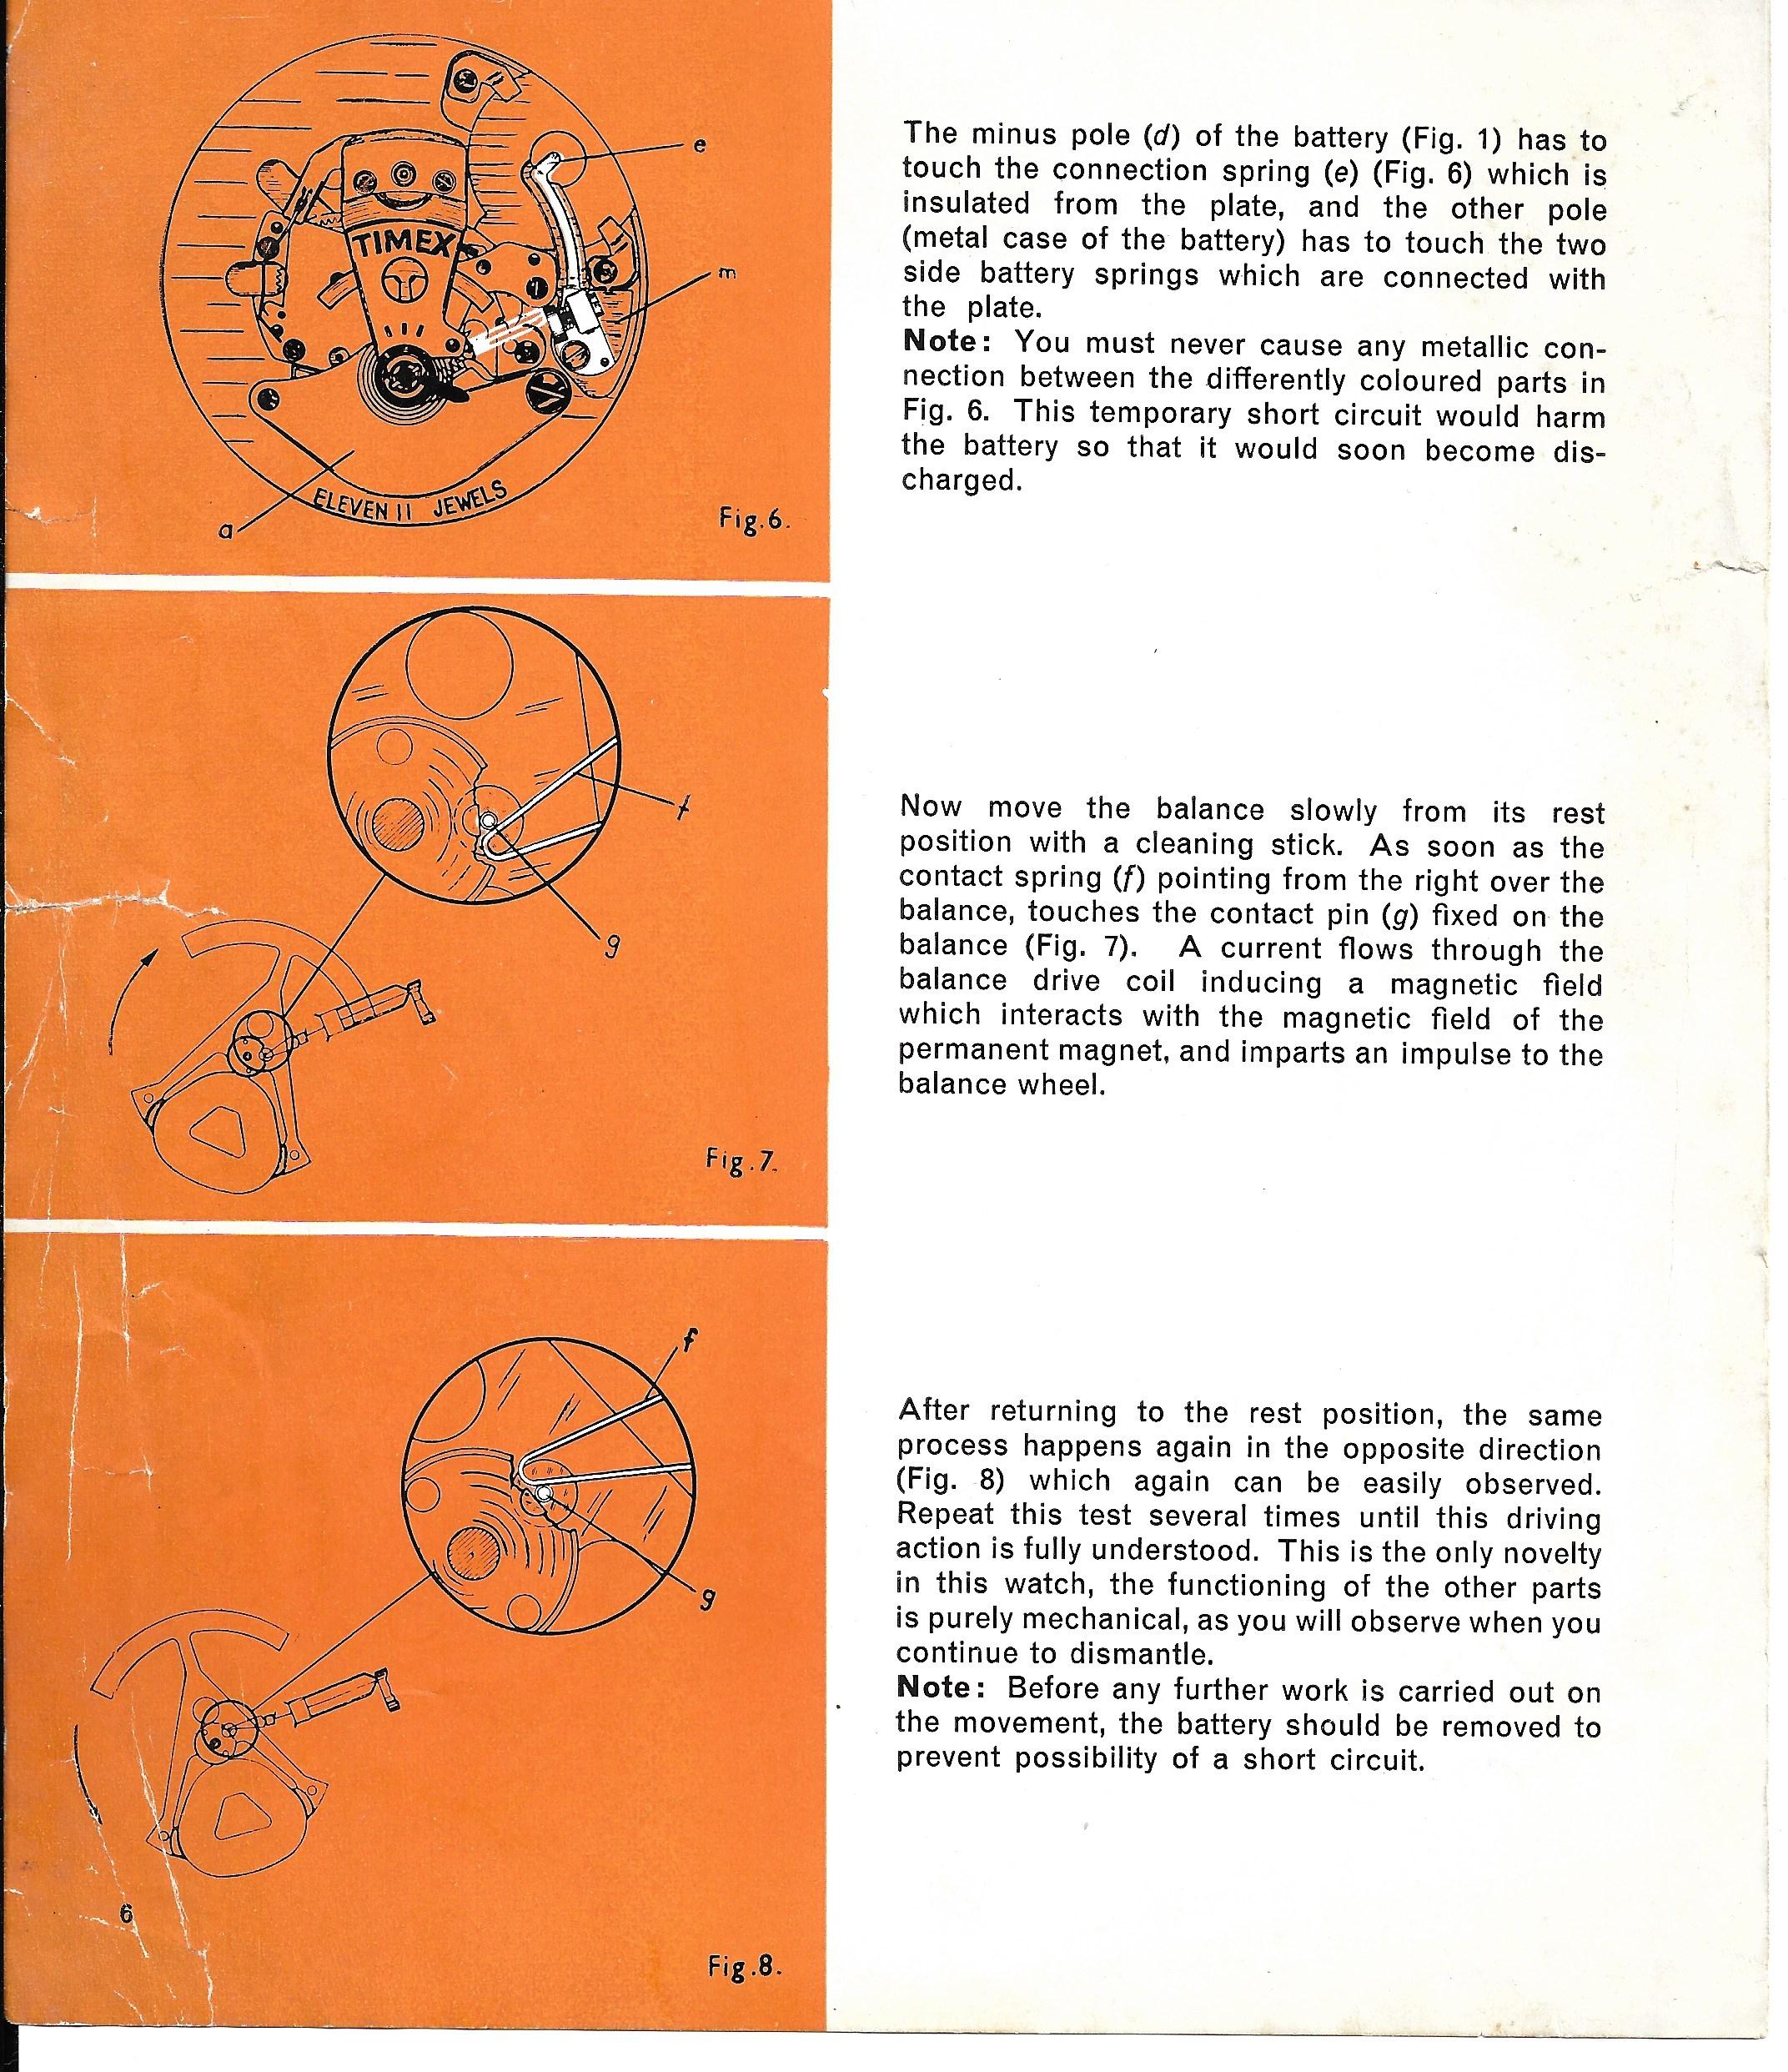
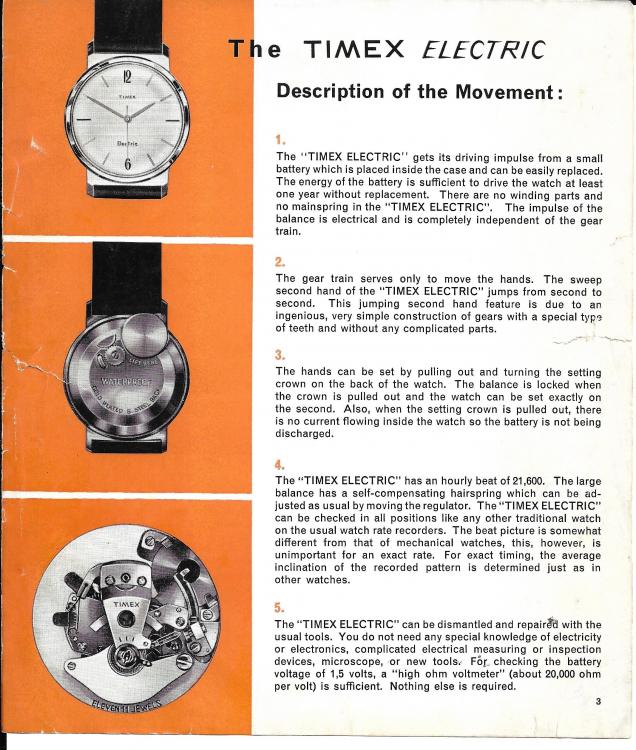
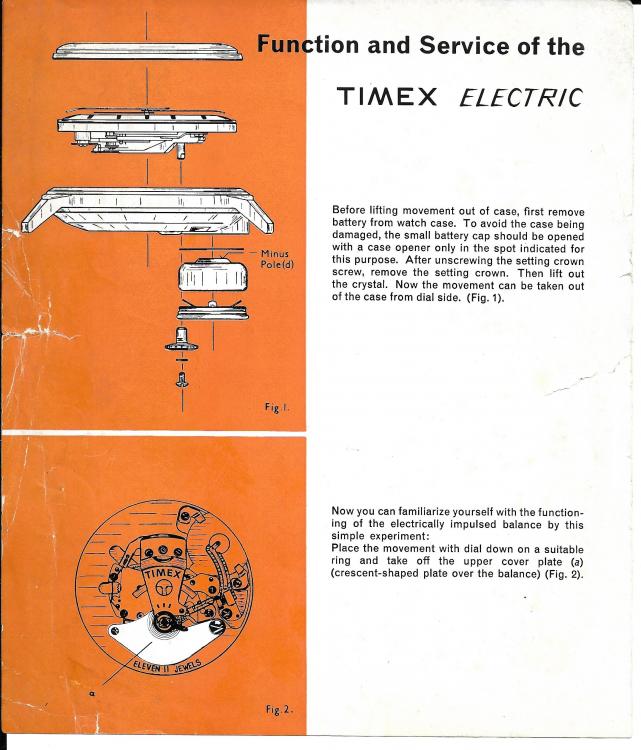
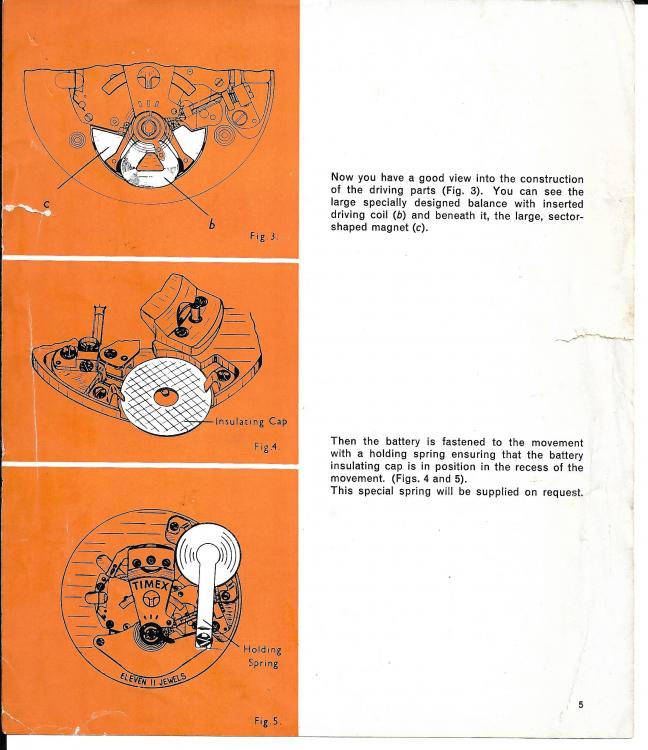
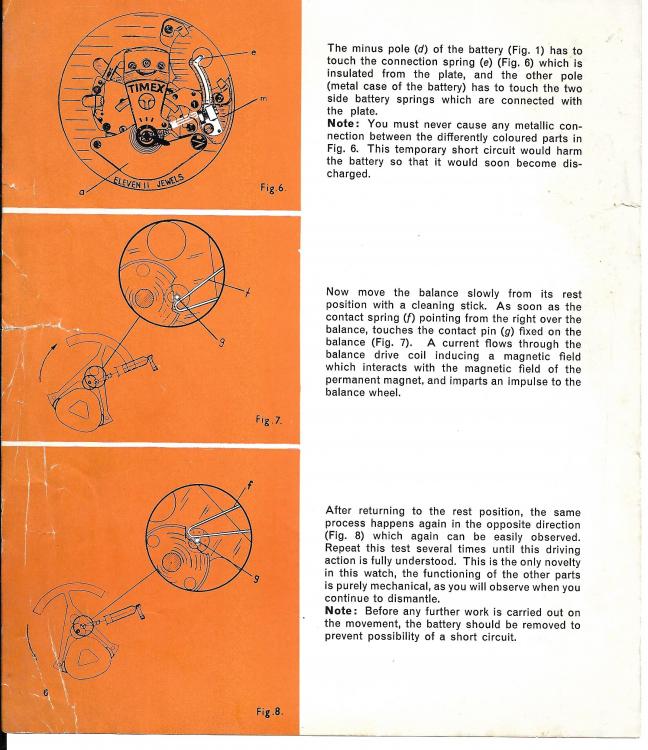
Timex Electric - Page 1 &2 seem to be missing, I scanned what I could.
 1 point
 -
Hello @tomh207 No joy there: I am currently developing the plans for a simple Portable Watchmakers Desk. I have already started talking with some manufacturers in South China about making them from a sustainable source (Bamboo or Pine). They will have: - An A2-sized 3-sided top - Integrated carry handles - 2x2 drawers configuration (4 total) - Sturdy base w/ integrated adjustable feet Here's some concept drawings... Here's a general idea of what the material (bamboo) looks like. Personally, I like the way it looks. g. ----

 1 point
 -
Hi 12. This topic has been discussed many times over here so some searching for previous info and people's experiences will give you a good insight of how to use lighter fluid. But in the meantime here is some to get you moving. There are obviously better specific proprietary fluids for cleaning but as a starter the light fluid is ok and was also my starting point with cleaning. So just to give you a little background on the substance you are using. Lighter fluid is a type of naptha which is petroleum ether. There various grades of naptha that all have different uses. The gradings are established according to their molecular structure, with two basic categories which are made up of a light and a heavy naptha. Light naptha is made up of a low carbon to hydrogen structure, heavy naptha has a high carbon molecule structure. In reference to cleaning, light naptha evaporates more quickly than a heavy naptha. You can do your own test here with a couple of drops on a mirror, this will also show you any residue left behind as an indication as to its purity. Lighter fluid often contains vm and p naptha with is varnish makers and painter's naptha. This has a higher count carbon atom structure so is a heavy naptha and does not evaporate as quickly as a light naptha. The time length of soak depends on how dirty the parts are. 10 mins with agitation and brushing can be enough or an overnight soak maybe required if heavy contamination is present. Watchpaper and a blower is fine for drying, just be mindful that tiny springs can fly, so consider some method of containment here. Enjoy your first experience of servicing1 point
-
Sorry but, to me it is not that complicated. It is just an old watch that has not run for a long time. Take the KISS approach. Old watch, old lube, maybe a bad board. so first off see if the movement at least runs without the board installed and take it from there. So now you have two M62 watches that don't work! Before you know it there will be a third and a fourth. what document does this come from?1 point
-
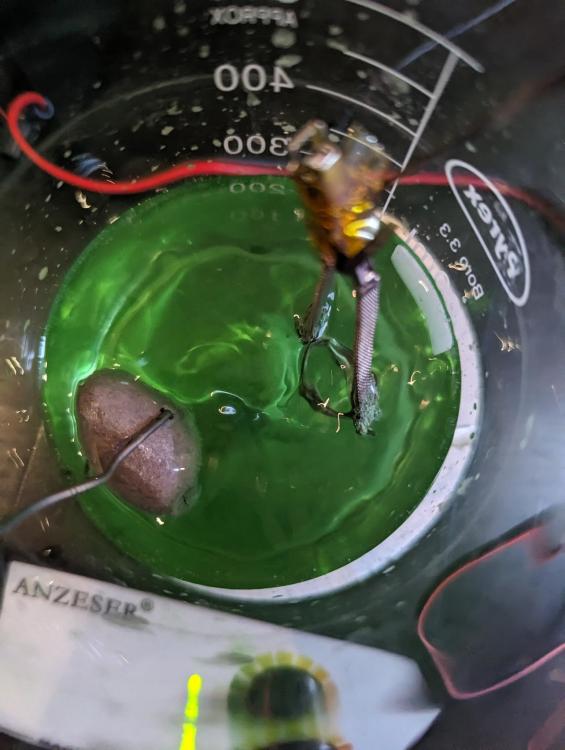
Update: So I just recieved this other watch from ebay, the same model movement and everything. Once taking the band off I was able to fit a battery in and it started ticking. However it started to tick for like 30 seconds and then it stopped. At the time I had not checked the forum and was not aware about the photosensitivity of the circuit. While the watch was working I noticed a brown coil moving back and forth below the mainspring which is different from my other one that I am trying to repair. I think the replacement watch I bought has promise but I am unsure of how long the circuit could be affected or if I messed it up while exposing it to light. Reupdate: After letting the watch sit closed in no light for an hour I was able to get it to start again. I put the battery in at around 1:30 pm and it has been working for around 15-20 minutes so far. I am in a dilemma because I am not sure what the best plan of action would be. I don't feel comfortable working on the watches myself so I am trying to decide what the best course of action would be. I believe there is some watch shops in my town that could swap the movements on the watch to the red dial, however to keep it running continuously I think it needs to be serviced and cleaned. Before finding this new watch I found a watch repair website called clevelandwatchrepair.com. I spoke to him and he said he could clean and most likely restore the red dial watch for around $200 with spare donor parts from other watches. I'm just unsure what my best plan of action would be. Any opinion is appreciated. Video of watch running:1 point
-
Google in their infinite wisdom has changed the link format for shared content. As a result the old links that I had shared on Google Drive no longer work correctly. Here is a new link to the Timex Documents collection, hopefully folks will spot this one first when they search. Timex Documents The following is a direct link to the Timex service manuals folder. Timex Service Manuals1 point
-
It bugged me that the L&R basket sets at an angle and is unstable. So...I printed this holder for it. Gonna make some improvements, but here it is for now.
 1 point
 -
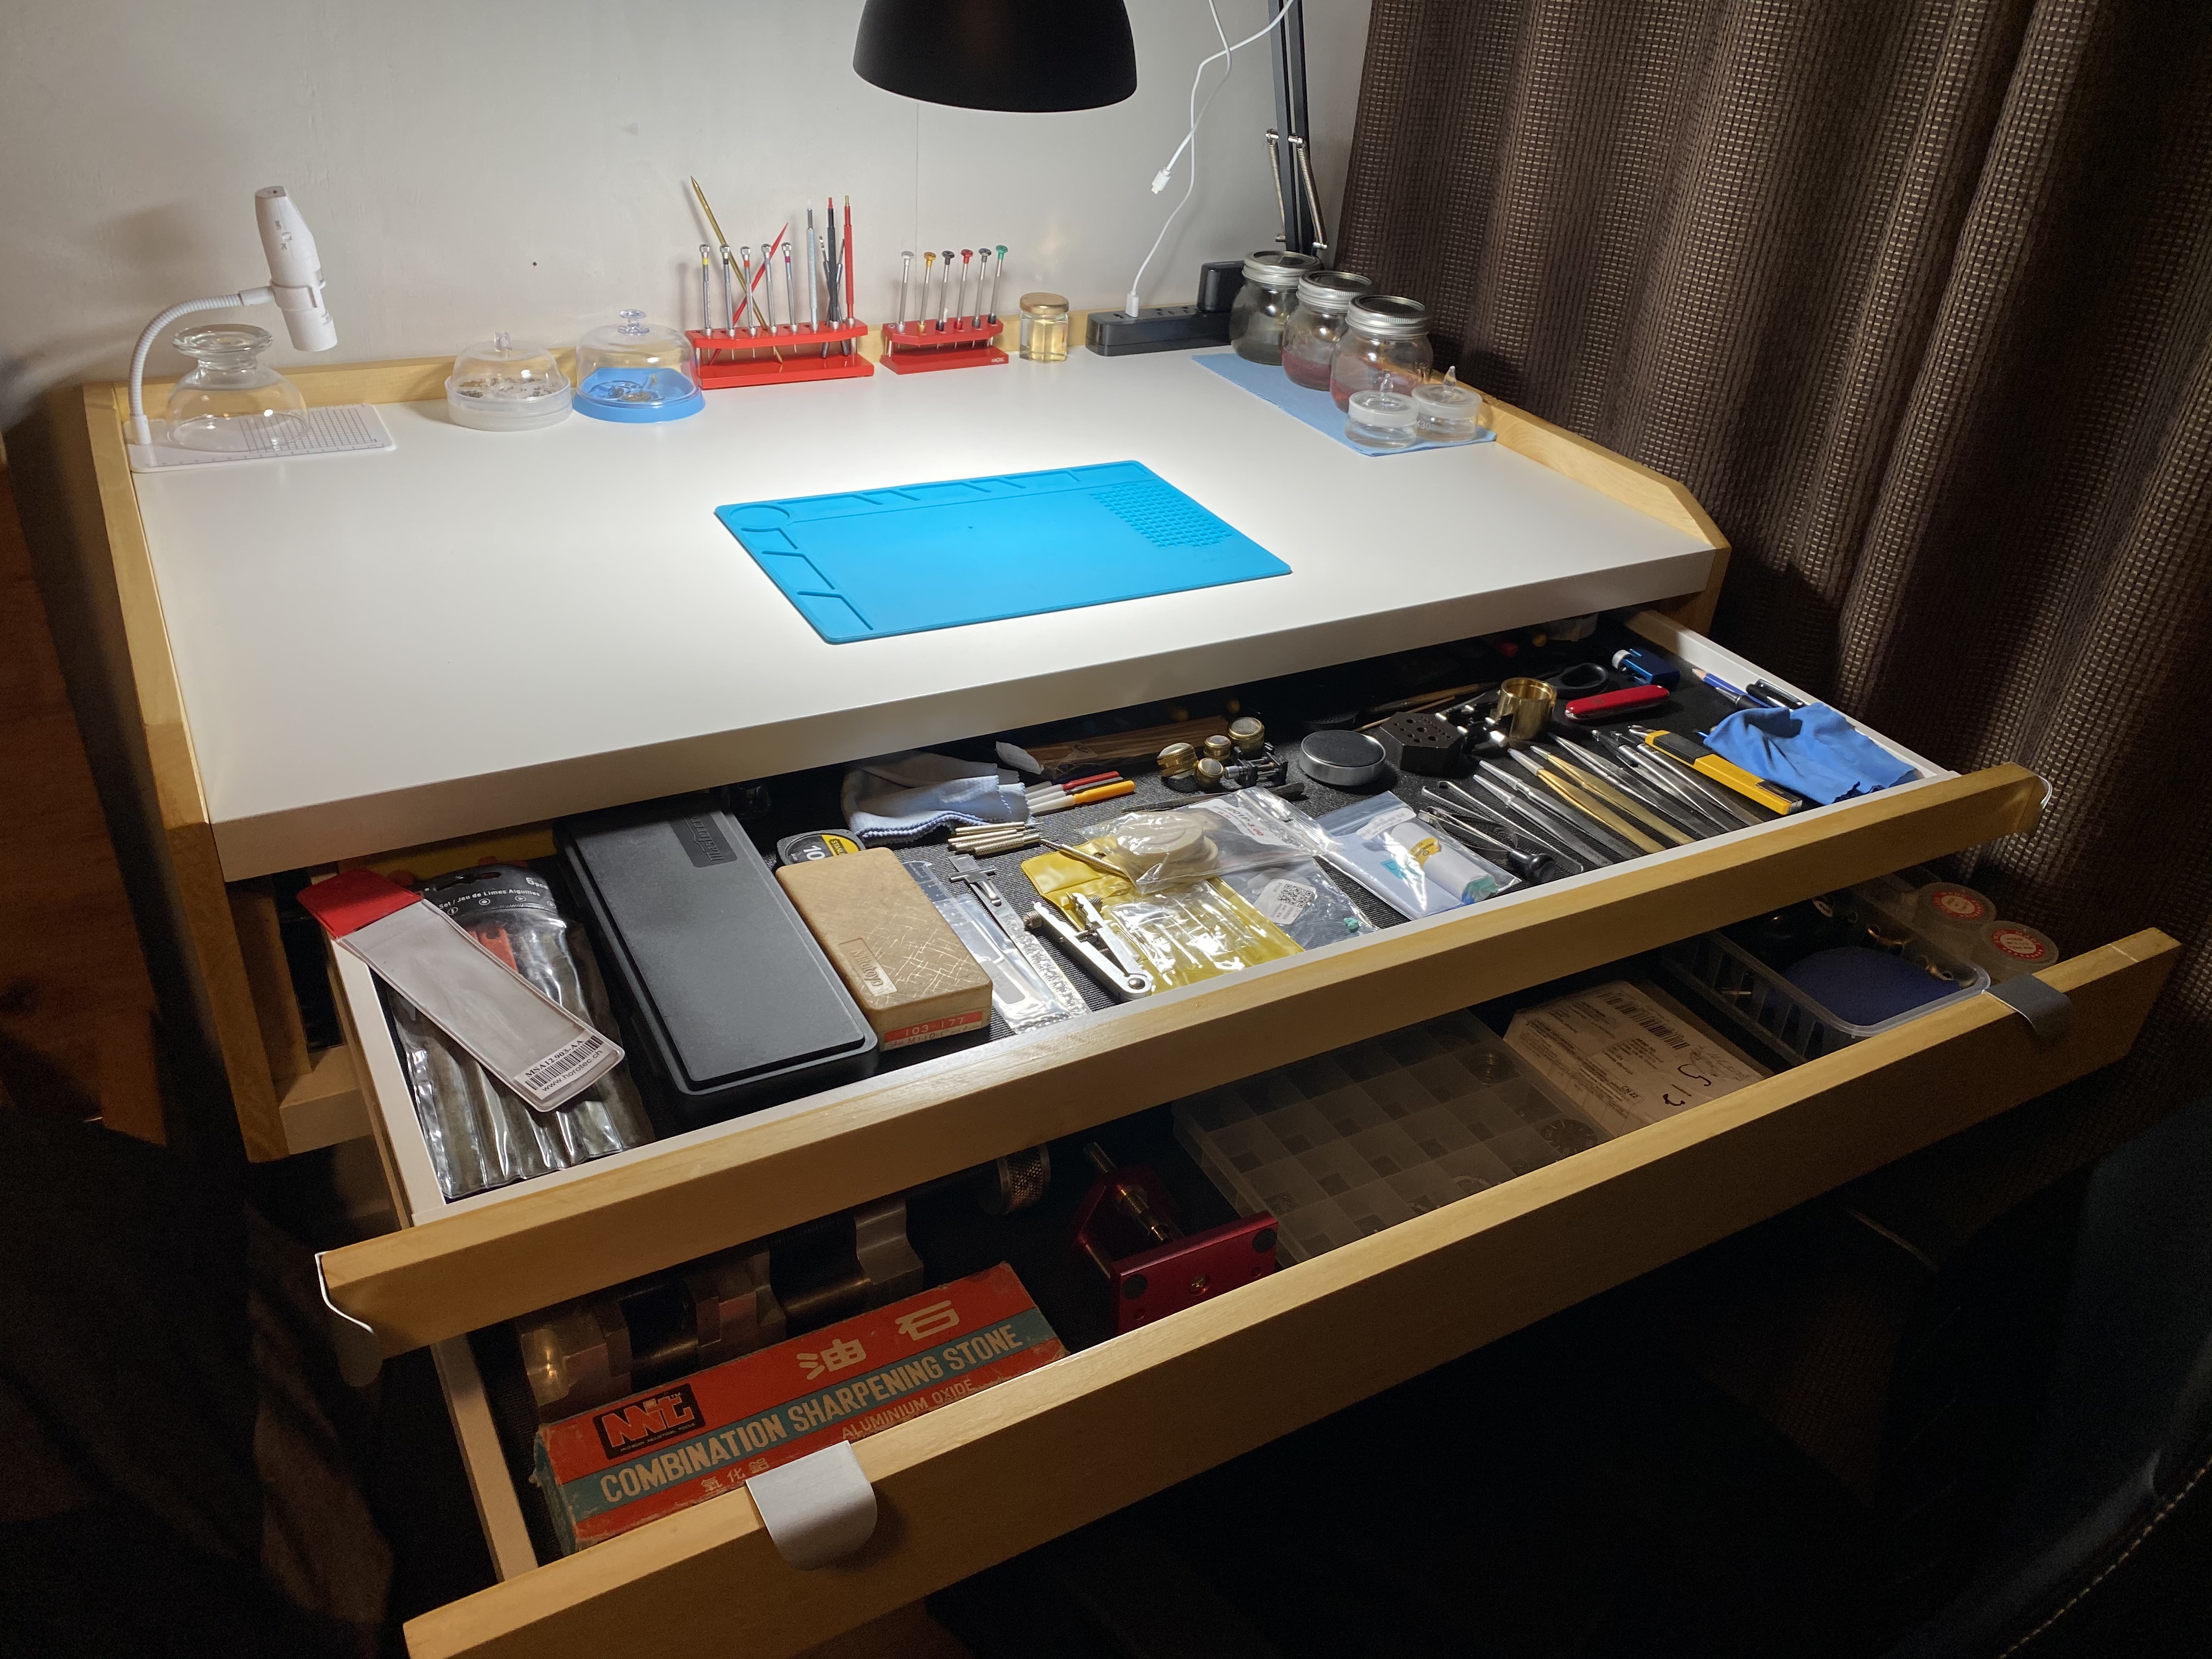
Here's mine with lots of drawers. I make it a rule to not have anything useless cluttering the work surface and store unused tools/consumables in drawers.

 1 point
 -
Thanks for the reply. The guy seems to be changing his tune and wants more $ after all. He said he needs to look at what he paid for it, and thinks it was around 300. Feels like he’s milking me, not sure this is a going to work out for me.0 points


.jpg.c2af72eab833726da8604b17cad5314a.jpg)


.jpg.20e6964015a03f5baa9e79249ef69e40.jpg)