Leaderboard


Popular Content
Showing content with the highest reputation on 01/31/16 in all areas
-
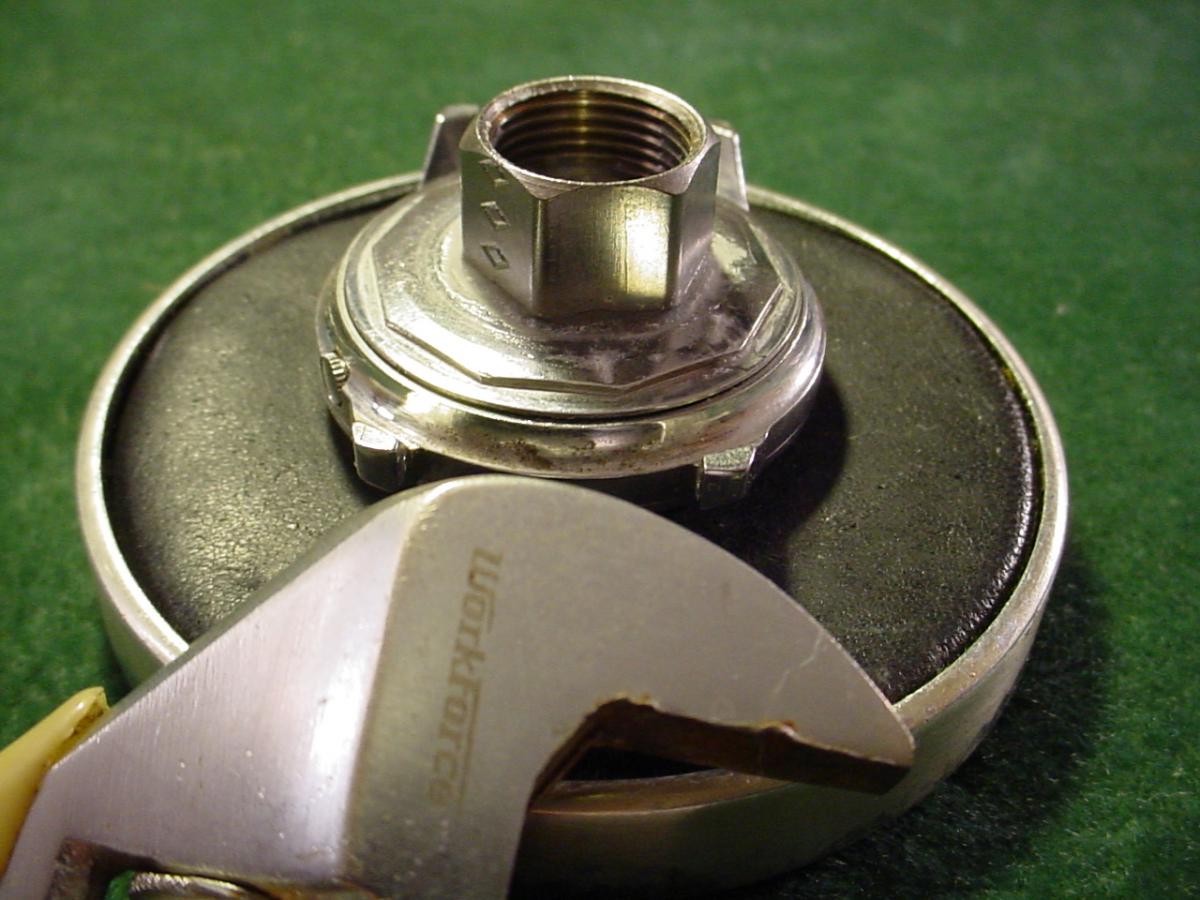
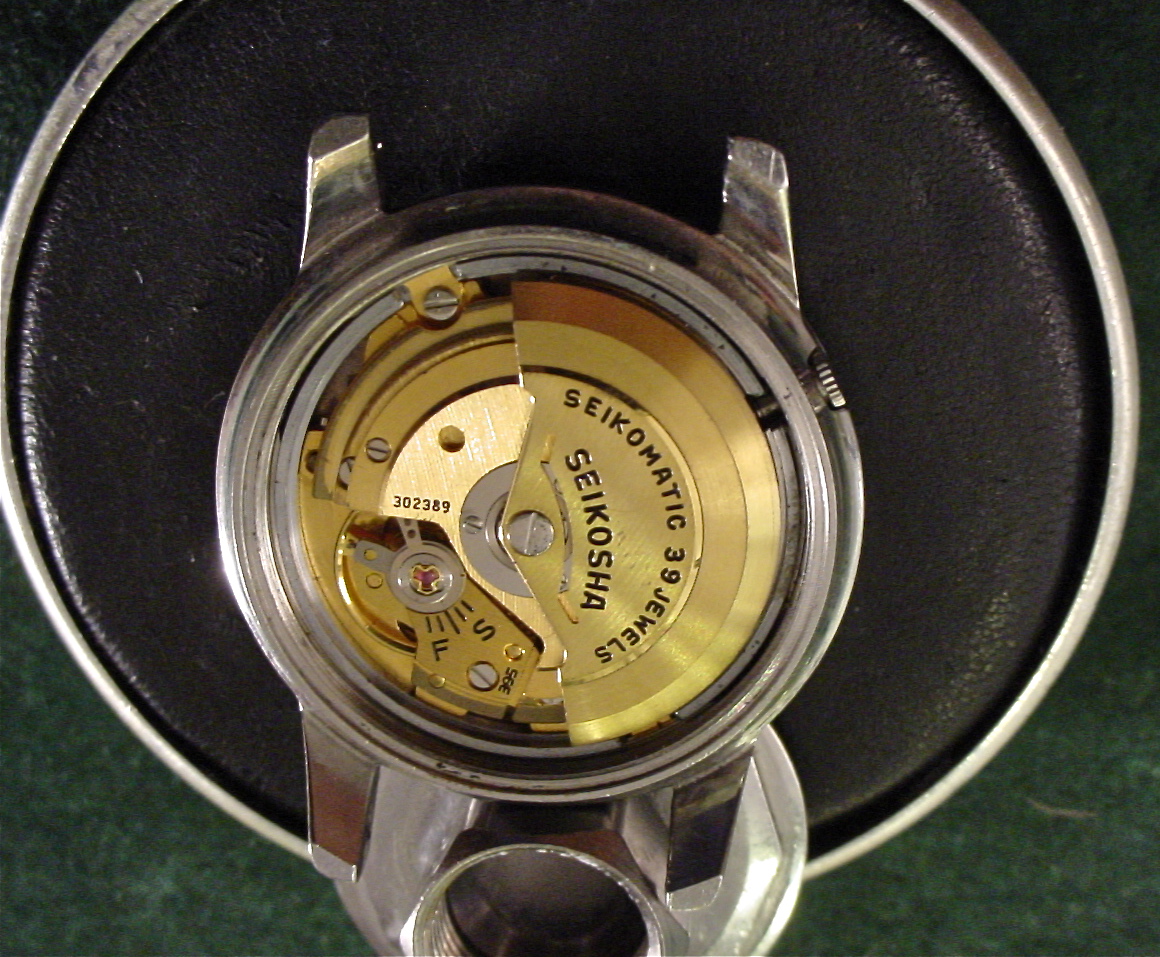
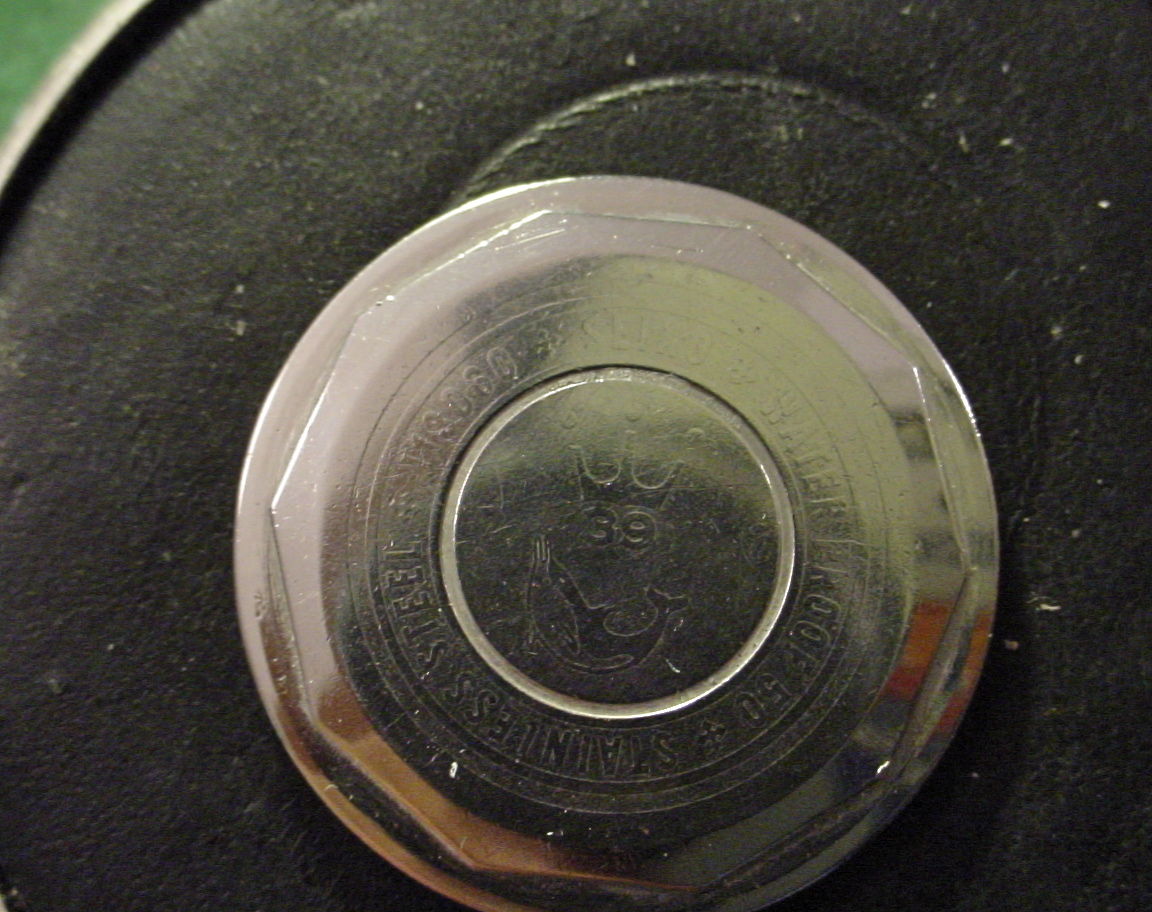
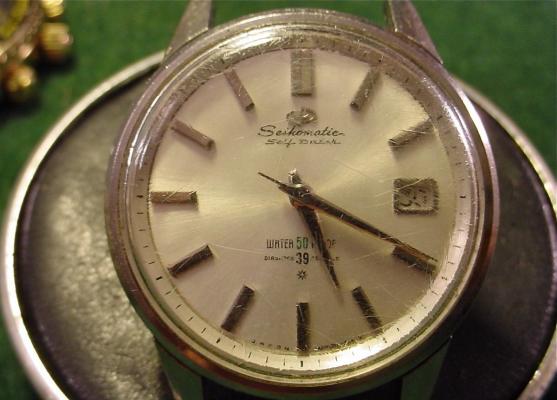
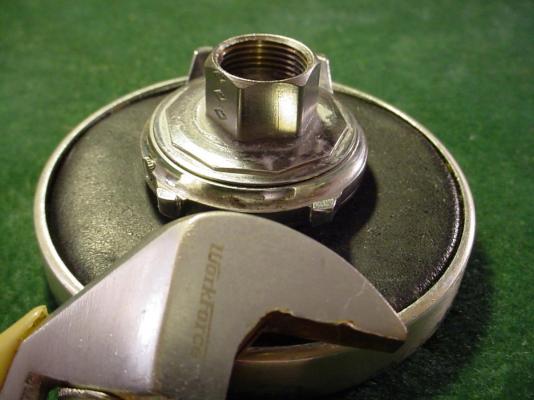
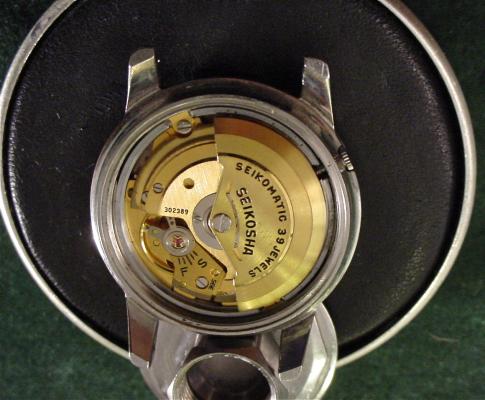
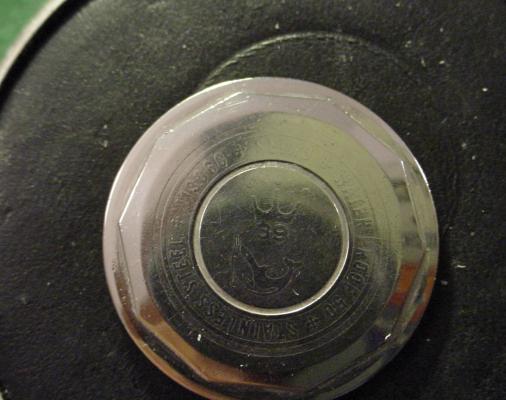
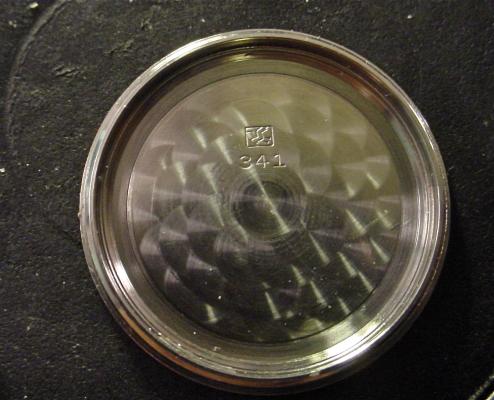
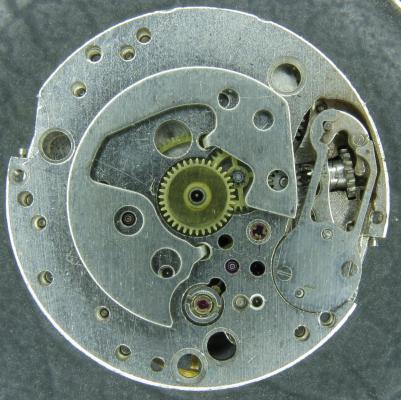
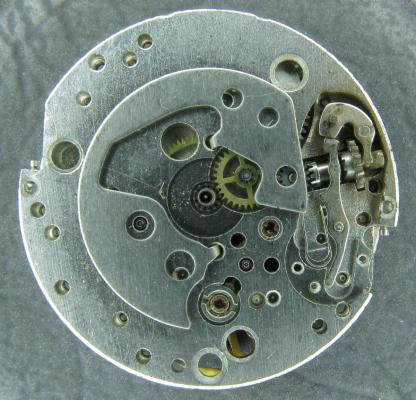
I picked up this vintage 39 jewel Seiko Self Dater automatic at the swap meet today . The seller knows I'm a watch collector so when he saw me he called me over and pulled it out of a bag he had under the table . I am not familiar with this model , but what I do know is: It's waterproof and has an old seiko model # J13060 , which would date it at least to the late 60's . It has a Seikosha 39 Jewel movement , and the numbers 302389 stamped on the winding mechanism and 395 on the balance cock. The winding mechanism is the widely used by Seiko "Magic Fingers" , or something like that mechanism . The case back cover has the vintage Dolphin on it , but has a Crown over the Dolphin and the number 39 under the crown . The inside of the case back has the Seiko Stork in a square emblem that may tell where it was manufactured , ...I'm not sure of that , It also has the number 341 stamped , which may be the serial number . I will have to get more info on some of these facts . It also has a Swiss-like 10 sided case back that was really tight and I couldn't budge with a rubber ball case opener . Here's where it gets good ........ I crazy glued a SS nut from a plumbing fixture and let the glue set up ..... I kept a steady pressure on the nut with a crescent wrench , and finally the case back started to break loose from the case exposing a clean gold colored movement . I removed the crazy glue and the nut with acetone,..slowly and patiently so as not to damage the case back . Thus exposing the info on the case back.... As I said , I'll have to get more info on this model and see what I have .

 4 points
 -
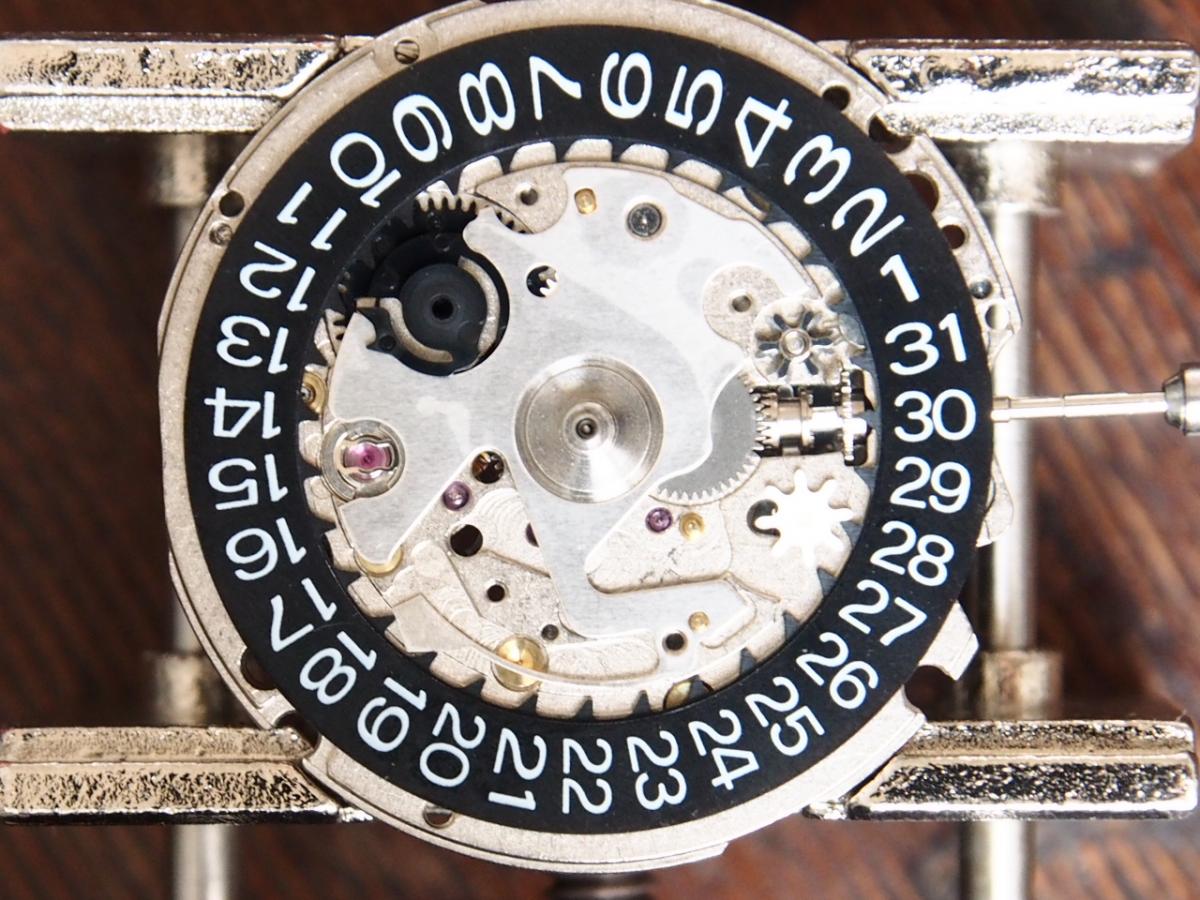
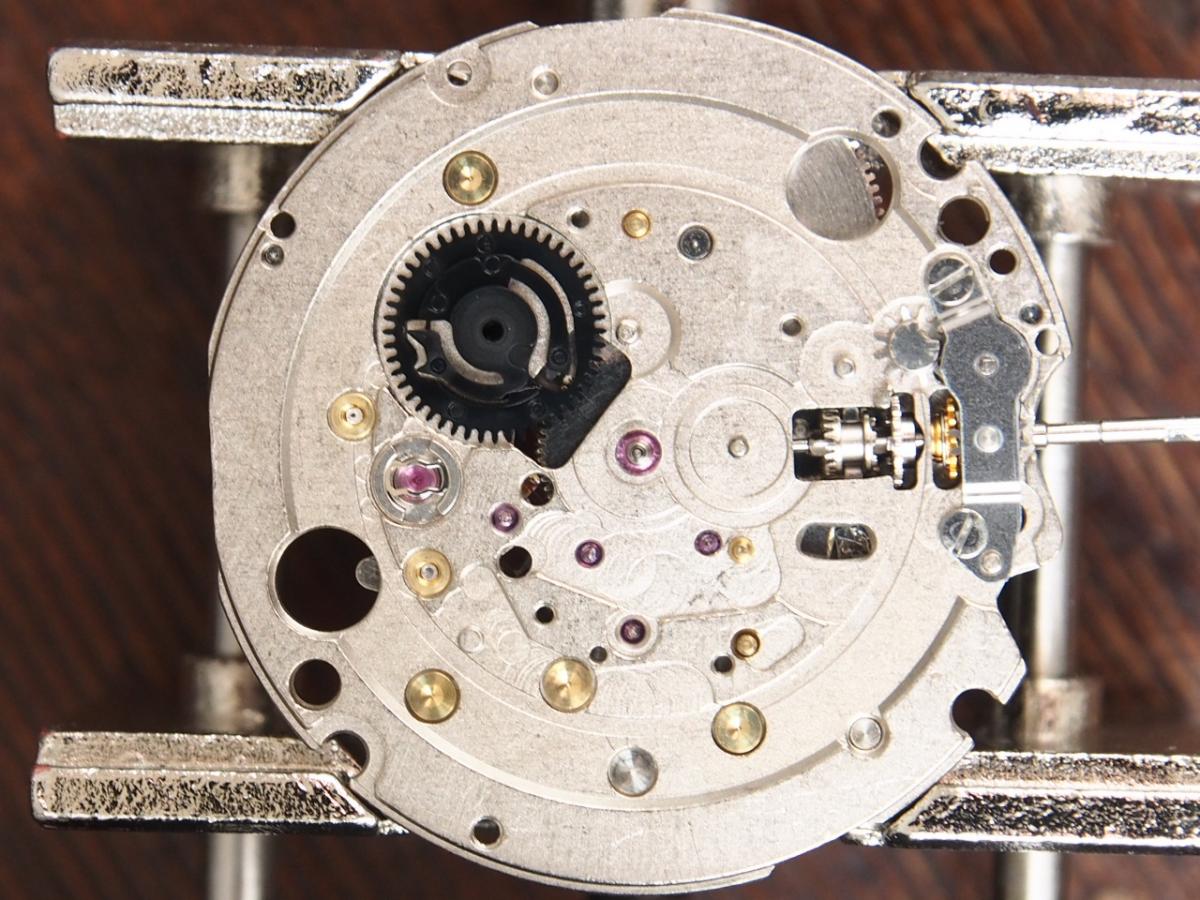
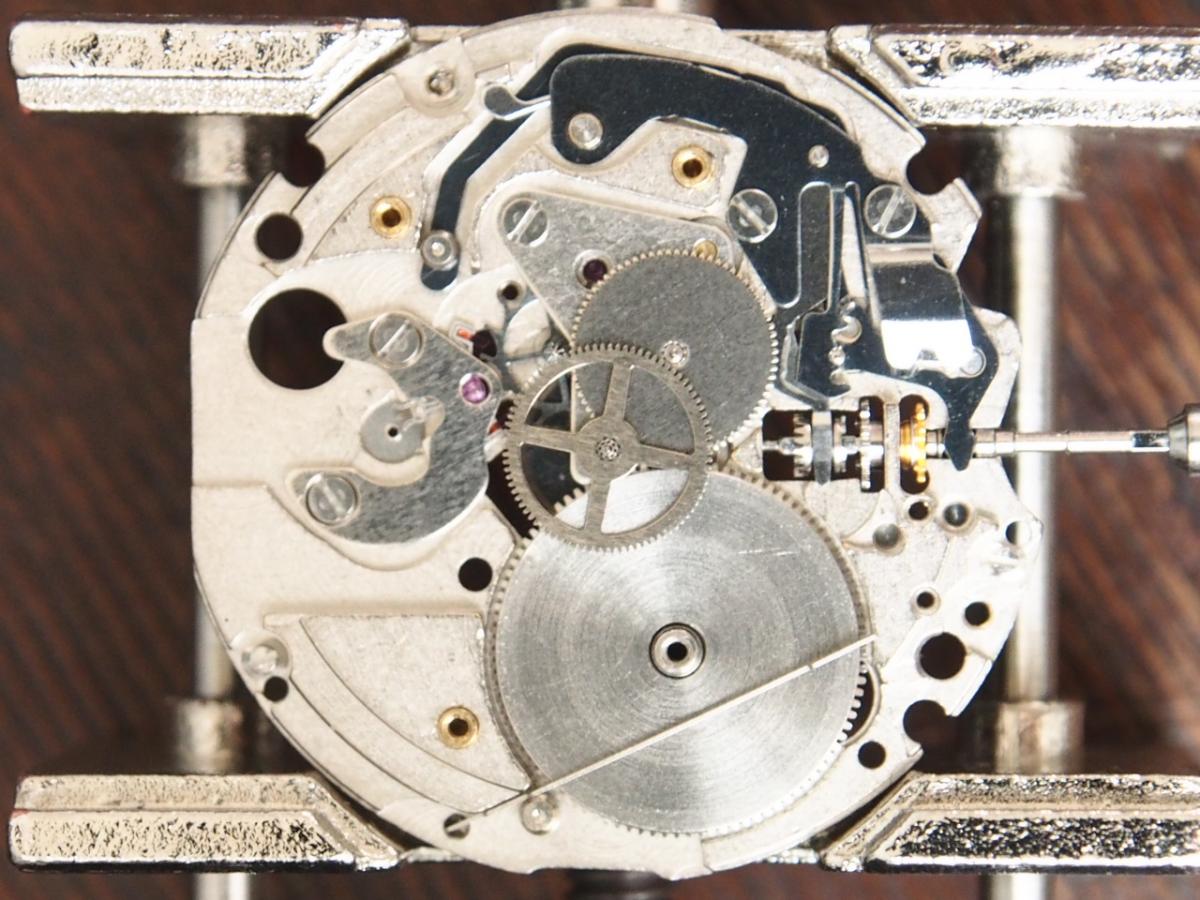
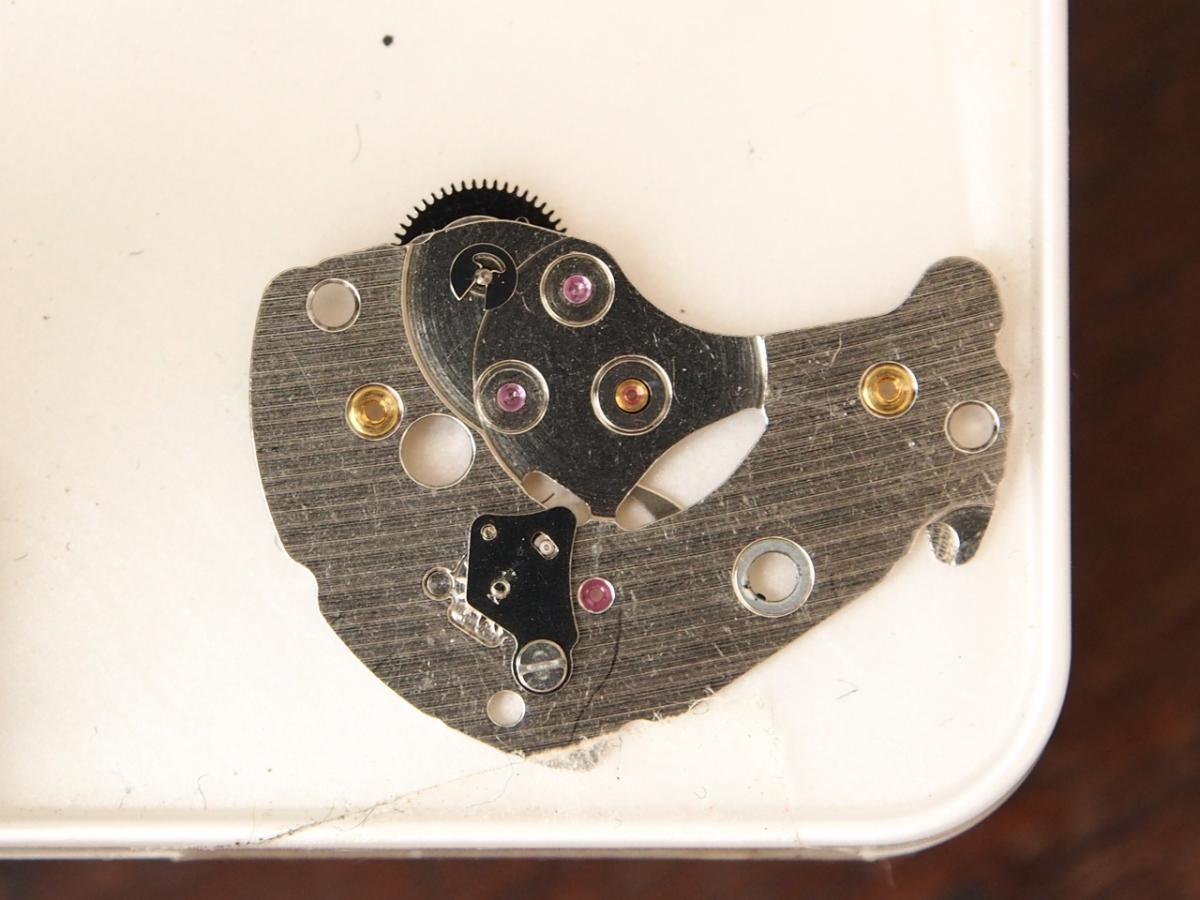
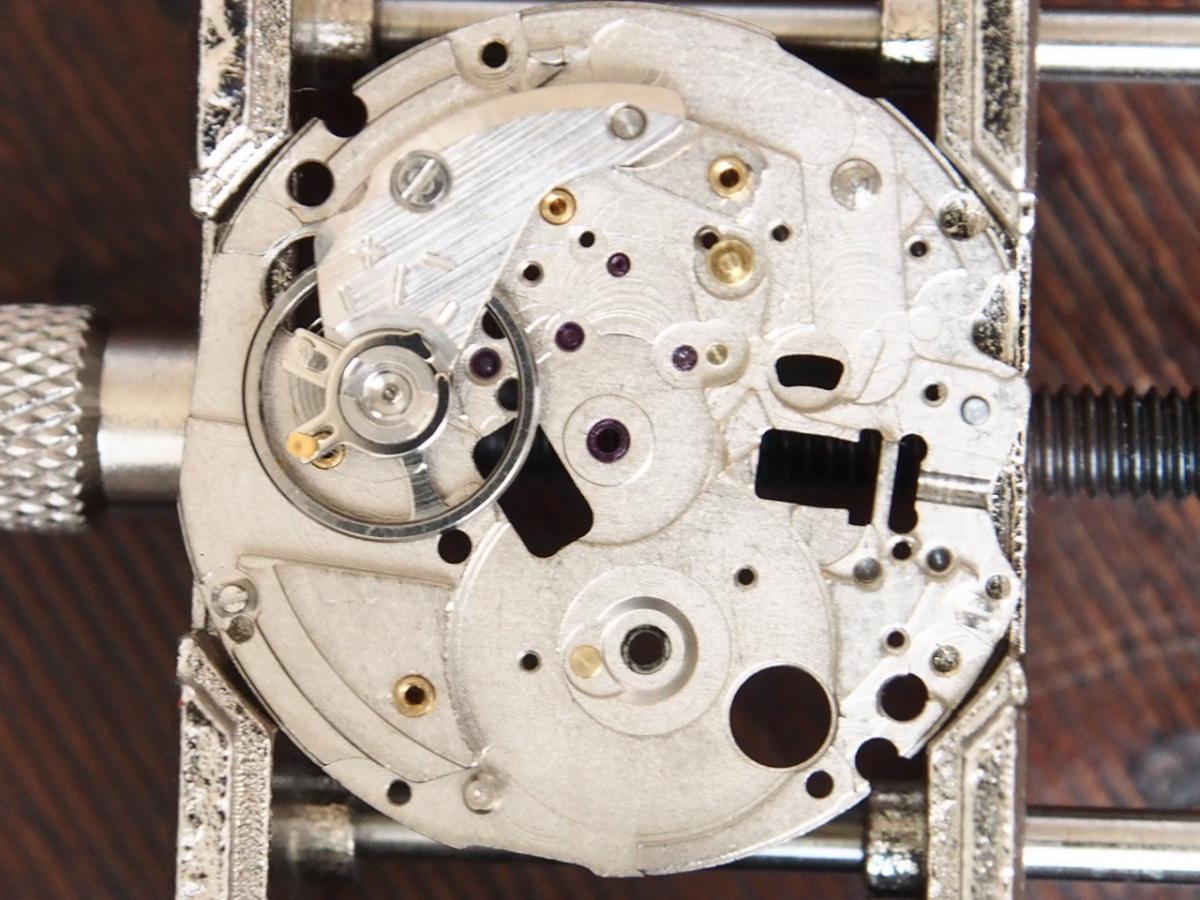
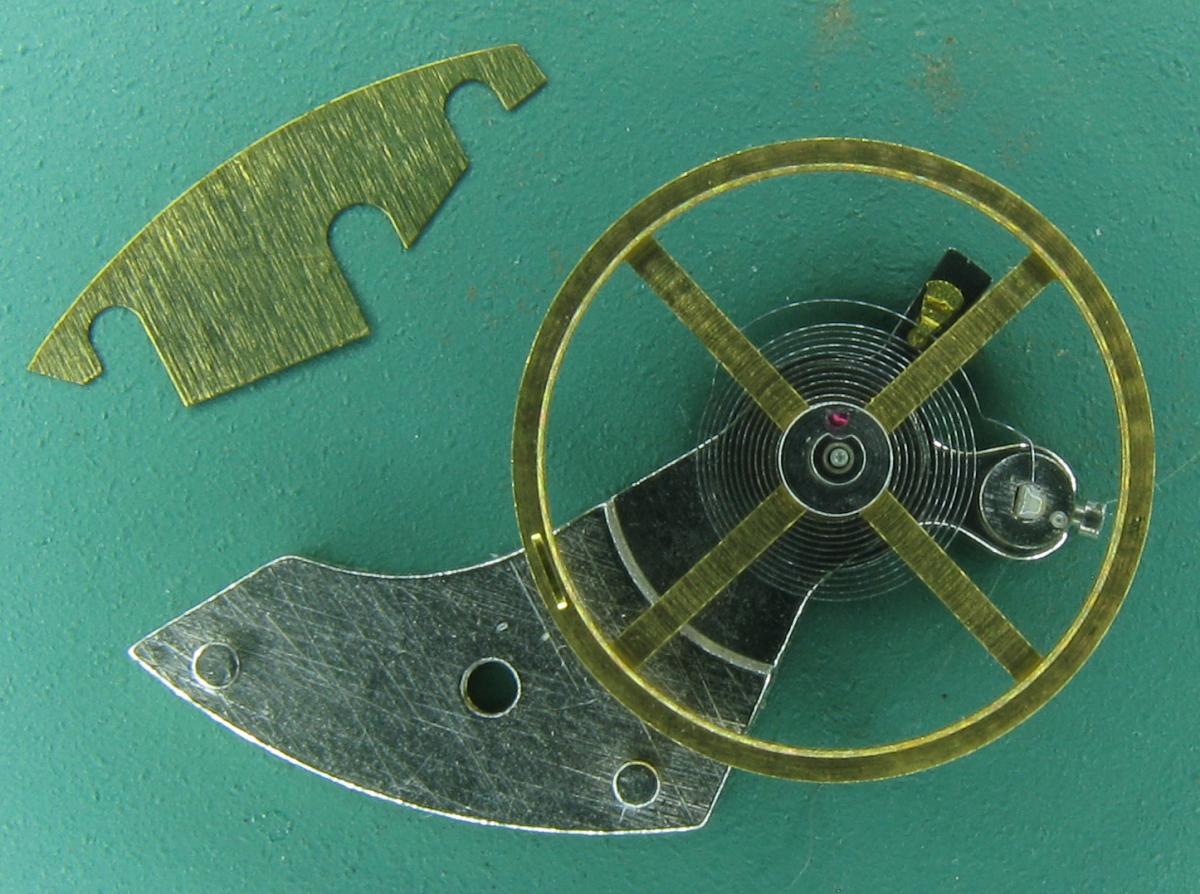
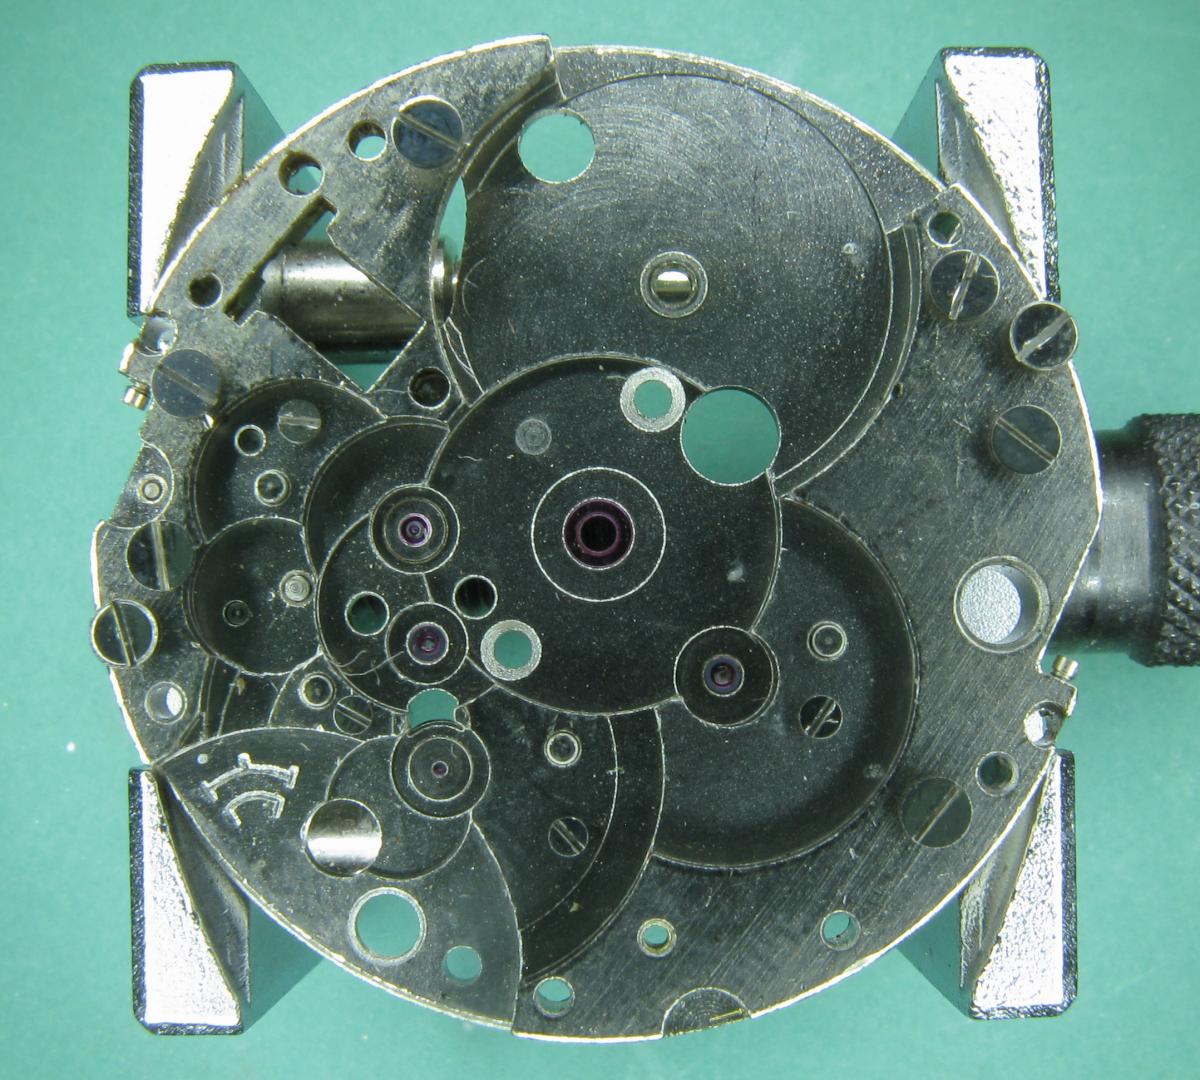
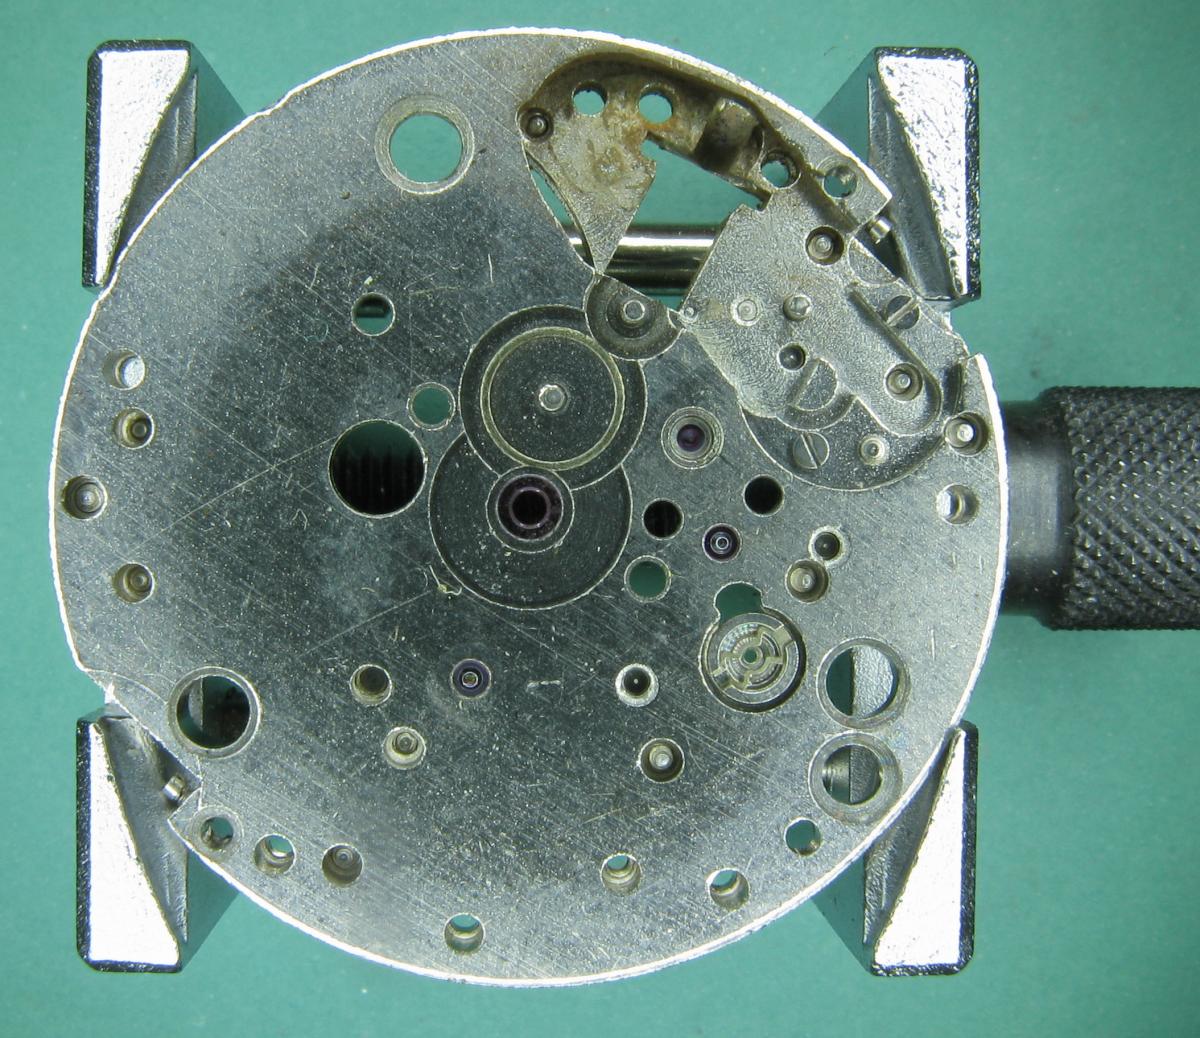
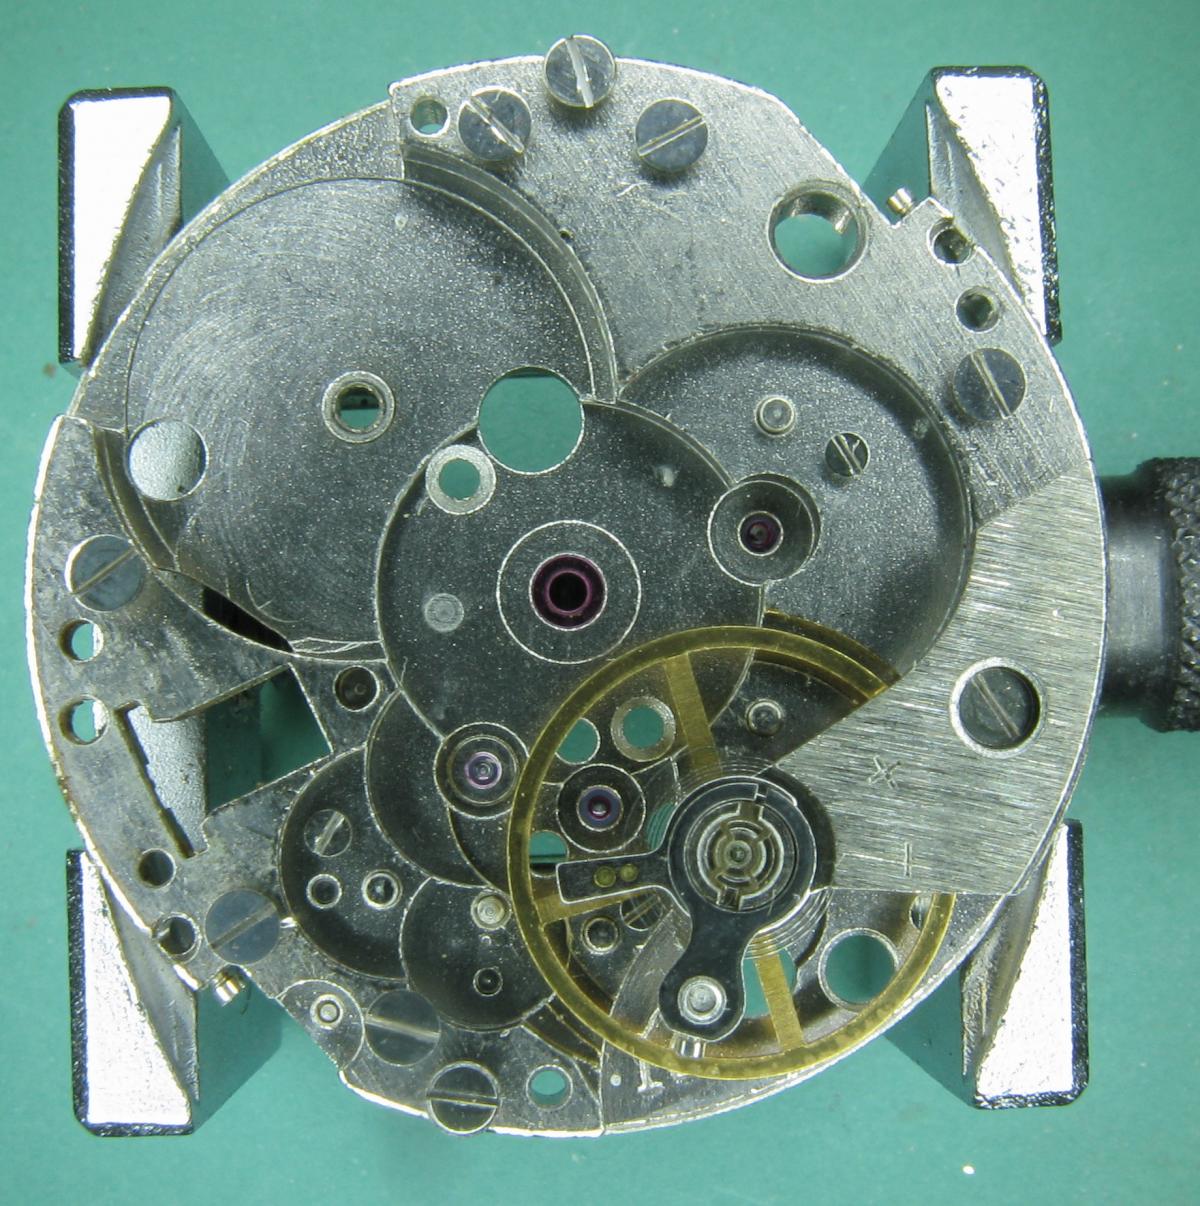
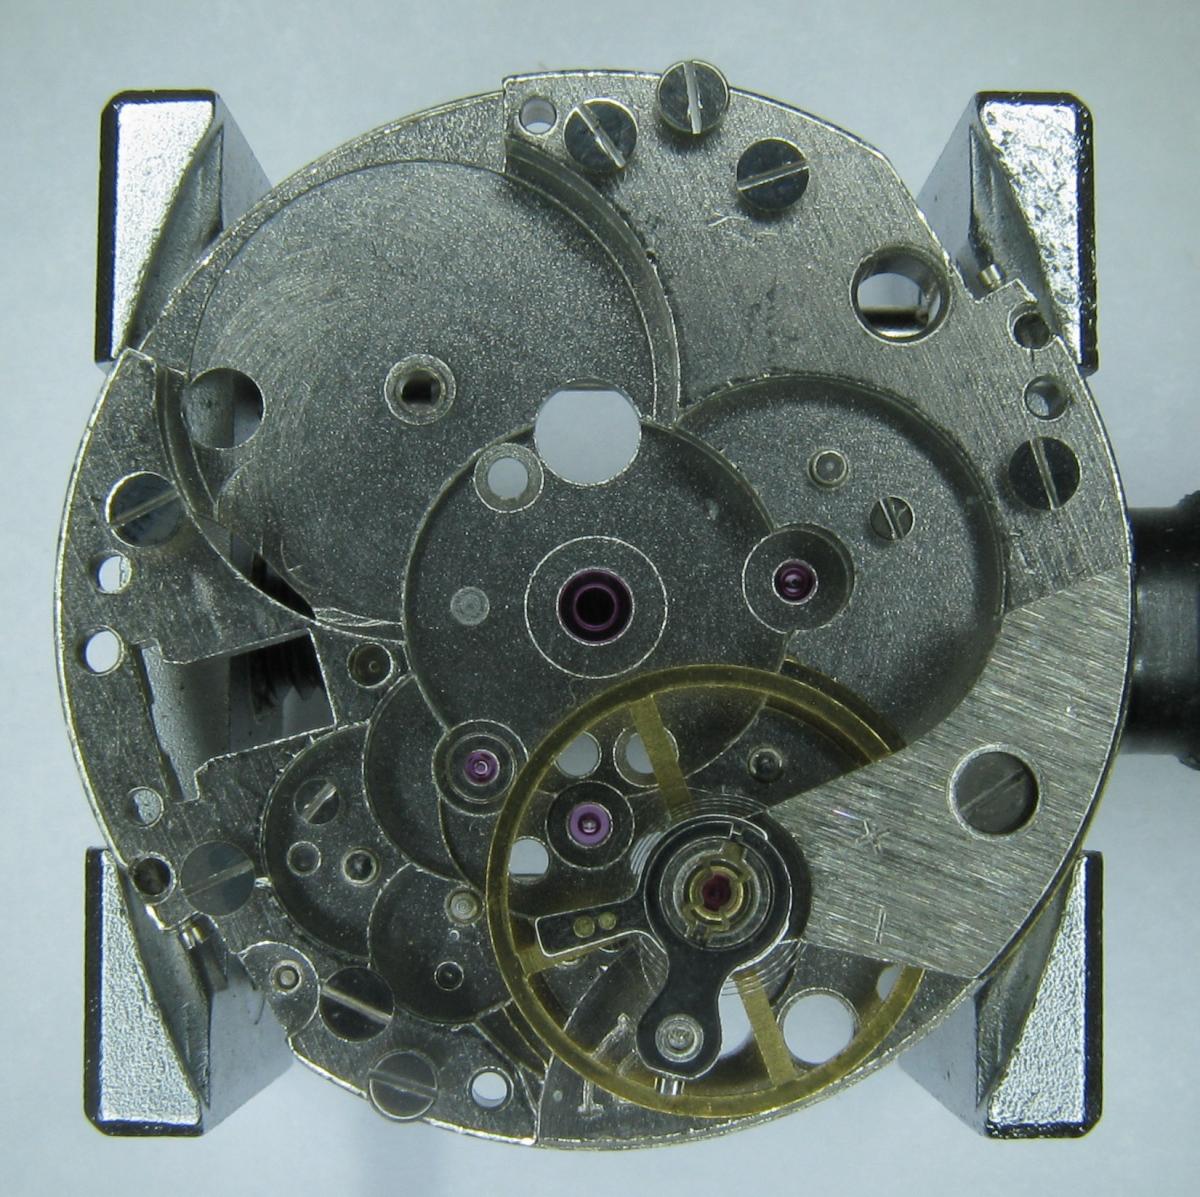
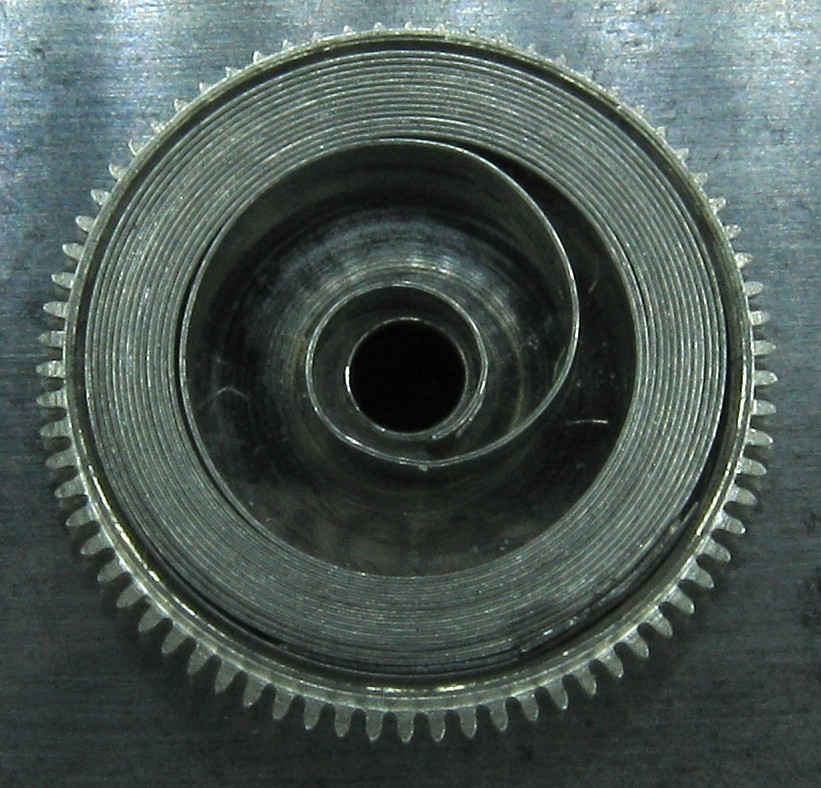
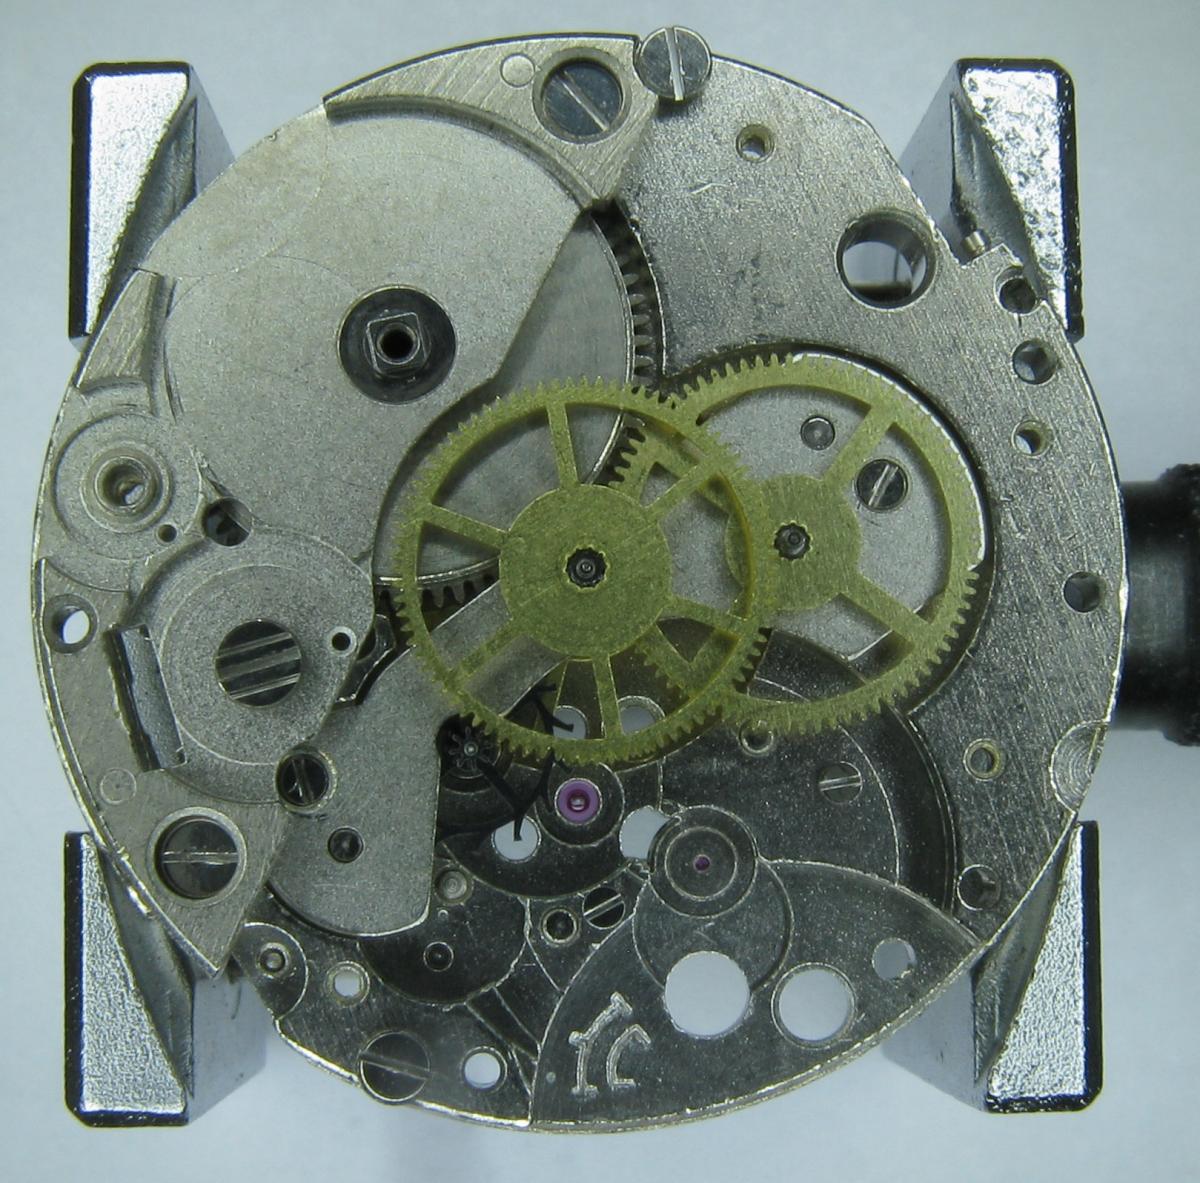
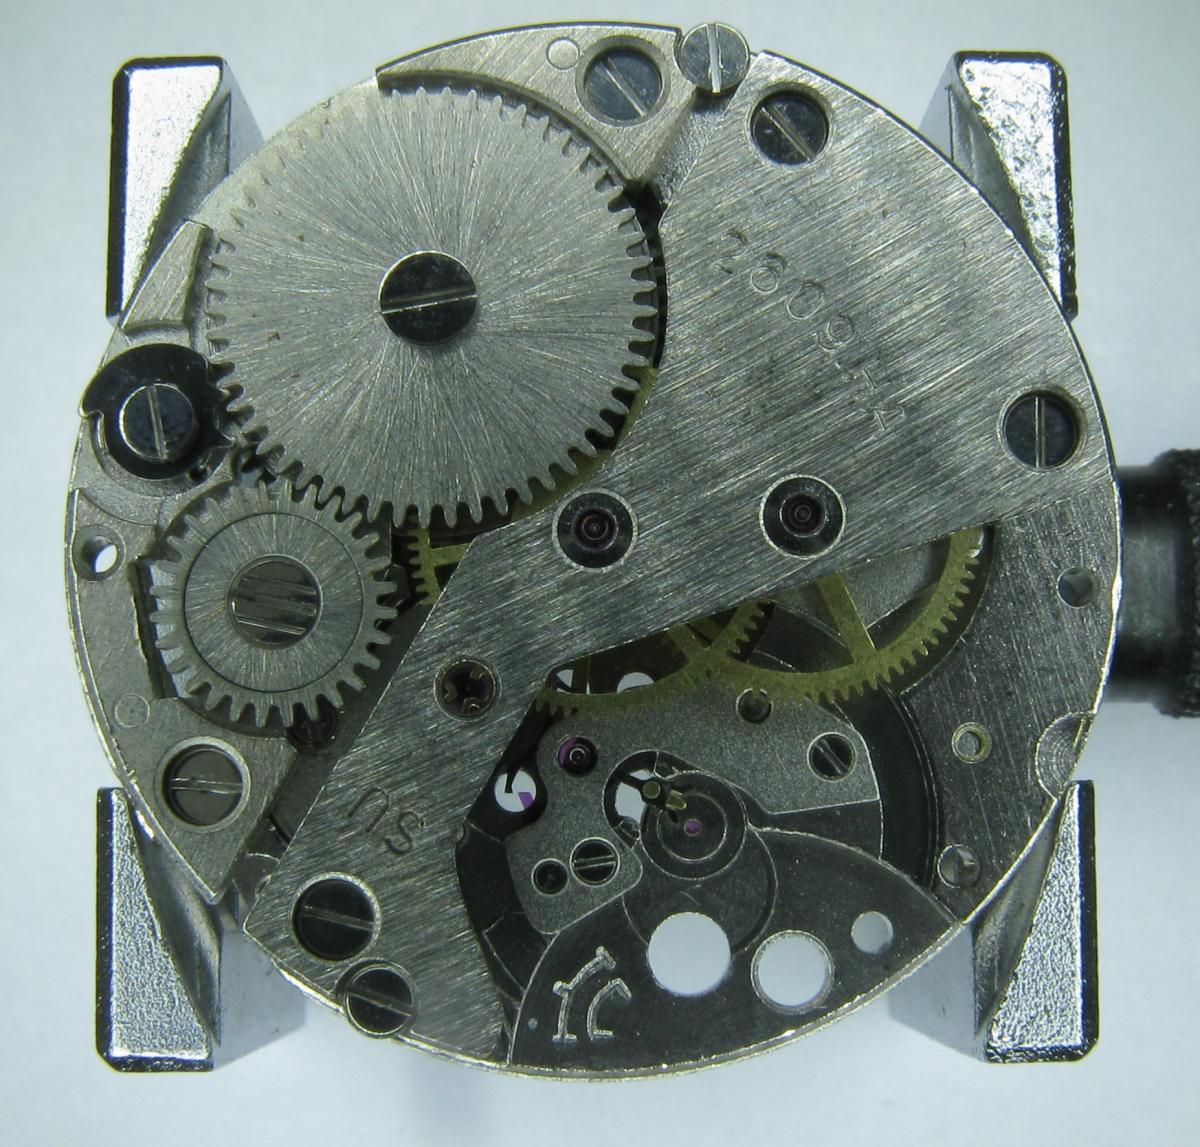
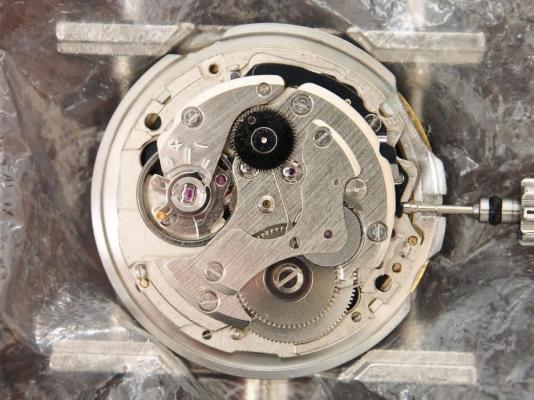
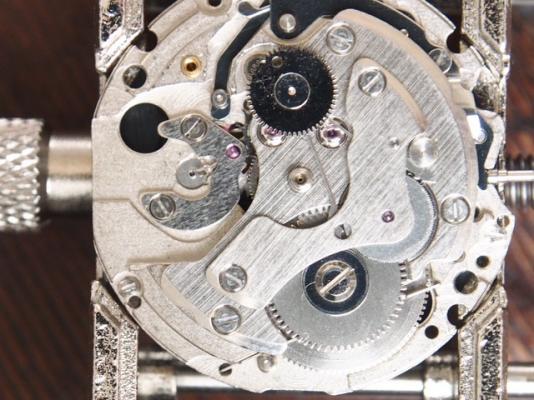
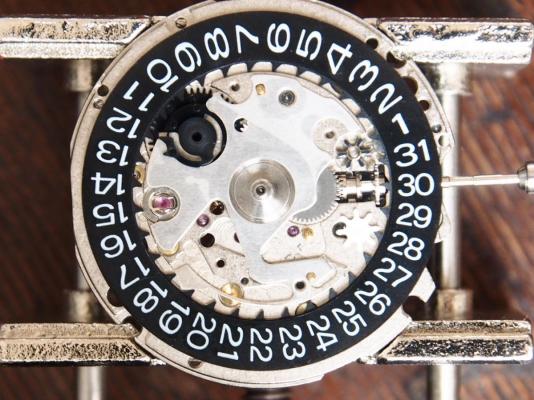
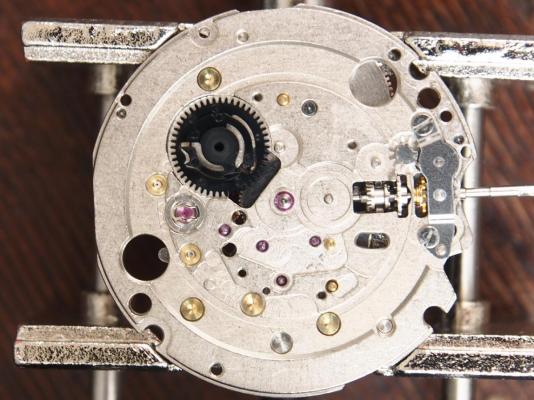
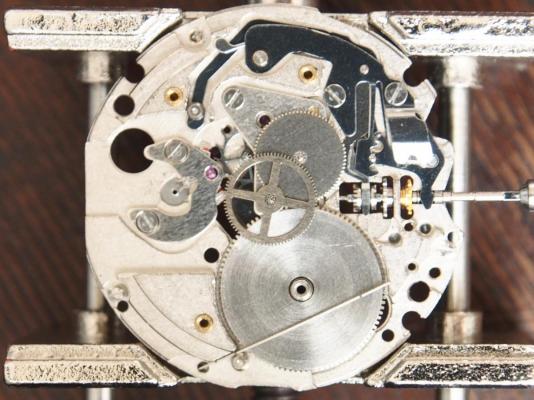
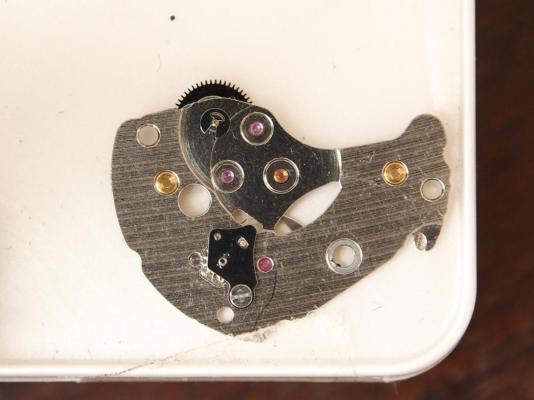
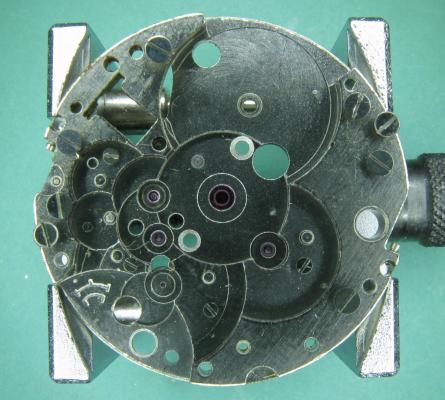
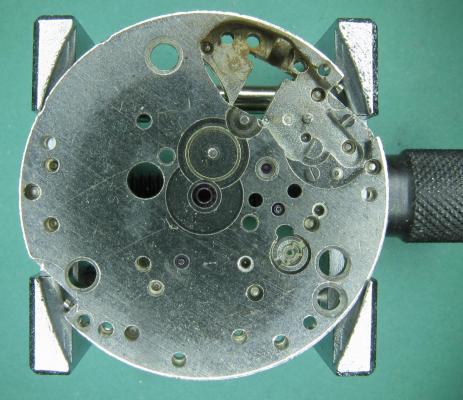
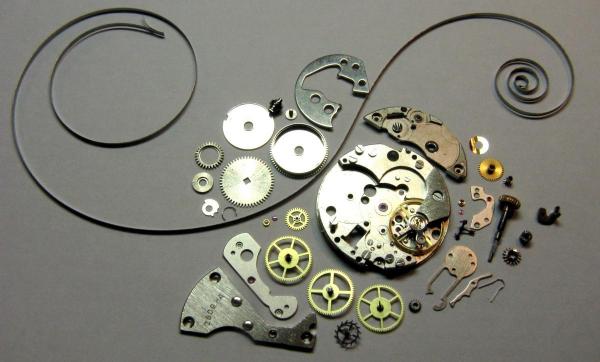
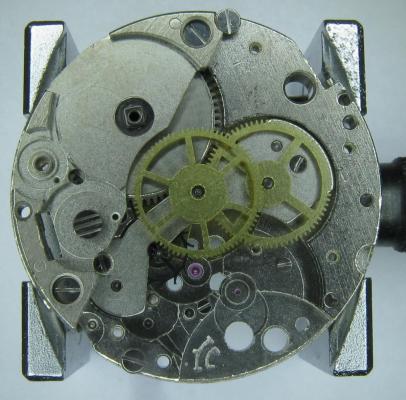
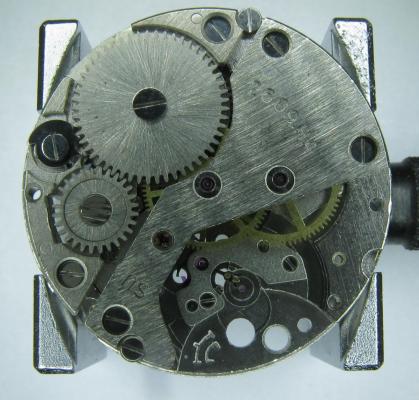
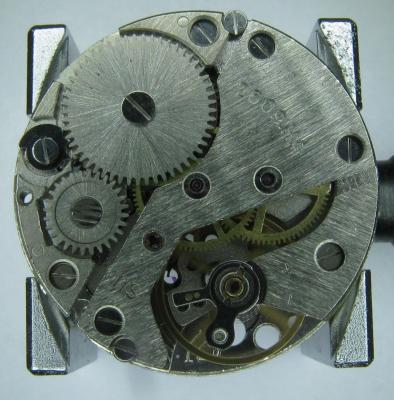
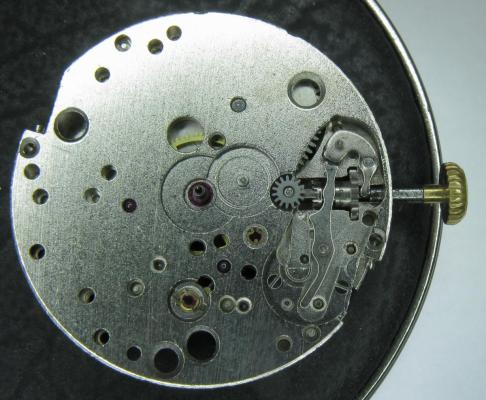
This is my first service walk-through, for which I've chosen this well know Seiko movement. It has a lot of similarities and common parts with the 7S and 4R families. The most notable differences are a separate bridge for the auto winding, and a better mainspring giving 50 hours power reserve. Also, the tiny anti-shock for the train wheels (of debatable usefulness) are not present. Some version have a cotes de Geneve finishing, the one pictured does not. Just like the others it is quite easy to work on. Find attached the technical guide for the SII version, which is named NE15B, In this walk-trough my intent is to give practical advice on certain aspects, which comes from my personale experience and reasoning, Reassembly and lubrication will be covered in the 2nd part. Let's start with the disassembly for which the absolutely indispensable tools are: Movement holder Hand remover tool 1.4mm and 2.0mm flat head drivers Seiko cross-head driver Fine or medium tip tweezers First, I recommend to remove rotor weight with the movement stil in the case, as it it of impediment for all the work to be done later. The movement is kept in case with 2 screws and 2 tabs (not pictured). Remove these, case ring and stem (usual pressing point with crown full in), the movement can now drop from the case - unlike the 7S and 4R where the plastic ring keep it place with some friction. You can now place movement on holder, reinsert stem as it's needed to hold related wheels in place until the very end. Remove hands with your favorite tool, then keeping movement in hand or placing it on the holder with a plastic protection, quarter-run dial the feet retainers at 3 and 10. Gently push the dial out, I recommend to place it in a plastic bag for additional protection. The movement ring goes with other parts not to be washed. Tip: label the tray sectors as in last picture to make it easier to sort and find small parts. Of course some parts will get mixed for cleaning, more on that later. First, remove the balance cock to protect balance wheel and hairspring from any possible incident during subsequent work. When removing the balance push gently the wheel from below to set it free from the fork, and avoid as much as possible suspending the balance by the hairspring. Store it wheel up with pivot set in hole. Turn movement over again to remove all dial side parts, starting with date maintaining plate screws. These can be four flat head screws, or three screws 'A' and one screw 'B' which requires the Seiko or equivalent small cross-head driver. Lift the date maintaining plate and the underneath parts will be exposed You can now remove: Date dial Date corrector wheel (white plastic) Date corrector wheel E (metal) Date jumper Intermediate date wheel (white plastic) Date driving wheel (black plastic) Hour wheel Minute wheel Cannon pinion Now, remove two date corrector wheel guard screws, wheel guard and corrector wheel C. Note: depending on versions the date corrector wheel B can be either a separate part, or attached to the guard. Turn over the movement and referring to 1st picture removing the two automatic bridge screws and bridge, and 2nd reduction wheel. Now we can let down any tension left in the mainspring. Just keep the tip of pegwood on the barrel to prevent it from spinning to fast, with push away the click away from from the ratchet wheel. Now we can remove in order: Ratchet wheel screw and wheel Three train bridge screws Train bridge And will be presented with the train system From which we will remove Click and barrel Fourth and third wheels Escape wheel Pallet bridge screws, bridge and pallet fork. Note: I recommend to not disassemble the barrel on the 6R15 movement, because a special material (SPRON 510) mainspring is used link, for which one would not find an exact replacement, and the barrel is sealed and lubricated for life. If there is any issue with the mainspring, replace the barrel complete. Now, undo the single screw for central wheel bridge to remove bridge, and wheel itself. Next the keyless system, which is kept in place with two screws. There is not much tension in it but is always better to keep the setting lever in place with a stick and then lift the parts, which are: Yoke spring Yoke Setting lever Balance stop lever My tip for last remaining parts (clutch, winding pinion and date corrector wheel A) is to just pull out the stem and pick them up from the mat to place directly in mesh basket. You can now place back the balance back in the movement to protect it during cleaning, and in preparation for the next step, which is removing anti-shock upper and lower balance jewels (Diafix) . My recommended technique is the following: place the tip of the tweezers on the inside of the spring, and rotate the entire holder and movement. Once the spring is out of the frame, close tweezers and store spring in tray, pick up the jewel with Rodico, and place it directly in the metal mesh basket. There is one last task which is removing the 1st reduction wheel and pawl, as well the lower plate from barrel from the automatic train. Just pay attention to not lose the C-clip while pushing it out as shown in the technical guide. My recommendation about cleaning is that with a movement which is spotless like the one in these pictures, I do not wash all the parts, but only those that have jewels, or are to be lubricated. That means you can leave screws, some plates, plastic wheel in the tray, saving time and minimizing chances of losing them during handling. A small mesh closed basket and a larger plastic one are enough. For cleaning I use an household ultrasonic machine, and isopropylic alcohol only, then blow briefly with an hairdryer. Again the reason is that we only need to clean any old oil. Note: although alcohol is detrimental to shellac, I've found that even 10 minutes in there do no harm to the pallet fork jewels, but leave all parts perfectly clean without no residue whatsoever. This concludes the 1st part of this walk-through. NE15-TG.pdf
 1 point
 -
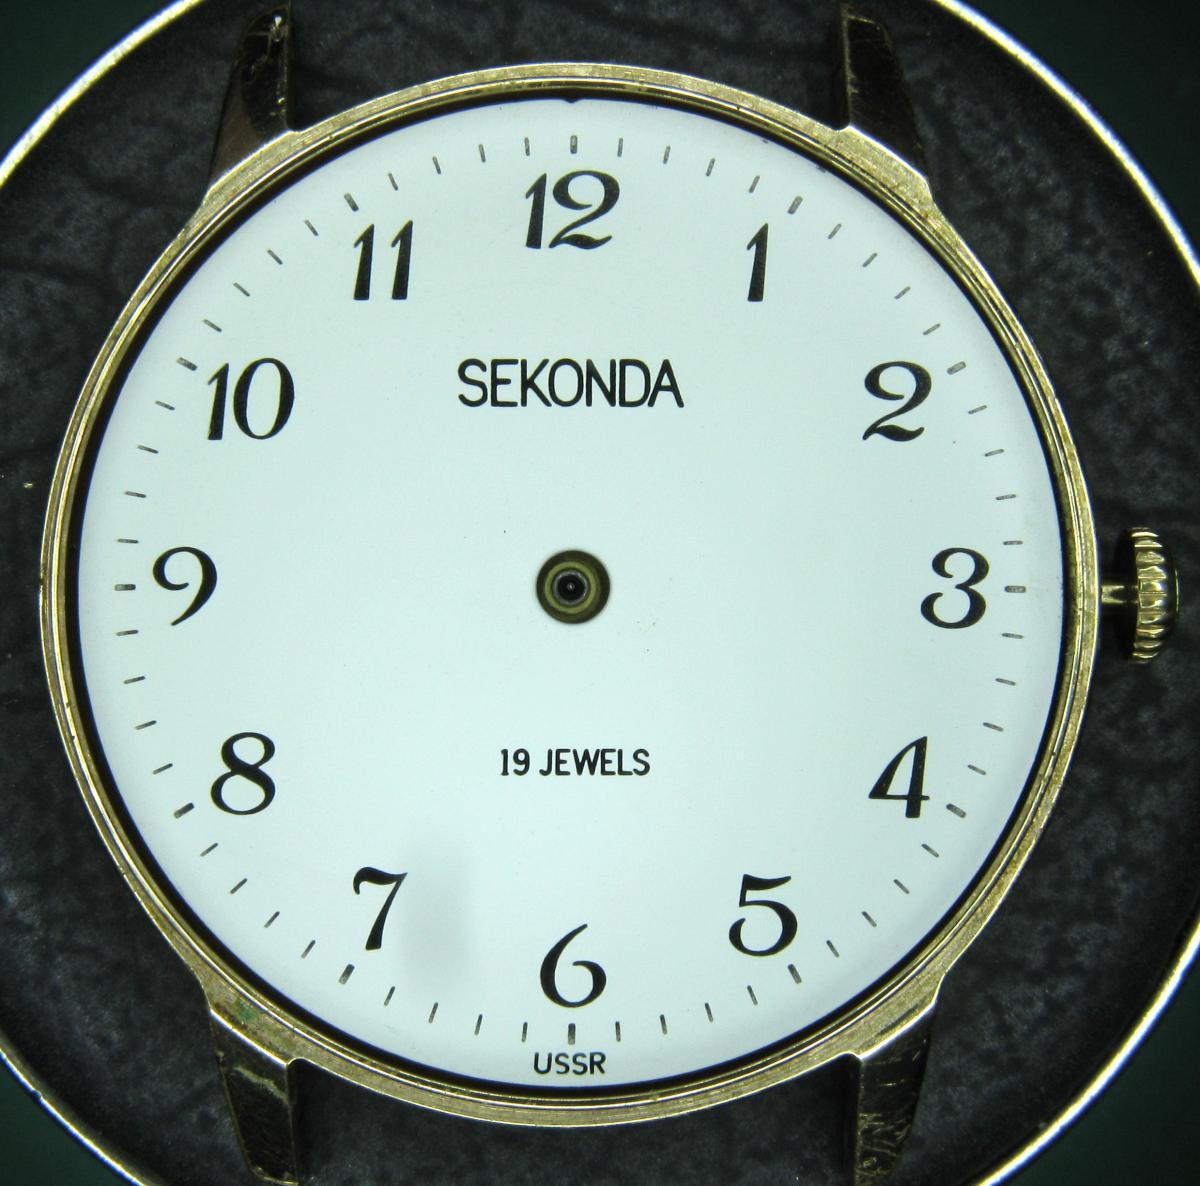
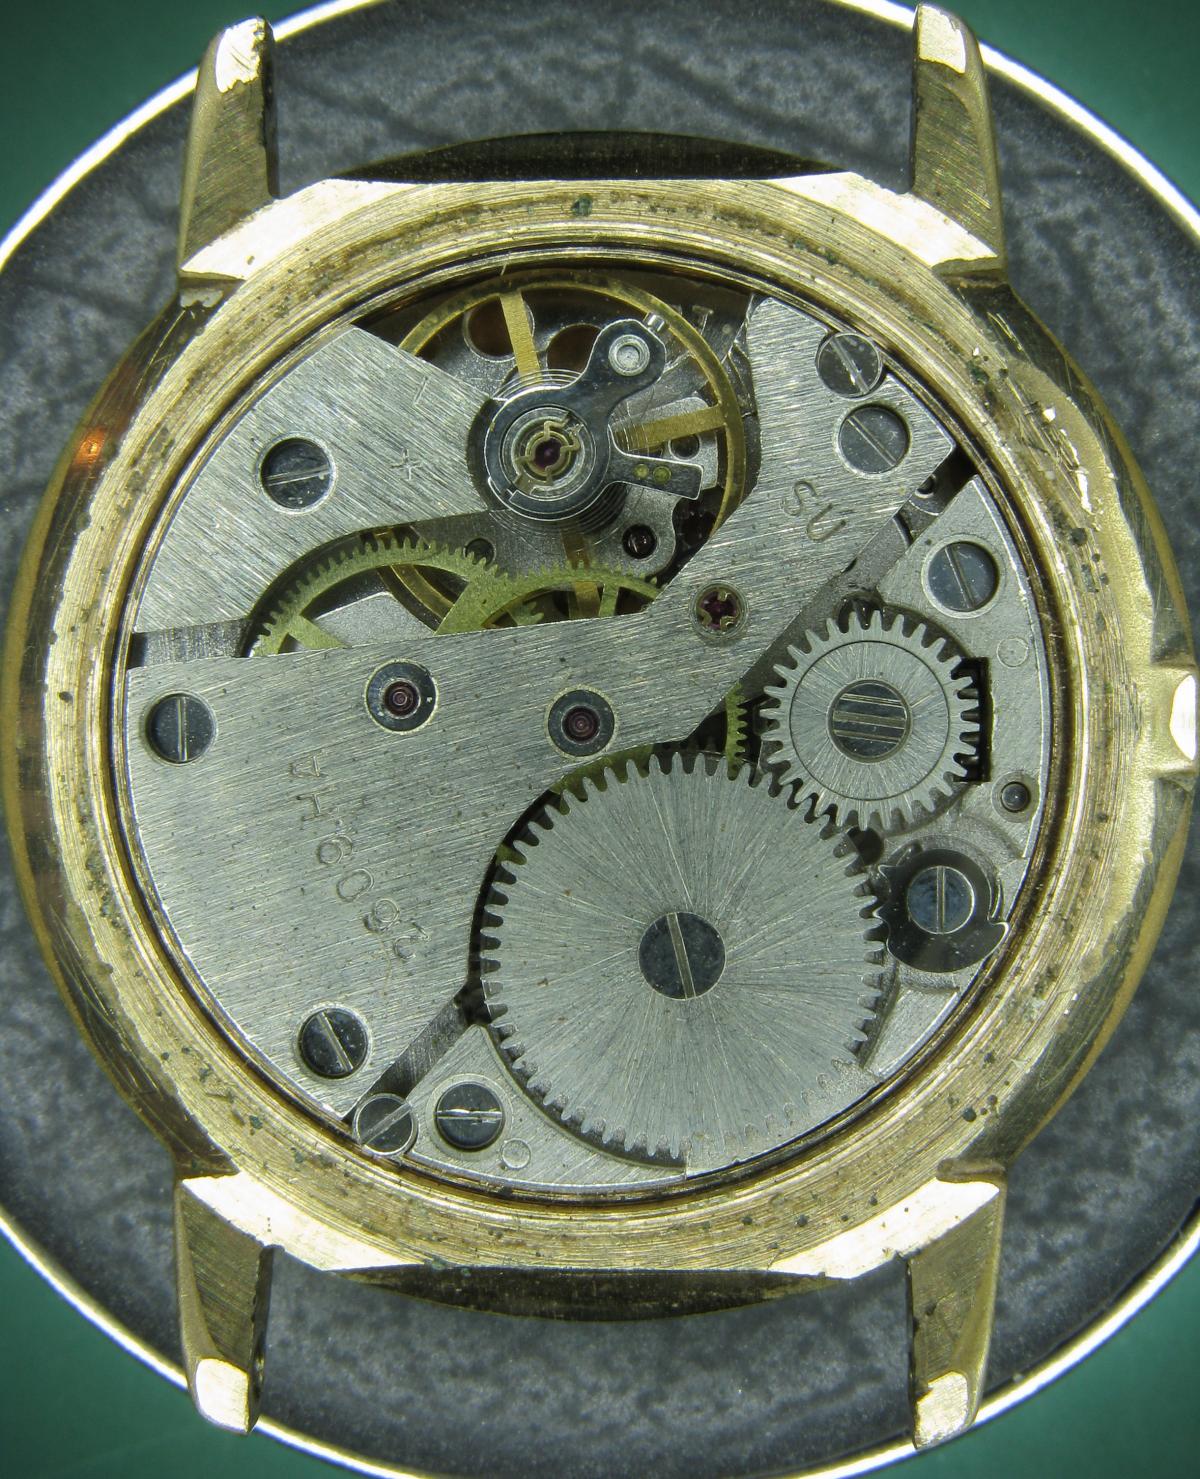
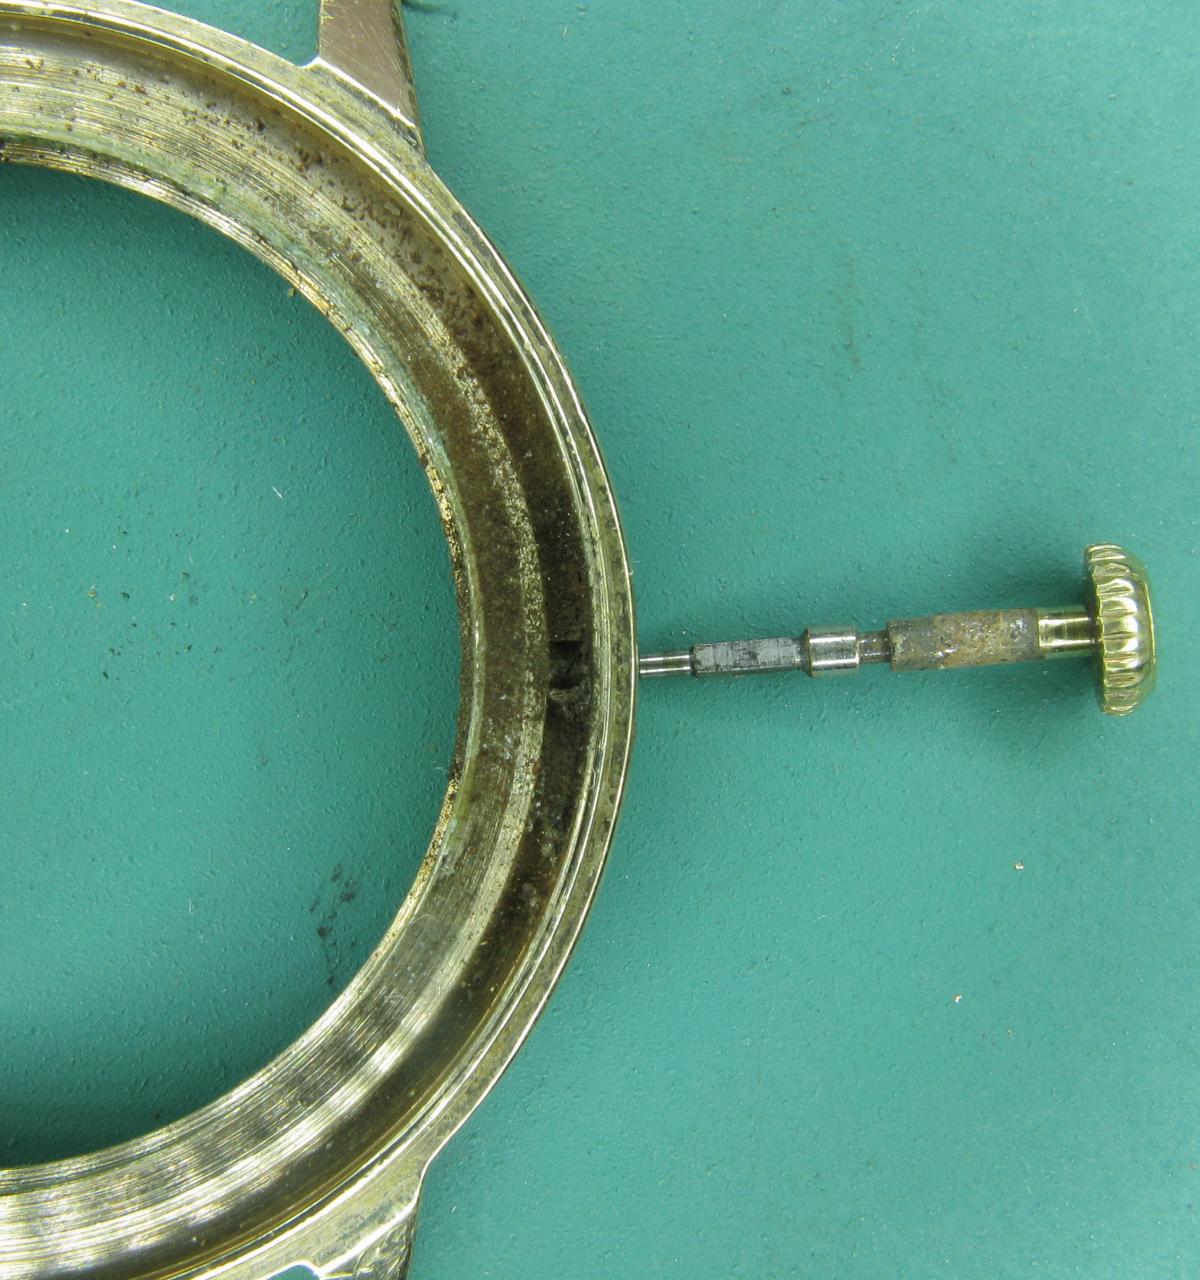
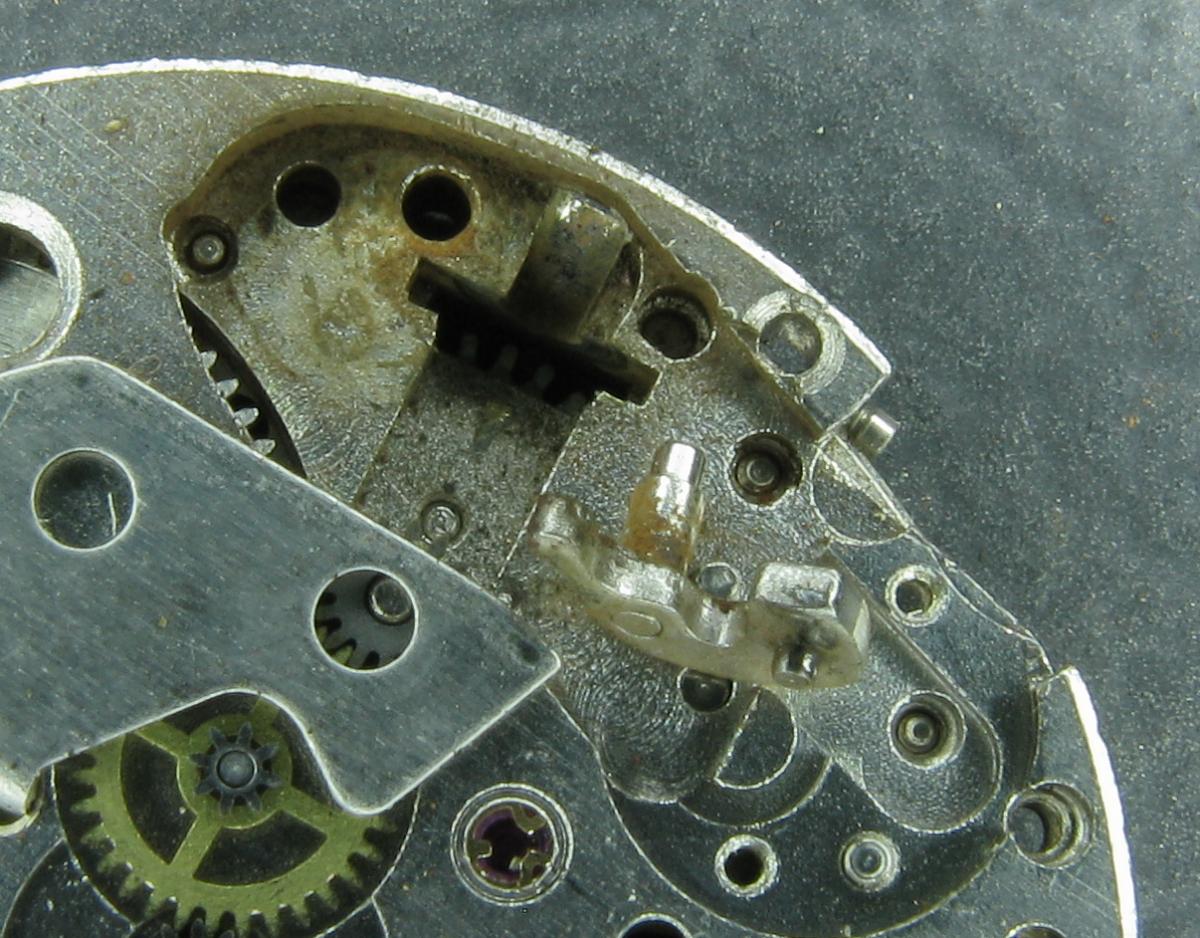
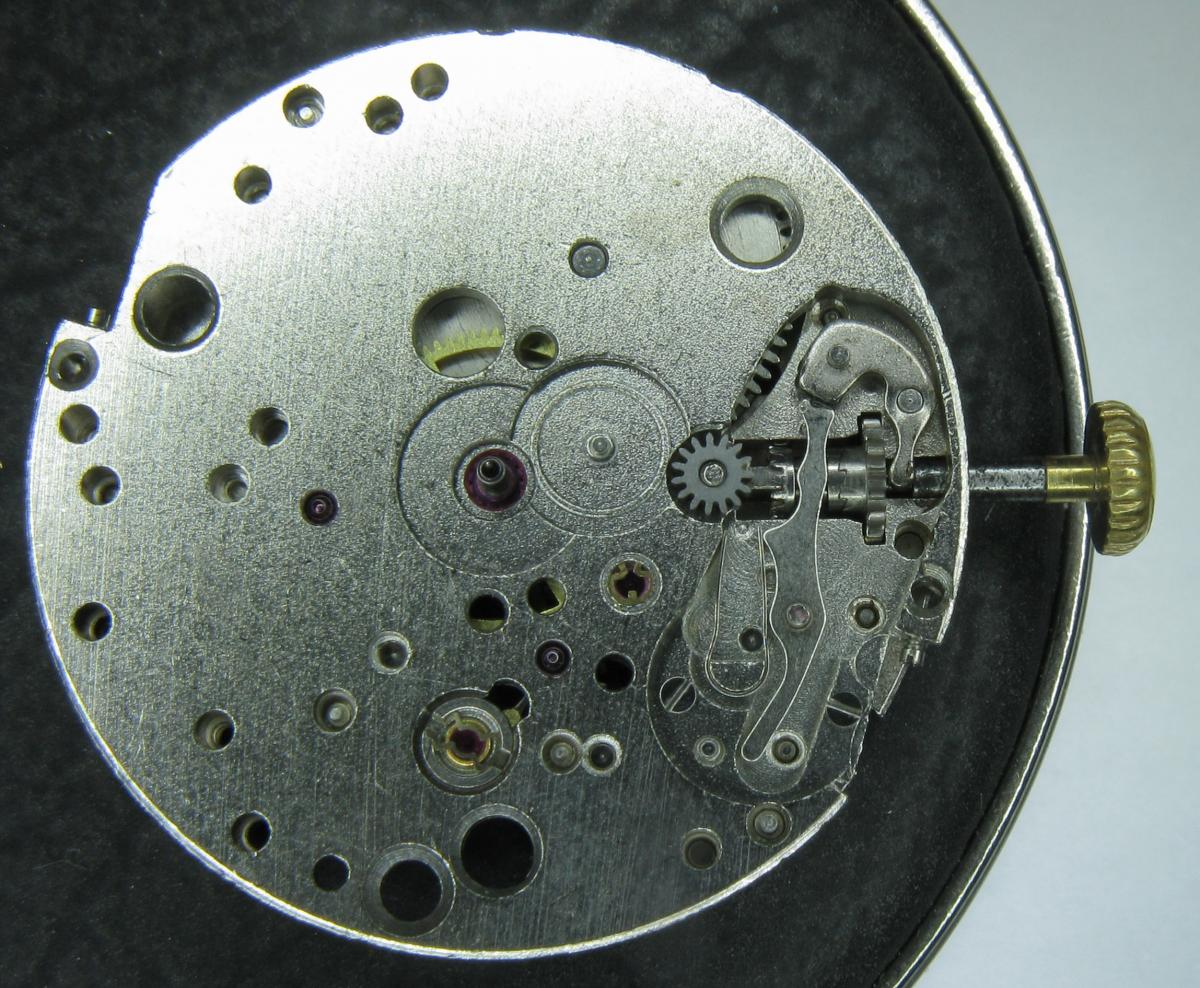
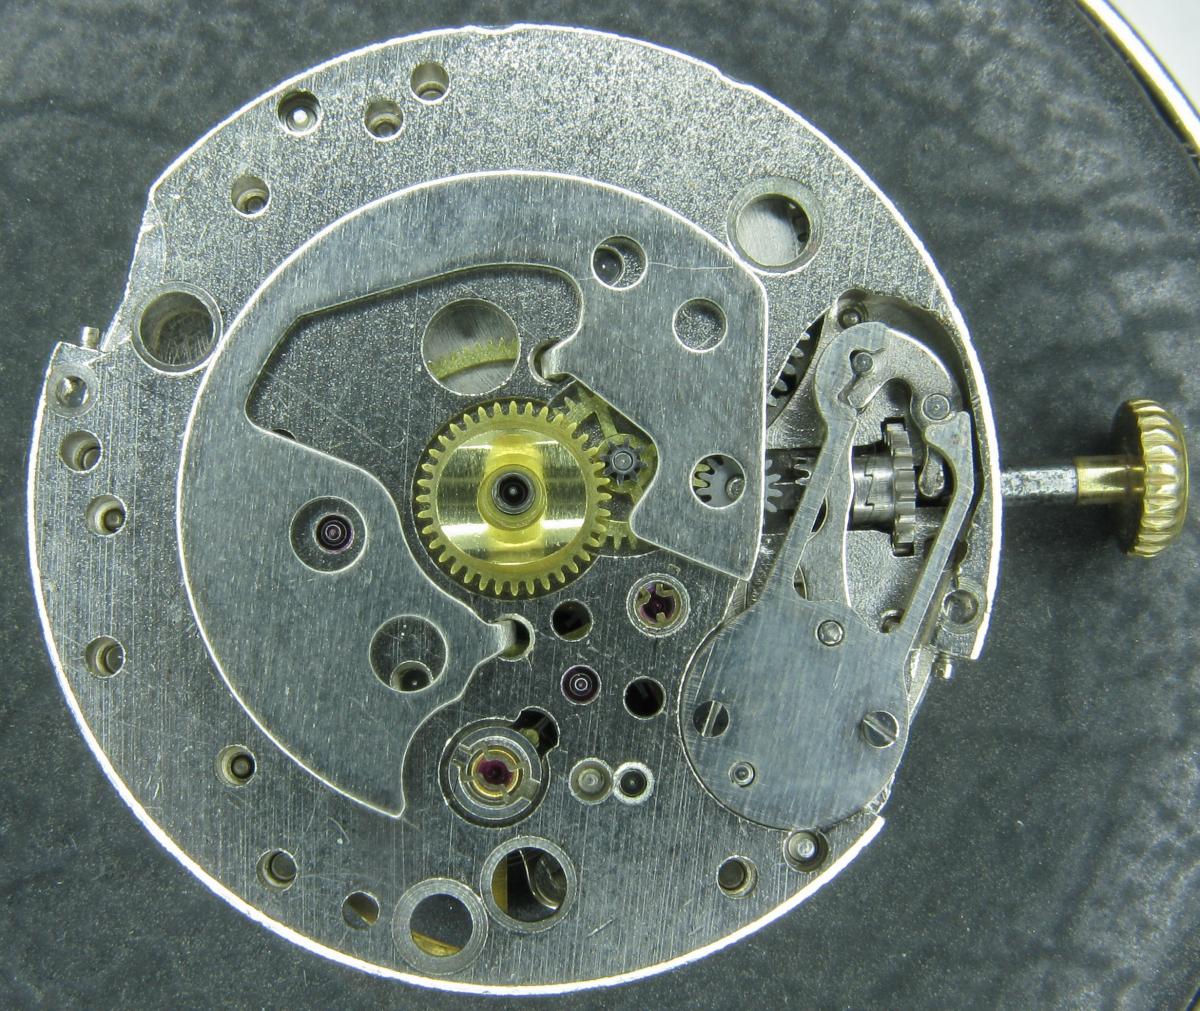
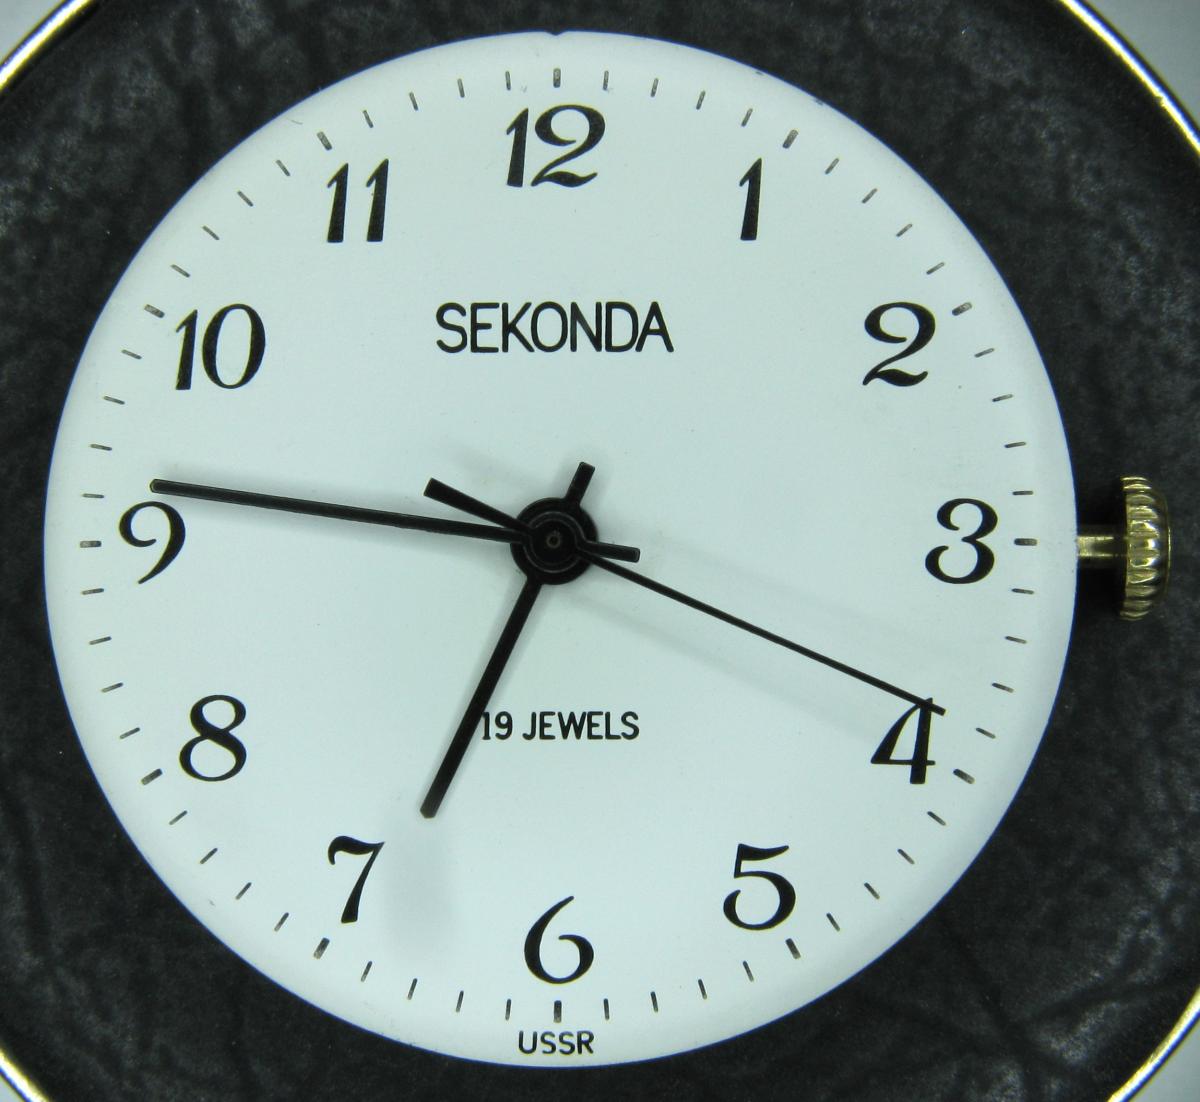
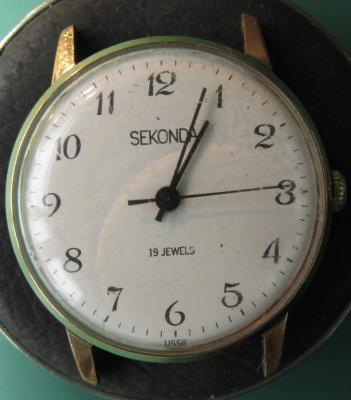
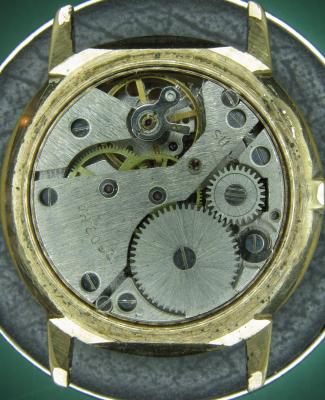
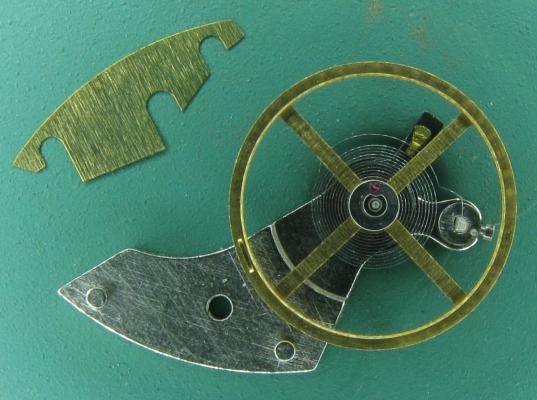
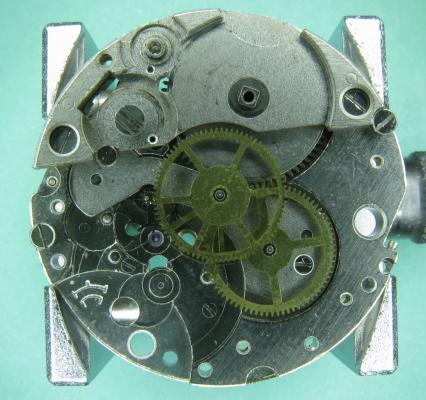
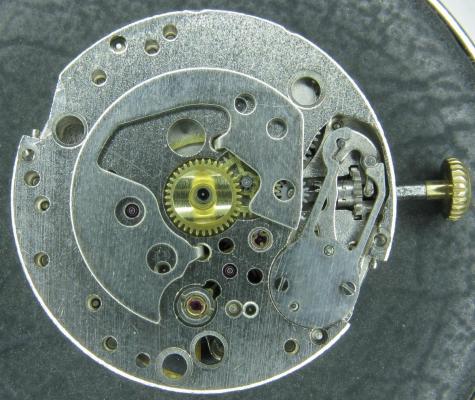
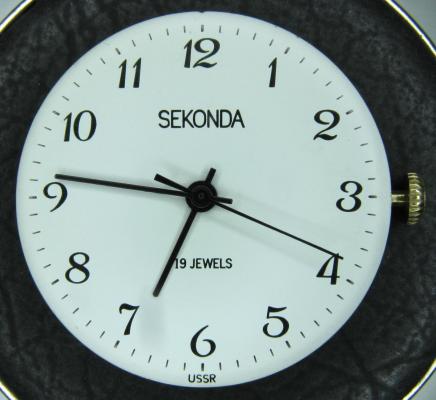
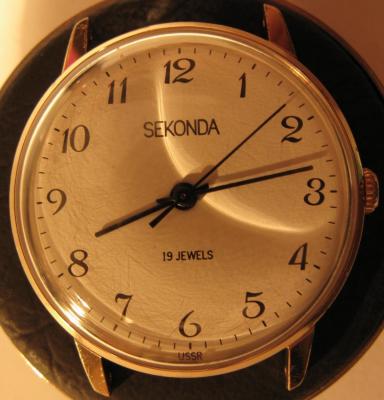
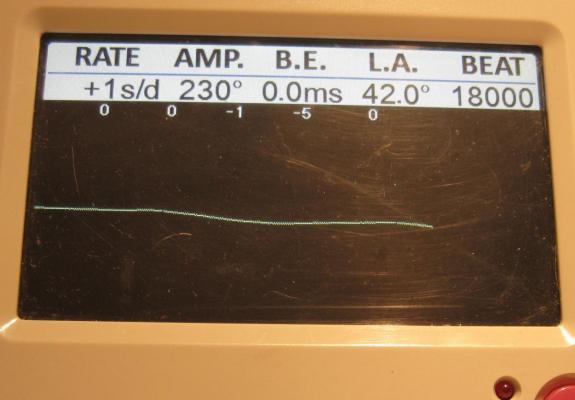
Just before Christmas I sold (through the good offices of eBay) an absolutely immaculate example of a 19 jewel Sekonda hand winder. I was a little sad to see it go as I don't think I am likely to see another in as good order for some time, and having just serviced it it was running like a champ but I couldn't justify holding on to it. Well, shortly after it had arrived with its new owner I received a message through eBay from the buyer. Huw had contacted me to say how pleased he was with his new acquisition, and did I service watches? as he had another example of one of these that was a little stiff in the winder and gained about a minute per day, and he felt that it maybe could benefit from a bit of a spruce up. I have done quite a few of these so am reasonably comfortable with them so I quoted a price and accepted the commission. A couple of weeks ago Huw's watch arrived so I thought I'd do this as a walk through. Looking well used but not abused, Huw had explained that he bought this not too long ago as a stop gap whilst his other watch (a Sekonda quartz chrono) was out of action with battery issues. First impressions are of a watch that has seen a lot of wrist time in its (probably) 40 years. The Timegrapher trace confirms the rate at roughly +60s/day, and confirms that a service is long over due. With the crystal out of the way the condition of the dial is actually rather good. The shadow to the right of the 7 is a lens fault on my camera, not the dial. With the back removed there is plenty of dirt speckled around the whole movement and everything is bone dry. The good news though is that it doesn't look like anyone has messed anything up inside. You can see the spring clip retainer on the escape wheel end stone (a bit like Seiko Diafix but not quite as clever). You can also see corrosion to the back of the bezel, this watch spent a lot of time on some ones wrist. With the movement out of the case the reason for the stiff winder and all of the dusty crud in the movement is brutally apparent. The outer end of the stem has started to rust causing it to bind in the case, and the resulting rust powder is thick on the inside of the case. These cases are a bit prone to this kind of problem as there is absolutely no attempt to seal them even against dust, let alone water, so even sweat on a hot day can seed the beginnings of a corrosion problem. With the dial off the press fit retaining plate for the motion works is exposed along with the keyless works. There's that little end stone retaining clip again, and the Raketa version of Incabloc on the balance. The rust doesn't seem to have got this far. With the set bridge out of the way though there is a hint of rust in the keyless works. Ouch!!! Just in time me thinks!! Balance and cock removed and the hairspring looks to be in good shape apart from the terminal curve which is off concentric. That will need to be sorted or the regulator will distort the hair spring as it is moved. Here also is the shim that Raketa are fond of using under the balance cock to adjust the balance end shake. A bit further in and plenty of gunge under the ratchet and crown wheels. Train bridge removed to reveal the train layout and a sub-bridge for the 2nd wheel. The main plate stripped with the screws put back in their respective holes. I do this so that screws don't go missing in the cleaning machine and I always know which screw goes where. The stripped main plate dial side. And then with the balance reinstalled (minus jewels) ready for the Elma. After a thorough clean everything is ready for inspection and reassembly..... ....starting with the balance jewels. This is when I check and adjust the hair spring for flatness and concentricity, eyeball the beat, check the end and side shake on the balance, and that everything swings freely. If you leave it until later there is too much other stuff in the way. Once I'm happy with it the balance/cock assembly comes back off until later. There is still a little work to do in this pic as the coils are still not quite concentric. The main spring re-lubricated and back in the barrel. This maybe could have been replaced but it wasn't too bad so went back in to help keep the cost down. Barrel, barrel bridge, 2nd wheel sub-bridge, and train back in place. Pallet fork and bridge installed. You can see the exit pallet poised ready to receive a drop of 941 on its impulse face. Walking the pallet too and fro then distributes the oil to the escape wheel teeth. Drop in the balance and away she goes. The cleaned up and de-rusted keyless works go back in.... ...and then the motion works and cover plate. Dial and hands back on, and ready to re-case. Again, to help keep the cost down I didn't replace the crystal with a new one, however, the original was just a little too deeply scored to easily polish out and there was what looked like a very small fracture. So a quick scout through my spares box and I found a second hand replacement which has cleaned up nicely. And the proof of the pudding ... as they say!! At 230 degrees the amplitude isn't anything to write home about but it is a significant improvement on the starting point. A new mainspring would almost certainly help this up into the high 200's (on the watch Huw bought from me I seem to remember it was 300+), but 230 is certainly usable. It is otherwise a nice clean trace with minimal beat error. It has been running for a week now in which it has gained just under a minute, so after a final tweak to the regulator it will be ready to return to Huw. I like these movements a lot. They are well designed and well executed, and capable of excellent results if looked after. They also seem to turn up quite frequently at the boot fairs. Unfortunately though, the lack of any attempt to keep moisture out of the case does mean that they quite often suffer from corrosion issues, and the relatively low cost (both when they were new, and when they turn up second hand) means that they are often used as a beginner watch smiths practice or learning watch, with the resultant butchery that many of us have dealt out as part of our learning curve. It's a shame in many respects, but then we all have to learn somehow. When you do find one that has survived unmolested though they are very well worth looking after. My thanks to Huw firstly for buying my watch, secondly for asking me to help this one to keep going for a few more years, and finally for allowing me to post his watch on here.


 1 point
 -
Disassembly done I have the full disassembly on my facebook site Sent from my iPhone using Tapatalk1 point
-
I think that cutting the hour wheel tube a bit will enough. Should be possible, although not professional, even without a lathe.1 point
-
Where's your spirit of adventure Bob?1 point
-
I do not want to risk dropping or confusing them and do not enjoy handling things without a specific purpose. I think that is fair enough.1 point
-
Hi Joe, the first chrono I worked on was a Landeron 48. I'm not saying it is the best, but one would still give you invaluable experience regarding chrono work. Finding out about eccentric adjusters and fly back mechanisms is all part of the learning curve. I suggest you purchase this http://www.amazon.com/Complicated-Watches-Their-Repair-Donald/dp/0719800900if you don't already have one, there is a lot of good information in it. I wish you well with the chronograph venture, it's well worth doing.1 point
-
Well done and easy to follow for others who wish to under take this movement.1 point
-
Looks too high to me. I would suggest that you source the dial you are going to use and then you will know if the hour wheel is too high, or the cannon pinion is too short.1 point
-
Hi JDM, Nice walkthrough, I did one, some time ago, for the newer version of this one, the NH36, -- or maybe the same with a different marketing name? -- here: http://www.watchrepairtalk.com/topic/1635-seiko-nh36-walkthrough/?hl=nh36 I believe that with Lawson's 7S26 walkthrough, all these walkthroughs complement one another nicely...same family, and show their evolution. Your oil equivalents are very interesting. There is more about them here if you search for lubricants. Nevertheless, for Seikos, I use the Seiko lubricants readily available on the bay with exception of the Moebious 9010 that, as you so rightly point out, is the "A" type they talk about in their spec sheets. Nicely done although I disagree with the "cleaning only the oil" part. Best practice indicates everything should be cleaned...but I suppose it is a personal preference. In a hobby thing I believe everything is valid! :) Keep them coming! Cheers, Bob1 point
-
Hey Charles, Yes I use the same method when I am looking for something cheap and fixable--I think it's getting harder to find the gems, yes! I'm still looking but he prices for a working 7750 means the case and or watch containing it are in real bad shape. If the case is in good shape then the movement has water damage--usually at the crown or pushers. I also see a lot of Leonidas, Landeron and a few Venus movements. Are these any good to practice on, or are they simply too outdated to waste time on? It seems the Valjoux workings have the market for good. Did you get the Rolex? JC1 point
-
Good walk through always wondered what the Seiko lubrications equivalents were. nice Sent from my iPhone using Tapatalk1 point
-
I knew it was too easy for you guys. :bow: In my case, I first suspected the slightly bent sweep second hand pinion. But I figured it could not have caused it to stop at the same spot. I also suspected a tooth of one of the gears in the train was damaged but after inspection, everything was in order. I ignored the friction spring thinking that as long as it presses on the second hand pinion, it won't matter that it was not centered. As it turned out, its edge/corner blocked a particular pinion leaf from turning. Adjustment of the friction spring to proper shape solved the problem - and my hair pulling. :thumbsu:1 point
-
Why do you need to know this? JDM has taken a lot of time to produce a well illustrated and documented walkthrough this highly commendable of him. His way may not be your way, accept it for what it is and please don't put him off producing another.1 point
-
You need one that fits through the hand then pinch it lightly in the middle of the pipe, do not use force but gently does it.1 point
-
I would put the hand onto a watch reamer and pinch it a little. I found this to be most satisfactory.1 point
-
Genius, sheer genius! Why did no one else think of that?!1 point
-
Try wearing it on you other arm. It might resolve the upside down issue.[emoji12] Sent from my iPad using Tapatalk1 point
-
Yep. I do have the service manual and I am going to use Moebius 9010, D5 and KT22.....that should do.1 point
-
The video is basically a diagram of the 7750. You start out with a complete movement and you step by step disassemble and then reassemble it in correct sequence. It tells you what goes where and why. Also it lists what parts gets oil and what kind of oil is suggested. If you google 7750 movement diagram it will be the first thing that pops up from eta swiss labs. You can watch it for free and is very informative. I have it on disc and have actually installed it on my laptop just for quick reference. Charles K1 point
-
I am on Canada. An Electrical Engineer by degree but now mgmt.Sent from my iPhone using Tapatalk1 point